VistA Imaging DICOM Gateway User Manual - … Imaging System VistA Imaging DICOM Gateway User Manual...
268
VistA Imaging System VistA Imaging DICOM Gateway User Manual September 2013 – Revision 15 MAG*3.0*138 Department of Veterans Affairs Product Development Health Provider Systems
Transcript of VistA Imaging DICOM Gateway User Manual - … Imaging System VistA Imaging DICOM Gateway User Manual...
VistA Imaging System
VistA Imaging DICOM Gateway User Manual
September 2013 – Revision 15 MAG*3.0*138
Department of Veterans Affairs Product Development
Health Provider Systems

ii VistA Imaging System MAG*3.0*138 September 2013 DICOM Gateway User Manual – Rev. 15
DICOM Gateway User Manual VistA Imaging MAG*3.0*138 September 2013
Property of the US Government This is a controlled document. No changes to this document may be made without the express written consent of the VistA Imaging Product Development group.
While every effort has been made to assure the accuracy of the information provided, this document may include technical inaccuracies and/or typographical errors. Changes are periodically made to the information herein and incorporated into new editions of this document.
Product names mentioned in this document may be trademarks or registered trademarks of their respective companies, and are hereby acknowledged.
VistA Imaging Product Development Department of Veterans Affairs Internet: http://www.va.gov/imaging VA intranet: http://vaww.va.gov/imaging
Caution: Federal law restricts this device to use by or on the order of either a licensed practitioner or persons lawfully engaged in the manufacture or distribution of the product.
September 2013 VistA Imaging System MAG*3.0*138 iii DICOM Gateway User Manual – Rev. 15
Preface This is a draft of the user guide for the VistA Imaging DICOM Gateway. The purpose of this document is to help users understand the operation of the VistA Imaging DICOM Gateway and to assist them in their daily tasks. Revision History 13 Sept 2013 Rev 15: Updated for MAG*3.0*138. Changed Healthcare Providers to Clinical Specialties,
added Anatomic Pathology to Section 4.1.3, changes Quick PID to Short PID, changed section 5.5.11.1 Select DICOM Images for Transmission and added 5.5.11.7 Display Export Transmission Statistics. Added new 9.1 Edit CLINICAL SPECIALTY DICOM & HL7 file and new Display DICOM OBJECT EXPORT file Entries paragraphs. Peter Kuzmak
04 June 2013 Rev 14: Updates for MAG*3.0*34, 116, 118 (Sections 1.5, 3.3, 3.4, 3.5, 5.4, 5.5, 7.2, 7.3, 7.8, 7.9, 7.11, 8.3, 8.6, 9 Intro, 9.1) P. Yeager, R. Seabolt, C. Titton, B. Peterson, M. Mitchell
10 May 2013 Rev 13: Updates for MAG*3.0*34, 116, 118 (Sections 1.2, 2.5, 3.3, 3.4, 3.5, 5.4, 7.2, 7.3, 7.11, 8.6) P. Yeager, R. Seabolt, C. Titton, B. Peterson, M. Mitchell
06 Feb 2013 Rev 12: Updates for MAG*3.0*34, 116, 118 (Sections 1.2, 1.4, 1.5, Chapter 2, New Chapter 3, Chapter 5 changes in most sections all sections renumbered, Chapter 6, Chapter 7, Sections 8.1, 8.3.2, 8.3.4, 8.3.13, Chapter 9 Introduction, Sections 12.1, 12.4, 12.4.1, 14.4.3, 14.5, 15.1.2, Appendix A deleted) P. Yeager, R. Seabolt, C. Titton, B. Peterson, M. Mitchell
07 Sept 2012 Rev 11: Updates for MAG*3.0*34, 116, 118 (Sections 1.6, 2.1, Chapter 3, 5.3, 5.4, 5.5, 5.6, 5.8, 5.11.3, 5.19, Chapter 7, 8.1, 8.3.2.18, 8.3.2.27, 8.3.12, Chapter 9, 14.5) J. Lewis, P. Yeager, M. Mitchell
1 Sept 2011 Rev 10: Updates for MAG*3.0*49 (Sections 3.1, 3.1.1, 3.6, 3.9.2.1, 4.11.3, 4.17, 10.3.3, and 10.4.2.3) and MAG*3.0* 99 (Sections 4.11.1, 4.11.2, 4.12, 4.13, 4.16, 6.3.5, 10.1, 10.3.3, 10.3.4, 10.4, 10.4.1, 10.4.2, 10.4.2.1, 10.4.2.2, 10.4.2.3, 10.4.2.4, 10.4.2.5, and 10.5) L. Scorza, L. Jenkins.
1 Dec 2010 Rev 9: Updates for MAG*3.0*53 (Sections 1.6, 4.8, 6.1., 6.3.3, 6.3.4, 6.3.5, 6.3.6, 6.3.7, 6.3.8, 6.3.9, 6.3.11, 6.3.12, and 7.9) and MAG*3.0* 66 (Sections 6.4.2 and Appendix A) L. Scorza, L. Jenkins.
20 Oct 2009 Rev 8: Updates for Patch 54. Also removed obsolete information from section 6.2.7. Typo and document convention corrections throughout. A. McFarren, S. Littles.
28 June 2007 Rev 7: updates for Patch 69. Updated content in sections 1.6, 2.1, 2.2.1, 2.3, 3.2, 3.3, 4.1.2, 4.2, 6.2.7, 6.3.2.17, 6.3.2.28-29, 6.4.1, 6.4.2, 6.4.3, 6.4.5, and 12.5. Additional cosmetic updates reflecting shift to Caché made throughout manual. E. deMoel, A. McFarren.
07 May 2007 Rev 6: new material for Patch 65. Added sections 10.6 and 10.7. A. McFarren, J. Christensen.
20 Jul 2006 Rev 5: updates for Patch 50: updates sections 4.16, and 4.16.1. Added new sections: 4.16.5 and 4.16.6. S. Davis, A. McFarren, R. Coney.
30 Jun 2006 Updates for Patch 51, updated section 4.18. A. McFarren, R. Coney. 12 Dec 2005 Rev 4: updates for Patch 57: Updated obsolete screen shots in sections 6.3.1, 6.4.3, 6.4.4,
14.1, 14.4, and 14.7. Removed NT references, verified sensitive data removal throughout. A. McFarren, C. Huesman.
16 Apr 2004 Rev 3: changes for final release of Patch 11 31 Mar 2004 Changes for final release of Patch 11

Preface
iv VistA Imaging System MAG*3.0*138 September 2013 DICOM Gateway User Manual – Rev. 15
12 Feb 2004 Changes for final release of Patch 11 12 Nov 2003 Rev 2: changes for final release of Patch 10 3 Nov 2003 Changes for final release of Patch 10 23 June 2003 Changes for final release of Patch 10 13 Nov 2002 Changes for Patch 9 – inserted new chapter on Routing (Chapter 5) 31 Oct 2002 Changes for Patch 10 – replaced references to Clinical Specialties with Healthcare Providers 6 Aug 2002 Changes for Patch 10 – DICOM Interface for Healthcare Providers 21 Mar 2002 Rev 1: Final revision for Version 3.0 12 Sept 2001 Added radiology report corruption error 29 Sept 2000 Final revision for Version 2.5 9 Aug 2000 Add troubleshooting information from Support Database 31 May 2000 Made corrections suggested by Lisa C. Barnett, Mt. Home, TN 2 May 2000 Peter Kuzmak added PACS Image Transfer appendixes Apr 2000 Extensive editing by Ed de Moel and Pete Kuzmak 24 Feb 2000 Incorporated Peter Kuzmak’s review comments 2 Feb 2000 Remove chapter about automated routing, to be re-included when routing will be included in
product 28 Jan 2000 Add new site parameter: Send CPT Modifiers 3 Jan 2000 Added more trouble shooting details 18 Aug 1999 Incorporated more of Peter Kuzmak’s additions 29 Jul 1999 Added Amy Padgett’s Standard Operating Procedures 21 Jul 1999 Incorporated Lucille Barrios’ additions, re-arranged menu-options 23 Jun 1999 Incorporated Peter Kuzmak’s additions, distributed for comments 10 Jun 1999 Almost complete version, reviewed by Peter Kuzmak 1 Jun 1999 Initial Version Copyrights and Trademarks Product names mentioned in this document are trademarks or registered trademarks of their respective companies: ADAC ADAC Laboratories, Milpitas, CA
AGFA Agfa Division of Miles Laboratory, Inc., Ridgefield Park, NJ
ACR-NEMA National Electrical Manufacturers Association, Rosslyn, VA
Accuson Accuson Corporation, Mountain View, CA
BRIT Brit Systems, Dallas, TX
Caché InterSystems, Corp., Cambridge, MA
Cemax-Icon Cemax-Icon, a Kodak Company, Fremont, CA
CT/i General Electric Medical Systems, Milwaukee, WI
DICOM National Electrical Manufacturers Association, Rosslyn, VA
EasyVision Philips Medical Systems, Shelton, CT
Preface
September 2013 VistA Imaging System MAG*3.0*138 v DICOM Gateway User Manual – Rev. 15
eMed eMed Technologies Corporation, Lexington, MA
EndoWorks Olympus America, Inc., Melville, NY
GEMS General Electric Medical Systems, Milwaukee, WI
ImageShare DeJarnette Research Systems, Towson, MD
Lumisys 75 Lumisys, Inc., Sunnyvale, CA
MediShare DeJarnette Research Systems, Towson, MD
OEC C-Arm OEC Medical Systems, Inc., Salt Lake City, UT
PACS Broker Mitra Imaging Inc., Waterloo, Ontario Canada (owned by Agfa)
Siemens Siemens, Iselin, NJ
TARGA, TGA Truevision, Inc. Indianapolis, IN
VistA U.S. Department of Veterans Affairs
Windows XP, Windows 7, Windows Server 2003, etc.
Microsoft, Redmond, WA
All patient and provider names, as well as all IP addresses used in example scripts are fictional.

Preface
vi VistA Imaging System MAG*3.0*138 September 2013 DICOM Gateway User Manual – Rev. 15
This page is intentionally blank.

September 2013 VistA Imaging System MAG*3.0*138 vii DICOM Gateway User Manual – Rev. 15
Table of Contents
Chapter 1 Introduction ............................................................................................................1 1.1 The System: VistA Imaging ................................................................................................. 1 1.2 The VistA Imaging Service Architecture (VISA) ................................................................ 1
1.2.1 VIX ............................................................................................................................... 2 1.3 The VistA Imaging DICOM Gateway ................................................................................. 2
1.3.1 Caché Database ............................................................................................................. 3 1.3.2 Legacy DICOM Gateway ............................................................................................. 3 1.3.3 VISA/HDIG .................................................................................................................. 3
1.4 Installation of the VistA Imaging VIX ................................................................................. 5 1.5 Installation of the VistA Imaging Legacy DICOM Gateway ............................................... 6 1.6 Installation of the VistA Imaging HDIG .............................................................................. 6
Chapter 2 General Operation .................................................................................................7 2.1 VistA Imaging DICOM Menu ............................................................................................. 7 2.2 VistA Imaging Windows Menu ........................................................................................... 9 2.3 High-Level Overview of Components of the VistA Imaging Legacy DICOM Gateway .... 9
2.3.1 Caché Cube ................................................................................................................... 9 2.3.2 Caché Terminal ........................................................................................................... 10 2.3.3 VistA DICOM Viewer ................................................................................................ 10 2.3.4 Command Prompt ....................................................................................................... 10
2.4 Starting the Caché Server ................................................................................................... 10 2.5 VistA Gateway Main Menu ............................................................................................... 11 2.6 Directory Path Conventions ............................................................................................... 12 2.7 Legacy DICOM Gateway Shutdown ................................................................................. 12
Chapter 3 Text Gateway ........................................................................................................15 3.1 DICOM Modality Worklist ................................................................................................ 15
3.1.1 DICOM Modality Worklist for Radiology ................................................................. 16 3.1.2 DICOM Modality Worklist for Clinical Specialties ................................................... 17 3.1.3 DICOM Modality Worklist for Anatomic Pathology ................................................. 18
3.2 Text Gateway Folder Icons and Screen Layouts ................................................................ 20 3.3 Starting the Caché Server ................................................................................................... 22 3.4 Text Gateway Menu ........................................................................................................... 22 3.5 Start Processing Text Messages from HIS ......................................................................... 23
3.5.1 Configuration with a Commercial PACS and/or Broker ............................................ 24 3.5.2 Configuration without a Commercial PACS or Broker .............................................. 25
3.6 Send DICOM Text Messages to Commercial PACS or Broker ........................................ 25 3.7 Display Text Gateway Statistics ......................................................................................... 29 3.8 Display Modality Worklist Statistics ................................................................................. 31 3.9 Modality Worklist Query ................................................................................................... 33
3.9.1 Query by Patient ......................................................................................................... 34 3.9.2 Query by Study ........................................................................................................... 37 3.9.3 Query by Modality ...................................................................................................... 41
Table of Contents
viii VistA Imaging System MAG*3.0*138 September 2013 DICOM Gateway User Manual – Rev. 15
3.9.4 Query by Modality and Date/Time ............................................................................. 43 3.10 Display a HL7 Message ..................................................................................................... 45
3.10.1 Short Format ............................................................................................................... 45 3.10.2 Long Format................................................................................................................ 46
3.11 Display an Unprocessed DICOM Message ........................................................................ 48 3.12 Modify the HL7 Message Pointer ...................................................................................... 51 3.13 Generate a Daily Summary Report .................................................................................... 52 3.14 Purge Old Modality Worklist Entries ................................................................................. 53 3.15 Purge Old DICOM Message Files ...................................................................................... 54 3.16 Purge Old HL7 Transaction Global Nodes ........................................................................ 57 3.17 Purge Old Audit Records ................................................................................................... 57
Chapter 4 Image Gateway .....................................................................................................59 4.1 Overview of the DICOM Image Storage Process .............................................................. 59 4.2 Starting the Caché Server ................................................................................................... 59 4.3 Storage Server Service ....................................................................................................... 60 4.4 Processing Images through the HDIG ................................................................................ 60
4.4.1 2006 Data Structures Associated With Image Processing .......................................... 62 4.4.2 Supported SOP Classes ............................................................................................... 64
4.5 Processing Images through the Legacy DICOM Image Gateway ..................................... 69 4.5.1 Viewing Rejected Images on the Gateway ................................................................. 69 4.5.2 Testing the Communications ...................................................................................... 71 4.5.3 Image Gateway Menu ................................................................................................. 71 4.5.4 Receive PACS Exam Complete Messages ................................................................. 72 4.5.5 Send PACS Request Image Transfer Messages.......................................................... 73 4.5.6 Processing DICOM Images through the Legacy Gateway ......................................... 75 4.5.7 Software Steps in DICOM Correct Processing (Legacy and HDIG) ......................... 77 4.5.8 Increment DICOM Image Input Pointer ..................................................................... 79 4.5.9 Display Storage Server Statistics in Real Time .......................................................... 80 4.5.10 Display Cumulative Storage Server Statistics ............................................................ 81 4.5.11 Display Daily Image Processing Statistics ................................................................. 82 4.5.12 Send DICOM Images to Another Storage Server ....................................................... 83 4.5.13 Display a DICOM Image Header ............................................................................... 99 4.5.14 Re-Transmit Images from PACS .............................................................................. 102
4.6 Correcting Errors in the Processing Flow Using DICOM Correct .................................. 104
Chapter 5 The Hybrid DICOM Image Gateway ..............................................................105 5.1 Storage .............................................................................................................................. 105
5.1.1 Main Features............................................................................................................ 105 5.1.2 Benefits ..................................................................................................................... 107
5.2 Query/Retieve ................................................................................................................... 109 5.3 DICOM Importing ............................................................................................................ 109 5.4 DICOM AE Security Matrix ............................................................................................ 109 5.5 HDIG Components ........................................................................................................... 111 5.6 Stopping and Starting the HDIG ...................................................................................... 112 5.7 Understanding the HDIG Notification Mechanism .......................................................... 114
Table of Contents
September 2013 VistA Imaging System MAG*3.0*138 ix DICOM Gateway User Manual – Rev. 15
5.8 Monitoring an HDIG ........................................................................................................ 115 5.8.1 Viewing Statistics About an HDIG........................................................................... 115 5.8.2 Information the HDIG Statistics Page Provides ....................................................... 122 5.8.3 HDIG Security and Performance Features ............................................................... 124 5.8.4 Enhancements to the View HDIG Statistics Page .................................................... 124
5.9 HDIG Logs ....................................................................................................................... 129 5.9.1 Application Log ........................................................................................................ 129 5.9.2 HDIG Summary Log................................................................................................. 130 5.9.3 Accessing the Application and HDIGSummary Logs .............................................. 131 5.9.4 Patient Security Logging for Sensitive Patients........................................................ 138
Chapter 6 Routing ................................................................................................................139 6.1 Routing Menu Options ..................................................................................................... 139
Chapter 7 VistA Imaging Query/Retrieve Application ....................................................141 7.1 Overview .......................................................................................................................... 141 7.2 DICOM Services .............................................................................................................. 141
7.2.1 Query SCP Service ................................................................................................... 141 7.2.2 Move SCP Service .................................................................................................... 141 7.2.3 Store SCU Service .................................................................................................... 141
7.3 Query/Retrieve and the HDIG .......................................................................................... 143 7.4 Audit Log ......................................................................................................................... 143
7.4.1 Types of Events That the Audit Log Records ........................................................... 144 7.5 Query/Retrieve and the DICOM AE Security Matrix ...................................................... 144 7.6 DICOM Requirements ..................................................................................................... 144 7.7 Query/Retrieve vs. Other Methods for Moving Images ................................................... 145 7.8 Starting Query/Retrieve .................................................................................................... 146 7.9 How Query/Retrieve Works ............................................................................................. 146 7.10 Setting Up the Social Security Number Format ............................................................... 147 7.11 Printsets ............................................................................................................................ 148
7.11.1 Definition .................................................................................................................. 148 7.11.2 Behavior – 2006.6x Database Only .......................................................................... 148 7.11.3 Behavior – 2006.72 Database Only .......................................................................... 148 7.11.4 Behavior – 2006.6x and 2006.72 Databases ............................................................. 148
Chapter 8 Legacy Gateway System Maintenance .............................................................151 8.1 System Maintenance Menu Options ................................................................................. 151 8.2 System Operation Tools ................................................................................................... 151
8.2.1 Display MUMPS-to-MUMPS Broker Status............................................................ 151 8.2.2 Display DICOM Message Log ................................................................................. 152 8.2.3 Issue a DICOM Echo Request .................................................................................. 155 8.2.4 Display the Version of the Software ......................................................................... 156 8.2.5 Display Gateway Application Usage Statistics......................................................... 157 8.2.6 Support Telephone Numbers .................................................................................... 158 8.2.7 Test E-mail Transmission ......................................................................................... 158
8.3 Gateway Configuration and DICOM Master Files .......................................................... 159
Table of Contents
x VistA Imaging System MAG*3.0*138 September 2013 DICOM Gateway User Manual – Rev. 15
8.3.1 Display Gateway Configuration Parameters ............................................................. 159 8.3.2 Update Gateway Configuration Parameters.............................................................. 161 8.3.3 Update AE_TITLE.................................................................................................... 169 8.3.4 Update INSTRUMENT.DIC .................................................................................... 169 8.3.5 Update MODALITY.DIC ......................................................................................... 170 8.3.6 Update PORTLIST.DIC ........................................................................................... 172 8.3.7 Update SCU_LIST.DIC ............................................................................................ 172 8.3.8 Update WORKLIST.DIC ......................................................................................... 174 8.3.9 Reinitialize All the DICOM Master Files ................................................................. 175 8.3.10 Create Shortcuts for Instruments .............................................................................. 177 8.3.11 Validate Access/Verify Codes for Modality Worklist .............................................. 177 8.3.12 Display Versions and/or Time Stamps of Components ............................................ 178 8.3.13 Site-Specific Parameters ........................................................................................... 179
8.4 MUMPS Utilities .............................................................................................................. 180 8.4.1 Access MUMPS Error Log ....................................................................................... 180 8.4.2 Global Variable Lister............................................................................................... 181 8.4.3 Display MUMPS System Status ............................................................................... 183 8.4.4 Check Available Disk Space ..................................................................................... 186 8.4.5 Display License Expiration Date .............................................................................. 187
8.5 Enter Programmer's Mode ................................................................................................ 188 8.6 Failover Procedure ........................................................................................................... 188
Chapter 9 Menu Options on VistA .....................................................................................191 9.1 Edit CLINICAL SPECIALTY DICOM & HL7 file ........................................................ 192 9.2 Display DICOM OBJECT EXPORT file Entries ............................................................ 192 9.3 Correct Clinical Specialties DICOM File Entries ............................................................ 192 9.4 Correct RAD-DICOM File Entries [MAGD FIX DICOM FILE] ................................... 194
9.4.1 Selection by Patient................................................................................................... 194 9.4.2 Looping through the List of Failed Images............................................................... 196 9.4.3 Scanning the List of Failed Images by Date Range .................................................. 197
9.5 List Unread Studies [MAGD LIST UNREAD STUDIES] .............................................. 198 9.6 Print DICOM Failed Image File Entries [MAGD PRINT DICOM FILE] ...................... 198 9.7 Clean Up Gateway (DICOM Destinations) [MAGD REMOVE GATEWAY XMIT] ... 199 9.8 Clean Up DICOM Gateway (Failed Images) [MAGD REMOVE GATEWAY FAILED]
.......................................................................................................................................... 199 9.9 Rename DICOM Gateway (DICOM Destinations) [MAGD RENAME GATEWAY
XMIT] .............................................................................................................................. 200 9.10 Rename DICOM Gateway (Failed Images) [MAGD RENAME GATEWAY FAILED] 200 9.11 Validate DICOM Correct Information [MAG DICOM CORRECT VALIDATE] ......... 200
Chapter 10 Re-Define Access and Verify Codes .................................................................203 10.1 Overview .......................................................................................................................... 203
Chapter 11 Text Gateway File Modes of Operation ...........................................................205 11.1 Overview .......................................................................................................................... 205 11.2 DIRECT Mode of Operation ............................................................................................ 205
Table of Contents
September 2013 VistA Imaging System MAG*3.0*138 xi DICOM Gateway User Manual – Rev. 15
11.3 FIFO QUEUE Mode of Operation ................................................................................... 205 11.3.1 Queue Pointer File .................................................................................................... 206 11.3.2 Processing Algorithm – Message Source ................................................................. 207 11.3.3 Processing Algorithm – Message Destination .......................................................... 208 11.3.4 Message Queue File Deletion ................................................................................... 209
Chapter 12 Image Acquisition Devices – Modalities ..........................................................211 12.1 Image-Producing Equipment ............................................................................................ 211 12.2 Distribute Modalities Over Processors ............................................................................. 212 12.3 Image Acquisition ............................................................................................................ 212
12.3.1 Add IP Addresses to HOSTS File ............................................................................. 212 12.3.2 Configuring the Instruments ..................................................................................... 213 12.3.3 Registering the Instrument with VistA Modality Worklist SCP .............................. 213 12.3.4 Registering the Instrument with VistA Storage Provider SCP ................................. 214
12.4 Setting up DICOM Image Processing .............................................................................. 214 12.4.1 Registering the Type of Modality with VistA .......................................................... 214 12.4.2 Format of entries in MODALITY.DIC ..................................................................... 218
12.5 Loading data from MODALITY.DIC into VistA ............................................................ 219 12.6 Setting up the MAG CT PARAMETER File for VistARad ............................................ 219
12.6.1 Verifying the CT HU Calculation Problem .............................................................. 220 12.6.2 Applying the Correction ........................................................................................... 221
12.7 Setting up the MAG CR PARAMETER File for VistARad ............................................ 221 12.7.1 Verifying the CR Measurement Problem ................................................................. 222 12.7.2 Applying the Correction ........................................................................................... 222
Chapter 13 Diagnostic Tests ..................................................................................................225 13.1 PING ................................................................................................................................. 225 13.2 DICOM Echo ................................................................................................................... 225 13.3 Sending a Test Image ....................................................................................................... 226
Chapter 14 Image Transfer from Commercial PACS - DICOM Exam Complete ..........229 14.1 Overview .......................................................................................................................... 229 14.2 Query/Retrieve ................................................................................................................. 230 14.3 VistA DICOM Image Gateway Processes ....................................................................... 231 14.4 Configuration Preparation for PACS Interface ................................................................ 231
14.4.1 Gateway Parameters for PACS ................................................................................. 231 14.4.2 Receive Exam Complete Messages .......................................................................... 231 14.4.3 C-STORE Provider ................................................................................................... 232 14.4.4 Send PACS Request Image Transfer Messages........................................................ 232 14.4.5 Process DICOM Images ........................................................................................... 233 14.4.6 Display Real-Time Storage Server Statistics ............................................................ 233
14.5 Startup Sequence for Commercial PACS Interface ......................................................... 233
Chapter 15 Autorouting Images from PACS to VistA .......................................................235 15.1 Configuration Preparation for PACS Interface ................................................................ 235
15.1.1 Gateway Parameters.................................................................................................. 235
Table of Contents
xii VistA Imaging System MAG*3.0*138 September 2013 DICOM Gateway User Manual – Rev. 15
15.1.2 C-STORE Provider ................................................................................................... 235 15.2 Startup Sequence for commercial PACS .......................................................................... 235
Chapter 16 VistA Interface for Clinicical Specialty DICOM & HL7 Operation ............237 16.1 Introduction ...................................................................................................................... 237 16.2 Workflow for the Clinical Specialties .............................................................................. 237 16.3 DICOM Modality Worklist for Clinical Specialties ........................................................ 238
16.3.1 Obtaining Information for the Modality Worklist Database ..................................... 238 16.3.2 Image Acquisition Devices Queries the Modality Worklist ..................................... 240
16.4 Image Acquisition and Association .................................................................................. 240 16.5 Image Verification ............................................................................................................ 242 16.6 Entering a TIU Result Note and Completing the Consult ................................................ 242 16.7 Viewing Images ................................................................................................................ 242 16.8 Handling Follow-Up Visits .............................................................................................. 244 16.9 Listing of Unread Studies ................................................................................................. 244
Chapter 17 Delete Study by Accession Number ..................................................................245 17.1 Delete a Study by Accession Number [MAG SYS-DELETE STUDY] .......................... 245
Glossary ..............................................................................................................................249
Index ..............................................................................................................................253

September 2013 VistA Imaging System MAG*3.0*138 xiii DICOM Gateway User Manual – Rev. 15
Document Conventions This document uses the following typographic conventions.
Symbol/Typeface Meaning/Use Example
Bold User input, selection, GUI element (menu item, button, field)
Click Finish. Choose Open from the File menu. Type the user account name in the Name field.
Monospaced font (typically in a box) (Bold indicates user input or selection).
Command-line sample or output (such as character-based screen captures and computer source code), menus, file names
Navigate to the \Docs\Imaging_Docs_Latest folder.
Italics Emphasis, reference to section in the document or another document, or a variable
For more information, see the VistA Imaging DICOM Gateway Installation Guide.
Square brackets, monospace or italics
Variable, placeholder, VistA menu
Access the Kernel Installation and Distribution System Menu [XPD MAIN]. ;;3.0;IMAGING;**[Patch List]**;Mar 19, 2002;Build 1989;Feb 21, 2011 MAG*3.0*<PatchNumber>.KID
How to Get Software and Documentation Updates This software will be available in the Imaging FTP directory under your site's folder. Installation instructions are included in this folder.
Terms of Use: FDA regulations require that each Imaging software distribution be documented and tracked by the VistA Imaging project. To receive this patch, sites must have a Site Agreement filed with and approved by the VistA Imaging Team.
For information concerning the status of a Site Agreement contact the VistA Imaging Team via e-mail ([email protected]).

xiv VistA Imaging System MAG*3.0*138 September 2013 DICOM Gateway User Manual – Rev. 15
This page is intentionally blank.
September 2013 VistA Imaging System MAG*3.0*138 1 DICOM Gateway User Manual – Rev. 15
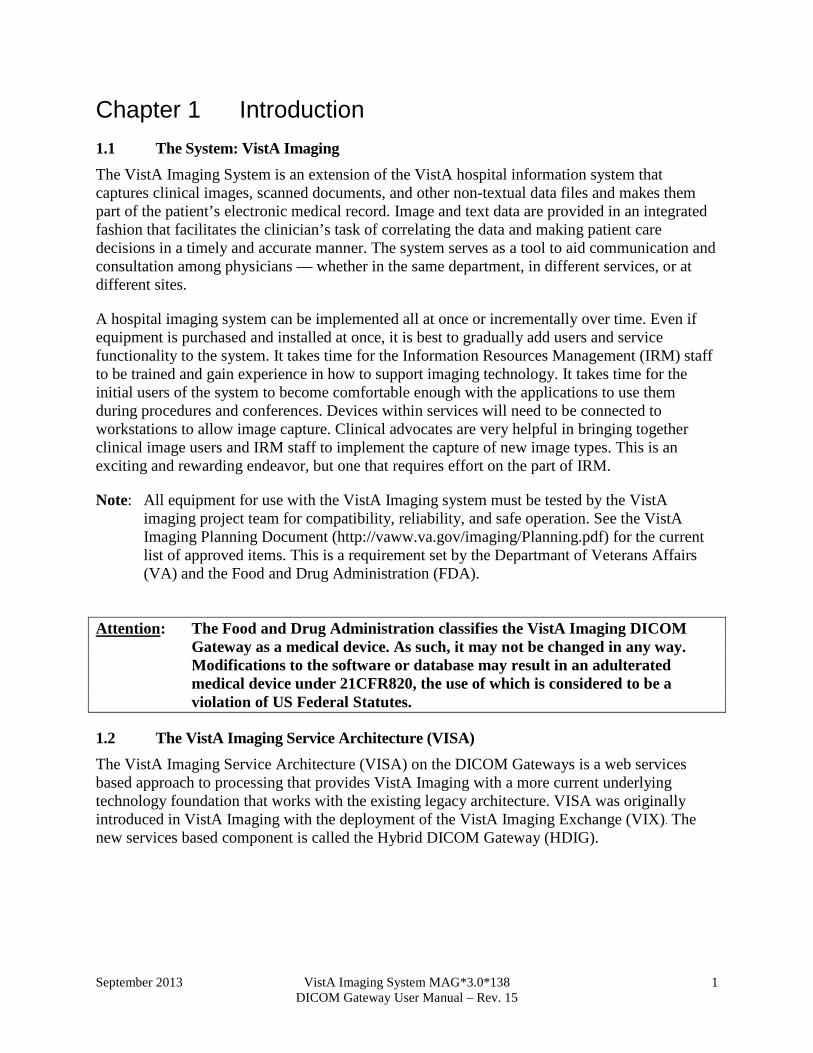
Chapter 1 Introduction 1.1 The System: VistA Imaging The VistA Imaging System is an extension of the VistA hospital information system that captures clinical images, scanned documents, and other non-textual data files and makes them part of the patient’s electronic medical record. Image and text data are provided in an integrated fashion that facilitates the clinician’s task of correlating the data and making patient care decisions in a timely and accurate manner. The system serves as a tool to aid communication and consultation among physicians — whether in the same department, in different services, or at different sites.
A hospital imaging system can be implemented all at once or incrementally over time. Even if equipment is purchased and installed at once, it is best to gradually add users and service functionality to the system. It takes time for the Information Resources Management (IRM) staff to be trained and gain experience in how to support imaging technology. It takes time for the initial users of the system to become comfortable enough with the applications to use them during procedures and conferences. Devices within services will need to be connected to workstations to allow image capture. Clinical advocates are very helpful in bringing together clinical image users and IRM staff to implement the capture of new image types. This is an exciting and rewarding endeavor, but one that requires effort on the part of IRM.
Note: All equipment for use with the VistA Imaging system must be tested by the VistA imaging project team for compatibility, reliability, and safe operation. See the VistA Imaging Planning Document (http://vaww.va.gov/imaging/Planning.pdf) for the current list of approved items. This is a requirement set by the Departmant of Veterans Affairs (VA) and the Food and Drug Administration (FDA).
Attention: The Food and Drug Administration classifies the VistA Imaging DICOM Gateway as a medical device. As such, it may not be changed in any way. Modifications to the software or database may result in an adulterated medical device under 21CFR820, the use of which is considered to be a violation of US Federal Statutes.
1.2 The VistA Imaging Service Architecture (VISA) The VistA Imaging Service Architecture (VISA) on the DICOM Gateways is a web services based approach to processing that provides VistA Imaging with a more current underlying technology foundation that works with the existing legacy architecture. VISA was originally introduced in VistA Imaging with the deployment of the VistA Imaging Exchange (VIX). The new services based component is called the Hybrid DICOM Gateway (HDIG).

Chapter 1 - Introduction
2 VistA Imaging System MAG*3.0*138 September 2013 DICOM Gateway User Manual – Rev. 15
Figure 1. VISA and the DICOM Gateway
1.2.1 VIX For the DICOM Gateway to function in the VISA, a VIX must be installed and properly configured.
The VIX facilitates the transmission of images between VA sites and between VA and Department of Defense (DOD) sites; whereas, the DICOM Gateway facilitates the transmission of images within a VA site.
NOTE The VIX and HDIG cannot be installed on the same server. The HDIG is discussed in-depth in this user manual.
1.3 The VistA Imaging DICOM Gateway DICOM is the abbreviation for the Digital Imaging and COmmunications in Medicine standard. DICOM brings open systems technology to the medical imaging marketplace and enables VistA to communicate directly with commercial medical imaging equipment.
Chapter 1 - Introduction
September 2013 VistA Imaging System MAG*3.0*138 3 DICOM Gateway User Manual – Rev. 15
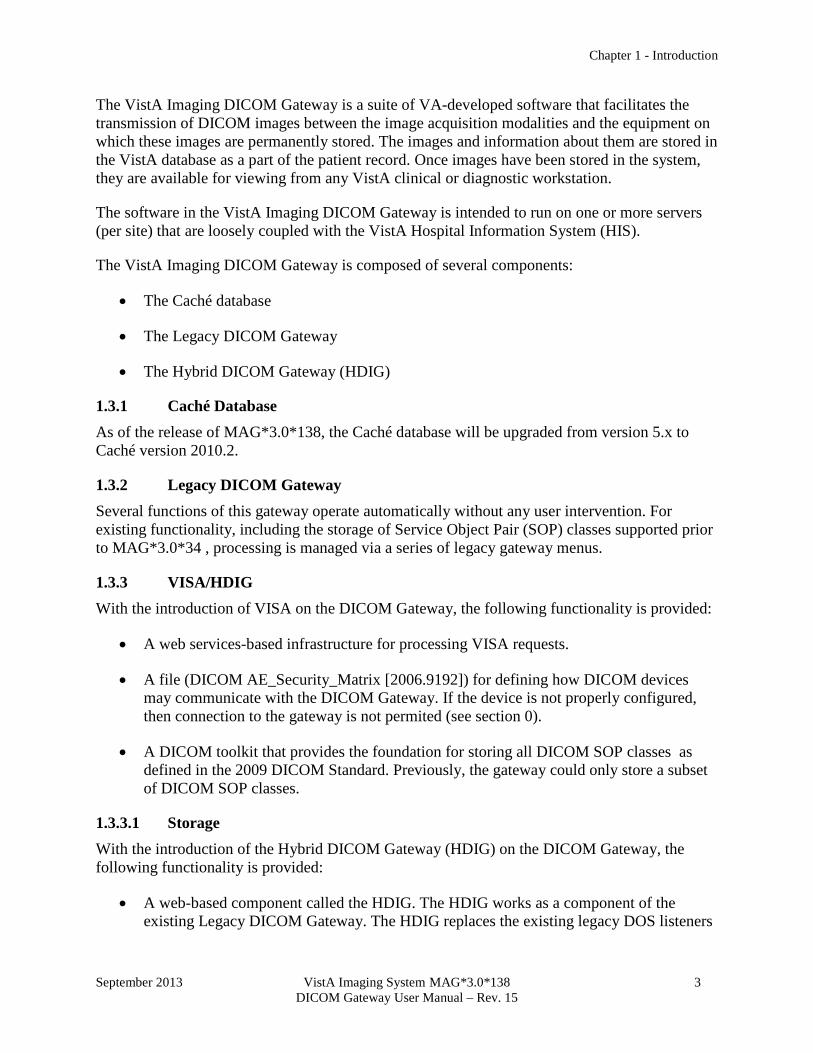
The VistA Imaging DICOM Gateway is a suite of VA-developed software that facilitates the transmission of DICOM images between the image acquisition modalities and the equipment on which these images are permanently stored. The images and information about them are stored in the VistA database as a part of the patient record. Once images have been stored in the system, they are available for viewing from any VistA clinical or diagnostic workstation.
The software in the VistA Imaging DICOM Gateway is intended to run on one or more servers (per site) that are loosely coupled with the VistA Hospital Information System (HIS).
The VistA Imaging DICOM Gateway is composed of several components:
• The Caché database
• The Legacy DICOM Gateway
• The Hybrid DICOM Gateway (HDIG)
1.3.1 Caché Database As of the release of MAG*3.0*138, the Caché database will be upgraded from version 5.x to Caché version 2010.2.
1.3.2 Legacy DICOM Gateway Several functions of this gateway operate automatically without any user intervention. For existing functionality, including the storage of Service Object Pair (SOP) classes supported prior to MAG*3.0*34 , processing is managed via a series of legacy gateway menus.
1.3.3 VISA/HDIG With the introduction of VISA on the DICOM Gateway, the following functionality is provided:
• A web services-based infrastructure for processing VISA requests.
• A file (DICOM AE_Security_Matrix [2006.9192]) for defining how DICOM devices may communicate with the DICOM Gateway. If the device is not properly configured, then connection to the gateway is not permited (see section 0).
• A DICOM toolkit that provides the foundation for storing all DICOM SOP classes as defined in the 2009 DICOM Standard. Previously, the gateway could only store a subset of DICOM SOP classes.
1.3.3.1 Storage With the introduction of the Hybrid DICOM Gateway (HDIG) on the DICOM Gateway, the following functionality is provided:
• A web-based component called the HDIG. The HDIG works as a component of the existing Legacy DICOM Gateway. The HDIG replaces the existing legacy DOS listeners

Chapter 1 - Introduction
4 VistA Imaging System MAG*3.0*138 September 2013 DICOM Gateway User Manual – Rev. 15
and receives all incoming DICOM Objects. DICOM Objects are processed based on the gateway configuration.
• An object-independent Archiver solution for the offline storage of all DICOM Objects stored in the new file structure. The Archiver runs as as service on the HDIG.
1.3.3.2 Query/Retreive MAG*3.0*116 introduced the following functionality:
• An updated Query/Retrieve (Q/R) service that replaces the MAG*3.0*66 Query/Retrieve application. The Q/R services starts automatically when a gateway configured to run the Q/R service starts.
• The ability to Q/R all study information from all data structures. This includes radiology Printsets.
• Enhanced Logging - Audit logging, application logging and Sensitive Patient logging.
• The ability to delete a study by accession number through a VistA menu option.
1.3.3.3 DICOM Import MAG*3.0*118 introduces a client-based Import service, which replaces the original MAG*3.0*53 Importer. MAG*3.0*118 functionality includes:
• A workstation Graphical User Interface (GUI), allowing multiple users to perform import processing simultaneously.
• The assignment of security keys that control what levels of the DICOM importing workflow can be performed by an individual.
• A relaxed validation of the DICOMDIR standard on the import media. If the DICOMDIR does not conform to the DICOM Standard or does not exist on the media, the MAG*3.0*118 software bypasses it and still tries to read the DICOM data.
• The ability to import any valid 2009 Standard DICOM object. This includes radiology, dental, opthmology, and other imaging specialities.
• A DICOM Correct mechanism utilizing the new Importer MAG*3.0*118 GUI and reconciliation workflow.
MAG*3.0*136 is an enhancement patch to MAG*3.0*118. All functionality introduced with MAG*3.0*118 still exists; however, authorized users can perform these additional functions (see the VistA Imaging DICOM Importer III User Manual):
• Import a non-DICOM report, convert it to a DICOM encapsulated PDF and store it as part of the imported study.
Chapter 1 - Introduction
September 2013 VistA Imaging System MAG*3.0*138 5 DICOM Gateway User Manual – Rev. 15
• Assign a primary diagnostic code to a radiology study.
• Assign multiple secondary diagnostic codes to a radiology study.
• Import and associate DICOM objects to a CLOSED, no-credit radiology study.
1.3.3.4 Telepathology MAG*3.0*138 is a new patch to all VistA Imaging to store Telepathology DICOM objects through the DICOM Gateway.
Functionality consists of:
• A Telepathology solution that includes the VistA Imaging Telepathology Applications (VITA) and enables their use in the Department of Veterans Affairs (VA) Enterprise. The VistA Imaging Telepathology Applications (VITA) include:
• VistA Imaging Telepathology Worklist
• VistA Imaging Telepathology Configurator
The VITA provide a graphical user interface that pathologists can use to view daily workload at their sites. for Surgical Pathology (SP), Cytopathology (CY) and Electron Microscopy cases (EM). At this time the applications will not be in support of autopsy cases. It also provides a graphical interface that site administrators can use to set some configuration parameters for the VistA Imaging Telepathology Worklist and to view the VITA and the system logs.
• Enhancements to the VIX and CVIX that enable the support of VITA and provide interfaces (APIs) that are made available for third party applications to access image data from VistA Imaging.
• Enhancements to the Legacy DICOM Gateway, HDIG and Importer III that enable the telepathology application to interface with the VistA Lab package.
• A DICOM image acquisition capability for Anatomic Pathology.
• An HL7 interface that provides Digital Pathology Systems with Anatomic Pathology case ordering, case edit, and report information. The new HL7 interfaces implement the HL7 order and patient update transactions in the IHE Anatomic Pathology Scheduled Workflow Profile.1
1.4 Installation of the VistA Imaging VIX The installation procedure for the VistA Imaging VIX is described in the VistA Imaging VistA Imaging DICOM Gateway User Manual.
1For more information, go to http://www.ihe.net/Technical_Framework/#anatomic.
Chapter 1 - Introduction
6 VistA Imaging System MAG*3.0*138 September 2013 DICOM Gateway User Manual – Rev. 15
The Installation Guide contains a concise set of instructions that depict an initial installation, as well as a detailed set of instructions that describe all tuning parameters that pertain to the VistA Imaging VIX.
1.5 Installation of the VistA Imaging Legacy DICOM Gateway The installation procedure for the VistA Imaging Legacy DICOM Gateway is described in the VistA Imaging DICOM Gateway Installation Guide.
The Installation Guide contains a concise set of instructions that depict an initial installation, as well as a detailed set of instructions that describe all tuning parameters that pertain to the VistA Imaging Legacy DICOM Gateway.
1.6 Installation of the VistA Imaging HDIG The installation procedure for the VistA Imaging HDIG is described in the VistA Imaging Hybrid DICOM Image Gateway (HDIG) Installation Guide.
The Installation Guide contains a concise set of instructions that depict an initial installation, as well as a detailed set of instructions that describe all tuning parameters that pertain to the VistA Imaging HDIG.
September 2013 VistA Imaging System MAG*3.0*138 7 DICOM Gateway User Manual – Rev. 15
Chapter 2 General Operation The VistA Imaging DICOM Gateway runs on a Windows-based server. The gateway has two functional areas that process imaging service requests; the Legacy DICOM Gateway service and the HDIG service.
The Legacy DICOM Gateway services run as a set of tasks within a Caché™ Server system. To operate the system, the Caché Server needs to be running first. The various subtasks of the VistA Imaging Legacy DICOM Gateway then run either invisibly in the background or as telnet sessions connected to the Caché Server process.
2.1 VistA Imaging DICOM Menu The Legacy DICOM Gateway is a menu driven system. The primary menu is shown, Each menu option will be described throughout this document.
1. Text Gateway 1.1. Start Processing Text Messages from HIS 1.2. Send DICOM Text Messages to Commercial PACS or Broker 1.3. Display Text Gateway Statistics 1.4. Display Modality Worklist Statistics 1.5. Modality Worklist Query 1.6. Display a HL7 Message 1.7. Display a DICOM Message 1.8. Modify the HL7 Message Pointer 1.9. Generate a Daily Summary Report 1.10. Purge Old Modality Worklist Entries 1.11. Purge Old DICOM Message Files 1.12. Purge Old HL7 Transaction Global Nodes 1.13. Purge Old Audit Records
2. Image Gateway
2.1. Receive PACS Exam Complete Messages 2.2. Send PACS Request Image Transfer Messages 2.3. Process DICOM Images 2.4. Increment DICOM Image Input Pointer 2.5. Display Real-Time Storage Server Statistics 2.6. Display Cumulative Storage Server Statistics 2.7. Display Daily Image Processing Statistics 2.8. Send DICOM Images to Another Storage Server
2.8.1. Select DICOM Images for Transmission 2.8.2. Transmit DICOM Images to a Storage SCP 2.8.3. Stop Image Transmission Queue Processor 2.8.4. (Re)Initialize Image Transmission Queue 2.8.5. Batch Export VistA Radiology Images 2.8.6. Display Batch Export Statistics
Chapter 2 – General Operation
8 VistA Imaging System MAG*3.0*138 September 2013 DICOM Gateway User Manual – Rev. 15
2.9. Display a DICOM Image Header 2.9.1. Re-Transmit Images from PACS
2.9.1.1. Start Querying the PACS 2.9.1.2. Stop Querying the PACS 2.9.1.3. Maintain Set-Up Parameters
2.10. Purge Incomplete Image Information 2.11. Validate Failed Image Table
3. Routing Gateway
3.1. Start the Transmission Processor 3.2. Stop the Transmission Processor 3.3. Start the Evaluation Processor 3.4. Stop the Evaluation Processor 3.5. Import Routing Rules 3.6. Purge all Completed Entries in the Transmission Queue 3.7. Purge Completed and Expired Entries in the Transmission Queue 3.8. Re-Queue all Failed Entries in the Transmission Queue 3.9. Remove Obsolete Entries from Transmission Queue 3.10. Display Routing Rules
4. System Maintenance
4.1. System Operation 4.1.1. Display MUMPS-to-MUMPS Broker Status 4.1.2. Display DICOM Message Log 4.1.3. Issue a DICOM Echo Request 4.1.4. Display the Version of the Software 4.1.5. Display Gateway Application Usage Statistics 4.1.6. Support Telephone Numbers 4.1.7. Test E-Mail Transmission
4.2. Gateway Configuration and DICOM Master Files 4.2.1. Display Gateway Configuration Parameters 4.2.2. Update Gateway Configuration Parameters 4.2.3. Update AETITLE.DIC 4.2.4. Update INSTRUMENT.DIC 4.2.5. Update MODALITY.DIC 4.2.6. Update PORTLIST.DIC 4.2.7. Update SCU_LIST.DIC 4.2.8. Update WORKLIST.DIC 4.2.9. Reinitialize All the DICOM Master Files 4.2.10. Create Shortcuts for Instruments 4.2.11. Validate Access/Verify Codes for Modality Worklist 4.2.12. Display Versions and/or Time Stamps of Components
4.3. MUMPS Utilities 4.3.1. Access MUMPS Error Log 4.3.2. Global Variable Lister 4.3.3. Display MUMPS System Status
Chapter 2 – General Operation
September 2013 VistA Imaging System MAG*3.0*138 9 DICOM Gateway User Manual – Rev. 15
4.3.4. Check Available Disk Space 4.3.5. Display License Expiration Date
4.4. Enter Programmer Mode 5. Quit
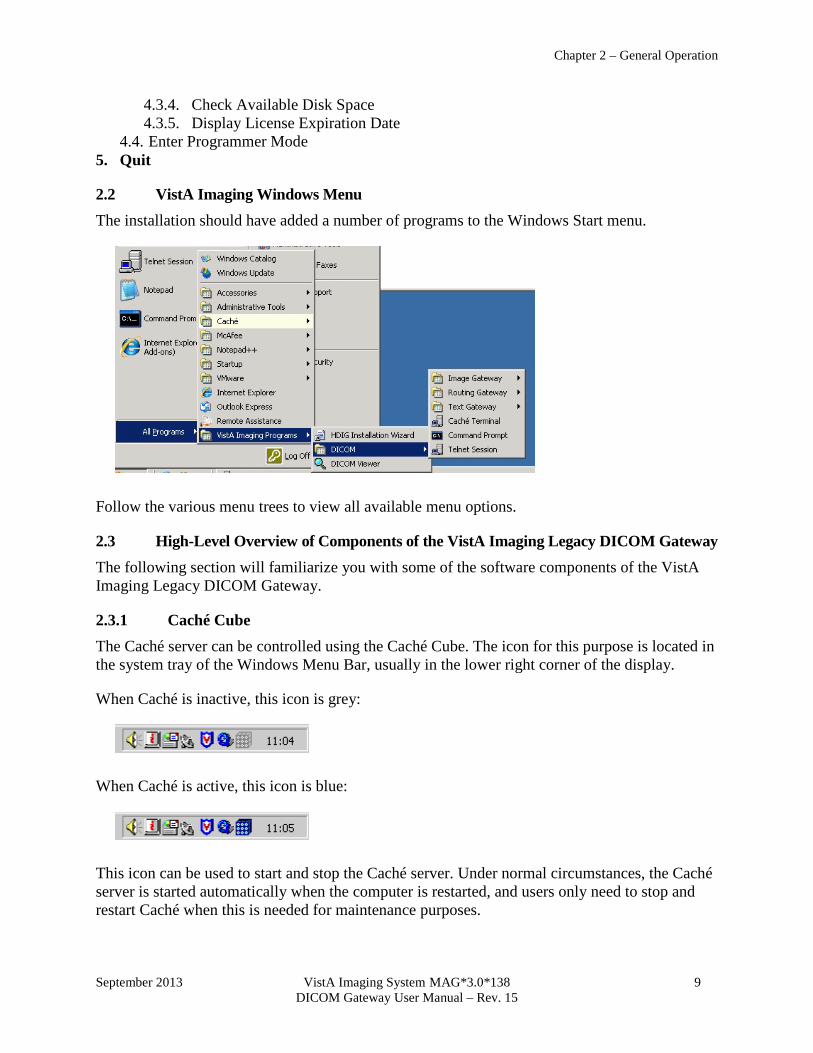
2.2 VistA Imaging Windows Menu The installation should have added a number of programs to the Windows Start menu.
Follow the various menu trees to view all available menu options.
2.3 High-Level Overview of Components of the VistA Imaging Legacy DICOM Gateway The following section will familiarize you with some of the software components of the VistA Imaging Legacy DICOM Gateway.
2.3.1 Caché Cube The Caché server can be controlled using the Caché Cube. The icon for this purpose is located in the system tray of the Windows Menu Bar, usually in the lower right corner of the display.
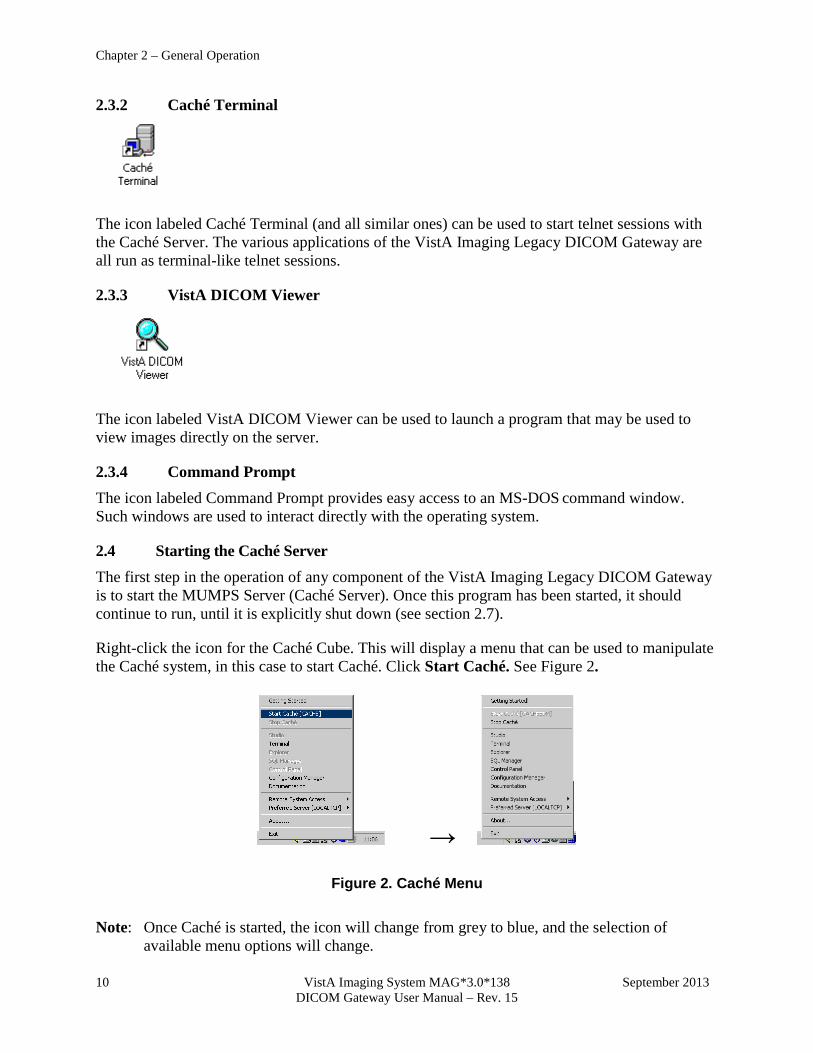
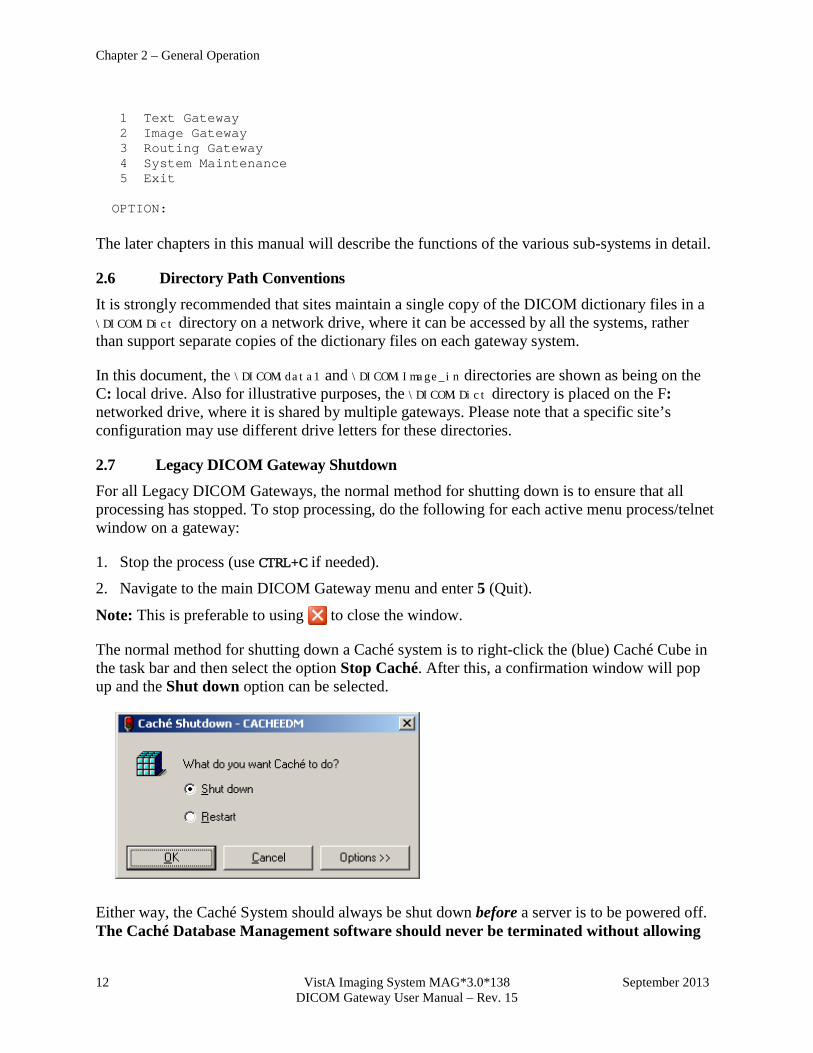
When Caché is inactive, this icon is grey:
When Caché is active, this icon is blue:
This icon can be used to start and stop the Caché server. Under normal circumstances, the Caché server is started automatically when the computer is restarted, and users only need to stop and restart Caché when this is needed for maintenance purposes.
Chapter 2 – General Operation
10 VistA Imaging System MAG*3.0*138 September 2013 DICOM Gateway User Manual – Rev. 15
2.3.2 Caché Terminal
The icon labeled Caché Terminal (and all similar ones) can be used to start telnet sessions with the Caché Server. The various applications of the VistA Imaging Legacy DICOM Gateway are all run as terminal-like telnet sessions.
2.3.3 VistA DICOM Viewer
The icon labeled VistA DICOM Viewer can be used to launch a program that may be used to view images directly on the server.
2.3.4 Command Prompt The icon labeled Command Prompt provides easy access to an MS-DOS command window. Such windows are used to interact directly with the operating system.
2.4 Starting the Caché Server The first step in the operation of any component of the VistA Imaging Legacy DICOM Gateway is to start the MUMPS Server (Caché Server). Once this program has been started, it should continue to run, until it is explicitly shut down (see section 2.7).
Right-click the icon for the Caché Cube. This will display a menu that can be used to manipulate the Caché system, in this case to start Caché. Click Start Caché. See Figure 2.
→
Figure 2. Caché Menu
Note: Once Caché is started, the icon will change from grey to blue, and the selection of available menu options will change.

Chapter 2 – General Operation
September 2013 VistA Imaging System MAG*3.0*138 11 DICOM Gateway User Manual – Rev. 15
2.5 VistA Gateway Main Menu When a telnet session is initiated after Caché is started, a window will open that shows the VistA Imaging Legacy DICOM Gateway login dialog. ******************************************************************************** ** VistA DICOM Interface Caché Test System ** ** ** ** The Food and Drug Administration classifies this software as a medical ** ** device. Modification of this software may result in an adulterated ** ** medical device, the use of which is considered to be a violation of ** ** US Federal Statutes. Federal law restricts this device to use by or ** ** on the order of either a licensed practitioner or persons lawfully ** ** engaged in the manufacture, support, or distribution of the product. ** ** ** ** The information in this system is further protected by the Privacy Act ** ** of 1974 (PL93-579). Unauthorized access to or use of this system is a ** ** serious violation of Federal Law. Violators will be prosecuted. ** ** ** ** Use of this software is monitored. ** ******************************************************************************** ACCESS CODE: VERIFY CODE:
To log in to a Legacy DICOM Gateway, you can choose among a number of different access and verify codes.
1. The access and verify codes that were entered as part of the installation procedure are to be used for maintenance on the Legacy DICOM Gateway itself. When interaction with the VistA Hospital Information System is required, a different combination of access and verify code is required.
2. When you need to interact with the VistA Hospital Information System, a combination of access and verify code must be used that is valid on the VistA system (these codes cannot be maintained or modified on the Legacy DICOM Gateway and should be set up on the VistA system using Kernel User Management menu options). Such a combination of access and verify code will identify you as a valid user of the VistA system, and you will have the privileges that the VistA system assigns to the owner of the specified access and verify codes.
Each Legacy DICOM Gateway is associated with a location (see section 8.3.2.2). When you use credentials that are to be validated on the VistA system, the Legacy DICOM Gateway will attempt to set the current division such that it corresponds to the location of the Legacy DICOM Gateway. Access to the Legacy DICOM Gateway is granted only when the VistA system acknowledges that the specified credentials give access to that division or location.
The procedure to modify access code and/or verify code is, for obvious reasons, protected by a password of its own. See Chapter 10 for a description of this procedure.
When a valid access code and verify code have been entered, the main menu will appear:
VistA DICOM Gateway Menu
Chapter 2 – General Operation
12 VistA Imaging System MAG*3.0*138 September 2013 DICOM Gateway User Manual – Rev. 15
1 Text Gateway
2 Image Gateway 3 Routing Gateway 4 System Maintenance 5 Exit
OPTION: The later chapters in this manual will describe the functions of the various sub-systems in detail.
2.6 Directory Path Conventions It is strongly recommended that sites maintain a single copy of the DICOM dictionary files in a \DICOM\Dict directory on a network drive, where it can be accessed by all the systems, rather than support separate copies of the dictionary files on each gateway system.
In this document, the \DICOM\data1 and \DICOM\Image_in directories are shown as being on the C: local drive. Also for illustrative purposes, the \DICOM\Dict directory is placed on the F: networked drive, where it is shared by multiple gateways. Please note that a specific site’s configuration may use different drive letters for these directories.
2.7 Legacy DICOM Gateway Shutdown For all Legacy DICOM Gateways, the normal method for shutting down is to ensure that all processing has stopped. To stop processing, do the following for each active menu process/telnet window on a gateway:
1. Stop the process (use CTRL+C if needed).
2. Navigate to the main DICOM Gateway menu and enter 5 (Quit).
Note: This is preferable to using to close the window.
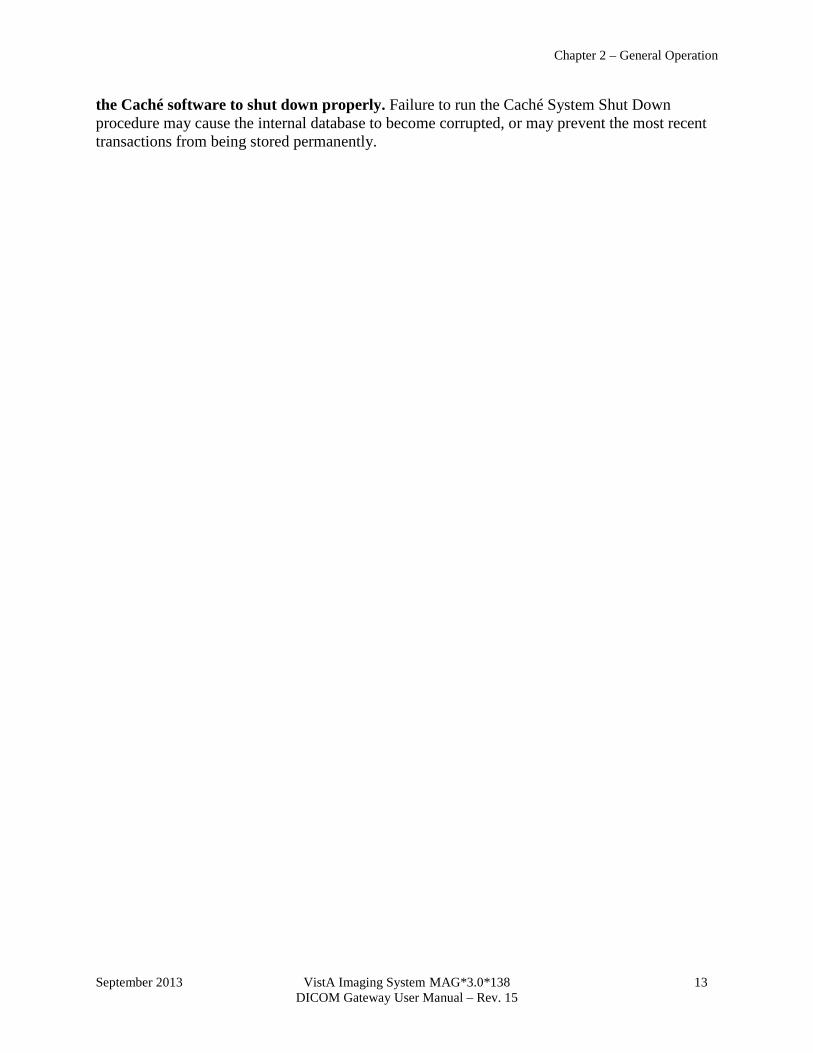
The normal method for shutting down a Caché system is to right-click the (blue) Caché Cube in the task bar and then select the option Stop Caché. After this, a confirmation window will pop up and the Shut down option can be selected.
Either way, the Caché System should always be shut down before a server is to be powered off. The Caché Database Management software should never be terminated without allowing
Chapter 2 – General Operation
September 2013 VistA Imaging System MAG*3.0*138 13 DICOM Gateway User Manual – Rev. 15
the Caché software to shut down properly. Failure to run the Caché System Shut Down procedure may cause the internal database to become corrupted, or may prevent the most recent transactions from being stored permanently.

Chapter 2 – General Operation
14 VistA Imaging System MAG*3.0*138 September 2013 DICOM Gateway User Manual – Rev. 15
This page is left intentionally blank.
September 2013 VistA Imaging System MAG*3.0*138 15 DICOM Gateway User Manual – Rev. 15
Chapter 3 Text Gateway The general function of the Text Gateway is to distribute event data from the VistA Hospital Information System to image acquisition modalities and Picture Archiving and Communication Systems (PACS).
This event data is used to build the database that supports the DICOM Modality Worklist service. The various modalities are able to use this service to obtain information about their respective outstanding orders.
Two different methodologies are used in the VistA Imaging Legacy DICOM Gateway to handle the text files. For Modality Worklist, a single process performs both the TCP/IP communications and the message handling. An entirely different technique is used for messages sent to a commercial PACS. In this case, separate processes perform the communications and message handling chores, and prioritized messages queues are used to ensure reliable delivery to multiple destinations. The details of these different methods are described in Chapter 11.
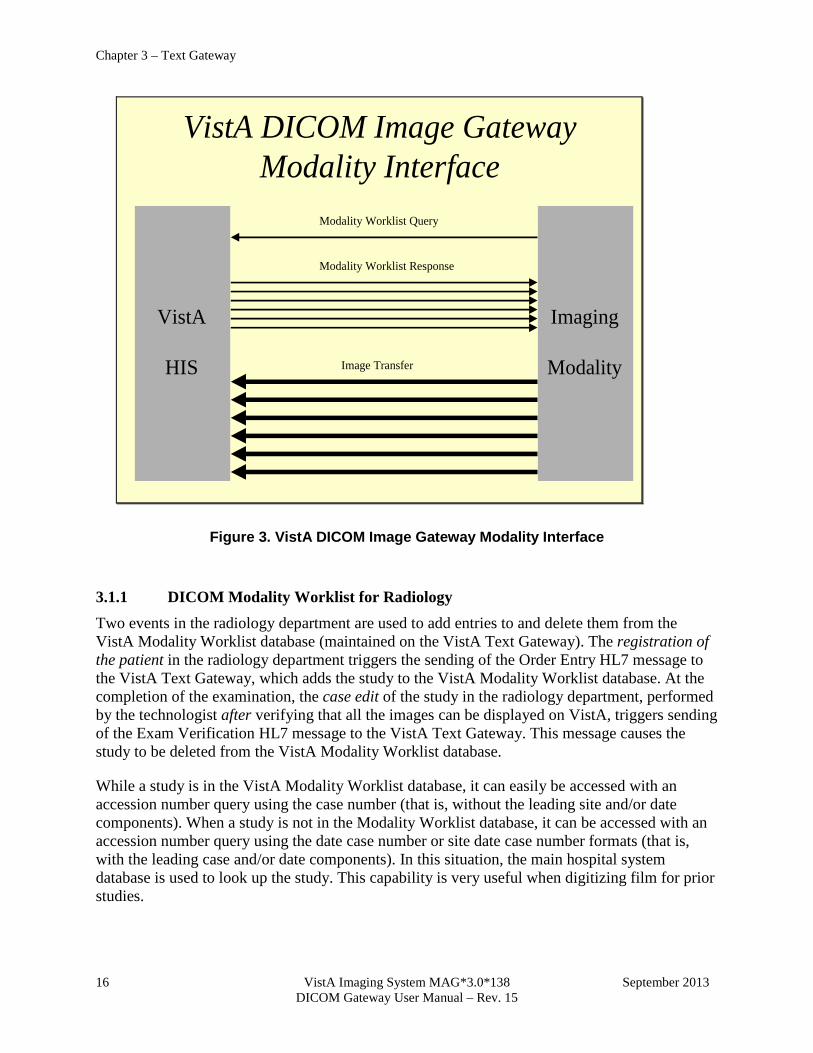
3.1 DICOM Modality Worklist Modality Worklist is the DICOM service that allows an image acquisition instrument, like a CT scanner, to query a provider system, connected to a hospital information system, to obtain a list of examinations that are to be performed at that unit. The modality worklist query precedes the acquisition of the images so that the electronically obtained data can be copied to the header of each image. Modality Worklist eliminates the manual entry of patient and study data at the acquisition workstation. At least six pieces of information are typically returned in a modality worklist query: patient name, patient ID (social security number), accession number (for example, the radiology date case number in MMDDYY-NNNNN format or in site-specific SSS-MMDDYY-NNNNN format), procedure name, date of procedure, and Study Instance UID. All new DICOM image acquisition devices are required by the VA to support the Modality Worklist service to automatically download selected patient and study information.
There are a variety of different ways for a user (image acquisition instrument) to query a provider of the DICOM Modality Worklist service. The user may ask for the entire list of examinations that can be performed at that unit, or may use the accession number to select just the study of interest. Both are useful, one to get a heads up to see how much work there is to do, and the other for drilling down to get specific, detailed information about a particular study. Querying for the entire list of examinations and providing a “pick list” gives too many choices to the technologist and has proven to be error prone in practice. Generally, the accession number query is preferred when dealing with individual examinations, since it gives feedback about the particular case and presents the technologist with the smallest number of possible choices. (See section 3.9 for examples of Modality Worklist queries.)
VistA is a provider of the DICOM Modality Worklist service. (This service can also be supplied commercially by a PACS.)
Chapter 3 – Text Gateway
16 VistA Imaging System MAG*3.0*138 September 2013 DICOM Gateway User Manual – Rev. 15
VistA DICOM Image GatewayModality Interface
VistA
HIS Image Transfer
Modality Worklist Query
Imaging
Modality
Modality Worklist Response
Figure 3. VistA DICOM Image Gateway Modality Interface
3.1.1 DICOM Modality Worklist for Radiology Two events in the radiology department are used to add entries to and delete them from the VistA Modality Worklist database (maintained on the VistA Text Gateway). The registration of the patient in the radiology department triggers the sending of the Order Entry HL7 message to the VistA Text Gateway, which adds the study to the VistA Modality Worklist database. At the completion of the examination, the case edit of the study in the radiology department, performed by the technologist after verifying that all the images can be displayed on VistA, triggers sending of the Exam Verification HL7 message to the VistA Text Gateway. This message causes the study to be deleted from the VistA Modality Worklist database.
While a study is in the VistA Modality Worklist database, it can easily be accessed with an accession number query using the case number (that is, without the leading site and/or date components). When a study is not in the Modality Worklist database, it can be accessed with an accession number query using the date case number or site date case number formats (that is, with the leading case and/or date components). In this situation, the main hospital system database is used to look up the study. This capability is very useful when digitizing film for prior studies.
Chapter 3 – Text Gateway
September 2013 VistA Imaging System MAG*3.0*138 17 DICOM Gateway User Manual – Rev. 15
In the VistA Modality Worklist database, the acquisition instruments are mapped to the radiology studies by physical location and Image Type (radiology package parameter). This means that for a consolidated site, each radiology location is subdivided into general radiology, CTs, MRIs, and so forth. When a query for the entire list of examinations is received, only the subset of cases for that specific site and Image Type are sent back to the acquisition instrument.
Some studies are performed on more than one acquisition instrument; for example, a Barium Enema, which has one procedure step that is performed on a general x-ray (computed radiography (CR) or digital radiography (DX)) device, and another step that is performed via digital radio fluoroscopy (RF). In order to direct the studies to the specific instruments, the entry in the RAD/NUC MED PROCEDURE file (#71), stored in ^RAMIS(71), needs to be mapped to the RAD MODALITY DEFINED TERMS file (#73.1) , stored in ^RAMIS(73.1). The entry for Barium Enema would need to be mapped to both CR (or DX) and RF, in this example.
Some studies span several days, with multiple examinations (for example, nuclear medicine). A report may be entered after the first examination, causing the entry in the VistA Modality Worklist database to be deleted. In this situation, the accession number query with the site and/or date case number (that is, either SSS-MMDDYY-NNNNN or MMDDYY-NNNNN) should be used on subsequent days to retrieve the patient information for the same study.
3.1.2 DICOM Modality Worklist for Clinical Specialties The Consult Request Tracking application is used in the clinical specialties for order entry, request tracking, and result reporting. The VistA Appointment Management package (which is separate from the Computerized Patient Record System (CPRS)) is used for scheduling clinic visits. The following steps are performed for both consult and procedure requests:
1) The clinician enters an order for a consultation or a procedure. 2) The consult service is notified of the request. 3) The consult service may accept the request with notification sent back to the patient’s
clinician. a. Alternatively, the consult service may forward the request to a different service;
or b. The consult service can discontinue or cancel the request.
4) The consult service schedules an appointment for the patient. 5) The consult service checks the patient in when the patient arrives for the appointment. 6) The consult service performs the consultation and/or procedure(s) and enters the results.
a. Image acquisition devices and result reporting systems may be used in this process.
7) The consult service signs the final result, completing the request; results are sent back to patient’s primary care provider.
8) The consult service checks the patient out, thus completing the visit and recording billing codes.
The DICOM interface for Clinical Specialties meshes seamlessly with the existing workflow and integrates with the Health Information System (HIS) applications being used by the clinical specialties and with VistA Imaging.
Chapter 3 – Text Gateway
18 VistA Imaging System MAG*3.0*138 September 2013 DICOM Gateway User Manual – Rev. 15
To provide the greatest flexibility for different workflow scenarios, the interface is designed to operate entirely from the CPRS Consult Request Tracking messages. Many of the Consult Request Tracking steps can be omitted. All the appointment management messages are completely optional. The appointment messages are important, however, because they provide the scheduling information that is required to support date-range modality worklist queries. Appointment management was modified some years ago to identify the related consults and procedures for appointments (see Patch SD*5.3*478). Imaging uses this information to provide accurate scheduling information for the worklist.
VistA DICOM Modality Worklist interface receives information from the CPRS Consult/Procedure Request Tracking application and the VistA Appointment Management package during various steps of the workflow. The ordering, accepting, scheduling, check-in, and result entry steps in the workflow are used to create and update the Modality Worklist database, while the completion steps cause entries to be deleted.
A broad modality worklist query produces a list for all the pending and scheduled consults and procedures for that clinical specialty. The DICOM Text Gateway also supports patient or accession number query, which may be more useful.
The VA HIS supports a Short PID alternate patient identification scheme. This is a hash index, which uses an abbreviated identifier consisting of the first letter of the last name follow by the last four digits of the social security number (for example, K1234). This value is then used in either the Patient Name or Patient ID matching key to retrieve all of the consult/procedure requests for the patient.
The accession number identifies the consult/procedure and is displayed on the CPRS screen with the request. This value can be used in either the Accession Number or Requested Procedure ID matching key to retrieve the specific request.
Note: See Chapter 16 for detailed information.
3.1.3 DICOM Modality Worklist for Anatomic Pathology DICOM image acquisition is supported for Anatomic Pathology (surgical pathology, cytopathology, and electron microscopy). The following events of the Lab Package are the triggers for DICOM Modality Worklist:
1) Log in a case (Log-in menu, anat path ... [LRAPL]) – puts the new case on the modality worklist
2) Data entry (Data entry, anat path ... [LRAPD]) – updates the case on the modality worklist
3) Edit (Edit/modify data, anat path ... [LRAPE]) – updates the case on the modality worklist
4) Completing report (Edit/modify data, anat path ... [LRAPE]) – entering the date that the report is completed removes the case from the modality worklist
5) Deleting a case (Delete accession #, anat path [LRAPKILL]) – removes the case from the modality worklist

Chapter 3 – Text Gateway
September 2013 VistA Imaging System MAG*3.0*138 19 DICOM Gateway User Manual – Rev. 15
6) Verifying a case (Electronically Sign Reports) – removes the case from the modality worklist. This step also generates a TIU document with which acquired DICOM images may be associated.
There are three separate image types for Anatomic Pathology that correspond to the different lab sections: CY – Cytopathology EM – Electron Microscopy SP – Surgical Pathology The worklist can be queried by any combination of these image type – please refer to the VistA Imaging DICOM Gateway Installation Guide. Many of the same features, such as the modality worklist support for CPRS Consults and Procedures, are also supported for Anatomic Pathology cases. A broad modality worklist query produces a list for all cases for that lab section. The DICOM Text Gateway also supports patient, accession number, or case number query, whichever may be more useful.
The VA HIS supports a Short PID alternate patient identification scheme. This is a hash index, which uses an abbreviated identifier consisting of the first letter of the last name followed by the last four digits of the social security number (for example, K1234). This value is then used in either the Patient Name or Patient ID matching key to retrieve all of the consult/procedure requests for the patient.
The accession number and case number identify the case. Either value can be entered in either the Accession Number or Requested Procedure ID matching key to retrieve the specific request.
Note: See Chapter 16 for detailed information.
Chapter 3 – Text Gateway
20 VistA Imaging System MAG*3.0*138 September 2013 DICOM Gateway User Manual – Rev. 15
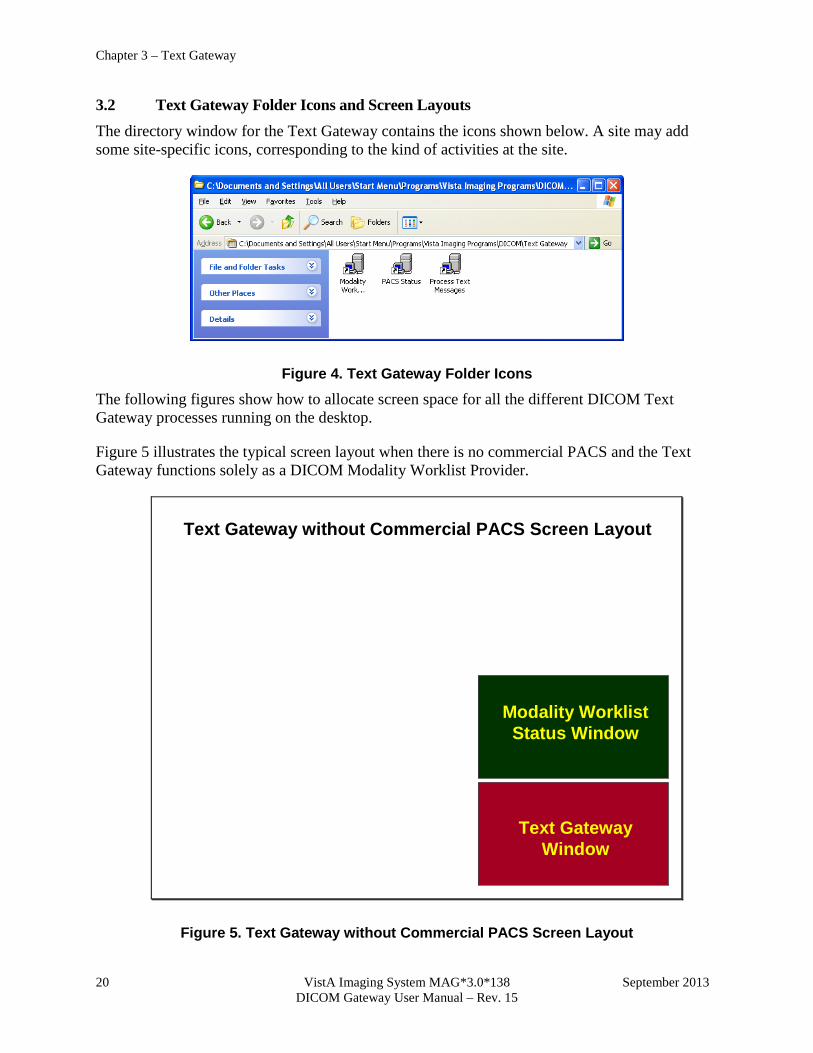
3.2 Text Gateway Folder Icons and Screen Layouts The directory window for the Text Gateway contains the icons shown below. A site may add some site-specific icons, corresponding to the kind of activities at the site.
Figure 4. Text Gateway Folder Icons
The following figures show how to allocate screen space for all the different DICOM Text Gateway processes running on the desktop.
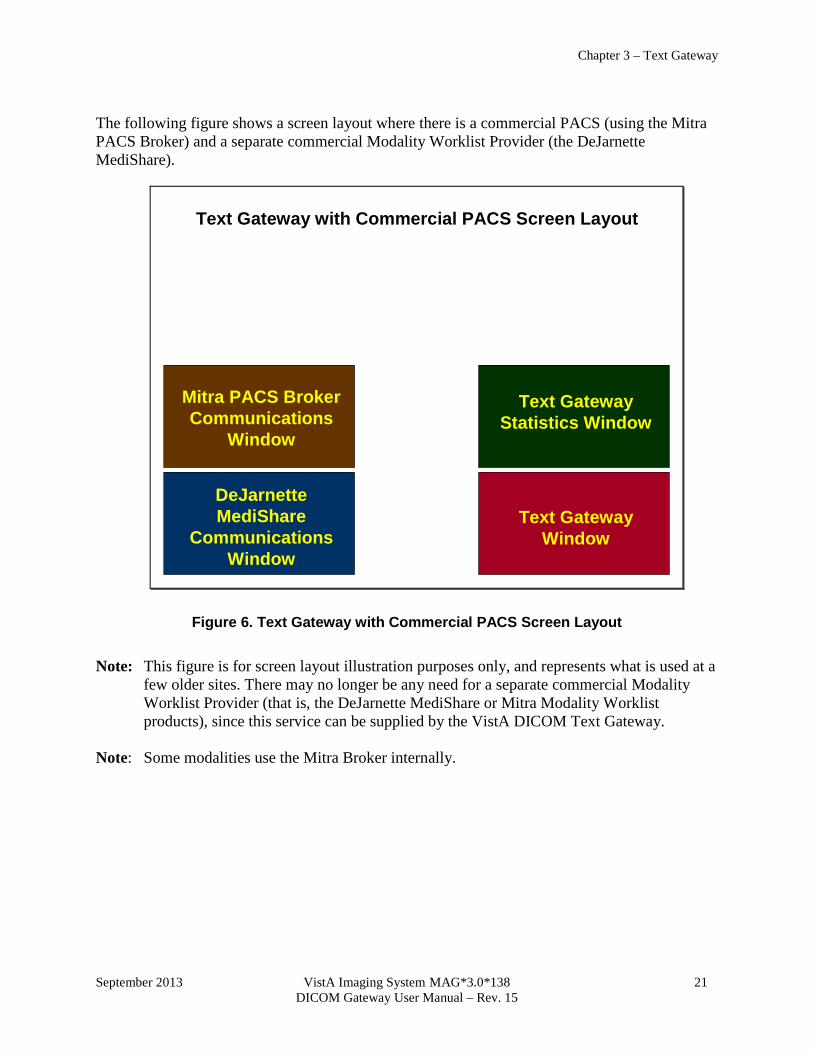
Figure 5 illustrates the typical screen layout when there is no commercial PACS and the Text Gateway functions solely as a DICOM Modality Worklist Provider.
Text Gateway Window
Modality Worklist Status Window
Text Gateway without Commercial PACS Screen Layout
Figure 5. Text Gateway without Commercial PACS Screen Layout
Chapter 3 – Text Gateway
September 2013 VistA Imaging System MAG*3.0*138 21 DICOM Gateway User Manual – Rev. 15
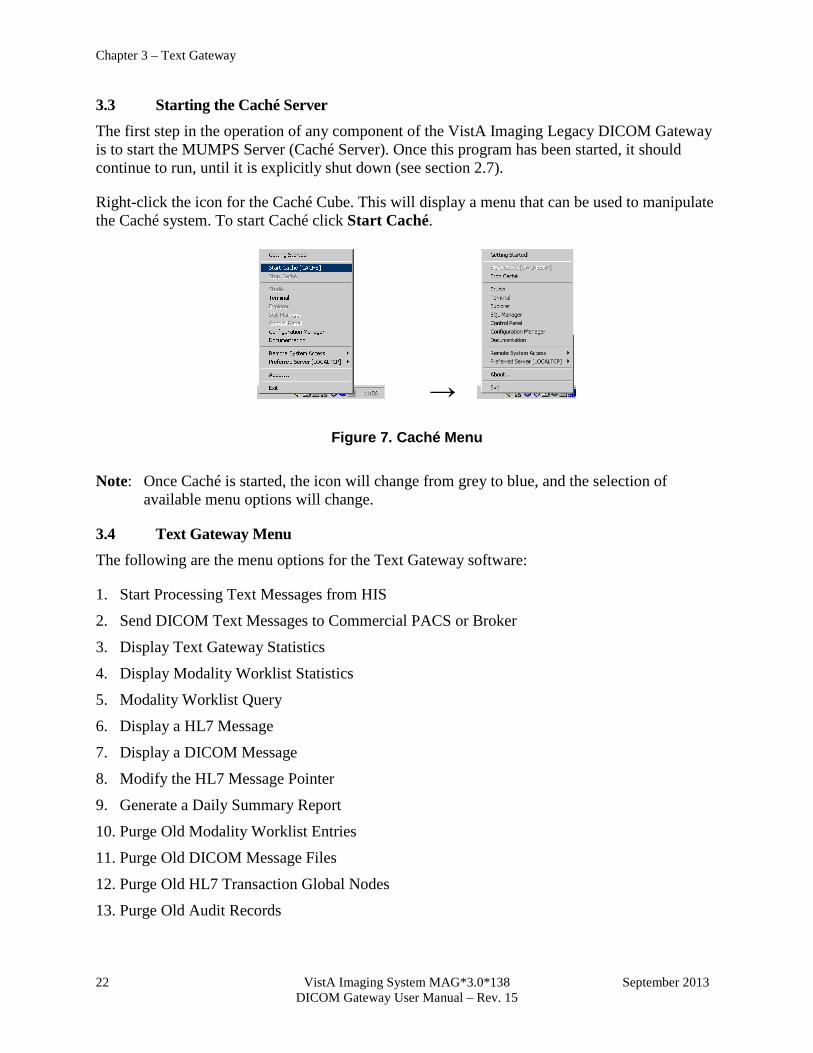
The following figure shows a screen layout where there is a commercial PACS (using the Mitra PACS Broker) and a separate commercial Modality Worklist Provider (the DeJarnette MediShare).
Text Gateway Window
Text Gateway Statistics Window
Text Gateway with Commercial PACS Screen Layout
DeJarnette MediShare
Communications Window
Mitra PACS Broker Communications
Window
Figure 6. Text Gateway with Commercial PACS Screen Layout
Note: This figure is for screen layout illustration purposes only, and represents what is used at a few older sites. There may no longer be any need for a separate commercial Modality Worklist Provider (that is, the DeJarnette MediShare or Mitra Modality Worklist products), since this service can be supplied by the VistA DICOM Text Gateway. Note: Some modalities use the Mitra Broker internally.
Chapter 3 – Text Gateway
22 VistA Imaging System MAG*3.0*138 September 2013 DICOM Gateway User Manual – Rev. 15
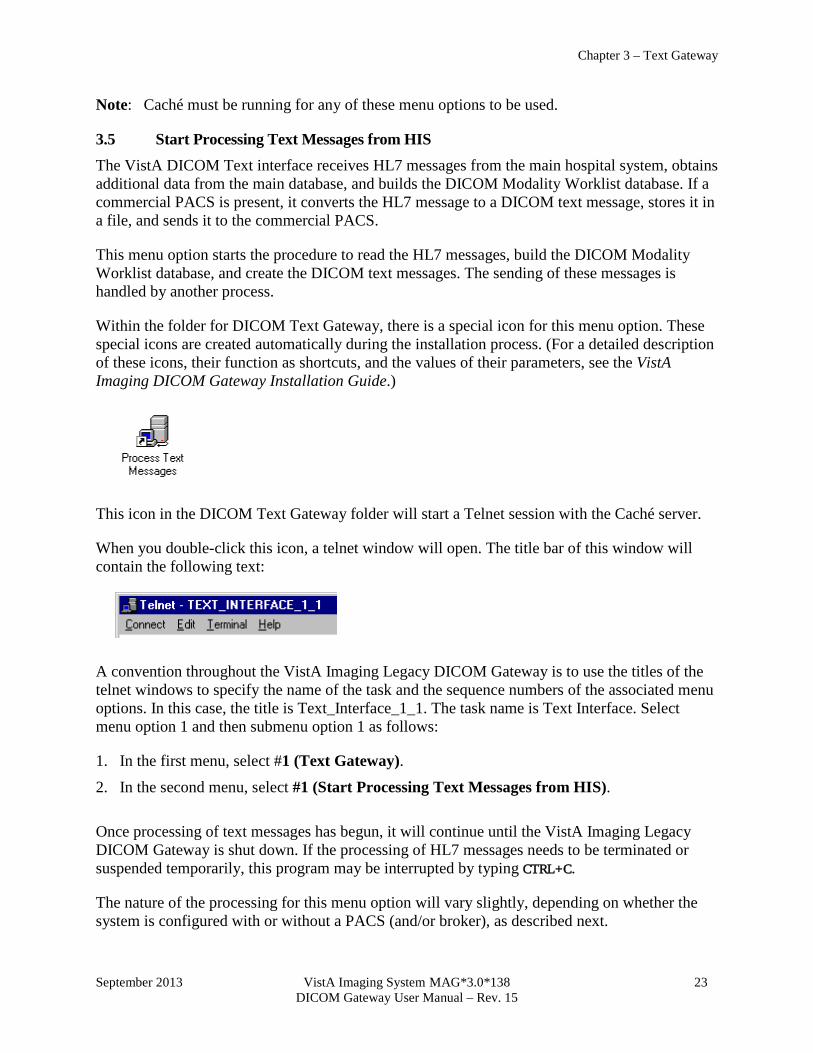
3.3 Starting the Caché Server The first step in the operation of any component of the VistA Imaging Legacy DICOM Gateway is to start the MUMPS Server (Caché Server). Once this program has been started, it should continue to run, until it is explicitly shut down (see section 2.7).
Right-click the icon for the Caché Cube. This will display a menu that can be used to manipulate the Caché system. To start Caché click Start Caché.
→
Figure 7. Caché Menu Note: Once Caché is started, the icon will change from grey to blue, and the selection of available menu options will change.
3.4 Text Gateway Menu The following are the menu options for the Text Gateway software:
1. Start Processing Text Messages from HIS
2. Send DICOM Text Messages to Commercial PACS or Broker
3. Display Text Gateway Statistics
4. Display Modality Worklist Statistics
5. Modality Worklist Query
6. Display a HL7 Message
7. Display a DICOM Message
8. Modify the HL7 Message Pointer
9. Generate a Daily Summary Report
10. Purge Old Modality Worklist Entries
11. Purge Old DICOM Message Files
12. Purge Old HL7 Transaction Global Nodes
13. Purge Old Audit Records
Chapter 3 – Text Gateway
September 2013 VistA Imaging System MAG*3.0*138 23 DICOM Gateway User Manual – Rev. 15
Note: Caché must be running for any of these menu options to be used.
3.5 Start Processing Text Messages from HIS The VistA DICOM Text interface receives HL7 messages from the main hospital system, obtains additional data from the main database, and builds the DICOM Modality Worklist database. If a commercial PACS is present, it converts the HL7 message to a DICOM text message, stores it in a file, and sends it to the commercial PACS.
This menu option starts the procedure to read the HL7 messages, build the DICOM Modality Worklist database, and create the DICOM text messages. The sending of these messages is handled by another process.
Within the folder for DICOM Text Gateway, there is a special icon for this menu option. These special icons are created automatically during the installation process. (For a detailed description of these icons, their function as shortcuts, and the values of their parameters, see the VistA Imaging DICOM Gateway Installation Guide.)
This icon in the DICOM Text Gateway folder will start a Telnet session with the Caché server.
When you double-click this icon, a telnet window will open. The title bar of this window will contain the following text:
A convention throughout the VistA Imaging Legacy DICOM Gateway is to use the titles of the telnet windows to specify the name of the task and the sequence numbers of the associated menu options. In this case, the title is Text_Interface_1_1. The task name is Text Interface. Select menu option 1 and then submenu option 1 as follows:
1. In the first menu, select #1 (Text Gateway). 2. In the second menu, select #1 (Start Processing Text Messages from HIS). Once processing of text messages has begun, it will continue until the VistA Imaging Legacy DICOM Gateway is shut down. If the processing of HL7 messages needs to be terminated or suspended temporarily, this program may be interrupted by typing CTRL+C.
The nature of the processing for this menu option will vary slightly, depending on whether the system is configured with or without a PACS (and/or broker), as described next.

Chapter 3 – Text Gateway
24 VistA Imaging System MAG*3.0*138 September 2013 DICOM Gateway User Manual – Rev. 15
3.5.1 Configuration with a Commercial PACS and/or Broker The messages exchanged with a commercial PACS or broker are shown in Table 1.
Table 1. Messages Exchanched with Commercial PACS or Broker
Real World Event Direction Detached VA SOP Class & Event Type
Patient Demographic Change VistA Patient Management, Patient Updated
ADT VistA Visit Management, Visit Updated
Order Entry VistA Study Management, Study Created
Exam Change (cancel) VistA Study Management, Study Updated
Exam Verification VistA Study Management, Study Updated
Exam Complete † PACS VistA
N-CREATE of the Study Component Management
Get Image Request † VistA C-MOVE request of Query/Retrieve
Get Image Data † PACS VistA
MAG_C-STORE of Storage Service
Get Image Response† PACS VistA
C-MOVE response of Query/Retrieve
Report Transfer VistA Interpretation Management/Update
† VistA DICOM Image Gateway with commercial PACS Note: Messages for the DICOM Interface for Clinical Providers and Anatomic Pathology will
not be sent to a commercial Radiology PACS.
HL7 messages for Radiology, Clinical Speciality, and Anatomic Pathology (Digital Pathology Systems) will replace these DICOM messages.
When the local system is configured so that commercial PACS and/or Mitra broker is present, all messages from the HIS will be processed, creating files stored in the First-In-First-Out (FIFO) message queues on the gateway (see section 3.11). All these messages will be listed in the log. You will first be asked if you are ready to begin processing, as follows:
Ready to process HL7 messages and send them to the PACS? y// <Enter> yes ****************************************************************** *** PACS Gateway Process Started on MAY 25, 1999 at 13:21:49 *** ******************************************************************
Tue 13:21 C:\DICOM\Data1\U00000\U0000000 -- EXAM CHANGE -- HL7(461405) Tue 13:21 C:\DICOM\Data1\U00000\U0000001 -- ORDER ENTRY -- HL7(461406) Tue 13:21 C:\DICOM\Data1\U00000\U0000002 -- EXAM VERIFICATION -- HL7(461407)
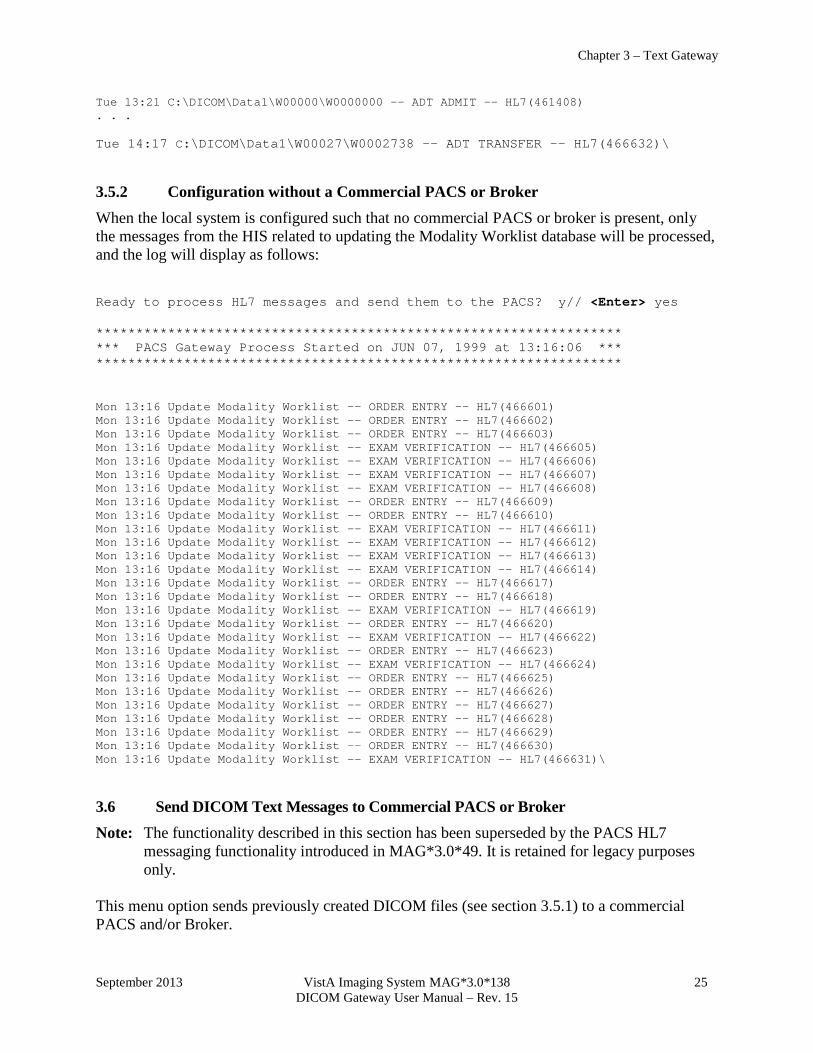
Chapter 3 – Text Gateway
September 2013 VistA Imaging System MAG*3.0*138 25 DICOM Gateway User Manual – Rev. 15
Tue 13:21 C:\DICOM\Data1\W00000\W0000000 -- ADT ADMIT -- HL7(461408) . . . Tue 14:17 C:\DICOM\Data1\W00027\W0002738 -- ADT TRANSFER -- HL7(466632)\
3.5.2 Configuration without a Commercial PACS or Broker When the local system is configured such that no commercial PACS or broker is present, only the messages from the HIS related to updating the Modality Worklist database will be processed, and the log will display as follows:
Ready to process HL7 messages and send them to the PACS? y// <Enter> yes ****************************************************************** *** PACS Gateway Process Started on JUN 07, 1999 at 13:16:06 *** ****************************************************************** Mon 13:16 Update Modality Worklist -- ORDER ENTRY -- HL7(466601) Mon 13:16 Update Modality Worklist -- ORDER ENTRY -- HL7(466602) Mon 13:16 Update Modality Worklist -- ORDER ENTRY -- HL7(466603) Mon 13:16 Update Modality Worklist -- EXAM VERIFICATION -- HL7(466605) Mon 13:16 Update Modality Worklist -- EXAM VERIFICATION -- HL7(466606) Mon 13:16 Update Modality Worklist -- EXAM VERIFICATION -- HL7(466607) Mon 13:16 Update Modality Worklist -- EXAM VERIFICATION -- HL7(466608) Mon 13:16 Update Modality Worklist -- ORDER ENTRY -- HL7(466609) Mon 13:16 Update Modality Worklist -- ORDER ENTRY -- HL7(466610) Mon 13:16 Update Modality Worklist -- EXAM VERIFICATION -- HL7(466611) Mon 13:16 Update Modality Worklist -- EXAM VERIFICATION -- HL7(466612) Mon 13:16 Update Modality Worklist -- EXAM VERIFICATION -- HL7(466613) Mon 13:16 Update Modality Worklist -- EXAM VERIFICATION -- HL7(466614) Mon 13:16 Update Modality Worklist -- ORDER ENTRY -- HL7(466617) Mon 13:16 Update Modality Worklist -- ORDER ENTRY -- HL7(466618) Mon 13:16 Update Modality Worklist -- EXAM VERIFICATION -- HL7(466619) Mon 13:16 Update Modality Worklist -- ORDER ENTRY -- HL7(466620) Mon 13:16 Update Modality Worklist -- EXAM VERIFICATION -- HL7(466622) Mon 13:16 Update Modality Worklist -- ORDER ENTRY -- HL7(466623) Mon 13:16 Update Modality Worklist -- EXAM VERIFICATION -- HL7(466624) Mon 13:16 Update Modality Worklist -- ORDER ENTRY -- HL7(466625) Mon 13:16 Update Modality Worklist -- ORDER ENTRY -- HL7(466626) Mon 13:16 Update Modality Worklist -- ORDER ENTRY -- HL7(466627) Mon 13:16 Update Modality Worklist -- ORDER ENTRY -- HL7(466628) Mon 13:16 Update Modality Worklist -- ORDER ENTRY -- HL7(466629) Mon 13:16 Update Modality Worklist -- ORDER ENTRY -- HL7(466630) Mon 13:16 Update Modality Worklist -- EXAM VERIFICATION -- HL7(466631)\
3.6 Send DICOM Text Messages to Commercial PACS or Broker Note: The functionality described in this section has been superseded by the PACS HL7 messaging functionality introduced in MAG*3.0*49. It is retained for legacy purposes only. This menu option sends previously created DICOM files (see section 3.5.1) to a commercial PACS and/or Broker.
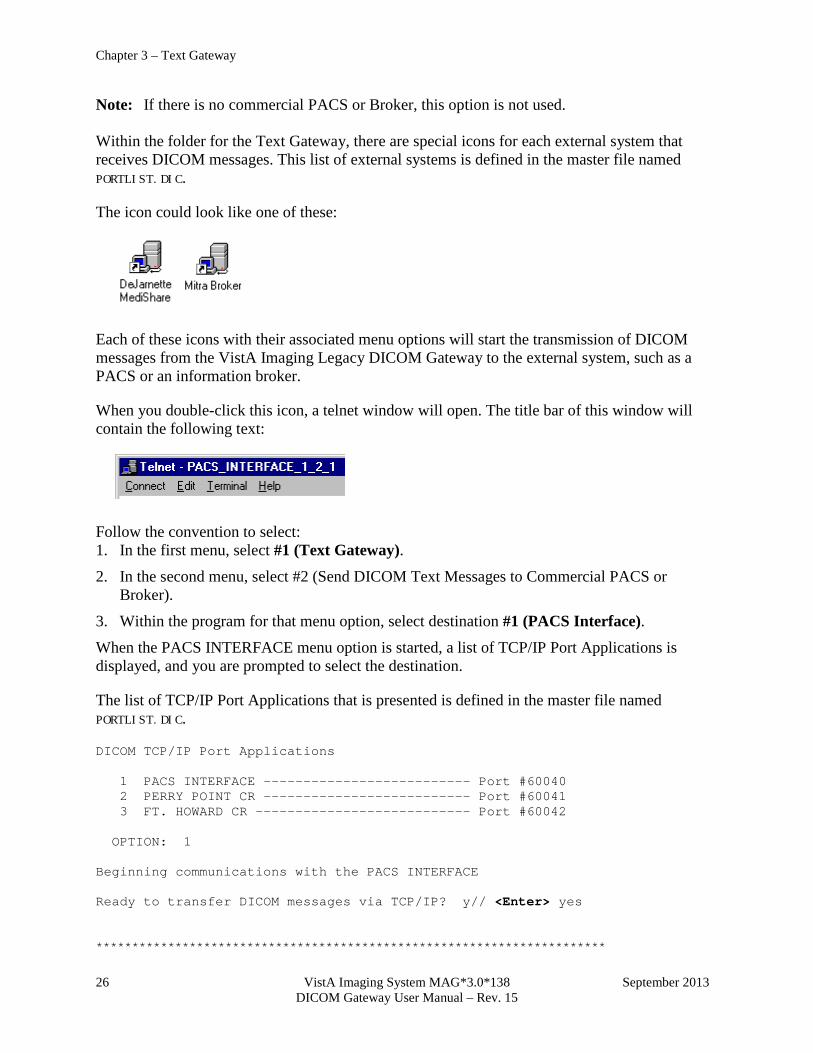
Chapter 3 – Text Gateway
26 VistA Imaging System MAG*3.0*138 September 2013 DICOM Gateway User Manual – Rev. 15
Note: If there is no commercial PACS or Broker, this option is not used. Within the folder for the Text Gateway, there are special icons for each external system that receives DICOM messages. This list of external systems is defined in the master file named PORTLIST.DIC.
The icon could look like one of these:
Each of these icons with their associated menu options will start the transmission of DICOM messages from the VistA Imaging Legacy DICOM Gateway to the external system, such as a PACS or an information broker.
When you double-click this icon, a telnet window will open. The title bar of this window will contain the following text:
Follow the convention to select: 1. In the first menu, select #1 (Text Gateway). 2. In the second menu, select #2 (Send DICOM Text Messages to Commercial PACS or
Broker).
3. Within the program for that menu option, select destination #1 (PACS Interface). When the PACS INTERFACE menu option is started, a list of TCP/IP Port Applications is displayed, and you are prompted to select the destination.
The list of TCP/IP Port Applications that is presented is defined in the master file named PORTLIST.DIC.
DICOM TCP/IP Port Applications 1 PACS INTERFACE -------------------------- Port #60040 2 PERRY POINT CR -------------------------- Port #60041 3 FT. HOWARD CR --------------------------- Port #60042 OPTION: 1 Beginning communications with the PACS INTERFACE Ready to transfer DICOM messages via TCP/IP? y// <Enter> yes ***********************************************************************
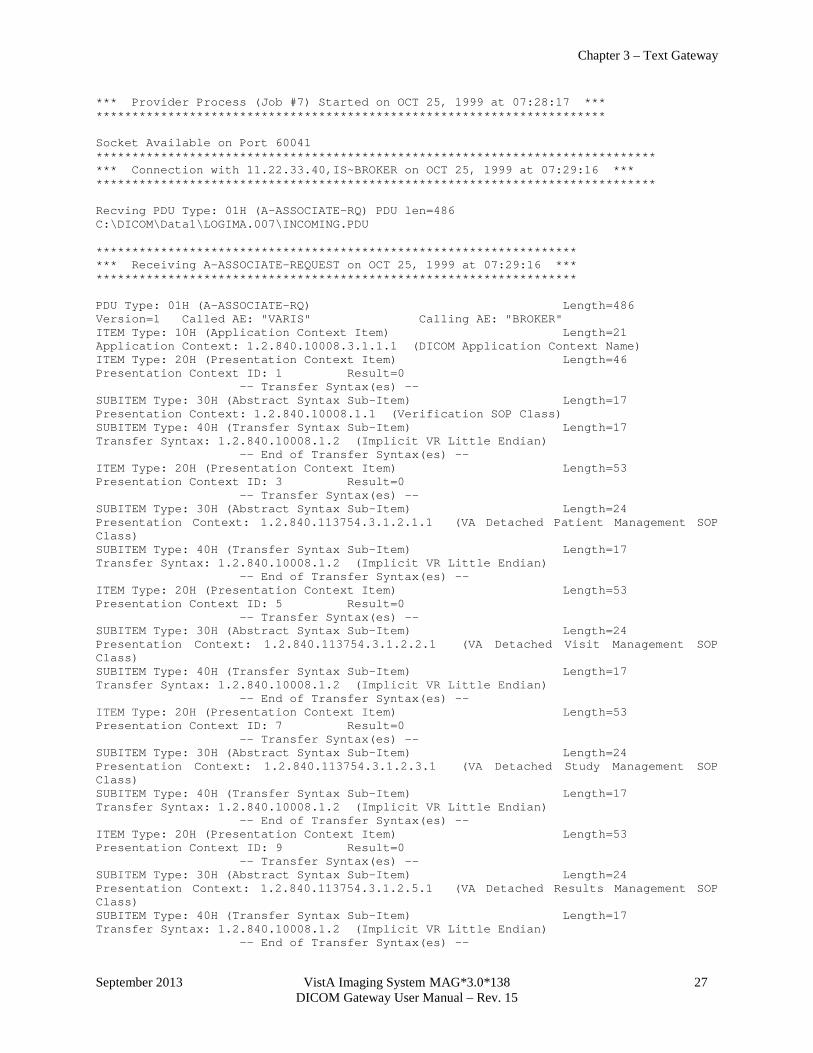
Chapter 3 – Text Gateway
September 2013 VistA Imaging System MAG*3.0*138 27 DICOM Gateway User Manual – Rev. 15
*** Provider Process (Job #7) Started on OCT 25, 1999 at 07:28:17 *** *********************************************************************** Socket Available on Port 60041 ****************************************************************************** *** Connection with 11.22.33.40,IS~BROKER on OCT 25, 1999 at 07:29:16 *** ****************************************************************************** Recving PDU Type: 01H (A-ASSOCIATE-RQ) PDU len=486 C:\DICOM\Data1\LOGIMA.007\INCOMING.PDU ******************************************************************* *** Receiving A-ASSOCIATE-REQUEST on OCT 25, 1999 at 07:29:16 *** ******************************************************************* PDU Type: 01H (A-ASSOCIATE-RQ) Length=486 Version=1 Called AE: "VARIS" Calling AE: "BROKER" ITEM Type: 10H (Application Context Item) Length=21 Application Context: 1.2.840.10008.3.1.1.1 (DICOM Application Context Name) ITEM Type: 20H (Presentation Context Item) Length=46 Presentation Context ID: 1 Result=0 -- Transfer Syntax(es) -- SUBITEM Type: 30H (Abstract Syntax Sub-Item) Length=17 Presentation Context: 1.2.840.10008.1.1 (Verification SOP Class) SUBITEM Type: 40H (Transfer Syntax Sub-Item) Length=17 Transfer Syntax: 1.2.840.10008.1.2 (Implicit VR Little Endian) -- End of Transfer Syntax(es) -- ITEM Type: 20H (Presentation Context Item) Length=53 Presentation Context ID: 3 Result=0 -- Transfer Syntax(es) -- SUBITEM Type: 30H (Abstract Syntax Sub-Item) Length=24 Presentation Context: 1.2.840.113754.3.1.2.1.1 (VA Detached Patient Management SOP Class) SUBITEM Type: 40H (Transfer Syntax Sub-Item) Length=17 Transfer Syntax: 1.2.840.10008.1.2 (Implicit VR Little Endian) -- End of Transfer Syntax(es) -- ITEM Type: 20H (Presentation Context Item) Length=53 Presentation Context ID: 5 Result=0 -- Transfer Syntax(es) -- SUBITEM Type: 30H (Abstract Syntax Sub-Item) Length=24 Presentation Context: 1.2.840.113754.3.1.2.2.1 (VA Detached Visit Management SOP Class) SUBITEM Type: 40H (Transfer Syntax Sub-Item) Length=17 Transfer Syntax: 1.2.840.10008.1.2 (Implicit VR Little Endian) -- End of Transfer Syntax(es) -- ITEM Type: 20H (Presentation Context Item) Length=53 Presentation Context ID: 7 Result=0 -- Transfer Syntax(es) -- SUBITEM Type: 30H (Abstract Syntax Sub-Item) Length=24 Presentation Context: 1.2.840.113754.3.1.2.3.1 (VA Detached Study Management SOP Class) SUBITEM Type: 40H (Transfer Syntax Sub-Item) Length=17 Transfer Syntax: 1.2.840.10008.1.2 (Implicit VR Little Endian) -- End of Transfer Syntax(es) -- ITEM Type: 20H (Presentation Context Item) Length=53 Presentation Context ID: 9 Result=0 -- Transfer Syntax(es) -- SUBITEM Type: 30H (Abstract Syntax Sub-Item) Length=24 Presentation Context: 1.2.840.113754.3.1.2.5.1 (VA Detached Results Management SOP Class) SUBITEM Type: 40H (Transfer Syntax Sub-Item) Length=17 Transfer Syntax: 1.2.840.10008.1.2 (Implicit VR Little Endian) -- End of Transfer Syntax(es) --
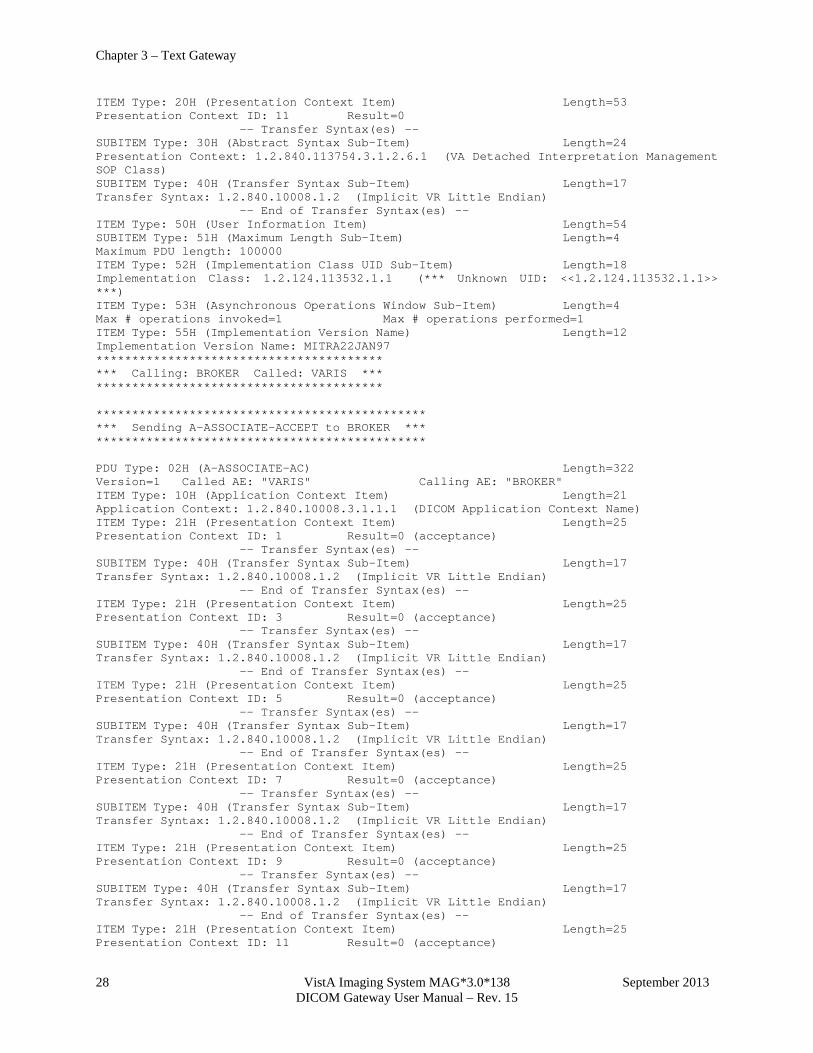
Chapter 3 – Text Gateway
28 VistA Imaging System MAG*3.0*138 September 2013 DICOM Gateway User Manual – Rev. 15
ITEM Type: 20H (Presentation Context Item) Length=53 Presentation Context ID: 11 Result=0 -- Transfer Syntax(es) -- SUBITEM Type: 30H (Abstract Syntax Sub-Item) Length=24 Presentation Context: 1.2.840.113754.3.1.2.6.1 (VA Detached Interpretation Management SOP Class) SUBITEM Type: 40H (Transfer Syntax Sub-Item) Length=17 Transfer Syntax: 1.2.840.10008.1.2 (Implicit VR Little Endian) -- End of Transfer Syntax(es) -- ITEM Type: 50H (User Information Item) Length=54 SUBITEM Type: 51H (Maximum Length Sub-Item) Length=4 Maximum PDU length: 100000 ITEM Type: 52H (Implementation Class UID Sub-Item) Length=18 Implementation Class: 1.2.124.113532.1.1 (*** Unknown UID: <<1.2.124.113532.1.1>> ***) ITEM Type: 53H (Asynchronous Operations Window Sub-Item) Length=4 Max # operations invoked=1 Max # operations performed=1 ITEM Type: 55H (Implementation Version Name) Length=12 Implementation Version Name: MITRA22JAN97 **************************************** *** Calling: BROKER Called: VARIS *** **************************************** ********************************************** *** Sending A-ASSOCIATE-ACCEPT to BROKER *** ********************************************** PDU Type: 02H (A-ASSOCIATE-AC) Length=322 Version=1 Called AE: "VARIS" Calling AE: "BROKER" ITEM Type: 10H (Application Context Item) Length=21 Application Context: 1.2.840.10008.3.1.1.1 (DICOM Application Context Name) ITEM Type: 21H (Presentation Context Item) Length=25 Presentation Context ID: 1 Result=0 (acceptance) -- Transfer Syntax(es) -- SUBITEM Type: 40H (Transfer Syntax Sub-Item) Length=17 Transfer Syntax: 1.2.840.10008.1.2 (Implicit VR Little Endian) -- End of Transfer Syntax(es) -- ITEM Type: 21H (Presentation Context Item) Length=25 Presentation Context ID: 3 Result=0 (acceptance) -- Transfer Syntax(es) -- SUBITEM Type: 40H (Transfer Syntax Sub-Item) Length=17 Transfer Syntax: 1.2.840.10008.1.2 (Implicit VR Little Endian) -- End of Transfer Syntax(es) -- ITEM Type: 21H (Presentation Context Item) Length=25 Presentation Context ID: 5 Result=0 (acceptance) -- Transfer Syntax(es) -- SUBITEM Type: 40H (Transfer Syntax Sub-Item) Length=17 Transfer Syntax: 1.2.840.10008.1.2 (Implicit VR Little Endian) -- End of Transfer Syntax(es) -- ITEM Type: 21H (Presentation Context Item) Length=25 Presentation Context ID: 7 Result=0 (acceptance) -- Transfer Syntax(es) -- SUBITEM Type: 40H (Transfer Syntax Sub-Item) Length=17 Transfer Syntax: 1.2.840.10008.1.2 (Implicit VR Little Endian) -- End of Transfer Syntax(es) -- ITEM Type: 21H (Presentation Context Item) Length=25 Presentation Context ID: 9 Result=0 (acceptance) -- Transfer Syntax(es) -- SUBITEM Type: 40H (Transfer Syntax Sub-Item) Length=17 Transfer Syntax: 1.2.840.10008.1.2 (Implicit VR Little Endian) -- End of Transfer Syntax(es) -- ITEM Type: 21H (Presentation Context Item) Length=25 Presentation Context ID: 11 Result=0 (acceptance)
Chapter 3 – Text Gateway
September 2013 VistA Imaging System MAG*3.0*138 29 DICOM Gateway User Manual – Rev. 15
-- Transfer Syntax(es) -- SUBITEM Type: 40H (Transfer Syntax Sub-Item) Length=17 Transfer Syntax: 1.2.840.10008.1.2 (Implicit VR Little Endian) -- End of Transfer Syntax(es) -- ITEM Type: 50H (User Information Item) Length=51 SUBITEM Type: 51H (Maximum Length Sub-Item) Length=4 Maximum PDU length: 32768 ITEM Type: 52H (Implementation Class UID Sub-Item) Length=22 Implementation Class: 1.2.840.113754.2.1.1.0 (VA DICOM V2.5) ITEM Type: 55H (Implementation Version Name) Length=13 Implementation Version Name: VA DICOM V2.5 Sending PDU Type: 02H (A-ASSOCIATE-AC) Length: 322 C:\DICOM\Data1\LOGIMA.007\OUTGOING.PDU Sending PDU Type: 04H (P-DATA-TF) Length: 1330 (1330) C:\DICOM\Data1\U00107\U0010738.DCM PDU len=168 PDV hdr=3, pc=7, len=162 Mon 07:30 PDU len=1000 PDV hdr=0, pc=7, len=994 Mon 07:30 PDU len=180 PDV hdr=2, pc=7, len=174 Sending PDU Type: 04H (P-DATA-TF) Length: 1412 (1412) C:\DICOM\Data1\U00107\U0010739.DCM PDU len=168 PDV hdr=3, pc=7, len=162 Mon 07:30 PDU len=1000 PDV hdr=0, pc=7, len=994 Mon 07:30 PDU len=262 PDV hdr=2, pc=7, len=256 Recving PDU Type: 04H (P-DATA-TF) PDU len=166 PDV hdr=3, pc=7, len=160 C:\DICOM\Data1\V00107\V0010736.TMP PDU len=102 PDV hdr=2, pc=7, len=96 Recving PDU Type: 04H (P-DATA-TF) PDU len=166 PDV hdr=3, pc=7, len=160 C:\DICOM\Data1\V00107\V0010737.TMP PDU len=102 PDV hdr=2, pc=7, len=96 Sending PDU Type: 04H (P-DATA-TF) Length: 1326 (1326) C:\DICOM\Data1\U00107\U0010740.DCM PDU len=168 PDV hdr=3, pc=7, len=162 Mon 07:30 PDU len=1000 PDV hdr=0, pc=7, len=994 Mon 07:30 PDU len=176 PDV hdr=2, pc=7, len=170 Recving PDU Type: 04H (P-DATA-TF) PDU len=166 PDV hdr=3, pc=7, len=160 C:\DICOM\Data1\V00107\V0010738.TMP PDU len=102 PDV hdr=2, pc=7, len=96 If the transmission of images needs to be terminated or suspended temporarily, this program may be interrupted by typing CTRL+C without any risk of data loss.
3.7 Display Text Gateway Statistics This application displays statistics about the numbers of files and events that have been processed by the DICOM Text Gateway. In particular, this application allows you to check whether all messages have been sent to a commercial PACS. It also keeps a daily running tally of the number of different kinds of messages handled.
When you double-click this icon, a telnet window will open. The title bar of this window will contain the following text:
Chapter 3 – Text Gateway
30 VistA Imaging System MAG*3.0*138 September 2013 DICOM Gateway User Manual – Rev. 15
Follow the convention to select: 1. In the first menu, select #1 (Text Gateway). 2. In the second menu, select #3 (Display Text Gateway Statistics).
When this menu option is started, a list of TCP/IP Port Applications is displayed, and you are requested to select the application for which statistics are to be displayed. More than one application can be monitored, if additional telnet sessions are invoked.
The list of TCP/IP Port Applications is defined in the master file named PORTLIST.DIC. Once an application is selected, the statistics for that application will be compiled and displayed.
The top of the display shows the current pointers for the various queues. (An initial value of 9999999 typically indicates that no activity has occurred for that queue at all). The rest of the display shows the event statistics: a count that indicates the number of occurrences of each event and the time of the last.
Every 30 seconds, an updated set of statistics will be displayed. After each set of statistics, the program will ask whether or not to exit. If this question is not answered with Yes, the program will continue indefinitely.
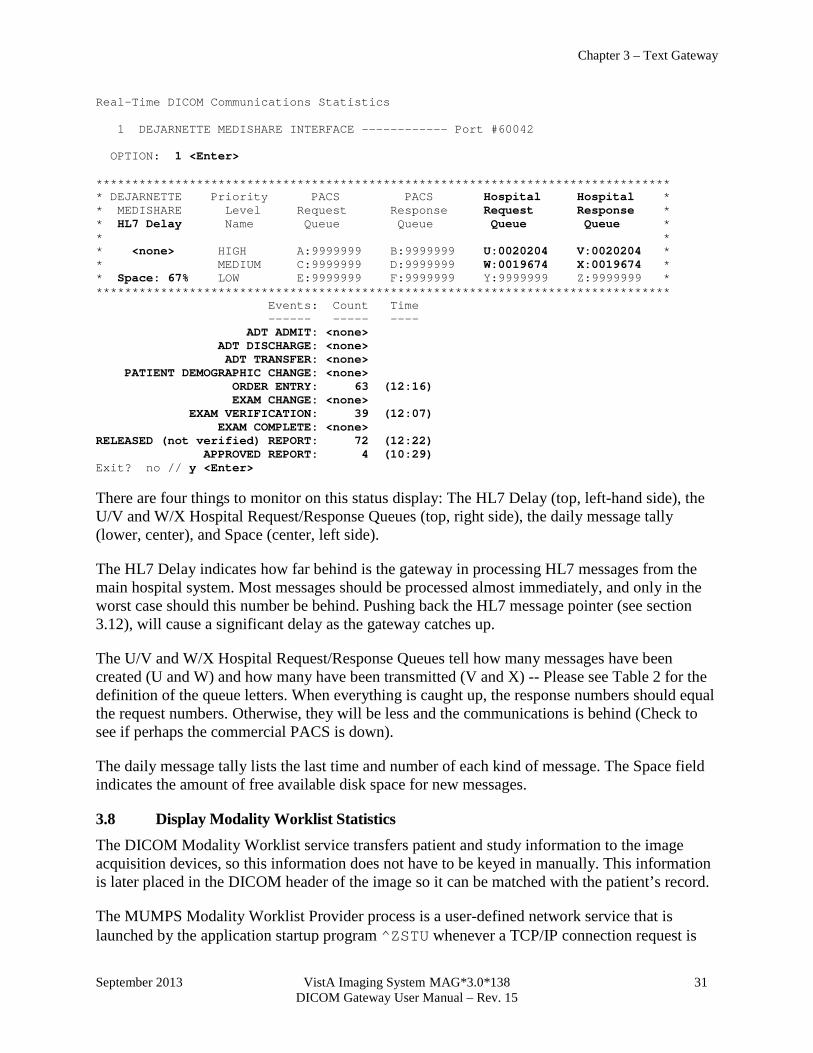
Chapter 3 – Text Gateway
September 2013 VistA Imaging System MAG*3.0*138 31 DICOM Gateway User Manual – Rev. 15
Real-Time DICOM Communications Statistics 1 DEJARNETTE MEDISHARE INTERFACE ------------ Port #60042 OPTION: 1 <Enter> ******************************************************************************** * DEJARNETTE Priority PACS PACS Hospital Hospital * * MEDISHARE Level Request Response Request Response * * HL7 Delay Name Queue Queue Queue Queue * * * * <none> HIGH A:9999999 B:9999999 U:0020204 V:0020204 * * MEDIUM C:9999999 D:9999999 W:0019674 X:0019674 * * Space: 67% LOW E:9999999 F:9999999 Y:9999999 Z:9999999 * ******************************************************************************** Events: Count Time ------ ----- ---- ADT ADMIT: <none> ADT DISCHARGE: <none> ADT TRANSFER: <none> PATIENT DEMOGRAPHIC CHANGE: <none> ORDER ENTRY: 63 (12:16) EXAM CHANGE: <none> EXAM VERIFICATION: 39 (12:07) EXAM COMPLETE: <none> RELEASED (not verified) REPORT: 72 (12:22) APPROVED REPORT: 4 (10:29) Exit? no // y <Enter>
There are four things to monitor on this status display: The HL7 Delay (top, left-hand side), the U/V and W/X Hospital Request/Response Queues (top, right side), the daily message tally (lower, center), and Space (center, left side).
The HL7 Delay indicates how far behind is the gateway in processing HL7 messages from the main hospital system. Most messages should be processed almost immediately, and only in the worst case should this number be behind. Pushing back the HL7 message pointer (see section 3.12), will cause a significant delay as the gateway catches up.
The U/V and W/X Hospital Request/Response Queues tell how many messages have been created (U and W) and how many have been transmitted (V and X) -- Please see Table 2 for the definition of the queue letters. When everything is caught up, the response numbers should equal the request numbers. Otherwise, they will be less and the communications is behind (Check to see if perhaps the commercial PACS is down).
The daily message tally lists the last time and number of each kind of message. The Space field indicates the amount of free available disk space for new messages.
3.8 Display Modality Worklist Statistics The DICOM Modality Worklist service transfers patient and study information to the image acquisition devices, so this information does not have to be keyed in manually. This information is later placed in the DICOM header of the image so it can be matched with the patient’s record.
The MUMPS Modality Worklist Provider process is a user-defined network service that is launched by the application startup program ^ZSTU whenever a TCP/IP connection request is
Chapter 3 – Text Gateway
32 VistA Imaging System MAG*3.0*138 September 2013 DICOM Gateway User Manual – Rev. 15
received on port 60010. Each modality worklist request starts out by making a TCP/IP connection to port 60010, launching its MUMPS provider process to run in the background.
This procedure displays statistics about the Modality Worklist Queries that have been processed by the DICOM Text Gateway. There are two parts to the display. The first gives a history of the outstanding open cases. This is useful for quickly seeing how many studies are currently active for each imaging type. The ones that are old have probably not been case edited, so they remain on the worklist. The second part of the display gives a daily running tally of number of queries from each instrument, and the number of successful hits. This is useful for debugging problems with the modality worklist service.
When you double-click this icon, a telnet window will open. The title bar of this window will contain the following text:
Follow the convention to select: 1. In the first menu, select #1 (Text Gateway). 2. In the second menu, select #4 (Display Modality Worklist Statistics).
When this menu option is started, the statistics for the site will be compiled and displayed.
The first table to display shows the numbers of exams per day for the various imaging types in reverse chronological order (most recent date first).
The list of Instrument Names that are presented are Application Entities defined in the master file named WORKLIST.DIC.
Every 30 seconds, an updated set of statistics will be displayed. After each set of statistics, the program will ask whether or not to exit. If this question is not answered with Yes, the program will continue indefinitely.

Chapter 3 – Text Gateway
September 2013 VistA Imaging System MAG*3.0*138 33 DICOM Gateway User Manual – Rev. 15
Compiling modality worklist statistics for WICHITA-MC Exam Imaging Type Date ------------- CT MRI NM RAD US JUN 01 4 3 12 2 5 MAY 31 1 MAY 27 2 MAY 26 3 MAY 25 1 7 . . . JAN 26 1 2 JAN 25 2 JAN 22 2 JAN 20 7 JAN 19 2 1 JAN 16 1 Modality Worklist Activity -------------------------- Instrument Name Queries Time Matches --------------- ------- ---- ------- IM_CR <none> MS_FCR <none> SCANNER1 <none> WIC-RADSCAN <none> WORKLIST_PIC 3 10:17:13 5 Exit? no // y
In the last part of this report, all information relates to activity that took place that day. The column labeled Queries displays the numbers of queries processed today. The column labeled Time shows the time-stamp for the most recent query, and the column labeled Matches shows the number of entries returned in that query.
3.9 Modality Worklist Query Note: This function is primarily used to test the VistA Imaging Modality Worklist Service, and is somewhat involved. It is used to simulate exactly how a commercial imaging modality would generate a query and thereby exercise VistA. It is meant as a testing tool, and not for operational use.
Prerequisites:
VistA Hospital Information System (for historical radiology only, where the data resides on the main hospital system). It is not needed for looking up active radiology and CPRS consult request tracking studies, as these are stored locally in a global in the gateway database.
This procedure generates queries against the local VistA Imaging DICOM Modality Worklist provider, and will display records from the response that match the arguments specified in the query request.
Chapter 3 – Text Gateway
34 VistA Imaging System MAG*3.0*138 September 2013 DICOM Gateway User Manual – Rev. 15
Use the Caché Terminal icon to start a session to simulate a Modality Worklist User.
After login, select the following menu options:
1. In the first menu, select #1 (Text Gateway). 2. In the second menu, select #5 (Modality Worklist Query). The program first asks for the name of the Modality Worklist provider that is to be queried. The list of DICOM Service Class Providers that can be called from VistA is defined in the master file named SCU_LIST.DIC. (In the case of the following example, the Modality Worklist Provider is identified as LOCAL MODALITY WORKLIST.)
You are then asked to identify the Modality Application Entity2 to be simulated. The list of Application Entities that is presented is defined in the master file named WORKLIST.DIC.
Next, you must select the type of query to be used. A query can be…
• By patient
• By study
• By modality
• By date/time
In the examples below, all names of patients and physicians have been replaced by scrambled names.
3.9.1 Query by Patient The identity of the patient is entered, and then information will be returned for all patients and studies that match.
It is not necessary to type the complete name of the patient: all names that start with the characters entered will match the query (that is, just pressing ENTER will select all patients). You can also enter the VA Short PID (that is, the initial of the last name followed by the last four digits of the social security number). The Short PID can be entered in either the patient name or patient id fields.
2 The term “Application Entity” is from the DICOM standard and refers to any provider or user of a DICOM service.

Chapter 3 – Text Gateway
September 2013 VistA Imaging System MAG*3.0*138 35 DICOM Gateway User Manual – Rev. 15
3.9.1.1 Query by Patient using Initial of Last Name Modality Worklist Query Service Class Providers ----------------------- 1 -- LOCAL IMAGE STORAGE 2 -- LOCAL MODALITY WORKLIST Select the provider application (1-2): 2// 2 <Enter> Select the Application Entity Title: ? <Enter> AE Titles in the WORKLIST.DIC file ---------------------------------- ALI_SCU IMCR_1 SCANNER1 TEST Select the Application Entity Title: TEST <Enter> First Screen PATIENT NAME (1) : PATIENT ID (2) : ACCESSION NUMBER (3) : REQUESTED PROCEDURE ID (4) : MODALITY (5) : START DATE (6) : START TIME (7) : Enter 1-7 to change an item above, "R" to refresh, "Q" to query: 1 Enter the Patient Name: L Second Screen PATIENT NAME (1) : L PATIENT ID (2) : ACCESSION NUMBER (3) : REQUESTED PROCEDURE ID (4) : MODALITY (5) : START DATE (6) : START TIME (7) : Enter 1-7 to change an item above, "R" to refresh, "Q" to query: q Performing Query... Sending the PDU to the SCP completed! There are 8 matches... Push <Enter> for list Social Sec# Patient's Name Case# Procedure Description ----------- -------------- ----- --------------------- 1) 000-01-9676 IMAGPATIENT,ONE M. 1025 CR CHEST 2 VIEWS PA&LAT 2) 000-02-7748 IMAGPATIENT,TWO N. 687 US ECHOGRAM RETROPERITONEAL COMPLE 3) 000-02-7748 IMAGPATIENT,TWO N. 688 US ECHOGRAM PELVIC B-SCAN &/OR REA 4) 000-05-1613 IMAGPATIENT,THREE O. 975 INTRODUCTION OF CATHETER, AORTA 5) 000-05-1613 IMAGPATIENT,THREE O. 976 AORTO ABDOMEN CATH W/SERIAL FIL 6) 000-05-1613 IMAGPATIENT,THREE O. 977 X-RAY EXAM OF ABDOMEN 1 VIEW, P 7) 000-05-1613 IMAGPATIENT,THREE O. 978 SEDATION WITH OR WITHOUT ANALGE 8) 000-05-1613 IMAGPATIENT,THREE O. 979 CR ANGIO EXTREMITY BILAT S&I
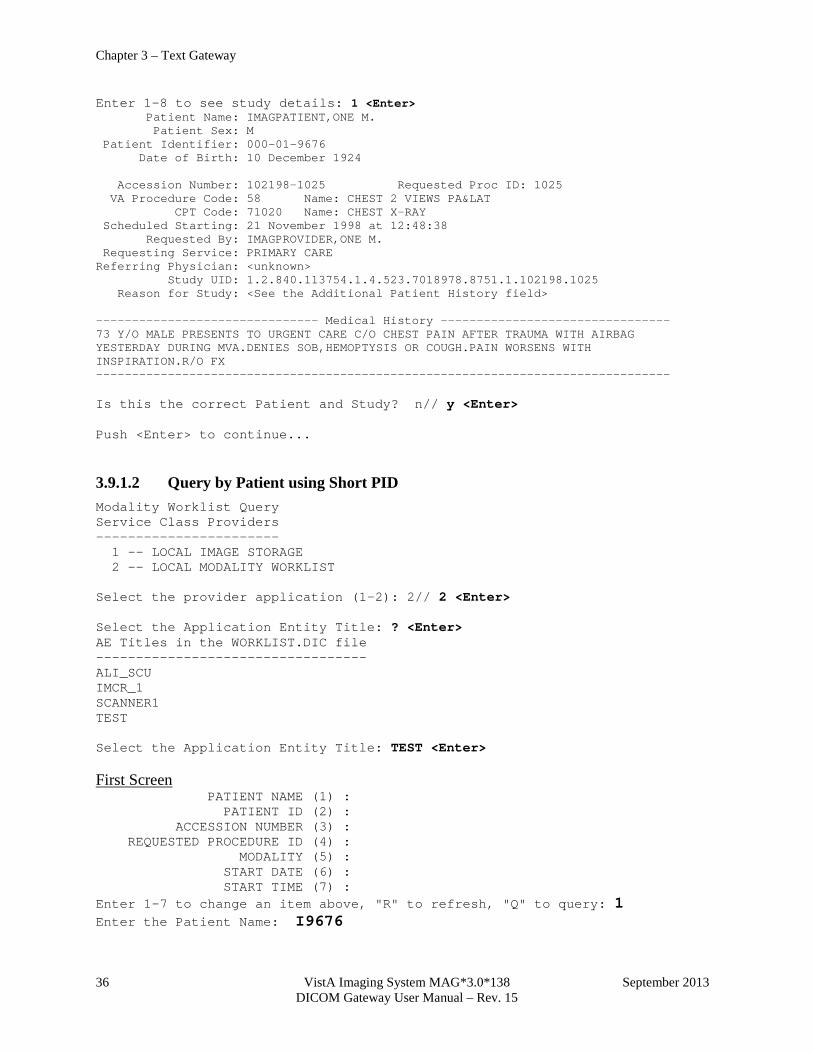
Chapter 3 – Text Gateway
36 VistA Imaging System MAG*3.0*138 September 2013 DICOM Gateway User Manual – Rev. 15
Enter 1-8 to see study details: 1 <Enter> Patient Name: IMAGPATIENT,ONE M. Patient Sex: M Patient Identifier: 000-01-9676 Date of Birth: 10 December 1924 Accession Number: 102198-1025 Requested Proc ID: 1025 VA Procedure Code: 58 Name: CHEST 2 VIEWS PA&LAT CPT Code: 71020 Name: CHEST X-RAY Scheduled Starting: 21 November 1998 at 12:48:38 Requested By: IMAGPROVIDER,ONE M. Requesting Service: PRIMARY CARE Referring Physician: <unknown> Study UID: 1.2.840.113754.1.4.523.7018978.8751.1.102198.1025 Reason for Study: <See the Additional Patient History field> ------------------------------- Medical History -------------------------------- 73 Y/O MALE PRESENTS TO URGENT CARE C/O CHEST PAIN AFTER TRAUMA WITH AIRBAG YESTERDAY DURING MVA.DENIES SOB,HEMOPTYSIS OR COUGH.PAIN WORSENS WITH INSPIRATION.R/O FX -------------------------------------------------------------------------------- Is this the correct Patient and Study? n// y <Enter> Push <Enter> to continue...
3.9.1.2 Query by Patient using Short PID Modality Worklist Query Service Class Providers ----------------------- 1 -- LOCAL IMAGE STORAGE 2 -- LOCAL MODALITY WORKLIST Select the provider application (1-2): 2// 2 <Enter> Select the Application Entity Title: ? <Enter> AE Titles in the WORKLIST.DIC file ---------------------------------- ALI_SCU IMCR_1 SCANNER1 TEST Select the Application Entity Title: TEST <Enter> First Screen PATIENT NAME (1) : PATIENT ID (2) : ACCESSION NUMBER (3) : REQUESTED PROCEDURE ID (4) : MODALITY (5) : START DATE (6) : START TIME (7) : Enter 1-7 to change an item above, "R" to refresh, "Q" to query: 1 Enter the Patient Name: I9676
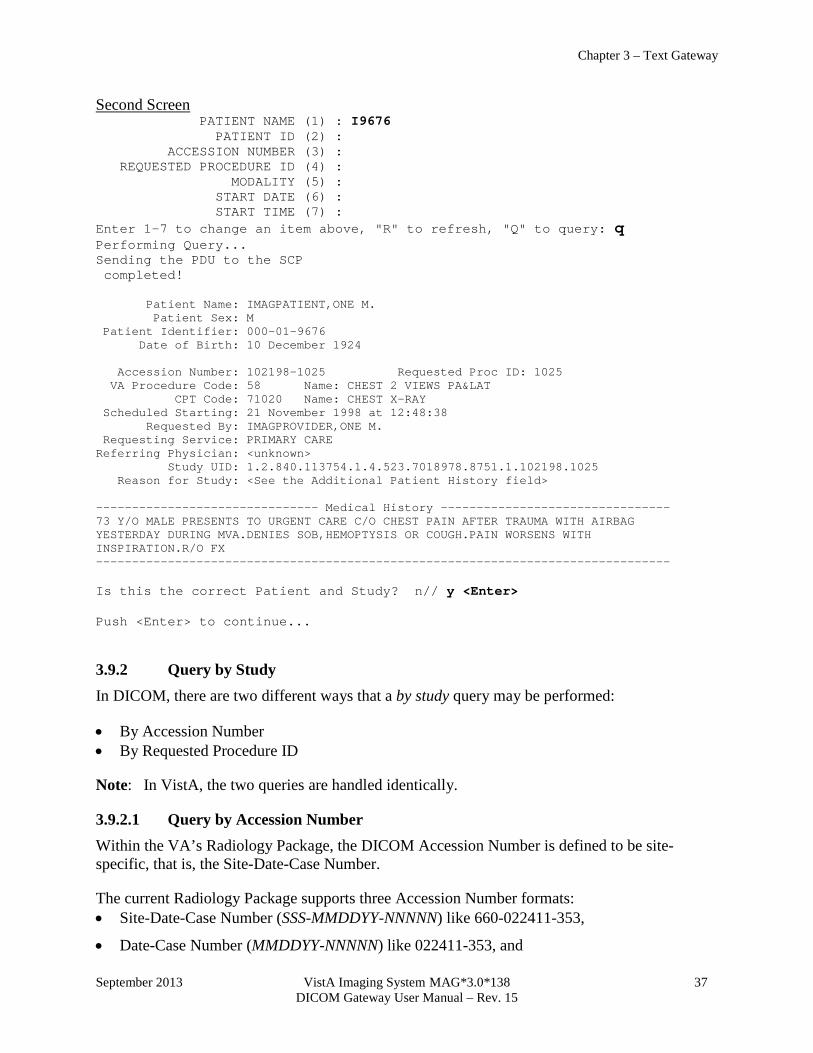
Chapter 3 – Text Gateway
September 2013 VistA Imaging System MAG*3.0*138 37 DICOM Gateway User Manual – Rev. 15
Second Screen PATIENT NAME (1) : I9676 PATIENT ID (2) : ACCESSION NUMBER (3) : REQUESTED PROCEDURE ID (4) : MODALITY (5) : START DATE (6) : START TIME (7) : Enter 1-7 to change an item above, "R" to refresh, "Q" to query: q Performing Query... Sending the PDU to the SCP completed! Patient Name: IMAGPATIENT,ONE M. Patient Sex: M Patient Identifier: 000-01-9676 Date of Birth: 10 December 1924 Accession Number: 102198-1025 Requested Proc ID: 1025 VA Procedure Code: 58 Name: CHEST 2 VIEWS PA&LAT CPT Code: 71020 Name: CHEST X-RAY Scheduled Starting: 21 November 1998 at 12:48:38 Requested By: IMAGPROVIDER,ONE M. Requesting Service: PRIMARY CARE Referring Physician: <unknown> Study UID: 1.2.840.113754.1.4.523.7018978.8751.1.102198.1025 Reason for Study: <See the Additional Patient History field> ------------------------------- Medical History -------------------------------- 73 Y/O MALE PRESENTS TO URGENT CARE C/O CHEST PAIN AFTER TRAUMA WITH AIRBAG YESTERDAY DURING MVA.DENIES SOB,HEMOPTYSIS OR COUGH.PAIN WORSENS WITH INSPIRATION.R/O FX -------------------------------------------------------------------------------- Is this the correct Patient and Study? n// y <Enter> Push <Enter> to continue...
3.9.2 Query by Study In DICOM, there are two different ways that a by study query may be performed:
• By Accession Number • By Requested Procedure ID
Note: In VistA, the two queries are handled identically.
3.9.2.1 Query by Accession Number Within the VA’s Radiology Package, the DICOM Accession Number is defined to be site-specific, that is, the Site-Date-Case Number.
The current Radiology Package supports three Accession Number formats: • Site-Date-Case Number (SSS-MMDDYY-NNNNN) like 660-022411-353,
• Date-Case Number (MMDDYY-NNNNN) like 022411-353, and

Chapter 3 – Text Gateway
38 VistA Imaging System MAG*3.0*138 September 2013 DICOM Gateway User Manual – Rev. 15
• Case Number (NNNNN) like 353.
The Case Number can also be entered as the Requested Procedure ID.
The Site-Date-Case Number (SSS-MMDDYY-NNNNN) Accession Number format was introduced in RA*5.0*47. Previously, the Accession Number could only be in the formats : Date-Case Number (MMDDYY-NNNNN) or the shorter Case Number (NNNNN).
Users can turn on the Site-Date-Case Number in the Radiology package. Once turned on, the format is applied for the entire site. We recommend using the site-specific format only with HL7 v.2.4 interfaces.
If the site-specific accession number is enabled for HL7 v. 2.1 interfaces, some subscriber systems will get the old MMDDYY- NNNNN format while others will get the SSS-MMDDYY- NNNNN format for the same study, and they will not match.
In the following example, the Date-Case Number and the Accession Number for the requested study is 102198-1025.
Either the complete Date-Case Number or the shorter Case Number can be used for the Accession Number argument of the query. In both instances, the system will search the local database (that is, the ^MAGDWLST global), and if a matching study is found, the information is returned. If no matching study is found in the local database for a \case number query, a null is returned and the search ends.
For a date-case number query, however, an additional search is performed for the study in the main VistA system database (RAD/NUC MED PATIENT file (#70), stored in ^RADPT). If the study is found there, that information is returned. This capability is very useful when digitizing film for old studies.
3.9.2.1.1 Query by Case Number Modality Worklist Query Service Class Providers ----------------------- 1 -- LOCAL IMAGE STORAGE 2 -- LOCAL MODALITY WORKLIST Select the provider application (1-2): 2// 2 <Enter> Select the Application Entity Title: TEST// <Enter> TEST First Screen PATIENT NAME (1) : PATIENT ID (2) : ACCESSION NUMBER (3) : REQUESTED PROCEDURE ID (4) : MODALITY (5) : START DATE (6) : START TIME (7) : Enter 1-7 to change an item above, "R" to refresh, "Q" to query: 3 Enter the Accession Number: 1025
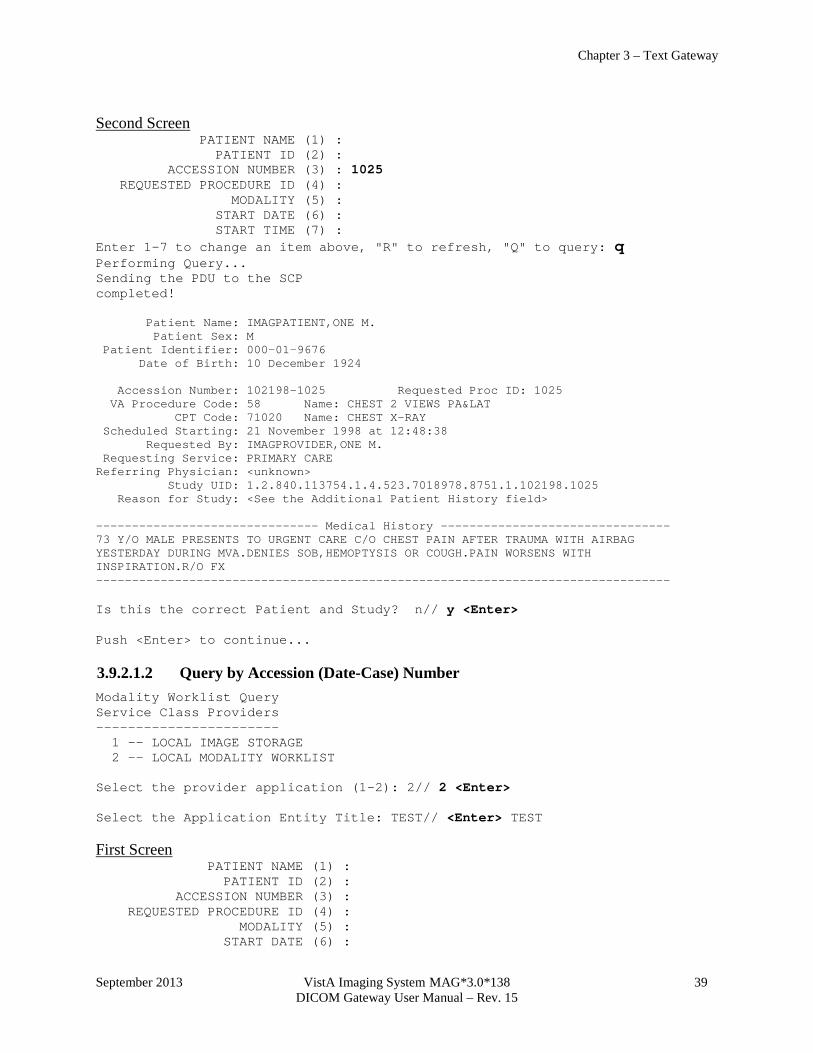
Chapter 3 – Text Gateway
September 2013 VistA Imaging System MAG*3.0*138 39 DICOM Gateway User Manual – Rev. 15
Second Screen PATIENT NAME (1) : PATIENT ID (2) : ACCESSION NUMBER (3) : 1025 REQUESTED PROCEDURE ID (4) : MODALITY (5) : START DATE (6) : START TIME (7) : Enter 1-7 to change an item above, "R" to refresh, "Q" to query: q Performing Query... Sending the PDU to the SCP completed! Patient Name: IMAGPATIENT,ONE M. Patient Sex: M Patient Identifier: 000-01-9676 Date of Birth: 10 December 1924 Accession Number: 102198-1025 Requested Proc ID: 1025 VA Procedure Code: 58 Name: CHEST 2 VIEWS PA&LAT CPT Code: 71020 Name: CHEST X-RAY Scheduled Starting: 21 November 1998 at 12:48:38 Requested By: IMAGPROVIDER,ONE M. Requesting Service: PRIMARY CARE Referring Physician: <unknown> Study UID: 1.2.840.113754.1.4.523.7018978.8751.1.102198.1025 Reason for Study: <See the Additional Patient History field> ------------------------------- Medical History -------------------------------- 73 Y/O MALE PRESENTS TO URGENT CARE C/O CHEST PAIN AFTER TRAUMA WITH AIRBAG YESTERDAY DURING MVA.DENIES SOB,HEMOPTYSIS OR COUGH.PAIN WORSENS WITH INSPIRATION.R/O FX -------------------------------------------------------------------------------- Is this the correct Patient and Study? n// y <Enter> Push <Enter> to continue...
3.9.2.1.2 Query by Accession (Date-Case) Number Modality Worklist Query Service Class Providers ----------------------- 1 -- LOCAL IMAGE STORAGE 2 -- LOCAL MODALITY WORKLIST Select the provider application (1-2): 2// 2 <Enter> Select the Application Entity Title: TEST// <Enter> TEST First Screen PATIENT NAME (1) : PATIENT ID (2) : ACCESSION NUMBER (3) : REQUESTED PROCEDURE ID (4) : MODALITY (5) : START DATE (6) :

Chapter 3 – Text Gateway
40 VistA Imaging System MAG*3.0*138 September 2013 DICOM Gateway User Manual – Rev. 15
START TIME (7) : Enter 1-7 to change an item above, "R" to refresh, "Q" to query: 3 Enter the Accession Number: 102198-1025 Second Screen PATIENT NAME (1) : PATIENT ID (2) : ACCESSION NUMBER (3) : 102198-1025 REQUESTED PROCEDURE ID (4) : MODALITY (5) : START DATE (6) : START TIME (7) : Enter 1-7 to change an item above, "R" to refresh, "Q" to query: Q Performing Query... Performing Query... Sending the PDU to the SCP completed! Patient Name: IMAGPATIENT,ONE M. Patient Sex: M Patient Identifier: 000-01-9676 Date of Birth: 10 December 1924 Accession Number: 102198-1025 Requested Proc ID: 1025 VA Procedure Code: 58 Name: CHEST 2 VIEWS PA&LAT CPT Code: 71020 Name: CHEST X-RAY Scheduled Starting: 21 November 1998 at 12:48:38 Requested By: IMAGPROVIDER,ONE M. Requesting Service: PRIMARY CARE Referring Physician: <unknown> Study UID: 1.2.840.113754.1.4.523.7018978.8751.1.102198.1025 Reason for Study: <See the Additional Patient History field> ------------------------------- Medical History -------------------------------- 73 Y/O MALE PRESENTS TO URGENT CARE C/O CHEST PAIN AFTER TRAUMA WITH AIRBAG YESTERDAY DURING MVA.DENIES SOB,HEMOPTYSIS OR COUGH.PAIN WORSENS WITH INSPIRATION.R/O FX -------------------------------------------------------------------------------- Is this the correct Patient and Study? n// Y Push <Enter> to continue...
3.9.2.2 Query by Requested Procedure ID Within the VA’s Radiology Package, the DICOM Requested Procedure ID is defined to be the Case Number, formatted nnnnn.
In the example below, the Case Number and the Requested Procedure ID for the requested study is 1025.
In VistA, Requested Procedure ID query is handled exactly like an Accession Number query.
Modality Worklist Query Service Class Providers ----------------------- 1 -- LOCAL IMAGE STORAGE 2 -- LOCAL MODALITY WORKLIST
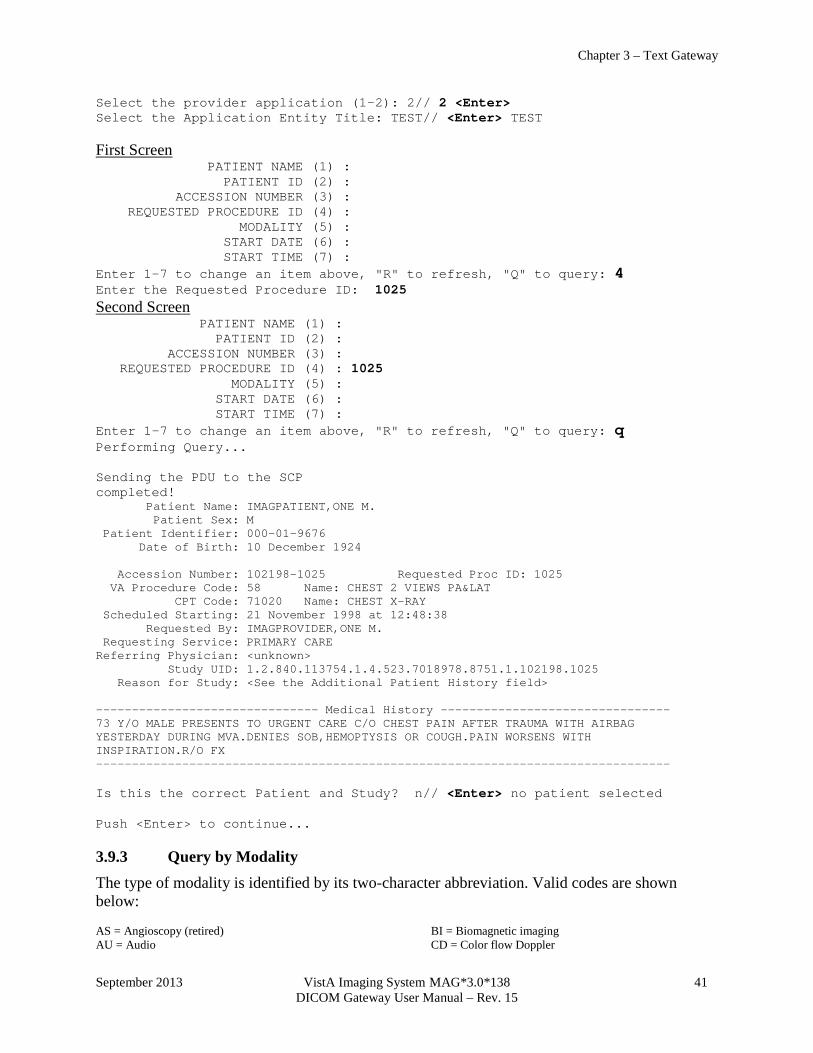
Chapter 3 – Text Gateway
September 2013 VistA Imaging System MAG*3.0*138 41 DICOM Gateway User Manual – Rev. 15
Select the provider application (1-2): 2// 2 <Enter> Select the Application Entity Title: TEST// <Enter> TEST First Screen PATIENT NAME (1) : PATIENT ID (2) : ACCESSION NUMBER (3) : REQUESTED PROCEDURE ID (4) : MODALITY (5) : START DATE (6) : START TIME (7) : Enter 1-7 to change an item above, "R" to refresh, "Q" to query: 4 Enter the Requested Procedure ID: 1025 Second Screen PATIENT NAME (1) : PATIENT ID (2) : ACCESSION NUMBER (3) : REQUESTED PROCEDURE ID (4) : 1025 MODALITY (5) : START DATE (6) : START TIME (7) : Enter 1-7 to change an item above, "R" to refresh, "Q" to query: q Performing Query... Sending the PDU to the SCP completed! Patient Name: IMAGPATIENT,ONE M. Patient Sex: M Patient Identifier: 000-01-9676 Date of Birth: 10 December 1924 Accession Number: 102198-1025 Requested Proc ID: 1025 VA Procedure Code: 58 Name: CHEST 2 VIEWS PA&LAT CPT Code: 71020 Name: CHEST X-RAY Scheduled Starting: 21 November 1998 at 12:48:38 Requested By: IMAGPROVIDER,ONE M. Requesting Service: PRIMARY CARE Referring Physician: <unknown> Study UID: 1.2.840.113754.1.4.523.7018978.8751.1.102198.1025 Reason for Study: <See the Additional Patient History field> ------------------------------- Medical History -------------------------------- 73 Y/O MALE PRESENTS TO URGENT CARE C/O CHEST PAIN AFTER TRAUMA WITH AIRBAG YESTERDAY DURING MVA.DENIES SOB,HEMOPTYSIS OR COUGH.PAIN WORSENS WITH INSPIRATION.R/O FX -------------------------------------------------------------------------------- Is this the correct Patient and Study? n// <Enter> no patient selected Push <Enter> to continue...
3.9.3 Query by Modality The type of modality is identified by its two-character abbreviation. Valid codes are shown below: AS = Angioscopy (retired) AU = Audio
BI = Biomagnetic imaging CD = Color flow Doppler
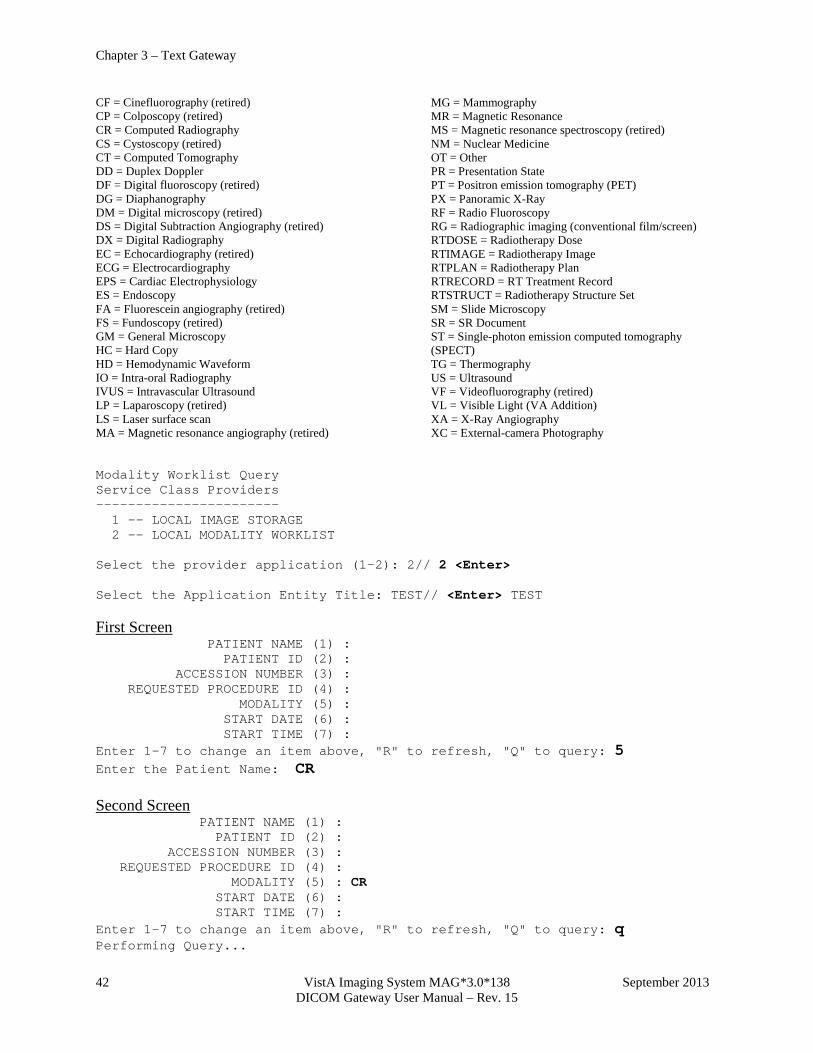
Chapter 3 – Text Gateway
42 VistA Imaging System MAG*3.0*138 September 2013 DICOM Gateway User Manual – Rev. 15
CF = Cinefluorography (retired) CP = Colposcopy (retired) CR = Computed Radiography CS = Cystoscopy (retired) CT = Computed Tomography DD = Duplex Doppler DF = Digital fluoroscopy (retired) DG = Diaphanography DM = Digital microscopy (retired) DS = Digital Subtraction Angiography (retired) DX = Digital Radiography EC = Echocardiography (retired) ECG = Electrocardiography EPS = Cardiac Electrophysiology ES = Endoscopy FA = Fluorescein angiography (retired) FS = Fundoscopy (retired) GM = General Microscopy HC = Hard Copy HD = Hemodynamic Waveform IO = Intra-oral Radiography IVUS = Intravascular Ultrasound LP = Laparoscopy (retired) LS = Laser surface scan MA = Magnetic resonance angiography (retired)
MG = Mammography MR = Magnetic Resonance MS = Magnetic resonance spectroscopy (retired) NM = Nuclear Medicine OT = Other PR = Presentation State PT = Positron emission tomography (PET) PX = Panoramic X-Ray RF = Radio Fluoroscopy RG = Radiographic imaging (conventional film/screen) RTDOSE = Radiotherapy Dose RTIMAGE = Radiotherapy Image RTPLAN = Radiotherapy Plan RTRECORD = RT Treatment Record RTSTRUCT = Radiotherapy Structure Set SM = Slide Microscopy SR = SR Document ST = Single-photon emission computed tomography (SPECT) TG = Thermography US = Ultrasound VF = Videofluorography (retired) VL = Visible Light (VA Addition) XA = X-Ray Angiography XC = External-camera Photography
Modality Worklist Query Service Class Providers ----------------------- 1 -- LOCAL IMAGE STORAGE 2 -- LOCAL MODALITY WORKLIST Select the provider application (1-2): 2// 2 <Enter> Select the Application Entity Title: TEST// <Enter> TEST First Screen PATIENT NAME (1) : PATIENT ID (2) : ACCESSION NUMBER (3) : REQUESTED PROCEDURE ID (4) : MODALITY (5) : START DATE (6) : START TIME (7) : Enter 1-7 to change an item above, "R" to refresh, "Q" to query: 5 Enter the Patient Name: CR Second Screen PATIENT NAME (1) : PATIENT ID (2) : ACCESSION NUMBER (3) : REQUESTED PROCEDURE ID (4) : MODALITY (5) : CR START DATE (6) : START TIME (7) : Enter 1-7 to change an item above, "R" to refresh, "Q" to query: q Performing Query...
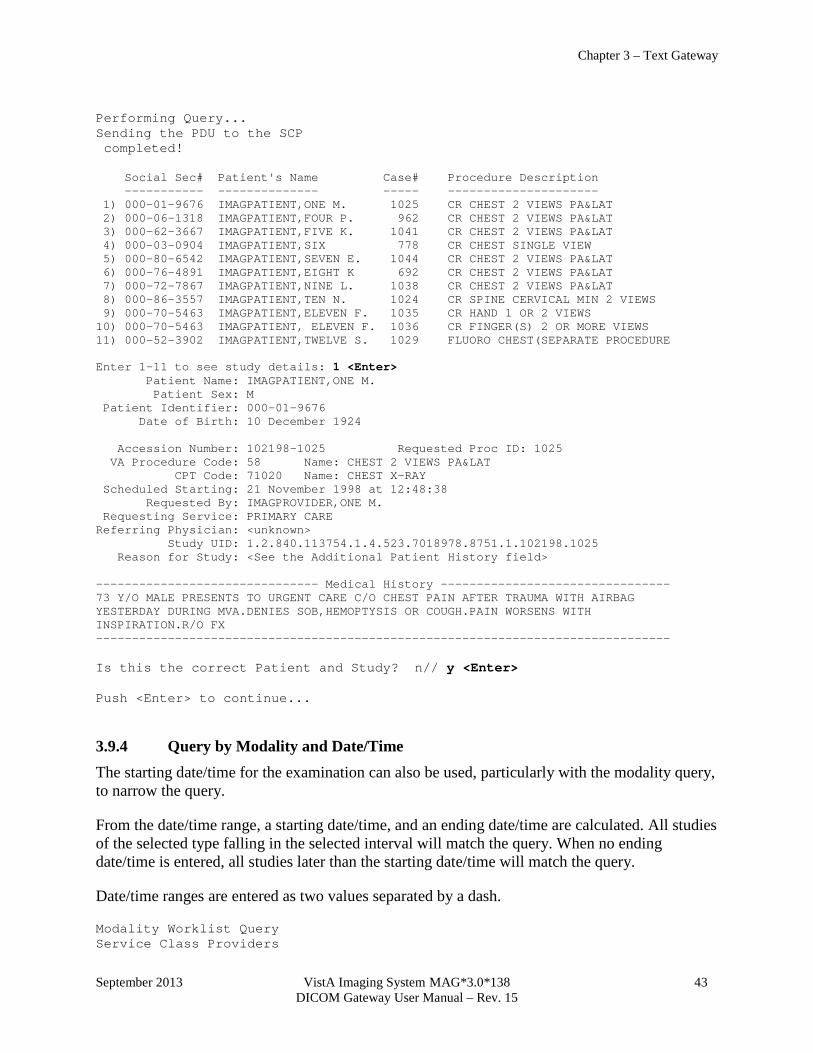
Chapter 3 – Text Gateway
September 2013 VistA Imaging System MAG*3.0*138 43 DICOM Gateway User Manual – Rev. 15
Performing Query... Sending the PDU to the SCP completed! Social Sec# Patient's Name Case# Procedure Description ----------- -------------- ----- --------------------- 1) 000-01-9676 IMAGPATIENT,ONE M. 1025 CR CHEST 2 VIEWS PA&LAT 2) 000-06-1318 IMAGPATIENT,FOUR P. 962 CR CHEST 2 VIEWS PA&LAT 3) 000-62-3667 IMAGPATIENT,FIVE K. 1041 CR CHEST 2 VIEWS PA&LAT 4) 000-03-0904 IMAGPATIENT,SIX 778 CR CHEST SINGLE VIEW 5) 000-80-6542 IMAGPATIENT,SEVEN E. 1044 CR CHEST 2 VIEWS PA&LAT 6) 000-76-4891 IMAGPATIENT,EIGHT K 692 CR CHEST 2 VIEWS PA&LAT 7) 000-72-7867 IMAGPATIENT,NINE L. 1038 CR CHEST 2 VIEWS PA&LAT 8) 000-86-3557 IMAGPATIENT,TEN N. 1024 CR SPINE CERVICAL MIN 2 VIEWS 9) 000-70-5463 IMAGPATIENT,ELEVEN F. 1035 CR HAND 1 OR 2 VIEWS 10) 000-70-5463 IMAGPATIENT, ELEVEN F. 1036 CR FINGER(S) 2 OR MORE VIEWS 11) 000-52-3902 IMAGPATIENT,TWELVE S. 1029 FLUORO CHEST(SEPARATE PROCEDURE Enter 1-11 to see study details: 1 <Enter> Patient Name: IMAGPATIENT,ONE M. Patient Sex: M Patient Identifier: 000-01-9676 Date of Birth: 10 December 1924 Accession Number: 102198-1025 Requested Proc ID: 1025 VA Procedure Code: 58 Name: CHEST 2 VIEWS PA&LAT CPT Code: 71020 Name: CHEST X-RAY Scheduled Starting: 21 November 1998 at 12:48:38 Requested By: IMAGPROVIDER,ONE M. Requesting Service: PRIMARY CARE Referring Physician: <unknown> Study UID: 1.2.840.113754.1.4.523.7018978.8751.1.102198.1025 Reason for Study: <See the Additional Patient History field> ------------------------------- Medical History -------------------------------- 73 Y/O MALE PRESENTS TO URGENT CARE C/O CHEST PAIN AFTER TRAUMA WITH AIRBAG YESTERDAY DURING MVA.DENIES SOB,HEMOPTYSIS OR COUGH.PAIN WORSENS WITH INSPIRATION.R/O FX -------------------------------------------------------------------------------- Is this the correct Patient and Study? n// y <Enter> Push <Enter> to continue...
3.9.4 Query by Modality and Date/Time The starting date/time for the examination can also be used, particularly with the modality query, to narrow the query.
From the date/time range, a starting date/time, and an ending date/time are calculated. All studies of the selected type falling in the selected interval will match the query. When no ending date/time is entered, all studies later than the starting date/time will match the query.
Date/time ranges are entered as two values separated by a dash.
Modality Worklist Query Service Class Providers
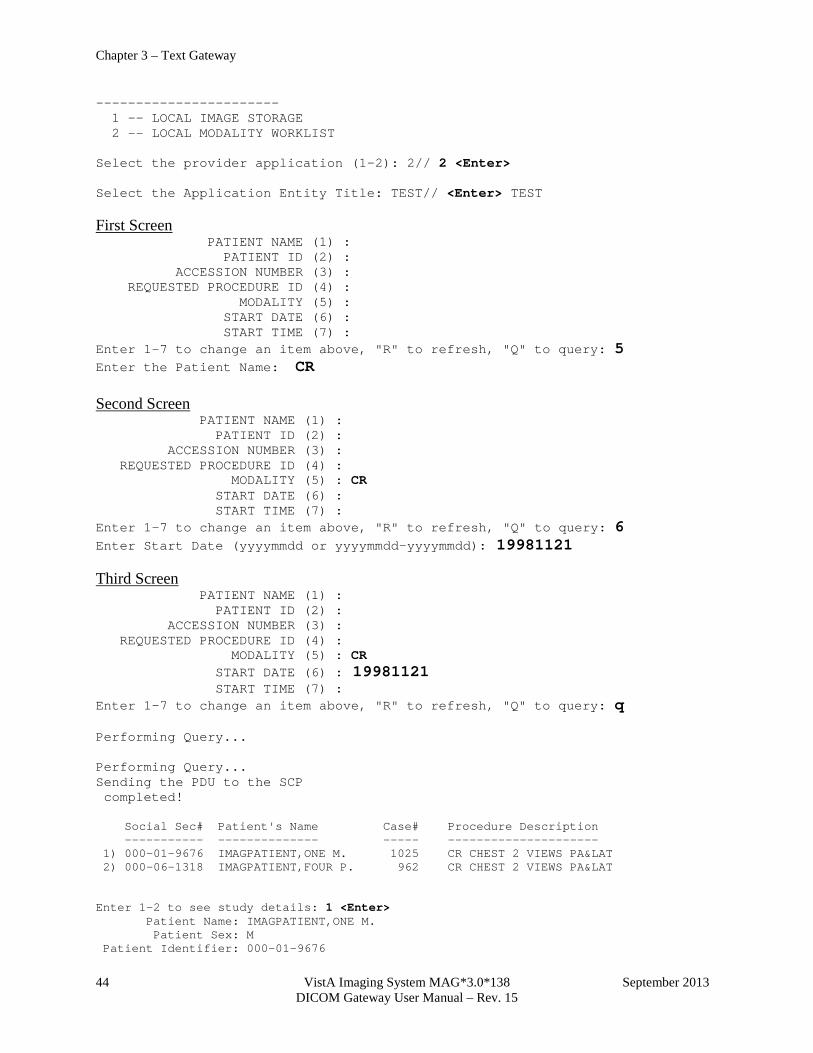
Chapter 3 – Text Gateway
44 VistA Imaging System MAG*3.0*138 September 2013 DICOM Gateway User Manual – Rev. 15
----------------------- 1 -- LOCAL IMAGE STORAGE 2 -- LOCAL MODALITY WORKLIST Select the provider application (1-2): 2// 2 <Enter> Select the Application Entity Title: TEST// <Enter> TEST First Screen PATIENT NAME (1) : PATIENT ID (2) : ACCESSION NUMBER (3) : REQUESTED PROCEDURE ID (4) : MODALITY (5) : START DATE (6) : START TIME (7) : Enter 1-7 to change an item above, "R" to refresh, "Q" to query: 5 Enter the Patient Name: CR Second Screen PATIENT NAME (1) : PATIENT ID (2) : ACCESSION NUMBER (3) : REQUESTED PROCEDURE ID (4) : MODALITY (5) : CR START DATE (6) : START TIME (7) : Enter 1-7 to change an item above, "R" to refresh, "Q" to query: 6 Enter Start Date (yyyymmdd or yyyymmdd-yyyymmdd): 19981121 Third Screen PATIENT NAME (1) : PATIENT ID (2) : ACCESSION NUMBER (3) : REQUESTED PROCEDURE ID (4) : MODALITY (5) : CR START DATE (6) : 19981121 START TIME (7) : Enter 1-7 to change an item above, "R" to refresh, "Q" to query: q Performing Query... Performing Query... Sending the PDU to the SCP completed! Social Sec# Patient's Name Case# Procedure Description ----------- -------------- ----- --------------------- 1) 000-01-9676 IMAGPATIENT,ONE M. 1025 CR CHEST 2 VIEWS PA&LAT 2) 000-06-1318 IMAGPATIENT,FOUR P. 962 CR CHEST 2 VIEWS PA&LAT Enter 1-2 to see study details: 1 <Enter> Patient Name: IMAGPATIENT,ONE M. Patient Sex: M Patient Identifier: 000-01-9676
Chapter 3 – Text Gateway
September 2013 VistA Imaging System MAG*3.0*138 45 DICOM Gateway User Manual – Rev. 15
Date of Birth: 10 December 1924 Accession Number: 102198-1025 Requested Proc ID: 1025 VA Procedure Code: 58 Name: CHEST 2 VIEWS PA&LAT CPT Code: 71020 Name: CHEST X-RAY Scheduled Starting: 21 November 1998 at 12:48:38 Requested By: IMAGPROVIDER,ONE M. Requesting Service: PRIMARY CARE Referring Physician: <unknown> Study UID: 1.2.840.113754.1.4.523.7018978.8751.1.102198.1025 Reason for Study: <See the Additional Patient History field> ------------------------------- Medical History -------------------------------- 73 Y/O MALE PRESENTS TO URGENT CARE C/O CHEST PAIN AFTER TRAUMA WITH AIRBAG YESTERDAY DURING MVA.DENIES SOB,HEMOPTYSIS OR COUGH.PAIN WORSENS WITH INSPIRATION.R/O FX -------------------------------------------------------------------------------- Is this the correct Patient and Study? n// y <Enter> Push <Enter> to continue...
3.10 Display a HL7 Message This procedure displays the contents of HL7 messages for debugging purposes.
Use the Caché Terminal icon to start a session for this menu option.
After login, select the following menu options:
1. In the first menu, select #1 (Text Gateway). 2. In the second menu, select #7 (Display a HL7 Message). There are two display formats: • Short
• Long
The short format outputs the text of the messages as they are stored within the VistA ^MAGDHL7 global (condensed, all optional spaces removed, all separator characters visible). The long format outputs the messages so that all fields are labeled and displayed on separate lines. The long format also identifies each message segment.
3.10.1 Short Format Enter output device ("S" for screen or "F" for file): S// <Enter> Screen Format (Long or Short) S// S <Enter> Enter HL7 subscript: 461405 <Enter> MSH^~|\&^RA-SERVER-IMG^523^MAGD-CLIENT^523^19981014000017^^ORM~O01^3789535^P^2.1
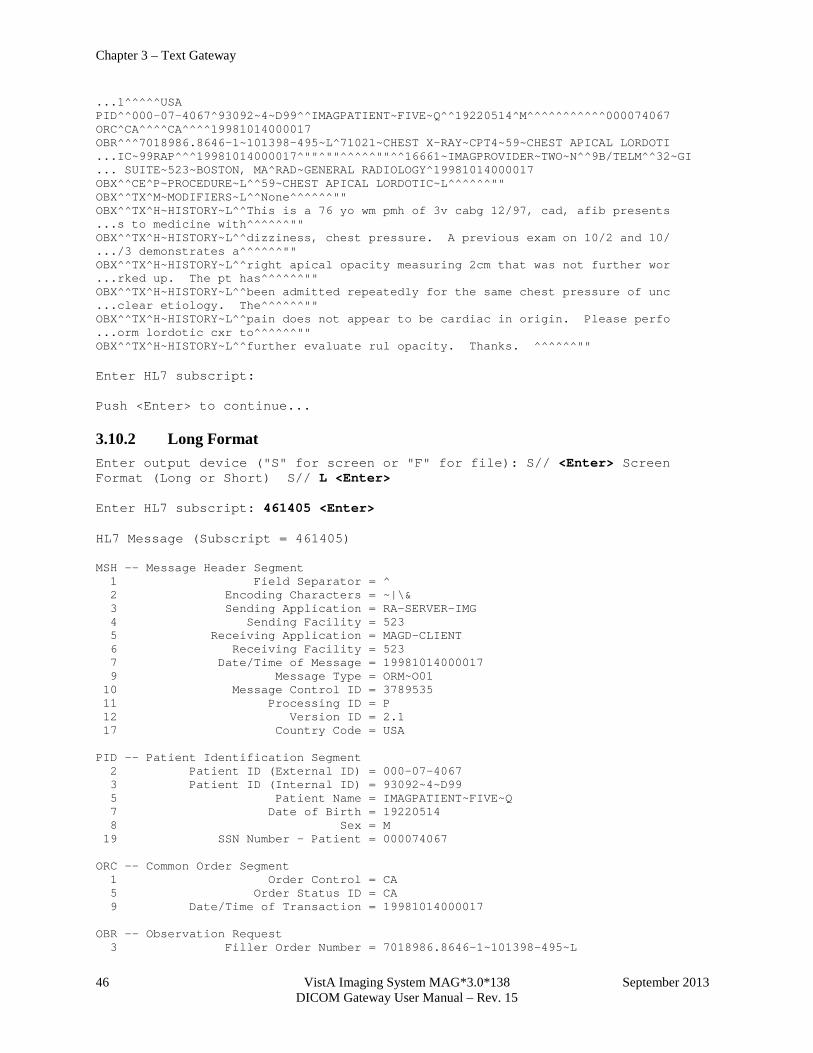
Chapter 3 – Text Gateway
46 VistA Imaging System MAG*3.0*138 September 2013 DICOM Gateway User Manual – Rev. 15
...1^^^^^USA PID^^000-07-4067^93092~4~D99^^IMAGPATIENT~FIVE~Q^^19220514^M^^^^^^^^^^^000074067 ORC^CA^^^^CA^^^^19981014000017 OBR^^^7018986.8646-1~101398-495~L^71021~CHEST X-RAY~CPT4~59~CHEST APICAL LORDOTI ...IC~99RAP^^^19981014000017^""^""^^^^^""^^16661~IMAGPROVIDER~TWO~N^^9B/TELM^^32~GI ... SUITE~523~BOSTON, MA^RAD~GENERAL RADIOLOGY^19981014000017 OBX^^CE^P~PROCEDURE~L^^59~CHEST APICAL LORDOTIC~L^^^^^^"" OBX^^TX^M~MODIFIERS~L^^None^^^^^^"" OBX^^TX^H~HISTORY~L^^This is a 76 yo wm pmh of 3v cabg 12/97, cad, afib presents ...s to medicine with^^^^^^"" OBX^^TX^H~HISTORY~L^^dizziness, chest pressure. A previous exam on 10/2 and 10/ .../3 demonstrates a^^^^^^"" OBX^^TX^H~HISTORY~L^^right apical opacity measuring 2cm that was not further wor ...rked up. The pt has^^^^^^"" OBX^^TX^H~HISTORY~L^^been admitted repeatedly for the same chest pressure of unc ...clear etiology. The^^^^^^"" OBX^^TX^H~HISTORY~L^^pain does not appear to be cardiac in origin. Please perfo ...orm lordotic cxr to^^^^^^"" OBX^^TX^H~HISTORY~L^^further evaluate rul opacity. Thanks. ^^^^^^"" Enter HL7 subscript: Push <Enter> to continue...
3.10.2 Long Format Enter output device ("S" for screen or "F" for file): S// <Enter> Screen Format (Long or Short) S// L <Enter> Enter HL7 subscript: 461405 <Enter> HL7 Message (Subscript = 461405) MSH -- Message Header Segment 1 Field Separator = ^ 2 Encoding Characters = ~|\& 3 Sending Application = RA-SERVER-IMG 4 Sending Facility = 523 5 Receiving Application = MAGD-CLIENT 6 Receiving Facility = 523 7 Date/Time of Message = 19981014000017 9 Message Type = ORM~O01 10 Message Control ID = 3789535 11 Processing ID = P 12 Version ID = 2.1 17 Country Code = USA PID -- Patient Identification Segment 2 Patient ID (External ID) = 000-07-4067 3 Patient ID (Internal ID) = 93092~4~D99 5 Patient Name = IMAGPATIENT~FIVE~Q 7 Date of Birth = 19220514 8 Sex = M 19 SSN Number - Patient = 000074067 ORC -- Common Order Segment 1 Order Control = CA 5 Order Status ID = CA 9 Date/Time of Transaction = 19981014000017 OBR -- Observation Request 3 Filler Order Number = 7018986.8646-1~101398-495~L
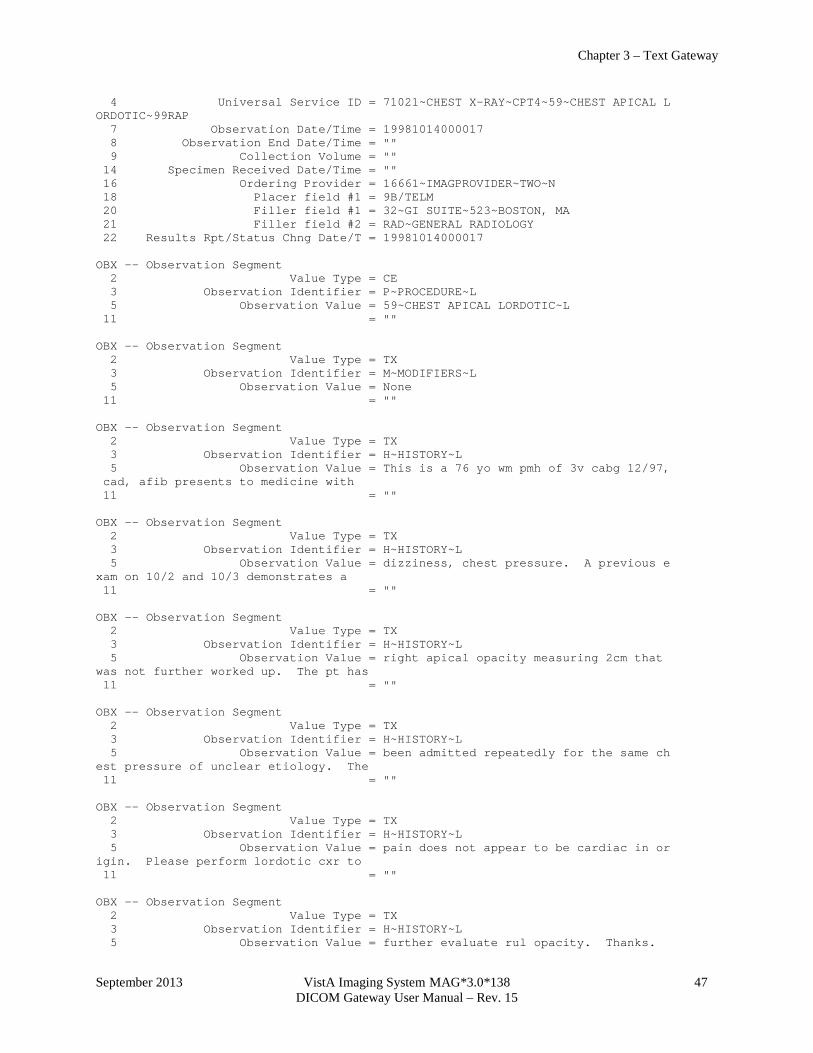
Chapter 3 – Text Gateway
September 2013 VistA Imaging System MAG*3.0*138 47 DICOM Gateway User Manual – Rev. 15
4 Universal Service ID = 71021~CHEST X-RAY~CPT4~59~CHEST APICAL L ORDOTIC~99RAP 7 Observation Date/Time = 19981014000017 8 Observation End Date/Time = "" 9 Collection Volume = "" 14 Specimen Received Date/Time = "" 16 Ordering Provider = 16661~IMAGPROVIDER~TWO~N 18 Placer field #1 = 9B/TELM 20 Filler field #1 = 32~GI SUITE~523~BOSTON, MA 21 Filler field #2 = RAD~GENERAL RADIOLOGY 22 Results Rpt/Status Chng Date/T = 19981014000017 OBX -- Observation Segment 2 Value Type = CE 3 Observation Identifier = P~PROCEDURE~L 5 Observation Value = 59~CHEST APICAL LORDOTIC~L 11 = "" OBX -- Observation Segment 2 Value Type = TX 3 Observation Identifier = M~MODIFIERS~L 5 Observation Value = None 11 = "" OBX -- Observation Segment 2 Value Type = TX 3 Observation Identifier = H~HISTORY~L 5 Observation Value = This is a 76 yo wm pmh of 3v cabg 12/97, cad, afib presents to medicine with 11 = "" OBX -- Observation Segment 2 Value Type = TX 3 Observation Identifier = H~HISTORY~L 5 Observation Value = dizziness, chest pressure. A previous e xam on 10/2 and 10/3 demonstrates a 11 = "" OBX -- Observation Segment 2 Value Type = TX 3 Observation Identifier = H~HISTORY~L 5 Observation Value = right apical opacity measuring 2cm that was not further worked up. The pt has 11 = "" OBX -- Observation Segment 2 Value Type = TX 3 Observation Identifier = H~HISTORY~L 5 Observation Value = been admitted repeatedly for the same ch est pressure of unclear etiology. The 11 = "" OBX -- Observation Segment 2 Value Type = TX 3 Observation Identifier = H~HISTORY~L 5 Observation Value = pain does not appear to be cardiac in or igin. Please perform lordotic cxr to 11 = "" OBX -- Observation Segment 2 Value Type = TX 3 Observation Identifier = H~HISTORY~L 5 Observation Value = further evaluate rul opacity. Thanks.
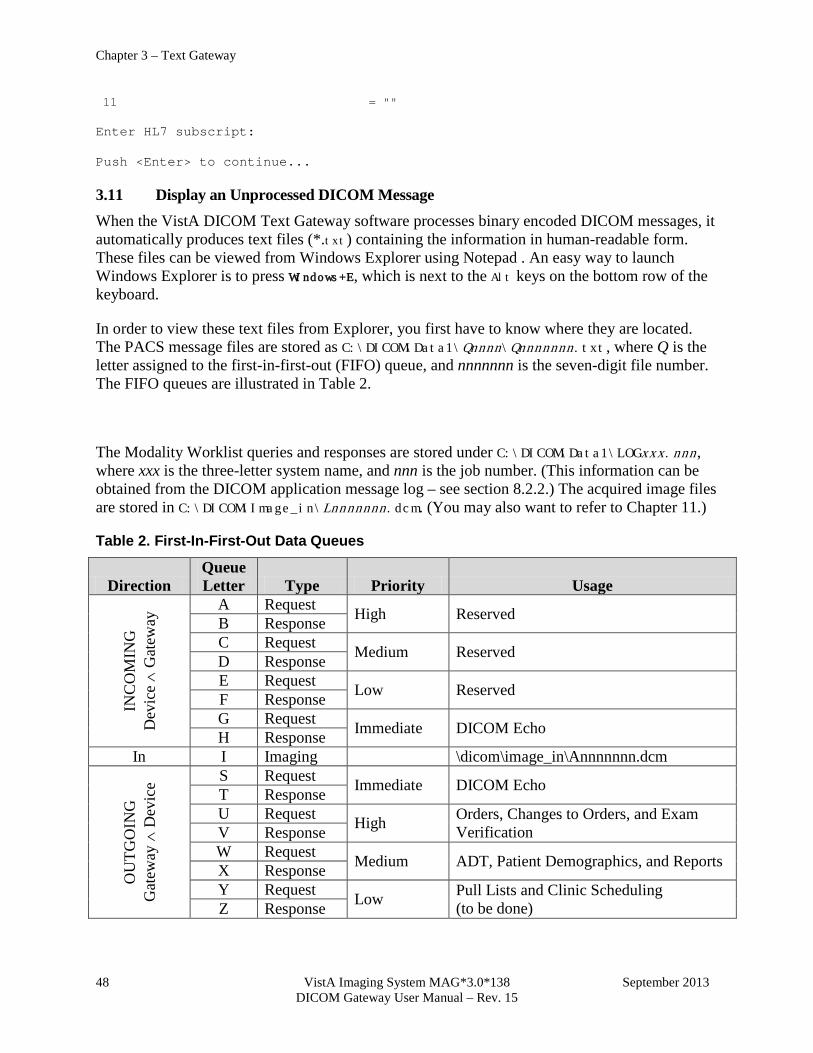
Chapter 3 – Text Gateway
48 VistA Imaging System MAG*3.0*138 September 2013 DICOM Gateway User Manual – Rev. 15
11 = "" Enter HL7 subscript: Push <Enter> to continue...
3.11 Display an Unprocessed DICOM Message When the VistA DICOM Text Gateway software processes binary encoded DICOM messages, it automatically produces text files (*.txt) containing the information in human-readable form. These files can be viewed from Windows Explorer using Notepad . An easy way to launch Windows Explorer is to press Windows+E, which is next to the Alt keys on the bottom row of the keyboard.
In order to view these text files from Explorer, you first have to know where they are located. The PACS message files are stored as C:\DICOM\Data1\Qnnnn\Qnnnnnnn.txt, where Q is the letter assigned to the first-in-first-out (FIFO) queue, and nnnnnnn is the seven-digit file number. The FIFO queues are illustrated in Table 2.
The Modality Worklist queries and responses are stored under C:\DICOM\Data1\LOGxxx.nnn, where xxx is the three-letter system name, and nnn is the job number. (This information can be obtained from the DICOM application message log – see section 8.2.2.) The acquired image files are stored in C:\DICOM\Image_in\Lnnnnnnn.dcm. (You may also want to refer to Chapter 11.)
Table 2. First-In-First-Out Data Queues
Direction Queue Letter Type Priority Usage
INC
OM
ING
D
evic
e ∧
Gat
eway
A Request High Reserved B Response C Request Medium Reserved D Response E Request Low Reserved F Response G Request Immediate DICOM Echo H Response
In I Imaging \dicom\image_in\Annnnnnn.dcm
OU
TGO
ING
G
atew
ay ∧
Dev
ice S Request Immediate DICOM Echo T Response
U Request High Orders, Changes to Orders, and Exam Verification V Response
W Request Medium ADT, Patient Demographics, and Reports X Response Y Request Low Pull Lists and Clinic Scheduling
(to be done) Z Response
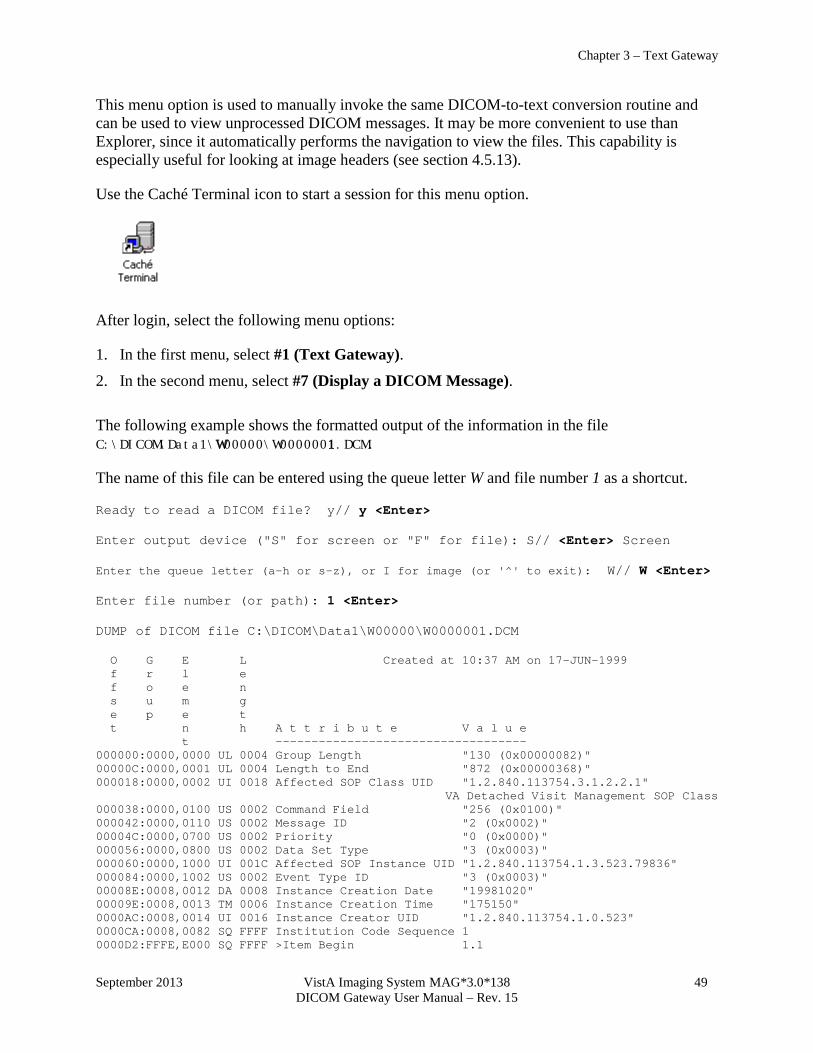
Chapter 3 – Text Gateway
September 2013 VistA Imaging System MAG*3.0*138 49 DICOM Gateway User Manual – Rev. 15
This menu option is used to manually invoke the same DICOM-to-text conversion routine and can be used to view unprocessed DICOM messages. It may be more convenient to use than Explorer, since it automatically performs the navigation to view the files. This capability is especially useful for looking at image headers (see section 4.5.13).
Use the Caché Terminal icon to start a session for this menu option.
After login, select the following menu options:
1. In the first menu, select #1 (Text Gateway). 2. In the second menu, select #7 (Display a DICOM Message). The following example shows the formatted output of the information in the file C:\DICOM\Data1\W00000\W0000001.DCM.
The name of this file can be entered using the queue letter W and file number 1 as a shortcut.
Ready to read a DICOM file? y// y <Enter> Enter output device ("S" for screen or "F" for file): S// <Enter> Screen Enter the queue letter (a-h or s-z), or I for image (or '^' to exit): W// W <Enter> Enter file number (or path): 1 <Enter> DUMP of DICOM file C:\DICOM\Data1\W00000\W0000001.DCM O G E L Created at 10:37 AM on 17-JUN-1999 f r l e f o e n s u m g e p e t t n h A t t r i b u t e V a l u e t ----------------------------------- 000000:0000,0000 UL 0004 Group Length "130 (0x00000082)" 00000C:0000,0001 UL 0004 Length to End "872 (0x00000368)" 000018:0000,0002 UI 0018 Affected SOP Class UID "1.2.840.113754.3.1.2.2.1"
VA Detached Visit Management SOP Class 000038:0000,0100 US 0002 Command Field "256 (0x0100)" 000042:0000,0110 US 0002 Message ID "2 (0x0002)" 00004C:0000,0700 US 0002 Priority "0 (0x0000)" 000056:0000,0800 US 0002 Data Set Type "3 (0x0003)" 000060:0000,1000 UI 001C Affected SOP Instance UID "1.2.840.113754.1.3.523.79836" 000084:0000,1002 US 0002 Event Type ID "3 (0x0003)" 00008E:0008,0012 DA 0008 Instance Creation Date "19981020" 00009E:0008,0013 TM 0006 Instance Creation Time "175150" 0000AC:0008,0014 UI 0016 Instance Creator UID "1.2.840.113754.1.0.523" 0000CA:0008,0082 SQ FFFF Institution Code Sequence 1 0000D2:FFFE,E000 SQ FFFF >Item Begin 1.1

Chapter 3 – Text Gateway
50 VistA Imaging System MAG*3.0*138 September 2013 DICOM Gateway User Manual – Rev. 15
0000DA:0008,0100 SH 0000 >Code Value "<unknown>" 0000E2:0008,0102 SH 0000 >Coding Scheme Designator "<unknown>" 0000EA:0008,0104 LO 0000 >Code Meaning "<unknown>" 0000F2:FFFE,E00D SQ 0000 >Item End 1.1 0000FA:FFFE,E0DD SQ 0000 >Sequence End 1 000102:0008,1120 SQ FFFF Referenced Patient Sequen 1 00010A:FFFE,E000 SQ FFFF >Item Begin 1.1 000112:0008,1150 UI 0018 >Referenced SOP Class UID "1.2.840.113754.3.1.2.1.1"
VA Detached Patient Management SOP Class 000132:0008,1155 UI 001C >Referenced SOP Instance "1.2.840.113754.1.1.523.79836" 000156:FFFE,E00D SQ 0000 >Item End 1.1 00015E:FFFE,E0DD SQ 0000 >Sequence End 1 000166:0009,0010 LO 0008 Owner of Group "VA DHCP" 000176:0009,1010 SQ FFFF Referring Physician Seque 1 00017E:FFFE,E000 SQ FFFF >Item Begin 1.1 000186:0008,0090 PN 0000 >Referring Physician's Na "<unknown>" 00018E:0008,0092 ST 0000 >Referring Physician's Ad "<unknown>" 000196:0008,0094 SH 0000 >Referring Physician's Te "<unknown>" 00019E:0008,0100 SH 0000 >Code Value "<unknown>" 0001A6:0008,0102 SH 0000 >Coding Scheme Designator "<unknown>" 0001AE:FFFE,E00D SQ 0000 >Item End 1.1 0001B6:FFFE,E0DD SQ 0000 >Sequence End 1 0001BE:0009,1020 SQ FFFF Performing Physician Sequ 1 0001C6:FFFE,E000 SQ FFFF >Item Begin 1.1 0001CE:0008,0100 SH 0000 >Code Value "<unknown>" 0001D6:0008,0102 SH 0000 >Coding Scheme Designator "<unknown>" 0001DE:0008,1050 PN 0000 >Performing Physician's N "<unknown>" 0001E6:FFFE,E00D SQ 0000 >Item End 1.1 0001EE:FFFE,E0DD SQ 0000 >Sequence End 1 0001F6:0010,0010 PN 0012 Patient's Name "IMAGPATIENT^TWO^N" 000210:0010,0020 LO 000C Patient ID "000-02-7748" 000224:0010,0021 LO 0004 Issuer of Patient ID "523" 000230:0010,0030 DA 0008 Patient's Birth Date "19330315" 000240:0010,0040 CS 0002 Patient's Sex "M" 00024A:0010,1000 LO 0006 Other Patient IDs "L7748" 000258:0010,1040 LO 0000 Patient's Address "<unknown>" 000260:0010,2160 SH 0000 Ethnic Group "<unknown>" 000268:0010,21B0 LT 0000 Additional Patient Histor "<unknown>" 000270:0038,0008 CS 0008 Visit Status ID "ADMITTED" 000280:0038,0020 DA 0008 Admitting Date "19981020" 000290:0038,0021 TM 0006 Admitting Time "175150" 00029E:0038,0030 DA 0000 Discharge Date "<unknown>" 0002A6:0038,0032 TM 0000 Discharge Time "<unknown>" 0002AE:0039,0010 LO 0008 Owner of Group "VA DHCP" 0002BE:0039,1010 SQ FFFF Current Patient Location 1 0002C6:FFFE,E000 SQ FFFF >Item Begin 1.1 0002CE:0008,0100 SH 0000 >Code Value "<unknown>" 0002D6:0008,0102 SH 0000 >Coding Scheme Designator "<unknown>" 0002DE:0038,0300 LO 0000 >Current Patient Location "<unknown>" 0002E6:FFFE,E00D SQ 0000 >Item End 1.1 0002EE:FFFE,E0DD SQ 0000 >Sequence End 1 0002F6:0039,1020 SQ FFFF Patient's Institutional R 1 0002FE:FFFE,E000 SQ FFFF >Item Begin 1.1 000306:0008,0100 SH 0000 >Code Value "<unknown>" 00030E:0008,0102 SH 0000 >Coding Scheme Designator "<unknown>" 000316:0038,0400 LO 0000 >Patient's Institution Re "<unknown>" 00031E:FFFE,E00D SQ 0000 >Item End 1.1 000326:FFFE,E0DD SQ 0000 >Sequence End 1 00032E:FFFD,0010 LO 0008 Owner of Group "VA DHCP" 00033E:FFFD,1010 ST 003A Message Handle "ADT ADMIT" "C:\DICOM\Data1\W00000\W0000001.DCM" "HL7(466004)"
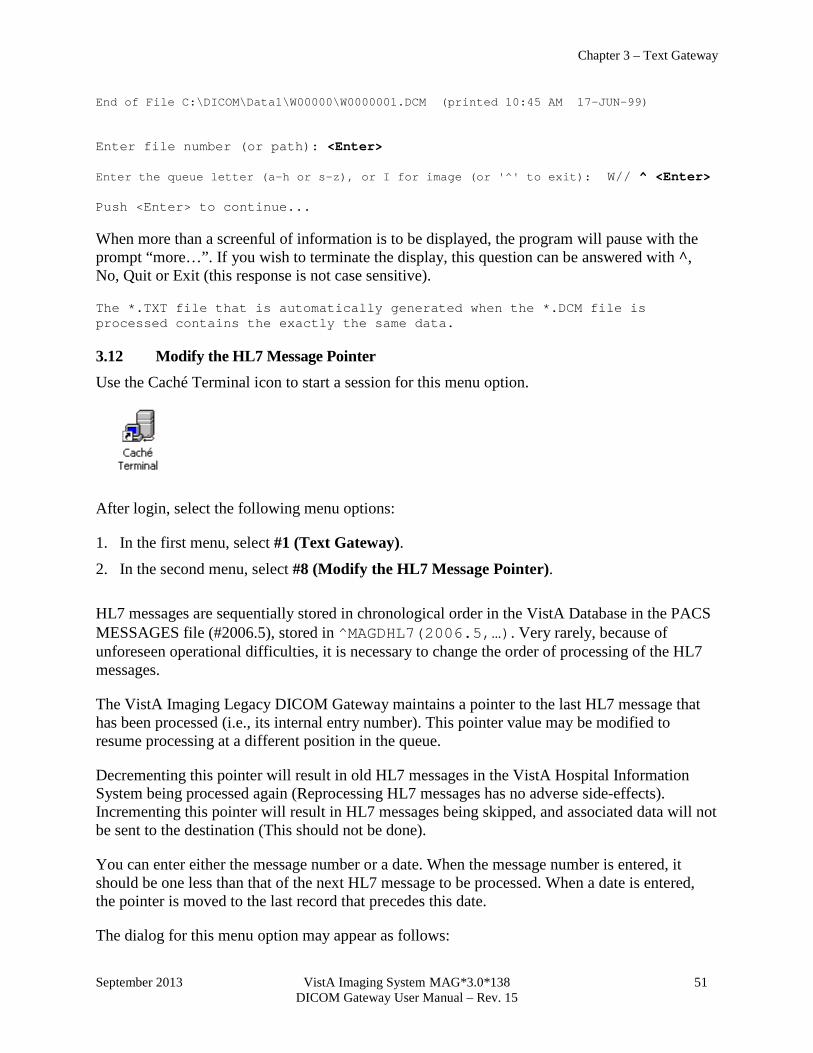
Chapter 3 – Text Gateway
September 2013 VistA Imaging System MAG*3.0*138 51 DICOM Gateway User Manual – Rev. 15
End of File C:\DICOM\Data1\W00000\W0000001.DCM (printed 10:45 AM 17-JUN-99) Enter file number (or path): <Enter> Enter the queue letter (a-h or s-z), or I for image (or '^' to exit): W// ^ <Enter> Push <Enter> to continue... When more than a screenful of information is to be displayed, the program will pause with the prompt “more…”. If you wish to terminate the display, this question can be answered with ^, No, Quit or Exit (this response is not case sensitive).
The *.TXT file that is automatically generated when the *.DCM file is processed contains the exactly the same data.
3.12 Modify the HL7 Message Pointer Use the Caché Terminal icon to start a session for this menu option.
After login, select the following menu options:
1. In the first menu, select #1 (Text Gateway). 2. In the second menu, select #8 (Modify the HL7 Message Pointer). HL7 messages are sequentially stored in chronological order in the VistA Database in the PACS MESSAGES file (#2006.5), stored in ^MAGDHL7(2006.5,…). Very rarely, because of unforeseen operational difficulties, it is necessary to change the order of processing of the HL7 messages.
The VistA Imaging Legacy DICOM Gateway maintains a pointer to the last HL7 message that has been processed (i.e., its internal entry number). This pointer value may be modified to resume processing at a different position in the queue.
Decrementing this pointer will result in old HL7 messages in the VistA Hospital Information System being processed again (Reprocessing HL7 messages has no adverse side-effects). Incrementing this pointer will result in HL7 messages being skipped, and associated data will not be sent to the destination (This should not be done).
You can enter either the message number or a date. When the message number is entered, it should be one less than that of the next HL7 message to be processed. When a date is entered, the pointer is moved to the last record that precedes this date.
The dialog for this menu option may appear as follows:

Chapter 3 – Text Gateway
52 VistA Imaging System MAG*3.0*138 September 2013 DICOM Gateway User Manual – Rev. 15
Current HL7 Pointer Value: 465230 (OCT 19, 1998@23:24:00) Enter new value of HL7 pointer or date: 466000 <Enter> New HL7 Pointer Value: 466000 (OCT 20, 1998@17:42:00) Push <Enter> to continue... or like this: Current HL7 Pointer Value: 466000 (OCT 20, 1998@17:42:00) Enter new value of HL7 pointer or date: 18 oct 1998<Enter> New HL7 Pointer Value: 464083 (OCT 17, 1998@23:53:00) Push <Enter> to continue... or like this:
Current HL7 Pointer Value: 464083 (OCT 17, 1998@23:53:00) Enter new value of HL7 pointer or date: t-5<Enter> New HL7 Pointer Value: 466632 (OCT 21, 1998@13:42:00) Push <Enter> to continue...
3.13 Generate a Daily Summary Report This menu option may be used to produce a report that shows how often the following events have been processed.
• ADT ADMIT
• ADT DISCHARGE
• ADT TRANSFER
• PATIENT DEMOGRAPHIC CHANGE
• ORDER ENTRY
• EXAM CHANGE
• EXAM VERIFICATION
• EXAM COMPLETE
• RELEASED (not verified) REPORT
• APPROVED REPORT
• GET IMAGE REQUEST (Only if a PACS is sending images)
• GET IMAGE REPLY (Only if a PACS is sending images)
The report will show the counts for the various events per day, starting from the first day for which statistics were recorded.
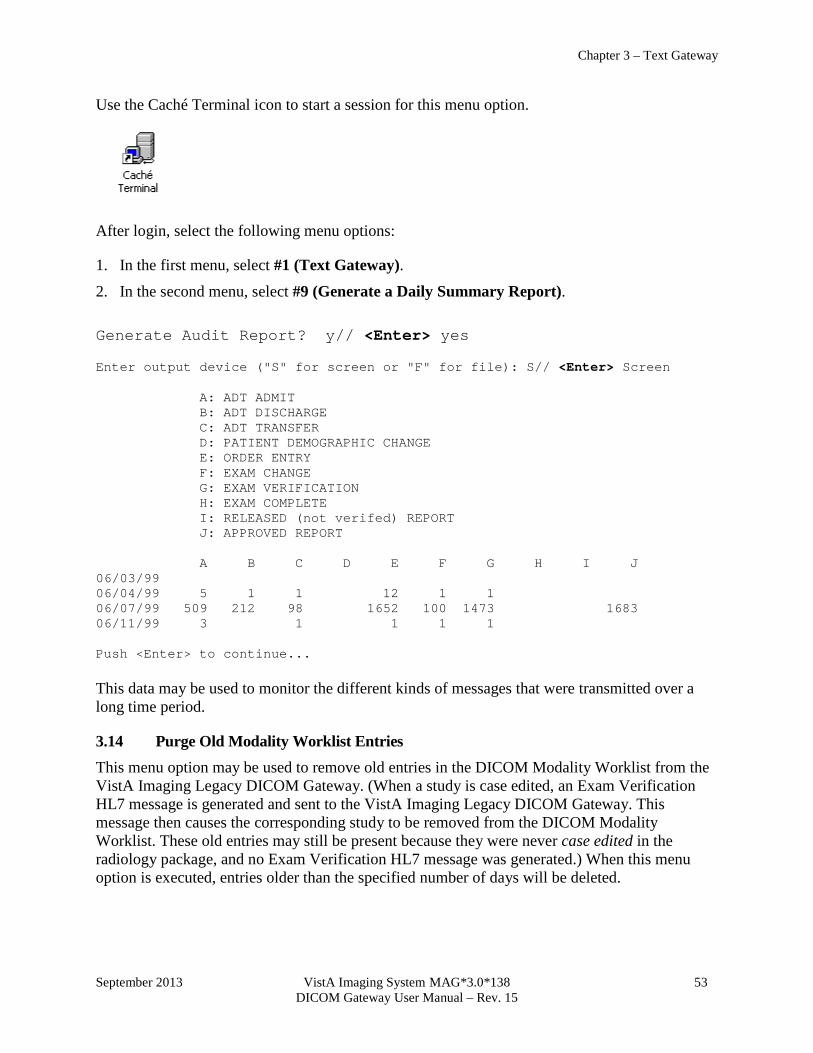
Chapter 3 – Text Gateway
September 2013 VistA Imaging System MAG*3.0*138 53 DICOM Gateway User Manual – Rev. 15
Use the Caché Terminal icon to start a session for this menu option.
After login, select the following menu options:
1. In the first menu, select #1 (Text Gateway). 2. In the second menu, select #9 (Generate a Daily Summary Report). Generate Audit Report? y// <Enter> yes Enter output device ("S" for screen or "F" for file): S// <Enter> Screen A: ADT ADMIT B: ADT DISCHARGE C: ADT TRANSFER D: PATIENT DEMOGRAPHIC CHANGE E: ORDER ENTRY F: EXAM CHANGE G: EXAM VERIFICATION H: EXAM COMPLETE I: RELEASED (not verifed) REPORT J: APPROVED REPORT A B C D E F G H I J 06/03/99 06/04/99 5 1 1 12 1 1 06/07/99 509 212 98 1652 100 1473 1683 06/11/99 3 1 1 1 1 Push <Enter> to continue... This data may be used to monitor the different kinds of messages that were transmitted over a long time period.
3.14 Purge Old Modality Worklist Entries This menu option may be used to remove old entries in the DICOM Modality Worklist from the VistA Imaging Legacy DICOM Gateway. (When a study is case edited, an Exam Verification HL7 message is generated and sent to the VistA Imaging Legacy DICOM Gateway. This message then causes the corresponding study to be removed from the DICOM Modality Worklist. These old entries may still be present because they were never case edited in the radiology package, and no Exam Verification HL7 message was generated.) When this menu option is executed, entries older than the specified number of days will be deleted.
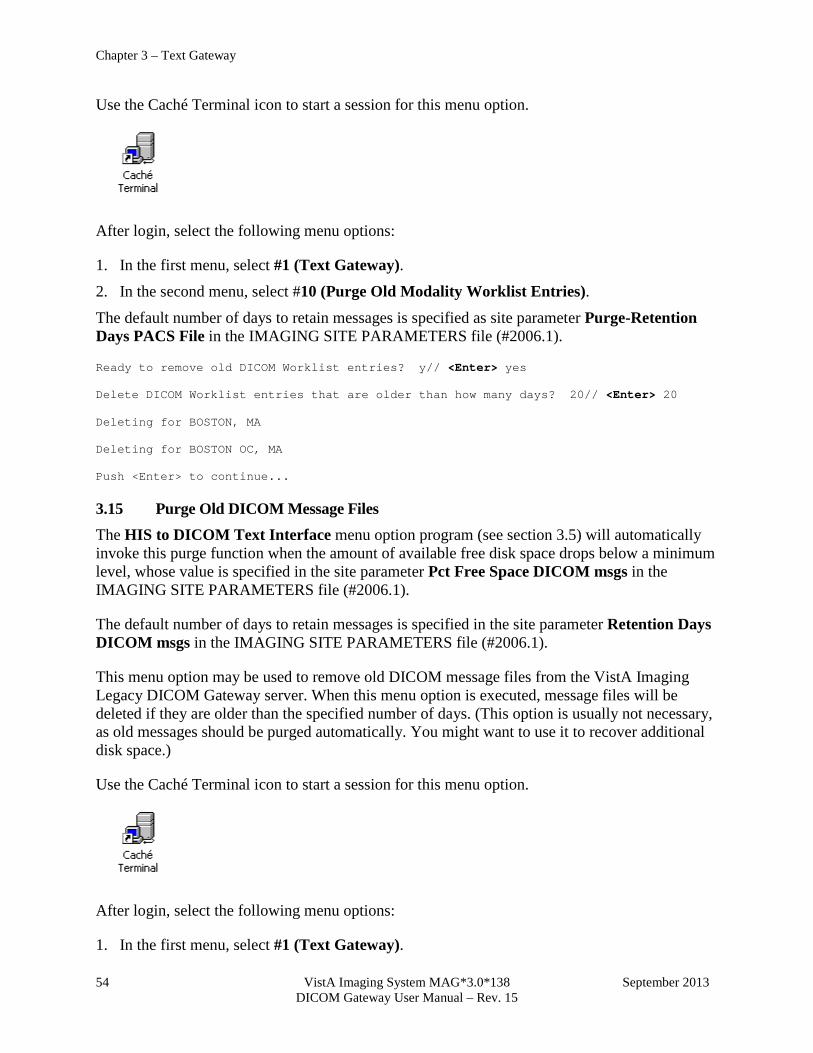
Chapter 3 – Text Gateway
54 VistA Imaging System MAG*3.0*138 September 2013 DICOM Gateway User Manual – Rev. 15
Use the Caché Terminal icon to start a session for this menu option.
After login, select the following menu options:
1. In the first menu, select #1 (Text Gateway). 2. In the second menu, select #10 (Purge Old Modality Worklist Entries). The default number of days to retain messages is specified as site parameter Purge-Retention Days PACS File in the IMAGING SITE PARAMETERS file (#2006.1).
Ready to remove old DICOM Worklist entries? y// <Enter> yes Delete DICOM Worklist entries that are older than how many days? 20// <Enter> 20 Deleting for BOSTON, MA Deleting for BOSTON OC, MA Push <Enter> to continue...
3.15 Purge Old DICOM Message Files The HIS to DICOM Text Interface menu option program (see section 3.5) will automatically invoke this purge function when the amount of available free disk space drops below a minimum level, whose value is specified in the site parameter Pct Free Space DICOM msgs in the IMAGING SITE PARAMETERS file (#2006.1).
The default number of days to retain messages is specified in the site parameter Retention Days DICOM msgs in the IMAGING SITE PARAMETERS file (#2006.1).
This menu option may be used to remove old DICOM message files from the VistA Imaging Legacy DICOM Gateway server. When this menu option is executed, message files will be deleted if they are older than the specified number of days. (This option is usually not necessary, as old messages should be purged automatically. You might want to use it to recover additional disk space.)
Use the Caché Terminal icon to start a session for this menu option.
After login, select the following menu options:
1. In the first menu, select #1 (Text Gateway).
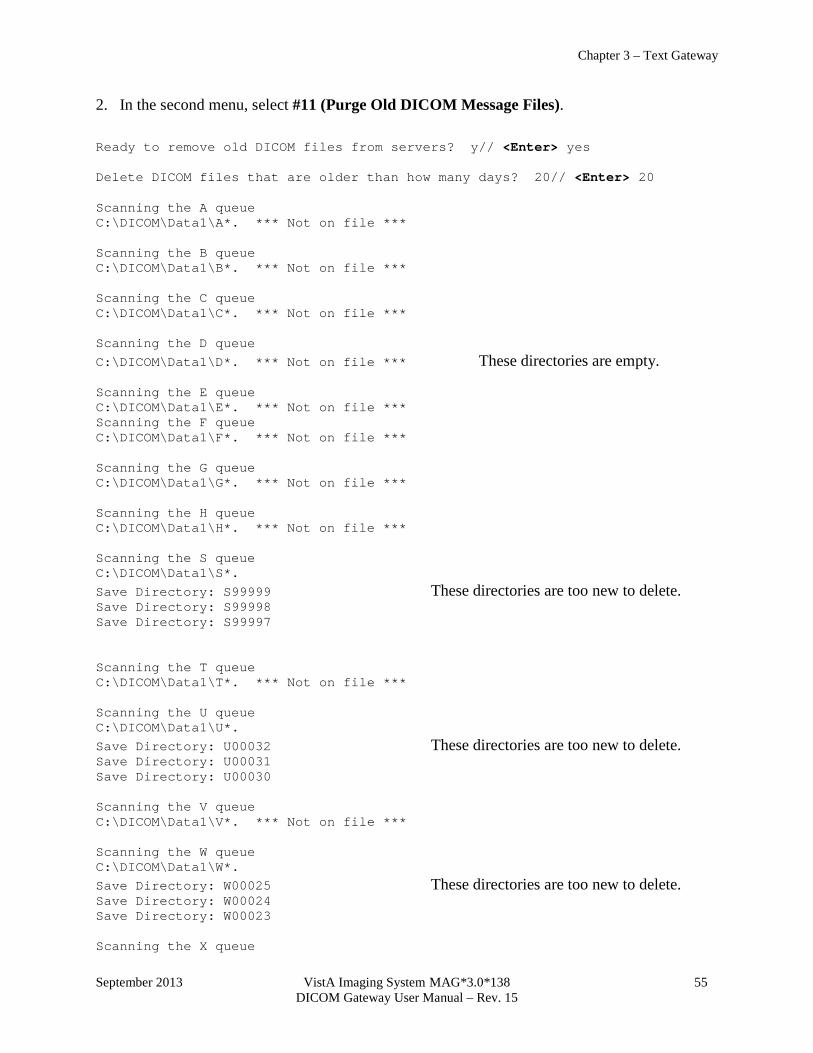
Chapter 3 – Text Gateway
September 2013 VistA Imaging System MAG*3.0*138 55 DICOM Gateway User Manual – Rev. 15
2. In the second menu, select #11 (Purge Old DICOM Message Files). Ready to remove old DICOM files from servers? y// <Enter> yes Delete DICOM files that are older than how many days? 20// <Enter> 20 Scanning the A queue C:\DICOM\Data1\A*. *** Not on file *** Scanning the B queue C:\DICOM\Data1\B*. *** Not on file *** Scanning the C queue C:\DICOM\Data1\C*. *** Not on file *** Scanning the D queue C:\DICOM\Data1\D*. *** Not on file *** These directories are empty. Scanning the E queue C:\DICOM\Data1\E*. *** Not on file *** Scanning the F queue C:\DICOM\Data1\F*. *** Not on file *** Scanning the G queue C:\DICOM\Data1\G*. *** Not on file *** Scanning the H queue C:\DICOM\Data1\H*. *** Not on file *** Scanning the S queue C:\DICOM\Data1\S*. Save Directory: S99999 These directories are too new to delete. Save Directory: S99998 Save Directory: S99997 Scanning the T queue C:\DICOM\Data1\T*. *** Not on file *** Scanning the U queue C:\DICOM\Data1\U*. Save Directory: U00032 These directories are too new to delete. Save Directory: U00031 Save Directory: U00030 Scanning the V queue C:\DICOM\Data1\V*. *** Not on file *** Scanning the W queue C:\DICOM\Data1\W*. Save Directory: W00025 These directories are too new to delete. Save Directory: W00024 Save Directory: W00023 Scanning the X queue

Chapter 3 – Text Gateway
56 VistA Imaging System MAG*3.0*138 September 2013 DICOM Gateway User Manual – Rev. 15
C:\DICOM\Data1\X*. *** Not on file *** Scanning the Y queue C:\DICOM\Data1\Y*. *** Not on file *** Scanning the Z queue C:\DICOM\Data1\Z*. *** Not on file *** Scanning the A queue C:\DICOM\Data2\A*. *** Not on file *** Scanning the B queue C:\DICOM\Data2\B*. *** Not on file *** These directories are empty. Scanning the C queue C:\DICOM\Data2\C*. *** Not on file *** Scanning the D queue C:\DICOM\Data2\D*. *** Not on file *** Scanning the E queue C:\DICOM\Data2\E*. *** Not on file *** Scanning the F queue C:\DICOM\Data2\F*. *** Not on file *** Scanning the G queue C:\DICOM\Data2\G*. *** Not on file *** Scanning the H queue C:\DICOM\Data2\H*. *** Not on file *** Scanning the S queue C:\DICOM\Data2\S*. Save Directory: S99999 These directories are too new to delete. Save Directory: S99998 Save Directory: S99997 Scanning the T queue C:\DICOM\Data2\T*. *** Not on file *** Scanning the U queue C:\DICOM\Data2\U*. *** Not on file *** Scanning the V queue C:\DICOM\Data2\V*. *** Not on file *** Scanning the W queue C:\DICOM\Data2\W*. *** Not on file *** These directories are empty. Scanning the X queue C:\DICOM\Data2\X*. *** Not on file *** Scanning the Y queue C:\DICOM\Data2\Y*. *** Not on file ***

Chapter 3 – Text Gateway
September 2013 VistA Imaging System MAG*3.0*138 57 DICOM Gateway User Manual – Rev. 15
Scanning the Z queue C:\DICOM\Data2\Z*. *** Not on file *** Push <Enter> to continue...
3.16 Purge Old HL7 Transaction Global Nodes This menu option may be used to remove old HL7 messages from the VistA Hospital Information System. When this menu option is executed, messages will be deleted if they are older than the specified number of days. The purge should be done monthly.
The number of days that is used is the value that is entered for the site parameter called Purge-Retention Days PACS File in the IMAGING SITE PARAMETERS file (#2006.1).
Use the Caché Terminal icon to start a session for this menu option.
After login, select the following menu options:
1. In the first menu, select #1 (Text Gateway). 2. In the second menu, select #12 (Purge Old HL7 Transaction Global Nodes). Ready to remove old HL7 transaction global nodes? y// <Enter> yes ................... Push <Enter> to continue...
3.17 Purge Old Audit Records This menu option may be used to remove old audit records from the VistA Hospital Information System. This menu option removes only audit records that are related to the VistA PACS transactions. When this menu option is executed, audit records will be deleted if they are older than the date that is entered (records created on the date entered will remain in the database). This might be done annually.
Use the Caché Terminal icon to start a session for this menu option.
After login, select the following menu options:
1. In the first menu, select #1 (Text Gateway).
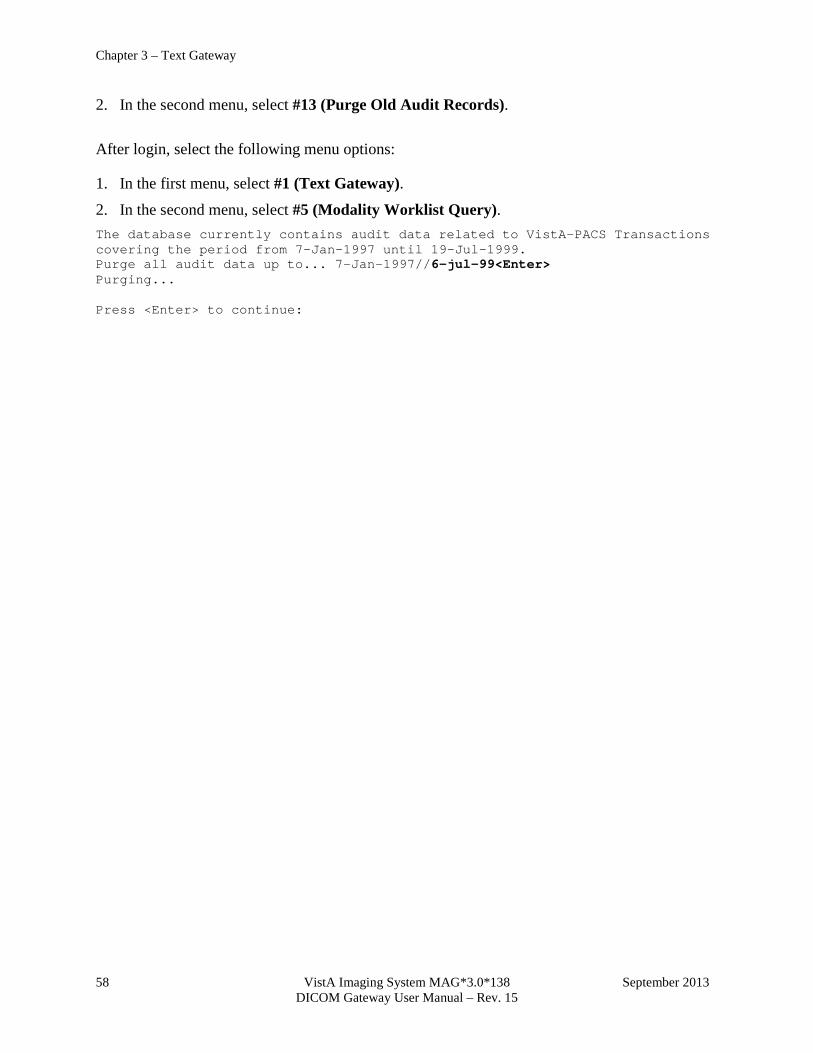
Chapter 3 – Text Gateway
58 VistA Imaging System MAG*3.0*138 September 2013 DICOM Gateway User Manual – Rev. 15
2. In the second menu, select #13 (Purge Old Audit Records). After login, select the following menu options:
1. In the first menu, select #1 (Text Gateway). 2. In the second menu, select #5 (Modality Worklist Query). The database currently contains audit data related to VistA-PACS Transactions covering the period from 7-Jan-1997 until 19-Jul-1999. Purge all audit data up to... 7-Jan-1997//6-jul-99<Enter> Purging... Press <Enter> to continue:
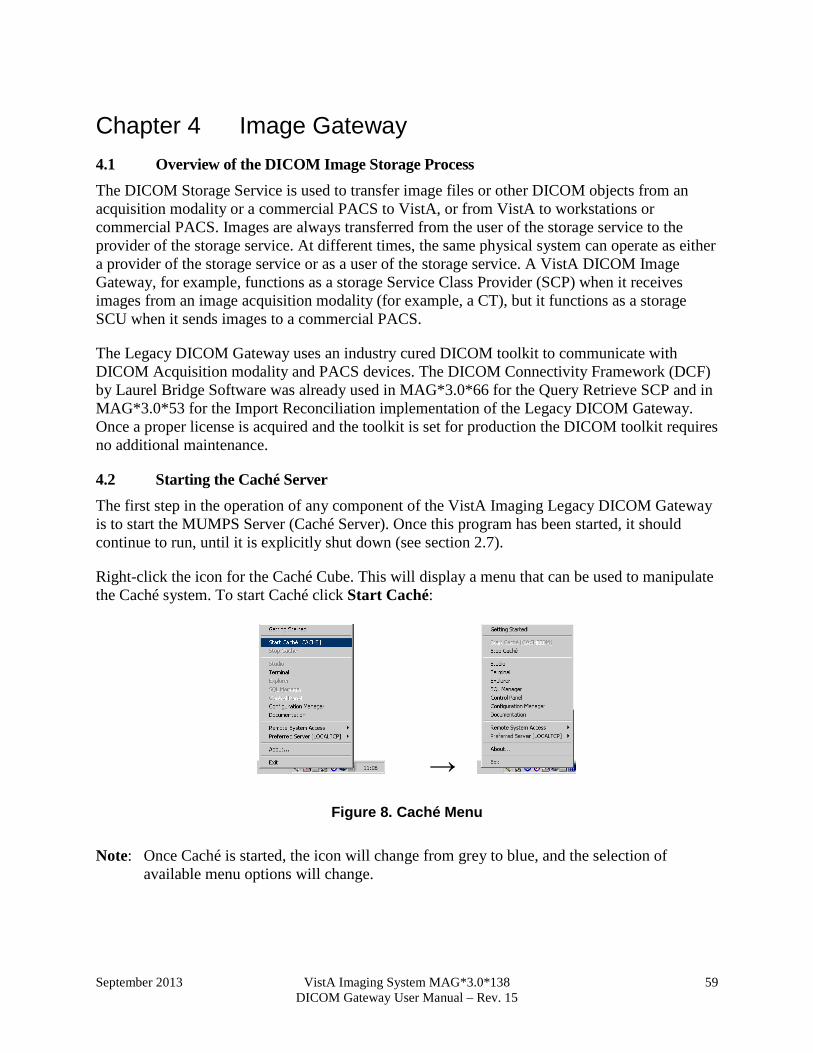
September 2013 VistA Imaging System MAG*3.0*138 59 DICOM Gateway User Manual – Rev. 15
Chapter 4 Image Gateway 4.1 Overview of the DICOM Image Storage Process The DICOM Storage Service is used to transfer image files or other DICOM objects from an acquisition modality or a commercial PACS to VistA, or from VistA to workstations or commercial PACS. Images are always transferred from the user of the storage service to the provider of the storage service. At different times, the same physical system can operate as either a provider of the storage service or as a user of the storage service. A VistA DICOM Image Gateway, for example, functions as a storage Service Class Provider (SCP) when it receives images from an image acquisition modality (for example, a CT), but it functions as a storage SCU when it sends images to a commercial PACS.
The Legacy DICOM Gateway uses an industry cured DICOM toolkit to communicate with DICOM Acquisition modality and PACS devices. The DICOM Connectivity Framework (DCF) by Laurel Bridge Software was already used in MAG*3.0*66 for the Query Retrieve SCP and in MAG*3.0*53 for the Import Reconciliation implementation of the Legacy DICOM Gateway. Once a proper license is acquired and the toolkit is set for production the DICOM toolkit requires no additional maintenance.
4.2 Starting the Caché Server The first step in the operation of any component of the VistA Imaging Legacy DICOM Gateway is to start the MUMPS Server (Caché Server). Once this program has been started, it should continue to run, until it is explicitly shut down (see section 2.7).
Right-click the icon for the Caché Cube. This will display a menu that can be used to manipulate the Caché system. To start Caché click Start Caché:
→
Figure 8. Caché Menu Note: Once Caché is started, the icon will change from grey to blue, and the selection of available menu options will change.
Chapter 4 – Image Gateway
60 VistA Imaging System MAG*3.0*138 September 2013 DICOM Gateway User Manual – Rev. 15
4.3 Storage Server Service The Storage Server Service starts up with the HDIG, when the HDIG is configured to operate with the storage server option. To start the service the HDIG needs VistA connectivity and access to short-term (RAID) and long-term (Jukebox, WORM, OTG, and so forth) storage.
4.4 Processing Images through the HDIG The HDIG provides the following:
• Enables the processing of and storage of any enabled SOP Class DICOM object.
• Improves Unique Identifier (UID) checking for study, series, and SOP instance UIDs, which eliminates the possibility of storing duplicate objects in the new database.
• Interfaces to all DICOM devices (modalities, cPACS, and so forth).
Important: Display of disabled SOP classes will be supported in future releases. You will not be able to view these objects in the display clients (Clinical Capture, Clinical Display, and VistA RAD). You can access these objects using the Query/Retrieve application.
Note: These SOP classes are initially disabled on the Legacy DICOM Gateway. Contact the CLIN3 team to enable support of disabled SOP classes on the gateway.
• Figure 9 shows the data flow for storing SOP classes prior to MAG*3.0*34 and those introduced with MAG*3.0*34.

Chapter 4 – Image Gateway
September 2013 VistA Imaging System MAG*3.0*138 61 DICOM Gateway User Manual – Rev. 15
Figure 9. DICOM Image Processing Flow The DICOM Listener listens on several ports, monitoring several application entity (AE) titles for incoming DICOM objects (images, structured reports, and so on). DICOM Listener ports are defined in the INSTRUMENT.DIC Legacy DICOM Gateway configuration file.
Application entities are devices that are associated with a DICOM service class and a DICOM role. An AE title must be defined in the AE Security Matrix in order to send data to VistA Imaging. AE Titles, as defined by the DICOM Standard, are 16 character unique alphanumeric strings per Application Entity or device. The AE Security Matrix implementation for AE Titles is
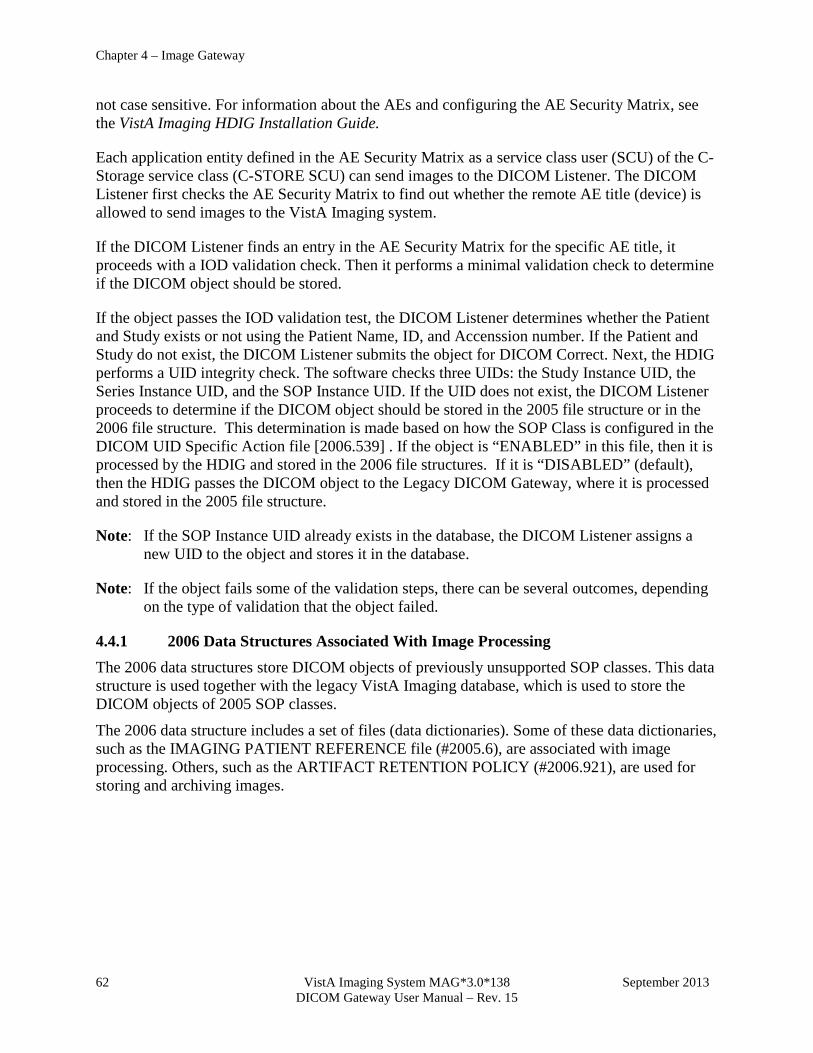
Chapter 4 – Image Gateway
62 VistA Imaging System MAG*3.0*138 September 2013 DICOM Gateway User Manual – Rev. 15
not case sensitive. For information about the AEs and configuring the AE Security Matrix, see the VistA Imaging HDIG Installation Guide.
Each application entity defined in the AE Security Matrix as a service class user (SCU) of the C-Storage service class (C-STORE SCU) can send images to the DICOM Listener. The DICOM Listener first checks the AE Security Matrix to find out whether the remote AE title (device) is allowed to send images to the VistA Imaging system.
If the DICOM Listener finds an entry in the AE Security Matrix for the specific AE title, it proceeds with a IOD validation check. Then it performs a minimal validation check to determine if the DICOM object should be stored.
If the object passes the IOD validation test, the DICOM Listener determines whether the Patient and Study exists or not using the Patient Name, ID, and Accenssion number. If the Patient and Study do not exist, the DICOM Listener submits the object for DICOM Correct. Next, the HDIG performs a UID integrity check. The software checks three UIDs: the Study Instance UID, the Series Instance UID, and the SOP Instance UID. If the UID does not exist, the DICOM Listener proceeds to determine if the DICOM object should be stored in the 2005 file structure or in the 2006 file structure. This determination is made based on how the SOP Class is configured in the DICOM UID Specific Action file [2006.539] . If the object is “ENABLED” in this file, then it is processed by the HDIG and stored in the 2006 file structures. If it is “DISABLED” (default), then the HDIG passes the DICOM object to the Legacy DICOM Gateway, where it is processed and stored in the 2005 file structure.
Note: If the SOP Instance UID already exists in the database, the DICOM Listener assigns a new UID to the object and stores it in the database.
Note: If the object fails some of the validation steps, there can be several outcomes, depending on the type of validation that the object failed.
4.4.1 2006 Data Structures Associated With Image Processing The 2006 data structures store DICOM objects of previously unsupported SOP classes. This data structure is used together with the legacy VistA Imaging database, which is used to store the DICOM objects of 2005 SOP classes.
The 2006 data structure includes a set of files (data dictionaries). Some of these data dictionaries, such as the IMAGING PATIENT REFERENCE file (#2005.6), are associated with image processing. Others, such as the ARTIFACT RETENTION POLICY (#2006.921), are used for storing and archiving images.
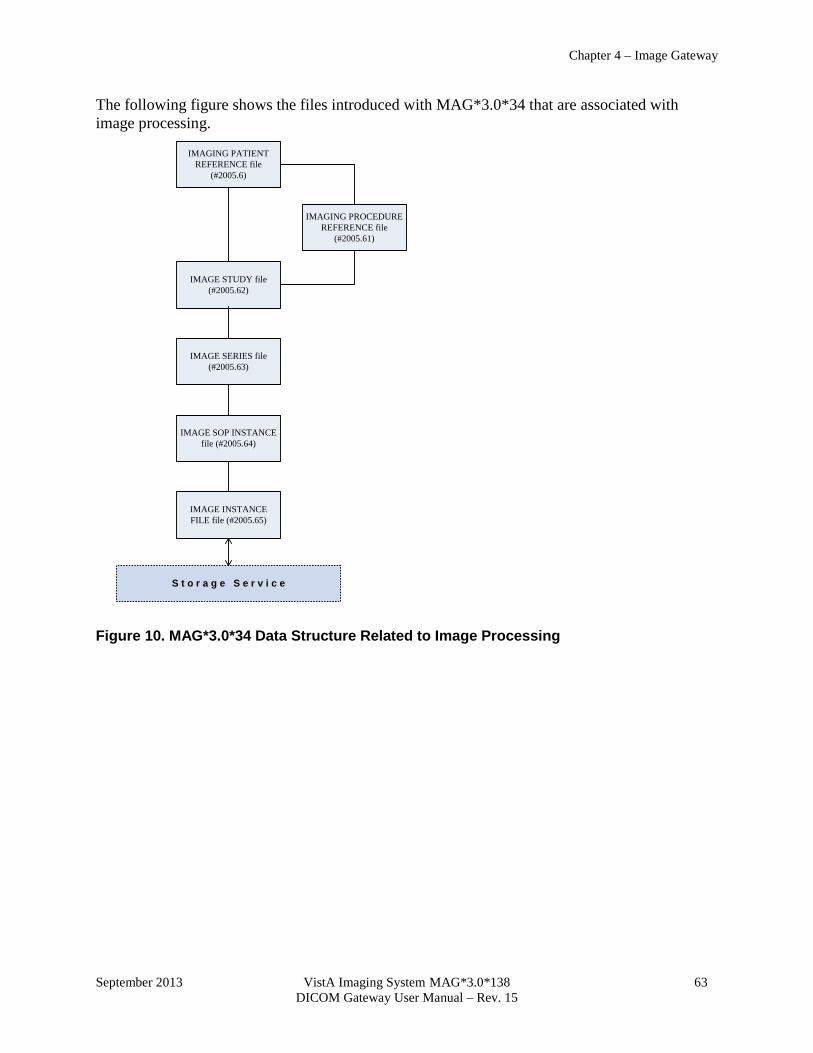
Chapter 4 – Image Gateway
September 2013 VistA Imaging System MAG*3.0*138 63 DICOM Gateway User Manual – Rev. 15
The following figure shows the files introduced with MAG*3.0*34 that are associated with image processing.
IMAGING PATIENT REFERENCE file
(#2005.6)
IMAGING PROCEDURE REFERENCE file
(#2005.61)
IMAGE STUDY file (#2005.62)
IMAGE SERIES file (#2005.63)
S t o r a g e S e r v i c e
IMAGE SOP INSTANCE file (#2005.64)
IMAGE INSTANCE FILE file (#2005.65)
Figure 10. MAG*3.0*34 Data Structure Related to Image Processing
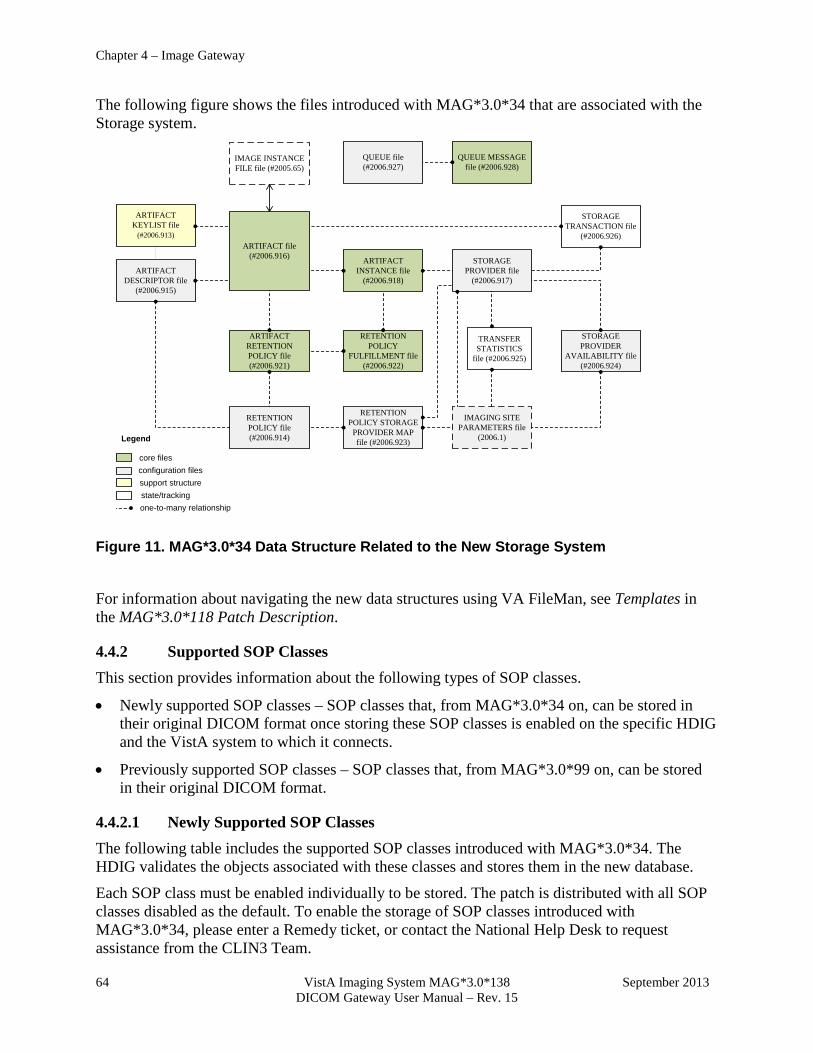
Chapter 4 – Image Gateway
64 VistA Imaging System MAG*3.0*138 September 2013 DICOM Gateway User Manual – Rev. 15
The following figure shows the files introduced with MAG*3.0*34 that are associated with the Storage system.
ARTIFACT DESCRIPTOR file
(#2006.915)
QUEUE file (#2006.927)
IMAGE INSTANCE FILE file (#2005.65)
ARTIFACT KEYLIST file
(#2006.913)
ARTIFACT RETENTION POLICY file (#2006.921)
RETENTION POLICY file (#2006.914)
ARTIFACT file (#2006.916)
QUEUE MESSAGE file (#2006.928)
ARTIFACT INSTANCE file
(#2006.918)
RETENTION POLICY
FULFILLMENT file (#2006.922)
RETENTION POLICY STORAGE
PROVIDER MAP file (#2006.923)
TRANSFER STATISTICS
file (#2006.925)
IMAGING SITE PARAMETERS file
(2006.1)
STORAGE PROVIDER file
(#2006.917)
STORAGE PROVIDER
AVAILABILITY file (#2006.924)
STORAGE TRANSACTION file
(#2006.926)
Legend
state/tracking
core filesconfiguration filessupport structure
one-to-many relationship
Figure 11. MAG*3.0*34 Data Structure Related to the New Storage System
For information about navigating the new data structures using VA FileMan, see Templates in the MAG*3.0*118 Patch Description.
4.4.2 Supported SOP Classes This section provides information about the following types of SOP classes.
• Newly supported SOP classes – SOP classes that, from MAG*3.0*34 on, can be stored in their original DICOM format once storing these SOP classes is enabled on the specific HDIG and the VistA system to which it connects.
• Previously supported SOP classes – SOP classes that, from MAG*3.0*99 on, can be stored in their original DICOM format.
4.4.2.1 Newly Supported SOP Classes The following table includes the supported SOP classes introduced with MAG*3.0*34. The HDIG validates the objects associated with these classes and stores them in the new database.
Each SOP class must be enabled individually to be stored. The patch is distributed with all SOP classes disabled as the default. To enable the storage of SOP classes introduced with MAG*3.0*34, please enter a Remedy ticket, or contact the National Help Desk to request assistance from the CLIN3 Team.
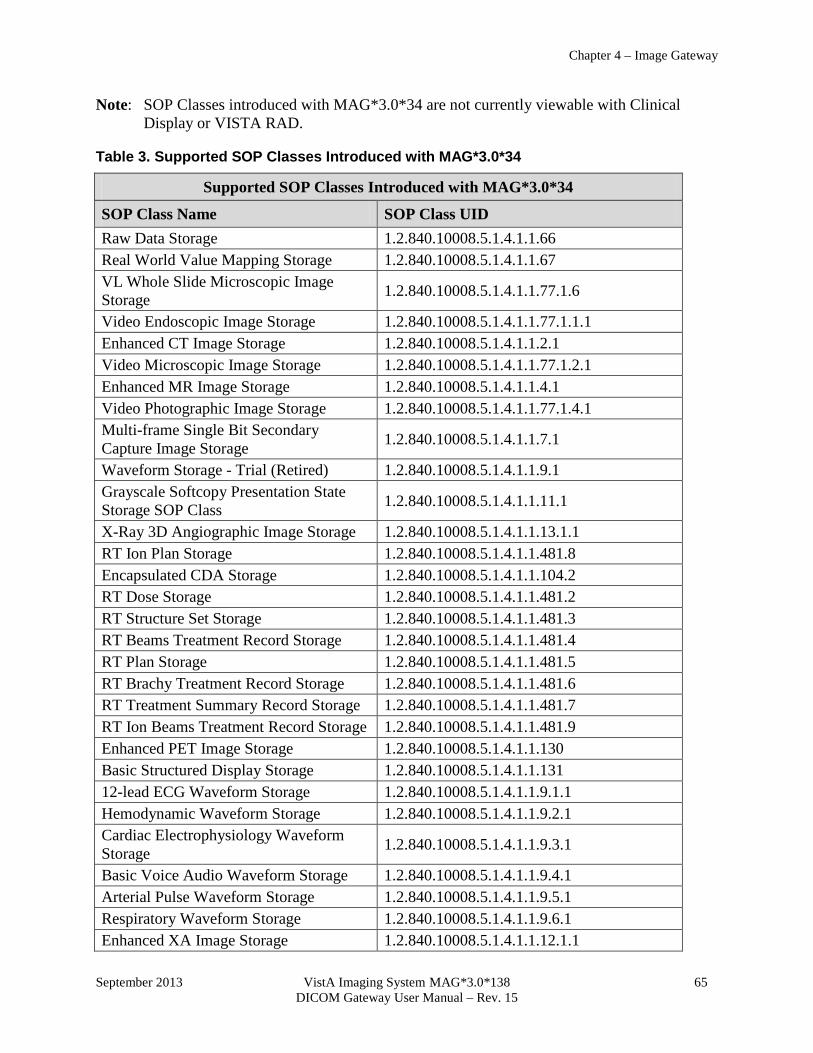
Chapter 4 – Image Gateway
September 2013 VistA Imaging System MAG*3.0*138 65 DICOM Gateway User Manual – Rev. 15
Note: SOP Classes introduced with MAG*3.0*34 are not currently viewable with Clinical Display or VISTA RAD.
Table 3. Supported SOP Classes Introduced with MAG*3.0*34
Supported SOP Classes Introduced with MAG*3.0*34
SOP Class Name SOP Class UID Raw Data Storage 1.2.840.10008.5.1.4.1.1.66 Real World Value Mapping Storage 1.2.840.10008.5.1.4.1.1.67 VL Whole Slide Microscopic Image Storage 1.2.840.10008.5.1.4.1.1.77.1.6
Video Endoscopic Image Storage 1.2.840.10008.5.1.4.1.1.77.1.1.1 Enhanced CT Image Storage 1.2.840.10008.5.1.4.1.1.2.1 Video Microscopic Image Storage 1.2.840.10008.5.1.4.1.1.77.1.2.1 Enhanced MR Image Storage 1.2.840.10008.5.1.4.1.1.4.1 Video Photographic Image Storage 1.2.840.10008.5.1.4.1.1.77.1.4.1 Multi-frame Single Bit Secondary Capture Image Storage 1.2.840.10008.5.1.4.1.1.7.1
Waveform Storage - Trial (Retired) 1.2.840.10008.5.1.4.1.1.9.1 Grayscale Softcopy Presentation State Storage SOP Class 1.2.840.10008.5.1.4.1.1.11.1
X-Ray 3D Angiographic Image Storage 1.2.840.10008.5.1.4.1.1.13.1.1 RT Ion Plan Storage 1.2.840.10008.5.1.4.1.1.481.8 Encapsulated CDA Storage 1.2.840.10008.5.1.4.1.1.104.2 RT Dose Storage 1.2.840.10008.5.1.4.1.1.481.2 RT Structure Set Storage 1.2.840.10008.5.1.4.1.1.481.3 RT Beams Treatment Record Storage 1.2.840.10008.5.1.4.1.1.481.4 RT Plan Storage 1.2.840.10008.5.1.4.1.1.481.5 RT Brachy Treatment Record Storage 1.2.840.10008.5.1.4.1.1.481.6 RT Treatment Summary Record Storage 1.2.840.10008.5.1.4.1.1.481.7 RT Ion Beams Treatment Record Storage 1.2.840.10008.5.1.4.1.1.481.9 Enhanced PET Image Storage 1.2.840.10008.5.1.4.1.1.130 Basic Structured Display Storage 1.2.840.10008.5.1.4.1.1.131 12-lead ECG Waveform Storage 1.2.840.10008.5.1.4.1.1.9.1.1 Hemodynamic Waveform Storage 1.2.840.10008.5.1.4.1.1.9.2.1 Cardiac Electrophysiology Waveform Storage 1.2.840.10008.5.1.4.1.1.9.3.1
Basic Voice Audio Waveform Storage 1.2.840.10008.5.1.4.1.1.9.4.1 Arterial Pulse Waveform Storage 1.2.840.10008.5.1.4.1.1.9.5.1 Respiratory Waveform Storage 1.2.840.10008.5.1.4.1.1.9.6.1 Enhanced XA Image Storage 1.2.840.10008.5.1.4.1.1.12.1.1
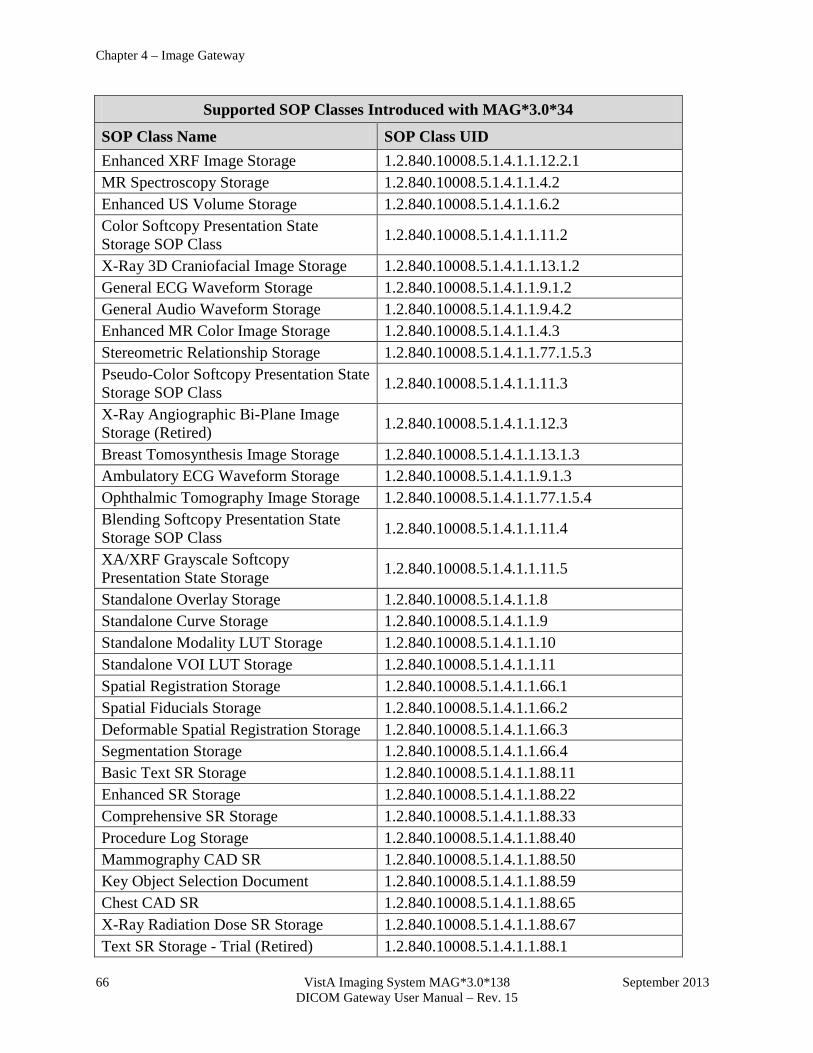
Chapter 4 – Image Gateway
66 VistA Imaging System MAG*3.0*138 September 2013 DICOM Gateway User Manual – Rev. 15
Supported SOP Classes Introduced with MAG*3.0*34
SOP Class Name SOP Class UID Enhanced XRF Image Storage 1.2.840.10008.5.1.4.1.1.12.2.1 MR Spectroscopy Storage 1.2.840.10008.5.1.4.1.1.4.2 Enhanced US Volume Storage 1.2.840.10008.5.1.4.1.1.6.2 Color Softcopy Presentation State Storage SOP Class 1.2.840.10008.5.1.4.1.1.11.2
X-Ray 3D Craniofacial Image Storage 1.2.840.10008.5.1.4.1.1.13.1.2 General ECG Waveform Storage 1.2.840.10008.5.1.4.1.1.9.1.2 General Audio Waveform Storage 1.2.840.10008.5.1.4.1.1.9.4.2 Enhanced MR Color Image Storage 1.2.840.10008.5.1.4.1.1.4.3 Stereometric Relationship Storage 1.2.840.10008.5.1.4.1.1.77.1.5.3 Pseudo-Color Softcopy Presentation State Storage SOP Class 1.2.840.10008.5.1.4.1.1.11.3
X-Ray Angiographic Bi-Plane Image Storage (Retired) 1.2.840.10008.5.1.4.1.1.12.3
Breast Tomosynthesis Image Storage 1.2.840.10008.5.1.4.1.1.13.1.3 Ambulatory ECG Waveform Storage 1.2.840.10008.5.1.4.1.1.9.1.3 Ophthalmic Tomography Image Storage 1.2.840.10008.5.1.4.1.1.77.1.5.4 Blending Softcopy Presentation State Storage SOP Class 1.2.840.10008.5.1.4.1.1.11.4
XA/XRF Grayscale Softcopy Presentation State Storage 1.2.840.10008.5.1.4.1.1.11.5
Standalone Overlay Storage 1.2.840.10008.5.1.4.1.1.8 Standalone Curve Storage 1.2.840.10008.5.1.4.1.1.9 Standalone Modality LUT Storage 1.2.840.10008.5.1.4.1.1.10 Standalone VOI LUT Storage 1.2.840.10008.5.1.4.1.1.11 Spatial Registration Storage 1.2.840.10008.5.1.4.1.1.66.1 Spatial Fiducials Storage 1.2.840.10008.5.1.4.1.1.66.2 Deformable Spatial Registration Storage 1.2.840.10008.5.1.4.1.1.66.3 Segmentation Storage 1.2.840.10008.5.1.4.1.1.66.4 Basic Text SR Storage 1.2.840.10008.5.1.4.1.1.88.11 Enhanced SR Storage 1.2.840.10008.5.1.4.1.1.88.22 Comprehensive SR Storage 1.2.840.10008.5.1.4.1.1.88.33 Procedure Log Storage 1.2.840.10008.5.1.4.1.1.88.40 Mammography CAD SR 1.2.840.10008.5.1.4.1.1.88.50 Key Object Selection Document 1.2.840.10008.5.1.4.1.1.88.59 Chest CAD SR 1.2.840.10008.5.1.4.1.1.88.65 X-Ray Radiation Dose SR Storage 1.2.840.10008.5.1.4.1.1.88.67 Text SR Storage - Trial (Retired) 1.2.840.10008.5.1.4.1.1.88.1
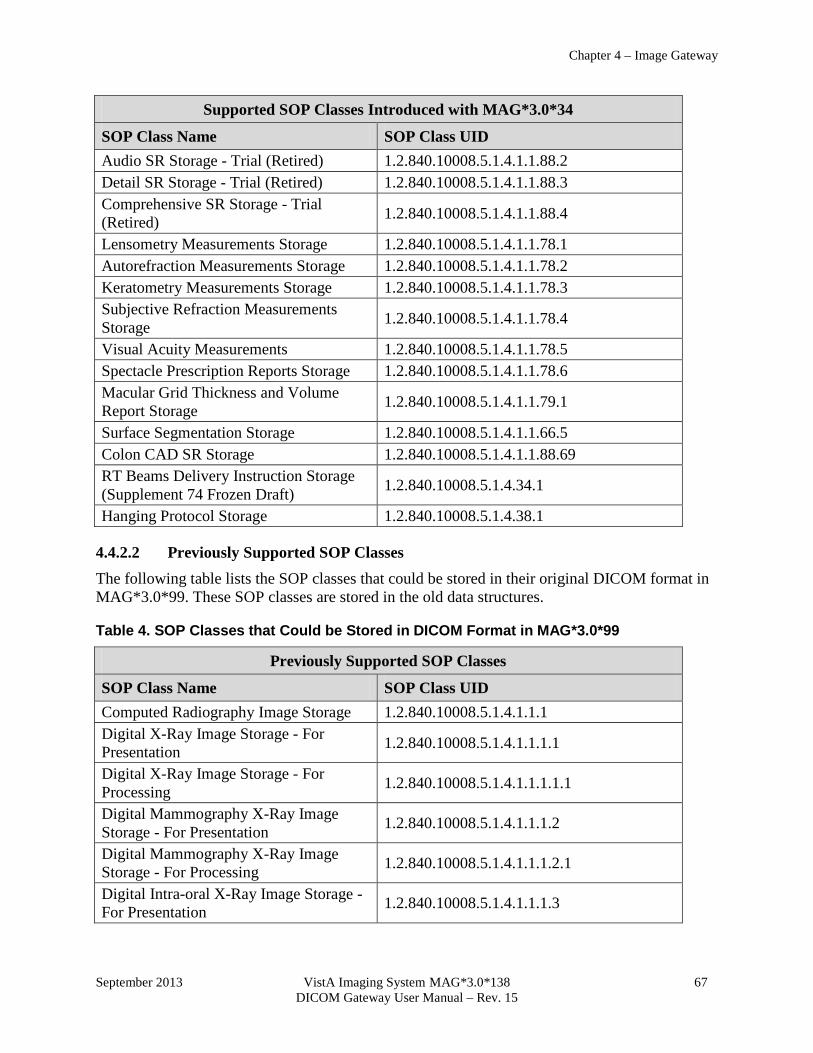
Chapter 4 – Image Gateway
September 2013 VistA Imaging System MAG*3.0*138 67 DICOM Gateway User Manual – Rev. 15
Supported SOP Classes Introduced with MAG*3.0*34
SOP Class Name SOP Class UID Audio SR Storage - Trial (Retired) 1.2.840.10008.5.1.4.1.1.88.2 Detail SR Storage - Trial (Retired) 1.2.840.10008.5.1.4.1.1.88.3 Comprehensive SR Storage - Trial (Retired) 1.2.840.10008.5.1.4.1.1.88.4
Lensometry Measurements Storage 1.2.840.10008.5.1.4.1.1.78.1 Autorefraction Measurements Storage 1.2.840.10008.5.1.4.1.1.78.2 Keratometry Measurements Storage 1.2.840.10008.5.1.4.1.1.78.3 Subjective Refraction Measurements Storage 1.2.840.10008.5.1.4.1.1.78.4
Visual Acuity Measurements 1.2.840.10008.5.1.4.1.1.78.5 Spectacle Prescription Reports Storage 1.2.840.10008.5.1.4.1.1.78.6 Macular Grid Thickness and Volume Report Storage 1.2.840.10008.5.1.4.1.1.79.1
Surface Segmentation Storage 1.2.840.10008.5.1.4.1.1.66.5 Colon CAD SR Storage 1.2.840.10008.5.1.4.1.1.88.69 RT Beams Delivery Instruction Storage (Supplement 74 Frozen Draft) 1.2.840.10008.5.1.4.34.1
Hanging Protocol Storage 1.2.840.10008.5.1.4.38.1
4.4.2.2 Previously Supported SOP Classes The following table lists the SOP classes that could be stored in their original DICOM format in MAG*3.0*99. These SOP classes are stored in the old data structures.
Table 4. SOP Classes that Could be Stored in DICOM Format in MAG*3.0*99
Previously Supported SOP Classes
SOP Class Name SOP Class UID Computed Radiography Image Storage 1.2.840.10008.5.1.4.1.1.1 Digital X-Ray Image Storage - For Presentation 1.2.840.10008.5.1.4.1.1.1.1
Digital X-Ray Image Storage - For Processing 1.2.840.10008.5.1.4.1.1.1.1.1
Digital Mammography X-Ray Image Storage - For Presentation 1.2.840.10008.5.1.4.1.1.1.2
Digital Mammography X-Ray Image Storage - For Processing 1.2.840.10008.5.1.4.1.1.1.2.1
Digital Intra-oral X-Ray Image Storage - For Presentation 1.2.840.10008.5.1.4.1.1.1.3
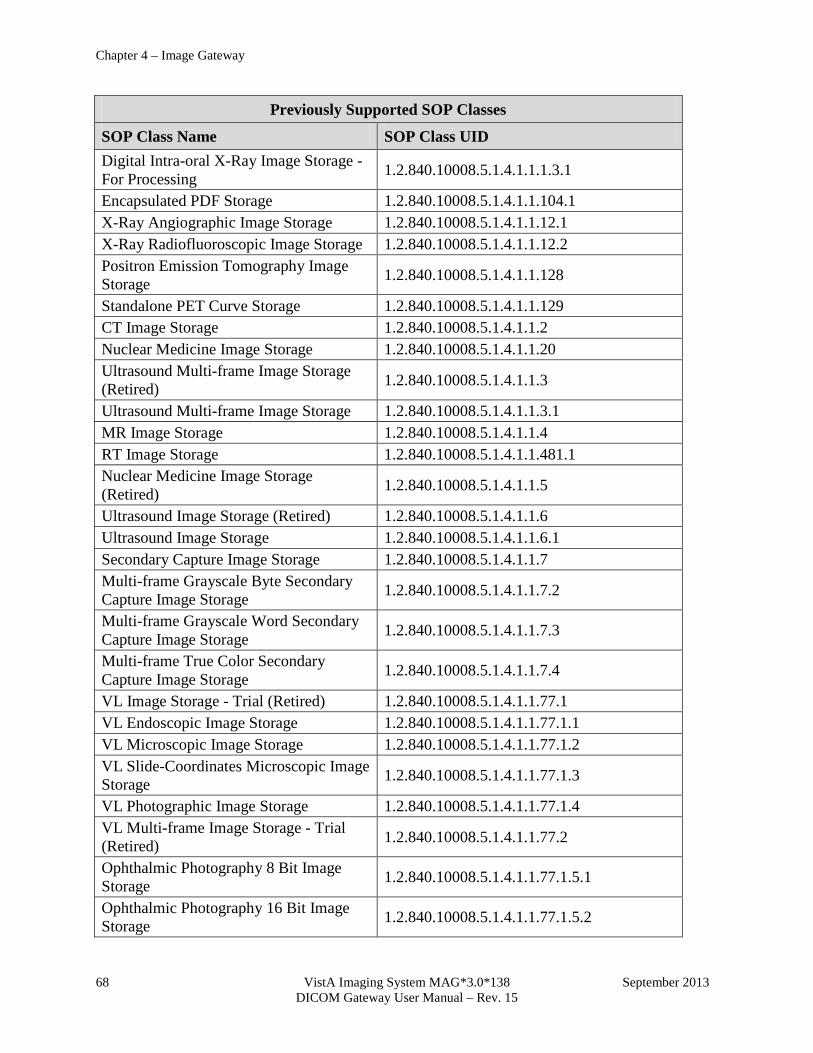
Chapter 4 – Image Gateway
68 VistA Imaging System MAG*3.0*138 September 2013 DICOM Gateway User Manual – Rev. 15
Previously Supported SOP Classes
SOP Class Name SOP Class UID Digital Intra-oral X-Ray Image Storage - For Processing 1.2.840.10008.5.1.4.1.1.1.3.1
Encapsulated PDF Storage 1.2.840.10008.5.1.4.1.1.104.1 X-Ray Angiographic Image Storage 1.2.840.10008.5.1.4.1.1.12.1 X-Ray Radiofluoroscopic Image Storage 1.2.840.10008.5.1.4.1.1.12.2 Positron Emission Tomography Image Storage 1.2.840.10008.5.1.4.1.1.128
Standalone PET Curve Storage 1.2.840.10008.5.1.4.1.1.129 CT Image Storage 1.2.840.10008.5.1.4.1.1.2 Nuclear Medicine Image Storage 1.2.840.10008.5.1.4.1.1.20 Ultrasound Multi-frame Image Storage (Retired) 1.2.840.10008.5.1.4.1.1.3
Ultrasound Multi-frame Image Storage 1.2.840.10008.5.1.4.1.1.3.1 MR Image Storage 1.2.840.10008.5.1.4.1.1.4 RT Image Storage 1.2.840.10008.5.1.4.1.1.481.1 Nuclear Medicine Image Storage (Retired) 1.2.840.10008.5.1.4.1.1.5
Ultrasound Image Storage (Retired) 1.2.840.10008.5.1.4.1.1.6 Ultrasound Image Storage 1.2.840.10008.5.1.4.1.1.6.1 Secondary Capture Image Storage 1.2.840.10008.5.1.4.1.1.7 Multi-frame Grayscale Byte Secondary Capture Image Storage 1.2.840.10008.5.1.4.1.1.7.2
Multi-frame Grayscale Word Secondary Capture Image Storage 1.2.840.10008.5.1.4.1.1.7.3
Multi-frame True Color Secondary Capture Image Storage 1.2.840.10008.5.1.4.1.1.7.4
VL Image Storage - Trial (Retired) 1.2.840.10008.5.1.4.1.1.77.1 VL Endoscopic Image Storage 1.2.840.10008.5.1.4.1.1.77.1.1 VL Microscopic Image Storage 1.2.840.10008.5.1.4.1.1.77.1.2 VL Slide-Coordinates Microscopic Image Storage 1.2.840.10008.5.1.4.1.1.77.1.3
VL Photographic Image Storage 1.2.840.10008.5.1.4.1.1.77.1.4 VL Multi-frame Image Storage - Trial (Retired) 1.2.840.10008.5.1.4.1.1.77.2
Ophthalmic Photography 8 Bit Image Storage 1.2.840.10008.5.1.4.1.1.77.1.5.1
Ophthalmic Photography 16 Bit Image Storage 1.2.840.10008.5.1.4.1.1.77.1.5.2
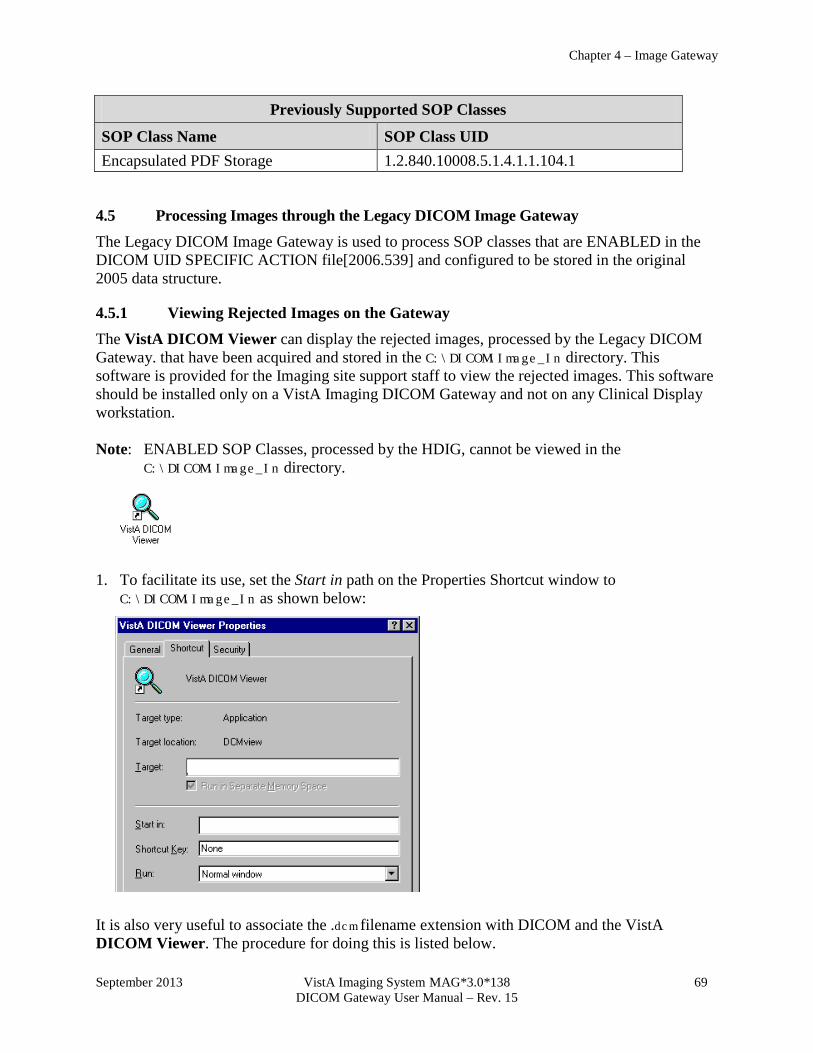
Chapter 4 – Image Gateway
September 2013 VistA Imaging System MAG*3.0*138 69 DICOM Gateway User Manual – Rev. 15
Previously Supported SOP Classes
SOP Class Name SOP Class UID Encapsulated PDF Storage 1.2.840.10008.5.1.4.1.1.104.1
4.5 Processing Images through the Legacy DICOM Image Gateway The Legacy DICOM Image Gateway is used to process SOP classes that are ENABLED in the DICOM UID SPECIFIC ACTION file[2006.539] and configured to be stored in the original 2005 data structure.
4.5.1 Viewing Rejected Images on the Gateway The VistA DICOM Viewer can display the rejected images, processed by the Legacy DICOM Gateway. that have been acquired and stored in the C:\DICOM\Image_In directory. This software is provided for the Imaging site support staff to view the rejected images. This software should be installed only on a VistA Imaging DICOM Gateway and not on any Clinical Display workstation. Note: ENABLED SOP Classes, processed by the HDIG, cannot be viewed in the C:\DICOM\Image_In directory.
1. To facilitate its use, set the Start in path on the Properties Shortcut window to C:\DICOM\Image_In as shown below:
It is also very useful to associate the .dcm filename extension with DICOM and the VistA DICOM Viewer. The procedure for doing this is listed below.
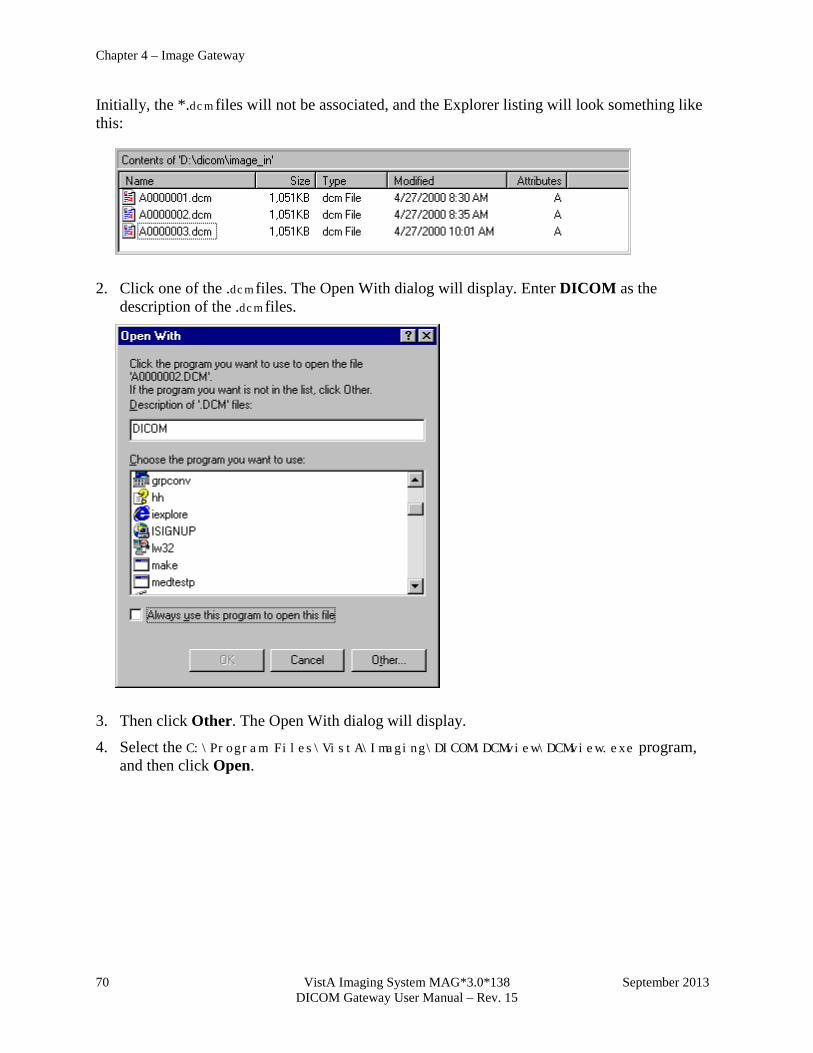
Chapter 4 – Image Gateway
70 VistA Imaging System MAG*3.0*138 September 2013 DICOM Gateway User Manual – Rev. 15
Initially, the *.dcm files will not be associated, and the Explorer listing will look something like this:
2. Click one of the .dcm files. The Open With dialog will display. Enter DICOM as the description of the .dcm files.
3. Then click Other. The Open With dialog will display.
4. Select the C:\Program Files\VistA\Imaging\DICOM\DCMview\DCMview.exe program, and then click Open.
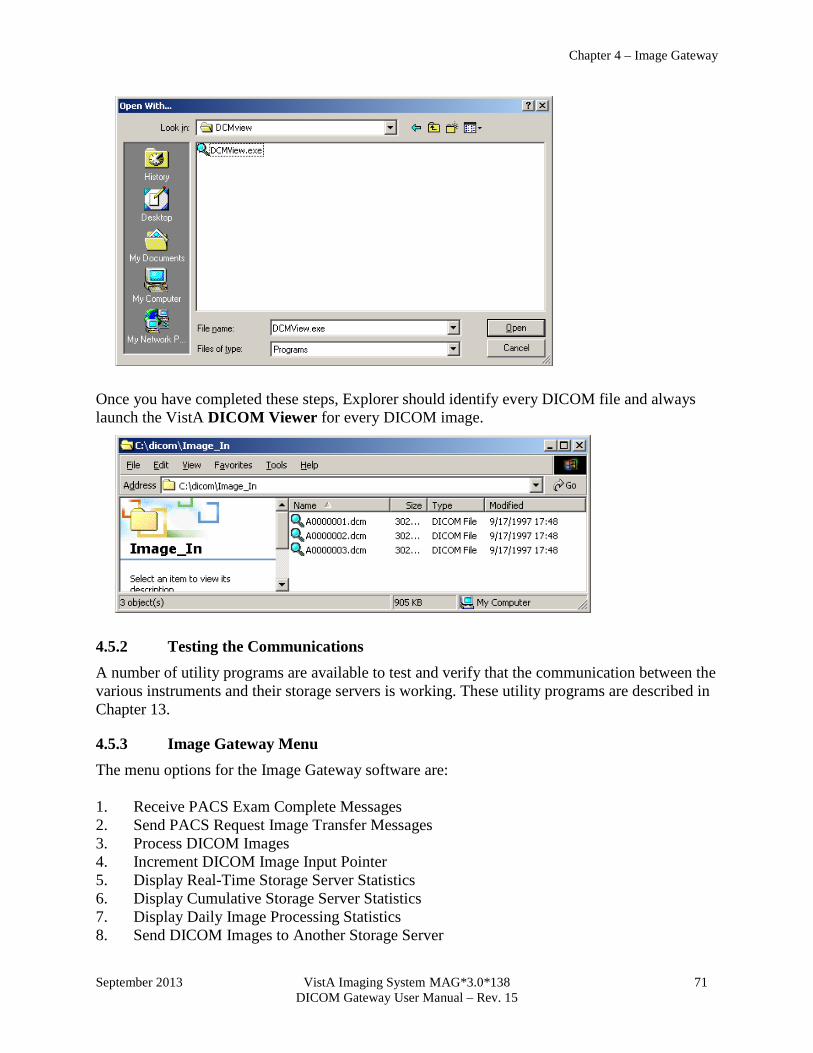
Chapter 4 – Image Gateway
September 2013 VistA Imaging System MAG*3.0*138 71 DICOM Gateway User Manual – Rev. 15
Once you have completed these steps, Explorer should identify every DICOM file and always launch the VistA DICOM Viewer for every DICOM image.
4.5.2 Testing the Communications A number of utility programs are available to test and verify that the communication between the various instruments and their storage servers is working. These utility programs are described in Chapter 13.
4.5.3 Image Gateway Menu The menu options for the Image Gateway software are: 1. Receive PACS Exam Complete Messages 2. Send PACS Request Image Transfer Messages 3. Process DICOM Images 4. Increment DICOM Image Input Pointer 5. Display Real-Time Storage Server Statistics 6. Display Cumulative Storage Server Statistics 7. Display Daily Image Processing Statistics 8. Send DICOM Images to Another Storage Server
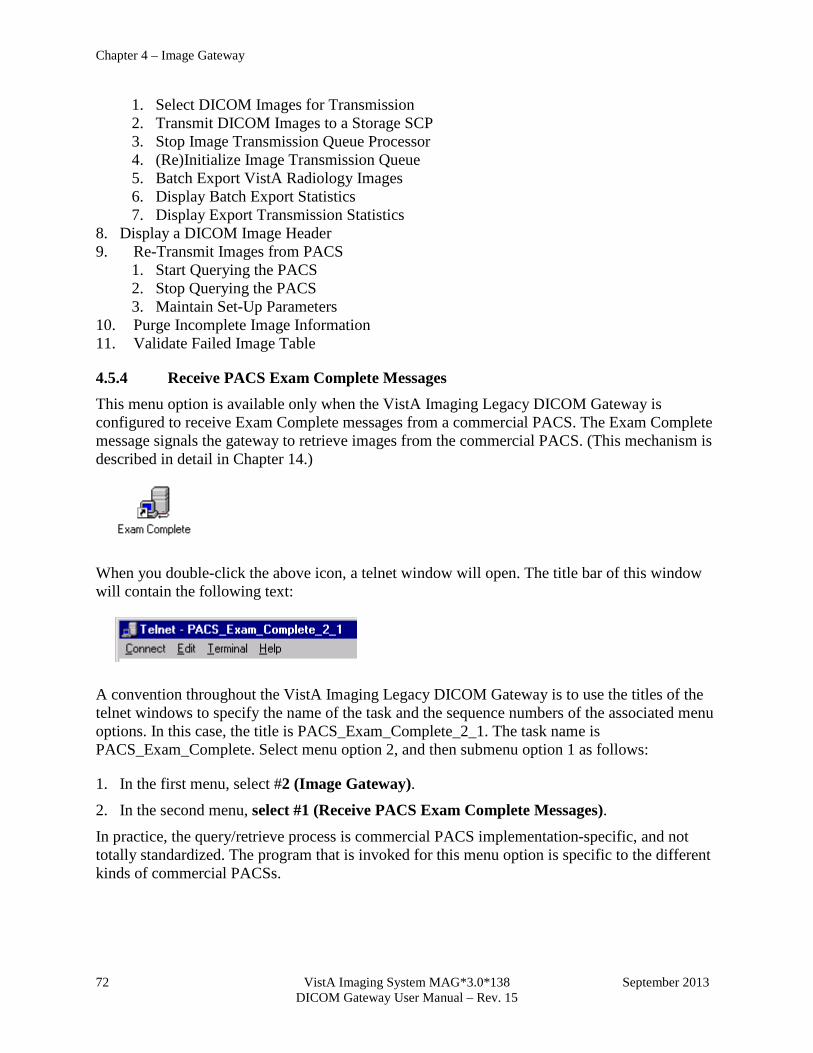
Chapter 4 – Image Gateway
72 VistA Imaging System MAG*3.0*138 September 2013 DICOM Gateway User Manual – Rev. 15
1. Select DICOM Images for Transmission 2. Transmit DICOM Images to a Storage SCP 3. Stop Image Transmission Queue Processor 4. (Re)Initialize Image Transmission Queue 5. Batch Export VistA Radiology Images 6. Display Batch Export Statistics 7. Display Export Transmission Statistics
8. Display a DICOM Image Header 9. Re-Transmit Images from PACS
1. Start Querying the PACS 2. Stop Querying the PACS 3. Maintain Set-Up Parameters
10. Purge Incomplete Image Information 11. Validate Failed Image Table
4.5.4 Receive PACS Exam Complete Messages This menu option is available only when the VistA Imaging Legacy DICOM Gateway is configured to receive Exam Complete messages from a commercial PACS. The Exam Complete message signals the gateway to retrieve images from the commercial PACS. (This mechanism is described in detail in Chapter 14.)
When you double-click the above icon, a telnet window will open. The title bar of this window will contain the following text:
A convention throughout the VistA Imaging Legacy DICOM Gateway is to use the titles of the telnet windows to specify the name of the task and the sequence numbers of the associated menu options. In this case, the title is PACS_Exam_Complete_2_1. The task name is PACS_Exam_Complete. Select menu option 2, and then submenu option 1 as follows:
1. In the first menu, select #2 (Image Gateway). 2. In the second menu, select #1 (Receive PACS Exam Complete Messages). In practice, the query/retrieve process is commercial PACS implementation-specific, and not totally standardized. The program that is invoked for this menu option is specific to the different kinds of commercial PACSs.
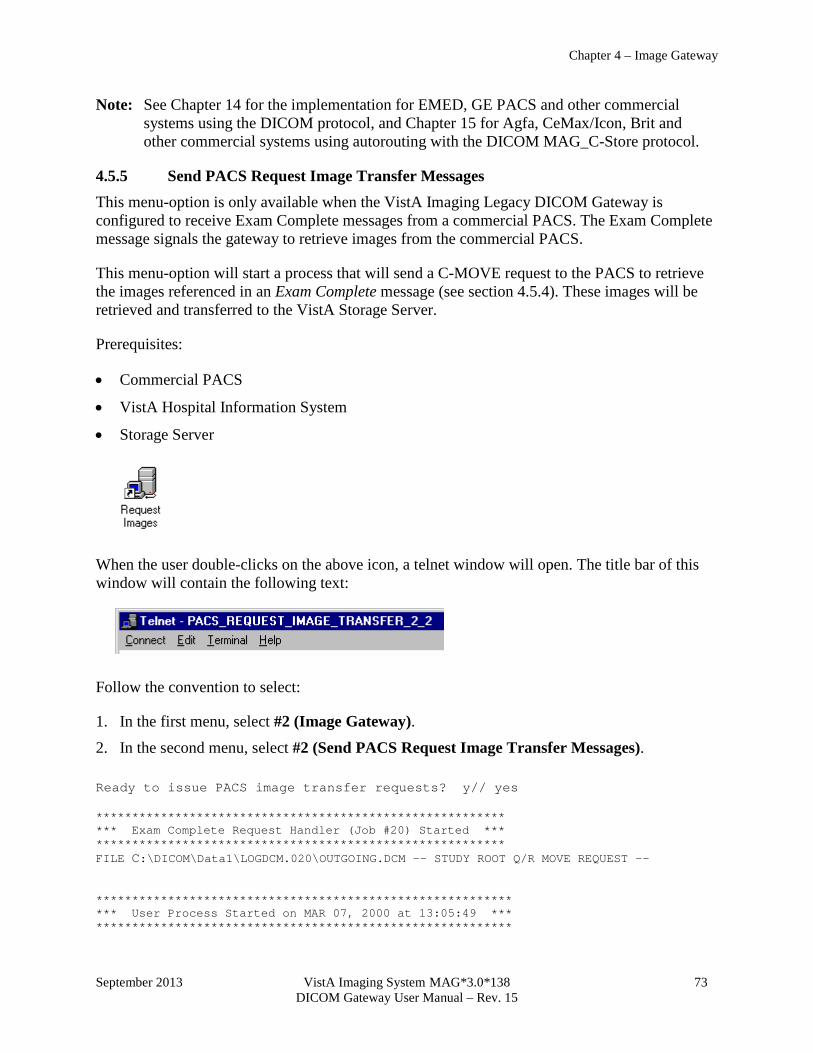
Chapter 4 – Image Gateway
September 2013 VistA Imaging System MAG*3.0*138 73 DICOM Gateway User Manual – Rev. 15
Note: See Chapter 14 for the implementation for EMED, GE PACS and other commercial systems using the DICOM protocol, and Chapter 15 for Agfa, CeMax/Icon, Brit and other commercial systems using autorouting with the DICOM MAG_C-Store protocol.
4.5.5 Send PACS Request Image Transfer Messages This menu-option is only available when the VistA Imaging Legacy DICOM Gateway is configured to receive Exam Complete messages from a commercial PACS. The Exam Complete message signals the gateway to retrieve images from the commercial PACS.
This menu-option will start a process that will send a C-MOVE request to the PACS to retrieve the images referenced in an Exam Complete message (see section 4.5.4). These images will be retrieved and transferred to the VistA Storage Server.
Prerequisites:
• Commercial PACS
• VistA Hospital Information System
• Storage Server
When the user double-clicks on the above icon, a telnet window will open. The title bar of this window will contain the following text:
Follow the convention to select:
1. In the first menu, select #2 (Image Gateway). 2. In the second menu, select #2 (Send PACS Request Image Transfer Messages). Ready to issue PACS image transfer requests? y// yes ********************************************************* *** Exam Complete Request Handler (Job #20) Started *** ********************************************************* FILE C:\DICOM\Data1\LOGDCM.020\OUTGOING.DCM -- STUDY ROOT Q/R MOVE REQUEST -- ********************************************************** *** User Process Started on MAR 07, 2000 at 13:05:49 *** **********************************************************

Chapter 4 – Image Gateway
74 VistA Imaging System MAG*3.0*138 September 2013 DICOM Gateway User Manual – Rev. 15
Connecting to 11.22.33.41 on port 104 ****************************************************** *** Sending A-ASSOCIATE-REQUEST to EMED_SCP_LAND *** ****************************************************** PDU Type: 01H (A-ASSOCIATE-RQ) Length=258 Version=1 Called AE: "EMED_SCP_LAND" Calling AE: "VA VISTA" ITEM Type: 10H (Application Context Item) Length=21 Application Context: 1.2.840.10008.3.1.1.1 (DICOM Application Context Name) ITEM Type: 20H (Presentation Context Item) Length=46 Presentation Context ID: 1 Result=0 -- Transfer Syntax(es) -- SUBITEM Type: 30H (Abstract Syntax Sub-Item) Length=17 Presentation Context: 1.2.840.10008.1.1 (Verification SOP Class) SUBITEM Type: 40H (Transfer Syntax Sub-Item) Length=17 Transfer Syntax: 1.2.840.10008.1.2 (Implicit VR Little Endian) -- End of Transfer Syntax(es) -- ITEM Type: 20H (Presentation Context Item) Length=56 Presentation Context ID: 3 Result=0 -- Transfer Syntax(es) -- SUBITEM Type: 30H (Abstract Syntax Sub-Item) Length=27 Presentation Context: 1.2.840.10008.5.1.4.1.2.2.2 (Study Root Query/Retrieve Information Model - MOVE) SUBITEM Type: 40H (Transfer Syntax Sub-Item) Length=17 Transfer Syntax: 1.2.840.10008.1.2 (Implicit VR Little Endian) -- End of Transfer Syntax(es) -- ITEM Type: 50H (User Information Item) Length=51 SUBITEM Type: 51H (Maximum Length Sub-Item) Length=4 Maximum PDU length: 16384 ITEM Type: 52H (Implementation Class UID Sub-Item) Length=22 Implementation Class: 1.2.840.113754.2.1.1.0 (VA DICOM V2.5) ITEM Type: 55H (Implementation Version Name) Length=13 Implementation Version Name: VA DICOM V2.5 Sending PDU Type: 01H (A-ASSOCIATE-RQ) Length: 258 C:\DICOM\Data1\LOGDCM.020\OUTGOING.PDU Recving PDU Type: 02H (A-ASSOCIATE-AC) PDU len=205 C:\DICOM\Data1\LOGDCM.020\INCOMING.PDU ******************************************************************** *** Receiving A-ASSOCIATE-RESPONSE on MAR 07, 2000 at 13:05:49 *** ******************************************************************** PDU Type: 02H (A-ASSOCIATE-AC) Length=205 Version=1 Called AE: "EMED_SCP_LAND" Calling AE: "VA VISTA" ITEM Type: 10H (Application Context Item) Length=21 Application Context: 1.2.840.10008.3.1.1.1 (DICOM Application Context Name) ITEM Type: 21H (Presentation Context Item) Length=25 Presentation Context ID: 1 Result=0 (acceptance) -- Transfer Syntax(es) -- SUBITEM Type: 40H (Transfer Syntax Sub-Item) Length=17 Transfer Syntax: 1.2.840.10008.1.2 (Implicit VR Little Endian) -- End of Transfer Syntax(es) -- ITEM Type: 21H (Presentation Context Item) Length=25 Presentation Context ID: 3 Result=0 (acceptance) -- Transfer Syntax(es) -- SUBITEM Type: 40H (Transfer Syntax Sub-Item) Length=17 Transfer Syntax: 1.2.840.10008.1.2 (Implicit VR Little Endian) -- End of Transfer Syntax(es) -- ITEM Type: 50H (User Information Item) Length=50 SUBITEM Type: 51H (Maximum Length Sub-Item) Length=4 Maximum PDU length: 16384
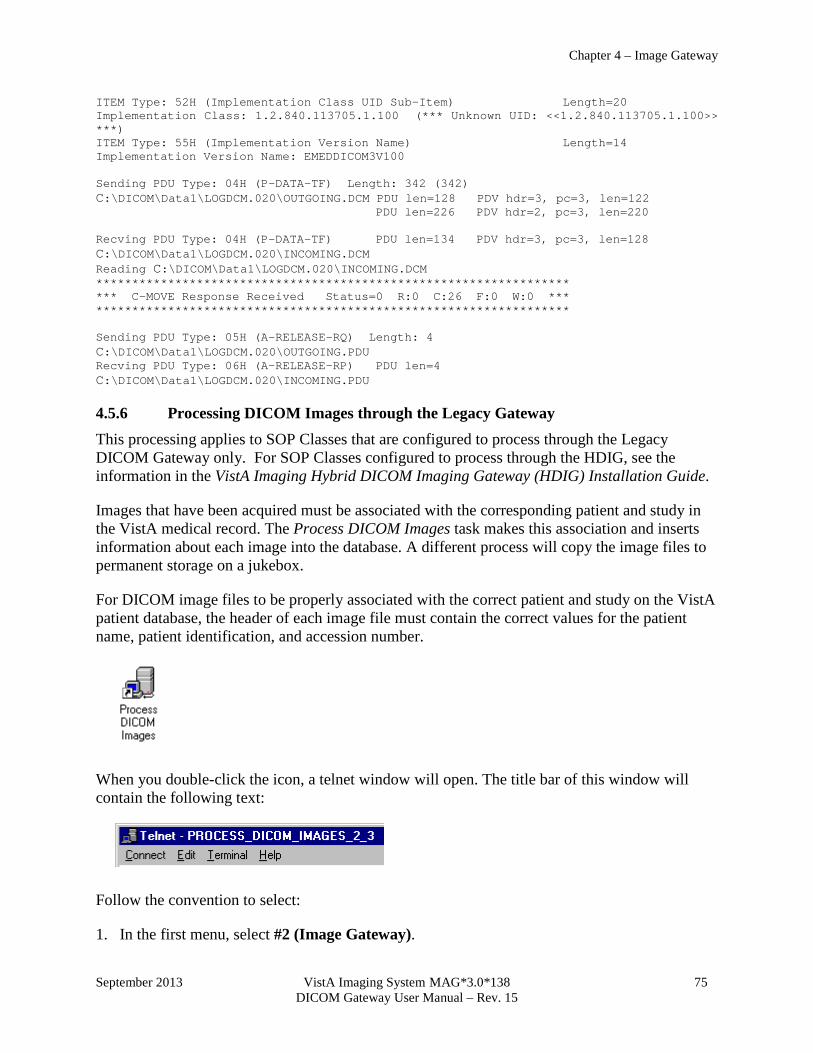
Chapter 4 – Image Gateway
September 2013 VistA Imaging System MAG*3.0*138 75 DICOM Gateway User Manual – Rev. 15
ITEM Type: 52H (Implementation Class UID Sub-Item) Length=20 Implementation Class: 1.2.840.113705.1.100 (*** Unknown UID: <<1.2.840.113705.1.100>> ***) ITEM Type: 55H (Implementation Version Name) Length=14 Implementation Version Name: EMEDDICOM3V100 Sending PDU Type: 04H (P-DATA-TF) Length: 342 (342) C:\DICOM\Data1\LOGDCM.020\OUTGOING.DCM PDU len=128 PDV hdr=3, pc=3, len=122 PDU len=226 PDV hdr=2, pc=3, len=220 Recving PDU Type: 04H (P-DATA-TF) PDU len=134 PDV hdr=3, pc=3, len=128 C:\DICOM\Data1\LOGDCM.020\INCOMING.DCM Reading C:\DICOM\Data1\LOGDCM.020\INCOMING.DCM ****************************************************************** *** C-MOVE Response Received Status=0 R:0 C:26 F:0 W:0 *** ****************************************************************** Sending PDU Type: 05H (A-RELEASE-RQ) Length: 4 C:\DICOM\Data1\LOGDCM.020\OUTGOING.PDU Recving PDU Type: 06H (A-RELEASE-RP) PDU len=4 C:\DICOM\Data1\LOGDCM.020\INCOMING.PDU
4.5.6 Processing DICOM Images through the Legacy Gateway This processing applies to SOP Classes that are configured to process through the Legacy DICOM Gateway only. For SOP Classes configured to process through the HDIG, see the information in the VistA Imaging Hybrid DICOM Imaging Gateway (HDIG) Installation Guide.
Images that have been acquired must be associated with the corresponding patient and study in the VistA medical record. The Process DICOM Images task makes this association and inserts information about each image into the database. A different process will copy the image files to permanent storage on a jukebox.
For DICOM image files to be properly associated with the correct patient and study on the VistA patient database, the header of each image file must contain the correct values for the patient name, patient identification, and accession number.
When you double-click the icon, a telnet window will open. The title bar of this window will contain the following text:
Follow the convention to select:
1. In the first menu, select #2 (Image Gateway).
Chapter 4 – Image Gateway
76 VistA Imaging System MAG*3.0*138 September 2013 DICOM Gateway User Manual – Rev. 15
2. In the second menu, select #3 (Process DICOM Images). Note: This option should always be running on the DICOM Image Gateway.
4.5.6.1 Software Steps in Processing a DICOM Image The storage device AE_Title is validated against the DICOM_AE_SECURITY_MATRIX file [2006.xxxxx] (see section 0). If there is a matching entry, then processing continues as described in the following. If there is not a valid entry, the DICOM object is rejected and an error is written to the HDIG logs.
This task processes the images that were obtained from the acquisition instruments (see section 4.3) and are referenced in DICOM RAW IMAGE file (#2006.571) (stored in ^MAGDINPT(2006.571,…)). The program loops through the following steps:
1. Obtain the pointer to the next entry to process from ^MAGDINPT(2006.571,“ACOUNT”).
2. If that image file is not complete wait for a maximum of five minutes. If, after five minutes, the file is still not completed, then add an entry to DICOM INCOMPLETE IMAGE file (#2006.593)( stored in ^MAGD(2006.593,…)) for later processing, update the counter in ^MAGDINPT(2006.571,“ACOUNT”), and start another iteration of the processing loop (go back to step 1). The name of the file is changed by appending “INCOMPLETE” to the name-extension.
3. When the image file is complete, read the information in the header of the DICOM file and extract the information that identifies the modality (manufacturer, model and model name), patient (demographics), study, and image.
4. When the VistA DICOM Image Gateway attempts to process an image, it tries to extract these values from the image header. Since not all image acquisition modalities place the accession number value in the proper DICOM element (0008,0050), processing an image first involves trying to figure out what kind of a modality created the image and determining where it put the accession number. This mapping for the image acquisition device is defined in the file MODALITY.DIC. (If this mapping does not exist, the process is terminated and a pointer to the image is placed in the FileMan table DICOM Undefined Modalities (stored in ^MAGD(2006.5712,…)).)
5. If the VistA database already contains the image (that is, the Image Instance UID is already present), display an error message, delete the image file from the input directory, update the ^MAGDINPT(2006.571,“ACCOUNT”) counter, and start another iteration of the processing loop (go back to step 1).
Chapter 4 – Image Gateway
September 2013 VistA Imaging System MAG*3.0*138 77 DICOM Gateway User Manual – Rev. 15
Note: With the release of MAG*3.0*099, there should be default entries in the MODALITY.DIC file so that most images pass through the image processing in their DEFAULT DICOM format. If there is need for images from a specific modality to be processed differently than the default DICOM format, an exception entry is added to MODALITY.DIC. If the modality cannot use the DICOM default, add an entry to MODALITY.DIC
Note: With the release of MAG*3.0*99, images are stored in a native DICOM format. If there is an exception entry in MODALITY.DIC, then the system may create derived files (.BIG, .TGA, and .ABS). Image files (DCM, BIG, TGA) along with ABS and TXT files are created on the Legacy DICOM Gateway, each with an image size.
6. If a DICOM Object does not fail the Patient/Study lookup (DICOM Correct) checks, then create an entry in the IMAGE file (#2005) (stored in ^MAG(2005,…)).
7. Update the image pointer in the corresponding parent report file (one of Radiology or Medicine).
8. The images are transmitted to the RAID image server with a request placed for the return of the size of each of the transmitted images, which is compared with the calculated image sizes. If the numbers agree, the transmission is considered successful.
9. Add entries to the copy file to jukebox background processor queue.
10. Delete the image file in C:\DICOM\Image_In.
11. Update the counter in ^MAGDINPT(2006.571,“ACCOUNT”).
12. Process completed entries in the DICOM INCOMPLETE IMAGE file (#2006.5713) (stored in ^MAGD(2006.5713,…)). If entries in this file are more than one hour old, delete the image file from the directory C:\DICOM\Image_In.
13. Process completed entries in the DICOM FAILED IMAGES file (#2006.575) (stored in ^MAGD(2006.575,…)).
14. Go back to step 1.
4.5.7 Software Steps in DICOM Correct Processing (Legacy and HDIG) Each image acquisition instrument is mapped to a specific medical service (like radiology or consults). The patient and study are looked up on that service using the name, identification, and accession number. If the proper study is found, an association is created between the image and the corresponding study.
A study that fails the following checks will be placed in the DICOM Correct queue [DICOM FAILED IMAGES (#2006.575)]. Image files that fail to be matched to the corresponding patient and study are reported on the HDIG Stat page under FAILED DICOM Studies.
1. Check whether the accession number that is provided by the modality is stored in the VistA database. If the accession number is not found in the VistA database, then add the study to the DICOM Correct queue (see the VistA Imaging Importer II User Manual).

Chapter 4 – Image Gateway
78 VistA Imaging System MAG*3.0*138 September 2013 DICOM Gateway User Manual – Rev. 15
2. Check whether the name of the patient that is provided by the commercial PACS or the modality corresponds to the name stored in the VistA database for the accession number in question. This check is based on the full name of the patient. The check allows for the possibility that characters are transposed. The last name and the first six characters of the first name must match. The middle initial, if provided, must match.
3. Check whether the social security number corresponds to the number stored in the VistA database. This check allows for the possibility that digits are transposed.
4.5.7.1 Operational Details of DICOM Image Processing When the Legacy DICOM Gateway creates an association between the image and the corresponding study, it assigns the VistA image file name to the image file, processes the file, and stores the resulting images.
Note: The patient name and patient ID (social security number) may either be displayed or hidden, depending on the setting of the Display Patient Name/ID in Image Processing? switch in the gateway configuration.
Ready to process DICOM Images and send them to VistA? y// <Enter> Yes M0000114.DCM -- IMAGPATIENT,ONE M. -- 000-01-9676 -- G MRC-154 (with name and id displayed) M0000114.DCM -- ****,* -- ***-**-**** -- GMRC-154 (with name and id suppressed) DEL C:\DICOM\IMAGE_IN\TMP_IMAGE.TGA MAG_DCMTOTGA C:\DICOM\IMAGE_IN\M0000114.DCM C:\DICOM\IMAGE_IN\TMP_IMAGE.TGA X576 Y456 O1598 B8 F0 C255 COPY C:\DICOM\IMAGE_IN\TMP_IMAGE.TGA \isw-imgqadb\image1$\DE\00\38\DE003841.TGA 1) 1 file(s) copied. DEL C:\DICOM\IMAGE_IN\TMP_IMAGE.ABS MAG_ABSTRTGA C:\DICOM\IMAGE_IN\TMP_IMAGE.TGA C:\DICOM\IMAGE_IN\TMP_IMAGE.ABS /8 COPY C:\DICOM\IMAGE_IN\TMP_IMAGE.ABS \isw-imgqadb\image1$\DE\00\38\DE003841.ABS 1) 1 file(s) copied. DEL C:\DICOM\IMAGE_IN\TMP_TEXT.TXT COPY C:\DICOM\IMAGE_IN\TMP_TEXT.TXT \isw-imgqadb\image1$\DE\00\38\DE003841.TXT 1) 1 file(s) copied. DEL C:\DICOM\IMAGE_IN\M0000114.DCM
4.5.7.2 Interaction Between Image Processing and Radiology Exam Editing When a radiology technologist opens a study for editing in the Radiology package before the Legacy DICOM Gateway has processed all images associated with the study, the Legacy DICOM Gateway stops processing the images associated with the study. It generates a message in the Image Processing session indicating that the study is locked and that processing is temporarily blocked.
The following is an example of such a message.
VistA DICOM Image Gateway -- Pete's Cache 5.0 Development 1 (Receive PACS Exam Complete Messages) 2 (Send PACS Request Image Transfer Messages) 3 Process DICOM Images 4 Increment DICOM Image Input Pointer 5 Display Real-Time Storage Server Statistics 6 Display Cumulative Storage Server Statistics 7 Display Daily Image Processing Statistics 8 Send DICOM Images to Another Storage Server 9 Display a DICOM Image Header

Chapter 4 – Image Gateway
September 2013 VistA Imaging System MAG*3.0*138 79 DICOM Gateway User Manual – Rev. 15
10 Re-Transmit Images from PACS 11 Purge Incomplete Image Information 12 Validate Failed Image Table 13 TELEREADER OPTION: 3 Fetching UID Table from VistA ... 6272 nodes Ready to process DICOM Images and send them to VistA? y// Yes Connecting to M-to-M RPC Broker Server "LOCALHOST" on Port 4800 - SUCCESS! <UserLogin>_0000022.DCM -- PATIENT^FOURZEROONE^^^ -- 000-00-0401 -- 040111-362 Waiting (radiology exam locked)... 0:00:54
Once the record is locked, if the editing continues for more than five (5) minutes, the Legacy DICOM Gateway sends an e-mail message to the mailgroup defined in its configuration.
The following is an example of such an e-mail message:
NON-FATAL WARNING: IMAGE PROCESSING IS BLOCKED Someone in the Radiology Department is editing study 040111-362 whose images are being processed by the DICOM gateway. Image processing is temporarily stopped and will resume upon completion of the editing. Message generated at 1-Apr-2011, 07:58:54 Routine: MAGDIR6 DICOM Gateway "Pete's Cache 5.0 Development (<UserLogin>)".
Important: Do not open a study in the Radiology package before the Legacy DICOM
Gateway has processed all images related to the study. If you do so, image processing will stop while the study is edited. We highly recommend that images be viewed in VistA Imaging Display for quality, quantity, and accuracy before performing a case edit or updating the exam status in the radiology package.
4.5.8 Increment DICOM Image Input Pointer On rare occasions, a garbled image may be transmitted to the Image Gateway, which would cause image processing to stop. In order to continue operations, the corrupted image file can be manually bypassed by incrementing the image pointer.
Use the Caché Terminal icon to start a session for this menu option.
After login, select the following menu options:
1. In the first menu, select #2 (Image Gateway). 2. In the second menu, select #4 (Increment DICOM Image Input Pointer).
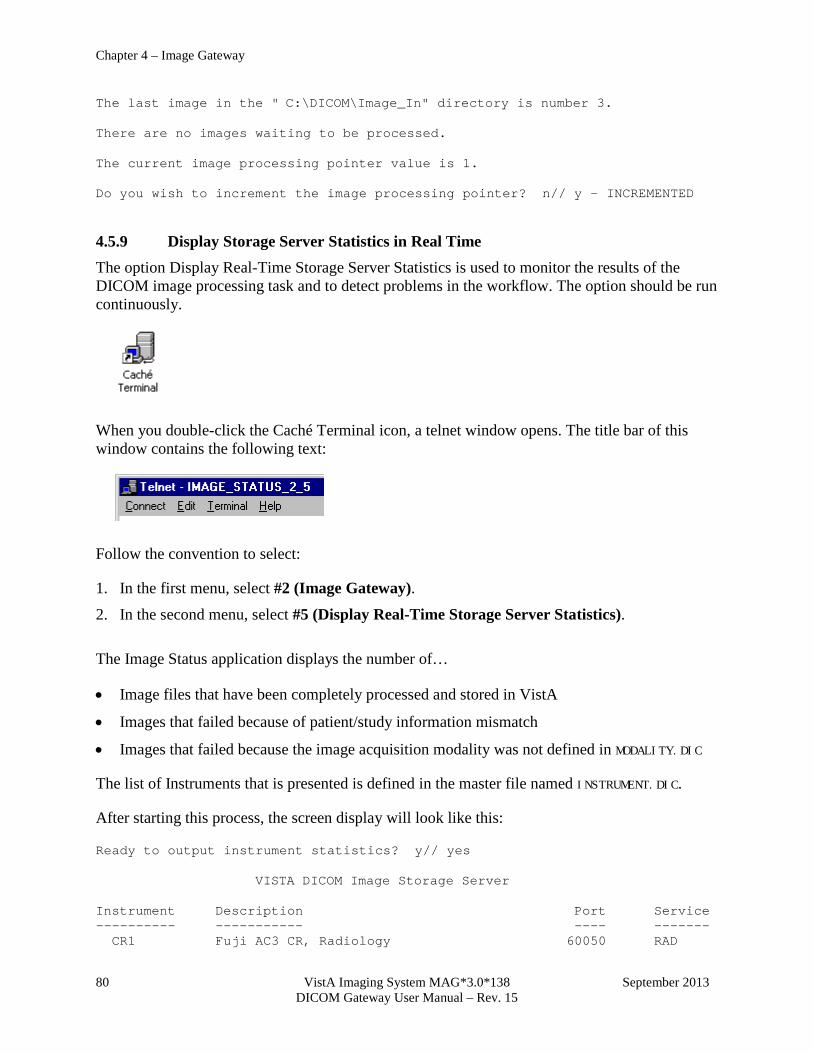
Chapter 4 – Image Gateway
80 VistA Imaging System MAG*3.0*138 September 2013 DICOM Gateway User Manual – Rev. 15
The last image in the " C:\DICOM\Image_In" directory is number 3. There are no images waiting to be processed. The current image processing pointer value is 1. Do you wish to increment the image processing pointer? n// y – INCREMENTED
4.5.9 Display Storage Server Statistics in Real Time The option Display Real-Time Storage Server Statistics is used to monitor the results of the DICOM image processing task and to detect problems in the workflow. The option should be run continuously.
When you double-click the Caché Terminal icon, a telnet window opens. The title bar of this window contains the following text:
Follow the convention to select:
1. In the first menu, select #2 (Image Gateway). 2. In the second menu, select #5 (Display Real-Time Storage Server Statistics). The Image Status application displays the number of…
• Image files that have been completely processed and stored in VistA
• Images that failed because of patient/study information mismatch
• Images that failed because the image acquisition modality was not defined in MODALITY.DIC
The list of Instruments that is presented is defined in the master file named INSTRUMENT.DIC.
After starting this process, the screen display will look like this:
Ready to output instrument statistics? y// yes VISTA DICOM Image Storage Server Instrument Description Port Service ---------- ----------- ---- ------- CR1 Fuji AC3 CR, Radiology 60050 RAD
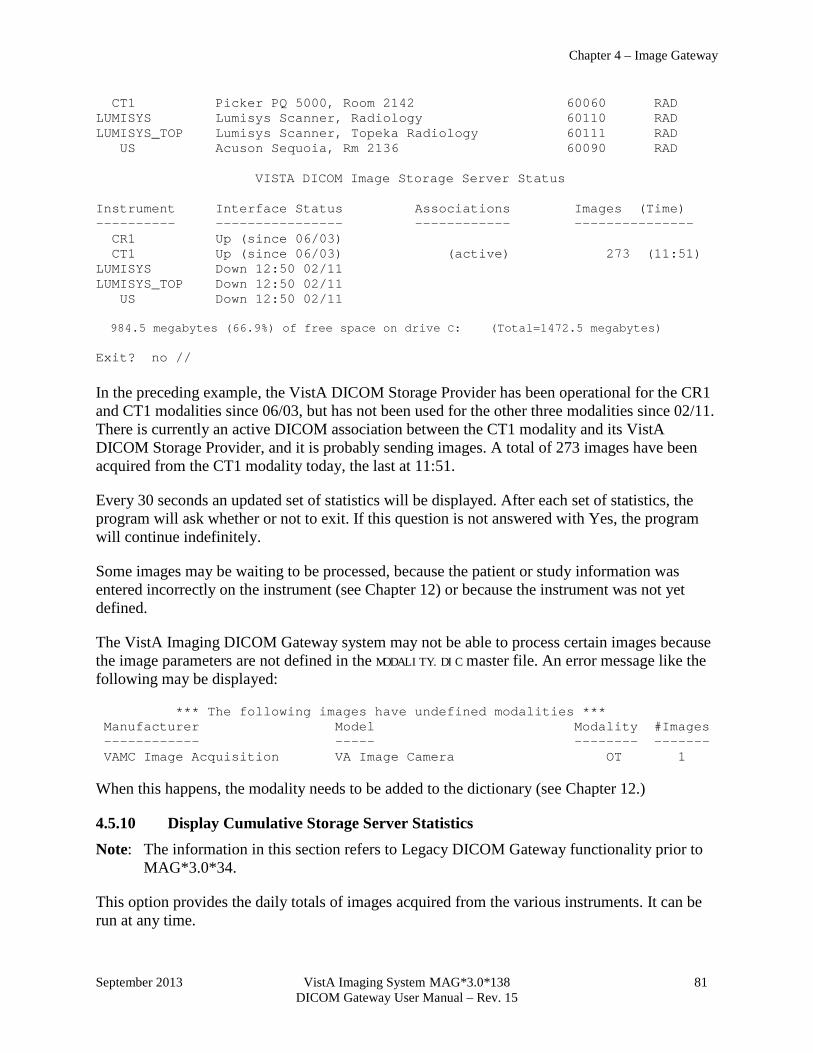
Chapter 4 – Image Gateway
September 2013 VistA Imaging System MAG*3.0*138 81 DICOM Gateway User Manual – Rev. 15
CT1 Picker PQ 5000, Room 2142 60060 RAD LUMISYS Lumisys Scanner, Radiology 60110 RAD LUMISYS_TOP Lumisys Scanner, Topeka Radiology 60111 RAD US Acuson Sequoia, Rm 2136 60090 RAD VISTA DICOM Image Storage Server Status Instrument Interface Status Associations Images (Time) ---------- ---------------- ------------ --------------- CR1 Up (since 06/03) CT1 Up (since 06/03) (active) 273 (11:51) LUMISYS Down 12:50 02/11 LUMISYS_TOP Down 12:50 02/11 US Down 12:50 02/11 984.5 megabytes (66.9%) of free space on drive C: (Total=1472.5 megabytes) Exit? no // In the preceding example, the VistA DICOM Storage Provider has been operational for the CR1 and CT1 modalities since 06/03, but has not been used for the other three modalities since 02/11. There is currently an active DICOM association between the CT1 modality and its VistA DICOM Storage Provider, and it is probably sending images. A total of 273 images have been acquired from the CT1 modality today, the last at 11:51.
Every 30 seconds an updated set of statistics will be displayed. After each set of statistics, the program will ask whether or not to exit. If this question is not answered with Yes, the program will continue indefinitely.
Some images may be waiting to be processed, because the patient or study information was entered incorrectly on the instrument (see Chapter 12) or because the instrument was not yet defined.
The VistA Imaging DICOM Gateway system may not be able to process certain images because the image parameters are not defined in the MODALITY.DIC master file. An error message like the following may be displayed:
*** The following images have undefined modalities *** Manufacturer Model Modality #Images ------------ ----- -------- ------- VAMC Image Acquisition VA Image Camera OT 1 When this happens, the modality needs to be added to the dictionary (see Chapter 12.)
4.5.10 Display Cumulative Storage Server Statistics Note: The information in this section refers to Legacy DICOM Gateway functionality prior to MAG*3.0*34.
This option provides the daily totals of images acquired from the various instruments. It can be run at any time.
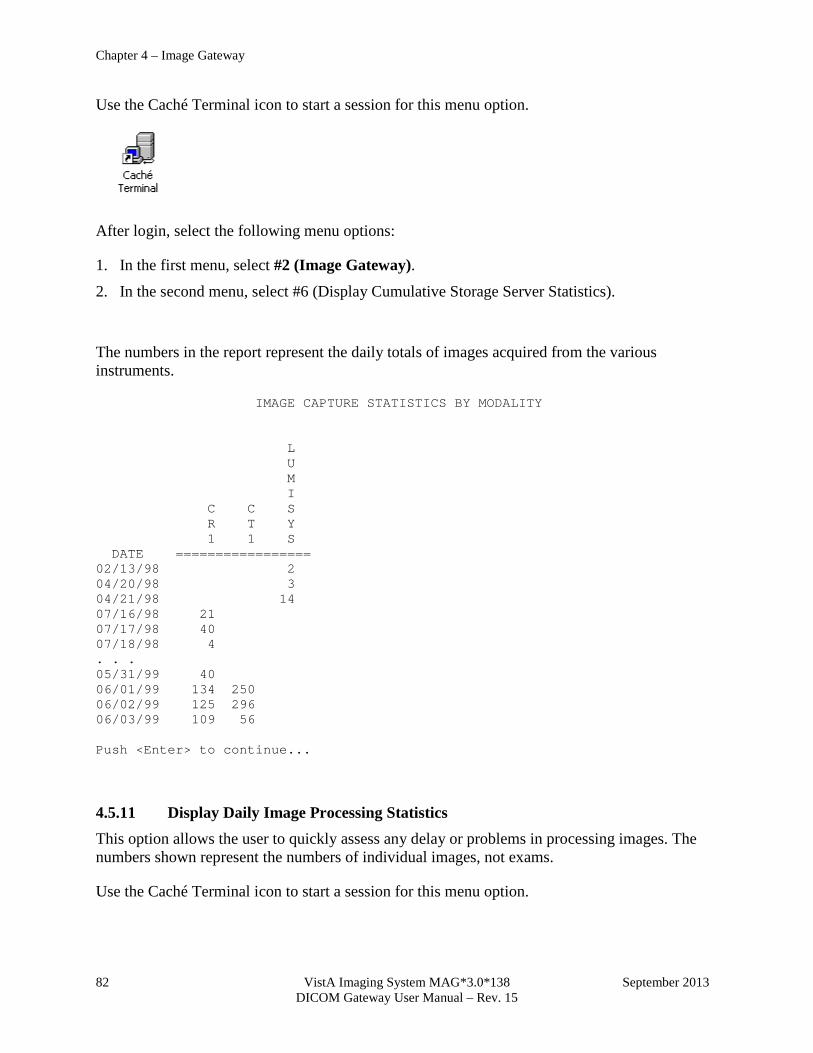
Chapter 4 – Image Gateway
82 VistA Imaging System MAG*3.0*138 September 2013 DICOM Gateway User Manual – Rev. 15
Use the Caché Terminal icon to start a session for this menu option.
After login, select the following menu options:
1. In the first menu, select #2 (Image Gateway). 2. In the second menu, select #6 (Display Cumulative Storage Server Statistics).
The numbers in the report represent the daily totals of images acquired from the various instruments.
IMAGE CAPTURE STATISTICS BY MODALITY L U M I C C S R T Y 1 1 S DATE ================= 02/13/98 2 04/20/98 3 04/21/98 14 07/16/98 21 07/17/98 40 07/18/98 4 . . . 05/31/99 40 06/01/99 134 250 06/02/99 125 296 06/03/99 109 56 Push <Enter> to continue...
4.5.11 Display Daily Image Processing Statistics This option allows the user to quickly assess any delay or problems in processing images. The numbers shown represent the numbers of individual images, not exams.
Use the Caché Terminal icon to start a session for this menu option.
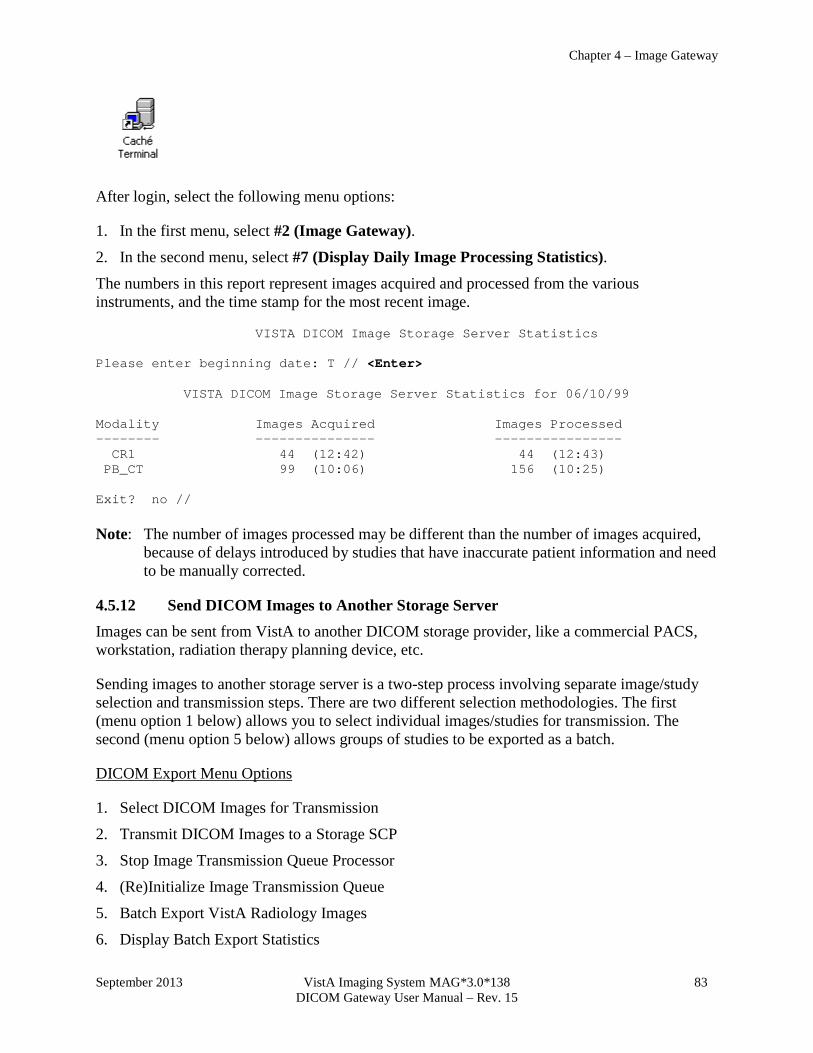
Chapter 4 – Image Gateway
September 2013 VistA Imaging System MAG*3.0*138 83 DICOM Gateway User Manual – Rev. 15
After login, select the following menu options:
1. In the first menu, select #2 (Image Gateway). 2. In the second menu, select #7 (Display Daily Image Processing Statistics). The numbers in this report represent images acquired and processed from the various instruments, and the time stamp for the most recent image. VISTA DICOM Image Storage Server Statistics Please enter beginning date: T // <Enter> VISTA DICOM Image Storage Server Statistics for 06/10/99 Modality Images Acquired Images Processed -------- --------------- ---------------- CR1 44 (12:42) 44 (12:43) PB_CT 99 (10:06) 156 (10:25) Exit? no // Note: The number of images processed may be different than the number of images acquired, because of delays introduced by studies that have inaccurate patient information and need to be manually corrected.
4.5.12 Send DICOM Images to Another Storage Server Images can be sent from VistA to another DICOM storage provider, like a commercial PACS, workstation, radiation therapy planning device, etc.
Sending images to another storage server is a two-step process involving separate image/study selection and transmission steps. There are two different selection methodologies. The first (menu option 1 below) allows you to select individual images/studies for transmission. The second (menu option 5 below) allows groups of studies to be exported as a batch.
DICOM Export Menu Options
1. Select DICOM Images for Transmission
2. Transmit DICOM Images to a Storage SCP
3. Stop Image Transmission Queue Processor
4. (Re)Initialize Image Transmission Queue
5. Batch Export VistA Radiology Images
6. Display Batch Export Statistics
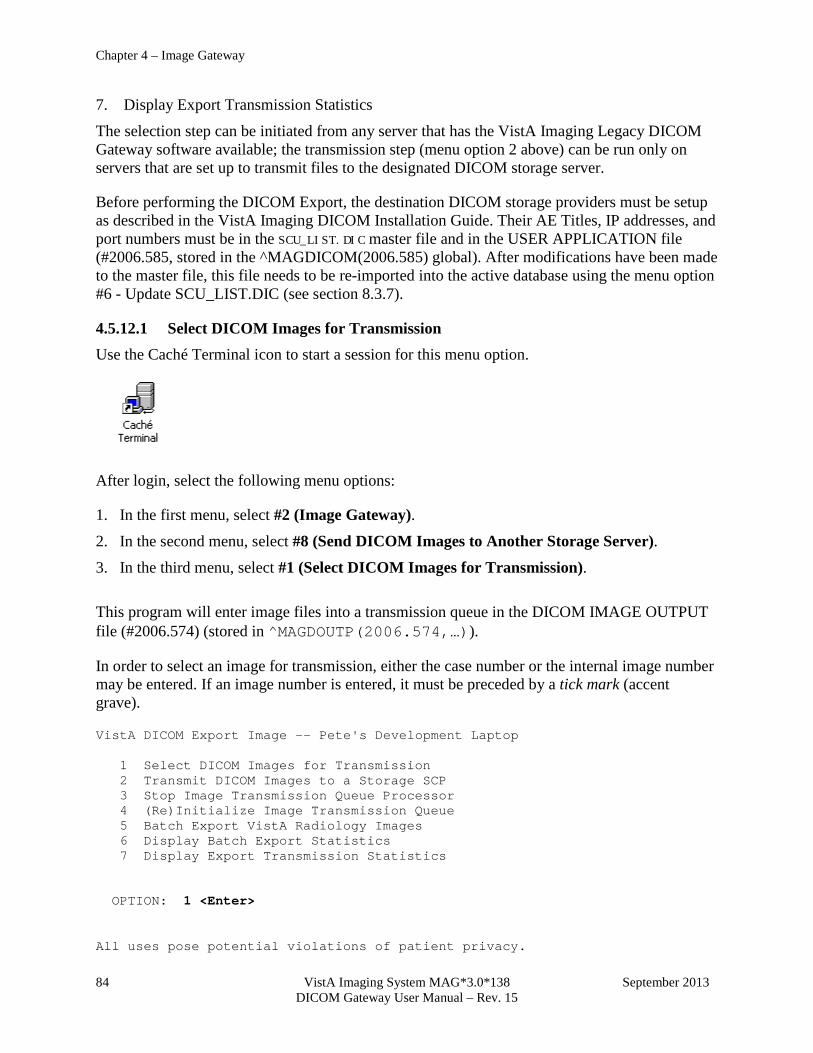
Chapter 4 – Image Gateway
84 VistA Imaging System MAG*3.0*138 September 2013 DICOM Gateway User Manual – Rev. 15
7. Display Export Transmission Statistics
The selection step can be initiated from any server that has the VistA Imaging Legacy DICOM Gateway software available; the transmission step (menu option 2 above) can be run only on servers that are set up to transmit files to the designated DICOM storage server.
Before performing the DICOM Export, the destination DICOM storage providers must be setup as described in the VistA Imaging DICOM Installation Guide. Their AE Titles, IP addresses, and port numbers must be in the SCU_LIST.DIC master file and in the USER APPLICATION file (#2006.585, stored in the ^MAGDICOM(2006.585) global). After modifications have been made to the master file, this file needs to be re-imported into the active database using the menu option #6 - Update SCU_LIST.DIC (see section 8.3.7).
4.5.12.1 Select DICOM Images for Transmission Use the Caché Terminal icon to start a session for this menu option.
After login, select the following menu options:
1. In the first menu, select #2 (Image Gateway). 2. In the second menu, select #8 (Send DICOM Images to Another Storage Server). 3. In the third menu, select #1 (Select DICOM Images for Transmission). This program will enter image files into a transmission queue in the DICOM IMAGE OUTPUT file (#2006.574) (stored in ^MAGDOUTP(2006.574,…)).
In order to select an image for transmission, either the case number or the internal image number may be entered. If an image number is entered, it must be preceded by a tick mark (accent grave).
VistA DICOM Export Image -- Pete's Development Laptop 1 Select DICOM Images for Transmission 2 Transmit DICOM Images to a Storage SCP 3 Stop Image Transmission Queue Processor 4 (Re)Initialize Image Transmission Queue 5 Batch Export VistA Radiology Images 6 Display Batch Export Statistics 7 Display Export Transmission Statistics OPTION: 1 <Enter> All uses pose potential violations of patient privacy.
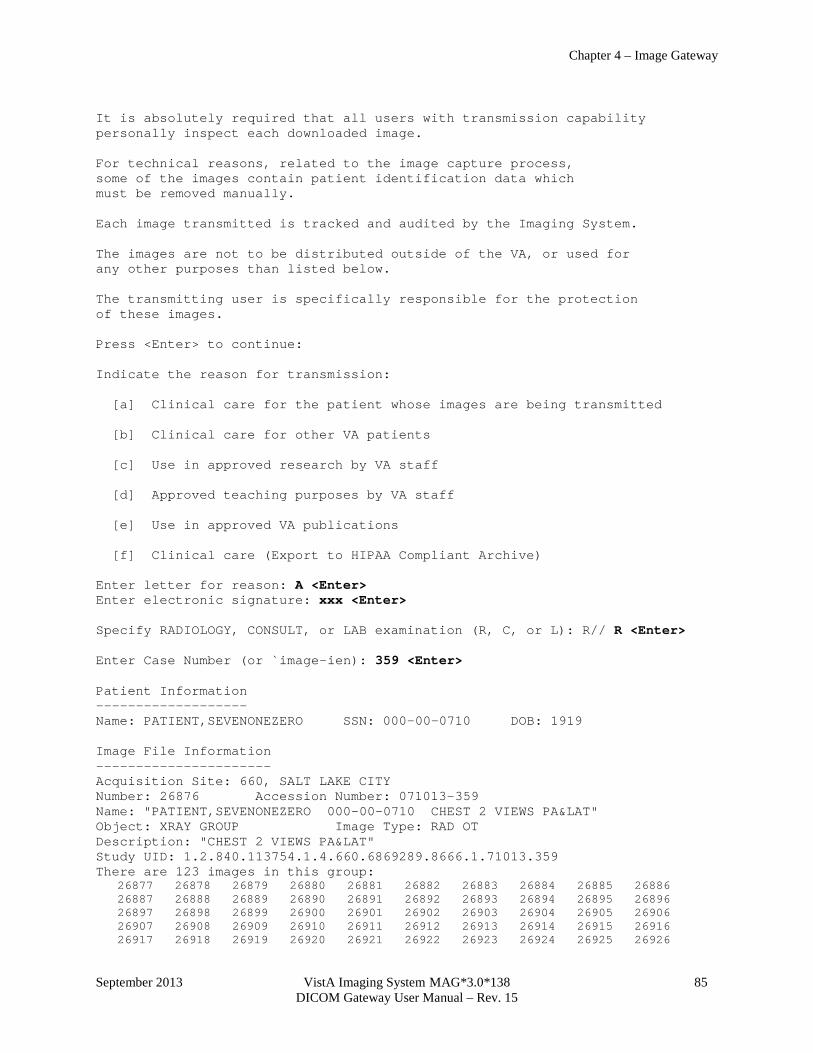
Chapter 4 – Image Gateway
September 2013 VistA Imaging System MAG*3.0*138 85 DICOM Gateway User Manual – Rev. 15
It is absolutely required that all users with transmission capability personally inspect each downloaded image. For technical reasons, related to the image capture process, some of the images contain patient identification data which must be removed manually. Each image transmitted is tracked and audited by the Imaging System. The images are not to be distributed outside of the VA, or used for any other purposes than listed below. The transmitting user is specifically responsible for the protection of these images. Press <Enter> to continue: Indicate the reason for transmission: [a] Clinical care for the patient whose images are being transmitted [b] Clinical care for other VA patients [c] Use in approved research by VA staff [d] Approved teaching purposes by VA staff [e] Use in approved VA publications [f] Clinical care (Export to HIPAA Compliant Archive) Enter letter for reason: A <Enter> Enter electronic signature: xxx <Enter> Specify RADIOLOGY, CONSULT, or LAB examination (R, C, or L): R// R <Enter> Enter Case Number (or `image-ien): 359 <Enter> Patient Information ------------------- Name: PATIENT,SEVENONEZERO SSN: 000-00-0710 DOB: 1919 Image File Information ---------------------- Acquisition Site: 660, SALT LAKE CITY Number: 26876 Accession Number: 071013-359 Name: "PATIENT,SEVENONEZERO 000-00-0710 CHEST 2 VIEWS PA&LAT" Object: XRAY GROUP Image Type: RAD OT Description: "CHEST 2 VIEWS PA&LAT" Study UID: 1.2.840.113754.1.4.660.6869289.8666.1.71013.359 There are 123 images in this group: 26877 26878 26879 26880 26881 26882 26883 26884 26885 26886 26887 26888 26889 26890 26891 26892 26893 26894 26895 26896 26897 26898 26899 26900 26901 26902 26903 26904 26905 26906 26907 26908 26909 26910 26911 26912 26913 26914 26915 26916 26917 26918 26919 26920 26921 26922 26923 26924 26925 26926

Chapter 4 – Image Gateway
86 VistA Imaging System MAG*3.0*138 September 2013 DICOM Gateway User Manual – Rev. 15
26927 26928 26929 26930 26931 26932 26933 26934 26935 26936 26937 26938 26939 26940 26941 26942 26943 26944 26945 26946 26947 26948 26949 26950 26951 26952 26953 26954 26955 26956 26957 26958 26959 26960 26961 26962 26963 26964 26965 26966 26967 26968 26969 26970 26971 26972 26973 26974 26975 26976 26977 26978 26979 26980 26981 26982 26983 26984 26985 26986 26987 26988 26989 26990 26991 26992 26993 26994 26995 26996 26997 26998 26999 Do you want to transmit these images? n// Y <Enter> DICOM Service Class Providers ----------------------------- 1 -- CONSULT STORAGE SCP 2 -- GOLD MWL 3 -- GOLD STORE 4 -- LOCAL MODALITY WORKLIST 5 -- LOCAL MODALITY WORKLIST 60011 6 -- PACS 60040 7 -- PATHOLOGY STORAGE SCP 8 -- RADIOLOGY STORAGE SCP Select the provider application (1-8): 8 <Enter> Send the images to RADIOLOGY STORAGE SCP? n// Y -- images will be sent Enter Case Number (or `image-ien): Press <Enter> to continue... VistA DICOM Export Image -- Pete's Development Laptop 1 Select DICOM Images for Transmission 2 Transmit DICOM Images to a Storage SCP 3 Stop Image Transmission Queue Processor 4 (Re)Initialize Image Transmission Queue 5 Batch Export VistA Radiology Images 6 Display Batch Export Statistics 7 Display Export Transmission Statistics OPTION: 1 <Enter> All uses pose potential violations of patient privacy. It is absolutely required that all users with transmission capability personally inspect each downloaded image. For technical reasons, related to the image capture process, some of the images contain patient identification data which must be removed manually. Each image transmitted is tracked and audited by the Imaging System. The images are not to be distributed outside of the VA, or used for any other purposes than listed below.
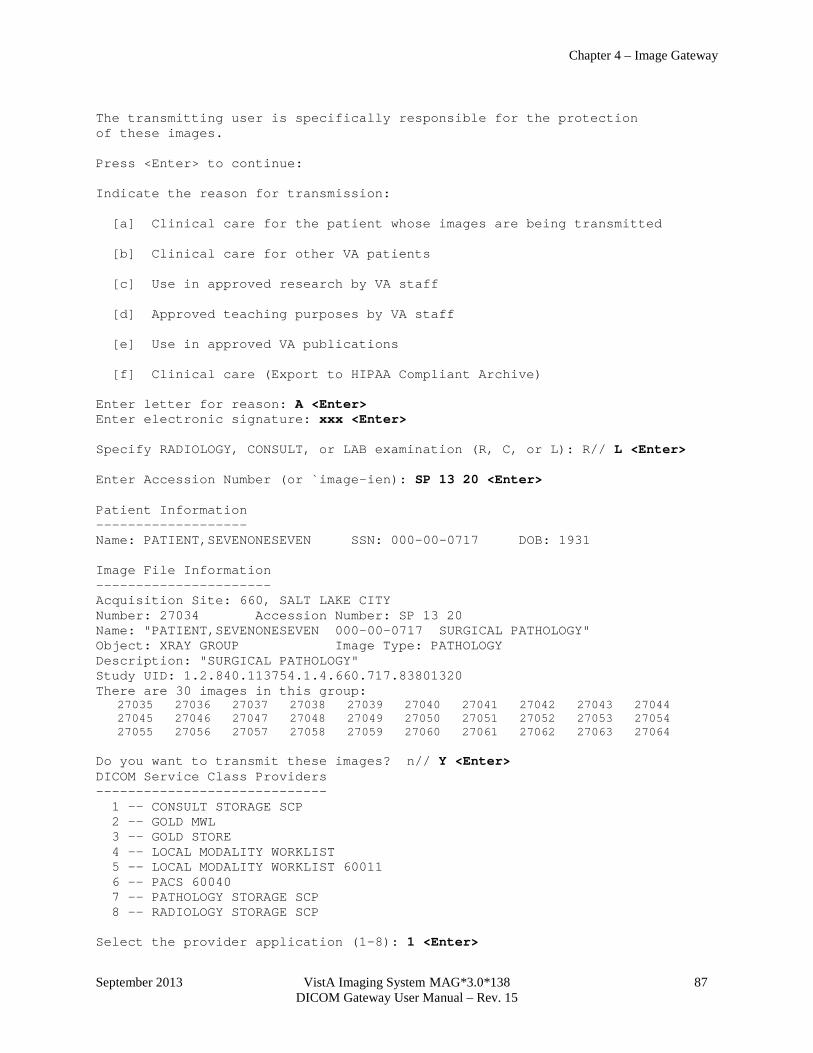
Chapter 4 – Image Gateway
September 2013 VistA Imaging System MAG*3.0*138 87 DICOM Gateway User Manual – Rev. 15
The transmitting user is specifically responsible for the protection of these images. Press <Enter> to continue: Indicate the reason for transmission: [a] Clinical care for the patient whose images are being transmitted [b] Clinical care for other VA patients [c] Use in approved research by VA staff [d] Approved teaching purposes by VA staff [e] Use in approved VA publications [f] Clinical care (Export to HIPAA Compliant Archive) Enter letter for reason: A <Enter> Enter electronic signature: xxx <Enter> Specify RADIOLOGY, CONSULT, or LAB examination (R, C, or L): R// L <Enter> Enter Accession Number (or `image-ien): SP 13 20 <Enter> Patient Information ------------------- Name: PATIENT,SEVENONESEVEN SSN: 000-00-0717 DOB: 1931 Image File Information ---------------------- Acquisition Site: 660, SALT LAKE CITY Number: 27034 Accession Number: SP 13 20 Name: "PATIENT,SEVENONESEVEN 000-00-0717 SURGICAL PATHOLOGY" Object: XRAY GROUP Image Type: PATHOLOGY Description: "SURGICAL PATHOLOGY" Study UID: 1.2.840.113754.1.4.660.717.83801320 There are 30 images in this group: 27035 27036 27037 27038 27039 27040 27041 27042 27043 27044 27045 27046 27047 27048 27049 27050 27051 27052 27053 27054 27055 27056 27057 27058 27059 27060 27061 27062 27063 27064 Do you want to transmit these images? n// Y <Enter> DICOM Service Class Providers ----------------------------- 1 -- CONSULT STORAGE SCP 2 -- GOLD MWL 3 -- GOLD STORE 4 -- LOCAL MODALITY WORKLIST 5 -- LOCAL MODALITY WORKLIST 60011 6 -- PACS 60040 7 -- PATHOLOGY STORAGE SCP 8 -- RADIOLOGY STORAGE SCP Select the provider application (1-8): 1 <Enter>
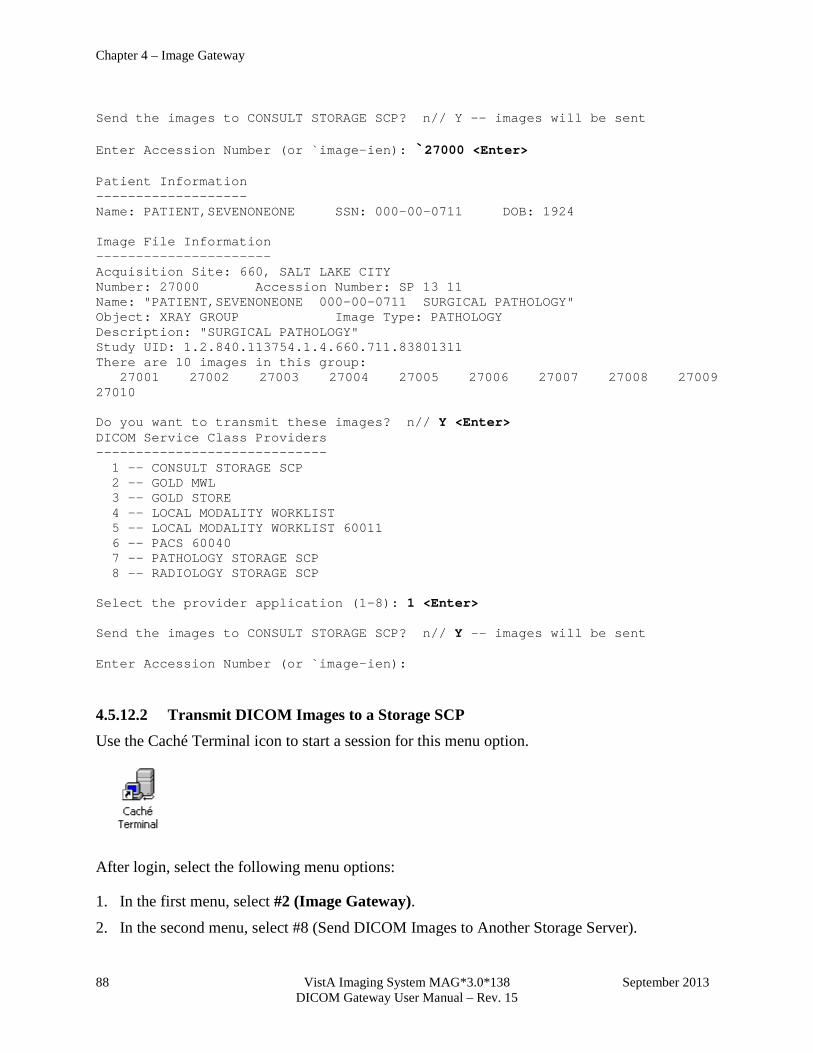
Chapter 4 – Image Gateway
88 VistA Imaging System MAG*3.0*138 September 2013 DICOM Gateway User Manual – Rev. 15
Send the images to CONSULT STORAGE SCP? n// Y -- images will be sent Enter Accession Number (or `image-ien): `27000 <Enter> Patient Information ------------------- Name: PATIENT,SEVENONEONE SSN: 000-00-0711 DOB: 1924 Image File Information ---------------------- Acquisition Site: 660, SALT LAKE CITY Number: 27000 Accession Number: SP 13 11 Name: "PATIENT,SEVENONEONE 000-00-0711 SURGICAL PATHOLOGY" Object: XRAY GROUP Image Type: PATHOLOGY Description: "SURGICAL PATHOLOGY" Study UID: 1.2.840.113754.1.4.660.711.83801311 There are 10 images in this group: 27001 27002 27003 27004 27005 27006 27007 27008 27009 27010 Do you want to transmit these images? n// Y <Enter> DICOM Service Class Providers ----------------------------- 1 -- CONSULT STORAGE SCP 2 -- GOLD MWL 3 -- GOLD STORE 4 -- LOCAL MODALITY WORKLIST 5 -- LOCAL MODALITY WORKLIST 60011 6 -- PACS 60040 7 -- PATHOLOGY STORAGE SCP 8 -- RADIOLOGY STORAGE SCP Select the provider application (1-8): 1 <Enter> Send the images to CONSULT STORAGE SCP? n// Y -- images will be sent Enter Accession Number (or `image-ien):
4.5.12.2 Transmit DICOM Images to a Storage SCP Use the Caché Terminal icon to start a session for this menu option.
After login, select the following menu options:
1. In the first menu, select #2 (Image Gateway). 2. In the second menu, select #8 (Send DICOM Images to Another Storage Server).
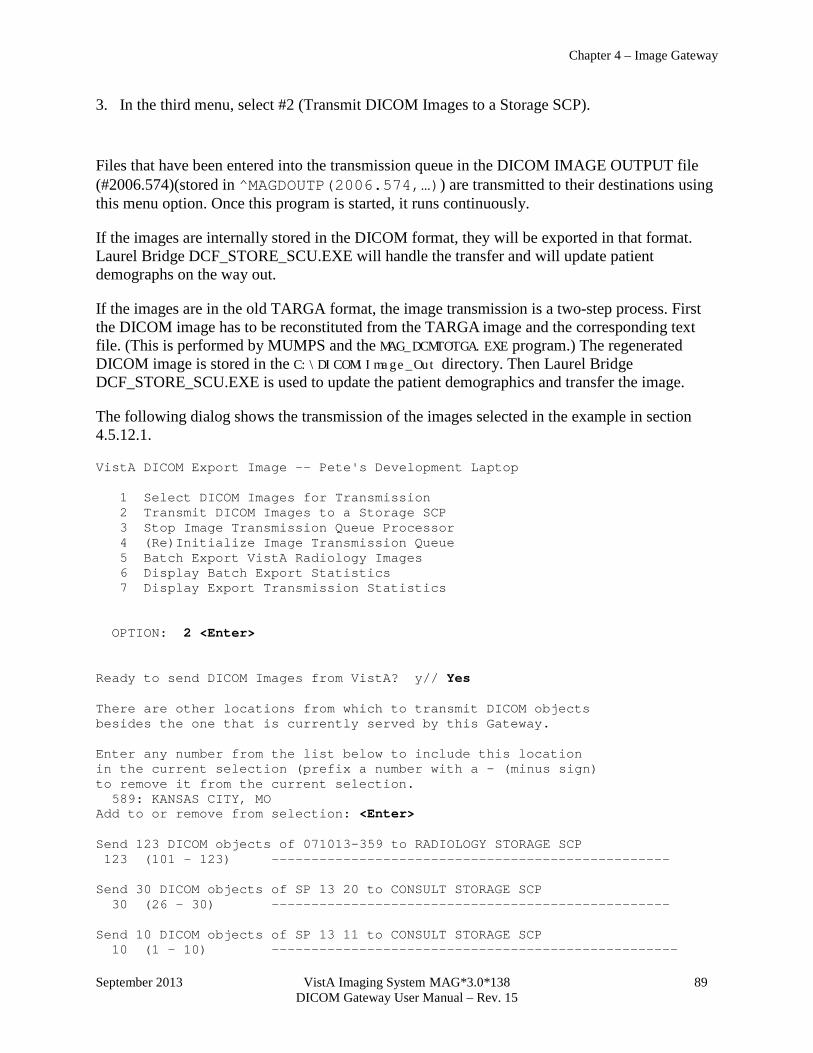
Chapter 4 – Image Gateway
September 2013 VistA Imaging System MAG*3.0*138 89 DICOM Gateway User Manual – Rev. 15
3. In the third menu, select #2 (Transmit DICOM Images to a Storage SCP).
Files that have been entered into the transmission queue in the DICOM IMAGE OUTPUT file (#2006.574)(stored in ^MAGDOUTP(2006.574,…)) are transmitted to their destinations using this menu option. Once this program is started, it runs continuously.
If the images are internally stored in the DICOM format, they will be exported in that format. Laurel Bridge DCF_STORE_SCU.EXE will handle the transfer and will update patient demographs on the way out.
If the images are in the old TARGA format, the image transmission is a two-step process. First the DICOM image has to be reconstituted from the TARGA image and the corresponding text file. (This is performed by MUMPS and the MAG_DCMTOTGA.EXE program.) The regenerated DICOM image is stored in the C:\DICOM\Image_Out directory. Then Laurel Bridge DCF_STORE_SCU.EXE is used to update the patient demographics and transfer the image.
The following dialog shows the transmission of the images selected in the example in section 4.5.12.1.
VistA DICOM Export Image -- Pete's Development Laptop 1 Select DICOM Images for Transmission 2 Transmit DICOM Images to a Storage SCP 3 Stop Image Transmission Queue Processor 4 (Re)Initialize Image Transmission Queue 5 Batch Export VistA Radiology Images 6 Display Batch Export Statistics 7 Display Export Transmission Statistics OPTION: 2 <Enter> Ready to send DICOM Images from VistA? y// Yes There are other locations from which to transmit DICOM objects besides the one that is currently served by this Gateway. Enter any number from the list below to include this location in the current selection (prefix a number with a - (minus sign) to remove it from the current selection. 589: KANSAS CITY, MO Add to or remove from selection: <Enter> Send 123 DICOM objects of 071013-359 to RADIOLOGY STORAGE SCP 123 (101 - 123) -------------------------------------------------- Send 30 DICOM objects of SP 13 20 to CONSULT STORAGE SCP 30 (26 - 30) -------------------------------------------------- Send 10 DICOM objects of SP 13 11 to CONSULT STORAGE SCP 10 (1 - 10) ---------------------------------------------------
Chapter 4 – Image Gateway
90 VistA Imaging System MAG*3.0*138 September 2013 DICOM Gateway User Manual – Rev. 15
^C *** Error: <INTERRUPT>IDLE+3^MAGDBB (,ZINTERRUPT,) *** Press <Enter> to continue... When all files are transmitted, this menu option may be terminated by pressing CTRL+C, as shown above.
4.5.12.3 Stop Image Transmission Queue Processor When a transmission queue processor has been started using this menu option, the processor will continue until instructed to stop using the menu option.
Use the Caché Terminal icon to start a session for this menu option.
After login, select the following menu options:
1. In the first menu, select #2 (Image Gateway). 2. In the second menu, select #8 (Send DICOM Images to Another Storage Server).
3. In the third menu, select #3 (Stop Image Transmission Queue Processor).
When this menu option is selected, the Image Transmission Queue processor that was started (in a different Telnet window) will stop; the program will acknowledge the request by displaying:
The transmitter will stop soon.
4.5.12.4 Initialize Image Transmission Queue If a communication error occurs, the transmission queue will have to be reinitialized.
Use the Caché Terminal icon to start a session for this menu option.
After login, select the following menu options:
1. In the first menu, select #2 (Image Gateway). 2. In the second menu, select #8 (Send DICOM Images to Another Storage Server).
Chapter 4 – Image Gateway
September 2013 VistA Imaging System MAG*3.0*138 91 DICOM Gateway User Manual – Rev. 15
3. In the third menu, select #4 ((Re) Initialize Image Transmission Queue). Initialize Image Transmission Queue? n// y <Enter> Image Transmission Queue has been initialized Push <Enter> to continue...
4.5.12.5 Batch Export VistA Radiology Images Batch Export allows a multiple Radiology studies to be exported at one time. This may be by a date range, radiology report number range, or by a selected patient. The first two capabilities can be used to transfer images from VistA to a commercial PACS, while the third can be used to transfer multiple studies to a DICOM CD burner. The following examples show all three scenarios.
4.5.12.5.1 Batch Export of Radiology Images by Date Range This capability is used to export a set of Radiology images for a given Radiology Report date range. You establish the date range and indicate whether the studies should be exported in ascending (chronological) or descending (reverse chronological) order. It also allows you to determine when to run the Batch Export process, perhaps only during the off-hours. This capability is useful for exporting a set of studies to a commercial PACS.
Use the Caché Terminal icon to start a session for this menu option.
After login, select the following menu options:
1. In the first menu, select #2 (Image Gateway). 2. In the second menu, select #8 (Send DICOM Images to Another Storage Server).
3. In the third menu, select #5 (Batch Export VistA Radiology Images). This program will enter image files into a transmission queue in the DICOM IMAGE OUTPUT file (#2006.574) (stored in ^MAGDOUTP(2006.574,…)).
******************************************************************************** *** *** *** V i s t A D I C O M I m a g e E x p o r t e r *** *** --------------------------------------------------- *** *** *** *** This program may be used to copy radiology images from VistA to a *** *** another DICOM image archive. *** *** *** *** The regular "Transmit DICOM Images to a Storage SCP" menu option ***
Chapter 4 – Image Gateway
92 VistA Imaging System MAG*3.0*138 September 2013 DICOM Gateway User Manual – Rev. 15
*** is used to copy the images to the other DICOM image archive. *** *** You may use Ctrl-C (^C) to stop this process, if you need to abort it. *** *** *** ******************************************************************************** Scan by Date, Report Number, or Patient (D, N, or P): DATE <Enter> All uses pose potential violations of patient privacy. It is absolutely required that all users with transmission capability personally inspect each downloaded image. For technical reasons, related to the image capture process, some of the images contain patient identification data which must be removed manually. Each image transmitted is tracked and audited by the Imaging System. The images are not to be distributed outside of the VA, or used for any other purposes than listed below. The transmitting user is specifically responsible for the protection of these images. Press <Enter> to continue: <Enter> Indicate the reason for transmission: [a] Clinical care for the patient whose images are being transmitted [b] Clinical care for other VA patients [c] Use in approved research by VA staff [d] Approved teaching purposes by VA staff [e] Use in approved VA publications [f] Clinical care (Export to HIPAA Compliant Archive) Enter letter for reason: A <Enter> Enter electronic signature: xxx <Enter> The DICOM storage provider is "LOCAL PACS SIMULATOR". Do you wish to change it? n // <Enter> n The radiology reports will be scanned in the "ASCENDING" order. Do you wish to change it? n // <Enter> n Enter the earliest date for the report. Earliest Report Date: NOV 24, 1998// <Enter> (NOV 24, 1998) Enter the latest date for the report. Latest Report Date: FEB 23, 2006@23:59// <Enter> (FEB 23, 2006@23:59) The active hours of operation are indicated below with a "Y" M12345678901N12345678901 (M=midnight, N=noon)
Chapter 4 – Image Gateway
September 2013 VistA Imaging System MAG*3.0*138 93 DICOM Gateway User Manual – Rev. 15
Active hours are: YYYYYYYYYYYYYYYYYYYYYYYY Do you wish to change these hours? n // <Enter> n F i n a l P a r a m e t e r C h e c k l i s t ------------------------------------------------ DICOM storage provider: LOCAL PACS SIMULATOR Report scanning order: ASCENDING Earliest date for report: NOV 24, 1998 Latest date for report: FEB 23, 2006@23:59 Active hours of operation: M12345678901N12345678901 (M=midnight, N=noon) YYYYYYYYYYYYYYYYYYYYYYYY Ready to begin exporting DICOM images? Y Report # Accession Group # #Images Date -------- --------- ------- ------- ---- 28 : 112498-19 318 27 images NOV 24, 1998-
4.5.12.5.2 Batch Export of Radiology Images by Report Number This capability is used to export a set of Radiology images by the Radiology Report number. The user establishes the initial report number and how many to export. You indicate whether the studies should be exported in ascending (chronological) or descending (reverse chronological) order. It also allows you to determine when to run the Batch Export process; for example, only during the off-hours. This capability is useful for exporting a set of studies to a commercial PACS.
Use the Caché Terminal icon to start a session for this menu option.
After login, select the following menu options:
1. In the first menu, select #2 (Image Gateway). 2. In the second menu, select #8 (Send DICOM Images to Another Storage Server).
3. In the third menu, select #5 (Batch Export VistA Radiology Images). This program will enter image files into a transmission queue in the DICOM IMAGE OUTPUT file (#2006.574) (stored in ^MAGDOUTP(2006.574,…)).
******************************************************************************** *** *** *** V i s t A D I C O M I m a g e E x p o r t e r *** *** --------------------------------------------------- *** *** *** *** This program may be used to copy radiology images from VistA to a *** *** another DICOM image archive. *** *** ***
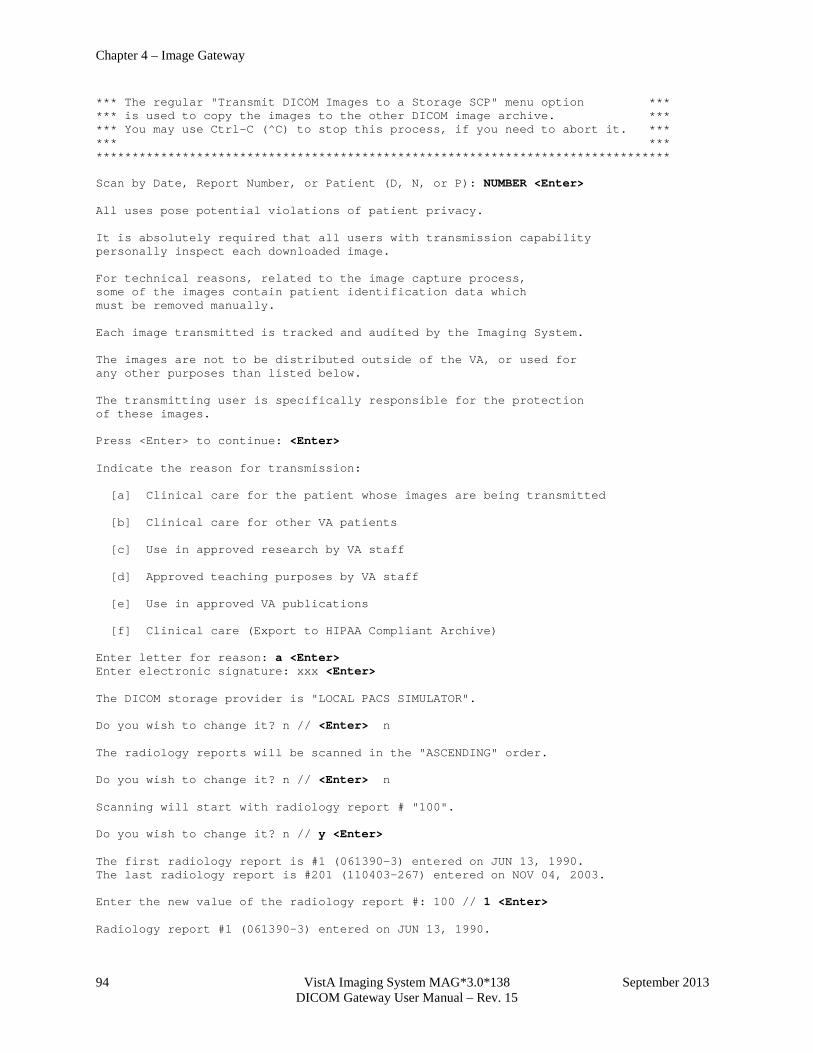
Chapter 4 – Image Gateway
94 VistA Imaging System MAG*3.0*138 September 2013 DICOM Gateway User Manual – Rev. 15
*** The regular "Transmit DICOM Images to a Storage SCP" menu option *** *** is used to copy the images to the other DICOM image archive. *** *** You may use Ctrl-C (^C) to stop this process, if you need to abort it. *** *** *** ******************************************************************************** Scan by Date, Report Number, or Patient (D, N, or P): NUMBER <Enter> All uses pose potential violations of patient privacy. It is absolutely required that all users with transmission capability personally inspect each downloaded image. For technical reasons, related to the image capture process, some of the images contain patient identification data which must be removed manually. Each image transmitted is tracked and audited by the Imaging System. The images are not to be distributed outside of the VA, or used for any other purposes than listed below. The transmitting user is specifically responsible for the protection of these images. Press <Enter> to continue: <Enter> Indicate the reason for transmission: [a] Clinical care for the patient whose images are being transmitted [b] Clinical care for other VA patients [c] Use in approved research by VA staff [d] Approved teaching purposes by VA staff [e] Use in approved VA publications [f] Clinical care (Export to HIPAA Compliant Archive) Enter letter for reason: a <Enter> Enter electronic signature: xxx <Enter> The DICOM storage provider is "LOCAL PACS SIMULATOR". Do you wish to change it? n // <Enter> n The radiology reports will be scanned in the "ASCENDING" order. Do you wish to change it? n // <Enter> n Scanning will start with radiology report # "100". Do you wish to change it? n // y <Enter> The first radiology report is #1 (061390-3) entered on JUN 13, 1990. The last radiology report is #201 (110403-267) entered on NOV 04, 2003. Enter the new value of the radiology report #: 100 // 1 <Enter> Radiology report #1 (061390-3) entered on JUN 13, 1990.
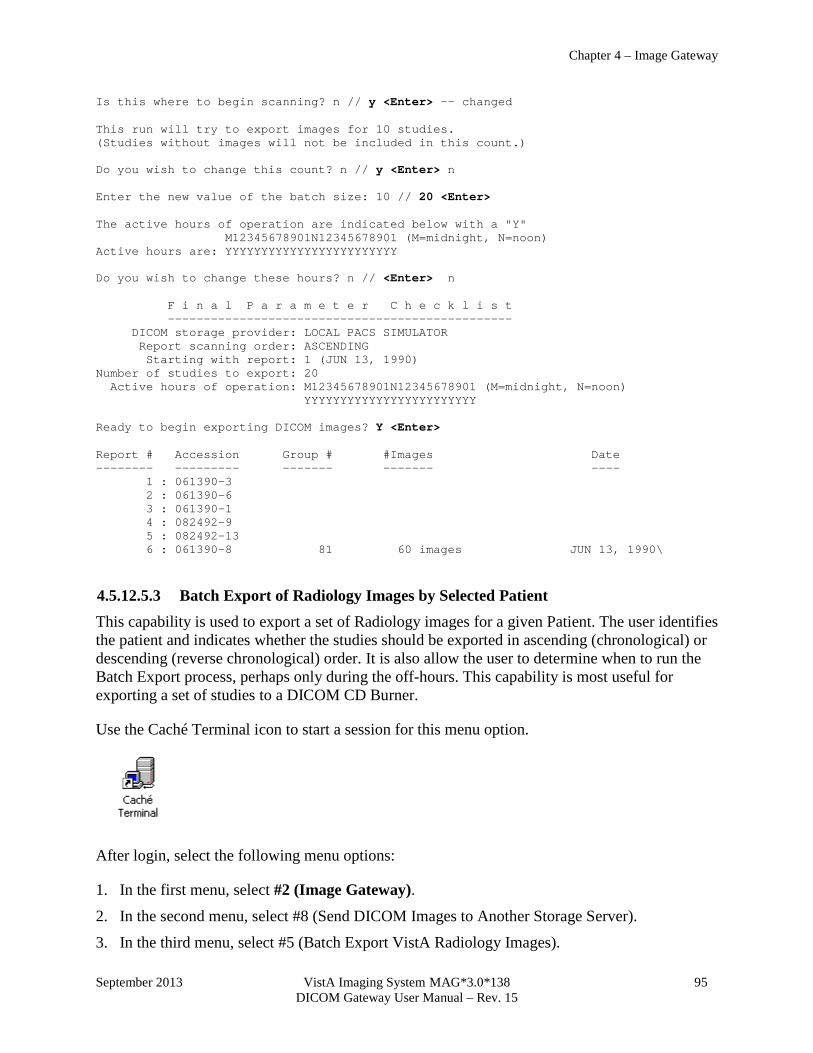
Chapter 4 – Image Gateway
September 2013 VistA Imaging System MAG*3.0*138 95 DICOM Gateway User Manual – Rev. 15
Is this where to begin scanning? n // y <Enter> -- changed This run will try to export images for 10 studies. (Studies without images will not be included in this count.) Do you wish to change this count? n // y <Enter> n Enter the new value of the batch size: 10 // 20 <Enter> The active hours of operation are indicated below with a "Y" M12345678901N12345678901 (M=midnight, N=noon) Active hours are: YYYYYYYYYYYYYYYYYYYYYYYY Do you wish to change these hours? n // <Enter> n F i n a l P a r a m e t e r C h e c k l i s t ------------------------------------------------ DICOM storage provider: LOCAL PACS SIMULATOR Report scanning order: ASCENDING Starting with report: 1 (JUN 13, 1990) Number of studies to export: 20 Active hours of operation: M12345678901N12345678901 (M=midnight, N=noon) YYYYYYYYYYYYYYYYYYYYYYYY Ready to begin exporting DICOM images? Y <Enter> Report # Accession Group # #Images Date -------- --------- ------- ------- ---- 1 : 061390-3 2 : 061390-6 3 : 061390-1 4 : 082492-9 5 : 082492-13 6 : 061390-8 81 60 images JUN 13, 1990\
4.5.12.5.3 Batch Export of Radiology Images by Selected Patient This capability is used to export a set of Radiology images for a given Patient. The user identifies the patient and indicates whether the studies should be exported in ascending (chronological) or descending (reverse chronological) order. It is also allow the user to determine when to run the Batch Export process, perhaps only during the off-hours. This capability is most useful for exporting a set of studies to a DICOM CD Burner.
Use the Caché Terminal icon to start a session for this menu option.
After login, select the following menu options:
1. In the first menu, select #2 (Image Gateway). 2. In the second menu, select #8 (Send DICOM Images to Another Storage Server).
3. In the third menu, select #5 (Batch Export VistA Radiology Images).
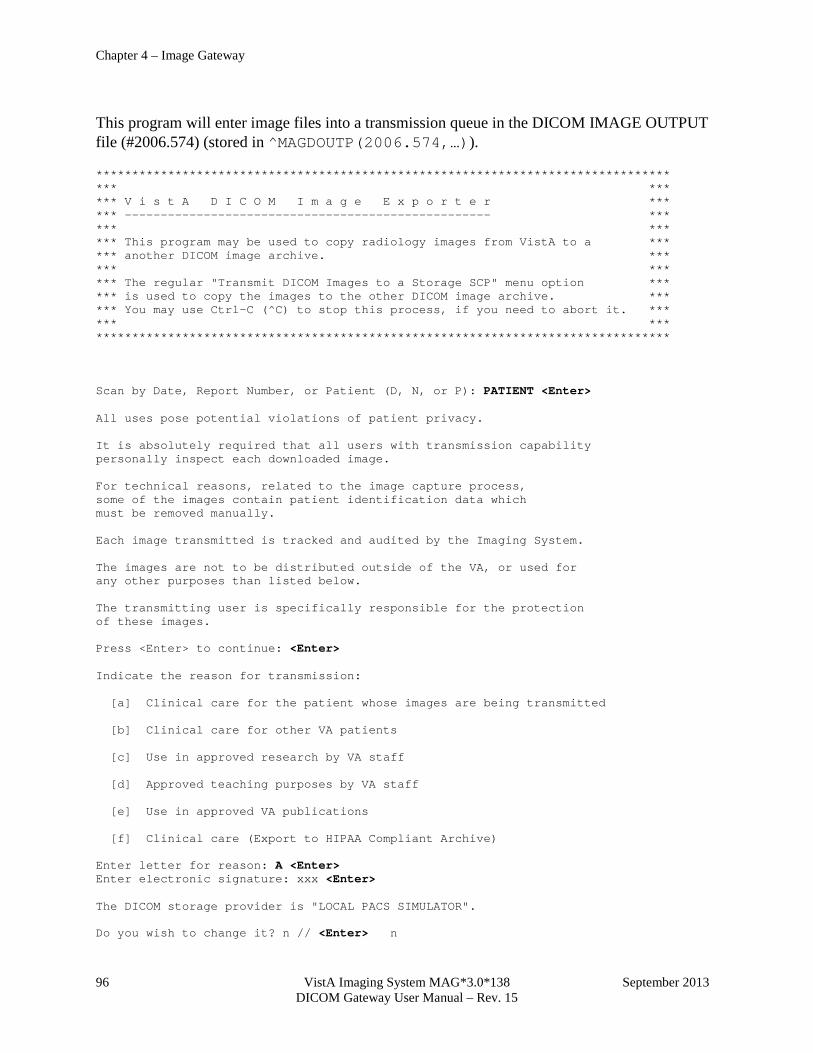
Chapter 4 – Image Gateway
96 VistA Imaging System MAG*3.0*138 September 2013 DICOM Gateway User Manual – Rev. 15
This program will enter image files into a transmission queue in the DICOM IMAGE OUTPUT file (#2006.574) (stored in ^MAGDOUTP(2006.574,…)).
******************************************************************************** *** *** *** V i s t A D I C O M I m a g e E x p o r t e r *** *** --------------------------------------------------- *** *** *** *** This program may be used to copy radiology images from VistA to a *** *** another DICOM image archive. *** *** *** *** The regular "Transmit DICOM Images to a Storage SCP" menu option *** *** is used to copy the images to the other DICOM image archive. *** *** You may use Ctrl-C (^C) to stop this process, if you need to abort it. *** *** *** ******************************************************************************** Scan by Date, Report Number, or Patient (D, N, or P): PATIENT <Enter> All uses pose potential violations of patient privacy. It is absolutely required that all users with transmission capability personally inspect each downloaded image. For technical reasons, related to the image capture process, some of the images contain patient identification data which must be removed manually. Each image transmitted is tracked and audited by the Imaging System. The images are not to be distributed outside of the VA, or used for any other purposes than listed below. The transmitting user is specifically responsible for the protection of these images. Press <Enter> to continue: <Enter> Indicate the reason for transmission: [a] Clinical care for the patient whose images are being transmitted [b] Clinical care for other VA patients [c] Use in approved research by VA staff [d] Approved teaching purposes by VA staff [e] Use in approved VA publications [f] Clinical care (Export to HIPAA Compliant Archive) Enter letter for reason: A <Enter> Enter electronic signature: xxx <Enter> The DICOM storage provider is "LOCAL PACS SIMULATOR". Do you wish to change it? n // <Enter> n
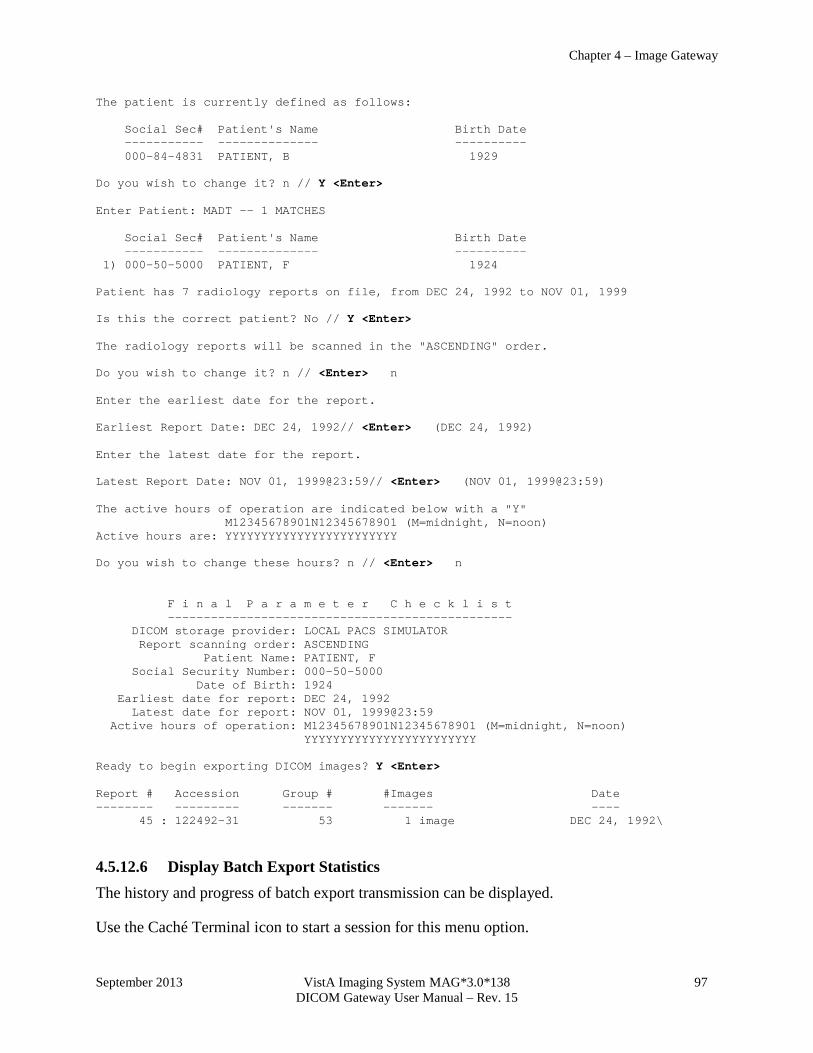
Chapter 4 – Image Gateway
September 2013 VistA Imaging System MAG*3.0*138 97 DICOM Gateway User Manual – Rev. 15
The patient is currently defined as follows: Social Sec# Patient's Name Birth Date ----------- -------------- ---------- 000-84-4831 PATIENT, B 1929 Do you wish to change it? n // Y <Enter> Enter Patient: MADT -- 1 MATCHES Social Sec# Patient's Name Birth Date ----------- -------------- ---------- 1) 000-50-5000 PATIENT, F 1924 Patient has 7 radiology reports on file, from DEC 24, 1992 to NOV 01, 1999 Is this the correct patient? No // Y <Enter> The radiology reports will be scanned in the "ASCENDING" order. Do you wish to change it? n // <Enter> n Enter the earliest date for the report. Earliest Report Date: DEC 24, 1992// <Enter> (DEC 24, 1992) Enter the latest date for the report. Latest Report Date: NOV 01, 1999@23:59// <Enter> (NOV 01, 1999@23:59) The active hours of operation are indicated below with a "Y" M12345678901N12345678901 (M=midnight, N=noon) Active hours are: YYYYYYYYYYYYYYYYYYYYYYYY Do you wish to change these hours? n // <Enter> n F i n a l P a r a m e t e r C h e c k l i s t ------------------------------------------------ DICOM storage provider: LOCAL PACS SIMULATOR Report scanning order: ASCENDING Patient Name: PATIENT, F Social Security Number: 000-50-5000 Date of Birth: 1924 Earliest date for report: DEC 24, 1992 Latest date for report: NOV 01, 1999@23:59 Active hours of operation: M12345678901N12345678901 (M=midnight, N=noon) YYYYYYYYYYYYYYYYYYYYYYYY Ready to begin exporting DICOM images? Y <Enter> Report # Accession Group # #Images Date -------- --------- ------- ------- ---- 45 : 122492-31 53 1 image DEC 24, 1992\
4.5.12.6 Display Batch Export Statistics The history and progress of batch export transmission can be displayed.
Use the Caché Terminal icon to start a session for this menu option.

Chapter 4 – Image Gateway
98 VistA Imaging System MAG*3.0*138 September 2013 DICOM Gateway User Manual – Rev. 15
After login, select the following menu options:
1. In the first menu, select #2 (Image Gateway). 2. In the second menu, select #8 (Send DICOM Images to Another Storage Server).
3. In the third menu, select #6 (Display Batch Export Statistics). VistA DICOM Export Utility Statistics ------------------------------------- Current Status: Export Utility has ABORTED Active hours of operation: M12345678901N12345678901 (M=midnight, N=noon) YYYYYYYYYYYYYYYYYYYYYYYY DICOM storage provider: EYE STORAGE SCP *** REPORT NUMBER SCAN ORDER *** Run Started A/D First Batch/Studies Finished Last #Images --- ------- --- ------ ------------ -------- ------ ------- 1 10/07 08:18 D 201 10/2 10/07 08:19 200 4 *** PATIENT: PATIENT,C 000-10-3663 JUN 10,1945 *** Run Started A/D Begin Date Stop Date Finished #Images --- ------- --- ---------- --------- -------- ------- 2 12/14 07:42 D 11/24/98 04/01/05 12/14 08:08 987 DICOM storage provider: RADIOLOGY STORAGE SCP *** DATE/TIME SCAN ORDER *** Run Started A/D Begin Date Stop Date Last Date Finished #Images --- ------- --- ---------- --------- --------- -------- ------- 3 02/23 14:33 A 11/24/98 02/23/06 11/24/98 (incomplete) 27 DICOM storage provider: LOCAL PACS SIMULATOR *** DATE/TIME SCAN ORDER *** Run Started A/D Begin Date Stop Date Last Date Finished #Images --- ------- --- ---------- --------- --------- -------- ------- 4 02/23 14:35 A 11/24/98 02/23/06 11/24/98 (incomplete) 27 *** REPORT NUMBER SCAN ORDER *** Run Started A/D First Batch/Studies Finished Last #Images --- ------- --- ------ ------------ -------- ------ ------- 5 02/23 14:42 A 1 20/ 02/23 14:42 5 60 *** PATIENT: PATIENT,B 000-84-4831 1929 *** Run Started A/D Begin Date Stop Date Finished #Images --- ------- --- ---------- --------- -------- ------- 6 02/23 14:52 A 06/13/90 08/24/92 02/23 14:52

Chapter 4 – Image Gateway
September 2013 VistA Imaging System MAG*3.0*138 99 DICOM Gateway User Manual – Rev. 15
4.5.13 Display a DICOM Image Header Occasionally, for operational reasons, you may have to display the contents of a DICOM image header.
This program displays DICOM encoded image headers in human-readable form (it is the same program as described for the DICOM Text Gateway above in section 3.11, but with different defaults).
Use the Caché Terminal icon to start a session for this menu option.
After login, select the following menu options:
1. In the first menu, select #2 (Image Gateway). 2. In the second menu, select #9 (Display a DICOM Image Header). You will be asked to enter the number of the file to display. All unprocessed image files are in the C:\DICOM\Image_In directory. The following example shows the formatted output of the information in the file C:\DICOM\Image_In\A0000001.DCM. As a shortcut, the name of this file can be entered by selecting I (for image) and file number 1 (to indicate the first image).
Note: An object that has been stored in VistA in DICOM format can be displayed by entering the grave accent (`) followed by the internal entry number in the Image file (#2005) (stored in ^MAG(2005)).
Ready to read a DICOM file? y// y <Enter> Enter output device ("S" for screen or "F" for file): S// <Enter> Screen Enter the queue letter (a-h or s-z), or I for image (or '^' to exit): I// I <Enter> Enter file number (or path): 1 <Enter> DUMP of DICOM file C:\DICOM\Image_In\A0000001.DCM O G E L Created at 14:17 PM on 26-MAY-1999 f r l e f o e n s u m g e p e t t n h A t t r i b u t e V a l u e t ----------------------------------- 000084:0002,0000 UL 0004 Group Length "204 (0x000000CC)" 000090:0002,0001 OB 0002 File Meta Information Ver "0 (0x00)" "1 (0x01)" 00009E:0002,0002 UI 001A Media Storage SOP Class U "1.2.840.10008.5.1.4.1.1.1"
Computed Radiography Image Storage 0000C0:0002,0003 UI 0034 Media Storage SOP Instanc "1.3.46.670589.8.922140021400
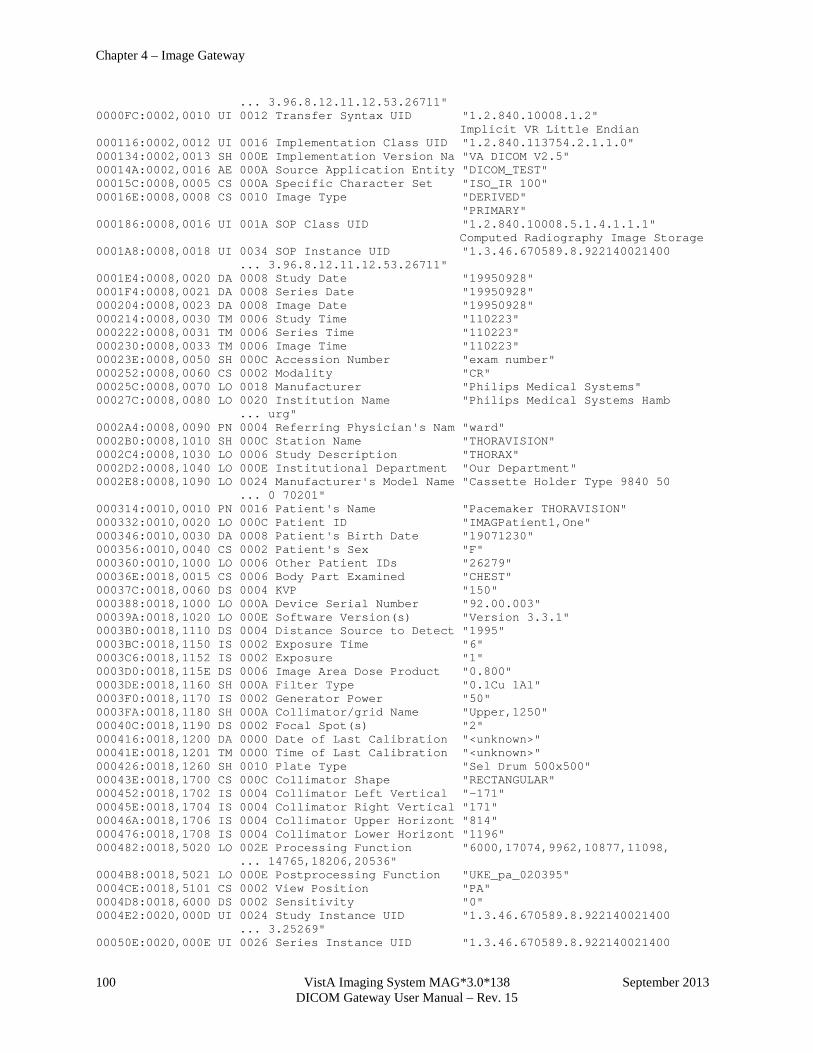
Chapter 4 – Image Gateway
100 VistA Imaging System MAG*3.0*138 September 2013 DICOM Gateway User Manual – Rev. 15
... 3.96.8.12.11.12.53.26711" 0000FC:0002,0010 UI 0012 Transfer Syntax UID "1.2.840.10008.1.2"
Implicit VR Little Endian 000116:0002,0012 UI 0016 Implementation Class UID "1.2.840.113754.2.1.1.0" 000134:0002,0013 SH 000E Implementation Version Na "VA DICOM V2.5" 00014A:0002,0016 AE 000A Source Application Entity "DICOM_TEST" 00015C:0008,0005 CS 000A Specific Character Set "ISO_IR 100" 00016E:0008,0008 CS 0010 Image Type "DERIVED" "PRIMARY" 000186:0008,0016 UI 001A SOP Class UID "1.2.840.10008.5.1.4.1.1.1"
Computed Radiography Image Storage 0001A8:0008,0018 UI 0034 SOP Instance UID "1.3.46.670589.8.922140021400 ... 3.96.8.12.11.12.53.26711" 0001E4:0008,0020 DA 0008 Study Date "19950928" 0001F4:0008,0021 DA 0008 Series Date "19950928" 000204:0008,0023 DA 0008 Image Date "19950928" 000214:0008,0030 TM 0006 Study Time "110223" 000222:0008,0031 TM 0006 Series Time "110223" 000230:0008,0033 TM 0006 Image Time "110223" 00023E:0008,0050 SH 000C Accession Number "exam number" 000252:0008,0060 CS 0002 Modality "CR" 00025C:0008,0070 LO 0018 Manufacturer "Philips Medical Systems" 00027C:0008,0080 LO 0020 Institution Name "Philips Medical Systems Hamb ... urg" 0002A4:0008,0090 PN 0004 Referring Physician's Nam "ward" 0002B0:0008,1010 SH 000C Station Name "THORAVISION" 0002C4:0008,1030 LO 0006 Study Description "THORAX" 0002D2:0008,1040 LO 000E Institutional Department "Our Department" 0002E8:0008,1090 LO 0024 Manufacturer's Model Name "Cassette Holder Type 9840 50 ... 0 70201" 000314:0010,0010 PN 0016 Patient's Name "Pacemaker THORAVISION" 000332:0010,0020 LO 000C Patient ID "IMAGPatient1,One" 000346:0010,0030 DA 0008 Patient's Birth Date "19071230" 000356:0010,0040 CS 0002 Patient's Sex "F" 000360:0010,1000 LO 0006 Other Patient IDs "26279" 00036E:0018,0015 CS 0006 Body Part Examined "CHEST" 00037C:0018,0060 DS 0004 KVP "150" 000388:0018,1000 LO 000A Device Serial Number "92.00.003" 00039A:0018,1020 LO 000E Software Version(s) "Version 3.3.1" 0003B0:0018,1110 DS 0004 Distance Source to Detect "1995" 0003BC:0018,1150 IS 0002 Exposure Time "6" 0003C6:0018,1152 IS 0002 Exposure "1" 0003D0:0018,115E DS 0006 Image Area Dose Product "0.800" 0003DE:0018,1160 SH 000A Filter Type "0.1Cu 1Al" 0003F0:0018,1170 IS 0002 Generator Power "50" 0003FA:0018,1180 SH 000A Collimator/grid Name "Upper,1250" 00040C:0018,1190 DS 0002 Focal Spot(s) "2" 000416:0018,1200 DA 0000 Date of Last Calibration "<unknown>" 00041E:0018,1201 TM 0000 Time of Last Calibration "<unknown>" 000426:0018,1260 SH 0010 Plate Type "Sel Drum 500x500" 00043E:0018,1700 CS 000C Collimator Shape "RECTANGULAR" 000452:0018,1702 IS 0004 Collimator Left Vertical "-171" 00045E:0018,1704 IS 0004 Collimator Right Vertical "171" 00046A:0018,1706 IS 0004 Collimator Upper Horizont "814" 000476:0018,1708 IS 0004 Collimator Lower Horizont "1196" 000482:0018,5020 LO 002E Processing Function "6000,17074,9962,10877,11098, ... 14765,18206,20536" 0004B8:0018,5021 LO 000E Postprocessing Function "UKE_pa_020395" 0004CE:0018,5101 CS 0002 View Position "PA" 0004D8:0018,6000 DS 0002 Sensitivity "0" 0004E2:0020,000D UI 0024 Study Instance UID "1.3.46.670589.8.922140021400 ... 3.25269" 00050E:0020,000E UI 0026 Series Instance UID "1.3.46.670589.8.922140021400
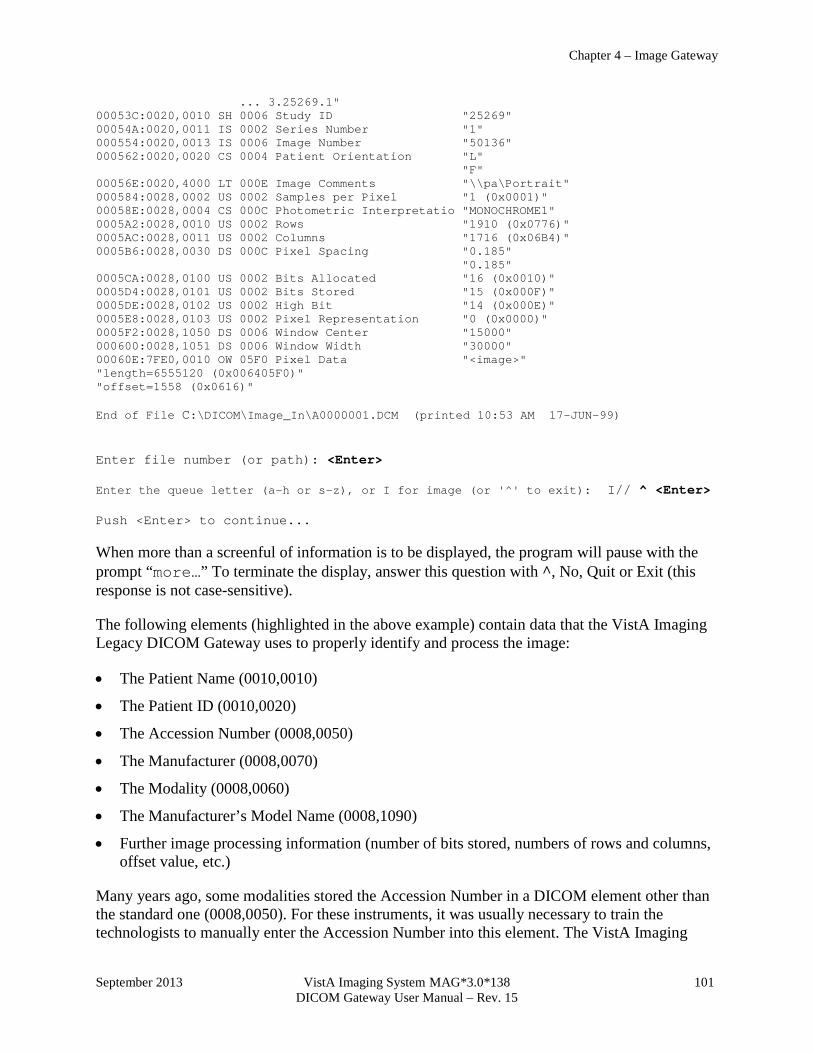
Chapter 4 – Image Gateway
September 2013 VistA Imaging System MAG*3.0*138 101 DICOM Gateway User Manual – Rev. 15
... 3.25269.1" 00053C:0020,0010 SH 0006 Study ID "25269" 00054A:0020,0011 IS 0002 Series Number "1" 000554:0020,0013 IS 0006 Image Number "50136" 000562:0020,0020 CS 0004 Patient Orientation "L" "F" 00056E:0020,4000 LT 000E Image Comments "\\pa\Portrait" 000584:0028,0002 US 0002 Samples per Pixel "1 (0x0001)" 00058E:0028,0004 CS 000C Photometric Interpretatio "MONOCHROME1" 0005A2:0028,0010 US 0002 Rows "1910 (0x0776)" 0005AC:0028,0011 US 0002 Columns "1716 (0x06B4)" 0005B6:0028,0030 DS 000C Pixel Spacing "0.185" "0.185" 0005CA:0028,0100 US 0002 Bits Allocated "16 (0x0010)" 0005D4:0028,0101 US 0002 Bits Stored "15 (0x000F)" 0005DE:0028,0102 US 0002 High Bit "14 (0x000E)" 0005E8:0028,0103 US 0002 Pixel Representation "0 (0x0000)" 0005F2:0028,1050 DS 0006 Window Center "15000" 000600:0028,1051 DS 0006 Window Width "30000" 00060E:7FE0,0010 OW 05F0 Pixel Data "<image>" "length=6555120 (0x006405F0)" "offset=1558 (0x0616)" End of File C:\DICOM\Image_In\A0000001.DCM (printed 10:53 AM 17-JUN-99) Enter file number (or path): <Enter> Enter the queue letter (a-h or s-z), or I for image (or '^' to exit): I// ^ <Enter> Push <Enter> to continue... When more than a screenful of information is to be displayed, the program will pause with the prompt “more…” To terminate the display, answer this question with ^, No, Quit or Exit (this response is not case-sensitive).
The following elements (highlighted in the above example) contain data that the VistA Imaging Legacy DICOM Gateway uses to properly identify and process the image:
• The Patient Name (0010,0010)
• The Patient ID (0010,0020)
• The Accession Number (0008,0050)
• The Manufacturer (0008,0070)
• The Modality (0008,0060)
• The Manufacturer’s Model Name (0008,1090)
• Further image processing information (number of bits stored, numbers of rows and columns, offset value, etc.)
Many years ago, some modalities stored the Accession Number in a DICOM element other than the standard one (0008,0050). For these instruments, it was usually necessary to train the technologists to manually enter the Accession Number into this element. The VistA Imaging
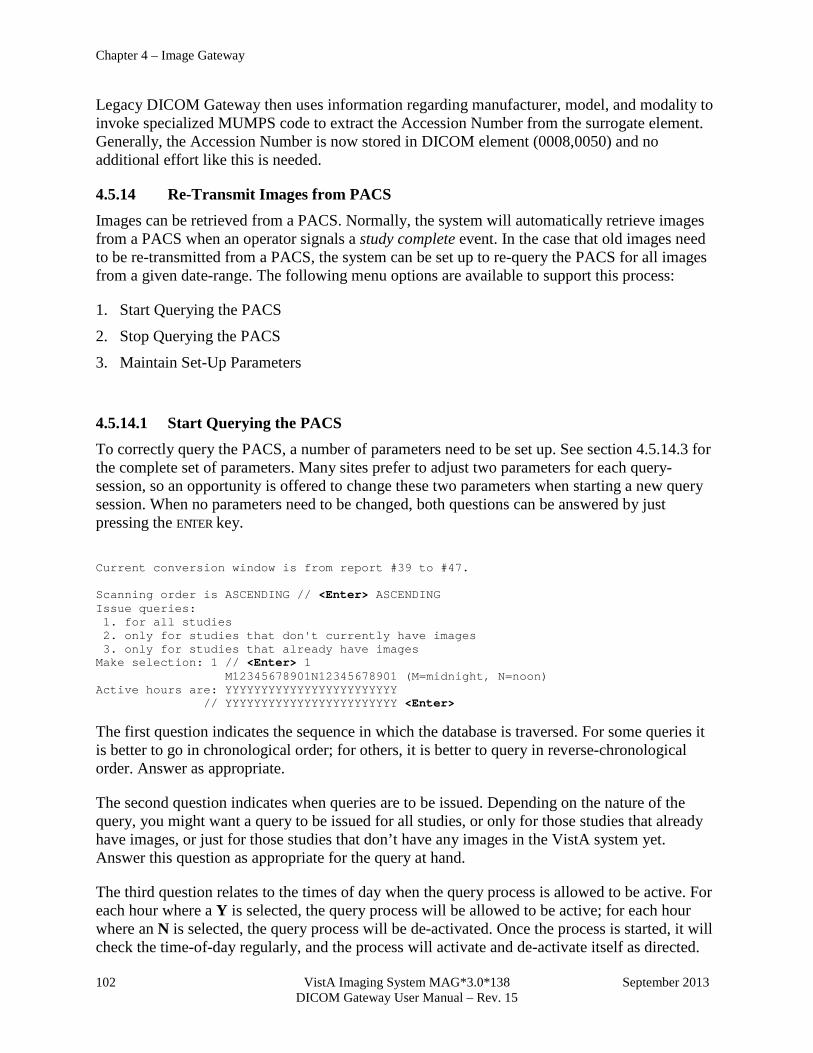
Chapter 4 – Image Gateway
102 VistA Imaging System MAG*3.0*138 September 2013 DICOM Gateway User Manual – Rev. 15
Legacy DICOM Gateway then uses information regarding manufacturer, model, and modality to invoke specialized MUMPS code to extract the Accession Number from the surrogate element. Generally, the Accession Number is now stored in DICOM element (0008,0050) and no additional effort like this is needed.
4.5.14 Re-Transmit Images from PACS Images can be retrieved from a PACS. Normally, the system will automatically retrieve images from a PACS when an operator signals a study complete event. In the case that old images need to be re-transmitted from a PACS, the system can be set up to re-query the PACS for all images from a given date-range. The following menu options are available to support this process:
1. Start Querying the PACS
2. Stop Querying the PACS
3. Maintain Set-Up Parameters
4.5.14.1 Start Querying the PACS To correctly query the PACS, a number of parameters need to be set up. See section 4.5.14.3 for the complete set of parameters. Many sites prefer to adjust two parameters for each query-session, so an opportunity is offered to change these two parameters when starting a new query session. When no parameters need to be changed, both questions can be answered by just pressing the ENTER key.
Current conversion window is from report #39 to #47. Scanning order is ASCENDING // <Enter> ASCENDING Issue queries: 1. for all studies 2. only for studies that don't currently have images 3. only for studies that already have images Make selection: 1 // <Enter> 1 M12345678901N12345678901 (M=midnight, N=noon) Active hours are: YYYYYYYYYYYYYYYYYYYYYYYY // YYYYYYYYYYYYYYYYYYYYYYYY <Enter>
The first question indicates the sequence in which the database is traversed. For some queries it is better to go in chronological order; for others, it is better to query in reverse-chronological order. Answer as appropriate.
The second question indicates when queries are to be issued. Depending on the nature of the query, you might want a query to be issued for all studies, or only for those studies that already have images, or just for those studies that don’t have any images in the VistA system yet. Answer this question as appropriate for the query at hand.
The third question relates to the times of day when the query process is allowed to be active. For each hour where a Y is selected, the query process will be allowed to be active; for each hour where an N is selected, the query process will be de-activated. Once the process is started, it will check the time-of-day regularly, and the process will activate and de-activate itself as directed.
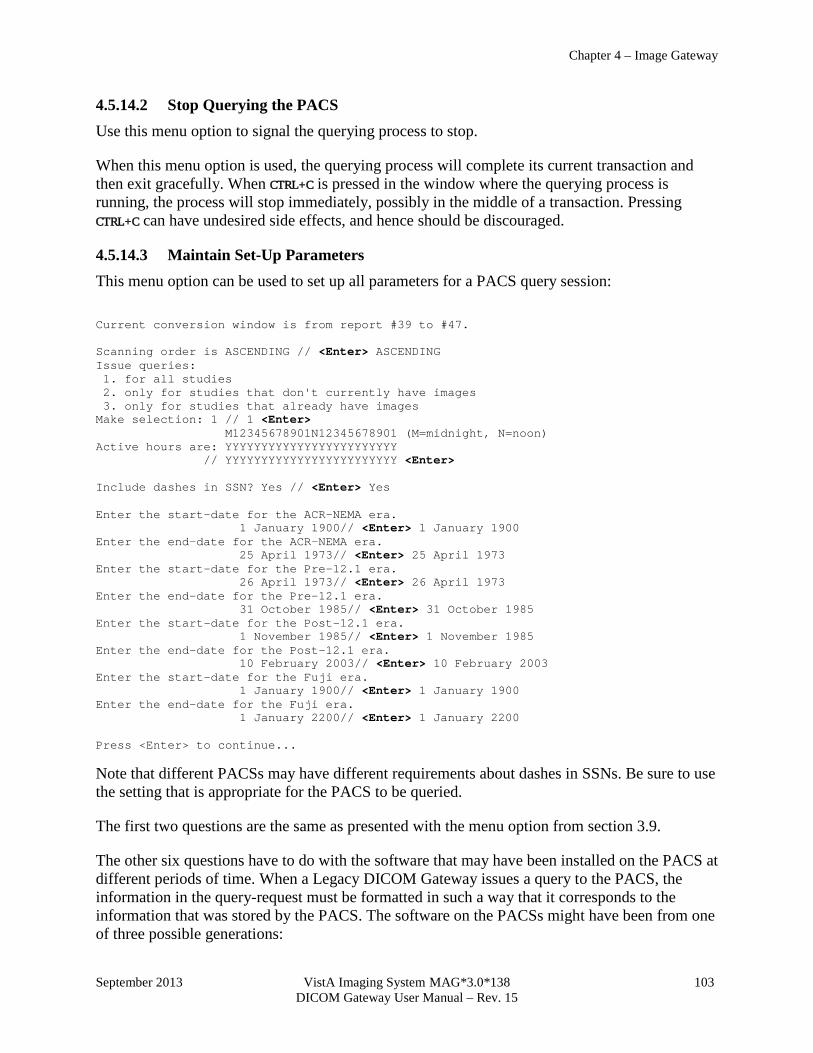
Chapter 4 – Image Gateway
September 2013 VistA Imaging System MAG*3.0*138 103 DICOM Gateway User Manual – Rev. 15
4.5.14.2 Stop Querying the PACS Use this menu option to signal the querying process to stop.
When this menu option is used, the querying process will complete its current transaction and then exit gracefully. When CTRL+C is pressed in the window where the querying process is running, the process will stop immediately, possibly in the middle of a transaction. Pressing CTRL+C can have undesired side effects, and hence should be discouraged.
4.5.14.3 Maintain Set-Up Parameters This menu option can be used to set up all parameters for a PACS query session:
Current conversion window is from report #39 to #47. Scanning order is ASCENDING // <Enter> ASCENDING Issue queries: 1. for all studies 2. only for studies that don't currently have images 3. only for studies that already have images Make selection: 1 // 1 <Enter> M12345678901N12345678901 (M=midnight, N=noon) Active hours are: YYYYYYYYYYYYYYYYYYYYYYYY // YYYYYYYYYYYYYYYYYYYYYYYY <Enter> Include dashes in SSN? Yes // <Enter> Yes Enter the start-date for the ACR-NEMA era. 1 January 1900// <Enter> 1 January 1900 Enter the end-date for the ACR-NEMA era. 25 April 1973// <Enter> 25 April 1973 Enter the start-date for the Pre-12.1 era. 26 April 1973// <Enter> 26 April 1973 Enter the end-date for the Pre-12.1 era. 31 October 1985// <Enter> 31 October 1985 Enter the start-date for the Post-12.1 era. 1 November 1985// <Enter> 1 November 1985 Enter the end-date for the Post-12.1 era. 10 February 2003// <Enter> 10 February 2003 Enter the start-date for the Fuji era. 1 January 1900// <Enter> 1 January 1900 Enter the end-date for the Fuji era. 1 January 2200// <Enter> 1 January 2200 Press <Enter> to continue...
Note that different PACSs may have different requirements about dashes in SSNs. Be sure to use the setting that is appropriate for the PACS to be queried.
The first two questions are the same as presented with the menu option from section 3.9.
The other six questions have to do with the software that may have been installed on the PACS at different periods of time. When a Legacy DICOM Gateway issues a query to the PACS, the information in the query-request must be formatted in such a way that it corresponds to the information that was stored by the PACS. The software on the PACSs might have been from one of three possible generations:
Chapter 4 – Image Gateway
104 VistA Imaging System MAG*3.0*138 September 2013 DICOM Gateway User Manual – Rev. 15
• Software from the ACR/NEMA era (at most sites, that era either never happened or ended around 1998)
• Software from the pre level 12.1 era (as far as the Development Group knows, no VistA site ever ran that software in production, but the possibility is included as an option nevertheless)
• Software from the post level 12.1 era (this is most likely the format for all data on most current PACS models)
• Software for the Fuji Synapse PACS models
The dates that are entered indicate the start and end of the various eras. It does not hurt to be generous with these limit-dates, and it is permissible to have overlapping date ranges. In order to prevent the Legacy DICOM Gateway from issuing any request formatted according to one era, the limit-dates for that era could be set to 1-January-1900 through 1-January-1901 (since there were no computers in those days, the software wouldn’t find any data-records for such an era).
Enter dates as appropriate for the site and query.
4.6 Correcting Errors in the Processing Flow Using DICOM Correct Use the utility workflow called DICOM Correct to correct errors in the processing flow, such as studies with mismatched or missing patient information (patient name or patient ID). Images requiring correction are queued in the DICOM Correct queue of the HDIG. To manage all studies in the DICOM Correct queue, use the DICOM Importer GUI client. Using the DICOM Importer reconciliation workflow to match the study to the proper patient. The DICOM Importer then resubmits the study for image processing.
To use DICOM Correct, you must have the DICOM Importer client installed. You must also have the Import Reconciler security key (MAGV IMPORT RECON ARTIFACT).
For more information on using DICOM Correct, see the Vista Imaging DICOM Importer III User Manual.
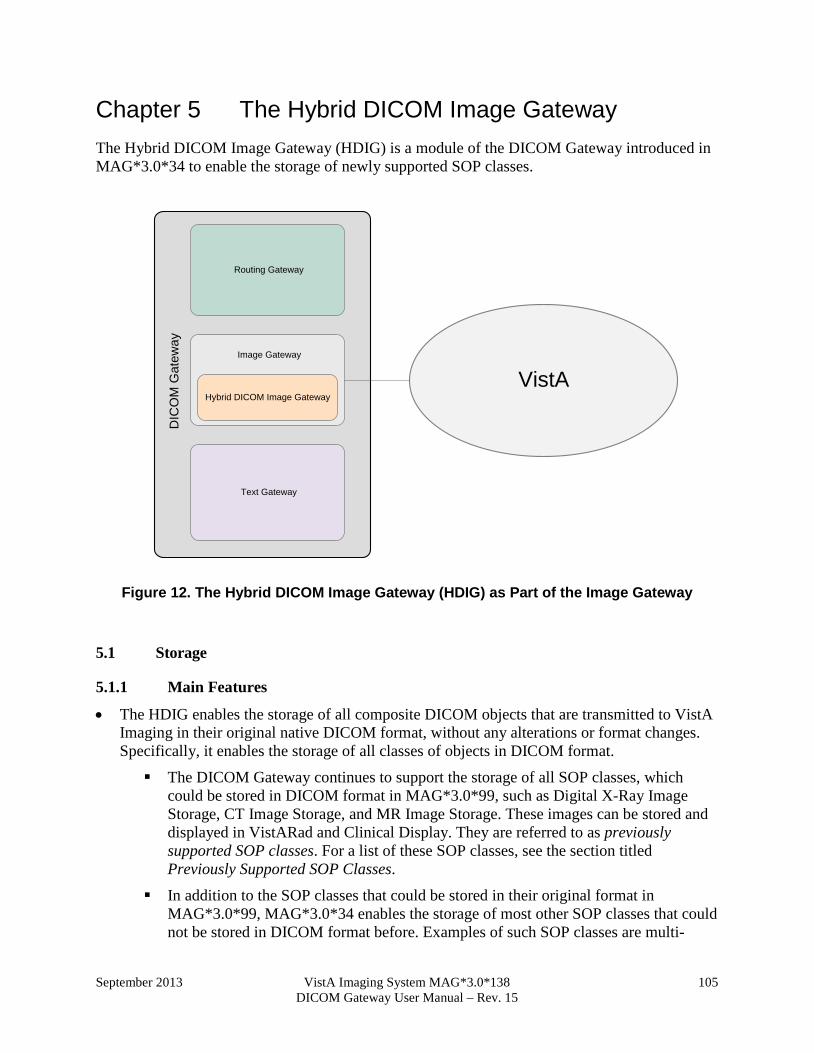
September 2013 VistA Imaging System MAG*3.0*138 105 DICOM Gateway User Manual – Rev. 15
Chapter 5 The Hybrid DICOM Image Gateway The Hybrid DICOM Image Gateway (HDIG) is a module of the DICOM Gateway introduced in MAG*3.0*34 to enable the storage of newly supported SOP classes.
Hybrid DICOM Image Gateway
Image Gateway
VistA
Text Gateway
Routing Gateway
DIC
OM
Gat
eway
Figure 12. The Hybrid DICOM Image Gateway (HDIG) as Part of the Image Gateway
5.1 Storage
5.1.1 Main Features
• The HDIG enables the storage of all composite DICOM objects that are transmitted to VistA Imaging in their original native DICOM format, without any alterations or format changes. Specifically, it enables the storage of all classes of objects in DICOM format.
The DICOM Gateway continues to support the storage of all SOP classes, which could be stored in DICOM format in MAG*3.0*99, such as Digital X-Ray Image Storage, CT Image Storage, and MR Image Storage. These images can be stored and displayed in VistARad and Clinical Display. They are referred to as previously supported SOP classes. For a list of these SOP classes, see the section titled Previously Supported SOP Classes.
In addition to the SOP classes that could be stored in their original format in MAG*3.0*99, MAG*3.0*34 enables the storage of most other SOP classes that could not be stored in DICOM format before. Examples of such SOP classes are multi-
Chapter 5 – The Hybrid DICOM Image Gateway
106 VistA Imaging System MAG*3.0*138 September 2013 DICOM Gateway User Manual – Rev. 15
frame CTs, multi-frame MRs, or structured reports. They are referred to as newly supported SOP classes. The ability to display these objects in the display clients will be added in future patches. For a list of these newly supported SOP classes, see the section titled Newly Supported SOP Classes.
Important Display of the newly supported SOP classes (DICOM objects) will be supported in future releases. You will not be able to view these objects in the display clients (Clinical Capture, Clinical Display, and VistA RAD). You can access these objects using the Query/Retrieve application.
• The HDIG implements the input components of a DICOM Level 2 Archive. DICOM Level 2 Archive is a complex storage system designed to faithfully store all DICOM Objects generated by modalities and other sources involved in DICOM workflows. The archive provides extended search capabilities through DICOM services (DICOM Q/R) of the tags present in the stored objects. In addition, DICOM Level 2 archives must satisfy additional low-level requirements in order to claim full conformance.
MAG*3.0*34 creates the additional data structures and code needed to satisfy the Storage SCP requirements of a DICOM Level 2 archive.
The HDIG implements DICOM Level 2 archive for all DICOM SOP Classes, while providing user configuration options for acceptable DICOM Presentation Contexts.
It supports archival storage of the DICOM objects as an integral part of the VistA Imaging Service Architecture (VISA).
MAG*3.0*34 enables the archiving of newly supported SOP classes.
• The HDIG extends the DICOM correction of images to include newly supported SOP classes.
• MAG*3.0*34 improves UID (unique identifier) checking for study, series, and SOP instance UIDs, which eliminates the possibility of storing duplicate objects in the database.
• The HDIG attempts to store all DICOM SOP instances in their original format without alteration, except for accepted coercion for the purpose of patient reconciliation and DICOM Correction. There are instances where the information may be altered, for example – changes in transfer syntaxes.
• The HDIG provides backwards compatible access to currently supported SOP classes for existing display clients and VistA Imaging applications:g
This patch does not change access to any stored DICOM objects that are used by the current display clients and VistA Imaging Applications.
Existing clients and VistA Imaging applications may only retrieve and display the SOP classes supported by MAG*3.0*99. These display clients and applications require changes to display the newly supported SOP classes.
Chapter 5 – The Hybrid DICOM Image Gateway
September 2013 VistA Imaging System MAG*3.0*138 107 DICOM Gateway User Manual – Rev. 15
NOTE MAG*3.0*34 does not migrate existing data into any new data structure.
• The HDIG displays statistics for the operation of all storage mechanisms.
• The HDIG provides a DICOM Application Entity (AE) Security Matrix that site administrators and VistA Imaging coordinators must use to control access to the VistA Imaging database.
• The HDIG provides data structures to store all SOP classes.
• The HDIG provides a new storage and archiving system to store all SOP classes.
• The HDIG provides an archive policy manager that determines archiving locations and retention based upon a set of configurable archive rules.
• The HDIG provides a storage manager that routes files to the proper archival repositories based upon the archiving.
5.1.2 Benefits The HDIG provides the following benefits:
• Introduces a common receiver for all DICOM devices, the DICOM Listener.
• Enables the Image Gateway and VistA Imaging to receive, process, and store artifacts and information on clinical images of all DICOM SOP classes, including DICOM objects that could not be processed and stored before, such as radiotherapy images (RT) and structured reports (SR). For more information, see Newly Supported SOP Classes.
NOTE Storing the newly supported SOP classes must be enabled on the specific HDIG and in VistA.
• Handles all SOP classes without altering their format or their content. This is a step towards implementing a DICOM Level 2 archive.
NOTE The DICOM Listener corrects the duplicate instance UIDs. This is the one exception in which it alters the content of the DICOM objects it processes.
• Provides a data structure to store the newly supported DICOM objects.
• Data structures enforce interfaces toward the application (APIs) to prevent direct access to data, which is a source of inconsistencies. The interface is the collection of all database RPCs that are used to store and query the data. The storage system has no direct access to M (MUMPS) data structures. An added benefit to using interfaces for interacting with the application and the data is that this makes it possible to replace the specific databases without changing the data acquisition and storage system. For example, it would be possible to replace Caché with another tool without having to change the DICOM Gateway or the storage system.
Chapter 5 – The Hybrid DICOM Image Gateway
108 VistA Imaging System MAG*3.0*138 September 2013 DICOM Gateway User Manual – Rev. 15
Database provides the following benefits:
Guarantees the integrity of the newly stored data by validating the DICOM object (IOD) and checking the UIDs of the artifacts before they are stored to ensure that all stored objects are unique and that there are no duplicate UIDs in the database. It checks the uniqueness of artifacts on three levels – study, series, and instance – to ensure that there is no duplication in the database.
Speeds access to all application-relevant DICOM metadata, such as relevant DICOM attributes that are specific to series and study.
Implements the DICOM Real-World Model of the Medical Imaging workflow.
Is extensible, which makes it easy to make changes to the database, such as adding new storage devices and/or switching to new software.
Provides the capability to store images from non-VA sources in the future, such as images from the Department of Defense databases.
• The HDIG provides an AE Security Matrix that Imaging coordinators or administrators of the VistA system must use to define the DICOM devices (a DICOM device can be a modality, a work station or a PACS) that can communicate with the VistA system.
• Provides a Statistics page that displays similar statistics to those the DICOM Gateway menus show.
• Provides persistent redundant storage of source data attributes to facilitate disaster recovery. Each stored artifact includes a key list, which provides information about the position of the data in the data hierarchy and allows the data topology to be reconstructed.
The Archiver, introduced in MAG*3.0*34, monitors queue files for new archive requests. When it gets a new archive request, the Archiver:
Verifies that the request is still valid
Transfers the files to the archive device (based on specified storage rules)
Inserts storage records in the files.
• Users can configure the number of additional attempts the Archiver does to archive the files when the first attempt is not successful. Additionally, the Archiver logs errors during the storage process in an error message queue.
• If a site chooses to use a new archive system, they may be able to use an existing provider if the new archive system uses a standard interface. If the new archive system requires a custom interface, then another patch is required to support the custom interface.
• The archive process is similar to the existing archiving process. It stores the files in the same types of storage locations (short-term and long-term storage) and uses the same naming conventions.
Chapter 5 – The Hybrid DICOM Image Gateway
September 2013 VistA Imaging System MAG*3.0*138 109 DICOM Gateway User Manual – Rev. 15
5.2 Query/Retieve
• Q/R runs as a web service, an application login is not required. • Q/R all DICOM objects from all data stores. • Audit Logging • Secure Application logging including Sensitive Patient logging
5.3 DICOM Importing DICOM Importing automates the importation of DICOM objects from outside facilities, and streamlines the reconciliation of patient demographic and imaging study data among outside imaging facilities, including the DOD, and systems of the VA.
5.4 DICOM AE Security Matrix Before any gateways can process images, perform Query/Retreive, or import images from a network location, entries must be made in a VistA file called the DICOM AE_Security_Matrix [2006.9192].
The DICOM AE Security Matrix is the file DICOM AE SECURITY MATRIX (#2006.9192). The DICOM AE Security Matrix includes the configuration settings of all devices that use DICOM services to connect to the VistA system. This includes devices that can send data to the VistA system, devices that can query the data stored in the VistA system, and devices that can retrieve images from the VistA system. The remote devices support these DICOM services. The DICOM services at each local site are identified with unique 16-character strings called application entity (AE) titles.
A device can have more than one DICOM service. For example, when a device stores images in VistA, the service associated with it is the storage service class (C-STORE). If the same device queries VistA, it uses the query service class (C-FIND). The device has a DICOM role associated with each service class. For example, a remote device that sends data to VistA is a service class user (SCU) of the storage service class (C-STORE SCU). VistA is a service class provider (SCP) of the storage service class (C-STORE SCP). There can be devices at different locations with the same AE title, service, and role. However, the combination of the remote AE title, the service, role, and site (location) number defines a device uniquely.
For new devices, you must add an entry to the DICOM AE Security Matrix for the device, which will allow the DICOM Listener to receive data. If a device is not defined in the DICOM AE Security Matrix, then it is not able to send images or other data to the DICOM Listener and the data from the device is not stored in the VistA system.
If you are using the Query/Retrieve application, you must also define all new devices that can query and retrieve data from the VistA system in the DICOM AE Security Matrix. For more information about configuring these devices, see the VistA Imaging Hybrid DICOM Image Gateway (HDIG) Installation Guide.
The following figure illustrates the logical relationships of the DICOM services and roles. The image shows, through an example, two devices that are configured to connect to the VistA system through the DICOM Gateways (Hybrid DICOM Image Gateways).
NOTE Only the remote devices (the ultrasound device and the 3-D reconstruction station) are defined as entries in the DICOM AE Security Matrix. The local AE titles (the DICOM
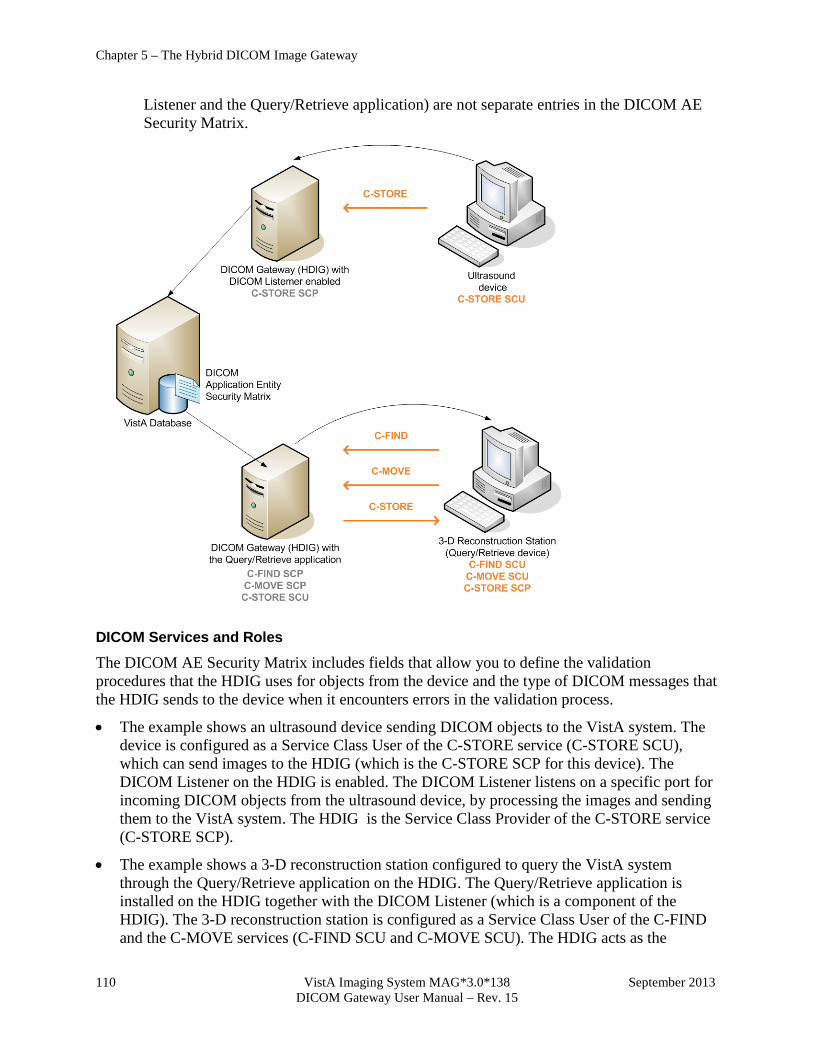
Chapter 5 – The Hybrid DICOM Image Gateway
110 VistA Imaging System MAG*3.0*138 September 2013 DICOM Gateway User Manual – Rev. 15
Listener and the Query/Retrieve application) are not separate entries in the DICOM AE Security Matrix.
DICOM Services and Roles
The DICOM AE Security Matrix includes fields that allow you to define the validation procedures that the HDIG uses for objects from the device and the type of DICOM messages that the HDIG sends to the device when it encounters errors in the validation process.
• The example shows an ultrasound device sending DICOM objects to the VistA system. The device is configured as a Service Class User of the C-STORE service (C-STORE SCU), which can send images to the HDIG (which is the C-STORE SCP for this device). The DICOM Listener on the HDIG is enabled. The DICOM Listener listens on a specific port for incoming DICOM objects from the ultrasound device, by processing the images and sending them to the VistA system. The HDIG is the Service Class Provider of the C-STORE service (C-STORE SCP).
• The example shows a 3-D reconstruction station configured to query the VistA system through the Query/Retrieve application on the HDIG. The Query/Retrieve application is installed on the HDIG together with the DICOM Listener (which is a component of the HDIG). The 3-D reconstruction station is configured as a Service Class User of the C-FIND and the C-MOVE services (C-FIND SCU and C-MOVE SCU). The HDIG acts as the
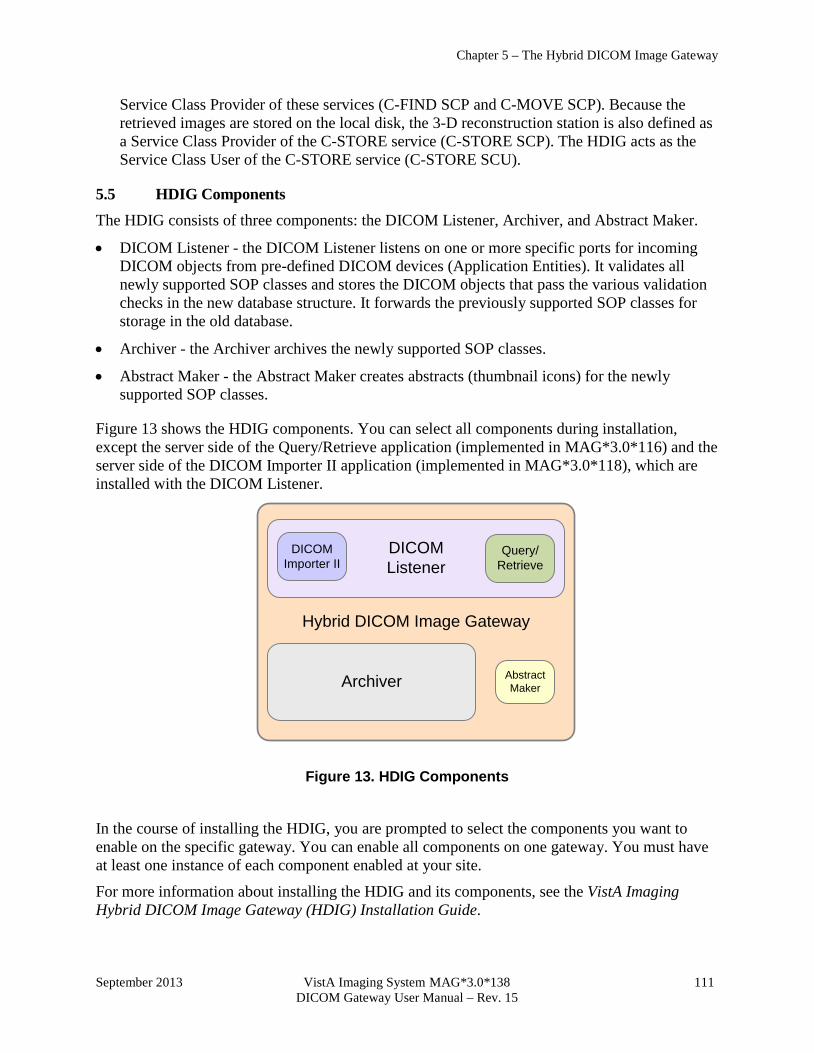
Chapter 5 – The Hybrid DICOM Image Gateway
September 2013 VistA Imaging System MAG*3.0*138 111 DICOM Gateway User Manual – Rev. 15
Service Class Provider of these services (C-FIND SCP and C-MOVE SCP). Because the retrieved images are stored on the local disk, the 3-D reconstruction station is also defined as a Service Class Provider of the C-STORE service (C-STORE SCP). The HDIG acts as the Service Class User of the C-STORE service (C-STORE SCU).
5.5 HDIG Components The HDIG consists of three components: the DICOM Listener, Archiver, and Abstract Maker.
• DICOM Listener - the DICOM Listener listens on one or more specific ports for incoming DICOM objects from pre-defined DICOM devices (Application Entities). It validates all newly supported SOP classes and stores the DICOM objects that pass the various validation checks in the new database structure. It forwards the previously supported SOP classes for storage in the old database.
• Archiver - the Archiver archives the newly supported SOP classes.
• Abstract Maker - the Abstract Maker creates abstracts (thumbnail icons) for the newly supported SOP classes.
Figure 13 shows the HDIG components. You can select all components during installation, except the server side of the Query/Retrieve application (implemented in MAG*3.0*116) and the server side of the DICOM Importer II application (implemented in MAG*3.0*118), which are installed with the DICOM Listener.
Hybrid DICOM Image Gateway
DICOM Listener
Archiver Abstract Maker
Query/Retrieve
DICOM Importer II
Figure 13. HDIG Components
In the course of installing the HDIG, you are prompted to select the components you want to enable on the specific gateway. You can enable all components on one gateway. You must have at least one instance of each component enabled at your site.
For more information about installing the HDIG and its components, see the VistA Imaging Hybrid DICOM Image Gateway (HDIG) Installation Guide.
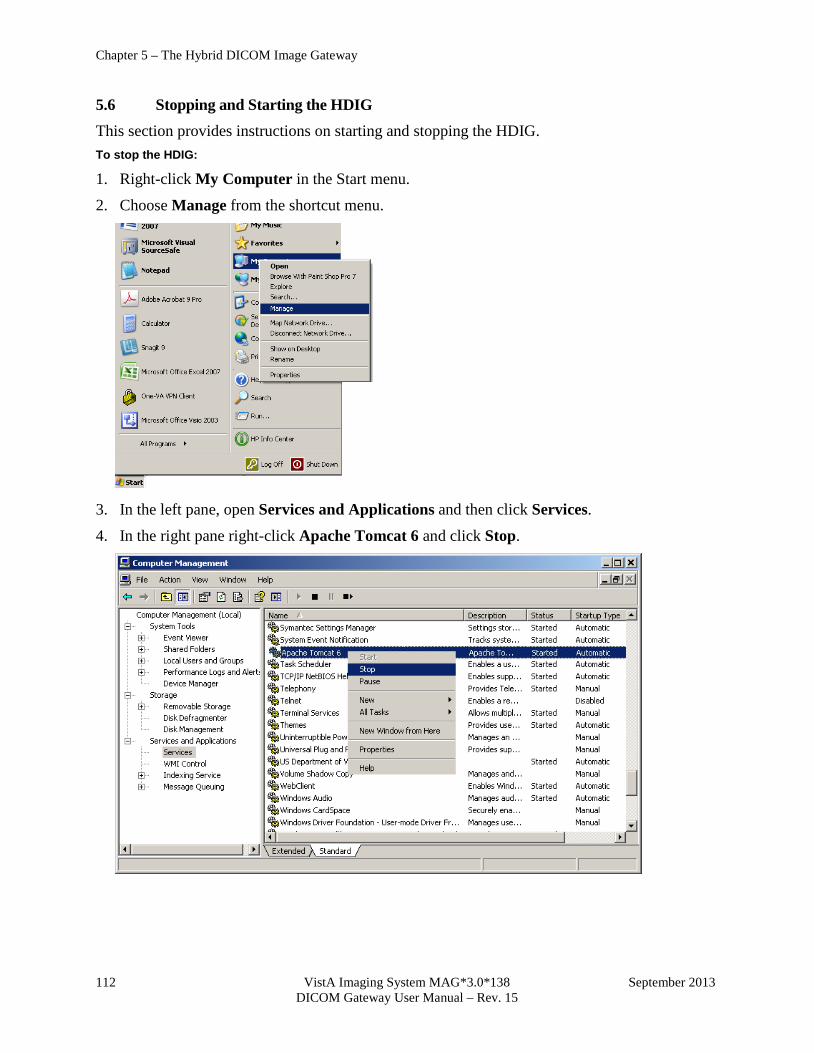
Chapter 5 – The Hybrid DICOM Image Gateway
112 VistA Imaging System MAG*3.0*138 September 2013 DICOM Gateway User Manual – Rev. 15
5.6 Stopping and Starting the HDIG This section provides instructions on starting and stopping the HDIG. To stop the HDIG:
1. Right-click My Computer in the Start menu.
2. Choose Manage from the shortcut menu.
3. In the left pane, open Services and Applications and then click Services.
4. In the right pane right-click Apache Tomcat 6 and click Stop.
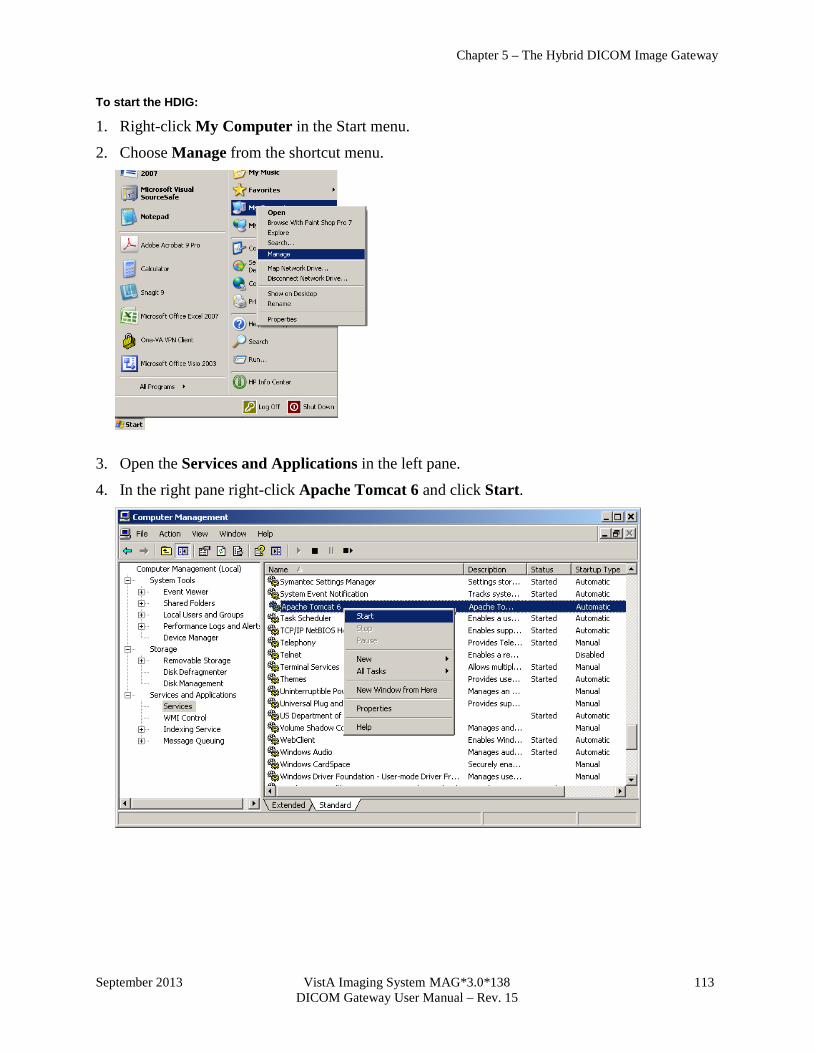
Chapter 5 – The Hybrid DICOM Image Gateway
September 2013 VistA Imaging System MAG*3.0*138 113 DICOM Gateway User Manual – Rev. 15
To start the HDIG:
1. Right-click My Computer in the Start menu.
2. Choose Manage from the shortcut menu.
3. Open the Services and Applications in the left pane.
4. In the right pane right-click Apache Tomcat 6 and click Start.
Chapter 5 – The Hybrid DICOM Image Gateway
114 VistA Imaging System MAG*3.0*138 September 2013 DICOM Gateway User Manual – Rev. 15
5.7 Understanding the HDIG Notification Mechanism The HDIG logs all actions in a log file, including errors in the processing flow, such as when an object fails Information Object Definition (IOD) validation or when it cannot be stored.
MAG*3.0*34 introduces a new email queuing mechanism for warning and critical email messages. The HDIG processes the email queue. The email queue is checked on a configurable time interval. All critical messages collected in this interval are bundled and sent immediately to the designated email address. All warning messages collected in this interval are bundled, but are not sent until one of following criteria are met:
• The configured maximum number of messages in a single bundle is reached. The default is 100.
• The configured maximum message body size is reached. The default is 5 megabytes (MB).
The criteria can be modified by the user as follows:
1. Under C:\VixConfig\, open the NotificationEmailConfiguration.config XML file.
2. Adjust the values appropriately in the following two designated lines:
….
</senderAddress> <maximumMessageCountPerEmail>100</maximumMessageCountPerEmail> <maximumByteSizePerEmail>5242880</maximumByteSizePerEmail>
<notificationTypeToRecipientsMap>
…. Note: 5242880 is 5MB in byte size. Negative or larger values are ignored by the application and 5MB will be used.
These updates ensure that generated e-mails are not sent too frequently to recipient(s) and not too large for the mail server in use. The total size is capped at 5MB.
For more information on HDIG e-mail notifications and warning message bundling, see the chapter titled HDIG Post-Installation in the VistA Imaging HDIG Installation Guide. The HDIG also reports problems in the processing flow using the Legacy DICOM Gateway notification mechanism. It sends e-mail messages to the user or user group whose e-mail address is specified in the configuration of the Legacy DICOM Gateway.
In addition to e-mails, the HDIG reports problems in the processing flow back to the device that sent the DICOM object, if the DICOM object was rejected or could not be stored. These messages are DICOM messages. They can be more detailed, explaining the nature of the problem, such as Reject messages or Resource Error messages, or messages which indicate that the DICOM object could not be processed and stored, but do not provide more detail about the nature of the error. The latter are useful for older devices, which do not support the more explicit and detailed messages. Such devices could crash when they get the more detailed messages.
Chapter 5 – The Hybrid DICOM Image Gateway
September 2013 VistA Imaging System MAG*3.0*138 115 DICOM Gateway User Manual – Rev. 15
These fields in the DICOM AE SECURITY MATRIX file (#2006.9192) define the type of messages that the HDIG sends about errors in the processing flow. • RELAX VALIDATION (#10)
• VALIDATE (#9)
• REJECT (#6)
• WARNING (#7)
• RESERR (#8)
The values are defined for each device, which allows the DICOM Gateway administrator for the site to configure different settings for the individual devices. This is particularly useful for older devices that cannot receive detailed DICOM messages explaining the nature of the error, such as reject messages, but can only receive messages that indicate that there was an error in the validation process.
Note: The settings in these fields are applicable for remote image-acquisition devices that are configured as C-STORE Service Class Users (SCUs).
5.8 Monitoring an HDIG The HDIG Statistics page displays statistical information about the HDIG on which it runs. It allows authorized users to view this information and monitor the operation of each HDIG.
5.8.1 Viewing Statistics About an HDIG The HDIG Statistics page is installed as part of the HDIG installation. You can access it through a Web browser.
To view statistics about a specific HDIG instance, you need:
• The URL to the HDIG Statistics page.
• A Web browser
Note: The HDIG host must be accessible on the network.
To view statistics about an HDIG:
In your browser, open the URL for the HDIG Statistics page:
http://<HDIG hostname>:8080/HDIGManagementWebApp/ViewHDIGStats.jsp
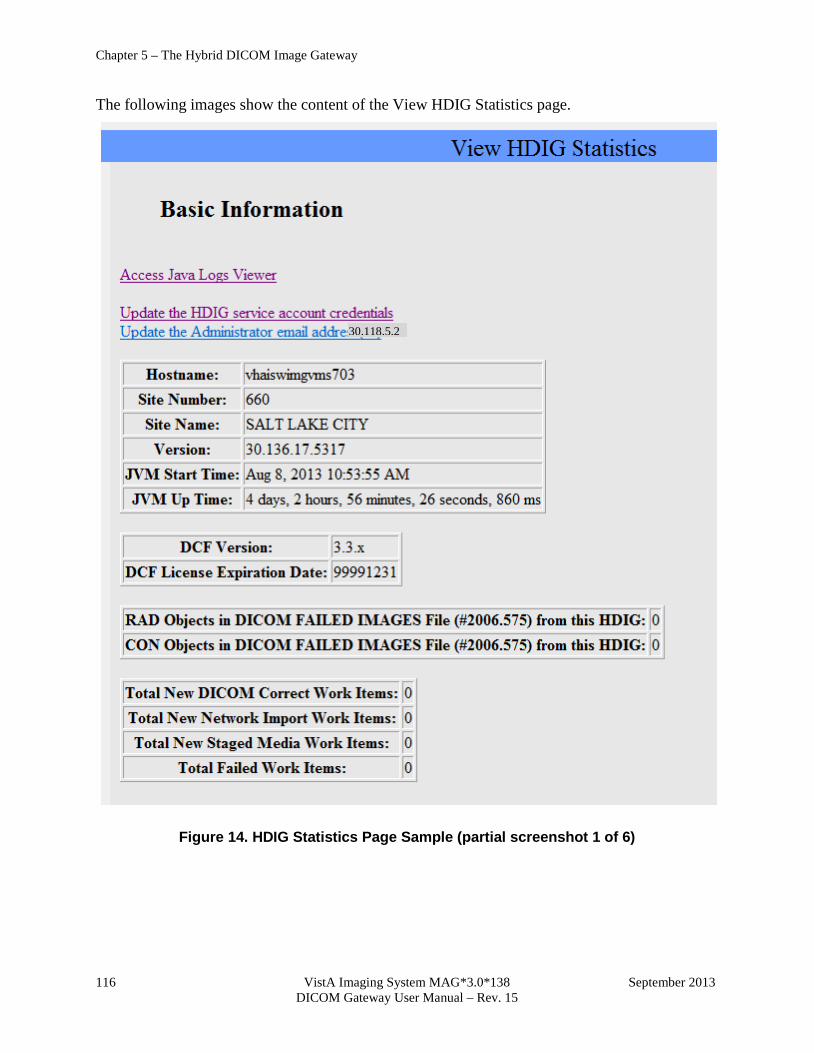
Chapter 5 – The Hybrid DICOM Image Gateway
116 VistA Imaging System MAG*3.0*138 September 2013 DICOM Gateway User Manual – Rev. 15
The following images show the content of the View HDIG Statistics page.
Figure 14. HDIG Statistics Page Sample (partial screenshot 1 of 6)
30.118.5.2

Chapter 5 – The Hybrid DICOM Image Gateway
September 2013 VistA Imaging System MAG*3.0*138 117 DICOM Gateway User Manual – Rev. 15
Figure 15. HDIG Statistics Page Sample (partial screenshot 2 of 6)

Chapter 5 – The Hybrid DICOM Image Gateway
118 VistA Imaging System MAG*3.0*138 September 2013 DICOM Gateway User Manual – Rev. 15
Figure 16. HDIG Statistics Page Sample (partial screenshot 3 of 6)
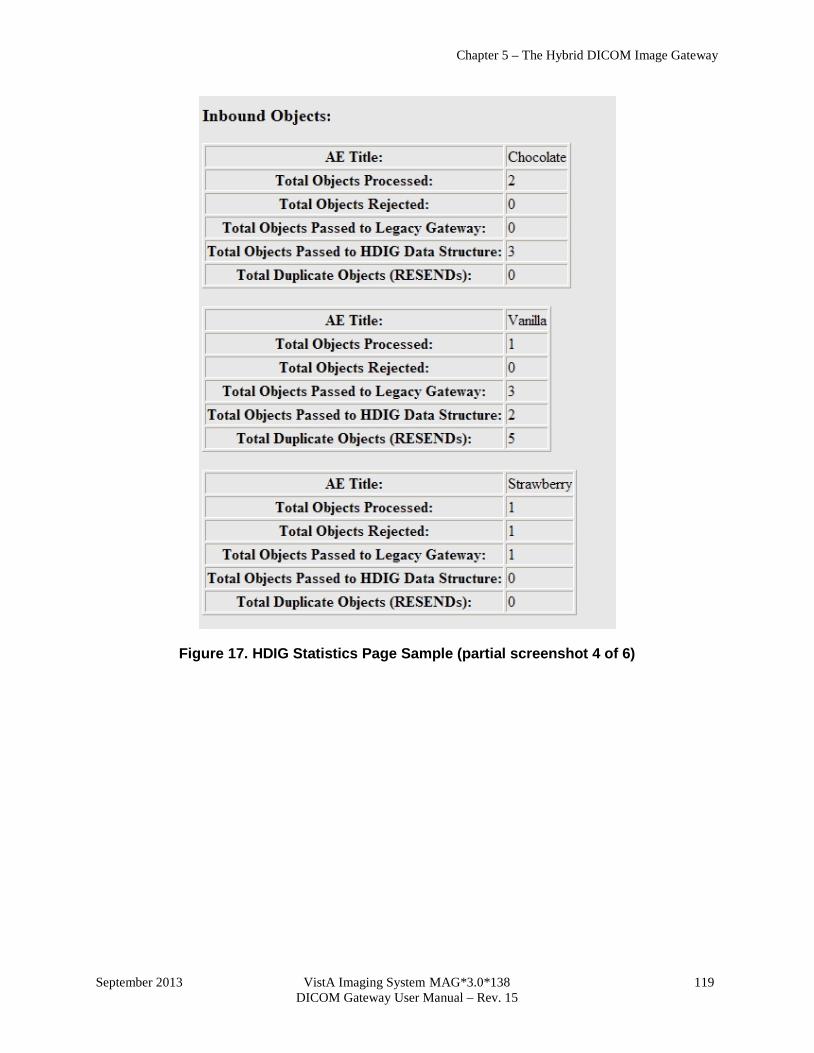
Chapter 5 – The Hybrid DICOM Image Gateway
September 2013 VistA Imaging System MAG*3.0*138 119 DICOM Gateway User Manual – Rev. 15
Figure 17. HDIG Statistics Page Sample (partial screenshot 4 of 6)
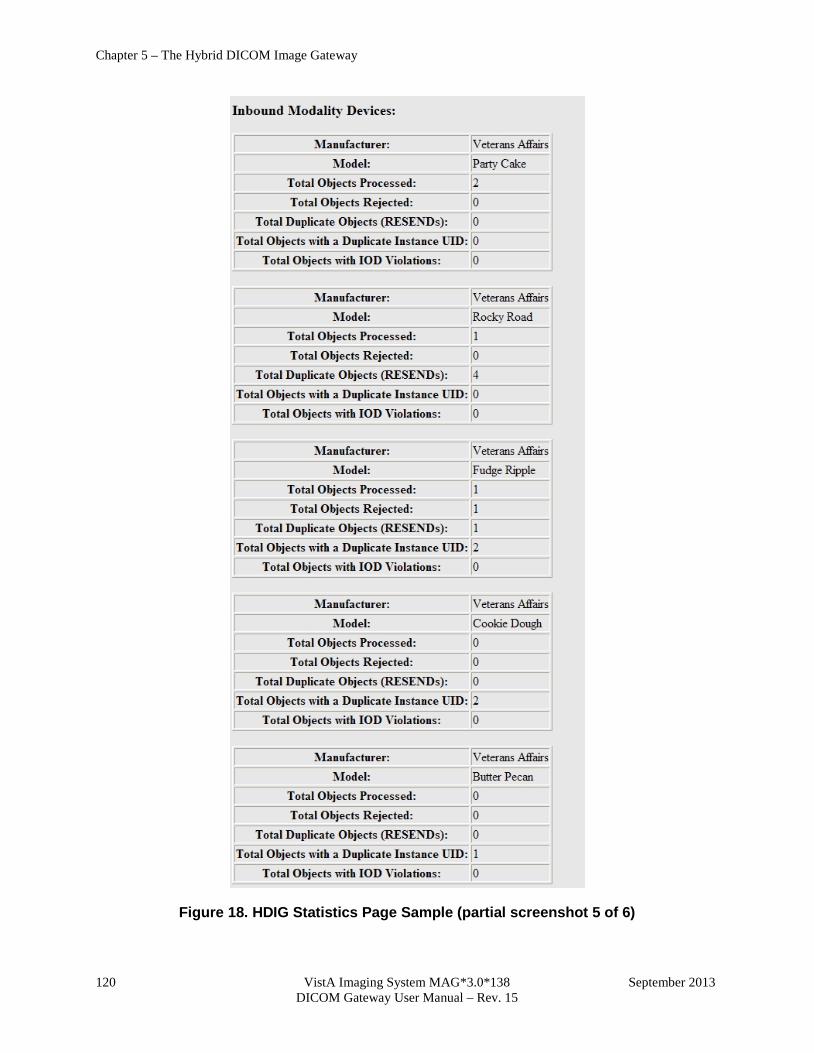
Chapter 5 – The Hybrid DICOM Image Gateway
120 VistA Imaging System MAG*3.0*138 September 2013 DICOM Gateway User Manual – Rev. 15
Figure 18. HDIG Statistics Page Sample (partial screenshot 5 of 6)
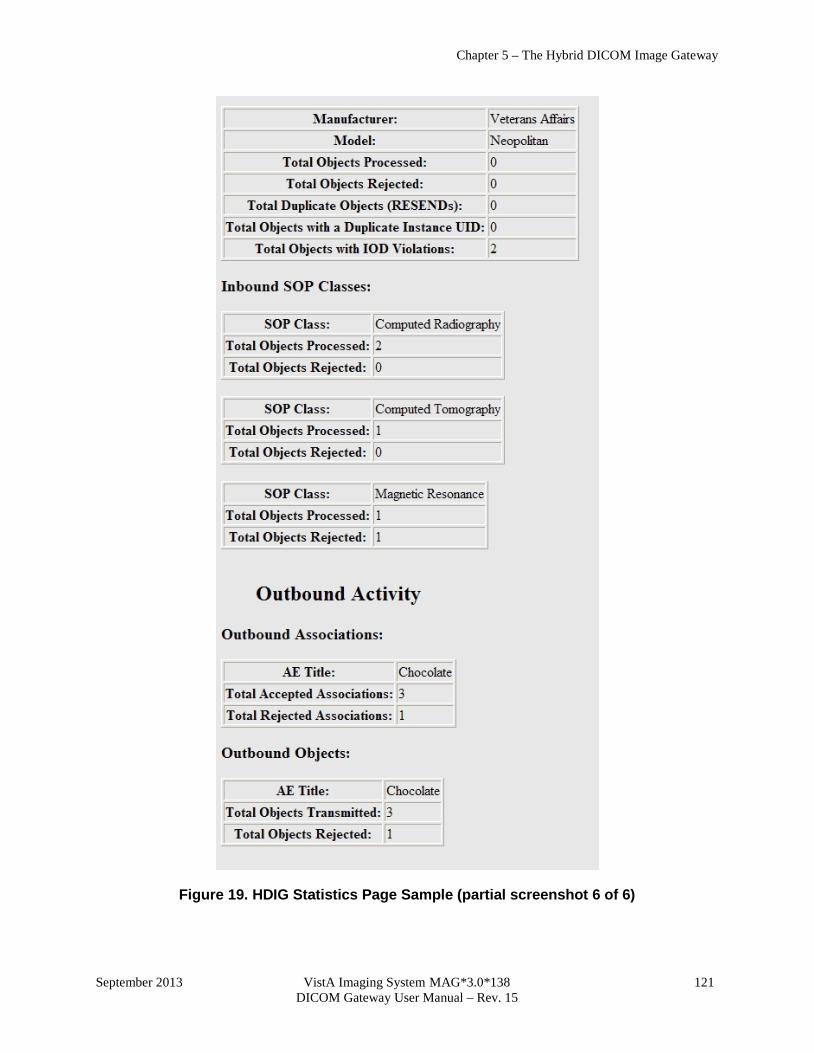
Chapter 5 – The Hybrid DICOM Image Gateway
September 2013 VistA Imaging System MAG*3.0*138 121 DICOM Gateway User Manual – Rev. 15
Figure 19. HDIG Statistics Page Sample (partial screenshot 6 of 6)

Chapter 5 – The Hybrid DICOM Image Gateway
122 VistA Imaging System MAG*3.0*138 September 2013 DICOM Gateway User Manual – Rev. 15
5.8.2 Information the HDIG Statistics Page Provides The HDIG Statistics page provides the following information for a specific HDIG instance.
Table 5. HDIG Statistics Information Group Field Name Description
Basic Information Information about the HDIG: the host on which the HDIG is installed, the license it uses and the studies that it needs to correct.
Update the vHDIG service account credentials
Link for updating the HDIG service account. Users with the MAG VIX ADMIN key can use this link to update the credentials of the HDIG service account for the specific HDIG.
Update the Administrator email address(es)
Link for updating the e-mail addresses that receive notifications that the HDIG service account has invalid credentials. Users with the MAG VIX ADMIN key can use this link to update the address for e-mail notifications.
Hostname The name of the host on which the HDIG is installed.
Site Number The identifier of the site.(The Site ID code that the HDIG is associated with.)
Site Name The name of the site. (The Site Name that corresponds to the Site Number.)
Version The version of the HDIG.
JVM Start Time The date and time when the Java Virtual Machine (and the HDIG) started.
JVM Up Time The time the Java Virtual Machine (and the HDIG) have been running.
DCF Version Version of the DICOM Toolkit (DCF) license.
DCF License Expiration Date
Expiration date of the DICOM Toolkit (DCF) license in the format YYYYMMDD.
RAD objects in DICOM FAILED IMAGES File (#2006.575) from this HDIG
The number of radiology objects that need to be corrected.
CON objects in DICOM FAILED IMAGES File (#2006.575) from this HDIG
The number of Consult objects that need to be corrected.
Total New DICOM Correct Work Items
The number of new DICOM Correct work items waiting to be reconciled.
Total New Network Import Work Items
The number of network import work items waiting to be reconciled.
Total New Staged Media Work Items
The number of new staged media work items waiting to be reconciled.
Total Failed Work Items
The total number of work items that failed processing on the HDIG after they were submitted by the client GUI.
Inbound Activity Information about inbound activity of the HDIG.
DICOM Listening Ports
Information about the TCP/IP ports on which the DICOM listener listens for incoming DICOM objects (such as images, structured reports and other DICOM objects). The ports are configured in the file INSTRUMENT.DIC and set during installation.
Port Number The port number.
Status The current status of the port. The possible values are LISTENING and NOT LISTENING.
Listening Since The length of time since the DICOM listener was restarted for the specific port. The time is in the format YYYYMMDD.
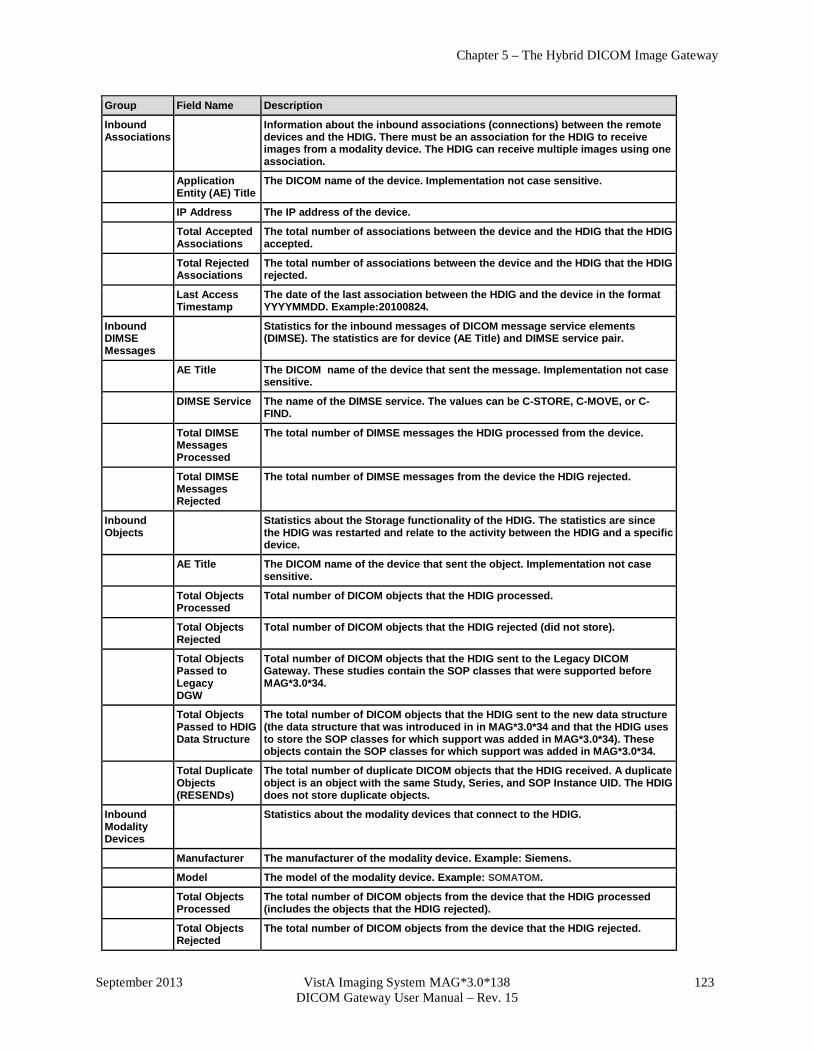
Chapter 5 – The Hybrid DICOM Image Gateway
September 2013 VistA Imaging System MAG*3.0*138 123 DICOM Gateway User Manual – Rev. 15
Group Field Name Description
Inbound Associations
Information about the inbound associations (connections) between the remote devices and the HDIG. There must be an association for the HDIG to receive images from a modality device. The HDIG can receive multiple images using one association.
Application Entity (AE) Title
The DICOM name of the device. Implementation not case sensitive.
IP Address The IP address of the device.
Total Accepted Associations
The total number of associations between the device and the HDIG that the HDIG accepted.
Total Rejected Associations
The total number of associations between the device and the HDIG that the HDIG rejected.
Last Access Timestamp
The date of the last association between the HDIG and the device in the format YYYYMMDD. Example:20100824.
Inbound DIMSE Messages
Statistics for the inbound messages of DICOM message service elements (DIMSE). The statistics are for device (AE Title) and DIMSE service pair.
AE Title The DICOM name of the device that sent the message. Implementation not case sensitive.
DIMSE Service The name of the DIMSE service. The values can be C-STORE, C-MOVE, or C-FIND.
Total DIMSE Messages Processed
The total number of DIMSE messages the HDIG processed from the device.
Total DIMSE Messages Rejected
The total number of DIMSE messages from the device the HDIG rejected.
Inbound Objects
Statistics about the Storage functionality of the HDIG. The statistics are since the HDIG was restarted and relate to the activity between the HDIG and a specific device.
AE Title The DICOM name of the device that sent the object. Implementation not case sensitive.
Total Objects Processed
Total number of DICOM objects that the HDIG processed.
Total Objects Rejected
Total number of DICOM objects that the HDIG rejected (did not store).
Total Objects Passed to Legacy DGW
Total number of DICOM objects that the HDIG sent to the Legacy DICOM Gateway. These studies contain the SOP classes that were supported before MAG*3.0*34.
Total Objects Passed to HDIG Data Structure
The total number of DICOM objects that the HDIG sent to the new data structure (the data structure that was introduced in in MAG*3.0*34 and that the HDIG uses to store the SOP classes for which support was added in MAG*3.0*34). These objects contain the SOP classes for which support was added in MAG*3.0*34.
Total Duplicate Objects (RESENDs)
The total number of duplicate DICOM objects that the HDIG received. A duplicate object is an object with the same Study, Series, and SOP Instance UID. The HDIG does not store duplicate objects.
Inbound Modality Devices
Statistics about the modality devices that connect to the HDIG.
Manufacturer The manufacturer of the modality device. Example: Siemens.
Model The model of the modality device. Example: SOMATOM.
Total Objects Processed
The total number of DICOM objects from the device that the HDIG processed (includes the objects that the HDIG rejected).
Total Objects Rejected
The total number of DICOM objects from the device that the HDIG rejected.
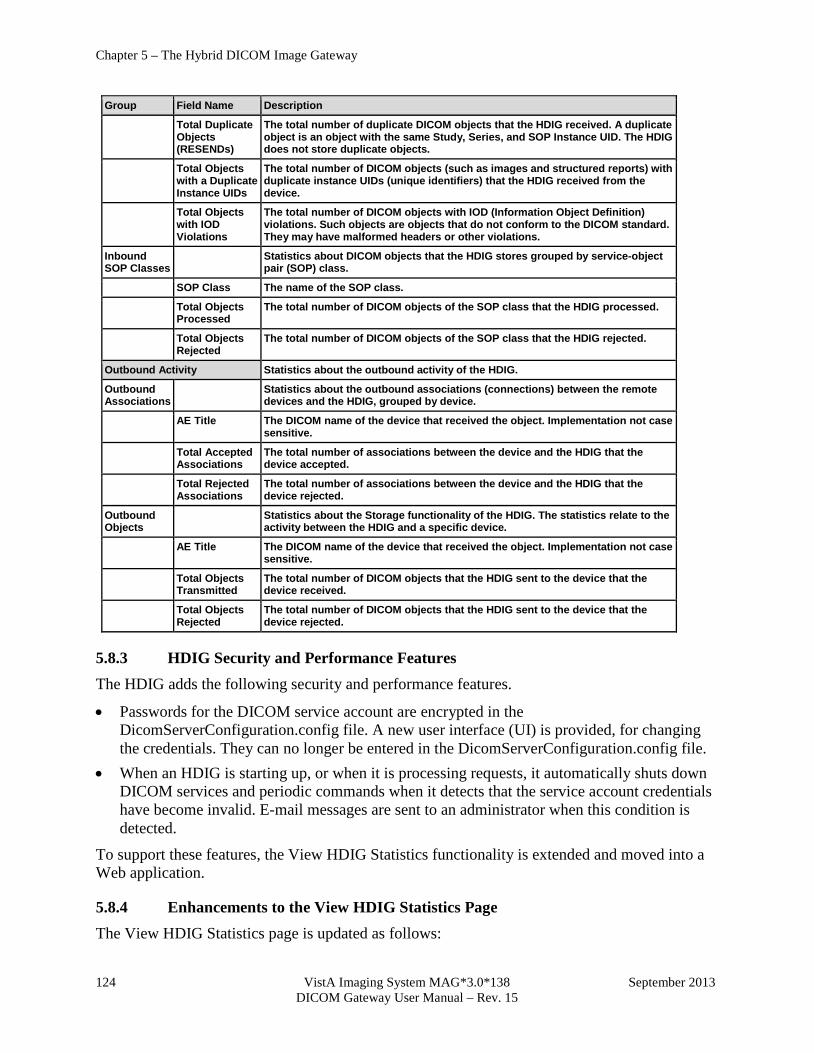
Chapter 5 – The Hybrid DICOM Image Gateway
124 VistA Imaging System MAG*3.0*138 September 2013 DICOM Gateway User Manual – Rev. 15
Group Field Name Description
Total Duplicate Objects (RESENDs)
The total number of duplicate DICOM objects that the HDIG received. A duplicate object is an object with the same Study, Series, and SOP Instance UID. The HDIG does not store duplicate objects.
Total Objects with a Duplicate Instance UIDs
The total number of DICOM objects (such as images and structured reports) with duplicate instance UIDs (unique identifiers) that the HDIG received from the device.
Total Objects with IOD Violations
The total number of DICOM objects with IOD (Information Object Definition) violations. Such objects are objects that do not conform to the DICOM standard. They may have malformed headers or other violations.
Inbound SOP Classes
Statistics about DICOM objects that the HDIG stores grouped by service-object pair (SOP) class.
SOP Class The name of the SOP class.
Total Objects Processed
The total number of DICOM objects of the SOP class that the HDIG processed.
Total Objects Rejected
The total number of DICOM objects of the SOP class that the HDIG rejected.
Outbound Activity Statistics about the outbound activity of the HDIG.
Outbound Associations
Statistics about the outbound associations (connections) between the remote devices and the HDIG, grouped by device.
AE Title The DICOM name of the device that received the object. Implementation not case sensitive.
Total Accepted Associations
The total number of associations between the device and the HDIG that the device accepted.
Total Rejected Associations
The total number of associations between the device and the HDIG that the device rejected.
Outbound Objects
Statistics about the Storage functionality of the HDIG. The statistics relate to the activity between the HDIG and a specific device.
AE Title The DICOM name of the device that received the object. Implementation not case sensitive.
Total Objects Transmitted
The total number of DICOM objects that the HDIG sent to the device that the device received.
Total Objects Rejected
The total number of DICOM objects that the HDIG sent to the device that the device rejected.
5.8.3 HDIG Security and Performance Features The HDIG adds the following security and performance features.
• Passwords for the DICOM service account are encrypted in the DicomServerConfiguration.config file. A new user interface (UI) is provided, for changing the credentials. They can no longer be entered in the DicomServerConfiguration.config file.
• When an HDIG is starting up, or when it is processing requests, it automatically shuts down DICOM services and periodic commands when it detects that the service account credentials have become invalid. E-mail messages are sent to an administrator when this condition is detected.
To support these features, the View HDIG Statistics functionality is extended and moved into a Web application.
5.8.4 Enhancements to the View HDIG Statistics Page The View HDIG Statistics page is updated as follows:

Chapter 5 – The Hybrid DICOM Image Gateway
September 2013 VistA Imaging System MAG*3.0*138 125 DICOM Gateway User Manual – Rev. 15
• A new error message displays at the top of the screen if the server detects that the current service account credentials are invalid.
• A new hyperlink Update the HDIG service account credentials displays. Click the hyperlink to display a new page to update the service account credentials.
• A new hyperlink Update the Administrator email address(es) displays. Click the hyperlink to display a new page to update the email addresses for administrators who should receive notifications if the HDIG detects expired or bad service account credentials.
The View HDIG Statistics Page enhancements are illustrated in the following image.
5.8.4.1 Updating the HDIG Service Account Credentials If the Update the HDIG service account credentials or Update the Administrator email address(es) hyperlink is clicked, then the following login page displays if the user has the MAG VIX ADMIN security key.
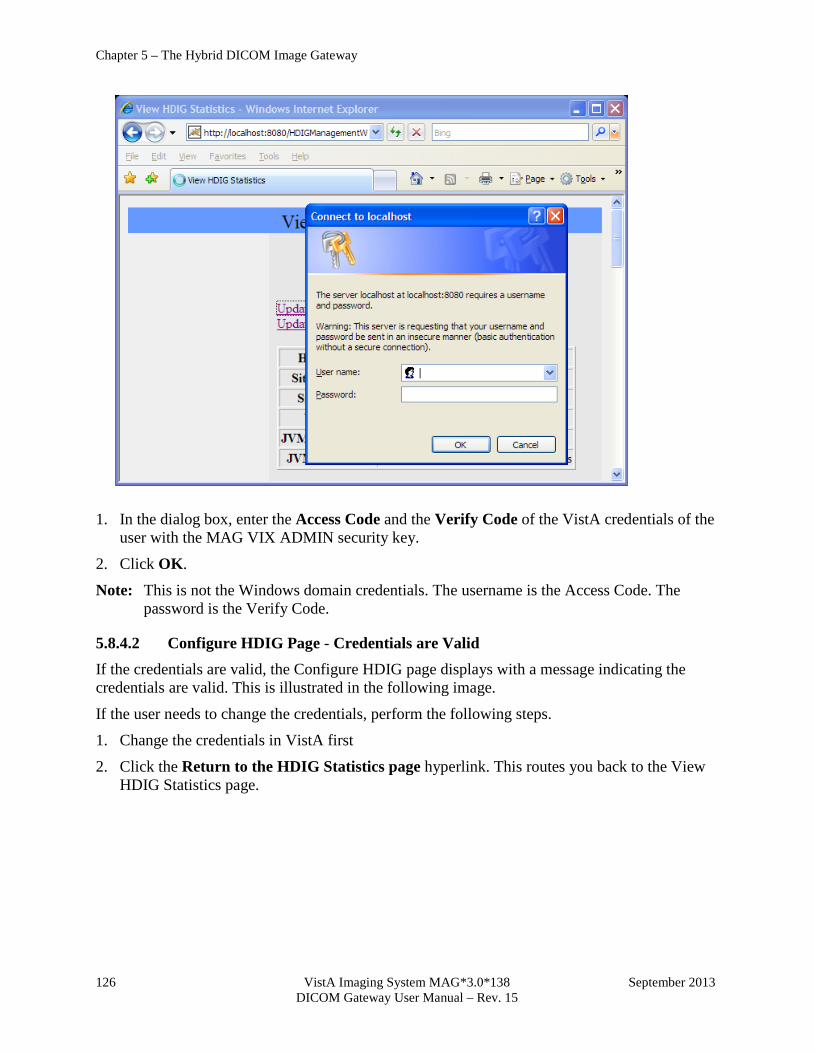
Chapter 5 – The Hybrid DICOM Image Gateway
126 VistA Imaging System MAG*3.0*138 September 2013 DICOM Gateway User Manual – Rev. 15
1. In the dialog box, enter the Access Code and the Verify Code of the VistA credentials of the user with the MAG VIX ADMIN security key.
2. Click OK.
Note: This is not the Windows domain credentials. The username is the Access Code. The password is the Verify Code.
5.8.4.2 Configure HDIG Page - Credentials are Valid If the credentials are valid, the Configure HDIG page displays with a message indicating the credentials are valid. This is illustrated in the following image.
If the user needs to change the credentials, perform the following steps.
1. Change the credentials in VistA first
2. Click the Return to the HDIG Statistics page hyperlink. This routes you back to the View HDIG Statistics page.

Chapter 5 – The Hybrid DICOM Image Gateway
September 2013 VistA Imaging System MAG*3.0*138 127 DICOM Gateway User Manual – Rev. 15
3. Click the Update the HDIG service account credentials hyperlink on the View HDIG Statistics page.
5.8.4.3 Configure HDIG Page - Credentials are Invalid If the credentials are invalid, the Configure HDIG page displays with the capability to update the service account credentials by entering and submitting a new Access Code and Verify Code. This is illustrated in the following image.
If an HDIG or VIX is configured with an incorrect Access/Verify code, then periodic commands, DICOM listeners, and so forth will fail until the credentials are corrected and the server is restarted.
Rather than allowing the server to continue requesting resources with the bad credentials, the server is updated to do the following:
• Detect bad credentials.
• Shut down the processes (listeners, periodic commands, and so forth) that are using the invalid credentials, to prevent them from using broker connections that will be rejected anyway.
• Notify an admin via email that the credentials are invalid and the service(s) has been shut down.
• Add a notification on the server health page that the configured service account credentials are invalid.
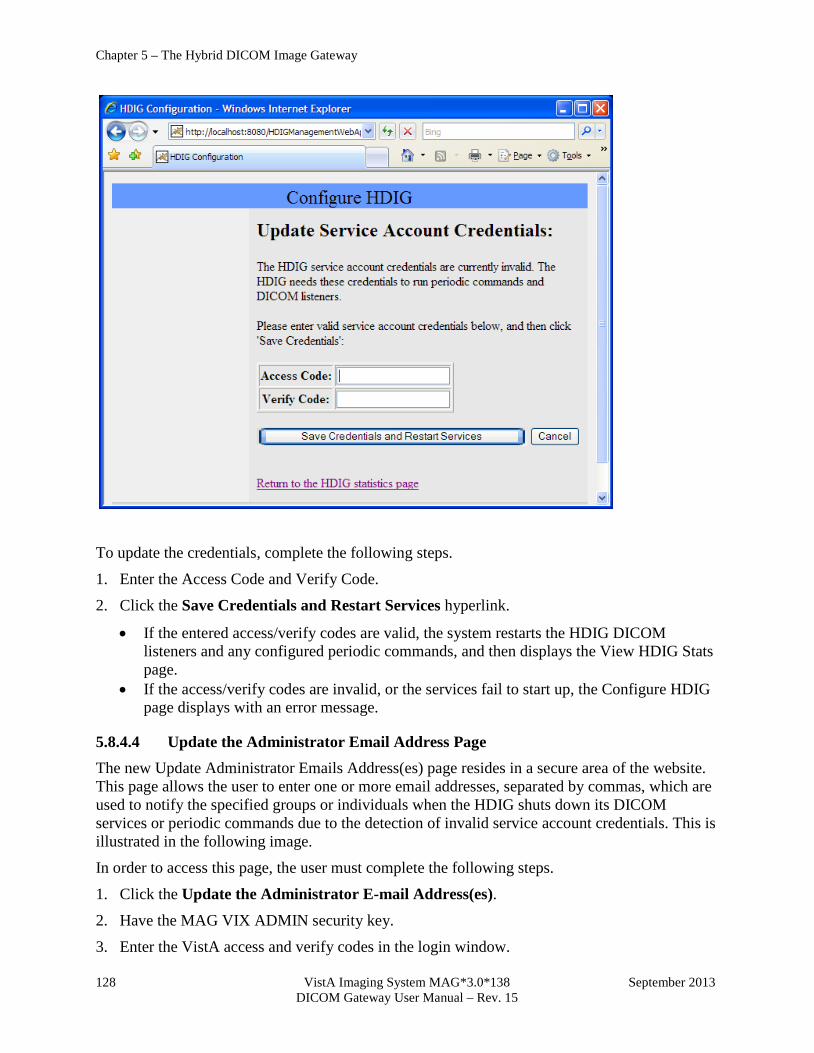
Chapter 5 – The Hybrid DICOM Image Gateway
128 VistA Imaging System MAG*3.0*138 September 2013 DICOM Gateway User Manual – Rev. 15
To update the credentials, complete the following steps.
1. Enter the Access Code and Verify Code.
2. Click the Save Credentials and Restart Services hyperlink.
• If the entered access/verify codes are valid, the system restarts the HDIG DICOM listeners and any configured periodic commands, and then displays the View HDIG Stats page.
• If the access/verify codes are invalid, or the services fail to start up, the Configure HDIG page displays with an error message.
5.8.4.4 Update the Administrator Email Address Page The new Update Administrator Emails Address(es) page resides in a secure area of the website. This page allows the user to enter one or more email addresses, separated by commas, which are used to notify the specified groups or individuals when the HDIG shuts down its DICOM services or periodic commands due to the detection of invalid service account credentials. This is illustrated in the following image.
In order to access this page, the user must complete the following steps.
1. Click the Update the Administrator E-mail Address(es). 2. Have the MAG VIX ADMIN security key.
3. Enter the VistA access and verify codes in the login window.
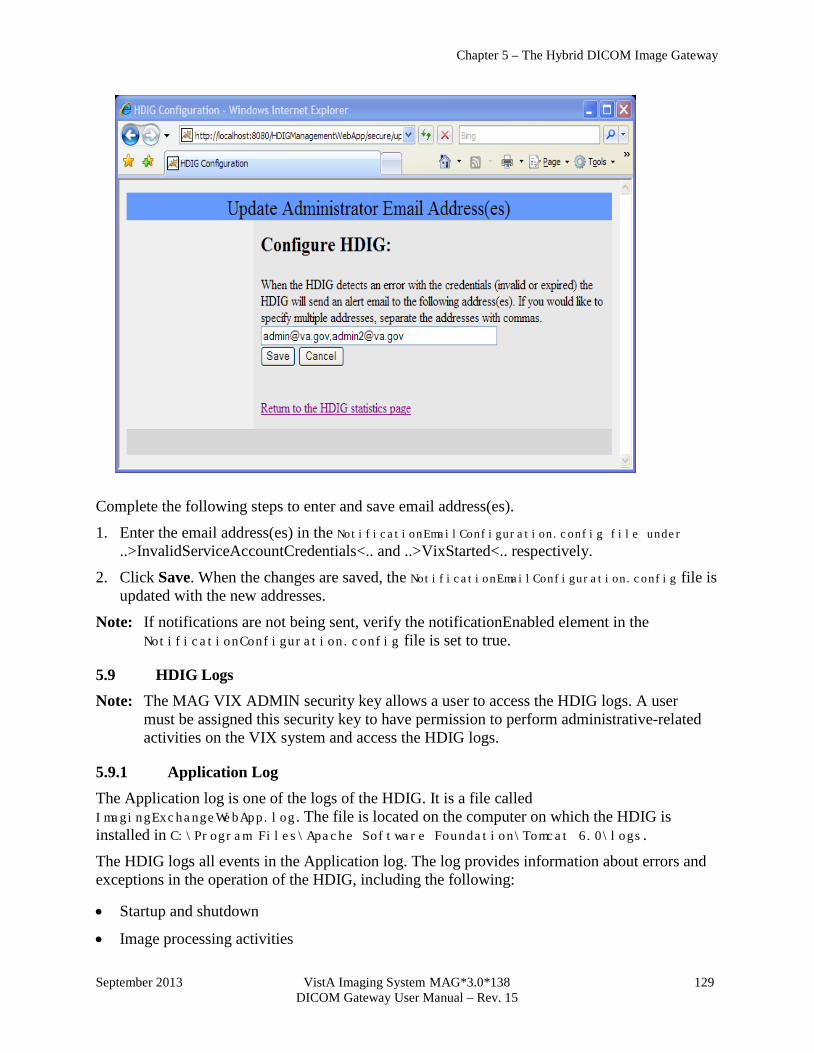
Chapter 5 – The Hybrid DICOM Image Gateway
September 2013 VistA Imaging System MAG*3.0*138 129 DICOM Gateway User Manual – Rev. 15
Complete the following steps to enter and save email address(es).
1. Enter the email address(es) in the NotificationEmailConfiguration.config file under ..>InvalidServiceAccountCredentials<.. and ..>VixStarted<.. respectively.
2. Click Save. When the changes are saved, the NotificationEmailConfiguration.config file is updated with the new addresses.
Note: If notifications are not being sent, verify the notificationEnabled element in the NotificationConfiguration.config file is set to true.
5.9 HDIG Logs Note: The MAG VIX ADMIN security key allows a user to access the HDIG logs. A user must be assigned this security key to have permission to perform administrative-related activities on the VIX system and access the HDIG logs.
5.9.1 Application Log The Application log is one of the logs of the HDIG. It is a file called ImagingExchangeWebApp.log. The file is located on the computer on which the HDIG is installed in C:\Program Files\Apache Software Foundation\Tomcat 6.0\logs.
The HDIG logs all events in the Application log. The log provides information about errors and exceptions in the operation of the HDIG, including the following:
• Startup and shutdown
• Image processing activities
Chapter 5 – The Hybrid DICOM Image Gateway
130 VistA Imaging System MAG*3.0*138 September 2013 DICOM Gateway User Manual – Rev. 15
• Errors and exceptions
You can use the information in the Application log for maintenance and troubleshooting tasks, such as the following:
• Making sure that the HDIG is operating properly and processing images after initial installation or an upgrade.
• Verifying image processing after adding a new modality.
• Troubleshooting errors in the operation of the HDIG.
• Getting information and notifications of critical conditions or problems in the operation of the HDIG.
The HDIG creates a new log file every day and appends the date to the name of the file.
Example: ImagingExchangeWebApp.log.2011-06-21.
The Application log is encrypted because it may contain protected health information. Access to the Application log is restricted to authorized users.
5.9.1.1 Types of Events the Application Log Records The Application log includes events related to HDIG operation, including Query/Retrieve events. It includes all events written to the Audit log. For more information about these events, see section 7.4.
In addition to this, it includes troubleshooting information. Because the Application log can be accessed by authorized support and administrative personnel, it is useful for troubleshooting.
5.9.2 HDIG Summary Log The HDIGSummary log is one of the logs of the HDIG. It is useful for detecting and correcting errors in the operation of the HDIG, because it contains troubleshooting information in plain language – a format that is simple and easy to read and understand. In addition to this, the log is not encrypted and authorized support and administrative personnel can access it.
The HDIGSummary log is a file called HDIGSummary.log. The file is located on the computer on which the HDIG is installed in C:\Program Files\Apache Software Foundation\Tomcat 6.0\logs.
The HDIG creates a new log file every day and appends the date to the name of the file.
Example: HDIGSummary.log.2011-06-21.
5.9.2.1 Features of the HDIGSummary Log
• The log does NOT contain protected health information(PHI).
• The log is NOT encrypted.
• Access to the log is restricted to authorized users, but does not require a security key.
• The log includes only summary level warning and error events related to HDIG operation, including Query/Retrieve events.
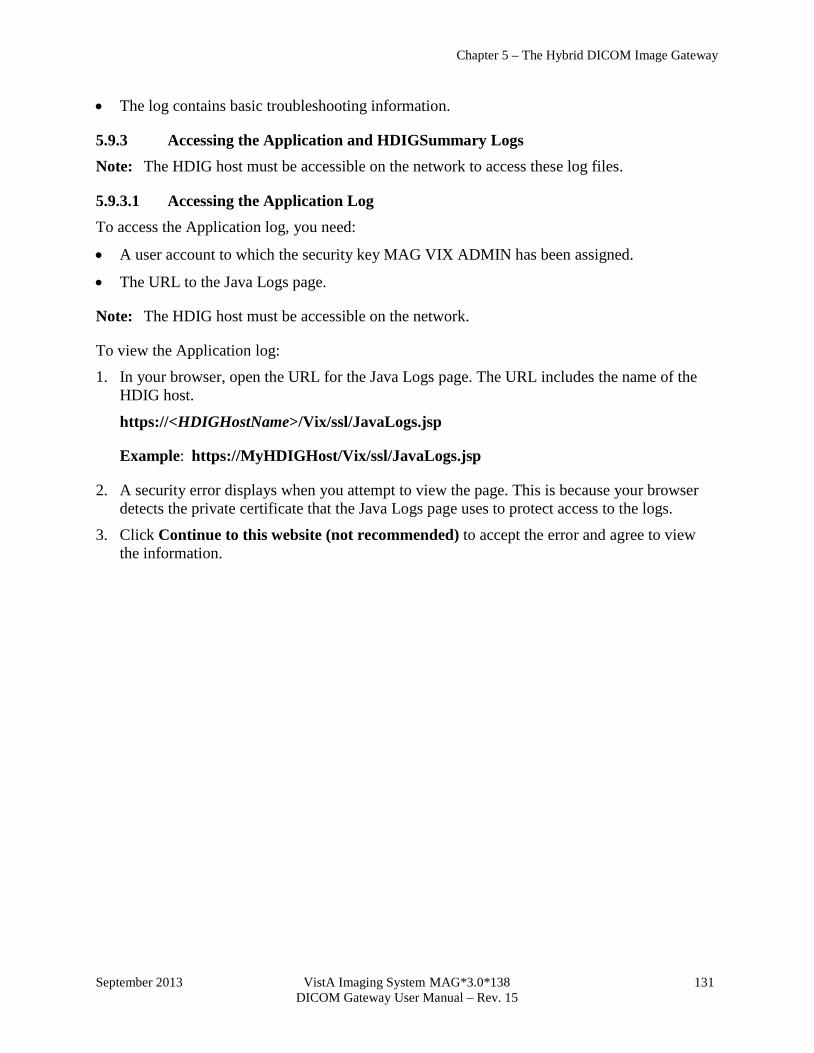
Chapter 5 – The Hybrid DICOM Image Gateway
September 2013 VistA Imaging System MAG*3.0*138 131 DICOM Gateway User Manual – Rev. 15
• The log contains basic troubleshooting information.
5.9.3 Accessing the Application and HDIGSummary Logs Note: The HDIG host must be accessible on the network to access these log files.
5.9.3.1 Accessing the Application Log To access the Application log, you need:
• A user account to which the security key MAG VIX ADMIN has been assigned.
• The URL to the Java Logs page.
Note: The HDIG host must be accessible on the network.
To view the Application log:
1. In your browser, open the URL for the Java Logs page. The URL includes the name of the HDIG host.
https://<HDIGHostName>/Vix/ssl/JavaLogs.jsp
Example: https://MyHDIGHost/Vix/ssl/JavaLogs.jsp
2. A security error displays when you attempt to view the page. This is because your browser detects the private certificate that the Java Logs page uses to protect access to the logs.
3. Click Continue to this website (not recommended) to accept the error and agree to view the information.
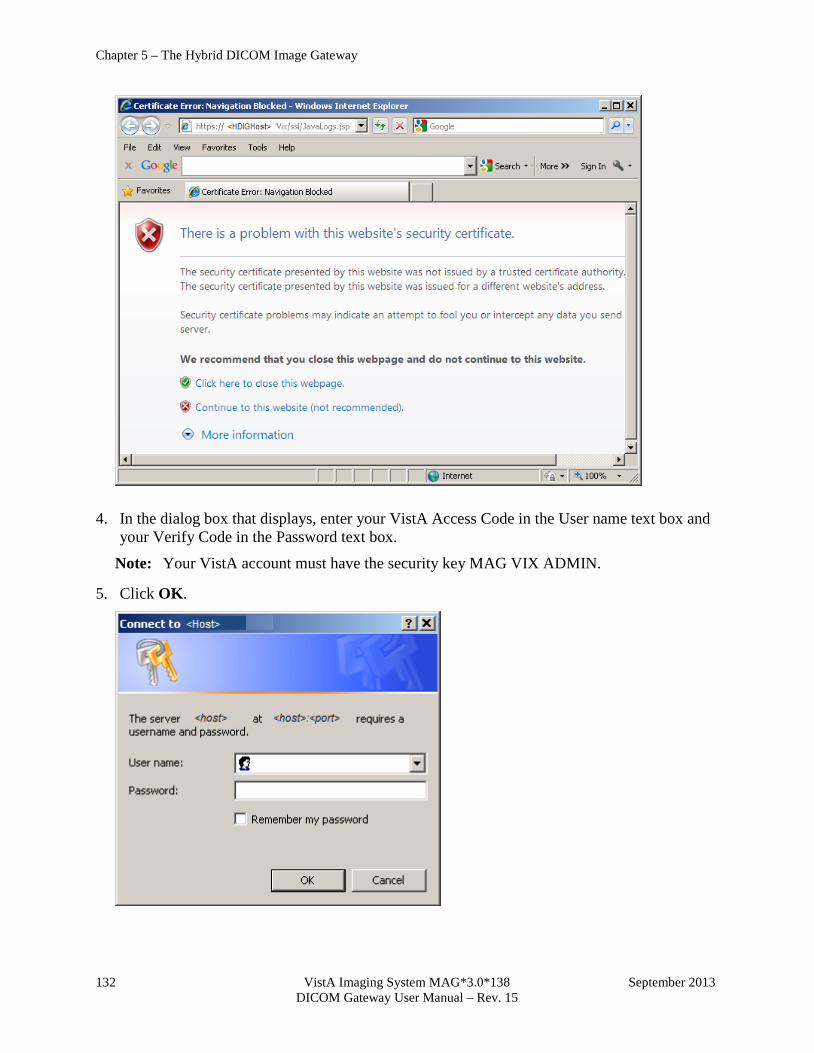
Chapter 5 – The Hybrid DICOM Image Gateway
132 VistA Imaging System MAG*3.0*138 September 2013 DICOM Gateway User Manual – Rev. 15
4. In the dialog box that displays, enter your VistA Access Code in the User name text box and your Verify Code in the Password text box.
Note: Your VistA account must have the security key MAG VIX ADMIN.
5. Click OK.
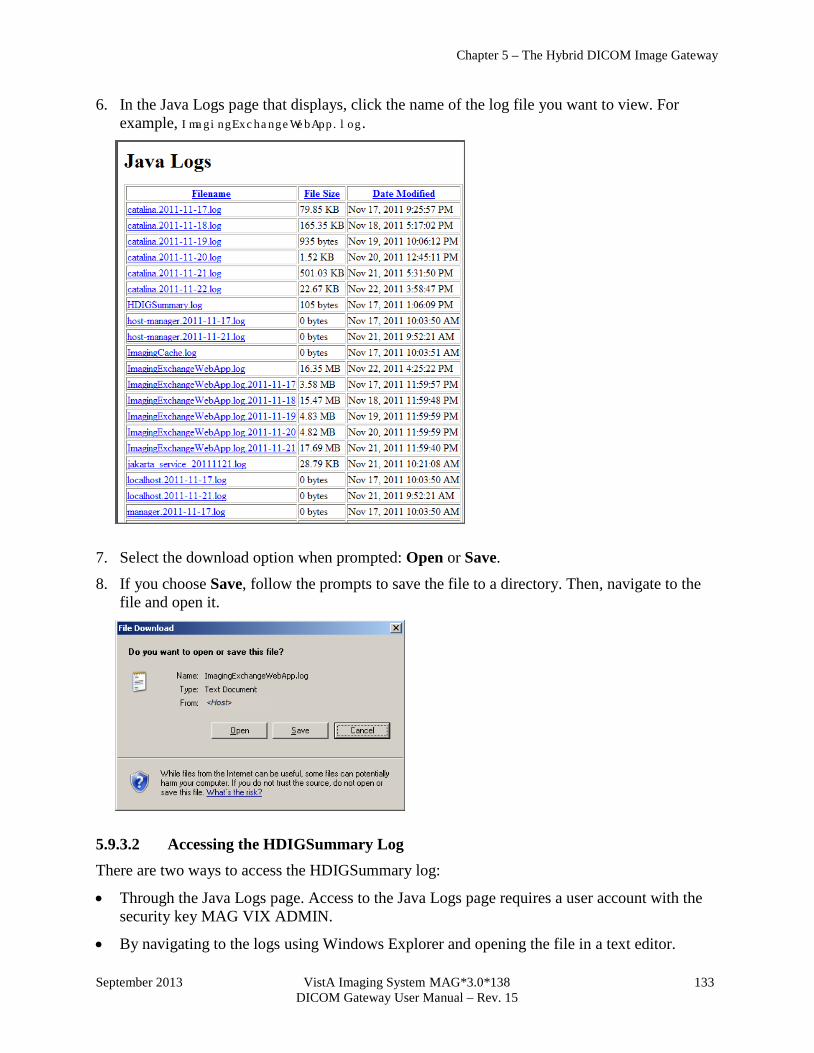
Chapter 5 – The Hybrid DICOM Image Gateway
September 2013 VistA Imaging System MAG*3.0*138 133 DICOM Gateway User Manual – Rev. 15
6. In the Java Logs page that displays, click the name of the log file you want to view. For example, ImagingExchangeWebApp.log.
7. Select the download option when prompted: Open or Save.
8. If you choose Save, follow the prompts to save the file to a directory. Then, navigate to the file and open it.
5.9.3.2 Accessing the HDIGSummary Log There are two ways to access the HDIGSummary log:
• Through the Java Logs page. Access to the Java Logs page requires a user account with the security key MAG VIX ADMIN.
• By navigating to the logs using Windows Explorer and opening the file in a text editor.
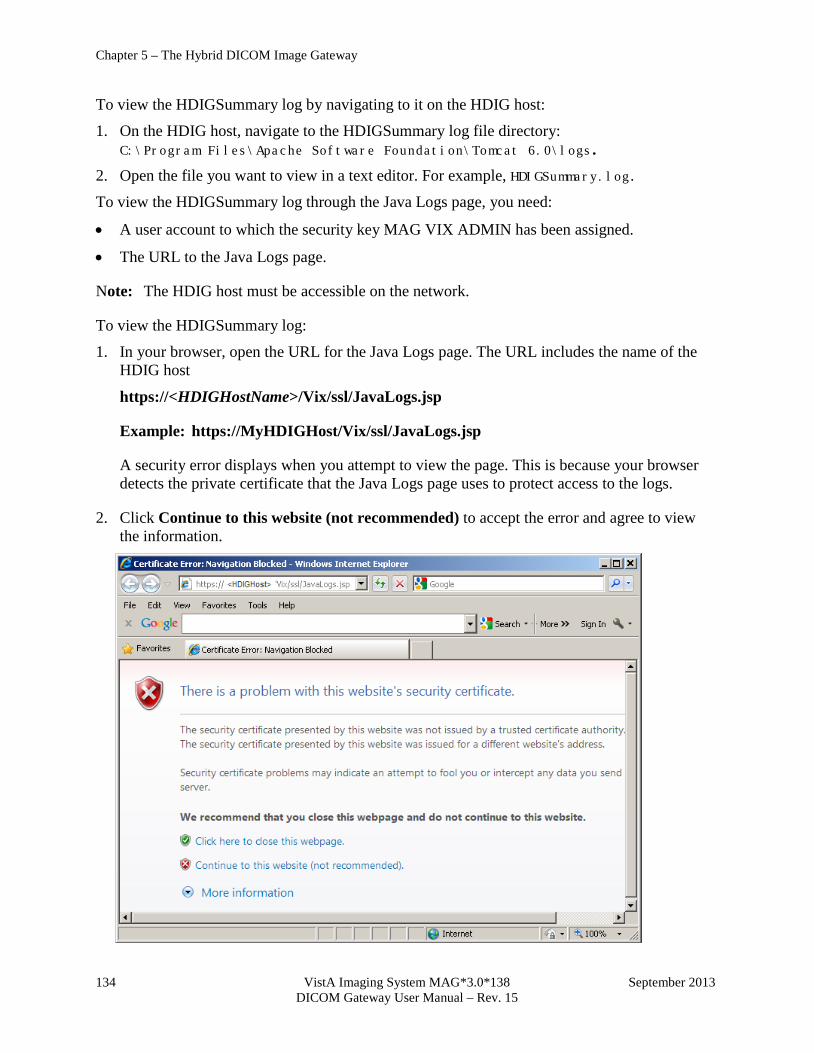
Chapter 5 – The Hybrid DICOM Image Gateway
134 VistA Imaging System MAG*3.0*138 September 2013 DICOM Gateway User Manual – Rev. 15
To view the HDIGSummary log by navigating to it on the HDIG host:
1. On the HDIG host, navigate to the HDIGSummary log file directory: C:\Program Files\Apache Software Foundation\Tomcat 6.0\logs.
2. Open the file you want to view in a text editor. For example, HDIGSummary.log.
To view the HDIGSummary log through the Java Logs page, you need:
• A user account to which the security key MAG VIX ADMIN has been assigned.
• The URL to the Java Logs page.
Note: The HDIG host must be accessible on the network.
To view the HDIGSummary log:
1. In your browser, open the URL for the Java Logs page. The URL includes the name of the HDIG host
https://<HDIGHostName>/Vix/ssl/JavaLogs.jsp
Example: https://MyHDIGHost/Vix/ssl/JavaLogs.jsp
A security error displays when you attempt to view the page. This is because your browser detects the private certificate that the Java Logs page uses to protect access to the logs.
2. Click Continue to this website (not recommended) to accept the error and agree to view the information.
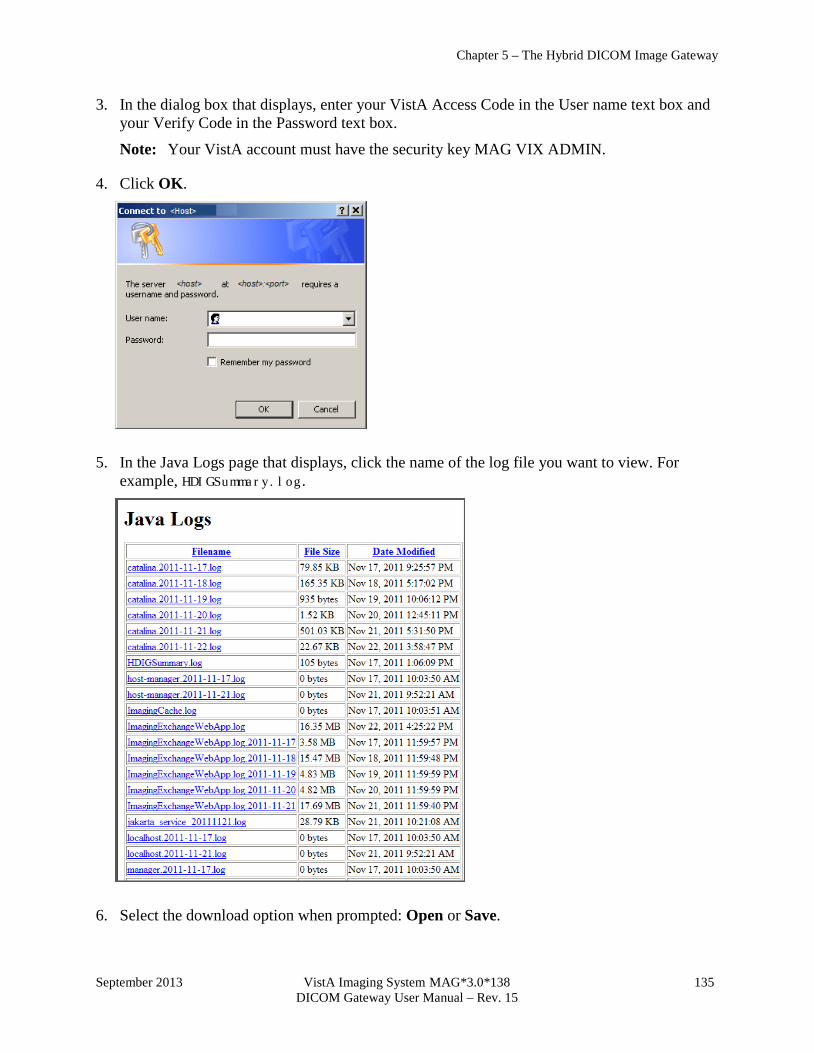
Chapter 5 – The Hybrid DICOM Image Gateway
September 2013 VistA Imaging System MAG*3.0*138 135 DICOM Gateway User Manual – Rev. 15
3. In the dialog box that displays, enter your VistA Access Code in the User name text box and your Verify Code in the Password text box.
Note: Your VistA account must have the security key MAG VIX ADMIN.
4. Click OK.
5. In the Java Logs page that displays, click the name of the log file you want to view. For example, HDIGSummary.log.
6. Select the download option when prompted: Open or Save.

Chapter 5 – The Hybrid DICOM Image Gateway
136 VistA Imaging System MAG*3.0*138 September 2013 DICOM Gateway User Manual – Rev. 15
7. If you choose Save, follow the prompts to save the file to a directory. Then, navigate to the file and open it.
5.9.3.3 Sample of the Application Log This section shows a sample of the Application log. The HDIG creates a new log file every day and appends the date to the name of the file.
21 Jun 2011 17:46:50,440 WARN [Thread-1] (ImageXChangeHttpCommonsSender.java:367) - Method [/VistaWebSvcs/ImagingExchangeSiteService.asmx] on target [http://vhaiswimgvms720] succeeded, parsing response. 21 Jun 2011 17:46:50,503 WARN [Thread-1] (ImageXChangeHttpCommonsSender.java:367) - Method [/VistaWebSvcs/siteservice.asmx] on target [http://vhaiswimgvms720] succeeded, parsing response. 21 Jun 2011 17:46:50,549 WARN [Thread-1] (RouterImpl.java:102) - The following routing overrides are in place: gov.va.med.imaging.vistadatasource.VistaDelegateRedirector@56c3cf, 21 Jun 2011 17:46:50,612 WARN [Thread-1] (ImageXChangeHttpCommonsSender.java:367) - Method [/VistaWebSvcs/ImagingExchangeSiteService.asmx] on target [http://vhaiswimgvms720] succeeded, parsing response. 21 Jun 2011 17:46:50,628 WARN [Thread-1] (ImageXChangeHttpCommonsSender.java:367) - Method [/VistaWebSvcs/siteservice.asmx] on target [http://vhaiswimgvms720] succeeded, parsing response. 21 Jun 2011 17:46:53,878 INFO [Thread-1] (DicomEngineAdapter.java:102) - Dicom Toolkit Layer: ...Starting Authorization process. 21 Jun 2011 17:46:55,518 INFO [Thread-1] (DicomEngineAdapter.java:470) - DCF License Check: valid 21 Jun 2011 17:46:56,581 INFO [Thread-1] (DicomEngineAdapter.java:367) - Loading DICOM instrument configuration. Found 3 entries. 21 Jun 2011 17:46:56,612 INFO [Thread-1] (DicomEngineAdapter.java:374) - Loading DICOM modality configuration. Found 4 entries. 21 Jun 2011 17:46:56,628 INFO [Thread-1] (DicomEngineAdapter.java:384) - Loading DGW E-mail/config Info. Found 1 entry. 21 Jun 2011 17:46:56,753 INFO [Thread-1] (DicomEngineAdapter.java:392) - Loading the DICOM SOP Class UID Actions configuration. Found 125 entries. 21 Jun 2011 17:46:56,753 INFO [Thread-1] (DicomEngineAdapter.java:245) - Starting a listener on port 60100 for instrument 'Fuji AC3 CR, Room 2156' (CR1) located at site 'SALT LAKE CITY' (660) 21 Jun 2011 17:46:56,768 INFO [Thread-1] (DicomEngineAdapter.java:245) - Starting a listener on port 60120 for instrument 'GE High Speed Advantage, Room 2142' (CT1) located at site 'SALT LAKE CITY' (660) 21 Jun 2011 17:46:56,768 INFO [Thread-1] (DicomEngineAdapter.java:245) - Starting a
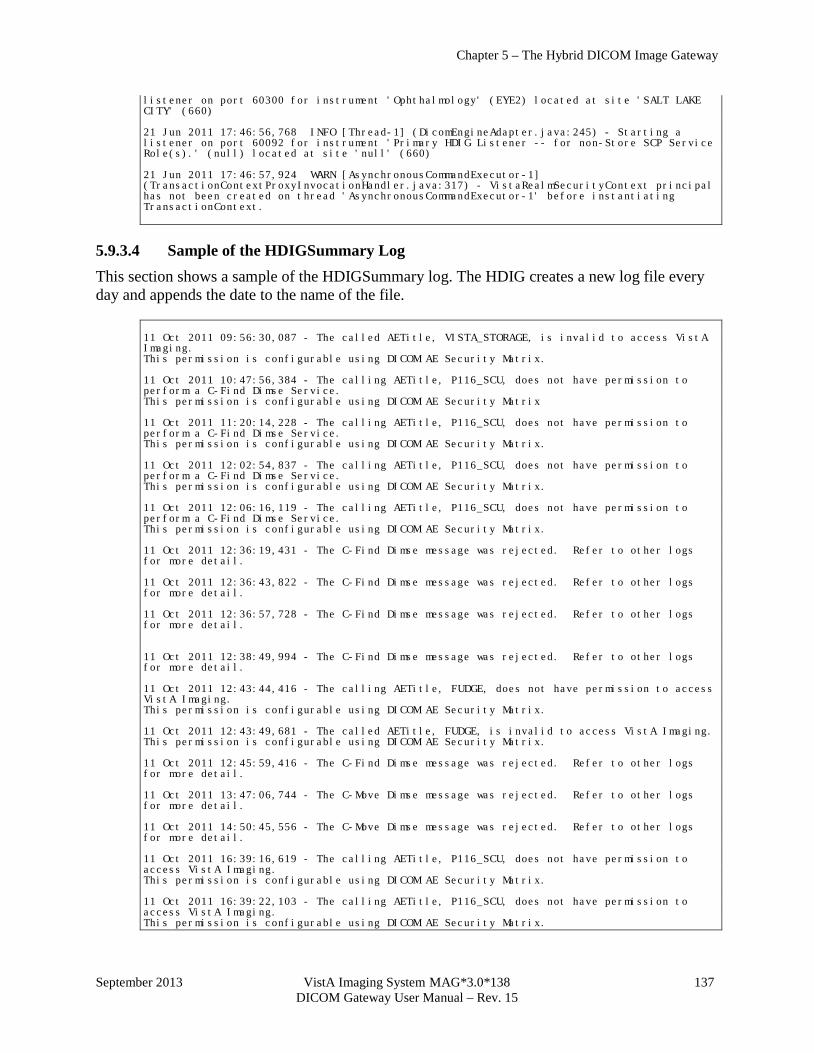
Chapter 5 – The Hybrid DICOM Image Gateway
September 2013 VistA Imaging System MAG*3.0*138 137 DICOM Gateway User Manual – Rev. 15
listener on port 60300 for instrument 'Ophthalmology' (EYE2) located at site 'SALT LAKE CITY' (660) 21 Jun 2011 17:46:56,768 INFO [Thread-1] (DicomEngineAdapter.java:245) - Starting a listener on port 60092 for instrument 'Primary HDIG Listener -- for non-Store SCP Service Role(s).' (null) located at site 'null' (660) 21 Jun 2011 17:46:57,924 WARN [AsynchronousCommandExecutor-1] (TransactionContextProxyInvocationHandler.java:317) - VistaRealmSecurityContext principal has not been created on thread 'AsynchronousCommandExecutor-1' before instantiating TransactionContext.
5.9.3.4 Sample of the HDIGSummary Log This section shows a sample of the HDIGSummary log. The HDIG creates a new log file every day and appends the date to the name of the file.
11 Oct 2011 09:56:30,087 - The called AETitle, VISTA_STORAGE, is invalid to access VistA Imaging. This permission is configurable using DICOM AE Security Matrix. 11 Oct 2011 10:47:56,384 - The calling AETitle, P116_SCU, does not have permission to perform a C-Find Dimse Service. This permission is configurable using DICOM AE Security Matrix 11 Oct 2011 11:20:14,228 - The calling AETitle, P116_SCU, does not have permission to perform a C-Find Dimse Service. This permission is configurable using DICOM AE Security Matrix. 11 Oct 2011 12:02:54,837 - The calling AETitle, P116_SCU, does not have permission to perform a C-Find Dimse Service. This permission is configurable using DICOM AE Security Matrix. 11 Oct 2011 12:06:16,119 - The calling AETitle, P116_SCU, does not have permission to perform a C-Find Dimse Service. This permission is configurable using DICOM AE Security Matrix. 11 Oct 2011 12:36:19,431 - The C-Find Dimse message was rejected. Refer to other logs for more detail. 11 Oct 2011 12:36:43,822 - The C-Find Dimse message was rejected. Refer to other logs for more detail. 11 Oct 2011 12:36:57,728 - The C-Find Dimse message was rejected. Refer to other logs for more detail. 11 Oct 2011 12:38:49,994 - The C-Find Dimse message was rejected. Refer to other logs for more detail. 11 Oct 2011 12:43:44,416 - The calling AETitle, FUDGE, does not have permission to access VistA Imaging. This permission is configurable using DICOM AE Security Matrix. 11 Oct 2011 12:43:49,681 - The called AETitle, FUDGE, is invalid to access VistA Imaging. This permission is configurable using DICOM AE Security Matrix. 11 Oct 2011 12:45:59,416 - The C-Find Dimse message was rejected. Refer to other logs for more detail. 11 Oct 2011 13:47:06,744 - The C-Move Dimse message was rejected. Refer to other logs for more detail. 11 Oct 2011 14:50:45,556 - The C-Move Dimse message was rejected. Refer to other logs for more detail. 11 Oct 2011 16:39:16,619 - The calling AETitle, P116_SCU, does not have permission to access VistA Imaging. This permission is configurable using DICOM AE Security Matrix. 11 Oct 2011 16:39:22,103 - The calling AETitle, P116_SCU, does not have permission to access VistA Imaging. This permission is configurable using DICOM AE Security Matrix.
Chapter 5 – The Hybrid DICOM Image Gateway
138 VistA Imaging System MAG*3.0*138 September 2013 DICOM Gateway User Manual – Rev. 15
5.9.4 Patient Security Logging for Sensitive Patients There are two categories of sensitive patients:
• VIPs • Employees
For more information about the Security log, see the VistA Imaging HDIG Installation Guide.
September 2013 VistA Imaging System MAG*3.0*138 139 DICOM Gateway User Manual – Rev. 15
Chapter 6 Routing Note: Routing does not work on SOP classes introduced with MAG*3.0*34, or have any relation to the operation of the HDIG. The information in this chapter refers to Legacy DICOM Gateway functionality prior to MAG*3.0*34.
In VistA Imaging, routing is the combination of methods and software used to identify and transmit exams produced at one site to a storage location at another site. Routing takes two forms: autorouting, and on-demand routing.
In autorouting, automatically selected images are transmitted to one or more destinations. Images are selected based on a predefined set of routing rules. Autorouting functions are managed using the Routing Gateway.
In on-demand routing, manually selected exams are transmitted to one or more destinations. Exams are selected using the VistARad diagnostic workstation and are transmitted by the Routing Gateway.
A properly implemented routing system can streamline a site’s Imaging workflow. Scenarios where routing can be used include:
• Workload sharing between institutions or service providers
• Rapid access of exams at remote clinics or other facilities
• Remote specialist interpretation or consultation
• Off-hours, holiday, or emergency services
• Off-site contract radiology services for primary interpretation
6.1 Routing Menu Options The menu options for the Routing software are: 1. Start the Transmission Processor
2. Stop the Transmission Processor
3. Start the Evaluation Processor
4. Stop the Evaluation Processor
5. Import Routing Rules
6. Purge all Completed Entries in the Transmission Queue
7. Purge Completed and Expired Entries in the Transmission Queue
8. Re-Queue all Failed Entries in the Transmission Queue
9. Remove Obsolete Entries from Transmission Queue
10. Display Routing Rules
Chapter 6 – Routing
140 VistA Imaging System MAG*3.0*138 September 2013 DICOM Gateway User Manual – Rev. 15
The functionality of these menu options is further explained in the VistA Imaging Routing User Guide.
September 2013 VistA Imaging System MAG*3.0*138 141 DICOM Gateway User Manual – Rev. 15
Chapter 7 VistA Imaging Query/Retrieve Application 7.1 Overview The Query/Retrieve application is used by 3rd party devices to retrieve studies from VistA Imaging. 3rd party devices are devices such as a commercial PACS or specialty systems like cardiology workstations, PET/CT fusion workstations, or radiation treatment planning systems.
Once the Query/Retrieve service is configured and running, it operates without manual intervention. There are no application-level limitations on the number of devices that can be serviced by an instance of the Query/Retrieve service. However, hardware and network capacity considerations do apply.
The DICOM Query/Retrieve SCP allows DICOM Users (user AEs) to query Vista Imaging and have Vista Imaging route selected DICOM studies (objects) to a DICOM destination. This task is accomplished by implementing three individual DICOM Services.
7.2 DICOM Services
7.2.1 Query SCP Service The Query SCP Service is a Provider Service. Query SCP is listening on the designated Q/R port and waiting for a user to perform a Query (C-FIND) Request. The Query Request will contain criteria to find study information of interest to the user. Once received, this service queries against the Persistence (Database) to find any matches to the Query Request. The matches are the result and the result is returned to the user. The goal of the user is to find, at the study level, all DICOM objects located in the Persistence for desired study. DICOM objects, in this specific usage, take the form of a study.
7.2.2 Move SCP Service The Move SCP Service is a Provider Service. Move SCP is listening on the designated Q/R port and waiting for a user to perform a C-MOVE request. The C-MOVE request generally follows the Query C-FIND request. The C-MOVE request, containing Persistence information from the Query Request/Result, will provide the criteria to move (push) selected DICOM objects to a DICOM destination. The DICOM destination does not have to be the same as the user issuing the C-MOVE request. The result is to move the selected DICOM objects to the requested DICOM destination. The C-MOVE service indirectly initiates the Store SCU Service. The C-MOVE service and the Store SCU Service run independently of each other. However, the Move SCP needs to give intermittent updates to the user containing the current status of moving (pushing) the DICOM objects. The Store SCU supplies this status. There is a mechanism between the Move SCP and the Store SCU Services to pass the status from the Store SCU to the Move SCP, but leave the two services running independently of each other.
7.2.3 Store SCU Service The Store SCU is a User Service. The other services, mentioned previously, are provider services. This is a necessary role reversal. The purpose of this service is to push (move) DICOM
Chapter 7 – VistA Imaging Query/Retrieve Application
142 VistA Imaging System MAG*3.0*138 September 2013 DICOM Gateway User Manual – Rev. 15
objects to a DICOM destination. When pushing, or initiating an association with a DICOM destination, this application’s role changes into the user.
The Query/Retrieve application provides these features and benefits:
• Can query and retrieve all stored SOP classes regardless of archived storage location.
• Runs as a service on the HDIG.
• Supports enhanced logging in compliance with the recommendations of the audit requirements that were made for MAG*3.0*66.
• Logs all system level events in a new Audit log.
• Logs all application level events in the Application log.
• Logs all warnings and errors in the ImagingExchangeWebApp.log file.
• Logs all Query/Retrieve requests to access sensitive patient records in the VistA DG Security SECURITY LOG file (#38.1).
Use of the Query/Retrieve application is subject to the following requirements:
• The Query/Retrieve application must be installed and configured as described in the VistA Imaging HDIG Installation Guide.
• Any device that will be using the Query/Retrieve application to retrieve studies from VistA must be validated for Query/Retrieve functionality before use. A list of approved devices, contact information, and an explanation of the device validation test procedure is posted at http://www.va.gov/IMAGING/docs/VistA_Imaging_DICOM_Modality_Interfaces.pdf .
• Images associated with patients designated as sensitive can also be retrieved. The data elements are not masked, allowing both the patient and the provider to be identified. Appropriate info is captured in the audit.log , application.log and VistA sensitive patient.log
WARNING: Because the medical records of sensitive patients are not blocked and because the data in these records is not masked, control of these records is achieved through the set of authorized users that can query and access the VistA database. It is the responsibility of the VA Medical center that is providing the records that are retrieved using MAG*3.0*116 (and Query/Retrieve) to ensure that the privacy guidelines of HIPAA, the Federal Privacy Act, VA Directive 6500, and all other applicable regulations are met. For more information about patient privacy and patient privacy regulations, consult your local Privacy and Security Officers.
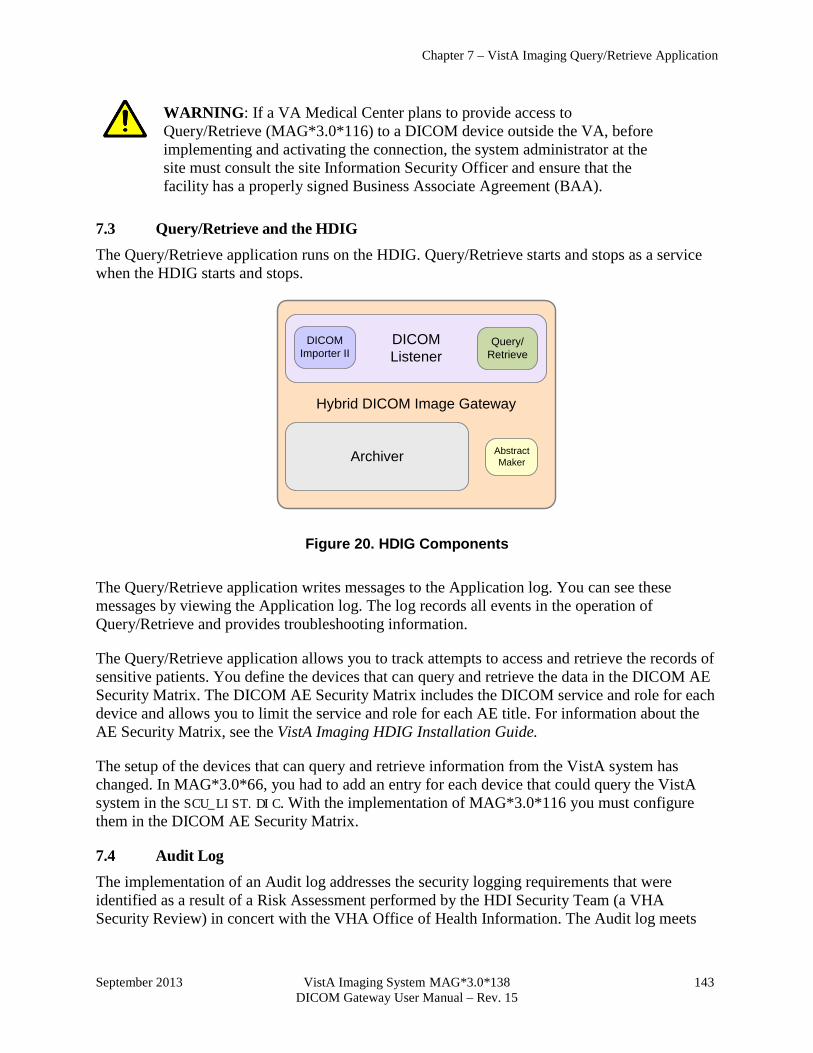
Chapter 7 – VistA Imaging Query/Retrieve Application
September 2013 VistA Imaging System MAG*3.0*138 143 DICOM Gateway User Manual – Rev. 15
WARNING: If a VA Medical Center plans to provide access to Query/Retrieve (MAG*3.0*116) to a DICOM device outside the VA, before implementing and activating the connection, the system administrator at the site must consult the site Information Security Officer and ensure that the facility has a properly signed Business Associate Agreement (BAA).
7.3 Query/Retrieve and the HDIG The Query/Retrieve application runs on the HDIG. Query/Retrieve starts and stops as a service when the HDIG starts and stops.
Hybrid DICOM Image Gateway
DICOM Listener
Archiver Abstract Maker
Query/Retrieve
DICOM Importer II
Figure 20. HDIG Components The Query/Retrieve application writes messages to the Application log. You can see these messages by viewing the Application log. The log records all events in the operation of Query/Retrieve and provides troubleshooting information.
The Query/Retrieve application allows you to track attempts to access and retrieve the records of sensitive patients. You define the devices that can query and retrieve the data in the DICOM AE Security Matrix. The DICOM AE Security Matrix includes the DICOM service and role for each device and allows you to limit the service and role for each AE title. For information about the AE Security Matrix, see the VistA Imaging HDIG Installation Guide.
The setup of the devices that can query and retrieve information from the VistA system has changed. In MAG*3.0*66, you had to add an entry for each device that could query the VistA system in the SCU_LIST.DIC. With the implementation of MAG*3.0*116 you must configure them in the DICOM AE Security Matrix.
7.4 Audit Log The implementation of an Audit log addresses the security logging requirements that were identified as a result of a Risk Assessment performed by the HDI Security Team (a VHA Security Review) in concert with the VHA Office of Health Information. The Audit log meets
Chapter 7 – VistA Imaging Query/Retrieve Application
144 VistA Imaging System MAG*3.0*138 September 2013 DICOM Gateway User Manual – Rev. 15
the Enterprise Security requirements and deficiencies identified as a result of the Risk Assessment.
The Audit log records system level events, such as HDIG startup and shutdown. It does not contain protected health information (PHI) or any other type of patient information.
Access to the Audit log is restricted to authorized VA personnel (typically the VistA administrator and the Security Officer). All events written to the Audit log are also written to the Application log. This enables VistA Imaging coordinators and administrators to access information when troubleshooting the HDIG or trying to identify causes of problems in its operation.
The Audit log cannot be changed or deleted.
7.4.1 Types of Events That the Audit Log Records The Audit log records attributes of the following events:
• DICOM QUERY (C-FIND)
• DICOM RETRIEVE (C-MOVE)
• DICOM STORAGE (C-STORE)
• HDIG shutdown/startup
7.5 Query/Retrieve and the DICOM AE Security Matrix To use Query/Retrieve, you must configure the following entries in the DICOM AE Security Matrix:
• All remote devices that use the Query/Retrieve service at your site are assigned remote AE titles. They must be configured as Service Class Users of the Query/Retrieve Service Class (Q/R SCUs). This means to configure each one as a Service Class User of:
• C-FIND Service Class
• C-MOVE Service Class
• C-STORE Service Class (Device Dependent)* * All remote devices that will locally store the retrieved DICOM objects must be configured as Service Class Providers of the C-Storage Service Class (C-STORE SCU).
• Within the configuration of each remote device, the Query/Retrieve application entity (AE) title at your site must be specified as the local AE Title for that remote device.
7.6 DICOM Requirements The Query/Retrieve application supports the following SOP classes as a DICOM SCP.
• Study Root Query/Retrieve Information Model – FIND
• Study Root Query/Retrieve Information Model – MOVE

Chapter 7 – VistA Imaging Query/Retrieve Application
September 2013 VistA Imaging System MAG*3.0*138 145 DICOM Gateway User Manual – Rev. 15
The Query/Retrieve application will respond to query and move requests from valid DICOM SCUs. Only Study Root/Study Level queries are supported.
The following is a partial list of the attributes that can be used in a query:
Table 6. DICOM Attributes Used in Queries
DICOM Attribute VistA Equivalent
Study Date (0008,0020) Exam Date field in RAD/NUC MED PATIENT file (#70.02,.01)
Study Time (0008,0030) Exam Date field in RAD/NUC MED PATIENT file (#70.02,.01)
Study ID (0020,0010) Case Number field in RAD/NUC MED PATIENT file (#70.03,.01)
Patient's Name (0010,0010) Name field in PATIENT file (#2,.01)
Patient ID (0010,0020) Social Security Number field in PATIENT file (#2,.09)
Accession Number (0008,0050)
Exam Date and Case number fields in RAD/NUC MED PATIENT file (#70.02,.01) and (#70.03,.01)
For complete list of attributes, see the VistA Imaging DICOM Conformance Statement as revised for MAG*3.0*116.
7.7 Query/Retrieve vs. Other Methods for Moving Images With the introduction of the Query/Retrieve application, there are three ways to send exams from VistA to outside devices such as a commercial PACS or specialty workstation. All methods assume that the outside device is a DICOM-compliant Storage SCP.
Table 7. Methods for Moving Images
Method Details
Query/Retrieve application Ad hoc retrieval of studies on a patient-by-patient basis. Retrieval is initiated by the outside device.
Automatic routing Rules-based delivery of newly acquired studies; rules are highly configurable; automatic retrieval of related priors is available. Once a rule is implemented and applicable studies are acquired, no manual intervention is needed. For more information, see the Routing User Guide.
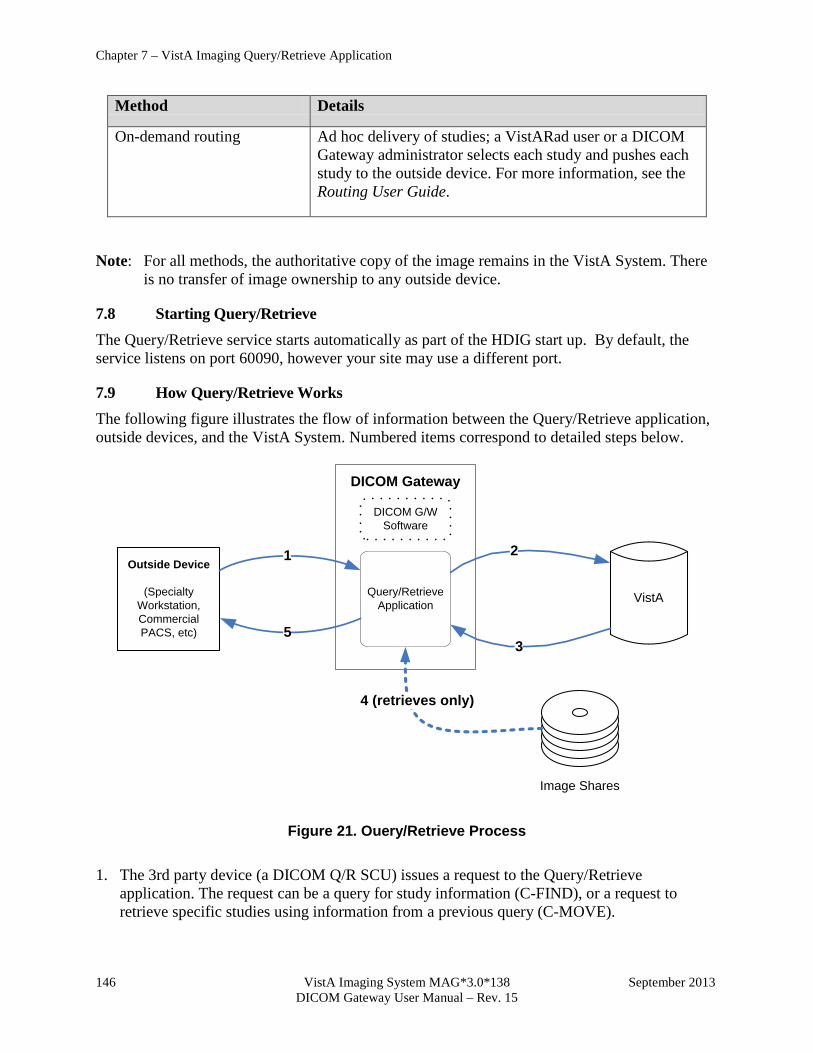
Chapter 7 – VistA Imaging Query/Retrieve Application
146 VistA Imaging System MAG*3.0*138 September 2013 DICOM Gateway User Manual – Rev. 15
Method Details
On-demand routing Ad hoc delivery of studies; a VistARad user or a DICOM Gateway administrator selects each study and pushes each study to the outside device. For more information, see the Routing User Guide.
Note: For all methods, the authoritative copy of the image remains in the VistA System. There is no transfer of image ownership to any outside device.
7.8 Starting Query/Retrieve The Query/Retrieve service starts automatically as part of the HDIG start up. By default, the service listens on port 60090, however your site may use a different port.
7.9 How Query/Retrieve Works The following figure illustrates the flow of information between the Query/Retrieve application, outside devices, and the VistA System. Numbered items correspond to detailed steps below.
Image Shares
VistA
Outside Device
(Specialty Workstation, Commercial PACS, etc)
DICOM Gateway
DICOM G/W Software
Query/Retrieve Application
2
3
4 (retrieves only)
1
5
Figure 21. Ouery/Retrieve Process
1. The 3rd party device (a DICOM Q/R SCU) issues a request to the Query/Retrieve
application. The request can be a query for study information (C-FIND), or a request to retrieve specific studies using information from a previous query (C-MOVE).
Chapter 7 – VistA Imaging Query/Retrieve Application
September 2013 VistA Imaging System MAG*3.0*138 147 DICOM Gateway User Manual – Rev. 15
2. Using the information provided by the outside device, the Query/Retrieve application checks VistA for any matching studies.
3. If the outside device requested specific studies for retrieval (C-MOVE), the Query/Retrieve application locates those studies in the Imaging System.
4. The Query/Retrieve application sends the requested data (either study information or study images) back to the outside device, or it sends a no matches response if nothing was found.
7.10 Setting Up the Social Security Number Format By default, the Query/Retrieve application returns the social security number, which appears in the PatientID (PID) field, without dashes. If a Text Gateway at your site is configured to include dashes in the social security numbers it sends to commercial PACS and other medical devices (a setting that is defined in the configuration of the Modality worklist), you must configure the Query/Retrieve application to output the social security numbers with dashes.
The parameter formatPatientIDwithDashes in the file DICOMServerConfiguration.config controls whether the Query/Retrieve application returns the social security number with or without dashes. The possible values are:
• false – When this setting is used, the social security numbers do not have dashes.
• true – When this setting is used, the social security numbers have dashes.
To configure Query/Retrieve to insert dashes in the social security numbers:
1. Navigate to C:\VixConfig\ and open the DICOMServerConfiguration.config file in WordPad.
Note: Do not use NotePad. This is known to cause corruption of the file.
2. Set the value of the parameter formatPatientIDwithDashes to true.
Note: Do not change any other values in this file.
3. Save and close the file.
The new settings will take effect when you start the Query/Retrieve application. To restart the Q/R service, restart the Apache Tomcat service.
The property formatPatientIDwithDashes controls the entire output of the specific Query/Retrieve application instance. If you need to have the social security number output in both formats (with and without dashes), you must install, license and configure another instance of the Query/Retrieve application with a different setting (without dashes) and direct both instances to send the results of the query to the proper devices.
Chapter 7 – VistA Imaging Query/Retrieve Application
148 VistA Imaging System MAG*3.0*138 September 2013 DICOM Gateway User Manual – Rev. 15
7.11 Printsets
7.11.1 Definition A PrintSet is a group of studies, treated as one study. There is no less than two studies (Accession Numbers) in a PrintSet, but there can be more than two studies. Printsets only occur on the Radiology side of imaging, not Consults.
They are used for two purposes:
• Billing
• Creating a single report for multiple studies being performed PrintSet Example – CT BODY w/ contract
1. Accn 1 – CT Chest w/ contrast
2. Accn 2 – CT Abdomen w/ contrast
3. Accn 3 – CT Pelvis w/ contrast
7.11.2 Behavior – 2006.6x Database Only (Printsets where all study data is stored in the 2006.6x file only.)
1. All study data is encapsulated under the accession number assigned to the report. 2. Query any study in the PrintSet and all data is returned for the PrintSet.
a. The Study data is the same for all studies, the study data assigned to the accession number assigned to the report.
b. The image count is the same for all studies in the PrintSet, the total number of images in the study.
c. View any study and you see all the images that constitute the PrintSet and the same Report.
3. C-MOVE – all data moved to the Q/R device.
7.11.3 Behavior – 2006.72 Database Only (Printsets where all study data is stored in the 2006.72 file only.)
1. All study data is NOT encapsulated under a single accession number. 2. Query any study in the PrintSet and all data is returned for the PrintSet.
a. The study data is for each study and displays with its individual study data. b. The image count is based on the number of images in the individual study. c. The report is the same for all studies.
3. C-MOVE – all data moved to the Q/R device.
7.11.4 Behavior – 2006.6x and 2006.72 Databases (Printsets where study data is stored in the 2006.6x file and the 2006.72 file.)
1. 2006.6x - All study data is encapsulated under the accession number assigned to the report.
Chapter 7 – VistA Imaging Query/Retrieve Application
September 2013 VistA Imaging System MAG*3.0*138 149 DICOM Gateway User Manual – Rev. 15
2. 2006.72- All study data is NOT encapsulated under a single accession number – Individual study info is returned for studies stored in the MAG*3.0*34 data structures.
3. Query (C-FIND) any study in the PrintSet and all data is returned for the PrintSet. a. 2006.6x - The Study data is the same for all studies, the study data stored in the
2006 database to the accession number assigned to the report b. 2006.6x - The image count is the same for all studies in the PrintSet, the total
number of images in the study. c. 2006.72- The study data is for each study and displays with its individual study
data. d. 2006.72- The image count is based on the number of images in the individual
study. e. All studies have the same Report.
4. C-MOVE – all data moved to the Q/R device.
Chapter 7 – VistA Imaging Query/Retrieve Application
150 VistA Imaging System MAG*3.0*138 September 2013 DICOM Gateway User Manual – Rev. 15
This page is intentionally blank.

September 2013 VistA Imaging System MAG*3.0*138 151 DICOM Gateway User Manual – Rev. 15
Chapter 8 Legacy Gateway System Maintenance Various utility programs are available to help in the maintenance of the software on the VistA Imaging DICOM Gateway servers. This chapter describes the various utility programs and tools.
8.1 System Maintenance Menu Options The menu options for the System Maintenance software are:
1. System Operation 1. Display MUMPS-to-MUMPS Broker Status 2. Display DICOM Message Log 3. Issue a DICOM Echo Request 4. Display the Version of the Software 5. Display Gateway Application Usage Statistics 6. Support Telephone Numbers 7. Test E-Mail Transmission
2. Gateway Configuration and DICOM Master Files 1. Display Gateway Configuration Parameters 2. Update Gateway Configuration Parameters 3. Update AETITLE.DIC 4. Update INSTRUMENT.DIC 5. Update MODALITY.DIC 6. Update PORTLIST.DIC 7. Update SCU_LIST.DIC 8. Update WORKLIST.DIC 9. Reinitialize All the DICOM Master Files
10. Create Shortcuts for Instruments 11. Validate Access/Verify Codes for Modality Worklist 12. Display Versions and/or Time Stamps Components
3. MUMPS Utilities 1. Access MUMPS Error Log 2. Global Variable Lister 3. Display MUMPS System Status 4. Check Available Disk Space 5. Display License Expiration Date
4. Enter Programmer Mode
8.2 System Operation Tools
8.2.1 Display MUMPS-to-MUMPS Broker Status The servers that run the VistA Imaging DICOM Gateway are connected to the main VistA Hospital Information System using a VA-proprietary protocol for calling remote procedures, commonly known as VA Kernel Broker.
One characteristic of networking in general is that connections occasionally get broken and need to be remade. All current-day protocols are resilient enough to recover automatically from these
Chapter 8 – Legacy Gateway System Maintenance
152 VistA Imaging System MAG*3.0*138 September 2013 DICOM Gateway User Manual – Rev. 15
temporary lapses in connectivity. However, sometimes the lapses in connectivity may last long enough that you might notice a disruption in communication.
The VA Kernel Broker also depends on the validity of your credentials that determine which menu options are accessible to you.
This menu option may be used to determine that:
• The VistA Hospital Information System can still be reached using the configured parameters
• Your credentials are still valid on the VistA system
Use the Caché Terminal icon to start a session for this menu option.
After login, select the following menu options:
1. In the first menu, select #4 (System Maintenance). 2. In the second menu, select #1 (System Operation). 3. In the third menu, select #1 (Display MUMPS-to-MUMPS Broker Status). When this menu option is executed, any issues with the connectivity will be reported. A normal, successful, status will be displayed as:
Configured to connect using M-to-M Broker to address "10.11.12.13", port 4300
8.2.2 Display DICOM Message Log The operation of the VistA Imaging Legacy DICOM Gateway is performed by a number of separate tasks, some which run in the foreground while others run in the background. Many of these tasks produce log files that can be reviewed to observe their progress and to check for any error conditions that may have occurred.
This tool includes a real-time message display. This tool can also select which activity is displayed.
Use the Caché Terminal icon to start a session for this menu option.
Chapter 8 – Legacy Gateway System Maintenance
September 2013 VistA Imaging System MAG*3.0*138 153 DICOM Gateway User Manual – Rev. 15
After login, select the following menu options:
1. In the first menu, select #4 (System Maintenance). 2. In the second menu, select #1 (System Operation). 3. In the third menu, select #2 (Display DICOM Message Log). You will receive a “Historical Log or New Activity? N//” prompt.
8.2.2.1 New Activity If you select the option to monitor new activity, you will be asked if you want to display all new activity or the activity for only a specific session. The following example illustrates this: Show new activity in All logs or just the One log? A// O Display which log? (enter matching string or <null> for all) 127.0.0.1 Receiving "Echo DICOM_ECHO 127.0.0.1" ************************************************************************* *** Provider Process (Job #292) Started on AUG 06, 2002 at 08:01:13 *** ************************************************************************* *************************************************************** *** Connection with 127.0.0.1 on AUG 06, 2002 at 08:01:13 *** *************************************************************** Recving PDU Type: 01H (A-ASSOCIATE-RQ) PDU len=206 C:\DICOM\DATA1\LOGDCM.292\INCOMING.PDU ******************************************************************* *** Receiving A-ASSOCIATE-REQUEST on AUG 06, 2002 at 08:01:13 *** ******************************************************************* PDU Type: 01H (A-ASSOCIATE-RQ) Length=206 Version=1 Called AE: "DICOM_STORAGE" Calling AE: "DICOM_ECHO" ITEM Type: 10H (Application Context Item) Length=21 Application Context: 1.2.840.10008.3.1.1.1 (DICOM Application Context Name) ITEM Type: 20H (Presentation Context Item) Length=46 Presentation Context ID: 1 Result=0 -- Transfer Syntax(es) -- SUBITEM Type: 30H (Abstract Syntax Sub-Item) Length=17 Presentation Context: 1.2.840.10008.1.1 (Verification SOP Class) SUBITEM Type: 40H (Transfer Syntax Sub-Item) Length=17 Transfer Syntax: 1.2.840.10008.1.2 (Implicit VR Little Endian) -- End of Transfer Syntax(es) -- ITEM Type: 50H (User Information Item) Length=59 SUBITEM Type: 51H (Maximum Length Sub-Item) Length=4 Maximum PDU length: 16384 ITEM Type: 52H (Implementation Class UID Sub-Item) Length=30 Implementation Class: 1.2.840.113654.2.3.1995.2.10.0 (*** Unknown UID: <<1.2.84 0.113654.2.3.1995.2.10.0>> ***) ITEM Type: 55H (Implementation Version Name) Length=13 Implementation Version Name: MIRCTN03AUG98 **************************************************** *** Calling: DICOM_ECHO Called: DICOM_STORAGE *** **************************************************** ************************************************** *** Sending A-ASSOCIATE-ACCEPT to DICOM_ECHO *** ************************************************** PDU Type: 02H (A-ASSOCIATE-AC) Length=177 Version=1 Called AE: "DICOM_STORAGE" Calling AE: "DICOM_ECHO" ITEM Type: 10H (Application Context Item) Length=21 Application Context: 1.2.840.10008.3.1.1.1 (DICOM Application Context Name) ITEM Type: 21H (Presentation Context Item) Length=25 Presentation Context ID: 1 Result=0 (acceptance) -- Transfer Syntax(es) --

Chapter 8 – Legacy Gateway System Maintenance
154 VistA Imaging System MAG*3.0*138 September 2013 DICOM Gateway User Manual – Rev. 15
SUBITEM Type: 40H (Transfer Syntax Sub-Item) Length=17 Transfer Syntax: 1.2.840.10008.1.2 (Implicit VR Little Endian) -- End of Transfer Syntax(es) -- ITEM Type: 50H (User Information Item) Length=51 SUBITEM Type: 51H (Maximum Length Sub-Item) Length=4 Maximum PDU length: 32768 ITEM Type: 52H (Implementation Class UID Sub-Item) Length=22 Implementation Class: 1.2.840.113754.2.1.3.0 (VA DICOM V3.0) ITEM Type: 55H (Implementation Version Name) Length=13 Implementation Version Name: VA DICOM V3.0 Sending PDU Type: 02H (A-ASSOCIATE-AC) Length: 177 C:\DICOM\DATA1\LOGDCM.292\OUTGOING.PDU Recving PDU Type: 04H (P-DATA-TF) PDU len=74 PDV hdr=3, pc=1, len=68 C:\DICOM\DATA1\LOGDCM.292\INCOMING.DCM Reading C:\DICOM\DATA1\LOGDCM.292\INCOMING.DCM ******************************* *** Echo Request Received *** ******************************* FILE C:\DICOM\DATA1\LOGDCM.292\OUTGOING.DCM -- VERIFICATION ECHO RESPONSE -- NO MESSAGE HANDLE YET Sending PDU Type: 04H (P-DATA-TF) Length: 90 (90) C:\DICOM\DATA1\LOGDCM.292\OUTGOING.DCM PDU len=96 PDV hdr=3, pc=1, len=90 Recving PDU Type: 05H (A-RELEASE-RQ) PDU len=4 C:\DICOM\DATA1\LOGDCM.292\INCOMING.PDU Sending PDU Type: 06H (A-RELEASE-RP) Length: 4 C:\DICOM\DATA1\LOGDCM.292\OUTGOING.PDU
The real-time display of the log is terminated by entering CTRL+C (^C) on the keyboard.
8.2.2.2 Historical Log The historical log files may be viewed as follows:
Log # Process Start & End Description ----- ------------------- ----------- 1 25-FEB 11:22 11:22 PACS Gateway 2 25-FEB 11:22 11:22 User Requested DICOM Echo 3 25-FEB 11:22 11:22 User with LOCAL MODALITY WORKLIST 4 25-FEB 11:22 11:22 Echo VistA Testing 127.0.0.1,localhost Enter Log Number: 4// <Enter> 4 Print the log to a File or display it on the Screen? S// <Enter> S ************************************************************************ *** Provider Process (Job #19) Started on FEB 25, 2000 at 11:22:10 *** ************************************************************************ ************************************************************************* *** Connection with 127.0.0.1,localhost on FEB 25, 2000 at 11:22:10 *** ************************************************************************* Recving PDU Type: 01H (A-ASSOCIATE-RQ) PDU len=253 C:\DICOM\Data1\LOGDCE.019\INCOMING.PDU
Chapter 8 – Legacy Gateway System Maintenance
September 2013 VistA Imaging System MAG*3.0*138 155 DICOM Gateway User Manual – Rev. 15
******************************************************************* *** Receiving A-ASSOCIATE-REQUEST on FEB 25, 2000 at 11:22:11 *** ******************************************************************* PDU Type: 01H (A-ASSOCIATE-RQ) Length=253 Version=1 Called AE: "VistA_Worklist" Calling AE: "VistA Testing" ITEM Type: 10H (Application Context Item) Length=21 Application Context: 1.2.840.10008.3.1.1.1 (DICOM Application Context Name) Press <Enter> to continue, ^ to exit... The TCP/IP connection is shown above, followed by the beginning of the association session. The details of the log require a working knowledge of the DICOM Standard (PS 3.7-1999), as well as familiarization with the VistA Imaging DICOM Gateway implementation. It is more useful for support personnel.
8.2.3 Issue a DICOM Echo Request This menu option may be used to check whether DICOM communication is possible with a known Application Entity (instrument, PACS, etc.) that is registered in the master file SCU_LIST.DIC.
Prerequisite:
Target DICOM Validation Service Class Provider (configured to respond to VistA)
Use the Caché Terminal icon to start a session for this menu option.
After login, select the following menu options:
1. In the first menu, select #4 (System Maintenance). 2. In the second menu, select #1 (System Operation). 3. In the third menu, select #3 (Issue a DICOM Echo Request). The following example shows the results of a successful DIOCM Echo test:
Generate a DICOM ECHO request Service Class Providers ----------------------- 1 -- LOCAL MODALITY WORKLIST 2 -- LOCAL IMAGE STORAGE Select the provider application (1-2): 1// 1 Sending the PDU to the SCP | DICOM ECHO Completed Successfully
When either the TCP/IP address or the port number is incorrect, the following response and error message might be obtained:
Chapter 8 – Legacy Gateway System Maintenance
156 VistA Imaging System MAG*3.0*138 September 2013 DICOM Gateway User Manual – Rev. 15
Generate a DICOM ECHO request Service Class Providers ----------------------- 1 -- LOCAL MODALITY WORKLIST 2 -- LOCAL IMAGE STORAGE Select the provider application (1-2): 1// 2 ******************************************************************************** *** TCP not setup correctly *** *** Connecting to IP Address "ERRORHOST", port "60100". *** *** Cannot open Socket *** *** Routine: ^MAGDTCP1 Please Call Support Personnel *** ********************************************************************************
When the target Application Entity is not set up to respond to DICOM Echo requests, the following response and error message may be encountered:
Generate a DICOM ECHO request Service Class Providers ----------------------- 1 -- LOCAL MODALITY WORKLIST 2 -- LOCAL IMAGE STORAGE Select the provider application (1-2): 2// 2 Sending the PDU to the SCP | ******************************************************************************** *** DICOM GATEWAY ERROR *** *** Unknown Presentation Context ID for 1.2.840.10008.1.1 *** *** Routine: ^MAGDTCP2 Please Call Support Personnel *** ********************************************************************************
8.2.4 Display the Version of the Software Use the Caché Terminal icon to start a session for this menu option.
After login, select the following menu options:
1. In the first menu, select #4 (System Maintenance). 2. In the second menu, select #1 (System Operation). 3. In the third menu, select #4 (Display the Version of the Software). This menu option may be used to identify the version and build numbers of the current VistA Imaging Legacy DICOM Gateway software.
This is "IMAGING 3.0" created on 12-February-2004. Installed patches:
Chapter 8 – Legacy Gateway System Maintenance
September 2013 VistA Imaging System MAG*3.0*138 157 DICOM Gateway User Manual – Rev. 15
Patch 9: 31-March-2003 Patch 10: 20-November-2003 Patch 11: 12-February-2004 Patch 21: 30-October-2003 Press <Enter> to continue...
8.2.5 Display Gateway Application Usage Statistics This menu option starts a program that displays the numbers of invocations of menu options at the site. It is useful for troubleshooting problems.
Use the Caché Terminal icon to start a session for this menu option.
After login, select the following menu options:
1. In the first menu, select #4 (System Maintenance). 2. In the second menu, select #1 (System Operation). 3. In the third menu, select #5 (Display Gateway Application Usage Statistics). Display Gateway Configuration Parameters 25 Feb 2000: 1 invocation Total: 1 Install INSTRUMENT.DIC 29 Feb 2000: 3 invocations Total: 3 Support Telephone Numbers 25 Feb 2000: 1 invocation Total: 1 Display Imaging Usage Statistics 25 Feb 2000: 2 invocations Total: 2 Issue DICOM Echo Request 25 Feb 2000: 4 invocations Total: 4 Start Processing Text Messages from HIS 25 Feb 2000: 3 invocations Total: 3 Display DICOM Message Log 25 Feb 2000: 6 invocations 29 Feb 2000: 5 invocations Total: 11 Press <Enter> to continue:

Chapter 8 – Legacy Gateway System Maintenance
158 VistA Imaging System MAG*3.0*138 September 2013 DICOM Gateway User Manual – Rev. 15
8.2.6 Support Telephone Numbers If you encounter problems with the VistA Imaging DICOM Gateway Software, the National VistA Support Help Desk can be called for assistance. This option may be used to list the telephone numbers. Please tell the Help Desk personnel that this is a problem with a VistA Imaging DICOM Gateway.
Use the Caché Terminal icon to start a session for this menu option.
After login, select the following menu options:
1. In the first menu, select #4 (System Maintenance). 2. In the second menu, select #1 (System Operation). 3. In the third menu, select #6 (Support Telephone Numbers). The following information will be output:
National VISTA Support Help Desk (888) 596-HELP Push <Enter> to continue...
8.2.7 Test E-mail Transmission In order to verify that the Test E-mail Transmission capability is operational, it is necessary to generate a test e-mail message. The e-mail message will be sent to the emergency e-mail address specified in the Legacy DICOM Gateway Configuration Parameters (menu option 4-2-2).
This menu option may be used to create a test message:
1. In the first menu, select #4 (System Maintenance). 2. In the second menu, select #1 (System Operation). 3. In the third menu, select #7 (Test E-mail Transmission). The following information will be output:
Enter text to be included in message >This is a test <Enter> > <Enter> Test message should contain the content to be generated.

Chapter 8 – Legacy Gateway System Maintenance
September 2013 VistA Imaging System MAG*3.0*138 159 DICOM Gateway User Manual – Rev. 15
OK to send: YES// <Enter> Message will be transmitted within minutes. Press <Enter> to continue...
8.3 Gateway Configuration and DICOM Master Files This set of menu options reference the various parameters that control the VistA Imaging Legacy DICOM Gateway.
The format and content of the master files is described in a separate document (VistA Imaging DICOM Gateway Installation Guide).
Note: It is strongly recommended that rather than support separate copies of the dictionary files on each gateway system, the site maintain a single copy of the DICOM dictionary files in the F:\DICOM\Dict directory on a network drive, from which it can be accessed by all the systems.
Warning: Using any of the menu options in this section while VistA Imaging DICOM Gateway software is active may have unpredictable results. Before making any changes to the configuration parameters or master files, always stop all active DICOM processes by waiting until they reach an idle state, and then terminating them.
8.3.1 Display Gateway Configuration Parameters This menu option can be used to obtain a quick overview of the parameters that define the processor-specific settings for the current computer. These parameters (stored locally in the DICOM GATEWAY PARAMETER file (#2006.563) ^MAGDICOM(2006.563)) may be changed and updated using the Update Gateway Configuration Parameters menu option. (see section 0).
Use the Caché Terminal icon to start a session for this menu option.
After login, select the following menu options:
1. In the first menu, select #4 (System Maintenance). 2. In the second menu, select #2 (Gateway Configuration and DICOM Master Files).
3. In the third menu, select #1 (Display Gateway Configuration Parameters).
Chapter 8 – Legacy Gateway System Maintenance
160 VistA Imaging System MAG*3.0*138 September 2013 DICOM Gateway User Manual – Rev. 15
The Gateway Configuration Parameters file will display. A sample file is shown below; values will vary from site to site.
Gateway Configuration Parameters -------------------------------- ABSTRACT PATH = C:\DICOM\ABSTRACT AGENCY = V ASCII DICOM TEXT = YES COMMERCIAL PACS = N/A CONFIG DATE/TIME = 3130510.215509 CONSOLIDATED = NO CSTORE CONTROL PORT = 60000 CURRENT IMAGE DESTINATION = \\VHAISWIMGVMS103\IMAGE1$\CIN0\00\00\02\76\ CURRENT IMAGE FILE NAME = CIN00000027615.TGA CURRENT IMAGE POINTER = CURRENT IMAGE SOURCE = C:\DICOM\IMAGE_IN\VHAISWIMGVMS104_0000842.DCM DAILY REPORT = 62979,-4, Could not connect to smtp.va.gov, port 25 DATA PATH / 1 = C:\DICOM\DATA1 DATA PATH / 2 = C:\DICOM\DATA2 DICT PATH = C:\DICOM\DICT DOMAIN = IMGDEM01.MED.VA.GOV EMED_C_MOVE_DELAY = 0 FREE DISK SPACE = 15 HL7_PTR = 726 IMAGE GATEWAY = YES IMAGE INPUT PATH = C:\DICOM\IMAGE_IN IMAGE OUTPUT PATH = C:\DICOM\IMAGE_OUT IMPORTER = NO INSTRUMENT PATH = C:\DICOM\INSTRUMENT ISSUER OF PATIENT ID = USVHA LAST IMAGE POINTER = 27615 Jun 03 at 10:10:38 LAST RAD REPORT POINTER = 390 Jun 03 at 10:10:38 LAST UID = 1.2.840.113754.1.7.660.8.20130603.101016.0 LOCATION = 660 - SALT LAKE CITY LOCATION STATION NUMBER = 660 P LOGIN PROGRAMMER ACCESS = 5007061268 M-to-M BROKER ADDR = vhaiswimgvms103 M-to-M BROKER BGND ACCESS = o1AGHM4L- M-to-M BROKER BGND STATUS = 1^3130510.215517 M-to-M BROKER BGND VERIFY = 0j_Oug+)`s. M-to-M BROKER PORT = 4800 MACHINE ID = 8 MAILGROUP = [email protected] MESSAGE LOG = YES MODALITY WORKLIST = YES MOVE DESTINATION AE TITLE = MULTIFRAME COUNTER = 0 PACS EXAM COMPLETE = NO POST OFFICE = smtp.va.gov POST PORT = 25 ROUTING PROCESSOR = NO ROUTING RULES = NO SCRATCH = C:\DOCUME~1\ADMINI~1\LOCALS~1\Temp SEND CPT MODIFIERS = NO SEND PACS TEXT = NO
Chapter 8 – Legacy Gateway System Maintenance
September 2013 VistA Imaging System MAG*3.0*138 161 DICOM Gateway User Manual – Rev. 15
SHOW PATIENT NAME & ID = NO SSN DASHES FOR PACS = NO SYSTEM TITLE = P116 TEST TEXT GATEWAY = YES TEXT GATEWAY SERVICE = RAD,CON UID ROOT = 1.2.840.113754 VERSION = VA DICOM V3.0
8.3.2 Update Gateway Configuration Parameters This section describes parameters that will be different for every Imaging Legacy DICOM Gateway. System-specific parameters deal with names of workstations, names of disks where certain groups of data are stored, whether or not certain transactions are to be processed, and so forth.
Please refer to the VistA Imaging DICOM Gateway Installation Guide for a description of these configuration parameters.
Use the Caché Terminal icon to start a session for this menu option.
After login, select the following menu options:
1. In the first menu, select #4 (System Maintenance). 2. In the second menu, select #2 (Gateway Configuration and DICOM Master Files).
3. In the third menu, select #2 (Update Gateway Configuration Parameters).
8.3.2.1 System Title Please enter the system title: system title xxxxxxxxx <Enter> • The system title is a short character string that appears on the top of the main DICOM
application menu.
• The system title may not contain caret (^) or vertical bar (|).
Examples: DICOM Image Server System #3 DICOM Text Gateway and Background Processor
Chapter 8 – Legacy Gateway System Maintenance
162 VistA Imaging System MAG*3.0*138 September 2013 DICOM Gateway User Manual – Rev. 15
8.3.2.2 Location (Institution) This computer is currently located at location name (location number) Are you sure you wish to change it? NO// Each VistA Imaging DICOM Gateway belongs to a location. A location is defined in the INSTITUTION file (#4). When a site does not run the consolidated version of the Imaging Software, the locations of all VistA Imaging DICOM Gateways at that site are the same as the location of the site that is defined in the Imaging SITE PARAMETERS file (#2006.1).
When a site does run the consolidated version of the Imaging Software, each VistA Imaging DICOM Gateway may have its own location. However, a VistA Imaging DICOM Gateway can only have a location that is defined as an entry in the Imaging Site Parameters.
Note: If a VistA Imaging DICOM Gateway is configured to use the MUMPS-to-MUMPS Broker, a user will be able to login only on that VistA Imaging DICOM Gateway if, in the main VistA system, that user is granted access to the Division that corresponds to the location of the VistA Imaging DICOM Gateway.
8.3.2.3 Drive Letter for Text Gateway Data Please enter the device letter for the DICOM text directory: C:// The DICOM text directory is usually on the local system, and is used to hold the DICOM text files. C:\DICOM is typically the DICOM text directory.
You may select another device letter (C:-Z:), however.
8.3.2.4 Drive Letter for Image Gateway Data Please enter the device letter for the DICOM image directories: c:// The DICOM image directories are usually on the local system and are used to hold both the input and output image files. C:\DICOM is typically the DICOM image directory.
You may select another device letter (C:-Z:), however.
8.3.2.5 Free Disk Space Threshold Please enter the percentage of free disk space required to allow storage of image files: free space%// Storage of image files should not be allowed when there is not enough free disk space left to allow for proper processing of these files.
A typical percentage of free space to require is 15%.
8.3.2.6 Drive Letter for Master File Data Enter the device letter for
Chapter 8 – Legacy Gateway System Maintenance
September 2013 VistA Imaging System MAG*3.0*138 163 DICOM Gateway User Manual – Rev. 15
the DICOM dictionary directory: c:// The DICOM dictionary directory is usually on a networked system, and is used to hold both the DICOM text and image files. C:\DICOM is typically the DICOM data directory.
Note: You may select another device letter (C:-Z:), however.
8.3.2.7 Number of Channels Please enter the number of communication channels number// Communication channels are used to broadcast VistA event data. A separate channel is needed for each different destination. For instance, event data may be sent to both a commercial PACS and to one or more Modality Worklist service class providers. Each destination must have its own event channel number and a dedicated subdirectory on the Text Gateway drive (C:\DICOM\Datan\...).
The number of communication channels must be between 1 and 9.
8.3.2.8 Image Gateway Will this computer be a DICOM Image Gateway? Yes or No// • Answering Yes to this question will enable settings that allow this system to be used as an
image gateway.
• Answering No means that it will not be possible to use this system as an image gateway.
• A system can be configured to be a text gateway as well as an image gateway, as well as a Routing Gateway.
8.3.2.9 Text Gateway Will this computer be a DICOM Text Gateway? Yes or No// • Answering Yes this question will enable settings that allow this system to be used as a text
gateway.
• Answering No means that it will not be possible to use this system as a text gateway.
• A system can be configured to be a text gateway as well as an image gateway, as well as a Routing Gateway.
8.3.2.10 Routing Gateway Will this computer be a Routing Processor? Yes or No// • Answering Yes to this question will enable settings that allow this system to be used as a
Routing Processor.
• Answering No means that it will not be possible to use this system as a Routing Processor.
• Only answer Yes when auto-routing is active.
Chapter 8 – Legacy Gateway System Maintenance
164 VistA Imaging System MAG*3.0*138 September 2013 DICOM Gateway User Manual – Rev. 15
• A system can be configured to be a text gateway as well as an image gateway, as well as a Routing Gateway.
8.3.2.11 Auto Routing Will this computer be part of a system where 'autorouting' is active? Yes or No// • Answering Yes to this question will generate queue entries for the evaluation of routing rules
when images are acquired.
• Answering No means that no such entries will be generated.
• Only answer Yes when auto-routing is active.
Note: If a site has experimented with Routing and has completed the experiment, or when a site decides to not perform Routing activities for a while, it is important that this switch be set to No. Failure to do so will cause a significant accumulation of entries in the Rule Evaluation Queue, while there will be no process that takes any of these entries out of this queue.
8.3.2.12 Radiology and/or Consults Will this Text Gateway be used for RADIOLOGY? Yes or No// Will this Text Gateway be used for CONSULTS? Yes or No// • It is possible to configure two Text Gateways, one for RADIOLOGY and the other for
CONSULTS.
• If the Gateway being configured is to be the only Text Gateway and it is going to be used for both RADIOLOGY and CONSULTS (the default configuration), answer Yes to both questions.
• Otherwise, answer Yes or No as appropriate for the computer at hand.
8.3.2.13 Text messages to Commercial PACS Send text to a commercial PACS, Mitra Broker, et cetera? Yes or No// This question will only be asked on a system that is slated to be used as a Text Gateway.
• Answering Yes to this question will enable settings to use this system to send text messages to external systems.
• Answering No means that it will not be possible to send such messages.
8.3.2.14 Exam Complete Messages Is a PACS going to send Exam Complete messages to VistA? Yes or No//
Chapter 8 – Legacy Gateway System Maintenance
September 2013 VistA Imaging System MAG*3.0*138 165 DICOM Gateway User Manual – Rev. 15
• Answering Yes to this question will enable settings that allow this system to receive Exam Complete messages from a PACS to trigger image transfer.
• Answering No means that this system will not be prepared to receive such messages.
8.3.2.15 Commercial PACS Select the kind of commercial PACS at this site ----------------------------------------------- 1. GE Medical Systems PACS with Mitra PACS Broker 2. GE Medical Systems PACS with ACR-NEMA Text Gateway 3. EMED;eMed Technology Corporation PACS 4. Other commercial PACS What kind of a PACS? type// This question will only be asked on a system that is slated to either be sending text messages to a PACS, or to be receiving Exam Complete messages from a PACS.
Select the kind of commercial PACS that is installed at the site. If the PACS is from GE Medical Systems, make sure to specify whether it uses the (new) Mitra Broker, or the (old) ACR-NEMA protocol version of the Text Gateway.
8.3.2.16 Modality Worklist Will this system be a Modality Worklist Provider? Yes or No// This question will only be asked on a system that is slated to be used as a Text Gateway.
• Answering Yes to this question will enable settings that allow this system to operate as a Modality Worklist Provider.
• Answering No means that this system will not be able to respond to Modality Worklist requests.
8.3.2.17 CPT Modifiers Send CPT Modifiers? Yes or No// • Answering Yes to this question will have the effect that when CPT codes are transmitted,
modifiers will be included.
• Answering No means that such modifiers will be omitted.
8.3.2.18 VistA System IP Address Enter the network address for the main VistA HIS: address// This question will be asked only on a system that is slated to use the MUMPS-to-MUMPS Broker.
Chapter 8 – Legacy Gateway System Maintenance
166 VistA Imaging System MAG*3.0*138 September 2013 DICOM Gateway User Manual – Rev. 15
Please enter the network address for the main VistA Hospital Information System where the MUMPS-to-MUMPS Broker Listener is running. Enter it either in nnn.nnn.nnn.nnn format, or as an entry in the HOSTS file.
8.3.2.19 Delay after Exam Complete Delay for C-Move request after Exam Complete [min]: time// This question will be asked only on a system that is slated to either be sending text messages to a PACS, or to be receiving Exam Complete messages from a PACS.
Enter a time-delay value (like 5m 30s for 5 minutes, 30 seconds) for the period that should elapse between the moment an Exam Complete message arrives, and the moment a C-MOVE request can be initiated.
8.3.2.20 Dashes in Social Security Numbers Include DASHES in Social Security Numbers sent to PACS? Yes or No// This question will be asked only on a system that is slated to send text messages to a PACS.
• Answering Yes to this question will have the effect that when Social Security Numbers are transmitted to PACS, dashes will be included. (This is the default: nnn-nn-nnnn.)
• Answering No means that this pair of dashes will be omitted.
8.3.2.21 MUMPS-to-MUMPS Broker Listener Port Number Enter the network port number for the main VistA HIS: number// This question will be asked only on a system that is slated to use the MUMPS-to-MUMPS Broker.
• Please enter the port number of the MUMPS-to-MUMPS Broker Listener on the main VistA Hospital Information System.
• A TCP/IP port number is an integer between 0 and 65,535 (typically higher than 2048).
• Please note that the MUMPS-to-MUMPS Broker Listener must be running on the main VistA Hospital Information System in addition to the regular RPC Broker. Be sure to enter the port number of the MUMPS-to-MUMPS Broker Listener and not that of the traditional RPC Broker.
8.3.2.22 Email Address for Emergency Messages Send emergency e-mail notices to: address// The answer to this question must be the name of a mailgroup.
• Note that names of mailgroups may contain letters and digits and dashes, but no spaces.
Chapter 8 – Legacy Gateway System Maintenance
September 2013 VistA Imaging System MAG*3.0*138 167 DICOM Gateway User Manual – Rev. 15
• The name of the mailgroup and the name of the server where this group resides are separated by one at-sign (@). (These messages are sent by SMTP-mail, not by FORUM-mail!)
• A valid name of a mailgroup would be: [email protected]
8.3.2.23 Display Names of Patients Display Patient Name/ID in Image Processing? Yes or No// • Answering Yes to this question will enable the normal image processing application to
display the patient name and id ssn.
• Answering No will disable the display of the patient identification. This may be necessary to comply with HIPAA.
8.3.2.24 Access Code for Modality Worklist When an external entity sends a Modality Worklist request to a Legacy DICOM Gateway, the Legacy DICOM Gateway is usually able to respond to the request using information that is stored on the Gateway itself. In some cases, the Legacy DICOM Gateway will need to query the VistA system for details to report back to the requester. When the Legacy DICOM Gateway makes such a request to the VistA system, it will use the access code that is specified as the answer to this question.
Note: The response to this question is treated as a password (that is, it is not displayed on your monitor).
Access Code for Modality Worklist //
8.3.2.25 Verify Code for Modality Worklist When an external entity sends a Modality Worklist request to a Legacy DICOM Gateway, the Legacy DICOM Gateway is usually able to respond to the request using information that is stored on the Gateway itself. In some cases, the Legacy DICOM Gateway will need to query the VistA system for details to report back to the requester. When the Legacy DICOM Gateway makes such a request to the VistA system, it will use the access code that is specified as the answer to this question.
Note: The response to this question is treated as a password; i.e., it is not displayed on your monitor.
Verify Code for Modality Worklist //
Chapter 8 – Legacy Gateway System Maintenance
168 VistA Imaging System MAG*3.0*138 September 2013 DICOM Gateway User Manual – Rev. 15
8.3.2.26 Modality Worklist Port Numbers Modality worklist requests are usually processed through TCP/IP port number 60010. Some sites have equipment that uses a different port number, and that cannot be configured to use any other port number. In order to support such equipment, it is possible to define additional port numbers for modality worklist processors.
Currently, there is a Modality WorkList processor for the following port: 60010 Change? [A/D/N] N// ? <Enter> Enter one of the following: No if no (additional) change is to be made Add <number> to add a listener for a port Delete <number> to remove a listener for a port Note that valid port numbers are integers between 1 and 65535. Note that the listener for port 60010 may not be removed. Currently, there is a Modality WorkList processor for the following port: 60010 Change? [A/D/N] N// a 104 <Enter> Currently, there are Modality WorkList processors for the following ports: 104 60010 Change? [A/D/N] N// d 104 <Enter> Currently, there is a Modality WorkList processor for the following port: 60010 Change? [A/D/N] N//
8.3.2.27 Email Post Office The Department of Veterans Affairs has three virus-checking post offices set up for nationwide e-mail. The post office to select for this setting should be the one to which the site has the best network connection. Possible responses are listed below:
0: use the local VistA system (default) 1: use the Virus-Checking Office in Silver Spring, MD at 10.2.27.92 2: use the Virus-Checking Office in Hines, IL at 10.3.27.92 3: use the Virus-Checking Office in San Francisco, CA at 10.6.27.92 4: use VA-Forum at 10.2.29.131 ...or enter the TCP/IP address of the system to be used. Which post-office will this computer use? // smtp.va.gov <Enter> Which port number will this computer use for e-mail? // Is this gateway installed in VA (V)or IHS (I)? V//
Chapter 8 – Legacy Gateway System Maintenance
September 2013 VistA Imaging System MAG*3.0*138 169 DICOM Gateway User Manual – Rev. 15
Note: VA policy on the use of e-mail post offices has changed several times while this documentation was being prepared. At the time this document was published, the only value allowed for this setting was smtp.va.gov. Consult with your ISO to obtain information about current policy regarding this.
8.3.3 Update AE_TITLE The AE_TITLE.SAMPLE file will be copied to the AE_TITLE.DIC file in the network dictionary file folder. The installation process does this automatically. AE_TITLE.DIC may be edited by the site.
8.3.4 Update INSTRUMENT.DIC The list of individual instruments that are being used at a site is maintained in master file INSTRUMENT.DIC. This menu option loads the contents of this file into the VistA Imaging Legacy DICOM Gateway MUMPS database. The last field of this file represents the HDIG host name that is selected to receive objects from a specific C-STORE SCU. If this field is left blank, then the port # will not start listening on any HDIG.
Use the Caché Terminal icon to start a session for this menu option.
After login, select the following menu options:
1. In the first menu, select #4 (System Maintenance). 2. In the second menu, select #2 (Gateway Configuration and DICOM Master Files).
3. In the third menu, select #4 (Update INSTRUMENT.DIC). The following will be displayed to confirm the progress of the dictionary update:
Building the Instrument Dictionary -- ^MAGDICOM(2006.581) Ready to read dictionary file "F:\DICOM\Dict\INSTRUMENT.DIC"? y// y <Enter> Comment: <<List of Image Acquisition Instruments>> Comment: <<>> Comment: <<Mnemonic|Description|Institution ID|Imaging Service|Port|MachineID>> Comment: << Instituion ID can be the number (688), name (Washington, DC), our null.>> Comment: << Leave Institution ID to null to default to the local site>> Comment: << Note: the Machine ID is optional>> Comment: <<>> Comment: << Imaging services are defined as follows>> Comment: << RAD --------- Radology>> Comment: << CON --------- Consult/Procedure Request Tracking (CPRS)>> Comment: <<>> Comment: <<>> Comment: << Examples:>>

Chapter 8 – Legacy Gateway System Maintenance
170 VistA Imaging System MAG*3.0*138 September 2013 DICOM Gateway User Manual – Rev. 15
Comment: <<>> Comment: << Computed Radiography>> CR1 -- Fuji AC3 CR, Room 2156 -- 460 -- RAD -- 60100 CR2 -- Fuji AC3 CR, Room 2160 (Chest) -- 460 -- RAD -- 60101 CR3 -- Fuji AC3 CR, Cubby, 2145 Hallway -- 460 -- RAD -- 60102 Comment: <<>> Comment: << Computed Tomography>> CT1 -- GE High Speed Advantage, Room 2142 -- 460 -- RAD -- 60120 Comment: <<>> Comment: << Digital Radio Fluoro>> DRS1 -- GE Digital Radio Fluoro, Rm 2163 -- 460 -- RAD -- 60140 DRS2 -- GE Digital Radio Fluoro, Rm 2150 -- 460 -- RAD -- 60141 Comment: <<>> Comment: << Special Procedures>> LCA -- GE LCA Advantex DLX, Rm 2143 -- 460 -- RAD -- 60150 Comment: <<>> LUMISYS -- Lumisys Scanner, Rm 2122 -- 460 -- RAD -- 60190 Comment: <<>> Comment: << Ultrasound>> US -- ATL Ultramark9, Rm 2136 -- 460 -- RAD -- 60160 Comment: <<>> Comment: << Nuclear Medicine>> NM -- Siemens, Rm 2093 -- 460 -- RAD -- 60170 Comment: <<>> Comment: << GE Windows Workstation>> GI-FLUORO -- ASPECT -- 512 -- CON -- 60210 Comment: <<>> ADW -- GE Advantage Workstation -- 460 -- RAD -- 60200 Comment: <<>> Comment: << Default DICOM Port>> DEFAULT -- Default DICOM Port -- 512 -- RAD -- 104 Comment: <<>> Comment: <<>> Comment: << Place your entries below>>
Note: In the .DIC files, leading and trailing spaces are ignored when the data is imported into the database. This makes it possible to align information for easier reading.
8.3.5 Update MODALITY.DIC Image processing is controlled by fields in the MODALITY.DIC master file. This menu option loads the contents of this file into the VistA Imaging Legacy DICOM Gateway MUMPS database.
Use the Caché Terminal icon to start a session for this menu option.
After login, select the following menu options:
1. In the first menu, select #4 (System Maintenance). 2. In the second menu, select #2 (Gateway Configuration and DICOM Master Files).
3. In the third menu, select #5 (Update MODALITY.DIC).
Chapter 8 – Legacy Gateway System Maintenance
September 2013 VistA Imaging System MAG*3.0*138 171 DICOM Gateway User Manual – Rev. 15
The following will be displayed to confirm the progress of the dictionary update:
Building the Modality Type Dictionary -- ^MAGDICOM(2006.582) Ready to read dictionary file "F:\DICOM\Dict\MODALITY.DIC"? y// y <Enter> Comment: << List of different typs of modality image acquisition instruments>> Comment: <<>> Comment: << mfgr | model | modality | mag_dcmtotga.exe parameters | case# lookup code Comment: << | data extraction code|data extraction file|imaging service>> Comment: <<>> Comment: << Note: for CPRS Consults and Procedures, use the following two values: >> Comment: << demtotga.exe parameters should be "<DICOM>">> Comment: << Case# lookup code should be "CORRECT^MAGDIR3">> Comment: <<>> Comment: << Imaging services are defined as follows>> Comment: << RAD --------- Radology>> Comment: << CON --------- Consult/Procedure Request Tracking (CPRS)>> Comment: << Comment: << Examples:>> Comment: <<>> ACMECTCOMPANY -- BETA -- CT -- b12 f0 GECT^MAGDIR3 -- GECT^MAGDIR4A -- datagect.dic GEMEDICALSYSTEMS -- GENESIS_JUPITER -- CT -- b12 f0 GECT^MAGDIR3 -- GECT^MAGDIR4A -- datagect.dic GEMEDICALSYSTEMS -- GENESIS_HISPEED_RP -- CT -- b12 f0 GECTHISA^MAGDIR3 -- GECT^MAGDIR4A -- datagect.dic GEMEDICALSYSTEMS -- HISPEEDRP -- CT -- b12 f0 GECTHISA^MAGDIR3 -- GECT^MAGDIR4A -- datagect.dic GEMEDICALSYSTEMS -- GENESIS_SIGNA -- MR -- b12 f0 LONGCASE^MAGDIR3 -- GECT^MAGDIR4A -- datagect.dic GEMEDICALSYSTEMS -- DRS -- RF -- b8 GEDRS^MAGDIR3 -- GELCA^MAGDIR4A -- datamisc.dic GEMEDICALSYSTEMS -- DLX -- XA -- b10 STUDYID^MAGDIR3 -- GELCA^MAGDIR4A -- datamisc.dic PICKERINTERNATIONAL,INC. -- PQ2000 -- CT -- b12 a1000 f0 c4095 PQ2000^MAGDIR3 -- PICKERCT^MAGDIR4A -- datagect.dic PICKERINTERNATIONAL,INC. -- PQ2000 -- SC -- b12 a1000 f0 c4095 PQ2000^MAGDIR3 -- PICKERCT^MAGDIR4A -- datagect.dic DEJARNETTERESEARCHSYSTEMS -- IMAGESHAREFUJICRACQUISITIONSTATION -- CR -- b10 f0 c1023 R8/b10 f0 c1023 LONGCASE^MAGDIR3 -- -- datamisc.dic LUMISYS -- * -- CR -- b12 f0 c4095 R8 LONGCASE^MAGDIR3 -- -- datamisc.dic LUMISYS -- * -- SC -- b12 f0 c4095 R8 LONGCASE^MAGDIR3 -- -- datamisc.dic LUMISYS -- * -- RAD -- b12 f0 c4095 R8 LONGCASE^MAGDIR3 -- -- datamisc.dic ASPECTELECTRONICS,INC. -- ACCESSACQUISITIONMODULE -- US -- b8 PIDCASE^MAGDIR3 -- -- datamisc.dic TOPCON –- NW6S -– XC -- <DICOM>
CORRECT^MAGDIR3 -- datamisc.dic -- CON # Comment: <<>> Comment: << Place your entries below>> Comment: << end of file>> Ready to build the "Data Transfer" Dictionaries? y// y <Enter> F:\DICOM\Dict\DataGECT.DIC F:\DICOM\Dict\DataMISC.DIC
Chapter 8 – Legacy Gateway System Maintenance
172 VistA Imaging System MAG*3.0*138 September 2013 DICOM Gateway User Manual – Rev. 15
Note: In the .DIC files, leading and trailing spaces are ignored when the data is imported into the database. This makes it possible to align information for easier reading.
8.3.6 Update PORTLIST.DIC Note: This dictionary is needed only if your site is interfacing to a commercial PACS or a commercial Modality Worklist Broker (that is, a Mitra Broker or a DeJarnette MediShare).
The list of VistA Server TCP/IP port numbers is maintained in master file PORTLIST.DIC. This menu option loads the contents of this file into the VistA Imaging Legacy DICOM Gateway MUMPS database.
Use the Caché Terminal icon to start a session for this menu option.
After login, select the following menu options:
1. In the first menu, select #4 (System Maintenance). 2. In the second menu, select #2 (Gateway Configuration and DICOM Master Files).
3. In the third menu, select #6 (Update PORTLIST.DIC). The following will be displayed to confirm the progress of the dictionary update:
Building the TCP/IP Provider Port Dictionary -- ^MAGDICOM(2006.584) Ready to read dictionary file "F:\DICOM\Dict\PORTLIST.DIC"? y// y <Enter> Comment: <<Menu Option|AE Title|Port|File Mode (FIFO QUEUE or DIRECT)|CHANNEL>> PACS INTERFACE -- VISTA PACS I/F -- 60040 -- FIFO QUEUE -- 1 Comment: <<MITRA Broker Interface|VistA PACS I/F|60041|FIFO QUEUE|2>> Comment: <<DeJarnette Medishare Interface|VistA PACS I/F|60042|FIFO QUEUE|2>> Comment: <<Perry Point CR (a)|PP_CR_A|60043|DIRECT|1>> Comment: <<Perry Point CR (b)|PP_CR_B|60044|DIRECT|1>>
Note: In the .DIC files, leading and trailing spaces are ignored when the data is imported into the database. This makes it possible to align information for easier reading.
8.3.7 Update SCU_LIST.DIC This menu option loads the contents of the SCU_LIST.DIC .file into the VistA Imaging Legacy DICOM Gateway MUMPS database (#2006.585), and into the DICOM TRANSMIT DESTINATION file (#2006.587) in the VistA System.
Use the Caché Terminal icon to start a session for this menu option.
Chapter 8 – Legacy Gateway System Maintenance
September 2013 VistA Imaging System MAG*3.0*138 173 DICOM Gateway User Manual – Rev. 15
After login, select the following menu options:
1. In the first menu, select #4 (System Maintenance). 2. In the second menu, select #2 (Gateway Configuration and DICOM Master Files).
3. In the third menu, select #7 (Update SCU_LIST.DIC). The following will be displayed to confirm the progress of the dictionary update:
Building the User Application Dictionary -- ^MAGDICOM(2006.585) Ready to read dictionary file "F:\DICOM\Dict\SCU_LIST.DIC"? y// y <Enter> Comment: << User Application List>> Comment: << Format:>> Comment: << line 1:Application Name|Called AE Title|Calling AE Title|Destination IP Address|Socket>> Comment: << line 2:|Presentation Context Name|Transfer Syntax Name>> Comment: << line 3:||Transfer Syntax Name (if there are more than one)>> Comment: <<>> Comment: << Examples:>> Comment: <<>> Comment: << EMED Query/Retrieve|EMED_SCP_LAND|VISTA_QR_SCU|111.222.333.172|104>> Comment: << |Verification SOP Class|Implicit VR Little Endian>> Comment: << |Study Root Query/Retrieve Information Model - MOVE|Implicit VR Litt le Endian>> Comment: <<>> Comment: << GEMS PACS Query/Retrieve|QueryRetrieve|VISTA_QR_SCU|111.222.333.73|1 04>> Comment: << |Verification SOP Class|Implicit VR Little Endian>> Comment: << |Study Root Query/Retrieve Information Model - FIND|Implicit VR Litt le Endian>> Comment: << |Study Root Query/Retrieve Information Model - MOVE|Implicit VR Litt le Endian>> Comment: <<>> Comment: << MITRA Modality Worklist|Testing|SCANNER1|TEST_NT1|60010>> Comment: << |Verification SOP Class|Implicit VR Little Endian>> Comment: << |Modality Worklist Information Model - FIND|Implicit VR Little Endia n>> Comment: <<>> Comment: << DeJarnette Lasershare|Lasershare|VistA Send Image|127.0.0.1|60100>> Comment: << |CT Image Storage|Implicit VR Little Endian>> Comment: <<>> Comment: <<>> LOCAL MODALITY WORKLIST^VistA_Worklist^VistA Testing^LOCALHOST^60010 Verification SOP Class Implicit VR Little Endian Modality Worklist Information Model - FIND Implicit VR Little Endian Comment: <<>> LOCAL IMAGE STORAGE^VistA_Storage^VistA Testing^LOCALHOST^60100 CT Image Storage Implicit VR Little Endian
Chapter 8 – Legacy Gateway System Maintenance
174 VistA Imaging System MAG*3.0*138 September 2013 DICOM Gateway User Manual – Rev. 15
Comment: <<>> Comment: << Place your entries below>> Comment: << end of file>>
For detailed information about adding entries to this file, refer to the DICOM Imaging Installation Guide.
8.3.8 Update WORKLIST.DIC Note: This dictionary must contain an entry for every device that is going to use the DICOM Modality Worklist service.
The list of descriptions of instruments that use DICOM Modality Worklist at each site is maintained in master file WORKLIST.DIC. This menu option loads the contents of this file into the VistA Imaging Legacy DICOM Gateway MUMPS database.
Use the Caché Terminal icon to start a session for this menu option.
After login, select the following menu options:
1. In the first menu, select #4 (System Maintenance). 2. In the second menu, select #2 (Gateway Configuration and DICOM Master Files).
3. In the third menu, select #8 (Update WORKLIST.DIC). The following will be displayed to confirm the progress of the dictionary update:
Building the Modality Worklist Dictionary -- ^MAGDICOM(2006.583) Ready to read dictionary file "F:\DICOM\Dict\WORKLIST.DIC"? y// y <Enter> Comment: << List of Modality Worklist service users>> Comment: <<>> Comment: << Station AE Title|Institution ID|Imaging Service|Imaging Type>> Comment:<< |Short or Long Accession Number|Description>> Comment: << Instituion ID can be the number (688), name (Washington, DC), or null.>> Comment: << Leave Institution ID to null to default to the local site >> Comment: << Imaging Types are from IMAGE INDEX FOR SPECIALTY / SUBSPECIALTY>> Comment: <<>> Comment: << Imaging services are defined as follows>> Comment: << RAD --------- Radology>> Comment: << CON --------- Consult/Procedure Request Tracking (CPRS)>> Comment: <<>> Comment: <<>> Comment: << Examples:>> Comment: <<>> Comment: << IM_CR|BALTIMORE, MD|RAD|RAD|SHORT>> Comment: << MS_FCRIDGW|BALTIMORE, MD|RAD|RAD|SHORT>> Comment: << SCANNER1|BALTIMORE, MD|RAD|RAD|LONG>> Comment: << LUMISYS|BALTIMORE, MD|RAD|RAD|LONG>>
Chapter 8 – Legacy Gateway System Maintenance
September 2013 VistA Imaging System MAG*3.0*138 175 DICOM Gateway User Manual – Rev. 15
Comment: << ALI_SCU|BALTIMORE, MD|RAD|RAD|LONG>> Comment: << PICKER_KRUSTY|BALTIMORE, MD|RAD|RAD|LONG>> Comment: << PCU_QWL_SCU|BALTIMORE, MD|RAD|RAD|LONG>> Comment: << PICKER_NM_MW|BALTIMORE, MD|RAD|RAD|LONG>> Comment: << ALIPC_QWL_SCU|BALTIMORE, MD|RAD|RAD|LONG>> Comment: << IMCR_1|BALTIMORE, MD|RAD|RAD|LONG>> Comment: <<>> Comment: << Healthcre Providers>> Comment: << IRIS-1||CON|OPHTH|LONG|Canon Retinal Camera, Eye Clinic, Rm, E-170>> Comment: << DENIX-2||CON|DENTAL|LONG|Intra-Oral Xray Unit, Rm, D-153>> Comment: << GI_LAB_SCU|<Your Institution goes here>|CON|GI|LONG|North Clinic>> Comment: << IRIS-1||CON|OPHTH|LONG|Canon Retinal Camera, Eye Clinic, Rm, E-170>> Comment: << DENIX-2||CON|DENTAL|LONG|Intra-Oral Xray Unit, Rm, D-153>> Comment: << GI_LAB_SCU|<Your Institution goes here>|CON|GI|LONG|North Clinic>> Comment: <<>> Comment: << Test AE title is for exercising the local VISTA MWL provider>> TEST -- 523 -- RAD -- RAD -- LOG Comment: <<>> Comment: << Place your entries below>>
Note: In the .DIC files, leading and trailing spaces are ignored when the data is imported into the database. This makes it possible to align information for easier reading.
8.3.9 Reinitialize All the DICOM Master Files In addition to the site-specific master files, there are a number of master files that contain static information that is needed by the VistA Imaging Legacy DICOM Gateways. Examples of such files are the list of DICOM elements, the list of supported SOP classes, and the list of recognized HL7 messages.
When this menu option is started, the contents of all master files, the static ones as well as the site-specific ones, will be re-loaded into the VistA Imaging Legacy DICOM Gateway.
This menu option should be run whenever you need to apply an update to the static master file dictionaries.
Use the Caché Terminal icon to start a session for this menu option.
After login, select the following menu options:
1. In the first menu, select #4 (System Maintenance). 2. In the second menu, select #2 (Gateway Configuration and DICOM Master Files).
3. In the third menu, select #9 (Reinitialize All the DICOM Master Files). Ready to build all of the DICOM Master Files? YES// yes Wed 16:35 Import Master File with "DICOM Element" definitions. Wed 16:35 from file "C:\DICOM\DICT\Element.dic".
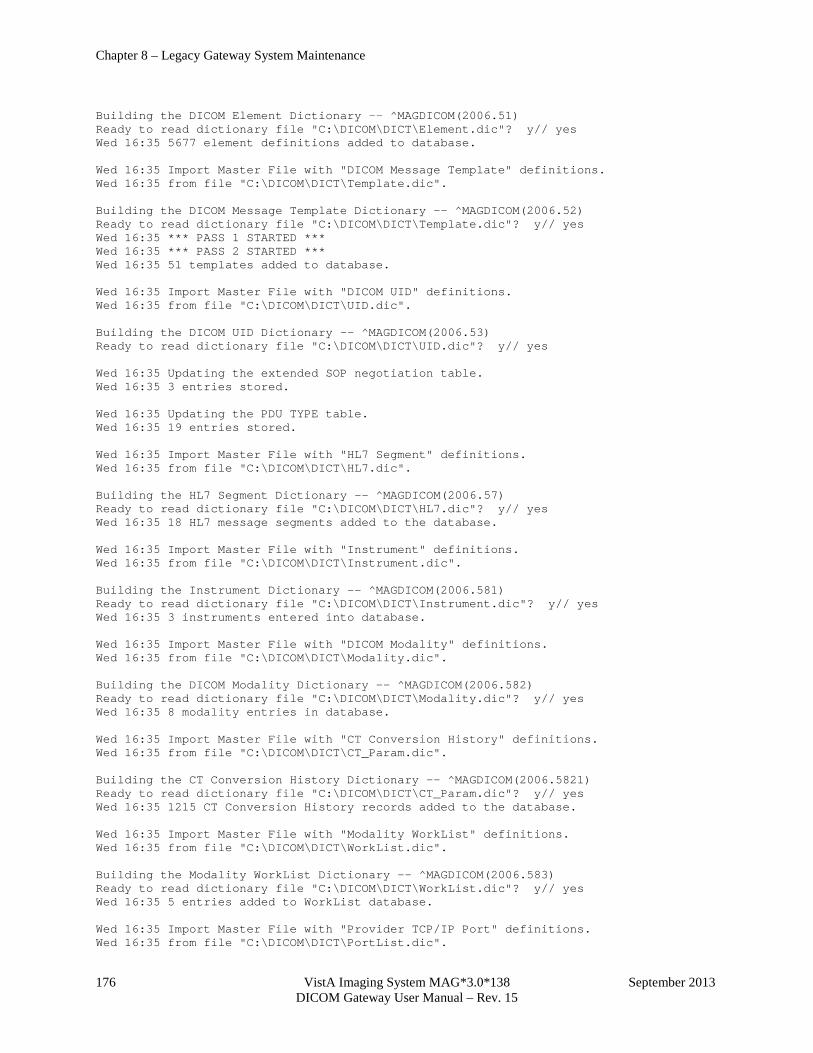
Chapter 8 – Legacy Gateway System Maintenance
176 VistA Imaging System MAG*3.0*138 September 2013 DICOM Gateway User Manual – Rev. 15
Building the DICOM Element Dictionary -- ^MAGDICOM(2006.51) Ready to read dictionary file "C:\DICOM\DICT\Element.dic"? y// yes Wed 16:35 5677 element definitions added to database. Wed 16:35 Import Master File with "DICOM Message Template" definitions. Wed 16:35 from file "C:\DICOM\DICT\Template.dic". Building the DICOM Message Template Dictionary -- ^MAGDICOM(2006.52) Ready to read dictionary file "C:\DICOM\DICT\Template.dic"? y// yes Wed 16:35 *** PASS 1 STARTED *** Wed 16:35 *** PASS 2 STARTED *** Wed 16:35 51 templates added to database. Wed 16:35 Import Master File with "DICOM UID" definitions. Wed 16:35 from file "C:\DICOM\DICT\UID.dic". Building the DICOM UID Dictionary -- ^MAGDICOM(2006.53) Ready to read dictionary file "C:\DICOM\DICT\UID.dic"? y// yes Wed 16:35 Updating the extended SOP negotiation table. Wed 16:35 3 entries stored. Wed 16:35 Updating the PDU TYPE table. Wed 16:35 19 entries stored. Wed 16:35 Import Master File with "HL7 Segment" definitions. Wed 16:35 from file "C:\DICOM\DICT\HL7.dic". Building the HL7 Segment Dictionary -- ^MAGDICOM(2006.57) Ready to read dictionary file "C:\DICOM\DICT\HL7.dic"? y// yes Wed 16:35 18 HL7 message segments added to the database. Wed 16:35 Import Master File with "Instrument" definitions. Wed 16:35 from file "C:\DICOM\DICT\Instrument.dic". Building the Instrument Dictionary -- ^MAGDICOM(2006.581) Ready to read dictionary file "C:\DICOM\DICT\Instrument.dic"? y// yes Wed 16:35 3 instruments entered into database. Wed 16:35 Import Master File with "DICOM Modality" definitions. Wed 16:35 from file "C:\DICOM\DICT\Modality.dic". Building the DICOM Modality Dictionary -- ^MAGDICOM(2006.582) Ready to read dictionary file "C:\DICOM\DICT\Modality.dic"? y// yes Wed 16:35 8 modality entries in database. Wed 16:35 Import Master File with "CT Conversion History" definitions. Wed 16:35 from file "C:\DICOM\DICT\CT_Param.dic". Building the CT Conversion History Dictionary -- ^MAGDICOM(2006.5821) Ready to read dictionary file "C:\DICOM\DICT\CT_Param.dic"? y// yes Wed 16:35 1215 CT Conversion History records added to the database. Wed 16:35 Import Master File with "Modality WorkList" definitions. Wed 16:35 from file "C:\DICOM\DICT\WorkList.dic". Building the Modality WorkList Dictionary -- ^MAGDICOM(2006.583) Ready to read dictionary file "C:\DICOM\DICT\WorkList.dic"? y// yes Wed 16:35 5 entries added to WorkList database. Wed 16:35 Import Master File with "Provider TCP/IP Port" definitions. Wed 16:35 from file "C:\DICOM\DICT\PortList.dic".
Chapter 8 – Legacy Gateway System Maintenance
September 2013 VistA Imaging System MAG*3.0*138 177 DICOM Gateway User Manual – Rev. 15
Building the Provider TCP/IP Port Dictionary -- ^MAGDICOM(2006.584) Ready to read dictionary file "C:\DICOM\DICT\PortList.dic"? y// yes Wed 16:35 1 entry added to database. Wed 16:35 Import Master File with "User Application" definitions. Wed 16:35 from file "C:\DICOM\DICT\SCU_List.dic". Building the User Application Dictionary -- ^MAGDICOM(2006.585) Ready to read dictionary file "C:\DICOM\DICT\SCU_List.dic"? y// yes Wed 16:35 3 user applications added to database. Wed 16:35 On VistA System: 3 updated Wed 16:35 Import Master File with "Provider Application" definitions. Wed 16:35 from file "C:\DICOM\DICT\SCP_List.dic". Building the Provider Application Dictionary -- ^MAGDICOM(2006.586) Ready to read dictionary file "C:\DICOM\DICT\SCP_List.dic"? y// yes Wed 16:35 Import Master File with "Application Entity Title" definitions. Wed 16:35 from file "C:\DICOM\DICT\AE_TITLE.dic". Building the Application Entity Title Dictionary -- ^MAGDICOM(2006.588) Ready to read dictionary file "C:\DICOM\DICT\AE_TITLE.dic"? y// yes Wed 16:35 Import Master File with "Data Transfer" definitions. Wed 16:35 from file "C:\DICOM\DICT\DATAGECT.DIC". Building the Data Transfer Dictionary -- ^MAGDICOM(2006.511) Ready to read dictionary file "C:\DICOM\DICT\DATAGECT.DIC"? y// yes Wed 16:35 Import Master File with "Data Transfer" definitions. Wed 16:35 from file "C:\DICOM\DICT\DATAMISC.DIC". Building the Data Transfer Dictionary -- ^MAGDICOM(2006.511) Ready to read dictionary file "C:\DICOM\DICT\DATAMISC.DIC"? y// yes Wed 16:35 2 files added to database. -- DICOM Master File Build completed successfully --
8.3.10 Create Shortcuts for Instruments For more information on creating shortcuts for instruments see the VistA Imaging HDIG Installation Guide.
8.3.11 Validate Access/Verify Codes for Modality Worklist When an external entity sends a Modality Worklist request to a Legacy DICOM Gateway, the Legacy DICOM Gateway is usually able to respond to the request using information that is stored on the Gateway itself. In some cases, the Legacy DICOM Gateway will need to query the VistA system for details to report back to the requester. When the Legacy DICOM Gateway makes such a request to the VistA system, it will use the access and verify codes that were set up using menu option 4-2-2, Update Gateway Configuration Parameters. Since credentials may be changed on the VistA system, there is a need to check temporarily whether the stored credentials are still valid. This menu option is provided to perform such checks.
Use the Caché Terminal icon to start a session for this menu option.
Chapter 8 – Legacy Gateway System Maintenance
178 VistA Imaging System MAG*3.0*138 September 2013 DICOM Gateway User Manual – Rev. 15
After login, select the following menu options:
1. In the first menu, select #4 (System Maintenance). 2. In the second menu, select #2 (Gateway Configuration and DICOM Master Files). 3. In the third menu, select #11 (Validate Access/Verify Codes for Modality Worklist). When this menu option is executed, it will report either:
Access and Verify codes are valid for background task usage.
or
Access and Verify codes are NOT valid for background task usage.
8.3.12 Display Versions and/or Time Stamps of Components This menu option is used to display path and date information about dictionary and executable files used by the local gateway. This option also uploads the path and date information for these files into the VistA system.
The database on the VistA system can then be queried through Remote Procedure Calls by non-M[UMPS] applications to obtain information about these components.
Use the Caché Terminal icon to start a session for this menu option.
After login, select the following menu options:
1. In the first menu, select #4 (System Maintenance). 2. In the second menu, select #2 (Gateway Configuration and DICOM Master Files). 3. In the third menu, select #12 (Display Versions and/or Time Stamps of Components). When this menu option is executed, it will display a report like:
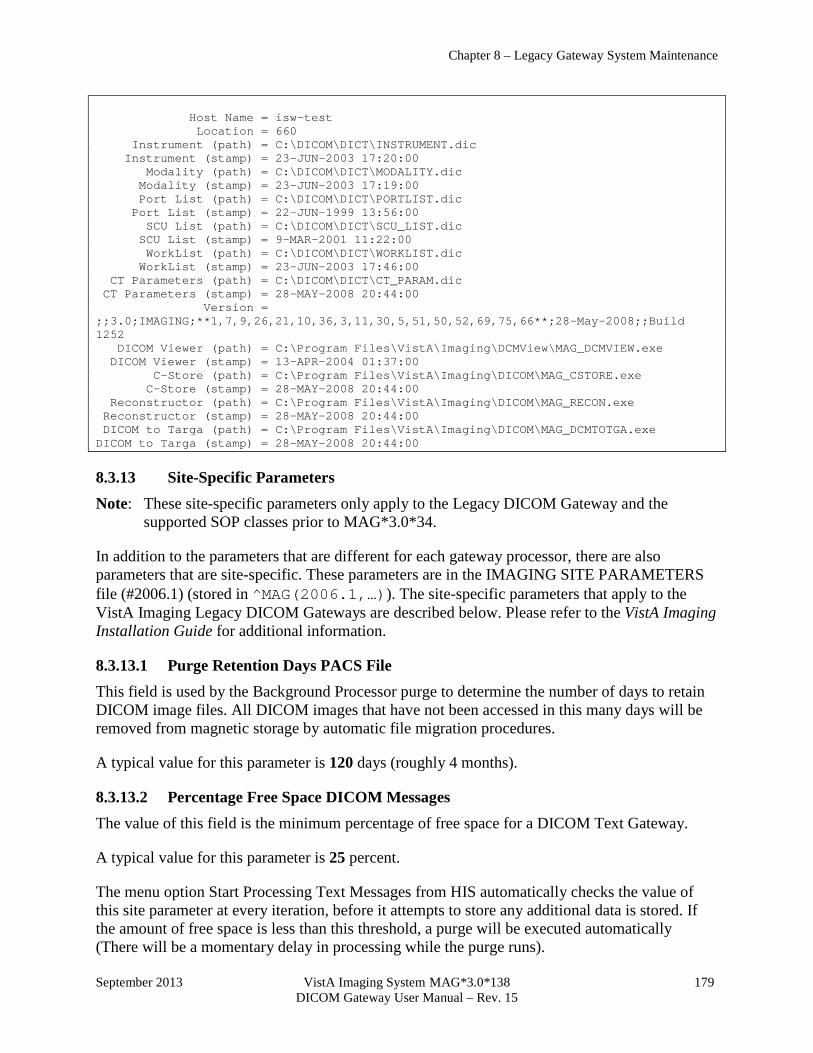
Chapter 8 – Legacy Gateway System Maintenance
September 2013 VistA Imaging System MAG*3.0*138 179 DICOM Gateway User Manual – Rev. 15
Host Name = isw-test Location = 660 Instrument (path) = C:\DICOM\DICT\INSTRUMENT.dic Instrument (stamp) = 23-JUN-2003 17:20:00 Modality (path) = C:\DICOM\DICT\MODALITY.dic Modality (stamp) = 23-JUN-2003 17:19:00 Port List (path) = C:\DICOM\DICT\PORTLIST.dic Port List (stamp) = 22-JUN-1999 13:56:00 SCU List (path) = C:\DICOM\DICT\SCU_LIST.dic SCU List (stamp) = 9-MAR-2001 11:22:00 WorkList (path) = C:\DICOM\DICT\WORKLIST.dic WorkList (stamp) = 23-JUN-2003 17:46:00 CT Parameters (path) = C:\DICOM\DICT\CT_PARAM.dic CT Parameters (stamp) = 28-MAY-2008 20:44:00 Version = ;;3.0;IMAGING;**1,7,9,26,21,10,36,3,11,30,5,51,50,52,69,75,66**;28-May-2008;;Build 1252 DICOM Viewer (path) = C:\Program Files\VistA\Imaging\DCMView\MAG_DCMVIEW.exe DICOM Viewer (stamp) = 13-APR-2004 01:37:00 C-Store (path) = C:\Program Files\VistA\Imaging\DICOM\MAG_CSTORE.exe C-Store (stamp) = 28-MAY-2008 20:44:00 Reconstructor (path) = C:\Program Files\VistA\Imaging\DICOM\MAG_RECON.exe Reconstructor (stamp) = 28-MAY-2008 20:44:00 DICOM to Targa (path) = C:\Program Files\VistA\Imaging\DICOM\MAG_DCMTOTGA.exe DICOM to Targa (stamp) = 28-MAY-2008 20:44:00
8.3.13 Site-Specific Parameters Note: These site-specific parameters only apply to the Legacy DICOM Gateway and the supported SOP classes prior to MAG*3.0*34.
In addition to the parameters that are different for each gateway processor, there are also parameters that are site-specific. These parameters are in the IMAGING SITE PARAMETERS file (#2006.1) (stored in ^MAG(2006.1,…)). The site-specific parameters that apply to the VistA Imaging Legacy DICOM Gateways are described below. Please refer to the VistA Imaging Installation Guide for additional information.
8.3.13.1 Purge Retention Days PACS File This field is used by the Background Processor purge to determine the number of days to retain DICOM image files. All DICOM images that have not been accessed in this many days will be removed from magnetic storage by automatic file migration procedures.
A typical value for this parameter is 120 days (roughly 4 months).
8.3.13.2 Percentage Free Space DICOM Messages The value of this field is the minimum percentage of free space for a DICOM Text Gateway.
A typical value for this parameter is 25 percent.
The menu option Start Processing Text Messages from HIS automatically checks the value of this site parameter at every iteration, before it attempts to store any additional data is stored. If the amount of free space is less than this threshold, a purge will be executed automatically (There will be a momentary delay in processing while the purge runs).
Chapter 8 – Legacy Gateway System Maintenance
180 VistA Imaging System MAG*3.0*138 September 2013 DICOM Gateway User Manual – Rev. 15
8.3.13.3 Retention Days DICOM Messages The value of this parameter is the number of days that old processed DICOM messages are to be retained. The subroutine that purges old DICOM messages will only remove messages that are older than this number of days.
A typical value for this parameter is 25 days.
8.3.13.4 Purge Retention Days PACS Big File This field is used by the Background Processor purge function to determine the number of days to retain Big DICOM files. All Big DICOM images that have not been accessed in this many days will be removed from magnetic storage by the Background Processor purge function.
A typical value for this parameter is 90 days (roughly 3 months).
8.3.13.5 PACS Interface Switch The value of this field is set to 1 if there is a VistA DICOM Image Gateway. Otherwise, this value is either empty or 0.
When this switch is turned off, the site parameters PURGE-RETENTION DAYS PACS FILE, PCT FREE SPACE DICOM MSGS and PURGE-RETEN DAYS PACS BIG FILE will be ignored by the VistA Imaging Legacy DICOM Gateway software.
8.3.13.6 PACS Image Write Location The value of this parameter is a pointer to the NETWORK LOCATION file (#2005.2) (stored in ^MAGD(2005.2,…)). This value indicates the drive to which images are currently being written. DICOM images are copied to the network location specified by this field.
8.4 MUMPS Utilities
8.4.1 Access MUMPS Error Log To help diagnose problems with the VistA Imaging Legacy DICOM Gateway software, it is necessary to determine if there was a MUMPS error in the application.
When a MUMPS error occurs in the VistA Imaging Legacy DICOM Gateway software, an entry is made in an error log file. Information is recorded about the nature of the error, the date and time the error occurred, and the internal status of the application when the error occurred.
This error log may be accessed and maintained using this menu option. (This utility can also be invoked by typing D ^%ER at the command line in programmer mode.) Please report all significant errors to the National Help Desk.
Use the Caché Terminal icon to start a session for this menu option.

Chapter 8 – Legacy Gateway System Maintenance
September 2013 VistA Imaging System MAG*3.0*138 181 DICOM Gateway User Manual – Rev. 15
After login, select the following menu options:
1. In the first menu, select #4 (System Maintenance). 2. In the second menu, select #3 (MUMPS Utilities). 3. In the third menu, select #1 (Access MUMPS Error Log). The output typically will look like the following:
For Date: T <Enter> 30 Dec 2005 1 Error Error: 1 <Enter> 1. <SUBSCRIPT>SHIELD+19^MAGDMFB at 8:23 am. $I=|TRM|:|2540 ($X=0 $Y=242) $J=2540 $ZA=2 $ZB= $ZS=16384 ($S=16634272) E S D1=0 F S D1=$O(^MAGDMLOG(D0,1,D1)) Q:'D0 W $G(^MAGDMLOG(D0,1,D1,0)),! Variable: D0 <Enter> (copying data ... done) (base stack level = 3) D0 = 16 Variable: <Enter> Error: <Enter> For Date: <Enter>
8.4.2 Global Variable Lister This menu option can be used to view the values of entries in databases through the general-purpose Global Variable Lister program. (This utility can also be invoked by typing D ^%G at the command line in programmer mode.)
This utility program is mainly intended to support diagnostic activities.
DO NOT CHANGE ENTRIES IN ANY GLOBAL FILE.
The Food and Drug Administration classifies the VistA Imaging DICOM Gateway as a medical device. As such, it may not be changed in any way. Modifications to the software or database may result in an adulterated medical device under 21CFR820, the use of which is considered to be a violation of US Federal Statutes.
Use the Caché Terminal icon to start a session for this menu option.
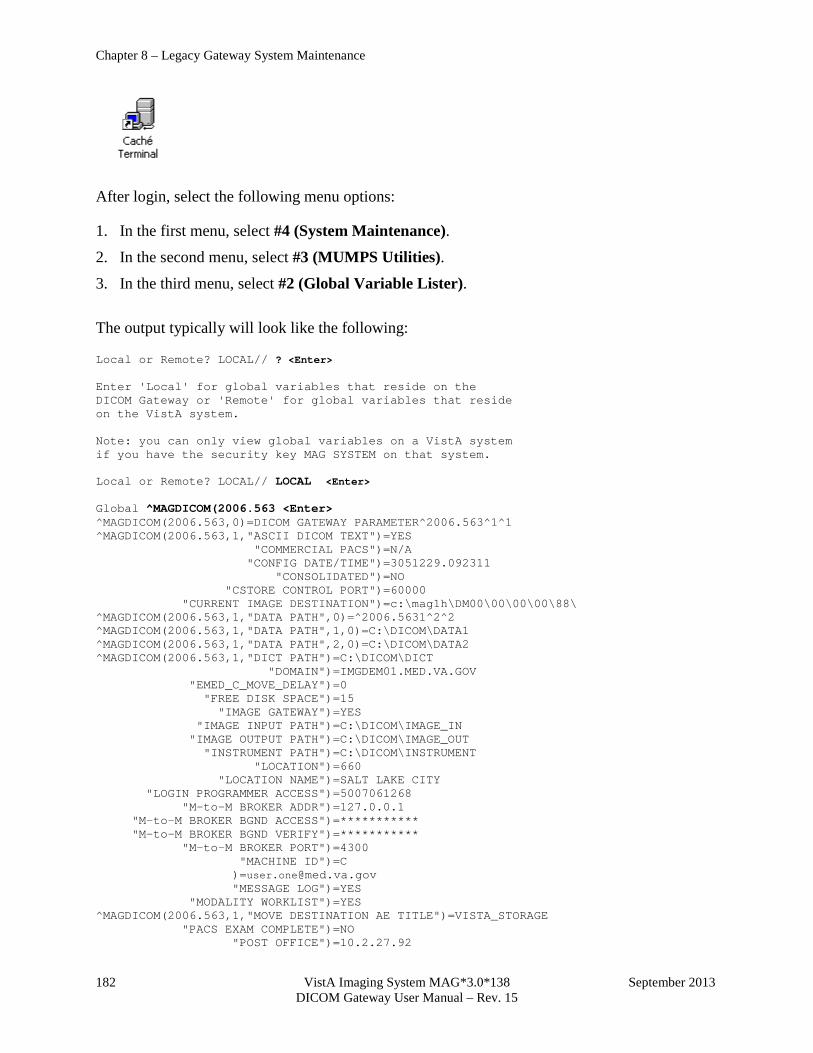
Chapter 8 – Legacy Gateway System Maintenance
182 VistA Imaging System MAG*3.0*138 September 2013 DICOM Gateway User Manual – Rev. 15
After login, select the following menu options:
1. In the first menu, select #4 (System Maintenance). 2. In the second menu, select #3 (MUMPS Utilities). 3. In the third menu, select #2 (Global Variable Lister). The output typically will look like the following:
Local or Remote? LOCAL// ? <Enter> Enter 'Local' for global variables that reside on the DICOM Gateway or 'Remote' for global variables that reside on the VistA system. Note: you can only view global variables on a VistA system if you have the security key MAG SYSTEM on that system. Local or Remote? LOCAL// LOCAL <Enter> Global ^MAGDICOM(2006.563 <Enter> ^MAGDICOM(2006.563,0)=DICOM GATEWAY PARAMETER^2006.563^1^1 ^MAGDICOM(2006.563,1,"ASCII DICOM TEXT")=YES "COMMERCIAL PACS")=N/A "CONFIG DATE/TIME")=3051229.092311 "CONSOLIDATED")=NO "CSTORE CONTROL PORT")=60000 "CURRENT IMAGE DESTINATION")=c:\mag1h\DM00\00\00\00\88\ ^MAGDICOM(2006.563,1,"DATA PATH",0)=^2006.5631^2^2 ^MAGDICOM(2006.563,1,"DATA PATH",1,0)=C:\DICOM\DATA1 ^MAGDICOM(2006.563,1,"DATA PATH",2,0)=C:\DICOM\DATA2 ^MAGDICOM(2006.563,1,"DICT PATH")=C:\DICOM\DICT "DOMAIN")=IMGDEM01.MED.VA.GOV "EMED_C_MOVE_DELAY")=0 "FREE DISK SPACE")=15 "IMAGE GATEWAY")=YES "IMAGE INPUT PATH")=C:\DICOM\IMAGE_IN "IMAGE OUTPUT PATH")=C:\DICOM\IMAGE_OUT "INSTRUMENT PATH")=C:\DICOM\INSTRUMENT "LOCATION")=660 "LOCATION NAME")=SALT LAKE CITY "LOGIN PROGRAMMER ACCESS")=5007061268 "M-to-M BROKER ADDR")=127.0.0.1 "M-to-M BROKER BGND ACCESS")=*********** "M-to-M BROKER BGND VERIFY")=*********** "M-to-M BROKER PORT")=4300 "MACHINE ID")=C )[email protected] "MESSAGE LOG")=YES "MODALITY WORKLIST")=YES ^MAGDICOM(2006.563,1,"MOVE DESTINATION AE TITLE")=VISTA_STORAGE "PACS EXAM COMPLETE")=NO "POST OFFICE")=10.2.27.92
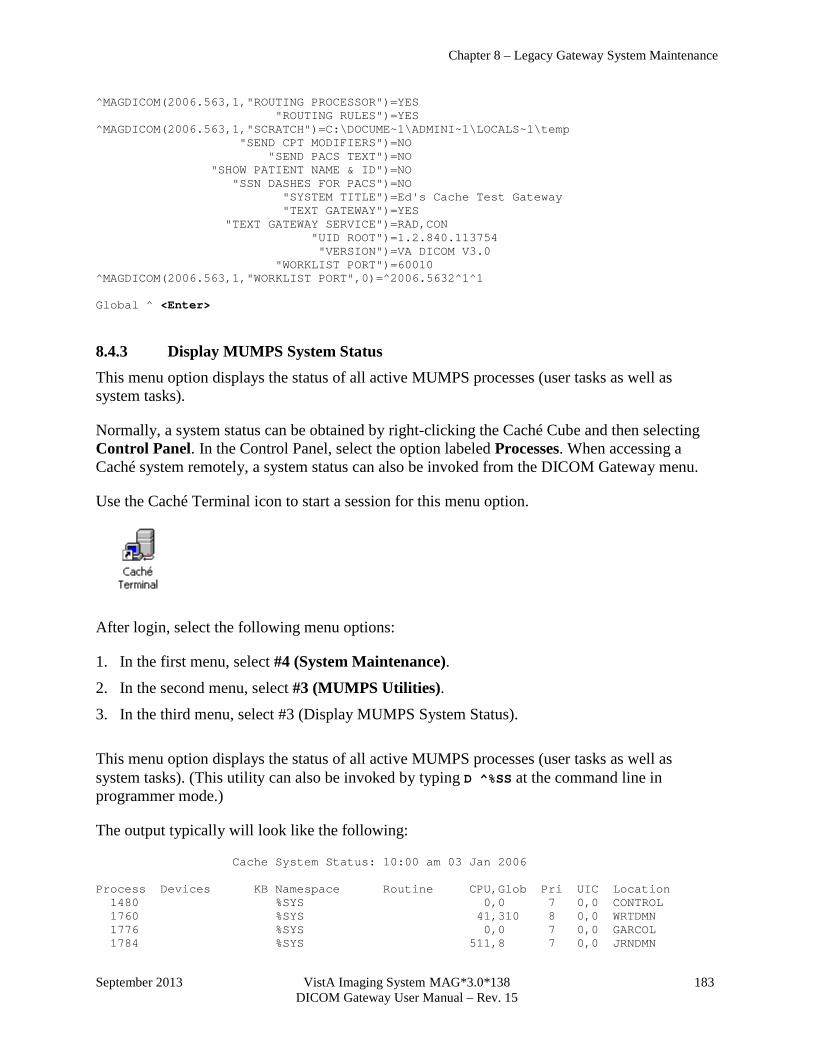
Chapter 8 – Legacy Gateway System Maintenance
September 2013 VistA Imaging System MAG*3.0*138 183 DICOM Gateway User Manual – Rev. 15
^MAGDICOM(2006.563,1,"ROUTING PROCESSOR")=YES "ROUTING RULES")=YES ^MAGDICOM(2006.563,1,"SCRATCH")=C:\DOCUME~1\ADMINI~1\LOCALS~1\temp "SEND CPT MODIFIERS")=NO "SEND PACS TEXT")=NO "SHOW PATIENT NAME & ID")=NO "SSN DASHES FOR PACS")=NO "SYSTEM TITLE")=Ed's Cache Test Gateway "TEXT GATEWAY")=YES "TEXT GATEWAY SERVICE")=RAD,CON "UID ROOT")=1.2.840.113754 "VERSION")=VA DICOM V3.0 "WORKLIST PORT")=60010 ^MAGDICOM(2006.563,1,"WORKLIST PORT",0)=^2006.5632^1^1 Global ^ <Enter>
8.4.3 Display MUMPS System Status This menu option displays the status of all active MUMPS processes (user tasks as well as system tasks).
Normally, a system status can be obtained by right-clicking the Caché Cube and then selecting Control Panel. In the Control Panel, select the option labeled Processes. When accessing a Caché system remotely, a system status can also be invoked from the DICOM Gateway menu.
Use the Caché Terminal icon to start a session for this menu option.
After login, select the following menu options:
1. In the first menu, select #4 (System Maintenance). 2. In the second menu, select #3 (MUMPS Utilities). 3. In the third menu, select #3 (Display MUMPS System Status). This menu option displays the status of all active MUMPS processes (user tasks as well as system tasks). (This utility can also be invoked by typing D ^%SS at the command line in programmer mode.)
The output typically will look like the following:
Cache System Status: 10:00 am 03 Jan 2006 Process Devices KB Namespace Routine CPU,Glob Pri UIC Location 1480 %SYS 0,0 7 0,0 CONTROL 1760 %SYS 41,310 8 0,0 WRTDMN 1776 %SYS 0,0 7 0,0 GARCOL 1784 %SYS 511,8 7 0,0 JRNDMN
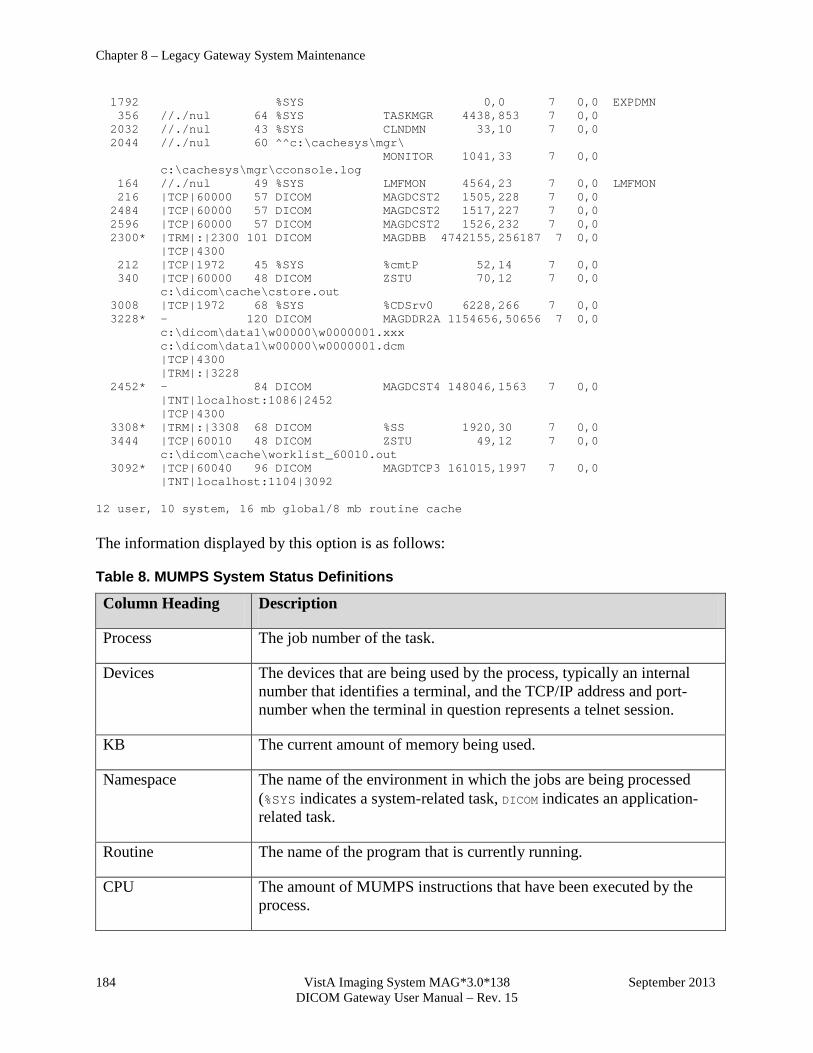
Chapter 8 – Legacy Gateway System Maintenance
184 VistA Imaging System MAG*3.0*138 September 2013 DICOM Gateway User Manual – Rev. 15
1792 %SYS 0,0 7 0,0 EXPDMN 356 //./nul 64 %SYS TASKMGR 4438,853 7 0,0 2032 //./nul 43 %SYS CLNDMN 33,10 7 0,0 2044 //./nul 60 ^^c:\cachesys\mgr\ MONITOR 1041,33 7 0,0 c:\cachesys\mgr\cconsole.log 164 //./nul 49 %SYS LMFMON 4564,23 7 0,0 LMFMON 216 |TCP|60000 57 DICOM MAGDCST2 1505,228 7 0,0 2484 |TCP|60000 57 DICOM MAGDCST2 1517,227 7 0,0 2596 |TCP|60000 57 DICOM MAGDCST2 1526,232 7 0,0 2300* |TRM|:|2300 101 DICOM MAGDBB 4742155,256187 7 0,0 |TCP|4300 212 |TCP|1972 45 %SYS %cmtP 52,14 7 0,0 340 |TCP|60000 48 DICOM ZSTU 70,12 7 0,0 c:\dicom\cache\cstore.out 3008 |TCP|1972 68 %SYS %CDSrv0 6228,266 7 0,0 3228* - 120 DICOM MAGDDR2A 1154656,50656 7 0,0 c:\dicom\data1\w00000\w0000001.xxx c:\dicom\data1\w00000\w0000001.dcm |TCP|4300 |TRM|:|3228 2452* - 84 DICOM MAGDCST4 148046,1563 7 0,0 |TNT|localhost:1086|2452 |TCP|4300 3308* |TRM|:|3308 68 DICOM %SS 1920,30 7 0,0 3444 |TCP|60010 48 DICOM ZSTU 49,12 7 0,0 c:\dicom\cache\worklist_60010.out 3092* |TCP|60040 96 DICOM MAGDTCP3 161015,1997 7 0,0 |TNT|localhost:1104|3092 12 user, 10 system, 16 mb global/8 mb routine cache
The information displayed by this option is as follows:
Table 8. MUMPS System Status Definitions
Column Heading Description
Process The job number of the task.
Devices The devices that are being used by the process, typically an internal number that identifies a terminal, and the TCP/IP address and port-number when the terminal in question represents a telnet session.
KB The current amount of memory being used.
Namespace The name of the environment in which the jobs are being processed (%SYS indicates a system-related task, DICOM indicates an application-related task.
Routine The name of the program that is currently running.
CPU The amount of MUMPS instructions that have been executed by the process.
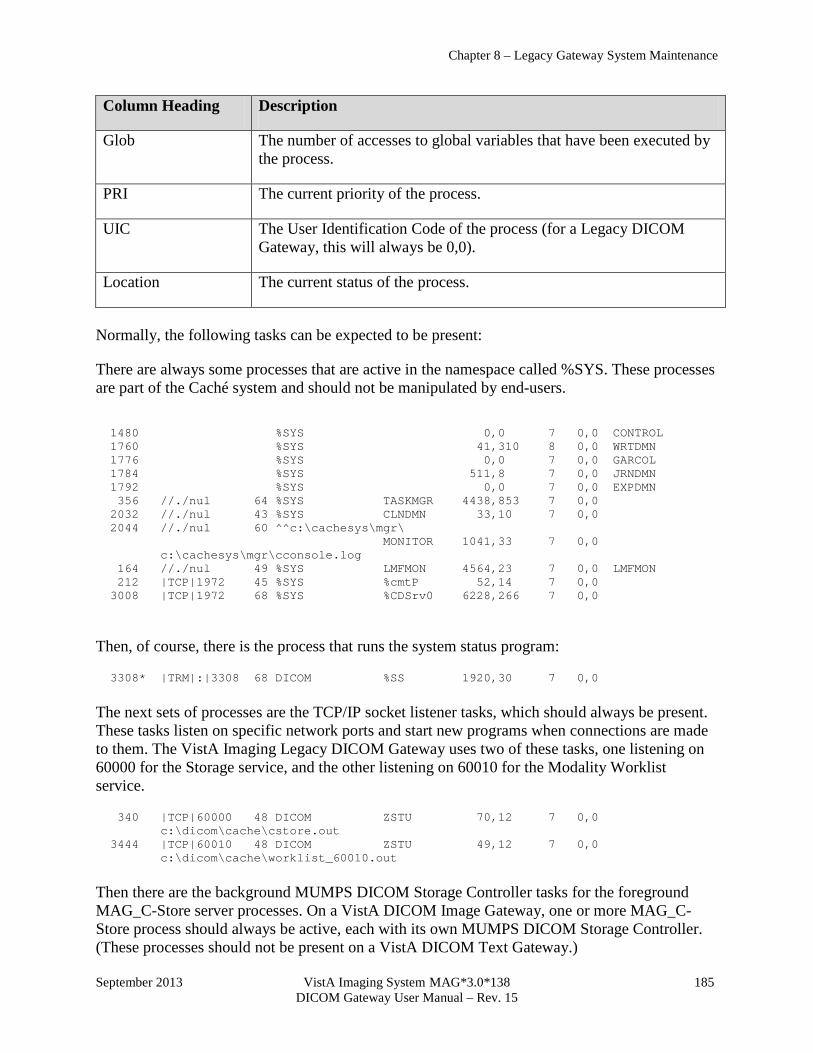
Chapter 8 – Legacy Gateway System Maintenance
September 2013 VistA Imaging System MAG*3.0*138 185 DICOM Gateway User Manual – Rev. 15
Column Heading Description
Glob The number of accesses to global variables that have been executed by the process.
PRI The current priority of the process.
UIC The User Identification Code of the process (for a Legacy DICOM Gateway, this will always be 0,0).
Location The current status of the process.
Normally, the following tasks can be expected to be present:
There are always some processes that are active in the namespace called %SYS. These processes are part of the Caché system and should not be manipulated by end-users.
1480 %SYS 0,0 7 0,0 CONTROL 1760 %SYS 41,310 8 0,0 WRTDMN 1776 %SYS 0,0 7 0,0 GARCOL 1784 %SYS 511,8 7 0,0 JRNDMN 1792 %SYS 0,0 7 0,0 EXPDMN 356 //./nul 64 %SYS TASKMGR 4438,853 7 0,0 2032 //./nul 43 %SYS CLNDMN 33,10 7 0,0 2044 //./nul 60 ^^c:\cachesys\mgr\ MONITOR 1041,33 7 0,0 c:\cachesys\mgr\cconsole.log 164 //./nul 49 %SYS LMFMON 4564,23 7 0,0 LMFMON 212 |TCP|1972 45 %SYS %cmtP 52,14 7 0,0 3008 |TCP|1972 68 %SYS %CDSrv0 6228,266 7 0,0
Then, of course, there is the process that runs the system status program:
3308* |TRM|:|3308 68 DICOM %SS 1920,30 7 0,0
The next sets of processes are the TCP/IP socket listener tasks, which should always be present. These tasks listen on specific network ports and start new programs when connections are made to them. The VistA Imaging Legacy DICOM Gateway uses two of these tasks, one listening on 60000 for the Storage service, and the other listening on 60010 for the Modality Worklist service.
340 |TCP|60000 48 DICOM ZSTU 70,12 7 0,0 c:\dicom\cache\cstore.out 3444 |TCP|60010 48 DICOM ZSTU 49,12 7 0,0 c:\dicom\cache\worklist_60010.out
Then there are the background MUMPS DICOM Storage Controller tasks for the foreground MAG_C-Store server processes. On a VistA DICOM Image Gateway, one or more MAG_C-Store process should always be active, each with its own MUMPS DICOM Storage Controller. (These processes should not be present on a VistA DICOM Text Gateway.)
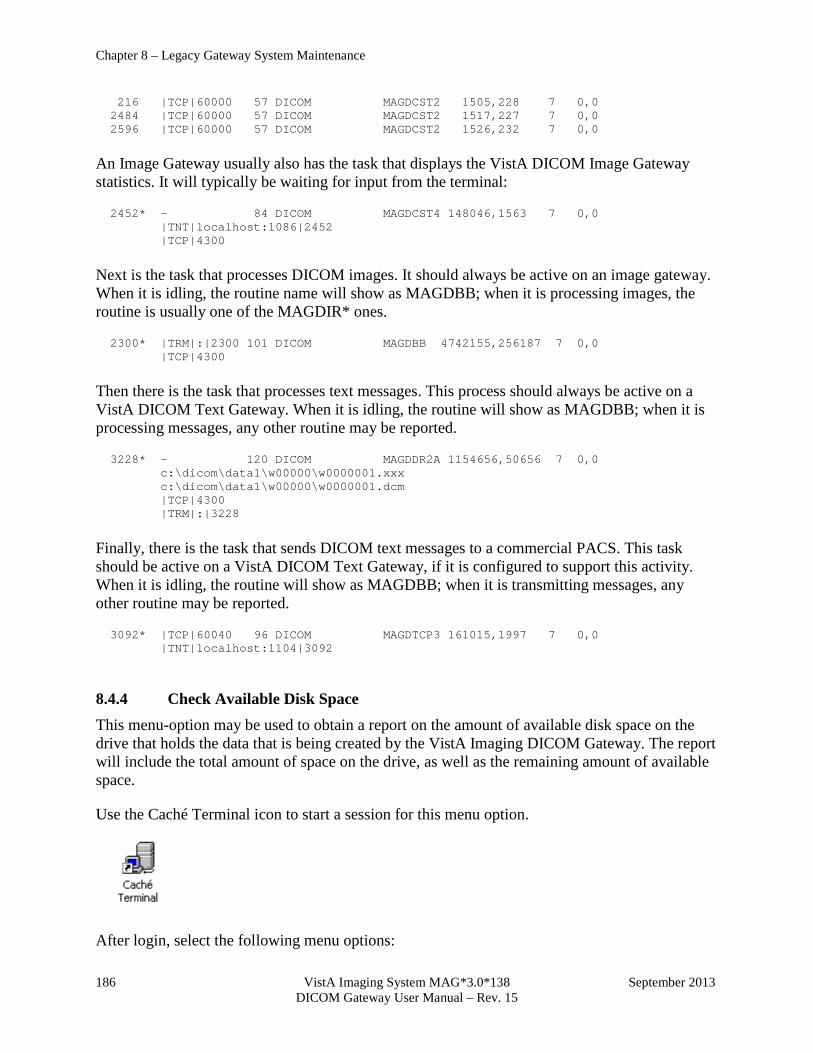
Chapter 8 – Legacy Gateway System Maintenance
186 VistA Imaging System MAG*3.0*138 September 2013 DICOM Gateway User Manual – Rev. 15
216 |TCP|60000 57 DICOM MAGDCST2 1505,228 7 0,0 2484 |TCP|60000 57 DICOM MAGDCST2 1517,227 7 0,0 2596 |TCP|60000 57 DICOM MAGDCST2 1526,232 7 0,0
An Image Gateway usually also has the task that displays the VistA DICOM Image Gateway statistics. It will typically be waiting for input from the terminal:
2452* - 84 DICOM MAGDCST4 148046,1563 7 0,0 |TNT|localhost:1086|2452 |TCP|4300
Next is the task that processes DICOM images. It should always be active on an image gateway. When it is idling, the routine name will show as MAGDBB; when it is processing images, the routine is usually one of the MAGDIR* ones.
2300* |TRM|:|2300 101 DICOM MAGDBB 4742155,256187 7 0,0 |TCP|4300
Then there is the task that processes text messages. This process should always be active on a VistA DICOM Text Gateway. When it is idling, the routine will show as MAGDBB; when it is processing messages, any other routine may be reported.
3228* - 120 DICOM MAGDDR2A 1154656,50656 7 0,0 c:\dicom\data1\w00000\w0000001.xxx c:\dicom\data1\w00000\w0000001.dcm |TCP|4300 |TRM|:|3228
Finally, there is the task that sends DICOM text messages to a commercial PACS. This task should be active on a VistA DICOM Text Gateway, if it is configured to support this activity. When it is idling, the routine will show as MAGDBB; when it is transmitting messages, any other routine may be reported.
3092* |TCP|60040 96 DICOM MAGDTCP3 161015,1997 7 0,0 |TNT|localhost:1104|3092
8.4.4 Check Available Disk Space This menu-option may be used to obtain a report on the amount of available disk space on the drive that holds the data that is being created by the VistA Imaging DICOM Gateway. The report will include the total amount of space on the drive, as well as the remaining amount of available space.
Use the Caché Terminal icon to start a session for this menu option.
After login, select the following menu options:

Chapter 8 – Legacy Gateway System Maintenance
September 2013 VistA Imaging System MAG*3.0*138 187 DICOM Gateway User Manual – Rev. 15
1. In the first menu, select #4 (System Maintenance). 2. In the second menu, select #3 (MUMPS Utilities). 3. In the third menu, select #4 (Check Available DISK Space). The display typically will look like:
Free space on drive c: 472.3 Megabytes Total space on drive c: 1460.5 Megabytes Push <Enter> to continue... You should get approximately the same figures looking at the disk properties screen (i.e., click on My Computer, right-click on the disk, and click Properties).
You should keep track of disk utilization to ensure there is always enough free disk space to run the gateway for an extended period of time.
8.4.5 Display License Expiration Date The VistA Imaging Legacy DICOM Gateway operates on top of a MUMPS system that is separately licensed. Licenses for MUMPS systems have a pre-determined expiration date. Since it important to be able to extend a license before it expires, this menu option is provided to check the actual expiration date of the current license.
Use the Caché Terminal icon to start a session for this menu option.
After login, select the following menu options:
1. In the first menu, select #4 (System Maintenance). 2. In the second menu, select #3 (MUMPS Utilities). 3. In the third menu, select #5 (Display License Expiration Date). When this menu option is executed, it will report the expiration date of the license that is currently being used:
Cache Key display: Based on the file 'c:\cachesys\mgr\cache.key' LicenseCapacity = Cache 5.0 Enterprise - Concurrent Users for Intel (Windows):800, Multi-Server CustomerName = VA CIOFO Silver Spring OrderNumber = 200385564 ExpirationDate = 4/14/2033

Chapter 8 – Legacy Gateway System Maintenance
188 VistA Imaging System MAG*3.0*138 September 2013 DICOM Gateway User Manual – Rev. 15
AuthorizationKey = ********************** MachineID = currently available = 798 minimum available = 798 maximum available = 800
8.5 Enter Programmer's Mode Access to Programmer’s Mode is protected by an additional password. For information on how to re-define this password (see Chapter 10).
Use the Caché Terminal icon to start a session for this menu option.
After login, select the following menu options:
1. In the first menu, select #4 (System Maintenance). 2. In the second menu, select #4 (Enter Programmer’s Mode). This menu option is included for use by VistA support personnel.
Note: In the sample text below, the text “password” appears. Use a site-specific password that is appropriate.
The user will be prompted to enter the Programmer Access Code:
PROGRAMMER ACCESS CODE: password <Enter> (Programmer Mode)
[DCM,DCE]>
Important: DO NOT EDIT ANY ROUTINES OR CHANGE ENTRIES IN ANY GLOBAL FILE.
8.6 Failover Procedure It is possible to allow a gateway processor to take over the tasks of another, in case one of the gateways should fail. To allow for a smooth fail-over, take the following steps:
1. Add the TCP/IP address of the failed gateway to the substitute gateway processor. This will be the second IP address on the substitute gateway's Network Interface Card (NIC). Make sure that the failed gateway is taken off of the network.
2. On the substitute gateway, open the INSTRUMENT.DIC file and add/enable the settings from the INSTRUMENT.DIC on the failed gateway that are not already on the substitute gateway, allowing the substitute gateway to listen on the respective ports. Make sure the hostname (content of the Machine ID field) on the end of each line refers to the hostname of
Chapter 8 – Legacy Gateway System Maintenance
September 2013 VistA Imaging System MAG*3.0*138 189 DICOM Gateway User Manual – Rev. 15
the substitute gateway. Update the instrument setting changes to the VistA Database by running the 4-2-4 “Update INSTRUMENT.DIC” menu option. Once editing is complete, restart Tomcat. The substitute gateway can continue to work for the modalities that already were assigned to that processor.
3. If the failed gateway is an HDIG and performed extra options (such as, ProcessAsyncStorage, IconImageCreation, and so forth) that the substitute does not perform, then the appropriate settings must be enabled/replicated in the <drive>:\VixConfig\DicomServerConfiguration.config XML file and the PeriodicCommandConfiguration.config file.
Nothing has to be changed on the modality configurations. It is completely transparent to the modalities; however, there could be a performance degradation on the substitute gateway.
Chapter 8 – Legacy Gateway System Maintenance
190 VistA Imaging System MAG*3.0*138 September 2013 DICOM Gateway User Manual – Rev. 15
This page is intentionally blank.

September 2013 VistA Imaging System MAG*3.0*138 191 DICOM Gateway User Manual – Rev. 15
Chapter 9 Menu Options on VistA The DICOM Gateway operates together with a VistA system. A number of features are controlled directly from the DICOM Gateway computer; a couple of other features are controlled from a menu on the VistA system.
The menu for Hybrid DICOM Gateway related features on VistA is called the Hybrid DICOM Gateway Menu [MAGV HDIG MENU]. This menu is accessed through the Imaging System Manager Menu [MAG SYS MENU] (shown as follows) on the VistA system.
HL7 Imaging HL7 Messaging Maintenance ... IX Image Index Conversion Menu ... LS Edit Network Location STATUS TR Telereader Menu ... Ad hoc Enterprise Site Report Configure AE Security Matrix Settings Delete Image Group Delete Study by Accession Number DICOM Menu Options ... Enter/edit Reason Hybrid DICOM Gateway Menu ... Imaging Database Integrity Checker Menu ... Imaging Site Reports ... Importer Menu ...
The Hybrid DICOM Gateway Menu [MAGV HDIG MENU] contains the following options.
• Find Async Storage Request Errors [MAGVA ASYNC STORAGE ERR QURY]
• List Async Storage Request Errors [MAGVA ASYNC STORAGE ERR LIST]
• Requeue Async Storage Request Errors [MAGVA ASYNC STORAGE ERR REQU]
The menu for Legacy DICOM Gateway related features on VistA is called DICOM Menu Options [MAGD DICOM MENU]. This menu contains the following options:
ECTP Edit CT PARAMETER File [MAGD CT PARAMETER EDIT] ICTP Display MAGD CT PARAMETER entries [MAGD CT PARAMETER INQUIRY] ECRP Edit CR PARAMETER File [MAGD CR PARAMETER EDIT] ICRP Display MAGD CR PARAMETER entries [MAGD CR PARAMETER INQUIRY] ECS ICAL SPECIALTY DICOM & HL7 file [MAGD EDIT CLIN SPEC DICOM/HL7] EXP Display DICOM OBJECT EXPORT file entries [MAGD PRINT DICOM OBJECT EXPORT] CLN Correct Clinical Specialties DICOM File Entries [MAGD FIX CLINSPEC DICOM FILE] RAD Correct RAD-DICOM File Entries [MAGD FIX DICOM FILE] Clean Up DICOM Gateway (Failed Images) [MAGD REMOVE GATEWAY FAILED] Clean Up Gateway (DICOM Destinations) [MAGD REMOVE GATEWAY XMIT] List Unread Studies [MAGD LIST UNREAD STUDIES] Print DICOM Failed Image File Entries [MAGD PRINT DICOM FILE] Rename DICOM Gateway (DICOM Destinations) [MAGD RENAME GATEWAY XMIT] Rename DICOM Gateway (Failed Images) [MAGD RENAME GATEWAY FAILED] Validate DICOM Correct Information [MAG DICOM CORRECT VALIDATE]
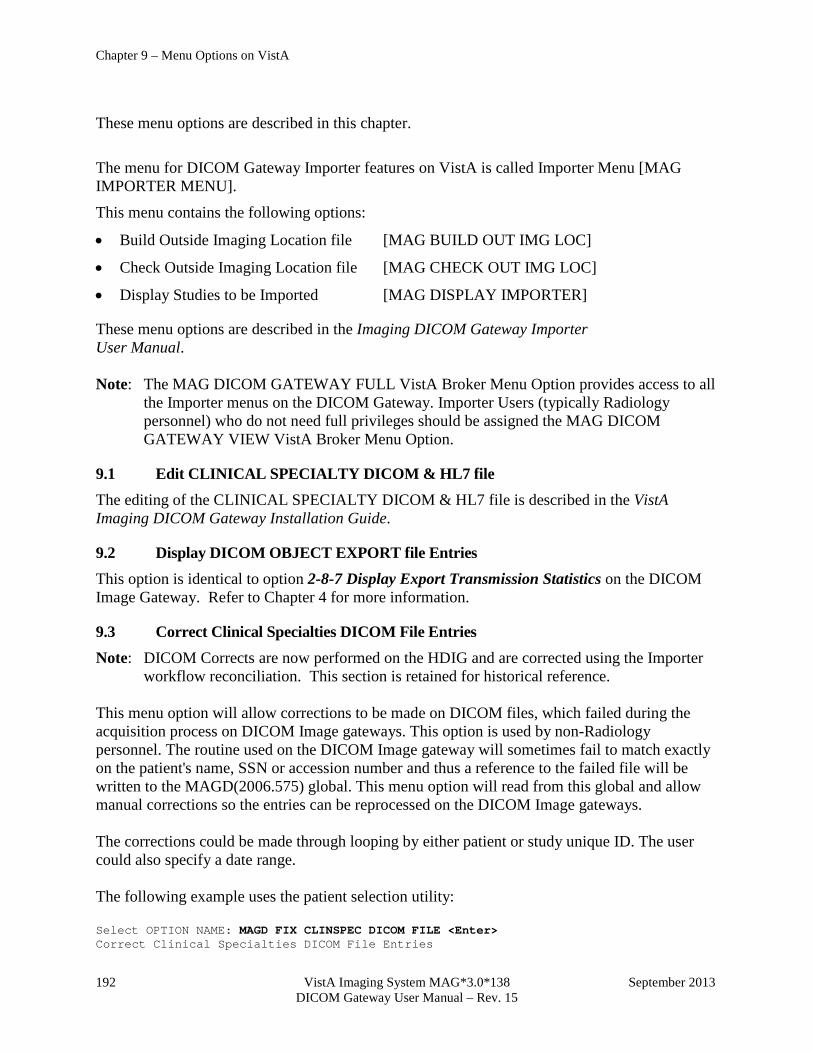
Chapter 9 – Menu Options on VistA
192 VistA Imaging System MAG*3.0*138 September 2013 DICOM Gateway User Manual – Rev. 15
These menu options are described in this chapter.
The menu for DICOM Gateway Importer features on VistA is called Importer Menu [MAG IMPORTER MENU].
This menu contains the following options:
• Build Outside Imaging Location file [MAG BUILD OUT IMG LOC]
• Check Outside Imaging Location file [MAG CHECK OUT IMG LOC]
• Display Studies to be Imported [MAG DISPLAY IMPORTER]
These menu options are described in the Imaging DICOM Gateway Importer User Manual. Note: The MAG DICOM GATEWAY FULL VistA Broker Menu Option provides access to all the Importer menus on the DICOM Gateway. Importer Users (typically Radiology personnel) who do not need full privileges should be assigned the MAG DICOM GATEWAY VIEW VistA Broker Menu Option.
9.1 Edit CLINICAL SPECIALTY DICOM & HL7 file The editing of the CLINICAL SPECIALTY DICOM & HL7 file is described in the VistA Imaging DICOM Gateway Installation Guide.
9.2 Display DICOM OBJECT EXPORT file Entries This option is identical to option 2-8-7 Display Export Transmission Statistics on the DICOM Image Gateway. Refer to Chapter 4 for more information.
9.3 Correct Clinical Specialties DICOM File Entries Note: DICOM Corrects are now performed on the HDIG and are corrected using the Importer
workflow reconciliation. This section is retained for historical reference. This menu option will allow corrections to be made on DICOM files, which failed during the acquisition process on DICOM Image gateways. This option is used by non-Radiology personnel. The routine used on the DICOM Image gateway will sometimes fail to match exactly on the patient's name, SSN or accession number and thus a reference to the failed file will be written to the MAGD(2006.575) global. This menu option will read from this global and allow manual corrections so the entries can be reprocessed on the DICOM Image gateways. The corrections could be made through looping by either patient or study unique ID. The user could also specify a date range. The following example uses the patient selection utility: Select OPTION NAME: MAGD FIX CLINSPEC DICOM FILE <Enter> Correct Clinical Specialties DICOM File Entries
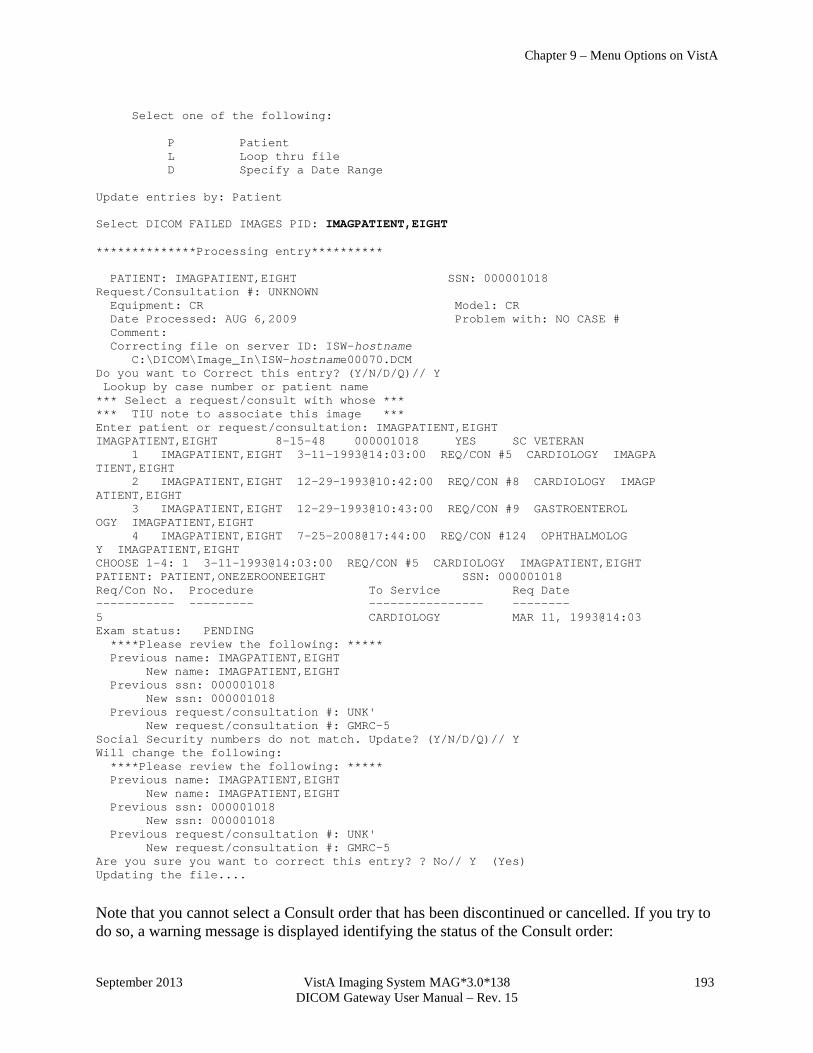
Chapter 9 – Menu Options on VistA
September 2013 VistA Imaging System MAG*3.0*138 193 DICOM Gateway User Manual – Rev. 15
Select one of the following: P Patient L Loop thru file D Specify a Date Range Update entries by: Patient Select DICOM FAILED IMAGES PID: IMAGPATIENT,EIGHT **************Processing entry********** PATIENT: IMAGPATIENT,EIGHT SSN: 000001018 Request/Consultation #: UNKNOWN Equipment: CR Model: CR Date Processed: AUG 6,2009 Problem with: NO CASE # Comment: Correcting file on server ID: ISW-hostname C:\DICOM\Image_In\ISW-hostname00070.DCM Do you want to Correct this entry? (Y/N/D/Q)// Y Lookup by case number or patient name *** Select a request/consult with whose *** *** TIU note to associate this image *** Enter patient or request/consultation: IMAGPATIENT,EIGHT IMAGPATIENT,EIGHT 8-15-48 000001018 YES SC VETERAN 1 IMAGPATIENT,EIGHT 3-11-1993@14:03:00 REQ/CON #5 CARDIOLOGY IMAGPA TIENT,EIGHT 2 IMAGPATIENT,EIGHT 12-29-1993@10:42:00 REQ/CON #8 CARDIOLOGY IMAGP ATIENT,EIGHT 3 IMAGPATIENT,EIGHT 12-29-1993@10:43:00 REQ/CON #9 GASTROENTEROL OGY IMAGPATIENT,EIGHT 4 IMAGPATIENT,EIGHT 7-25-2008@17:44:00 REQ/CON #124 OPHTHALMOLOG Y IMAGPATIENT,EIGHT CHOOSE 1-4: 1 3-11-1993@14:03:00 REQ/CON #5 CARDIOLOGY IMAGPATIENT,EIGHT PATIENT: PATIENT,ONEZEROONEEIGHT SSN: 000001018 Req/Con No. Procedure To Service Req Date ----------- --------- ---------------- -------- 5 CARDIOLOGY MAR 11, 1993@14:03 Exam status: PENDING ****Please review the following: ***** Previous name: IMAGPATIENT,EIGHT New name: IMAGPATIENT,EIGHT Previous ssn: 000001018 New ssn: 000001018 Previous request/consultation #: UNK' New request/consultation #: GMRC-5 Social Security numbers do not match. Update? (Y/N/D/Q)// Y Will change the following: ****Please review the following: ***** Previous name: IMAGPATIENT,EIGHT New name: IMAGPATIENT,EIGHT Previous ssn: 000001018 New ssn: 000001018 Previous request/consultation #: UNK' New request/consultation #: GMRC-5 Are you sure you want to correct this entry? ? No// Y (Yes) Updating the file....
Note that you cannot select a Consult order that has been discontinued or cancelled. If you try to do so, a warning message is displayed identifying the status of the Consult order:
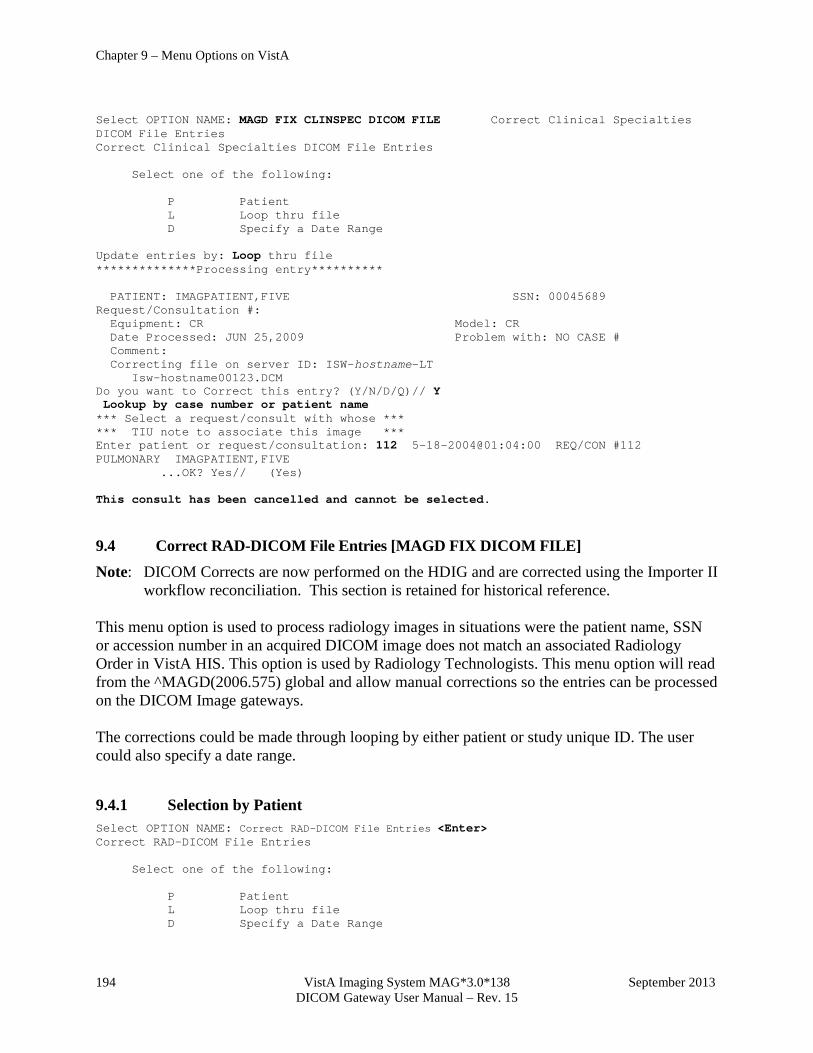
Chapter 9 – Menu Options on VistA
194 VistA Imaging System MAG*3.0*138 September 2013 DICOM Gateway User Manual – Rev. 15
Select OPTION NAME: MAGD FIX CLINSPEC DICOM FILE Correct Clinical Specialties DICOM File Entries Correct Clinical Specialties DICOM File Entries Select one of the following: P Patient L Loop thru file D Specify a Date Range Update entries by: Loop thru file **************Processing entry********** PATIENT: IMAGPATIENT,FIVE SSN: 00045689 Request/Consultation #: Equipment: CR Model: CR Date Processed: JUN 25,2009 Problem with: NO CASE # Comment: Correcting file on server ID: ISW-hostname-LT Isw-hostname00123.DCM Do you want to Correct this entry? (Y/N/D/Q)// Y Lookup by case number or patient name *** Select a request/consult with whose *** *** TIU note to associate this image *** Enter patient or request/consultation: 112 5-18-2004@01:04:00 REQ/CON #112 PULMONARY IMAGPATIENT,FIVE ...OK? Yes// (Yes) This consult has been cancelled and cannot be selected.
9.4 Correct RAD-DICOM File Entries [MAGD FIX DICOM FILE] Note: DICOM Corrects are now performed on the HDIG and are corrected using the Importer II
workflow reconciliation. This section is retained for historical reference. This menu option is used to process radiology images in situations were the patient name, SSN or accession number in an acquired DICOM image does not match an associated Radiology Order in VistA HIS. This option is used by Radiology Technologists. This menu option will read from the ^MAGD(2006.575) global and allow manual corrections so the entries can be processed on the DICOM Image gateways. The corrections could be made through looping by either patient or study unique ID. The user could also specify a date range.
9.4.1 Selection by Patient Select OPTION NAME: Correct RAD-DICOM File Entries <Enter> Correct RAD-DICOM File Entries Select one of the following: P Patient L Loop thru file D Specify a Date Range
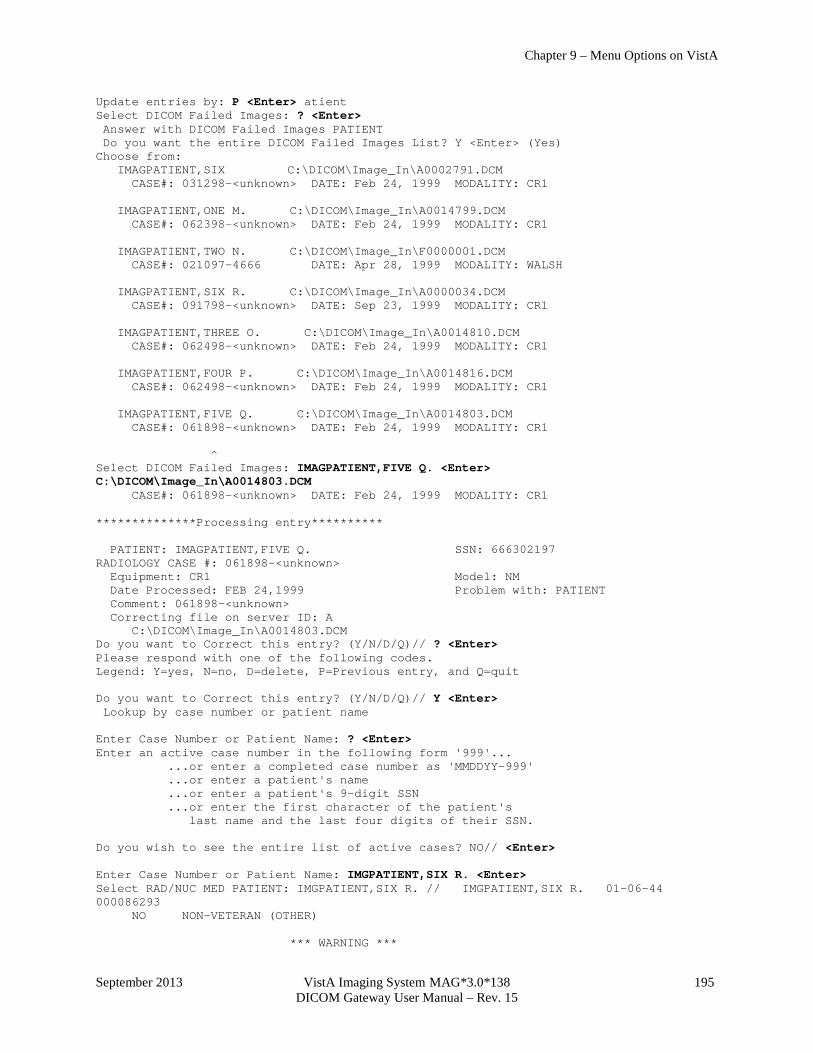
Chapter 9 – Menu Options on VistA
September 2013 VistA Imaging System MAG*3.0*138 195 DICOM Gateway User Manual – Rev. 15
Update entries by: P <Enter> atient Select DICOM Failed Images: ? <Enter> Answer with DICOM Failed Images PATIENT Do you want the entire DICOM Failed Images List? Y <Enter> (Yes) Choose from: IMAGPATIENT,SIX C:\DICOM\Image_In\A0002791.DCM CASE#: 031298-<unknown> DATE: Feb 24, 1999 MODALITY: CR1 IMAGPATIENT,ONE M. C:\DICOM\Image_In\A0014799.DCM CASE#: 062398-<unknown> DATE: Feb 24, 1999 MODALITY: CR1 IMAGPATIENT,TWO N. C:\DICOM\Image_In\F0000001.DCM CASE#: 021097-4666 DATE: Apr 28, 1999 MODALITY: WALSH IMAGPATIENT,SIX R. C:\DICOM\Image_In\A0000034.DCM CASE#: 091798-<unknown> DATE: Sep 23, 1999 MODALITY: CR1 IMAGPATIENT,THREE O. C:\DICOM\Image_In\A0014810.DCM CASE#: 062498-<unknown> DATE: Feb 24, 1999 MODALITY: CR1 IMAGPATIENT,FOUR P. C:\DICOM\Image_In\A0014816.DCM CASE#: 062498-<unknown> DATE: Feb 24, 1999 MODALITY: CR1 IMAGPATIENT,FIVE Q. C:\DICOM\Image_In\A0014803.DCM CASE#: 061898-<unknown> DATE: Feb 24, 1999 MODALITY: CR1 ^ Select DICOM Failed Images: IMAGPATIENT,FIVE Q. <Enter> C:\DICOM\Image_In\A0014803.DCM CASE#: 061898-<unknown> DATE: Feb 24, 1999 MODALITY: CR1 **************Processing entry********** PATIENT: IMAGPATIENT,FIVE Q. SSN: 666302197 RADIOLOGY CASE #: 061898-<unknown> Equipment: CR1 Model: NM Date Processed: FEB 24,1999 Problem with: PATIENT Comment: 061898-<unknown> Correcting file on server ID: A C:\DICOM\Image_In\A0014803.DCM Do you want to Correct this entry? (Y/N/D/Q)// ? <Enter> Please respond with one of the following codes. Legend: Y=yes, N=no, D=delete, P=Previous entry, and Q=quit Do you want to Correct this entry? (Y/N/D/Q)// Y <Enter> Lookup by case number or patient name Enter Case Number or Patient Name: ? <Enter> Enter an active case number in the following form '999'... ...or enter a completed case number as 'MMDDYY-999' ...or enter a patient's name ...or enter a patient's 9-digit SSN ...or enter the first character of the patient's last name and the last four digits of their SSN. Do you wish to see the entire list of active cases? NO// <Enter> Enter Case Number or Patient Name: IMGPATIENT,SIX R. <Enter> Select RAD/NUC MED PATIENT: IMGPATIENT,SIX R. // IMGPATIENT,SIX R. 01-06-44 000086293 NO NON-VETERAN (OTHER) *** WARNING ***

Chapter 9 – Menu Options on VistA
196 VistA Imaging System MAG*3.0*138 September 2013 DICOM Gateway User Manual – Rev. 15
Case Lookup by Patient Patient's Name: IMGPATIENT,SIX R. 000086293 Run Date: OCT 26,1999 Case No. Procedure Exam Date Status of Exam Imaging Loc -------- ------------- --------- ---------------- ----------- 1 106 RENAL ULTRASOUND 09/23/99 WAITING FOR EXAM NUCLEAR MED 2 93 RENAL ULTRASOUND 03/30/99 CANCELLED ONCOLOGY CL 3 90 SPINE LUMBOSACRAL MIN 2 VI 02/19/99 WAITING FOR EXAM ONCOLOGY CL 4 72 (i)CT ABDOMEN W/CONT 09/23/98 WAITING FOR EXAM RADIOLOGY C 5 71 CT ABDOMEN W&W/O CONT 09/21/98 CANCELLED RADIOLOGY C 6 88 RENAL ULTRASOUND 08/26/98 WAITING FOR EXAM RADIOLOGY C 7 75 CHEST 2 VIEWS PA&LAT 08/26/98 WAITING FOR EXAM RADIOLOGY C 8 70 CT ABDOMEN W&W/O CONT 08/04/98 COMPLETE CAT SCAN 9 71 CT ABDOMEN W/O CONT 08/04/98 COMPLETE CAT SCAN 10 72 CT ABDOMEN W&W/O CONT 08/04/98 COMPLETE CAT SCAN 11 14 CHEST 2 VIEWS PA&LAT 08/03/98 CANCELLED RADIOLOGY C 12 70 ABDOMEN 1 VIEW 06/27/98 COMPLETE RADIOLOGY C 13 42 UPPER GI AIR CONT W/O KUB 05/12/98 CANCELLED RADIOLOGY C 14 42 CT ABDOMEN W/CONT 03/25/97 COMPLETE RADIOLOGY C ***DICOM Image information to correct: Patient Date Acquired Case No. Modality IMAGPATIENT,FIVE Q. FEB 24,1999 061898-<unknown>NM ****Please review the following: ***** Previous name: IMAGPATIENT,FIVE Q. New name: IMAGPATIENT,SIX R. Previous ssn: 000074067 New ssn: 000086293 Previous case #: 061898-<unknown> New case #: 106 Social Security numbers do not match. Update? (Y/N/D/Q)// Y <Enter> Will change the following: ****Please review the following: ***** Previous name: IMAGPATIENT,FIVE Q. New name: IMAGPATIENT,SIX R. Previous ssn: 000074067 New ssn: 000086293 Previous case #: 061898-<unknown> New case #: 106 Are you sure you want to correct this entry? ? No// <Enter> (No)
9.4.2 Looping through the List of Failed Images The following example uses the loop utility: Correct Clinical Specialties DICOM File Entries Select one of the following: P Patient L Loop thru file D Specify a Date Range Update entries by: Loop thru file **************Processing entry********** PATIENT: IMAGPATIENT,FIVE SSN: 0000112 Request/Consultation #: Equipment: CT Model: CT Date Processed: AUG 10,2009 Problem with: NO CASE # Comment:
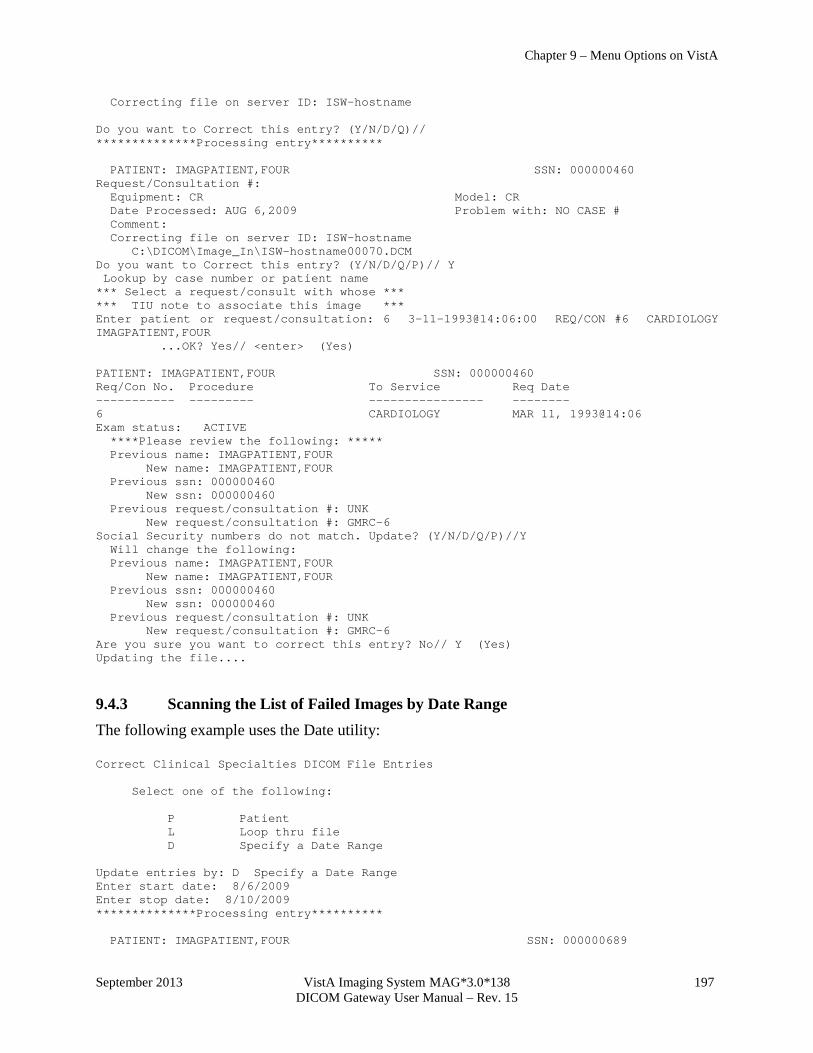
Chapter 9 – Menu Options on VistA
September 2013 VistA Imaging System MAG*3.0*138 197 DICOM Gateway User Manual – Rev. 15
Correcting file on server ID: ISW-hostname Do you want to Correct this entry? (Y/N/D/Q)// **************Processing entry********** PATIENT: IMAGPATIENT,FOUR SSN: 000000460 Request/Consultation #: Equipment: CR Model: CR Date Processed: AUG 6,2009 Problem with: NO CASE # Comment: Correcting file on server ID: ISW-hostname C:\DICOM\Image_In\ISW-hostname00070.DCM Do you want to Correct this entry? (Y/N/D/Q/P)// Y Lookup by case number or patient name *** Select a request/consult with whose *** *** TIU note to associate this image *** Enter patient or request/consultation: 6 3-11-1993@14:06:00 REQ/CON #6 CARDIOLOGY IMAGPATIENT,FOUR ...OK? Yes// <enter> (Yes) PATIENT: IMAGPATIENT,FOUR SSN: 000000460 Req/Con No. Procedure To Service Req Date ----------- --------- ---------------- -------- 6 CARDIOLOGY MAR 11, 1993@14:06 Exam status: ACTIVE ****Please review the following: ***** Previous name: IMAGPATIENT,FOUR New name: IMAGPATIENT,FOUR Previous ssn: 000000460 New ssn: 000000460 Previous request/consultation #: UNK New request/consultation #: GMRC-6 Social Security numbers do not match. Update? (Y/N/D/Q/P)//Y Will change the following: Previous name: IMAGPATIENT,FOUR New name: IMAGPATIENT,FOUR Previous ssn: 000000460 New ssn: 000000460 Previous request/consultation #: UNK New request/consultation #: GMRC-6 Are you sure you want to correct this entry? No// Y (Yes) Updating the file....
9.4.3 Scanning the List of Failed Images by Date Range The following example uses the Date utility: Correct Clinical Specialties DICOM File Entries Select one of the following: P Patient L Loop thru file D Specify a Date Range Update entries by: D Specify a Date Range Enter start date: 8/6/2009 Enter stop date: 8/10/2009 **************Processing entry********** PATIENT: IMAGPATIENT,FOUR SSN: 000000689
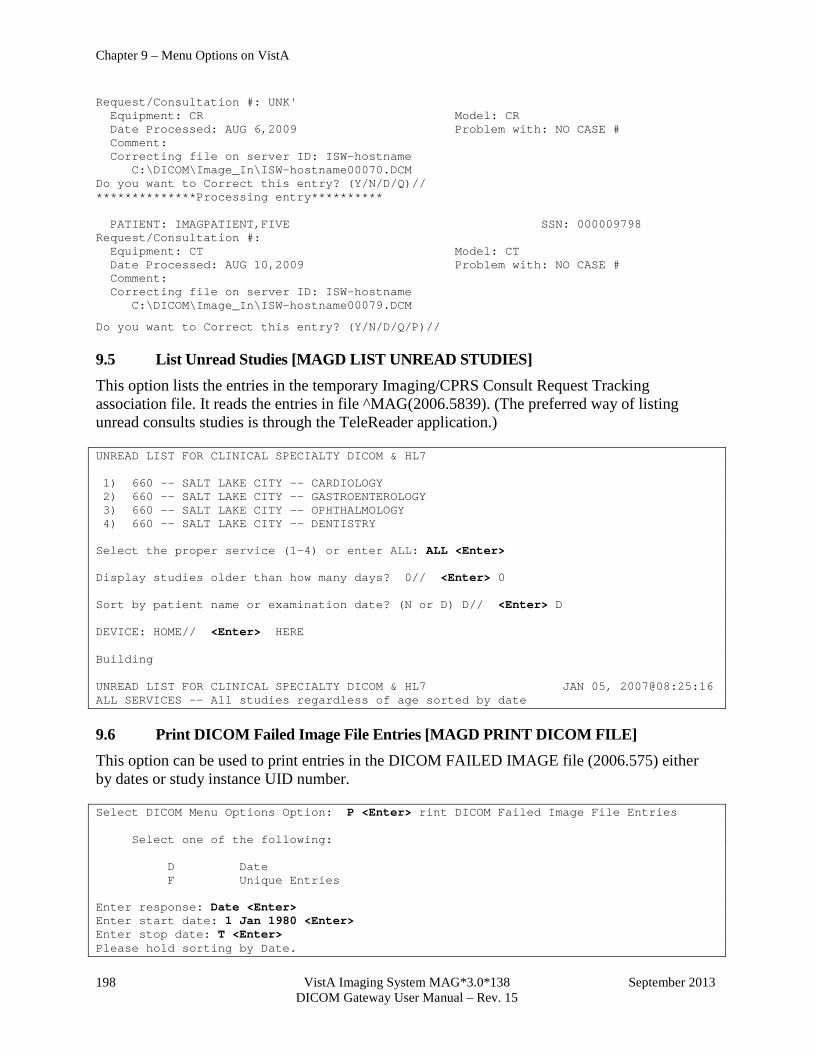
Chapter 9 – Menu Options on VistA
198 VistA Imaging System MAG*3.0*138 September 2013 DICOM Gateway User Manual – Rev. 15
Request/Consultation #: UNK' Equipment: CR Model: CR Date Processed: AUG 6,2009 Problem with: NO CASE # Comment: Correcting file on server ID: ISW-hostname C:\DICOM\Image_In\ISW-hostname00070.DCM Do you want to Correct this entry? (Y/N/D/Q)// **************Processing entry********** PATIENT: IMAGPATIENT,FIVE SSN: 000009798 Request/Consultation #: Equipment: CT Model: CT Date Processed: AUG 10,2009 Problem with: NO CASE # Comment: Correcting file on server ID: ISW-hostname C:\DICOM\Image_In\ISW-hostname00079.DCM
Do you want to Correct this entry? (Y/N/D/Q/P)//
9.5 List Unread Studies [MAGD LIST UNREAD STUDIES] This option lists the entries in the temporary Imaging/CPRS Consult Request Tracking association file. It reads the entries in file ^MAG(2006.5839). (The preferred way of listing unread consults studies is through the TeleReader application.)
UNREAD LIST FOR CLINICAL SPECIALTY DICOM & HL7 1) 660 -- SALT LAKE CITY -- CARDIOLOGY 2) 660 -- SALT LAKE CITY -- GASTROENTEROLOGY 3) 660 -- SALT LAKE CITY -- OPHTHALMOLOGY 4) 660 -- SALT LAKE CITY -- DENTISTRY Select the proper service (1-4) or enter ALL: ALL <Enter> Display studies older than how many days? 0// <Enter> 0 Sort by patient name or examination date? (N or D) D// <Enter> D DEVICE: HOME// <Enter> HERE Building UNREAD LIST FOR CLINICAL SPECIALTY DICOM & HL7 JAN 05, 2007@08:25:16 ALL SERVICES -- All studies regardless of age sorted by date
9.6 Print DICOM Failed Image File Entries [MAGD PRINT DICOM FILE] This option can be used to print entries in the DICOM FAILED IMAGE file (2006.575) either by dates or study instance UID number.
Select DICOM Menu Options Option: P <Enter> rint DICOM Failed Image File Entries Select one of the following: D Date F Unique Entries Enter response: Date <Enter> Enter start date: 1 Jan 1980 <Enter> Enter stop date: T <Enter> Please hold sorting by Date.
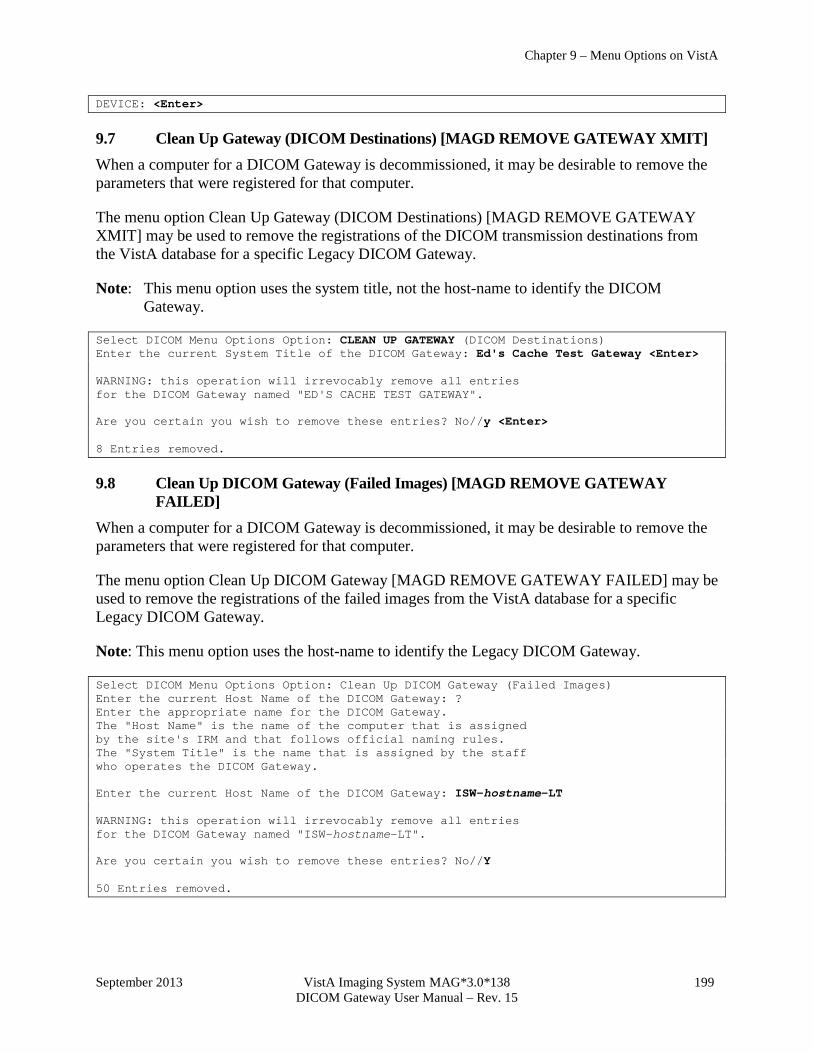
Chapter 9 – Menu Options on VistA
September 2013 VistA Imaging System MAG*3.0*138 199 DICOM Gateway User Manual – Rev. 15
DEVICE: <Enter>
9.7 Clean Up Gateway (DICOM Destinations) [MAGD REMOVE GATEWAY XMIT] When a computer for a DICOM Gateway is decommissioned, it may be desirable to remove the parameters that were registered for that computer.
The menu option Clean Up Gateway (DICOM Destinations) [MAGD REMOVE GATEWAY XMIT] may be used to remove the registrations of the DICOM transmission destinations from the VistA database for a specific Legacy DICOM Gateway.
Note: This menu option uses the system title, not the host-name to identify the DICOM Gateway.
Select DICOM Menu Options Option: CLEAN UP GATEWAY (DICOM Destinations) Enter the current System Title of the DICOM Gateway: Ed's Cache Test Gateway <Enter> WARNING: this operation will irrevocably remove all entries for the DICOM Gateway named "ED'S CACHE TEST GATEWAY". Are you certain you wish to remove these entries? No//y <Enter> 8 Entries removed.
9.8 Clean Up DICOM Gateway (Failed Images) [MAGD REMOVE GATEWAY FAILED]
When a computer for a DICOM Gateway is decommissioned, it may be desirable to remove the parameters that were registered for that computer.
The menu option Clean Up DICOM Gateway [MAGD REMOVE GATEWAY FAILED] may be used to remove the registrations of the failed images from the VistA database for a specific Legacy DICOM Gateway.
Note: This menu option uses the host-name to identify the Legacy DICOM Gateway.
Select DICOM Menu Options Option: Clean Up DICOM Gateway (Failed Images) Enter the current Host Name of the DICOM Gateway: ? Enter the appropriate name for the DICOM Gateway. The "Host Name" is the name of the computer that is assigned by the site's IRM and that follows official naming rules. The "System Title" is the name that is assigned by the staff who operates the DICOM Gateway. Enter the current Host Name of the DICOM Gateway: ISW-hostname-LT WARNING: this operation will irrevocably remove all entries for the DICOM Gateway named "ISW-hostname-LT". Are you certain you wish to remove these entries? No//Y 50 Entries removed.
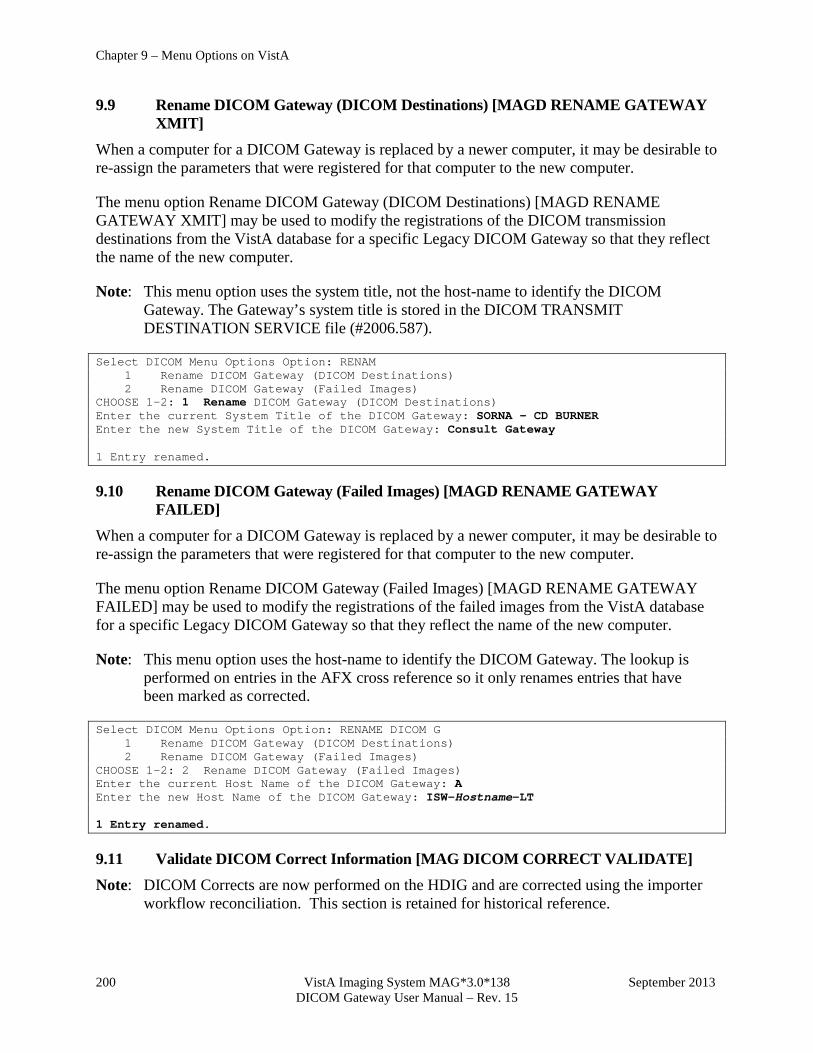
Chapter 9 – Menu Options on VistA
200 VistA Imaging System MAG*3.0*138 September 2013 DICOM Gateway User Manual – Rev. 15
9.9 Rename DICOM Gateway (DICOM Destinations) [MAGD RENAME GATEWAY XMIT]
When a computer for a DICOM Gateway is replaced by a newer computer, it may be desirable to re-assign the parameters that were registered for that computer to the new computer.
The menu option Rename DICOM Gateway (DICOM Destinations) [MAGD RENAME GATEWAY XMIT] may be used to modify the registrations of the DICOM transmission destinations from the VistA database for a specific Legacy DICOM Gateway so that they reflect the name of the new computer.
Note: This menu option uses the system title, not the host-name to identify the DICOM Gateway. The Gateway’s system title is stored in the DICOM TRANSMIT DESTINATION SERVICE file (#2006.587).
Select DICOM Menu Options Option: RENAM 1 Rename DICOM Gateway (DICOM Destinations) 2 Rename DICOM Gateway (Failed Images) CHOOSE 1-2: 1 Rename DICOM Gateway (DICOM Destinations) Enter the current System Title of the DICOM Gateway: SORNA - CD BURNER Enter the new System Title of the DICOM Gateway: Consult Gateway 1 Entry renamed.
9.10 Rename DICOM Gateway (Failed Images) [MAGD RENAME GATEWAY FAILED]
When a computer for a DICOM Gateway is replaced by a newer computer, it may be desirable to re-assign the parameters that were registered for that computer to the new computer.
The menu option Rename DICOM Gateway (Failed Images) [MAGD RENAME GATEWAY FAILED] may be used to modify the registrations of the failed images from the VistA database for a specific Legacy DICOM Gateway so that they reflect the name of the new computer.
Note: This menu option uses the host-name to identify the DICOM Gateway. The lookup is performed on entries in the AFX cross reference so it only renames entries that have been marked as corrected.
Select DICOM Menu Options Option: RENAME DICOM G 1 Rename DICOM Gateway (DICOM Destinations) 2 Rename DICOM Gateway (Failed Images) CHOOSE 1-2: 2 Rename DICOM Gateway (Failed Images) Enter the current Host Name of the DICOM Gateway: A Enter the new Host Name of the DICOM Gateway: ISW-Hostname-LT 1 Entry renamed.
9.11 Validate DICOM Correct Information [MAG DICOM CORRECT VALIDATE] Note: DICOM Corrects are now performed on the HDIG and are corrected using the importer
workflow reconciliation. This section is retained for historical reference.
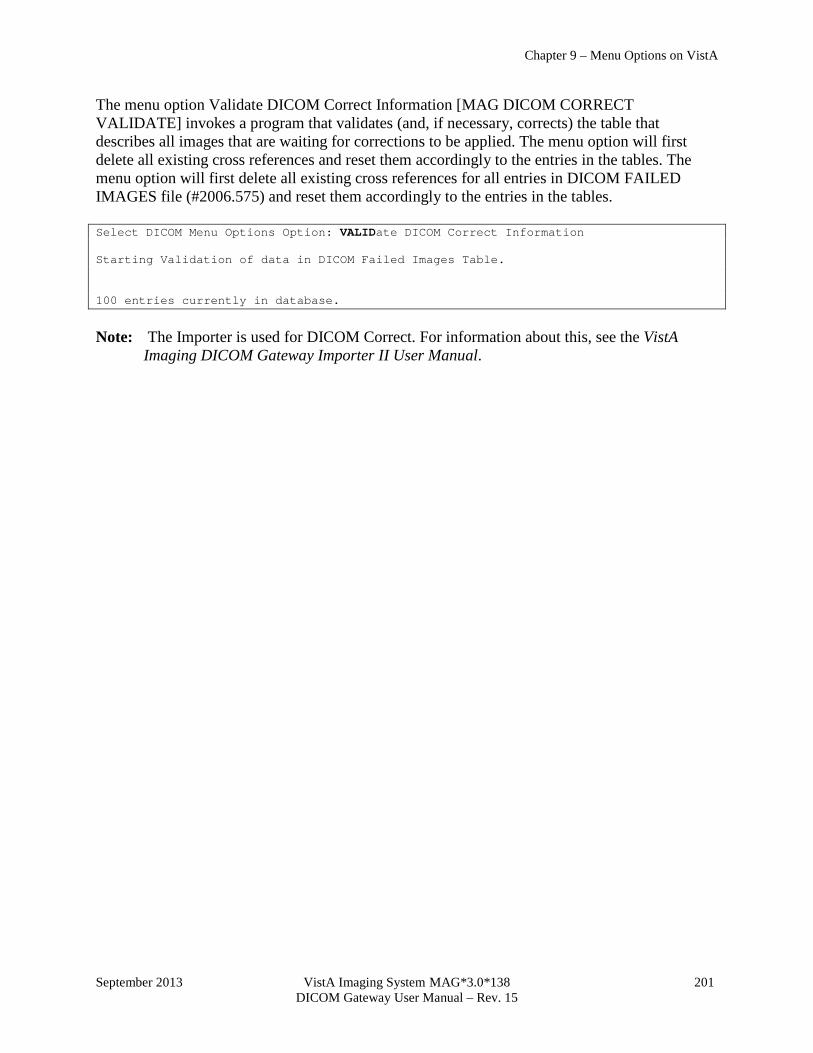
Chapter 9 – Menu Options on VistA
September 2013 VistA Imaging System MAG*3.0*138 201 DICOM Gateway User Manual – Rev. 15
The menu option Validate DICOM Correct Information [MAG DICOM CORRECT VALIDATE] invokes a program that validates (and, if necessary, corrects) the table that describes all images that are waiting for corrections to be applied. The menu option will first delete all existing cross references and reset them accordingly to the entries in the tables. The menu option will first delete all existing cross references for all entries in DICOM FAILED IMAGES file (#2006.575) and reset them accordingly to the entries in the tables. Select DICOM Menu Options Option: VALIDate DICOM Correct Information Starting Validation of data in DICOM Failed Images Table. 100 entries currently in database.
Note: The Importer is used for DICOM Correct. For information about this, see the VistA Imaging DICOM Gateway Importer II User Manual.
Chapter 9 – Menu Options on VistA
202 VistA Imaging System MAG*3.0*138 September 2013 DICOM Gateway User Manual – Rev. 15
This page is intentionally blank.
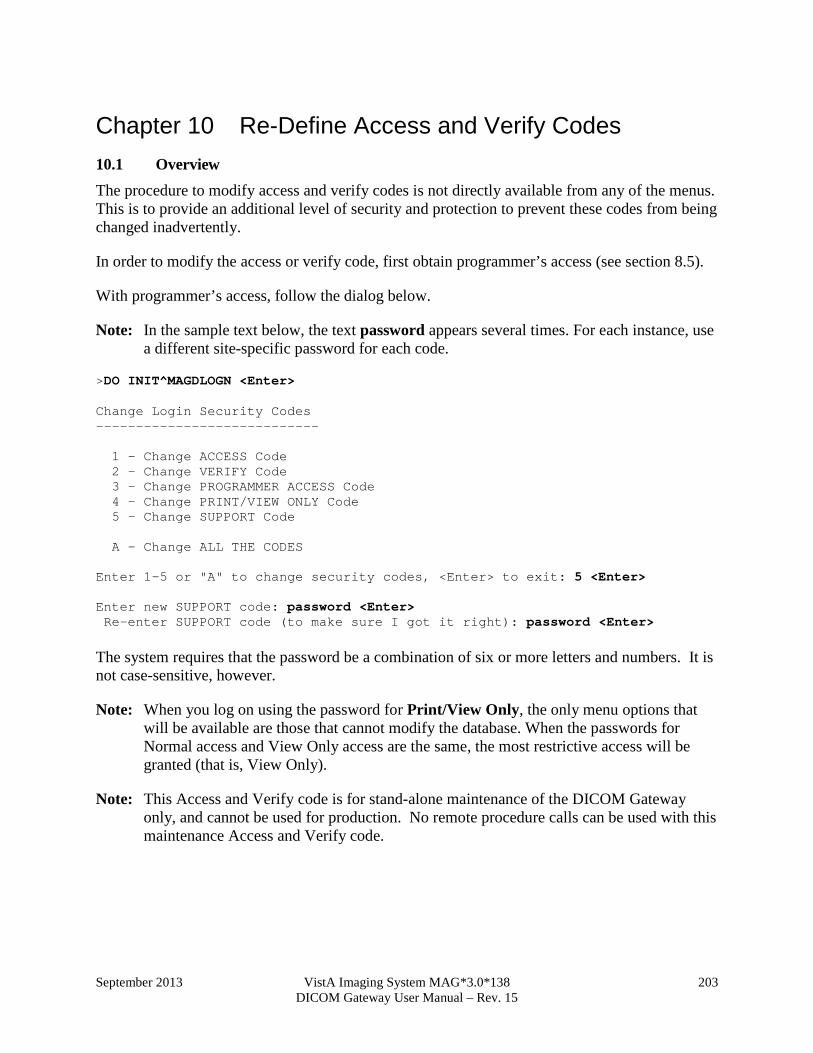
September 2013 VistA Imaging System MAG*3.0*138 203 DICOM Gateway User Manual – Rev. 15
Chapter 10 Re-Define Access and Verify Codes 10.1 Overview The procedure to modify access and verify codes is not directly available from any of the menus. This is to provide an additional level of security and protection to prevent these codes from being changed inadvertently.
In order to modify the access or verify code, first obtain programmer’s access (see section 8.5).
With programmer’s access, follow the dialog below.
Note: In the sample text below, the text password appears several times. For each instance, use a different site-specific password for each code.
>DO INIT^MAGDLOGN <Enter> Change Login Security Codes ---------------------------- 1 - Change ACCESS Code 2 - Change VERIFY Code 3 - Change PROGRAMMER ACCESS Code 4 - Change PRINT/VIEW ONLY Code 5 - Change SUPPORT Code A - Change ALL THE CODES Enter 1-5 or "A" to change security codes, <Enter> to exit: 5 <Enter> Enter new SUPPORT code: password <Enter> Re-enter SUPPORT code (to make sure I got it right): password <Enter> The system requires that the password be a combination of six or more letters and numbers. It is not case-sensitive, however.
Note: When you log on using the password for Print/View Only, the only menu options that will be available are those that cannot modify the database. When the passwords for Normal access and View Only access are the same, the most restrictive access will be granted (that is, View Only).
Note: This Access and Verify code is for stand-alone maintenance of the DICOM Gateway only, and cannot be used for production. No remote procedure calls can be used with this maintenance Access and Verify code.
Chapter 10 – Re-Define Access and Verify Codes
204 VistA Imaging System MAG*3.0*138 September 2013 DICOM Gateway User Manual – Rev. 15
This page is left intentionally blank.
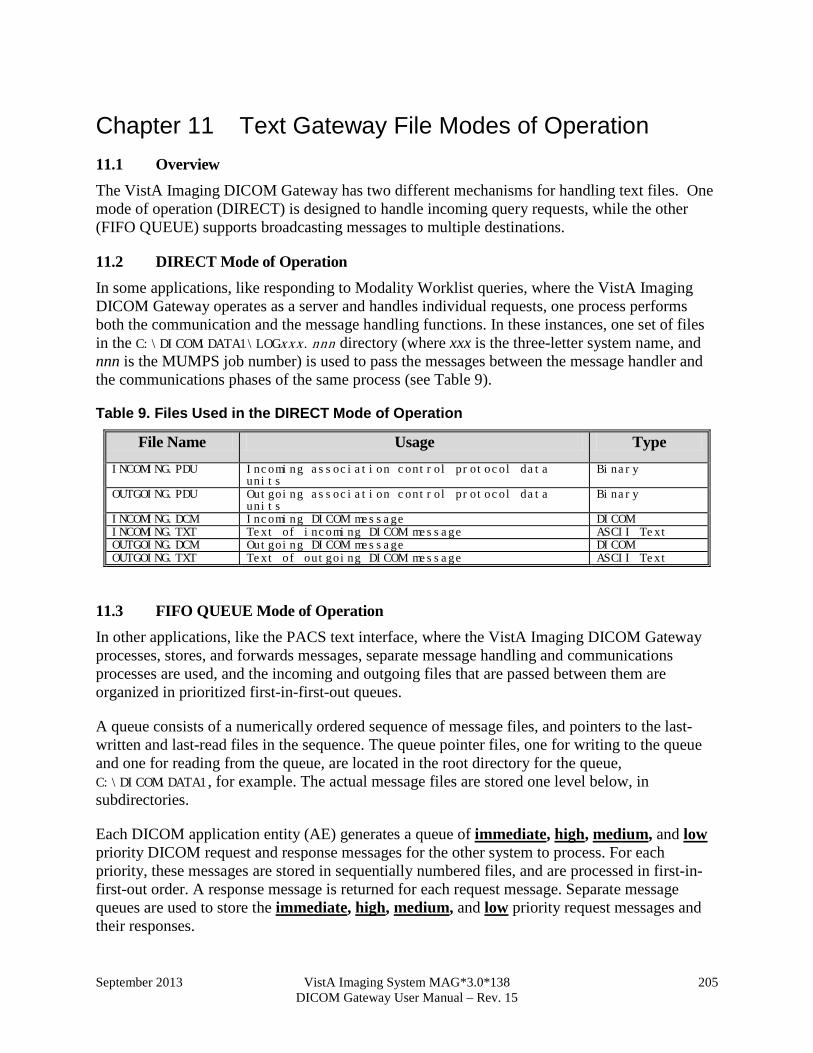
September 2013 VistA Imaging System MAG*3.0*138 205 DICOM Gateway User Manual – Rev. 15
Chapter 11 Text Gateway File Modes of Operation 11.1 Overview The VistA Imaging DICOM Gateway has two different mechanisms for handling text files. One mode of operation (DIRECT) is designed to handle incoming query requests, while the other (FIFO QUEUE) supports broadcasting messages to multiple destinations.
11.2 DIRECT Mode of Operation In some applications, like responding to Modality Worklist queries, where the VistA Imaging DICOM Gateway operates as a server and handles individual requests, one process performs both the communication and the message handling functions. In these instances, one set of files in the C:\DICOM\DATA1\LOGxxx.nnn directory (where xxx is the three-letter system name, and nnn is the MUMPS job number) is used to pass the messages between the message handler and the communications phases of the same process (see Table 9).
Table 9. Files Used in the DIRECT Mode of Operation
File Name Usage Type INCOMING.PDU Incoming association control protocol data
units Binary
OUTGOING.PDU Outgoing association control protocol data units
Binary
INCOMING.DCM Incoming DICOM message DICOM INCOMING.TXT Text of incoming DICOM message ASCII Text OUTGOING.DCM Outgoing DICOM message DICOM OUTGOING.TXT Text of outgoing DICOM message ASCII Text
11.3 FIFO QUEUE Mode of Operation In other applications, like the PACS text interface, where the VistA Imaging DICOM Gateway processes, stores, and forwards messages, separate message handling and communications processes are used, and the incoming and outgoing files that are passed between them are organized in prioritized first-in-first-out queues.
A queue consists of a numerically ordered sequence of message files, and pointers to the last-written and last-read files in the sequence. The queue pointer files, one for writing to the queue and one for reading from the queue, are located in the root directory for the queue, C:\DICOM\DATA1, for example. The actual message files are stored one level below, in subdirectories.
Each DICOM application entity (AE) generates a queue of immediate, high, medium, and low priority DICOM request and response messages for the other system to process. For each priority, these messages are stored in sequentially numbered files, and are processed in first-in-first-out order. A response message is returned for each request message. Separate message queues are used to store the immediate, high, medium, and low priority request messages and their responses.
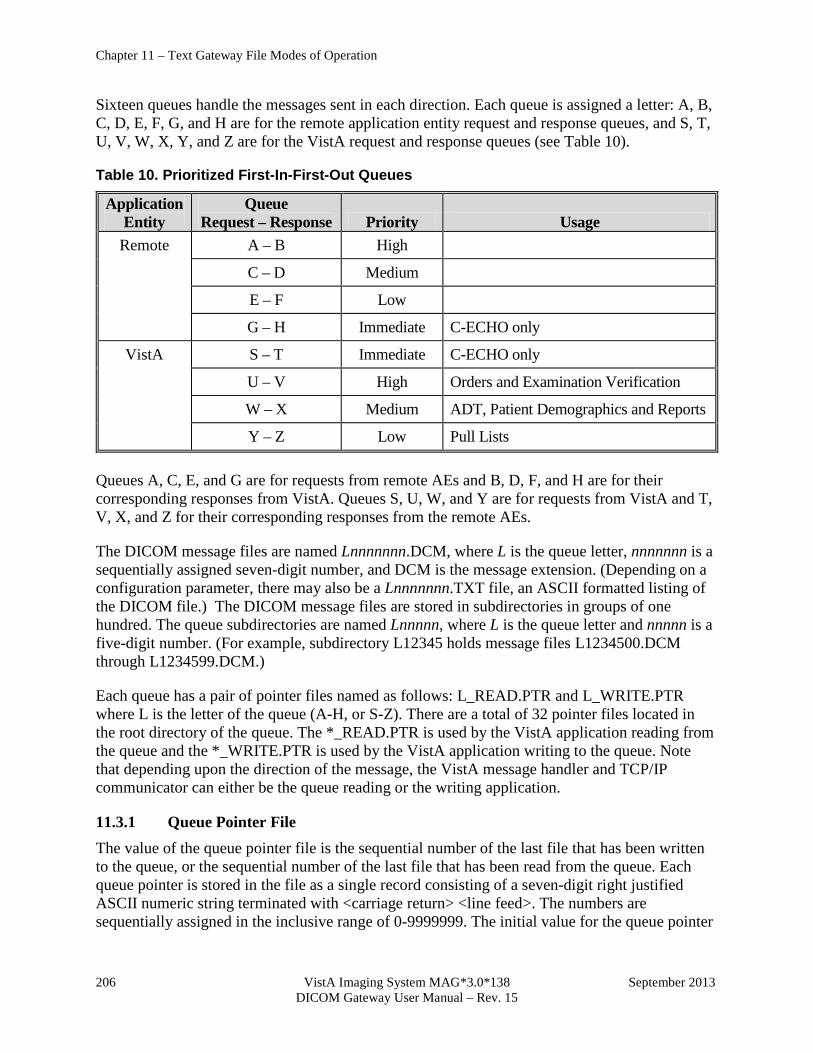
Chapter 11 – Text Gateway File Modes of Operation
206 VistA Imaging System MAG*3.0*138 September 2013 DICOM Gateway User Manual – Rev. 15
Sixteen queues handle the messages sent in each direction. Each queue is assigned a letter: A, B, C, D, E, F, G, and H are for the remote application entity request and response queues, and S, T, U, V, W, X, Y, and Z are for the VistA request and response queues (see Table 10).
Table 10. Prioritized First-In-First-Out Queues
Application Entity
Queue Request – Response Priority Usage
Remote A – B High
C – D Medium
E – F Low
G – H Immediate C-ECHO only
VistA S – T Immediate C-ECHO only
U – V High Orders and Examination Verification
W – X Medium ADT, Patient Demographics and Reports
Y – Z Low Pull Lists
Queues A, C, E, and G are for requests from remote AEs and B, D, F, and H are for their corresponding responses from VistA. Queues S, U, W, and Y are for requests from VistA and T, V, X, and Z for their corresponding responses from the remote AEs.
The DICOM message files are named Lnnnnnnn.DCM, where L is the queue letter, nnnnnnn is a sequentially assigned seven-digit number, and DCM is the message extension. (Depending on a configuration parameter, there may also be a Lnnnnnnn.TXT file, an ASCII formatted listing of the DICOM file.) The DICOM message files are stored in subdirectories in groups of one hundred. The queue subdirectories are named Lnnnnn, where L is the queue letter and nnnnn is a five-digit number. (For example, subdirectory L12345 holds message files L1234500.DCM through L1234599.DCM.)
Each queue has a pair of pointer files named as follows: L_READ.PTR and L_WRITE.PTR where L is the letter of the queue (A-H, or S-Z). There are a total of 32 pointer files located in the root directory of the queue. The *_READ.PTR is used by the VistA application reading from the queue and the *_WRITE.PTR is used by the VistA application writing to the queue. Note that depending upon the direction of the message, the VistA message handler and TCP/IP communicator can either be the queue reading or the writing application.
11.3.1 Queue Pointer File The value of the queue pointer file is the sequential number of the last file that has been written to the queue, or the sequential number of the last file that has been read from the queue. Each queue pointer is stored in the file as a single record consisting of a seven-digit right justified ASCII numeric string terminated with <carriage return> <line feed>. The numbers are sequentially assigned in the inclusive range of 0-9999999. The initial value for the queue pointer
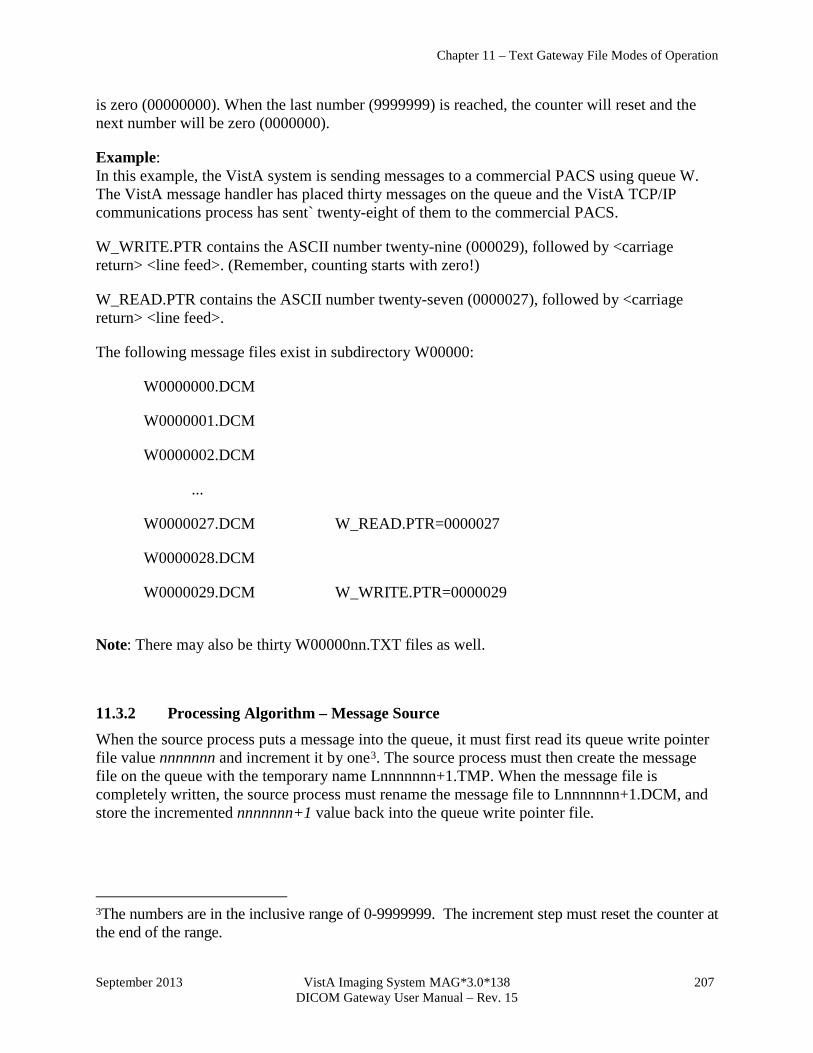
Chapter 11 – Text Gateway File Modes of Operation
September 2013 VistA Imaging System MAG*3.0*138 207 DICOM Gateway User Manual – Rev. 15
is zero (00000000). When the last number (9999999) is reached, the counter will reset and the next number will be zero (0000000).
Example: In this example, the VistA system is sending messages to a commercial PACS using queue W. The VistA message handler has placed thirty messages on the queue and the VistA TCP/IP communications process has sent` twenty-eight of them to the commercial PACS.
W_WRITE.PTR contains the ASCII number twenty-nine (000029), followed by <carriage return> <line feed>. (Remember, counting starts with zero!)
W_READ.PTR contains the ASCII number twenty-seven (0000027), followed by <carriage return> <line feed>.
The following message files exist in subdirectory W00000:
W0000000.DCM
W0000001.DCM
W0000002.DCM
...
W0000027.DCM W_READ.PTR=0000027
W0000028.DCM
W0000029.DCM W_WRITE.PTR=0000029
Note: There may also be thirty W00000nn.TXT files as well.
11.3.2 Processing Algorithm – Message Source When the source process puts a message into the queue, it must first read its queue write pointer file value nnnnnnn and increment it by one3. The source process must then create the message file on the queue with the temporary name Lnnnnnnn+1.TMP. When the message file is completely written, the source process must rename the message file to Lnnnnnnn+1.DCM, and store the incremented nnnnnnn+1 value back into the queue write pointer file.
3The numbers are in the inclusive range of 0-9999999. The increment step must reset the counter at the end of the range.
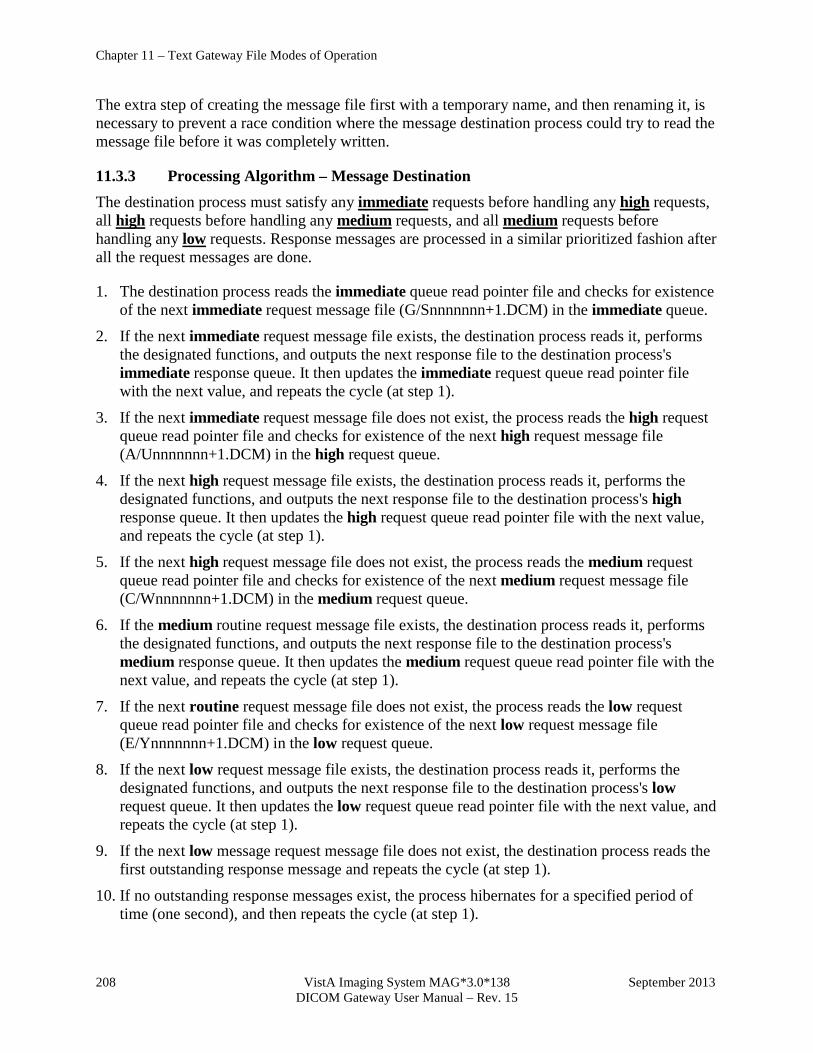
Chapter 11 – Text Gateway File Modes of Operation
208 VistA Imaging System MAG*3.0*138 September 2013 DICOM Gateway User Manual – Rev. 15
The extra step of creating the message file first with a temporary name, and then renaming it, is necessary to prevent a race condition where the message destination process could try to read the message file before it was completely written.
11.3.3 Processing Algorithm – Message Destination The destination process must satisfy any immediate requests before handling any high requests, all high requests before handling any medium requests, and all medium requests before handling any low requests. Response messages are processed in a similar prioritized fashion after all the request messages are done.
1. The destination process reads the immediate queue read pointer file and checks for existence of the next immediate request message file (G/Snnnnnnn+1.DCM) in the immediate queue.
2. If the next immediate request message file exists, the destination process reads it, performs the designated functions, and outputs the next response file to the destination process's immediate response queue. It then updates the immediate request queue read pointer file with the next value, and repeats the cycle (at step 1).
3. If the next immediate request message file does not exist, the process reads the high request queue read pointer file and checks for existence of the next high request message file (A/Unnnnnnn+1.DCM) in the high request queue.
4. If the next high request message file exists, the destination process reads it, performs the designated functions, and outputs the next response file to the destination process's high response queue. It then updates the high request queue read pointer file with the next value, and repeats the cycle (at step 1).
5. If the next high request message file does not exist, the process reads the medium request queue read pointer file and checks for existence of the next medium request message file (C/Wnnnnnnn+1.DCM) in the medium request queue.
6. If the medium routine request message file exists, the destination process reads it, performs the designated functions, and outputs the next response file to the destination process's medium response queue. It then updates the medium request queue read pointer file with the next value, and repeats the cycle (at step 1).
7. If the next routine request message file does not exist, the process reads the low request queue read pointer file and checks for existence of the next low request message file (E/Ynnnnnnn+1.DCM) in the low request queue.
8. If the next low request message file exists, the destination process reads it, performs the designated functions, and outputs the next response file to the destination process's low request queue. It then updates the low request queue read pointer file with the next value, and repeats the cycle (at step 1).
9. If the next low message request message file does not exist, the destination process reads the first outstanding response message and repeats the cycle (at step 1).
10. If no outstanding response messages exist, the process hibernates for a specified period of time (one second), and then repeats the cycle (at step 1).
Chapter 11 – Text Gateway File Modes of Operation
September 2013 VistA Imaging System MAG*3.0*138 209 DICOM Gateway User Manual – Rev. 15
11.3.4 Message Queue File Deletion Old message files and status files are automatically deleted after a predefined number of days by a VistA batch job.
Chapter 11 – Text Gateway File Modes of Operation
210 VistA Imaging System MAG*3.0*138 September 2013 DICOM Gateway User Manual – Rev. 15
This page is left intentionally blank.

September 2013 VistA Imaging System MAG*3.0*138 211 DICOM Gateway User Manual – Rev. 15
Chapter 12 Image Acquisition Devices – Modalities This chapter describes the steps to define the initial set of image acquisition devices and modalities, and how to modify the configuration at a later time to add more devices.
Begin by taking an inventory of all the image acquisition devices and mapping them to the VistA DICOM Image Gateways. Such an inventory should include the information shown in the tables below. Then register each instrument with the VistA Modality Worklist Provider on the VistA DICOM Text Gateway. section 12.3 presents the details on how to do this. Finally, set up the image processing parameters for each different instrument modality. This is described in section 12.4.
12.1 Image-Producing Equipment Table 11 contains information about all image acquisition equipment at the site. (The following example shows equipment at a fictitious site.) Site personnel have assigned port numbers for the VistA DICOM Storage processes different pieces of equipment, based on the scheme described in the VistA Imaging DICOM Installation Guide.
Note: The parameters that are shown in the shaded columns in Table 11 will be entered in the INSTRUMENT.DIC master file (see also the VistA Imaging DICOM Gateway Installation Guide).
Table 11. Contents of INSTRUMENT.DIC File
Description Remote Host Name
Remote IP Address
Port Assigned Mnemonic Institution
ID Imaging Service
HDIG Host Name
DeJarnette ImageShare VHAXXXIMG1 111.222.333.229 60100 CR1 660 RAD VHAXXXDIG1
DeJarnette ImageShare VHAXXXIMG2 111.222.333.230 60101 CR2 660 RAD VHAXXXDIG1
DeJarnette ImageShare VHAXXXIMG3 111.222.333.231 60102 CR3 660 RAD VHAXXXDIG1
GE CT/i CT Scanner VHAXXXCTS1 111.222.333.111 60120 CT1 660AA RAD VHAXXXDIG1
OEC C-Arm 9400 VHAXXXOEC1 111.222.333.120 60140 DRS1 660 RAD VHAXXXDIG2
OEC C-Arm 9700 VHAXXXOEC2 111.222.333.121 60141 DRS2 660 RAD VHAXXXDIG2
Acuson 128 Ultrasound VHAXXXACU1 111.222.333.117 60160 US1 660 RAD VHAXXXDIG2
Acuson 128 Ultrasound VHAXXXACU2 111.222.333.118 60161 US2 660 RAD VHAXXXDIG3
Acuson 128 Ultrasound VHAXXXACU3 111.222.333.119 60162 US3 660 RAD VHAXXXDIG3
ADAC Vertex VHAXXXADAC1 111.222.333.178 60170 NM1 660AA RAD VHAXXXDIG3
ADAC Solus VHAXXXADAC2 111.222.333.184 60171 NM2 660 RAD VHAXXXDIG3
ADAC Siemens Basicam
VHAXXXADAC3 111.222.333.185 60172 NM3 660 RAD VHAXXXDIG3
ADAC Siemens Orbiter
VHAXXXADAC4 111.222.333.177 60173 NM4 660 RAD VHAXXXDIG3
Lumisys 75 VHAXXXLUM1 111.222.333.150 60190 LUMISYS 660 RAD VHAXXXDIG3
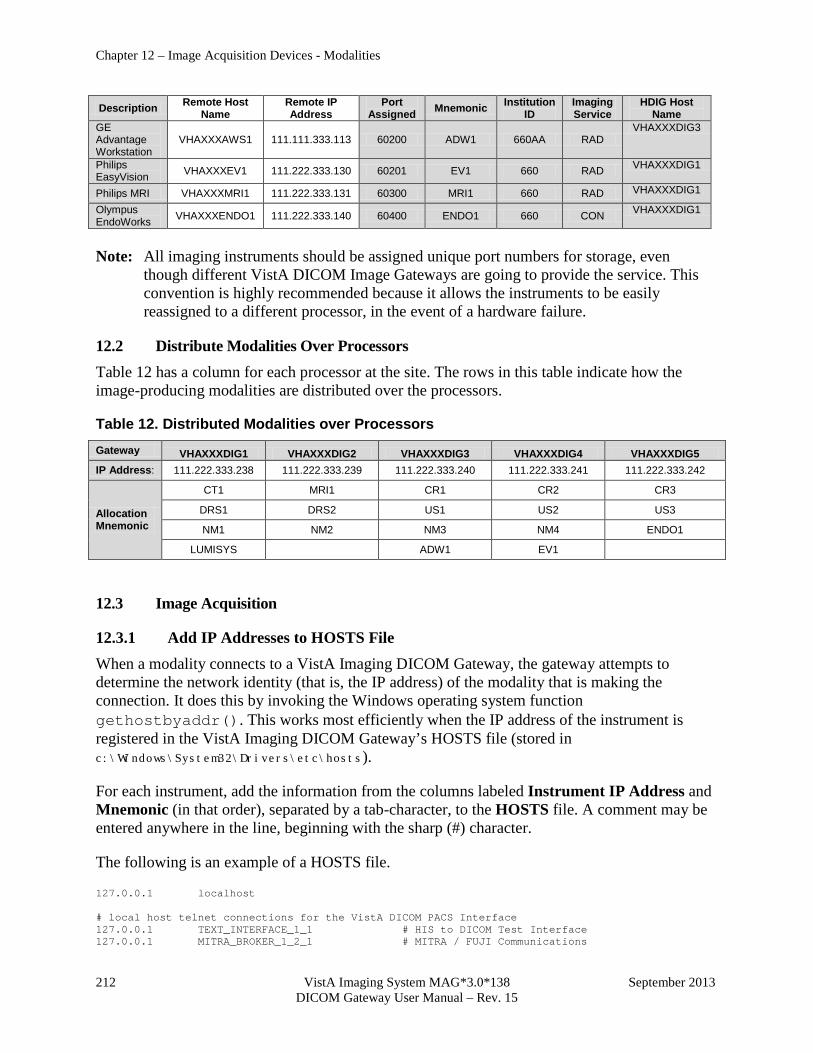
Chapter 12 – Image Acquisition Devices - Modalities
212 VistA Imaging System MAG*3.0*138 September 2013 DICOM Gateway User Manual – Rev. 15
Description Remote Host Name
Remote IP Address
Port Assigned Mnemonic Institution
ID Imaging Service
HDIG Host Name
GE Advantage Workstation
VHAXXXAWS1 111.111.333.113 60200 ADW1 660AA RAD VHAXXXDIG3
Philips EasyVision VHAXXXEV1 111.222.333.130 60201 EV1 660 RAD VHAXXXDIG1
Philips MRI VHAXXXMRI1 111.222.333.131 60300 MRI1 660 RAD VHAXXXDIG1
Olympus EndoWorks VHAXXXENDO1 111.222.333.140 60400 ENDO1 660 CON VHAXXXDIG1
Note: All imaging instruments should be assigned unique port numbers for storage, even though different VistA DICOM Image Gateways are going to provide the service. This convention is highly recommended because it allows the instruments to be easily reassigned to a different processor, in the event of a hardware failure.
12.2 Distribute Modalities Over Processors Table 12 has a column for each processor at the site. The rows in this table indicate how the image-producing modalities are distributed over the processors.
Table 12. Distributed Modalities over Processors Gateway VHAXXXDIG1 VHAXXXDIG2 VHAXXXDIG3 VHAXXXDIG4 VHAXXXDIG5 IP Address: 111.222.333.238 111.222.333.239 111.222.333.240 111.222.333.241 111.222.333.242
Allocation Mnemonic
CT1 MRI1 CR1 CR2 CR3
DRS1 DRS2 US1 US2 US3
NM1 NM2 NM3 NM4 ENDO1
LUMISYS ADW1 EV1
12.3 Image Acquisition
12.3.1 Add IP Addresses to HOSTS File When a modality connects to a VistA Imaging DICOM Gateway, the gateway attempts to determine the network identity (that is, the IP address) of the modality that is making the connection. It does this by invoking the Windows operating system function gethostbyaddr(). This works most efficiently when the IP address of the instrument is registered in the VistA Imaging DICOM Gateway’s HOSTS file (stored in c:\Windows\System32\Drivers\etc\hosts).
For each instrument, add the information from the columns labeled Instrument IP Address and Mnemonic (in that order), separated by a tab-character, to the HOSTS file. A comment may be entered anywhere in the line, beginning with the sharp (#) character.
The following is an example of a HOSTS file.
127.0.0.1 localhost # local host telnet connections for the VistA DICOM PACS Interface 127.0.0.1 TEXT_INTERFACE_1_1 # HIS to DICOM Test Interface 127.0.0.1 MITRA_BROKER_1_2_1 # MITRA / FUJI Communications
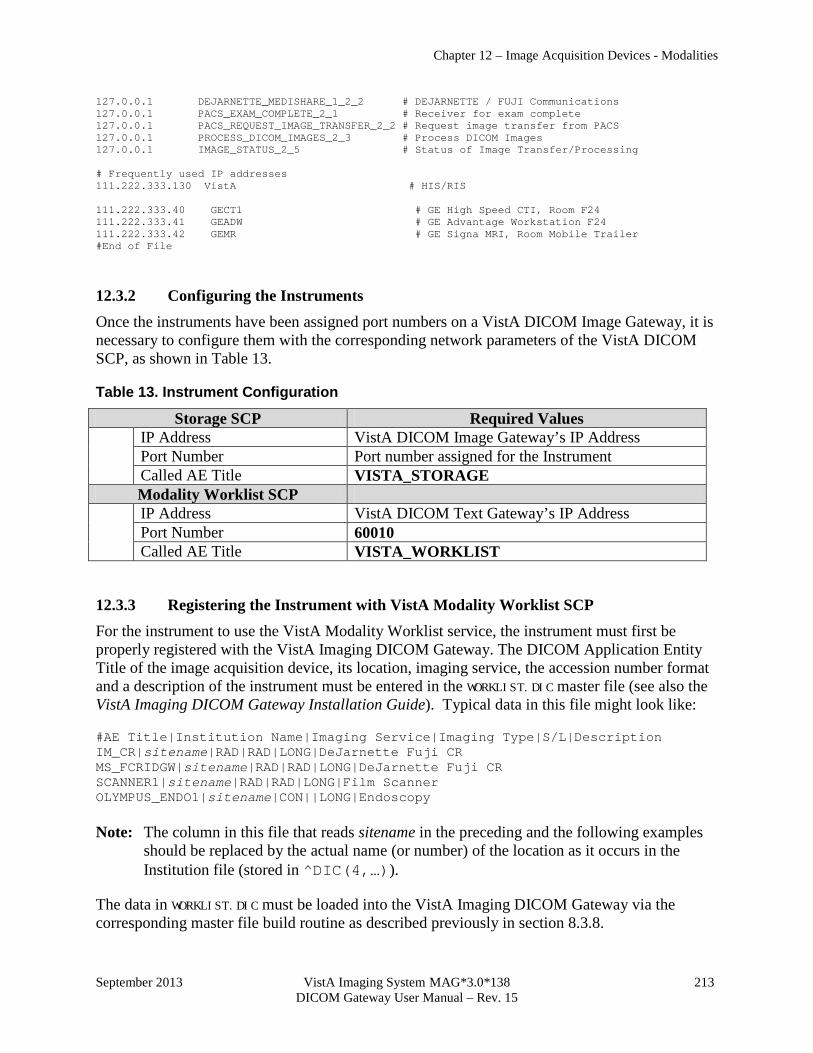
Chapter 12 – Image Acquisition Devices - Modalities
September 2013 VistA Imaging System MAG*3.0*138 213 DICOM Gateway User Manual – Rev. 15
127.0.0.1 DEJARNETTE_MEDISHARE_1_2_2 # DEJARNETTE / FUJI Communications 127.0.0.1 PACS_EXAM_COMPLETE_2_1 # Receiver for exam complete 127.0.0.1 PACS_REQUEST_IMAGE_TRANSFER_2_2 # Request image transfer from PACS 127.0.0.1 PROCESS_DICOM_IMAGES_2_3 # Process DICOM Images 127.0.0.1 IMAGE_STATUS_2_5 # Status of Image Transfer/Processing # Frequently used IP addresses 111.222.333.130 VistA # HIS/RIS 111.222.333.40 GECT1 # GE High Speed CTI, Room F24 111.222.333.41 GEADW # GE Advantage Workstation F24 111.222.333.42 GEMR # GE Signa MRI, Room Mobile Trailer #End of File
12.3.2 Configuring the Instruments Once the instruments have been assigned port numbers on a VistA DICOM Image Gateway, it is necessary to configure them with the corresponding network parameters of the VistA DICOM SCP, as shown in Table 13.
Table 13. Instrument Configuration
Storage SCP Required Values IP Address VistA DICOM Image Gateway’s IP Address Port Number Port number assigned for the Instrument Called AE Title VISTA_STORAGE
Modality Worklist SCP IP Address VistA DICOM Text Gateway’s IP Address Port Number 60010 Called AE Title VISTA_WORKLIST
12.3.3 Registering the Instrument with VistA Modality Worklist SCP For the instrument to use the VistA Modality Worklist service, the instrument must first be properly registered with the VistA Imaging DICOM Gateway. The DICOM Application Entity Title of the image acquisition device, its location, imaging service, the accession number format and a description of the instrument must be entered in the WORKLIST.DIC master file (see also the VistA Imaging DICOM Gateway Installation Guide). Typical data in this file might look like:
#AE Title|Institution Name|Imaging Service|Imaging Type|S/L|Description IM_CR|sitename|RAD|RAD|LONG|DeJarnette Fuji CR MS_FCRIDGW|sitename|RAD|RAD|LONG|DeJarnette Fuji CR SCANNER1|sitename|RAD|RAD|LONG|Film Scanner OLYMPUS_ENDO1|sitename|CON||LONG|Endoscopy Note: The column in this file that reads sitename in the preceding and the following examples should be replaced by the actual name (or number) of the location as it occurs in the Institution file (stored in ^DIC(4,…)).
The data in WORKLIST.DIC must be loaded into the VistA Imaging DICOM Gateway via the corresponding master file build routine as described previously in section 8.3.8.
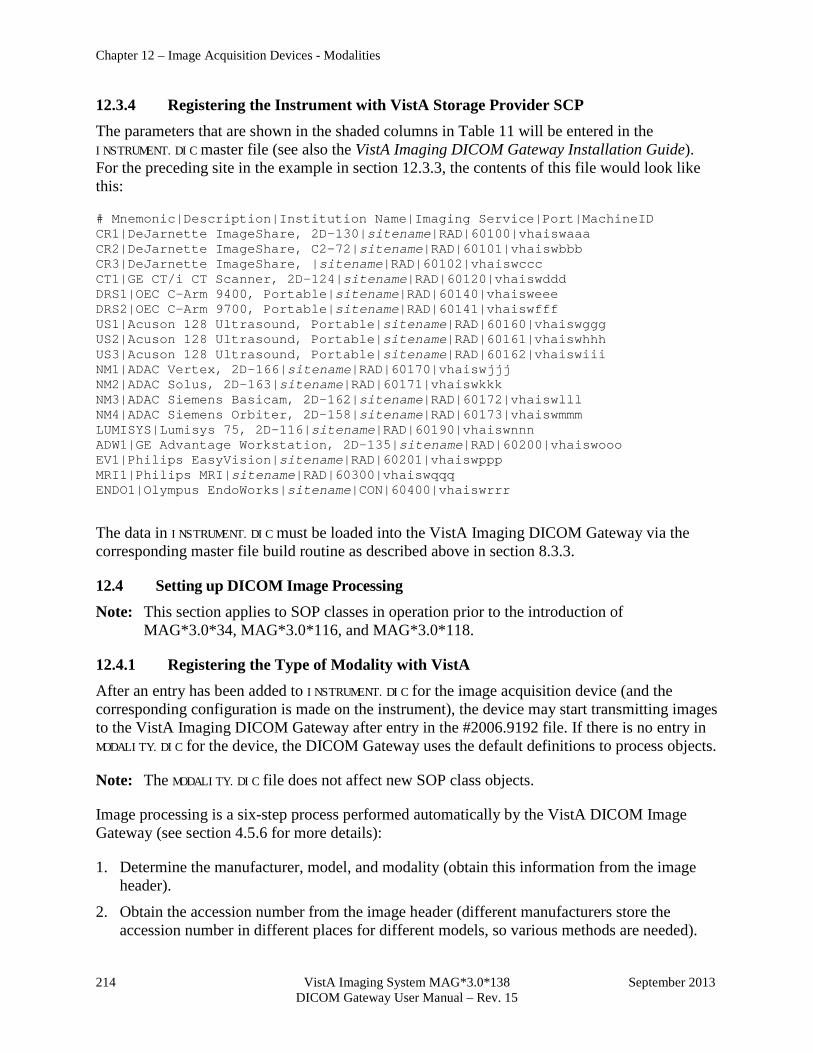
Chapter 12 – Image Acquisition Devices - Modalities
214 VistA Imaging System MAG*3.0*138 September 2013 DICOM Gateway User Manual – Rev. 15
12.3.4 Registering the Instrument with VistA Storage Provider SCP The parameters that are shown in the shaded columns in Table 11 will be entered in the INSTRUMENT.DIC master file (see also the VistA Imaging DICOM Gateway Installation Guide). For the preceding site in the example in section 12.3.3, the contents of this file would look like this:
# Mnemonic|Description|Institution Name|Imaging Service|Port|MachineID CR1|DeJarnette ImageShare, 2D-130|sitename|RAD|60100|vhaiswaaa CR2|DeJarnette ImageShare, C2-72|sitename|RAD|60101|vhaiswbbb CR3|DeJarnette ImageShare, |sitename|RAD|60102|vhaiswccc CT1|GE CT/i CT Scanner, 2D-124|sitename|RAD|60120|vhaiswddd DRS1|OEC C-Arm 9400, Portable|sitename|RAD|60140|vhaisweee DRS2|OEC C-Arm 9700, Portable|sitename|RAD|60141|vhaiswfff US1|Acuson 128 Ultrasound, Portable|sitename|RAD|60160|vhaiswggg US2|Acuson 128 Ultrasound, Portable|sitename|RAD|60161|vhaiswhhh US3|Acuson 128 Ultrasound, Portable|sitename|RAD|60162|vhaiswiii NM1|ADAC Vertex, 2D-166|sitename|RAD|60170|vhaiswjjj NM2|ADAC Solus, 2D-163|sitename|RAD|60171|vhaiswkkk NM3|ADAC Siemens Basicam, 2D-162|sitename|RAD|60172|vhaiswlll NM4|ADAC Siemens Orbiter, 2D-158|sitename|RAD|60173|vhaiswmmm LUMISYS|Lumisys 75, 2D-116|sitename|RAD|60190|vhaiswnnn ADW1|GE Advantage Workstation, 2D-135|sitename|RAD|60200|vhaiswooo EV1|Philips EasyVision|sitename|RAD|60201|vhaiswppp MRI1|Philips MRI|sitename|RAD|60300|vhaiswqqq ENDO1|Olympus EndoWorks|sitename|CON|60400|vhaiswrrr
The data in INSTRUMENT.DIC must be loaded into the VistA Imaging DICOM Gateway via the corresponding master file build routine as described above in section 8.3.3.
12.4 Setting up DICOM Image Processing Note: This section applies to SOP classes in operation prior to the introduction of MAG*3.0*34, MAG*3.0*116, and MAG*3.0*118.
12.4.1 Registering the Type of Modality with VistA After an entry has been added to INSTRUMENT.DIC for the image acquisition device (and the corresponding configuration is made on the instrument), the device may start transmitting images to the VistA Imaging DICOM Gateway after entry in the #2006.9192 file. If there is no entry in MODALITY.DIC for the device, the DICOM Gateway uses the default definitions to process objects.
Note: The MODALITY.DIC file does not affect new SOP class objects.
Image processing is a six-step process performed automatically by the VistA DICOM Image Gateway (see section 4.5.6 for more details):
1. Determine the manufacturer, model, and modality (obtain this information from the image header).
2. Obtain the accession number from the image header (different manufacturers store the accession number in different places for different models, so various methods are needed).
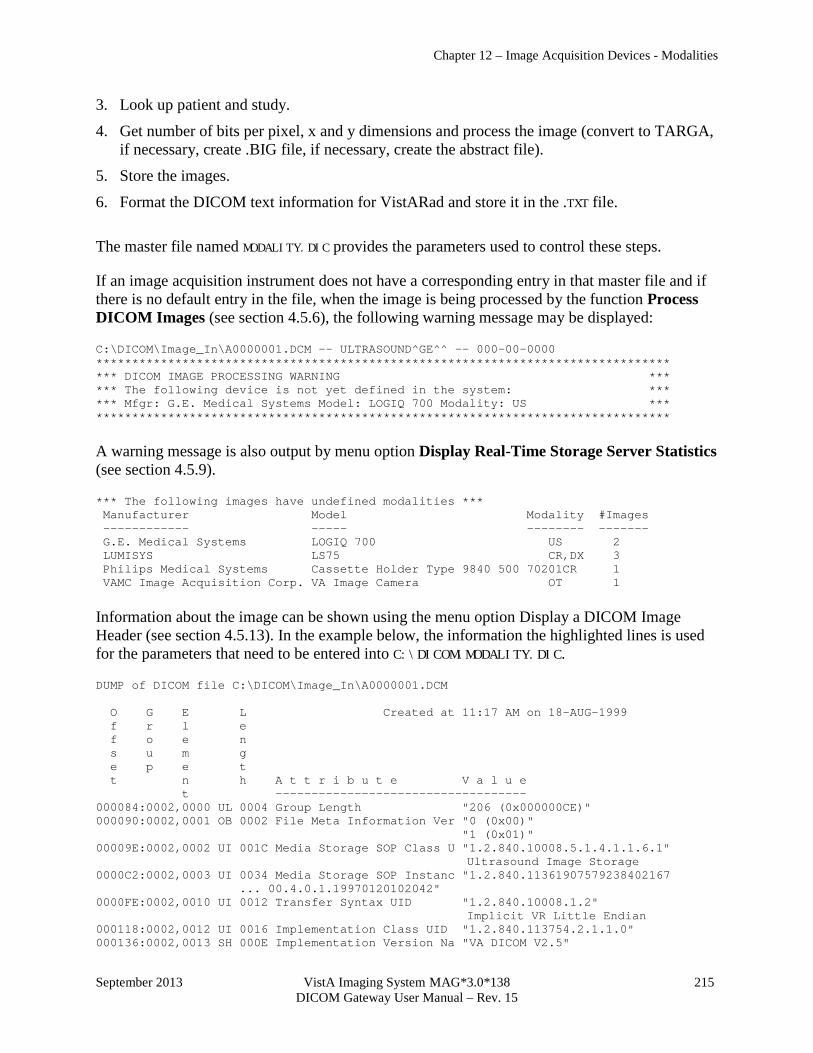
Chapter 12 – Image Acquisition Devices - Modalities
September 2013 VistA Imaging System MAG*3.0*138 215 DICOM Gateway User Manual – Rev. 15
3. Look up patient and study.
4. Get number of bits per pixel, x and y dimensions and process the image (convert to TARGA, if necessary, create .BIG file, if necessary, create the abstract file).
5. Store the images.
6. Format the DICOM text information for VistARad and store it in the .TXT file. The master file named MODALITY.DIC provides the parameters used to control these steps.
If an image acquisition instrument does not have a corresponding entry in that master file and if there is no default entry in the file, when the image is being processed by the function Process DICOM Images (see section 4.5.6), the following warning message may be displayed:
C:\DICOM\Image_In\A0000001.DCM -- ULTRASOUND^GE^^ -- 000-00-0000 ******************************************************************************** *** DICOM IMAGE PROCESSING WARNING *** *** The following device is not yet defined in the system: *** *** Mfgr: G.E. Medical Systems Model: LOGIQ 700 Modality: US *** ******************************************************************************** A warning message is also output by menu option Display Real-Time Storage Server Statistics (see section 4.5.9).
*** The following images have undefined modalities *** Manufacturer Model Modality #Images ------------ ----- -------- ------- G.E. Medical Systems LOGIQ 700 US 2 LUMISYS LS75 CR,DX 3 Philips Medical Systems Cassette Holder Type 9840 500 70201CR 1 VAMC Image Acquisition Corp. VA Image Camera OT 1 Information about the image can be shown using the menu option Display a DICOM Image Header (see section 4.5.13). In the example below, the information the highlighted lines is used for the parameters that need to be entered into C:\DICOM\MODALITY.DIC.
DUMP of DICOM file C:\DICOM\Image_In\A0000001.DCM O G E L Created at 11:17 AM on 18-AUG-1999 f r l e f o e n s u m g e p e t t n h A t t r i b u t e V a l u e t ----------------------------------- 000084:0002,0000 UL 0004 Group Length "206 (0x000000CE)" 000090:0002,0001 OB 0002 File Meta Information Ver "0 (0x00)" "1 (0x01)" 00009E:0002,0002 UI 001C Media Storage SOP Class U "1.2.840.10008.5.1.4.1.1.6.1"
Ultrasound Image Storage 0000C2:0002,0003 UI 0034 Media Storage SOP Instanc "1.2.840.11361907579238402167 ... 00.4.0.1.19970120102042" 0000FE:0002,0010 UI 0012 Transfer Syntax UID "1.2.840.10008.1.2"
Implicit VR Little Endian 000118:0002,0012 UI 0016 Implementation Class UID "1.2.840.113754.2.1.1.0" 000136:0002,0013 SH 000E Implementation Version Na "VA DICOM V2.5"

Chapter 12 – Image Acquisition Devices - Modalities
216 VistA Imaging System MAG*3.0*138 September 2013 DICOM Gateway User Manual – Rev. 15
00014C:0002,0016 AE 000A Source Application Entity "DICOM_TEST" 00015E:0008,0008 CS 001C Image Type "ORIGINAL" "PRIMARY" "OBSTETRICAL" 000182:0008,0016 UI 001C SOP Class UID "1.2.840.10008.5.1.4.1.1.6.1"
Ultrasound Image Storage 0001A6:0008,0018 UI 0034 SOP Instance UID "1.2.840.11361907579238402167 ... 00.4.0.1.19970120102042" 0001E2:0008,0020 DA 0008 Study Date "19970120" 0001F2:0008,0030 TM 0006 Study Time "102042" 000200:0008,0050 SH 0000 Accession Number "<unknown>" 000208:0008,0060 CS 0002 Modality "US" 000212:0008,0070 LO 0014 Manufacturer "G.E. Medical Systems" 00022E:0008,0080 LO 0012 Institution Name "GE MEDICAL SYSTEMS" 000248:0008,0090 PN 0000 Referring Physician's Nam "<unknown>" 000250:0008,1010 SH 0006 Station Name "mvme22" 00025E:0008,1090 LO 000A Manufacturer's Model Name "LOGIQ 700" 000270:0008,2122 IS 0002 Stage Number "0" 00027A:0008,2124 IS 0002 Number of Stages "1" 000284:0008,2128 IS 0002 View Number "0" 00028E:0008,212A IS 0002 Number of Views in Stage "1" 000298:0010,0010 PN 0010 Patient's Name "IMAGPATIENT1^ONE^^" 0002B0:0010,0020 LO 000C Patient ID "000-00-0000" 0002C4:0010,0030 DA 0000 Patient's Birth Date "<unknown>" 0002CC:0010,0032 TM 0000 Patient's Birth Time "<unknown>" 0002D4:0010,0040 CS 0002 Patient's Sex "F" 0002DE:0010,1020 DS 0008 Patient's Size "0.000000" 0002EE:0010,1030 DS 0008 Patient's Weight "0.000000" 0002FE:0010,21B0 LT 0000 Additional Patient Histor "<unknown>" 000306:0018,1000 LO 0008 Device Serial Number "4121885" 000316:0018,1020 LO 0006 Software Version(s) "R1.0.D" 000324:0018,6011 SQ FFFF Sequence of Ultrasound Re 1 00032C:FFFE,E000 SQ FFFF >Item Begin 1.1 000334:0018,6012 US 0002 >Region Spatial Format "0 (0x0000)" 00033E:0018,6014 US 0002 >Region Data Type "0 (0x0000)" 000348:0018,6016 UL 0004 >Region Flags "0 (0x00000000)" 000354:0018,6018 UL 0004 >Region Location Min X0 "0 (0x00000000)" 000360:0018,601A UL 0004 >Region Location Min Y0 "0 (0x00000000)" 00036C:0018,601C UL 0004 >Region Location Max X1 "0 (0x00000000)" 000378:0018,601E UL 0004 >Region Location Max Y1 "0 (0x00000000)" 000384:0018,6020 SL 0004 >Reference Pixel X0 "0 (0x00000000)" 000390:0018,6022 SL 0004 >Reference Pixel Y0 "0 (0x00000000)" 00039C:0018,6024 US 0002 >Physical Units X Directi "0 (0x0000)" 0003A6:0018,6026 US 0002 >Physical Units Y Directi "0 (0x0000)" 0003B0:0018,6028 FD 0008 >Reference Pixel Physical "0" 0003C0:0018,602A FD 0008 >Reference Pixel Physical "0" 0003D0:0018,602C FD 0008 >Physical Delta X "0" 0003E0:0018,602E FD 0008 >Physical Delta Y "0" 0003F0:0018,6030 UL 0004 >Transducer Frequency "0 (0x00000000)" 0003FC:0018,6032 UL 0004 >Pulse Repetition Frequen "0 (0x00000000)" 000408:FFFE,E00D SQ 0000 >Item End 1.1 000410:FFFE,E000 SQ FFFF >Item Begin 1.2 000418:0018,6012 US 0002 >Region Spatial Format "0 (0x0000)" 000422:0018,6014 US 0002 >Region Data Type "0 (0x0000)" 00042C:0018,6016 UL 0004 >Region Flags "0 (0x00000000)" 000438:0018,6018 UL 0004 >Region Location Min X0 "0 (0x00000000)" 000444:0018,601A UL 0004 >Region Location Min Y0 "0 (0x00000000)" 000450:0018,601C UL 0004 >Region Location Max X1 "0 (0x00000000)" 00045C:0018,601E UL 0004 >Region Location Max Y1 "0 (0x00000000)" 000468:0018,6020 SL 0004 >Reference Pixel X0 "0 (0x00000000)" 000474:0018,6022 SL 0004 >Reference Pixel Y0 "0 (0x00000000)" 000480:0018,6024 US 0002 >Physical Units X Directi "0 (0x0000)" 00048A:0018,6026 US 0002 >Physical Units Y Directi "0 (0x0000)"
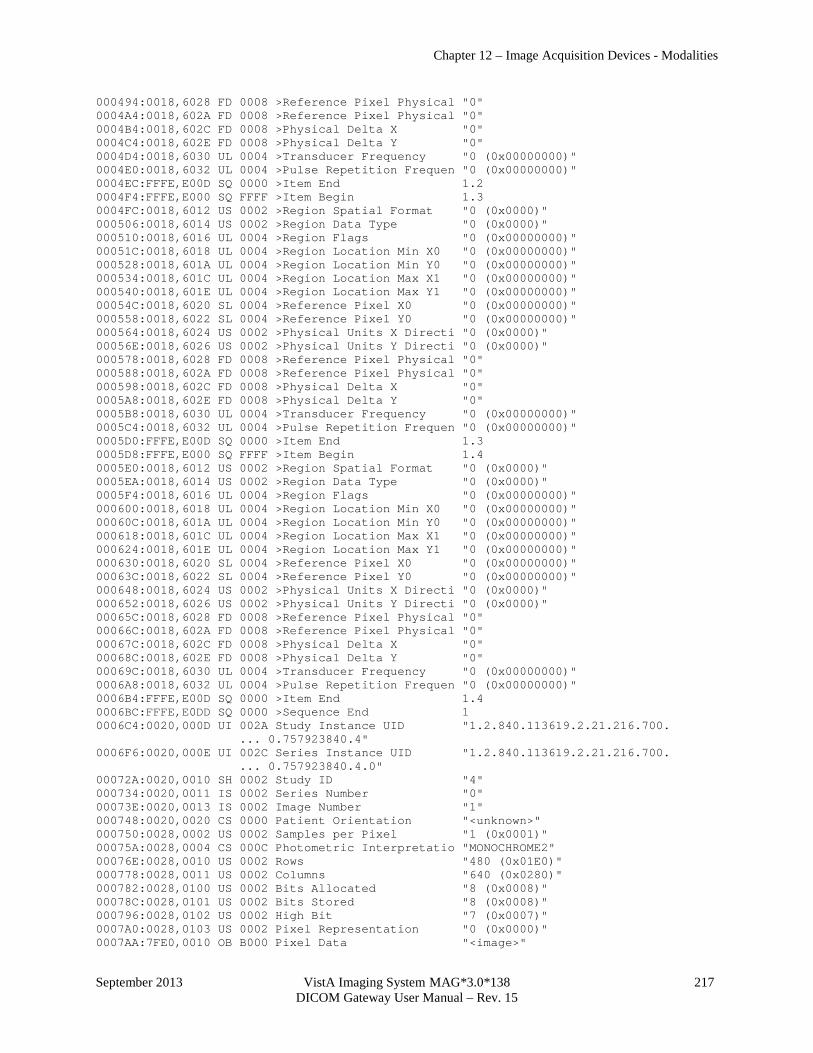
Chapter 12 – Image Acquisition Devices - Modalities
September 2013 VistA Imaging System MAG*3.0*138 217 DICOM Gateway User Manual – Rev. 15
000494:0018,6028 FD 0008 >Reference Pixel Physical "0" 0004A4:0018,602A FD 0008 >Reference Pixel Physical "0" 0004B4:0018,602C FD 0008 >Physical Delta X "0" 0004C4:0018,602E FD 0008 >Physical Delta Y "0" 0004D4:0018,6030 UL 0004 >Transducer Frequency "0 (0x00000000)" 0004E0:0018,6032 UL 0004 >Pulse Repetition Frequen "0 (0x00000000)" 0004EC:FFFE,E00D SQ 0000 >Item End 1.2 0004F4:FFFE,E000 SQ FFFF >Item Begin 1.3 0004FC:0018,6012 US 0002 >Region Spatial Format "0 (0x0000)" 000506:0018,6014 US 0002 >Region Data Type "0 (0x0000)" 000510:0018,6016 UL 0004 >Region Flags "0 (0x00000000)" 00051C:0018,6018 UL 0004 >Region Location Min X0 "0 (0x00000000)" 000528:0018,601A UL 0004 >Region Location Min Y0 "0 (0x00000000)" 000534:0018,601C UL 0004 >Region Location Max X1 "0 (0x00000000)" 000540:0018,601E UL 0004 >Region Location Max Y1 "0 (0x00000000)" 00054C:0018,6020 SL 0004 >Reference Pixel X0 "0 (0x00000000)" 000558:0018,6022 SL 0004 >Reference Pixel Y0 "0 (0x00000000)" 000564:0018,6024 US 0002 >Physical Units X Directi "0 (0x0000)" 00056E:0018,6026 US 0002 >Physical Units Y Directi "0 (0x0000)" 000578:0018,6028 FD 0008 >Reference Pixel Physical "0" 000588:0018,602A FD 0008 >Reference Pixel Physical "0" 000598:0018,602C FD 0008 >Physical Delta X "0" 0005A8:0018,602E FD 0008 >Physical Delta Y "0" 0005B8:0018,6030 UL 0004 >Transducer Frequency "0 (0x00000000)" 0005C4:0018,6032 UL 0004 >Pulse Repetition Frequen "0 (0x00000000)" 0005D0:FFFE,E00D SQ 0000 >Item End 1.3 0005D8:FFFE,E000 SQ FFFF >Item Begin 1.4 0005E0:0018,6012 US 0002 >Region Spatial Format "0 (0x0000)" 0005EA:0018,6014 US 0002 >Region Data Type "0 (0x0000)" 0005F4:0018,6016 UL 0004 >Region Flags "0 (0x00000000)" 000600:0018,6018 UL 0004 >Region Location Min X0 "0 (0x00000000)" 00060C:0018,601A UL 0004 >Region Location Min Y0 "0 (0x00000000)" 000618:0018,601C UL 0004 >Region Location Max X1 "0 (0x00000000)" 000624:0018,601E UL 0004 >Region Location Max Y1 "0 (0x00000000)" 000630:0018,6020 SL 0004 >Reference Pixel X0 "0 (0x00000000)" 00063C:0018,6022 SL 0004 >Reference Pixel Y0 "0 (0x00000000)" 000648:0018,6024 US 0002 >Physical Units X Directi "0 (0x0000)" 000652:0018,6026 US 0002 >Physical Units Y Directi "0 (0x0000)" 00065C:0018,6028 FD 0008 >Reference Pixel Physical "0" 00066C:0018,602A FD 0008 >Reference Pixel Physical "0" 00067C:0018,602C FD 0008 >Physical Delta X "0" 00068C:0018,602E FD 0008 >Physical Delta Y "0" 00069C:0018,6030 UL 0004 >Transducer Frequency "0 (0x00000000)" 0006A8:0018,6032 UL 0004 >Pulse Repetition Frequen "0 (0x00000000)" 0006B4:FFFE,E00D SQ 0000 >Item End 1.4 0006BC:FFFE,E0DD SQ 0000 >Sequence End 1 0006C4:0020,000D UI 002A Study Instance UID "1.2.840.113619.2.21.216.700. ... 0.757923840.4" 0006F6:0020,000E UI 002C Series Instance UID "1.2.840.113619.2.21.216.700. ... 0.757923840.4.0" 00072A:0020,0010 SH 0002 Study ID "4" 000734:0020,0011 IS 0002 Series Number "0" 00073E:0020,0013 IS 0002 Image Number "1" 000748:0020,0020 CS 0000 Patient Orientation "<unknown>" 000750:0028,0002 US 0002 Samples per Pixel "1 (0x0001)" 00075A:0028,0004 CS 000C Photometric Interpretatio "MONOCHROME2" 00076E:0028,0010 US 0002 Rows "480 (0x01E0)" 000778:0028,0011 US 0002 Columns "640 (0x0280)" 000782:0028,0100 US 0002 Bits Allocated "8 (0x0008)" 00078C:0028,0101 US 0002 Bits Stored "8 (0x0008)" 000796:0028,0102 US 0002 High Bit "7 (0x0007)" 0007A0:0028,0103 US 0002 Pixel Representation "0 (0x0000)" 0007AA:7FE0,0010 OB B000 Pixel Data "<image>"
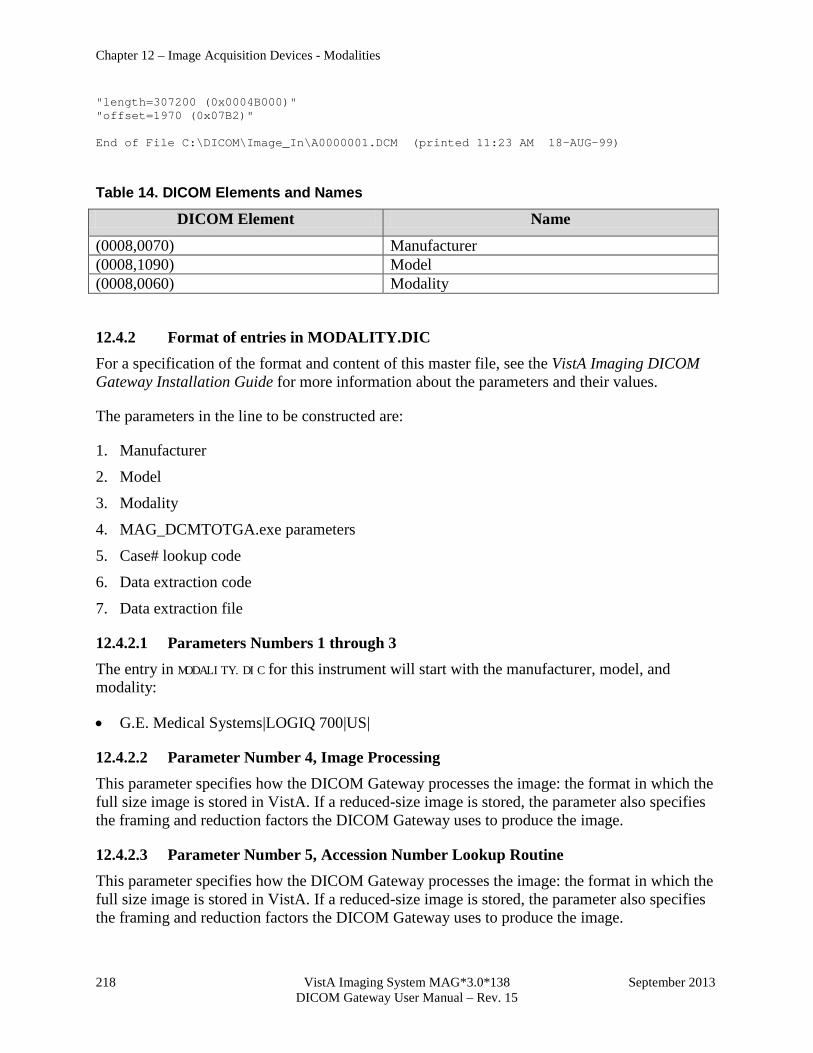
Chapter 12 – Image Acquisition Devices - Modalities
218 VistA Imaging System MAG*3.0*138 September 2013 DICOM Gateway User Manual – Rev. 15
"length=307200 (0x0004B000)" "offset=1970 (0x07B2)" End of File C:\DICOM\Image_In\A0000001.DCM (printed 11:23 AM 18-AUG-99)
Table 14. DICOM Elements and Names
DICOM Element Name
(0008,0070) Manufacturer (0008,1090) Model (0008,0060) Modality
12.4.2 Format of entries in MODALITY.DIC For a specification of the format and content of this master file, see the VistA Imaging DICOM Gateway Installation Guide for more information about the parameters and their values.
The parameters in the line to be constructed are:
1. Manufacturer
2. Model
3. Modality
4. MAG_DCMTOTGA.exe parameters
5. Case# lookup code
6. Data extraction code
7. Data extraction file
12.4.2.1 Parameters Numbers 1 through 3 The entry in MODALITY.DIC for this instrument will start with the manufacturer, model, and modality:
• G.E. Medical Systems|LOGIQ 700|US|
12.4.2.2 Parameter Number 4, Image Processing This parameter specifies how the DICOM Gateway processes the image: the format in which the full size image is stored in VistA. If a reduced-size image is stored, the parameter also specifies the framing and reduction factors the DICOM Gateway uses to produce the image.
12.4.2.3 Parameter Number 5, Accession Number Lookup Routine This parameter specifies how the DICOM Gateway processes the image: the format in which the full size image is stored in VistA. If a reduced-size image is stored, the parameter also specifies the framing and reduction factors the DICOM Gateway uses to produce the image.
Chapter 12 – Image Acquisition Devices - Modalities
September 2013 VistA Imaging System MAG*3.0*138 219 DICOM Gateway User Manual – Rev. 15
12.4.2.4 Parameter number 6, Data Extraction Routine This parameter specifies the name of the routine that is invoked to extract and process data from the header of the image file for the diagnostic workstation.
Some commercial PACS place the proper value in the Accession Number field before sending the image to VistA.
12.4.2.5 Parameter Number 7, Text Data Extraction Element List This parameter specifies the name of the file that contains the list of DICOM elements passed to a diagnostic workstation.
12.5 Loading data from MODALITY.DIC into VistA The data in MODALITY.DIC must be loaded into the VistA Imaging DICOM Gateway via the corresponding master file build routine as described in section 8.3.5.
12.6 Setting up the MAG CT PARAMETER File for VistARad The MAG CT PARAMETER file (#2006.621) is used to correct problems with Hounsfield Unit (HU) calculations on certain historical CT images that have been stored in the Targa (.tga) file format. The problem may occur for some images processed by a DICOM Gateway that was configured with incorrect or inconsistent DCM-to-TGA processing parameters for the CT device. VistARad MAG*3.0*65 (and subsequent versions) can compensate for the incorrect modality processing parameters to perform corrected Hounsfield calculations, provided that some parts of the processing parameters that were used can be determined. The MAG CT PARAMETER file provides a place to maintain a date-indexed history of the processing parameters for each CT device which the VistARad client software can use to apply the correction, if needed.
Note: Images that could potentially be affected by this problem include those from any CT that was processed by a DICOM Gateway prior to the installation of Imaging DICOM Patch 50. Images processed after installation of MAG*3.0*50 (beginning with test build T29) are not subject to the problem; MAG*3.0*50 was released on July 13, 2006.
Note: If this problem occurs with images acquired with different CT models, the required fix must be implemented independently for each model.
The following sections explain how to verify if this problem exists and how to correct it. Note that to research the problem and apply the fix described below, you will need:
• Access to the DICOM Menu Options menu [MAGD DICOM MENU] on the VistA system.
• Access to the Imaging server/shares where images’ associated text files are stored.
• An Imaging professional or support staff member with access to VistARad for viewing CT images and performing the Hounsfield measurement function.
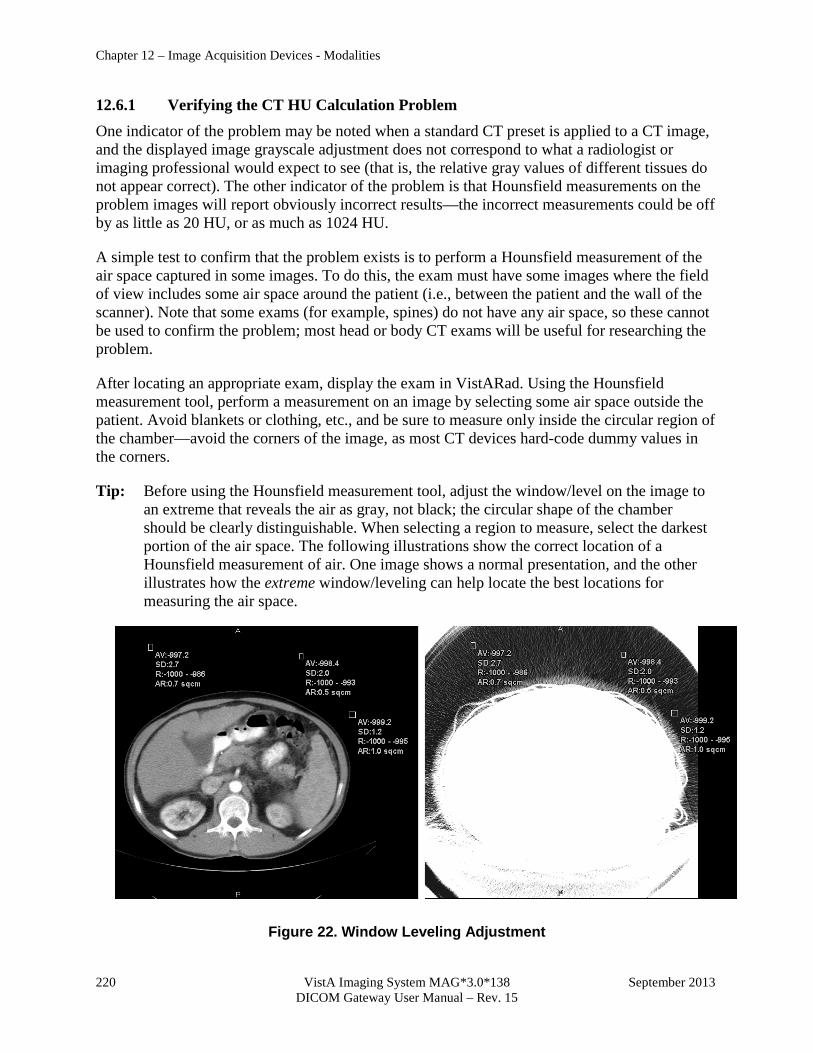
Chapter 12 – Image Acquisition Devices - Modalities
220 VistA Imaging System MAG*3.0*138 September 2013 DICOM Gateway User Manual – Rev. 15
12.6.1 Verifying the CT HU Calculation Problem One indicator of the problem may be noted when a standard CT preset is applied to a CT image, and the displayed image grayscale adjustment does not correspond to what a radiologist or imaging professional would expect to see (that is, the relative gray values of different tissues do not appear correct). The other indicator of the problem is that Hounsfield measurements on the problem images will report obviously incorrect results—the incorrect measurements could be off by as little as 20 HU, or as much as 1024 HU.
A simple test to confirm that the problem exists is to perform a Hounsfield measurement of the air space captured in some images. To do this, the exam must have some images where the field of view includes some air space around the patient (i.e., between the patient and the wall of the scanner). Note that some exams (for example, spines) do not have any air space, so these cannot be used to confirm the problem; most head or body CT exams will be useful for researching the problem.
After locating an appropriate exam, display the exam in VistARad. Using the Hounsfield measurement tool, perform a measurement on an image by selecting some air space outside the patient. Avoid blankets or clothing, etc., and be sure to measure only inside the circular region of the chamber—avoid the corners of the image, as most CT devices hard-code dummy values in the corners.
Tip: Before using the Hounsfield measurement tool, adjust the window/level on the image to an extreme that reveals the air as gray, not black; the circular shape of the chamber should be clearly distinguishable. When selecting a region to measure, select the darkest portion of the air space. The following illustrations show the correct location of a Hounsfield measurement of air. One image shows a normal presentation, and the other illustrates how the extreme window/leveling can help locate the best locations for measuring the air space.
Figure 22. Window Leveling Adjustment

Chapter 12 – Image Acquisition Devices - Modalities
September 2013 VistA Imaging System MAG*3.0*138 221 DICOM Gateway User Manual – Rev. 15
The actual HU value for air is -1,000 (minus 1,000). Perform several measurements on the image; if the Average measurements you obtain are more than 8 HU off from -1,000 (i.e., outside the range -1,008 to -992), and the Range indicated does not show a low end almost exactly equal to -1,000, then the problem is in evidence.
The above examples show expected correct HU values—note the Average (AV:) and Range (R:) values for comparison.
12.6.2 Applying the Correction If you have confirmed that the problem exists, then log a support request with National VistA Support (NVS)—specify Need HU Calibration in the Remedy ticket. NVS Imaging support staff will provide assistance in determining the correct parameters needed, and make sure that the time frames that need to be covered are correctly accounted for.
You will need to provide NVS with:
• A sample image that exhibits the problem, with the corresponding .TXT file.
• A screen dump from the VistA menu option MAGD DICOM MENU / Display MAGD CT PARAMETER entries for your location code.
NVS will provide to you the information needed to make appropriate entries to the MAG CT PARAMETER file.
12.7 Setting up the MAG CR PARAMETER File for VistARad The MAG CR PARAMETER file (#2006.623) is used to correct measurement problems in images acquired by Fuji CRs using specific versions of the Flash IIP console software. The affected software versions (as indicated by Fuji) were: A09-17 A11-18 A10-06 A11-21 A11-02 A11-22 A11-12 V1.0(B) A11-15 V2.0(B) A11-16 V3.0(B) A11-17 Fuji notified sites of this problem and took corrective action in May 2004. However, images acquired before the problem was fixed will continue to underreport measurements because of an incorrect value in their DICOM header (and associated text file).

Chapter 12 – Image Acquisition Devices - Modalities
222 VistA Imaging System MAG*3.0*138 September 2013 DICOM Gateway User Manual – Rev. 15
Note: If an intermediary device such as a DeJarnette ImageShare CR is present, affected images may be identified as being from the intermediary device, rather than from a Fuji device.
Note: Sites running VistARad Patch 32 are not affected by this problem. However sites that use newer VistARad versions (18 and 65) will experience this problem because newer versions of VistARad use the tag (Pixel Spacing (0018,1164)) that was incorrectly populated at acquisition.
The following sections explain how to verify if this problem exists and how to correct it. Note that to apply the fix described below, you will need:
• Access to the DICOM Menu Options menu [MAGD DICOM MENU] on the VistA system.
• Access to the Imaging server/shares where images’ associated text files are stored.
12.7.1 Verifying the CR Measurement Problem In VistARad Patch 18 and later, images with this problem will underreport length or area measurements by as much as 50 percent. If this is reported by users, locate and display the text file associated with the problematic image.
In the part of the file that contains the DICOM header information, locate the lines related to pixel spacing:
0018,1164|Imager Pixel Spacing^DS|1,1|0.10 ... 0028,0030|Pixel Spacing^DS|1,1|0.20
If the values in each of these fields are the same, there is a different basis for the problem that will need to be determined (contact NVS if necessary). If the values for Imager Pixel Spacing and Pixel Spacing are different, use steps in the next section to correct the problem.
12.7.2 Applying the Correction If it is not open already, open a text file from an image where you have verified that pixel spacing values are incorrect. Then identify the following listed fields (specific values may vary).
0008,0070|Manufacturer^LO|1,1|FUJI PHOTO FILM Co., ltd. ... 0008,1090|Manufacturer's Model Name^LO|1,1|5000 ...
0018,1020|Software Version(s)^LO|1,1|A11-02
Use the Edit CR PARAMETER file [MAGD CR PARAMETER EDIT] option to update the MAG CR PARAMETER file (#2006.623) as shown below.
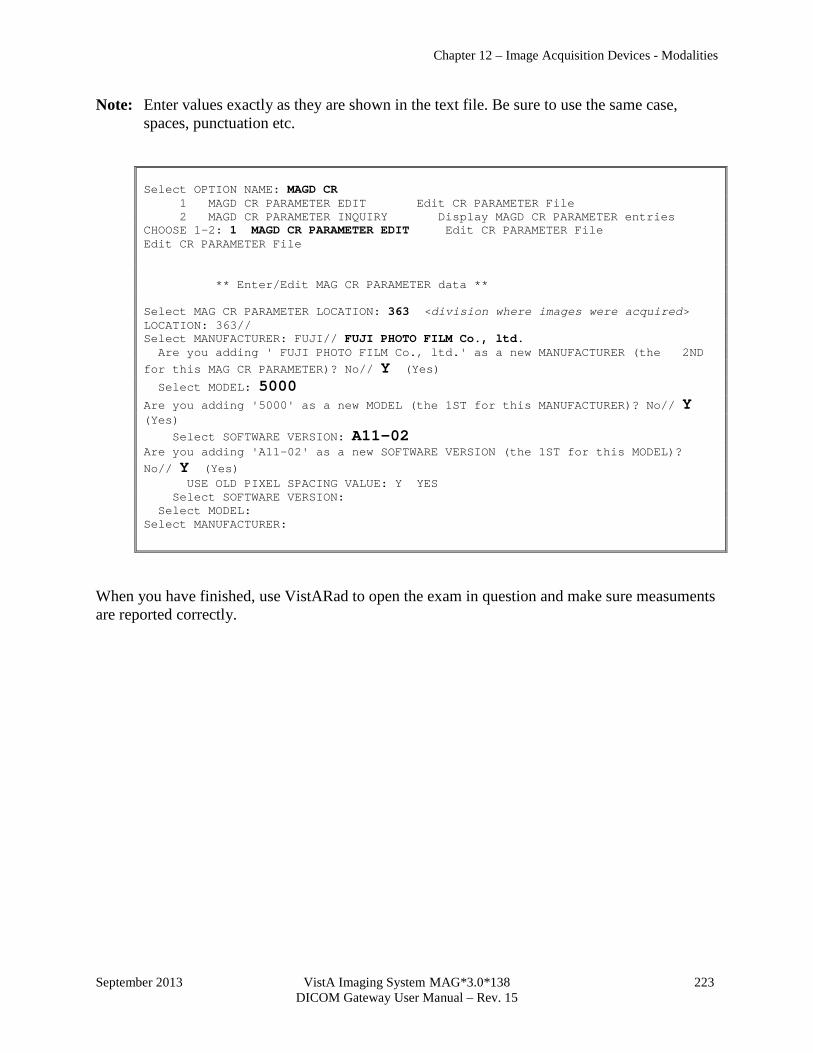
Chapter 12 – Image Acquisition Devices - Modalities
September 2013 VistA Imaging System MAG*3.0*138 223 DICOM Gateway User Manual – Rev. 15
Note: Enter values exactly as they are shown in the text file. Be sure to use the same case, spaces, punctuation etc.
Select OPTION NAME: MAGD CR 1 MAGD CR PARAMETER EDIT Edit CR PARAMETER File 2 MAGD CR PARAMETER INQUIRY Display MAGD CR PARAMETER entries CHOOSE 1-2: 1 MAGD CR PARAMETER EDIT Edit CR PARAMETER File Edit CR PARAMETER File ** Enter/Edit MAG CR PARAMETER data ** Select MAG CR PARAMETER LOCATION: 363 <division where images were acquired> LOCATION: 363// Select MANUFACTURER: FUJI// FUJI PHOTO FILM Co., ltd. Are you adding ' FUJI PHOTO FILM Co., ltd.' as a new MANUFACTURER (the 2ND for this MAG CR PARAMETER)? No// Y (Yes) Select MODEL: 5000 Are you adding '5000' as a new MODEL (the 1ST for this MANUFACTURER)? No// Y (Yes) Select SOFTWARE VERSION: A11-02 Are you adding 'A11-02' as a new SOFTWARE VERSION (the 1ST for this MODEL)? No// Y (Yes) USE OLD PIXEL SPACING VALUE: Y YES Select SOFTWARE VERSION: Select MODEL: Select MANUFACTURER:
When you have finished, use VistARad to open the exam in question and make sure measuments are reported correctly.
Chapter 12 – Image Acquisition Devices - Modalities
224 VistA Imaging System MAG*3.0*138 September 2013 DICOM Gateway User Manual – Rev. 15
This page is left intentionally blank.

September 2013 VistA Imaging System MAG*3.0*138 225 DICOM Gateway User Manual – Rev. 15
Chapter 13 Diagnostic Tests This chapter describes some simple diagnostic tests that are useful when troubleshooting a problem in an installation containing a VistA Imaging DICOM Gateway. (See the VistA Imaging DICOM Gateway Installation Guide for additional tests.)
13.1 PING Probably the most useful command for network troubleshooting is PING, which, like the navy destroyers of old, listens for an echo response from its destination. The pinging of Forum, the VA e-mail system, is shown as follows:
C:\> ping forum <Enter> Pinging FORUM [11.22.33.44] with 32 bytes of data: Reply from 11.22.33.44: bytes=32 time<10ms TTL=254 Reply from 11.22.33.44: bytes=32 time<10ms TTL=254 Reply from 11.22.33.44: bytes=32 time<10ms TTL=254 Reply from 11.22.33.44: bytes=32 time<10ms TTL=254
or Request timed out. Request timed out. Request timed out. Request timed out. The above example shows the results of a successful and an unsuccessful PING. PING issued four impc requests, and four (or zero) impc responses were received.
A system should always be able to ping its TCP/IP default gateway. A good initial test for physical network integrity is to try to ping the system’s default gateway.
Note: While most DICOM devices support PING in both directions, at least one commercial DICOM image acquisition device (the GE Digital Radiofluoro DRS 3.1) simulates an artificial PING function by attempting to establish an FTP session with the destination system. This does not work with the VistA DICOM system, since Windows workstations do not normally provide an FTP server.
13.2 DICOM Echo This program verifies that a connection can be made between the processor on which it is started and a DICOM compatible instrument on a specified network location. It is the most useful tool for testing DICOM application connectivity.
This program can be started from the MS-DOS prompt. The syntax to call the program is:
> DICOM_Echo <ip_address> <port>
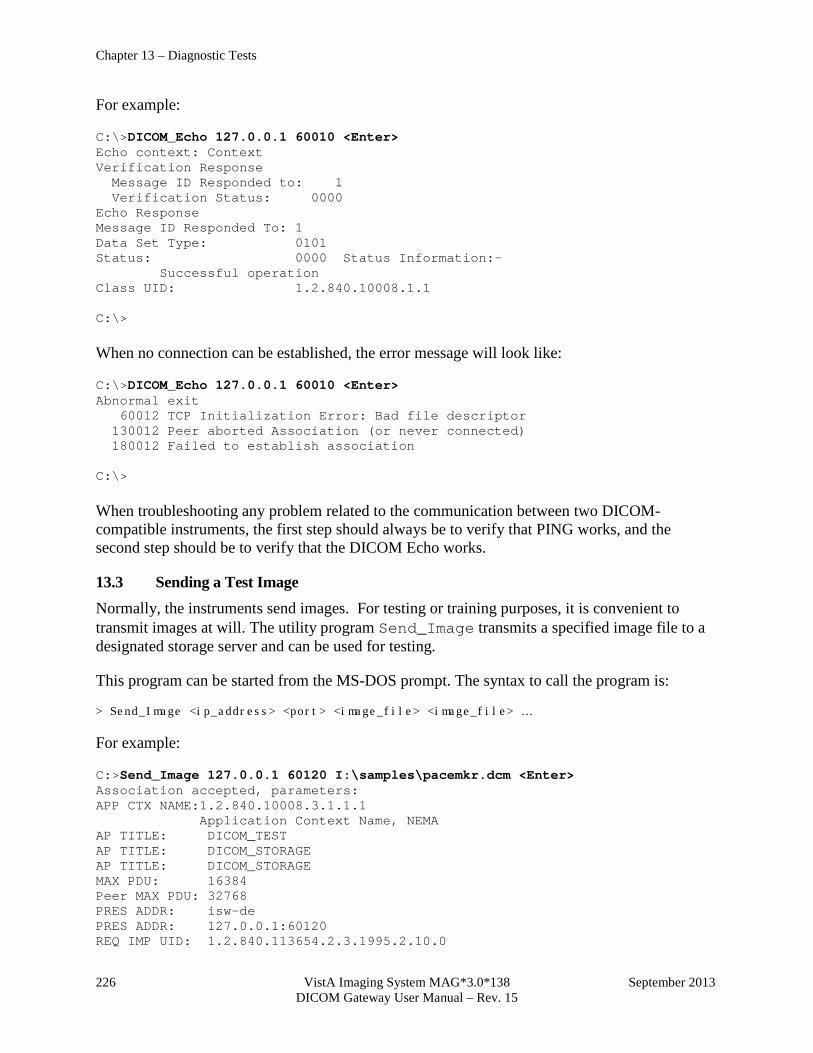
Chapter 13 – Diagnostic Tests
226 VistA Imaging System MAG*3.0*138 September 2013 DICOM Gateway User Manual – Rev. 15
For example:
C:\>DICOM_Echo 127.0.0.1 60010 <Enter> Echo context: Context Verification Response Message ID Responded to: 1 Verification Status: 0000 Echo Response Message ID Responded To: 1 Data Set Type: 0101 Status: 0000 Status Information:- Successful operation Class UID: 1.2.840.10008.1.1 C:\> When no connection can be established, the error message will look like:
C:\>DICOM_Echo 127.0.0.1 60010 <Enter> Abnormal exit 60012 TCP Initialization Error: Bad file descriptor 130012 Peer aborted Association (or never connected) 180012 Failed to establish association C:\> When troubleshooting any problem related to the communication between two DICOM-compatible instruments, the first step should always be to verify that PING works, and the second step should be to verify that the DICOM Echo works.
13.3 Sending a Test Image Normally, the instruments send images. For testing or training purposes, it is convenient to transmit images at will. The utility program Send_Image transmits a specified image file to a designated storage server and can be used for testing.
This program can be started from the MS-DOS prompt. The syntax to call the program is:
> Send_Image <ip_address> <port> <image_file> <image_file> …
For example:
C:>Send_Image 127.0.0.1 60120 I:\samples\pacemkr.dcm <Enter> Association accepted, parameters: APP CTX NAME:1.2.840.10008.3.1.1.1 Application Context Name, NEMA AP TITLE: DICOM_TEST AP TITLE: DICOM_STORAGE AP TITLE: DICOM_STORAGE MAX PDU: 16384 Peer MAX PDU: 32768 PRES ADDR: isw-de PRES ADDR: 127.0.0.1:60120 REQ IMP UID: 1.2.840.113654.2.3.1995.2.10.0
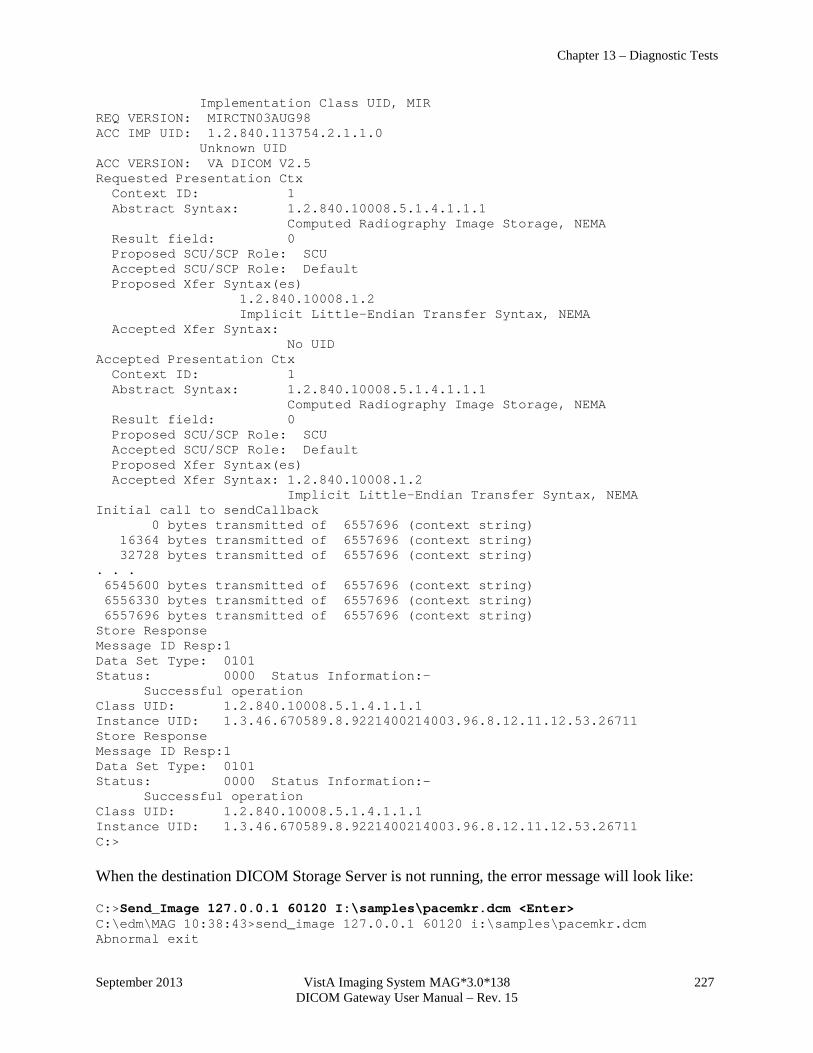
Chapter 13 – Diagnostic Tests
September 2013 VistA Imaging System MAG*3.0*138 227 DICOM Gateway User Manual – Rev. 15
Implementation Class UID, MIR REQ VERSION: MIRCTN03AUG98 ACC IMP UID: 1.2.840.113754.2.1.1.0 Unknown UID ACC VERSION: VA DICOM V2.5 Requested Presentation Ctx Context ID: 1 Abstract Syntax: 1.2.840.10008.5.1.4.1.1.1 Computed Radiography Image Storage, NEMA Result field: 0 Proposed SCU/SCP Role: SCU Accepted SCU/SCP Role: Default Proposed Xfer Syntax(es) 1.2.840.10008.1.2 Implicit Little-Endian Transfer Syntax, NEMA Accepted Xfer Syntax: No UID Accepted Presentation Ctx Context ID: 1 Abstract Syntax: 1.2.840.10008.5.1.4.1.1.1 Computed Radiography Image Storage, NEMA Result field: 0 Proposed SCU/SCP Role: SCU Accepted SCU/SCP Role: Default Proposed Xfer Syntax(es) Accepted Xfer Syntax: 1.2.840.10008.1.2 Implicit Little-Endian Transfer Syntax, NEMA Initial call to sendCallback 0 bytes transmitted of 6557696 (context string) 16364 bytes transmitted of 6557696 (context string) 32728 bytes transmitted of 6557696 (context string) . . . 6545600 bytes transmitted of 6557696 (context string) 6556330 bytes transmitted of 6557696 (context string) 6557696 bytes transmitted of 6557696 (context string) Store Response Message ID Resp:1 Data Set Type: 0101 Status: 0000 Status Information:- Successful operation Class UID: 1.2.840.10008.5.1.4.1.1.1 Instance UID: 1.3.46.670589.8.9221400214003.96.8.12.11.12.53.26711 Store Response Message ID Resp:1 Data Set Type: 0101 Status: 0000 Status Information:- Successful operation Class UID: 1.2.840.10008.5.1.4.1.1.1 Instance UID: 1.3.46.670589.8.9221400214003.96.8.12.11.12.53.26711 C:> When the destination DICOM Storage Server is not running, the error message will look like:
C:>Send_Image 127.0.0.1 60120 I:\samples\pacemkr.dcm <Enter> C:\edm\MAG 10:38:43>send_image 127.0.0.1 60120 i:\samples\pacemkr.dcm Abnormal exit
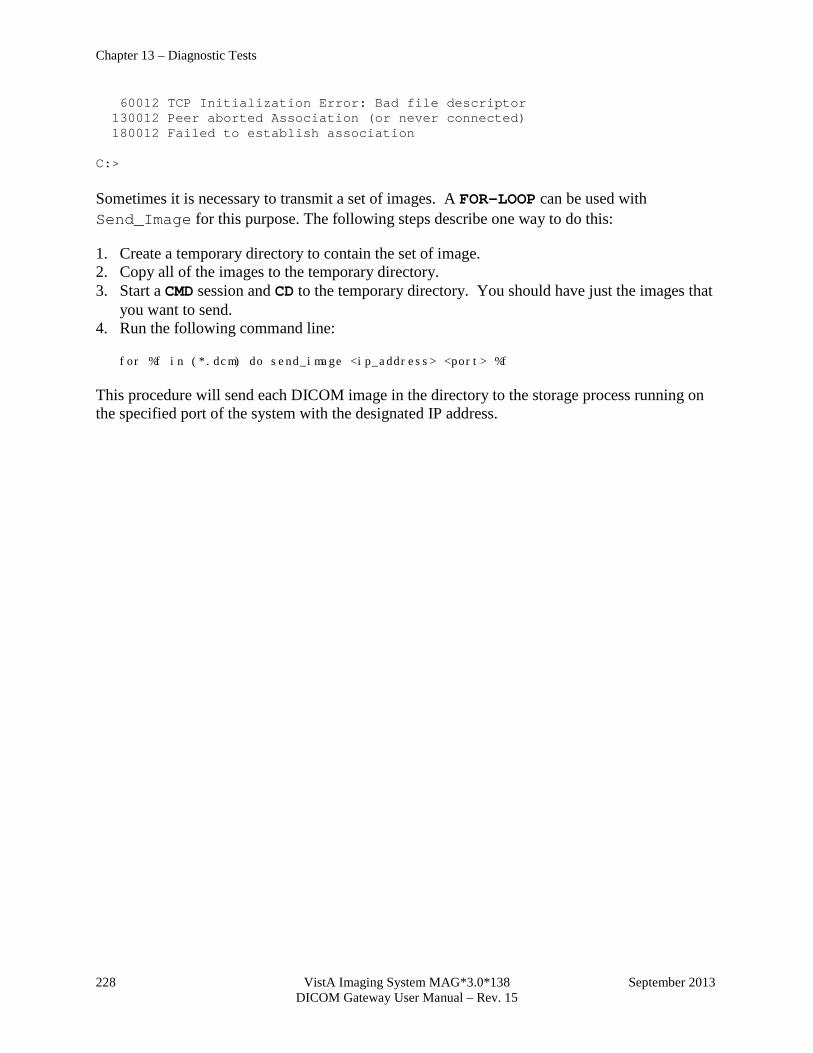
Chapter 13 – Diagnostic Tests
228 VistA Imaging System MAG*3.0*138 September 2013 DICOM Gateway User Manual – Rev. 15
60012 TCP Initialization Error: Bad file descriptor 130012 Peer aborted Association (or never connected) 180012 Failed to establish association C:> Sometimes it is necessary to transmit a set of images. A FOR-LOOP can be used with Send_Image for this purpose. The following steps describe one way to do this:
1. Create a temporary directory to contain the set of image. 2. Copy all of the images to the temporary directory. 3. Start a CMD session and CD to the temporary directory. You should have just the images that
you want to send. 4. Run the following command line:
for %f in (*.dcm) do send_image <ip_address> <port> %f
This procedure will send each DICOM image in the directory to the storage process running on the specified port of the system with the designated IP address.

September 2013 VistA Imaging System MAG*3.0*138 229 DICOM Gateway User Manual – Rev. 15
Chapter 14 Image Transfer from Commercial PACS - DICOM Exam Complete
This is the method used by the GEMS PACS when configured with the Mitra PACS Broker and by the EMED PACS.
14.1 Overview The following sequence of messages and events are used in the commercial PACS interface (see Figure 23).
1. The Order Entry message is sent to the commercial PACS when the patient arrives in Radiology and the case number is assigned to the study. This also puts the imaging service request on the VistA Modality Worklist Provider.
2. The patient is moved to the image acquisition modality.
3. The image acquisition modality retrieves the information about the study from the VistA Modality Worklist.
4. The modality acquires the images and sends them to the commercial PACS.
5. The technologist performs CASE EDIT using the VistA Radiology package to mark the completion of the acquisition of the images. This information is conveyed to the PACS in the Exam Verification message (where it is usually ignored). The same event removes the imaging service request from the VistA Modality Worklist Provider.
6. The PACS sends the Exam Complete message to VistA when it is ready to transfer the images. At what time this occurs depends upon the commercial PACS implementation. The Exam Complete message contains the Study Instance UID (0020,000D) that is needed to retrieve the images.
7. The VistA DICOM Image Gateway issues a C-MOVE Request to initiate the transfer of copies of the images from the commercial PACS to the VistA DICOM Image Gateway.
8. The commercial PACS uses the MAG_C-STORE service to transfer each image to the VistA DICOM Image Gateway.
9. The commercial PACS sends one or more C-MOVE Responses to the VistA DICOM Image Gateway. The last C-MOVE Response is required to complete the transfer operation. (Intermediate C-MOVE Responses are optional, and are used to provide progress information about the request.)
The detailed operation of steps 6-9 is presented in the following sections.
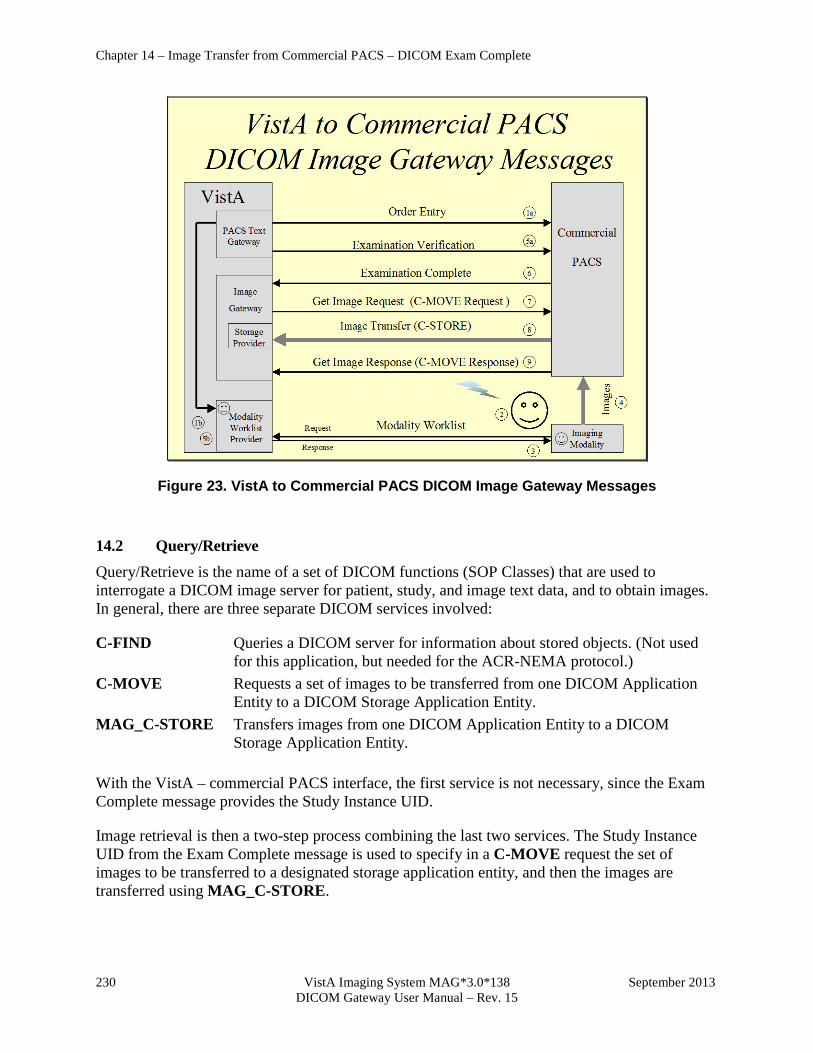
Chapter 14 – Image Transfer from Commercial PACS – DICOM Exam Complete
230 VistA Imaging System MAG*3.0*138 September 2013 DICOM Gateway User Manual – Rev. 15
Figure 23. VistA to Commercial PACS DICOM Image Gateway Messages
14.2 Query/Retrieve Query/Retrieve is the name of a set of DICOM functions (SOP Classes) that are used to interrogate a DICOM image server for patient, study, and image text data, and to obtain images. In general, there are three separate DICOM services involved:
C-FIND Queries a DICOM server for information about stored objects. (Not used for this application, but needed for the ACR-NEMA protocol.)
C-MOVE Requests a set of images to be transferred from one DICOM Application Entity to a DICOM Storage Application Entity.
MAG_C-STORE Transfers images from one DICOM Application Entity to a DICOM Storage Application Entity.
With the VistA – commercial PACS interface, the first service is not necessary, since the Exam Complete message provides the Study Instance UID.
Image retrieval is then a two-step process combining the last two services. The Study Instance UID from the Exam Complete message is used to specify in a C-MOVE request the set of images to be transferred to a designated storage application entity, and then the images are transferred using MAG_C-STORE.
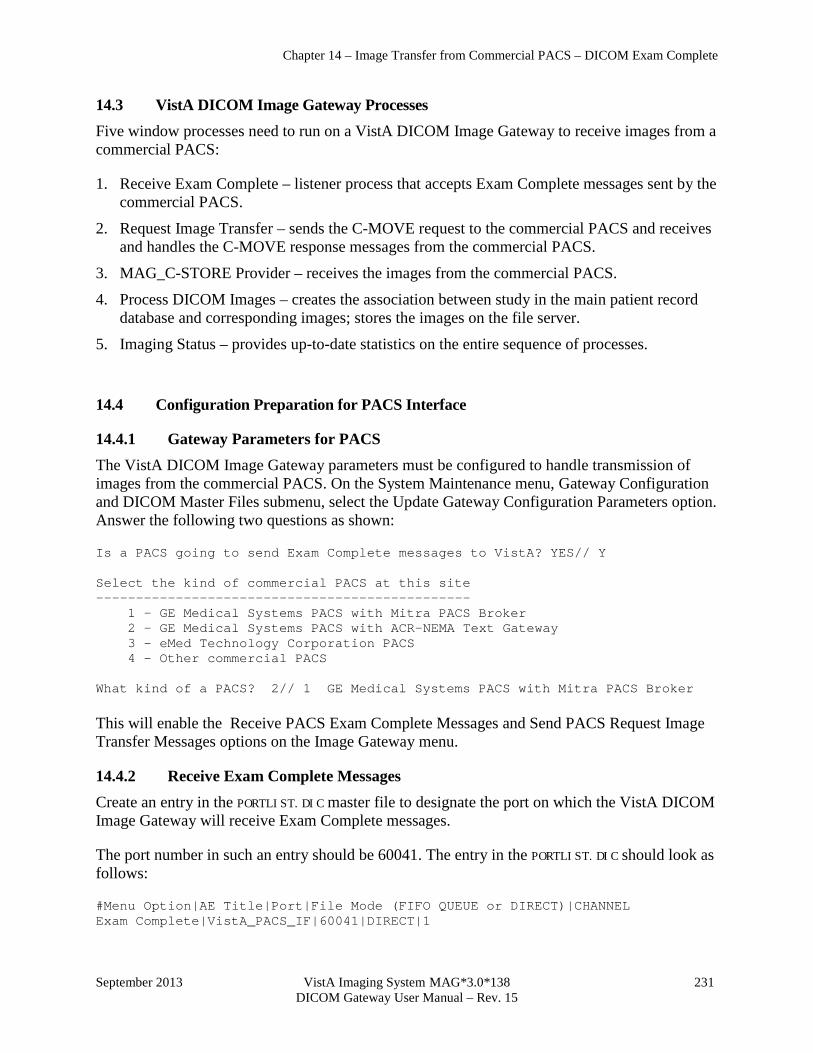
Chapter 14 – Image Transfer from Commercial PACS – DICOM Exam Complete
September 2013 VistA Imaging System MAG*3.0*138 231 DICOM Gateway User Manual – Rev. 15
14.3 VistA DICOM Image Gateway Processes Five window processes need to run on a VistA DICOM Image Gateway to receive images from a commercial PACS:
1. Receive Exam Complete – listener process that accepts Exam Complete messages sent by the commercial PACS.
2. Request Image Transfer – sends the C-MOVE request to the commercial PACS and receives and handles the C-MOVE response messages from the commercial PACS.
3. MAG_C-STORE Provider – receives the images from the commercial PACS.
4. Process DICOM Images – creates the association between study in the main patient record database and corresponding images; stores the images on the file server.
5. Imaging Status – provides up-to-date statistics on the entire sequence of processes.
14.4 Configuration Preparation for PACS Interface
14.4.1 Gateway Parameters for PACS The VistA DICOM Image Gateway parameters must be configured to handle transmission of images from the commercial PACS. On the System Maintenance menu, Gateway Configuration and DICOM Master Files submenu, select the Update Gateway Configuration Parameters option. Answer the following two questions as shown:
Is a PACS going to send Exam Complete messages to VistA? YES// Y Select the kind of commercial PACS at this site ----------------------------------------------- 1 - GE Medical Systems PACS with Mitra PACS Broker 2 - GE Medical Systems PACS with ACR-NEMA Text Gateway 3 - eMed Technology Corporation PACS 4 - Other commercial PACS What kind of a PACS? 2// 1 GE Medical Systems PACS with Mitra PACS Broker This will enable the Receive PACS Exam Complete Messages and Send PACS Request Image Transfer Messages options on the Image Gateway menu.
14.4.2 Receive Exam Complete Messages Create an entry in the PORTLIST.DIC master file to designate the port on which the VistA DICOM Image Gateway will receive Exam Complete messages.
The port number in such an entry should be 60041. The entry in the PORTLIST.DIC should look as follows:
#Menu Option|AE Title|Port|File Mode (FIFO QUEUE or DIRECT)|CHANNEL Exam Complete|VistA_PACS_IF|60041|DIRECT|1
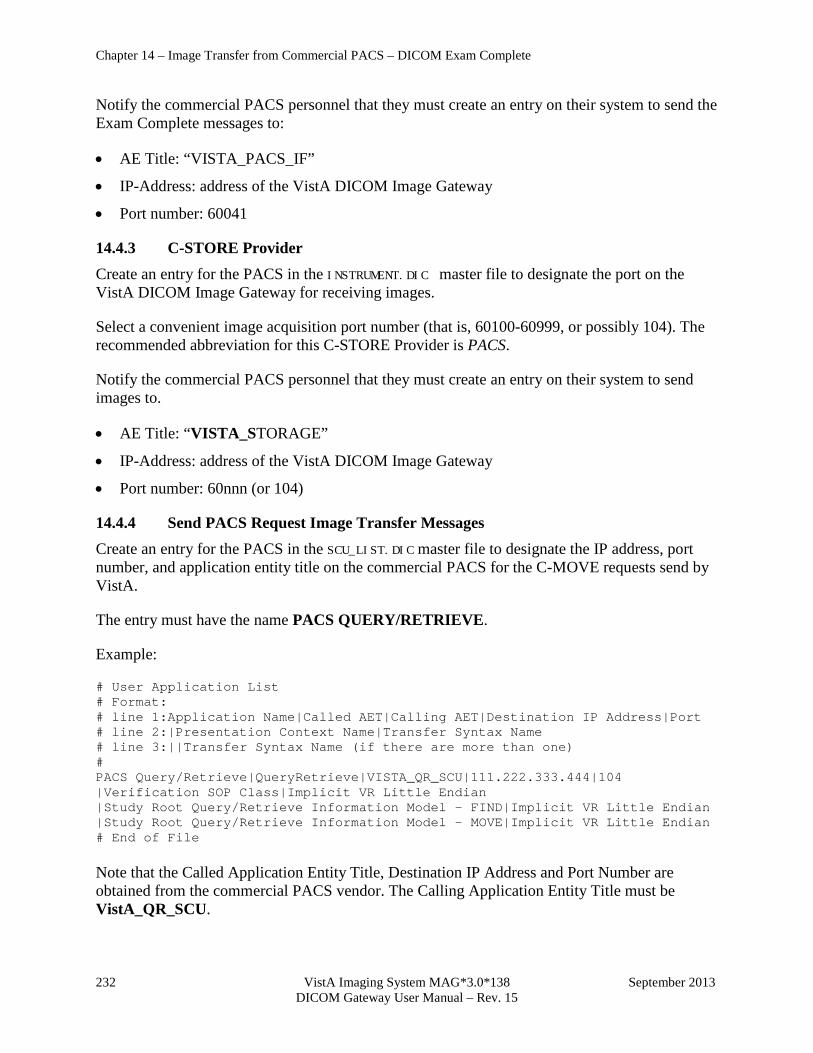
Chapter 14 – Image Transfer from Commercial PACS – DICOM Exam Complete
232 VistA Imaging System MAG*3.0*138 September 2013 DICOM Gateway User Manual – Rev. 15
Notify the commercial PACS personnel that they must create an entry on their system to send the Exam Complete messages to:
• AE Title: “VISTA_PACS_IF”
• IP-Address: address of the VistA DICOM Image Gateway
• Port number: 60041
14.4.3 C-STORE Provider Create an entry for the PACS in the INSTRUMENT.DIC master file to designate the port on the VistA DICOM Image Gateway for receiving images.
Select a convenient image acquisition port number (that is, 60100-60999, or possibly 104). The recommended abbreviation for this C-STORE Provider is PACS.
Notify the commercial PACS personnel that they must create an entry on their system to send images to.
• AE Title: “VISTA_STORAGE”
• IP-Address: address of the VistA DICOM Image Gateway
• Port number: 60nnn (or 104)
14.4.4 Send PACS Request Image Transfer Messages Create an entry for the PACS in the SCU_LIST.DIC master file to designate the IP address, port number, and application entity title on the commercial PACS for the C-MOVE requests send by VistA.
The entry must have the name PACS QUERY/RETRIEVE.
Example:
# User Application List # Format: # line 1:Application Name|Called AET|Calling AET|Destination IP Address|Port # line 2:|Presentation Context Name|Transfer Syntax Name # line 3:||Transfer Syntax Name (if there are more than one) # PACS Query/Retrieve|QueryRetrieve|VISTA_QR_SCU|111.222.333.444|104 |Verification SOP Class|Implicit VR Little Endian |Study Root Query/Retrieve Information Model - FIND|Implicit VR Little Endian |Study Root Query/Retrieve Information Model - MOVE|Implicit VR Little Endian # End of File Note that the Called Application Entity Title, Destination IP Address and Port Number are obtained from the commercial PACS vendor. The Calling Application Entity Title must be VistA_QR_SCU.
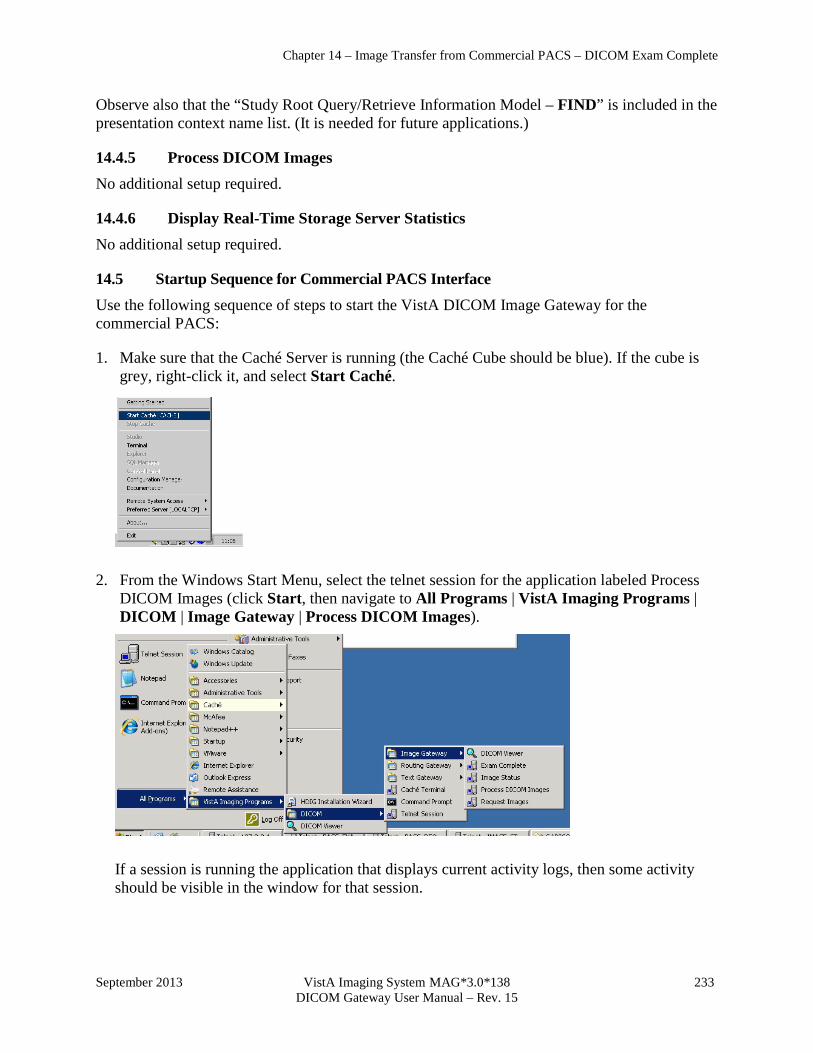
Chapter 14 – Image Transfer from Commercial PACS – DICOM Exam Complete
September 2013 VistA Imaging System MAG*3.0*138 233 DICOM Gateway User Manual – Rev. 15
Observe also that the “Study Root Query/Retrieve Information Model – FIND” is included in the presentation context name list. (It is needed for future applications.)
14.4.5 Process DICOM Images No additional setup required.
14.4.6 Display Real-Time Storage Server Statistics No additional setup required.
14.5 Startup Sequence for Commercial PACS Interface Use the following sequence of steps to start the VistA DICOM Image Gateway for the commercial PACS:
1. Make sure that the Caché Server is running (the Caché Cube should be blue). If the cube is grey, right-click it, and select Start Caché.
2. From the Windows Start Menu, select the telnet session for the application labeled Process DICOM Images (click Start, then navigate to All Programs | VistA Imaging Programs | DICOM | Image Gateway | Process DICOM Images).
If a session is running the application that displays current activity logs, then some activity should be visible in the window for that session.
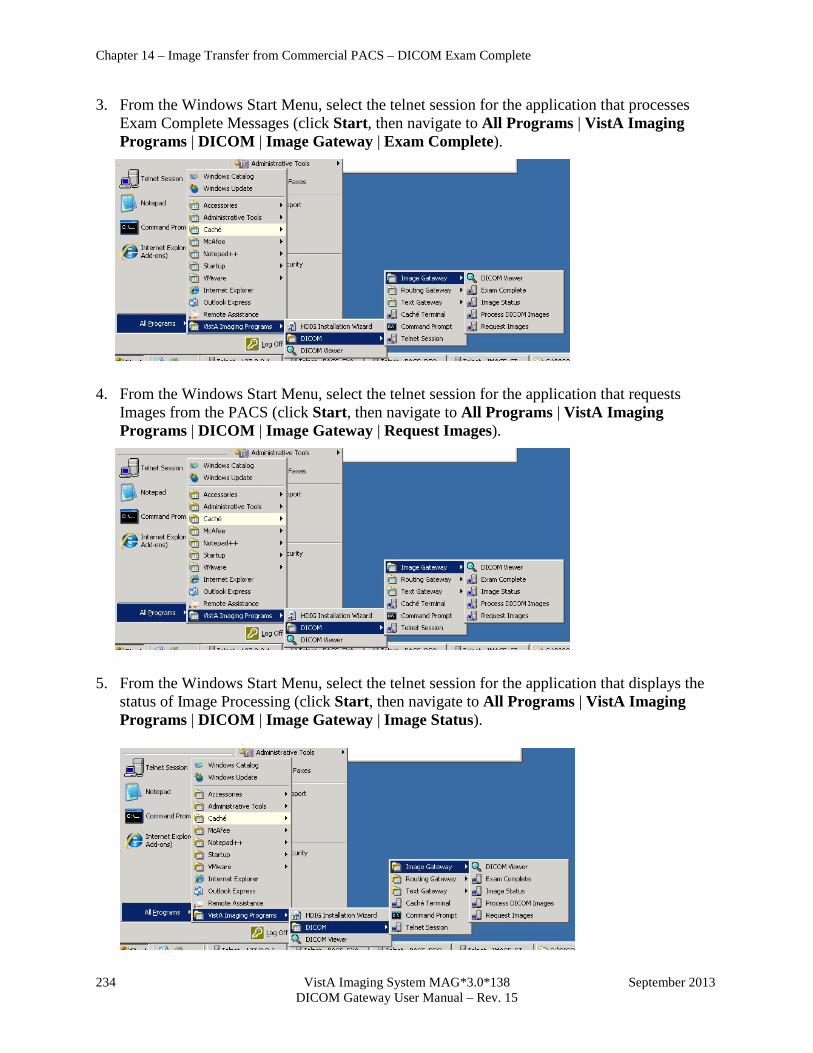
Chapter 14 – Image Transfer from Commercial PACS – DICOM Exam Complete
234 VistA Imaging System MAG*3.0*138 September 2013 DICOM Gateway User Manual – Rev. 15
3. From the Windows Start Menu, select the telnet session for the application that processes Exam Complete Messages (click Start, then navigate to All Programs | VistA Imaging Programs | DICOM | Image Gateway | Exam Complete).
4. From the Windows Start Menu, select the telnet session for the application that requests Images from the PACS (click Start, then navigate to All Programs | VistA Imaging Programs | DICOM | Image Gateway | Request Images).
5. From the Windows Start Menu, select the telnet session for the application that displays the status of Image Processing (click Start, then navigate to All Programs | VistA Imaging Programs | DICOM | Image Gateway | Image Status).
September 2013 VistA Imaging System MAG*3.0*138 235 DICOM Gateway User Manual – Rev. 15
Chapter 15 Autorouting Images from PACS to VistA Some commercial PACS (like AGFA, BRIT, and KODAK CEMAX-ICON) automatically route all images to VistA and do not use the Exam Complete message and Query/Retrieve C-MOVE service described in Chapter 14.
The VistA interface for these PACS is simpler to setup and easier to operate. The commercial PACS looks like a single-image acquisition modality to VistA, albeit a prolific one.
15.1 Configuration Preparation for PACS Interface
15.1.1 Gateway Parameters The VistA DICOM Image Gateway parameters must be configured to handle transmission of images from the commercial PACS . On the System Maintenance menu, Gateway Configuration and DICOM Master Files submenu, select the Update Gateway Configuration Parameters option. Answer NO to the following question:
• Is a PACS going to send Exam Complete messages to VistA? NO
This will disable the Receive PACS Exam Complete Messages and Send PACS Request Image Transfer Messages options on the Image Gateway menu.
15.1.2 C-STORE Provider Create an entry for the PACS in the INSTRUMENT.DIC master file to designate the port on the VistA DICOM Image Gateway for receiving images.
Select a convenient image acquisition port number (that is, 60100-60999, or possibly 104). The recommended abbreviation for this C-STORE Provider is PACS.
Notify the commercial PACS personnel that they must create an entry on their system to send images to:
• AE Title: “VISTA_STORAGE”
• IP-Address: address of the VistA DICOM Image Gateway
• Port number: 60nnn (or 104)
15.2 Startup Sequence for commercial PACS The startup of the VistA DICOM Image Gateway is exactly the same as that for an image acquisition modality interface.

Chapter 15 – Autorouting Images from PACS to VistA
236 VistA Imaging System MAG*3.0*138 September 2013 DICOM Gateway User Manual – Rev. 15
This page is left intentionally blank.
September 2013 VistA Imaging System MAG*3.0*138 237 DICOM Gateway User Manual – Rev. 15
Chapter 16 VistA Interface for Clinicical Specialty DICOM & HL7 Operation
16.1 Introduction DICOM was developed for radiology and was first supported for that service. The VistA DICOM Interface for Clinical Specialties supports image acquisition devices in the clinical specialties outside of radiology. It is a bi-directional interface that allows the image acquisition device to download patient and study information from CPRS Consults Request Tracking and to upload images to VistA, where they are automatically associated with the corresponding patient consult or procedure request and stored in the multimedia database.
The VistA DICOM Interface for Clinical Specialties uses CPRS Consult Request Tracking and the Appointment/Scheduling module of the Patient Information Management System (PIMS) to pass data to the DICOM Text Gateway. Each image acquisition device downloads the patient name, patient id, and accession number from the DICOM Text Gateway, and stores them in the header of every image. When the gateway receives the images, it uses these three values to identify the patient and the corresponding consult or procedure request. The gateway then links the images to the most recent TIU note for the request. If a TIU note is not present at that moment, the application waits for it to be generated and links the images to it when it is created. The interface is totally automatic and completely transparent to the CPRS user.
The DICOM interface supports CPRS Consults, Procedures and Clinical Procedures, but not Progress Notes.
All CPRS Consult Request Tracking, Appointment/Scheduling, and ADT events can be transmitted via HL7 to Clinical Specialy PACS.
16.2 Workflow for the Clinical Specialties The CPRS Consult Request Tracking application is used in the clinical specialties for order entry, request tracking, and result reporting. The PIMS Scheduling/Appointment module (which is separate from CPRS) is used for scheduling clinic visits. The following steps are performed for both consult and procedure requests:
1. The clinician enters an order for a consultation, a procedure, or a clinical procedure.
a. The consult service gets notified about the request. b. The consult service may accept the request with notification sent back to the patient’s
clinician. c. Alternatively, the consult service may forward the request to a different service; or d. The consult service can discontinue or cancel the request.
2. The consult service schedules an appointment for the patient.
3. The consult service checks the patient in when the patient arrives for the appointment.
4. The patient arrives at the image acquisition workstation.
Chapter 16 – VistA Interface for Clinicical Specialty DICOM & HL7 Operation
238 VistA Imaging System MAG*3.0*138 September 2013 DICOM Gateway User Manual – Rev. 15
5. The technologist at the image acquisition workstation uses Modality Worklist to download patient and study information to the workstation.
6. The technologist acquires the images from the patient and sends them to VistA.
7. The technologist verifies that the images are correctly associated with the patient’s study on VistA.
8. The patient leaves the image acquisition workstation. The consult service checks the patient out when s/he leaves.
9. The specialist performs a diagnostic reading of the images.
10. The diagnostic report is entered.
11. The consult request is completed by electronic signing the report.
12. Clinicians review the diagnostic report and the images. There is quite a bit of flexibility for different workflow scenarios. Some of the CPRS steps can be omitted and all of the PIMS Scheduling/Appointment module messages are optional. It is absolutely essential, however, to complete each CPRS consult/procedure request by entering a signed TIU result note. Otherwise, the images will not be properly associated and the request will remain on the worklist.
16.3 DICOM Modality Worklist for Clinical Specialties The VistA DICOM Text Gateway supports a DICOM service called Modality Worklist, which is used to pass patient demographics and ordering information to the image acquisition device. All new DICOM image acquisition devices (that is, the modalities) are required by the VA to support the Modality Worklist service and be able to automatically download selected patient and study information. The DICOM interface receives information from the CPRS Consult/Procedure Request Tracking application and the VistA Appointment Management package during various steps of the workflow. The ordering, accepting, scheduling, check-in, and result entry steps in the workflow are used to create and update the Modality Worklist database, while the consult/procedure completion step causes entries to be deleted.
16.3.1 Obtaining Information for the Modality Worklist Database The DICOM interface assumes that each clinical specialty uses the CPRS Consult Request Tracking package to manage consult and procedure workflow, and uses the VistA Appointment Management package to handle scheduling details (see Figure 24). Information about the request (patient demographics, ordering details -- why is the consult or procedure ordered, what service will perform the request, and so forth) flows from the CPRS Consult Request Tracking package to the VistA DICOM Text Gateway. Similarly, scheduling information (when will the request will be performed and in which clinic) is sent from the Appointment Management package to the VistA DICOM Text Gateway.
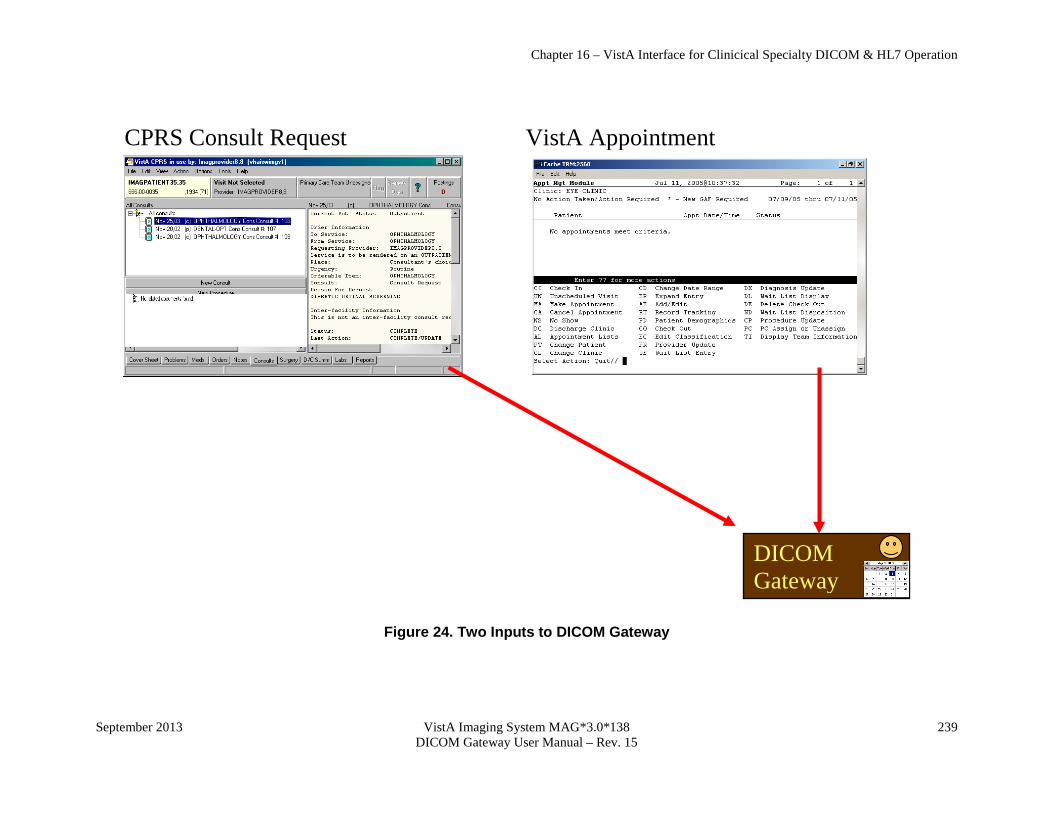
Chapter 16 – VistA Interface for Clinicical Specialty DICOM & HL7 Operation
September 2013 VistA Imaging System MAG*3.0*138 239 DICOM Gateway User Manual – Rev. 15
Figure 24. Two Inputs to DICOM Gateway
CPRS Consult Request
VistA Appointment
DICOM Gateway
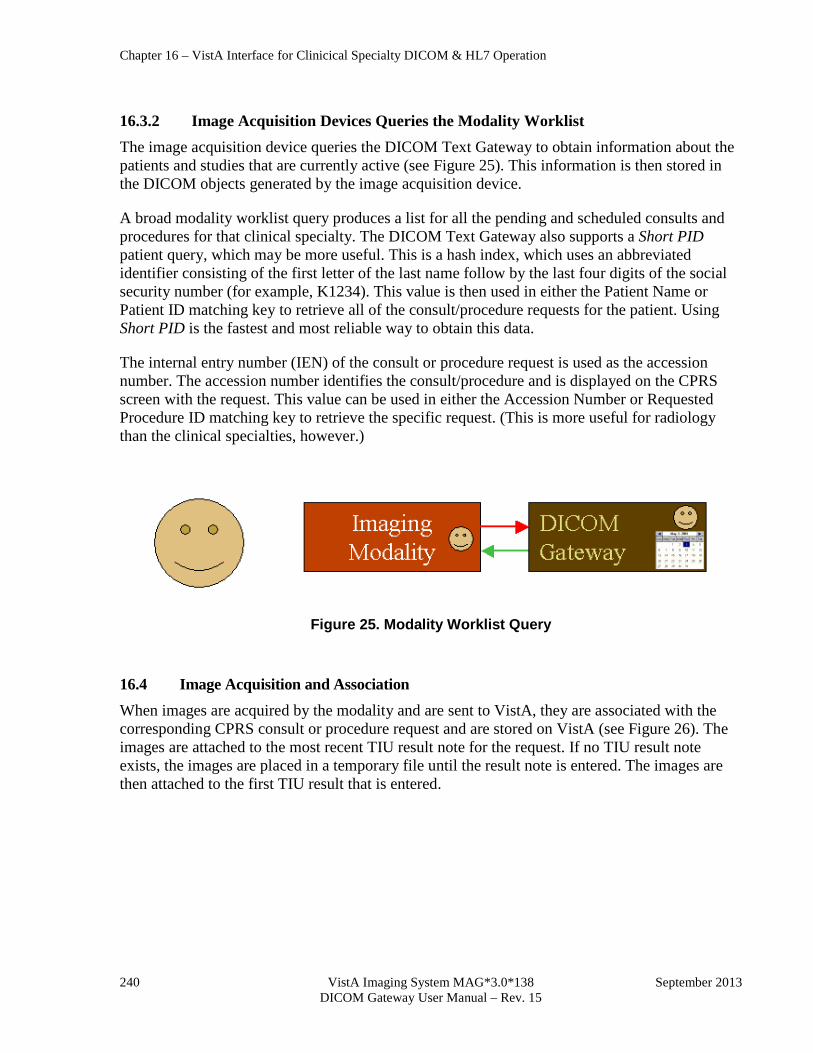
Chapter 16 – VistA Interface for Clinicical Specialty DICOM & HL7 Operation
240 VistA Imaging System MAG*3.0*138 September 2013 DICOM Gateway User Manual – Rev. 15
16.3.2 Image Acquisition Devices Queries the Modality Worklist The image acquisition device queries the DICOM Text Gateway to obtain information about the patients and studies that are currently active (see Figure 25). This information is then stored in the DICOM objects generated by the image acquisition device.
A broad modality worklist query produces a list for all the pending and scheduled consults and procedures for that clinical specialty. The DICOM Text Gateway also supports a Short PID patient query, which may be more useful. This is a hash index, which uses an abbreviated identifier consisting of the first letter of the last name follow by the last four digits of the social security number (for example, K1234). This value is then used in either the Patient Name or Patient ID matching key to retrieve all of the consult/procedure requests for the patient. Using Short PID is the fastest and most reliable way to obtain this data.
The internal entry number (IEN) of the consult or procedure request is used as the accession number. The accession number identifies the consult/procedure and is displayed on the CPRS screen with the request. This value can be used in either the Accession Number or Requested Procedure ID matching key to retrieve the specific request. (This is more useful for radiology than the clinical specialties, however.)
Figure 25. Modality Worklist Query
16.4 Image Acquisition and Association When images are acquired by the modality and are sent to VistA, they are associated with the corresponding CPRS consult or procedure request and are stored on VistA (see Figure 26). The images are attached to the most recent TIU result note for the request. If no TIU result note exists, the images are placed in a temporary file until the result note is entered. The images are then attached to the first TIU result that is entered.
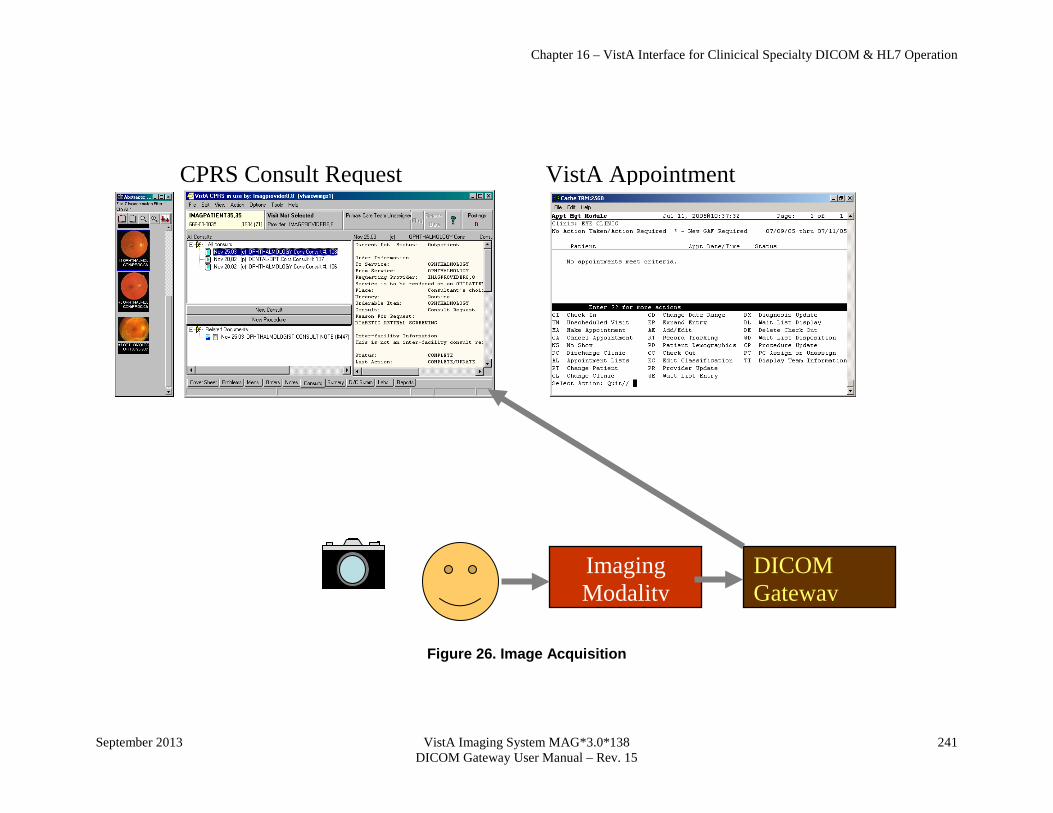
Chapter 16 – VistA Interface for Clinicical Specialty DICOM & HL7 Operation
September 2013 VistA Imaging System MAG*3.0*138 241 DICOM Gateway User Manual – Rev. 15
Figure 26. Image Acquisition
CPRS Consult Request
VistA Appointment
DICOM Gateway
Imaging Modality
Chapter 16 – VistA Interface for Clinicical Specialty DICOM & HL7 Operation
242 VistA Imaging System MAG*3.0*138 September 2013 DICOM Gateway User Manual – Rev. 15
16.5 Image Verification After the images have been acquired and sent to VistA, the technologist should view the images using the VistA Imaging Display application (see Figure 27). The ICON on the CPRS note will not be present because a result has not yet been entered.
The technologist should verify that all the images that were acquired are present on VistA, that they are displayed properly, that they are the correct images, and that there are no unexpected additions (that is, images from another patient).
The patient should be allowed to leave the image acquisition device only after the technologist has successfully verified the images.
16.6 Entering a TIU Result Note and Completing the Consult The specialist should perform a diagnostic interpretation of the images, enter the TIU result note, and complete the consult by electronically signing it. These two steps are necessary for the proper operation of the interface. The images are permanently linked to the TIU result note so that they can be viewed from the CPRS Consult tab. Completing the consult removes the request from the Modality Worklist.
16.7 Viewing Images Images can be viewed from the VistA Imaging Display application (see Figure 27). After a TIU result note is entered for the consult/procedure, they can also be viewed from the CPRS Consult tab. (Until the TIU result note is entered, this capability is not supported.)
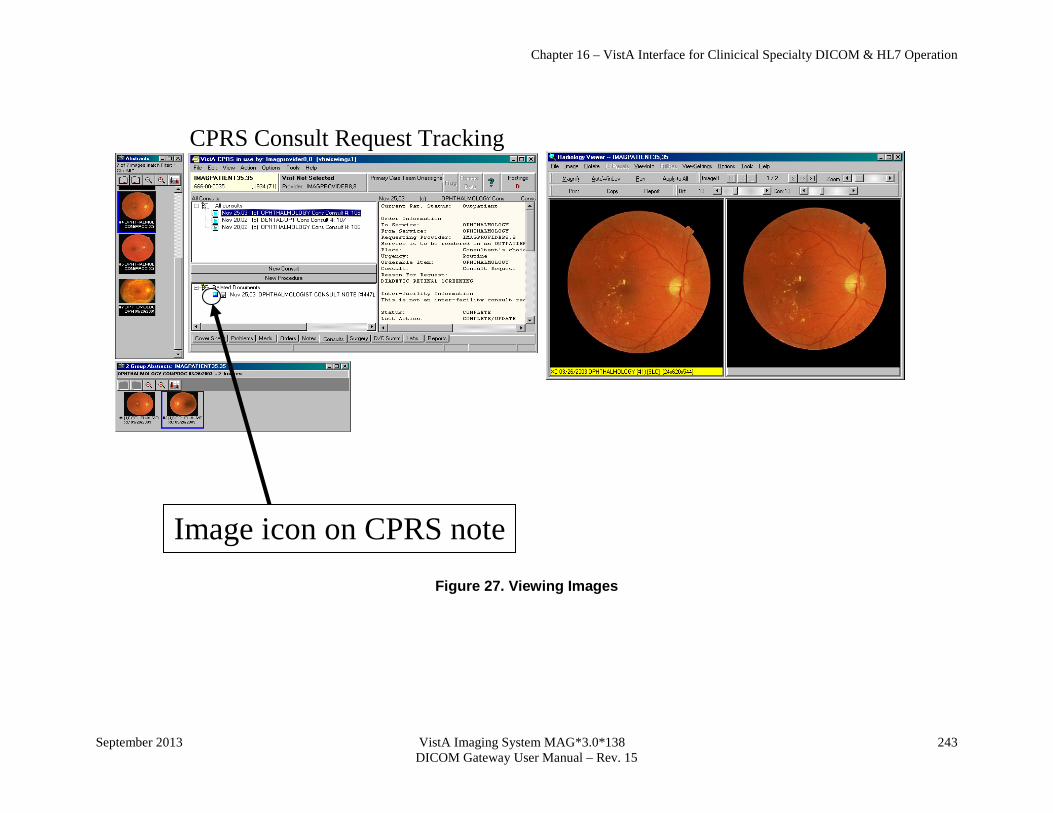
Chapter 16 – VistA Interface for Clinicical Specialty DICOM & HL7 Operation
September 2013 VistA Imaging System MAG*3.0*138 243 DICOM Gateway User Manual – Rev. 15
Figure 27. Viewing Images
CPRS Consult Request Tracking
Image icon on CPRS note
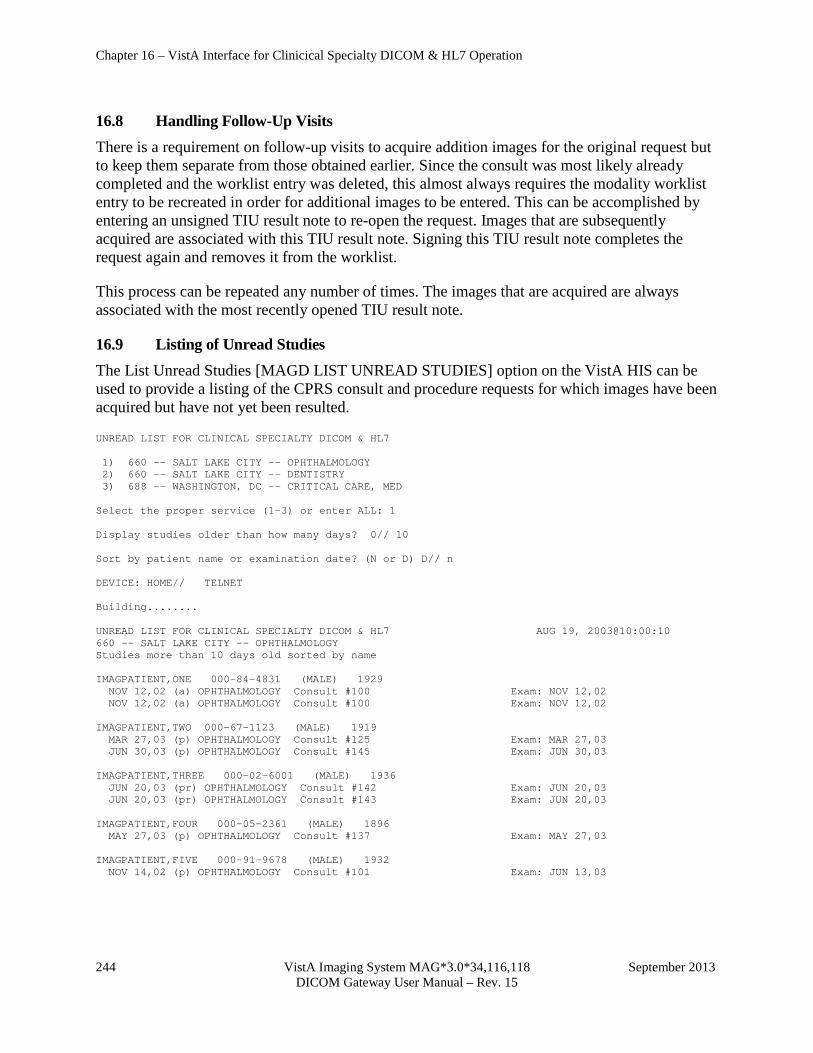
Chapter 16 – VistA Interface for Clinicical Specialty DICOM & HL7 Operation
244 VistA Imaging System MAG*3.0*34,116,118 September 2013
DICOM Gateway User Manual – Rev. 15
16.8 Handling Follow-Up Visits There is a requirement on follow-up visits to acquire addition images for the original request but to keep them separate from those obtained earlier. Since the consult was most likely already completed and the worklist entry was deleted, this almost always requires the modality worklist entry to be recreated in order for additional images to be entered. This can be accomplished by entering an unsigned TIU result note to re-open the request. Images that are subsequently acquired are associated with this TIU result note. Signing this TIU result note completes the request again and removes it from the worklist.
This process can be repeated any number of times. The images that are acquired are always associated with the most recently opened TIU result note.
16.9 Listing of Unread Studies The List Unread Studies [MAGD LIST UNREAD STUDIES] option on the VistA HIS can be used to provide a listing of the CPRS consult and procedure requests for which images have been acquired but have not yet been resulted.
UNREAD LIST FOR CLINICAL SPECIALTY DICOM & HL7 1) 660 -- SALT LAKE CITY -- OPHTHALMOLOGY 2) 660 -- SALT LAKE CITY -- DENTISTRY 3) 688 -- WASHINGTON, DC -- CRITICAL CARE, MED Select the proper service (1-3) or enter ALL: 1 Display studies older than how many days? 0// 10 Sort by patient name or examination date? (N or D) D// n DEVICE: HOME// TELNET Building........ UNREAD LIST FOR CLINICAL SPECIALTY DICOM & HL7 AUG 19, 2003@10:00:10 660 -- SALT LAKE CITY -- OPHTHALMOLOGY Studies more than 10 days old sorted by name IMAGPATIENT,ONE 000-84-4831 (MALE) 1929 NOV 12,02 (a) OPHTHALMOLOGY Consult #100 Exam: NOV 12,02 NOV 12,02 (a) OPHTHALMOLOGY Consult #100 Exam: NOV 12,02 IMAGPATIENT,TWO 000-67-1123 (MALE) 1919 MAR 27,03 (p) OPHTHALMOLOGY Consult #125 Exam: MAR 27,03 JUN 30,03 (p) OPHTHALMOLOGY Consult #145 Exam: JUN 30,03 IMAGPATIENT,THREE 000-02-6001 (MALE) 1936 JUN 20,03 (pr) OPHTHALMOLOGY Consult #142 Exam: JUN 20,03 JUN 20,03 (pr) OPHTHALMOLOGY Consult #143 Exam: JUN 20,03 IMAGPATIENT,FOUR 000-05-2361 (MALE) 1896 MAY 27,03 (p) OPHTHALMOLOGY Consult #137 Exam: MAY 27,03 IMAGPATIENT,FIVE 000-91-9678 (MALE) 1932 NOV 14,02 (p) OPHTHALMOLOGY Consult #101 Exam: JUN 13,03
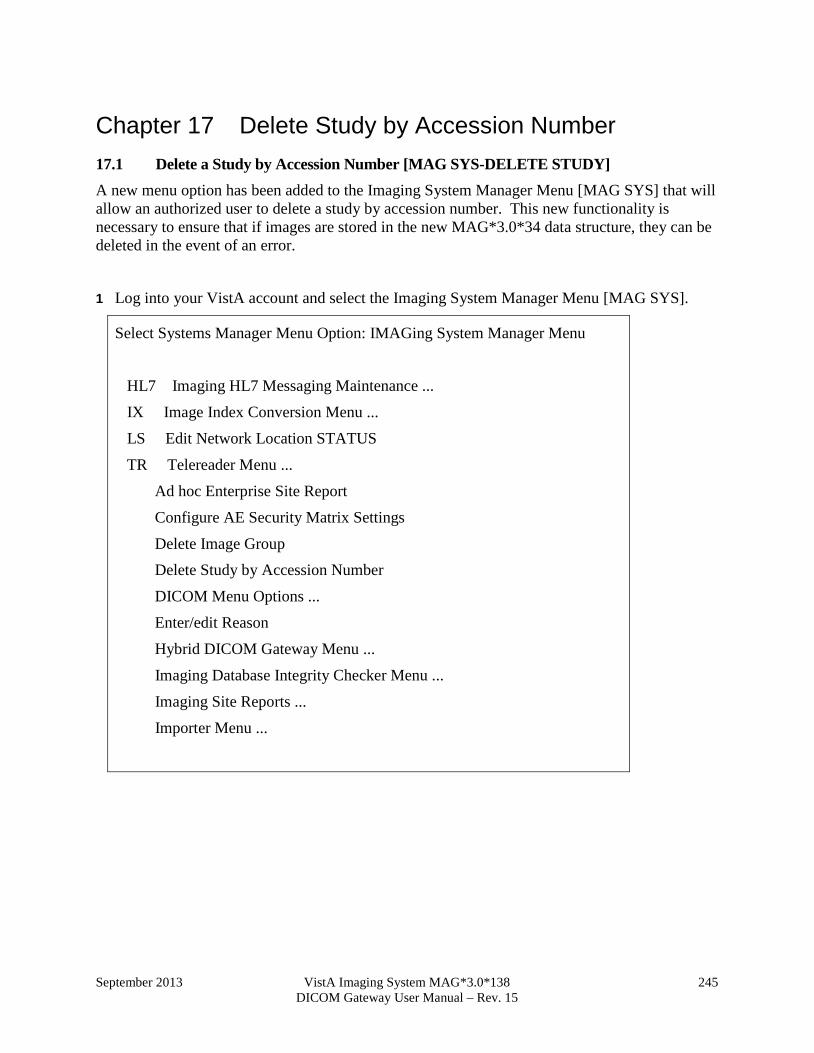
September 2013 VistA Imaging System MAG*3.0*138 245 DICOM Gateway User Manual – Rev. 15
Chapter 17 Delete Study by Accession Number 17.1 Delete a Study by Accession Number [MAG SYS-DELETE STUDY] A new menu option has been added to the Imaging System Manager Menu [MAG SYS] that will allow an authorized user to delete a study by accession number. This new functionality is necessary to ensure that if images are stored in the new MAG*3.0*34 data structure, they can be deleted in the event of an error.
1 Log into your VistA account and select the Imaging System Manager Menu [MAG SYS].
Select Systems Manager Menu Option: IMAGing System Manager Menu
HL7 Imaging HL7 Messaging Maintenance ...
IX Image Index Conversion Menu ...
LS Edit Network Location STATUS
TR Telereader Menu ...
Ad hoc Enterprise Site Report
Configure AE Security Matrix Settings
Delete Image Group Delete Study by Accession Number
DICOM Menu Options ...
Enter/edit Reason
Hybrid DICOM Gateway Menu ...
Imaging Database Integrity Checker Menu ...
Imaging Site Reports ...
Importer Menu ...

Chapter 17 – Delete Study by Accession Number
246 VistA Imaging System MAG*3.0*138 September 2013 DICOM Gateway User Manual – Rev. 15
2 Select Menu Option Delete Study by Accession Number [MAG SYS-DELETE STUDY]
Select Imaging System Manager Menu Option: delete study by Accession Number
Enter an Accession Number:
3 Enter the Accession Number of the study that you want to delete.
4 Select a reason for the deletion
5 Review the deletion information to verify that it is the correct study.
6 Confirm the deletion
7 VistA Imaging confirms deletion.
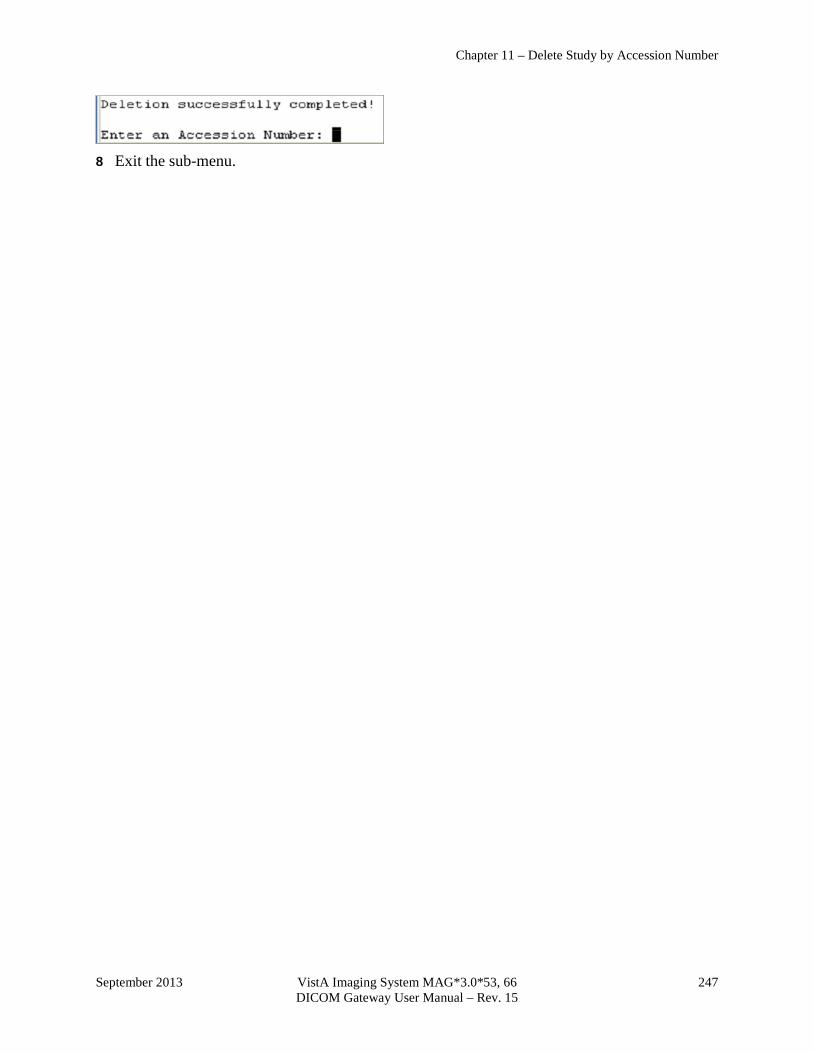
Chapter 11 – Delete Study by Accession Number
September 2013 VistA Imaging System MAG*3.0*53, 66 247 DICOM Gateway User Manual – Rev. 15
8 Exit the sub-menu.
Chapter 17 – Delete Study by Accession Number
248 VistA Imaging System MAG*3.0*138 September 2013 DICOM Gateway User Manual – Rev. 15
This page is intentionally blank.
September 2013 VistA Imaging System MAG*3.0*138 249 DICOM Gateway User Manual – Rev. 15
Glossary Annotation The ability to attach notes to images.
Architecture The design of the components of a computer, network, or software system.
Archive The long-term storage of data or images.
Audit trail Record of activity on a particular file or computer.
Background processing Simultaneous running of a job on a computer while working on another job. Examples would be printing one document while working on another, or the software may do automatic saves while you are working on something else.
BLOB Stands for Binary Large Object and refers to the non-textual elements of a mail message.
Brightness The balance of light and dark shades in an image.
Composite video TV signal which sends all colors, and vertical and horizontal signals together.
Contrast Range between the lightest and darkest tones in an image.
Density The degree of darkness in an image.
DHCP Decentralized Hospital Computer Program the earlier name of the VA's hospital information system, now called VistA.
DICOM Digital Imaging and Communications in Medicine. A medical imaging standard, DICOM is standard for Radiology equipment and is being adopted by the other members of the medical imaging community.
Digital camera A camera that transforms a picture into a system of numbers. The picture can then be manipulated pixel (dot) by pixel, and stored and transmitted in the manner as textual data.
File All the data that describes a document or image.
File protection Techniques for preventing files from being erased.
File server A machine where shared software is stored.
Frame grabber A device that changes a video picture into a digital computer language.

Glossary
250 VistA Imaging System MAG*3.0*138 September 2013
DICOM Gateway User Manual – Rev. 15
Gray scale The range of shades of black in an image. The more shades recognized by the device, the clearer and sharper the image will be.
High resolution Refers to a better quality of display over the original achieved by increasing the number of pixels (dots) per inch.
Hot spot The single pixel that is activated by selection using a mouse, light pen, or other means.
Image The computerized representation of a picture, or graphic.
Image abstract A thumbnail version of an image, which requires less computer processing resources to display than the actual image.
Image group A group of images associated with a medical examination.
Image processing The translation of an image into a digital computer language so that it may be manipulated in size, color, clarity, or to enhance portions of it.
Image resolution The fineness or coarseness of an image.
Imaging system Collection of units that work together to capture and recreate images.
IOD Information Object Definition
Jitter The flickering of a displayed image.
Jukebox A device that holds multiple optical discs and can swap them in and out of the drive as needed.
Login (Logon) Procedure for gaining access to the system or program.
Modality A term from the DICOM standard that denotes any equipment that produces images.
Multimedia Combining more than one media for the dissemination of information (i.e., text, graphics, full video motion, audio).
On-line Something that is available for access on the system.
Glossary
September 2013 VistA Imaging System MAG*3.0*138 251 DICOM Gateway User Manual – Rev. 15
Optical disc A direct access storage device that is written to and read by laser light. Optical discs have greater storage capacity than magnetic media. Many optical discs are Write Once Read Many (WORM).
OTG Stands for On-The-Go.
Pan To view different parts of the image that extend beyond the borders of the screen.
Pixel The individual dots that define a picture.
RAID Stands for Redundant Array of Independent Disks - a storage technology that combines multiple disk drive components into a logical unit. Data is distributed across the drives in one of several ways called "RAID levels", depending on the level of redundancy and performance required.
Resolution Measure of output quality (dpidots per inch) or halftone quality (lpilines per inch).
Retrieval The ability to search for, select, and display a document or image from storage.
RGB Red, Green, Blue. The colors used in varying combinations and intensities on monitors, TV screens, etc.
Scaling Uniformly changing the size of an image.
Scanner A device that converts a hardcopy image into machine-readable code.
SCU Stands for Service Class User – a gateway or remote device is configured as a user of the services CSTORE, C-FIND, and C-MOVE.
SCP Stands for Service Class Provider – a gateway or remote device is configured as a provider of the services CSTORE, C-FIND, and C-MOVE.
Server A computer which is dedicated to one task.
Storage media The physical device onto which data is recorded.
TWAIN An interface standard for scanners, cameras and other input devices.
Glossary
252 VistA Imaging System MAG*3.0*138 September 2013
DICOM Gateway User Manual – Rev. 15
User preferences The preferences that each user sets in the User Preferences window that control the circumstances and ways in which the Imaging package displays images.
Video camera Camera which records full motion video.
Video digitizer A device that changes a video picture into a digital computer language.
VistA Stands for Veterans Health Information System Technology Architecture. VistA replaces DHCP.
VISA Stands for VistA Imaging Service Architecture - a web services based approach to processing that provides VistA Imaging with a more current underlying technology foundation that works with the existing legacy architecture.
Workstation A computer that is dedicated to a single type of task.
Write Once Read Many (WORM)
Once written to the disc, data is only available for reading and cannot be altered.
Zoom To enlarge an image or a portion of an image.
September 2013 VistA Imaging System MAG*3.0*138 253 DICOM Gateway User Manual – Rev. 15
Index
^ ^DIC(4,…), 213 ^MAG(2005,…), 77 ^MAG(2006.1,…), 179 ^MAGD(2005.2,…), 180 ^MAGD(2006.5713,…), 76 ^MAGD(2006.575,…), 77 ^MAGD(2006.592,…), 76 ^MAGD(2006.593,…), 77 ^MAGDHL7(2006.5,…), 51 ^MAGDINPT(2006.571,“ACOUNT”), 76 ^MAGDINPT(2006.571,…), 76 ^MAGDOUTP(2006.574,…), 84, 89, 91, 93, 96 ^RADPT, 38
A Access code, 203 annotation, 249 Application Entity, 32 architecture, 249 archive, 249 audit trail, 249
B background processing, 249 batch export, 91 BLOB, 249 Brightness, 249
C Composite Video, 249 contrast, 249
D density, 249 DHCP, 249 DICOM, 249 DICOM Undefined Modalities, 76 DICOM_Echo, 225 Digital camera, 249
E export radiology studies, 91
F file, 249 File 2005.2, 180
File 2006.1, 179 File number 2005, 77 File number 2006.1, 54, 57 File number 2006.574, 89 File number 2006.575, 77 File number 2006.592, 76 File number 2006.593, 76, 77 File number 4, 213 FOR-LOOP, 228 Frame Grabber, 249
H Hot spot, 250
I Imaging Site Parameters, 54, 57, 179 Institution file, 213 INSTRUMENT.DIC, 232, 235 INSTRUMENT.DIC, 80, 169, 211, 214, 231
J Jitter, 250 Jukebox, 250
M Master file, 26, 30, 32, 34, 80 MODALITY.DIC, 80 MODALITY.DIC, 76 MODALITY.DIC, 81 MODALITY.DIC, 170 MODALITY.DIC, 215 MODALITY.DIC, 215
N Notepad, 48
O optical disc, 251
P Panning, 251 PORTLIST.DIC, 26, 30, 172
R Rad/Nuc Med Patient, 38 RGB, 251
Index
254 VistA Imaging System MAG*3.0*138 September 2013
DICOM Gateway User Manual – Rev. 15
S Scaling, 251 Scanner, 251 SCU_LIST.DIC, 34, 84, 155, 172 Send_Image, 226, 228 Servers, 251
T TWAIN, 251
V Verify code, 203
Video Camera, 252 VistA, 252
W WORKLIST.DIC, 32, 34, 174 Workstation, 252 WORM, 252
Z Zoom, 252