Visit our Page LaisDccTM Decoders Manual …Visit our Page LaisDccTM Decoders Manual...
17
Visit our Page LaisDcc TM Decoders Manual [email protected] www.laisdcc.com 2002-2018 ©LaisDcc TM 1 / 17 1. Decoders CV list, please download it via our website www.laisdcc.com/cvlist.pdf 2. Reset We offer two CV for reset. You can use any of them. A. Write 4 to CV8 to reset the decoders. B. Write 4 to CV30 to reset the decoders. Note: Please refer to the CV list for the default value and the value after reset. Attention: If you find after you reset your decoders keep all the settings the same as before. If so maybe you have lock the decoders. Please program the CV15 to 0 and program CV16 to 1 at the Programming track to unlock it first. Then Reset it again. 3. Know more about your decoders (Some of them only available in the version after V2, CV7=2) a) CV7, read CV7 to know the Manufacturer Version Number of your decoders. b) CV8, read CV8 to see our NMRA ID=134 c) CV60, read CV60 to check the Production Place of this decoders. (1=CN, 2=HK, 3=VN, 4=PH, 5=MY) d) CV137, Read CV138, CV139, CV140 to know LaisDcc decoders Production Time. CV137CV138=YYYY, CV139=MM, CV140=DD e) CV105, CV106, The CV105, CV106 is the NMRA default USER ID #1, USER ID #2, and we offer CV48, CV62, CV65, CV66 as USER ID #3, USER ID #4, USER ID #5, USER ID #6, you can set your information here. All above USER ID will not reset. And we have reserve a CV47 for you use, this CV will be reset to 0 after factory reset. f) All the CV that not in USE by LaisDcc, you can use it freely. The value in the CV that not in Use will not reset. g) Please make sure you know which model of LaisDcc decoders you have got. h) Most of LaisDcc decoders are with extra stay alive wires (BLUE and BLACK) for you to connect to stay alive kit. The blue wire is the Function common of the decoders and it is the wire to Positive connection for connect with LaisDcc stay alive blue wire also. The BLACK wires to Negative connection at the Anode for connect with the LaisDcc stay alive kit’s black wire. i) 8600xx Series decoders we call it PanGu Series decoders. Which is only support LaisDcc PanGu Stayin Aive kits/860007 j) 8700xx Series decoders we call it KungFu Series decoders. Which is support LaisDcc KungFu Stayin Alive kits/860009 Note: LaisDcc decoders are compatible with NMRA DCC standards. And not compatible with Railcom and Motorola right now. We will add Railcom to it soon. 4. Model No./Ordering No./Product No. of LaisDcc decoders a) 860012/860010/ 2 Fun decoders with wires 2 Function decoders with NME651 6 wires, Function Rating at 100 mA, total Rating at 1.0 Amp continuous, 2.0 Amp peak.
Transcript of Visit our Page LaisDccTM Decoders Manual …Visit our Page LaisDccTM Decoders Manual...

Visit our Page LaisDccTM Decoders Manual [email protected]
www.laisdcc.com 2002-2018 ©LaisDccTM 1 / 17
1. Decoders CV list, please download it via our website www.laisdcc.com/cvlist.pdf
2. Reset
We offer two CV for reset. You can use any of them.
A. Write 4 to CV8 to reset the decoders.
B. Write 4 to CV30 to reset the decoders.
Note: Please refer to the CV list for the default value and the value after reset.
Attention: If you find after you reset your decoders keep all the settings the same as before.
If so maybe you have lock the decoders. Please program the CV15 to 0 and program CV16
to 1 at the Programming track to unlock it first. Then Reset it again.
3. Know more about your decoders (Some of them only available in the version after
V2, CV7=2)
a) CV7, read CV7 to know the Manufacturer Version Number of your decoders.
b) CV8, read CV8 to see our NMRA ID=134
c) CV60, read CV60 to check the Production Place of this decoders. (1=CN, 2=HK,
3=VN, 4=PH, 5=MY)
d) CV137, Read CV138, CV139, CV140 to know LaisDcc decoders Production Time.
CV137CV138=YYYY, CV139=MM, CV140=DD
e) CV105, CV106, The CV105, CV106 is the NMRA default USER ID #1, USER ID #2,
and we offer CV48, CV62, CV65, CV66 as USER ID #3, USER ID #4, USER ID #5,
USER ID #6, you can set your information here. All above USER ID will not reset.
And we have reserve a CV47 for you use, this CV will be reset to 0 after factory
reset.
f) All the CV that not in USE by LaisDcc, you can use it freely. The value in the CV
that not in Use will not reset.
g) Please make sure you know which model of LaisDcc decoders you have got.
h) Most of LaisDcc decoders are with extra stay alive wires (BLUE and BLACK) for
you to connect to stay alive kit. The blue wire is the Function common of the
decoders and it is the wire to Positive connection for connect with LaisDcc stay
alive blue wire also. The BLACK wires to Negative connection at the Anode for
connect with the LaisDcc stay alive kit’s black wire.
i) 8600xx Series decoders we call it PanGu Series decoders. Which is only support
LaisDcc PanGu Stayin Aive kits/860007
j) 8700xx Series decoders we call it KungFu Series decoders. Which is support
LaisDcc KungFu Stayin Alive kits/860009
Note: LaisDcc decoders are compatible with NMRA DCC standards. And not
compatible with Railcom and Motorola right now. We will add Railcom to it soon.
4. Model No./Ordering No./Product No. of LaisDcc decoders
a) 860012/860010/ 2 Fun decoders with wires
2 Function decoders with NME651 6 wires, Function Rating at 100 mA, total
Rating at 1.0 Amp continuous, 2.0 Amp peak.

Visit our Page LaisDccTM Decoders Manual [email protected]
www.laisdcc.com 2002-2018 ©LaisDccTM 2 / 17
Note: If your decoders CV7=1, your decoders will be only with 0.5A continuous
rating. Please make sure you know which pin is No. 1. All the wire colors following
NMRA NEM651 standard. The below drawings for your reference.
b) 860013(Dimension is 14.5*8.5*3mm)
2 Function decoders with NEM651 6 pin, Function Rating at 100 mA, total Rating
at 1.0 Amp continuous, 2.0 Amp peak.
Note: If your decoders CV7=1, your decoders will be only with 0.5A continuous
rating. Please make sure you know which pin is No. 1. All the wire colors following
NMRA NEM651 standard. The above drawings for your reference. The PIN1 on the
shrink film is mark as star sign: *
Attention: Over current rating will burn your decoders.
c) 860014
4 Function decoders with NMRA 9 wire color standard, Function Rating at 100
mA, total Rating at 1.0 Amp continuous, 2.0 Amp peak.
Note: If your decoders CV7=1, your decoders will be only with 0.5A continuous
rating. Please make sure you know which pin is No. 1. All the wire colors following
NMRA standard. The following drawings for your reference.
Attention: Over current rating will burn your decoders.

Visit our Page LaisDccTM Decoders Manual [email protected]
www.laisdcc.com 2002-2018 ©LaisDccTM 3 / 17
Color VS Function:
Orange = Motor Right
Yellow = Reverse Headlight FL(F0R)
Green = Function 1
Black = Left Rail
Grey = Motor Left
White = Forward Headlight FL(F0F)
Blue = Function common positive
Red = Right Rail
Purple= Function 2
d) 860021/4 Function decoders with NEM652 8Pin interface
4 Function decoders with NEM652 interface standard and with a fly out purple

Visit our Page LaisDccTM Decoders Manual [email protected]
www.laisdcc.com 2002-2018 ©LaisDccTM 4 / 17
wire F2, Function Rating at 100 mA, total Rating at 1.0 Amp continuous, 2.0 Amp
peak.
Note: If your decoders CV7=1, your decoders will be only with 0.5A continuous
rating. Please make sure you know which pin is No. 1. All the wire colors
following NMRA standard. The following drawings for your reference.

Visit our Page LaisDccTM Decoders Manual [email protected]
www.laisdcc.com 2002-2018 ©LaisDccTM 5 / 17
Color and Function:
Orange = Motor Right
Yellow = Reverse Headlight FL(F0R)
Green = Function 1
Black = Left Rail
Grey = Motor Left
White = Forward Headlight FL(F0F)
Blue = Function common positive
Red = Right Rail
Purple= Function 2
e) 860018(860020)/ NEM652 8PIN on Board 4 Fun Decoder
4 Function decoders with NEM652 interface standard and with a fly out purple
wire F2, Function Rating at 100 mA, total Rating at 1.0 Amp continuous, 2.0 Amp
peak.
Note: Please make sure you know which pin is No. 1. All the wire colors following
NMRA standard. The following drawings for your reference.

Visit our Page LaisDccTM Decoders Manual [email protected]
www.laisdcc.com 2002-2018 ©LaisDccTM 6 / 17
The difference between 860021 and 860020 is only a 8PIN NEM652 on board
or with wires to fly out then on board.
f) 860019/21MTC/ENM660 6 Fun Decoders
6 Function decoders with 21MTC/NEM 660/MTX interface standard, Function
Rating at 100 mA, total Rating at 1.0 Amp continuous, 2.0 Amp peak.
Note: This decoders have a Index, so you will not install wrong.
If your CV7=4, you have 6 functions, It have extra Aux 3 and Aux 4 and with
logic output only. You can connect with amplifier circuit by yourself to make as
much as current rating as they want, this is compatible with ESU 51900 DCC
DECODER TESTER, you can test it with this decoder tester.
The light effects is the same settings as Aux 1& Aux 2
g) 860011/Function only decoder ( DO NOT have wires for motor)
Color and Function:
Yellow = Reverse Headlight FL(F0R)
Green = Function 1
Black = Left Rail
White = Forward Headlight FL(F0F)
Blue = Function common positive
Red = Right Rail
Purple= Function 2
h) 860016/Plux 22 decoders with 6 Functions

Visit our Page LaisDccTM Decoders Manual [email protected]
www.laisdcc.com 2002-2018 ©LaisDccTM 7 / 17
i) 860015/Next18/NEM 662 decoders with 6 Functions
5. CV Setting (CV LIST)
Attention: All LaisDcc decoders following the same CV settings. The difference between
all type of decoders is only the interface difference.
a) CV1, Primary Address/2 Digit Address/Short Address
The default address of the decoders is 3. You can set the CV1 from 1-127.
b) CV17/CV18, Extended Address/4 Digit Address/Long address
The Extended Address is the locomotives address when the decoder is set up
for extended addressing, (indicated by a value of "1" in bit location 5 of CV#29).
Make sure 4-digit Addressing is enabled in CV29 when you use CV17/CV18 long
adress. Addresses between 128-9999. Adding a value of 32 to the value of CV29 will
enable the long address function.

Visit our Page LaisDccTM Decoders Manual [email protected]
www.laisdcc.com 2002-2018 ©LaisDccTM 8 / 17
Right now there are many CV17 & CV18 Calculator on the internet, you can search
it by google or use or Digitrax CV17/CV18 calculator directly. Usually your command
station will assign the value for you. But if not, please program it by yourself after
calculation.
http://www.digitrax.com/support/cv/calculators/#cv17_18_calc
c) CV19, Consist Address
Consist Addressing is similar to 2-Digit Addressing in that it can accept values from
1-128. However, Consist Addressing differs in that it allows for a second address to
be applied to a decoder specifically for use when the locomotive is being operated
in a Consist or double heading train. The second differing feature of the Consist
Address is that if you add a value of 128 to whatever address you plan to use the
locomotives forward and reverse will be swapped. This allows for consists that have
locomotives running back to back.
d) CV21/CV22 Consist Lighting Control
You can choose White and Yellow Wire, Green and Purple wire to respond to
instructions addressed to the consist address or instructions addressed to the
locomotive address.
The default setting the decoders light functions will only respond to the 2/4 Digit
locomotive Address.
By write the Green wire/F1(1), Purple wire/F2(2) value to CV21 will change it to
respond to consist address.
By write the White wire/F0R(1), Yellow wire/F0R(2) value to CV22 will change it to
respond to consist address.
For example, you want to the F1 and F2 to respond to consist address, just add 1+2
then write it to CV21.
e) CV15 & CV16, Decoder Lock
The Decoder Lock is used to change CVs in only one of several decoders with the
same short address (CV1) or long address (CV17 and CV18) that are installed in the
same locomotive. Assign a number to CV16 in each decoder (i.e. 1 to motor decoder,
2 to sound decoder, 3 or higher to other decoders) before the decoders are installed

Visit our Page LaisDccTM Decoders Manual [email protected]
www.laisdcc.com 2002-2018 ©LaisDccTM 9 / 17
in the locomotive. To change a value in another CV of one of the installed decoders,
first write the number 1 (motor), 2 (sound), or 3 or higher (other) into CV15, then
send the new value to the CV to be changed. The decoders will compare CV15 to
CV16 and, if the values are equal, the CV to be changed will be changed. If the
values in CV15 and CV16 are different, the update will be ignored.
The default CV15 = 0, which unlocks all decoders, if you set CV15 = 7, all decoders
will be locked.
The default CV16=1 as the motor decoders, and CV15 range is 0-7, the CV16 range
is 1-6. This follow NMRA standards, if you used other brand decoders before, the
setting is the same.
If you find after you reset, you can not read any CV or find the default CV1 address
3 or the reset not responding, maybe you have lock your decoders.
Please program the CV15 to 0 and program CV16 to 1 at the Programming track.
Then Reset it again.
f) CV29/Decoder Configurations
Our decoders are compatibility with Digitrax CV29 calculators. Use the below link to
choose the function you want, then get a CV29 value to program into CV29
http://www.digitrax.com/support/cv/calculators/#cv29_calc
g) Lighting Effects
Yellow = Reverse Headlight FL(F0R)
Green = Function 1
White = Forward Headlight FL(F0F)
Purple= Function 2
The decoder will have 2 or 4 function. Usually the F1 and F2 is for Forward Head
light FL(F0F) and Reverse Head light FL(F0R).
Visit our Page LaisDccTM Decoders Manual [email protected]
www.laisdcc.com 2002-2018 ©LaisDccTM 10 / 17
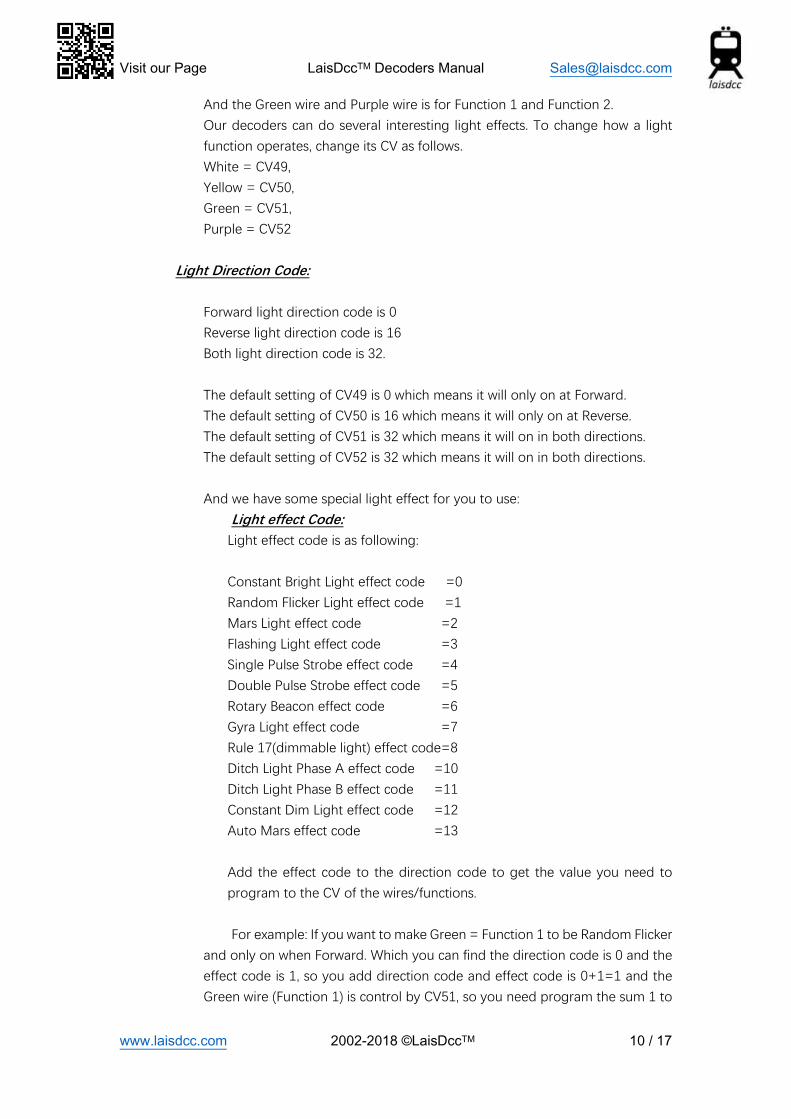
And the Green wire and Purple wire is for Function 1 and Function 2.
Our decoders can do several interesting light effects. To change how a light
function operates, change its CV as follows.
White = CV49,
Yellow = CV50,
Green = CV51,
Purple = CV52
Light Direction Code:
Forward light direction code is 0
Reverse light direction code is 16
Both light direction code is 32.
The default setting of CV49 is 0 which means it will only on at Forward.
The default setting of CV50 is 16 which means it will only on at Reverse.
The default setting of CV51 is 32 which means it will on in both directions.
The default setting of CV52 is 32 which means it will on in both directions.
And we have some special light effect for you to use:
Light effect Code:
Light effect code is as following:
Constant Bright Light effect code =0
Random Flicker Light effect code =1
Mars Light effect code =2
Flashing Light effect code =3
Single Pulse Strobe effect code =4
Double Pulse Strobe effect code =5
Rotary Beacon effect code =6
Gyra Light effect code =7
Rule 17(dimmable light) effect code=8
Ditch Light Phase A effect code =10
Ditch Light Phase B effect code =11
Constant Dim Light effect code =12
Auto Mars effect code =13
Add the effect code to the direction code to get the value you need to
program to the CV of the wires/functions.
For example: If you want to make Green = Function 1 to be Random Flicker
and only on when Forward. Which you can find the direction code is 0 and the
effect code is 1, so you add direction code and effect code is 0+1=1 and the
Green wire (Function 1) is control by CV51, so you need program the sum 1 to

Visit our Page LaisDccTM Decoders Manual [email protected]
www.laisdcc.com 2002-2018 ©LaisDccTM 11 / 17
CV51. Then the Green wire will on with Flicker effect when running in Forward.
h) Function Remapping
Control Key (Buttons on the cab) & Value of the Key(Buttons)
Control Key Value of Key
Forward 1
Reverse 2
1 4
2 8
3 16
4 32
5 64
6 128
7 4
8 8
9 16
10 32
11 64
12 128
CV No. & Functions
CV No. Function Default Key Value
CV33 Forward Headlight FL(F0F)/White Wire 1
CV34 Reverse Headlight FL(F0R)/Yellow Wire 2
CV35 Function 1/Green Wire(0-6) 4
CV36 Function 2/Purple Wire(0-6) 8
CV37 Function 1/Green Wire(7-12) 0
CV38 Function 2/Purple Wire(7-12) 0
CV39 Function 3/Brown Wire(0-6) 16
CV40 Function 4/Pink Wire((0-6) 32
CV41 Function 3/Brown Wire(7-12) 0
CV42 Function 4/Pink Wire((7-12) 0
CV43 Function 5/Pink/Purple Wire(0-6) 0
CV44 Function 6/Green/Brown Wire(0-6) 0
CV45 Function 5/Pink/Purple Wire(7-12) 0
CV46 Function 6/Green/Brown Wire(7-12) 0
CV123 ON/OFF Rule 17 Dimming 32
CV124 ON/OFF Ditch Light Blink 8
CV134 Button Control of Motor Circuit 2
CV136 BEMF Map 2
Find the function/wires you want like to remapping, then program the value of the key you

Visit our Page LaisDccTM Decoders Manual [email protected]
www.laisdcc.com 2002-2018 ©LaisDccTM 12 / 17
want to use as control to the CV of the function. The button of 0-6 and 7-12 is in different
CV.
For example, if you want to remapping function of purple wire to button (Key) 3, you need to
program the value of No. 3 key 16 to CV36.
Of course you can use one button to control multiple wires/functions. If you want button 3
can control Green wire and purple wire at the same time. Can you program 16 to both CV35
and CV36. Then the button 3 key will can control two light.
Of course one wires can be operated by multiple buttons also. If you want to use both Button
1 and Button 3 to control Green wires, you need to program the sum of the value of button
1 and the value of button 3 to CV35. So sum 4+16=20, so program 20 to CV35.
When you want Button 7 to control the Green Wire, you need program the value 4 to CV37.
i) CV2/CV5/CV6 3 Point Speed Graph(1V=18 Steps, please use it at 128 Step)
CV2 = Start Volts
CV6 = Mid Volts
CV5 = Top Volts
To enable 3 Point Speed Curves simply program values into CV 2 (Start Volts),
CV 6 (Mid Volts), and CV 5 (Top Volts).
The Speed Curve is defined in CV’s 2, 6 and 5 with each CV corresponding to
approximately 1/3 of the speed range.
Values may range from 1-255 and every value of 18 (approximately) added to
one of the Speed Curve CV’s adds about 1 volt to the motor speed at the CV being
adjusted.
NOTE: 3 Point Speed Curves do not allow for parabolic speed curves. That is to
say each consecutive CV must have a value higher than, or equal to, the CV before
it.
You can adjust CV2 to make the moves off consistently at speed step 1 of
control cab. Or to make it moves at step 1.
You can set the start voltage by using CV2. The higher the start voltage, the
higher the locomotive’s initial speed when started. This adjustment is used to trim
the locomotive to compensate for its motor efficiency. If you have a locomotive
that takes a lot of voltage to get started, this adjustment can be helpful.
The mid-point voltage adjustment allows the motor speed curve to be altered
at step 15, the midpoint of the motor voltage curve by using CV6.
The maximum voltage adjustment lets you set the maximum voltage to be
applied at the top speed step. Use the maximum voltage CV05 to limit the top speed
of your locomotives.

Visit our Page LaisDccTM Decoders Manual [email protected]
www.laisdcc.com 2002-2018 ©LaisDccTM 13 / 17
Start voltage, mid-point voltage and maximum voltage can be used to quickly
and effectively set your locomotive’s throttle response curve to simulate the
prototype.
j) Loadable Speed table: CV67-CV94
In order to use the speed table, you need to change the setting of CV29, to add 16
to the value of CV29 to enable the speed table function.
If you wish to be more precise in setting your throttle response curve, loadable
speed tables let you define each individual speed step for a locomotive. Once you
have defined the speed curve you like, you can use the forward and reverse
multiplier to move the curve up or down in speed.
Setting up a loadable speed table involves setting many CV’s since you will set a
value for each of 28 speed steps. Many DCC users find that using a computer based
programmer makes this process much easier. When you use a computer, you can
even save the speed tables you like and load them into other decoders quickly and
easily via the computer.
There are a lot of topic about it and a lot of fans share their settings via website, you
can search it via google to discuss with them.
You can learn more about it at the following link:
http://tonystrains.com/dccprimer-intro-faq-how-can-i-customize-each-locos-
performance/
http://dcc-mueller.de/decoder/speedt_e.htm
https://www.youtube.com/watch?v=ZSy22RR66oY
k) CV3,CV4 Acceleration & Deceleration Rates
Acceleration is the rate at which the decoder increases speed from one speed step
to the next in response to a new increase speed command. The acceleration rate
(CV3) can be set to simulate train weight. Deceleration is the rate at which the
decoder decreases speed from one speed step to the next in response to a new
decrease speed command. The deceleration rate (CV4) can be used to simulate
inertia. Just like the prototype, you can set your locomotives to get off to a slow start
because of a heavy load and to take a long time to come to a stop because of the
inertia of the train once it is moving.
l) BEMF
Back-EMF is self-adjusting and can be either on or off. Set CV61 to 1 (default) for
on, 0 for off.
If you want Back-EMF to turn off after the locomotive is underway (for example, if
consisted locos fight each other, this will make consisting smoother) set CV10 to the
speed step at which you want it to turn off.

Visit our Page LaisDccTM Decoders Manual [email protected]
www.laisdcc.com 2002-2018 ©LaisDccTM 14 / 17
e.g. CV10 = 15 will make Back-EMF turn off at speed step 15.
m) CV59, Passenger/Coaches Light F0 Control
Attention: When you want to use this function, please make sure the F1, F2 is turned
off before setting. Or else the F1 and F2 will not control by F0.
CV59=0,
Function turned off
CV59=1,
Function 1/Green Wire, Function 2/Purple Wire will be flicker when you use F0 to
power it on. Later it will stay on. Both F1 and F2 control by F0.
CV59=2,
Forward Headlight FL(F0F)/White Wire, Reverse Headlight FL(F0R)/Yellow Wire,
Function 1/Green Wire, Function 2/Purple Wire will flicker when use F0 to power
it on, then it will stay on. All lights control by F0.
n) Troubleshooting:
Every decoder was tested before it was packed, so we are sure that they are OK
and ready to use when you buy them. Nothing can go too badly wrong if the loco
ran well before you added the decoder, the decoder is installed correctly and you
pre-checked your installation on the program track as we advised, before putting it
on the main line!
Nothing happens:
* Have you selected the address? If it’s a new decoder it will be 3. If you did it
a while ago & you can’t recall
its number then reset the decoder. it will now be 3 again.
* If it is not reading or running and you KNOW the address, be sure that it is
not suffering from loco failure or a short circuit in the wiring or it will be damaged.
And please make sure you are not lock your decoders.
Loco runs reverse when the controller says forward.
* Please remove and reverse the 8 pin plug (or if you hard-wired the loco,
change over the orange and gray wires at the motor) Alternately you can add 1 to
the value already in CV29.
Light / functions will not work!
* Have you turned the lights ON with Function 0 (zero) and also tried the
direction switch – remember white and yellow functions are both always directional

Visit our Page LaisDccTM Decoders Manual [email protected]
www.laisdcc.com 2002-2018 ©LaisDccTM 15 / 17
by default.
* Have you perhaps wired the LED back to front? (long lead is the LED positive)
* Did you add a resistor? If not, you may have burn the LED! (The function will
still be OK).
Help - I think I must have made a CV setting mistake. Now it won’t work.
Just do a reset and it will be back to the settings it had when you bought it.
It has got a big black hole in the heat-shrink!
The only way this can happen is by incorrect wiring, overload or similar. You
killed it! (It may only be a dead light function - if in Doubt, always try a RESET using
CV8 or CV30)
Even More functions:
Button control of Back EMF: CV136
You can choose to turn back EMF on and off at will if you set your decoder up to make this
function available. This gives your hands on control of B-EMF via you chosen function button.
You can select which button will switch BEMF using this table.
* Set CV61 = 3
* CV136 should be set as per this table. We recommend that you choose a function 9 or lower
for most systems to preserve direct on/off access.
Fn Button CV136
5 1
6 2
7 4
8 8
9 16
10 32
11 64
12 128
CV64, Dimmed Brightness function.
2-6 for LEDs, 12-18 for bulbs.
Button control of the motor: CV133
There are many uses for this: turntables, cranes, conveyor belts &high current devices using
up to 1 Amp. Setup is simple:
Establish the motor speed and then choose the style of button control and its done!
Setting the motor speed: This is important as there is no variable speed control in this mode,
just forward or reverse, so unless you are making a model weapon or centrifuge, you are

Visit our Page LaisDccTM Decoders Manual [email protected]
www.laisdcc.com 2002-2018 ©LaisDccTM 16 / 17
going to want a slower motor speed.
This uses CV133, range is 0~255. Start off with 60.
Choosing your preferred control method:
There are 2 options: The first will use F2 for forward and F3 for reverse. (Just press the Fn on
to start, off to stop). This uses CV61. Set it to 64 and you can give it a try!
The second control option:
This will use Function 2 to turn the motor on and the forward/reverse buttons of your
controller for direction. This uses CV61. Set it to 68 and see what you think.
We prefer method 1, however there is ONE advantage of the second method. If you want to
power several motors like this for a crane, you can remap the functions on each of them
differently, set them to the same number and control each with its own specific function
buttons.
Manual control of Rule 17 Lighting
Rule 17 Lighting: This is primarily a US lighting style, however UK diesel models often have a
“day” and “night” lighting level, and this “rule 17” setup can also help you to get that to work
properly in your locomotives if you think about it!
In general, this rule stipulates that light in the rear of a loco should be on & dimmed when
the front light is at full brightness & importantly, that the headlight should also always be
dimmed in the direction of travel when….
(1) At stations/yards where switching is underway.
(2) If a locomotive is stopped close behind another train.
(3) On non-signaled lines when a locomotive is stopped on the main and waiting for an
approaching train.
(4) When a locomotive is approaching and passing the head end & rear end of a train on the
adjacent track.
(5) At other times to permit clearly visible passing of hand signals or when safety of employees
requires it.
Some decoders offer a very basic form of Rule 17 but we decided to do it properly. Because
it requires several CVs to be set we will describe it in a series of simple steps, each properly
explained.
We are going to set up front & rear lighting so that lights:
* Are not directional on/off (manual on/off selection)
* Are on separate buttons (F0 and F1) and also...
* Light in the end opposite to direction auto-dims if on.
* Are NOT automatically dimmed when stopped but...
* Can be dimmed when stopped or when switching with F4 no matter which direction the
loco is moving.
Visit our Page LaisDccTM Decoders Manual [email protected]
www.laisdcc.com 2002-2018 ©LaisDccTM 17 / 17
Now... Let’s do it as a step-by-step setup - we will use the White and yellow function wires
for Rule 17.
(1) We need to set CV61 to engage “Opposite Dim”. Opposite dim needs 32 added to the
value already in CV61. As CV61 also controls BEMF it will already be either 1 (BEMF on) or 3
(BEMF on via a function button).
So... For CV 61, enter either 1+32 = 33 or 3+32 = 35.
(2) We need to set CV64 to set the Dimming level. The range for this CV is 0~15. We find the
best range to use to dim LEDS is 1~6. We use 3 with our own locomotives.
So... For CV 64, enter 3.
(3) Now we need to set White wire control / CV49 and Yellow wire control / CV50 to Rule 17
always on.
The options for this are 8 (Rule 17 fwd. only) 24 (rule 17 Rev only) or 40 (rule 17 always /
manual) So... For BOTH CV49 and CV50, enter 40.
(3) Now to reallocate function control. We are going to make White F0, Yellow F1, Green F2,
Purple F3. White is already F0 so leave it. To remap the others just set their function allocation
CVs to the following values.
CV34 enter 4, CV35 enter 8, CV36 enter 16.
Did you follow that OK? If so, then it is time to take a break & have a Play with Rule 17!
CV135: Random Flicker Adjust
For Random Flicker generator the overall speed of the flicker can be adjusted from 1-255 (1
being the fastest and 255 being the slowest).
LaisDCC decoder definition in JMRI can be find on our website or at the website of
https://github.com/JMRI/JMRI/blob/master/xml/decoders/LaisDcc.xml
Visit our website at www.laisdcc.com
We suggest you to buy our products via our whole sellers or distributors at your local country
so you can get a good after-sales service and fast reply.
If you want to be our whole sellers or distributor, please contact with us at [email protected]