ViSi SOMO-II Demo - 4D Systems
12
APPLICATION NOTES ViSi SOMO-II Demo DOCUMENT DATE: 21 st May 2019 DOCUMENT REVISION: 1.1 WWW.4DSYSTEMS.COM.AU
Transcript of ViSi SOMO-II Demo - 4D Systems

AP
PL
ICA
TIO
N N
OT
ES
ViSi SOMO-II Demo
DOCUMENT DATE: 21st May 2019
DOCUMENT REVISION: 1.1
W W W . 4 D S Y S T E M S . C O M . A U

APPLICATION NOTES 4D-AN-00071
Page 2 of 12 www.4dsystems.com.au
Description
This application note shows how to interface a 4D Systems intelligent display
to the embedded Sound Module SOMO-II. Before getting started, the
following are required:
Any of the following 4D Picaso display modules: gen4-uLCD-24PT gen4-uLCD-28PT gen4-uLCD-32PT uLCD-24PTU uLCD-28PTU uVGA-III
and other superseded modules which support the ViSi Genie environment
The target module can also be a Diablo16 display gen4-uLCD-24D series gen4-uLCD-28D series gen4-uLCD-32D series gen4-uLCD-35D series gen4-uLCD-43D series gen4-uLCD-50D series gen4-uLCD-70D series uLCD-35DT uLCD-43D Series uLCD-70DT
Visit www.4dsystems.com.au/products to see the latest display
module products that use the Diablo16 processor.
4D Programming Cable or µUSB-PA5
2 micro-SD (µSD) memory cards
Workshop 4 IDE (installed according to the installation
document)
SOMO-II module*
Jumper wires for connecting the SOMO-II to the display
Speaker
or has a working knowledge of the topics presented in these
recommended application notes.
When downloading an application note, a list of recommended
application notes is shown. It is assumed that the user has read
or has a working knowledge of the topics presented in these
recommended application notes.
*Even without a SOMO-II module, it is still possible for the user to run the
demo in this application note by using the terminal utility in Workshop. See
the section “Simulate the SOMO-II Module using the Terminal”.

APPLICATION NOTES 4D-AN-00071
Page 3 of 12 www.4dsystems.com.au
Content
Description ............................................................................................. 2
Content ................................................................................................... 3
Application Overview .............................................................................. 3
Setup Procedure ..................................................................................... 3
Create a New Project ............................................................................... 3
Design the Project ................................................................................... 4
Writing the Code for a Form ........................................................ 4
Writing the Code for the Demo .................................................... 5
The Include File ........................................................................... 5
Program Flow .............................................................................. 6
Initialization 6
modeCheck( ) 7
Touch routine 7
somoDoEvents( ) 7
Return to main 7
Functions for Communicating with the SOMO-II Module ............. 8
Adding Serial Commands to the Include File 10
Run the Program ................................................................................... 11
Proprietary Information ........................................................................ 12
Disclaimer of Warranties & Limitation of Liability ................................... 12
Application Overview
It is often difficult to design a graphical display without being able to see the
immediate results of the application code. 4D-ViSi is the perfect software
tool that allows users to see the instant results of their desired graphical
layout. Additionally, there is a selection of inbuilt dials, gauges, and meters
(called widgets) that can simply be dragged and dropped onto the simulated
display. From here each widget can have its properties edited, and at the
click of a button all relevant code is produced in the user program.
Setup Procedure
For instructions on how to launch Workshop 4, how to open a ViSi project,
and how to change the target display, kindly refer to the section “Setup
Procedure” of the application note
ViSi Getting Started - First Project for Picaso and Diablo16
Create a New Project
For instructions on how to create a new ViSi project, please refer to the
section “Create a New Project” of the application note
ViSi Getting Started - First Project for Picaso and Diablo16

APPLICATION NOTES 4D-AN-00071
Page 4 of 12 www.4dsystems.com.au
Design the Project
Writing the Code for a Form
The general instructions below can be followed when writing the 4DGL code
for a form that handles graphics and touch detection. The objective is to be
able to display objects and control their behaviour when touched.
Enable touch detection for objects that are meant to respond to touch
Disable touch detection for objects that are not meant to respond to touch
Set initial frames of objects then show the objects.
Start touch detection routine.
Define behaviour of objects when pressed.
Define behaviour of objects when touch is released.
Define behaviour of objects when touch is moving.
Create an exit button to get out of the loop.
Loop back to start of touch detection routine.
Disable touch detection for all objects in the form before returning to main.
start touch detection routine
Objects behave as defined
when pressed.
Objects behave as defined
when touch is released.
Objects behave as defined
when touch is moving.
Program breaks out ofthe loop if the exitbutton is triggered by atouch press, release, ormovement.
end of touch routine, back to
start
Disable/enable touch detection of objects.
Set initial frame and show objects.
Disable touch detection of objects.
Exit form and return to main.
C
C
loop
APPLICATION NOTES 4D-AN-00071
Page 5 of 12 www.4dsystems.com.au
In Form1 of miniSOMOII_demo, behaviour of objects is defined only when
touch status is moving (TOUCH_MOVING). In Form2, behaviour of objects is
defined only when the touch status is released (TOUCH_RELEASED). For a
more “complete” program, the user has the option of defining the
behaviour of objects for all three touch statuses in a loop -
“TOUCH_PRESSED”, “TOUCH_RELEASED”, and “TOUCH_MOVING”.
Writing the Code for the Demo
Theoretically, the program for miniSOMOII_demo has two tasks – to handle
graphics and to manage communication with the SOMO-II module. The task
of handling graphics involves the process of displaying objects and defining
their behaviour during touch detection. This part is illustrated in the diagram
to the left. Beginners may refer to the enumerated application notes on
page 4. The task of communicating with the SOMO-II module requires the
addition of an include file at the start of the code. In this include file all the
high level commands for talking to and listening from the SOMO-II module
are defined. These high level commands or functions are called when a form
is running. The following paragraphs provide further discussions.
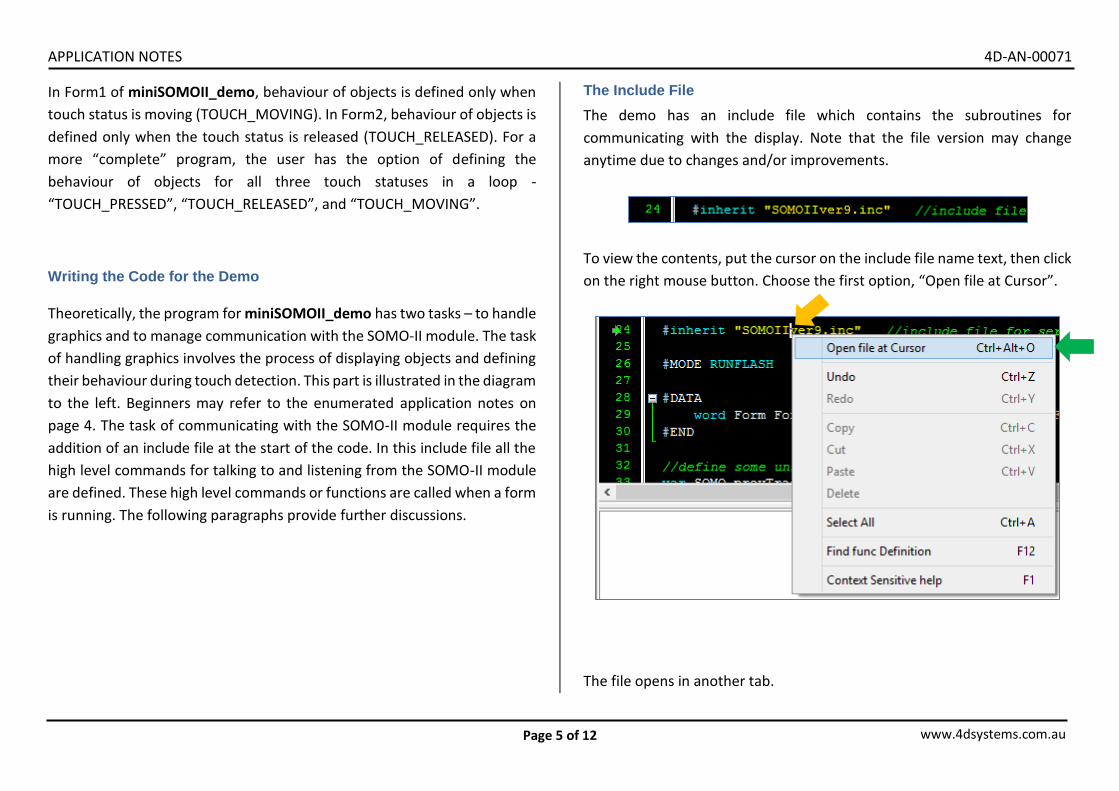
The Include File
The demo has an include file which contains the subroutines for
communicating with the display. Note that the file version may change
anytime due to changes and/or improvements.
To view the contents, put the cursor on the include file name text, then click
on the right mouse button. Choose the first option, “Open file at Cursor”.
The file opens in another tab.

APPLICATION NOTES 4D-AN-00071
Page 6 of 12 www.4dsystems.com.au
The include file can be edited and improved by adding in more commands.
The contents of the include file are further discussed in the section
“Functions for Communicating with the SOMO-II module”.
Program Flow
Form1 of miniSOMOII_demo follows the model shown below. Note that the
graphics handling and communications routines are integrated into this
model.
Initialization
Here constants are defined, and variables are declared and initialized. Some
of these variables are used as flags. Touch detection is enabled or disabled
initialization
modeCheck( )
touch routine
somoDoEvents( )
return to main
loop

APPLICATION NOTES 4D-AN-00071
Page 7 of 12 www.4dsystems.com.au
for objects depending on their purpose. The initial frames of objects are set
and the objects are shown.
modeCheck( )
This subroutine queries the SOMO-II module which track is currently
playing. Since querying involves the sending and receiving of messages to
and from the SOMO-II module, this subroutine is executed not every time
the loop repeats but only when any of the five predefined conditions is true.
See lines 165 to 182 of the code.
modeCheck() also sets the initial state of the play/pause button and the
initial frame of the album cover user images object depending on the
current play mode and other flags. The status of the play/pause button and
the frame of the album cover user images object may change each time the
loop repeats.
Touch routine
Here the behaviour of objects when they are touched are defined.
Commands are also sent to the SOMO-II module depending on the object
touched. Note that there are three specific touch status values. The
programmer can use one or all of these when coding.
somoDoEvents( )
This subroutine queues messages from the SOMO-II module. If a message is
or messages are present in the queue, one is taken out and evaluated. When
the message "finished playing a track” has been received, the flag
SOMO_finishedPlayingFlag will be set so that modeCheck( ) will know what
to do in the next iteration of the loop. This makes the music player “smart”,
since it knows when to change the status of the play/pause button back to
“press-to-play” if a track has finished playing. This is true for the single play
mode.
Return to main
If a certain condition has been met (the “exit” button has been pressed for
instance), the program breaks out of the loop, disables touch detection for
all relevant objects, sets the return value (if present), and returns to main.
It is important to disable touch detection of objects in a form before exiting
that form since many of the objects in Workshop respond to touch even
though they are not shown. To illustrate:
Form1 Form 2
Object A
Object B
Object C Object D

APPLICATION NOTES 4D-AN-00071
Page 8 of 12 www.4dsystems.com.au
In the image shown, each of the forms has two objects that respond to
touch. In Workshop, objects are named as they are added to the project.
Suppose the program exits Form1 and executes Form2 without disabling
touch detection for objects A and B. Now that the program is in Form2, only
objects C and D are shown. Objects A and B still respond to touch however,
and this may bring about undesirable or unexpected results. If the lower
regions of objects C and D are touched, these objects will not respond. It is
actually object B that will respond since it is still active and it was added to
the project first before objects C and D. So if, for example, objects C and D
will each turn on and off an LED, the user may observe that the LEDs are not
responding when objects C and D are touched at the lower regions.
Functions for Communicating with the SOMO-II Module
The following is a table of functions defined in the include file
“SOMOIIver9.inc”.
Command initializeSomo(attempts)
Description Sends the reset command for attempts times. Display waits for the correct reply.
Return Returns ‘0’ if failed, ‘1’ if successful.
Command somoBufferEvents()
Description Queues a maximum of 6 replies from the SOMO-II module. Queued replies are stored in global arrays.
Return None
Command somoDequeue(*reply)
Description Takes the latest message from the queue and evaluates it. The message is stored in an array with the address reply.
Return Returns ‘1’ if a message has been taken from the queue, ‘0’ if none
Command playSong( )
Description Play the audio track selected (if selected) else the first track copied on to the media
Return None
Command stopSong( )
Description Stop the current playing audio Track. If PLAY command is then sent, the audio track will start from the beginning.
Return none
Command pauseSong( )
Description Pause the current playing audio Track. If PLAY command is then sent, the audio track will resume from where it was paused.
Return none
Command nextSong( )
Description If no track is currently playing, issuing the NEXT command will start playing the first track copied to the media. If the SOMO-II is currently playing a song or has previously played a song, this will play the next song in the order copied on to the media.
Return none

APPLICATION NOTES 4D-AN-00071
Page 9 of 12 www.4dsystems.com.au
Command previousSong( )
Description If no track is currently playing, issuing the PREVIOUS command will start playing the last track copied to the media. If the SOMO-II is currently playing a song or has previously played a song, this will play the previous song in the order copied on to the media.
Return none
Command volumeSet(volume)
Description Sets the volume level to volume. Maximum value is 30.
Return none
Command selectuSD( )
Description This will set the SOMO-II to play from a micro-SD Card
Return none
Command queryCurrentTrackuSD(timeLimit)
Description Query the current track playing from the micro-SD Card.
Return Returns ‘1’ if a valid message has been received within the time limit timeLimit (in milliseconds). Returns ‘0’ otherwise. To get the track number, access the fourth element of a private variable, like as shown below.
Command queryTracksuSD(timeLimit)
Description Query the number of files present on the uSD card.
Return Returns ‘1’ if a valid message has been received within the time limit timeLimit (in milliseconds). Returns ‘0’ otherwise. To get the number of files present on the media, access the fourth element of a private variable, like as shown below.
Command specifyTrack(trackNumber)
Description Specify the number of a track then play it.
Return none
Command specifyEQ(eq)
Description Configure the eq setting. Values for eq: 0/1/2/3/4/5 Normal, Pop, Rock, Jazz, Classic, Bass. See Form4 of the full demo.
Return none
Command sleepSOMO( )
Description This will put the SOMO-II into a sleep state, which consumes low power. To get the SOMO-II out of sleep, you need to use a PLAY SOURCE command, followed by your next chosen command.
Return none

APPLICATION NOTES 4D-AN-00071
Page 10 of 12 www.4dsystems.com.au
Command resetSOMO( )
Description This will reset the SOMO-II module, to be in its powered-on state.
Return none
Command singlePLAY( )
Description This will disable CONTINUOUS, RANDOM TRACK or REPEAT CURRENT modes if previously enabled, which is how the module starts up by default. This will allow one song to play and then stop. Start track with PLAY.
Return none
Command continuousPLAY( )
Description This will enable continuous mode (disable RANDOM TRACK and REPEAT CURRENT if previously enabled), which will play all songs on the memory card, one after the other. Start track with PLAY.
Return none
Command randomPLAY( )
Description This will enable Random Mode (disable CONTINUOUS and REPEAT CURRENT if previously enabled), which plays random tracks one after the other, continuously. Start track with PLAY.
Return none
Command repeatCurrent( )
Description This will enable the repeat play mode (disable CONTINUOUS and RANDOM TRACK if previously enabled), which repeats the currently playing track, so it will play over and over continuously. Track must be playing before this command is sent.
Return none
Command setPlayMode(mode)
Description Set the play mode to mode: 0/1/2/3 – single play/continuous play/random/repeat current
Return none
Adding Serial Commands to the Include File
The SOMO-II datasheet contains all of the predefined SOMO-II serial
commands and their corresponding function and meaning. To add more of
these to the include file, simple edit the file and save it.
C
C

APPLICATION NOTES 4D-AN-00071
Page 11 of 12 www.4dsystems.com.au
As an example, the serial command for choosing the USB flash drive as the
play source is “7E 09 00 00 01 FF F6 EF”. From the datasheet:
This command can be implemented in 4DGL and added to the include file as
shown below.
Run the Program
For instructions on how to save a ViSi project, how to connect the target display to
the PC, how to select the program destination (this option is not available for
Goldelox displays), and how to compile and download a program, please refer to
the section “Run the Program” of the application note
ViSi Getting Started - First Project for Picaso and Diablo16
The uLCD-32PTU and uLCD-35DT display modules are commonly used as examples, but the procedure is the same for other displays.

APPLICATION NOTES 4D-AN-00071
Page 12 of 12 www.4dsystems.com.au
Proprietary Information
The information contained in this document is the property of 4D Systems Pty. Ltd. and may be the subject of patents pending or granted, and must not be
copied or disclosed without prior written permission.
4D Systems endeavours to ensure that the information in this document is correct and fairly stated but does not accept liability for any error or omission. The
development of 4D Systems products and services is continuous and published information may not be up to date. It is important to check the current position
with 4D Systems.
All trademarks belong to their respective owners and are recognised and acknowledged.
Disclaimer of Warranties & Limitation of Liability
4D Systems makes no warranty, either expresses or implied with respect to any product, and specifically disclaims all other warranties, including, without
limitation, warranties for merchantability, non-infringement and fitness for any particular purpose.
Information contained in this publication regarding device applications and the like is provided only for your convenience and may be superseded by updates.
It is your responsibility to ensure that your application meets with your specifications.
In no event shall 4D Systems be liable to the buyer or to any third party for any indirect, incidental, special, consequential, punitive or exemplary damages
(including without limitation lost profits, lost savings, or loss of business opportunity) arising out of or relating to any product or service provided or to be
provided by 4D Systems, or the use or inability to use the same, even if 4D Systems has been advised of the possibility of such damages.
4D Systems products are not fault tolerant nor designed, manufactured or intended for use or resale as on line control equipment in hazardous environments
requiring fail – safe performance, such as in the operation of nuclear facilities, aircraft navigation or communication systems, air traffic control, direct life
support machines or weapons systems in which the failure of the product could lead directly to death, personal injury or severe physical or environmental
damage (‘High Risk Activities’). 4D Systems and its suppliers specifically disclaim any expressed or implied warranty of fitness for High Risk Activities.
Use of 4D Systems’ products and devices in 'High Risk Activities' and in any other application is entirely at the buyer’s risk, and the buyer agrees to defend,
indemnify and hold harmless 4D Systems from any and all damages, claims, suits, or expenses resulting from such use. No licenses are conveyed, implicitly or
otherwise, under any 4D Systems intellectual property rights.