Video Client: Software...
58
Video Client en Software manual
-
Upload
nguyenkien -
Category
Documents
-
view
224 -
download
0
Transcript of Video Client: Software...

Video Client
en Software manual


Table of contents
1 Introduction 61.1 System requirements 61.2 Software installation 61.3 Conventions used in the application 6
2 Start-up and configuration 82.1 System overview 82.1.1 Live viewing and playback application 82.1.2 Configuration Manager 82.2 Start-up 82.3 Configuration wizard 82.4 Configuring with Configuration Manager 102.4.1 Video Client 102.4.2 Installing licenses 122.4.3 Saving the configuration 122.5 How to log on 12
3 Live window overview 133.1 Basic overview 133.2 Toolbar icons 153.2.1 Playback 163.2.2 Setting user preferences 163.2.3 Sequencing views 163.2.4 Selecting quick display modes 173.2.5 Opening text viewer pane 173.2.6 Configuring cameo window display 173.2.7 Maximizing video area 173.2.8 Enabling audio 173.2.9 Controlling audio volume 173.2.10 Configuration 173.2.11 Getting help 173.2.12 Minimizing Video Client 173.2.13 Log-off 183.3 Favorite views and video device list panes 183.3.1 Favorite views pane 183.3.2 Video device list pane 193.3.3 Device icons 193.4 Relays, contacts and snapshots panes 203.4.1 Output relays 203.4.2 Input contacts 203.4.3 Snapshots 203.5 Cameos 203.5.1 Cameo context menu 213.6 Text view pane 223.6.1 Exporting text 223.6.2 Clearing and closing the text pane 223.7 Status tabs 223.7.1 Logbook 223.7.2 Export job 23
Video Client Table of Contents | en 3
Bosch Sicherheitssysteme GmbH Software manual 2013.01 | v1.4 SR1 | F.01U.247.166

3.7.3 Image calibration 23
4 Viewing live images 244.1 Selecting favorite views 244.2 Making quick views 244.3 Video image overlays 24
5 Setting up favorites 265.1 Making a view 265.2 Making a sequenced view 27
6 Workstation recording 287 Saving snapshots 298 Instant playback 309 Monitor wall 3110 Controlling cameras 3310.1 Digital zoom 3310.2 PTZ cameras 3310.2.1 Mouse control 3310.2.2 Control console 34
11 Playback window 3511.1 Playback toolbar 3511.1.1 Setting user preferences 3511.1.2 Selecting quick display modes 3611.1.3 Opening text viewer pane 3611.1.4 Configuring cameo window display 3611.1.5 Maximizing video area 3711.1.6 Enabling audio 3711.1.7 Controlling audio volume 3711.1.8 Configuration 3711.1.9 Getting help 3711.1.10 Minimizing Video Client 3711.2 Selecting camera recordings 3711.3 Timeline 3811.3.1 Context commands 3911.4 Playback controls 4011.5 Exporting recorded video clips to a PC hard disk 4111.6 Taking snapshots 4111.7 Search tabs 4111.8 Playing stored files 4211.8.1 Exported video clips 4211.8.2 Archived snapshots 4211.9 Camera SD card 43
12 Searching for events 4413 IVA search 4614 Searching for text 4715 Command line start 4916 Using keyboards 5216.1 Standard keyboard shortcut keys 5216.2 Using a Bosch IntuiKey keyboard 5416.2.1 Before installing the IntuiKey keyboard 54
4 en | Table of Contents Video Client
2013.01 | v1.4 SR1 | F.01U.247.166 Software manual Bosch Sicherheitssysteme GmbH

16.2.2 Setting up the IntuiKey keyboard 5516.2.3 Using the IntuiKey keyboard 55
Video Client Table of Contents | en 5
Bosch Sicherheitssysteme GmbH Software manual 2013.01 | v1.4 SR1 | F.01U.247.166

IntroductionVideo Client is a PC application for live viewing, control, search and playback facilities for anycamera connected to the network.Remote control functions include pan, tilt, and zoom control of cameras (including fullAutoDome control). The on-line status of the connected units is provided and you can accessthe Configuration Manager application to set up a unit or configure your system.The Forensic Search tool, which is an integral part of Video Client, provides a powerful meansof searching recorded material for IVA (Intelligent Video Analysis) events.
System requirementsOperating platform: A PC running Windows XP SP3, Windows Vista SP2 or Windows 7with .NET 3.5 installed.The recommended PC requirements are:– Processor: Intel Pentium DualCore, 3.0 GHz or comparable– RAM memory: 2048 MB– Free hard disk space: 10 GB– Graphics card: NVIDIA GeForce 8600 or higher– Video memory: 256 MB– Network interface: 100/1000-BaseT
Software installation1. Insert the product disk into the optical drive of the PC;
The installation program should start automatically.2. If installation does not start automatically, locate the BVC-...-Installer.exe file on the disk
and double-click it.3. Follow the instructions on the screen to complete the installation.
Note:Software updates are released periodically. Check the Bosch Security Systems website for thelatest version.
Logging support for VRMTo integrate VRM logs into the Video Client logbook, carry out the following steps:1. Copy VrmLogMonitor.exe and VrmLogService.exe from the Video Client installation folder
(default C:\Program Files\Bosch\Video Client) to a folder on the computer running VRM.2. Open a command shell on the VRM computer (run as administrator!).3. Go to the folder containing VrmLogMonitor.exe and VrmLogService.exe.4. Install the service by typing: VrmLogService.exe -i5. Start the service by typing: VrmLogService.exe –sP The log monitor service now reports all current VRM logs to all connected Video Client
applications (starting 15 minutes in the past).The service is now automatically started every time the system boots.– To stop the service, type: VrmLogService.exe -k– To completely remove the service, type: VrmLogService.exe -u
Conventions used in the applicationInterpreting icon colors– Disabled functions are shaded.– Active selections are highlighted in yellow in the live window and in light blue in the
playback window.
1
1.1
1.2
1.3
6 en | Introduction Video Client
2013.01 | v1.4 SR1 | F.01U.247.166 Software manual Bosch Sicherheitssysteme GmbH

Calendar windowThe calendar window is displayed after clicking the calendar icon in windows where a datemust be filled in.– Click the arrow keys to change months.– Click a date to return to the date box with the selected value filled in.– Press Esc on the keyboard to leave the window without changing the date.
Lists– In lists, click a column header to sort the list according to that column item.– Click a second time to sort the list in reverse order.– Use the scroll bars to scroll long lists.
Expand/collapse lists
In the device tree or favorites panes, the tree structure shows or next to an icon. Click
to expand the list; click to collapse the list.
Multiple selectionTo select multiple items, select a single item, and then hold down the CTRL key while youclick other items that you want to select.
Video Client Introduction | en 7
Bosch Sicherheitssysteme GmbH Software manual 2013.01 | v1.4 SR1 | F.01U.247.166

Start-up and configuration
System overviewVideo Client consists of the following components:– Live viewing and playback application– Configuration Manager
Live viewing and playback applicationThis application provides two windows; one for live viewing and camera control, and one forplayback of recordings and exports.
Configuration Manager
The Configuration Manager application can be opened via an icon in the live viewing andplayback application. Configuration Manager allows the user to configure the system setupand to set the configuration settings for supported devices. A wizard that helps with the initialconfiguration of a system can be activated by clicking Configuration Wizard... in the Toolsmenu of Configuration Manager.
Start-upStarting the program
When installation is complete, double-click the Bosch Video Client icon on thedesktop to start the program. Alternatively, start the application via the Start button and thePrograms menu (path: Start/Programs/Bosch Video Client/Bosch Video ClientBosch VideoClient).
Starting the first timeWhen the program is started for the first time, a wizard opens to help you detect andconfigure devices on the network. Follow the steps in the wizard to set up the Bosch VideoClient Video Client for first-time use.
Command line startThe program can also be started from the command line with additional parameters.
See also– Command line start, page 49
Configuration wizardThe configuration wizard is a quick way of setting up the most important parameters for thesystem for a first-time installation. The parameters shown in the wizard are a subset of all theparameters that can be set in the System > Applications > Video Client menu of ConfigurationManager. When the wizard opens it guides you through the configuration process in a few steps. ClickNext > and < Back to navigate through the wizard.
2
2.1
2.1.1
2.1.2
2.2
2.3
8 en | Start-up and configuration Video Client
2013.01 | v1.4 SR1 | F.01U.247.166 Software manual Bosch Sicherheitssysteme GmbH

PasswordsEnter (and confirm) universal, system-wide passwords for three user groups (leave the fieldsempty if you do not wish to do this).The passwords for the system user levels are mapped to the system components. Whenaccessing a device, for example, the password for administrator is used for access levelservice, while the password for operator is used for access level user.
Authorization level Configuration Manager BVIP device
Highest administrator service
Medium operator user
Lowest live live
RecorderSelect whether to record locally on the devices (for example, to an SD card) or to use a VRMrecorder.To record using a recorder, enter the relevant IP address or select the address of a configuredrecorder from the list.
Device SelectionAll devices detected in the network are listed. If you think that a device is missing clickUpdate.All devices with a check mark will be configured (allocated an IP address). If you do not wishto configure a device using the wizard, click the box to remove the check mark. Devices marked with a green square are already allocated to a VRM recorder. If these aredeselected the allocation is broken and the associated recordings are deleted.Not all devices support IP address configuration via DHCP. If required, configure these devicesmanually.
NetworkSelect Use DHCP if all devices support DHCP and you want to assign IP addressesautomatically.Alternatively, enter an IP address range. This range must provide sufficient IP addresses for allthe devices to be configured.
Date and TimeSelect whether the date and time are to be taken from the settings on your PC or from anSNTP server. If necessary, reset the system time and date on your PC or enter the IP addressof an SNTP server.
Video Client Start-up and configuration | en 9
Bosch Sicherheitssysteme GmbH Software manual 2013.01 | v1.4 SR1 | F.01U.247.166

Video QualityUse the slider to select the quality of the video for all devices. The relevant settings for eachdevice are made automatically. Set a bandwidth limit if required.
RecordingCreate a uniform recording scheduler for all devices. Define three recording profiles (Day,Night and Weekend) by selecting a recording mode (Continuous, Motion or Off) and settingthe quality slider. Fill the weekly recording calendar with these profiles. If no recordings are tobe scheduled, you must select Off mode for every recording profile.
SummaryA summary of the selected settings is displayed. If you want to change the settings, click <Back to go back step by step in the wizard.Click Apply to configure the devices according to the selected settings; click Cancel to cancelthe wizard.
Configuring with Configuration ManagerWhen the wizard finishes, Configuration Manager opens.1. Click the System tab.2. Under Applications, click Video Client.This is where you can change the default settings for Video Client.
Video ClientUse the following menus to configure Video Client:1. In the User Management menu, set user accounts, user passwords, and access rights if
required.2. In the Cameras menu, verify that the correct cameras are selected and that they are in
the correct order, and assign access rights.3. In the Digital Inputs menu, verify that the correct inputs are selected and that they are in
the correct order, and assign access rights.4. In the Relays menu, verify that the correct relays are selected and that they are in the
correct order, and assign access rights.5. In the Application menu, configure workstation recording and the use of the keyboard,
and manage licenses.
Implementing user administrationIf you define a password for administrator, this will have to be entered every time thedatabase is opened.To create users and define user rights:1. Select the User Management group.2. To create an additional user, click Add....
A dialog box appears.3. Enter the user name and password.4. To define individual user rights, select the relevant entry in the list of created users and
activate or deactivate the required options under Rights.5. To remove a user, select an entry in the list of created users and click Remove.
2.4
2.4.1
10 en | Start-up and configuration Video Client
2013.01 | v1.4 SR1 | F.01U.247.166 Software manual Bosch Sicherheitssysteme GmbH

Selecting components1. Depending on the group for which you want to select components, select the Camera
Order, Digital Input Order or Relay Order tab under the respective group.2. Check those components you want listed in Video Client.
The sort order of these lists matches that in Video Client.3. Click the Top, Up , Down and Bottom buttons to change the position of a selected
component within the list.
Assigning rights1. Depending on the group for which you want to assign rights, select the Camera Access,
Digital Input Access or Relay Access tab under either the respective group.Each user is assigned the highest authorization level by default.
2. To change a user's access rights, left-click the relevant table cell until the desiredauthorization level is selected.
3. To assign a user the same authorization level for all components, or vice versa, right-clickthe relevant column or row header and select the desired authorization level.
Camera access
PTZ configuration The user can configure the PTZ settings
PTZ control The user can control the camera
View only The user can watch videos
Access denied The user has no access to the camera
Digital input access, relay access
Control allowed The user can control the component
View only The user can see the component
Access denied The user has no access to the component
Configuring workstation recording and the use of IntuiKey1. Select the Application tab of the Application group.2. Select the path for workstation recordings. If you do not enter anything here, the
following default setting is used: %current user%\My Documents\Bosch\Video Client\Recording.Define the maximum hard disk space in GB to be used for manual recordings. If you donot enter anything, 10 is used.
3. Select the IntuiKey communication port if you have activated the use of the keyboard.
LicensesOn the Licenses tab of the Application group you can find information on the licensing ofcamera channels in Video Client. A Video Client installation has 16 camera channels asstandard. You can enable additional channels by purchasing a license.
Video Client Start-up and configuration | en 11
Bosch Sicherheitssysteme GmbH Software manual 2013.01 | v1.4 SR1 | F.01U.247.166

The host ID displayed here is needed to install a license for additional camera channels. Thenumber of enabled camera channels is shown. Click Add License... to open a dialog box forthe installation of additional licenses.
Installing licensesFollow these steps to install a license for Video Client:1. Order a license - you will receive an authorization code.2. Go to the Licenses tab of the Configuration Manager application to determine the host ID
of your computer.3. Log on to the Bosch license manager (https://activation.boschsecurity.com/) using your
authorization code.4. Fill-in and submit the license activation data (including your host ID).5. Enter an e-mail address to receive the activation code.6. Save the license key file from the received e-mail to your hard disk.7. Go to the Licenses tab of the Configuration Manager application and click Add License....8. Navigate to the license key file on your hard disk and click Open.9. Check that the license has been activated.10. Save your configuration and restart Video Client.
Saving the configurationWhen finished:1.
Click to save the configuration.2. Close the Configuration Manager application.
How to log onWhen the application is started, the log-on window appears. The user name and passwordboxes are blank.To log on:1. Type a user name and password.2. Click Log on.
Check with the administrator if access is denied to the unit.
Note:When no user name and password settings are entered or modified in the wizard or in theConfiguration Manager application, you can log on using the user name administrator and nopassword.
2.4.2
2.4.3
2.5
12 en | Start-up and configuration Video Client
2013.01 | v1.4 SR1 | F.01U.247.166 Software manual Bosch Sicherheitssysteme GmbH

Live window overviewThe live window appears when you start Video Client.In the live window you can:– view live video– select different multiscreen displays– set up favourite views– assign cameras to cameos– open an instant playback window of the active cameo– record a camera video clip to the PC hard disk– capture a still frame snapshot of the active cameo– configure a monitor wall– control PTZ cameras– monitor unit status and alarm conditions
Note:
If you are in the playback mode, click to switch to the live window.
Figure 3.1: Typical live window
Basic overviewThe control areas of a basic live window are shown below.
3
3.1
Video Client Live window overview | en 13
Bosch Sicherheitssysteme GmbH Software manual 2013.01 | v1.4 SR1 | F.01U.247.166

Figure 3.2: Basic live window
Toolbar Contains icons for various functions (see below).
Video display area Displays the video cameos. Can be dragged to secondmonitor, if installed.
Task panel Click the tabs to open or close task panes for favoritesdesigner, image capture, instant playback, and monitorwall.
Operational panel Click to open a pane containing the camera controlconsole, and tabs for logbook, export jobs and imagecalibration.
Accessories panel Click the tabs to open the Relays, Contacts orSnapshots panes.
System panel Click the tabs to open the Favorite views or Videodevice list panes.
14 en | Live window overview Video Client
2013.01 | v1.4 SR1 | F.01U.247.166 Software manual Bosch Sicherheitssysteme GmbH

Toolbar icons
View live video Switches the Video Client window to the live view(yellow highlighting).
Playback recordedvideo
Switches the Video Client window to the playback view(blue highlighting).
User preferences Displays a dialog box for setting user preferences.
Display cameras insequence
Starts a sequence of cameo views.
Quick display modes Contains icons to select a cameo layout.
Open text viewer Opens the text viewer pane (only available if a Divar700-connected camera is allocated to the system).
Select cameodecoration
Selects how the cameos are displayed: withoutadditional information, or with additional information ina top bar or as overlay. Furthermore, you can overlay thecameo with the local device time and VCA data.
Maximize video area(F10)
Maximizes the video display area.
Mute audio Mutes the audio.
Change volume Adjusts the audio volume.
Start ConfigurationManager
Opens the Configuration Manager application in aseparate window.
Show help index Opens the help index.
Minimize Minimizes the Video Client window to the task bar.
Log Off Closes Video Client and returns to the log-on window.
The date and time, and the CPU usage bar are also displayed on the toolbar. Hover over theCPU usage bar to see the CPU usage as a percentage.Double-click the toolbar to resize the application window.
3.2
Video Client Live window overview | en 15
Bosch Sicherheitssysteme GmbH Software manual 2013.01 | v1.4 SR1 | F.01U.247.166

Playback
Click to open the playback window. Get a graphical timeline overview of allrecordings, or search for recordings based on events and play them back.
Setting user preferencesThese settings are saved for the user who is logged on and are applied each time this userlogs on with the same computer.1.
To change the user preferences for Video Client, click to open a dialog box withtabs for various configuration settings.
2. Configure the settings as described below.3. Click OK to save changes and close, or Cancel to close the window without change.
Settings tab1. Place a check mark next to the alarms and errors items to be activated.
The computer beeps on the specified alarms or maximizes the application window.2. Select a sequence dwell time between 5 and 60 seconds to determine how long a
sequenced view remains displayed.3. Check Show device local time to display a cameo overlay of the actual time set on a
device.4. Check Kiosk Mode to expand the Video Client window to full screen. It requires a restart
for it to take effect and is only available to the administrator. When in kiosk mode a usercannot exit the application.
5. Select an instant playback time offset between 5 and 120 seconds.6. If you have multiple monitors set up in Windows, check Enable second monitor to use
one of these monitors as a second monitor. Select the monitor you wish to use in the boxbelow.
Directories tab1. Enter the locations that will be monitored for exported recordings.2. Enter the locations that will be monitored for exported snapshots.3. Enter the location for workstation recording.
Monitor Wall tab1. Drag the available monitors to a position on the monitor wall graphic.2. Alternatively, use the arrows to place or remove the monitors.
Sequencing views
The sequence icon is enabled when a view with multiple cameos is selected or whenmultiple cameras or views are selected. You can design sets of sequencing views on the ViewDesigner pane.–
Select a view and click to start sequencing the cameras within that view in a singlecameo display.
–
Select multiple views and click to start sequencing between the views and notwithin the views.
See also– Making a sequenced view, page 27
3.2.1
3.2.2
3.2.3
16 en | Live window overview Video Client
2013.01 | v1.4 SR1 | F.01U.247.166 Software manual Bosch Sicherheitssysteme GmbH

Selecting quick display modesTo switch the display mode, click a cameo view icon to change the layout configuration of thevideo viewing area.In the live window the following icons are available:–
Single cameo–
2x2 cameos–
3x3 cameos–
4x3 cameos
Opening text viewer pane
Click to open the text viewer pane. Live text from a Divar 700-connected camera isdisplayed in the pane. Note that in the live window the icon to open the text viewer pane isonly available if a Divar 700-connected camera is allocated to the system.
Configuring cameo window display
Click and select the items you want displayed in the cameo window:– No additional information– A title overlay– A title barFurthermore, you can select to show or hide the local device time and VCA data overlay.
Maximizing video area
Click to maximize the video display area. Click the icon again on the auto-hide toolbar atthe top of the screen to switch back to normal mode, or use F10 to switch between modes.
Enabling audio
Click to enable or disable audio output. When enabled, the audio of the selected cameo isheard, if available.
Controlling audio volume
Click to adjust the audio volume.
Configuration
Click to open the Configuration Manager application (administrator only).
Getting help
Click to open the help index. Select a help topic.
Minimizing Video Client
Click to minimize Video Client to the taskbar.
3.2.4
3.2.5
3.2.6
3.2.7
3.2.8
3.2.9
3.2.10
3.2.11
3.2.12
Video Client Live window overview | en 17
Bosch Sicherheitssysteme GmbH Software manual 2013.01 | v1.4 SR1 | F.01U.247.166

Log-off
Click to close Video Client and return to the log-on window.
Favorite views and video device list panesTwo side tabs are located on the top left of the Video Client window:–
Click to open the Favorite views pane.–
Click to open the Video device list pane.
Favorite views pane
Figure 3.3: Favorite views pane
The Favorite views pane shows the various views and sequences that have been made in theFavorites Designer pane.– Double-click a view to see it in the live video area or drag one or more views to the live
video area.–
Click to expand a view and see the devices and cameras assigned to it; click tocollapse the view.
– Right-click a view to open a context menu with the following commands:– Sequence– Send to monitor (main, second, or wall if set up)– Save View– Delete– Rename– Properties
– Right-click a device to open a context menu with the following commands:– Connect– Disconnect– Sequence– Send to monitor (main, second, or wall if set up)
3.2.13
3.3
3.3.1
18 en | Live window overview Video Client
2013.01 | v1.4 SR1 | F.01U.247.166 Software manual Bosch Sicherheitssysteme GmbH

– Properties (including name, type and IP address)
Note:If the application was started from the command line with the sites parameter, then the
Favorite views tab is replaced by the Site Connector tab.
See also– Command line start, page 49
Video device list pane
Figure 3.4: Video device list pane
The Video device list pane shows all configured devices. These devices can be put into groupsin Configuration Manager:–
Click to expand a group and see the devices and cameras assigned to it; click tocollapse the group.
– To see a device in the live video area, double-click it or drag the device to a cameo.– To see multiple devices in the live video area, select the devices and drag them to the live
video area.– Right-click a device to open a context menu with the following commands:
– Connect– Disconnect– Sequence– Send to monitor (main, second, or wall if set up)– Properties (including name, type and IP address)
Device iconsEach device has an icon related to its type. To show the status of the device, the icon has anoverlay, for example:
Body camera not connected
Body camera connected
Dome camera connected
Body camera with video loss
Body-camera is in alarm mode
Body-camera with motion detected
Body-camera with motion alarm
3.3.2
3.3.3
Video Client Live window overview | en 19
Bosch Sicherheitssysteme GmbH Software manual 2013.01 | v1.4 SR1 | F.01U.247.166

Note:
If configured accordingly, Divar-connected cameras show the alarm mode overlay toindicate that the connection is interrupted:– Analog cameras are physically disconnected.– IP cameras are offline.
Relays, contacts and snapshots panesThree side tabs are located on the bottom left of the application window:–
Click to open the Relays pane.–
Click to open the Contacts pane.–
Click to open the Snapshots pane.
Output relaysConnected relays are indicated by a green overlay dot. The icon shows the status of the relay:
A closed relay icon indicates an active output.
An open relay icon indicates an inactive output. – Double-click a connected relay to toggle its state.– Right-click a relay to view its properties or toggle its state via the context menu.
Input contactsConnected input contacts are indicated by a green overlay dot. The icon shows the status ofthe input:
A red contact icon indicates an active input.
A grey contact icon indicates an inactive input. – Right-click an input contact to view its properties via the context menu.
SnapshotsThe pane lists the snapshots taken.– Double-click a list entry to show the snapshot in a cameo.– Right-click a list entry to view its properties via the context menu. Other menu options
are:– Rename image– Delete image
CameosA cameo is a single image area within the video display area. There can be one or manycameos in this area.– If you choose to make quick views, the display mode is selected with the display mode
icons in the toolbar.
3.4
3.4.1
3.4.2
3.4.3
3.5
20 en | Live window overview Video Client
2013.01 | v1.4 SR1 | F.01U.247.166 Software manual Bosch Sicherheitssysteme GmbH

– If a favorite view is selected, the number and layout of the cameos has already beendefined.
To assign a camera to a cameo:4 Drag a camera from the left side pane to a cameo position.P The camera picture appears in the cameo.P A yellow border appears around the cameo.P The aspect ratio of the cameo column adapts to the aspect ratio of the camera.
To assign multiple cameras to cameos:4 Select multiple cameras and drag them from the left side pane to a cameo position.P The first camera picture appears in this cameo.P The following cameos are filled from left to right and top to bottom with the remaining
selected cameras.P The aspect ratio of the cameo column adapts to the aspect ratio of the camera.
To remove a camera from a cameo:4 Click the delete icon in the cameo header.
To enlarge a cameo:1. Double-click the cameo or click the enlarge icon in the header.
The cameo fills the video display area.2. To return a cameo to its original size, double-click it again or click the reduce icon in the
cameo header. Overlays generated by the camera itself can also be displayed, for example, camera names,alarm messages, times and dates.
The manual live recording icon appears when the pointer is placed over a cameo.
See also– Workstation recording, page 28
Cameo context menuRight-click in a cameo to display the context menu. Some commands may not be availabledepending on the source for the cameo display:– Select video input– Enter digital zoom/Exit digital zoom– Start workstation recording/Stop workstation recording– Maximize video/Restore video size– Stop display– Reset counters– Show alternate stream– Capture image– Open instant playback– Properties– TrackingIf a monitor wall is configured, Send to monitor and Send view to monitor commands are alsoavailable.
3.5.1
Video Client Live window overview | en 21
Bosch Sicherheitssysteme GmbH Software manual 2013.01 | v1.4 SR1 | F.01U.247.166
Text view paneThe Text view pane displays metadata from a text source associated with a Divar 700-connected camera. The line number and date stamp are shown in front of the text. Note thatin the live window the icon to open the text viewer pane is only available if a Divar 700-connected camera is allocated to the system.
Figure 3.5: Text view pane
Exporting textTo export text from the text pane:1.
Click to freeze the text in the text pane.2.
Click to copy the text to the clipboard, or click to save the text to a file.
Clearing and closing the text pane1.
To clear the text pane, click .2.
To close the text pane, click .
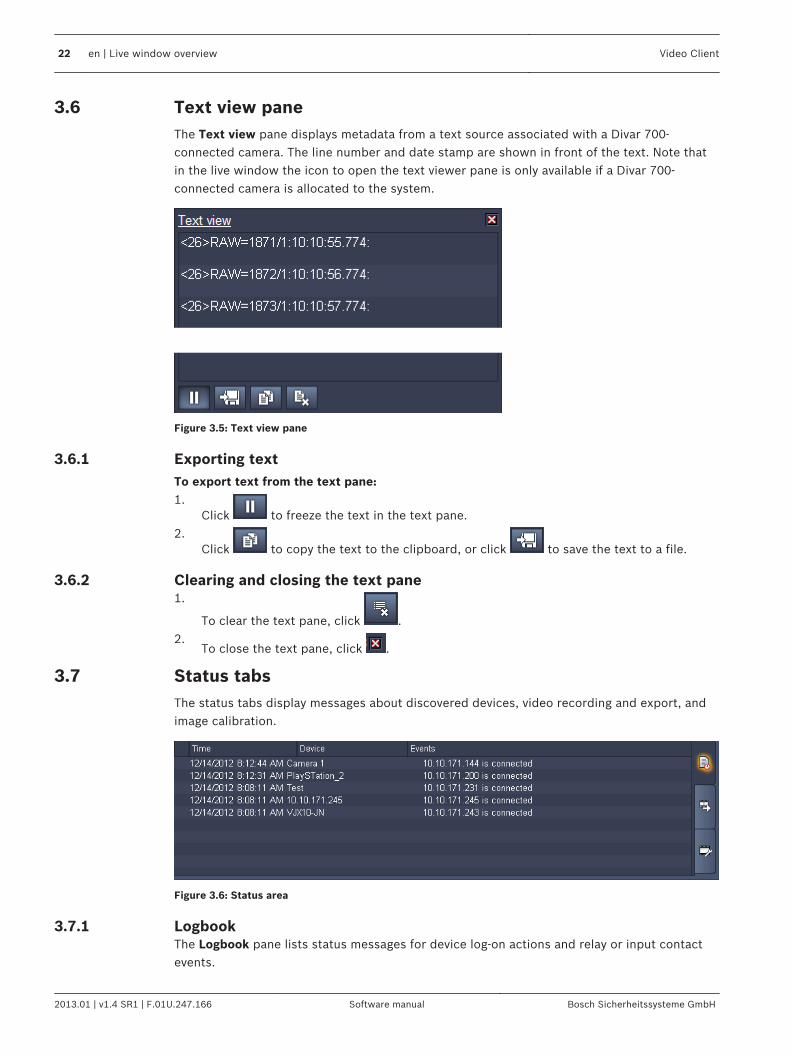
Status tabsThe status tabs display messages about discovered devices, video recording and export, andimage calibration.
Figure 3.6: Status area
LogbookThe Logbook pane lists status messages for device log-on actions and relay or input contactevents.
3.6
3.6.1
3.6.2
3.7
3.7.1
22 en | Live window overview Video Client
2013.01 | v1.4 SR1 | F.01U.247.166 Software manual Bosch Sicherheitssysteme GmbH

4
To see the logbook, click .
Note:To see status messages from VRM, install the patch delivered with Video Client on therespective VRM application.
Export jobThe Export job pane shows the progress of manual video recording and video export jobs.1.
To see the status of an export job, click .2. To stop a manual video recording or a video export job, click .3. To remove a stopped or completed entry from the list click again.
Image calibrationThe Image calibration pane shows information on the settings for brightness, sharpness,contrast, and the gamma correction value for the various color channels for the display of thevideo in the active cameo. It also allows you to adapt the values to your needs.1. To see the status of the various values for the display of the video in the active cameo,
click .2. To select the color channel for which you want to see the values, click the rectangle of
the respective color. Click the tricolored rectangle to show the values for all channels.
To adapt the values for the display of the video in the active cameo to your needs:1.
Click to decrease the brightness, or click to increase the brightness of thedisplay.
2.Click to decrease the contrast, or click to increase the contrast of thedisplay.
3.Click to decrease the gamma correction value, or click to increase thegamma correction value for the display.
4.Click to decrease the sharpness, or click to increase the sharpness of thedisplay.
5. Click to Set as Default to save the settings for the display.
As soon as you change one of the values, the icon is displayed in the cameo toindicate that the image calibration settings differ from the factory default settings.
6. Click Reset to set the values back to the factory default settings.
3.7.2
3.7.3
Video Client Live window overview | en 23
Bosch Sicherheitssysteme GmbH Software manual 2013.01 | v1.4 SR1 | F.01U.247.166

Viewing live imagesThere are two ways of showing live images in the video area:– Select a pre-defined view in the Favorite views pane to provide persistent video area
layouts.– Drag cameras from the device tree into the quick (scratch) viewing layouts.Regardless of which way you choose, overlays in the video images provide additionalinformation.
Note:It is recommended that you take the time to set up a collection of favorite views.
See also– Setting up favorites, page 26
Selecting favorite viewsTo select a pre-defined view:1.
Click to open the Favorite views pane.The list of pre-defined favorite views appears including sequencing views.
2. Double-click a view name to display the pre-defined layout in the live video area. You canalso drag the view to the live video area.A yellow border appears around the first cameo.
3. To change to a different view, double-click another view name in the favorites pane. Youcan also drag the new view to the live video area.
Making quick viewsTo make a quick view:1. Click one of the display mode icons in the toolbar to define the layout configuration of
the video display area, for example the 3x3 camera display icon.In the video display area, three rows with 3 cameos respectively are shown.
2.
Click to open the Video device list pane.3. To populate a specific cameo, drag a camera from the device list to that cameo, or
double-click a camera to assign it to the next available cameo.The camera picture appears in the cameo.A yellow border appears around the cameo.
4.
In the toolbar, click and select Title bar decoration.Each cameo has a title bar which you can drag and drop to reorder the cameo positions.
Within a session, a quick display layout retains its assignments unless overruled by a pre-defined favorite view.
Video image overlaysVarious overlays in the video image provide important status information. The overlays providethe following information:
Decoding error
4
4.1
4.2
4.3
24 en | Viewing live images Video Client
2013.01 | v1.4 SR1 | F.01U.247.166 Software manual Bosch Sicherheitssysteme GmbH

The frame might show artefacts due to decoding errors. If other frames reference this frame,they might also show decoding errors but won’t be marked with the icon.
Alarm flagShown on a media item to indicate an alarm.
Communication errorA communication error, such as a connection failure to the storage medium, a protocolviolation or a timeout, is indicated by this icon. An automatic reconnection procedure isstarted in the background to recover from this error.
GapIndicates a gap in the recorded video.
Watermark flagWatermark is set on media item.
Invalid watermark flagIndicates that the watermark is not valid.
Motion flagIndicates that motion is detected.
Storage discoveryIndicates that recorded video is being retrieved.
Video Client Viewing live images | en 25
Bosch Sicherheitssysteme GmbH Software manual 2013.01 | v1.4 SR1 | F.01U.247.166

Setting up favoritesOn the Favorites Designer pane you find two tabs:– The View Designer helps you to set up and save favorite views.– The Sequence Designer helps you to define and save favorite sequences.
Making a viewUse the View Designer to make your favourite collections of views. A view is a collection ofcamera-to-cameo assignments that can be recalled for instant live viewing. Camera views canbe grouped in a logical way; for example, all cameras showing an entrance to a building.
To make a favorite view in the live window:4
Click the Favorites Designer icon .The View Designer pane opens.
Figure 5.1: Live video window - designing views
1. Click a layout icon in the View Designer pane to select it.The layout appears in the live video area.If you continue to click a particular layout icon, its orientation changes.
2. Drag cameras from the Video inputs list to the cameos.3. Enter a name for the new view.
4. Check the Freeze layout box so the aspect ratios do not change on re-assignment.5.
Click .P The view is stored in the Favorite views pane.P You can drag relays and contacts to a view in the Favorite views pane to create system
overviews.
5
5.1
26 en | Setting up favorites Video Client
2013.01 | v1.4 SR1 | F.01U.247.166 Software manual Bosch Sicherheitssysteme GmbH

Making a sequenced viewUse the Sequence Designer tab to make your favorite collections of sequenced views. Asequenced view is a collection of views and devices that can be recalled for instant sequencedlive viewing. Camera views made with the View Designer tab and separate devices can beselected to create an ordered sequence.
To make a sequenced view in the live window:1.
Click the Favorites Designer icon .The View Designer pane opens.
2. Click the Sequence Designer tab.
3.
Select a view or a device and click to add it to the Sequence list field. Continuedoing this until your list is complete.
4.
To remove an item from the sequence list, select it and click .5.
To re-order the sequence list, click the move up and move down icons.6. Enter a name for the new sequenced view.
7.
Click .P The view is stored in the Favorite views pane.You can easily change sequenced views any time or use them as starting point for a newsequenced view by importing them into the Sequence Designer pane.
To rework sequenced views:1.
To import a saved sequence list, click .The Select Sequence window appears.
2. From the list, select the sequenced view you want to import.3. Click OK.P The components of the selected sequence are listed in the Sequence list field and can be
rearranged as desired.
5.2
Video Client Setting up favorites | en 27
Bosch Sicherheitssysteme GmbH Software manual 2013.01 | v1.4 SR1 | F.01U.247.166

Workstation recordingRecord a live video clip to your computer’s hard disk. A recording is limited to ten minutes andonly two manual recordings can be active at the same time. Date and time overlays are notrecorded.
To do workstation recording:1. Place the pointer over a cameo with the camera which you would like to record to the
workstation.2.
Click the Start workstation recording icon that appears.The export job pane is shown.
3.
To stop workstation recording, either click in the cameo or click in the exportjob pane.
6
28 en | Workstation recording Video Client
2013.01 | v1.4 SR1 | F.01U.247.166 Software manual Bosch Sicherheitssysteme GmbH

Saving snapshotsCapture still images from a camera and save them to the PC hard disk in a bitmap format.
To save a snapshot to the PC hard disk:1. Click a cameo to make it active.2.
Click the image capture tab .The image capture pane opens with the still image displayed.
3. To change the default location, click the drop-down arrow to select a different path onyour PC.
4. To change the file name, type the new name for the file.5. To change the image format, click the drop-down arrow and select the image type.6.
Click to save the image.Saved images are listed in the Snapshots pane in the lower left part of the window.
7.
Click to capture a new still image from the currently active cameo.The snapshot video image has the same resolution as the camera image. Identificationinformation is shown under the image.
8.
To close the image capture pane, click the image capture tab .
7
Video Client Saving snapshots | en 29
Bosch Sicherheitssysteme GmbH Software manual 2013.01 | v1.4 SR1 | F.01U.247.166

Instant playbackUse instant playback to view the previous 5 to 120 seconds of recorded video for a particularcamera. The camera must, of course, have recording facilities.The offset time (5 to 120 seconds) is set in the user preferences.
To view the recorded video of a particular camera from 5 to 120 seconds earlier:1. Click a cameo to make it active.2.
Click the Instant playback tab . You can also right-click in the cameo and select Open instant playback in the contextmenu.The instant playback pane appears.
3.Click to start playback.
4.Click to pause playback.
5.
Click to restart playback of the currently selected cameo 5 to 120 seconds beforethe current time.
A timeline scale is shown with a recording indicator bar below it. A grey box indicates arecording.
To control playback:1.
When paused, click to move back one frame; click to move forward oneframe.
2. Drag the timeline scale to move it in time.3. Right-click the timeline indicator bar to center the timeline on the hairline that indicates
the playback position.If available, you can also hide or show search results.
4. Drag the hairline to move playback to a point within a recording.5. Enter the date and time in the time box to move the hairline to that point of the timeline.
To close the playback pane:4
Click the Instant playback tab .
8
30 en | Instant playback Video Client
2013.01 | v1.4 SR1 | F.01U.247.166 Software manual Bosch Sicherheitssysteme GmbH

Monitor wallThe monitor wall is first set-up in the User preferences dialog box by dragging availablemonitors to a position in the wall.
Figure 9.1: User preferences - monitor wall set-up
When a wall has been set up, the monitor wall icon is shown in the task pane.
See also– Setting user preferences, page 35
To populate the wall with cameras and views:4
Click the Monitor Wall icon .The Monitor Wall pane opens.
9
Video Client Monitor wall | en 31
Bosch Sicherheitssysteme GmbH Software manual 2013.01 | v1.4 SR1 | F.01U.247.166

Figure 9.2: Live video window - Monitor Wall pane
1. Click a monitor in the top section of the Monitor Wall pane to select it.2. Click a view on the selected monitor to select it.3. Drag cameras from the cameos to the selected view.
Alternatively, use the context menu of the cameras to assign a camera or a view to amonitor.
32 en | Monitor wall Video Client
2013.01 | v1.4 SR1 | F.01U.247.166 Software manual Bosch Sicherheitssysteme GmbH

Controlling cameras
Digital zoomTo zoom in and out digitally on any type of camera:1. Click the cameo of the camera to make it active.2. With the pointer in the cameo, scroll the mouse wheel forward to zoom in.
Alternatively, click the button on the control console to activate digital zoom.
A light grey box appears in the top left corner of the cameo.When you zoom in, the light grey box appears within a dark grey box; this is the zoomarea in relation to the full picture.
3.Use the mouse scroll wheel to zoom in and out, or use the and buttons.If you zoom out completely, the digital zoom function switches off.
To move the zoomed area:1. Move the pointer to the picture area.
The pointer changes to a direction arrow.2. Click, or click and drag within the cameo.
Alternatively use the arrows in the control console.The zoomed area moves in the direction of the arrow.A light grey overlay box within a dark grey box indicates the zoomed area.
Note:Digital zoom can also be used with snapshots and archived video files.
PTZ camerasYou can control controllable (PTZ) cameras by using the mouse on the cameo of the camera orby using the control console icons.
Mouse controlUse the mouse to do in-window pan, tilt, and zoom:Make sure to have a controllable (PTZ) camera in use.1. Click the cameo of the camera to make it active.2. Place the pointer on the active cameo (not in the center).
The pointer arrow indicates the direction in which the camera will move.3. Click and hold the left mouse button.
Alternatively, drag the pointer in the desired direction to move the camera. Move thepointer horizontally to pan the camera and vertically to tilt the camera.The camera moves in the direction indicated.Pan and tilt speed depends on the position of the pointer on the cameo. Click closer tothe edge of the cameo to increase the speed; click closer to the center to decrease thespeed.
4. Release the button when the camera is positioned.
10
10.1
10.2
10.2.1
Video Client Controlling cameras | en 33
Bosch Sicherheitssysteme GmbH Software manual 2013.01 | v1.4 SR1 | F.01U.247.166

5. Use the mouse scroll wheel to zoom in or out.
Control consolePan and tilt
1. Select the cameo of the camera to be controlled.2. Click and hold the up and down arrows for tilt.3. Click and hold the left and right arrows to pan.4. Release the mouse button to stop camera movement controls.
Zoom, focus, and iris1. Select the cameo of the camera to be controlled.2.
Click and hold the left zoom button to zoom out; click and hold the right zoom
button to zoom in.3.
Click and hold the left focus button for far focus; click and hold the right focus
button for near focus.4.
Click and hold the left iris button to close the iris; click and hold the right iris
button to open the iris.5. Release the mouse button to stop camera adjustment controls.
To move the active camera to a pre-position:
1. Click buttons one to six for immediate positioning to one of the first six pre-positions.2. Alternatively, enter a pre-position number using the keyboard.3. Click Shot (or press ENTER).
To store the current position of the camera in a pre-position:1. Position the camera.2. Enter a pre-position number.3. Click Set.
Aux functionsAux commands are special commands for controlling cameras.1. To switch on the Aux command, enter an Aux number.2. Click Aux On (or press ENTER).3. To switch off the Aux command, click Off.
10.2.2
34 en | Controlling cameras Video Client
2013.01 | v1.4 SR1 | F.01U.247.166 Software manual Bosch Sicherheitssysteme GmbH

Playback windowIn the playback window you can:– select a single or a quad display mode– assign cameras to playback cameos to view recorded video– search for recordings– control playback– export recorded video clips to your PC– take a snapshot of the active playback cameo– view stored snapshots and video clips
Note:
If you are in the live mode, click to switch to the playback window.
Figure 11.1: Typical playback window
Note:You cannot assign a favorite view to the playback window.
Playback toolbarThe toolbar is shown at the top of the playback window.
Setting user preferencesThese settings are saved for the user who is logged on and are applied each time this userlogs on with the same computer.
11
11.1
11.1.1
Video Client Playback window | en 35
Bosch Sicherheitssysteme GmbH Software manual 2013.01 | v1.4 SR1 | F.01U.247.166

1.
To change the user preferences for Video Client, click to open a dialog box withtabs for various configuration settings.
2. Configure the settings as described below.3. Click OK to save changes and close, or Cancel to close the window without change.
Settings tab1. Place a check mark next to the alarms and errors items to be activated.
The computer beeps on the specified alarms or maximizes the application window.2. Select a sequence dwell time between 5 and 60 seconds to determine how long a
sequenced view remains displayed.3. Check Show device local time to display a cameo overlay of the actual time set on a
device.4. Check Kiosk Mode to expand the Video Client window to full screen. It requires a restart
for it to take effect and is only available to the administrator. When in kiosk mode a usercannot exit the application.
5. Select an instant playback time offset between 5 and 120 seconds.6. If you have multiple monitors set up in Windows, check Enable second monitor to use
one of these monitors as a second monitor. Select the monitor you wish to use in the boxbelow.
Directories tab1. Enter the locations that will be monitored for exported recordings.2. Enter the locations that will be monitored for exported snapshots.3. Enter the location for workstation recording.
Monitor Wall tab1. Drag the available monitors to a position on the monitor wall graphic.2. Alternatively, use the arrows to place or remove the monitors.
Selecting quick display modesTo switch the display mode, click a cameo view icon to change the layout configuration of thevideo viewing area:In the playback window the following icons are available:–
Single cameo–
2x2 cameos
Opening text viewer pane
Click to open the text viewer pane. Text associated with a Divar 700-connected camerarecording is displayed in the pane.
Configuring cameo window display
Click and select the items you want displayed in the cameo window:– No additional information– A title overlay– A title barFurthermore, you can select to show or hide the local device time and VCA data overlay.
11.1.2
11.1.3
11.1.4
36 en | Playback window Video Client
2013.01 | v1.4 SR1 | F.01U.247.166 Software manual Bosch Sicherheitssysteme GmbH

Maximizing video area
Click to maximize the video display area. Click the icon again on the auto-hide toolbar atthe top of the screen to switch back to normal mode, or use F10 to switch between modes.
Enabling audio
Click to enable or disable recorded audio. When enabled, the audio of the selected cameois heard, if available.
Controlling audio volume
Click to adjust the audio volume.
Configuration
Click to open the Configuration Manager application (administrator only).
Getting help
Click to open the help index. Select a help topic.
Minimizing Video Client
Click to minimize Video Client to the taskbar.
Selecting camera recordingsVideo recordings created by cameras that have on-board storage (a memory card), or directiSCSI or VRM storage, or DVR storage can be viewed. Expand a camera to see if it has more than one track and then select the track you wish toview. VRM recordings can also have backups that can be selected for viewing.
Figure 11.2: VRM backup
To view a camera recording, assign the camera to a cameo:4 Drag one or multiple cameras from the left side pane to a cameo.P The recorded camera picture appears in the cameo.P A blue border appears around the cameo.P The aspect ratio of the cameo column adapts to the aspect ratio of the camera.
To enlarge a cameo in a 2x2 display:1. Double-click the cameo.
The cameo fills the video display area.2. Double-click the cameo again to return it to its original size.
11.1.5
11.1.6
11.1.7
11.1.8
11.1.9
11.1.10
11.2
Video Client Playback window | en 37
Bosch Sicherheitssysteme GmbH Software manual 2013.01 | v1.4 SR1 | F.01U.247.166

Timeline
Click the Timeline tab to view the timeline.A timeline with the recordings of the displayed cameras is shown with all camera trackssynchronized to the same playback time.
Figure 11.3: Timeline
The timeline shows the recorded sequence in light blue, motion recording in yellow, contactrecording in red and text recording in orange.
To change the timeline scale:1.
Click the or box to adjust the timeline scale.Alternatively, place the pointer on the timeline scale and rotate the mouse wheel tochange the timeline scale.The timeline shows the interval indicated between the two boxes, for example threeminutes or one week.
2. To show the full timeline for the entire recording, click until All is displayed between theboxes.
3. To zoom in on a smaller section of the timeline, select a shorter time period.
To navigate in the timeline:1. Use the arrows above the timeline or drag the timeline scale to move back and forward in
time.2. Click somewhere in the timeline.
Alternatively, enter the required values in the date and time field.The hairline jumps to this time. The images of this point in time are displayed in the videodisplay area.
3. Use the timeline controls for the required playing option.
See also– Playback controls, page 40
To select a time period:You can select a time period in the timeline using the hairline. You can use this selection forfurther tasks such as exporting video data.1. Drag the bottom arrow handles of the hairline to select a time period.
Drag the left or right edge of the selection to change the size of the selection.Drag the bottom of this selection to move the selection.
2. Right-click the selection and click Clear selection to remove the selection and display thesingle hairline again.
To check the authenticity of an export video clip selection:4 Select a time period in the timeline, right-click this selection and click Authenticate.
The authenticity is checked and an appropriate message box opens.
To export a selection:1. Select a time period in the timeline, right-click this selection and click Export.
11.3
38 en | Playback window Video Client
2013.01 | v1.4 SR1 | F.01U.247.166 Software manual Bosch Sicherheitssysteme GmbH

The Export dialog box opens.2. Make the appropriate settings.
See also– Exporting recorded video clips to a PC hard disk, page 41
Context commandsThe commands available in the context menu depend on what you have selected on thetimeline. For example, the context menu for a VRM recorder camera is as follows:
Note:When you click a context menu command that is not available for all cameras in the timeline,the command is executed only on the cameras that have this option available.
Center at playback time Moves the timeline to center the current playbacktime.
Authenticate Checks the authenticity of the selection.
Delete Deletes the selection (recorders only).
Delete until Deletes all recorded video associated with thetracks up to the end time of the selection(recorders only).
Export Exports the selection.
Backup Makes a backup of the selection (VRM only).
Protect Protects the selection (VRM only).
Unprotect Unprotects the selection (VRM only).
Show event search results Displays results of the event search. Other searchresults cannot be displayed at the same time.
Show text search results Displays results of the text search. Other searchresults cannot be displayed at the same time(recorders only).
Show IVA search results Displays results of the IVA search. Other searchresults cannot be displayed at the same time.
Clear selection Removes the selection.
11.3.1
Video Client Playback window | en 39
Bosch Sicherheitssysteme GmbH Software manual 2013.01 | v1.4 SR1 | F.01U.247.166

Playback controls
Figure 11.4: Playback controls
Playback1.
Click to play forward recorded video in the playback window.2. Playback speed and direction can be selected in three different ways:
- with the jog dial
- with the forward and reverse buttons
- with the forward and reverse speed slider 3.
Click to freeze the image.
Step forward / Step backward
The step buttons are only enabled when was clicked.1. Click a step button to move the image back or forward one frame.2. When you press and hold the mouse button, every 0.5 seconds a next frame is displayed.
Earliest / Latest recording4
Click the earliest or latest recording button to move to the earliest orlatest recording.
Jump to eventThe last executed search (for example event or IVA) is used. Only the search results for thiscamera are used.4
Click the previous or next event button to move to the previous or nextevent.
P If no search was performed, nothing happens.P If the current playback time is after the last search result, nothing happens when jumping
to the next event.P If the current playback time is before the first search result, nothing happens when
jumping to the previous event.The date and time are shown under the playback controls.1. Click one of the values to activate it, for example the day or the seconds.
The background color for the activated value changes.
11.4
40 en | Playback window Video Client
2013.01 | v1.4 SR1 | F.01U.247.166 Software manual Bosch Sicherheitssysteme GmbH

2.Click the up or down button to count up or down the activated value by one.Alternatively, type the desired value.
P If a recording is available for the entered value, the hairline jumps to this time. Theimages of this point in time are displayed in the video display area.
P If no recording is available for the entered value, nothing happens.
Exporting recorded video clips to a PC hard diskTo store recordings from a selected period on a PC hard disk:1. Drag one or multiple cameras from the left side pane to a cameo.2.
Click the Export button on the playback controls.The export window appears listing all assigned cameras by default. If the same camera isassigned multiple times in your displayed view, only one entry for this camera is listed.
3. To change the default location, browse to the location in the PC file system where thearchive file is to be stored.
4. Type a new name for the file to change the file name.5. Decide if you want to add the location to the directory list.6. Enter new values in the From and To boxes to change the selection start and end date/
time.7. Select which cameras to archive in the confirmation window that appears.8. Under Export format decide for the format of the exported file.
The approximate size of the archive file is shown. Ensure that there is sufficient space tostore this file.
9. Click Export to start saving the archive file.
The export is added to the export status list on the Export job pane and a progress bar isshown there. The export job runs in the background, so you can continue using Video Clientfor live viewing, playback, search or other export tasks.
Note:A log of all exports can be found at the following locations:– Windows XP: C:\Documents and Settings\All Users\Application Data\Bosch\Video Client– Windows 7/Windows Vista: C:\Program Data\Bosch\Video Client
Taking snapshots
Use the Image capture tab to take a snapshot of a recorded image.
See also– Saving snapshots, page 29
Search tabsThe playback window has two search tabs on the right:– The Event search tab allows a search for recordings based on alarm and motion events.– The IVA search tab allows a search for recordings based on intelligent motion analysis.A third search tab is available for Divar 700-connected cameras:– The Text search tab allows a search for recordings based on text.
See also– Searching for events, page 44– IVA search, page 46
11.5
11.6
11.7
Video Client Playback window | en 41
Bosch Sicherheitssysteme GmbH Software manual 2013.01 | v1.4 SR1 | F.01U.247.166

– Searching for text, page 47
Playing stored filesExported video files and exported snapshots that are stored on your PC are played back in theplayback window.
Exported video clipsTo play back exported video clips:1.
Click to open the exported video clip pane.A list of exported files is displayed.
2.To see the tracks stored in a file, click .
3. To display a file or a track, double-click it or drag it to a cameo.The video is assigned to a cameo and the timeline of this recording is displayed.
4.
Click to start playback.
Note:Files exported in ASF format will not play within Video Client. ASF files can be played usingstandard Windows media players.
Context commandsRight-click a file or a track to open the context menu:
File context menu
Rename export Marks the filename of the selected export tochange it.
Delete export Deletes the selected export directly without afurther warning.
Properties Displays the File set properties dialog boxwith information on the export file.
Track context menu
Authenticate The authenticity is checked and anappropriate message box opens.
Properties Displays the Track properties dialog box withinformation on the export file.
Archived snapshotsTo play back exported snapshots:1.
Click to open the exported snapshots pane.A list of exported files is displayed.
2. To display a snapshot, double-click it or drag it to a cameo.
Context commandsRight-click a file to open the context menu:
11.8
11.8.1
11.8.2
42 en | Playback window Video Client
2013.01 | v1.4 SR1 | F.01U.247.166 Software manual Bosch Sicherheitssysteme GmbH

File context menu
Rename image Marks the filename of the selected image tochange it.
Delete image Deletes the selected image directly without afurther warning.
Properties Displays the Capture file properties dialogbox with information on the image file.
Camera SD cardYou can access recording files on an SD card that has been removed from a camera.1. Ensure that Video Client is open on your computer.2. Insert the SD card into the card reader of your computer.
A list of files suitable for playback is displayed.
11.9
Video Client Playback window | en 43
Bosch Sicherheitssysteme GmbH Software manual 2013.01 | v1.4 SR1 | F.01U.247.166

Searching for events
Click the Event search tab of the playback window to set up a search filter for events.
Figure 12.1: Playback window - Event search pane
To set the search period:4 Enter the date and time in the From and To boxes to define the period to search:
The From box shows the time and date of the earliest (oldest) recording and the To boxthe latest (newest) recording by default.
To select a track:4 Check a camera selection box to mark those cameras to be included in the search.Only the assigned cameras are listed here. If a camera is assigned multiple times in yourdisplayed view, only one entry for this camera is listed.
To specify the type of event to search for:4 Check an event type selection box to mark those events to be included in the search.– Contact: recorded video for contact events for the selected tracks is searched for within
the defined period.– Motion: recorded video for motion events for the selected tracks is searched for within
the defined period.– Text: recorded video for text events for the selected tracks is searched for within the
defined period.– Video loss: recorded video for video loss events for the selected tracks is searched for
within the defined period.
12
44 en | Searching for events Video Client
2013.01 | v1.4 SR1 | F.01U.247.166 Software manual Bosch Sicherheitssysteme GmbH

– System events: recorded video for system events for the selected tracks is searched forwithin the defined period.
– Alarms only: the search is restricted to alarm events only.
To start the search:4
Click to start the search.
Search resultsWhen the search is completed, a list of video clips that match the filter criteria is displayed.This list shows the latest event recordings at the top, the earliest at the bottom.1. Click on a column header to sort the list according to that column item. Click a second
time to sort the list in reverse order.2. Use the scroll bar to examine the full list.3. Click on an entry in the list to select it.
The selected event is displayed in the playback window.4. Use the playback controls to adjust playback speed and direction.5.
Click to close the list.6.
Click to reopen the list.7.
Click to clear the list.
See also– Playback controls, page 40
Video Client Searching for events | en 45
Bosch Sicherheitssysteme GmbH Software manual 2013.01 | v1.4 SR1 | F.01U.247.166

IVA search
Click the IVA search tab of the playback window to set up an IVA search.
Figure 13.1: Playback window - IVA search pane
To select a time period for IVA search, select it in the timeline using the hairline.
Algorithm selection1. In the drop-down box, select an IVA algorithm to be used in the search.
A window opens with the parameters of the IVA algorithm.2. Change the desired parameters.3. In the drop-down box, select a preset.4.
Click to save your choices.5.
Click to return to the saved choices for a preset.
Note:Refer to the documentation supplied with the IVA application for more details on setting upalgorithms and presets.
To start the search:4
Click to start the search.
Search resultsWhen the search is completed, a list of video clips that match the filter criteria is displayed.This list shows the latest event recordings at the top, the earliest at the bottom.1. Click on a column header to sort the list according to that column item. Click a second
time to sort the list in reverse order.2. Use the scroll bar to examine the full list.3. Click on an entry in the list to select it.
The selected event is displayed in the playback window.4. Use the playback controls to adjust playback speed and direction.5.
Click to close the list.6.
Click to reopen the list.7.
Click to clear the list.
See also– Playback controls, page 40
13
46 en | IVA search Video Client
2013.01 | v1.4 SR1 | F.01U.247.166 Software manual Bosch Sicherheitssysteme GmbH

Searching for textText search is only supported on Divar 700-connected cameras with an appropriate licenseinstalled.
Click the Text search tab of the playback window to set up a search filter for text.
Figure 14.1: Playback window - Text search pane
To set the search period:4 Enter the date and time in the From and To boxes to define the period to search:
The From box shows the time and date of the earliest (oldest) recording and the To boxthe latest (newest) recording by default.
To select a track:4 Check a camera selection box to mark those cameras to be included in the search.Only the assigned cameras are listed here. If a camera is assigned multiple times in yourdisplayed view, only one entry for this camera is listed.
Text filter1. Type the text you wish to search for.2. Check the Case sensitive search box to exactly match the case of the typed text to the
text you are searching for.
To start the search:4
Click to start the search.
14
Video Client Searching for text | en 47
Bosch Sicherheitssysteme GmbH Software manual 2013.01 | v1.4 SR1 | F.01U.247.166

Search resultsWhen the search is completed, a list of video clips that match the filter criteria is displayed.This list shows the latest event recordings at the top, the earliest at the bottom.1. Click on a column header to sort the list according to that column item. Click a second
time to sort the list in reverse order.2. Use the scroll bar to examine the full list.3. Click on an entry in the list to select it.
The selected event is displayed in the playback window.4. Use the playback controls to adjust playback speed and direction.5.
Click to close the list.6.
Click to reopen the list.7.
Click to clear the list.
See also– Playback controls, page 40
48 en | Searching for text Video Client
2013.01 | v1.4 SR1 | F.01U.247.166 Software manual Bosch Sicherheitssysteme GmbH

Command line startThe program can also be started from the command line with additional parameters. For example, the command C:\Program Files\Bosch\Video Client\videoclient.exe -? opens a helpwindow with more information about the parameters that can be used.
Sites parameterIf you use the sites parameter, you must specify the path to an xml file which describes thedevices at the different sites. For example, the command:C:\Program Files\Bosch\Video Client\videoclient.exe -sites D:\sites_file.xml
XML file structureThe xml file has a simple structure as is shown in the following example:
15
Video Client Command line start | en 49
Bosch Sicherheitssysteme GmbH Software manual 2013.01 | v1.4 SR1 | F.01U.247.166

A sample editable xml file can be found on the Bosch web site.
Site connector paneThe Site Connector pane shows the devices that have been listed in the start-up xml file.
50 en | Command line start Video Client
2013.01 | v1.4 SR1 | F.01U.247.166 Software manual Bosch Sicherheitssysteme GmbH

Figure 15.1: Site connector pane
To log on to a device:1. If required, enter text in the filter area to reduce the number of sites listed.2. Select a device and enter its user name and password.3.
Click to log on to the device and obtain the list of cameras connected to it.
Video Client Command line start | en 51
Bosch Sicherheitssysteme GmbH Software manual 2013.01 | v1.4 SR1 | F.01U.247.166

Using keyboardsMany functions of Video Client can be controlled by shortcut keys on a standard computerkeyboard. You can also use a Bosch IntuiKey keyboard to control a pre-defined set offunctions.
Standard keyboard shortcut keysThe following table lists the functions that can be controlled by shortcut keys on a standardcomputer keyboard.
Action Key
Switch mode (Live <--> Playback) F2
Show favorite views tab CTRL+F
Show device list tab CTRL+D
Show relays tab CTRL+R
Show contacts tab CTRL+C
Show snapshots tab CTRL+S
Show capture image task ALT+C
Show Instant Playback task ALT+P
Show view designer pane ALT+V
Show monitor wall task ALT+M
Show logbook CTRL+L
Show jobs CTRL+J
Go to play control area CTRL+P
Go to viewer CTRL+V
Set single view CTRL+1
Set quad view CTRL+2
Set 3x3 view CTRL+3
Set 4x3 view CTRL+4
Show text view F9
Show preferences F5
Set no cameo decorations ALT+1
Set title overlay cameo decorations ALT+2
Set title bar decoration ALT+3
Toggle VCA overlay ALT+4
Maximize video area F10
Mute audio F7
16
16.1
52 en | Using keyboards Video Client
2013.01 | v1.4 SR1 | F.01U.247.166 Software manual Bosch Sicherheitssysteme GmbH

Action Key
Show Help F1
Toggle full screen F11
Volume up F8
Volume down SHIFT+F8
Log off F4
Exit application ALT+F4
Only in Playback mode
Show exported files tab CTRL+X
Show event search task ALT+E
Show IVA search task ALT+I
Show text search task ALT+T
Go to timeline CTRL+T
Go to play control area (CTRL+p)
Play reverse SHIFT+SPACEBAR
Pause play SPACEBAR
Play forward SPACEBAR
Play speed up PLUS SIGN
Play speed down MINUS SIGN
Move back 1 frame LEFT ARROW
Move forward 1 frame RIGHT ARROW
Go to timeline (CTRL+t)
Timeline page left LEFT ARROW
Timeline page right RIGHT ARROW
Timeline step left SHIFT+LEFT ARROW
Timeline step right SHIFT+RIGHT ARROW
Timeline begin selection HOME
Timeline end selection END
Timeline increase resolution PAGE UP
Timeline decrease resolution PAGE DOWN
Video Client Using keyboards | en 53
Bosch Sicherheitssysteme GmbH Software manual 2013.01 | v1.4 SR1 | F.01U.247.166

Action Key
Go to viewer (CTRL+v)
Select cameo
Toggle full screen / multi-screen ENTER
Move to cameo on left LEFT ARROW
Move to cameo on right RIGHT ARROW
Move to cameo above UP ARROW
Move to cameo below DOWN ARROW
Using a Bosch IntuiKey keyboardThe Bosch IntuiKey keyboard can be used to control a limited number of functions in the liveand playback mode. The keyboard is connected to the computer via an RS-232 connection.Refer to the IntuiKey documentation for more information on installing and general operatingprinciples.When the IntuiKey keyboard is controlling Video Client, several functions of the application aredisabled, so it is necessary to ensure that the application is set-up correctly for IntuiKeyoperation.
Before installing the IntuiKey keyboardBefore installing the IntuiKey keyboard configure Video Client taking the following points intoaccount:– – User name and password may only consist of numbers as you can only enter this
information using the numeric keypad of the IntuiKey keyboard.– – Set up all the favorite views you will require (at least one layout must be defined).– – Set up sequences.
Tip:If you precede a favorite group with a number in square brackets (for example, [300]), theitems in that group will be numbered sequentially based on that number ([301], [302], etc.)The View Designer and Monitor Wall task panels will not be available.In the toolbar, the following functions will be unavailable or limited:
User preferences (limited)
Display cameras in sequence
Select cameo decoration (limited)
Configuration Manager
Show help index
Minimize
16.2
16.2.1
54 en | Using keyboards Video Client
2013.01 | v1.4 SR1 | F.01U.247.166 Software manual Bosch Sicherheitssysteme GmbH
Setting up the IntuiKey keyboardConnect the IntuiKey keyboard to the computer. In the Configuration Manager application, setthe communication port number of the computer and enable Use keyboard.
See also– Configuring with Configuration Manager, page 10When the IntuiKey keyboard is installed, restart Video Client. On connection, press the Prodbutton and then press the softkey next to Terminal.To log on to the application, enter the user name and password using the numeric keypad and
the enter key .Video Client opens with a compact user interface.
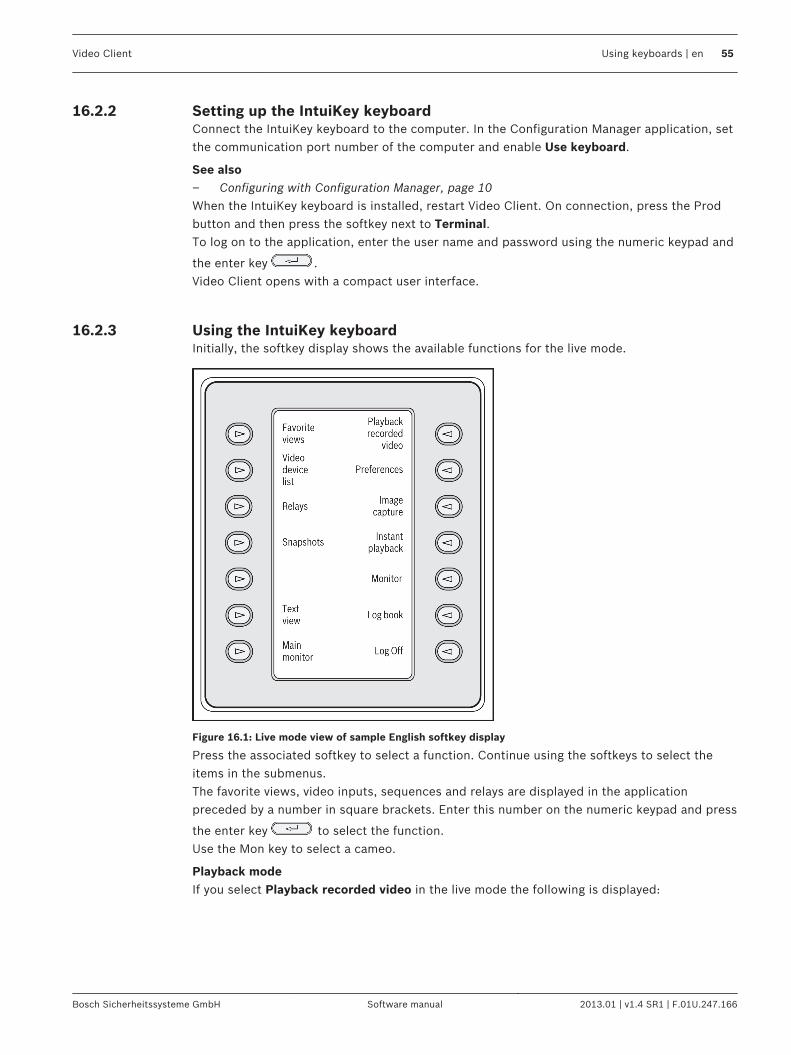
Using the IntuiKey keyboardInitially, the softkey display shows the available functions for the live mode.
Figure 16.1: Live mode view of sample English softkey display
Press the associated softkey to select a function. Continue using the softkeys to select theitems in the submenus.The favorite views, video inputs, sequences and relays are displayed in the applicationpreceded by a number in square brackets. Enter this number on the numeric keypad and press
the enter key to select the function.Use the Mon key to select a cameo.
Playback modeIf you select Playback recorded video in the live mode the following is displayed:
16.2.2
16.2.3
Video Client Using keyboards | en 55
Bosch Sicherheitssysteme GmbH Software manual 2013.01 | v1.4 SR1 | F.01U.247.166

Figure 16.2: Playback mode view of sample English softkey display
You can also use the joystick to control playback and timeline actions.
Exiting the applicationTo exit the application, select Log Off.
56 en | Using keyboards Video Client
2013.01 | v1.4 SR1 | F.01U.247.166 Software manual Bosch Sicherheitssysteme GmbH


Bosch Sicherheitssysteme GmbH
Robert-Bosch-Ring 5
85630 Grasbrunn
Germany
www.boschsecurity.com
© Bosch Sicherheitssysteme GmbH, 2013