Version 5 - Pentaho User...
79
Version 5.4 [ Embed and Extend PDI ] ] https://help.pentaho.com/Draft_Content/Version_5.4 Updated: Wed, 27 May 2015 15:29:00 GMT 1/79
Transcript of Version 5 - Pentaho User...

Version 5.4
[ Embed and Extend PDI ]
]
https://help.pentaho.com/Draft_Content/Version_5.4Updated: Wed, 27 May 2015 15:29:00 GMT
1/79
Copyright Page
This document supports Pentaho Business Analytics Suite 5.4 GA and Pentaho Data Integration 5.4 GA,
documentation revision June 9th, 2015, copyright © 2015 Pentaho Corporation. No part may be reprinted
without written permission from Pentaho Corporation. All trademarks are the property of their respective
owners.
Help and Support Resources
To view the most up-to-date help content, visit https://help.pentaho.com.
If you do not find answers to your questions here, please contact your Pentaho technical support
representative.
Support-related questions should be submitted through the Pentaho Customer Support Portal at
http://support.pentaho.com.
For information about how to purchase support or enable an additional named support contact, please
contact your sales representative, or send an email to [email protected].
For information about instructor-led training, visit http://www.pentaho.com/training.
Liability Limits and Warranty Disclaimer
The author(s) of this document have used their best efforts in preparing the content and the programs
contained in it. These efforts include the development, research, and testing of the theories and programs to
determine their effectiveness. The author and publisher make no warranty of any kind, express or implied,
with regard to these programs or the documentation contained in this book.
The author(s) and Pentaho shall not be liable in the event of incidental or consequential damages in
connection with, or arising out of, the furnishing, performance, or use of the programs, associated instructions,
and/or claims.
Trademarks
The trademarks, logos, and service marks ("Marks") displayed on this website are the property of Pentaho
Corporation or third party owners of such Marks. You are not permitted to use, copy, or imitate the Mark, in
whole or in part, without the prior written consent of Pentaho Corporation or such third party. Trademarks of
Pentaho Corporation include, but are not limited, to "Pentaho", its products, services and the Pentaho logo.
https://help.pentaho.com/Draft_Content/Version_5.4/Copyright_PageUpdated: Wed, 27 May 2015 15:29:00 GMT
2/79
Trademarked names may appear throughout this website. Rather than list the names and entities that own the
trademarks or inserting a trademark symbol with each mention of the trademarked name, Pentaho
Corporation states that it is using the names for editorial purposes only and to the benefit of the trademark
owner, with no intention of infringing upon that trademark.
Third-Party Open Source Software
For a listing of open source software used by each Pentaho component, navigate to the folder that contains
the Pentaho component. Within that folder, locate a folder named licenses. The licenses folder contains
HTML.files that list the names of open source software, their licenses, and required attributions.
Contact Us
Global Headquarters Pentaho Corporation Citadel International, Suite 460
5950 Hazeltine National Drive Orlando, FL 32822
Phone: +1 407 812-OPEN (6736)
Fax: +1 407 517-4575
http://www.pentaho.com
Sales Inquiries: [email protected]
https://help.pentaho.com/Draft_Content/Version_5.4/Copyright_PageUpdated: Wed, 27 May 2015 15:29:00 GMT
3/79
Get Started
Pentaho software engineers have anticipated that you may want to develop custom plugins to extend Pentaho
Data Integration (PDI) functionality or to embed the PDI engine into you own Java applications. To aid
experienced Java developers, we provide Java classes and methods, as well as sample Eclipse-based projects
with detailed code-level documentation. The instructions in this publication show you how to approach your
plugin project. When reading the instructions, we recommended that you open the related sample project and
follow along.
Unless specifically stated otherwise, developing custom plugins and extending or embedding PDI is not
covered under the standard Pentaho customer support agreement.
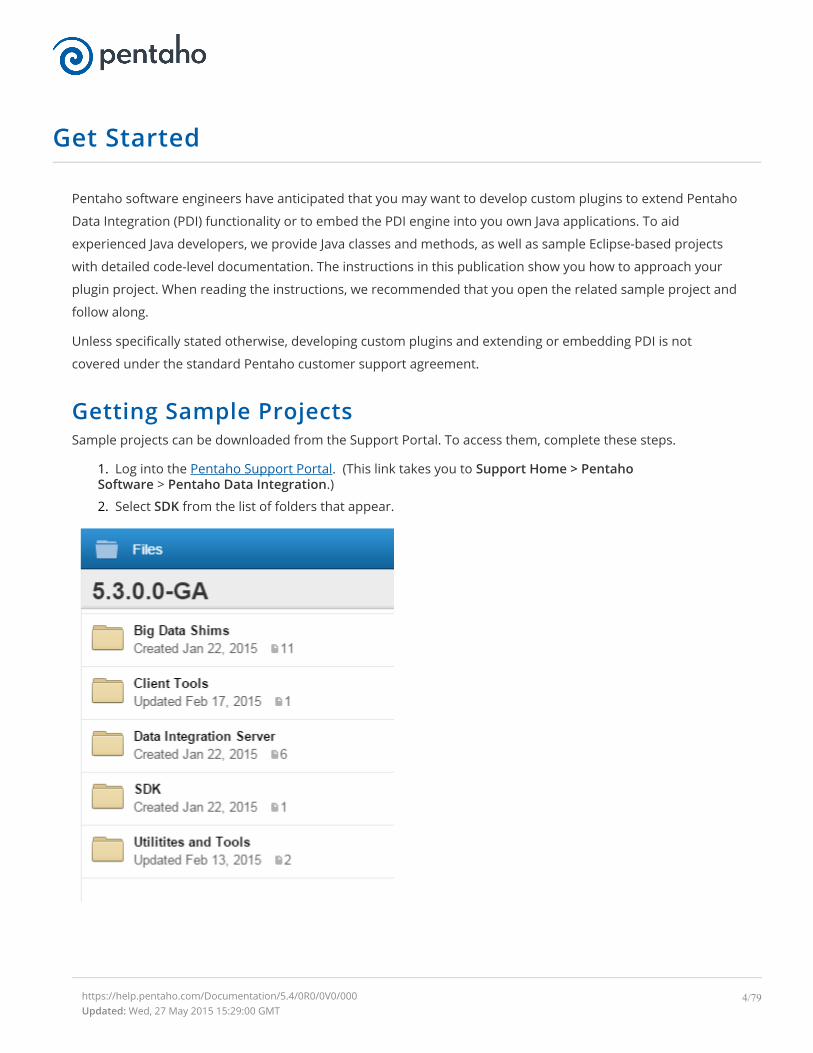
Getting Sample ProjectsSample projects can be downloaded from the Support Portal. To access them, complete these steps.
1. Log into the Pentaho Support Portal. (This link takes you to Support Home > PentahoSoftware > Pentaho Data Integration.)
2. Select SDK from the list of folders that appear.
https://help.pentaho.com/Documentation/5.4/0R0/0V0/000Updated: Wed, 27 May 2015 15:29:00 GMT
4/79
Note: The sample projects are provided "as is" and are subject to the warranty disclaimer contained in the applicable
project license. Sample projects are informational only and are not recommended for use in production. Use in
production is at your own risk.
Setting Up a Development EnvironmentWhen beginning a new PDI-related project we recommend you start from one of the sample projects and
adapt it to your development environment.
The sample projects come preconfigured as Eclipse projects, complete with dependencies to a stable release of
PDI. If you are developing for a specific version of PDI, you must replace the dependency jar files to match
your version of PDI. The PDI classes and methods are stable for any major version of PDI, so you can safely
replace the jar files and develop for any PDI 5.x release.
Getting PDI SourcesWhen developing with PDI, also known as the Kettle project to the open source community, it is helpful to have
the Kettle sources close by. Including them in development projects makes it possible to trace and step
through core PDI code, which helps when debugging your solution.Note: It is not necessary or supported to modify or compile any of the PDI sources when embedding orextending PDI. Including the PDI sources in your projects is optional.
PDI source code is publicly available from the Pentaho GitHub repository at https://github.com/pentaho/
pentaho-kettle.
PDI follows the standard project layout for GitHub repositories. The version currently in development is hosted
in the trunk folder, patch branches are hosted in the branch folders, and released versions are tagged in the
tags folder.
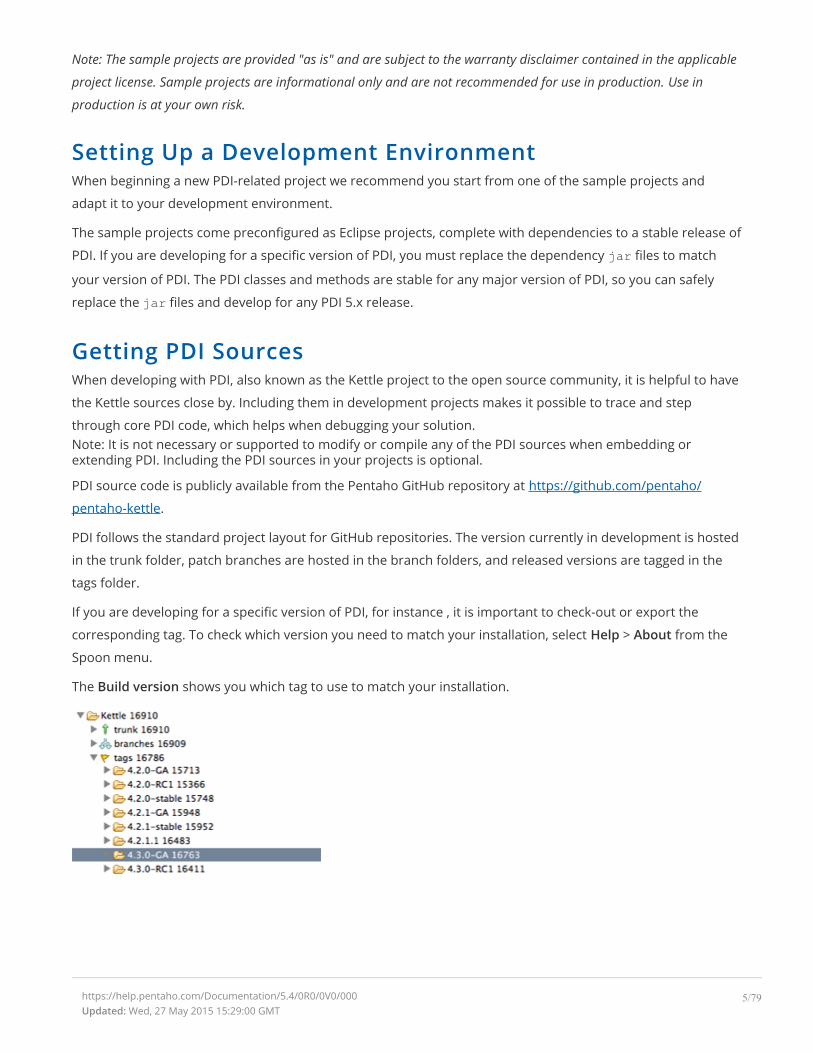
If you are developing for a specific version of PDI, for instance , it is important to check-out or export the
corresponding tag. To check which version you need to match your installation, select Help > About from the
Spoon menu.
The Build version shows you which tag to use to match your installation.
https://help.pentaho.com/Documentation/5.4/0R0/0V0/000Updated: Wed, 27 May 2015 15:29:00 GMT
5/79
Attach Source to PDI JAR FilesIf you checked out PDI sources, you may want to associate the source to the matching PDI jar files against
which you are compiling your plugin. This optional step may improve the debugging experience, as it allows
you to trace into PDI core code.
Additional Developer DocumentationJavadoc
The javadoc documentation reflects the most recent stable release of PDI and is available
at http://community.pentaho.com/javadoc/.
Pentaho Developer's Center
The Pentaho Developer's Center contains the PDI Embed and Extend documentation, PDI Server API, and
more: https://help.pentaho.com/Documentation/5.3/0R0
Pentaho Help
Pentaho Help contains documentation for developers, evaluators, and end users: https://help.pentaho.com
Pentaho PDI Community Wiki
Additional developer documentation is available in the PDI community wiki: http://wiki.pentaho.com/display/EAI/Latest+Pentaho+Data+Integration+%28aka+Kettle%29+Documentation.
The “Documentation for (Java) Developers" section has additional information for extending PDI with plugins or
embedding the PDI engine.
https://help.pentaho.com/Documentation/5.4/0R0/0V0/000Updated: Wed, 27 May 2015 15:29:00 GMT
6/79
Extend Pentaho Data Integration
To extend the standard PDI functionality, you may want to develop custom plugins. The instructions in this
section address common extending scenarios, with each scenario having its own sample project. These folders
of the sample code package contain sample projects. See the Getting Sample Projects topic in the Get Started
section of this guide to learn how to access the sample code.
kettle-sdk-step-plugin
kettle-sdk-jobentry-plugin
kettle-sdk-database-plugin
kettle-sdk-partitioner-plugin
Here is information on how to create and debug different types of plugins. Links to the localization section, as
well as to a topic that explains how to create PDI icons, also appears below.
• Create Step Plugins
• Create Job Entry Plugins
• Create Database Plugins
• Create Partitioner Plugins
• Creating PDI Icons
• Debug Plugins
• Localization
https://help.pentaho.com/Documentation/5.4/0R0/0V0/010Updated: Wed, 27 May 2015 15:29:00 GMT
7/79
Create Step Plugins
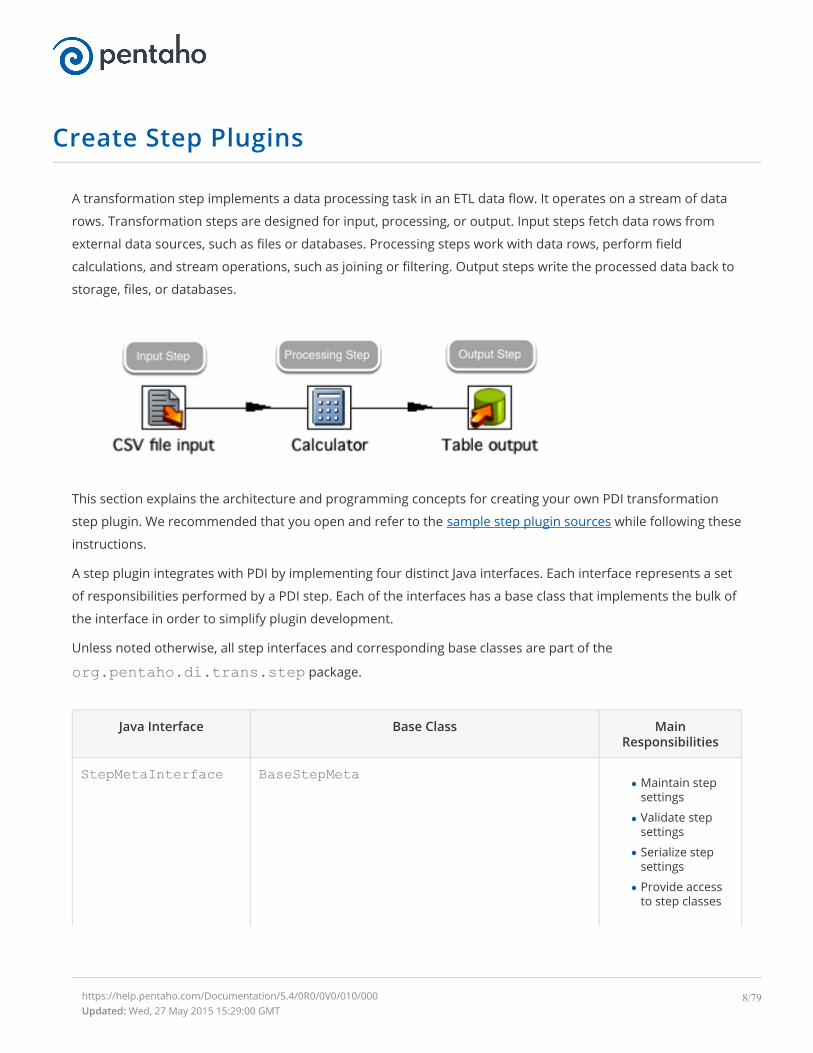
A transformation step implements a data processing task in an ETL data flow. It operates on a stream of data
rows. Transformation steps are designed for input, processing, or output. Input steps fetch data rows from
external data sources, such as files or databases. Processing steps work with data rows, perform field
calculations, and stream operations, such as joining or filtering. Output steps write the processed data back to
storage, files, or databases.
This section explains the architecture and programming concepts for creating your own PDI transformation
step plugin. We recommended that you open and refer to the sample step plugin sources while following these
instructions.
A step plugin integrates with PDI by implementing four distinct Java interfaces. Each interface represents a set
of responsibilities performed by a PDI step. Each of the interfaces has a base class that implements the bulk of
the interface in order to simplify plugin development.
Unless noted otherwise, all step interfaces and corresponding base classes are part of the
org.pentaho.di.trans.step package.
Java Interface Base Class MainResponsibilities
StepMetaInterface BaseStepMetaMaintain stepsettings
Validate stepsettings
Serialize stepsettings
Provide accessto step classes
https://help.pentaho.com/Documentation/5.4/0R0/0V0/010/000Updated: Wed, 27 May 2015 15:29:00 GMT
8/79
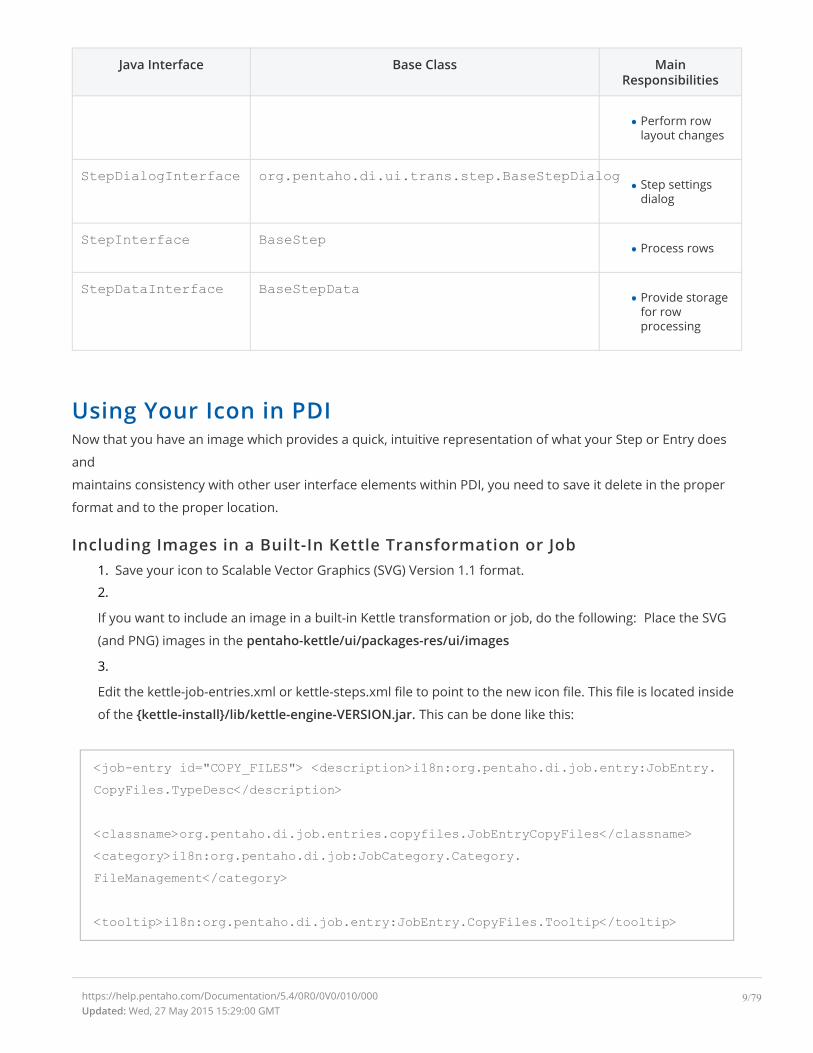
Java Interface Base Class MainResponsibilities
Perform rowlayout changes
StepDialogInterface org.pentaho.di.ui.trans.step.BaseStepDialogStep settingsdialog
StepInterface BaseStepProcess rows
StepDataInterface BaseStepDataProvide storagefor rowprocessing
Using Your Icon in PDINow that you have an image which provides a quick, intuitive representation of what your Step or Entry does
and
maintains consistency with other user interface elements within PDI, you need to save it delete in the proper
format and to the proper location.
Including Images in a Built-In Kettle Transformation or Job1. Save your icon to Scalable Vector Graphics (SVG) Version 1.1 format.
2.
If you want to include an image in a built-in Kettle transformation or job, do the following: Place the SVG
(and PNG) images in the pentaho-kettle/ui/packages-res/ui/images
3.
Edit the kettle-job-entries.xml or kettle-steps.xml file to point to the new icon file. This file is located inside
of the {kettle-install}/lib/kettle-engine-VERSION.jar. This can be done like this:
<job-entry id="COPY_FILES"> <description>i18n:org.pentaho.di.job.entry:JobEntry.CopyFiles.TypeDesc</description>
<classname>org.pentaho.di.job.entries.copyfiles.JobEntryCopyFiles</classname><category>i18n:org.pentaho.di.job:JobCategory.Category.FileManagement</category>
<tooltip>i18n:org.pentaho.di.job.entry:JobEntry.CopyFiles.Tooltip</tooltip>
https://help.pentaho.com/Documentation/5.4/0R0/0V0/010/000Updated: Wed, 27 May 2015 15:29:00 GMT
9/79
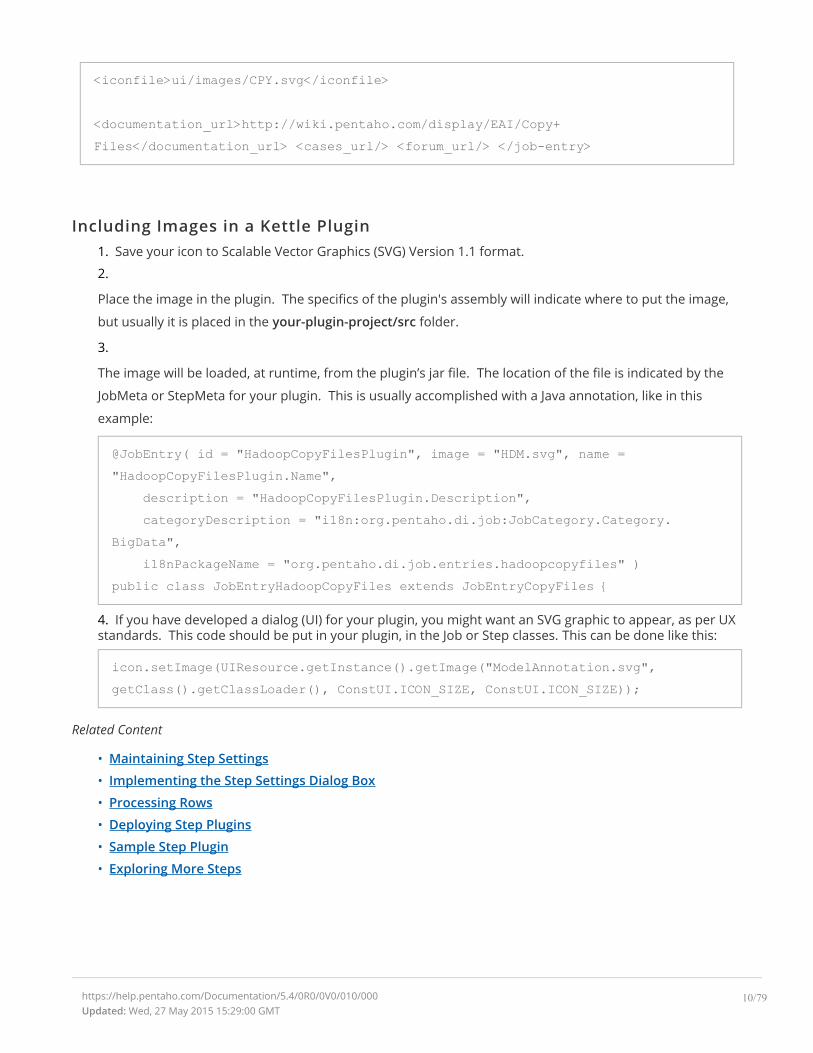
<iconfile>ui/images/CPY.svg</iconfile>
<documentation_url>http://wiki.pentaho.com/display/EAI/Copy+Files</documentation_url> <cases_url/> <forum_url/> </job-entry>
Including Images in a Kettle Plugin1. Save your icon to Scalable Vector Graphics (SVG) Version 1.1 format.
2.
Place the image in the plugin. The specifics of the plugin's assembly will indicate where to put the image,
but usually it is placed in the your-plugin-project/src folder.
3.
The image will be loaded, at runtime, from the plugin’s jar file. The location of the file is indicated by the
JobMeta or StepMeta for your plugin. This is usually accomplished with a Java annotation, like in this
example:
@JobEntry( id = "HadoopCopyFilesPlugin", image = "HDM.svg", name ="HadoopCopyFilesPlugin.Name",
description = "HadoopCopyFilesPlugin.Description",categoryDescription = "i18n:org.pentaho.di.job:JobCategory.Category.
BigData",i18nPackageName = "org.pentaho.di.job.entries.hadoopcopyfiles" )
public class JobEntryHadoopCopyFiles extends JobEntryCopyFiles {
4. If you have developed a dialog (UI) for your plugin, you might want an SVG graphic to appear, as per UXstandards. This code should be put in your plugin, in the Job or Step classes. This can be done like this:
icon.setImage(UIResource.getInstance().getImage("ModelAnnotation.svg",getClass().getClassLoader(), ConstUI.ICON_SIZE, ConstUI.ICON_SIZE));
Related Content
• Maintaining Step Settings
• Implementing the Step Settings Dialog Box
• Processing Rows
• Deploying Step Plugins
• Sample Step Plugin
• Exploring More Steps
https://help.pentaho.com/Documentation/5.4/0R0/0V0/010/000Updated: Wed, 27 May 2015 15:29:00 GMT
10/79
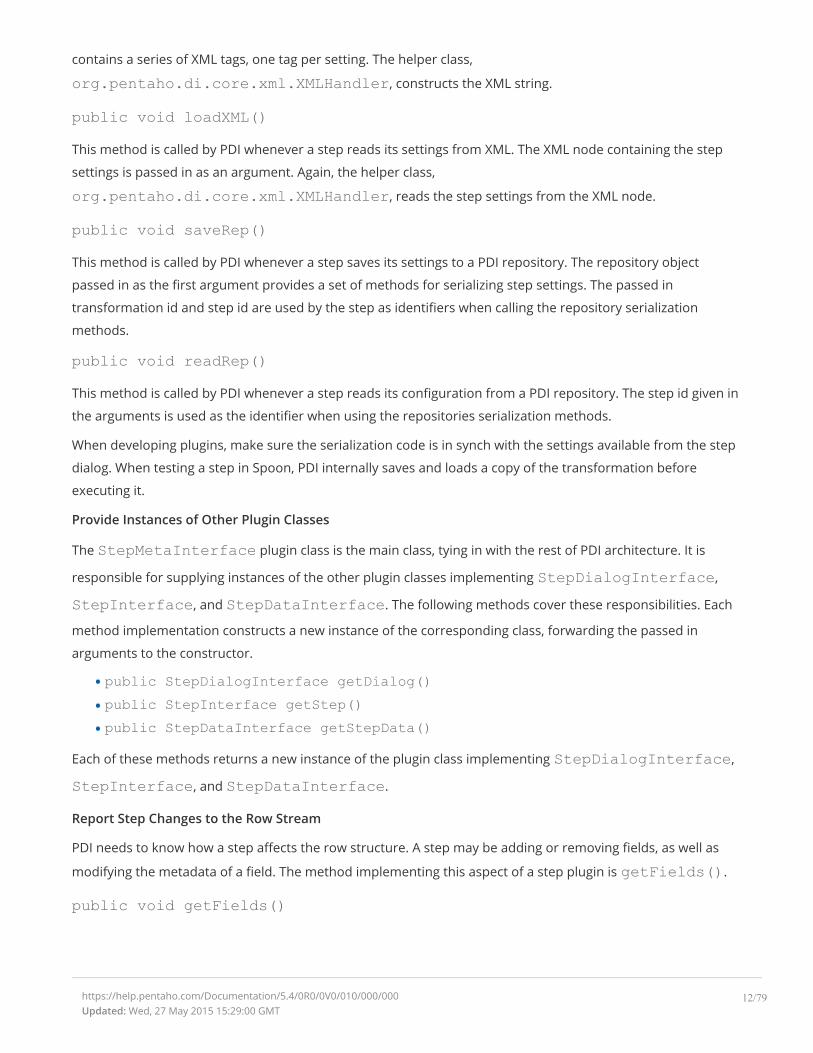
Maintain Step Settings
Java Interface org.pentaho.di.trans.step.StepMetaInterface
Base class org.pentaho.di.trans.step.BaseStepMeta
The StepMetaInterface is the main Java interface that a plugin implements.
Keep Track Of the Step Settings
The implementing class keeps track of step settings using private fields with corresponding get and setmethods. The dialog class implementing StepDialogInterface uses these methods to copy the user
supplied configuration in and out of the dialog.
These interface methods are also used to maintain settings.
void setDefault()This method is called every time a new step is created and allocates or sets the step configuration to sensible
defaults. The values set here are used by Spoon when a new step is created. This is a good place to ensure that
the step settings are initialized to non-null values. Values that are null can be cumbersome to deal with in
serialization and dialog population, so most PDI step implementations stick to non-null values for all step
settings.
public Object clone()This method is called when a step is duplicated in Spoon. It returns a deep copy of the step meta object. It is
essential that the implementing class creates proper deep copies if the step configuration is stored in
modifiable objects, such as lists or custom helper objects.
See org.pentaho.di.trans.steps.rowgenerator.RowGeneratorMeta.clone() in the
PDI source for an example of creating a deep copy.
Serialize Step Settings
The plugin serializes its settings to both XML and a PDI repository. These interface methods provide this
functionality.
public String getXML()This method is called by PDI whenever a step serializes its settings to XML. It is called when saving a
transformation in Spoon. The method returns an XML string containing the serialized step settings. The string
https://help.pentaho.com/Documentation/5.4/0R0/0V0/010/000/000Updated: Wed, 27 May 2015 15:29:00 GMT
11/79
contains a series of XML tags, one tag per setting. The helper class,
org.pentaho.di.core.xml.XMLHandler, constructs the XML string.
public void loadXML()This method is called by PDI whenever a step reads its settings from XML. The XML node containing the step
settings is passed in as an argument. Again, the helper class,
org.pentaho.di.core.xml.XMLHandler, reads the step settings from the XML node.
public void saveRep()This method is called by PDI whenever a step saves its settings to a PDI repository. The repository object
passed in as the first argument provides a set of methods for serializing step settings. The passed in
transformation id and step id are used by the step as identifiers when calling the repository serialization
methods.
public void readRep()This method is called by PDI whenever a step reads its configuration from a PDI repository. The step id given in
the arguments is used as the identifier when using the repositories serialization methods.
When developing plugins, make sure the serialization code is in synch with the settings available from the step
dialog. When testing a step in Spoon, PDI internally saves and loads a copy of the transformation before
executing it.
Provide Instances of Other Plugin Classes
The StepMetaInterface plugin class is the main class, tying in with the rest of PDI architecture. It is
responsible for supplying instances of the other plugin classes implementing StepDialogInterface,
StepInterface, and StepDataInterface. The following methods cover these responsibilities. Each
method implementation constructs a new instance of the corresponding class, forwarding the passed in
arguments to the constructor.
public StepDialogInterface getDialog()public StepInterface getStep()public StepDataInterface getStepData()
Each of these methods returns a new instance of the plugin class implementing StepDialogInterface,
StepInterface, and StepDataInterface.
Report Step Changes to the Row Stream
PDI needs to know how a step affects the row structure. A step may be adding or removing fields, as well as
modifying the metadata of a field. The method implementing this aspect of a step plugin is getFields().
public void getFields()
https://help.pentaho.com/Documentation/5.4/0R0/0V0/010/000/000Updated: Wed, 27 May 2015 15:29:00 GMT
12/79
Given a description of the input rows, the plugin modifies it to match the structure for its output fields. The
implementation modifies the passed in RowMetaInterface object to reflect changes to the row stream. A
step adds fields to the row structure. This is done by creating ValueMeta objects, such as the PDI default
implementation of ValueMetaInterface, and appending them to the RowMetaInterface object.
The Working with Fields section goes into deeper detail about ValueMetaInterface.
This sample transformation uses two steps. The Demo step adds the field, demo_field, to empty rows
produced by the Generate Rows step.
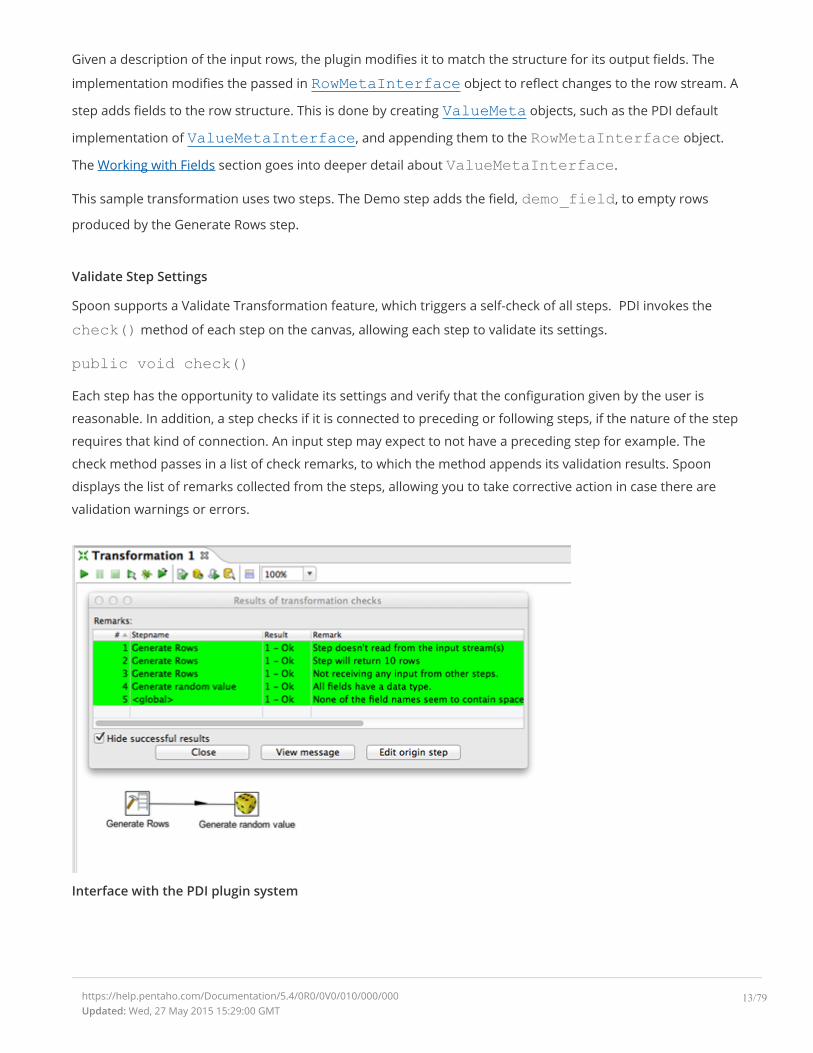
Validate Step Settings
Spoon supports a Validate Transformation feature, which triggers a self-check of all steps. PDI invokes the
check() method of each step on the canvas, allowing each step to validate its settings.
public void check()Each step has the opportunity to validate its settings and verify that the configuration given by the user is
reasonable. In addition, a step checks if it is connected to preceding or following steps, if the nature of the step
requires that kind of connection. An input step may expect to not have a preceding step for example. The
check method passes in a list of check remarks, to which the method appends its validation results. Spoon
displays the list of remarks collected from the steps, allowing you to take corrective action in case there are
validation warnings or errors.
Interface with the PDI plugin system
https://help.pentaho.com/Documentation/5.4/0R0/0V0/010/000/000Updated: Wed, 27 May 2015 15:29:00 GMT
13/79

The class implementing StepMetaInterface must be annotated with the Step Java annotation. Supply
the following annotation attributes:
Attribute Description
id A globally unique ID for the step
image The resource location for the png icon image of the step
name A short label for the step
description A longer description for the step
categoryDescription The category the step should appear under in the PDI step tree. For example Input,Output, Transform, etc.
i18nPackageName If the i18nPackageName attribute is supplied in the annotation attributes, the valuesof name, description, and categoryDescription are interpreted as i18n keys relative tothe message bundle contained in given package. The keys may be supplied in theextended form i18n:<packagename> key to specify a package that is differentfrom the package given in the i18nPackageName attribute.
Please refer to the Sample Step Plugin for a complete implementation example.
https://help.pentaho.com/Documentation/5.4/0R0/0V0/010/000/000Updated: Wed, 27 May 2015 15:29:00 GMT
14/79
Implement the Step Settings Dialog Box
Java Interface org.pentaho.di.trans.step.StepDialogInterface
Base class org.pentaho.di.ui.trans.step.BaseStepDialog
StepDialogInterface is the Java interface that implements the plugin settings dialog.
Maintain the Dialog for Step Settings
The dialog class is responsible for constructing and opening the settings dialog for the step. Whenever you
open the step settings in Spoon, the system instantiates the dialog class passing in the
StepMetaInterface object and calling open() on the dialog. SWT is the native windowing environment
of Spoon and is the framework used for implementing step dialogs.
public String open()This method returns only after the dialog has been confirmed or cancelled. The method must conform to these
rules.
If the dialog is confirmed
The StepMetaInterface object must be updated to reflect the new step settings
If you changed any step settings, the Changed flag of the StepMetaInterface object flag must be setto trueopen() returns the name of the step
If the dialog is cancelled
The StepMetaInterface object must not be changed
The Changed flag of the StepMetaInterface object must be set to the value it had at the time thedialog opened
open() must return null
The StepMetaInterface object has an internal Changed flag that is accessible using hasChanged()and setChanged(). Spoon decides whether the transformation has unsaved changes based on the
Changed flag, so it is important for the dialog to set the flag appropriately.
The sample step plugin project has an implementation of the dialog class that is consistent with these rules
and is a good basis for creating your own dialog.
https://help.pentaho.com/Documentation/5.4/0R0/0V0/010/000/010Updated: Wed, 27 May 2015 15:29:00 GMT
15/79
Process Rows
Java Interface org.pentaho.di.trans.step.StepInterface
Base class org.pentaho.di.trans.step.BaseStep
The class implementing StepInterface is responsible for the actual row processing when the
transformation runs.
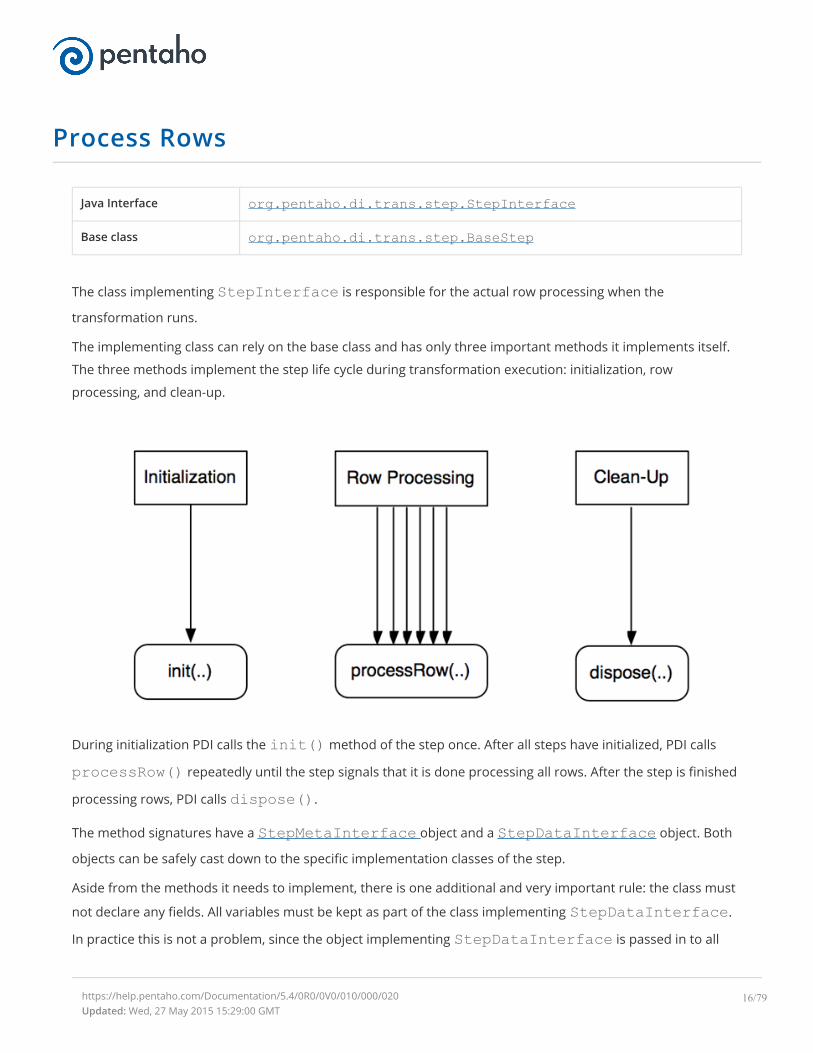
The implementing class can rely on the base class and has only three important methods it implements itself.
The three methods implement the step life cycle during transformation execution: initialization, row
processing, and clean-up.
During initialization PDI calls the init() method of the step once. After all steps have initialized, PDI calls
processRow() repeatedly until the step signals that it is done processing all rows. After the step is finished
processing rows, PDI calls dispose().
The method signatures have a StepMetaInterface object and a StepDataInterface object. Both
objects can be safely cast down to the specific implementation classes of the step.
Aside from the methods it needs to implement, there is one additional and very important rule: the class must
not declare any fields. All variables must be kept as part of the class implementing StepDataInterface.
In practice this is not a problem, since the object implementing StepDataInterface is passed in to all
https://help.pentaho.com/Documentation/5.4/0R0/0V0/010/000/020Updated: Wed, 27 May 2015 15:29:00 GMT
16/79
relevant methods, and its fields are used instead of local ones. The reason for this rule is the need to decouple
step variables from instances of StepInterface. This enables PDI to implement different threading
models to execute a transformation.
Step Initialization
The init() method is called when a transformation is preparing to start execution.
public boolean init()Every step is given the opportunity to do one-time initialization tasks, such as opening files or establishing
database connections. For any steps derived from BaseStep, it is mandatory that super.init() is
called to ensure correct behavior. The method returns true in case the step initialized correctly, it returns
false if there is an initialization error. PDI will abort the execution of a transformation in case any step
returns false upon initialization.
Row Processing
Once the transformation starts, it enters a tight loop, calling processRow() on each step until the method
returns false. In most cases, each step reads a single row from the input stream, alters the row structure
and fields, and passes the row on to the next step. Some steps, such as input, grouping, and sorting steps, read
rows in batches, or can hold on to the read rows to perform other processing before passing them on to the
next step.
public boolean processRow()
A PDI step queries for incoming input rows by calling getRow(), which is a blocking call that returns a row
object or null in case there is no more input. If there is an input row, the step does the necessary row
processing and calls putRow() to pass the row on to the next step. If there are no more rows, the step calls
setOutputDone() and returns false.
The method must conform to these rules.
If the step is done processing all rows, the method calls setOutputDone() and returns false.
If the step is not done processing all rows, the method returns true. PDI calls processRow() again in thiscase.
The sample step plugin project shows an implementation of processRow() that is commonly used in data
processing steps.
In contrast to that, input steps do not usually expect any incoming rows from previous steps. They are
designed to execute processRow() exactly once, fetching data from the outside world, and putting them
into the row stream by calling putRow() repeatedly until done. Examining existing PDI steps is a good guide
for designing your processRow() method.
https://help.pentaho.com/Documentation/5.4/0R0/0V0/010/000/020Updated: Wed, 27 May 2015 15:29:00 GMT
17/79
The row structure object is used during the first invocation of processRow() to determine the indexes of
fields on which the step operates. The BaseStep class already provides a convenient First flag to help
implement special processing on the first invocation of processRow(). Since the row structure is equal for
all input rows, steps cache field index information in variables on their StepDataInterface object.
Step Clean-Up
Once the transformation is complete, PDI calls dispose() on all steps.
Public void dispose()
Steps are required to deallocate resources allocated during init() or subsequent row processing. Your
implementation should clear all fields of the StepDataInterface object, and ensure that all open files or
connections are properly closed. For any steps derived from BaseStep, it is mandatory that
super.dispose() is called to ensure correct deallocation.
• Storing the Processing State
• Working with Rows
• Working With Fields
• Handling Errors
• Understanding Row Counters
• Logging in Transformation Steps
https://help.pentaho.com/Documentation/5.4/0R0/0V0/010/000/020Updated: Wed, 27 May 2015 15:29:00 GMT
18/79
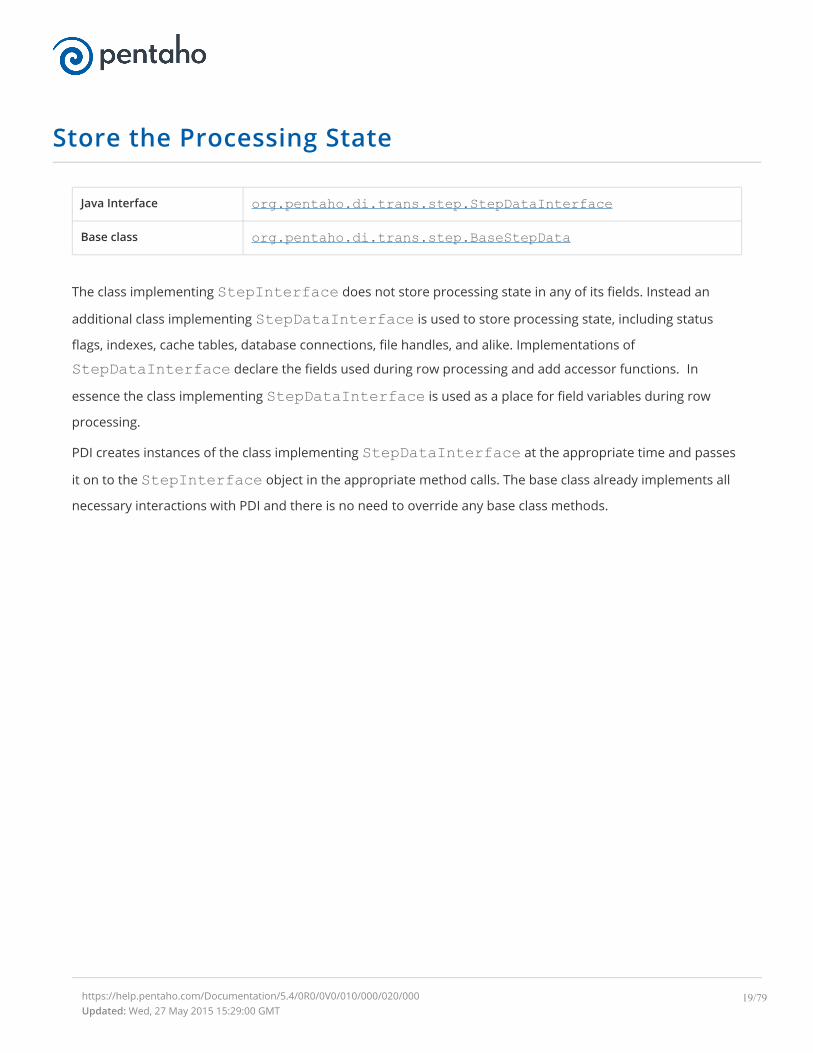
Store the Processing State
Java Interface org.pentaho.di.trans.step.StepDataInterface
Base class org.pentaho.di.trans.step.BaseStepData
The class implementing StepInterface does not store processing state in any of its fields. Instead an
additional class implementing StepDataInterface is used to store processing state, including status
flags, indexes, cache tables, database connections, file handles, and alike. Implementations of
StepDataInterface declare the fields used during row processing and add accessor functions. In
essence the class implementing StepDataInterface is used as a place for field variables during row
processing.
PDI creates instances of the class implementing StepDataInterface at the appropriate time and passes
it on to the StepInterface object in the appropriate method calls. The base class already implements all
necessary interactions with PDI and there is no need to override any base class methods.
https://help.pentaho.com/Documentation/5.4/0R0/0V0/010/000/020/000Updated: Wed, 27 May 2015 15:29:00 GMT
19/79
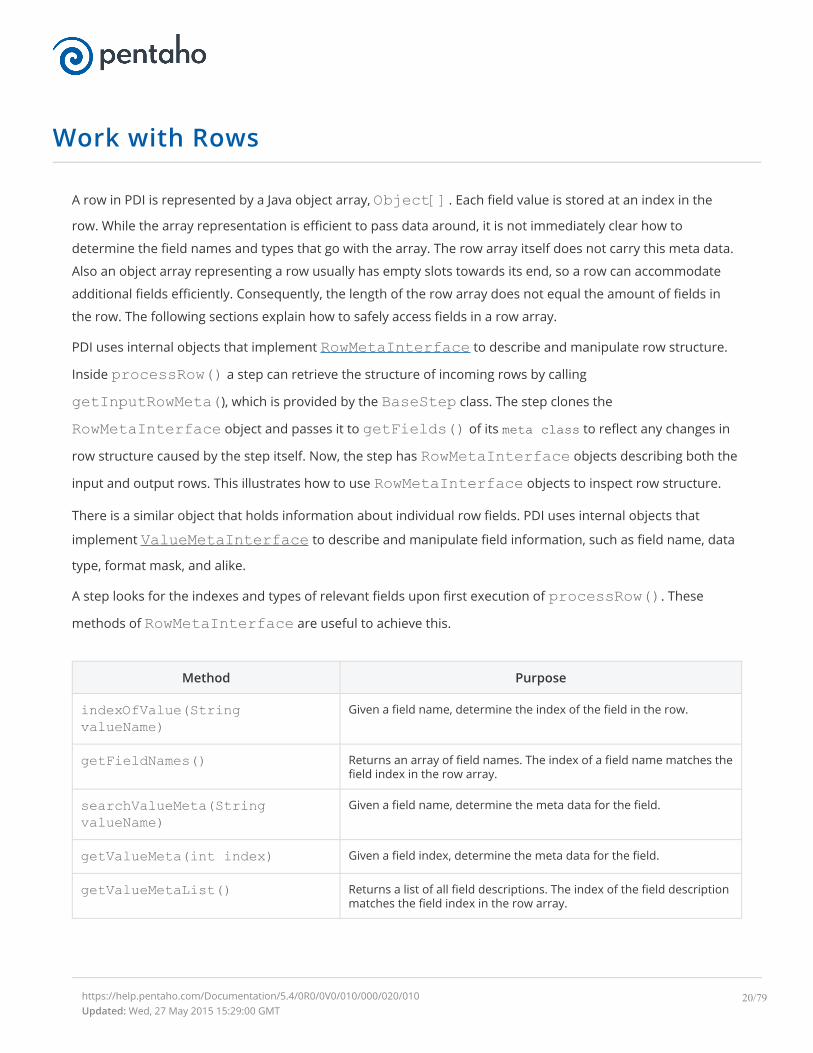
Work with Rows
A row in PDI is represented by a Java object array, Object[]. Each field value is stored at an index in the
row. While the array representation is efficient to pass data around, it is not immediately clear how to
determine the field names and types that go with the array. The row array itself does not carry this meta data.
Also an object array representing a row usually has empty slots towards its end, so a row can accommodate
additional fields efficiently. Consequently, the length of the row array does not equal the amount of fields in
the row. The following sections explain how to safely access fields in a row array.
PDI uses internal objects that implement RowMetaInterface to describe and manipulate row structure.
Inside processRow() a step can retrieve the structure of incoming rows by calling
getInputRowMeta(), which is provided by the BaseStep class. The step clones the
RowMetaInterface object and passes it to getFields() of its meta class to reflect any changes in
row structure caused by the step itself. Now, the step has RowMetaInterface objects describing both the
input and output rows. This illustrates how to use RowMetaInterface objects to inspect row structure.
There is a similar object that holds information about individual row fields. PDI uses internal objects that
implement ValueMetaInterface to describe and manipulate field information, such as field name, data
type, format mask, and alike.
A step looks for the indexes and types of relevant fields upon first execution of processRow(). These
methods of RowMetaInterface are useful to achieve this.
Method Purpose
indexOfValue(StringvalueName)
Given a field name, determine the index of the field in the row.
getFieldNames() Returns an array of field names. The index of a field name matches thefield index in the row array.
searchValueMeta(StringvalueName)
Given a field name, determine the meta data for the field.
getValueMeta(int index) Given a field index, determine the meta data for the field.
getValueMetaList() Returns a list of all field descriptions. The index of the field descriptionmatches the field index in the row array.
https://help.pentaho.com/Documentation/5.4/0R0/0V0/010/000/020/010Updated: Wed, 27 May 2015 15:29:00 GMT
20/79
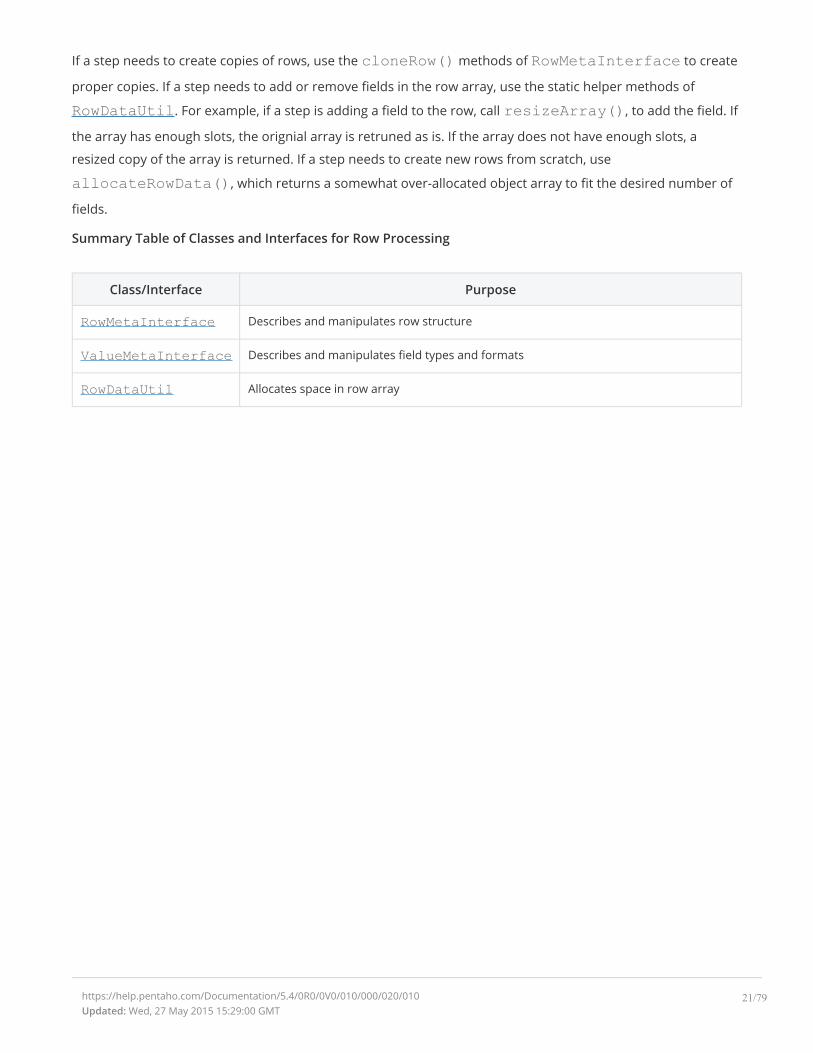
If a step needs to create copies of rows, use the cloneRow() methods of RowMetaInterface to create
proper copies. If a step needs to add or remove fields in the row array, use the static helper methods of
RowDataUtil. For example, if a step is adding a field to the row, call resizeArray(), to add the field. If
the array has enough slots, the orignial array is retruned as is. If the array does not have enough slots, a
resized copy of the array is returned. If a step needs to create new rows from scratch, use
allocateRowData(), which returns a somewhat over-allocated object array to fit the desired number of
fields.
Summary Table of Classes and Interfaces for Row Processing
Class/Interface Purpose
RowMetaInterface Describes and manipulates row structure
ValueMetaInterface Describes and manipulates field types and formats
RowDataUtil Allocates space in row array
https://help.pentaho.com/Documentation/5.4/0R0/0V0/010/000/020/010Updated: Wed, 27 May 2015 15:29:00 GMT
21/79
Work With Fields
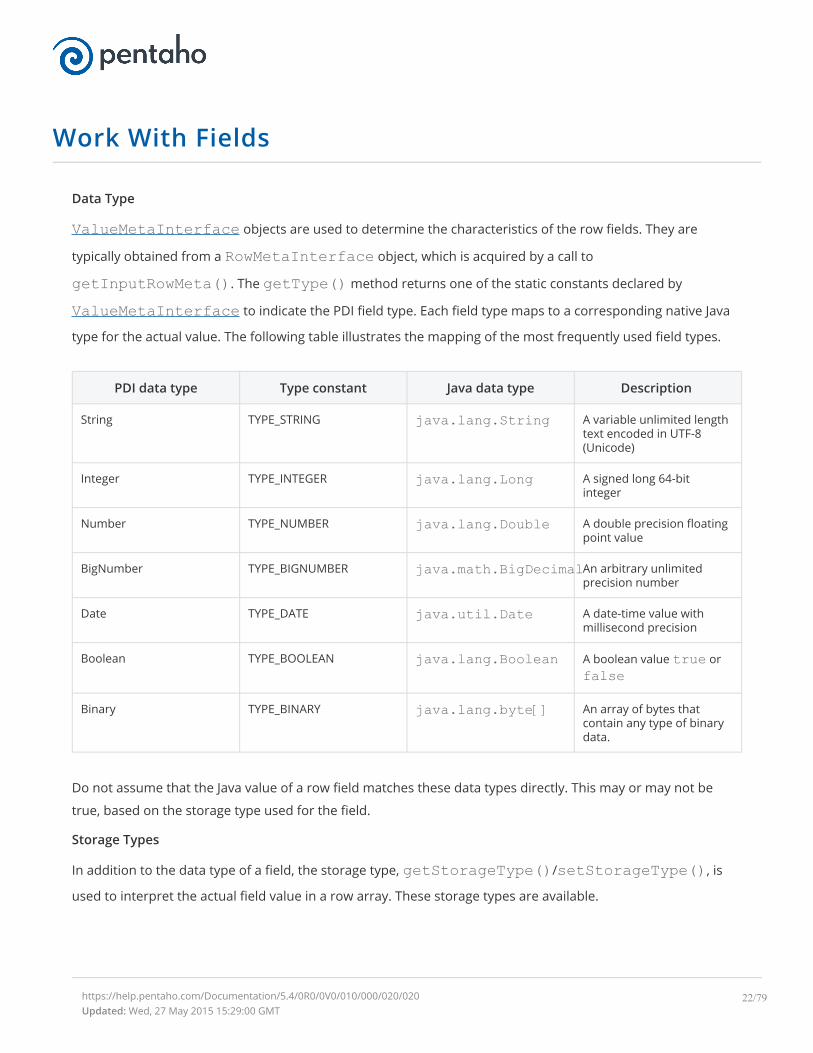
Data Type
ValueMetaInterface objects are used to determine the characteristics of the row fields. They are
typically obtained from a RowMetaInterface object, which is acquired by a call to
getInputRowMeta(). The getType() method returns one of the static constants declared by
ValueMetaInterface to indicate the PDI field type. Each field type maps to a corresponding native Java
type for the actual value. The following table illustrates the mapping of the most frequently used field types.
PDI data type Type constant Java data type Description
String TYPE_STRING java.lang.String A variable unlimited lengthtext encoded in UTF-8(Unicode)
Integer TYPE_INTEGER java.lang.Long A signed long 64-bitinteger
Number TYPE_NUMBER java.lang.Double A double precision floatingpoint value
BigNumber TYPE_BIGNUMBER java.math.BigDecimalAn arbitrary unlimitedprecision number
Date TYPE_DATE java.util.Date A date-time value withmillisecond precision
Boolean TYPE_BOOLEAN java.lang.Boolean A boolean value true orfalse
Binary TYPE_BINARY java.lang.byte[] An array of bytes thatcontain any type of binarydata.
Do not assume that the Java value of a row field matches these data types directly. This may or may not be
true, based on the storage type used for the field.
Storage Types
In addition to the data type of a field, the storage type, getStorageType()/setStorageType(), is
used to interpret the actual field value in a row array. These storage types are available.
https://help.pentaho.com/Documentation/5.4/0R0/0V0/010/000/020/020Updated: Wed, 27 May 2015 15:29:00 GMT
22/79
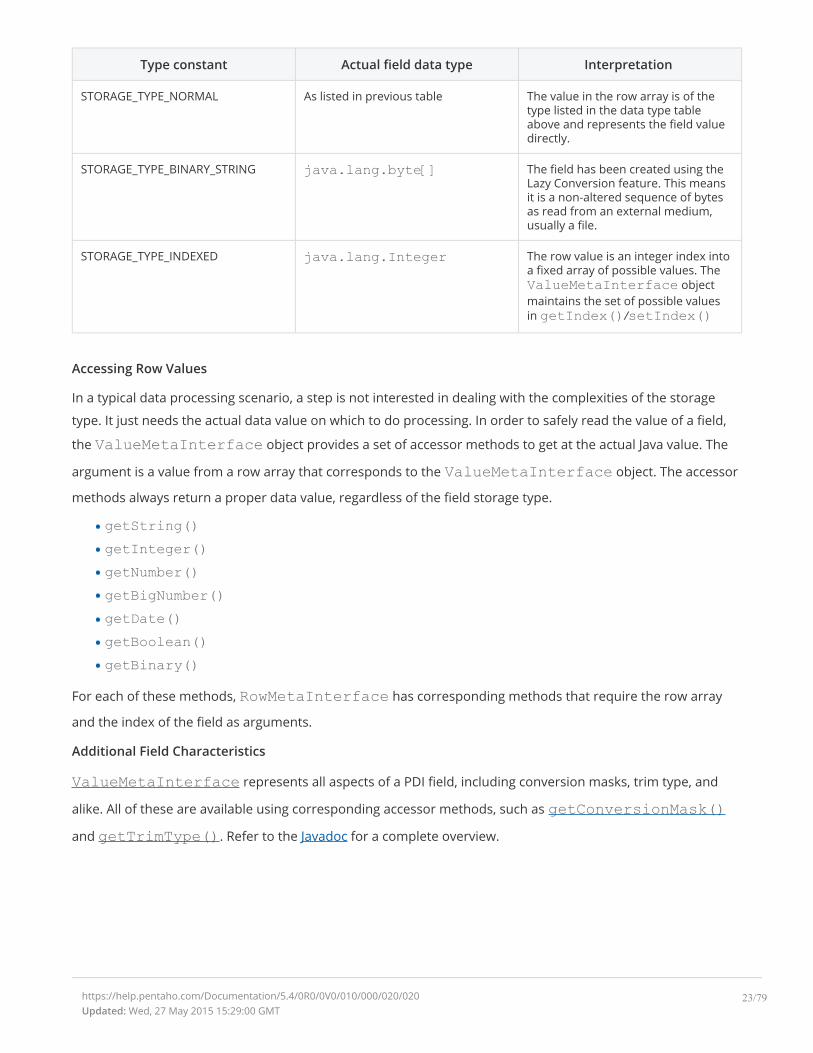
Type constant Actual field data type Interpretation
STORAGE_TYPE_NORMAL As listed in previous table The value in the row array is of thetype listed in the data type tableabove and represents the field valuedirectly.
STORAGE_TYPE_BINARY_STRING java.lang.byte[] The field has been created using theLazy Conversion feature. This meansit is a non-altered sequence of bytesas read from an external medium,usually a file.
STORAGE_TYPE_INDEXED java.lang.Integer The row value is an integer index intoa fixed array of possible values. TheValueMetaInterface objectmaintains the set of possible valuesin getIndex()/setIndex()
Accessing Row Values
In a typical data processing scenario, a step is not interested in dealing with the complexities of the storage
type. It just needs the actual data value on which to do processing. In order to safely read the value of a field,
the ValueMetaInterface object provides a set of accessor methods to get at the actual Java value. The
argument is a value from a row array that corresponds to the ValueMetaInterface object. The accessor
methods always return a proper data value, regardless of the field storage type.
getString()getInteger()getNumber()getBigNumber()getDate()getBoolean()getBinary()
For each of these methods, RowMetaInterface has corresponding methods that require the row array
and the index of the field as arguments.
Additional Field Characteristics
ValueMetaInterface represents all aspects of a PDI field, including conversion masks, trim type, and
alike. All of these are available using corresponding accessor methods, such as getConversionMask()and getTrimType(). Refer to the Javadoc for a complete overview.
https://help.pentaho.com/Documentation/5.4/0R0/0V0/010/000/020/020Updated: Wed, 27 May 2015 15:29:00 GMT
23/79
Handling Errors
Transformation steps may encounter errors at many levels. They may encounter unexpected data, or
problems with the execution environment. Depending on the nature of the error, the step may decide to stop
the transformation by throwing an exception, or support the PDI Error Handling feature, which allows you to
divert bad rows to an error handling step.
Throwing a KettleException: Calling a Hard Stop
If a step encounters an error during row processing, it may log an error and stop the transformation. This is
done by calling setErrors(1), stopAll(), setOutputDone(), and returning false from
processRow(). Alternatively, the step can throw a KettleException, which also causes the
transformation to stop.
It is sensible to stop the transformation when there is a problem with the environment or configuration of a
step. For example, when a database connection cannot be made, a required file is not present, or an expected
field is not in the row stream. These are errors that affect the execution of the transformation as a whole. If on
the other hand the error is related to row data, the step should implement support for the PDI Error Handling
feature.
Implementing Per-Row Error Handling
You may want to divert bad rows to a specific error handling step. This capability is referred to as the Error
Handling feature. A step supporting this feature overrides the BaseStep implementation of
supportsErrorHandling() to return true. This enables you to specify a target step for bad rows in
the Spoon UI. During runtime, the step checks if you configured a target step for error rows by calling
getStepMeta().isDoingErrorHandling(). If error rows are diverted, the step passes the
offending input row to putError() and provides additional information about the errors encountered. It
does not throw a KettleException. If you do not configure a step to generate error rows and send them
to another step for processing, the step falls back to calling a hard stop.
Most core PDI steps support row-level error handling. The Number Range step is a good example. If error
handling is enabled, it diverts the row into the error stream. If it is not, the step stops the transformation.
https://help.pentaho.com/Documentation/5.4/0R0/0V0/010/000/020/030Updated: Wed, 27 May 2015 15:29:00 GMT
24/79

Understanding Row Counters
During transformation execution, each PDI step keeps track of a set of step metrics. These are displayed in
Spoon in the Step Metrics tab.
Each step metric is essentially a row counter. The counters are manipulated by calling the corresponding
increment, decrement, get, and set methods on BaseStep. This table provides a list of the counters and the
correct way to use them.
Counter Name Meaning When to Increment
linesRead Rows received from previous steps Never increment manually. This is handled bygetRow().
linesWritten Rows passed to next steps Never increment manually. This is handled byputRow().
linesInput Rows read from external sources,such as files, database, and alike
Call incrementLinesInput() when a new row isreceived from an external source.
linesOutput Rows written to external sources,such as files, database, and alike
Call incrementLinesOutput() when a row iswritten to an external system or file.
linesUpdated Rows updated in external sources,such as database, and alike
Call incrementLinesUpdated() when a row isupdated in an external system or file.
https://help.pentaho.com/Documentation/5.4/0R0/0V0/010/000/020/040Updated: Wed, 27 May 2015 15:29:00 GMT
25/79
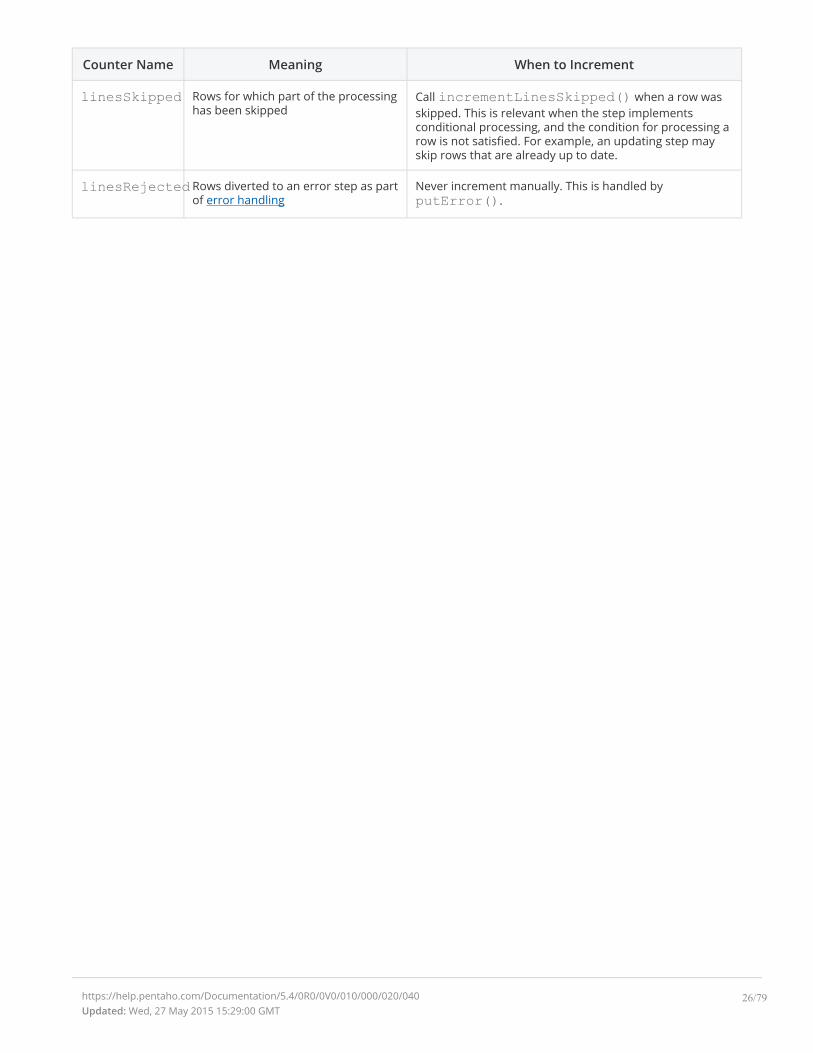
Counter Name Meaning When to Increment
linesSkipped Rows for which part of the processinghas been skipped
Call incrementLinesSkipped() when a row wasskipped. This is relevant when the step implementsconditional processing, and the condition for processing arow is not satisfied. For example, an updating step mayskip rows that are already up to date.
linesRejected Rows diverted to an error step as partof error handling
Never increment manually. This is handled byputError().
https://help.pentaho.com/Documentation/5.4/0R0/0V0/010/000/020/040Updated: Wed, 27 May 2015 15:29:00 GMT
26/79
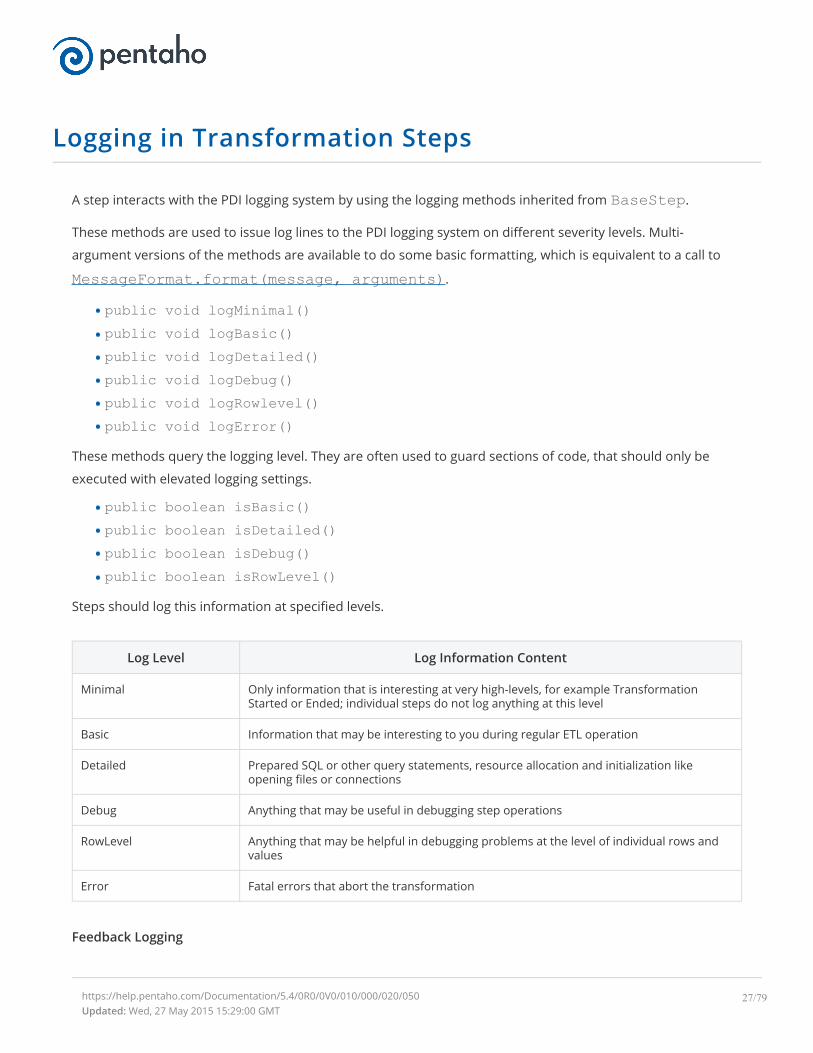
Logging in Transformation Steps
A step interacts with the PDI logging system by using the logging methods inherited from BaseStep.
These methods are used to issue log lines to the PDI logging system on different severity levels. Multi-
argument versions of the methods are available to do some basic formatting, which is equivalent to a call to
MessageFormat.format(message, arguments).
public void logMinimal()public void logBasic()public void logDetailed()public void logDebug()public void logRowlevel()public void logError()
These methods query the logging level. They are often used to guard sections of code, that should only be
executed with elevated logging settings.
public boolean isBasic()public boolean isDetailed()public boolean isDebug()public boolean isRowLevel()
Steps should log this information at specified levels.
Log Level Log Information Content
Minimal Only information that is interesting at very high-levels, for example TransformationStarted or Ended; individual steps do not log anything at this level
Basic Information that may be interesting to you during regular ETL operation
Detailed Prepared SQL or other query statements, resource allocation and initialization likeopening files or connections
Debug Anything that may be useful in debugging step operations
RowLevel Anything that may be helpful in debugging problems at the level of individual rows andvalues
Error Fatal errors that abort the transformation
Feedback Logging
https://help.pentaho.com/Documentation/5.4/0R0/0V0/010/000/020/050Updated: Wed, 27 May 2015 15:29:00 GMT
27/79

A transformation defines a feedback size in its settings. The feedback size defines the number of rows after
which each step logs a line reporting its progress. This is implemented by calling checkFeedback() with
an appropriate row counter as argument to determine if feedback should be logged. Feedback logging
happens on the basic log-level. There are many ways you can implement this. Here is an example
implementation snippet.
if (checkFeedback(getLinesWritten())) {if(isBasic()) logBasic("linenr "+getLinesWritten());
}
It may make sense to use different row counters for checking the feedback size depending on the
implementation logic of your step. For example, a step that accumulates incoming rows into one single
summary row, should probably use the linesRead counter to determine the feedback interval.
The Excel Output step has a good example implementation of feedback logging.
https://help.pentaho.com/Documentation/5.4/0R0/0V0/010/000/020/050Updated: Wed, 27 May 2015 15:29:00 GMT
28/79
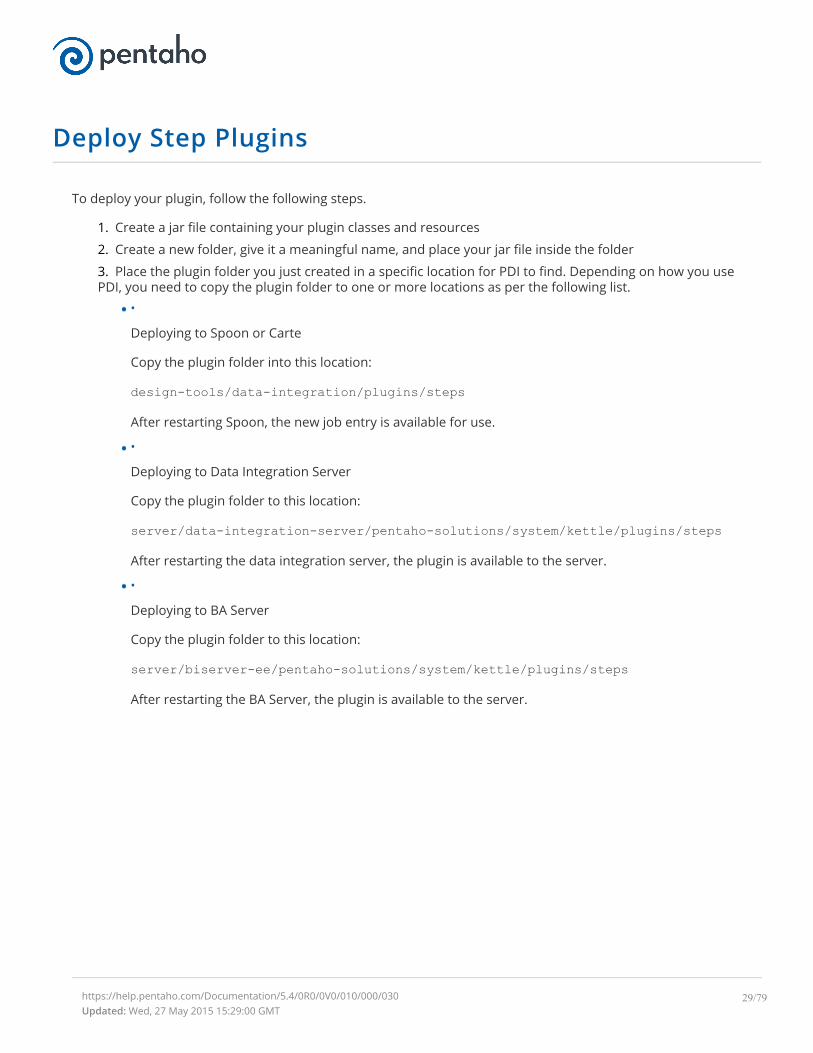
Deploy Step Plugins
To deploy your plugin, follow the following steps.
1. Create a jar file containing your plugin classes and resources
2. Create a new folder, give it a meaningful name, and place your jar file inside the folder
3. Place the plugin folder you just created in a specific location for PDI to find. Depending on how you usePDI, you need to copy the plugin folder to one or more locations as per the following list.
•
Deploying to Spoon or Carte
Copy the plugin folder into this location:
design-tools/data-integration/plugins/steps
After restarting Spoon, the new job entry is available for use.
•
Deploying to Data Integration Server
Copy the plugin folder to this location:
server/data-integration-server/pentaho-solutions/system/kettle/plugins/steps
After restarting the data integration server, the plugin is available to the server.
•
Deploying to BA Server
Copy the plugin folder to this location:
server/biserver-ee/pentaho-solutions/system/kettle/plugins/steps
After restarting the BA Server, the plugin is available to the server.
https://help.pentaho.com/Documentation/5.4/0R0/0V0/010/000/030Updated: Wed, 27 May 2015 15:29:00 GMT
29/79
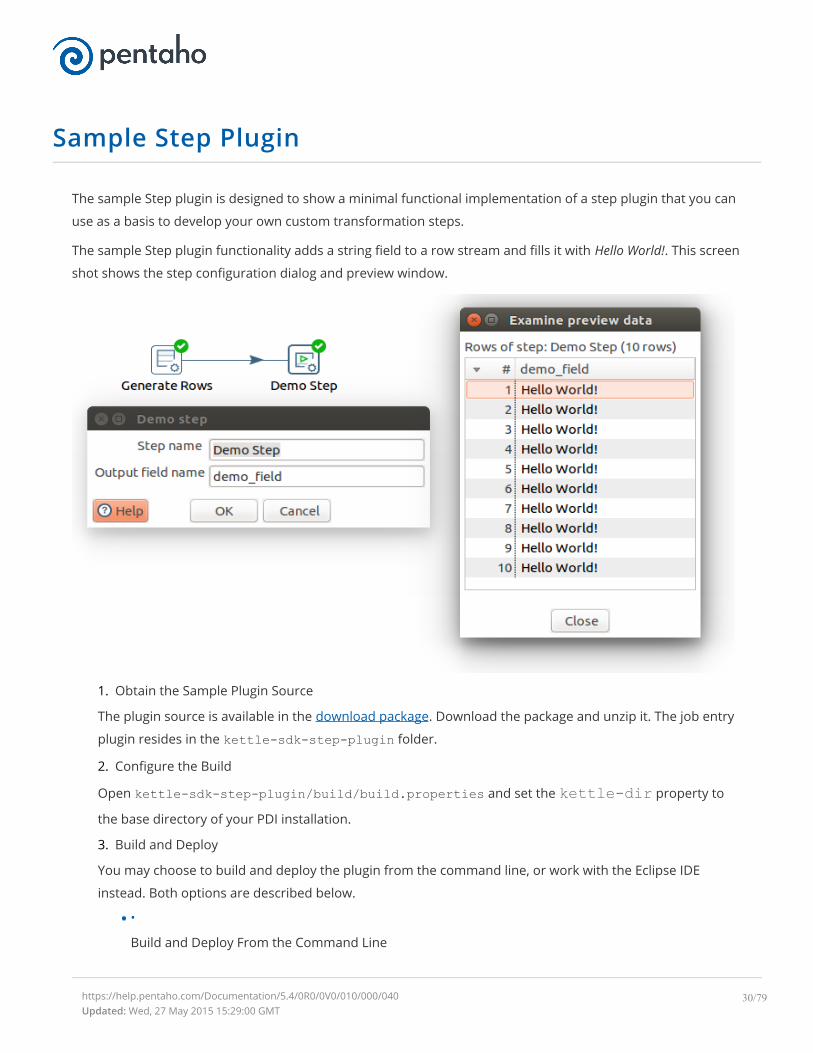
Sample Step Plugin
The sample Step plugin is designed to show a minimal functional implementation of a step plugin that you can
use as a basis to develop your own custom transformation steps.
The sample Step plugin functionality adds a string field to a row stream and fills it with Hello World!. This screen
shot shows the step configuration dialog and preview window.
1. Obtain the Sample Plugin Source
The plugin source is available in the download package. Download the package and unzip it. The job entry
plugin resides in the kettle-sdk-step-plugin folder.
2. Configure the Build
Open kettle-sdk-step-plugin/build/build.properties and set the kettle-dir property to
the base directory of your PDI installation.
3. Build and Deploy
You may choose to build and deploy the plugin from the command line, or work with the Eclipse IDE
instead. Both options are described below.
•
Build and Deploy From the Command Line
https://help.pentaho.com/Documentation/5.4/0R0/0V0/010/000/040Updated: Wed, 27 May 2015 15:29:00 GMT
30/79
The plugin is built using Apache Ant. Build and deploy the plugin from the command line by invoking
the install target from the build directory.
kettle-sdk-step-plugin $ cd buildbuild $ ant install
The install target compiles the source, creates a jar file, creates a plugin folder, and copies the
plugin folder into the plugins/steps directory of your PDI installation.
•
Build and Deploy From Eclipse
Import the plugin sources into Eclipse:
• From the menu, select File > Import > Existing Projects Into Worksapace.
• Browse to the kettle-sdk-step-plugin folder and choose the project to be imported.
To build and install the plugin, follow these steps:
• Open the Ant view in Eclipse by selecting Window > Show View from the main menu and select Ant.
You may have to select Other > Ant if you have not used the Ant view before.
• Drag the file build/build.xml from your project into the Ant view, and execute the install target bydouble-clicking it.
• After the plugin has been deployed, restart Spoon.
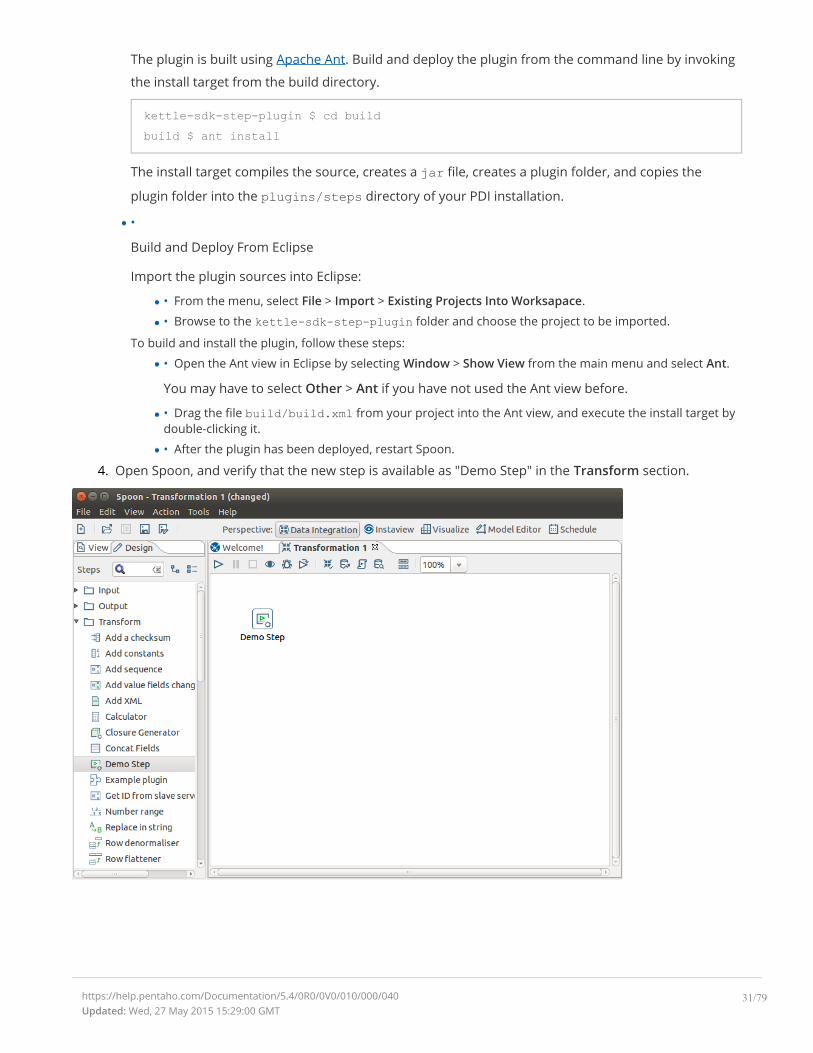
4. Open Spoon, and verify that the new step is available as "Demo Step" in the Transform section.
https://help.pentaho.com/Documentation/5.4/0R0/0V0/010/000/040Updated: Wed, 27 May 2015 15:29:00 GMT
31/79
Exploring More Steps
PDI sources provide example implementations of transformation steps. Each PDI core step is located in a sub-
package of org.pentaho.di.trans.steps found in the engine/src folder. The corresponding dialog
class in located in org.pentaho.di.ui.trans.steps found in the ui/src folder.
For example, these are the classes that make up the Row Generator step.
org.pentaho.di.trans.steps.rowgenerator.RowGeneratorMetaorg.pentaho.di.trans.steps.rowgenerator.RowGeneratororg.pentaho.di.trans.steps.rowgenerator.RowGeneratorDataorg.pentaho.di.ui.trans.steps.rowgenerator.RowGeneratorDialog
The dialog classes of the core PDI steps are located in a different package and source folder. They are also
assembled into a separate jar file. This allows PDI to load the UI-related jar file when launching Spoon and
avoid loading the UI-related jar when it is not needed.
https://help.pentaho.com/Documentation/5.4/0R0/0V0/010/000/050Updated: Wed, 27 May 2015 15:29:00 GMT
32/79
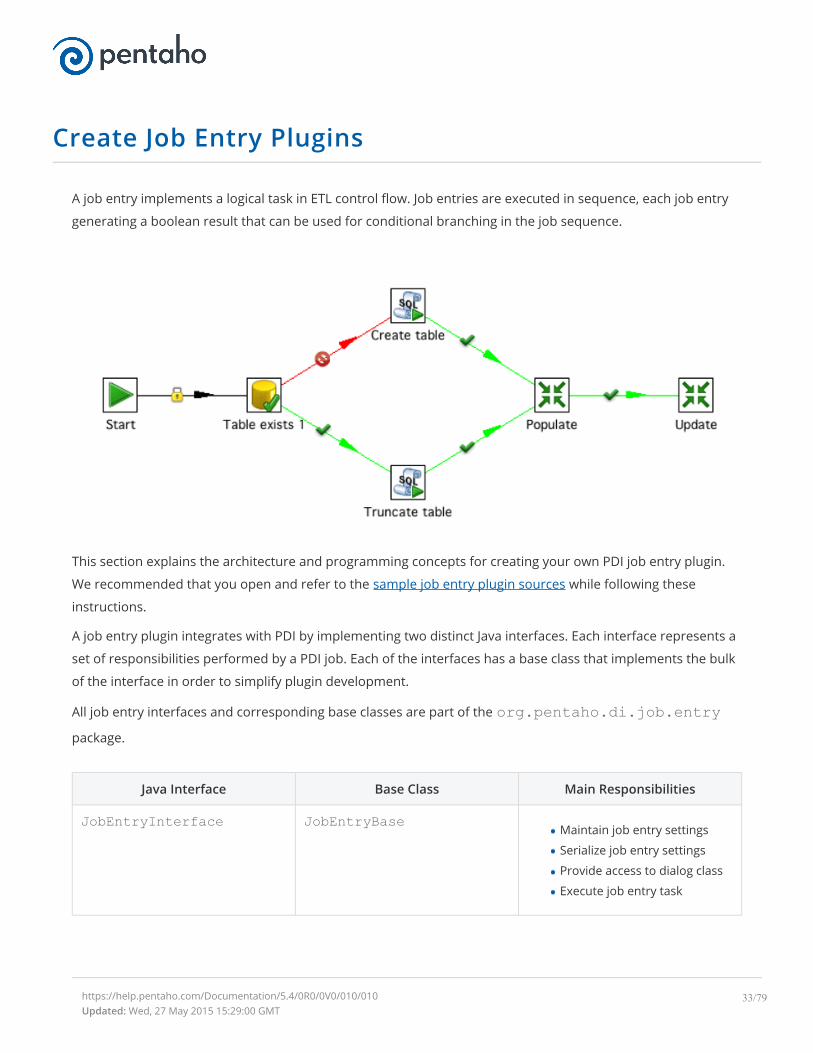
Create Job Entry Plugins
A job entry implements a logical task in ETL control flow. Job entries are executed in sequence, each job entry
generating a boolean result that can be used for conditional branching in the job sequence.
This section explains the architecture and programming concepts for creating your own PDI job entry plugin.
We recommended that you open and refer to the sample job entry plugin sources while following these
instructions.
A job entry plugin integrates with PDI by implementing two distinct Java interfaces. Each interface represents a
set of responsibilities performed by a PDI job. Each of the interfaces has a base class that implements the bulk
of the interface in order to simplify plugin development.
All job entry interfaces and corresponding base classes are part of the org.pentaho.di.job.entrypackage.
Java Interface Base Class Main Responsibilities
JobEntryInterface JobEntryBaseMaintain job entry settings
Serialize job entry settings
Provide access to dialog class
Execute job entry task
https://help.pentaho.com/Documentation/5.4/0R0/0V0/010/010Updated: Wed, 27 May 2015 15:29:00 GMT
33/79
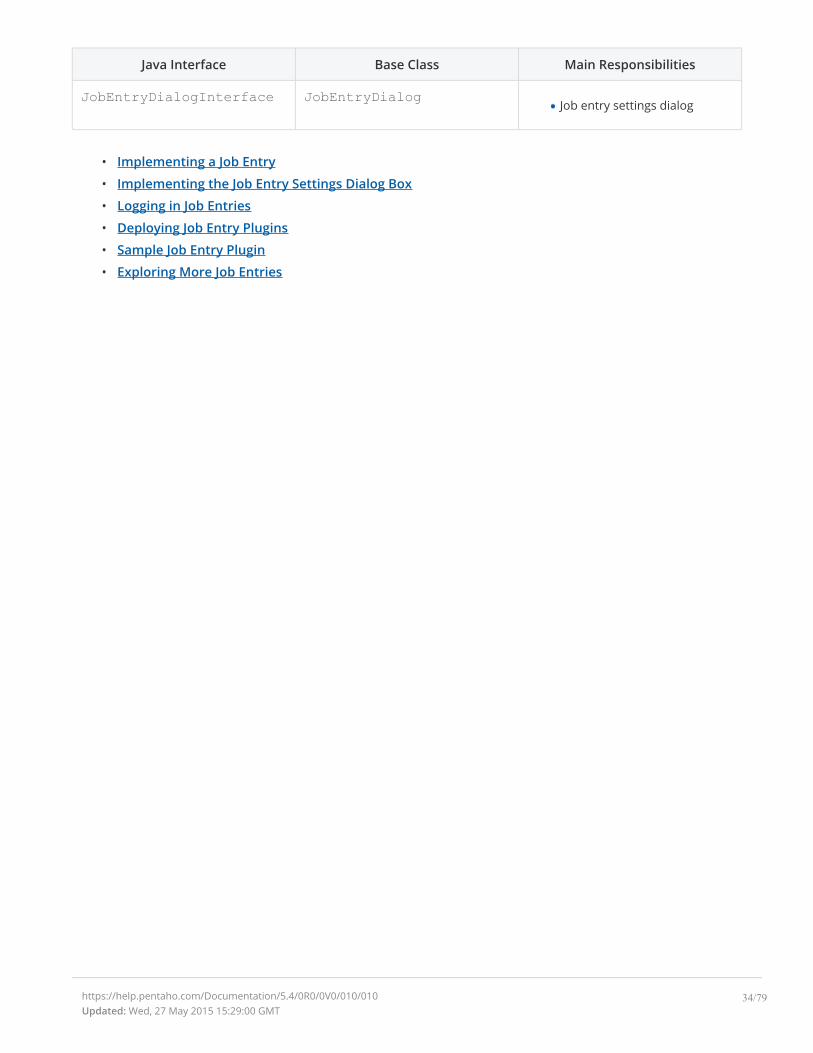
Java Interface Base Class Main Responsibilities
JobEntryDialogInterface JobEntryDialogJob entry settings dialog
• Implementing a Job Entry
• Implementing the Job Entry Settings Dialog Box
• Logging in Job Entries
• Deploying Job Entry Plugins
• Sample Job Entry Plugin
• Exploring More Job Entries
https://help.pentaho.com/Documentation/5.4/0R0/0V0/010/010Updated: Wed, 27 May 2015 15:29:00 GMT
34/79
Implementing a Job Entry
Java Interface org.pentaho.di.job.entry.JobEntryInterface
Base class org.pentaho.di.job.entry.JobEntryBase
JobEntryInterface is the main Java interface that a plugin implements.
Keep Track of Job Entry Settings
The implementing class keeps track of job entry settings using private fields with corresponding get and setmethods. The dialog class implementing JobEntryDialogInterface uses these methods to copy the
user supplied configuration in and out of the dialog box.
public Object clone()This method is called when a job entry is duplicated in Spoon. It returns a deep copy of the job entry object. It
is essential that the implementing class creates proper deep copies if the job entry configuration is stored in
modifiable objects, such as lists or custom helper objects.
Serialize Job Entry Settings
The plugin serializes its settings to both XML and a PDI repository.
public String getXML()This method is called by PDI whenever a job entry serializes its settings to XML. It is called when saving a job in
Spoon. The method returns an XML string containing the serialized settings. The string contains a series of XML
tags, one tag per setting. The helper class, org.pentaho.di.core.xml.XMLHandler, constructs the
XML string.
public void loadXML()This method is called by PDI whenever a job entry reads its settings from XML. The XML node containing the
job entry settings is passed in as an argument. Again, the helper class,
org.pentaho.di.core.xml.XMLHandler, is used to read the settings from the XML node.
public void saveRep()This method is called by PDI whenever a job entry saves its settings to a PDI repository. The repository object
passed in as the first argument provides a convenient set of methods for serializing job entry settings. When
calling repository serialization methods, job id and job entry id are required. The job id is passed in to
https://help.pentaho.com/Documentation/5.4/0R0/0V0/010/010/000Updated: Wed, 27 May 2015 15:29:00 GMT
35/79
saveRep() as an argument, and the job entry id can be obtained by a call to getObjectId() inherited
from the base class.
public void loadRep()This method is called by PDI whenever a job entry reads its configuration from a PDI repository. The job entry
id given in the arguments is used as the identifier when using the repositories serialization methods. When
developing plugins, make sure the serialization code is in synch with the settings available from the job entry
dialog. When testing a plugin in Spoon, PDI internally saves and loads a copy of the job before it is executed.
Provide the Name of the Dialog Class
PDI needs to know which class takes care of the settings dialog box for the job entry. The interface method
getDialogClassName() returns the name of the class implementing the
JobEntryDialogInterface.
Provide Information About Possible Outcomes
A job entry may support up to three types of outgoing hops: True, False, and Unconditional. Sometimes it does
not make sense to support all three. For instance, if the job entry performs a task that does not produce a
boolean outcome, like the dummy job entry, it may make sense to suppress the True and False outgoing hops.
There are other job entries, which carry an inherent boolean outcome, such as the File Exists job entry. It may
make sense in such cases to suppress the unconditional outgoing hop.
The job entry plugin class must implement two methods to indicate to PDI which outgoing hops it supports.
public boolean evaluates()
This method returns true if the job entry supports the True and False outgoing hops. If the job entry does not
support distinct outcomes, it returns false.
public boolean isUnconditional()
This method returns true if the job entry supports the unconditional outgoing hop. If the job entry does not
support the unconditional hop, it returns false.
Execute the Job Entry Task
The class implementing JobEntryInterface executes the actual job entry task.
public Result execute()
The execute() method is called by PDI when it is time for the job entry to execute its logic. The arguments
are a result object, which is passed in from the previously executed job entry, and an integer number
indicating the distance of the job entry from the start entry of the job.
The job entry should execute its configured task and report back on the outcome. A job entry does that by
calling specified methods on the passed in result object.
https://help.pentaho.com/Documentation/5.4/0R0/0V0/010/010/000Updated: Wed, 27 May 2015 15:29:00 GMT
36/79

prev_result.setNrErrors()The job entry indicates whether it has encountered any errors during execution. If there are errors,
setNrErrors calls with the number of errors encountered. Typically, this is 1. If there are no errors,
setNrErrors is called with an argument of zero (0).
prev_result.setResult()The job entry must indicate the outcome of the task. This value determines which output hops follow next. If a
job entry does not support evaluation, it need not call prev_result.setResult().
Finally, the passed in prev_result object is returned.
Interface with the PDI plugin system
The class implementing JobEntryInterface must be annotated with the JobEntry Java annotation.
Supply the following annotation attributes:
Attribute Description
id A globally unique ID for the job entry
image The resource location for the png icon image of the job entry
name A short label for the job entry
description A longer description for the job entry
categoryDescription The category the entry should appear under in the PDI job entry tree. For exampleGeneral, Utility, File Management, etc.
i18nPackageName If the i18nPackageName attribute is supplied in the annotation attributes, the valuesof name, description, and categoryDescription are interpreted as i18n keys relative tothe message bundle contained in given package. The keys may be supplied in theextended form i18n:<packagename> key to specify a package that is differentfrom the package given in the i18nPackageName attribute.
Please refer to the Sample Job Entry Plugin for a complete implementation example.
https://help.pentaho.com/Documentation/5.4/0R0/0V0/010/010/000Updated: Wed, 27 May 2015 15:29:00 GMT
37/79
Implementing the Job Entry Settings Dialog Box
Java Interface org.pentaho.di.job.entry.JobEntryDialogInterface
Base class org.pentaho.di.ui.job.entry.JobEntryDialog
JobEntryDialogInterface is the Java interface that implements the settings dialog of a job entry
plugin.
Maintain the Dialog for Job Entry Settings
The dialog class is responsible for constructing and opening the settings dialog for the job entry. When you
open the job entry settings in Spoon, the system instantiates the dialog class passing in the
JobEntryInterface object and calling the open() method on the dialog. SWT is the native windowing
environment of Spoon and the framework used for implementing job entry dialogs.
public JobEntryInterface open()This method returns only after the dialog has been confirmed or cancelled. The method must conform to these
rules.
If the dialog is confirmed
The JobEntryInterface object must be updated to reflect the new settings
If you changed any settings, the Changed flag of the JobEntryInterface object must be set to trueopen() returns the JobEntryInterface object
If the dialog is cancelled
The JobEntryInterface object must not be changed
The Changed flag of theJobEntryInterface object must be set to the value it had at the time thedialog opened
open() must return null
The JobEntryInterface object has an internal Changed flag that is accessible using hasChanged()and setChanged(). Spoon decides whether the job has unsaved changes based on the Changed flag, so it
is important for the dialog to set the flag appropriately.
Additionally, the job entry dialog must make sure that the job entry name is not set to be empty. The dialog
may be confirmed only after a non-empty name is set.
The sample Job Entry plugin project has an implementation of the dialog class that is consistent with these
rules and is a good basis for creating your own dialogs.
https://help.pentaho.com/Documentation/5.4/0R0/0V0/010/010/010Updated: Wed, 27 May 2015 15:29:00 GMT
38/79

https://help.pentaho.com/Documentation/5.4/0R0/0V0/010/010/010Updated: Wed, 27 May 2015 15:29:00 GMT
39/79
Logging in Job Entries
A job entry interacts with the PDI logging system by using the logging methods inherited from
JobEntryBase.
These methods are used to issue log lines to the PDI logging system on different severity levels. Multi-
argument versions of the methods are available to do some basic formatting, which is equivalent to a call to
MessageFormat.format(message, arguments).
public void logMinimal()public void logBasic()public void logDetailed()public void logDebug()public void logRowlevel()public void logError()
These methods query the logging level. They are often used to guard sections of code, that should only be
executed with elevated logging settings.
public boolean isBasic()public boolean isDetailed()public boolean isDebug()public boolean isRowLevel()
Job entries should log the this information at specified levels:
Log Level Log Information Content
Minimal Only information that is interesting at a very high-level, for example Job Started or Ended jobs.Individual job entries do not log anything at this level.
Basic Information that may be interesting to you during regular ETL operation
Detailed Prepared SQL or other query statements, resource allocation and initialization like opening filesor connections
Debug Anything that may be useful in debugging job entries
Row Level Anything that may be helpful in debugging problems at the level of individual rows and values
Error Fatal errors that abort the job
https://help.pentaho.com/Documentation/5.4/0R0/0V0/010/010/020Updated: Wed, 27 May 2015 15:29:00 GMT
40/79

Deploying Job Entry Plugins
To deploy your plugin, follow the following steps.
1.
Create a jar file containing your plugin classes and resources
2.
Create a new folder, give it a meaningful name, and place your jar file inside the folder
3.
Place the plugin folder you just created in a specific location for PDI to find. Depending on how you use
PDI, you need to copy the plugin folder to one or more locations as per the following list.
•
Deploying to Spoon or Carte
Copy the plugin folder into this location:
design-tools/data-integration/plugins/jobentries
After restarting Spoon, the new job entry is available for use.
•
Deploying to Data Integration Server
Copy the plugin folder to this location:
server/data-integration-server/pentaho-solutions/system/kettle/plugins/jobentries
After restarting the data integration server, the plugin is available to the server.
•
Deploying to BA Server
Copy the plugin folder to this location:
server/biserver-ee/pentaho-solutions/system/kettle/plugins/jobentries
After restarting the BA Server, the plugin is available to the server.
https://help.pentaho.com/Documentation/5.4/0R0/0V0/010/010/030Updated: Wed, 27 May 2015 15:29:00 GMT
41/79
Sample Job Entry Plugin
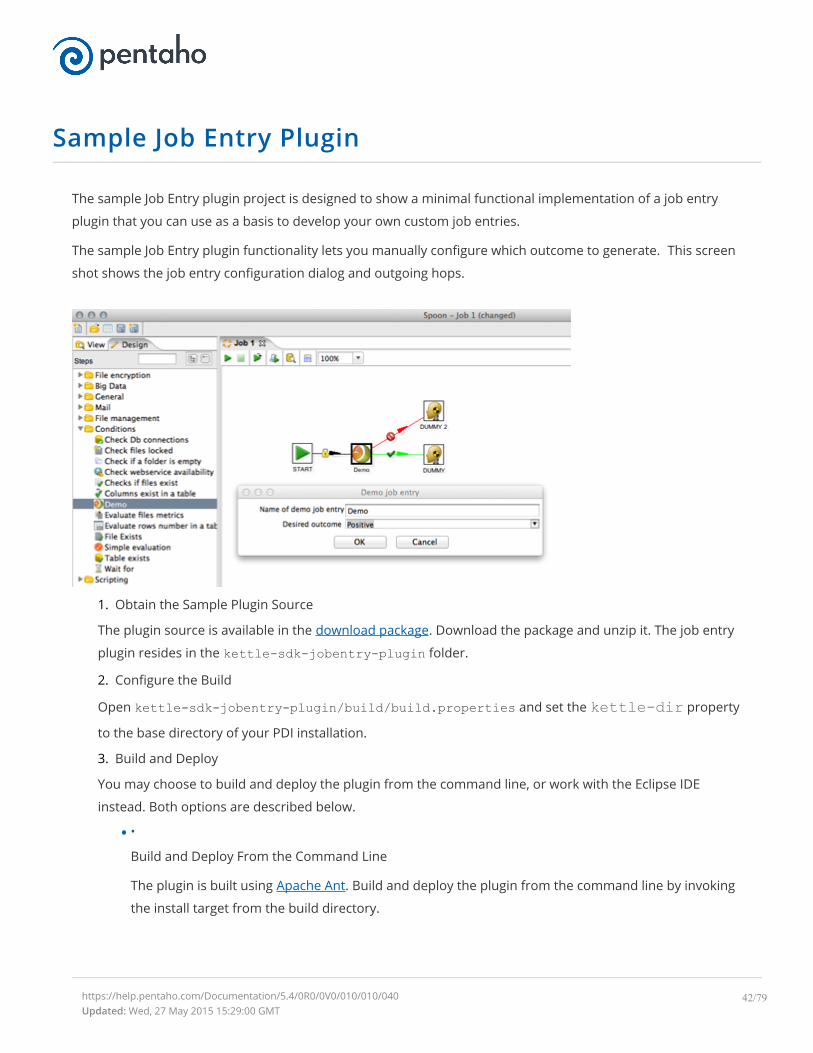
The sample Job Entry plugin project is designed to show a minimal functional implementation of a job entry
plugin that you can use as a basis to develop your own custom job entries.
The sample Job Entry plugin functionality lets you manually configure which outcome to generate. This screen
shot shows the job entry configuration dialog and outgoing hops.
1. Obtain the Sample Plugin Source
The plugin source is available in the download package. Download the package and unzip it. The job entry
plugin resides in the kettle-sdk-jobentry-plugin folder.
2. Configure the Build
Open kettle-sdk-jobentry-plugin/build/build.properties and set the kettle-dir property
to the base directory of your PDI installation.
3. Build and Deploy
You may choose to build and deploy the plugin from the command line, or work with the Eclipse IDE
instead. Both options are described below.
•
Build and Deploy From the Command Line
The plugin is built using Apache Ant. Build and deploy the plugin from the command line by invoking
the install target from the build directory.
https://help.pentaho.com/Documentation/5.4/0R0/0V0/010/010/040Updated: Wed, 27 May 2015 15:29:00 GMT
42/79
kettle-sdk-jobentry-plugin $ cd buildbuild $ ant install
The install target compiles the source, creates a jar file, creates a plugin folder, and copies the
plugin folder into the plugins/jobentries directory of your PDI installation.
•
Build and Deploy From Eclipse
Import the plugin sources into Eclipse:
• From the menu, select File > Import > Existing Projects Into Worksapace.
• Browse to the kettle-sdk-jobentry-plugin folder and choose the project to be imported.
To build and install the plugin, follow these steps:
• Open the Ant view in Eclipse by selecting Window > Show View from the main menu and select Ant.
You may have to select Other > Ant if you have not used the Ant view before.
• Drag the file build/build.xml from your project into the Ant view, and execute the install target bydouble-clicking it.
• After the plugin has been deployed, restart Spoon.
4. Open Spoon, and verify that the new job entry is available as "Demo" in the Conditions section.
https://help.pentaho.com/Documentation/5.4/0R0/0V0/010/010/040Updated: Wed, 27 May 2015 15:29:00 GMT
43/79
Exploring More Job Entries
PDI sources provide example implementations of job entries. Each PDI core job entry is located in a sub-
package of org.pentaho.di.job.entries found in the engine/src folder. The corresponding
dialog class is located in org.pentaho.di.ui.job.entries found in the ui/src folder.
For example, these are the classes that make up the File Exists job entry:
org.pentaho.di.job.entries.fileexists.JobEntryFileExistsorg.pentaho.di.ui.job.entries.fileexists.JobEntryFileExistsDialog
The dialog classes of the core PDI job entries are located in a different package and source folder. They are
also assembled into a separate jar file. This allows PDI to load the UI-related jar file when launching Spoon
and avoid loading the UI-related jar when it is not needed.
https://help.pentaho.com/Documentation/5.4/0R0/0V0/010/010/050Updated: Wed, 27 May 2015 15:29:00 GMT
44/79
Creating Database Plugins
PDI uses database plugins to support specific database systems beyond generic JDBC functionality. A database
plugin helps in the following areas:
constructing connection strings
passing connection settings to JDBC
dialect-aware SQL generation
detecting special abilities and limitations of JDBC drivers
A database plugin introduces a new entry in the PDI database dialog.
https://help.pentaho.com/Documentation/5.4/0R0/0V0/010/020Updated: Wed, 27 May 2015 15:29:00 GMT
45/79
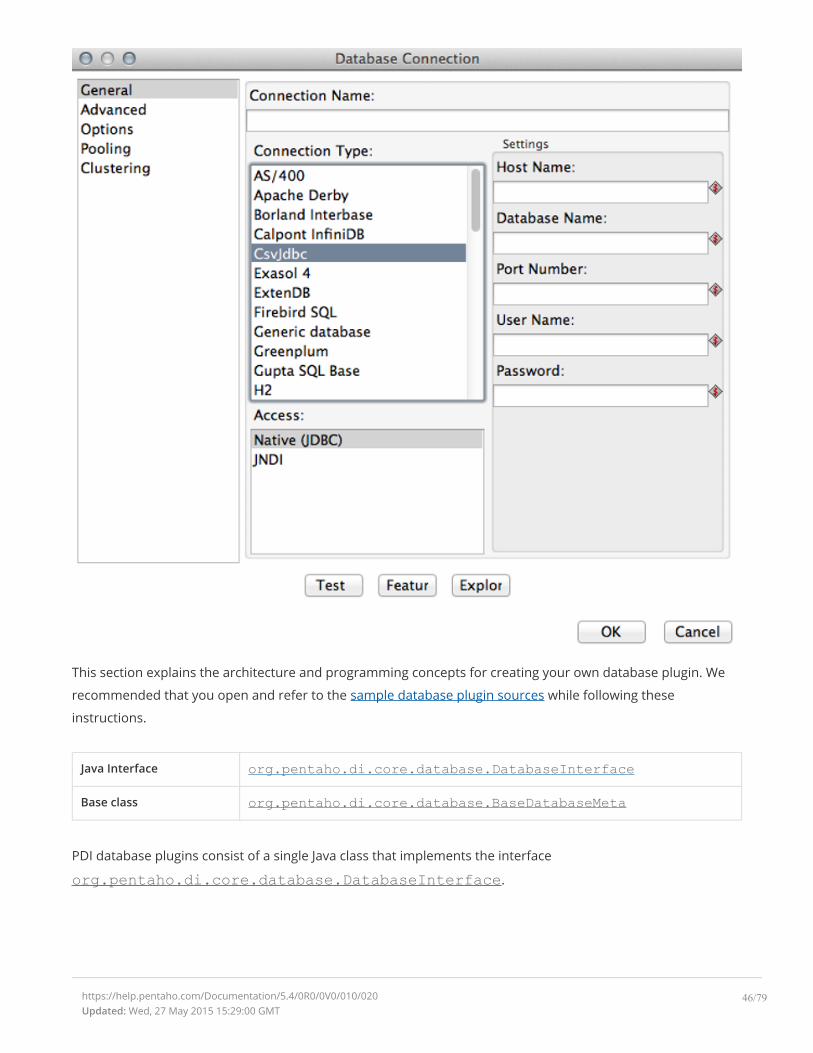
This section explains the architecture and programming concepts for creating your own database plugin. We
recommended that you open and refer to the sample database plugin sources while following these
instructions.
Java Interface org.pentaho.di.core.database.DatabaseInterface
Base class org.pentaho.di.core.database.BaseDatabaseMeta
PDI database plugins consist of a single Java class that implements the interface
org.pentaho.di.core.database.DatabaseInterface.
https://help.pentaho.com/Documentation/5.4/0R0/0V0/010/020Updated: Wed, 27 May 2015 15:29:00 GMT
46/79
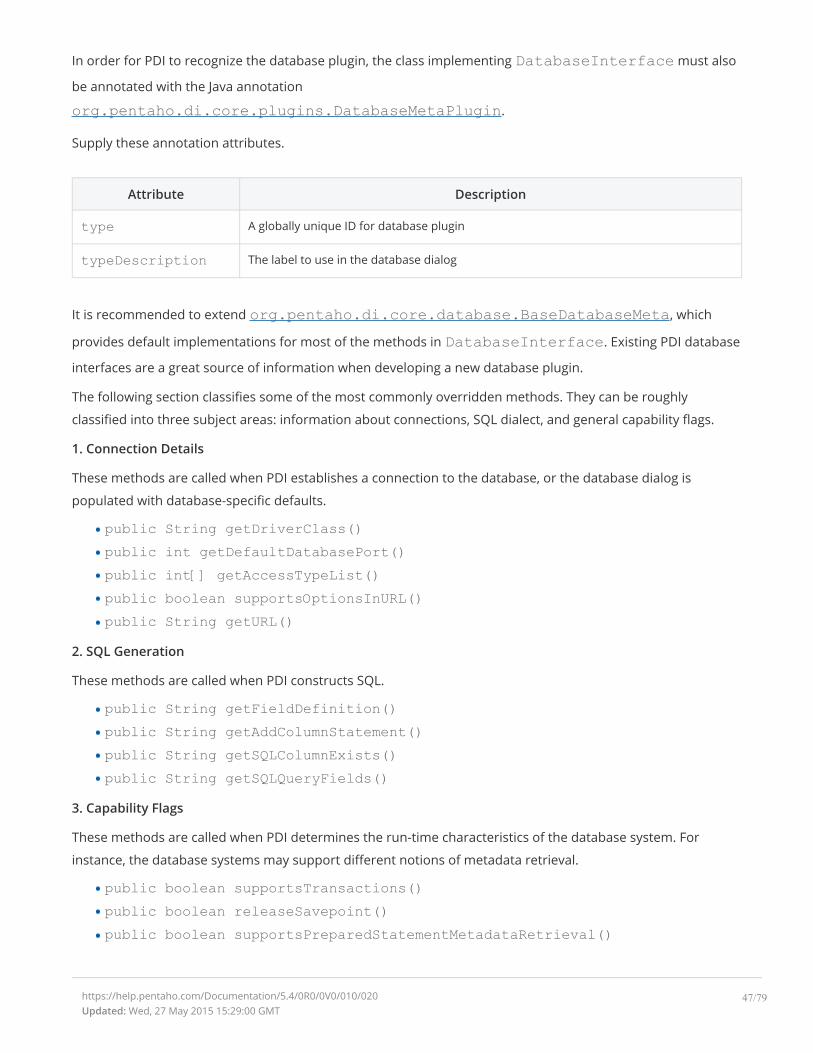
In order for PDI to recognize the database plugin, the class implementing DatabaseInterface must also
be annotated with the Java annotation
org.pentaho.di.core.plugins.DatabaseMetaPlugin.
Supply these annotation attributes.
Attribute Description
type A globally unique ID for database plugin
typeDescription The label to use in the database dialog
It is recommended to extend org.pentaho.di.core.database.BaseDatabaseMeta, which
provides default implementations for most of the methods in DatabaseInterface. Existing PDI database
interfaces are a great source of information when developing a new database plugin.
The following section classifies some of the most commonly overridden methods. They can be roughly
classified into three subject areas: information about connections, SQL dialect, and general capability flags.
1. Connection Details
These methods are called when PDI establishes a connection to the database, or the database dialog is
populated with database-specific defaults.
public String getDriverClass()public int getDefaultDatabasePort()public int[] getAccessTypeList()public boolean supportsOptionsInURL()public String getURL()
2. SQL Generation
These methods are called when PDI constructs SQL.
public String getFieldDefinition()public String getAddColumnStatement()public String getSQLColumnExists()public String getSQLQueryFields()
3. Capability Flags
These methods are called when PDI determines the run-time characteristics of the database system. For
instance, the database systems may support different notions of metadata retrieval.
public boolean supportsTransactions()public boolean releaseSavepoint()public boolean supportsPreparedStatementMetadataRetrieval()
https://help.pentaho.com/Documentation/5.4/0R0/0V0/010/020Updated: Wed, 27 May 2015 15:29:00 GMT
47/79

public boolean supportsResultSetMetadataRetrievalOnly()• Exploring Existing Database Implementations
• Deploying Database Plugins
• Sample Database Plugin
https://help.pentaho.com/Documentation/5.4/0R0/0V0/010/020Updated: Wed, 27 May 2015 15:29:00 GMT
48/79
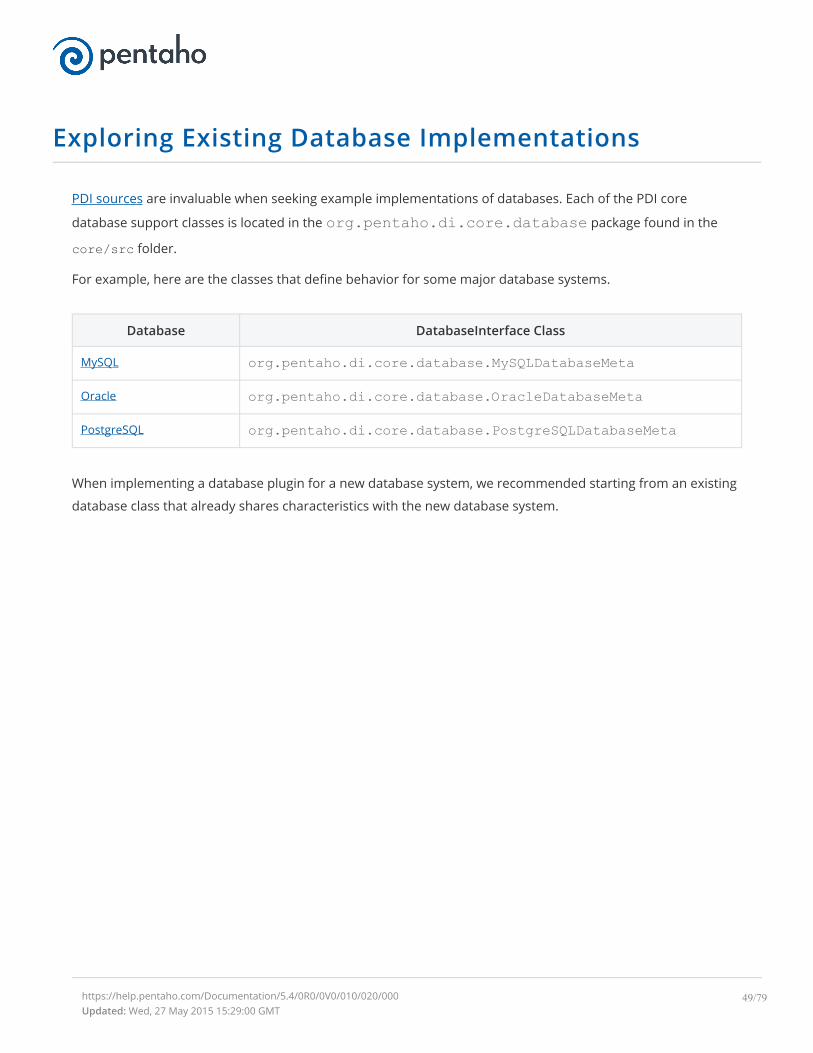
Exploring Existing Database Implementations
PDI sources are invaluable when seeking example implementations of databases. Each of the PDI core
database support classes is located in the org.pentaho.di.core.database package found in the
core/src folder.
For example, here are the classes that define behavior for some major database systems.
Database DatabaseInterface Class
MySQL org.pentaho.di.core.database.MySQLDatabaseMeta
Oracle org.pentaho.di.core.database.OracleDatabaseMeta
PostgreSQL org.pentaho.di.core.database.PostgreSQLDatabaseMeta
When implementing a database plugin for a new database system, we recommended starting from an existing
database class that already shares characteristics with the new database system.
https://help.pentaho.com/Documentation/5.4/0R0/0V0/010/020/000Updated: Wed, 27 May 2015 15:29:00 GMT
49/79
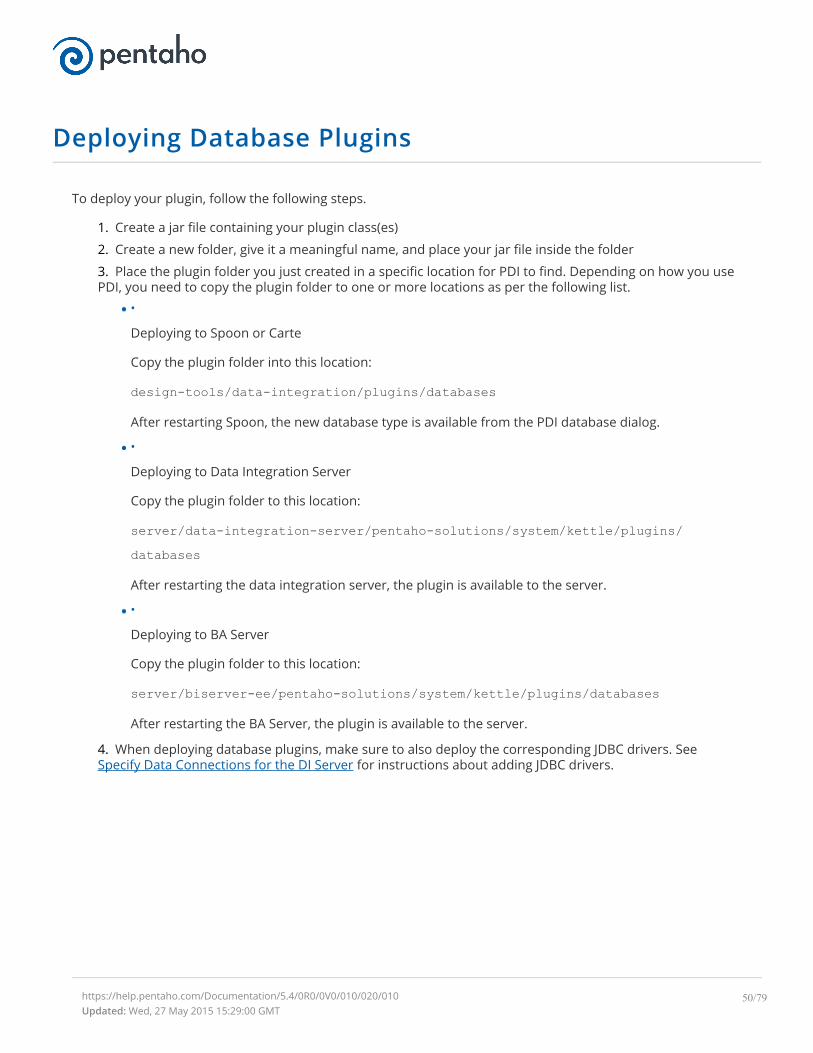
Deploying Database Plugins
To deploy your plugin, follow the following steps.
1. Create a jar file containing your plugin class(es)
2. Create a new folder, give it a meaningful name, and place your jar file inside the folder
3. Place the plugin folder you just created in a specific location for PDI to find. Depending on how you usePDI, you need to copy the plugin folder to one or more locations as per the following list.
•
Deploying to Spoon or Carte
Copy the plugin folder into this location:
design-tools/data-integration/plugins/databases
After restarting Spoon, the new database type is available from the PDI database dialog.
•
Deploying to Data Integration Server
Copy the plugin folder to this location:
server/data-integration-server/pentaho-solutions/system/kettle/plugins/databases
After restarting the data integration server, the plugin is available to the server.
•
Deploying to BA Server
Copy the plugin folder to this location:
server/biserver-ee/pentaho-solutions/system/kettle/plugins/databases
After restarting the BA Server, the plugin is available to the server.
4. When deploying database plugins, make sure to also deploy the corresponding JDBC drivers. SeeSpecify Data Connections for the DI Server for instructions about adding JDBC drivers.
https://help.pentaho.com/Documentation/5.4/0R0/0V0/010/020/010Updated: Wed, 27 May 2015 15:29:00 GMT
50/79
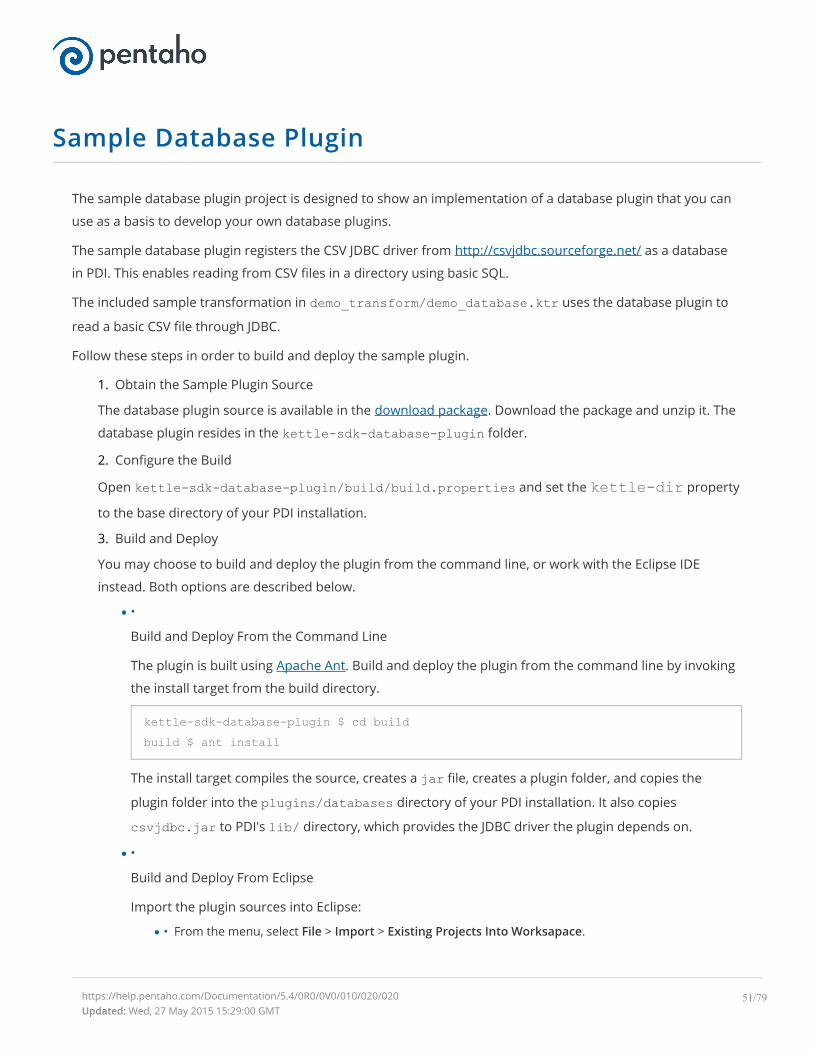
Sample Database Plugin
The sample database plugin project is designed to show an implementation of a database plugin that you can
use as a basis to develop your own database plugins.
The sample database plugin registers the CSV JDBC driver from http://csvjdbc.sourceforge.net/ as a database
in PDI. This enables reading from CSV files in a directory using basic SQL.
The included sample transformation in demo_transform/demo_database.ktr uses the database plugin to
read a basic CSV file through JDBC.
Follow these steps in order to build and deploy the sample plugin.
1. Obtain the Sample Plugin Source
The database plugin source is available in the download package. Download the package and unzip it. The
database plugin resides in the kettle-sdk-database-plugin folder.
2. Configure the Build
Open kettle-sdk-database-plugin/build/build.properties and set the kettle-dir property
to the base directory of your PDI installation.
3. Build and Deploy
You may choose to build and deploy the plugin from the command line, or work with the Eclipse IDE
instead. Both options are described below.
•
Build and Deploy From the Command Line
The plugin is built using Apache Ant. Build and deploy the plugin from the command line by invoking
the install target from the build directory.
kettle-sdk-database-plugin $ cd buildbuild $ ant install
The install target compiles the source, creates a jar file, creates a plugin folder, and copies the
plugin folder into the plugins/databases directory of your PDI installation. It also copies
csvjdbc.jar to PDI's lib/ directory, which provides the JDBC driver the plugin depends on.
•
Build and Deploy From Eclipse
Import the plugin sources into Eclipse:
• From the menu, select File > Import > Existing Projects Into Worksapace.
https://help.pentaho.com/Documentation/5.4/0R0/0V0/010/020/020Updated: Wed, 27 May 2015 15:29:00 GMT
51/79

• Browse to the kettle-sdk-database-plugin folder and choose the project to be imported.
To build and install the plugin, follow these steps:
• Open the Ant view in Eclipse by selecting Window > Show View from the main menu and select Ant.
You may have to select Other > Ant if you have not used the Ant view before.
• Drag the file build/build.xml from your project into the Ant view, and execute the install target bydouble-clicking it.
• After the plugin has been deployed, restart Spoon.
4. You can test the new plugin using the transformation from the database plugin demo_transformfolder.
https://help.pentaho.com/Documentation/5.4/0R0/0V0/010/020/020Updated: Wed, 27 May 2015 15:29:00 GMT
52/79

Creating Partitioner Plugins
PDI uses partitioner plugins for its partitioning feature. Each partitioner plugin implements a specific
partitioning method.
For most applications, the Remainder of Division partitioner works well. On the rare occasion that an
application would benefit from an additional partitioning method, this section explains how to implement
them.
This section explains the architecture and programming concepts for creating your own partitioner plugin. We
recommended you open and refer to the sample partitioner plugin sources while following these instructions.
A partitioner plugin integrates with PDI by implementing two distinct Java interfaces. Each interface represents
a set of responsibilities performed by a PDI partitioner. Each of the interfaces has a base class that implements
the bulk of the interface in order to simplify plugin development.
Package Interface Base Class MainResponsibilities
org.pentaho.di.trans Partitioner BasePartitionerMaintainpartitionersettings
Serializepartitionerenumerations
Provide accessto dialog class
Assign rows topartitions
https://help.pentaho.com/Documentation/5.4/0R0/0V0/010/030Updated: Wed, 27 May 2015 15:29:01 GMT
53/79

Package Interface Base Class MainResponsibilities
duringruntime
org.pentaho.di.ui.trans.stepStepDialogInterface BaseStepDialogPartitionersettings dialog
Additional Reading
A complete explanation of partitioning in Kettle, including sample transformations, is available here
http://type-exit.org/adventures-with-open-source-bi/2011/09/partitioning-in-kettle/.
• Implementing the Partitioner Interface
• Implementing the Partitioner Settings Dialog Box
• Deploying Partitioner Plugins
• Sample Partitioner Plugin
• Exploring Existing Partitioners
https://help.pentaho.com/Documentation/5.4/0R0/0V0/010/030Updated: Wed, 27 May 2015 15:29:01 GMT
54/79
Implementing the Partitioner Interface
Java Interface org.pentaho.di.trans.Partitioner
Base class org.pentaho.di.trans.BasePartitioner
Partitioner is the main Java interface that a plugin implements.
Keep Track of Partitioner Settings
The implementing class keeps track of partitioner settings using private fields with corresponding get and
set methods. The dialog class implementing PartionerDialogInterface is using these methods
to copy the user supplied configuration in and out of the dialog.
public Object clone()This method is called when a step containing partitioning configuration is duplicated in Spoon. It needs to
return a deep copy of this partitioner object. It is essential that the implementing class creates proper deep
copies if the configuration is stored in modifiable objects, such as lists or custom helper objects. The copy is
created by calling super.clone() and deep-copying any fields the partitioner may have declared.
public Partitioner getInstance()This method is required to return a new instance of the partitioner class, with the plugin id and plugin
description inherited from the instance upon which this method is called.
Serialize Partitioner Settings
The plugin serializes its settings to both XML and a PDI repository.
public String getXML()This method is called by PDI whenever the plugin needs to serialize its settings to XML. It is called when saving
a transformation in Spoon. The method returns an XML string containing the serialized settings. The string
contains a series of XML tags, one tag per setting. The helper class
org.pentaho.di.core.xml.XMLHandler constructs the XML string.
public void loadXML()This method is called by PDI whenever a plugin reads its settings from XML. The XML node containing the
plugin settings is passed in as an argument. Again, the helper class
org.pentaho.di.core.xml.XMLHandler is used to read the settings from the XML node.
https://help.pentaho.com/Documentation/5.4/0R0/0V0/010/030/000Updated: Wed, 27 May 2015 15:29:01 GMT
55/79
public void saveRep()This method is called by PDI whenever a plugin saves its settings to a PDI repository. The repository object
passed in as the first argument provides a convenient set of methods for serializing settings. The
transformation id and step id passed in are used as identifiers when calling the repository serialization
methods.
public void readRep()This method is called by PDI whenever a plugin needs to read its configuration from a PDI repository. The step
id given in the arguments should be used as the identifier when using the repositories serialization methods.
When developing plugins, make sure the serialization code is in synch with the settings available from the
partitioner plugin dialog. When testing a partitioned step in Spoon, PDI internally saves and loads a copy of the
transformation before it is executed.
Provide the Name of the Dialog Class
PDI needs to know which class will take care of the settings dialog for the plugin. The interface method
getDialogClassName() must return the name of the class implementing the
StepDialogInterface for the partitioner.
Partition Incoming Rows During Runtime
The class implementing Partitioner executes the actual logic that distributes the rows to available
partitions.
public int getPartition()This method is called with the row structure and the actual row as arguments. It returns the partition to which
this row is sent. The total number of partitions is available in the inherited field nrPartitions and the
return value is between zero (0, inclusive) and nrPartitions (exclusive).
Interface with the PDI plugin system
In order for PDI to recognize the plugin, the class implementing the Partitioner interface must also be
annotated with the Java annotation
org.pentaho.di.core.annotations.PartitionerPlugin.
Supply these annotation attributes:
Attribute Description
id A globally unique ID for the plugin
name A short label for the plugin
description A longer description for the plugin
https://help.pentaho.com/Documentation/5.4/0R0/0V0/010/030/000Updated: Wed, 27 May 2015 15:29:01 GMT
56/79

Attribute Description
i18nPackageName If the i18nPackageName attribute is supplied in the annotation attributes, the valuesof name and description are interpreted as i18n keys. The keys may be supplied in theextended form i18n:<packagename> key to specify a package that is differentfrom the default package given in the i18nPackageName attribute.
https://help.pentaho.com/Documentation/5.4/0R0/0V0/010/030/000Updated: Wed, 27 May 2015 15:29:01 GMT
57/79
Implementing the Partitioner Settings Dialog Box
Java Interface org.pentaho.di.trans.step.StepDialogInterface
Base class org.pentaho.di.ui.trans.step.BaseStepDialog
StepDialogInterface is the Java interface that implements the settings dialog of a partitioner plugin.
Maintain the Dialog for Partitioner Settings
The dialog class is responsible for constructing and opening the settings dialog for the partitioner. When
you open the partitioning settings in Spoon, the system instantiates the dialog class passing in a
StepPartitioningMeta object. Retrieve the Partitioner object by calling getPartitioner()and call the open() method on the dialog. SWT is the native windowing environment of Spoon and the
framework used for implementing dialogs.
public String open()This method returns only after the dialog has been confirmed or cancelled. The method must conform to these
rules.
If the dialog is confirmed
The Partition object must be updated to reflect the new settings
If you changed any settings, the StepPartitioningMeta object Changed flag must be set to trueopen() returns the name of the step to which the partitioning is applied—use the stepname fieldinherited from BaseStepDialog
If the dialog is cancelled
The Partition object must not be changed
The StepPartitioningMeta object Changed flag must be set to the value it had at the time the dialogopened
open() must return null
The StepPartitioningMeta object has an internal Changed flag that is accessible using
hasChanged() and setChanged(). Spoon decides whether the transformation has unsaved changes
based on the Changed flag, so it is important for the dialog to set the flag appropriately.
The sample Partitioner plugin project has an implementation of the dialog class that is consistent with the
these rules and is a good basis for creating your own dialogs.
https://help.pentaho.com/Documentation/5.4/0R0/0V0/010/030/010Updated: Wed, 27 May 2015 15:29:01 GMT
58/79

Deploying Partitioner Plugins
To deploy your plugin, follow the following steps.
1. Create a jar file containing your plugin class(es)
2. Create a new folder, give it a meaningful name, and place your jar file inside the folder
3. Place the plugin folder you just created in a specific location for PDI to find. Depending on how you usePDI, you need to copy the plugin folder to one or more locations as per the following list.
•
Deploying to Spoon or Carte
Copy the plugin folder into this location:
design-tools/data-integration/plugins/steps
After restarting Spoon, the new database type is available from the PDI database dialog.
•
Deploying to Data Integration Server
Copy the plugin folder to this location:
server/data-integration-server/pentaho-solutions/system/kettle/plugins/steps
After restarting the data integration server, the plugin is available to the server.
•
Deploying to BA Server
Copy the plugin folder to this location:
server/biserver-ee/pentaho-solutions/system/kettle/plugins/steps
After restarting the BA Server, the plugin is available to the server.
https://help.pentaho.com/Documentation/5.4/0R0/0V0/010/030/020Updated: Wed, 27 May 2015 15:29:01 GMT
59/79
Sample Partitioner Plugin
The sample Partitioner plugin project is designed to show a minimal functional implementation of a partitioner
plugin that you can use as a basis to develop your own custom plugins.
The sample Partitioner plugin distributes rows to partitions based on the value of a string field, or more
precisely the string length. The sample shows a partitioner executing on five partitions, assigning longer strings
to higher partition numbers.
Follow these steps in order to build and deploy the sample plugin.
1. Obtain the Sample Plugin Source
The plugin source is available in the download package. Download the package and unzip it. The
partitioner plugin resides in the kettle-sdk-partitioner-plugin folder.
2. Configure the Build
Open kettle-sdk-partitioner-plugin/build/build.properties and set the kettle-dirproperty to the base directory of your PDI installation.
3. Build and Deploy
You may choose to build and deploy the plugin from the command line, or work with the Eclipse IDE
instead. Both options are described below.
•
Build and Deploy From the Command Line
The plugin is built using Apache Ant. Build and deploy the plugin from the command line by invoking
the install target from the build directory.
kettle-sdk-partitioner-plugin $ cd buildbuild $ ant install
The install target compiles the source, creates a jar file, creates a plugin folder, and copies the
plugin folder into the plugins/steps directory of your PDI installation.
•
Build and Deploy From Eclipse
Import the plugin sources into Eclipse:
• From the menu, select File > Import > Existing Projects Into Worksapace.
• Browse to the kettle-sdk-partitioner-plugin folder and choose the project to be imported.
To build and install the plugin, follow these steps:
• Open the Ant view in Eclipse by selecting Window > Show View from the main menu and select Ant.
https://help.pentaho.com/Documentation/5.4/0R0/0V0/010/030/030Updated: Wed, 27 May 2015 15:29:01 GMT
60/79
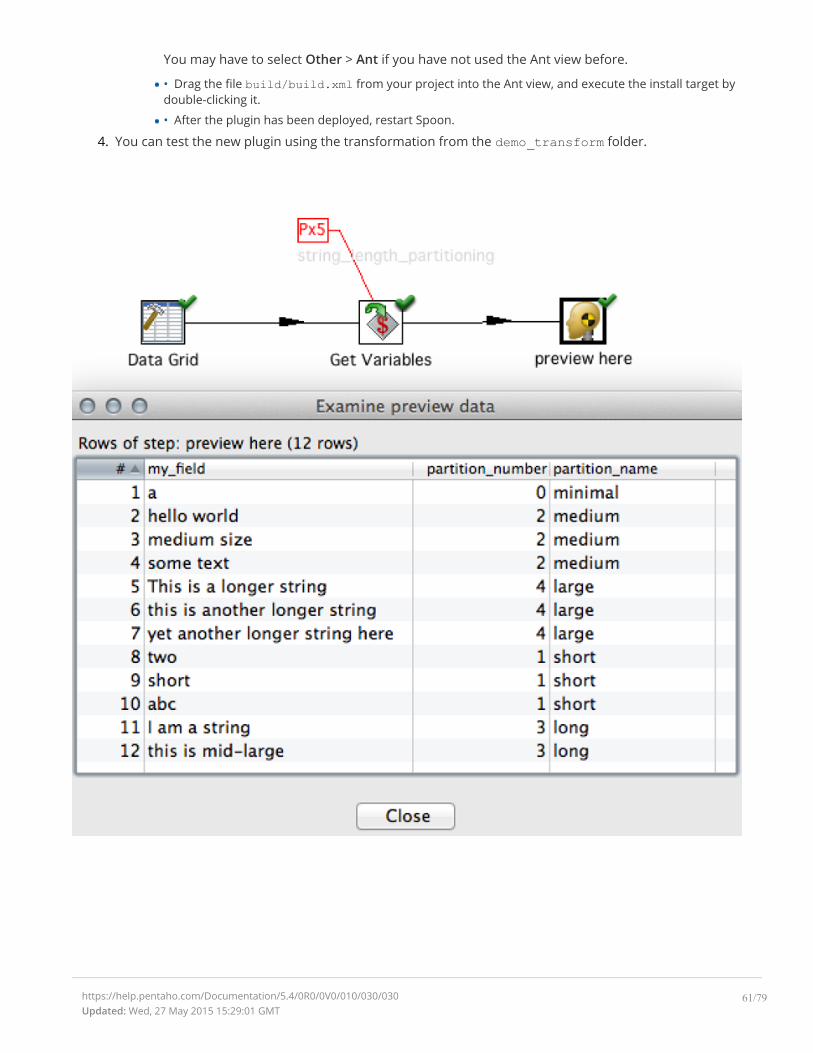
You may have to select Other > Ant if you have not used the Ant view before.
• Drag the file build/build.xml from your project into the Ant view, and execute the install target bydouble-clicking it.
• After the plugin has been deployed, restart Spoon.
4. You can test the new plugin using the transformation from the demo_transform folder.
https://help.pentaho.com/Documentation/5.4/0R0/0V0/010/030/030Updated: Wed, 27 May 2015 15:29:01 GMT
61/79
Exploring Existing Partitioners
PDI sources are useful if you want to investigate the implementation of the standard modulo partitioner. The
main class is available as org.pentaho.di.trans.ModPartitioner. The corresponding dialogclass in located in org.pentaho.di.ui.trans.dialog.ModPartitionerDialog.
https://help.pentaho.com/Documentation/5.4/0R0/0V0/010/030/040Updated: Wed, 27 May 2015 15:29:01 GMT
62/79
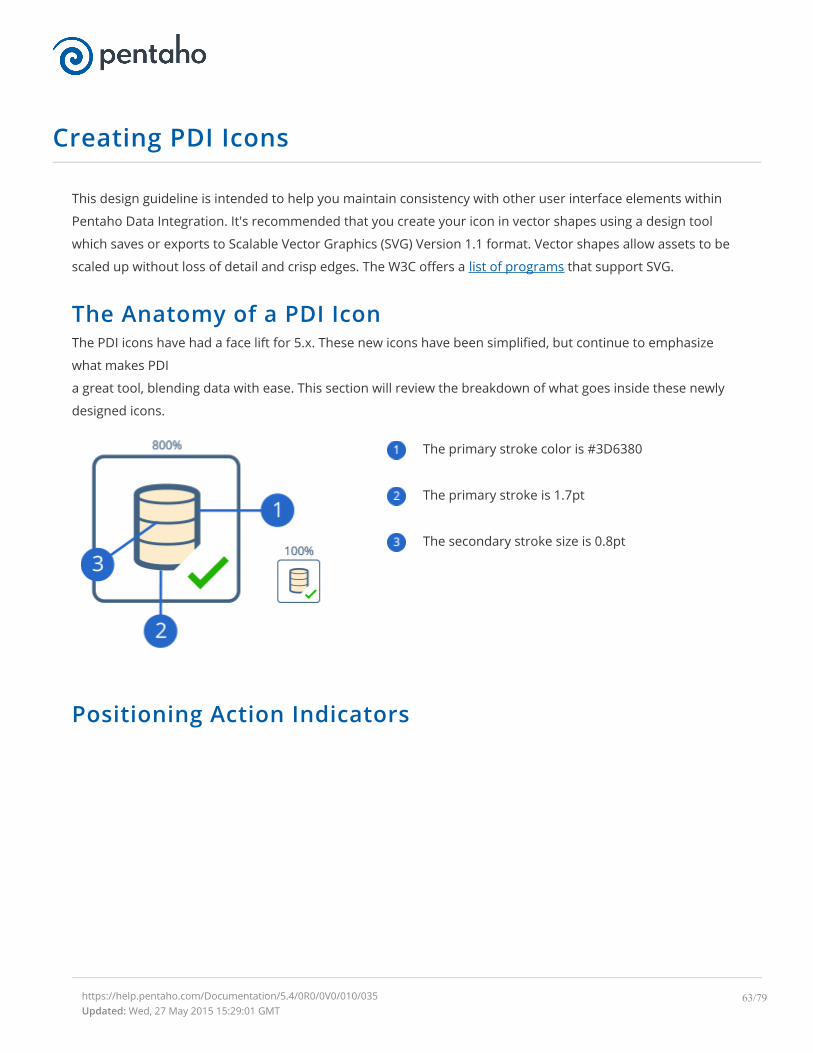
Creating PDI Icons
This design guideline is intended to help you maintain consistency with other user interface elements within
Pentaho Data Integration. It's recommended that you create your icon in vector shapes using a design tool
which saves or exports to Scalable Vector Graphics (SVG) Version 1.1 format. Vector shapes allow assets to be
scaled up without loss of detail and crisp edges. The W3C offers a list of programs that support SVG.
The Anatomy of a PDI IconThe PDI icons have had a face lift for 5.x. These new icons have been simplified, but continue to emphasize
what makes PDI
a great tool, blending data with ease. This section will review the breakdown of what goes inside these newly
designed icons.
The primary stroke color is #3D6380
The primary stroke is 1.7pt
The secondary stroke size is 0.8pt
Positioning Action Indicators
https://help.pentaho.com/Documentation/5.4/0R0/0V0/010/035Updated: Wed, 27 May 2015 15:29:01 GMT
63/79
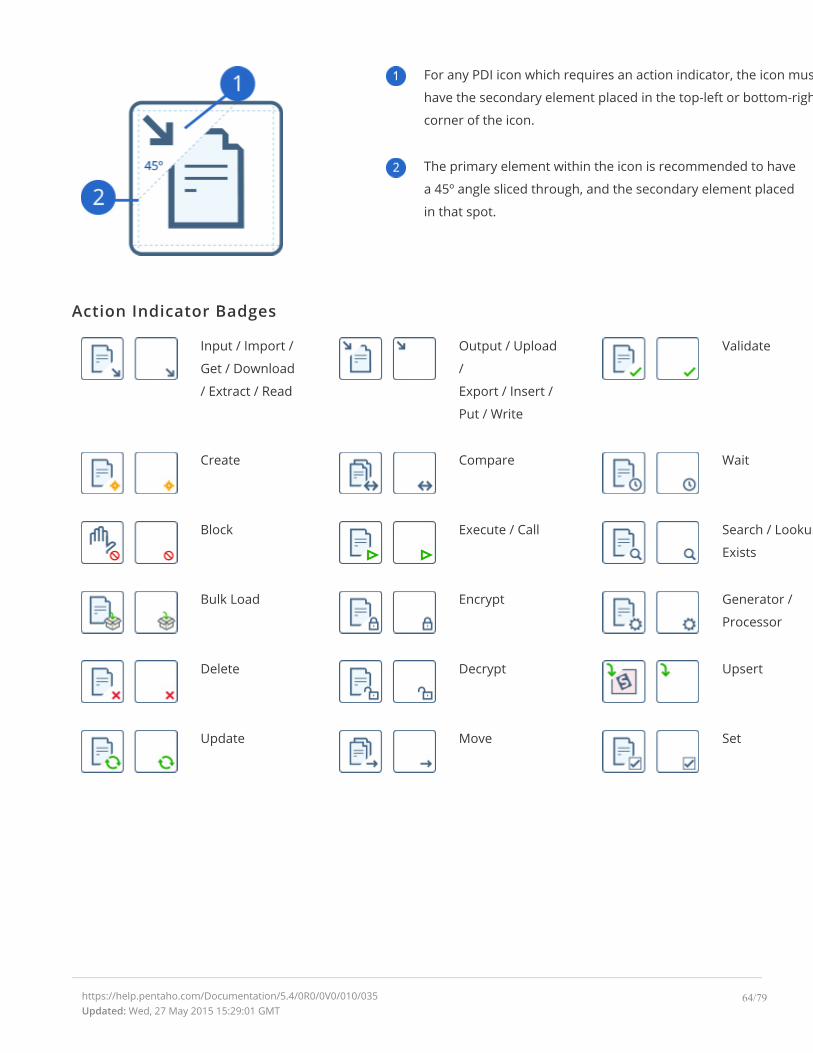
For any PDI icon which requires an action indicator, the icon must
have the secondary element placed in the top-left or bottom-right
corner of the icon.
The primary element within the icon is recommended to have
a 45º angle sliced through, and the secondary element placed
in that spot.
Action Indicator Badges
Input / Import /
Get / Download
/ Extract / Read
Output / Upload
/
Export / Insert /
Put / Write
Validate
Create Compare Wait
Block Execute / Call Search / Lookup /
Exists
Bulk Load Encrypt Generator /
Processor
Delete Decrypt Upsert
Update Move Set
https://help.pentaho.com/Documentation/5.4/0R0/0V0/010/035Updated: Wed, 27 May 2015 15:29:01 GMT
64/79
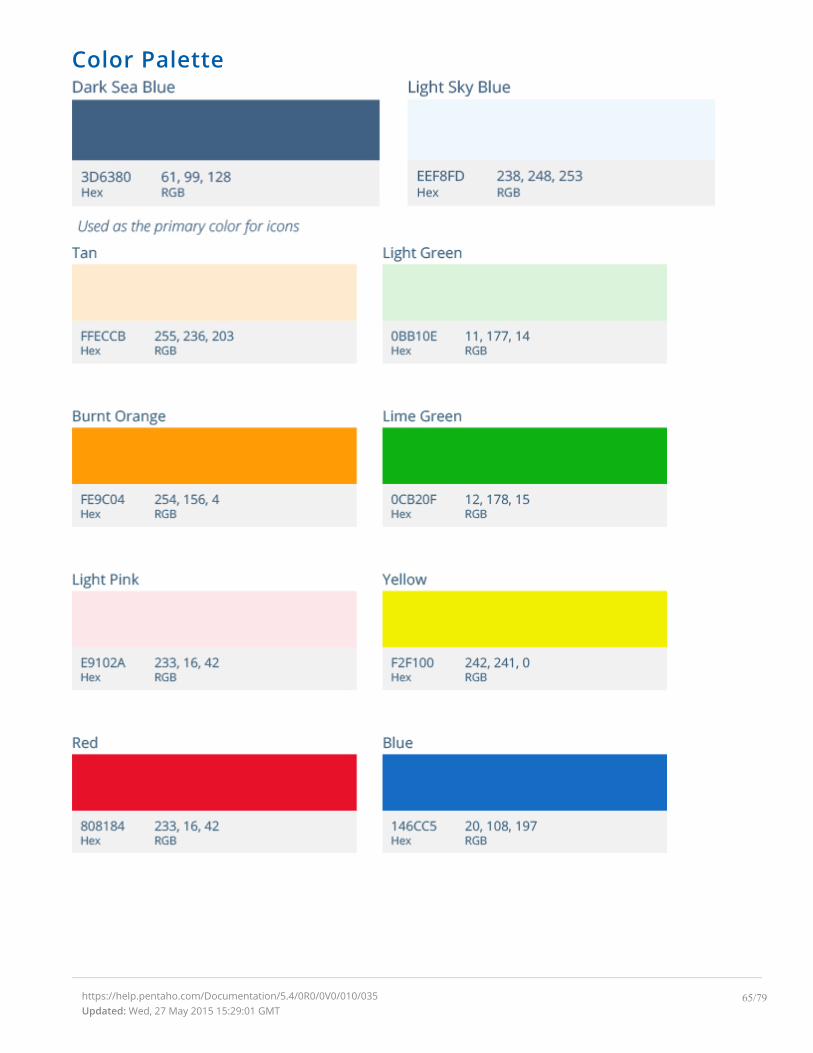
Color Palette
https://help.pentaho.com/Documentation/5.4/0R0/0V0/010/035Updated: Wed, 27 May 2015 15:29:01 GMT
65/79

Downloading PDI Icon TemplateYou can use our SVG template file, (PDI_Icon_Guide.ai), as a starting point for creating a PDI icon. This file
is bundled with the other samples in the Pentaho Data Integration SDK. You can download it here.
https://help.pentaho.com/Documentation/5.4/0R0/0V0/010/035Updated: Wed, 27 May 2015 15:29:01 GMT
66/79
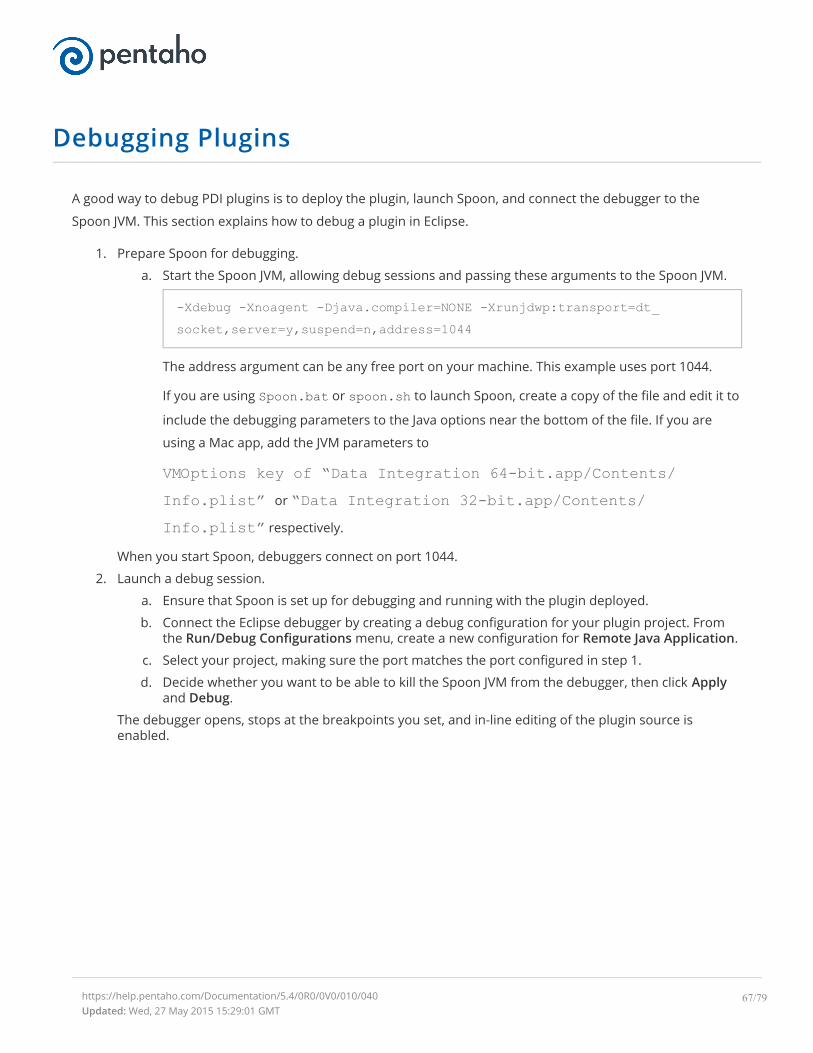
Debugging Plugins
A good way to debug PDI plugins is to deploy the plugin, launch Spoon, and connect the debugger to the
Spoon JVM. This section explains how to debug a plugin in Eclipse.
1. Prepare Spoon for debugging.
a. Start the Spoon JVM, allowing debug sessions and passing these arguments to the Spoon JVM.
-Xdebug -Xnoagent -Djava.compiler=NONE -Xrunjdwp:transport=dt_socket,server=y,suspend=n,address=1044
The address argument can be any free port on your machine. This example uses port 1044.
If you are using Spoon.bat or spoon.sh to launch Spoon, create a copy of the file and edit it to
include the debugging parameters to the Java options near the bottom of the file. If you are
using a Mac app, add the JVM parameters to
VMOptions key of “Data Integration 64-bit.app/Contents/Info.plist” or “Data Integration 32-bit.app/Contents/Info.plist” respectively.
When you start Spoon, debuggers connect on port 1044.
2. Launch a debug session.
a. Ensure that Spoon is set up for debugging and running with the plugin deployed.
b. Connect the Eclipse debugger by creating a debug configuration for your plugin project. Fromthe Run/Debug Configurations menu, create a new configuration for Remote Java Application.
c. Select your project, making sure the port matches the port configured in step 1.
d. Decide whether you want to be able to kill the Spoon JVM from the debugger, then click Applyand Debug.
The debugger opens, stops at the breakpoints you set, and in-line editing of the plugin source isenabled.
https://help.pentaho.com/Documentation/5.4/0R0/0V0/010/040Updated: Wed, 27 May 2015 15:29:01 GMT
67/79
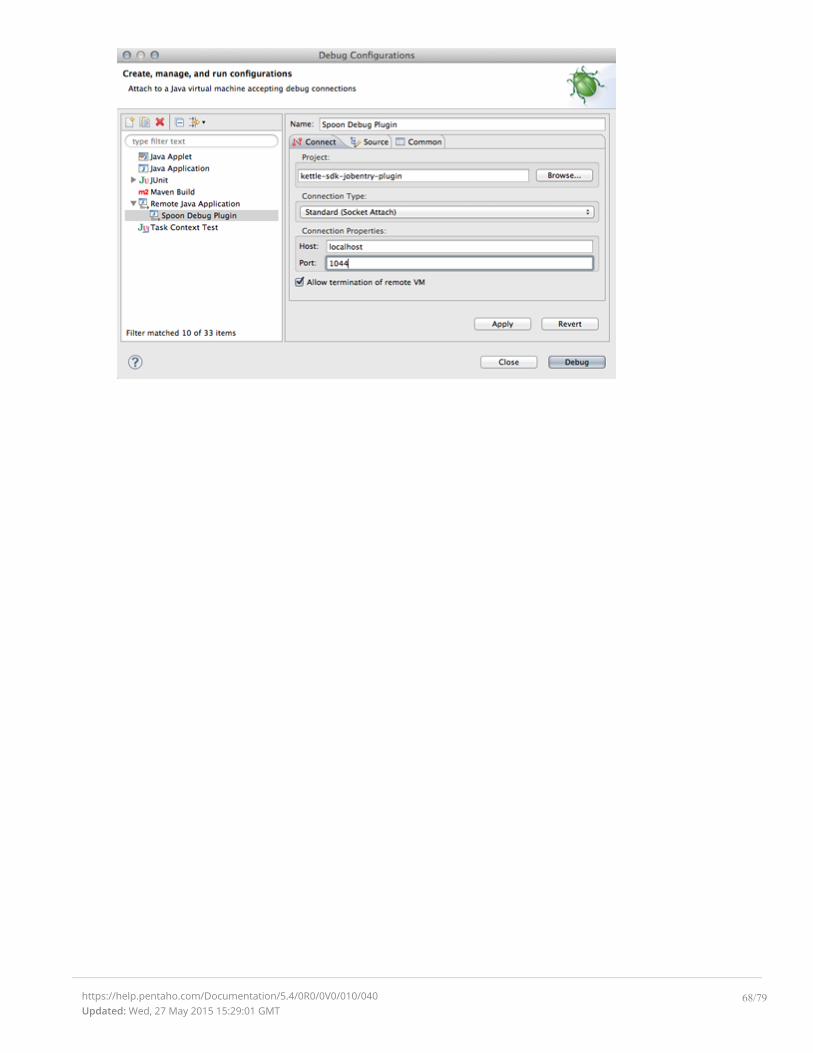
https://help.pentaho.com/Documentation/5.4/0R0/0V0/010/040Updated: Wed, 27 May 2015 15:29:01 GMT
68/79
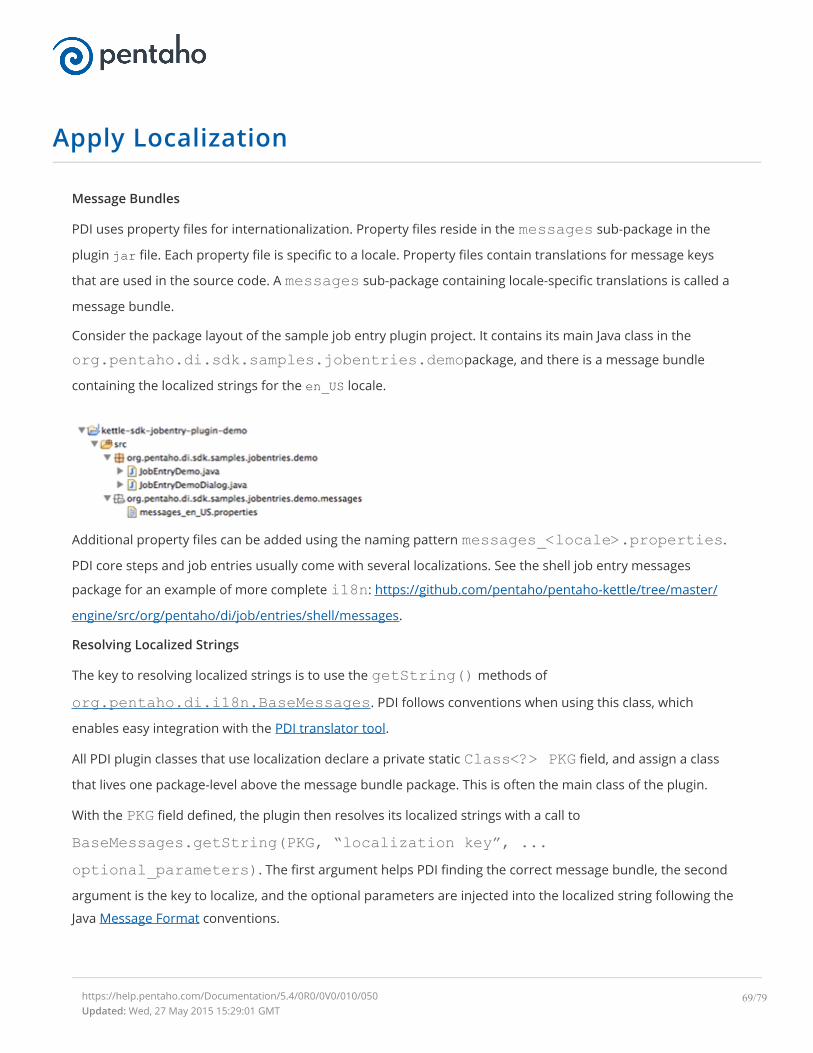
Apply Localization
Message Bundles
PDI uses property files for internationalization. Property files reside in the messages sub-package in the
plugin jar file. Each property file is specific to a locale. Property files contain translations for message keys
that are used in the source code. A messages sub-package containing locale-specific translations is called a
message bundle.
Consider the package layout of the sample job entry plugin project. It contains its main Java class in the
org.pentaho.di.sdk.samples.jobentries.demopackage, and there is a message bundle
containing the localized strings for the en_US locale.
Additional property files can be added using the naming pattern messages_<locale>.properties.
PDI core steps and job entries usually come with several localizations. See the shell job entry messages
package for an example of more complete i18n: https://github.com/pentaho/pentaho-kettle/tree/master/
engine/src/org/pentaho/di/job/entries/shell/messages.
Resolving Localized Strings
The key to resolving localized strings is to use the getString() methods of
org.pentaho.di.i18n.BaseMessages. PDI follows conventions when using this class, which
enables easy integration with the PDI translator tool.
All PDI plugin classes that use localization declare a private static Class<?> PKG field, and assign a class
that lives one package-level above the message bundle package. This is often the main class of the plugin.
With the PKG field defined, the plugin then resolves its localized strings with a call to
BaseMessages.getString(PKG, “localization key”, ...optional_parameters). The first argument helps PDI finding the correct message bundle, the second
argument is the key to localize, and the optional parameters are injected into the localized string following the
Java Message Format conventions.
https://help.pentaho.com/Documentation/5.4/0R0/0V0/010/050Updated: Wed, 27 May 2015 15:29:01 GMT
69/79
https://github.com/pentaho/pentaho-kettle/blob/master/core/src/org/pentaho/di/i18n/BaseMessages.java

Common Localization Strings
Some strings are commonly used,and have been pulled together into a common message bundle in
org.pentaho.di.i18n.messages. Whenever BaseMessages cannot find the key in the specified
message bundle, PDI looks for the key in the common message bundle.
Example
For an example, check the sample Job Entry plugin project, which uses this technique for localized string
resolution in its dialog class.
https://help.pentaho.com/Documentation/5.4/0R0/0V0/010/050Updated: Wed, 27 May 2015 15:29:01 GMT
70/79

Embedding Pentaho Data Integration
To integrate PDI transformations and jobs into your applications, embed PDI objects directly into your
application code. The instructions in this section address common embedding scenarios.
You can get the accompanying sample project from the kettle-sdk-embedding-samples folder of the
sample code package. The sample project is bundled with a minimal set of dependencies. In a real-world
implementation, projects require the complete set of PDI dependencies that include all .jar files from data-integration/lib.
For each embedding scenario, there is a sample class that can be executed as a stand-alone java application.
You can execute the classes manually or run the Ant targets provided in build/build.xml to run the sample
classes.
• Running Transformations
• Running Jobs
• Building Transformations Dynamically
• Building Jobs Dynamically
• Obtaining Logging Information
• Exposing a Transformation or Job as a Web Service
https://help.pentaho.com/Documentation/5.4/0R0/0V0/020Updated: Wed, 27 May 2015 15:29:01 GMT
71/79
Running Transformations
If you want to run a PDI transformation from Java code in a stand-alone application, take a look at this sample
class, org.pentaho.di.sdk.samples.embedding.RunningTransformations. It sets the
parameters and executes the transformation in etl/parametrized_transformation.ktr. The transform
can be run from the .ktr file using runTransformationFromFileSystem() or from a PDI
repository using runTransfomrationFromRepository().
1. Always make the first call to KettleEnvironment.init() whenever you are working with thePDI APIs.
2. Prepare the transformation. The definition of a PDI transformation is represented by a TransMetaobject. You can load this object from a .ktr file, a PDI repository, or you can generate it dynamically. Toquery the declared parameters of the transformation definition use listParameters(), or toquery the assigned values use setParameterValue().
3. Execute the transformation. An executable Trans object is derived from the TransMeta object thatis passed to the constructor. The Trans object starts and then executes asynchronously. To ensurethat all steps of the Trans object have completed, call waitUntilFinished().
4. Evaluate the transformation outcome. After the Trans object completes, you can access the resultusing getResult(). The Result object can be queried for success by evaluatinggetNrErrors(). This method returns zero (0) on success and a non-zero value when there areerrors. To get more information, retrieve the transformation log lines.
https://help.pentaho.com/Documentation/5.4/0R0/0V0/020/000Updated: Wed, 27 May 2015 15:29:01 GMT
72/79
Running Jobs
If you want to run a PDI job from Java code in a stand-alone application, take a look at this sample class,org.pentaho.di.sdk.samples.embedding.RunningJobs. It sets the parameters andexecutes the job in etl/parametrized_job.kjb. The job can be run from the .kjb file usingrunJobFromFileSystem() or from a repository using runJobFromRepository().
1. Always make the first call to KettleEnvironment.init() whenever you are working with thePDI APIs..
2. Prepare the job. The definition of a PDI job is represented by a JobMeta object. You can load thisobject from a .ktb file, a PDI repository, or you can generate it dynamically. To query the declaredparameters of the job definition use listParameters(). To set the assigned values usesetParameterValue().
3. Execute the job. An executable Job object is derived from the JobMeta object that is passed in to theconstructor. The Job object starts, and then executes in a separate thread. To wait for the job tocomplete, call waitUntilFinished().
4. Evaluate the job outcome. After the Job completes, you can access the result using getResult().The Result object can be queried for success using getResult(). This method returns true onsuccess and false on failure. To get more information, retrieve the job log lines.
https://help.pentaho.com/Documentation/5.4/0R0/0V0/020/010Updated: Wed, 27 May 2015 15:29:01 GMT
73/79
Building Transformations Dynamically
To enable your application to respond quickly to changing conditions, you can build transformations
dynamically. The example class,
org.pentaho.di.sdk.samples.embedding.GeneratingTransformations, shows you
how. It generates a transformation definition and saves it to a .ktr file.
1. Always make the first call to KettleEnvironment.init() whenever you are working with thePDI APIs.
2. Create and configure a transformation definition object. A transformation definition is represented by aTransMeta object. Create this object using the default constructor. The transformation definitionincludes the name, the declared parameters, and the required database connections.
3. Populate the TransMeta object with steps. The data flow of a transformation is defined by steps thatare connected by hops.
a. Create the step by instantiating its class directly and configure it using its get and setmethods. Transformation steps reside in sub-packages oforg.pentaho.di.trans.steps. For example, to use the Get File Names step , createan instance oforg.pentaho.di.trans.steps.getfilenames.GetFileNamesMeta and useits get and set methods to configure it.
b. Obtain the step id string. Each PDI step has an id that can be retrieved from the PDI pluginregistry. A simple way to retrieve the step id is to callPluginRegistry.getInstance().getPluginId(StepPluginType.class,theStepMetaObject).
c. Create an instance of org.pentaho.di.trans.step.StepMeta, passing the step idstring, the name, and the configured step object to the constructor. An instance of StepMetaencapsulates the step properties, as well as controls the placement of the step on the Spooncanvas and connections to hops. Once the StepMeta object has been created, callsetDrawn(true) and setLocation(x,y) to make sure the step appears correctly on theSpoon canvas. Finally, add the step to the transformation, by calling addStep() on thetransformation definition object.
d. Once steps have been added to the transformation definition, they need to be connected byhops. To create a hop, create an instance of org.pentaho.di.trans.TransHopMeta,passing in the From and To steps as arguments to the constructor. Add the hop to thetransformation definition by calling addTransHop().
After all steps have been added and connected by hops, the transformation definition object can be serializedto a .ktr file by calling getXML() and opening it in Spoon for inspection. The sample classorg.pentaho.di.sdk.samples.embedding.GeneratingTransformations generates thistransformation.
https://help.pentaho.com/Documentation/5.4/0R0/0V0/020/020Updated: Wed, 27 May 2015 15:29:01 GMT
74/79
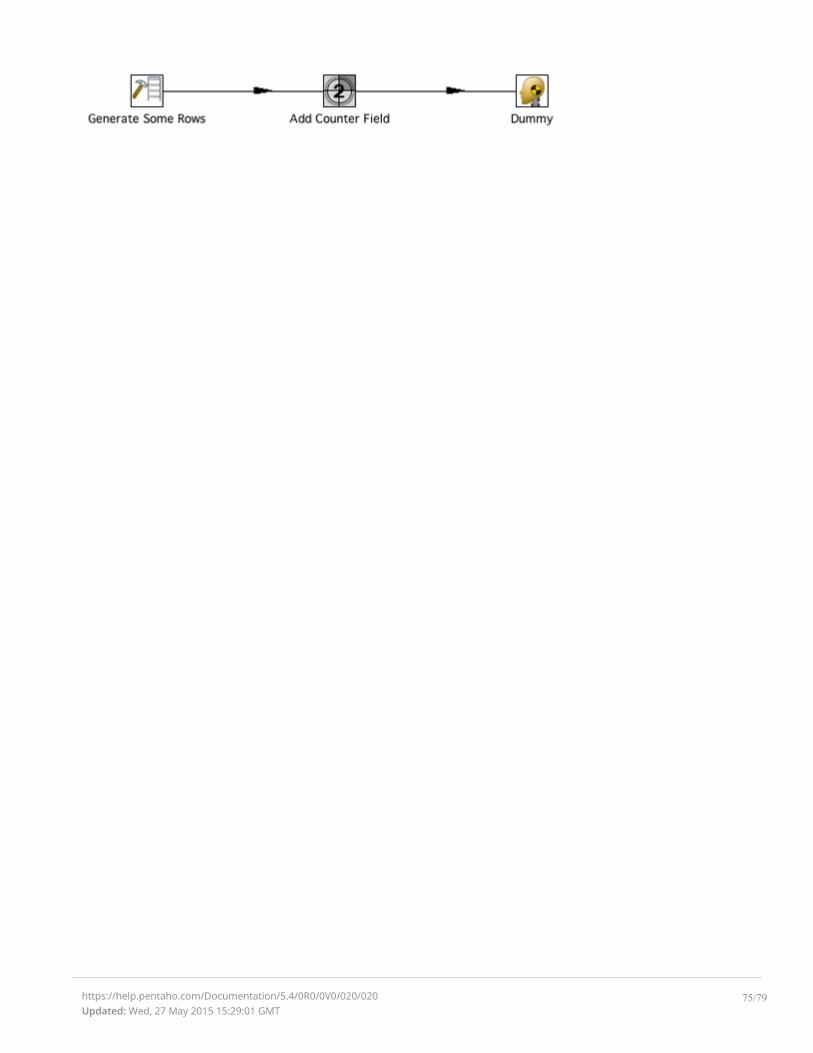
https://help.pentaho.com/Documentation/5.4/0R0/0V0/020/020Updated: Wed, 27 May 2015 15:29:01 GMT
75/79
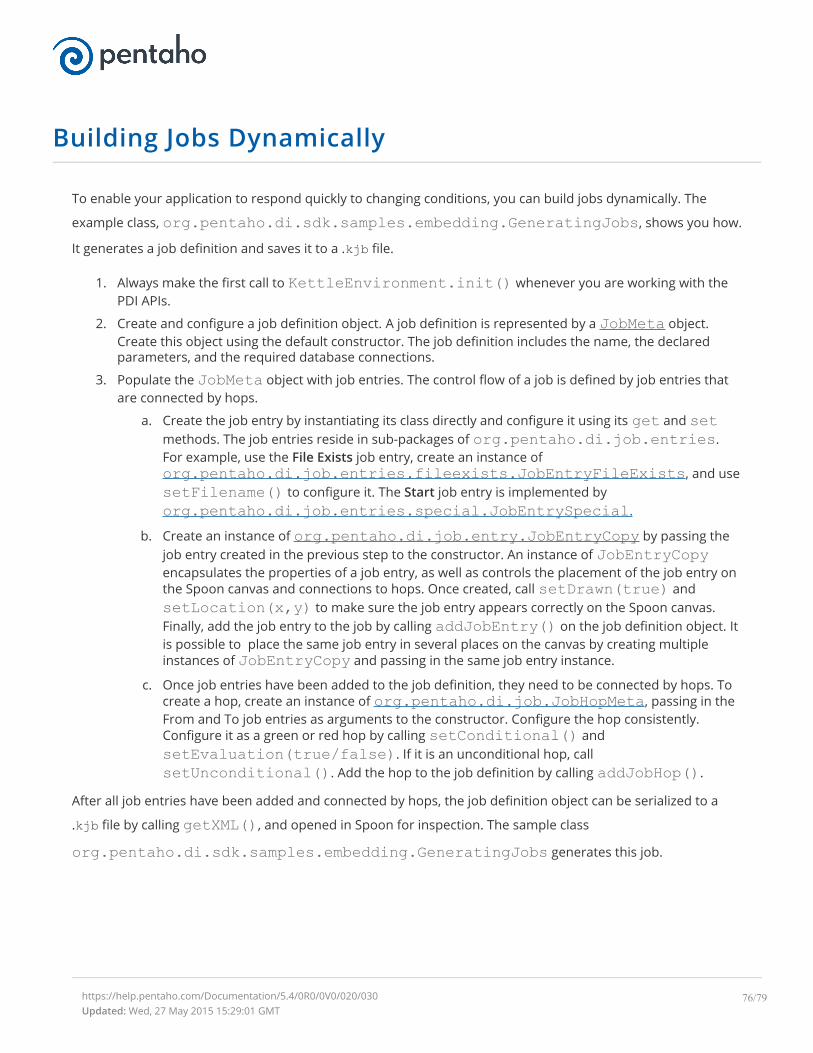
Building Jobs Dynamically
To enable your application to respond quickly to changing conditions, you can build jobs dynamically. The
example class, org.pentaho.di.sdk.samples.embedding.GeneratingJobs, shows you how.
It generates a job definition and saves it to a .kjb file.
1. Always make the first call to KettleEnvironment.init() whenever you are working with thePDI APIs.
2. Create and configure a job definition object. A job definition is represented by a JobMeta object.Create this object using the default constructor. The job definition includes the name, the declaredparameters, and the required database connections.
3. Populate the JobMeta object with job entries. The control flow of a job is defined by job entries thatare connected by hops.
a. Create the job entry by instantiating its class directly and configure it using its get and setmethods. The job entries reside in sub-packages of org.pentaho.di.job.entries.For example, use the File Exists job entry, create an instance oforg.pentaho.di.job.entries.fileexists.JobEntryFileExists, and usesetFilename() to configure it. The Start job entry is implemented byorg.pentaho.di.job.entries.special.JobEntrySpecial.
b. Create an instance of org.pentaho.di.job.entry.JobEntryCopy by passing thejob entry created in the previous step to the constructor. An instance of JobEntryCopyencapsulates the properties of a job entry, as well as controls the placement of the job entry onthe Spoon canvas and connections to hops. Once created, call setDrawn(true) andsetLocation(x,y) to make sure the job entry appears correctly on the Spoon canvas.Finally, add the job entry to the job by calling addJobEntry() on the job definition object. Itis possible to place the same job entry in several places on the canvas by creating multipleinstances of JobEntryCopy and passing in the same job entry instance.
c. Once job entries have been added to the job definition, they need to be connected by hops. Tocreate a hop, create an instance of org.pentaho.di.job.JobHopMeta, passing in theFrom and To job entries as arguments to the constructor. Configure the hop consistently.Configure it as a green or red hop by calling setConditional() andsetEvaluation(true/false). If it is an unconditional hop, callsetUnconditional(). Add the hop to the job definition by calling addJobHop().
After all job entries have been added and connected by hops, the job definition object can be serialized to a
.kjb file by calling getXML(), and opened in Spoon for inspection. The sample class
org.pentaho.di.sdk.samples.embedding.GeneratingJobs generates this job.
https://help.pentaho.com/Documentation/5.4/0R0/0V0/020/030Updated: Wed, 27 May 2015 15:29:01 GMT
76/79
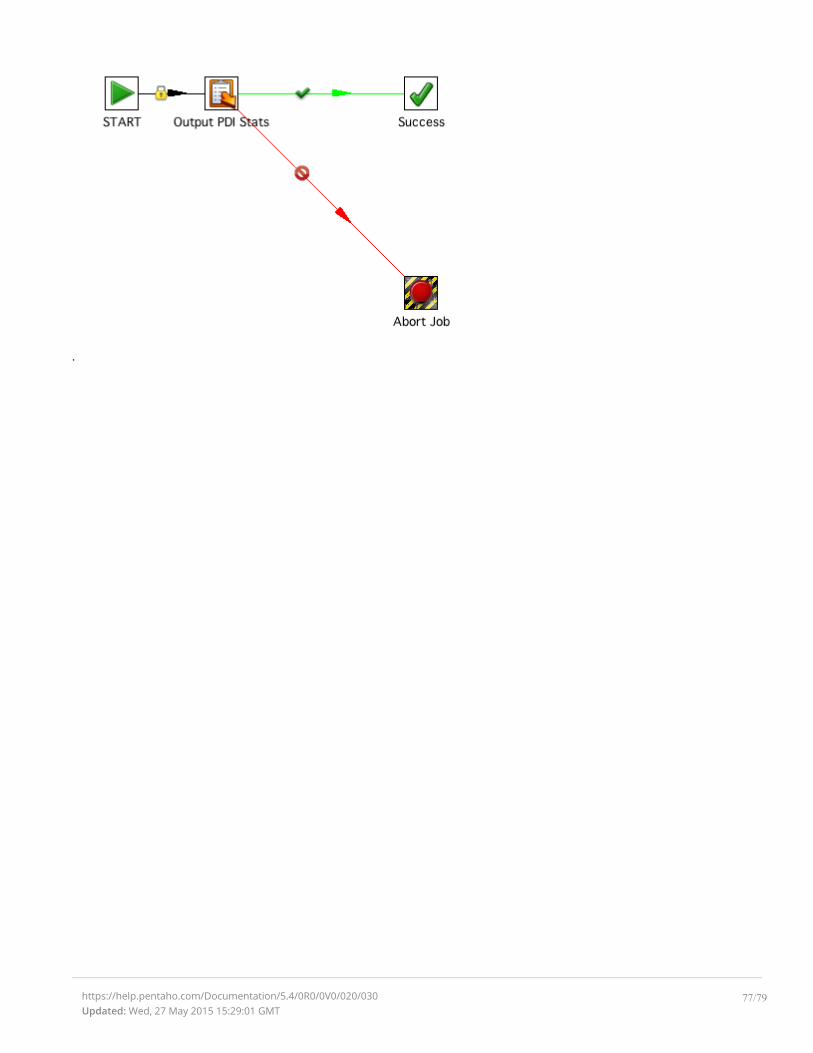
.
https://help.pentaho.com/Documentation/5.4/0R0/0V0/020/030Updated: Wed, 27 May 2015 15:29:01 GMT
77/79
Obtaining Logging Information
When you need more information about how transformations and jobs execute, you can view PDI log lines and
text.
PDI collects log lines in a central place. The class
org.pentaho.di.core.logging.KettleLogStore manages all log lines and provides methods
for retrieving the log text for specific entities. To retrieve log text or log lines, supply the log channel id
generated by PDI during runtime. You can obtain the log channel id by calling getLogChannelId(), which
is part of LoggingObjectInterface. Jobs, transformations, job entries, and transformation steps all
implement this interface.
For example, assuming the job variable is an instance of a running or completed job. This is how you retrieve
its log lines:
LoggingBuffer appender = KettleLogStore.getAppender();String logText = appender.getBuffer(job.getLogChannelId(), false).toString();
The main methods in the sample classes
org.pentaho.di.sdk.samples.embedding.RunningJobs and
org.pentaho.di.sdk.samples.embedding.RunningTransformations retrieve log
information from the executed job or transformation in this manner.
https://help.pentaho.com/Documentation/5.4/0R0/0V0/020/040Updated: Wed, 27 May 2015 15:29:01 GMT
78/79

Exposing a Transformation or Job as a Web Service
Running a PDI job or transformation as part of a web-service is implemented by writing a servlet that maps
incoming parameters for a transformation or job entry and executes them as part of the request cycle.
Alternatively, you can use Carte or the Data Integration server directly by building a transformation that writes
its output to the HTTP response of the Carte server. This is achieved by using the Pass Output to Servlet
feature of the Text output, XML output, JSON output, or scripting steps. For an example, run the sample
transformation, /data-integration/samples/transformations/Servlet Data Example.ktr, on
Carte.
https://help.pentaho.com/Documentation/5.4/0R0/0V0/020/050Updated: Wed, 27 May 2015 15:29:01 GMT
79/79