VersaReports ReportServer Installation Guide ReportServer... · • Microsoft SQL Server 2008 or...
82
Johns Creek, GA (USA) www.versareports.com VersaReports ReportServer Installation Guide
Transcript of VersaReports ReportServer Installation Guide ReportServer... · • Microsoft SQL Server 2008 or...

Johns Creek, GA (USA) www.versareports.com
VersaReports ReportServer Installation Guide

Copyright Notice Copyright © 2010-2016 VersaReports, LLC. All Rights, including the right to copy, disseminate, or reproduce this in whole or part, are reserved. All other brand or product names are trademarks or registered trademarks of their respective companies or organizations. Company names listed are trademarks or trade names of their respective companies. For information, please contact:
VersaReports, LLC. Email: [email protected] Johns Creek, Georgia (USA) Web: www.versareports.com
Document Version Information Document Name VersaReports ReportServer Installation Guide Document Edition, Date Edition 4, November 2016 For Release: VersaReports ReportServer Version 2.7

iii
Table of Contents Chapter 1 About This Guide ................................................................................................... 5
1.1 Purpose ............................................................................................................................... 5
1.2 Audience ............................................................................................................................. 5
1.3 How to Use This Guide ........................................................................................................ 5 Chapter 2 Introduction to VersaReports ReportServer ........................................................... 6
2.1 Product Overview ............................................................................................................... 6
2.2 System Requirements ......................................................................................................... 7 2.2.1 Server Requirements ................................................................................................. 7 2.2.2 Workstation Requirements ........................................................................................ 7
2.3 Installation Overview .......................................................................................................... 8 Chapter 3 Pre-Installation Steps for VersaReports ReportServer ............................................. 9
3.1 Review System Requirements ............................................................................................ 9
3.2 Create a Database ............................................................................................................... 9 3.2.1 Identify or install the server you want to use for VersaReports ReportServer ......... 9 3.2.2 Determine the amount of disk space required.......................................................... 9 3.2.3 Create an Empty Database/Schema for VersaReports ReportServer ..................... 10 3.2.4 Create a User with Administrator rights .................................................................. 10 3.2.5 Special Considerations for Microsoft SQL Server .................................................... 10 3.2.6 Create an ODBC Connection .................................................................................... 10
Chapter 4 Installing VersaReports ReportServer on your Host Server ................................... 11
4.1 Overview ........................................................................................................................... 11
4.2 Installing VersaReports ReportServer ............................................................................... 11 Chapter 5 Post-Installation Steps for VersaReports ReportServer ......................................... 18
5.1 Overview ........................................................................................................................... 18
5.2 ReportServer Configuration Tool ...................................................................................... 18 5.2.1 Settings Tab .............................................................................................................. 21
Web Site URL ............................................................................................................. 22 SMTP Mail Server Settings ......................................................................................... 22 Portal Look ................................................................................................................. 23
5.2.2 Report Settings Tab .................................................................................................. 28 Where Do You Want To Store Completed Reports? ................................................. 29
5.2.3 Database Tab ........................................................................................................... 32 Database Server Type – Notes ................................................................................... 32 Field and Button Definitions ...................................................................................... 33
5.2.4 Site Authentication Tab ........................................................................................... 36 Authentication Types - Notes .................................................................................... 36 Field and Button Definitions – Windows or Active Directory Authentication .......... 37
5.2.5 Report Connectors Tab ............................................................................................ 39

VersaReports ReportServer Installation Guide
iv
Field and Button Definitions ...................................................................................... 39 Add A Folder .............................................................................................................. 40
5.2.6 Licensing Tab ............................................................................................................ 42 5.2.5.1 Activating Your License via the Internet ........................................................ 43 5.2.5.2 Activating Your License Without Internet Access ......................................... 46 5.2.5.3 Run VersaReports ReportServer .................................................................... 48
5.3 Platform Considerations ................................................................................................... 49
5.4 Start ReportsRunner ......................................................................................................... 49
5.5 ReportServer Web Services API ........................................................................................ 49 Appendix A Values in the appSettings Section of web.config ................................................ 50
A.1 ReportTypesXML key ........................................................................................................ 50
A.2 ReportStorage key ............................................................................................................ 50
A.3 ReportFileViewer key ........................................................................................................ 50
A.4 Telerik.Skin key ................................................................................................................. 51
A.5 ExternalURL key ................................................................................................................ 51 Appendix B Report Designer Integration .............................................................................. 52
B.1 GrapeCity/ComponentOne ActiveReports ....................................................................... 53
B.2 DevExpress XtraReports .................................................................................................... 54
B.3 Telerik Reporting............................................................................................................... 56
B.4 SAP Crystal Reports ........................................................................................................... 57
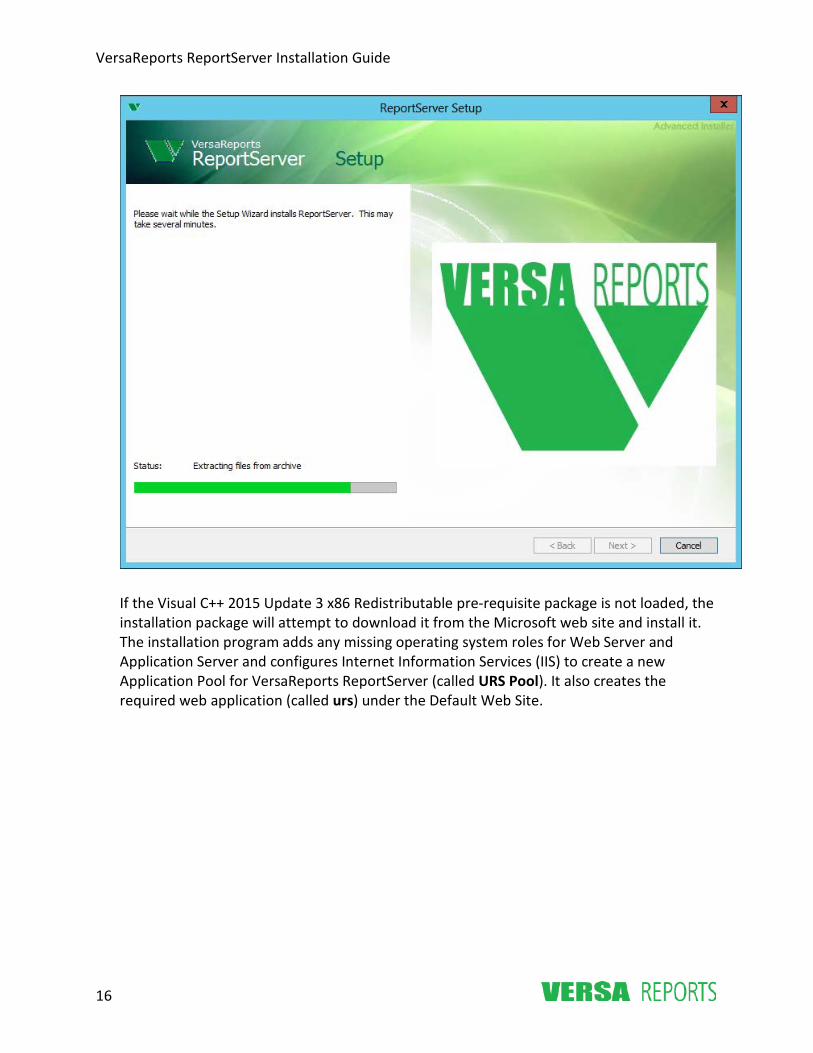
B.5 Other Report Connectors ................................................................................................. 58 Appendix C Instructions for Creating a Report Connector ..................................................... 59 Appendix D The report_types.xml File ................................................................................. 69 Appendix E Managing User Accounts for Forms Authentication ........................................... 73

Chapter 1 About This Guide
5
Chapter 1 About This Guide
1.1 Purpose This Installation Guide provides specific instructions to the person or persons who will be installing the VersaReports ReportServer software for the first time, or who will be upgrading their existing ReportServer version to the current version.
1.2 Audience This Guide is intended for the IT professional who will be installing VersaReports ReportServer and who is knowledgeable and qualified to make changes to certain installation files.
1.3 How to Use This Guide This Installation Guide covers installation procedures for multiple site configurations that can be accommodated by VersaReports ReportServer. The Introduction to VersaReports ReportServer chapter provides a description of the ReportServer product, lists the system requirements, and explains that there are pre- and post- installation steps you must undertake in addition to the software installation from the disk. The pre-installation instructions are the same for all configurations. The post-installation instructions explain the Configuration tool and its options that allow you to specify the security infrastructure you want to use and what report designers you have installed. The Appendices supply important information and instructions for tweeking your system or for when you want to create your own Report Connector. If you are upgrading your version of VersaReports ReportServer to the current release, please contact VersaReports support for assistance.

VersaReports ReportServer Installation Guide
6
Chapter 2 Introduction to VersaReports ReportServer
2.1 Product Overview The VersaReports ReportServer is the first web report server to support nearly ALL report designers, including SAP Crystal Reports, DevExpress XtraReports, GrapeCity/ComponentOne ActiveReports, Telerik Reporting, and others. The VersaReports ReportServer provides the following: • An easy-to-use web interface. • Support for SAP Crystal Reports, DevExpress XtraReports, GrapeCity/ComponentOne
ActiveReports, and Telerik Reporting, including native report viewing support and support for parameters. Developer licenses for report designers are not included with ReportServer and you are encouraged to check with those vendors for licensing terms, pricing, and resellers.
• Support for Oracle and MySQL type databases as well as Microsoft SQL Server. • API support for integrating your favorite report designer if it's not already included. • Support for ActiveDirectory (domains), Windows NT security (non-domains), and Forms
authentication. • API support for integrating with your corporate security infrastructure if it's not already
included. • Support for dynamic (database-based) and cascading report parameters. • Batch reports, based on a database query, with the values from the batch query useable in
the report as parameters or as users for distribution. • Report distribution to users within your network (via the web interface); to mobile or
remote users who rely on receiving their reports via e-mail; to the users who are the result of a SQL query; to a Sharepoint server, Windows file server, or FTP server; or to a printer connected to your server (either local or networked).
• Report archival, including default and personalized retention rules. • A web services API for performing nearly any task from an external application. • A Configuration Tool that, for most configurations, eliminates the need for you to manually
modify and copy files as part of the post-installation procedure.
Important Disclaimer: VersaReports ReportServer operates with a number of third-party products. Those products are mentioned in this document or other marketing documents from VersaReports. However, those vendors own the copyrights and/or trademarks for their products. VersaReports documentation only mentions those products but does not endorse or imply any ownership in those products. Likewise, those third-party vendors do not endorse VersaReports ReportServer, nor does VersaReports LLC -- the creator of VersaReports ReportServer -- endorse any specific report designer or third-party product.

Chapter 2 Introduction to VersaReports ReportServer
7
2.2 System Requirements VersaReports ReportServer is a Microsoft Windows Server-based application. Users and administrators interact with the software via a browser; no ReportServer software is loaded on the user's workstation to interact with this product.
2.2.1 Server Requirements • Microsoft Windows Server 2008 SP2 or later with the latest updates and service packs
installed. • Microsoft SQL Server 2008 or later, MySQL 5.0 or later, or Oracle 9i or later (can be on
another server, if desired). Minimum of 100 MB is required for the database for ReportServer.
• Microsoft .NET 4.6 framework (with the latest service packs and updates installed). This is installed automatically if it’s not detected.
• At least 3 GB of RAM. • At least 1 GB of free disk space. • For creating a Report Connector for a report designer that is not included with VersaReports
ReportServer, you need the following: o Microsoft Visual Studio 2012 or later o Developer license for your report designer
Note: The Report Connector is a compiled piece of software that provides an interface between the ReportServer software and the report designer's report engine software. ReportServer includes several example Report Connectors and instructions for creating and installing the Report Connector DLL.
Note: Most report designer packages support only 32-bit interfaces, so ReportServer is designed for 32-bit operation. However, as with all 32-bit products, you can run ReportServer on a server running a 64-bit operating system.
2.2.2 Workstation Requirements Users and report administrators work with ReportServer via one of several popular browsers: • Firefox 3.0+ • Internet Explorer 10.0+ (no support for Mac workstations) • Microsoft Edge • Safari 4.0+ • Google Chrome 1.0+ For all browser types, JavaScript and cookies must be enabled. For Internet Explorer, browser scripting must be enabled. In addition to the browser requirements, you may also need one or more of the following programs installed locally on your PC to view completed reports. • Microsoft Excel (for spreadsheet reports) • Adobe Acrobat (for PDF reports) • Microsoft Word (for RTF and Word-based reports)

VersaReports ReportServer Installation Guide
8
2.3 Installation Overview Installing VersaReports ReportServer requires some pre- and post- installation steps in addition to running the install program itself. The pre-installation steps are the same no matter what your operating system, user authentication method, or report designer you will be using. The main post-installation step is to run the ReportServer Configuration Tool that is used to tell ReportServer about certain settings for the ReportServer web site, what user authentication method you are going to use, the report designer(s) you have installed, and the version of Windows Server you have. The Configuration Tool is also where you will activate your software license. The pre-installation steps, software installation steps, and post-installation steps are covered in separate chapters.

Chapter 3 Pre-Installation Steps for VersaReports ReportServer
9
Chapter 3 Pre-Installation Steps for VersaReports ReportServer As with most server-based software, installation requires a series of steps to be completed. The steps outlined in this chapter must be performed prior to actually running the installation program from the CD.
3.1 Review System Requirements Ensure your server meets or exceeds the Server Requirements mentioned in the previous chapter and that your server is properly configured within your corporate infrastructure. The important system requirements are: • Windows 2008 SP2 or later (with latest updates) • 3 GB of RAM • A large enough disk to hold the reports your users want to run and save • Microsoft .NET Framework version 4.6 installed (with latest service packs) To optionally compile a Report Connector on the server, you will also need: • Microsoft Visual Studio 2012 or later • Developer license for your report designer If you intend to use the SAP Crystal Reports Connector, you must also purchase a copy of SAP Crystal Reports, because of licensing requirements imposed by SAP on server products like VersaReports ReportServer. Please contact your favorite software reseller for assistance in purchasing this product. If you do not want to use VersaReports ReportServer to generate reports from SAP Crystal Reports, you will not need to purchase one of these additional products.
3.2 Create a Database
3.2.1 Identify or install the server you want to use for VersaReports ReportServer VersaReports supports Microsoft SQL Server, Oracle Database, and MySQL. Any of these databases can be on the same server as ReportServer, or it can be on a different server. Note: If you install the database on a different server than ReportServer, you will also need to
install client software available from that vendor on the server where ReportServer will be installed.
ReportServer uses the database to store both information about the reports you want to run and the report contents once the report is run.
3.2.2 Determine the amount of disk space required The amount of disk space required for the ReportServer database is based on how many reports you plan to use with ReportServer and how long you intend for users to retain reports that have been run. You may choose to store the actual archived reports within the database or on a local or networked disk. If you archive your reports within the database, make sure you

VersaReports ReportServer Installation Guide
10
have adequate disk space on your database system as well as a way to monitor disk space usage on a regular basis. If you archive your reports to local/networked disk space, the database disk usage will be less than 100 MB.
3.2.3 Create an Empty Database/Schema for VersaReports ReportServer Create a database/schema for ReportServer. No special settings are needed for this database. The structure for this database will be created during ReportServer post-installation steps (Chapter 5 of this document).
3.2.4 Create a User with Administrator rights Once the schema has been created, create a database user that has administrator rights to manipulate that schema.
3.2.5 Special Considerations for Microsoft SQL Server If you are using Microsoft SQL Server as your ReportServer database, use the SQL Server Management Studio to configure your SQL Server database to support Mixed SQL security (as opposed to Integrated-only security, which requires a windows login to connect to the server).
3.2.6 Create an ODBC Connection On the server where ReportServer is to be installed, create (and test) an ODBC connection to the database you just created for ReportServer. Use the credentials for the login you created as the owner/administrator of the database. Once you successfully complete this step, you are ready to do the installation. This ODBC connection will not be used by ReportServer and can be deleted after testing is successful.

Chapter 4 Installing VersaReports ReportServer on your Host Server
11
Chapter 4 Installing VersaReports ReportServer on your Host Server
4.1 Overview The VersaReports ReportServer installation is performed via a wizard that requires just a few simple steps. The ReportServer Setup Wizard asks you to read and accept the license agreement and then specify the folder location for the ReportServer files. The installation program then checks for any missing programs that are needed for ReportServer. If there are missing programs, you are led through their installation prior to the installation of the ReportServer files. When that is finished, the ReportServer files are copied, extracted, and installed. Starting with ReportServer version 2.1, you will use a Configuration Tool to choose the database server you are going to use, to log in to the database server and choose the database/schema you previously created, and to select a folder location for the ReportServer files. These settings, and more, are covered in the next chapter.
4.2 Installing VersaReports ReportServer 1. On the server where you plan to load ReportServer, login as an administrator. 2. Identify the installation file on the Install CD and double-click it.
Note: The Installation program initially checks your system for prerequisite software needed by ReportServer. VersaReports will install up to two Microsoft packages if your system does not already have them installed. These are:
• .NET Framework 4.6 (32-bit) • Visual C++ 2015 Update 3 x86 Redistributable package
If the ReportServer installation program finds either of these packages missing from your server, then the installation package will reach out to Microsoft’s server to download and install them first. If your server is not connected to the internet, you will need to manually install both of these pre-requisites before attempting the ReportServer installation. If both of these packages are already installed on your server, then the Welcome to the ReportServer Setup Wizard dialog box displays immediately.

VersaReports ReportServer Installation Guide
12
3. Click the Next button. The End-User License Agreement dialog box displays.

Chapter 4 Installing VersaReports ReportServer on your Host Server
13
4. Read the License Agreement, click I accept the terms in the License Agreement, and then click Next. Important: Although a summary of the license agreement is displayed during installation, you are bound by the full license agreement available for viewing in the file InstallationDirectory\VersaReports ReportServer EULA 2.7.pdf that is loaded as part of the installation. (Please see Step 10 for an explanation of the InstallationDirectory). After the install is finished, please open the EULA file mentioned and read the entire agreement. After you click Next, the Select Installation Folder dialog box displays.

VersaReports ReportServer Installation Guide
14
5. A folder name is suggested in the Folder box. If you wish to install in a different location or want to use a different folder name, make the change to the displayed path, or click the Browse button and select a new path. The Disk Space Requirements box shows you the installation drives and available disk space; please ensure you place the installation folder on a disk with at least 1 GB of available space. Note: The path you choose here will be referred to as the InstallationDirectory throughout
this manual. Click Next when you are ready to continue. The Ready to Install dialog box displays.

Chapter 4 Installing VersaReports ReportServer on your Host Server
15
6. Click Install when you are ready to continue.
VersaReports ReportServer Installation Guide
16
If the Visual C++ 2015 Update 3 x86 Redistributable pre-requisite package is not loaded, the installation package will attempt to download it from the Microsoft web site and install it. The installation program adds any missing operating system roles for Web Server and Application Server and configures Internet Information Services (IIS) to create a new Application Pool for VersaReports ReportServer (called URS Pool). It also creates the required web application (called urs) under the Default Web Site.

Chapter 4 Installing VersaReports ReportServer on your Host Server
17
7. For the initial installation, we recommend you run the Configuration Tool at this time. Leave the Launch ReportServer Configuration Tool checkbox selected and click Finish. The next chapter covers the instructions for completing the information in the Configuration Tool.

VersaReports ReportServer Installation Guide
18
Chapter 5 Post-Installation Steps for VersaReports ReportServer
5.1 Overview After the software is installed, there are some aspects of ReportServer that need to be configured to work with your security infrastructure and report designers. The ReportServer Configuration Tool provides an easy-to-use interface that collects this configuration information. Once you have successfully entered all required information, you will be able to start using ReportServer immediately.
5.2 ReportServer Configuration Tool When the Setup Wizard has finished installing ReportServer, the VersaReports ReportServer Configuration Tool splash screen displays if you left the Launch ReportServer Configuration Tool checkbox selected. You can also access the Configuration Tool from the Start Menu on Windows 2008.

Chapter 5 Post-Installation Steps for VersaReports ReportServer
19
Select VersaReports ReportServer Configuration Tool from the VersaReports ReportServer program folder. On Windows 2012 systems, the Configuration Tool can be accessed from the Start page:

VersaReports ReportServer Installation Guide
20
When you start the VersaReports ReportServer Configuration Tool, it displays its splash screen.

Chapter 5 Post-Installation Steps for VersaReports ReportServer
21
The VersaReports ReportServer Configuration Tool dialog box then displays. The following table describes the actions on the menu bar (shown below).
Action Description
Select this action to save your current choices and entries. After the save, you remain on the current tab of the Configuration Tool. In some cases you will not be able to save your entries until you have supplied missing information. A dialog box tells you what information you need.
Select this action to revert to the Configuration Tool information that was last saved. A dialog box warns you that any changes you have made since your last Save will be lost. Click Yes to continue to undo your recent changes.
Select this action to exit the Configuration Tool. A confirmation dialog warns you that any changes you have made since your last Save will be lost. Click Yes to continue exiting.
5.2.1 Settings Tab The initial dialog box displays the selections and entries for the Settings tab. Use this tab to supply ReportServer with information that includes where you want to store completed reports, the web site URL, SMTP mail server settings, and the portal look.

VersaReports ReportServer Installation Guide
22
Web Site URL Set this value to the URL that users outside of your intranet will use to reach the ReportServer web site on this server. This URL is used for all notifications and RSS feeds and must be properly configured before users outside your intranet can use the notifications and feeds features.
SMTP Mail Server Settings For reports and notifications that might be sent by e-mail from the server, the SMTP Mail Server Settings allow you to set the “From” e-mail address. This is a required field and you will not be able to save your configuration if you leave it blank. Enter the outgoing Mail Server and e-mail address you want to use. If your mail server does not use the standard SMTP port 25 for communications, append a colon and the port number to the Mail Server name. For example, instead of mail.yourcompany.com, you would put something like mail.yourcompany.com:587 if your mail server uses port 587. The Server Login has to be a valid e-mail account that can be used to transmit e-mail messages on that server. If authentication is required for outgoing mail, enter the Server Login and

Chapter 5 Post-Installation Steps for VersaReports ReportServer
23
Password, and then click the Test Mail Server Settings… button. A dialog box will display if the e-mail was sent successfully.
If the mail server settings are incorrect, a dialog box displays indicating the e-mail was unsuccessful.
Make the correction in the Server Login and/or Password boxes and click Test Mail Server Settings….again.
Portal Look You can determine to some extent the way ReportServer looks to users by specifying a title, skin, and logo for the portal.
Title The Portal Title displays as the first item in the title bar of the ReportServer browser window.
Skin Select the type of skin you want. The options available at this time are: Default, Office2007, Outlook, Vista, and Windows7. An example of each of these is illustrated below:

VersaReports ReportServer Installation Guide
24
Default
Office2007

Chapter 5 Post-Installation Steps for VersaReports ReportServer
25
Outlook
Vista

VersaReports ReportServer Installation Guide
26
Windows7
Logo You have the opportunity on this Settings Tab to change the default logo (“Your Logo Here”) to a logo of your choice. This logo will be displayed on each page of the ReportServer application. Change it here by browsing for a graphics file of your logo. This file must be a jpg, png, bmp, or

Chapter 5 Post-Installation Steps for VersaReports ReportServer
27
gif file of not more than 600x60 pixels in size. For example, the dialog box for the Settings tab might look like this for a fictitious company and logo for “ABC Manufacturing”:

VersaReports ReportServer Installation Guide
28
The following VersaReports ReportServer dialog box illustrates the Portal Look as defined in the Settings Tab example above.
5.2.2 Report Settings Tab Use this tab to specify the location for completed reports, and to control what types of report recipients can receive reports in this system and whether portal recipients can forward reports they receive. The initial screen of the Report Settings Tab is shown below.

Chapter 5 Post-Installation Steps for VersaReports ReportServer
29
Where Do You Want To Store Completed Reports? ReportServer gives you the option of storing completed reports in the database or on disk in a folder of your choosing.
• You would choose to store completed reports in the database if you plan to access those files from another server or if you want stronger security than might be available to files on your server's disk.
• You would choose to store completed reports on disk because files stored on disk are faster to retrieve and easier to backup and restore.
Select the Store Completed Reports option of your choosing. A folder is suggested for the On Disk Storage Directory. If you want to change this, click the Select… button to display the selection dialog box.

VersaReports ReportServer Installation Guide
30
Click the Browse button to locate/create the desired folder. If special credentials are needed to write to this directory, enter them in the Login Name and Password boxes. When you click OK in the dialog box, your selection is populated in the On Disk Storage Directory box. Important: If you choose On Disk Storage Directory and don’t supply proper authorization
credentials, you must be sure that when you run ReportsRunner (the background program that creates the scheduled reports) you must run it as a user with permission to write to the folder specified in the On Disk Storage Directory box. If a user runs ReportsRunner without the necessary permission to write to the specified folder and does not explicitly supply credentials in the above dialog box, the folder will not be created and the reports will be put into the database instead. For more information on running ReportsRunner, see Section 5.4 Start ReportsRunner on page 49.
Note: Later, after using ReportServer, you may decide you need to change the location of the reports. Refer to the table below to see how to implement this change and the effect it may have on viewing the reports.
Reason for change How to Implement / Effect of Change
You want to move your reports from one disk location to a new location (for example, you are getting a bigger disk or a SAN for them).
The Administrator needs to manually move all the reports from the old location to new location first, and then change the value of this setting to the new directory location. Otherwise the users will not be able to view those reports.
You want to start storing completed reports in the database instead of in the folder where they are currently stored.
Click the In the Database option. New reports will be stored in the database. Note that existing reports, however, will no longer be visible because you are removing the only reference to where they resided on disk.
You want to store completed reports on disk instead of in the database where they are currently stored.
Click the On Disk Storage Directory option and then click the Select button and locate/create the desired folder. If a completed report is in the database, users will be able to continue to view that report until it is deleted; new reports

Chapter 5 Post-Installation Steps for VersaReports ReportServer
31
are stored on disk and users can see those as well.
What Distribution Recipients Do You Want To Permit? ReportServer gives administrators the option to restrict which types of recipients can be scheduled to receive a report. For example, if you want to prevent reports from being transferred to remote servers, you might limit the list of recipient types to just E-mails and Printers. Check the checkbox next to each recipient type you want to permit all report schedulers to use. By default, all recipient types are selected. Portal users – those who can access completed reports via the ReportServer web portal – are always allowed to receive a report.
Allow Portal Recipients To Forward A Report? ReportServer gives administrators the option to restrict a feature in the ReportServer Portal that allows recipients to turn around and forward a completed report to other users. For example, a sales manager might receive a report and decide to send it to the salespeople who work for him. This setting controls whether that forwarding is permitted for any recipient who is not also a scheduler on the report. Select Yes to allow any recipient to forward a report; select No to turn off this feature for report recipients who are not allowed to schedule that report. Schedulers can always forward a report, because they are allowed to schedule and distribute the report.

VersaReports ReportServer Installation Guide
32
5.2.3 Database Tab Use this tab to indicate the database server type you will be using, and to supply the required information about the server, login information, and the name of the database you are going to use. The initial screen of the Database Tab is shown below.
The database server types available display when you click the drop-down arrow:
Database Server Type – Notes For any database server type selected, you must pre-load the database vendor’s 32-bit client software on the ReportServer system.

Chapter 5 Post-Installation Steps for VersaReports ReportServer
33
MySQL: MySQL Connectivity requires the MySQL Connector/ODBC software available at http://www.mysql.com/downloads. Oracle: Oracle Database requires that you load special client software on all systems that access a remote Oracle database. You will need the full Windows client package. If you are an expert Oracle Administrator, you could choose to use the Oracle InstaClient product to provide the necessary Oracle client access. If you are not an expert at configuring an Oracle Server, we do not recommend the “InstaClient” software because it does not provide the tools to help you figure out any connectivity issues. Important: When you load Oracle client software, you must load the connectivity and ODBC
features from the package at the very least. The Windows client software can be downloaded from http://www.oracle.com.
SQL Server: Microsoft SQL Server requires that you load special client software on all systems that access a remote SQL Server database. The SQL Server client software is available from www.microsoft.com. Existing ODBC System Connection: On 64-bit operating systems, you must use the 32-bit version of ODBC Administrator (odbcac32.exe) to create System DSNs for the ReportServer. Only SQL Server, Oracle, and MySQL are supported via the ODBC DSN connection. Because each database server uses different SQL syntax to create tables, please use the appropriate SQL file from the Admin Tools directory to manually create your database.
Field and Button Definitions The information required in this tab depends on the Database Server Type. The following table defines the fields and buttons you may find for these database server types. If a cell in this table is checked (), it means the field or button applies to that database server type.
Field or Button
Database Server Type*
Definition
SQL
Serv
er
MyS
QL
Ora
cle
Exist
ing
ODB
C
Driver
Select the database server driver you want to use for the connection. For Oracle, be sure to use the latest client software.
Refresh
Click this button to populate the Driver list box with those 32-bit ODBC drivers that have been installed.

VersaReports ReportServer Installation Guide
34
Field or Button
Database Server Type*
Definition
SQL
Serv
er
MyS
QL
Ora
cle
Exist
ing
ODB
C
Server
Select from the list or type the server name you are going to use. The Driver must be selected before a refresh of this list displays any options. You have the option of typing in the server name if it is not found in the local network.
Refresh
Click this button to populate the Server list box with those that have been found from a search of the network.
Port
This box can be left blank if you are using the default port (3306) for MySQL. If the server is configured to use a different port, enter that here.
SID
The database service ID.
Windows or SQL Server Authentication
To use Windows Authentication, the database needs to be accessible by the “Network Service” user, which the Administrator sets up manually in the database. Select SQL Server Authentication for any SQL server selected or typed into the Server box above.
Login Name
A valid login name to the specified server. For Oracle, this is the schema name of your database.
Password
Security password for the login name.
DSN
For ODBC, this is the system data source name (DSN) that was created for the ReportServer. (See the Database Server Type - Notes topic above.)
Refresh
Click this button to populate the DSN list box with those names that have been defined.
User ID
User login ID for the database specified for the data source.
Password
Security password for the User ID.

Chapter 5 Post-Installation Steps for VersaReports ReportServer
35
Field or Button
Database Server Type*
Definition
SQL
Serv
er
MyS
QL
Ora
cle
Exist
ing
ODB
C
Test Connection
Click this button to test not only the login and password, but also the other fields to verify the database settings are correct. A dialog box displays indicating if the action completed successfully or if the database information is incorrect. For Oracle, if you get a connectivity error (ORA-12154), it means the Oracle client software is incorrectly configured. In this case you need to work with VersaReports support and your Oracle support person to resolve the connectivity issues.
Database
Select the name of the database/schema you want to use for ReportServer.
Refresh
Click this button to populate the Database list box with those database/schemas names that have been defined for the selected database server type.
Create Database Tables Now
Click this button to create the database tables needed for the ReportServer configuration you have set up.
* A checked box indicates the field or button applies to that Database Server Type.

VersaReports ReportServer Installation Guide
36
5.2.4 Site Authentication Tab Use this tab to select the authentication type for the site, and to supply any required information for that authentication type. The initial screen of the Site Authentication Tab is shown below with the available authentication types listed in the drop-down box.
Authentication Types - Notes Forms: For the Forms (Database-based) authentication type, no additional information is needed on this tab. Continue to the Report Connectors tab. Administering users for Forms Authentication is explained in Appendix F, Managing User Accounts for Forms Authentication on page 73. Windows and Active Directory: For the Windows and Active Directory authentication types, you will need to enter additional information as shown in the screen below and as described in the Field and Button Definitions section.

Chapter 5 Post-Installation Steps for VersaReports ReportServer
37
Field and Button Definitions – Windows or Active Directory Authentication Field or Button Definition
Provider Path For Windows authentication, this will default to the name of your local computer preceded by WinNT:// (this is case-senstive). For Active Directory authentication, this field defaults to the standard network directory prefix of LDAP. Change or complete the field information to match the path to your authentication provider. An example for LDAP would be LDAP://dc=domain,dc=com
Login Name The login name for an account that can authenticate requests against the specified authentication provider. It is recommended you do NOT use your network administrator’s account. Instead, the account you log in to should be provided with sufficient permission to perform authentication requests.
Password Security password for the Login Name.

VersaReports ReportServer Installation Guide
38
Field or Button Definition Verify Connection Click this button to test the login and password to the provider
path. A dialog box displays indicating if the authentication information was verified successfully or if the authentication information is incorrect.
What Group of Users Can Add Reports To The Server?
For Windows authentication, the Group names that are listed in this field are pulled directly from the Groups that have been defined in the Computer Management section of the system Administrative Tools. The members of this group should be those users you want to permit to create reports in VersaReports ReportServer. For Active Directory authentication, the Groups listed in this field are those that have been defined in the Active Directory Users and Computers management console in Administrative Tools. The members of this group should be those users you want to permit to create reports in ReportServer.
Refresh Click this button to populate or refresh the Groups list box with those group names that have been defined for the selected authentication type.
Directory to Cache Account Names and IDs for improved performance
As this field name indicates, this folder will be used to store cache account names and IDs to improve the performance of VersaReports ReportServer.
Select… Click this button to display a Browse For Folder dialog that allows you to choose an existing folder, or create a new one, on your local disk, floppy disk drive, or CD drive.

Chapter 5 Post-Installation Steps for VersaReports ReportServer
39
5.2.5 Report Connectors Tab Use this tab to supply connection information for each of the report connectors you have chosen to install. Note: If you change a report connector’s configuration after users have started creating and
running reports, this change may result in errors. For example, an error will occur if you disable a report connector that has a completed report in the archive.
A typical screen of the Report Connectors Tab is shown below.
Field and Button Definitions Field or Button Definition
This Report Connector Is Active
Select this checkbox if you are going to use this type of report at this time. If you clear this checkbox, this report connector is not active and this report type will not show up on the Report Type drop-down list in Step 1 of the Report Definition Wizard.

VersaReports ReportServer Installation Guide
40
Field or Button Definition Connector DLL Location/ Select
This field contains a default location for the Report Connector DLL based on the standard installation directory structure. If the connector is in a different location, use the Select button to locate and choose that folder.
Connector Class This is the name of the Class (including namespace) for the Report Connector. This field is initially populated with the common class name for the Report Connector, but you may change it by typing in the class name you want to use.
Report Editor/Scheduler can update which data source information
Some report types (for example Crystal Reports) support the ability to allow the registering or scheduling user to change the data connection information. Select the checkbox or checkboxes indicating the data source information that can be updated by the person creating or editing a report, or by the scheduler of a report.
New Reports To Run Are Initially Uploaded from Files On The Report Editor’s Local Workstation
Select this option if new reports are stored on users’ workstations and are to be uploaded to the server via the ReportServer Report Manager.
All Reports To Run Are Stored On This Server And Can Be Found in the Following Folders
The folder locations listed here are where the reports for this Report Connector are stored. Multiple locations can be added to this list using the Add A Folder button. If there are multiple folder locations, the positioning and delete buttons are activated. Use the move up ( ), move down ( ), and delete ( ) buttons to adjust the placement of these locations on the list. Note: These locations are where the Define a Report: Step 1 of the Report Definition Wizard looks to populate the Select File On Server field. The order in which the folders are listed in this Directory list is the same order as they will be listed in the Select File On Server field.
Add A Folder Click this button to display a dialog box that permits you to navigate to the folder or folders containing the report files, including folders located on remote servers. See below.
Add A Folder When you click to Add A Folder for where report administrators can locate report files, you are shown this dialog box.

Chapter 5 Post-Installation Steps for VersaReports ReportServer
41
Click the Browse button to display a Windows-standard Folder Selection dialog box, like this one:
Navigate to any folder you wish to allow report administrators to access for the purpose of using reports in that folder for scheduling in ReportServer. If a network folder is chosen, you might be required to enter a username and password to authenticate your access to that location. Once you have navigated to the desired directory, click Select Folder to close the dialog box and return to the previous dialog box. Remember that ReportServer Portal and the ReportServer program to create reports both run as system process that have very limited permission to access folders on the local server, let alone folders on a remote system. Enter credentials in the dialog box that will have at least read permission on the selected folder. Our recommendation is to create or choose a user

VersaReports ReportServer Installation Guide
42
account that has very limited rights on the remote system, just enough rights to access the selected directory.
Once you have selected the desired folder/directory and entered the necessary credentials, click OK. The credentials will be validated and if it cannot access that directory, an error will be displayed and you will be allowed to change the information. Once you have entered an acceptable location with valid credentials, the folder will be added to the list.
5.2.6 Licensing Tab Use this tab to activate your ReportServer license. The initial version you install is an Evaluation Copy and it will expire 30 days from when you install it. This date is shown in the Current License Details at the top of the Licensing Tab. Once you have purchased your license, you will receive a serial number to enter into the box in this tab. VersaReports ReportServer version 2.x is licensed on a per-server basis. You may run the web site and the ReportsRunner on exactly one physical/logical server. If you want to split these pieces up or create a web farm for the ReportServer, you are obligated to purchase a separate license for each physical/logical server. VersaReports ReportServer comes in several editions: ReportServer CR, ReportServer XR, ReportServer AR, ReportServer TR, ReportServer Universal Standard, and ReportServer Universal Enterprise. ReportServers CR/XR/AR/TR support only a single ReportConnector to run reports, with the letters indicating which Report Connector is included in the product. ReportServer Universal editions includes all supported Report Connectors and the two Universal editions are differentiated by the number of physical CPUs that can be used by the product (Standard edition is limited to 2 physical CPUs in a single server, Enterprise edition does not have that limitation). The installation program installs an evaluation copy of the application. The evaluation copy will have an expiration date that is displayed along with the copyright message at the bottom of the main web pages. If you decide to purchase the license any time during or after the evaluation period, run the ReportServer Configuration Tool, Licensing Tab to activate your VersaReports ReportServer license.

Chapter 5 Post-Installation Steps for VersaReports ReportServer
43
5.2.5.1 Activating Your License via the Internet Use the following instructions to convert your evaluation copy to a purchased program if you have internet access. 1. Run the ReportServer Configuration Tool and click the Licensing Tab.

VersaReports ReportServer Installation Guide
44
Enter (Copy and Paste) the serial number provided by VersaReports or its authorized reseller when you completed your purchase and click ACTIVATE.
2. If your license activation is successful, a dialog box similar to the following displays:
This example, activated on October 20, 2011, illustrates the purchase of a Support contract providing for free upgrades for one year. You also may see a dialog box similar to the following:

Chapter 5 Post-Installation Steps for VersaReports ReportServer
45
This example illustrates the activation of ReportServer without having purchased a Support contract (only 30 days of upgrades).
3. Click OK on this Completed dialog box. 4. In the future, when you need to know when your support contract ends, just return to this
Licensing Tab of the Configuration Tool and that information is displayed at the top in the Current License Details. For our example of one year support, the Licensing Tab would look similar to that shown below:
Note: If you enter the wrong serial number, if you do not have an internet connection, or for some other reason the activation is not successful, a dialog box similar to the following displays:
Click OK and try again or contact VersaReports for assistance.

VersaReports ReportServer Installation Guide
46
5.2.5.2 Activating Your License Without Internet Access Use the following instructions to obtain your license when you do not have internet access from the machine where ReportServer is installed. 1. Run the ReportServer Configuration Tool and click the Licensing Tab.
2. Click the I DO NOT HAVE INTERNET ACCESS button. New information on the tab displays.

Chapter 5 Post-Installation Steps for VersaReports ReportServer
47
3. Follow the instructions on the screen that tell you to send an email to [email protected] and send the displayed machine identifier string (it can be copied) along with your company name and the serial number you receive with your purchase.
4. Upon receipt and verification of this information, VersaReports will activate your license and email back to you a new license code.
5. Take this new license code to the server where ReportServer is installed and enter it into the first box of the Licensing Tab. Click ACTIVATE. A Completed dialog box displays informing you of your support term. Click OK in this dialog box.

VersaReports ReportServer Installation Guide
48
5.2.5.3 Run VersaReports ReportServer When you run ReportServer, the VersaReports ReportServer edition and version is printed at the bottom of the screen:
If you are still running the Evaluation Copy, the bottom of this window would look similar to this:
The information here states that this is an Evaluation Copy and gives the expiration date.

Chapter 5 Post-Installation Steps for VersaReports ReportServer
49
5.3 Platform Considerations The installation program automatically configures Internet Information Services (IIS) to create a new Application Pool for VersaReports ReportServer (called URS Pool) and the required web application under the Default Web Site. Open Internet Information Services (IIS) and make sure ASP.NET 4.0 for 32 bit is allowed. For more information, please refer to the http://support.microsoft.com/kb/894435 Microsoft Knowledgebase article for switching between the 32-bit version and the 64-bit version of ASP.NET 4.0 on a 64-bit version of Windows.
5.4 Start ReportsRunner To run all reports, VersaReports ReportServer includes a "ReportsRunner" program in the InstallationDirectory\ReportsRunner folder. This program can either be run from a Command Prompt window or it can be installed as a service that restarts when the computer restarts and never needs to have a user logged in. To install ReportsRunner as a service using the Local System Account, open a Command Prompt window on server, and navigate (using the CD command) to the InstallationDirectory\ReportsRunner folder. Enter the command:
ReportsRunner -install When ReportsRunner is installed as a service, all error and status messages from it are logged to the Application Event Log. To run ReportsRunner in interactive mode from the Command Prompt window, start a command prompt window, CD to InstallationDirectory\ReportsRunner and enter the command
ReportsRunner without the "-install" command line argument. Running ReportsRunner in interactive mode is an excellent way to debug your reports and the Report Connectors because the program displays error and status messages showing the reports it is running and any errors about them.
5.5 ReportServer Web Services API VersaReports ReportServer includes a web services-based Application Programming Interface (API) for remote applications to query and modify certain data used or produced by ReportServer. With the API, a remote program – with the appropriate permissions – could, for example, access a completed report, adjust the repeat interval for a scheduled report, create a distribution list, or cause a report schedule to immediately run. On installation, the Web Services API is automatically deactivated for security purposes. You should only activate the API if you intend to have external programs access and/or modify ReportServer data. To activate the API, edit the web.config file in the InstallationDirectory\web directory to set the following value in the <appSettings> section:
<add key="AllowWebServices" value="true"/> If the value is not set, missing, or set to “false”, any Web Services API request will return an exception. If you set the value to “true”, then Web Services API requests to ReportServer will be accepted (although the request may still return an error or an exception as described in the VersaReports ReportServer Web Services Guide documentation.

VersaReports ReportServer Installation Guide
50
Appendix A Values in the appSettings Section of web.config The installation of ReportServer includes a web.config file located in the InstallationDirectory\web folder. Most settings in this file are predefined with default values. The values for other settings in this file have been populated by the entries on the tabs of the ReportServer Configuration Tool. On occasion, however, you may need to add or change some settings to accommodate the structure and file location within your system. Of particular interest are the values (keys) in the <appSettings> section of the web.config file. These keys are explained below.
A.1 ReportTypesXML key Verify the location of the report_types.xml file. This file is installed in the InstallationDirectory\web\App_Data folder shown in the example. This key should only be updated if the file has been moved. For example:
<add key="ReportTypesXML" value="~\web\App_Data\report_types.xml"/>
A.2 ReportStorage key This key was set according to the choice you made on the Settings Tab of the Configuration Tool. If you chose to Store Completed Reports In The Database, then this key will not be set, and all completed reports go into the database. For example:
<add key="ReportStorage" value=""/> If you chose to Store Completed Reports On the Disk in the Following Folder, then this key will be set showing that folder on the server for storing completed reports. For example:
<add key="ReportStorage" value="c:\VersaReports\CompletedReports"/>
For further information and cautions about the value in for this key, please refer to the “Where Do You Want To Store Completed Reports?” field in Section 5.2.1 Settings Tab on page 29.
A.3 ReportFileViewer key Set the value for this key to the web page that handles displaying completed reports that are not "native" reports. This page handles displaying pdf, word, and xls files for example. In most circumstances, you will not modify this setting's value. Note: “Native” report viewers are described to ReportServer in the report_types.xml file (see
Appendix D on page 69 for more information).

Appendix A Values in the appSettings Section of web.config
51
For example: <add key="ReportFileViewer" value="ReportFileViewer.ashx?id={0}"/>
A.4 Telerik.Skin key This is the skin choice for the main pages of the application. The value of this key was determined by the choice in the Portal Look Skin field in Section 5.2.1 Settings Tab on page 29.
A.5 ExternalURL key Set this value to the URL that users outside of your intranet will use to reach the ReportServer web site on this server. This URL is used for all notifications and RSS feeds and must be properly configured before users outside your intranet can use the notifications and feeds features. For example: <add key="ExternalURL" value="http://www.versareports.com/urs"/>

VersaReports ReportServer Installation Guide
52
Appendix B Report Designer Integration VersaReports ReportServer currently integrates with four common report designers: SAP Crystal Reports, DevExpress XtraReports, GrapeCity/ComponentOne ActiveReports, and Telerik Reporting. The Configuration Tool collected all required information for the report designers that are installed and already integrated them to work with ReportServer. However, you may need to refer to these instructions if you need to use a different version of a supported report engine or if you want to create and support a Report Connector to a different reporting engine. Refer to the table below to identify the report designer you will be using, and then follow the instructions starting in the section noted for that report designer. Note: Disregard the instructions for any report designer you will not be using.
Report Designer Instructions in Section
Starts on Page
GrapeCity/ComponentOne ActiveReports
B.1 53
DevExpress XtraReports B.2 54 Telerik Reporting B.3 56 SAP Crystal Reports B.4 57
As additional report designers are identified and integrated, VersaReports will include those as options in the Configuration Tool and will publish Configuration Notes for those designers in the Support area at www.versareports.com. The basic steps for configuring a report designer to work with ReportServer are: • Load the report designer's deployment libraries and configure it for web access, if available. • Create a "Report Connector" (software that ReportServer uses to interact with the report
designer's libraries to run a report) and copy the Report Connector library to both the InstallationDirectory\ReportsRunner folder and the InstallationDirectory\web\Bin folder.
• Create a "native" report viewer web page for those designers that support a native report viewer (for example, Crystal Reports, XtraReports, and ActiveReports Professional). Sample report viewer web pages are included in the InstallationDirectory\Sample Report Viewers folder, and if you are integrating with one of the supported report designers, use the correct sample report viewer files from that folder. Place the report viewer web pages into the InstallationDirectory\web folder. Configure the <assemblies> section of the web.config file to include any libraries residing in the server's GAC that the web viewer requires in order to display a report for that report designer package. The report designer documentation will detail the lines that need to be included in web.config. There is a web.config in the InstallationDirectory\Sample Report Viewers folder that contains a sampling of what these assemblies' lines will look like.
• Modify the InstallationDirectory\web\App_Data\report_types.xml file to describe the Report Connectors available for report administrators to handle reports with ReportServer. The report_types.xml file is used by both the web site and the ReportsRunner service, and

Appendix B Report Designer Integration
53
must be correct for reports to be properly loaded and run. The basic report_types.xml file that is included with the ReportServer installation defines the necessary information about the sample Report Connectors included in the installation package. For more information about the structure of the report_types.xml file, refer to Appendix D on page 69.
Note: Report connectors can be compiled on the same system as the VersaReports ReportServer or they can be compiled on a developer's workstation. To compile on a developer's workstation, you will need to copy VersaReports.ReportConnector.dll from the ReportServer installation to your development server, since that file is required to compile a report connector.
B.1 GrapeCity/ComponentOne ActiveReports VersaReports ReportServer includes the source code for creating a Report Connector that will interact with ActiveReports 8 (and with slight code adjustments it will also interact with other versions of ActiveReports, including 3.0 and later), including support for report parameters and support for the Professional Edition's web viewer. The Report Connector you will create supports accessing DLL-based reports instead of RPX-based reports, primarily because reports created with ActiveReports are so much more flexible if you have additional .NET-based code around them. However, because the source code for the Report Connector is included, you can modify it to support RPX-based reports instead. To create a Report Connector for ActiveReports, you must do the following: 1. Deploy ActiveReports to the same server where ReportServer is running, as described in the
ActiveReports documentation. 2. Using Visual Studio 2012 or later:
Note: Please refer to Appendix C on page 59 for detailed instructions (including screen shots) on using Visual Studio to create and install the Report Connector DLL.
a. Create a Visual C# Windows Class Library project giving it a name that identifies the Report Connector you are creating. For example, ActiveReports8Connector.
b. Delete the default class (Class1.cs). c. Add ActiveReports8Connector.cs as an existing item to the project (from the
InstallationDirectory\Sample Report Connectors\ActiveReports8Connector folder). d. Add a reference to the VersaReports.ReportConnector.dll library (from the
InstallationDirectory\ReportsRunner folder). e. Add references to the installed version of ActiveReports' libraries. Set Copy Local to True
for all the added libraries. f. Make sure the Target Framework on the Applications tab (of Project Properties) is set to
.NET Framework 4.0 and the Platform target on the Build tab is set to x86. g. Build the project to create ActiveReportsDllConnector.dll.
3. Copy the ActiveReportsDllConnector.dll file from ProjectFolder\Bin\Debug into both the InstallationDirectory\web\Bin and InstallationDirectory\ReportsRunner folders on the ReportServer system. If the ActiveReports libraries have been deployed to the server's GAC, modify the <assemblies> node in the InstallationDirectory\web\web.config file to include the list of assemblies that are needed to create and view an ActiveReports report. For example, one of

VersaReports ReportServer Installation Guide
54
these lines might be: <add assembly="GrapeCity.ActiveReports.Web.v8, Version=8.3.645.0, Culture=neutral, PublicKeyToken=cc4967777c49a3ff"/>
If the libraries have not been deployed to the system GAC, copy them into both the InstallationDirectory\web\Bin and the InstallationDirectory\ReportsRunner folders. The list of deployable libraries is described in the ActiveReports documentation and you must include ALL of them for ActiveReports reports to execute and be viewed properly.
4. Make sure the ActiveReports report type lines are included in the InstallationDirectory\web\App_Data\report_types.xml file. This report type is included as part of the default installation. If the ActiveReports libraries have not been deployed to the system GAC or into the directory where the VersaReports.ReportConnector.dll file is located, then edit the report_types.xml file to create add nodes in the supporting_assemblies node to enumerate this Report Connector's supporting DLLs. Review the documentation on the report_types.xml file in Appendix D on page 69 for more information about the XML structure for this file. Note: If you have ActiveReports Professional Edition, your edition includes a way to display
native ActiveReports reports using a web viewer. To configure this viewer: 1. Modify report_types.xml to include the following line in the <output_formats>
section for each of the two ActiveReports report types. <format extension="rdf" name="Preview-Only Format" native="true" display_page="ActiveReportsViewer.aspx?id={0}" icon="images/report.png" />
2. Next, copy the ActiveReports8Viewer.* files from InstallationDirectory\Sample Report Viewers folder to the InstallationDirectory\web folder.
You're ready to register and run an ActiveReports report. When you register the DLL containing the report, the Report Definition Wizard will request the "Class Name of Report", which should be the fully-defined class name (including namespace) for the report class within the DLL.
B.2 DevExpress XtraReports VersaReports ReportServer includes the source code for creating a Report Connector that will interact with DevExpress XtraReports version 16.1 and above, including support for report parameters and support for its web viewer. With slight adjustments to the connector code, the connector can work with any version starting with 2010.2. The Report Connector you will create supports accessing DLL-based reports created with DevExpress XtraReports. If you want to implement REPX (XtraReports' native report designer file format) report handling, the source code just needs some minor modification to work with REPX files. To create a Report Connector for XtraReports, you must do the following: 1. Deploy DevExpress XtraReports to the same server where ReportServer is running, as
described in the XtraReports documentation.

Appendix B Report Designer Integration
55
2. Using Visual Studio 2012 or later: Note: Please refer to Appendix C on page 59 for detailed instructions (including screen
shots) on using Visual Studio to create and install the Report Connector DLL. a. Create a Visual C# Windows Class Library project giving it a name that identifies the
Report Connector you are creating. For example, XtraReportsDllConnector. b. Delete the default class (Class1.cs). c. Add XtraReportsDllConnector.cs as an existing item to the project (from the
InstallationDirectory\Sample Report Connectors\XtraReportConnector folder). d. Add a reference to the VersaReports.ReportConnector.dll library (from the
InstallationDirectory\ReportsRunner folder). e. Add references to the installed version of XtraReports. Set Copy Local to True for all the
added libraries. f. Make sure the Target Framework on the Applications tab (of Project Properties) is set to
.NET Framework 4.0 and the Platform target on the Build tab is set to x86. g. Build the project to create XtraReportsDllConnector.dll.
3. Copy the XtraReportsDllConnector.dll file from ProjectFolder\Bin\Debug into both the InstallationDirectory\web\Bin and InstallationDirectory\ReportsRunner folders.
4. If the DevExpress XtraReports libraries have been deployed to the GAC, modify the <assemblies> node in the InstallationDirectory\web\web.config file to include the list of assemblies that are needed to create and view an XtraReports report. For example, one of these lines might be: <add assembly=" DevExpress.Web.v16.1, Version=16.1.5.0, Culture=neutral, PublicKeyToken=B88D1754D700E49A" /> If the libraries have not been deployed to the system GAC, copy them into both the both the InstallationDirectory\web\Bin and the InstallationDirectory\ReportsRunner folders. The list of deployable libraries is described in the XtraReports documentation and you must include ALL of them for an XtraReports report to work properly.
5. Make sure the DevExpress XtraReports report type lines are included in the InstallationDirectory\web\App_Data\report_types.xml file. This report type is included as part of the default installation. If the DevExpress XtraReports libraries have not been deployed to the system GAC or into the directory where the VersaReports.ReportConnector.dll file is located, then edit the report_types.xml file to create add nodes in the supporting_assemblies node to enumerate this Report Connector's supporting DLLs. Review the documentation on the report_types.xml file in Appendix D on page 69 for more information about the XML structure for this file. Note: DevExpress XtraReports includes a way to display native-format reports using a web
viewer. To configure this viewer: 1. Modify report_types.xml to include the following line in the <output_formats>
block for the XtraReportsDll report type. <format extension="prnx" name="Preview-Only Format" native="true" display_page="XtraReportsViewer.aspx?id={0}" icon="images/report.png" />

VersaReports ReportServer Installation Guide
56
2. Finally, copy the XtraReportsViewer.* files from InstallationDirectory\Sample Report Viewers folder to the InstallationDirectory\web folder.
You're ready to register and run a DevExpress XtraReports report. When you register the DLL containing the report, the Report Definition Wizard will request the "Class Name of Report", which should be the fully-defined class name (including namespace) for the report class within the DLL.
B.3 Telerik Reporting ReportServer includes the source code for creating a Report Connector that will interact with Telerik Reporting version 2016 R2 and above, including support for report parameters. With slight adjustments to the connector code, the connector can work with any version starting with 2010.1. The Report Connector you will create supports accessing DLL-based reports created with Telerik Reporting. To create a Report Connector for Telerik Reporting, you must do the following: 1. Deploy Telerik Reporting to the same server where ReportServer is running, as described in
the Telerik Reporting documentation. 2. Using Visual Studio 2012 or later:
Note: Please refer to Appendix C on page 59 for detailed instructions (including screen shots) on using Visual Studio to create and install the Report Connector DLL.
a. Create a Visual C# Windows Class Library project giving it a name that identifies the Report Connector you are creating. For example, TelerikReportingConnector.
b. Delete the default class (Class1.cs) c. Add TelerikReportingConnector.cs as an existing item to the project (from the
InstallationDirectory\Sample Report Connectors\TelerikReportingConnector folder). d. Add a reference to the VersaReports.ReportConnector.dll library (from the
InstallationDirectory\ReportsRunner folder). e. Add references to the installed version of Telerik Reporting. Set Copy Local to True for
all the added libraries. f. Make sure the Target Framework on the Applications tab (of Project Properties) is set to
.NET Framework 4.0 and the Platform target on the Build tab is set to x86. g. Build the project to create TelerikReportingConnector.dll.
3. Copy the TelerikReportingConnector.dll file from ProjectFolder\Bin\Debug into both the InstallationDirectory\web\Bin and InstallationDirectory\ReportsRunner folders.
4. If the Telerik Reporting libraries have been deployed to the GAC, modify the <assemblies> node in the InstallationDirectory\web\web.config file to include the list of assemblies that are needed to create and view a Telerik Reporting report. If the libraries have not been deployed to the system GAC, copy them into both the InstallationDirectory\web\Bin and the InstallationDirectory\ReportsRunner folders. The list of deployable libraries is described in the Telerik Reporting documentation and you must include ALL of them for a Telerik Reporting report to work properly.
5. Make sure the Telerik Reporting report type lines are included in the InstallationDirectory\web\App_Data\report_types.xml file. This report type is included as

Appendix B Report Designer Integration
57
part of the default installation. If the Telerik Reporting libraries have not been deployed to the system GAC or into the directory where the VersaReports.ReportConnector.dll file is located, then edit the report_types.xml file to create add nodes in the supporting_assemblies node to enumerate this Report Connector's supporting DLLs. Review the documentation on the report_types.xml file in Appendix D on page 69 for more information about the XML structure for this file. Note: The Telerik Reporting Report Connector does not support the native Telerik
Reporting web viewer. Only exportable formats are allowed at this time. You're ready to register and run a Telerik Reporting report. When you register the DLL containing the report, the Report Definition Wizard will request the "Class Name of Report", which should be the fully-defined class name (including namespace) for the report class within the DLL.
B.4 SAP Crystal Reports VersaReports ReportServer includes the source code for creating a Report Connector that will interact with SAP Crystal Reports, including support for report parameters. Similar Report Connectors have been tested with several versions of Crystal Reports. The Report Connector you will create supports accessing RPT file-based reports created with Crystal Reports Designer. To create a Report Connector for Crystal Reports, you must do the following: 1. Install the SAP Crystal Reports deployment package to the same server where ReportServer
is running, as described in the Crystal Reports documentation. 2. Using Visual Studio 2012 or later:
Note: Please refer to Appendix C on page 59 for detailed instructions (including screen shots) on using Visual Studio to create and install the Report Connector DLL.
a. Create a Visual C# Windows Class Library project giving it a name that identifies the Report Connector you are creating. For example, CrystalReportsConnector.
b. Delete the default class (Class1.cs). c. Add CrystalReportsConnector.cs as an existing item to the project (from the
InstallationDirectory\Sample Report Connectors\CrystalReportsConnector folder). d. Add a reference to the VersaReports.ReportConnector.dll library (from the
InstallationDirectory\ReportsRunner folder). e. Add references to the installed version of Crystal Reports. Set Copy Local to True for all
the added libraries. f. Make sure the Target Framework on the Applications tab (of Project Properties) is set to
.NET Framework 4.0 and the Platform target on the Build tab is set to x86. g. Build the project to create XtraReportsDllConnector.dll.
3. Copy the CrystalReportsConnector.dll file from ProjectFolder\Bin\Debug into both the InstallationDirectory\web\Bin and InstallationDirectory\ReportsRunner folders.
4. The Crystal Reports deployment package installs its libraries into the system GAC, so modify the <assemblies> node in the InstallationDirectory\web\web.config file to include the list of

VersaReports ReportServer Installation Guide
58
assemblies that are needed to create and view a Crystal Reports report. The list of libraries in the GAC is described in the Crystal Reports documentation and you must include ALL of them for a Crystal Reports report to work properly.
5. Make sure the Crystal Reports report type lines are included in the InstallationDirectory\web\App_Data\report_types.xml file. This report type is included as part of the default installation. Review the documentation on the report_types.xml file in Appendix D on page 69 for more information about the XML structure for this file. Note: Crystal Reports includes a way to display native-format reports using a web viewer.
To configure this viewer: 1. Modify report_types.xml to include the following line in the <output_formats>
block for the CrystalReportsRpt report type. <format key="rpt" extension="rpt" name="Preview-Only Format" native="true" display_page="CrystalViewerMain.aspx?id={0}" icon="images/report.png" />
2. Next, copy the Crystal*.* files from InstallationDirectory\Sample Report Viewers folder to the InstallationDirectory\web folder.
3. Finally, check with the Crystal Reports documentation for information about the virtual directory you will need to create in the Web folder (the name of the directory and its physical location are specific to the version of CR that you installed). This step is VERY important for successful use of the Crystal Reports web viewer.
You're ready to register and run a Crystal Reports report.
B.5 Other Report Connectors Periodically, VersaReports will release report connectors for other report generators. You will find the source code and documentation for these connectors on the VersaReports support web site at http://www.versareports.com/support.

Appendix C Instructions for Creating a Report Connector
59
Appendix C Instructions for Creating a Report Connector The Report Connector is a compiled piece of software that provides an interface between the VersaReports ReportServer software and the report designer's report engine software. ReportServer includes several example Report Connectors. This appendix provides detailed instructions for creating and installing the Report Connector DLL. The currently supported report designers are: • SAP Crystal Reports for Visual Studio 2010 • DevExpress XtraReports • GrapeCity/ComponentOne ActiveReports • Telerik Reporting Please refer to the Release Notes “Read Me” file included with your installation for specific release version numbers. For creating a Report Connector for these report designers, or to create a Report Connector for a report designer that is not included with ReportServer, you need the following: • Microsoft Visual Studio 2012 or later • Developer license for your report designer Note: Report connectors can be compiled on the same system as VersaReports ReportServer
or they can be compiled on a developer's workstation. To compile on a developer's workstation, you will need to copy VersaReports.ReportConnector.dll from the ReportServer installation to your development server, since that file is required to compile a report connector.
Note: The screens in the following steps show XtraReports as the report designer for which we are creating the Report Connector. The steps and screens would be virtually the same for the other report designers.

VersaReports ReportServer Installation Guide
60
1. Open Visual Studio and create a new Visual C# Windows Class Library project. One way to do this is on the File menu, point to New, and then click Project.

Appendix C Instructions for Creating a Report Connector
61
2. Be sure to select Windows from the Visual C# Project types list, and Class Library from the VS installed templates list. Select .NET Framework 4.6 from the framework list. Give the project a name that identifies the Report Connector you are creating. In our example, XtraReportsConnector.

VersaReports ReportServer Installation Guide
62
3. Delete the default class file (Class1.cs) by right-clicking on Class1.cs and selecting the Delete option. Click OK on the confirmation dialog.
4. Add XtraReportsConnector.cs as an existing item to the project. To do this, first right click the project, point to Add, and then click Existing Item…

Appendix C Instructions for Creating a Report Connector
63
5. Then navigate to the InstallationDirectory\Sample Report Connectors\XtraReportsConnector folder and select the XtraReportsConnector.cs file.

VersaReports ReportServer Installation Guide
64
6. Add references to the VersaReports.ReportConnector.dll library (from the InstallationDirectory\ReportsRunner folder). Do this by right-clicking the project and then clicking Add Reference. In the Add Reference dialog box, click the Browse tab, and then in the Look In field navigate to InstallationDirectory\ReportsRunner\VersaReports.ReportConnector.dll. Select it and click OK.

Appendix C Instructions for Creating a Report Connector
65
7. Add references to all distributable libraries for the report designer. Do this by right-clicking the project and then clicking Add Reference. In the Add Reference dialog box, click the .NET tab and select the appropriate references. Refer to the report designer documentation for the .NET references to be added. Multi-select them (Ctrl-click each) and click OK.

VersaReports ReportServer Installation Guide
66
8. Change Copy Local to True for all report designer libraries you added.

Appendix C Instructions for Creating a Report Connector
67
9. From the Project menu, click Properties and then click the Applications tab. Verify that the target framework matches the framework required by the report designer’s SDK (.NET Framework 2.0 or .NET Framework 4.0).
10. Click the Build tab and in the Platform target list, click x86.
11. Build the project by clicking Build ReportConnectorProjectName on the Build menu. In our example you would click Build XtraReportsConnector.

VersaReports ReportServer Installation Guide
68
12. If the build is successful, copy the .dll files from the ProjectFolder\Bin\Debug (in our example, XtraReportsConnector\Bin\Debug) to the InstallationDirectory\ReportsRunner and InstallationDirectory\web\Bin folders.
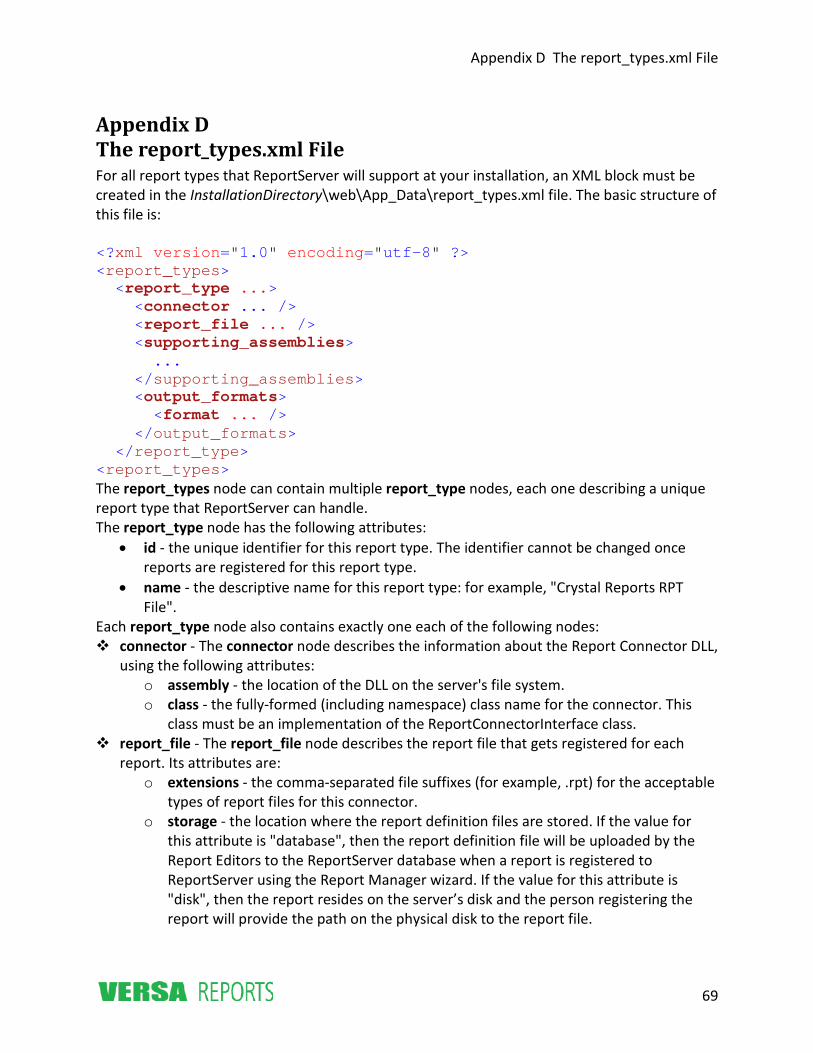
Appendix D The report_types.xml File
69
Appendix D The report_types.xml File For all report types that ReportServer will support at your installation, an XML block must be created in the InstallationDirectory\web\App_Data\report_types.xml file. The basic structure of this file is: <?xml version="1.0" encoding="utf-8" ?> <report_types> <report_type ...> <connector ... /> <report_file ... /> <supporting_assemblies> ... </supporting_assemblies> <output_formats> <format ... /> </output_formats> </report_type> <report_types> The report_types node can contain multiple report_type nodes, each one describing a unique report type that ReportServer can handle. The report_type node has the following attributes:
• id - the unique identifier for this report type. The identifier cannot be changed once reports are registered for this report type.
• name - the descriptive name for this report type: for example, "Crystal Reports RPT File".
Each report_type node also contains exactly one each of the following nodes: connector - The connector node describes the information about the Report Connector DLL,
using the following attributes: o assembly - the location of the DLL on the server's file system. o class - the fully-formed (including namespace) class name for the connector. This
class must be an implementation of the ReportConnectorInterface class. report_file - The report_file node describes the report file that gets registered for each
report. Its attributes are: o extensions - the comma-separated file suffixes (for example, .rpt) for the acceptable
types of report files for this connector. o storage - the location where the report definition files are stored. If the value for
this attribute is "database", then the report definition file will be uploaded by the Report Editors to the ReportServer database when a report is registered to ReportServer using the Report Manager wizard. If the value for this attribute is "disk", then the report resides on the server’s disk and the person registering the report will provide the path on the physical disk to the report file.

VersaReports ReportServer Installation Guide
70
extra_info_prompt -if the person registering the report needs to provide extra info about the report file, this attribute needs the value of the prompt string that will be shown. In other words, if the report being registered is a DLL file, the extra_info_prompt might contain the string "Enter the Class Name for the Report". If this attribute is not set or set to a blank string, the extra info prompt is not displayed to the person registering reports of this type.
o pass_connection - some report types support the ability to allow the registering or scheduling user to change the data connection information. If this report type supports that change – and the Report Connector for the report type must support it – then this attribute is set to "true", otherwise, set it to "false".
o directories – if the report type is to be loaded from one or more directories on the server, set this attribute to a comma-delimited string containing the directories where those reports reside (e.g., “C:\reports,D:\reports2”). This attribute only matters if the storage attribute is set to “disk”.
connection_info - The connection_info node describes which, if any, of the data connection information can be updated by the person creating or editing a report, or by the user scheduling a report. Note that not all Report Connectors support these options. The connection_info node has the following attributes whose possible values are “true” and “false”:
o server - If set to “true,” the report creator/editor or report scheduler can update which server to use.
o database - If set to “true,” the report creator/editor or report scheduler can update which database to use.
o connection_string - If set to “true,” the report creator/editor or report scheduler can update the connection string to use. The connection_string attribute is mutually exclusive of the other attributes. If set to “true”, the other three attributes will be interpreted as “false.”
o user - If set to “true,” the report creator/editor or report scheduler can update the user name and password for logging into the database.
supporting_assemblies - The supporting_assemblies node contains zero or more add nodes to enumerate the Report Connector's supporting DLLs that are not loaded into the GAC or into the directory where the VersaReports.ReportConnector.dll file is located. In other words, if your report designer's deployment files are not installed in the GAC and you don't want to copy them from their installation location into both the InstallationDirectory\web\Bin and the InstallationDirectory\ReportsRunner folders, create add nodes in the supporting_assemblies node to list those files. For example:
<supporting_assemblies> <add assembly="C:\Program Files\Developer Express .NET v8.3\Sources\DevExpress.DLL\DevExpress.Charts.v16.1.Core.dll" /> <add assembly="C:\Program Files\Developer Express .NET v16.1\Sources\DevExpress.DLL\DevExpress.Data.v16.1.dll" /> <add assembly="C:\Program Files\Developer Express .NET v16.1\Sources\DevExpress.DLL\DevExpress.Utils.v16.1.dll" /> <add assembly="C:\Program Files\Developer Express .NET v16.1\Sources\DevExpress.DLL\DevExpress.Web.v16.1.dll" /> <add assembly="C:\Program Files\Developer Express .NET v16.1\Sources\DevExpress.DLL\DevExpress.XtraCharts.v16.1.dll" /> <add assembly="C:\Program Files\Developer Express .NET v16.1\Sources\DevExpress.DLL\DevExpress.XtraPrinting.v16.1.dll" />

Appendix D The report_types.xml File
71
<add assembly="C:\Program Files\Developer Express .NET v16.1\Sources\DevExpress.DLL\DevExpress.XtraReports.v16.1.dll" /> <add assembly="C:\Program Files\Developer Express .NET v16.1\Sources\DevExpress.DLL\DevExpress.XtraReports.v16.1.Web.dll" /> </supporting_assemblies>
Note that the add node has a single attribute, assembly, which contains an absolute path location to a DLL file. You cannot use relative path locations in the assembly attribute.
output_formats - the output_formats node contains a list of format nodes that describe the type of report result files that can be created with the Report Connector. A sample output_formats block looks like this:
<output_formats> <format key="pdf" extension="pdf" name="Acrobat Reader" mime_type="application/pdf" native="false" icon="images/pdf.png" /> <format key="rtf" extension="rtf" name="Rich Text File" mime_type="application/rtf" native="false" icon="images/rtf.png"/> <format key="xls" extension="xls" name="Excel 2003" mime_type="application/vnd.ms-excel" native="false" icon="images/xls.png" /> <format key="xlsr" extension="xls" name="Excel 2003 Data Only" mime_type="application/vnd.ms-excel" native="false" icon="images/xls.png" />
<format extension="prnx" name="Preview-Only Format" native="true" display_page="XtraReportsViewer.aspx?id={0}" icon="images/report.png" printable="true" /> </output_formats>
Each format node has a number of attributes: o key – the short key used in the database to reference this format. If this
attribute is not present, the extension attribute will be used for this purpose. This additional attribute was introduced for the situation for Crystal Reports where two report formats had the same extension but different contents.
o extension - the suffix to add to this type of report file output. This extension is also stored in the database along with the scheduled report definition, so do not change these extensions once you start scheduling reports with this type of output format.
o name - the visible name shown to the user in the Report Scheduling Wizard for this output format.
o mime_type - the MIME type of the output file, so that it can be properly displayed in the user's browser (this instructs the browser how to display this type of report output). For "native" report outputs, do not include a mime_type attribute.
o native - set to "false" if the report output format does not require a special web page to display it; set to "true" if the report designer requires a special web page to display the report output. If set to "true", the display_page attribute must be set.
o display_page - for native report formats, specify the URL for the page name along with ?id={0} and ReportServer will load that page and pass it an encoded ID for the report to be displayed. See the Configuration Notes for Report Connectors for the appropriate URL to assign to this attribute.
o icon - the URL for a small icon to use to represent the type of report in the Report Archives page.
o printable – set this attribute to “true” if the ReportConnector supports directly routing this type of output to a printer. Otherwise, set this attribute to “false”.

VersaReports ReportServer Installation Guide
72
The file report_type.sample.xml is included with the basic ReportServer installation and you should use this as a guide to creating the specific report_type.xml that you need for your installation, based on the Report Connectors and features you need for your report administrators and schedulers.

Appendix E Managing User Accounts for Forms Authentication
73
Appendix E Managing User Accounts for Forms Authentication If you are installing ReportServer for the first time and you selected Forms Authentication in the Configuration Tool, then you will need to set up the users who will have access to ReportServer. This is accomplished through the User Administration page of ReportServer. Initially, only the Administrator has permission to access this program. If your ReportServer web site URL is http://localhost/urs, then navigate to the Login page.
Log in to ReportServer by entering the Username and Password for the administrator. An administrator account with the user name of Administrator and the password URSadmin was automatically created during installation. After logging in, you should change your administrator password as soon as possible.

VersaReports ReportServer Installation Guide
74
Click the link at the top-right corner. The User Administration window displays.

Appendix E Managing User Accounts for Forms Authentication
75
Begin by clicking Add a User. The screen displays additional fields for you to define the user information.
VersaReports ReportServer Installation Guide
76
Complete the information for this user and click SAVE. The following table describes the fields on this window:
Field Definition
Display Name The name that will display on each of the ReportServer screens as the person logged in, and also as the person who created or scheduled reports, or the person to whom a report should be sent.
E-mail Address The address in this field is used to populate the e-mail address on:
• The Define a Report: Step 1 - Basic Information page (Send Exception E-mails to field)
• The Notifications sub-tab of the My Settings tab (Enter E-mail Address to Receive These Notifications field)
Login Name The name by which this user will log in to ReportServer.

Appendix E Managing User Accounts for Forms Authentication
77
Field Definition Password The initial password of the user. The user can change the
password at any time by using the Change Password link at the top of every page. However, any person who is granted permission (via the Can Administer Users checkbox) to manage user accounts is able to change the password at any time.
Note that this is a required field for the initial user definition only. It is not required if this user’s information is being edited.
Can Add Reports This checkbox controls whether or not the user can add reports to be managed by ReportServer. When selected, users are granted this permission and when they run ReportServer, the Reports Manager tab will be displayed allowing them to add, delete, and edit report definitions, dynamic parameter queries, and dynamic parameter connections.
Can Administer Users This checkbox controls whether or not the user can manage (add, modify, or delete) other users and their information. When selected, users are granted this permission and they will have the Administer Users link at the top of every page. Clicking that link directs them to this ReportServer – User Administration page.
Actions Select Cancel to return to the User list without saving any of the information in these fields.
Select SAVE to save or update all of the information you entered. If this is the initial user definition, the user is added to the list.

VersaReports ReportServer Installation Guide
78
Once you have added users, they are listed in alphabetical order.

Appendix E Managing User Accounts for Forms Authentication
79
You can sort the information in the Display Name, E-mail Address, or Login Name columns by clicking on that column heading.
In the example above, after clicking the Display Name heading, the information in that column is listed in descending (Z to A) order.

VersaReports ReportServer Installation Guide
80
Furthermore, the information in any of the columns can be “narrowed down” by selecting the Filter icon.
Type the character string you want to filter by, and then click the Filter icon.

Appendix E Managing User Accounts for Forms Authentication
81
In the example above, we wanted to display just those users who have an e-mail address of abcmanufacturing.com. (Note that “EndsWith” would have worked as well to get the desired results.)
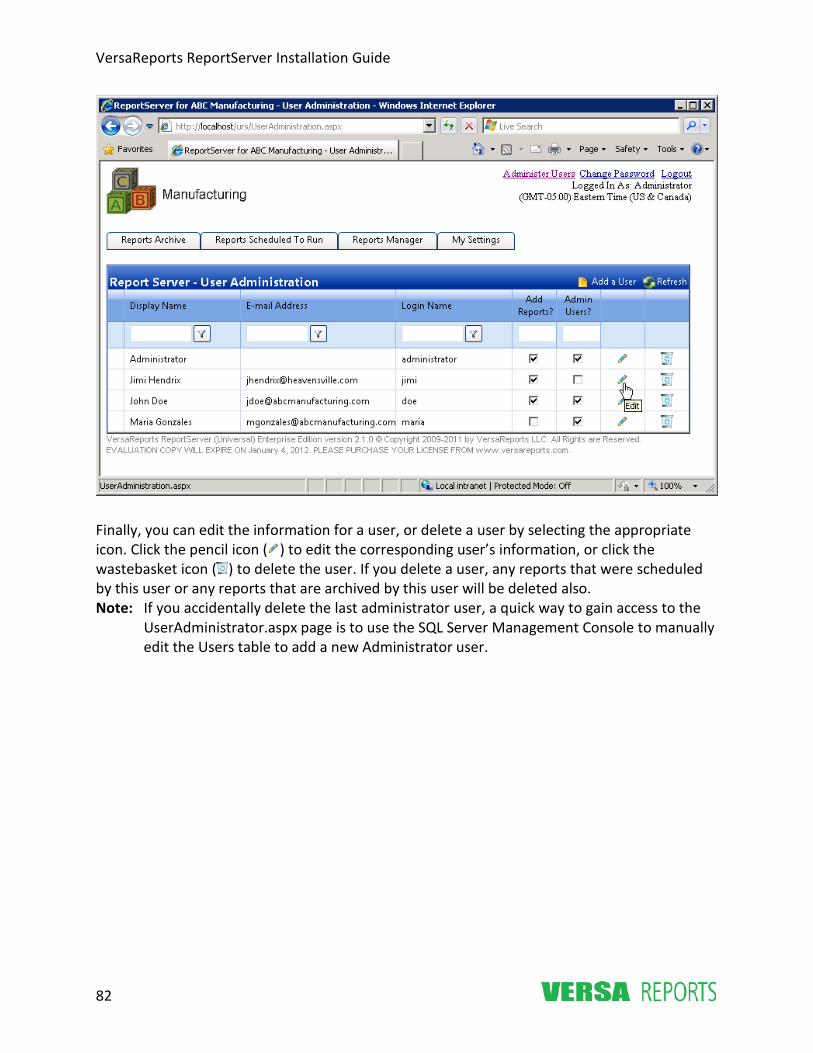
VersaReports ReportServer Installation Guide
82
Finally, you can edit the information for a user, or delete a user by selecting the appropriate icon. Click the pencil icon ( ) to edit the corresponding user’s information, or click the wastebasket icon ( ) to delete the user. If you delete a user, any reports that were scheduled by this user or any reports that are archived by this user will be deleted also. Note: If you accidentally delete the last administrator user, a quick way to gain access to the
UserAdministrator.aspx page is to use the SQL Server Management Console to manually edit the Users table to add a new Administrator user.