Variations on the EASY Kutsudama Flowers (using ... · Variations on the EASY Kutsudama Flowers...
9
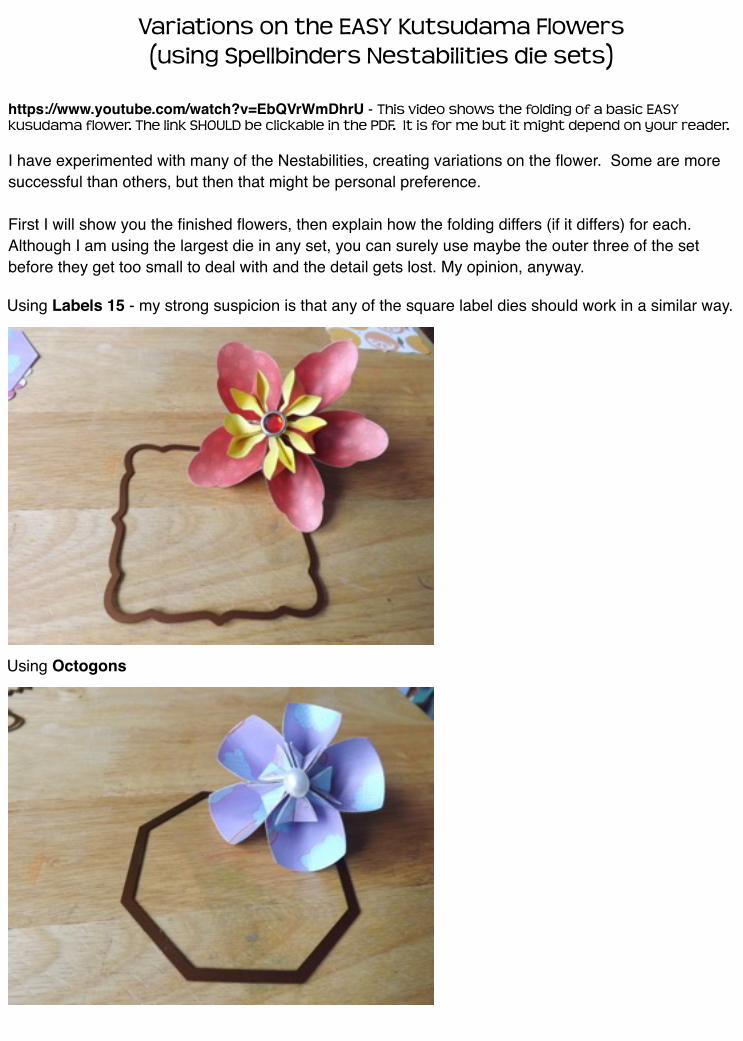
Variations on the EASY Kutsudama Flowers (using Spellbinders Nestabilities die sets) https://www.youtube.com/watch?v=EbQVrWmDhrU - This video shows the folding of a basic EASY kusudama flower. The link SHOULD be clickable in the PDF. It is for me but it might depend on your reader. I have experimented with many of the Nestabilities, creating variations on the flower. Some are more successful than others, but then that might be personal preference. First I will show you the finished flowers, then explain how the folding differs (if it differs) for each. Although I am using the largest die in any set, you can surely use maybe the outer three of the set before they get too small to deal with and the detail gets lost. My opinion, anyway. Using Labels 15 - my strong suspicion is that any of the square label dies should work in a similar way. Using Octogons
Transcript of Variations on the EASY Kutsudama Flowers (using ... · Variations on the EASY Kutsudama Flowers...
Variations on the EASY Kutsudama Flowers (using Spellbinders Nestabilities die sets)
https://www.youtube.com/watch?v=EbQVrWmDhrU - This video shows the folding of a basic EASY kusudama flower. The link SHOULD be clickable in the PDF. It is for me but it might depend on your reader.
I have experimented with many of the Nestabilities, creating variations on the flower. Some are more successful than others, but then that might be personal preference.!!First I will show you the finished flowers, then explain how the folding differs (if it differs) for each. Although I am using the largest die in any set, you can surely use maybe the outer three of the set before they get too small to deal with and the detail gets lost. My opinion, anyway.
Using Labels 15 - my strong suspicion is that any of the square label dies should work in a similar way.
Using Octogons
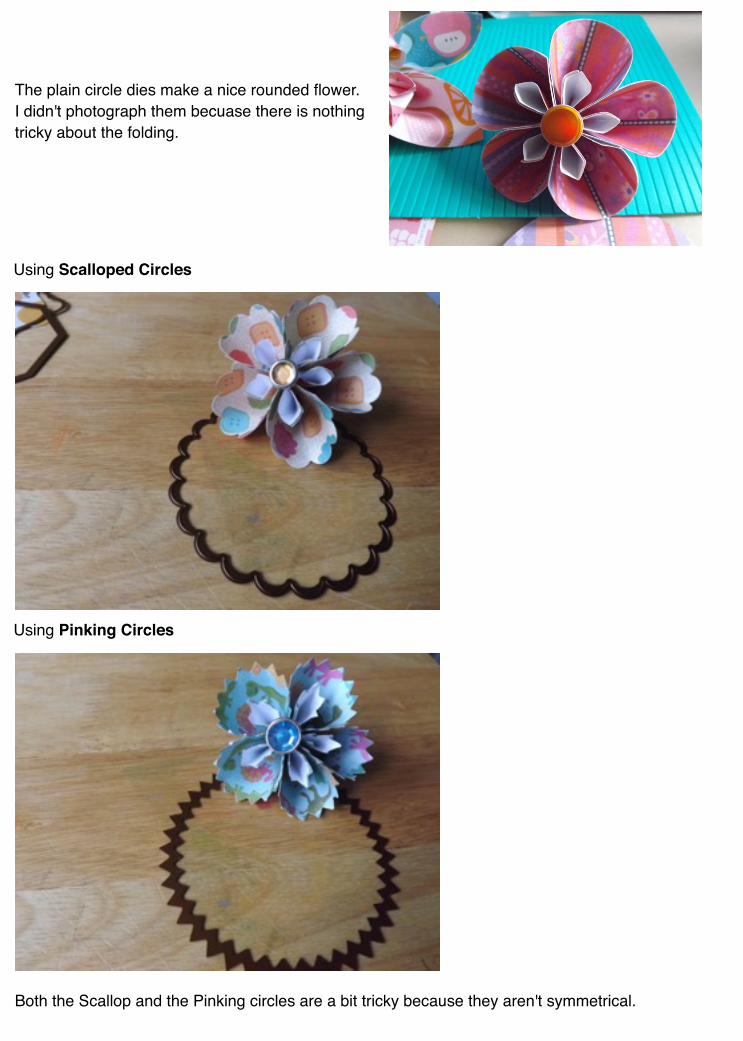
Using Scalloped Circles
Using Pinking Circles
The plain circle dies make a nice rounded flower. I didn't photograph them becuase there is nothing tricky about the folding.
Both the Scallop and the Pinking circles are a bit tricky because they aren't symmetrical. !
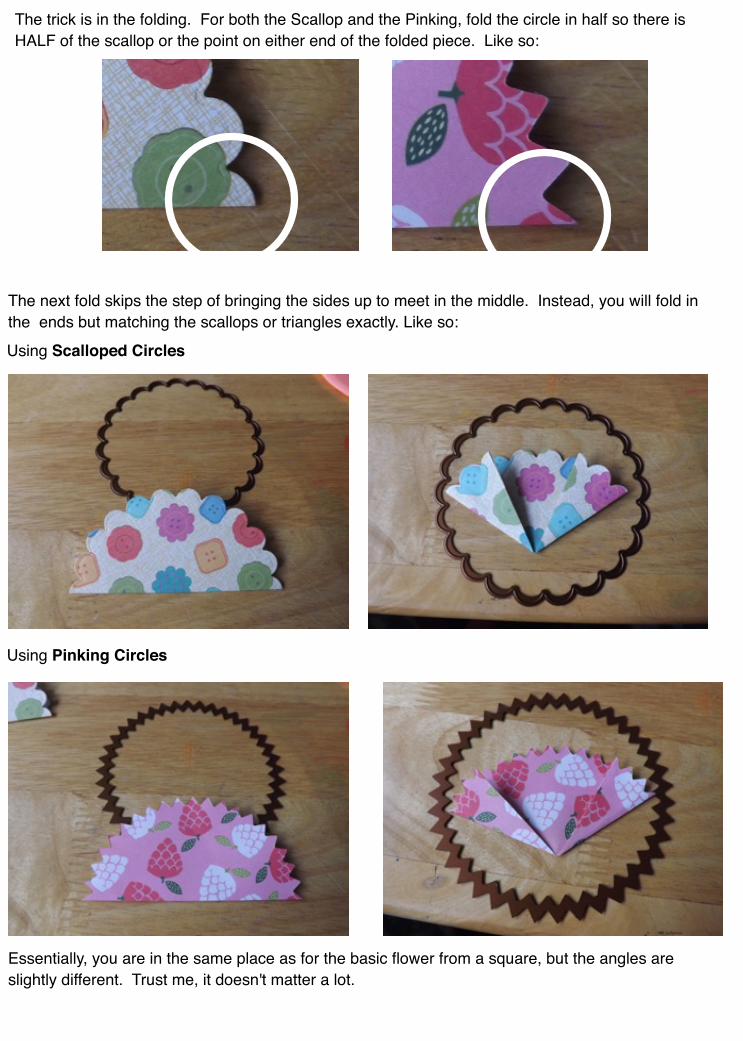
The trick is in the folding. For both the Scallop and the Pinking, fold the circle in half so there is HALF of the scallop or the point on either end of the folded piece. Like so:
The next fold skips the step of bringing the sides up to meet in the middle. Instead, you will fold in the ends but matching the scallops or triangles exactly. Like so:
Using Scalloped Circles
Using Pinking Circles
Essentially, you are in the same place as for the basic flower from a square, but the angles are slightly different. Trust me, it doesn't matter a lot.
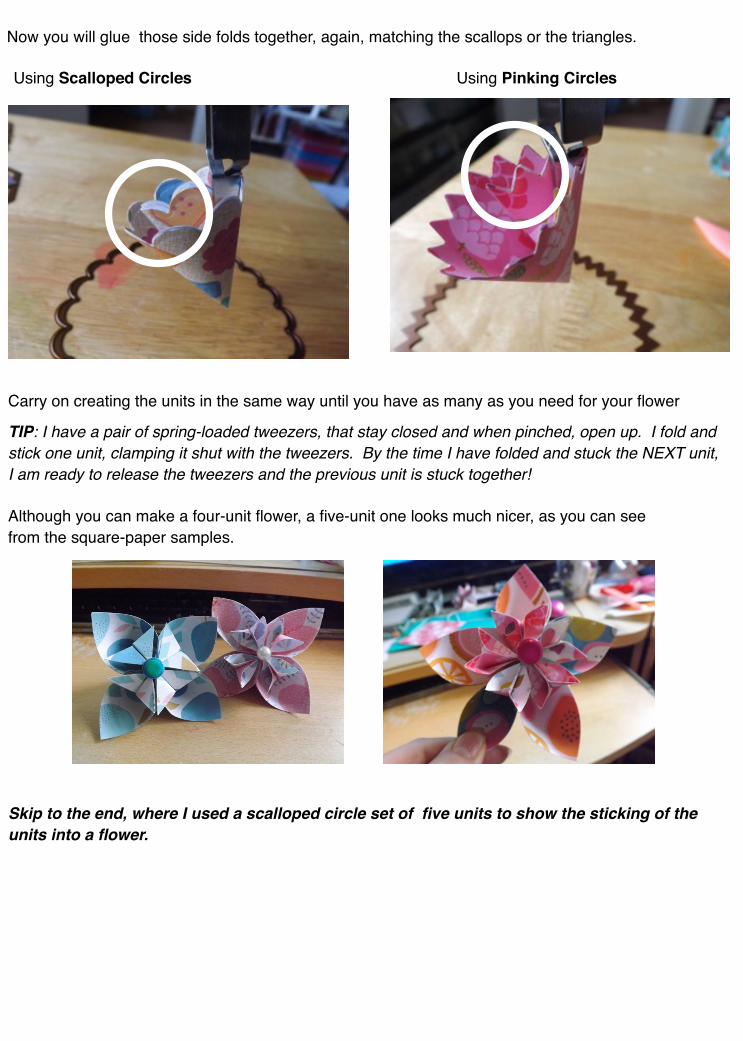
!!TIP: I have a pair of spring-loaded tweezers, that stay closed and when pinched, open up. I fold and stick one unit, clamping it shut with the tweezers. By the time I have folded and stuck the NEXT unit, I am ready to release the tweezers and the previous unit is stuck together!
Carry on creating the units in the same way until you have as many as you need for your flower
Now you will glue those side folds together, again, matching the scallops or the triangles.
Using Scalloped Circles Using Pinking Circles
Although you can make a four-unit flower, a five-unit one looks much nicer, as you can see from the square-paper samples.
!!Skip to the end, where I used a scalloped circle set of five units to show the sticking of the units into a flower.

Octagons is in half, like the previous samples while Labels is clearly on the diagonal, as with the square paper start. And both need the fold-up to meet in the middle step
In fact, the other two versions, the Octagons and the Labels versions, are more like the basic fold from a square than you might think. The first fold in in half.
Using Octagons Using Labels
Both need the side fold inward to meet the crease

You will need to be mindful of these tips when glueing. Make sure you only glue the straight section and not the folded tips.
Here is where they differ, but not by much.
Using Octagons
Using Labels
With the square paper start you would flip over and fold the tip down. But the curvy label edge makes that hard to do. Instead you will fold the tip, without flipping it over, the open it up again.
Octagons gets the tip folded inwards, like so. This will create the little centre flower like you see in the sample.
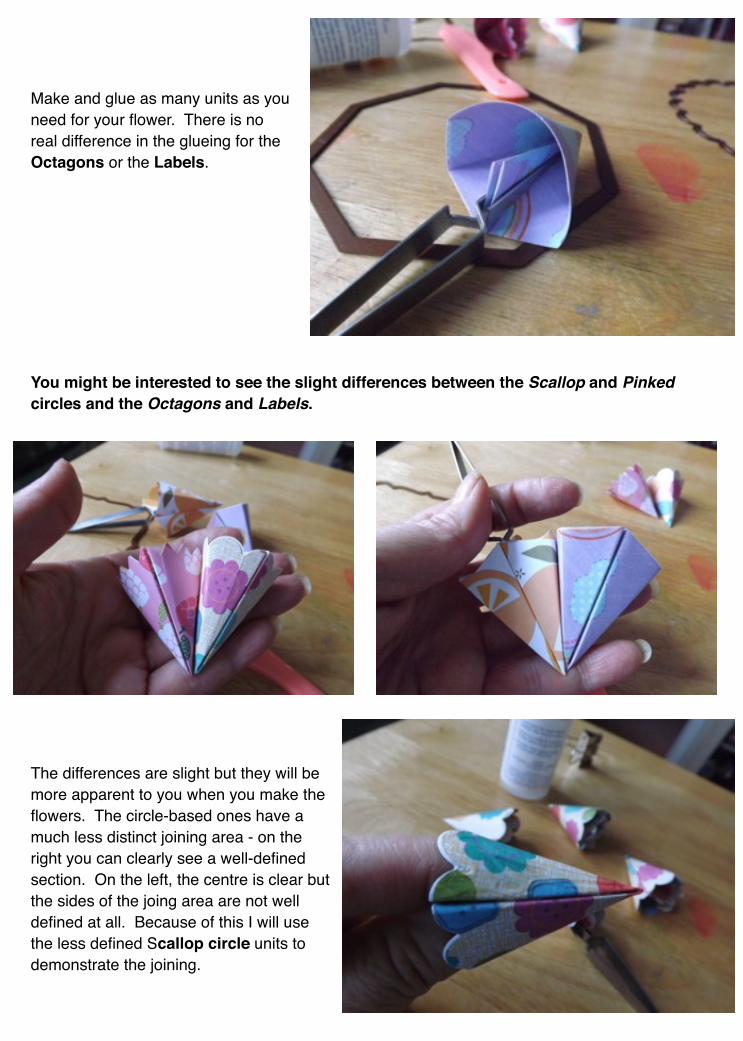
You might be interested to see the slight differences between the Scallop and Pinked circles and the Octagons and Labels.
Make and glue as many units as you need for your flower. There is no real difference in the glueing for the Octagons or the Labels.
The differences are slight but they will be more apparent to you when you make the flowers. The circle-based ones have a much less distinct joining area - on the right you can clearly see a well-defined section. On the left, the centre is clear but the sides of the joing area are not well defined at all. Because of this I will use the less defined Scallop circle units to demonstrate the joining.

Match the scallops of two units, and stick them together. Leave the other half unstuck. Either hold this firmly until you ar sure you have a good, solid join, or clamp it together. Check all the edges to make sure they line up.
Make two of these two-unit pieces. !Join a third unit to one of the pieces. I know this is very hard to see.
In order to make sure the pieces are well stuck, I will actually FOLD the units and line up all the edges, then clamp them together with a binder clip!!
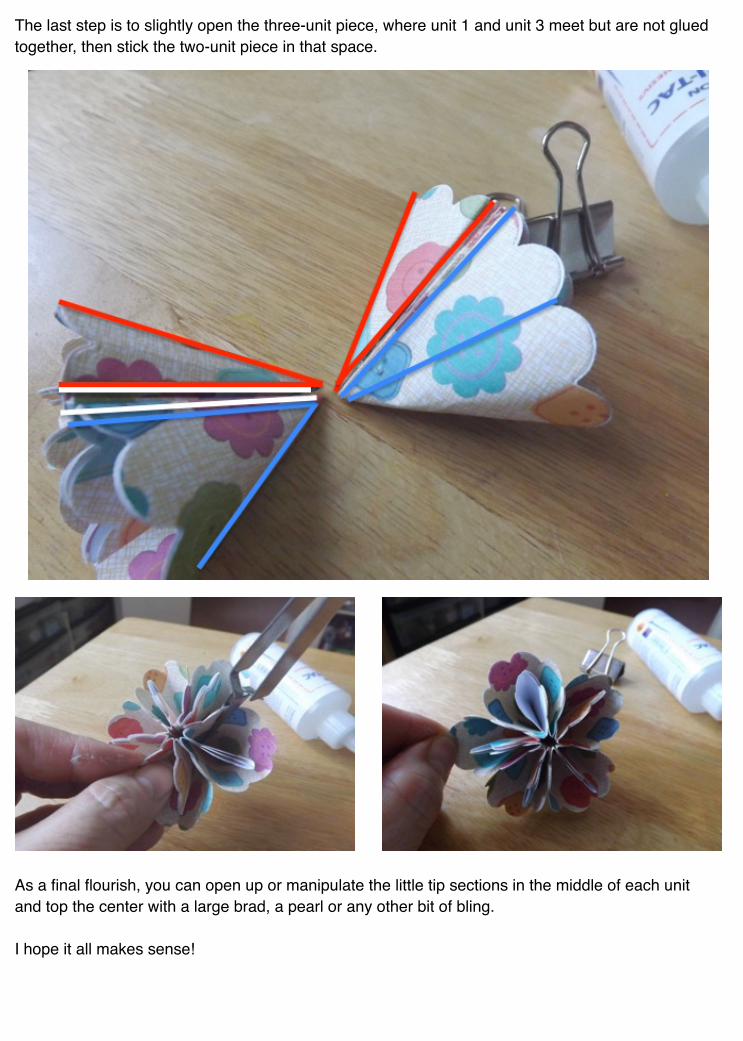
The last step is to slightly open the three-unit piece, where unit 1 and unit 3 meet but are not glued together, then stick the two-unit piece in that space.
As a final flourish, you can open up or manipulate the little tip sections in the middle of each unit and top the center with a large brad, a pearl or any other bit of bling.!!I hope it all makes sense!


![HOME [queeniebridal.com]...BROOCHES LACE BORDERS WREATHS BRIDESMAID FLOWERS DRESS FLOWERS FAMILY FLOWERS GROOM FLOWERS HEAD FLOWERS OTHER ACCESSORIES HOME ABOUT US BRIDAL GOWNS BOUQUETS](https://static.fdocuments.in/doc/165x107/6046947d70039863261e7053/home-brooches-lace-borders-wreaths-bridesmaid-flowers-dress-flowers-family.jpg)