Valable pour : pays CE et Suisse / Geldig voor: EU-landen ... · Das Connectivity Modul ist ein...
32
Einbauanleitung / Installation instructions / Instructions de montage / Inbouwhandleiding JUDO Connectivity Modul JUDO connectivity module / JUDO module de connectivité Gültig für: EU-Länder und Schweiz / Valid for: EU-countries and Switzerland Valable pour : pays CE et Suisse / Geldig voor: EU-landen en Zwitserland Vor Gebrauch lesen und aufbewahren! Read before use and store! À lire avant l’utilisation et à conserver ! Vóór gebruik lezen en bewaren! Einbauanleitung / Installation instructions / Instructions de montage / Inbouwhandleiding JUDO Connectivity Modul JUDO connectivity module / JUDO module de connectivité Gültig für: EU-Länder und Schweiz / Valid for: EU-countries and Switzerland Valable pour : pays CE et Suisse / Geldig voor: EU-landen en Zwitserland Vor Gebrauch lesen und aufbewahren! Read before use and store! À lire avant l’utilisation et à conserver ! Vóór gebruik lezen en bewaren!
-
Upload
nguyenkien -
Category
Documents
-
view
214 -
download
0
Transcript of Valable pour : pays CE et Suisse / Geldig voor: EU-landen ... · Das Connectivity Modul ist ein...

Einbauanleitung / Installation instructions / Instructions de montage / Inbouwhandleiding
JUDO Connectivity ModulJUDO connectivity module / JUDO module de connectivité
Gültig für: EU-Länder und Schweiz / Valid for: EU-countries and SwitzerlandValable pour : pays CE et Suisse / Geldig voor: EU-landen en Zwitserland
Vor Gebrauch lesen und aufbewahren! Read before use and store! À lire avant l’utilisation et à conserver ! Vóór gebruik lezen en bewaren!

Inhaltsverzeichnis
2 JUDO Connectivity Modul 1702929 • 2019/02
Inhaltsverzeichnis1 Sicherheit........................................................................................................................21.1 Sicherheitshinweis........................................................................................................... 21.2 Bestimmungsgemäße Verwendung.................................................................................22 Lieferumfang...................................................................................................................23 Zum Einbau zusätzlich notwendig...............................................................................24 Beschreibung der Anschlüsse.....................................................................................35 Einbau in SOFTwell Enthärtungsanlage..................................................................... 36 Einbau in das Warmwasserheizungs-Füllsystem i-fill...............................................57 Bedienung per App....................................................................................................... 78 Entsorgung..................................................................................................................... 89 Kundendienst............................................................................................................... 32
1 Sicherheit
1.1 Sicherheitshinweis
GEFAHRGefahr eines Stromschlags!Der Einbau des Connectivity Moduls darf ausschließlich von Fachhandwerkernvorgenommen werden.Das Gerät vor dem Einbau des Connectivity-Moduls vom Stromnetz trennen.
1.2 Bestimmungsgemäße VerwendungDas Connectivity Modul ist ein nachrüstbares Zubehörteil und ausschließlich bestimmt für • entsprechend nachrüstbare JUDO Enthärtungsanlagen• das Warmwasserheizungs-Füllsystem i-fill.Es ermöglicht die Verbindung der Steuerung des Geräts mit dem Internet über das Heim-netzwerk (Router).
2 Lieferumfang• Connectivity-Modul• Verbindungskabel Gerätesteuerung - Connectivity-Modul• 2 Klett-Klebepads zur Befestigung am Connectivity-Modul• Einbauanleitung
3 Zum Einbau zusätzlich notwendig• LAN-Kabel oder Powerline-Modul zur Verbindung mit dem Heimnetzwerk
Beschreibung der Anschlüsse
1702929 • 2019/02 JUDO Connectivity Modul 3
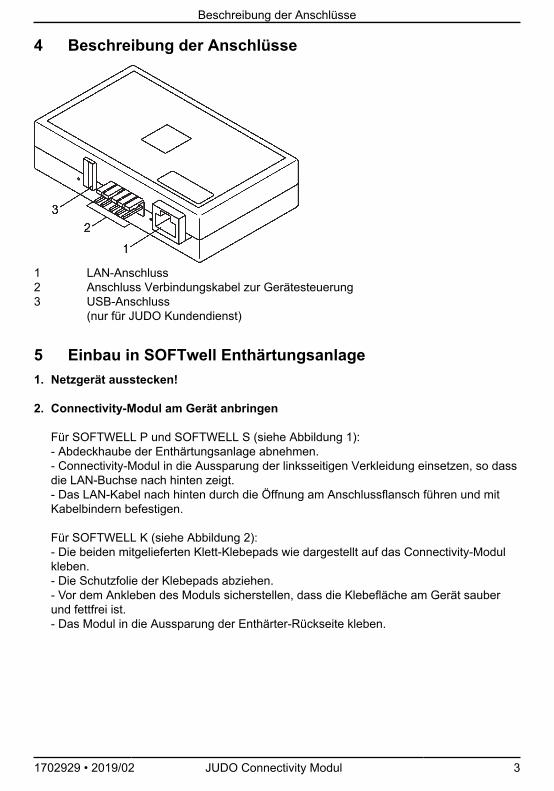
4 Beschreibung der Anschlüsse
1 LAN-Anschluss2 Anschluss Verbindungskabel zur Gerätesteuerung3 USB-Anschluss
(nur für JUDO Kundendienst)
5 Einbau in SOFTwell Enthärtungsanlage1. Netzgerät ausstecken!
2. Connectivity-Modul am Gerät anbringen
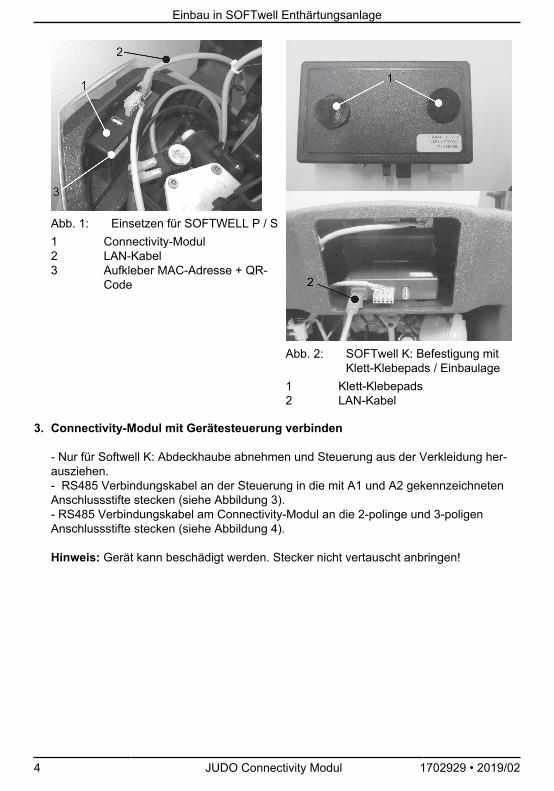
Für SOFTWELL P und SOFTWELL S (siehe Abbildung 1):- Abdeckhaube der Enthärtungsanlage abnehmen.- Connectivity-Modul in die Aussparung der linksseitigen Verkleidung einsetzen, so dassdie LAN-Buchse nach hinten zeigt.- Das LAN-Kabel nach hinten durch die Öffnung am Anschlussflansch führen und mitKabelbindern befestigen.
Für SOFTWELL K (siehe Abbildung 2):- Die beiden mitgelieferten Klett-Klebepads wie dargestellt auf das Connectivity-Modulkleben.- Die Schutzfolie der Klebepads abziehen.- Vor dem Ankleben des Moduls sicherstellen, dass die Klebefläche am Gerät sauberund fettfrei ist.- Das Modul in die Aussparung der Enthärter-Rückseite kleben.
Einbau in SOFTwell Enthärtungsanlage
4 JUDO Connectivity Modul 1702929 • 2019/02
Abb. 1: Einsetzen für SOFTWELL P / S1 Connectivity-Modul2 LAN-Kabel3 Aufkleber MAC-Adresse + QR-
Code
Abb. 2: SOFTwell K: Befestigung mitKlett-Klebepads / Einbaulage
1 Klett-Klebepads2 LAN-Kabel
3. Connectivity-Modul mit Gerätesteuerung verbinden
- Nur für Softwell K: Abdeckhaube abnehmen und Steuerung aus der Verkleidung her-ausziehen.- RS485 Verbindungskabel an der Steuerung in die mit A1 und A2 gekennzeichnetenAnschlussstifte stecken (siehe Abbildung 3).- RS485 Verbindungskabel am Connectivity-Modul an die 2-polinge und 3-poligenAnschlussstifte stecken (siehe Abbildung 4).
Hinweis: Gerät kann beschädigt werden. Stecker nicht vertauscht anbringen!

Einbau in das Warmwasserheizungs-Füllsystem i-fill
1702929 • 2019/02 JUDO Connectivity Modul 5
Abb. 3: Kabelanschluss an Steuerung
1 2-poliger Stecker2 3-poliger Stecker
Abb. 4: Kabelanschluss an Connec-tivity-Modul
1 2-poliger Stecker2 3-poliger Stecker
4. LAN-Kabel anschließen
INFO_NO_HEADERDer Router des Heimnetzwerks muss so konfiguriert sein, dass interne IP-Adres-sen automatisch per DHCP vergeben werden. In der Regel ist dies die werksei-tige Einstellung.
- LAN-Kabel in die LAN-Steckdose des Connectivity-Moduls einstecken (SOFTWELL Pund S siehe Einsetzen für SOFTWELL P / S / SOFTWELL K siehe Abbildung 2).- Nur für SOFTWELL P und S: LAN-Kabel durch die Öffnung am Anschlussflansch füh-ren und mit Kabelbindern befestigen. Abdeckhaube vorsichtig aufsetzen. Keine Kabeleinklemmen!
5. Netzgerät wieder einstecken
Das Connectivity-Modul verbindet sich automatisch mit dem JUDO Server. Zur sicherenDatenübertragung ist die Verbindung TLS-verschlüsselt.
6 Einbau in das Warmwasserheizungs-Füllsystem i-fill1. Netzgerät ausstecken.2. Vordere Isolierschale des i-fill abziehen (siehe Abbildung 5).3. Das LAN- und das Verbindungskabel in das Connectivity-Modul einstecken.4. Beide Stecker des Verbindungskabels in die Anschlüsse A1 und A2 der elektronischen
Steuerung stecken (siehe Abbildung 6).

Einbau in das Warmwasserheizungs-Füllsystem i-fill
6 JUDO Connectivity Modul 1702929 • 2019/02
Abb. 5: Vordere Isolierschale; Fließrich-tung Wasser
Abb. 6: Stecker A1 und A2 an Steue-rung anschließen
5. Das Connectivity-Modul in die Aussparung der vorderen Isolierschale so einsetzen, dassdas LAN-Kabel unter dem Connectivity-Modul verläuft (siehe Abbildung 7).
Abb. 7: Kabel anschließen und unterModul verlegen
1 Entlüftungsschlauch2 Schlauchführung
Abb. 8: Verbindungskabel in den Kabel-binder einsetzen
6. Das LAN-Kabel zusammen mit dem Verbindungskabel unten durch die Öffnung(Schlitze) der vorderen und hinteren Isolierschale führen.
7. Den Kabelbinder öffnen, das Verbindungskabel zu den anderen Leitungen einsetzenund den Kabelbinder wieder schließen (siehe Abbildung 8). Das Kabel so positionieren,dass es den Zusammenbau beider Isolierschalen nicht verhindert.
8. Den Entlüftungsschlauch in den Führungskanal der vorderen Isolierschale einpassen(siehe Abbildung 7) und beide Isolierschalen ohne Kraftaufwand zusammenfügen.
Bedienung per App
1702929 • 2019/02 JUDO Connectivity Modul 7
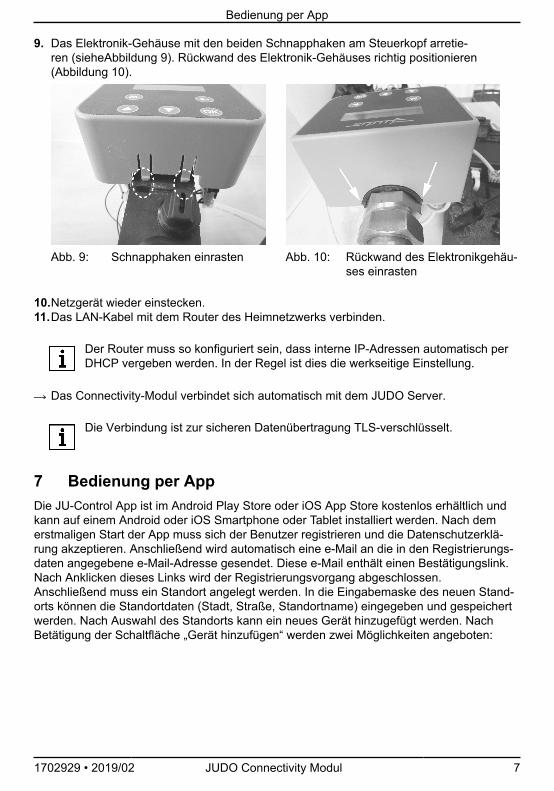
9. Das Elektronik-Gehäuse mit den beiden Schnapphaken am Steuerkopf arretie-ren (sieheAbbildung 9). Rückwand des Elektronik-Gehäuses richtig positionieren(Abbildung 10).
Abb. 9: Schnapphaken einrasten Abb. 10: Rückwand des Elektronikgehäu-ses einrasten
10.Netzgerät wieder einstecken.11.Das LAN-Kabel mit dem Router des Heimnetzwerks verbinden.
INFO_NO_HEADERDer Router muss so konfiguriert sein, dass interne IP-Adressen automatisch perDHCP vergeben werden. In der Regel ist dies die werkseitige Einstellung.
Das Connectivity-Modul verbindet sich automatisch mit dem JUDO Server.
INFO_NO_HEADERDie Verbindung ist zur sicheren Datenübertragung TLS-verschlüsselt.
7 Bedienung per AppDie JU-Control App ist im Android Play Store oder iOS App Store kostenlos erhältlich undkann auf einem Android oder iOS Smartphone oder Tablet installiert werden. Nach demerstmaligen Start der App muss sich der Benutzer registrieren und die Datenschutzerklä-rung akzeptieren. Anschließend wird automatisch eine e-Mail an die in den Registrierungs-daten angegebene e-Mail-Adresse gesendet. Diese e-Mail enthält einen Bestätigungslink.Nach Anklicken dieses Links wird der Registrierungsvorgang abgeschlossen.Anschließend muss ein Standort angelegt werden. In die Eingabemaske des neuen Stand-orts können die Standortdaten (Stadt, Straße, Standortname) eingegeben und gespeichertwerden. Nach Auswahl des Standorts kann ein neues Gerät hinzugefügt werden. NachBetätigung der Schaltfläche „Gerät hinzufügen“ werden zwei Möglichkeiten angeboten:
Entsorgung
8 JUDO Connectivity Modul 1702929 • 2019/02
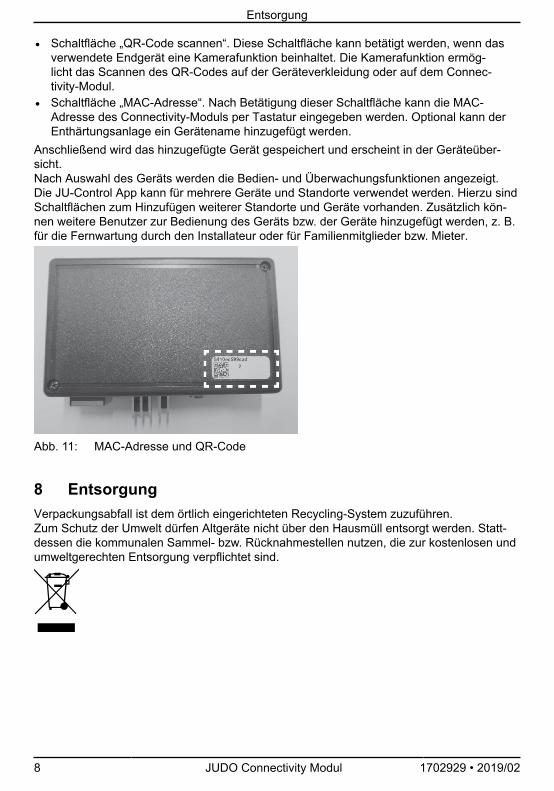
• Schaltfläche „QR-Code scannen“. Diese Schaltfläche kann betätigt werden, wenn dasverwendete Endgerät eine Kamerafunktion beinhaltet. Die Kamerafunktion ermög-licht das Scannen des QR-Codes auf der Geräteverkleidung oder auf dem Connec-tivity-Modul.
• Schaltfläche „MAC-Adresse“. Nach Betätigung dieser Schaltfläche kann die MAC-Adresse des Connectivity-Moduls per Tastatur eingegeben werden. Optional kann derEnthärtungsanlage ein Gerätename hinzugefügt werden.
Anschließend wird das hinzugefügte Gerät gespeichert und erscheint in der Geräteüber-sicht.Nach Auswahl des Geräts werden die Bedien- und Überwachungsfunktionen angezeigt.Die JU-Control App kann für mehrere Geräte und Standorte verwendet werden. Hierzu sindSchaltflächen zum Hinzufügen weiterer Standorte und Geräte vorhanden. Zusätzlich kön-nen weitere Benutzer zur Bedienung des Geräts bzw. der Geräte hinzugefügt werden, z. B.für die Fernwartung durch den Installateur oder für Familienmitglieder bzw. Mieter.
Abb. 11: MAC-Adresse und QR-Code
8 EntsorgungVerpackungsabfall ist dem örtlich eingerichteten Recycling-System zuzuführen.Zum Schutz der Umwelt dürfen Altgeräte nicht über den Hausmüll entsorgt werden. Statt-dessen die kommunalen Sammel- bzw. Rücknahmestellen nutzen, die zur kostenlosen undumweltgerechten Entsorgung verpflichtet sind.
Contents
1702929 • 2019/02 JUDO Connectivity Modul 9
Contents1 Safety...............................................................................................................................91.1 Safety instructions........................................................................................................... 91.2 Intended use.................................................................................................................... 92 Scope of supply.............................................................................................................93 Additionally needed for installation............................................................................ 94 Ports.............................................................................................................................. 105 Installation in water softener SOFTwell.................................................................... 106 Installation in the i-fill filling system for heating circuits........................................127 Operation via app........................................................................................................ 148 Disposal........................................................................................................................ 15
1 Safety
1.1 Safety instructions
DANGERDanger of electric shock!The connectivity module may only be installed by qualified technical person-nel.Disconnect the device from the mains before installing the connectivity mod-ule.
1.2 Intended useThe connectivity module is a retrofittable accessory and is exclusively destined for• appropriate retrofittable JUDO water softeners• i-fill filling system for hot water heatings.It allows connection of the control unit of the device to the internet via the home network(router).
2 Scope of supply• Connectivity-Modul• Cable for connecting control of appliance to connectivity module• 2 hook-and-loop adhesive pads to stick to the connectivity module• Installation instructions
3 Additionally needed for installation• LAN-cable or powerline adapter to connect to the home network
Ports
10 JUDO Connectivity Modul 1702929 • 2019/02
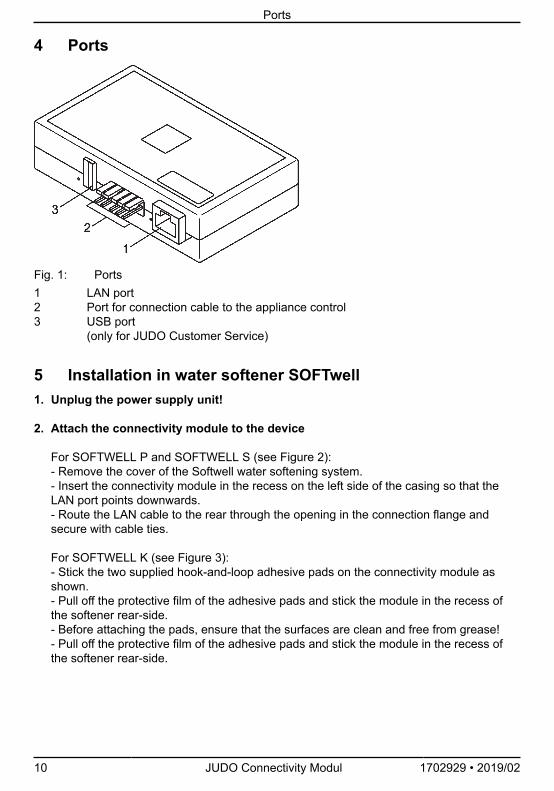
4 Ports
Fig. 1: Ports1 LAN port2 Port for connection cable to the appliance control3 USB port
(only for JUDO Customer Service)
5 Installation in water softener SOFTwell1. Unplug the power supply unit!
2. Attach the connectivity module to the device
For SOFTWELL P and SOFTWELL S (see Figure 2):- Remove the cover of the Softwell water softening system.- Insert the connectivity module in the recess on the left side of the casing so that theLAN port points downwards.- Route the LAN cable to the rear through the opening in the connection flange andsecure with cable ties.
For SOFTWELL K (see Figure 3):- Stick the two supplied hook-and-loop adhesive pads on the connectivity module asshown.- Pull off the protective film of the adhesive pads and stick the module in the recess ofthe softener rear-side.- Before attaching the pads, ensure that the surfaces are clean and free from grease!- Pull off the protective film of the adhesive pads and stick the module in the recess ofthe softener rear-side.
Installation in water softener SOFTwell
1702929 • 2019/02 JUDO Connectivity Modul 11
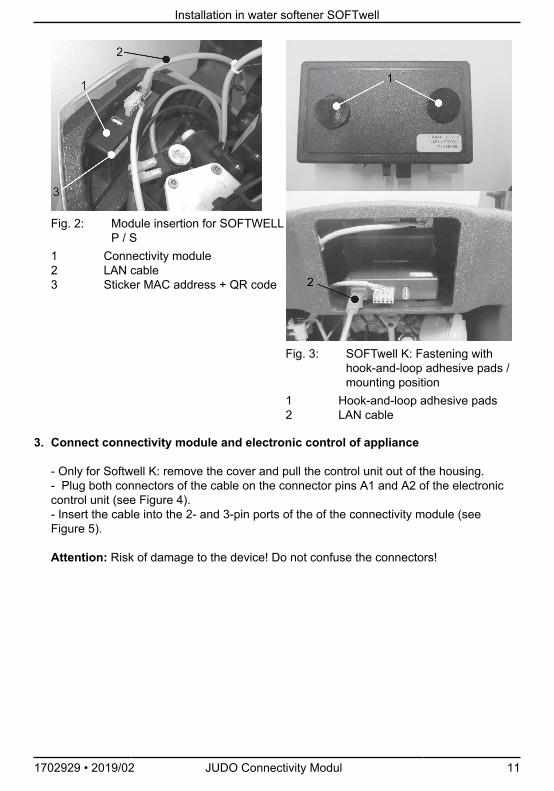
Fig. 2: Module insertion for SOFTWELLP / S
1 Connectivity module2 LAN cable3 Sticker MAC address + QR code
Fig. 3: SOFTwell K: Fastening withhook-and-loop adhesive pads /mounting position
1 Hook-and-loop adhesive pads2 LAN cable
3. Connect connectivity module and electronic control of appliance
- Only for Softwell K: remove the cover and pull the control unit out of the housing.- Plug both connectors of the cable on the connector pins A1 and A2 of the electroniccontrol unit (see Figure 4).- Insert the cable into the 2- and 3-pin ports of the of the connectivity module (seeFigure 5).
Attention: Risk of damage to the device! Do not confuse the connectors!

Installation in the i-fill filling system for heating circuits
12 JUDO Connectivity Modul 1702929 • 2019/02
Fig. 4: Cable connection at the controlunit
1 2-pin connector2 3-pin connector
Fig. 5: Cable connection at the connec-tivity module
1 2-pin connector2 3-pin connector
4. Connect LAN-cable
INFO_NO_HEADERThe home network router must be configured so that internal IP addresses areautomatically allocated via DHCP. In general this is the factory setting.
° Plug the LAN cable into the LAN port of the connectivity module (see Module inser-tion for SOFTWELL P / S X for SOFTwell P and S; see SOFTwell K: Fastening withhook-and-loop adhesive pads / mounting position for SOFTwell K).
° Only for SOFTwell P and S: Route the LAN cable to the rear through the opening inthe connection flange and secure with cable ties. Carefully position the cover. Do notclamp any cables!
5. Plug in the power supply unit again
The connectivity module connects automatically to the JUDO server. The connection isTLS-encrypted to ensure secure data transfer.
6 Installation in the i-fill filling system for heating circuits1. Unplug the power supply unit.2. Pull off the front insulation shell of the i-fill (see Figure 6).3. Insert the LAN and the connection cable into the connectivity module.4. Insert both plugs of the connection cable into the ports A1 and A2 of the electronic con-
trol unit (see Figure 7).

Installation in the i-fill filling system for heating circuits
1702929 • 2019/02 JUDO Connectivity Modul 13
Fig. 6: Front insulation shell; water flowdirection
Fig. 7: Insert plugs A1 und A2 into portsof control unit
5. Insert the connectivity module into the recess of the front insulation shell so that the LANcable runs under the connectivity module (see Figure 8).
Fig. 8: Connect cable and lay it underthe module
1 Bleeding hose2 Hose routing
Fig. 9: Insert cable into cable tie
6. Route the LAN cable together with the 24 V DC cable underneath through the opening(slot) of the front and rear insulation shell.
7. Open the cable tie, use the connection cable for the other cables and then close thecable tie again (see Figure 9). Position the cable so that the assembly does not inhibitboth insulation shells.
8. Fit the bleeding hose into the guide duct of the front insulation shell (siehe Figure 8) andjoin both shells without the use of force.

Operation via app
14 JUDO Connectivity Modul 1702929 • 2019/02
9. Lock the electronic housing with the two snap-fits on the control head (see Figure 10).Position the rear wall of the electronic housing correctly (see Figure 11).
Fig. 10: Lock into place place snap-fits Fig. 11: Lock into place rear wall of elec-tronic housing
10.Plug the power supply unit in.11.Connect the LAN cable of the system to the router.
INFO_NO_HEADERThe home network router must be configured so that internal IP addresses areautomatically allocated via DHCP. In general this is the factory setting.
The connectivity module connects automatically to the JUDO server.
INFO_NO_HEADERThe connection is TLS-encrypted to ensure secure data transfer.
7 Operation via appThe JU-Control App is available for free from the Android Play Store or iOS App Store andcan be installed on an Android or iOS smartphone or tablet. Upon first starting of the app,the user must register and accept the data protection declaration. Then an email is auto-matically sent to the email address in the registration data. This email contains a confirma-tion link. Clicking this link completes the registration process.Then a location must be created. Location data (town, street, location name) can beentered and saved in the input form of the new location. After selecting the location, a newdevice can be added. After confirmation of the button ‘Add device’, two options are offered:• Button ‘Scan QR-code’. This button can be pressed if the device used has a camera
function. The camera function enables scanning of the QR code on the device casing oron the connectivity module.
• Button ‘MAC address’ After pressing this button, the connectivity module MAC addresscan be entered via the keypad. Optionally a device name can be added for the watersoftening system.
Then the added device is saved and appears in the device overview.After device selection the operating and monitoring functions are displayed.
Disposal
1702929 • 2019/02 JUDO Connectivity Modul 15
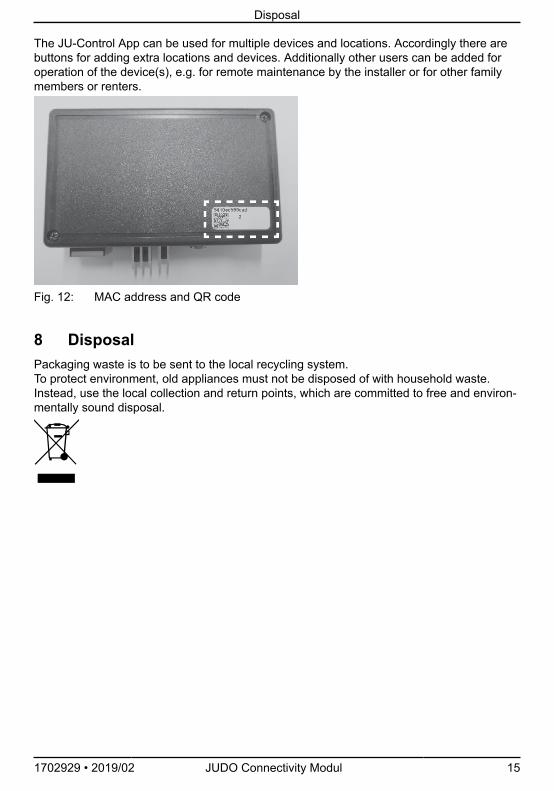
The JU-Control App can be used for multiple devices and locations. Accordingly there arebuttons for adding extra locations and devices. Additionally other users can be added foroperation of the device(s), e.g. for remote maintenance by the installer or for other familymembers or renters.
Fig. 12: MAC address and QR code
8 DisposalPackaging waste is to be sent to the local recycling system.To protect environment, old appliances must not be disposed of with household waste.Instead, use the local collection and return points, which are committed to free and environ-mentally sound disposal.

Table des matières
16 JUDO Connectivity Modul 1702929 • 2019/02
Table des matières1 Sécurité......................................................................................................................... 161.1 Consignes de sécurité...................................................................................................161.2 Utilisation conforme....................................................................................................... 162 Contenu de la livraison...............................................................................................163 En plus nécessaire pour l'installation.......................................................................174 Ports.............................................................................................................................. 175 Montage à la station d'adoucissement SOFTwell.................................................... 176 Montage dans le système de remplissage i-fill........................................................197 Opération via appli...................................................................................................... 218 Mise au rebut............................................................................................................... 22
1 Sécurité
1.1 Consignes de sécurité
DANGERDanger d’électrocution !L’installation de l’appareil est strictement réservée aux artisans spécialisés etqualifiés.Avant d'installer le module de connectivité, débrancher le bloc d’alimentationde la prise !
1.2 Utilisation conformeLe module de connectivité est un accessoire complémentaire qui est exclusivement destinépour• les adoucisseur d'eau JUDO adaptables• le système de remplissage intelligent i-fill pour des circuits de chauffage à eau chaud.Il permet la connexion de la commande de l'appareil à l'Internet via le réseau domestique(router).
2 Contenu de la livraison• Module de connectivité• Câble de connexion entre commande électronique et module de connectivité• 2 tampons adhésifs auto-agrippants pour coller sur le module de connectivité• Instructions de montage

En plus nécessaire pour l'installation
1702929 • 2019/02 JUDO Connectivity Modul 17
3 En plus nécessaire pour l'installation• Câble LAN ou module CPL pour la connexion au réseau domestique
4 Ports
Fig. 1: Ports1 Port LAN2 Port pour câble de connexion à la commande de l'appareil3 Port USB
(seulement pour JUDO service clientèle)
5 Montage à la station d'adoucissement SOFTwell1. Débrancher le bloc d’alimentation !
2. Attacher le module de connectivité à l'appareil
Pour SOFTWELL P et SOFTWELL S (Figure 2):- Retirer le capot de la station d'adoucissement SOFTwell.- Insérer le module de connectivité dans l’évidement de l’habillage sur le côté gauche enveillant à ce que le port LAN pointe vers l’arrière.- Faire passer le câble LAN vers l’arrière à travers l’orifice sur la bride de raccordementpuis le fixer à l’aide d’attache-câbles.
Pour SOFTWELL K (Figure 3):- Coller les deux tampons adhésifs auto-agrippants fournis comme représenté sur lemodule de connectivité.- Décoller le film protecteur des tampons adhésifs.- Avant d’appliquer les tampons, s’assurer que les surfaces sont propres et exemptes degraisse.- Coller le module dans l’évidement sur la face arrière de l’adoucisseur.

Montage à la station d'adoucissement SOFTwell
18 JUDO Connectivity Modul 1702929 • 2019/02
Fig. 2: Mise en place du module pourSOFTwell P / S
1 Module de connectivité2 Câble LAN3 Etiquette adresse MAC + Code
QR
Fig. 3: SOFTwell K: Fixation à l’aide detampons adhésifs auto-agrip-pants / position de montage
1 Tampons adhésifs auto-agrip-pants
2 Câble LAN
3. Brancher le module de connectivité à la commande de la station d'adoucissement
- Seulement pour SOFTwell K: Retirer le capot et sortir la commande de l’habillage en latirant.- Emboîter le câble dans les broches de raccordement A1 et A2 sur la commande(Figure 4).- Sur le module de connectivité, emboîter le câble sur les broches de raccordement à 2et 3 pôles (Figure 5).
Attention: Danger de détérioration de l’appareil ! Ne pas permuter les fiches !

Montage dans le système de remplissage i-fill
1702929 • 2019/02 JUDO Connectivity Modul 19
Fig. 4: Raccordement filaire à la com-mande
1 Fiche à 2 pôles2 Fiche à 3 pôles
Fig. 5: Raccordement filaire au modulede connectivité
1 Fiche à 2 pôles2 Fiche à 3 pôles
4. Raccordement du câble LAN
INFO_NO_HEADERLe routeur du réseau domestique doit être configuré en veillant à ce que lesadresses IP internes soient automatiquement attribuées via DHCP. En général, ils’agit du réglage en usine.
- Emboîter le câble LAN dans la prise LAN du module de connectivité (cf. Figure 2 pourSOFTwell P et SOFTwell S / cf. Figure 3 pour SOFTWELL K).- Pour SOFTwell P et SOFTwell S: Faire passer le câble LAN vers l’arrière à traversl’orifice sur la bride de raccordement puis le fixer à l’aide d’attache-câbles. Remettre enplace le capot avec précaution. Ne pas coincer les câbles !
5. Rebrancher le bloc d'alimentation
Le module de connectivité se connecte automatiquement au serveur JUDO. Afin degarantir une transmission des données sécurisée, la connexion est cryptée avec le pro-tocole TLS.
6 Montage dans le système de remplissage i-fill1. Débrancher le bloc d’alimentation.2. Retirer la coque isolante avant du système i-fill (Figure 6).3. Brancher le câble LAN et le câble de connexion dans le module de connectivité.4. Brancher les deux fiches du câble de connexion dans les raccords A1 et A2 de la com-
mande électronique (Figure 7).
Montage dans le système de remplissage i-fill
20 JUDO Connectivity Modul 1702929 • 2019/02
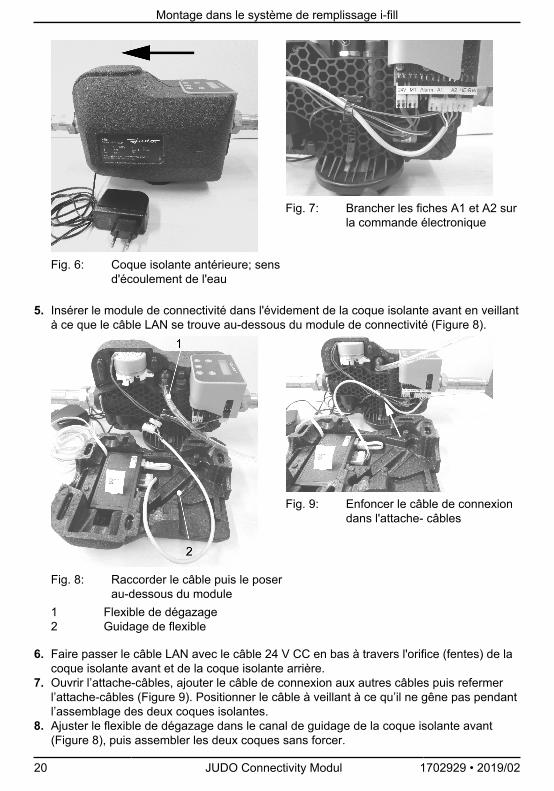
Fig. 6: Coque isolante antérieure; sensd'écoulement de l'eau
Fig. 7: Brancher les fiches A1 et A2 surla commande électronique
5. Insérer le module de connectivité dans l'évidement de la coque isolante avant en veillantà ce que le câble LAN se trouve au-dessous du module de connectivité (Figure 8).
Fig. 8: Raccorder le câble puis le poserau-dessous du module
1 Flexible de dégazage2 Guidage de flexible
Fig. 9: Enfoncer le câble de connexiondans l'attache- câbles
6. Faire passer le câble LAN avec le câble 24 V CC en bas à travers l'orifice (fentes) de lacoque isolante avant et de la coque isolante arrière.
7. Ouvrir l’attache-câbles, ajouter le câble de connexion aux autres câbles puis refermerl’attache-câbles (Figure 9). Positionner le câble à veillant à ce qu’il ne gêne pas pendantl’assemblage des deux coques isolantes.
8. Ajuster le flexible de dégazage dans le canal de guidage de la coque isolante avant(Figure 8), puis assembler les deux coques sans forcer.

Opération via appli
1702929 • 2019/02 JUDO Connectivity Modul 21
9. Bloquer le boîtier électronique avec les deux crans d'arrêt sur la tête de commande(Figure 10). Correctement positionner la paroi arrière du boîtier (Figure 11).
Fig. 10: Enclencher les crans d'arrêt Fig. 11: Enclencher la paroi arrière duboîtier électronique
10.Rebrancher le bloc d'alimentation.11.Raccorder le câble LAN de l'installation au routeur.
INFO_NO_HEADERLe routeur du réseau domestique doit être configuré en veillant à ce que lesadresses IP internes soient automatiquement attribuées via DHCP. En général, ils’agit du réglage en usine.
Le module de connectivité se connecte automatiquement au serveur JUDO.
INFO_NO_HEADERAfin de garantir une transmission des données sécurisée, la connexion est cryp-tée avec le protocole TLS.
7 Opération via appliL’appli JU-Control App est gratuitement disponible dans le Play Store (Android) ou AppStore (iOS) et peut être installée sur un smartphone ou une tablette Android ou iOS. Aprèsle premier démarrage de l’appli, l’utilisateur doit s’inscrire et accepter la déclaration deprotection des données. Un courrier électronique est ensuite automatiquement envoyé àl’adresse e-mail renseignée pendant l’inscription. Ce courrier électronique contient un liende confirmation. Cliquer sur ce lien pour compléter l’inscription.Un site doit ensuite être créé. Les paramètres du site (ville, rue, nom du site) peuvent êtresaisis et enregistrés dans le masque de saisie du nouveau site. Après la sélection du site, ilest possible d’ajouter un nouvel appareil. Après une pression sur le bouton « Ajouter appa-reil », deux méthodes sont disponibles :• Bouton « Scanner code QR ». Appuyer sur ce bouton lorsque le périphérique employé
est équipé d’un appareil photo. L’appareil photo permet de scanner le code QR sur l’ha-billage de l’appareil ou sur le module de connectivité.
• Bouton « Adresse MAC ». Après une pression sur ce bouton, il est possible de saisirl’adresse MAC du module de connectivité sur le clavier. En option, il est possible d’ajou-ter un nom d’appareil pour la station d’adoucissement.
Mise au rebut
22 JUDO Connectivity Modul 1702929 • 2019/02
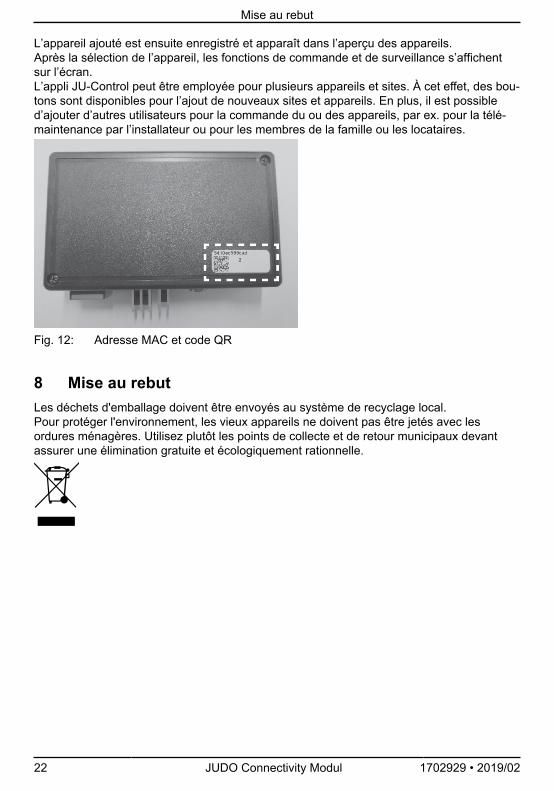
L’appareil ajouté est ensuite enregistré et apparaît dans l’aperçu des appareils.Après la sélection de l’appareil, les fonctions de commande et de surveillance s’affichentsur l’écran.L’appli JU-Control peut être employée pour plusieurs appareils et sites. À cet effet, des bou-tons sont disponibles pour l’ajout de nouveaux sites et appareils. En plus, il est possibled’ajouter d’autres utilisateurs pour la commande du ou des appareils, par ex. pour la télé-maintenance par l’installateur ou pour les membres de la famille ou les locataires.
Fig. 12: Adresse MAC et code QR
8 Mise au rebutLes déchets d'emballage doivent être envoyés au système de recyclage local.Pour protéger l'environnement, les vieux appareils ne doivent pas être jetés avec lesordures ménagères. Utilisez plutôt les points de collecte et de retour municipaux devantassurer une élimination gratuite et écologiquement rationnelle.
Inhoudsopgave
1702929 • 2019/02 JUDO Connectivity Modul 23
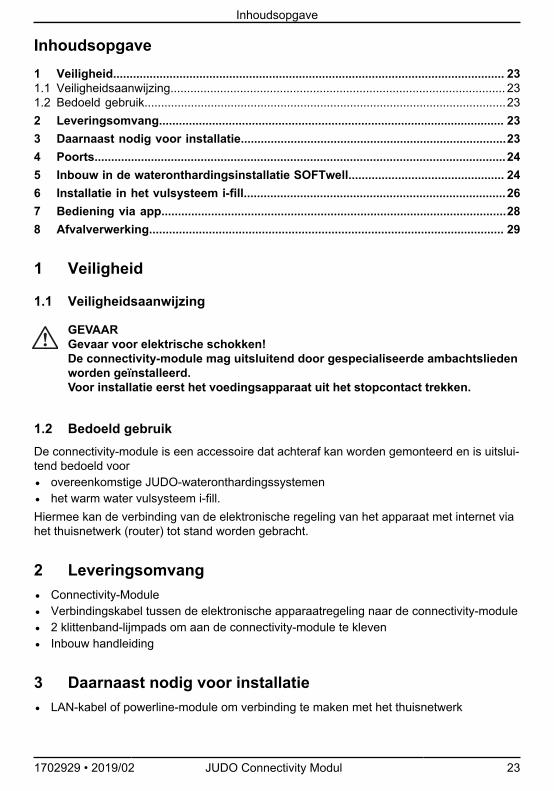
Inhoudsopgave1 Veiligheid...................................................................................................................... 231.1 Veiligheidsaanwijzing..................................................................................................... 231.2 Bedoeld gebruik.............................................................................................................232 Leveringsomvang........................................................................................................ 233 Daarnaast nodig voor installatie................................................................................234 Poorts............................................................................................................................245 Inbouw in de wateronthardingsinstallatie SOFTwell............................................... 246 Installatie in het vulsysteem i-fill...............................................................................267 Bediening via app........................................................................................................288 Afvalverwerking........................................................................................................... 29
1 Veiligheid
1.1 Veiligheidsaanwijzing
GEVAARGevaar voor elektrische schokken!De connectivity-module mag uitsluitend door gespecialiseerde ambachtsliedenworden geïnstalleerd.Voor installatie eerst het voedingsapparaat uit het stopcontact trekken.
1.2 Bedoeld gebruikDe connectivity-module is een accessoire dat achteraf kan worden gemonteerd en is uitslui-tend bedoeld voor • overeenkomstige JUDO-wateronthardingssystemen• het warm water vulsysteem i-fill.Hiermee kan de verbinding van de elektronische regeling van het apparaat met internet viahet thuisnetwerk (router) tot stand worden gebracht.
2 Leveringsomvang• Connectivity-Module• Verbindingskabel tussen de elektronische apparaatregeling naar de connectivity-module• 2 klittenband-lijmpads om aan de connectivity-module te kleven• Inbouw handleiding
3 Daarnaast nodig voor installatie• LAN-kabel of powerline-module om verbinding te maken met het thuisnetwerk

Poorts
24 JUDO Connectivity Modul 1702929 • 2019/02
4 Poorts
1 LAN-poort2 Poort verbindingskabel voor apparaatcontrole3 USB-poort
(alleen voor JUDO servicedienst)
5 Inbouw in de wateronthardingsinstallatie SOFTwell1. Voedingsapparaat uittrekken!
2. Connectiviteitsmodule aan het apparaat aanbrengen
Voor SOFTWELL P en SOFTWELL S (zie Afbeelding 1):- Afdekkap van de wateronthardingsinstallatie afnemen.- De connectivity-module in de uitsparing van de linker bekleding plaatsen, zodat deLANbus naar achteren wijst.- De LAN-kabel naar achteren door de opening op de aansluitflens leiden en met kabel-binders bevestigen.
Für SOFTWELL K (zie Afbeelding 2):- De beide meegeleverde klittenband-lijmpads zoals weergegeven op het connecti-vity-module plakken.- De beschermfolie van de lijmpad aftrekken.- Voor het aanbrengen van de pads ervoor zorgen dat oppervlakken schoon en vetvrijzijn.- De module in de uitsparing de ontharder-achterzijde plakken.

Inbouw in de wateronthardingsinstallatie SOFTwell
1702929 • 2019/02 JUDO Connectivity Modul 25
Afb. 1: Plaatsen module voor SOFT-WELL P / S
1 Connectivity-module2 LAN-kabel3 Sticker MAC-adres + QR-code
Afb. 2: SOFTwell K: Bevestiging metklittenband- lijmpads / inbouwpo-sitie
1 Klittenband-lijmpads2 LAN-kabel
3. Connectivity-Module met de elektronische regeling van de wateronthardingsin-stallatie verbinden
- Alleen voor Softwell K: Afdekkap verwijderen en elektronische regeling uit bekledingtrekken.- Aan de regeling de kabel in de met A1 en A2 gemarkeerde aansluitstift steken (zieAfbeelding 3).- Op de connectivity-module de kabel op de 2-polige en 3-polige aansluitstift steken(siehe Afbeelding 4).
Opmerking: Gevaar voor beschadiging van het apparaat. Stekkers niet verwisseld aan-sluiten!

Installatie in het vulsysteem i-fill
26 JUDO Connectivity Modul 1702929 • 2019/02
Afb. 3: Kabelaansluiting aan elektroni-sche regeling
1 2-polige stekker2 3-polige stekker
Afb. 4: Kabelaansluiting aan connecti-vity-module
1 2-polige stekker2 3-polige stekker
4. Aansluiting en montage van de LAN-kabelINFO_NO_HEADERDe router van het thuisnetwerk moet zo geconfigureerd zijn, dat interne IP-adres-sen automatisch per DHCP toegewezen worden. In de regel is dit de fabrieksma-tige instelling.
- LAN-kabel in het LAN-stopcontact van de connectivity-module steken (SOFTWELL Pund S zie Afbeelding 1 / SOFTWELL K zie Afbeelding 2).- Alleen voor SOFTWELL P en S: LAN-kabel naar achteren door de opening op de aan-sluitflens leiden en met kabelbinders bevestigen. Afdekkap voorzichtig plaatsen. Geenkabel inklemmen!
5. Voedingsapparaat weer insteken
De connectivity-module verbindt zich automatisch met de JUDO server. De verbinding isvoor veilige gegevensoverdracht TLS-versleuteld.
6 Installatie in het vulsysteem i-fill1. Netdeel uit contactdoos trekken.2. Verwijder de voorste isolatieschaal van de i-fill (Afbeelding 5).3. Steek de LAN- en verbindingskabel in de Connectivity-module.4. Steek beide stekkers van de verbindingskabel in de aansluitingen A1 en A2 van de elek-
tronische regeling (Afbeelding 6).

Installatie in het vulsysteem i-fill
1702929 • 2019/02 JUDO Connectivity Modul 27
Afb. 5: Voorste isolatieschaal; stro-mingsrichting water
Afb. 6: Sluit de stekkers A1 en A2 aanop de elektronische regeling
5. Plaats de Connectivity-module zo in de uitsparing van de voorste isolatieschaal (afb. 6)dat de LAN-kabel onder de Connectivity-module loopt (Afbeelding 7).
Afb. 7: Sluit de kabel aan op de Con-nectivitymodule en leg dezeonder de module
1 Ventilatieslang2 Slanggeleiding
Afb. 8: Plaats de verbindingskabel in dekabelbinder
6. Breng de LAN-kabel samen met de 24VDC-kabel onderaan door de opening (spleet)van de voorste en achterste isolatieschaal.
7. Open de kabelbinder, plaats de verbindingskabel naar de andere leidingen en sluit dekabelbinder weer (Afbeelding 8). Positioneer de kabel zo dat de montage van beide iso-latieschalen niet belemmerd wordt.
Bediening via app
28 JUDO Connectivity Modul 1702929 • 2019/02
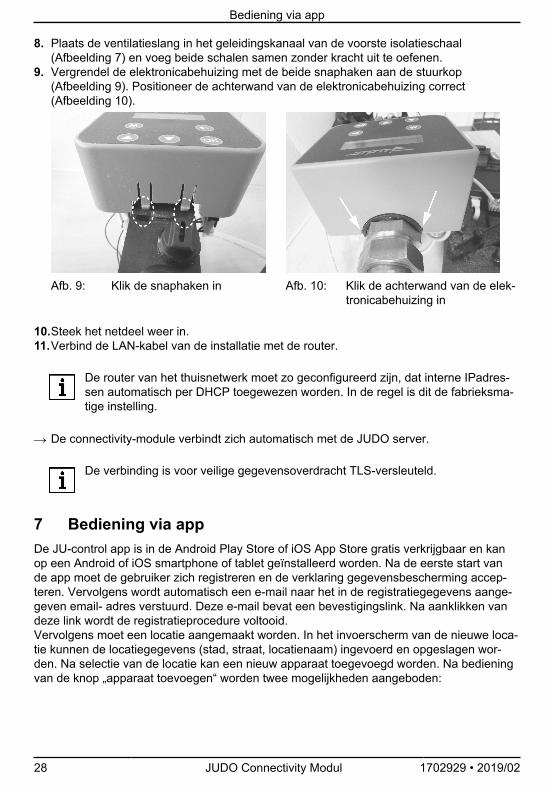
8. Plaats de ventilatieslang in het geleidingskanaal van de voorste isolatieschaal(Afbeelding 7) en voeg beide schalen samen zonder kracht uit te oefenen.
9. Vergrendel de elektronicabehuizing met de beide snaphaken aan de stuurkop(Afbeelding 9). Positioneer de achterwand van de elektronicabehuizing correct(Afbeelding 10).
Afb. 9: Klik de snaphaken in Afb. 10: Klik de achterwand van de elek-tronicabehuizing in
10.Steek het netdeel weer in.11.Verbind de LAN-kabel van de installatie met de router.
INFO_NO_HEADERDe router van het thuisnetwerk moet zo geconfigureerd zijn, dat interne IPadres-sen automatisch per DHCP toegewezen worden. In de regel is dit de fabrieksma-tige instelling.
De connectivity-module verbindt zich automatisch met de JUDO server.
INFO_NO_HEADERDe verbinding is voor veilige gegevensoverdracht TLS-versleuteld.
7 Bediening via appDe JU-control app is in de Android Play Store of iOS App Store gratis verkrijgbaar en kanop een Android of iOS smartphone of tablet geïnstalleerd worden. Na de eerste start vande app moet de gebruiker zich registreren en de verklaring gegevensbescherming accep-teren. Vervolgens wordt automatisch een e-mail naar het in de registratiegegevens aange-geven email- adres verstuurd. Deze e-mail bevat een bevestigingslink. Na aanklikken vandeze link wordt de registratieprocedure voltooid.Vervolgens moet een locatie aangemaakt worden. In het invoerscherm van de nieuwe loca-tie kunnen de locatiegegevens (stad, straat, locatienaam) ingevoerd en opgeslagen wor-den. Na selectie van de locatie kan een nieuw apparaat toegevoegd worden. Na bedieningvan de knop „apparaat toevoegen“ worden twee mogelijkheden aangeboden:

Afvalverwerking
1702929 • 2019/02 JUDO Connectivity Modul 29
• Knop „QR-code scannen“. Deze knop kan bediend worden, wanneer het gebruikte eind-apparaat een camerafunctie bevat. De camerafunctie maakt het mogelijk het scannenvan de QR-code op de apparaatbekleding of op de connectivity-module.
• Knop „MAC-adres“. Na activering van deze knop kan het MAC-adres van de connec-tivity- module per toetsenbord ingevoerd worden. Optioneel kan aan de wateronthar-dingsinstallatie een apparaatnaam toegevoegd worden.
Vervolgens wordt het toegevoegde apparaat opgeslagen en verschijnt in het apparaten-overzicht.Na selectie van het apparaat worden de bedien- en bewakingsfuncties weergegeven.De JU-control app kan voor meerdere apparaten en locaties gebruikt worden. Hiervoorzijn knoppen voor het toevoegen van verdere vestigingen en apparaten aanwezig. Aanvul-lend kunnen meer gebruikers voor de bediening van de apparaat resp. de apparaten toege-voegd worden, bijv. voor de onderhoud op afstand door de installateur of voor familieledenresp. huurders.
Afb. 11: MAC-adres en QR-code
8 AfvalverwerkingHet verpakkingsafval moet naar de lokale afvalverwerkings eenheid worden gebracht.Om het milieu te beschermen, mogen oude apparaten niet worden weggegooid met hethuishoudelijk afval. Maak gebruik van de lokale inzamel- en inleverpunten, die zich inzettenvoor gratis en milieuverantwoorde afvalverwerking.
Notizen
30 JUDO Connectivity Modul 1702929 • 2019/02
Notizen
1702929 • 2019/02 JUDO Connectivity Modul 31
Kundendienst
32 JUDO Connectivity Modul 1702929 • 2019/02
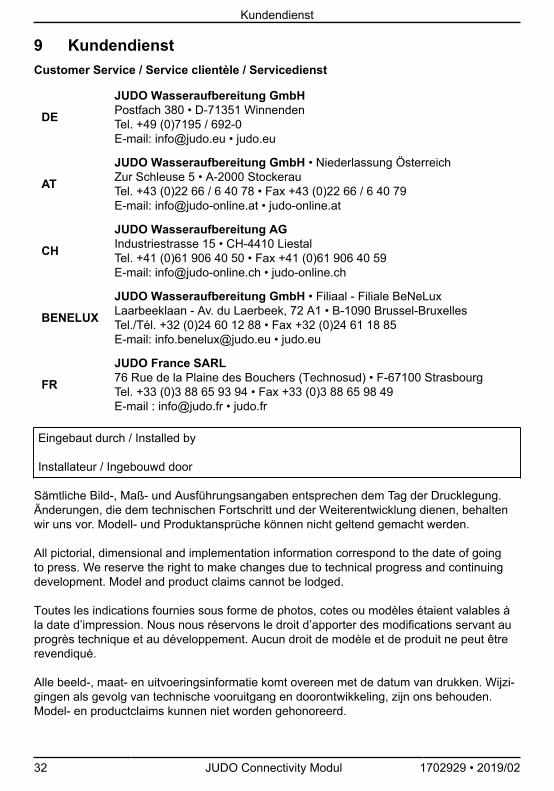
9 KundendienstCustomer Service / Service clientèle / Servicedienst
DE
JUDO Wasseraufbereitung GmbHPostfach 380 • D-71351 WinnendenTel. +49 (0)7195 / 692-0E-mail: [email protected] • judo.eu
AT
JUDO Wasseraufbereitung GmbH • Niederlassung ÖsterreichZur Schleuse 5 • A-2000 StockerauTel. +43 (0)22 66 / 6 40 78 • Fax +43 (0)22 66 / 6 40 79E-mail: [email protected] • judo-online.at
CH
JUDO Wasseraufbereitung AGIndustriestrasse 15 • CH-4410 LiestalTel. +41 (0)61 906 40 50 • Fax +41 (0)61 906 40 59E-mail: [email protected] • judo-online.ch
BENELUX
JUDO Wasseraufbereitung GmbH • Filiaal - Filiale BeNeLuxLaarbeeklaan - Av. du Laerbeek, 72 A1 • B-1090 Brussel-BruxellesTel./Tél. +32 (0)24 60 12 88 • Fax +32 (0)24 61 18 85E-mail: [email protected] • judo.eu
FR
JUDO France SARL76 Rue de la Plaine des Bouchers (Technosud) • F-67100 StrasbourgTel. +33 (0)3 88 65 93 94 • Fax +33 (0)3 88 65 98 49E-mail : [email protected] • judo.fr
Eingebaut durch / Installed by
Installateur / Ingebouwd door
Sämtliche Bild-, Maß- und Ausführungsangaben entsprechen dem Tag der Drucklegung.Änderungen, die dem technischen Fortschritt und der Weiterentwicklung dienen, behaltenwir uns vor. Modell- und Produktansprüche können nicht geltend gemacht werden.
All pictorial, dimensional and implementation information correspond to the date of goingto press. We reserve the right to make changes due to technical progress and continuingdevelopment. Model and product claims cannot be lodged.
Toutes les indications fournies sous forme de photos, cotes ou modèles étaient valables àla date d’impression. Nous nous réservons le droit d’apporter des modifications servant auprogrès technique et au développement. Aucun droit de modèle et de produit ne peut êtrerevendiqué.
Alle beeld-, maat- en uitvoeringsinformatie komt overeen met de datum van drukken. Wijzi-gingen als gevolg van technische vooruitgang en doorontwikkeling, zijn ons behouden.Model- en productclaims kunnen niet worden gehonoreerd.