UX-CC500U Operation Manual - PDF.TEXTFILES.COMpdf.textfiles.com/manuals/FAXMACHINES/Sharp UX-CC500...
139
MODEL UX-CC500 FACSIMILE OPERATION MANUAL 1. Installation 2. Using the Cordless Handset 3. Using the Answering System 4. Sending Faxes 5. Receiving Faxes 6. Making Copies 7. Special Functions 8. Printing Lists 9. Maintenance 10. Troubleshooting SharpPlace congratulations on the purchase of your new Sharp Product! For your convenience, Genuine Sharp Supplies, Accessories, and additional Sharp Products can be purchased from the Authorized Sharp Reseller where you purchased your product or on-line at: www.SharpPlace.com visit SharpPlace to enter periodic contests and drawings! 2002 Sharp Electronics Corporation Design and specifications are subject to change without notice. To ensure Sharp quality, look for the Sharp Genuine Supplies Logo on Your business products. We provide a full line of supplies that are designed and tested to maximize the life and performance of all Sharp products. FROM SHARP MINDS COME SHARP PRODUCTS TM C
Transcript of UX-CC500U Operation Manual - PDF.TEXTFILES.COMpdf.textfiles.com/manuals/FAXMACHINES/Sharp UX-CC500...
MODEL
UX-CC500
FACSIMILEOPERATION MANUAL
1. Installation 2. Using the Cordless Handset 3. Using the Answering System 4. Sending Faxes 5. Receiving Faxes 6. Making Copies 7. Special Functions 8. Printing Lists 9. Maintenance10. Troubleshooting
UX
-CC
500 F
AC
SIM
ILE
SharpPlace
congratulations on the purchase of your new Sharp Product!
For your convenience, Genuine Sharp Supplies, Accessories, andadditional Sharp Products can be purchased from the Authorized SharpReseller where you purchased your product or on-line at:
www.SharpPlace.com
visit SharpPlace to enter periodic contests and drawings!
2002 Sharp Electronics CorporationDesign and specifications are subject to change without notice.
To ensure Sharpquality, look for the Sharp GenuineSupplies Logo onYour businessproducts. We provide a full lineof supplies thatare designed andtested to maximizethe life andperformance of allSharp products.
F R O M S H A R P M I N D S C O M E S H A R P P R O D U C T S TM
C

WARNING - FCC Regulations state that any unauthorized changes or modifications to this equipment not expressly approved by the manufacturer could void the user’s authority to operate this equipment.
Note: This equipment has been tested and found to comply with the limits for a Class B digital device, pursuant to Part 15 of the FCC Rules.These limits are designed to provide reasonable protection against harmful interference in a residential installation.This equipment generates, uses and can radiate radio frequency energy and, if not installed and used in accordance with the instructions, may cause harmful interference to radio communications. However, there is no guarantee that interference will not occur in a particular installation. If this equipment does cause harmful interference to radio or television reception, which can be determined by turning the equipment off and on, the user is encouraged to try to correct the interference by one or more of the following measures:- Reorient or relocate the receiving antenna.- Increase the separation between the equipment and the receiver.- Connect the equipment into an outlet on a circuit different from that to which the receiver is
connected.- Consult the dealer or an experienced radio/TV technician for help.
IMPORTANT NOTICEFax machineFCC Radiation Exposure Statement:This equipment complies with FCC radiation exposure limits set forth for at uncontrolled equipment.This equipment should be installed and operated with minimum distance at least 20cm between the radiator and persons body (excluding extremities: hands, wrists, feet and legs) and must not be co-located or operated with any other antenna or transmitter.Cordless handsetFor body worn operation, this phone has been tested and meets FCC RF exposure gudelines when used with an accessory that contains no metal and that positions the handset a minimum of 1.5cm from the body. Use of other accessories may not ensure compliance with FCC RF exposure guidelines.
ABOUT THE TELEPHONE CONSUMER PROTECTION ACT OF 1991"The Telephone Consumer Protection Act of 1991 makes it unlawful for any person to use a computer or other electronic device to send any message via a telephone facsimile machine unless such message clearly contains in a margin at the top or bottom of each transmitted page or on the first page of the transmission the following information:
(1) The date and time of transmission.
(2) Identification of either the business, business entity or individual sending the message.
(3) Telephone number of either the sending machine, business, business entity or individual.
In order to program this information into your facsimile machine, please refer to the appropriate instructions in the operation manual."
As an ENERGY STAR partner, SHARP has
determined that this product meets the ENERGY
STAR guidelines for energy efficiency.
FCC-15.fm⦆⦆Page⦆1⦆⦆Friday,⦆May⦆31,⦆2002⦆⦆10:48⦆AM
1
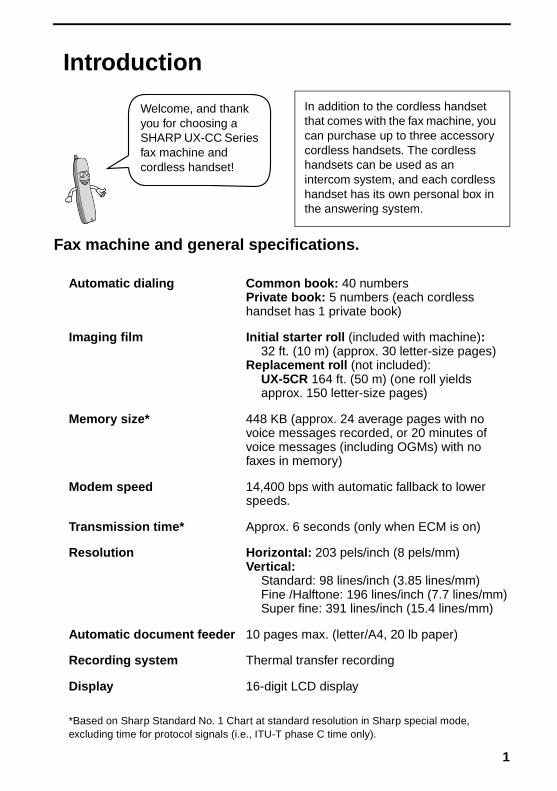
Introduction
Fax machine and general specifications.
*Based on Sharp Standard No. 1 Chart at standard resolution in Sharp special mode, excluding time for protocol signals (i.e., ITU-T phase C time only).
Automatic dialing Common book: 40 numbersPrivate book: 5 numbers (each cordless handset has 1 private book)
Imaging film Initial starter roll (included with machine):32 ft. (10 m) (approx. 30 letter-size pages)
Replacement roll (not included):UX-5CR 164 ft. (50 m) (one roll yieldsapprox. 150 letter-size pages)
Memory size* 448 KB (approx. 24 average pages with no voice messages recorded, or 20 minutes of voice messages (including OGMs) with no faxes in memory)
Modem speed 14,400 bps with automatic fallback to lower speeds.
Transmission time* Approx. 6 seconds (only when ECM is on)
Resolution Horizontal: 203 pels/inch (8 pels/mm)Vertical:
Standard: 98 lines/inch (3.85 lines/mm)Fine /Halftone: 196 lines/inch (7.7 lines/mm)Super fine: 391 lines/inch (15.4 lines/mm)
Automatic document feeder 10 pages max. (letter/A4, 20 lb paper)
Recording system Thermal transfer recording
Display 16-digit LCD display
In addition to the cordless handset that comes with the fax machine, you can purchase up to three accessory cordless handsets. The cordless handsets can be used as an intercom system, and each cordless handset has its own personal box in the answering system.
Welcome, and thank you for choosing a SHARP UX-CC Series fax machine and cordless handset!
all.book⦆⦆Page⦆1⦆⦆Friday,⦆May⦆31,⦆2002⦆⦆9:49⦆AM
2
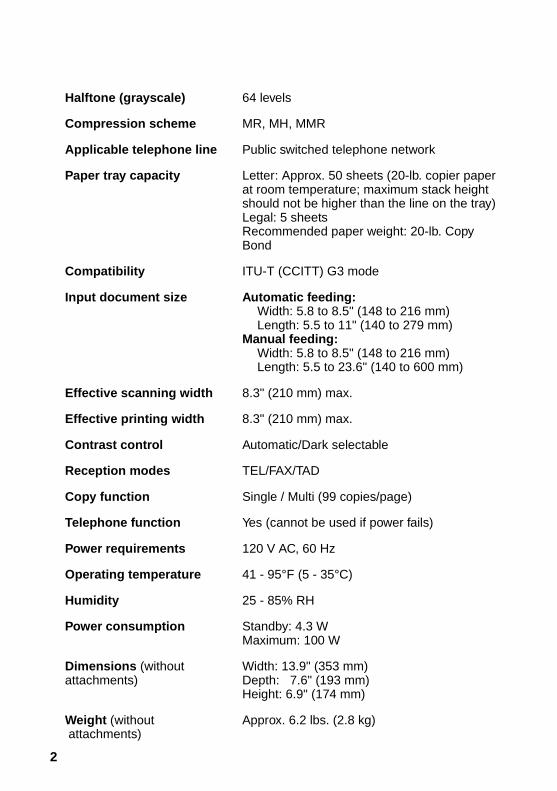
Halftone (grayscale) 64 levels
Compression scheme MR, MH, MMR
Applicable telephone line Public switched telephone network
Paper tray capacity Letter: Approx. 50 sheets (20-lb. copier paper at room temperature; maximum stack height should not be higher than the line on the tray)Legal: 5 sheetsRecommended paper weight: 20-lb. Copy Bond
Compatibility ITU-T (CCITT) G3 mode
Input document size Automatic feeding:Width: 5.8 to 8.5" (148 to 216 mm)Length: 5.5 to 11" (140 to 279 mm)
Manual feeding:Width: 5.8 to 8.5" (148 to 216 mm)Length: 5.5 to 23.6" (140 to 600 mm)
Effective scanning width 8.3" (210 mm) max.
Effective printing width 8.3" (210 mm) max.
Contrast control Automatic/Dark selectable
Reception modes TEL/FAX/TAD
Copy function Single / Multi (99 copies/page)
Telephone function Yes (cannot be used if power fails)
Power requirements 120 V AC, 60 Hz
Operating temperature 41 - 95°F (5 - 35°C)
Humidity 25 - 85% RH
Power consumption Standby: 4.3 WMaximum: 100 W
Dimensions (without attachments)
Width: 13.9" (353 mm)Depth: 7.6" (193 mm)Height: 6.9" (174 mm)
Weight (without attachments)
Approx. 6.2 lbs. (2.8 kg)
all.book⦆⦆Page⦆2⦆⦆Friday,⦆May⦆31,⦆2002⦆⦆9:49⦆AM

3
Cordless handset specifications
Frequency 2.4 GHz (2.405 to 2.475 GHz)
Dimensions Width: 1.8" (46 mm)Depth: 1.7" (42 mm)Height: 7.1" (180 mm) (not including antenna)
Weight Approx. 0.3 lbs. (115 g) (without battery)
Battery 3.6 V Ni-MH battery; capacity: 850 mAh
Power consumption Initial chargingBattery lifeBattery life in standbymode
Approx. 1.0 W (in standby mode)Approx. 10 hours for initial chargeApprox. 4 hours (240 minutes) (at room temp.)Approx. 3 days with one full charge (at room temperature)Battery life (both normal and in standby mode) may vary depending on usage, range from base machine, and environmental conditions such as temperature.
Accessory cordless handset UX-K01 (up to 3 handsets can be added)
As a part of our policy of continuous improvement, SHARP reserves the right to make design and specification changes for product improvement without prior notice. The performance specification figures indicated are nominal values of production units. There may be some deviations from these values in individual units.
Important: This fax machine is not designed for use on a line which has call waiting, call forwarding, or certain other special services offered by your telephone company. If you attempt to use the fax machine in conjunction with any of these services, you may experience errors during transmission and reception of facsimile messages. The fax machine is not compatible with digital telephone systems.
Important safety information
Do not disassemble this machine or attempt any procedures not described in this manual. Refer all servicing to qualified service personnel.
Do not install or use the machine near water, or when you are wet. For example, do not use the machine near a bath tub, wash bowl, kitchen sink or laundry tub, in a wet basement, or near a swimming pool. Take care not to spill any liquids on the machine.
Unplug the machine from the power outlet and telephone jack and consult a qualified service representative if any of the following situations occur:- Liquid has been spilled into the machine or the machine has been exposed to rain or water.
all.book⦆⦆Page⦆3⦆⦆Friday,⦆May⦆31,⦆2002⦆⦆9:49⦆AM

4
- The machine produces odors, smoke, or unusual noises.- The power cord is frayed or damaged.- The machine has been dropped or the housing damaged.
Do not allow anything to rest on the power cord, and do not install the machine where people may walk on the power cord.
This machine must only be connected to a 120 V, 60 Hz, grounded (3-prong) outlet. Connecting it to any other kind of outlet will damage the machine and invalidate the warranty.
Never insert objects of any kind into slots or openings on the machine. This could create a risk of fire or electric shock. If an object falls into the machine that you cannot remove, unplug the machine and consult a qualified service representative.
Do not place this machine on an unstable cart, stand or table. The machine could be seriously damaged if it falls.
Never install telephone wiring during a lightning storm.
Never install telephone jacks in wet locations unless the jack is specifically designed for wet locations.
Never touch bare telephone wires or terminals unless the telephone line has been disconnected at the network interface.
Use caution when installing or modifying telephone lines.
Avoid using a telephone (other than a cordless type) during an electrical storm. There may be a remote risk of electric shock from lightning.
Do not use a telephone to report a gas leak in the vicinity of the leak.
The power outlet must be installed near the equipment and must be easily accessible.
Battery
Use only the battery specified in this manual. Use only the provided charger to charge the battery.
Do not open or mutilate the battery pack. Corrosive fluid may leak out and cause injury or burns to the eyes and skin. The fluid may be toxic if swallowed. In case of contact with eyes, flush with clean water (do not rub), and seek medical attention immediately.
Do not store or carry the battery with other metal objects such as keys or pins. These may short the battery and cause it to overheat.
Do not allow the battery to become wet.
Do not dispose of the battery in a fire or heat the battery. The battery may explode.
Health care facilities and equipment
Radio frequency energy emitted from the cordless handset equipment may cause medical equipment to malfunction. Verify that any personal medical equipment you are using is adequately shielded from external radio frequency energy before using the cordless handset equipment. Do not use the cordless handset equipment in health care facilities where such use is prohibited.
all.book⦆⦆Page⦆4⦆⦆Friday,⦆May⦆31,⦆2002⦆⦆9:49⦆AM
5
Table of Contents
A Look at the Operation Panel 7
1. Installation 12Unpacking Checklist . . . . . . . . . . . . . . . . . . . . . . . . . . . . . . . . . . . . . 12Setting Up. . . . . . . . . . . . . . . . . . . . . . . . . . . . . . . . . . . . . . . . . . . . . 13Loading the Imaging Film . . . . . . . . . . . . . . . . . . . . . . . . . . . . . . . . . 22Loading Printing Paper . . . . . . . . . . . . . . . . . . . . . . . . . . . . . . . . . . . 24Entering Your Name and Fax Number . . . . . . . . . . . . . . . . . . . . . . . 26Setting the Date and Time . . . . . . . . . . . . . . . . . . . . . . . . . . . . . . . . 28Setting the Reception Mode . . . . . . . . . . . . . . . . . . . . . . . . . . . . . . . 30Volume Adjustment - Fax Machine. . . . . . . . . . . . . . . . . . . . . . . . . . 31Volume Adjustment - Cordless Handset. . . . . . . . . . . . . . . . . . . . . . 32
2. Using the Cordless Handset 34Making a Phone Call . . . . . . . . . . . . . . . . . . . . . . . . . . . . . . . . . . . . 34Receiving a Phone Call . . . . . . . . . . . . . . . . . . . . . . . . . . . . . . . . . . 35Receiving a Fax Using the Cordless Handset . . . . . . . . . . . . . . . . . 36Storing and Using Auto-Dial Numbers . . . . . . . . . . . . . . . . . . . . . . . 36Redial . . . . . . . . . . . . . . . . . . . . . . . . . . . . . . . . . . . . . . . . . . . . . . . . 41Using the Intercom Feature . . . . . . . . . . . . . . . . . . . . . . . . . . . . . . . 41Transferring Calls . . . . . . . . . . . . . . . . . . . . . . . . . . . . . . . . . . . . . . . 44
3. Using the Answering System 47Recording an Outgoing Message. . . . . . . . . . . . . . . . . . . . . . . . . . . 48Setting a Passcode for a Personal Box . . . . . . . . . . . . . . . . . . . . . . 49Operating the Answering System. . . . . . . . . . . . . . . . . . . . . . . . . . . 50Optional Answering System Settings . . . . . . . . . . . . . . . . . . . . . . . . 56Transfer Function . . . . . . . . . . . . . . . . . . . . . . . . . . . . . . . . . . . . . . . 59Remote Operations . . . . . . . . . . . . . . . . . . . . . . . . . . . . . . . . . . . . . 62
4. Sending Faxes 69Transmittable Documents. . . . . . . . . . . . . . . . . . . . . . . . . . . . . . . . . 69Loading the Document . . . . . . . . . . . . . . . . . . . . . . . . . . . . . . . . . . . 70Adjusting the Resolution and Contrast . . . . . . . . . . . . . . . . . . . . . . . 71Sending a Fax by Normal Dialing . . . . . . . . . . . . . . . . . . . . . . . . . . . 73
all.book⦆⦆Page⦆5⦆⦆Friday,⦆May⦆31,⦆2002⦆⦆9:49⦆AM

Table of Contents
6
Sending a Fax by Automatic Dialing . . . . . . . . . . . . . . . . . . . . . . . . . 74Sending a Fax From Memory . . . . . . . . . . . . . . . . . . . . . . . . . . . . . . 81
5. Receiving Faxes 83Using FAX Mode. . . . . . . . . . . . . . . . . . . . . . . . . . . . . . . . . . . . . . . . 83Using TEL Mode . . . . . . . . . . . . . . . . . . . . . . . . . . . . . . . . . . . . . . . . 84Optional Reception Settings . . . . . . . . . . . . . . . . . . . . . . . . . . . . . . . 86Substitute Reception to Memory. . . . . . . . . . . . . . . . . . . . . . . . . . . . 88
6. Making Copies 89
7. Special Functions 91Caller ID (Requires Subscription to Service) . . . . . . . . . . . . . . . . . . 91Distinctive Ring (Requires Subscription to Service) . . . . . . . . . . . . . 97Blocking Reception of Unwanted Faxes . . . . . . . . . . . . . . . . . . . . . . 98
8. Printing Lists 99
9. Maintenance 103Replacing the Cordless Handset Battery . . . . . . . . . . . . . . . . . . . . 106
10. Troubleshooting 108Problems and Solutions . . . . . . . . . . . . . . . . . . . . . . . . . . . . . . . . . 108Messages and Signals . . . . . . . . . . . . . . . . . . . . . . . . . . . . . . . . . . 114Clearing Paper Jams . . . . . . . . . . . . . . . . . . . . . . . . . . . . . . . . . . . 119Ordering Parts. . . . . . . . . . . . . . . . . . . . . . . . . . . . . . . . . . . . . . . . . 121FCC Regulatory Information . . . . . . . . . . . . . . . . . . . . . . . . . . . . . . 122
Quick Reference Guide 125
Guía de referencia rápida 127
Index 129
all.book⦆⦆Page⦆6⦆⦆Friday,⦆May⦆31,⦆2002⦆⦆9:49⦆AM

7
DisplayThis displays messages and prompts to help you operate the machine.
INTERCOM keyPress this key to page or locate the cordless handset.
REC/MEMO keyPress this key to record an outgoing message, phone conversation, or memo.
PLAY keyPress this key to play recorded messages.
Left and right arrow keysAuto-dial numbers: When sending a fax or making a phone call, press these keys to scroll through your auto-dial numbers, the “REVIEW CALLS” list (only available if you have Caller ID), and the last number dialed (redial).FUNCTION key settings: Press the right arrow key after scrolling with the up and down arrow keys to select a FUNCTION key setting.
Number keysUse these keys to dial numbers, and enter numbers and letters when storing auto-dial numbers.
Panel releasePress this release to open the operation panel.
A Look at the Operation Panel
Fax machine
1
2
3
4
5
6
7
REC/MEMO PLAY
JKL
DELETEREPEAT
ABC
1DEF
WXYZ
9
GHI
4 5MNO
6PQRS
TEL
TAD
FAX
STOP COPY/HELP START/MEMORY
RESOLUTION/RECEPTION MODE
INTERCOM
FUNCTION
REDIAL
Z A
SPEAKER
7TUV
8
SKIP
0
2 3
1
8 9 10 12 14
5 6 7
DOWN
UP
11 15 16 17
32 4
13
all.book⦆⦆Page⦆7⦆⦆Friday,⦆May⦆31,⦆2002⦆⦆9:49⦆AM
8
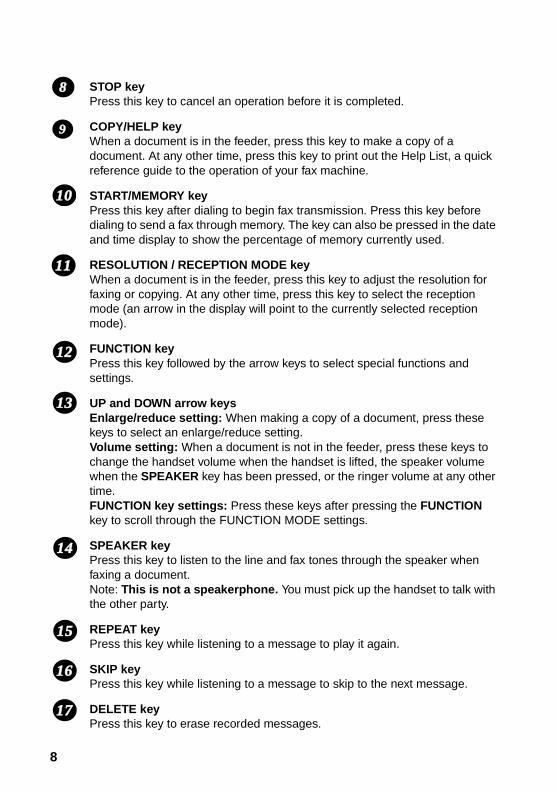
STOP keyPress this key to cancel an operation before it is completed.
COPY/HELP keyWhen a document is in the feeder, press this key to make a copy of a document. At any other time, press this key to print out the Help List, a quick reference guide to the operation of your fax machine.
START/MEMORY keyPress this key after dialing to begin fax transmission. Press this key before dialing to send a fax through memory. The key can also be pressed in the date and time display to show the percentage of memory currently used.
RESOLUTION / RECEPTION MODE keyWhen a document is in the feeder, press this key to adjust the resolution for faxing or copying. At any other time, press this key to select the reception mode (an arrow in the display will point to the currently selected reception mode).
FUNCTION keyPress this key followed by the arrow keys to select special functions and settings.
UP and DOWN arrow keysEnlarge/reduce setting: When making a copy of a document, press these keys to select an enlarge/reduce setting. Volume setting: When a document is not in the feeder, press these keys to change the handset volume when the handset is lifted, the speaker volume when the SPEAKER key has been pressed, or the ringer volume at any other time.FUNCTION key settings: Press these keys after pressing the FUNCTION key to scroll through the FUNCTION MODE settings.
SPEAKER keyPress this key to listen to the line and fax tones through the speaker when faxing a document. Note: This is not a speakerphone. You must pick up the handset to talk with the other party.
REPEAT keyPress this key while listening to a message to play it again.
SKIP keyPress this key while listening to a message to skip to the next message.
DELETE keyPress this key to erase recorded messages.
12
11
10
9
13
14
15
16
17
8
all.book⦆⦆Page⦆8⦆⦆Friday,⦆May⦆31,⦆2002⦆⦆9:49⦆AM

9
Antenna
DisplayThis displays messages and prompts to help you use the cordless handset.
UP and DOWN arrow keysReceiver volume: When talking on the cordless handset, press these keys to adjust the receiver volume. This also adjusts the volume when using a headset (purchased separately) connected to the cordless handset.Ringer volume: When not talking on the cordless handset, press these keys to adjust the cordless handset ringer volume.Scroll through numbers: Press these keys to scroll when searching for an auto-dial number or reviewing received calls (only available when you have Caller ID).
FUNCTION/PAUSE key
Press this key to after pressing to store a new auto dial number.
When entering an auto-dial number, press this key to insert a pause between digits.
SEARCH
1
2
3
4
FUNCTION/PAUSE
TALK OFF
REMOTE/FLASH
START
UP
DOWN
PLAY NEWPLAY
REPEAT SKIP DELETE
ERASE
STOP
RECEPTION
REVIEW
INTERCOM
HOLDREDIAL
SEARCH
1 ABC DEF
JKLGHI MNO
TUVPQRS WXYZ
2 3
4 5 6
7 8 9
0
7
18
11
19
17
1
3
4
5
6
14
16
20
21
8
13
122
22
2315
10
9
Cordless handset
all.book⦆⦆Page⦆9⦆⦆Friday,⦆May⦆31,⦆2002⦆⦆9:49⦆AM

10
TALK keyPress this key to make or answer a call.
REVIEW (left) arrow keyPress the REVIEW arrow key and then the UP or DOWN arrow key to scroll through your 30 most recent calls (only available if you have Caller ID). This key can also be used to move the cursor left when entering or editing an auto-dial number or name.
Number keysUse these keys to dial numbers, and enter numbers and letters when storing auto-dial numbers.
PLAY NEW key
Press this key after pressing to listen to new messages recorded in the
personal box corresponding to the cordless handset.
PLAY key
Press this key after pressing to listen to all messages recorded in the
personal box corresponding to the cordless handset.
REPEAT keyPress this key while listening to a message to play it again.
INTERCOM keyPress this key to page the fax machine or another cordless handset.
START keyPress this key to start fax reception from the cordless handset, or to complete entries when storing, editing, or deleting auto-dial numbers.
REMOTE/FLASH keyPress this key to perform remote operations on the fax machine. The key is also used to access special services from your phone company that require subscription (contact your phone company for details).
OFF keyPress this key to end a call.
SEARCH (right) arrow keyPress the SEARCH arrow key and then the UP or DOWN arrow key to scroll through your auto-dial numbers. This key can also be used to move the cursor right when entering or editing an auto-dial number or name.
REMOTE/FLASH
REMOTE/FLASH
6
7
8
12
11
10
9
13
14
15
5
all.book⦆⦆Page⦆10⦆⦆Friday,⦆May⦆31,⦆2002⦆⦆9:49⦆AM

11
RECEPTION key
Press this key after pressing to change the reception mode on the fax
machine.
STOP keyPress this key to stop playback of messages.
DELETEPress this key while listening to a message to delete it. To delete all your messages, press this key after playback ends (while the display shows
REMOTE MODE), followed by .
HOLD/ERASE keyHold: Press this key during a call to put the other party on hold.Erase: Press this key to delete a phone number when searching through your recently received calls (only when you have Caller ID), or when searching through your auto-dial numbers. Press the key to delete a digit or character when storing or editing an auto-dial number.
SKIP keyPress this key while listening to your messages to skip to the next message.
REDIAL keyPress this key to redial the last number dialed using the cordless handset.
Headset jackThis jack lets you connect a headset (purchased separately) to the cordless handset.
Battery coverRemove this cover to install or replace the handset battery.
REMOTE/FLASH
START
17
16
18
19
20
21
22
23
all.book⦆⦆Page⦆11⦆⦆Friday,⦆May⦆31,⦆2002⦆⦆9:49⦆AM

12
1. Installation
Unpacking Checklist
Paper tray Paper tray extension
Operation manual
Gears (2)
Handset Handset cord
Telephone line cord
Imaging film(initial starter roll)
Cordlesshandset
Battery cover
Battery pack
Cordless handset charger
AC adapter
If any are missing, contact your dealer or retailer.
Before setting up, make sure you have all of the following items.
all.book⦆⦆Page⦆12⦆⦆Friday,⦆May⦆31,⦆2002⦆⦆9:49⦆AM

Setting Up
13
1. In
stal
latio
n
Setting Up
Selecting a location for the fax machine
To maximize the talking range of the cordless handset, we recommend installing the fax machine in a high and central location away from obstructions such as walls.
Do not place the machine in direct sunlight.
Do not place the machine near heaters or air conditioners.
Keep dust away from the machine.
Keep the area around the machine clear.
Keep the fax machine away from other electrical appliances such as TVs, microwave ovens, computers, and other cordless phones.
High and central location with no obstructions
all.book⦆⦆Page⦆13⦆⦆Friday,⦆May⦆31,⦆2002⦆⦆9:49⦆AM

Setting Up
14
Connecting the power cord
Plug the power cord into a 120 V, 60 Hz, grounded AC (3-prong) outlet.
Caution!Do not plug the power cord into any other kind of outlet. This will damage the machine and is not covered under the warranty.
The machine does not have a power on/off switch, so the power is turned on and off by simply plugging in or unplugging the power cord.
Connecting the handset
Connect the handset as shown and place it on the handset rest.
♦ The ends of the handset cord are identical, so they will go into either jack.
Make sure the handset cord goes into the jack marked with a handset symbol on the side of the machine!
Use the handset to make ordinary phone calls, or to transmit and receive faxes manually.
all.book⦆⦆Page⦆14⦆⦆Friday,⦆May⦆31,⦆2002⦆⦆9:49⦆AM
Setting Up
15
1. In
stal
latio
n
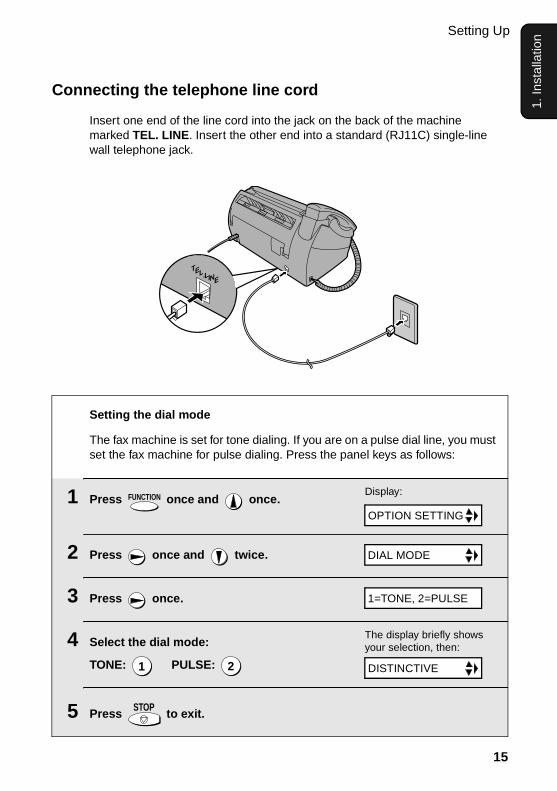
Connecting the telephone line cord
Insert one end of the line cord into the jack on the back of the machine marked TEL. LINE. Insert the other end into a standard (RJ11C) single-line wall telephone jack.
TEL.LINE
Setting the dial mode
The fax machine is set for tone dialing. If you are on a pulse dial line, you must set the fax machine for pulse dialing. Press the panel keys as follows:
1 Press once and once.
2 Press once and twice.
3 Press once.
4 Select the dial mode:
TONE: PULSE:
5 Press to exit.
FUNCTION
1 2
STOP
Display:
The display briefly shows your selection, then:
OPTION SETTING
DIAL MODE
DISTINCTIVE
1=TONE, 2=PULSE
all.book⦆⦆Page⦆15⦆⦆Friday,⦆May⦆31,⦆2002⦆⦆9:49⦆AM

Setting Up
16
Note: If your area experiences a high incidence of lightning or power surges, we recommend that you install surge protectors for the power and telephone lines. Surge protectors can be purchased at most telephone specialty stores.
Attach the paper tray and paper tray extension
Attach the paper tray.
Note: The paper tray extension has a top side and a bottom side. If the tabs do not go into the holes, turn the support over.
About condensationIf the machine is moved from a cold to a warm place, it is possible that condensation may form on the scanning glass, preventing proper scanning of documents for transmission. To remove the condensation, turn on the power and wait approximately two hours before using the machine.
Insert horizontally and rotate up
Attach the paper tray extension.
Click!
all.book⦆⦆Page⦆16⦆⦆Friday,⦆May⦆31,⦆2002⦆⦆9:49⦆AM

Setting Up
17
1. In
stal
latio
n
Connecting the cordless handset charger
1 Connect the AC adapter to the cordless handset charger.
2 Plug the AC adapter into a standard 120 V AC outlet.
Important: Never cover the charger and AC adapter with a blanket, cloth, or other material. Excessive heating may result and cause fire.
Raising the base antenna
Raise the base antenna to ensure clear communication with the cordless handset.
Fit the cord into the holders.
all.book⦆⦆Page⦆17⦆⦆Friday,⦆May⦆31,⦆2002⦆⦆9:49⦆AM

Setting Up
18
Installing the battery and charging the cordless handset
1 Connect the battery connector ➊1 Connect the battery connector ➊ , and then place the battery pack in the cordless handset.
• Place the wires as shown.
2 Place the battery cover on the cordless handset, making sure it snaps firmly into place.
• Make sure the wires are not caught or pinched by the cover.
3 Place the cordless handset in the charger with the dial pad facing forward.
• Important! The dial pad must face forward, or the battery will not charge.
• The battery charges automatically while the cordless handset is in the charger. While charging, the display shows CHARGING. When charging is completed, the display shows IN CHARGER.
• The cordless handset and charger may feel warm while charging. This is normal.
The battery cannot be overcharged. When not using the cordless handset, keep it in the charger to ensure that it is always charged.
Charge the battery at least 10 hours the first time!
BlackRed
BlackRed
all.book⦆⦆Page⦆18⦆⦆Friday,⦆May⦆31,⦆2002⦆⦆9:49⦆AM

Setting Up
19
1. In
stal
latio
n
When the battery needs charging, LOW BATTERY will appear in the display and you will hear beeps during a phone conversation. If you need to continue
the conversation, press to transfer the call to the fax machine. Place the
cordless handset in the charger and let it charge.
Note: If the battery is extremely low, nothing may appear in the display during the first several minutes that the cordless handset is in the charger. The battery will begin to charge normally after several minutes.
INTERCOM
Reinforced concreteMetalAluminum sash
Talking rangeThe talking range of the cordless handset is approximately 1200 ft. (400 m) (line of sight). If you hear noise or interference while talking on the cordless handset, move closer to the fax machine.
♦ When outside the talking range, OUT OF RANGE appears in the display. If you move out of the talking range while talking on the cordless handset, the handset will beep and you may hear interference.
Large metal objects, metal structures, and thick walls reduce the talking range.
To ensure that the battery charges properly, wipe the charger contacts once a month with a cotton swab.
all.book⦆⦆Page⦆19⦆⦆Friday,⦆May⦆31,⦆2002⦆⦆9:49⦆AM

Setting Up
20
Entering a name for the cordless handset
You can enter a name for the cordless handset in the fax machine.
♦ The fax machine will transmit the name that you enter to your cordless handset. The name will appear in the cordless handset’s display.
1 Press once and 3 times on the fax machine.
2 Press once and once.
3 Press once.
4 Press to select SET.
5 Press . (“1” is the ID number of the cordless handset that came with the fax machine.)
6 Enter the name by pressing number keys for each letter as shown in the chart below. Up to 10 characters can be entered.
Example: BILL = 22 444 555 555
♦ To enter two letters in succession that require the same key, press
after entering the first letter.
♦ To clear a mistake, press .
FUNCTION
1
1
SPEAKER
Fax machine display:
ENTRY MODE
HS NAME SET
1=SET, 2=CLEAR
SELECT ID NO. 1
SELECT HS NO.
A =
B =
C =
D =
E =
F =
G =
H =
I =
J =
K =
L =
M =
N =
O =
P =
Q =
R =
S =
T =
U =
V =
W =
X =
Y =
Z =
SPACE =
all.book⦆⦆Page⦆20⦆⦆Friday,⦆May⦆31,⦆2002⦆⦆9:49⦆AM

Setting Up
21
1. In
stal
latio
n
♦ To enter a lower case letter, continue pressing the key for the letter until the lower case letter appears.
♦ To enter one of the following symbols, press or repeatedly:
. / ! " # $ % & ’ ( ) + + , - : ; < = > ? @ [ ¥ ] ^ _ ' { | } ) (
7 Press to store the name.
8 Press to exit.
START/MEMORY
STOP
Connecting a headset
You can connect a headset (purchased separately) to the headset jack. Remove the cap and insert the connector as shown.
Accessory cordless handsets
You can use up to 3 additional UX-K01 cordless handsets with the fax machine.
For information on setting up an accessory cordless handset for use with the fax machine, see the manual that accompanies the accessory handset.
Please purchase accessory UX-K01 handsets at your dealer or retailer.
OWN NUMBER SET
Display:
HANDSET1BILL
The handset number and name appear in the standby display of the cordless handset
all.book⦆⦆Page⦆21⦆⦆Friday,⦆May⦆31,⦆2002⦆⦆9:49⦆AM

Loading the Imaging Film
22
Loading the Imaging FilmYour fax uses a roll of imaging film to create printed text and images. The print head in the fax applies heat to the imaging film to transfer ink to the paper. Follow the steps below to load or replace the film.
1 Remove the paper from the paper tray and open the operation panel (press ➊ ).
2 Remove the used film andempty spool.
3 Remove the two green gears from the spools. DO NOT DISCARD THE TWO GREEN GEARS!
1
2
When replacing the film, use a roll of Sharp UX-5CR imaging film. One roll can print about 150 letter-size pages.
The initial starter roll of imaging film included with your fax can print about 30 letter-size pages.
If you are loading the imaging film for the first time, go to Step 4.
Use only Sharp Genuine Supplies with this logo:
all.book⦆⦆Page⦆22⦆⦆Friday,⦆May⦆31,⦆2002⦆⦆9:49⦆AM

Loading the Imaging Film
23
1. In
stal
latio
n
4 Remove the new roll of imaging film from its packaging.
• Cut the band that holds the rolls together.
5 Insert the green gears.
6 Insert the film into the print compartment.
7 Rotate the front gear as shown until the film is taut.
8 Close the operation panel (press down on both sides to make sure it clicks into place).
Fit ends of rolls onto hubs
Make sure the gears fit into the slots in the ends of the rolls.
1 slot
2 slots
Thick roll to rear
all.book⦆⦆Page⦆23⦆⦆Friday,⦆May⦆31,⦆2002⦆⦆9:49⦆AM
Loading Printing Paper
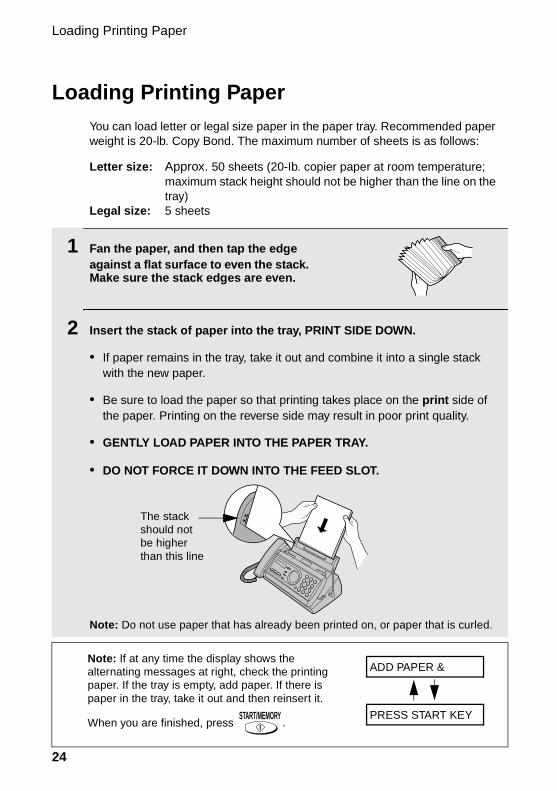
24
1 Fan the paper, and then tap the edge against a flat surface to even the stack. Make sure the stack edges are even.
2 Insert the stack of paper into the tray, PRINT SIDE DOWN.
• If paper remains in the tray, take it out and combine it into a single stack with the new paper.
• Be sure to load the paper so that printing takes place on the print side of the paper. Printing on the reverse side may result in poor print quality.
• GENTLY LOAD PAPER INTO THE PAPER TRAY.
• DO NOT FORCE IT DOWN INTO THE FEED SLOT.
Note: Do not use paper that has already been printed on, or paper that is curled.
Loading Printing PaperYou can load letter or legal size paper in the paper tray. Recommended paper weight is 20-lb. Copy Bond. The maximum number of sheets is as follows:
Letter size: Approx. 50 sheets (20-Ib. copier paper at room temperature; maximum stack height should not be higher than the line on the tray)
Legal size: 5 sheets
Note: If at any time the display shows the alternating messages at right, check the printing paper. If the tray is empty, add paper. If there is paper in the tray, take it out and then reinsert it.
When you are finished, press .START/MEMORY
ADD PAPER &
PRESS START KEY
The stack should not be higher than this line
all.book⦆⦆Page⦆24⦆⦆Friday,⦆May⦆31,⦆2002⦆⦆9:49⦆AM

Loading Printing Paper
25
1. In
stal
latio
n
1 Press once and once.
2 Press once and twice.
3 Press once.
4 Select the paper size:
LETTER: LEGAL:
5 Press to return to the date and time display.
FUNCTION
1 2
STOP
Print contrast setting
Your fax has been set at the factory to print at normal contrast. If desired, you can change the print contrast setting to LIGHT.
The display briefly shows your selection, then:
1 Press once and once.
2 Press once and 3 times.
3 Press once.
4 Select the print contrast:
NORMAL: LIGHT:
5 Press to return to the date and time display.
FUNCTION
1 2
STOP
Display:
The display briefly shows your selection, then:
PAPER SIZE SET
COPY CUT-OFF
OPTION SETTING
PRINT CONTRAST
PAPER SIZE SET
1=LETTER,2=LEGAL
1:NORMAL
Display: OPTION SETTING
Setting the paper size
The fax has been set at the factory to scale received faxes to letter size paper. If you loaded legal paper, you must change the paper size setting to LEGAL.
all.book⦆⦆Page⦆25⦆⦆Friday,⦆May⦆31,⦆2002⦆⦆9:49⦆AM
Entering Your Name and Fax Number
26
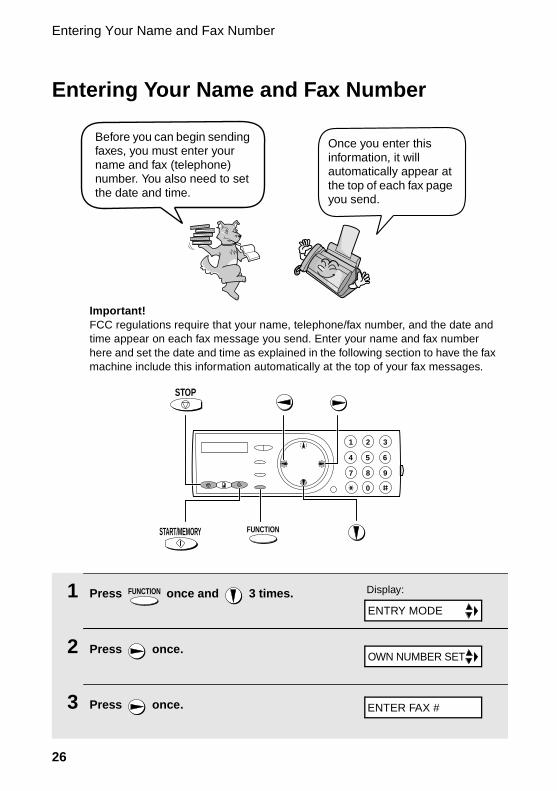
Entering Your Name and Fax Number
Once you enter this information, it will automatically appear at the top of each fax page you send.
Before you can begin sending faxes, you must enter your name and fax (telephone) number. You also need to set the date and time.
FUNCTIONSTART/MEMORY
STOP
Important!FCC regulations require that your name, telephone/fax number, and the date and time appear on each fax message you send. Enter your name and fax number here and set the date and time as explained in the following section to have the fax machine include this information automatically at the top of your fax messages.
1 Press once and 3 times.
2 Press once.
3 Press once.
FUNCTION
1
9
4 5 6
7 8
0
2 3
Display:
ENTER FAX #
ENTRY MODE
OWN NUMBER SET
all.book⦆⦆Page⦆26⦆⦆Friday,⦆May⦆31,⦆2002⦆⦆9:49⦆AM
Entering Your Name and Fax Number
27
1. In
stal
latio
n
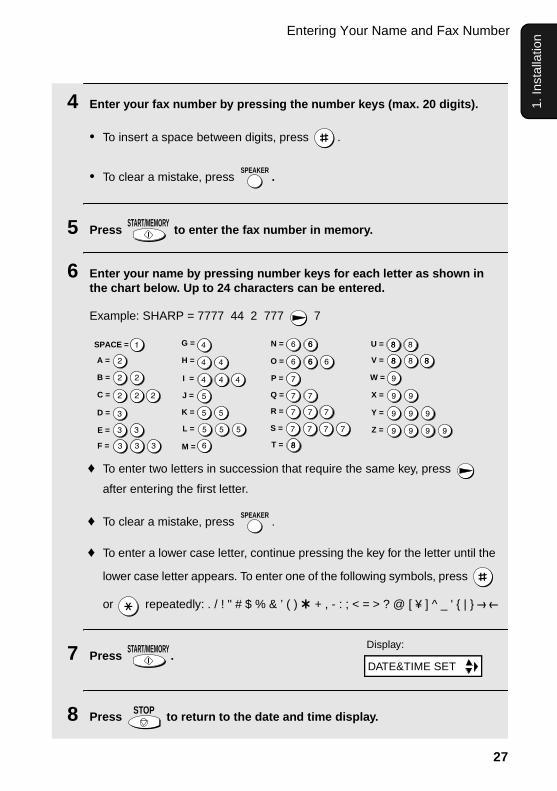
4 Enter your fax number by pressing the number keys (max. 20 digits).
• To insert a space between digits, press .
• To clear a mistake, press .
5 Press to enter the fax number in memory.
6 Enter your name by pressing number keys for each letter as shown in the chart below. Up to 24 characters can be entered.
Example: SHARP = 7777 44 2 777 7
♦ To enter two letters in succession that require the same key, press
after entering the first letter.
♦ To clear a mistake, press .
♦ To enter a lower case letter, continue pressing the key for the letter until the
lower case letter appears. To enter one of the following symbols, press
or repeatedly: . / ! " # $ % & ’ ( ) + + , - : ; < = > ? @ [ ¥ ] ^ _ ' { | } ) (
7 Press .
8 Press to return to the date and time display.
SPEAKER
START/MEMORY
SPEAKER
START/MEMORY
STOP
Display:
DATE&TIME SET
A =
B =
C =
D =
E =
F =
G =
H =
I =
J =
K =
L =
M =
N =
O =
P =
Q =
R =
S =
T =
U =
V =
W =
X =
Y =
Z =
SPACE =
all.book⦆⦆Page⦆27⦆⦆Friday,⦆May⦆31,⦆2002⦆⦆9:49⦆AM
Setting the Date and Time
28
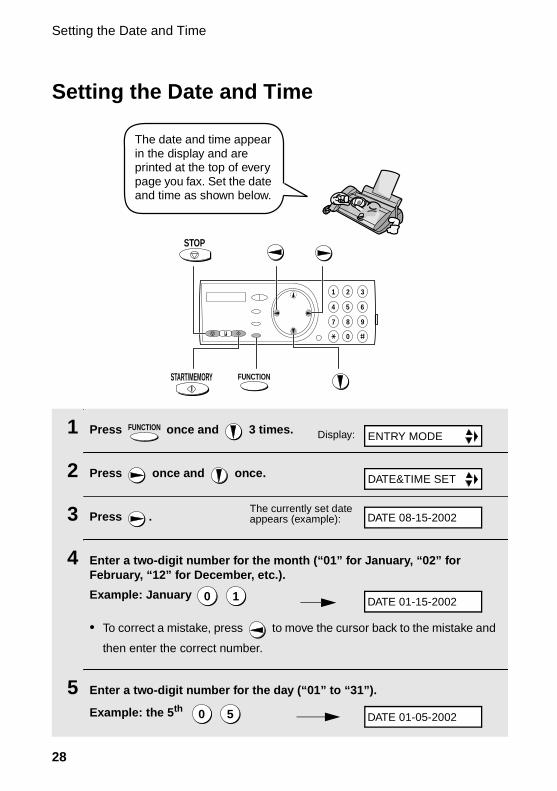
Setting the Date and Time
1 Press once and 3 times.
2 Press once and once.
3 Press .
4 Enter a two-digit number for the month (“01” for January, “02” for February, “12” for December, etc.).
Example: January
• To correct a mistake, press to move the cursor back to the mistake and
then enter the correct number.
5 Enter a two-digit number for the day (“01” to “31”).
Example: the 5th
FUNCTION
0 1
0 5
The date and time appear in the display and are printed at the top of every page you fax. Set the date and time as shown below.
FUNCTION
STOP
1
9
4 5 6
7 8
0
2 3
Display:
The currently set date appears (example):
ENTRY MODE
DATE&TIME SET
DATE 08-15-2002
DATE 01-15-2002
DATE 01-05-2002
START/MEMORY
all.book⦆⦆Page⦆28⦆⦆Friday,⦆May⦆31,⦆2002⦆⦆9:49⦆AM

Setting the Date and Time
29
1. In
stal
latio
n
1 Press once and once.
2 Press once and 5 times.
3 Press once.
4 Press to select YES, or to select NO.
5 Press to return to the date and time display.
FUNCTION
1 2
STOP
Daylight Saving Time
If desired, you can set the clock to move forward and backward automatically at the beginning and end of Daylight Saving Time. Follow these steps:
6 Enter the year (four digits).
Example: 2002
7 Enter a two-digit number for the hour (“01” to “12”) and a two-digit number for the minute (“00” to “59”).
Example: 9:25
8 Press to select A.M. or to select P.M.
9 Press to start the clock.
10 Press to return to the date and time display.
2 0 0 2
0 9 2 5
START/MEMORY
STOP
The currently set time appears (example):
TIME 12:19 PM
TIME 09:25 PM
ANTI JUNK #
RECEIVE RATIO
OPTION SETTING
DAY LIGHT SAVE
1=YES, 2=NO
all.book⦆⦆Page⦆29⦆⦆Friday,⦆May⦆31,⦆2002⦆⦆9:49⦆AM
Setting the Reception Mode
30
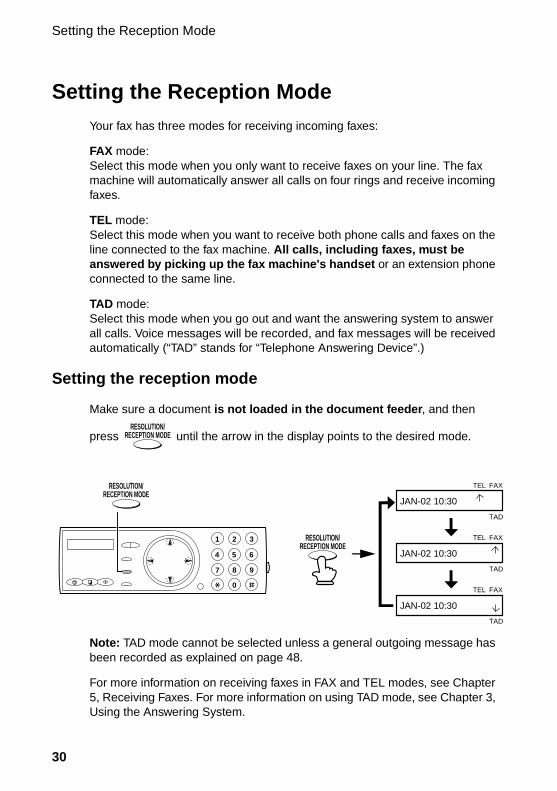
Setting the Reception ModeYour fax has three modes for receiving incoming faxes:
FAX mode:Select this mode when you only want to receive faxes on your line. The fax machine will automatically answer all calls on four rings and receive incoming faxes.
TEL mode:Select this mode when you want to receive both phone calls and faxes on the line connected to the fax machine. All calls, including faxes, must be answered by picking up the fax machine's handset or an extension phone connected to the same line.
TAD mode:Select this mode when you go out and want the answering system to answer all calls. Voice messages will be recorded, and fax messages will be received automatically (“TAD” stands for “Telephone Answering Device”.)
Setting the reception mode
Make sure a document is not loaded in the document feeder, and then
press until the arrow in the display points to the desired mode.RESOLUTION/
RECEPTION MODE
Note: TAD mode cannot be selected unless a general outgoing message has been recorded as explained on page 48.
For more information on receiving faxes in FAX and TEL modes, see Chapter 5, Receiving Faxes. For more information on using TAD mode, see Chapter 3, Using the Answering System.
FAXTEL
JAN-02 10:30
FAXTEL
JAN-02 10:30
FAXTEL
JAN-02 10:30
TAD
TAD
TAD
1
9
4 5 6
7 8
0
2 3 RESOLUTION/RECEPTION MODE
RESOLUTION/RECEPTION MODE
all.book⦆⦆Page⦆30⦆⦆Friday,⦆May⦆31,⦆2002⦆⦆9:49⦆AM

Volume Adjustment - Fax Machine
31
1. In
stal
latio
n
Volume Adjustment - Fax Machine
1 Press .
2 Press or to select the desired volume level.
• Press again to turn off the speaker.
SPEAKER
SPEAKER
Speaker
1
9
4 5 6
7 8
0
2 3
SPEAKER
1 When talking through the handset,
press or to select the desired volume level.
• Note: The volume reverts to MIDDLE each time you replace the handset.
Display:
Fax machine handset
RECEIVER: HIGH
RECEIVER: MIDDLE
RECEIVER: LOW
You can adjust the volume of the speaker, handset, and ringer using the up and down arrow keys.
all.book⦆⦆Page⦆31⦆⦆Friday,⦆May⦆31,⦆2002⦆⦆9:49⦆AM

Volume Adjustment - Cordless Handset
32
1 Press or to select the desired volume level.
(Make sure has not been pressed, the handset is not lifted, and a document is not loaded in the feeder.)
• The ringer rings once at the selected level, and then the date and time reappear in the display.
2 If you selected “RINGER: OFF OK ?” to
turn off the ringer, press .
SPEAKER
START/MEMORY
Fax machine ringer
Display: RINGER: HIGH
RINGER: MIDDLE
RINGER: LOW
RINGER: OFF OK ?
Volume Adjustment - Cordless Handset
You can adjust the volume of the ringer and handset, receiver using the up and down arrow keys.
all.book⦆⦆Page⦆32⦆⦆Friday,⦆May⦆31,⦆2002⦆⦆9:49⦆AM

Volume Adjustment - Cordless Handset
33
1. In
stal
latio
n
Cordless handset ringer
1 When you are not talking on the
cordless handset, press or to select the desired ringer volume level.
• The ringer will ring once at the selected level.
2 If you selected “RINGER: OFF OK ?” to
turn off the ringer, press .START
RINGER: HIGH
Cordless handset display:
RINGER: MIDDLE
RINGER: LOW
RINGER: OFF OK ?OK: PRESS START
1 When talking on the cordless handset,
press or to select the desired volume level.
• Note: The volume reverts to MIDDLE
each time you hang up (press ).OFFOFF
RECEIVER: HIGH
Cordless handset display:
RECEIVER: MIDDLE
RECEIVER: LOW
Cordless handset receiver volume
all.book⦆⦆Page⦆33⦆⦆Friday,⦆May⦆31,⦆2002⦆⦆9:49⦆AM

34
2. Using the Cordless Handset
Making a Phone Call
1 Pick up the cordless handset and
press .
2 When you hear the dial tone, dial the number.
3 When you are ready to end the call, press .
• You can also end the call by simply placing the cordless handset in the charger.
TALK
OFFOFF
TALK
Cordless handset display:
TALKOFFOFF
1 ABC2 DEF3
GHI4 JKL5 MNO6
PQRS7RECEPTION
TUV8 WXYZ9PLAY PLAY NEW
0STOP
REPEAT SKIP DELETE
If the display shows FAX BUSY, you must wait until the fax machine is no longer in use to use the cordless handset.
all.book⦆⦆Page⦆34⦆⦆Friday,⦆May⦆31,⦆2002⦆⦆9:49⦆AM

Receiving a Phone Call
35
2. C
ordl
ess
Han
dset
Receiving a Phone Call
1 When the cordless handset rings, pick it up and press any key (except
) to answer. Talk to the other party.
• If the cordless handset is in the charger, simply pick it up to answer (you do not need to press a key).
2 When you are ready to end the call, press .
• You can also end the call by simply placing the cordless handset in the charger.
OFFOFF
OFFOFF
Putting a Call on Hold
To put the other party on hold during a call, press . The cordless handset
will beep while the call is on hold. When you are ready to resume the call,
press once again. Note that placing the cordless handset in the charger
will not break the connection while a call is on hold, and thus phone charges may continue to apply.
HOLD
HOLD
You can also dial by entering the phone
number first and then pressing .TALK
Check the number in the display before pressing . If there is a mistake,
press to clear the mistake and then enter the correct digits.
Note: If a pause is needed between any of the digits to access an outside
line or a special service, press . The pause will appear as a hyphen (-).
TALK
ERASE
HOLD
FUNCTION/PAUSE
all.book⦆⦆Page⦆35⦆⦆Friday,⦆May⦆31,⦆2002⦆⦆9:49⦆AM

Receiving a Fax Using the Cordless Handset
36
START Press to begin fax reception
Note: If the fax machine detects a fax signal after you answer a call on the cordless handset, it will begin reception automatically.
Receiving a Fax Using the Cordless HandsetIf you hear a fax tone after answering a call on the cordless handset, or if the
other party speaks to you and then wants to send a fax, press . This
signals the fax machine to begin fax reception.
START
Storing and Using Auto-Dial NumbersYou can store your most frequently dialed numbers for automatic dialing. Numbers can be stored in the Common book or the Private book.
♦ Up to 40 numbers can be stored in the Common book. These numbers are shared with the fax machine and other cordless handsets, and can be stored using a cordless handset as explained below, or the fax machine as explained on page 74.
♦ Up to 5 numbers can be stored in the Private book. Each cordless handset has its own Private book, and the numbers are stored using the cordless handset as explained below.
1 Press .
2 Press to select the Common book,
or to select the Private book.
SEARCHCordless handset display:
SELECT SEARCH▲: COMMON▼: PRIVATE
COMMON DIAL▲▼: SEARCHFUNCTION: ENTRY
Example: Common book selected
all.book⦆⦆Page⦆36⦆⦆Friday,⦆May⦆31,⦆2002⦆⦆9:49⦆AM
Storing and Using Auto-Dial Numbers
37
2. C
ordl
ess
Han
dset
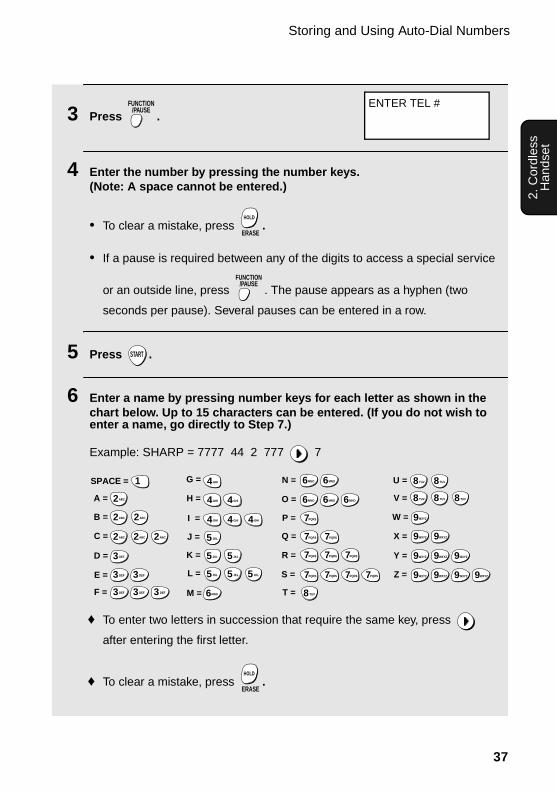
3 Press .
4 Enter the number by pressing the number keys. (Note: A space cannot be entered.)
• To clear a mistake, press .
• If a pause is required between any of the digits to access a special service
or an outside line, press . The pause appears as a hyphen (two
seconds per pause). Several pauses can be entered in a row.
5 Press .
6 Enter a name by pressing number keys for each letter as shown in the chart below. Up to 15 characters can be entered. (If you do not wish to enter a name, go directly to Step 7.)
Example: SHARP = 7777 44 2 777 7
♦ To enter two letters in succession that require the same key, press
after entering the first letter.
♦ To clear a mistake, press .
FUNCTION/PAUSE
ERASE
HOLD
FUNCTION/PAUSE
START
ERASE
HOLD
A =
B =
C =
D =
E =
F =
G =
H =
I =
J =
K =
L =
M =
N =
O =
P =
Q =
R =
S =
T =
U =
V =
W =
X =
Y =
Z =
SPACE =
WXYZ9 WXYZ9 WXYZ9 WXYZ9
WXYZ9 WXYZ9 WXYZ9
WXYZ9 WXYZ9
WXYZ9
TUV8
TUV8
TUV8 TUV8
TUV8 TUV8
PQRS7 PQRS7 PQRS7 PQRS7
PQRS7 PQRS7 PQRS7
PQRS7 PQRS7
PQRS7
MNO6 MNO6MNO6
MNO6MNO6
JKL5 JKL5 JKL5
MNO6
JKL5 JKL5
JKL5
GHI4 GHI4 GHI4
GHI4 GHI4
GHI4
DEF3 DEF3 DEF3
DEF3 DEF3
DEF3
ABC2 ABC2 ABC2
ABC2 ABC2
ABC2
1
ENTER TEL #
all.book⦆⦆Page⦆37⦆⦆Friday,⦆May⦆31,⦆2002⦆⦆9:49⦆AM

Storing and Using Auto-Dial Numbers
38
♦ To enter a lower case letter, continue pressing the key for the letter until the lower case letter appears.
♦ To enter one of the following symbols, press or repeatedly:
. / ! " # $ % & ’ ( ) + + , - : ; < = > ? @ [ ¥ ] ^ _ ' { | } ) (
7 Press .
8 Return to Step 2 to store another number, or press to exit.
START
OFFOFF
Dialing an auto-dial number
1 Press once.
2 Press to select the Common book,
or to select the Private book.
3 Press or until the number you wish to dial appears in the display.
4 Press .
• The number is automatically dialed.
SEARCH
TALK
COMMON DIAL▲▼: SEARCHFUNCTION: ENTRY
Example: Common book selected
SELECT SEARCH▲: COMMON▼: PRIVATE
Cordless handset display:
SELECT SEARCH▲: COMMON▼: PRIVATE
all.book⦆⦆Page⦆38⦆⦆Friday,⦆May⦆31,⦆2002⦆⦆9:49⦆AM
Storing and Using Auto-Dial Numbers
39
2. C
ordl
ess
Han
dset
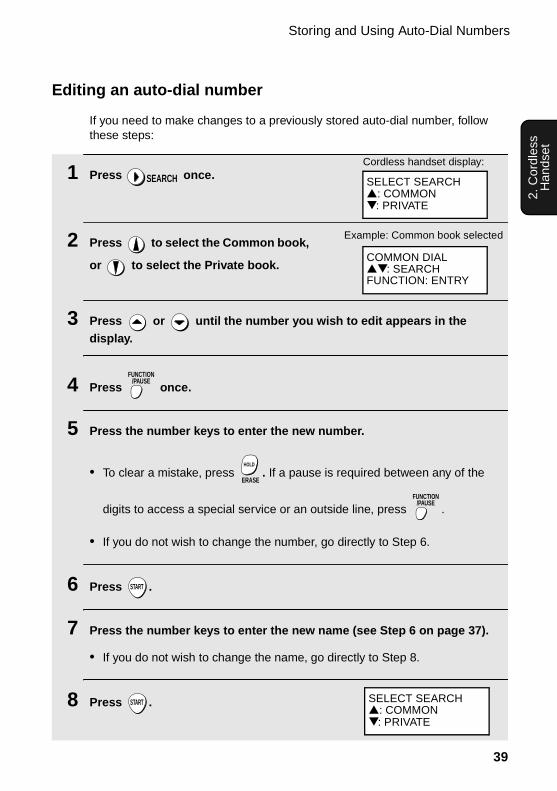
Editing an auto-dial number
If you need to make changes to a previously stored auto-dial number, follow these steps:
1 Press once.
2 Press to select the Common book,
or to select the Private book.
3 Press or until the number you wish to edit appears in the display.
4 Press once.
5 Press the number keys to enter the new number.
• To clear a mistake, press . If a pause is required between any of the
digits to access a special service or an outside line, press .
• If you do not wish to change the number, go directly to Step 6.
6 Press .
7 Press the number keys to enter the new name (see Step 6 on page 37).
• If you do not wish to change the name, go directly to Step 8.
8 Press .
SEARCH
FUNCTION/PAUSE
ERASE
HOLD
FUNCTION/PAUSE
START
START
COMMON DIAL▲▼: SEARCHFUNCTION: ENTRY
Example: Common book selected
Cordless handset display:
SELECT SEARCH▲: COMMON▼: PRIVATE
SELECT SEARCH▲: COMMON▼: PRIVATE
all.book⦆⦆Page⦆39⦆⦆Friday,⦆May⦆31,⦆2002⦆⦆9:49⦆AM

Storing and Using Auto-Dial Numbers
40
Clearing an auto-dial number
If you need to clear an auto-dial number, follow these steps:
1 Press once.
2 Press to select the Common book,
or to select the Private book.
3 Press or until the number you wish to clear appears in the display.
4 Press .
5 Press .
6 Press to exit.
SEARCH
ERASE
HOLD
START
OFFOFF
COMMON DIAL▲▼: SEARCHFUNCTION: ENTRY
Example: Common book selected
ERASE?PRESS START KEY
9 Press to exit.OFFOFF
SELECT SEARCH▲: COMMON▼: PRIVATE
Cordless handset display:
SELECT SEARCH▲: COMMON▼: PRIVATE
all.book⦆⦆Page⦆40⦆⦆Friday,⦆May⦆31,⦆2002⦆⦆9:49⦆AM
Redial
41
2. C
ordl
ess
Han
dset
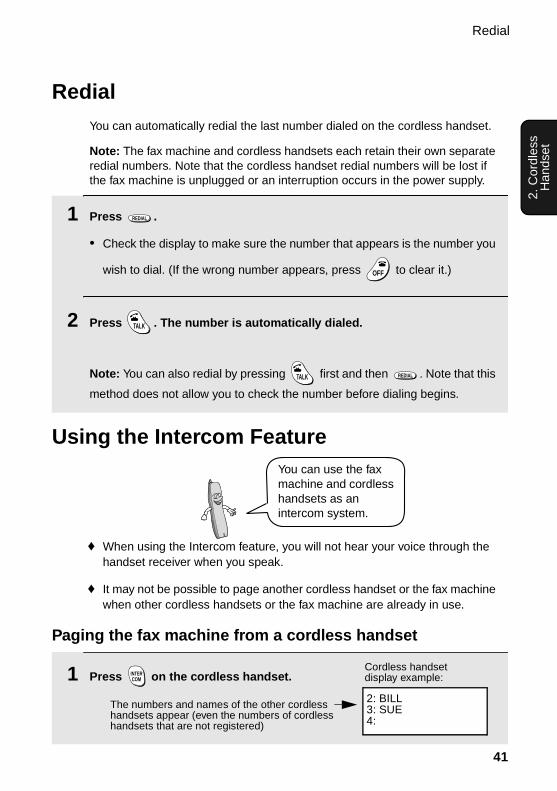
RedialYou can automatically redial the last number dialed on the cordless handset.
Note: The fax machine and cordless handsets each retain their own separate redial numbers. Note that the cordless handset redial numbers will be lost if the fax machine is unplugged or an interruption occurs in the power supply.
1 Press .
• Check the display to make sure the number that appears is the number you
wish to dial. (If the wrong number appears, press to clear it.)
2 Press . The number is automatically dialed.
Note: You can also redial by pressing first and then . Note that this
method does not allow you to check the number before dialing begins.
REDIAL
OFFOFF
TALK
TALK REDIAL
Using the Intercom Feature
♦ When using the Intercom feature, you will not hear your voice through the handset receiver when you speak.
♦ It may not be possible to page another cordless handset or the fax machine when other cordless handsets or the fax machine are already in use.
Paging the fax machine from a cordless handset
You can use the fax machine and cordless handsets as an intercom system.
1 Press on the cordless handset. INTERCOM
2: BILL3: SUE4:
Cordless handset display example:
The numbers and names of the other cordless handsets appear (even the numbers of cordless handsets that are not registered)
all.book⦆⦆Page⦆41⦆⦆Friday,⦆May⦆31,⦆2002⦆⦆9:49⦆AM

Using the Intercom Feature
42
2 Press on the cordless handset to select the fax machine.
3 The fax machine rings.
4 The other person picks up the fax machine handset to answer.
5 Talk with the other person. When you are ready to end the conversation,
press .
0
OFFOFF
INTERCOM0: BASE STATION
Cordless handset display:
Fax machine display:
INTERCOM
1: BOBNumber and name of calling handset
Paging a cordless handset from another cordless handset(walkie-talkie feature)
The cordless handsets can be used for walkie-talkie like communication The talking range of the cordless handsets is ???? ft. (??? m), and there is no need to be in the talking range of the fax machine.
1 Press on the cordless handset.
2 Enter the number of the cordless handset that you wish to page.
Example:
• To page all cordless handsets and the fax machine, press .
INTERCOM
ABC2
2: BILL3: SUE4:
Cordless handset display example:
The numbers and names of the other cordless handsets appear (even the numbers of cordless handsets that are not registered)
INTERCOM2: BILL
all.book⦆⦆Page⦆42⦆⦆Friday,⦆May⦆31,⦆2002⦆⦆9:49⦆AM
植月 さおり

Using the Intercom Feature
43
2. C
ordl
ess
Han
dset
Paging a cordless handset from the fax machine (cordless handset locator)
You can use this procedure to page a cordless handset, or locate a handset in the event that you misplace it.
1 Pick up the fax machine handset.
2 Press on the fax machine, and enter the number of the cordless handset that you wish to page.
Example:
• To page all of the cordless handsets, press .
3 The selected cordless handset rings.
• This allows you to locate the cordless handset if you have misplaced it.
4 The other person presses any key (except ) on the cordless handset to answer.
INTERCOM
3
OFFOFF
3 The selected cordless handset rings.
4 The other person presses any key (except ) on the cordless handset to answer.
5 Talk with the other person. When you are ready to end the conversation,
press .
OFFOFF
OFFOFF
INTERCOM0: BASE STATION
Fax machine display:
INTERCOM
3: SUE
Display of selected cordless handset:
INTERCOM1: BOB
Display of paged handset:
Number and name of calling handset
all.book⦆⦆Page⦆43⦆⦆Friday,⦆May⦆31,⦆2002⦆⦆9:49⦆AM

Transferring Calls
44
Transferring CallsYou can transfer a call to the fax machine or to a cordless handset.
Note: It is not possible to talk to the recipient of a transfer call before transferring.
Transferring a call from a cordless handset to the fax machine or to another cordless handset
1 During the call, press on the
cordless handset.
• The call is placed on hold.
2 To transfer the call to the fax machine,
press .To transfer the call to a cordless handset, enter the number of the handset.
• To page the fax machine and all
cordless handsets, press
INTERCOM
0
If a call comes in while the Intercom feature is being usedIf an outside call comes in while you are using the Intercom feature, the person who wishes to take the call should first stop the Intercom call (press
on the cordless handset or replace the fax machine handset), and then
answer the outside call (press any key except on the cordless handset
or pick up the fax machine handset).
OFFOFF
OFFOFF
5 Talk with the other person. When you are ready to end the conversation, replace the handset.
2: BILL3: SUE4:
Cordless handset display example:
The numbers and names of the other cordless handsets appear (even the numbers of cordless handsets that are not registered)
CALL TRANSFER
The fax machine and cordless handsets all show the above message, regardless of which is selected.
CALL TRANSFER
all.book⦆⦆Page⦆44⦆⦆Friday,⦆May⦆31,⦆2002⦆⦆9:49⦆AM
Transferring Calls
45
2. C
ordl
ess
Han
dset
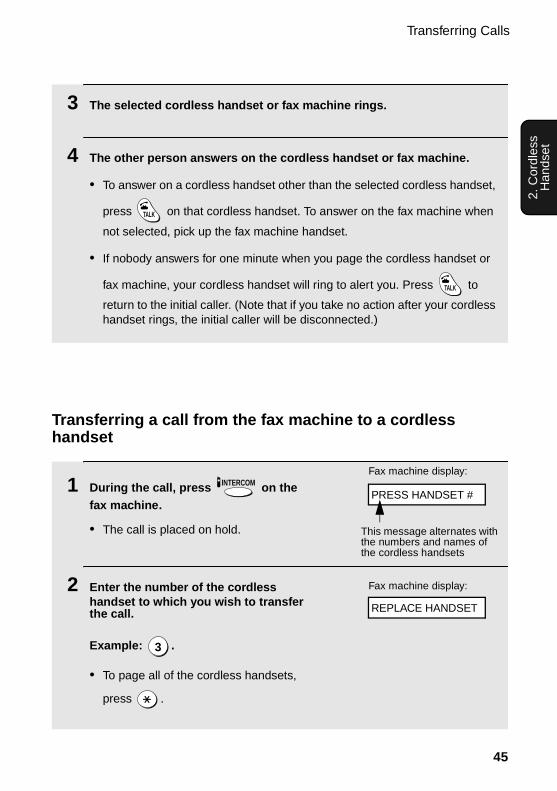
3 The selected cordless handset or fax machine rings.
4 The other person answers on the cordless handset or fax machine.
• To answer on a cordless handset other than the selected cordless handset,
press on that cordless handset. To answer on the fax machine when
not selected, pick up the fax machine handset.
• If nobody answers for one minute when you page the cordless handset or
fax machine, your cordless handset will ring to alert you. Press to
return to the initial caller. (Note that if you take no action after your cordless handset rings, the initial caller will be disconnected.)
TALK
TALK
Transferring a call from the fax machine to a cordless handset
1 During the call, press on the fax machine.
• The call is placed on hold.
2 Enter the number of the cordless handset to which you wish to transfer the call.
Example: .
• To page all of the cordless handsets,
press .
INTERCOM
3
Fax machine display:
REPLACE HANDSET
PRESS HANDSET #
This message alternates with the numbers and names of the cordless handsets
Fax machine display:
all.book⦆⦆Page⦆45⦆⦆Friday,⦆May⦆31,⦆2002⦆⦆9:49⦆AM

Transferring Calls
46
3 Replace the fax machine handset. The selected cordless handset rings.
4 The other person presses any key (except ) on the cordless handset to answer.
• To answer on a cordless handset other than the selected cordless handset,
press on the other cordless handset.
• If no one answers for one minute when you page the cordless handset, the fax machine will ring to alert you. Pick up the fax machine handset to return to the initial caller. (Note that if you take no action after the fax machine rings, the initial caller will be disconnected.)
OFFOFF
TALK
CALL TRANSFER
Displays of all cordless handsets
Fax machine display:
CALL TRANSFER
Changing the reception mode on the fax machine
1 Press .
2 Press until the desired reception mode appears in the display.
3 Press or to exit REMOTE MODE.
REMOTE/FLASH
JKL5RECEPTION
REMOTE/FLASH
OFFOFF
RECEPTIONFAX
Example: FAX mode
REMOTE MODE
Cordless handset display:
Note: When a cordless handset is paged, it will continue ringing until the
paging is answered, even if is pressed on the cordless handset or the
cordless handset is placed in the charger.
OFFOFF
all.book⦆⦆Page⦆46⦆⦆Friday,⦆May⦆31,⦆2002⦆⦆9:49⦆AM
植月 さおり

47
3. A
nsw
erin
g M
achi
ne
3. Using the Answering System
The answering system allows you to receive both voice messages and faxes while you are out.
The answering system has one general box and four personal boxes for callers to leave messages.
To use the answering system, you must record a greeting for the general box, and a greeting for each personal box you wish to use.
Each cordless handset can be used to listen to the messages in its corresponding personal box (the personal box with the same number as the cordless handset). (A personal box can still be used even if you do not have the corresponding accessory cordless handset.)
1 2 3 4
General Box
Personal Box
1 2 3 4
Press
General Message
Personal Message
1 2 3 4
all.book⦆⦆Page⦆47⦆⦆Friday,⦆May⦆31,⦆2002⦆⦆9:49⦆AM
Recording an Outgoing Message
48
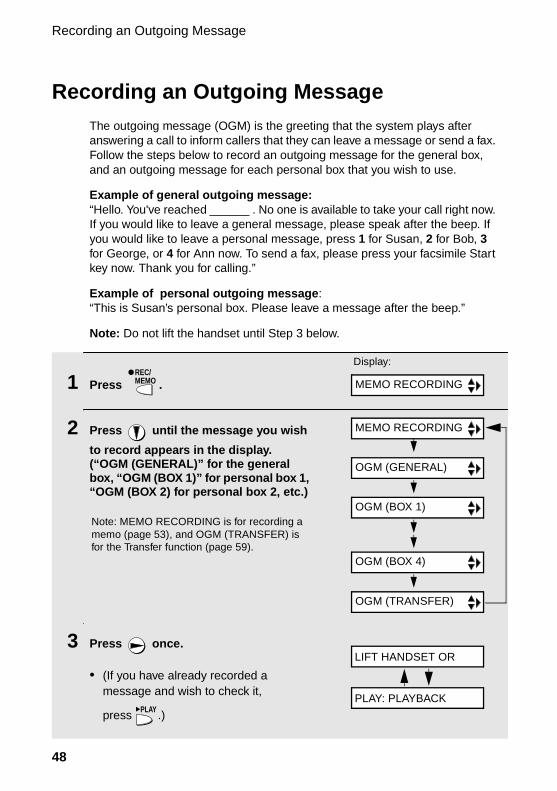
Recording an Outgoing MessageThe outgoing message (OGM) is the greeting that the system plays after answering a call to inform callers that they can leave a message or send a fax. Follow the steps below to record an outgoing message for the general box, and an outgoing message for each personal box that you wish to use.
Example of general outgoing message:“Hello. You've reached ______ . No one is available to take your call right now. If you would like to leave a general message, please speak after the beep. If you would like to leave a personal message, press 1 for Susan, 2 for Bob, 3 for George, or 4 for Ann now. To send a fax, please press your facsimile Start key now. Thank you for calling.”
Example of personal outgoing message:“This is Susan’s personal box. Please leave a message after the beep.”
Note: Do not lift the handset until Step 3 below.
1 Press .
2 Press until the message you wish
to record appears in the display. (“OGM (GENERAL)” for the general box, “OGM (BOX 1)” for personal box 1, “OGM (BOX 2) for personal box 2, etc.)
3 Press once.
• (If you have already recorded a message and wish to check it,
press .)
REC/MEMO
PLAY
Display:
MEMO RECORDING
MEMO RECORDING
OGM (GENERAL)
OGM (BOX 1)
OGM (BOX 4)
OGM (TRANSFER)
Note: MEMO RECORDING is for recording a memo (page 53), and OGM (TRANSFER) is for the Transfer function (page 59).
LIFT HANDSET OR
PLAY: PLAYBACK
all.book⦆⦆Page⦆48⦆⦆Friday,⦆May⦆31,⦆2002⦆⦆9:49⦆AM

Setting a Passcode for a Personal Box
49
3. A
nsw
erin
g M
achi
ne
4 Lift the handset.
5 Press and speak into the handset to record the message.
• While recording, the display will show the time left to record.
6 When finished, replace the handset or press .
START/MEMORY
STOP
To listen to an outgoing message
To listen to an outgoing message, follow Steps 1 and 2 of the above
procedure and then press . Note that the general outgoing message
cannot be erased. If you need to change it, simply repeat the recording procedure.
Setting a Passcode for a Personal BoxYou can set a 3-digit passcode for each personal box. When this is done, the passcode must be entered to listen to messages in a personal box at the fax machine.
(Note: When listening to the messages in a personal box from its corresponding cordless handset, is not necessary to enter the passcode. )
PLAY
1 Press once and once.
2 Press once and once.
3 Press .
FUNCTION
BOX PASSCODE
Display:
T.A.D. SETTING
1=SET, 2=CLEAR
all.book⦆⦆Page⦆49⦆⦆Friday,⦆May⦆31,⦆2002⦆⦆9:49⦆AM

Operating the Answering System
50
4 Press to set a passcode.
(To clear a previously set passcode,
press .)
5 Enter the number of the personal box for which you wish to set a passcode.
Example: for Box 1
(If you are clearing a passcode, enter the number of the box and go to Step 7.)
6 Enter a 3-digit number for the passcode. The first digit of the number must be 0, 5, 6, 7, 8, or 9.
7 Press .
8 Return to Step 5 to set another passcode, or press to return to the date and time display.
1
2
1
START/MEMORY
STOP
ENTER PASSCODE
Note: If you wish to change a passcode, clear the passcode and then enter a new passcode. If you forget a passcode, clear it and enter a new passcode.
ENTER BOX # (1-4)
Operating the Answering System
Activating the answering system
To turn on the answering system so that callers can leave messages, press
until the arrow in the display points to TAD. (TAD stands for
“Telephone Answering Device”.)
RESOLUTION/RECEPTION MODE
RESOLUTION/RECEPTION MODE FAXTEL
TAD
ENTER BOX # (1-4)
all.book⦆⦆Page⦆50⦆⦆Friday,⦆May⦆31,⦆2002⦆⦆9:49⦆AM
Operating the Answering System
51
3. A
nsw
erin
g M
achi
ne
♦ Each outgoing message will play (to stop playback, press ).
♦ It will not be possible to set the reception mode to TAD if a general outgoing message has not been recorded.
Note: In TAD mode, the machine will automatically switch to fax reception if it detects 6 seconds of silence after answering a call. For this reason, if a caller pauses for this length of time while leaving a message, they will be cut off.
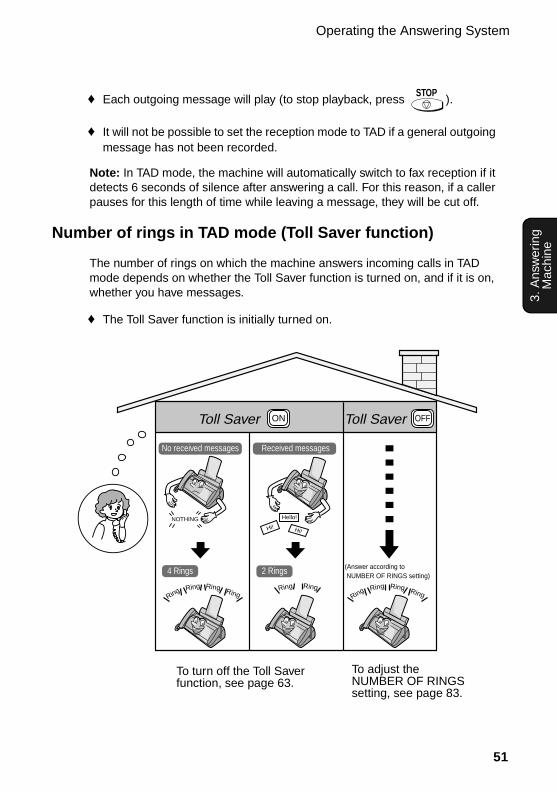
Number of rings in TAD mode (Toll Saver function)
The number of rings on which the machine answers incoming calls in TAD mode depends on whether the Toll Saver function is turned on, and if it is on, whether you have messages.
♦ The Toll Saver function is initially turned on.
STOP
To adjust the NUMBER OF RINGS setting, see page 83.
To turn off the Toll Saver function, see page 63.
ON OFF
No received messages
4 Rings
Received messages
2 Rings
Toll Saver Toll Saver
NOTHING Hello!
Hi!Hi!
Ring
RingRing Ring
Ring Ring Ring
RingRing Ring
(Answer according to NUMBER OF RINGS setting)
all.book⦆⦆Page⦆51⦆⦆Friday,⦆May⦆31,⦆2002⦆⦆9:49⦆AM

Operating the Answering System
52
Listening to received messages (at the fax machine)
When you return, the fax machine display will show the number of messages recorded in each box. Follow the steps below to listen to your messages.
1 Press .
• If you only want to listen to new messages (messages not previously
listened to), continue to hold down for at least two seconds.
2 If you wish to listen to the messages in a personal box, press the number of the box.
Example: for Box 1
3 Enter the passcode of the personal box.
Example:
4 The messages will play.
• As each message plays, the date and time of recording will appear briefly in the display. If no messages were received, NO MESSAGES will appear.
• Repeat: To listen to a message a second time, press before
playback of that message ends. To move back to the previous message,
press within 3 seconds of the beginning of the current message.
• Skip: To skip forward to the next message, press .
PLAY
PLAY
1
5 5 1
REPEAT
REPEAT
SKIP
0
Note: Playback will stop if you receive a call, lift the handset, or press .
♦ You can print out a list of your received messages that shows the date and time that each was received. See page 99.
STOP
all.book⦆⦆Page⦆52⦆⦆Friday,⦆May⦆31,⦆2002⦆⦆9:49⦆AM

Operating the Answering System
53
3. A
nsw
erin
g M
achi
ne
Erasing received messages
It is important to erase received messages after you listen to them to ensure that the memory does not become full.
♦ Erasing all messages in the general box: To erase all messages in the
general box, press , , and then .
♦ Erasing all messages in a personal box: To erase all messages in a
personal box, press , , enter the number of the box, enter the
passcode, and then press .
♦ Erasing a single message: To erase a single message, press
while the message is being played.
FUNCTION
DELETE
START/MEMORY
FUNCTION
DELETE
START/MEMORY
DELETE
Recording memos
You can record memos for yourself and other users of the machine. These are recorded in the general box, and will be played back together with
incoming messages when the key is pressed.PLAY
1 Press once and once.
2 Pick up the handset, press , and speak into the handset.
3 When you have finished speaking, replace the handset or press .
REC/MEMO
START/MEMORY
STOP
all.book⦆⦆Page⦆53⦆⦆Friday,⦆May⦆31,⦆2002⦆⦆9:49⦆AM
Operating the Answering System
54
Recording phone conversations
To record a phone conversation, hold down the key during the
conversation you want to record. When you are finished, release the key. The conversation is recorded in the general box, and will be played back when the
key is pressed.
REC/MEMO
PLAY
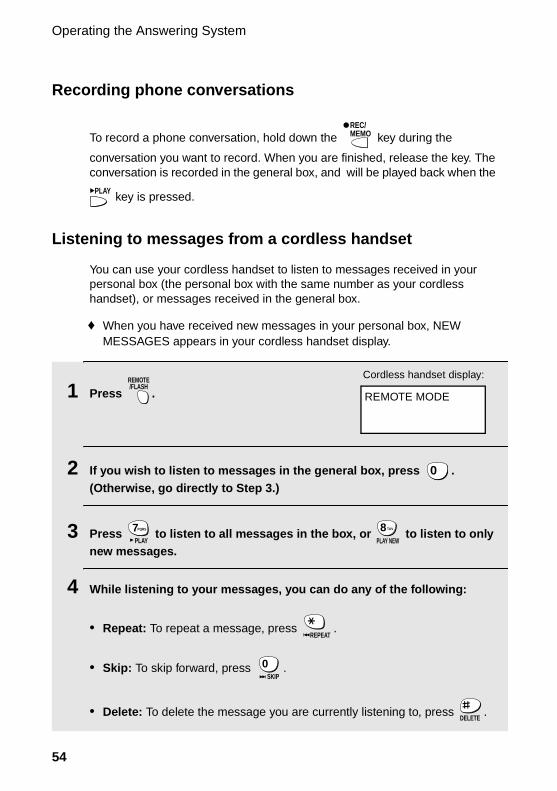
Listening to messages from a cordless handset
You can use your cordless handset to listen to messages received in your personal box (the personal box with the same number as your cordless handset), or messages received in the general box.
♦ When you have received new messages in your personal box, NEW MESSAGES appears in your cordless handset display.
1 Press .
2 If you wish to listen to messages in the general box, press . (Otherwise, go directly to Step 3.)
3 Press to listen to all messages in the box, or to listen to only new messages.
4 While listening to your messages, you can do any of the following:
• Repeat: To repeat a message, press .
• Skip: To skip forward, press .
• Delete: To delete the message you are currently listening to, press .
REMOTE/FLASH
0
PQRS7PLAY
TUV8PLAY NEW
REPEAT
0SKIP
DELETE
REMOTE MODE
Cordless handset display:
all.book⦆⦆Page⦆54⦆⦆Friday,⦆May⦆31,⦆2002⦆⦆9:49⦆AM

Operating the Answering System
55
3. A
nsw
erin
g M
achi
ne
• Stop: To stop playback, press .
5 To return to the STAND-BY display, press or .
• If a call comes in while you are listening to your messages, playback will stop automatically. Press any key to answer.
• If you take no action for 60 seconds in REMOTE MODE, the cordless handset will automatically return to the STAND-BY display.
STOP
WXYZ9
OFFOFF
REMOTE/FLASH
Deleting all messages from a cordless handset
You can use your cordless handset to delete all messages in your personal box, or all messages in the general box.
1 Press .
(Note: This step is not necessary if you are already in REMOTE MODE.)
2 If you wish to delete all messages in the general box, press . (Otherwise, go directly to Step 3.)
3 Press .
4 Press to delete the messages, and then or to return to the STAND-BY display.
• To cancel, press , , or .
REMOTE/FLASH
0
DELETE
STARTOFFOFF
REMOTE/FLASH
STOP
WXYZ9OFFOFF
REMOTE/FLASH
REMOTE MODE
Cordless handset display:
REMOTE MODEDELETE ALL?PRESS START KEY
all.book⦆⦆Page⦆55⦆⦆Friday,⦆May⦆31,⦆2002⦆⦆9:49⦆AM
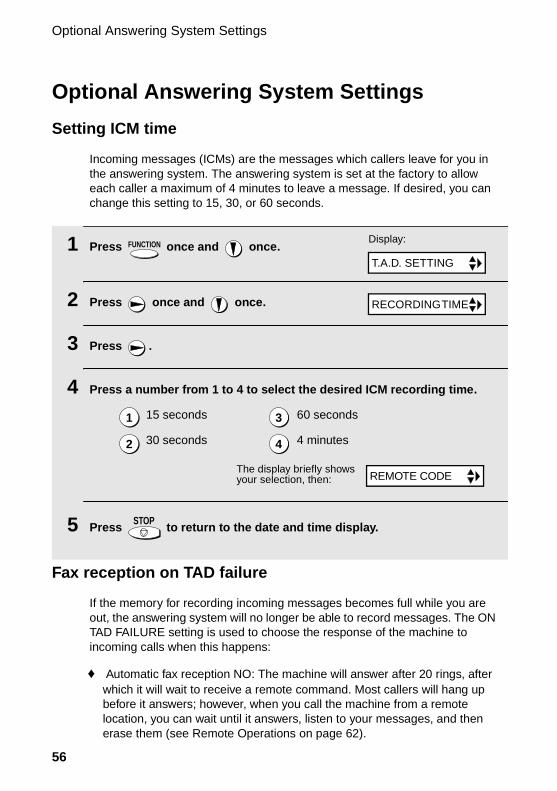
Optional Answering System Settings
56
1 Press once and once.
2 Press once and once.
3 Press .
4 Press a number from 1 to 4 to select the desired ICM recording time.
5 Press to return to the date and time display.
15 seconds 60 seconds
30 seconds 4 minutes
FUNCTION
STOP
Optional Answering System Settings
Setting ICM time
Incoming messages (ICMs) are the messages which callers leave for you in the answering system. The answering system is set at the factory to allow each caller a maximum of 4 minutes to leave a message. If desired, you can change this setting to 15, 30, or 60 seconds.
Display:
T.A.D. SETTING
RECORDING TIME
1
2
3
4
The display briefly shows your selection, then: REMOTE CODE
Fax reception on TAD failure
If the memory for recording incoming messages becomes full while you are out, the answering system will no longer be able to record messages. The ON TAD FAILURE setting is used to choose the response of the machine to incoming calls when this happens:
♦ Automatic fax reception NO: The machine will answer after 20 rings, after which it will wait to receive a remote command. Most callers will hang up before it answers; however, when you call the machine from a remote location, you can wait until it answers, listen to your messages, and then erase them (see Remote Operations on page 62).
all.book⦆⦆Page⦆56⦆⦆Friday,⦆May⦆31,⦆2002⦆⦆9:49⦆AM

Optional Answering System Settings
57
3. A
nsw
erin
g M
achi
ne
1 Press once and once.
2 Press once and 4 times.
3 Press .
4 Press to turn on automatic fax
reception, or to turn it off.
5 Press to return to the date and time display.
FUNCTION
1
2
STOP
ON TAD FAILURE
♦ Automatic fax reception YES: The reception mode will switch to FAX mode, allowing the machine to continue to receive faxes automatically. With this setting, you can still use the remote commands to listen to your messages and then erase them (see Remote Operations on page 62).
Automatic fax reception is set to NO at the factory before shipping. If you want to set it to YES, press the panel keys as follows:
Display:
T.A.D. SETTING
1=YES, 2=NO
The display briefly shows your selection, then:
OGM ONLY MODE
OGM only mode
If needed, you can turn off recording of incoming messages. In this case, your outgoing message will play, but callers will not be able to leave a message (this applies to all boxes). The machine will still receive faxes sent by automatic dialing.
1 Press once and once.
2 Press once and 3 times.
FUNCTION
OGM ONLY MODE
Display:
T.A.D. SETTING
all.book⦆⦆Page⦆57⦆⦆Friday,⦆May⦆31,⦆2002⦆⦆9:49⦆AM
Optional Answering System Settings
58
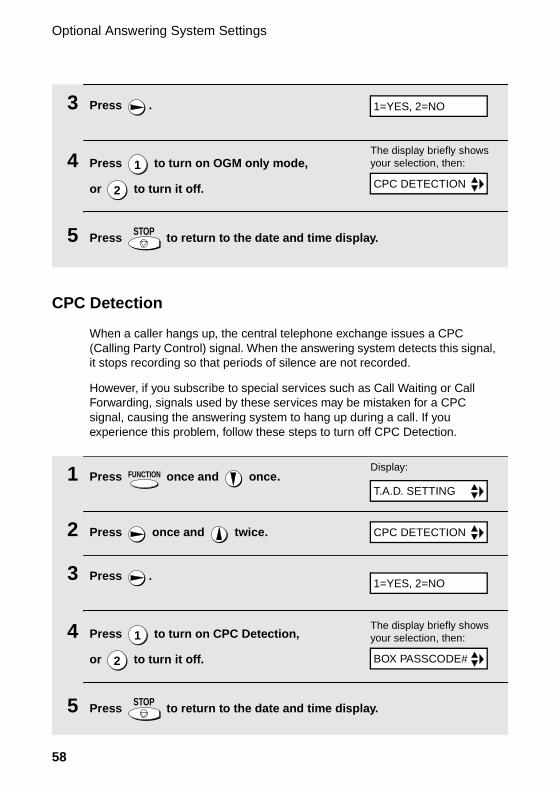
3 Press .
4 Press to turn on OGM only mode,
or to turn it off.
5 Press to return to the date and time display.
1
2
STOP
The display briefly shows your selection, then:
CPC DETECTION
CPC Detection
When a caller hangs up, the central telephone exchange issues a CPC (Calling Party Control) signal. When the answering system detects this signal, it stops recording so that periods of silence are not recorded.
However, if you subscribe to special services such as Call Waiting or Call Forwarding, signals used by these services may be mistaken for a CPC signal, causing the answering system to hang up during a call. If you experience this problem, follow these steps to turn off CPC Detection.
1 Press once and once.
2 Press once and twice.
3 Press .
4 Press to turn on CPC Detection,
or to turn it off.
5 Press to return to the date and time display.
FUNCTION
1
2
STOP
CPC DETECTION
Display:
T.A.D. SETTING
1=YES, 2=NO
The display briefly shows your selection, then:
BOX PASSCODE#
1=YES, 2=NO
all.book⦆⦆Page⦆58⦆⦆Friday,⦆May⦆31,⦆2002⦆⦆9:49⦆AM

Transfer Function
59
3. A
nsw
erin
g M
achi
ne
Transfer FunctionThe Transfer function is used to have the machine automatically call you at a specified number every time it receives an incoming message in a specified box. This lets you hear your messages immediately after they come in, even when you are at a remote location.
To use the Transfer function, you must first program the number that you wish the machine to call (the transfer number), and record the transfer message that plays when you answer the phone at the remote location.
When you go out and wish to use the transfer function, turn it on. When you return and no longer wish to use the transfer function, turn it off.
Programming the transfer number
To use the Transfer function, you must first give the machine the number to call (the transfer number).
1 Press once and once.
2 Press once and 3 times.
3 Press .
4 Press the number keys to enter the transfer number.
• To insert a pause between any two digits of the number, press .
5 Press .
6 Press to return to the date and time display.
FUNCTION
FUNCTION
START/MEMORY
STOP
TRANSFER TEL #
Display:
T.A.D. SETTING
ENTER TEL #
all.book⦆⦆Page⦆59⦆⦆Friday,⦆May⦆31,⦆2002⦆⦆9:49⦆AM
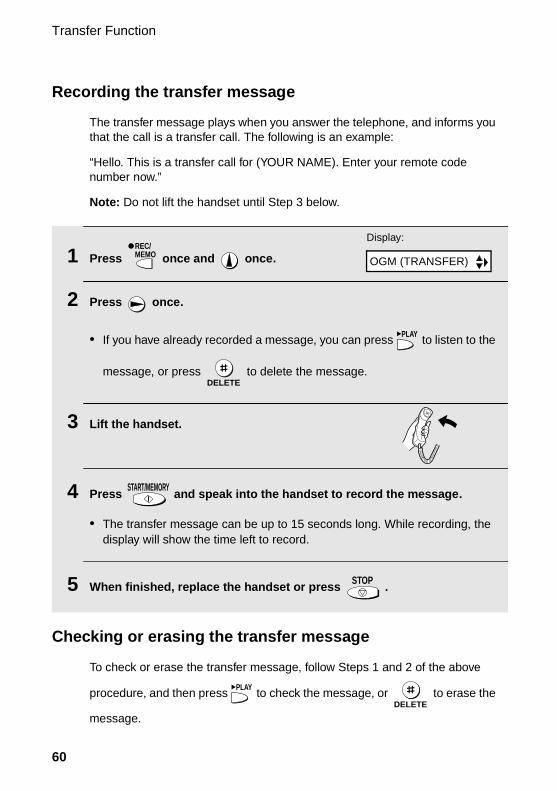
Transfer Function
60
Recording the transfer message
The transfer message plays when you answer the telephone, and informs you that the call is a transfer call. The following is an example:
“Hello. This is a transfer call for (YOUR NAME). Enter your remote code number now.”
Note: Do not lift the handset until Step 3 below.
1 Press once and once.
2 Press once.
• If you have already recorded a message, you can press to listen to the
message, or press to delete the message.
3 Lift the handset.
4 Press and speak into the handset to record the message.
• The transfer message can be up to 15 seconds long. While recording, the display will show the time left to record.
5 When finished, replace the handset or press .
REC/MEMO
PLAY
DELETE
START/MEMORY
STOP
Display:
OGM (TRANSFER)
Checking or erasing the transfer message
To check or erase the transfer message, follow Steps 1 and 2 of the above
procedure, and then press to check the message, or to erase the
message.
PLAY
DELETE
all.book⦆⦆Page⦆60⦆⦆Friday,⦆May⦆31,⦆2002⦆⦆9:49⦆AM

Transfer Function
61
3. A
nsw
erin
g M
achi
ne
Turning the Transfer function on and off
When you go out and wish to use the Transfer function, turn it on as follows:
1 Press once and once.
2 Press once and 4 times.
3 Press .
4 Press to turn on the Transfer function.
(Press to turn the function off.)
5 Press the number of the box for which you want the Transfer function to
operate (for the general box, press ).
6 Press to return to the date and time display.
7 Each time the machine receives an incoming message, it will call your programmed transfer number. When you answer, you will hear your recorded message telling you that the call is a transfer call. On the dial
pad of your phone, enter , your remote code number (see page 62) if the general box was selected in Step 5, or the box passcode number if a
personal box was selected, and then . Your messages will play.
• You can also perform any of the remote operations described in Remote Operations later in this chapter (see page 62).
Note: When you hang up after a transfer call, the machine will not immediately resume normal operation. If you want the machine to accept calls
immediately after a transfer call, enter twice before hanging up (if
hanging up during message playback, first enter and to stop
playback, then enter twice).
FUNCTION
1
2
0
STOP
0
TRANSFER FUNC
Display:
T.A.D. SETTING
1=YES, 2=NO
The display briefly shows your selection, then:
ON TAD FAILURE
all.book⦆⦆Page⦆61⦆⦆Friday,⦆May⦆31,⦆2002⦆⦆9:49⦆AM
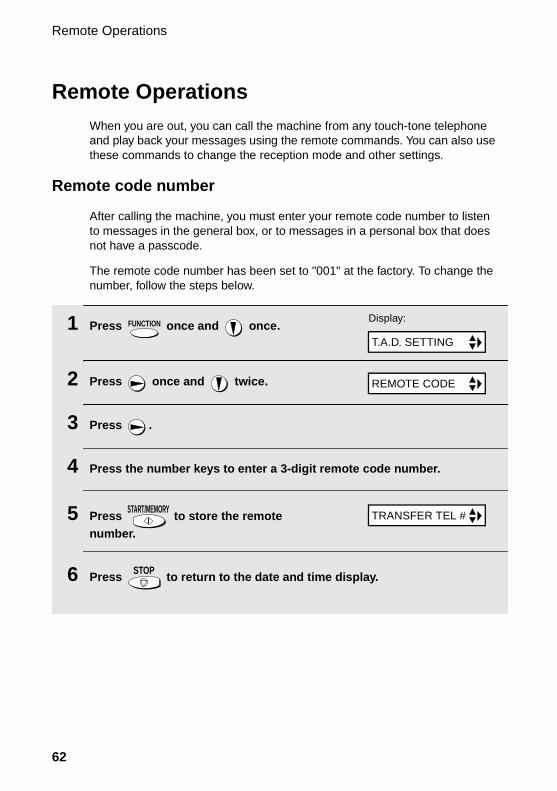
Remote Operations
62
1 Press once and once.
2 Press once and twice.
3 Press .
4 Press the number keys to enter a 3-digit remote code number.
5 Press to store the remote number.
6 Press to return to the date and time display.
FUNCTION
START/MEMORY
STOP
Remote OperationsWhen you are out, you can call the machine from any touch-tone telephone and play back your messages using the remote commands. You can also use these commands to change the reception mode and other settings.
Remote code number
After calling the machine, you must enter your remote code number to listen to messages in the general box, or to messages in a personal box that does not have a passcode.
The remote code number has been set to "001" at the factory. To change the number, follow the steps below.
Display:
T.A.D. SETTING
REMOTE CODE
TRANSFER TEL #
all.book⦆⦆Page⦆62⦆⦆Friday,⦆May⦆31,⦆2002⦆⦆9:49⦆AM
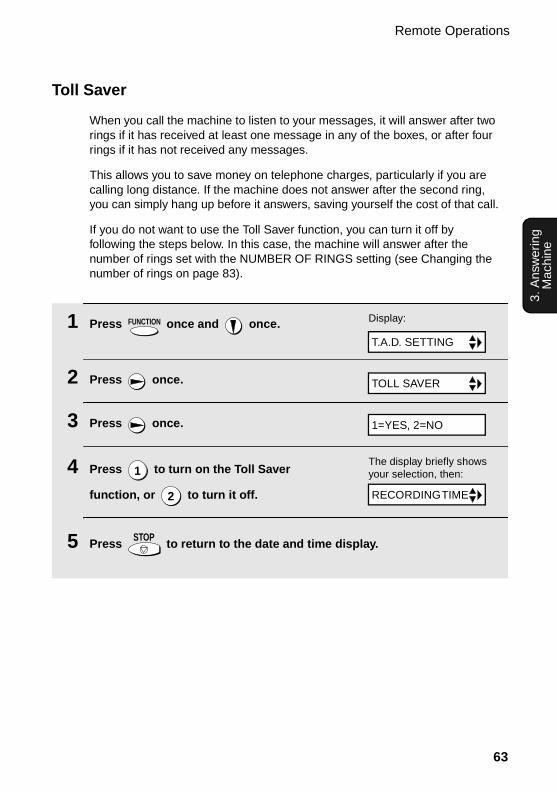
Remote Operations
63
3. A
nsw
erin
g M
achi
ne
Toll Saver
When you call the machine to listen to your messages, it will answer after two rings if it has received at least one message in any of the boxes, or after four rings if it has not received any messages.
This allows you to save money on telephone charges, particularly if you are calling long distance. If the machine does not answer after the second ring, you can simply hang up before it answers, saving yourself the cost of that call.
If you do not want to use the Toll Saver function, you can turn it off by following the steps below. In this case, the machine will answer after the number of rings set with the NUMBER OF RINGS setting (see Changing the number of rings on page 83).
1 Press once and once.
2 Press once.
3 Press once.
4 Press to turn on the Toll Saver
function, or to turn it off.
5 Press to return to the date and time display.
FUNCTION
1
2
STOP
TOLL SAVER
Display:
T.A.D. SETTING
1=YES, 2=NO
The display briefly shows your selection, then:
RECORDING TIME
all.book⦆⦆Page⦆63⦆⦆Friday,⦆May⦆31,⦆2002⦆⦆9:49⦆AM

Remote Operations
64
Retrieving your messages
Note: You can only access one box per call. If you wish to access more than one box, you must make a separate call for each box.
1 Call the machine from a touch-tone telephone. When the general
outgoing message begins, press on the telephone.
• You will hear a short beep, and the outgoing message will stop.
2 If you wish to listen to the messages in a personal box, enter the number of that box (otherwise, go directly to Step 3).
Example: for Box 1
3 If you are accessing the general box, enter your remote code. If you are accessing a personal box, enter the passcode of the box (if the box does not have a passcode, enter your remote code).
When finished, press .
• You will hear a series of beeps equal to the number of messages recorded in the box, or one long beep if four or more messages have been received. The machine will then play back the messages, beeping once at the end of each message. When all messages have been played back, you will hear a long beep.
• If no messages have been received, you will hear a short beep. You can either hang up, or perform any of the operations described in the following section, Other remote operations.
1
all.book⦆⦆Page⦆64⦆⦆Friday,⦆May⦆31,⦆2002⦆⦆9:49⦆AM

Remote Operations
65
3. A
nsw
erin
g M
achi
ne
4 While the messages are playing, you can do any of the following:
• Repeat: To listen to a message a second time, press and on the
telephone before that message ends. To move back to the previous
message, press and during the first 3 seconds of the current
message.
• Skip forward: To skip forward to the next message, press and
on the telephone.
• Stop: To stop playback, press and on the telephone. After this,
you can enter any of the commands described in the following section, Other remote operations.
• Play new messages: To listen to only your new messages, first stop
playback by pressing and , and then press and .
• Erase a message: To erase the message you are currently listening to,
press and before it ends.
5 When you have finished listening to your messages, you can do any of the following:
• Erase all messages: Press , , and .
• Repeat playback: Press and .
• Perform other operations: You can enter any of the commands described in the following section, Other remote operations.
• Hang up: If you do not erase your messages first, they will be saved and any new messages will be recorded after them. If you want the machine to
resume normal operation immediately, press twice before hanging up
(in some cases, particularly when the Transfer function is used, the machine may not accept new calls for one or two minutes after you hang up
unless you press twice).
2
2
5
0
0 6
3
3 3
7
all.book⦆⦆Page⦆65⦆⦆Friday,⦆May⦆31,⦆2002⦆⦆9:49⦆AM
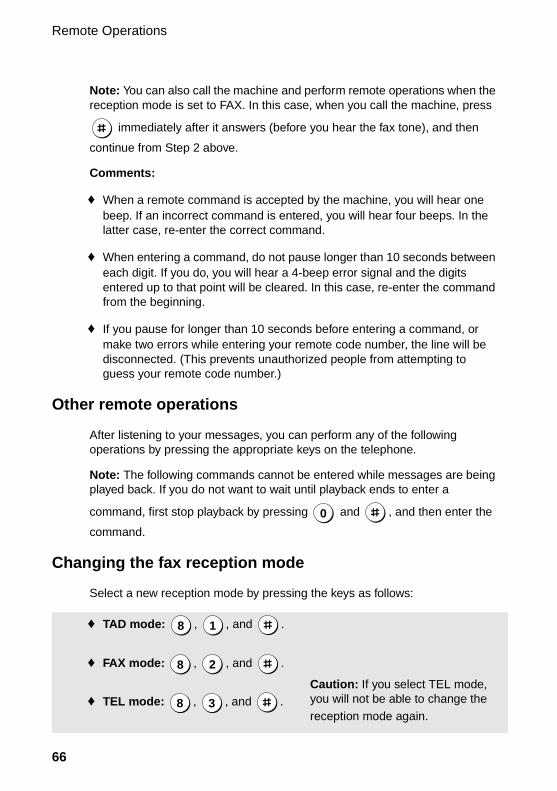
Remote Operations
66
Note: You can also call the machine and perform remote operations when the reception mode is set to FAX. In this case, when you call the machine, press
immediately after it answers (before you hear the fax tone), and then
continue from Step 2 above.
Comments:
♦ When a remote command is accepted by the machine, you will hear one beep. If an incorrect command is entered, you will hear four beeps. In the latter case, re-enter the correct command.
♦ When entering a command, do not pause longer than 10 seconds between each digit. If you do, you will hear a 4-beep error signal and the digits entered up to that point will be cleared. In this case, re-enter the command from the beginning.
♦ If you pause for longer than 10 seconds before entering a command, or make two errors while entering your remote code number, the line will be disconnected. (This prevents unauthorized people from attempting to guess your remote code number.)
Other remote operations
After listening to your messages, you can perform any of the following operations by pressing the appropriate keys on the telephone.
Note: The following commands cannot be entered while messages are being played back. If you do not want to wait until playback ends to enter a
command, first stop playback by pressing and , and then enter the
command.
Changing the fax reception mode
Select a new reception mode by pressing the keys as follows:
0
♦ TAD mode: , , and .
♦ FAX mode: , , and .
♦ TEL mode: , , and .
8 1
8 2
8 3
Caution: If you select TEL mode, you will not be able to change the
reception mode again.
all.book⦆⦆Page⦆66⦆⦆Friday,⦆May⦆31,⦆2002⦆⦆9:49⦆AM
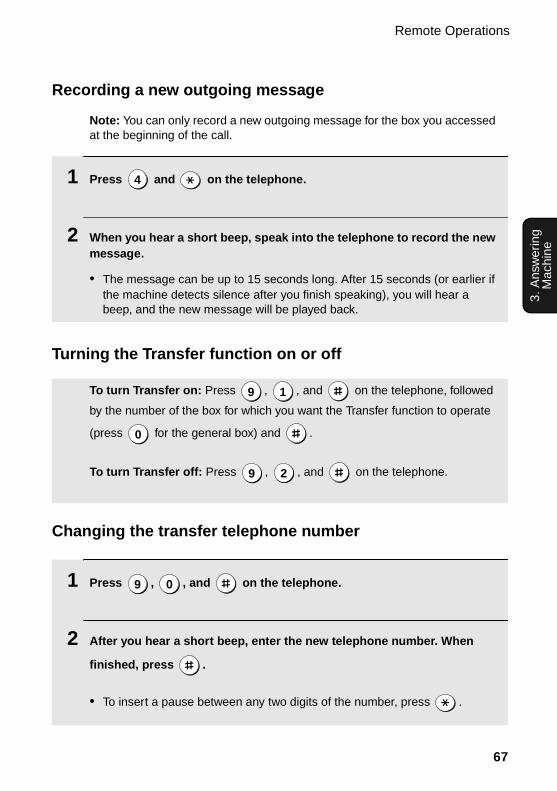
Remote Operations
67
3. A
nsw
erin
g M
achi
ne
Recording a new outgoing message
Note: You can only record a new outgoing message for the box you accessed at the beginning of the call.
1 Press and on the telephone.
2 When you hear a short beep, speak into the telephone to record the new message.
• The message can be up to 15 seconds long. After 15 seconds (or earlier if the machine detects silence after you finish speaking), you will hear a beep, and the new message will be played back.
4
Turning the Transfer function on or off
To turn Transfer on: Press , , and on the telephone, followed
by the number of the box for which you want the Transfer function to operate
(press for the general box) and .
To turn Transfer off: Press , , and on the telephone.
9 1
0
9 2
Changing the transfer telephone number
1 Press , , and on the telephone.
2 After you hear a short beep, enter the new telephone number. When
finished, press .
• To insert a pause between any two digits of the number, press .
9 0
all.book⦆⦆Page⦆67⦆⦆Friday,⦆May⦆31,⦆2002⦆⦆9:49⦆AM

Remote Operations
68
Recording a memo
You can record a memo for yourself or other users of the machine. The memo will be recorded in the general box.
1 Press and on the telephone.
2 When you hear a short beep, speak into the telephone to record the memo.
3 When you are finished, press and on the telephone.
• If the machine detects silence, it will stop recording automatically.
0
Recording a new transfer message
1 Press , , and on the telephone.
2 When you hear a short beep, speak into the telephone to record the new message.
• The time for the transfer message is fixed at 15 seconds. After 15 seconds (or earlier if the machine detects silence after you finish speaking), you will hear a beep, and the new message will be played back automatically.
9 3
OGM only mode
To turn on OGM only mode: Press , , and on the telephone.
(Outgoing messages will play, but callers will not be able to record a message. Faxes sent by automatic dialling will be received)
To turn off OGM only mode: Press , , and on the telephone.
1 1
1 2
all.book⦆⦆Page⦆68⦆⦆Friday,⦆May⦆31,⦆2002⦆⦆9:49⦆AM

69
4. S
endi
ng
Faxe
s
4. Sending Faxes
Transmittable Documents
Size and weight
The size and weight of documents that you can load in the document feeder depend on whether you load one page at a time or several pages at once.
Note: Letters or graphics on the edges of a document will not be scanned.
0.16"(4 mm) 0.16"(4 mm)
0.2"(5 mm)
0.2"(5 mm) Letters in the shaded area will not be scanned.
8.5"(216 mm)
23.6"(600 mm)
14 lbs. (52 g/m² )
42 lbs. (157 g/m²)
11"(279 mm)
8.5"(216 mm)
21.5 lbs.(80 g/m²)
Loading one page at a time:
Minimum size Maximum size
Minimum weight Maximum weight
Minimum size Maximum size
Minimum weight Maximum weight
14 lbs. (52 g/m² )
Loading up to 10 pages at once:
5.5"(140 mm)
5.8"(148 mm)
5.5"(140 mm)
5.8"(148 mm)
The illustration shows the scanning margins for letter-size documents. The scanning width is 8.3” (210 mm). The horizontal margins decrease for smaller-width documents.
all.book⦆⦆Page⦆69⦆⦆Friday,⦆May⦆31,⦆2002⦆⦆9:49⦆AM

Loading the Document
70
Other restrictions
♦ The scanner cannot recognize yellow, greenish yellow, or light blue ink.
♦ Ink, glue, and correcting fluid on documents must be dry before they pass through the document feeder.
♦ All clips, staples, and pins must be removed from documents before loading in the feeder. If these are not removed, they may damage the machine.
♦ Documents which are patched, taped, torn, smaller than the minimum size, carbon backed, easily smudged, or have a slick coated surface should be photocopied, and the copy loaded in the feeder.
Loading the DocumentUp to 10 pages can be placed in the feeder at one time. The pages will automatically feed into the machine starting from the bottom page.
♦ If you need to send or copy more than 10 pages, place the additional pages gently and carefully in the feeder just before the last page is scanned. Do not try to force them in, as this may cause double-feeding or jamming.
♦ If your document consists of several large or thick pages which must be loaded one at a time, insert each page into the feeder as the previous page is being scanned. Insert gently to prevent double-feeding.
1 Adjust the document guides to the width of your document.
2 Insert the document face down in the document feeder. The top edge of the document should enter the feeder first.
• READY TO SEND will appear in the display.
all.book⦆⦆Page⦆70⦆⦆Friday,⦆May⦆31,⦆2002⦆⦆9:49⦆AM

Adjusting the Resolution and Contrast
71
4. S
endi
ng
Faxe
s
Adjusting the Resolution and ContrastIf desired, you can adjust the resolution and contrast before sending a document.
Note: The resolution and contrast settings are only effective for sending a document. They are not effective for receiving a document.
Resolution settings
STANDARD Use STANDARD for ordinary documents. This setting gives you the fastest and most economical transmission.
FINE Use FINE for documents containing small letters or fine drawings.
SUPER FINE Use SUPER FINE for documents containing very small letters or very fine drawings.
HALF TONE Use HALF TONE for photographs and illustrations. The original will be reproduced in 64 shades of gray.
You must adjust the settings each time you don’t want to use the default settings.
The default resolution setting is STANDARD and the default contrast setting is AUTO.
3 Adjust the resolution and/or contrast settings as explained in Resolution and Contrast below, then dial the receiving machine as explained on page 72.
all.book⦆⦆Page⦆71⦆⦆Friday,⦆May⦆31,⦆2002⦆⦆9:49⦆AM
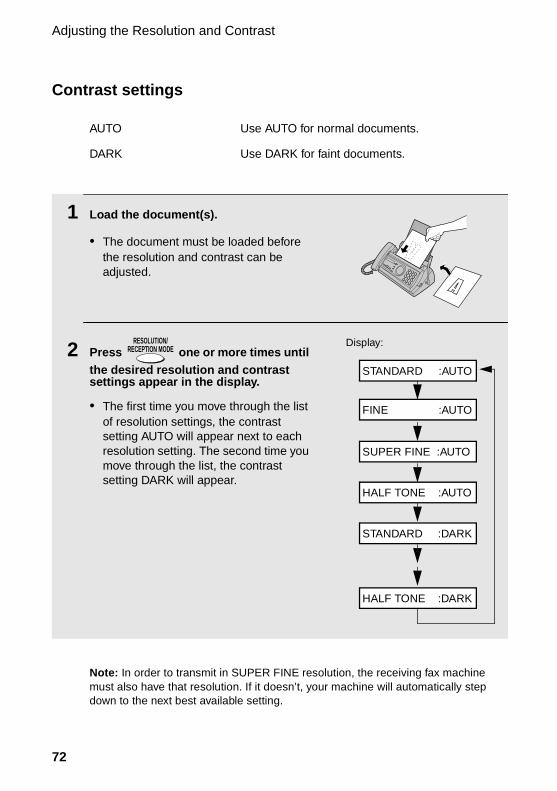
Adjusting the Resolution and Contrast
72
Note: In order to transmit in SUPER FINE resolution, the receiving fax machine must also have that resolution. If it doesn’t, your machine will automatically step down to the next best available setting.
1 Load the document(s).
• The document must be loaded before the resolution and contrast can be adjusted.
2 Press one or more times until the desired resolution and contrast settings appear in the display.
• The first time you move through the list of resolution settings, the contrast setting AUTO will appear next to each resolution setting. The second time you move through the list, the contrast setting DARK will appear.
RESOLUTION/RECEPTION MODE
Display:
STANDARD :AUTO
FINE :AUTO
SUPER FINE :AUTO
HALF TONE :AUTO
STANDARD :DARK
HALF TONE :DARK
Contrast settings
AUTO Use AUTO for normal documents.
DARK Use DARK for faint documents.
all.book⦆⦆Page⦆72⦆⦆Friday,⦆May⦆31,⦆2002⦆⦆9:49⦆AM

Sending a Fax by Normal Dialing
73
4. S
endi
ng
Faxe
s
1 Load the document(s).
• If desired, press to set the
resolution and/or contrast.
2 Pick up the handset or press . Listen for the dial tone.
3 Dial the number of the receiving machine by pressing the number keys.
4 Wait for the connection. Depending on the setting of the receiving machine, you will either hear a fax tone or the other person will answer.
• If the other party answers, ask them to press their Start key (if you pressed
, pick up the handset to speak with them). This causes the receiving
machine to issue a fax tone.
RESOLUTION/RECEPTION MODE
SPEAKER
SPEAKER
or
Sending a Fax by Normal Dialing
With Normal Dialing, you pick up the handset (or press ) and dial by
pressing the number keys.
♦ If a person answers, you can talk with them through the handset before
sending the fax. (If you pressed , you must pick up the handset to
talk.)
♦ Normal Dialing allows you to listen to the line and make sure the other fax machine is responding.
SPEAKER
SPEAKER
JKL
ABC
1DEF
WXYZ
9
GHI
4 5MNO
6PQRS
7TUV
8
0
2 3
DELETEREPEAT SKIP
READY TO SEND
SPEAKER
all.book⦆⦆Page⦆73⦆⦆Friday,⦆May⦆31,⦆2002⦆⦆9:49⦆AM
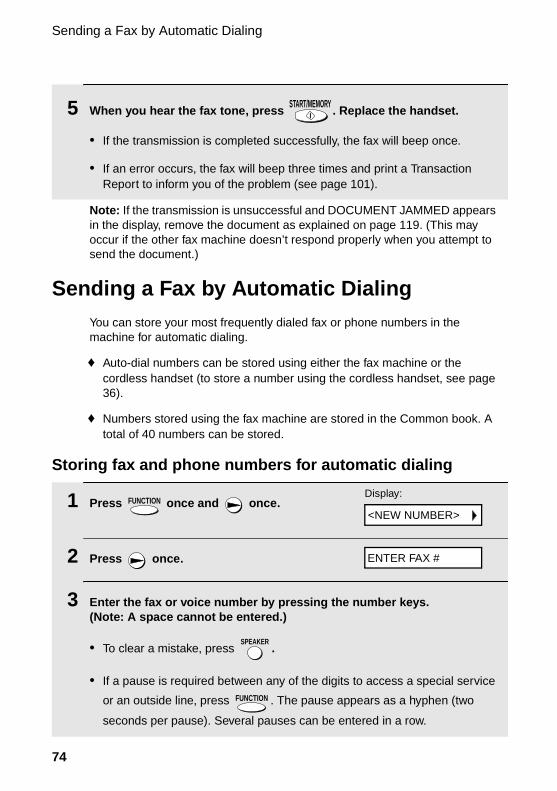
Sending a Fax by Automatic Dialing
74
Sending a Fax by Automatic DialingYou can store your most frequently dialed fax or phone numbers in the machine for automatic dialing.
♦ Auto-dial numbers can be stored using either the fax machine or the cordless handset (to store a number using the cordless handset, see page 36).
♦ Numbers stored using the fax machine are stored in the Common book. A total of 40 numbers can be stored.
Storing fax and phone numbers for automatic dialing
1 Press once and once.
2 Press once.
3 Enter the fax or voice number by pressing the number keys. (Note: A space cannot be entered.)
• To clear a mistake, press .
• If a pause is required between any of the digits to access a special service
or an outside line, press . The pause appears as a hyphen (two
seconds per pause). Several pauses can be entered in a row.
FUNCTION
SPEAKER
FUNCTION
5 When you hear the fax tone, press . Replace the handset.
• If the transmission is completed successfully, the fax will beep once.
• If an error occurs, the fax will beep three times and print a Transaction Report to inform you of the problem (see page 101).
START/MEMORY
Display:
ENTER FAX #
<NEW NUMBER>
Note: If the transmission is unsuccessful and DOCUMENT JAMMED appears in the display, remove the document as explained on page 119. (This may occur if the other fax machine doesn’t respond properly when you attempt to send the document.)
all.book⦆⦆Page⦆74⦆⦆Friday,⦆May⦆31,⦆2002⦆⦆9:49⦆AM

Sending a Fax by Automatic Dialing
75
4. S
endi
ng
Faxe
s
4 Press .
5 Enter a name by pressing number keys for each letter as shown in the chart below. Up to 15 characters can be entered. (If you do not wish to enter a name, go directly to Step 6.)
Example: SHARP = 7777 44 2 777 7
♦ To enter two letters in succession that require the same key, press
after entering the first letter.
♦ To enter a lower case letter, continue pressing the key for the letter until the lower case letter appears.
♦ To enter one of the following symbols, press or repeatedly:
. / ! " # $ % & ’ ( ) + + , - : ; < = > ? @ [ ¥ ] ^ _ ' { | } ) (
6 Press .
7 Return to Step 2 to store another number, or press to return to the date and time display.
START/MEMORY
START/MEMORY
STOP
A =
B =
C =
D =
E =
F =
G =
H =
I =
J =
K =
L =
M =
N =
O =
P =
Q =
R =
S =
T =
U =
V =
W =
X =
Y =
Z =
SPACE =
Display:
Note: The fax machine uses a lithium battery to keep automatic dialing numbers and other programmed information in memory when the power is turned off. Battery power is consumed primarily when the power is off. With the power kept continuously off, the life of the battery is about 5 years. If the battery dies, have your dealer or retailer replace it. Do not try to replace it yourself.
<NEW NUMBER>
all.book⦆⦆Page⦆75⦆⦆Friday,⦆May⦆31,⦆2002⦆⦆9:49⦆AM

Sending a Fax by Automatic Dialing
76
Editing and clearing auto-dial numbers
If you need to make changes to a previously stored auto-dial number, or clear a number, follow these steps:
1 Press once and once.
2 Press or until the number you wish to edit or clear appears in the display.
3 Press .
4 Press for EDIT or for CLEAR.
• If you selected CLEAR, go to Step 8.
5 If you selected EDIT, make the desired changes to the number.
• Press or to move the cursor to the digit or digits you wish to
change, and then enter the new digit. The new digit will replace the old digit.
• If you do not wish to change the number, go directly to Step 6.
6 Press .
7 Make the desired changes to the name.
• Press or to move the cursor to the letter or letters you wish to
change, and then press the appropriate number key repeatedly until the desired letter appears (see Step 5 on page 75). The new letter will replace the old letter.
• If you do not wish to change the name, go directly to Step 8.
FUNCTION
1 2
START/MEMORY
Display:
1=EDIT, 2=CLEAR
<NEW NUMBER>
all.book⦆⦆Page⦆76⦆⦆Friday,⦆May⦆31,⦆2002⦆⦆9:49⦆AM

Sending a Fax by Automatic Dialing
77
4. S
endi
ng
Faxe
s
8 Press .
9 Return to Step 2 to edit or clear another number, or press to return to the date and time display.
START/MEMORY
STOP
Using an auto-dial number
Once you have stored a fax or phone number, you can use it to send a fax or make a phone call.
1 If you are sending a fax, load the document(s).
• If desired, press to set the
resolution and/or contrast.
2 Press (or ) until the name of the other party appears in the display (if no name was stored, the number will appear).
3 If you are sending a fax, press . Dialing and transmission begins.
• If the transmission is completed successfully, the fax will beep once.
• If an error occurs, the fax will beep three times and print a Transaction Report to inform you of the problem (see page 101).
If you are making a phone call, lift the handset. Dialing begins.
RESOLUTION/RECEPTION MODE
START/MEMORY
READY TO SEND
all.book⦆⦆Page⦆77⦆⦆Friday,⦆May⦆31,⦆2002⦆⦆9:49⦆AM

Sending a Fax by Automatic Dialing
78
Sending a fax by Direct Keypad Dialing
You can also enter a full number with the number keys and then press the
key to begin dialing. You can use this method to dial a full number
when you don't need to speak to the other party before faxing.
START/MEMORY
1 Load the document(s).
• If desired, press to set the
resolution and/or contrast.
2 Enter the number of the receiving machine by pressing the number keys.
• If a pause is required between any of the digits to access a special service
or an outside line, press . The pause will appear as a hyphen (two
seconds per pause). Several pauses can be entered in a row.
3 Check the display. If the number of the receiving machine shown is
correct, press .
• If the number is not correct, press to backspace and clear one digit
at a time, and then re-enter the correct digit(s).
RESOLUTION/RECEPTION MODE
FUNCTION
START/MEMORY
STOP
READY TO SEND
all.book⦆⦆Page⦆78⦆⦆Friday,⦆May⦆31,⦆2002⦆⦆9:49⦆AM
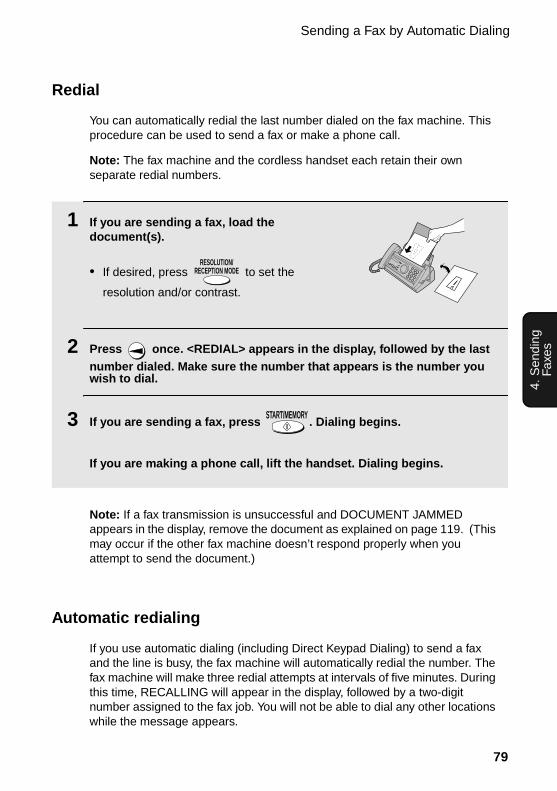
Sending a Fax by Automatic Dialing
79
4. S
endi
ng
Faxe
s
1 If you are sending a fax, load the document(s).
• If desired, press to set the
resolution and/or contrast.
2 Press once. <REDIAL> appears in the display, followed by the last number dialed. Make sure the number that appears is the number you wish to dial.
3 If you are sending a fax, press . Dialing begins.
If you are making a phone call, lift the handset. Dialing begins.
RESOLUTION/RECEPTION MODE
START/MEMORY
Redial
You can automatically redial the last number dialed on the fax machine. This procedure can be used to send a fax or make a phone call.
Note: The fax machine and the cordless handset each retain their own separate redial numbers.
Automatic redialing
If you use automatic dialing (including Direct Keypad Dialing) to send a fax and the line is busy, the fax machine will automatically redial the number. The fax machine will make three redial attempts at intervals of five minutes. During this time, RECALLING will appear in the display, followed by a two-digit number assigned to the fax job. You will not be able to dial any other locations while the message appears.
Note: If a fax transmission is unsuccessful and DOCUMENT JAMMED appears in the display, remove the document as explained on page 119. (This may occur if the other fax machine doesn’t respond properly when you attempt to send the document.)
all.book⦆⦆Page⦆79⦆⦆Friday,⦆May⦆31,⦆2002⦆⦆9:49⦆AM

Sending a Fax by Automatic Dialing
80
Error Correction Mode
The fax machine is set to automatically correct any distortions in a transmission due to noise on the telephone line before printing at the receiving end. This function is called Error Correction Mode (ECM). ECM is effective for both transmissions and receptions, and is only effective when the other fax machine has ECM as well.
If desired, you can turn ECM off. This will increase slightly the amount of memory available for memory transmission and reception.
1 Press once and once.
2 Press once and 6 times.
3 Press once.
4 Press to select YES, or to select NO.
5 Press to return to the date and time display.
FUNCTION
1 2
STOP
OPTION SETTING
ECM MODE
1=YES, 2=NO
The display briefly shows your selection, then:
DAY LIGHT SAVE
♦ You can press to clear the message and stop automatic redialing.
♦ Under certain conditions (for example if a person answers the call on a telephone), automatic redialing may stop before three redialing attempts are made.
STOP
all.book⦆⦆Page⦆80⦆⦆Friday,⦆May⦆31,⦆2002⦆⦆9:49⦆AM

Sending a Fax From Memory
81
4. S
endi
ng
Faxe
s
Sending a Fax From MemoryYou can scan a document into the fax’s memory and send the document from memory. This increases transmission speed and allows you to send a fax to multiple destinations in a single operation. After transmission, the document is automatically cleared from memory.
Note: If a power failure occurs while sending a fax from memory, you will need to repeat the operation.
Broadcasting (sending a fax to multiple destinations)
This function allows you to send the same fax to as many as 20 different destinations in just one operation.
♦ When sending to multiple destinations, only auto-dial numbers can be used to dial the numbers of the receiving machines.
1 Load the document(s).
• If desired, press to set the
resolution and/or contrast.
2 Press .
3 Press (or ) until the name of the destination appears in the display (if no name was stored, the number will appear).
4 Press to select the destination.
5 Repeat Steps 3 and 4 for each of the other destinations to which you wish to send the fax (maximum of 20).
• To check your selected destinations, press to scroll through them. To
delete a destination, scroll to the destination and then press .
RESOLUTION/RECEPTION MODE
START/MEMORY
STOP
all.book⦆⦆Page⦆81⦆⦆Friday,⦆May⦆31,⦆2002⦆⦆9:49⦆AM

Sending a Fax From Memory
82
Memory transmission
You can also send a fax through memory when sending to a single destination. This is convenient when sending to destinations where the line is often busy, as it saves you from waiting to pick up the original document and frees the feeder for other operations.
6 When you are ready to begin transmission, press .
• A Transaction Report is automatically printed out after Broadcasting is completed. Check the "Note" column of the report to see if any of the destinations are marked "Busy" or have a communication error code. If so, send the document to those destinations again.
START/MEMORY
To send a fax through memory, load the document, press , and then
dial using one of the following methods:
♦ Press the number keys to enter the fax number and then press .
♦ Press repeatedly to select an auto-dial number and press .
♦ Press once to select the last number dialed and press .
START/MEMORY
START/MEMORY
START/MEMORY
START/MEMORY
If the memory becomes full...
If the memory becomes full while the document is being scanned, MEMORY IS FULL and SEE MANUAL will alternately appear in the display.
♦ Press if you want to transmit the pages which have been stored up
to that point in memory. The remaining pages will be ejected from the feeder. After transmission, the memory will be cleared and you can transmit the remaining pages. You will also need to transmit the page which was being scanned when the memory filled up.
♦ Press if you want to cancel the entire transmission.
START/MEMORY
STOP
all.book⦆⦆Page⦆82⦆⦆Friday,⦆May⦆31,⦆2002⦆⦆9:49⦆AM

83
5. R
ecei
ving
Fa
xes
When the reception mode is set to FAX, the fax machine will automatically answer all calls on four rings and receive incoming faxes.
♦ If you pick up the handset before the machine answers, you can talk to the other party and/or receive a fax as explained in Using TEL Mode on page 84.
4 rings Fax reception
5. Receiving Faxes
Using FAX Mode
RESOLUTION/RECEPTION MODE
Changing the number of rings
If desired, you can change the number of rings on which the fax machine answers incoming calls in FAX mode. Any number from 2 to 5 can be selected.
1 Press once and once.FUNCTIONDisplay:
FAXTEL
TAD
OPTION SETTING
To select FAX mode, press
until the arrow in
the display points to FAX.
RESOLUTION/RECEPTION MODE
all.book⦆⦆Page⦆83⦆⦆Friday,⦆May⦆31,⦆2002⦆⦆9:49⦆AM
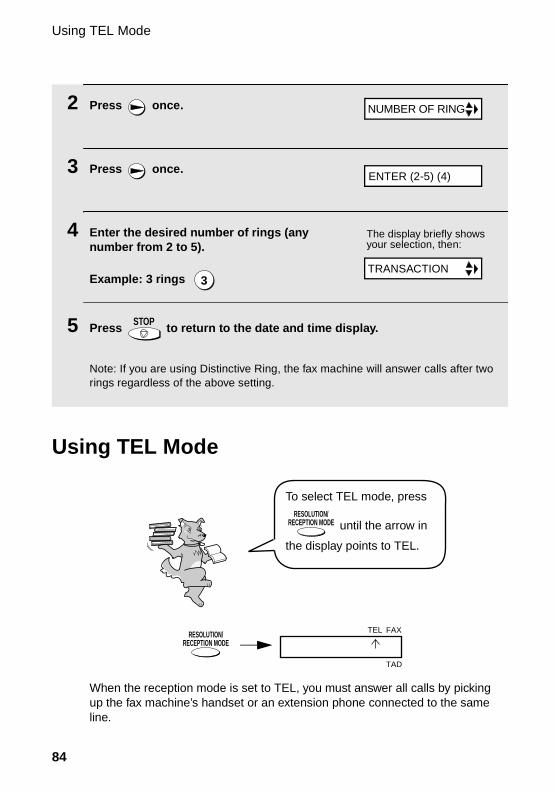
Using TEL Mode
84
2 Press once.
3 Press once.
4 Enter the desired number of rings (any number from 2 to 5).
Example: 3 rings
5 Press to return to the date and time display.
Note: If you are using Distinctive Ring, the fax machine will answer calls after two rings regardless of the above setting.
3
STOP
Using TEL Mode
The display briefly shows your selection, then:
To select TEL mode, press
until the arrow in
the display points to TEL.
RESOLUTION/RECEPTION MODE
When the reception mode is set to TEL, you must answer all calls by picking up the fax machine’s handset or an extension phone connected to the same line.
RESOLUTION/RECEPTION MODE
FAX
TAD
TEL
NUMBER OF RING
TRANSACTION
ENTER (2-5) (4)
all.book⦆⦆Page⦆84⦆⦆Friday,⦆May⦆31,⦆2002⦆⦆9:49⦆AM
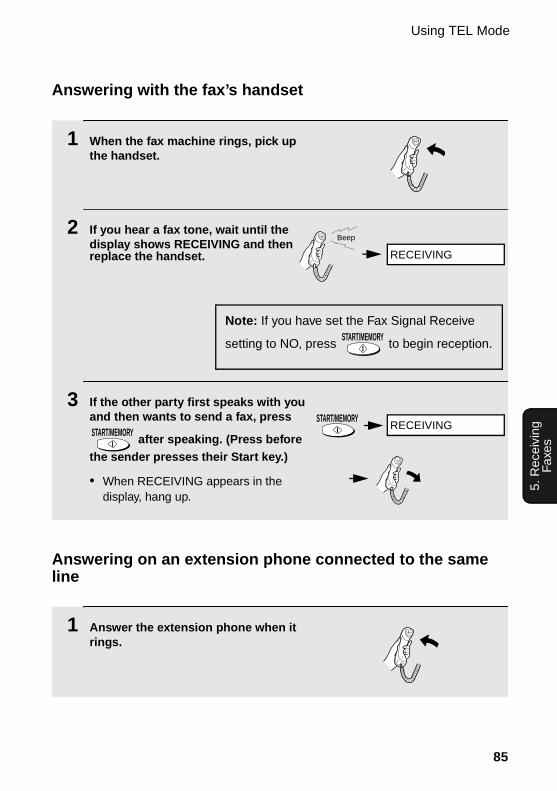
Using TEL Mode
85
5. R
ecei
ving
Fa
xes
1 When the fax machine rings, pick up the handset.
2 If you hear a fax tone, wait until the display shows RECEIVING and then replace the handset.
3 If the other party first speaks with you and then wants to send a fax, press
after speaking. (Press before the sender presses their Start key.)
• When RECEIVING appears in the display, hang up.
START/MEMORY
Answering on an extension phone connected to the same line
Answering with the fax’s handset
Note: If you have set the Fax Signal Receive
setting to NO, press to begin reception.START/MEMORY
Beep
START/MEMORY
1 Answer the extension phone when it rings.
RECEIVING
RECEIVING
all.book⦆⦆Page⦆85⦆⦆Friday,⦆May⦆31,⦆2002⦆⦆9:49⦆AM

Optional Reception Settings
86
2 If you hear a soft fax tone, wait until your fax responds (you will hear pronounced, high-pitched tones), then hang up.
3 If the fax doesn't respond, or if the other party first talks to you and then wants to send a fax, set the phone down (do not hang up), walk over to
the fax, lift the fax’s handset, and press .
• The above step is necessary if you have set the Fax Signal Receive setting to NO.
START/MEMORY
Pronounced, high-pitched tones
Beep
Optional Reception Settings
Fax Signal Receive
Your fax will automatically begin reception if you hear a soft fax tone after answering a call on your fax or an extension phone. If you use a computer fax modem to send documents on the same line, you must turn this function off in order to prevent your fax from mistakenly attempting to receive documents from the computer fax modem. Follow the steps below to change the setting.
1 Press once and once.
2 Press once and 4 times.
3 Press once.
FUNCTION Display:
OPTION SETTING
FAX SIGNAL RX
1=YES, 2=NO
all.book⦆⦆Page⦆86⦆⦆Friday,⦆May⦆31,⦆2002⦆⦆9:49⦆AM
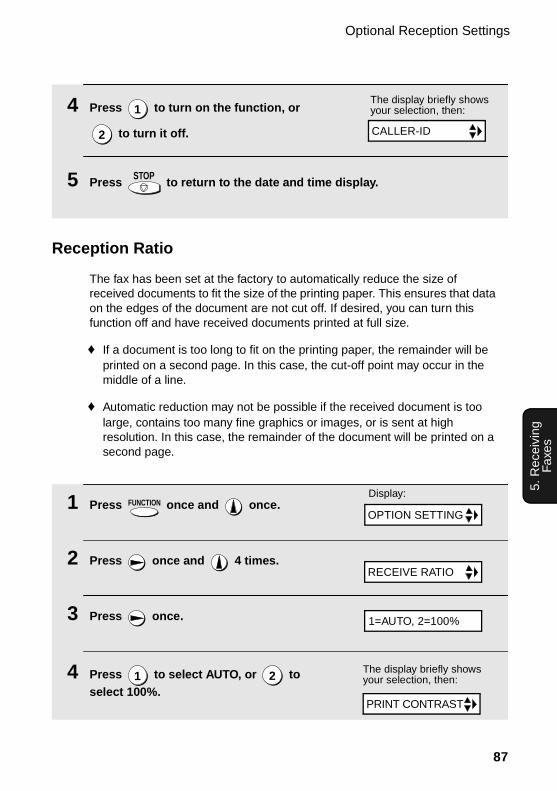
Optional Reception Settings
87
5. R
ecei
ving
Fa
xes
4 Press to turn on the function, or
to turn it off.
5 Press to return to the date and time display.
1
2
STOP
Reception Ratio
The fax has been set at the factory to automatically reduce the size of received documents to fit the size of the printing paper. This ensures that data on the edges of the document are not cut off. If desired, you can turn this function off and have received documents printed at full size.
♦ If a document is too long to fit on the printing paper, the remainder will be printed on a second page. In this case, the cut-off point may occur in the middle of a line.
♦ Automatic reduction may not be possible if the received document is too large, contains too many fine graphics or images, or is sent at high resolution. In this case, the remainder of the document will be printed on a second page.
1 Press once and once.
2 Press once and 4 times.
3 Press once.
4 Press to select AUTO, or to select 100%.
FUNCTION
1 2
The display briefly shows your selection, then:
Display:
CALLER-ID
OPTION SETTING
RECEIVE RATIO
The display briefly shows your selection, then:
PRINT CONTRAST
1=AUTO, 2=100%
all.book⦆⦆Page⦆87⦆⦆Friday,⦆May⦆31,⦆2002⦆⦆9:49⦆AM
Substitute Reception to Memory
88
Substitute Reception to MemoryIn situations where printing is not possible, such as when your fax runs out of paper, the imaging film needs replacement, or the paper jams, incoming faxes will be received to memory.
When you have received a document in memory, FAX RX IN MEMORY will appear in the display, alternating with ADD PAPER & PRESS START KEY or CHECK FILM / CHECK COVER / CHECK PAPER JAM. When you add paper
(and press ), replace the imaging film, or clear the jam, the stored
documents will automatically print out.
♦ If you received documents in memory because the fax ran out of paper, be sure to add paper which is the same size as the paper previously used. If not, the document print-out size may not match the size of the printing paper.
START/MEMORY
5 Press to return to the date and time display.STOP
all.book⦆⦆Page⦆88⦆⦆Friday,⦆May⦆31,⦆2002⦆⦆9:49⦆AM

89
6. M
akin
gC
opie
s
6. Making Copies
Your fax machine can also be used to make copies. Single and multiple copies (up to 99 per original) can be made, enabling your fax to double as a convenience office copier.
1 Load the document(s) face down. (Maximum of 10 pages.)
• If desired, press to set the
resolution and/or contrast. (The default resolution setting for copying is FINE.)
2 If desired, select an enlarge/reduce setting, and/or select the number of copies per original:
• ENLARGE/REDUCE: Press or until the desired setting appears
in the display. Settings are 100%, 125%, 135%, 50%, 73%, 88%, 94%, and AUTO (auto size adjustment to match the size of the paper). The default setting is 100%.
Example: Press twice
• Number of copies per original: Press the number keys to enter a number from 1 to 99. The default setting is 1.
Example: Press for five copies
3 When you are ready to begin copying, press .
RESOLUTION/RECEPTION MODE
5
COPY/HELP
READY TO SEND
RATIO: 125%
5
If MEMORY IS FULL appears...If the memory becomes full while a document is being scanned, MEMORY IS FULL and SEE MANUAL will alternately appear in the display and the document will automatically feed out. This may happen if the resolution is set to SUPER FINE, or if you selected an enlarge/reduce setting, or if you are making more than one copy per original. To avoid using memory, use STANDARD or FINE for the resolution, 100% for the enlarge/reduce setting, and make only one copy per original.
all.book⦆⦆Page⦆89⦆⦆Friday,⦆May⦆31,⦆2002⦆⦆9:49⦆AM
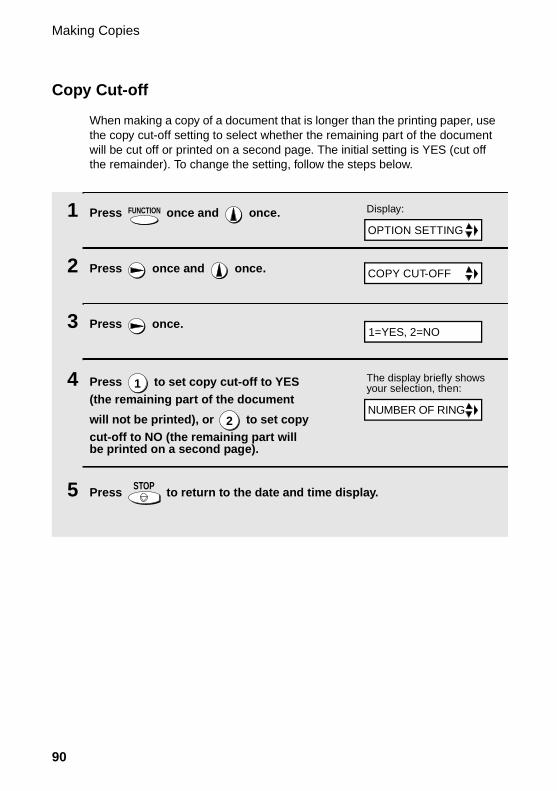
Making Copies
90
1 Press once and once.
2 Press once and once.
3 Press once.
4 Press to set copy cut-off to YES (the remaining part of the document
will not be printed), or to set copy cut-off to NO (the remaining part will be printed on a second page).
5 Press to return to the date and time display.
FUNCTION
1
2
STOP
Display:
The display briefly shows your selection, then:
OPTION SETTING
COPY CUT-OFF
NUMBER OF RING
1=YES, 2=NO
Copy Cut-off
When making a copy of a document that is longer than the printing paper, use the copy cut-off setting to select whether the remaining part of the document will be cut off or printed on a second page. The initial setting is YES (cut off the remainder). To change the setting, follow the steps below.
all.book⦆⦆Page⦆90⦆⦆Friday,⦆May⦆31,⦆2002⦆⦆9:49⦆AM

91
7. S
peci
al
Fun
ctio
ns
7. Special Functions
Caller ID (Requires Subscription to Service)If you subscribe to a caller identification service from your telephone company, you can have the fax machine and the cordless handset display the name and number of the caller when you receive a call.
Important:
♦ To use this function, you must subscribe to a caller identification service from your telephone company. Note that your fax may not be compatible with some caller identification services.
♦ Area Code mode: This step is needed if your telephone exchange cannot dial a local phone number (within your calling area code) when the area code is dialed with the phone number (see Step 5).
1 Press once and once on the fax machine.
2 Press once and 5 times.
3 Press once.
4 Press (YES) to turn on Caller ID.
(To turn off Caller ID, press and go to Step 8.)
5 Press to select SET. (To clear a previously set area code,
press and go to Step 8.)
Note: Entering your area code in this step causes it to be automatically removed from local numbers in the Caller ID list (page 93). This is only required if you need to eliminate dialing of the area code when dialing a local number from the list.Example (using the area code “123”): If Step 5 is skipped, the Caller ID display will show 123-444-1234, and the number that will dial from the Caller ID list is 123-444-1234. If the area code 123 is entered in Step 5, the Caller ID display will show 444-1234, and the number that will dial from the Caller ID list is 444-1234.
FUNCTION
1
2
1
2
Display:
OPTION SETTING
CALLER-ID
AREA CODE # MODE
ENTER AREA CODE
1=YES, 2=NO
1=SET, 2=CLEAR
all.book⦆⦆Page⦆91⦆⦆Friday,⦆May⦆31,⦆2002⦆⦆9:49⦆AM
植月 さおり
植月 さおり
植月 さおり
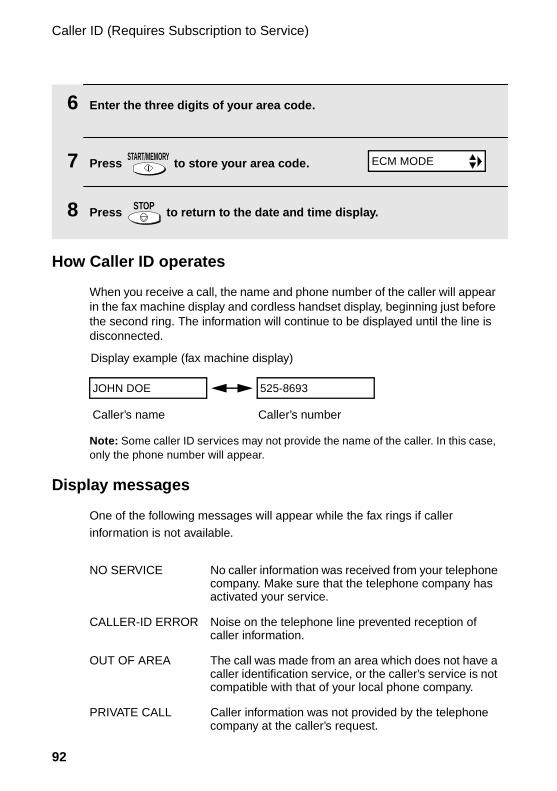
Caller ID (Requires Subscription to Service)
92
6 Enter the three digits of your area code.
7 Press to store your area code.
8 Press to return to the date and time display.
START/MEMORY
STOP
How Caller ID operates
When you receive a call, the name and phone number of the caller will appear in the fax machine display and cordless handset display, beginning just before the second ring. The information will continue to be displayed until the line is disconnected.
Note: Some caller ID services may not provide the name of the caller. In this case, only the phone number will appear.
Display messages
One of the following messages will appear while the fax rings if caller information is not available.
NO SERVICE No caller information was received from your telephone company. Make sure that the telephone company has activated your service.
CALLER-ID ERROR Noise on the telephone line prevented reception of caller information.
OUT OF AREA The call was made from an area which does not have a caller identification service, or the caller’s service is not compatible with that of your local phone company.
PRIVATE CALL Caller information was not provided by the telephone company at the caller’s request.
Display example (fax machine display)
Caller’s name Caller’s number
JOHN DOE 525-8693
ECM MODE
all.book⦆⦆Page⦆92⦆⦆Friday,⦆May⦆31,⦆2002⦆⦆9:49⦆AM
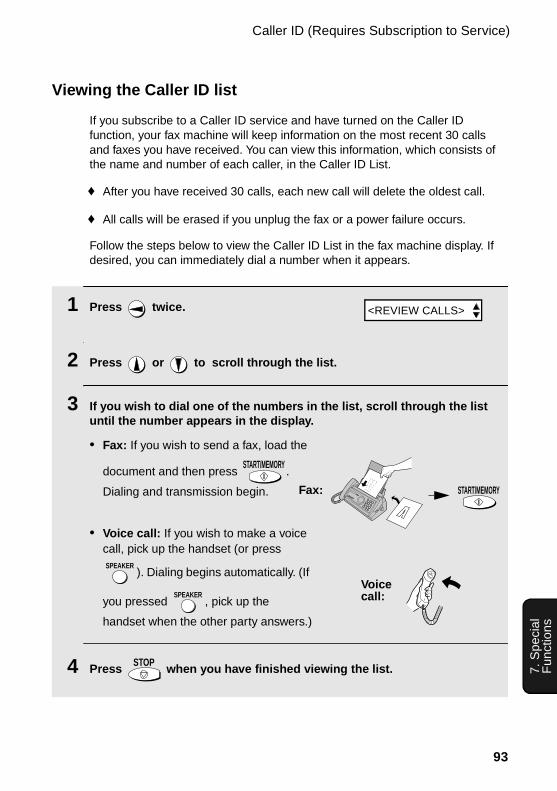
Caller ID (Requires Subscription to Service)
93
7. S
peci
al
Fun
ctio
ns
Viewing the Caller ID list
If you subscribe to a Caller ID service and have turned on the Caller ID function, your fax machine will keep information on the most recent 30 calls and faxes you have received. You can view this information, which consists of the name and number of each caller, in the Caller ID List.
♦ After you have received 30 calls, each new call will delete the oldest call.
♦ All calls will be erased if you unplug the fax or a power failure occurs.
Follow the steps below to view the Caller ID List in the fax machine display. If desired, you can immediately dial a number when it appears.
1 Press twice.
2 Press or to scroll through the list.
3 If you wish to dial one of the numbers in the list, scroll through the list until the number appears in the display.
• Fax: If you wish to send a fax, load the
document and then press .
Dialing and transmission begin.
• Voice call: If you wish to make a voice call, pick up the handset (or press
). Dialing begins automatically. (If
you pressed , pick up the
handset when the other party answers.)
4 Press when you have finished viewing the list.
START/MEMORY
SPEAKER
SPEAKER
STOP
START/MEMORYFax:
Voicecall:
<REVIEW CALLS>
all.book⦆⦆Page⦆93⦆⦆Friday,⦆May⦆31,⦆2002⦆⦆9:49⦆AM

Caller ID (Requires Subscription to Service)
94
To delete calls from the Caller ID list
If you want to delete a single call from the caller list, press while the call
appears in the display. If you want to delete all calls from the list, hold
down for at least 3 seconds while you are viewing any number in the list.
0
0
Viewing the Caller ID list from the cordless handset
You can also view the Caller ID list in the cordless handset display, and automatically dial a number from the list. (Note that the cordless handset and the fax machine share the same list.)
1 Press .
2 Press or to scroll through the numbers in the list.
3 While viewing the list, you can do the following:
• Dial a number: Scroll to the desired number and then press . (Note:
You can only make a phone call from the cordless handset; you cannot start a fax transmission.)
• Erase a call: Scroll to the call you wish to erase, press , and then
press .
4 Press when you have finished viewing the list.
REVIEW
TALK
ERASE
HOLD
START
OFFOFF
REVIEW CALLS▲▼: REVIEW
Cordless handset display:
all.book⦆⦆Page⦆94⦆⦆Friday,⦆May⦆31,⦆2002⦆⦆9:49⦆AM
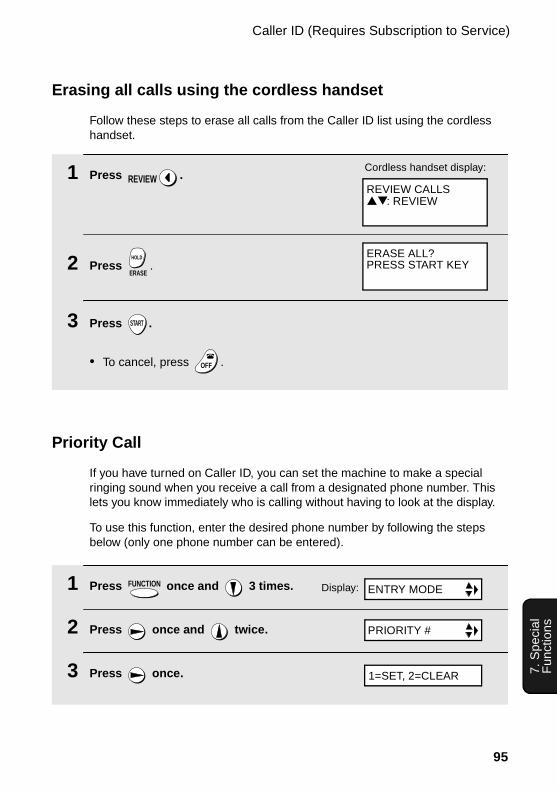
Caller ID (Requires Subscription to Service)
95
7. S
peci
al
Fun
ctio
ns
1 Press once and 3 times.
2 Press once and twice.
3 Press once.
FUNCTION
Priority Call
If you have turned on Caller ID, you can set the machine to make a special ringing sound when you receive a call from a designated phone number. This lets you know immediately who is calling without having to look at the display.
To use this function, enter the desired phone number by following the steps below (only one phone number can be entered).
Display: ENTRY MODE
PRIORITY #
1=SET, 2=CLEAR
Erasing all calls using the cordless handset
Follow these steps to erase all calls from the Caller ID list using the cordless handset.
1 Press .
2 Press .
3 Press .
• To cancel, press .
REVIEW
ERASE
HOLD
START
OFFOFF
REVIEW CALLS▲▼: REVIEW
Cordless handset display:
ERASE ALL?PRESS START KEY
all.book⦆⦆Page⦆95⦆⦆Friday,⦆May⦆31,⦆2002⦆⦆9:49⦆AM
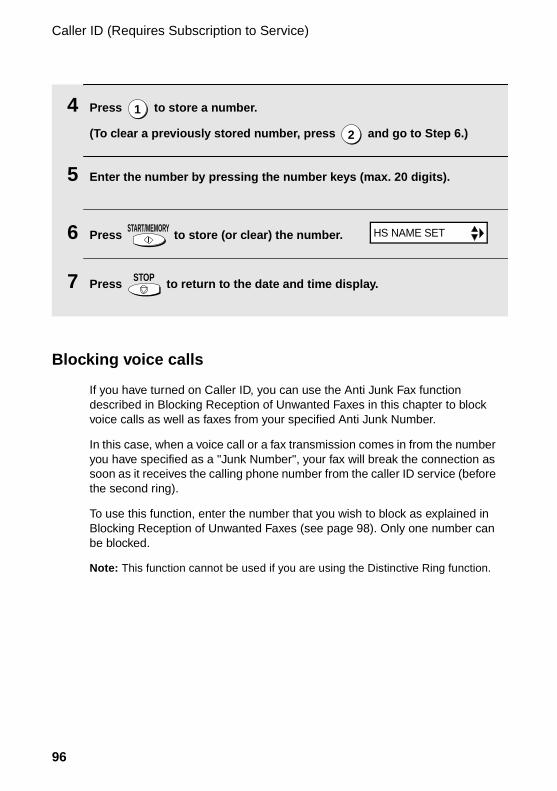
Caller ID (Requires Subscription to Service)
96
Blocking voice calls
If you have turned on Caller ID, you can use the Anti Junk Fax function described in Blocking Reception of Unwanted Faxes in this chapter to block voice calls as well as faxes from your specified Anti Junk Number.
In this case, when a voice call or a fax transmission comes in from the number you have specified as a "Junk Number", your fax will break the connection as soon as it receives the calling phone number from the caller ID service (before the second ring).
To use this function, enter the number that you wish to block as explained in Blocking Reception of Unwanted Faxes (see page 98). Only one number can be blocked.
Note: This function cannot be used if you are using the Distinctive Ring function.
4 Press to store a number.
(To clear a previously stored number, press and go to Step 6.)
5 Enter the number by pressing the number keys (max. 20 digits).
6 Press to store (or clear) the number.
7 Press to return to the date and time display.
1
2
START/MEMORY
STOP
HS NAME SET
all.book⦆⦆Page⦆96⦆⦆Friday,⦆May⦆31,⦆2002⦆⦆9:49⦆AM

Distinctive Ring (Requires Subscription to Service)
97
7. S
peci
al
Fun
ctio
ns
Distinctive Ring (Requires Subscription to Service)
Important:
♦ To use distinctive ring, you must subscribe to a distinctive ring service from your local phone company.
♦ Your fax machine may not be compatible with some distinctive ring services.
Distinctive ring is a service offered by some local telephone companies whereby they assign an additional second number to your regular single line. The second number rings differently from your normal number.
If you subscribe to a distinctive ring service, you can set the fax machine to automatically answer when your second number is called. This allows you to use the second number as an exclusive fax number. To have your fax automatically answer when your second number is called, follow the steps below:
1 Press once and once.
2 Press once and 3 times.
3 Press once.
4 Press a number from 1 to 3 to select the ring pattern below that matches your second number’s ring pattern. Or, press 4 to have your fax automatically answer your normal telephone number. Press 5 to turn off the distinctive ring function.
RING PATTERN 1 Two short rings
RING PATTERN 2 One short, one long, and one short ring
RING PATTERN 3 Two short rings and one long ring
STANDARD RING Your standard (normal) ring pattern
OFF SETTING Turn distinctive ring off
FUNCTION Display:
1
2
3
4
5
OPTION SETTING
DISTINCTIVE
all.book⦆⦆Page⦆97⦆⦆Friday,⦆May⦆31,⦆2002⦆⦆9:49⦆AM

Blocking Reception of Unwanted Faxes
98
5 Press to return to the date and time display.
6 Set the reception mode to FAX.
♦ When using distinctive ring, you must set the reception mode of your fax machine to FAX. When your designated fax number is dialed, your fax will automatically answer and begin reception after two rings. Note that other devices on the same line will also ring until your fax answers. If one of your other numbers is dialed, the fax will ring; however, it will not answer.
STOP
1 Press once and 3 times.
2 Press once and twice.
3 Press once.
4 Press to store an Anti Junk number, or to clear a previously stored number (if you are clearing a number, go to Step 6).
5 Enter the fax number by pressing the number keys (max. 20 digits).
6 Press and then press to return to the date and time display.
FUNCTION
1 2
START/MEMORY STOP
Blocking Reception of Unwanted FaxesThe Anti Junk Fax function allows you to block reception of faxes from a party that you specify. This saves paper by not printing out unwanted "junk" faxes. To use this function, follow the steps below to enter the fax number from which you do not wish to receive faxes. One fax number can be entered.
The display briefly shows your selection, then:
RESOLUTION/RECEPTION MODE
Display:
FAXTEL
TAD
FAX SIGNAL RX
ENTRY MODE
ANTI JUNK #
1=SET, 2=CLEAR
all.book⦆⦆Page⦆98⦆⦆Friday,⦆May⦆31,⦆2002⦆⦆9:49⦆AM

99
8. P
rintin
g Li
sts8. Printing Lists
You can print lists showing settings and information entered in the fax machine. The lists are described below. To print a list, follow these steps.
1 Press once and twice.
2 Press once.
3 Press or until the desired list appears in the display.
4 Press once.
5 Press to print the list.
FUNCTION
START/MEMORY
Display:
LISTING MODE
TEL # LIST
PRESS START KEY
all.book⦆⦆Page⦆99⦆⦆Friday,⦆May⦆31,⦆2002⦆⦆9:49⦆AM
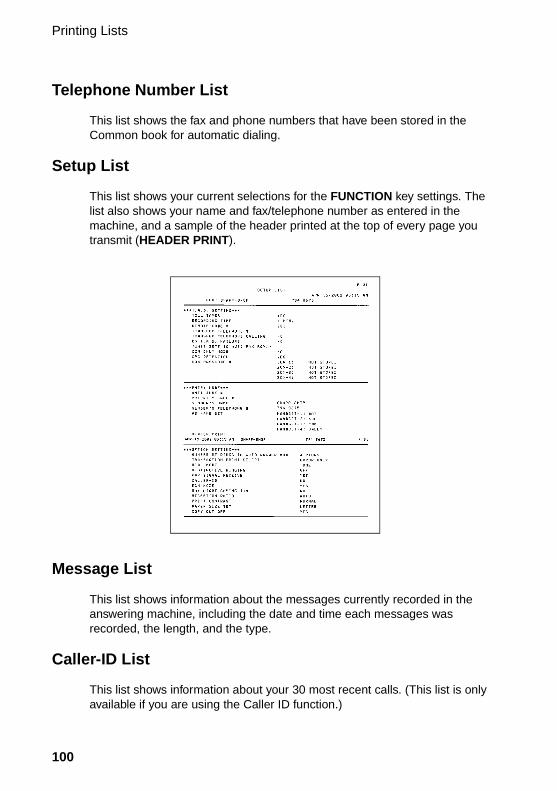
Printing Lists
100
Message List
This list shows information about the messages currently recorded in the answering machine, including the date and time each messages was recorded, the length, and the type.
Caller-ID List
This list shows information about your 30 most recent calls. (This list is only available if you are using the Caller ID function.)
Telephone Number List
This list shows the fax and phone numbers that have been stored in the Common book for automatic dialing.
Setup List
This list shows your current selections for the FUNCTION key settings. The list also shows your name and fax/telephone number as entered in the machine, and a sample of the header printed at the top of every page you transmit (HEADER PRINT).
all.book⦆⦆Page⦆100⦆⦆Friday,⦆May⦆31,⦆2002⦆⦆9:49⦆AM
Printing Lists
101
8. P
rintin
g Li
sts
Transaction Report
This report is printed out automatically after an operation is completed to allow you to check the result. Your fax machine is set at the factory to print out the report only when an error occurs.
♦ The Transaction report cannot be printed on demand.
Headings in Transaction Report
SENDER/RECEIVER
The name or fax number of the other machine involved in the transaction. If that machine does not have an ID function, the communication mode will appear (for example, "G3").
START The time at which transmission/reception started.
TX/RX TIME Total time taken for transmission/reception.
PAGES Number of pages transmitted/received.
NOTE (One of the following notes will appear under NOTE in the report to indicate whether the transaction was successful, and if not, the reason for the failure.)
OK - Transmission/reception was successful.
P.FAIL - A power failure prevented the transaction.
JAM - The printing paper or document jammed, preventing the transaction.
BUSY - The fax was not sent because the line was busy.
COM.E-X - (Where “X” is a number.) A telephone line error prevented the transaction. See Line error on page 108.
CANCEL - The transaction was cancelled because the STOP key was pressed, no document was in the feeder, or the other machine requested transmission using a function which your fax machine does not have. If you were attempting to fax, make sure a document is in the feeder. If you were receiving, contact the faxing party to see how they are trying to send to you.
all.book⦆⦆Page⦆101⦆⦆Friday,⦆May⦆31,⦆2002⦆⦆9:49⦆AM

Printing Lists
102
Transaction Report print condition
You can change the condition under which a Transaction Report is printed out. Follow the steps below.
1 Press once and once.
2 Press once and once.
3 Press once.
4 Press a number from to to select the condition for printing.
5 Press to return to the date and time display.
ALWAYS PRINT A report will be printed after each transmission, reception, or error.
ERROR/MEMORY A report will be printed after an error or a memory operation.
SEND ONLY A report will be printed after each transmission.
ERROR ONLY A report will be printed only when an error occurs.
NEVER PRINT A report will never be printed.
FUNCTION
1 5
STOP
Display:
The display briefly shows your selection, then:
1
2
3
4
5
OPTION SETTING
TRANSACTION
DIAL MODE
1:ALWAYS PRINT
(Selections appear alternately)
all.book⦆⦆Page⦆102⦆⦆Friday,⦆May⦆31,⦆2002⦆⦆9:49⦆AM
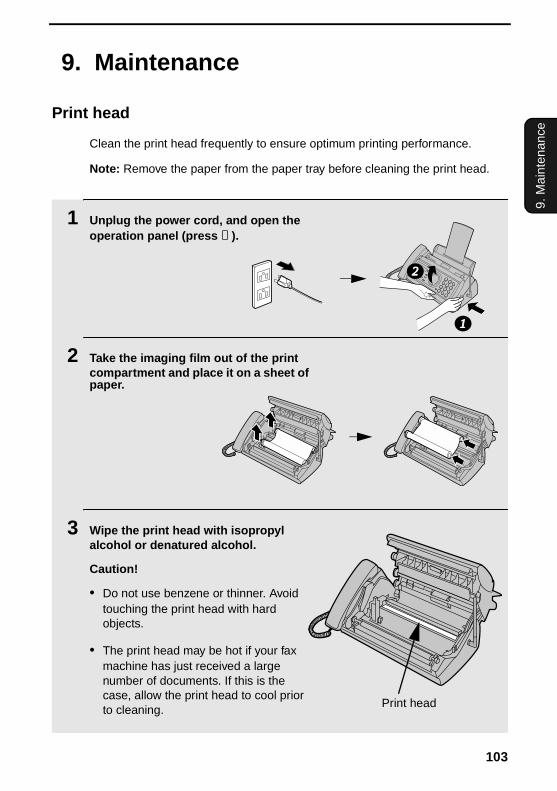
103
9. M
aint
enan
ce
9. Maintenance
Print head
Clean the print head frequently to ensure optimum printing performance.
Note: Remove the paper from the paper tray before cleaning the print head.
1 Unplug the power cord, and open the operation panel (press ➊ ).
2 Take the imaging film out of the print compartment and place it on a sheet of paper.
3 Wipe the print head with isopropyl alcohol or denatured alcohol.
Caution!
• Do not use benzene or thinner. Avoid touching the print head with hard objects.
• The print head may be hot if your fax machine has just received a large number of documents. If this is the case, allow the print head to cool prior to cleaning.
1
2
Print head
all.book⦆⦆Page⦆103⦆⦆Friday,⦆May⦆31,⦆2002⦆⦆9:49⦆AM

Maintenance
104
4 Place the imaging film back in the print compartment.
5 Rotate the front gear until the film is taut, and then close the operation panel (press down on both sides to make sure it clicks into place).
Scanning glass and rollers
Clean the scanning glass and rollers frequently to ensure the quality of transmitted images and copies.
Note: Remove the paper from the paper tray before cleaning the scanning glass and rollers.
1 Open the operation panel (press ➊ ).
1
2
all.book⦆⦆Page⦆104⦆⦆Friday,⦆May⦆31,⦆2002⦆⦆9:49⦆AM
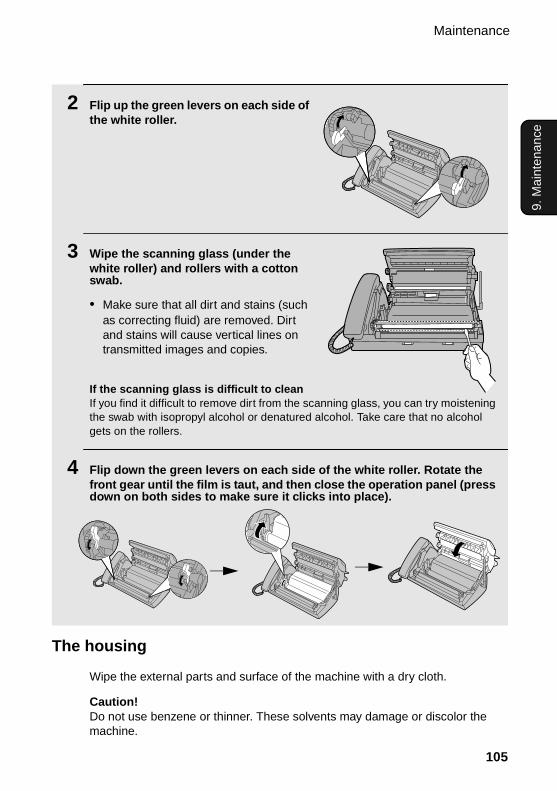
Maintenance
105
9. M
aint
enan
ce
2 Flip up the green levers on each side of the white roller.
3 Wipe the scanning glass (under the white roller) and rollers with a cotton swab.
• Make sure that all dirt and stains (such as correcting fluid) are removed. Dirt and stains will cause vertical lines on transmitted images and copies.
If the scanning glass is difficult to cleanIf you find it difficult to remove dirt from the scanning glass, you can try moistening the swab with isopropyl alcohol or denatured alcohol. Take care that no alcohol gets on the rollers.
4 Flip down the green levers on each side of the white roller. Rotate the front gear until the film is taut, and then close the operation panel (press down on both sides to make sure it clicks into place).
The housing
Wipe the external parts and surface of the machine with a dry cloth.
Caution!Do not use benzene or thinner. These solvents may damage or discolor the machine.
all.book⦆⦆Page⦆105⦆⦆Friday,⦆May⦆31,⦆2002⦆⦆9:49⦆AM
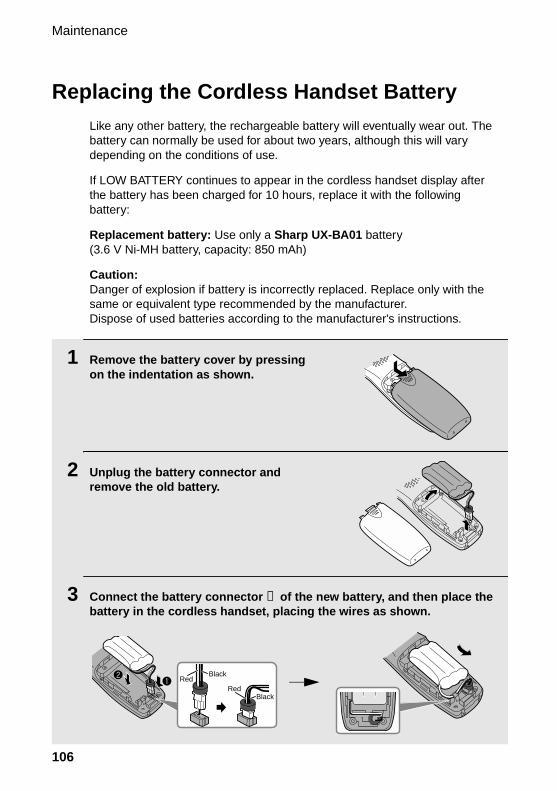
Maintenance
106
Replacing the Cordless Handset BatteryLike any other battery, the rechargeable battery will eventually wear out. The battery can normally be used for about two years, although this will vary depending on the conditions of use.
If LOW BATTERY continues to appear in the cordless handset display after the battery has been charged for 10 hours, replace it with the following battery:
Replacement battery: Use only a Sharp UX-BA01 battery (3.6 V Ni-MH battery, capacity: 850 mAh)
Caution:Danger of explosion if battery is incorrectly replaced. Replace only with the same or equivalent type recommended by the manufacturer.Dispose of used batteries according to the manufacturer's instructions.
1 Remove the battery cover by pressing on the indentation as shown.
2 Unplug the battery connector and remove the old battery.
3 Connect the battery connector ➊ of the new battery, and then place the battery in the cordless handset, placing the wires as shown.
BlackRed
BlackRed
all.book⦆⦆Page⦆106⦆⦆Friday,⦆May⦆31,⦆2002⦆⦆9:49⦆AM
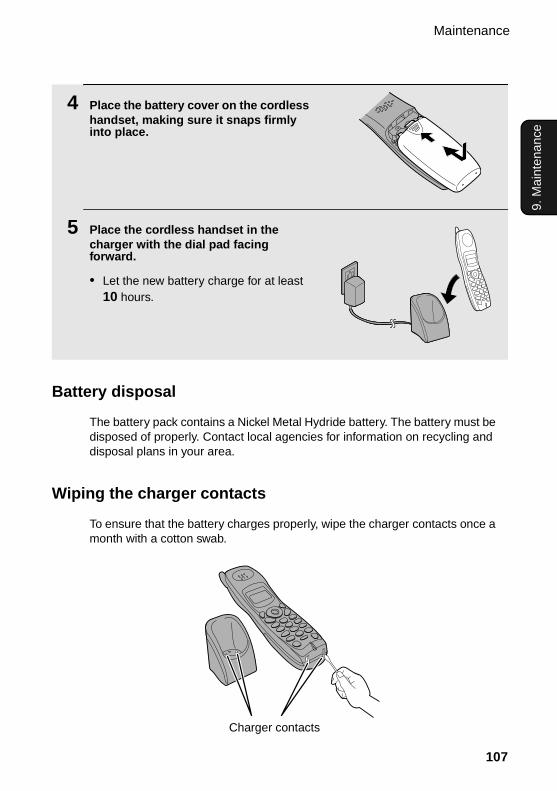
Maintenance
107
9. M
aint
enan
ce
4 Place the battery cover on the cordless handset, making sure it snaps firmly into place.
5 Place the cordless handset in the charger with the dial pad facing forward.
• Let the new battery charge for at least 10 hours.
Battery disposal
The battery pack contains a Nickel Metal Hydride battery. The battery must be disposed of properly. Contact local agencies for information on recycling and disposal plans in your area.
Wiping the charger contacts
To ensure that the battery charges properly, wipe the charger contacts once a month with a cotton swab.
Charger contacts
all.book⦆⦆Page⦆107⦆⦆Friday,⦆May⦆31,⦆2002⦆⦆9:49⦆AM

108
10. Troubleshooting
Problems and SolutionsIf you have any problems with your fax, first refer to the following troubleshooting guide. If you cannot solve the problem, call Sharp's Customer Assistance Center at 1-877-794-8675.
Line error
Problem Solution
LINE ERROR appears in the display.
Try the transaction again. If the error persists, check the following:
• Check the connection. The cord from the TEL. LINE jack to the wall jack should be no longer than six feet.
• Make sure there are no modem devices sharing the same telephone line.
• Check with the other party to make sure their fax machine is functioning properly.
• Have your telephone line checked for line noise.
• Try connecting the fax machine to a different telephone line.
• If the problem still occurs, your fax machine may need service.
all.book⦆⦆Page⦆108⦆⦆Friday,⦆May⦆31,⦆2002⦆⦆9:49⦆AM
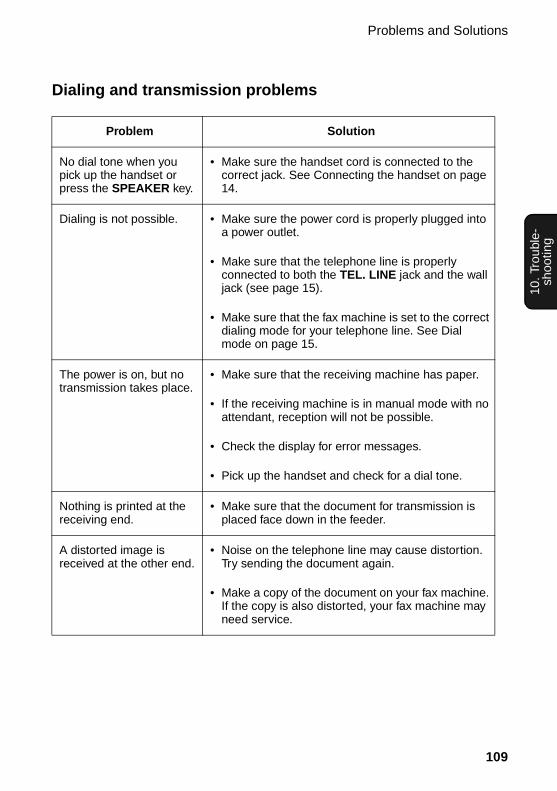
Problems and Solutions
109
10. T
roub
le-
shoo
ting
Dialing and transmission problems
Problem Solution
No dial tone when you pick up the handset or press the SPEAKER key.
• Make sure the handset cord is connected to the correct jack. See Connecting the handset on page 14.
Dialing is not possible. • Make sure the power cord is properly plugged into a power outlet.
• Make sure that the telephone line is properly connected to both the TEL. LINE jack and the wall jack (see page 15).
• Make sure that the fax machine is set to the correct dialing mode for your telephone line. See Dial mode on page 15.
The power is on, but no transmission takes place.
• Make sure that the receiving machine has paper.
• If the receiving machine is in manual mode with no attendant, reception will not be possible.
• Check the display for error messages.
• Pick up the handset and check for a dial tone.
Nothing is printed at the receiving end.
• Make sure that the document for transmission is placed face down in the feeder.
A distorted image is received at the other end.
• Noise on the telephone line may cause distortion. Try sending the document again.
• Make a copy of the document on your fax machine. If the copy is also distorted, your fax machine may need service.
all.book⦆⦆Page⦆109⦆⦆Friday,⦆May⦆31,⦆2002⦆⦆9:49⦆AM
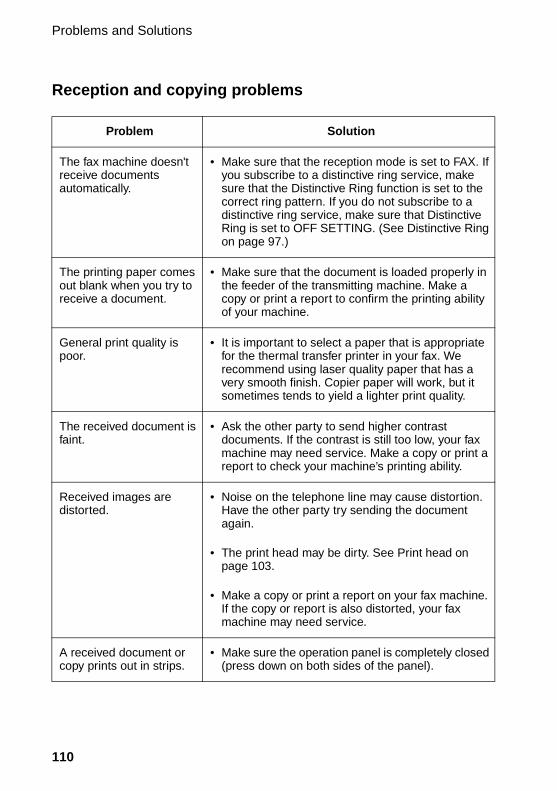
Problems and Solutions
110
Reception and copying problems
Problem Solution
The fax machine doesn't receive documents automatically.
• Make sure that the reception mode is set to FAX. If you subscribe to a distinctive ring service, make sure that the Distinctive Ring function is set to the correct ring pattern. If you do not subscribe to a distinctive ring service, make sure that Distinctive Ring is set to OFF SETTING. (See Distinctive Ring on page 97.)
The printing paper comes out blank when you try to receive a document.
• Make sure that the document is loaded properly in the feeder of the transmitting machine. Make a copy or print a report to confirm the printing ability of your machine.
General print quality is poor.
• It is important to select a paper that is appropriate for the thermal transfer printer in your fax. We recommend using laser quality paper that has a very smooth finish. Copier paper will work, but it sometimes tends to yield a lighter print quality.
The received document is faint.
• Ask the other party to send higher contrast documents. If the contrast is still too low, your fax machine may need service. Make a copy or print a report to check your machine’s printing ability.
Received images are distorted.
• Noise on the telephone line may cause distortion. Have the other party try sending the document again.
• The print head may be dirty. See Print head on page 103.
• Make a copy or print a report on your fax machine. If the copy or report is also distorted, your fax machine may need service.
A received document or copy prints out in strips.
• Make sure the operation panel is completely closed (press down on both sides of the panel).
all.book⦆⦆Page⦆110⦆⦆Friday,⦆May⦆31,⦆2002⦆⦆9:49⦆AM
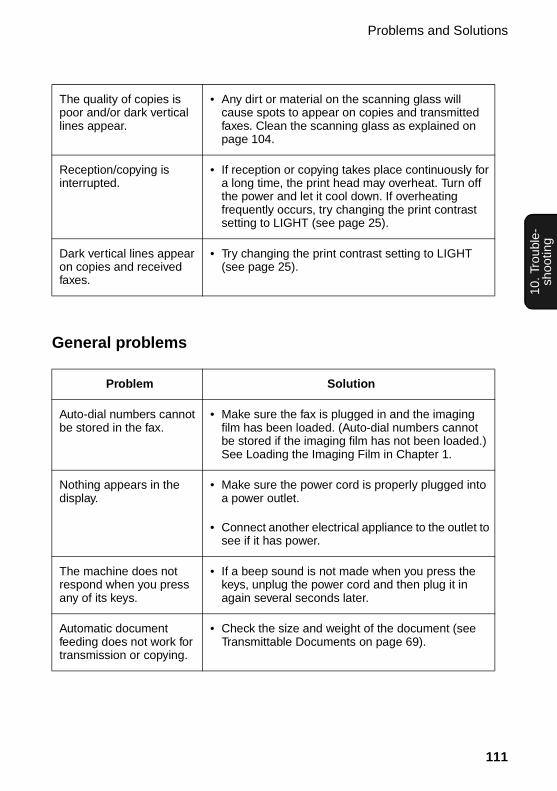
Problems and Solutions
111
10. T
roub
le-
shoo
ting
The quality of copies is poor and/or dark vertical lines appear.
• Any dirt or material on the scanning glass will cause spots to appear on copies and transmitted faxes. Clean the scanning glass as explained on page 104.
Reception/copying is interrupted.
• If reception or copying takes place continuously for a long time, the print head may overheat. Turn off the power and let it cool down. If overheating frequently occurs, try changing the print contrast setting to LIGHT (see page 25).
Dark vertical lines appear on copies and received faxes.
• Try changing the print contrast setting to LIGHT (see page 25).
General problems
Problem Solution
Auto-dial numbers cannot be stored in the fax.
• Make sure the fax is plugged in and the imaging film has been loaded. (Auto-dial numbers cannot be stored if the imaging film has not been loaded.) See Loading the Imaging Film in Chapter 1.
Nothing appears in the display.
• Make sure the power cord is properly plugged into a power outlet.
• Connect another electrical appliance to the outlet to see if it has power.
The machine does not respond when you press any of its keys.
• If a beep sound is not made when you press the keys, unplug the power cord and then plug it in again several seconds later.
Automatic document feeding does not work for transmission or copying.
• Check the size and weight of the document (see Transmittable Documents on page 69).
all.book⦆⦆Page⦆111⦆⦆Friday,⦆May⦆31,⦆2002⦆⦆9:49⦆AM

Problems and Solutions
112
Cordless handset problems
Problem Solution
The cordless handset does not operate and nothing appears in the display.
• Make sure the battery is properly connected inside the cordless handset (see page 18).
• The battery may be low. Place the cordless handset in the charger and let it charge.
Calls cannot be made or received on the cordless handset.
• Make sure the fax machine is plugged into a power outlet and has power.
• Make sure the telephone line is properly connected to both the TEL. LINE jack on the fax machine and the wall jack (see page 15). (If the telephone line is connected correctly, you should hear a dial tone when you pick up the fax machine handset.)
• The battery may be low. Place the cordless handset in the charger and let it charge.
• Calls cannot be made or received while the fax machine is being used (while FAX BUSY appears in the cordless handset display). Wait until the fax machine is no longer being used.
• Calls cannot be made or received during a power failure.
• You may be outside of the talking range. Move closer to the fax machine.
all.book⦆⦆Page⦆112⦆⦆Friday,⦆May⦆31,⦆2002⦆⦆9:49⦆AM
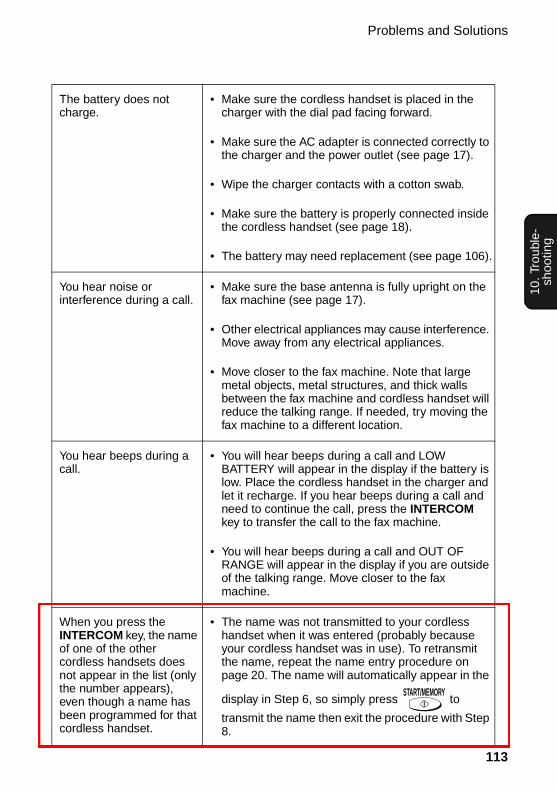
Problems and Solutions
113
10. T
roub
le-
shoo
ting
The battery does not charge.
• Make sure the cordless handset is placed in the charger with the dial pad facing forward.
• Make sure the AC adapter is connected correctly to the charger and the power outlet (see page 17).
• Wipe the charger contacts with a cotton swab.
• Make sure the battery is properly connected inside the cordless handset (see page 18).
• The battery may need replacement (see page 106).
You hear noise or interference during a call.
• Make sure the base antenna is fully upright on the fax machine (see page 17).
• Other electrical appliances may cause interference. Move away from any electrical appliances.
• Move closer to the fax machine. Note that large metal objects, metal structures, and thick walls between the fax machine and cordless handset will reduce the talking range. If needed, try moving the fax machine to a different location.
You hear beeps during a call.
• You will hear beeps during a call and LOW BATTERY will appear in the display if the battery is low. Place the cordless handset in the charger and let it recharge. If you hear beeps during a call and need to continue the call, press the INTERCOM key to transfer the call to the fax machine.
• You will hear beeps during a call and OUT OF RANGE will appear in the display if you are outside of the talking range. Move closer to the fax machine.
When you press the INTERCOM key, the name of one of the other cordless handsets does not appear in the list (only the number appears), even though a name has been programmed for that cordless handset.
• The name was not transmitted to your cordless handset when it was entered (probably because your cordless handset was in use). To retransmit the name, repeat the name entry procedure on page 20. The name will automatically appear in the
display in Step 6, so simply press to
transmit the name then exit the procedure with Step 8.
START/MEMORY
all.book⦆⦆Page⦆113⦆⦆Friday,⦆May⦆31,⦆2002⦆⦆9:49⦆AM
植月 さおり
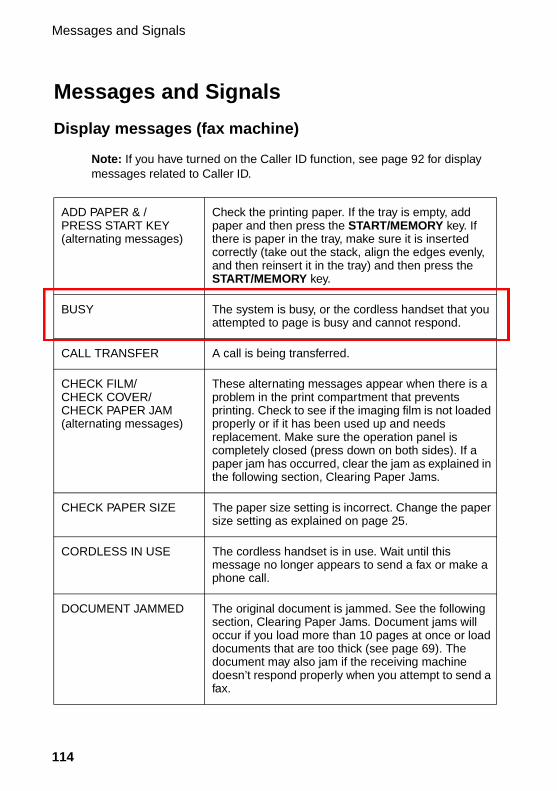
Messages and Signals
114
Messages and Signals
Display messages (fax machine)
Note: If you have turned on the Caller ID function, see page 92 for display messages related to Caller ID.
ADD PAPER & /PRESS START KEY(alternating messages)
Check the printing paper. If the tray is empty, add paper and then press the START/MEMORY key. If there is paper in the tray, make sure it is inserted correctly (take out the stack, align the edges evenly, and then reinsert it in the tray) and then press the START/MEMORY key.
BUSY The system is busy, or the cordless handset that you attempted to page is busy and cannot respond.
CALL TRANSFER A call is being transferred.
CHECK FILM/CHECK COVER/CHECK PAPER JAM(alternating messages)
These alternating messages appear when there is a problem in the print compartment that prevents printing. Check to see if the imaging film is not loaded properly or if it has been used up and needs replacement. Make sure the operation panel is completely closed (press down on both sides). If a paper jam has occurred, clear the jam as explained in the following section, Clearing Paper Jams.
CHECK PAPER SIZE The paper size setting is incorrect. Change the paper size setting as explained on page 25.
CORDLESS IN USE The cordless handset is in use. Wait until this message no longer appears to send a fax or make a phone call.
DOCUMENT JAMMED The original document is jammed. See the following section, Clearing Paper Jams. Document jams will occur if you load more than 10 pages at once or load documents that are too thick (see page 69). The document may also jam if the receiving machine doesn’t respond properly when you attempt to send a fax.
all.book⦆⦆Page⦆114⦆⦆Friday,⦆May⦆31,⦆2002⦆⦆9:49⦆AM
植月 さおり

Messages and Signals
115
10. T
roub
le-
shoo
ting
FAX RX IN MEMORY A fax has been received in memory because the imaging film needs replacement, you have run out of printing paper, or the paper is jammed. The fax will print out automatically when the problem is fixed.
FUNCTION MODE The FUNCTION key has been pressed.
INTERCOM A cordless handset is paging the fax machine (lift the handset to talk), or the fax machine is paging a cordless handset. The name and number of the cordless handset appear alternately with INTERCOM.
LINE ERROR Transmission or reception was not successful. Press the STOP key to clear the message and then try again. If the error persists, see Line Error on page 108.
MEMORY IS FULL/SEE MANUAL(alternating messages)
The memory is full. You may have too many messages recorded in the answering system. To erase messages, see page 53.This message may also occur during fax reception if too much data is received before the pages can be printed out. If faxes have been received to memory because printing is not possible (an additional message will indicate the problem), resolve the problem so that printing can continue (see Substitute Reception to Memory on page 88). If you are attempting to transmit from memory, see If the memory becomes full on page 82.If you are copying, see If MEMORY IS FULL appears on page 89.
MEMORY PRINTING The fax is preparing to or printing out a document from memory.
NO DATA This appears if you attempt to search for an auto-dial number when none have been stored.
OFF HOOK This appears if you forgot to replace the handset after using it to dial and send a fax. Replace the handset or press the STOP key to clear the message.
ON HOOK DIAL The SPEAKER key has been pressed and the fax machine is waiting for you to dial.
all.book⦆⦆Page⦆115⦆⦆Friday,⦆May⦆31,⦆2002⦆⦆9:49⦆AM
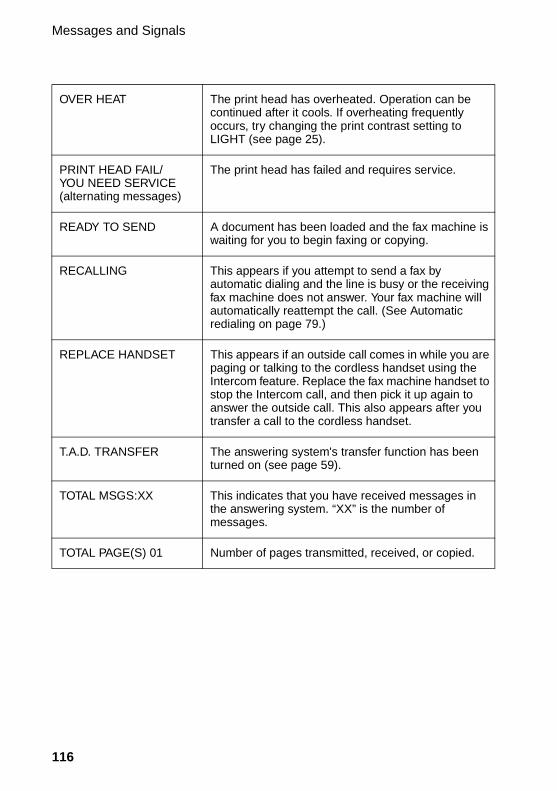
Messages and Signals
116
OVER HEAT The print head has overheated. Operation can be continued after it cools. If overheating frequently occurs, try changing the print contrast setting to LIGHT (see page 25).
PRINT HEAD FAIL/YOU NEED SERVICE(alternating messages)
The print head has failed and requires service.
READY TO SEND A document has been loaded and the fax machine is waiting for you to begin faxing or copying.
RECALLING This appears if you attempt to send a fax by automatic dialing and the line is busy or the receiving fax machine does not answer. Your fax machine will automatically reattempt the call. (See Automatic redialing on page 79.)
REPLACE HANDSET This appears if an outside call comes in while you are paging or talking to the cordless handset using the Intercom feature. Replace the fax machine handset to stop the Intercom call, and then pick it up again to answer the outside call. This also appears after you transfer a call to the cordless handset.
T.A.D. TRANSFER The answering system's transfer function has been turned on (see page 59).
TOTAL MSGS:XX This indicates that you have received messages in the answering system. “XX” is the number of messages.
TOTAL PAGE(S) 01 Number of pages transmitted, received, or copied.
all.book⦆⦆Page⦆116⦆⦆Friday,⦆May⦆31,⦆2002⦆⦆9:49⦆AM

Messages and Signals
117
10. T
roub
le-
shoo
ting
Display messages (cordless handset)
BUSY The system is busy, or the fax machine or other cordless handset that you attempted to page is busy and cannot respond.
CALL TRANSFER A call is being transferred.
CHARGING The cordless handset is in the charger and the battery is charging.
FAX BUSY The fax machine is in use. Wait until the fax machine is no longer being used to use the cordless handset.
HOLD A call has been placed on hold by pressing the HOLD key. To resume the call, press the HOLD key again.
IN CHARGER The cordless handset is in the charger and is fully charged (the cordless handset can be left in the charger without damaging the battery).
INTERCOM Your cordless handset is being paged (press the TALK key to talk), or your cordless handset is paging the fax machine or another cordless handset. The number and name of the other handset appear alternately with INTERCOM.
LOW BATTERY The cordless handset battery is low. Place the cordless handset in the charger and let it recharge. If this message continues to appear after recharging, the battery may need replacement (see page 106). If this message appears during a phone call (you will also hear beeps) and you wish to continue the call, press the INTERCOM key to transfer the call to the fax machine.
NEW MESSAGES New messages have been received in your personal box (the box corresponding to your cordless handset) in the answering system. You can either listen to the messages using the cordless handset (see page 54), or using the fax machine (see page 52).
all.book⦆⦆Page⦆117⦆⦆Friday,⦆May⦆31,⦆2002⦆⦆9:49⦆AM
植月 さおり
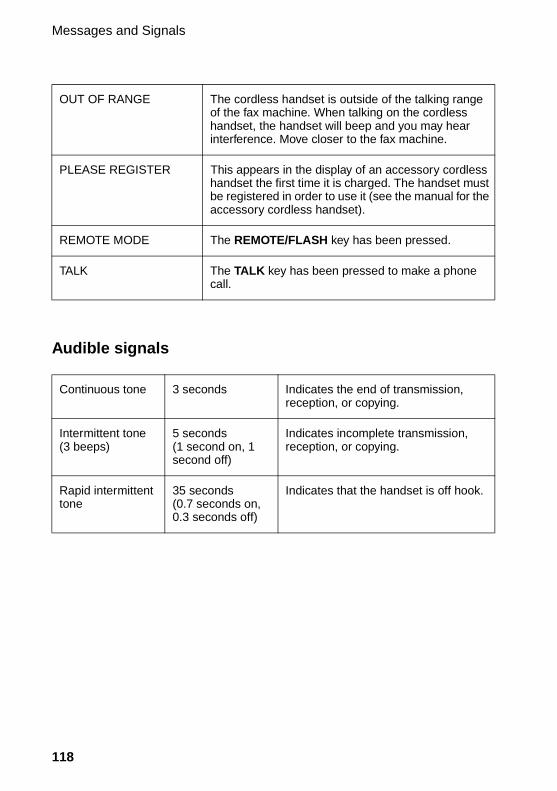
Messages and Signals
118
OUT OF RANGE The cordless handset is outside of the talking range of the fax machine. When talking on the cordless handset, the handset will beep and you may hear interference. Move closer to the fax machine.
PLEASE REGISTER This appears in the display of an accessory cordless handset the first time it is charged. The handset must be registered in order to use it (see the manual for the accessory cordless handset).
REMOTE MODE The REMOTE/FLASH key has been pressed.
TALK The TALK key has been pressed to make a phone call.
Audible signals
Continuous tone 3 seconds Indicates the end of transmission, reception, or copying.
Intermittent tone (3 beeps)
5 seconds(1 second on, 1 second off)
Indicates incomplete transmission, reception, or copying.
Rapid intermittent tone
35 seconds(0.7 seconds on, 0.3 seconds off)
Indicates that the handset is off hook.
all.book⦆⦆Page⦆118⦆⦆Friday,⦆May⦆31,⦆2002⦆⦆9:49⦆AM
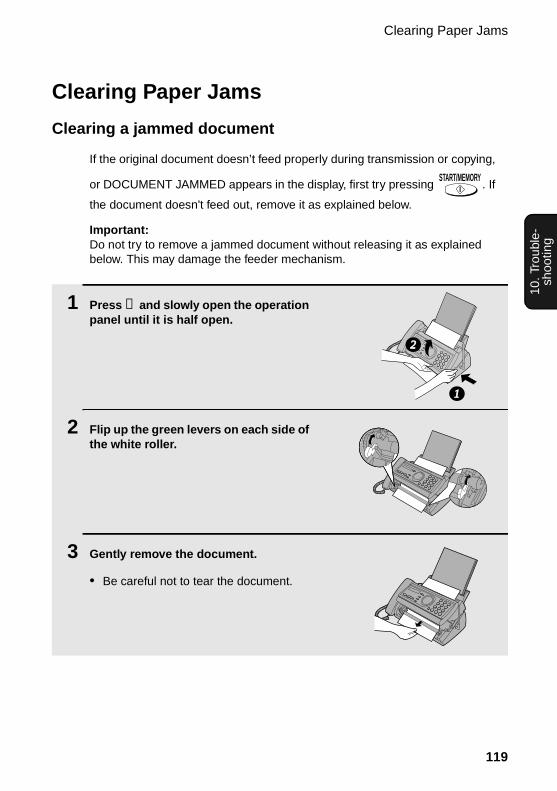
Clearing Paper Jams
119
10. T
roub
le-
shoo
ting
Clearing Paper Jams
Clearing a jammed document
If the original document doesn’t feed properly during transmission or copying,
or DOCUMENT JAMMED appears in the display, first try pressing . If
the document doesn't feed out, remove it as explained below.
Important:Do not try to remove a jammed document without releasing it as explained below. This may damage the feeder mechanism.
START/MEMORY
1 Press ➊ and slowly open the operation panel until it is half open.
2 Flip up the green levers on each side of the white roller.
3 Gently remove the document.
• Be careful not to tear the document.
1
2
all.book⦆⦆Page⦆119⦆⦆Friday,⦆May⦆31,⦆2002⦆⦆9:49⦆AM
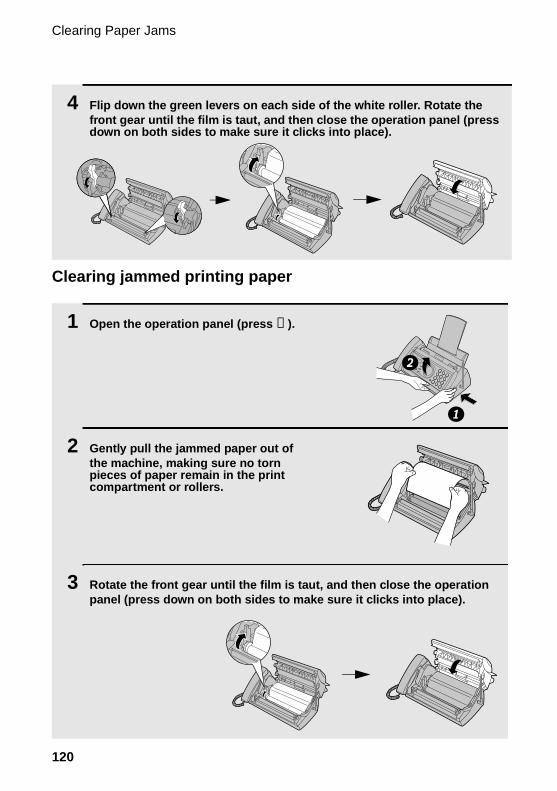
Clearing Paper Jams
120
1 Open the operation panel (press ➊ ).
2 Gently pull the jammed paper out of the machine, making sure no torn pieces of paper remain in the print compartment or rollers.
3 Rotate the front gear until the film is taut, and then close the operation panel (press down on both sides to make sure it clicks into place).
Clearing jammed printing paper
4 Flip down the green levers on each side of the white roller. Rotate the front gear until the film is taut, and then close the operation panel (press down on both sides to make sure it clicks into place).
1
2
all.book⦆⦆Page⦆120⦆⦆Friday,⦆May⦆31,⦆2002⦆⦆9:49⦆AM

Ordering Parts
121
Ordering Parts
To order parts, contact the parts distribution center located nearest you. When ordering a part, use the part order number shown below.
Operation manual TINSE4273XHTZ
Setup Guide TCADZ3323XHZA
Handset cord QCNWG209BXHGY
Telephone line cord QCNWG208BXHZZ
Handset DUNTK468BXHGY
Paper tray CPLTP3183XHR7
Paper tray extension LPLTP3184XHZZ
Gears CGERH2566XH01NGERH2568XHZZ
AC adapter RADPA2027XHZZ
Cordless handset charger RUNTZ2100XHE2
Part distribution centers
Tritronics, Inc. 1306 Continental Drive Abingdon, MD 21009
Tel: 1-800-638-3328 Fax: 1-800-888-FAXD
Tritronics, Inc. 1015 NW 52nd Street Ft. Lauderdale, FL 33309
Tel:1-800-365-8030 Fax: 1-800-999-FAXD
Fox International, Ltd. 23600 Aurora Road Bedford Heights, OH 44146
Tel: 1-800-321-6993 Fax: 1-800-445-7991
Andrews Electronics 25158 Avenue Stanford Santa Clarita, CA 91355
Tel: 1-800-274-4666 Fax: 1-805-295-5126
Sharp Accessories and Supply Center 2130 Townline Road Peoria, IL 61615
Tel: 1-800-642-2122
all.book⦆⦆Page⦆121⦆⦆Friday,⦆May⦆31,⦆2002⦆⦆9:49⦆AM
FCC Regulatory Information
122
FCC Regulatory Information
This equipment complies with Part 68 of the FCC rules and the requirements adopted by the ACTA. On the rear of this equipment is a label that contains, among other information, a product identifier in the format US:AAAEQ##TXXXX. If requested, this number must be provided to the telephone company.
A plug and jack used to connect this equipment to the premises wiring and telephone network must comply with the applicable FCC Part 68 rules and requirements adopted by the ACTA. A compliant telephone cord and modular plug is provided with this product. It is designed to be connected to a compatible modular jack that is also compliant. See installation instructions for details. This equipment connects to the telephone network through a standard USOC RJ-11C network interface jack.
The REN is used to determine the number of devices that may be connected to a telephone line. Excessive RENs on a telephone line may result in the devices not ringing in response to an incoming call. In most but not all areas, the sum of RENs should not exceed five (5.0). To be certain of the number of devices that may be connected to a line, as determined by the total RENs, contact the local telephone company. For products approved after July 23, 2001, the REN for this product is part of the product identifier that has the format US:AAAEQ##TXXXX. The digits represented by ## are the REN without a decimal point (e.g., 03 is a REN of 0.3). For earlier products, the REN is separately shown on the label.
If this equipment causes harm to the telephone network, the telephone company will notify you in advance that temporary discontinuance of service may be required. But if advance notice isn't practical, the telephone company will notify the customer as soon as possible. Also, you will be advised of your right to file a complaint with the FCC if you believe it is necessary.
The telephone company may make changes in its facilities, equipment, operations or procedures that could affect the operation of the equipment. If this happens the telephone company will provide advance notice in order for you to make necessary modifications to maintain uninterrupted service.
If trouble is experienced with this equipment, or for repair or warranty information, please contact Sharp’s Customer Assistance Center. The number is 1-877-794-8675. If the equipment is causing harm to the telephone network, the telephone company may request that you disconnect the equipment until the problem is resolved.
This equipment may not be used on coin service provided by the telephone company. Connection to party line service is subject to state tariffs. Contact the state public utility commission, public service commission or corporation commission for information.
If your home has specially wired alarm equipment connected to the telephone line, ensure the installation of this equipment ID does not disable your alarm equipment. If you have questions about what will disable alarm equipment, consult your telephone company or a qualified installer.
This equipment is hearing-aid compatible.
When programming and/or making test calls to emergency numbers:
♦ Remain on the line and briefly explain to the dispatcher the reason for the call.
♦ Perform such activities in the off-peak hours, such as early morning or late evening.
all.book⦆⦆Page⦆122⦆⦆Friday,⦆May⦆31,⦆2002⦆⦆9:49⦆AM
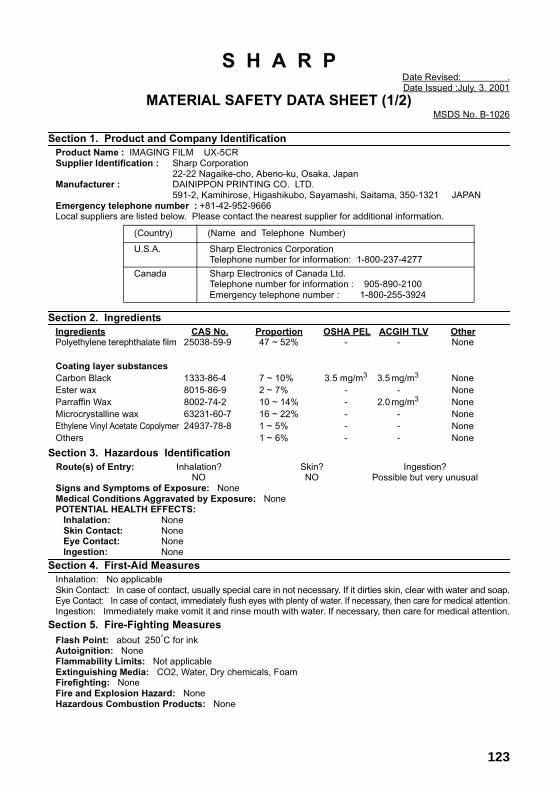
123
S H A R PDate Revised: .Date Issued :July. 3. 2001
MATERIAL SAFETY DATA SHEET (1/2)MSDS No. B-1026
Section 1. Product and Company IdentificationProduct Name : IMAGING FILM UX-5CRSupplier Identification : Sharp Corporation
22-22 Nagaike-cho, Abeno-ku, Osaka, JapanManufacturer : DAINIPPON PRINTING CO. LTD.
591-2, Kamihirose, Higashikubo, Sayamashi, Saitama, 350-1321 JAPANEmergency telephone number : +81-42-952-9666Local suppliers are listed below. Please contact the nearest supplier for additional information.
Section 2. IngredientsIngredients CAS No. Proportion OSHA PEL ACGIH TLV OtherPolyethylene terephthalate film 25038-59-9 47 ~ 52% - - None
Coating layer substancesCarbon Black 1333-86-4 7 ~ 10% 3.5 mg/m3 3.5mg/m3 NoneEster wax 8015-86-9 2 ~ 7% - - NoneParraffin Wax 8002-74-2 10 ~ 14% - 2.0mg/m3 NoneMicrocrystalline wax 63231-60-7 16 ~ 22% - - NoneEthylene Vinyl Acetate Copolymer 24937-78-8 1 ~ 5% - - NoneOthers 1 ~ 6% - - None
Section 3. Hazardous IdentificationRoute(s) of Entry: Inhalation? Skin? Ingestion?
NO NO Possible but very unusualSigns and Symptoms of Exposure: NoneMedical Conditions Aggravated by Exposure: NonePOTENTIAL HEALTH EFFECTS:Inhalation: NoneSkin Contact: NoneEye Contact: NoneIngestion: None
Section 4. First-Aid MeasuresInhalation: No applicableSkin Contact: In case of contact, usually special care in not necessary. If it dirties skin, clear with water and soap.Eye Contact: In case of contact, immediately flush eyes with plenty of water. If necessary, then care for medical attention.Ingestion: Immediately make vomit it and rinse mouth with water. If necessary, then care for medical attention.
Section 5. Fire-Fighting MeasuresFlash Point: about 250°C for inkAutoignition: NoneFlammability Limits: Not applicableExtinguishing Media: CO2, Water, Dry chemicals, FoamFirefighting: NoneFire and Explosion Hazard: NoneHazardous Combustion Products: None
(Country) (Name and Telephone Number)
U.S.A. Sharp Electronics CorporationTelephone number for information: 1-800-237-4277
Canada Sharp Electronics of Canada Ltd.Telephone number for information : 905-890-2100Emergency telephone number : 1-800-255-3924
all.book⦆⦆Page⦆123⦆⦆Friday,⦆May⦆31,⦆2002⦆⦆9:49⦆AM
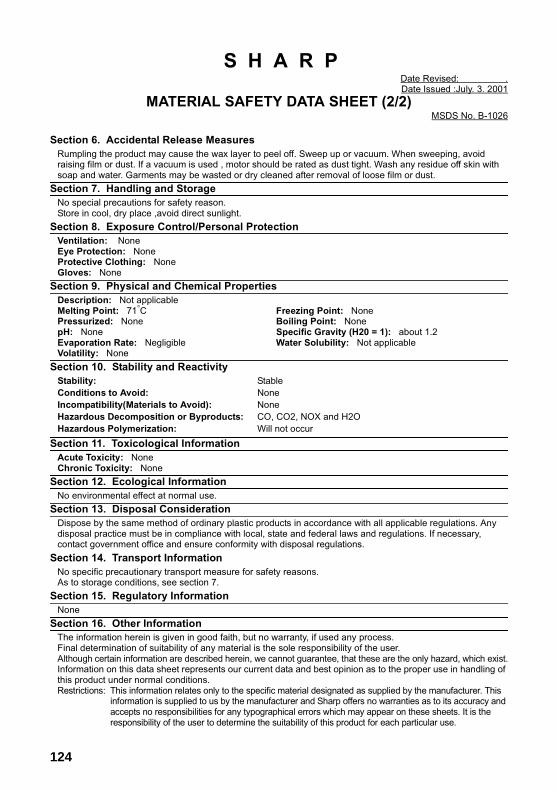
124
S H A R PDate Revised: .Date Issued :July. 3. 2001
MATERIAL SAFETY DATA SHEET (2/2)MSDS No. B-1026
Section 6. Accidental Release MeasuresRumpling the product may cause the wax layer to peel off. Sweep up or vacuum. When sweeping, avoidraising film or dust. If a vacuum is used , motor should be rated as dust tight. Wash any residue off skin withsoap and water. Garments may be wasted or dry cleaned after removal of loose film or dust.
Section 7. Handling and StorageNo special precautions for safety reason.Store in cool, dry place ,avoid direct sunlight.
Section 8. Exposure Control/Personal ProtectionVentilation: NoneEye Protection: NoneProtective Clothing: NoneGloves: None
Section 9. Physical and Chemical PropertiesDescription: Not applicableMelting Point: 71°C Freezing Point: NonePressurized: None Boiling Point: NonepH: None Specific Gravity (H20 = 1): about 1.2Evaporation Rate: Negligible Water Solubility: Not applicableVolatility: None
Section 10. Stability and ReactivityStability: StableConditions to Avoid: NoneIncompatibility(Materials to Avoid): NoneHazardous Decomposition or Byproducts: CO, CO2, NOX and H2OHazardous Polymerization: Will not occur
Section 11. Toxicological InformationAcute Toxicity: NoneChronic Toxicity: None
Section 12. Ecological InformationNo environmental effect at normal use.
Section 13. Disposal ConsiderationDispose by the same method of ordinary plastic products in accordance with all applicable regulations. Anydisposal practice must be in compliance with local, state and federal laws and regulations. If necessary,contact government office and ensure conformity with disposal regulations.
Section 14. Transport InformationNo specific precautionary transport measure for safety reasons.As to storage conditions, see section 7.
Section 15. Regulatory InformationNone
Section 16. Other InformationThe information herein is given in good faith, but no warranty, if used any process.Final determination of suitability of any material is the sole responsibility of the user.Although certain information are described herein, we cannot guarantee, that these are the only hazard, which exist.Information on this data sheet represents our current data and best opinion as to the proper use in handling ofthis product under normal conditions.Restrictions: This information relates only to the specific material designated as supplied by the manufacturer. This
information is supplied to us by the manufacturer and Sharp offers no warranties as to its accuracy andaccepts no responsibilities for any typographical errors which may appear on these sheets. It is theresponsibility of the user to determine the suitability of this product for each particular use.
all.book⦆⦆Page⦆124⦆⦆Friday,⦆May⦆31,⦆2002⦆⦆9:49⦆AM

125
Quick Reference Guide
Sending Faxes
Place your document (up to 10 pages) face down in the document feeder.
Normal Dialing
1. Lift the handset or press .
2. Dial the fax number.
3. Wait for the reception tone (if a person answers, ask them to press their Start key).
4. Press .
Automatic Dialing
1. Press or until the desired
destination appears in the display.
2. Press .
Direct Keypad Dialing
1. Dial the fax number.
2. Press .
Recording an OGM
1. Press , press until desired
OGM is displayed, and then once.
2. Lift the handset, press , and
speak into the handset.
3. When finished, press .
SPEAKER
START/MEMORY
START/MEMORY
START/MEMORY
REC/MEMO
START/MEMORY
STOP
Receiving Faxes
Press until the arrow in the
display points to the desired reception mode.
FAX mode: The fax machine automatically answers and receives faxes.
TEL mode: Answer all calls (even faxes) by picking up the handset. To begin fax
reception, press .
TAD mode: Select this mode when you go out to receive both voice messages and faxes.
Storing Auto Dial Numbers
1. Press once and twice.
2. Enter the full fax/phone number.
3. Press .
4. Enter a name by pressing number keys. (To enter two letters in succession that
require the same key, press after
entering the first letter.)
5. Press and then .
RESOLUTION/RECEPTION MODE
START/MEMORY
FUNCTION
START/MEMORY
START/MEMORY STOP
FAXTEL
JAN-02 10:30
FAXTEL
JAN-02 10:30
FAXTEL
JAN-02 10:30
TAD
TAD
TAD
RESOLUTION/RECEPTION MODE
A =
B =
C =
D =
E =
F =
G =
H =
I =
J =
K =
L =
M =
N =
O =
P =
Q =
R =
S =
T =
U =
V =
W =
X =
Y =
Z =
SPACE =
all.book⦆⦆Page⦆125⦆⦆Friday,⦆May⦆31,⦆2002⦆⦆9:49⦆AM

126
Using the Cordless Phone
Making a phone call
1. Pick up the cordless handset and press
.
2. When you hear the dial tone, dial the number.
3. When you are ready to end the call,
press .
Making a phone call using automatic dialing
1. Press once.
2.Press or to select the book.
3. Press or until the number you
wish to dial appears in the display.
4. Press .
Receiving a phone call
1. When the cordless handset rings, pick it up and press any key to answer.
2. When you are ready to end the call,
press .
Receiving a fax using the cordless handset
If you hear a fax tone after answering a call on the cordless handset, or if the other party speaks to you and then
wants to send a fax, press .
TALK
OFFOFF
SEARCH
TALK
OFFOFF
START
Storing auto dial numbers
1. Press , or to select
the book, and then .
2. Enter the full fax/phone number.
To clear a mistake, press .
To insert a pause, press .
3. Press .
4. Enter a name by pressing number keys. (To enter two letters in succession that
require the same key, press after
entering the first letter.)
5. Press and then .
Listening to messages
1. Press .
(For the general box, press .)
2. Press to listen to all your
messages, or to listen to only your
new messages.
3. While listening, you can press
, , , or .
4 When finished, press
SEARCH
FUNCTION/PAUSE
ERASE
HOLD
FUNCTION/PAUSE
START
START OFFOFF
REMOTE/FLASH
0
PQRS7PLAY
TUV8PLAY NEW
REPEAT0
SKIP DELETE STOP
WXYZ9
OFFOFF
A =
B =
C =
D =
E =
F =
G =
H =
I =
J =
K =
L =
M =
N =
O =
P =
Q =
R =
S =
T =
U =
V =
W =
X =
Y =
Z =
SPACE =
WXYZ9 WXYZ9 WXYZ9 WXYZ9
WXYZ9 WXYZ9 WXYZ9
WXYZ9 WXYZ9
WXYZ9
TUV8
TUV8
TUV8 TUV8
TUV8 TUV8
PQRS7 PQRS7 PQRS7 PQRS7
PQRS7 PQRS7 PQRS7
PQRS7 PQRS7
PQRS7
MNO6 MNO6MNO6
MNO6MNO6
JKL5 JKL5 JKL5
MNO6
JKL5 JKL5
JKL5
GHI4 GHI4 GHI4
GHI4 GHI4
GHI4
DEF3 DEF3 DEF3
DEF3 DEF3
DEF3
ABC2 ABC2 ABC2
ABC2 ABC2
ABC2
1
all.book⦆⦆Page⦆126⦆⦆Friday,⦆May⦆31,⦆2002⦆⦆9:49⦆AM
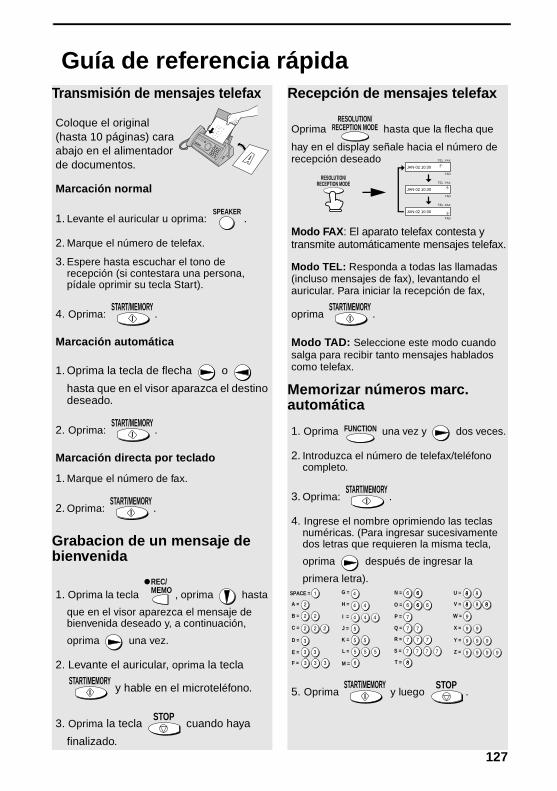
127
Guía de referencia rápidaTransmisión de mensajes telefax
Coloque el original (hasta 10 páginas) cara abajo en el alimentador de documentos.
Marcación normal
1. Levante el auricular u oprima: .
2. Marque el número de telefax.
3. Espere hasta escuchar el tono de recepción (si contestara una persona, pídale oprimir su tecla Start).
4. Oprima: .
Marcación automática
1. Oprima la tecla de flecha o
hasta que en el visor aparazca el destino deseado.
2. Oprima: .
Marcación directa por teclado
1. Marque el número de fax.
2. Oprima: .
Grabacion de un mensaje de bienvenida
1. Oprima la tecla , oprima hasta
que en el visor aparezca el mensaje de bienvenida deseado y, a continuación,
oprima una vez.
2. Levante el auricular, oprima la tecla
y hable en el microteléfono.
3. Oprima la tecla cuando haya
finalizado.
SPEAKER
START/MEMORY
START/MEMORY
START/MEMORY
REC/MEMO
START/MEMORY
STOP
Recepción de mensajes telefax
Oprima hasta que la flecha que
hay en el display señale hacia el número de recepción deseado
Modo FAX: El aparato telefax contesta y transmite automáticamente mensajes telefax.
Modo TEL: Responda a todas las llamadas (incluso mensajes de fax), levantando el auricular. Para iniciar la recepción de fax,
oprima .
Modo TAD: Seleccione este modo cuando salga para recibir tanto mensajes hablados como telefax.
Memorizar números marc. automática
1. Oprima una vez y dos veces.
2. Introduzca el número de telefax/teléfono completo.
3. Oprima: .
4. Ingrese el nombre oprimiendo las teclas numéricas. (Para ingresar sucesivamente dos letras que requieren la misma tecla,
oprima después de ingresar la
primera letra).
5. Oprima y luego .
RESOLUTION/RECEPTION MODE
START/MEMORY
FUNCTION
START/MEMORY
START/MEMORY STOP
FAXTEL
JAN-02 10:30
FAXTEL
JAN-02 10:30
FAXTEL
JAN-02 10:30
TAD
TAD
TAD
RESOLUTION/RECEPTION MODE
A =
B =
C =
D =
E =
F =
G =
H =
I =
J =
K =
L =
M =
N =
O =
P =
Q =
R =
S =
T =
U =
V =
W =
X =
Y =
Z =
SPACE =
all.book⦆⦆Page⦆127⦆⦆Friday,⦆May⦆31,⦆2002⦆⦆9:49⦆AM
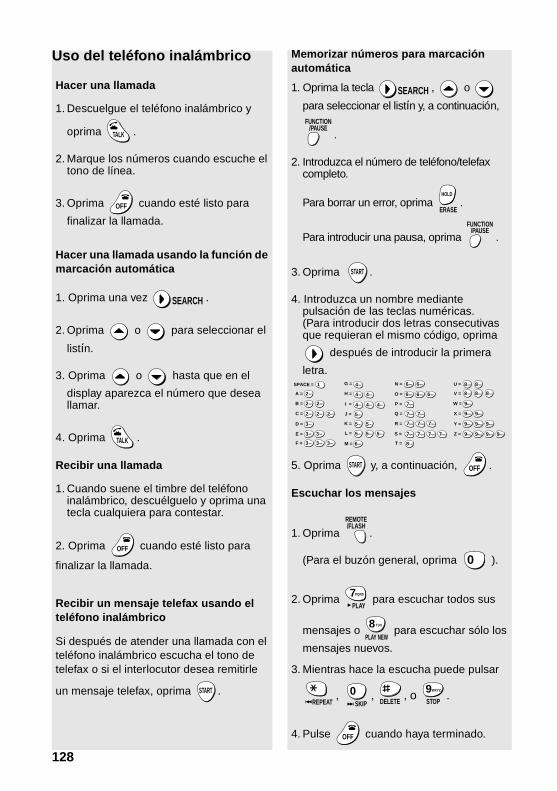
128
Uso del teléfono inalámbrico
Hacer una llamada
1. Descuelgue el teléfono inalámbrico y
oprima .
2. Marque los números cuando escuche el tono de línea.
3. Oprima cuando esté listo para
finalizar la llamada.
Hacer una llamada usando la función de marcación automática
1. Oprima una vez .
2. Oprima o para seleccionar el
listín.
3. Oprima o hasta que en el
display aparezca el número que desea llamar.
4. Oprima .
Recibir una llamada
1. Cuando suene el timbre del teléfono inalámbrico, descuélguelo y oprima una tecla cualquiera para contestar.
2. Oprima cuando esté listo para
finalizar la llamada.
Recibir un mensaje telefax usando el teléfono inalámbrico
Si después de atender una llamada con el teléfono inalámbrico escucha el tono de telefax o si el interlocutor desea remitirle
un mensaje telefax, oprima .
TALK
OFFOFF
SEARCH
TALK
OFFOFF
START
Memorizar números para marcación automática
1. Oprima la tecla , o
para seleccionar el listín y, a continuación,
.
2. Introduzca el número de teléfono/telefax completo.
Para borrar un error, oprima .
Para introducir una pausa, oprima .
3. Oprima .
4. Introduzca un nombre mediante pulsación de las teclas numéricas.(Para introducir dos letras consecutivas que requieran el mismo código, oprima
después de introducir la primera
letra.
5. Oprima y, a continuación, .
Escuchar los mensajes
1. Oprima .
(Para el buzón general, oprima ).
2. Oprima para escuchar todos sus
mensajes o para escuchar sólo los
mensajes nuevos.
3. Mientras hace la escucha puede pulsar
, , , o .
4. Pulse cuando haya terminado.
SEARCH
FUNCTION/PAUSE
ERASE
HOLD
FUNCTION/PAUSE
START
START OFFOFF
REMOTE/FLASH
0
PQRS7PLAY
TUV8PLAY NEW
REPEAT0
SKIP DELETE STOP
WXYZ9
OFFOFF
A =
B =
C =
D =
E =
F =
G =
H =
I =
J =
K =
L =
M =
N =
O =
P =
Q =
R =
S =
T =
U =
V =
W =
X =
Y =
Z =
SPACE =
WXYZ9 WXYZ9 WXYZ9 WXYZ9
WXYZ9 WXYZ9 WXYZ9
WXYZ9 WXYZ9
WXYZ9
TUV8
TUV8
TUV8 TUV8
TUV8 TUV8
PQRS7 PQRS7 PQRS7 PQRS7
PQRS7 PQRS7 PQRS7
PQRS7 PQRS7
PQRS7
MNO6 MNO6MNO6
MNO6MNO6
JKL5 JKL5 JKL5
MNO6
JKL5 JKL5
JKL5
GHI4 GHI4 GHI4
GHI4 GHI4
GHI4
DEF3 DEF3 DEF3
DEF3 DEF3
DEF3
ABC2 ABC2 ABC2
ABC2 ABC2
ABC2
1
all.book⦆⦆Page⦆128⦆⦆Friday,⦆May⦆31,⦆2002⦆⦆9:49⦆AM
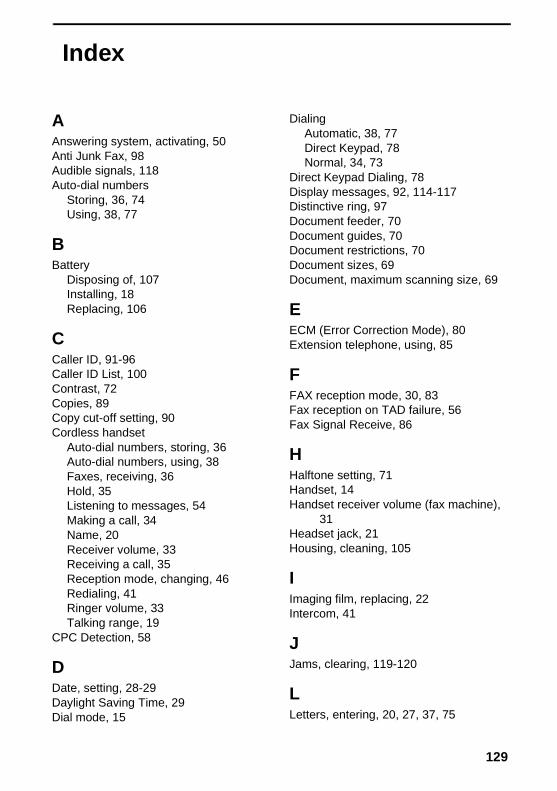
129
AAnswering system, activating, 50Anti Junk Fax, 98Audible signals, 118Auto-dial numbers
Storing, 36, 74Using, 38, 77
BBattery
Disposing of, 107Installing, 18Replacing, 106
CCaller ID, 91-96Caller ID List, 100Contrast, 72Copies, 89Copy cut-off setting, 90Cordless handset
Auto-dial numbers, storing, 36Auto-dial numbers, using, 38Faxes, receiving, 36Hold, 35Listening to messages, 54Making a call, 34Name, 20Receiver volume, 33Receiving a call, 35Reception mode, changing, 46Redialing, 41Ringer volume, 33Talking range, 19
CPC Detection, 58
DDate, setting, 28-29Daylight Saving Time, 29Dial mode, 15
DialingAutomatic, 38, 77Direct Keypad, 78Normal, 34, 73
Direct Keypad Dialing, 78Display messages, 92, 114-117Distinctive ring, 97Document feeder, 70Document guides, 70Document restrictions, 70Document sizes, 69Document, maximum scanning size, 69
EECM (Error Correction Mode), 80Extension telephone, using, 85
FFAX reception mode, 30, 83Fax reception on TAD failure, 56Fax Signal Receive, 86
HHalftone setting, 71Handset, 14Handset receiver volume (fax machine),
31Headset jack, 21Housing, cleaning, 105
IImaging film, replacing, 22Intercom, 41
JJams, clearing, 119-120
LLetters, entering, 20, 27, 37, 75
Index
all.book⦆⦆Page⦆129⦆⦆Friday,⦆May⦆31,⦆2002⦆⦆9:49⦆AM

Index
130
Line error, 108Loading paper, 24Loading the document, 70
MMemory transmission, 82Memory, substitute reception to, 88Message List, 100Messages
Erasing, 53, 54Listening to, 52Listening to on cordless handset, 54Listening to remotely, 64Setting allowed time, 56
NNormal dialing, 34, 73Number of rings in FAX reception mode,
83Number of rings in TAD mode, 51
OOGM only mode, 57Ordering parts, 121Outgoing message, 48
PPaper jams, clearing, 119-120Paper size setting, 25Paper tray extension, 16Paper, loading, 24Personal box, setting passcode, 49Power cord, 14Print contrast setting, 25Print head, cleaning, 103-104
Priority Call, 95
RReception mode
FAX mode, 30, 83TAD mode, 30, 50TEL mode, 30, 84
Reception Ratio setting, 87Redialing, 41, 79Remote code number, 62Remote operations, 62Resolution, 71Ringer volume
Cordless handset, 33Fax machine, 32
SScanning glass, cleaning, 104Sender’s name and number, entering,
26-27Setup List, 100Speaker volume, 31
TTAD reception mode, 30, 50TEL reception mode, 30, 84TEL. LINE jack, 15Telephone line cord, 15Telephone Number List, 100Time, setting, 28-29Toll Saver function, 51, 63Transaction Report, 101
Setting print condition, 102Transfer Function, 59Transferring calls, 44
all.book⦆⦆Page⦆130⦆⦆Friday,⦆May⦆31,⦆2002⦆⦆9:49⦆AM

1. Call your fax from a touch-tone telephone, and press # when the outgoing message begins.
2. If you want to listen to a personal box, enter its number.
3. Enter your passcode or remote code:
4. Press # .
5. After listening to your messages, you can either hang up to save them, or enter one of the commands on the reverse side.
REMOTE OPERATION CARD
The card below is provided as a quick guide to remote operation. Cut it out and carry it with you when you go out.
Remote Operation Guide
all.book⦆⦆Page⦆131⦆⦆Friday,⦆May⦆31,⦆2002⦆⦆9:49⦆AM

REMOTE COMMANDS• FAX RECEPTION MODES
TAD mode......................... 8 1 #FAX mode......................... 8 2 #TEL mode......................... 8 3 #
• TRANSFER FUNCTION Turn on ............................. 9 1 # (Box#) #Turn off ............................. 9 2 #New transfer number ........ 9 0 # (Tel. #)
#Record transfer OGM ....... 9 3 #To quickly disconnect........ * *
• OGM ONLY MODE Turn on ............................. 1 1 # Turn off ............................. 1 2 #
• PLAYBACK Play messages ................. 7 # Move backward/repeat...... 2 #Skip forward ...................... 5 #Stop .................................. 0 #Play new messages only .. 6 #(first stop playback)
• ERASING MESSAGES Erase single message ...... 3 # Erase all messages .......... 3 3 #
• RECORDING A MEMO Start .................................. * # End ................................... 0 #
• RECORDING A NEW OGM Start .................................. 4 *
all.book⦆⦆Page⦆132⦆⦆Friday,⦆May⦆31,⦆2002⦆⦆9:49⦆AM

all.book⦆⦆Page⦆133⦆⦆Friday,⦆May⦆31,⦆2002⦆⦆9:49⦆AM

END USER LIMITED WARRANTY
SHARP ELECTRONICS CORPORATION warrants to the first end user purchaser that this Sharpbrand product (the "Product"), when shipped in its original container, will be free from defectiveworkmanship and materials, and agrees that it will, at its option, either repair the defect or replacethe defective Product or part thereof with a new or remanufactured equivalent at no charge to thepurchaser for parts or labor for the period(s) set forth below.
This warranty does not apply to any appearance items of the Product nor to the additional excludeditem(s) set forth below nor to any product the exterior of which has been damaged or defaced,which has been subjected to misuse, abnormal service or handling, or which has been altered ormodified in design or construction.
In order to enforce the rights under this limited warranty, the purchaser should follow the steps setforth below and provided proof of purchase to the servicer.
To the extent permitted by applicable state law, the warranties set forth herein are in lieu of, andexclusive of, all other warranties, express or implied. Specifically, ALL OTHER WARRANTIESOTHER THAN THOSE SET FORTH ABOVE ARE EXCLUDED. ALL EXPRESS AND IMPLIEDWARRANTIES INCLUDING THE WARRANTIES OF MERCHANTABILITY, FITNESS FOR USE,AND FITNESS FOR A PARTICULAR PURPOSE ARE SPECIFICALLY EXCLUDED. If, underapplicable state law, implied warranties may not validly be disclaimed or excluded, the duration ofsuch implied warranties is limited to the period(s) from the date of purchase set forth below.
Neither the sales personnel of the seller nor any other person is authorized to make any warrantiesother than those described above, or to extend the duration of any warranties beyond the timeperiod described above on behalf of Sharp.
The warranties described herein shall be the sole and exclusive warranties granted by Sharp andshall be the sole and exclusive remedy available to the purchaser. Correction of defects, in themanner and for the period of time described herein, shall constitute complete fulfillment of allliabilities and responsibilities of Sharp to the purchaser with respect to the Product, and shallconstitute full satisfaction of all claims, whether based on contact, negligence, strict liability orotherwise. In no event shall Sharp be liable, or in any way responsible, for any damages or defectsin the Product which were caused by repairs or attempted repairs performed by anyone other thanan authorized servicer. Nor shall Sharp be liable or in any way responsible for any incidental orconsequential economic or property damage. Some states do not allow limits on warranties or onremedies for breach in certain transactions; in such state the limits herein may not apply.
Your Product: Personal Facsimile UX-CC500 Warranty Period for this Product: Ninety (90) days parts and labor from date of purchase. Additional items excluded Any consumable items such as paper or Imaging Film supplied with from warranty coverage: the Product. What to do to obtain service: Call Sharp at 1-877-794-8675 to obtain a Return Authorization Number and
shipping instructions. A technician will troubleshoot your problem with youon the phone and if it is determined that your Product needs service, youwill have your choice of having your unit repaired or replaced to any U.S.location. Be sure to have Proof of Purchase available.
For product information or customer assistance, please visit http://www.sharpusa.com on theWorld Wide Web or call 1-877-794-8675.
SHARP ELECTRONICS CORPORATIONSharp Plaza,Mahwah, New Jersey 07430-2135
all.book⦆⦆Page⦆135⦆⦆Friday,⦆May⦆31,⦆2002⦆⦆9:49⦆AM
IMPORTANT SERVICE INFORMATION
If a Problem OccursMost operational questions can be answered by referring to this "Setup Guide and Operation Manual"Also, for your convenience, you will find answers to most frequently askedquestions on our website at www.sharpusa.com/, or by sending e-mail to [email protected]. Should you require further assistance, call 1-877-794-8675; a Customer Relations Specialist will assist you. Before your call, please be ready to provide the model number of your product, serial number, date of purchase, description of the problem, and a valid credit card number (should it be required).
How Exchange is ObtainedA replacement unit in exchange for your fax is provided by Sharp to any U.S. location. You will be required to provide consent for acceptance of an exchange unit and provide credit card authorization. At that time, Sharp will ship to you, at no cost, an exchange for your defective product. The exchange unit we ship to you will be new or remanufactured. Upon your receipt of the exchange unit, packaging and shipping instructions will be enclosed for you to return the defective unit. Upon Sharp's receipt of the defective unit, your credit card hold will be released.
How Warranty Repair Service is ObtainedIf you prefer that we repair your unit instead of replacing it, our Customer Relations Specialists at 1- 877-794-8675 will explain how to obtain warranty repair service. Please be sure to retain the original packaging materials in order to facilitate shipment. Upon repair of your unit, Sharp will promptly return it at no cost to you at any U.S. location.
What You Must DoYour Product is designed to perform with a minimum amount of user maintenance. However, you are responsible for the required user maintenance described in the "Operation Manual". This requires user maintenance including replacement of the imaging film and battery, cleaning of the unit and removal of dust and foreign matter, clearing of paper misfeeds, and proper routine and preventive maintenance.
Service After Expiration of Warranty CoverageShould you require service repair after warranty coverage has expired, contact Sharp at 1-877-794- 8675 for information.
To Purchase Consumables From SharpVisit www.sharpplace.com/ or call Sharp at 1-877-794-8675 to order replacement Sharp Thermal Ribbons & Accesories. Before your call, please be ready to provide the model number of your product, and a valid credit card number. Consumables may also be obtained through your reseller.
all.book⦆⦆Page⦆136⦆⦆Friday,⦆May⦆31,⦆2002⦆⦆9:49⦆AM

all.book⦆⦆Page⦆137⦆⦆Friday,⦆May⦆31,⦆2002⦆⦆9:49⦆AM

PRINTED IN THAILAND
(TINSE4273XHTZ)
SHARP ELECTRONICS CORPORATION
Sharp Plaza, Mahwah, New Jersey 07430-2135
http://www.sharpusa.com
SHARP CORPORATION
FOR YOUR RECORDSPlease record the model number and serial number below, for easy reference, in case of loss or theft. These numbers are located on the rear side of the unit.Space is also provided for other relevant information.
Model Number UX-CC500Serial NumberDate of PurchasePlace of Purchase
all.book⦆⦆Page⦆138⦆⦆Friday,⦆May⦆31,⦆2002⦆⦆9:49⦆AM