
Using Tempo Two Pass - Telestream · Using Tempo Two Pass Steps to Set Up Tempo for Two Pass 4...
20
December 2016 © 2016 Telestream, LLC 208411 Application Note Vantage Introduction .................................................................................... 2 Steps to Set Up Tempo for Two Pass .............................................. 2 Vantage General Configuration ................................................................. 2 Tempo Configuration ................................................................................. 4 Tempo Two Pass Workflows ........................................................... 8 Ingest Workflow .......................................................................................... 9 Pass 1 Workflow ....................................................................................... 10 Pass 2 Workflow ....................................................................................... 12 Approved Workflow.................................................................................. 13 Using the Workflows and Portal .............................................................. 14 Copyright and Trademark Notice ................................................ 19 Note: This guide is written for video professionals who are familiar with using Vantage. To implement applications in Vantage, you should know how to create workflows and submit jobs. If you aren’t familiar with Vantage, we suggest that you review the Vantage User’s Guide and Vantage Domain Management Guide as needed. Using Tempo Two Pass V This App Note applies to Vantage Version 7.0 UP1 and later
Transcript of Using Tempo Two Pass - Telestream · Using Tempo Two Pass Steps to Set Up Tempo for Two Pass 4...

December 2016 © 2016 Telestream, LLC 208411
Application NoteVantage
Introduction .................................................................................... 2
Steps to Set Up Tempo for Two Pass.............................................. 2Vantage General Configuration.................................................................2Tempo Configuration .................................................................................4
Tempo Two Pass Workflows ........................................................... 8Ingest Workflow..........................................................................................9Pass 1 Workflow .......................................................................................10Pass 2 Workflow .......................................................................................12Approved Workflow..................................................................................13Using the Workflows and Portal..............................................................14
Copyright and Trademark Notice ................................................19
Note: This guide is written for video professionals who are familiar with using Vantage. To implement applications in Vantage, you should know how to create workflows and submit jobs. If you aren’t familiar with Vantage, we suggest that you review the Vantage User’s Guide and Vantage Domain Management Guide as needed.
Using Tempo Two Pass
VThis App Noteapplies toVantage
Version 7.0 UP1and later
Using Tempo Two PassIntroduction
2
IntroductionThe Tempo Two Pass feature allows you to re-time media in multiple passes through two workflow stages to achieve very high-quality re-timing results.
The first stage workflow identifies segments that may not respond well to re-timing.
You can then modify your processing choices for those segments and put the media through the second stage publishing workflow.
This produces the best possible quality in the final output.
Steps to Set Up Tempo for Two PassBefore you can re-time media files using Tempo Two Pass, you need to configure Vantage generally and make a few specific settings for Tempo:
Vantage General Configuration
Tempo Configuration
Note: These tasks should have already been completed as described in the Configuring Tempo chapter of the Tempo User Guide. They are summarized here: Licensing, Vantage user management, Vantage stores, Edit Service session limits, and Workflow Portal deployment. For details, refer to Configuring Tempo Resources.
Vantage General ConfigurationBefore you can use Tempo, you need to configure some Vantage settings:
Ensuring Maximum Server Performance
Licensing Vantage and Tempo
Creating Vantage Users
Enabling Open Workflows
Creating Vantage Stores
Setting the Edit Service’s Session Limit
Ensuring Maximum Server PerformanceIt is important that your Tempo server never goes to sleep. Set the server Control Panel > Power Options to prevent sleep. Select the High Performance plan, and set Sleep mode to Never (never sleep). Select Change advanced power settings, and set all critical functions so that they are always ON (Never turn OFF).
Using Tempo Two PassSteps to Set Up Tempo for Two Pass
3
Licensing Vantage and TempoIn the Vantage Management Console, select Licenses in the left panel, and click the Add/Update license button (gold key icon) to add Vantage and Tempo licenses. You should have received license files from your Telestream sales or support representative.
Creating Vantage UsersIf you want to create Vantage user accounts requiring logging into Vantage, open the Vantage Management Console and select Settings & Options in the left panel. Then in the General tab on the right, select Enable User Administration. If you want to use Windows Active Directory to log in with Windows user names, also select Use Windows Active Directory for Users.
Next, click the Users topic near the bottom of the left panel, and use the New User button in the right panel to add new users.
Enabling Open WorkflowsEnable Open Workflows for the Two Pass feature. In the Vantage Management Console, access Settings & Options, General tab, and check the Enable Open Workflows option. Then press Save.
Also enable Open Workflows at the top of the Workflow Designer and in each action, and then press Save.
Restart services for open actions, and close and re-open the Workflow Designer.
Creating Vantage StoresBefore you can begin configuring Tempo, you must have a fully-operational Vantage domain with Vantage Stores (folders) for holding interim results of Vantage and Tempo workflow processing.
If you have not already done so in the Vantage Domain Console, create Vantage stores as needed (skip this topic if your stores are already configured). For additional details about stores, See Managing Vantage Stores in the Vantage Domain Management Guide.
Setting the Edit Service’s Session LimitThe session limit for each Vantage service determines the maximum number of concurrent sessions (actions that can execute) for a given service. This value is displayed in the Vantage Management Console, Services > Session Limit column.
To change the Session Limit for the Edit (Tempo) service, click the service in the list, click the Setup tab, and click Service Limits and adjust the Session Limit value. The default Edit (Tempo) limit is 4 and the recommended limit is 2.
Note: Changing the Edit service session limit affects all Edit actions (Conform, etc.). Specify Run On rules to dedicate a given Edit service to Tempo actions only.

Using Tempo Two PassSteps to Set Up Tempo for Two Pass
4
Tempo ConfigurationYou’ll need to configure a few things for Tempo as well:
Creating Tempo CatalogsYour media files must be registered in a Vantage catalog for access in the Tempo Portal. Before you can do so using an Ingest workflow, you must create the catalogs.
Use the Catalogs selection in the left panel of the Vantage Management Console Catalogs panel to access the Catalogs panel and create new catalogs. For a single-pass retiming, only one catalog is required. For two-pass retiming, create two new Tempo catalogs, one named Pass 1 Sources and the second named Pass 2 Sources.
Binders are added to the catalogs as you ingest files (explained later).
Creating a Workflow Portal Tempo ConfigurationTo create a Workflow Portal configuration for Tempo Portal, follow these steps:
1. Start the Vantage Management Console and connect to your Vantage domain.
2. Select Application Configurations > Workflow Portal to display the panel below.
3. Click the Create configuration button and create a Tempo Portal configuration.
4. Enter the Name and details of the configuration. For the Mode, select Re-time Asset from Catalogs (create binder).
5. Make selections for each tab as listed below.
Using Tempo Two PassSteps to Set Up Tempo for Two Pass
5
Tempo Tab
Set the following Tempo settings as you prefer:
– Read Only: Check to disallow changing settings directly in Workflow Portal.
– Preserve and re-time captions: Select to re-time captions.
– Use subtitle/caption file: Select to include an SCC (.scc) or STL (.stl) caption file.
– Subtitle/caption file: Enter a path to an SCC or an STL caption/subtitle file.
– Subtitle/caption offset sign: Set the start time of captions (+) for a later start or backward (-) for an earlier start than the specified caption file starting timecode.
– Subtitle/caption offset: Sets the amount of start time adjustment (+/-) to captions or subtitles to change the start time specified in the caption file.
– Set timecode at: Sets start or end timecode in the re-timed output.
– Re-time: Determines what type of default re-timing operation to perform.
Browsable Catalogs Tab
Select the catalogs to make visible in the portal, including Pass 1 Sources and Pass 2 Sources.
– Move the Tempo catalogs on the left to the Visible to user list on the right.
– Select the Show Media Nicknames List option.
– Select the Require All Expected Nicknames option
– Enable or disable Binder Deletions as you prefer
Binder Details Tab
Set the Binder Details as you prefer:
– Binder name: Displays the name assigned to the binder when it was created.
– Created: Displays the date and time the binder was created.
– Expiration: Displays the date and time the binder expires.
– Play button: Displays a button that the operator can use to play or pause the selected job.
Labels Tab
Set the Labels tab to allow operators to view and modify values in the selected metadata labels when they submit jobs to a workflow:
– To enable visibility of metadata labels, check Show Metadata Labels.
– Move (Add) the desired labels on the left to the Visible to user list on the right.
– To allow operators to add and delete metadata labels, check Allow Add/Delete.
– To change label order, select labels in the Visible to user list (Ctrl-click or Shift-click to select multiples) and use the green up and down arrows to move the labels.
Using Tempo Two PassSteps to Set Up Tempo for Two Pass
6
Variables Tab
Set the Variables tab to display the desired variables in the portal:
– Check the desired variables
– Select variable names from the drop-down menus of checked variables
Content Branding Tab
Set Content Branding as desired:
– Click the Content Branding or Rating drop-down menu to access the settings.
– Click Browse to specify the path to the branding logo, or click Placement & duration and select Custom to change settings for the Rating image. Modify the positioning and appearance settings. Logos and images can be added as an overlay image. The origin or default starting point for the logo or image is in the top left corner.
– X, Y: Enter x and y coordinates for the graphic location. Select percentage/pixels.
– Width, Height: Enter graphic dimensions. Select units in percentage or pixels.
– Opacity: Enter the percentage of logo opacity.
– Duration: Enter the length of time that the graphic will appear in the segment in minutes, seconds, or frames. Check Entire segment for a logo on the whole time.
– Frequency: Enter how often the logo will appear in minutes, seconds, or frames.
– Fade duration: Enter graphic fade in and fade out duration in seconds or frames.
Embedded Metadata Settings Tab
Configure default content ratings to show up in the Embedded Metadata panel:
– Select the default Rating system (MPA, US TV, Canadian English, Canadian French).
– Select the default Rating.
– Check the content descriptions you want checked by default.
Timeline Navigation Tab
Set the silence values for the preview panel.
– Set the Silence level threshold for detecting silence. Default is -40db.
– Set the Silence duration minimum to the minimum number of frames defining a period of silence. Default is 1 frame.

Using Tempo Two PassSteps to Set Up Tempo for Two Pass
7
Forward to Workflows Tab
Select the workflows to make available to operators in the portal:
– Check Show Forward to Workflows to make target workflows visible.
– Click Add to move available workflows to the Visible to user panel.
– To accept forwarded binders, the target workflow must start with a Receive action. The Available panel only displays workflows with a Receive action.
– To specify whether a target workflow is required for forwarding or optional, check the Req’d check box next to the workflow in the Visible to user panel.
Storage Tab
Any storage you prefer can be used.
– Select Available Vantage Store or specify a Vantage Store or folder.
Permitted Users Tab
Move (Add) permitted users from the left panel to the right, or check Everyone.
Saving Tempo Portal Settings
When all settings are complete, click the blue disk icon to save the Tempo Portal configuration.

Using Tempo Two PassTempo Two Pass Workflows
8
Tempo Two Pass WorkflowsThe Tempo Two Pass feature allows you to process media in two re-timing passes to achieve very high quality re-timing results. These are the workflows in a typical Tempo Two Pass configuration:
Ingest Workflow
Pass 1 Workflow
Pass 2 Workflow
Approved Workflow
Note: To make the process of learning how to create and use these workflows easy, you can download from Telestream.net a zip file containing the workflows and a video explaining how to import and deploy them. The combination of the videos, the pre-built workflows, and this document should help reduce the learning curve, making you productive with Tempo very quickly.
The configuration steps presented in the following pages are for a typical 1080p 23.976 source and a DNxHD QuickTime output. You can change these media parameters according your needs.
Using Tempo Two PassTempo Two Pass Workflows
9
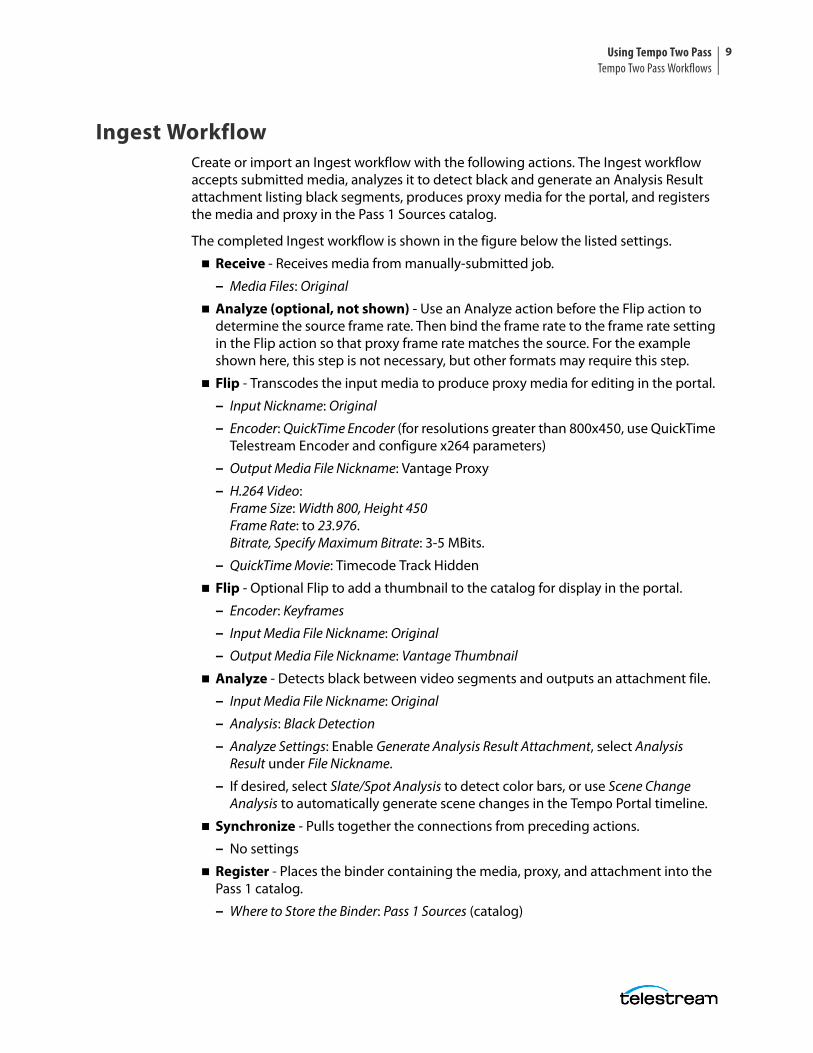
Ingest WorkflowCreate or import an Ingest workflow with the following actions. The Ingest workflow accepts submitted media, analyzes it to detect black and generate an Analysis Result attachment listing black segments, produces proxy media for the portal, and registers the media and proxy in the Pass 1 Sources catalog.
The completed Ingest workflow is shown in the figure below the listed settings.
Receive - Receives media from manually-submitted job.
– Media Files: Original
Analyze (optional, not shown) - Use an Analyze action before the Flip action to determine the source frame rate. Then bind the frame rate to the frame rate setting in the Flip action so that proxy frame rate matches the source. For the example shown here, this step is not necessary, but other formats may require this step.
Flip - Transcodes the input media to produce proxy media for editing in the portal.
– Input Nickname: Original
– Encoder: QuickTime Encoder (for resolutions greater than 800x450, use QuickTime Telestream Encoder and configure x264 parameters)
– Output Media File Nickname: Vantage Proxy
– H.264 Video: Frame Size: Width 800, Height 450Frame Rate: to 23.976. Bitrate, Specify Maximum Bitrate: 3-5 MBits.
– QuickTime Movie: Timecode Track Hidden
Flip - Optional Flip to add a thumbnail to the catalog for display in the portal.
– Encoder: Keyframes
– Input Media File Nickname: Original
– Output Media File Nickname: Vantage Thumbnail
Analyze - Detects black between video segments and outputs an attachment file.
– Input Media File Nickname: Original
– Analysis: Black Detection
– Analyze Settings: Enable Generate Analysis Result Attachment, select Analysis Result under File Nickname.
– If desired, select Slate/Spot Analysis to detect color bars, or use Scene Change Analysis to automatically generate scene changes in the Tempo Portal timeline.
Synchronize - Pulls together the connections from preceding actions.
– No settings
Register - Places the binder containing the media, proxy, and attachment into the Pass 1 catalog.
– Where to Store the Binder: Pass 1 Sources (catalog)
Using Tempo Two PassTempo Two Pass Workflows
10
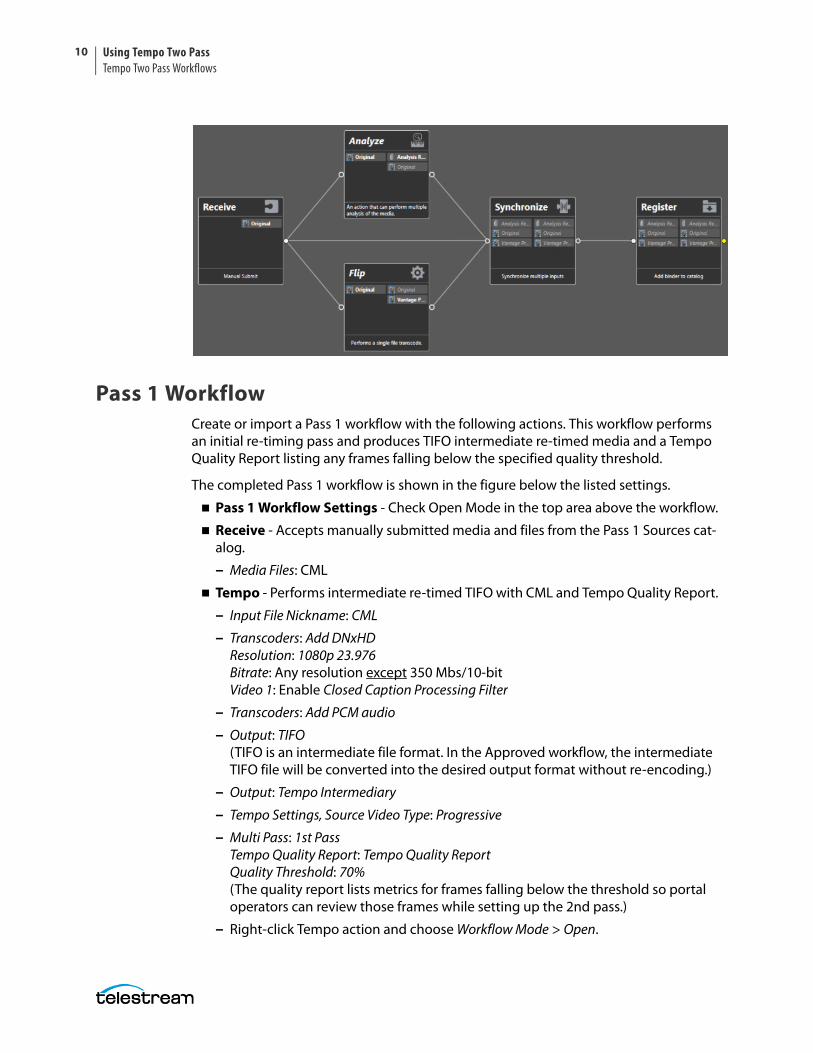
Pass 1 WorkflowCreate or import a Pass 1 workflow with the following actions. This workflow performs an initial re-timing pass and produces TIFO intermediate re-timed media and a Tempo Quality Report listing any frames falling below the specified quality threshold.
The completed Pass 1 workflow is shown in the figure below the listed settings.
Pass 1 Workflow Settings - Check Open Mode in the top area above the workflow.
Receive - Accepts manually submitted media and files from the Pass 1 Sources cat-alog.
– Media Files: CML
Tempo - Performs intermediate re-timed TIFO with CML and Tempo Quality Report.
– Input File Nickname: CML
– Transcoders: Add DNxHDResolution: 1080p 23.976Bitrate: Any resolution except 350 Mbs/10-bitVideo 1: Enable Closed Caption Processing Filter
– Transcoders: Add PCM audio
– Output: TIFO (TIFO is an intermediate file format. In the Approved workflow, the intermediate TIFO file will be converted into the desired output format without re-encoding.)
– Output: Tempo Intermediary
– Tempo Settings, Source Video Type: Progressive
– Multi Pass: 1st PassTempo Quality Report: Tempo Quality ReportQuality Threshold: 70%(The quality report lists metrics for frames falling below the threshold so portal operators can review those frames while setting up the 2nd pass.)
– Right-click Tempo action and choose Workflow Mode > Open.
Using Tempo Two PassTempo Two Pass Workflows
11
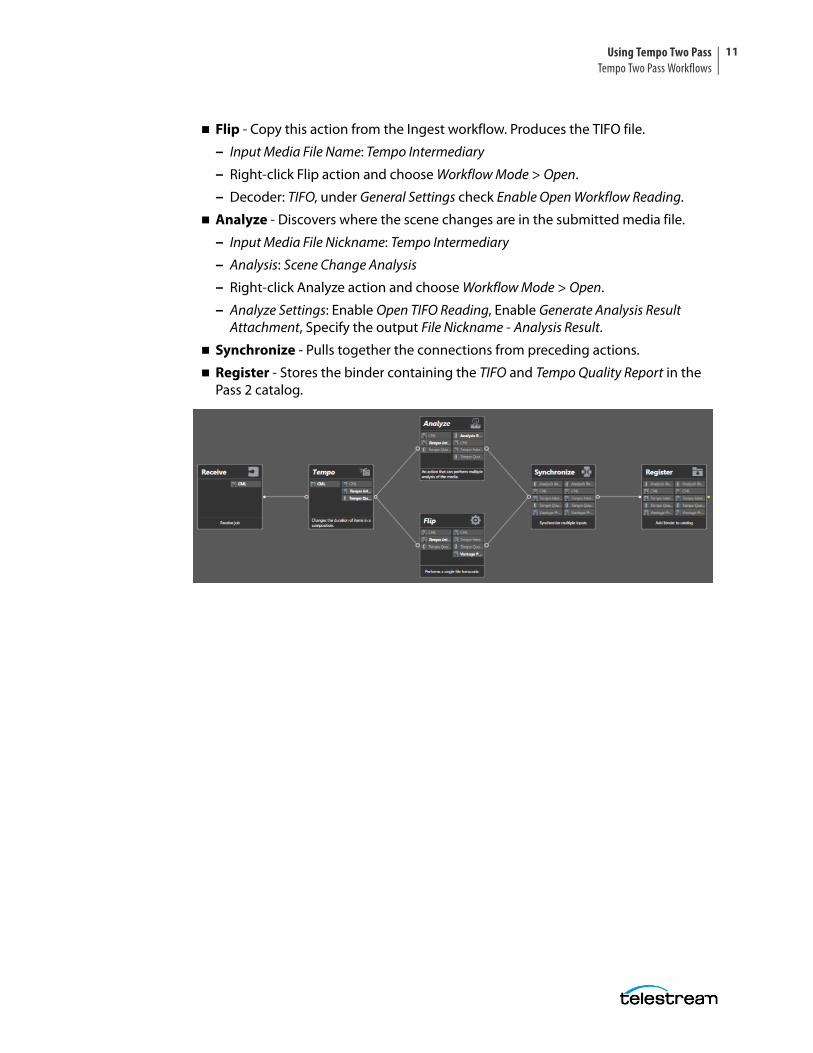
Flip - Copy this action from the Ingest workflow. Produces the TIFO file.
– Input Media File Name: Tempo Intermediary
– Right-click Flip action and choose Workflow Mode > Open.
– Decoder: TIFO, under General Settings check Enable Open Workflow Reading.
Analyze - Discovers where the scene changes are in the submitted media file.
– Input Media File Nickname: Tempo Intermediary
– Analysis: Scene Change Analysis
– Right-click Analyze action and choose Workflow Mode > Open.
– Analyze Settings: Enable Open TIFO Reading, Enable Generate Analysis Result Attachment, Specify the output File Nickname - Analysis Result.
Synchronize - Pulls together the connections from preceding actions.
Register - Stores the binder containing the TIFO and Tempo Quality Report in the Pass 2 catalog.
Using Tempo Two PassTempo Two Pass Workflows
12
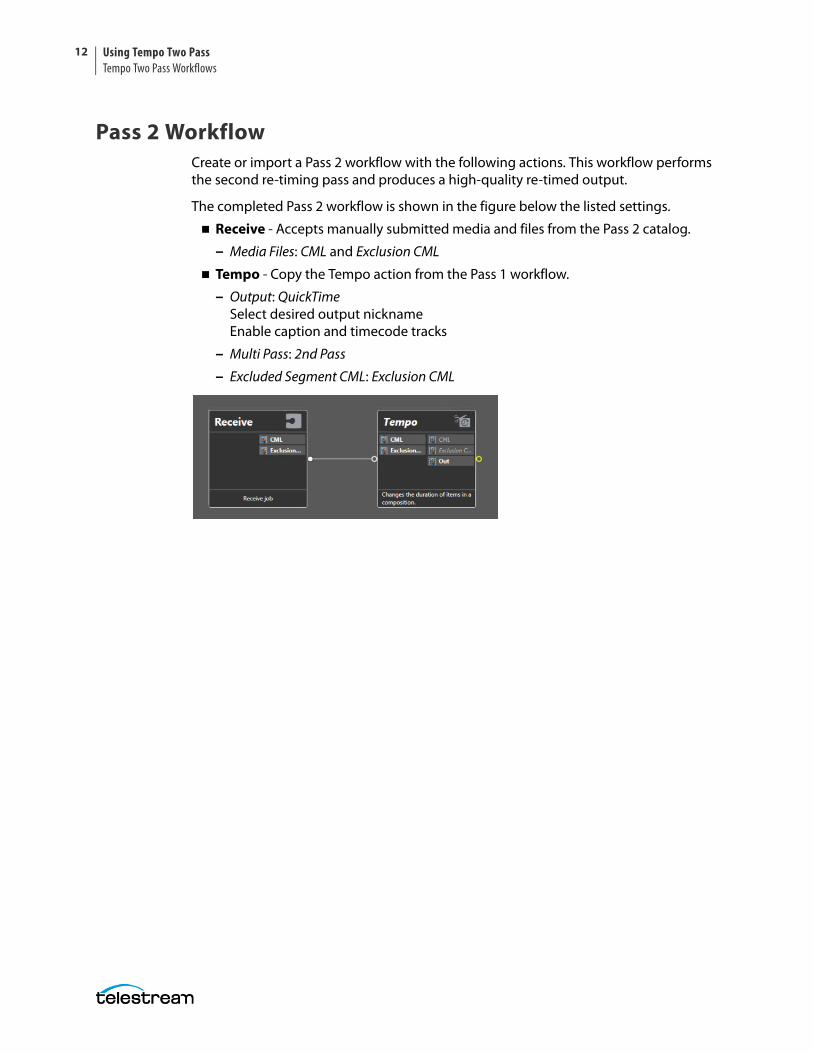
Pass 2 WorkflowCreate or import a Pass 2 workflow with the following actions. This workflow performs the second re-timing pass and produces a high-quality re-timed output.
The completed Pass 2 workflow is shown in the figure below the listed settings.
Receive - Accepts manually submitted media and files from the Pass 2 catalog.
– Media Files: CML and Exclusion CML
Tempo - Copy the Tempo action from the Pass 1 workflow.
– Output: QuickTimeSelect desired output nicknameEnable caption and timecode tracks
– Multi Pass: 2nd Pass
– Excluded Segment CML: Exclusion CML
Using Tempo Two PassTempo Two Pass Workflows
13
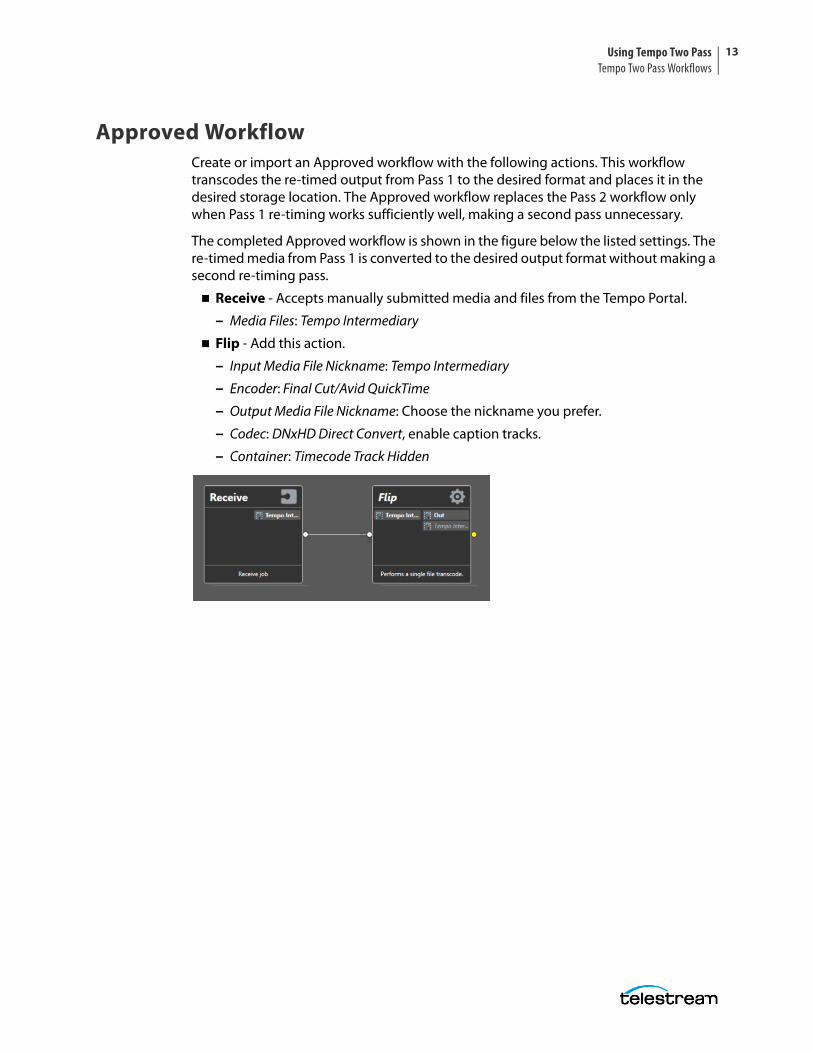
Approved WorkflowCreate or import an Approved workflow with the following actions. This workflow transcodes the re-timed output from Pass 1 to the desired format and places it in the desired storage location. The Approved workflow replaces the Pass 2 workflow only when Pass 1 re-timing works sufficiently well, making a second pass unnecessary.
The completed Approved workflow is shown in the figure below the listed settings. The re-timed media from Pass 1 is converted to the desired output format without making a second re-timing pass.
Receive - Accepts manually submitted media and files from the Tempo Portal.
– Media Files: Tempo Intermediary
Flip - Add this action.
– Input Media File Nickname: Tempo Intermediary
– Encoder: Final Cut/Avid QuickTime
– Output Media File Nickname: Choose the nickname you prefer.
– Codec: DNxHD Direct Convert, enable caption tracks.
– Container: Timecode Track Hidden

Using Tempo Two PassTempo Two Pass Workflows
14
Using the Workflows and PortalOnce your workflows are built, you are ready to use the Tempo Portal and workflows to produce a re-timed media output.
Creating the Portal ConfigurationThe following brief list summarizes the Tempo Portal configuration you created earlier in the Vantage Management Console:
Vantage Management Console > Application Configurations > Workflow Portal
Name: Tempo
Mode: Re-time Asset from Catalogs (create binder)
Use dropframe notation for duration when appropriate: Check to enable.
Browsable Catalogs: Add Pass 1 Sources and Pass 2 Sources catalogs.
Forward to Workflows: Add Pass 1, Pass 2, and Approved workflows.
Set all other panels as you prefer, and save the configuration.
Running the Ingest WorkflowBefore you can use the portal and workflows to perform re-timing, you need to register the media file and attachment using the Ingest workflow:
1. Launch the Workflow Designer from the desktop icon.
2. Select and Activate the Ingest workflow.
3. Use Submit Job to submit the media to be re-timed to the workflow.
4. Monitor workflow completion in the Job Status tab.
5. Check the Pass 1 catalog (in the Vantage Management Console) when the workflow completes to see that the media, proxy, and Analysis Result attachment are present.
Starting the Tempo PortalStart the Tempo Portal as follows:
1. Launch the Workflow Portal from the desktop icon.
2. Select the Vantage Domain and the Application Configuration (Tempo Portal). You will be asked for these when the portal starts, but you can also change them using these File menu selections: Change Vantage Domain and Change/Reload Application Configuration.
3. Select the Pass 1 Sources catalog in the portal Catalogs list. You should see an icon representing the ingested media in the Pass 1 Sources list.
Using Tempo Two PassTempo Two Pass Workflows
15
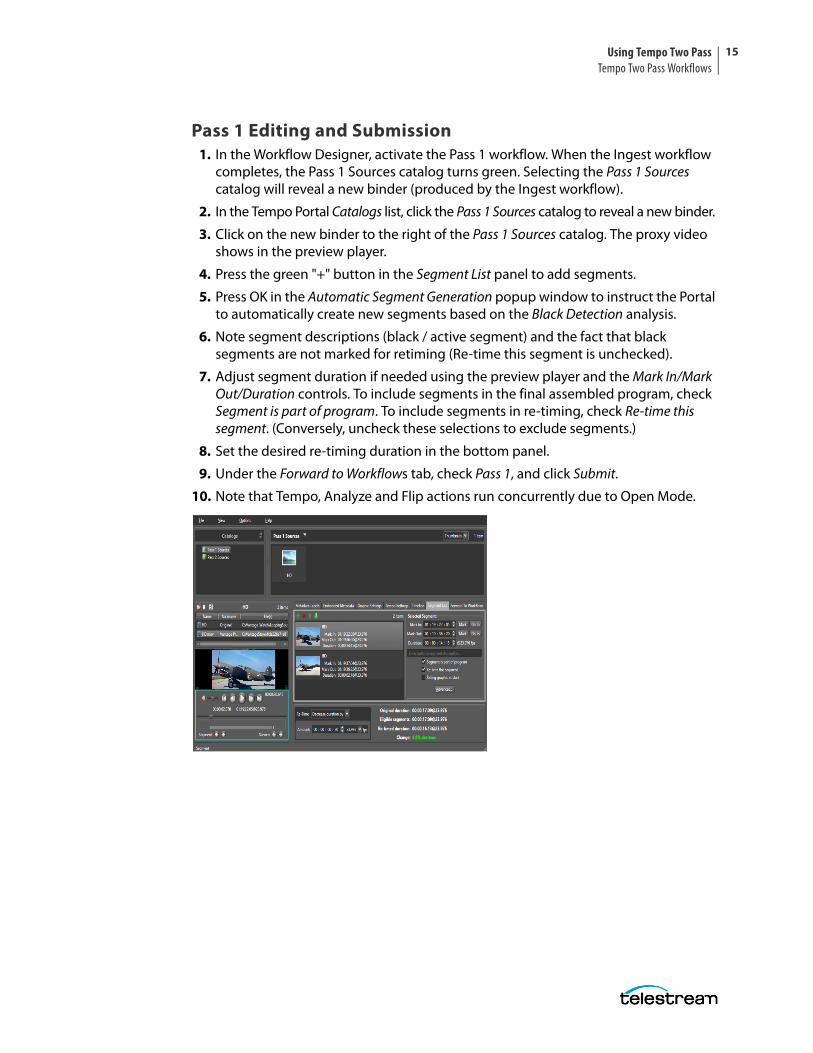
Pass 1 Editing and Submission1. In the Workflow Designer, activate the Pass 1 workflow. When the Ingest workflow
completes, the Pass 1 Sources catalog turns green. Selecting the Pass 1 Sources catalog will reveal a new binder (produced by the Ingest workflow).
2. In the Tempo Portal Catalogs list, click the Pass 1 Sources catalog to reveal a new binder.
3. Click on the new binder to the right of the Pass 1 Sources catalog. The proxy video shows in the preview player.
4. Press the green "+" button in the Segment List panel to add segments.
5. Press OK in the Automatic Segment Generation popup window to instruct the Portal to automatically create new segments based on the Black Detection analysis.
6. Note segment descriptions (black / active segment) and the fact that black segments are not marked for retiming (Re-time this segment is unchecked).
7. Adjust segment duration if needed using the preview player and the Mark In/Mark Out/Duration controls. To include segments in the final assembled program, check Segment is part of program. To include segments in re-timing, check Re-time this segment. (Conversely, uncheck these selections to exclude segments.)
8. Set the desired re-timing duration in the bottom panel.
9. Under the Forward to Workflows tab, check Pass 1, and click Submit.
10. Note that Tempo, Analyze and Flip actions run concurrently due to Open Mode.

Using Tempo Two PassTempo Two Pass Workflows
16
When the Pass 1 workflow completes, the re-timed TIFO intermediary file, a Tempo Quality Report (CML), and retimed Vantage Proxy are added to the Pass 2 Sources binder and catalog. The Pass 2 Sources catalog in the portal turns green, indicating the new binder is available.
11. In the portal, click File, and New Project to clear out the Pass 1 sources and segments.
12. Click the Pass 2 Sources catalog and select the new binder.
Notice that the sources at the top of the preview player window, and a timeline with orange and green markers appears at the bottom of the preview window.
13. If there are NO orange (top line) artifact markers on the Pass 2 Sources, indicating that Pass 1 quality was consistently above the quality threshold, no additional re-timing is required. Skip the Pass 2 workflow below, and follow the Approved Submission steps.
If there are orange artifact markers on the timeline, indicating that Pass 1 quality was below the quality threshold, review the artifacts to determine whether the quality is acceptable. If not, follow the Pass 2 Editing and Submission steps below.
Pass 2 Editing and SubmissionBegin the second pass by activating the Pass 2 workflow in the Workflow Designer. Then using the Tempo Portal, follow the steps below:
1. As described previously, when the Pass 1 workflow finishes, the Pass 2 Sources catalog turns green.
2. You should have already selected File and New Project to remove Pass 1 segments from the segment list. (Only one segment list at a time can be used in the Portal.)
3. You should also have already selected the Pass 2 Sources catalog to reveal a new binder and the timeline below the preview player.
4. Notice the timeline features described below. The orange artifact markers indicate places that did not meet the re-timing quality threshold in Pass 1. You can then mark the scenes containing those artifacts to be excluded from re-timing in Pass 2.
– Timeline markers:
Orange - Artifacts
Green - Scene changes
– Timeline buttons:
Scene
Artifacts
Silence
– Jump between artifacts and scene changes by pressing the corresponding buttons.
Orange Markers
Using Tempo Two PassTempo Two Pass Workflows
17
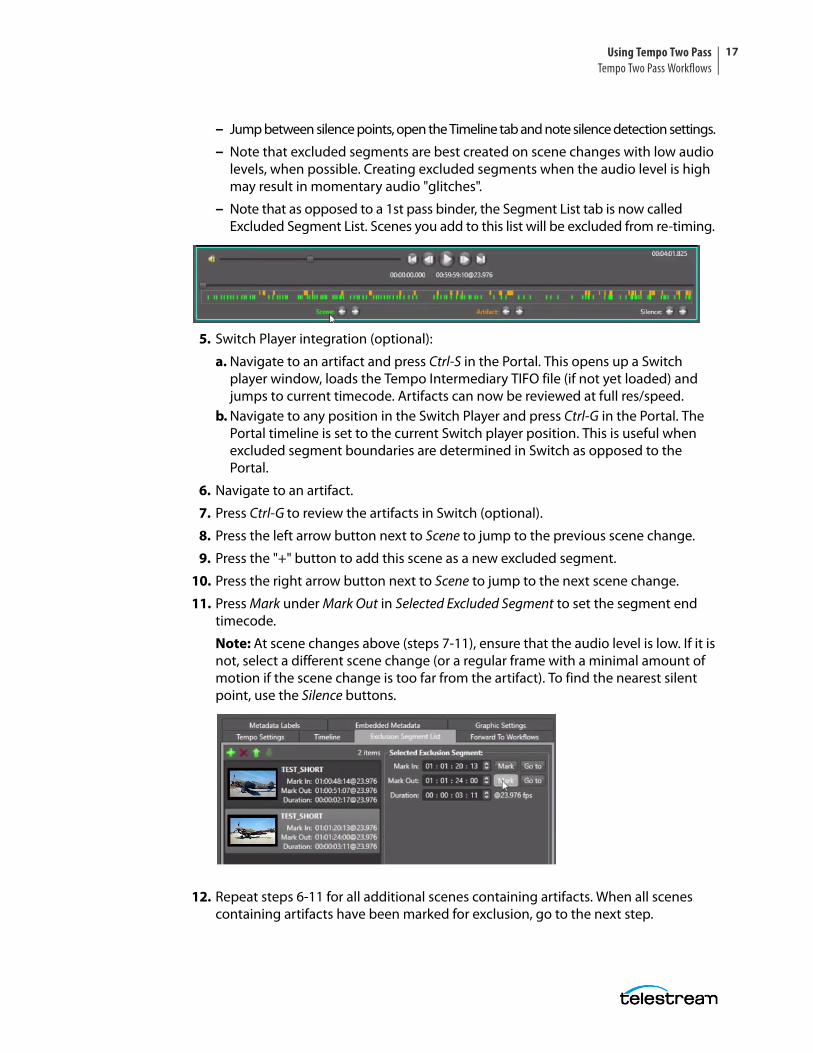
– Jump between silence points, open the Timeline tab and note silence detection settings.
– Note that excluded segments are best created on scene changes with low audio levels, when possible. Creating excluded segments when the audio level is high may result in momentary audio "glitches".
– Note that as opposed to a 1st pass binder, the Segment List tab is now called Excluded Segment List. Scenes you add to this list will be excluded from re-timing.
5. Switch Player integration (optional):
a. Navigate to an artifact and press Ctrl-S in the Portal. This opens up a Switch player window, loads the Tempo Intermediary TIFO file (if not yet loaded) and jumps to current timecode. Artifacts can now be reviewed at full res/speed.
b. Navigate to any position in the Switch Player and press Ctrl-G in the Portal. The Portal timeline is set to the current Switch player position. This is useful when excluded segment boundaries are determined in Switch as opposed to the Portal.
6. Navigate to an artifact.
7. Press Ctrl-G to review the artifacts in Switch (optional).
8. Press the left arrow button next to Scene to jump to the previous scene change.
9. Press the "+" button to add this scene as a new excluded segment.
10. Press the right arrow button next to Scene to jump to the next scene change.
11. Press Mark under Mark Out in Selected Excluded Segment to set the segment end timecode.
Note: At scene changes above (steps 7-11), ensure that the audio level is low. If it is not, select a different scene change (or a regular frame with a minimal amount of motion if the scene change is too far from the artifact). To find the nearest silent point, use the Silence buttons.
12. Repeat steps 6-11 for all additional scenes containing artifacts. When all scenes containing artifacts have been marked for exclusion, go to the next step.
Using Tempo Two PassTempo Two Pass Workflows
18
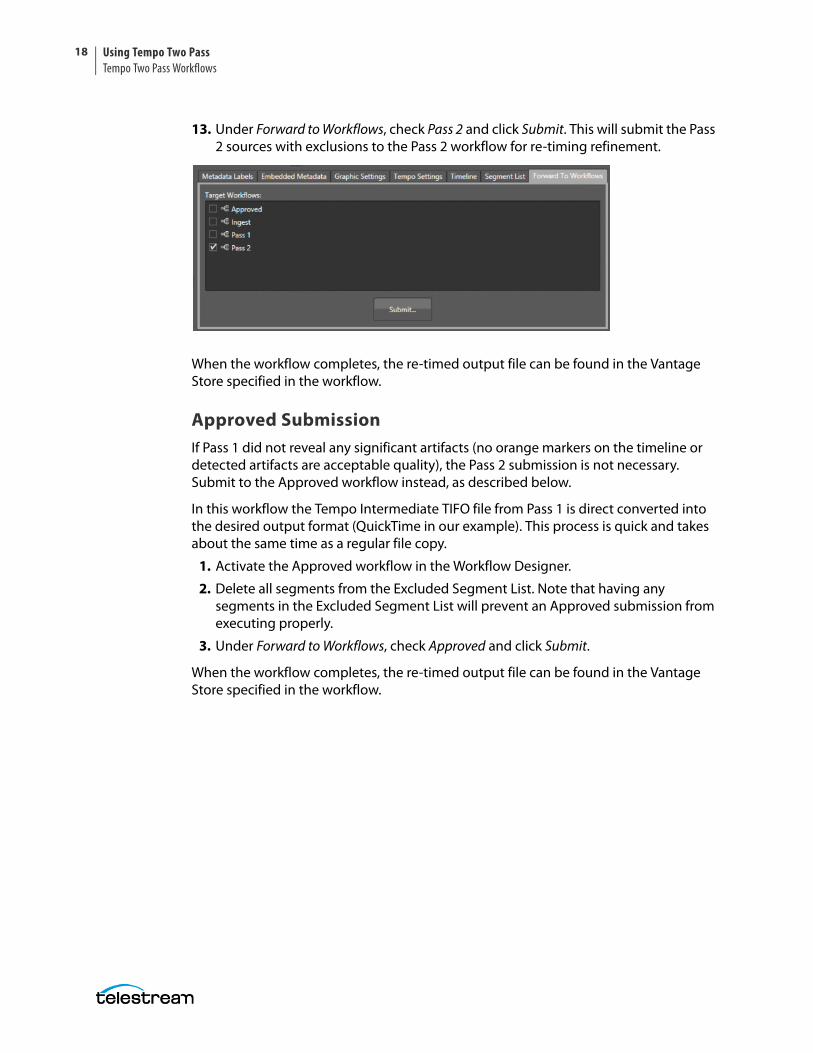
13. Under Forward to Workflows, check Pass 2 and click Submit. This will submit the Pass 2 sources with exclusions to the Pass 2 workflow for re-timing refinement.
When the workflow completes, the re-timed output file can be found in the Vantage Store specified in the workflow.
Approved SubmissionIf Pass 1 did not reveal any significant artifacts (no orange markers on the timeline or detected artifacts are acceptable quality), the Pass 2 submission is not necessary. Submit to the Approved workflow instead, as described below.
In this workflow the Tempo Intermediate TIFO file from Pass 1 is direct converted into the desired output format (QuickTime in our example). This process is quick and takes about the same time as a regular file copy.
1. Activate the Approved workflow in the Workflow Designer.
2. Delete all segments from the Excluded Segment List. Note that having any segments in the Excluded Segment List will prevent an Approved submission from executing properly.
3. Under Forward to Workflows, check Approved and click Submit.
When the workflow completes, the re-timed output file can be found in the Vantage Store specified in the workflow.

Using Tempo Two PassCopyright and Trademark Notice
19
Copyright and Trademark Notice©2016 Telestream®, LLC. All rights reserved. No part of this publication may be reproduced, transmitted, transcribed, altered, or translated into any languages without written permission of Telestream, Inc. Information and specifications in this document are subject to change without notice and do not represent a commitment on the part of Telestream.
Telestream, CaptionMaker, Episode, Flip4Mac, FlipFactory, Flip Player, Lightspeed, ScreenFlow, Switch, Vantage, Wirecast, Gameshow, GraphicsFactory, MetaFlip, and Split-and-Stitch are registered trademarks and MacCaption, e-Captioning, Pipeline, Post Producer, Tempo, TrafficManager, VidChecker, and VOD Producer are trademarks of Telestream, LLC. All other trademarks are the property of their respective owners.
All other brand, product, and company names are the property of their respective owners and are used only for identification purposes.

Using Tempo Two PassCopyright and Trademark Notice
20