
Using Inside SOU
6
Using Inside SOU is your gateway to campus systems. When you are logged in, you'll have quick links to all kinds of important information and services: academic calendar, events calendar, Moodle (our learning management system), email, schedule of classes, library services… and that's just for starters! Inside SOU is also home to Banner Self Service, the data services that support everything administrative that you'll engage in at SOU—from admission to graduation. Here you'll register for classes, pay your tuition, and check your grades. Activate Your Account—New Students In order to log in to Inside SOU, you first need to activate your SOU student account: 1. Open your browser and go to Inside SOU (note that you can also click on the Inside SOU logo from throughout the SOU website, as well.) 2. In the upper right corner, select the link labeled Students - Activate your Account. 3. In the dialog box, verify your: a. First name b. Last name c. Birth date (in YYYY-MM-DD format) d. SOU ID number (940------) 4. Click on Activate to generate your network account user name. 5. Make a note of the user name, SOU email address, and student ID number that are displayed (note that these are different from those you used when you applied for admission). 6. Everyone who uses an SOU account must review and agree to SOU's Acceptable Use Policy. To indicate that you will abide by this policy, check the box labeled I agree and click on Continue on the Success screen. 7. Create a password as described, then enter it in the fields provided and click on Change Password. 8. Next, create security settings to protect your account. First, create your own security question and provide an answer. Then, use the drop-down menus to select three pre-defined questions and enter an answer for each. Correctly answering these questions will allow you to reset your password in the future. When you have provided answers for all four security questions, click on Save Responses. 9. The Inside SOU login page will reappear. Click on the Login link and enter your user name and password. Access Your Account—Returning Students How you access your account after stepping out from your studies will vary depending on how long you have been away (and by the way, we missed you!). One of the following methods should allow you to reactivate your account. For assistance, contact the Help Desk at (541) 552-6900.
Transcript of Using Inside SOU
Using Inside SOU is your gateway to campus systems. When you are logged in, you'll have quick links
to all kinds of important information and services: academic calendar, events calendar, Moodle (our learning management system), email, schedule of classes, library services… and that's just for starters! Inside SOU is also home to Banner Self Service, the data services that support everything administrative that you'll engage in at SOU—from admission to graduation. Here you'll register for classes, pay your tuition, and check your grades.
Activate Your Account—New Students In order to log in to Inside SOU, you first need to activate your SOU student account:
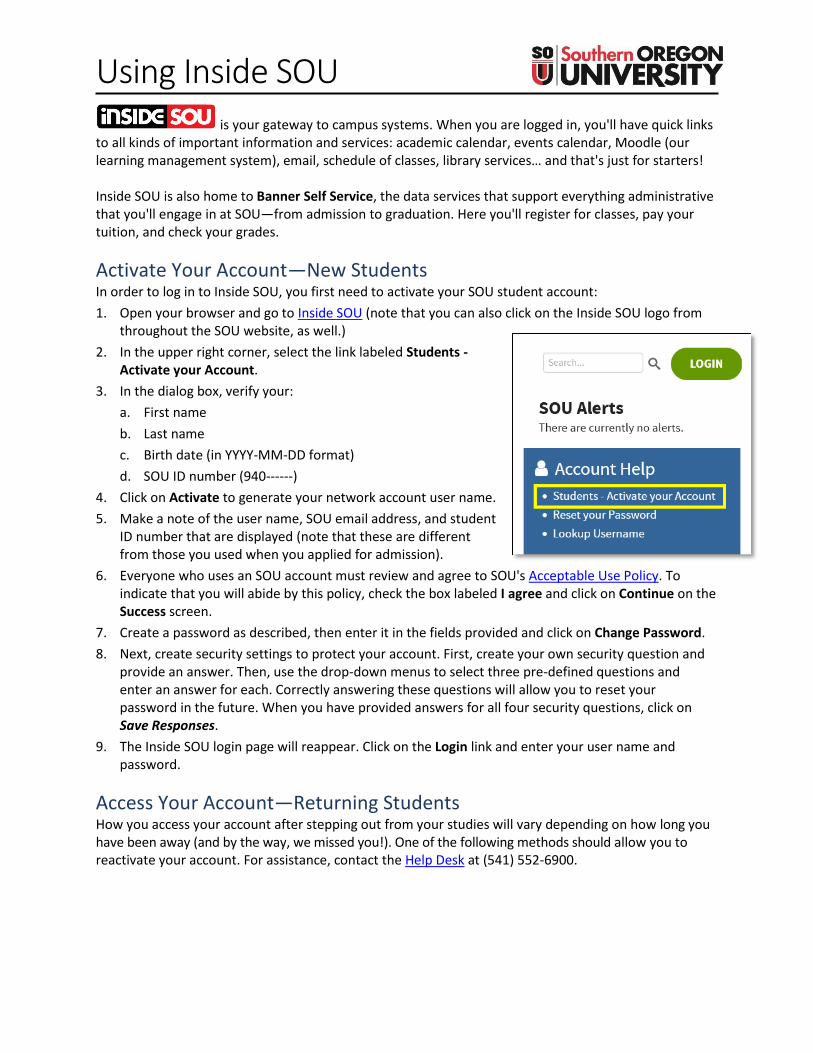
1. Open your browser and go to Inside SOU (note that you can also click on the Inside SOU logo from throughout the SOU website, as well.)
2. In the upper right corner, select the link labeled Students - Activate your Account.
3. In the dialog box, verify your:
a. First name
b. Last name
c. Birth date (in YYYY-MM-DD format)
d. SOU ID number (940------)
4. Click on Activate to generate your network account user name.
5. Make a note of the user name, SOU email address, and student ID number that are displayed (note that these are different from those you used when you applied for admission).
6. Everyone who uses an SOU account must review and agree to SOU's Acceptable Use Policy. To indicate that you will abide by this policy, check the box labeled I agree and click on Continue on the Success screen.
7. Create a password as described, then enter it in the fields provided and click on Change Password.
8. Next, create security settings to protect your account. First, create your own security question and provide an answer. Then, use the drop-down menus to select three pre-defined questions and enter an answer for each. Correctly answering these questions will allow you to reset your password in the future. When you have provided answers for all four security questions, click on Save Responses.
9. The Inside SOU login page will reappear. Click on the Login link and enter your user name and password.
Access Your Account—Returning Students How you access your account after stepping out from your studies will vary depending on how long you have been away (and by the way, we missed you!). One of the following methods should allow you to reactivate your account. For assistance, contact the Help Desk at (541) 552-6900.
Page 2 of 6 Rev. 9/28/21
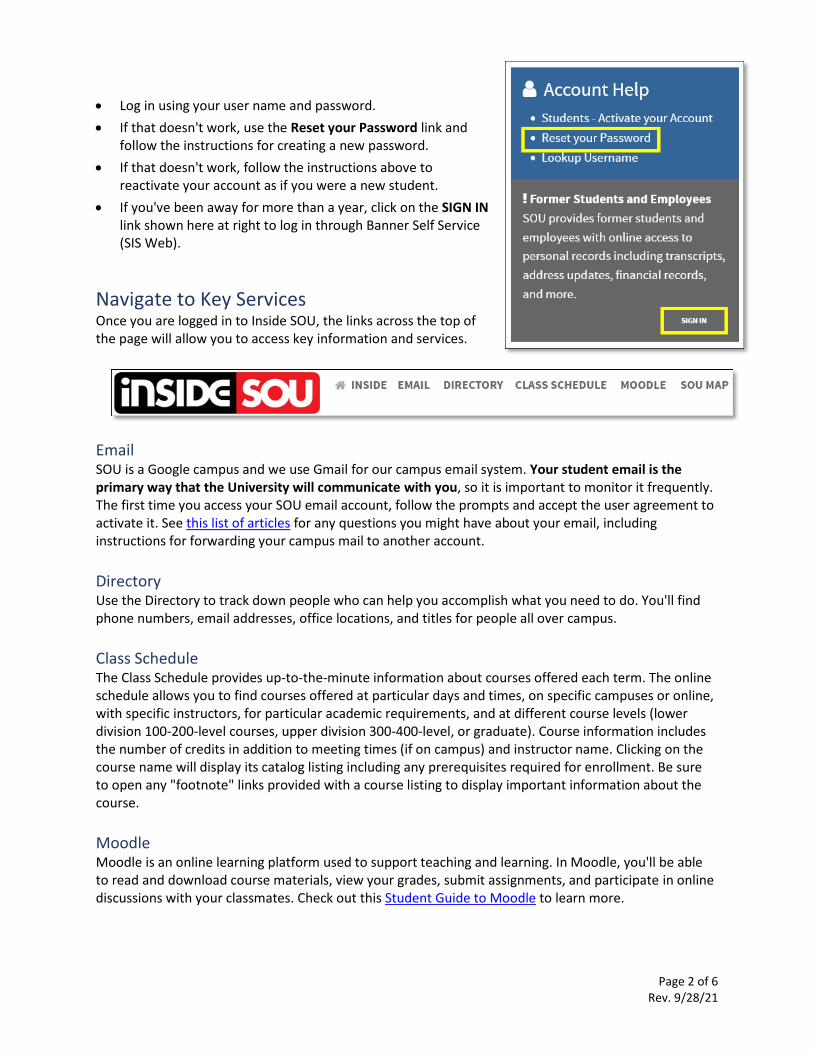
Log in using your user name and password.
If that doesn't work, use the Reset your Password link and follow the instructions for creating a new password.
If that doesn't work, follow the instructions above to reactivate your account as if you were a new student.
If you've been away for more than a year, click on the SIGN IN link shown here at right to log in through Banner Self Service (SIS Web).
Navigate to Key Services Once you are logged in to Inside SOU, the links across the top of the page will allow you to access key information and services.
Email SOU is a Google campus and we use Gmail for our campus email system. Your student email is the primary way that the University will communicate with you, so it is important to monitor it frequently. The first time you access your SOU email account, follow the prompts and accept the user agreement to activate it. See this list of articles for any questions you might have about your email, including instructions for forwarding your campus mail to another account.
Directory Use the Directory to track down people who can help you accomplish what you need to do. You'll find phone numbers, email addresses, office locations, and titles for people all over campus.
Class Schedule The Class Schedule provides up-to-the-minute information about courses offered each term. The online schedule allows you to find courses offered at particular days and times, on specific campuses or online, with specific instructors, for particular academic requirements, and at different course levels (lower division 100-200-level courses, upper division 300-400-level, or graduate). Course information includes the number of credits in addition to meeting times (if on campus) and instructor name. Clicking on the course name will display its catalog listing including any prerequisites required for enrollment. Be sure to open any "footnote" links provided with a course listing to display important information about the course.
Moodle Moodle is an online learning platform used to support teaching and learning. In Moodle, you'll be able to read and download course materials, view your grades, submit assignments, and participate in online discussions with your classmates. Check out this Student Guide to Moodle to learn more.
Page 3 of 6 Rev. 9/28/21
SOU Map This 3-D map tool will help you get where you are going! Apply filters to find parking lots and buildings as well as safety services like AED defibrillating devices and emergency phones.
Register for Classes Find Courses
1. At Inside SOU, click on CLASS SCHEDULE at the top of the home page.
2. Select the desired Term from the search box on the left, then look for courses:
To find courses that meet specific criteria (number of credits, meeting days or times, course level, etc.), use the Optional Filters to narrow your search.
To find courses offered in a specific academic program, select it from the Subject list.
3. Click on to display courses that meet your criteria.
4. Make a note of the 4-digit course reference number (CRN) of each class you want to take.
Register for Courses
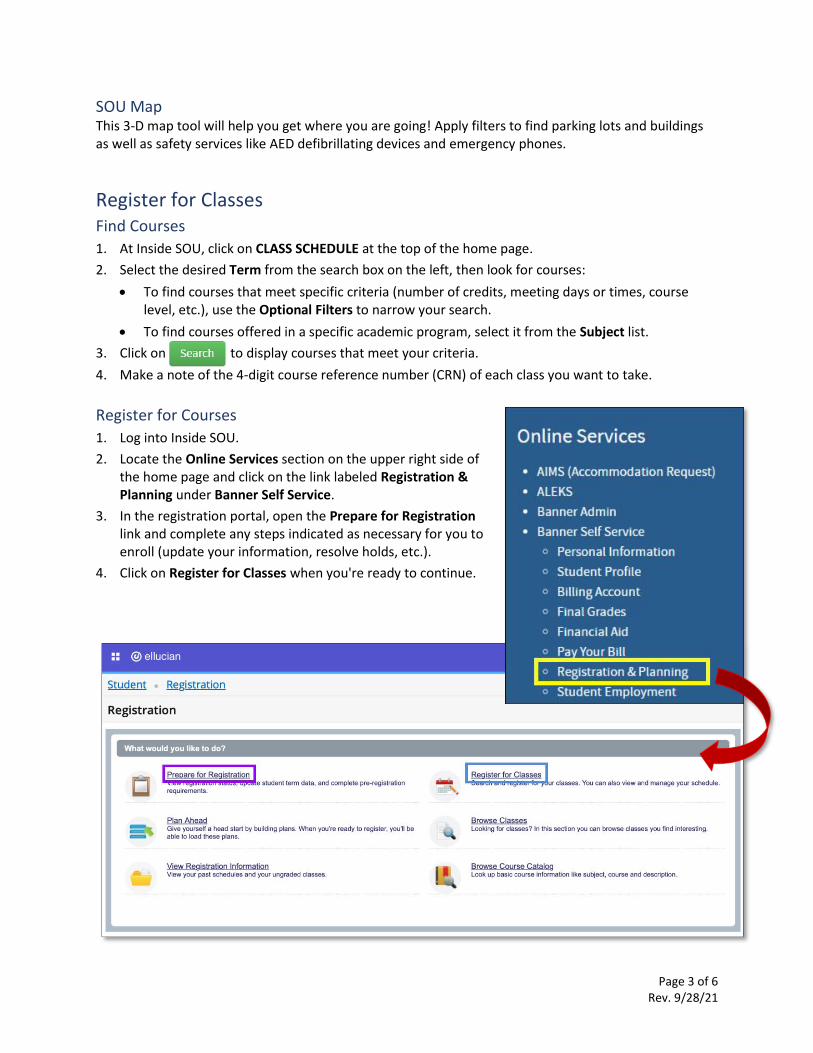
1. Log into Inside SOU.
2. Locate the Online Services section on the upper right side of the home page and click on the link labeled Registration & Planning under Banner Self Service.
3. In the registration portal, open the Prepare for Registration link and complete any steps indicated as necessary for you to enroll (update your information, resolve holds, etc.).
4. Click on Register for Classes when you're ready to continue.
Page 4 of 6 Rev. 9/28/21
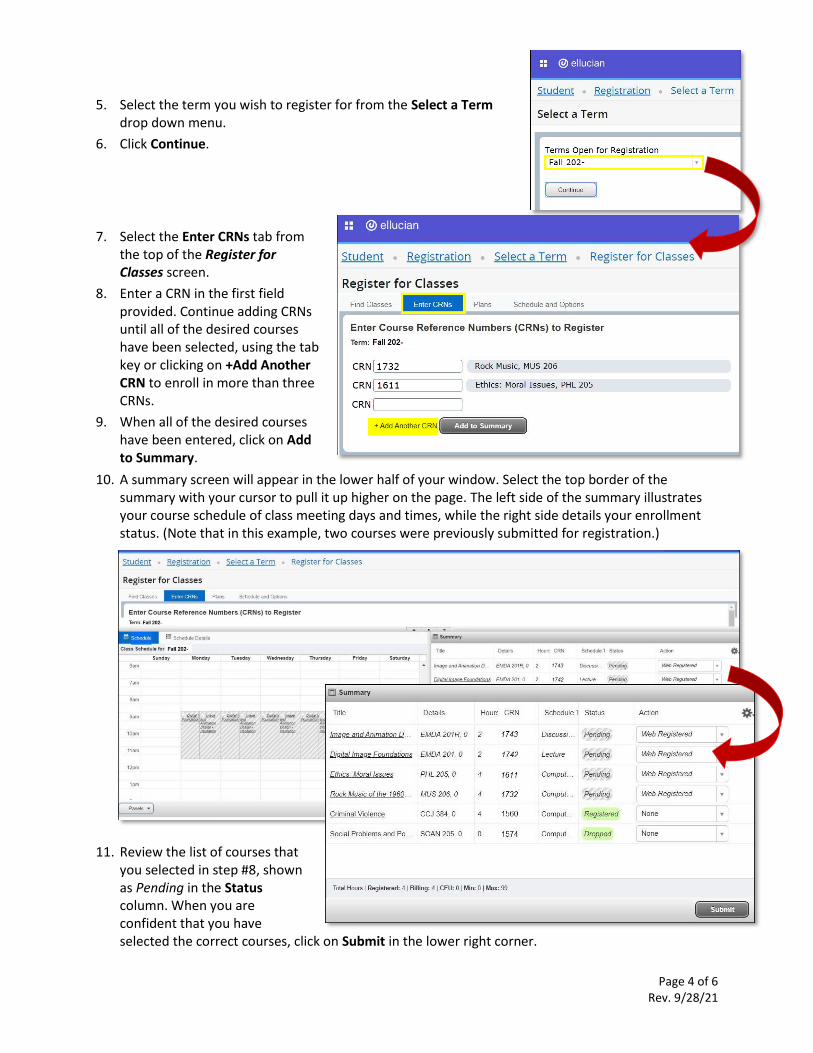
5. Select the term you wish to register for from the Select a Term drop down menu.
6. Click Continue.
7. Select the Enter CRNs tab from the top of the Register for Classes screen.
8. Enter a CRN in the first field provided. Continue adding CRNs until all of the desired courses have been selected, using the tab key or clicking on +Add Another CRN to enroll in more than three CRNs.
9. When all of the desired courses have been entered, click on Add to Summary.
10. A summary screen will appear in the lower half of your window. Select the top border of the summary with your cursor to pull it up higher on the page. The left side of the summary illustrates your course schedule of class meeting days and times, while the right side details your enrollment status. (Note that in this example, two courses were previously submitted for registration.)
11. Review the list of courses that you selected in step #8, shown as Pending in the Status column. When you are confident that you have selected the correct courses, click on Submit in the lower right corner.
Page 5 of 6 Rev. 9/28/21
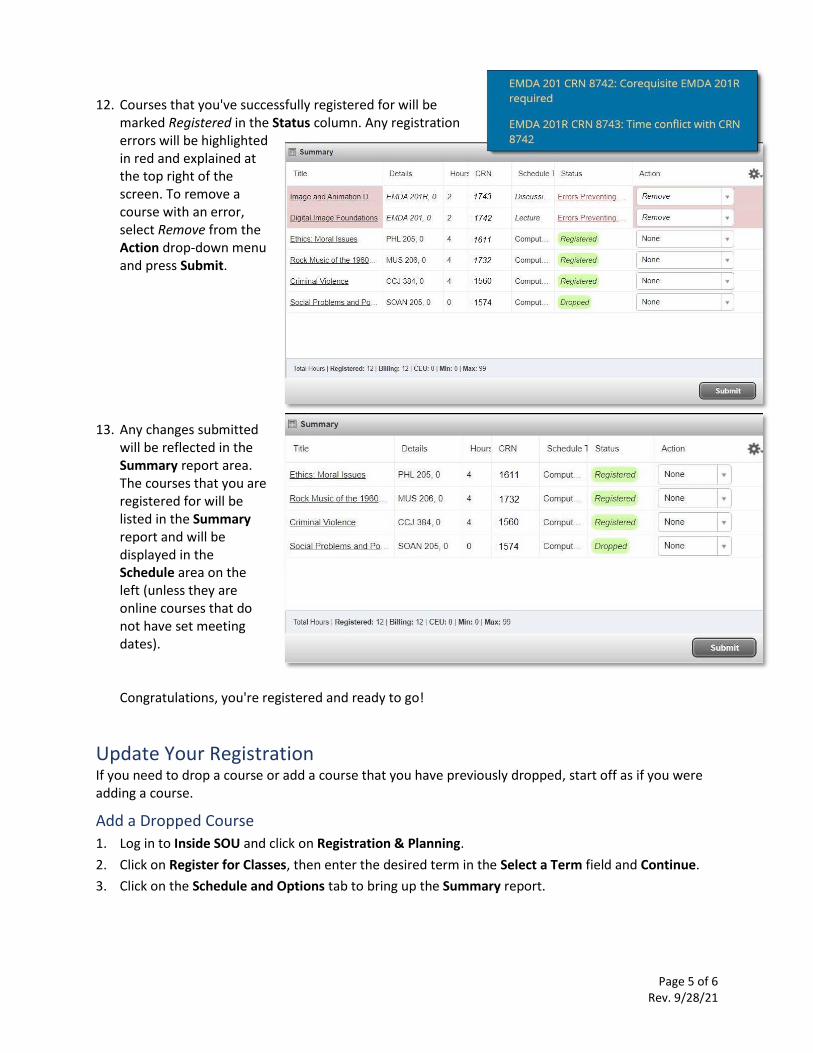
12. Courses that you've successfully registered for will be marked Registered in the Status column. Any registration errors will be highlighted in red and explained at the top right of the screen. To remove a course with an error, select Remove from the Action drop-down menu and press Submit.
13. Any changes submitted will be reflected in the Summary report area. The courses that you are registered for will be listed in the Summary report and will be displayed in the Schedule area on the left (unless they are online courses that do not have set meeting dates). Congratulations, you're registered and ready to go!
Update Your Registration If you need to drop a course or add a course that you have previously dropped, start off as if you were adding a course.
Add a Dropped Course
1. Log in to Inside SOU and click on Registration & Planning.
2. Click on Register for Classes, then enter the desired term in the Select a Term field and Continue.
3. Click on the Schedule and Options tab to bring up the Summary report.
Page 6 of 6 Rev. 9/28/21
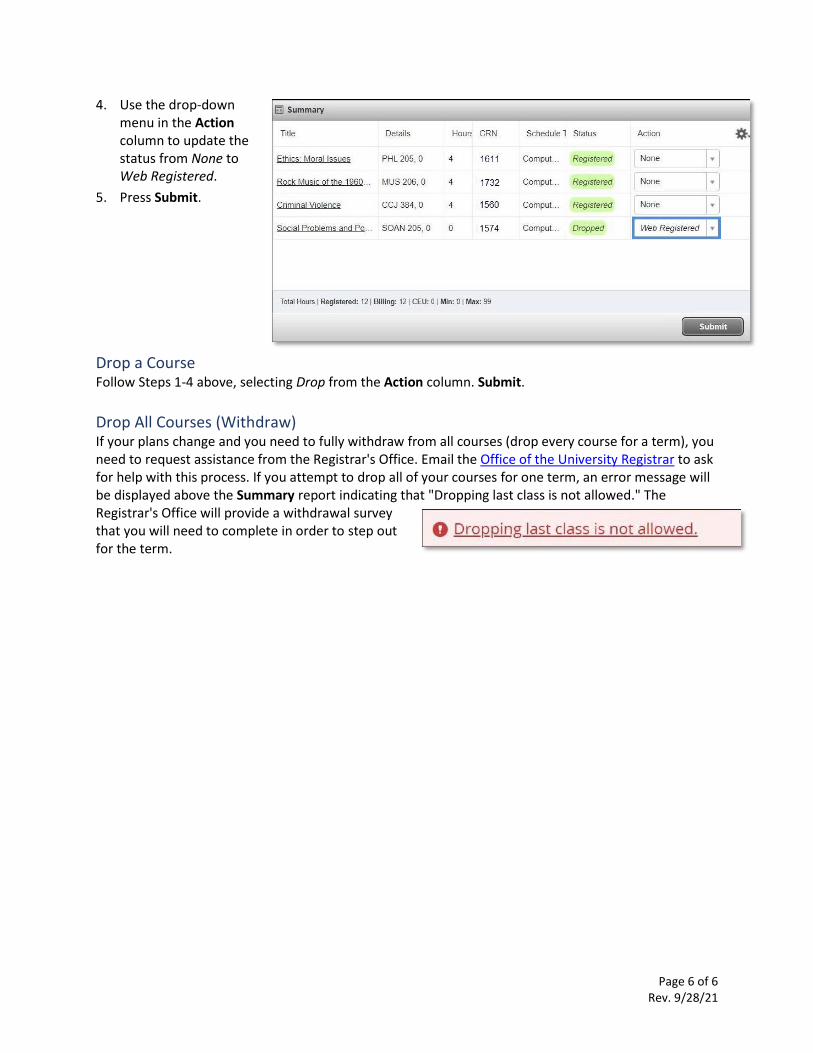
4. Use the drop-down menu in the Action column to update the status from None to Web Registered.
5. Press Submit.
Drop a Course Follow Steps 1-4 above, selecting Drop from the Action column. Submit.
Drop All Courses (Withdraw) If your plans change and you need to fully withdraw from all courses (drop every course for a term), you need to request assistance from the Registrar's Office. Email the Office of the University Registrar to ask for help with this process. If you attempt to drop all of your courses for one term, an error message will be displayed above the Summary report indicating that "Dropping last class is not allowed." The Registrar's Office will provide a withdrawal survey that you will need to complete in order to step out for the term.