
User Manual—Version 3
92
Auto Sentry ® Petro User Manual—Version 3.0 March 5, 2012 Copyright © 2012 Innovative Control Systems, Inc. Portions of this document may contain information that is ICS proprietary.
Transcript of User Manual—Version 3

Auto Sentry® PetroUser Manual—Version 3.0March 5, 2012
Copyright © 2012 Innovative Control Systems, Inc.Portions of this document may contain information that is ICS proprietary.

Auto Sentry® Petro User Manual—Version 3.0
About the Auto Sentry® Petro
Innovative Control Systems is proud to present the new Auto Sentry® Petro. It is the latest version of the industry-leading Auto Sentry express payment terminal.
Some key features include the following:
• A ruggedly designed touch-screen area with an optimal radius of touch for quick transaction processing.
• A large color 10.4-inch sunlight-readable display.
• A customized user interface, including customer-branded buttons, back-grounds and promotional videos (additional fees may apply).
• An optional built-in site intercom for customer assistance.
• Bi-directional card reader with high-throughput and fast processing.
• WashConnect™ software provides configuration and reporting for the Auto Sentry® Petro. WashConnect™ is designed with special consider-ation for multi-site car washes. As your business grows, WashConnect™can grow along with it.
2 Copyright © Innovative Control Systems March 5, 2012

Auto Sentry® Petro User Manual—Version 3.0
Information in this manual is subject to change without notice. Companies, names and data used in examples within the manual are fictitious unless otherwise noted. No part of this manual may be reproduced or transmitted in any form or by any means, electronic or mechanical, for any purpose without the express written permission of Innovative Control Systems, Inc.
© 2012 Innovative Control Systems, Inc. All rights reserved.
Innovative Control Systems, Inc.
1349 Jacobsburg Road
Wind Gap, PA 18091
(610) 881-8000
March 5, 2012 Copyright © Innovative Control Systems 3

Auto Sentry® Petro User Manual—Version 3.0
4 Copyright © Innovative Control Systems March 5, 2012

Auto Sentry Petro User Manual—Version 3.0
Table of ContentsChapter 1: Introduction - - - - - - - - - - - - - - - - - - - - - - - - - - - - - - 13
Version Considerations - - - - - - - - - - - - - - - - - - - - - - - - -13
Audience - - - - - - - - - - - - - - - - - - - - - - - - - - - - - - - -13
Operating Requirements - - - - - - - - - - - - - - - - - - - - - - - - -14
System Overview - - - - - - - - - - - - - - - - - - - - - - - - - - - -14
Petro Equipment - - - - - - - - - - - - - - - - - - - - - 14WashConnect™ Software - - - - - - - - - - - - - - - - - - 14
Auto Sentry® Petro Hardware Description - - - - - - - - - - - - - - - -15
Touch Screen - - - - - - - - - - - - - - - - - - - - - - - 15 - - - - - - - - - - - - - - - - - - - - - - - - - - - - - 15Single Board Computer (SBC) - - - - - - - - - - - - - - - - 16Parallel Input/Output Board (PIO)- - - - - - - - - - - - - - 16Card Reader - - - - - - - - - - - - - - - - - - - - - - - 17Printer - - - - - - - - - - - - - - - - - - - - - - - - - - 18
Chapter 2: Operating- - - - - - - - - - - - - - - - - - - - - - - - - - - - - - - - 19
Introducing the Auto Sentry® Petro Touch-Screen - - - - - - - - - - - -19
About Touch-Screen Configurations - - - - - - - - - - - - - 20About Custom Graphics - - - - - - - - - - - - - - - - - - 21About Damage Waiver Videos- - - - - - - - - - - - - - - - 21About Welcome Videos- - - - - - - - - - - - - - - - - - - 22About Product Information Clips - - - - - - - - - - - - - - 22About the Secondary Language Display - - - - - - - - - - - 23
Understanding Purchasing Scenarios - - - - - - - - - - - - - - - - - - -24
About Purchase Button Combinations - - - - - - - - - - - - 25Purchasing a Wash with a Fleet Account Card - - - - - - - - 25Sensing a High Vehicle - - - - - - - - - - - - - - - - - - - 27
Understanding Payment Scenarios - - - - - - - - - - - - - - - - - - - -30
About Credit Card On Screen Graphics - - - - - - - - - - - 31Drive Ahead Screen - - - - - - - - - - - - - - - - - - - - 31About Gift Card Payments - - - - - - - - - - - - - - - - - 32About Receipt Options - - - - - - - - - - - - - - - - - - - 32
About Errors and Command Buttons - - - - - - - - - - - - - - - - - - -33
Card Authorization Failure - - - - - - - - - - - - - - - - - 33Card Maximum Timeout - - - - - - - - - - - - - - - - - - 34Card Duplicate Transaction- - - - - - - - - - - - - - - - - 34Wash Code Not Valid- - - - - - - - - - - - - - - - - - - - 35Wash Code Expired - - - - - - - - - - - - - - - - - - - - 36Unspecified Error - - - - - - - - - - - - - - - - - - - - - 36
March 5, 2012 Copyright © Innovative Control Systems 5
Auto Sentry Petro User Manual—Version 3.0
Wash Busy - - - - - - - - - - - - - - - - - - - - - - - - 37Help Button - - - - - - - - - - - - - - - - - - - - - - - 37Back, Cancel and Replay Buttons - - - - - - - - - - - - - - 38English and Spanish Buttons - - - - - - - - - - - - - - - - 38
Chapter 3: Customizing - - - - - - - - - - - - - - - - - - - - - - - - - - - - - - - 39
Using Custom Buttons - - - - - - - - - - - - - - - - - - - - - - - - - - 39
About Custom Buttons, PLUs and Profiles - - - - - - - - - - 39Sizing Custom Buttons - - - - - - - - - - - - - - - - - - - 41Naming Custom Buttons - - - - - - - - - - - - - - - - - - 41Saving Custom Buttons - - - - - - - - - - - - - - - - - - 42Enabling Custom Buttons - - - - - - - - - - - - - - - - - 42Custom Button Layout Examples - - - - - - - - - - - - - - 42Small Custom Buttons for Five or Six Services - - - - - - - - 43Medium Custom Buttons for Four Services- - - - - - - - - - 43Large Custom Buttons for Three Services - - - - - - - - - - 44Extra Large Custom Buttons for Two Services - - - - - - - - 44
Using Videos - - - - - - - - - - - - - - - - - - - - - - - - - - - - - - 44
About Promotional Clips - - - - - - - - - - - - - - - - - - 44Ordering Video Clips - - - - - - - - - - - - - - - - - - - 45Recording Video Clips - - - - - - - - - - - - - - - - - - - 45Naming Video Clips - - - - - - - - - - - - - - - - - - - - 45Saving Video Clip Files - - - - - - - - - - - - - - - - - - 45Video Clip Specifications - - - - - - - - - - - - - - - - - 46Enabling Video Clip Files for Base Service and Extra Service Sales Items47Enabling Video Clip Files - - - - - - - - - - - - - - - - - 47Enabling Welcome Videos and Damage Waivers - - - - - - - 48
Using Profiles and Schedule - - - - - - - - - - - - - - - - - - - - - - - 48
About Wash Selections Based on the Day and Time- - - - - - 49Display a Standard Offerings Schedule - - - - - - - - - - - 50Display a Holiday Schedule - - - - - - - - - - - - - - - - 50Display Busy and Slow Schedules - - - - - - - - - - - - - - 51Display an Bug Blaster Profile Offering - - - - - - - - - - - 52Display a Twenty-Four Hour Schedule- - - - - - - - - - - - 52Display Wash Selections Based on Vehicle Height - - - - - - 54About Wash Selections Based on Transaction Type - - - - - - 54Display a Retail Schedule - - - - - - - - - - - - - - - - - 54Display a Fleet Schedule- - - - - - - - - - - - - - - - - - 55Display a Paid Ticket Schedule - - - - - - - - - - - - - - - 56Display a Coupon Schedule- - - - - - - - - - - - - - - - - 57Coupon Schedule - - - - - - - - - - - - - - - - - - - - - 58
Chapter 4: Reporting - - - - - - - - - - - - - - - - - - - - - - - - - - - - - - - - 59
About the Shift Report - - - - - - - - - - - - - - - - - - - - - - - - - 59
View a Shift Report - - - - - - - - - - - - - - - - - - - - 64
6 Copyright © Innovative Control Systems March 5, 2012

Auto Sentry Petro User Manual—Version 3.0
About the Credit Cards Report - - - - - - - - - - - - - - - - - - - - - -65
View the Credit Cards Report- - - - - - - - - - - - - - - - 66
Viewing Other Reports - - - - - - - - - - - - - - - - - - - - - - - - - -66
Chapter 5: Configuring - - - - - - - - - - - - - - - - - - - - - - - - - - - - - - - 69
About Settings- - - - - - - - - - - - - - - - - - - - - - - - - - - - - -69
About Settings and Logon Location - - - - - - - - - - - - - 70Restart Touch - - - - - - - - - - - - - - - - - - - - - - - 71Auto Sentry® Language - - - - - - - - - - - - - - - - - - 71Auto Sentry® Receipt Footer - - - - - - - - - - - - - - - - 71Auto Sentry® Receipt Header- - - - - - - - - - - - - - - - 72Auto Sentry® Coin Acceptor - - - - - - - - - - - - - - - - 72Auto Sentry® Control - - - - - - - - - - - - - - - - - - - 72Auto Sentry® Credit Card - - - - - - - - - - - - - - - - - 77Auto Sentry® Gift Card - - - - - - - - - - - - - - - - - - 78Auto Sentry® TouchDebug - - - - - - - - - - - - - - - - - 79Auto Sentry® Vandalism Deterrent - - - - - - - - - - - - - 79Auto Sentry® Main Options - - - - - - - - - - - - - - - - - 79Auto Sentry® WBC Connection - - - - - - - - - - - - - - - 80Auto Sentry® Receipt - - - - - - - - - - - - - - - - - - - 81Auto Sentry® Service Font Color - - - - - - - - - - - - - - 82Auto Sentry® Shift- - - - - - - - - - - - - - - - - - - - - 82Auto Sentry® DeviceIntDebug- - - - - - - - - - - - - - - - 82Auto Sentry® RFID- - - - - - - - - - - - - - - - - - - - - 83Auto Sentry® Logging - - - - - - - - - - - - - - - - - - - 83Auto Sentry® Component Port - - - - - - - - - - - - - - - 83
Change History - - - - - - - - - - - - - - - - - - - - - - - - - - - - -91
March 5, 2012 Copyright © Innovative Control Systems 7

Auto Sentry Petro User Manual—Version 3.0
8 Copyright © Innovative Control Systems March 5, 2012

Auto Sentry Petro User Manual—Version 3.0
List of TablesTable 1: System Overview - - - - - - - - - - - - - - - - - - - - - - - - - - - - - - - - - 14
Table 2: Audio Prompts for Wash Purchase with a Fleet Account Card - - - - - - - - - - - - - 26
Table 3: Audio Prompts for Wash Purchase with a Club Tag for Auto Sentry® Petro - - - - - - - 27
Table 4: Audio Prompts for Special HVP Wash Purchase - - - - - - - - - - - - - - - - - - - 28
Table 5: Audio Prompts for Purchase with Coupon and No Extra Services - - - - - - - - - - - 30
Table 6: Audio Prompt for Card Authorization Failure - - - - - - - - - - - - - - - - - - - - 34
Table 7: Audio Prompts for Invalid Wash Code- - - - - - - - - - - - - - - - - - - - - - - - 35
Table 8: Audio Prompts for Expired Wash Code - - - - - - - - - - - - - - - - - - - - - - - 36
Table 9: Audio Prompts for Unspecified Error - - - - - - - - - - - - - - - - - - - - - - - - 37
Table 10: Audio Prompt for Help Button - - - - - - - - - - - - - - - - - - - - - - - - - - - 38
Table 11: Button Sizes and Specifications - - - - - - - - - - - - - - - - - - - - - - - - - - 41
Table 12: Video and Audio Specifications - - - - - - - - - - - - - - - - - - - - - - - - - - 46
Table 13: Shift Report Descriptions - - - - - - - - - - - - - - - - - - - - - - - - - - - - - 62
Table 14: Credit Card Report Description - - - - - - - - - - - - - - - - - - - - - - - - - - 66
Table 15: Auto Sentry® Language Description - - - - - - - - - - - - - - - - - - - - - - - - 71
Table 16: Auto Sentry® Receipt Footer - - - - - - - - - - - - - - - - - - - - - - - - - - - 71
Table 17: Auto Sentry® Receipt Header - - - - - - - - - - - - - - - - - - - - - - - - - - - 72
Table 18: Auto Sentry® Coin Acceptor - - - - - - - - - - - - - - - - - - - - - - - - - - - - 72
Table 19: Auto Sentry® Control - - - - - - - - - - - - - - - - - - - - - - - - - - - - - - - 72
Table 20: Auto Sentry® Credit Card - - - - - - - - - - - - - - - - - - - - - - - - - - - - - 77
Table 21: Auto Sentry® Gift Card - - - - - - - - - - - - - - - - - - - - - - - - - - - - - - 78
Table 22: Auto Sentry® TouchDebug- - - - - - - - - - - - - - - - - - - - - - - - - - - - - 79
Table 23: Auto Sentry® Vandalism Deterrent - - - - - - - - - - - - - - - - - - - - - - - - - 79
Table 24: Auto Sentry® Main Options - - - - - - - - - - - - - - - - - - - - - - - - - - - - 79
Table 25: Auto Sentry® WBC Connection - - - - - - - - - - - - - - - - - - - - - - - - - - - 80
Table 26: Auto Sentry® Receipt - - - - - - - - - - - - - - - - - - - - - - - - - - - - - - - 81
Table 27: Auto Sentry® Service Font Color - - - - - - - - - - - - - - - - - - - - - - - - - - 82
Table 28: Auto Sentry® Shift - - - - - - - - - - - - - - - - - - - - - - - - - - - - - - - - 82
Table 29: Auto Sentry® DeviceIntDebug - - - - - - - - - - - - - - - - - - - - - - - - - - - 82
Table 30: Auto Sentry® RFID - - - - - - - - - - - - - - - - - - - - - - - - - - - - - - - - 83
July 8, 2011 Copyright © Innovative Control Systems 9

Auto Sentry Petro User Manual—Version 3.0
Table 31: Auto Sentry® Logging - - - - - - - - - - - - - - - - - - - - - - - - - - - - - - - 83
Table 32: Auto Sentry® Component Port - - - - - - - - - - - - - - - - - - - - - - - - - - - 83
Table 33: Document Change History - - - - - - - - - - - - - - - - - - - - - - - - - - - - - 91
10 Copyright © Innovative Control Systems July 8, 2011
Auto Sentry Petro User Manual—Version 3.0
List of FiguresFigure 1. Touch Screen Example - - - - - - - - - - - - - - - - - - - - - - - - - - - - - - 15
Figure 2. SBC - - - - - - - - - - - - - - - - - - - - - - - - - - - - - - - - - - - - - - - 16
Figure 3. PIO Board - - - - - - - - - - - - - - - - - - - - - - - - - - - - - - - - - - - - 16
Figure 4. Card Reader - - - - - - - - - - - - - - - - - - - - - - - - - - - - - - - - - - - 17
Figure 5. Printer - - - - - - - - - - - - - - - - - - - - - - - - - - - - - - - - - - - - - 18
Figure 6. Custom Welcome Screen Configuration with Video on Left - - - - - - - - - - - - - - 19
Figure 7. Custom Welcome Screen configuration with video on right. - - - - - - - - - - - - - 20
Figure 8. Custom Welcome Screen, Two-Button Configuration - - - - - - - - - - - - - - - - - 20
Figure 9. Custom Welcome Screen with Custom Graphics - - - - - - - - - - - - - - - - - - - 21
Figure 10. Custom Video - - - - - - - - - - - - - - - - - - - - - - - - - - - - - - - - - - 22
Figure 11. Promotional Video Clip Standard Screen and Standard Buttons - - - - - - - - - - - - 23
Figure 12. Spanish Language Interface with Standard Buttons - - - - - - - - - - - - - - - - - 24
Figure 13. Spanish Language Interface with Custom Designed Buttons - - - - - - - - - - - - - - 24
Figure 14. Custom Purchase Buttons - - - - - - - - - - - - - - - - - - - - - - - - - - - - - 25
Figure 15. Enter Pin Screen for a Fleet Account Card - - - - - - - - - - - - - - - - - - - - - 26
Figure 16. Custom buttons for High Vehicle Wash Offerings - - - - - - - - - - - - - - - - - - 28
Figure 17. Wash Purchase with Coupon and No Extra Services - - - - - - - - - - - - - - - - - 29
Figure 18. Custom Insert Credit Card or Gift Card Payment Screen - - - - - - - - - - - - - - - 31
Figure 19. Custom Drive Ahead Screen - - - - - - - - - - - - - - - - - - - - - - - - - - - - 32
Figure 20. Card Authorization Failure Standard Screen - - - - - - - - - - - - - - - - - - - - - 33
Figure 21. Card Maximum Timeout Standard Screen - - - - - - - - - - - - - - - - - - - - - - 34
Figure 22. Card Duplicate Transaction Standard Screen - - - - - - - - - - - - - - - - - - - - 34
Figure 23. Wash Code Not Valid Custom Screen - - - - - - - - - - - - - - - - - - - - - - - - 35
Figure 24. Wash Code Expired Standard Screen - - - - - - - - - - - - - - - - - - - - - - - - 36
Figure 25. Unspecified Error Standard Screen - - - - - - - - - - - - - - - - - - - - - - - - - 36
Figure 26. Wash Busy Standard Screen - - - - - - - - - - - - - - - - - - - - - - - - - - - - 37
Figure 27. Help Custom Button - - - - - - - - - - - - - - - - - - - - - - - - - - - - - - - 37
Figure 28. Back, Cancel and Replay Custom Buttons - - - - - - - - - - - - - - - - - - - - - - 38
Figure 29. English and Spanish Custom Buttons - - - - - - - - - - - - - - - - - - - - - - - - 38
Figure 30. Custom Button Enabled for Sales Item PLU 15 - - - - - - - - - - - - - - - - - - - - 40
July 8, 2011 Copyright © Innovative Control Systems 11

Auto Sentry Petro User Manual—Version 3.0
Figure 31. Small Custom Buttons used for 5 or 6 Wash Buttons with Info Video Clips. - - - - - - - 43
Figure 32. Medium Custom Buttons for 4 Wash Buttons with Info Video Clips. - - - - - - - - - - - 43
Figure 33. Large Custom Buttons for 3 extra services with Info video clips. - - - - - - - - - - - - 44
Figure 34. Extra Large Custom Buttons for 2 services. - - - - - - - - - - - - - - - - - - - - - 44
Figure 35. Custom Wash Service buttons with associated Info Button for video. - - - - - - - - - - 45
Figure 36. Video Clip File in AVI Files Directory - - - - - - - - - - - - - - - - - - - - - - - - 46
Figure 37. Extra Service button with Tire Shine video clip Info button enabled. - - - - - - - - - - 47
Figure 38. Custom Extra Services buttons with Info buttons for enabled video clips.- - - - - - - - 48
Figure 39. Profile Tab displaying the list of created profiles. - - - - - - - - - - - - - - - - - - 49
Figure 40. Example of a Standard Offerings Schedule. - - - - - - - - - - - - - - - - - - - - - 50
Figure 41. Example of Labor Day Schedule- - - - - - - - - - - - - - - - - - - - - - - - - - - 51
Figure 42. Busy and Slow Profile Schedules Example. - - - - - - - - - - - - - - - - - - - - - - 51
Figure 43. Buggy Thursdays Profile and Schedule Example. - - - - - - - - - - - - - - - - - - - 52
Figure 44. Hour Profile Schedule Example. - - - - - - - - - - - - - - - - - - - - - - - - - - 53
Figure 45. Twenty-Four Hour High Vehicle Profile Schedule - - - - - - - - - - - - - - - - - - - 54
Figure 46. Retail Profile Schedule- - - - - - - - - - - - - - - - - - - - - - - - - - - - - - - 55
Figure 47. Fleet Profile Schedule Example. - - - - - - - - - - - - - - - - - - - - - - - - - - 56
Figure 48. Paid Ticket Schedule - - - - - - - - - - - - - - - - - - - - - - - - - - - - - - - 57
Figure 49. Shift Report, Page 1 - - - - - - - - - - - - - - - - - - - - - - - - - - - - - - - - 60
Figure 50. Shift Report, Page 2 - - - - - - - - - - - - - - - - - - - - - - - - - - - - - - - - 61
Figure 51. Shift Report, Page 3 - - - - - - - - - - - - - - - - - - - - - - - - - - - - - - - - 61
Figure 52. Shift Detail Tab - - - - - - - - - - - - - - - - - - - - - - - - - - - - - - - - - - 64
Figure 53. Credit Cards Report - - - - - - - - - - - - - - - - - - - - - - - - - - - - - - - - 65
Figure 54. Settings Menu - - - - - - - - - - - - - - - - - - - - - - - - - - - - - - - - - - - 69
Figure 55. Settings - - - - - - - - - - - - - - - - - - - - - - - - - - - - - - - - - - - - - 70
Figure 56. Logon to Ultimate - - - - - - - - - - - - - - - - - - - - - - - - - - - - - - - - - 70
12 Copyright © Innovative Control Systems July 8, 2011

Auto Sentry® Petro User Manual—Version 3.0 Introduction
CHAPTER 1: Introduction
Congratulations, and thank you for purchasing the Auto Sentry® Petro.
Version Considerations
Version 3.0 of this document includes content based on the following ICS software versions:
• Container App Version 1.0.1.8
• WashConnect™ (Web) Version 1.0.1.20
• WashConnect™ Reports 2.0.1.5
• ICS.Core Version 1.0.1.38
• Touch.exe software version 5.2.14.201
• DeviceInt.exe software version 2.4.7.15
• CoreGatewayServer 2.0.1.21
• AlertServer 2.0.1.3
• Replication 4.0.1.14
• CagePADSS 3.0.1.20
• CageCommunication 1.0.0.15
• SMSS 1.0.1.0
• NetFuelEXP 1.1.6.7
Subsequent updates are summarized in “Change History” on page 91.
Audience
This document was written for Auto Sentry® Petro owners and operators. Some familiarity with WashConnect™ software and Auto Sentry® Petro operations is assumed.
March 5, 2012 Copyright © 2012 Innovative Control Systems 13

Introduction Auto Sentry® Petro User Manual—Version 3.0
Operating Requirements
Before you begin, the Auto Sentry® Petro should be installed and operational. This guide will help you configure the system. Installation instructions are not included. Maintenance instructions are found in separate documents.
System Overview
The Auto Sentry® Petro terminal works together with your wash equipment and WashConnect™ software.
Table 1: System Overview
Module Communication Process
Auto Sentry® Petro Sends sales activity information to WashConnect™ software for reporting purposes. Communicates with the in-bay to sequence cars from the Auto Sentry® Petro to the entrance of the car wash tunnel.
In-Bay Equipment Receives wash selection from Auto Sentry® Petro. Sends wash activity information to WashConnect™ software for reporting purposes.
WashConnect™ Provides reporting and configuration information for the Auto Sentry® Petro.
Petro Equipment
The Petro equipment can address a maximum of nine physical outputs on the Auto Sentry® Petro. However, the Petro’s binary digital interface allows expansion up to 63 outputs and is only available for wash equipment systems that accept binary input: Istobal and Ecojet. The Petro Equipment configuration is set up in WashConnect™ software.
WashConnect™ Software
WashConnect™ software can operate as a control, configuration and management system, providing sales, marketing, and reporting information. Specifically for the Auto Sentry® Petro, WashConnect™provides a way to configure options, wash services, promotions and reports. This includes the base wash services to display at the Auto Sentry® Petro, upgrades (or extra services) to display, whether or not to accept pre-paid wash tickets, etc.
14 Copyright © 2012 Innovative Control Systems March 5, 2012

Auto Sentry® Petro User Manual—Version 3.0 Introduction
Auto Sentry® Petro Hardware Description
The Auto Sentry® Petro is equipped with various hardware and software components you can configure.
Touch Screen
The Auto Sentry® Petro touch screen is durable and generally resistant to harsh environments. The entire unit, including the touch screen, has been rated IPX NEMA 4X. The enclosure is constructed for either indoor or outdoor use to provide a degree of protection against falling rain, sleet, snow, windblown dust, spattered mud, splashing water, and hose-directed water. It will be undamaged by the external formation of ice on the enclosure, and includes protection against corrosion.
Figure 1. Touch Screen Example
March 5, 2012 Copyright © 2012 Innovative Control Systems 15

Introduction Auto Sentry® Petro User Manual—Version 3.0
Single Board Computer (SBC)
The industrial SBC provides processing and memory for the Auto Sentry® Petro. Different peripheral devices (Ex. card reader, receipt printer, etc.) connect to the SBC through various communication ports (COM1, COM2, COM3, COM4, and 4 USB connections).
Figure 2. SBC
Parallel Input/Output Board (PIO)
Most of the field wiring is terminated on the PIO board.
Figure 3. PIO Board
16 Copyright © 2012 Innovative Control Systems March 5, 2012

Auto Sentry® Petro User Manual—Version 3.0 Introduction
Card Reader
The card reader will accept credit, gift and fleet cards. This device includes dual heads to simplify the customer’s transaction by allowing the card to be inserted in multiple directions.
Figure 4. Card Reader
March 5, 2012 Copyright © 2012 Innovative Control Systems 17

Introduction Auto Sentry® Petro User Manual—Version 3.0
Printer
The installed high-speed printer is designed to provide your customers with 2 3/8-inch wide receipt or ticket, with or without barcodes depending on your configuration preferences. This device has a low power consumption rate and will detect when the printer paper is reaching the end of the roll. We offer custom length paper specifically designed for this printer at a great price. Contact our Sales department to place an order 800-642-9396.
Figure 5. Printer
18 Copyright © 2012 Innovative Control Systems March 5, 2012
Auto Sentry® Petro User Manual—Version 3.0 Operating
CHAPTER 2: Operating
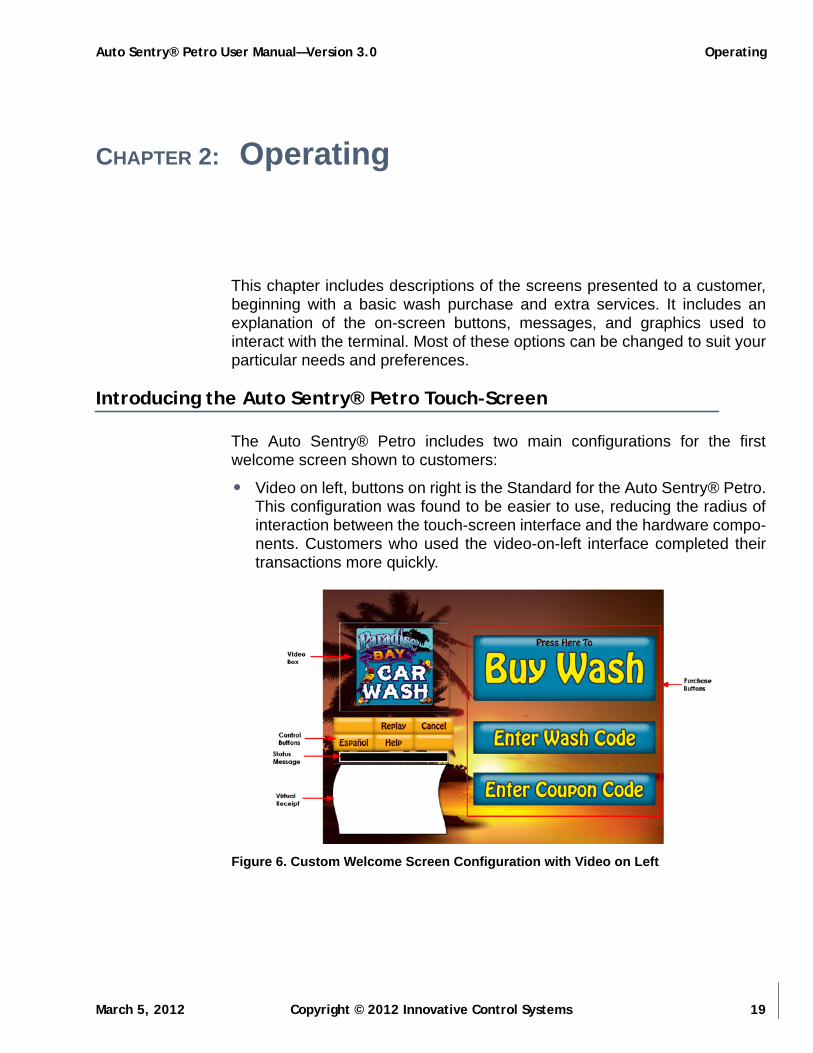
This chapter includes descriptions of the screens presented to a customer, beginning with a basic wash purchase and extra services. It includes an explanation of the on-screen buttons, messages, and graphics used to interact with the terminal. Most of these options can be changed to suit your particular needs and preferences.
Introducing the Auto Sentry® Petro Touch-Screen
The Auto Sentry® Petro includes two main configurations for the first welcome screen shown to customers:
• Video on left, buttons on right is the Standard for the Auto Sentry® Petro. This configuration was found to be easier to use, reducing the radius of interaction between the touch-screen interface and the hardware compo-nents. Customers who used the video-on-left interface completed their transactions more quickly.
Figure 6. Custom Welcome Screen Configuration with Video on Left
March 5, 2012 Copyright © 2012 Innovative Control Systems 19

Operating Auto Sentry® Petro User Manual—Version 3.0
• Video on right, buttons on left was the former standard configuration. If this configuration is the car wash operator’s preference, it can be selected.
Figure 7. Custom Welcome Screen configuration with video on right.
For more information on left-right video options, see “Auto Sentry® Main Options” on page 79.
About Touch-Screen Configurations
Touch screens shown in this manual may not appear exactly the same as touch screens displayed on your Auto Sentry® Petro. The Auto Sentry® Petro was built to be custom tailored to your car wash requirements. For example, if you do not accept coupons, then the Enter Coupon button can be turned off for your Auto Sentry® Petro.
Figure 8. Custom Welcome Screen, Two-Button Configuration
20 Copyright © 2012 Innovative Control Systems March 5, 2012

Auto Sentry® Petro User Manual—Version 3.0 Operating
About Custom Graphics
In addition to your configuration settings, the Auto Sentry® Petro can be visually customized with your own graphics, including fonts, color schemes, logos and backgrounds. This is similar to the application of a custom skin on popular media players and other software applications. With a fully customized skin, you can use the Auto Sentry® Petro to build brand recognition.
Figure 9. Custom Welcome Screen with Custom Graphics
Contact ICS for more information about designing custom graphics for your Auto Sentry® Petro. Your custom graphics can be created with our marketing department. This service is optional and additional fees apply.
Custom audio and video prompts produced by ICS are available, and again they are optional and additional fees apply. You can create your own custom audio and video prompts.
For more information, see “Recording Video Clips” on page 45
About Damage Waiver Videos
You can include a damage waiver video on the Auto Sentry® Petro.
• Damage waiver videos inform customers of potential vehicle damage caused by in-bay equipment operations. A Yes button requires custom-ers to provide consent.
• ICS does not provide a standard damage waiver video. You can record your own damage waiver video, and then enable it at the Auto Sentry® Petro.
March 5, 2012 Copyright © 2012 Innovative Control Systems 21

Operating Auto Sentry® Petro User Manual—Version 3.0
For more information about enabling a damage waiver video, see “Custom-izing” on page 39.
About Welcome Videos
You can include welcome videos on the Auto Sentry® Petro. Welcome videos typically feature a short welcome message before customers interact with the terminal.
Figure 10. Custom Video
• Welcome videos can be produced to market your facility and services. For example, a welcome video might also promote your fleet or wash club memberships.
About Product Information Clips
You can include short informational clips at the Auto Sentry® Petro. Informational clips typically feature products such as tire shine and sealer wax.
22 Copyright © 2012 Innovative Control Systems March 5, 2012

Auto Sentry® Petro User Manual—Version 3.0 Operating
Figure 11. Promotional Video Clip Standard Screen and Standard Buttons
• Customers can view video clips by pressing the Info button next to the extra service button featuring the product.
NOTE: The following clips are available: Rain-X®, Tire Shine, polish wax, sealer wax and under carriage. These short promotional clips are provided at no extra charge. Contact ICS for more information.
For more information about enabling product information clips, see “Using Videos” on page 44.
About the Secondary Language Display
The Auto Sentry® Petro touch screen interface can be fully translated into Spanish. A standard set of Spanish-language buttons is included with your Auto Sentry® Petro.
March 5, 2012 Copyright © 2012 Innovative Control Systems 23

Operating Auto Sentry® Petro User Manual—Version 3.0
Figure 12. Spanish Language Interface with Standard Buttons
Figure 13. Spanish Language Interface with Custom Designed Buttons
You can configure the button text and many other text fields to your own Spanish-language requirements. For more information on setting language options, see “Auto Sentry® Language” on page 71.
Understanding Purchasing Scenarios
Before a customer purchases a wash at the Auto Sentry® Petro, a process to identify the customer must first take place. The Auto Sentry® Petro must determine various conditions. For example:
• Is this a fleet or club customer?
• Is this a high vehicle profile?
• Is the customer redeeming a wash code?
24 Copyright © 2012 Innovative Control Systems March 5, 2012

Auto Sentry® Petro User Manual—Version 3.0 Operating
• Is the customer redeeming a coupon?
Once identified, the Auto Sentry® Petro can display the correct screens to meet customer requirements.
About Purchase Button Combinations
You can add or remove the following purchase buttons on your Auto Sentry® Petro touch screen.
1
2
3
4
Figure 14. Custom Purchase Buttons
NOTE: All buttons are available in Spanish.
The order of the buttons cannot change that you view them on the touch screen. The order you see them will be in the figure above:
1 Buy Wash Button. Used to purchase a wash.
2 Join Wash Club. Used to sign up customers in a wash club.
3 Wash Code Button. Used to enter a five-digit paid ticket code from the fuel pump. (Wash codes are generated randomly from the fuel pump and include an expiration date. A wash code is unique and cannot be reused.)
4 Coupon Code Button. Used to enter a three- four- or five-digit coupon code. (A PLU needs to be created for the coupon and the PLU number is the Coupon number. A Profile needs to be created for Coupons and acti-vated with a Schedule. Coupons numbers can be reused.)
Purchasing a Wash with a Fleet Account Card
A fleet account is available for customers who want to include multiple vehicles on a single billing account. For example, a state police station can establish a single fleet billing account for the entire fleet of patrol cars.
Fleet wash selections are typically restricted to the amount of choices that the fleet account manager designate. Fleet account cards are issued to
March 5, 2012 Copyright © 2012 Innovative Control Systems 25

Operating Auto Sentry® Petro User Manual—Version 3.0
authorized users and are accepted at the Auto Sentry® Petro with or withouta secured pin number.
In WashConnect™, accounts are assigned to customers from the Membership > Customers menu. Fleet wash selections are enabled from the Configurations > Goods and Services > Profiles menu and need to have a valid time Schedule for that profile. The fleet account manager approves the washes to be offered up to six different wash selections.
The following example includes a fleet customer purchasing a wash using a fleet card at the Auto Sentry® Petro. In this example, the customer swipes their fleet card, and then must enter a PIN.
Figure 15. Enter Pin Screen for a Fleet Account Card
In the figure above, the customer swipes a fleet card. A PIN is required. The card is approved and then the wash is charged to the fleet account.
Table 2: Audio Prompts for Wash Purchase with a Fleet Account Card
Screen Transcription
1 Please enter your pin number.[User input. Security beeps, not audio prompts, provide feedback for digits.]
2 Welcome to our car wash. To get started, press "Buy Wash." Or if you have a valid wash code, press "Enter Wash Code." If you have a coupon, press "Enter Coupon."
3 Buy wash.
26 Copyright © 2012 Innovative Control Systems March 5, 2012

Auto Sentry® Petro User Manual—Version 3.0 Operating
Sensing a High Vehicle
Customers with high vehicles, such as cargo and conversion vans, can receive a different set of wash choices at the Auto Sentry® Petro after the high vehicle sensor activates the high vehicle High Vehicle Profile (HVP).
NOTE: Separate hardware must be installed to enable the high vehicle pro-file sensor and additional fees will apply.
To create HV wash buttons, separate High Vehicle wash PLUs are created in the Sales Item dialog box, and then add these washes to a profile for high vehicles. Set the time Schedule for your hours of operation, select High Vehicle from the Vehicle Height drop-down box and select Retail from the Applies To drop-down box.The following example shows a list of wash services for a high vehicle profile.
4 You are now ready to enter the car wash. Please take your receipt, wait for the gate to open, and then proceed toward the car wash.
Table 3: Audio Prompts for Wash Purchase with a Club Tag for Auto Sentry® Petro
Screen Transcription
1 Welcome to the car wash. Please wait while we verify your membership.
2 Please select a car wash from the list on the left by simply touching that item on the screen. Thank you.
3 Please select an extra service. Or push the no extra service button located at the bottom of the screen.
4 Please insert card. [Customer inserts credit card or gift card].To complete your car wash purchase, please insert a card into the acceptor to the right of the screen.
5 You are now ready to enter the car wash. Please take your receipt, wait for the gate to open, and then proceed toward the car wash.
March 5, 2012 Copyright © 2012 Innovative Control Systems 27

Operating Auto Sentry® Petro User Manual—Version 3.0
Figure 16. Custom buttons for High Vehicle Wash Offerings
In the figure above, these wash selections will only appear if you have a high vehicle sensor installed. For more information, contact ICS technical sup-port.
Table 4: Audio Prompts for Special HVP Wash Purchase
Screen Video Transcription
1 Welcome to our car wash. To get started, touch "Buy Wash." or if you have a valid wash code, touch "Enter Wash Code." If you have a coupon, touch "Enter Coupon."[Customer input.] Buy wash.
2 Buy wash. Please select a car wash by touching one of the service buttons on the screen.[Customer input.] Thank you.
3 Please insert card.[Customer inserts a card.]
4 You are now ready to enter the car wash. Please take your receipt, wait for the gate to open, and then proceed toward the car wash.
About Purchasing a Wash with a Coupon
Coupons are typically used for promotions offering money off a wash. For example, if a customer arrives at a special time of day when the discount is offered on select washes, then they can enter a coupon code. Coupons can also be used to provide free washes.
28 Copyright © 2012 Innovative Control Systems March 5, 2012

Auto Sentry® Petro User Manual—Version 3.0 Operating
Coupons can be set up to be active during certain hours, specific days, or within a specified date range. However, they are available to any customer who knows the coupon code.
Unlike wash codes, coupons are not unique. You can set up a coupon code, and then make it active for any customer. The coupon code is good for unlimited redemptions, as long as you have activated it at the Auto Sentry® Petro terminal.
Coupons can be set up in WashConnect™ software. Coupons are created in the Sales Item dialog box, and then activated in the Profile dialog box.
The following example shows a car wash purchased with a coupon.
Figure 17. Wash Purchase with Coupon and No Extra Services
In the figure above, the customer touches Enter Coupon. He enters the three-digit code. The virtual receipt shows BEST WASH $2.00 CPN, which is the best wash (normally $12.00), given at a reduced price of $10.00.
March 5, 2012 Copyright © 2012 Innovative Control Systems 29

Operating Auto Sentry® Petro User Manual—Version 3.0
Table 5: Audio Prompts for Purchase with Coupon and No Extra Services
Screen Transcription
1 Welcome to our car wash. To get started, touch "Buy Wash." Or if you have a valid wash code, touch "Enter Wash Code." If you have a coupon, touch "Enter Coupon."
2 Enter coupon. Use the numeric keypad on the screen to enter your coupon code. If you have a five-digit wash code, press "Back," and then press "Enter Wash Code."[User input.] One. Nine. One.
3 Please insert cash or card.
Track Zip Codes by Using Coupons
With this feature, customers can track zip codes by using coupon codes. coupon codes can be set up to track a five-digit zip code.
1 From Configuration > Goods and Services > Sales Item, add a new PLU named for the zip code and type in the discounted wash and dis-counted price.
2 Select the same output as the original wash has selected.
3 Set up your coupon schedule in Profiles.
For more information about coupons, see “Display a Coupon Schedule” on page 57.
Understanding Payment Scenarios
A customer will first select a wash service then an upgrade. Next, the customer must select a card payment method. They include the following:
• Credit cards
• Gift cards
• Fleet cards
• Club cards
NOTE: The Auto Sentry® Petro does not accept debit cards since there is no provision for a secure pin pad.
30 Copyright © 2012 Innovative Control Systems March 5, 2012

Auto Sentry® Petro User Manual—Version 3.0 Operating
About Credit Card On Screen Graphics
The credit card payment screen is standard and will appear for all Auto Sentry® Petro express payment terminals. A generic Please Insert Cardgraphic will appear showing no card logos.
Figure 18. Custom Insert Credit Card or Gift Card Payment Screen
Custom graphics are available upon request. If you would like the credit card logos to display your available credit card options, i.e. American Express®, then contact technical support to have our marketing department create custom graphics for your site (additional fees may apply).
Drive Ahead Screen
After the customer has finalized the transaction, the Drive Ahead screen appears.
March 5, 2012 Copyright © 2012 Innovative Control Systems 31

Operating Auto Sentry® Petro User Manual—Version 3.0
Figure 19. Custom Drive Ahead Screen
About Gift Card Payments
Gift cards can be used to provide full or partial payment.
Split payments are allowed for gift cards. If a customer swipes a gift card and the remaining balance on the gift card is not sufficient to complete the sale, then the option is given to add value to the gift card or to complete the transaction with a card.
About Receipt Options
You can configure your Auto Sentry® Petro to print a receipt automatically or to prompt a customer to press a button for a receipt.
For more information, see “Auto Sentry® Receipt Footer” on page 71 and “Auto Sentry® Receipt Header” on page 72.
32 Copyright © 2012 Innovative Control Systems March 5, 2012

Auto Sentry® Petro User Manual—Version 3.0 Operating
About Errors and Command Buttons
Various error messages provide instructions to customers when an unexpected condition occurs. Command buttons such as Cancel and Backhelp customers navigate the touch-screen interface.
Card Authorization Failure
If a card fails to authorize, an error message is displayed. Customers are given the option to cancel or try again.
Figure 20. Card Authorization Failure Standard Screen
March 5, 2012 Copyright © 2012 Innovative Control Systems 33

Operating Auto Sentry® Petro User Manual—Version 3.0
Table 6: Audio Prompt for Card Authorization Failure
Screen Transcription
1 The credit card you provided has failed to authorize. Please check the card and try again.
Card Maximum Timeout
If a card reaches the maximum timeout period, the following screen is displayed.
Figure 21. Card Maximum Timeout Standard Screen
Card Duplicate Transaction
If a card is used to process a duplicate transaction, the following screen is displayed.
Figure 22. Card Duplicate Transaction Standard Screen
34 Copyright © 2012 Innovative Control Systems March 5, 2012

Auto Sentry® Petro User Manual—Version 3.0 Operating
Wash Code Not Valid
The following screen is displayed if a wash code is not valid.
Figure 23. Wash Code Not Valid Custom Screen
Table 7: Audio Prompts for Invalid Wash Code
Screen Transcription
1 The wash code you entered is not valid. Please check the code and try again.
March 5, 2012 Copyright © 2012 Innovative Control Systems 35

Operating Auto Sentry® Petro User Manual—Version 3.0
Wash Code Expired
The following screen is displayed if a wash code is expired.
Figure 24. Wash Code Expired Standard Screen
Table 8: Audio Prompts for Expired Wash Code
Screen Transcription
1 The wash code you entered has expired. Please check the code and try again.
Unspecified Error
The following screen is displayed when a customer encounters an unspecified error, such as when no services are available in the current Profile Times dialog box.
Figure 25. Unspecified Error Standard Screen
36 Copyright © 2012 Innovative Control Systems March 5, 2012

Auto Sentry® Petro User Manual—Version 3.0 Operating
Table 9: Audio Prompts for Unspecified Error
Screen Transcription
1 An error has occurred. Please touch cancel and try again.
Wash Busy
The following screen is displayed if the in-bay is busy and the gate (if installed) is not raised.
Figure 26. Wash Busy Standard Screen
Help Button
The Help button is available for customers who need more information about using the Auto Sentry® Petro touch-screen interface.
Figure 27. Help Custom Button
March 5, 2012 Copyright © 2012 Innovative Control Systems 37

Operating Auto Sentry® Petro User Manual—Version 3.0
Table 10: Audio Prompt for Help Button
Screen Transcription
1 You may press the button below labeled replay to hear the instructions for the screen that you are viewing. Press the button below labeled cancel at any time to go back to the first screen. If you continue to experience difficulty using the automated attendant, please notify the attendant.
Back, Cancel and Replay Buttons
The Back, Cancel and Replay buttons are available to help customers navigate through the Auto Sentry® Petro touch-screen interface.
Figure 28. Back, Cancel and Replay Custom Buttons
English and Spanish Buttons
The English and Spanish buttons are available to change the Auto Sentry® Petro touch screen interface between the English language and the Spanishlanguage.
Figure 29. English and Spanish Custom Buttons
For more information, see “Auto Sentry® Language” on page 71.
38 Copyright © 2012 Innovative Control Systems March 5, 2012

Auto Sentry Petro User Manual—Version 4.0 Customizing
CHAPTER 3: Customizing
This chapter includes information on using your Auto Sentry Petro to promote and market your car wash.
This chapter includes information about the following: custom buttons, video clips, scheduling profiles, and time-limited PLUs.
Using Custom Buttons
Custom buttons are used in place of the standard buttons presented to customers at the Select Wash and Select Extra Services screens. The buttons can be designed with or without our marketing department. Custom buttons, graphics and decals are all available and involve additional fees. All you need to do is call technical support at 800-246-3469 to get started.
You can enable custom buttons to make your Auto Sentry Petro stand out in various ways:
• Custom buttons can increase brand recognition for your car wash.
• They can be used with time-sensitive profiles to offer a different “look and feel” for special promotional periods.
• They can include familiar product logos for tire shine, wax, etc.
About Custom Buttons, PLUs and Profiles
Your custom button is assigned to one or more PLUs in the Service Tabledialog box. The PLU is added to a profile, which may contain other PLUs. Other PLUs in the profile can also link to custom buttons. (If not, then a combination of standard and custom buttons will appear.)
When the profile is active, based on settings in the Profile Times dialog box, then the custom buttons will be used at the Auto Sentry Petro touchscreen.
Different sized buttons are automatically displayed, based on how many services are contained in the profile. For example, if the profile contains two services, then the extra-large button size is used. But if the profile contains six services, then the small button size is used.
February 10, 2012 Copyright © 2012 Innovative Control Systems 39

Customizing Auto Sentry Petro User Manual—Version 4.0
Figure 30. Custom Button Enabled for Sales Item PLU 15
40 Copyright © 2012 Innovative Control Systems February 10, 2012

Auto Sentry Petro User Manual—Version 4.0 Customizing
In the figure above:
• In the Sales Item dialog box, PLU 15 is shown. The Name box contains Exterior Wash, which is a reference to the custom button file name. Including a file name in this box enables the custom button.
• PLU 15 is part of the Retail Services profile, with two base washes. Since there are two services in the profile, the extra-large (X) size cus-tom button is required and is automatically selected. The number of ser-vices in the profile determines the required size of the custom buttons.
• The PLU1X.bmp file is located in the ICS/BMPFiles/Primary/Custom directory. It will be used whenever PLU 15 is part of the active profile at the Auto Sentry Petro.
• The custom button appears on the Auto Sentry Petro touch-screen, along with another custom button and associated Info buttons for the selected video clips.
Sizing Custom Buttons
You can create up to four different sizes for each custom button:
• Extra Large—X
• Large—L
• Medium—M
• Small—S
The following table contains specifications for each button size.
Table 11: Button Sizes and Specifications
Size SuffixPixel
Dimensions (W X H)
Number of Buttons per
Screen
Example File Name
Extra Large X 465 X 230 1 or 2 FullservX.bmp
Large L 465 X 150 3 FullservL.bmp
Medium M 465 X 100 4 FullservM.bmp
Small S 465 X 81 5 or 6 FullservS.bmp
Naming Custom Buttons
File names are a maximum of eight characters plus a suffix (X, L, M or S). Following the suffix is the file extension .bmp. Custom button files must be saved as the Bitmap image format. An example file name follows:
• FullservX.bmp
February 10, 2012 Copyright © 2012 Innovative Control Systems 41

Customizing Auto Sentry Petro User Manual—Version 4.0
Saving Custom Buttons
You must save custom button files on the Auto Sentry Petro drive (e.g., by using a network connection).
• Save primary-language custom button bitmap files here: \ICS\BMPFiles\Primary\Custom
• Save second-language custom button bitmap files here: \ICS\BMPFiles\Secondary\Custom
Enabling Custom Buttons
You can use the Sales Item dialog box to enable custom buttons. To enable a custom button, follow these steps:
1 Select Configuration > Goods and Services > Sales Item. The Sales Item tab appears.
2 Browse to the PLU number for which you want to enable a custom but-ton.
3 Select the PLU, and then click Edit. The Sales Item dialog box appears.
4 In the BMP File box, type the file name of the custom button. Do not type the size suffix (e.g., S, M, L or X). Do not type the .bmp file extension.
5 Click Save when you are finished. The custom button is enabled for the PLU.
Custom Button Layout Examples
The following figures show examples of how each size custom button is displayed on the Auto Sentry Petro touch screen. The number of buttons that appears on the screen depends upon the number of services included in the profile.The size button for S, M, L, or X do not change. We cannot make them bigger. Even if video clip Info buttons are not enabled, the size of the buttons cannot be extended.
42 Copyright © 2012 Innovative Control Systems February 10, 2012

Auto Sentry Petro User Manual—Version 4.0 Customizing
Small Custom Buttons for Five or Six Services
Figure 31. Small Custom Buttons used for 5 or 6 Wash Buttons with Info Video Clips.
Medium Custom Buttons for Four Services
Figure 32. Medium Custom Buttons for 4 Wash Buttons with Info Video Clips.
February 10, 2012 Copyright © 2012 Innovative Control Systems 43

Customizing Auto Sentry Petro User Manual—Version 4.0
Large Custom Buttons for Three Services
Figure 33. Large Custom Buttons for 3 extra services with Info video clips.
Extra Large Custom Buttons for Two Services
Figure 34. Extra Large Custom Buttons for 2 services.
Using Videos
Videos are available to provide welcome messages, damage waivers and more detailed product promotions or wash service descriptions. The most commonly used videos are promotional clips.
About Promotional Clips
Clips can be assigned to base wash services or extra services. They can be associated with custom buttons or standard buttons. Info buttons on the Auto Sentry Petro touch screen provide access to video clips.
44 Copyright © 2012 Innovative Control Systems February 10, 2012

Auto Sentry Petro User Manual—Version 4.0 Customizing
Figure 35. Custom Wash Service buttons with associated Info Button for video.
Ordering Video Clips
The following promotional video clips are available:
• Rain-X®
• Tire shine
• Polish wax
• Sealer wax
• Under carriage
These short promotional clips are provided at no charge. Contact technical support for more information.
Recording Video Clips
You can record your own video clips. If the clip includes a narrator, he or she should be recorded in a portrait setting with the head and top of shoulders just inside the frame.
Naming Video Clips
Video clip file names are a maximum of eight characters.
Saving Video Clip Files
Video clips must be saved as audio-video interleave (.avi) format.
You must save video clip files on the Auto Sentry Petro drive (e.g., by using a network connection).
• Save primary-language video clip files here: \ICS\AVIFiles\Primary\
February 10, 2012 Copyright © 2012 Innovative Control Systems 45

Customizing Auto Sentry Petro User Manual—Version 4.0
• Save second-language video clip files here: \ICS\AVIFiles\Secondary\
Figure 36. Video Clip File in AVI Files Directory
Video Clip Specifications
A video clip file must be saved in the audio-video interleave (.avi) format with the following specifications:
Table 12: Video and Audio Specifications
Parameter Setting
Video Specifications
Codec Microsoft® MPEG-4 Video Codec V3
Frame Size for Info Video Clip Width, 352—Height, 288
Frame Size for Welcome Video Width, 720—Height, 480
Frame Rate 29.970 (NTSC)
Pixel Aspect Ratio 1.0
Field Order Lower field first (B)
Audio Specifications
MP3 Codec MPEG Layer-3 (MPEG-2 Layer 3)
Bit Depth 32 kBit/s
Sample Rate 22,050 Hz
Channel Mono
To Set Volume Level Normalize –12 dB
46 Copyright © 2012 Innovative Control Systems February 10, 2012

Auto Sentry Petro User Manual—Version 4.0 Customizing
Enabling Video Clip Files for Base Service and Extra Service Sales Items
To enable a video clip for a base service or for extra services, you can add a reference and associate the video clip file name in the Info Video File box of the Sales Item dialog box.
Figure 37. Extra Service button with Tire Shine video clip Info button enabled.
In the figure above:
• The Sales Item dialog box is shown for PLU 7, Tire Shine.
• In the Info Video File box, tire appears. This associates the video clip file named Tire.avi with PLU 7.
Enabling Video Clip Files
To enable a video clip for a custom button, you must save it in the correct directory on the Auto Sentry Petro drive.
For example:
• You might include a video clip named Tire.avi in the \ICS\AVIFiles\Primary\ directory.
NOTE: The video clip file must have an extension of .avi.
Once video clips are saved in the Auto Sentry Petro AVIFiles directory\ICS\AVIFiles\ they are automatically enabled for any PLU that includes the file name in the Info Video File box.
February 10, 2012 Copyright © 2012 Innovative Control Systems 47

Customizing Auto Sentry Petro User Manual—Version 4.0
Figure 38. Custom Extra Services buttons with Info buttons for enabled video clips.
Enabling Welcome Videos and Damage Waivers
To enable a welcome video or damage waiver, follow these steps:
1 After you have recorded the file, name it as follows:
▪ For a welcome video, name the file CustomAdvertise.avi.
▪ For a damage waiver video, name the file DamageWaiver.avi.
2 Save the file here:
▪ \ICS\AVIFiles
3 Restart Touch.exe. The video is enabled.
NOTE: Except for the size, the specifications for welcome videos and dam-age waivers are the same as the specifications for promotional clips. Promotional clips are 352 by 288 pixels. Welcome videos and damage waivers are 720 by 480 pixels.
For more information, see “Video Clip Specifications” on page 46.
Using Profiles and Schedule
A profile is a group of base washes including any extra services for each base wash. A profile can be enabled or disabled at the Auto Sentry Petro. For example, you might create a basic profile that is enabled for ordinary operations. You might also create a promotion profile to encourage more business on slower days or at a slower time of day. By using a profile to contain your services, you can display a customized wash menu to customers at the Auto Sentry Petro.
48 Copyright © 2012 Innovative Control Systems February 10, 2012

Auto Sentry Petro User Manual—Version 4.0 Customizing
Profiles can be enabled based on the following parameters:
• Day and time
• Vehicle height (normal or high vehicle)
• Transaction type (Retail, Program, Paid Ticket, Coupon and Program Sales)
• Program type (clubs and fleets)
This section includes general information about how you might use differ-ent profile times. It does not include detailed, step-by-step instructions on how to create wash services, profiles or schedules. For instructions, see the WashConnect™ User Manual.
The following example shows a Profile tab. From the Profile tab, you can view the list of created profiles which include a profile for standard offerings, early-bird specials, fleets, high-vehicle profiles, upgrades, etc.
Figure 39. Profile Tab displaying the list of created profiles.
About Wash Selections Based on the Day and Time
You can configure Auto Sentry Petro to offer a different set of wash options based on various conditions which might include the following:
• Weekdays, weekends and evenings
• Holidays
• Slow times and busy times
February 10, 2012 Copyright © 2012 Innovative Control Systems 49

Customizing Auto Sentry Petro User Manual—Version 4.0
• Inclement weather
• Twenty-four hour washes
You can use the Profile Times dialog box to set up these conditions. Using the Day, Start Time, and Stop Time fields, you can create your own profile times. Examples are shown in the following figures.
Display a Standard Offerings Schedule
This example displays a standard offerings profile. It enables the Auto Sentry Petro to operate on different weekday and weekend schedules.
Figure 40. Example of a Standard Offerings Schedule.
In the example above, the wash is open from 6:00 a.m. to 9:00 p.m. week-days, and 6:00 a.m. to 5:00 p.m. on weekends. The Standard Offerings pro-file is selected. It includes separate schedules for weekdays and weekends, which enables the Auto Sentry Petro to display the same services at differ-ent times.
Display a Holiday Schedule
The next example shows a schedule to accommodate extended hours over the Labor Day weekend.
50 Copyright © 2012 Innovative Control Systems February 10, 2012

Auto Sentry Petro User Manual—Version 4.0 Customizing
Figure 41. Example of Labor Day Schedule
In the example above, the Standard Offerings schedule includes specific dates for the Labor Day weekend, when the wash is open for extended hours. The weekend schedule is active from 9/3/2011 to 9/4/2011. The extended hours are 5:00 AM through 10:00 PM.
Display Busy and Slow Schedules
The next example shows how you can provide different profiles for your busy times and slow times.
Figure 42. Busy and Slow Profile Schedules Example.
In the example above, two profiles enable the Auto Sentry Petro to display wash selections based on how busy the wash is expected to be.
February 10, 2012 Copyright © 2012 Innovative Control Systems 51

Customizing Auto Sentry Petro User Manual—Version 4.0
During busy times, from 8:00 AM to 1:00 PM, the wash choices are limited to the Express Wash to provide a speedier selection process and wash experi-ence. During slow times, free tokens can be offered with each selection to encourage repeat visits.• The Busy profile is used for weekdays between 8:00 AM and 1:00 PM.
• The Slow profile is used for weekdays between 1:00 PM and 3:00 PM.
Display an Bug Blaster Profile Offering
You might consider creating a special profile for stretches of heavy bug activity when you offer extra bug remover.
Figure 43. Buggy Thursdays Profile and Schedule Example.
In this example, Thursdays between Memorial Day and Labor Day are Buggy Thursdays when Bug Blaster is offered as an extra service with every wash.
Display a Twenty-Four Hour Schedule
The next example shows how a twenty-four hour wash might be set up.
52 Copyright © 2012 Innovative Control Systems February 10, 2012

Auto Sentry Petro User Manual—Version 4.0 Customizing
Figure 44. Hour Profile Schedule Example.
This example includes a schedule for a twenty-four hour wash. Leaving the Start Date and End Date as well as the Start Time and End Time fields empty will enable a twenty-four hour wash.
February 10, 2012 Copyright © 2012 Innovative Control Systems 53

Customizing Auto Sentry Petro User Manual—Version 4.0
Display Wash Selections Based on Vehicle Height
Vehicle height is either Normal or High Vehicle. The following example shows an additional profile for a twenty-four hour wash to be set up if the wash has a High Vehicle sensor installed .
Figure 45. Twenty-Four Hour High Vehicle Profile Schedule
The Twenty-Four Hour High Vehicle schedule is available, along with the normal Twenty-Four Hour schedule. High Vehicle is selected from the Vehicle Height column.
NOTE: The High Vehicle feature requires a high vehicle sensor that is optional and additional fees apply.
About Wash Selections Based on Transaction Type
Transaction types include Retail, Program, Paid Ticket, Open Ticket, Coupon, Program Sales, and Gift Sales.
Display a Retail Schedule
The Retail transaction type is default. When a customer selects the Buy Wash button at the Auto Sentry Petro, the system attempts to match a profile by the day, time and vehicle height. If a match is found, the profile associated with the Retail transaction type is used. Retail appears in the Applies To column.
54 Copyright © 2012 Innovative Control Systems February 10, 2012

Auto Sentry Petro User Manual—Version 4.0 Customizing
Figure 46. Retail Profile Schedule
Display a Fleet Schedule
The Program transaction type is active for customers who swipe a fleet card at the Auto Sentry Petro as well as those with Auto Passport windshield tags. Auto Passport vehicle identification system has optional and additional hardware and software installed. Fleet profiles offer a limited set of wash choices.
February 10, 2012 Copyright © 2012 Innovative Control Systems 55

Customizing Auto Sentry Petro User Manual—Version 4.0
Figure 47. Fleet Profile Schedule Example.
The illustration above shows a schedule with Program selected in the Applies To column. The Longford Landscapes fleet program is active AllDays from 6:00 AM to 9:00 PM. If the systems recognizes a valid fleet account customer, this profile is used.
Display a Paid Ticket Schedule
The Paid Ticket transaction type is active for customers with pre-paid wash tickets. A customer who receives a paid ticket receives a wash code at the fuel terminal. To redeem their purchase, the customer can touch the Enter Wash Code button on the Auto Sentry Petro. The associated profile might include an upsell for extra services.
56 Copyright © 2012 Innovative Control Systems February 10, 2012

Auto Sentry Petro User Manual—Version 4.0 Customizing
Figure 48. Paid Ticket Schedule
In the figure above, the Fuel Upgrade Standard profile is active for AllDays from 6:00 AM to 9:00 PM. A customer with a paid ticket who selects Enter Wash Code will receive this profile which contains wash upgrades and extra services.
Display a Coupon Schedule
The Coupon transaction type is available for customers who enter a coupon code at the Auto Sentry Petro touch screen. Coupon codes are three-, four- or five-digit codes that give a discount on the wash service.
February 10, 2012 Copyright © 2012 Innovative Control Systems 57

Customizing Auto Sentry Petro User Manual—Version 4.0
Coupon Schedule
The Wash Coupon profile is selected. It is active for All Days from 6:00 AM to 9:00 PM. Customers who enter the correct coupon code at the Auto Sentry Petro touch screen will receive a menu of discounted selection of base wash services. Without the discount, the services are $7.00, $9.00, $12.00 and $13.00. With the discount, the services are $6.00, $8.00, $11.00 and $12.00, as shown in the illustration. The discount is $1.00. Extra services are not discounted in this example; however, they could be.
58 Copyright © 2012 Innovative Control Systems February 10, 2012

Auto Sentry® Petro User Manual—Version 3.0 Reporting
CHAPTER 4: Reporting
You can view the Shift report, the Credit Card report and other reports. You can also set up performance reporting updates for your Auto Sentry® Petro.
For more information on reporting, please refer to the WashConnect™ User Manual.
About the Shift Report
You can view the Shift report.
March 5, 2012 Copyright © 2012 Innovative Control Systems 59

Reporting Auto Sentry® Petro User Manual—Version 3.0
Figure 49. Shift Report, Page 1
60 Copyright © 2012 Innovative Control Systems March 5, 2012

Auto Sentry® Petro User Manual—Version 3.0 Reporting
Figure 50. Shift Report, Page 2
Figure 51. Shift Report, Page 3
The Shift Detail report summarizes all transactions and lists all services sold for the selected shift or shifts.
The following table describes the shift report section headings and line-item labels. The table is comprehensive. Not every shift report includes all the labels described in the table. For example, if there were no fuel sales to show in your report, then the Fuel Sales heading does not appear on the report.
March 5, 2012 Copyright © 2012 Innovative Control Systems 61

Reporting Auto Sentry® Petro User Manual—Version 3.0
Table 13: Shift Report Descriptions
Label Description
Wash or Account (Profit Center) Name
Main headings indicate the specific Profit Center sales informa-tion that is being viewed. Each category will display the type of service, PLU number, name, along with the combined quantity and price for each service purchased. The total quantity and price for each PLU is combined to display the total revenue.
Base Wash Service Base Wash Service is a “base” or basic PLU (e.g., not extra ser-vices). Each base wash service is listed separately by profit cen-ter.
Extra Wash Service Extra wash service is an extra service such as detailing or wax. Customers are charged extra for these services, usually in addi-tion to the base wash service.
Upgrade Credit Upgrade credit is a credited item for a transaction that includes additional purchases. For example, a customer paid $5.00 for a wash at the fuel pump. Then he purchased a $2.00 upgrade at the Auto Sentry® Petro. The total transaction was $7.00, but $5.00 was shown as an Upgrade Credit.On the shift report, the total for all Upgrade Credits is subtracted from the Total Sales for the profit center.
Promotion Promotion is a discount applied to a purchase made by eligible customers. The system automatically applies discounts for pro-motions sold in the Wash profit center. The promotions include: Frequent Customer and Car, Cascading Prices, Coupons, etc. The total from the Promotion category is subtracted from the Total Sales for the profit center.
Other Other is an item that may or may not have a dollar value. It is counted separately from Extra Sales items.
Net Sales Net Sales is total sales in each profit center shown as a pre-tax amount.
Sales @ Tax Rate This entry will include sales at each defined tax rate for your site. It includes totals from all profit centers. The first amount shown is Net Sales. The second amount shown is the sales tax.
Total Sales Total Sales is the total sales from each profit center including tax.
Gift Card Sold [Not Implemented] The total value of gift cards sold.
Gift Card Free [Note Implemented] The dollar amount equal to the percent set up for the Add Value Promo when a customer adds value to a gift card.
Fund Raisers The dollars collected for the various fund raiser promotions set up in the system. Fund raisers are reported as a liability.
62 Copyright © 2012 Innovative Control Systems March 5, 2012

Auto Sentry® Petro User Manual—Version 3.0 Reporting
Refunds Due Total dollar amount due to customers that are owed a refund from the Auto Sentry® Petro. The Refund Due amount does not carry over to the next day. Refund amounts are generally due to the machine running out of money.
Total Income Total income is the total dollars of revenue for all sales made from all profit centers during the selected shift or shifts.Total income is calculated as follows:Total Sales + Gift Sold + Fund Raisers – Gift Free – Refund Due
Beginning Bank Amount of Cash in the machine at the start of the shift.
Accounts The number and total dollar value of sales that were charged to Fleet Account customers.
Credit Card This entry includes the number and total dollar value of all sales identified as being processed with a Credit Card. If Payment Methods have been setup, the Credit Card totals will instead be broken down by type, i.e. Visa, MasterCard, etc.
Fuel Sales Includes the total dollar amount of sales for wash services sold at a fuel pump.
Gift Card Redeemed [Not Implemented] This entry includes the number and total dollar value of all Gift Cards redeemed during the shift.
Tokens Redeemed The dollar value of the tokens used toward payment of services. This amount is part of the non-cash total.
Total Credit Cards Total dollar amount of transactions paid by credit card.
Total Non-Cash [Not Implemented] Combined amount of non-cash items which include credit cards, debit cards, tokens, gift cards, fleet accounts, and fuel sales.
Total Cash Total dollar amount of cash and checks on hand for the shift.
Total Checks Total checks received as payment for transactions. Not applica-ble to the Auto Sentry® Petro, which does not accept checks.
Total Cash and Checks (+)
Total Cash + Total Checks.
Deposits (-) Dollar amount removed from the device to be deposited in the bank.
Safe Deposit Dollar amount that is added to the device. This can be verified by reviewing the Journal Editor.
Ending Bank (-) Amount of cash in the machine at the end of the shift.
Beginning Balance Edit
User edit to the shift’s beginning bank amount.
Ending Balance Edit User edit to the shift’s ending bank amount.
Table 13: Shift Report Descriptions (Continued)
Label Description
March 5, 2012 Copyright © 2012 Innovative Control Systems 63

Reporting Auto Sentry® Petro User Manual—Version 3.0
View a Shift Report
To view the Shift report, follow these steps:
1 Select Financial, and then click Shift. The Shift Detail tab appears.
Figure 52. Shift Detail Tab
2 In the From Date and To Date boxes, select a date range.
3 In the Site box, select a site.
4 In the Device Type box, select one or more devices.
▪ To see sales from the fuel pump, this is where you would select a device type such as Fuel.
Corporate Bank Deposit Edit
User edit to the corporate bank deposit entry.
Bank Deposits (Cash)
Amount of cash funds removed from the device.
Bank Deposits (Checks)
Amount of check funds removed from the device. Not applicable to the Auto Sentry® Petro, which does not accept checks.
Total Bank Deposits Bank Deposits (Cash) + Bank Deposits (Checks)
Over/Under/Even Dollar amount at end of shift for the difference in device totals. Over means the device ended the shift with extra money than what was recorded by the software. Under means the device ended the shift with less money than what was recorded by the software.
Edited Transactions This is the number and dollar value of all transactions that have been edited for this shift. These transactions could have been edited while the shift was open or after it was closed. When transactions are edited after a shift has been closed, you can reprint the Shift Report to see the updated entry for Edited Trans-actions.
Retired Transactions This is the number and dollar value of all transactions that have been retired for this shift. These transactions could have been retired while the shift was open or after it was closed. When transactions are retired after a shift has been closed, you can reprint the Shift Report to see the updated entry for Retired Transactions.
Table 13: Shift Report Descriptions (Continued)
Label Description
64 Copyright © 2012 Innovative Control Systems March 5, 2012

Auto Sentry® Petro User Manual—Version 3.0 Reporting
5 In the Group On box, do one of the following:
▪ Select PLU to see PLUs. The report will show PLUs sorted numeri-cally for each profit center.
▪ Select Account to see profit centers. The report will show profit cen-ter summaries, not PLUs.
6 In the Shift box, select one or more shifts.
7 Click View. The shift report appears.
About the Credit Cards Report
You can view the Credit Cards report.
Figure 53. Credit Cards Report
In the previous figure, the report header shows information about who requested the report, for what site, and at what time:
• The report was requested by SuperUser on Monday, January 24, 2011at 1:40:11 PM.
• The report is titled CREDIT CARDS.
• The Date Range From 1/1/2010 to 4/23/2010 shows the range of dates the user selected for the report.
NOTE: The credit report can shows all card data for a selected site and shift (or shifts) across the report date range. You can select all shifts, a single shift, or a combination of shifts.
March 5, 2012 Copyright © 2012 Innovative Control Systems 65
Reporting Auto Sentry® Petro User Manual—Version 3.0
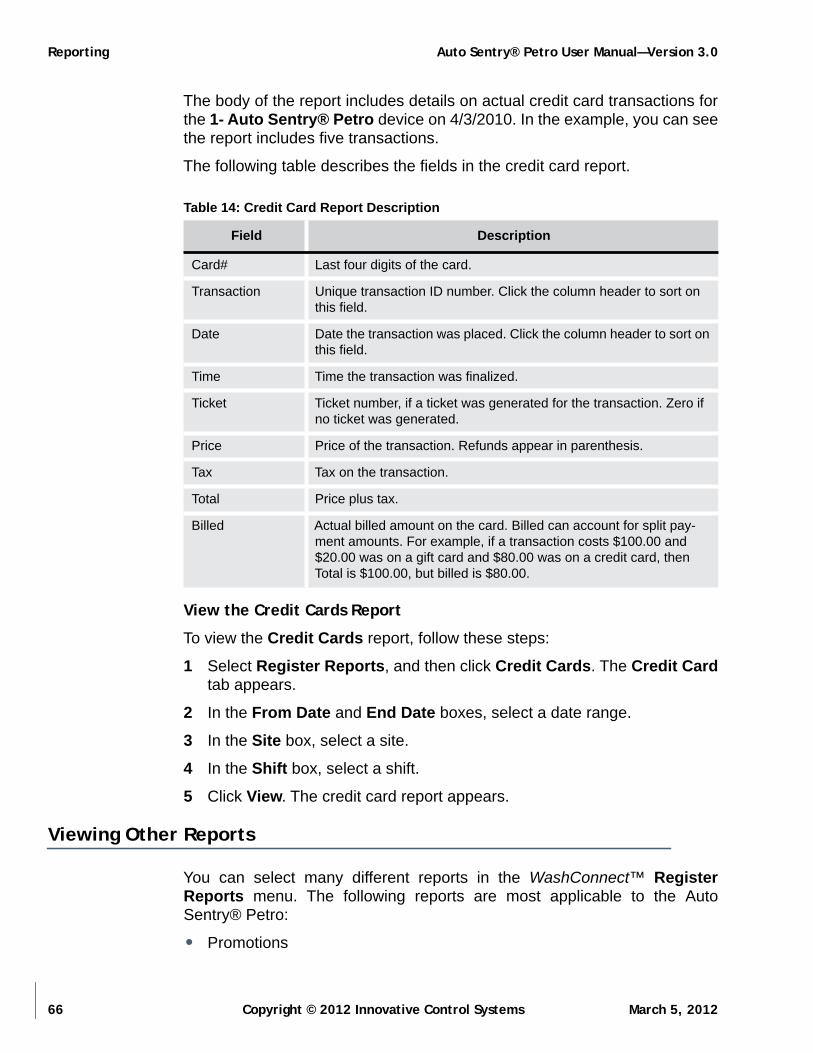
Table 14: Credit Card Report Description
Field Description
Card# Last four digits of the card.
Transaction Unique transaction ID number. Click the column header to sort on this field.
Date Date the transaction was placed. Click the column header to sort on this field.
Time Time the transaction was finalized.
Ticket Ticket number, if a ticket was generated for the transaction. Zero if no ticket was generated.
Price Price of the transaction. Refunds appear in parenthesis.
Tax Tax on the transaction.
Total Price plus tax.
Billed Actual billed amount on the card. Billed can account for split pay-ment amounts. For example, if a transaction costs $100.00 and $20.00 was on a gift card and $80.00 was on a credit card, then Total is $100.00, but billed is $80.00.
The body of the report includes details on actual credit card transactions for the 1- Auto Sentry® Petro device on 4/3/2010. In the example, you can see the report includes five transactions.
The following table describes the fields in the credit card report.
View the Credit Cards Report
To view the Credit Cards report, follow these steps:
1 Select Register Reports, and then click Credit Cards. The Credit Cardtab appears.
2 In the From Date and End Date boxes, select a date range.
3 In the Site box, select a site.
4 In the Shift box, select a shift.
5 Click View. The credit card report appears.
Viewing Other Reports
You can select many different reports in the WashConnect™ Register Reports menu. The following reports are most applicable to the Auto Sentry® Petro:
• Promotions
66 Copyright © 2012 Innovative Control Systems March 5, 2012

Auto Sentry® Petro User Manual—Version 3.0 Reporting
• Accounts
• Fuel Sales
Some reports are not applicable to the Auto Sentry® Petro, such as Checks, Debits and Deposits.
March 5, 2012 Copyright © 2012 Innovative Control Systems 67

Reporting Auto Sentry® Petro User Manual—Version 3.0
68 Copyright © 2012 Innovative Control Systems March 5, 2012

Auto Sentry Petro User Manual—Version 3.0 Configuring
CHAPTER 5: Configuring
This chapter includes descriptions of the Configuration > Devices > Settings menu in WashConnect™.
About Settings
Figure 54. Settings Menu
You can find the Settings menu in WashConnect™ software from System Setup. Many of these settings are configured by ICS technicians during installation. Therefore, you should contact ICS support if you are not sure of the correct settings.
Other settings can be modified to enhance the functionality of your Auto Sentry® Petro. For example, you can change settings for tokens, receipts, and screen layout.
March 5, 2012 Copyright © 2012 Innovative Control Systems 69

Configuring Auto Sentry Petro User Manual—Version 3.0
In WashConnect™, the Settings tab includes selections for Device Type. Each Device Type includes various Device Name selections. And each Device Name includes various Settings selections.
Figure 55. Settings
For example, you can select the Device Type of Autosentry (i.e., Auto Sentry® Petro); the Device Name of AA1002, and then select specific Settings for that device (e.g., Language, etc.).
There are many Device Type and Settings combinations. For each combination, a description table is included in this section. Description tables provide more information about the settings for a particular combination.
About Settings and Logon Location
To change settings for a specific device, you must logon to the site location where that device is installed.
Figure 56. Logon to Ultimate
In the illustration, Ultimate is selected as the logon location. The Ultimatelocation is a site where devices are installed. After you logon, you can select devices in the Device Name list, and then edit settings for those devices.
NOTE: If you do not see devices in the Device Name list, then you can logon to a site location in the organization layout. Once you logon to a site where devices are installed, devices appear in the Device Name list.
70 Copyright © 2012 Innovative Control Systems March 5, 2012

Auto Sentry Petro User Manual—Version 3.0 Configuring
Restart Touch
After you make changes in any Settings screen, you must remember to restart the corresponding Auto Sentry® Petro. Doing so will enable the changes.
To restart to the Auto Sentry® Petro, follow these steps:
1 Verify that Switch Enabled in the Auto Sentry® Control dialog box is set to TRUE.
2 Go to the Auto Sentry® Petro, open the door with a hex key, and then locate the service button.
3 Press and hold the button for about five seconds or longer. The unit will reboot.
4 After the unit has rebooted, verify that the settings have taken effect.
NOTE: If the unit does not reboot or if Switch Enabled is FALSE, then you can make the settings effective by restarting Touch.exe with a USB keyboard attached to the motherboard of the Auto Sentry® Petro. Contact ICS support for more information.
Auto Sentry® Language
Table 15: Auto Sentry® Language Description
Field Description
Primary Cul-ture Info
Primary language setting.
Secondary Culture Info
Secondary language setting.
Auto Sentry® Receipt Footer
Table 16: Auto Sentry® Receipt Footer
Field Description
Receipt Footer 0 to 5
Text that appears on the receipt footer. Six lines are available. Each line is limited to 50 characters.
March 5, 2012 Copyright © 2012 Innovative Control Systems 71

Configuring Auto Sentry Petro User Manual—Version 3.0
Auto Sentry® Receipt Header
Table 17: Auto Sentry® Receipt Header
Field Description
Receipt Header 0 to 5
Text that appears on the receipt header. Six lines are available. Each line is limited to 50 characters.
Auto Sentry® Coin Acceptor
Table 18: Auto Sentry® Coin Acceptor
Field Description
CoinAcceptor [NOT IMPLEMENTED. Should be false.]Accept Multiple Tokens, True or False.
Auto Sentry® Control
Table 19: Auto Sentry® Control
Field Description
Accept Token Note
Determines whether or not to accept token notes. Set to True to accept token notes and identify them as such. Set to False when the site does not have or accept token notes.
Admin RFID Card
[FOR FUTURE USE. NOT IMPLEMENTED. Should be false.] The manager RFID card number used as an override for customers with RFID tags that do not read.
Conveyor Hold
Time in milliseconds to hold the conveyor/gate output (i.e., 500 repre-sents ½ of a second).
Description The name (descriptive) of the Auto Sentry® terminal. This will appear on shift reports.
72 Copyright © 2012 Innovative Control Systems March 5, 2012

Auto Sentry Petro User Manual—Version 3.0 Configuring
Drive Ahead Hold Timer
In seconds. When DriveAheadHoldTime is configured, if there is a Wash Busy signal coming in before this timer expires, the system does not remove the Drive Ahead screen on the Auto Sentry® Petro.When a time is defined in the DriveAheadHoldTime option and the green arrow appears on the screen, the defined timer begins to immedi-ately count down. If a Wash Busy is seen within this timer, the timer sim-ply continues counting down until it meets the defined time. This means the Drive Ahead screen will always be displayed for a consistent amount of time, regardless of a difference in timing of a received Wash Busy sig-nal. For example, say you defined the DriveAheadHoldTime to be 30 sec-onds. A customer bought a wash and waited 5 seconds after the Green Arrow appeared to apply a Wash Busy signal. In this case the green arrow remained up for an additional 25 seconds. Drive Ahead Hold Timer can also be used to shorten the green arrow display. But keep in mind that if it is set with a shorter time, like 5 sec-onds, it may shorten the amount of time the drive ahead arrow is dis-played.
Fifth Loop Gate Master
Only applicable for double Auto Sentry® Petro and WBC with stacking. This setting is ignored for the typical setup, (i.e., one Auto Sentry® Petro to an in-bay automatic, no gate, no stacking).When applicable, recommended setting is True. Setting to True means Auto Sentry® Petro will be the one to receive the gate close signal/fifth loop signal in a double Auto Sentry® Petro setup.Setting to False means Auto Sentry® Petro is a second unit.
Font Color Font color to use for displaying non-service text on the interface. Only use if not using custom graphics.
Gate Indicator that represents how terminals are stacked (valid range is 0 to 3).For in-bay automatics, set to 0 for no gate or 3 for a gate.Gate settings of 1 and 2 are not supported for in-bay automatics.Zero (0) means terminals are not stacked (i.e. there is only one terminal or one terminal per tunnel and, therefore, cars can be added to the stack at will). One (1) represents terminals that are stacked side by side which requires the terminal to fire a gate output. The gate input represents the terminals actual gate state (NOT the other terminals gate state). Two (2) represents terminals that are stacked front to back (there are no physi-cal gates in this scenario). For the terminal closest to the wash entry, the gate input MUST NOT be used (always off - this terminal can always add the car to the stack). For the other terminal, the gate input repre-sents whether or not a car is at the terminal in front of this terminal (i.e. the proximity sensor from the first terminal is wired to the gate input of the second terminal).
Table 19: Auto Sentry® Control (Continued)
Field Description
March 5, 2012 Copyright © 2012 Innovative Control Systems 73

Configuring Auto Sentry Petro User Manual—Version 3.0
Gross Time Out
Gross period of inactivity to wait (in seconds) before returning to base state.
Control_MaxAllowedToken-Notes
If using token notes, this value will limit how many token notes can be used in one transaction. If the customer inserts the maximum quantity of notes, the next one inserted will be rejected and the system will write a log entry.
Max InBay Wash Time
This timer should be set to a value based on the maximum time required to wash a car, plus a minute or two. The wash equipment manufacturer can provide this time.This timer is enabled as soon as the Auto Sentry® Petro gets a Wash Busy signal. If Wash Busy does not drop and the timer expires, then a message is posted to the log.An email is sent if the system is configured to do so.Error code to look for: Max Inbay Wash Time exceeded.
Multiple Lan-guages
Set to True for multiple languages (primary/secondary), otherwise False. Primary/secondary avi files, bitmaps, and text (in WashConnect™) must be defined if this is set to True.
No Extra Buy Time Out
The set time that the system will move forward to the next screen if the customer does not make a selection on the buy extra services screen (set to 0 to disable)
OnBounce Sense car loop. Amount of time between when the loop senses the car and the input is sent to the Auto Sentry® Petro to begin the transaction.
OnDelay The time between when the sense loop is acknowledged and the Auto Sentry® Petro screen becomes active.
Restart Delay Timeout to wait when at the final screen before returning to the base state. This gets set if a user starts the transaction by touching the screen instead of being sensed by sensor. Also gets set if stacking and wash is busy (via gate control).
Screen Bright Level
Sets screen hardware bright level. Default is 22.For more information, refer to the document titled AutoSentryBright-DimSettings.pdf.
Screen Dim Level
Sets screen hardware dim level. Default is 2.For more information, refer to the document titled AutoSentryBright-DimSettings.pdf.
Secondary Tunnel
[NOT APPLICABLE TO Auto Sentry® Petro]. Set this to true (1) if the site contains two tunnels, you are stacking and this terminal stacks to the "secondary" (as opposed to the "primary") tunnel. Otherwise, set to false (0 - default).
Stacking Add car to stack? (Yes = True, No = False).
Table 19: Auto Sentry® Control (Continued)
Field Description
74 Copyright © 2012 Innovative Control Systems March 5, 2012

Auto Sentry Petro User Manual—Version 3.0 Configuring
Station Unique station identifier. If using PCCharge, set this to the user name.
Switch Enabled
Set to False if the service unit switch is to be ignored, otherwise True. Only for rebooting purposes.
Use Wash Detail
[NOT APPLICABLE TO Auto Sentry® Petro]. Print wash detail "WD" ticket (Yes = True, No = False).
Use Wash Open
Use signal from rollover (or some other external source) to determine if wash is open (Yes = True, No = False).
Use Wash Open Label
Display text field on bitmap when wash is closed/out of service. If the owner does not have a custom bitmap for this feature, set it to True, oth-erwise False.
Table 19: Auto Sentry® Control (Continued)
Field Description
March 5, 2012 Copyright © 2012 Innovative Control Systems 75

Configuring Auto Sentry Petro User Manual—Version 3.0
Wash Busy Wait Tmr
In-bay only. Estimate (in seconds) of how long it will take for a customer to drive into the In-Bay. When this timer expires, the system will try to program the next wash if there is one queued up. If not, it will go to the initial touch screen.
Wash Eqpt ErrTmr
In-bay only. For handling equipment errors when wash goes busy. In seconds. When system goes into error mode when wash is busy, it will wait for the WashEqptErrTmr before closing the wash.
Wash Equip-ment
In-bay only. May be set to any of the following recognized parameters:NONEAUTECBELANGERBELANGER FREESTYLEBELANGER FREESTYLE 2BELANGER VECTORCECCATOCECCATO 2DNS ODYSSEYECOJETISTOBALISTOBAL M18MARK7NUSTAR COMET 2PDQ 4000PDQ G5 RYKORYKO2RYKORADIUSSUPERIORTMJTMJPLUSWESUMATWASH WORLD RAZORDefault is NULL.Contact ICS support for more detailed information.
Table 19: Auto Sentry® Control (Continued)
Field Description
76 Copyright © 2012 Innovative Control Systems March 5, 2012

Auto Sentry Petro User Manual—Version 3.0 Configuring
Auto Sentry® Credit Card
Table 20: Auto Sentry® Credit Card
Field Description
American Express
Set to True if site accepts American Express® cards, otherwise False. Only effects the buy wash bitmap that is displayed.
CreditCard_CageHost
Host location where Cage.exe credit card processing software runs. Example: localhost.
CreditCard_CagePort
Port number to communicate with Cage.exe credit card processing soft-ware. Example: 11240.
CAPS Host Strongly advised not to change.Machine name or IP Address of machine which is running CAPS.
CAPS Port Strongly advised not to change.Port number CAPS is listening on (typically 32511).
Card Path Path used to produce the file for clearing. If using PCCharge, set this to where the program was installed (usually C:\Program Files\Active-Charge).
Discover Set to True if site accepts Discover® cards, otherwise False. Only effects the buy wash bitmap that is displayed.
Interface Set to "PCCharge" if clearing gift cards through PCCharge Payment Server or "Cage" for clearing gift cards through Cage.
Merchant ID Merchant number. Defined by PCCharge, ICVerify or TransActive.
Processor Name of the credit card processor (i.e. "VISA").
Store ID Store ID assigned by Lynk eCommerce.
Tax Credit Card
Set to True if credit card sales are taxable, but cash sales are not. Oth-erwise set to False. Currently, this is only necessary for New York loca-tions.
Terminal ID Terminal ID assigned by Lynk eCommerce.
TimeOut Timeout (in seconds) to wait for credit card to clear. Set this to 10 sec-onds greater than the CAGE timeout, (which is set in CAGE software).For example, if the CAGE timeout is 120, then this TimeOut should be 130. This way the timeout from CAGE will always be sent back to Touch.exe. first, before Touch.exe has a chance to timeout.
Transactive Use TransActive credit card processor (Yes = True, No = False).
Visa Master Set to True if site accepts Visa/MC cards, otherwise False. Only effects the buy wash bitmap that is displayed.
March 5, 2012 Copyright © 2012 Innovative Control Systems 77

Configuring Auto Sentry Petro User Manual—Version 3.0
Auto Sentry® Gift Card
Table 21: Auto Sentry® Gift Card
Field Description
GiftCard_AddValueBonus-Dollars
NOT IIMPLEMENTED. FOR FUTURE USE.Promotional dollars given to a customer who purchases a gift card.
GiftCard_AddValueFree-WashPLU
NOT IIMPLEMENTED. FOR FUTURE USE.PLU number of free wash given to a customer who purchases a gift card.
Add Value Promo
NOT IIMPLEMENTED. FOR FUTURE USE. % Increase to use for recharging gift cards. Set to 0 if promotion is not in use, otherwise set to the proper %. For example, if this value is set to 10 (for 10%), then if a customer recharges a gift card with $20.00, the value added to the gift card would be $22.00 (20 + 2). The customer would be charged only the $20.00.
Clerk Gift clerk. Usually not necessary, however if using World Gift Card and Use Require Clerk ID is checked, then you must provide the Gift Clerk ID here.
Merchant ID Merchant ID for World Gift Card. May be 0 if using WashCard gift cards.
Path Path to produce file for clearing. If using World Gift, set this path to the same path as the CardPath above. If using WashCard, set this path to the same directory the WashCard Interface program is looking at.
Processor "WRLD" for World Gift Card. "WCRD" for WashCard.
Time Out Timeout (in seconds) to wait for gift card to clear.
Interface Set to "PCCharge" if clearing gift cards through PCCharge Payment Server or "Cage" for clearing gift cards through Cage processor.
Max Increase Maximum dollars customer is allowed to add to the gift card.
Min Increase Minimum dollars customer is allowed to add to the gift card.
GiftCard_PromoFontColor
This setting will allow the font color of the text in the bonus increase box to be customized for easier reading. This field follows the standard col-ors that can be used for text colors for the services. The choices are WHITE, BLACK, MAROON, GREEN, NAVY, PURPLE, TEAL, GRAY, SILVER, RED, YELLOW, BLUE. Default is BLACK.
GiftCard_SellStyle
[NOT IMPLEMENTED. FOR FUTURE USE].NONE sets the Auto Sentry® Petro to not sell gift cards. Default setting.ACTIVE sets the buy gift card option to appear up front for the customer to choose. If the customer touches NO THANK YOU, then the Buy Wash screen appears.PASSIVE sets the buy gift card option to have an extra button for Buy Gift Card along with the other buttons on the Buy Wash screen.
78 Copyright © 2012 Innovative Control Systems March 5, 2012

Auto Sentry Petro User Manual—Version 3.0 Configuring
Auto Sentry® TouchDebug
Table 22: Auto Sentry® TouchDebug
Field Description
Log to Disk Set to True for enhanced logging, otherwise set to False. Enhanced log-ging is only used for debugging purposes, so it should generally be set to False.
Monitor For software development debugging. Should be “False.”
Auto Sentry® Vandalism Deterrent
Table 23: Auto Sentry® Vandalism Deterrent
Field Description
Deterrent Alarm Output
Numeric. The output that will be fired when the alarm is tripped.
Deterrent Alarm Time Out
Numeric. Minutes. If set to zero, the alarm never resets based on this timeout. Any number entry greater than zero represents the time to wait (in minutes) until the alarm is automatically reset.
Deterrent Dis-arm Alarm Time Out
Numeric. Seconds. How long the alarm stays off after you press the Dis-able Alarm button in the Service Unit diagnostics screen.
Deterrent Enable
True or False. Enable or disable the vandalism alarm.
Deterrent On Change Low High
Type HIGH if the alarm triggers on a logic change from low to high. Else, type LOW.
Auto Sentry® Main Options
Table 24: Auto Sentry® Main Options
Field Description
MainOption_MyListenPort
Port number (e.g., 32503) for debugging and logging. This setting should only be modified by ICS technicians.
Allow Card Credit cards accepted (Yes = True, No = False).
Allow Cash Cash accepted (Yes = True, No = False).
Allow Code Paid tickets accepted (Yes = True, No = False).
March 5, 2012 Copyright © 2012 Innovative Control Systems 79

Configuring Auto Sentry Petro User Manual—Version 3.0
Auto Sentry® WBC Connection
Table 25: Auto Sentry® WBC Connection
Field Description
WBC Device Key
Configured by ICS technician. This is the Device ID (from the transac-tion engine database).
MainOptions_AllowFund-raiser
[NOT IMPLEMENTED FOR Auto Sentry® Petro. FOR FUTURE USE Only. Always set to False for the Auto Sentry® Petro.] Set to True if you want the Fundraiser button to appear on the main choice screen of the Auto Sentry® Petro. The software will require a new bitmap to be placed in the primary and secondary folders of the BMPFiles. This file will be called MainForm.Fundraiser.bmp.
Allow Pay [NOT IMPLEMENTED FOR Auto Sentry® Petro. FOR FUTURE USE Only. Always set to False for the Auto Sentry® Petro.] Pay attendant feature (Yes = True, No = False).
No Video Only Audio
Set to True if you want to turn off the video.
Pay Output Output to fire if pay attendant is selected (0 = no output).
Save Logs of Days
Number of days to save logs.
Show Video to Left
Set to True if you want the video to be displayed on the left hand side of the screen. A separate set of graphics may be required.Otherwise set to False and the video will be displayed on the right hand side of the screen.
Wash Type Valid values are "Presell", "Conveyor" or "Automatic". Set to Automatic for the Auto Sentry® Petro.
Table 24: Auto Sentry® Main Options (Continued)
Field Description
80 Copyright © 2012 Innovative Control Systems March 5, 2012

Auto Sentry Petro User Manual—Version 3.0 Configuring
Auto Sentry® Receipt
Table 26: Auto Sentry® Receipt
Field Description
Bar Code Receipt
[NOT APPLICABLE TO Auto Sentry® Petro]. Print barcode on receipt (Yes = True, No = False). You generally only need the barcode if you are manually stacking from the input terminal and want to scan the ticket
Bar Code Ticket
[NOT APPLICABLE TO Auto Sentry® Petro]. Print barcode on presell ticket (Yes = True, No = False) (Yes = True, No = False). You generally only need the barcode on the presell ticket if you are manually stacking from the input terminal and want to scan the ticket. Not valid for the Auto Sentry® Petro.
Change Error Msg1
[NOT APPLICABLE TO Auto Sentry® Petro]. Error message to print on receipt when touch is incapable of dispensing the correct change (coin out, bill dispenser failure, etc)
Change Error Msg2
[NOT APPLICABLE TO Auto Sentry® Petro]. Error message to print on receipts when touch is incapable of dispensing the correct change (coin out, bill dispenser failure, etc). This is appended to ChangeErrorMsg1
Club Receipt Count
Number of receipts to automatically dispense for club transactions. Set to 0 if you want the system to prompt the customer to print a receipt.
Credit Receipt Count
Number of receipts to automatically dispense for credit/gift transactions. Set to 0 if you want the system to prompt the customer to print a receipt.
Receipt_PromoReceiptBar-code
[NOT APPLICABLE TO Auto Sentry® Petro]. Print promotional bar-code on receipt (Yes = True, No = False)
Receipt_PromoReceipt On Demand
[NOT APPLICABLE TO Auto Sentry® Petro]. Print Promotion on Receipt.
Receipt_PromoReceipt-Timeout
Number of seconds to pass before promotional receipt is automatically printed. Enter a number = seconds.
Receipt Count
[NOT APPLICABLE TO Auto Sentry® Petro.] Number of receipts to print. Set to 0 if you want the system to prompt the customer to print a receipt during a cash transaction.
Token Error Msg1
[NOT APPLICABLE TO Auto Sentry® Petro.] Error message to print on receipts when touch is incapable of dispensing the correct tokens.
Token Error Msg2
[NOT APPLICABLE TO Auto Sentry® Petro.] Error message to print on receipts when touch is incapable of dispensing the correct tokens. This is appended to TokenErrorMsg1.
March 5, 2012 Copyright © 2012 Innovative Control Systems 81

Configuring Auto Sentry Petro User Manual—Version 3.0
Auto Sentry® Service Font Color
Table 27: Auto Sentry® Service Font Color
Field Description
Font Color Description1
Color of text for the first description. Select a color from a drop-down list of 13 preselected colors.
Font Color Description2
Color of text for the second description Select a color from a drop-down list of 13 preselected colors.
Font Color Name
Color of text for the service name.Select a color from a drop-down list of 13 preselected colors.
Font Color Price
Color of text for the price. Select a color from a drop-down list of 13 pre-selected colors.
Auto Sentry® Shift
Table 28: Auto Sentry® Shift
Field Description
Auto Bump Parameter no longer supported. Formerly used to automatically bump the shift at midnight (closes the previous shift at 11:59 pm the previous day and opens a new shift at 12:00 am the current day).
Close on Exit Parameter no longer supported. Formerly used to close the register shift whenever the touch application was shutdown (Yes = True, No = False).
Coupon Length
Number of digits in PLU for coupons (may be set to 3, 4 or 5).
Max Transac-tion Amount
Set the register to desired dollar value for maximum cash amount to be accepted by Auto Sentry® per transaction.
Auto Sentry® DeviceIntDebug
Table 29: Auto Sentry® DeviceIntDebug
Field Description
Log to Disk For debugging purposes. Should be False.
Monitor For development debugging purposes. Should be "False."
82 Copyright © 2012 Innovative Control Systems March 5, 2012

Auto Sentry Petro User Manual—Version 3.0 Configuring
Auto Sentry® RFID
Table 30: Auto Sentry® RFID
Field Description
Antenna Sequence
Antenna to use for this lane.
Device ID Configured by ICS technician. This is the Device ID (from the transac-tion engine database).
Auto Sentry® Logging
Table 31: Auto Sentry® Logging
Field Description
LogPurge-Threshold
Number of days to keep logs. Example: 30.
Auto Sentry® Component Port
Table 32: Auto Sentry® Component Port
Field Description
XCeptor - Coin Acceptor
[NOT APPLICABLE TO Auto Sentry® Petro]. Port selection for the coin acceptor.
Mars - Bill Acceptor
[NOT APPLICABLE TO Auto Sentry® Petro]. Port selection for the bill acceptor.
Card Reader Port selection for the card reader.
Coin Hopper 1 [NOT APPLICABLE TO Auto Sentry® Petro]. Port selection for coin hopper 1.
Coin Hopper 2 [NOT APPLICABLE TO Auto Sentry® Petro]. Port selection for coin hopper 2.
Coin Hopper 3 [NOT APPLICABLE TO Auto Sentry® Petro]. Port selection for coin hopper 3.
NMD50 - Bill Dispenser
[NOT APPLICABLE TO Auto Sentry® Petro]. Port selection for the bill dispenser.
Hengstler C-56 Printer
Port selection for the receipt printer.
March 5, 2012 Copyright © 2012 Innovative Control Systems 83

Configuring Auto Sentry Petro User Manual—Version 3.0
84 Copyright © 2012 Innovative Control Systems March 5, 2012

Auto Sentry Petro User Manual—Version 3.0
IndexAAccept token note
auto sentry control, 72Accounts
shift detail report, 63Add value promo
auto sentry gift card, 78Admin RFID card
auto sentry control, 72Allow card
auto sentry main options, 79Allow cash
auto sentry main options, 79Allow code
auto sentry main options, 79Allow pay
auto sentry main options, 80American express
auto sentry credit card, 77Antenna sequence
auto sentry RFID, 83Audio
specifications, 46Auto bump
auto sentry shift, 82Auto sentry control, 72Auto sentry credit card, 77Auto sentry DeviceIntDebug, 82Auto sentry ETL heartbeat, 83Auto sentry gift card, 78Auto sentry language, 71Auto sentry logging, 83Auto sentry main options, 79Auto sentry receipt, 81Auto sentry receipt footer, 71Auto sentry receipt header, 72Auto sentry RFID, 83Auto sentry service font color, 82Auto sentry shift, 82Auto sentry touch debug, 79Auto sentry vandalism deterrent, 79Auto sentry WBC connection, 80
BBack button, 38Bank deposits (cash)
shift detail report, 64Bank deposits (checks)
shift detail report, 64Bar code receipt
auto sentry receipt, 81Bar code ticket
auto sentry receipt, 81Base wash service
shift detail report, 62Beginning balance edit
shift detail report, 63Beginning bank
shift detail report, 63Billed
credit card report, 66Buttons
payment buttons, 25
CCancel button, 38CAPS host
auto sentry credit card, 77CAPS port
auto sentry credit card, 77Card
duplicate transaction, 34maximum timeout, 34
Card authorization failure, 33Card path
auto sentry credit card, 77Card reader
about, 17auto sentry component port, 83
Card#credit card report, 66
Change error msg1auto sentry receipt, 81
Change error msg2auto sentry receipt, 81
Clerkauto sentry gift card, 78
Close on exitauto sentry shift, 82
Club receipt countauto sentry receipt, 81
Coin hopper 1auto sentry component port, 83
Coin hopper 2auto sentry component port, 83
Coin hopper 3auto sentry component port, 83
Control_MaxAllowedTokenNotesauto sentry control, 74
Conveyor hold
March 5, 2012 Copyright © Innovative Control Systems 85

Auto Sentry Petro User Manual—Version 3.0
auto sentry control, 72Corporate bank deposit edit
shift detail report, 64Coupon length
auto sentry shift, 82Credit card
shift detail report, 63Credit cards
screen options, 31Credit cards report
about, 65viewing, 66
Credit receipt countauto sentry receipt, 81
CreditCard_CageHostauto sentry credit card, 77
CreditCard_CagePortauto sentry credit card, 77
Custom buttons, 39layout examples, 42naming, 41saving, 42sizing, 41
Custom graphicsabout, 21
DDate
credit card report, 66Deposits
shift detail report, 63Description
auto sentry control, 72Deterrent alarm output
auto sentryvandalism deterrent, 79Deterrent alarm time out
auto sentry vandalism deterrent, 79Deterrent disarm alarm time out
auto sentry vandalism deterrent, 79Deterrent enabled
auto sentry vandalism deterrent, 79Deterrent on change low high
auto sentry vandalism deterrent, 79Device ID
auto sentry RFID, 83Discover
auto sentry credit card, 77Drive ahead hold timer
auto sentry control, 73Drive ahead screen
about, 31
EEdited transactions
shift detail report, 64Ending balance edit
shift detail report, 63Ending bank
shift detail report, 63English button, 38Enhanced log
auto sentry touch debug, 79Even
shift detail report, 64Extra wash service
shift detail report, 62
FFatal system error, 36Fifth loop gate master
auto sentry control, 73Font color
auto sentry control, 73Font color description1
auto sentry service font color, 82Font color description2
auto sentry service font color, 82Font color name
auto sentry service font color, 82Font color price
auto sentry service font color, 82Fuel sales
shift detail report, 63Fund raisers
shift detail report, 62
GGate
auto sentry control, 73Gift card
screen options, 31Gift card free
shift detail report, 62Gift card redeemed
shift detail report, 63Gift card sold
shift detail report, 62Gift cards
about, 32GiftCard_AddValueBonusDollars
auto sentry gift card, 78GiftCard_AddValueFreeWashPLU
auto sentry gift card, 78GiftCard_PromoFontColor
auto sentry gift card, 78GiftCard_SellStyle
auto sentry gift card, 78Gross time out
86 Copyright © Innovative Control Systems March 5, 2012

Auto Sentry Petro User Manual—Version 3.0
auto sentry control, 74
HHECON-C56 -printer
auto sentry component port, 83Help button, 37
IInfo video, 47Interface
auto sentry credit card, 77auto sentry gift card, 78
LLog to disk
auto sentry DeviceIntDebug, 82LogPurgeThreshold
auto sentry logging, 83
MMainOption_MyListenPort
auto sentry main options, 79MainOptions_AllowFundraiser
auto sentry main options, 80Mars - bill acceptor
auto sentry component port, 83Max in-bay wash time
auto sentry control, 74Max increase
auto sentry gift card, 78Max transaction amount
auto sentry shift, 82Merchant ID
auto sentry credit card, 77auto sentry gift card, 78
Min increaseauto sentry gift card, 78
Monitorauto sentry DeviceIntDebug, 82auto sentry touch debug, 79
Multiple languagesauto sentry control, 74
NNet sales
shift detail report, 62NMD50 - bill dispenser
auto sentry component port, 83No extra buy time out
auto sentry control, 74No video only audio
auto sentry main options, 80
OOnBounce
auto sentry control, 74OnDelay
auto sentry control, 74Operating requirements, 14Other
shift detail report, 62Over
shift detail report, 64
PPath
auto sentry gift card, 78Pay output
auto sentry main options, 80Payment
credit card, 31gift card, 31, 32receipt options, 32scenarios, 30
PIO board, 16Price
credit card report, 66Printer
about, 18Processor
auto sentry credit card, 77auto sentry gift card, 78
Profile timesexamples, 48
Promotionshift detail report, 62
RReceipt footer 0 to 5
auto sentry receipt footer, 71Receipt header 0 to 5
auto sentry receipt header, 72Receipt options, 32Refund due
shift detail report, 63Register reports
credit cards report, 65shift report, 59
Replay button, 38Reporting
other reports, 66Restart delay
auto sentry control, 74Retired transactions
shift detail report, 64
March 5, 2012 Copyright © Innovative Control Systems 87

Auto Sentry Petro User Manual—Version 3.0
SSafe deposit
shift detail report, 63Sales @ tax rate
shift detail report, 62Save logs of days
auto sentry main options, 80Screen bright level
auto sentry control, 74Screen dim level
auto sentry control, 74Secondary language
about, 23Secondary tunnel
auto sentry control, 74Settings
about, 69assign for devices, 70logon location, 70touch, restart, 71
Shift reportabout, 59viewing, 64
Show video to leftauto sentry main options, 80
Single-board computer, 15Spanish button, 38Stacking
auto sentry control, 74Station
auto sentry control, 75Store ID
auto sentry credit card, 77Switch enabled, 71
auto sentry control, 75
TTax
credit card report, 66Tax credit card
auto sentry credit card, 77Terminal ID
auto sentry credit card, 77Ticket
credit card report, 66Time
credit card report, 66Time out
auto sentry gift card, 78TimeOut
auto sentry credit card, 77Token error msg1
auto sentry receipt, 81
Token error msg2auto sentry receipt, 81
Tokens redeemedshift detail report, 63
Totalcredit card report, 66
Total bank depositsshift detail report, 64
Total cashshift detail report, 63
Total cash and checksshift detail report, 63
Total credit cardsshift detail report, 63
Total incomeshift detail report, 63
Total non-cashshift detail report, 63
Total salesshift detail report, 62
Touchrestart, 71
Touch screenabout, 15configurations, 19, 20
Transactioncredit card report, 66
Transactiveauto sentry credit card, 77
UUnder
shift detail report, 64Upgrade credit
shift detail report, 62Use wash detail
auto sentry control, 75Use wash open
auto sentry control, 75Use wash open label
auto sentry, 75
VVersion, 13Videos
about, 44enabling damage waiver, 48enabling promotional clips, 47enabling welcome video, 48ordering promotional clips, 45promotional clips, 44specifications, 46
Videos, damage waiverabout, 21
88 Copyright © Innovative Control Systems March 5, 2012

Auto Sentry Petro User Manual—Version 3.0
Videos, product promotionsabout, 22
Videos, welcomeabout, 22
Visa masterauto sentry credit card, 77
WWash busy, 37Wash busy wait timer
auto sentry control, 76Wash code
expired, 36not valid, 35
Wash equipmentauto sentry control, 76
Wash equipment error timerauto sentry control, 76
Wash or profit center nameshift detail report, 62
Wash typeauto sentry main options, 80
WBC device keyauto sentry WBC connection, 80
XXCeptor - coin acceptor
auto sentry component port, 83
March 5, 2012 Copyright © Innovative Control Systems 89

Auto Sentry Petro User Manual—Version 3.0
90 Copyright © Innovative Control Systems March 5, 2012

March 5, 2012 User Manual—Version 3.0
Change History
Table 33: Document Change History
Document Version Date(s) Reviewer
Initials Description
1.0 10/8/2010 MR, DP, J.M, JL-S
First release.
2.0 07/08/2011 MR, BM, JM JL-S
Second release. Updated for WashConnect™ interface.
3.0 03/05/2012 WS, JM, SD Third release. Updated to include custom graph-ics.
March 5, 2012 Copyright © Innovative Control Systems 91

Auto Sentry Petro User Manual—Version 3.0
Auto Sentry, Lube Master, and Tunnel Master are registered trademarks of Innovative Control Systems, Inc.WashConnect™ and Touch ‘N Clean™ are trademarks of Innovative Control Systems, Inc.
American Express is a registered trademark of American Express Company.De La Rue is a registered trademark of De La Rue Holdings, Plc.Discover is a registered trademark of Discover Financial Services Corporation.Fujitsu is a registered trademark of Fujitsu Limited Corporation.Mastercard is a registered trademark of MasterCard International Incorporated.Rain-X is a registered trademark of Pennzoil-Quaker State Company.Talaris is a trademark of Talaris, Ltd.TransFirst is a registered trademark of TransFirst, LLC.Visa is a registered trademark of Visa International Service Association.Windows and Internet Explorer are registered trademarks of Microsoft Corporation.Hengstler is a registered trademark of Hengstler GMBH, a division of Danaher Corporation.
All other company or product names are referenced for identification and may be trademarks of their respective owners.
No part of this document may be reproduced in any form or by any means, including but not exclusive to electronic, mechanical, photocopying, etc., without the prior written permission of Innovative Control Systems.This document and the information contained within subject to change without notice.
UM 072210 Auto Sentry® Petro User Manual Version 3.0 March 5, 2012
Innovative Control Systems, Inc.1349 Jacobsburg RoadWind Gap, PA 18091www.icscarwashsystems.com610-881-8000610-881-8100 - [email protected]
92 Copyright © Innovative Control Systems March 5, 2012


