User Manual WebAccess + IMM Network Series -...
42
User Manual WebAccess + IMM Network Series Advantech Intelligent Services Digital Signage Management System (Network Version)
Transcript of User Manual WebAccess + IMM Network Series -...

User Manual
WebAccess + IMM Network Series
Advantech Intelligent Services Digital Signage Management System (Network Version)

CopyrightThe documentation and the software included with this product are copyrighted 2014by Advantech Co., Ltd. All rights are reserved. Advantech Co., Ltd. also reserves theright to improve the products described in this manual at any time without notice. Nopart of this manual may be reproduced, copied, translated, or transmitted in any formor by any means without the prior written permission of Advantech Co., Ltd. Theinformation provided in this manual is intended to be accurate and reliable. However,Advantech Co., Ltd. assumes no responsibility for its use, nor for any infringementson the rights of third parties that may result from its use.
AcknowledgementsIntel and Pentium are trademarks of Intel Corporation.
Microsoft Windows and MS-DOS are registered trademarks of Microsoft Corp.
All other product names or trademarks are the property of their respective owners.
Product Warranty (2 years)Advantech warrants the original purchaser that all its products will be free fromdefects in materials and workmanship for two years from the date of purchase.
This warranty does not apply to products that have been repaired or altered by per-sons other than the repair personnel authorized by Advantech, or products that havebeen subject to misuse, abuse, accident, or improper installation. Advantechassumes no liability under the terms of this warranty as a consequence of suchevents.
Because of Advantech’s high quality-control standards and rigorous testing, mostcustomers never need to use our repair service. However, if an Advantech product isdefective, it will be repaired or replaced at no charge during the warranty period. Forout-of-warranty repairs, customers are billed according to the cost of replacementmaterials, service time, and freight. Please consult your dealer for more details.
If you suspect your product to be defective, please follow the steps listed below.
1. Collect all information about the problem encountered. (For example, CPU speed, Advantech products used, other hardware and software used.) Note anything abnormal and list all onscreen messages received when the problem occurs.
2. Call your dealer and describe the problem. Please have your manual, product, and relevant information readily available.
3. If your product is diagnosed as defective, obtain an RMA (return merchandize authorization) number from your dealer. This enables us to process your return more quickly.
4. Carefully pack the defective product, a completed Repair and Replacement Order Card, and proof of the purchase date (such as a a photocopy of your sales receipt) in a shippable container. Products returned without proof of pur-chase date are not eligible for our warranty service.
5. Write the RMA number clearly on the outside of the package, and ship the prod-uct prepaid to your dealer.
Part No. 2008PNWM50 Edition 1
Printed in Taiwan December 2014
WebAccess + IMM Network Series User Manual ii

Declaration of Conformity
CE
This product has passed the CE test for environmental specifications when shieldedcables are used for external wiring. We recommend the use of shielded cables. Thistype of cable is available from Advantech. Please contact your local supplier forordering information.
CE
This product has passed the CE test for environmental specifications. Test conditionsfor passing included the equipment being operated in an industrial enclosure. To pro-tect the product from damage resulting from electrostatic discharge (ESD) or electro-magnetic interference (EMI) leakage, we strongly recommend using CE-compliantindustrial enclosure products.
FCC Class B
This equipment has been tested and found to comply with the limits for a Class B dig-ital device, pursuant to part 15 of the FCC regulations. These limits are designed toprovide reasonable protection from harmful interference in residential installations.This equipment generates, uses, and can radiate radio frequency energy and, if notinstalled and used in accordance with the instructions, may cause harmful interfer-ence to radio communications. There is no guarantee that interference will not occurin specific installations. If this equipment does cause harmful interference to radio ortelevision reception, which can be determined by turning the equipment off and on,users should attempt to correct the interference using one or more of the followingmeasures:
Reorient or relocate the receiving antenna. Increase the distance between the equipment and receiver. Ensure that the equipment is connected to an outlet on a circuit that differs from
that to which the receiver is connected. Consult the dealer or an experienced radio/TV technician for assistance.
Technical Support and Assistance1. Visit the Advantech website at http://support.advantech.com to obtain the latest
product information.2. Contact your distributor, sales representative, or Advantech's customer service
center for technical support if you require additional assistance. Please have the following information ready before calling:– Product name and serial number– Description of your peripheral attachments– Description of your software (operating system, version, application software,
etc.)– A complete description of the problem– The exact wording of any error messages
iii WebAccess + IMM Network Series User Manual

Safety Instructions1. Read these safety instructions carefully.2. Retain this user manual for future reference.3. Disconnect the equipment from AC outlets before cleaning. Do not use liquid or
spray detergents for cleaning. Instead, use a damp cloth.4. For pluggable equipment, the power outlet must be located near the equipment
and easily accessible.5. Protect this equipment from humidity.6. Place this equipment on a reliable surface during installation. Dropping or letting
it fall may cause damage.7. The openings on the enclosure are for air convection to protect the equipment
from overheating. Do not cover these openings.8. Ensure the power voltage is correct before connecting the equipment to a power
outlet.9. Position the power cord so that people cannot step on it. Do not place anything
over the power cord.10. All cautions and warnings on the equipment should be heeded.11. If not used for a long time, disconnect the equipment from the power source to
prevent damage from transient overvoltage.12. Never pour liquid into the openings. This can cause fire or electrical shock.13. Never open the equipment. For safety reasons, the equipment should only be
opened by qualified service personnel.14. If one of the following situations occurs, have the equipment checked by service
personnel:The power cord or plug is damaged.Liquid has penetrated the equipment.The equipment is exposed to moisture.The equipment is malfunctioning or does not operate according to the user
manual.The equipment has been dropped and damaged.The equipment shows obvious signs of breakage.
15. Do not store this equipment in an environment where the storage temperature fluctuates below -20 °C (-4 °F) or above 60 °C (140 °F) as this may damage the equipment. The device should be stored in a controlled environment.
16. The battery is at risk of exploding if incorrectly replaced or installed. Replace only with the same or equivalent type, as recommended by the manufacturer. Discard used batteries according to the manufacturer’s instructions.
The sound pressure level at the operator position should not exceed 70 dB (A), asper the IEC 704-1:1982 specifications.
DISCLAIMER: These instructions are provided according to IEC 704-1. Advantechdisclaims all responsibility for the accuracy of any statements contained herein.
WebAccess + IMM Network Series User Manual iv

Safety Precautions - Static ElectricityFollow these simple precautions to protect yourself from harm and the products fromdamage.
To avoid electrical shock, always disconnect the power from the PC chassis before manual handling. Do not touch components on the CPU card or other cards when the PC is on.
Disconnect the power before implementing configuration changes. The sudden rush of power when connecting a jumper or installing a card can damage sensi-tive electronic components.
v WebAccess + IMM Network Series User Manual

WebAccess + IMM Network Series User Manual vi

Contents
Chapter 1 Preface..................................................11.1 Software Applications and Background .................................................... 21.2 Precautions ............................................................................................... 21.3 Product Description................................................................................... 3
Chapter 2 Operation Description.........................52.1 System Login ............................................................................................ 62.2 Program Management .............................................................................. 72.3 Schedule Management ........................................................................... 102.4 Media Management ................................................................................ 132.5 System Management .............................................................................. 172.6 Program Dispatch ................................................................................... 212.7 Data Backup and Recovery .................................................................... 232.8 System Logout ........................................................................................ 25
Chapter 3 Sample Demonstration .....................273.1 Setup Flow .............................................................................................. 283.2 Media Management ................................................................................ 283.3 Program Editing ...................................................................................... 293.4 Material Selection.................................................................................... 303.5 Schedule Editing ..................................................................................... 32
vii WebAccess + IMM Network Series User Manual

WebAccess + IMM Network Series User Manual viii

Chapter 1
1 PrefaceSoftware Applications andBackground
Precautions
Product Description

1.1 Software Applications and BackgroundThank you for purchasing WebAccess + IMM Network Series (hereafter referred toas this software). This software provides the system platform of a digital signagemanagement network designed for Advantech’s intelligent industrial computers.
The software features a client-server architecture, where program editing and sched-uling are conducted on the server side and data is transmitted to the client side overthe Internet. The programs are then played on the client side.
1.2 Precautions1. This software can only be used on Advantech platforms or with systems certified
by Advantech. For problems resulting from use with non-Advantech platforms or systems, we do not provide technical support. (The figure below shows the error message presented when the software is operated on non-Advantech platforms and systems)
2. This software should be used in combination with third-party software, such as a video decoder, to completely display the edited screen. Please refer to the Installation Guide for further details.
3. For the operating system, we recommend using Windows Embedded Stan-dards, which have been tested on this platform.
4. The Windows taskbar is automatically hidden when the software is running and displayed when the program is exited. If not automatically displayed, users can select “Show TaskBar” to display the taskbar.
5. For the data directory, auto run, and hide taskbar (as shown in the figure below) settings, please refer to the WebAccess + IMM Network Installation Guide.
WebAccess + IMM Network Series User Manual 2

Chapter 1
Preface
1.3 Product Description1. WebAccess + IMM Network Server is installed on the server side and used to
conduct program editing, scheduling, and dispatching, as well as the remote management of all devices installed with WebAccess + IMM Network Client.
2. WebAccess + IMM Network Client is installed on the client side and used to receive and operate programs dispatched by the server.
3 WebAccess + IMM Network Series User Manual

WebAccess + IMM Network Series User Manual 4

Chapter 2
2 Operation DescriptionSystem LoginProgram Management
Schedule Management
Media Management
System Management
Program Dispatch
Data Backup and Recovery
System Logout

2.1 System Login
This software is a web-based system. Please open Internet Explorer and inputthe URL http://127.0.0.1/psn/ to begin using the software.
* We recommend using Internet Explorer version 8 or above.
* External connection: http://SERVER IP/psn/
* In the above screenshot, the software version is displayed along the bottom.
Select Language: English, Traditional Chinese, Simplified Chinese (This refers to the language of the operation interface, not the OS).
Default User Name and Password: admin (case sensitive).
WebAccess + IMM Network Series User Manual 6

Chapter 2
Operation
Description
2.2 Program Management
The “Program” window options allow users to configure the digital signage layout andcontent. Users can view all programs as well as edit, add, and delete programsthrough the “Program Management” function.
Function Description:
[New]: Add a new program. Access the program editing page. [Copy]: Copy programs.The name of copied files will contain “Copy”. [Remove]: Delete programs <<Files cannot be restored once deleted.>>
7 WebAccess + IMM Network Series User Manual

A. Playback formats supported:
[Image], [Video], [Versatile], [Scrolling], [Web], [FLASH], [PPT], [Time], [TV] and [Bulletin Board].
B. Edit screen display:
Set the editing screen display based on the resolution or by zooming in/out.
Three zoom options are provided.
C. Set the block size and position:
Select a block to edit from the dropdown list. Enter X and Y coordinate values to precisely position the block. Input width and height values to set the screen or block size.
D. Save and exit:
Clicking “Close” will exit the program without saving changes.
E. Set program name (required):
Select “Program” from the dropdown list in Area C and input a program name. The background image and music can also be set from this screen.
WebAccess + IMM Network Series User Manual 8

Chapter 2
Operation
Description
F. Quickly adjust block position and size:
Select a play type in Area A to display all blocks of this type on the edit page. Drag blocks to move them. Grab and drag the lower right corner of a block using the mouse to adjust the size. The block position and size can also be finely adjusted by inputting specific X and Y coordinates and width and height values (*Note 1).
G. Edit playlist:
Select a block and click the pencil icon to edit a playlist. Select a media file to add to the list (*Note 2).
Note 1 This software supports multiple display outputs. Click the “New Monitor” option on the “Program Edit” page to add a new screen.
Note 2 When editing a playlist, media files can be directly uploaded and syn-chronized to the “Media Management” database.
The “Media Management” window options allow users to upload and manage program materials. We recommend uploading program materi-als before editing programs. For additional information, see Section 2.4 “Media Management”.
9 WebAccess + IMM Network Series User Manual

2.3 Schedule Management
Programs are scheduled by time, day, week, and month. Users should create a sin-gle day schedule before creating a overall weekly or month schedule.
A. Create a new daily schedule
[New]: Add a new daily program schedule. Existing programs are displayed for userselection.[Copy]: Copy a schedule. Select the item to be copied and click “Copy”. [Remove]: Delete a schedule. Select the item to be deleted and click “Remove”.
WebAccess + IMM Network Series User Manual 10

Chapter 2
Operation
Description
B. Edit the daily schedule
B-1 Set the program start and end time
To edit a program, drag the program into the area marked as B-1. Move the twoboundaries of a program block in the time axis to adjust the length/play duration ofthe program. When the mouse cursor is hovered over a program in the time axis, a
trash icon will appear. Click the trash icon to delete the program.
B-2 Fine tune the program start and end time
After moving the program block into the time axis, input a start and end time (lowestunit value = minute).
B-3 Enter a title for the daily schedule (required)
Users must enter a title/name before saving a schedule.
B-4 Menu bar
[Save & Exit]: Save the schedule and exit the editing page.
[Save]: Save the schedule and continue editing.
[Close]: Close the page without saving and return to the previous page.
11 WebAccess + IMM Network Series User Manual

C. Overall schedule
[New]: Create a new overall schedule including the daily schedule.
[Copy]: Select the schedule to be copied and click “Copy”.
[Remove]: Select the schedule to remove and click “Remove”.
D. Edit the overall schedule
D-1 Enter a title for the overall schedule (required)
Users must enter a title/name before saving the overall schedule.
D-2 Items per page and sorting
Users can set the number of schedules displayed on each page and the sortingsequence.
D-3 Default program schedule
Users can set the default program to be played when no program schedule is set.
D-4 Edit the weekly and monthly program schedule
Drag the program into a calendar cell. Move the two boundaries of the blue block toadjust the time/ play duration of the program. Right click the blank area of a calendarcell to delete, copy, or paste a program.
WebAccess + IMM Network Series User Manual 12
Chapter 2
Operation
Description
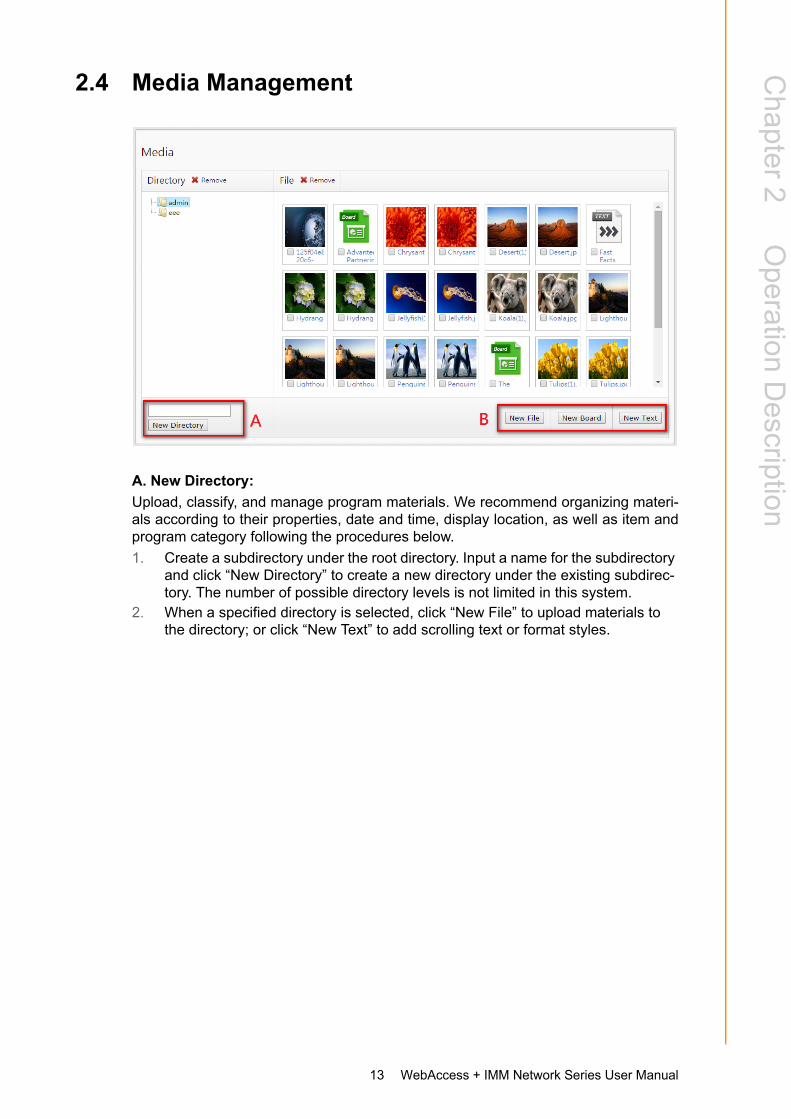
2.4 Media Management
A. New Directory:
Upload, classify, and manage program materials. We recommend organizing materi-als according to their properties, date and time, display location, as well as item andprogram category following the procedures below.
1. Create a subdirectory under the root directory. Input a name for the subdirectory and click “New Directory” to create a new directory under the existing subdirec-tory. The number of possible directory levels is not limited in this system.
2. When a specified directory is selected, click “New File” to upload materials to the directory; or click “New Text” to add scrolling text or format styles.
13 WebAccess + IMM Network Series User Manual

B-1 New File:
Click “New” to access the window shown in the first image below. Click “New” againto upload files (all files should be stored locally on the computer in accessible storagespace). When the uploading process is complete, the new media file can be added toa specified directory.
WebAccess + IMM Network Series User Manual 14

Chapter 2
Operation
Description
B-2 New Bulletin Board:
1. Save & Close: Close the page after saving all changes, or without saving. 2. Bulletin Title: Enter a name for the bulletin.3. Font Family: Select the font to be used for the bulletin from the dropdown list.4. Font Size: Set the font size.5. Background Color: Set the background color of the bulletin area. This can be
set to transparent, which will show any background images.6. Text Color: Set the text color.7. Content: Enter the content to be displayed on the bulletin board.
15 WebAccess + IMM Network Series User Manual

B-3 New Scrolling Text:
1. Save & Close: Close the page after saving all changes, or without saving. 2. Title: Enter a name for the scrolling text.3. Font Family: Select a font for the scrolling text from the options in the drop-
down list.4. Font Size: Set the font size.5. Background Color: Set the background color of the scrolling area. This can be
set to transparent, which will show the background image of the scrolling area.6. Text Color: Set the text color.7. Scrolling Speed: The default value is 50. The higher the value is, the faster the
text will scroll.8. Preview: Preview the result after selecting the font type, size, and text color.9. Content: Enter the content of the scrolling text.
WebAccess + IMM Network Series User Manual 16
Chapter 2
Operation
Description
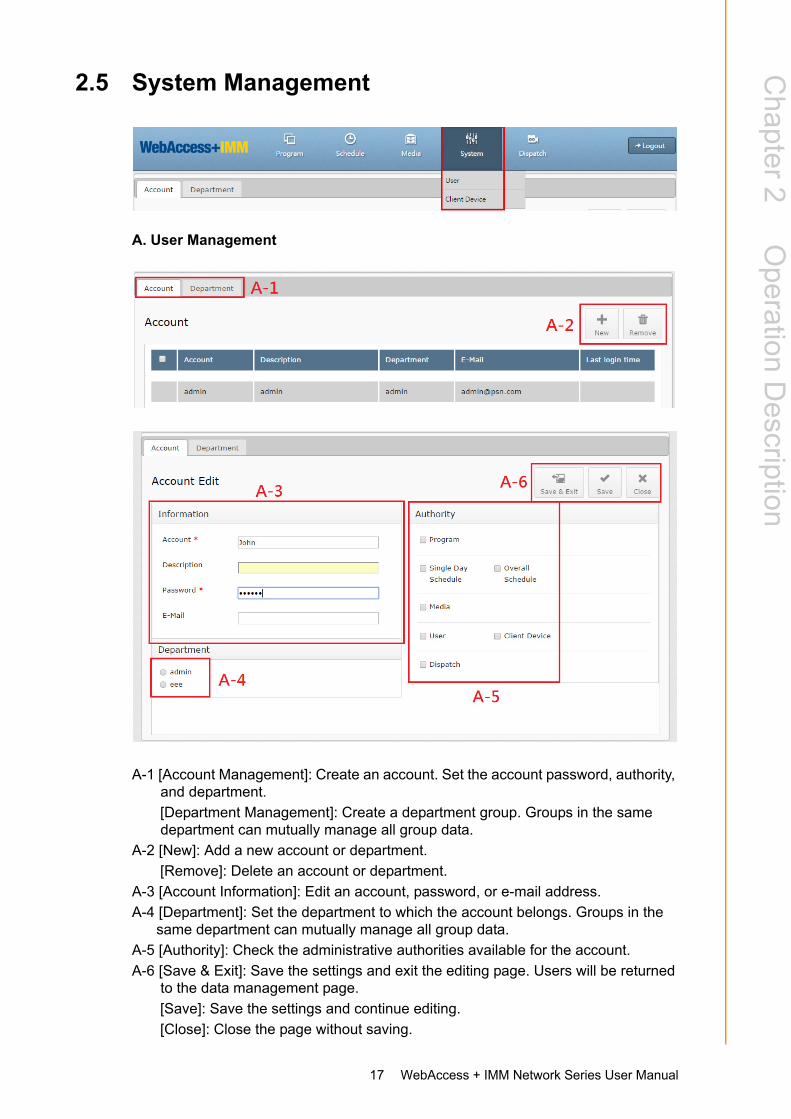
2.5 System Management
A. User Management
A-1 [Account Management]: Create an account. Set the account password, authority, and department.
[Department Management]: Create a department group. Groups in the same department can mutually manage all group data.
A-2 [New]: Add a new account or department.
[Remove]: Delete an account or department.
A-3 [Account Information]: Edit an account, password, or e-mail address.
A-4 [Department]: Set the department to which the account belongs. Groups in the same department can mutually manage all group data.
A-5 [Authority]: Check the administrative authorities available for the account.
A-6 [Save & Exit]: Save the settings and exit the editing page. Users will be returned to the data management page.
[Save]: Save the settings and continue editing.
[Close]: Close the page without saving.
17 WebAccess + IMM Network Series User Manual
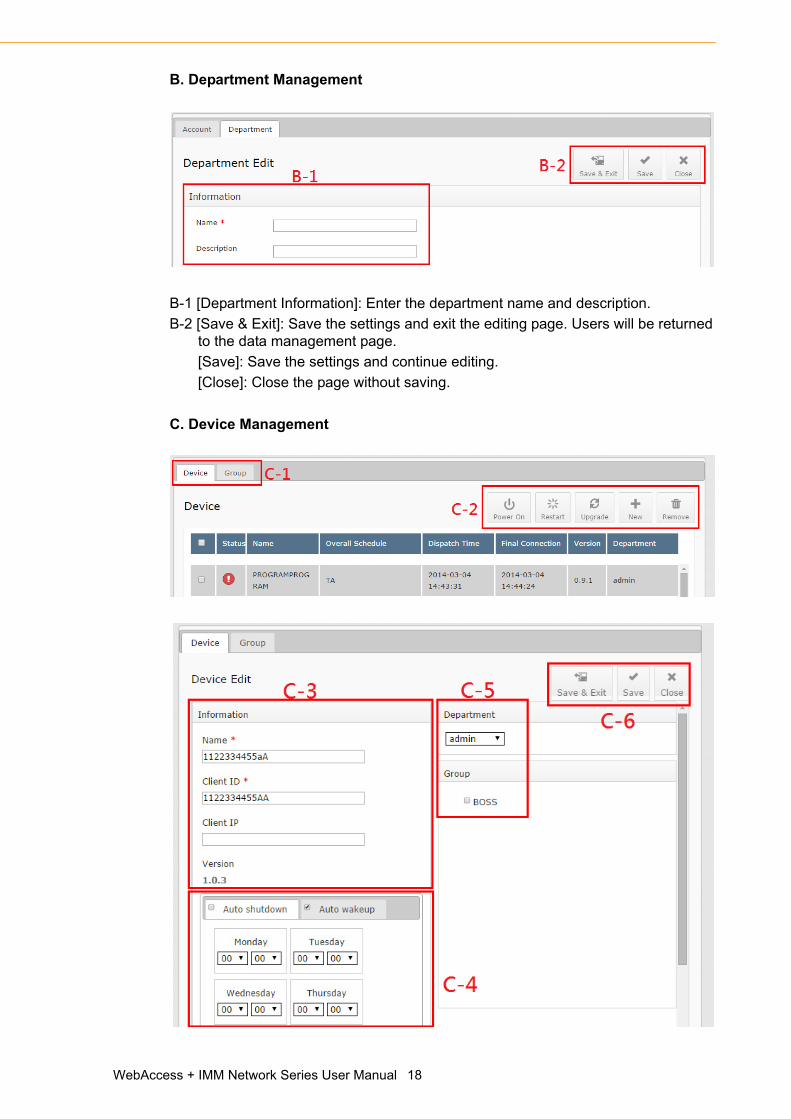
B. Department Management
B-1 [Department Information]: Enter the department name and description.
B-2 [Save & Exit]: Save the settings and exit the editing page. Users will be returned to the data management page.
[Save]: Save the settings and continue editing.
[Close]: Close the page without saving.
C. Device Management
WebAccess + IMM Network Series User Manual 18

Chapter 2
Operation
Description
C-1 [Device Management]: Display all client devices. Users can manage and add devices.
[Group Management]: Display devices in all groups. Users can organize devices according to department and manage the device classification.
C-2 [Power On]: Select a device to remotely power on (multi-selection is supported).
[Restart]: Select a device to remotely restart (multi-selection is supported).
[Upgrade]: Select a device to upgrade. Users can also set the playback software for remote upgrades (multi-selection is supported).
[New]: Add a new device.
[Remove]: Delete a device.
C-3 [Device Information]: Enter or edit a device name or Client ID, and view the software version.
C-4 [Auto Shutdown]: Set a specific time to automatically shut down the system.
C-5 [Department and Group]: Select a department and add a device to a certain group in the department (Regarding adding a new group, please refer to the section on “Group Management”).
C-6 [Save & Exit]: Save all settings and exit the editing page. Users will be returned to the device management.
[Save]: Save all settings and continue editing.
[Close]: Close the page without saving.
Click the device status icon to access the device information, as shown in the imagebelow. Users can view the device information, screenshot, as well as hardware andsoftware status.
19 WebAccess + IMM Network Series User Manual

D. Group Management
D-1 [Group Management]: Manage all existing departments and their groups.
D-2 [New Group]: Add a new group to a department.
D-3 [Add Device]: Select a device and click “Add” to add a new device to a group. Select the device and click “Remove” to remove a device from a group.
WebAccess + IMM Network Series User Manual 20

Chapter 2
Operation
Description
2.6 Program Dispatch
A. Dispatch Schedule
A-1 [Overall Schedule]: Select a schedule to dispatch.
[Start to dispatch]: Set the date and time for dispatch.
[Activation time]: Set the dispatched program to play immediately or at another specified time.
A-2 [Group]: Dispatch based on the group selection.
[Device]: Dispatch based on the device selection.
A-3 [Execute]: Click “Execute” after configuring all the settings on this page.
*Remarks: Schedule dispatch can be delayed by the network status. Users cancheck the dispatch status by selecting “Dispatch Status” from the dropdown list.
21 WebAccess + IMM Network Series User Manual

B. Dispatch Status
Select a department to check the dispatch status of a program.
C. History
Select a department and date to check the dispatch history.
WebAccess + IMM Network Series User Manual 22

Chapter 2
Operation
Description
2.7 Data Backup and Recovery
Access “Windows” -> “Start” -> “AIS” -> “WebAccess + IMM Network Server” -> andclick “Backup and Recover”.
23 WebAccess + IMM Network Series User Manual
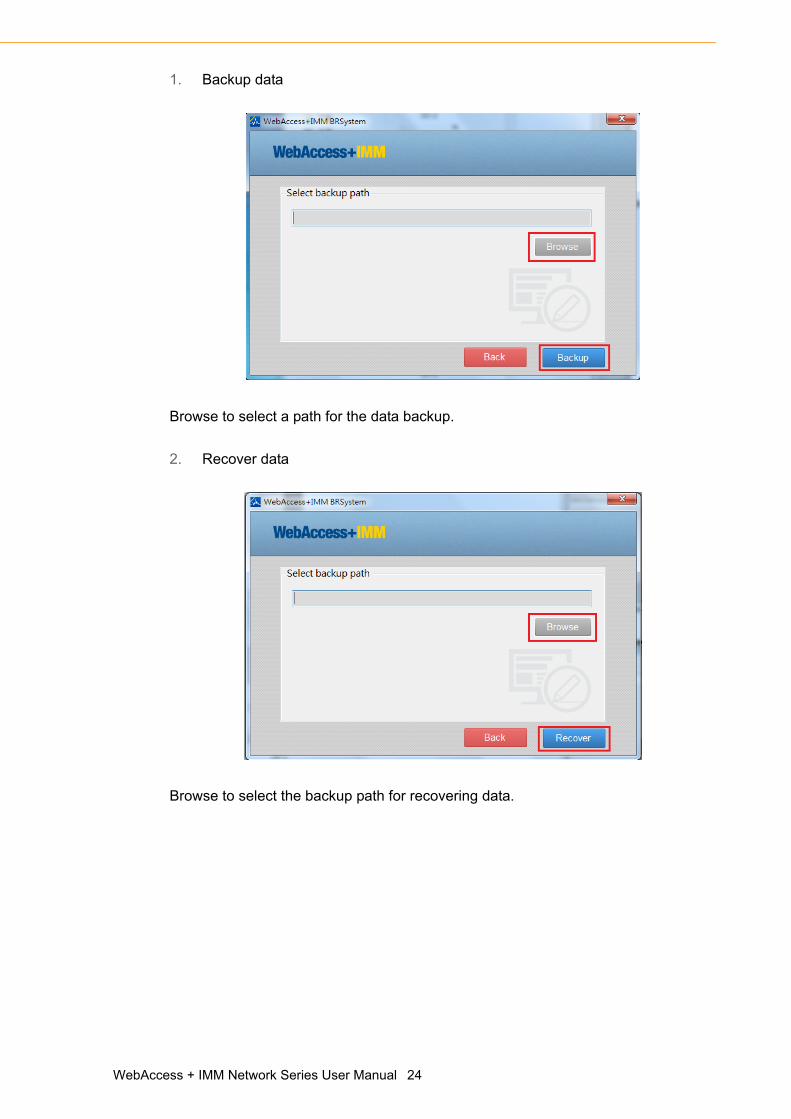
1. Backup data
Browse to select a path for the data backup.
2. Recover data
Browse to select the backup path for recovering data.
WebAccess + IMM Network Series User Manual 24

Chapter 2
Operation
Description
2.8 System Logout1. Logout: Click “Logout” to exit the software. The password must be entered to
access the software again.
2. Quit: Right click on the displayed program to select whether to quit.
*Remarks: When the system is on, the program is automatically played. To executeother functions in the background or within the OS, right click on the displayed pro-gram to exit the screen.
25 WebAccess + IMM Network Series User Manual

WebAccess + IMM Network Series User Manual 26

Chapter 3
3 Sample DemonstrationSetup FlowMedia Management
Program Editing
Material Selection
Schedule Editing

3.1 Setup Flow1. Media Management -> Upload materials2. Program Management -> New -> Adjust the screen height and width -> Enter a
“Program Name” -> Configure the “Background Image and Program Layout” -> “Save”
3. Schedule Management -> Create a new single-day schedule and apply the overall schedule
4. System Management -> Add a device5. Dispatch -> Dispatch the schedule to a specific device
3.2 Media Management
Create a directory and upload materials (as shown in the above figure)
WebAccess + IMM Network Series User Manual 28

Chapter 3
Sam
pleD
emonstration
3.3 Program Editing1. Select the required materials, and the corresponding block will appear in the
edit area (Zone E).2. The block can be moved by dragging the lower right corner.3. The block size and X and Y coordinates are shown in Zone C.4. Select a block to delete or edit.
29 WebAccess + IMM Network Series User Manual

3.4 Material Selection1. Select a block to edit and click “Edit” in the “Block Setting” options to access the
window shown below. Next, select “Add File”.
2. After adding new files, the file properties can be set according to user prefer-ences (the effect depends on the material type).
3. After configuring the program, click “Save & Exit”.
WebAccess + IMM Network Series User Manual 30

Chapter 3
Sam
pleD
emonstration
Note 3 The “TV” function is only available when using a TV dongle.
1. Three input formats are supported, that is, “digital TV”, “analog cable” and “AV input”.
2. Select the TV signal source before selecting the channel.3. Save and exit.
31 WebAccess + IMM Network Series User Manual
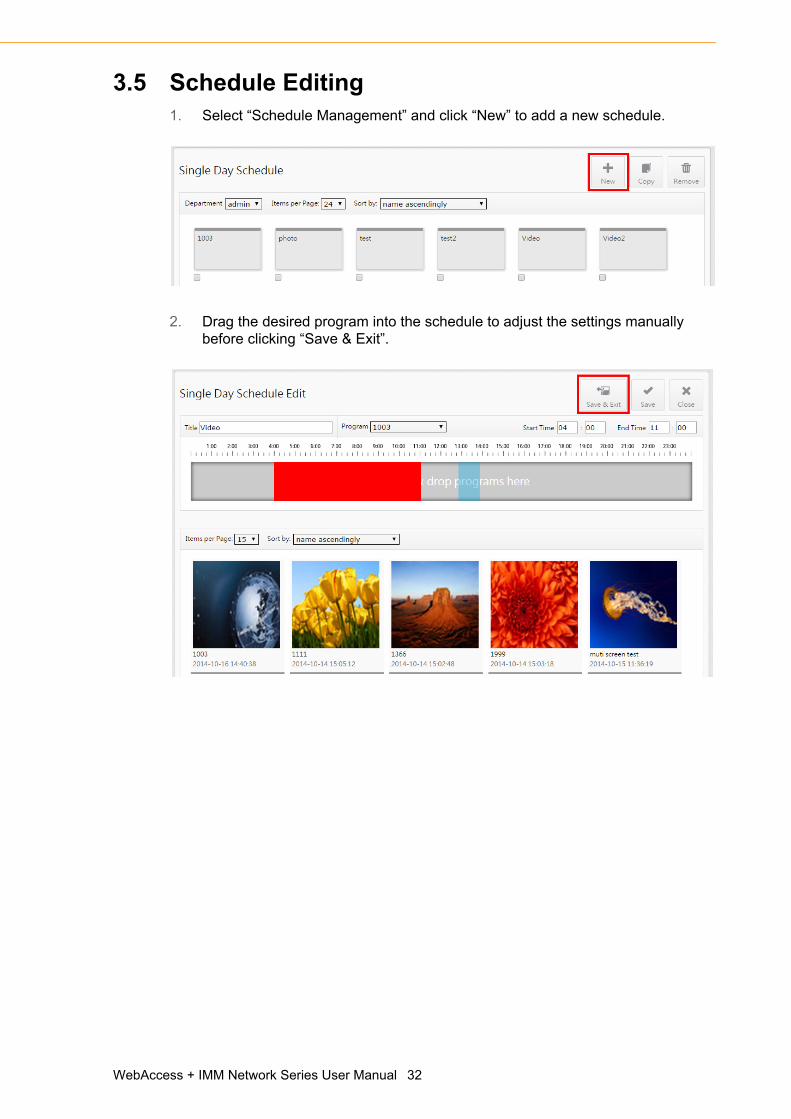
3.5 Schedule Editing1. Select “Schedule Management” and click “New” to add a new schedule.
2. Drag the desired program into the schedule to adjust the settings manually before clicking “Save & Exit”.
WebAccess + IMM Network Series User Manual 32

Chapter 3
Sam
pleD
emonstration
3. Apply a single-day schedule to the overall schedule.
4. Dispatch a schedule to a specific device.
33 WebAccess + IMM Network Series User Manual

www.advantech.comPlease verify specifications before quoting. This guide is intended for referencepurposes only.All product specifications are subject to change without notice.No part of this publication may be reproduced in any form or by any means,such as electronically, by photocopying, recording, or otherwise, without priorwritten permission from the publisher.All brand and product names are trademarks or registered trademarks of theirrespective companies.© Advantech Co., Ltd. 2014