
User Manual - UCL Institute of Education user manual.pdf · EPPI –Reviewer 4.7 User Manual ......
143
EPPI-Reviewer 4 Software for research synthesis User Manual
Transcript of User Manual - UCL Institute of Education user manual.pdf · EPPI –Reviewer 4.7 User Manual ......

EPPI-Reviewer 4 Software for research synthesis
User Manual

EPPI-Reviewer 4: Software for research synthesis
2
This page is blank

EPPI-Reviewer 4: Software for research synthesis
3
Table of Contents EPPI –Reviewer 4.7 User Manual ...................................................................................................................................... 8
Description and background ......................................................................................................................................... 8
System and internet requirement ................................................................................................................................ 8
About the User Manual ................................................................................................................................................. 8
Easy introduction .............................................................................................................................................................. 9
Functionality ................................................................................................................................................................... 13
Systematic review ....................................................................................................................................................... 13
Functions ..................................................................................................................................................................... 13
Reference management .......................................................................................................................................... 13
Study classification and data extraction ................................................................................................................. 14
Synthesis ................................................................................................................................................................. 14
Review Management .............................................................................................................................................. 14
Accessing EPPI-Reviewer 4 .............................................................................................................................................. 15
Selecting your review .................................................................................................................................................. 15
Review home screen ................................................................................................................................................... 16
Creating a new review ................................................................................................................................................ 16
Changing reviews ........................................................................................................................................................ 16
Access for Cochrane Authors .......................................................................................................................................... 16
Logging on with Archie credentials for the first time ................................................................................................. 17
Logging on with Archie credentials (after the first time) ............................................................................................ 20
Working with Archie reviews ...................................................................................................................................... 21
Bringing references into your review.............................................................................................................................. 22
Importing text file search results ................................................................................................................................ 22
Importing directly from external databases ............................................................................................................... 23
Manually adding references ....................................................................................................................................... 23
Uploading full text documents .................................................................................................................................... 23
Extracting references from uploaded documents ...................................................................................................... 25
Managing your search sources ....................................................................................................................................... 26
Deleting a search source ............................................................................................................................................. 26
Managing your documents ............................................................................................................................................. 27
I, E and D flags ............................................................................................................................................................. 28
Changing an items Include / Exclude / Delete flag ................................................................................................. 29
Creating reference lists ............................................................................................................................................... 30
Exporting documents .................................................................................................................................................. 31

EPPI-Reviewer 4: Software for research synthesis
4
Managing duplicate documents ..................................................................................................................................... 31
Manually adding a duplicate ....................................................................................................................................... 34
Overlapping duplicate groups ..................................................................................................................................... 36
Create a new duplicate group ..................................................................................................................................... 38
Resetting the duplicate checking ................................................................................................................................ 39
Managing linked records ................................................................................................................................................. 40
Setting up the screening / coding tools .......................................................................................................................... 41
Moving Codesets and Codes ....................................................................................................................................... 44
Copying and pasting codes ......................................................................................................................................... 45
Copying codesets across and within reviews .............................................................................................................. 47
Coding references or documents .................................................................................................................................... 48
Screening references .................................................................................................................................................. 48
Applying codes to a reference or document .............................................................................................................. 48
Auto advance and Hotkeys ..................................................................................................................................... 49
Adding text to a coded response ............................................................................................................................ 50
Coding complete vs. coding not complete .................................................................................................................. 51
Normal vs. Comparison data entry (formally single vs. multiple) .................................................................................. 52
Changing between normal and comparison data entry ............................................................................................. 52
Changing from normal data entry to comparison data entry ................................................................................. 53
Changing from Comparison data entry to Normal data entry ................................................................................ 54
Allocating references for coding ..................................................................................................................................... 56
Random allocation ...................................................................................................................................................... 56
Setting up coding allocations ...................................................................................................................................... 57
Allocating items for double/multiple coding .............................................................................................................. 58
Coding by allocated references ................................................................................................................................... 58
Comparison and reconciling of Comparison coded items .......................................................................................... 59
Dealing with agreements ........................................................................................................................................ 62
Dealing with disagreements.................................................................................................................................... 63
Coding only interface ...................................................................................................................................................... 68
Screening tab .................................................................................................................................................................. 71
Screening tab layout ................................................................................................................................................... 71
Setting up for Random screening ............................................................................................................................... 72
Setting up for Priority Screening ................................................................................................................................. 74
Grouping items................................................................................................................................................................ 77
Analysis of your data ....................................................................................................................................................... 77

EPPI-Reviewer 4: Software for research synthesis
5
Searching ..................................................................................................................................................................... 77
Code set searching .................................................................................................................................................. 78
Code searching ........................................................................................................................................................ 78
Freetext searching ................................................................................................................................................... 78
Frequency reports ....................................................................................................................................................... 79
Crosstab reports .......................................................................................................................................................... 79
Coding reports............................................................................................................................................................. 80
Configurable Reports .................................................................................................................................................. 81
Creating a Risk of Bias report .................................................................................................................................. 84
Creating a report that best displays your data ....................................................................................................... 87
Meta-analysis .................................................................................................................................................................. 92
Setting up a meta-analysis in EPPI-Reviewer .................................................................................................................. 94
Planning....................................................................................................................................................................... 94
Stage 1: Setting up the coding tool ............................................................................................................................. 94
Summary of EPPI-Reviewer code types .................................................................................................................. 96
Study codes ............................................................................................................................................................. 96
Intervention / Outcome / Comparison codes ......................................................................................................... 96
Outcome classification codes .................................................................................................................................. 96
Stage 2: Entering outcome data ................................................................................................................................. 96
Stage 3: Setting up your data and choosing studies for inclusion .............................................................................. 98
Running meta-analyses in EPPI-Reviewer ............................................................................................................... 98
Setting up your meta-analysis..................................................................................................................................... 99
How to use the functionality available in the meta-analysis table ....................................................................... 101
How the Intervention / Outcome / Comparison and Outcome Classification codes can be used ....................... 102
How you can use generic study-level codes to organise outcomes in your meta-analysis .................................. 103
Stage 4 – specifying the data type ........................................................................................................................ 104
Stage 5 – specifying the model type ..................................................................................................................... 105
Stage 6 – specifying additional modifications, model output, and publication bias options ............................... 107
Stage 7 – Choosing forest plot options ................................................................................................................. 109
Stage 8 – Interpreting and exporting output ........................................................................................................ 109
Stage 9 - Subgroup analysis................................................................................................................................... 109
Meta-analysis training............................................................................................................................................... 111
Text Mining ................................................................................................................................................................... 111
Using text mining ...................................................................................................................................................... 113
Auto-Coding or Clustering ............................................................................................................................................. 115

EPPI-Reviewer 4: Software for research synthesis
6
Translations – Title and Abstract .................................................................................................................................. 116
Key term highlighting .................................................................................................................................................... 117
Line-by-line PDF / Inductive coding .............................................................................................................................. 118
Coding textual data ................................................................................................................................................... 118
PDF documents ......................................................................................................................................................... 119
Annotations ........................................................................................................................................................... 120
Reset ..................................................................................................................................................................... 121
Other types of documents ........................................................................................................................................ 121
Inductive coding reports ........................................................................................................................................... 122
Creating conceptual diagrams .................................................................................................................................. 123
Diagrams ....................................................................................................................................................................... 124
Expiration of user accounts and shareable reviews ..................................................................................................... 125
Appendix A: Example review ........................................................................................................................................ 127
Layout of a systematic review in EPPI-Reviewer 4 ................................................................................................... 127

EPPI-Reviewer 4: Software for research synthesis
7
This page is blank

EPPI-Reviewer 4: Software for research synthesis
8 EPPI –Reviewer 4.7 User Manual
EPPI –Reviewer 4.7 User Manual
Description and background EPPI-Reviewer 4 is a multi-user web-based application for managing and analyzing data for use in research synthesis.
System and internet requirement The only requirement is that the computer must be able to run Silverlight 5 and be connected to the internet.
For optimum performance we would suggest:
Computer: PC or Mac
Silverlight 5+
Minimum OS: Windows XP or Mac OS 10.4
Minimum browser: Internet Explorer 8+ ; Firefox 3+; Safari (Mac only)
Broadband internet connection: > 1Mb/sec
About the User Manual The user manual provides instructions on how to use EPPI-Reviewer 4 and leads you through the most commonly
used functions in the software.
Version: 4.7.0.0
Last update: September 05, 2017.
For details of changes introduced to the manual and software please see the Forum announcements on the EPPI-
Reviewer 4 gateway (http://eppi.ioe.ac.uk/cms/er4). Each time the software is updated details of the update are
listed there.
EPPI-Reviewer 4: Software for research synthesis
9 Easy introduction
Easy introduction This is an easy introduction to EPPI-Reviewer 4. In this example you will:
1. Login and create a review
2. Import some references from PubMed.
3. Create a coding tool
4. Code some documents
5. Run a frequency report
1. Go to the login page at http://eppi.ioe.ac.uk/eppireviewer4/, enter your username and password and click
Login. If this is the first time you have used EPPI-Reviewer 4 you may see the Create New Review window. If so,
enter a name in the box and click on New Review. If a review is already present then you can click Go next to the
review name.
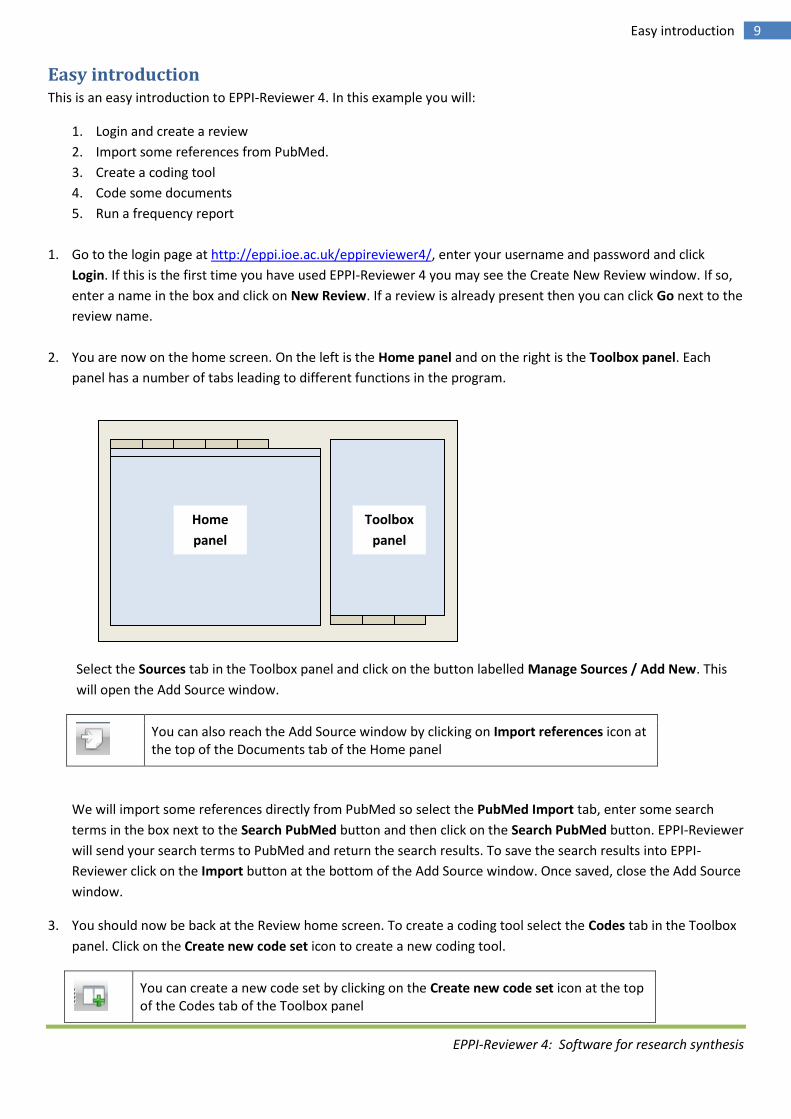
2. You are now on the home screen. On the left is the Home panel and on the right is the Toolbox panel. Each
panel has a number of tabs leading to different functions in the program.
Select the Sources tab in the Toolbox panel and click on the button labelled Manage Sources / Add New. This
will open the Add Source window.
You can also reach the Add Source window by clicking on Import references icon at the top of the Documents tab of the Home panel
We will import some references directly from PubMed so select the PubMed Import tab, enter some search
terms in the box next to the Search PubMed button and then click on the Search PubMed button. EPPI-Reviewer
will send your search terms to PubMed and return the search results. To save the search results into EPPI-
Reviewer click on the Import button at the bottom of the Add Source window. Once saved, close the Add Source
window.
3. You should now be back at the Review home screen. To create a coding tool select the Codes tab in the Toolbox
panel. Click on the Create new code set icon to create a new coding tool.
You can create a new code set by clicking on the Create new code set icon at the top of the Codes tab of the Toolbox panel
Toolbox
panel
Home
panel

EPPI-Reviewer 4: Software for research synthesis
10 Easy introduction
A window will appear where you should select a CodeSet Type. For this example select Screening. Next, enter a
name for your codeset, such as ‘Screening criteria’, for the coding tool.
Click Save and the new tool will appear in the Codes tab. A code set contains a set of codes. To add codes to the
code set, right click the new code and select the option Add child code to add a code to the code set. This will
open the Add / edit code window.
In the window enter a name for one of your codes, such as ‘Exclude on date’ or ‘Include based on title and
abstract’, the codetype depending on whether it is an include or exclude code and click on Save. Do the same
for a few more child nodes to create a number of codes to apply to your references. Your code set may look
similar to this when finished.

EPPI-Reviewer 4: Software for research synthesis
11 Easy introduction
4. The items that you had previously imported for PubMed are displayed in the Documents tab of the Home panel.
To apply your new codes to the references click on Go for the first reference in the Documents tab of the Home
panel. This will open up the Document details window where the reference is displayed on the right side of the
screen and the coding tools is displayed on the left hand side. Expand your new code set to reveal the individual
codes and apply the codes for each reference. Coding a document means clicking in the checkboxes to assign a
particular code to that reference. The program automatically saves your selection when you select a check box.
Move through the references using the Next and Previous buttons until a number of references have been
coded and then close the Documents details window.
5. Now that the references have been coded you can run a frequency report on the results. Select the Frequencies
tab of the Home panel. Select the code set you wish to run the frequency report against and then click on Get
frequencies. The frequencies will be displayed based on your coding along with access to the references.

EPPI-Reviewer 4: Software for research synthesis
12 Easy introduction
Now that you have started, try out many of the other functions and consult the user manual for further details.

EPPI-Reviewer 4: Software for research synthesis
13 Functionality
Functionality EPPI-Reviewer 4 is the EPPI-Centre's comprehensive online software tool for research synthesis. It is a web-based
software program for managing and analysing data in literature review and has been developed for all types of
systematic review such as meta-analysis, framework synthesis and thematic synthesis.
Systematic review EPPI-Reviewer 4 has the functionality to help manage your systematic review through all stages of the process from
bibliographic management, screening, coding and right through to synthesis.
It manages references, stores PDF files, facilitates qualitative and quantitative analyses and allows easy export of
review data to enable use with other software programmes.
The software allows multiple concurrent users to access the system and being web-based allows members of a
review group to be located in different geographic locations.
EPPI-Reviewer 4 supports many different analytic functions for synthesis including meta-analysis, empirical synthesis
and qualitative thematic synthesis. It allows you to present your data in summary diagrams and customisable
reports.
Recent additions to the software include text mining, data clustering, classification and term extraction which are
leading to new possibilities in the field of systematic reviewing.
Functions Its many functions include:
Reference management
Managing the thousands of references that often result from comprehensive searches of electronic
databases
Importing references in a wide variety of 'tagged' formats

EPPI-Reviewer 4: Software for research synthesis
14 Functionality
Duplicate checking using 'fuzzy logic'. (Potential duplicates can be checked manually and / or automatically
classified as duplicates, depending on how similar they are.)
Document storage: store the original document file (such as pdf, doc etc) along with the study record.
'Linked documents': the 'unit of analysis' in a systematic review is usually the study, but there are often
multiple publications originating from the same study; ER4 helps reviewers to use the correct 'unit'.
Direct access to PubMed through web services. EPPI-Reviewer 4.0 makes use of this capability to allow direct
searching and search result data transfer from PubMed.
Study classification and data extraction
Flexible coding schemas for classifying studies:
o Inclusion / exclusion / eligibility criteria;
o Codes for descriptive 'mapping' of research activity.
o Codes to capture detailed information about a study.
Concurrent multi-user classification: multiple users can classify studies independently and then compare
their results; ER4 works throughout this process, producing summary discrepancy reports and an interface to
facilitate the process of agreeing final decisions.
Bulk application / removal of codes to selected studies
Calculation of common measures of effect (odds ratios, risk ratios, risk differences, standardized mean
differences, mean differences) from a variety of statistics (2 x 2 tables, means, standard deviations,
confidence intervals, p, t and r values).
Text mining: automatic term recognition and document clustering.
Synthesis
Running meta-analyses (fixed and random effects models); calculating I-squared and supporting sub-group
analyses using analog to the anova
A powerful search engine enabling users to search by categories and text and combine searches using
Boolean terms
Producing reports of categorical, numeric and textual data in a wide variety of formats from frequency
reports, crosstabs and full-text reports, to tabular summary reports and summary statistics of numeric data
Text mining functionality. Automatic document clustering, using text mining, is one way of describing the
range of studies you have identified at the click of a button. Text mining can assist with searching by
identifying significant terms in the documents you have already included.
Inductive coding functionality. This allows line by line coding of textual data and organising and structuring
these codes graphically into ‘conceptual relationship diagrams to display analytic and descriptive themes
found through inductive coding.
Fulltext reference searching using the uploaded pdfs.
Diagrams to summarise e.g. qualitative syntheses and theories of change for interventions.
Review Management
The ability to create an unlimited number of non-shareable reviews.
Allocation of classification tasks (e.g. screening / data extraction) to individual users.
Work progress reporting.
Individual reviewer permissions (forthcoming)
Review flow charts which update automatically (e.g. with counts of how many studies have been included /
excluded according to which criterion).
Easy export of review data to enable use with other software programmes and to enable long term
independent storage of data.

EPPI-Reviewer 4: Software for research synthesis
15 Accessing EPPI-Reviewer 4
Accessing EPPI-Reviewer 4 The login screen can be found at http://eppi.ioe.ac.uk/eppireviewer4/.
You need a Username and Password to access the program. Enter your Username and password in the textboxes
and then either hit the return key or click on the Login command button. If you see the message ‘Invalid Login. Try
again’ be sure you have entered your username and password correctly. The password is case sensitive.
If you have successfully logged in you will see all of the reviews that you have access to listed on the screen,
If you are not yet in a review the option to create a first non-shareable review is displayed. Enter a review name into
the textbox and click on New review. You will now see the Review home screen.
Selecting your review The reviews that you have access to are listed on the screen once you have logged in successfully. Find the review
you wish to work on in the list and click on the command button labelled Go next to the review name.
Clicking on Go loads the documents for your review. EPPI-Reviewer will preload much of the information needed for
working on your review during the ‘Loading documents’ stage so this step may take a few moments. Once this stage
is complete you should be on the review home screen for your review. The review home screen is the starting point
for many of the programs operations.

EPPI-Reviewer 4: Software for research synthesis
16 Access for Cochrane Authors
Review home screen The review home screen provides access to many of the functions in EPPI-Reviewer. It is divided into two tabbed
panels; the Home panel and the Toolbox panel.
The Home panel provides access to the references and many of the operations that you carry out on the references.
The Toolbox panel provides access to tools that prepare references for further operations.
Creating a new review The user can create an unlimited number of non-shareable reviews. A non-shareable review contains only one
reviewer; the person who set it up.
To create a new review click on the My info tab in the home panel. All existing reviews are listed in a table at the top
of the panel. Click on the command button labelled New review. A window will appear where the user can enter the
review name and select Save. The new review will now appear in the list of reviews.
To change the active review click on the command button labelled Go next to the review name. Click on the Go
button to the left of the review name to change the active review.
Changing reviews The user can change the active review through the My info tab in the Home panel. All existing reviews are listed at
the top of the panel. To change reviews click on the Go button next to the review you wish to change to.
Access for Cochrane Authors EPPI-Reviewer now includes an open-ended license for use in Cochrane reviews. Anyone registered as a Cochrane
author (i.e. anyone with a registered account on Cochrane - https://archie.cochrane.org/) can logon to EPPI-
Reviewer and gain almost unrestricted access to the software. As part of the Cochrane Author Support Tool (CAST -
http://tech.cochrane.org/our-work/cochrane-author-support-tool) program, Cochrane Authors can now use EPPI-
Reviewer, free of charge, for the following scenarios:
- Work on private non-shareable reviews.
- Work on reviews that are registered in Archie (provided that their Archie account has access to them and
that they are not checked out elsewhere).
- Work on prospective Archie reviews.
Toolbox
panel
Home
panel

EPPI-Reviewer 4: Software for research synthesis
17 Access for Cochrane Authors
The role of EPPI-Reviewer within the CAST program is to support the production of complex reviews, as well as
develop and evaluate new reviewing methodologies. This means that a review in EPPI-Reviewer can be marked as a
Prospective Cochrane review. This allows the reviewer to perform experimental/scoping/exploratory work in
preparation of what is expected to become a new Cochrane review. To mark a review as a Prospective Cochrane
review you will need to get in touch with us.
Licensing for non-Cochrane shared reviews remains unaffected. In such cases, both the review and the accounts
used to work on it will still need to be licensed individually.
Logging on with Archie credentials for the first time Please note that these instructions are for the first time that you logon to EPPI-Reviewer via Archie. For subsequent
logons the details are listed further down in this document.
The EPPI-Reviewer logon screen includes a link for Cochrane Authors. Click on the link click HERE to logon with your
Archie credentials to access the logon via Archie features
The following screen simply allows you to Logon via Archie. For this step to work, ‘Pop-up’ windows must be
enabled in your browser for EPPI-Reviewer. Your browser will show an alert in case a Pop-Up is blocked. Please use
the browser on-screen instructions to allow Pop-Ups, if needed.

EPPI-Reviewer 4: Software for research synthesis
18 Access for Cochrane Authors
The resulting Pop-Up will open a specific Archie page, please enter your Archie credentials.
After logging on, Archie will ask your specific permission to exchange data with EPPI-Reviewer on your behalf.

EPPI-Reviewer 4: Software for research synthesis
19 Access for Cochrane Authors
Clicking ‘Accept’ will close the window (some browsers may ask if that’s OK). If your Archie logon details were
entered correctly EPPI-Reviewer will show a new screen, allowing to decide how to use the verified Archie
credential. Two options are available: users may link their Archie identity to an existing EPPI-Reviewer account or
create a new one.
If you already have an EPPI-Reviewer account, please use the first option. It is best to only have one EPPI-Reviewer
account that is used for all of your EPPI-Reviewer activities.
Picking the first option ‘Link to an existing account’ will send you to an additional logon page. This page allows you to
certify your EPPI-Reviewer identity by logging on with your EPPI-Reviewer username and password.

EPPI-Reviewer 4: Software for research synthesis
20 Access for Cochrane Authors
If you do not have an EPPI-Reviewer account you can pick the second option and create a new account by filling the
form shown below.
After successfully completing this step your list of reviews will be displayed.
Logging on with Archie credentials (after the first time) These instructions apply once you have already linked your EPPI-Reviewer account with your Archie account. If this is
the first time you are logging into EPPI-Reviewer via Archie please see the instructions earlier in this document.
Once your EPPI-Reviewer and Archie accounts have been linked, logging on in the normal way (EPPI-Reviewer
credentials) or via Archie will yield the same results. Your lists of reviews will be loaded and shown. Archie accounts
will show two list of reviews: the ones that are exclusively held in EPPI-Reviewer, and the reviews available on
Archie.
Occasionally, in order to load the list of Archie reviews, EPPI-Reviewer will need to refresh your permissions to
exchange data with Archie, and will show the following window:

EPPI-Reviewer 4: Software for research synthesis
21 Access for Cochrane Authors
Clicking OK will allow you re-authenticate on Archie (same procedure shown above), clicking Cancel will prevent
EPPI-Reviewer from collecting the list of your Archie review. Therefore, in the latter case, you won’t be able to
access your Archie reviews from within EPPI-Reviewer. To solve this, reload the EPPI-Reviewer page and either log on
via Archie or click “OK” when the dialog above is shown again.
Working with Archie reviews Once logged on, two lists or reviews will be available, in two separate tabs. The “Archie Reviews” tab is shown
below:
Reviews that were never opened in EPPI-Reviewer will only show the “Check Out” button. Once a review has been
checked out by EPPI-Reviewer at least once, the “Open” button will appear. EPPI-Reviewer will use Archie to fetch
the list of reviews you have access to and will control the read-write access to each review based on its checked
in/out status. The following rules apply:
- A review checked out by EPPI-Reviewer allows Read and Write access.
- All other states, not checked out, or checked out from Archie by some other tool (RevMan, Covidence) will
be read-only in EPPI-Reviewer.
At the present time EPPI-Reviewer currently can’t exchange data with Archie, RevMan or the Cochrane Registry of
Studies (CRS), it only allows you to ‘Undo Check Out’. Development to allow checking in of review data back to
Archie/RevMan is in progress and will be available in future releases of EPPI-Reviewer. This documentation will be
updated once that functionality is available.
If a review is checked back in while other Authors are logged on and working in the review, within 30 seconds the
system will pick up the change (the review should now allow access only in Read-Only) and currently logged on users
will be automatically be logged out.

EPPI-Reviewer 4: Software for research synthesis
22 Bringing references into your review
Bringing references into your review There are a number of different ways to bring references into your review. You can carry out searches on external
databases and import the saved text file results into the program. For some external databases, such as PubMed you
access the database using EPPI-Reviewer and load your references directly into the software. You can also enter
references manually.
Importing text file search results When you carry out a search on an external database, you can normally save the results of the search in a format
that is appropriate for importing. The file to import must be in a tagged format. This means that each piece of
information must be clearly labelled so an import filter can identify it. For example, the author information will
normally be identified by a heading such as AU or Author. A typical tagged reference might look something like this:
AN: 343708-100300 TI: The five dimensions of social pedagogy within schools. AU: KYRIACOU, C AB: This paper discusses social pedagogy in the context of schools, which it defines as taking an integrated view of the whole child in terms of five key dimensions: care and welfare; inclusion; socialisation; academic support; and social education. Considers the implications for professional practice within schools if a social pedagogical approach is adopted and the advantages of such an approach. DE: SOCIAL PEDAGOGUES, WORKING WITH CHILDREN, SCHOOLS, PUPILS, TEACHERS, PRACTICE, INTERAGENCY RELATIONS, INCLUSION, WELLBEING, SOCIAL SKILLS, ATTITUDES, BEHAVIOUR, PSHE, PERSONAL AND SOCIAL EDUCATION, HEALTH EDUCATION, PASTORAL CARE SO: Pastoral Care in Education, vol.27, no.2 (Jun). pp101-108. 2009 PT: Journal Article YR: 2009 UP: 200910
Search results can exist in hundreds of different formats. Each database may be different but most should have
some type of tagged format available.
To import your search results into EPPI-Reviewer select the Sources tab on the toolbox panel to access to the source
and importing functions.
Data is imported into a search ‘source’ to create a log of searches that have been carried out. At the top of the
Sources tab of toolbox panel you can see a table. Each time a new source is imported it will be added to this table.
You can reach the Add Source window by clicking on the Import references icon at the top of the Documents tab of the Home panel
You can also add a new source by clicking on the link labelled Manage sources / save new in the sources tab. This
will open the Add source window.
In the Add source window be sure the Import New tab is selected.
Select the appropriate import filter from the dropdown menu labelled Import Filter. Although there are only a few
import filters available in EPPI-Reviewer 4 you have access to hundreds of filters through the 'Export to RIS function'
on the EPPI-Reviewer 4 gateway (http://eppi.ioe.ac.uk/cms/er4) that is available through the EPPI-Centre website
(http://eppi.ioe.ac.uk). These are all of the filters that were created for EPPI-Reviewer 3.0. The 'Export to RIS’ utility

EPPI-Reviewer 4: Software for research synthesis
23 Bringing references into your review
will take your file and return an RIS formatted file that will import easily into EPPI-Reviewer 4. Full instructions on
using this utility are available on the ‘Export to RIS’ page.
Now click on the Read file button and choose the text file containing your search results. The name of the file
selected will appear in the Name box. The software will load the file and separate it into individual references. The
references titles are displayed in the text box in the bottom half of the page.
If you decide that the items displayed appear correct click on the command button labelled Upload items at the
bottom of the screen and the items will be uploaded to your review. Close the Add source window to return to the
Review home screen where you items will be listed in the Documents tab of the Home panel.
Importing directly from external databases Some databases such as PubMed allow software to access their data directly. EPPI-Reviewer allows you to connect
to this database directly to run your search and return your search results.
Select the Sources tab on the toolbox panel to access to the source and importing functions. Click on the link labelled
‘Mange sources / save new’. This will open the Add source window.
In the Add source window be sure the PubMed Import tab is selected.
Enter you search terms into text box labelled Search PubMed. You should also enter data in the Source Name and
Notes boxes. Now click on the command button labelled Search PubMed to run your search. The system will access
PubMed and show the results in the box at the bottom of the screen.
If you are satisfied with the results click on the command button labelled Import and the items will be uploaded to
your review. Close the Add source window to return to the Review home screen where you items will be listed in the
documents tab of the Home panel.
Manually adding references References can be entering individually by hand. On the Documents tab of the home panel there is a Create new
document record icon. Click on this button to go open the Document details window.
This is the Create new documents record icon that can be found at the top of the Documents tab of the Home panel.
First select the publication type by picking from the Pub type drop down menu. The fields available to fill in will
change based on the publication type selected.
Fill in as many fields as possible and then click on the command button labelled Save. The item is saved to your
review and you are returned to the Review home screen.
Uploading full text documents You can upload and access the full text version of a document in EPPI-Reviewer. Any type of file can be uploaded.
Word and pdf files, when uploaded will have their content extracted into a text format.
To upload a file, select the reference from the Documents tabs of the Home panel. This will open the Documents
details window. In the Citation details tab, near the bottom is a table where any uploaded files are displayed. Click
on the button labelled Upload. You can now browse to the location of the file to upload. Select the file and click

EPPI-Reviewer 4: Software for research synthesis
24 Bringing references into your review
Open. The Selected file window will be visible where you can click on Upload. This will upload the file into the
review.
There is a file size limit of 15 Mbytes. Files larger than this will need to be subdivided or reduced in size before they
can be uploaded.
You should now see it in the table of uploaded files. In the ‘View text’ column clicking on Go! will open the textual
content of the document and display it in the ‘Text document’ tab. Clicking in the View original column will open the
document in its native format. This may be in a new tab or window depending on the document type.
If the document is a pdf you can click in the ‘View pdf’ column. The pdf will open within EPPI-Reviewer 4.
In this view you can also add annotations to the document using the commands at the top of the screen. PDF
annotations are short comments that reviewers may add to a PDF document. They should not be used to hold
coding information as they cannot be searched, exported or included in reports.
To add an annotation click the Show Annotations button to display the annotations column. Now double click in the
column where you want the annotation to display. This will open the ‘New Annotation’ window where you can enter
you comment and then click Save. The annotation will be displayed in the semi-transparent right hand column.

EPPI-Reviewer 4: Software for research synthesis
25 Bringing references into your review
Double clicking an existing annotation will allow you to edit or delete it. Annotations can be dragged up and down
within a page but cannot be moved to a new page.
When the annotations are visible the annotations button will change to Hide Annotations. Clicking on the
annotations button now will hide the annotations column.
Extracting references from uploaded documents If you have uploaded full text documents that contain a reference list, EPPI-Reviewer will help you extract the
references and carry out searches for those references.
For example, if you have uploaded an article in pdf format, click on Go! in the ‘View text’ column of the list of
uploaded files. The textual content of the file is displayed in the Text document tab. Select the text that you wish to
extract the reference from. This is often at the end of the pdf. Right click and select Send Selection to Reference
Search. The selected text is now displayed in the Reference Search tab and to the right of it the separated
references are displayed. You may need to edit the text to get the references to separate correctly. There is a help
screen available on this page giving tips on how best to use this feature. To show the help screen click on the button
labelled ? near the top of the reference list.
Once you are satisfied with the reference separation, you can run searches for the items in Google, Bing, PubMed
and ROAR (Registry of Open Access Repositories) by selecting a reference and clicking on the links below the
references. There may be multiple links for each place that you can search. This means that the system is using
different variations of the content of the reference to carry out the search.

EPPI-Reviewer 4: Software for research synthesis
26 Managing your search sources
Managing your search sources Each time a new import occurs a line is added to the list of sources. This list is displayed on in the Sources tab. This
table shows the all of the sources, the number of items imported, the number of deleted items and the number of
duplicates identified using the duplicated checking functions.
Manually created items are given a line in the table as well. All manually created items are placed in the source
called Manually create items.
You can edit the details of a source by clicking on the Manage source / Add new button in the Sources tab of the
Toolbox panel. This will take you to the Add Source window.
Select the source you would like to edit from the Used Sources List on the right side of the window. Then click on the
Manage Sources tab at the top left side of the window.
There are a number of text boxes available where you can enter further information about search. When you are
finished your edits be sure to select the Save button just below the Manage Sources tab.
You can export a list of your search sources in the sources tab of the Toolbox panel. Next to the Manage source /
Add new button is the Export Sources Table icon.
The Export Sources Table icon can be found at the top of the Sources tab of the Toolbox panel.
Clicking on the icon will open a Save As window where you can select the location and name of the file to save. The
file will be save as an .xls file that can be opened in Excel.
Deleting a search source Quite often a reviewer may refine their search strategy resulting in searches being re-run. This could result in
uploaded search sources that are no longer relevant and require removal.

EPPI-Reviewer 4: Software for research synthesis
27 Managing your documents
To remove a search source first mark it as deleted in the Sources tab of the Toolbox panel by clicking on the delete
source icon, shaped like a garbage can, next to the source name. This will mark the items in the source as deleted
but not permanently remove them.
To undelete a search source click on the undelete source icon, shaped like a return arrow, next to the source name.
All items in that source will change from delete to include.
To permanently remove the source and all of the items in it, click on the Manage Sources / Add New button at the
top of the Sources tab. This will open the Add Source window. Select the Manage Sources tab on the left hand side.
Now select the source to permanently remove in the Used Sources List. If the source has already been marked as
Deleted and none of the items in the source are marked as Master items after duplicate checking it will be eligible
for permanent deletion. If it is eligible you should see a red X in the Add Source window. Click on the X and a
confirmation window will appear. Clicking on Yes will delete the source and all of the items in that source. If you click
on Yes the deletion cannot be undone so please be sure are deleting the correct source.
Managing your documents Documents that are imported or manually created are displayed in the Documents tab of the home panel. By default
the Authors, Title and Year fields are displayed. If you wish to change the fields displayed click on the Select the
fields you want to display below icon that can be found at the top of the Documents tab
The Select the fields you want to display below icon can be found at the top of the Documents tab of the Home panel.
This will open the Select fields to display window. Click on the fields you would like to display and then click on Close.

EPPI-Reviewer 4: Software for research synthesis
28 Managing your documents
By default the documents are loaded 700 items at a time. If there are more than 700 documents in your review, they
will be paged. You can change pages at the bottom of the Documents tab. You can change the number of documents
in a page in the Select fields to display window.
In the documents tab you can also order the fields by dragging the header columns left or right in the table.
You can change the order of items on a page by clicking on the column name in the Documents tab. If you click on
the 'Authors' column it will order by Authors. If you click on the 'Title' column it will order by Title.
You can filter what is displayed by typing in the Find: textbox at the top of the Documents tab. As you type in the box
the items in the table will filter down in real time based on what you type.
You can also filter what is displayed on each page by clicking on the filter icon (the one that looks like a funnel) in the
header of each column. This is a very powerful filter that gives you a number of options of what to display. It is
column specific.
The ordering and filtering are page specific so if you have more that 700 items you will need to move to the correct
page and then run any filtering or reordering functions.
I, E and D flags Items in EPPI-Reviewer can be labelled as Included (I), Excluded (E) or Deleted (D). When a review is loaded all of the
items with the (I) flag are displayed in the Documents tab.
Included (I) or Excluded (E) items do not necessarily refer to the screening criteria applied to an item. Whether an
item is included or excluded from your review could depend on a number of different judgements spread across

EPPI-Reviewer 4: Software for research synthesis
29 Managing your documents
many different codesets. The I or E flags are a method of indicating an items status and aid in information
management.
For example, a user may have many thousands of items that require screening. The process of screening might
narrow the items for further coding to hundreds and further coding might reduce the number of items to dozens.
The user can dynamically change what items are considered included or excluded to help identify the items they are
presently working with. The items considered included or excluded might change often based on the reviewer’s
requirements at that time.
By default, documents brought into a review are marked as (I) unless the user decides otherwise. All includes items
can be displayed by clicking on the List included documents icon.
The List included documents icon can be found at the top of the Documents tab of the Home panel.
The documents marked as Excluded or Deleted can be listed by clicking on the corresponding icons.
The List excluded documents icon can be found at the top of the Documents tab of the Home panel
The List deleted documents icon can be found at the top of the Documents tab of the Home panel.
You can mark an item with an Include or Exclude flag based on previously assigned codes or by selecting individual
items.
Changing an items Include / Exclude / Delete flag
To mark an item or items as being included based on previously assigned codes click on the icon labelled Assign
documents to be included or excluded.
The Assign documents to be included or excluded icon can be found at the top of the Documents tab of the Home panel.
This will open the Assign documents dialog window.

EPPI-Reviewer 4: Software for research synthesis
30 Managing your documents
From the Assign dropdown menu select the documents with this code option.
A second dropdown menu will appear containing the codesets. You can expand the codesets to find the conditional
code for the assignment.
You should now click on Include or Exclude in the dialog window depending on the assignment you wish to make.
Finally click on the Assign button. All the items marked with the selected code will be assign the Include or Exclude
flag depending on the choice made.
If you wish to just assign selected items with a code, first click on the items to assign in the Documents tab. Then
click on the Assign documents to be included or excluded icon to open the Assign documents dialog window. In the
Assign dropdown menu select selected documents and click on either Included or Excluded. Now click on Assign and
the Exclude or Include flag will be assigned to the selected documents.
If you wish to mark selected items as deleted, first click on the items to delete in the Documents tab. Now click on
the Delete selected documents icon. A confirmation window will appear allowing you to complete the operation
The Delete selected documents icon can be found at the top of the Documents tab of the Home panel.
An item marked as delete is still in the review. Deleted items can be listed by clicking on the List deleted documents
icon. Its status can be changed back to Include or Exclude in the normal fashion described above.
Items can also be marked as Deleted when the search source it belongs to is deleted. When a search source is
deleted, it is not physically deleted. It remains in the review but is just shown as deleted allowing it to be recovered
at any time. Undeleting a source will mark all of its items as includes. Sources can be deleted, or recovered in the
Sources tab of the Toolbox panel.
You may also notice that all items in a deleted source are marked as Shadow (S) rather than I, E or D. This means that
the item is out of the review but still exists and can be returned to the review if necessary. Duplicate items are also
marked as Shadow (S).
Creating reference lists To create a reference list, select the items that will be in the list. Then click on the List formatted bibliography icon
at the top of the Documents tab.

EPPI-Reviewer 4: Software for research synthesis
31 Managing duplicate documents
The List formatted bibliography icon can be found at the top of the Documents tab of the Home panel.
Clicking on the icon will display the formatted references in the Report viewer window. The Report viewer window is
a full editor that will allow the user to format, save and print the list of references.
Exporting documents To export references out of EPPI-Reviewer 4, select the references you want to export in the Documents tab. Then
click on the Export references icon at the top of the Documents tab.
The Export references icon can be found at the top of the Documents tab of the Home panel.
An RIS formatted text file is generated and you will be prompted to name and save it. RIS files can be imported into
most reference management software including EndNote, Procite, Reference Manager and EPPI-Reviewer.
Managing duplicate documents If you are importing documents from multiple databases you will likely have duplicate versions of some documents.
EPPI-Reviewer will help identify and manage those duplicates.
If possible, it is a good idea to finish the importing of your references before carrying out duplicate checking. This will avoid you having to check for duplicates multiple times whenever new items are brought into the review and will avoid the creation of overlapping duplicate groups. As well, it is best to finish duplicate checking before you start coding items to avoid the situation of coded items being marked as duplicates.
To identify duplicate documents click on the Manage duplicates icon located on the Documents tab of the Home
panel.
This is the Manage duplicates icon that can be found at the top of the Documents tab of the Home panel.
This will bring up the Manage Duplicate Groups window. From this window click on the Get new duplicates button
to list all of the possible duplicates.

EPPI-Reviewer 4: Software for research synthesis
32 Managing duplicate documents
When you click on this button the system goes through all the items in the review and compares each item with all
of the others. It calculates a score based on the authors and titles, book authors and titles, when applicable, and
journal names, when applicable. If the score is 1, the chance of an exact match is 100%. The possible duplicates are
grouped together into duplicate groups that are displayed on the left side of the screen. Each group holds items that
the system believes are similar.
Once this list of duplicate groups is created you can begin working with it. You should only need to click on the Get
new duplicates button when new items are added to your review.
If your review has many thousands of items, it may take a few minutes to complete this operation. In this case, after
5 minutes you will get a message telling you that the system is still compiling your list. You will not be able to access
the duplicate checking screen during this time but you will still be able to access the rest of the program.
If the user clicks on the button labelled Mark Automatically, the program will mark all of items with a score of 1 as
checked and assign a duplicate / master relationship among the items based on the statistics calculated when the
Get new duplicates operation was first run. This should narrow down the number of duplicate groups that the user
needs to check manually. Something to watch out for with this operation is that it will ignore items that have a code
assigned to it or have a file uploaded. This is to avoid the situation where an item that has already been coded
ending up as a duplicate.
When a group of possible duplicates are marked as complete it will be indicated in the list of item groups on the left
hand side by having a check in the checkbox. To identify the groups of items that still need to be addressed you can
filter the Complete column by clicking on the filter icon (the one that looks like a funnel) and setting the Is equal to

EPPI-Reviewer 4: Software for research synthesis
33 Managing duplicate documents
option to False. This results in only the unchecked items appearing in the list. You can also order the checkbox
column so all of the unchecked items are displayed first.
To manually deal with a duplicate group, click on the row in the list of groups. This will display the items on the right
side of the page. At the top the Master item is listed. Underneath are the possible duplicates.
Click on the title in one of the items in the list of possible duplicates to expand it.
Determine whether the expanded item is a duplicate of the master item.
Whenever a field (Title, Journal, Authors, etc.) is different, the text on the master item will be highlighted with four
different background hues to help quickly identify the differences. The brighter the hue, the larger the difference
detected. This means that items without highlights are identical to the master.
If a field is empty in either the master or group member, it will be highlighted with a lighter hue to show that there is
a slight difference. If a field is different then it will be highlighted in a darker hue.
If it is a duplicate, click on the A duplicate button to mark it. The check boxes labelled This is a duplicate and This
item has been checked will now be ticked. It will also show as having been checked in the list of groups on the left
hand side
If the two items are not duplicates click on the Not a duplicate button. This action will also check the This item has
been checked box.
If you wish to make the possible duplicate the master item click on the Mark as Master button and the duplicate and
master will switch places. You will still need to mark the initial master as a duplicate of the new master.
Move through each row in the list of duplicate groups table assigning the items as duplicates or not duplicates.
If you are duplicate checking after coding has started, pay attention to the Applied Codes field. It will tell you if the
document has been coded yet. This will help you determine which item you should mark it as the duplicate. If an
item has already been coded you may wish to keep it as the master item and mark other items as duplicates of this
one.

EPPI-Reviewer 4: Software for research synthesis
34 Managing duplicate documents
If you come across a group where all of the items are greyed out this means that the master item for the group has
also been marked as a duplicate in a different group. This is possible if new items have been added to the review and
the Get new duplicates function has been run multiple times. An item can end up in more than one duplicate group
depending on the information contained in the reference. In this case, the user should choose a different item to be
the master item. Please see the section on Overlapping duplicate groups.
If you are returning to the duplicate function after previously running the duplicate check but not having finished
you should first click on the Refresh list button. This will bring up the list as you left off the previous time without re-
running the duplicate checking function. You can then carry checking duplicates where you left off.
If you are returning to the duplicate function after uploading more documents you should click on the Get new
duplicates button. This will look for new possible duplicates but will not affect any duplicate checking that you have
already done.
After completing the duplicate checking close the Duplicates window. On the Documents tab click on the List
included documents icon and the items marked as duplicates will be removed from the list.
When an item is marked as a duplicate it will no longer show up in the review. It has not been deleted and can still
be retrieved if necessary. A duplicate is assigned a special flag called Shadow (S). You can see the shadow items if
you list a source on the Sources tab of the Toolbox panel. Rather than just seeing I, E or D flags, there will also be S
flags for the items in the source that have been marked as duplicates.
Manually adding a duplicate If you find a duplicate item that was not picked up by the Get new duplicates you can manually add it to a group. In
the manage duplicates window there is a Manual/Advance tab. When you click on this tab the items in the
duplicate group selected on the left is displayed. At the bottom of the screen is the list of items that were displayed
in the Duplicates tab.
Select an item from this list by clicking on the checkbox and then click on the Add selected item(s) link at the top of
the list. The selected item will be added to the group and marked as a duplicate. All items manually added as
duplicates are listed below the item details in this tab. An item can be removed from this list by clicking on the
Remove button next to the item.

EPPI-Reviewer 4: Software for research synthesis
35 Managing duplicate documents
At the top of the Documents from Main List there are other options including Add Group and Advanced Mark
Automatically.
Add Group allows the user to take the items from one duplicate group and add them to a different duplicate group.
Click on the Add Group link at the top of the list and an Add Group box will appear. Enter the group ID from the list
on the left side of the screen and click on Go. The items from selected group will be placed in the group listed at the
top of the screen.

EPPI-Reviewer 4: Software for research synthesis
36 Managing duplicate documents
The Advanced Mark Automatically option allows the user to adjust a number of thresholds that the Mark
Automatically function considers.
The Similarity Threshold tells the system how close a match must be for the Mark Automatically function to use. By
default the setting is 1.0. If the threshold is lowered the sensitivity of the matching will be lowered.
Note: Adjusting the Similarity threshold must be used with caution as it could lead to incorrect matches. Correcting
false positive matches can be difficult as you may not know they exist and finding them may require looking through
all of the duplicate groups.
The Codes threshold and the Uploaded Documents threshold allow coded items and items with uploaded documents
to be considered by the Mark Automatically function. By default this function will ignore items that have been coded
and items that have uploaded documents.
Overlapping duplicate groups When Get new duplicates is run multiple times due to new items entering the review it is possible that overlapping
duplicate groups are created. This means that the same item may appear in multiple groups. Since the master item
is chosen automatically when Get new duplicates is run, new and larger versions of existing groups may appear.
Sorting out these overlapping groups can sometimes become complicated.
An overlap group can be identified as it will normally contain a greyed out group member (meaning the A duplicate,
Not a duplicate and Mark as Master are greyed out). This means that this item is either
marked as a master in a different group or
is already marked as a duplicate in a different group.

EPPI-Reviewer 4: Software for research synthesis
37 Managing duplicate documents
Sometimes the entire group is greyed out. This would indicate that the master item for this group is marked as a
duplicate in a different group.
The best way to deal with overlapping groups is to:
1. Select the group with the greyed out items from the list of groups on the left

EPPI-Reviewer 4: Software for research synthesis
38 Managing duplicate documents
2. Go to the Manual/Advanced tab and use the ‘find related groups’ function to identify the overlapping groups.
This function is described in the previous section.
3. Among the related list of overlapping groups, there should be one group that contains all of the items found in
the other related groups. This will normally be the group with the highest Group ID number (the most recently
created group). You can examine the items in each group to confirm this.
4. Delete all of the other related groups. This is done by selecting the group to delete over on the left and clicking
on the trash can icon (labelled Delete the current group).
5. You should now just have a single group of duplicates rather than overlapping groups.
Please note also that with the previous update we have added the “Reset” features to deal with situations where a
huge number of overlapping groups are present. The “Reset” features are explained within EPPI-Reviewer and
should be used with care!
Create a new duplicate group If the Get new duplicates function has not spotted some items as being duplicated you can create a new group and
add items to it.
On the Manual/Advanced tab there is an icon that looks like a blue addition symbol. It is labelled ‘Add new group’. If
you click on this icon the Create New Group window will appear.
All of the items that were displayed on the Documents tab before you entered the duplicate checking screen are
displayed. You can click on the items that should be in the group or enter the ID’s of the items in the box below.
Then click on the Next button.

EPPI-Reviewer 4: Software for research synthesis
39 Managing duplicate documents
You should now decide which item should be the Master item and which items are the duplicates. The system will
tell you is any of the items are already in a duplicate group. Clicking in the second column will close the window and
show the related groups the item is in. You could also select the Back button at the bottom of the screen and
unselect the item that is already in a group.
One you are satisfied with your selection click on the Finish button to create the new group. It can now be treated as
any other duplicate group.
Resetting the duplicate checking If a user has decided that what they have done while duplicate checking was all wrong and they wish to start again
there is a reset option in the Manual/Advanced tab. When clicking on the Reset ling the user is presented with two
options.
The first option allows you to delete all duplicate groups but still keep the information about documents already
marked as duplicates. This gives you the options to re-evaluate the duplicates without losing the work that you’ve
already done. When you Get new duplicates after resetting you will have a much smaller number of duplicate

EPPI-Reviewer 4: Software for research synthesis
40 Managing linked records
groups as all ‘completed’ duplicate groups will not appear. Overlapping groups will not appear unless further imports
take place and Get new duplicates is then multiple times. While the system will know what items are marked as
duplicates (and what items are their masters) any information but the older ‘completed’ duplicate groups is now
lost.
To run this option you will need to enter I agree in the text box and then click Yes, I confirm.
The second option involves a complete reset of all duplicate information. Entering Confirm in the textbox and then
clicking Yes, Wipe All will remove all duplicate information allowing the user to start from the beginning. There are a
few scenarios where you may wish to use this form of reset:
The Mark Automatically function was used at too low of a threshold and you have too many items marked as
duplicates that shouldn’t be
You have a very large number of overlapping groups and have not yet spent too much time evaluating the
groups. Resetting the will eliminate the overlapping groups. The overlap groups are created from running
the Get new duplicates multiple times after importing new items. Running Get new duplicates once will not
create overlap groups.
Managing linked records It is often the case that the same study is described in two or more documents. We call these linked records or
documents. EPPI-Reviewer 4 has a function to deal with this situation.
First, make a record of the ID numbers of the records you wish to link. Now pull up the citation for the first record by
clicking on Go for that record on the Documents tab. This will open the Document details window.
Go to the Linked records tab that you should see near the top and over to the right. In this tab all of the records
linked to the presently selected item will be displayed. To add a new link click on the New link button. This will open
the Create / edit link window.
In the Item Id box enter the document number of the item that you want to link and click on Get item. This will
display the Item Id, the Short title, and the Title of the item so you can confirm you have the correct ID. You can also
enter a Link description if you wish. When you are finished click on Save and the link will be complete and displayed
in the Linked records tab.

EPPI-Reviewer 4: Software for research synthesis
41 Setting up the screening / coding tools
Items in the link records tab are displayed in rows. Each record can be edited by clicking on the Edit button. A link
can be removed by clicking on the Delete button. The full citation can be viewed by clicking on the View button.
If you have uploaded a full text document, such as a pdf, to a linked item, the pdf will appear with all of items linked
together.
There are different ways that a reviewer can deal with linked records. One method is to keep all of the items
accessible. Any uploaded pdfs will be visible to all of the items linked together.
Another possible method is to only keep one record per study making the study the base unit. For example, if you
have 3 records or documents looking at the same study, decide which record will be the main one. You could then
link the other two to this main record. As well, you could upload any pdfs for the linked documents to the main
record. After this is complete, you could mark the two linked records with the exclude flag indicating that you will no
longer need those records. They are still in the review but are not part of your active records.
Setting up the screening / coding tools Coding studies is the process of examining your studies and answering a series of questions about those studies to
create a database of substantive information. Whether this is the process of applying inclusion/exclusion criteria,
often called screening, or the process of carrying out a detailed data extraction, it is all considered coding in EPPI-
Reviewer. To carry out coding the user must first design and create their coding tools.
Coding tools are called code sets in EPPI-Reviewer. Each code set contains a set of codes that are applied to the
studies. These applied codes are used to build a database of information about your studies that can be queried in
many different ways.
A code set is a hierarchal structure. At the top is the code set and below that are the lower level or child nodes. The
child nodes or codes can be many different things such as questions, answers, inclusion/exclusion criteria or groups
of studies.
For example, if you had a data extraction tool containing different sections part of a section may look like this:
Coding tools are created in the Codes tab of the Toolbox panel. All existing coding tools are displayed and can be
edited in this panel.
Data extraction tool
Section A: Document details
Has paper been published?
Yes
No
Unknown (provide details)
Code set name
Child node (‘Section A’)
Child node of ‘Section A’ (question)
Child node of ‘Has paper been
published?’ (possible answer 1)
Child node of ‘Has paper been
published?’ (possible answer 2)
Child node of ‘Has paper been
published?’ (possible answer 3)

EPPI-Reviewer 4: Software for research synthesis
42 Setting up the screening / coding tools
To create a new set of codes click on the Create a new code set icon at the top of the Codes tab of the Toolbox
panel. This will open the Create / edit code set window.
You can create a new code set by clicking on the Create new code set icon at the top of the Codes tab of the Toolbox panel
Once the ‘Create / edit code set’ window is you need to decide that type of codeset that you require. As shown in
the diagram there are 3 codeset types available
Standard
The Standard codeset type is used for regular coding such as keywording or data-extraction. This codeset type can
contain multiple levels of child codes but cannot contain the special code types 'Include' and 'Exclude'.
Screening
The screening codeset type has been designed to simplify coding comparisons that are commonly used in screening
by restricting it to the code types 'Include' and 'Exclude' and only allowing one level of hierarchy. The Screening
codeset type will be displayed in green.
Administration
The Administration codeset type is used for setting up codesets for activities such as Allocation, Retrieval and
Reports. It only allows Selectable and Non-selectable code types and cannot be used for comparison coding. The
Administration codeset type will be displayed in blue.
You also need to decide if multi-user data entry will be allowed (where two or more reviewers code the same item
for quality assurance purposes. Please see Single vs. Multiple data entry for more details on multiple data entry).
You can also display the code properties of a selected code or code set by clicking on the Code / code set properties icon at the top of the Codes tab of the Toolbox panel

EPPI-Reviewer 4: Software for research synthesis
43 Setting up the screening / coding tools
Once the code set is created you can then add the questions and answers to it in the form of codes. To add lower
level codes to a code set right click the code/code set to reveal a further options menu. Select the Add child code
option and the Add / edit code window will appear. For a lower level code (child node) you can edit the name,
provide a description and choose the code type.
If you are using the Screening codeset type you will only be able to select Exclude or Include code types. The Exclude
or Include code types will display a checkbox next to the code.
If you are using the Standard codeset type there will be a number of code types are available. If you wish to display a
checkbox with the code you should choose Selectable (show checkbox). To enter outcome data you could choose
Outcome.
When the example from the beginning of this section is assembled in EPPI-Reviewer 4 in the codes tab it would look
like this:

EPPI-Reviewer 4: Software for research synthesis
44 Setting up the screening / coding tools
Moving Codesets and Codes You can drag and drop codesets and codes to reorganize your coding tools and codes.
To move a codeset left click the codeset and drag it to where you want it to be. The system will not allow a codeset
to get dropped into another codeset.
To move a code left click the code and drag it to where you want it to be. You can move the codes to different levels
of hierarchy within the codeset. The system will not allow you to move a code to a new codeset.

EPPI-Reviewer 4: Software for research synthesis
45 Setting up the screening / coding tools
You can have multiple levels in a code set. You can have multiple codes sets in a review.
Although there is no limit on the depth of hierarchy in a codeset, having more than 4 levels can become cumbersome due to the width of the tool and having to expand many levels to find a particular code.
Copying and pasting codes Different questions in a coding tool will often present the user with the same possible responses. Rather than
individually creating a number of similar codes the copy and paste functions will allow you to copy sections of your
coding tool as needed.
The copy and paste function will copy the selected code and all of its child codes. The steps to follow would be:
1. Select the level you wish to copy
2. Right-click and select Copy

EPPI-Reviewer 4: Software for research synthesis
46 Setting up the screening / coding tools
3. The selected code and all codes below that level will be placed in the clip-board
4. Select the position where you want to copy your codes
5. Right-click and select Paste…

EPPI-Reviewer 4: Software for research synthesis
47 Setting up the screening / coding tools
6. The pasted section will be placed at the bottom of the level selected
You can copy individual codes or you can copy sections of the coding tool.
For example, if you wanted to copy some codes named ‘yes’, no’ and ‘unknown’ you could copy the individual codes
one at a time. But if you select their parent you can include all of those codes in the copy operation. If you copy all of
them at once (including the parent code) you just need to edit the pasted parent code to represent your new
question.
Copying codesets across and within reviews If you are carrying out multiple reviews and need to use the same codeset in more than one review, or just wish
make a copy of an existing codeset in the same review you can use the codeset copy utility.
The codeset copy utility can be found in EPPI-Reviewer 4 account and review manager that can be found on the
EPPI-Reviewer 4 gateway. You will find it under Utilities / Codesets.
The process to follow is:
1. Select the source review
2. Select a codeset from the source review
3. Select a destination review. This can be the same as the source review if required.

EPPI-Reviewer 4: Software for research synthesis
48 Coding references or documents
4. Click on Copy and a copy of the selected codeset will be placed in the source review.
Coding references or documents Coding studies is the process of examining your studies and answering a series of questions about those studies to
create a database of substantive information. Each of these questions and possible answers are codes that the user
creates when assembling their coding tools.
Screening references Reference screening in EPPI-Reviewer 4 is treated as just another form of coding. Exclusion / Inclusion criteria are set
up in the system as a series of codes to be applied to the references. The user then applies the criteria to each
reference.
The software allows the user to carry out both ‘single’ and ‘double’ screening. Single screening is where a single user
applies the screening criteria to a reference. Double screening is where two users apply the screening criteria to the
same reference and then compare and reconcile their disagreements.
A popular function to assist in screening is Key term highlighting. This function will allow you to highlight in green
terms that are relevant and highlight in red terms that are not relevant. You can find more information about this
under Key term highlighting.
Applying codes to a reference or document Items can be coded individually or in batches. The items to code are accessed through the Documents tab of the
Home panel.
To code one study at a time select a reference from the Documents tab by clicking on the Go button next to the
item. The document is now displayed in the Documents details window. The document is displayed on the right

EPPI-Reviewer 4: Software for research synthesis
49 Coding references or documents
hand side while any created codes sets are displayed on the left hand side. Expand the relevant code set on the left
hand side.
Using the same example as before the code set in the Document details would appear as:
Depending on the code type you should then select an answer or add information to the code relevant to the
document displayed. Clicking on a checkbox will select the answer and automatically save the selection.
Auto advance and Hotkeys
To assist in the screening process there are Auto-advance and Hotkey functions available.
If you turn auto advance on, by selecting the checkbox next to Auto advance, the system will advance to the next
item automatically each time you check a code in a coding tool. This will reduce the number of clicks required to
code an item.
The Hotkey function has been added to remove the need to use a mouse when coding. This might be helpful to
reviewers who have RSI (Repetitive Strain Injury) from using a mouse too often. You can turn on Hotkeys by selecting
the checkbox next to Hotkeys. If you then select the codeset or a code in the codeset a number will appear next to
the immediate child codes of your selection.
You can now select the code by typing Ctrl-shift and the number.

EPPI-Reviewer 4: Software for research synthesis
50 Coding references or documents
You can combine Auto advance and Hotkeys to make the process even quicker.
Adding text to a coded response
If the code has a checkbox visible there will also be a button labelled Info. Clicking on this button will open up a
window for entering a text response to the question. Enter your response and then click Save.
When you are finished applying your codes to the document click on Next or Previous at the top of the Citation
details tab to move to a new document.
To code items by batch display the documents to code in the documents tab of the home panel. The documents can
be listed in many ways such as the result of a search, or by source or by previously assigned codes or by selecting
individual items. Once listed, select the code to apply to the documents from the Codes tab of the Toolbox panel by
left clicking it. Now right click on the code and select Assign selected items to this code. Select Yes from the
confirmation window and the selected code will be applied to all of the selected items. Codes can be removed from
selected items in the same manner.

EPPI-Reviewer 4: Software for research synthesis
51 Coding references or documents
Coding complete vs. coding not complete For an item’s coding to be available for reports or searches the item must be marked as complete. The complete or
not complete status is code-set specific so an item could be marked as complete with respect to one code-set but
not complete with respect to another.
Applying a code to an item will automatically mark it as complete except when multiple coding (i.e. two or more
users coding the same item) is being carried out. Please see the section on Normal vs. Comparison data entry for
details.
You can tell if an item is marked as complete based on icon next to the code set.
If the icon is a red disc, the item is not complete. A green disc with a checkmark indicates the item is marked as
complete.
The Coding not complete icon (red disc) indicates that coding for this item is not finalised. Items with codes not finalised will not appear in reports or searches.

EPPI-Reviewer 4: Software for research synthesis
52 Normal vs. Comparison data entry (formally single vs. multiple)
The Coding complete icon (green disc) indicates that coding for this item is finalized. Items with finalised codes will appear in reports and searches.
To manually mark an item as complete left-click on the red disk. The coding complete window will appear allowing
the user to mark the item as complete.
To manually mark an item as incomplete, open the code set properties window by either clicking on the code set
properties icon or right clicking on the code set and selecting properties. Uncheck the Coding complete checkbox
and then click on Save.
Normal vs. Comparison data entry (formally single vs. multiple) EPPI-Reviewer supports Normal data entry/coding and Comparison data entry/coding. This was previously known in
EPPI-Reviewer as single data entry and multiple data entry data entry but has been renamed to more closely reflect
its purpose and behaviour.
Normal data entry is when you are applying codes to items.
Comparison data entry is when two or more reviewers are coding the same item independently and will then
compare their work to identify agreements and disagreements. This is often called double coding or double
screening.
Changing between normal and comparison data entry Normal and comparison data entry are properties of the codeset. When a codeset is changed from normal data
entry to comparison data entry (or vice versa) the process of coding documents changes accordingly.
When a codeset is set for Normal data entry, any code applied to an item using a code from that codeset will mark
the item as ‘complete’. The codeset will display a green disc on the Document details page for that item (see figure

EPPI-Reviewer 4: Software for research synthesis
53 Normal vs. Comparison data entry (formally single vs. multiple)
below). If an item is marked as complete for a particular codeset, then the coding for that item becomes visible to
the programs searching and reporting functions.
When a codeset is set for Comparison data entry the assumption is that multiple users will be coding the same item
using the codeset that is set for comparison coding. When a code is applied to the item the item is not marked as
complete. The codeset will display a red disc on the Document details page for that item (see figure below). It is
expected that the coders will need to compare their coding selections and reconcile their differences before marking
the item as complete.
Codesets should normally be set for normal data entry and only changed to comparison data entry if the user
intends to double code/screen (or triple code/screen) items.
Changing from normal data entry to comparison data entry
Normal data entry and comparison data entry are properties of a codeset. If you wish to change that property you
can right-click the codeset and select Properties. This will open the Edit codeset window where you can click on the
Change to comparison data entry link.

EPPI-Reviewer 4: Software for research synthesis
54 Normal vs. Comparison data entry (formally single vs. multiple)
If a user tries to change a codeset from normal coding to comparison data entry they will get a warning telling them
that Comparion coding implies that multiple users will be coding the same item using the codeset that is being
changed.
If Comparison data entry is to be used the reviewers should expect to compare results, reconcile the disagreements,
and mark the agreed version as complete.
Changing from Comparison data entry to Normal data entry
If a user tries to change a codeset from Comparison data entry to Normal data entry and all of the multiple coded
items have been reconciled and marked as complete, then the system will tell the user there are no conflicts and
that it is safe to proceed (see figure below). Once returned to single data entry any further coding carried out,
whether on new items or previously coded items, will behave as expected under normal data entry.

EPPI-Reviewer 4: Software for research synthesis
55 Normal vs. Comparison data entry (formally single vs. multiple)
If a user tries to change a codeset from Comparison data entry to Normal data entry and there are items that are not
marked as complete the system will put up a warning message (see figure below). The default selection is to cancel
the operation so the reviewer can ‘complete’ the items that need completing.
These items can be identified in the Review statistics tab in the toolbox panel. A breakdown of the number of
incomplete items is listed and the coders associated with them. If the user clicks on the number, the items will be
displayed in the Documents tab.

EPPI-Reviewer 4: Software for research synthesis
56 Allocating references for coding
If the user clicks on the green checkmark they can bulk complete the items. A warning will be displayed as bulk
completing can have implications. For example, if the items you are bulk completing have been double coded and
you select a coder whose selection of codes was ‘incorrect’ (i.e. not the best selection of codes) you could be
completing items using ‘incorrect’ codes. If you are confident that a particular coder’s selection of codes is correct,
then bulk completing the items using this method is an appropriate method.
If the user chooses to proceed and not complete the items by clicking on ‘Carry on: Even if there are uncompleted
unreconciled disagreements’ in the warning window they may end up having coded but not completed items. The
coding for these items will not show up in searches and reports as the item is not marked as complete. If you look at
the coding in the Document details window the user will only see their own coding for those items. If they apply
further codes to those items, using the changed codeset, the items will remain un-completed. The items will need to
be manually completed by opening the properties window for the codeset and checking the Coding completed
option or by using the bulk coding function in the Review statistics tab.
Allocating references for coding References to be coded can be allocated or assigned to individuals in a number of different ways. The system can
help manage the coding process but telling the users what code set to apply, to which items to apply it, what has
been coded and what still needs to be code.
Random allocation To create groups of randomly selected items for allocation go to the Codes tab of the Toolbox panel. Create a new
code set, chose a codeset type of Administration and give it a name such as ‘Allocation groups’ to indicate it will
contain the allocated items. Now click on the icon labelled Assign documents to specified codes randomly that is at
the top of the Documents tab of the Home panel.
For allocation you can randomly assign documents to a code set by clicking on the Assign documents to specified codes randomly icon at the top of the Documents tab.
The ‘Allocated items to codes randomly’ window will appear.

EPPI-Reviewer 4: Software for research synthesis
57 Allocating references for coding
Choose an option from the ‘Select from’ drop down menu. To allocate all items not already coded by a particular
code set choose ‘all without any codes from this set’ and select the code set. For the ‘Create codes below this code
option you should select the code set that was just create. Finally select the number of groups to create and the
percentage of items to allocate. The number of groups will normally be the number of reviewers that will be coding
items. If you are double coding the number of groups will normally be half the number of reviewers that will be
coding items. Select Go! to register the choices and to close the window. In the recently created code set new child
nodes, named Group 1, Group 2, etc. will now exist. The number of child nodes will match the number of group you
created. The total number of all items across all groups will total the percentage of items allocated.
If you select and right click on one of the child codes, say Group 1, and choose List items with this code the
randomly selected items will be listed in the Documents tab of the Home panel. All of those items have been
assigned the Group 1 code.
Now that the items have been placed in groups, the groups can be assigned to individuals. There are a couple of
ways to do this. You could just rename the groups to match the individuals who will be doing the coding by selecting
the code and pulling up the code / code set properties window.
Setting up coding allocations If you wish to assign the new groups of random documents to individuals and let the system keep track of what code
set to apply and what has been coded, go to the Collaborate tab of the Home panel.

EPPI-Reviewer 4: Software for research synthesis
58 Allocating references for coding
Click on the Create new button and the assign work box will appear. From the first drop down menu select the code
that contains the items that will be coded. This would be the Group 1, Group 2, etc. nodes that we created
previously. From the next dropdown menu select the codeset that will be applied to the allocated items. Finally,
select the person to allocate the items to by using the third dropdown menu.
Since the allocation process uses items assigned to a code you can use any group of items when allocating. If you
need to allocated items to individuals based on previous coding, you just need to select that previous coding for
‘Code studies in this group’ when setting up the allocation.
Now click on Assign work button. The assignment will be listed in the Coding assignments table.
Allocating items for double/multiple coding For quality assurance items are often double (or even triple) coded. Double coding means a code set may be applied
twice times to an item by different reviewers. This is often called double screening or double data-extraction
depending on the purpose of the codeset.
If double coding is to be used, repeat the steps for allocation, as described above in the allocation instructions, but
rather than allocating a different group of items to each reviewer, use the same items for each reviewer. After
clicking on Assign work for the first reviewer, change the reviewers name and click on Assign work again.
Be sure to check that the Codeset that will be used for double coding (ex. the screening codeset) is set to
Comparison data entry. A codeset that is set for Comparison data entry has the two-person icon displayed next to it.
Codesets set for Comparison data entry have a two-person icon displayed.
You can also change or check the this property by right-clicking the code set, displaying the properties for that set
and editing the properties accordingly.
Coding by allocated references
Normal coding
If the items to be coded have been allocated to a single reviewer the user must be sure they are accessing the
correct items. Select the My Info tab of the Home panel. The allocated coding tasks are listed in the ‘My work
allocation in this review’ table.

EPPI-Reviewer 4: Software for research synthesis
59 Allocating references for coding
Find the row in the table for the task you are going to work on and click in the cell of the column labelled Remaining.
The Documents tab will appear listing the allocated items that have not yet been coded in the selected allocation.
Select the first item in the list by to open the Documents details window. Move through the items applying the
codes. As it is single coding, the items will be automatically marked as Complete when a code is applied. The list of
items assigned to an individual for coding can also be found in the Collaborate tab.
Comparison coding
If the items to be coded have been allocated to a code-set set up for Comparison coding the reviewer will still access
their items in the My info tab. The items for coding can also be accesses on the Collaborate tab by clicking in the cell
of the Allocated and Started column of the ‘My work allocation in this review’ table.
Please note that when carrying out Comparison data entry, the item is not marked as Complete until reconciling has been carried out. This means that if you run searches or reports on those items based on their coding, the codings will not appear until the Agreements are marked as complete and the Disagreements are reconciled and marked as complete.
Comparison and reconciling of Comparison coded items If Comparison data entry has been carried out the reviewers will want to compare coding and reconcile the
differences.
Go to the Collaborate tab of the Home panel. The allocations are displayed on in this panel. Click on the button
labelled Create comparison to bring up the Create comparison record window. Select the name of Reviewer 1 and
Reviewer 2 and the code set to compare. To restrict the comparison to a particular group of items (such as the ones
that you just coded) select the code that will identify those items in the Codes tab and then click on Set Attribute
(optional).

EPPI-Reviewer 4: Software for research synthesis
60 Allocating references for coding
Now click on the Create Comparison button in the window to run the comparison and create a new row in the
comparison table.
From this new comparison row you can generate a ‘Quick report’ of the coding by clicking on the Run button for the
new table row. Clicking on Run will bring up the Quick comparison report window. Select the code set to compare
from the Codes panel (the code set used to carry out the coding), click on Select this code (set) button and then click
on the Run button in the window.
An html window will pop up containing the report. This report shows how each reviewer coded each document and
the agreed version if any items have been reconciled at this point. Since this window is in html, the contents can be
cut and pasted into most word processing or spreadsheet software such as Word or Excel.

EPPI-Reviewer 4: Software for research synthesis
61 Allocating references for coding
To view the statistics on the coding and reconcile the agreements click on the View button in the Stats column. This
will bring up the Comparison statistics window. The number of items coded for each reviewer is listed along with the
number of agreements and disagreements. Clicking on the list button for either agreements or disagreements will
pull up those items in the Documents tab.
There may be two tabs in this window labelled Full and Include/Exclude Only. The Full tab will calculate the number
of agreements and disagreements based on any differences between the different coders.
The Include/Exclude Only tab is available when you are running a comparison that uses the screening codeset type.
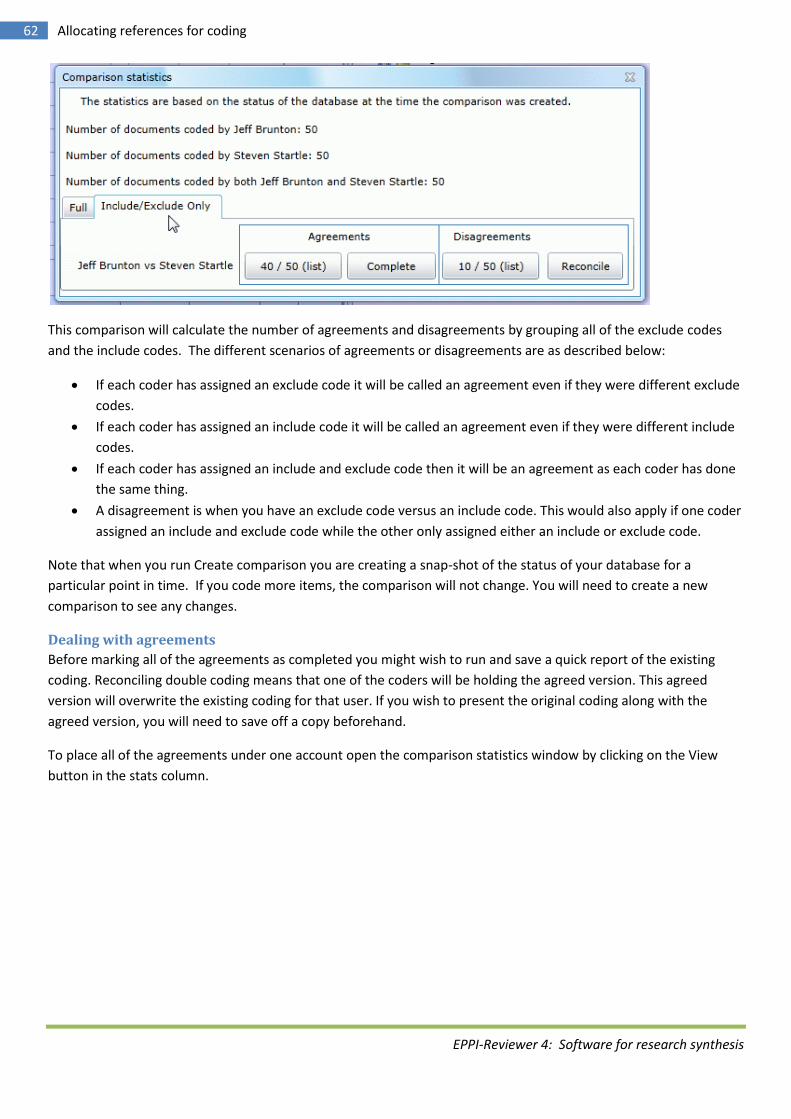
EPPI-Reviewer 4: Software for research synthesis
62 Allocating references for coding
This comparison will calculate the number of agreements and disagreements by grouping all of the exclude codes
and the include codes. The different scenarios of agreements or disagreements are as described below:
If each coder has assigned an exclude code it will be called an agreement even if they were different exclude
codes.
If each coder has assigned an include code it will be called an agreement even if they were different include
codes.
If each coder has assigned an include and exclude code then it will be an agreement as each coder has done
the same thing.
A disagreement is when you have an exclude code versus an include code. This would also apply if one coder
assigned an include and exclude code while the other only assigned either an include or exclude code.
Note that when you run Create comparison you are creating a snap-shot of the status of your database for a
particular point in time. If you code more items, the comparison will not change. You will need to create a new
comparison to see any changes.
Dealing with agreements
Before marking all of the agreements as completed you might wish to run and save a quick report of the existing
coding. Reconciling double coding means that one of the coders will be holding the agreed version. This agreed
version will overwrite the existing coding for that user. If you wish to present the original coding along with the
agreed version, you will need to save off a copy beforehand.
To place all of the agreements under one account open the comparison statistics window by clicking on the View
button in the stats column.

EPPI-Reviewer 4: Software for research synthesis
63 Allocating references for coding
In the Comparison statistics window click on the Complete button to open the Complete agreed coding window.
Select the user account from the dropdown menu that will hold the agreed versions and click on Go!
Although there is no requirement for one account to hold all of the agreed versions, it might be easier to keep track
of your process if this was the case.
It is important to remember that while the coding may be in agreement between two users any textual response may be different. If textural responses have been given the user may wish to compare the responses using the ‘Quick report’ function.
Once you click on Go! the items will be marked as Coding complete..
Dealing with disagreements
There are a number of different ways to compare and reconcile the disagreements depending on the complexity of
your coding tool. For coding tools that have many levels of hierarchy and contain a large amount of textual input
then it would be expected that almost all items would be disagreements. In this situation the reviewer may prefer to
make comparisons using the View comparison options in the Coding record tab (see further down in this section for
details).
For most coding tools, such as screening tools or tools with two or possible three levels of hierarchy, then the
Comparison reconciliation screen is the preferred method dealing with disagreements.

EPPI-Reviewer 4: Software for research synthesis
64 Allocating references for coding
This screen can be access by clicking on the Reconcile button in the Comparison statistics window.
The Comparison Reconciliation screen will display the items that are listed as disagreements. Each reviewers work is
displayed in a column and each row represents an item. The codes selected by each review are displayed as text
boxes on the screen.
When you select a row the row is highlighted and the citation details are listed at the bottom of the screen. If a pdf
has been uploaded it can be accessed as well.
The person reconciling the disagreements can see the codes that each reviewer selected. Once a agreed version is
chosen the item can be completed by clicking on the Complete button that exists in each column for each item. If

EPPI-Reviewer 4: Software for research synthesis
65 Allocating references for coding
you click the Complete button for the first reviewer then it will be first reviewers version of the coding that is the
agreed/completed version.
The green check in that cell will indicate which reviewers coding is the agreed version. As well, once an item is
completed the checkbox on the left side of the row will be marked.
This method of completing items will allow a third person to carry out the operation by selecting coding other than
their own as the agreed version.
To un-complete an item you can click the Un-Complete button that appears in the second column.
As each item is completed the row will turn green to help the reviewer identify the items that still need to be
completed.
If you are reconciling many items you can page what is displayed on the screen. The number of items in the page is
tied to the number of items in a page in the Document details window. To keep the page fast and responsive you
might wish to lower the value from the default value of 700.
If you need to go to the actual citation in the Document details window you can click on the ID link just below the
Author(Year) data that can be found in each row.

EPPI-Reviewer 4: Software for research synthesis
66 Allocating references for coding
If your coding tool has more than one level of hierarchy you can display the full path by clicking on the code that is
displayed. Each parent code up to the root level will be shown.
If any text has been entered in the Info box while coding, that text will also be displayed if you click on the code.
For comparisons using more complex coding tools you may prefer to use the Run comparison or Live comparison in
the Coding record tab. With the Comparison statistics window open click on the list button for the disagreements.
The disagreements are then listed in the Documents tab. Select the first document to open the Documents details
window by clicking on the Go button on the left.
You should now be in the Documents details window. Select the ‘Coding record’ tab on the right hand side of the
screen. The reviewers who have coded the item across all codesets will be listed.
To compare the coding of an individual item select the Run comparison button after selecting the coders to
compare. This will present the choices of the different coders for the particular item in a popup window.

EPPI-Reviewer 4: Software for research synthesis
67 Allocating references for coding
To compare the coding on each item click on the Live comparison button. Now change to the Citation details tab so
you can move through the items. Finally, click on the code set on the left side of the screen bring up the live
comparisons.
At the bottom of the screen, under the citation details box, the codings for each reviewer in the comparison will be
displayed.
The code selections displayed on the left side of the screen in the code treeview are your own selections (assuming
you have logged in using your own account). You can edit these choices based on the comparison data displayed
below the citation box.
When you have made your agreed selection (i.e. reconcile the item) you need to mark the item as complete. A
Coding not complete item has the red disc displayed next to it. If you click on this disk a Coding complete window
will appear where you can select OK to mark it as complete. The item should now have a green disc next to it; the
Coding complete icon.
The Coding not complete icon indicates that coding for this item is not finalised. Items with codes not finalised will not appear in reports or searches.
The Coding complete icon indicates that coding for this item is finalized. Items with finalised codes will appear in reports and searches.

EPPI-Reviewer 4: Software for research synthesis
68 Coding only interface
The user can now move through each item by clicking on the next or previous button at the top of the citation
details box.
An important point to remember when marking an item as complete is that the coding of the person marking the items as complete becomes the completed coding. Always make sure your coding is correct before you mark the item as complete. If someone else comes along later, edits the coding and marks it as complete, then their coding becomes the completed coding.
Coding only interface The ‘Coding only’ interface is designed to simplify your coding tasks by using your coding allocations to direct your
work in an optimised interface. It also allows true double blind coding / screening by ensuring that the different
reviewers cannot access each other's work.
In order to use this interface, you should first set up each reviewer’s coding assignments in the Collaborate tab. This
is described under Allocating references for coding.
To enter the ‘Coding only’ interface you must click on the ‘Coding only’ button when selecting your review.
The coding only option is available just after the login screen as well as in the My info tab.
The coding only interface has 2 main areas. The Documents tab is on the left as always. On the right side is the My
info tab where the reviewers coding allocations and available reviews are listed.

EPPI-Reviewer 4: Software for research synthesis
69 Coding only interface
When you enter the ‘Coding only’ interface the system will automatically load the list of ‘Remaining’ items from your
first coding allocation.

EPPI-Reviewer 4: Software for research synthesis
70 Coding only interface
To begin coding click on Go for the first item and you will be taken to the Document details window.
The document details window will look the same except some of the functionality has been removed. The codeset
properties icon has been removed so the reviewer cannot edit the codeset.
In the Coding record tab the coder will only be able to examine their own coding. The Run comparison and the Live
comparison options have been removed. This means that the coder cannot see other reviewers work allowing true
double blind coding.
The ability to upload full text documents has been removed as well although if a document has already been
uploaded it will be available to the coder to access.

EPPI-Reviewer 4: Software for research synthesis
71 Screening tab
A review administrator can also restrict a reviewer to the ‘Coding only’ role through the ‘EPPI-Reviewer 4 account
and review manager’. When a reviewer is the ‘Coding only’ role they will not have the option to load the review
using the normal interface.
Screening tab Much of the coding functionality that has been described up to this point has now been incorporated into the
Screening tab. From this tab you can set a number of screening parameters, let EPPI-Reviewer select the items that
you will screen, and then click on the Begin screening button to access your items.
Screening tab layout There are 4 main areas in the screening tab. In the top left corner is where you can set up the different options for
the type of screening you will be carrying out.
(Note that any changes you make here should be saved, using the Save Options button – otherwise you will lose your
changes. The exception is the chosen Screening codeset, which will be stored automatically.)
To the right, the screening progress is represented graphically.

EPPI-Reviewer 4: Software for research synthesis
72 Screening tab
On the bottom left the codes used by the Priority screening function are listed, whilst on the bottom right the
training records related to the system’s text mining functionality are displayed.
The process of setting up the screening tab depends on whether you are using the Priority screening functionality
(text mining) or Random screening.
It is important to note that all the features described here are designed to work for standard screening exercises. Departures from the expected conventions might produce unexpected results: for example, the “Multiple (auto-complete)” reconciliation mode, expects that items will receive one and only one code from the screening codeset, assigning more than one code might lead to incorrect detection of agreements.
Setting up for Random screening To use Random screening (i.e. the items to screen are selected randomly based on your chosen parameters) you
must select Random from the Screening mode dropdown menu in the Screening options area.
You should then select the coding tool you will be using from the Screening codeset dropdown menu. This screening
tool should be set up using the Screening codeset type. You should see the codes from that selected codeset
displayed at the bottom left hand side of the screen (unless you have unchecked the Add codes automatically
option in that area).
Next, you need to let the system know where you are selecting the items from. The options are Screen everything or
Screen selected code. Screen everything means that the selection of items will include all items in the review.
Screen on selected code means you can select the items based on previous coding. For example, if you are screening
on full report you might want to select the Include code from your Screen on title and abstract codeset so you are
only looking at the items with that include code.
Now that the system knows what codeset to use and where to select the items from you can set the Reconciliation
mode and the # of people screening each item option. What you set this to will depend on the codeset that you
selected and whether it was set for normal or comparison coding.
If your coding tool is set for normal coding mode then the # of people screening each item value should be set to 1.
As well, the Reconciliation mode should be set to Single (auto-completes).

EPPI-Reviewer 4: Software for research synthesis
73 Screening tab
If your coding tool is set for comparison coding then the # of people screening each item value should be set to a
value greater than one.
If you have set the # of people screening each item option to a value greater than one, then you should select one of
the 4 Multiple: reconciliation options. These options are:
Multiple (no auto-completion) – this option will leave all of the coding marked as ‘not complete’
Multiple: auto complete (code level) – this option will mark the coding as complete if there is agreement
between the reviewers
Multiple: auto complete (include / exclude level) – this option will mark the coding as complete if there is
agreement at the include vs exclude code level (i.e. two different excludes will still be an agreement)
Multiple: safety first – this will mark the item as complete and ‘included’ if any of the reviewers select an
include code
A final option is the Auto-exclude check. If this option is selected, items that are given an exclude code are also given
the E flag.
This means the item will not be loaded when the review is loaded. You can find details about these flags under I, E
and D flags.
The Review needs indexing option is not relevant if you are using random screening. It should be unchecked.
Once the reconciliation mode has been set you should now click the Save options button to save your selections.
You can now create the list of items to screen by clicking on the Create list of items to screen at the top of the page.

EPPI-Reviewer 4: Software for research synthesis
74 Screening tab
Depending on the size of the review and the options you selected this operation can take a while to run. To see if the
list generation is complete you can click on the Refresh icon next to the Save button. If the List creation in progress
checkbox is selected then the list is still being generated. If the checkbox is not selected and disabled then the list
generation is complete.
Once the list generation is complete you can begin screening items by clicking on the Begin Screening button at the
top of the page.
If you are using comparison coding and have selected one of the multiple reconciliation modes the system will
determine the items each person will screen to match the chosen parameters. For example, imagine a review with 3
screeners, the screening tool was set up for comparison coding, the ‘# people screening each item’ was set for 2 and
the reconciliation mode was ‘Multiple (no auto-completion)’. If each reviewer clicked on Begin screening and started
working through the items the system give each reviewer the correct number of items so that all items in the review
were screened twice. If one person was screening quickly and the other two more slowly it would match up the
items accordingly.
Note that making further changes to the screening options in this tab normally mean you should create a new list of
items to screen, by clicking the appropriate button. Otherwise, you will still be working from the old list of items.
(This won’t matter for changes in reconciliation mode, for example, but changes in the screening codeset, changes in
what to screen, and the like should be accompanied by the creation of a new, correct and up-to-date, list of items to
screen.)
Setting up for Priority Screening Setting up for Priority screening is very similar to setting up for Random screening but with a few extra steps. All of
the steps will be repeated here for the benefit of the reviewer who hasn’t read the Random screening section.
To begin you should select Priority from the Screening mode dropdown menu in the Screening options area.
As well you should select the screening tool that you will be using. This screening tool should be set up using the
Screening codeset type.

EPPI-Reviewer 4: Software for research synthesis
75 Screening tab
Next you need to let the system know where you are selecting the items from. The options are Screen everything or
Screen selected code. Screen everything means that the selection of items will include all items in the review.
Screen on selected code means you can select the items based on previous coding. For example, if you are screening
on full report you might want to select the Include code from your Screen on title and abstract codeset. If you are
screening on Title and Abstract you will most likely select Screen everything.
Now that the system knows what codeset to use and where to select the items from you can set the Reconciliation
mode and the # of people screening each item option. If you change the # of people screening each item to a value
greater than 1 then you need to change the screening codeset to comparison coding. This is a property of the
codeset. The value selected for the # of people screening each item option will determine what options you should
select in the Reconciliation mode dropdown menu.
If the # of people screening each item option is set to 1 then you are in normal coding mode and Reconciliation
mode should be set to Single (auto-completes).

EPPI-Reviewer 4: Software for research synthesis
76 Screening tab
If you have set the # of people screening each item option to a value greater than one then you will want to select
one of the 4 Multiple: reconciliation options. These options are:
Multiple (no auto-completion) – this option will leave all of the coding marked as ‘not complete’
Multiple: auto complete (code level) – this option will mark the coding as complete if there is agreement
between the reviewers
Multiple: auto complete (include / exclude level) – this option will mark the coding as complete is there is
agreement at the include vs exclude code level (i.e. two different excludes will still be an agreement)
Multiple: safety first – this will mark the item as complete and ‘included’ if any of the reviewers select an
include code
Once the reconciliation mode has been set you should now click the Save options button to save your selections.
You now need to let the system know what codes will be used to train the system. These will most likely be codes
from the selected codeset (in the dropdown at the top of the screen) but it doesn’t need to be all of those codes. If
you have secondary codes that are classification in nature and not specific to screening codes you would probably
not add them to the list. If you have criteria such as ‘Exclude on date’ you might not include them either as the date
information is not normally in the title and abstract fields. The text mining functions only look at the title and
abstract fields so criteria based on information outside of those fields will be ignored and would probably not be
added to the list.
The method of adding individual criteria to the area at the bottom left of the screen is as follows:
Select the code in the Codes tab…
…and then click on the Add selected code to include/exclude list arrow. This will place it in the list. Be sure to tick or untick the Include? box as appropriate.
You should now be ready to create the list of items to screen by clicking on the Create list of items to screen at the
top of the page.
Depending on the size of the review and the options you selected this operation can take a while to run. To see if the
list generation is complete you can click on the Refresh icon next to the Save button. If the List creation in progress

EPPI-Reviewer 4: Software for research synthesis
77 Grouping items
checkbox is selected then the list is still being generated. If the checkbox is not selected and disabled then the list
generation is complete.
Once the list generation is complete you can begin screening items by clicking on the Begin Screening button at the
top of the page.
As with random screening, as described above, note that making further changes to the screening options in this tab
normally mean you should create a new list of items to screen, by clicking the appropriate button. Otherwise, you
will still be working from the old list of items. (This won’t matter for changes in reconciliation mode, for example, but
changes in the screening codeset, changes in what to screen, and the like should be accompanied by the creation of
a new, correct and up-to-date, list of items to screen.)
Grouping items Quite often you may wish to create groups of studies or references based on how the items are coded. This is done
using code sets.
For example, if you wanted to group all the references that were coded in a particular manner you would first run a
search, based on a particular code, to identify the items (see Searching).
A code can now be assigned to the search results. Select the search result so the checkbox is ticked. Now right click a
code in the Codes tab over on the right to display the menu. You will see an option labelled ‘Assign items in selected
searches to this code’. Click on this option and the selected code will be assigned to all of the items in the search.
You may wish to create a code set labelled Groups. In this code set you can set up a number of child codes, each one
corresponding to a group.
This group of coded items can now be recalled at any time in the future.
Analysis of your data As you code your studies you are building up a database of information about those studies. The analysis functions in
EPPI-Reviewer enable you to analyse and synthesise the data you have entered. These features include:
searching the data
generating many different types of reports
performing meta-analysis on the data
Searching The data entered into EPPI-Reviewer are held in a powerful SQL database. This enables quick, sophisticated and
sensitive searches to be performed.
To access the search functions click on the Search tab in the Home panel.

EPPI-Reviewer 4: Software for research synthesis
78 Analysis of your data
Each search is stored as a row in the in the search table. To combine searches, select the searches in the search
table, select a Boolean operator and click on Combine selected. The new search will appear in the table. Click on the
Select button in the appropriate row to list the results in the Documents tab.
All searches can be restricted to either Included documents or Excluded documents.
To carry out a search click on the New search button on the top of the screen. This will open the search window.
From this window searches are constructed.
The Search for documents icon on the Documents tab will also give you access to the search functions.
Code set searching
From the top dropdown menu select either ‘that have at least code from this set’ or ‘that don’t have any codes from
this set’. From the second dropdown menu pick the code set. Decide whether you are looking for excluded and
included documents and then click Search.
The search results will place the search results in the search table.
Code searching
From the top dropdown menu select either ‘with this code’ or ‘without this code’. From the second dropdown menu
pick the code. You can expand the code set to find the code to search on. Decide whether you are looking for
excluded and included documents and then click Search.
The search results will place the search results in the search table.
Freetext searching
Every piece of free-text information entered is indexed and available for searching. Free-text searches include:
searching for phrases
Boolean searching for words in the same record
wildcard searching (for example, “behavio*” will locate both English and American spellings of the word
proximity searching
inflectional searching (for example, entering the term “run” will also search for “running” and “ran”)

EPPI-Reviewer 4: Software for research synthesis
79 Analysis of your data
The free text search can be applied to the Title/Abstract, additional text entered by the reviewer, the text of the
uploaded documents (pdfs, word docs, etc.), Authors, document IDs and publication year.
To search on free text information select ‘containing this text’ from the first drop down menu. Enter the text to be
searched on in the box below. In the second dropdown menu select what to search. This could be Title/Abstract,
Additional text (what you have entered) or Uploaded documents (any pdfs, etc. that you have uploaded), authors
and document IDs. Now click on Search and the results will be displayed in the search table.
Frequency reports Frequency reports allow a reviewer to gain an overview of the answers given to a particular question. It presents all
possible answers together with the number of studies which were categorised with that answer and displays them in
a table.
To run a frequency report, select the Frequencies tab in the Home panel. Highlight the code to be used in the Codes
tab of the Toolbox panel. The frequency report will be generated based on the child nodes of the selected code.
Click on the Get frequencies button at the bottom of the Frequencies tab. The results will be displayed in a table
where each row is a code. The frequencies of each code are contained in the Count column. Click on the Go button
for a particular row and you are taken to the Documents tab where the selected items are displayed.
You can limit the Frequency report to specific documents by selecting a code from the codes tab and clicking on Set
for filter (optional).
You can also generate a frequency report for a codeset by right clicking on the codeset and selecting Display
included item frequencies (children). This operation will run a frequency report on the selected codeset and place
the results in the Frequency tab.
The results of the frequency report can be exported to a number of different formats including Word and Excel.
Crosstab reports Using the crosstab report, it is possible to cross-tabulate the answers of one question against another into a matrix
to find the relationship between certain answers. This function is useful when comparing things such as types of
interventions against results.
To run a crosstabs report, select the Crosstabs tab from the Home panel. You should also select the Codes tab from
the Toolbox panel. Now select a question from a code set. Set this as the X axis of the Cross tabs by clicking on Set
for the X-axis in the Crosstabs tab. Select a second question and make that the Y-axis by clicking on Set for the Y-axis.

EPPI-Reviewer 4: Software for research synthesis
80 Analysis of your data
Now click on Get crosstabs to display the results. The matrix is displayed with the answers for one question in rows
and the answers for the other question in columns. Clicking on the intersection point for two answers will list the
documents that have been coded with both answers.
You can limit the crosstab report to specific documents by selecting a code from the codes tab and clicking on Set for
filter (optional).
The results of the Crosstab report can be exported to a number of different formats including Word and Excel.
Coding reports Coding reports are a way of displaying all of the coding for an item across the different codesets. To access the
coding reports functions click on the Get coding reports(s) for the selected item(s) icon.
The Search for documents icon on the Documents tab will also give you access to the search functions.
First select the item or items you wish to have in the report from the documents tab. Then click on the icon to access
the Item coding reports window.

EPPI-Reviewer 4: Software for research synthesis
81 Analysis of your data
Select the codesets to include in the report and then click on Get report(s).
This will produce a report that will display the citation, it’s abstract and all of the coding that was carried out using
the selected codesets. If no coding was carried out, only the citation and abstract will be displayed.
Configurable Reports The report functions will allow the user to display their coding in many different formats. The user can select the
codes or codesets to build the report and then select the documents to include in the report.
To create a report go to the Reports tab of the Home panel. Enter a name in the ‘Report title’ box and click on the
Save button. This title can be edited at any time.
A report consists of one or more columns that contain the codes that make up the report. To add a new column to
your report click on the Add new column button and the new column will be displayed on the screen.

EPPI-Reviewer 4: Software for research synthesis
82 Analysis of your data
You can now drag the codes or codesets from the Code tab on the right side of the screen over to column. The codes
or codesets that can be dragged will have an arrow next to them. Depending on the type of report the user can
choose as many codes as they wish to put in a column. The user can add as many columns as they wish to a report.
There are two types of report. 'Question' reports summarise all the answers or codes directly below a specified code
or code set. These reports can also have multiple codes per column. ‘Answer’ reports contain one answer (code) per
column. 'Answer' reports can also contain information about outcomes. Where this is selected, they default to a
format that is suitable for use in other statistical software and do not display additional text.
You can change your report between ‘Question’ and ‘Answer’ using the drop down menu.
To edit a column’s properties click on the Minimize button at the top right hand corner of the column. The column
properties will displayed where the user can edit the Column title and choose what to display in the report. By

EPPI-Reviewer 4: Software for research synthesis
83 Analysis of your data
default the code selected, any additional text added by the user and any text coded in uploaded documents, such as
pdfs, will be displayed in the report. This can be seen by the checked boxes.
Be sure to save your report when you have finished putting it together.
Once a report is saved it can be retrieved by clicking on the Load button next to the Save button at the top of the
Reports tab.
To run a report first select the documents that will be included in the report. This could be documents grouped with
a particular code or individually selected items. The documents to include should be selected in the Documents tab
of the Home panel.
Once the documents are selected click on the Run reports icon in the Documents panel.
The Run reports icon can be found at the top of the Documents tab of the Home panel.
You can also click on the Run button at the top of the Reports tab.
Clicking on the Run reports icon opens up the Reports dialog box.
Select the saved report from the Report dropdown menu. If you have not already picked the items to include in your
report you can select them based on previous coding by selecting Items with this coding in the Items to include
dropdown menu. You can also decide the order the items in the report should appear from the Order by dropdown
menu.

EPPI-Reviewer 4: Software for research synthesis
84 Analysis of your data
The Display option allows you to select fields from the citation to be displayed in the report.
Other options include whether to display the report in a horizontal or vertical alignment.
You can also specify a tag to place in front of the Info text and whether place bullets in front of the selected codes.
Bullets are useful when the user may have selected multiple responses for a particular question.
The Show as Risk of Bias figure option is described below.
Once your options are selected click on the command button labelled Go. The report is then generated and
displayed in the Report viewer window. From this window can user can edit, save or print the report.
Creating a Risk of Bias report
You can generate Risk of Bias diagrams using the configurable report function. A Risk of Bias diagram can be used to
summarise reviewer judgements about the reliability of the studies in a review.
To generate these diagrams you must first create a risk of bias coding tool. This could be a separate codeset in your
review or it could be part of an existing codeset. You are free to construct the tool however you wish to examine
any concepts of the studies that may be subject to bias. The only restriction is that the ratings of risk must be in a
particular order.
The order must be:
1. Low Risk

EPPI-Reviewer 4: Software for research synthesis
85 Analysis of your data
2. High Risk
3. Unclear
The names or wording that you give to the ratings is not important. You can word the ratings however you wish as
long as the order is the same.
An example is shown of how the Cochrane Collaboration’s risk of bias tool could be set up in EPPI-Reviewer.
This particular tool is available to copy into your review using the Codeset copy utility that you can find under
Utilities in the EPPI-Reviewer 4 account and review manager. You can find the Account manager on the EPPI-
Reviewer 4 gateway (http://eppi.ioe.ac.uk/cms/er4).
Once you have created your coding tool and coded your studies you can create the risk of bias diagram in the
Reports tab.

EPPI-Reviewer 4: Software for research synthesis
86 Analysis of your data
The report should be a Question report. You should start by creating a new column for each question that you wish
to display and then drag in the appropriate question into each column from your coding tool. For the report to
appear as you expect you will want to only have one question in each column.
Be sure to Save your report once you finished putting it together.
Once the report is set up you should click Run. This will bring up the Reports window.
From this window you should select the report name and the items to include in the report. You should also check
the Show as Risk of Bias figure checkbox. Once you have done this click Go.
Two diagrams will be generated and displayed in the Report viewer window.

EPPI-Reviewer 4: Software for research synthesis
87 Analysis of your data
The first diagram will display each study in its own row and the rating that you have given it for each question. The
low risk ratings are shown as green with a plus sign, the high risk ratings are red with a minus sign and the unclear
items are displayed in yellow with a questions mark.
The second diagram will display the percentage of items that were assigned a particular rating with respect to each
question. The colour coding is as before (green : low, red : high, yellow : unclear) but with the percentage written in
the bar.
As with all other reports that are displayed in the Report viewer you can save it as a Word document, or an html file
or a text file. If you wish to have it in Excel you just need to save it as an html file and then open that file in Excel.
Creating a report that best displays your data
The report function offers the user many options on how to best present their data. How to set up your report can
depend on how you have set up your coding tool.

EPPI-Reviewer 4: Software for research synthesis
88 Analysis of your data
If your coding tool has many levels you will need to drag the lower levels to the columns as report function will only
examine one level of hierarchy at a time. You can place the lower levels in the same column or different columns
depending on what you prefer. For example, if you were creating a multiple report and your coding tool looks like
this (see below), the root level would be ‘Small Animals’. To be sure you had all responses in your report, including
the levels below the root level, you should drag in ‘Small Animals’ and the levels below them such as ‘Infection’ so
you would get the codes below that level. This will ensure that all of the possible responses will be accessible to the
report.
These are a few examples of reports for different scenarios.
1. Show the responses to a number of questions In the same column

EPPI-Reviewer 4: Software for research synthesis
89 Analysis of your data
This is how it looks when setting it up.
This is how it looks when presented.
This can be set up with multiple columns so you can group related questions in each column.

EPPI-Reviewer 4: Software for research synthesis
90 Analysis of your data
2. Have a question in each column
This is how it looks when setting it up.
This is how it looks when presented.

EPPI-Reviewer 4: Software for research synthesis
91 Analysis of your data
3. Show the responses to a question but have each answer in it’s own column
This is how it looks when setting it up.
This is how it looks when presented.

EPPI-Reviewer 4: Software for research synthesis
92 Meta-analysis
4. Show the outcomes entered for the studies
This is how it looks when setting it up.
Be sure you have checked Outcomes when running the report.
This is how it looks when presented.
The column widths will need adjusting depending on the content.
Meta-analysis A statistical meta-analysis allows the user to combine the numerical results of primary research studies that are
addressing similar research questions.

EPPI-Reviewer 4: Software for research synthesis
93 Meta-analysis
EPPI-Reviewer contains a suite of functions to support statistical meta-analysis, supporting this process from the
extraction of data from primary studies to the production of forest plots and sub-group analyses.
There are three stages involved in conducting meta-analysis on EPPI-Reviewer:
1. Setting up your coding tool
2. Entering outcome data
3. Getting your results
Results are available in two forms: either through the built-in statistical functions within ER4, or though exporting
your data for use in other statistical packages (such as stata, SPSS or excel).
Please note: The newest meta-analysis functions in ER4 allow for complex meta-analysis analysis to be undertaken
and the new capabilities mirror most of those found in other software packages. Specifically, the new functions are
based on the ‘metafor’ package in R. In their reporting, users of these functions should cite: Wolfgang Viechtbauer
(2010). Conducting meta-analyses in R with the metafor package. Journal of Statistical Software, 36(3), 1-48
Users of these functions should familiarise themselves with these techniques and the underlying assumptions before
undertaking meta-analyses – many of these are discussed in the EPPI-Centre Introductory text on systematic reviews
(which also contains suggestions for sources for more indepth reading): Gough, D., Oliver, S., & Thomas, J. (Eds.).
(2012). An introduction to systematic reviews. Sage.
The example that follows assumes that you are doing a ‘standard’ meta-analysis, which is looking at the
effectiveness of a given intervention using controlled trials. However, the functions work equally well for other types
of analysis, including the synthesis of correlation coefficients.
Special mention should be made to two chapters which have informed the development of these functions:
Borenstein M, Hedges LV, Higgins JPT, Rothstein HR (2009) Subgroup analyses. In: Introduction to Meta-Analysis. :
John Wiley & Sons, Ltd, pages 59-86; and Deeks JJ, Douglas AG, Bradburn MJ (2001) Statistical methods for
examining heterogeneity and combining results from several studies in meta-analysis. In: Egger M, Davey Smith G;
Altman DG Systematic Reviews in Health Care: Meta-analysis in Context. London: BMJ Publishing Group.
Set up coding
tool
Enter outcome
data
Get results:
export data
Get results: run
meta-analyses

EPPI-Reviewer 4: Software for research synthesis
94 Setting up a meta-analysis in EPPI-Reviewer
Setting up a meta-analysis in EPPI-Reviewer
Planning You should begin to plan your meta-analysis at the beginning of your data extraction, so that you classify your
studies in the way that you want to be able to use them in the meta-analysis. There are three types of codes to
consider creating in your code set:
Study codes;
Intervention / Outcome / Comparison codes; and
Outcome classification codes
Stage 1: Setting up the coding tool Setting up coding tools, as described under Setting up the coding tool earlier in the manual, is a matter of creating
a code set and then right-clicking its nodes to create the structure of your choice. The same tool is used for meta-
analysis, but the types of codes involved are slightly different.
Usually, when you are setting up codes for data extraction, you use the top two options in the dropdown list
depending whether you want a code to be selectable (i.e. appear with a checkbox next to it) or not. Codes for
outcomes are set up in the same way, though additional options are available: outcome, intervention, comparison,
and ‘outcome classification code’.
It is not necessary to use intervention, comparison or classification codes, though you do need to set up at least one
outcome code for the ‘outcomes’ button to appear on the coding screen.
Outcome, intervention and comparison codes Codes which allow you to classify the outcome, intervention and comparison are each individually selectable. While
you may need to compile a list of, for example, all the outcomes a study evaluates (and so select from a list when
doing a data extraction of a study), you also need to be able to distinguish which outcome from the list each
outcome refers to. The same principle applies to interventions and comparisons. If you specify that a given code is

EPPI-Reviewer 4: Software for research synthesis
95 Setting up a meta-analysis in EPPI-Reviewer
one of these types, it is still selectable in the standard coding screen, but it also then appears in the screen where
statistical outcome data are entered, and in the meta-analysis screens.
Outcome classification codes As well as being able to specify the set categories of outcome, intervention and comparison, it is also possible to set
up as many additional categorisations are needed. These are useful in situations in which you have multiple
outcomes with the same outcome, intervention and comparison definitions. An example of their use might be sub-
group analyses in which results are presented separately for males and females, or to be able to distinguish different
types of measurement tool for assessing the same outcome. Outcome classification codes appear as a list of
selectable checkboxes on the right hand side of the screen where statistical data are entered.
Once you have set up at least one code as an outcome, the ‘outcomes’ button will appear on the coding screen

EPPI-Reviewer 4: Software for research synthesis
96 Setting up a meta-analysis in EPPI-Reviewer
Summary of EPPI-Reviewer code types
Study codes These are normal ‘answer’ codes in a code set. They describe a given study characteristic, for example, an aspect of the population, or particular intervention component. These characteristics are constant for all outcomes – they only vary across studies, not across outcomes in the same study. The ways of creating these codes are documented above.
Intervention / Outcome / Comparison codes These are specific categories which are useful for classifying outcome characteristics. Importantly, they can differ between outcomes in the same study, so are applied to individual outcomes, rather than whole studies. These are special code types that are selected when you create a new code.
Outcome classification codes Like intervention / outcome / comparison codes, outcome classification codes are codes which apply to individual outcomes, rather than the whole study. For example, you might want to have classification codes which allow you to identify the follow-up period for intervention measurement, as you might have several of these per study. Classifying study outcomes in this way allows you to quickly to identify specific sub-sets for meta-analysis.
Stage 2: Entering outcome data Once you have specified at least one code as being an ‘outcome’ (in order for the outcome button to appear in your
coding screen), you are able to enter outcomes. Outcomes are associated with a given code set, so you will need to
have at selected at least one code for the coding record to be created. Clicking the ‘outcomes’ button presents you
with a small box containing a list of the outcomes already entered (in your current coding record) against the study
record you are working with.
You can edit existing outcomes, enter new ones and delete redundant outcomes from this screen. Clicking ‘new
outcome’ will cause the outcome editing screen to appear

EPPI-Reviewer 4: Software for research synthesis
97 Setting up a meta-analysis in EPPI-Reviewer
This figure shows an outcome being entered manually. The codes set up previously all appear in the appropriate
places on this screen: outcomes, interventions and comparisons are available to select on the left hand side, and
classification codes appear as a list on the right.
As well as classifying outcomes, of course, this screen enables you to enter numeric data. There are currently eight
types of outcome available. If you require other types please contact us and we will see if they can be added to the
program.
You should name the outcome, enter your outcome data based on the outcome type selected and then click Save
outcome. Once you have outcomes entered, you can view them from the ‘coding record’ tab by clicking view.

EPPI-Reviewer 4: Software for research synthesis
98 Setting up a meta-analysis in EPPI-Reviewer
Your outcomes will then appear in a table as shown below (image is for demonstration purposes only).
The saved outcomes are available for running meta-analysis once the coding for that item is marked as completed.
Stage 3: Setting up your data and choosing studies for inclusion There are two ways of using the data entered as outcomes in ER4: running meta-analyses with the ER4 program
itself, and exporting the data for use in another software application.
Running meta-analyses in EPPI-Reviewer
Once outcomes have been entered, they can be selected for inclusion in individual meta-analyses on the ‘Meta-
analysis’ tab. Any existing meta-analyses will be listed.
Existing users will see options for editing/running meta-analysis (using a new set of commands added in in
September 2015), or will be able to run commands using the ‘old’ method. When the same specifications are
entered, both methods should give the same results, although selecting the edit/run option will allow users greater
flexibility and functionality over the analyses that are undertaken and the diagnostics and outputs that are produced.
Users setting up new meta-analysis will be guided through the full set of (new) options, which are discussed below.

EPPI-Reviewer 4: Software for research synthesis
99 Setting up a meta-analysis in EPPI-Reviewer
To create a new meta-analysis click on the New meta-analysis button. This will open the Setup meta-analysis
window.
The window gives a snapshot of the data to be synthesised as well as the possible commands and options available
for the meta-analysis.
Setting up your meta-analysis Once you have completed your data extraction, you are ready to create your meta-analysis. The ‘meta-analysis’ tab
allows you to create and edit any number of meta-analyses. The Setup meta-analysis screen is the place to do this.

EPPI-Reviewer 4: Software for research synthesis
100 Setting up a meta-analysis in EPPI-Reviewer

EPPI-Reviewer 4: Software for research synthesis
101 Setting up a meta-analysis in EPPI-Reviewer
How to use the functionality available in the meta-analysis table

EPPI-Reviewer 4: Software for research synthesis
102 Setting up a meta-analysis in EPPI-Reviewer
How the Intervention / Outcome / Comparison and Outcome Classification codes can be used

EPPI-Reviewer 4: Software for research synthesis
103 Setting up a meta-analysis in EPPI-Reviewer
How you can use generic study-level codes to organise outcomes in your meta-analysis

EPPI-Reviewer 4: Software for research synthesis
104 Setting up a meta-analysis in EPPI-Reviewer
Stage 4 – specifying the data type
As with entering the numeric outcome data, the outcomes, interventions and comparisons are
available in order to help you select which outcomes you want to include in each analysis. As well as
specifying which outcomes should be included in the analysis, you also select the effect measure you
want to use in the meta-analysis (odds ratio / mean difference, etc). Users can select which type of
outcome to analyse through clicking on the drop down menu. In the example below the data contain
both binary and continuous outcomes – only values for the selected outcome type will appear
(others will be viewed as zero) and be selectable on the left hand side.
It is therefore not possible to combine different outcome types without first transforming the data
(e.g. using Chinn’s formula to convert odds ratios to d’s and vice versa). *note in the next planned
iteration there will be additional functionality to help users to undertake such transformations.
The full range of outcome types available are:
Specifying the ‘outcome type’ above will mean that
relevant outcomes are available for selection
below. The ‘type’ column shows the different data
types you have in your dataset. Be careful at this
stage as you may unintentionally include two
outcomes from the same study for analysis

EPPI-Reviewer 4: Software for research synthesis
105 Setting up a meta-analysis in EPPI-Reviewer
Stage 5 – specifying the model type
EPPI-Reviewer now supports a greater range of models including fixed effects meta-analysis as well
as a range of different random effects models that employ different techniques to estimate the
between study variance.
There are now five different options for meta-analysis in ER4
There are a range of sources that can provide support in guiding the selection of different meta-
analysis model as well as aiding in the interpretation of their output. These include:
- Higgins, J. P. (Ed.). (2008). Cochrane handbook for systematic reviews of interventions (Vol.
5). Chichester, England: Wiley-Blackwell.
- Cooper, H., Hedges, L. V., & Valentine, J. C. (eds.) (2009) The handbook of research synthesis
and meta-analysis. Russell Sage Foundation.
- Borenstein, M., Hedges, L. V., Higgins, J. P., & Rothstein, H. R. (2011). Introduction to Meta-
analysis Wiley. com.
- Further information is also available within the metafor documentation https://cran.r-
project.org/web/packages/metafor/metafor.pdf and may want to post queries or discuss
issues on http://stats.stackexchange.com/
In brief, the five options entail the following assumptions around the data:

EPPI-Reviewer 4: Software for research synthesis
106 Setting up a meta-analysis in EPPI-Reviewer
a. Fixed effects models make the assumption that within study variance may differ but
that there is homogeneity in effect size across studies (note - this is often an unlikely
assumption in practice and users should examine the heterogeneity statistics given
in the outputs carefully; for fixed effect models only the Q value and the result of
whether the heterogeneity is statistically significant are provided)
b. DerSimonian-Laird (DL) models are the most commonly used form of random effects
model in the literature. Random effects (RE) models explicitly assume that there is
heterogeneity in the true underlying effect under study, and the different types of
model estimate the between study variance (tau squared (τ2) in different ways with
different assumptions. This is also used as an additional factor in weighting the
studies. In the case of DL models, there is no specification as to the form of this
variance.
c. In Maximum Likelihood (ML) estimation, assumptions are made around the
distribution of the between study variance (normality) which are necessary to solve
using the log likelihood function1.
d. Restricted Maximum Likelihood (REML) estimation is similar to the ML above, but
only part of the likelihood function that is fixed is maximised.
e. Empirical Bayes (EB) models are a reduced form of full Bayesian models that allow
for flexibility in the estimation of the model parameters (which are derived from the
data themselves as opposed to prior knowledge or subjective judgement). While
they represent a reduced form of Bayesian models, they may be equally as
computationally complex (and therefore less likely to converge; for more
information and an overview of Empirical Bayes models and Bayesian meta analysis
more generally see Sutton, A. J., & Abrams, K. R. (2001). Bayesian methods in meta-
analysis and evidence synthesis. Statistical Methods in Medical Research, 10(4), 277-
303.).
Running a random effects model does require sufficient between study heterogeneity, and this is
not always the case (where there is not sufficient between study heterogeneity the estimates will be
identical to a fixed effects model). In a number of cases where there are a large amount of studies
and significant between study heterogeneity, the simplest DL model will suffice; although ML and
REML may be favoured and provide better estimates where there is a small number of studies. ML,
REML and EB are more complex estimators. Overall, there is no definitive answer as to which model
specification should be used when running a meta-analysis – this is mainly determined by the data
that are entered into ER4 - and ER4 users should read up on the suggested references at the
beginning of section 2 before proceeding (Borenstein et al 2011 provide a useful outline).
1

EPPI-Reviewer 4: Software for research synthesis
107 Setting up a meta-analysis in EPPI-Reviewer
Stage 6 – specifying additional modifications, model output, and publication bias options
1. Knapp-Hartung adjustment – This option is available for RE models only and provides an
alternative means of calculating the variances. There is not complete consensus in literature
on whether the use of this adjustment improves estimates – there are many occasions when
it appears advantageous although there are other instances where it appears to provide
estimates that are too conservative. The choice of model selection (above) and the degree
of heterogeneity also have implications as to whether selection of KH adjustment is
appropriate. In STATA’s meta-regression package, the adjustment is set to default, although
in R (and hence ER4) users can select this option. ER4 users are advised to note/report
whether adjustment is used in their analyses in reporting results. For more information on
the relative merits and drawbacks of this adjustment please see: Röver, C., Knapp, G., &
Friede, T. (2015). Modified Knapp-Hartung random-effects meta-analysis recommended for
applications in rare diseases. arXiv preprint arXiv:1508.01227
2. Significance level and decimal places – The default for these is 95% with outputs showing
estimates with up to four decimal points. Users may want to alter the significance level of
tests from 95% infrequently, but may choose to alter decimal places more often to match
journal/publishing requirements.
3. Rank correlation test for funnel plot asymmetry – This test carries out the rank correlation
between standardized intervention effect and its standard error to assess the extent of
publication bias. This tests the extent to which the association between the effect size of
studies and their size is greater than might be expected by chance; significant tests indicate
evidence of publication bias. The output produces an estimate of Kendall’s tau (the
correlation coefficient) and its p-value. The specific test used is that proposed by Begg and
1
2
3
4
5
6
7
8

EPPI-Reviewer 4: Software for research synthesis
108 Setting up a meta-analysis in EPPI-Reviewer
Mazumdar (1994)2; Egger’s test is an alternative (see 5). Although this test is based on the
funnel plot, users will need to select this in the output [select 6 to produce funnel plots]. For
further notes see http://www-users.york.ac.uk/~mb55/msc/systrev/week7/pub_text.pdf on
publication bias.
4. Trim and Fill - Unlike the test proposed in 3 and 5, trim and fill is a means of estimating the
impact of potential publication bias on the estimates through trimming extreme values and
‘imputing’ values for ‘missing’ studies. Trim and fill is essentially a means of identifying and
correcting for asymmetry in funnel plots – it is based on the assumption that any asymmetry
in the funnel plot is caused by publication bias and needs to be ‘corrected’ in this way. In
some cases, this can be quite a strong assumption to make. Rothstein and colleagues have a
whole book dedicated to publication bias which includes detailed description of the merits
and drawbacks of this procedure3. Users implementing trim and fill will find that their model
outputs now contain unadjusted estimates as well as trim and fill adjusted estimates (see
example below)
5. Egger’s test for publication bias is based on the Galbraith plot (which is produced as
standard in output) and is based on whether the intercept in a regression of x and x deviates
significantly from zero. Where the intercept does deviate at a statistically significant level,
this is taken as evidence of publication bias. The ER4 output produced gives the t-test
statistic, standard error and a p-value.
6. Show funnel plots – Four funnel plots are produced when this one is selected; the most
familiar is that plotting the Standard Error (SE) against the effect size.
7. Show box plot and q-q charts – These can be used to explore assumptions in the data and to
assess the presence and influence of outliers in the data.
8. Show credibility/prediction intervals – This is appropriate for Random Effects (RE) models
where the overall effect is the average of the true effects; in this case a prediction interval
can help understand what might be the effect within an individual study through calculating
alternative confidence intervals, which are displayed on the forest plot. (Note: future
planned updates of ER4 will display the values of the interval on the forest plot)
2 Begg, C. B., & Mazumdar, M. (1994). Operating characteristics of a rank correlation test for publication bias. Biometrics, 1088-1101. 3 Rothstein, H. R., Sutton, A. J., & Borenstein, M. (Eds.). (2006). Publication bias in meta-analysis: Prevention, assessment and adjustments. John Wiley & Sons.

EPPI-Reviewer 4: Software for research synthesis
109 Setting up a meta-analysis in EPPI-Reviewer
Stage 7 – Choosing forest plot options
- ER4 users can choose from the following options in specifying forest plots
Stage 8 – Interpreting and exporting output
When you click Run meta-analysis the results are displayed in the Report viewer. From this screen
you have the option of editing and printing the results or saving them in a number of different
formats. These include Word, text and html. If you save it as html you can open the file in excel thus
saving your results as an excel file as well.
Stage 9 - Subgroup analysis
EPPI-Reviewer also supports limited subgroup analysis. You perform these by selecting two
outcomes from your list and clicking ‘sub-group analysis.
*Note – the functionality of subgroup analysis and moderator analysis in regression will be
improved in future iterations of ER4. Currently all sub-group analysis takes place off the main
meta-analysis screen. Currently, readers should familiarise themselves with how to add in study
characteristics and select studies on the basis of these (see Stage 3)
The studies from the two selected meta-analyses are then entered into a sub-group analysis. The
variance in the random effects analysis is calculated individually for each sub-group, though the
pooled effect size at the bottom of the plot assumes that there is no ‘meaning’ in the sub-groups
and is therefore based on the variance across all the studies, as though they were not subdivided.
The statistical test for difference is ‘Method 1’ from the chapter on Sub group analysis in Borenstein
et al 2009 (for both fixed and random effects models). The calculation to establish the amount of
‘heterogeneity explained’ by the sub-group division is taken from the same chapter (page 179).

EPPI-Reviewer 4: Software for research synthesis
110 Setting up a meta-analysis in EPPI-Reviewer
Exporting effect sizes in reports
The final function to be outlined here is exporting outcomes data in reports. Details on creating
reports can be found under Reports., but in summary, to create a report that exports your
outcomes, you should select the report type ‘single’ and should check the ‘outcomes’ box when
running the report. These reports enable you to export all relevant data about each outcome as well
as study level data that can be used as covariates in a regression. In order to facilitate the use of
these data in other software packages, the application of a given code to a study is indicated by a ‘1’
in the cell (rather than the word). All outcome classification codes are also available in this report,
again, in order for them to be used either as covariates, or to be the basis for sub-group analyses in
whichever statistical software is used.

EPPI-Reviewer 4: Software for research synthesis
111 Text Mining
Meta-analysis training To help understand how meta-analysis works a training section has been added where new and
existing data can be manipulated to see the affect different changes will make. This can be found on
the ‘Meta-analysis training’ tab of the Home panel.
Click on the button labelled Load data and pre-existing data is loaded into the system. Data from 6
studies is loaded. To change the data in a cell, double click the cell and edit the contents. To add a
new study click on the button labelled Add study. You can delete selected studies or all studies using
the Delete highlighted and Delete all studies buttons.
To run a Meta-analysis select the studies to include and click on the Calculate button. Data and
forest plots will be displayed for both Fixed effect and Random effects models. A Funnel plot will
also be calculated and displayed.
Text Mining Text mining is a new feature introduced with EPPI-Reviewer 4 and is leading to new possibilities in
the field of systematic reviewing.
It can assist with searching by identifying significant terms in the documents you have already
included.
It can also be used in prioritising your work by identifying items most likely to be ‘includes’ base on
previously included documents.
EPPI-Reviewer gives you access to a number of different term extraction engines that will extract or
mine relevant terms from the abstracts.
To access the text mining functions select the Find more documents like the ones icon from the top
of the Documents tab.
The Find more documents like the ones listed can be found at the top of the Documents tab of the Home panel.
Clicking on this icon opens the Find similar documents window.

EPPI-Reviewer 4: Software for research synthesis
112 Text Mining
The user has access to four text mining engines.
TF*IDF
TerMine (NaCTeM)
Zemanta
Yahoo
TF*IDF - Term Frequency–Inverse Document Frequency, is a numerical statistic which reflects how
important a word is to a document in a collection or corpus. It is often used as a weighting factor in
information retrieval and text mining. The tf-idf value increases proportionally to the number of
times a word appears in the document, but is offset by the frequency of the word in the corpus,
which helps to control for the fact that some words are generally more common than others. (from
Wikipedia - http://en.wikipedia.org/wiki/Tf%E2%80%93idf).
EPPI-Reviewer uses the MS SQL TF-IDF functionality where the TFIDF of a Term T = (frequency of T) *
log( (#rows in Input) / (#rows having T) ). Further details can be found at
http://msdn.microsoft.com/en-us/library/ms141809.aspx
TerMine – TerMine functionality is provided with permission from the National Centre for Text
Mining (NaCTeM) , Manchester, UK (http://www.nactem.ac.uk/). Termine
(http://www.nactem.ac.uk/software/termine/) is a Term Management System which identifies key
phrases in text. The TerMine service integrates C-Value multiword term extraction and AcroMine
acronym recognition. An analysis result will be a list of candidate multiword terms and their C-Value
scores.
Zemanta – Zemanta (http://www.zemanta.com) provides a web service with named entity
extraction and known phrases extraction from user supplied text. (description from Breda Wiki -
http://neuro.imm.dtu.dk/wiki/Zemanta).
Yahoo – The Yahoo Term Extraction API allows users to perform content analysis by providing a list
of significant words or phrases extracted from a larger content. It is one of the technologies used in
Yahoo! Search.

EPPI-Reviewer 4: Software for research synthesis
113 Text Mining
The extraction engines can be applied to all documents or selected documents.
The Current document option will run the engine again the selected document.
The All items listed option will run the engine against all items on the documents tab.
To extract some terms select a term extraction engine, such as TerMine, from the radio button list.
Let’s apply the TerMine engine to all of the studies so select ‘All items listed’ from the radio button
list. Now click on Get Terms.
The results are now displayed along with a score. This score, in the case of TerMine, is a combination
of a number of factors including:
1. the occurrence frequency of the candidate term 2. the frequency of the candidate term as part of other longer candidate terms 3. the number of these longer candidate terms 4. the length of the candidate term
The table of terms and scores can be exported in a number of different formats.
Using text mining One way to make use of text mining is to let it help you identify documents that are potentially
relevant based on items that you have already identified as relevant. This is particularly useful when
a review has many tens of thousands (possibly hundreds of thousands) of items. It may not be
possible to examine every item and being able to prioritise the items to look at will ensure your
resources are used most efficiently.
To begin, the user should create a random sample of items. This can be done using the Assign
documents to specified codes randomly function. The larger you can make the sample, the more
accurate it will be. A good start may be a sample of 1000 items. It is very important that the sample
is random as it will be used to estimate the percentage of your items that are ‘includes’.
You should now apply your inclusion/exclusion criteria to that sample. When you are finished you
will have a number of ‘included’ items and will be able to calculate the percentage of the items that
are includes.
Next, you should run the text mining functions against your included items. This will help identify
terms and ideas that are representative of a typical ‘included’ item. In the example below TerMine
has been used and the terms are displayed on the right side of the Find similar documents window.
If there are terms in the list that are not representative of your topic you can delete those terms
using the Delete term button. This will give you a more accurate list of terms.

EPPI-Reviewer 4: Software for research synthesis
114 Text Mining
Finally, you want to Search on terms. You can tell the program to search through all of the items
that you have not examined yet to identify the ones that have terms similar to what were identified
by the text mining engine.
If you created your random sample using the Assign documents to specified codes randomly
function then you will have a code identifying those items. If you limit the Search on terms to Search
all documents without this code and select your allocation code (in this example it is called Group 1
(randomly selected items) the program will search through all of those remaining items.
The results of the search will be placed in the Search tab under a search called Term search.
This search will be ordered from the item most likely to be an ‘include’ to least likely. If you proceed
through the list in the order provided you are more likely to find potentially relevant items.
If you compare the number of items to examine with the percentage of potentially relevant items
that you calculated from your random sample you can also get an estimate of how far you need to

EPPI-Reviewer 4: Software for research synthesis
115 Auto-Coding or Clustering
move through your list of items before the chances of finding an included item approaches nil (i.e.
the law of diminishing returns).
This process can be carried out in an iterative fashion. The more items that you have identified as
‘includes’, the more accurate the list of terms become. As the number of includes increase it might
be useful to Get terms again based on those new items to optimise your list of terms.
Another way of using the text mining functions is to use the new terms to identify concepts that you
may not have included in your original database searches.
Auto-Coding or Clustering EPPI-Reviewer can categorise imported items into clusters based on the text in the abstracts.
Automatic document clustering, using text mining, is one way of describing the range of studies you
have identified at the click of a button. Text mining can assist with searching by identifying
significant terms in the documents you have already included. Clustering is taking it step further by
taking the extracted terms and coding the items into a tree structure consisting of the extracted
terms that can be searched and manipulated. This is done using the Lingo3G clustering engine.
To auto-code references click on the Automatically generate codes icon on the Documents tab of
the Home panel. The ‘Automatically code documents’ window will appear where you can set the
constraints of the clustering. The options are:
Maximum hierarchy depth:
o Default 2.0
o Determines how deep in the code tree to go
Minimum cluster size
o Default 0.0 (values 0.0 to 1.0)
Maximum cluster size
o Default 0.35 (values 0.0 1.0)
Single word label weight
o Default 0.5
o How the minimum label length is weighted.
Minimum label length
o Default 1.0
o The minimum number of words in a cluster
You can either select the items to cluster ahead of time or run it on all included items. Click on
Cluster documents and the newly created codes will appear in the Codes tab of the Toolbox panel in
a code set called ‘Lingo3G clusters’.
Now that the items are coded with the extracted terms the items can be searched and manipulated
similar to any other coded item.
This clustering functionality becomes useful when dealing with search results that are in the range of
many thousands. It allows you to quickly categorise, or ‘Auto-code’ the terms contained in the
documents and identify the most relevant documents to your subject.

EPPI-Reviewer 4: Software for research synthesis
116 Translations – Title and Abstract
Further details of the Lingo3G clustering engine can be found in the EPPI-Reviewer 4 reference
manual.
Translations – Title and Abstract EPPI-Reviewer 4 will translate your title and abstract. The system will automatically detect the
source language and allow you to select the language you would like it to be translated to.
The translation function can be found in the Document details window under the Citation details
window.
Clicking on Translate makes a sub-menu appear that allows users to pick the destination language.
This system relies on the Azure Translator from Microsoft, which offers a computer-generated
translation that should aid assessment as to whether the current citation is relevant for a given
review. As a result, the list of languages is limited to those available on the Azure service. For

EPPI-Reviewer 4: Software for research synthesis
117 Key term highlighting
convenience, the list of languages shows the more common languages on top, followed by all the
other languages in alphabetical order.
Clicking on a "to {this language}" option on the sub-menu will generate the translation and
automatically save it as additional text on the top of the Abstract. The translated text is delimited by
the "[Translated title]", "[Translated abstract]" and "[End translation]" tags. No direct "undo" is
provided, but in the case the translation is unsatisfactory it is always possible to edit the abstract in
the Abstract box and remove the unwanted translation.
Key term highlighting A popular function to assist in screening or any other type of coding is the Key term highlighting
function. This function will allow you to select and highlight in green terms that are relevant and
highlight in red terms that are not relevant. By drawing your visual attention to particular key terms
in the title and abstract you may be able to more quickly comprehend the content of the text.
To use this function click on the Show terms button (located to the right of the Next button). When
you click on this button it will change to Hide Terms as displayed below.
You can now select a relevant or irrelevant term from the displayed title and/or abstract and click on
one of three buttons. You can choose between "Relevant Term", "Irrelevant Term" and "Remove
Term". Only exact matches will be are shown, wildcards are not implemented and the system
ignores word boundaries. For example, if term is listed as relevant the phrase "highlighting all terms
in the abstract" will be shown as "highlighting all terms in the abstract".
To edit the list of terms you can click on the Show/Hide Terms List button. The list will appear on the
left side of the screen temporarily hiding the code-trees.

EPPI-Reviewer 4: Software for research synthesis
118 Line-by-line PDF / Inductive coding
You can use the list to edit the terms, change their relevant/irrelevant status and delete them. The
changes will be immediately reflected in the Title and Abstract fields.
Line-by-line PDF / Inductive coding EPPI-Reviewer 4 has inductive coding functionality to allow line by line coding of textual data and
organising and structuring these codes graphically into ‘conceptual relationship diagrams.
Coding textual data Coding the textual data involves examining the text of the study, highlighting certain passages and
applying codes to those passages to identify descriptive and analytic themes.
To begin you may want to first create a new codeset in the Codes tab of the Toolbox panel. For
clarity it could be called something like ‘Inductive coding’. Add 1st level child codes to the code set
that describe the different themes you are looking for. 2nd level child codes relating to the actual text
can be dynamically added at the time of coding. Please note that it is not necessary to create a new
inductive coding codeset; the inductive codes can be part of an existing codeset if you prefer.
Select the document that you are going to code in the Documents tab of the Home panel. This will
take you to the Document details window. You need to upload a full text version of the study to

EPPI-Reviewer 4: Software for research synthesis
119 Line-by-line PDF / Inductive coding
work with. To upload a file click on the button labelled Upload. This will open the ‘Upload File’
window. Click on the Select file button and then access the file to upload from your computer. Once
the file is selected click on Save to upload it to your review. It is now displayed in the table of
uploaded files.
You can work on many different types of documents such as pdfs, Word docs and text.
PDF documents With pdf documents you can select text and apply code to that text directly on the pdf. The pdf
retains all of its formatting while you are working in it.
To work within the pdf, click on View in the ‘View PDF’ column to open the document. It will be
displayed in the PDF tab.
To assign a code to some selected text highlight a relevant section of document. Next, select the
appropriate code (or create a new one) in the inductive coding codeset. The selected code will be
displayed at the top of the page in the cyan coloured box. Finally, click on the Add code to selected
text icon. This is the icon that has the small green plus symbol. This action will assign the selected
code to the highlighted text. You can also click on the ‘a’ key to assign the code to the highlighted
text.

EPPI-Reviewer 4: Software for research synthesis
120 Line-by-line PDF / Inductive coding
The selected text will now be highlighted in yellow.
Removing a code from highlighted text is done the same way except you would select the ‘Remove
code from selected text’ icon. As before you can also click the ‘d’ key in place of the icon.
In the pdf tab you can zoom in and out using the + and – microscope icons or select a specific zoom
percentage. You can also search the document using Find text box.
Annotations
PDF annotations are short comments that reviewers may add to a PDF document. They should not
be used to hold coding information as they cannot be searched, exported or included in reports.
To add an annotation click the Show Annotations button to display the annotations column. Now
double click in the column where you want the annotation to display. This will open the ‘New
Annotation’ window where you can enter you comment and then click Save. The annotation will be
displayed in the semi-transparent right hand column.
Double clicking an existing annotation will allow you to edit or delete it. Annotations can be dragged
up and down within a page but cannot be moved to a new page.
When the annotations are visible the annotations button will change to Hide Annotations. Clicking
on the annotations button now will hide the annotations column.

EPPI-Reviewer 4: Software for research synthesis
121 Line-by-line PDF / Inductive coding
Reset
PDF documents can have a very complex internal representation of text and layout and interpreting
this information can sometimes be difficult. If a user selects a section of text that contains hidden
characters it can be difficult to later remove coding from that hidden text. To overcome this issue
there is a reset option.
If you select the code you want to remove and click Reset… the Reset Pdf Coding window will
appear. This window shows the current code and the current page number. You can then choose to
remove the code from current page or the entire document.
Other types of documents With other types of documents such as text files or Word files you will need to work within the
extracted text of the document.

EPPI-Reviewer 4: Software for research synthesis
122 Line-by-line PDF / Inductive coding
To extract the text from the document click on Go! in the ‘View text’ column. The extracted text,
minus its formatting, will be displayed the ‘Text document’ tab.
You can now select text by holding down the left button of the mouse and sliding across the text.
When you have selected some text, find the appropriate code on the left and highlight it, right click
on the code and select Code selected text. If you need to add a new code select Add child code.
Removing a code from text is done the same way except you should select Uncode selected text.
Inductive coding reports To see what text has been assigned to a particular code, just select the code from the left hand side
of the screen. The applicable text will be highlighted in yellow throughout the document.
If you select Report: all text coded with this code (all PDFs) all instances where this code has been
applied across all studies will be displayed in the report viewer.

EPPI-Reviewer 4: Software for research synthesis
123 Line-by-line PDF / Inductive coding
The report viewer is a text editor that will allow the user to format and print the report.
The selected text can also be displayed in the configurable reports that you can create in the Reports
tab. If you minimise a report column to edit the columns details you specify whether the selected
text will be displayed in the report.
The selected or Coded text (as labelled in the column) is displayed by default and can be turned off
by un-clicking the Coded text checkbox.
Creating conceptual diagrams After codes have been applied to the textual data EPPI-Reviewer can represent the relationships
between those codes in conceptual diagrams.
Select the Diagram tab in the Home panel. At the bottom of the screen click the button labelled New
to create a new diagram.
Be sure the Codes tab is visible in the Toolbox panel. Expand your inductive coding code set and
highlight a code that you would like to show in your diagram by selecting it. Right click on the code
and select Insert in diagram from the menu.
The code will be displayed as rectangle in the Diagrams tab. If you click on the new rectangle and
then click in the centre of it you can move it around the screen by holding down the mouse button.
If you wish to stretch it, select either a corner or side and drag it out. You can change its shape by
selecting a new shape from the drop down menu at the top of the screen. You can also change the

EPPI-Reviewer 4: Software for research synthesis
124 Diagrams
background colour or text colour from the menus at the top of the screen. To delete a shape, select
the shape and click on the button labelled Delete at the bottom of the screen.
Once you have placed your codes in the diagram as images you can connect them with arrows to
show the relationships. To draw an arrow, left click in the centre of one shape and drag the mouse
into the centre of a second shape. An arrow will be drawn between the two shapes.
At any time you can save your diagram by clicking on the Save button at the bottom of the screen.
The Save function can also behave like a Save as function if you change the name in the Save
diagram window. It won't remove the original file so you will end up with the old and new version.
To retrieve a saved diagram click on the Load button. You can the select a diagram from a list of your
saved diagrams.
Diagrams The diagram functionality described above can be used for more than just inductive coding. Flow
charts of your review processes can be displayed using the drawing tools.
To insert the all of the child codes of codeset into the diagram, right-click on the codeset and select
Insert child codes into diagram. All of the child codes are placed in the diagram. You can arrange
them by clicking on a code and then dragging it.
To display the code counts for a particular code click on the Add code counts button at the top of the
diagram. This will display the number of times the code was selected in the boxes.
This method can be used to create a complete flow chart of your entire review.

EPPI-Reviewer 4: Software for research synthesis
125 Expiration of user accounts and shareable reviews
Expiration of user accounts and shareable reviews User accounts and shareable reviews have an expiry date associated with them. If the user goes to
the My info tab they will see listed at the top of the screen the date their account expires and the
date the review expires, if it is a shareable review.
When your user account expires you will be restricted to read-only access to EPPI-Reviewer 4. Read-
only access will allow the user to look at the data and carry out certain operations on the data such
as running reports but they will not be able to add new data such as new records and new coding.
Functions that cannot be access will be greyed out in the interface.
If a shareable review expires it will become read-only with the same limitations as someone trying to
access it with a user account that has expired.
When a user account is expired for more than 2 months the user will not be able to log into the
software. If they require read-only access we can set their account expiry date to the present day - 1
(giving them another 2 months). We can do that as often as a user requests.
You can regain full access to EPPI-Reviewer 4 by extending the expiry date. This will require
purchasing further account access or review access if you have a shareable review.
Our online payment system is active allowing you to extend your account or shareable review expiry
date. Online payments can be made on the EPPI-Reviewer 4 review and account manager than can
be found on the EPPI-Reviewer 4 gateway (http://eppi.ioe.ac.uk/cms/er4). If you prefer the more
traditional invoice and payment method you can contact us at [email protected] to make
these arrangements.

EPPI-Reviewer 4: Software for research synthesis
126 Expiration of user accounts and shareable reviews

EPPI-Reviewer 4: Software for research synthesis
127 Appendix A: Example review
Appendix A: Example review
Layout of a systematic review in EPPI-Reviewer 4 The following pages and figures show a ‘typical’ systematic review as it might be set up in EPPI-
Reviewer 4. Although there may not be such a thing as a ‘typical’ systematic review, most will
include some, if not all, of the steps listed below.
The process flow of this example includes EPPI-Reviewer screenshots of some of the steps from this
list.
1. Importing of search results
2. Duplicate checking
3. Code set creation
4. Allocating items for double screening
5. Double screening on title and abstract to identify potential includes
6. Reconciling disagreements in double screening
7. Full text document retrieval
8. Allocating potential includes for double screening on full text
9. Double screening on full text to verify potential includes
10. Allocating items for keywording
11. Mapping of included studies using a keywording tool
12. Running searches to identify items for detailed data extraction
13. Detailed data extraction
14. Input of numeric outcome data
15. Line by line coding of uploaded full text documents
16. Generating of reports
17. Running meta-analysis
18. Showing the work distribution in a diagram
19. Showing the process flow in a diagram

EPPI-Reviewer 4: Software for research synthesis
128 Appendix A: Example review
Importing of search results In the manage sources window the search log fields should be filled in so there is a clear record of the sources searched and the search terms used. All import activity is also summarised in the Sources tab.

EPPI-Reviewer 4: Software for research synthesis
129 Appendix A: Example review
Duplicate checking All duplicate groups should be checked and marked as completed. The number of duplicates is summarised in the Sources tab.

EPPI-Reviewer 4: Software for research synthesis
130 Appendix A: Example review
Code set creation Codesets should be clearly labelled as to their purpose. Try to keep the code names to a reasonable length by using the description fields and avoid using more than 4 levels of hierarchy. Code sets should normally be set for single data entry unless double coding is being carried using that codeset.

EPPI-Reviewer 4: Software for research synthesis
131 Appendix A: Example review
Allocating items for double screening Items for allocation should be arranged in their own allocation code set and clearly labelled as to their purpose. This makes the work allocations in the Collaborate tab easier to understand.

EPPI-Reviewer 4: Software for research synthesis
132 Appendix A: Example review
Double screening on title and abstract Coding is carried out in the document details window. The items to code for an individual are retrieved in the Collaborate tab. Since double screening is taking place the items are not automatically marked as complete when codes are assigned.

EPPI-Reviewer 4: Software for research synthesis
133 Appendix A: Example review
Reconciling disagreements in double screening Run a Create comparison in the Collaborate tab to generate a Quick report of the coding that has been carried out. The View stats function summarises the agreements and disagreements allowing you to ‘complete’ the agreements and reconcile the disagreements in the Comparison Reconciliation window.

EPPI-Reviewer 4: Software for research synthesis
134 Appendix A: Example review
Full text document retrieval You should create a code set to mange the retrieval of full text documents. When a document is retrieved and uploaded into the system it can be marked as ‘In file’.

EPPI-Reviewer 4: Software for research synthesis
135 Appendix A: Example review
Double screening on full text Uploaded full text documents can be displayed in EPPI-Reviewer and shared among the review team during coding.

EPPI-Reviewer 4: Software for research synthesis
136 Appendix A: Example review
Running searches to identify items To indentify items that will move forward in the process searches based on previous coding can be generated in the Search tab. All searches are recorded and listed in a table. Searches can be combined using Boolean operators.

EPPI-Reviewer 4: Software for research synthesis
137 Appendix A: Example review
Input of numeric outcome data Outcome data from the studies can be entered during the coding process. Multiple outcomes, with different outcome types can be entered for the same item. Outcomes, Intervention, comparisons and outcome classifications can be predefined allowing quick retrieval during data input.

EPPI-Reviewer 4: Software for research synthesis
138 Appendix A: Example review
Line by line text coding coding The textual content of uploaded full text documents can be highlighted and assigned codes. Reports can be generated to identify all text assigned a particular code. All inline text coding can be displayed when generating reports.

EPPI-Reviewer 4: Software for research synthesis
139 Appendix A: Example review
Setting up reports Report structures can be created in a number of different configurable formats. The report structure can be saved and reused on different datasets.

EPPI-Reviewer 4: Software for research synthesis
140 Appendix A: Example review
Running reports Once a report structure is saved it can be run against different datasets. The generated report can be saved in a number of different file formats for direct insertion in the users final report.

EPPI-Reviewer 4: Software for research synthesis
141 Appendix A: Example review
Running a statistical meta-analysis Entered numeric outcome data can be used to run a statistical meta-analysis. Outcome data from different studies can be combined and the program returns the results for fixed and random effects models. Studies from the two selected meta-analyses can also be entered into a sub-group analysis.

EPPI-Reviewer 4: Software for research synthesis
142 Appendix A: Example review
Process flow diagram Most systematic reviews require a process flow diagram showing what took place during the review. The diagram function allows the user to pull their codes into the diagram and have the system add the code counts. Each cell is fully configurable and can be connected by arrows. The diagram can also be exported.

EPPI-Reviewer 4: Software for research synthesis
143 Appendix A: Example review
Work assignment diagrams The diagram functions can be used in many different ways. One possible use is a visual representation of work assignments throughout the review process.