
User Manual - TMI Characterization Laboratory …utw10193.utweb.utexas.edu/InstrumentManuals/WITec...
117
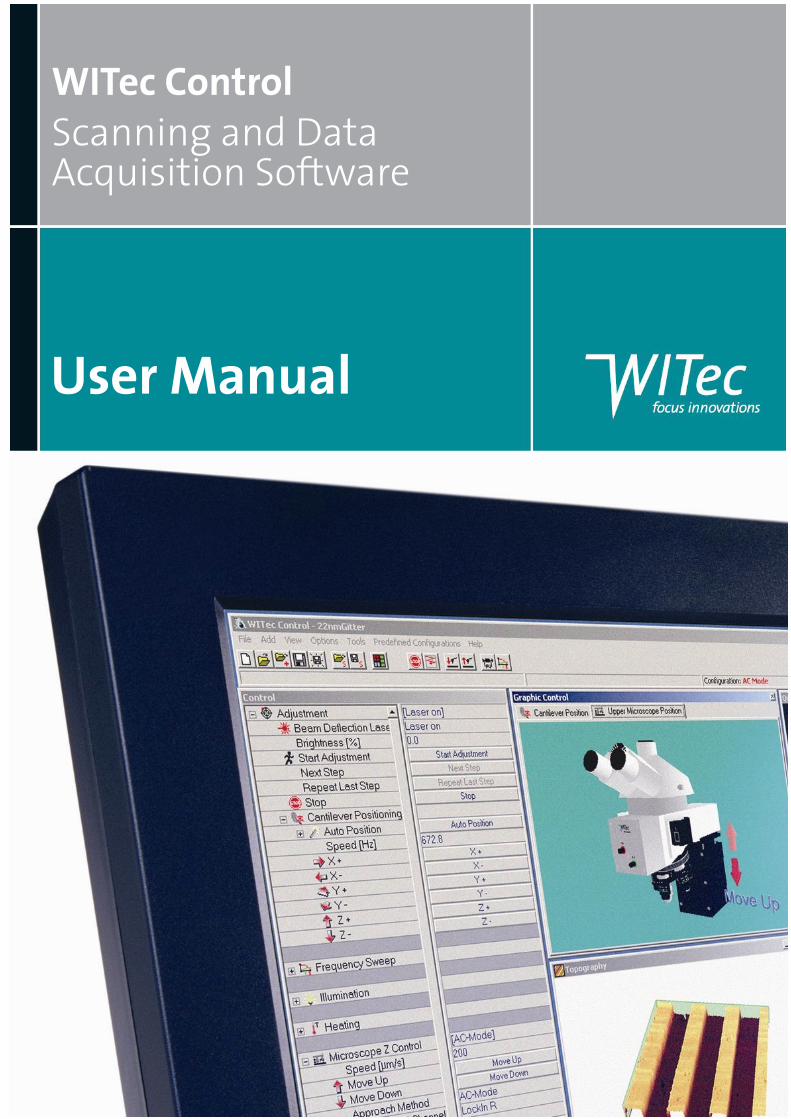
User Manual WITec Control Scanning and Data Acquisition Software
Transcript of User Manual - TMI Characterization Laboratory …utw10193.utweb.utexas.edu/InstrumentManuals/WITec...
User Manual
WITec ControlScanning and DataAcquisition Software

About this manual
This manual describes the WITec Control scanning and data acquisition software.WITec Control is based on the WITec Project software. It uses the structure andall the components of the WITec Project software with additional functionalitiesfor measuring modes such as Confocal Raman Microscopy, SNOM, and AFM. Onlythese functionalities and their corresponding spectroscopy options are describedin this manual.For information about all other features, the user is referred to the WITec Projectmanual.
Warnings are marked with a red bar. Please read these warnings carefully to avoidproblems that may otherwise occur.
If extra care should be taken by the operator due to the presence of intense laserradiation, this warning sign will be present.
HINT Throughout the manual, you will find text blocks with a blue HINT on the left–hand side of the text. These text blocks contain additional, useful information.
Text marked with a shaded rectangle such as Menu Item Name refer to a menuitem in the software.
Text marked with a rectangle such as Button Name refer to a button or checkboxin the software.
Keyboard keys are highlighted as Key .
Version: May 7, 2007
Page iii

Page iv

Safety Information
Please read this manual carefully before using the software.
Copyright
c© Copyright WITec Wissenschaftliche Instrumente und Technologie GmbH1997-2007
WITec Wissenschaftliche Instrumente und Technologie GmbHHorvelsinger Weg 689081 Ulm Germany
fon ++49 (0) 731 140700fax ++49 (0) 731 1407020
email: [email protected]: http://www.WITec-instruments.com
Page v

Page vi

CONTENTS
Contents
1 Opening and closing WITec Control 11.1 Open WITec Control . . . . . . . . . . . . . . . . . . . . . . . . . . . . . . 11.2 Close WITec Control . . . . . . . . . . . . . . . . . . . . . . . . . . . . . . 1
2 Appearance 32.1 Main Menu . . . . . . . . . . . . . . . . . . . . . . . . . . . . . . . . . . . 3
2.1.1 Hardware Control . . . . . . . . . . . . . . . . . . . . . . . . . . . 32.1.2 Configurations . . . . . . . . . . . . . . . . . . . . . . . . . . . . . 5
2.2 Speed Buttons . . . . . . . . . . . . . . . . . . . . . . . . . . . . . . . . . 52.3 Status Bar . . . . . . . . . . . . . . . . . . . . . . . . . . . . . . . . . . . . 6
3 Control Window 73.1 Basic Functional Principles . . . . . . . . . . . . . . . . . . . . . . . . . . 73.2 Visual Representation . . . . . . . . . . . . . . . . . . . . . . . . . . . . . 83.3 Navigation . . . . . . . . . . . . . . . . . . . . . . . . . . . . . . . . . . . 103.4 Devices . . . . . . . . . . . . . . . . . . . . . . . . . . . . . . . . . . . . . 11
3.4.1 Remote Control . . . . . . . . . . . . . . . . . . . . . . . . . . . . 113.4.2 Microscope Illumination . . . . . . . . . . . . . . . . . . . . . . . 123.4.3 Scan Table . . . . . . . . . . . . . . . . . . . . . . . . . . . . . . . 123.4.4 Lock-In . . . . . . . . . . . . . . . . . . . . . . . . . . . . . . . . . 163.4.5 Feedback Settings . . . . . . . . . . . . . . . . . . . . . . . . . . . 193.4.6 Heating . . . . . . . . . . . . . . . . . . . . . . . . . . . . . . . . . 223.4.7 Cantilever Positioning . . . . . . . . . . . . . . . . . . . . . . . . 233.4.8 Filter Wheel . . . . . . . . . . . . . . . . . . . . . . . . . . . . . . 243.4.9 Inverted Microscope . . . . . . . . . . . . . . . . . . . . . . . . . 243.4.10 PFM Control . . . . . . . . . . . . . . . . . . . . . . . . . . . . . . 263.4.11 Spectrograph . . . . . . . . . . . . . . . . . . . . . . . . . . . . . 29
Page vii

CONTENTS
3.4.12 Spec Camera . . . . . . . . . . . . . . . . . . . . . . . . . . . . . . 333.4.13 Signal Routing . . . . . . . . . . . . . . . . . . . . . . . . . . . . . 353.4.14 Sample Positioning . . . . . . . . . . . . . . . . . . . . . . . . . . 363.4.15 Power Meter . . . . . . . . . . . . . . . . . . . . . . . . . . . . . . 39
3.5 Sequencers . . . . . . . . . . . . . . . . . . . . . . . . . . . . . . . . . . . 413.5.1 Auto Illumination . . . . . . . . . . . . . . . . . . . . . . . . . . . 423.5.2 Image Scan . . . . . . . . . . . . . . . . . . . . . . . . . . . . . . . 423.5.3 Line Scan . . . . . . . . . . . . . . . . . . . . . . . . . . . . . . . . 483.5.4 Sample Raster . . . . . . . . . . . . . . . . . . . . . . . . . . . . . 493.5.5 Frequency Sweep . . . . . . . . . . . . . . . . . . . . . . . . . . . 503.5.6 Auto Resonance . . . . . . . . . . . . . . . . . . . . . . . . . . . . 503.5.7 Distance Curve . . . . . . . . . . . . . . . . . . . . . . . . . . . . 513.5.8 Tip Approach . . . . . . . . . . . . . . . . . . . . . . . . . . . . . . 523.5.9 Calibrate Scan Table . . . . . . . . . . . . . . . . . . . . . . . . . 543.5.10 Adjust . . . . . . . . . . . . . . . . . . . . . . . . . . . . . . . . . . 553.5.11 Oscilloscope . . . . . . . . . . . . . . . . . . . . . . . . . . . . . . 563.5.12 Single Spectrum . . . . . . . . . . . . . . . . . . . . . . . . . . . . 573.5.13 Time Series (Fast) . . . . . . . . . . . . . . . . . . . . . . . . . . . 583.5.14 Auto Focus . . . . . . . . . . . . . . . . . . . . . . . . . . . . . . . 583.5.15 Process Script . . . . . . . . . . . . . . . . . . . . . . . . . . . . . 59
3.6 Data Sources . . . . . . . . . . . . . . . . . . . . . . . . . . . . . . . . . . 613.6.1 Channels . . . . . . . . . . . . . . . . . . . . . . . . . . . . . . . . 623.6.2 Fast Stream Channels . . . . . . . . . . . . . . . . . . . . . . . . 693.6.3 Spectral Channels . . . . . . . . . . . . . . . . . . . . . . . . . . . 693.6.4 Controller . . . . . . . . . . . . . . . . . . . . . . . . . . . . . . . . 72
3.7 Auto Save . . . . . . . . . . . . . . . . . . . . . . . . . . . . . . . . . . . . 72
4 Video Control Window 75
5 Status Window 81
6 Message Window 83
7 Quadrant Window 85
8 Graphic Control Window 87
Page viii

CONTENTS
9 Point Viewer 899.1 Speed Buttons . . . . . . . . . . . . . . . . . . . . . . . . . . . . . . . . . 909.2 Sample Area . . . . . . . . . . . . . . . . . . . . . . . . . . . . . . . . . . 969.3 Point List . . . . . . . . . . . . . . . . . . . . . . . . . . . . . . . . . . . . . 979.4 The Context Menu . . . . . . . . . . . . . . . . . . . . . . . . . . . . . . . 97
10 Other Windows 101
11 Configurations 103
Page ix

CONTENTS
Page x

LIST OF FIGURES
List of Figures
3.1 Examples of the Control Window . . . . . . . . . . . . . . . . . . . . . . 93.2 Internal and external coordinate systems in WITec Control . . . . . . . 133.3 Schematic representation of the lock-in of the alphaControl . . . . . . 173.4 Schematic illustration of the PI controller . . . . . . . . . . . . . . . . . 193.5 Schematic illustration of the filter wheel . . . . . . . . . . . . . . . . . . 253.6 The typical PFM curve with the search regions marked. . . . . . . . . . 293.7 Schematic illustration of the slow scan direction. . . . . . . . . . . . . . 46
4.1 Video Control window . . . . . . . . . . . . . . . . . . . . . . . . . . . . . 764.2 Confirmation of video calibration window . . . . . . . . . . . . . . . . . 774.3 Video Channel Options window . . . . . . . . . . . . . . . . . . . . . . . 78
6.1 Message window . . . . . . . . . . . . . . . . . . . . . . . . . . . . . . . 83
7.1 Quadrant Window . . . . . . . . . . . . . . . . . . . . . . . . . . . . . . . 85
8.1 Graphic Control: extended visual interfaces . . . . . . . . . . . . . . . . 88
9.1 The Point Viewer window . . . . . . . . . . . . . . . . . . . . . . . . . . . 899.2 The Sample Size and Bitmap Underlay dialog window with the Point
Viewer in the background. . . . . . . . . . . . . . . . . . . . . . . . . . . 919.3 The options dialog for the point viewer. . . . . . . . . . . . . . . . . . . 929.4 The edit point dialog. . . . . . . . . . . . . . . . . . . . . . . . . . . . . . 949.5 The Point Viewer context menu. . . . . . . . . . . . . . . . . . . . . . . . 97
Page xi

LIST OF FIGURES
Page xii

Chapter 1
Opening and closing WITec Control
The WITec Control software is designed to manage the acquisition of data usingWITec microscopes in conjunction with the alphaControl. Therefore, the softwareshould only be started if the computer is already connected to the controller andthe controller is switched ON.
1.1 Open WITec Control
After double-clicking the WITec Control symbol on the desktop of the computer,the main menu of the software is displayed (Section 2.1). Additionally, the softwarechecks for the presence of various hardware components, the system configuration,and whether or not the software was shut down properly after the last usage.After these initial checks, a start-up sequence is activated. In this procedure severaloperations such as: calibrating the scan table, initializing the spectrometer, coolingthe CCD camera, etc, are performed to ensure the optimal performance of the al-pha300 / alpha500 / alpha700 system. The performed operations are listed in themessage window (Chapter 6).Interrupting this start-up sequence might lead to malfunctions.
1.2 Close WITec Control
When closing the WITec Control software, a shut-down sequence is initiated. Thissequence includes:
• An increase of the distance between the sample and the objective by 500µm.
• The reset of all voltages to default values, which avoids potential damage tothe system components.
Page 1

CHAPTER 1. OPENING AND CLOSING WITEC CONTROL
• The deactivation of the white light illumination.
• The controlled heating of the CCD camera (if present) to room temperature.
The performed operations are listed in the message window (Chapter 6).Shutting down the computer without completing the shut-down sequence mayharm the CCD camera due to excessive thermal stress.
Page 2

Chapter 2
Appearance
After opening the WITec Control software, the main window is displayed. Whilealmost identical to the WITec Project software, this software offers additional fea-tures related to measurement control and the acquisition of data. Descriptions ofthese features are included in this manual. For a detailed description of all otherfunctions, the user is referred to the WITec Project manual.
2.1 Main Menu
The main menu of the WITec Control software provides access to all functions andmenus. All functions can be selected using either the mouse or via HotKeys usingthe Alt - key on your keyboard in combination with the appropriate letter for thedesired menu.
2.1.1 Hardware Control
All hardware controls, visual displays and message windows are listed in this menu.By activating the checkbox, the desired window is displayed at its designated loca-tion.
Control
The control window provides access to all functions and parameters of the con-troller. Based on their functionality, the parameters are grouped in a tree-like struc-ture, allowing quick and intuitive access to all parameters. The functions listed inthe control window depend on the configuration of the system and may vary fromone data acquisition method to another. A detailed description of the functions andthe appropriate parameters can be found in Chapter 3.
Page 3

CHAPTER 2. APPEARANCE
Video Control
The video images acquired by the alpha300 / alpha500 / alpha700 system are dis-played in the video control window. All functions required for proper video imagingare contained within this window. A detailed description of its functions is given inChapter 4.
Status
The status window contains a 2 column chart which lists the actual values of impor-tant parameters. The displayed parameters vary from one data acquisition methodto another (see Chapter 5).
Message Window
The message window provides information about the status of an operation andthe remaining time required to fulfill the given task. Hints and warnings for the userare also displayed in this window. A detailed description of the various messagesand their symbols can be found in Chapter 6.
Quadrant
The quadrant window is a visual representation of the beam deflection laser detec-tor. This window is useful for AFM and SNOM measurements. A detailed descrip-tion of the display is given in Chapter 7.
Graphic Control
This function opens the graphic control window. In this window some of the con-trols are displayed in extended visual interfaces. These are accessible via tab sheetsand a detailed description of each extended visual interface can be found in Chap-ter 8.
Point Viewer
The point viewer is used for the definition of sample rasters. Using these it is possi-ble to automatically move to up to several thousand predefined points on the sam-ple and execute automated script functions. A detailed description of the pointviewer is given in Chapter 9.
Page 4

2.2. SPEED BUTTONS
2.1.2 Configurations
In this menu, the microscope’s mode of operation can be selected. The softwarewill list only the microscope operation modes corresponding to the system config-uration. When selecting a predefined measuring configuration, the control, status,and quadrant windows will change accordingly. The current measuring mode isdisplayed in the status bar of the main menu (Section 2.3).
Save current Parameters
This function allows the current parameter settings displayed in the right columnof the control window to be saved. The name the parameters are saved under isthe same as the operation mode displayed in the status bar of the main menu. Thenext time this operation mode is selected the saved parameters will be loaded au-tomatically.
Save current Configuration
This function saves the current configuration displayed in the left column of thecontrol window. The name the configuration is saved under is the same as the op-eration mode displayed in the status bar of the main menu. The next time thisoperation mode is selected the saved configuration will be loaded automatically.For a more detailed discussion of parameters and configurations see Chapter 3.
Save as
This function is similar to the save current configuration function, while offeringthe possibility to change the filename using the Windows R© standard save-dialog.
2.2 Speed Buttons
The main menu contains several groups of speed buttons, which allow quick accessto different functionalities of the software.The first group of speed buttons refers to filemanagement, project settings, and the reset of viewers. A detailed description ofthese buttons can be found in the WITec Project manual.
The remaining speed buttons allow quick access to microscope and controller func-tions. The speed buttons displayed vary with the selected microscopy method andare therefore described in separate documents corresponding to the individual con-figuration of the system purchased.
Page 5

CHAPTER 2. APPEARANCE
2.3 Status Bar
The status bar provides, in addition to the information about the available com-puter memory (similar to WITec Project), information about the current configura-tion of the alpha300 / alpha500 / alpha700 system and the functionality of theremote control.
Page 6

Chapter 3
Control Window
The Control Window provides access to the full functionality of the alphaControl.Due to the large number of available parameters, the concept of the Control Win-dow is based on a highly flexible tree structure. Sections 3.1, 3.2 and 3.3 will coverthe functionality, appearance and operation of the Control Window. While only theparameters necessary for the selected measurement mode will generally be dis-played, all relevant parameters will be described in in Section 3.4, Section 3.5 andSection 3.6.In the default setting the Control Window will open upon starting WITec Control.Alternatively the Control Window can be opened through the hardware control inthe menu bar.
3.1 Basic Functional Principles
The representation of the values needed for a certain measurement is individuallyadjustable using WITec Control. The following basic distinctions illustrate the un-derlying philosophy of the controls.
ParametersParameters are a set of values which are needed to perform a certain task.They are predefined for all standard measurement methods and define thestate of the instrument before, during and after each task. Some parameterswill depend on other parameters or will automatically be changed during theexecution of a certain task.
StylesA style is a visual representation of a set of parameters. Styles are used inWITec Control to group the parameters in logical categories. These are eitherdevices or sequencers (see below) and will vary from one measurementmodus to another. Additional speed buttons appearing in the main windoware also defined within the styles.
Page 7

CHAPTER 3. CONTROL WINDOW
ConfigurationsA configuration combines a style with the numerical values of all parameters.However, only the parameters relevant for the chosen measurement mode aredisplayed. Therefore, the configuration must be changed when changing themeasurement modus (eg. from AFM to SNOM).
DevicesA device is a logical collection of parameters relevant for a physical apparatussuch as the scan table or the microscope illumination. The assemblies of pa-rameters are defined in the style and may vary from one measurement modeto another.
SequencersSequencers are, similar to devices, sets of parameters defined by the stylesas groups of parameters. In contrast to devices however, sequencers performcertain tasks such as the oscilloscope function or a scan. Sequencers use someof the devices to perform their tasks and automatically change some of theparameters of the devices used.
3.2 Visual Representation
Fig. 3.1 shows two examples of how the Control Window may appear. Fig. 3.1(a)shows the default tree which can be opened through the context menu of the Con-trol Window. The context menu can be accessed by right-clicking on the ControlWindow.Only very advanced users should use the default tree for their measurements. Thedefault tree will allow access to all parameters of the alphaControl and enteringwrong parameter values may lead to malfunctioning of the alphaControl or falsemeasurement results. The user will generally only need to access the default treewhen in contact with a WITec service representative.Fig. 3.1(b) shows the Control Window in the AFM contact configuration. In this
example some of the logical categories are expanded and others collapsed (as canbe seen from the - and + symbols to the left of the category names).Some devices display a button in the cell to the right of the category namewhen activated. Clicking this button will open the corresponding extended visualinterface (see Chapter 8).The Control Window is split in two columns where the left column shows either thecategory name or the parameter description and the physical unit of the parameter,which is given in square brackets. If the left cell contains a category name, the rightcell will -where applicable- contain a summary of the most important informationwithin the category in square brackets. Where the left cell contains a parameter de-scription, the right cell will contain the corresponding value of the parameter. These
Page 8

3.2. VISUAL REPRESENTATION
(a) (b)
Dev
ices
Seq
uenc
ers
Fig. 3.1: Examples of the Control Window using the default tree (a) and the AFM Contactconfiguration (b). In (a) the devices and the sequencers are identified.
parameters are either numerical values, strings, items selectable from a drop downmenu or buttons. Regarding buttons, two types can be distinguished. First, the socalled trigger buttons, which trigger a corresponding action upon clicking (eg. theStop button) and second, the continuous-action buttons (eg. the Move Up but-ton). The latter will continue to have an effect on the system as long as they arepressed (eg. while the Move Up button is pressed, the Z-Microscope will continueto move up).As mentioned above, all functions available though the alphaControl are accessiblevia the Control Window. The parameters displayed will depend on the hardwarepresent as well as the configuration chosen. Upon shipment of the system, thesoftware will be configured according to the hardware specific to your individualsystem. As mentioned in Chapter 1, WITec Control will search for the presence ofthe hardware upon start up. If any part of the hardware the software is configured
Page 9

CHAPTER 3. CONTROL WINDOW
for is not found, a warning will be issued and the parameters related to the missinghardware will not be available.Upon installation of WITec Control (which will generally not be necessary for theuser) the configurations appropriate for the individual hardware will be saved in[Install Dir ]\WITec\WITecControl VersionNumber \UserDefaults\Configurations
where Install Dir is the chosen installation directory (typically C:\Program Files)and VersionNumber is the actual version number of the installed software. Every timea new user uses the software, these default configurations will be copied toC:\Documents and Settings\UserName \WITecControl VersionNumber \Configurations
where UserName is the WindowsTM user name.
HINT Should problems with the configuration occur, the default configurations cansimply be copied again into the corresponding directory. Similarly, if a user wantsto use the exact same configuration as saved by another user, these configura-tions can also be copied as required.
3.3 Navigation
Most functions are accessible through both the mouse and keyboard. The controlusing the mouse is similar to the standard WindowsTM usage and the control usingthe keyboard is described below for each of the columns. Using the Tab key it ispossible to switch between the left and right columns.
Left ColumnIn the left column, the ↑ and ↓ keys can be used to move up and downthe list. When pressing the → key while sitting on an entry with a + , thecategory will expand. Similarly, pressing the ← key while a field with a - ishighlighted, will collapse the category. If one of the lines within an expandedcategory is highlighted and the ← key is pressed, the field corresponding tohigher level category will be activated.
Right ColumnSimilar to the left column, the ↑ and ↓ keys can be used to move up anddown the list and if a collapsible or expandable field (indicated by the - and+ in the left column) is highlighted, the functionality of the ← and → is
again to collapse or expand the category.If a numerical value is activated, a new value can be entered or the valuechanged by holding the Control key and pressing the ↑ key to increase andthe ↓ key to decrease the value. Larger increments for increasing or decreas-ing a value using this method can be selected by simultaneously pressing theShift key.
Page 10

3.4. DEVICES
If a drop down menu is highlighted, pressing the ← and → allows browsingthrough the possible entries.A button can be activated by pressing either the Enter or the Space key. Ifthe button is a continuous-action button, the action will be executed whilethe key is pressed.
3.4 Devices
In this section all devices accessible through the default tree configuration (seeFig. 3.1a) and their respective parameters will be explained. The specific con-figuration selected for the individual measurement mode will contain a subsetof the devices described in the following. Some of the devices will -for specificconfigurations- be included as a subset of another parameter group and not allparameters set in the specific configuration will be displayed through the styleselected. A detailed description of the configurations of your individual system areprovided in separate documents.
3.4.1 Remote Control
The remote control device determines the behavior of the remote control which issupplied with the alphaControl. The following parameters can be adjusted:
Active Duration [s]This parameter identifies the time the remote control will remain active afterone of the buttons or the rotation knob were last operated. Upon expirationof this time, the remote control is set to the NONE device, its idle state.
Controlled DeviceThe controlled device is selectable from a drop down menu which contains alldevices that may be remote controlled plus the idle state NONE. However, onlythe devices permitted for remote control (see below) will be selectable fromthe drop down menu.
NoneThe idle state of the remote control. It is always permitted and cannot bechanged.
Scan TableThis parameter controls whether the Scan Table can be moved using the re-mote control (setting YES) or not (setting NO).
Page 11

CHAPTER 3. CONTROL WINDOW
Microscope ZThis parameter controls whether the microscope Z stage can be moved usingthe remote control (setting YES) or not (setting NO).
Cantilever PositionThis parameter controls whether the cantilever position can be moved via theinertial drive using the remote control (setting YES) or not (setting NO).
Inverted MicroscopeThis parameter controls whether the inverted microscope can be moved usingthe remote control (setting YES) or not (setting NO).
Sample PositioningThis parameter controls whether the sample positioning via the motorized XYstage can be accessed using the remote control (setting YES) or not (settingNO).
3.4.2 Microscope Illumination
The parameters for the control of the microscope illumination are
Brightness [%]Using this parameter, the percentage of the maximum illumination powercan be selected.
Illumination on/offThis button toggles the illumination on and off where the brightness set us-ing the parameter described above is used as the ON state.
Current StateThis field informs the user whether the illumination is [on] or [off].
3.4.3 Scan Table
The scan table parameter group provides access not only to the position and thebehavior of the X, Y, and Z axes of the scan table, but also to the microscope Zstage. The microscope Z stage is either moving the microscope body up and downfor alpha300 systems or, for industrial applications using the alpha500 or alpha700systems, the Z stage can be located underneath the scan table providing up anddown movement of the scan table. The control in both cases is identical and thevalue given as the Z position is always the relative objective↔sample distance (iethe larger the number the bigger this distance).
Page 12

3.4. DEVICES
WITec Control allows the use of various reference positions which are helpful duringthe scanning operations. These reference positions and their relationships to oneanother are outlined in the following before the individual parameters of the scantable parameter group will be described.
Coordinate Systems
WITec Control uses an external and an internal coordinate system for the control ofthe scan and the microscope Z stage as illustrated in figure Fig. 3.2.
Internal scan coordinate system
Reference Zero position
X
Y
Z
External microscope Z stage coordinate system
Origin
Fig. 3.2: Internal and external coordinate systems in WITec Control.
Scans will always be performed in the internal coordinate system. The Z axis of theexternal coordinate system is always the direction of movement of the microscopeZ stage. The Z axis of the internal coordinate system can, however, be either theZ axis of the scan table or the microscope Z stage. This allows depth scans withup to 200µm depth while the scan table would only be capable of a 20µm move-ment. The zero point or origin in the Z direction can be freely set in both coordinatesystems to allow the logical referencing of relevant positions and it also facilitatesreturning to those positions after performing various operations. The zero point inthe external coordinate system might be, for example, the position at which thesample surface is in focus in confocal mode. Therefore entering 0 as the desired Zmicroscope position at any time will refocus the image (if the sample Z position hasnot changed).
Page 13

CHAPTER 3. CONTROL WINDOW
The parameters
Position(X)[µm]Shows the X position of the scan table and can be increased or decreased upto the limits of the scan table (±50 or ±100µm depending on the scan tablepurchased). If an out of range value is entered, the scan table will move to itsmaximum position which will then also be displayed as the parameter value.
Position(Y)[µm]Shows the Y position of the scan table and can be increased or decreased upto the limits of the scan table (±50 or ±100µm depending on the scan tablepurchased). If an out of range value is entered, the scan table will move to itsmaximum position which will then also be displayed as the parameter value.
Position(Z)[µm]Shows the Z position of the scan table and can be increased or decreased upto the limits of the scan table (±10µm). If an out of range value is entered,the scan table will move to its maximum position which will then also be dis-played as the parameter value.
Position(Z, Microscope)[µm]This parameter represents the relative distance between the objective andthe sample and can be increased or decreased.Upon start up, the software cannot recognize the position of the microscopeZ stage. Therefore it is possible to drive the objective into the sample anddestroy the objective and/or the sample while decreasing this distance. Caremust therefore be taken when approaching the sample with the microscopeZ stage. When increasing this distance the microscope Z stage can potentiallybe driven into its limit which will be audible by a clicking noise from the table.This must also be avoided.
Move modeUsing this drop down menu, the behavior of the Z axis can be controlled withthe following options:
I Z for FeedbackThis mode is typically used for SNOM or AFM measurements. Here the Zaxis of the scan table is controlled through the PI controller using the feed-back laser as a reference. If this mode is selected, the position of the Z axisof the scan table cannot be changed manually.
I Z by MicroscopeThis is the typical mode of operation when performing confocal or confocal
Page 14

3.4. DEVICES
Raman measurements, in which the microscope Z stage is used as the Zaxis of the internal coordinate system. This allows depth scans of up to200µm. However, only scans in the X-Y or X-Z plane are possible (ie no tiltedscans) with the Z position changing from line to line or image to image ifapplicable.
I Z by Scan TableThis mode is not yet implemented in the standard configurations providedto date but will in the future allow tilted scans. Here the Z axis of the scantable is the Z axis of the internal coordinate system. Additionally, using theZ axis of the scan table only allows for depth scans with a maximum rangeof 20µm.
Move UpUsing this continuous action button, the distance between the objective andthe sample can be increased using the speed entered (see below).
Move DownUsing this continuous action button, the distance between the objective andthe sample can be decreased using the speed entered (see below).
Speed [µm/s]Here a numerical value for the speed used to move the microscope Z stagecan be selected from between the limits of 0.01 and 500µm/s. This speedcan also be changed using the potentiometer on the remote control or thegraphical representation of the potentiometer in the graphic Control Window.The numerical value displayed in the graphic Control Window is the same asdisplayed here. Entering out of range values will result in the use and displayof the maximum or minimum value.
Focus UpUsing this continuous action button, the Z value of the axis (which is NOTthe Z axis of the internal coordinate system) can be increased using the focusspeed entered (see below).
Focus DownUsing this continuous action button, the Z value of the axis which is NOT the Zaxis of the internal coordinate system can be decreased using the focus speedentered (see below).
Focus Speed [µm/s]Here, a numerical value for the speed used to move along the Z axis which isnot the Z axis of the internal coordinate system can be entered. The minimumand maximum speeds are 0.001 and 10µm/s respectively and entering out of
Page 15

CHAPTER 3. CONTROL WINDOW
range values will result in the use and display of the maximum or minimumvalue.
Listen PositionThe listen position parameter allows the selection of coordinates for the posi-tioning of the scan table and/or the microscope Z stage using any graph or im-age linked to a spatial cursor. See the WITec Project manual for a more detaileddescription of spatial cursors. In the drop down list of this menu item theoptions Never, Once or Multiple can be selected to identify how many timesthe coordinates will be adjusted if a corresponding position is selected via amouse click. Upon clicking on, for example, the video image, the scan tablewill automatically move to the X and Y coordinates of the point clicked on inthe video image if the listen position option is activated. The X and Y coor-dinates can be changed through this action using any image captured in theX-Y plane such as a 2D scan, video image or a bitmap so long as this bitmap islinked to the corresponding cursor. The Z axis of the internal coordinate sys-tem can be altered using this action by clicking on a depth scan for example.Additionally, positioning using this feature is also allowed using graphs fromcross sections or line scans.
3.4.4 Lock-In
Lock-in amplifiers are used to measure very small AC signals, especially when thesignals are obscured by noise. They use a technique known as phase-sensitive de-tection to single out the component of the signal at a specific reference frequency.Noise signals at frequencies other than the reference frequency are rejected and donot affect the measurement.Lock-in measurements require a reference signal d which typically is of the form
d = Dsin(ωdt + φd). (3.1)
Here D is the amplitude, ωd the frequency and φd the phase of the reference signal.Typically, parts of an experimental setup are excited at a fixed frequency and thelock-in detects the response from the setup at the reference frequency.The lock-in amplifier of the alphaControl is represented schematically in Fig. 3.3. Itgenerates its own reference signal d, which is also typically used as the dither-signalto excite the cantilever during AFM AC Mode measurements.The input signal (e.g. the T-B signal in AC mode), which can be represented as
s = Ssin(ωst + φs), (3.2)
is amplified and multiplied with the lock-in reference (Equ. 3.1) using a phase sen-sitive multiplier. Here S is the amplitude, ωs the frequency and φs the phase of thedetected signal. The output of the phase sensitive detectors are the products of
Page 16

3.4. DEVICES
Fig. 3.3: Schematic representation of the dual-phase lock-in of the alphaControl.
two sine waves (Equ. 3.3) which can also be represented as the sum of two AC sig-nals, one at the difference frequency (ωs − ωd) and the other at the sum frequency(ωs + ωd) as shown in Equ. 3.4.
PSDX = DSsin(ωdt + φd)sin(ωst + φs) (3.3)
=1
2DScos[(ωs − ωd)t + φs − φd]−
1
2DScos[(ωs + ωd)t + φs + φd] (3.4)
If ωs = ωd, the difference frequency component (term one of Equ. 3.4) will be a DCoffset proportional to the signal amplitude. Therefore, if this PSD output is passedthrough a low pass filter with which the AC signal is removed (the second term ofEqu. 3.4), the resulting signal can be described by the following equation:
PSDX =1
2DScosφ (3.5)
Page 17

CHAPTER 3. CONTROL WINDOW
with
φ = φs − φd. (3.6)
The time dependence of the phase φs is eliminated by multiplying the signal s(Equ. 3.2) by the reference signal shifted by 90o. The second low pass filtered PSDsignal is therefore
PSDY =1
2DSsinφ. (3.7)
The signal defined by Equ. 3.5 is proportional to cosφ and the second signal definedby Equ. 3.7 is proportional to sinφ. If the two signals are called X and Y,
X =1
2DScosφ (3.8)
Y =1
2DSsinφ (3.9)
these two quantities represent the signal as a vector relative to the lock-in referenceoscillator. X is called the in-phase component and Y the quadrature component.By computing the magnitude R of the signal vector, the phase dependency is re-moved.
R =√
X2 + Y 2 =1
2DS (3.10)
The magnitude R measures the signal amplitude and does not depend on the phasebetween the signal and lock-in reference. The phase φ between the signal and lock-in reference can be measured according to
φ = arctanX
Y. (3.11)
The parameters used for the operation of the lock-in are listed below.
Driving Amp. pk-pk [V]This parameter is used to set the output of the internal oscillator of the lock-inamplifier. This amplitude can be varied from 0− 20 V and is used as the driveamplitude for the cantilever oscillation.
Listen FrequencyWith this parameter the frequency cursor can be activated. The status of thecursor is displayed in the right column. Clicking with the mouse on this fieldopens a drop down window in which the duration of the active time of thefrequency cursor can be selected.With the frequency cursor, the driving frequency can be set by clicking on anygraph viewer linked to a corresponding cursor.
Page 18

3.4. DEVICES
Driving Frequency [Hz]This parameter is used to set the driving frequency of the reference oscillator(e.g. for the cantilever oscillation).
Filter Frequency [Hz]This parameter sets the low pass filter for the PSD outputs of the lock-in am-plifier. This filter is implemented as a 3rd order IIR filter[1].For AFM AC Mode measurements the default setting of this filter is 1
10
th of thedriving frequency.
Phase Offset [ ◦ ]The measured phase φ (Equ. 3.11) can be shifted with this parameter.
Auto PhaseThis button sets the phase offset in a way that φshifted (see Fig. 3.3) becomeszero.
3.4.5 Feedback Settings
The feedback settings allow access to the parameters used in conjunction with thePI control of the scan table Z axis.
Comparator
Proportional amplifier
Integrator
P-Gain
I-Gain
PI Controlled Channel
Setpoint
Control deviation
Signal for Z position control of the scan table
Fig. 3.4: Schematic illustration of the PI controller
Fig. 3.4 illustrates schematically the functional principle of this digital controller. Anadjustable setpoint is first compared to a selectable PI controlled channel. The re-sulting control deviation is used in conjunction with a proportional amplifier andan integrator to calculate the control signal for the Z axis of the scan table in order
Page 19

CHAPTER 3. CONTROL WINDOW
to minimize the control deviation. Of the parameters described in the following,only the first four may need to be adjusted by the user during normal operation ofthe instrument. The others are set automatically and should not be altered.
Beam Deflection LaserThis parameter controls whether the laser is On or Off.
Setpoint [V]The setpoint voltage can be adjusted from -10V to +10V and is compared tothe voltage measured from the PI Controlled Channel (see below).
P-Gain [%]This parameter allows the increase or decrease of the proportional gain of thePI controller from 0 to 100%. It might be necessary to adjust this value toavoid oscillations due to the natural frequency of the cantilever or oscillationsinduced by the sample.
I-Gain [%]This parameter allows the increase or decrease of the integral gain of the PIcontroller from 0 to 100%. It might be necessary to adjust this value to avoidoscillations due to the natural frequency of the cantilever or oscillations in-duced by the sample.
PI Controlled ChannelWith this parameter, the channel which is compared to the setpoint can beselected. The following options are available for selection:
I Top-BottomThis signal is the difference between the electrical signal received from thetop and the bottom halves of the four quadrant diode. This is the typicalsetting for AFM and SNOM contact measurements.
I LockIn RLockIn R is the amplitude recorded through the Lock-In amplifier. This chan-nel is typically selected if the measurement mode is AFM AC or SNOM AC.
I FmaxIn this selection the maximum force, as determined from the peak of theforce distance curve in PFM or DPFM mode, is used as the controlled vari-able.
I offNo channel is used as an input and the PI controller is off.
I Aux1The signal read from the Aux1 input is used as the controlled variable.
Page 20

3.4. DEVICES
I Aux2The signal read from the Aux2 input is used as the controlled variable.
I Z-sensorUsing this signal, the capacitive sensor in Z direction of the scan table isused as an input and the system then acts as an active feedback controllerfor the Z position of the scan table.
InvertedThis variable allows the inversion of the control deviation signal (see Fig. 3.4).This is due to the fact that in AFM contact mode the scan table should retractif the signal is too high whereas it should move up in AFM AC mode.
HV Amp ActiveDuring AFM measurements, the regulation of the bending of the can-tilever can be achieved in two different ways. Either the Z axis ofthe scan table is used or a cantilever arm with a piezo position-ing element. If such a cantilever arm is used, a high voltage sig-nal needs to be provided to the piezo. The HV Amp Active cantherefore be activated (setting YES) or not (setting NO). The signal isthen automatically amplified and directed to the respective hardware.
HINT If the regulation using the cantilever with the positioning element is used,the topography readout of the scan table will not show the topographysince the Z position of the table will be held constant during those mea-surements. Instead the feedback signal recorded can be used to derive thetopography from it.
Output Limitation ActiveThis parameter is generally set to Yes to protect the controlling card of thescan table. This is necessary because the output of the alphaControl is ±10Vwhich exceeds the maximum range of the controlling card of the scan table.
Output Limitation RangeHere a multiplicative factor is entered (typically 0.65) which if multiplied withthe voltage output range of the alphaControl (20V) results in the correct rangeof the controlling card of the scan table (13V). The minimum and maximumvalues are 0 and 1 respectively.
Output Limitation OffsetA multiplicative factor for the offset of the signal in the range from -1 to +1 canbe entered as the output limitation offset. Multiplying this factor with thepositive voltage range of the controller (+10V) results in the offset necessaryfor the electronics of the scan table.
Page 21

CHAPTER 3. CONTROL WINDOW
3.4.6 Heating
The heating stage can be mounted directly onto the scan stage and is driventhrough the alphaControl controller via the WITec Control data acquisition soft-ware. Its temperature range is from room temperature to 200◦C, which it typically(depending on the volume of the sample) reaches within less than 2 minutes.Upon start of the software, the heating stage is calibrated using the PT100 elementwithin the stage. Information about this process is displayed in the message win-dow. The state of the heating stage (enabled, disabled, stabilized,...) as well as thecurrent temperature while heating is also displayed in the message window.If the heating stage is present, the temperature determined at the start and the endof a measurement (such as an image scan) is saved in the automatically created textobject describing the scan.The following parameters allow control over the the heating stage.
Enable Temp. ControlUsing this parameter the temperature control can be enabled (Yes) or disabled(No). If the temperature control is disabled, all other parameters in this groupwill be inactive and the target temperature is set automatically 20◦C.
Target Temp. [◦C]Here the target temperature of the stage can be entered. If it is changed, thestage will try to reach the new target temperature using the P, I and D param-eters for the Proportional(P) Integral(I) Differential(D) regulating loop.
Temperature RampUsing this group it is possible to ramp the temperature linear to a certain tar-get temperature. The following parameters allow this control:
I End Temp. [◦C]The temperature the stage should reach at the end of the ramp.
I Temp. Gradient [◦C/min]The slope of the temperature ramp in ◦C per minute.
I Start GradientStarts the temperature ramp.
I Stop GradientStops the temperature ramp.
P-GainThe P-gain for the PID regulating loop.
I-GainThe I-gain for the PID regulating loop.
Page 22

3.4. DEVICES
D-GainThe D-gain for the PID regulating loop.
CalibrateThis button triggers the automatic calibration of the heating stage using thePT100 element inside the stage. This procedure is automatically executedupon starting the WITec Control software.
Get Temperature Interval [s]This parameter determines in which time intervals the temperature is mea-sured.
3.4.7 Cantilever Positioning
Cantilever positioning is facilitated by a piezoelectrically driven inertial drive. Theposition of the cantilever (in X, Y and Z) can be altered in three different ways: theremote control, the graphic control and through the parameter set described here.In the following, the parameters will be described as well as their connection to thesettings on the remote and graphic control interfaces. When driving any of the axesby using the remote control or the parameter list, the arrows in the graphic ControlWindow will indicate the active axis and the direction of movement.
X+This continuous action button causes the cantilever to move in the positive Xdirection.
X-This continuous action button causes the cantilever to move in the negative Xdirection.
Y+This continuous action button causes the cantilever to move in the positive Ydirection.
Y-This continuous action button causes the cantilever to move in the negative Ydirection.
Z+This continuous action button causes the cantilever to move in the positive Zdirection (upward).
Page 23

CHAPTER 3. CONTROL WINDOW
Z-This continuous action button causes the cantilever to move in the negativeZ direction (downward).Care must be taken when moving the cantilever in the negative Z directionbecause this could potentially allow the cantilever to be driven into the sam-ple. This could result in damage to the cantilever and/or sample. In general,the inertial drive should generally not be used if the tip is in contact with thesample.
Speed [Hz]The value entered here is the repetition rate with which the piezos push theaxes in their respective directions. This value is identical for all three axes. Theminimum and maximum values are 1 and 1500Hz respectively. By using thepotentiometer on the remote control as well as through the graphical repre-sentation of the potentiometer in the graphic control, this value can also bealtered. The numerical value displayed in the graphic Control Window is an-other representation of this value.
StepSizeX (StepSizeY, StepSizeZ)This parameter is a measure of the distance the piezo is pushing the X (Y,Z)axis during each cycle. It can be adjusted between 0 and 100 and will in com-bination with the speed (see above) be a measure of the velocity with whichthe axis moves.
BalanceX (BalanceY, BalanceZ)Due to the nature of the inertial drive, it is possible that the velocity in +X(+Y,+Z) will vary from the velocity in -X (-Y,-Z). The balance setting which isadjustable from -100 to +100 can be used to compensate for this effect.
3.4.8 Filter Wheel
Using the drop down menu, which is the only parameter in this group, the filterplaced in the transmitted beam (e.g. during transmission SNOM measurements)can be selected. The drop down menu contains the entries Filter 1, Filter 2, Filter 3and Filter 4. Fig. 3.5 indicates the positions of filters within the filter wheel. Thefilter wheel itself is situated in the housing for transmission SNOM measurements.
3.4.9 Inverted Microscope
The inverted microscope can be moved in the X, Y and Z directions with steppermotors. The position can, as with the cantilever, be entered by the remote control,
Page 24

3.4. DEVICES
Fig. 3.5: Schematic illustration of the filter wheel indicatingthe positions of the individual filters.
the graphic control and through the parameter set described here. In the following,the parameters will be described as well as their connection to the settings on theremote and graphic control interfaces. When driving any of the axes though theremote control or the parameter list, the arrows in the graphic Control Window willindicate the active axis and direction of movement. Of the following parametersonly the first 8 may be altered whereas the others should not be modified.
HINT If used within the measurement mode, the position of the inverted microscope isdisplayed in the status window (see Section 5).
X+This continuous action button causes the inverted microscope to move in thepositive X direction.
X-This continuous action button causes the inverted microscope to move in thenegative X direction.
Y+This continuous action button causes the inverted microscope to move in thepositive Y direction.
Y-This continuous action button causes the inverted microscope to move in thenegative Y direction.
Z+This continuous action button causes the inverted microscope to move in the
Page 25

CHAPTER 3. CONTROL WINDOW
positive Z direction (upward).Care must be taken when moving the inverted microscope upward becausethis could potentially allow the objective of the inverted microscope to bedriven into the sample. This could result in damage to the objective and/orsample as well as the cantilever if in contact.
Z-This continuous action button causes the inverted microscope to move in thenegative Z direction (downward).
Speed [µm/s]The value entered here is the speed with which the stepper motors drive theinverted microscope. This value is identical for all three axes. The minimumand maximum values are 0.1 and 200µm/s. By using the potentiometer onthe remote control as well as through the graphical representation of the po-tentiometer in the graphic control, this value can also be altered. The numer-ical value displayed in the graphic Control Window is another representationof this value.
Set Zero (XYZ)Using this button, the X, Y, and Z positions of the inverted microscope canbe set to 0 for referencing purposes. This position in combination with themaximum travel (see below), will also limit the positions within the range ofthe inverted microscope.
MaximumTravelX (MaximumTravelY, MaximumTravelZ)The values displayed here cannot be changed and are for informative purposesonly. They indicate the maximum travel in steps in the positive and negativedirections relative to the last zero position. Multiplied with the internally de-fined factor for the conversion of steps to micrometers, this results in a rangeof approximately±1.5mm for each axis.
HINT Should the inverted microscope not respond to a move request, the statuswindow should be checked to see if the limits of the axis of the invertedmicroscope have been reached.
3.4.10 PFM Control
Pulsed Force Mode (PFM) is a non-resonant, intermittent contact mode imagingtechnique for AFM/SNOM. A detailed description of the technique is given in thePFM Configuration manual.
Page 26

3.4. DEVICES
The PFM control parameter group contains the additional control parameter re-quired for the acquisition of pulsed force mode images.
ModulationThis binary variable either turns the modulation of the cantilever On or Off.
Driving Amp. pk-pk [V]The peak to peak voltage of the sinusoidal modulation of the cantilever canbe entered as a value between 0 and 20V.
Driving Frequency [Hz]The frequency of the cantilever oscillation can be entered as a value between1 and 10000Hz.
Excitation Phase [◦]The excitation phase can be adjusted in order to ensure that the pulsed forcecurve will be displayed in the graph window in the standard way with thesnap-in near the left hand side of the window, then the force increasing tothe maximum force, followed by the decrease of the force up to the maximumadhesion and the free oscillation after the snap-out as shown in Fig. 3.6.
Reference Modulation Phase [◦]The reference modulation phase can be adjusted to ensure that the sinu-soidal reference modulation signal displays a minimum where the PFM curvedisplays a maximum. This is necessary for the proper representation of thepulsed force curves as force↔distance curves.
Fmax Window Start [◦]The start of the region in the PFM curve where the hardware will search forthe maximum force can be defined from 0 to 360◦ using this parameter.
Fmax Window Width [◦]The width of the region in the PFM curve where the hardware will search forthe maximum force can be defined from 0 to 360◦ using this parameter.
Listen (F max)The listen (F max) parameter allows the selection of the angular range for thedetermination of the maximum force from the displayed PFM curve. In thedrop down list of this menu item the options Never, Once or Multiple can beselected to identify how many times the entries in the Fmax Window Start andFmax Window Width will be adjusted if a corresponding area is selected. Theselection is done by activating the button in the graph tool window afterthe PFM window was activated. The angular range of interest can then be
Page 27

CHAPTER 3. CONTROL WINDOW
selected and will be marked in the PFM window. If the selection is still active,the color of the marked area will be dark purple and if it is not active anymoreit will be red (Fig. 3.6).
Adhesion Window Start [◦]The start of the region in the PFM curve from which the hardware will deter-mine the adhesion can be defined from 0 to 360◦ using this parameter.
Adhesion Window Width [◦]The width of the region in the PFM curve from which the hardware will deter-mine the adhesion can be defined from 0 to 360◦ using this parameter.
Listen (Adhesion)The listen (Adhesion) parameter allows the selection of the angular range forthe determination of the adhesion from the displayed PFM curve. In the dropdown list of this menu item the options Never, Once or Multiple can be se-lected to identify how many times the entries in the Adhesion Window Startand Adhesion Window Width will be adjusted if a corresponding area is se-lected. The selection is done by activating the button in the graph toolwindow after the PFM window was activated. The angular range of interestcan then be selected and will be marked in the PFM window. If the selection isstill active, the color of the marked area will be dark blue and if it is not activeanymore it will be light blue (Fig. 3.6).
Stiffness Window Start [◦]The start of the region in the PFM curve from which the hardware will deter-mine the stiffness can be defined from 0 to 360◦ using this parameter.
Stiffness Window Width [◦]The width of the region in the PFM curve from which the hardware will deter-mine the stiffness can be defined from 0 to 360◦ using this parameter.
Listen (Stiffness)The listen (Stiffness) parameter allows the selection of the angular range forthe determination of the stiffness from the displayed PFM curve. In the dropdown list of this menu item the options Never, Once or Multiple can be se-lected to identify how many times the entries in the Stiffness Window Startand Stiffness Window Width will be adjusted if a corresponding area is se-lected. The selection is done by activating the button in the graph toolwindow after the PFM window was activated. The angular range of interestcan then be selected and will be marked in the PFM window. If the selection isstill active, the color of the marked area will be dark blue and if it is not activeanymore it will be green (Fig. 3.6).
Page 28

3.4. DEVICES
Fig. 3.6: The typical PFM curve with the search regions marked. (Green = Stiffness; Red =Fmax; Blue = Adhesion)
3.4.11 Spectrograph
For each spectrometer connected to the alphaControl one spectrograph parametergroup will be present in the default configuration tree. The parameters described inthe following provide access to the full functionality of the spectrometer includingits calibration.
GratingThe grating parameter allows the selection of the gating used for spectrom-etry. The gratings listed in the the pull down menu depend on the individualconfiguration but generally have the form
[Turret number : Groove density Blaze wavelength ]and an example typical for the UHTS would be
T1 : 600 g/mm BLZ=500nm.
Laser Wavelength [nm]This parameter should contain the wavelength of the laser used for the spec-tral measurements.
Center Wavelength [nm]The wavelength hitting the center of the CCD chip can be adjusted using thisparameter. This wavelength will then also be the central wavelength in thespectra displayed in the software. To change the central wavelength, the soft-ware calculates the necessary rotation of the grating selected.
Page 29

CHAPTER 3. CONTROL WINDOW
Spectral CenterThe spectral center is identical to the center wavelength. The only difference isthat the units this central position is described by are variable and adjustableusing the Spectral Unit parameter (see below). It may, for example, be desir-able to enter 2050 rel. 1/cm which is a good starting point for the 600 g/mmgrating if a 532 nm laser is used for excitation. The laser wavelength will thenbe displayed on the left hand side of the spectra with virtually the entire spec-trum visible to its right. The central wavelength (λc) and the relative wavenumber in the center (νc) are related as follows.
νc =1
λex
− 1
λc
, (3.12)
where λex is the excitation wavelength.
Spectral UnitThe spectral unit controls the display of the numerical value in the spectralcenter parameter field. If the spectral unit is changed, the entry in the spectralcenter parameter field will be changed accordingly. Additionally any change inthe spectral unit will also change the X axis and thus the display of the hard-ware spectrum currently recorded. Any measurement started after changingthis parameter will also use the units set with this parameter. The units avail-able are:
I nm
I µm
I 1/cm
I rel. 1/cm
I eV
I meV
I rel. eV
I rel. meV
ListenThe Listen parameter allows the selection of a new spectral center using anygraph linked to a spectral cursor. See the WITec Project manual for a moredetailed description of spectral cursors. In the drop down list of this menuitem the options Never, Once or Multiple can be selected. This identifies howmany times the coordinates will be adjusted if a corresponding position is se-lected via a mouse click. If this option is activated, the grating will be movedso that a position clicked on in a recorded spectrum, for instance, will be thenew central wavelength.
Page 30

3.4. DEVICES
Exit MirrorThis parameter is only present if the corresponding spectrometer with an in-tegrated flip mirror is included with the spectrometer. It then allows to set theexit mirror position to Front which typically directs the light towards the CCDcamera and Side allowing the detection of the signal using an APD (if includedwith the system).
OptionsClicking the Options button opens the options dialog which contains twotab sheets: Startup and Information. The detailed appearance of these tabsheets will depend on the spectrograph used and therefore the following de-scriptions can only be seen as examples for the most common spectrometers.The startup tab sheet allows the startup configuration of the spectrometerto be programmed. The adjustable parameters are the grating and thecenter wavelength and their description is identical to that or their respectiveparameters above. The information tab contains information about, forexample, the hardware version or the serial number of the spectrometer.
Start CalibrationUsing this button, the spectrometer can be calibrated or the calibration can beverified. Upon clicking this button the standard WindowsTM open file dialog isactivated. This dialog opens per default in the directoryC:\Documents and Settings\All Users\WITecControl VersionNumber \Optionsand VersionNumber is the actual version number of the installed software. Thefiles necessary for calibration and verification of the calibration can be foundin this directory. They generally have the form
SpectrometerName Action AdditionalInformation.WHD
where the SpectrometerName identifies the spectrometer. Action identi-fies if the file is used for calibration or verification of the calibration andAdditionalInformation offers information about such considerations aswhich spectral range the routine is intended for.
I CalibrationThe calibration file contains the definitions necessary for the software toperform the calibration of the spectrometer. These include a set of calibra-tion lines (typically a subset of the lines emitted from an Ar/Hg spectrallamp) which will be measured at various off-axis positions on the CCD chip.
HINT Please contact WITec if another calibration lamp is intended to be usedfor calibration purposes.
From the positions determined, the calibration parameters are calculatedand a text data object containing this information will be added to theproject. This text data object will contain the following three major sec-tions:
Page 31

CHAPTER 3. CONTROL WINDOW
GeneralGeneral information concerning the date and time as well as the opera-tor is displayed in this section.
New Calibration ParameterThe calculated calibration parameters are displayed as in the examplebelow:
Focus: 298.88Gamma: 24.7247Delta: 2.71003CCDCenter: 512Offset: -1.22493E-04Amplitude: 3.46354E-05Phase: 9.67982E-01
Calibration DataThe calibration data is displayed in the following form:
Average Error [Pixel]: 0.647Average Error [nm]: 0.087Maximum Error [Pixel]: 2.246Maximum Error [nm]: 0.306
Emission Line[nm] Position[Pixel] Error[nm] Error[Pixel] Peak...435.833 510.170 -0.306 -2.246 1.355546.074 373.790 +0.185 +1.376 0.415435.833 231.081 -0.179 -1.307 1.308
...
The values displayed here are the measured values on whose basis thecalibration values are calculated and are NOT the errors the spectrometerwill display following calibration.
I VerificationFollowing the calibration a verification of the calibration should be per-formed. This verification will be performed automatically by simply choos-ing the appropriate file. The measured off-axis positions of the individualspectral lines are compared to the calculated values. The deviations arepresented as the errors in a text data object which will be added to theproject. This data object will contain general information similar to the onedescribed above followed by the verification data which is of the same for-mat as the calibration data described above. The verification data reportedin this file is a realistic estimate for the maximum error of the spectrometer.
Page 32

3.4. DEVICES
3.4.12 Spec Camera
For each spectral camera connected to the alphaControl , one Spec Camera param-eter group will be present in the default configuration tree. The parameters de-scribed in the following provide access to the full functionality of the spectral cam-eras.
Temperature[ ◦C]This parameter determines the setpoint for the temperature of the spectralcamera. Upon changing this parameter the camera will be heated or cooledaccordingly. The message window (see Chapter 6) then displays the tempera-ture during the heating/cooling until the set temperature is reached.
HINT If a measurement is started during the heating or cooling of the camera,the display of the temperature change will be disabled.
Oscilloscope TypeThis parameter determines if the oscilloscope (see Section 3.5.11) will displaythe spectrum when engaged or the full two dimensional image recorded bythe CCD camera.
DescriptionThis parameter cannot be changed and contains information about the spec-tral camera.
OptionsThe Options button opens the options dialog for the spectral camera. This di-alog contains tab sheets of which one will contain general information aboutthe camera. An additional one allows control over the read-out speed and athird the selection of the active binning area. All of these tab sheets will varydepending on the camera used. However, the parameters for the most com-monly used cameras on the tab sheets are:
I The Speed tab sheet
AD ConverterThe respective AD converter can be selected here. For most cameras onlyone will be selectable. However, some cameras will allow the selectionof a fast and a slow converter.
Output AmplifierThis field will only be visible if a NewtonEM CCD camera is present. Itthen allows the change between conventional and EMCCD. The EMCCDis a electron multiplying output amplifier allowing the camera to be op-erated with only few ms integration times.
Page 33

CHAPTER 3. CONTROL WINDOW
Vertical Shift SpeedThe vertical shift speed is the speed used for vertical binning of the CCDchip within the camera. The minimum and maximum values which canbe entered here will depend on the individual camera and/or its mode ofoperation.
Horizontal Shift SpeedThe horizontal shift speed is the speed used for horizontal binning ofthe CCD chip within the camera. The minimum and maximum valueswhich can be entered here will depend on the individual camera and/orits mode of operation.
Preamplifier GainThe Gain used for pre-amplification before AD conversion can be ad-justed using this parameter. The minimum and maximum values whichcan be entered here will depend on the individual camera and/or itsmode of operation.
EMCCD GainThis field will only be visible if a NewtonEM CCD camera is present. Herea value between 0 and 255 can be entered as a measure for the electronmultiplication gain.
Preset SelectionThis field will only be visible if a NewtonEM CCD camera is present. Herecertain presets can be selected where all the parameters above are setaccording to the requirements. The selectable presets are: High Intensitylow noise, High Intensity High Speed, Low Intensity and No Preset.
I The Binning tab sheetThe binning tab sheet allows the selection of the active binning area. Typ-ically the detectors consist of 1024×127 or 1600×200 pixels while only thecentral 10-20 rows are illuminated. Depending on the mode of operation ofthe CCD camera, it can be beneficial to use only these central rows for thereadout since this will eliminate the signal originating from the thermalnoise of the non-illuminated pixels. This is especially useful if the camera isoperated in EM-CCD mode. In conventional mode it is generally only usefulfor single spectra. For both the Continuous Spectrum and the Single Spec-trum mode, the following parameters can be adjusted:
FVBFull Vertical Binning. If this check box is selected, the entire height of thechip is binned (ie each column is added up from top to bottom).
Start/Stop RowThese parameters defines the start and stop row for the binning if notthe entire chip is used.
Single Data
Page 34

3.4. DEVICES
Using this parameter group, an active spectral range can be defined fromwhich a single value is calculated as the sum of the pixels covered by thearea. This function is similar to the Σ-filter function (see WITec Project man-ual). It is mainly used for the automatic focusing function as described in Sec-tion 3.5.14. The following parameters can be accessed for the definition of theactive range.
I ListenThis feature is similar to the Listen parameter described in Section 3.4.11.The difference is that upon clicking onto a position, the spectrometer willnot move to this spectral position but the area marked will be used as thestart and end points of the spectral range from which the single data isevaluated. To select such an spectral area the following steps should be fol-lowed:
1.Set the Listen parameter to Once or Multiple.2.Activate an graph marker through the corresponding button in the
graph tool window. This function is also available through the contextmenu (Mouse Mode⇒Marker) in any graph window.
3.The new single data range can then be defined by marking the area ofinterest in any graph window linked to a spectral cursor. Simply holddown the left mouse button while moving the mouse over the area ofinterest to mark it. The new start and stop values will then automati-cally be enterer in the single data parameter group.
I Start / StopThese two values identify the start and the stop of the evaluated area. Theywill automatically be entered if the Listen option (see above) is used. Thevalues are given in the unit as displayed in the spectral unit field as de-scribed below.
I Spectral UnitThis field is for information purposes only and shows the unit the Start andStop values are given in. It will automatically change to the unit selected inthe window from which the Start and Stop values are selected.
3.4.13 Signal Routing
This section allows the setting of the Dither DAC output. The signal can either bethe lock in excitation signal (in AC mode) or the PFM modulation curve (in PFMmode).This setting is for internal and automated use only. Do not change the settingsmanually.
Page 35

CHAPTER 3. CONTROL WINDOW
3.4.14 Sample Positioning
The Sample Positioning menu allows the control of an additional, motorized XYstage. This stage is driven by stepper motors and allows an expansion of the scan-ning range of the instrument. Using the standard, piezo-driven scan table (see Sec-tion 3.4.3) the maximum scan range is 200×200 µm2. With the sample positioningstage the scan range can be expanded to 150 mm in X and 80 mm in Y directionusing the alpha300 system. Switching to the industrial size setup, the alpha500achieves scan ranges of 150×150 mm2 and the alpha700 of up to 300×300 mm2.These scan ranges are achieved while maintaining a positioning accuracy betterthan 10 µm.The use of the inverted microscope (as for example needed for SNOM measure-ments) is not possible using these sample positioning stages.
The sample positioning stage is located underneath the piezo driven scan table. Itis calibrated at WITec using a second order positioning correction before shipment.The sample positioning stage therefore needs to be driven to a calibrated positionin X and Y in order to activate this calibrated hardware positioning correction. Oth-erwise the positioning is performed using the nominal (non-calibrated) step widthof the stepper motors. See also the Go To Calibration Pos. parameter descriptionbelow.
HINT The sample positioning stage is especially useful in combination with the Sam-ple Raster (Section 3.5.4) and the Process Script sequencer (Section 3.5.15). Usingthese, various (up to several thousand) points on a large sample (or a sample ar-ray) can be approached automatically and predefined scripting functions can beexecuted at each of these positions.
A separate, independent coordinate system can be defined for the sample position-ing stage to suit the current sample or sample array. This coordinate system is in-dependent of the coordinate systems introduced in Section 3.4.3.
Upon startup of the system, the current position of the sample positioning stage isassumed as the origin of the coordinate system (coordinate 0/0) with 0 ◦ rotation.Several methods to define the coordinate system thereafter are available for thestage as can be seen below.
The following parameters are available for the control of the sample positioningstage.
Reset Coord. Sys.Using this trigger button, the current position is set to the origin of the samplecoordinate system (0/0) and the rotation is set to 0.
Coord. Learn Meth.The sample coordinate system can be defined using various methods. The
Page 36

3.4. DEVICES
method can be selected here and the software will, upon starting the proce-dure, guide the user through the respective procedure. This guidance is simi-lar to the one described in Section 3.5.10. The selectable methods are:
I Coord. Syst. by 3 PointsIn this method three points are used to calculate the offset and the rota-tional angle of the sample coordinate system.Once this method is started through the Establish Coord. Sys. button, theuser is asked to drive the sample positioning stage manually to three dif-ferent positions. The movement can be achieved through the Absolute X/Yor the X± / Y± functions described below, or the remote control. Once aposition is reached the user is asked to enter the actual coordinates of thecurrent position. Upon completion of the last point, the new coordinatesystem is evaluated and used from there on.
I Circular Center by 3 PointsUsing this method, three points are used to evaluate their circular center.For this point the coordinates can then be entered and from this the newoffset is calculated. The rotational angle of the sample coordinate system isnot changed through this procedure.Once this method is started through the Establish Coord. Sys. button, theuser is asked to drive the sample positioning stage manually to three differ-ent positions. The movement can be achieved through the Absolute X/Y orthe X± / Y± functions described below, or the remote control. Once a posi-tion is reached the user is asked to enter the actual coordinates of the centerposition. Upon completion of the last point, the new coordinate system isevaluated and used from there on.
I Offset by one PointUsing this method, a single point is used to evaluate the new offset of thecoordinate system. The rotational angle of the sample coordinate system isnot changed through this procedure.
I Rotation and Offset by 2 PointsUsing this method the coordinate calibration is based on an orthogonal co-ordinate system with identical scaling on both axis. Then two points areused to calculate the offset and the rotation of the new coordinate system.
Establish Coord. Sys.Pressing this trigger button causes the system to start the coordinate learningmethod selected (see above). The user will be guided step by step though therespective method. If necessary, the sequencer requests user inputs and/ormanual adjustments from the user via the status window (see Chapter 5)where information about the progress of the procedure is also displayed. Theprocedure can be stopped at any time by pressing any stop button within thesoftware.
Page 37

CHAPTER 3. CONTROL WINDOW
Next StepWhen executing a coordinate learning method, this trigger button will be-come active. After finishing a task given to the user by the sequencer via themessage window, this trigger button should be pressed to continue the pro-cedure.
Abs. Pos. X/Y [µm]These fields show the actual position of the sample positioning system withinthe actually valid coordinate system. New target positions can also be enteredhere and by pressing the Go to Abs. Position button the sample positioningstage moves to the entered coordinates. During movement of the sample po-sitioning stage, the fields are blocked and only upon arrival of the stage at thefinal position will the display be updated again.
Go to Abs. PositionThis trigger button causes the sample positioning stage to move to the coor-dinates entered as Abs. Pos. X [µm] and Abs. Pos. Y [µm] within the currentcoordinate system.
X+This continuous action button causes the sample positioning stageto move in the positive X direction along the X-axis of the XY stage.Since this movement is along the axis of the XY table, this way show a move-ment in X and Y of the currently defined coordinate system.
X-This continuous action button causes the sample positioning stageto move in the negative X direction along the X-axis of the XY stage.Since this movement is along the axis of the XY table, this way show a move-ment in X and Y of the currently defined coordinate system.
Y+This continuous action button causes the sample positioning stageto move in the positive Y direction along the Y-axis of the XY stage.Since this movement is along the axis of the XY table, this way show a move-ment in X and Y of the currently defined coordinate system.
Y-This continuous action button causes the sample positioning stage
Page 38

3.4. DEVICES
to move in the negative Y direction along the Y-axis of the XY stage.Since this movement is along the axis of the XY table, this way show a move-ment in X and Y of the currently defined coordinate system.
Speed [%]The relative speed of the sample positioning stage can be entered in % here.
Go To Cal. Pos. X/YThese trigger buttons causes the sample positioning stage to drive to thecalibrated position of the respective axis. Once these positions are reached,the calibrated hardware positioning correction as determined at WITec beforeshipment becomes active. Without driving the sample positioning stage tothese points, the positioning is performed using the nominal (non-calibrated)step width of the stepper motors.
Go To Calibration Pos.These trigger buttons causes the sample positioning stage to drive to the cali-brated position of both axis. Once this position is reached, the calibrated hard-ware positioning correction as determined at WITec before shipment becomesactive. Without driving the sample positioning stage to these points, the po-sitioning is performed using the nominal (non-calibrated) step width of thestepper motors.
HW Cal. X/Y AxisThese buttons are intended for the hardware calibration of theaxis. This requires an interferometer and is done at WITec.The user should not use these functions unless specifically instructed byWITec personnel.
Stop X-/Y-AxisUsing these stop buttons, the axes can be stopped individually.
3.4.15 Power Meter
The Power Meter device allows the calibrated measurement of the power of excita-tion lasers. The measured value can be displayed in the status window (see Chap-ter 5). The calibration data for the measurement of up to ten different wavelengthscan be stored and accessed by the user. To calibrate the power meter for a certainwavelength an external, calibrated power meter is needed. Through the determi-nation of the reading of the two devices a linear calibration curve for the internal
Page 39

CHAPTER 3. CONTROL WINDOW
power meter is calculated. This procedure needs to be performed for each wave-length used.The following parameters are accessible within the power meter device:
Available WavelengthsIn this drop down list, the wavelengths for which the power meter has alreadybeen calibrated are listed. If no calibration data is available, the list will beempty. Selecting the appropriate wavelength will load the calibration dataand convert the raw sensor reading into a calibrated power value which canbe displayed in the status window.
Read Laser PowerThis trigger button causes the system to read the current reading of the powermeter and to display the calibrated value in the status window.
Calibrate Laser IntensityThis parameter group allows the computer guided calibration of the powermeter for different wavelengths. Since the response of the detector will bewavelength dependent, a calibration for each wavelength used needs to beperformed. The way this calibration should be performed is that a high laserintensity is set for the laser and the power out of the fiber should then bemeasured using the external, calibrated laser power meter. This should bedone once with the laser shutter open and once with the laser shutter closed.Ensure that the room light will not interfere with the measurement. The fibershould then be connected to the instrument WITHOUT changing the laser in-tensity. The signal determined by the internal power meter for the two re-spective cases (shutter open and closed) will then allow the determination ofa linear regression curve for the calculation of the laser power from the sensorreading.To perform the calibration the following parameters are available:
I Storage PositionIn this drop down list the available storage positions are listed. This list maylook like:
1. 488 nm2. 514 nm3. ---4. - - -
...10. - - -
“-- -” denotes a free entry in this list.From this list the user should choose the storage position for the calibration.If a used storage position is chosen the user is prompted if the existing entryshould be overwritten.
Page 40

3.5. SEQUENCERS
I Start CalibrationThis trigger button starts the calibration procedure. The user will be askedto perform certain tasks through the message window. First the user isasked to enter the power measured by the external power meter for case1 (for example shutter closed). The laser power measured should then beentered in the field Current Laser Intensity[µW] and the same laser powershould be applied to the system at this point (eg if the power entered isthe one when the shutter is closed, the fiber should now be connected tothe microscope and the shutter closed as well). Pressing the Next Stepbutton triggers the readout of the internal power meter. Then the user isasked to enter the second value measured with the external power meter.This power again should at this point be present within the microscope.Pressing the Next Step button again triggers the next readout of the inter-nal power meter. Following this the user is asked to verify the wavelengthof the radiation currently measured (which should be entered under LaserWavelength [nm]) before the calibration data is calculated and stored at theselected storage position.
I Next StepThis trigger button moves to the next step of the computer guided calibra-tion procedure.
I Delete CalibrationThis trigger button deletes the currently selected calibration after confir-mation through the user.
I Laser Wavelength [nm]The laser wavelength for which the current calibration is performed shouldbe entered in this field.
I Current Intensity [µW]In this field, the laser power as determined using the external power me-ter should be entered when prompted by the computer guided calibrationprocedure.
3.5 Sequencers
This section describes all sequencers accessible through the default tree configura-tion and their respective parameters (see Fig. 3.1a). Since the parameter group DataLabeling is used by a variety of sequencers while its functionality does not change,this parameter group is described first.
Data LabelingData labeling groups belong to certain sequencers which are used for datarecording. Using this parameter group, the data recorded can be labeled with
Page 41

CHAPTER 3. CONTROL WINDOW
a name (Sample Name) and a number for the data recorded (Number). Thenumber will automatically increase with each recorded data set thus facilitat-ing the identification of the data. The name and number entered can be savedthrough Configurations⇒Save current Parameters.
3.5.1 Auto Illumination
The auto illumination parameter group allows the automatic adjustment of the mi-croscope illumination based on the currently displayed video image (see Chapter 4).If the iris is closed too much, the auto illumination may not deliver satisfying resultsbecause the entire video image is used for the calculations.
The following parameters are contained within this parameter group:
Max. BrightnessThis value, which is adjustable between 0 and 255, is a comparison value forthe adjustment of the brightness.
Auto BrightnessThis trigger button prompts the sequencer to adjust the microscope illumina-tion.
3.5.2 Image Scan
In the image scan parameter group, all parameters necessary for the capture of atwo or three dimensional data set can be defined. While the data sources recordedare defined within the individual data sources parameter groups (see Section 3.6),all other parameters such as the geometry of the scan or the scan speed can beadjusted in this parameter group. The adjustable parameters in detail are:
StartPressing this button starts the scan and the data acquisition using the param-eters currently entered.
RestartThis trigger button causes the scan to restart using the parameters currentlyentered.
HINT WITec Control allows most parameters within the image scan parametergroup to be changed during the scan. This allows optimization of the scanparameters while scanning.
The data of the currently collected data set will be lost
Page 42

3.5. SEQUENCERS
Pre Measurement StateThis parameter group is identical to the one which can be found with somedata sources (see Section 3.6).
Post Measurement StateThis parameter group is identical to the one which can be found with somedata sources (see Section 3.6).If any of the pre or post measurement states of the recorded channels and/orthe values set in the image scan parameter group are in conflict, the statesin question will not be changed before or after the measurement (see Sec-tion 3.6).
Points per LineThis parameter allows the user to change the number of pixels, data points orspectra per line.
Lines per ImageLines per image allows the user to select the number of lines scanned insidethe selected scan area (see below).
Layers per ScanThis parameter defines how many layers are recorded in a stack scan (confocalmode only). It does not have an effect on other modes.
GeometryThe geometry parameter group allows the selection of the desired scanarea where the coordinates are given in the internal coordinate system (seeFig. 3.2). Since the scan table performs the movement, the selectable geom-etry is limited by the scan range of the scan table. The following parameterscan be adjusted:
I Listen Position/AreaThis feature is similar to the Listen Position parameter described in Sec-tion 3.4.3. The difference is that upon clicking onto a position, the scan tablewill not move to this position but the position clicked upon will be markedas the new center position for the scan. It also allows the selection of thedesired scan area from any image linked to a spatial cursor. To select suchan area the following steps should be followed:
1.Set the Listen Position/Area parameter to Once or Multiple.2.Activate an image marker through the corresponding buttons in
the video image or the image tool window. This function is also avail-
Page 43

CHAPTER 3. CONTROL WINDOW
able through the context menu (Mouse Mode⇒Marker) in any imagelinked to a spatial cursor.
3.The new scan area can then be defined by clicking the mouse on oneof the corners of the desired area and pulling a rectangle of the desiredsize over the image. The new center of the scan as well as the scan di-mensions will be automatically entered in their respective fields. If theselected scan area lies outside the maximum scan range, the geometryparameters will be displayed in red indicating this fault.
I Width [µm]The width sets the size of the box scan. It is always the size of the fast scandirection (length of one line).
I Height [µm]The height is always the size of the slow scan direction (height of the rect-angular) of the box scan. This parameter will not have any effect if a depthscan is performed.
I Depth [µm]The depth parameter is used not only in conjunction with the width fordepth scans, but also in conjunction with both width and height for stackscans. In depth scans, it is the dimension of the slow scan direction and instack scans, the distance from the uppermost to the lowest stack scanned.
I Center at Current Pos.Clicking this trigger button causes the current coordinates within the inter-nal coordinate system to be copied into the respective fields for the centerposition of the scan.
I Center (X) [µm]The X coordinate of the central position about which the scan will be per-formed.
I Center (Y) [µm]The Y coordinate of the central position about which the scan will be per-formed.
I Center (Z) [µm]The Z coordinate of the central position about which the scan will be per-formed.
I Alpha [ ◦ ]Alpha identifies the rotation of the scan area about the X axis and is mea-sured relative to the Y axis.
I Beta [ ◦ ]Beta identifies the rotation of the scan area about the Y axis and is mea-sured relative to the X axis.
I Gamma [ ◦ ]
Page 44

3.5. SEQUENCERS
Gamma identifies the rotation of the scan area about the Z axis and is mea-sured relative to the X axis.
HINT Entering a positive value for one of the angles will rotate the scan in themathematically positive direction. Since, however, the recording device(e.g. AFM tip) remains stationary, the resulting image will appear rotatedin the mathematically negative direction.For the determination of the position of the scan area when using a ro-tated scan, the rotation about the X axis is applied first. Then the rotationabout the Y axis is performed relative to the rotated plane. Last, the rota-tion about Z is applied which is again performed within the rotated/tiltedplane.
Scan ModeUsing this parameter, the scan mode can be selected from the following op-tions.
I SingleUsing this selection a single scan is performed on the plane definedthrough the angles Alpha, Beta and Gamma (typically the X-Y plane ifAlpha = Beta = 0◦) using the width and height entered. The scan tablewill remain in the final position of the scan upon completion.
I ContinuousIn this mode the scan will be performed as in the single setting. However,it will automatically be repeated upon completion using the exact samesettings. Change Scan Direction and Overwrite Previous (see below) are ad-ditional parameters defining the behavior of this scan mode.
I DepthUsing this selection, a single depth scan is performed perpendicular to theplane defined through the angles Alpha, Beta and Gamma (typically the X-Zplane if Alpha = Gamma = 0◦) using the width and depth entered. Thescan table will remain in the final position of the scan upon completion.
I Continuous DepthIn this mode the scan will be performed as in the depth setting. However,it will automatically be repeated upon completion using the exact samesettings. Change Scan Direction and Overwrite Previous (see below) are ad-ditional parameters defining the behavior of this scan mode.
I StackA stack scan is a collection of single scans which are performed at differ-ent depths (typical for confocal mode). The number of scans performed de-pends on the Layers per Scan parameter and the different depth levels onthe combination of Layers per Scan and the Depth parameters. The individ-ual scans are labeled automatically with incremented numbers.
Page 45

CHAPTER 3. CONTROL WINDOW
Change Scan DirectionThis parameter takes effect for continuous or stack scans and has the follow-ing options:
I Keep DirectionIn this setting each scan will start in the direction defined by the Slow ScanDirection.
I AlternateThis setting will cause the Slow Scan Direction to alternate with each scan.Therefore if a scan, which had started at the upper left hand corner of thescan area, has finished, the next scan will start at the bottom left hand cor-ner.
Slow Scan DirectionThis parameter sets the scan direction as illustrated in Fig. 3.7.
(a) Top�Bottom (b) Bottom�Top
Fig. 3.7: Schematic illustration of the slow scan direction.
Overwrite PreviousThis parameter takes effect for continuous or stack scans and can be set toCreate New Object and Overwrite. If Create New Object is selected a new dataobject will be created for each scan. If the option Overwrite is selected thesecond scan will overwrite the first one.
Speed Defined ByThis parameter can be set to Integration Time or Time per Line. Both of theseparameters can be entered and are described as
[Time per Line] = [Integration T ime] ∗ [Points per Line] (3.13)
Speed Defined By determines which variable will remain unchanged if the[Points per Line] parameter is changed.
Int. Time (Trace) [s]The integration time in the forward scan direction defines the time for onepixel, data point or spectrum. Changing this time will automatically changethe Time / Line (Trace) [s] parameter.
Page 46

3.5. SEQUENCERS
Int. Time (Retrace) [s]The integration time in the backward scan direction also defines the time forone pixel, data point or spectrum. If no data is recorded in this scan direc-tion this time basically defines the backward motion speed of the scan table.Changing this time will automatically change the Time / Line (Retrace) [s] pa-rameter.
Time / Line (Trace) [s]The time required for one line of the scan in the forward direction can be al-tered here. Changing this parameter will automatically change the Int. Time(Trace) [s] parameter.
Time / Line (Retrace) [s]The time required for one line of the scan in the backward direction can bealtered here. Changing this parameter will automatically change the Int. Time(Retrace) [s] parameter.If no data is recorded in the backward direction this time can be shortened sig-nificantly. However, if the time is selected too short, the sample might movedue to the impact upon turnaround if the sample is not fixed properly.
Acquire DataThis parameter determines whether or not data is recorded in only the For-ward scan direction or in both the Forward and Backward scan directions.
Pre/Post PixelsThis parameter defines how many pixel triggers will be output before and af-ter each line. This might be necessary if certain external devices are triggeredthrough the alphaControl.
Slow Turnaround [%]The slow turnaround reduces the impact caused by the change of directionof the scan table. If the slow turnaround is activated the scan table will beaccelerated to the final scan speed and slowed down from the final scan speedupon turnaround. The distance taken for this acceleration can be altered withthis parameter. The reference used with this percentage is the scan widthand half of this distance will be used on each side of the line scanned. WITecControl sets this parameter automatically and it is dependent on the mode ofmeasurement.
Linear Overscan [%]The linear overscan is an extension of the scan width which is used in combi-nation with the TrueScanTM mode implemented within the alphaControl. The
Page 47

CHAPTER 3. CONTROL WINDOW
reference used with this percentage is the scan width and half of this distancewill be used on each side of the line scanned. WITec Control sets this parame-ter automatically and it is dependent on the mode of measurement.
Data LabelingData labeling (see page 41 for a more detailed description) is available forthese scans with the keyword Scan being the default name.
3.5.3 Line Scan
The line scan parameter group allows the adjustment of all parameters necessaryfor the collection of data along a definable straight line. Currently WITec Controlonly allows the collection of spectra and/or distance curves along the line. How-ever in future versions all single data channels will be available for recording. Thebehavior of the line scan can be defined using the following parameters.
Start Line ScanPressing this trigger button starts the line scan and the data acquisition usingthe parameters currently entered.
Nr. of PointsThis parameter defines the number of equidistant points at which measure-ments will be performed along the line.
Listen LineThis feature is similar to the Listen Position/Area parameter described in Sec-tion 3.5.2. The difference is that instead of choosing the marker ( ) fromthe video window, the image window or the context menu, the line marker (
) must be selected. With this a line can be drawn on the images and thestart and end points of this line are then used as the start and end points ofthe line scan. The respective coordinates will automatically be entered as thecorresponding position parameters.
Start PointThis parameter group contains the parameters for the three coordinates X, Yand Z (in µm) of the starting point for the line scan. Note that the scan tableperforms the line scan.
End PointThis parameter group contains the parameters for the three coordinates X, Yand Z (in µm) of the end point for the line scan.
Page 48

3.5. SEQUENCERS
At Every PointHere the user can define which actions should be performed at every point.Currently only Distance Curve and Single Spectrum can be selected (Yes or Noselection). If any of these are selected, the parameter values set in the corre-sponding parameter groups (see Section 3.5.7 and Section 3.5.12) are used forthe respective task. If both of the tasks are selected they will be performedsequentially.
Data LabelingData labeling (see page 41 for a more detailed description) is available forthese scans with the keyword Line being the default name.
3.5.4 Sample Raster
This parameter group is used in combination with the Point Viewer (see Chapter 9).In the Point Viewer up to several thousand points on the sample can be definedwhere automated measurements can be performed. The Sample Raster parametergroup is used to define the state of the instrument before and after the executionof the raster of the defined points. Also, the execution of the raster is started fromthis parameter group and the Point Viewer can be opened.
Start RasterThis trigger button starts the execution of the currently defined raster (= thepoint list as defined in the Point Viewer).
Pre Measurement StateThis parameter group is identical to the one which can be found with somedata sources (see Section 3.6).
Post Measurement StateThis parameter group is identical to the one which can be found with somedata sources (see Section 3.6).If any of the pre or post measurement states of the recorded channels and/orthe values set in the Sample Raster parameter group here are in conflict, thestates in question will not be changed before or after the measurement (seeSection 3.6).
Point List EditorThis trigger button openes the Point Viewer window described in Chapter 9.In this window the points of which the raster consists can be defined.
Page 49

CHAPTER 3. CONTROL WINDOW
3.5.5 Frequency Sweep
The frequency sweep varies the frequency of the output signal of the lock-in am-plifier (Section 3.4.4) in order to determine the response in amplitude and phaseof the detected signal as a function of the excitation frequency. E.g. in AC modethis is used to find the resonance frequency of the cantilever. Amplitude and phaseare represented in a graph viewer. (see also WITecProject Manual). The parametersused to perform a frequency sweep are listed below.
Start SweepThis parameter starts the frequency sweep.
Listen RangeThe frequency cursor can be activated with this parameter. Clicking with themouse on this field opens a drop down window in which the duration of theactive time of the frequency cursor can be selected. From the graph whichdisplays the frequency sweep, a frequency range can be selected and the cor-responding values will automatically be entered as the initial and final fre-quency.
Initial Frequency [Hz]This parameter defines the initial frequency of the frequency sweep.
Final Frequency [Hz]This parameter defines the end frequency of the frequency sweep.
DivisionsThis parameter defines the number of steps between the initial and final fre-quency.
Create DataThis parameter allows the user to either only view the frequency sweep or tosave the frequency sweep as a graph data object in the project manager.
Data LabelingData labeling (see page 41 for a more detailed description) is available forthese scans with the keyword FrequencySweep being the default name.
3.5.6 Auto Resonance
This sequencer is used to automatically determine the resonance frequency of thecantilever when the alphaControl is operated in AFM AC Mode. Similar to the fre-
Page 50

3.5. SEQUENCERS
quency sweep (Section 3.5.5), the frequency of the output signal of the lock-in am-plifier is varied and the amplitude of the cantilever is measured at every frequency.In this procedure a coarse frequency sweep is performed over a large frequencyrange (typically from 10 kHz up to 500 kHz). As the maximum amplitude of thecantilever is approached, a second fine frequency sweep is performed to determinethe exact resonance frequency.The graph represented in the graph viewer displays the amplitude and phase vari-ations close to the resonance frequency. The resonance frequency is automaticallyset as the drive frequency of the reference signal in the lock-in amplifier and thephase offset is adjusted to zero (Section 3.4.4).
Auto ResonanceThis parameter starts the auto resonance procedure.
Initial Start Frequency [Hz]This parameter sets the initial start frequency for the auto resonance proce-dure.
Initial End Frequency [Hz]This parameter sets the initial end frequency for the auto resonance proce-dure.
3.5.7 Distance Curve
Distance curves are used to study phenomena which occur at a defined sampleposition if a probe is approached to and retracted from the sample by using the z-scan of the scan table. The probe can be for instance a cantilever tip in AFM andSNOM measurements, where the tip↔sample interactions are examined. In theseexperiments the cantilever tip is approached to and retracted from the sample. Therecorded signals as a function of distance are:
• the T-B signal of the beam deflection system if the AFM is operated in contactmode. The resulting curve displayed in the graph viewer is a force - distancecurve.
• the variation of the amplitude as described by Equ. 3.10 if the AFM is operatedin AC mode. The resulting curve displayed in the graph viewer is an amplitude- distance curve.
Typically, distance curves are recorded when the tip is already in contact with thesample and its position is controlled by the feedback loop.In addition to studies of tip↔sample interactions, the probe can also be a lightsource, in which case the light intensity is recorded as a function of distance fromthe sample.The parameters required to measure a force distance curve are listed below.
Page 51

CHAPTER 3. CONTROL WINDOW
StartThis parameter starts the distance curve.
Sample PointsThis parameter defines the number of points recorded in a distance curve.
Pull [µm]This parameter defines the distance the probe will be lifted off the samplebefore and after recording a distance curve.
Push [µm]This parameter defines the distance the probe will be moved downwards intothe sample. As reference for the downwards movement is the start position(see below).
Speed [µm/s]This parameter defines the speed of movement in the z-direction of the scantable during the complete distance curve.
Start PositionThis parameter defines the reference point within the internal coordinate sys-tem for the pull and push parameters described above. This parameter caneither be set to current or absolute. If absolute is chosen, the Absolute StartPosition parameter (see below) is used as the start position.
Absolute Start Position [µm]This parameter defines the start position in terms of the absolute positionalong the z-axis of the scan table.
Data LabelingData labeling (see page 41 for a more detailed description) is available forthese scans with the keyword FDC being the default name.
3.5.8 Tip Approach
This sequencer is used for the tip approach for AFM and SNOM measurements withthe alphaControl. The following parameters are used to control and perform a tipapproach.
Start ApproachThis button starts the tip approach procedure.
Page 52

3.5. SEQUENCERS
Out of Contact Speed [µm/s]This parameter defines the speed of the microscope Z stage during an ap-proach before the feedback setpoint is reached (see Section 3.4.5).
In Contact Speed [µm/s]This parameter defines the speed of the microscope Z stage during an ap-proach after the feedback setpoint is reached (see Section 3.4.5). As the scantable (Section 3.4.3) is completely extended in the Z-direction, the microscopeZ stage travels at the in contact speed downwards, while the feedback loopretracts the scan table to its final Z position (see below).
Final Position Z [µm]This parameter sets the z-position of the scan table at which the approach iscompleted.
Approach MethodThe tip approach depends on the selected feedback settings as describedin Section 3.4.5. This function allows the selection of the proper approachmethod for the following modes:
Contact ModeDuring the approach in contact mode, the tip is in contact with the sur-face as soon as the setpoint is reached. At this point the cantilever is bentand a force, defined by the setpoint and the spring constant of the can-tilever, is acting between tip and sample. Following this the scan tableretracts to its middle position while the microscope Z stage simultane-ously compensated for this movement in order to keep the bending ofthe cantilever constant.
AC ModeDuring the approach in AC mode, the cantilever is oscillating at a de-fined free amplitude before the sample is reached. As the tip reachescontact with the sample this amplitude is damped and the tip is in itsdesignated position once the setpoint defined by the feedback has beenreached. Due to long range forces however, the amplitude damping canbegin before the tip is in physical contact with the sample. Therefore, theindication that the tip is in contact during AC approach is the change ofphase shift φ (see Section 3.4.4) when the setpoint is decreased slightly.To determine the phase shift reliably, φ is sampled continuously duringthe tip approach. As soon as the final Z position is reached, the setpointis decreased further and the standard deviation σ(φ) is determined. Ifσ(φ) < σmax (the maximum deviation of φ) the setpoint is decreased fur-ther while the final Z position is corrected using the microscope Z stage.The tip approach is stopped when the standard deviation σ(φ) ≥ σmax.
Page 53

CHAPTER 3. CONTROL WINDOW
For safety reasons, the AC mode tip approach is also stopped if the cur-rent setpoint is smaller than half of the initial setpoint.
PFM ModeThe approach in PFM mode is similar to the approach in contact modewith the difference the the signal used for regulation is not the T-B sig-nal (ie the signal of the constant bending of the cantilever). The signalused here is the Fmax signal determined from the PFM curve. This ensuresa constant maximum force on the cantilever. See also Section 3.4.10.
HINT The approach in PFM mode will only be successful if the Fmax windowis selected properly.
Tip Regulated Contact ModeIn this mode, the tip positioning in Z direction is regulated by the posi-tioning piezo located in the cantilever arm instead of the Z axis of thescan table. Therefore the retracting of the tip is done to the middle po-sition of this piezo and not of the scan table.
PhiStdDevAccumsTo calculate the standard deviation σ(φ), n samples of φ are utilized. The pa-rameter PhiStdDevAccums defines the number n of the φ samples.
Stop@PhiStdDevThis parameter defines the maximum deviation σmax at which the AC ap-proach is stopped.
Retract Distance [µm]This parameter defines the upward travel distance of the microscope z stageduring tip retraction.
Retract TipThis button retracts the tip using the microscope z stage by the defined retractdistance.
3.5.9 Calibrate Scan Table
This sequencer is executed upon each startup of WITec Control but generally re-mains hidden from the user.Only advanced users should alter the settings herein.
When executed, the scan table will be driven to two different positions per axis atwhich the output of the capacitive sensors are measured. Using these values a lead
Page 54

3.5. SEQUENCERS
and an offset error are calculated for each axis. These values are then used to correctthe stationary positioning of the scan table during its use. A text data object namedCalibration Information is added to the project tree for information purposes.
HINT This file should also be checked if the calibration of the scan table fails. This mayoccur if the offset potentiometers for the scan table on the alphaControl are notset to their minimum positions.
The following parameters are available to set the calibration routine:
Start CalibrationThis trigger button starts the calibration sequencer.
CalibrateXAxis (CalibrateYAxis, CalibrateZAxis)This parameter determines if the X (Y,Z) axis is calibrated (Yes) or not (No).
XAxisPos1/2 (YAxisPos1/2 ZAxisPos1/2) [µm]Using these parameters the two target positions for the calibration of the X(Y,Z) axis can be entered. Entering an out of range value will cause the soft-ware to automatically enter the maximum/minimum value possible.
Calibrate Relative To Current PositionIf this option is selected (Yes), the scan table will move not to the position en-tered in e.g. XAxisPos1 but to ([Current X-Axis Position] + XAxisPos1). Similarlyit will move to ([Current X-Axis Position] + XAxisPos2) instead of XAxisPos2.
3.5.10 Adjust
The adjust sequencer offers software assisted step by step alignment procedures forcertain measurement modes. It automatically changes the parameters required forthe adjustments. If necessary, the sequencer requests user inputs and/or manualadjustments from the user via the status window (see Chapter 5) where informa-tion about the progress of the adjustment is also displayed. The adjustment can bestopped at any time by pressing any stop button within the software. The followingparameters are available within this parameter group:
Start AdjustmentPressing this trigger button will start the adjustment procedure using the cur-rent set of parameters.
Next StepWhen executing an adjustment this trigger button will become active. Afterfinishing a task given to the user by the sequencer via the message window,this trigger button should be pressed to continue the adjustment.
Page 55

CHAPTER 3. CONTROL WINDOW
Repeat Last StepThis trigger button allows repetition of the last task performed during theadjustment.
Adjust MethodThis parameter defines for which method the adjustment will be performed.
3.5.11 Oscilloscope
The oscilloscope sequencer allows the user to display measured values in a similarway as is done through an oscilloscope. The measured values which are displayedare set by the configurations and defined by WITec.
HINT If other values are required to be displayed in the oscilloscope window, contactWITec for assistance.
If single value signals such as the counter output of a photomultiplier are displayed,the signal will be integrated for the set time and the recorded value will then bedisplayed. The currently displayed values will shift to the left in the oscilloscopewindow with each new value recorded and the total time displayed is adjustable aswell. If the recorded signal is a spectrum, the CCD camera will integrate the signalfor the set amount of time and then refresh the entire oscilloscope window usingthe new spectrum. The following parameters are adjustable within the oscilloscopeparameter group.
Start OscilloscopePressing this trigger button will start the oscilloscope using the current set ofparameters.
Pre Measurement StateThis parameter group is identical to the one which can be found with somedata sources (see Section 3.6).
Post Measurement StateThis parameter group is identical to the one which can be found with somedata sources (see Section 3.6).If any of the pre or post measurement states of the recorded channels and/orthe values set in the oscilloscope parameter group here are in conflict, thestates in question will not be changed before or after the measurement (seeSection 3.6).
Displayed Time [s]This parameter sets the total time displayed within the oscilloscope window.
Page 56

3.5. SEQUENCERS
Integration Time [s]This parameter sets the integration time per point measured. This is thecounting time for a photon counting device or the integration time in thecases where spectra are recorded.
3.5.12 Single Spectrum
This parameter group allows (if applicable) recording of single spectra using theCCD camera connected to the system. A single spectrum acquisition stores onlyone spectrum. This spectrum can be an accumulation of several spectra, which caneither be added or the average spectrum can be calculated. The single spectrumacquisition is controlled by the following parameters:
Acc. Single SpectrumPressing this trigger button, will start the acquisition using the current set ofparameters.
Pre Measurement StateThis parameter group is identical to the one which can be found with somedata sources (see Section 3.6).
Post Measurement StateThis parameter group is identical to the one which can be found with somedata sources (see Section 3.6).If any of the pre or post measurement states of the recorded channels and/orthe values set in the single spectrum parameter group here are in conflict, thestates in question will not be changed before or after the measurement (seeSection 3.6).
AccumulationsThis parameter describes how many spectra will be accumulated using theintegration time for each of them.
Integration Time [s]This parameter defines the integration time for one spectrum. The minimumand maximum integration times depend on the CCD camera used.
Infinite AccumulationIf this option is selected (Yes) the CCD camera will continuously record spectrausing the integration time and the software will accumulate them until themeasurement is interrupted by the user by pressing any of the stop triggerbuttons.
Page 57

CHAPTER 3. CONTROL WINDOW
Accumulation ModeHere the mode of accumulation can be switched between accumulate andaverage. If average is selected, only the average spectra will be displayedwhereas if accumulate is selected, the spectra are added and displayed as thesum of all spectra recorded.
3.5.13 Time Series (Fast)
The time series (fast) sequencer allows the acquisition of data sources (e.g. spectraor count rates) at a fixed scan table position as a function of time. In this modechanges to the sample over time can for example be observed. The fast time serieswas developed for maximum speed and therefore does not allow pauses betweenthe measurements. The following parameters can be adjusted to control the timeseries:
Start Time SeriesPressing this trigger button will start the time series using the current set ofparameters.
MeasurementsThis parameter determines how many measurements will be performed. Itcan be adjusted between 1 and 217(=131072).
Integration Time [s]Using this parameter, the integration time per measurement can be set be-tween 0.1 ms and 10 s. Changes to this parameter will automatically alsochange the frequency parameter. If the integration time entered is shorterthan the fastest possible by the device (e.g. the CCD camera), the time willautomatically set to the fastest possible by the device.
Frequency [Hz]Using this parameter, the frequency of the measurements can be set between0.1 Hz and 10 kHz. Changes to this parameter will automatically also changethe integration time parameter. If the frequency entered is higher than thehighest possible by the device (e.g. the CCD camera), the frequency will auto-matically set to the highest possible by the device.
3.5.14 Auto Focus
The auto focus function allows the automatic focusing of the microscope based oneither a counter output (typically PMT or APD) or the integrated intensity of certainparts of the spectrum as recorded by the spectral camera. If a spectral camera is
Page 58

3.5. SEQUENCERS
used, the single data function as described in Section 3.4.12 is used. In this case thecurrently entered values in the Spectrograph and Spec Camera parameter groups areused for the evaluation of the numerical data.The auto focus procedure works as follows:
1. The intensity is measured from the counter selected or the spectrometer in50 equidistant points within the Search Range. The starting position is in themiddle of the Search Range.
2. The maximum of the points measured is determined.
3. Around the position where the maximum was found the new search range isdetermined as[Search Range] = 4
50× [Old Search Range]
4. Points 1 to 3 are repeated until the step width is smaller than an internallydefined threshold.
5. The microscope Z stage is driven to the maximum found.
The following parameters are available within the Auto Focus parameter group:
Start Auto FocusThis trigger button starts the auto focus procedure.
Max Search Range [µm]In this field the initial search range can be entered.
Min. Integration Time [µm]The integration time of the photon counting device / the spectral camera canbe entered here. The CCD camera may add read-out time to this value if used.
The auto focus procedure either finds the maximum or aborts, if no definite maxi-mum in terms of signal to noise ratio is found.
3.5.15 Process Script
The Process Script parameter group allows the definition of script based commandlines for the automatic execution of several consecutive tasks. Each task that canbe included in the script is shown in this parameter group. Tasks, which are fully de-fined in their respective parameter groups (such as Image Scan or Auto Focus) usethe parameters set in their respective parameter groups. These tasks will neverthe-less be shown in the Process Script parameter group, but without any parameters.Some additional tasks are included in the Process Script parameter group and their
Page 59

CHAPTER 3. CONTROL WINDOW
Task Name Command Line Parameter Parameter DescriptionPause pause Duration [ms] The duration of the
pause at this pointSnapshot snapshot Color Color video snapshot
(YES) or black andwhite (NO)
Brightness [%] Brightness of thewhile light illuminationfor the snapshot
Move Z movezmicroscope Distance [µm] The distance theMicroscope microscope Z stage
should move( + = increase;
- = decreasein objective↔ sampledistance)
Speed [µm/s] The speed of themicroscope Z stageduring the movement
Auto-Illumination autoillumination Uses the parameters described inSection 3.5.1.
Auto-Focus autofocus Uses the parameters described inSection 3.5.14.
Tip-Approach tipapproach Uses the parameters described inSection 3.5.8.
Single Spectrum singlespectrum Uses the parameters described inSection 3.5.12.
Image Scan imagescan Uses the parameters described inSection 3.5.2.
Save Project saveproject Uses the parameters described inSection 3.7.
Table 3.1: The tasks usable in the Process Script sequencer. New parameters are de-scribed and the location of the parameters defined in other parameter groups areindicated.
parameters can be adjusted herein. Table 3.1 shows the tasks available and theirparameters.During the execution of one scrip, the parameters remain constant. If, for example,several Move Z Microscope commands are included in the script, all of them will beexecuted with the same speed and distance.The script itself can contain the various commands separated by semicolons. Anexample for a script is given below:
pause ; autofocus ; singlespectrum ; imagescan ; saveproject ; movezmicroscope
Page 60

3.6. DATA SOURCES
In this example, the microscope will first pause for the defined duration before per-forming the auto focus function. Then a single spectrum will be recorded before animage scan is performed. Following the completion of this image scan, the projectwill be saved and the microscope will move the defined distance in Z.Scripts can be executed by pressing the Start Script trigger button (see below) orthrough a raster as defined in the point editor (see Chapter 9).Once the execution of a script is triggered, it is first checked for syntax errors.Should the script contain any error, the execution will not be started and a corre-sponding message identifying the number of the command where the error occurswill be displayed in the message window (see Chapter 6). The erroneous commandwill also be displayed.Apart from the executable commands the following entries can be found in theProcess Script parameter group:
Start ScriptUsing this trigger button the execution of the script can be started.
Cancel Current Cmd.This trigger button cancels the current command. The next command in thecommand line will automatically be executed. In the example of the com-mand line shown above, pressing the Cancel Current Cmd. button while theimage scan is executed will cancel this execution and the saveproject functionwill automatically be executed.
Command LineThe command for the script function as shown in an example above can beentered here.
Command ParametersThis group contains all tasks which can be executed through the script andwhich have been explained in Table 3.1.
HINT Using the Save As function which can be found in the Configurations menu, thecurrent script as well as all parameters set in the individual parameter groupscan be saved for later usage. This would essentially then represent another con-figuration, based on a standard one, but with the predefined parameters for thescript execution.
3.6 Data Sources
The alpha Controller fulfills a wide variety of functions, during which data are mea-sured and communicated continuously among various devices and sequencers.
Page 61

CHAPTER 3. CONTROL WINDOW
In most cases the users interest lies in the output of a sequencer and not in allthe intermediate measured data. Therefore, WITec Control provides access tothis data via channels, fast stream channels and spectral channels. However, thedata sources tree-structure also contains some internal controller managementparameters (Section 3.6.4), which are for internal use only and should not bemodified by any user.
The tree-structure of the data sources lists a large number of available channels.However, some of these channels are for internal use only and will not be describedin this manual.
3.6.1 Channels
The channels provide access to controller outputs where each measuring pointdescribes one measured data. This data may be single values or sets of values asis the case for e.g. distance curves or a spectra. The listed output channels arecharacterized by a set of parameters followed by the sequencers which are able torecord this channel.
Common Channel ParametersThe parameters listed below are available for all channels.
I Channel NrThis parameter cannot be modified by the user and is for internal referenceonly.
I CaptionThis caption is stored with the name of every data object created throughthe output of this channel.
I UnitThis parameter describes the physical unit of the measured channel. It willbe stored with every data object created through the output of this channel.
I Offset (Unit)This parameter is used in conjunction with the scale (see below) to calculatethe physical value from the measured signal.
I ScaleThis parameter is used in conjunction with the offset (see above) to calcu-late the physical value from the measured signal.
I Show StatusThe output of the channel can be displayed as a numerical value in the sta-tus window (see Chapter 5). The caption is used as the parameter name
Page 62

3.6. DATA SOURCES
followed by its unit. The displayed numerical value is calculated based onthe unit offset and scaling parameter.
Pre Measurement StateThese parameter groups define the state of various devices before the mea-surement of a specific data channel is started. Each group hereby consists oftwo entries where one parameter can be set to either Change State or Do NotChange State. If the Change State is selected, the corresponding device willchange into the defined state whereas if Do Not Change State is selected noaction will be performed. The other parameter defines the state the devicewill change into if applicable and the only choices available for this parameterare described in the following.
I Microscope Illumination (State)The white light can be turned off (Light Off) or on (Light On) before the mea-surement of the specific channel.
I Flip Mirror (State)Up to two mirrors can be added to an alpha300 system. Each mirror canbe switched between its two states (e.g. for the alpha300 S the standardmirror has the states CCD Camera and Photo Multiplier).
I Counter (State)An alpha300 / alpha500 / alpha700 system can be equipped with up tothree counters. Each counter can be switched On or Off before a measure-ment.
I Filter Wheel (Filter Number)If the filter wheel is included, the position of the filter wheel (ie which filterwill intersect the beam path) can be set to Filter 1, ... , Filter 4.
Post Measurement StateThe Post Measurement State contains the same parameters as the Pre Mea-surement State. These parameters however, define the state of the devicesafter measuring the specific channel.
SequencersThe sequencers which are able to record channels are listed below.
I Image ScanThe parameters required to record and display an image scan are:
CaptureThis parameter allows the selection of Yes - the data set is captured in animage data object and listed in the project manager, or No - the image isnot captured.
Page 63

CHAPTER 3. CONTROL WINDOW
ShowIf an image is captured, it can be automatically displayed in an imageviewer if Yes is selected.
Show RetraceThe retrace of a captured image is automatically displayed in an imageviewer if Yes is selected.
Show Line GraphIf Yes is selected, a graph viewer is automatically opened. It displays thevalue of the channel recorded along the current line of an image scan.
Image Line CorrectionThe image displayed in the image viewer can be line corrected. This linecorrection does not affect the saved data. It refers only to the display ofthe image in the image viewer (see also WITec Project Manual - ImageViewer).
Graph Line CorrectionThe graph displayed in the graph viewer can be line corrected. This linecorrection does not affect the captured data. It refers only to the displayof the line in the graph viewer (see also WITec Project Manual - GraphViewer).
I Line Scan
CaptureThis parameter allows the selection of Yes - the data set is captured ina data object and listed in the project manager, or No - the data is notcaptured.
ShowIf the data is captured, it can be automatically displayed in an graphviewer if Yes is selected.
I Frequency SweepThe parameters required to record, display and store a frequency sweep arelisted below.Capture
If this parameter is set to Yes, the frequency sweep is captured. However,a graph data object is created only if the Create Data parameter is set toYes in the frequency sweep sequencer (see Section 3.5.5).
ShowIf this parameter is set to Yes, the frequency sweep is opened automati-cally in a graph viewer.
I Distance CurveThe parameters required to record, display and store a distance curve arelisted below.
Page 64

3.6. DATA SOURCES
CaptureDistance curves are captured and stored in graph data objects if Yes isselected.
ShowIf Yes is selected, the distance curves are automatically opened in a graphviewer.
I OscilloscopeThe parameters required to record and display the channel output in theoscilloscope mode are listed below.
HINT Oscilloscope displays do not create a data object and can not be stored.
CaptureIf Yes is selected, the channel output is captured without creating a graphdata object.
ShowThe data captured in the oscilloscope mode are displayed in a graphviewer if Yes is selected.
I Time Series (Fast)The parameters required to record, display and store a fast time series arelisted below.Capture
This parameter allows the selection of Yes - the data set is captured ina data object and listed in the project manager, or No - the data is notcaptured.
ShowThe data captured in the time series is displayed in a graph viewer if Yesis selected.
I Auto FocusThe parameters required to allow the usage of the channel for the auto fo-cusing procedure as described in Section 3.5.14, are shown below.Capture
If Yes is selected, the single data created by this channel is used for theauto focusing function. Only one channel at a time may be set to Yes,otherwise the auto focus routine will not start.
ShowIf Yes is selected, the data collected in each cycle of the auto focusingprocedure is displayed in a graph window.
The Output ChannelsIn Tab. 3.2 the available output channels are listed in combination with thesequencers which are able to record the channels. The positions of the X in-
Page 65

CHAPTER 3. CONTROL WINDOW
dicate valid combinations in Tab. 3.2. Additionally, the individual channels aredescribed below.
I T-BThe T-B output is the difference in the electrical signals collected from thetop and the bottom halves of the four quadrant photo diode of the beamdeflection system. Its unit is V . This output is used to monitor the feedbackduring contact mode measurements.
I Lock-In RThe Lock-In R output signal of the lock-in amplifier (see Section 3.4.4) is thesignal amplitude defined by Equ. 3.10. Its unit is V and it is used to monitorthe feedback during AC mode measurements.
I Lock-In PhiThe Lock-In Phi output signal of the lock-in amplifier (see Section 3.4.4) isthe phase φ defined by Equ. 3.11. Its unit is ◦ and it is used to monitor thephase shift during AC mode measurements.
I F max.The F max. output is the maximum of the PFM curve as evaluated by thecontroller hardware (see Section 3.4.10). Its unit is V and it is mainly usedas the PI controlled channel in PFM measurements.
I AdhesionThe adhesion is measured in V and is determined by the controller basedon the adhesion search window from the PFM curve (see Section 3.4.10).Variations in the adhesion of a sample can be determined using this signal.
I StiffnessThe stiffness is measured in V and is evaluated by the controller based onthe stiffness search window from the PFM curve (see Section 3.4.10). Varia-tions in the stiffness of a sample can be determined using this signal.
I ViscosityThe viscosity is measured in ◦ and is determined by the controller based onthe viscosity search window from the PFM curve (see Section 3.4.10). Varia-tions in the viscosity of a sample can be determined using this signal. This,however, is not yet implemented.
I L-RThe L-R output is the difference in the electrical signals collected from theleft and right halves of the four quadrant photo diode of the beam deflec-tion system. Its unit is V . This output is used to monitor the torsion of thecantilever during contact mode measurements.
I Aux 1 and Aux 2Aux 1 and Aux 2 are the auxiliary channels of the alphaControl system. Theunit of these signals is V .
Page 66

3.6. DATA SOURCES
Channel Image Line Freq. Dist. Oscillos- Display in Time AutoScan Scan Sweep Curve cope Stat. Win. Series Focus
T-B X X X X XLock-In R X X X X X XLock-In Phi X X X X X XF max. X X X XAdhesion X X X XStiffness X X X XViscosity X X X XL-R X X X X XAux 1 X X X X X XAux 2 X X X X X XSum XX-Sensor X X X XY-Sensor X X X XZ-Sensor X X X X XFeedback X X X X XPhoton Cnt. X X X X X X XCounter Rate X X X X X X XMicroscope Z X XInv. Mic. X XInv. Mic. Y XInv. Mic. Z XSample Pos. X XSample Pos. Y XOpt. Laser Pow. X
Table 3.2: Output channels and their sequencer. The Xindicate valid combinationsof channels and sequencers.
I SumThe Sum output is the total electrical signal collected from the four quad-rant photo diode of the beam deflection system. Its unit is V .
I X-SensorThe X-sensor output is the signal collected from the capacitive sensor mea-suring the X-axis position of the scan table (Section 3.4.3). Its unit is µm.This signal is used to determine the precise position of the scan table.
I Y-SensorThe Y-sensor output is the signal collected from the capacitive sensor mea-suring the Y-axis position of the scan table (Section 3.4.3). Its unit is µm.This signal is used to determine the precise position of the scan table.
I Z-SensorThe Z-sensor output is the signal collected from the capacitive sensor mea-suring the Z-axis position of the scan table (Section 3.4.3). Its unit is typi-cally µm. This signal is used to represent the topography of a surface during
Page 67

CHAPTER 3. CONTROL WINDOW
AFM and SNOM measurements. For confocal measurements the z-sensoroutput reads the precise z position of the scan table.
I FeedbackThe feedback output is the setpoint position of the z-axis of the scan table.Its unit is typically µm∗ (proportional to µm), but without the linear correc-tions induced by the sensor. This signal is used in AFM and SNOM measure-ments especially if the surface topography varies by less than 1 nm.
I PMT, APD and other photon counting devicesSeveral photon counting devices can be added to an alpha system. Typi-cally, the first photon counter is a PMT and the second counter an APD. Theoutput of the counters is the actual counter reading of how many photonswere counted during the last pixel. Its unit is cts (counts).
I Count Rate of photon counting devicesThe Count Rate output is the counter reading divided by the time requiredto record the pixel. Its unit is Hz (counts /second).
I Microscope ZThe microscope Z output is the relative position of the microscope z-stage.Its unit is µm.
I Inv. Mic. XThe inverted microscope X output is the relative position of the invertedmicroscope in the X-direction. Its unit is µm.
I Inv. Mic. YThe inverted microscope Y output is the relative position of the invertedmicroscope in the Y-direction. Its unit is µm.
I Inv. Mic. ZThe inverted microscope Z output is the relative position of the invertedmicroscope in the Z-direction. Its unit is µm.
I Sample Pos. XThe Sample Pos. X is the X position of the sample positioning stage in thecurrently active coordinate system. Its unit is µm.
I Sample Pos. YThe Sample Pos. Y is the Y position of the sample positioning stage in thecurrently active coordinate system. Its unit is µm.
I Optical Laser PowerThe optical laser power parameter contains the power as read from thephoto-detector and converted by the calibrated conversion. Its unit is µW .
I Heating Stage TemperatureThe heating stage temperature contains the temperature as determinedthrough the calibrated PT100 element in the heating stage.
Page 68

3.6. DATA SOURCES
3.6.2 Fast Stream Channels
Fast stream channels can be transferred with higher speed (5 MHz) from the con-troller to the PC. There is a limited number of channels available for this fast transfer(T-B, L-R, Aux1 and Aux2) and their description is similar to how they were describedin Section 3.6.1. At this point the T-B is the only signal used in fast streaming modeand this is implemented during PFM measurements.
3.6.3 Spectral Channels
This category of data sources contains the outputs of the spectral cameras con-nected to the alpha300 / alpha500 / alpha700 system. Up to three spectralcameras can be added to an alpha300 / alpha500 / alpha700 system. In this case,one measuring point describes a set of measured data (e.g. a full spectrum).
Each spectral camera delivers a set of data to the software. The parameters whichdescribe each camera are listed below.
General Parameters
I Spectral CameraThis parameter defines the internal code for a spectral camera and is notaccessible to users.
I CaptionThe caption is stored with the name of every data object created using theoutput of the spectral camera
I UnitThis parameter describes the physical unit of the spectral camera (e.g. CCDcts).
Spectral channels can also have defined pre- and post measurement states whichare similar to the ones described in Section 3.6.1.The sequencers, which are able to record the data of a spectral camera, are listedbelow.
Image ScanThis image scan sequencer records a 2D data array (see Section 3.5.2). The pa-rameters listed below are used to capture, store, and display a 2D data arrayimage scan.
I CaptureThis parameter allows the selection of Yes - the spectral data are captured
Page 69

CHAPTER 3. CONTROL WINDOW
in a multi-graph data object and listed in the project manager, or No - thespectral data are not captured.All spectra read from the spectral camera are displayed in a graph viewerlabeled Hardware Spectrum. This viewer opens automatically upon startinga measurement.
I ShowIf Yes is selected, an additional graph viewer is opened. This graph viewerdisplays one spectrum of the multi-graph data object captured during thetrace movement of the scan table.
I Show RetraceIf Yes is selected, the graph viewer displays one spectrum of the multi-graphdata objet which contains the data recorded during the retrace movementof the scan table.
I Create Filt.Man. TraceIf a multi-graph data object is created, the filter manager can be used to cal-culate specific spectral features by using predefined filters and summarizethese features in an image data object. A filter manager can be created au-tomatically and displayed. If this parameter is set to Yes, the filter manageris created for all data measured during the trace movement of the scanner.
I Create Filt.Man. RetraceIf Yes is selected for this parameter, a filter manager is created for all datameasured during a retrace movement of the scanner.
Line ScanThe parameters required to record a multi-graph line scan are listed below.
I CaptureIf Yes is selected, a one dimensional multi-graph data object is created andlisted in the project manager. All spectra read from the spectral camera aredisplayed in a graph viewer labeled Hardware Spectrum. This viewer opensautomatically when the measurement is started.
I ShowIf Yes is selected, an additional graph viewer is opened. This graph viewerdisplays the captured multi-graph data object.
Oscilloscope Mode
I CaptureIf Yes is selected, all spectra read from the spectral camera are displayedautomatically in a graph viewer. Storage of the spectra is not possible inthe oscilloscope mode.
Page 70

3.6. DATA SOURCES
Single SpectrumThe parameters required to record a single spectrum are listed below.
I CaptureIf Yes is selected, a one dimensional graph data object is created and listedin the project manager. The single spectrum (or each of the spectra whichare accumulated) read from the spectral camera is displayed in a graphviewer labeled Hardware Spectrum. This viewer opens automatically whenthe measurement is started.
I ShowIf Yes is selected, an additional graph viewer is opened. This graph viewerdisplays the captured graph data object which is the current accumulationof the single spectra (if more then one accumulation is selected).
Time Series (Fast)This fast time series sequencer records series of spectra (see Section 3.5.13).The parameters listed below are used to capture, store, and display a theseseries.
I CaptureIf Yes is selected, a one dimensional multi-graph data object is created andlisted in the project manager. All spectra read from the spectral camera aredisplayed in a graph viewer labeled Hardware Spectrum. This viewer opensautomatically when the measurement is started.
I ShowIf Yes is selected, an additional graph viewer is opened. This graph viewerdisplays the captured multi-graph data object.
I Create Filt.Man.If a multi-graph data object is created, the filter manager can be used to cal-culate specific spectral features by using predefined filters and summarizethese features in an graph data object. A filter manager can be created au-tomatically and displayed. If this parameter is set to Yes, the filter manageris created for all data measured during time series.
Auto FocusThe parameters required to allow the usage of the spectral channel for theauto focusing procedure using the single data function as shown in Sec-tion 3.4.12, are described below.
I CaptureIf Yes is selected, the single data created by this channel is used for the autofocusing function. Only one channel at a time may be set to Yes, otherwisethe auto focus routine will not start.
Page 71

CHAPTER 3. CONTROL WINDOW
I ShowIf Yes is selected, the data collected in each cycle of the auto focusing proce-dure is displayed in a graph window.
3.6.4 Controller
This category of data sources contains the internal outputs of the controller. Thechannels within this category are for internal use only and should not be modifiedby any user.
3.7 Auto Save
The auto save parameter group allows the definition for automatic saving of thedata acquired. It can either be triggered through the Store Project trigger buttonor through the corresponding command in the process script sequencer.If directories defined for the auto saving procedure do not exist, they will be createdby the software upon saving.The parameters available for the auto save function are described below:
Store ProjectThis trigger button stores the project using the current settings.
Start DirectoryIn this field the starting directory can be defined. The full path where the filewill be stored will be explained below.
Extra DirectoryAn additional directory for saving the project can be defined using this field.The full path where the file will be stored will be explained below.
File NameThe first part of the file name can be defined using this field. The compositionof the full file name is described in the next point.
File NumberHere a number for the file saved can be assigned. This will automatically be in-cremented with each saving cycle and the number is automatically expandedto four digits. If for example the number entered is 2 the number used will be0002.The total file name will then be:
[File Name] [File Number].WIP
Page 72

3.7. AUTO SAVE
Next FileThis field is for information purposes only and displays the path and filenameof the next file that will be saved.
Directory ModeVarious modes can be selected here. Below the resulting file path for all meth-ods will be shown.
I No Extra Directory[Start Directory]\
I Extra Directory[Start Directory]\[Extra Directory]\
I Date[Start Directory]\YYYYMMDD\Here YYYY identifies the year, MM the month and DD the day.
I Extra Directory + Date[Start Directory]\[Extra Directory]\YYYYMMDD\
I Date + Extra Directory[Start Directory]\YYYYMMDD\[Extra Directory]\
Store ModeStore and Store and Clear can be selected for this parameter. The difference isthat Store and Clear will clear the project after saving it.
Overwrite ModeThis parameter will only be of importance if the file which is about to be savedexists already. If Overwrite is chosen, the existing file will be overwritten. IfAdd Extra Suffix is selected the file name shown above will be changed to:
[File Name] [File Number] YYYYMMDD HHMMSSmmm.WIPHere YYYY denotes the year, MM the month, DD the day, HH the hour, MM theminute, SS the second and mmm the milliseconds of the moment when thefile is saved.
Page 73

CHAPTER 3. CONTROL WINDOW
Page 74

Chapter 4
Video Control Window
The video control window displays the image captured by one of the video camerasof the alpha300 / alpha500 / alpha700 system. It allows access to all functions re-quired for video image display, view calibration, laser position marking, scan rangedisplay and image data storage. The video control window can be opened from themenu bar via the hardware control menu (see Section 2.1.1).The three major functional components of the video control window, which isshown in Fig. 4.1, are discussed below.
ToolbarThe toolbar allows quick access to the functions of the video control windowand it contains the following speed buttons:
I CursorWith this button a spatial cursor is activated. Its standard unit is µm. Moreinformation about the role of spatial cursors can be found in the WITecProject manual.
I Set Tip PositionThis button allows the user to position a permanent marker in the videoimage. This is particularly useful for marking the laser or tip position withinthe video image.
I Set Reference PointThis button allows a spatial synchronization of the video image with abitmap or an image data object using distinctive features displayed in therespective windows. This feature is especially helpful if the laser is not visi-ble in the video image or the exact tip position is hidden by the cantilever. Inthis case an image can be scanned and displayed in an image viewer. Afteractivating the set reference point function, the synchronization betweenthe image window and the video control window is achieved by clickingon a specific sample feature in the image viewer followed by a click on thesame feature in the video control window.
Page 75

CHAPTER 4. VIDEO CONTROL WINDOW
Fig. 4.1: Video Control window.
I Image MarkerWith this button a scan area can be defined within the video image. Thiscan be achieved by clicking onto one corner of the desired scan area andwhile holding the left mouse button, dragging the square into the desiredshape.
HINT The area marked will only have an effect on the scan area if the “listen”option in Image Scan⇒ Geometry is set (see Section 3.5.2).If the selected scan area lies outside the maximum scan range, the ge-ometry parameters will be displayed in red indicating this error.
I Line MarkerSimilar to the image marker, the line marker can be used to define the ge-ometry of a future scan. In this case a line is defined by clicking on thestart point of the line and while holding the left mouse button, draggingthe mouse to the desired end point. If the “listen” option in Line Scan (seeSection 3.5.3) is set, this line will be used for the next line scan.
I Calibrate VideoThis button allows the spatial calibration of the video image. Upon press-ing this button, the scan table moves a defined, magnification-dependentdistance. Based on the movement of specific features within the video im-age, the video image display is calibrated. A confirmation window similarto Fig. 4.2 opens upon completion of the calibration. After the parameters
Page 76

in this window are approved by the user, a calibrated scale bar will be dis-played in the video image.
Fig. 4.2: Confirmation of video calibration window.
For successful calibration of the video image display, the video camera mustbe properly oriented, the objective properly focused on a sample with anirregular but distinctive pattern and all laser sources should be switchedoff. To check the calibration, several distinctive features can be moved intothe center of the video image using the Scan Table ⇒ Listen Position op-tion (see Section 3.4.3). If the calibration was successful clicking onto a fea-ture should cause this feature to move into the marked laser or tip position.
HINT Failure of the calibration can occur if the entered magnification of the ob-jective is deviating from the actual magnification by more than approxi-mately 20%. Additionally, the calibration may fail if the sample does notshow enough distinctive features.If the laser source is on, a cantilever is mounted or the field stop di-aphragm is visible within the video image, the calibration will also failsince these are distinct features which will not move as the scan tabledoes.
I Add View PortThis button opens the video channel options window as shown in Fig. 4.3.It allows access to all parameters required for the setup of a new view port.These parameters are described under “Options” below. Title, magnifica-tion and video input channel will be used to identify the view as an addi-tional entry in the view port drop down menu (see below).
HINT After adding a new view port, the video image display should be cali-brated. The calibration will be saved with the respective view.
I Remove View PortThe view port selected in the drop down window (see below) is removed by
Page 77

CHAPTER 4. VIDEO CONTROL WINDOW
clicking this button.
I OptionsThis button opens the video channel options window (Fig. 4.3) in which thefollowing parameters can be adjusted for the individual views.
Fig. 4.3: Video Channel Options win-dow.
Title The title is used for the identification of the view in the view port dropdown menu (see below).
Magnification The magnification is also used for identification purposesbut is also needed for the calibration of the view. Variation of more thanapproximately 20% from the actual magnification of the objective maylead to problems during the calibration.
Video Input Channel Different cameras can be selected using the video in-put channel. These are connected to the frame grabber card of the PCwith “Top View” being the BNC connector closest to the mother board,then “Bottom View”, “Rear View” and “Aux View”. All alpha300 / al-pha500 / alpha700 systems are equipped with a top view camera. Thebottom view is used for all systems using an inverted microscope such asthe alpha300 S and the rear view is used if the system is equipped withthe SNOM reflection mode extension. The auxiliary view allows the at-tachment of an additional camera if necessary. The information enteredhere is again used for the identification of the view.
Page 78

Allow Calibration If this tick box is unchecked, no calibration can be per-formed. This may be desirable for view ports using the back view sincethis view cannot be calibrated.
Brightness, Contrast and Saturation These sliders allow the user to changethe appearance of the video signal within the control window.
X- and Y-Position Using these sliders, the position of the video image withinthe video control window can be changed.
Flip Image up/down The image can be flipped if desired using this option.
I ImageThis speed button copies the image to the graphic export window, whosefunctions are described in the WITec Project manual.
I Add Video Image to ProjectUsing this speed button, the video image can be added as a color bitmap tothe project.
I Gray-scale ImageThis speed button copies the image as a gray-scale image to the graphicexport window, whose functions are described in the WITec Project manual.
I Add gray-scale Image to projectUsing this speed button, the video image can be added as a gray-scalebitmap to the project.
Drop down windowThe drop down window lists the available video ports. By choosing one of thelisted views, the calibration for this particular view is loaded and the videoimage originating from the respective camera is displayed.
Video Image DisplayIn the lower left hand corner of the video display area, the scale bar for theselected view port is shown. The red circle shows the position of the referencepoint (in most cases the laser or cantilever position). The red frame aroundthe spot indicates the full scan area of the scanner. For high magnifications,this frame might not be visible if it lies outside the viewing area.The context menu of the video image display can be accessed using the rightmouse button. This context menu allows access to the functions of the abovediscussed speed buttons.
Page 79

CHAPTER 4. VIDEO CONTROL WINDOW
Page 80

Chapter 5
Status Window
The status window consists of a 2 column chart which lists the actual value of mea-sured output channels. The left column contains the name of the output channelincluding its physical unit in square brackets. The right column displays the actualnumerical value of the output channel in its physical unit.Many of the system parameters (output channels) of the alpha300 / alpha500 /alpha700 system can be listed in the status window as described in Section 3.6.However, the display of too many parameters would lead to a complex list of pa-rameters and their respective numerical values. It is therefore recommended toreduce the parameters listed in the status window to a minimum for the selecteddata acquisition mode as is done for the predefined basic configurations mentionedin Chapter 11. Detailed descriptions of the configurations matched to the individualhardware purchased can be found in separate documents.
Page 81

CHAPTER 5. STATUS WINDOW
Page 82

Chapter 6
Message Window
The message window is a message interface between the controller hardware andthe user as shown in Fig. 6.1. The upper part of the window is a chronological clas-sification of past operations. The lower part of the window displays the currentoperation followed by the display of the remaining time required for the operation.
Fig. 6.1: Message window
.
The nature of the message can be identified by the symbol displayed in front of themessage. The following types of messages are displayed:
InformationThis class of messages contains only information about ongoing processesperformed by the controller. The message description next to this symbol,informs the user about the actual process.
WarningsIf a controller process fails, a warning message is displayed.
Page 83

CHAPTER 6. MESSAGE WINDOW
User input for an operationSome routines of the controller are automated. Nevertheless they can notbe completed without user inputs. Messages which contain the user inputsymbol describe the action which should be accomplished by the user.
HazardHazard messages indicate severe problems of the hardware. They contain in-formation about communication errors between computer and controller orfailures of the power supply.
Page 84

Chapter 7
Quadrant Window
The quadrant window shown in Fig. 7.1 is a graphical representation of the fourquadrant beam deflection detector. It is useful for the alignment of the beamdeflection system used during AFM and SNOM measurements. In addition itprovides visual information about the status of the four quadrant detector whileacquiring data in the AFM or SNOM operation mode.
Fig. 7.1: Quadrant Window
The window consists of three parts:
Z-Position IndicatorThe column on the left hand side of the window displays the position of the
Page 85

CHAPTER 7. QUADRANT WINDOW
scanner (ZPos.). During the approach of the cantilever towards the sample,the scanner is fully extended, which is indicated with the full size of the col-umn. Upon contact between the cantilever and the sample, the scanner willstart to retract, which is indicated through a decrease in the hight of this col-umn. The cantilever reaches its final position when the scanner is retractedto the middle position of the scanner and the column is at half height. If thebasic configuration for AFM or SNOM is selected, the numerical value of theposition of the scan table is listed in the status window (Chapter 5).
Sum Signal IndicatorThe column on the right side of the window (Sum) is proportional in length tothe total reflected laser light from the cantilever captured by the four quad-rant detector.
The Four Quadrant DiodeThe central area displays the four quadrants of the beam deflection detector.Depending on operation mode, this display changes.
I Contact Mode: If the system is operated in contact mode, a red marker (dot)appears in this four quadrant display. This marker indicates the position ofthe laser spot reflected from the cantilever onto the four quadrant diode.The active low pass filter is displayed at the bottom of the four quadrantdisplay.
I AC Mode: If the system is operated in AC mode, the red marker is replacedby an arrow in the center of the four quadrants. The length of this arrowis proportional to the oscillation amplitude of the cantilever. The rotationof the arrow indicates the phase offset between modulation and cantileveroscillation. At the bottom of the four quadrant display, the note ”AC cou-pling” appears, indicating that all DC-voltage offsets are neglected in thisrepresentation.
I PFM Mode: When operated in pulsed force mode, the red marker is replacedby a red line which only moves in the vertical direction indicating the Top-Bottom signal. No horizontal movement is implemented since the Left-Right signal is not evaluated in PFM. The active low pass filter is displayedat the bottom of the four quadrant display.
Page 86

Chapter 8
Graphic Control Window
The alpha300 / alpha500 / alpha700 system consists of several devices whichmay have to be aligned, focused, and/or synchronized. Some of these devices arecontrollable through extended visual interfaces which are displayed within thegraphic control window. Each interface can be selected through the tab sheetsvisible within the graphic control window.Generally, these tab sheets consist of a graphic representation of the selecteddevice. The directions of movement available for the specific devices are indicatedby red arrows. Clicking with the left mouse button on one of these arrows willmove the device in the selected direction using the speed indicated by the numer-ical value within the window. This speed can be adjusted through the graphicalrepresentation of the potentiometer within the window, the potentiometer on theremote control (if available) or the parameter setting of the corresponding devicewithin the control window (see Chapter 3).
The following extended visual interfaces are available within the graphic controlwindow.
Cantilever PositioningThe extended visual interface for the cantilever positioning displays the sixpossible movements of the cantilever as shown in Fig. 8.1(a). This extendedvisual interface is used for the alignment of the AFM/SNOM cantilever.
Inverted MicroscopeThe movement of the inverted microscope of the alpha300 system can becontrolled using the extended visual interface of the inverted microscope(Fig. 8.1(b)). The six directions of movement are indicated by the red arrowson this tab sheet.
Microscope Z MovementThe graphic control for the microscope z movement is displayed in Fig. 8.1(c).It displays the upper part of the microscope. The red arrows indicate the twopossible directions of movement for this microscope.
Page 87

CHAPTER 8. GRAPHIC CONTROL WINDOW
(a) (b)
(c)
Fig. 8.1: Graphic Control: (a) cantilever positioning; (b) inverted microscope; (c) Z microscope
Page 88

Chapter 9
Point Viewer
The Point Viewer (see Fig. 9.1) is used to define the points for the use with the sam-ple raster as described in Section 3.5.4. At the points defined in the point list, theprocess script sequencer (see Section 3.5.15) can be executed before the system au-tomatically moves the sample to the next point in the list. The points can be editedmanually or imported from .CSV files or SP1 KLARF 1.2 files. Please contact WITecshould you require import functions for different file formats.
Unused Points
UnderlayBitmap
TravellingPath
Used Points
Point List
Fig. 9.1: The Point Viewer window showing the menu bar, the sample area and the point list.Some functions of the window are labeled.
In the following, the menu bar and the functions of the speed buttons will be de-
Page 89

CHAPTER 9. POINT VIEWER
scribed before the sample area is outlined. The point list and the context menu willthen be described.
9.1 Speed Buttons
The following speed buttons are available in the menu bar of the Point Viewer win-dow:
New point listBy pressing this speed button a new point list is created.The existing point list will be deleted.
Open Point ListThis function starts the Windows R© standard open-dialog for WITec Point Listfiles (*.wpt). Using this dialog, a saved point list can be opened. The savedpoint list file also contains the bitmap underlay and the sample and bitmapcoordinates. Previously opened point lists will be closed.
Save Point ListThis menu function allows a Point List to be saved. If it is a new list, the savefile as-dialog will be opened.
Save Point List AsThis function is similar to the save point list function, while offering the possi-bility to change the filename. The Windows R© standard save-dialog for WITecPoint List files is activated.
Import SP1 KLARF 1.2 FileThis function allows the import of data saved in the SP1 KLARF 1.2 file formatusing the Windows R© standard open-dialog. Previously opened point lists willbe closed. The bitmap underlay as well as the sample and bitmap size aredefined internally and set automatically for the import filter.
Define Sample Size and Underlay BitmapThis speed button opens the sample size and bitmap underlay dialogs asshown in Fig. 9.2.This dialog can be used to load a bitmap (in .BMP format) which is used asa background in the sample area of the Point Viewer window. The dialog al-lows the definition of the sample area and the size and position of the bitmaptherein. In Fig. 9.2, a sample area of 200×200µm was defined and the bitmapwas defined in the upper left-hand corner of the sample area as can be seen in
Page 90

9.1. SPEED BUTTONS
Fig. 9.2: The Sample Size and Bitmap Underlay dialog window withthe Point Viewer in the background.
the point viewer in the background of Fig. 9.2. The bitmaps should, if possible,be located in the directoryC:\Program Files\WITec\WITecControl X.XX\BMPbecause this is the standard directory where the bitmaps are searched for.The following entries can be modified in this window:
I Minimum Position [µm] X/YThe minimum position of the sample within the coordinate system shouldbe entered here. Following a change to the values entered here, the corre-sponding fields for the bitmap coordinates in the lower left hand corner arechanged to the same value.
I Maximum Position [µm] X/YThe maximum position of the sample within the coordinate system shouldbe entered here. Following a change to the values entered here, the corre-sponding fields for the bitmap coordinates in the upper right hand cornerare changed to the same value.
I Underlay BitmapThe file containing the underlying bitmap should be entered here. Thebutton opens the Windows R© standard open-dialog for bitmap files (*.bmp).
I Select Color for TransparencyThis trigger button opens the color selection dialog from which the trans-parency color for the bitmap can be selected. This color will not be displayedin the sample area. The currently selected color is shown to the right of thetrigger button.
Page 91

CHAPTER 9. POINT VIEWER
I Sample coordinate at lower left corner [µm] X/YThese fields are automatically filled in following a change to the minimumsample position field, but can also be changed manually. The coordinates ofthe bitmap at the lower left corner can be entered here. See Fig. 9.2 for anillustration of the effects of the coordinates entered. Here the underlyingbitmap is shown at the coordinates as entered in the Define Sample Sizeand Underlay Bitmap dialog shown.
I Sample coordinate at upper right corner [µm] X/YThese fields are automatically filled in following a change to the maximumsample position field, but can also be changed manually. The coordinates ofthe bitmap at the upper right corner can be entered here. See Fig. 9.2 for anillustration of the effects of the coordinates entered. Here the underlyingbitmap is shown at the coordinates as entered in the Define Sample Sizeand Underlay Bitmap dialog shown.
OptionsIn the options dialog, which is shown in Fig. 9.3, the export parameters forthe export and graphic representation of the point list, as well as for the ASCIIexport of the list itself, are given.
Fig. 9.3: The options dialog for the pointviewer.
For the export of an image representing the points as shown in the samplearea, the number of pixels in the larger dimension of the bitmap can be en-tered. The dimension of the smaller side of the exported image will be deter-mined by the aspect ratio of the current view.
Page 92

9.1. SPEED BUTTONS
HINT The actual number of pixels may vary due to an automatic crop function,which cuts off excess white borders.
The Size factor for blinking points is the factor by which the points are enlargedand then reduced again when blinking. The blinking in the sample area indi-cates that the points are selected.
For the export of the point list in ASCII format, the following options are avail-able:
I Export All PointsIf this check box is selected, all points will be exported regardless of theirUsage status (see Section 9.4). If it is unchecked, only points with the usageset to Yes or Used will be exported.
I Export All ColmnsIf this checkbox is selected all columns will be exported. Otherwise onlythose selected through the context menu (see Section 9.4) are included inthe export.
I Include Column NamesThis selection allows the column names to be included with the exportedASCII file.
I SeparatorThe following separators for the ASCII export are selectable:
SpaceThe columns are separated by one space.
TabThe columns are separated by a tab.
SemicolonThe columns are separated by a semicolon.
Add PointThis speed button is only active if the point list is not imported from a KLARFfile but is defined manually as a four column table. If active, it opens the editpoint dialog as shown in Fig. 9.4.
Page 93

CHAPTER 9. POINT VIEWER
Fig. 9.4: The edit point dialog.
The name for the point, the X and Y coordinates in µm and the state can beselected here. The states are explained in Section 9.4.
Delete Point [Keyboard shortcut: DEL ]This button is only active if points are selected (highlighted in the point list).Pressing this speed button deletes the selected points.
Edit PointThis button is only active if a single point, which has been defined manually, isselected. Upon activating this speed button, the system opens the edit pointdialog as shown in Fig. 9.4 and described with the Add Point speed buttonabove.
Sort by orderThis button sorts the points in the order that they to be are executed. Thedisplay order may be changed by, for example, displaying them sorted by theirname, usage or coordinates.
HINT Upon defining the points, or upon opening or importing a point list, the or-der of the points is defined. Re-sorting the points by their name, coordinatesor usage will only change the appearance of the points and NOT the orderin which they are executed. This speed button displays the points again inthe order of execution.
Move Selection Up [Keyboard shortcut: CTRL+ U ]This button causes the selected points to be moved up in the list. It is onlyactive if the list is displayed in the way it is processed.
HINT This changes the order of execution.
Move Selection Down [Keyboard shortcut: CTRL+ D ]This button causes the selected points to be moved down in the list. It is only
Page 94

9.1. SPEED BUTTONS
active if the list is displayed in the way it is processed.HINT This changes the order of execution.
Select Single PointIf this button is activated, single points from the point list can be selectedby clicking on them in the sample area. The selected point will blink in thesample area and will be highlighted in the point list. Pressing the CTRL keywhile selecting the points allows the selection of multiple points. Pressingthe SHIFT key when clicking on a selected point causes this point to be de-selected. This function will remain active until de-activated (though clickingonto the button again) or until a different mouse function ( , or ) isactivated.
Select Multiple PointsIf this button is selected, multiple points from the point list can be selectedby drawing a rectangle around them in the sample area. The selected pointswill blink in the sample area and be highlighted in the point list. Pressing theCTRL key while selecting the points allows the selection of multiple regions.Pressing the SHIFT key when selecting an area causes the points within thisarea to be de-selected. This function will remain active until de-activated (byclicking onto the button again) or until a different mouse function ( ,or ) is activated.
Immediately move to selected PointThis button allows the immediate movement of the sample to the selectedpoint. This point will only be active if the sample positioning system ispresent. Once activated, the system will move the sample to the point se-lected by the mouse. The point can either be selected by clicking onto thegraphic representation in the sample area or by selecting it from the pointlist. The speed set in Section 3.4.14 is used for this movement. Clicking ontoa void area within the sample area has no effect. This function will remainactive until de-activated (by clicking onto the button again) or until a differentmouse function ( , or ) is activated.
Zoom inIf this button is selected an area for zooming-in can be selected from the sam-ple area. This function will remain active until de-activated (by clicking ontothe button again) or until a different mouse function ( , or ) isactivated.
Zoom to fit allPressing this button causes the entire sample area to be displayed. This is thestandard view when defining the underlay bitmap and the sample size as well
Page 95

CHAPTER 9. POINT VIEWER
as after loading new point lists.
Zoom to previousThis button returns to the last zoomed view.
Zoom to nextThis button moves one step forward (if available) in the list of zoomed views.
9.2 Sample Area
The sample area can be seen at the left in Fig. 9.1. Here the bitmap underlay isshown as well as the points. Additionally, the traveling path of the microscope canbe displayed through the context menu (see Section 9.4).
The visible parts in the sample area are:
Coordinate SystemThe coordinate system is scaled according to the sample size as defined by theDefine Sample Size and Underlay Bitmap dialog (see Fig. 9.2).
Underlay BitmapThe bitmap chosen through the Define Sample Size and Underlay Bitmap dia-log (see Fig. 9.2) is displayed at the corresponding coordinates.
PointsThe points displayed are either red if set to Yes or Used or blue if set to No.Selected points blink in the sample area.Points defined outside the sample area are not displayed.
Traveling PathThe traveling path of the instrument is shown in green, connecting the pointsin the order they will be processed in. Only points set to Yes are connected.
HINT The traveling path can be optimized through the context menu (see Sec-tion 9.4).
Current PositionThe current position of the instrument is indicated by green crosshairs.
Page 96

9.3. POINT LIST
9.3 Point List
The point list set up is similar to a spreadsheet, with each row representing a point.The number of columns may vary depending on the import filter used. However,manually defined point lists as well as point lists imported from .CSV files have onlyfour columns:
Name | Use | X [µm] | Y [µm]
These columns are also the first four in other imported point lists. The columnsdisplayed can be selected through the context menu (see Section 9.4). By clickingon the column headers, the list is sorted by these columns (i.e. by name or usage).
HINT This will not change the order in which the points are handled, but only theirrepresentation in the list. Use the Move Selection Up ( ) or Move Selection Down( ) speed buttons to change the order in which the points are processed.
If points are selected, they will be marked along the entire row.
9.4 The Context Menu
The context menu, which can be seen in Fig. 9.5, can be opened by a right clickwithin the point viewer window.
Fig. 9.5: The Point Viewer con-text menu.
The commands available through the context menu are:
Page 97

CHAPTER 9. POINT VIEWER
ExportThe export menu point allows the export of the sample area as a bitmap aswell as the ASCII export of the point list. The exported bitmap will be copiedto the Graphic Export window which is described in the WITec Project manual.The exported ASCII data will be copied to the clipboard, from which it can thenbe pasted into the desired document. The export functions use the settingsset in the options dialog described in Section 9.1 on page 92.
Import CSVUsing this menu, comma separated value data (.CSV) can be imported. Thedata must be a three column CSV file with the first column containing thename of the point, the second the X coordinate in µm and the third the Y co-ordinate in µm. The format of the name has to be alphanumerical withoutspaces and special characters. The X and Y coordinates may have a + or - asa leading sign, a dot as the decimal separator and an optional ‘e’ or ‘E’ indi-cating an exponent followed by a signed integer. The strings may not have athousands separator.The usage state for all points imported is initially set to Yes.
Show point viewer optionsThis menu point opens the same dialog as the options speed button ( ).The dialog is described in Section 9.1 on page 92.
Show Traveling PathUsing this menu entry, the display of the traveling path can be turned on andoff.
Define Sample SizeThis menu entry opens the Define Sample Size and Underlay Bitmap dialogdescribed in Section 9.1 on page 90.
Optimize RouteThis menu entry automatically optimizes the traveling route in order tominimize the travel length and thus the traveling time. A window will informthe user about the change in traveling distance due to the re-ordering of thepoints.This procedure is not recommended while performing a measurement be-cause it can require substantial processing power. If the point list containsmore than 2000 points the software prompts the user for a confirmation ofthe task due to the considerable amount of time it might take.
Add PointThis menu point has the same functionality as the Add Point speed button (
Page 98

9.4. THE CONTEXT MENU
) which is described in Section 9.1 on page 93.
Delete PointThis menu point has the same functionality as the Delete Point speed button( ) which is described in Section 9.1 on page 94.
Edit PointThis menu point has the same functionality as the Edit Point speed button (
) which is described in Section 9.1 on page 94.
Select FunctionsThis menu point allows the selection of all points as well as the inversion ofthe current selection.
Usage FunctionThe usage of the currently selected points can be edited here. The possiblechoices are:
I UseAt this point the process script sequencer (see Section 3.5.15) is executedonce the point list is carried out.
I Do not useThe system will, upon execution of the raster, ignore this point and the sys-tem will not drive to it.
I UsedThe system automatically sets points with the label Yes to Used once theprocess script has been executed at this position.
I Used -> UseThis function changes all points marked Used in the current selection to Yes.Points marked No in the current selection are not changed.
Sort by OrderThis menu point has the same functionality as the Sort by Order speed button( ) which is described in Section 9.1 on page 94.
Move SelectionThis menu entry contains the two entries Move Selection Up and Move Selec-tion Down, which are identical to the corresponding speed buttons ( , )described in Section 9.1 on page94.
ColumnsThis menu entry contains all columns of the point list. Activating them in this
Page 99

CHAPTER 9. POINT VIEWER
menu entry will show them in the point list editor.
Page 100

Chapter 10
Other Windows
All other windows visible, such as the Project Manager, Graph Tools, Image Tools,Cursor Manager and the Drop Action Window, are described in the WITec Projectmanual.
Page 101

CHAPTER 10. OTHER WINDOWS
Page 102

Chapter 11
Configurations
The WITec Control software is designed to control WITecs alpha300 / alpha500 /alpha700 microscopes. The capabilities of these microscopes include confocal mi-croscopy, confocal Raman microscopy, AFM and SNOM techniques and any combi-nation thereof. By loading a configuration, the alpha300 / alpha500 / alpha700system is set up for a specific measuring mode (e.g. confocal microscope or AFMcontact mode).When loading a configuration, the following operations are performed:
• the parameters described in Chapter 3 are loaded from hard disk and/or set topredefined values.
• the layout of the parameters in the control window as well as the speed but-tons are adjusted.
• the size, position, and whether a window is displayed or not are established.
Configurations can be selected from the main menu of the WITec Control software(Section 2.1.2). The name of the selected configuration is displayed in the statusbar of the main menu (Section 2.3). Switching from e.g. high resolution AFMmeasurements to confocal Raman imaging requires only the selection of theproper configuration.
When switching from one configuration to another, the system should first be setto a safe state, where e.g. the AFM tip is not in contact with the sample anymore.
alpha300 / alpha500 / alpha700 systems are delivered with standard configu-rations. These configurations can be changed and saved. However, new namesshould be given to modified configurations. If a new configuration is required,it can be created in collaboration with the WITec support team. The standardconfigurations which apply to a specific alpha300 / alpha500 / alpha700 systemare described in separate documents.
Page 103

CHAPTER 11. CONFIGURATIONS
Page 104

BIBLIOGRAPHY
Bibliography
[1] U. Tietze und Ch. Schenk. Halbleiter-Schaltungstechnik. 11. Auflage. SpringerVerlag, 1999.
Page 105


