USER MANUAL SUPERVISOR 24/48/72 - Electronic … · ©2002 IES BV Veenendaal 10-01-02 page 3...
34
©2002 IES BV Veenendaal 10-01-02 Issue 3 SXX V34A USER MANUAL SUPERVISOR 24/48/72 10 9 8 7 6 5 3 4 2 0 1 10 9 8 7 6 5 3 4 2 0 1 10 9 8 7 6 5 3 4 2 0 1 10 9 8 7 6 5 3 4 2 0 1 10 9 8 7 6 5 3 4 2 0 1 10 9 8 7 6 5 3 4 2 0 1 22 16 23 17 24 18 21 15 20 14 19 13 4 10 5 11 6 12 3 9 2 8 1 7 10 9 8 7 6 5 3 4 2 0 1 x 6 x 5 x 4 x 3 x 2 0 x 1/3 x 1/2 x 1/4 x 1/6 x 1/5 A B FLASH- BUTTONS PRESET B PRESET A 10 9 8 7 6 5 3 4 2 0 1 10 9 8 7 6 5 3 4 2 0 1 10 9 8 7 6 5 3 4 2 0 1 10 9 8 7 6 5 3 4 2 0 1 10 9 8 7 6 5 3 4 2 0 1 10 9 8 7 6 5 3 4 2 0 1 10 9 8 7 6 5 3 4 2 0 1 10 9 8 7 6 5 3 4 2 0 1 10 9 8 7 6 5 3 4 2 0 1 10 9 8 7 6 5 3 4 2 0 1 34 28 35 29 36 30 33 27 32 26 31 25 22 16 23 17 24 18 21 15 20 14 19 13 4 10 5 11 6 12 3 9 2 8 1 7 46 47 48 45 44 43 40 41 42 39 38 37 10 9 8 7 6 5 3 4 2 0 1 x 6 x 5 x 4 x 3 x 2 0 x 1/3 x 1/2 x 1/4 x 1/6 x 1/5 A B FLASH- BUTTONS PRESET B PRESET A
Transcript of USER MANUAL SUPERVISOR 24/48/72 - Electronic … · ©2002 IES BV Veenendaal 10-01-02 page 3...

©2002 IES BV Veenendaal 10-01-02 Issue 3 SXX V34A
USER MANUAL SUPERVISOR 24/48/72
10987
65
34
2
01
1098
765
34
2
0
1
10
9876
5
34
2
01
10987
65
34
2
01
10987
65
34
2
01
10
9876
5
34
2
01
2216 2317 2418 2115 2014 1913
4 105 116 123 92 81 7
10
9876
5
34
2
01
x 6
x 5x 4x 3x 2
0
x 1/3x 1/2
x 1/4
x 1/6x 1/5
A BFLASH-BUTTONS
PRESET B
PRESET A
10
9876
5
34
2
01
10987
65
34
2
01
10987
65
34
2
01
10
9876
5
34
2
01
10
9876
5
34
2
01
10987
65
34
2
01
10987
65
3
4
2
01
10
9876
5
34
2
01
10
9876
5
34
2
01
10987
65
3
4
2
01
3428 3529 3630 3327 3226 3125
2216 2317 2418 2115 2014 19134 105 116 123 92 81 7
46 47 4845444340 41 42393837
10987
65
3
4
2
01
x 6x 5x 4x 3
x 20
x 1/3
x 1/2
x 1/4
x 1/6x 1/5
A BFLASH-BUTTONS
PRESET B
PRESET A

©2002 IES BV Veenendaal 10-01-02 page
2
CONTENTS : Content .........................................................................................................page 2 Introduction...................................................................................................page 3 Function overview.........................................................................................page 4 Specifications ...............................................................................................page 5 Internal connections .....................................................................................page 6 External connections ....................................................................................page 7 Menu tree .....................................................................................................page 8 Turning on the supervisor .............................................................................page 9 Manual mode................................................................................................page 9 Programming a cue ......................................................................................page 10 Editing a cue time .........................................................................................page 11 Modifying a cue ............................................................................................page 12 Programming a chaser .................................................................................page 13 Editing a chaser time ....................................................................................page 14 Modifying a chaser step................................................................................page 15 Insert or delete a step...................................................................................page 16 Clear chaser .................................................................................................page 16 Copy cue to chaser.......................................................................................page 17 Insert chaser into a chaser ...........................................................................page 17 Setup cue or chaser function for sub master 1-6 ..........................................page 18 Entering and clearing a patch .......................................................................page 19 Function control ............................................................................................page 20 Top and bottom set.......................................................................................page 21 Test functions ...............................................................................................page 22 Curve selection.............................................................................................page 22 Flash function ...............................................................................................page 23 Fader calibration...........................................................................................page 24 Serial connections ........................................................................................page 25 MIDI controls ................................................................................................page 26 Return to factory settings..............................................................................page 27 Password functions ......................................................................................page 28 Display board................................................................................................page 29 Processor board ..........................................................................................page 30 Fader board ..................................................................................................page 31 Updating system software ............................................................................page 32 Declaration of conformity ..............................................................................page 33
CAUTION!
To prevent fire or shock hazard, do not expose the unit In rain or moisture. To avoid electrical shock, do not open the cabinet. Refer servicing to qualified personnel only.
WARRANTY We warranty each of our products to be free from defects in material and workmanship. Our obligation under this warranty is to repair or replace any instrument or part thereof which, within two years after shipment, proves defective upon examination. External influences are excluded. To exercise this warranty, write or cal IES representative, or contact the IES service department. You will be given prompt assistance and if necessary shipping instructions.

©2002 IES BV Veenendaal 10-01-02 page
3
INTRODUCTION : Congratulations with the purchase of the SUPERVISOR light control desk. Going through all of the functions will confirm that this has been the right choice, and will be for at least the next ten years. The flexible setup from the input device and internal network communication, as well as the enormous memory capacity does not enforce any hardware limitations therefore only the system software has to be upgraded by means of the monitor software to provide you with additional functions. The supervisor was designed together with experienced TV / theater and rental users. Each party contributed with their own specific problems and experience to the present functions. Combining all this was the base for the way the Supervisor works, Simply define your wishes in the set-up menu and it will be arranged. In the future new ideas and functional improvements will be made and can easily be implemented in your desk as well. The SUPERVISOR is equipped with three serial outputs. An RS-485 port for bi-directional communication with dimmers and other DMX-512 controllable devices and a RS-232 port to enable communication with an overhead system such as a personal computer. The RS-485 output is prepared to handle more advanced protocols and speeds then DMX-512 without any problems. The reason that the SUPERVISOR uses DMX-512 is that this is the only lighting protocol, which is worldwide adapted and accepted. The real limitations using DMX-512 are found using indeed 512 channels and high resolutions for scanners as well as the absence of a checksum which makes it in fact a blind protocol. But don't worry, for the moment it is a very big improvement against all the critical and complex wiring from conventional analog systems, and when the time is ready for a new standard the SUPERVISOR is prepared. The MIDI in and output opens the possibilities for master/slave use and easy synchronization between different devices. The manual will guide you through all functions step by step. For all chapters is presumed that you have read the page called "turning on the supervisor" which explains a few essential steps before you should turn on the desk, and how the input device with cursor and LCD display works. Hopefully you will find much joy in working with the SUPERVISOR.
IES International Electronics Service
Wageningselaan 52-54 3903 LA Veenendaal
The Netherlands tel: +31 (0)318 555495 fax: +31 (0)318 555661
www.ies.nl

©2002 IES BV Veenendaal 10-01-02 page
4
FUNCTION OVERVIEW :
10
9876
5
34
2
01
10
9876
5
34
2
01
10
9876
5
34
2
01
10
9876
5
34
2
01
10
9876
5
34
2
01
10
9876
5
34
2
01
10987
65
34
2
01
10
9876
5
34
2
01
10
9876
5
34
2
01
10987
65
34
2
01
3428 3529 3630 3327 3226 3125
2216 2317 2418 2115 2014 19134 105 116 123 92 81 7
46 47 4845444340 41 42393837
10987
65
34
2
01
x 6x 5x 4x 3
x 20
x 1/3x 1/2
x 1/4
x 1/6x 1/5
A BFLASH-BUTTONS
PRESET B
PRESET A
2
1 3 4 5 6
11 14
12
987 10
15 2016 1718 19
fun-1 ⇒ Flash buttons to flash a channel a chaser or a cue. The red led shows the status of the upper
channel, the green led from the lower channel. fun-2 ⇒ This row of faders is used for PRESET-A and controls the first half of available channels. fun-3 ⇒ This row of faders is used for PRESET-B in manual mode and in automatic mode are sub
masters for the stored cues. Sub master 1 until 6 also can be selected to operate as chaser sub masters.
fun-4 ⇒ Master A controls the total level for preset A. The flash button beneath this fader is a master flash. fun-5 ⇒ Master B controls the total level for preset B in manual mode, and for the sub masters in
Automatic mode. fun-6 ⇒ Grand master controls the total level for preset A as well as all the sub masters, except the chaser
master. The flash button acts as a black out. fun-7 ⇒ Chaser master controls the level of the main chaser. With the flash button the chaser function is
enabled. fun-8 ⇒ Beats Per Minute fader selects if you want to use the sound input. If on, the fader in the down
position means every beat is a new step, in the top position it needs 10 beats to proceed one step. A special function is available by pressing the flash button over 5 seconds, the led is flashing and the fader has become a X fader to go from one cue to another.
fun-9 ⇒ The time fader is used to modify the programmed times in both cue's as well as chasers until a maximum of 6 times slower or faster. If the switch is pressed the chaser is blocked and with the cursor on the "step" position the up and down buttons are used to step forward or back in the chaser sequence.
fun-10 ⇒ ON button. Press once to switch on the Supervisor, and press over 3 seconds to switch off. fun-11 ⇒ 2 x 20 character LCD screen with back light. fun-12 ⇒ Left and right buttons to set the cursor on the desired position. fun-13 ⇒ "ENTER' button, used to confirm different actions. fun-14 ⇒ Up and down buttons to in- or decrease the by the cursor selected figure. fun-15 ⇒ "PROG CUE" quick access button for cue programming. fun-16 ⇒ "MOD CUE" button to quickly select the modify cue function. fun-17 ⇒ "PROG CHASER" quick access to the program mode for chasers. fun-18 ⇒ "MOD CHASER" button to quickly select the modify chaser function. fun-19 ⇒ "PATCH" gives a direct access to the patch entry menu. fun-20 ⇒ "EXIT" this function can be used at any point to return to the main menu.

©2002 IES BV Veenendaal 10-01-02 page
5
SPECIFICATIONS : SUPERVISOR-24 SUPERVISOR-48 SUPERVISOR-72 Signal input ............................. DMX-512 USITT optical isolated RS485 / 250 kbaud MIDI output ............................... with selectable channel and key address MIDI input ................................. with selectable channel / flash button / function start address Master/slave ............................. by means of MIDI out in Channels (wide mode) ............. 24 48 72 Soft patch channels .................. 96 / 256 / 512 96 / 256 / 512 96 / 256 / 512 Data exchange (bi-directional).. RS232 9600b optical isolated (X-on / X-off) Power supply ........................... 150-250V AC 150-250V AC 150-250V AC Frequency................................. 50-60 Hz 50-60 Hz 50-60 Hz Power consumption .................. 14 VA max. 14 VA max. 14 VA max. Top-set ..................................... 30-100% 30-100% 30-100% Bottom-set ................................ 0-30% 0-30% 0-30% Pages ....................................... 40 30 20 Cue’s ........................................ 6420 4680 2700 Chasers / sequences................ 60 40 20 Steps per chaser ...................... 99 99 99 Output curves ........................... linear / square linear / square linear / square User memory ............................ 1,0MB 1,0MB 1,0MB System memory........................ 512kb 512kb 512kb Display ..................................... L.C.D. super twisted led backlight BATRON Audio input................................ 0,775V – 50V auto ranging and optical isolated Fader module processor........... 78HC11 8Mhz / board Main processor ......................... 78HC11 8Mhz Password.................................. one technical and one user password (4 digits) Manual mode............................ 2 or 1 preset (wide) mode Output device (per 6ch) ............ selectable for scanner or real (proportional) level Flash function (per 6ch) ............ add-solo-channel Serial protocol........................... n.c. / Monitor / P.C. edit program Master B ................................... normal / inverse GO button................................. by means of the sound input or “step up” button X-fade ...................................... by means of the B.P.M. fader ( press the B.P.M button for 5 sec.) Step time .................................. 0-99,9 sec Pause time................................ 0-99,9 sec Size (wxhxd) ............................. 482,5 x 266 x 95 mm 708 x 308 x 95 mm 958 x 308 x 95 mm Weight ..................................... 4,6 Kg 5,4 Kg 7,3Kg Order code................................ 9801 S 9802 S 9803 S Metal built-in console................ included included included Monitor/up-down load software included included included Desktop console ....................... 9801 W 9802 W 9803 W

©2002 IES BV Veenendaal 10-01-02 page
6
INTERNAL CONNECTIONS :
A
C
B
D
E
O N M L K
F G H I J A : Mains power supply 230 50-60 Hz 2 x 15V 0,4 A. B : Back-up battery witch guaranties a reliable back up for over 3 months. C : Output connector for all external connections. D : Dipswitch 4 clears the memory EPROM. E : 78HC11 8Mhz / processor board. F : MIDI controller 16C550. G : INTERNAL communications controller 16C550. H : DMX 512 controller 16C550. I : Processor 78HC11 8Mhz / fader board. J : Fader-board device address settings. K : 16 pole flat-cable for communication distribution. L : Pot for LCD contrast. M : 3 Pole output connector for MIDI. N : Mains power connector phase / GND / Neutral. O : Automatic fuse 400 mAT

©2002 IES BV Veenendaal 10-01-02 page
7
EXTERNAL CONNECTIONS :

©2002 IES BV Veenendaal 10-01-02 page
8
MENU TREE :

©2002 IES BV Veenendaal 10-01-02 page
9
-SUPERVISOR-SLEEPING
WAKE-UP-SUPERVISOR-
-SUPERVISOR-I.E.S.
PAGE CUE CHASER 01 01 c01 s06
PROG SETUP MAINSELECT
PASSWORD ????
FUNCTION CONTROL CH 01-06 07-12FUN REAL SCAN
TOP SET MAX OUTPUT 100%
(MAX 30%)MIN OUTPUT 00%BOTTOM SET
TEST ADC ADC 01 02 03IN 000 000 255
I/O SWI 01 02 03 04TEST SWITCH
SELECT CURVE SELECT CURVE LINEAR SQUARE
FUN ADD SOLOFLH 01-06 07-12FLASH FUNCTION
CALIBRATION SERV CODE ????(34 15)
+0 +0 255MIN MAX ADC 01
ch1-24 ch1-48 A/B A&B
MANUAL SETUP
DMX CHANNELS DMX CHANNELS 96 256 512
OUT 001 007 512DIM 001 002 003ADJUST PATCH
CLEAR PATCH CLEAR PATCHARE YOU SURE Y/N
MODIFY CHASER
EDIT CHASER TIME
01 S01CH STEP FADE DELPROG CHASER
MODIFY CUE PAGE CUE MODIFY01 05 LOCK
EDIT CUE TIME
01 00,0 00,0PAGE T_IN T_OUTPROG CUE
PASSWORD ????
0,5S
0,5S
0,5S
PAGE T_IN T_OUT01 00,0 00,0
CHASER MODIFYc01 s01 LOCK 19
OR
OR
OR
OR
OR
OR
OR
OR
OR
OR
MANUAL MODEA 100% B 000%
A B M
ENTER
ENTER
ENTER
ENTER
ENTER
ENTER
ENTER
ENTER
ENTER
ENTER
ENTER
ENTER
ENTER
ENTER
ENTER
ENTER
ENTER
ENTER
ENTER
ON
ENTER
PRESS 3 sec TO TURN OFF
ENTERENTER
ORSERIAL SERV CODE ????
(34 15)
NC MON PCSERIAL OUTPUT
ENTER
MAIN SCREEN
ADD / SOLO / CHAN
ENTER
ORFUN MASTER-B
INVERSE NORMALFUN MASTER-B
VERSION V72.33I.E.S. (C) 1992-98
VERSION V72.33I.E.S. (C) 1992-98
OR
0,5S00,0 00,0
PRESS THE DE SIRED FLASHBUTTON ANDPULS THE ENTER BUTTON TO LOAD THE CUE
PRESS E NTER TO LOAD THE CUE
USE UP OR DOWN TO ADJUST, LEFT OR RIGHT TO SELECT THE DESIRED DIMMER
PRESS THE DESIRED FLASHBUTTON ANDENTER
0,5S
PROG CUE BLIND PAGE T_IN T_OUT01 00,0 00,0
PULS THE ENTER BUTTON TO LOAD THE CUE
PRESS THE BUTTON OF THE DESIREDCUE, AND CHANGE THE TIME.CONFIRM BY PRESSING ENTER.
ENTER ARE YOU SURE Y/NCLEAR PAGE 01CLEAR PAGE
PRESS THE BUTTON OF THE DESIRED CUE.CHANGE THE SETTING OF CHANNELS BY SLIDING THE FADER UP UNTIL 'LOCK' AND STORE THE MODIFIEDCUE BY PRESSING THE DESIRED FLASHBUTTON.
00,000,00,5S
CH STEP FADE DEL01 S01
ENTERPROG CHAS BLIND
PRESS ENTER TO LOAD THE CUE
00,000,00,5S
CH STEP FADE DEL01 S01
SELECT THE RIGHT STEP AND CHANGETHE TIME, THEN PRESS ENTER.
SELECT THE DESIRED STEP AND THE CHANNELSETTING BY SLIDING THE FADER UP UNTIL 'LOCK'AND CHANGE THE SETTING, THEN PRESS ENTER.
0,5S
01 S01CH STEP FADE DEL
0,5S00,0 00,0ENTER
INSERT CHAS STEP
SELECT THE LOCATION FOR THE STEPTO BE INSERTED, STORE THE CUE BY PRESSING ENTER.
DELETE CHAS STEP DEL STEP c01 s01ARE YOU SURE Y/NENTER
ENTER ARE YOU SURE Y/NCLEAR CHASER 01CLEAR CHASER
PAG E 9
CLIENT:WHEN QUALITY....
H255H0
(IF SELECTED) (IF SELECTED)
H1
H2
H3
H4
H5
H6
H81
H82
H85
H86
H87
H88
H84
H83
ENTER
ENTER
OR
ORSELECT CHASER NO
FADER SETUP1-6 CUE/CHASER
CH 01 02 03 04FAD 1 2 3 4
SETUP CUE/CHASER
H7
H8
H9
H10
H11
H12
H13
H14
EXIT
EXIT
EXIT
EXIT
EXIT
EXIT
EXIT
EXIT
EXIT
EXIT
EXIT
EXIT
EXIT
EXITEXIT
EXIT
EXIT
EXIT
EXIT
EXIT
EXIT
EXIT
EXIT
EXIT
EXIT
EXIT
EXIT
EXIT
OR
OR
OR
OR
OR
OR
OR
OR
OR
OR
OR
OR
OR
OR
OR
EXIT
H15
COPY CUE TO CHAS PAG CUE CH ST 08 32 38 01ENTER
H89
H90
H91
H92
H93
H94
H99
H96
H95
-MIDI CONTROL- NC MASTER SLAVE
(34 15)
SERV CODE ????MIDIENTER ENTER
ENTER CHAN 01 01 30 00MIDI F1 F2MIDI (IN / OUT)
EXIT
EXIT
OR
OR
NEW PASSWORD !! SET NEW PASSWORD ****ENTER
ENTERENTERFACTORY SETTINGS SERV CODE ????
(34 15)H97
H98
OR
OR
EXIT
EXIT
FACTORY SETTINGSARE YOU SURE Y/N
EXIT
(MIN 30%)
ORP-CUE
ORP-CH
OR
PATCH
OR
EXIT
H16
INSERT CHASERENTER CH 23
CH STEP CHASER01 S01

©2002 IES BV Veenendaal 10-01-02 page
10
TURNING ON THE SUPERVISOR : Before the Supervisor is plugged into the mains, first check the supply voltage / frequency and earth connection. Connect the power plug into the mains socket, The led' s from the flash buttons are on until the internal communication is checked, The display now shows "SUPERVISOR SLEEPING". Then press the ON switch and you should see the screens as below. If everything is o.k. the main screen is now shown. Please make the external connections like DMX / sound / RS232 / MIDI. Also do not forget that the earth connections are properly made because of your own safety! To turn the Supervisor off you have to press the ON button for 3 seconds. This is to prevent from a accidental switch-off. Please read the next section and you will have the Supervisor working in a basic manual mode. Always try to keep a copy of the menu-tree (page 8) nearby, since this will help you as a quick overview to use basic as well as more advanced functions without the manual. MANUAL OPERATION : The Supervisor can be used in a automatic as well as a very basic "two preset" mode. In this mode only the first group of channels can be used. The masters of A and B are working inverse of each other, which allows an easy cross facility, the grand master controls the total output. The flash button below the grand master operates as a blackout switch. This mode can be terminated by pressing the "enter" or "exit" button once. Example: Step-1: Turn the Supervisor on and put it on manual by pressing the buttons A+B+M simultaneous. Step-2: Set the faders for A-B-M to the upper position (the LED's in the flash button for A and M will now burn) Step-3: Create the desired light setting on preset A. Step-4: In the mean time you can make the setting on preset B by means of the position of the faders. Step-5: Slide master fader A and B to the bottom position to make a cross-fade to preset-B. This way of operation requires that all levels are set for each cue. In automatic mode the Supervisor of course takes care of this memory function. It is also possible to control the full number of channels. In order to do so select "manual setup" in the setup function, and select A/B for the two preset mode or A&B for a one preset full channel function. The sub master A now controls the total level.

©2002 IES BV Veenendaal 10-01-02 page
11
PROGRAMMING A CUA. (quick access) To program a cue press the "prog cue" button. You now have to enter the password, number by number, and confirm it by pressing "enter". If the password is "0000" you will not be asked for a password. All channels are now sent to the DMX-512 output according to the position of the faders, independent from any master setting. The screen now shows: PAGE : a page contains depending of the desk version, 12, 24 or 36 cue's. Again depending on the version, available are 40/30/20 pages T_IN : For each cue it is possible to enter a fade-in time between 0 and 99,9 seconds. T_OUT : This is the fade-out time, and can also be set between 0 and 99,9 seconds. Step-1 : Press the "prog cue" button. Step-2 : First select on which page you would like to store one or more cue's. Step-3 : Set the fade-in/out time to the desired value. Step-4 : Make the light setting to your liking. Step-5 : Press the flash button from the cue number where you want to store this setting.
(the cue's which are not yet programmed will show a green led), and keep it pressed while you momentarily press "enter".
Step-6 : As a confirmation the matching red led is now illuminated and the green led will go out.
Repeat these actions if you want to store an other cue, if not double click on the "enter" button (within 0,5 sec.) or press "exit". The main screen will reappear and the bottom row of faders (preset-B) will work again as a cue master, instead of a channel fader . Set master B and M to full and master A on 0%. By sliding up one of the preset B faders the corresponding cue is recalled. By means of the upper fader row (preset-A) it is still possible to make a setting for the first 12/24/36 channels manually. The programmed fade in/out time can live be modified using the "TIME-FADER". This gives you the possibility to in-or decrease the programmed time with a maximum factor 6. If the time fader is not in the neutral position, an arrow appears to indicate the direction of the modification. Switching on the time button sets all fade times to zero. The stored cue's can be modified per channel, in the "modify cue" mode. (see page 12) The stored fade times can be edited in the "edit cue time" mode. (see page 11) To program a cue "blind" use the "prog cue blind" function in the same way as described above. The only difference is found in the outputs, since these are frozen at the moment you enter this menu function.

©2002 IES BV Veenendaal 10-01-02 page
12
EDITING A CUE TIME : If the fade-in -or out time is not programmed correctly it is possible to change these times in the "edit cue time" menu. Starting at the main screen, press "enter" and go to the position "prog" and press "enter" again. You now have to enter a password, number by number and confirm this by pressing "enter". If the password is "0000" you will not be asked to enter a password. By means of the "down" button go to the "edit cue time" screen and press "enter". The display now indicates the present page. If necessary it is possible to select an other page. To change the programmed times follow the next sequence. Step-1 : Press the corresponding flash button to select the desired cue. The matching led is now on, and the programmed times are displayed. Step-2 : Change the times to the correct settings. Step-3 : Press "enter" to store these new times if no other cue time has to be modified, or the corresponding flash button to store these times and you would like to change the times from an other cue.
©2002 IES BV Veenendaal 10-01-02 page
13
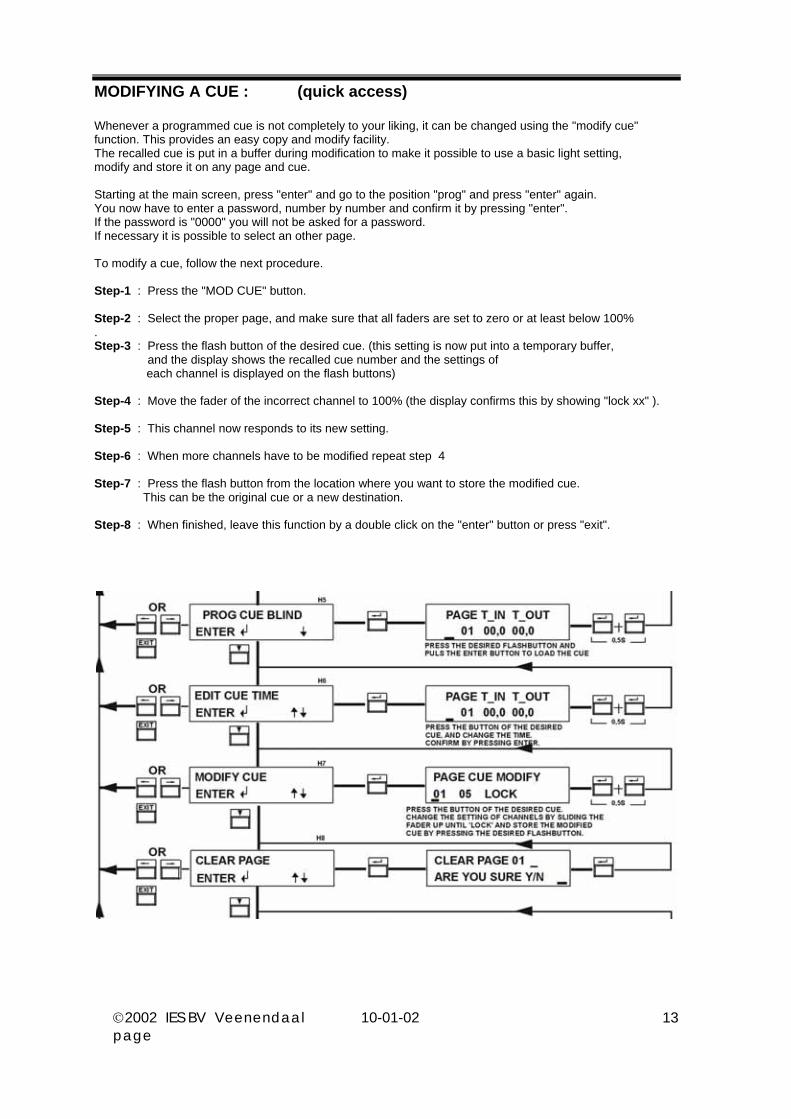
MODIFYING A CUE : (quick access) Whenever a programmed cue is not completely to your liking, it can be changed using the "modify cue" function. This provides an easy copy and modify facility. The recalled cue is put in a buffer during modification to make it possible to use a basic light setting, modify and store it on any page and cue. Starting at the main screen, press "enter" and go to the position "prog" and press "enter" again. You now have to enter a password, number by number and confirm it by pressing "enter". If the password is "0000" you will not be asked for a password. If necessary it is possible to select an other page. To modify a cue, follow the next procedure. Step-1 : Press the "MOD CUE" button. Step-2 : Select the proper page, and make sure that all faders are set to zero or at least below 100% . Step-3 : Press the flash button of the desired cue. (this setting is now put into a temporary buffer, and the display shows the recalled cue number and the settings of
each channel is displayed on the flash buttons)
Step-4 : Move the fader of the incorrect channel to 100% (the display confirms this by showing "lock xx" ). Step-5 : This channel now responds to its new setting. Step-6 : When more channels have to be modified repeat step 4 Step-7 : Press the flash button from the location where you want to store the modified cue.
This can be the original cue or a new destination.
Step-8 : When finished, leave this function by a double click on the "enter" button or press "exit".

©2002 IES BV Veenendaal 10-01-02 page
14
PROGRAMMING A CHASER : (quick access) To program a chaser, press PROG CHASER. You now have to enter a password, number for number, and confirm it by pressing "enter". If the password is"0000" you will not be asked for a password. All channels are now sent to the DMX-512 according to the position of the faders, independent from any master setting. The screen now shows: CH XX : Shows the selected chaser. STP Sxx : Shows the actual step. FADE XX.X : Shows the programmed step(=fade) time, or "END" position for the final step. DEL XX,X : Shows the programmed pause time. Step-1 : Press the "PROG CHASER" button. Step-2 : First select which chaser you wish to program or reprogram. Step-3 : Put the chaser at step 01. Step-4 : Make the light setting to your liking. Step-5 : Put the fade time and delay time on the desired value. Step-6 : Momentarily press "enter" to store this cue. The step counter is now increased with one step. Step-7 : Repeat step 4/5/6 until the chaser is finished. Step-8 : Define the last step as "END" by setting the time below 00,1. End appears, and press "enter". Step-9 : Leave this menu by means of "EXIT" or double click the enter button. To recall a chaser, select the desired chaser and turn the chaser on. With "B.P.M." and "TIME" off the step counter is automatically incremented after the step time is finished. The programmed step time can live be modified by means of the time fader. This gives you the possibility to in- or decrease the programmed time with a maximum factor 6. If this fader is not in the neutral position, an arrow appears to indicate the direction of the modification. Switching on the time button stops the automatic counter. Put the cursor on the "step" field and use the "up" or "down" button to go to the next or previous chaser step. In this way a "GO" button is created. The time fader still works. Switching on the "B.P.M." button enables the sound triggering. With the fader on 0 each time there is a beat the next step is activated. With this one set to maximum, 10 beats are needed for the next step. During programming it is possible to preview a programmed step by pressing the chaser button (the led is flashing). If the "B.P.M." button is pressed for more then 5 seconds with the chaser "ON" the led will start flashing and the B.P.M. fader has become a cross fader for the chaser cue's. To program a chaser "blind" use the "PROG CHAS BLIND" function in the same way as described above. The only difference is found in the outputs, since these are frozen at the moment you enter this menu function.

©2002 IES BV Veenendaal 10-01-02 page
15
EDITING A CHASER TIME : The chaser is equipped with a fade time for each step, however it might be necessary to change one or more step times. This is done by means of the "edit chaser time" function. Starting at the main screen, press "enter" and go to the position "prog" and press enter again. You now have to enter a password, number by number and confirm it by pressing "enter". If the password is "0000" you will not be asked for a password. Go to the "edit chaser time" screen and press enter to select. The screen now shows the selected chaser, actual step and the present time values. To change the programmed times, follow the next sequence. Step-1 : Go to the desired step, and change the value of fade and delay time. Step-2 : Press "enter", after which the time is stored and the step counter goes up. Step-3 : After having set all times to the proper value, leave this function by pressing "exit".
©2002 IES BV Veenendaal 10-01-02 page
16
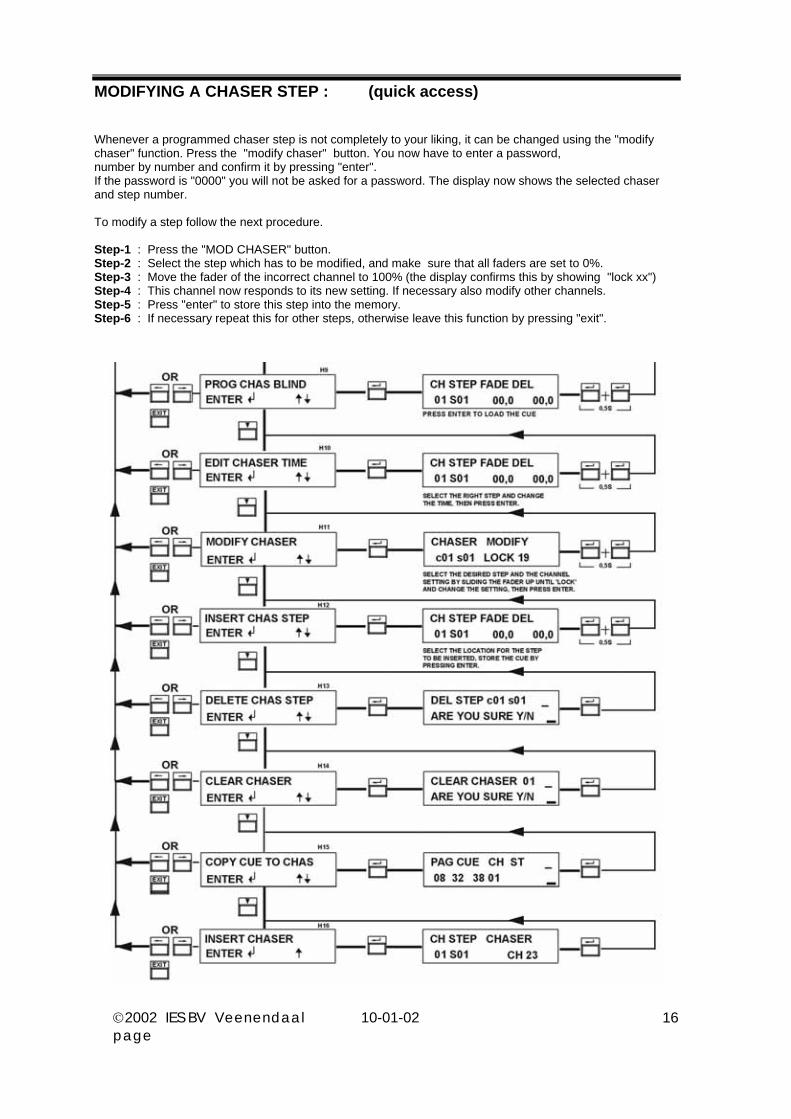
MODIFYING A CHASER STEP : (quick access) Whenever a programmed chaser step is not completely to your liking, it can be changed using the "modify chaser" function. Press the "modify chaser" button. You now have to enter a password, number by number and confirm it by pressing "enter". If the password is "0000" you will not be asked for a password. The display now shows the selected chaser and step number. To modify a step follow the next procedure. Step-1 : Press the "MOD CHASER" button. Step-2 : Select the step which has to be modified, and make sure that all faders are set to 0%. Step-3 : Move the fader of the incorrect channel to 100% (the display confirms this by showing "lock xx") Step-4 : This channel now responds to its new setting. If necessary also modify other channels. Step-5 : Press "enter" to store this step into the memory. Step-6 : If necessary repeat this for other steps, otherwise leave this function by pressing "exit".

©2002 IES BV Veenendaal 10-01-02 page
17
INSERT OR DELETE A CHASER STEP : If a chaser is not complete a chaser step can be inserted or deleted by means of these functions. Insert: Step-1 : Select the "INSERT CHAS STEP" menu and press enter. Step-2 : Select the desired chaser and chaser step. (the new step is inserted before the indicated step) Step-3 : Select the right fade and pause time. Step-4 : Prepare the desired light setting and press enter to store this cue. Step-5 : Repeat step 2-4 if necessary or leave this function by pressing "exit" or a double click on "enter" Delete: Step-1 : Select the "DELETE CHAS STEP" menu and press enter. Step-2 : Select the chaser and chaser step you wish to delete. Step-3 : Change the cursor to the position "Y" if you are shore and press enter. Step-4 : Repeat step 1-3 if you want to delete more steps, otherwise leave this menu by pressing "exit".
CLEAR CHASER : It is also possible to clear a complete chaser if you want to use this for an other purpose. Step-1 : Select the "CLEAR CHASER" menu and press enter to select. Step-2 : Select the chaser you wish to delete Step-3 : Change the cursor position to "Y" if you are shore and press "enter". Step-4 : If you are finished leave this menu by means of "exit"

©2002 IES BV Veenendaal 10-01-02 page
18
COPY CUE TO CHASER : To save double work it is possible to insert an programmed cue into a chaser step by means of this function. The fade and delay time are set to zero and have to be entered with the "edit cue time" menu function. The old data of this chaser step is over written. Step-1 : Select the "COPY CUE TO CHAS" menu. Step-2 : Select the cue which has to be copied to a chaser. Step-3 : Select the destination chaser and chaser step. Step-4 : Check these values once more and confirm with enter. If you want to cancel press "exit". INSERT CHASER INTO A CHASER : An additional powerful function is the possibility to insert a complete chaser into an other chaser. This means that at the moment this step is reached in the primary chaser the second chaser is completed, and then it continuous with the next step of the primary chaser. Warning: Beware not to nest chasers. Step-1 : Select the "INSERT CHASER" menu. Step-2 : Select the chaser and chaser step where the secondary chaser has to be inserted. Step-3 : Select the chaser which has to be inserted. Step-4 : Check these values once more and confirm with "enter". The display now shows an arrow to confirm this insertion. It is possible to delete this link by pressing "enter" once more. If you want to cancel press "exit".

©2002 IES BV Veenendaal 10-01-02 page
19
SETUP CUE OR CHASER : A special function of the Supervisor is the capability to run multiple chasers at the same time. For this purpose the first 6 sub masters are reserved. With this function it is even possible to run the same chaser started at different points. Step-1 : Select the "SETUP CUE/CHASER" menu. Step-2 : Move the cursor to "CUE" if you want the first 6 sub masters respond as cue master, or "CHASER" if each sub master has to control a chaser. Step-3 : Confirm this choice by pressing "enter". SELECT CHASER NUMBER : If you have selected "CHASER" it is necessary to assign a chaser to each individual sub master. Step-1 : Select the "SELECT CHASER NO" menu. Step-2 : Move the cursor to the first sub master number and by means of up and down which chaser it has to control. Step-3 : Leave this menu by pressing "enter".
©2002 IES BV Veenendaal 10-01-02 page
20
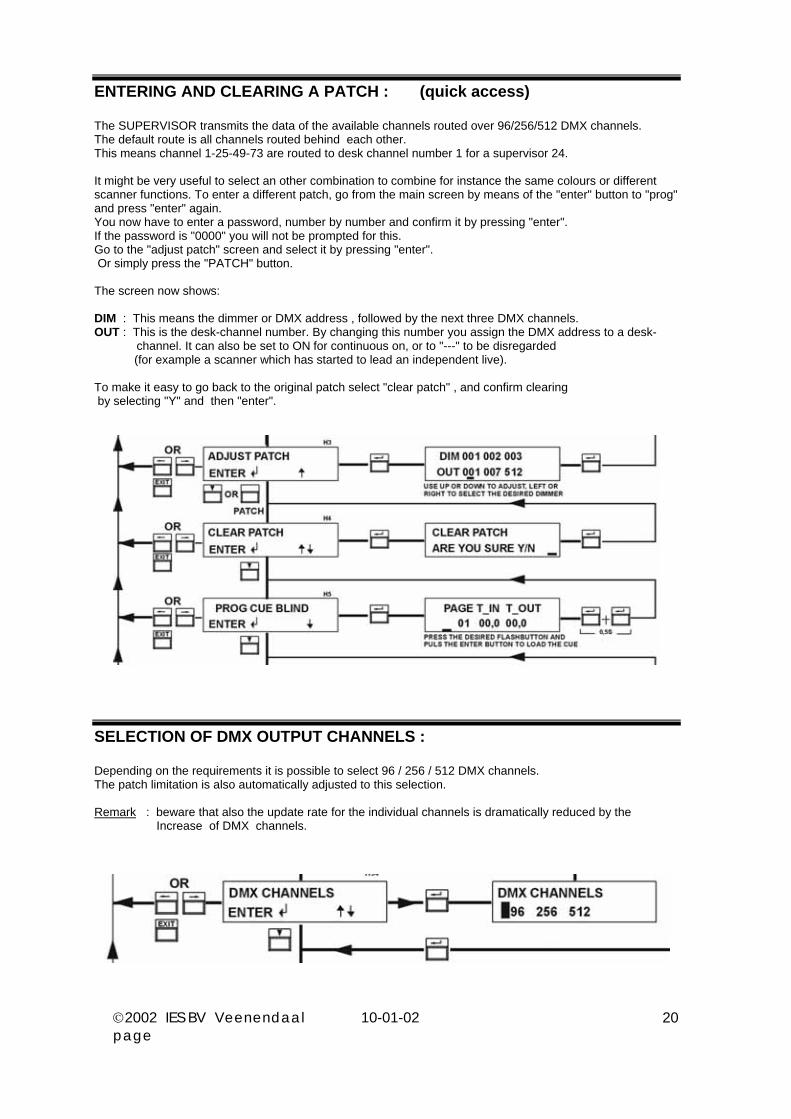
ENTERING AND CLEARING A PATCH : (quick access) The SUPERVISOR transmits the data of the available channels routed over 96/256/512 DMX channels. The default route is all channels routed behind each other. This means channel 1-25-49-73 are routed to desk channel number 1 for a supervisor 24. It might be very useful to select an other combination to combine for instance the same colours or different scanner functions. To enter a different patch, go from the main screen by means of the "enter" button to "prog" and press "enter" again. You now have to enter a password, number by number and confirm it by pressing "enter". If the password is "0000" you will not be prompted for this. Go to the "adjust patch" screen and select it by pressing "enter". Or simply press the "PATCH" button. The screen now shows: DIM : This means the dimmer or DMX address , followed by the next three DMX channels. OUT : This is the desk-channel number. By changing this number you assign the DMX address to a desk- channel. It can also be set to ON for continuous on, or to "---" to be disregarded (for example a scanner which has started to lead an independent live). To make it easy to go back to the original patch select "clear patch" , and confirm clearing by selecting "Y" and then "enter".
SELECTION OF DMX OUTPUT CHANNELS : Depending on the requirements it is possible to select 96 / 256 / 512 DMX channels. The patch limitation is also automatically adjusted to this selection. Remark : beware that also the update rate for the individual channels is dramatically reduced by the
Increase of DMX channels.

©2002 IES BV Veenendaal 10-01-02 page
21
FUNCTION CONTROL : Your SUPERVISOR is not only designed to be used with standard lights but also to work together with scanners or colour changers as well as switch functions. Without the "scan" function it would mean that while making a cue cross all positions/gobos/colors etc. will be passed, instead of a instantaneous transition from one position to an other. This possibility can be selected for each group of six channels to allow a flexible combination. The main screen will show the cue number or chaser from whom the values are sent to the "scan" programmed channels. It is recommended when using scanners to combine functions like speed and focus to limit the necessary number of channels, functions like shutter and dimmer are best controlled as a standard light to allow a smooth cue crossing. To select the desired function go via the "setup" part of the menu tree to the screen "function control" and press "enter". The screen now shows: CH : On this line the group of channels is displayed. By moving the cursor left or right different groups can be selected. FUN : This stands for "function" and can be changed from "real" to "scan" by means of the up and down button. To return to the main part of the setup tree press "enter", to return to the main screen press in this position the "left" or "right" button. Or return to the main screen by pressing "exit".

©2002 IES BV Veenendaal 10-01-02 page
22
TOP AND BOTTOM SET : In several applications it might be useful to adjust the overall maximum or minimum setting, for instance if your running on a generator with an underrated power or working in the U.K.. with a supply voltage of 240V while your lamps are 220V. These adjustments do not influence the settings for the "scan" selected channels. To set the maximum output, go via the "setup" part of the menu tree to the screen "top set" and press "enter" to select. The screen now shows: MAX OUTPUT 100% : By means of "up" and "down" a new value can be set.
Return to the tree by pressing "enter". Return to the main screen by pressing "exit". The minimum can be adjusted with the function "bottom set". The screen now shows: MIN. OUTPUT 00% : By means op "up" and "down" a new value can be set.
Return to the tree by pressing "enter". Return to the main screen by pressing "exit".

©2002 IES BV Veenendaal 10-01-02 page
23
TEST FUNCTIONS : To provide a easy check of all controls a test function is available for the faders and the switches. Faders are tested with the "test ADC" function. By moving the cursor left or right the desired channel can be selected. If the fader moves from 0 to 100% the ADC (Analog Digital Converter) should go from 0-255. Switches are tested with the "test switch" function. The desired channel is selected in the same way as the faders.
CURVE SELECTION : It is possible by means of the "SELECT CURVE" menu to choose a square curve instead of the standard linear curve. This is only useful if this is not possible on the dimmers itself.

©2002 IES BV Veenendaal 10-01-02 page
24
FLASH FUNCTIONS : The flash buttons beneath the sub masters can be selected per block of 6 buttons to operate in three different modes. The default setting is "ADD". The three possible modes are: ADD This means that the stored cue is recalled and added to the present light setting.
The fade time is still valid when the button is pressed. SOLO In this mode only this cue is recalled when pressed, without any fade time,
and all other cues and chasers are killed. This mode is intended to highlight a spot on the stage with a high contrast
CHAN The flash button now works as a single channel flash.
©2002 IES BV Veenendaal 10-01-02 page
25
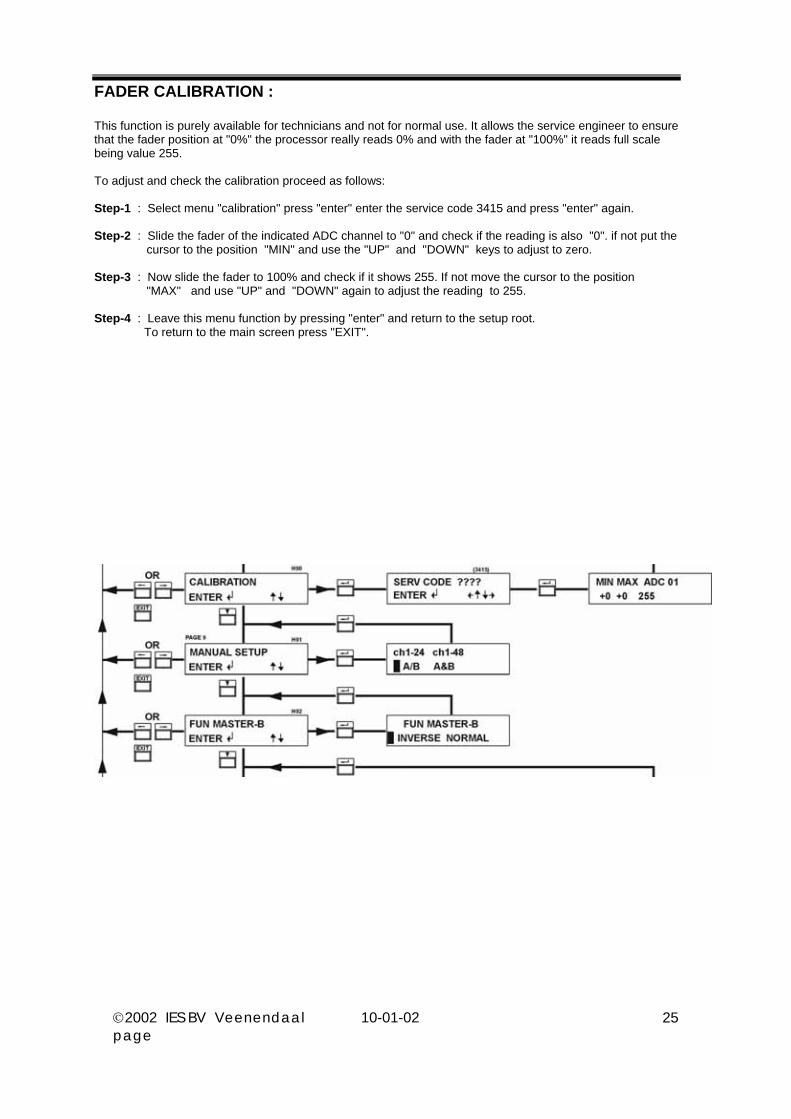
FADER CALIBRATION : This function is purely available for technicians and not for normal use. It allows the service engineer to ensure that the fader position at "0%" the processor really reads 0% and with the fader at "100%" it reads full scale being value 255. To adjust and check the calibration proceed as follows: Step-1 : Select menu "calibration" press "enter" enter the service code 3415 and press "enter" again. Step-2 : Slide the fader of the indicated ADC channel to "0" and check if the reading is also "0". if not put the cursor to the position "MIN" and use the "UP" and "DOWN" keys to adjust to zero. Step-3 : Now slide the fader to 100% and check if it shows 255. If not move the cursor to the position
"MAX" and use "UP" and "DOWN" again to adjust the reading to 255.
Step-4 : Leave this menu function by pressing "enter" and return to the setup root. To return to the main screen press "EXIT".

©2002 IES BV Veenendaal 10-01-02 page
26
SERIAL CONNECTION TO A PERSONAL COMPUTER : Standard with the SUPERVISOR comes a very powerful software package hat runs under windows 95 it allows you to monitor the actual status of the 96 outgoing channels, second readout of the LCD display, possibilities to enter name tags to cue's and chasers, an overview of the sub masters, it follows what you are doing on the supervisor and assist you with a help function in multiple languages. As well as the up and down loading of user and system software. System requirements for the monitor software: IBM compatible PC 486/66 Mhz with 8 Mb RAM, 16 colors at 800x600 pixels, Windows 95. Procedure to install the software and Supervisor settings: Step-1 : Select the "SERIAL" menu press "enter" and enter the service code, confirming it by pressing enter Step-2 : Move the cursor to the position "MON" by means of the left and right button.
"NC" means not connected, and "PC" is used together with the full edit software. Step-3 : Leave the menu by pressing "EXIT". Step-4 : Connect the provided 9-pole cable to the Supervisor and a free COM port of the PC Step-5 : Insert the floppy in drive A or B and start Windows. Start the setup program. Step-6 : Follow the instructions and do not forget to specify the right COM port and to enter a "user name" (after downloading a program this will appear in the LCD screen during start up). Step-7 : If the installation was successful the actual status of the Supervisor is displayed.

©2002 IES BV Veenendaal 10-01-02 page
27
MIDI out/input configuration : For maximum flexibility the Supervisor desks are provided with an midi-input and midi-output. At first it is necessary to decide if the supervisor is going to be a master controller or has to perform as a slave (for example a perfect way to synchronize a show with multiple controllers). To make this selection go to MIDI screen in the setup tree, and pres enter to confirm your selection. The possibilities are: N.C. MIDI control is now disabled MASTER The supervisor now generates a MIDI output for a selectable MIDI channel and start key for both the flash buttons as the function buttons.
If a sub master goes up the MIDI key velocity is changed from value 00-127 SLAVE The supervisor checks the MIDI input for the right MIDI channel and routes the keys to the right
flash buttons and function keys. In this mode the intensity is controlled with the “velocity”. Choose the desired possibility by moving the solid cursor to this position by means of the left and right button and press the enter button to confirm.
MIDI address settings : After the right mode is selected it is still necessary to tell the Supervisor to which MIDI channel and which key is assigned to which flash button or function button. This is achieved as follows: > 01 The first 2 digits determine the channel number to whom the supervisor responds in slave mode. < 01 This is the channel number which is added to the key number. F1 53 This number here is the key that corresponds with the first flash button (Supervisor 24=12 key's,
Supervisor 48=24 key's, Supervisor 72=36 key's). If the cursor is moved to the position of F1 you only have to press the MIDI key to enter the key number.
F2 41 For the function it is possible to select a different start number, so you can decide to use these
functions or not. If the cursor is moved to the position of F2 again you only have to press the MIDI key to enter the key number.
Sequential assignment of the function key's F2+01 chaser on F2+08 step up F2+02 chaser off F2+09 step down F2+03 flash master A F2+10 page up F2+04 flash master B F2+11 page down F2+05 black out F2+06 chaser up F2+07 chaser down

©2002 IES BV Veenendaal 10-01-02 page
28
RETURN TO FACTORY SETTINGS : It might be desirable to have a quick solution to clear the memory of the desk and return to the default factory settings. Before you clear the desk keep in mind that there is no way back after confirming this. So better make a back up with the monitor software first. Step-1 : Select "FACTORY SETTINGS" Step-2 : Enter the service code and press "enter" Step-3 : If you are really sure move the cursor to the position "Y" by means of the left button. Step-4 : If you are really really sure press "enter", otherwise press "exit". An alternative way to clear the memory is to open the front panel and switch on DIP switch number 4. Now aplly power to the supervisor and push "ON". The screen will now show "DIP 4 OFF". Return DIPswitch four to the position "OFF" and the display indicates "ALL CLEAN , run setup". The desk now has initialized the memory and is returned to factory settings. WARNING: This should only be done by qualified technicians. Beware not to touch high voltage parts.

©2002 IES BV Veenendaal 10-01-02 page
29
PASSWORD FUNCTIONS : The Supervisor provides the possibility to protect the setup and program functions from unauthorized use. The technical password is set to 3415 and can not be changed. The user password can freely be set to any four-digit code with the "NEW PASSWORD" function. If the password is"0000" it means you will not be asked for a password. Changing it to any other value, it is active after 5 minutes or switching off/on the Supervisor. This means that if you want to enter the setup or program menu the four-digit code has to be entered. After leaving the menu both the menus are not locked for the next 5 minutes to allow a easy and quick access to the menu.
©2002 IES BV Veenendaal 10-01-02 page
30
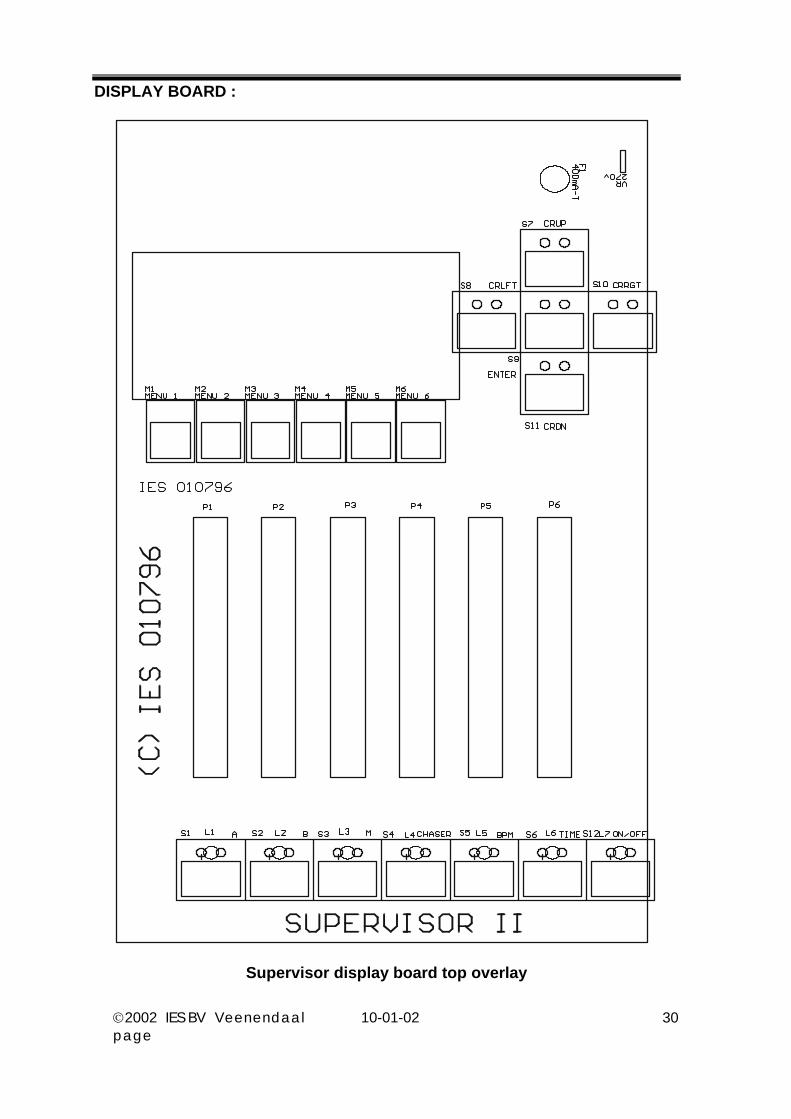
DISPLAY BOARD :
Supervisor display board top overlay

©2002 IES BV Veenendaal 10-01-02 page
31
PROCESSOR BOARD :

©2002 IES BV Veenendaal 10-01-02 page
32
FADER BOARD :

©2002 IES BV Veenendaal 10-01-02 page
33
UPDATING SYSTEM SOFTWARE : Because of the flexible setup of the Supervisor and the input-device it is possible in a very simple way to add or modify functions or text. This means that new ideas are always very welcome, so your Supervisor can become even more powerful in this way, and is never outdated. The present software version is shown during start-up in the third screen. This is also shown on the front page of this manual. In the event that a problem might arise it is essential to check this number. To up-date your Supervisor it is necessary to update the software by means of the included software package, and erase the memory. Therefore follow the next procedure, before starting this procedure make sure the monitor software runs without any problems). The Supervisor should be on.: Step-1 : Select the program function and the select "transmit to Supervisor" and "transmit systemprog hot". Step-2 : Now select the latest software version for the right desk named sXX_vYY.cod and press "OK". Step-3 : Confirm the update by pressing "START". Step-4 : During the update the display shows "update system program".
After the update the supervisor goes into sleep mode. Step-5 : Now turn on the desk and clear the memory by means of "return to factory settings". If the above-mentioned procedure does not work, the following alternative procedure can be followed. Warning: these steps should only be done by experienced technicians. Step-1 : Make sure that the power cord is not connected. Step-2 : Remove the three screws on both sides to remove the front panel. Step-3 : Switch on DIPswitch 1. Step-4 : Select the program function and then select "transmit to Supervisor" and "transmit Systemprog cold". Step-5 : Now choose the latest software version for the right desk named sXX_vYY.cod and press "OK". Step-6 : The display now asks if DIPswitch 1 is on. Step-7 : Make sure that no mains parts can be touched, and apply the mains. Then press "START". Step-8 : The Supervisor channel led' s are on and if all went well the PC indicates "GOOD LUCK" and the
“Time” and “on” led are on. Step-9 : Turn off the power and switch back dipswitch 1. Step 10 : Return the mounting screws back in the original position and you are finished. Good luck. Remark: Before starting this procedure make sure that all essential data is retrieved and stored into the P.C. so after changing the system software the data easily can be downloaded into the SUPERVISOR.

©2002 IES BV Veenendaal 10-01-02 page
34
I.E.S. B.V.
DECLARATION OF CONFORMITY According to ISO / IEC Guide 22
Manufacturer’s name: I.E.S. B.V. Manufacturer’s address: Wageningselaan 52-54 3903 LA Veenendaal Netherlands Declares that the product: Product name: Supervisor Model number: 24 \ 48 \ 72 Conforms to the following product Specifications: Emission EN 50081-1 / EN 50081-2 EN 55011 EN 55014 Immunity EN 50082-1 / EN 50082-2 EN 55024-2 6 kV Contact discharge 8 kV Air discharge EN 55024-3 3 V / m EN 55024-4 1 kV Signal lines 2 kV Power lines Supplementary information: The product complies with the EMC Directive 89/336/EEC. Veenendaal March 2001 J.H.D. de Jonge Technical Manager