user manual - Princeton Universityjot.cs.princeton.edu/manual/pdf/jot.pdf · Coat−→Texture and...
56
Jot user manual Robert D. Kalnins [email protected] Philip L. Davidson [email protected] David M. Bourguignon [email protected]
Transcript of user manual - Princeton Universityjot.cs.princeton.edu/manual/pdf/jot.pdf · Coat−→Texture and...

Jot user manual
Robert D. Kalnins
Philip L. Davidson
David M. Bourguignon

Jot user manualby Robert D. Kalnins, Philip L. Davidson, and David M. Bourguignon
Copyright © 2003 by Princeton University
Here is the Jot user manual abstract.

Table of Contents1. Introduction ................................................................................................................12. License Information ..................................................................................................33. Tutorials .......................................................................................................................5
Basic Tutorial..........................................................................................................5Intermediate Tutorial ............................................................................................9Advanced Tutorial...............................................................................................16Animation Tutorial..............................................................................................16
4. Reference guide........................................................................................................27Camera Manipulation.........................................................................................27
Mouse ..........................................................................................................27Tablet ...........................................................................................................27
Editing Mode - Overview ..................................................................................27Editing Mode - Line Editing Mode...................................................................27
Mouse ..........................................................................................................28GUI...............................................................................................................28
Editing Mode - Hatching Editing Mode ..........................................................35Mouse ..........................................................................................................35GUI...............................................................................................................35
Editing Mode - Basecoat Editing Mode ...........................................................37Mouse ..........................................................................................................37GUI...............................................................................................................37
Global Parameters ...............................................................................................41Lighting.......................................................................................................41Background.................................................................................................42Paper............................................................................................................43Antialiasing ................................................................................................43
Keyboard Commands.........................................................................................43Global Commands.....................................................................................44Line Mode Commands .............................................................................45Hatching Mode Commands.....................................................................45Animation Commands .............................................................................45
5. Jot Setup ...................................................................................................................47How to obtain Jot ...............................................................................................47Requirements .......................................................................................................47Installation............................................................................................................47File Tree and File Formats ..................................................................................47
File Tree .......................................................................................................47File Formats ................................................................................................49
6. Questions and Answers..........................................................................................51
iii

iv

Chapter 1. Introduction
Jot is a program that lets designers, artists and animators to directly annotate3D computer graphics models (and animation) for stylized (NPR) rendering. Jotcurrently implements many of the ideas described in the research papers WYSI-WYG NPR1 and Coherent Stylized Silhouettes2, and will soon include SuggestiveContours3 as well. The long-range goals of the project are described here4.
The Jot software is under development at Princeton University, in collaborationwith researchers at Brown, Rutgers, and the University of Michigan. The imple-mentation is intended as a research prototype, not commercial software, so itcomes with the usual caveats: we know it has bugs, the UI is not well-designed,and so forth. Nonetheless, if you encounter obvious bugs, please send emailto <[email protected] >. For other concerns, such as problems withthese web pages, send mail to <[email protected] >.
Our current release runs on PC/Windows only, though we anticipate a releaseon LINUX soon and Mac OS-X after that. We are currently releasing softwareexecutables only, but intend to make source code available in the long run.
Made with DocBook5!
Notes1. http://www.cs.princeton.edu/gfx/proj/wnpr
2. http://www.cs.princeton.edu/gfx/proj/css
3. http://www.cs.princeton.edu/gfx/proj/sc
4. http://www.cs.princeton.edu/gfx/proj/3Dcontent
5. http://opensource.bureau-cornavin.com/crash-course/index.html
1

Chapter 1. Introduction
2

Chapter 2. License Information
License info coming soon.
3

Chapter 2. License Information
4

Chapter 3. Tutorials
We present below two tutorials of increasing complexity to describe Jot workflow.
Basic Tutorial
Drawing the Cactus Picture!
In this tutorial, we will create a picture of a cactus.
1. Loading the cactus model in flat rendering.C:\ cd JOT_ROOTC:\ cd manual\tutorials\tutorial-1C:\ jotq cactus-1.jot
The 3D geometric model of the cactus, in flat shading.
2. Rendering the model in default NPR renderer (black silhouettes and no fill).
Click with left mouse button on the model.
5

Chapter 3. Tutorials
The 3D geometric model of the cactus, with default NPR rendering.
3. Editing the silhouette
a. Select the silhouette by clicking on it with left mouse button. The sil-houette turns red.
Cactus model with selected silhouette.
b. Adjust stroke width with the slider: NPR Stroke Editor−→StrokeShape/Appearance
c. Adjust stroke flare to zero: NPR Stroke Editor−→Style
d. Apply change permanently: NPR Stroke Editor−→Style and pressApply Current.
4. Sketching the silhouette offset pattern.
a. With the silhouette selected, sketch the silhouette offset pattern, suchas the one on the lower right of the figure, using the left mouse button.
Cactus model with modified silhouette and offset pattern.
b. Apply offset pattern to the strokes: NPR Stroke Editor−→Stylizationand press Apply Sketch.
6

Chapter 3. Tutorials
Cactus model with modified silhouette with offset pattern.
5. Setting the basecoat
a. Switch to basecoat editing mode. Click on Previous Mode to enterBasecoat mode. Click on the model to select it again.
Cactus model selected.
b. Add a normal shader: Base Coat Editor−→Base Coat−→Layer Editor.Select Norm and press Add. Adjust hue (0.3), saturation (0.5), value(0.6).
7

Chapter 3. Tutorials
Cactus model with normal shader.
c. Add a toon shader: Base Coat Editor−→Base Coat−→Layer Editor.Select Toon and press Add.
Select alpha_thin.png texture: Base Coat Editor−→BaseCoat−→Texture and adjust alpha (0.5): Base Coat Editor−→BaseCoat−→Alpha.
Cactus model with toon shader.
d. Adjust lighting: Base Coat Editor−→Base Coat−→Toon Lighting. Se-lect custom light L? and adjust lighting direction with Dir/Pos.
8

Chapter 3. Tutorials
Cactus model with lighting.
6. Done!
Cactus model completed.
Intermediate Tutorial
Drawing the Mechanical Part Picture!
In this tutorial, we will create a picture of a mechanical part.
1. Loading the model in flat rendering.C:\ cd JOT_ROOTC:\ cd manual\tutorials\tutorial-2C:\ jotq mechanical-1.jot
9

Chapter 3. Tutorials
The 3D geometric model of the mechanical part, in flat shading.
2. Setting the background
a. while in the the WYSIWYG NPR window, press v for bringing upGlobal Parameters
b. Adjust color: Global Parameters−→Background. Adjust hue (0.65),saturation (0.12), value (0.9), alpha (0.9). Check box Apply Paper toBkg.
c. Adjust paper: Global Parameters−→Paper. Check box Active. Selectp-cement-6.png in paper in Texture. Adjust brightness (0.6), contrast(0.3).
Mechanical part model with background.
Type v again to hide the Global Parameters window.
3. Setting the basecoat
a. Switch to basecoat editing mode. Click on Previous Mode to enterBasecoat mode. Click on the model to select it again.
10

Chapter 3. Tutorials
Mechanical part model selected.
b. Add a toon shader: Base Coat Editor−→Base Coat−→Layer Editor.Select Toon and press Add.
Select alpha_thin.png texture: Base Coat Editor−→BaseCoat−→Texture and adjust alpha (0.5): Base Coat Editor−→BaseCoat−→Alpha.
Select Apply Paper Effect.
Mechanical part model with toon shader.
c. Adjust lighting: Base Coat Editor−→Base Coat−→Toon Lighting.
Select custom light L? and adjust lighting direction with Dir/Pos.
11

Chapter 3. Tutorials
Mechanical part model with lighting.
4. Stylizing visible lines
a. Switch to line editing mode. Click on Next Mode to enter Line mode.Click on a visible crease line (CRE_VIS) to select it.
Mechanical part model with line selected.
b. Select a preset line style: NPR Stroke Editor−→StrokeEditor−→Presets. Select preset mech-solid .
Apply change permanently: NPR Stroke Editor−→Line Plug-inControls−→Stylization−→Style. Select Apply Current.
12

Chapter 3. Tutorials
Mechanical part model with new crease line style.
c. Apply the same active style to silhouette lines: Select a silhouette line(SIL_VIS). Apply change permanently: NPR Stroke Editor−→LinePlug-in Controls−→Stylization−→Style. Select Apply Current.
Mechanical part model with new silhouette line style.
5. Stylizing hidden lines
a. Enable hidden lines: NPR Stroke Editor−→Line Plug-inControls−→Line Types. Select See Thru, Sil-Hid and Cre-Hid.
13
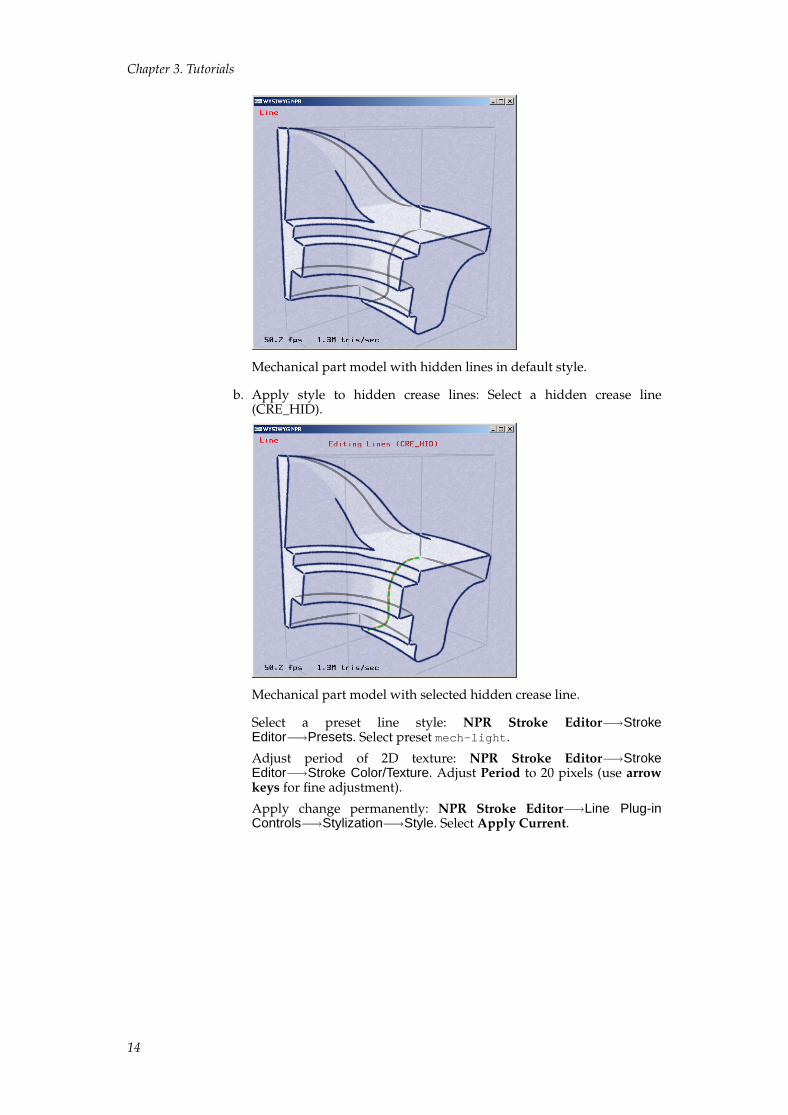
Chapter 3. Tutorials
Mechanical part model with hidden lines in default style.
b. Apply style to hidden crease lines: Select a hidden crease line(CRE_HID).
Mechanical part model with selected hidden crease line.
Select a preset line style: NPR Stroke Editor−→StrokeEditor−→Presets. Select preset mech-light .
Adjust period of 2D texture: NPR Stroke Editor−→StrokeEditor−→Stroke Color/Texture. Adjust Period to 20 pixels (use arrowkeys for fine adjustment).
Apply change permanently: NPR Stroke Editor−→Line Plug-inControls−→Stylization−→Style. Select Apply Current.
14

Chapter 3. Tutorials
Mechanical part model with hidden crease line style.
c. Apply style to hidden silhouette lines: Manipulate the camera to re-veal a hidden silhouette line (SIL_HID). (Learn about camera manipu-lation). Select it.
Mechanical part model with selected hidden silhouette line.
Apply the same active style to hidden silhouette lines: Applychange permanently: NPR Stroke Editor−→Line Plug-inControls−→Stylization−→Style. Select Apply Current.
15

Chapter 3. Tutorials
Mechanical part model with new hidden silhouette line style.
6. Done!
Mechanical part model completed.
Advanced TutorialThis tutorial will include Hatching Editing Mode.
Animation Tutorial
Dances with Cactii
In this tutorial, we will export from Lightwave an animated scene and then im-port the result to Jot .
1. Load the lightwave scene in Ligthwave.C:\ cd JOT_ROOTC:\ cd manual\tutorials\tutorial-4\lw_filesC:\ lightwav.exe cactus_dancing.lws
2. Manually indicate to Lightwave the location of object file:manual\tutorials\tutorial-4\lw_files\cactus_dancing.lwo .
16

Chapter 3. Tutorials
Cactus model loaded in Lightwave.
3. If this is the first time you are exporting from Lightwave to Jot, load the JotExport plugin
a. In the Layout menu, select Plug-ins > Add Plug-in
b. Navigate to the file "Jot Export.p", located in scripts\lw2jot.p . Click"Ok".
c. Click "Ok" in the Information dialog.
4. Start the Jot Export plug-in, from the Layout > Plugins > Generic menu.
Lightwave GUI.
5. The left-hand list ("All Objects") shows a list of objects in the scene, and, if theobject is textured, the number of textures on that object.
a. To export geometry but not texture information:
i. Select the object you wish to export from the "All Objects" list.Click Export. This will move the object you have selected from
17

Chapter 3. Tutorials
the "All Objects" list to the "Export List", and will disregardany textures belonging to that object.
Lightwave GUI.
18

Chapter 3. Tutorials
Lightwave GUI.
ii. Alternately, to export all objects (without texture information),click Export All. This will move all objects in the "All Objects"list to the "Export List", and will disregard any textures belong-ing to these objects. Objects already exported with textureswill remain unchanged.
19

Chapter 3. Tutorials
Lightwave GUI.
b. To export geometry with texture information:
i. Select the object you wish to export from the "All Objects" list(it must be an object with at least one texture). Click the Exportwith Texture button.
20

Chapter 3. Tutorials
Lightwave GUI.
ii. If the object has more than one texture, you must choose one tobe exported with the object from the dialog box that appears.
Lightwave GUI.
The object now appears in the "Export List", with "+ tex" af-ter it to indicate that this object is being exported with texturecoordinates.
6. Enter the starting frame in the First Frame field, and the final frame in theLast Frame field. The scene will be exported including both the first and lastframes.
21

Chapter 3. Tutorials
Lightwave GUI.
7. Enter a filename to save the exported scene as. The extension of the file willbe changed to ".jot" regardless of what extension is entered here. Additionally,potentially many other files will be created during the export, so you maywant to create a directory to save the exported files in.
22

Chapter 3. Tutorials
Lightwave GUI.
8. Click "Ok". The frame slider will move from the first frame to the last frameyou entered, and you will see your scene animated as it is exporting. A dialogbox will alert you to the end of the export process.
9. Now import the exported files in directory manual\tutorials\tutorial-4\jot_files into Jot . (A copy of the files which should have exported intothe directory manual\tutorials\tutorial-4\jot_files is provided inmanual\tutorials\tutorial-4\jot_files.bak .)C:\ cd JOT_ROOTC:\ cd manual\tutorials\tutorial-4\jot_filesC:\ jotq cactus_export.jot
Cactus model with default style.
23

Chapter 3. Tutorials
10. The various components of the cactus can be stylized using thetechniques demonstrated in the previous tutorials. You maystylized this cactus and save the result by pressing s. However,manual\tutorials\tutorial-4\jot_files.npr contains another copy ofthe exported files which already have been stylized.C:\ cd JOT_ROOTC:\ cd manual\tutorials\tutorial-4\jot_files.nprC:\ jotq cactus_export.jot
Cactus model with npr style.
11. To access the other frames of the animation, engage Animator Mode bypressing X. (WYSIWYG NPR rendering window must have focus to receivekeystroke commands.)
Cactus model with Animator Mode ON.
12. Step through the frames using the numeric keypad: 4 and 6 step backwardand forward by one frame; 2 and 8 step backward and forward by ten frames;5 returns to the first frame.
24

Chapter 3. Tutorials
Stepping through the frames of the cactus animation.
13. To play back the entire animation, press /. Press + to stop. (Each frame isloaded from disk, so playback is slooow. Don’t ask...)
Playing the cactus animation.
14. To render frames to disk, engage time sync with - and render mode with *.
Engaging render to disk mode.
15. Pressing / now with render to disk mode on will play back the framesand render them to disk. (A DivX movie file of these frames is provided:manual\tutorials\tutorial-4\jot_files.npr\cactus_export.avi ).
25

Chapter 3. Tutorials
Frames are rippen to disk.
26

Chapter 4. Reference guide
Camera Manipulation
Mouse
Left button: Model Interaction
The left button is used for selection and stylization of the scene. This specificbehavior depends upon the current mode.
In general, click once on an object to select it
Object attributes can now be edited.
In general, hold the button down and move to draw
The lines you draw affect stylization.
Right button: Navigation
In all modes, the right mouse button is used for camera manipulation.
Click in the center of the window and drag with horizontal motion
Translation parallel to image plane.
Click in the center of the window and drag with vertical motion
Translation perpendicular to image plane ("zooming").
Click near the border of the window and drag
Rotation.
Click anywhere and release, then drag
Define a center of rotation (blue sphere) and use it.
Double click on the model
Define a point on the model surface and position it at the center of the win-dow.
Tablet
TODO.
Editing Mode - OverviewAt any given time, Jot is in one of three Editing Modes. The current is indicatedin the upper left of the rendering window. In each different mode the left mousebutton, some key strokes, and the GUI window behave differently.
We describe in the following sections the three Editing Modes. The first concernsline editing (e.g. silhouettes and creases), the second hatching editing, the thirdbasecoat editing (i.e. shaders for the triangle meshes).
27

Chapter 4. Reference guide
Editing Mode - Line Editing ModeIn this mode, various lines types arising from the geometry (e.g. silhouettes,creases) or sketched unto mesh surfaces by the user (e.g. decals) can be selectedand stylized. Stylization controls described in this section include appearance pa-rameters (e.g. width, color), path parameters (e.g. directly oversketched wiggles),and temporal parameters (e.g. frame-to-frame coherence behavior and stroke an-imation).
Mouse
In general, the left mouse button is used to select line entities (e.g. decals, sil-houettes) to be stylized, and then sketch their associated stylization. If a mesh, orexisting decal is left-clicked, then decal editing mode is entered as indicated atthe top of the rendering window and in the status field of the GUI. The selectedmesh will be indicated by showing a bounding box, and any selected decal willbe highlighted. Sketching in decal mode serves to define additional decals.
If any other line type (i.e. silhouette, crease, border) is selected, then line editingmode is entered as indicated at the top of the rendering window and in the statusfield of the GUI. The selected mesh will be indicated by showing a boundingbox, and selected line will be highlighted. Sketching in line mode serves to defineoffset-based stylization for the selected line type.
Clicking on the background or another entity will deselect the current entity. Ifstroke style changes in the GUI, or sketched offsets are not yet "applied" they willbe lost upon deselection.
GUI
In this mode the GUI is used to edit the stylization and behavior of the currentlyselected line type. Controls common to this mode and hatching mode are de-scribed first, followed by the controls specific to line editing mode.
Common Stroke Controls
These controls comprise the parameters which govern stroke rendering.
Presets Management
Strokes parameter sets can be grouped together into named presets and saved todisk.
Presets Management.
Presets
List box for selecting amongst the available presets.
Save
If "-=NEW=-" preset is selected, a new preset will be created from the cur-rent settings. If an existing preset is selected, it will be overwritten with thecurrent settings.
28

Chapter 4. Reference guide
Debug
Don’t ask...
Preview
Displays the current active settings. Up to five example strokes can besketched in this box.
Color and Texture Settings
Parameters which govern the rendering of the stroke triangle strip.
Color and Texture Settings.
Hue, Saturation, Value
Set the stroke color.
Alpha
Set the stroke alpha. This is analogous to pressure wrt paper effect simulationshader.
Texture
Select an alpha texture. The texture can be applied as a 1D or 2D texture. If1D then the Y direction is mapped across the width of the stroke. If 2D thenthe X direction is mapped along the length of the stroke.
Period
If ZERO then texture considered 1D. If NON_ZERO then the texture is con-sidered 2D with period equal to NON_ZERO pixel length.
Phase
Phase offset (as a fraction of period length) applied to stroke parameteriza-tion (i.e. longitude in texture coordinates or sketched offset parameteriza-tion).
Paper
Paper height field texture for paper simulation shader (n.b. strokes do notuse the globally selected paper texture).
Contrast, Brightness
Modify the paper height field texture.
29

Chapter 4. Reference guide
Shape and Appearance
These controls influence mainly the shape of the stroke.
Shape and Appearance.
Width
Pixel width of the stroke.
Halo
Don’t ask...
Taper
Distance in pixels over which the end points are tapered.
Fade
Distance in pixels over which the end points are faded using alpha.
Flare
Fraction of the stroke over which the width is tapered from one end.
AFlare
Fraction of the stroke over which the width is faded from one end.
Line Mode Specific Controls
These remaining controls are specific to the line mode.
Line Type Settings
These flags control which line types are rendered for the selected mesh. Silhouette(SIL), backfacing silhouette (BAK), border (BOR), and crease (CRE) line typescan be optionally rendered. The visible (VIS), hidden (HID), and occluded (OCC)portions of each line type can be toggled for rendering separately.
30

Chapter 4. Reference guide
Line Type Settings.
See Thru
"See thru" objects can render hidden and occluded line types. Non "see thru"objects can render only visible types. Non "see thru" objects can cause hiddenlines on "see thru" objects to become occluded lines.
Sil-Vis, Bak-Vis, Bor-Vis, Cre-Vis
Toggle rendering of the visible line types.
Sil-Hid, Bak-Hid, Bor-Hid, Cre-Hid
Toggle rendering of the hidden line types.
Sil-Occ, Bak-Occ, Bor-Occ, Cre-Occ
Toggle rendering of the occluded line types.
Coherence Settings
Settings which govern how a coherent parameterization is applied to each linetype from frame to frame (see corresponding paper1).
Coherence Settings.
31

Chapter 4. Reference guide
Global
If checked, all other parameters in this section are ignored and the globaldefaults are used.
NoSig
If checked, the onscreen mesh size doesn’t influence parameterization (i.e.sigma, rho = 1)
Major, 1 to 1, Hybrid
Policy for assigning brush paths.
Rand, ArcL, Phase, Interp, Optim
Policy for fitting parameterization to brush paths.
Pix
Pixel spacing of polylines vertices for optimization fitting policy.
Wf, Ws, Wb, Wh
Weights in energy expression for optimization fitting policy.
Mv
Minimum number of votes per vote group.
Mp
Minimum pixel length per vote group.
M%
Minimum percentage of the lenght of the silhouette path per vote group.
Hj
Pixel length threshold for healing together brush paths.
Ht
Pixel length threshold for coercing brush paths to heal.
Mesh Settings
Various meshwide settings.
Mesh Settings.
32

Chapter 4. Reference guide
Crease Detect Angle
Dihedral angle threshold for considering a mesh edge to be a crease.
Regen. Creases
Regenerates the mesh creases using the current Crease Detect Angle thresh-old.
Crease Joint Angle
Adjacent crease edge joint angle threshold for connecting creases in contigu-ous paths.
Crease Visibility Step
Pixel spacing of crease visibility testing under legacy crease rendering mode(don’t ask...).
Polygon Offset Factor, Polygon Offset Units
Polygon offset parameters used to render mesh in ID image. Increase thesevalues if line visibility is lousy.
Noise Settings
Line stylization noise (a.k.a. animation of stroke stylization) is achieved by as-signing more than one stylization to a given line type and changing among themin time. Note, all additional stylization prototypes for a given line type must sharethe period (or sketched offset baseline length) of the first prototype.
Noise Settings.
Selected
Indicate which stylization prototype is selected.
Next
Changes to the next stylization prototype.
Del
Delete current prototype.
Add
Add new prototype.
33

Chapter 4. Reference guide
Lock
Force rendering to lock to current prototype.
Motion Only
Animation only occurs when camera is in motion.
Frequency
Number of times per second that the prototype is cycled.
Rand. Order
Degree to which the prototype cycling order is randomized.
Rand. Duration
Degree to which the prototype cycling duration is randomized.
Stylization Controls
These controls govern the selection, adding, removal, and editing of stroke styl-ization for lines types.
Stylization Controls.
Status
This field indicates the currently selected entity.
Line Types
Cycle selection between the line types (e.g. SIL-VIS, CRE-HID).
Decal Marks
Enter decal editing mode and cycle selection of existing decals.
Crease Paths
Cycle selection of legacy style crease paths (don’t ask...).
Crease Strokes
Don’t ask...
34

Chapter 4. Reference guide
Edit Selected (h)
Edit the sketched offset stylization of selected line types.
Clear Selected
Clear the sketched offset stylization of selected line types, or clear the se-lected decal.
Undo Sketch (Esc)
Remove the last mark from the current set of sketched offsets.
Apply Sketch (y)
Apply the current set of sketched offsets to the chosen line type, or generatedecals.
Apply Current (u)
Apply the current stroke parameters (as seen in the Preview window) to thecurrently selected entity.
Get Selected (j)
Replace the current stroke parameters (as seen in the Preview window) withthose of the currently selected entity.
Vary Width, Vary Alpha
Toggle effects caused by tablet pressure.
Virtual Baseline, Selected Baseline
Type of baseline for sketched offsets.
Add New, Delete
Add and remove legacy style crease strokes (don’t ask...).
Synthesis
Stylization synthesis for legacy style crease strokes (don’t ask...).
Editing Mode - Hatching Editing ModeTODO.
Mouse
TODO.
GUI
TODO.
Common Stroke Controls
See previous line editing section.
Hatching Mode Specific Controls
TODO.
35

Chapter 4. Reference guide
Editing Controls
TODO.
Editing Controls.
Type
Curves
Style
All
Last
Apply
Animation Settings
TODO.
36

Chapter 4. Reference guide
Animation Settings.
Lo Thresh
Hi Thresh
Lo Width
Hi Width
Global Scale
Limit Scale
Trans. Time
Max. LOD
Editing Mode - Basecoat Editing ModeThe triangle meshes of objects can be rendered using an arbitrary number ofshaders composited in layers. The result is called the basecoat.
Mouse
Left-clicking the mesh will select it.
37

Chapter 4. Reference guide
GUI
The GUI displays the basecoat configuration of the currently selected object.
Layer management
The basecoat is composed of shaders arranged in layers. The layer editor dis-plays the current set of layers in the order in which they are composited. It alsofacilitates the adding and removing of shader layers.
Layer management.
Layer Editor List Box
Selects the current active layer. A layer consists of one shader either a nor-mal shader or a toon shader. Layers are numbered in order and layer zero iscomposited first. A selection "----" indicates that no layer is selected.
Layer Editor Text Box
Text entered here is used to name the active layer.
Norm, Toon
Selects the type of shader to be created, when a layer is added.
Add
Adds a new layer of the currently selected type after the current active layer.To insert a layer before the zero layer, set the active layer to "----".
Del
Deletes the current active layer.
Transparency to Background
If checked, a special layer is composited first, before the zero layer. Thisshader renders the mesh triangles to look identical to the background, ac-counting for the current background texture, paper, etc.
Annotatable
If unchecked, this object is not rendered into the ID image. This will causevisibility to fail on all stroke-based effects. This can be useful to achieve trans-parent objects which do not occlude the strokes of objects behind them.
38

Chapter 4. Reference guide
Normal Shaders
When a normal shader layer is selected, the remaining basecoat controls adaptto display the relevent settings. The normal shader consists of a solid color, op-tional texture map, optional alpha and optional paper shader, and can be lit bythe global lighting environment.
Normal Shaders.
Hue, Saturation, Value
Sets the solid color of the shader.
Alpha
Sets the alpha used for compositing this layer. This is analogous to pressurew.r.t. paper effect simulation shader.
Texture
Selects an optional texture map to modulate the triangles. This texture mapcould include alpha.
Apply Paper Effect
Enable paper effect shader on this layer.
Mobile Paper Co-ords
If unchecked, the paper shader’s height field texture, for this layer, is fixedin screen space. If checked, the height field texture moves with the boundingbox of the object.
Use Global Lighting
If checked, triangles are modulated by the current diffuse lighting environ-ment.
Specular Lighting
Adds a white specular component to each active light.
Refresh
Regenerates the texture list.
39

Chapter 4. Reference guide
Toon Shaders
When a toon shader layer is selected, the remaining basecoat controls adapt todisplay the relevent settings. Toon shading is defined by a diffuse lighting calcu-lations which looks up into a 1D texture. Here, the toon shader consists of a solidcolor, a 1D texture map, a lighting description, an optional alpha and an optionalpaper shader.
Toon Shaders.
Hue, Saturation, Value
Sets the solid color.
Alpha
Sets the alpha used for compositing this layer. This is analogous to pressurew.r.t. paper effect simulation shader.
Texture
Sets the 1D lookup texture. Optionaly contains alpha.
Apply Paper Effect
Enable paper effect shader on this layer.
Mobile Paper Co-ords
If unchecked, the paper shader’s height field texture, for this layer, is fixedin screen space. If checked, the height field texture moves with the boundingbox of the object.
L0, L1, L2, L3, L?
Switch the light to use. L0 through L3 are the global lights. L? specifies a lightunique to the active layer.
Direction
If checked, directional light, if unchecked, positional light.
Cam Frame
If checked, light is stationary in camera frame, if unchecked, light is station-ary in world frame.
40

Chapter 4. Reference guide
Dir/Pos
Sets direction/position of light.
Radius
Sets the radius of light from the camera/world origin.
Refresh
Regenerates the texture list.
Transform
Controls for transforming objects in the scene. This is mostly a hack, these opera-tions will be performed in Maya, Lightwave, etc.
Transform.
Global ParametersThese windows collect all the global settings such as background and lighting.
Lighting
Jot supports up to four positional/directional light sources and one global am-bient light source. Lighting can have an effect on the normal and toon shadersdescribed in the basecoat section.
Global lighting parameters.
0, 1, 2, 3
Select one of the four positional/directional lights to edit. When a light isselected the other controls will change to reflect the chosen light settings.
41

Chapter 4. Reference guide
G
Select global ambient light.
On
Light is active when checked.
Dir
Light is directional when checked, positional when not checked.
Cam
Light position/direction is defined in terms of camera frame when checked,world frame when not checked.
Dif/Amb
Select the editing of diffuse/ambient color of light.
Pos/Dir
Adjust position/direction of the light.
Radius
Adjust the radius from world/cam origin associated with positional light.
Hue, Saturation, Value
Adjust color of the chosen light.
Background
The background is rendered as a solid colored quad with optional texture map-ping and paper shader.
Global background parameters.
Hue, Saturation, Value
Adjust the color of the background.
Alpha
Adjust the alpha of the background. This has effect in conjunction with thepaper shader.
Texture
Select an optional texture map to apply to background quad. The list box ispopulated with textures from the appropriate directory (see description offile tree).
42

Chapter 4. Reference guide
Apply Paper to Bkg
Apply paper shader.
Paper
A paper effect shader can be applied to basecoat shader, strokes, and the back-ground. The paper parameters selected here affect only basecoat and the back-ground.
Global paper parameters.
Active (p)
Global override to disable all paper shaders, including strokes.
Texture
Select global paper height field texture. The list box is populated with tex-tures from the appropriate directory (see description of file tree).
Brightness, Contrast
Adjust the global height field texture.
Antialiasing
Full scene jittered antialiasing is implemented using the accumulation buffer.This incurses a tremendous performance hit, making it useful for batch renderingof animations.
Global antialiasing parameters.
Active (a)
Toggle antialiasing on and off.
Mode (A)
Select an antialiasing scheme, i.e., number of jittered passes.
43

Chapter 4. Reference guide
Keyboard Commands
WarningKey commands are only accepted when the WYSIWYG NPR ren-dering window has focus! They are case-sensitive. Tab, Arrowsand modifiers (Ctrl , etc.) affect GUI windows which have focus.
Global Commands
These commands operate under all modes.
Quit (q)
Terminates the application.
Save scene (s)
Save the entire scene to out.jot .
Write mesh (w)
Write the mesh under the mouse cursor to out.sm .
Next Mode (.)
Change to the next Editing Mode (e.g. Basecoat Edition Mode).
Previous Mode (,)
Change to the previous Editing Mode (e.g. Basecoat Edition Mode).
Render Mode Menu (M)
Toggle display of the Render Mode Menu. Allows global override controlof various shaders. (Select Textured Patch to render with NPR stylizationshaders/strokes.)
Global Parameters Menu (v)
Toggle display of the Global Parameters Menu.
Reset View (V)
Adjust camera such that entire scene fits in render window.
Toggle Animator Mode (X)
Engage frame stepping of exported animation (see Tutorial).
Change Selected Style (’)
Cycles through various selection representations (e.g. wireframe, boundingbox, etc.)
Toggle Repair (‘)
Toggles whether or not system attempts to "repair" strokes with tight bends(work in progress...).
Toggle Paper Shader (p)
Toggles globally enabled/defeat paper shader.
Toggle Antialiasing (a)
Toggles full scene antialiasing.
44

Chapter 4. Reference guide
Antialiasing Mode (A)
Cycle through the available Antialiasing Modes. (All of which are slow with-out a hardware accumulation buffer.)
Line Mode Commands
See section on Line Mode.
Edit Selected (h)
Edit the sketched offset stylization of selected line types.
Undo Sketch (Esc)
Remove the last mark from the current set of sketched offsets.
Apply Sketch (y)
Apply the current set of sketched offsets to the chosen line type, or generatedecals.
Apply Current (u)
Apply the current stroke parameters (as seen in the Preview window) to thecurrently selected entity.
Get Selected (j)
Replace the current stroke parameters (as seen in the Preview window) withthose of the currently selected entity.
Hatching Mode Commands
See section on Hatching Mode.
TODO.
Animation Commands
See tutorial on Animation.
Toggle Animator Mode (X)
Engage frame stepping of exported animation (see Tutorial).
Back 1 Frame (4)
Step 1 frame backward.
Forward 1 Frame (6)
Step 1 frame forward.
Back 10 Frames (2)
Step 10 frames backward.
Forward 10 Frames (8)
Step 10 frames forward.
First Frame (5)
Go to first frame.
Play (/)
Play entire animation.
45

Chapter 4. Reference guide
Stop (+)
Stop playing animation.
Toggle Sync (-)
When engaged, system time is synchronized with frame number. When dis-engaged, system time is interactive real-time.
Toggle Disk (*)
Toggle if playback causes frames to be rendered to disk. (Requires SyncMode to be enabled.)
Notes1. http://www.cs.princeton.edu/gfx/proj/css/
46

Chapter 5. Jot Setup
How to obtain Jot
Got to the Jot Homepage1.
RequirementsJot requires nVidia GeForce or ATI Radeon 8000 series graphics hardware onMicrosoft Windows (Linux coming soon).
Installation
1. Unpack the jot.zip in the desired directory DEST.
2. Edit jot-config.bat so that JOT_ROOTis now equal to DEST\jot .
3. For MS Windows users: Edit the properties of the jot-cmd file and set its tar-get to DEST\jot\batch\jot-config.bat .
4. Execute jot-cmd shortcut to launch Jot command line.
5. Start out with the basic tutorial.
File Tree and File Formats
File Tree
jot\
Location of Jot command line shortcuts and README.txt.
batch\
Various batch files for configuring and invoking Jot .
bin\
Handy shell tools for MS Windows, e.g. cd , ls and tiff2png .
D\
Debug binary (invoke with jotd.bat ).
Q\
Optimized binary (invoke with jotq.bat ).
R\
Release binary (invoke with jotr.bat ).
47

Chapter 5. Jot Setup
manual\
This manual in html and pdf format.
tutorials\
tutorial-1\
Jot scene files for the basic tutorial.
tutorial-2\
Jot scene files for the intermediate tutorial.
tutorial-4\
Lightwave scene files and sample exported Jot scenes for theanimation tutorial.
models\
Sample models in Jot format.
nprdata\
background_textures\
Background images. Can contain alpha.
debugging\
Don’t ask...
other_textures\
2D Texture maps for the Normal Shader. Can contain alpha.
paper_textures\
Can contain alpha as well.
stroke_presets\
Saved stroke styles.
stroke_textures\
Stroke texture maps. Can be 1D or 2D. White in the color channeland "pressure" in the alpha channel.
system_textures\
Don’t ask...
toon_textures\
1D Texture maps for the Toon Shader. Can contain alpha.
48

Chapter 5. Jot Setup
scripts\
Script files for exporting to Jot format from Lightwave, 3DS Max,Blender, etc.
File Formats
.jot File Format
Contains entire scene.
.sm File Format
Contains a single mesh.
.npr File Format
Contains stylization information.
.view File Format
Contains global scene parameters.
Animation File Format
TODO.
Notes1. http://www.cs.princeton.edu/gfx/proj/jot/
49

Chapter 5. Jot Setup
50

Chapter 6. Questions and Answers
1. What is Jot ?
No one can tell you what Jot is -- you must see for yourself.
51

Chapter 6. Questions and Answers
52