USER MANUAL - Flir.com - Flir.com parts of this manual, in whole or in part, may be copied,...
16
P USER MANUAL Thermal Monocular
Transcript of USER MANUAL - Flir.com - Flir.com parts of this manual, in whole or in part, may be copied,...

P
U S E R M A N U A L
Thermal Monocular

2U S E R M A N U A L # 4204190 - Rev 1
© 2016 FLIR Systems, Inc. All rights reserved worldwide. No parts of this manual, in whole or in part, may be copied, photocopied, translated, or transmitted by any electronic medium or in machine readable form without the prior written permission of FLIR Systems, Inc.
Names and marks appearing on the products herein are either registered trademarks or trademarks of FLIR Systems, Inc. and/or its subsidiaries. All other trademarks, trade names, or company names referenced herein are used for identification only and are the property of their respective owners.
This product may be protected by patents, design patents, patents pending, or design patents pending.
If you have questions that are not covered in this manual, or need service, contact FLIR Systems, Inc. customer support for additional information prior to returning a product.
Phone: 888.747.3547 , select option 2 at the prompt (“Handheld Products”)
Email: [email protected]
This documentation is subject to change without notice.
Proper Disposal of Electrical and Electronic Equipment (EEE)The European Union (EU) has enacted Waste Electrical and Electronic Equipment Directive 2002/96/EC (WEEE), which aims to prevent EEE waste from arising; to encourage reuse, recycling, and recovery of EEE waste; and to promote environmental responsibility.
In accordance with these regulations, all EEE products labeled with the “crossed out wheeled bin” either on the product itself or in the product literature must not be disposed of in regular rubbish bins, mixed with regular household or other commercial waste, or by other regular municipal waste collection means. Instead, and in order to prevent possible harm to the environment or human health, all EEE products(including any cables that came with the product) should be responsibly discarded or recycled.
To identify a responsible disposal method where you live, please contact your local waste collection or recycling service, your original place of purchase or product supplier, or the responsible government authority in your area. Business users should contact their supplier or refer to their purchase contract.
Important Instructions and Notices to the User:Modification of this device without the express authorization of FLIR Commercial Systems, Inc. may void the user’s authority under FCC rules to operate this device.
Note 1: This equipment has been tested and found to comply with the limits for a Class B digital device, pursuant to Part 15 of the FCC rules. These limits are designed to provide reasonable protection against harmful interference in a residential installation.
This equipment generates, uses, and can radiate radio frequency energy and, if not installed and used in accordance with the instructions, may cause harmful interference to radio communications. However, there is no guarantee that the interference will not occur in a particular installation. If this equipment does cause harmful interference to radio or television reception, which can be determined by turning the equipment off and on, the user is encouraged to try to correct the interference by one or more of the following measures:
• Reorient or relocate the receiving antenna
• Increase the separation between the equipment and receiver
• Connect the equipment into an outlet on a circuit different from that of the receiver
• Consult the dealer or an experienced radio/television technician for help.
Industry Canada Notice:This Class B digital apparatus complies with Canadian ICES-003.
Avis d’Industrie Canada:Cet appareil numérique de la classe B est conforme à la norme NMB-003 du Canada
FLIR Systems, Inc.25 Esquire RoadN. Billerica, MA 01862Phone: 888.747.3547Email: [email protected]

3U S E R M A N U A L # 4204190 - Rev 1
CONTENT Page
1. Introduction 4
2. Getting Started 5
3. Operating the Camera 6
4. User Menu 10
5. Maintenance 13
6. Specifications 15
4U S E R M A N U A L # 4204190 - Rev 1
SECTION 1. INTRODUCTION
1.1 SCOPEThis manual covers the FLIR SCOUT TK Series and all applicable components. It is recommended that this manual be read and understood to optimize camera operation.
1.2 INTRODUCTIONFLIR’s SCOUT TK Series thermal handheld camera gives the user the ability to see clearly in total darkness, providing a wealth of information during any nighttime activity. The design is rugged enough to withstand the demands of outdoor use. It uses FLIR’s proprietary Digital Detail Enhancement™ image processing and employs a fixed focus lens. It has 4 external buttons for unit operation and an internal menu to configure options. See Operating the Camera and Using the Menu System sections for more details on buttons and menu options.
SCOUT TK SERIES FEATURES:• Rugged design
• 160 X 120 VOx Lepton® Microbolometer
• 20° horizontal field of view
• 640 x 480 LCD Display
• Palm sized, light weight design (6 oz)
• Snapshot capture and Internal storage for up to 1000 images
• Video recording up to 4 hours of video
• Internal rechargeable Li-Ion battery
• USB cable for battery charging and image download
THE SCOUT TK SERIES CAMERA ALLOWS THE USER TO:
• See wildlife and difficult terrain in reduced visibility conditions or total darkness
• See through smoke, dust, and light fog
• Search for missing pets
• Scan sidewalks, parking lots, and other public areas in the dark
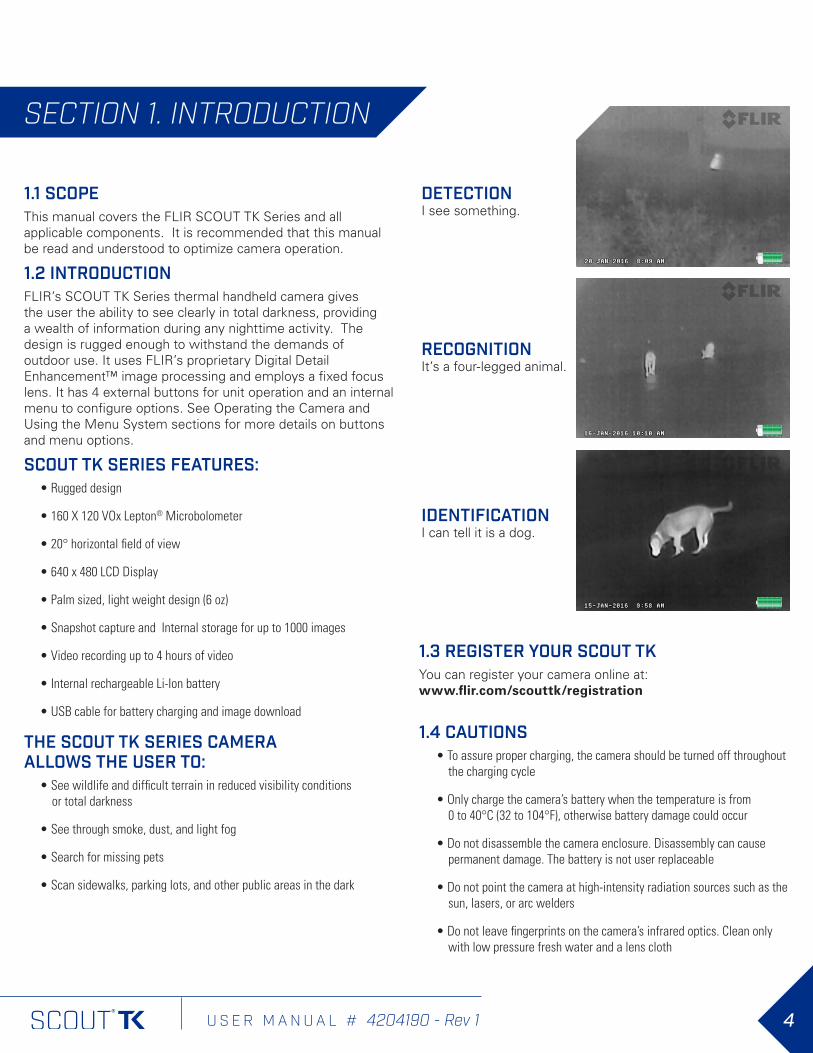
DETECTION I see something.
RECOGNITION It’s a four-legged animal.
IDENTIFICATION I can tell it is a dog.
1.4 CAUTIONS• To assure proper charging, the camera should be turned off throughout
the charging cycle
• Only charge the camera’s battery when the temperature is from 0 to 40°C (32 to 104°F), otherwise battery damage could occur
• Do not disassemble the camera enclosure. Disassembly can cause permanent damage. The battery is not user replaceable
• Do not point the camera at high-intensity radiation sources such as the sun, lasers, or arc welders
• Do not leave fingerprints on the camera’s infrared optics. Clean only with low pressure fresh water and a lens cloth
1.3 REGISTER YOUR SCOUT TKYou can register your camera online at: www.flir.com/scouttk/registration

5U S E R M A N U A L # 4204190 - Rev 1
SECTION 2. GETTING STARTED
2.1 UNPACKING AND INSPECTINGThe FLIR SCOUT TK Series camera is available with the features, options, and accessories described in this manual. Refer to the packing list enclosed with your camera to determine the actual contents of your camera package.
In addition to the camera the following items are included in the camera package:
Lanyard
Quick Start Guide Thank You Card
USB Cable
2.2 CHARGING THE CAMERAThe camera’s battery should be fully charged prior to use. Note: The battery is not user replaceable.
TO CHARGE THE CAMERA’S BATTERY:1. Lift the cover from the USB port.
2. Plug the cable provided with the FLIR SCOUT TK into the camera’s USB port.
3. Plug the opposite end of the cable into a USB power source.
Indicator LED
The indicator LED flashes while charging. The color of the Indicator LED is determined by the level of charge.
FLASHING LED COLOR LEVEL OF CHARGERed <10%
Amber 10-20%
Green (Long Flash) >20%
Green (Short Flash) 100%
LED COLOR LEVEL OF CHARGERed <10%
Amber 10-20%
Green >20%
During normal operation the color of the indicator LED shows the battery’s level of charge.
• FCC Declaration of Conformity
• CE Declaration of Conformity

6U S E R M A N U A L # 4204190 - Rev 1
SECTION 3. OPERATING THE CAMERA
3.1 CAMERA BUTTONSThis section details the use of the camera’s buttons.
3.1.2 POWER BUTTONThe Power Button performs the following functions:
3.1.3 DISPLAY BRIGHTNESS BUTTONPress the Display Brightness Button to open the display brightness selection screen. The display brightness can only be adjusted while the display brightness selection screen is displayed. There are 8 brightness levels which can be selected. The graph on the left hand side of the display brightness selection screen shows the current brightness.
P
PowerColor Palettes
Indicator LED
Display Brightness Snapshot / RecordingAdjustable Diopter
CAMERA STATE SHORT PRESS LONG PRESS
Camera OFF Turns Power ON N/A
Camera ON Access User Menu Turns Power OFF
Display brightness selection screen
BUTTON SHORT PRESS LONG PRESS
Accesses User Menu Turns Power OFF
Increases the display brightness by one increment
Quickly increases the display brightness
Exits the brightness selection screen N/A
PDecreases the
display brightness by one increment
Quickly decreases the display brightness
While in the display brightness selection screen the buttons have the following functionality:
3.1.1 DIOPTER ADJUSTMENTWhile looking through the eyepiece, adjust the position of the diopter lever to optimize the sharpness of the image in the viewfinder.

7U S E R M A N U A L # 4204190 - Rev 1
THE SCOUT TK HAS 9 USER SELECTABLE COLOR PALETTES.
WHITE HOTMost commonly used palette. Hot objects appear white. Good for scenes with either high or low contrast.
GRADED FIRE 1The hottest things in the image are colored with a gradient of color, and everything else is greyscale.
BLACK HOTHot objects appear black. Scenes appear more lifelike than White-Hot, especially at night.
InstAlert™
The hottest things in the image are colored and everything else is greyscale.
3.1.4 COLOR PALETTE BUTTONThe color palette button is used to select the color palette that is applied to the image.
Press the color palette button to open the color palette selection screen. Color palettes can only be changed while the color palette selection screen is active. The graph on the left side of the color palette selection screen displays the name and color gradients of the current palette.
Note: The color palette selection screen automatically exits after three seconds of inactivity.
P
Color palette selection screen

8U S E R M A N U A L # 4204190 - Rev 1
LAVALava simulates the glow of hot lava against a cold surface. The colors are in strong color contrast.
RAINWell-suited for low contrast scenes.
COLOR WHEELSimilar to rain but has even more contrast since the base colors are opposites in the color wheel.
BUTTON SHORT PRESS LONG PRESS
Accesses User Menu Turns Power OFF
Moves up through the color palette options
by one increment
Quickly moves up through the color palette options
Exits the color palette menu N/A
P
Moves down through the color palette options
by one increment
Quickly moves down through the color palette options
While in the color palette selection menu the buttons have the following functionality:
GRADED FIRE 2Similar to Graded Fire 1 but has more grey levels colorized at the top.
IRONIron simulates the glow of things that are heated to visible incandescence, like an iron in the fire.
9U S E R M A N U A L # 4204190 - Rev 1
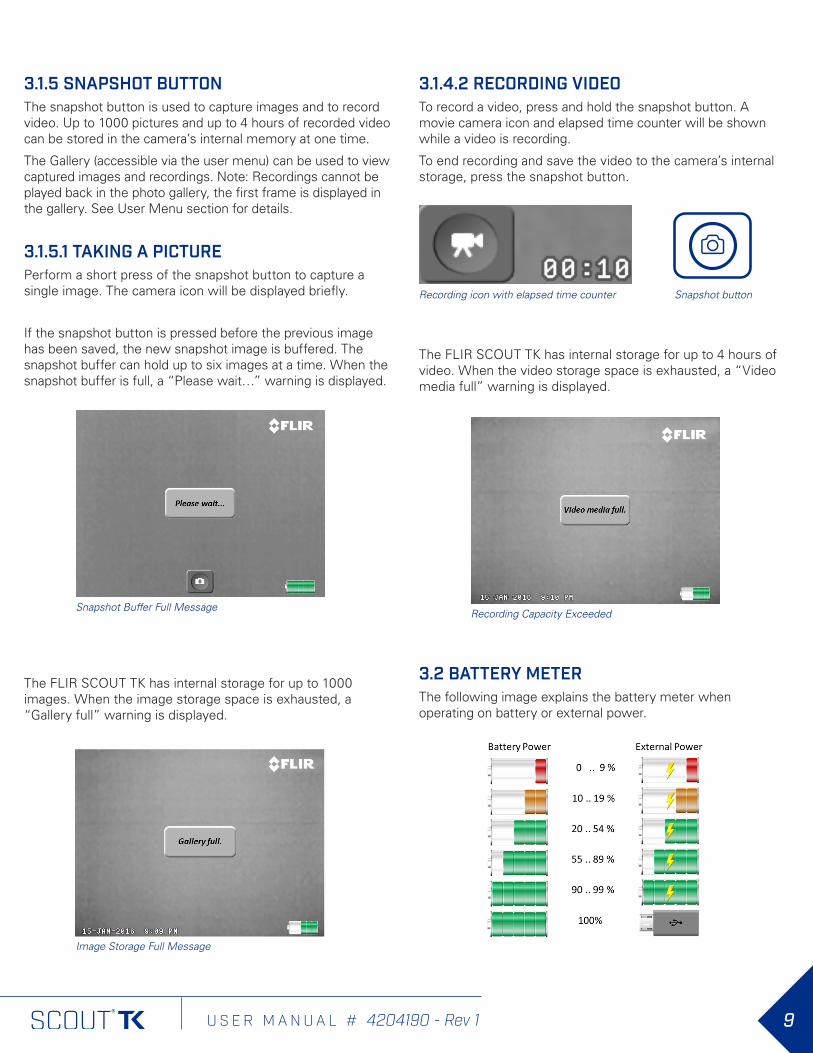
3.1.4.2 RECORDING VIDEOTo record a video, press and hold the snapshot button. A movie camera icon and elapsed time counter will be shown while a video is recording.
To end recording and save the video to the camera’s internal storage, press the snapshot button.
3.2 BATTERY METERThe following image explains the battery meter when operating on battery or external power.
The FLIR SCOUT TK has internal storage for up to 1000 images. When the image storage space is exhausted, a “Gallery full” warning is displayed.
Recording icon with elapsed time counter Snapshot button
Image Storage Full Message
Recording Capacity Exceeded
The FLIR SCOUT TK has internal storage for up to 4 hours of video. When the video storage space is exhausted, a “Video media full” warning is displayed.
3.1.5 SNAPSHOT BUTTONThe snapshot button is used to capture images and to record video. Up to 1000 pictures and up to 4 hours of recorded video can be stored in the camera’s internal memory at one time.
The Gallery (accessible via the user menu) can be used to view captured images and recordings. Note: Recordings cannot be played back in the photo gallery, the first frame is displayed in the gallery. See User Menu section for details.
3.1.5.1 TAKING A PICTUREPerform a short press of the snapshot button to capture a single image. The camera icon will be displayed briefly.
If the snapshot button is pressed before the previous image has been saved, the new snapshot image is buffered. The snapshot buffer can hold up to six images at a time. When the snapshot buffer is full, a “Please wait…” warning is displayed.
Snapshot Buffer Full Message

10U S E R M A N U A L # 4204190 - Rev 1
SECTION 4. USER MENU
4.1 USER MENUTo access the user menu press the power button while the camera is operational. The user menu screen will be displayed
4.1.1 BATTERY INDICATORThis selection is used to toggle the battery indicator on/off in the display.
4.1.2 DATE/TIMEThis selection is used to toggle the date and time on/off in the display.
4.1.3 TWENTY-FOUR HOURWhen the date/time stamp is enabled in the display, this option toggles the time display between 12 hour (AM/PM) and 24 hour mode.
User Menu
Battery Indicator icon on/off
Date & Time Stamp On/Off
24-Hour Clock Enabled
The following items are available in the user menu:
• Battery: Turns the battery meter on/off in the display.
• Date/Time: Turns the date/time on/off in the display.
• 24 Hour: Changes the time display between 12 hour (AM/PM) and 24 hour mode.
• Buttons: Enables/disables on-screen button display for navigation.
• User-selectable auto power off. The options are 5 min (default), 10 min, 20 min, or never.
• Set Clock: Used to set the date and time.
• About: Displays the camera’s software version and serial number.
• Gallery: Accesses the camera’s snapshot and video browser.
BUTTON SHORT PRESS LONG PRESS
Exits the user menu Turns Power OFF
Moves up through the menu by one increment
Quickly moves up through the menu
Selects Current Item N/A
P
Moves down through the menu by one increment
Quickly moves down through the menu
While in the user menu the buttons have the following functionality:

11U S E R M A N U A L # 4204190 - Rev 1
4.1.4 BUTTONSThe user can enable/disable the reference button actions from the display. The button functions shown on the screen match the actions generated by pressing the camera’s buttons.
4.1.5 AUTO POWER OFF (APO)The user can set the amount of time that the camera can be active without any user interaction prior to shutting off. The options are 5 minutes (Default), 10 minutes, 20 minutes, and never.
4.1.7 ABOUTPressing the snapshot button with the About option highlighted will bring up the About dialogue box. This displays the software loaded into the camera as well as the serial numbers of the camera and sensor. Press any button to exit.
4.1.6 SET THE CLOCKPressing the snapshot button with the Clock option highlighted will bring up the set clock dialogue box.
On-Screen button functionality
Set length of time for auto shutoff Access information about your specific camera
Buttons
BUTTON SHORT PRESS LONG PRESS
Exits the set clock dialog box Turns Power OFF
Increases the value of the highlighted item
by one increment
Quickly increases the value of the
highlighted item
Moves to the next item N/A
P
Decreases the value of the highlighted item
by one increment
Quickly decreases the value of the
highlighted item
4.1.6 SET THE CLOCK continuedThe button actions listed below can be used to set the date and time:
The only software that has the ability to be updated by the end user is the “Camera” software. See Software Update section for details. The about dialogue box provides the following information.
ITEM DESCRIPTIONCamera: VX.XX.X Current version of camera’s software
Sensor: VX.X.XX Current version of Lepton core software
Battery: VX.XX.X Current version of battery management software
Loader: VX.XX.X Current version of system bootloader
Camera SN: XXXXXX Scout TK’s serial number
Sensor SN: XXXXXX Lepton core’s serial number
SOC: MA21XX Processor Type

12U S E R M A N U A L # 4204190 - Rev 1
4.1.8 GALLERYPressing the snapshot button with the Gallery option highlighted will launch the snapshot and video gallery.
Select Gallery in user menu to view snapshots
Images appear to the left as thumbnails
Deleting Images one at a time
Deleting All Images and Videos
BUTTON SHORT PRESS LONG PRESS
Exits the Gallery Turns Power OFF
Scrolls up through images by
one increment
Quickly scrolls up through images in the Gallery
Brings up a dialog box to delete the
current image/video
Brings up a dialog box to delete all of the
camera’s images/videos
P
Scrolls down through images by
one increment
Quickly scrolls down through images in the Gallery
BUTTON SHORT PRESS
Exits the Gallery
Cancels the deletion
Deletes Selected File
PCancels the
deletion
BUTTON SHORT PRESS
Exits the Gallery
Cancels the deletion
Brings up a question box
delete all?
PCancels the
deletion
The button operation while in the Gallery is as follows:
The button operation while in the individual image/video delete dialog box is as follows:
4.1.9 DELETE IMAGE/VIDEO INDIVIDUALLY
4.1.10 DELETE ALL IMAGES/VIDEOSThe Gallery provides a convenient way to review the images and video recording files that have been saved to the camera’s internal storage.
The button operation while in the delete all images/video dialog box is as follows:
If you confirm the deletion a final confirmation dialog box will be shown. The button operation in the final delete all images/video dialog box is as follows:
Confirmation for deleting ALL images and videos
BUTTON SHORT PRESS
Exits the Gallery
Cancels the deletion
Deletes all images
and videos
PCancels the
deletion
CONFIRM DELETE OF ALL IMAGES/VIDEOS

13U S E R M A N U A L # 4204190 - Rev 1
Warning dialogue box for low battery during update
SECTION 5. MAINTENANCE
5.1 SOFTWARE UPDATESoftware updates for your FLIR SCOUT TK can be found at www.flir.com/hunting-outdoor/ under the “Resources” tab.
5.1.1 Software Update ProcedureTo update your camera’s software:
1) Go to Resources tab at www.flir.com/hunting-outdoor/
2) Download the latest version of software to your computer
3) Fully charge the FLIR SCOUT TK - Note: The software update procedure cannot be performed
while the battery is low. If the battery is too low to complete the software update, the charge battery message will be displayed.
4) Turn on your FLIR SCOUT TK
5) Connect your FLIR SCOUT TK to your computer using the USB cable provided
6) Locate and open the drive named “FLIR” on your computer
7) Copy the latest software files to the folder labeled “UPDATE” on the drive named “FLIR”. After the file has finished copying, press the Power Button twice and remove the USB cable from the computer
- Note: The USB cable must be removed within three seconds of the first button press.
First Update status reading in SCOUT TK eyepiece
8) During the software update the messages below are displayed through the eyepiece:
Loading bar progression in SCOUT TK eyepiece
Loading bar progression in SCOUT TK eyepiece

14U S E R M A N U A L # 4204190 - Rev 1
Notification screen of a successful load and pending restart to finish software update
Loading bar progression in SCOUT TK eyepiece
9) It will take approximately 5 minutes for the software to load. The camera will restart when the process is complete
5.2 BATTERY SERVICE AND REPLACEMENTIf the battery will not hold a charge and requires replacement, please contact FLIR Systems for details on returning the unit for service. For instructions on charging the battery refer to Section 2.3 Charging the Camera.
5.3 CLEANING THE SCOUT TKWipe the housing with a damp cloth as needed. Use a high quality lens wipe to remove dirt or smudges from the lens and display window. Do not use abrasives or solvents to clean the housing, lens, or display window.
5.4 OVER TEMPERATURE PROTECTIONThe camera has built in over temperature protection to prevent damage to the electronics. When an over temperature condition is detected the image below is displayed for ten seconds before the Scout TK shuts down. After a thermal shutdown, the Scout TK will not turn on until the camera’s interior has returned to a safe operating temperature.
Excessive Temperature warning

15U S E R M A N U A L # 4204190 - Rev 1
SECTION 6. SPECIFICATIONS
SCOUT TK PRODUCT FEATURE PARAMETERSStart up <10 seconds
Detector Type 160 x 120 VOx Lepton® Microbolometer
Thermal Sensitivity, Waveband 7.5-13.5µm
Field of View (H x V) 20° x 16°
Image Processing FLIR Proprietary Digital Detail Enhancement™
Media Storage 1000 images and 4 hours of video
USER INTERFACEDisplay 640 x 480 pixel LCD
Refresh Rate <9Hz
Color Palettes User Selectable: WhiteHot/BlackHot/InstAlert™/ Graded Fire/Iron/Lava/Rain/Color Wheel
POWERBattery Type Internal Li-Ion Cell
Battery Life (Operating @ 20°C) >5 Hours
USB Port Micro-USB
ENVIRONMENTALIngress Protection Rating IP-67, Submersible
Operating Temperature -20°C to 40°C (-4°F to 104°F)
Storage Temperature -40°C to 60°C (-40°F to 140°F)
Drop 1.2m (3.93 ft)
PHYSICALWeight 184g (6.5 oz)
Size 14.9cm x 5.5cm x 5.5cm (5.9” x 2.2” x 2.2”)
Country Of Origin USA
6.1 CURRENT SPECIFICATIONS CHARTThe table below contains the latest product specifications for the FLIR SCOUT TK; however, with all of our products as they evolve and are further developed these specifications are subject to change without notice.

Equipment described herein is subject to US export regulations and may require a license prior to export. Diversion contrary to US law is prohibited. Imagery for illustration purposes only. Specifications are subject to change without notice. ©2016 FLIR Systems, Inc. All rights reserved. 05/23/2016
CORPORATE HEADQUARTERSFLIR Systems, Inc.27700 SW Parkway Ave.Wilsonville, OR 97070PH: +1 877.773.3547
THE AMERICAS 25 Esquire RoadN. Billerica, MA 01862USAT +1 888.747.3547, Option 2 Email: [email protected]
www.flir.comNASDAQ: FLIR