User Guide Part 4 - B-Scadascada.com/Content/UserGuides/StatusEnterprise/Status Enterprise... ·...
20
User Guide Part 4 Application Designer
Transcript of User Guide Part 4 - B-Scadascada.com/Content/UserGuides/StatusEnterprise/Status Enterprise... ·...

User Guide Part 4
Application Designer
Status Enterprise Application Designer
2
© 2017 B-Scada, Inc. All Rights Reserved.
Contents 1 Overview ............................................................................................................................................... 4
1.1 HMI Designers............................................................................................................................... 4 1.1.1 Mimic Designer .......................................................................................................................... 4
1.1.2 Application Designer ................................................................................................................. 4
1.2 General .......................................................................................................................................... 4 2 Shared Technology with the Mimic Designer ................................................................................... 5
2.1 What is the Same .......................................................................................................................... 5 2.2 What is Different ............................................................................................................................ 5 3 Project Creation ................................................................................................................................... 6
3.1 Getting Started .............................................................................................................................. 6 3.2 Creating a Project in the Application Designer ............................................................................. 7 3.3 Toolbar Icons................................................................................................................................. 8 3.3.1 File Management Icons ............................................................................................................. 9
3.4 Saving a Project ............................................................................................................................ 9 4 Mimic Creation ................................................................................................................................... 11
4.1 MainPage .................................................................................................................................... 11 4.2 Creating a Mimic ......................................................................................................................... 11 4.3 Data Binding ................................................................................................................................ 13 4.4 Building and Test Running a Project ........................................................................................... 13 5 Deploying a Status Enterprise Application ..................................................................................... 15
5.1 Using the Application Runtime .................................................................................................... 15 5.2 Project Files ................................................................................................................................. 15 5.3 Creating a Deployment Configuration File .................................................................................. 16 5.4 Running the Application Runtime ................................................................................................ 18 5.5 Deploying to other Machines....................................................................................................... 19 6 Additional Information and Support ................................................................................................ 20
Status Enterprise Application Designer
3
© 2017 B-Scada, Inc. All Rights Reserved.
Figure 1 - Login Dialog ................................................................................................................................................... 6
Figure 2 - New Project Icon ............................................................................................................................................ 7
Figure 3 - New Project Menu Item .................................................................................................................................. 7
Figure 4 - New Project Dialog ........................................................................................................................................ 7
Figure 5 - Project Tree ................................................................................................................................................... 8
Figure 6 - Application Designer Toolbar ......................................................................................................................... 8
Figure 7 - Application Designer Project and File Management Icons ............................................................................. 9
Figure 8 - New Project and File Icons ............................................................................................................................ 9
Figure 9 - Project Save Icon ........................................................................................................................................... 9
Figure 10 - Save Project Menu Item ............................................................................................................................. 10
Figure 11 - Create Mimic Dialog................................................................................................................................... 11
Figure 12 - Select Document Type Dialog ................................................................................................................... 12
Figure 13 - Screen Shot New Mimic ............................................................................................................................. 12
Figure 14 - Data Binding Panel in the Designer ........................................................................................................... 13
Figure 15 - Build and Run Icons ................................................................................................................................... 14
Figure 16 - Application Project Files ............................................................................................................................. 15
Figure 17 - Output files generated when building a project. ......................................................................................... 16
Figure 18 – Application Runtime Configuration Dialog ................................................................................................. 17
Figure 19 - Config file saved with the project assemblies. ........................................................................................... 18
Figure 20 - Select Configuration File Dialog Box.......................................................................................................... 18
Figure 21 - Status Application in the Application Runtime ............................................................................................ 19

Status Enterprise Application Designer
4
© 2017 B-Scada, Inc. All Rights Reserved.
1 Overview
1.1 HMI Designers
1.1.1 Mimic Designer
Design once view in Windows Thick Client or HTML 5 enabled browser Screens are saved into the Data Model in the Status Server Zero deployment required Limited code behind capabilities Screens viewable in the Model Browser Screens embeddable into 3rd party applications using WPF StatusRuntimeControl Supports Custom WPF controls
1.1.2 Application Designer
High performance Unlimited extensibility with full .NET code behind in C# or Visual Basic with intellisense Screens compiled into a .NET assembly and viewed by a Windows Thick Client Automated screen scheduling for digital signage and other applications Supports Custom WPF controls
This document outlines the design and creation of graphical interfaces using the Status Enterprise Application Designer. The Mimic Designer is discussed in Part 3 – Mimic Designer For more information, frequently used terms, definitions and abbreviations, please see Part 1 – Overview and Concepts.
1.2 General As with the Mimic Designer, the Application Designer is used to create screens (mimics) with graphics and user interface controls, and attach those graphics and controls to data in the Object Model with data bindings. Unlike the Mimic Designer, the Application Designer creates mimics as Visual Studio .NET projects that can be modified and extended using Visual Basic or Visual C#. This allows users to extend the functionality of the application to meet any possible custom requirements of usability and functionality.
Status Enterprise Application Designer
5
© 2017 B-Scada, Inc. All Rights Reserved.
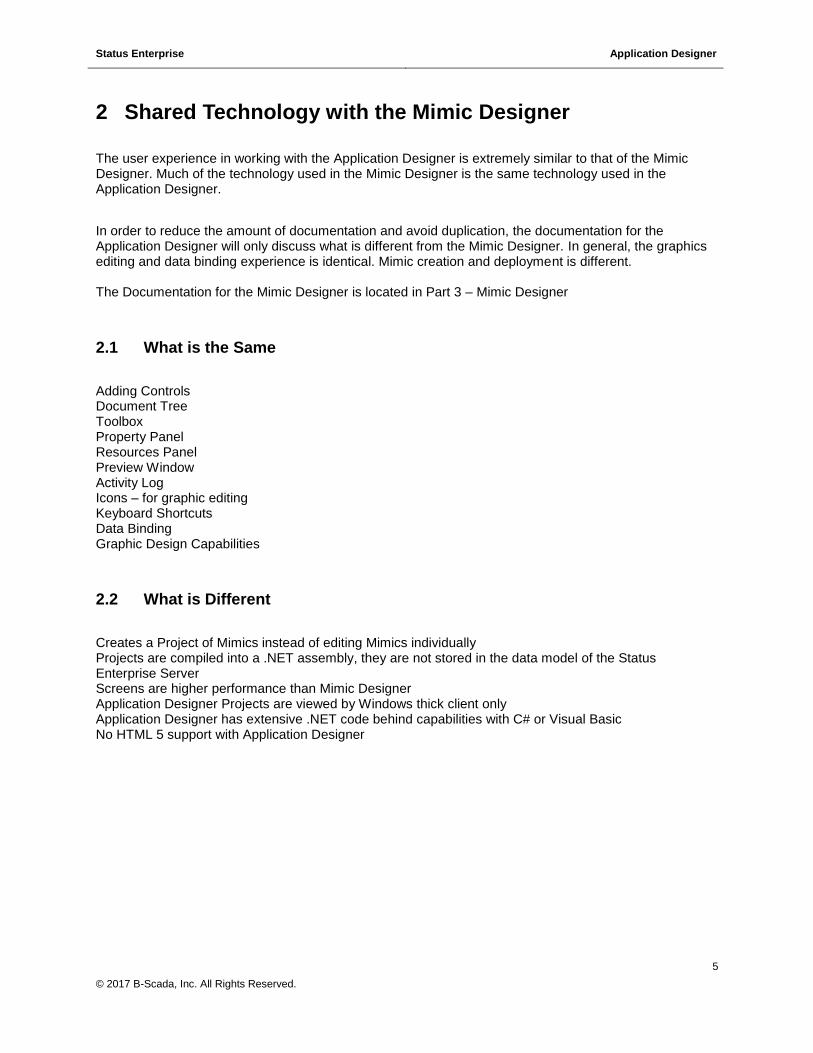
2 Shared Technology with the Mimic Designer
The user experience in working with the Application Designer is extremely similar to that of the Mimic Designer. Much of the technology used in the Mimic Designer is the same technology used in the Application Designer.
In order to reduce the amount of documentation and avoid duplication, the documentation for the Application Designer will only discuss what is different from the Mimic Designer. In general, the graphics editing and data binding experience is identical. Mimic creation and deployment is different. The Documentation for the Mimic Designer is located in Part 3 – Mimic Designer
2.1 What is the Same
Adding Controls Document Tree Toolbox Property Panel Resources Panel Preview Window Activity Log Icons – for graphic editing Keyboard Shortcuts Data Binding Graphic Design Capabilities
2.2 What is Different
Creates a Project of Mimics instead of editing Mimics individually Projects are compiled into a .NET assembly, they are not stored in the data model of the Status Enterprise Server Screens are higher performance than Mimic Designer Application Designer Projects are viewed by Windows thick client only Application Designer has extensive .NET code behind capabilities with C# or Visual Basic No HTML 5 support with Application Designer
Status Enterprise Application Designer
6
© 2017 B-Scada, Inc. All Rights Reserved.
3 Project Creation
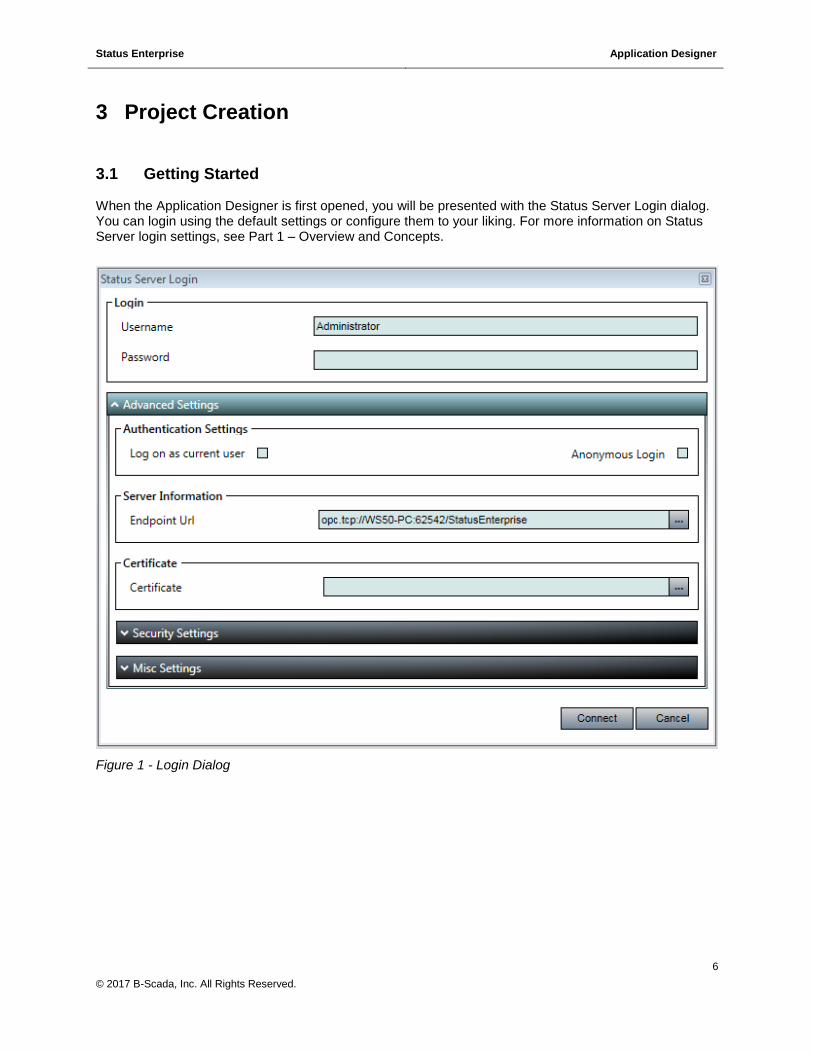
3.1 Getting Started When the Application Designer is first opened, you will be presented with the Status Server Login dialog. You can login using the default settings or configure them to your liking. For more information on Status Server login settings, see Part 1 – Overview and Concepts.
Figure 1 - Login Dialog

Status Enterprise Application Designer
7
© 2017 B-Scada, Inc. All Rights Reserved.
3.2 Creating a Project in the Application Designer
A Mimic created in the Mimic designer is saved as a single .xaml document, in the Application Designer we create a project. These projects can contain many mimics. To create a project, select New Project from the File menu or click on the <New Project> icon.
Figure 2 - New Project Icon
Figure 3 - New Project Menu Item
The New Project dialog box will appear, giving you a choice of scripting languages upon which to build the project. Choose either Visual Basic or Visual C#. Name your project and choose a location where you would like it to be saved. Projects are saved on your local machine, projects saved on the network are not supported.
Figure 4 - New Project Dialog
Status Enterprise Application Designer
8
© 2017 B-Scada, Inc. All Rights Reserved.
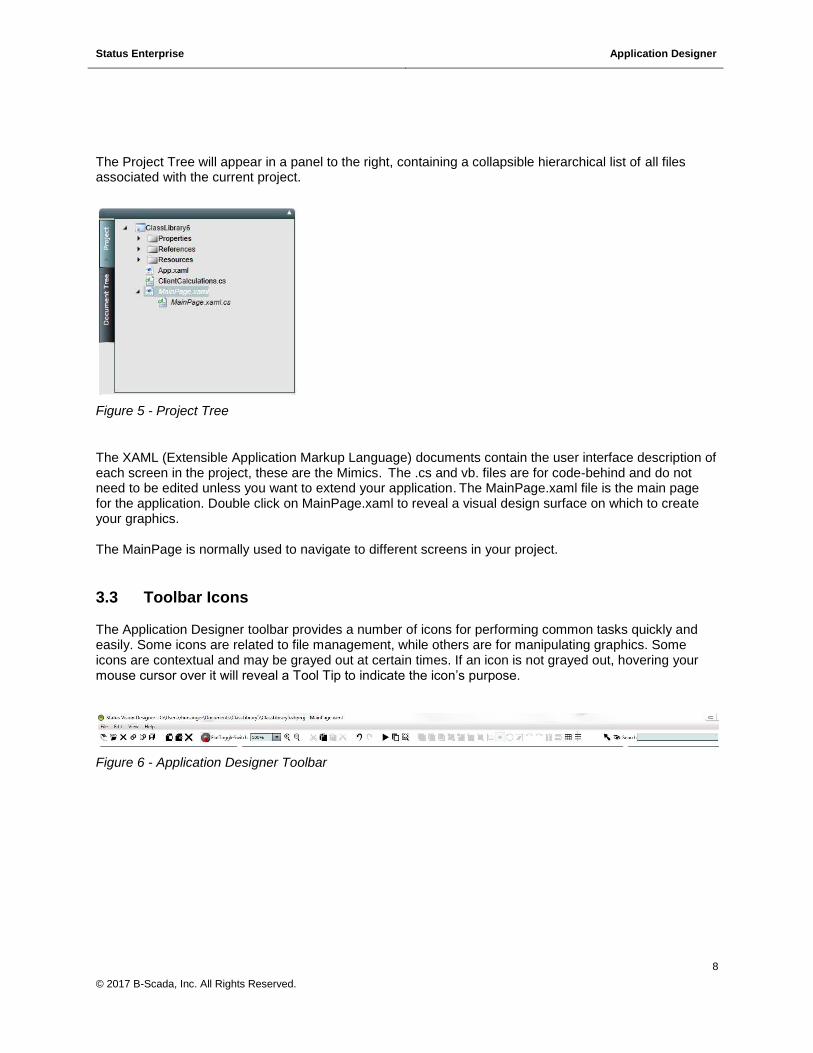
The Project Tree will appear in a panel to the right, containing a collapsible hierarchical list of all files associated with the current project.
Figure 5 - Project Tree
The XAML (Extensible Application Markup Language) documents contain the user interface description of each screen in the project, these are the Mimics. The .cs and vb. files are for code-behind and do not need to be edited unless you want to extend your application. The MainPage.xaml file is the main page for the application. Double click on MainPage.xaml to reveal a visual design surface on which to create your graphics. The MainPage is normally used to navigate to different screens in your project.
3.3 Toolbar Icons The Application Designer toolbar provides a number of icons for performing common tasks quickly and easily. Some icons are related to file management, while others are for manipulating graphics. Some icons are contextual and may be grayed out at certain times. If an icon is not grayed out, hovering your mouse cursor over it will reveal a Tool Tip to indicate the icon’s purpose.
Figure 6 - Application Designer Toolbar

Status Enterprise Application Designer
9
© 2017 B-Scada, Inc. All Rights Reserved.
3.3.1 File Management Icons
Figure 7 - Application Designer Project and File Management Icons
The icons grouped on the far left of the toolbar are used to provide various file management functions:
New Project – click this icon to create a new project
Open Project – click this icon to open a previously created project
Build – click this icon to build the current project
Build and Run – click this icon to build the current project and open it in Runtime
Save Project – click this icon to save the current project
Export XAML – click this icon to export the raw XAML that describes your mimic
Export Raster – click this icon to export your mimic as an image
Close – click this icon to close the mimic currently on your design surface
Figure 8 - New Project and File Icons
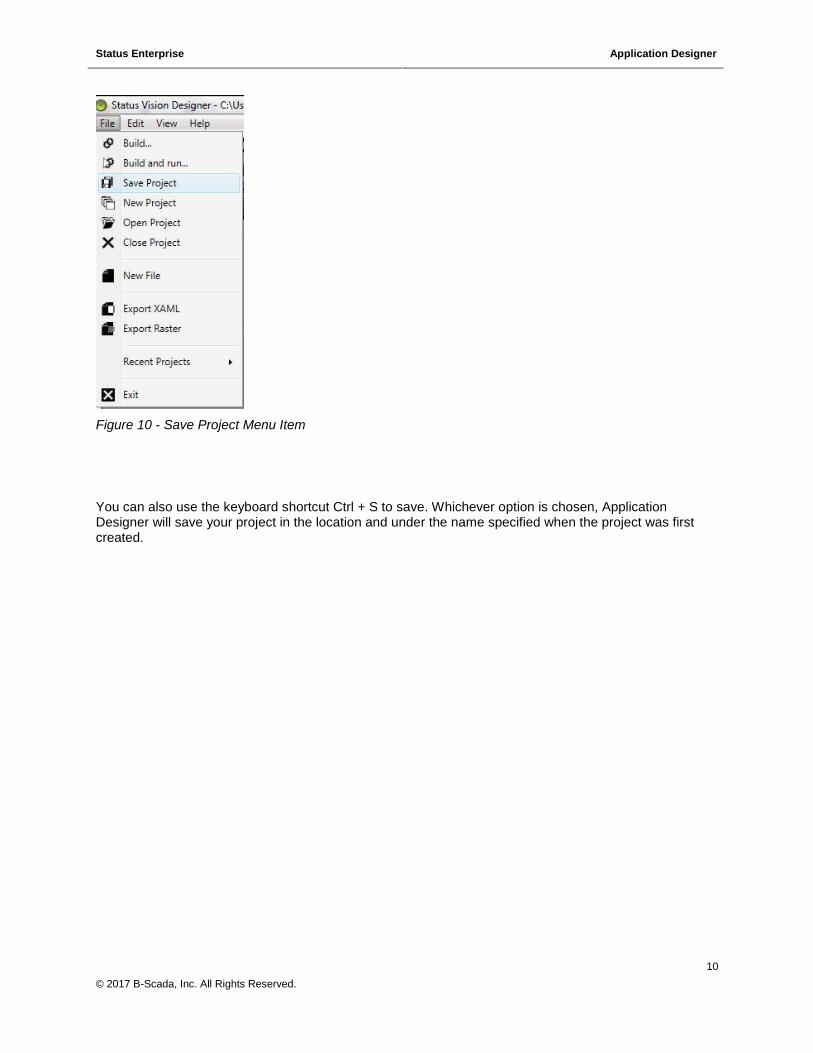
3.4 Saving a Project
To save your Project in Application Designer, you can either select Save Project in the file menu or click on the <Save Project> icon on the toolbar.
Figure 9 - Project Save Icon
Status Enterprise Application Designer
10
© 2017 B-Scada, Inc. All Rights Reserved.
Figure 10 - Save Project Menu Item
You can also use the keyboard shortcut Ctrl + S to save. Whichever option is chosen, Application Designer will save your project in the location and under the name specified when the project was first created.
Status Enterprise Application Designer
11
© 2017 B-Scada, Inc. All Rights Reserved.
4 Mimic Creation
4.1 MainPage
When a project is created, one mimic is created by default. This mimic is the MainPage mimic. It is used for navigating to other mimics in your project. It is a regular mimic, not a template.
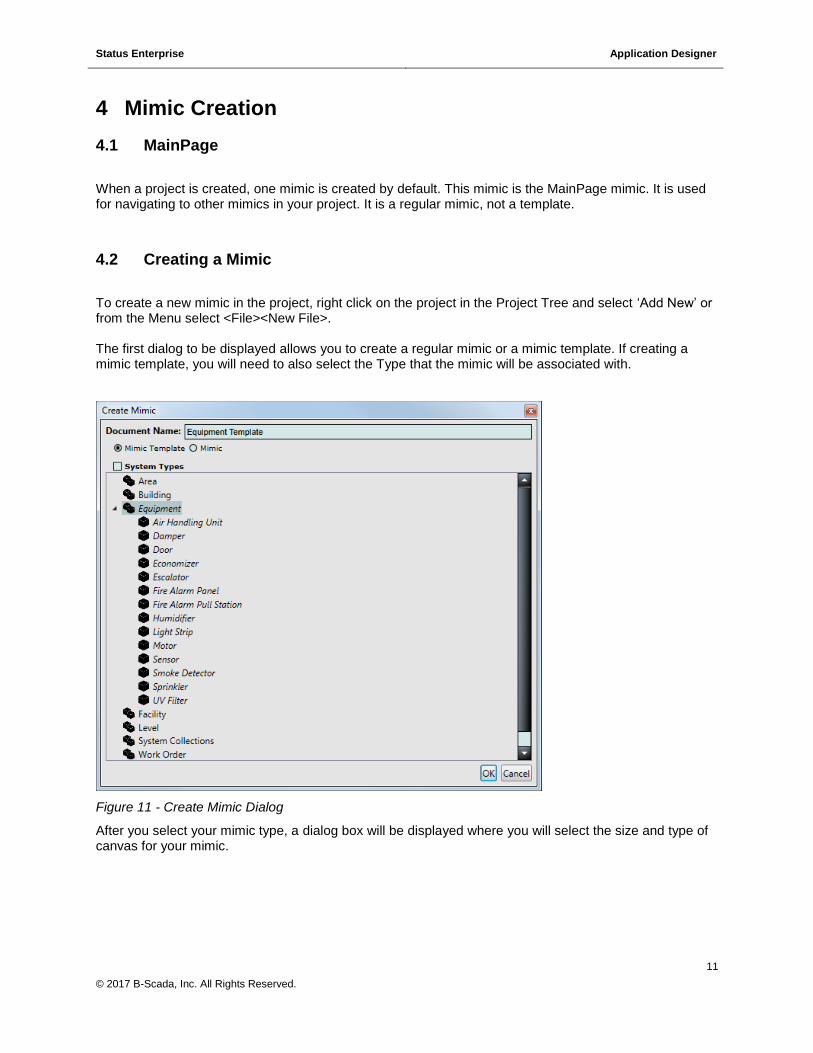
4.2 Creating a Mimic
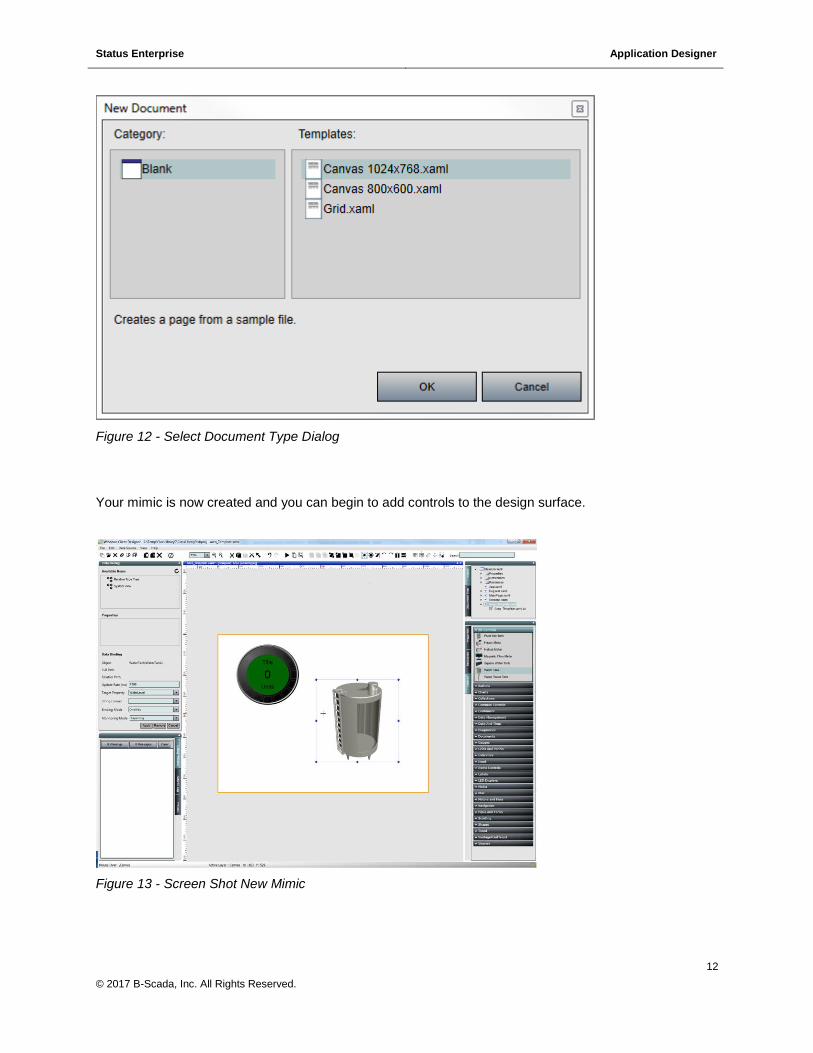
To create a new mimic in the project, right click on the project in the Project Tree and select ‘Add New’ or from the Menu select <File><New File>. The first dialog to be displayed allows you to create a regular mimic or a mimic template. If creating a mimic template, you will need to also select the Type that the mimic will be associated with.
Figure 11 - Create Mimic Dialog
After you select your mimic type, a dialog box will be displayed where you will select the size and type of canvas for your mimic.
Status Enterprise Application Designer
12
© 2017 B-Scada, Inc. All Rights Reserved.
Figure 12 - Select Document Type Dialog
Your mimic is now created and you can begin to add controls to the design surface.
Figure 13 - Screen Shot New Mimic
Status Enterprise Application Designer
13
© 2017 B-Scada, Inc. All Rights Reserved.
4.3 Data Binding
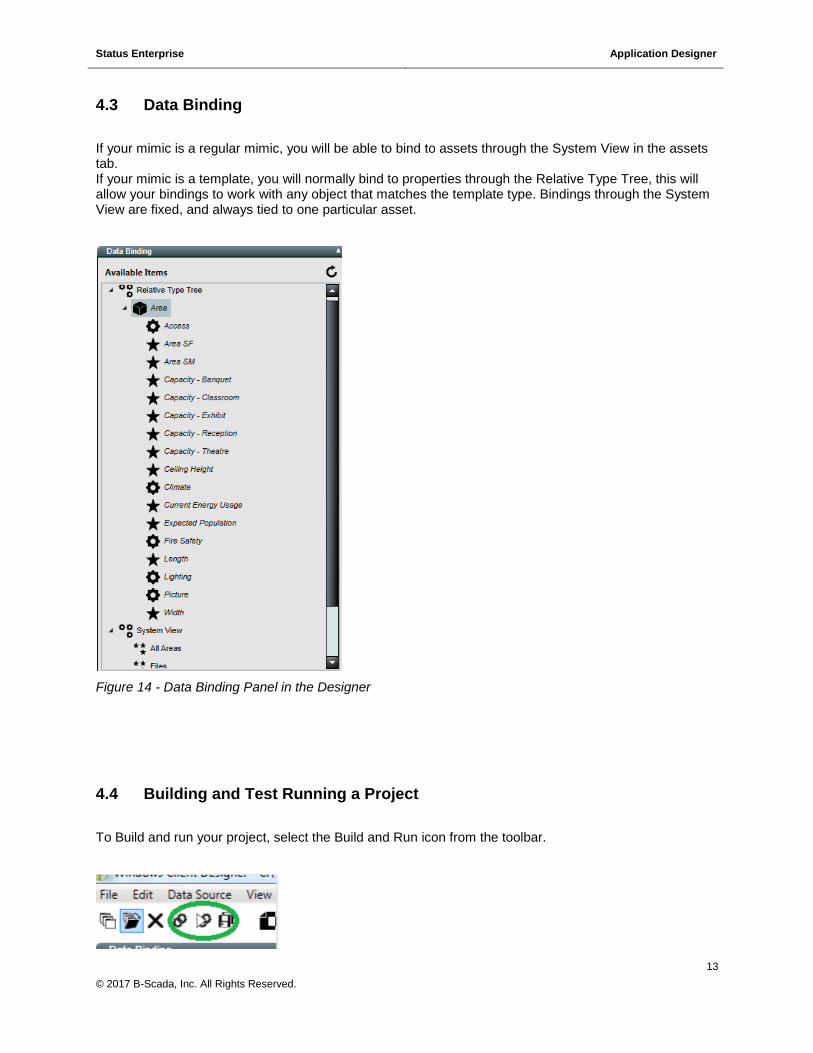
If your mimic is a regular mimic, you will be able to bind to assets through the System View in the assets tab. If your mimic is a template, you will normally bind to properties through the Relative Type Tree, this will allow your bindings to work with any object that matches the template type. Bindings through the System View are fixed, and always tied to one particular asset.
Figure 14 - Data Binding Panel in the Designer
4.4 Building and Test Running a Project
To Build and run your project, select the Build and Run icon from the toolbar.

Status Enterprise Application Designer
14
© 2017 B-Scada, Inc. All Rights Reserved.
Figure 15 - Build and Run Icons
Your project will be compiled and the Application Client that hosts your project will be started. If you have a mimic up on the screen, the mimic will be displayed. Mimics that are templates will not have any data in test run, because they have not been associated with an asset. Regular mimics will display data. If you have no mimics open in the designer when you start test run, the application will prompt you for a screen to open.

Status Enterprise Application Designer
15
© 2017 B-Scada, Inc. All Rights Reserved.
5 Deploying a Status Enterprise Application
5.1 Using the Application Runtime Windows projects created using the Status Application Designer are compiled as a .NET assembly that is hosted by the Application Runtime when deployed. The workflow is as follows: Create a Status Application. Compile your project into a .NET assembly using the Application Designer. Create a runtime configuration file using the Application Runtime Configuration Utility. Use your .NET assembly in that configuration. Start the Application Runtime and load the configuration file.
5.2 Project Files
The files for your project are located in the directory you specified when your project was created, these files are only needed to open and edit your project.
Figure 16 - Application Project Files
The compiled .NET assembly containing your application and mimics is located in the bin directory (application assembly).

Status Enterprise Application Designer
16
© 2017 B-Scada, Inc. All Rights Reserved.
Figure 17 - Output files generated when building a project.
5.3 Creating a Deployment Configuration File
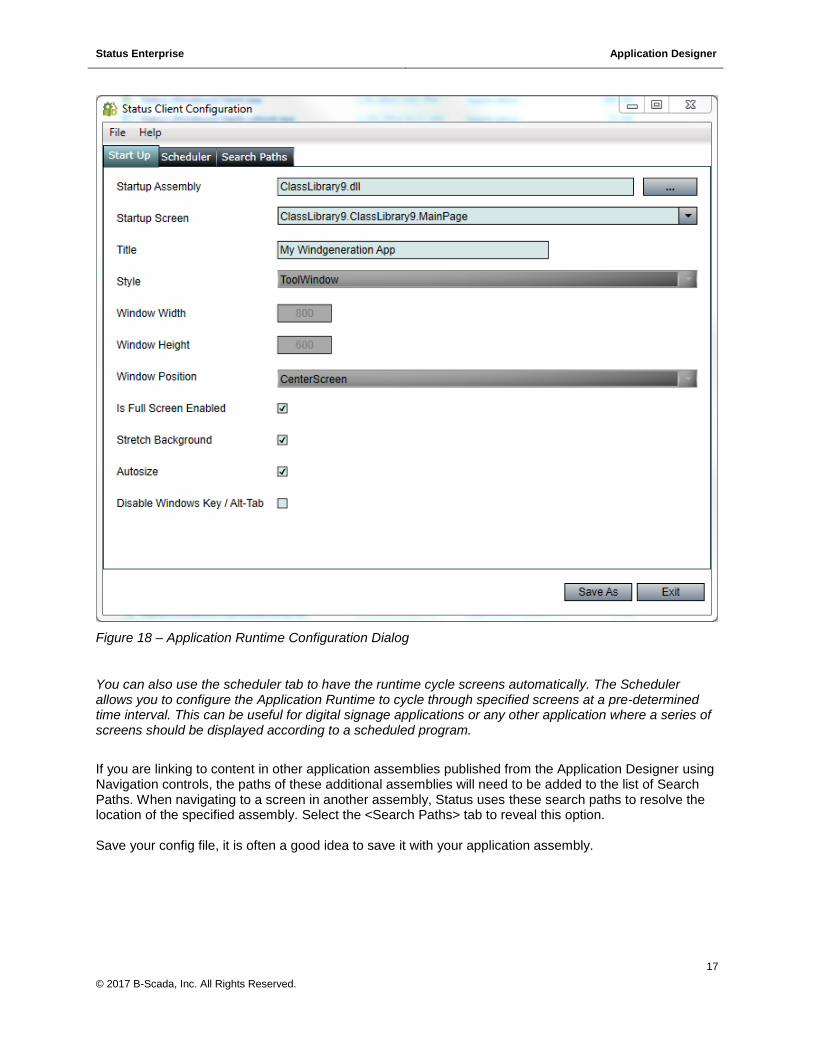
Start the Application Runtime Configuration Utility. Select the application assembly that was output from the Application Designer when your project was compiled, and the mimic that you would like to have displayed when the runtime starts. Other options that can be configured under the Startup tab include: Title – The title that will be displayed on the title bar of the window. Window Height – A fixed window height that will be used if ‘Is Full Screen Enabled’ is unchecked. Window Width – A fixed window width that will be used if ‘Is Full Screen Enabled’ is unchecked. Window Position – Determines the placement of the window on your screen if ‘Is Full Screen Enabled’ is unchecked. Is Full Screen Enabled – Determines whether the runtime client will open your project in full screen mode. Stretch Background – Stretches the background of the project to cover the entire client space. Autosize – If selected, will wrap your project in a viewbox so that the content will scale when you resize the window. Disable Windows Key – If selected, the runtime client cannot be minimized or closed by the Esc key. The only way to close the client is by pressing Control-Alt-Delete and stopping the client process. If you are using a remote desktop, press Control-Alt and End to end the process.
Status Enterprise Application Designer
17
© 2017 B-Scada, Inc. All Rights Reserved.
Figure 18 – Application Runtime Configuration Dialog
You can also use the scheduler tab to have the runtime cycle screens automatically. The Scheduler allows you to configure the Application Runtime to cycle through specified screens at a pre-determined time interval. This can be useful for digital signage applications or any other application where a series of screens should be displayed according to a scheduled program.
If you are linking to content in other application assemblies published from the Application Designer using Navigation controls, the paths of these additional assemblies will need to be added to the list of Search Paths. When navigating to a screen in another assembly, Status uses these search paths to resolve the location of the specified assembly. Select the <Search Paths> tab to reveal this option. Save your config file, it is often a good idea to save it with your application assembly.
Status Enterprise Application Designer
18
© 2017 B-Scada, Inc. All Rights Reserved.
Figure 19 - Config file saved with the project assemblies.
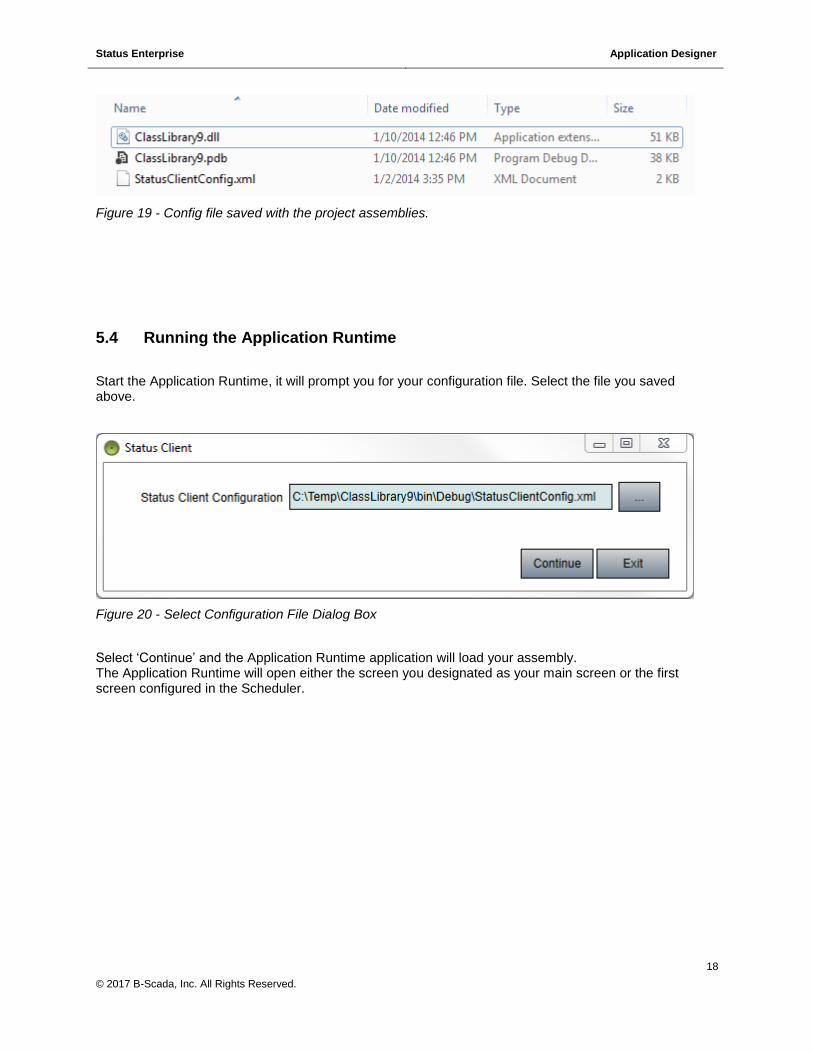
5.4 Running the Application Runtime
Start the Application Runtime, it will prompt you for your configuration file. Select the file you saved above.
Figure 20 - Select Configuration File Dialog Box
Select ‘Continue’ and the Application Runtime application will load your assembly. The Application Runtime will open either the screen you designated as your main screen or the first screen configured in the Scheduler.
Status Enterprise Application Designer
19
© 2017 B-Scada, Inc. All Rights Reserved.
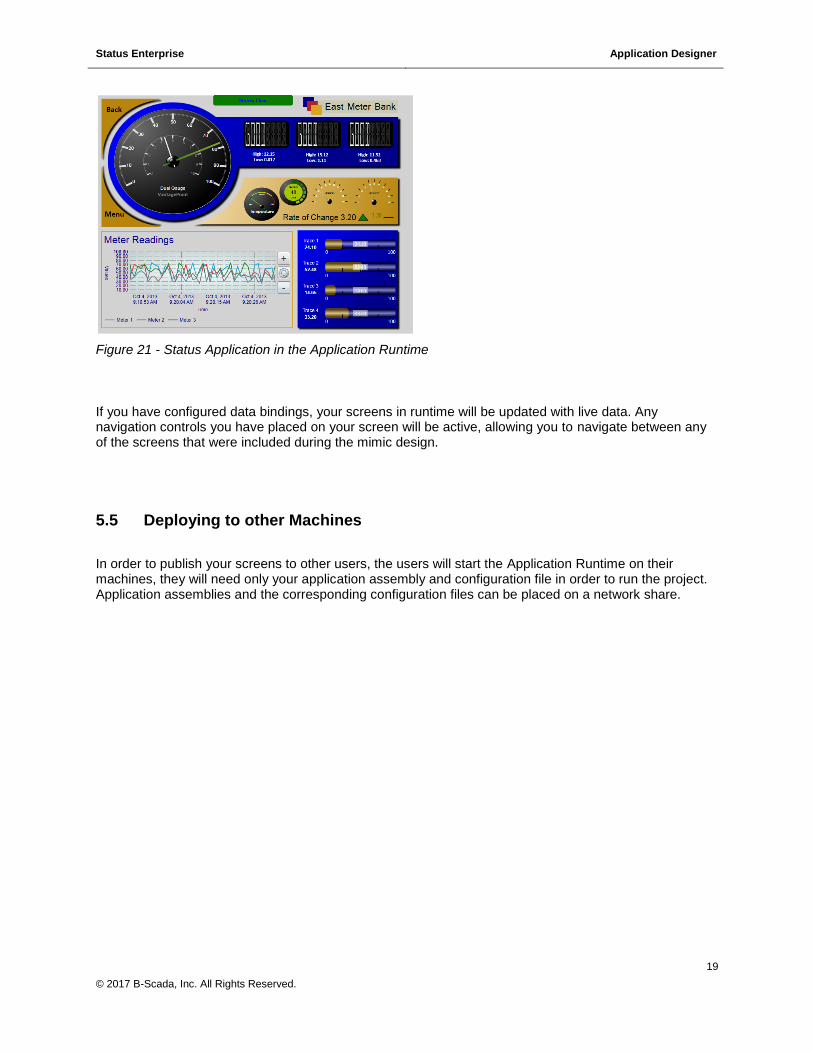
Figure 21 - Status Application in the Application Runtime
If you have configured data bindings, your screens in runtime will be updated with live data. Any navigation controls you have placed on your screen will be active, allowing you to navigate between any of the screens that were included during the mimic design.
5.5 Deploying to other Machines
In order to publish your screens to other users, the users will start the Application Runtime on their machines, they will need only your application assembly and configuration file in order to run the project. Application assemblies and the corresponding configuration files can be placed on a network share.

Status Enterprise Application Designer
20
© 2017 B-Scada, Inc. All Rights Reserved.
6 Additional Information and Support For more information in using Status Enterprise, please visit us at www.scadauniversity.com. This will give you access to instructional videos, documentation and our online forum. You can also email B-Scada support at [email protected]. B-Scada, Inc. 9030 W. Fort Island Trail Building 9
Crystal River, FL 34429 USA +1 352-564-9610 www.scada.com