User Guide Multi Device Wireless Headset...
35
Savi ® W710-M/W720-M Multi Device Wireless Headset System User Guide
Transcript of User Guide Multi Device Wireless Headset...
Savi®
W710-M/W720-MMulti Device Wireless Headset System
User Guide
Contents
Welcome 4System Requirements 4DECT Enhanced Security 4DECT Information 4
What's in the Box 6
Base and Headset Basics 7
Accessories 8
Customize Your Headset 9Adjust the Headband 9Adjust the Mouthpiece 9
Charge Your Headset 11
Desk Phone: Connect and Call 12Choose Desk Phone Setup 12Make a Desk Phone Call 13
Mobile: Connect and Call 14
Computer: Connect and Call 15Connect Your Computer 15Place a Softphone Call 15Position Your Base 15Audio streaming 15
Headset Features 17Headset Controls 17Headset Power 17Headset Battery Level 18Mute your Headset During a Call 18Adjust Your Headset Volume 19Turn On/Off Headset LED 19Out of Range Warning Tones 19
Base Features 21Base Buttons 21Base Subscription Button 21Bluetooth Pairing Button 23
Daily Use 24Incoming Calls 24Outgoing Calls 24Multi-Phone Status 26Mobile Phone and Headset Audio 26Combine Audio From Any Two Lines or Channels 26Conference Up to Three Additional Headsets 26Conferencing Additional Headsets and Security Levels 27
Advanced Use 28Install Plantronics Hub 28Start Hub 28Hub Tabs 28Hub Settings Options 29Ring Tones and Volumes 31
2

Softphones and Media Players 31Presence 32Wireless 32Advanced 33Additional Device Management Tools 34
3
Congratulations on purchasing your new Plantronics product. This guide contains instructionsfor setting up and using your Savi W710-M/W720-M
Please refer to the safety instructions in the quick start guide for important product safetyinformation prior to installation or use of the product.
Computer
• Supported Operating Systems: Windows Vista® Windows® 7, Windows® 8, 8.1
• Processor: 400 MHz Pentium® processor or equivalent (Minimum); 1 GHz Pentium processor orequivalent (Recommended)
• RAM: 96 MB (Minimum); 256 MB (Recommended)
• Hard Disk: 280 MB (Minimum); 500 MB or more (Recommended)
• Microsoft® Windows XP® Service Pack 3 (SP3) or later (Recommended) Microsoft WindowsVista Service Pack 1 (SP1) or later (Recommended)
Display
• At least 800 x 600, 256 colors
• 1024 x 768 high color, 32-bit (Recommended)
Browser
• Internet Explorer® V10 or better must be on the user’s system (Required)
Plantronics is a member of the DECT Forum has fully adopted their recommendations forenhancements to security within all DECT products.
Plantronics DECT-based products now fully incorporate the latest recommendations onEnhanced Security from the DECT Forum and ETSI. These improvements cover registration,authentication, authorization and encryption procedures. Plantronics DECT products are nowsecure against all the known vulnerabilities that were highlighted by the publicannouncements of the Chaos Council in 2009.
Plantronics Savi 700 Series DECT products have been tested against and passed the DECTForum security certification requirements and consequently have been granted 'DECT Forumsecurity' logo certification.
Plantronics products using the new enhanced version of DECT that includes these securityimprovements are marked on the base with the DECT Forum security logo.
The enclosed DECT 6.0 wireless product uses restricted wireless radio frequencies which varyby country. DECT 6.0 devices are generally authorized for use in The Americas. Use of thisDECT 6.0 product in unauthorized countries is a violation of law, may disrupttelecommunications networks and devices, and can subject you to fines and penalties byregulatory agencies. For specific countries in which DECT 6.0 devices may be lawfully used,please consult the following: http://www.dect.org/content.aspx?id=28
Welcome
System Requirements
DECT Enhanced Security
DECT Information
4

5
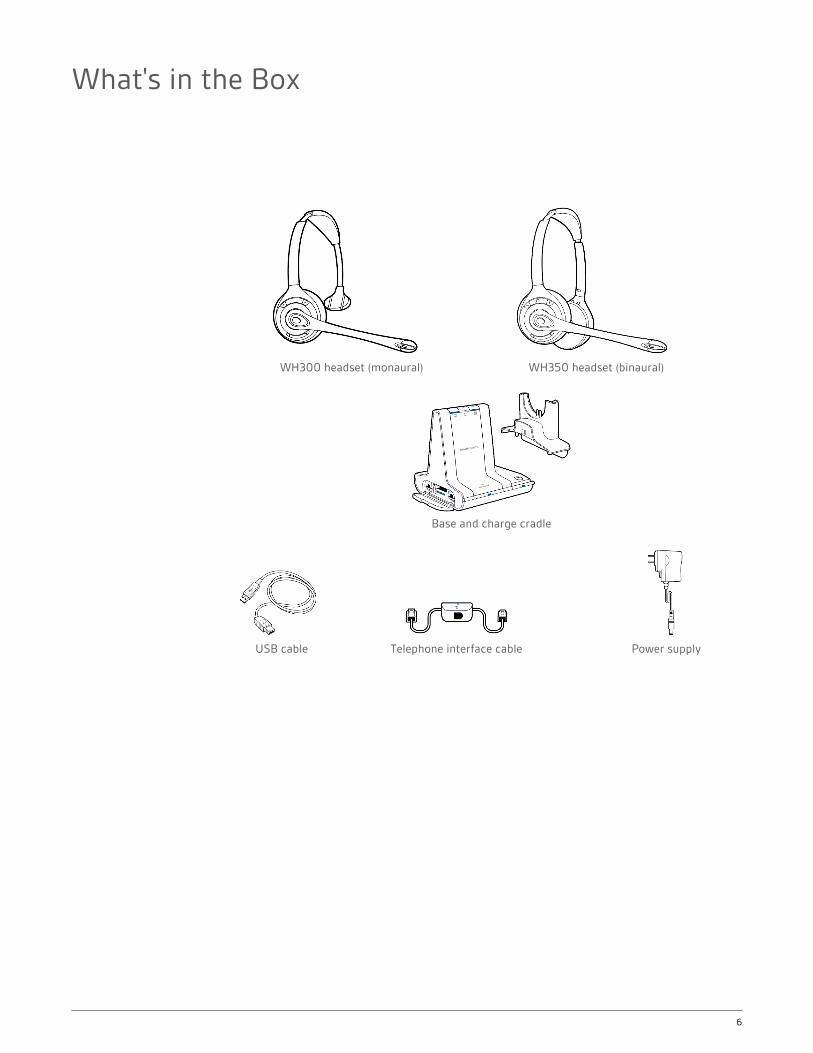
WH300 headset (monaural) WH350 headset (binaural)
Base and charge cradle
USB cable Telephone interface cable Power supply
What's in the Box
6

Base
1 Power jack 8 Computer button2 Handset lifter jack 9 Mobile phone button3 Telephone interface cable jack 10 Desk phone button4 USB port 11 Bluetooth pairing button/LED5 Desk phone speaking volume 12 Subscription button/LED6 Desk phone configuration switch 13 Charging LED7 Desk phone listening volume
Headset
1 Headset LED 4 Mute button2 Volume up button 5 Volume down button3 Call control button 6 Microphone
Base and Headset Basics
7
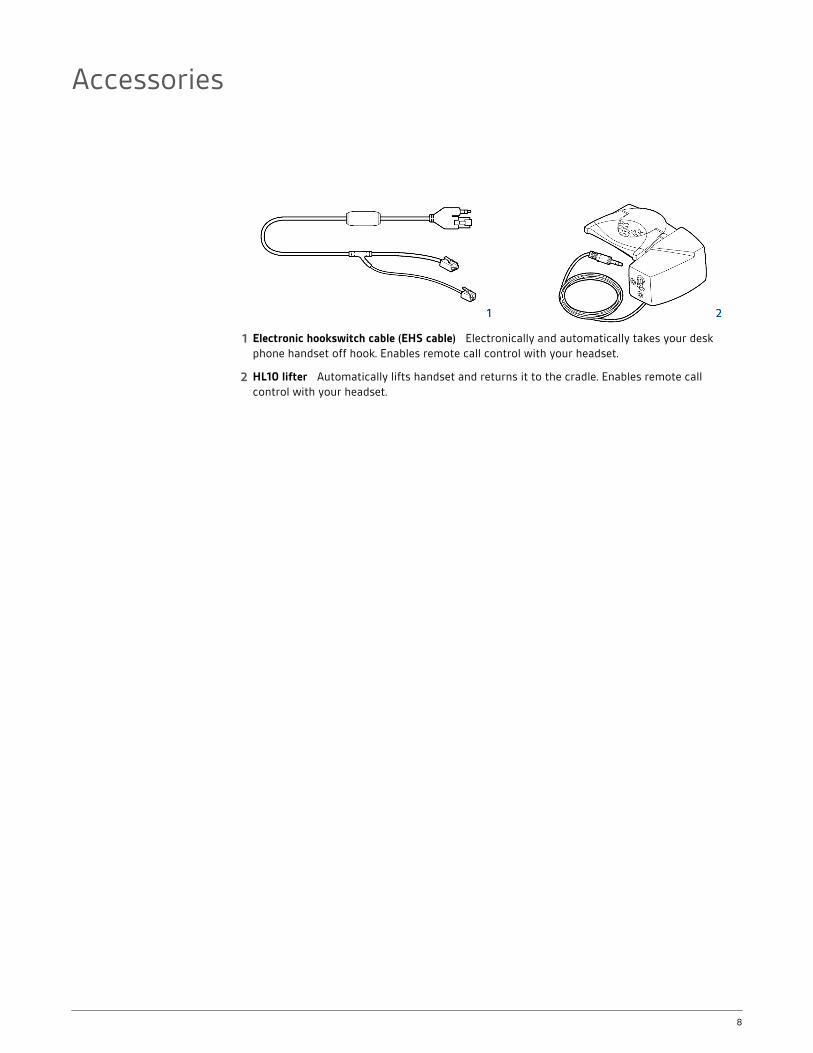
1 Electronic hookswitch cable (EHS cable) Electronically and automatically takes your deskphone handset off hook. Enables remote call control with your headset.
2 HL10 lifter Automatically lifts handset and returns it to the cradle. Enables remote callcontrol with your headset.
Accessories
8

Optimize the comfort and fit of your headset.
1 To adjust the headband, lengthen or shorten the band until it fits comfortably. Position theheadset receivers so that the foam cushions sit comfortably over the center of your ears.
2 On the WH300, position the stabilizer T-bar above your ear.
3 For a tighter fit, gently pull the opposite ends of the headset inward as shown.
1 Carefully bend and shape the boom with both hands as shown. Avoid bending or twisting theboom near the microphone or earpiece.
2 Position the click-stop turret and boom so that the microphone is two finger-widths from thecorner of your mouth.
Customize Your Headset
Adjust the Headband
Adjust the Mouthpiece
9

3 Make sure the front of the microphone faces your mouth. If necessary, twist the microphoneslightly so it’s in the proper position. Do not use forceful twisting motions or try to turn themicrophone completely around.
10
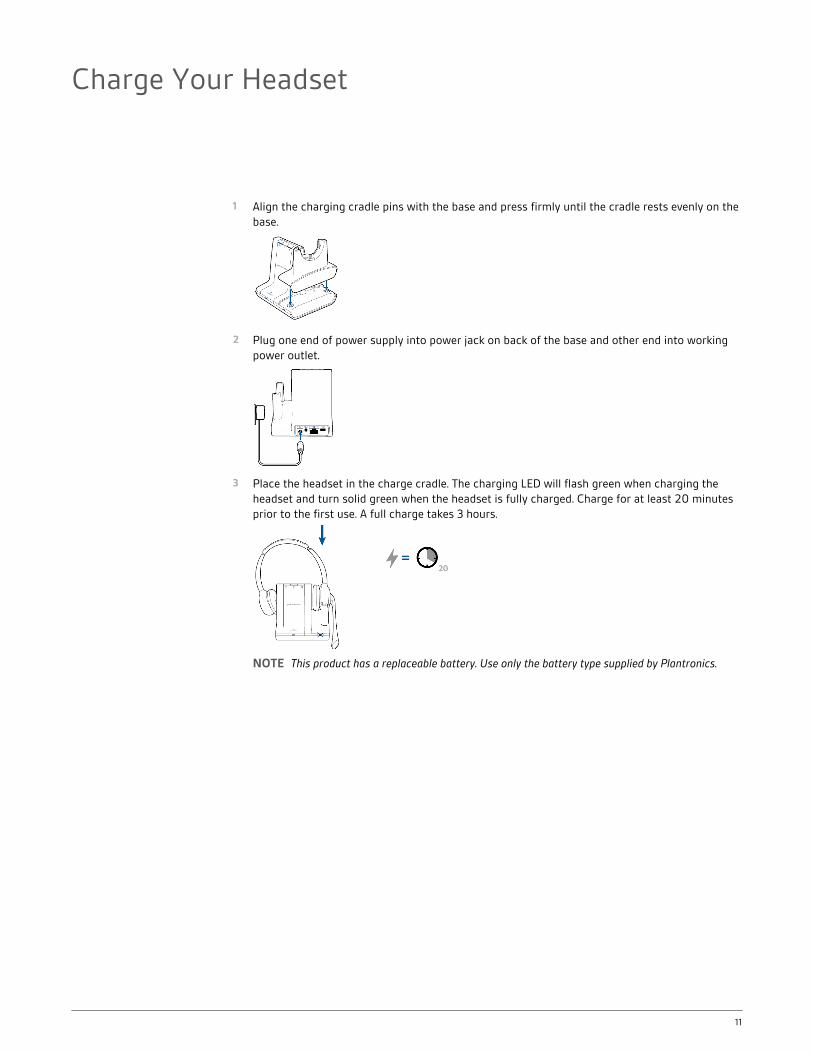
1 Align the charging cradle pins with the base and press firmly until the cradle rests evenly on thebase.
2 Plug one end of power supply into power jack on back of the base and other end into workingpower outlet.
3 Place the headset in the charge cradle. The charging LED will flash green when charging theheadset and turn solid green when the headset is fully charged. Charge for at least 20 minutesprior to the first use. A full charge takes 3 hours.
NOTE This product has a replaceable battery. Use only the battery type supplied by Plantronics.
Charge Your Headset
11
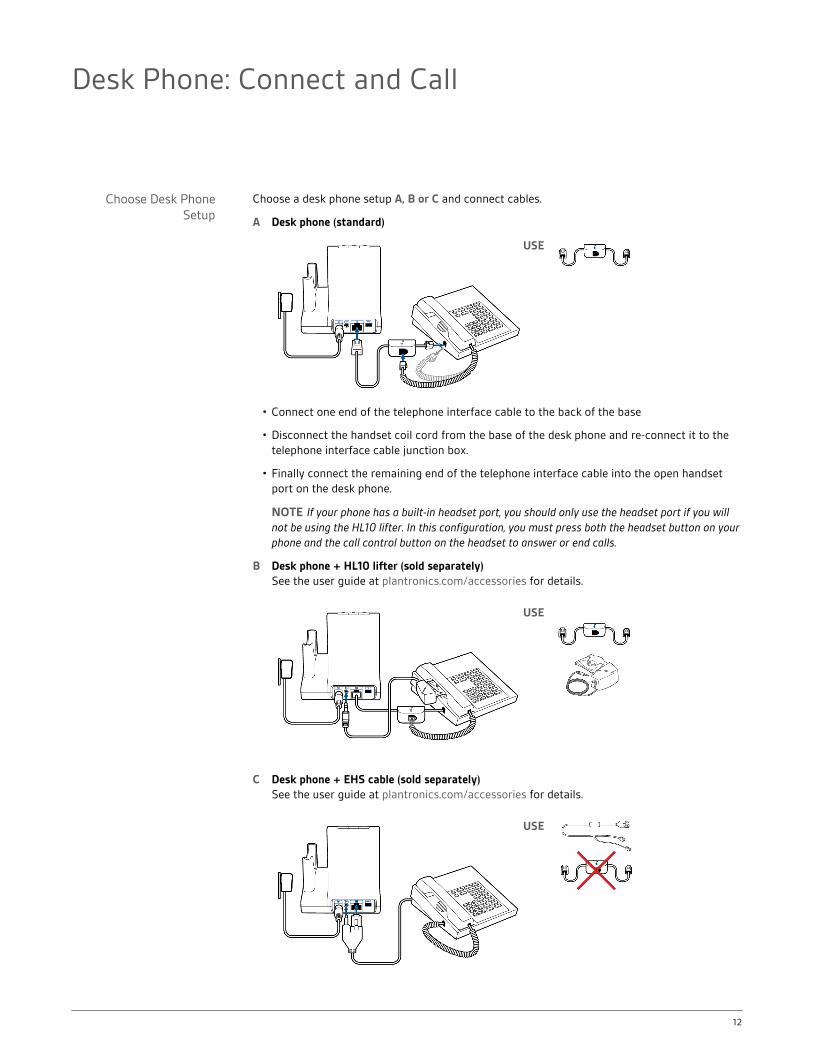
Choose a desk phone setup A, B or C and connect cables.
A Desk phone (standard)
USE
• Connect one end of the telephone interface cable to the back of the base
• Disconnect the handset coil cord from the base of the desk phone and re-connect it to thetelephone interface cable junction box.
• Finally connect the remaining end of the telephone interface cable into the open handsetport on the desk phone.
NOTE If your phone has a built-in headset port, you should only use the headset port if you willnot be using the HL10 lifter. In this configuration, you must press both the headset button on yourphone and the call control button on the headset to answer or end calls.
B Desk phone + HL10 lifter (sold separately)See the user guide at plantronics.com/accessories for details.
USE
C Desk phone + EHS cable (sold separately)See the user guide at plantronics.com/accessories for details.
USE
Desk Phone: Connect and Call
Choose Desk PhoneSetup
12
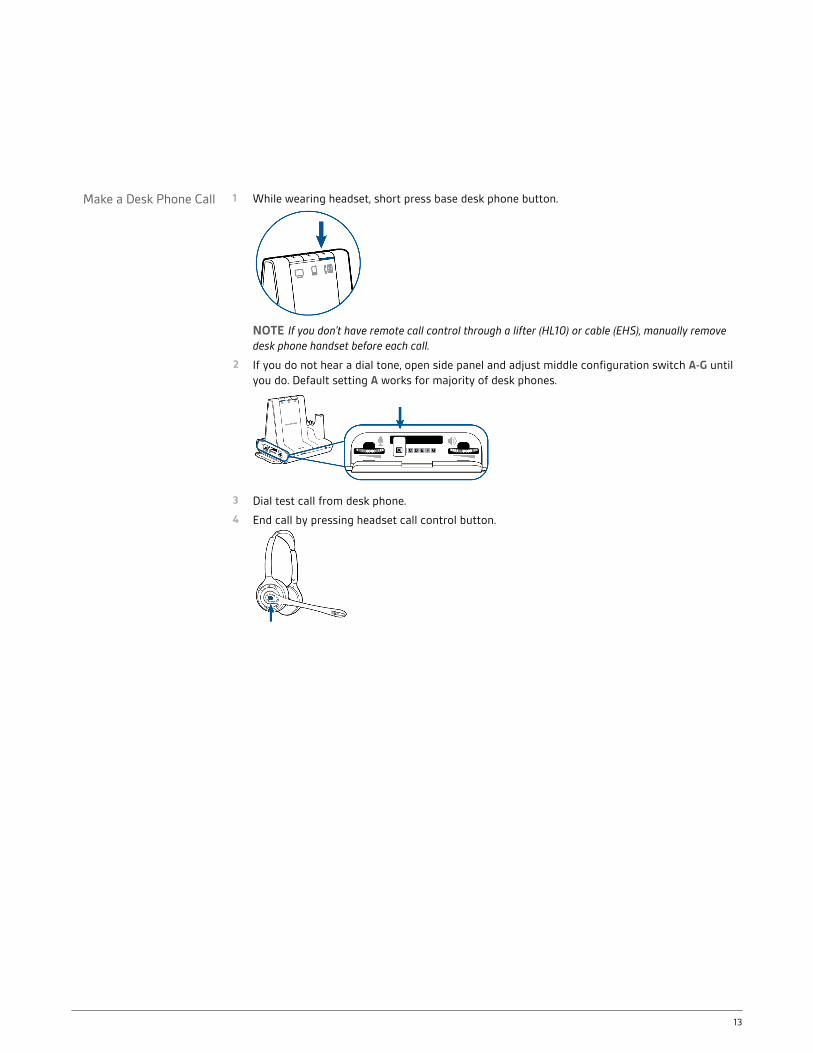
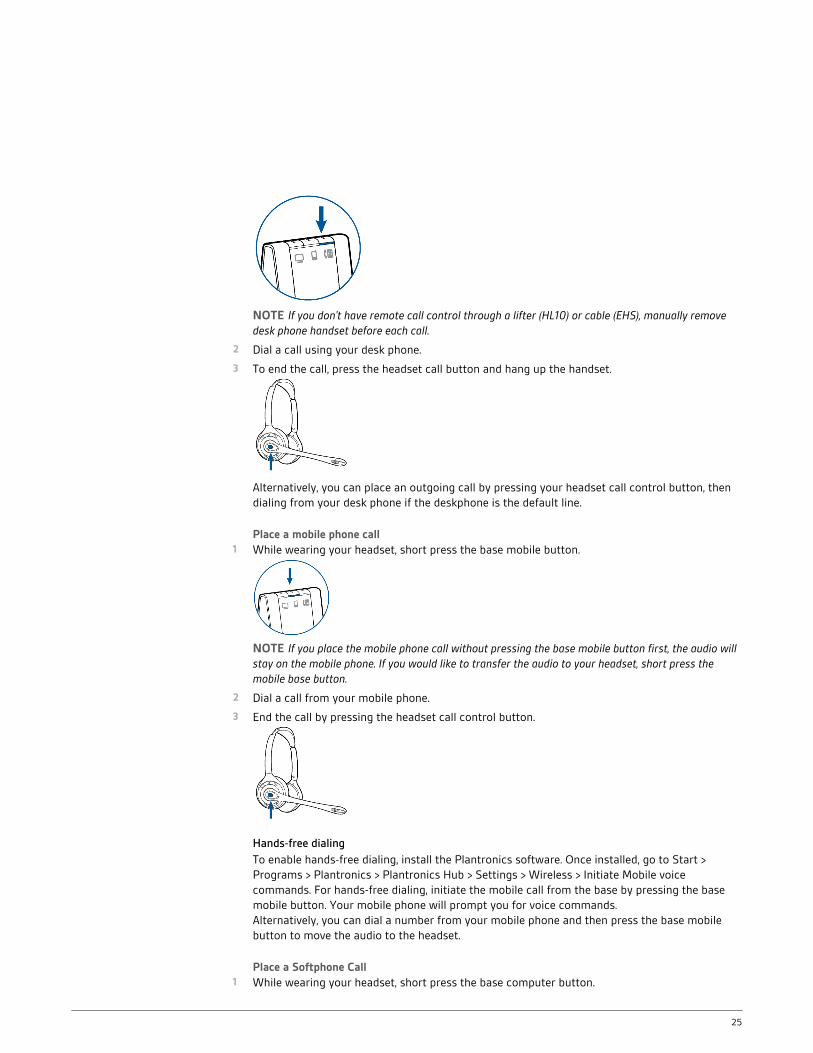
1 While wearing headset, short press base desk phone button.
NOTE If you don't have remote call control through a lifter (HL10) or cable (EHS), manually removedesk phone handset before each call.
2 If you do not hear a dial tone, open side panel and adjust middle configuration switch A-G untilyou do. Default setting A works for majority of desk phones.
3 Dial test call from desk phone.
4 End call by pressing headset call control button.
Make a Desk Phone Call
13
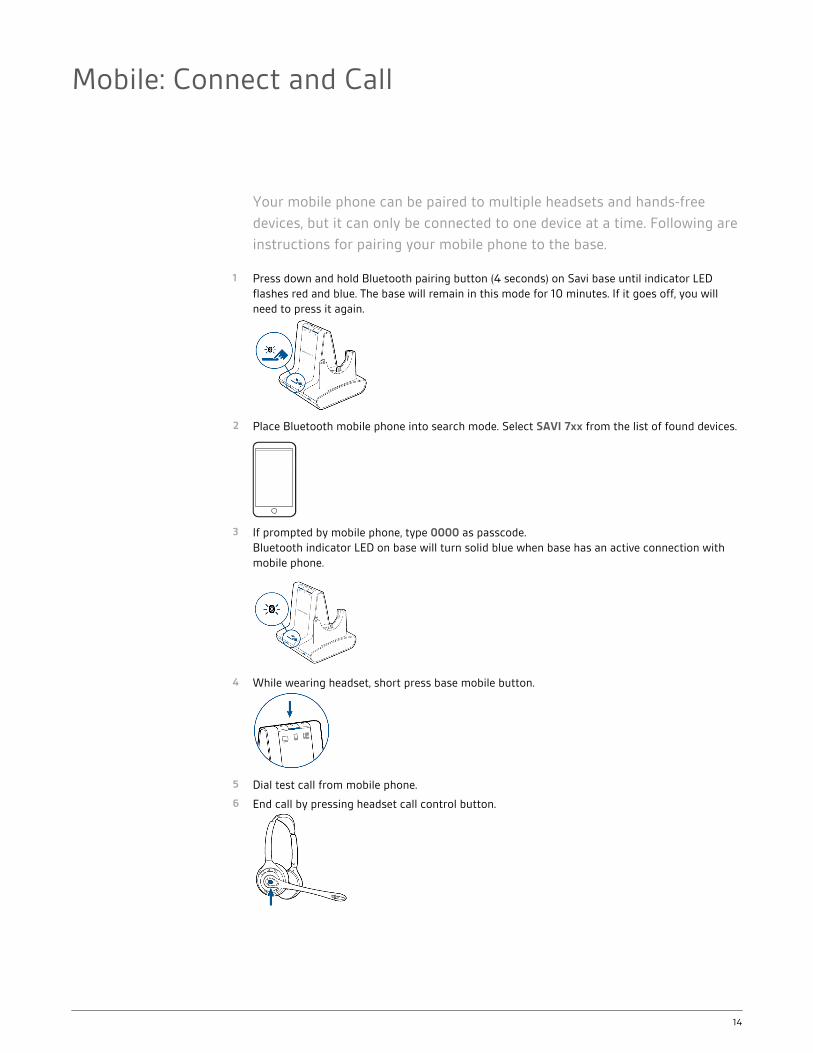
Your mobile phone can be paired to multiple headsets and hands-free
devices, but it can only be connected to one device at a time. Following are
instructions for pairing your mobile phone to the base.
1 Press down and hold Bluetooth pairing button (4 seconds) on Savi base until indicator LEDflashes red and blue. The base will remain in this mode for 10 minutes. If it goes off, you willneed to press it again.
2 Place Bluetooth mobile phone into search mode. Select SAVI 7xx from the list of found devices.
3 If prompted by mobile phone, type 0000 as passcode.Bluetooth indicator LED on base will turn solid blue when base has an active connection withmobile phone.
4 While wearing headset, short press base mobile button.
5 Dial test call from mobile phone.
6 End call by pressing headset call control button.
Mobile: Connect and Call
14
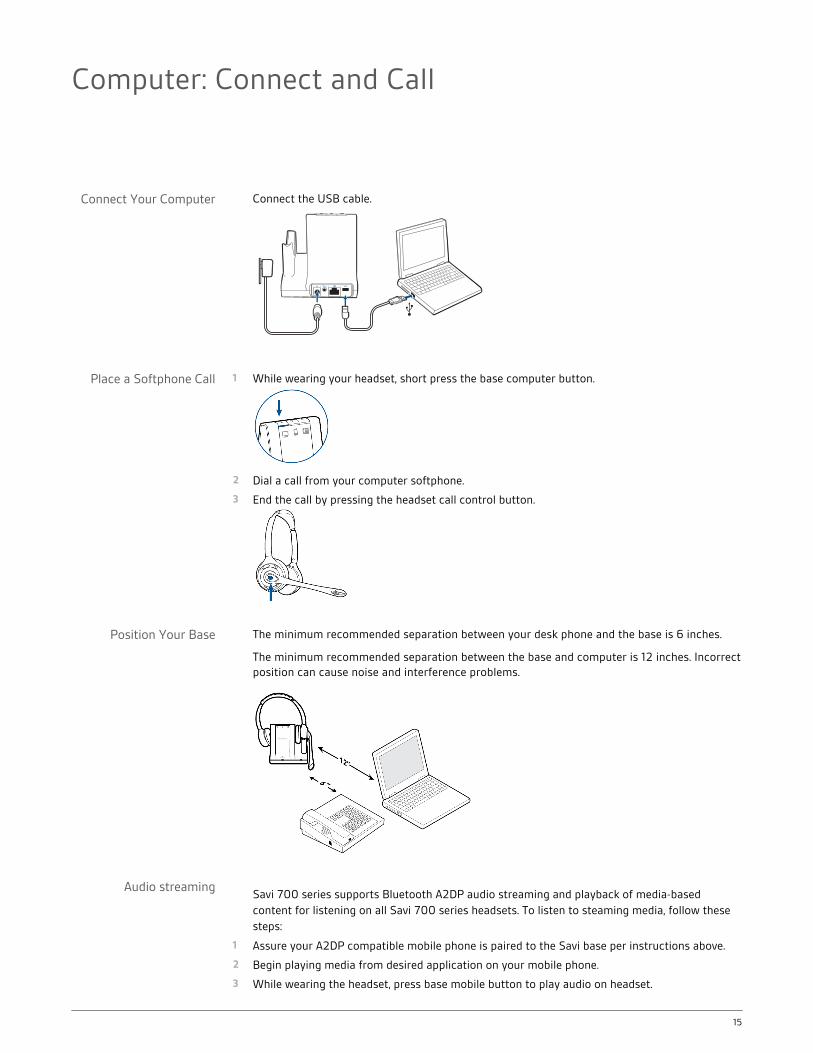
Connect the USB cable.
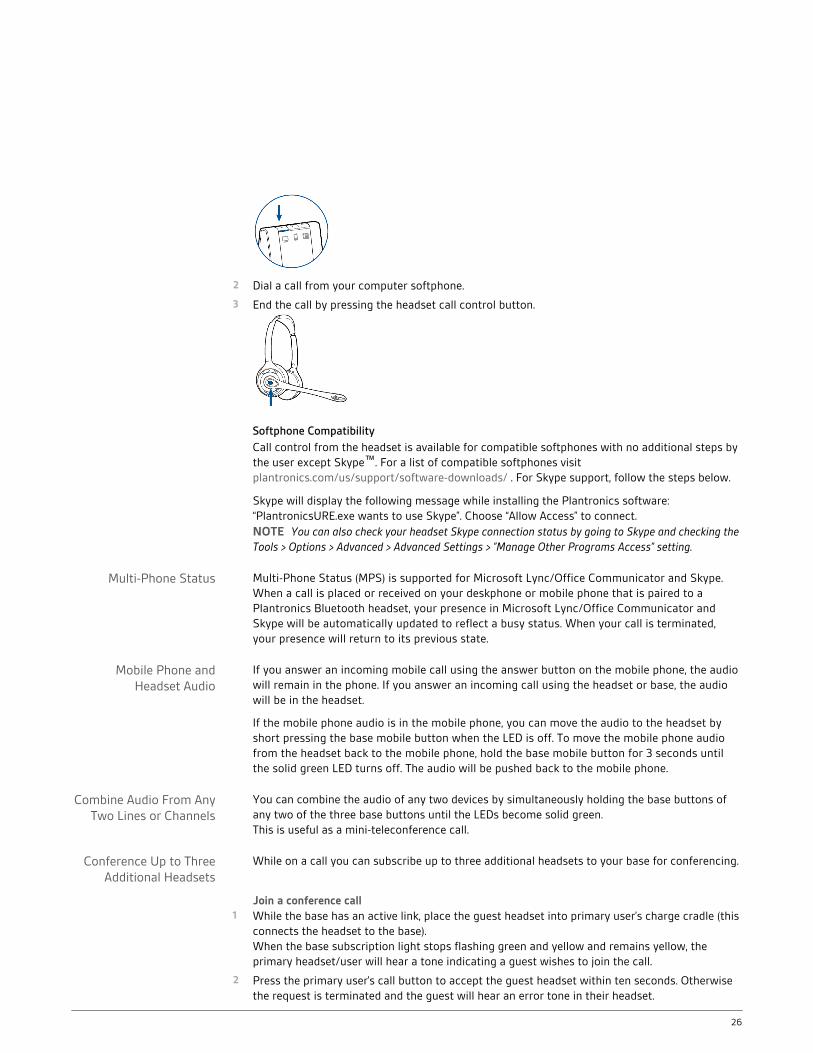
1 While wearing your headset, short press the base computer button.
2 Dial a call from your computer softphone.
3 End the call by pressing the headset call control button.
The minimum recommended separation between your desk phone and the base is 6 inches.
The minimum recommended separation between the base and computer is 12 inches. Incorrectposition can cause noise and interference problems.
Savi 700 series supports Bluetooth A2DP audio streaming and playback of media-basedcontent for listening on all Savi 700 series headsets. To listen to steaming media, follow thesesteps:
1 Assure your A2DP compatible mobile phone is paired to the Savi base per instructions above.
2 Begin playing media from desired application on your mobile phone.
3 While wearing the headset, press base mobile button to play audio on headset.
Computer: Connect and Call
Connect Your Computer
Place a Softphone Call
Position Your Base
Audio streaming
15

4 If media does not begin playing, assure "Savi 7xx" is selected from your list of connectedBluetooth devices.
5 To stop media playing, press the base mobile button again.
16
Now that you’ve assembled your headset, installed the software and
connected your phones, read this section to learn about the headset
features, how to use the controls and more.
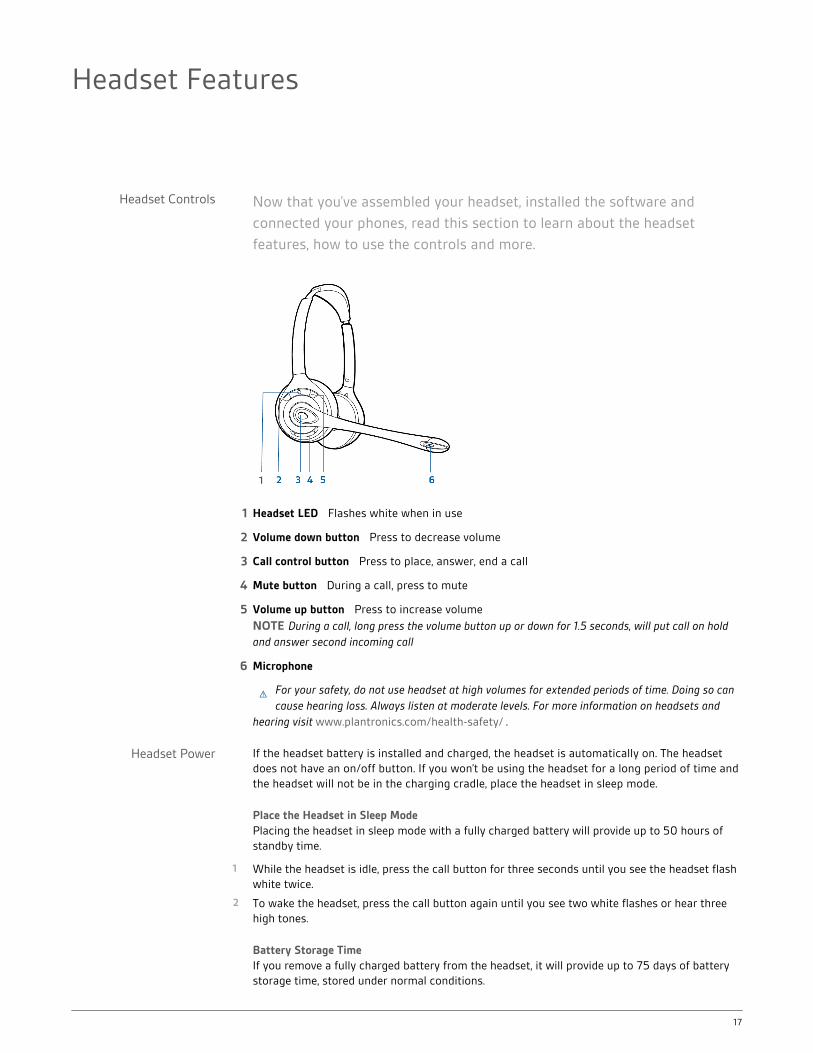
1 Headset LED Flashes white when in use
2 Volume down button Press to decrease volume
3 Call control button Press to place, answer, end a call
4 Mute button During a call, press to mute
5 Volume up button Press to increase volume
NOTE During a call, long press the volume button up or down for 1.5 seconds, will put call on holdand answer second incoming call
6 Microphone
For your safety, do not use headset at high volumes for extended periods of time. Doing so cancause hearing loss. Always listen at moderate levels. For more information on headsets and
hearing visit www.plantronics.com/health-safety/ .
If the headset battery is installed and charged, the headset is automatically on. The headsetdoes not have an on/off button. If you won’t be using the headset for a long period of time andthe headset will not be in the charging cradle, place the headset in sleep mode.
Place the Headset in Sleep ModePlacing the headset in sleep mode with a fully charged battery will provide up to 50 hours ofstandby time.
1 While the headset is idle, press the call button for three seconds until you see the headset flashwhite twice.
2 To wake the headset, press the call button again until you see two white flashes or hear threehigh tones.
Battery Storage TimeIf you remove a fully charged battery from the headset, it will provide up to 75 days of batterystorage time, stored under normal conditions.
Headset Features
Headset Controls
Headset Power
17
Talk TimeWith a single full charge, the headset will provide up to 9 hours of continual talk time. Talk timewill be reduced when operating in wideband mode and/or if the headset is used consistently ata long distance from the base.
Power consumptionOnce the headset battery is fully charged the product enters a networked standby mode. Theperiod of time taken to enter this mode depends on how long the battery takes to fully charge.In a networked standby mode the product consumes 1.9 Watts.
The wireless network port(s) of this product are designed to be always active.
Low Battery WarningIf you are on a call and the headset battery is critically low, you will hear a repeated single lowtone every 15 seconds indicating that the battery is low. You should recharge the headsetimmediately or swap out the low battery with a fully-charged battery.
If you are not on a call and press the call button, you will hear three low tones if the battery iscritically low. You should recharge the headset immediately or swap out the low battery with afully-charged battery.
Headset Battery StatusThere are two ways to determine your headset battery status.
View System Tray IconWith Plantronics software installed, a headset icon will appear in your system tray, displayingbattery status. A warning will be issued if your headset’s battery is critically low.
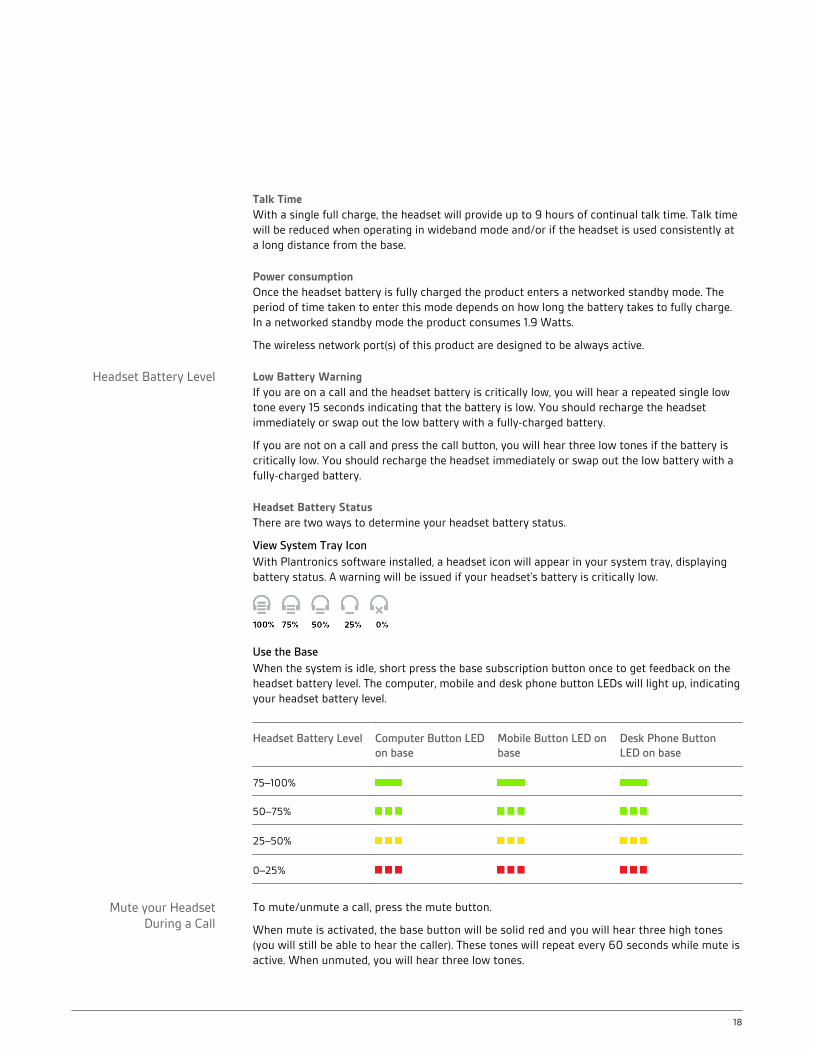
Use the BaseWhen the system is idle, short press the base subscription button once to get feedback on theheadset battery level. The computer, mobile and desk phone button LEDs will light up, indicatingyour headset battery level.
Headset Battery Level Computer Button LEDon base
Mobile Button LED onbase
Desk Phone ButtonLED on base
75–100%
50–75%
25–50%
0–25%
To mute/unmute a call, press the mute button.
When mute is activated, the base button will be solid red and you will hear three high tones(you will still be able to hear the caller). These tones will repeat every 60 seconds while mute isactive. When unmuted, you will hear three low tones.
Headset Battery Level
Mute your HeadsetDuring a Call
18
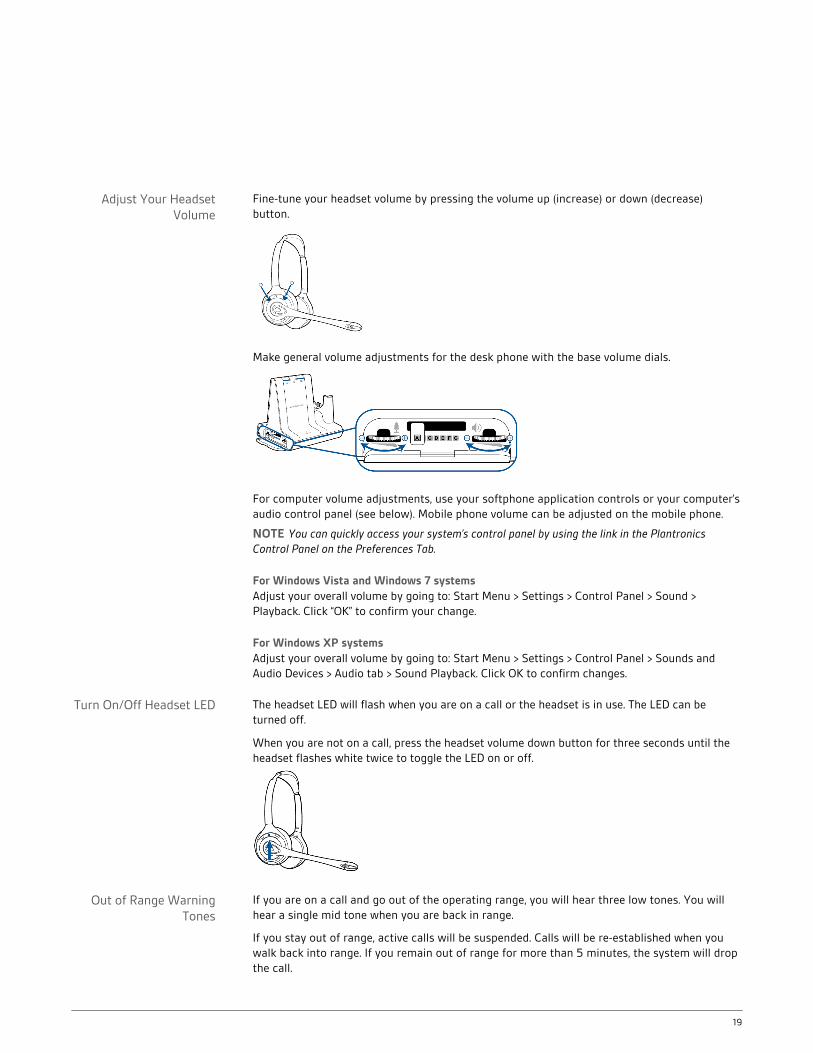
Fine-tune your headset volume by pressing the volume up (increase) or down (decrease)button.
Make general volume adjustments for the desk phone with the base volume dials.
For computer volume adjustments, use your softphone application controls or your computer’saudio control panel (see below). Mobile phone volume can be adjusted on the mobile phone.
NOTE You can quickly access your system’s control panel by using the link in the PlantronicsControl Panel on the Preferences Tab.
For Windows Vista and Windows 7 systemsAdjust your overall volume by going to: Start Menu > Settings > Control Panel > Sound >Playback. Click “OK” to confirm your change.
For Windows XP systemsAdjust your overall volume by going to: Start Menu > Settings > Control Panel > Sounds andAudio Devices > Audio tab > Sound Playback. Click OK to confirm changes.
The headset LED will flash when you are on a call or the headset is in use. The LED can beturned off.
When you are not on a call, press the headset volume down button for three seconds until theheadset flashes white twice to toggle the LED on or off.
If you are on a call and go out of the operating range, you will hear three low tones. You willhear a single mid tone when you are back in range.
If you stay out of range, active calls will be suspended. Calls will be re-established when youwalk back into range. If you remain out of range for more than 5 minutes, the system will dropthe call.
Adjust Your HeadsetVolume
Turn On/Off Headset LED
Out of Range WarningTones
19

If you are not on a call and go out of the operating range and press the call button, you willhear a single tone for the button press and three low tones for the failure to make a link.
20
This section describes the base, its buttons and their functions.
BasicsWhen you press on a base button, you are opening a phone line/audio channel. Depending onthe circumstances, you won’t necessarily hear a dial tone until you’ve dialed from your phone.The base buttons allow you to switch to a different phone line/audio channel.
Change your default outbound lineThis feature sets the preferred outbound line when the headset call control button is pushedwhile all lines are idle.
With the system idle, you can change your default outbound line by pressing the desiredoutbound base button until it flashes green four times.
You can also change the default outbound line using the Plantronics Hub by going to Start >Programs > Plantronics > Plantronics Hub> Settings > General > Default Phone Line.
The headset and base that came in the box are subscribed (connected) to each other. However,if you wish to use a new headset or need to restore subscription to your current headset (basesubscription button is red), the units can be subscribed to each other by the followingmethods.
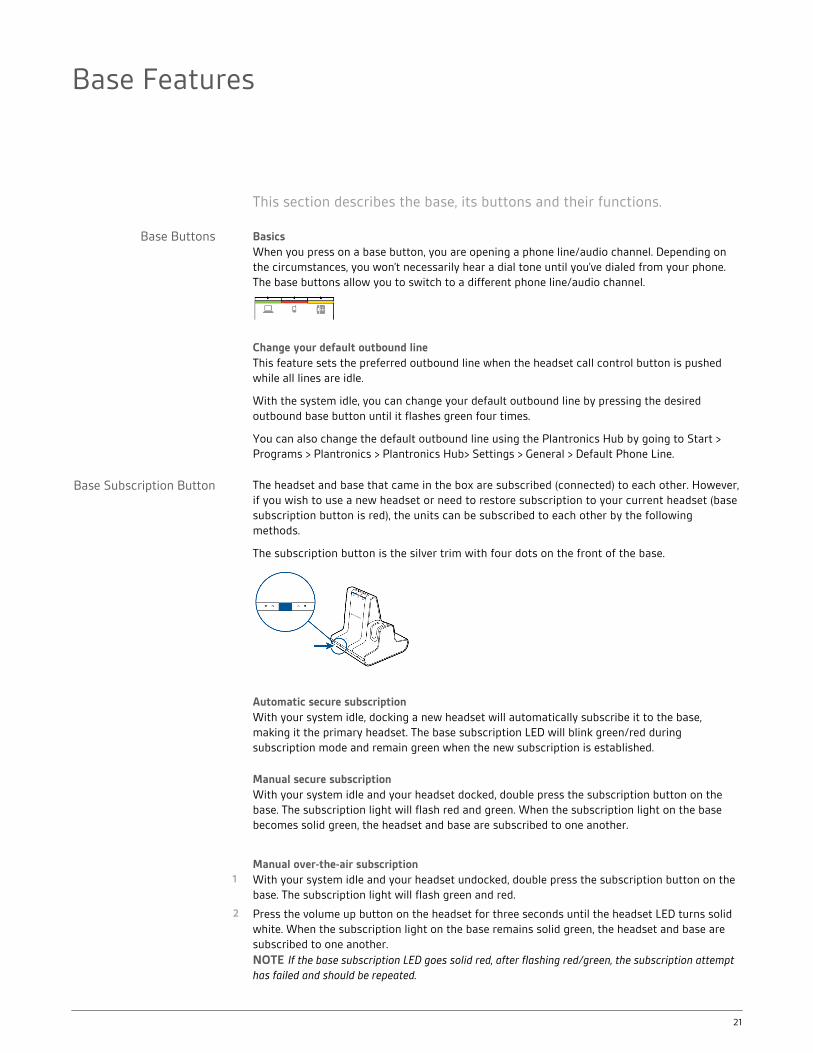
The subscription button is the silver trim with four dots on the front of the base.
Automatic secure subscriptionWith your system idle, docking a new headset will automatically subscribe it to the base,making it the primary headset. The base subscription LED will blink green/red duringsubscription mode and remain green when the new subscription is established.
Manual secure subscriptionWith your system idle and your headset docked, double press the subscription button on thebase. The subscription light will flash red and green. When the subscription light on the basebecomes solid green, the headset and base are subscribed to one another.
Manual over-the-air subscription1 With your system idle and your headset undocked, double press the subscription button on the
base. The subscription light will flash green and red.
2 Press the volume up button on the headset for three seconds until the headset LED turns solidwhite. When the subscription light on the base remains solid green, the headset and base aresubscribed to one another.NOTE If the base subscription LED goes solid red, after flashing red/green, the subscription attempthas failed and should be repeated.
Base Features
Base Buttons
Base Subscription Button
21
End SubscriptionIf the base is in subscription mode and you want to stop the base from searching for a headset,press the subscription button again. The subscription light will be solid red for four seconds andthen go to its previous state.
Subscription and Security Levels
Your Savi 700 Series headset system (v28 or later) supports DECT Forum recommendations for"Enhanced Security". Products with Enhanced Security are marked with the DECT Forumsecurity logo on the base.
Both your headset and headset base are compatible with older (prior to v28) headset bases andheadsets supporting older versions of DECT. Below is helpful information if you plan to useEnhanced Security and older DECT components together.
If your Enhanced Security headset or headset base is subscribed with an older headset orheadset base, the resulting security level for the mixed headset and base combination will beset to the level of the older headset for all calls. This is because older system components arenot able to support Enhanced Security.
All subscription details above apply when subscribing an Enhanced Security headset to an olderbase, or visa versa, however there are unique system alerts indicating that the system ischanging the security level from Enhanced Security to the older version of security.
If an older headset is subscribed to an Enhanced Security Base:
• The subscription LED (lower left) will flash GREEN 3 times followed by YELLOW 2 times. Thisflash pattern repeats 2 times.
If an Enhanced Security headset is subscribed to an older base:
• The Enhanced Security headset will play a security notification tone.
• The mono-colored LED on the headset will flash 3 times, then 2 times. This flash pattern isrepeated 2 times.
Disabling Over-the-Air SubscriptionThe Savi system ships with the over-the-air subscription enabled. In a multi-shift environment,you may want to disable this mode of subscription. You can enable/disable over-the-airsubscription with the base subscription button or with the Plantronics Hub.
While your system is idle, hold the subscription button and the PC phone button downsimultaneously until the PC phone button LED flashes. It will flash red for 4 seconds when over-the-air subscription has been disabled or green for 4 seconds when enabled.
You can also enable/disable over-the-air subscription with the Plantronics Hub. Go to Start >Programs > Plantronics > Plantronics Hub > Settings > Wireless > Over-the-Air-Subscription.
22
Base Subscription Button LED
Base Subscription LED Base Status
Flashes green and red Primary headset subscription mode
Solid green Primary headset subscribed to base
Solid yellow Active conference call with guest headsets
Solid red No headset subscribed
Flashes green 3X, the yellow 2X Security level changed from enhanced to standard
Set the Range
Changing the range can help with desk phone/PC audio quality, improve user density or restrictrange of users.
You can change the range using the subscription button on the base. With the system idle,press the subscription and desk phone buttons for three seconds. The desk phone button willflash green for high range. If you press the subscription button again for three seconds, the deskphone button will flash yellow for medium range. If you press the subscription button again forthree seconds, the desk phone button will flash red for low range.
Setting Range
High up to 350 ft.
Medium up to 150 ft.
Low up to 50 ft.
You can also set the range using the Plantronics Hub. Go to Start > Programs > Plantronics >Plantronics Hub> Settings > Wireless > Range.
Auto Connect FeatureOnce you have paired and connected your mobile phone to the base, the base will automaticallyconnect to it when you are in range of your base.
You can manually disconnect your mobile phone from the base by short pressing the baseBluetooth pairing button when it is solid blue. However if you do this, you must manuallyreestablish a connection with your mobile phone by pressing the base Bluetooth button again,before the auto connection feature will resume.
You may customize this feature by using the Plantronics Hub by going to Start > Programs >Plantronics > Plantronics Hub > Settings > Wireless > Auto Connect to Mobile Phone.
Bluetooth Pairing Button
23
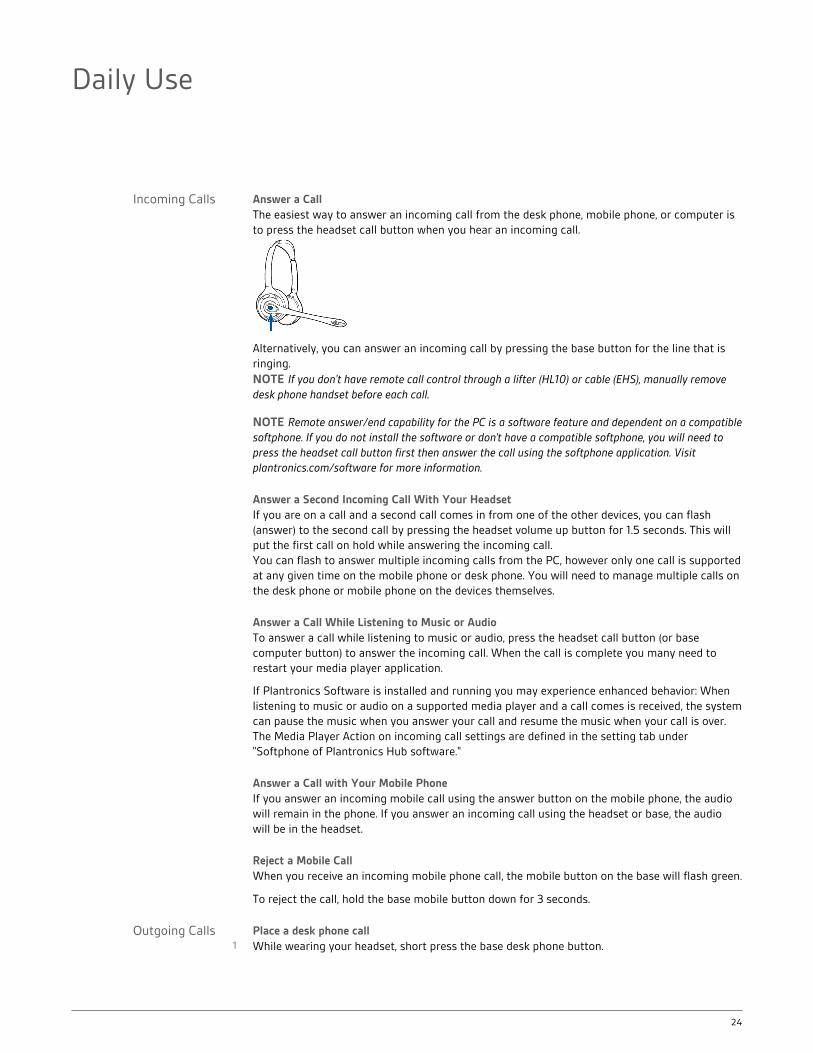
Answer a CallThe easiest way to answer an incoming call from the desk phone, mobile phone, or computer isto press the headset call button when you hear an incoming call.
Alternatively, you can answer an incoming call by pressing the base button for the line that isringing.NOTE If you don't have remote call control through a lifter (HL10) or cable (EHS), manually removedesk phone handset before each call.
NOTE Remote answer/end capability for the PC is a software feature and dependent on a compatiblesoftphone. If you do not install the software or don’t have a compatible softphone, you will need topress the headset call button first then answer the call using the softphone application. Visitplantronics.com/software for more information.
Answer a Second Incoming Call With Your HeadsetIf you are on a call and a second call comes in from one of the other devices, you can flash(answer) to the second call by pressing the headset volume up button for 1.5 seconds. This willput the first call on hold while answering the incoming call.You can flash to answer multiple incoming calls from the PC, however only one call is supportedat any given time on the mobile phone or desk phone. You will need to manage multiple calls onthe desk phone or mobile phone on the devices themselves.
Answer a Call While Listening to Music or AudioTo answer a call while listening to music or audio, press the headset call button (or basecomputer button) to answer the incoming call. When the call is complete you many need torestart your media player application.
If Plantronics Software is installed and running you may experience enhanced behavior: Whenlistening to music or audio on a supported media player and a call comes is received, the systemcan pause the music when you answer your call and resume the music when your call is over.The Media Player Action on incoming call settings are defined in the setting tab under"Softphone of Plantronics Hub software."
Answer a Call with Your Mobile PhoneIf you answer an incoming mobile call using the answer button on the mobile phone, the audiowill remain in the phone. If you answer an incoming call using the headset or base, the audiowill be in the headset.
Reject a Mobile CallWhen you receive an incoming mobile phone call, the mobile button on the base will flash green.
To reject the call, hold the base mobile button down for 3 seconds.
Place a desk phone call1 While wearing your headset, short press the base desk phone button.
Daily Use
Incoming Calls
Outgoing Calls
24
NOTE If you don't have remote call control through a lifter (HL10) or cable (EHS), manually removedesk phone handset before each call.
2 Dial a call using your desk phone.
3 To end the call, press the headset call button and hang up the handset.
Alternatively, you can place an outgoing call by pressing your headset call control button, thendialing from your desk phone if the deskphone is the default line.
Place a mobile phone call1 While wearing your headset, short press the base mobile button.
NOTE If you place the mobile phone call without pressing the base mobile button first, the audio willstay on the mobile phone. If you would like to transfer the audio to your headset, short press themobile base button.
2 Dial a call from your mobile phone.
3 End the call by pressing the headset call control button.
Hands-free dialingTo enable hands-free dialing, install the Plantronics software. Once installed, go to Start >Programs > Plantronics > Plantronics Hub > Settings > Wireless > Initiate Mobile voicecommands. For hands-free dialing, initiate the mobile call from the base by pressing the basemobile button. Your mobile phone will prompt you for voice commands.Alternatively, you can dial a number from your mobile phone and then press the base mobilebutton to move the audio to the headset.
Place a Softphone Call1 While wearing your headset, short press the base computer button.
25
2 Dial a call from your computer softphone.
3 End the call by pressing the headset call control button.
Softphone CompatibilityCall control from the headset is available for compatible softphones with no additional steps bythe user except Skype™. For a list of compatible softphones visit plantronics.com/us/support/software-downloads/ . For Skype support, follow the steps below.
Skype will display the following message while installing the Plantronics software:“PlantronicsURE.exe wants to use Skype”. Choose “Allow Access” to connect.NOTE You can also check your headset Skype connection status by going to Skype and checking theTools > Options > Advanced > Advanced Settings > ”Manage Other Programs Access” setting.
Multi-Phone Status (MPS) is supported for Microsoft Lync/Office Communicator and Skype.When a call is placed or received on your deskphone or mobile phone that is paired to aPlantronics Bluetooth headset, your presence in Microsoft Lync/Office Communicator andSkype will be automatically updated to reflect a busy status. When your call is terminated,your presence will return to its previous state.
If you answer an incoming mobile call using the answer button on the mobile phone, the audiowill remain in the phone. If you answer an incoming call using the headset or base, the audiowill be in the headset.
If the mobile phone audio is in the mobile phone, you can move the audio to the headset byshort pressing the base mobile button when the LED is off. To move the mobile phone audiofrom the headset back to the mobile phone, hold the base mobile button for 3 seconds untilthe solid green LED turns off. The audio will be pushed back to the mobile phone.
You can combine the audio of any two devices by simultaneously holding the base buttons ofany two of the three base buttons until the LEDs become solid green.This is useful as a mini-teleconference call.
While on a call you can subscribe up to three additional headsets to your base for conferencing.
Join a conference call1 While the base has an active link, place the guest headset into primary user’s charge cradle (this
connects the headset to the base).When the base subscription light stops flashing green and yellow and remains yellow, theprimary headset/user will hear a tone indicating a guest wishes to join the call.
2 Press the primary user’s call button to accept the guest headset within ten seconds. Otherwisethe request is terminated and the guest will hear an error tone in their headset.
Multi-Phone Status
Mobile Phone andHeadset Audio
Combine Audio From AnyTwo Lines or Channels
Conference Up to ThreeAdditional Headsets
26
NOTE To connect a guest headset that is of different variety than the primary headset, short pressthe base subscription button while the base has an active link. Next, press the guest headset volumeup button until the indicator light turns on. When the base subscription LED stops flashing green andyellow and remains solid yellow, the request to join will be heard in the primary user’s headset andthe primary user will have to press their call button within 10 seconds to accept the guest .
Exit a conference callGuests headsets can remain as guests through multiple calls.
To remove a guest headset, press the guest headset’s call button or dock the primary user’sheadset in the charge cradle.A single tone in the master headset will be heard as each guest leaves the call.
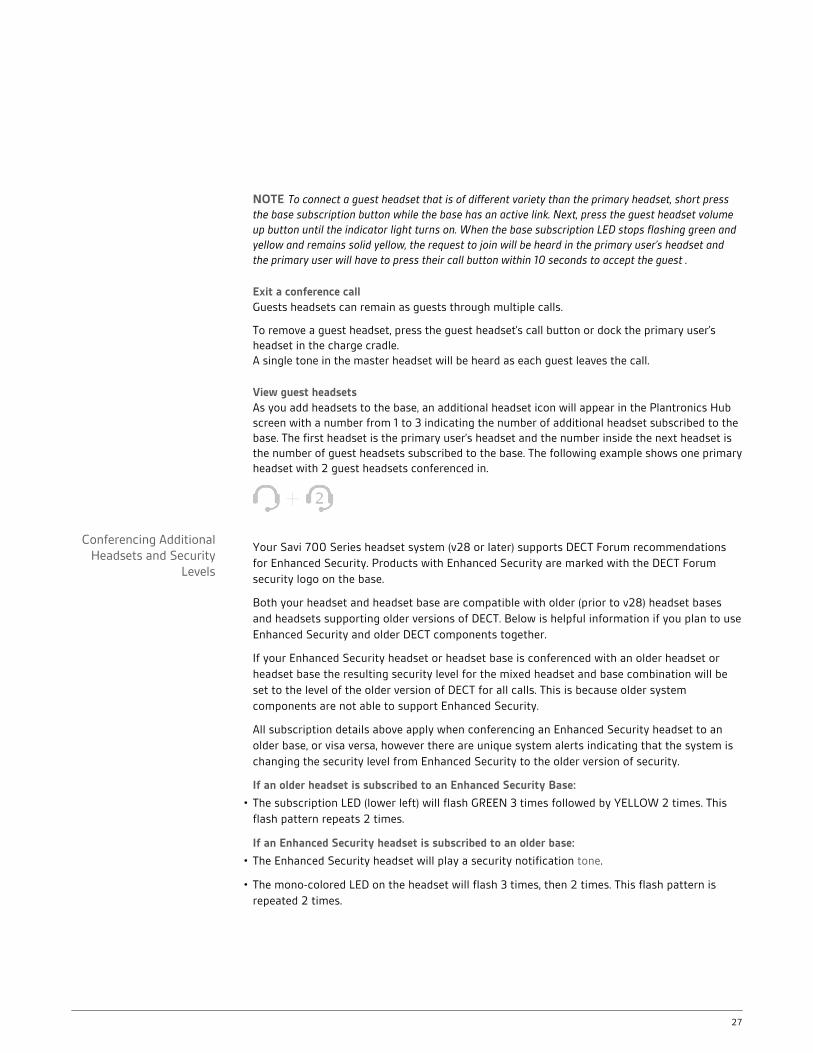
View guest headsetsAs you add headsets to the base, an additional headset icon will appear in the Plantronics Hubscreen with a number from 1 to 3 indicating the number of additional headset subscribed to thebase. The first headset is the primary user’s headset and the number inside the next headset isthe number of guest headsets subscribed to the base. The following example shows one primaryheadset with 2 guest headsets conferenced in.
Your Savi 700 Series headset system (v28 or later) supports DECT Forum recommendationsfor Enhanced Security. Products with Enhanced Security are marked with the DECT Forumsecurity logo on the base.
Both your headset and headset base are compatible with older (prior to v28) headset basesand headsets supporting older versions of DECT. Below is helpful information if you plan to useEnhanced Security and older DECT components together.
If your Enhanced Security headset or headset base is conferenced with an older headset orheadset base the resulting security level for the mixed headset and base combination will beset to the level of the older version of DECT for all calls. This is because older systemcomponents are not able to support Enhanced Security.
All subscription details above apply when conferencing an Enhanced Security headset to anolder base, or visa versa, however there are unique system alerts indicating that the system ischanging the security level from Enhanced Security to the older version of security.
If an older headset is subscribed to an Enhanced Security Base:
• The subscription LED (lower left) will flash GREEN 3 times followed by YELLOW 2 times. Thisflash pattern repeats 2 times.
If an Enhanced Security headset is subscribed to an older base:
• The Enhanced Security headset will play a security notification tone.
• The mono-colored LED on the headset will flash 3 times, then 2 times. This flash pattern isrepeated 2 times.
Conferencing AdditionalHeadsets and Security
Levels
27
Plantronics Hub resides on your computer system and allows you to
customize your settings and get visible status of your Plantronics audio
device on your desktop. Plantronics Hub provides users with an easy way
to change device and software settings and install software and firmware
updates.
This section provides information specific to Savi 700 Series products, with an emphasis oncovering all of the available settings for your Savi 700 headset system.
Plantronics Hub has its own comprehensive Plantronics Hub User Guide which can befound:www.plantronics.com/us/product/plantronics-hub-desktop/#support .
To access the Plantronics Hub, load Plantronics software by visiting www.plantronics.com/us/product/plantronics-hub-desktop/#support and click on downloadbutton.
To start Hub, click Start > Programs > Plantronics > Hub
When you first start Plantronics Hub the About Tab will be displayed. If you have at least onePlantronics device connected to your computer using a USB connector you will see an imageof your device along with some information about that device. You will also see tabs across thetop of the application that read "About", "Updates", "Settings", and "Help" which are describedbelow.
About Tab
Provides information about your connected device or devices; switch between devicesor set primary device (pull down menu, upper left, appears when multiple devicespresent).
Updates tabCheck for device firmware and Hub software updates; get information about updateswhen available, install as necessary
Settings tabConfigure available settings for your device or devices, Hub software
Help tabSupport, contact, and troubleshooting information and resources
Advanced Use
Install Plantronics Hub
Start Hub
Hub Tabs
28
Feature Settings Default
General (software) Ring location Headset, Headset/PC Headset only
Maintain Headset to PCRadio Link
Active Only During Call/Always Active
Active Only During Call
Software Log LevelDetail
Low/Med/High/Verbose Low
Metrics Collection toHelp Improve Hub
Off/On On
General (Savi 700Series)
Default Phone Line Deskphone/PC/Mobile PC
Auto Answer Off / On Off
MS OC
Lync Dial Tone
Off / On On
Audio Sensing Off / On On
Second Inbound Call Ring Continuously/RingOnce/Ignore
Ring Continuously
Mute Reminder Volume Default Volume/LowVolume /Off
Off
Ring LocationThis feature gives you the option to have the PC ringtone played on both the headset as well asthe PC speaker.
When this feature is selected, the PC ringtone will be heard on both the PC speaker as well asthe headset.
When this feature is not selected, the PC ringtone will only be heard on either the headset orthe PC speaker based on how the PC audio has been set up.
Maintain Headset to PC LinkThis feature forces the radio link to the PC to stay active even after the call has ended. This caneliminate the need to re-establish the radio link when switching between PC audioapplications.
Software Log Level DetailAdjust the level of detail captured in log files.
Metrics Collection to Help Improve HubWhen selected, this will allow Plantronics to collect data on feature usage pattern. Thisinformation will only be used by Plantronics to improve the quality of our future software andhardware products.
Hub Settings Options
29
Default Phone Line for Outbound CallsSet the preferred phone line for outbound calls when you press the headset call control button.To change the default outbound line with the base see Change your default outbound line.
Auto AnswerWhen enabled, this feature will configure your headset to automatically answer a call when itis removed from the charge cradle.
Microsoft Office Communicator/Lync Dial ToneThis feature enables/disables mobile phone voice commands for hands-free dialing with yourmobile phone. When this is enabled, you will be prompted for voice commands by your mobilephone when a call is initiated with the base mobile button. This feature requires mobile phonesupport for voice commands.
If this feature is selected, when a PC radio link is established, Microsoft Office Communicator/Lync will assume the user is trying to place a VoIP call and provide a dial tone.
If this feature is not selected, when a PC radio link is established, Microsoft OfficeCommunicator/Lync will sit idle.
Audio SensingAudio Sensing is a special feature supported by Plantronics wireless devices that can detect anaudio signal at the USB port and automatically establish the radio link between the base andthe wireless headset without the user having to press the call control button. When theConfigure Lync Dial Tone parameter is set to On, every time the user presses the call controlbutton, the Lync dial tone will be heard (assuming the user wants to make a softphone call).However, the user may have pressed the call control button to listen to PC music, etc., anddoes not want to hear the dial tone. In this case, if the user sets the Audio Sensing parameterto On, the radio link will be established automatically when any PC audio is detected at theUSB port, thus eliminating the need for the user to press the call control button.
Second Inbound CallWhen you are on a call and a second call comes in, this feature enables you to control the ringbehavior for the second call. The options are for the call to Ring Continuously until answered(default), for the call to Ring Once and then be silent until answered, or for the call to beignored completely if Ignore Ring is selected.
Mute Reminder VolumeControls the volume of the tone to remind you your microphone is muted, or turn the mutetone off.
30
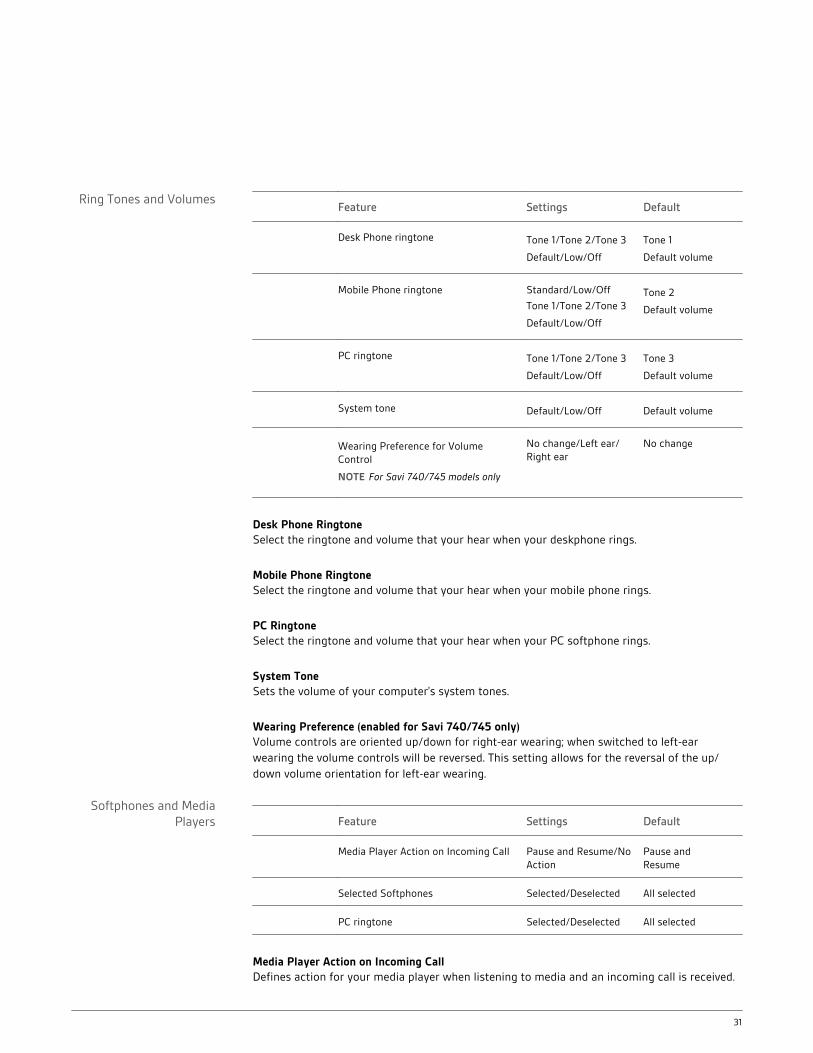
Feature Settings Default
Desk Phone ringtone Tone 1/Tone 2/Tone 3
Default/Low/Off
Tone 1
Default volume
Mobile Phone ringtone Standard/Low/Off
Tone 1/Tone 2/Tone 3
Default/Low/Off
Tone 2
Default volume
PC ringtone Tone 1/Tone 2/Tone 3
Default/Low/Off
Tone 3
Default volume
System tone Default/Low/Off Default volume
Wearing Preference for VolumeControl
NOTE For Savi 740/745 models only
No change/Left ear/Right ear
No change
Desk Phone RingtoneSelect the ringtone and volume that your hear when your deskphone rings.
Mobile Phone RingtoneSelect the ringtone and volume that your hear when your mobile phone rings.
PC RingtoneSelect the ringtone and volume that your hear when your PC softphone rings.
System ToneSets the volume of your computer's system tones.
Wearing Preference (enabled for Savi 740/745 only)Volume controls are oriented up/down for right-ear wearing; when switched to left-earwearing the volume controls will be reversed. This setting allows for the reversal of the up/down volume orientation for left-ear wearing.
Feature Settings Default
Media Player Action on Incoming Call Pause and Resume/NoAction
Pause andResume
Selected Softphones Selected/Deselected All selected
PC ringtone Selected/Deselected All selected
Media Player Action on Incoming CallDefines action for your media player when listening to media and an incoming call is received.
Ring Tones and Volumes
Softphones and MediaPlayers
31
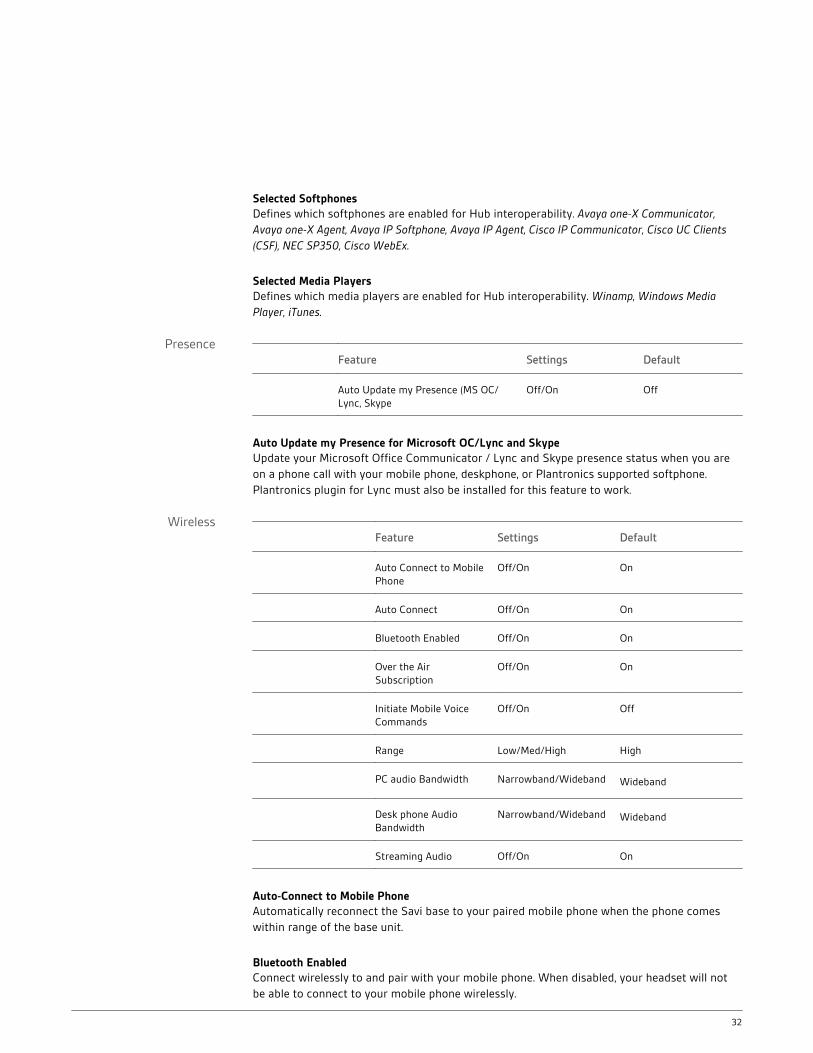
Selected SoftphonesDefines which softphones are enabled for Hub interoperability. Avaya one-X Communicator,Avaya one-X Agent, Avaya IP Softphone, Avaya IP Agent, Cisco IP Communicator, Cisco UC Clients(CSF), NEC SP350, Cisco WebEx.
Selected Media PlayersDefines which media players are enabled for Hub interoperability. Winamp, Windows MediaPlayer, iTunes.
Feature Settings Default
Auto Update my Presence (MS OC/Lync, Skype
Off/On Off
Auto Update my Presence for Microsoft OC/Lync and SkypeUpdate your Microsoft Office Communicator / Lync and Skype presence status when you areon a phone call with your mobile phone, deskphone, or Plantronics supported softphone.Plantronics plugin for Lync must also be installed for this feature to work.
Feature Settings Default
Auto Connect to MobilePhone
Off/On On
Auto Connect Off/On On
Bluetooth Enabled Off/On On
Over the AirSubscription
Off/On On
Initiate Mobile VoiceCommands
Off/On Off
Range Low/Med/High High
PC audio Bandwidth Narrowband/Wideband Wideband
Desk phone AudioBandwidth
Narrowband/Wideband Wideband
Streaming Audio Off/On On
Auto-Connect to Mobile PhoneAutomatically reconnect the Savi base to your paired mobile phone when the phone comeswithin range of the base unit.
Bluetooth EnabledConnect wirelessly to and pair with your mobile phone. When disabled, your headset will notbe able to connect to your mobile phone wirelessly.
Presence
Wireless
32

Over the Air SubscriptionThis feature allows a headset to be subscribed to the base without physically docking theheadset. It is required when conferencing multiple models of Plantronics headsets.
For more on subscription, see Base Subscription Buttons. For more on headset guestconferencing, see Conference Up to Three Additional Headsets.
Initiate Mobile Voice CommandsSets whether or not you can put a paired mobile phone in voice command mode by pressingthe mobile phone button on the base.
RangeChanging the range can help with desk phone/PC audio quality, improve user density orrestrict range of users. To change the range with the base see Setting the Range.
Setting Range
High up to 350 ft.
Medium up to 150 ft.
Low up to 50 ft.
PC Audio BandwidthWideband audio delivers heightened speech clarity and life-like fidelity, but consumes morebattery power, resulting in reduced talk time.
Desk phone Audio BandwidthWideband audio delivers heightened speech clarity and life-like fidelity, but consumes morebattery power, resulting in reduced talk time.
Streaming AudioStream music, podcasts, and other types of audio to your headset. If you are not streamingaudio to your headset, disable this feature to conserve battery life.
Feature Settings Default
Anti-Startle (Plantronics Enhanced Off/On Off
Anti-Startle (G616) Off/On Off
Audio Limiting Off/80dB/85dB Off
Hours on phone per day Off/2/4/6/8 Off
Anti-Startle (Plantronics Enhanced)Plantronics enhanced anti-startle goes beyond G616, and provides advanced hearingprotection against sudden loud sounds. When Anti-Startle is SELECTED, the system identifiesand eliminates sudden loud sounds and rapidly reduces them to a comfortable level. WhenAnti-startle is NOT SELECTED, the headset limits sound levels at 118 dBA to protect yourhearing.
Advanced
33
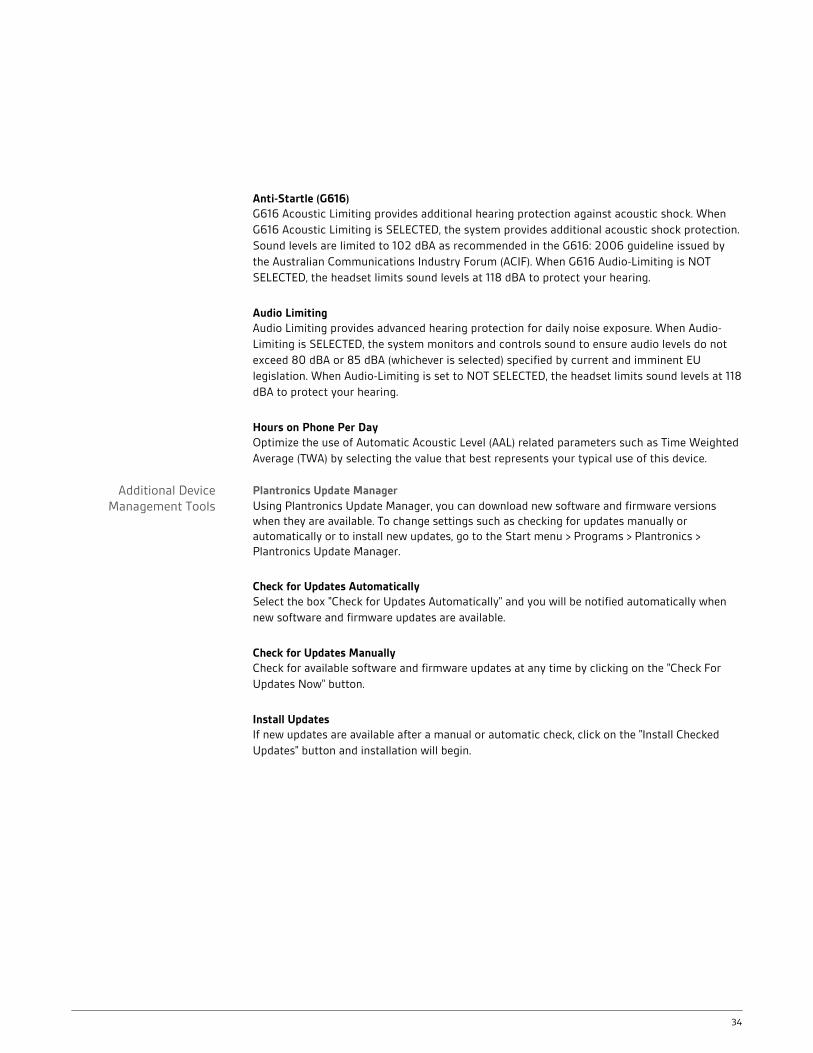
Anti-Startle (G616)G616 Acoustic Limiting provides additional hearing protection against acoustic shock. WhenG616 Acoustic Limiting is SELECTED, the system provides additional acoustic shock protection.Sound levels are limited to 102 dBA as recommended in the G616: 2006 guideline issued bythe Australian Communications Industry Forum (ACIF). When G616 Audio-Limiting is NOTSELECTED, the headset limits sound levels at 118 dBA to protect your hearing.
Audio LimitingAudio Limiting provides advanced hearing protection for daily noise exposure. When Audio-Limiting is SELECTED, the system monitors and controls sound to ensure audio levels do notexceed 80 dBA or 85 dBA (whichever is selected) specified by current and imminent EUlegislation. When Audio-Limiting is set to NOT SELECTED, the headset limits sound levels at 118dBA to protect your hearing.
Hours on Phone Per DayOptimize the use of Automatic Acoustic Level (AAL) related parameters such as Time WeightedAverage (TWA) by selecting the value that best represents your typical use of this device.
Plantronics Update ManagerUsing Plantronics Update Manager, you can download new software and firmware versionswhen they are available. To change settings such as checking for updates manually orautomatically or to install new updates, go to the Start menu > Programs > Plantronics >Plantronics Update Manager.
Check for Updates AutomaticallySelect the box "Check for Updates Automatically" and you will be notified automatically whennew software and firmware updates are available.
Check for Updates ManuallyCheck for available software and firmware updates at any time by clicking on the "Check ForUpdates Now" button.
Install UpdatesIf new updates are available after a manual or automatic check, click on the "Install CheckedUpdates" button and installation will begin.
Additional DeviceManagement Tools
34
Avoid touching the contacts at the rear of the unit unnecessarily. If operation is interrupted by a static event, power-cycle the product to restorenormal functions.
NEED MORE HELP?plantronics.com/support
1-800-544-4660
Plantronics, Inc. Plantronics BV
345 Encinal Street
Santa Cruz, CA 95060
United States
South Point Building C
Scorpius 140
2132 LR Hoofddorp
© 2015 Plantronics, Inc. All rights reserved. Plantronics, the logo design, HL10, Savi, Sound Innovation are trademarks or registered trademarks ofPlantronics, Inc. Windows is a registered trademark of Microsoft Corporation. Nortel is a trademark of Nortel Networks. Skype is a registeredtrademark of Skype Limited. All other trademarks are property of their respective owners.
Patents: U.S. 7,633,963; D599,331; D582,901; D603,372; D589,031; China ZL200830005437.x; CN301013095D; EM 000873823-0004;001151336-0002; 000873823-0002; Taiwan D127496; D127399
89945-06 (04.15)