USE AND CARE GUIDE - Yotrio Corporation · 2013-05-09 · Item #625-683 Model #GGHL00019 USE AND...
16
Item #625-683 Model #GGHL00019 USE AND CARE GUIDE ARROW GAZEBO Questions, problems, missing parts? Before returning to the store, call Hampton Bay Customer Service 8 a.m. - 6 p.m., EST Monday - Friday 1-877-527-0313 HAMPTONBAY.COM THANK YOU We appreciate the trust and confidence you have placed in Hampton Bay through the purchase of this gazebo. We strive to continually create quality products designed to enhance your home. Visit us online to see our full line of products available for your home improvement needs. Thank you for choosing Hampton Bay!
Transcript of USE AND CARE GUIDE - Yotrio Corporation · 2013-05-09 · Item #625-683 Model #GGHL00019 USE AND...

Item #625-683Model #GGHL00019
USE AND CARE GUIDE
ARROW GAZEBO
Questions, problems, missing parts? Before returning to the store,
call Hampton Bay Customer Service
8 a.m. - 6 p.m., EST Monday - Friday
1-877-527-0313
HAMPTONBAY.COM
THANK YOUWe appreciate the trust and confidence you have placed in Hampton Bay through the purchase of this gazebo. We strive to continually createquality products designed to enhance your home. Visit us online to see our full line of products available for your home improvement needs.
Thank you for choosing Hampton Bay!

Table of Contents
Warranty
Table of Contents ..................................................2Warranty ................................................................2
What is Covered ..............................................................2
What is Not Covered .......................................................2
Pre-Assembly ............................................................3Planning Assembly ..............................................................3
Hardware Included ...............................................................3
Package Contents ................................................................4
Assembly ..................................................................5Care and Cleaning ..................................................15
1 YEAR FRAME AND FABRIC WARRANTY
WHAT IS COVEREDWe warrant the frame and fabric to be free of manufacturing defects to the original purchaser for one year.
WHAT IS NOT COVEREDIt remains the customer’s responsibility for freight and package charges to and from our service center. This warranty does not cover
commercial use, hardware, acts of nature, fire, freezing and abusive use. In addition, purchased parts are not covered under this warranty.We reserve the right to make the substitutions with similar merchandise, if the model in question is no longer in production.
Contact the Customer Service Team at 1-877-527-0313 or visit www.HamptonBay.com.
2
Warranty
Safety Information .................................................2
Safety Information
WARNING: Keep all flame and heat sources away
from this gazebo fabric.
WARNING: The application of any foreign substance to
the gazebo fabric may render the flame-resistant
properties ineffective.
WARNING: This gazebo is made with fabric that meets
CPAI - 84 specifications for flame resistance. It is not
fire proof. The fabic will burn if left in continuous
contact with any flame source.
CAUTION: Children under the age of 10 who are near
the gazebo should be supervised by a competent
adult at all times.
CAUTION: This gazebo is made for the explicit purpose of
providing limited outdoor sunshade and is not to be used
as a toy, shelter, or tent.
CAUTION: This gazebo is made for the explicit purpose of
providing limited outdoor sunshade and is not to be used
as a toy, shelter, or tent.
CAUTION: Do not locate the gazebo near any open
flame.
CAUTION: Do not use the gazebo as a support.
CAUTION: Do not shake, lean, or climb on the gazebo.
!
!

Pre-AssemblyPLANNING ASSEMBLYRead all instructions before assembly.
To avoid damaging this product, assemble it on a soft, non-abrasive
surface such as carpet or cardboard.
NOTE: More than one person may be required to
complete the assembly for this product.
HARDWARE INCLUDED
Part Description Quantity
AA
BB
CC
DD
M6x18 Bolt and nut
M6x35 Bolt and nut
M6x15 Bolt
M6x10 Bolt and nut
8
12
4
4
3
NOTE: Hardware not shown to actual size.
EE M6x28 Bolt and nut 16
FF Ground spike 12
HAMPTONBAY.COM
Please contact 1-877-527-0313 for further assistance.
AA BB CC
DD EE FF

Pre-Assembly (continued)
PACKAGE CONTENTS
4
Part Description Quantity
A
B
C
D
Panel A
Panel B
Beam
Canopy spoke
4
4
4
4
E
F
G
H
Canopy frame
Track tube
Short canopy spoke
Lower canopy hub
4
8
4
1
I
J
K
L
Corner connector
Upper canopy hub
Small fabric cover
Large fabric cover
4
1
1
1
M
N
O
P
Netting
Plastic ring
Corner shelf
Top arrow
4
48
4
1
Q
R
Corner arrow
Corkscrew ground spike
4
1
Part Description Quantity
AB
H
D
E
G
FF
C
I
J
O
P
Q
F
D
D
E
C
I
O
QE
F
C
M
K
L
N
R
Assembly
5 HAMPTONBAY.COM
Please contact 1-877-527-0313 for further assistance.
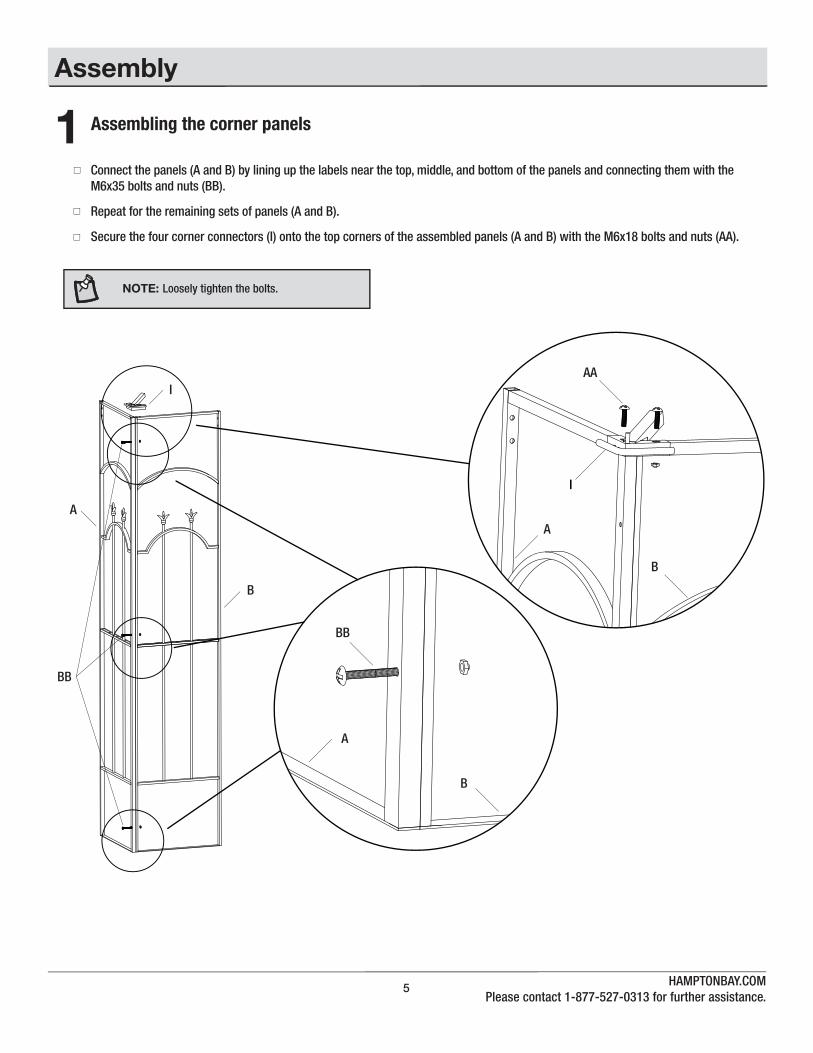
Assembling the corner panels
Connect the panels (A and B) by lining up the labels near the top, middle, and bottom of the panels and connecting them with the
M6x35 bolts and nuts (BB).
Repeat for the remaining sets of panels (A and B).
Secure the four corner connectors (I) onto the top corners of the assembled panels (A and B) with the M6x18 bolts and nuts (AA).
1
NOTE: Loosely tighten the bolts.
B
A
A
B
BB
I
BB
A
B
AA
I

Assembly (continued)
6
Connecting the corner panels
Line up the two holes on the two ends of the beam (C) with the corresponding bolt holes on the side tubes of panels (A and B).
Attach the panels to the beam (C) using the M6x28 bolts and nuts (EE).
Repeat for the remaining three beams (C).
2
NOTE: Loosely tighten the bolts.
C
C
C
C
BA C
EE
A \ B

Assembly (continued)
7 HAMPTONBAY.COM
Please contact 1-877-527-0313 for further assistance.
Assembling the canopy
Insert the four canopy spokes (D) into the four long tubes of the lower canopy hub (H).
Insert the four canopy frames (E) into the four short tubes of the lower canopy hub (H).
Make sure all push pins are in place.
3
E
E
E
D
D
D
D
DD
D
E
E
E
E
H
H
E
D

Assembly (continued)
8
Placing the large fabric cover
Place the large fabric cover (L) loosely on top of the assembled frame.
4
NOTE: Do not fully extend the fabric cover.
D
D
D
D
E
E
E
L

Assembly (continued)
9 HAMPTONBAY.COM
Please contact 1-877-527-0313 for further assistance.
Assembling the small canopy 5Insert the three short canopy spokes (G) into the upper canopy hub (J). See figure 1.
Install the small fabric cover (K) on the three short canopy spokes (G), and pull the three corresponding pouches of the small fabric
cover (K) onto the ends of the three short canopy spokes (G). See figure 2.
Pull the remaining pouch of the small fabric cover (K) onto the end of the remaining short canopy spoke (G). See figure 3.
Insert the remaining short canopy spoke (G) into the upper canopy hub (J). See figure 4.
Ensure all snap buttons are in place. Screw the top arrow (P) onto the upper canopy hub (J). See figure 5.
Fig. 5
K
P
J
G Fig. 4
Fig. 3
Fig. 2
Fig. 1
G
GG
J
K
G
K
P

Assembly (continued)
10
Attaching the small canopy
Attach the four short canopy spokes (G) to each of the regular canopy spokes (D) by inserting the connecting peices of (G) into (D).
Ensure all push pins are secure.
6
G
LD
E
D
D
E
D
Assembly (continued)
11 HAMPTONBAY.COM
Please contact 1-877-527-0313 for further assistance.
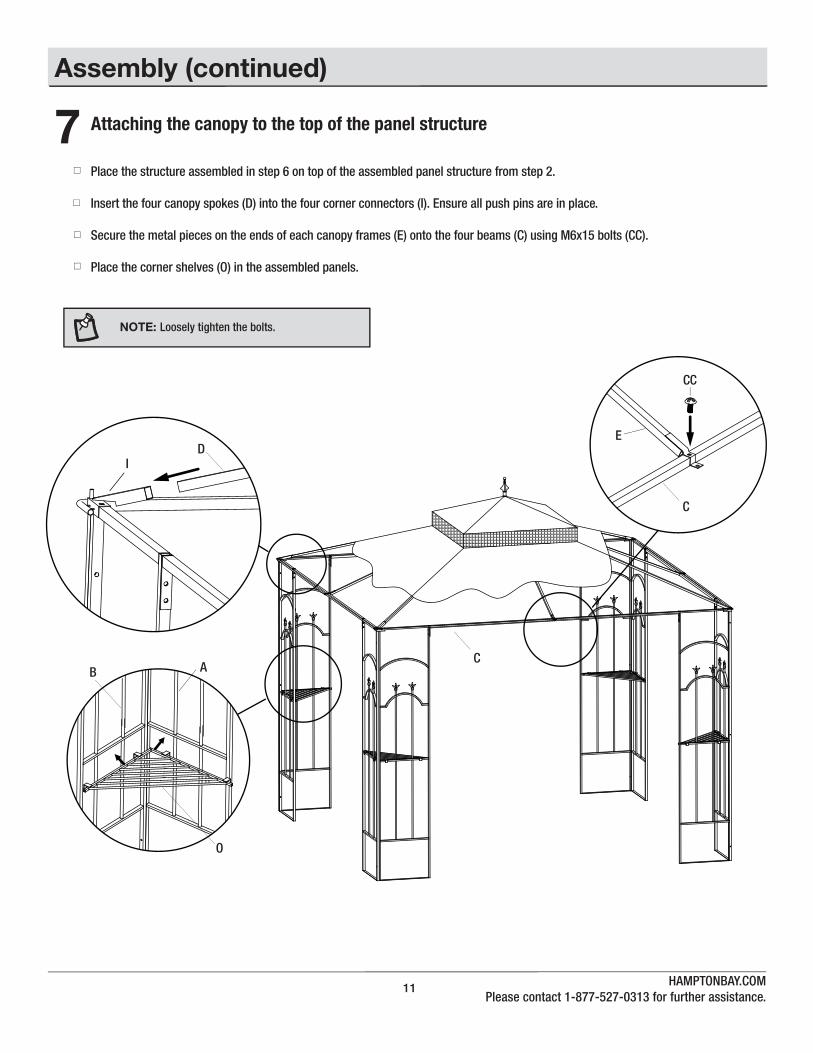
Attaching the canopy to the top of the panel structure
Place the structure assembled in step 6 on top of the assembled panel structure from step 2.
Insert the four canopy spokes (D) into the four corner connectors (I). Ensure all push pins are in place.
Secure the metal pieces on the ends of each canopy frames (E) onto the four beams (C) using M6x15 bolts (CC).
Place the corner shelves (O) in the assembled panels.
7
NOTE: Loosely tighten the bolts.
B A
O
C
CC
C
E
ID

Assembly (continued)
12
Attaching the track tubes
Connect the end of a track tube (F) to a corner connector (I).
Insert the other end of the track tube (F) into the bracket on the end of the canopy frame (E), and secure them together by using
M6x10 bolts and nuts (DD).
Repeat step 8 for the remaining track tubes (F).
8
NOTE: You may opt to tighten all bolts now before
the fabric cover is attached to the frame of the gazebo.
F
F
I
E
DD
F
FC
C
BA

Assembly (continued)
13 HAMPTONBAY.COM
Please contact 1-877-527-0313 for further assistance.
Hanging the netting
Put up the netting (M) onto the track tubes (F) using the plastic rings (N).
Hang the fabric buckles in the middle of the netting (M) onto the bolts of the corner connectors (I).
9
I N
M
M
F

Assembly (continued)
14
Attaching the large fabric cover
Pull the large fabric cover (L) onto the corner connectors (I).
Attach all the velcro of the large fabric cover (L) on the top frames and the top bars of the panels (A and B).
Screw the four corner arrows (Q) onto the four corner connectors (I).
Once all bolts and nuts are in place, tighten all bolts completely.
10
Q
Q
L
I

Assembly (continued)
15
Grounding the gazebo11
Care and Cleaning
For the best results, clean the frame and fabric with a damp cloth and dry thoroughly. This will help prevent mildew by removing
dirt particles that may accumulate.
Do not clean with abrasive materials, bleach, or solvents.
Keep the gazebo out of fire, extreme heat, freezing conditions, and inclement weather such as rain, hail, sleet, snow, or wind.
Store the gazebo in a dry, sheltered place when not in use.
Slightly lift up the corners of the panels (A and B), and put the corkscrew ground spike (R) through the hole on the flat bars on the
bottom of the panels (A and B). Twist the corkscrew ground spike (R) down while the panels are lifted up. Next, twist the corkscrew
ground spike (R) into the ground until the panels (A and B) are secure. Once the corkscrew ground spikes are secured, pound
the ground spikes (FF) through the holes on the flat bars on the bottom of panels (A and B).
HAMPTONBAY.COM
Please contact 1-877-527-0313 for further assistance.
FF
FF
A B
R
R
NOTE: You may opt to insert a ground spike (FF) though the
loop in the corkscrew ground spike (R) to assist in twisting the
corkscrew ground spike (R) into the ground.

Questions, problems, missing parts? Before returning to the store,
call Hampton Bay Customer Service
8 a.m. - 6 p.m., EST Monday - Friday
1-877-527-0313
HAMPTONBAY.COM
Retain this manual for future use.