USB Flash Drive Preparation
13
Thomas Hum Page 1 20/03/2012 USB Flash Drive Preparation using USB PrepTool and USB Flash Installer v3.21 for Bustled Fiery Controllers for the DocuColor 240/242/250/252/260, Xerox 700/700i Digital Color Press, Xerox Color 550/560, WorkCentre 7300, 7400, 7500 and 7700 MFP Series (Serial Number Prefixes: WUP, AXA, ERB, MMX, BP2, XYY, LUA, UAF, and WXN) 1. Purpose : This document will explain how to properly prepare your USB Flash Drive or Thumb Drive for the purpose of loading software on the Bustled Fiery Controllers using the USB Flash Installer v3.21 or the USB PrepTool. The USB method is a more reliable and quicker way of loading software than the PWS method. 2. Terminology : System Software – The actual System Software CDs or DVDs required to load the Fiery controllers using a PWS. Software Image – The software that resides on a USB Flash Drive after prepping with the USB PrepTool. Support DVD – DVD with Software Image files from prepared USB Flash Drives. 3. Requirements : 3.1 - USB Flash Drive (Kingston DataTraveler 2GB, 4GB, and 8GB models preferred) 3.2 - USB PrepTool v1.1, v1.2, or v1.3 CD (refer to Tables 1 and 2 for proper usage) 3.3 - USB Flash Installer v3.21 CD (iso image file from GSN Library 10731 or 10039) 3.4 - One of the following System Software DVDs DC240/250 v1.1 (kit 701S45118) DC240/250 v1.2 (kit 701S48272 sent to the field May 2008) DC242/252/260 v2.0 (Kit 301K18330 delivered with the Server) Xerox 700 DCP v1.0 SP1 (kit 301N42850 delivered with the Server) Xerox 700 DCP v1.5 (kit 301N45190 delivered with the Server) Xerox 700i DCP v1.0 (kit 301N61700 delivered with the Server) Xerox Color 550/560 v1.0 (kit 301N55100 delivered with the Server) Xerox Color 550/560 v1.1 (kit 301N60870) EFI Fiery Network Controller for WC7300 v1.0 (kit 301K20330 delivered with the Controller) EFI Fiery Network Controller for WC7400 v1.0 (kit 301N45120 delivered with the Controller) EFI Fiery Network Controller for WC7500 v1.0 (kit 301N57610 delivered with the Controller) EFI Fiery Network Controller for WC7700 v1.01 (kit 301N51740 already contains USB drives) 3.5 - The System Software CDs for the DC240/250 v1.1 and v1.2, and the DC242/252/260 v2.0 do not work with the USB PrepTool, these versions of System Software is compatible with the USB Flash Installer v3.21 instead. 3.6 - A new version of USB PrepTool, v1.3 is included with the Integrated Fiery software kits for the Xerox Color 550/560, 700i Digital Color Press, and the EFI Fiery Network Controller for WC7500 MFP. This version is only compatible with these versions of Fiery Software. 3.7 - Please refer to the compatibility matrix on the next page to ensure that you are using the correct Tool/Software to prep the USB Flash Drive.
description
Usb flash drive preparation for loading software in Xerox Machine.
Transcript of USB Flash Drive Preparation

Thomas Hum Page 1 20/03/2012
USB Flash Drive Preparation using USB PrepTool and USB Flash Installer v3.21 for Bustled Fiery Controllers for the DocuColor 240/242/250/252/260,
Xerox 700/700i Digital Color Press, Xerox Color 550/560, WorkCentre 7300, 7400, 7500 and 7700 MFP Series
(Serial Number Prefixes: WUP, AXA, ERB, MMX, BP2, XYY, LUA, UAF, and WXN)
1. Purpose: This document will explain how to properly prepare your USB Flash Drive or Thumb Drive for the purpose of loading software on the Bustled Fiery Controllers using the USB Flash Installer v3.21 or the USB PrepTool. The USB method is a more reliable and quicker way of loading software than the PWS method. 2. Terminology: System Software – The actual System Software CDs or DVDs required to load the Fiery controllers using a PWS. Software Image – The software that resides on a USB Flash Drive after prepping with the USB PrepTool. Support DVD – DVD with Software Image files from prepared USB Flash Drives. 3. Requirements:
3.1 - USB Flash Drive (Kingston DataTraveler 2GB, 4GB, and 8GB models preferred) 3.2 - USB PrepTool v1.1, v1.2, or v1.3 CD (refer to Tables 1 and 2 for proper usage) 3.3 - USB Flash Installer v3.21 CD (iso image file from GSN Library 10731 or 10039) 3.4 - One of the following System Software DVDs
DC240/250 v1.1 (kit 701S45118) DC240/250 v1.2 (kit 701S48272 sent to the field May 2008) DC242/252/260 v2.0 (Kit 301K18330 delivered with the Server) Xerox 700 DCP v1.0 SP1 (kit 301N42850 delivered with the Server) Xerox 700 DCP v1.5 (kit 301N45190 delivered with the Server) Xerox 700i DCP v1.0 (kit 301N61700 delivered with the Server) Xerox Color 550/560 v1.0 (kit 301N55100 delivered with the Server) Xerox Color 550/560 v1.1 (kit 301N60870) EFI Fiery Network Controller for WC7300 v1.0 (kit 301K20330 delivered with the Controller) EFI Fiery Network Controller for WC7400 v1.0 (kit 301N45120 delivered with the Controller) EFI Fiery Network Controller for WC7500 v1.0 (kit 301N57610 delivered with the Controller) EFI Fiery Network Controller for WC7700 v1.01 (kit 301N51740 already contains USB drives)
3.5 - The System Software CDs for the DC240/250 v1.1 and v1.2, and the DC242/252/260 v2.0 do not work with the USB PrepTool, these versions of System Software is compatible with the USB Flash Installer v3.21 instead. 3.6 - A new version of USB PrepTool, v1.3 is included with the Integrated Fiery software kits for the Xerox Color 550/560, 700i Digital Color Press, and the EFI Fiery Network Controller for WC7500 MFP. This version is only compatible with these versions of Fiery Software. 3.7 - Please refer to the compatibility matrix on the next page to ensure that you are using the correct Tool/Software to prep the USB Flash Drive.
Thomas Hum Page 2 20/03/2012
3.8 - Below is a compatibility matrix that illustrates which USB Flash Installer CD, or USB PrepTool CD, will work with which version of System Software for creating the USB Flash Drive only.
DC250
v1.1 DC250
v1.2 DC260
v2.0 700 DCP v1.0 SP1
700 DCP v1.5
700i DCP V1.0
Xerox Color
550/560 v1.0
Xerox Color
550/560 v1.1
Transfer of files from
Support DVD?
USB Flash Installer v2.3 Yes Yes Yes No No No No No Yes
USB Flash Installer
v3.21 Yes Yes Yes Yes Yes No No No Yes
USB PrepTool v1.1 No No No Yes Yes No No No Yes
USB PrepTool v1.3 No No No No No Yes Yes Yes Yes
Table 1: Compatibility Matrix for Professional Color Products
EFI Fiery for
WC7300 v1.0 (EN)
EFI Fiery for
WC7300 v1.0 (FR)
EFI Fiery for
WC7400 v1.0 (EN)
EFI Fiery for
WC7400 v1.0 (FR)
EFI Fiery for
WC7500 v1.0 (EN)
EFI Fiery for
WC7700 v1.01 (EN)
EFI Fiery for
WC7700 v1.01 (FR)
Transfer of files from
Support DVD?
USB Flash Installer v2.3 Yes No Yes No No No No Yes
USB Flash Installer v3.21 Yes No Yes No No No No Yes
USB PrepTool v1.1 Yes Yes Yes Yes No No No Yes
USB PrepTool v1.2 No No No No No Yes Yes Yes
USB PrepTool v1.3 N/A N/A N/A N/A Yes No No Yes
Table 2: Compatiblilty Matrix for EFI for WorkCentre Products Note: You must have one of the original System Software discs listed in Step 3.4 to properly prepare the USB Flash Drive. Using the Support DVD(s) provided by the Hotline to prepare the USB Flash Drive will not work as they will contain ONLY the Software Image files.
Thomas Hum Page 3 20/03/2012
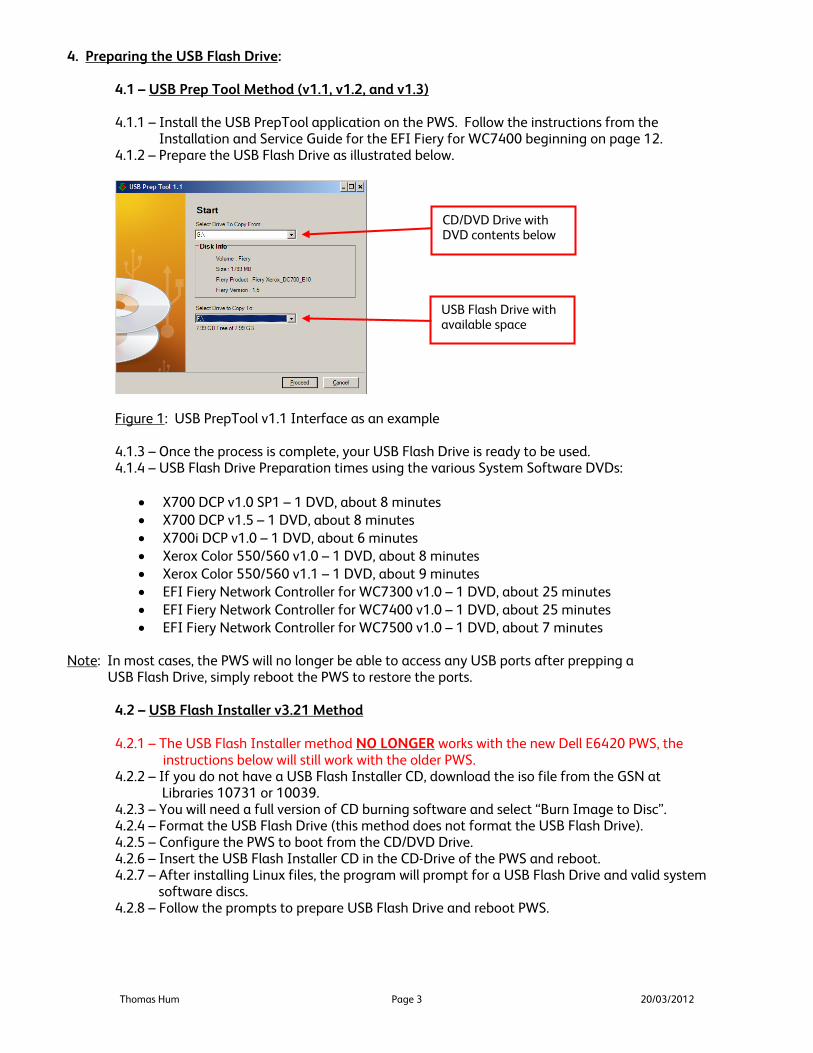
4. Preparing the USB Flash Drive:
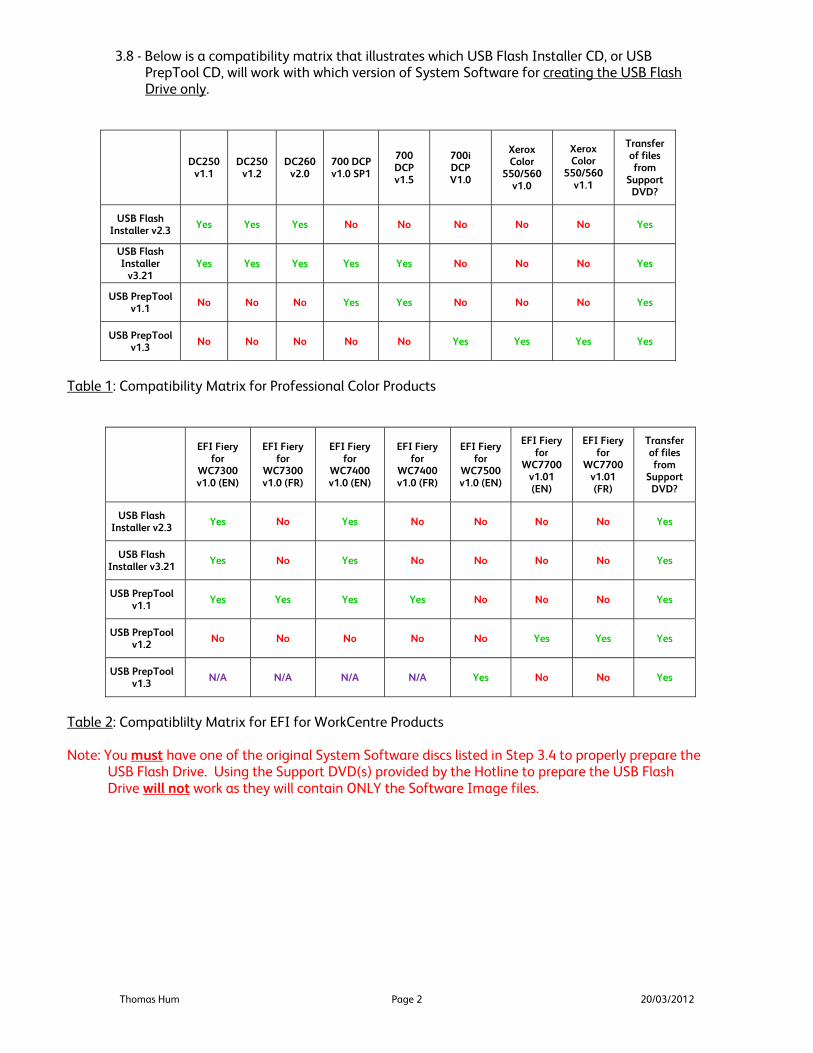
4.1 – USB Prep Tool Method (v1.1, v1.2, and v1.3) 4.1.1 – Install the USB PrepTool application on the PWS. Follow the instructions from the Installation and Service Guide for the EFI Fiery for WC7400 beginning on page 12. 4.1.2 – Prepare the USB Flash Drive as illustrated below.
Figure 1: USB PrepTool v1.1 Interface as an example 4.1.3 – Once the process is complete, your USB Flash Drive is ready to be used. 4.1.4 – USB Flash Drive Preparation times using the various System Software DVDs:
X700 DCP v1.0 SP1 – 1 DVD, about 8 minutes X700 DCP v1.5 – 1 DVD, about 8 minutes X700i DCP v1.0 – 1 DVD, about 6 minutes Xerox Color 550/560 v1.0 – 1 DVD, about 8 minutes Xerox Color 550/560 v1.1 – 1 DVD, about 9 minutes EFI Fiery Network Controller for WC7300 v1.0 – 1 DVD, about 25 minutes EFI Fiery Network Controller for WC7400 v1.0 – 1 DVD, about 25 minutes EFI Fiery Network Controller for WC7500 v1.0 – 1 DVD, about 7 minutes
Note: In most cases, the PWS will no longer be able to access any USB ports after prepping a USB Flash Drive, simply reboot the PWS to restore the ports. 4.2 – USB Flash Installer v3.21 Method 4.2.1 – The USB Flash Installer method NO LONGER works with the new Dell E6420 PWS, the
instructions below will still work with the older PWS. 4.2.2 – If you do not have a USB Flash Installer CD, download the iso file from the GSN at
Libraries 10731 or 10039. 4.2.3 – You will need a full version of CD burning software and select “Burn Image to Disc”.
4.2.4 – Format the USB Flash Drive (this method does not format the USB Flash Drive). 4.2.5 – Configure the PWS to boot from the CD/DVD Drive.
4.2.6 – Insert the USB Flash Installer CD in the CD-Drive of the PWS and reboot. 4.2.7 – After installing Linux files, the program will prompt for a USB Flash Drive and valid system software discs. 4.2.8 – Follow the prompts to prepare USB Flash Drive and reboot PWS.
CD/DVD Drive with DVD contents below
USB Flash Drive with available space

Thomas Hum Page 4 20/03/2012
5. Loading different versions of software: Once the USB Flash Drive has been prepared, you can use it to load System Software on the other controllers using the Support DVDs from the St-Laurent Hotline. The Hotline prepared the USB Flash Drive for each of the other software versions, and subsequently burned the files to DVD. The USB Flash Drive needs to have the software files deleted, and, depending on what controller needs to be reloaded, have the proper files copied to the USB Flash Drive. Note: The installation files can also be found on the Office Color Suppport DVD, p/n 701P49948. 6. Caution: It is critical that one file is not deleted. Figure 2 shows the hidden file “LDLINUX.SYS” because the option of viewing hidden files has been enabled in Folder Options. If this file is mistakenly deleted along with the others, it will render the USB Flash Drive unusable for the purpose of installing system software and you will have to prepare the drive again using the USB PrepTool CD. Follow Figure 3 on the following page to disable the ability to view hidden files.
Figure 2: Contents of a prepared USB Flash Drive showing hidden file
Figure 3: Disable the ability to view hidden files
Check-off this option
Do not delete this file

Thomas Hum Page 5 20/03/2012
7. File Sizes contained on USB Flash Drive: DC 240/250 v1.1 569 MB 6 files DC 240/250 v1.2 1.14 GB 6 files DC 242/252/260 v2.0 1.44 GB 6 files Xerox 700 DCP v1.0 SP1 1.76 GB 6 files Xerox 700 DCP v1.5 1.78 GB 6 files Xerox 700i DCP v1.0 1.95 GB 6 files Xerox Color 550/560 v1.0 2.05 GB 6 files Xerox Color 550/560 v1.1 2.16 GB 6 files EFI for WC7300 v1.0 4.01 GB 46 files, 2 folders EFI for WC7400 v1.0 3.84 GB 50 files, 2 folders EFI for WC7500 v1.0 1.98 GB 6 files EFI for WC7700 v1.01 3.82 GB 50 files, 2 folders For the DC 240/250 and DC 242/252/260 Bustled Fiery Controllers, the DVD contains the different versions of software in 3 separate folders, the 6 individual files, not the folder itself, needs to be copied to the USB Drive’s root directory. For the Xerox 700 Digital Color Press with Integrated Fiery Color Server, this DVD also contains the 2 versions of software in 2 separate folders, the 6 individual files, not the folder itself, needs to be copied to the USB Drive’s root directory. For the Xerox Color 550/560 Integrated Fiery Controller, the DVD contains versions 1.0 and 1.1 in two folders, the 6 individual files, not the folder itself, needs to be copied to the USB Drive’s root directory. For the WC7300, the entire contents of the DVD are to be copied to the USB Flash Drive AS IS. For the WC7400, the entire contents of the DVD are to be copied to the USB Flash Drive AS IS. 8. INSTALL.IMG file sizes
System Software File Size (KB) DC240/250 v1.1 551,232 DC240/250 v1.2 1,104,630
DC242/252/260 v2.0 1,401,356 X700 DCP v1.0 SP1 1,714,750
X700 DCP v1.5 1,735,150 X700i DCP v1.0 2,051,040
Xerox Color 550/560 v1.0 2,148,675 Xerox Color 550/560 v1.1 2,266,890
EFI Fiery for WC7500 2,077,708

Thomas Hum Page 6 20/03/2012
Figure 4: Contents of the Xerox 700 Digital Color Press with Integrated Fiery Color Server v1.5
Figure 5: Contents of the Xerox Color 550/560 Integrated Fiery Controller v1.0
Figure 6: Contents of the EFI Fiery Network Controller for WC7500 v1.0

Thomas Hum Page 7 20/03/2012
Figure 7: Contents of the EFI Fiery Network Controller for WC7400 v1.0
Figure 8: Contents of the EFI Fiery Network Controller for WC7300 v1.0
Figure 9: Contents of the EFI Fiery Network Controller for WC7700 v1.01

Thomas Hum Page 8 20/03/2012
9. Working with an 8GB Flash Drive with Multiple Versions of Software It is possible that several versions of Fiery Software can reside on a larger USB Flash Drive if the following conditions are met: 9.1 – Only Bustled Fiery Software for the DC240/242/250/252/260, Xerox 700 DCP, and the Xerox Color 550/560. 9.2 – The files are in their respective folders when not in use. 9.3 – The software that will be loaded is moved to the root directory. 9.4 – After loading, move the files back to its respective folder.
Figure 10: Contents of an 8GB USB Flash Drive with 5 versions of software in their respective directories No software will be loaded if the USB Drive is used in this state as the Bustled Fiery will only be looking at the any files in the Root Directory
Figure 11: The version of software that has been moved to the Root Directory is that of the DC260 Bustled Fiery Controller v2.0
Thomas Hum Page 9 20/03/2012
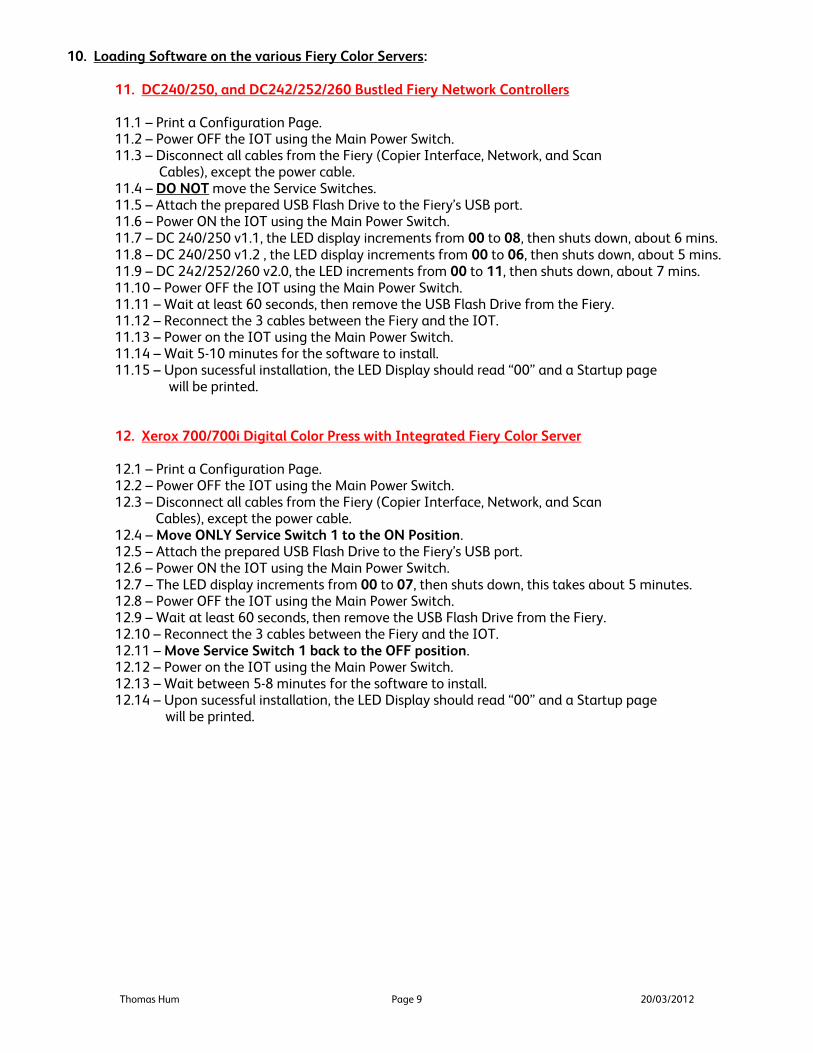
10. Loading Software on the various Fiery Color Servers: 11. DC240/250, and DC242/252/260 Bustled Fiery Network Controllers 11.1 – Print a Configuration Page.
11.2 – Power OFF the IOT using the Main Power Switch. 11.3 – Disconnect all cables from the Fiery (Copier Interface, Network, and Scan
Cables), except the power cable. 11.4 – DO NOT move the Service Switches. 11.5 – Attach the prepared USB Flash Drive to the Fiery’s USB port. 11.6 – Power ON the IOT using the Main Power Switch. 11.7 – DC 240/250 v1.1, the LED display increments from 00 to 08, then shuts down, about 6 mins. 11.8 – DC 240/250 v1.2 , the LED display increments from 00 to 06, then shuts down, about 5 mins. 11.9 – DC 242/252/260 v2.0, the LED increments from 00 to 11, then shuts down, about 7 mins. 11.10 – Power OFF the IOT using the Main Power Switch.
11.11 – Wait at least 60 seconds, then remove the USB Flash Drive from the Fiery. 11.12 – Reconnect the 3 cables between the Fiery and the IOT. 11.13 – Power on the IOT using the Main Power Switch. 11.14 – Wait 5-10 minutes for the software to install. 11.15 – Upon sucessful installation, the LED Display should read “00” and a Startup page will be printed.
12. Xerox 700/700i Digital Color Press with Integrated Fiery Color Server 12.1 – Print a Configuration Page. 12.2 – Power OFF the IOT using the Main Power Switch.
12.3 – Disconnect all cables from the Fiery (Copier Interface, Network, and Scan Cables), except the power cable. 12.4 – Move ONLY Service Switch 1 to the ON Position. 12.5 – Attach the prepared USB Flash Drive to the Fiery’s USB port. 12.6 – Power ON the IOT using the Main Power Switch. 12.7 – The LED display increments from 00 to 07, then shuts down, this takes about 5 minutes. 12.8 – Power OFF the IOT using the Main Power Switch.
12.9 – Wait at least 60 seconds, then remove the USB Flash Drive from the Fiery. 12.10 – Reconnect the 3 cables between the Fiery and the IOT. 12.11 – Move Service Switch 1 back to the OFF position. 12.12 – Power on the IOT using the Main Power Switch. 12.13 – Wait between 5-8 minutes for the software to install. 12.14 – Upon sucessful installation, the LED Display should read “00” and a Startup page will be printed.

Thomas Hum Page 10 20/03/2012
13. Xerox Color 550/560 with Integrated Fiery Color Server 13.1 – Print a Configuration Page. 13.2 – Clone the ESS. 13.3 – Power OFF the IOT using the Main Power Switch.
13.4 – Disconnect all cables from the Fiery (Copier Interface, Network, and Scan Cables), except the power cable. 13.5 – Move ONLY Service Switch 1 to the ON Position. 13.6 – Attach the prepared USB Flash Drive to the Fiery’s USB port. 13.7 – Power ON the Fiery by pressing on the Soft Power Switch. 13.8 – The LED display increments from 00 to 07, then shuts down, this takes about 5 minutes. 13.9 – Wait at least 60 seconds, then remove the USB Flash Drive from the Fiery.
13.10 – Reconnect the 3 cables between the Fiery and the IOT. 13.11 – Move Service Switch 1 back to the OFF position. 13.12 – Power on the IOT using the Main Power Switch. 13.13 – Power on the Fiery by pressing the Soft Power Switch. 13.14 – Wait approximately 12 minutes for the software to install. 13.15 – Upon successful installation, the LED Display should read “00” and a Startup page will be printed.
14. EFI Fiery Network Controller for WorkCentre 7300
14.1 – Print a Configuration Page. 14.2 – Power OFF the IOT using the Main Power Switch.
14.3 – Disconnect all cables from the Fiery (Copier Interface, Network, and Scan Cables), except the power cable. 14.4 – DO NOT move the Service Switches. 14.5 – Attach the prepared USB Flash Drive to the Fiery’s USB port. 14.6 – Power ON the Fiery Controller by pressing the soft power button once. 14.7 – The LED display increments from 00 to 26, then displays FF, this takes about 10 minutes. 14.8 – Wait 30 secs, power off the Fiery by pressing and holding the soft power button for 5 secs. 14.9 – Wait at least 30 seconds, then remove the USB Flash Drive. 14.10 – Reconnect all cables from step 2. 14.11 – Power on the IOT and wait 50 minutes for the software to install, the LED display will only increment from 00 to 03 during this time. 14.12 – The Fiery needs to be reconfigured to print a Startup page.
15. EFI Fiery Network Controller for WorkCentre 7400 MFP Series
15.1 – Print a Configuration Page. 15.2 – Power OFF the IOT using the Main Power Switch.
15.3 – Disconnect all cables from the Fiery (Copier Interface, Network, and Scan Cables), except the power cable. 15.4 – Move ONLY Service Switch 1 to the ON Position. 15.5 – Attach the prepared USB Flash Drive to the Fiery’s USB port. 15.6 – Power ON the Fiery Controller by pressing the soft power button once. 15.7 – The LED display increments from 00 every 30 seconds, then displays FF, about 15 minutes. 15.8 – Wait 30 secs, power off the Fiery by pressing and holding the soft power button for 5 secs. 15.9 – Wait at least 30 seconds, then remove the USB Flash Drive. 15.10 – Reconnect all cables from step 2. 15.11 – Move Service Switch 1 back to the OFF position. 15.12 – Power on the IOT and wait 60 minutes for the software to install, the LED display will only increment from 00 to 03 during this time.

Thomas Hum Page 11 20/03/2012
16. EFI Fiery Network Controller for WorkCentre 7500 MFP Series 16.1 – Print a Configuration Page. 16.2 – Clone the ESS. 16.3 – Shut down the Fiery using the following steps: 16.3.1 – Press the Services Home button. 16.3.2 – Touch the Fiery icon on the UI. 16.3.3 – Touch the Jobs tab.
16.3.4 – Touch Login. 16.3.5 – Select the Administrator option and enter the password. 16.3.6 – Touch Restart Server, and then touch Shut Down System. 16.3.7 – If the above steps do not work, press and hold down the Soft Power Switch on the
Fiery for 5 seconds until the green light goes out and the system powers off. 16.4 – Power Off the IOT using the Power Switch, then the Main Power Switch.
16.5 – Disconnect all cables from the Fiery except the power cable. 16.6 – Move ONLY Service Switch 1 to the ON Position. 16.7 – Attach the prepared USB Flash Drive to the Fiery’s USB port. 16.8 – Power ON the Fiery by pressing on the Soft Power Switch. 16.9 – The LED display increments from 00 to 06, then shuts down this takes about 4 minutes. 16.10 – Wait at least 30 seconds, then remove the USB Flash Drive from the Fiery.
16.11 – Reconnect the cables between the Fiery and the IOT. 16.12 – Move Service Switch 1 back to the OFF position.
16.13 – Power ON the Fiery by pressing the Soft Power Switch. 16.14 – Wait approximately 2 minutes until the Fiery LED displays and remains at 00. 16.15 – Power on the IOT using the Main Power Switch, then the Power Switch. 16.16 – About 4 minutes after the IOT is powered on, the Configuration sheet should print. 16.17 – About 10 minutes after the IOT is powered on, the Fiery Start page should print. 16.18 – Reconfigure the Fiery IP address and perform a reboot of the Fiery. 16.19 – The reconfigured Fiery Start page should print out in about 3 minutes. Note: Loading times are approximate, but will usually fall within this range. 17. Additional Notes:
Check the BIOS settings on your PWS to verify the order of bootable devices, press F2 when the PWS first boots up. If “USB Device” is listed as a bootable device, move it down the list so that it boots AFTER the “Internal HDD”. Booting the PWS with a prepared USB Flash Drive connected to it will change the partition on your HDD to boot from Linux. This will render your PWS inoperable and will have to be reimaged completely.
If a USB Flash Drive was formatted using Windows XP only and not properly prepared with a USB Flash
Installer CD, copying the files from the DVD will not work.
DO NOT use the drive for any other purpose as this will corrupt the drive.
The Kingston DataTraveler USB Flash Drive is the model preferred because it is the one tested at the Hotline.
If you service only the DC240/250, DC242/252/260 and Xerox 700 Digital Color Press, the 2GB Flash
Drive, p/n 701P48715 is all you require.
A minimum 4GB Flash Drive is required for the Xerox Color 550/560 and EFI Fiery for WC7500 MFP
The EFI for WC7300 and WC7400 installation files are quite large and will not necessarily fit on a 4GB Flash Drive, for this reason, an 8GB USB Flash Drive is preferred.

Thomas Hum Page 12 20/03/2012

Thomas Hum Page 13 20/03/2012