USB-Cascading User Guide - Raritan...
34
USB-Cascading Solution User Guide Release 2.3.1 Copyright © 2012 Raritan, Inc. USBcascade-0B-v2.3.1-E August 2012 255-80-0012-00 RoHS
Transcript of USB-Cascading User Guide - Raritan...

USB-Cascading Solution
User Guide Release 2.3.1
Copyright © 2012 Raritan, Inc.
USBcascade-0B-v2.3.1-E
August 2012
255-80-0012-00 RoHS

Safety Guidelines
WARNING! Read and understand all sections in this guide before installing or operating this product.
WARNING! Connect this product to an AC power source whose voltage is within the range specified on the product's nameplate. Operating this product outside the nameplate voltage range may result in electric shock, fire, personal injury and death.
WARNING! Connect this product to an AC power source that is current limited by a suitably rated fuse or circuit breaker in accordance with national and local electrical codes. Operating this product without proper current limiting may result in electric shock, fire, personal injury and death.
WARNING! Connect this product to a protective earth ground. Never use a "ground lift adaptor" between the product's plug and the wall receptacle. Failure to connect to a protective earth ground may result in electric shock, fire, personal injury and death.
WARNING! This product contains no user serviceable parts. Do not open, alter or disassemble this product. All servicing must be performed by qualified personnel. Disconnect power before servicing this product. Failure to comply with this warning may result in electric shock, personal injury and death.
WARNING! Use this product in a dry location. Failure to use this product in a dry location may result in electric shock, personal injury and death.
WARNING! Do not rely on this product's receptacle lamps, receptacle relay switches or any other receptacle power on/off indicator to determine whether power is being supplied to a receptacle. Unplug a device connected to this product before performing repair, maintenance or service on the device. Failure to unplug a device before servicing it may result in electric shock, fire, personal injury and death.
WARNING! Only use this product to power information technology equipment that has a UL/IEC 60950-1 or equivalent rating. Attempting to power non-rated devices may result in electric shock, fire, personal injury and death.
WARNING! Do not use a Raritan product containing outlet relays to power large inductive loads such as motors or compressors. Attempting to power a large inductive load may result in damage to the relay.
WARNING! Do not use this product to power critical patient care equipment, fire or smoke alarm systems. Use of this product to power such equipment may result in personal injury and death.
WARNING! If this product is a model that requires assembly of its line cord or plug, all such assembly must be performed by a licensed electrician and the line cord or plugs used must be suitably rated based on the product's nameplate ratings and national and local electrical codes. Assembly by unlicensed electricians or failure to use suitably rated line cords or plugs may result in electric shock, fire, personal injury or death.
WARNING! This product contains a chemical known to the State of California to cause cancer, birth defects, or other reproductive harm.

Safety Instructions
1. Installation of this product should only be performed by a person who has knowledge and experience with electric power.
2. Make sure the line cord is disconnected from power before physically mounting or moving the location of this product.
3. This product is designed to be used within an electronic equipment rack. The metal case of this product is electrically bonded to the line cord ground wire. A threaded grounding point on the case may be used as an additional means of protectively grounding this product and the rack.
4. Examine the branch circuit receptacle that will supply electric power to this product. Make sure the receptacle’s power lines, neutral and protective earth ground pins are wired correctly and are the correct voltage and phase. Make sure the branch circuit receptacle is protected by a suitably rated fuse or circuit breaker.
5. If the product is a model that contains receptacles that can be switched on/off, electric power may still be present at a receptacle even when it is switched off.

This document contains proprietary information that is protected by copyright. All rights reserved. No part of this document may be photocopied, reproduced, or translated into another language without express prior written consent of Raritan, Inc.
© Copyright 2012 Raritan, Inc. All third-party software and hardware mentioned in this document are registered trademarks or trademarks of and are the property of their respective holders.
FCC Information
This equipment has been tested and found to comply with the limits for a Class A digital device, pursuant to Part 15 of the FCC Rules. These limits are designed to provide reasonable protection against harmful interference in a commercial installation. This equipment generates, uses, and can radiate radio frequency energy and if not installed and used in accordance with the instructions, may cause harmful interference to radio communications. Operation of this equipment in a residential environment may cause harmful interference.
VCCI Information (Japan)
Raritan is not responsible for damage to this product resulting from accident, disaster, misuse, abuse, non-Raritan modification of the product, or other events outside of Raritan's reasonable control or not arising under normal operating conditions.

v
Contents
Safety Guidelines ii
Safety Instructions iii
Chapter 1 Introduction 1
Hardware Requirements................................................................................................................1 Software Requirements .................................................................................................................1 Plug and Play.................................................................................................................................1
Chapter 2 USB-Cascading Applications 2
Appropriate Applications................................................................................................................2 Best Practices ................................................................................................................................4 Inappropriate Applications .............................................................................................................5
Chapter 3 USB-Cascading Instructions 6
Cascading Limitations....................................................................................................................6 Cascading the Raritan PX .............................................................................................................6 Identifying the Cascaded Devices .................................................................................................9
Using the Web Interface ......................................................................................................9 Using the CLI .....................................................................................................................12 Using the SNMP ................................................................................................................13
Chapter 4 Network Access 15
Finding the IP Address ................................................................................................................15 Local Console ....................................................................................................................15 MAC Address.....................................................................................................................16
HTTP/HTTPS Access ..................................................................................................................16 Supported Web Browsers..................................................................................................18
SSH/Telnet Access......................................................................................................................18 SNMP Management.....................................................................................................................19
SNMP Traps ......................................................................................................................19

Contents
vi
Third-Party SNMP Managers ............................................................................................19 Power IQ and dcTrack Management ...........................................................................................19
Power IQ............................................................................................................................20 dcTrack ..............................................................................................................................20
Chapter 5 Updating the Firmware 21
Appendix A Accessibility Troubleshooting 23
Possible Root Causes .................................................................................................................23 Slave Connection and Disconnection Events..............................................................................24 The Ping Tool...............................................................................................................................24
Using the Web Interface ....................................................................................................24 Using the CLI .....................................................................................................................25
Appendix B Ethernet Limitations on Slave Devices 26
Ethernet Disabled Example 1 ......................................................................................................26 Ethernet Disabled Example 2 ......................................................................................................26
Index 27

Introduction Chapter 1
1
Raritan provides a USB-cascading solution, which enables a maximum of
d configuration has its own IP address,
In This Chapter
nts............................................................................1
Hardware Requirements
four Raritan PX PDUs to share the network connectivity after cascading them through the USB interface.
Each individual PDU in the cascadeand can be accessed and administered over the Internet from anywhere. Besides, the firmware of each PDU in the cascaded configuration can be upgraded separately.
Hardware RequiremeSoftware Requirements .............................................................................1 Plug and Play ............................................................................................1
Only those PDUs whose model names are prefixed with PX2 support the
umeric digit)
aded configuration can be of identical or different
USB-cascading feature, including:
PX2-1nnn series (where n represents a n
PX2-2nnn series
PX2-3nnn series
PX2-4nnn series
PX2-5nnn series
The PDUs in the cascmodels.
Software Requirements
A Raritan PX supports the USB-cascading feature as of the firmware
cascaded use the firmware version 2.3.1 or later
Plug and Play
version 2.3.1.
Make sure all PDUs to be before you cascade them. If any PDU's firmware version is earlier than 2.3.1, upgrade it. See Updating the Firmware (on page 21).
The USB-cascading solution is a plug-and-play function. This means you can cascade or uncascade the Raritan PX at any time, and the network connectivity is immediately in effect or lost based on the USB connection status.

2
This chapter illustrates several USB-cascading scenarios, and points out best practices and the condition to which the USB-cascading solution should not be applied.
In
Appro
This Chapter
priate Applications............................................................................2 Best Practices............................................................................................4 Inappropriate Applications .........................................................................5
Appropriate Applications
When it is necessary to reduce the Ethernet connections or save the networking costs, apply the USB-cascading solution.
The USB-cascading solution allows you to cascade two to four Raritan PX PDUs, and makes all cascaded PDUs share one Ethernet connection after connecting the first PDU to the LAN.
The following show six USB-cascading example scenarios. Red lines in the diagrams represent USB connections.
Scenario 1: Cabinet 1 has two PDUs cascaded, both of which share one Ethernet connection.
Chapter 2 USB-Cascading Applications

Chapter 2: USB-Cascading Applications
3
Scenario 2: Cabinet 1 has three PDUs cascaded, all of which share one Ethernet connection.
ScenEthernet con
ario 3: Cabinet 1 has four PDUs cascaded, all of which share one nection.
Scenario 4: Cabinet 1 has two PDUs, and Cabinet 2 has one PDU. The three PDUs are cascaded, sharing one Ethernet connection.

Chapter 2: USB-Cascading Applications
4
Scenario 5: Both Cabinet 1 and Cabinet 2 have two PDUs. The four PDUs are cascaded, sharing one Ethernet connection.
Scenario 6: Cabinet 1 has two PDUs, Cabinet 2 has one PDU, and Cabinet 3 has one PDU. The four PDUs are cascaded, sharing one Ethernet connection.
Best Practices
One Ethernet connection per cabinet is better than one Ethernet connection across cabinets because of the following advantages:
Easier to manage or maintain one cabinet when all of the power cabling and connections are located in the same cabinet.
Reduces the cross-cabinet cabling.
A four-PDU cascaded configuration saves the most Ethernet connections and cost, and it is recommended when ernet ports are limited.
available Eth

Chapter 2: USB-Cascading Applications
5
Inappropriate Applications
Though the USB-cascading solution helps decrease the Ethernet connections and cost, it increases the number of network bridging points for the cascaded PDUs, which may result in network unreliability. Therefore, when high network reliability is required for PDUs, establish a separate Ethernet connection per PDU to lower the number of potential network failure points.

6
This chapter describes the USB-cascading limitations, instructions aways to identify a cascaded Raritan PX.
In this section, the master device refers to the first device in the caconfiguration and slave devices refer to all subsequent devices connected to the master device.
nd the
scaded
This Chapter
scading Limitations ...............................................................................6 scading the Raritan PX .........................................................................6
Identifying the Cascaded Devices .............................................................9
Cascading Limitations
In
CaCa
The USB-cascading solution has the following limitations:
Up to four PDUs can be connected per cascaded configuration.
Only the Ethernet interface on the master device is enabled. The Ethernet interface on slave devices is disabled automatically. See Ethernet Limitations on Slave Devices (on page 26) for details.
The Ethernet connectivity on the master device must be wired -- that is, a Category 5e/6 network cable is required.
The USB-cascading solution is NOT supported by wireless connectivity.
Cascading the Raritan PX
A maximum of four identical or different Raritan PX models can be cascaded via the USB interface.
The cascaded configuration only supports wired networking so you must connect it to the LAN through a Category 5e/6 cable.
Important: Only Raritan PX devices whose model names begin with PX2 support the USB-cascading function. See Hardware Requirements (on page 1).
Chapter 3 USB-Cascading Instructions

Chapter 3: USB-Cascading Instructions
7
A slave device automatically detects and configures the networking settings so it is NOT necessary to configure or change the slave device's network settings before or after making the USB connection.
To cascade the Raritan PX devices:
1. Verify that the firmware version of the Raritan PX devices meet the
rsion 2.3.1 or later
device is used as the master device.
another Raritan PX via a USB cable.
The subsequent device connected to the master device is the first slave device -- Slave 1.
ther Raritan
lave
requirement below. If not, upgrade these devices. See Updating the Firmware (on page 21).
Raritan PX: ve
2. Determine which
The master device must be connected to the LAN via a standard Category 5e/6 UTP cable.
3. Connect the USB-A port of the master device to the USB-B port of
4. Connect Slave 1's USB-A port to the USB-B port of anoPX via a USB cable.
The subsequent device connected to Slave 1 is the second sdevice -- Slave 2.
5. Connect Slave 2's USB-A port to the USB-B port of another RaritanPX via a USB cable.
The subsequent device connected to Slave 2 is the third slave device -- Slave 3.

Chapter 3: USB-Cascading Instructions
8
Number Device role
Master device
Slave 1
Slave 2
Slave 3

Chapter 3: USB-Cascading Instructions
9
Identifying the Cascaded Devices
You can identify whether a Raritan PX is a cascaded device and whether it is the master or slave by accessing its web interface or command line interface (CLI).
The web interface is accessible via HTTP or HTTPS. The CLI is accessible via SSH, Telnet or the serial interface.
In addition to the web interface and CLI, you can use SNMP to retrieve a Raritan PX's USB-cascading status.
Before you can remotely access a Raritan PX's web interface, CLI or SNMP, you need to get its IP address. See Finding the IP Address (on page 15).
Using the Web Interface
This section explains how to identify a cascaded Raritan PX through the web interface.
To identify a cascaded device via the web interface:
1. Log in to the desired Raritan PX using a supported web browser. See HTTP/HTTPS Access (on page 16).
2. Choose Maintenance > Device Information. The Device Information dialog appears.
3. Click the Network tab and locate the Interface section. The Interface section contains two read-only fields: Networking Mode and Cascaded Device Connected.
Field Description
Networkin field indicates how the Raritan PX is connected LAN.
Wired: The device is connected to the LAN through a Category 5e/6 network cable.
Wired (USB): The device is connected to the LAN through a USB-cascaded configuration. In other words, it is a slave device.
g Mode Thisto the
Cascaded Device Connected
This field indicates whether the Raritan PX detects the connection to a Raritan PX on its USB-A port.
yes: The connection to a Raritan PX is detected.
no: The connection to a Raritan PX is NOT detected.

Chapter 3: USB-Cascading Instructions
10
A master device shows Wired in the Networking Mode field and ascaded Device Connected field. yes in the C

Chapter 3: USB-Cascading Instructions
11
A slave device in the middle of the cascaded configuration showsWired (USB) in the Networking Mode field and
yes in the
Cascaded Device Connected field.

Chapter 3: USB-Cascading Instructions
12
The final slave device shows Wired (USB) in the Networking Mode field and no in the Cascaded Device Connected field.
Using the CLI
This section explains how to identify a cascaded Raritan PX through the CLI.
To identify a cascaded device via the CLI:
1. Log in to the desired Raritan PX using the SSH or Telnet service. See SSH/Telnet Access (on page 18).
2. Type either of the following CLI commands and press Enter.
# show network
# show network details
3. Locate the "Networking mode" and "Cascaded device connected" fields displayed onscreen. For the meaning of each field, see the table in the section titled Using the Web Interface (on page 9).

Chapter 3: USB-Cascading Instructions
13
A master device shows Wired in the "Networking mode" field and yes in the "Cascaded device connected" field.
A slave device in the middle of the cascaded configuration shows Wired (USB) in the "Networking mode" field and yes in the "Cascaded device connected" field.
The final slave device shows Wired (USB) in the "Networking mode" field and no in the "Cascaded device connected" field.
Using the SNMP
SNMP allows you to retrieve a Raritan PX's USB-cascading status, which indicates whether a Raritan PX has been connected to its USB-A port. However, the networking mode is NOT retrievable via SNMP so you cannot tell:
Whether the Raritan PX is a master or slave device.
Whether the Raritan PX is a cascaded device when it is the final slave device. This is because the final slave device has no subsequent Raritan PX connected to it.
SB-cascading status, one SNMP MIB manager, such as To retrieve the Uan MIB browser, is required.
To identify a cascaded device via SNMP:
t to the desired Raritan
llowing:
1. Launch your SNMP MIB manager and connecPX.
2. Retrieve the value of either of the fo
SNMP name SNMP object identifier (OID)
cascadedDeviceConnected 1.3.6.1.4.1.13742.6.3.2.2.1.58

Chapter 3: USB-Cascading Instructions
14
3. Check which value is returned.
SNMP value Description
True(1) A Raritan PX has been connected to this Raritan PX's USB-A port.
False(2) No Raritan PX is connected to this Raritan PX's USB-A port.

15
The fupac een the e, you can remotely acc r and slave devices via the Web, SNMP, SSH, or Teln IQ or dcTrack .
This Chapter
Finding the IP Address ............................................................................15 HTTP/HTTPS Access..............................................................................16 SSH/Telnet Access..................................................................................18 SNMP Management ................................................................................19 Power IQ and dcTrack Management.......................................................19
Finding the IP Address
master dkets betw
evice nctions as a network bridge and can transmit IP LAN and all slave devices connected to it. Thereforess both the maste
et interface, or manage them via Raritan's Power ™
In
There are two ways to retrieve the IP address of a Raritan PX.
Access the device from the local console
Use the device's MAC address and common networking tools
Local Console
The IP address of the master or slave device can be found in each device's local console, which is a command line interface. To access the local console, first you should connect the desired Raritan PX to the computer using a serial cable, and then use a terminal emulation program on the computer to access it.
You can use any terminal emulation programs for local access to the command line interface.
This section illustrates HyperTerminal, which is part of Windows operating systems prior to Windows Vista.
To get the IP address using HyperTerminal:
1. Connect your computer to the Raritan PX device via a local connection.
2. Launch HyperTerminal on your computer and open a console window. When the window first opens, it is blank.
Make sure the COM port settings use this configuration:
Bits per second = 115200 (115.2Kbps)
Data bits = 8
Stop bits = 1
Chapter 4 Network Access

Chapter 4: Network Acce
ss
16
Parity = None
Flow control = None
3. Press Enter. Now you should see the Raritan PX's IP address displayed in the terminal.
Note: If you haven't configured the Raritan PX, see the PX2 Quick Setup Guide, which is available on the Raritan website's Firmware and Documentation section
upport/firmware-and-documentation/). (http://www.raritan.com/s
MAC Address
A label is affixed to a Raritan PX device, near the LED display, showing both the serial number and MAC address of the PDU.
If necessary, you can find the PDU's IP address through the MAC address rator
HTTP/HTTPS Acce
by using commonly-used network tools. Contact your LAN administfor assistance.
ss
You can remotely access the web interface of any Raritan PX in a cascaded configuration by using a web browser. See Supported WeBrowsers (on page 18) for a list of supported web browsers.
The web interface allows a maximum of
b
16 users to log in simultaneously.
You must enable JavaScript in the web browser for proper operation.
To log in to the web interface:
1. Open a browser, such as Microsoft Internet Explorer or Mozilla Firefox,
dress> is the IP address of the Raritan PX device.
and type this URL:
http(s)://<ip address>
where <ip ad
Chapter 4: Network Access
17
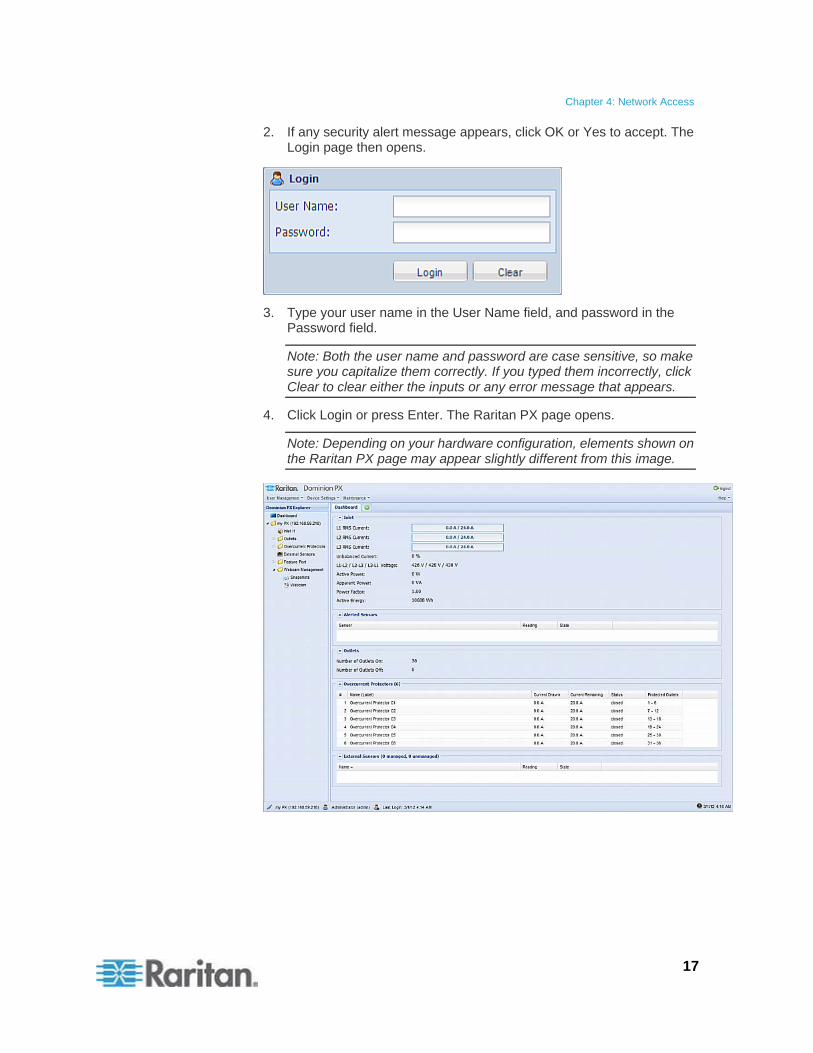
2. If any security alert message appears, click OK or Yes to accept. The ens. Login page then op
3. Type your user name in the User Name field, and password in the ld.
Password fie
Note: Both the user name and password are case sensitive, so makesure you capitalize them correctly. If you typed them incorrectly, click Clear to clear either the inputs or any error message that appears.
4. Click Login or press Enter. The Raritan PX page opens.
Note: Depending on your hardware configuration, elements shown on the Raritan PX page may appear y different from this image. slightl

Chapter 4: Network Access
18
Supported Web Browsers
The following web browsers can be used to access the Raritan PX web interface:
Internet Explorer® 8 and 9
Firefox® 3.x and 4+
Safari® 5.x (MacOS Lion)
Google® Chrome® 12+
SSH/Telnet Access
All devices in the cascaded configuration, including master and slave dev
YouTelnet client, such as PuTTY.
Note: PuTTY is a free program you can download from the Internet. See
ices, support the SSH or Telnet service.
can remotely log in to the command line interface using an SSH or
PuTTY's documentation for details on configuration.
To log in using SSH or Telnet:
1. Ensure SSH or Telnet has been enabled. See Modifying the Network Service Settings in the Raritan PX User Guide.
2. Launch an SSH or Telnet client and open a console window. A login prompt appears.
3. Type a name and press Enter. The name is case sensitive, so make sure you capitalize the correct letters.
Note: If using the SSH client, the name must NOT exceed 25 characters. Otherwise, the login fails.
Then you are prompted to enter a password.
4. Type a password and press Enter. The password is case sensitive, so make sure you capitalize the correct letters.
5. After properly entering the password, the # or > system prompt appears. See Different CLI Modes and Prompts in the Raritan PX User Guide for details.

Chapter 4: Network Access
19
Tip: The "Last Login" information, including the date and time, is also displayed if the same user profile was once used to log in to the Raritan PX web interface or CLI.
You are now logged in to the commadministering the Raritan PX de
and line interface and can begin vice.
SNMP Management
Though cascaded, the SNMP capability of each Raritan PX remains ged. A cascaded device is still able to send SNMP traps and
mmunicate with an SNMP manager.
unchanco
SNMP Traps
To have a Raritan PX in the cascaded configuration send out SNMP trapto one or multiple SNMP destinations when an event occurs, you have to configure the SNMP trap setting on t
s
hat device. For details, see the
(http://www.raritan.com/support/firmware-and-documentation/).
section titled Configuring SNMP Traps in the PX2 User Guide, which is available on the Raritan website's Firmware and Documentation section
Third-Party SNMP Managers
A third-party SNMP manager can communicate with any Raritan PX in thecascaded configuration, including the master and slave devices. There areno differences made to the SNMP acce
ssibility regardless of the device's USB-cascading status.
To allow a Raritan PX to communicate with an SNMP manager, you must
e on the Rar(htt ).
Power IQ and dcTrack Management
enable the SNMP agent implemented on that device and download the latest SNMP MIB for your SNMP manager. For details, see the section titled Enabling SNMP in the PX2 User Guide, which is availabl
itan website's Firmware and Documentation section p://www.raritan.com/support/firmware-and-documentation/
The way to manage a cascaded Raritan PX with Raritan's Power IQ and dcTrack™ is the same as managing a uncascaded Raritan PX.

Chapter 4: Network Access
20
Power IQ
Rar ation that collects and manages the data from different PDUs installed in your server room or data center. With
Name outlets on different PDUs
Switch on/off outlets on outlet-switching capable PDUs
the Raritan website's Firmware and Documentation section
w.raritan.com/support/firmware-and-documentation/).
ne Help: Available on the
itan's Power IQ is a software applic
this software, you can:
Do bulk configuration for multiple PDUs
For more information on Power IQ, see either of the following:
Power IQ User Guide: Available on
(http://ww
Power IQ Onli Product Online Help section(http://www.raritan.com/support/online-help/).
dcTrack
Raritan's dcTrack™ is a software application that collects the data ofcomponenon-power items, and then administer and maintain the data center
all nts implemented in the data center, including power and
efficiently after the data center building is completed in dcTrack.
d configuration can be added to dcTrack,
: Available on the Raritan website's Firmware
Each Raritan PX in the cascadeand communicate with dcTrack via SNMP separately.
For more information on dcTrack, see either of the following:
dcTrack User Guideand Documentation section (http://www.raritan.com/support/firmware-and-documentation/).
dcTrack Online Help: Available on the Product Online Help section(http://www.raritan.com/support/online-help/).

21
You can remotely upgrade each Raritan PX in the cascaded configuration through the web interface. The upgrade procedure is completely identical to a uncascaded device. Note that all devices in the cascaded
riate firmware version or the upported. See Software
ite's
re file from the ritan website, read the release notes, then start the upgrade. If you
questions or concerns about the upgrade, contact Raritan Support BEFORE upgrading.
configuration must be upgraded to the appropUSB-cascading feature becomes unsRequirements (on page 1).
The Raritan PX firmware files are available on the Raritan websFirmware and Documentation section (http://www.raritan.com/support/firmware-and-documentation/).
You must be the system administrator or log in to the user profile with theFirmware Update permission to update the Raritan PX device's firmware.
If applicable to your model, download the latest firmwaRahave any Technical
Warning: Do NOT perform the firmware upgrade over a wireless connection.
To update the firmware:
1. Choose Maintenance > Update Firmware. The Firmware Update
g you a last chance to terminate the update.
5. To view the certificate of the uploaded firmware, click View Certificate. Optional.
6. To proceed with the update, click Update Firmware. The update may take several minutes.
Warning: Do NOT power off the Raritan PX device during the update.
dialog appears.
2. In the Firmware File field, click Browse to select an appropriate firmware file.
3. Click Upload. A progress bar appears to indicate the upload status.
4. When the upload is complete, version information of both the existing firmware and uploaded firmware is shown, providin
During the firmware update:
A progress bar appears in the web interface, indicating the update status.
On the Raritan PX device, the three-digit LED display shows “FUP.”
No users can successfully log in to the Raritan PX.
Chapter 5 Updating the Firmware

Chapter 5: Updating the
Firmw
22
are
In the web interface, all logged-in users see the Raritan PX time out message, and the "disconnected" state is shown in the status bar.
rs. You e your operation.
are
The user management operation, if any, is forced to suspend.
7. When the update is complete, a message appears, indicating the update is successful.
8. The Raritan PX device resets, and the Login page re-appeacan now log in and resum
Note 1: The other logged-in users are also logged out when the firmwupdate is complete.
Note 2: If you are using the Raritan PX with an SNMP manager, you should re-download the Raritan PX MIB after the firmware update. This ensures your SNMP manager has the correct MIB for the latest release you are using. See Using SNMP in the Raritan PX User Guide.

23
Any accessibility problem occurred on one of the devices in the cascaded configuration may result in failure to access all subsequent slave devices
3 ....................................24
Possible Root Cau
that are connected to it.
In This Chapter
Possible Root Causes .............................................................................2Slave Connection and Disconnection Events......The Ping Tool ..........................................................................................24
ses
The following lists the network accessibility issues and possible root causes.
Symptom Probable cause
Failure to access the master device
Lost the network connection
No power supply to the master device
Loose or lost the inlet cord connection
Power source failure
Failure to access a slave device Lost the network connection to the master device
Lost the USB connection to the slave device in question or any prior slave device (if available)
No power supply to the Raritan PX in question or any prior Raritan PX in the cascaded configuration
Inappropriate firmware version loaded to the Raritan PX in question or any prior Raritan PX in the cascaded configuration
Tip: To find which Raritan PX may be the failure point of network, you may ping each Raritan PX in the cascaded configuration, or look for the slave-related events in each Raritan PX's event log. See Slave Connection and Disconnection Events (on page 24) and The Ping Tool (on page 24).
Appendix A Accessibility Troubleshooting

Appendix A: Accessibility Tro
u
24
bleshooting
Slave Connection and Disconnection Events
Whenever the USB connection or disconnection of a subsequent slave device is detected, the Raritan PX logs it in the internal log. Note that only the Raritan PX at the USB-A end of the USB cable logs the connection or disconnection event of the subsequent slave device at the USB-B end.
elated events: There are two slave-r
Event Description
USB slave This is the log entry that is generated when a connected Raritan PX detects the connection to a slave Raritan
PX on its USB-A port.
USB slave disconnected
This is the log entry that is generated when it detects the loss of the connection to a slave Raritan PX on its USB-A port.
Tool
The Ping
The Raritan PX provides a ping tool in the web interface and CLI so you can pi er.
Using th
ng any host, including a PDU in your data cent
e Web Interface
To log in to the web interface, see HTTP/HTTPS Access (on page 16).
The Ping tool the network
is useful for checking whether a host is accessible through or Internet.
1.
2. he name or IP address of the host that
st the many
o start pinging the host. A dialog appears, displaying the Ping results.
5. Click Close to quit the dialog.
To ping a host:
Choose Maintenance > Network Diagnostics > Ping. The Ping Network Host dialog appears.
In the Host Name field, type tyou want to check.
3. In the Number of Requests field, type a number up to 10 or adjuvalue by clicking either arrow. This number determines how packets are sent for pinging the host.
4. Click Run Ping t

Appendix A: Accessibility Troubleshooting
25
Using the CLI
To use a CLI command, you must access the CLI interface. See SSH/Telnet Access (on page 18) for details.
The CLI ping command is a diagnostic command that must be performed in the diagnostic mode. To enter the diagnostic mode, type the following
# diag
he diag> pro you can perform the ping command.
d syn for ch
host is responding prope ctivity is good, or the host is r not b
diag> pin
Variables:
command.
When t mpt appears,
This commannetwork host
tax sends the ICMP ECHO_REQUEST message to aecking its network connectivity. If the output shows the
rly, the network conneshut down o
eing connected to the network.
g <host>
<host> is the host name or IP address whose networking connectivityyou want to check.
Options:
You can include any or all of additional options listed below in the pingcommand.
Options Description
count <number1> Determines the number of messages to be sent. <number1> is an integer number.
size <number2> Determines the packet size. <number2> is an integer number in bytes.
timeout <number3> Determines the waiting period before timeout. <number3> is an integer number in seconds.
The command looks like this syntax when it includes all options:
diag> ping <host> count <number1> size <number2> timeout <number3>

26
The Ethernet interface is automatically disabled on the slave devices. This appendix illustrates this limitation by showing two scenarios.
In This Chapter
ernet D Example 1..................................................................26
Ethernet Disabled
Eth isabledEthernet Disabled Example 2..................................................................26
Example 1
Raritan PX-1 has been directly connected to the LAN. Its Ethernet na king mode shows Wired.
aritan PX-2 has been directly connected to the LAN. Its Ethernet interface is enabled and networking mode shows Wired.
Raritan PX-2 becomes a slave device.
The Ethernet interface on the Raritan PX-2 is automatically disabled. its IP packets are transmitted through the master device in the
ing mode changes to Wired (USB).
Ethernet Disabled Exa
interface is e bled and networ
R
If now you connect Raritan PX-1 to the USB-B port of Raritan PX-2 using a USB cable, the following occur:
All of cascaded configuration.
The network
mple 2
Raritan PX-1 USB-A port. On Raritan PXnetw ws W
Raritan PX-2 is a slave de ce is automatically disatransmitted through the m
you directly connect Raritan PX-2 to the LAN now, NO changes occur.
The networking mode of Raritan PX-2 still shows Wired (USB).
Appendix B Ethernet Limitations on Slave Devices
is a master device, which has Raritan PX-2 connected to its -1, the Ethernet interface is enabled, and the
orking mode sho ired.
vice, whose Ethernet interfabled, networking mode shows Wired (USB), and IP packets are
aster device.
If
Raritan PX-2 continues to operate as a slave device.
The Ethernet interface on Raritan PX-2 remains disabled. All IP packets are still transmitted through Raritan PX-1.

27
A
Accessibility TroubleshootinAppropriate Applications • 3
B
Best Practices • 5
C
CasCascadin
D
dcTrack • 21
E
Ethernet Disabled Example Ethernet Disabled ExampleEthernet Limitations on Sla
F
Finding the IP Address • 1
H
HardHTTP/HTTPS Access • 10,
I Identifying the Cascaded DeInappropriate Applications • Introduction • 1
L
Local Console • 16
M
MAC Address • 17
N
P
Power IQ and dcTrack Management • 20
S
Slave Connection and Disconnection Events •
elnet Access • 13, 19, 26 rowsers • 17, 19
e Ping Tool • 24, 25 rs • 20
U
the CLI • 13, 26
Index
g • 24 Network Access • 16
cading Limitations • 7 g the Raritan PX • 7
1 • 27
SNMP Traps • 20 Software Requirements • 1, 22 SSH/T
2 • 27 ve Devices • 7, 27
Supported Web B
0, 16 Third-Party SNMP Manage
ware Requirements • 1, 7 17, 25
Updating the Firmware • 1, 7, 22 USB-Cascading Applications • 3 USB-Cascading Instructions • 7 Using
vices • 10 6
Using the SNMP • 14 Using the Web Interface • 10, 13, 25
Plug and Play • 2 Possible Root Causes • 24 Power IQ • 21
Safety Guidelines • ii Safety Instructions • iii
24, 25 SNMP Management • 20
T
Th

U.S./Canada/Latin America Monday - Friday 8 a.m. - 6 p.m. ET Phone: 800-724-8090 or 732-764-8886 For CommandCenter NOC: Press 6, then Press 1 For CommandCenter Secure Gateway: Press 6, then Press 2 Fax: 732-764-8887 Email for CommandCenter NOC: [email protected] Email for all other products: [email protected]
China
Beijing Monday - Friday 9 a.m. - 6 p.m. local time Phone: +86-10-88091890
Shanghai Monday - Friday 9 a.m. - 6 p.m. local time Phone: +86-21-5425-2499
GuangZhou Monday - Friday 9 a.m. - 6 p.m. local time Phone: +86-20-8755-5561
India Monday - Friday 9 a.m. - 6 p.m. local time Phone: +91-124-410-7881
Japan Monday - Friday 9:30 a.m. - 5:30 p.m. local time Phone: +81-3-3523-5991 Email: [email protected]
Europe
Europe Monday - Friday 8:30 a.m. - 5 p.m. GMT+1 CET Phone: +31-10-2844040 Email: [email protected]
United Kingdom Monday - Friday 8:30 a.m. to 5 p.m. GMT Phone +44(0)20-7090-1390
France Monday - Friday 8:30 a.m. - 5 p.m. GMT+1 CET Phone: +33-1-47-56-20-39
Germany Monday - Friday 8:30 a.m. - 5:30 p.m. GMT+1 CET Phone: +49-20-17-47-98-0 Email: [email protected]
Melbourne, Australia Monday - Friday 9:00 a.m. - 6 p.m. local time Phone: +61-3-9866-6887
Taiwan Monday - Friday 9 a.m. - 6 p.m. GMT -5 Standard -4 Daylight Phone: +886-2-8919-1333 Email: [email protected]