Under Lever
103
-
Upload
garymessenger -
Category
Documents
-
view
229 -
download
0
Transcript of Under Lever

8/8/2019 Under Lever
http://slidepdf.com/reader/full/under-lever 1/103

8/8/2019 Under Lever
http://slidepdf.com/reader/full/under-lever 2/103

8/8/2019 Under Lever
http://slidepdf.com/reader/full/under-lever 3/103

8/8/2019 Under Lever
http://slidepdf.com/reader/full/under-lever 4/103

8/8/2019 Under Lever
http://slidepdf.com/reader/full/under-lever 5/103
Because a lot of this build will be Color Case hardened for the finish, I chose 8620 as the material to build the action and other parts from. 8620
produces very nice result in color case hardening and also exceeds all the requirements for the strength required in this action once it is properly
hardened and treated. 3" x 2" 8620 bar stock, O-1 1/2" round stock for the pins, a commercial left handed L&R back action lock, 2 screw grip cap,
NECG multi-leaf express sight, Cast t rigger guard, and eschuteons. Pachmayr decelorator 752B.
I cut the action with a few extra inches in the length, and the monoblock with an extra inch. I do this for a couple reasons, the first is it is always
easier to take the extra off than it is to add metal back on if I end up short. The second reason is the extra gives me a place to clamp onto when I am
machining these parts.

8/8/2019 Under Lever
http://slidepdf.com/reader/full/under-lever 6/103
With the pieces cut down to a more manageable size I then rubbed a little cold blue on the metal to darken it up and scribe in my layout lines. These
layout lines are just a guide so I can cut out the bulk of the excess metal on my vertical bandsaw. I'll do all the fine metal work in the Mill and Lathe
with precision tools. Spent some time at the vertical bandsaw this afternoon and roughed out the water table and face. Nothing really exciting just a
long slow cut through more than a couple inches of steel.

8/8/2019 Under Lever
http://slidepdf.com/reader/full/under-lever 7/103
Sure glad I didn't have to cut that with a hacksaw....... My plan is to work this action in sections, starting with the most critical sections first and then
working on the outside shaping last. With that fairly large chunk of excess steel out of the way it was on to the mill.
It took a few times back and forth with the dial indicator in the mill, but I finally got i t squared and trued in all directions, and now I am ready to start
machining the water table and the face down to their final dimensions. That big block of steel sure makes my mill look a lot smaller than it really is.
The upside to that though is that I don't really have to worry about things flexing during the cuts until I get a lot more metal removed.
For those of you who have been following along with the build, I apologize for the delay in updating this. I had a family emergency to deal with, but
things are slowly settling down again and I am back to working in my shop at least a little anyways.
I machined the water table and breech face, square and true to within a few thousands of finished dimensions. Then I changed to a ball end mill and
cut the radius in the corner last. I always leave everything a few thousands proud of final, so that I can remove the tooling marks.

8/8/2019 Under Lever
http://slidepdf.com/reader/full/under-lever 8/103

8/8/2019 Under Lever
http://slidepdf.com/reader/full/under-lever 9/103
I then came in and cut the openings for the bite lumps. The front one was fairly easy since I could just rough right in from the front of the action. The
rear one I pre-drilled to depth and then milled away the slot . The final operation before I removed it from the mill was to drill an undersized hole, were
the underlever retaining screw will eventually get threaded into. This hole also gives me the index point to flip the action over and machine from the
bottom side.

8/8/2019 Under Lever
http://slidepdf.com/reader/full/under-lever 10/103

8/8/2019 Under Lever
http://slidepdf.com/reader/full/under-lever 11/103
I then draw filled all of the tooling marks out of the water table and the breech face, and then smoothed out the transition in the radius.

8/8/2019 Under Lever
http://slidepdf.com/reader/full/under-lever 12/103
As you can see this is proof positive that the same hand tools that have been producing quality products for hundreds of years still work just fine
today
Hopefully now that things are more normal around here again, I will be able to get back to my usual routine and shop time and be able to update this
more frequently as the build progresses.
I flipped it over, put it back on the Mill table and indexed off of the lever screw hole. I then step drilled it until I had it opened up enough to use my
Boring head to bring it out to full diameter.

8/8/2019 Under Lever
http://slidepdf.com/reader/full/under-lever 13/103

8/8/2019 Under Lever
http://slidepdf.com/reader/full/under-lever 14/103

8/8/2019 Under Lever
http://slidepdf.com/reader/full/under-lever 15/103
It isn't very exciting, but it is progress and it is starting to look like a Jones style lock. Monday will be another day of filing. I will be starting to square
up the radius, so the bite lumps will have a nice square shoulder to lap over.
I didn't get anything done yesterday, but I have a reasonably good excuse. I went up to visit Custom Engraver Steve Lindsay in Kearney Nebraska
Sunday and purchased one of his Classic Airgravers. SO with a new tool to try-out I spent most of yesterday making a few slight modifications to my
engraving bench, and then working with my new Airgraver.
This morning though I got busy and filed out the radius' left from machining the slots for the Bite Lumps. I worked the narrow side first bringing it out
square, and then worked the wider side last to bring it down to match the center distance from the screw hole.

8/8/2019 Under Lever
http://slidepdf.com/reader/full/under-lever 16/103

8/8/2019 Under Lever
http://slidepdf.com/reader/full/under-lever 17/103
It took a while to get everything filed in and then trued up, mostly because there was no convenient way to file through the opening and keep
everything square, so it just had to be done in short strokes. I also had to file a bit of the inside walls to cleanup the radius left from the milling.
With the Water table basically done, I can take all my measurements for the bite lumps and monoblock directly off the action. This will save me time
later when it comes time to smoke the fit together.
I spent most of this week focused on the machining the Monoblock, it's not ready to fit up to the water table yet, but it's getting closer.
I started by milling off the excess sides of the bite lumps.

8/8/2019 Under Lever
http://slidepdf.com/reader/full/under-lever 18/103

8/8/2019 Under Lever
http://slidepdf.com/reader/full/under-lever 19/103
Then I step drilled a hole through the length of it, so I would have a center line to the bore to start machining from. Then I turned some of the extra
length down to a shank that was concentric to the bore, by turning between center. This shank gives me a place to index off of and also a place for
my steady rest to ride on in the lathe.

8/8/2019 Under Lever
http://slidepdf.com/reader/full/under-lever 20/103
I then bored it out in the lathe, and while it was still indexed I went ahead and cut the threads. I went to a 1-9/16" - 20TPI thread and threaded the
full length of the Monoblock. I chose this diameter of thread for a couple reasons. The first is that the minimum and maximums of the thread will give
me the same amount of steel in the barrel and the same amount of steel in the Monoblock wall after it is profiled. The second reason just happened to
be convenient that the Rim diameter of the case and the minor diameter of the thread are very close, so when it is chambered the rim recess should
hide the thread at the chamber face. So that saved me having to turn to diameters in the Monoblock.

8/8/2019 Under Lever
http://slidepdf.com/reader/full/under-lever 21/103
And then I cut started cutting the bite lugs in. The width of the lumps is a little wide and the bites are a little narrow, I cut them over and undersized
respectively so that when I start fitting things together I have a little extra metal to work with. It's always easier to take it off than it is to put it back
on.

8/8/2019 Under Lever
http://slidepdf.com/reader/full/under-lever 22/103
Eventually when I have the barrel and I'm ready to fit it up , I will machine that extra shank off, but for now it makes a handy index and a good place
to clamp on to.
Yet another week has gone by that I didn't get as much accomplished on this as I would have liked. I was out of town several days this week for
follow-ups related to the family emergency that happened a few weeks ago. And today I will spend a large portion of the day casting balls for another
customer and finishing up some last minute work on a different project. It's amazing to me how long it takes to get your life back to a normal flow
after things get derailed. Hopefully next week I can dedicate my entire week to this project and make some real headway with it.
I did make a little progress though on this action, I started by machining the extractor recess into the monoblock. I actually figured out a fairly simple
way to make this cut a few years ago when I was converting a Shotgun to a Rifle. I was having problems indexing the monoblock in the mill and
getting everything clamped in place properly, and then I had one of those strokes of genius, or maybe just a stroke(haha). In any case I figured out
that for this one cut it was easier to use the tool post on my lathe as the vise. It takes about two minutes to square everything up in the tool post and
a few minutes later the recess is cut.

8/8/2019 Under Lever
http://slidepdf.com/reader/full/under-lever 23/103

8/8/2019 Under Lever
http://slidepdf.com/reader/full/under-lever 24/103
I didn't really have to do it this way because this monoblock is still square and would have been fairly easy to set up in the mill, but given how fast
this arrangement is, I pretty much use this way every time now. When the barrel finally arrives and I get it threaded to the monoblock, I will use this
same method to remove the extractor recess from the barrel shank as well.

8/8/2019 Under Lever
http://slidepdf.com/reader/full/under-lever 25/103
The other work I got done was to step drill the hinge pin hole. I did this on my mill, starting with a center drill to mark the location and then step
drilling to just under finished diameter. I then used a precision reamer to finish up to final diameter. And it came out just right, because the precision
ground tool steel I am using for the hinge pin is a press fit, just what I wanted. I also machine the corresponding half into the monblock for the hinge.

8/8/2019 Under Lever
http://slidepdf.com/reader/full/under-lever 26/103
This last picture is just a temporary fit up pin in place and the monoblock resting on the outside of the water table to give you an idea of how much
hand fitting will have to be done to bring this down to a proper fit.

8/8/2019 Under Lever
http://slidepdf.com/reader/full/under-lever 27/103
It not much progress, but at least I got something done on it this week. Hopefully next week will be more productive.
I started making the extractor and fitting it to the monoblock. There are several ways to machine an extractor and I've tried several of them. I've cut
them on my Mill using a boring head, I've cut them using the rotary table, and a few other variations of tooling set ups in the Mill. These days though I
have been using my Lathe, I put my face plate on, use a sacrificial piece of steel to back the part and then just clamp everything down on center. Set
up time is faster this way and I have the added advantage of being able to use the power feed to make the cuts, instead of manually cutting
everything on my Mill.

8/8/2019 Under Lever
http://slidepdf.com/reader/full/under-lever 28/103
The extra clamp on the right side in the picture is just for a counter weight to help keep things balanced a little better while it's turning it doesn't
actually hold anything.

8/8/2019 Under Lever
http://slidepdf.com/reader/full/under-lever 29/103
Making the cuts this way I can take the extractor out to within a few thousands of finished diameter so that I only have to do a little fine clean up
with the chamber reamer when I chamber the barrel.
The next step was to drill the extractor face for the 2 guide/push rods that would slide into the monoblock. Then it was time to drill the corresponding
hole in the monoblock and that is were things went bad for a little while. about 3/4" into the first hole my brand new 1/8" drill bit snapped off leaving
about a 1/4" of it buried down in the hole. I spent nearly a full afternoon getting it back out of there. I was less than happy about it, but I would
rather spend one afternoon fishing out a broken bit than have to start over and machine another monoblock from scratch.
The next day with another new bit everything went smoothly and I was able to drill both hole to depth in the monoblock. I then put it back in my Mill
and used a 1/4" ball endmill to open up the slots for the arms to push against the extractor guide rods.

8/8/2019 Under Lever
http://slidepdf.com/reader/full/under-lever 30/103
A quick test fit and trial with an empty cartridge, everything functions smoothly, and has plenty of movement, I may shorten the rods a little as things
start getting fitted, but for now longer is better.

8/8/2019 Under Lever
http://slidepdf.com/reader/full/under-lever 31/103

8/8/2019 Under Lever
http://slidepdf.com/reader/full/under-lever 32/103
I'm going to change directions for a few days and work on the lock plate and off side plate while I wait for a new Rotary Table for my Mill to arrive,
the one I own just isn't big enough to handle this action so I bought a bigger one.
I spent the last day or so reworking the Lock Plate and building the off side Plate. As I stated earlier in the build I bought a L&R left handed back
action lock to save time with building the internal parts. The Plate though is a straight body plate and I want to recreate the look of the dolphin lock
shape that is found on many of the original rifles of the era.
I start by cutting to plates large enough to get the finished shape out of. I then solder them together, this makes it easy to cut and shape them at the
same time and know that when I take them apart I will have a matched set. This is the same method I use when I am building locks for double rifles.
Once they are soldered together I then make a copy of the lock shape form the drawings and then use it as a template glued directly to the metal.

8/8/2019 Under Lever
http://slidepdf.com/reader/full/under-lever 33/103
I then punch around the template so I don't loose my edge if the paper gets rubbed off during cutting and shaping. Then it's on to the vertical
bandsaw to rough out around the punch marks.
Then I use a variety of hand grinds, belt sanders, files and disc sanders to bring the edges down to the punch marks and clean the mill scale off the
faces. Once they are shaped down to the final dimension I heat them up again and release the solder. At this point the off side plate is basically ready

8/8/2019 Under Lever
http://slidepdf.com/reader/full/under-lever 34/103
to inlet other than needing to bevel the edges. Then I make any changes to the internal lock geometry that I need to, to keep all the parts inside the
edges of the new plate shape. I then drill all of the holes, ream the tumbler hole to finished size and then I take it to the mill and remove the extra
width between the bolsters(the thick portion in front of and behind the internals, this is were the screws that hold the lock in will eventually get
threaded into). Then I thread the holes I drilled earlier, file and fit the few minor changes to the internals and I now have a left-handed Dolphin
shaped back action lock, and matching Off-side Plate.

8/8/2019 Under Lever
http://slidepdf.com/reader/full/under-lever 35/103
This last picture has the original lock plate in it for comparison of the changes. I think the Dolphin locks are so much more graceful, it really surprises
me that none of the commercial lock makers offer this style of lock. The hammer will get reshaped after the lock is fitted to the action.
I haven't gotten a lot accomplished the last couple weeks due to a couple of reasons. The first being that early the morning of the 15th we had a snow
storm come through and it broke over 300 power poles in our area and I was without power for several days. Since I was out of power I decided to
remodel my shop a little and give myself more space to work, that took a few days longer than I expected it to by the time I was done building a new
wall and rearranging equipment. Then this week being Thanksgiving I didn't get much accomplished because my Sister and her family were visiting
and I wanted to spend time with them instead of working the whole week. I did manage to squeeze a little work in though on the action.
With the new to me(used) rotary table here finally, I set up the action and radiused the front around the hinge pin, and then shaped the shelf on top
of the radius to a square shoulder. Nothing really fancy about my set-up just plain old indexing and a lot of back and forth with the rotary table. I
always like the action shots when I am about half way done and can still see the square shape and also see the radius that is developing, it always
intrigues me how something so simple as turning a square into a round looks when you can see the shoulders. So here's a couple of shots of it half
way cut:

8/8/2019 Under Lever
http://slidepdf.com/reader/full/under-lever 36/103

8/8/2019 Under Lever
http://slidepdf.com/reader/full/under-lever 37/103
When I was finished with the radius I took the rotary table off the mill, then indexed the action back to square on the table and cut the shoulder in the
top of the radius, this not only gives the classic look but it also serves to leave a shoulder of metal in the forearm metal instead of a sharp edge when I
make that piece.
Then I took the action back to the vertical bandsaw and started roughing out the top tang.
That's all I got accomplished the last two weeks and I probably won't get much done on it next week because my brother is coming for open week of
Whitetail Rifle season here and we will be out hunting all next week. There's a really nice 6x6 that has been roaming the north end of my property the
last couple months that I would like to t ry and put in front of my brother if I can manage it.
I know it has been nearly 6 weeks since I posted an update to this project, but I have a few valid reasons for the long delay. The first is I had family
here for two weeks over Thanksgiving and into Kansas Rifle season(First part of December), so I didn't spend much time in the shop while they were
here. The next reason is I left a couple days after Christmas to deliver the 2 Bore Boxlock rifle to it's new owner and then went on to visit my sister

8/8/2019 Under Lever
http://slidepdf.com/reader/full/under-lever 38/103
and didn't get back until after New Years, so that accounts for about 3 weeks of the 6. During the other 3 weeks we were without power for several
days at a time as the blizzards blew through, and with the blizzards comes the chores that go with owning livestock during foul weather, no power and
livestock to attend to keeps me away from my workbench.... I did however manage to get a hundred plus hours into fitting up the monoblock and
extractor to the breech/water table.
This is just a bit of old school hand tool work, no fancy machines, no custom jigs, just an oil lamp(couple of old cans) and files, scrapers and stones.
This is a fairly simple process, I start the monblock into the water table(just some quick filing to get it to barely fit in) then I smoke the part, black
soot from the oil lamp, then seat it into the action and when I lift it away the soot is left behind revealing a shiny spot at all the high spots. Sometimes
it's just a small little area(like in the following pictures) other times it's much larger areas that are touching. Each high spot gets filed down, and the
process of smoke and fit is repeated until the whole monoblock seats down properly on the Watertable and breech face.
The following picture is just a quick series to show were it started at and close to final fit, it took me over 100 hours to go from the first picture to the
final fit.

8/8/2019 Under Lever
http://slidepdf.com/reader/full/under-lever 39/103
Then the stoning and polish bring high spots down the last little bit into it's final fit. I know this doesn't really seem like much but it's hour upon hour
of smoke, then fit, then file/scrape or stone, then repeat over and over and over again until your fingers are numb and you start having dreams about
it at night.....well maybe that's being a little overly dramatic but you get the idea.
When you are all said and done it should be a near perfect fit.

8/8/2019 Under Lever
http://slidepdf.com/reader/full/under-lever 40/103
As a side note to this, I don't intentionally add blood, sweat and tears to every project it just seems to work out that way by the time I am done. I
forgot that as you file, the edges of some of the parts become very sharp, and can lay you open cleaner than a fillet knife...
I also managed to brand the palm of my right hand with the extractor after grinding it down some (Note to self things get hot when they are groundwith a 12" Disc grinder) in an effort to save some file t ime, I thought it was cooler than it was....my mistake.

8/8/2019 Under Lever
http://slidepdf.com/reader/full/under-lever 41/103
So this project has been christened with my blood and sweat, no tears yet but there is a lot to do.....
I managed to get some real work done this week for a change. I started by bandsawing out a huge chunk of the action since I didn't need it anymore.
I cut all but an inch of the underside of the tang out.
Then I set up in my mill and removed both sides of the inch behind the breechface, this took a while to mill out since I had to change set up severaltimes to machine the contours into the top section.
You are probably wondering why I went to all the trouble of machining that section behind the breech instead of just cutting it out on the bandsaw,
well there are several reasons why I chose to do it this way. The first reason is actually two parts A) it adds a lot of extra strength to the breechface
having that extra brace behind it while still leaving the outside appearance looking like it is a much thinner breechface, B) it strengthens the joining
area between the top of the action and the thinner tang(hopefully this will prevent the action from flexing away from the wood under recoil). The
second reason is leaving this area with steel in it gives me a place to tap the front screws into that will hold the lock and off-side plate, instead of
drilling clear through the wood and tapping into the off-side plate this prevents weakening the stock right in the area I need the most strength. The
last thing leaving that metal in there does it act as a set of shoulders, instead of the wood just butting up to the action, this gives a set of shoulders
that the wood will be set up against and wil l hopefully prevent the tang from acting like a splitting wedge under recoil.
The next bit of machining was to face off the bottom, and then make the cuts for the trigger plate to lock into the bottom of the action, pretty straight forward work here.

8/8/2019 Under Lever
http://slidepdf.com/reader/full/under-lever 42/103
Then I moved on to the first part of building the locking lever, I turned the locking shoulders of the "T" out on the lathe and then indexed it in the
mill and machined the opening flats at 180deg. The leading edge has to be machined just slightly deeper than the trailing side to allow for clearance
for the front lump of the monoblock to clear it as it closes.
In the above photos you can see it in the action - Unlocked and locked position, and I am just starting to fit the locking surfaces together.
Unfortunately there is no really good way to get a clear picture of how the surface mate without x-ray equipment, so I figured I would just give you
my high end technical drawing of how they intereact(read quickly and poorly sketched in MSPaint). The two surface should come together at matching

8/8/2019 Under Lever
http://slidepdf.com/reader/full/under-lever 43/103
angles, so they pull into each other as you rotate the handle of the underlever. The best way i can describe this is to think of it like a single thread on
a nut and bolt.
That is one high end technical drawing now isn't it, feel free to laugh, I know I did.
This last picture is just a quick mock up to see i f things are going to fit as I planned them to:
So far So good, back to filing on the locking surfaces....

8/8/2019 Under Lever
http://slidepdf.com/reader/full/under-lever 44/103
I finished fitting the locking surfaces of the underlever and monoblock first thing this morning. Then I started working on some of the outside profile,
there is still some mechanical work to do, such as the protrusions that bear against the extractor guides, and the firing pin. But I wanted to get rid of
some of the excess metal so I don't have to cut through the extra.

8/8/2019 Under Lever
http://slidepdf.com/reader/full/under-lever 45/103
I machined in the nice little detail bead(doesn't actually do anything, but it adds to the looks) that runs the length of the monoblock and sculpts it's
way into the action. Right now it is st ill just square and will need to be filed round and contoured into the action around the tang area.
Now that it is machined down on the sides and top you can see why I spent all that time smoking and filing these two pieces together. Not quite
seamless, but not bad....
This morning I shaped out some more of the profile, I started by milling the 45deg. flats on the tops of the monoblock/breech. Then I come in from
the sides and machined the radius' that transition into the tang. The rest of the tang was done by slicing off the extra on the Bandsaw and then
grinding and finally hand filing the shape down.

8/8/2019 Under Lever
http://slidepdf.com/reader/full/under-lever 46/103

8/8/2019 Under Lever
http://slidepdf.com/reader/full/under-lever 47/103
It's kinda starting to look like an action now instead of just a couple blocks of steel.
I know it seems like I am jumping around a lot on this but there is a method to my work. I'm getting to a point were I am ready to cut the relief for
the firing pin seat and drill for the firing pin hole. I also want to get the underlever lock finished up. In order to do that I need to be sure of were the
hammer/lockplate is going to sit, and in order to know were the lock is going to be positioned, I needed the trigger plate, I also need the trigger plate
to attach the trigger guard, so I can form the underlever handle over it. So with those next steps in mind I built the trigger plate, and the trigger and
installed the trigger guard today.
This was all pretty basic stuff, just a matter of cutting things out and then filing and fitting them to the appropriate shape. The Trigger guard is a
casting that I modified a little to suit my purposes, it isn't to it's final shape yet, but it is close enough for right now.
Yes I know it looks like the trigger plate is crooked, but it's just a trick of the camera and light, because when I lay a straight edge on it, it is nice and
parallel to the sides of the action.

8/8/2019 Under Lever
http://slidepdf.com/reader/full/under-lever 48/103
As you can see, my method of jumping around to different parts of the action, have revealed that on paper the top of Lock plate sits right at the
junction of the flat and the angle, but in the real world, in order to get the lock centered in the wrist area, it will have to be moved up slightly and the
lock will have to be filed to match the angle and transition of the action, not a big deal and I kind of expected it, since the 2 Bore is so much bigger
than the 8 Bore I modeled this off of, but it is important to know that before I cut and drill for the firing pin.
Just a minor observation from my life, but every little side project(such as vehicle maintenance), costs me half a day or more away from my actual
work bench, even the simplest things seem to take a lot of time out of my normal work day. Just thought that was worth mentioning because this littleupdate didn't take me 4 days to make, it took me that long to get back and take pictures and post it.....
I will be the first to admit that my blacksmithing skills are adequate at best, but I'm pretty happy with the way the underlever handle turned out. This
was pretty simple to build, I started with a flat strip of 1/4" x 1-1/2" flat stock, and then drilled the hole that the locking section would fit into in one
end(slightly undersized), then I heat, beat and bend, check the fit, heat, beat and bend until I finally got it shaped to wrap around the triggerguard
with just enough clearance to allow everything. to swing cleanly. Then I cut off the excess length on the locking part, counter beveled everything,
slipped the hole over the locking section and tacked it all in place and filled in the counter bevels inside and out with weld using my TIG welder. Then I
used a 4" hand grinder and files to clean everything up the extra filler metal from the welds and roughly shape the handle. I still need to drill the
countersink for the bolt that will hold it to the action, machine the bolt, and then finish filing the rest to a more refined shape.

8/8/2019 Under Lever
http://slidepdf.com/reader/full/under-lever 49/103
You'll notice it doesn't quite come to centerline of the triggerguard when closed, that is done intentionally to allow for any variation between now and
final finish, and if nothing changes it will remain just slightly off center, this has the added bonus that if from use it starts to wear the locking surface,
it will just get closer to centerline, whereas if it started on center it would rotate past center as t ime and use wear it in. Not that I expect after
everything is case hardened that it will wear much, but it leaves the possibility for it anyways.
This week I worked on the Forearm Iron and the Bites that push the Extractor out. The Forearm Iron took quite a bit of machining and a little fitting
to get it to fit and function properly. I built it in two piece the radius that matches the action, was milled out of the cut-out piece from the
watertable/breech area, then the attaching iron that will eventually affix the forearm wood to the underside of the barrel was milled out, then TIG
Welded the two parts together, and cleaned up the welds. It wasn't just a simple butt weld, I actually milled the two parts as overlapping piece and
then welded the length of the overlaps together, doing it this way saved me the time of having to machine the whole forearm out of a single block,
while still keeping the strength needed. Once it was all cleaned up you really can't tell it wasn't one piece. There will be two more slots that get
machined into the Forearm Iron, the slot that allows the attaching iron under the barrel to pass through, and the key slot for the wedge that affixes
the forearm onto the barrel, but these will have to wait until I have the barrel installed on the monblock and the attachment piece soldered to the
barrel.

8/8/2019 Under Lever
http://slidepdf.com/reader/full/under-lever 50/103
Then I milled in for the Extractor Bites, these actually serve two purposes, they extend into the bottom of the Monoblock and push against the
Extractor Guide Rods, but if you look closely at the pictures they also intersect the edge of the Hinge Pin. By having them intersect the Hinge Pin, I
won't need to have retaining screws on the outside of the action to keep the Hinge Pin from drifting. Should the Hinge Pin ever become worn allowing
the Monoblock to come off face(over a lifetime of use it happens) the pins are threaded in, so it is simply a matter of backing them out, driving the pin
out and replacing it to reestablish the Monoblock to face.

8/8/2019 Under Lever
http://slidepdf.com/reader/full/under-lever 51/103

8/8/2019 Under Lever
http://slidepdf.com/reader/full/under-lever 52/103
It took a little bit of smoking an fitting to get everything to have just the right amount of clearance and to get the Bites to contact the Extractor
Guides at the same time, but everything works as smooth as I could possibly want, so I'm happy with the results. I'm nearing the completion of the
action, all that is left is the firing pin hole and parts and then to do the final shaping. Contouring the transition between the breech and tang, and

8/8/2019 Under Lever
http://slidepdf.com/reader/full/under-lever 53/103
rounding over the bottom of the action. Then I can get the barrel threaded into the monoblock, and the make the final few parts for the barrel
(quarterrib, sight base, attaching iron, etc.) and this will be ready to go to wood.
Yesterday I spent most of the morning setting up to do one operation, to mill the Firing pin seat and drill the firing pin hole.It took me a long time to
get the compound angles just right, and then I must have rechecked everything about 10 times form every direction I could think of before I started
doing any cutting. This is one of the few very critical parts of this build and it doesn't allow for very much error and if I had made a mistake there is
really no way to fix it, so the whole piece would be wasted and have to be rebuilt. So like I said I checked and rechecked every angle multiple times.
This isn't a set-up you often see in a Mill, but I have done it a few times and it has worked out well. My sine-vise that came with the mill when I
bought it is not very rigid and doesn't have enough mass to do much, but I have figured out that if you lock everything in place and tighten it up really
good, then put the whole thing in the 100 pound mill vise it will allow me to make light cuts with good precision.
I really should spend the money and buy a better Sine-Vise, but I hardly ever need to make these kinds of cuts(once or twice a year) so it never really
seems worth the money until I actually need to use it, then I always wish I had a better one.
The action never left the mill after it was indexed until I had performed all of the milling, drilling and tapping operations. Leaving it set-up and indexed
guaranteed that everything stayed at the same angle and alignment.
The rest of my day was spent at the lathe making the through bolt that captures the firing pin, and then turning the first of two firing pins. Once I
have the first firing pin cut to length and finished I will turn and exact match so that there is a spare delivered with the rifle.

8/8/2019 Under Lever
http://slidepdf.com/reader/full/under-lever 54/103
It's a pretty simple arrangement with a spring return to keep it off the primer when opening and closing the action. Should a primer rupture the firing
pin should seal off against the bottom of the bolt and prevent the gases from getting to the shooter.

8/8/2019 Under Lever
http://slidepdf.com/reader/full/under-lever 55/103
Today I will trim the firing pin to length and turn another one, all that leaves on the action and monoblock is contouring and shaping the outside
profile, and then drilling and tapping for a few screws that hold the various parts on(underlever screw, extractor guide screws, etc..). Then on to fitting
and turning the barrel.
The first half of my week was spent standing at my lathe and the rest of the week was spent working files. I started Monday morning by turning the
spare firing pin, then I moved on to the barrel. I spec'd the barrel as an unturned blank 2" O.D. so that I would have some leeway to play with it and
get everything concentric to the bore. I started by indexing off the bore in the lathe and then turning the major thread diameter down, then I cut the
threads. I should mention that some careful planning early in the build helps a lot later, one thing I have done all the way through this build is keep a
running record of all the dimensions and measurements, so I had all the imperical data from when I cut the threads in the monoblock. If you
remember(or want to go back a page or two) I had a shank that I turned on the end of the Monoblock that I used to index that piece and clamp to
when I was machining it, well I saved the threaded stub when I cut it off the monoblock because I new I would have a use for it when I got to the
barrel.

8/8/2019 Under Lever
http://slidepdf.com/reader/full/under-lever 56/103
I used that cut-off stub to check my threads, I'll show you another use for it here in a moment. With the threads cut and checked, I was then able to
pull the tail stock and seat the Monoblock up for a quick test fit.

8/8/2019 Under Lever
http://slidepdf.com/reader/full/under-lever 57/103

8/8/2019 Under Lever
http://slidepdf.com/reader/full/under-lever 58/103
I purposely went a little long on the threads, this was done so that I could dress the face off to match the Monblock and Breechface. With the
threading operation complete and checked for fit, the next step was to get this thing turned down to a nice tapered profile. This is were that cut-off
stub ring comes in again, with the threads being concentric to the bore, I was then able to use the ring as a thread protector and turn the barrel
around in the lathe to do the tapering.

8/8/2019 Under Lever
http://slidepdf.com/reader/full/under-lever 59/103
This was actually a very simple profile since it is just a straight taper, but it takes a long time to make those lung cuts and remove all the excess
metal. Pretty much a whole day to thread and taper this barrel, and several more hours to clean up the machine marks. Then I cut it to length and
faced and crowned the muzzle.

8/8/2019 Under Lever
http://slidepdf.com/reader/full/under-lever 60/103
I like a slightly recessed crown, I think it helps protect the rifling and crown from damage if it is ever dropped, but I have no substantial proof that it
makes a difference, just my theory.
Once the barrel was finished I then torqued it in to the monblock(it doesn't get removed form this point on), I then machined the extractor slot out,
the same way I machined the extractor slot out of the monoblock(a few pages back).
The rest of this week has been spent putting the action on a diet and fitness program to give it all the right curves, this is all done the old fashioned
way with nothing but files. I started by laying out the scallops that end the side and top flats, then just got in there with whatever size of file wasrequired to work that area. It took about a dozen or so files of different shapes and sizes(micro files clear up to 12" bastard file) to work these area
down and blend all the contours together, then I came in with edging files and re-cut the bead line and extended it into the action. The flats all got
draw filed to remove the machine marks at this time as well.

8/8/2019 Under Lever
http://slidepdf.com/reader/full/under-lever 61/103

8/8/2019 Under Lever
http://slidepdf.com/reader/full/under-lever 62/103

8/8/2019 Under Lever
http://slidepdf.com/reader/full/under-lever 63/103

8/8/2019 Under Lever
http://slidepdf.com/reader/full/under-lever 64/103
You'll notice I carried the bead line around the firing pin seat on the left side, and tapered it into the tang on the right side, this is pretty much how the
original is as well.
The next step is to make the Forearm Hanger and get it soldered to the barrel, and then finish fitting the forearm Iron to it , I need the Forearm Iron in
place so I can shape the bottom half of the action. Essentially at this point though, if the chamber was cut this would be a fire-able barreled action.
Lots of pictures on this update. Sorry to the folks on dial up I know that these heavy pictured builds I do are slow to load, but I really haven't found a
better way to capture the work. I'm open to suggestions.
So what I have been doing so far this week is trying to finish up the last few bits of metal work and get this thing ready to inlet into wood. In an effort
to save a few pictures I'm only gonna show the process on one piece since they were all done the same way.
I attached the forearm hanger and fit the forearm iron to it first, this was just a matter of contouring the piece to match the barrel and then soldering
it on. Then I machined the shape in place and machined the forearm Iron to fit , a little file work and everything locks into place with a cross key(keyed
to match the escutcheons eventually). I'll show you the actual fit work on the quarterrib in a moment. Back to the Forearm Iron, once it was in place, I
then filed and shaped the bottom half of the action.

8/8/2019 Under Lever
http://slidepdf.com/reader/full/under-lever 65/103
Onto the Quarterrib(all the attached parts are done this same way), I started with a piece of 1/2" x 1" flat stock and machined the barrel contour
roughly into it, and then machine the flat.
The next step was to smoke and scrape the fit until it is seamless at all the edges, there can't be a solder line when I am done or it won't blue and
will look really bad. The trick to this is to have the piece slightly gaped at the center so the solder has somewhere to flow, while keeping the edges
tight.
Then it's just a matter of making a good soldered joint. I flux and tin all the joining surface, and then clamp everything in place to get a good joint.

8/8/2019 Under Lever
http://slidepdf.com/reader/full/under-lever 66/103
Then I milled off the excess metal fairly close to finished dimensions and filed the rest of the way down cleaning the solder that oozed out and final
shaping the part.

8/8/2019 Under Lever
http://slidepdf.com/reader/full/under-lever 67/103
Proper fitting, good soldering and careful filing, and it looks like the parts almost grew there. The rest of these parts were done the same way.
Front sight base:
Sling Swivel:
There's a lot of different styles of quarterribs, sight bases and sling swivels, but I thought the rounded ends with the predominant shoulder would
match the scallops and detail bead on the action and give a nice continuity to the overall rifle.
And today I finally got back to cleaning up the trigger guard and shaping out the under lever, I cut a nice shadow line border in the Underlever and
filed all the uneven spots out of it.

8/8/2019 Under Lever
http://slidepdf.com/reader/full/under-lever 68/103
A few Screw holes to drill and tap, a couple screws to make and fit and a couple dovetails to cut for the sights and this thing is ready to go to wood.
Wouldn't hurt to cut the chamber at this point but it isn't a necessity either.
The last of the metal work before I start inletting this rifle to wood; as I said I had to drill and tap for a screws and finish up the sights.
The first part was making the bolt that holds the Underlever in, this bolt is shouldered just behind the threads so that it seat to depth in the action and
is also shoulder just a few thousands long at the head to allow the Underlever to rotate freely, but still hold it close to the action.

8/8/2019 Under Lever
http://slidepdf.com/reader/full/under-lever 69/103
You're probably wondering what keeps it from backing out when you rotate the handle, there is a threaded plug on the opposite side that is partially
engaging the threads so it can't back out.

8/8/2019 Under Lever
http://slidepdf.com/reader/full/under-lever 70/103
You might also be wondering what keeps it from rotating all the way around when not engaged to the monoblock; there is a hidden spring loaded
detent that engages the side of the underlever.

8/8/2019 Under Lever
http://slidepdf.com/reader/full/under-lever 71/103
And the last picture here is of the set screw that prevents the extractors from coming completely out of the action.

8/8/2019 Under Lever
http://slidepdf.com/reader/full/under-lever 72/103
The rear sight; this is one of the few purchased parts of this rifle, it is an NECG multi-leaf express sight. I can make these from scratch if need be, but
it takes a considerable amount of time and the NECG is a good quality product for a decent price. This was simply a matter of machining out the bulk
of the material in the mill and then hand filing to dovetails to fit.
The front sight is one of min, made from scratch, it is a Silver bead partial caterpillar that is fit into a machined slot in the sight base and retained with
a set screw. Similar to the English style front sights. NECG makes sights similar to this but theirs use a detent to hold the sight in and I prefer the more
solid hold of a set screw.

8/8/2019 Under Lever
http://slidepdf.com/reader/full/under-lever 73/103
After all these months of metal work it's finally ready to go to wood, when I'm building from scratch like this I don't usually take them past a file finish
because I like to work my wood and metal together and it would mean that I would have to polish it twice if I went any further with the finish now.
I've been contacted by several people in the last week, moaning and begging and crying(just kidding) for another update, mostly they just wanted to
see the wood I found for this project.

8/8/2019 Under Lever
http://slidepdf.com/reader/full/under-lever 74/103
I'm gonna start by saying that finding the right piece of wood for this project took several months to track down and I think I know most of the
hardwood suppliers in this country by first name now. Ultimately it was Steve Zihn who finally found what I was looking for. The criteria for this was a
piece 3"minimum x 12" x minimum 24"and it had to be very tight grained, very dense Sugar(Rock) Maple, figure and character of the wood was a
secondary consideration for this project. The reason I wanted the hardest densest tightest grained piece of Maple I could get was because unlike the 2
Bore Boxlock were I was able to run a through rod to a steel buttspacer to "channel" the recoil and allow the wood to basically act a holding device,
this buttstock won't have that rod arrangement, so the stock has to take all the recoil. The hardest part of finding a piece of wood was the 3" wide
requirement, most of the hardwood suppliers I talked to were willing to reset there saws and cut me a piece any width I wanted, but it would be a
new piece. Since I didn't really have the time to wait a couple years for it to stabilize,(I don't care for kiln dried stock blanks) that limited me to findinga piece that was ready to go. Apparently most of the stock suppliers in this country cut 2-1/2" wide or narrower stock blanks, which is great unless
your action is 2" wide to start with and you have to have enough wood for cast off and a cheeckpiece.
The way I lay these out is fairly simple, I trace the pattern right off of the original drawings of the rifle, since all the critical dimension were drawn 1:1
on the originals I know that it is correct for length of pull, drop at comb, and drop at heel, etc... I then examined the blank and found what I
considered to be the correct lay of the grain and transferred the pattern for the buttstock and forearm.
Then I cut them out on my bandsaws, I start at my rough cut saw and get the blank down to a more manageable size and then I go to my smaller
bandsaw and cut pretty exact to the lines. The line thickness usually ends up leaving me about 1/8" over-sized all the way around, the extra allows me
to make corrections as I'm inletting if need be.

8/8/2019 Under Lever
http://slidepdf.com/reader/full/under-lever 75/103
Then I cut off a piece of Ebony for the forearm tip, and use small dowels and 2 part epoxy to secure it to the forearm.
Then I mark all of my layout lines, I started a bit off center with the action to allow for the cheekpiece and the cast off. Then the inletting process
begins, for light colored wood I like to use Prussian Blueand it's just a matter of getting in there with Chisels, Gouges, Scrapers and Files and removing
wood. All of the edges of the tang and most of the other parts are beveled, so that as it goes down into the wood it gets wider, as long as I don't
make any major mistakes, the bevels basically make the inletting process self correcting. The rest is just patience and time, I just keep removing the
high spots and widening out as it gets deeper into the wood.

8/8/2019 Under Lever
http://slidepdf.com/reader/full/under-lever 76/103

8/8/2019 Under Lever
http://slidepdf.com/reader/full/under-lever 77/103
I'm actually a little farther along than these pictures, but I haven't had time to get them on my computer and uploaded. But you can see from these
that if it's done right the inletting should look like the tree grew around the metal. You'll notice in this last picture there is a little check right there at
the grip that extends forward to the edge of the action, that will go away once I start shaping the stock down, it doesn't extend into the wood, when I
inlet for the shoulder on the action it wasn't visible inside.

8/8/2019 Under Lever
http://slidepdf.com/reader/full/under-lever 78/103
As a side note this is quite possibly the hardest piece of Maple I have ever laid my hands on, when I run a farriers rasp across it, it peels up these
tight little tiny curls instead of actually cutting in like a rasp does on most pieces of wood. It's going to fun to shape, but it should hold nice sharp,
crisp edges around everything.
I finished up inletting the action and the bottom tang/trigger plate, drilled and tapped for all the screws to hold the action into the stock, I attached
the Gripcap and did all the layout for the recoil pad. Then I started thinning down the left side of the stock so I could get closer to the final shape and
start inletting for the back-action lock and as I was working the wood down, a little gray line appeared in the wood, no big deal I thought, it's just a
dark streak, there's one up by the action left from the check that got removed, but as I got deeper into the wood that little gray streak turned into afairly large knot that leaves a pretty good blemish. I did some thorough examining and I can't find anywhere that it comes out any other place on the
stock, and since it is solid and not a core type Knot that would have a loose center, I think what it is, was a branch that got snapped off when the tree
was young and then grew over as the tree aged. It's not in an area that will effect the structure or strength of the rifle and it will be backed up with
epoxy and steel on the inside when I put the counterweights in the buttstock, so really it is just a visual issue. With that in mind I took a couple
pictures and emailed my customer and explained the situation, and that I would start over if he wanted or we could proceed from here and when I
start shaping the other side, we would be able to see if it runs through or if it is just a shallow blemish, unfortunately I can't go deeper on this side
since I am about a 1/16" proud of finished dimension at the butt. I got his email back this morning and he isn't concerned with the blemish so I'll
proceed as planned and with a little nod to God for his creation, hopefully this stock will work out just fine from here and have an interesting bit of
character. The wood does have some nice figure in a few areas, so it might blend in fairly well after it is stained.
It is starting to take on the shape of a rifle now though, and I think after it is stained it won't look to bad.
This week went very well, I didn't have to many interruptions and the work progressed nicely. I started by shaping down the right side of the stock
and the rest of the grip area. I really wanted to find out if that blemish ran through or if it was shallow like I thought it was, it turns out it doesn't run
out anywhere, so it should be good to go. I'll know for sure when I drill the buttstock for the counterweights, but I don't foresee any problems at this
point.

8/8/2019 Under Lever
http://slidepdf.com/reader/full/under-lever 79/103
Then I inlet for the forearm and shaped it down a bit, nothing really fancy here, I guess you would call it a splinter type forearm, not that it resembles
a splinter being as wide as it is... I used a piece of 1-3/4" roundstock as a scraper to get the final passes contoured to the barrel(nobody makes
inletting tools large enough for this type of work).
For as big as this thing is, 3" from top to bottom and 2" wide it really is shaping out to be a very graceful rifle looking rifle, of course looks are
deceiving, it weighs 19 pounds and I haven't add the counterweights to the butt to get the balance right on it yet. The desired weight is 22 pounds but
it might end up just a little heavier to get the balance correct, 28" is a lot of barrel hanging out there...
And now I am down to inletting the last few parts, off-side plate, lock plate, and forearm key escuteons. Then the rest will be finish work, sanding
polishing, engraving, etc... I still need to make the chamber reamer and cut the chamber, but that is a fairly easy job.

8/8/2019 Under Lever
http://slidepdf.com/reader/full/under-lever 80/103
I would have gotten a little farther yesterday, but as I was inletting the off-side lock plate, my son called from the barn...(kids and cell phones) and
said he needed help moving the livestock around. One of our Pygmy Nannies decided yesterday in the rain storm would be a good time to have her
kids. By the time I was done messing with the goats and had everything sorted out, I pretty much gave up for the day and went in the house.
I finally got the last of the inletting done this week. The Lock Plate, the Off-side plate, the escheutons and the trigger are all in now. With the lock in
place it was simply a matter of reshaping the hammer and making a few adjustments to get it striking the firing pin properly. I reshaped the hammerto give it the more flowing look that the original has, it will never have the deep "S" curve shape that the original has because of the difference in the
length due to the bigger action, but I think it worked out fairly nice and compliments this action well.

8/8/2019 Under Lever
http://slidepdf.com/reader/full/under-lever 81/103
The three pictures above show the hammerin the firing position, half cock and full cock position.
By the end of today I should have the Chamber reamer made and the Chamber cut, at that point this will basically be a working rifle. What remains to
be done is the counterweights in the buttstock to add a little more weight and balance the rifle properly, some stoning and refinement to the trigger
and then on to the finish work, sanding, polishing, engraving, Color Case hardening, Rust bluing, stock finish and sighting in.I know that doesn't sound
like a very short list, but this project really is heading into the final stretch.
I didn't get near as much done as I wanted to this week, I was out of town several days and had to many thing to mention get in the way of me
being in my shop as much as I wanted to be. Next week isn't looking much better.....such is life. In any case I did manage to get the Chamber Reamer
made and the chamber cut. I used the cases I had in hand to take dimensions off of and then turned a piece of O-1in my lathe to make the Reamer, I
then put it in my mill and roughed out most of the material for a single flute, then made a few precision cuts to gut the cutting edge and the relief
behind it. Then I spent the better part of last Saturday putting new bricks, elements and a new digital controller in my heat treat furnace. By the t ime I
was done conditioning the new equipment and had the reamer cooking, I didn't get done until 1am Sunday morning. Monday I was out of town,
Tuesday I finished reaming the chamber, this was a long process, with only a single flute reamer, I was only able to advance about .020" per cut....it
takes a while to cut 3.5" of chamber at .020" per cut. It mostly went well, the reamer makes a nice cut, but I did have one little problem, about 3/4 of
the way finished a chip must have slipped by the cutting edge because I ended up with a scratch ring, by the time the chamber was cut fully to depth
it is nearly gone, but there is still just a slight shadow of it in the chamber, I can barely feel it by dragging a dental pick across it, so I would say it is
probably less than .001", but I will have to come in and polish the chamber to get rid of it. Not a huge deal, but kind of frustrating, it's just one of
those things that has to be dealt with and I've had it happen with a commercial reamer, so it's just one of those things.

8/8/2019 Under Lever
http://slidepdf.com/reader/full/under-lever 82/103
Nothing really fancy in this reamer, just a single flute with a flat relief under the cutting edge, and then hand sharpened. I don't know if you can see
it in the picture or not, but this was taken after I did a test cut on the barrel scrap that was cut off earlier in the project, you can see the shavings at
the leading edge of the reamer. You can probably see the weird coloration ring(oval shaped) from the quench, I don't know why it discolored like that
, but it cut just fine even along the discolored area so it doesn't really matter.
It chambers smoothly and the head spacing is great, and the extractor works very well with a nice positive engagement to the rim. Once I get the
Chamber polished to get rid of the scratch it should be perfect.
I primed a couple cartridges to snap the hammer and test out the firing pin, the firing pin is striking off center, I should have figured that given the
extreme angle that it passes through the action and I should have drilled it slightly past center to compensate for the angle. It will still work fine it just
looks off....this is just part of prototyping unfortunately, you run into things that could have easily been compensated for if you had thought of it
sooner. The only other issue is the hammer isn't hitting quite hard enough, it's taking two hits to set off the primer, but that is something that I was
aware might happen, because of the angle of the firing pin and the fact that arsenal primers(50bmg) are harder anyways I figured I might have to do
some polishing to the lock internals and increase the tension on the main spring. If increasing the tension on the main spring doesn't give it enough
force, I will just replace it with a heavier one.

8/8/2019 Under Lever
http://slidepdf.com/reader/full/under-lever 83/103
As you can see the firing pin works, it just looks a little off. On the next one I will compensate
for the angle when I drill the firing pin hole so that it strikes center. I could bush the breech face and re-drill this one but since it is hitting partially on
center and setting the primer off fine when it gets enough force from the hammer, I don't think I will change it.
I ended up re-crowning the muzzle...as I was taking it out of the lathe(with my oily hands from the cutting oil used during chambering) the barrel
slipped and I managed to nick the crown on one of the ways on my lathe, so I had to face it back a little bit and re-crown it. These things happen
even to the masters(of which I'm not one).....such is life.
The next update may be a few weeks from now because I am basically down to sanding and polishing, prepping for finish work. Until things are all
polished out and all the sanding is done, the pictures really don't change enough to tell the difference, so no real point in posting anything. I have
been working on the engraving drawings in the evenings so I might post those soon.
It's been a few weeks since I updated this, but as I said in the last update, polishing and sanding doesn't really make for good pictures because the
changes are hardly noticeable until things are in the white and ready to start the fine detailed finish work.
So after quite a bit of sanding and polishing I have finally arrived at the stage were I am ready to start finishing the wood and engraving metal. I still
have a little bit of polishing to do to a couple spots in the metal, but I have already applied several coats of stain to get the color, sanding in between
each application.
I've also been working on the engraving drawings and think I've settled on the final revision for this project.

8/8/2019 Under Lever
http://slidepdf.com/reader/full/under-lever 84/103

8/8/2019 Under Lever
http://slidepdf.com/reader/full/under-lever 85/103
The wood will get many coats of finish, hand rubbed in over the next week or two, with the humidity being what it is were I live it's a slow process, I
can only apply about one coat of finish a day, sometimes two if I'm lucky but it takes at least half a day for a single coat to dry and usually a full day.
In the in between time though I will be working on the metal, finishing up that last little bit of polish and then onto the engraving.
This is going to be kind of a long post with a lot of pictures, I've gotten quite a bit done in the last 2 weeks. I apologize for some of the pictures in this
update being a little grainy, my camera and I were not getting along very well today, and I couldn't get the lighting to work for me either. So if you'll
just suffer through I'll make sure and get better pictures of the finished rifle when the time comes.
I guess I'll start with the wood, I can't honestly tell you how many coats of oil it has on it since I didn't keep track, but it is nearly ready to be
checkered now. The blemish on the left side butt stock didn't turn out to bad.

8/8/2019 Under Lever
http://slidepdf.com/reader/full/under-lever 86/103

8/8/2019 Under Lever
http://slidepdf.com/reader/full/under-lever 87/103
On to the Engraving, this is what took the bulk of the last couple weeks to get done. I quit watching the clock at 100 hours of engraving, this thing is
a monstrous canvas to engrave.

8/8/2019 Under Lever
http://slidepdf.com/reader/full/under-lever 88/103

8/8/2019 Under Lever
http://slidepdf.com/reader/full/under-lever 89/103

8/8/2019 Under Lever
http://slidepdf.com/reader/full/under-lever 90/103

8/8/2019 Under Lever
http://slidepdf.com/reader/full/under-lever 91/103
I thought I was never going to finish the engraving. It just seemed to go on forever, but I am glad that I did this much coverage, I think it came out
very proportional to the rifle.
The other thing I managed to get made in the last few days is the reloading too ls. In the next couple of pictures I'll give a brief run down of how they
work, since most people are used to a reloading press, not manual hand tools.This is basically a version of a shotgun shell reloading set from around
the 1880's, I use a similar set for my 12 Bore Side by Side that I shoot black powder round ball loads in, it's slow but it works very well.

8/8/2019 Under Lever
http://slidepdf.com/reader/full/under-lever 92/103
This is the basic set of tools, minus the ball mould, powder measure, and wad cutter(These will need some wadding since 700gr FFg is probably more
than anyone wants to shoulder and shoot). I know you are probably thinking that doesn't look like any set of reloading tools I've ever seen, but it will
make sense by the time you get to the end of the process.

8/8/2019 Under Lever
http://slidepdf.com/reader/full/under-lever 93/103
The Process starts by placing the case upright on the "die", this is assuming you are knocking a primer out and not loading a brand new case, this
step can be skipped if it's a new case.

8/8/2019 Under Lever
http://slidepdf.com/reader/full/under-lever 94/103
You take the tool with the small punch end and tap the spent primer out.
Then you can clean the pocket and case if you like, then you flip it over and drop it into the "die", this isn't a normal die though, it won't re-size the
brass, it is cut with the same reamer as the chamber, so it is a matched set with the rifle.
8/8/2019 Under Lever
http://slidepdf.com/reader/full/under-lever 95/103
Put the priming end over the die, and set a primer in the hole. The hole is only a few thousands over sized and acts as a guide to seat the primers.
This is a lot easier than trying to seat a primer by hand with no way to line i t up and keep it square to the pocket.
Then use the primer seating tool and mallet to seat the primer. The seating tool is shouldered at the proper length to seat the primer, so once it hitsthe end of the die it can't go any further, no deep seated primers this way.

8/8/2019 Under Lever
http://slidepdf.com/reader/full/under-lever 96/103
Flip the whole thing over and set the top of the die aside for a moment while you load your powder, wad (filler) and ball. You'll notice the brass sticks
out of this end of the die body just a li ttle ways.
8/8/2019 Under Lever
http://slidepdf.com/reader/full/under-lever 97/103
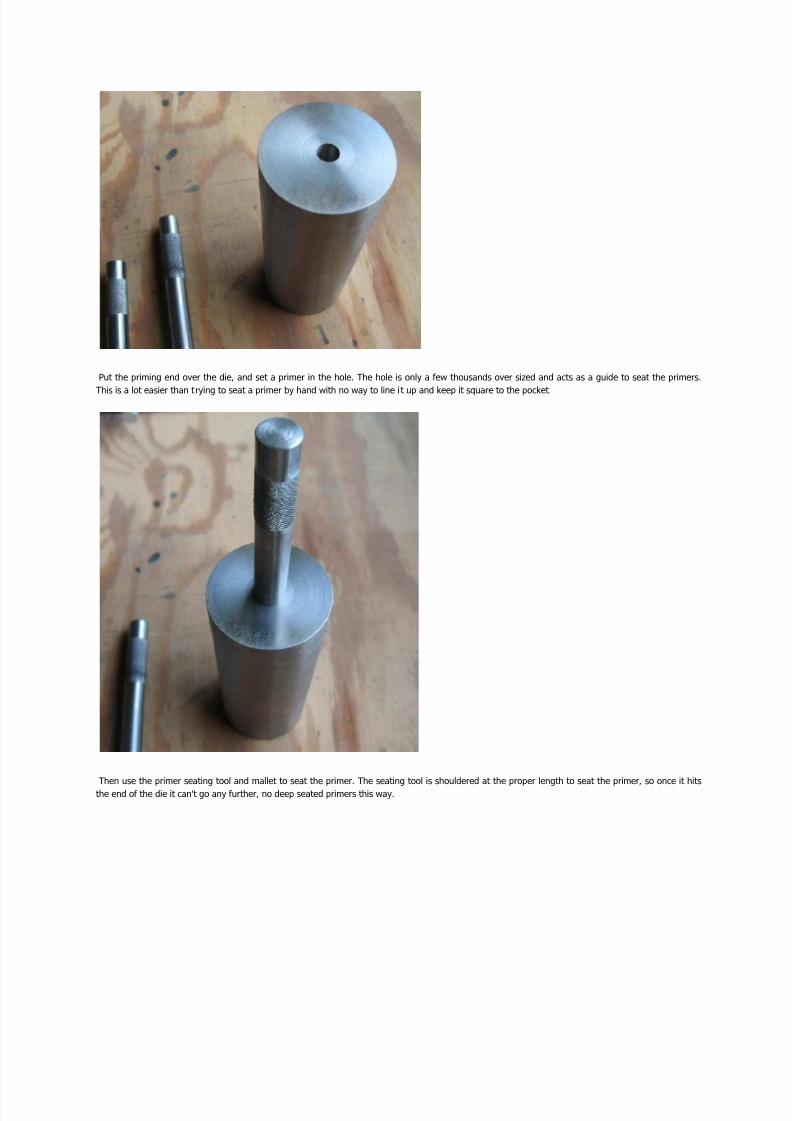
One side of the top of the die, is recessed and square so that when you are seating the primer the case mouth doesn't touch anything, flip it over
though and you will notice that this side has a crimp ring machined in it.
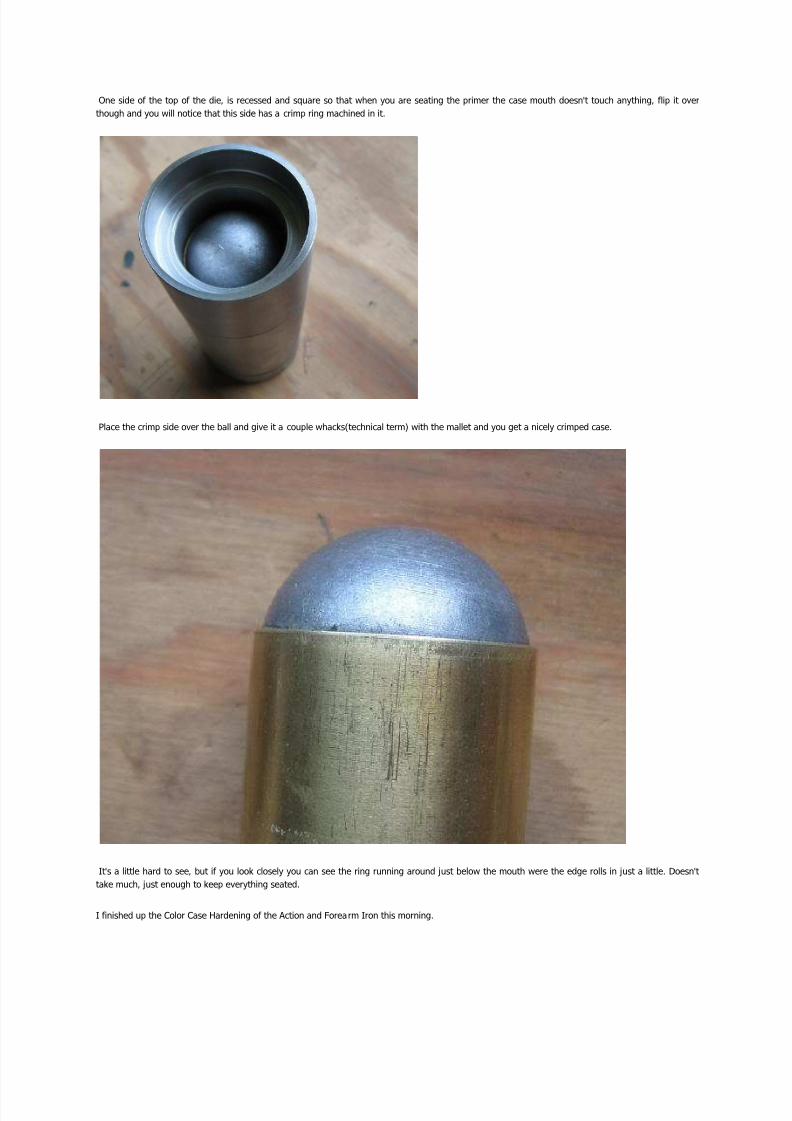
Place the crimp side over the ball and give it a couple whacks(technical term) with the mallet and you get a nicely crimped case.
It's a little hard to see, but if you look closely you can see the ring running around just below the mouth were the edge rolls in just a little. Doesn't
take much, just enough to keep everything seated.
I finished up the Color Case Hardening of the Action and Forearm Iron this morning.

8/8/2019 Under Lever
http://slidepdf.com/reader/full/under-lever 98/103
That's it for today, I am headed for the Dentist this afternoon to see about a tooth that has been bothering me for the past couple days.
Today was a big day event that quite a few people have been waiting to see. I started the morning my making a plunger/striker to use for the proof testing, pretty simple rig, it's just a plunger and a spring that thread into the firing pin hole to use in place of the firing pin retaining nut and the back
action lock.

8/8/2019 Under Lever
http://slidepdf.com/reader/full/under-lever 99/103
A little wood dowel piece holds the plunger back, then with a string attached to the dowel it is easy enough to yank it out and drop the plunger onto
the firing pin from a safe location.
With muzzleloaders, since I am just testing the breech plug and barrel, I usually just strap the barrel down to something and set it off, but in this case
since I have an actual action that needed to be tested, and the fact that the engraving and color case hardening is already done, I didn't want it
skidding across the ground damaging the finish, and I needed the action free to move any way it wanted to under the pressure. So I decided
suspending the barreled action with one rope around the barrel and one around the tang would be the best approach, leaving the action free to do
what it would.
Last Thursday I started the bluing process for the remainder of the parts. Friday was pretty much a wasted day for me, I had two Molars extracted
and spent the rest of the day dozing in my chair after I got back from Lincoln. Saturday was work a little while and nap a little while in between pain
meds wearing off and kicking in. Sunday was the most productive day of the weekend.The barrel, Trigger, Triggerplate, Firing Pin Nut, and Extractor
get rust blued. All the rest of the parts(mostly screws) get Nitre(Fire) Blued. So Thursday I started the rust bluing, I use a combination of bluing
solutions to get the results I want, I start with extrememly clean metal, and apply coats of Pilkington's Classic Solution(mixed with one cap full of LMF
Brown and Degreaser to a bottle of Pilkington's), I find that LMF is just about useless for anything else but mix just a little of it with Pilkington's and it
does away with the spotting problems that you can sometimes get with Pilkington's. We have fairly decent humidity here year round so I don't need a
sweat box, I just let things sit in the open air and they rust up nicely on their own.

8/8/2019 Under Lever
http://slidepdf.com/reader/full/under-lever 100/103
I usually apply 4-6 coats of Pilkington's carding in between each coat and then boil.
This usually produces a dark brown to sometimes black finish.
But this isn't really the finish I am going for, I am really looking to recreate that deep lack luster finish of the rust blues from the 1880's, so I use
several cycles of Mark Lee's express blue (rust, boil and card) over the top of the Pilkington's finish to get that deep luster with the nice undertone that
so many of the originals have.

8/8/2019 Under Lever
http://slidepdf.com/reader/full/under-lever 101/103
On to the screws, they were fairly easy to do, just a simple matter of bringing them up to 600degF for a while and letting them turn a nice purply-
blue color in the nitre salts. The front sight was also done this way.
Getting closer to being finished, The rear sight is unfinished and won't be done until the load work has been done and the rifle is sighted in. I still
have to make a new forearm key and blue it, and I need to make and blue the rear sling swivel post for the buttstock. But the main focus of this week
will be to get the stock checkered and the final coat of wax finish on the wood after Checkering.
I finished the Checkering last week. The pattern is off of an original I have pictures of, the style is 20 line per inch, semi-flattop, border-less. I also
finished up the last few parts(Forearm key, rear sling swivel stud) and got them installed. In these pictures the last coat of finish hasn't been applied
yet and the new key isn't in yet.

8/8/2019 Under Lever
http://slidepdf.com/reader/full/under-lever 102/103
I had the rifle finished this morning and completely assembled and was tweaking the lock(earlier in the build I mentioned that the hammer wasn't
hitting hard enough), when Murphy(Murphy's Law) showed up....I managed to strip the screw that holds the hammer to the tumbler, and when I went
to tap the threads out on the tumbler to clean them up, I snapped the tap off in the tumbler. iI the process of trying to dig the broken tap out, I
managed to damage the tumbler. So I had to put a call in to L&R(lock guts are L&R) and get a new tumbler and screw coming. So it will be a couple
days before I can finish this up and start load development and finish the rear sight. Basically at 10am I had a finished rifle and by noon I had a mess
and now a couple days wait for replacement parts. Don't you just love it when Murphy stops by for a visit....In any case the next post should have
finished pictures and videos of me shooting it.

8/8/2019 Under Lever
http://slidepdf.com/reader/full/under-lever 103/103