TVA Boone Dam PBL · Modeling clay or Play Dough Sticks and/or popsicle sticks Tootsie Roll pops...
40
TSIN PBL Template | www.tsin.org | Page 1 TVA Boone Dam PBL Created By: Wendy Courtney Topic: Earth and Human Activity and Forces as it Relates to Dam and Embankment Building Grade Level: Middle Grades Science Standards: ● Science and Engineering Practice: Asking questions (for science) and defining problems (for engineering) Students define design problems, invoking scientific background knowledge to define multiple criteria and constraints for solutions. ● Develop and use models. ● Evaluate design constraints on solutions for maintaining ecosystems and biodiversity. ● Evaluate and interpret that for every force exerted on an object there is an equal force exerted in the opposite direction. ● Interpret data to explain that earth’s groundwater resources are unevenly distributed as a result of geologic processes. Math Standards: ● Summarize numerical data sets in relation to their context. ● Using mathematics and computational thinking ELA & Other Content Area Standards: ● Integrate information presented in different media or formats, such as in tables, images, diagrams, and words to develop a coherent understanding of a topic or issue. ● Include multimedia components and visual displays in presentations to clarify information. Unit Summary: Write a few sentences describing this PBL unit. Background information: In October 2014, a sinkhole was discovered near the base of the embankment at Boone Dam, and water and sediment was found seeping from the riverbank below. While sinkhole occurrence in East Tennessee is common, the locations of the sinkhole and the Multi-Dimensional Question/Driving Question: Think of a relevant problem with multiple solutions that will drive student learning. How can we as civil engineers build a geotechnical wall that will prevent the seepage of groundwater from causing internal erosion and damaging the existing Boone Dam. Stu
Transcript of TVA Boone Dam PBL · Modeling clay or Play Dough Sticks and/or popsicle sticks Tootsie Roll pops...

TSIN PBL Template | www.tsin.org | Page 1
TVA Boone Dam PBL Created By: Wendy Courtney
Topic: Earth and Human Activity and Forces as it Relates to Dam and Embankment Building
Grade Level: Middle Grades
Science Standards: ● Science and Engineering Practice: Asking questions (for science) and defining problems (for engineering) Students
define design problems, invoking scientific background knowledge to define multiple criteria and constraints for solutions.
● Develop and use models. ● Evaluate design constraints on solutions for maintaining ecosystems and biodiversity. ● Evaluate and interpret that for every force exerted on an object there is an equal force exerted in the opposite
direction. ● Interpret data to explain that earth’s groundwater resources are unevenly distributed as a result of geologic
processes. Math Standards:
● Summarize numerical data sets in relation to their context. ● Using mathematics and computational thinking
ELA & Other Content Area Standards: ● Integrate information presented in different media or formats, such as in tables, images, diagrams, and words to
develop a coherent understanding of a topic or issue. ● Include multimedia components and visual displays in presentations to clarify information.
Unit Summary: Write a few sentences describing this PBL unit. Background information: In October 2014, a sinkhole was discovered near the base of the embankment at Boone Dam, and water and sediment was found seeping from the riverbank below. While sinkhole occurrence in East Tennessee is common, the locations of the sinkhole and the
Multi-Dimensional Question/Driving Question: Think of a relevant problem with multiple solutions that will drive student learning. How can we as civil engineers build a geotechnical wall that will prevent the seepage of groundwater from causing internal erosion and damaging the existing Boone Dam. Stu

TSIN PBL Template | www.tsin.org | Page 2
muddy discharge were indicators of potential issues with the safety of the dam.
TVA responded by assembling a team of TVA dam safety engineers and external experts to investigate the source of the observed seepage, and to determine whether dam safety may be compromised. The conditions of the embankment dam foundation were found to be favorable to a process termed “internal erosion,” in which voids develop within a dam and/or its foundation because of the action of flowing groundwater. Because internal erosion is one of the leading causes of dam failures worldwide, TVA staff and external experts implemented a number of interim risk reduction measures. TVA’s experienced team of dam engineers and safety experts evaluated a number of methods for repairing the dam.
Summary: Students will design and build a model of an innovative geotechnical solution to this problem. As a preparation for their task, the students will conduct research on why we build dams, the Boone Dam, the geographical and geological area, and possible solutions to repair an earthen dam embankment. Students will also engage in other extension activities associated with why we build dams as well as activities involving water usage.
By the end of this unit, my students will… Master the following content:
● Interpret and evaluate data to formulate conclusions.
● Understand the needs for and impacts of dams and reservoirs.
Create a solution to the following problem: How can we as civil engineers build a geotechnical wall that will prevent the seepage of groundwater from causing
Develop the following 21st Century Skills: Creativity Innovation Presentation Collaboration

TSIN PBL Template | www.tsin.org | Page 3
● Describe how the use of technology provides essentials and luxuries for everyday living.
● Identify various types of dams. ● Understand the different forces
acting on a dam. ● Understand the considerations
engineers must make when designing a dam.
● Understand the concept of a force.
● Understand that water acts as a force on a dam and that the dam must respond with an equal force to hold back the water.
● Name four different types of dams
● List some advantages and disadvantages of the different types of dams.
● Explain Pascal's law. ● Know that water pressure
increases with depth. ● Calculate volume. ● Discuss why dams do not last
forever. ● Name some of the forces acting
on dams that cause them to deteriorate.
internal erosion and damaging the existing Boone Dam.
Teamwork Critical Thinking Project Design
Culminating Event: What final student learning products will show student mastery of the content area standards? Students will design an innovative geotechnical solution to the Boone Dam seepage problem and present their designs/models to the Sullivan County Board of Commissioners, TVA civil engineers and geotechnical designers.

TSIN PBL Template | www.tsin.org | Page 4
Hook Event: Develop an introductory activity that will spark student interest and further questions. The students will watch several videos/news releases on the Boone Dam Repair project. TVA Boone Dam news update TVA Boone Dam Fix Boone Dam Project
Community Partners: List potential business or industry partners that could add to the learning experience for students. Include websites or contact info.
1. civil engineers - Patrick Kiser, Veronica Barredo
2. geologists 3. safety engineers 4. TVA - https://www.tva.gov/Newsroom/Boone-Dam-Project 5. STREAMWORKS Education
What do you need from these partners (i.e. guest speakers, field trips, help facilitate an activity)?
1. guest speakers 2. facilitate the geotechnical wall
challenge 3. possible field trip to Boone
Dam 4. Resources and supplies for the
activities
TSIN PBL Template | www.tsin.org | Page 5
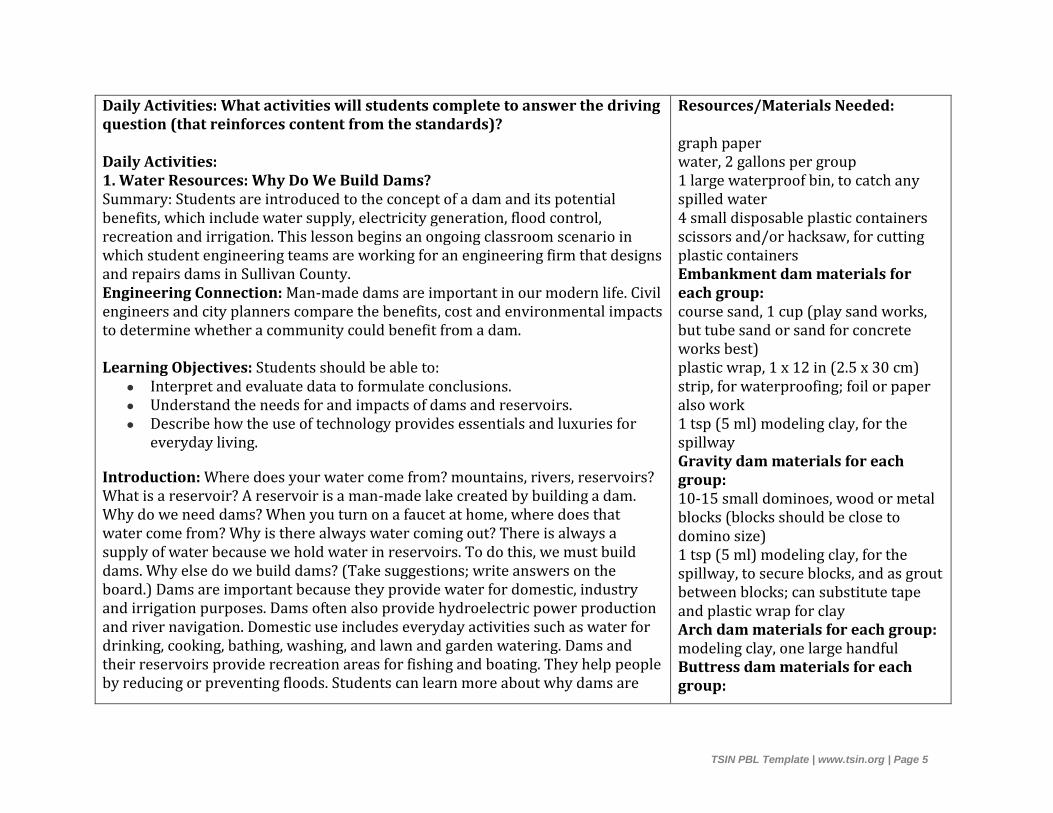
Daily Activities: What activities will students complete to answer the driving question (that reinforces content from the standards)? Daily Activities: 1. Water Resources: Why Do We Build Dams? Summary: Students are introduced to the concept of a dam and its potential benefits, which include water supply, electricity generation, flood control, recreation and irrigation. This lesson begins an ongoing classroom scenario in which student engineering teams are working for an engineering firm that designs and repairs dams in Sullivan County. Engineering Connection: Man-made dams are important in our modern life. Civil engineers and city planners compare the benefits, cost and environmental impacts to determine whether a community could benefit from a dam. Learning Objectives: Students should be able to:
● Interpret and evaluate data to formulate conclusions. ● Understand the needs for and impacts of dams and reservoirs. ● Describe how the use of technology provides essentials and luxuries for
everyday living.
Introduction: Where does your water come from? mountains, rivers, reservoirs? What is a reservoir? A reservoir is a man-made lake created by building a dam. Why do we need dams? When you turn on a faucet at home, where does that water come from? Why is there always water coming out? There is always a supply of water because we hold water in reservoirs. To do this, we must build dams. Why else do we build dams? (Take suggestions; write answers on the board.) Dams are important because they provide water for domestic, industry and irrigation purposes. Dams often also provide hydroelectric power production and river navigation. Domestic use includes everyday activities such as water for drinking, cooking, bathing, washing, and lawn and garden watering. Dams and their reservoirs provide recreation areas for fishing and boating. They help people by reducing or preventing floods. Students can learn more about why dams are
Resources/Materials Needed: graph paper water, 2 gallons per group 1 large waterproof bin, to catch any spilled water 4 small disposable plastic containers scissors and/or hacksaw, for cutting plastic containers Embankment dam materials for each group: course sand, 1 cup (play sand works, but tube sand or sand for concrete works best) plastic wrap, 1 x 12 in (2.5 x 30 cm) strip, for waterproofing; foil or paper also work 1 tsp (5 ml) modeling clay, for the spillway Gravity dam materials for each group: 10-15 small dominoes, wood or metal blocks (blocks should be close to domino size) 1 tsp (5 ml) modeling clay, for the spillway, to secure blocks, and as grout between blocks; can substitute tape and plastic wrap for clay Arch dam materials for each group: modeling clay, one large handful Buttress dam materials for each group:

TSIN PBL Template | www.tsin.org | Page 6
built with the associated activity “How Much Water Do You Use?” During times of excess water flow, dams store water in the reservoir; then they release water during times of low flow, when natural flows are inadequate to meet water demand. When engineers design and maintain dams, they consider all these purposes.
Introduction: Dams can be useful for a variety of reasons. What are some purposes for which we create dams? (Answers: To supply water for irrigation, municipal water, flood control, hydroelectric power generation, river navigation.) What might be negative effects from a dam? (Answers: Upstream flooding that destroys animals, plants, ecosystems and private property; downstream alteration of terrain, ecosystems, plants and wildlife; impeding fish migration, killing fish that pass through turbines, etc.)
In the case of the Boone Dam, why should TVA repair the dam? (Answers: To help control flash floods, to continue to produce electricity without air pollution, for a recreational area, etc.)
Vocabulary/Definitions:
adaptive management: The operation of dams and reservoirs to benefit not only human needs, but also the needs of the aquatic and terrestrial ecosystems impacted by the dam.
dam: A barrier to obstruct the flow of water, especially one made of earth, rock, masonry and/or concrete, built across a stream or river.
engineer: A person who applies her/his understanding of science and mathematics to creating things for the benefit of humanity and our world.
hydroelectric power: Renewable energy generated by water flowing through turbines.
migration: To periodically move from one region or climate to another, as by wildlife such as birds and fish.
modeling clay, half a handful 5 small (1-3 in, or 2.5-7.6 cm) dowel pieces (or straws or popsicle sticks), for dam support Items for alternate Dam Building Activity: Clear plastic shoe boxes (1-2 per group) Play sand Potting soil Pea gravel River pebbles Modeling clay or Play Dough Sticks and/or popsicle sticks Tootsie Roll pops (may tape twigs at stick ends to represent trees) Cardboard or plastic strips of varying widths, with some as wide as shoeboxes and some with ~1” overlap on each side. Small bucket of water (1 per group) Lots of small plastic containers for distributing building materials and dipping water Old towels & rags, newspaper, paper towels (to help contain & clean up the mess) 2-liter plastic soda bottle (ask students to bring from home) (optional) Bottle Template and Rulers; prepare bottle by printing and cutting

TSIN PBL Template | www.tsin.org | Page 7
reservoir: An artificial lake where water is collected and stored behind a dam.
turbine: A machine that converts the kinetic energy of falling water (or any moving fluid, including steam, gases or air) into electrical energy by connecting a generator to a rotating shaft that is spun by water pressure pushing blades, buckets or paddles
Pre-Lesson Assessment:
Brainstorming: Ask students to think of all the different ways in which they use water on an everyday basis. Possible answers include drinking, bathing, cooking, swimming, cleaning, etc. Write these answers on the board and then ask the students to tell you where the water comes from for these activities. Students may answer that water comes from rivers, lakes, and streams, in which case you can start a discussion about the need for dams to store water. Be sure to mention that 33% of American citizens get their water from groundwater sources.
Post-Introduction Assessment:
Teaming: After you have introduced the Boone Dam repair scenario, divide the class into engineering teams of 2-3 students each, and ask each team to write a short "proposal" proposal on how you would repair the earthen embankment section of Boone Dam to prevent the seepage of groundwater and internal erosion of the dam. Proposals should comment on the needs of the residents, some possible solutions (at least a Plan A and Plan B), and benefits/problems associated with each plan proposed. For example, students may write a statement that says their team will "address the situation by designing a solution that protects the people of Sullivan County from further breaching of the dam." This exercise helps students understand their role as civil engineers working for an engineering firm. Emphasize that engineers must propose multiple plans to the County Board and convince the board members that their design is worth spending taxpayer money. Encourage students to address topics such as not building on land that has a high risk of annual flooding.
out this template for drilling bottle holes ruler or tape measure (or make rulers by printing Bottle Template and Rulers on paper or overhead transparency sheets and cutting into strips) 2 strips of duct tape for covering holes drill with ~1/8-in bit (have students mark hole and teacher drill, or drill bottle holes before activity), or a sharp-pointed object to punch 1/8-in holes water from a faucet or large container sink or basin to catch water (unnecessary if working outside) stopwatch (or wall clock with second hand) Pascal's Law Worksheet calculator Dam Building Activity Sheet for teacher Personal Water Use Chart for students Four Types of Dams student sheet Water and Dams in Today’s World Get the Facts Worksheet Water and Dams in Today’s Get the Facts answers
TSIN PBL Template | www.tsin.org | Page 8
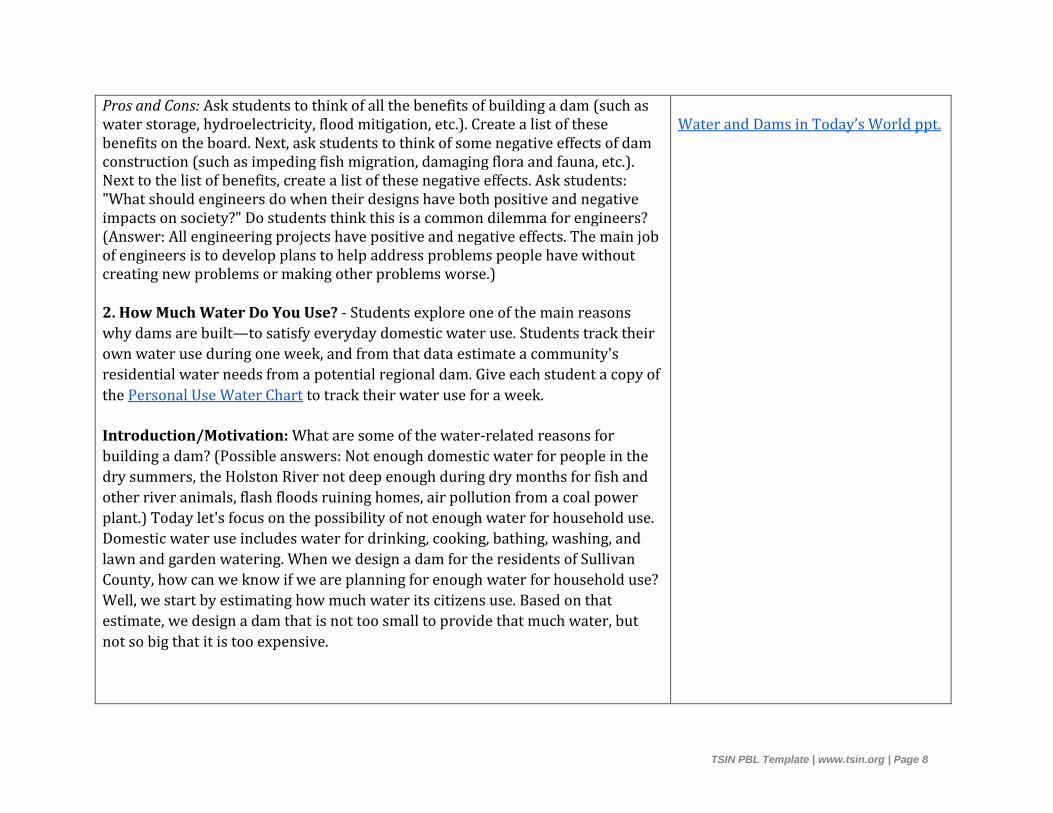
Pros and Cons: Ask students to think of all the benefits of building a dam (such as water storage, hydroelectricity, flood mitigation, etc.). Create a list of these benefits on the board. Next, ask students to think of some negative effects of dam construction (such as impeding fish migration, damaging flora and fauna, etc.). Next to the list of benefits, create a list of these negative effects. Ask students: "What should engineers do when their designs have both positive and negative impacts on society?" Do students think this is a common dilemma for engineers? (Answer: All engineering projects have positive and negative effects. The main job of engineers is to develop plans to help address problems people have without creating new problems or making other problems worse.)
2. How Much Water Do You Use? - Students explore one of the main reasons
why dams are built—to satisfy everyday domestic water use. Students track their
own water use during one week, and from that data estimate a community's
residential water needs from a potential regional dam. Give each student a copy of
the Personal Use Water Chart to track their water use for a week.
Introduction/Motivation: What are some of the water-related reasons for
building a dam? (Possible answers: Not enough domestic water for people in the
dry summers, the Holston River not deep enough during dry months for fish and
other river animals, flash floods ruining homes, air pollution from a coal power
plant.) Today let's focus on the possibility of not enough water for household use.
Domestic water use includes water for drinking, cooking, bathing, washing, and
lawn and garden watering. When we design a dam for the residents of Sullivan
County, how can we know if we are planning for enough water for household use?
Well, we start by estimating how much water its citizens use. Based on that
estimate, we design a dam that is not too small to provide that much water, but
not so big that it is too expensive.
Water and Dams in Today’s World ppt.

TSIN PBL Template | www.tsin.org | Page 9
How do we create a water use estimate for Sullivan County residents? Do you
think that Sullivan County citizens probably use water in the same ways that we
do? Starting today, we are all going to keep track of how much water we use every
day. Then, we can combine everyone's data to get a class average, and we will
consider that number to be the average water use for one person. We can use this
information to create an estimate of the residential water usage of Sullivan
County, and then we will be ready to move on with the dam design!
Procedure: Hand out the chart and explain to students how to use it.
Data Collection Instructions: Count the number of times you do each activity in
one day, and write that number in the box for that day. Using tallies is the best
way to keep track.
Ask an adult in your household whether you have standard or low-flow
showerheads and toilets. If you are not sure, assume a standard flow.
For activities that other members in your family might be doing for the household
(go through the list to talk about which ones those might be, such as cooking a
meal, doing dishes or laundry, etc.), count the number of times anyone in your
family does one of those activities in a day, and then divide that total by the
number of people in the household to count your portion of that water usage.
If your household has an automatic lawn watering system, find out the schedule so
you do not forget to include that water usage. Also, only count the water that you
use at home, and not at school or elsewhere.
Have students use the chart for one week, reminding them each day to fill it in.

TSIN PBL Template | www.tsin.org | Page 10
With the Students: Data Calculation: Mid-week, conduct a preliminary calculation and class discussion, as described in the Assessment section. At the end of the week, have students fill in the Total Number of Times column by adding across each row to get the total number for each activity.
● Have students calculate the water usage for each activity by multiplying the Total Number of Times column by the Estimated Amount of Water Used column.
● Have students add together the numbers in the Total Weekly Water Use column to get their Total Weekly Water Use.
● Ask each student to write his/her Total Weekly Water Use number on the board.
● As a class, take the average of those numbers. ● Tell the students that they can assume that an average person in Sullivan
County uses about that same amount of water in one week. ● As a class, divide the average by 7 to get a daily amount of water. ● As a class, figure out how much water is needed daily by the entire Sullivan
County, which has approximately 158,000 residents, by multiplying the average daily use by 158,000.
● Conclude with a class discussion. ● See the post-activity assessment questions provided in the Assessment
section. Vocabulary/Definitions: dam: A barrier to obstruct the flow of water, especially one made of earth, rock, masonry and/or concrete, built across a stream or river. domestic: Of or pertaining to the home, the household, household affairs, or the family. engineer: A person who applies her/his understanding of science and math to creating things for the benefit of humanity and our world.

TSIN PBL Template | www.tsin.org | Page 11
county: (in the US) a political and administrative division of a state, providing certain local governmental services. reservoir: A place where water is stored, often created by a dam. residential: Of or pertaining to residence or to residences (homes, households). tally: A mark made to record a number or count, often consisting of four consecutive vertical lines with a diagonal line through them to indicate a group of five. Assessment: Pre-Activity Assessment: Estimation: Have the students look at a gallon container to help them make the following estimations. Encourage them to play with filling the gallon jug with water to help them imagine and estimate. Ask the students: How many gallons of water do you think you use to: Wash your hands? Brush your teeth? Take a shower? Take a bath? Flush the toilet? Get a drink? Wash the dishes? Water the lawn? Wash the car? Activity Embedded Assessment: Mid-Week Calculation: After two or three days of data collection, ask students to calculate their total water usage so far. Have them use a separate piece of paper and follow the same steps outlined in the Procedure section. Have all the students write their numbers on the board, and then do the following with students: What is the average? What is the lowest number? Is there a particular reason why it is so low? What is the highest number? Is there a particular reason why it might be so high?

TSIN PBL Template | www.tsin.org | Page 12
What might you do to lower your water usage? (Possible answers: Switch to low-flow showerheads/toilets, turn-off water while brushing teeth, only run the dishwasher when it is full, use a spray nozzle to stop the hose from running while washing the car, etc.) Post-Activity Assessment: Graphing: Have students create a pie chart describing what activities make up their total weekly usage of water. Which activities tended to use the most water? The least? Discussion Questions: Have students answer the following questions by raising their hands. We counted the water usage in our homes, or for residential buildings. For what other kinds of buildings must engineers include when determining a county's estimated total water usage? (Possible answers: Schools, businesses, factories, power plants, farming irrigation, roadside irrigation, storage for drought season, fire protection, swimming pools, recreation/ball field irrigation, etc.) Say an engineer calculates the average water use for all buildings in a county, and then designs a dam to provide that exact amount of water. Is there always enough water for the residents to use? (Answer: Not necessarily; since the design is based on an average, sometimes the county might use more water than provided. Engineers almost always "over-design" to provide a little extra water, just in case.) 3. Field Trip Activity: Plan a field trip to Boone dam to give students a real-world sense of these gigantic engineering structures and to learn about dam safety and maintenance. If a field trip is not possible, show students videos on dams or pictures of local TVA dams in Tennessee such as: the video on the history of the Wilson Dam, “History of the Wilson Dam on the TN River - Tennessee Valley Uncharted, TVA Raccoon Mountain Hydroelectric Plant and Dam, Center Hill Dam - A Tennessee Marvel
Pre-visit activity: The students will do research on the different types of geotechnical/retaining walls and the reasons why we build them.

TSIN PBL Template | www.tsin.org | Page 13
4. Water and Dams in Today's World:
Summary: Students learn about the importance of dams by watching a powerpoint that presents historical and current information on dams, as well as descriptions of global water resources and the hydrologic cycle. Students also learn about the different types of dams, all designed to resist the forces on dams.
Engineering Connection: When engineers design dams and other large structures, they calculate the forces expected to act on the structure as well as its potential for reacting to these forces. Different geometries and materials respond differently to the forces created by a dam. As part of the design process, engineers take into consideration information about the intended use of a dam to help them determine the most suitable size and type.
Learning Objectives: After this lesson, students should be able to:
● Identify various types of dams. ● Understand the different forces acting on a dam. ● Understand the considerations engineers must make when designing a
dam.
Introduction/Motivation: Dams are one way that communities make sure they have enough water for everyone in their area as well as reduce the risk of flash flooding as in the case of Boone dam. Dams as help with irrigation, business needs, farming, and in producing hydroelectricity. How can water be stored so that you have enough in the middle of summer? How do hydroelectric plants have control over the amount of water entering a turbine? Can you think of any negative impacts of dams? What happens when you block a river? Where do the fish go? What happens to the river and terrain on the side below the dam? What happens to the natural environment above the dam? What about salmon that migrate upstream to lay eggs? These are important questions relating to the creation of dams.
The powerpoint, "Water and Dams in Today's World," that you are about to view provides information on many dams and their uses. While you watch the ppt.,
TSIN PBL Template | www.tsin.org | Page 14
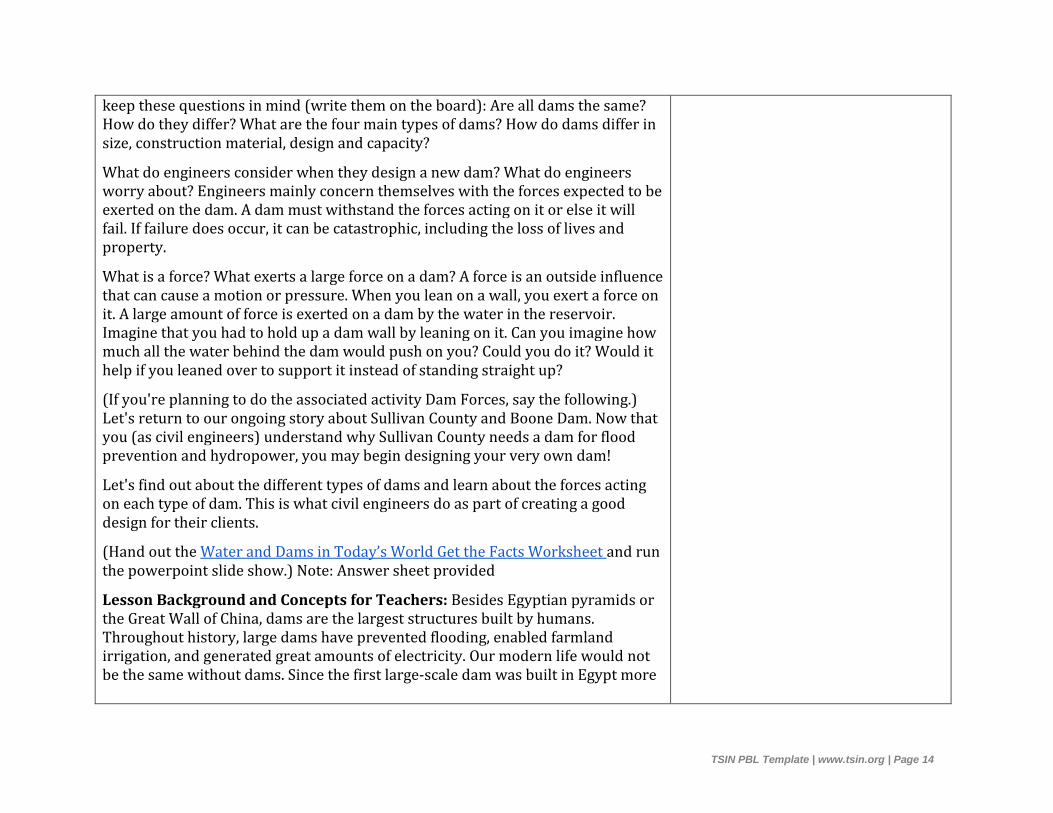
keep these questions in mind (write them on the board): Are all dams the same? How do they differ? What are the four main types of dams? How do dams differ in size, construction material, design and capacity?
What do engineers consider when they design a new dam? What do engineers worry about? Engineers mainly concern themselves with the forces expected to be exerted on the dam. A dam must withstand the forces acting on it or else it will fail. If failure does occur, it can be catastrophic, including the loss of lives and property.
What is a force? What exerts a large force on a dam? A force is an outside influence that can cause a motion or pressure. When you lean on a wall, you exert a force on it. A large amount of force is exerted on a dam by the water in the reservoir. Imagine that you had to hold up a dam wall by leaning on it. Can you imagine how much all the water behind the dam would push on you? Could you do it? Would it help if you leaned over to support it instead of standing straight up?
(If you're planning to do the associated activity Dam Forces, say the following.) Let's return to our ongoing story about Sullivan County and Boone Dam. Now that you (as civil engineers) understand why Sullivan County needs a dam for flood prevention and hydropower, you may begin designing your very own dam!
Let's find out about the different types of dams and learn about the forces acting on each type of dam. This is what civil engineers do as part of creating a good design for their clients.
(Hand out the Water and Dams in Today’s World Get the Facts Worksheet and run the powerpoint slide show.) Note: Answer sheet provided
Lesson Background and Concepts for Teachers: Besides Egyptian pyramids or the Great Wall of China, dams are the largest structures built by humans. Throughout history, large dams have prevented flooding, enabled farmland irrigation, and generated great amounts of electricity. Our modern life would not be the same without dams. Since the first large-scale dam was built in Egypt more

TSIN PBL Template | www.tsin.org | Page 15
than 5,000 years ago, engineers have devised various types of dams to withstand river forces.
The four main types of dams are: arch, embankment, gravity and buttress (as well as combinations of these types). A description of each is provided in the Vocabulary/Definitions section. Dam types differ in their design, size and material. A dam's design may be influenced by local topography. For instance, a deep narrow canyon provides an ideal place to construct a tall arch dam (like the Hoover Dam).
Much force is exerted on a dam by the water held in its reservoir. If this force is large enough, it can cause the dam to fail at any weak points. Engineers take these critical forces into account and design dams that can withstand large forces plus a safety factor. "Building in a safety factor" means designing something to withstand more force that is usually needed, so it will not fail in case unforeseen events of unusual magnitude happen, such as floods and earthquakes.
The Teton Dam failure in 1976 is the largest, recent dam failure in the US. The Teton Dam was authorized in 1964, and finished in November 1975. Filling began on October 3, 1975, and continued until the dam failed on June 5, 1976. At that time, the reservoir was 302-feet (92-meters) deep, ~3-feet (1-meter) below the spillway. Leaks below the dam were first noticed on June 3, 1976, but were not considered cause for alarm. However, starting at 7am on June 5, dam personnel noted leaks both in the abutment rock at the north bank of the river at the base of the dam and about 100 feet from the top of the dam. These leaks worsened and by mid-morning warnings were sent out that the dam might fail. Failure occurred at 11:50am. Property damage was estimated at up to $1 billion, and 14 people died in the flood. No one can agree on why it collapsed, and the dam was never rebuilt.
Lesson Closure: How important are dams to our society? Are all dams the same? Let's discuss the different types of dams and how forces affect them. What are some common dam types that engineers consider when designing a dam for a particular river location? (Answers: Arch, embankment, gravity, buttress.) What makes each one of these different from the others? Do you know of any dams in

TSIN PBL Template | www.tsin.org | Page 16
our community? Have you ever visited a dam in another town, state or country? Thinking of those dams, what types (or combination of types) were they?
Let's also review forces. Does anyone have any examples of forces? Remember that a force is anything that can cause motion. In what direction does the force of a student sitting in a chair act? Kicking a soccer ball? Why do we talk about forces when we talk about designing dams or any other big structure? (Possible answers: Because forces affect the design and materials chosen for a dam, and if we do not design a structure to handle the expected forces then it might fail and become dangerous.) What are the different forces acting on a dam? (Answer: The main force is the water in the reservoir pushing on the dam; other forces include the weight of the dam itself, any traffic across the dam, and in some cases wave pressure, snow load or earthquake forces.)
Vocabulary/Definitions:
arch dam: A curved dam whose shape directs the force of the water into the canyon walls adjacent to the dam. This type of dam requires less material than any other type of dam and is ideally suited to narrow, rocky locations.
buttress dam: A dam braced by a series of supports, or buttresses, on the downstream side. Most buttress dams are made of reinforced concrete.
dam: A barrier to obstruct the flow of water, especially one made of earth, rock, masonry and/or concrete, built across a stream or river.
embankment dam: A dam made of earth and/or rock, relying upon its heavy weight to resist the force of water. Embankment dams include a waterproof core that prevents water from seeping through it. Embankment dams are the most commonly-built type of dam in the US.
engineer: A person who applies her/his understanding of science and mathematics to creating things for the benefit of humanity and our world.

TSIN PBL Template | www.tsin.org | Page 17
force: An outside influence that can cause a motion or pressure. For example, to open a door, you exert a force on the door in the direction that you want to open it.
gravity dam: Massive dams that resist the thrust of water entirely by their own weight. Most gravity dams are expensive to build because they require so much concrete.
hydrologic cycle: The natural, continuous cycle of water in various forms, including ocean water, clouds and precipitation, around the Earth. Also called the water cycle.
spillway: The route, channel or passageway through which surplus water escapes from a reservoir, so as to not damage the dam. A common spillway type is an overflow: a rounded crest that is somewhat lower than the top of the dam. The overflow allows water to be spilled from the dam before the dam is overflowed.
Assessment:
Pre-Lesson Assessment:
Discussion Questions: Ask discussion questions to get students to think about the upcoming lesson. After soliciting answers, explain that these questions will be answered during the lesson.
How strong must a dam be to hold back the water of a river?
How would an engineer know how strong to make a dam?
How strong must the Thirsty County dam be to counteract the force of the water acting on it?
Post-Introduction Assessment: Concept Juggle: Have students stand in a circle and toss a ball to each other. Each time they toss the ball, have them give an example of a force and estimate how strong it is (such as, very strong, weak, etc.), and then pass the ball along to someone else. Go around the circle until everyone

TSIN PBL Template | www.tsin.org | Page 18
has had a chance to catch the ball. (Example forces: Pushing a wheelbarrow, pulling a rope, kicking a soccer ball, throwing a ball.)
Lesson Summary Assessment: Civil Engineering Conference/Discussion: As a class, discuss the answers to the Get the Facts Worksheet. Arrange student desks in a circle to mimic engineers holding a discussion around an office conference table.
5. Dam Forces: Students learn how the force of water helps determine the size and shape of dams. They use clay or play dough to build models of different types of dams, and observe the force of the water against each type. They conclude by deciding which type of dam Boone dam is, and the purpose(s) of the dam. Engineering Connection: Every dam is a unique structure, and provides engineers with the opportunity for much creativity. In designing a dam, engineers consider the specific existing environmental conditions, the forces expected to act upon the dam, and the suitability of different dam design types. Learning Objectives: Students should be able to:
● Understand the concept of a force. ● Understand that water acts as a force on a dam and that the dam must
respond with an equal force to hold back the water. ● Name four different types of dams ● List some advantages and disadvantages of the different types of dams.
Introduction: How do engineers decide how large or strong to build a dam? Is the
weight of the water pushing against the side of the dam important? Did you know
that one cubic foot (0.29 cubic meters) of water weighs 64 pounds (29 kg)? The
weight of the water actually determines how strong the dam must be. Water
pushes against the side of a dam with a certain amount of force or pressure. The
dam wall must push the water back with an equal amount of force, and the dam
must redirect the force of the water into the ground and canyon walls without
collapsing or moving downstream from the force of the water. How does a dam

TSIN PBL Template | www.tsin.org | Page 19
exert force on water? The dam must be strong and sturdy and have strong
connections to the ground, in the form of foundations, to help it stand.
By researching the size and direction of all the forces acting on a dam, engineers design a structure that is able to resist all these forces. The principle force acting on a dam is the weight of the water behind the dam. Other forces include the weight of the dam itself and in some cases wave pressure and earthquake forces.
When we make engineering drawings of a dam, we indicate the direction of a force by drawing an arrow (draw an example on the board). Today, you will fill out a worksheet to show forces on the different types of dams — just like engineers do.
Each student will receive a copy of the Four Types of Dams activity sheet to fill out to visually see the direction of the force of the water on a dam.
Let's talk about four of the most common dam types:
● The most commonly-built type of dam in the U.S. is an embankment dam made of earth (also known as an earthen dam) and/or rock, which are readily-available and inexpensive materials. Its heavy weight and large size create the force to push back against the force of the water.
● Gravity dams are similar to embankment dams because they also use heavy weight and large size to exert enough force on the water, but gravity dams are made of concrete and considered more secure than embankment dams since concrete holds together well. Because so much concrete is needed to exert the force, gravity dams can be expensive. Gravity dams are often used in situations when extremely large dams are required and when the additional cost (compared to a less-expensive embankment dam) is deemed necessary due to people and property below the dam.
● An arch dam has a curved shape and is ideal for narrow, rocky locations. The shape of the curve takes advantage of the canyon walls. The curved dam redirects the force of the water into the canyon walls, reducing the need for heavy materials to hold back the water (as is done in gravity

TSIN PBL Template | www.tsin.org | Page 20
dams). This can make arch dams less expensive to build, but more expensive to design.
● A buttress dam supports the force of a reservoir through its bracing supports, called buttresses. The supports are designed like beams and, because they are directly in line with the force of water, redirect the force of the water into the stream bed where they are anchored. Buttress dams use less material than gravity dams, making them less expensive to build.
If we want to test various types of dams to see how they work when water is present, how would we do that? What engineers do is create and test models. What would a model of a dam look like? (Take suggestions from students.) A model of a dam would be a small scale version of it. By making and testing many small-size versions of dams, you learn from them without the time and expense of making full-size dams. That's what we're going to do today — just like engineers do. Let's get started!
Procedure:
Before the Activity: Gather materials (see materials list in right column) and make copies of the Four Types of Dams Worksheet. Make four "landscape" tubs by cutting one side off each of the four tubs per team.
With the Students:

TSIN PBL Template | www.tsin.org | Page 21
1. Hand out the worksheet. Review with the students some details about each type of dam (see the Introduction/Motivation and Vocabulary/Definition sections).
2. Divide the class into four groups (about 3-4 students per group), and assign each team a type of dam. For larger classes, if needed, assign more than one group the same dam type.
3. Have each group create a design. This should include: 1) a list of the materials they will receive, 2) a drawing of the tub and their idea for their dam, and 3) dimensions of key features (such as the tub, dam length, dam thicknesses) and 4) all group members must sign the bottom of the design write-up. The teacher should initial when all four steps are complete.
4. Have each team of students use the materials provided to build their type of dam. Remember the key concepts from each dam!
5. For testing, direct students to place their entire model (plastic container and clay) into a waterproof bin so as to catch any leakage.
6. Have students fill their small containers with water to test its force on their clay dam (see Figure 1). Wait one minute and record your observations. How is it working? Any leaks? Is the dam able to withstand the force of the water?
7. Have students walk around the room to examine the dams created by other teams.
8. Have students complete the worksheet. 9. Conclude by conducting a class discussion, comparing team experiences,
and how forces are kept back by the different dam types.
Vocabulary/Definitions:
force: An outside influence that can cause a motion or pressure. For example, to open a door, you exert a force on the door in the direction that you want to open it.
model: (verb) To simulate, make or construct something to help visualize or learn about something else (a structure, an ecosystem, a process, etc.) that would be

TSIN PBL Template | www.tsin.org | Page 22
difficult or expensive to directly create or experiment on. (noun) A simplified representation of something, sometimes on a smaller scale.
spillway: The route, channel or passageway through which surplus water escapes from a reservoir, so as to not damage the dam. A common spillway type is an overflow — a rounded crest that is somewhat lower than the top of the dam. The overflow allows water to be spilled from the reservoir before the dam overflows.
Assessment:
Pre-Activity Assessment: Discussion/Brainstorming: As a class, have students engage in open discussion. All ideas should be respectfully heard. Take an uncritical position, encourage wild ideas and discourage criticism of ideas. Have students raise their hands to respond. Record their ideas on the board. Ask the students:
When engineers design a dam, what determines its size? How do you determine the size of the dam?
Activity Embedded Assessment: Have students complete the Four Types of Dams Worksheet; review their answers to gauge their mastery of the subject.
Post-Activity Assessment: Voting: Make sure each student has individually chosen which type of dam they want to use for Sullivan County on their worksheets. Take a class vote by having students raise their hands to vote for their type of dam. Declare the majority vote as the winner — the dam type that civil engineers will design for Sullivan County. Review with the students the features and advantages of that type of dam. (Note: In a real engineering analysis, environmental conditions and community requirements/limitations would also be considered in the decision on what type of dam to design and construct. Example considerations include the river's geology and terrain, availability/type of dam building materials, and budget.)

TSIN PBL Template | www.tsin.org | Page 23
Activity Scaffolding:
● Have each team make a short presentation about their type of dam, including a demonstration using their clay model.
● Have teams include a spillway as part of their clay model.
Alternate Dam Building Activity if time limits are a factor: Dam Building Activity
6. Under Pressure: Hands-on Activity Summary: Students learn about Pascal's law, an important concept behind the engineering of dam and lock systems, such as the one at Boone Dam. Students observe the behavior of water in plastic water bottles spilling through holes punctured at different heights, seeing the distance water spurts from the holes, learning how water at a given depth exerts equal pressure in all directions, and how water at increasing depths is under increasing pressure. Engineering Connection: An understanding of Pascal's law and hydrostatic pressure applies in many engineering and scientific fields. Engineers who design locks and dams use the known relationships between water depth and water pressure, as described in pressure laws, to estimate the amount of force expected to be exerted. They use these calculations to design functional structures that adequately meet community performance and safety objectives. Learning Objectives: After this activity, students should be able to:
● Explain Pascal's law. ● Know that water pressure increases with depth. ● Calculate volume.
Introduction/Motivation:

TSIN PBL Template | www.tsin.org | Page 24
Water creates large forces on dams, and engineers calculate the amount of those forces to figure out how big and sturdy dams and locks must be. How do you think engineers actually figure out the amount of force? They must figure out the amount of pressure that the water will apply to the structure. To do this, engineers use a special "law" that has to do with water pressure, called Pascal's law. Today we will learn about this water pressure law. Pascal's law describes the characteristics of water pressure; it says that water at a certain depth has a certain pressure. If you are comparing very deep water to shallow water, do you think they have the same pressure? The deep water has a higher pressure. Why? (Take suggestions from the students.)
Water is heavy! One gallon of water weighs 8.3 lbs (or 3.8 kg)!! Since there is no water above the surface (by definition), the water pressure at the water surface is zero. As you move further down, more water is pushing down from above, and the pressure goes up. This means that pressure changes with depth. Pascal's law tells us that if we know the height of water above a location, we can calculate the pressure at that location. In a reservoir behind a dam, where do you expect to find the highest pressures? At what spot on the dam do you find the most water above

TSIN PBL Template | www.tsin.org | Page 25
it? (Draw a picture on the whiteboard or interactive board so students can see why the pressure is highest at the bottom of the dam!) How do engineers use this information when designing a dam or a lock? Imagine a dam that is built into a deep, steep gorge in a river canyon. In this case, the water level against the dam is high, so you can bet that the pressure exerted by the water near the bottom of the dam is very high. Since engineers know this, they design dams to be able to handle more pressure at the bottom than at the top. That is why many dams are thicker at the bottom than they are at the top! You, as the engineers, must remember that the geotechnical embankment wall you design for Boone Dam as well as the dam itself must withstand high pressures, especially at the bottom. Let's do an activity so we better understand Pascal's law and water pressure. Procedure: This activity can be conducted three different ways: As one large group led by the teacher In two large groups either led by the teacher or student-led (this option results in two sets of the same graphs to compare) With students working in pairs using bottles brought from home; they make bottle set-ups and then experiment Before the Activity:Gather materials and make copies of the Pascal's Law Worksheet. If teaching as a class activity, prepare a 2-liter bottle with holes and measurement scales above the holes using the attached Bottle Template and Rulers. If students will be conducting the activity, print the Bottle Template and Rulers attachment on paper — or even better — on overhead transparency sheets. With the Students:

TSIN PBL Template | www.tsin.org | Page 26
1. Divide the class into groups, depending on how you plan to conduct the activity (two groups or student pairs) and pass out the materials and worksheets to each group.
2. As a class, go over the pre-activity assessment and prediction questions. Describe Pascal's law (water pressure increases with water depth!) and have students fill out the Definition section of their worksheets.
3. Cut out the Bottle Templates and Rulers template where marked on the template; tape the strips to the bottle. Using a 1/8-in drill bit (or a sharp-pointed object), make holes where the template denotes.
4. Make sure that all holes are the same size, and nothing is blocking the holes.
5. Place strips of duct tape (with a corner folded back to make removal easier) over the holes.
6. Pause and ask students to fill out the Hypothesis section of the worksheet. 7. Place the bottle(s) in a sink or basin to catch the leaking water. 8. Fill the bottle(s) with water. 9. Get ready to observe and compare the streams that come out of each hole
when the tape is removed. 10. Each bottle experiment has six jobs: 1) timekeeper, 2) tape puller, 3) height
measurer, 4) height recorder, 5) distance measurer, 6) distance recorder. Assign a timekeeper in each group who will either use the stopwatch, or watch the wall clock and announce to the group when 30 seconds and 60 seconds have passed.
11. When you are ready to start, have the "tape puller" remove the tape from Hole A and the "timekeeper" make a note of the starting time (or press Start on the stopwatch). Have the timekeeper update the group members every 5 seconds. At 30 seconds, the "height measurer" looks at the ruler above the hole and tells the "height recorder" the height of the water above the hole. At the same time, the "distance measurer" measures how far the water is shooting from the side of the bottle (5 cm below hole) and reports this to the "distance recorder" to write on the worksheet.

TSIN PBL Template | www.tsin.org | Page 27
12. Refill the bottle, and repeat Step 11 using Hole B (13 cm from bottom), instead of Hole A.
13. Have each group share their data with other teams so that each member has the table filled in on the worksheet.
14. Working as a group, have each student graph the data for Hole A and Hole B on the blank graphs provided.
15. Complete the Conclusions section of the worksheet. Then use calculators to answer the questions on page 2 of the worksheet.
16. As a class, revisit the predictions made before the activity, as described in the Assessment section.
17. End the lesson with a class discussion comparing results and conclusions. Water in a bottle spills through two holes at the same height with equal pressure in all directions. Water at increasing depth is under increasing pressure.
Vocabulary/Definitions: lock: An enclosed chamber in a waterway with watertight gates at each end, for raising or lowering vessels from one water level to another by admitting or releasing water. Pascal's law: A hydrostatics principle that says that for all points at the same absolute height in a body of fluid, the pressure is the same, even if additional pressure is applied on the fluid at some place. pressure: The exertion of force upon a surface by an object, fluid, etc., in contact with it. Expressed as force per unit area. Assessment: Pre-Activity Assessment: Discussion Questions: Solicit, integrate and summarize student responses to the following statements and questions. Say you have a plastic soda bottle with a hole punched in it, like we will have in this activity. After filling the bottle with water, the water will stream through the hole.

TSIN PBL Template | www.tsin.org | Page 28
1. What does it mean if the water streams fast vs. slow? (Answer: The speed of the water stream is related to the pressure of the water.)
2. Does a fast stream mean that the water has a relatively high pressure or relatively low pressure? (Answer: Relatively high pressure.)
Prediction: Have students make predictions by voting with raised hands to each possible answer:
1. Will water from a hole near the bottom of the bottle have more or less pressure than that from a hole near the top of the bottle? (Tally the votes and write the numbers on the board. Answer: Tell students that this is exactly what they will discover in the activity. Do not reveal the answer [higher pressure] until after the activity.)
Activity Embedded Assessment: Have students complete the Pascal's Law Worksheet. Make sure they write a hypothesis before starting the activity. Review their answers to gauge their mastery of the subject. Post-Activity Assessment: Prediction Analysis: Have students compare their initial predictions with their test results, as recorded on their worksheets. Investigating Questions: What is volume? (Answer: Volume is the amount of three-dimensional space an object occupies. Engineers usually describe the amount of water in a reservoir using "cubic feet" or "cubic meters," which are liquid measurements of volume. Another unit of liquid volume is a "gallon.") Why must an engineer know the volume of the water in a reservoir? (Answer: Water creates large forces on dams and locks. The greater the volume of water held back by a structure, the greater the pressure exerted on the walls of the structure. Engineers must be able to calculate volume to know how big and sturdy dams and locks must be to withstand the forces.)

TSIN PBL Template | www.tsin.org | Page 29
7. Are Dams Forever? Summary: Students learn in this lesson, and through the associated activity, that dams are constructed with specific purposes and unfortunately do not last forever. Similar to other human-made structures, such as roads and bridges, dams require regular maintenance and have a finite lifespan. Many dams built during the 1930-70s, an era of intensive dam construction, have an expected life of 50-100 years. Due to inadequate maintenance and/or for environmental reasons, some of these dams will fail or be removed in the next 50 years. Engineering Connection: Engineers are concerned with the long-term reliability and maintenance of structures, especially dams. While proper initial engineering design of dams is important, safe operation and maintenance is critical to sustaining the benefits of dams and avoiding potential disaster. To prevent failure, engineers inspect these large structures to analyze the condition of their materials, determine maintenance, and sometimes recommend removal. As the US infrastructure of dams ages and as environmental issues become better understood, more dams are being removed so that rivers flow freely. Learning Objectives: After this lesson, students should be able to:
● Discuss why dams do not last forever. ● Name some of the forces acting on dams that cause them to deteriorate.
Introduction/Motivation: Do you think dams last forever? (Take a quick poll.) Why do some dams fall apart? What if you do a really good job designing them, would they still fall apart? Eventually? (Conduct an informal brainstorming session, as described in the Assessment section.) Can anyone think of any dams they have seen in our community? What about any dams you might have seen while on a trip? (Take suggestions from students. Mention local dams as well as Boone Dam) What are they made of? Do you

TSIN PBL Template | www.tsin.org | Page 30
remember if they looked like they were in good condition? Let's brainstorm why some dams eventually fall apart and while others last longer. A key element to understanding the lifespan of a dam is analyzing the forces that act on it. Remember we talked about the forces that act on dams? Who can recall what some of those forces were? The main force acting on a dam is the water behind it, but wind and rain also apply forces to dams. Now imagine the impact of wind, sun and water on the materials of a dam over the course of 100 years. Can you think of any of your books, clothes, shoes or toys that started to look worn after only a few years? Imagine what they would look like after 50 or 100 years of being out in the weather, eroding under these forces! What would happen if a dam just collapsed? (Take suggestions from students about the possible impacts from a powerful flood of water going downstream and the rapid loss of reservoir water upstream.) Do you know, that to be safe, people inspect the condition of dams (just like they do for skyscrapers, bridges and other buildings) to see if they need any repair work and to schedule regular maintenance to keep them in good condition? Have you ever heard of a dam being removed? From what we've just talked about, what might be some reasons why dams are removed? (Possible answers: If no longer safe or needed, or if restoring the ecosystem is now more important that the original purpose[s] of the dam.) Many factors can lead to dam failure or removal. Refer to the Dam Pass or Fail activity to have students research existing projects and their current status. A dam might fail due to "old age" from physical deterioration as evidenced by concrete cracks, failing buttresses and worn-out materials. Removal due to structural material wear is more likely to happen if regular maintenance is not provided, resulting in unsafe dams that are removed to protect public safety. Natural disasters, such as earthquakes and storms, can also damage or destroy dams. The process of sedimentation, a reservoir filling with sands and soils from an incoming

TSIN PBL Template | www.tsin.org | Page 31
river, can reduce reservoir capacity and make dams no longer necessary. In addition, dams are sometimes removed if they cause more harm than good. Many people, including environmentalists, fishermen and Native Americans, argue for the removal of specific dams to restore the natural flow of the river along with its aquatic ecosystem and fish populations. In the Pacific Northwest, dam removal to restore legendary salmon runs, is a contentious political and environmental issue that has resulted in the removal of many dams. Dam failures are rare, but can cause immense damage and loss of life when they occur. Causes of dam failure include overtopping of a dam (by water spilling over the top of a dam); debris blockage of spillways; settlement of the dam crest; seepage due to eroded piping, animal burrowing and cracks; structural failure of the materials; and inadequate maintenance. Sometimes dam failures occur without much warning, such as from flash floods. Other times, failures and breeches develop over days and weeks, such as the accumulated effect of melting snow upriver or debris blockage. The dam and reservoir size makes a difference in the potential damage, too; some dams hold back immense reservoirs of water; others are relatively small. Many dams built during the large dam-building era from 1930-70 have a projected lifespan of 50-100 years. After 50 years, the maintenance costs and chances of failure start to rise dramatically. So, due to inadequate maintenance or for environmental reasons, many of these dams will either fail or be removed in the next 50 years. Engineers are in charge of dam safety. They inspect existing dam structures and decide to remove dangerous or unnecessary dams. Due to the catastrophic nature of dam failure, dam safety and inspection is a vital task. Dam removal is controversial but much has been learned in the last 20 years, including alternatives to damming rivers. Despite the benefits of restoring the natural river flow, dam removal also has consequences, such as the impact of destroying reservoirs, wetlands and recreational resources or impact on

TSIN PBL Template | www.tsin.org | Page 32
hydropower generation or irrigation supply that became established over the years because of the existence of dams. The process of removing a dam (or cleaning up from a failed dam) is unique for each dam, but generally it involves drawing down the reservoir or redirecting the water flow by using heavy earth-moving equipment and sometimes controlled explosives to reroute the water so the dam structural materials can be removed piece at a time, minimizing the downstream impact of releasing more water and sediment. Lesson Closure: (Lead a class discussion. See additional lesson summary questions in the Assessment section.) Who can tell me about a dam they have seen? Or a dam they know about? (Take suggestions from students. This should include Boone dam and other local as well as well-known dams from across the globe.) Why would a dam not last forever? (Answer: It might either fail or be removed.) Why might a dam fail? (Take suggestions from students. Possible answers: Physical deterioration of structural materials, breaks because of the forces acting on it, inadequate maintenance and operation.) What are some of the forces acting on dams that cause them to age? (Possible answers: The force of the great amount of water [in the reservoir, upstream] held back by the dam. Erosion by sun, wind, water, drainage, seepage, and earth settlement. Natural events such as earthquakes, storms, heavy rains and flash flooding.) Why might a dam be removed? (Possible answers: If it causes more harm than the benefits it provides. To restore a free-flowing river and natural conditions for the river and riparian ecosystems. To prevent loss of life and property damage if an unsafe, poorly-maintained or deteriorating dam structure might fail and cannot be repaired. If it is no longer needed for the original purpose [irrigation, power generation, to create a reservoir].)

TSIN PBL Template | www.tsin.org | Page 33
Vocabulary/Definitions: lifespan: The length of time something, such as a dam, is expected to last. maintenance: Any work needed to keep an object or a machine functional. Assessment: Pre-Lesson Assessment: Brainstorming: As a class, have students engage in open discussion. All ideas should be respectfully heard. Take an uncritical position, encourage wild ideas and discourage criticism of ideas. Have students raise their hands to respond. Write their ideas on the board. Ask the students: Do dams last forever? (Answer: No, dams have a finite lifespan.) Why is it that dams don't last forever? (Answer: Eventually they break down.) Why do dams break down? (Answer: Natural forces act on objects (whether a dam, a building, or a tree) and eventually causes the object, or structure, to fail. These forces are "unbalanced" forces, because even though the object appears to be still, these forces acting on the object cause it to slowly move or change.) Why and how might these forces eventually break a dam? Let's brainstorm as a class to figure it out. (Possible answers: Dams do not last forever because sun, wind, seepage, earth settlement and other natural erosion forces slowly weaken the dam structure. If the strong materials that hold back the water behind dams are not kept in good repair, they become a danger because they might fail; so some dams are removed to prevent their imminent failure. Storms, earthquakes and overspills can cause dams to collapse and fall apart, releasing all the water in the reservoir. Sometimes the reservoirs above dams fill with sediment making a dam no longer necessary. Maybe the dam was poorly/inadequately designed and could not withstand the normal forces acting on it. Sometimes people find out that having a dam across a river causes severe problems for the ecosystem, like blocking the life cycle passage of migratory fish upstream to spawn [reproduce], and so they remove the dam to restore the natural unobstructed river route.)
TSIN PBL Template | www.tsin.org | Page 34
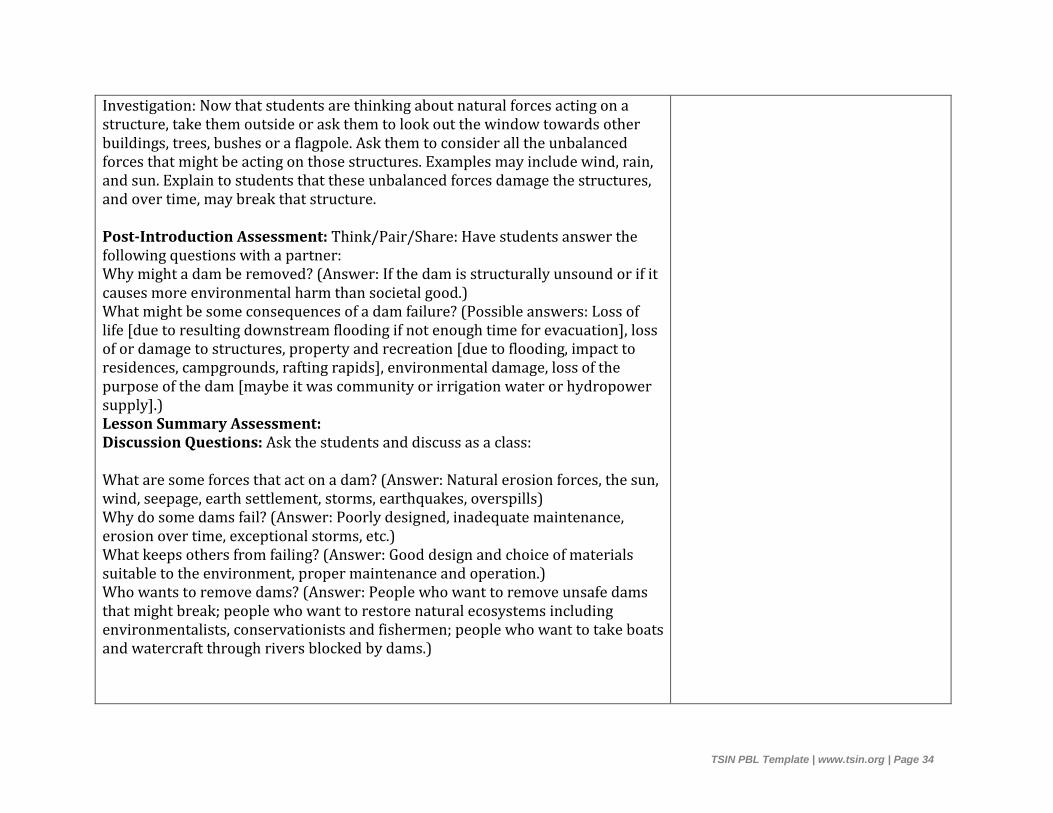
Investigation: Now that students are thinking about natural forces acting on a structure, take them outside or ask them to look out the window towards other buildings, trees, bushes or a flagpole. Ask them to consider all the unbalanced forces that might be acting on those structures. Examples may include wind, rain, and sun. Explain to students that these unbalanced forces damage the structures, and over time, may break that structure. Post-Introduction Assessment: Think/Pair/Share: Have students answer the following questions with a partner: Why might a dam be removed? (Answer: If the dam is structurally unsound or if it causes more environmental harm than societal good.) What might be some consequences of a dam failure? (Possible answers: Loss of life [due to resulting downstream flooding if not enough time for evacuation], loss of or damage to structures, property and recreation [due to flooding, impact to residences, campgrounds, rafting rapids], environmental damage, loss of the purpose of the dam [maybe it was community or irrigation water or hydropower supply].) Lesson Summary Assessment: Discussion Questions: Ask the students and discuss as a class: What are some forces that act on a dam? (Answer: Natural erosion forces, the sun, wind, seepage, earth settlement, storms, earthquakes, overspills) Why do some dams fail? (Answer: Poorly designed, inadequate maintenance, erosion over time, exceptional storms, etc.) What keeps others from failing? (Answer: Good design and choice of materials suitable to the environment, proper maintenance and operation.) Who wants to remove dams? (Answer: People who want to remove unsafe dams that might break; people who want to restore natural ecosystems including environmentalists, conservationists and fishermen; people who want to take boats and watercraft through rivers blocked by dams.)

TSIN PBL Template | www.tsin.org | Page 35
Who wants to keep dams? (Answer: People benefiting from hydropower or irrigation water they supply, people who like to use the resulting reservoir for lake-type recreational activities and have lake-front property.) 8. Geotechnical Wall Challenge: In this challenge students will build and test how different materials work as retaining walls. A retaining wall is one of the main tools used to prevent erosion. When looking at erosion prevention we focus on two main aspects: What happens to the dirt/soil? What happens to the water? During your class discussion, it is important that students understand why you’re focusing on soil and water. Ask and discuss questions such as: -Why do we want to prevent the soil from eroding? Answer: If the soil under/around our embankment wall at Boone Dam gets carried away, it can damage the surrounding areas, and in this case, Boone Dam. -How can water (surface and groundwater) affect the soil? Answer: The water can carry away the soil and make the ground mushy/muddy. -Why do we want the water to drain away from our building? Answer: The water makes the ground soggy and weak. These questions are essential to erosion prevention. These concepts are simple for students to understand but are the basic concepts that engineers focus on when it comes to erosion prevention. Introduction: Introduce the concept of a retaining wall. “A retaining wall is a wall that keeps the dirt from being washed away. Retain means to hold on to. Can anyone of you think of other objects that keep dirt from being carried away by water or wind? (Flower pot, flower box, your school will likely have retaining walls somewhere on the property, rock walls etc.) Go outside and make observations of retaining walls that your school has. Look online for images and examples of retaining walls. Look up images of retaining walls made of wood, concrete, and rock, or combination of two materials. As a class discuss the features they notice, similarities and differences, and how they work. “A retaining wall is one of the main ways humans prevent

TSIN PBL Template | www.tsin.org | Page 36
erosion. Now that we have an understanding of what they are and how they work, we’re going to build our own!” Brainstorm & Plan: Have students take out their STEM/Science notebooks or electronic notebooks. Pair the students up or have them work independently. Introduce the materials for the build and the dimension for the size of their retaining wall (11x11x3cm high). Assign each group or student a specific material they will be building with, either wood (Popsicle sticks), rock, or cement (clay). Allow the students building with wood to use some masking tape to make and attach their walls. The groups building with rocks will use glue to connect them. No other materials are allowed to be used. Once the students know which material they will be engineering with allow them time to brainstorm and draw out a plan for their retaining wall. Have the students draw and label their plan with the measurement for their wall and materials they are using. Build Activity: Have the students draw the outline of their retaining wall before they start to build. Measure out the 11x11 walls and use those lines as a guide to place the materials while building. For students using wood, masking tape seems to work the best in connecting all the pieces and for the students using rock, have them use basic white glue to connect their rocks. As students are building walk around to check that students are following their measurements and building their walls high enough. Suggestion: Have all of the “wood builders” working in the same area, same with the stone and clay so that all the materials are easily accessible to everyone in the group. Test: Once students have finished building their walls it’s now time to test them. Before testing, refer back to the main focus of the lesson, in terms of what we want the retaining walls to do. “Keep the soil in, get the water out.” It is best to test the walls outside to prevent a mess. Fill each retaining wall with soil or dirt. Whatever you choose to fill them with, make sure that you use the same material for each student because different types of dirt and soil will react differently during the

TSIN PBL Template | www.tsin.org | Page 37
test. Fill a large bucket with water and bring out a measuring cup. Use approximately 1 cup of water for each wall. Pour the cup of water evenly on top of the soil and have the students make observations of what is happening to both the water and the soil. While I’m testing, I also reference the terms “weathering, erosion, and deposition.” The result of the test will vary slightly and depend largely on the actual engineering of the walls but overall the type of material used has an effect on how well it performs in regards to retaining the soil and draining the water. See “Sample Teacher Script for Testing” below to see a suggested script while testing their retaining walls. Test all the walls and have students make observations of how the walls performed in keeping the soil in and letting the water out. Typical results for each material are as follows: Wood- Good at letting the water out, bad at keeping the soil in. Rocks- Good at letter the water out and a little better at keeping the soil in than the wood. Clay ( instead of Cement)- Bad at letting the water out, good at keeping the soil in. Sample Teacher Script for Testing: Teacher: This water (water in the measuring cup) represents my weathering. When we pour the water it will represent rain. We’re going to make it rain a lot. As I pour I want you to say the term “weathering.” Teacher: Now let’s see if there’s any erosion. Does anyone see any soil being carried away or eroded? Student: Yes there’s some soil that got carried outside of this retaining wall. Teacher: What do we call this? Students: Erosion! Teacher: This pile of dirt that is left outside the wall, what is this called? Students: Deposition Improve: After testing the walls and discussing the results as a class, allow students to make engineering modifications if necessary and time permits. Have students identify

TSIN PBL Template | www.tsin.org | Page 38
where modifications could be made in their walls in order to make them perform better. Have students make changes and re-test the walls. 9. Possible Activity: Geotechnical Wall Challenge with Veronica Barrado, civil engineer with TVA at the Boone Dam Project. Veronica and other civil engineers from TVA will come to the school with materials and resources to do a grade-level appropriate version of the Geotechnical Wall Challenge with the students. See attached document of the original Geotechnical Wall Challenge: http://pswc2018.weebly.com/uploads/9/3/3/9/93392612/geotechwallrules.pdf 10. Engineering Drawings and Presentation: Ask students to create preliminary drawings of their innovative geotechnical wall as civil engineers would do in repairing the earthen embankment of Boone Dam for Sullivan County. The drawings should illustrate their solution with the dimensions of the structure (how long, wide and deep) and what they would recommend using in reinforcing the stability of the structure and earthen embankment at Boone Dam. Students will use their knowledge from the previous lessons and activities as well as their research in this PBL unit to create a multimedia presentation of their innovative geotechnical wall design to present to the Sullivan County Commissioners and TVA Dam civil engineers and geotechnical designers. This may take extra time for students to complete if it is a classroom activity.

TSIN PBL Template | www.tsin.org | Page 39
Technology Integration: How is technology embedded into this PBL unit? Students will use technology for research, computation, recording their activities in an electronic journal, and presenting their innovative design idea in a google slide. Capstone Presentation: How will students present what they’ve learned publicly? The students will present their multimedia presentation showcasing their innovative design idea to a panel of Sullivan County Commissioners as well as TVA Boone Dam civil engineers and geotechnical designers.
Performance Based Rubric
Standards Developing On-Target Mastery Using mathematics and computational thinking
Students use mathematical skills or concepts but these are not connected to answering a scientific question.
Students use mathematical skills or concepts to answer a scientific question.
Students make decisions about what mathematical skills or concepts to use. Students use mathematical skills or concepts to answer a scientific question.
Developing and using models
Students create or use models. The models focus on describing natural phenomena rather than predicting or explaining the natural world. Students do not evaluate the merits and limitations of the model.
Students create or use models focused on predicting or explaining the natural world. Students do not evaluate the merits and limitations of the model.
Students create or use models focused on predicting or explaining the natural world. Students do evaluate the merits and limitations of the model.
Science ELA

TSIN PBL Template | www.tsin.org | Page 40