Tutorials: Project Managementimages.autodesk.com/adsk/files/3dsmax_2010_project_management.pdf ·...
12
Tutorials: Project Management 2010
Transcript of Tutorials: Project Managementimages.autodesk.com/adsk/files/3dsmax_2010_project_management.pdf ·...
Tutorials:ProjectManagement
2010

Autodesk® 3ds® Max 2010 Software© 2009 Autodesk, Inc. All rights reserved. Except as otherwise permitted by Autodesk, Inc., this publication, or parts thereof, may not bereproduced in any form, by any method, for any purpose.Certain materials included in this publication are reprinted with the permission of the copyright holder.The following are registered trademarks or trademarks of Autodesk, Inc., in the USA and other countries: 3DEC (design/logo), 3December,3December.com, 3ds Max, ADI, Alias, Alias (swirl design/logo), AliasStudio, Alias|Wavefront (design/logo), ATC, AUGI, AutoCAD, AutoCADLearning Assistance, AutoCAD LT, AutoCAD Simulator, AutoCAD SQL Extension, AutoCAD SQL Interface, Autodesk, Autodesk Envision, AutodeskInsight, Autodesk Intent, Autodesk Inventor, Autodesk Map, Autodesk MapGuide, Autodesk Streamline, AutoLISP, AutoSnap, AutoSketch,AutoTrack, Backdraft, Built with ObjectARX (logo), Burn, Buzzsaw, CAiCE, Can You Imagine, Character Studio, Cinestream, Civil 3D, Cleaner,Cleaner Central, ClearScale, Colour Warper, Combustion, Communication Specification, Constructware, Content Explorer, Create>what's>Next>(design/logo), Dancing Baby (image), DesignCenter, Design Doctor, Designer's Toolkit, DesignKids, DesignProf, DesignServer, DesignStudio,Design|Studio (design/logo), Design Web Format, Discreet, DWF, DWG, DWG (logo), DWG Extreme, DWG TrueConvert, DWG TrueView, DXF,Ecotect, Exposure, Extending the Design Team, Face Robot, FBX, Filmbox, Fire, Flame, Flint, FMDesktop, Freewheel, Frost, GDX Driver, Gmax,Green Building Studio, Heads-up Design, Heidi, HumanIK, IDEA Server, i-drop, ImageModeler, iMOUT, Incinerator, Inferno, Inventor, InventorLT, Kaydara, Kaydara (design/logo), Kynapse, Kynogon, LandXplorer, LocationLogic, Lustre, Matchmover, Maya, Mechanical Desktop, Moonbox,MotionBuilder, Movimento, Mudbox, NavisWorks, ObjectARX, ObjectDBX, Open Reality, Opticore, Opticore Opus, PolarSnap, PortfolioWall,Powered with Autodesk Technology, Productstream, ProjectPoint, ProMaterials, RasterDWG, Reactor, RealDWG, Real-time Roto, REALVIZ,Recognize, Render Queue, Retimer,Reveal, Revit, Showcase, ShowMotion, SketchBook, Smoke, Softimage, Softimage|XSI (design/logo),SteeringWheels, Stitcher, Stone, StudioTools, Topobase, Toxik, TrustedDWG, ViewCube, Visual, Visual Construction, Visual Drainage, VisualLandscape, Visual Survey, Visual Toolbox, Visual LISP, Voice Reality, Volo, Vtour, Wire, Wiretap, WiretapCentral, XSI, and XSI (design/logo).
TrademarksThe following are registered trademarks or trademarks of Autodesk Canada Co. in the USA and/or Canada and other countries: Backburner,Multi-Master Editing, River, and Sparks.The following are registered trademarks or trademarks of Moldflow Corp. in the USA and/or other countries: Moldflow MPA, MPA (design/logo),Moldflow Plastics Advisers, MPI, MPI (design/logo), Moldflow Plastics Insight, MPX, MPX (design/logo), Moldflow Plastics Xpert.clothfx™ is a trademark of Size8 Software, Inc. Havok.com™ is a trademark or registered trademark of Havok.com Inc. or its licensors. Intel is aregistered trademark of Intel Corporation. mental ray is a registered trademark of mental images GmbH licensed for use by Autodesk, Inc. Allother brand names, product names or trademarks belong to their respective holders.
DisclaimerTHIS PUBLICATION AND THE INFORMATION CONTAINED HEREIN IS MADE AVAILABLE BY AUTODESK, INC. "AS IS." AUTODESK, INC. DISCLAIMSALL WARRANTIES, EITHER EXPRESS OR IMPLIED, INCLUDING BUT NOT LIMITED TO ANY IMPLIED WARRANTIES OF MERCHANTABILITY ORFITNESS FOR A PARTICULAR PURPOSE REGARDING THESE MATERIALS.

Project Management
This tutorial introduces you to some basic management concepts that you will use whenworking on scenes in 3ds Max.
In this tutorial, you will learn how to:
■ Save scene configurations as individual scene states.
■ Switch global illumination engines to save rendering time.
■ Use Batch Render to render a number of scenes sequentially.
Skill level: Beginner
Time to complete: 40 minutes
Saving and Rendering a SceneOnce you have built a 3D environment with materials, lights and cameras, youcan save various scene states so that you can later recall stored parameters. Inthis lesson, you will adjust material and light values to effortlessly switchbetween a daytime and nighttime scene.
Switch global illumination engines:
You will use the mental ray renderer to simulate global illumination.
1 On the Quick Access toolbar, click the Open File button and navigateto the \scenes\scene_management folder. Highlight balcony_scene-states.maxand click Open.
2 From the Rendering menu, choose Indirect Illumination.
10
1789

3 On the Caustics And Global Illumination rollout > Global Illuminationgroup, turn on the Enable checkbox. Leave all other parameters at theirdefault settings.
4 Render the Camera01 viewport to test the results.
Saving scene states:
1 Right-click in the Camera viewport.
2 From the quad menu that displays, choose Save Scene State.
1790 | Chapter 10 Project Management
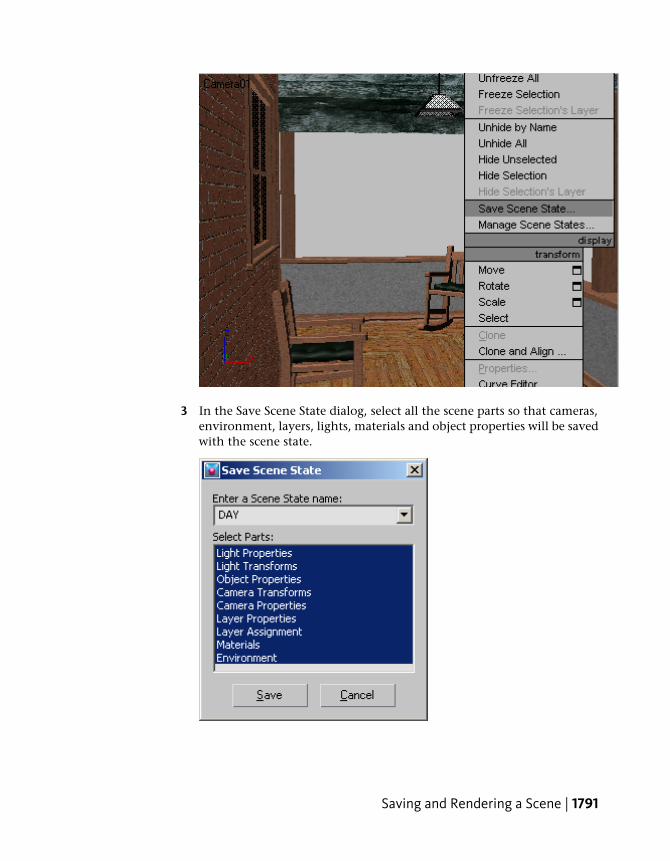
3 In the Save Scene State dialog, select all the scene parts so that cameras,environment, layers, lights, materials and object properties will be savedwith the scene state.
Saving and Rendering a Scene | 1791
4 Name the scene state DAY.
5 Click Save to exit the dialog.
Changing scene parameters:
1 Go to the Display panel.
2 On the Hide by Category rollout, turn off Lights.
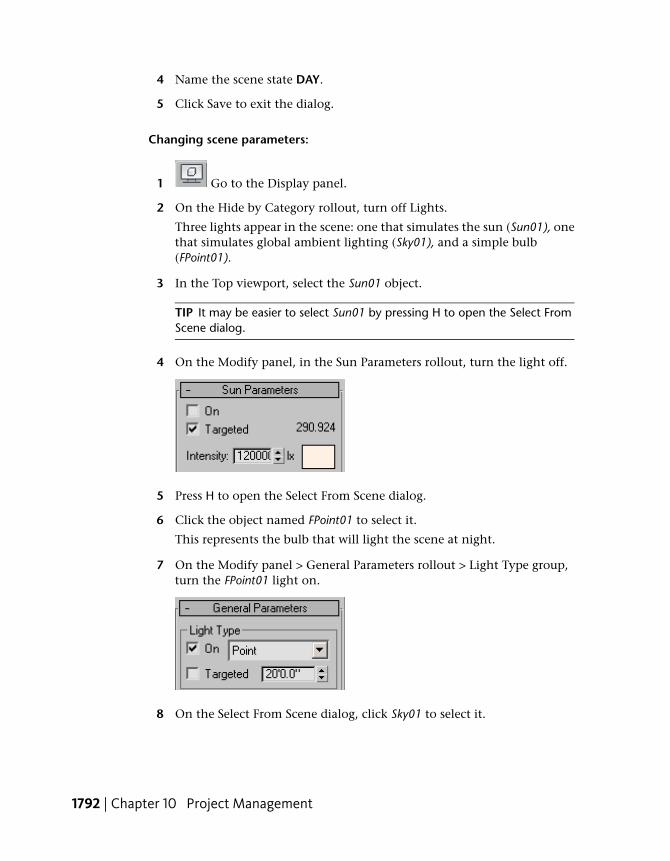
Three lights appear in the scene: one that simulates the sun (Sun01), onethat simulates global ambient lighting (Sky01), and a simple bulb(FPoint01).
3 In the Top viewport, select the Sun01 object.
TIP It may be easier to select Sun01 by pressing H to open the Select FromScene dialog.
4 On the Modify panel, in the Sun Parameters rollout, turn the light off.
5 Press H to open the Select From Scene dialog.
6 Click the object named FPoint01 to select it.
This represents the bulb that will light the scene at night.
7 On the Modify panel > General Parameters rollout > Light Type group,turn the FPoint01 light on.
8 On the Select From Scene dialog, click Sky01 to select it.
1792 | Chapter 10 Project Management

This object is the light system that will provide ambient illumination tothe sky (skylight).
9 On the Modify panel, in the IES Sky Parameters rollout, turn the Sky01light off.
10 Render the Camera viewport.
The scene is very dark, and the background still displays daytime lighting.
11 From the Rendering menu, choose Environment. In the LogarithmicExposure Control Parameters rollout, turn off the Exterior Daylight option.
Saving and Rendering a Scene | 1793
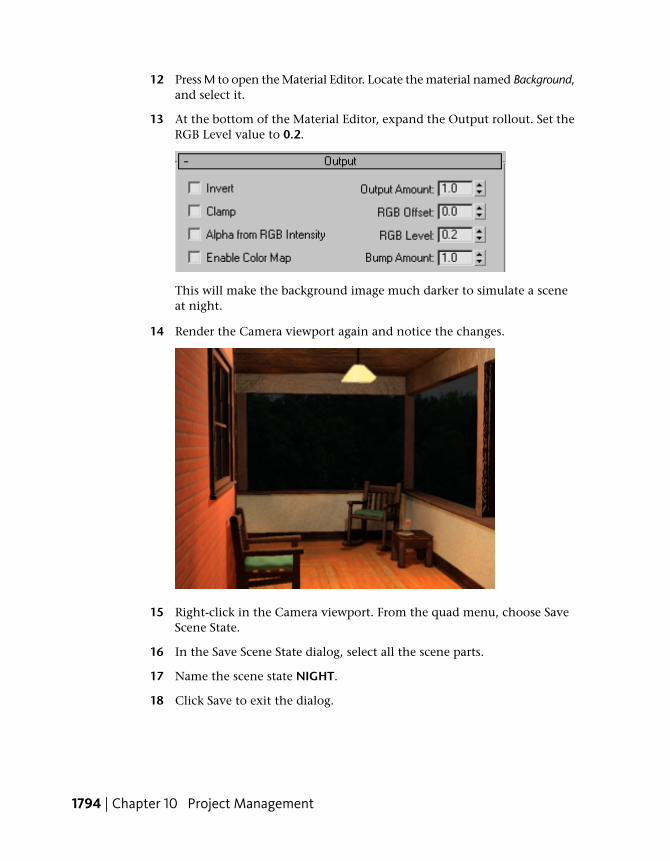
12 Press M to open the Material Editor. Locate the material named Background,and select it.
13 At the bottom of the Material Editor, expand the Output rollout. Set theRGB Level value to 0.2.
This will make the background image much darker to simulate a sceneat night.
14 Render the Camera viewport again and notice the changes.
15 Right-click in the Camera viewport. From the quad menu, choose SaveScene State.
16 In the Save Scene State dialog, select all the scene parts.
17 Name the scene state NIGHT.
18 Click Save to exit the dialog.
1794 | Chapter 10 Project Management

Restore scene states to render:
1 Right-click in the Camera viewport, and choose Restore Scene State fromthe quad menu.
Notice the cascading menu lists the two scene states you previously saved.
2 Choose DAY to restore the daytime scene.
Notice in the Top viewport that the point light is displayed in black,which means it's inactive. Sunlight is displayed in yellow, which meansit is enabled.
3 Render the Camera viewport to see that all scene parts such as light effectsand environment backgrounds have been restored to their original states.
Next
Using the Batch Render Tool on page 1795
Using the Batch Render ToolThe Batch Render tool lets you sequentially render any or all of the views inyour project. It is especially useful in conjunction with the scene states toolshown in the last lesson to render different aspects of the scene with very littleor no interaction on your part.
In this lesson, you will use Batch Render to automate the rendering of bothyour day and night scenes.
Accessing and setting up the Batch Render dialog:
1 Continue working on your scene from the last lesson, or click theOpen File button on the Quick Access toolbar and navigate to the\scenes\scene_management folder. Highlight balcony_batch-render.max, andclick Open.
2 From the Rendering menu, choose Batch Render.
The Batch Render dialog displays.
3 Click the Add button in the top left corner of the dialog. A new entrynamed View01 is added to the list.
Using the Batch Render Tool | 1795

4 In the Name field, rename the view: CamViewDay. Be sure to press Enterafter typing the name.
5 From the Camera drop-down list, choose Camera01. The view is nowassigned to what this particular camera is pointed at.
6 Click the Output Path button and name the output file DAY.JPG, andthen click Save.
7 Accept the JPEG Image Control defaults, and then click OK.
8 From the Scene State drop-down list, choose DAY.
1796 | Chapter 10 Project Management

NOTE This ensures that Batch Render will use the Camera01 viewport forrendering the DAY scene state, saving the output file DAY.JPG to disk.
9 Click the Add button at the top of the dialog again to add a second entryto the batch list. Rename the new entry: CamViewNight.
10 Assign Camera01 to this new view.
11 Make sure the new entry CamViewNight is displayed in the Name field,and create an output file for it named NIGHT.JPG.
12 Accept the JPEG Image Control defaults, and then click OK.
13 From the Scene State drop-down list, choose the NIGHT entry.
Using the Batch Render Tool | 1797

14 Click the Render button in the bottom-right corner.
Both the day and night scenes are rendered and saved to disk.
Summary
The previous lesson showed you how to save a scene state, and later restoreit. This lesson demonstrated the use of the Batch Render tool, which in a singlesession lets you render multiple views and save them to disk. You can useScene States together with Batch Render to generate multiple renderings of ascene under different conditions.
1798 | Chapter 10 Project Management