Tsunami's Ridiculously Comprehensive Guide to Warding - Part 1
7
Issue #8 April 9, 2014 Current as of Balance Patch - 6.80 Written by: tsunami was tired of it. I was tired of always blocking my own camp while dewarding. I was tired of failing to place an observer on the precise pixel that stops two camps from spawning. I was tired of anaphora. So I sat down, brushed up on my console-fu, loaded up a local lobby of Dotes, and wasted many an hour so I could create the authoritative guide to teach people how to properly utilize sticks of eyeballs in a game about anti-wizards and shoe-wearing birds. Pull Camps Effectively blocking and contesting the pull camp is one of the most challenging parts of playing in the hard lane. Not only do you need to speed on down the lane to place wards before the enemy shows up, but you need to choose which ward will best suit your purposes . Do you think you’ll be able to come into experience range and would like vision? Do you want to completely disable the enemy supports from earning jungle experience? Do you like reading rhetorical questions that extend just long enough so I can reach the bottom of this page?
Transcript of Tsunami's Ridiculously Comprehensive Guide to Warding - Part 1
Issue #8
April 9, 2014 Current as of Balance Patch - 6.80
Written by: tsunami
was tired of it. I was tired of always blocking my own camp while dewarding. I was tired of failing to place an observer on the precise pixel that stops two camps from spawning. I was tired of anaphora. So I sat down, brushed up on
my console-fu, loaded up a local lobby of Dotes, and wasted many an hour so I could create the authoritative guide to teach people how to properly utilize sticks of eyeballs in a game about anti-wizards and shoe-wearing birds.
Pull Camps Effectively blocking and contesting the pull camp is one of the most challenging parts of playing in the hard lane. Not only do you need to speed on down the lane to place wards before the enemy shows up, but you need to choose which ward will best suit your purposes. Do you think you’ll be able to come into experience range and would like vision? Do you want to completely disable the enemy supports from earning jungle experience? Do you like reading rhetorical questions that extend just long enough so I can reach the bottom of this page?

Issue #8
Radiant Pull Camp
These are seven of the most frequently placed wards used to block the Radiant pull camp. Each ward is useful in different situations. The red box represents the spawn site.
The Magic Bush
A1 is the famous Magic Bush ward. As you can see, this ward is conveniently located within two camp spawn sites. This allows you to block both the pull camp and one of the Radiant hard camps with a single ward. It’s cute, but it’ll instantly get countered in higher level games because it’s extremely obvious that there’s a ward on the bush when Radiant notices two camps mysteriously failed to appear.
Issue #8
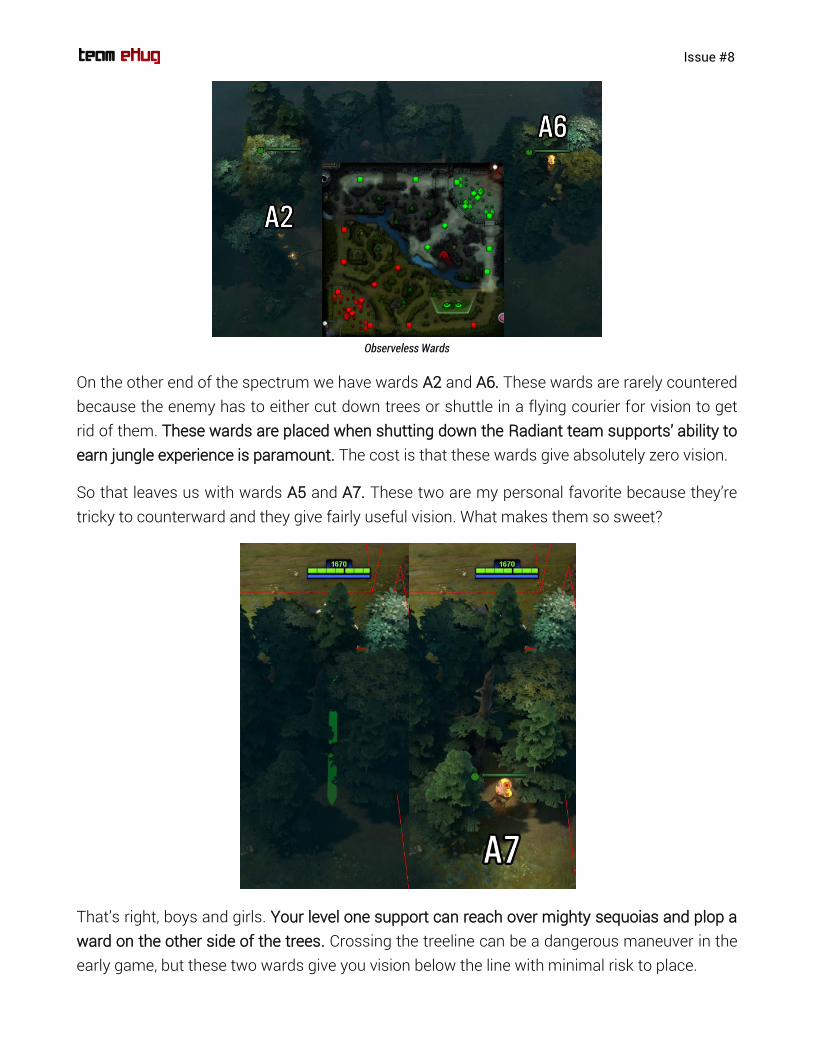
Observeless Wards
On the other end of the spectrum we have wards A2 and A6. These wards are rarely countered because the enemy has to either cut down trees or shuttle in a flying courier for vision to get rid of them. These wards are placed when shutting down the Radiant team supports’ ability to earn jungle experience is paramount. The cost is that these wards give absolutely zero vision.
So that leaves us with wards A5 and A7. These two are my personal favorite because they’re tricky to counterward and they give fairly useful vision. What makes them so sweet?
That’s right, boys and girls. Your level one support can reach over mighty sequoias and plop a ward on the other side of the trees. Crossing the treeline can be a dangerous maneuver in the early game, but these two wards give you vision below the line with minimal risk to place.
Issue #8
I’m glossing over wards A3 and A4 because they’re both pretty lazy. A4 is just dumb. If you wanted a ward that gave you lame vision, but blocks the camp, you might as well go for A6. And A3… well A3 is usually the “I just learned how to block camps” ward. But maybe one time A3 will be the most next level ward you’ve ever placed when the enemy support massively overthinks counterwarding and checks every area except the most obvious one.
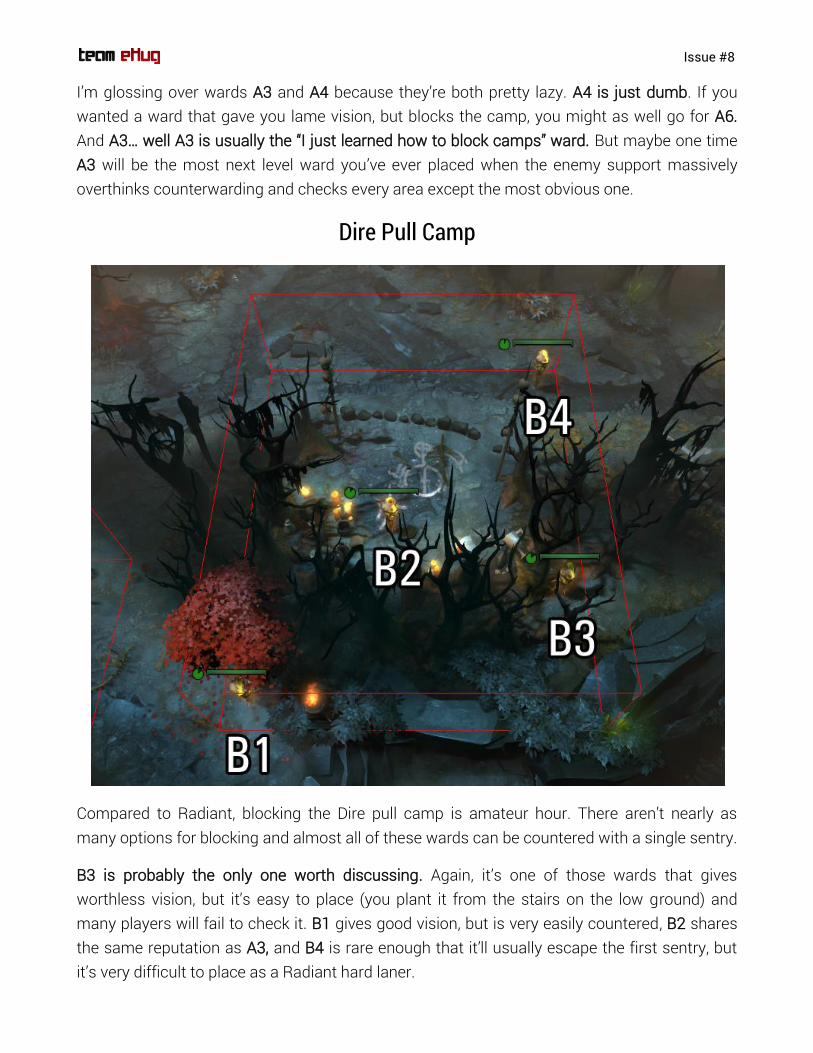
Dire Pull Camp
Compared to Radiant, blocking the Dire pull camp is amateur hour. There aren’t nearly as many options for blocking and almost all of these wards can be countered with a single sentry.
B3 is probably the only one worth discussing. Again, it’s one of those wards that gives worthless vision, but it’s easy to place (you plant it from the stairs on the low ground) and many players will fail to check it. B1 gives good vision, but is very easily countered, B2 shares the same reputation as A3, and B4 is rare enough that it’ll usually escape the first sentry, but it’s very difficult to place as a Radiant hard laner.
Issue #8
Runes Easily the most frequently contested warding locations in the game and also the most critical for map control. Despite the name, rune wards are not just for tracking runes. These wards provide vision over the most crucial junction points on the map. They give vision over the entrance to your jungle and the area near your ancients, which will both be frequently invaded by the enemy team.
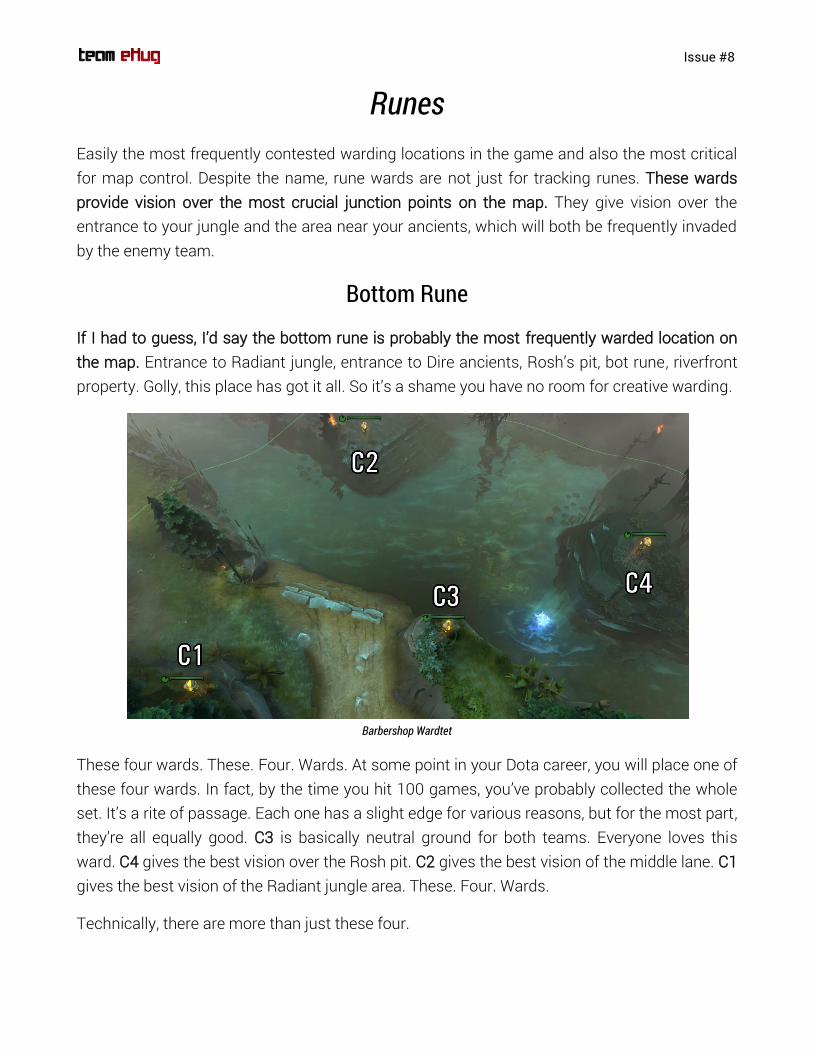
Bottom Rune
If I had to guess, I’d say the bottom rune is probably the most frequently warded location on the map. Entrance to Radiant jungle, entrance to Dire ancients, Rosh’s pit, bot rune, riverfront property. Golly, this place has got it all. So it’s a shame you have no room for creative warding.
Barbershop Wardtet
These four wards. These. Four. Wards. At some point in your Dota career, you will place one of these four wards. In fact, by the time you hit 100 games, you’ve probably collected the whole set. It’s a rite of passage. Each one has a slight edge for various reasons, but for the most part, they’re all equally good. C3 is basically neutral ground for both teams. Everyone loves this ward. C4 gives the best vision over the Rosh pit. C2 gives the best vision of the middle lane. C1 gives the best vision of the Radiant jungle area. These. Four. Wards.
Technically, there are more than just these four.
Issue #8
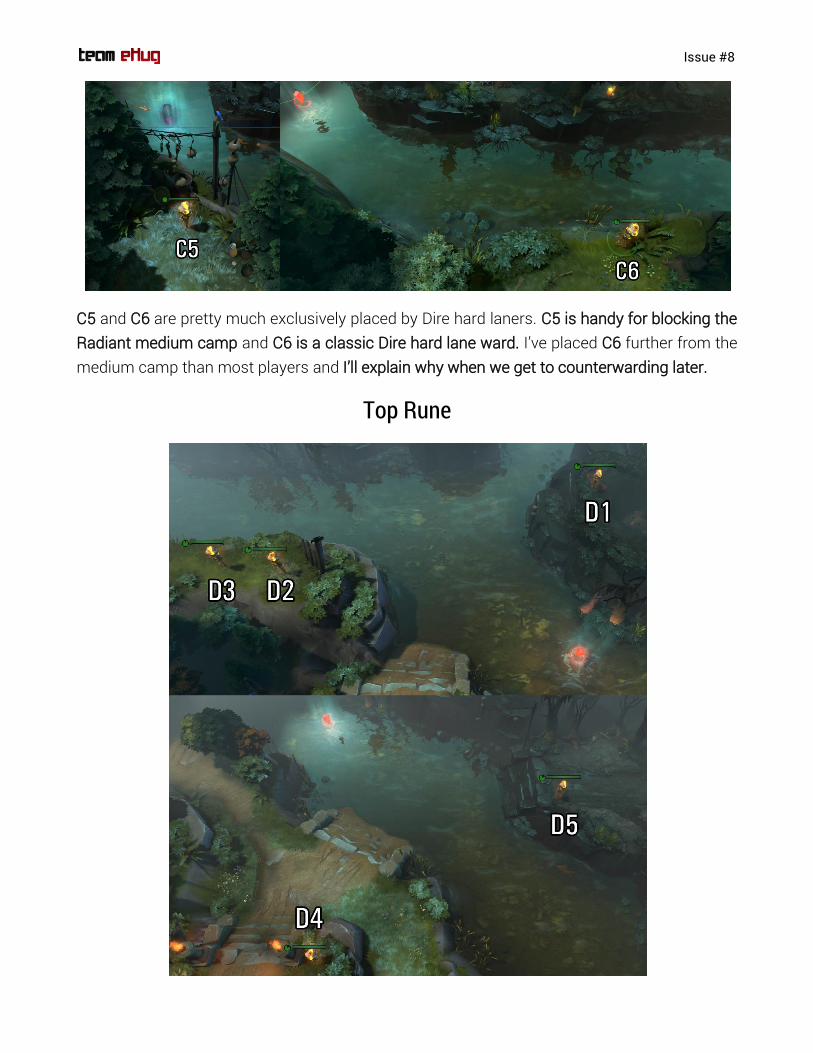
C5 and C6 are pretty much exclusively placed by Dire hard laners. C5 is handy for blocking the Radiant medium camp and C6 is a classic Dire hard lane ward. I’ve placed C6 further from the medium camp than most players and I’ll explain why when we get to counterwarding later.
Top Rune

Issue #8
Getting vision of the top rune is a far easier affair since you can cover it from way more angles. For the majority of the game, you’ll probably be using D1 the most. If you think D3 is redundant, once again, I’ll explain its relevancy when we start covering counterwarding.
And before I finish this part, I’d like to give a shoutout to the realest ward in the game: D4. I don’t care what you have to say, this is objectively the greatest ward in the game. I will go the distance to keep this spot under my possession all game long. Even if it’s dangerous. Even if I’m playing Faceless Void. Even you’re farming my fountain, I will smoke out to place this ward.
D4LYFE
No other ward is as useful during every stage of the game as my boy D4. Early game? Dude’s giving vision over half the middle lane and the top rune. Mid game? I got the Dire jungle entrance (mostly) covered. Late game? ANCIENTS ARE STACKED, GLAIVES OUT BOYS.
This is the first volume in the multi-part series: Tsunami’s Ridiculously Comprehensive Guide to Warding – A Harrowing Tale of Vision and Redemption. The next part will cover Pushing/Ancient/Miscellaneous Wards and the final part will cover counterwarding.
Images taken from Dota 2. Visit Team eHug for more articles!
This document is exclusive content of Team eHug and should not be uploaded or reproduced without express consent of Team eHug.