TROY XCD - images-na.ssl-images-amazon.com
252
TROY XCD External Print Servers for Ethernet Networks Administrator's Guide Part No. MAN-EXT2000 Revision 99-2 August 21, 1999 Printed in U.S.A. TROY XCD, Inc. 1692 Browning Irvine, CA 92606-4809 TEL: (949) 399-0820 FAX: (949) 399-0825 [email protected] TROY XCD A TROY Group, Inc. Company
Transcript of TROY XCD - images-na.ssl-images-amazon.com

TROY XCD ExternalPrint Servers
for Ethernet Networks
Administrator's Guide
Part No. MAN-EXT2000 Revision 99-2August 21, 1999 Printed in U.S.A.
TROY XCD, Inc.1692 BrowningIrvine, CA 92606-4809TEL: (949) 399-0820FAX: (949) [email protected]
TROY XCDA TROY Group, Inc. Company

TROY XCD, INC. SPECIFICALLY DISCLAIMS THE IMPLIEDWARRANTIES OF MERCHANTABILITY AND FITNESS OF THISPRODUCT FOR A PARTICULAR PURPOSE. TROY XCD shall not beliable for any errors contained in this manual or for any damages resulting fromloss of use, data profits, or any incidental or consequential damages arisingfrom the use of TROY XCD products or services.
This equipment has been tested and found to comply with the limits for a ClassA digital device pursuant to Part 15 of FCC Rules. These limits are designedto provide reasonable protection against such interference when operating in acommercial environment. This equipment generates, uses, and can radiateradio frequency energy, and if not installed and used in accordance with thisguide, may cause harmful interference to radio communications.
Operation of this equipment in a residential area is likely to cause interferencein which case the user, at his or her own expense, will be required to takewhatever measures will be required to correct the interference.
HP, HP/UX, LaserJet, DesignJet, DeskJet, PaintJet, JetDirect, and JetAdminare trademarks of Hewlett-Packard Company. DEC, DECserver, VMS, LAT,and ULTRIX are trademarks of Digital Equipment Corporation. UNIX is atrademark of UNIX Systems Laboratories. Ethernet is a trademark of XeroxCorporation. PostScript is a trademark of Adobe Systems Incorporated.NetWare is a trademark of Novell, Inc. Apple, Macintosh, LaserWriter, andAppleTalk are trademarks of Apple Computer, Inc. IBM, LAN Server, andAIX are trademarks of International Business Machines Corporation. LANManager, Windows, and MS-DOS are trademarks of Microsoft Corporation.VINES is a trademark of Banyan Systems Inc. PrintKit is a trademark ofNorthlake Software. QADD is a trademark of Network Compatibility Group.LAN Attached and UNIX Printing for VINES is a trademark of IncognitoSoftware Inc. XJet, XMark, XConnect, and XAdmin are trademarks of TROYXCD, Inc.
© Copyright 1992-1999 TROY XCD, Inc. All rights reserved.
Notice
Trademarks
Warning

Contents1. Introduction
Overview .................................................................................. 1-1
2. Installing the HardwareOverview .................................................................................. 2-1Before You Start ....................................................................... 2-1Unpacking and Handling .......................................................... 2-2Step 1-a Setting the Switches (XConnect II/II Lite) ............... 2-3Step 1-b Setting the Switches (XConnect 100 and Pony) ....... 2-5Step 2 Connecting to the Printer .............................................. 2-6Step 3 Connecting to the Ethernet ......................................... 2-12Step 4 Connecting to a LocalTalk Network (XConnect II) ... 2-15Step 5 Verifying Successful Hardware Installation .............. 2-16Step 6 Changing the Printer Reset ......................................... 2-20Changing the Print Server Configuration ............................... 2-22
3. TROY XCD Print Server Management MethodsOverview .................................................................................. 3-1TROY XCD XAdmin32 and XAdmin ..................................... 3-1TROY XCD WebXAdmin ....................................................... 3-4TROY XCD Print Server Console ........................................... 3-5HP JetAdmin ............................................................................ 3-7HP Web JetAdmin .................................................................... 3-8
4. TCP/IP Network ConfigurationOverview .................................................................................. 4-1TCP/IP Concepts ...................................................................... 4-1TCP/IP UNIX Host Configuration ........................................... 4-2IP Security .............................................................................. 4-23Raw TCP Ports ....................................................................... 4-23Changing the Configuration (Optional) ................................. 4-26
5. Novell Network ConfigurationOverview .................................................................................. 5-1NetWare Concepts .................................................................... 5-1

General Information ................................................................. 5-3Before You Begin ..................................................................... 5-4Default Print Server Names ...................................................... 5-4Configuring the Print Server and Adding the Print Queuein Queue Server Mode .............................................................. 5-6Configuring the Print Queue and Adding the Print Queuein Remote Printer Mode ......................................................... 5-18Configuring the Worksation ................................................... 5-26Changing the Print Server Configuration ............................... 5-30
6. AppleTalk Network ConfigurationOverview .................................................................................. 6-1AppleTalk Concepts ................................................................. 6-1Step 1 Macintosh Configuration............................................... 6-2Step 2 Printing .......................................................................... 6-2Printing Binary Graphics .......................................................... 6-3Changing the Configuration ..................................................... 6-4
7. Windows NT Network and LAN Server ConfigurationOverview .................................................................................. 7-1Windows NT IP Configuration ................................................ 7-2Windows NT 4.xx Configuration ............................................. 7-4Windows NT 3.5x Configuration ............................................. 7-6IBM LAN Server Installation ................................................... 7-7
8. Windows 95/98 Peer-to-Peer ConfigurationOverview .................................................................................. 8-1Configuring the Windows 95/98 PC ........................................ 8-1
9. Microsoft Network Configuration (NetBEUI/NetBIOS)Overview .................................................................................. 9-1Print Server Configuration ....................................................... 9-1Windows 95/98 and Windows NT Port Monitor Installation .. 9-3LAN Server/Warp Server Configuration ................................. 9-5
10. DLC/LLC ConfigurationOverview ................................................................................ 10-1Configuring DLC/LLC on Windows NT ............................... 10-1Configuring DLC/LLC on Other Systems ............................. 10-4

11. LAT Network ConfigurationOverview ................................................................................ 11-1LAT Concepts ........................................................................ 11-1VMS LAT Host Configuration............................................... 11-2Eliminating Blank Pages (Optional) ....................................... 11-5PATHWORKS for DOS Configuration ................................. 11-6PATHWORKS for Macintosh Configuration ........................ 11-9DECprint Supervisor Configuration Notes ............................ 11-9Installation on Other Host Computers .................................. 11-10Changing the Configuration (Optional) ............................... 11-11
12. Banyan VINES Configuration (Optional)Overview ................................................................................ 12-1File Server User Configuration .............................................. 12-2File Server Queue Configuration ........................................... 12-3Print Server Configuration Using XAdmin ............................ 12-6Print Server Configuration Using the Console ....................... 12-8Testing the Print Queue ........................................................ 12-10
13. PrintraNet Remote Internet PrintingOverview ................................................................................ 13-1PrintraNet Concepts ............................................................... 13-1Installing the Software on a Windows 95/98 PC ................... 13-3Configuring the Remote TROY XCD Print Server ................ 13-8Printing to the Remote TROY XCD Print Server ................ 13-12Troubleshooting.................................................................... 13-13Print Server Console Command Summary .......................... 13-13
14. TroubleshootingOverview ................................................................................ 14-1Installation Problems (Printer Not Ready) ............................. 14-1Installation Problems (Printer Ready) .................................... 14-2Intermittent Problems ............................................................. 14-7TCP/IP Troubleshooting......................................................... 14-7AppleTalk and PATHWORKS for Mac Troubleshooting ... 14-13NetWare Troubleshooting .................................................... 14-13Windows NT and LAN Server Troubleshooting ................. 14-16Windows 95/98 Peer-to-Peer Troubleshooting .................... 14-17

LAT Troubleshooting ........................................................... 14-18Banyan VINES Troubleshooting.......................................... 14-22
15. Warranty and Service InformationCustomer Support ................................................................... 15-1Whom to Call ......................................................................... 15-1Returning Products ................................................................. 15-2Advance Replacement and Extended Services ...................... 15-3Warranty ................................................................................. 15-3
A. Command Summary............................................................. A-1B. Using Services (lpd-Plus).......................................................B-1C. Reloading the Firmware ........................................................C-1D. Glossary/Index....................................................................... D-1
Introduction 1-1
1
LocalTalk
Printer with aTROYXCD print server
NetWarePC
LAN ManagerPC
DEC Host
UNIX Host
Apple Macintosh Computers
Banyan VINESPC
AppleMacintosh
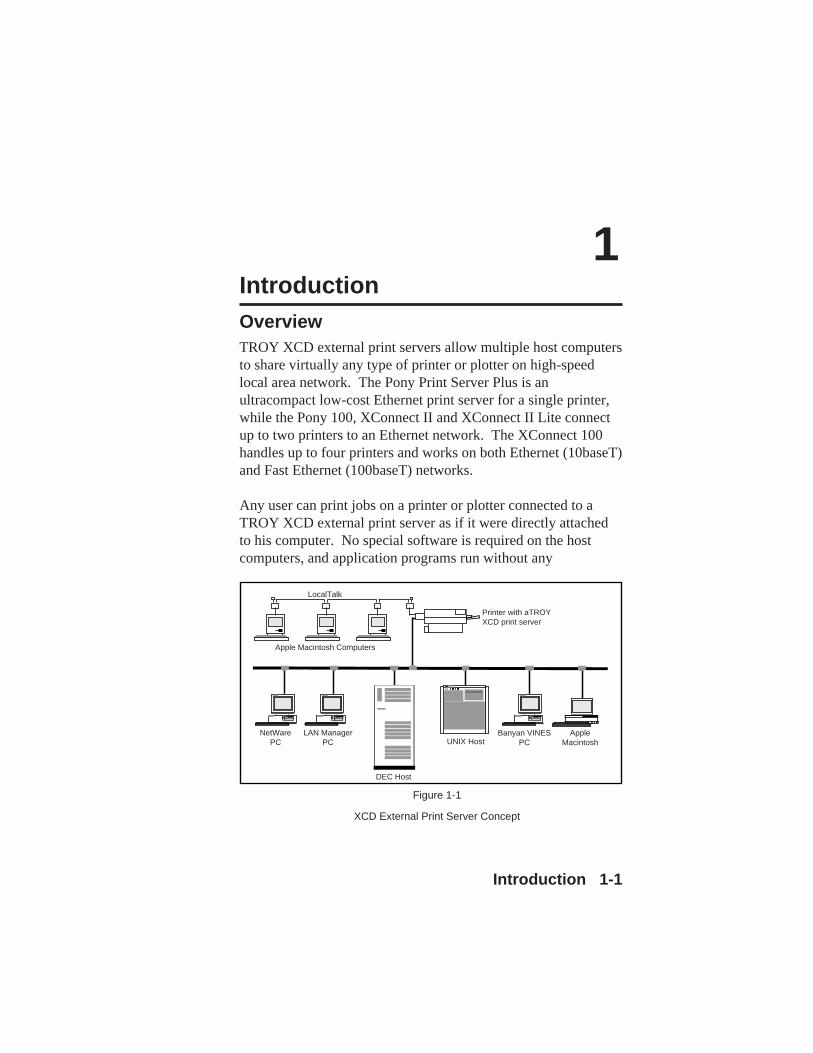
IntroductionOverviewTROY XCD external print servers allow multiple host computersto share virtually any type of printer or plotter on high-speedlocal area network. The Pony Print Server Plus is anultracompact low-cost Ethernet print server for a single printer,while the Pony 100, XConnect II and XConnect II Lite connectup to two printers to an Ethernet network. The XConnect 100handles up to four printers and works on both Ethernet (10baseT)and Fast Ethernet (100baseT) networks.
Any user can print jobs on a printer or plotter connected to aTROY XCD external print server as if it were directly attachedto his computer. No special software is required on the hostcomputers, and application programs run without any
Figure 1-1
XCD External Print Server Concept
Introduction 1-2
modification. Because the TROY XCD external print serversprovide multiprotocol capabilities, users on DEC, UNIX, Novell,AppleTalk, LAN Server, Windows NT, Windows 95, LANManager, and Banyan VINES computers can simultaneouslyaccess the same printer. With the optional XConnect IILocalTalk feature, non-Ethernet Macintosh computers can alsoaccess the same printer. Figure 1-1 shows how TROY XCDexternal print servers are used in a typical network.
Features
TROY XCD external print servers offer the widest range offeatures in the industry, including:
• TCP/IP, NetWare, AppleTalk, DLC/LLC, NetBEUI, LAT,and VINES IP protocols (protocols supported depend onmodel)
• Network Operating System compatibility:
- Digital Equipment Corporation networks, includingPATHWORKS and DECprint Supervisor ((not availableon XConnect II Lite)
- UNIX systems that support either the Berkeley lpr/lpdprinting protocol, the HP JetDirect card, or printing to araw TCP port
- Novell NetWare V2.15 or above, V3.xx, or V4.xx,including support for bindery mode and Novell DirectoryServices (NDS)*
- AppleTalk Phase 2 (XConnect II and XConnect 100 only)- Windows NT and NTAS V3.5 or above- IBM OS/2, LAN Server, Warp Server- Windows 95 (Peer-to-Peer or client mode; not supported
on XConnect II Lite)- Windows for Workgroups (Peer-to-Peer or client mode;
Peer-to-Peer requires DLC/LLC support on print server)

Introduction 1-3
*The NDS support on the XJet III (all models), XJet IV-2, XJet IV-T,plus certain models of the XJet IV-Plus is limited to NPrinter modeonly.
• Very high performance DMA operation (XConnect 100 andXConnect II only)
• High-speed Centronics parallel port compatible with IEEEP1284 Bitronics bidirectional parallel interface standard
• Serial port for console terminal or second printer
• Optional LocalTalk support (XConnect II only)
• Superior network and printer management
- Compatible with Hewlett-Packard JetAdmin and WebJetAdmin printer management software
- XAdmin Windows-based management utility (NetWare,TCP/IP, or VINES)
- Web XAdmin browser-based management- SNMP MIB I and MIB II over IP or IPX (XConnect II
and XConnect 100 only)- Remote console management via DEC NCP, TELNET,
NetWare, or serial port
• PrintraNet software for transparently sending documents toremote locations over the Internet
• lpd-Plus feature for providing multiple services with customsetup and reset strings, text-to-PostScript conversion, andcharacter substitution
• Flash memory for easy updating of firmware via NetWare,BOOTP, tftp (master or slave mode), DEC MOP, BanyanVINES, or serial port

Introduction 1-4
• AppleTalk spoofing capabilities for support of non-bidirectional parallel printers
• AppleTalk binary support on printers that support the HPTagged Binary Communications Protocol
• IP address configuration via DHCP, BOOTP, rarp, arp,serial port, XAdmin, or remote console.
- IP security to restrict printing based on IP address
• Optional DEC LN03 emulation (XConnect II and XConnect100 only)
TROY XCD External Print Server Models
The TROY XCD External Print Server family includes thefollowing models:
• Pony Print Server The Pony Print Server is the industry'ssmallest full-featured external print server. It plugs directlyinto the parallel port of the printer, and supports a 10baseTEthernet interface. The Pony Print Server is available in thefollowing models:
PPS-8S IPX/SPX, TCP/IP, AppleTalk, DLC/LLC,NetBEUI, Direct Mode IPX/IP, http
PPS-8 IPX/SPX*, TCP/IP, AppleTalk, DirectMode IPX/IP, LAT, http
PPS-8N IPX/SPX, TCP/IP, AppleTalk, DLC/LLC,NetBEUI, Direct Mode IPX/IP, LAT,VINES IP, http
*PPS-8 NDS support is limited to NPRINTER remote printer mode only
• XConnect II. The XConnect II is an external print serverthat supports the LAT, TCP/IP, NetWare, and AppleTalk

Introduction 1-5
protocols. It features a high-speed parallel port, a serial port,and both a thin Ethernet and UTP Ethernet connector. TheXConnect II is available in the following models:
XConnect II-8S IPX/SPX, TCP/IP, AppleTalk, DLC/LLC,NetBEUI, Direct Mode IPX/IP, http
XConnect II-8 IPX/SPX*, TCP/IP, AppleTalk, DirectMode IPX/IP, LAT, http
XConnect II-8N IPX/SPX*, TCP/IP, AppleTalk, DLC/LLC,NetBEUI, Direct Mode IPX/IP, LAT,VINES IP, http
XConnect II-8-LN03 XConnect II-8 with LN03 emulation option
*XConnect II-8 and XConnect II-8-LN03 NDS support is limited to NPRINTER remote printer mode only
• Pony 100 Print Server The Pony 100 Print Server is anultracompact print server that features both 100baseTX and10baseT operation. It includes one parallel port and oneserial port and is available in the following models:
PPS100-8S IPX/SPX, TCP/IP, AppleTalk, DLC/LLC,NetBEUI, Direct Mode IPX/IP, http
PPS100-8N IPX/SPX, TCP/IP, AppleTalk, DLC/LLC,NetBEUI, Direct Mode IPX/IP, LAT,VINES IP, http
• XConnect 100. The XConnect 100 features 100baseTXcapability for operation on 100 megabit/sec Fast Ethernetnetworks. It can also work on 10baseT networks, so it isideal for users who plan to upgrade to 100baseTX in thefuture. The XConnect 100 supports the same protocols asthe XConnect II, but has two high-speed parallel portsinstead of one. It is available in four models:
XConnect 100-8S IPX/SPX, TCP/IP, AppleTalk, DLC/LLC,NetBEUI, Direct Mode IPX/IP, http
XConnect 100-8 IPX/SPX*, TCP/IP, AppleTalk, DirectMode IPX/IP, LAT, http

Introduction 1-6
XConnect 100-8N IPX/SPX, TCP/IP, AppleTalk, DLC/LLC,NetBEUI, Direct Mode IPX/IP, LAT,VINES IP, http
XConnect 100-8-LN03 XConnect II-8 with LN03 emulation option
*XConnect 100-8 and XConnect 100-8-LN03 NDS support is limited to NPRINTER remote printer mode only
• XConnect II Lite The XConnect II Lite is a low-cost singleparallel port print server that offers the same features as thestandard XConnect II, but has a single Ethernet connectorand supports only the TCP/IP and NetWare protocols(XConnect II Lite Banyan models support VINES and TCP/IP only). Models include:
XConnect IIL-T 10baseT; TCP/IP and IPX/SPX*XConnect IIL-2 10base2; TCP/IP and IPX/SPX*XConnect IIL-T-B 10baseT; TCP/IP and VINES IPXConnect IIL-2-B 10base2; TCP/IP and VINES IP
*XConnect II Lite NDS support is limited to NPRINTER remote printer mode only
TROY XCD External Print Server Advantages
Compared to competing products, TROY XCD print serversoffer the advantages:
• Support for the most protocols and network operating systemsin the industry. This allows TROY XCD print servers to beused on virtually any network.
• Network management. TROY XCD offers more ways tomanage the print server, including proprietary Windows andDOS-based utilities, Web browser management, HPJetAdmin compatibility, and a powerful remote console.
• High performance. The TROY XCD print server family hasthe highest overall throughput capabilities in the industry.

Introduction 1-7
• More features. Capabilities like multiple services per port,programmable setup/reset strings, IP security, and charactersubstitution allow TROY XCD print servers to handlevirtually any network printing situation.
Terminology
The term "TROY XCD external print server" in this manualcovers the Pony Print Server Plus, XConnect II, XConnect 100,and XConnect II Lite. The term "XConnect II" is used torepresent either the XConnect II, II-LT, or II-LN03; the termXConnect 100 means either an XConnect 100 or 100-LN03;while the term "XConnect II Lite" designates either anXConnect II Lite-T or XConnect II Lite-2 .
This device complies with Part 15 of the FCC Rules.Operation is subject to the following two conditions: (1) Thisdevice may not cause harmful interference and (2) this devicemust accept any interference received, including interferencethat may cause undesired operation.
The following information applies to the Pony Print Server Plus(PPS-8S, PPS-8, and PPS-8N) only:
This equipment has been tested and found to comply with thelimits for a Class B digital device, pursuant to Part 15 of theFCC Rules. These limits are designed to provide reasonableprotection against harmful interference in a residentialinstallation. This equipment generates, uses and can radiateradio frequency energy and, if not installed and used inaccordance to the instructions, may cause harmful interferenceto radio communications. However, there is no guarantee thatinterference will not occur in a particular installation. If thisequipment does cause harmful interference to radio ortelevision reception, which can be determined by turning the

Introduction 1-8
equipment off and on, the user is encouraged to correct theinterference by one or more of the following measures:
• Reorient or relocate the receiver.• Increase the separation between the equipment and the receiver.• Connect the equipment into an outlet on a circuit different from
that to which the receiver is connected.• Consult the dealer or an experienced radio/TV technician for help.

Installation 2-1
2
Installing the HardwareOverviewThis chapter describes:
• How to connect a TROY XCD print server to your printer
• How to connect a TROY XCD print server to the Ethernetcable
Before You StartBefore attempting to install a TROY XCD print server, firstmake sure that you have completed installing your printer orplotter as described in the appropriate documentation for thedevice.
Unpacking and HandlingThe TROY XCD print server shipping box contains thefollowing items:
• Pony Print Server Plus, XConnect II, Pony 100,XConnect 100, or XConnect II Lite print server
• AC Adapter
• TROY XCD External Print Servers Administrator's Guide

2-2 Installation
Although TROY XCD external print servers are designed towithstand normal handling procedures, you should exercisereasonable precautions when installing them, particularlywith regard to static discharge.
• Make sure that you are adequately grounded by touching abare metal part of the printer before starting the installation.
• Avoid moving around the work area in order to eliminatestatic charge buildup.
• If possible, do not work on a carpeted area.
Step 1-a Setting the Switches(XConnect II and XConnect II Lite)Important Note: If you have an XConnect 100, Pony 100,or Pony Print Server Plus, skip to Step 1-b below).
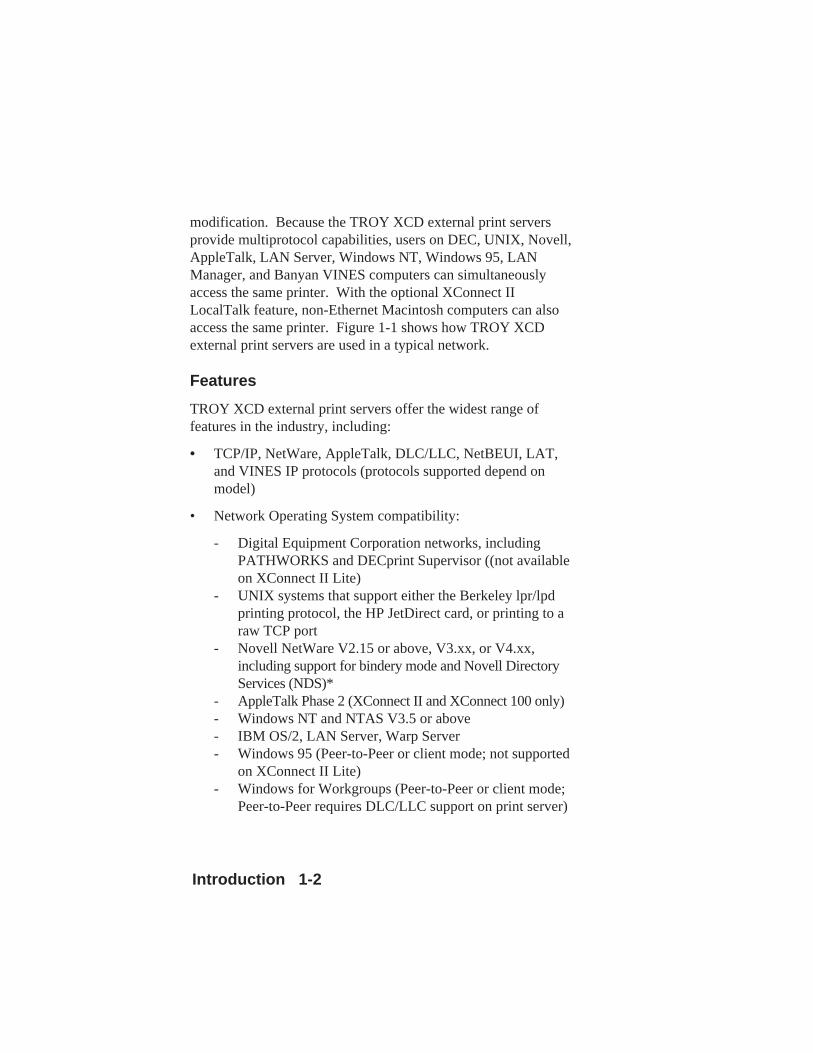
There are 4 DIP switches on one side of an XConnect II orXConnect II Lite print server (see figure 2-1) that are usedfor power-up options. As shipped, the two outside switchesare in the OFF (up) position and the two middle switches arein the ON (down) position (OFF=0, ON=1) for operation oneither a 10baseT or 10base2 network with a printer attachedto the parallel port. If you want to configure the print serverin a different manner, use a small screwdriver or pen togently flip the switch as described in the followingparagraphs.
Switch 1 (Normal/Factory Default/Test)Setting this switch ON allows you to restore the print serverparameter settings to their original factory settings. The next
Installation 2-3
OFF
ON
XConnect II Rear View
Sw4Sw3Sw2Sw1
time the print server is powered on, the print serverparameters (for example, node name, serial port speed, etc.)will be returned to the factory defaults. If you use thisswitch, don't forget to put it back to the OFF position afterthe factory default settings have been restored.
After the print server is powered on and running, this switchcan be used to print out a self-test page. This is done bymoving the switch to the ON position and then quicklyputting it back to the OFF position.
Switches 2 and 3 (10baseT/10base2)
These switches do not need to be changed from the defaultON position with newer versions of the XConnect II orXConnect II Lite print server firmware. However, if you areusing 10baseT Ethernet, putting the switches in the OFF
Figure 2-1
XConnect II Switches

2-4 Installation
position will conserve energy by drawing less power from theprinter.
Note: With V3.22 or earlier firmware (included withXConnect II and XConnect II Lite print servers shipped fromTROY XCD prior to September, 1995), switches 2 and 3must both be in the OFF position for 10baseT operation or inthe ON position for 10base2 operation.
Switch 4 (Console/Serial Printer)
This switch defines whether the serial port will be used for aconsole terminal or a serial printer. Leave switch 4 in thedefault OFF position if you want to use the serial port for aconsole terminal.
Figure 2-2
XConnect 100 Switch and LEDs
Link OK LEDTest LED100baseTX LED
Power Connector
Parallel Port 2Test SwitchConsole/Serial Port 2
Serial Port 1 Parallel Port 1100baseTX/10baseTConnector Serial ports are 9-pin male D-connectors
XConnect 100 Front View
XConnect 100 Rear View

Installation 2-5
Figure 2-3
Pony Print Server Plus and Pony 100 Switches and LEDs
Step 1-b XConnect 100, Pony 100, andPony Print Server Plus SwitchesImportant Note: Skip this step if you have an XConnect IIor XConnect II lite.
The XConnect 100, Pony 100, and Pony Print Server Plushave a single pushbutton switch test switch (see figures 2-2and 2-3). This switch does not need to be used during theconfiguration process. It has the following functions:
• To print a self-test page, press the switch in for at leastone-eighth second but less than five seconds.
• To reset the unit back to factory default settings, press theswitch and hold it in for at least 5 seconds
Test LED (Top)
Test/Factoryswitch
Power connectorTest/Factoryswitch
Pony Print Server Plus
Pony 100
Serial port100baseTX/10baseTconnector
Power connector
TEST LED Link LED

2-6 Installation
Figure 2-4
Connecting the XConnect II or XConnect II Lite to theparallel port (Pony Print Server Plus and Pony 100
procedure is similar)
Step 2 Connecting to the PrinterTROY XCD print servers can connect to any of thefollowing types of printers:
• Printers with Centronics-compatible parallel interfaces(this interface is by far the most popular type of parallelinterface)
• Printers with the new IEEE P1284 bidirectional parallelinterface
• Printers with RS-232 compatible serial interfaces (exceptPony Print Server Plus)

Installation 2-7
Connecting the Print Server to a Centronics-compatible printer
The XConnect II, XConnect II Lite, and Pony Print ServerPlus have a 36-pin male connector that is compatible with the36-pin female connectors found on most printers. Simplyplug the print server directly into the connector on the printeras shown in figure 2-4. If necessary, set your printer forparallel port operation. No cable is generally required, butthe optional CABLE-CEN2 Centronics male-to-female cableis available as an option in the event you cannot connect theprint server directly to the printer's Centronics connector.
The XConnect 100 has two 25-pin female connectors that arecompatible with the IBM PC standard 25-to-36 pinCentronics cable. This cable is available at any computerstore and most office supply stores, or it can be ordered fromTROY XCD (part number CABLE-CEN).
IMPORTANT NOTE: The XConnect II, XConnect II Lite,and XConnect 100 support a maximum parallel cable lengthof 1.75 meters (six feet). Exceeding this maximum may resultin printing problems.
NOTE: Some new printers, such as the HP LaserJet 8000,have the IEEE 1284C miniature Centronics connector insteadof the normal 36-pin Centronics connector. TROY XCDoffers the CABLE-C/B adapter cable for the XConnect II,XConnect II Lite, and Pony Print Server Plus, and theCABLE-C/A for the XConnect 100 to accommodate suchprinters.
Maximizing Performance (Recommended)Some printers, such as most HP LaserJets, support a high-speed handshake mode on the parallel port. TROY XCD

2-8 Installation
print servers support this mode, which can result in up to 50per cent higher performance. To enable this mode usingWebXAdmin, select Configure Port from the main menu,select port P1 (or P2 for the second parallel port on theXConnect 100), choose High Speed as the Output Method ,and click Submit. If you are using the print server console,enter the command SET PORT P1 FSTB ENABLED .WebXAdmin and the print server console are discussed inChapter 3 and Appendix B of this manual.
Connecting a TROY XCD Print Server to aSerial Printer
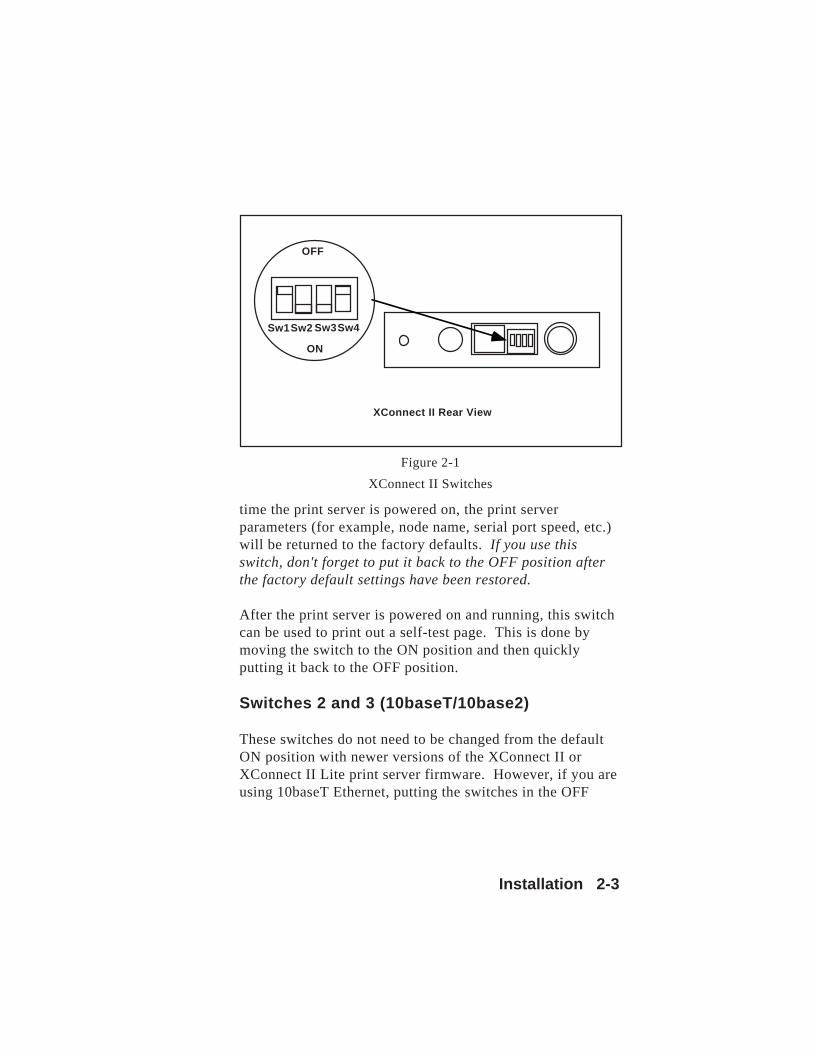
The Pony 100, XConnect II and XConnect II Lite have anRJ45 connector for connecting RS-232-compatible serialprinters, while the XConnect 100 has two standard PC-compatible 9-pin D-connectors (there is no serial port on thePony Print Server Plus). The XConnect II and XConnect IILite RJ45 connector is marked "Serial"; do not confuse itwith the 10baseT unshielded twisted pair connector, whichis also an RJ45.
Most printers use a DB25 connector for the serialconnection. Unfortunately, there are a number of variationsas to how this connector is implemented on differentprinters. For example, some printers have male connectorsconfigured as a DTE (Receive Data on pin 3), while othershave DCE female connectors (Receive Data on pin 2).Hewlett-Packard, Lexmark, and Apple printers generallyhave female DTE connectors. You must consult the manualfor your printer in order to determine what type of adaptercable you need. TROY XCD sells a variety of adapters forconnecting serial devices to the RJ45 connector. In the caseof the XConnect 100 9-pin connector, a null modem( a
Installation 2-9
device or cable that connects the input signals on one deviceto the output signals on another device) is often required sinceboth the printer and the print server are usually DTE devices.
The pinouts for the Pony 100, XConnect, and XConnect IILite RJ45 connector are shown below:
RJ45 DTE DCEpin Signal Signal pin pin1 RTS out* CTS in 5 42 DTR out* DSR in 6 203 Transmit Data Receive Data 3 24 Transmit return Signal Ground 7 75 Receive Return Signal Ground 7 76 Receive Data Transmit Data 2 37 DSR in* DTR out 20 68 CTS in* RTS out 4 5
*XConnect II models with serial numbers less than 40500 have RTS on pin8, DTR on pin 7, DSR on pin 2, and CTS on pin 1.
The XConnect 100 serial ports use PC-compatible 9-pin maleD-connectors. Note that the standard off-the-shelf 9-pinfemale to 25-pin male PC cables will require a null modem inorder to connect to most printers or terminals. The pinoutsare as follows:
Print Server (RJ45)1 2 3 4 5 6 7 8
Printer (DB25)

2-10 Installation
6 7 8 9
DE9 Male(female pinouts are in
reverse order)
XConnect 100 (DE9) Printer (DB25)DE9 DTE DCEpin Signal Signal pin pin1 Not used Not used - -2 Receive Data Transmit Data 2 33 Transmit Data Receive Data 3 24 DTR out DSR in 6 205 Signal Ground Signal Ground 7 76 DSR in DTR out 20 67 RTS out CTS in 5 48 CTS in RTS out 4 59 Not used Not used - -
Basically, the cable must connect input signals (e.g., ReceiveData) on the TROY XCD print server to the equivalentoutput signals (e.g., Transmit Data) on the device and vice-versa.
If you are connecting a printer to the second serial port (S2)on the XConnect 100, you must first disable console mode onthat port. This is done by using the console command SET
PORT S2 CONSOLE DISABLED and then typing the commandEXIT to exit the console (refer to Chapter 3 and Appendix Afor information on using the console). To re-enable theconsole function, you must either enter the command SET
PORT S2 CONSOLE ENABLED using TELNET, DEC MOP orthe TROY XCD XCONFIG NetWare utility, or reset the unitback to factory defaults.

Installation 2-11
The serial ports are factory set at 9600bps, 8-bit data, XON/XOFF flow control, and no parity. If your printer requiresdifferent settings, you must use WebXAdmin or the consoleterminal (refer to Chapter 2 and Appendix A for informationon how to use these utilities) to change the settings. WithWebXAdmin, select Configure Port from the main menu,click on the serial port (S1 for first serial port or S2 for theXConnect 100 second serial port), choose the desiredsettings, and click Submit. With the console terminal, useone or more of the following commands (use S2 instead of S1
if you are using the second serial port on the XConnect 100):
SET PORT S1 SPEED baudrateSET PORT S1 PARITY parity_typeSET PORT S1 FLOW flowctrlSET PORT S1 CHARACTER charsize
Note that the serial port always operates at 9600bps when inconsole mode. Also, if you are using 115200bps on one portof the XConnect 100, you cannot set the other port to 230400bps (57600bps and 7200bps are not supported on either port).
Important: The serial ports do not support Direct MemoryAccess (DMA). Therefore, sustained transfers at high baudrates (115200 or greater) can lock out activity on otherports.
Don't forget to set your serial port settings on your printer tomatch the settings of the print server. Also, make sure thatthe XConnect II or XConnect II Lite switch 4 (console/serialprinter) is in the proper position (OFF if you are using theserial port for a console terminal or ON if you are using it toconnect a printer.
IMPORTANT NOTE: Early versions of the XConnect 100 donot support the second serial port (the one marked "Console/

2-12 Installation
Figure 2-4
Connecting the Print Server to a 10baseT UTP network
To hub
unshieldedtwisted pair cable
Serial 2) for use with serial printers. This limitation can befixed by upgrading to a newer version of the firmware.
Step 3 Ethernet InstallationThe XConnect II can connect directly to either a 10baseTunshielded twisted pair Ethernet or a 10base2 thin Ethernet.The XConnect II Lite-2 can connect to a 10base2 thinEthernet, while the XConnect II Lite-T and the Pony PrintServer Plus can connect to a 10baseT Ethernet.
The Pony 100 and XConnect 100 connect to either a100baseTX Fast Ethernet network or a 10baseT Ethernetnetwork. It automatically senses the type of network, so noconfiguration is required.

Installation 2-13
Connecting the XConnect II, XConnect 100,XConnect II Lite-T, Pony 100, or Pony PrintServer Plus to an Unshielded Twisted PairNetwork
To connect an XConnect II, Pony 100, XConnect 100, orXConnect II Lite-T to a 10baseT unshielded twisted pair(UTP) Ethernet network, you will need an unshielded twistedpair Ethernet hub with at least one unused port installed onyour network, plus an appropriate length of RJ45 modularcable.
To connect a Pony 100 or XConnect 100 to a 100baseTXFast Ethernet network, you will need a 100baseTX FastEthernet hub with at least one unused port, plus anappropriate length of Category 5 RJ45 modular jack cable.
1. Connect one end of the RJ45 cable to the print serverconnector labelled "10baseT" on the XConnect II orXConnect II Lite (not the one labelled "Serial"), or"100baseTX/10baseT" on the XConnect 100 or Pony 100and the other end to a port on the twisted pair Ethernethub as shown in figure 2-4. Note that the XConnect 100automatically determines whether it is connected to a10baseT or 100baseTX network.
Note: If you have an older XConnect II or XConnect IILite with V3.22 or earlier firmware, make sure thatswitches 2 and 3 are in the OFF position (not requiredfor newer print servers).
You have now completed the unshielded twisted pairEthernet installation. Proceed to the Verifying SuccessfulHardware Installation section below to confirm that youhave properly installed the print server.

2-14 Installation
H1000
ThinEthernet
Cable
ThinEthernet
Cable
"T"
50 ohmTerminator
A
BThin
EthernetCable
"T"
Figure 2-5
Connecting the Print Server to a 10base2 thin Ethernet network
Connecting the XConnect II or XConnect II Lite-2to a Thin Ethernet Network
To connect an XConnect II or XConnect II Lite-2 to a thinEthernet network, first check to see that switches 2 and 3(10baseT/10base2) are in the ON position.
If you are installing the print server onto an existing network,the "T" connector may already be installed on the cable. Ifthis is the case, simply connect the "T" connector to the BNCconnector on the print server's BNC connector as shown infigure 2-5A (if the connection is in the middle of the thinEthernet segment) or 2-5B (if the connection is at the end ofthe thin Ethernet segment). This operation can be performedwithout impacting the operation of the network.
If the "T" connector is not already installed, proceed asfollows (caution: if you are connecting to a live network,

Installation 2-15
perform the following steps as quickly as possible tominimize disruption of the network):
1. Connect one section of the thin Ethernet cable to one endof the "T" connector as shown in figure 2-5.
2. If you are connecting the print server in the middle of athin Ethernet segment, attach the second section of thinEthernet cable to the other end of the "T" connector asshown in figure 2-5A. If you are connecting the printserver at the end of a thin Ethernet segment, attach a 50ohm terminator to the other end of the "T" connector asshown in 2-5B.
3. Connect the "T" connector to the BNC connector on thetransceiver.
You have now completed the thin Ethernet installation. Skip tothe Verifying Successful Hardware Installation section below toconfirm that you have correctly installed the print server.
Step 4 Connecting to the OptionalLocalTalk Port (XConnect II only)If you have the LocalTalk option, you can connect theXConnect II to an Apple LocalTalk network to allowMacintosh computers on the LocalTalk network to print jobson a printer attached to the XConnect II. Both the LocalTalkand Ethernet ports can be used simultaneously. To use theLocalTalk feature, plug a LocalTalk-compatible connector(such as the Apple LocalTalk connector or the FarallonPhoneNet connector) into the XConnect II LocalTalk port asshown in figure 2-6. Note this port can only be used for

2-16 Installation
Figure 2-6
Connecting the XConnect II to a LocalTalk network
Ethernet
LocalTalkConnector
XConnect II
LocalTalkConnector
LocalTalkConnector(must beterminatedif end node)
LocalTalkConnector
printing from computers on the LocalTalk to printersattached to the parallel or serial port of the XConnect II; itcannot be used to allow computers on the Ethernet to print toprinters connected to the LocalTalk network.
The LocalTalk port is enabled by default. If you are notusing this port, you should enter the command SETLOCALTALK DISABLED for maximum performance.
Step 5 Verifying Successful InstallationYou are now ready to apply power to the TROY XCD printserver. Plug the AC power adapter into a wall outlet andinsert the adapter cable into the print server connectorlabelled "Power". If possible, connect a terminal to the serialport (make sure that Switch 4 is OFF when using the consoleterminal with the XConnect II or XConnect II Lite).

Installation 2-17
The TROY XCD print server will go through the followingstartup sequence:
1. It will run through a set of power-up diagnostics for afew seconds. If the print server is operating properly, theTEST LED will blink momentarily and then go out. Ifthe TEST LED blinks continuously in a regular pattern,there is a problem. If this is the case, first verify that youhave a good Ethernet connection and then try powering theunit off and then on again. If the problem persists, refer tothe Troubleshooting chapter in this manual.
2. When the test LED goes out, the other LEDs on the printserver will come on as follows:
• On the XConnect II and XConnect II Lite, the LINKLED will blink to show activity on the network. TheXMIT and RCV LEDs will come on solid if there is avalid 10baseT connection (they are not used with10base2).
• On the XConnect 100, the Link OK LED will blink ifthe print server detects activity on the network. The100baseTX LED will come on if a valid 100baseTXconnection is detected (this LED will not come on if10baseT is used).
• On the Pony 100, the Link LED will come on solid ifthere is a valid 10baseT or 100baseTX connection.
• On the Pony Print Server Plus, the LED will blinkrandomly.
If the LEDs do not come on as described, there may be acabling problem or a bad hub port; if this is the case, try adifferent cable and/or hub port.

2-18 Installation
Verifying the Connection to the PrinterBefore attempting to print, it is very important to verify theconnection between the print server and the printer. If thisconnection is not good you will not be able to print!
To verify this connection, make sure that both the printserver and the printer are powered on and ready.
• If you have an XConnect II or XConnect II Lite, pushswitch 1 (Normal/Factory/Test) on the print server to theON position and then back to the OFF position.
• If you have an XConnect 100, Pony 100, or Pony PrintServer Plus, push the Test button in briefly (more thanon-eighth second but less than five seconds).
If the connection is good, a test page will be printed on theprinter. If nothing prints out, make sure that the cable isgood and that it is securely fastened. If possible, try adifferent cable. If you have an XConnect II, XConnect IILite, or XConnect 100, make sure that you are not exceedingthe 1.75 meter (6 foot) cable length restriction. If the cableis OK but you still can't print the self-test page, you mayneed to adjust the parallel port settings as described in thenext section.
Important Note: The test page only works with printersthat can directly print PCL, PostScript, or text. It will notwork with some low-end "Windows" printers like the HPDeskJet 820 (which does the image rasterization in the PC),nor will it work with HP-GL/2 or RTL plotters (unless thePostScript option is installed). For such devices, you mustprint a job from an appropriate application program in orderto test the print server-to-printer connection.

Installation 2-19
If you are using the serial port and the test page does notprint, verify that the baud rate, parity, and character sizematch on the print server and the printer. If you have anXConnect II, make sure that switch 4 is in the ON position.If you have an XConnect 100 and you are using the secondserial port, make sure that you have disabled consoleoperation via the SET PORT S2 CONSOLE DISABLED
command.
If none of the above suggestions work, contact TROY XCDTechnical Support (949-399-0820; http://www.troyxcd.com; e-mail: [email protected]) for additional assistance.
Adjusting the Parallel Port Settings for SpecificPrinters (Recommended)The parallel port on all new TROY XCD print server modelsis set by default to automatically configure itself to workwith the printer's parallel port However, it may sometimesbe necessary to adjust the print server's port settings to workwith specific printers by using the print server console orWebXAdmin. This is particularly true with older printers.The particular settings include:
1. pACK handshake. Older non-1284 printers require thishardware handshake and may not operate with the newer1284 handshake. Use the console command SET PORT
P1 ACKH ENABLED to enable the pACK handshake.
2. DMA (Direct Memory Access). The XConnect II andXConnect 100 use DMA for maximum performance.However, some printers cannot handle the high datarates. For such printers, use the console command SETPORT P1 DMA DISABLED. Alternatively, you maydisable DMA using the Configure Port option in theWebXAdmin menu,

2-20 Installation
3. Bidirectional. Some printers will not operate properly ifbidirectional communications is enabled on the printserver. To disable bidirectional, use the consolecommand SET PORT P1 BID DISABLED , or disable itfrom the WebXAdmin
4. Some printers, like most Okidata laser printers, cannotoperate fast enough even in 1284 mode to keep up with aTROY XCD print server. On the Pony Print Server Plusyou can enable a software handshake to handle suchprinters via the SET PORT P1 SWIO ENABLE consolecommand.
The print server console and WebXAdmin are discussed inChapter 3, with additional information on console commandsin Appendix B. If you are using WebXAdmin, click onConfigure Port in the main menu, select the desired port, andthen select the desired function. After you have made yourselections, click on Submit to enable them in the print server.
Step 6 Changing the Print Server Reset(Recommended)The printer reset is a sequence of characters that is sent to theprinter after the job is completed. It ensures that the lastpage of the job is ejected from the printer and that the printeris reset to its default state so that the next job will properlyprint.
The default printer reset for TROY XCD external printservers is a null, except on the TCP/IP text service, whichhas <Formfeed> as the default (see chapter 4 and AppendixB for information on the TCP/IP text service). A null resetmeans that some print jobs may not be ejected upon

Installation 2-21
completion. Some operating systems, such as NetWare,provide the ability to insert a reset sequence at the end ofeach job, in which case the TROY XCD print server nullreset is adequate. Also, Microsoft Windows printer driverstypically provide a printer reset at the end of each job. Butfor those operating systems that do not provide this resetcapability, TROY XCD print servers provide the ability tocustomize the printer reset to meet the requirements ofvirtually any type of printer.
The following predefined reset strings are available.
No. Definition Printer1 Null (use if no reset is desired)2 <ESC>E PCL printer3 CTRL-D PostScript printer4 <ESC>%-12345X PJL (use with newer HP and
Lexmark/IBM printers)11 <Formfeed> General
Refer to your printer documentation if you do not know theproper reset string. Use the null string if you are planning toreset the printer from the host software (for example, from aWindows driver). If you want to define a new reset string,refer to Appendix B, Using Services.
Note that you can put a printer reset either before or aftereach job, although generally the reset goes at the end the job.TROY XCD print servers allow you to define multipleservices for a given port. This is useful, for example, if youwant to use different reset strings with the same printer. Forexample, you might want to define a service for UNIX jobsthat contains a <ESC-E> reset, and a different service forNetWare that has no reset.
Print jobs are normally sent to service 1 (XCD_xxxxxx_P1,where "xxxxxx" is the last six digits of Ethernet address, for
2-22 Installation
all protocols except LAT, TCP/IP, and AppleTalk) or service2 (BINARY_P1, for LAT and TCP/IP). Refer to Appendix Band the individual protocol chapters for additionalinformation on services.
To change the printer reset on a TROY XCD print serverwith XAdmin, double click on the print server name, click onthe Services tab, double click on the desired service, andthen select the appropriate Printer Control String . WithWebXAdmin, click on Configure Service, and select thedesired service, choose the appropriate reset string, and thenclick Submit.
Alternatively, you may use the print server console by typingin the following command:
SET SERVICE servicename EOT stringno
where "servicename" is the name of the service (do aSHOW SERVICE command for a list of services) andstringno is the number of the string. For example to usestring 3 (the PostScript CTRL-D reset) on the defaultparallel port service, you would enter:
SET SERVICE BINARY_P1 EOT 3
Changing the Print Server Configuration(Optional)In addition to changing the printer reset string, you canmodify the TROY XCD print server configuration in anumber of other ways. The procedure and commands forchanging the configuration are described in Appendix A.

Management Methods 3-1
3TROY XCD Print Server Manage-ment MethodsOverviewTROY XCD offers a wide variety of ways to configure andmonitor the print server. These methods include:
• TROY XCD XAdmin Windows-based utility• TROY XCD WebXAdmin Web-browser utility• TROY XCD print server console• HP JetAdmin Windows-based utility• HP Web JetAdmin Web-browser utility
This chapter discusses the installation and the basic usage ofthese utilities. Refer to the various chapters of this manualfor specific details on configuring the print server.
TROY XCD XAdminTROY XCD offers two graphical utilities for configurationand management of TROY XCD print servers:
• XAdmin32. This 32-bit version works on either WindowsNT 4.xx or Windows 95/98 using the TCP/IP or IPX/SPXprotocols. To take full advantage of the capabilities ofXAdmin32, you should use the Novell 32-bit clientsoftware on the PC workstation that is used forconfiguring the print queues.
• XAdmin. This 16-bit version works on Windows 3.1 andWindows 95 for NetWare and Banyan VINES.

3-2 Management Methods
To install XAdmin32 or XAdmin, insert the appropriatediskette or CD-ROM in the computer, select Run from theWindows menu, select Browse, choose the appropriate drive(these programs are in the Utilities folder if you are using aCD-ROM), and double click on Setup.exe and then clickOK .
Note : XAdmin32 and other TROY XCD utilities areavailable on the TROY XCD web site (http://
www.troyxcd.com ) if you did not receive them on disk.
1. Follow the instructions on the screen to complete theinstallation.
2. Double click on the XAdmin icon or use the Windows95/NT 4.x Start button to select XAdmin in the XCDfolder in the list of Programs.
3. A list of configured print servers will appear. If youare running XAdmin or if you are running NetWarewith XAdmin32, skip to step 4. If you are runningTCP/IP, then you must enter an IP address into the printserver as follows (refer to Chapters 4 or 7 for alternatemethods for configuring the IP address):
- Make sure that your computer is configured forTCP/IP with a valid IP address configured for LANoperation (not PPP dial-up; refer to your systemdocumentation for additional information).
Important Note: Consult your system managerbefore assigning IP addresses to your computer or tothe print server in order to avoid duplications. Ifyour network does not have an officially assigned

Management Methods 3-3
block of IP addresses, you may use any uniqueaddress between 192.168.254.1 and192.168.254.254 (this is a reserved range of Class Caddresses for private networks that are notconnected to the Internet per RFC 1918; note thatyou must also assign the print server an IP addressin this range). You may also use a subnet mask of255.255.255.0 with no gateway address. If youhave more than one LAN adapter card, select theone you want to use for TCP/IP.
- Click on the TCP/IP folder icon under "Filter" onthe left side of the XAdmin screen.
- Click on the Search button (the leftmost button) orselect Devices and then Search Active Devicesfrom the menu bar.
- If you have a DHCP, BOOTP, or rarp server (or ifthe print server already has an IP address from someother source), the print server should appear in thelist of configured print servers. If this is the case,skip to step 4.
- If the print server does not have an IP address, thenclick on the Setup Unconfigured Devices button(the third from the left) or select Devices and thenSetup Unconfigured Devices from the menu bar.This will display the unconfigured print serverslisted by their Ethernet address (MAC Address).Double click on the desired print server to configureit.
- Enter the IP address, subnet mask, and gateway andclick OK .

3-4 Management Methods
- The list of unconfigured print servers will again bedisplayed. Click on Close to return to the mainscreen.
- The print server should show up on the mainXAdmin32 screen (the default name will beXCD_xxxxxx, where "xxxxxx" is the last six digits ofthe Ethernet address). If the print server does notappear on the main screen, click on the Searchbutton to find new print servers.
4. To configure a print server, double click on its nameand enter the password (ACCESS is the defaultpassword). A series of "index cards" will bedisplayed. Each of these "cards" represents a protocolor other configurable item. Click on the appropriatetab to configure the item.
TROY XCD WebXAdminWebXAdmin allows the user to configure the print serverwith a standard web browser like Netscape Navigator orMicrosoft Internet Explorer. It can therefore be used on anyoperating system that supports web browser capabilities. Touse WebXAdmin, you must first make sure that you have aweb browser installed on your computer and that you haveconfigured an IP address in both the computer and the printserver (refer to the previous XAdmin section if you do notknow how to put an IP address in the print server). Alsomake sure that you have configured your TCP/IP stack tocommunicate over the local area network (rather than via aPPP dial-up connection).
To use WebXAdmin, start your web browser and enter the IPaddress of the print server as the destination web site. Once

Management Methods 3-5
you are connected, enter the password (ACCESS is thedefault password) and select the protocol or other item thatyou wish to configure. You will then be connected to theappropriate web page for configuration of that item. Youmay use the normal browser buttons to move forward andback through the web pages.
TROY XCD Print Server ConsoleAll TROY XCD print servers support a sophisticatedcommand-line oriented console for configuration andmanagement. This console contains features that are notavailable through XAdmin or WebXAdmin, includingsophisticated diagnostic capabilities. The TROY XCD printserver console can be accessed via TELNET, DEC NCP/NCL/ccr, the print server serial port (if present), and theTROY XCD XCONFIG NetWare utility. It also availablethrough one of the web pages using the WebXAdmin facility.
The general configuration procedure is the same regardlessof which method is used.
DEC NCP, NCL, ccr. To connect to the print serverconsole with the VMS NCP utility, use the followingcommands:
MCR NCPCONNECT VIA circuit PHY ADD ethernetaddress
where circuit is the circuit-ID of the VAX or Alpha (forexample, SVA-0 for most DEC workstations, MNA-0 forXMI systems, BNA-0 for BI systems, and QNA-0 for Q-BUSsystems) and ethernetaddress is the hardware address of theprint server (for example, 00-40-17-00-61-35).

3-6 Management Methods
Newer OpenVMS systems use NCL instead of NCP. TheNCL command to connect to the print server console is:
SET HOST/MOP/CIRCUIT= circuit /ADD=ethernetaddress
ULTRIX systems use the addnode and ccr commands asfollows:
addnode xciiname -c circuit -h ethernetaddressccr xcdname
where xcdname is an arbitrary name for the print server(each print server on the network needs a unique name).
In all cases, you will get a message like Console Connected
or Remote Console Reserved when you are connected.When you are connected, push RETURN or ENTER to getthe "#" prompt, enter the password ACCESS (it will not print),and type anything in response to the Enter Username>
prompt. When you get the Local> prompt, you are ready toenter commands.
Note: The commands available are generally a subset of theones used on the DECserver terminal server. Note thatunlike the DECserver, there is no distinction between the SETand DEFINE commands or between the CLEAR and PURGEcommands. Instead, when you type CTRL-D to exit theremote console, any of these commands take effectimmediately and the results are stored permanently (forexample, it is not necessary to enter both a SET and aDEFINE to execute a command and save the results).
TELNET. To connect to the print server using TELNET onUNIX, Windows NT, or most other TCP/IP systems, type:
TELNET ipaddress
Management Methods 3-7
at the UNIX system prompt, where ipaddress is the IPaddress of the print server. When you are connected, pushRETURN or ENTER to get the "#" prompt, enter thepassword ACCESS (it will not print), and type anything inresponse to the Enter Username> prompt. When you getthe Local> prompt, you are ready to enter commands.
XCONFIG. To connect to the print server using the TROYXCD XCONFIG NetWare utility, insert the TROY XCDPrint Server Software diskette in Drive A and type:
A:XCONFIG
at the DOS system prompt (or choose the appropriate path ifyou are running XCONFIG from your CD-ROM or harddrive). If you have only one print server, you will beimmediately connected. If you have more than one printserver, you will be given a list of available print servers.Type the number of the print server to which you want toconnect. When you are connected, enter the passwordACCESS (it will not print) at the "#" prompt, and typeanything in response to the Enter Username> prompt.When you get the Local> prompt, you are ready to entercommands.
Serial Port. To connect to the print server using the serialport, refer to Chapter 2 for details on how to use this port.Once you have established a connection, press RETURN orENTER to get the Local> prompt (no password is required).You are now ready to enter commands.
HP JetAdminTROY XCD print servers work transparently with the HPJetAdmin utility. You can download JetAdmin from the HPweb site (http://www.hp.com ). Use the Windows Run

3-8 Management Methods
command to expand the downloaded file. Then use the Runcommand again to execute the SETUP.EXE file in thedestination directory that you selected (this file is generallyin the DISK1 subdirectory) and begin the installation.Follow the instructions on the screen to complete theinstallation.
Important: Windows 98 requires either JetAdmin V2.54(this version can be installed from the Microsoft Windows98 CD by running the SETUP.EXE file in theDRIVERS/PRINTERS/JETADMIN/DISK1/ directory)or V3.30 or later (available on the HP web site).
The TROY XCD print server will appear in the list ofconfigured print servers unless IPX is not running on thecomputer and the print server is not configured with a validIP address. If this is the case, then select Device from themenu bar and click on New. Select the desired print serverfrom the list of unconfigured devices and then pressConfigure. Enter the requested information, including the IPaddress, subnet mask, and gateway. Then click Close toreturn to the list of configured print servers.
You may now select the print server from the list and clickon the Modify button (or select Device and then Modifyfrom the menu bar) to change the print server configuration.
HP Web JetAdminTROY XCD print servers work transparently with the HPWeb JetAdmin utility for Windows NT Advanced Server.You can download this program at no charge from the HPweb site (http://www.hp.com ). Use the Windows NTRun command to expand the downloaded file. The files will

Management Methods 3-9
be expanded and the installation program will beautomatically run. Follow the instructions on the screen tocomplete the installation.
After you have completed the installation, you may use aweb browser on any computer that has access to theWindows NT server to access the TROY XCD print server.Start the browser and connect to the file server. Once youare connected and are at Web JetAdmin home page, click onthe Find Device tab. Then click on Find All Devices to geta list of all Web JetAdmin-compatible print servers (or youmay limit your search by using the Advanced Searchmethod). Click on the desired TROY XCD print servername, and the Properties page will be displayed for thatprint server. Then click on the Config tab to configure theprint server.

3-10 Management Methods

TCP/IP Network Configuration 4-1
4TCP/IP Network ConfigurationOverviewTROY XCD print servers include the Transmission ControlProtocol/Internet Protocol (TCP/IP) protocol suite. Sincevirtually all UNIX host computers support TCP/IP, thiscapability allows a printer to be shared on a UNIX Ethernetnetwork. TCP/IP communications can proceed concurrentlywith other protocols, which means that UNIX, DEC, NetWare,Apple, and other computers can share the same printer over anEthernet network using the TROY XCD print server.
TROY XCD TCP/IP ConceptsA TROY XCD print server with TCP/IP appears to thenetwork as a UNIX host computer with a unique IP addressrunning the lpd line printer daemon protocol. As a result,any host computer that supports the Berkeley remote-LPRcommand can spool jobs to the TROY XCD print serverwithout the need for any special software on the hostcomputer. Application programs run transparently and usersdo not need to learn new procedures in order to use theprinter. TROY XCD print servers also support gateways forcommunications with hosts on remote networks. In addition,raw TCP ports are available for special applications andcompatibility with the HP JetDirect print server.
TROY XCD print servers come preconfigured to run on aTCP/IP network with a minimum of setup. The only

4-2 TCP/IP Network Configuration
mandatory configuration in the print server is the entering ofan IP address (TROY XCD print servers come with a defaultIP address of 192.0.0.192 (192.189.207.254 on some models)but this should be changed to meet the addressingrequirements of your network).
TCP/IP UNIX Host ConfigurationThe configuration process for most UNIX systems isdescribed in the following steps. Unfortunately, this processis not very standardized, so refer to your system documenta-tion (or man pages) for additional information.
1. Configure the /etc/hosts file (or equivalent localhost table) on each UNIX host that needs to communicatewith the TROY XCD print server, or provide similarinformation to a name server on the network. Use yourfavorite editor to add an entry to the /etc/hostsfile containing the IP address and node name of theTROY XCD print server. For example:
192.189.207.3 XCD_00C351
The actual format of the entry may vary depending onyour system, so check your system documentation andalso note the format of other entries in the etc/hostsfile.
Note: The node name in this file does not necessarilyneed to be the same as the one that is actuallyconfigured into the TROY XCD print server (the namethat appears on the printer self-test), but it is goodpractice to make the names the same (however, someoperating systems, such as HP/UX, do not accept the"_" character in the default name, so for these systems

TCP/IP Network Configuration 4-3
you must use a different name). In any case, thenode name in the /etc/hosts file must match thenode name in the /etc/printcap file.
Note: Some systems, such as HP/UX and AIX allowyou to enter the IP address as the host name whensetting up the print queue. If this is the case, you donot need to configure the hosts file.
2. Choose which TROY XCD print server service youwant to use. There are two types of services availableon the TROY XCD print server. Binary services passdata through unmodified and are therefore required forPCL or PostScript rasterized graphics printouts. Textservices add a carriage return at the end of each line forproper formatting of UNIX text files (which end inlinefeed and do not have carriage returns). The textservice can also be used for non-rasterized graphics,such as ASCII PostScript graphics or many types ofPCL graphics.
If you are using the first parallel port on the printserver, choose one of the available services (thisservice name will be used in step 3):
BINARY_P1 Binary (parallel port)TEXT_P1 Text (parallel port)
The XConnect II and Pony 100 also support thefollowing services:
BINARY_S1 Binary (serial port)TEXT_S1 Text (serial port)
The XConnect 100 supports the following additionalservices:

4-4 TCP/IP Network Configuration
BINARY_S1 Binary (serial port)TEXT_S1 Text (serial port)BINARY_P2 Binary (second parallelport)TEXT_P2 Text (second parallel port)BINARY_S2 Binary (second serial port)TEXT_S2 Text (second serial port)
You may set up multiple print queues on your UNIX hostcomputer for the same TROY XCD print server, eachwith a different service name (for example, one queue forbinary graphics jobs and one for text jobs). Refer toAppendix B for additional information on using services.
3. Note: This step applies to the majority of UNIXsystems, including Sun OS (but not Solaris 2.xx),Silicon Graphics (lpr/lpd option required), DECULTRIX, DEC OSF/1, and Digital UNIX. SCO UNIXusers should follow these steps, but should also refer tothe SCO UNIX Configuration section in section 3-A.Users of RS/6000 AIX, HP/UX, Sun Solaris 2.xx, andother systems that do not use the printcap file shouldskip to section 3-A.
Configure the /etc/printcap file on each hostcomputer to specify the local print queue, the TROYXCD print server name (also called remote machine orrm), and the TROY XCD print server service name(also called remote printer, remote queue, or rp), andthe spool directory.
An example of a typical printcap file is as follows:
laser1|Printer on Floor 1:\:lp=:\:rm=XCD_003C51:\:rp=TEXT_P1:\:sd=/usr/spool/lpd/laser1:

TCP/IP Network Configuration 4-5
This will create a queue named laser1 on the hostcomputer that communicates to a TROY XCD printserver with a node name (rm) of XCD_003C51 and aservice name (rp) of TEXT_P1 for printing text files tothe printer through the spool directory /usr/spool/
lpd/laser1 . If you are printing binary graphics files,you would use the service BINARY_P1 instead ofTEXT_P1.
Note: The rm and rp options are not available on allUNIX systems, so if necessary check yourdocumentation (or man pages) to determine theequivalent options.
Users of Berkeley-compatible UNIX systems can usethe lpc command to obtain the printer status:
%lpc statuslaser1:
queuing is enabledprinting is enabledno entriesno daemon present
Users of AT&T-compatible UNIX systems cangenerally use the lpstat or rlpstat commands toobtain similar status information. Because thisprocedure varies from system to system, refer to yoursystem documentation for the exact usage.
3-a Note: Skip this section if you have completed Step 3,unless you have an SCO UNIX system.
If you have an HP/UX system, IBM RS/6000 AIXcomputer, or Sun Solaris 2.xx, there is no printcap file.This is also true for some other AT&T-based UNIX

4-6 TCP/IP Network Configuration
systems, as well as many VMS-based TCP/IP softwarepackages (for example, UCX, TGV Multinet, etc.).Such systems generally use a printer setup program todefine the service name (remote printer), the TROYXCD print server name (remote machine) or IP address,and the local queue name (spool directory).
HP/UX Configuration
In the case of HP/UX 10.xx, the sam program is used toset up the remote printer. The steps are as follows:
- Execute the sam program. When you get a list ofoptions, select Printers and Plotters.
- Select LP Spooler.- Select Printers and Plotters.- Select Actions and then Add Remote Printer/Plotter.
- Enter any name as the Printer Name (this willbe the name of the print queue)
- Enter the IP address of the print server as theRemote System Name
- Enter the desired print server service name as theRemote Printer Name.
- Check the box next to Remote Printer is onBSD System.
- You may accept the default values for theremaining items.
- Click OK to configure the printer.- You should now be able to print using the lp -d
command with the printer name.
If you are using the HP Distributed Print Service, theconfiguration procedure is slightly different becauseyou are sending the print jobs to a file server, which inturn spools the jobs to the print server. You must

TCP/IP Network Configuration 4-7
therefore know the name of the file server (spoolerhost) in addition to the above information. You willadd a physical printer and a remote printer, and thenassign a logical printer name to the remote printer (aunique name that does not match any other name). Toprint, use the lp -d command with the logicalprinter name.
Earlier versions of HP/UX use similar procedures to10.xx:
- Enter sam and select "Peripheral Devices" and then"Add Remote Printer" (not "networked printer")
- Enter the following remote printer settings (theother settings do not matter):- Line printer name (user-selectable)- Remote system name (the TROY XCD print
server name; must match what is in hosts file oruse TROY XCD print server IP address)
- Remote printer queue (TROY XCD print serverbinary or text service name)
- Remote Printer is on a BSD System (Yes)
IBM RS/6000 AIX Configuration
The RS/6000 AIX operating system uses the smitprogram to set up the remote printer. The procedure isas follows for AIX 4.0 and later:
1. Enter SMIT and select “devices”2. Select “Printer/Plotter”3. Select “Print Spooling”4. Select “Add a Print Queue”5. Select “Remote”6. Enter the following Remote Printer Settings:

4-8 TCP/IP Network Configuration
- Name of queue (user selectable)- Host Name of Remote Printer (TROY XCD
Print server name; must match name /etc/hostsfile or use TROY XCD print server IP address)
- Name of queue on remote server (TROY XCDprint server binary or text service name)
- Type of print spooler: BSD (press the listbutton and choose BSD).
The procedure for pre-V4.0 systems is as follows:
1. Enter smit and select "Devices"2. Select "Printer/plotter"3. Select "Manage remote printer subsystem"4. Select "Client services"5. Select "Remote printer queues"6. Select "Add a remote queue"7. Enter the following remote queue settings:
- Name of queue to add (user selectable)- Activate the queue (Yes)- Destination host (TROY XCD print server
name; must match name in /etc/hosts file or usethe print server IP address)
- Name of queue on remote printer(TROY XCD print server binary or text servicename)
- Name of device to add (user selectable; forexample lp0 )
Sun Solaris 2.x Configuration
Sun Solaris 2.x uses the lpsystem and lpadminprograms for remote printer configuration:

TCP/IP Network Configuration 4-9
lpsystem -t bsd xcdnamelpadmin -p queue -s xcdname!\xcdserviceaccept queue
enable queue
where queue is the name of the local print queue,xcdname is the TROY XCD print server name (mustmatch the entry in the /etc/hosts file) or IP address andxcdservice is the TROY XCD print server binary ortext service. If this is the first printer configured, youmust also use the lpsched command immediately priorto the accept command.
As an alternative, you may use Printer Manager in theadmintool utility under OpenWindows. Select Edit ,Add, and Add Access to Remote Printer. Then enterthe TROY XCD print server name in the formatxcdname!\xcdservice as described above. Make surethat the Printer Server OS is set to BSD (the defaultsetting), and then click Add.
Note that we recommend that use the /etc/hosts filefor the printer name rather than NIS or other nameservices. Also note that due to a bug in the Sun lpdimplementation on Solaris 2.4 and earlier releases, youmay experience problems printing very long print jobs.If this is the case, a workaround is to use the raw TCPport with the HP JetDirect software as described later inthis chapter.
SCO UNIX Configuration
SCO UNIX requires TCP/IP V1.2 or later to work withTROY XCD print servers. You must first configure the/etc/hosts and /etc/printcap files as described instep 2. Then run the sysadmsh program as follows:

4-10 TCP/IP Network Configuration
- Select Printers.- Select Configure.- Select Add.- Enter the name of the print queue you entered in
the /etc/printcap file as the Printer name,- Enter anything as the Comment, and Class name.- For the Use printer interface select "Existing".- Press the F3 key to get a list of available interfaces,
and select the desired one as the Name of interfaceusing the arrow keys and Enter key ("Dumb” is agood choice).
- Select "Direct" as the Connection.- Enter the desired Device name (/dev/lp generally
works).- Select "Hardwired" as the Device.- Select "No" for the Require banner field.
Other Non-Standard Configurations
With DEC TCP/IP Services for VMS (UCX), youfirst need to put a name for the TROY XCD printserver in the HOSTS file using the command SETHOST name /ADDRESS=ipaddress at theUCX> prompt, where name is the desired name for theprint server and ipaddress is the IP address for the printserver. Then use the sys$system:ucx$lprsetupcommand to add a printer (print queue). Enter thedesired printer name, and then use the TROY XCDprint server name as the remote system name. Specifyone of the TROY XCD print server services (seebeginning of this section for options) as the remotesystem printer name (accept the defaults for otherquestions).

TCP/IP Network Configuration 4-11
Process Software's TCPware simply uses the VMSINIT/QUEU command with their special symbiont inthe following format:
INIT/QUEUE/PROC=TCPWARE_TSSSYM/ON="host,port" queue
where host is the IP address or name of the TROYXCD print server, port is the TROY XCD print serverraw TCP port number (9100 for the parallel port, 9101for the serial port, 9102 for the XConnect 100 secondparallel port, or 9103 for the XConnect 100 secondserial port), and queue is the VMS queue name.
TGV's Multinet requires you to run the MULTINET
CONFIGURE /PRINTERS command, then use the ADDcommand to add a printer, specifying the TROY XCDprint server IP address, a protocol type of LPD, andone of the service options described at the beginning ofthis section as the remote print queue.
With Wollongong's PATHWAY, first make sure thatyou have the Access option with lpd enabled. Thenenter the print server name and IP address in theTWG$TCP:[NETDIST.ETC]HOSTS. file, run the LPGENprogram, and execute the command add queue /
rmachine= xcdname /rprinter= service, where queueis the name of the queue, xcdname is the TROY XCDprint server name from the hosts file, and service is theTROY XCD print server service name.
To use a TROY XCD print server with an IBM AS/400running IBM’s TCP/IP Gateway Services for OS/400(the OS/400 system must be v3.1 or later):

4-12 TCP/IP Network Configuration
- Assign a TCP/IP address to the AS/400 and theTROY XCD print server.
- Use the CFGTCP command at your OS/400 promptto add the print server’s TCP/IP address to the AS/400 host table.
- Use the following one-line OS/400 command tocreate the LPD queue:
CRTOUTQ OUTQ(<queuename> RMSTSYS(*INTNETADR) RMTPRTO(<service>)AUTOSTRWTR(1) CNNTYPE(*IP) DESTTYPE(*OTHER) MFRTYPMDL (<driver>)INTNETADR(‘<ipaddress>’) TEXT
(‘<description>’)
where <queuename> is the new AS/400 print queuename, <service> is the TROY XCD print serverservice name, <driver> is the OS/400 printer drivername (*HP4 is recommended if in doubt), and<ipaddress> is the IP address of the print server.Note that the IP address and description must beenclosed in single quotes.
Other systems use similar procedures to set up theTROY XCD print server. These programs willgenerally ask for the following information:
Requested information: You should use:remote printer or remote TROY XCD print serverbinary or text service
nameremote host computer name Any name (must match
name in printcap file, ifany) or in some cases,you may enter the TROY

TCP/IP Network Configuration 4-13
print server IP addresshere
remote host IP address TROY XCD print server IPaddress
Tech support specialists for these companies can usuallyanswer configuration questions if you provide themwith the equivalent UNIX configuration information(tell them that the TROY XCD print server looks like aremote UNIX host computer running the lpd line printerdaemon).
4. If you have not created a spool directory for the TROYXCD print server on your UNIX host computer, youwill need to do so now (the printer setup utilities in HP/UX, AIX, Solaris 2.xx, and other systems willautomatically create the spool directory). The lpd spooldirectory is usually located in the /usr/spool directory(check with your system manager to see if the locationis different for your system). To create a new spooldirectory, use the mkdir command. For example, tocreate a spool directory for the queue laser1, you wouldenter:
mkdir /usr/spool/lpd/laser1
On some systems it is also necessary to start thedaemon. This is done on Berkeley-compatible UNIXsystems with the lpc start command as shown in thefollowing example:
lpc start laser1
5. The final step before printing is to add the IP address tothe TROY XCD print server. Consult with your system

4-14 TCP/IP Network Configuration
administrator before assigning an IP address to avoidconflicts with other devices. If your network does nothave an officially assigned block of IP addresses, youmay use any unique address between 192.168.254.1 and192.168.254.254 (this is a reserved range of Class Caddresses for private networks that are not connected tothe Internet per RFC 1918; note that you must alsoassign your host computer an IP address in this range).
The IP address can be set in his can be done in any ofthe following ways:
1. XAdmin322. HP JetAdmin3. DHCP4. The UNIX arp and ping commands5 Reverse Arp (rarp)6. BOOTP7. DEC NCP, NCL, or ccr utilities8. TROY XCD XCONFIG NetWare utility9. XConnect II or XConnect 100 serial port
The easiest way to configure the IP address is usingeither XAdmin32 or JetAdmin as described in Chapter3. The remaining configuration methods are describedin the following paragraphs.
Important Note: The IP address you assign to theprint server must be on the same logical network asyour host computers (e.g., if your host has an IP addressof 192.189.207.3, the TROY XCD print server shouldhave an IP of 192.189.207.x, where x is an integerbetween 1 and 254), or you must properly configureyour router to work with the TROY XCD print server.

TCP/IP Network Configuration 4-15
Using DHCP to Configure the Print ServerIP AddressTROY XCD print servers support the DHCP protocolfor automatically loading the IP address from a hostcomputer that supports DHCP. By default, the printserver will automatically try DHCP, BOOTP, and rarpbefore using the IP address configured in the server.
Note: This procedure may take about a minute, so theprint server cannot be accessed via TCP/IP during thattime. If a faster IP address load is required, select thedesired IP configuration method (AUTO, DHCP,BOOTP, RARP, STATIC) via XAdmin, WebXAdmin,or the print server console SET IP METHODcommand (STATIC is used when the IP address ismanually entered).
Using arp and ping to Configure the PrintServer IP AddressThe arp and ping method is one of the simplest ways ofconfiguring the print server IP address (this methodrequires V3.27 or later firmware). To use arp andping, enter the following commands at the operatingsystem prompt::
arp -s ipaddress ethernetaddress [temp]ping ipaddress
where ethernetaddress is the Ethernet address of theprint server and ipaddress is the IP address of the printserver. The temp parameter should be used with UNIXsystems, but is not supported by Microsoft operatingsystems. For example, a typical UNIX entry would be:

4-16 TCP/IP Network Configuration
arp -s 192.189.207.2 00:40:17:00:c3:e4 tempping 192.189.207.2
while a typical Microsoft entry would be:
arp -s 192.189.207.2 00-40-17-00-c3-e4ping 192.189.207.2
If everything is OK, you will get a message back on thescreen indicating that the print server is alive. If you donot get such a message, first check the note bellow, andthen try entering the commands again.
Note: This procedure will not work through a router(gateway) and only works if the print server IP addresshas never been configured before. If you havepreviously configured an IP address, then use TELNETas described in Appendix A to change the IP address.
Note: This procedure will not work with Windows 95unless there are already entries in the Windows 95 arptable. If there are no entries, you can add one bypinging a known device on the network (you cannotping yourself).
Using rarp to Configure the TROY XCDPrint Server IP AddressThe TROY XCD print server IP address can beconfigured using the Reverse ARP (rarp) facility onyour host computer. This is done by editing the /etc/
ethers file (if this file does not exist, you can create it)with an entry similar to the following:
00:40:17:00:01:07 XCD_000107

TCP/IP Network Configuration 4-17
where the first entry is the Ethernet address of theTROY XCD print server and the second entry is thename of the TROY XCD print server (the name must bethe same as the one you put in the /etc/hosts file).
If the rarp daemon is not already running, start it(depending on the system the command can be rarpd,
rarpd -a, in.rarpd -a or something else; type man
rarpd or refer to your system documentation foradditional information). To verify that the rarp daemonis running on a Berkeley UNIX-based system, type thefollowing command:
ps -ax | grep -v grep | grep rarpd
For AT&T UNIX-based systems, type:
ps -ef | grep -v grep | grep rarpd
The TROY XCD print server will get the IP addressfrom the rarp daemon when it is powered on.
Using BOOTP to Configure the TROY XCDprint server IP AddressBOOTP is an alternative to rarp that has the advantageof allowing configuration of the subnet mask andgateway. In order to use BOOTP to configure the IPaddress into the TROY XCD print server, first makesure that BOOTP is installed and running on your hostcomputer (it should appear in the /etc/services fileon your host as a real service; type man bootpd or referto your system documentation for information).BOOTP is usually started up via the /etc/inetd.conf file,so you may need to enable it by removing the "#" in

4-18 TCP/IP Network Configuration
front of the bootp entry in that file. For example, atypical bootp entry in the /etc/inetd.conf file wouldbe:
#bootp dgram udp wait /usr/etc/bootpd bootpd -i
Depending on the system, this entry might be called"bootps" instead of "bootp". In order to enableBOOTP, simply use an editor to delete the "#" (if thereis no "#", then BOOTP is already enabled). Then editthe BOOTP configuration file (usually /etc/
bootptab ) to enter the name, network type (1 forEthernet), Ethernet address (which can be found on thelabel on the TROY XCD print server), and the IPaddress, subnet mask and gateway of the TROY XCDprint server. Unfortunately, the exact format for doingthis is not standardized, so you will need to refer toyour system documentation to determine how to enterthis information (many UNIX systems also havetemplate examples in the bootptab file that you can usefor reference). Some examples of typical /etc/
bootptab entries include:
xcd_000107 1 00:40:17:00:01:07192.189.207.3
and:
xcd_000107:ht=ethernet:ha=004017000107:\ip=192.189.207.3:
Certain BOOTP host software implementations will notrespond to BOOTP requests if you have not included adownload filename in the configuration file; if this isthe case, simply create a null file on the host and

TCP/IP Network Configuration 4-19
specify the name of this file and its path in theconfiguration file.
As with rarp, the TROY XCD print server will load itsIP address from the BOOTP server when the printer ispowered on.
Configuring the TROY XCD Print Server IPAddress with NCP, XCONFIG, or the SerialPort
Users of DEC and Novell computers have additionalalternatives for configuring the TROY XCD printserver IP address by using the remote console facility,while XConnect II, Pony 100, and XConnect 100 userscan also utilize the serial port. On VMS systems, youwill need to have DECNET running in order to use theremote console. The procedure is as follows:
a. Connect to the remote console or serial port (seechapter 2 for information on the serial port). Ifyou are using the remote console with VMS orULTRIX, you will need to know the circuit ID(EWA-0 for Alpha PCI systems, QNA-0 for Q-BUSsystems, SVA-0 for DEC workstations, UNA-0 forUNIBUS systems, BNA-0 for BI systems, andMNA-0 for XMI systems; you can get the circuitID by executing the VMS NCP command SHOW
KNOWN CIRCUITS) and the Ethernet address of theTROY XCD print server (which you can get eitherfrom the label on the TROY XCD print server orvia the printer self-test). On VMS systems, theconnection is made as shown in the followingexample:

4-20 TCP/IP Network Configuration
$ MCR NCPNCP>CONNECT VIA QNA-0 PHY ADD 00-40-17-00-01-07
On ULTRIX systems, you would executecommands similar to the following example:
# addnode XCD -c qna-0 -h 00-40-17-00-01-07# ccr XCD
On a NetWare system, you would use theXCONFIG utility included with every TROY XCDprint server. Simply type XCONFIG at the DOSprompt and select the desired TROY XCD printserver.
b. If you are using the remote console, you will getthe message Console connected (VMS) orConnection established XCONFIG) orRemote console reserved (ULTRIX). PressRETURN and enter the password ACCESS inresponse to the "#" prompt (it will not echo).Note : You will not be asked for a password if youare using the XConnect II or XConnect 100 serialport.
c. You will be prompted for a user name. Enteranything in response to this prompt (older versionsdo not ask for the user name).
d. You will then get the Local> prompt. Type SET
IP ADDRESS ipaddress , where ipaddress is thedesired IP address you wish to assign to the TROYXCD print server (check with your networkmanager for the IP address to use). For example:
Local> SET IP ADDRESS 192.189.207.3

TCP/IP Network Configuration 4-21
e. You will now need to set the subnet mask by typingSET IP SUBNET subnetmask , where subnetmask
is the desired subnet mask you wish to assign to theTROY XCD print server (check with your networkmanager for the subnet mask to use). For example:
Local> SET IP SUBNET 255.255.255.0
If you do not have any subnets, use one of thefollowing default subnet masks:
255.255.255.0 for class C networks255.255.0.0 for class B networks255.0.0.0 for class A networks
f. The type of network you have can be identified bythe leftmost group of digits in your IP address. Thevalue of this group ranges from 192 through 255for Class C networks (e.g., 192.189.207.3), 128through 191 for Class B networks (e.g.,128.10.1.30), and 1 through 127 for Class Anetworks (e.g., 13.27.7.1).
g. If you have a gateway (router), enter its addresswith the command SET IP ROUTER
routeraddress , where routeraddress is thedesired IP address of the gateway you wish toassign to the TROY XCD print server. Forexample:
Local> SET IP ROUTER 192.189.207.1
h. To verify that you have entered the IP informationcorrectly, type SHOW IP.
4-22 TCP/IP Network Configuration
i. Type EXIT or CTRL-D (i.e., hold down the controlkey and type "D") to end the remote consolesession.
j. With older versions of the firmware (V3.26 orearlier), you must wait about ten second and thenpower the printer off and then on again to make theIP address take effect (not necessary with newerversions).
6. Before attempting to print, it is very important toverify the connection between the host and the TROYXCD print server by using the UNIX ping commandwith the IP address of the TROY XCD print server.For example:
ping 192.189.207.3
You should get a message that the TROY XCD printserver is alive. If you get an error message or noresponse, then there is no connection. You will not beable to print if you cannot ping the TROY XCD printserver. If this is the case, verify that you have set upthe host and TROY XCD print server correctly and thatthe physical connections (e.g., the transceivers andcabling) are good. Refer to the Troubleshootingchapter for additional information.
7. To print to the TROY XCD print server from UNIX,use the standard lpr command with the -P option tospecify the queue name. For example, to print the fileTEST on the queue laser1, you would type:
lpr -Plaser1 TEST

TCP/IP Network Configuration 4-23
Some AT&T-based UNIX systems, such as SCO andHP/UX, use the standard lp command instead of lpr. Inthese cases, use the -d option instead of -P to specifythe queue name as shown in the following example:
lp -dlaser1 TEST
Note that TROY XCD print servers implement only asubset of the lpr options. If you want to utilize printingoptions such as landscape mode, language switching,etc., refer to Appendix B for information on usingservices.
For non-UNIX systems such as VMS, the TCP/IPprinting process is normally transparent, so you use thesame commands or procedures as you would for a localprinter.
IP SecurityTROY XCD print servers provide a means of allowing onlyhost computers with authorized IP addresses to access the printserver. This is very useful for applications like check printing,where general access to the printer is not allowed. The consolecommand SET IP ACCESS ENABLED ipaddress enters a hostcomputer IP address into the access table of the print server(where ipaddress is the IP address of the host computer; refer toAppendix A for information on using the print server console).To remove an IP address, use the command SET IP ACCESS
DISABLED ipaddress . To reenable general access, use the
command SET IP ACCESS ALL.

4-24 TCP/IP Network Configuration
Raw TCP PortsTROY XCD print servers provide a raw TCP port capabilitythat can be used by any application that can open and senddata to a TCP port. The port number is 9100 (238C hex) forthe parallel port, or 9101 for the XConnect II and XConnect100 first serial port, and 9102 for XConnect 100 secondparallel port. The ports pass data through unmodified, sothere is no TELNET interpretation provided. When using theraw TCP ports, make sure that TELNET interpretation isdisabled in your software or else you may get distortedprintouts.
The raw TCP port is compatible with many popular softwarepackages, including HP's JetDirect software for UNIX, TGVMultinet (streams mode), IBM AIX for the RS/6000 (V3.25or later), and any TCP/IP-based software that supports HP'sJetDirect Ethernet network interface card.
The HP JetDirect software for UNIX is available for SunSolaris, SunOS, and HP/UX. HP printer users can downloadthese utilities from HP's web site (http://www.hp.com orFTP site (ftp.hp.com ).
To use an TROY XCD print server with the HP host printingutilities on an HP/UX or Sun system:
1. Download the software from the HP web site or FTPsite.
2. If the download file is in tar format, use the tar xvffilename command to extract the software, wherefilename is the name of the software that youdownloaded (you must be logged in as root). If the fileis in pkgadd format, use the pkgadd -d filename all
TCP/IP Network Configuration 4-25
command to extract the software. Accept the defaultdirectory to store the files. Follow the instructions inthe README files to install the software.
3. Run JetAdmin by typing jetadmin at the UNIXprompt (on SunOS 4.xx systems, you use the hpnpcfgprogram instead of JetAdmin, but the configurationsteps are similar).
4. Select item 1 (Configuration) and then select item 3(Add printer to local spooler).
5. Enter the desired name for the TROY XCD print serveror IP address at the Enter the networkprinter name/IP Name prompt.
Note : With versions of firmware earlier than 3.46, youmust enter the name (do not enter the IP address)before configuring the print server name in the /etc/hosts file, or in NIS or DNS. You will get amessage Unknown printer. Do you wishto continue? ". Enter "Y" to continue.
6. Select the printer type (for example, “HP LaserJet IIISiPrinters”).
7. If desired, change any of the configurable parameters(note that the default queue name is the name of theprinter plus an “_” and a number (e.g., laser_1)). Thenenter 0 to configure the queue.
8. Answer “Y” at the “OK to Continue?” prompt. Exit theJetAdmin utility by pressing RETURN and then “q”twice.

4-26 TCP/IP Network Configuration
9. Print a job using the lp command. For example,
lp -dlaser_1 /etc/hosts
If you need a different TCP port number or if you wantadditional TCP ports, you may define a TCP port number onany TROY XCD print server service by using the
SET SERVICE servicename TCP nn
where servicename is the name of the service, and nn is thedesired port number (must be greater than 1023). Refer toAppendix A for information on using the console.
Changing the Configuration (Optional)You may use TELNET, the DEC NCP utility, the XCONFIGNetWare utility, or the XConnect II/Pony 100/XConnect 100serial port to connect to the TROY XCD print server remoteconsole and change the configuration or view the status. Theprocedure and configuration commands are described inAppendix A.

Novell Network Configuration 5-1
5Novell Network ConfigurationOverviewTROY XCD print servers allow NetWare client PCs to printjobs on the same printer as DEC, UNIX, AppleTalk, LANManager, and Banyan users. All NetWare jobs are spooledthrough the Novell server, so NetWare utilities andapplication programs can use the printer transparently.
NetWare ConceptsNovell NetWare is a sophisticated network operating systemthat allows PC clients (and other nodes) to access networkresources such as disk drives and printers as if they weredirectly connected. NetWare networks require at least onefile server, and users must log into this server to takeadvantage of the NetWare capabilities.
To handle printing over the network, the file server providesprint spooling for the clients. It holds print jobs locally untilcontacted by a print server on the network, which in turnsends the job to appropriate printer. In the past, a NetWareprint server was typically either a PC dedicated to handlingprinters or a Network Loadable Module (NLM) or ValueAdded Process (VAP) running on the file server. Today,NetWare print servers are often special-purpose networkinghardware like a TROY XCD print server.

5-2 Novell Network Configuration
TROY XCD print servers can operate in two different modesto service NetWare print queues:
• Remote Printer mode (also known as NPRINTER mode onNetWare 4.xx or RPRINTER mode on NetWare 2.xx or3.xx networks)
• Queue Server mode (also called print server or PSERVERmode)
In remote printer mode (see figure 5-1), the client PC sendsthe print job to the file server, which in turn spools it to a
PC ClientWorkstation
FileServer
PrintServer
PC ClientWorkstation
FileServer
Printer withXConnect II
Printer withXConnect II
PC
PC
Figure 5-1TROY XCD Print Server Operating as a NetWare Remote Printer
Figure 5-2TROY XCD Print Server Operating as a NetWare Queue Server

Novell Network Configuration 5-3
print server (the print server may be a physical device like aPC or a software NLM or VAP on the file server), which inturn sends it to the printer. This approach provides goodperformance, and has the advantage of not consuming a userslot on the file server.
A TROY XCD print server can also act as a NetWare printserver (queue server) with an attached printer, whichtherefore eliminates the need for a dedicated PC print serveror for an NLM or VAP on the file server. As shown in figure5-2, this means that jobs from the client PC are spooled to thefile server, which in turn spools the job directly to the TROYXCD print server. The advantage of this approach is higherperformance, but it has the drawback of requiring a user sloton the file server.
Generally speaking, TROY XCD recommends that you usequeue server mode instead of remote printer mode becausethe performance will be much higher. The exception to thisrecommendation is if you have a limited number of availableuser slots (for example, if you have a 5-user NetWare licenseand you have five active users).
TROY XCD print servers will work with NetWare DirectoryServices (NDS) or bindery emulation mode on NetWare 4.xxand later networks (not all TROY XCD print servers supportNDS queue server mode; refer to chapter 2 for specificprotocol support information).
General InformationIn order to use a TROY XCD print server on a NetWarenetwork, one or more file servers must be configured with a

5-4 Novell Network Configuration
print queue that the TROY XCD print server can service.Users send their print requests to the file server’s printqueue, and the jobs are then spooled (either directly, or in thecase or remote printer mode, via an intermediate print server)to the TROY XCD print server.
TROY XCD print servers can be configured under Windowsusing Hewlett-Packard's JetAdmin utility or TROY XCD'sXAdmin32 and XAdmin utilities. Alternatively, they can beconfigured using the NetWare PCONSOLE utility inconjunction with TROY XCD's DOS XCONFIG utility.
Important Note: Not all TROY XCD print server modelssupport queue server mode with Novell Directory Services(refer to chapter 2 for protocol support information). Youmust enable bindery emulation in order to use queue servermode with these products.
Before You BeginBefore you can configure a NetWare print queue, you musthave sufficient privileges. With NetWare 3.xx and earlier,you MUST be logged in as SUPERVISOR (not someone withSupervisor privileges). With NetWare 4.xx and later, makesure that you have sufficient administrator privileges tocreate a print queue in the desired context.
Default Print Server Names (ServiceNames)TROY XCD print servers automatically make themselvesknown on a NetWare network. Each print server port has anassociated default NetWare name; these names are used

Novell Network Configuration 5-5
extensively during the configuration process, so be sure toremember them. The names are as follows:
XConnect IIXCD_xxxxxx_P1 (parallel port)XCD_xxxxxx_S1 (serial port, if enabled)XCD_xxxxxx_LN (parallel port if LN03 option
is installed)
XConnect IIXCD_xxxxxx_P1 (parallel port)XCD_xxxxxx_S1 (serial port, if enabled)XCD_xxxxxx_LN (parallel port if LN03 option
is installed)
XConnect II LiteXCD_xxxxxx_P1 (parallel port)XCD_xxxxxx_S1 (serial port, if enabled)
Pony Print Server PlusXCD_xxxxxx_P1 (parallel port)
The default NetWare print server names are actually thenames of the print server's NetWare services (refer toAppendix B for more information on services). The "xxxxxx"in all of the above cases is the last six digits of the Ethernetaddress (for example, XCD_034578_P1). Refer to the labelon the print server or to the print server self-test for theEthernet address. If desired, you may change the defaultnames to something more meaningful by using XAdmin32,XAdmin, WebXAdmin, JetAdmin, or the print serverconsole.

5-6 Novell Network Configuration
Configuring the Print Server and Addingthe Print Queue in Queue Server ModeTROY XCD print servers can be configured in Queue Servermode for either bindery or NDS mode operation. Thesimplest way to do this is with TROY XCD's XAdmin32 orHP's JetAdmin utilities. XAdmin32 is a Windows 95/98 andWindows NT 4.xx-based utility that allows you to configurethe print server and create NetWare print queues withoutusing NetWare utilities like PCONSOLE or NWAdmin (ifyou have Windows 3.xx, you must use XAdmin as describedlater in this chapter). JetAdmin is a Hewlett-Packard utilitythat provides similar capabilities. Other methods includeTROY XCD's XAdmin or XCONFIG utilities in conjunctionwith Novell's NWAdmin or PCONSOLE.
Configuring the Print Server and Print Queue withXAdmin32 (Queue Server Mode)
NOTE: TROY XCD recommends you use the Novell 32-bitclient on your Windows 95/98/NT workstation instead of theMicrosoft NetWare client, because it allows directconfiguration of print queues without the need for a Novellutility like NWAdmin or PCONSOLE.
NOTE: If you have a Windows 3.xx system, you must useXAdmin as described later in this chapter.
NOTE: NDS Queue Server mode is only supported by "S"and "N" Series models (for example, PPS-8S and XConnectII-8N; refer to Chapter 2 for specific mode information).
1. Make sure that you are logged in as ADMIN orequivalent (NetWare 4.xx and above) or SUPERVISOR(NetWare 2.xx and 3.xx). Install the XAdmin32

Novell Network Configuration 5-7
software from the TROY XCD Print Server SoftwareCD-ROM by clicking on the Start button and selectingRun. Click on Browse and select the CD-ROM drive.Open the Utilities folder, open the XAdmin32 folder,and click on SETUP.EXE, Click OK twice and followthe instructions on the screen.
2. Click on Start, select Programs, select the XAdmin32folder, and then select XAdmin32.
3. Click on the IPX/SPX icon under Filters to set theoperating mode to IPX/SPX (TCP/IP mode will notallow you to configure NetWare print queues directly).The TROY XCD external print server should appear inthe list of available printers (the name will one of theones listed in the Default Print Server Names section atthe beginning of this chapter). If it does not, try goingto the menu bar and selecting Devices and then SearchActive Devices.
Important Note: V3.59 and earlier firmware do notsupport more than one service and one port (thefirmware version is listed on the self-test page). If youhave an XConnect II or XConnect 100 and need to usethe serial port for printing, you must upgrade to anewer revision of the firmware.
4. Double click on the printer that you wish to configure,enter the configuration password (ACCESS is thedefault), and press OK .
5. A series of index card tabs will be displayed. Click onthe NetWare P1 tab to configure the first parallel port,the NetWare S1 tab to configure the serial port, the
5-8 Novell Network Configuration
NetWare P2 tab to configure the XConnect 100 secondparallel port, or the NetWare S2 tab to configure theXConnect 100 second serial port.
• If it is not already selected, select Queue Server asthe operating mode.
• Click on the ▼ button and select the NDS tree (ifyou are using the Microsoft NetWare client, youmust type in the name of the tree)..
• Click Change... button to select the NDS contextwhere the queue will reside (if you are using theMicrosoft client, you must type in the name of thecontext).
• If desired, you may change the print server name (dothis with caution, because it changes the print serverservice name and will therefore affect any otherprotocols that use this service).
If you are using the Microsoft Client for NetWare, STOPHERE. Go to the Adding NetWare Print Queues UsingNWAdmin section to complete the configuration.
6. Click on the Change NDS Queues... button toconfigure an NDS print queue or click the ChangeBindery Queues... to configure a bindery mode queue.
7. Two windows will appear, Available Print Queues andServiced Print Queues. First go to the AvailablePrint Queues window:
• If you are configuring an NDS queue, click on thecontext where the print queue will reside.

Novell Network Configuration 5-9
• If you are configuring a bindery queue, click on thevolume where the queue will reside (a volume namewill have a file server icon next to it).
8. Click on New Queue.
• Enter any unique name for the Queue name. If youare configuring a bindery queue, click OK andproceed to step 8.
• If you are configuring an NDS queue, clickBrowse, select the file server volume where youwant the queue to reside (a volume name will havea file server icon next to it), and click OK .
9. The queue name will now appear in the AvailablePrint Queues under the selected volume (for binderymode) or in the selected context (for NDS mode).
• Click on the desired queue.
• Click on Add>>
The name will now appear in the Serviced PrintQueues window.
10. Click Close and then OK . You can now use the printqueue from your NetWare workstation.
Configuring the Print Server and Print Queue withHP JetAdmin 3.XX (Queue Server Mode)
NOTE: JetAdmin 1.xx and 2.xx do not allow directconfiguration of NetWare print queues. If you are usingthese versions, you may configure the print server with

5-10 Novell Network Configuration
JetAdmin and then use NWAdmin or PCONSOLE to add theprint queue. If possible, TROY XCD recommends that youupgrade to JetAdmin 3.xx (available on the HP web site athttp://www.hp.com).
1. Make sure that JetAdmin 3.xx is running on yoursystem and that you have sufficient privileges to use itto create print queues. If you are using the MicrosoftNetWare client on your workstation, make sure that youhave installed Services for NetWare DirectoryServices in the Network control panel.
2. Click on Start, select Programs, select the HPJetAdmin Utilities 3.0 folder, and then select HPJetAdmin.
3. One or more TROY XCD print server NetWare serviceswill show up in the list of printers (the default servicenames are listed in the Default Print Server Namessection at the beginning of this chapter). Single clickon the one that you wish to configure and then go themenu bar, select File and then Modify .
Important Note: V3.59 and earlier firmware do notsupport more than one service and one port (thefirmware version is listed on the self-test page). If youhave an XConnect II or XConnect 100 and need to usemore than one port for printing, you must upgrade to anewer revision of the firmware.
4. If desired, change the print server name and description.Click Next. Do this with caution because this willchange the print server service name, and will thereforeaffect any other protocols that use this service.

Novell Network Configuration 5-11
5. Make sure that NetWare Directory Services is selectedin the window on the left side of the display.
• Click on the ▼ button and select the NDS tree.
• Click Change... button to select the NDS context.
6. Click on the Operating Mode button and select QueueServer Mode.
7. Click on the Queues button and then click on theChange... button. Two windows will appear, AvailablePrint Queues and Serviced Print Queues. Go to theAvailable Print Queues window:
• If you are configuring an NDS queue, click on thecontext where the print queue will reside.
• If you are configuring a bindery queue, click on thevolume where the queue will reside.
8. Click on Create and enter any unique name for theQueue name.
• If you are configuring an NDS queue, the default fileserver on which the print queue will reside will belisted.. You may optionally change this by clicking onthe ▼ button and selecting a different server. Youmay also optionally change the context that youselected in the previous step by clicking on theBrowse... button. Click OK and proceed to step 9.
• If you are configuring a bindery queue, you mayoptionally click on the ▼ button to change the file

5-12 Novell Network Configuration
server volume that you selected in the previous step.Click OK to continue and go to step 9.
9. Click Yes when asked if you want to add the queue tothe list of serviced queues. The queue name will nowappear in the Available Print Queues in the selectedcontext (for NDS mode) or under the selected volume(for bindery mode).
10. Click OK and then Next. If applicable, enter the IPaddress and click Next.
11. If desired you can enable users that will be notified inthe event of printer problems. Click Finish. You cannow use the print queue from your NetWareworkstation.
Configuring the Print Server using XAdmin Version2.0 or WebXAdmin (Queue Server Mode):
Important Note: Although XAdmin runs on Windows 95/98, TROY XCD recommends that you use XAdmin32 on theseoperating systems.
1. If you are using XAdmin 2.0, install the XAdminsoftware. On Windows 3.xx systems, go the menu barin the Program Manager, select File, and then Run.Click Browse to locate the Setup file (either onfloppy disk or in the \Utilities\XAdmin folderon CD-ROM. On Windows 95, go the Start button,select Run, and then Browse for the Setup file.
Click OK to start the installation.

Novell Network Configuration 5-13
2. If you are using XAdmin, start it up by double clickingon the icon.
If you are using WebXAdmin, start up your webbrowser (you must have a valid IP address configured inthe PC and in the print server).
3. If you are using XAdmin, one or more TROY XCDprint server NetWare services will show up in the list ofprinters (the default services names are listed in theDefault Print Server Names section at the beginning ofthis chapter). Double click on the one that you wish toconfigure.
If you are using WebXAdmin, enter the IP address ofthe print server as the destination address in yourbrowser and press ENTER or RETURN .
4. Enter the configuration password (ACCESS is thedefault) and press OK (XAdmin) or Submit(WebXAdmin).
5. If you have XAdmin, click on the NetWare tab.
If you are using WebXAdmin, click on ConfigureNetWare. You will see one or more enabled services(the default service names are listed in the Default PrintServer Names section at the beginning of this manual).Click on the desired service.
6. If you are using NDS, type in the tree and context (thecontext may be entered in either the formprinters.mytree or OU=printers.O=mytree. If youare using XAdmin, click OK , Yes, and OK to save the

5-14 Novell Network Configuration
configuration changes. If you are using WebXAdmin,click Submit and exit the browser. Proceed to the nextsection, Adding NetWare Print Queues using NWAdmin.
If you are using bindery mode with XAdmin (notavailable with WebXAdmin), you may click on the AddQueue button to directly add a NetWare bindery queue:
• Click Create. Use the ▼ button to change the fileserver volume and then enter any unique name for theprint and click OK.
• Click Yes when asked if you want to add the queue tothe service list, click OK and Close. The queue willappear in the Bindery Print Queues window. ClickOK and then Yes. You can now use the print queuefrom a NetWare workstation. Skip to theConfiguring the Windows Printer section.
If you are using bindery mode with WebXAdmin, clickConfigure NetWare from the main menu, type in thename of the file server where the print queue willreside, and click Add . Proceed to the next section,Configuring NetWare Print Queues using NWAdmin.
Adding NetWare Print Queues Using NWAdmin(Queue Server Mode)
If you are using XAdmin32 with the Microsoft NetWareclient, or you are using XAdmin, WebXAdmin, or JetAdmin1.xx or 2.xx, you need to use NWAdmin to configure theactual NetWare print queue. This is because these utilitiesonly allow you to define the print server context and tree (orfile server, if you are using bindery mode). The followingsteps are required:

Novell Network Configuration 5-15
1. Start the Novell NWAdmin program by double clickingon the icon.
2. Create a printer object:
- Click on the container where the object will reside.-Select Object from the menu bar and then Create.
- When you get the New Object menu, select Printerand then OK .
- Enter any desired name for the printer and selectCreate.
3. Create a print queue object:
- Click on the container where the object will reside.Select Object from the menu bar and then Create.
- When you get the New Object menu, select PrintQueue and then OK .
- Enter any desired name for the print queue- Click on the Print Queue Volume button and select
the volume on which the print queue will reside.- Press OK and then Create.
4. Create a print server object:
- Click on the container where the object will reside.- Select Object from the menu bar and then Create.- When you get the New Object menu, select Print
Server and then OK .- Enter the name of the TROY XCD print server and
select Create. Use the default print server name (thedefault names are listed in the Default Print ServerNames section at the beginning of this chapter) unlessyou specifically changed it with XAdmin32, Admin,JetAdmin, or the print server console.

5-16 Novell Network Configuration
5. Associate the printer with the print queue:
- Change context if required and then double click onthe name of the printer you created in step 3.
- Click on Assignments and then Add...- Change context if necessary and select the print
queue you created in step 4. Click OK and then OKagain
6. Associate the print server with the printer:
- Change context if required and then double click onthe name of the print server you created in step 5.
- Click on Assignments and then Add...- Change context if necessary and select the printer
you created in step 3. Click OK and then OK again.
7. Exit NWAdmin. You are now ready to use the printqueue from a NetWare workstation.
Configuring the Print Server and Print Queue UsingPCONSOLE and XCONFIG (Queue Server Mode)
As an alternative to JetAdmin and XAdmin, you can use thestandard Novell PCONSOLE utility in conjunction withTROY XCD's XCONFIG program to set up your printqueues (note that if desired, you may use TELNET, the DECNCP utility, or the serial port instead of XCONFIG). Theprocedure is basically as follows:
1. Use XCONFIG to connect to the print server. Enter thepassword (ACCESS is the default) and type anything inresponse to the Enter Username> prompt.

Novell Network Configuration 5-17
2. If you are configuring an NDS queue, enter thecommands:
SET SERVICE servicename TREE treename
SET SERVICE servicename CONTEXT contextname
where servicename is the service that you want toconfigure (the default service names are listed in theDefault Print Server Names section at the beginning ofthis chapter), treename is the name of your NDS tree,and contextname is the NDS context where the printserver will reside. Now skip to step 3.
If you are configuring a bindery queue, enter thecommand:
SET NETW QSERVER fileserver ON servicename
where fileserver is the name of the file server where thequeue will reside (note that this is not necessarily thesame as the volume name), and servicename is thename of the print server service (the default servicenames are listed in the Default Print Server Namessection at the beginning of this chapter).
Note: The SET NETWARE SERVER command,which enables file servers on a global basis, isavailable for compatibility with older firmwarereleases, but is not recommended for new applications.
3. Start PCONSOLE
- If necessary, change to the desired context if youare using NDS.

5-18 Novell Network Configuration
- Go to Print Queues, press Insert to create a newprint queue, and enter the name of the print queue.If you are configuring an NDS queue, you will alsoneed to enter a volume name (press Insert tobrowse for available volumes).
- Select Print Servers (NetWare 4.xx and later) orQueue Servers (NetWare 2.xx and 3.xx), pressInsert and enter the name of the TROY XCD printserver (the default print server names are discussedin the Default Print Server Names section at thebeginning of this manual).
- Go to Print Queues, select the desired printqueue, then select Print Servers and press Insert toselect the name of the TROY XCD print server.
- Exit PCONSOLE.
4. Go back to XCONFIG and enter the command:
SET NETWARE RESCAN
After a few seconds, do a SHOW NETWAREcommand; you should see the queue you created beingserviced by the file server. You are now ready to usethe queue.
Configuring the Print Server and Addingthe Print Queue in Remote Printer ModeTo configure a TROY XCD print server for remote printermode, there are two basic steps required. First, you must use

Novell Network Configuration 5-19
Novell's NWAdmin or PCONSOLE to add the print queue tothe NetWare server. Then you must configure the printserver for remote printer operation using XAdmin32,XAdmin, JetAdmin, WebXAdmin, or the print serverconsole.
Important Note: You cannot configure both Queue Serverand Remote Printer mode on the same print server port. It ispossible, however, to configure a multiport print server (suchas the XConnect 100) with one port running in Queue Servermode and the other in Remote Printer mode.
Configuring the Print Server and Print Queue usingNWADMIN and XAdmin32, XAdmin, WebXAdmin, orJetAdmin (NDS Remote Printer Mode):
To configure an TROY XCD print server for remote printermode with NWADMIN (NetWare Administrator utility) andXAdmin32, XAdmin, WebXAdmin, or JetAdmin, first makesure that you have V3.28 or later firmware (refer to the self-test page or do a SHOW VERSION command from theconsole). Then perform the following steps:
1. Make sure that the PSERVER NLM (NetWareLoadable Module) is loaded on your file server and thatyou are logged in as ADMIN in NDS mode on theNetWare 4.xx file server.
2. Start NWADMIN by double clicking on the icon.Select the desired Container Object (OrganizationalUnit) that will contain the new printer.
3. Select Object from the menu bar and then Create.When you get the New Object menu, select Printerand then OK .

5-20 Novell Network Configuration
4. Enter the name of the printer and select Create.
5. Double click on the name of your PSERVER NLM.Click on Assignments and then Add...
6. If necessary, change the directory context. Select theprinter you created and click OK . Note the number ofthe printer, as you will use this later, then click OK .
7. Select the desired Container Object (OrganizationalUnit) that will contain the default print queue, and thenclick on Object and Create to get New Object menu.
8. Select Print Queue and then OK . Make sure thatDirectory Service Queue is selected, and then type ina name for the default print queue.
9. Click on the button to select the print queue volume.Change the directory context if necessary, then selectthe desired volume (Objects) and click OK . ClickCreate to create the print queue.
10. Change context if required and then double click thename of the printer you created previously.
11. Click Assignments and then Add..
12. Change context if necessary and select the print queueyou created. Click OK and then OK again, and thenexit NWADMIN.
13. Select the print server and service that you wish toconfigure:

Novell Network Configuration 5-21
• If you have XAdmin32, double click on the printserver name and then click on the appropriateNetWare tab (NetWare P1 for the first parallel port,NetWare S1 for the first serial port, NetWare P2for the XConnect 100 second parallel port orNetWare S2 for the XConnect 100 second serialport).
• If you are using XAdmin, one or more TROY XCDprint server NetWare services will show up in thelist of printers (the default service names are listedin the Default Print Server Names section at thebeginning of this chapter). Double click on the onethat you wish to configure and then click on theNetWare tab.
• If you are using WebXAdmin, start your webbrowser, enter the IP address of the print server asthe destination address, and then push ENTER orRETURN . Click on Configure NetWare, and thenclick on the Enabled Service that you wish toconfigure (the default service names are listed in theDefault Print Server Names section at the beginningof this chapter).
• If you are using JetAdmin, one or more TROY XCDprint server NetWare services will show up in thelist of printers (the default service names are listedin the Default Print Server Names section at thebeginning of this chapter; note that JetAdminsupports a maximum of three ports per print server).Single click on the one you want to configure, go tothe menu bar and select Device and then Modify .Then click Next and select Operating Mode.

5-22 Novell Network Configuration
NOTE: If you want to enable remote printercapabilities on services other than the default NetWareservices, you must define new services that are enabledfor NetWare and for the desired port (only one serviceper port can be defined for NetWare). Refer to AppendixB in this manual for information on how to do this.
14. Select the Remote Printer as the Operating Mode,enter the name of your PSERVER NLM as the PrintServer Name, and select the number of the printerfrom step 6 as the Printer Number (XAdmin32 andJetAdmin allow you to choose from a list of availableprint server NLMs rather than typing in the name).
15. If you have XAdmin 32 or XAdmin, click OK . If youhave JetAdmin, click Next two times, and then clickFinish. If you have WebXAdmin, click Submit.
16. Exit the configuration utility. You must now unloadthe PSERVER NLM from your NetWare file serverconsole and then reload it in order for the changes to takeeffect.
Configuring the Print Server and Print Queue usingPCONSOLE and XCONFIG (Remote Printer Mode)
To configure an TROY XCD print server for remote printermode operation using PCONSOLE and XCONFIG, firstmake sure that you have V3.27 or later firmware (refer tothe self-test page or do a SHOW VERSION command fromthe console). Then perform the following steps:
1. Make sure that the PSERVER NLM (NetWareLoadable Module) is loaded on your file server.

Novell Network Configuration 5-23
2. Log into the file server from your PC workstation asADMIN if you are using NetWare 4.xx (if you wantNDS support, do not login under bindery mode). If youare using NetWare 2.XX or 3.xx, login asSUPERVISOR.
3. Run the PCONSOLE utility from your PC workstation.
4. If you are creating a new print queue, select PrintQueue Information (NetWare 3.xx) or Print Queues(NetWare 4.xx) from the Available Options menu.Press INSERT, type in the desired print queue name(with NetWare 4.xx, you will also be asked for avolume name; press INSERT and select theappropriate volume), and press ESCAPE to return tothe main menu.
The following steps apply to configuring a remote printerwith NDS support on NetWare 4.xx systems:
a. Select Print Servers from the PCONSOLE menuand then select the name of the PSERVER NLM onyour host computer.
b. Select Printers.
c. Press INSERT to get Object, Class menu.
d. Press INSERT and enter the Printer Name (anyunique name is OK).
e. Highlight the printer name and press ENTER twiceto get Printer Configuration Menu.

5-24 Novell Network Configuration
f. PCONSOLE will assign a Printer Number .Remember this number, since it will be used later.
g. Highlight Print Queues Assigned and pressENTER and then INSERT to get a list of availablequeues.
h. Highlight the name of the print queue you wish toassign to the remote printer and press ENTER.
i. The other settings in the menu are not required.Push ESCAPE several times to exit PCONSOLE.
j. Skip to step 5 below.
The following steps apply to configuring a remote printeron NetWare 3.xx systems:
a. Select Print Server Information from thePCONSOLE main menu and choose the name ofthe PSERVER NLM.
b. Select Print Server Configuration and thenPrinter Configuration . Select any "Not Installed"printer and press Enter. Remember the number ofthis printer, since it will be used later in theconfiguration process.
c. If desired, type in a new name for the printer.
d. Go to Type, press ENTER, highlight RemoteOther/Unknown and press ENTER again. Theother settings in this menu are not required.

Novell Network Configuration 5-25
e. Push ESCAPE and save the changes.
f. Push ESCAPE and select Queues Serviced byPrinter.
g. Highlight the printer name that you just configuredand press ENTER.
h. Press INSERT, choose the desired print queue, andpress ENTER (you can accept the default priority).
i. Press ESCAPE several times to exit PCONSOLE.
5. Insert the TROY XCD Print Server Software diskette orCD-ROM into your PC and run the XCONFIG utility(in the \utilities directory on the CD-ROM)
Select the TROY XCD print server from the list ofprint servers. When you get the message that the printserver is connected, press the ENTER key and type thepassword ACCESS in response to the "#" prompt (thepassword will not echo), and then press the ENTER keyagain in response to the Enter Username>prompt. When you get the Local> prompt, type:
SET NET NPRINTER nlm number ON serviceSET NET RESCANEXIT
where nlm is the name of the PSERVER NLM on yourfile server, number is the printer number (must matchthe printer number you selected during the PCONSOLEconfiguration in the previous steps) and service is thename of the service (the default service names are listedin the Default Print Server Names section of this chapter).

5-26 Novell Network Configuration
For example, to set up remote printer 3 for an HP printerwith the TROY XCD print server XCD_00C3E4 usingthe PSERVER NLM called XCD1PS, you would type:
SET NET NPRINTER XCD1PS 3 ON XCD_00C3E4_P1SET NET RESCANEXIT
NOTE: The same service cannot be used for bothqueue server mode and remote printer mode.
NOTE: If you want to enable remote printercapabilities on services other than the default NetWareservices, you must define new services that are enabledfor NetWare and for the desired port. Refer toAppendix B in this manual for information on how todo this.
6. You must now unload the PSERVER NLM from yourNetWare file server console and then reload it in orderfor the changes to take effect.
Configuring the WorkstationThe final step is to configure the workstation(s) to print tothe TROY XCD print server. The TROY XCD print servercan be used with any workstation that supports either theNovell or Microsoft client software.
Configuring the Workstation (Windows 95/98)
To use a NetWare print queue from a Windows 95workstation, first make sure that the appropriate NetWaredrivers are installed. Then go to the Start button, chooseSettings, and then select Printers. Double click on the Add

Novell Network Configuration 5-27
Printer icon and then execute the following steps when youget to the Add Printer Wizard.
1. Click on Next, Select Network Printer and click onNext again.
2. Select Browse, double click on the appropriate fileserver name, select the print queue, and click OK . Ifyou used JetAdmin to configure the queue, you shoulddouble click on the HP_Network_Printers iconinstead of the file server icon, and then select theTROY XCD print server name. Click on Next.
3. Select the desired printer manufacturer and model(click Have Disk if your printer is not listed), and clickon Next.
4. If the driver already exists, select Keep ExistingDriver (if it does not, this step will be skipped), andthen click on Next.
5. If desired, change the name of the printer and/or makeit the default, and then click on Next.
6. Select Yes when you are asked "Would you like toprint a test page?" Click on Finish.
Configuring the Workstation (Windows NT 4.xx)
To add a queue from a Windows NT 4.xx workstation,execute the following steps: NetWare Windows VLMdrivers and utilities installed. Then go to the Start button,choose Settings, and then select Printers. Double click onthe Add Printer icon and then execute the following stepswhen you get to the Add Printer Wizard:
5-28 Novell Network Configuration
1. Select Network Printer Server and click on Next.
2. Select the desired print queue and click OK . AnswerOK when asked if you want to install the printer driver.
3. Select the desired printer manufacturer and model, andclick on Next.
4. If desired, make the printer the default, and then clickon Next.
5. Click on Finish.
Configuring the Workstation (Windows 3.xx)
To use a NetWare print queue from a Windows 3.xxworkstation, first make sure that you have the appropriateNetWare Windows VLM drivers and utilities installed. Thenexecute the following steps:
1. Open the Main window of the Windows ProgramManager and start the Print Manager.
2. Select Options (or Printer ) from the menu bar andthen Network Connections.
3. Select the desired port (for example, LPT1:) underPorts: and the desired print queue under Resources. Ifyou have configured the TROY XCD print server forNDS mode, you may alternatively select the printername instead of the print queue name.
4. Click Capture and Permanent.
5. Close the window and select Options and then PrinterSetup.

Novell Network Configuration 5-29
6. Choose the desired printer under Installed Printers. Ifthe desired printer does not exist, select Add>> andselect the printer from the List of Printers , and clickon Install (normally you will need either the originalWindows diskette distribution or the printermanufacturer's driver diskette).
7. If the desired printer is not on the correct port, click onConnect, select the port, and click OK .
8. If desired, click Set as Default Printer to make theprinter your default printer.
9. Exit the Print Manager.
Configuring the Workstation (DOS-based NetWaredrivers)
To configure the PC workstation so that DOS applicationscan print transparently to the TROY XCD print server (youmay also use this procedure if you do not have Windows-specific NetWare drivers), use the DOS editor to add acommand with the following format to theAUTOEXEC.BAT file on your PC:
capture l= n q= queuename ti= timeout
where n is the number of the parallel port you wish toredirect, queuename is the name of the queue you created (ifyou using NetWare 4.xx in NDS mode, you may specifyp=printername instead of the queue, where printername isthe name of the NDS printer; be sure to enter the entiredirectory context of the printer), and timeout is a the numberof seconds the file server will send data to the printer afterthe application last writes to a file (use at least 5 seconds forDOS applications and at least 50 seconds for Windows

5-30 Novell Network Configuration
applications, and you may need to increase the values if youare unable to print). For example, if your queue is calledmyqueue and you wish to use LPT1 with a timeout of 5seconds, you would enter:
capture l=1 q=myqueue ti=5
After the workstation is restarted, you will be able to printfrom applications programs as if the printer were directlyconnected to the LPT1 parallel port.
Testing the Print Queue
Test the queue by printing a small job from an applicationprogram like the Windows 95 Paint Accessory program(make sure that the program is set up to print to the correctprint queue if the TROY XCD print server is not assigned toservice the default queue). The file will be spooled to theTROY XCD print server for printing and should print on theprinter within a short period of time. If it does not, doublecheck your configuration, and if necessary, refer to theTroubleshooting chapter of this manual for additionalinformation.
Changing the Print Server Configuration(Optional)The TROY XCD print server default parameters can bechanged via the XCONFIG utility to meet a wide variety ofuser needs. The procedure for doing this is described indetail in Appendix A of this manual.

AppleTalk Network Configuration 6-1
6
AppleTalk Network ConfigurationOverviewAll TROY XCD print servers except the XConnect II Litesupport the AppleTalk protocol running over Ethernet (alsoknown as EtherTalk). This capability allows Macintoshcomputers to print jobs to a printer simultaneously with jobsfrom DEC, UNIX, NetWare, and other computers.
If you have the XConnect II LocalTalk option, LocalTalk-based Macintosh computers can also share the same printerwith Ethernet-based systems.
AppleTalk ConceptsTROY XCD print server AppleTalk capabilities allow aprinter to appear as a shareable printer node on an AppleTalkPhase 2 network. The TROY XCD print server broadcastsinformation to Macintoshes on the network, andautomatically appears in the Chooser on each Macintosh.Application programs (such as Microsoft Word, Excel,PageMaker, etc.) can print without modification or specialsoftware on the Macintosh.
6-2 AppleTalk Network Configuration
Step 1 Macintosh ConfigurationTROY XCD print servers are compatible with the AppleLaserWriter 8 drivers as well as drivers supplied by manyprinter manufacturers (earlier versions of the LaserWriterdrivers may crash or cause PostScript errors on largenetworks). If none of these drivers is installed on yourMacintosh, you must install one of them from diskettefollowing the instructions of the manufacturer.
Before using a TROY XCD print server, you must firstenable Ethernet or LocalTalk (if you want to use theXConnect II LocalTalk option) from the Network ControlPanel on the Macintosh. If Ethernet is not selectable or theNetwork Control Panel does not exist, you must use Apple'sNetwork Installer software to add these capabilities.
Step 2 PrintingOnce the print server is installed powered on, the print serverservice name (default is XCD_xxxxxx_pp_AT, where"xxxxxx" is the last six digits of the Ethernet address and "pp"is P1 for the parallel port, S1 for the serial port, and P2 orS2 for the XConnect 100 second parallel and serial ports; forexample, XCD_009C53_P1_AT) should appear in theChooser. Note that the serial ports will not appear if they areset for console mode operation.
To select the TROY XCD print server, open the Chooserfrom the Apple Menu on the Macintosh, and then click on theLaserWriter icon (if necessary, select the appropriateAppleTalk zone from the Network Control Panel). Thenclick on the TROY XCD print server name and close the
AppleTalk Network Configuration 6-3
Chooser. You should now be able to print from theMacintosh.
If you cannot see the print server, first make sure that yourcabling is correct and that you have enabled EtherTalk or (ifapplicable) LocalTalk from your Macintosh Network ControlPanel. You may also need to force the TROY XCD printserver into the correct AppleTalk zone using the SETAPPLETALK ZONE command described in Appendix A.
Important: AppleTalk requires a PostScript printer.
Important: If you are using the parallel port, your printermust either support the IEEE P1284 Bitronics bidirectionalstandard (refer to your printer documentation) or you mustenable AppleTalk spoofing by using the following commandfrom the print server console (refer to Appendix A if you donot know how to use the console):
SET SERVICE servicename RECEIVE ENABLED
where servicename is the name of the AppleTalk service(XCD_xxxxxx_P1_AT by default, where "xxxxxx" is the lastsix digits of the print server Ethernet address and "pp" is theport name).
Printing Binary GraphicsScanned images and other types of graphics are frequentlysaved in a format known as binary PostScript. Hewlett-Packard and some other printers require that the printer be setin a special binary mode, which is unfortunately not alwayspossible with an external print server. However, a TROYXCD external print server can print binary files under thefollowing circumstances:

6-4 AppleTalk Network Configuration
• If the printer supports printing binary files through theparallel or serial port. This option is sometimes selectablethrough the front panel of the printer.
• If the printer supports the HP Tagged BinaryCommunications Protocol. If this is the case, you mustenable filter 4 on the print server AppleTalk service viathe console as described in Appendix B.
Refer to your printer's documentation for additionalinformation. If neither of the above is true, the solution is toprint the files in ASCII mode, a mode that is supported in thePRINT menu of most graphics programs includingQuarkXpress, Adobe Photoshop, and others. The onlydrawback of ASCII mode is that print times will be longerdue to the increased file sizes.
Changing the Configuration (Optional)You may use the Apple LaserWriter Utility or Apple PrinterUtility (or equivalent utility from your printer manufacturer)to change the AppleTalk name of the TROY XCD printserver. You may also use NCP, TELNET, XCONFIG, or theserial port to access the print server remote console to changeTROY XCD print server AppleTalk name and default zonename, and to disable AppleTalk broadcasts. The exactprocedure and configuration commands are described inAppendix A.
Note: A free unsupported version of TELNET is available onthe National Center for Supercomputer Applications (NCSA)FTP site (ftp.ncsa.edu/Mac/Telnet/Telnet2.7 ).This TELNET requires Mac TCP, which is standard with allnew versions of the Mac OS.

Windows NT/LAN Server Configuration 7-1
7Windows NT/LAN Server/WarpServer Network ConfigurationOverviewUsers of Windows NT V3.5 or later (including Windows NTAdvanced Server) can print directly using the TCP/IPprotocol to printers that are equipped with a TROY XCDprint server. No special software is required on the WindowsNT system, and the printing operates transparently with anyapplication program.
TROY XCD print servers also support transparent printingfrom IBM LAN Server and Warp Server file server, as wellas from OS/2 Warp Connect workstations, using the TCP/IPprotocol. TCP/IP is included standard with Warp Server andwith LAN Server V4.0, and is optional on LAN Server V3.xsystems. It is also included standard with OS/2 WarpConnect, and is optional on earlier versions of OS/2.
In addition, client PCs connected to a Windows NT AdvancedServer or to an IBM LAN Server file server can printtransparently to the TROY XCD print server. In this case, theclient PCs typically use the NetBEUI protocol to print jobs tothe file server, which in turn spools the job to the TROY XCDprint server via TCP/IP. The advantage of TCP/IP compared toother approaches is that it is a high-performance routableindustry-standard protocol.
Important: TROY XCD recommends TCP/IP for WindowsNT and OS/2 printing because it is routable and provides

7-2 Windows NT/LAN Server Configuration
higher performance. Some TROY XCD print server modelsalso support printing using the NetBEUI or DLC/LLCprotocols (refer to Chapter 1 for specific protocol supportinformation). Windows NT and OS/2 configuration usingthese protocols is described in Chapters 9 and 10 of thismanual.
Windows NT IP ConfigurationTo configure a print queue from a Windows NT computer,you must first configure an IP address in both the computerand in the print server as follows:
1. If you have not already done so, install TCP/IP on yourWindows NT system. This is done via the Networkicon in the Control Panel window of the Windows NTsystem (the Control Panel is in the Main window on NTV3.5x systems, or use the Start button on NT V4.xx toaccess the Settings menu).
a. On NT V3.5x systems, select Add Software and addTCP/IP Protocol and related components. Clickon Continue and choose the options TCP/IPNetwork Printing Support and ConnectivityOptions, and click on Continue again. Insert therequested disk(s) to copy the required files.
b. On NT V4.xx systems, click on the Protocols tab,select Add, and double click on TCP/IP protocol.Insert the requested disk(s) to copy the required files.Then click on the Services tab and double click onMicrosoft TCP/IP Printing . Again insert therequested disk(s). Click on the Protocols tab whenthen copying is finished.

Windows NT/LAN Server Configuration 7-3
Double click on the TCP/IP Protocol option and add thehost IP address, subnet mask, and gateway address.Consult your system manager for these addresses. If youare not directly connected to the Internet, you may assignany arbitrary Class C address of the formaaa.bbb.ccc.ddd, where aaa is any number from 192 to222, bbb and ccc are any number from 0 to 255, and dddis any number from 0 to 254; for example, 192.189.207.3.You may also use a subnet mask of 255.255.255.0 withno gateway address. If you have more than one LANadapter card, select the one you want to use for TCP/IP.
If you have more than one LAN adapter card, select theone you want to use with TCP/IP. Click OK twice toexit (you may need to restart the system).
2. If you have not already configured the print server IPaddress, you will need to do so now. The simplest wayto do this with Windows NT 4.x is to use XAdmin-32as described in Chapter 3.
As an alternative, or if you have Windows NT 3.5x, youmay go to the MS-DOS Command Prompt and use thearp -s command to enter the IP address into the TROYXCD print server as shown in the following example:
arp -s 192.189.207.77 00-40-17-00-ed-d6
ping 192.189.207.77
Again, substitute your actual IP address for192.189.207.77 , and replace the 00-40-17-00-ed-d6
with the actual Ethernet hardware address of the TROYXCD print server (which can be found on the labelaffixed to the bottom of the box or via the printer self-

7-4 Windows NT/LAN Server Configuration
test). If you get the message "The arp entry additionfailed: 3", try pinging a known device on the networkusing the command ping ipaddress , where ipaddressis the IP address of that device.
Important: You must be on the same Ethernetsegment (that is, there cannot be a router between theTROY XCD print server and the Windows NT system)to use the arp -s command. If there is a router, youmay use BOOTP or other methods described inChapter 4 to enter the IP address. Also, this methodonly works the first time the TROY XCD print server isconfigured. If the TROY XCD print server already hasan IP address, you may use TELNET to access it andchange the IP address using the SET IP ADDRESS
command described in Appendix A.
Important: The TROY XCD print server has a defaultIP address of 192.0.0.192 (192.189.207.254 on olderfirmware versions). You must change this address to aunique value to avoid having duplicate IP addresses.
Windows NT V4.xx Configuration
Note: If you have Windows NT V3.5 or V3.51, skip to thenext section.
1. Go to the Start button, choose Settings, and thenselect Printer . Double click on the Add Printer iconto get the Add Printer Wizard. Click. Select MyComputer (Not Network Printer ) and click on Next.
2. Select Add Port, select LPR Port from the list ofavailable ports, and click on New Port.

Windows NT/LAN Server Configuration 7-5
3. Type in the IP address that you wish to assign to theprint server in the Name or address of serverproviding lpd: box. If you do not have a router on thenetwork, this IP address must match the first threebytes of the IP address of your computer. Forexample, if your computer has an IP address of192.189.207.53, your print server must have an addresslike 192.189.207.27.
4. Type in the print server service name in the Name ofprinter of print queue on that server: box. If you donot know which service name to use, enter BINARY_P1for the first parallel port, BINARY_S1 for the first serialport, BINARY_P2 for the XConnect 100 second parallelport, or BINARY_S2 for XConnect 100 second serialport and then click on OK :
5. Click on Close. The new print server IP address shouldbe listed and highlighted as an available port. Click onNext.
6. Select the desired printer manufacturer and model(click Have Disk if your printer is not listed), and clickon Next.
7. If the driver already exists, select Keep ExistingDriver (if it does not, this step will be skipped), andthen click on Next.
8. If desired, change the name of the printer and/or makeit the default, and then click on Next.
9. If desired, make the printer shared (so other users canaccess it), and select the operating system(s) that theseother computers will be running. Click on Next.

7-6 Windows NT/LAN Server Configuration
10. Select Yes when you are asked "Would you like to print atest page?" Click on Finish to complete the installation.
You may now print to the printer as if it were a local printer.
Windows NT V3.5x ConfigurationIf you have Windows NT or NT AS V3.5 or V3.51, use thefollowing procedure to configure the TROY XCD print server:
1. Go to the Main window and elect Print Manager icon.
2. Select Printer menu.
3. Select Create Printer
4. Enter any name for the printer for the Printer Name.
5. Select Driver . Choose appropriate driver.
6 . Select Description. Enter anything.
7. Select Print to .
8. Select Other.
9. Select LPR Port .
10. Enter the TROY XCD print server IP address or name(from HOSTS file) as the Name or Address of HostProviding LPD .
11. Enter the TROY XCD print server service name as theName of Printer on That Machine. Generally

Windows NT/LAN Server Configuration 7-7
speaking, you should use the service BINARY_xx(where "xx" is the P1 for the first parallel port, S1 forthe first serial port, P2 for the XConnect 100 secondparallel port, and S2 for the XConnect 100 secondserial port) to pass the data through unmodified.
LAN Server/Warp Server ConfigurationTROY XCD print servers will work with IBM LAN Server/Warp Server networks that have IBM TCP/IP V2.0 or latersoftware installed on the file server (TCP/IP is standard withLAN Server V4.0 and later, and on Warp Server). Use thefollowing procedure to configure the TROY XCD print serveron an OS/2 LAN Server or Warp Server file server, or on aOS/2 Warp Connect workstation:
Important: TROY XCD recommends TCP/IP for OS/2printing because it is routable and provides higherperformance. Some TROY XCD print server models alsosupport OS/2 printing using the NetBEUI or DLC/LLCprotocols (refer to Chapter 1 for specific protocol supportinformation). OS/2 configuration using these protocols isdescribed in Chapters 9 and 10 of this manual.
1. Make sure that TCP/IP software is installed on yourOS/2 file server. If you have not already done so, openthe TCP/IP folder on the desktop, and double click onthe TCP/IP Configuration icon to add the IP addressto the OS/2 file server (consult your system managerfor this address).
2. Add the TROY XCD print server name to the HOSTS file(usually located in the \tcpip\etc directory; this step isnot required if you use the TROY XCD print server IP

7-8 Windows NT/LAN Server Configuration
address as the name). To do this, go to the OS/2 Systemicon, open the Command Prompts folder, and doubleclick on the OS/2 Window icon. Use the OS/2 editor andadd the an entry similar to the following:
192.189.207.77 xps
Substitute the name of the TROY XCD print server (anyunique name will do) and the desired IP address in placeof xps and 192.189.207.77 in the above example.
3. While still at the OS/2 prompt, use the followingcommand to enter the IP address into the TROY XCDprint server:
arp -s xps 00:40:17:00:ed:d6 temp
Again, substitute your actual name and IP address forxps and 192.189.207.77 , and replace the00:40:17:00:ed:d6 with the actual Ethernet hardwareaddress of the TROY XCD print server (which can befound on the label affixed to the TROY XCD printserver box or via the printer self-test; note that youshould use colons rather than hyphens to separate thebytes of the hardware address). The IP address will beset when you ping the print server in the next step.
Important: You must be on the same Ethernetsegment (that is, there cannot be a router between theTROY XCD print server and the OS/2 system). If thereis a router, you may use BOOTP or other methodsdescribed in Chapter 4 to enter the IP address. Also,this method only works the first time the TROY XCDprint server is configured. If the TROY XCD printserver already has an IP address, you may use

Windows NT/LAN Server Configuration 7-9
TELNET to access it and change the IP address usingthe SET IP ADDRESS command described in AppendixA.
4. Set the IP address and verify the connection by usingthe ping command with the address or name of theTROY XCD print server. For example:
ping 192.189.207.77 orping xps
Again, substitute your actual name and IP address inplace of xps and 192.189.207.77 in the aboveexamples. You should get a response back from theTROY XCD print server if the IP address has been setand the print server is alive on the network. If you donot, run the printer self-test as described in Chapter 2and verify that you have entered the correct IP address.
5. From the OS/2 desktop open the Templates folder.Use the right mouse button to drag the Printer icon (notthe Network Printer icon) onto the desktop.
6. The Create a Printer window should be open (if it isnot, double click on the printer icon).
- Type in any name for the printer.
- Select the default printer driver. If the desiredprinter driver is not listed, click on the Install newPrinter Driver button and add the driver.
- Choose the output port. IBM TCP/IP automaticallycreates 8 named pipes called \PIPE\LPD0 through
7-10 Windows NT/LAN Server Configuration
\PIPE\LPD7 . Pick an unused one and double clickon it.
Important Note: Early versions of Warp Serverhave a bug in which the named pipes do not appear(the problem does not affect Warp Connect or LANServer). This problem is fixed via a patch availablefrom IBM.
You will get the Settings window. Enter thefollowing:
LPD server The TROY XCD printserver name (from HOSTS
file) or IP address.LPD printer For most applications, use the
TROY XCD print serverbinary serviceBINARY_P1 (for thethe first parallel port),BINARY_S1 (for the serialport), BINARY_P2 (for theXConnect 100 secondparallel port), andBINARY_S2 (for theXConnect 100 secondserial port) to passdata through unmodified.
However, if you are printingtext files from the DOS orOS/2 command prompt, youshould use the text serviceTEXT_P1, which will add

Windows NT/LAN Server Configuration 7-11n
carriage returns for properformatting of the data (butwill potentially distortgraphics printouts).
Host name The IP name of the OS/2file server
User The IP address of the OS/2file server
You may leave the other entries blank. Click onthe OK button. The pipe should be highlighted; ifnot click on it.
- Click on the Create button to create the printer.
7. Open the LAN Services folder and execute the LANRequester program:
- Select Definitions- Select Aliases- Select Printers- Select Create. Enter the following:
Alias Should be same as theprinter name previouslydefined
Description Anything you wantServer name Name of OS/2 serverSpooler queue Name of printer as defined
previouslyMaximum number Leave blank unless you wantof users to limit the number of users
- Exit the LAN Requester program.

7-12 Windows NT/LAN Server Configuration
8. You should now be able to print. To test the queue,type the following from either the OS/2 commandprompt or from a DOS workstation:
COPY C:\CONFIG.SYS \\ servername \ alias
where servername is the name of the file server andalias is the alias name that you specified during thisconfiguration process. This should print theCONFIG.SYS file on the printer. Note that if youselected a binary service as the LPD printer name, thelines will be staggered; don't worry about this becausenormal DOS, Windows, and OS/2 applications willprint OK.
9. The TROY XCD print server will appear as a standardOS/2 printer to application programs. To make theTROY XCD print server operate transparently withDOS programs, execute the following command oneach workstation:
NET USE LPT1: \\ servername \ alias
This will make the printer and the TROY XCD printserver appear to the software as a printer that is directlyconnected to the parallel port of the workstation.

Windows 95 Peer-to-Peer Configuration 8-1
8Windows 95/98 Peer-to-PeerConfiguration
OverviewThe Windows 95 and Windows 98 operating systems featurea built-in peer-to-peer networking capability that allowsnetwork printing without a central file server. TROY XCDprint servers support this capability using either the DirectMode IPX or TCP/IP protocols.
Note: TROY XCD recommends using Direct Mode IPX orTCP/IP for Windows 95/98 Peer-to-Peer printing because theseprotocols are routable and provide the highest performance.Some TROY XCD print server models also support the NetBEUIprotocol for printing from Windows 95 computers (refer toChapter 1 for protocol support information). Refer to Chapter9 for information on using NetBEUI.
Configuring the Windows 95/98 PCTo use a peer-to-peer print queue from a Windows 95/98workstation, first make sure that the following items areconfigured in the Network Control Panel:
• Client for Microsoft Networks• IPX/SPX-Compatible Protocol or TCP/IP Protocol
(TCP/IP requires V3.46 or later firmware and is notsupported on older versions of JetAdmin; if you are usingTCP/IP, both your PC and print server must beconfigured with a valid IP address; refer to chapter 3 for

8-2 Windows 95 Peer-to-Peer Configuration
information on setting the print server IP address withXAdmin32)
• HP JetAdmin (only required in the Control Panel if youhave a version of JetAdmin earlier than V2.33)
• The appropriate network adapter driver (for example,3Com EtherLink III)
If you want to use a version of JetAdmin later than 2.0, youmust install JetAdmin on your PC. JetAdmin is included onthe Windows 95 distribution CD, or it can be downloadedfrom the HP web site. The JetAdmin setup program providesa step-by-step guide through the installation process.
Important: JetAdmin 3.3 or later requires XJet firmwareversion 3.58 or higher.
Important: Windows 98 requires either JetAdmin V2.54(this version can be installed from the Microsoft Windows98 CD by running the SETUP.EXE file in theDRIVERS/PRINTERS/JETADMIN/DISK1/directory) or V3.30 or later (available on the HP website).
Configuring Windows 95/98 Peer-to-Peer (JetAdmin V3.0and above)
1. Go the Start button, choose Programs, HP JetAdminUtilities and then Add HP JetDirect Printers. SelectCustom Setup and press Next.
2. Select either IPX/SPX or TCP/IP printer, depending onwhich protocol you want to use. Click on Printer Listto get a list of available printers (or you may manuallyenter the information).

Windows 95 Peer-to-Peer Configuration 8-3
3. Click on the print server name (XCD_xxxxxx_P1 is thedefault name for IPX/SPX and XCD_xxxxxx is thedefault for TCP/IP, where "xxxxxx" is the last six digitsof the Ethernet address) and press OK and then Next.Note that if you have an multiple ports enabled, theprint server name will show up twice in the list; youmay click on either name to configure it.
4. Select the desired port (port #1 for the first parallelport, and if present, port #2 for the first serial port, andport #3 for the second parallel port (the XConnect 100second serial port is not supported). Press Next.
5. If you need to print from DOS, type in LPT2 or LPT3as the port name (do not put in the colon). Do not useLPT1 or any other physical port on the PC. If you donot need to print from DOS, you may enter any name.Click Next for TCP/IP or Finish for IPX/SPX.
Note: If you specify LPT2 or LPT3 you can ignore themessage about potential hardware conflicts if you donot have physical ports with these names.
If you are using IPX/SPX, click Finish and skip to step7. If you are using TCP/IP, click Next.
6. If you are using TCP/IP, you can change the desired IPaddress. Click on Finish to continue.
7. Click OK when you get the message that the port hasbeen successfully created.
8. Select the appropriate printer driver and click Next.

8-4 Windows 95 Peer-to-Peer Configuration
9. Choose the port you created in step 5 and then clickNext.
10. Pick any name for the printer and click Next. Print atest page if desired, and then press Finish.
Configuring Windows 95 Peer-to-Peer (JetAdmin V2.33to 2.53)
1. Go to the Start button, choose Settings, and thenselect Printers . Click on the Add Printer icon,click Next, select Local printer , and click Nextagain.
2. Select the appropriate printer driver and click Next.Choose LPT1: as the port and click Next. Pick anyname for the printer and click Next. Do not print atest page. Click Finish to complete the preliminaryprinter installation.
3. Click on the printer icon of the printer you just created.From the File menu, choose the Properties and thenselect the Details tab.
4. Choose Add Port .
5. Select Other.
6. Choose HP JetDirect port, OK .
7. Select IPX/SPX Printer (if you are using the IP/SPXcompatible protocol) or TCP/IP Printer (if you areusing TCP/IP) and click on Search. Select the desiredprint server from the list and click OK (it is alsopossible to manually type in the print server address,

Windows 95 Peer-to-Peer Configuration 8-5
name, and IP address). The print server informationwill now be displayed. Click Next to continue.
8. You will get the message that "The network device youhave selected has more than one port. Please select theport used in your printer." Select port 1 or the firstparallel port, and if present, port 2 for the first serialport, port 3 for the second parallel port, (the XConnect100 second serial port is not supported), and then clickOK .
9. If you need to print from DOS, type in LPT2 or LPT3as the port name (do not put in the colon). Do not useLPT1 or any other physical port on the PC. If you donot need to print from DOS, you may enter any name.Click Finish if you are using the IPX/SPX protocol orNext if you are using TCP/IP.
10. If you are using TCP/IP, the IP address, subnet mask,and gateway of the print server should be displayed.Click Finish.
11. At the Details tab, the section "Print to the followingport" should read something similar to "LPT2 (HPDirect Port)."
12. Click Apply and then OK to exit the Properties menu.
You should now be able to print to the new printerfrom either Windows 95 or DOS applications.
Configuring Windows 95 Peer-to-Peer (pre-V2.33)
1. Click on Next, Select Network Printer and click onNext again.
8-6 Windows 95 Peer-to-Peer Configuration
2. Select Browse, double click the HP_Network_Printersicon, and then select the print server name server name(default name is XCD_xxxxxx_pp , where "xxxxxx" isthe last six digits of the Ethernet address and "pp" is P1for the first parallel port, and if present, S1 for the firstserial port, P2 for the second parallel port; theXConnect 100 second serial port is not supported).Click on Next.
Please note pre-V2.33 versions of JetAdmin do notsupport Peer-to-Peer printing from DOS applications(this is a Microsoft/HP bug).
3. Select the desired printer manufacturer and model(click Have Disk if your printer is not listed), and clickon Next.
4. If the driver already exists, select Keep ExistingDriver (if it does not, this step will be skipped), andthen click on Next.
5. If desired, change the name of the printer and/or makeit the default, and then click on Next.
6. If desired, you may print a test page (this may take afew minutes to print). Click on Finish to complete theinstallation. You may now print to the printer as if itwere a local printer
NetBEUI Configuration 9-1
9
Microsoft Network Configuration(NetBEUI or NetBIOS/IP withWindows 95/98, Windows NT,OS/2 Warp/LAN Server)
OverviewCertain TROY XCD external print server models support theNetBEUI and NetBIOS/IP protocols for printing on Microsoft-compatible networks (refer to chapter 1 for specific protocolsupport information). Because they also support the SMBprotocol, TROY XCD print servers automatically appear in theWindows Network Neighborhood and can be managed usingstandard operating system utilities.
Note: The workstation will automatically use NetBIOS/IP ifTCP/IP is enabled on it. It will use NetBEUI only if TCP/IPis not available.
Note: NetBIOS/IP operation and support for more than oneport requires V3.62 or later firmware. The latest firmware isavailable on the Internet at http://www.troyxcd.com.
Important: If you are using NetBIOS/IP, you must firstconfigure the print server with a valid IP address using theXAdmin32 utility as described in Chapter 3. You may also

9-2 NetBEUI Configuration
need to set the WINS primary and secondary servers usingthe commands SET NETBIOS METHOD, SET NETBIOSPRIMARY, and SET NETBIOS SECONDARY commands fromthe print server console as described in Appendix A. This isnot required if you are using NetBEUI only.
Print Server ConfigurationTo use the print server with a Microsoft network, you mustknow which domain it resides on. By default, Microsoftnetworks use the domain name WORKGROUP, so if youhave not specifically configured a domain name for yournetwork, you may use the name WORKGROUP and skip theremainder of this section.
If you have a different domain name, then you mustconfigure this name into the print server. To do this, youmay use XAdmin32, XAdmin, WebXAdmin, or the printserver console to connect to the print server (refer to Chapter3 for information on installing and using these utilities):
• With XAdmin32, double click on the print server nameand then click on the Microsoft tab. Then enter thedesired domain name.
• With WebXAdmin, click on Configure Microsoft andthen enter the desired domain name.
• With the print server console, enter the command:
SET NETB DOMAIN domainname ,
where domainname is the desired domain name.

NetBEUI Configuration 9-3
Windows 95/98 and Windows NT PortMonitor InstallationAlthough it is possible to install the TROY XCD print serveras a network printer on Windows 95/98 or Windows NT, thisprocedure is not recommended unless you have a very simplenetwork. The reason is that these operating systems do notadequately support queuing print jobs from multiple hostcomputers to a diskless print server (the queues may stop).
To get around this problem, TROY XCD provides a portmonitor that installs on the Windows 95/98 or NT computer.This port monitor acts like a local printer port, and thereforeoperates transparently with all Windows software. If you didnot receive this software on CD-ROM or diskette, you maydownload it from the TROY XCD web site (http://www.troyxcd.com ).
To install the port monitor, go the Start button, select Runand click Browse.. Choose the appropriate drive, and if youare installing from CD-ROM, open the Monitors folder.Double click on the SETUP program. Follow theinstructions on the screen to complete the installation.
1. Click Next at the welcome screen.
2. Select Next at the Choose Destination Locationscreen (or Browse to choose a different folder).
3. Select Next at the Select Program Folder screen (orselect an existing folder from the list).
4. Click Yes when asked if you would like to configure aNetBIOS Port.

9-4 NetBEUI Configuration
5. You will be asked to enter a port name, which mustbegin with "NB" (for example NB23). Enter thedesired name or accept the default NB1. Click OK .
6. Select Browse when asked for the Remote Print Server.
- Choose the desired workgroup and click Next.- Choose the TROY XCD print server from the list of
available devices. The default name of the printserver is XCD_xxxxxx, where "xxxxxx" is the last sixdigits of the Ethernet address (for example,XCD_035893).
- Choose the desired printer (service) from the list.The default service is BINARY_P1 for the parallelport, BINARY_S1 for the serial port, BINARY_P2for the XConnect 100 second parallel port, andBINARY_S2 for the second serial port..
- Click Finish and then OK .
7. Click Finish to restart the computer.
Note: Print servers with firmware versions 3.58 and earlieruse an address of the form \\XCD_xxxxxx_pp \ pp,where "xxxxxx" is the last six digits of the Ethernet addressand "pp" is the port name (P1 for the parallel port, S1 for theserial pot, P2 for the second parallel port, and S2 for thesecond serial port).
You must then create a local (not network) printer on yoursystem that uses this port. First go the Networks icon in theControl Panel on your workstation and make sure that youhave the following enabled:
- TCP/IP or NetBEUI protocol- Client for Microsoft Network- Appropriate Ethernet LAN adapter card

NetBEUI Configuration 9-5
The procedures for doing this are as follows:
Windows 95/98 Printer Installation
1. Go to the Start button, choose Settings, and thenselect Printer . Click on the Add Printer icon, clickNext, select Local printer , and click Next again.
2. Select the appropriate printer driver and click Next. ChooseNB1 as the port (unless you changed the name to somethingelse) and click Next. Pick any name for the printer and clickNext. If desired, print a test page. Click Finish to completethe preliminary printer installation.
Windows NT 4.x Printer Installation
1. Go to the Start button, choose Settings, and thenselect Printer . Click on the Add Printer icon, selectMy Computer , and click Next again.
2. Choose NB1 as the port (unless you changed the name tosomething else) and click Next. Select the appropriateprinter driver and click Next. Pick any name for theprinter and click Next. Selected Shared or Not Shared,depending on whether you want other computers toaccess the printer. If desired, print a test page. ClickFinish to complete the preliminary printer installation.
LAN SERVER/WARP SERVERCONFIGURATION
OS/2 File Server Configuration:
1. Open the Templates folder on the OS/2 desktop.

9-6 NetBEUI Configuration
2. Using the right mouse button, drag the Printertemplate onto the desktop.
3. Type in any desired name for the printer from theCreate a Printer window.
4. Choose an unused port (for example, LPT3) to connectto the printer.
5. Choose the appropriate printer driver from the list.
6. Click Create and then OK.
7. If desired, indicate whether you want to share the printer.
OS/2 Workstation Configuration:
On each workstation that you wish to print from, execute thefollowing step:
1 Go to the DOS or OS/2 command prompt and enter thecommand:
NET USE LPT x: \\ servername \ servicename
where “x” is the LPT port number (1 through 9),servername is the print server name (XCD_xxxxxx) bydefault, where “xxxxxx” is the last six digits ofEthernet address and servicename is the service name,(BINARY_P1, BINARY_S1, BINARY_P2, orBINARY_S2)
NET USE LPT2: \\XCD_002477\BINARY_P1

DLC Configuration 10-1
10DLC/LLC ConfigurationOverviewCertain TROY XCD external print server models support the DLC/LLC protocol, a simple protocol that is supported on a wide rangeof network operating systems (refer to chapter 1 for specific printserver protocol support information). DLC/LLC is included as astandard part of Windows NT and Windows NT AS. It can be usedon other systems with the addition of vendor supplied software thatsupports the Hewlett-Packard JetDirect card.
Important Note: The DLC protocol cannot be enabled onmore than one print server service, and is therefore limited to asingle port. By default, print jobs will go the first parallel port.Because DLC is a non-routable protocol, there cannot be arouter between the print server and the sending computer.
Configuring DLC/LLC on Windows NTTo use DLC/LLC on Windows NT, you must first install theDLC protocol:
1. Go to the NT Control Panel and double click on theNetwork icon.
2. Click Add Software
3. On Windows NT 3.xx systems, select Add Software.On Windows NT 4.xx systems, click on the Protocolstab, and click Add.

10-2 DLC Configuration
4. Select DLC Protocol. Click Continue (for 3.xxsystems) or Close (for 4.xx systems).
5. Reboot your system to make the change take effect.
Windows NT 4.xx Printer Setup
1. From the Start menu, select Settings and then Printers.Double click on Add Printer.
2. Select My Computer and then click Next.
3. Select Add a Port.
4. Select Hewlett-Packard Network Port and then clickNew Port
5. A list of available print server Ethernet addressesappears in the larger box under Card Address. Selectthe address of the desired print server (the address ison the label affixed to the print server, or it can begotten through the self-test page). The selected printserver address will then appear in the smaller boxunder Card Address.
6. Type in any desired name for the port (the name mustnot be the name of an existing port or DOS device,such as LPT1) and click OK and Close.
7. The Printer Ports menu will appear. The name youselected in step 6 will appear as a checked port in thelist of available ports. Click Next.
8. Select the desired printer manufacturer and model andclick Next.

DLC Configuration 10-3
9. Give a name to the printer. If desired, select theprinter as the default.
10. Select Shared or Not Shared. If shared, select thetype of operating systems that will be printing to it.
11. Select whether or not you want a test page, and thenselect Finish.
12. You will need to reboot your system in order to makethe change take effect.
Windows NT 3.xx Printer Setup
1. From the Windows NT Main group, double click on thePrint Manager icon.
2. Select Printer from the menu bar and click on CreatePrinter .
3. Enter any desired name for the printer in the PrinterName box.
4. Select the printer model in the Driver menu.
5. Choose Other (or Network Printer for V3.1 systems)from the Print to menu.
6. Click on Hewlett-Packard Network Port.
7. Type in your desired name for the port (this name mustnot be an existing port or DOS device, such as LPT1).
8. The Ethernet addresses of available print servers willappear in the Card Address menu. Select the desired

10-4 DLC Configuration
address (the address is on the label affixed to the printserver, or it can be gotten through the self-test page)and then click OK .
9. If you want to share the printer, click Share thePrinter on the Network.
10. Click OK
11. If necessary, select the appropriate printer options andthen click OK .
Configuring DLC/LLC on Other SystemsTo use DLC/LLC on other network systems, you willgenerally need vendor supplied software. Typically suchsoftware is designed to support the HP JetDirect print server.Follow the vendor's instructions to install the DLC protocolon your system.
Once the protocol is installed, you create a network port in amanner similar to the Windows NT procedure described inthe previous sections. The Ethernet address of the printserver should automatically appear during the configurationprocess.
The final step is to create a printer using the normaloperating system printer setup method. The only differenceis that instead of connecting the printer to the LPT1 parallelport, you point it to the network port you just created.
Note: TROY XCD does not recommend using the DLCprotocol with Windows for Workgroups 3.11 in a peer-to-peer configuration if the printer will be heavily used. This isbecause jobs may be rejected due to print spooler timeouts.

DLC Configuration 10-5
The best solution in these situations is to set up one PC as aserver for handling network print jobs. All of the other PCssend their print jobs to the server PC using NetBEUI or TCP/IP, and the server PC then uses DLC to send the print jobs tothe TROY XCD print server.

10-6 DLC Configuration

LAT Network Configuration 11-1
11LAT Network ConfigurationOverviewTROY XCD print servers equipped with the LAT protocol arecompatible with the Digital Equipment DECserver family ofterminal servers. This means that if you are already familiarwith configuring DECservers or compatible terminal serversin your network, you can use similar procedures to configurethe TROY XCD print server.
TROY XCD Print Server LAT ConceptsThe TROY XCD print server is a node on the Ethernet thatoffers a printing service to other nodes on the network. Anode is simply a device, such as a host computer, terminalserver, or print server. Every node on the network has aunique name, so the TROY XCD print server comespreconfigured with the name "XCD_" followed by the last sixdigits of the Ethernet address (for example, "XCD_00C351").
The TROY print server comes preconfigured to run on a LATnetwork without any additional setup. The configuration canbe changed if necessary by using the NCP, NCL, or ccrfacility on your host computer, or via the XConnect II orXConnect 100 serial port; this procedure is described inAppendix A of this manual. Note that in most cases it is notnecessary to change the configuration.

11-2 LAT Network Configuration
To use the TROY XCD print server with a VMS hostcomputer, you will first need to create a LAT applicationport on the host. A LAT application port allows a programto send and receive data over a LAT connection as if it werecommunicating with a directly-connected physical port. Youwill then need to associate a print queue with this port.
VMS LAT Host ConfigurationThe configuration process requires that you have systemmanager privileges. Before beginning the LAT configura-tion process, you must first make sure that LAT has beenstarted on your system. If you are currently using terminalservers on your network, then LAT has probably alreadybeen activated. If LAT is not started, then you need toexecute the following command before proceeding withconfiguration of the TROY XCD print server:
@SYS$STARTUP:LAT$STARTUP
1. Before creating print queue, you will need to determinethe following:
• The VMS queue name. This can be any uniquename (do a SHOW QUEUE command at the VMSprompt to list the existing queues).
• The LAT application port. This name of this portis LTAxxx, where "xxx" is any unused number (doa SHOW PORT command in the VMS LATCPprogram to see the existing ports).
• The TROY XCD print server node name andport name . The default node name isXCD_xxxxxx, where "xxxxxx" is the last six digits

LAT Network Configuration 11-3
of the Ethernet address (for example,XCD_00C3E4). You can get the name of your printserver by running the TROY XCD print server self-test (refer to Chapter 2 for information on runningthe self-test), or with the SHOW SERVERcommand from the TROY XCD print serverconsole. The port name is P1 for the first parallelport. If you have an XConnect II or XConnect 100,the names of the additional ports are as follows:
XConnect II serial port S1XConnect II parallel port with LN03 option LNXConnect 100 first serial port S1XConnect 100 second parallel port P2XConnect 100 second serial port S2
Please note that the name of the XConnect 100parallel port is P1, even if the LN03 option isinstalled.
Important: If you wish to use a different node name,you must change the print server name as described inas described in Appendix A.
2. Use the VMS editor to create a text file with thenecessary configuration commands (alternatively, youmay edit the file LAT$SYSTARTUP.COM for VMS5.5-x and later systems or LTLOAD.COM for earlierVMS systems). For instance, the following samplecommand file creates a queue named XCD on LAT port33 for a TROY print server with a default node name ofXCD_00C351 using the LATSYM processor and thedefault VMS form:

11-4 LAT Network Configuration
$MCR LATCPCREATE PORT LTA33:/APPLICATIONSET PORT LTA33:/NODE=XCD_003C51/PORT=P1SHOW PORT LTA33:EXIT$SET TERM LTA33:/PASTHRU/TAB/NOBROADCAST-/PERM$SET DEVICE/SPOOL LTA33:$INIT/QUEUE/START/ON=LTA33:/PROC=LATSYM XCD
Substitute your actual node name, port name (P1, S1,P2, S2, or LN), LAT port and queue name for the onesin the example. If you are using a service name,specify/SERVICE= servicenam e instead of /PORT=P1.
Important: Use the default names unless you havespecifically changed the names via the TROY XCDprint server remote console.
Important: Be sure to specify PROC=LATSYM or thequeue will not service requests from multiple hostcomputers.
3. Execute the command file you have just created bytyping "@" plus the file name in response to the VMS"$" prompt (for example, @LATSTART.COM). Foradditional convenience, you may want to include the"@filename " command in your system startup file sothat the procedure is executed automatically when thesystem is booted.
4. Define or modify a form for use with the TROY XCDprint server. VMS uses forms to define the pagelayout. If you are printing graphics or PostScript jobs,you must define your form for NOTRUNCATE and

LAT Network Configuration 11-5
NOWRAP to prevent printer errors. For example, toredefine the VMS default form DEFAULT, you wouldtype the following at the "$" prompt:
DEFINE/FORM DEFAULT/NOTRUNCATE/NOWRAP
If you are defining a new form, be sure to specifySTOCK=DEFAULT (unless you are using a special stock)and initialize the queue with the DEFAULT=FORM option.For example, to create a form called PCL for the queueXCD on LAT port LTA33:, you would type:
DEFINE/FORM PCL/NOTRUNC/NOWRAP/STOCK=DEFAULTINIT/QUEUE/START/ON=LTA33:/PROC=LATSYM/-DEFAULT=FORM=PCL XCD
5. You are now ready to print. Use the PRINT commandwith the name of the queue and the file you wish toprint as shown in the following example:
PRINT/QUEUE=XCD MYFILE.TXT
If the file does not print, recheck the hardware andsoftware configuration, and then try printing again. Ifthe file still does not print, refer to the Chapter 10,Troubleshooting, for further assistance.
Eliminating Blank Pages (Optional)When Hewlett-Packard printers are used with VMS, a blankpage is often printed after each job. To eliminate this blankpage, first create a text file with the following contents:
<ESC>]VMS;2<ESC>\

11-6 LAT Network Configuration
where <ESC> is the escape character (ASCII 27) and the"VMS" must be in uppercase characters. Then insert this fileinto your default library (normally SYSDEVCTL.TLB), andspecify it as a setup module in your form (stop and reset allqueues that use the library before doing this procedure). Forexample:
$LIB/INS SYS$SYSROOT:[SYSLIB]SYSDEVCTL.TLB NOBL$DEF/FORM PCL/SETUP=NOBL
The above example inserts the file NOBL.TXT into thedefault library and then redefines the form PCL (previouslydefined in step 4) to eliminate blank pages.
Note: This procedure is not required for DECprintSupervisor (DCPS).
PATHWORKS for DOS ConfigurationThe instructions for configuring a PATHWORKS print queuedepend on whether you have V4.X or V5.X.
PATHWORKS V5.X Server Setup Instructions:
To print from PATHWORKS V5.X, you must first create aLAN Manager printer destination, and then you must make itshareable. The procedure is as follows:
1. To create a LAN Manager printer destination, use one ofthe following methods (note that by default the printername you supply also identifies the printer destination,a default LAN Manager print queue, and a VMS printqueue):

LAT Network Configuration 11-7
- Type ADMINISTRATE/PATHWORKS from the VMSprompt to enter the Server Admin interface. Thenselect Printer Destinations option from the ViewMenu and enter the required information.
OR
- Use the MANAGEWORKS program on aPATHWORKS PC. Select the desired server,choose the Create option from the Actions menu,and then choose the LAN Manager Printer Queueoption (the Create LM Print Queue dialog boxwill be displayed). In the Print Destinationssection of the dialog box, choose ADD .
These two methods will automatically create aVMS print queue and a default LAN Manager printqueue associated with the printer destination.
2. To share a LAN Manager print queue:
- From the Server Admin interface, choose theShared resources option from the View menu.
- From the MANAGEWORKS interface, select thedesired server, choose the Create option from theActions menu, and choose LAN Manager SharedPrinter .
- At the VMS Command line, type the command:
NET SHARE sharename =printername

11-8 LAT Network Configuration
where sharename is the share name associated withthe print queue and printername is the name of theprinter from Step 1.
PATHWORKS V4.X Server Setup Instructions:
1. Create a VMS queue as described in previous sections.
2. Run PCSA_MANAGER on the VMS system.
a. Type MENU to get the PCSA menu.b. Select SERVICE OPTIONSc. Select ADD SERVICE (do not use the ADD
PRINTER QUEUE option, as this will add a PCLprinter reset that will affect PostScript printing.
d. Select PRINTER SERVICEe. Enter service name (pick any name)f. Enter VMS queue name (previously defined)g. Enter VMS form name (use the default if you do
not have a specific form defined)
PC Setup Instructions (All Versions):
1. Perform the following steps on the PC to connect to theprint service you created in the previous steps:
a. If you are using DOS, type the command USE
LPTx:\\node\service at the DOS prompt, wherex is the PC parallel port number, node is theDECnet node name and service is the service namepicked previously. For example:
USE LPT1:\\VAX\LASER

LAT Network Configuration 11-9
You may delete this print service by typing LATCP
at the C:> prompt and then entering the commandDELETE LPT1:
b. If you are using WINDOWS, first make sure thatyou have selected DEC PATHWORKS as thenetwork under the Windows Setup icon. Then:
- Click on the Print Manager icon and selectOptions and then Printer Setup
- Click Add, go to the List of Printers , select thedesired printer type, and click Install . Ifdesired, click Set as Default Printer.
- Click Connect and select the desired port (e.g.,LPT1)
- Click Network and select the port you choseabove and type in the network path(\\node\service , where node is the DECnetnode name and service is the service namepicked previously; for example, \\VAX\LASER )
- Click Connect (the Current PrinterConnection should show the port and thenetwork path that you selected)
- Click Close, OK , Close, and Exit to get out ofthe Print Manager
PATHWORKS for Macintosh ConfigurationIf you are using PATHWORKS for Macintosh, you will needto make sure that you have a bidirectional channel (in otherwords, you did NOT enter the command SET SERVICE
servicename RECEIVE ENABLED from the TROY XCDprint server remote console). Then create a LAT port usingLATCP as shown in the following example (substitute youractual node name and LAT port number):

11-10 LAT Network Configuration
CREATE PORT LTA53:/APPLICATION
SET PORT LTA53:/NODE=XCD_009C53/PORT=P1
Do not set the LAT port as a spooled device. Now go intoADMIN/MSA and enter the command :
ADD PRINTER name/QUEUE=queuename /DEST=LTA53:
where name is the name of the printer, and queuename is thequeue name.
DECprint Supervisor Configuration NotesIf you want to use a TROY XCD print server with theDECprint Supervisor software, you must have the DCPS-Open option in order to support Hewlett-Packard printers(you may also need to modify the DCPS device controlmodules and queue setup to handle "unrecognized" printers).Do not use the print server console command SETSERVICE RECEIVE, because bidirectionalcommunications is required for DCPS.
Important: DCPS requires that the printer be forced intoPostScript mode. It will NOT work if the printer is set toautosense between PCL and PostScript.
Important: If you are using the parallel port on the printer,the port must be compatible with the IEEE P1284 bitronicsbidirectional standard.
Installation on Other Host ComputersInstallation procedures differ somewhat for other DEC

LAT Network Configuration 11-11
operating systems (e.g., RSTS/E and RSX-11M-PLUS).Refer to the appropriate DEC documentation for informationon setting up LAT print queues on these systems.
Changing the Configuration (Optional)The print server default configuration is adequate for mostapplications. However, if you wish to change theconfiguration, you may access the print server console viathe NCP or NCL utilities on a VMS system, the ccr orTELNET commands on an ULTRIX computer, or throughthe serial port using DECserver-style commands. Theconfiguration procedure is described in detail in Appendix A.

11-12 LAT Network Configuration

Banyan VINES Installation 12-1
12Banyan VINES NetworkConfigurationOverviewTROY XCD print servers that include the Banyan VINES IPprotocol (refer to chapter 1 for specific protocol supportinformation) allow printers to be shared on a Banyan VINESnetwork. Users on client PCs send their jobs to any VINES fileserver running the Banyan PCPrint software, which in turnspools the jobs to the TROY XCD print server and the printer.Printing is transparent to user applications, and the print servercan be managed using standard VINES utilities likeMANAGE, MSERVICE, MUSER, and the Operator Consoleprinter control. In addition, VINES users can printconcurrently with users of NetWare, TCP/IP, and AppleTalk.
In order to use a TROY XCD print server on a VINESnetwork, you will need the following:
• Banyan's PCPrint software (a Banyan-supplied softwareoption that is installed on the VINES file server)
• Optional Banyan firmware on the TROY XCD externalprint server
• TROY XCD XAdmin 16-bit utility software (on TROYXCD Print Server Software diskette or CD-ROM) oraccess to print server console via serial port, or throughTELNET, DEC NCP or NCL, or TROY XCD XCONFIG

12-2 Banyan VINES Installation
NetWare utilities (refer to Appendix A of the TROY XCDprint server manual for information on using the console).
Note: The new XAdmin32 32-bit utility does notcurrently work on a Banyan VINES workstation unless theworkstation is also running TCP/IP or NetWare.
A. File Server User ConfigurationThe first step in the configuration process is to configure thefile server so that the TROY XCD print server can log intothe Banyan VINES network. To do this, you will need toconfigure a StreetTalk user name for the print server (allVINES print servers log into the file server as users).
1. From any VINES workstation log in as a supervisor andexecute the MANAGE program by typing MANAGE atthe DOS prompt.
2. At the main menu, select 2 - Users and press ENTER.
3. You will get the Manage Users screen. Select ADD auser to get the Add A User screen. Type in aStreetTalk name for the desired TROY XCD printserver service. You may optionally type in adescription, nickname, and a password. Press the F10key when you are finished.
4. You will then get the Add User Profile screen. Selecta blank user profile and then press ENTER. If there isno existing blank profile, the select the Sample Profile.

Banyan VINES Installation 12-3
5. You will get the message "Do you want to force theuser to change passwords on the next login?". SelectNo and press ENTER.
6. You will then get the Manage A User screen. If youselected a blank user profile in step 4, you can skip tostep 8. Otherwise, use the arrow keys to selectMANAGE User Profile and press ENTER.
7. You will get the Manage User Profile screen. Executethe following steps to create a blank user profile:
- Select EDIT profile- When the profile appears on the screen, press CTRL-
X multiple times to delete every line in the profile,and press F10 when you have finished. You maythen use this newly created blank profile as atemplate when configuring additional TROY XCDprint servers. Then press ESCAPE to return to theManage a User screen.
8. Press ESCAPE twice to return to the main menu.
B. File Server Queue Configuration
You must now configure the queue(s) on the Banyan VINESfile servers. Print queues are one of several different typesof services that are available on a VINES file server. Youmay configure several print queues for a single TROY XCDprint server. For example, one print queue could be forprinting jobs to the print server parallel port, while anotherwould be for the serial port. To configure a print queue, usethe MANAGE utility as follows:
12-4 Banyan VINES Installation
1. From the main menu, select 1 - Services and pressENTER.
2. You will get the Manage Services menu. Select ADDa server-based service and press ENTER.
3. From the Add A Service screen type the desiredStreetTalk name for the print queue, press ENTER ,and then type in a description of the print serverfollowed by ENTER.
4. Select the desired file server (if there is more than one)and press ENTER.
5. When you get the Select Type Of Service screen,select 3 - VINES print service (for VINES 5.xx) or 2 -Banyan Print Service (for VINES 6.xx) and pressENTER.
6. Use the arrow keys to select the disk where the printqueue service will reside and press ENTER.
7. You will get the message "The service is running butnot yet available to users." Press F10.
8. If desired, type in the maximum number of jobs andmaximum size of job for the queue when you get theConfigure Queue screen. Otherwise press F10 forunlimited number and size.
9. If desired, choose a default paper format when you getthe Configure Paper Formats screen. Otherwise,press F10 to select the defaults.
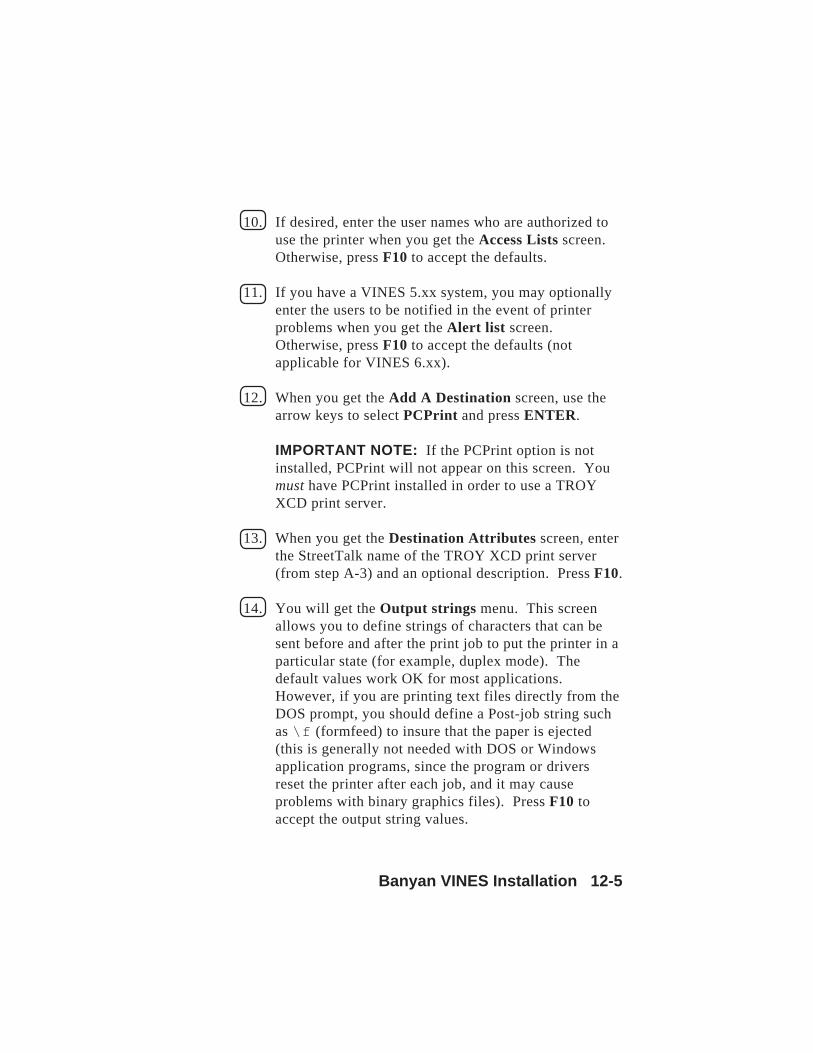
Banyan VINES Installation 12-5
10. If desired, enter the user names who are authorized touse the printer when you get the Access Lists screen.Otherwise, press F10 to accept the defaults.
11. If you have a VINES 5.xx system, you may optionallyenter the users to be notified in the event of printerproblems when you get the Alert list screen.Otherwise, press F10 to accept the defaults (notapplicable for VINES 6.xx).
12. When you get the Add A Destination screen, use thearrow keys to select PCPrint and press ENTER.
IMPORTANT NOTE: If the PCPrint option is notinstalled, PCPrint will not appear on this screen. Youmust have PCPrint installed in order to use a TROYXCD print server.
13. When you get the Destination Attributes screen, enterthe StreetTalk name of the TROY XCD print server(from step A-3) and an optional description. Press F10.
14. You will get the Output strings menu. This screenallows you to define strings of characters that can besent before and after the print job to put the printer in aparticular state (for example, duplex mode). Thedefault values work OK for most applications.However, if you are printing text files directly from theDOS prompt, you should define a Post-job string suchas \f (formfeed) to insure that the paper is ejected(this is generally not needed with DOS or Windowsapplication programs, since the program or driversreset the printer after each job, and it may causeproblems with binary graphics files). Press F10 toaccept the output string values.

12-6 Banyan VINES Installation
15. You will then get the Enable strings menu. This menuallows you to select whether or not a banner page isprinted, whether or not to use the setup and resetstrings, and other options. Choose the desired optionsor press F10 to select the defaults.
16. You will be asked "Would you like to add anotherdestination at this time?" Select No.
17. You will then get the Print Queue Status screen, whichwill show that the queue is not accepting jobs orprinting jobs. Change both values to Yes and thenpress F10. You will get the message that the queue isnow ready to accept and print jobs. Press F10 again.
18. If you are configuring more than one queue on the fileserver, repeat steps 1 through 17 of this section.Otherwise, press ESCAPE multiple times to exit theMANAGE utility.
C. Print Server Configuration UsingXAdmin
The last step is to add the StreetTalk login name to the TROYXCD print server and to associate the file server queue withone of the services on the print server. The procedure is asfollows:
1. Install the software from the TROY XCD Print ServerSoftware diskette or CD-ROM by selecting File fromthe Windows Program Manager menu bar. Then selectRun, enter A:SETUP.EXE as the command line (orselect the \Utilities\Xadmin\Setup.exe

Banyan VINES Installation 12-7
path on the CD-ROM), click OK , and follow theinstructions on the screen.
2. Double click on the XAdmin icon to start the programunder Windows.
3. The print server name (XCD_xxxxxx_P1, where"xxxxxx" is the last six digits of the Ethernet address)will show up in the list. If it does not, double checkyour Ethernet cabling and (if applicable) hubconnection. Click on this name with the mouse button.
4. Click on the Configure button.
5. Click on the Banyan tab.
6. The Banyan hop count is set by default to two hops,which is adequate for most networks. However, if thefile server is located more than two hops from the printserver, you must set the hop count to the appropriatevalue.
7. Enter the StreetTalk name of the TROY XCD printserver (this must exactly match the name you entered inStep A-3). If the StreetTalk name has spaces in it, youmust enclose the name in double quotation marks (forexample, "john smith@uc engineering@irvine"). Ifyou entered a password in step A-3, you should alsoenter the same password here.
8. Click on the Services tab.
9. Double click on the service you wish to enable forVINES. If in doubt, use BINARY_P1 (for the parallel

12-8 Banyan VINES Installation
port), BINARY_S1 (for the serial port), and BINARY_P2or BINARY_S2 for the XConnect 100 second paralleland serial ports. Refer to Appendix B of the manual foradditional information on using services.
10. Type in the StreetTalk name of the print queue youdefined in step B-3.
11. Click on OK, and then click OK again to save theconfiguration.
12. Click OK and then OK again to exit XAdmin
D. Print Server Configuration Using thePrint Server Console (Optional)
As an alternative to XAdmin, you may use the print serverconsole to configure an TROY XCD print server. The stepsare as follows:
1. Connect to the print server console using TELNET,NCP, XCONFIG, or the serial port (refer to AppendixA for information on using the console).
2. Execute the following commands:
SET BANyan LOgin loginnamePurpose: Sets StreetTalk login name of print server.
SET BANyan PAssword passwordPurpose: Sets login password of print server. Thepassword (if any) must match the password you set instep A-3. This command is not required if you did not

Banyan VINES Installation 12-9
assign a password to the print server with theMANAGE program.
SET SERVIce service STreettalk queuenamePurpose: Enables the Banyan protocol on the specifiedTROY XCD print server service and associates thisservice with the StreetTalk name of a given print queuethe VINES file server. Type SHOW SERVICE to seea list of the available services (if in doubt, useBINARY_P1 for the parallel port , BINARY_S1 forserial port, BINARY_P2 for the XConnect 100 secondparallel port, and BINARY_S2 for the XConnect 100second serial port).
3. If required, the following additional commands areavailable:
SET BANyan HOp nnPurpose: Sets number of hops between the TROYXCD print server and the Banyan file server. Thedefault value is 2, which is adequate for most sites, butyou will need to change this value if the file server ismore than two hops away from the print server.
SET BANyan [ENable|DISable]
Purpose: Enables or disables Banyan protocol on theTROY XCD print server. Banyan is enabled bydefault.
SET BANyan TImeout nnPurpose: Sets job timeout (in seconds).
CLEAR SERVIce service STreettalk
Purpose: Disables the Banyan protocol on thespecified service.

12-10 Banyan VINES Installation
SHow BANyan
Purpose: Shows Banyan protocol settings andstatistics.
4. When you have finished entering commands, typeEXIT to exit the remote console and cause thecommands to take effect.
E. Testing the Print Queue
To test the queue, use the Banyan BPRINT command fromthe DOS prompt on your workstation. For example:
BPRINT TEST.TXT /P:MYQUEUE
prints the file TEST.TXT to the file server queueMYQUEUE.

PrintraNet Internet Printing 13-1
PrintraNet Remote Internet Printing
OverviewTROY XCD's PrintraNet product is a software driver forWindowsTM 95, Windows 98, or Windows NT that allows aPC user at one location to send a print job to a printer con-nected to an TROY XCD print server at a remote locationacross the Internet in a simple and transparent manner. Forexample, a user on a PC in New York could print a documentdirectly from his Microsoft Excel application program to aprinter in Chicago. The PC may be attached to a Local AreaNetwork, or it may be connected via a dial-up PPP link to anInternet Service Provider. Because of the low cost of access-ing the Internet, the PrintraNet software can save the user asignificant amount of money in toll charges, particularlywhen international communications is involved.
If you did not receive the PrintraNet software on diskette orCD-ROM, you may download it from the TROY XCD web site(http://www.troyxcd.com ).
PrintraNet ConceptsThe PrintraNet software is installed using a standard Win-dows Installation Wizard. It creates a virtual port on theWindows 95, Windows 98, or Windows NT PC that operatessimilar to the standard LPT1 printer port from the applica-tions program point of view. The user can use the Windows
13

13-2 PrintraNet Internet Printing
95/98/NT Print Manager to create a printer that uses this portalong with a standard Windows 95/98/NT-compatible printerdriver (for example, the Hewlett-Packard LaserJet 5 orLexmark Optra drivers). Any Windows 95/98/NT applica-tions program can therefore print to this printer (and hence tothe virtual port) without modification or change in opera-tional procedure.
When a job is printed to the PrintraNet virtual port, it is actuallyMIME-encoded, converted to a standard Internet E-mail mes-sage, and sent out to a TROY XCD print server at the remotelocation using either the Messaging API (MAPI) or WINSOCK.This means that PrintraNet is compatible with most common E-mail software packages, and there is no requirement to install aTCP/IP stack on the PC. The only requirement is that the E-mailserver be capable of sending E-mail messages over the Internet.
In more detail, the procedure is as follows:
• If you are connected to a Local Area Network, the E-mailmessage gets passed to the E-mail server, which in turnsends it out over the Internet using the SMTP protocol(Simple Mail Transport Protocol) to the remote TROY XCDprint server.
• If you are connecting via a modem directly to an InternetService Provider (ISP), the ISP handles the routing of the E-mail to the remote TROY XCD print server.
At the remote site, an E-mail server receives the E-mail message.The remote print server, which has its own E-mail address, usesthe POP3 protocol (Post Office Protocol 3) to download the E-mail message from the E-mail server. It then decodes the

PrintraNet Internet Printing 13-3
attachment and prints it out on the printer. As a configurableoption, the remote print server can send an E-mail message backto notify the sending PC that the job was successfully printed.
The remote print server must be running Version 3.38 or laterfirmware. This firmware is available at no charge on the TROYXCD web site (http://www.troyxcd.com directory).PrintraNet is supported by all TROY XCD print servers exceptthe XConnect II Lite and XJet III.
A new feature of PrintraNet is its Address Book capability.This capability allows the Windows user to have a pre-defined list of remote printers. A print job can be sent toany of these remote printers by simply clicking on theappropriate address book entry. In addition, groups ofremote printers can be defined, so that a single print job canbe sent to multiple printers.
Another new feature of PrintraNet is direct E-mail printing.This feature allows ordinary text E-mail messages to besent to the print server and then printed out on the printer.No special software (other than an E-mail program) isrequired on the sending computer.
This chapter covers the following topics:
• Installation of the PrintraNet software on a Windows 95/98/NT PC at the local site
• Enabling the PrintraNet capability on the TROY XCDprint server at the remote site.
The manual assumes that you have already installed theTROY XCD print server at the remote site with a valid IPaddress per the instructions in the appropriate print server

13-4 PrintraNet Internet Printing
Administrator's Guide. It also assumes that you have thecapability of configuring E-mail services on your PC and E-mail server, or that you have access to a networkadministrator who can perform these tasks for you.
Step 1 Installing the Software on aWindows 95/98/NT PC
To install the PrintraNet software on a Windows 95/98/NTPC, execute the following steps:
1. Make sure that the PC is running an E-mail program (forexample, Microsoft Exchange) that is capable of sendingE-mail messages using either MAPI or WINSOCK.MAPI (Messaging Applications Program Interface) isused by most popular Windows 95/98/NT E-mailpackages, while WINSOCK is used by TCP/IP-basedmail packages.
2. Make sure that your E-mail server is capable of sendingmessages across the Internet. Alternatively, if you arecommunicating directly from the PC via a modem to anInternet Service Provider, make sure that you have anInternet mail account on the ISP, and that the PC isconfigured to send E-mail using this account.
3. Make a backup copy of the PrintraNet software, and usethis backup for the installation process. Store the originaldiskette in a safe place.
4. Insert the backup installation diskette into the PC. Fromthe Windows 95/98/NT Start button, select Run. Thenenter A:SETUP and press Enter to start the PrintraNetinstallation program.

PrintraNet Internet Printing 13-5
5. Push the Next button in response to the Welcomemessage.
6. Select the desired directory to install the PrintraNet files(the default directory is C:\Program Files\XCD\PrintraNet\ ), and then push Next.
7. Select either MAPI (the default) or WINSOCK as themail transport and press Next. Most mail programs,include the Microsoft Exchange program that is includedwith Windows 95/98/NT, use MAPI. The installationprogram will then begin installing the files.
8. You will then be asked for a port name. The default portname is PNET1. If you want to select a different portname (for example, if you have more than one PrintraNetremote printer), then enter the name of the port. The portname must begin with PNET and end with a number, forexample, PNET3.
Press OK to continue.
9. You will now get the Port Settings dialog box for theremote print server. Enter the following information:
• E-Mail Address: Enter any unique legal Internet E-mail address for the remote TROY XCD print server(for example, [email protected]).
Note: Internet E-mail addresses cannot have spacesin them.
You may also click on the Address Book button.This allows you to add E-mail addresses of other

13-6 PrintraNet Internet Printing
printers. To add addresses, go to the menu bar,select File and then New Address (or click on theNew Address icon, which is the one with a singleperson). Enter a description, an E-mail address, andan optional memo for the remote TROY XCD printserver. Click on OK to add it to the address book.The address book allows you to send print job to anyof the remote print servers without having to type inits E-mail address.
In addition, the Address Book allows you to creategroups of remote printers. To do this, select Fileand then New Group (or click on the New Groupicon, which is the one with three people) to addusers. The Group capability allows you to send asingle print job to more than one remote printer.
The Partial E-mail Print option breaks the print jobinto several smaller E-mail messages, which theprint server reassembles at the remote end into asingle print job. It is useful if you are sending printjobs through E-mail servers that limit the size ofprint jobs. If you check this option, you can enter apartition value or use the default value of 1024Kbytes.
The Port Settings dialog box will be displayed eachtime you print, thereby allowing you to select aremote print server from the address book or tomanually enter an address. The Show this dialogfor each Print Job box should be checked unlessyou plan to send jobs to only a single TROY XCDremote print server and therefore do not need tochange the destination E-mail address.

PrintraNet Internet Printing 13-7
• Service Name: Enter the service name on the remoteTROY XCD print server that you wish to use forprinting. This is normally BINARY_P1 for the firstparallel port, BINARY_S1 for the serial port,BINARY_P2 for the second parallel port, orBINARY_S2 for the second serial port. If you do notknow the service name, you may leave this fieldblank and the default binary service will be used.Refer to Appendix B of the appropriate TROY XCDprint server Administrator's Guide for information onhow to use services.
• Your E-Mail Address: If you are using MAPI, skipthis step. If you are using WINSOCK, enter your E-mail address (for example, [email protected]).
• SMTP E-Mail Server: If you are using MAPI, skipthis step. If you are using WINSOCK, enter the IPaddress of your SMTP E-mail server (consult yournetwork administrator if you do not know thisaddress).
• Select Desired Notification: You may optionallyhave the remote TROY XCD print server notify youwhen the job is complete or when the job fails or bothwhen the job is complete and if it fails. Select thedesired option and then enter the E-mail addresswhere you want the notification sent (generally youwould want the notification sent to your own E-mailaddress).
• Press OK to continue.

13-8 PrintraNet Internet Printing
10. If desired, you can read the README file for releasenote information regarding PrintraNet. The PrintraNetdriver installation is now complete.
11. You must now create a printer on your Windows 95/98/NT system using the standard Windows 95/98/NTprinter setup procedure. To do this, go the Start button,select Settings and then Printers.
12. Select Add Printer to begin the printer installation.
13. Click Next when you get the Add Printer Wizardwindow.
14. Select Local Printer when you are asked how theprinter is connected to your computer, and push Next.
15. Select the desired manufacturer and model of the remoteprinter (for example, Hewlett-Packard LaserJet 5). Ifnecessary click Have Disk to load the driver off of theprinter's installation diskette. Click Next when you aredone.
16. If you have picked a printer driver that is already beingused, you have the option of either keeping the existingdriver (recommended) or replacing it. Select the desiredoption and press Next.
17. Select the PrintraNet E-mail port (PNET1 by default)and press Next.
18. Enter any desired name for the PrintraNet remote printerand press Next. For example, you could call the printer"E-mail Printer". Note that this name does not need tomatch the E-mail address that you assigned in step 9.

PrintraNet Internet Printing 13-9
19. Select No when asked if you want to print a test page,unless you have already configured the remote TROYXCD print server to receive PrintraNet print jobs.
You have now finished installing the PrintraNet software. Ifyou have only one E-mail printer, go to Step 2, Configuringthe Remote TROY XCD Print Server.
Adding a Second E-Mail Printer Port
You should not rerun the install program to add a new E-Mail printer port. Instead, press the Start button, selectSettings, and open the Printers window. Click on the iconof a PrintraNet printer, select File from the menu bar, andthen choose Properties. Click on the Details tab and pushthe Add Port button.
In the Add Port dialog, select the Other radio button andthen "PrintraNet Port". Click on OK and it will give you thePort Name dialog (like in the install program). Any uniquename can be given here as long as it starts with "PNET" andanother port does not already exist with the same name.Then enter the port settings as described in step 9 of theInstalling the PrintraNet Software on a Windows 95/98/NTPC section.
Step 2 Configuring the Remote TROYXCD Print ServerThe next step is to configure the remote TROY XCD printserver. The remote print server can be configured withTROY XCD's XAdmin or XAdmin32 Windows 95/98/NTconfiguration utility, WebXAdmin browser-based utility, or

13-10 PrintraNet Internet Printing
by accessing the print server console through the print serverserial port or via TELNET, DEC NCP, or XCD's XCONFIGutilities. Refer to Appendix A for information on how to usethe serial port, TELNET, NCP, or XCONFIG to access theprint server console.
Print Server Configuration ChecklistBefore configuring the print server to receive PrintraNetprint jobs, check the following:
1. Make sure that the E-mail server at the remote site (thereceiving end) is configured to handle the TCP/IP POP3,and SMTP protocols (SMTP is only required if thenotification feature is enabled).
2. Configure the POP3 server on the E-mail server at theremote site with a mail account and password for theremote printer (generally, the mail account name will bethe first part of the name that you assigned in step 9 ofthe previous section; for example, if you assigned thename [email protected], the account name would beemailprinter). The procedure for configuring a POP3server varies depending on the operating system of the E-mail server, so consult your operating systemdocumentation for details.
3. Make sure that the TROY XCD print server is installedand running with TCP/IP enabled and has a valid IPaddress assigned to it.
Because access to the E-mail server on most networks isusually restricted, you may need to have your networkadministrator check the configuration and add the mailaccount.

PrintraNet Internet Printing 13-11
Using XAdmin, XAdmin32, or WebXAdmin toConfigure the Print Server
NOTE: Skip this section if you wish to use the print serverconsole to configure the print server.
Two graphical user configuration programs are included onthe TROY XCD Print Server Software diskette or CD-ROMthat is shipped with every TROY XCD print server. XAdminruns on Windows 3.11 or Windows 95/98, while XAdmin32runs on Windows 95/98 and Windows NT. To use XAdminor XAdmin32, you must be running either NetWare orBanyan VINES client software, and the PC must be on thesame network as the TROY XCD remote print server.
WebXAdmin allows the print server to be managed by anystandard web browser using the TCP/IP protocol. Refer toChapter 3 for additional information on XAdmin,XAdmin32, and WebXAdmin.
The steps required to configure the print server to receiveprint jobs from a Windows 95/98/NT PC running thePrintraNet software are as follows:
1. Select the name of the desired TROY XCD print serverfrom the list by double clicking on it (XAdmin orXAdmin32) or entering its IP address (WebXAdmin).
4. Click on the Internet tab or button.
5. Enter the IP address of the POP3 server (consult yournetwork administrator if you do not know this address).
6. Enter the mailbox name for the remote TROY XCD print

13-12 PrintraNet Internet Printing
server. Usually this will be the first part of the E-mailaddress that you entered in step 9 (for example, if the E-mail address of the remote print server isemailprinter@xyz, then the mailbox name would beemailprinter.
7. Enter the password for the mailbox, if any.
8. The print server is configured by default to poll the POP3server every 30 seconds. You may change this value, ifdesired.
9. If you have enabled notification, enter the IP address ofyour SMTP server (consult your network administrator ifyou do not know this address).
10. Press the OK button., and exit XAdmin or XAdmin32.You have now configured the print server to receive printjobs. Skip to the Printing to the Remote TROY PrintServer section later in this manual.
Using the Console to Configure the PrintServer
NOTE: Skip this section if you used XAdmin, Admin32, orWebXAdmin to configure the remote TROY XCD print server.
As an alternative to the TROY XCD graphical configurationutilities, you can use the print server console to configure theremote TROY XCD print server. The console can beaccessed via the print server serial port, TELNET, DECNCP, or the TROY XCD XCONFIG utility. Refer toAppendix A if you do not know how to use the console.

PrintraNet Internet Printing 13-13
1. When you get the "Local>" prompt after connecting tothe console, enter the command
SET POP3 ADDRESS ipaddres s
where ipaddress is the IP address of your POP3 server(consult with your network administrator if you do notknow this address).
2. Enter the commands:
SET POP3 NAME mailboxnameSET POP3 PASSWORD emailpassword
where mailboxname is the name of the remote TROYXCD print server mailbox and emailpassword is thepassword associated with this mailbox. Usually themailbox name is the same as the first part of the E-mailaddress that you defined previously (for example, if theE-mail address is [email protected], then themailbox name is emailprinter.
3. The print server is set by default to poll the POP3 serverevery 30 seconds. If you wish to change this value, enterthe command:
SET POP3 POLLING rate
where rate is the polling rate in seconds.
4. If you have enabled notification, enter the command:
SET SMTP ADDRESS ipaddress

13-14 PrintraNet Internet Printing
where ipaddress is the IP address of your SMTP server(usually the same as the IP address of your POP3 server).
5. Type EXIT to exit the console and save the changes.You have now completed configuring the remote TROYXCD print server.
Step 3 Printing to the Remote TROY XCDPrint ServerTo print to the remote TROY XCD print server from thelocal Windows 95/98/NT PC, you simply use select theprinter that you created in Step 1 and print to it the normalmanner. For example, to print the remote printer namedEmail Printer, you would select Print from the menu bar,push the Printer Setup button, click on the name EmailPrinter, and then click OK twice.
You will then get the Port Settings dialog box (assuming thatyou have not unchecked the Show this dialog for each PrintJob box). You can now use the address book, manuallychange the E-mail address of the destination, or modify otherparameters. Click OK when you are ready to print.
The job will then be sent over the Internet to the remoteTROY XCD print server.
TroubleshootingThe first step in troubleshooting is to make sure that youhave a valid E-mail connection on both the sending PC andthe receiving print server. Try sending an E-mail messagefrom the PC to a user at the remote site who can receive mail

PrintraNet Internet Printing 13-15
via the POP3 server. If this does not work, there may be anE-mail configuration problem on the PC, on the local E-mailserver, or on the remote POP3 server. Double check to makesure that the E-mail parameters that you configured on thePC and on the remote print server match those that areconfigured on the E-mail servers.
If you can print small files OK but are having troubleprinting large files, the problem may be in the E-mail system.Some E-Mail systems have difficulties printing files that arelarger than about 400KB in length. To verify this, trysending the large file as an attachment to an E-mail message.If the file does not reach its destination intact, then theproblem is with the E-Mail system.
If you get an SMTP error when using a WINSOCKconnection, you may need to configure the hosts file on yourWindows 95/98/NT system. To do this create a file namedHOSTS in the \WINDOWS\SYSTEM directory (or edit thisfile if it already exists) and add an entry for your mail serversimilar to the following using the DOS editor (substitute theactual IP address and name of your SMTP mail server):
192.189.207.222 mail.troyxcd.com
If you require additional support, contact TROY XCDTechnical support at (949) 399-0820, FAX: (949) 399-0825,E-mail: [email protected].
Print Server Console CommandSummaryThe following PrintraNet-related configuration and statuscommands are available from the TROY XCD print server

13-16 PrintraNet Internet Printing
console (for a complete list of commands, refer to AppendixA in the appropriate print server Administrator's Guide):
SET POP3 ADdress aa.bb.cc.ddPurpose: Sets POP3 Server IP address
SET POP3 ENable/DISableEnables or disables POP3 protocol
POP3 POlling nnSets POP3 server polling frequency in seconds
POP3 NAme <name>Sets POP3 mailbox name for print server
POP3 PAssword <password>Sets the POP3 Mailbox password
SET SMTP ADdress aa.bb.cc.ddSets the SMTP server IP address
SET SMTP ENable/DISableEnables or disables SMTP capabilities
SHOW POP3Shows POP3 parameter settings
SHOW SMTPShows SMTP parameter settings

Troubleshooting 14-1
14
TroubleshootingOverviewThis chapter describes procedures for troubleshootingproblems you may encounter with TROY XCD external printservers, and is divided into the following sections:
1. Installation Problems
2. Intermittent Problems
3. Protocol-Specific Troubleshooting
If you have followed the steps in this chapter and you believethat you have a bad board, then please refer to the CustomerSupport and Warranty chapter for information on returningdefective products.
Installation Problems(Printer Does Not Come Up Ready)If you cannot print to the TROY XCD external print server afteryou install it, check the following:
1. Make sure that the printer are powered on, that all cablesare securely plugged in, and that the printer is on-line.

14-2 Troubleshooting
2. If you have an XConnect II, XConnect II Lite, orXConnect 100, make sure that the parallel cable length isless than 1.8 meters (6 feet), which is the limit of theCentronics standard. The Pony Print Server Plus willsupport longer lengths up to 25 feet, depending onenvironmental conditions.
3. If possible, connect a terminal to the serial port. If yousee the boot> prompt, the print server firmware has notbeen loaded properly. Refer to Appendix C forinstructions on reloading the firmware. If reloading doesnot fix the problem, try setting switch 1 to ON (factorydefaults) and powering the print server off and then onagain; if the problem persists, the product may bedefective.
Installation Problems (Printer Comes upReady but You Cannot Print)If the printer starts up OK but you cannot print, the problemcould one of the following:
• There is a problem with the interface between the printserver and the printer
• There is a problem with the network connection orcabling.
• There is a queue setup problem, a print server setupproblem, or other protocol-related problem.

Troubleshooting 14-3
Checking the Interface between the PrintServer and the PrinterFirst make sure that the cable between the print server andthe printer is securely plugged in at both sides. Then:
1. Wait about two minutes after the printer is powered onand then run a printer self-test (see chapter 2 forinformation on how to run the self-test).
a. If the self-test does not print, then there is possibly ahardware problem. Double check the connections. Ifyou still cannot print, then make sure that your printeris capable of printing text, PCL or PostScript (the self-test will not work unless one of these is possible).Some examples of printers that do not support directprinting of text files:
• So-called Windows printers, usually low-end inkjetprinters, perform all the image rasterization in theprinter driver, so the printer only understands a rawimage file.
• Many plotters only support HP-GL/2, RTL, orproprietary languages.
The only way to test such printers is to use an applicationprogram with the correct printer drivers.
2. It may be necessary to adjust the parallel port defaultsettings in order to accommodate certain printers,especially older ones, by using console commands (referto Appendix A for information on how to use theconsole). Do a SHOW PORT command to see thecurrent port settings. In particular:

14-4 Troubleshooting
• Some printers are not fast enough to keep up with theXConnect II and XConnect 100. For these printers, trydisabling DMA with the command SET PORT P1DMA DISABLED (not on Pony Print Server Plus orXConnect II Lite).
• Some printers require the pACKH hardware handshake.For these printers, use the command SET PORT P1ACKH ENABLED.
• Some printers and applications do not work well ifbidirectional communications are enabled. Use thecommand SET PORT P1 BID DISABLED todisable bidirectional.
• If you are using ECP mode with Okidata printers and aPony Print Server Plus, you will need to enable softwarehandshaking with the command SET PORT P1 SWIOENABLED.
• Not all printers support Fast Strobe mode, so make surethat FSTB is not enabled on the port if you are havingproblems printing (Fast Strobe is disabled by default;use the command SET PORT P1 FSTBDISABLED to disable it).
• In some rare instances, disabling NBUF with thecommand SET PORT P1 NBUF DISABLED willsolve port compatibility issues.
3. If the self-test prints OK but you cannot print or you getgarbage printouts, make sure that the printer is set for thecorrect Page Description Language. Most new printerssupport AUTO mode, which means that they will

Troubleshooting 14-5
automatically switch between PCL and PostScript.However, older printers like the LaserJet II, LaserJet III,and LaserJet IIISi require that the printer be set to thedesired language through the printer front panel.
Also, verify that you have set up the drivers correctly onthe workstation. Some printers, like the Epson Stylus,require special drivers and will not print if standard PCLor PostScript drivers are used.
Checking the Network Connection and Cabling
If the self-test page prints but you cannot print documents,first check the network connection and cabling.
1. If you are connecting to a 10baseT network, verify thatthe XConnect II and XConnect II Lite RECV and XMITLEDs are BOTH lit. If you have an XConnect 100, theLink OK LED should be on. If the appropriate LEDsare not on, there is probably a bad 10baseT or100baseTX cable or the hub port is bad. If possible, try adifferent cable and hub port, or try connecting a differentdevice (such as a PC) to the cable.
2. If you have an old XConnect II (V3.19 firmware orearlier), make sure that you have set switches 2 and 3 forthe correct type of Ethernet.
3. If you are using a repeater or hub, make sure that SQE(heartbeat) is turned off at the hub (this is the defaultsetting for most hubs). Also, if you have a hub ormultiport repeater, verify that the hub or repeater port isgood by trying the print server on a different port.

14-6 Troubleshooting
4. If you have a bridge or router located between the TROYXCD print server and the host computer, make sure thatthe device is set up to allow the print server to send andreceive data from the host. For example, a bridge can beset up to only allow certain types of Ethernet addresses topass through (a process known as filtering); therefore,such a bridge must be configured to allow TROY XCDprint server addresses. Likewise, a router can be set upto pass only certain protocols, so be sure that the desiredprotocol can be passed through to the TROY XCD printserver. In the case of routers, also make sure that theprotocol is routable (LAT, NetBEUI, and DLC/LLC arenot routable).
5. If the job exits the queue but does not print, make surethat you are not trying to print a text job to a PostScriptprinter. If you have a printer that is capable of automaticlanguage switching, make sure that the printer is notforced into PostScript mode.
6. Make sure that you are not trying to perform an illegaloperation, such as attempting to print a legal-size formwhen the printer only supports 8.5" x 11" paper.
7. If you are using the serial port for printing, make surethat the baud rate, parity, stop bits, and character size onthe print server exactly match those on the printer.
8. Older HP plotters require a specially-wired cable toconnect to the print server serial port. Contact TROYXCD Tech Support for details regarding this cable.
9. Check the individual protocol troubleshooting sections inthis chapter for additional causes of intermittent printerproblems.

Troubleshooting 14-7
Intermittent ProblemsIf the print server and the printer start up OK, but youintermittently have problems printing, check the following:
1. Excessive NetWare polling can be a big cause ofintermittent problems. Make sure that you have onlyenabled the NetWare file servers that you need forprinting (do a SHOW NETWARE command from the printserver console to see the enabled file servers). If youhave V3.21 or earlier firmware, make sure that NetWarepolling is disabled by using the console command SETNETWARE RANGE 0. If you are not using NetWare,you can disable NetWare entirely with the command SETNETWARE DISABLED.
2. If you can print small jobs OK but large graphics jobs aredistorted or incomplete, make sure that you haveadequate memory in your printer.
3. There is a problem with V3.34 and earlier versions offirmware when printing long jobs over the serial port.The solution is to upgrade the print server to the latestfirmware.
4. Check the individual protocol troubleshooting sections inthis chapter for additional causes of intermittent printerproblems.
TCP/IP TroubleshootingIf you are using TCP/IP and cannot print to the print serverand you have checked the hardware and network as describedin the previous steps, then check the following (note that it is

14-8 Troubleshooting
always a good idea to try creating a another print queue toeliminate the possibility of setup errors):
l. The problem may be the result of mismatched orduplicate IP addresses. Verify that the IP address iscorrectly loaded into the TROY XCD print server (viathe self-test page or through the remote console) andmake sure that no other nodes on the network have thisaddress (DUPLICATE IP ADDRESSES ARE THEBIGGEST CAUSE OF TCP/IP PRINTINGPROBLEMS). If the address is not correct, then checkwhether the loading procedure was properly executed.
2. If you used NCP, XCONFIG, or ccr to enter the IPaddress, make sure that you exited the remote consoleproperly with a CTRL-D or EXIT command.
3. If you used rarp, make sure that you started the rarpdaemon using the rarpd, rarpd -a, in.rarpd -a , orequivalent command. Verify that the /etc/ethersfile contains the correct Ethernet address and that theTROY XCD print server name matches the name in the /etc/hosts file.
4. If you used bootp, make sure that bootp is enabled (i.e.,the “#” is removed from the bootp entry) in the/etc/inetd.conf file. Verify that /etc/bootptabfile is correctly configured.
5. Also verify that the host computer and the print serverare either on the same subnet (for example, if the printserver has a subnet mask of 255.255.255.0, the host musthave the same subnet mask) or that the router is properlyconfigured to pass data between the two devices.

Troubleshooting 14-9
6. Make sure that the /etc/printcap file (ifapplicable) is typed in correctly. In particular, look formissing ": " and "\ " characters, because a small erroranywhere in the file can have major consequences. Alsocheck the /usr/spool directory to make sure that youhave created a valid spool directory.
7. If you are using a Berkeley-based UNIX, make sure thatthe daemon is started on Berkeley based systems with thecommand lpc start printer , where printer is thename of the local print queue.
8. If you are using an AT&T-based UNIX, make sure theprinter is enabled (enable printer , where printer isthe name of the local print queue).
9. Make sure that the lpr/lpd remote line printer service arerunning on the host computer (refer to your hostcomputer documentation for information on how to dothis).
10. If you cannot print from DEC TCP/IP Services for VMS(UCX), make sure that you have version 2.0B or later ofthis software, because earlier versions will not work withthe TROY XCD print servers.
11. If jobs are run together or do not eject from the printer,try setting the service (remote printer) with EOT set tothe appropriate printer reset string. This string is number4 (<ESC>%-12345X) for all newer HP printers. Forexample:
SET SERVICE BINARY_P1 EOT 4

14-10 Troubleshooting
Important: Do not use the above command if you havea LaserJet II, IID, III, or IIID printer. Instead, use anEOT 2 for PCL jobs or 3 for PostScript jobs.
12. If the lines of a text file are staggered, make sure thatyou have specified a remote printer (rp ) name of TEXTin your /etc/printcap file.
13. If you are having trouble printing long jobs (over 1MB),add the line mx#0 to your /etc/printcap fileentry. Important: Sun Solaris has a bug with lpr/lpdprinting and long jobs. This bug affects any disklessprint server, not just TROY XCD. The solution is to usethe HP JetDirect UNIX host printing utilities asdescribed in the Raw TCP Port section at the end ofChapter 4.
14. If you are using the raw TCP port and are experiencingintermittent queue stalling problems, make sure thatqueueing is enabled on the service (do a SHOWSERVICE command from the remote console, and note if"Q" is listed in the OPT column for the desired service).If it is not, enable queueing with the command SETSERVICE servicename QUE ENA command.
15. If the wrong IP address is loaded, check your network forfile servers that have DHCP, BOOTP, or rarp enabled,and make sure that these file servers are not set up toload IP addresses into the print server. Also, make surethat you do not use the command SET IP BOOT 0 todisable TCP/IP broadcasts; instead, you should use thecommand SET IP METHOD STATIC (unpredictableresults will occur otherwise).

Troubleshooting 14-11
16. If you have problems with queues locking up when theactive print job is deleted, try setting the IP timeout toone minute with the console command SET IPTIMEOUT 1 .
17. There were a number of lpr/lpd-related problems fixed inthe V3.46 firmware. Therefore, if you are experiencingintermittent queue problems and you have an olderversion of firmware, TROY XCD recommends that youupgrade to 3.46 or later.
NetWare TroubleshootingIf you cannot print from NetWare and you have checked thehardware and network as described in the previous steps,first verify that the print server is attached to the serverqueue by going to PCONSOLE, selecting PRINT QUEUEINFORMATION, and then CURRENTLY ATTACHEDSERVERS. If the TROY XCD print server does not appearin the list of attached servers, then check the following (notethat it is always a good idea to try deleting and recreatingthe print server and creating a new print queue in order toeliminate the possibility of setup errors):
1. If you cannot create a print queue, make sure that youhave sufficient NetWare privileges. With NetWare 3.12and earlier, you MUST be logged in as SUPERVISOR(not someone with Supervisor privileges). If you arehaving problems creating queues with NetWare 4.xx andlater, try logging in as ADMIN. Also, make sure thatyou are not trying to run XAdmin32 with the MicrosoftNetWare client (you must use the Novell 32-bit client).
2. If you changed the login password, you must change thepassword in both the TROY XCD print server (using the

14-12 Troubleshooting
SET NETWARE PASSWORD command) and in the fileserver (using the PCONSOLE Print Server
Information Change Password command).
3. Make sure that you have enabled at least one NetWarefile server using the SET NETWARE SERVER servername
ENABLED command.
4. Have you exceeded your NetWare user limit?
5. If you have V3.00 or earlier firmware , make sure thatyou enabled either 802.3 or Ethernet II frames on yourfile server, particularly if you have a NetWare 3.12 or4.xx file server (since these NetWare versions default to802.2), since these versions of firmware do not support802.2 or SNAP frames. Also, if you are using NetWare4.xx, make sure that you have enabled bindery emulationon the file server.
6. Make sure that the print server name you used inPCONSOLE exactly matches the name that is configuredin the print server, and make sure it is defined as a QueueServer for the print queue.
7. If you are running both 802.3 and Ethernet II frames ondifferent file servers on your network, there is apossibility that the print server may not make aconnection to the desired file server. Try forcing theframe type to the desired one using the SET NETWARE
FRAME command from the TROY XCD print serverremote console.
8. If you are losing portions of your print job and you areusing the DOS NetWare drivers, try setting the

Troubleshooting 14-13
TIMEOUT parameter in your CAPTURE statement to ahigher value (at least 50 seconds for Windows).
9. Because of a bug in the vendor's software driver, fileservers equipped with certain models of SMC Ethernetcontrollers may crash when a TROY XCD print server isconnected to the network. This problem, which primarilyaffects EISA-based controllers made in 1993 or earlier, isnot specific to TROY XCD print servers, and can befixed by upgrading the file server with the latest SMCdrivers. Contact SMC technical support at (516) 435-6250 for additional information and instructions on howto download the new drivers from the SMC bulletinboard.
AppleTalk and PATHWORKS forMacintosh TroubleshootingIf you cannot print from an AppleTalk or PATHWORKS forMacintosh computer, you have checked the hardware andnetwork as described in the previous steps, then check:
1. Make sure that you are running Phase 2 AppleTalk andthat you have selected the correct network interface fromthe Network Control Panel on the Macintosh.
2. If you have a large network, make sure that you have theLaser Writer V8.2 or later drivers (or equivalent driversuch as the HP LaserJet 8.2), since earlier versions maycause PostScript errors. Also, verify that you get thecorrect printer information when you select Printer Infofrom the Setup button in the Chooser.

14-14 Troubleshooting
3. If you are using the LaserWriter 8.4 (or above) driversand the print server is at firmware revision 3.34 orearlier, then upgrade the print server to the latestfirmware.
4. Make sure that you have selected the correct PrinterDescription File (PPD) from the Chooser (otherwisePostScript errors may result)
5. If you are running PATHWORKS FOR Macintosh verifythat you can print directly from VMS and that you haveV1.1 or later of PATHWORKS.
6. Verify that you have selected the correct AppleTalk zone.Because the TROY XCD print server gets its zoneinformation from router broadcasts, it may not be in thezone you expect, and will therefore not show up in theChooser. If this is the case, you may need to force thezone name with the SET APPLETALK ZONEcommand described in Appendix A.
7. Verify that you have a PostScript printer, becauseAppleTalk and PATHWORKS for Macintosh requirePostScript. If you have a printer with automatic languageswitching, the printer may need to be manually forcedinto PostScript mode via the printer front panel.
8. If you are using PATHWORKS for Macintosh, make surethat you specified the LAT port (not the normalname@zone) as the destination.
9. Make sure that PATHWORKS for Macintosh softwarehas been upgraded for support of the Macintosh System 7finder (a patch is required; the easiest way to determinethis is to find out if you have Macintosh computers with

Troubleshooting 14-15
System 7 that are successfully printing to other printersvia PATHWORKS for Macintosh).
10. If you are using older versions of the LaserWriterdrivers, verify that the Laser Prep versions on allMacintosh computers that need to print to the TROYXCD print server are the same (not required withLaserWriter 8.xx drivers).
11. Make sure that printer supports bidirectionalcommunications. If it does not, use the consolecommand SET SERVICE servicename RECEIVE
ENABLED to enable AppleTalk spoofing (spoofing is notsupported with PATHWORKS FOR MACINTOSH).
If you have PATHWORKS for Macintosh, you can verifybidirectional communications from the VMS system asfollows:
- Stop the queue (STOP/QUEUE/RESET queuename )
- Connect to the device (SET HOST/DTE LTAxxx: )- When you get the message that you are connected,
type a <CTRL-T> to query the printer- You should get a response back similar to
%%[ status: idle ]%% . If you do not get thisresponse back, make sure that the printer is forcedinto PostScript mode; if necessary, do a SET
SERVICE servicename RECEIVE DISABLED to putthe TROY XCD print server back into bidirectionalmode.
- To exit the SET HOST/DTE mode, type a <CTRL-\>.Then try printing again.
If the above does not work, verify that the printer supportsbidirectional communications over the parallel port.

14-16 Troubleshooting
12. If you get an error message when printing fromPATHWORKS for MACINTOSH that indicates that thename cannot be found, the probably cause is that theLAT port is set as spooled (i.e., the queue was set upusing the SET DEVICE/SPOOL LTA xxx command). Ifthis is the case execute the STOP/QUEUE/RESET
queuename followed by the SET DEVICE/NOSPOOL
LTAxxx command.
13. If you are having problems printing scanned images,bitmapped graphics, or other binary graphics, you willneed to enable binary graphics support on the AppleTalkservice using the command SET SERVICEservicename FILTER 4 . The printer must supportthe HP Tagged Binary Communications Protocol.
14. There is a problem with HP printers introduced 1998 orlater that use Xionics PostScript rather than AdobePostScript. With these printers, which include theLaserJet 4000, 5000, and 8000, jobs will print OK but theprinter will be busy for several more minutes. Thesolution is to upgrade to V3.56 or later firmware (makesure that an EOT of 4 or 3 is enabled on the AppleTalkservice).
Windows NT/LAN Server TroubleshootingIf you are having trouble printing with Windows NT or LANServer, check the following:
1. Make sure that you can ping the TROY XCD print serverusing the DOS or OS/2 command PING ipaddress ,where ipaddress is the IP address of the TROY XCD

Troubleshooting 14-17
print server. If you cannot ping the print server, you willnot be able to print.
2. Make sure that TCP/IP and lpr printing are installed andrunning on the Windows NT system or the LAN Serverfile server.
3. If you are having problems printing to the TROY XCDprint server from a client PC that is connected to aWindows NTAS or LAN Server file server, verify that youcan print a job directly from the DOS or OS/2 prompt onthe file server. If you can print from the file server but notfrom the client, then the problem is probably with theNetBEUI communications rather than with the TCP/IPlink to the TROY XCD print server. Check your fileserver network setup (for example, make sure that you canprint from the client to other printers on the network.
4. If you have problems with Windows NT queues lockingup when the active print job is deleted, try setting the IPtimeout to one minute with the console command SETIP TIMEOUT 1 .
5. There were a number of lpr/lpd-related problems fixed inthe V3.46 firmware. Therefore, if you are experiencingintermittent queue problems and you have an older versionof firmware, TROY XCD recommends that you upgrade to3.46 or later.
Windows 95/98 Peer-to-Peer TroubleshootingIf you are having trouble printing on a Windows 95 Peer-to-Peer network, check the following:

14-18 Troubleshooting
1. If the print server does not show up under JetAdmin on aWindows 95/98 Peer-to-Peer network, try removing all ofthe Windows 95 network software from the NetworkControl panel and then reinstalling them as follows:
- First install the IPX/SPX-Compatible Protocol, theClient for Microsoft Networks , and the networkadapter card driver.
- Restart the system, and then add the HP JetAdminservice.
2. Because of the many changes that have been incorporatedin Windows 95/98 Peer-to-Peer printing since itsintroduction, it is a good idea to upgrade to the latestversion of JetAdmin (available on the HP web site athttp://www.hp.com ).
LAT TroubleshootingIf you cannot print from a VMS system and you havechecked the hardware and network as described in theprevious steps, then check the following (note that it isalways a good idea to try creating a new queue with adifferent LAT port to reduce the possibility of setup errors):
1. If the queue pauses (Dataset Hangup or Error WritingAs) when you try to print, check that the TROY XCDprint server node name and port name (or service name)agree with the names defined for the VMS print queue inLATCP or for ULTRIX print queue in the /etc/printcap file (ts parameter) and lcp -h command.The names MUST EXACTLY agree in order for printing

Troubleshooting 14-19
to work (in the case of ULTRIX, the case of the lettersmust also match exactly).
2. If you are using DECprint Supervisor (DCPS) make surethat the printer is forced into PostScript mode (DCPSwill not work with printers in auto language switchingmode and will not work with PCL-only printers).
3. Make sure LAT is enabled for outgoing connections. ForVMS, enter LATCP and type SHOW NODE at the Latcp>
prompt. The display should show Outgoing
Connections Enabled. If it does not, you should typeSET NODE/CONNECTIONS=BOTH. If you are usingULTRIX, make sure that you have started LAT with thelcp -s command and that you have enabled host-initiated connections with the lcp -h command.
4. Make sure that there are no duplicate LAT node names orLAT port numbers. Try changing the node name to adifferent name and/or creating a different LAT port to fixthe problem. Also avoid having multiple print queuesthat use the same LAT port.
5. If you are running ULTRIX, make sure that the/etc/printcap file is typed in correctly. Inparticular, look for missing ": " and "\ " characters,because a small error anywhere in the file can have majorconsequences. Also check the /usr/spool directoryto make sure that you have created a valid spooldirectory.
6. If you are running ULTRIX, check your tty device tomake sure that :

14-20 Troubleshooting
- The tty is a valid LAT tty (execute the commandfile /dev/tty* | grep LAT and observe if thedevice has a "39" in its description).
- The device is in the /etc/ttys file and in the/dev directory.
- The same tty number was entered throughout theconfiguration process.
7. Intermittent random queue pauses can be caused if theVMS LAT port is not set up as spooled device. TypeSHOW DEVICE LTAxxx from the VMS console; if thedevice is not spooled, type SET DEVICE/SPOOL LTA xxx
command. (One exception: PATHWORKS forMACINTOSH queues should not be set up with the LTAdevice set as spooled).
8. Make sure that PROCESSOR=LATSYM is enabled on yourVMS print queue if you get any of the followingsymptoms:
- The queue pauses when you power off the printserver for no apparent reason.
- The print server generates excessive LAT traffic onthe network
- Only one host computer can access the print serverand others are locked out
9. If the VMS LAT symbiont abruptly terminates and shutsdown one or more queues, the problem may be the resultof the inability of the LAT symbiont to handle the load

Troubleshooting 14-21
(particularly if you are printing heavy graphics). Trycreating multiple LAT processors (copy theLATSYM.EXE file) and splitting the load among theseprocessors.
10. If your VMS graphics printouts are distorted, make surethat you have the LTA port set for PASSALL,PASTHRU, and TAB.
11. If you are having trouble printing PostScript files withVMS (PostScript errors or no printout), make sure thatyou have the form set for NOTRUNCATE andNOWRAP. Also, make sure you are not trying to print aflag page (unless you are using DCPS) since the flagpage in the LAT symbiont is a non-PostScript text file.
12. WordPerfect for VMS will cause problems printing toany network printer, not just TROY XCD. Specifically:
• If WordPerfect for VMS is installed on VMS 6.xx,you will not be able to print to the print server frommore than one VMS system, even for non-WordPerfect print jobs. This is because WordPerfectdoes not properly break the circuit at the end of eachjob. The only solution is to de-integrate theWordPerfect and VMS print queues on the hostcomputer, which often means removing WordPerfectentirely from the system. This is a known bug withWordPerfect; contact WordPerfect for possible fixes.
• If you have V6.1 of VMS and you are experiencingconsistent queue pauses, you need to upgrade toV3.21 or later firmware. This problem is generallyassociated with a WordPerfect for VMS bug.

14-22 Troubleshooting
13. If DECprint Supervisor jobs print very slowly, you needto upgrade the print server to V3.23E or later firmware.
14. If you are printing across a wide area network bridge (forexample, Vitalink) and you get paused or stalled queues,increase the TROY XCD print server circuit timer to 120milliseconds with the command SET SERVERTRANSMIT 120.
15. If you can print successfully from PATHWORKS usingDOS but have problems printing from Windows, tryincreasing the Device Not Selected and TransmissionRetry timeouts from the Windows Printer Manager(select Printer Setup, select the desired printer, andpress the Connect button).
Banyan VINES TroubleshootingIf you are having trouble printing with Banyan VINES, checkthe following:
1. Make sure that you have the Banyan VINES PCPrintsoftware option installed.
2. If there are more than two hops (i.e., more than tworouters) between the print server and the file server,make sure that you have changed the hop count to theappropriate number via XAdmin or the print serverconsole.
3. Use the VINES MUSER or MANAGE utility to verifythat the print server has logged in. If it has not, makesure that the StreetTalk login name configured in theprint server exactly matches the login name that was
Troubleshooting 14-23
configured using the MUSER or MANAGE utility on thefile server.
4. Verify that the StreetTalk name associated with the printserver service name exactly matches the name of the printqueue that was configured using the MSERVICE orMANAGE utility on the file server.
5. Check to see that you have not exceeded the user limit onyour Banyan file server (because the print server mustlogin as a user), that printing is enabled on the queue,and that there are no security restrictions on the fileserver that would prevent the print server from loggingin.
6. There is a problem with Banyan 7.1 and diskless printservers (not just TROY XCD) which causes the printserver to intermittently go into a logged out state. Thisproblem was fixed in V3.40E firmware, so upgrade theprint server to this firmware version or later.
7. There was a problem with firmware versions 3.40B andearlier in which the print server would not log into verylarge networks. If you are experiencing this problem,upgrade the print server to the latest firmware.
8. Print servers with version 3.37 or earlier firmware willnot log into VINES 7.0 or later file servers. The solutionis to upgrade the print server to the latest firmware.
9. If you are running both NetWare and VINES on your clientPC, XAdmin will default to NetWare. To force XAdminto look at Banyan-enabled print servers, select Run fromthe Windows 95 Start menu. Enter the appropriate

14-24 Troubleshooting
path plus the command xadmin -b (for example,"\program files\TROY XCD\xadmin\xadmin-b" ) to start XAdmin in Banyan mode (alternatively,you may modify the Target in the Properties of theXAdmin shortcut with this command).
Customer Support and Warranty 15-1
15Customer Support andWarranty
Customer SupportTROY XCD, Inc. offers several customer support options toassist you in the event you experience difficulties with yourTROY XCD print server, including telephone support, repairservices, extended warranty, and advance replacement.
Worldwide Web Support
The TROY XCD worldwide web site provides a quick andeasy way to answer many common technical questions. Itincludes a wide variety of technical support tips, as well ascopies of product manuals, product literature, and firmwareload images.
The web site is located at http://www.troyxcd.com .
Whom to CallYour first point of contact for technical support is theDistributor or Dealer from whom you bought your TROYXCD print server. They are familiar with your needs, andwill generally be able to provide you with the fastest andmost comprehensive support.

15-2 Customer Support and Warranty
If your Distributor or Dealer is unable to answer yourquestions or is for some reason not available, then contactTROY XCD directly at 949-399-0820 (fax: 949-399-0825; e-mail [email protected]). Our technical support line isopen weekdays 8 AM to 5 PM Pacific Time.
Before contacting Technical support, please check theTroubleshooting chapter of this manual or the TROY XCDweb site to isolate any problems and be sure to write downany error messages. Also, make sure that you have the serialnumber of the product (located on the product label on thecard).
Returning ProductsIf you need to return an TROY XCD product for any reason(failures, incorrect shipments, etc.), first contact TROY XCDat (949) 399-0820 and request a Return AuthorizationNumber. Make sure that you put this number on the outsideof the shipping container you use to return the product and (ifout-of-warranty) on your purchase order. You will also beasked for the serial number of the defective print server.Ship the unit freight prepaid to:
TROY XCD, Inc.Returns Department1692 BrowningIrvine, CA 92606-4809 USA
(Adequate insurance is recommended)
If the unit is not in warranty, you will be billed for the standardrepair charges. If you do not have a valid TROY XCD accountnumber, you may be asked for payment in advance (Mastercard,Visa, American Express, check, or money order).

Customer Support and Warranty 15-3
The TROY XCD Advance Replacement Program is nowincluded at no extra cost during the warranty period. Thisprogram allows you to get an immediate replacement for adefective unit during the warranty period rather than waitinguntil TROY XCD has received the defective unit. To takeadvantage of this program you will need to fill out anAdvance Replacement form (available from TROY XCDTechnical Support) with details about the defective productand the problem, and then fax this form back to TROY XCDat (949) 399-0825.
WarrantyTo obtain the benefits of the Advance Replacement Programafter the warranty period has expired, the Extended ServiceProgram is available. This Program provides the samefeatures as the Advance Replacement program but also addsan extended warranty period. This program is also availablefor an annual fee; contact your distributor or TROY XCD forordering information.
With the Advance Replacement or Extended ServicesPrograms, you simply call TROY XCD at (949) 399-0820and give the Order Representative your account number. Anew card will be shipped to you immediately by expressfreight. You will be invoiced for the list price of a new unit.Ship the defective unit back prepaid to TROY XCD per the"Returning Products" section of this chapter. Upon receiptof the defective unit, TROY XCD will credit your account.
Units returned after 30 days will not qualify for a refund andwill be returned to you.

15-4 Customer Support and Warranty
TROY XCD print servers are warranted to be free of defectsin materials and workmanship for a period of one year . Thisperiod begins upon the date of shipment if the Hardware isinstalled by the Purchaser, or upon installation if theHardware is installed by TROY XCD. During the warrantyperiod, TROY XCD will repair or replace the unit at nocharge provided it is returned to TROY XCD freight prepaidas described in the "Returning Products" section of thischapter. To ensure prompt service, please fill out theenclosed warranty card.
The warranty on repaired products or replacement products is30 days or the last day of the warranty of the originaldefective product, whichever is longer.
This warranty does not apply if the Product has beendamaged by accident, misuse, natural catastrophe,modification, improper service, or conditions resulting fromcauses external to the Product. The warranty shall be void ifthe TROY XCD serial numbers have been removed.
DISCLAIMER OF WARRANTIES. THE ABOVEWARRANTIES ARE THE EXCLUSIVE WARRANTIES,AND NO OTHER WARRANTY, EXPRESSED ORIMPLIED, SHALL APPLY. TROY XCD SPECIFICALLYDISCLAIMS THE IMPLIED WARRANTIES OFMERCHANTABILITY AND FITNESS FOR APARTICULAR PURPOSE.
PURCHASER'S SOLE AND EXCLUSIVE REMEDY FORANY BREACH OF THIS WARRANTY, REGARDLESS OFTHE FORM OF ACTION, WHETHER CONTRACT, TORT,OR OTHERWISE, SHALL BE TROY XCD'SOBLIGATION TO REPAIR OR REPLACE AS SET FORTHABOVE.

Command Summary A-1
Appendix ACommand SummaryGeneral CommandsAlthough it is not normally necessary to change the print serverdefault parameters, you can change the configuration throughany following methods:
• DEC NCP or NCL Utility• TELNET• TROY XCD XCONFIG NetWare Utility• Serial Port
The general configuration procedure is the same regardless ofwhich method is used.
Certain print server NetWare parameters (such as theNetWare service name) can also be changed by using theHewlett-Packard JetAdmin utility or TROY XCD XAdminutility.
DEC NCP, NCL, ccr. To connect to the print serverconsole with the VMS NCP utility, use the followingcommands:
MCR NCPCONNECT VIA circuit PHY ADD ethernetaddress
where circuit is the circuit-ID of the VAX or Alpha (forexample, SVA-0 for most DEC workstations, MNA-0 forXMI systems, BNA-0 for BI systems, and QNA-0 for Q-BUSsystems) and ethernetaddress is the hardware address of the

A-2 Command Summary
print server (for example, 00-40-17-00-61-35). Type thecommand SHOW KNOW CIRCUITS at the NCP> prompt if youdo not know the circuit ID.
Newer OpenVMS systems use NCL instead of NCP. TheNCL command to connect to the print server console is:
SET HOST/MOP/CIRCUIT= circuit /ADD=ethernetaddress
ULTRIX systems use the addnode and ccr commands asfollows:
addnode xcdname -c circuit -h ethernetaddressccr xcdname
where xcdname is an arbitrary name for the print server(each print server on the network needs a unique name).
In all cases, you will get a message like Console
Connected or Remote Console Reserved when you areconnected. When you are connected, push RETURN orENTER to get the "#" prompt, enter the password ACCESS (itwill not print), and type anything in response to the Enter
Username> prompt. When you get the Local> prompt, youare ready to enter commands.
Note: The commands available are generally a subset of theones used on the DECserver terminal server. Note thatunlike the DECserver, there is no distinction between theSET and DEFINE commands or between the CLEAR andPURGE commands. Instead, when you type CTRL-D to exitthe remote console, any of these commands take effectimmediately and the results are stored permanently (forexample, it is not necessary to enter both a SET and aDEFINE to execute a command and save the results).

Command Summary A-3
TELNET. To connect to the print server using TELNET onUNIX, Windows NT, or most other TCP/IP systems, type:
TELNET ipaddress
at the UNIX system prompt, where ipaddress is the IPaddress of the print server. When you are connected, pushRETURN or ENTER to get the "#" prompt, enter thepassword ACCESS (it will not print), and type anything inresponse to the Enter Username> prompt. When you getthe Local> prompt, you are ready to enter commands.
XCONFIG. To connect to the print server using the TROYXCD XCONFIG NetWare utility, insert the TROY XCDPrint Server Software diskette in Drive A and type:
A:XCONFIG
at the DOS system prompt. If you have only one printserver, you will be immediately connected. If you have morethan one print server, you will be given a list of availableprint servers. Type the number of the print server to whichyou want to connect. When you are connected, When youare connected, enter the password ACCESS (it will not print)at the "#" prompt, and type anything in response to the Enter
Username> prompt. When you get the Local> prompt, youare ready to enter commands.
GENERAL SERVER COMMANDS
CLear FAtalDeletes fatal error log
CLear PAsswordRemove console password

A-4 Command Summary
CLear POrt portname JOBClears current entry in the print server's internal queue for the specifiedportname (P1 for the first parallel port, S1 for the first serial port, P2 forthe second parallel port, and S2 for the second serial port)
CLear SERVEr STRing nRemove BOT/EOT string (see Appendix B)
EXIT/^DExits print server console
HElpProvides information on available commands
SET DEFAULTSets print server parameters to factory defaults
SET LOAD DIsableDisables firmware reload after exit
SET LOAD ENableEnables firmware reload after exit
SET LOAD HOst <name>Sets node name of boot host for (NetWare firmware load)
SET LOAD IP aa.bb.cc.ddSets IP address of load host (TCP/IP firmware load)
SET LOAD SOftware <filename>Sets host filename of firmware to load
SET LOAD XModemBegins XModem serial download of new firmware
SET PAssword <password>Sets console password (default password is ACCESS)
SET PORT <parallelportname> BIDir [EN|DIS]Enables/disables bidirectional communications on parallel port, where<portname> is P1 for first parallel port or P2 for second parallel port

Command Summary A-5
SET PORT <parallelportname> DMA [EN|DIS]
Enables/disables DMA support on parallel port (not available on PonyPrint Server Plus or XConnect II Lite)
SET PORT <parallelportname> FSTB [EN|DIS]Enables/disables fast strobe mode support on parallel port
SET PORT <parallelportname> NBUF [EN|DIS]Enables/disables no buffer support on parallel port
SET PORT <serialportname> FLow [NO|XO|CT|DS]
Set serial port flow control to NONE, XON/XOFF, CTS, or DSR
SET PORT <serialportname> PArity <parity>Set serial port parity to NONE, EVEN, ODD, MARK, or SPACE
SET PORT <serialportname> SIgnal [EN|DIS]Enables/disables DTR signal check on serial port
SET PORT <serialportname> SPeed <baudrate>Sets serial port baud rate from 300 - 57600 bits per second
SET PORT <serialportname> STop [1|2]Sets serial port stop bits per character
SET PROtect <password>Set console protection password to prevent access to SET commands (useUNPROTECT command to access SET commands)
SET SERVEr DEscriptionSets node description string displayed with SHOW SERVER command
SET SERVEr STRing n "..."Defines server BOT/EOT string (see Appendix B)
SET SERVIce <servicename> <protocol> [EN|DIS] Enable or disables specified protocol on the specified service.
SET SERVIce <servicename> BOT nnSet service BOT string to nn (see Appendix B)

A-6 Command Summary
SET SERVIce <servicename> EOT nnSet service EOT string to nn (see Appendix B)
SET SERVIce <servicename> FIlter nnSet service filter to nn (see Appendix B)
SET SERVIce <servicename> FMS nnSets filter 1 match string to nn
SET SERVIce <servicename> FRS nnSets filter 1 replace string to nn
SET SERVIce <servicename> NAme <newname>Changes service name
SET SERVIce <servicename> POrt <portname>Change service port (<portname> is P1 for the first parallel port, S1 for thefirst serial port, P2 for second parallel port, and S2 for the second serialport
SET SERVIce <servicename> RECeive [EN|DIS]Set receive only mode on specified service
SET SERVIce <servicename> TCP nnSets TCP port number of service
SHow FAtalShow fatal error log
SHow FReeShows memory available
SHow LOAdShows firmware update parameters
SHow POP3Shows POP3 parameters
SHow POrtShows port parameters
SHow POrt <name> STAShows current port status.

Command Summary A-7
SHow SERVErShows server and LAT parameters
SHow SERVEr COuntersShows server statistics
SHow SERVEr QUeueShows print server internal queue
SHow SERVIce Shows service Parameters
SHow SMTPShows SMTP parameters
SHow SNMP Shows SNMP variables
SHow TEstpagePrints test page
SHow VErsionShows server firmware version
UNPROtectAllows system manager to temporarily access SET commands when remoteconsole is in protected mode (See SET PROTECTION command). TheSET DEFAULT command can be used to permanently disable the protectedmode.
ZEroZeroes statistical counts
AppleTalk Commands
SET APpletalk [EN|DIS]Enables or Disables Appletalk Processing
SET APpletalk ZOne "<name>" Set Appletalk zone name

A-8 Command Summary
SET LOCaltalk [EN|DIS]Enables/disables LocalTalk port
SET APpletalk [EN|DIS]Enables/disables Appletalk processing
SET SERVIce <servicename> APP [EN|DIS]Enables or disables AppleTalk jobs on specified service
SET SERVIce <servicename> RECEIVE [EN|DIS]Enables or Disables bidirectional communications on service.
SHow APpletalkShows AppleTalk parameters
SHow LOCaltalkShows LocalTalk parameters
Banyan VINES Commands
CLEAR BANYAN PAssword <password>Clears Banyan login password
CLEAR SERVIce <servicename> STreettalkDisables the Banyan protocol on the specified service.
SET BANyan LOgin <loginname>Sets StreetTalk login name of print server.
SET BANyan PAssword <password>Sets login password of print server.
SET SERVIce <servicename> STreettalk <queuename>Enables the Banyan protocol on the specified print server service andassociates this service with the StreetTalk name of a given print queuethe VINES file server.
SET BANyan HOp nnSets number of hops between the print server and the Banyan file server(default value is 2).

Command Summary A-9
SET BANyan [EN|DIS]Purpose: Enables or disables Banyan protocol on print server. Banyanis enabled by default.
SET BANyan TImeout nnSets job timeout (in seconds).
SHow BANyan Shows Banyan protocol settings and statistics.
DLC/LLC Commands
SET DLC [EN|DIS] Enables/disables DLC/LLC protocol
SHOw DLC [EN|DIS] Shows DLC/LLC parameters
LAT Commands
CLear/PUrge/DELete SERVEr GRoup numberRemoves LAT group membership
SET LAT RB nnSets LAT receive buffer size (0-5)
SET LAT TB nnSets LAT transmit buffer size (0-5)
SET/DEFine/CHange SERVer GRoup mm[-nn]Add to current LAT group membership
SET/DEFine/CHange SERVEr KEepalive nnLAT keepalive timer (sec)
SET/DEFine/CHange SERVEr NAme <name>Sets LAT Node name
SET/DEFine/CHange SERVEr TImeout nnLAT inactivity timeout (sec)

A-10 Command Summary
SET/DEFine/CHange SERVEr TRansmit nnLAT transmit interval (msec)
SET/DEFine/CHange SERVIce <servicename> LAT[EN|DIS]Enables/disables LAT jobs on specified service
SHow LATShows LAT parameters
NetBEUI Commands
CLear NETBeui DOMain <domainname>Clears domain name
Set NETBeui DOMain <domainname>Sets NetBEUI domain name
Set NETBeui [EN|DIS]Enables or disables NetBEUI
Set SERVIce <servicename> NETBeui [EN|DIS]Enables or disables NetBEUI on service
SHow NETBeuiShows NetBEUI parameters
NetWare Commands
CLear NETWare SErver <server>Removes specified NetWare file server from print server access list.
CLear NETWare QServer <fileserver> ON <servicename>Removes queue server mode on service
CLear SERVIce <servicename> CONtextRemove NDS context
CLear SERVIce <servicename> TREERemove NDS tree
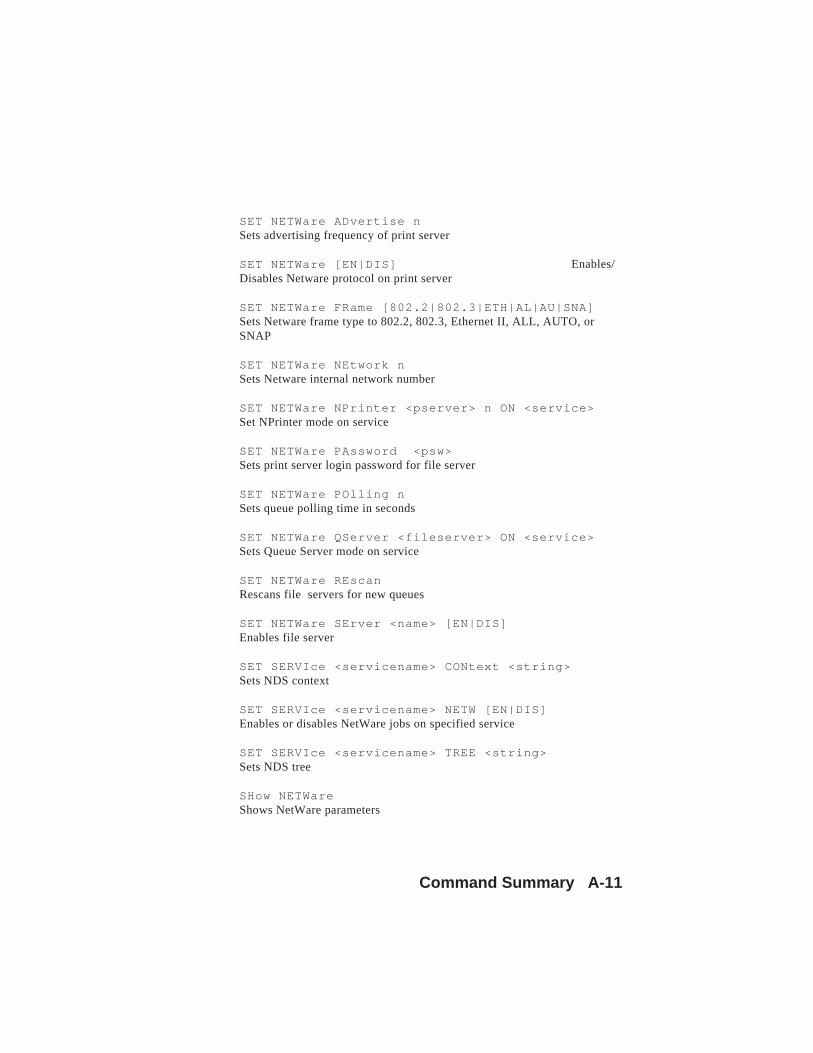
Command Summary A-11
SET NETWare ADvertise nSets advertising frequency of print server
SET NETWare [EN|DIS] Enables/Disables Netware protocol on print server
SET NETWare FRame [802.2|802.3|ETH|AL|AU|SNA]Sets Netware frame type to 802.2, 802.3, Ethernet II, ALL, AUTO, orSNAP
SET NETWare NEtwork nSets Netware internal network number
SET NETWare NPrinter <pserver> n ON <service>Set NPrinter mode on service
SET NETWare PAssword <psw>Sets print server login password for file server
SET NETWare POlling nSets queue polling time in seconds
SET NETWare QServer <fileserver> ON <service>Sets Queue Server mode on service
SET NETWare REscanRescans file servers for new queues
SET NETWare SErver <name> [EN|DIS]Enables file server
SET SERVIce <servicename> CONtext <string>Sets NDS context
SET SERVIce <servicename> NETW [EN|DIS]Enables or disables NetWare jobs on specified service
SET SERVIce <servicename> TREE <string>Sets NDS tree
SHow NETWareShows NetWare parameters

A-12 Command Summary
PrintraNet Commands
SET POP3 ADdress aa.bb.cc.dd Sets POP3 server IP address
SET POP3 [ENable|DISable]Enables/disables POP3
SET POP3 POlling nnSets POP3 server polling frequency
SET POP3 NAme <name>Sets POP3 mailbox
SET POP3 PAssword <password>Sets POP3 mailbox password
SET POP3 TImeout nnSets POP3 message timeout
SET SMTP ADdress aa.bb.cc.ddSet SMTP server IP address
SET SMTP [ENA|DIS]Enables or disables SMTP protocol
SNMP Commands
CLear SNMP CONtact <string>Removes SNMP SysLocation
CLear SNMP CONtact <string>Removes SNMP SysContact
SET SNMP CONtact <string>Set SNMP SysContact
SET SNMP LOCation <string>Removes SNMP Syscontact

Command Summary A-13
TCP/IP Commands
SET IP ACcess [EN|DI|ALL] aa.bb.cc.dd {MAskee.ff.gg.hh}Allows or prevents specified IP address from accessing print server.
SET IP ADdress aa.bb.cc.ddSets IP address of print server
SET IP BAnner [EN|DIS]Enables or Disables trailing banner page for lpr/lpd jobs
SET IP BOot nNumber of DHCP/BOOTP/RARP tries
SET IP [EN|DIS]Enables or Disables IP Processing
SET IP MEthod [AUTO|BOOTP|RARP|STATIC]Sets method of getting IP address
SET IP PIng aa.bb.cc.ddTest connection to IP host
SET IP RArp nnSets procedure used by print server when obtaining its IP address. Bydefault the IP address is set along with a default subnet mask and a routeraddress that is the same as the address of the load host. By setting nn to 1,the subnet mask is not set. If nn is set to 2, the router address is not set. Ifnn is set to 3, neither the subnet mask nor the router address is set.
SET IP ROuter aa.bb.cc.ddSets default router address
SET IP SUbnet aa.bb.cc.ddSets subnet mask
SET IP TImeout nSets inactivity timeout (minutes)
SET IP WIndow nnSets LPD/TCP maximum window size

A-14 Command Summary
SET SERVIce <servicename> IP [EN|DIS]Enables or disables TCP/IP jobs on specified service
SET SERVICE <servicename> TCP nn
Sets TCP port number (>1023) on service
SHow IPShows LPD/TCP/TELNET Parameters
SHow IP ACcessShows IP addresses that are allowed to access print server

Using Services B-1
Appendix BUsing Services (lpd-Plus)OverviewA service is a resource that can be accessed by computersthat wish to print the print server. TROY XCD external printservers provide the following predefined services (do a SHOW
SERVICE command in the print server remote console to get alist of available services; note that the serial port serviceswill only be displayed if the serial port has been enabled forprinting; the XConnect 100 will also display additionalsimilar services for the second parallel and serial ports):
Service DefinitionXCD_xxxxxx_P1 Parallel port binary serviceBINARY_P1 Parallel port binary serviceTEXT_P1_TX Parallel port TCP/IP text service (adds
carriage return after each line feed)POSTSCRIPT_P1 Parallel port PostScript service
(switches PJL-compatible printer toPostScript mode)
PCL_P1 Parallel port PCL service (switchesPJL-compatible printer to PCL mode)
XCD_xxxxxx_P1_AT Parallel port AppleTalk serviceXCD_xxxxxx_S1 Serial port binary serviceBINARY_S1 Serial port binary serviceTEXT_S1 Serial port TCP/IP text service (adds
carriage return after each line feed)POSTSCRIPT_S1 Serial port PostScript service
(switches PJL-compatible printer toPostScript mode)
PCL_S1 Serial port PCL service (switchesPJL-compatible printer to PCL mode)
XCD_xxxxxx_S1_AT Serial port AppleTalk service

B-2 Using Services
where "xxxxxx" is the last six digits of the Ethernet address(for example, XCD_009C53_P1). If the LN03 option isinstalled on an XConnect II (this is not applicable to theXConnect 100), the service names for the parallel portservice ends in "LN" instead of "P1" (for example,XCD_033355_LN). Note that any of the services, not justthe user-defined ones, can be modified to meet a user'sparticular requirements.
TROY XCD print servers provide the powerful capability tocustomize any of the services to meet specific userrequirements through the use of setup and reset strings.Such strings are printer command sequences that are sent tothe printer before or after the print job. For example, youcould define one of the services to provide landscape modeprinting by defining a setup string that contains theappropriate command to put the printer into landscape mode.
The print server provides several predefined strings forpopular PCL, PostScript, and PJL (the Page Job Languageused by new Hewlett-Packard and other printers) commands.These include (do a SHOW SERVER STRING command in theremote console to see the available strings):
No. String Definition0 (special) Using this number causes
printer not to be automaticallyreset at the end of each job.
1 NULL Null string2 \1BE PCL reset (<ESC>E )3 \04 PostScript reset (CTRL-D)4 \1B%-12345X PJL UEL5 @PJL Enter PJL mode6 Enter Language= PJL language switch7 PCL\0A PJL PCL command8 Postscript\0A PJL PostScript command9 \FF\04\FF\05\FF\06\FF\07 Enter Language=PCL

Using Services B-3
10 \FF\04\FF\05\FF\06\FF\08 Enter Language=PostScript11 \0C Formfeed
To define a new string, use the command:
SET SERVER STRING number “ string ”
where number is the number of the string (12 through 31)and string is the desired string (must be enclosed in quotationmarks).
A given string can include hexadecimal characters bypreceding the value with a “\” character. The next twocharacters after the “\” will then be interpreted as thehexadecimal value of a character. For example, to specify<ESC>E as string number 12, you would enter:
SET SERVER STRING 12 “\1BE”
Please note that when you associate a string number with aservice, the new string number completely replaces anyprevious string numbers. Also, if you are using one of thepredefined PostScript or PCL services, the new string willnullify the language switching function of these services.
However, you can combine several string numbers togetherby preceding the string number with “\FF”. For example, ifyou defined string number 21 as "\1B" (<ESC>), and stringnumber 22 as “&l1O”, you can create a new string number23 that contains <ESC>&l1O (the PCL landscape modecommand) by entering:
SET SERVER STRING 23 “\FF\15\FF\16”

B-4 Using Services
Note that the string numbers within the quotation marks areexpressed in hexadecimal when used with this command.
To associate a string with the service, use the followingcommands:
SET SERVICE servicename BOT stringnumberSET SERVICE servicename EOT stringnumber
where servicename is the name or number of the service andstringnumber is the number of the string as defined above.The first command (BOT) adds the specified string to thebeginning of the job, while the second command (EOT) addsthe specified string to the end of the job. A given service canhave both a setup and reset string associated with it.
To clear a string number, type:
CLEAR SERVER STRING stringnumber
To clear a setup or reset string, set the string number to 1(the null string):
SET SERVICE servicename BOT 1SET SERVICE servicename EOT 1
Enabling Protocols on a ServiceYou may enable or disable protocols that can access a givenservice with the following commands:
SET SERVICE name LAT ENABLED
SET SERVICE name IP ENABLED
SET SERVICE name NETWARE ENABLED

Using Services B-5
SET SERVICE name APPLE ENABLEDSET SERVICE name NETBEUI ENABLEDSET SERVICE name DLC ENABLED
where name is the name or number of the service (BanyanVINES services are slightly more complex to configure;refer to the Banyan chapter in this manual for details). Do aSHOW SERVICE command to see the enabled protocols. Notethat a given service must have at least one protocol enabled.
Adding Filters to a ServiceA filter is a program built into the print server that performsa specific function. The following filters are available:
filter no. Description1 This filter substitutes one user-specified
character string for another character string.By default, it substitutes a carriage returncharacter plus a linefeed characterevery time a linefeed character isencountered in the data stream. It is usefulfor printing UNIX text files, because suchfiles do not have carriage returns at the endat the end of lines.
filter no. Description2 This filter species that AppleTalk can be used
on the service.
filter no. Description3 This filter converts a text file to PostScript
for use with PostScript-only printers

B-6 Using Services
filter no. Description4 This filter enables the HP Tagged Binary
Communications Protocol to allow AppleTalkbinary jobs to be printed via the parallel port.
filter no. Description5 This filter enables LN03 emulation on the
specified service (XConnect 100 models only)
The service TEXT_pp is predefined with the text filter, whilethe service XCD_xxxxxx_pp_AT has the AppleTalk filterenabled. To use a filter with other services, use thefollowing command:
SET SERVICE name FILTER fltrno ENABLED
where name is the name of the service and fltrno is thenumber of the filter (e.g., 1 for the text filter).
Changing the Service NameThe default service names are rather long and difficult toremember. If you want to change a service name tosomething more meaningful, execute the following commandfrom the print server remote console:
SET SERVICE oldname NAME newname
Using Service Names with LAT, TCP/IP, orNetWareTo use a service in LAT, specify the /SERVICE optioninstead of the /PORT option when defining the LATCP port.For example:

Using Services B-7
LATCP> CREATE PORT LTA555LATCP> SET PORT LTA555/NODE=XCD_0009C3-/SERVICE=BINARY_P1
To use services from TCP/IP, specify the service name as theremote printer or "rp" parameter in the printcap file or theprinter setup program (e.g., SAM or SMIT). Remember thatif you want to print text files to a UNIX service, you shouldenable the TEXT filter (filter number 1).
To use a service with NetWare, use PCONSOLE to specifythe default NetWare service name as one of the print serversfor the queue (this service is XCD_xxxxxx_P1 by default,where "xxxxxx" is the last six digits of the Ethernet address).If you want to use a different service, you must also specifythis service as one of the print servers for the print queue.
Using the Character Substitution FilterThe character substitution filter (filter 1) allows a user tosubstitute any text string for any other text string (stringsmay be up to 64 characters, and the two strings may havedifferent lengths). To use this filter:
1. Define the desired strings using the SET SERVER STRING
stringnumber string command (the same commandused to define EOT and BOT strings). For example:
SET SERVER STRING 15 “\01”SET SERVER STRING 16 “This is a test\0D”
sets string 15 as <CONTROL-A> and string 16 as “This is atest”<RETURN>. The command SHOW SERVER STRINGS
shows the string settings.

B-8 Using Services
2. Enable filter 1 on the desired service with the SET
SERVICE servicename FILTER 1 command. Thecommand SHOW SERVICE displays which filters areenabled on the services, and the SHOW SERVICE FILTER
displays the filter settings.
3. Define the service with the desired match string andreplacement string with the following commands:
SET SERVICE servicename FMS matchnumber
SET SERVICE servicename FRS replacenumber
where matchnumber and replacenumber are the numbersof the strings defined in step 1. Note that if the matchstring is set to 00, the default match string <LINEFEED>
and replacement string <CARRIAGE RETURN><LINEFEED>
will be used. If the replacement string is set to 00 (andthe match string is not zero), then the replacement isNULL, and any matches are just deleted from the inputstream.
4. As an example of the use of filter 1, in certain types ofIBM CICS print jobs, pages end with a <CONTROL-A>.By using filter 1, you can substitute each occurrence of<CONTROL-A> with <FORMFEED>. This would beimplemented as follows on a service called “CICS”:
SET SERVER STRING 12 “\01”SET SERVICE CICS FILTER 1SET SERVICE CICS FMS 12SET SERVICE CICS FRS 11
When jobs are printed to the CICS service, all occurrences of<CONTROL-A> will be replaced with <FORMFEED>. Note thatfilter 11 is predefined as <FORMFEED>.

Reloading the Firmware C-1
Appendix CReloading the FirmwareGeneralThe firmware on TROY XCD external print servers isstored in flash memory. This means that you can upgradethe firmware by downloading the appropriate update file.Such update files are available from TROY XCD on floppydisk (DOS format), CD-ROM, or Internet access.
Downloading from a DEC VMS HostComputerThe download procedure for DEC computers is basicallyidentical to the procedure for downloading a DEC terminalserver. If MOP is not running on your host computer, enterthe following VMS commands to enable it:
$ RUN SYS$SYSTEM:NCPNCP> SHOW CIRCUIT QNA-0 CHARACTERISTICNCP> SET CIRCUIT QNA-0 STATE OFFNCP> SET CIRCUIT QNA-0 SERVICE ENABLENCP> SET CIRCUIT QNA-0 STATE ONNCP> DEFINE CIRCUIT QNA-0 SERVICE ENABLENCP> SHOW CIRCUIT QNA-0 CHARACTERISTIC
NCP> EXIT
Refer to the documentation included with your VMS systemand/or your terminal server if you need additionalinformation on starting MOP.
The file XJET.BIN must be installed in the directorySYS$SYSROOT:[MOM$SYSTEM]. The best way to copy

C-2 Reloading the Firmware
this file from diskette is to use the NFT (Network FileTransfer) utility included with PATHWORKS, makingsure that you copy in image mode with a maximum recordsize (MRS) of 512 bytes as shown in the followingexample:
COPY/IMAGE/MRS=512 A:XJET.BIN host :: directory
where host is the name of the VAX host computer anddirectory is the VMS load directory (for example,VAX::SYS$SYSROOT:[MOM$SYSTEM]. Note thatyou must specify both /IMAGE and /MRS=512 becausethe copy command defaults to DOS stream mode and 128byte records.
Make sure that the system logical MOM$LOAD is setcorrectly by verifying that the following line is in your sitestartup file:
$DEF/SYSTEM/EXEC/NOLOG MOM$LOAD -SYS$SYSROOT:[MOM$SYSTEM]
If there are other directories listed in the same command,add the server directory (if necessary) to the list separatedby commas. If this command does not exist, type it in atthe VMS "$" prompt and also add it to the startup fileusing the VMS editor.
Now use NCP or the serial port to access the print serverremote console (refer to Appendix A if you do not knowhow to do this), and type:
SET LOAD SOFTWARE XJET.BINSET LOAD ENABLE
in response to the Local> prompt.

Reloading the Firmware C-3
When you type a CTRL-D to exit the remote console, thefile XJET.BIN will then be loaded into the print server.The red TEST LED will blink during the load process andwill go out when the process is complete.
If the red LED does not go out after about two minutes,check to make sure that you correctly entered all parametersand that your network connections are good. Then powerthe print server off and then on again, enter the SET LOAD
ENABLE command, and exit the remote console to retry thedownload.
Downloading from a Windows NT or UNIXHost Computer using Master Mode tftpTo download the print server firmware from a Windows NTor UNIX system using master mode tftp, first copy the fileXJET.BIN to that host. Make sure that tftp is started bychecking the appropriate files on your system (on WindowsNT, TCP/IP and Simple TCP/IP Services must be enabled inthe Network Control Panel); with UNIX, tftp must beenabled in your /etc/services file and possibly in anotherconfiguration file, such as /etc/inetd.conf . Refer toyour system documentation or the UNIX man pages foradditional information.
Important Note: Master mode tftp requires V3.46 or laterfirmware plus 4.6 or later boot firmware. Do a SHOW
VERSION command in the print server console to verifywhich version you are using.
To download the firmware from Windows NT, enter thefollowing command:
tftp - i ipaddr put file password

C-4 Reloading the Firmware
where ipaddr is the IP address of the TROY XCD printserver, file is the name of the load file, and password is theprint server password (ACCESS is the default password).
To download the file from most UNIX systems, enter thefollowing commands from the UNIX system prompt:
tftp ipaddresstftp> binary
tftp> put file password
where ipaddress is the IP address of the TROY XCD printserver, file is the name of the load file, and password is theprint server password (ACCESS is the default password).
Downloading from a UNIX HostComputer using Slave Mode tftpTo download the print server firmware from a UNIX hostusing slave mode tftp, first copy the file XJET.BIN to thathost. Make sure that tftp is started by checking theappropriate files on your system (generally speaking, tftpmust be enabled in your /etc/services file andpossibly in another configuration file, such as /etc/inetd.conf ). Refer to your UNIX systemdocumentation or man pages for additional information.
Now log into the print server remote console usingTELNET or the serial port (see Appendix A if you do notknow how to do this), and execute the following commands:
SET LOAD IP unixhost-ipaddressSET LOAD SOFTWARE "pathname"SET LOAD ENABLE

Reloading the Firmware C-5
where unixhost-ip address is the IP address of the UNIXload host and pathname is the full path name for theXJET.BIN file (e.g., /tftpboot/XJET.BIN ). Notethat some tftp implementations require that the load file belocated in the /tftpboot directory. Be sure to put thepath name in quotes and remember that UNIX names arecase-sensitive. Also, make sure that your file protectionallows general access to the boot directory.
When you type a CTRL-D to exit the remote console, thefile XJET.BIN will then be loaded into the print server.The red TEST LED will blink about during the loadprocess and will go out when the process is complete.
If the red LED does not go out after about two minutes,check to make sure that you correctly entered allparameters and that your network connections are good.Then power the print server off and then on again, enterthe SET LOAD ENABLE command, and exit the remoteconsole to retry the download.
Downloading from a UNIX HostComputer using BOOTPTo download the print server firmware from a UNIX hostusing BOOTP, first copy the file XJET.BIN to that host.Make sure that BOOTP and tftp are started by checkingthe appropriate files on your system (generally speaking,BOOTP must be enabled in the /etc/inetd.conffile, while tftp must be enabled in your /etc/servicesfile and possibly in another configuration file, such as the/etc/inetd.conf file). Refer to your UNIX systemdocumentation or man pages for additional information.

C-6 Reloading the Firmware
Configure your /etc/bootptab file to specify theEthernet address of the print server and the name of theload file (XJET.BIN ). Make sure that your fileprotection allows general access to the directory thatcontains the load file. The exact format of the file/etc/bootptab varies widely, so you will need torefer to your UNIX system documentation for details. Atypical /etc/bootptab file entry might be:
xc2:ht=ethernet:ha=00401700c953:\ip=192.189.207.3:bf=/usr/XJET.BIN:
Now log into the print server remote console usingTELNET or the serial port (see Appendix A if you do notknow how to do this), and execute the followingcommands:
SET LOAD SOFTWARE "pathname"SET LOAD ENABLE
where unixhost-ip address is the IP address of the UNIXload host and pathname is the full path name for theXJET.BIN file (e.g., /tftpboot/XJET.BIN ). Besure to put the path name in quotes and remember thatUNIX names are case-sensitive. Also, make sure that yourfile protection allows general access to the boot directory.
When you type a CTRL-D to exit the remote console, thefile XJET.BIN will then be loaded into the print server.The red TEST LED will blink during the load process andwill go out when the process is complete.
If the red LED does not go out after about two minutes,check to make sure that you correctly entered allparameters and that your network connections are good.
Reloading the Firmware C-7
Power the printer off and then on again, enter the SET LOAD
ENABLE command, and then type EXIT to exit the remoteconsole and retry the download.
Downloading from a NetWare ServerTo download from a NetWare server, first copy the fileXJET.BIN into the \login directory on your SYSpartition (SYS:\LOGIN ). Using the \login directorywill eliminate any potential file protection problems.
Connect to the print server remote console usingXCONFIG or the serial port (refer to Appendix A if you donot know how to do this) and enter the followingcommands in response to Local> prompt.
SET LOAD HOST fileservernameSET LOAD SOFTWARE SYS:\LOGIN\XJET.BINSET LOAD ENABLE
where fileservername is the name of the file server. Whenyou type a CTRL-D to exit the remote console, the fileXJET.BIN will then be loaded into the print server. Thered diagnostic LED will blink during the load process andwill go out when the process is complete.
If the red LED does not go out after about two minutes,check to make sure that you correctly entered allparameters and that your network connections are good.Then power the print server off and then on again, enter theSET LOAD ENABLE command, and exit the remote consoleto retry the download.

C-8 Reloading the Firmware
Downloading through the Serial Port (AllModels Except Pony Print Server Plus)The print server can be downloaded from a PC connected tothe serial port via the XMODEM protocol. To do this, firstmake sure that you have Switch 1 in Console mode (OFF)and that the PC can communicate successfully with the printserver using terminal emulation mode (for example, througha program like QLII or PCTERM). Then type in thefollowing commands in response to the Local> prompt:
SET LOAD ENABLE
Type EXIT to exit console mode. The print server will thenreboot. You will get a series of messages displayed on theterminal; press RETURN at any time and then type:
SET LOAD XMODEM
in response to the Boot> prompt. You will get the message"You may begin your XModem transfer now." Set your PCterminal emulation program to send a file using theXMODEM protocol with the file name XJET.BIN . Theprint server will then download the XJET.BIN file.
Obtaining Firmware UpdatesTo get the latest firmware updates, go to the Tech Supportpages of the TROY XCD web site (http:/www.troyxcd.com ). Alternatively, you may obtain thefirmware from the TROY XCD FTP server(ftp.troyxcd.com ) in the firmware directory. Log inunder the user name anonymous with your e-mail address as thepassword.

Reloading the Firmware C-9
If you do not have Internet access, you may contact TROYXCD Tech Support at (949) 399-0820, fax (949) 399-0825 ore-mail [email protected]. The firmware can be mailedto you on diskette or electronically sent to you.

C-10 Reloading the Firmware

Glossary and Index D-1
10base2 A type of Ethernet that uses RG58 coaxial cable. Also calledThin Ethernet, ThinNet, and CheaperNet. pp. 1-4, 1-5, 2-7, 2-15 to 2-16.
10base5 The original Ethernet standard that uses a thick coaxial cable.Also called thick Ethernet or standard Ethernet. pp. 1-4, 1-6, 2-3, 2-14 to2-15.
10baseT A type of Ethernet that uses unshielded twisted pair cable. pp.1-4 to 1-6, 2-7, 2-12 to 2-13.
100baseT4 A 100 megabit/second networking standard based onEthernet technology that uses four pairs on a Category 3 twisted paircable. Not widely used.
100baseTX The most popular 100 megabit/second networking standardbased on Ethernet technology. It uses two pairs on a Category 5 twistedpair cable. 1-5, 2-12 to 2-13.
802.2 1. The IEEE standard for the Logical Link Control layer of theEthernet protocol. The LLC layer is implemented as special fieldscontaining control information within an IEEE compatible Ethernetframe. 2. The NetWare Ethernet frame type that includes both the IEEE802.3 and 802.2 fields. p. A-11.
802.3 1. The IEEE standard for Ethernet. 2. The default Ethernet frametype for NetWare 3.xx and 2.xx (also called 802.3 raw; the NetWare802.3 is technically not IEEE compatible because it does not have the802.2 fields). p. A-11.
A4 The international standard paper size (210 x 297mm).
Address An identifier. Every device on a network has a unique address.
AIX The variation of UNIX that runs on IBM computers. pp. 4-7 to 4-8.
Appendix DGlossary/Index

D-2 Glossary and Index
Anonymous FTP A method by which any user on a network can accesscertain files on a given host computer by logging in under the nameanonymous after connecting to that computer with the FTP protocol. pp.C-8.
AppleTalk A protocol developed by Apple Computer for file sharing andprint sharing. AppleTalk runs over Ethernet, LocalTalk, and Token Ring.pp. 1-1 to 1-2, 6-1 to 6-4, 14-13 to 14-16, A-7 to A-8.
arp The standard TCP/IP method for determining a device's actualnetwork address based on its IP address. Also used by TROY XCD printservers to set the IP address. pp. 4-15, 4-16.
ASCII A standard for the binary representation of characters.
AT&T UNIX One of two major variants of UNIX on which operatingsystems like HP/UX, Solaris, and SCO UNIX are based. Originallydeveloped by AT&T.
AUI Attachment Unit Interface; the 15-pin Ethernet connector that is usedto connect to a transceiver. Also called a DIX connector or a thickEthernet port. See also 10base5.
Batch File A file containing a number of system-level commands. Whenthis file is run, each of the commands in the file are executed, therebyeliminating the need to type in each command individually.
Berkeley UNIX One of two major variants of UNIX on which operatingsystems like Digital UNIX and SunOS are based. Originally developed bythe University of California-Berkeley.
Bidirectional Capable of communications in two directions. Withprinters, this usually means that the printer is capable of receiving data andsending back status information to the host computer. p. 1-3, 2-6, 2-20, A-4, A-6.
Binary File 1. A file that contains data that is not in a standard formatlike ASCII. In printing, binary files typically contain graphicalinformation such as scanned photographs. 2. A special type of PostScriptfile that contains compressed binary information. pp. 1-4, 4-3, 6-3, 6-4, 14-16.

Glossary and Index D-3
Bindery In NetWare 2.xx and 3.xx, a database containing definitions fornetwork entities, including users, file servers, print servers, etc., alongwith the properties associated with such entities. In NetWare 4.xx,bindery emulation is available for compatibility with older versions. p. 5-8, 5-11.
Bitronics Refers to a bidirectional P1284-compatible parallel port.
BOOTP A standard TCP/IP method for downloading information suchas the IP address into a network device. pp. 4-17 to 4-18, C-5 to C-7.
Bridge A device that connects two local area network segments together.A bridge operates at level 2 of the OSI Reference model, which meansthat it operates transparently with higher level protocols like NetWareand LAT. p. 14-15.
Broadcast In a network, a situation in which all destinations on thenetwork receive a copy of a given packet.
Centronics The de facto standard for parallel printer ports that is used onthe vast majority of all printers.
Chooser A Macintosh program that allows a user to select a printer on anetwork. p. 6-1, 6-3.
Circuit A logical connection between two or more devices on a network.
Client A computer on a local area network that obtains services from aserver on the network.
Command File The VMS equivalent of a batch file. See batch file.
Console A program running on a device (such as print server) that allowsa user to configure and monitor that device. Appendix A.
DCPS Abbreviation for DECprint Supervisor. p. 1-2, 11-8.
Data Link Layer. Layer 2 of the OSI Reference Model that assemblesand disassembles frames, handles synchronization, and detects errors.
Dataproducts A standard for parallel printer ports that was originallydeveloped by Dataproducts Corporation for its line printers and is

D-4 Glossary and Index
common on older Digital Equipment corporation printers. Rarelyused today. Can be handled with TROY XCD external printservers via a third-party adapter.
DECNET A network operating system and the correspondingprotocol developed by Digital Equipment Corporation. Not to beconfused with LAT, which is a different DEC protocol.
DECprint Supervisor Sophisticated PostScript-based printingsoftware for VMS that handles job queueing, error and statusreporting, and translation of PCL, Tektronix 4014, and LN03 pagedescription languages. pp. 1-2, 11-10.
Digital UNIX The latest Digital Equipment Corporation versionof UNIX. It replaces OSF/1 and ULTRIX, and uses standardBerkeley UNIX TCP/IP and lpr/lpd for printing. p. 4-4.
Direct Mode IPX The protocol used by Windows 95 for peer-to-peer communications. Chapter 8.
DLC/LLC A protocol used for printing on Windows forWorkgroups, LAN Manager, and other network operating systems;being phased out in favor of newer protocols like Windows 95Peer-to-Peer direct mode IPX and TCP/IP. Chapter 10.
DMA Direct Memory Access. A high performance computerarchitecture in which data is transferred in large blocks betweenthe processor's memory and an external device without anyprocessor intervention. p. 1-3, 2-11, 2-19, 2-20, A-5
DOS Disk Operating System; now commonly refers to the PCoperating system developed by Microsoft that is officially calledMS-DOS.
Download The process of copying firmware or software from acomputer to another computer or other device on the network(such as a print server). Appendix C.
Driver Low-level software that interfaces a hardware device suchas a printer to the computer's operating system. The driver allowsprograms running on the computer to access the hardware devicein a relatively simple manner.

Glossary and Index D-5
Duplex Printing Printing on both sides of a sheet of paper.
EIO The internal bus used by the latest HP printers like the HP LaserJet4000, 5000, and 8000.
Escape Sequence A series of characters, usually starting with theESCAPE character (ASCII 27), that is used to control a printer or printjob.
Ethernet The most popular Local Area Network standard, which wasdeveloped originally by Xerox, Intel, and Digital Equipment Corporation.It operates at a speed of 10 million bits per second.
Ethernet II 1. The second generation of Ethernet, which was developedbefore the IEEE 802.3 standard. 2. A frame that is compatible with theEthernet II standard. p. A-11.
Ethernet_SNAP Ethernet Sub-Network Access Protocol, an Ethernetframe type that is derived from the 802.2 standard. p. A-11.
FTP File Transfer Protocol, a TCP/IP-related protocol for transferringfiles between devices on a network. pp. C-8 to C-9.
File Server A device on a local area network that provides services toclient computers on the network, such as file sharing, print services, etc.
Firmware The program that operates a microprocessor-based device likea print server. Essentially the same as software, but the term "software"usually applies to general-purpose computers. Appendix C.
Flash Memory A type of memory which allows read and writeoperations, but permanently stores data when the power is turned off.Useful for storing firmware, because it can be easily updated bydownloading new code. pp. 1-2, Appendix C.
Font A set of characters (usually the alphabet plus numbers punctuation,and special characters) that have a particular style.
Form A template describing the way a page will appear when printed.pp. 11-4 to 11-5, 14-22.
Frame A group of data and control information that is sent over anetwork. Often used interchangeably with packet, although frame is

D-6 Glossary and Index
normally used with lower-layer protocols like Ethernet, while packet isassociated with higher layer protocols like IP and IPX. p. A-11.
Gateway 1. In TCP/IP jargon, a gateway is the same as a router (seeRouter). 2. A device that converts one higher-level network protocol toa different higher level protocol (for example, a LAT-to-TCP/IPgateway). pp. 4-18, 4-21
Hops The number of routers that are located between two devices, suchas the print server and the file server. pp. 12-7, 12-9.
Host Computer A computer that provides services to one or moreusers.
Hosts File The file on a UNIX host computer (usually in the /etcdirectory) that contains a list of host computers on the network). pp. 4-2to 4-3.
HP/UX The variation of UNIX that runs on Hewlett-Packardcomputers. pp. 4-4, 4-6, 4-7.
Hub 1. A multiport repeater for connecting several network segmentstogether; this term is usually associated with 10baseT networks. 2. Asophisticated network device consisting of a chassis plus several plug-inboards, including bridges, routers, 10baseT hubs, and other devices. p2-13.
IEEE International Electronics and Electrical Engineers, a standardsbody that controls the specifications for Ethernet and other networking-related standards.
IETF Internet Engineering Task Force; the group that defines the defacto standards for TCP/IP.
I/O Slot Input/Output slot; in printers, a place where network interfacecards like the TROY XCD XJet are mounted.
IOP Internal Option Port; the bus used on Lexmark 4039 and OptraSeries printers to connect network interface cards like the TROY XCDXMark.

Glossary and Index D-7
IP Internet Protocol, one of the core protocols of the TCP/IP protocolsuite. Chapter 4.
IP Address A network address used by the TCP/IP protocol. pp. 3-2 to 3-3, 4-13 to 4-21, 7-3, 7-7 to 7-8.
IPX Internetwork Packet Exchange, one of the NetWare core protocols.Used in conjunction with SPX for printing and other applications. 1-2;chapter 5.
JetAdmin A Hewlett-Packard printer management program available forNetWare and TCP/IP. pp. 1-2, 4-24, 5-9 to 5-12,5-18, 5-19, 5-20, 5-21, 8-2, 8-3.
JetStatus A feature of TROY XCD print servers that allows a user toview the status of the printer. The SHOW SERVER QUEUE commandinvokes JetStatus; on XJet IV print servers, more detailed information isavailable via the SHOW PORT P1 STATUS command. p A-7.
Job In printing, a document that is sent to the printer from a computer. p.1-1.
LAN Local Area Network; a high-speed method of interconnectingdevices in a local or campus environment.
LAN Manager A network operating system developed by MicrosoftCorporation. pp 1-1 to 1-2.
LAN Server A network operating system based on Microsoft's LANManager; developed by IBM Corporation. pp 1-1 to 1-2; pp 7-7 to 7-12.
Landscape mode Printing a document with the long edge of the paper atthe top. p. B-3.
LAT Local Area Transport, a protocol originally developed by DigitalEquipment Corporation. pp 1-1 to 1-2, chapter 11, 14-18 to 14-22, A-9,1-10.
LAT port A logical port through which LAT devices can send data toother LAT devices. A LAT application port is the default type of LATport that is used for printing applications (the other type of LAT port is adedicated port that always accesses a single service on the host computer).Chapter 11.

D-8 Glossary and Index
LATCP A VMS utility program used to configure LAT ports. pp. 11-2,11-4.
LAT Symbiont (LATSYM) A VMS program that controls the printingof jobs via LAT ports. pp. 11-3 to 11-5.
Legal Size The U.S. long paper size (8.5 x 14 inches).
Letter Size The U.S. standard paper size (8.5 x 11 inches).
LLC Logical Link Control, one of two Ethernet protocol layers thatcombined correspond to the OSI data link layer. The LLC layer providesa hardware-independent interface to higher level protocols.
LN03 An older Digital Equipment Corporation laser printer. The LN03used the ANSI PPL page description language, while its successor theLN03-Plus added Sixel graphics capabilities. pp. 1-4.
LocalTalk A low-speed (230.4Kbps) local area network standarddeveloped by Apple Computer. Normally used with the AppleTalkprotocol. pp. 1-1, 2-15 to 2-16, A-8.
Logical Refers to conceptual rather than physical. For example, acomputer may have a single physical connection to the network (anEthernet adapter card), but may have logical connections to manydifferent devices on the network.
lpd Line Printer Daemon, a program that runs on a host computer or adedicated print server that allows other host computers to print jobs onthat computer or print server. TROY XCD print servers use lpd to allowprinting from computers on the network. p. 1-2, Chapter 4.
lpd-Plus A feature of TROY XCD print servers that allows the user todefine multiple services, each with a different setup and reset string. Forexample, a user could have one service for landscape printing and anotherfor duplex printing. Also called logical printers. p. 1-3, Appendix B.
lpr Line Printer Remote, the program that runs on a client computer torequest print services from an lpd host computer or print server. p. 4-22.
lpq A Berkeley UNIX command for obtaining the status of printers.

Glossary and Index D-9
lpstat An AT&T UNIX command for obtaining the status of printers.
LPT1 The primary parallel port on a PC. Many networking programsallow transparent printing to network printers by accepting output intendedfor LPT1 and redirecting it over the network. pp. 5-28, 5-29, 7-12, 11-8.
MAC Medium Access Control, one of two Ethernet protocol layers thattogether correspond to the Data Link layer of the OSI model. The MAClayer interfaces to the Ethernet hardware. A MAC address is the same asan Ethernet address.
man page In UNIX systems, the man pages are an on-line help facilitythat provide information on various topics.
MAPI Messaging Applications Program Interface, a popular method forapplications programs to send E-mail messages through Windowsoperating systems. pp. 13-2 through 13-5.
MIO Modular I/O, the internal bus on newer HP printers that connects tonetwork interface cards like the TROY XCD XJet IV.
MOP Maintenance-Oriented Protocol, the protocol used by the VMS NCPand NCL utilities and for downloading files. pp. A-1 to A-2, C-1 to C-3.
multiprotocol Refers to the ability to handle multiple protocolssimultaneously. In a print server, this means that multiple computers canconcurrently send print jobs to the same printer.
Name Server A node on a TCP/IP network that provides a list of allnodes on the network. The name server is accessible from any node, andeliminates the need to have separate hosts files on each node.
NCL Network Control Language, the method in OpenVMS V6.1 and laterfor accessing and maintaining remote devices. Replaces NCP. pp. 11-1,A-1 to A-2.
NCP Network Control Program, a VMS utility for accessing andmaintaining remote devices. pp. 11-1, A-1 to A-2.
NDS NetWare Directory Services, a database of network entities inNetWare 4.xx, such as users, file servers, print servers, etc. NDS is aglobal directory service, which means that users anywhere on a network

D-10 Glossary and Index
can access a service such as a printer by name without being logged intothe file server that offers that service. p. 1-2, Chapter 5.
NetBEUI A networking protocol that is used on Microsoft networkoperating systems. Although NetBEUI can be used for printing, it is beingreplaced by newer printing protocols like the Windows 95 Peer-to-Peerdirect mode IPX and TCP/IP. Chapter 9.
NetWare A network operating system developed by Novell. pp. 1-1 to 1-2, Chapter 5, 14-11 to 14-13, A-8 to A-9.
Network Layer Layer 3 of the OSI Reference Model; establishes paths toallow packets to be routed throughout the network. IP and IPX areexamples of this layer.
Network Operating System A program that controls the operation of anetwork. pp 1-2.
NLM (NetWare Loadable Module) In NetWare 3.xx or 4.xx, a programthat runs on the file server that performs a specific function such ascommunications. pp. 5-1, 5-19, 5-21, 5-22
Node A device connected to a network, such as a computer or printserver.
NPRINTER The method for connecting a remote printer to a print serverin NetWare V4.xx. pp. 5-2, 5-3, 5-18 to 5-25.
NWADMIN The Windows-based NetWare Administrator utility that isused to manage NetWare file servers from a client workstation. pp. 5-14to 5-16; 5-18 to 5-20.
OpenVMS DEC's latest name for the VMS operating system, which wasoriginally called VAX/VMS. Chapter 11.
OS/2 IBM's PC operating system. Primarily significant because it is usedas the file server operating system on LAN Manager and LAN Servernetworks. Chapter 7.
OS/400 The operating system used on IBM AS/400 minicomputers. p 4-12.

Glossary and Index D-11
OSF/1 DEC's version of UNIX that was originally called ULTRIX and isnow called Digital UNIX. OSF/1 uses the standard Berkeley lpr/lpdprocedures for printing to remote host computers and print servers.
OSI Reference Model A seven-layer model developed by theInternational Standards Organization which is used as a reference fordeveloping protocols. Since each layer performs a different function,development and debugging are simplified, and there is greater flexibility(for example, this approach allows TCP/IP to run over both Ethernet andToken Ring).
P1284 An IEEE standard that defines a high-speed bidirectional parallelprinter port. P1284 ports are also compatible with the Centronics standard.There are three types of physical connectors associated with the 1284standard: 1284A (25-pin DB25), 1284B (36-pin standard Centronics), and1284C (miniature Centronics). pp. 1-3, 1-6, , 2-20.
Packet A group of data and control information that is sent over anetwork. Often used interchangeably with frame, although frame isnormally used with lower-layer protocols like Ethernet, while packet isassociated with higher layer protocols like IP and IPX.
Page Description Language A control language usually consisting ofcommands embedded within a document that control the way the documentwill look when printed. Such commands would set the type of fonts, pagemargins, colors, graphics, etc. within the document.
Parallel Port On a printer, a port that transfers data 8 bits at a time formaximum performance. The parallel port usually has a 36-pin Centronicsconnector. p. 1-3 through 1-6, 2-7, 2-8, 1-19, 2-20, A-4, A-5.
PATHWORKS The Digital Equipment Corporation network operatingsystem for PCs and Macintosh computers. pp. 1-2; 11-6 to 11-9, 14-20, 14-21, 14-22.
PCL A page description language originally developed by Hewlett-Packard for its LaserJet printers.
PCONSOLE A NetWare utility program for configuring and managingprinters. pp. 5-16 through 5-17; 5-22 through 5-24.
PDL An abbreviation for Page Description Language.

D-12 Glossary and Index
Peer-to-Peer 1. A LAN in which nodes communicate with each otherwithout the need for a file server. 2. A new protocol for peer-to-peercommunications that is included with Windows 95 (also known as DirectMode IPX). Chapter 8.
Physical Layer Layer 1 of the OSI Reference Model; defines the physicaland electrical connection to the network.
PJL Page Job Language, a Hewlett-Packard printer control language thatis independent of the page description language.
Ping A TCP/IP command that determines whether a device is alive on thenetwork. pp. 4-15 through 4-16, 4-22, 7-3, 7-6, 7-9.
POP3 Post Office Protocol, the protocol used to retrieve E-mail from theserver. pp. 13-2, 13-8, 13-9, 13-11, 13-12, 13-14, A-12.
Port 1. A physical connector, such as the parallel port. 2. A logicalconnection to a device.
Portrait mode Printing a document with the short edge of the paper atthe top (the normal method of printing).
PostScript A page description language originally developed by Adobethat is widely used in graphics arts applications. pp. 6-2, 6-3, 14-16, 14-20, B-3, B-5. B-6.
PPD See Printer Description File.
PPL An ANSI-standard page description language originally used in theDEC LN03 laser printer.
Printcap File The file on a UNIX host computer (usually in the /etcdirectory) that contains a list of printers. p. 4-4.
PRINTCON A NetWare utility program for defining the characteristics ofthe print job.
PRINTDEF A NetWare utility program for defining the characteristics ofa printer or form. These characteristics are associated with the print jobvia the PRINTCON utility.

Glossary and Index D-13
Printer Description File A file used in PostScript printing that describesthe features available on the printer. Commonly used with AppleMacintosh computers. Also called a PPD.
Print Server 1. A device that allows multiple host computers to share aprinter over a local area network. 2. In Novell NetWare, a logical devicethat services print queues on a file server. Chapter 1, 5.
Protocol A method of sending and receiving data between two or morenodes on a network, and insuring that the data is received without errors.
Queue A region on the computer or file server's disk where files aretemporarily stored before printing. Since the queue can store multiplefiles, it effectively allows users to send their jobs to the printer even if theprinter is busy (a procedure called spooling). Chapters 4 through 12.
Queue Server In Novell NetWare, a queue server is basically the same asa NetWare print server. Queue Server mode is a NetWare printing methodin which the printer is directly connected to the print server with noPSERVER NLM installed on the file server. Chapter 5.
rarp Reverse Arp, a standard TCP/IP method of determining a devices IPaddress based on its Ethernet address. pp. 4-14, 4-16, 4-17, A-13.
Raw TCP port A type of TCP port (see TCP port) in which data is passedunmodified to the receiving node. pp. 1-2, 4-23 through 4-25.
RCONSOLE A NetWare utility program that allows a workstation user toaccess the file server console.
Remote Console A method of accessing the print server console remotelyvia protocols like TELNET or NCP for configuration and managementpurposes. pp. 1-3; A-1 to A-3.
Remote Printer In Novell NetWare, a remote printer is a device thatconnects a printer to a NetWare print server via a network connectionrather than through the parallel or serial port of the print server. pp. 5-2,5-3; 5-18 to 5-25.
Repeater A network devices that connects two or more network segmentstogether and provides the additional function of strengthening andreshaping the electrical signals, thereby allowing the network to beextended over greater distances.

D-14 Glossary and Index
Reset In printing, a reset is a one or more characters sent after a print job.Usually, the purpose of a reset is to restore the printer back to its normalstate. pp. B-2 through B-4.
RJ45 A type of modular jack connector similar to a telephone connectorbut with 8 wires. Used for 10baseT Ethernet connections and for serialport connections. pp. 2-9, 2-13.
Router A device that connects networks together. A router operates atlevel 3 of the OSI Reference model. A router is called a gateway in TCP/IP terminology. pp. 4-18, 4-21, A-13.
RPRINTER The method for connecting a remote printer to a print serverin NetWare V3.xx and V2.xx. Replaced by NPRINTER in NetWareV4.xx. pp. 5-18 to 5-25.
RS-232 The most common serial interface electrical standard. p. 2-8.
RS/6000 IBM's RISC-based family of computers. pp 4-5; 4-7 to 4-8.
SCO UNIX A PC-based UNIX developed by the Santa Cruz Operation.pp. 4-4, 4-9, 4-10.
Segment A physically or logically separate part of a network, usually adifferent cable, that is joined with other segments of the network via arepeater, bridge, or router to form the complete network.
Serial Port On a printer or print server, a port that transfers data one bit ata time. Serial ports usually have either 25-pin, 9-pin "D", or RJ45connectors. pp. 1-3; 2-8 to 2-11.
Server A device on a local area network that provides services to clientcomputers on the network. See File Server, Print Server.
Service A capability offered by a node on a network. A single node canhave multiple services available. Appendix B.
Setup string. A series of characters that is sent before a print job.Usually the purpose of a setup string is to put the printer in a special state(for example, landscape mode). pp. 11-6; Appendix B.
Shell Script The UNIX equivalent of a batch file. See batch file.

Glossary and Index D-15
SMTP Simple Mail Transfer Protocol, a protocol used to send E-mailmessages over the Internet. pp. 13-2, 13-5, 13-6, 13-8, 13-10, 13-12, A-12.
SNAP See Ethernet_SNAP.
SNMP Simple Network Management Protocol, a protocol for monitoringand controlling devices on a network. pp. 1-3, A-12.
Solaris A UNIX operating system developed by Sun Microsystems thatruns on Sun computers and Intel-based PCs. pp. 4-4, 4-8.
Spoofing A method normally associated with AppleTalk in which the printserver simulates a bidirectional communications link by sending backcontrol information to the printer rather than relying on the printer to sendback this information. p. 6-3, A-8.
Spool Directory On UNIX systems, a directory that contains the names offiles being spooled to a printer. p. 4-5, 4-13.
Spooling In printing applications, spooling is the transfer of data to atemporary storage area on disk (the print queue) prior to printing. Spoolingallows many jobs to be queued to a single printer. Since printers arerelatively slow devices compared to disk drives, spooling allows a user tosubmit a job to the printer and then perform other tasks while the job isbeing printed.
SPX Sequenced Packet Exchange, one of the NetWare core protocols.Used in conjunction with IPX for printing and other applications. Chapter 5.
StreetTalk Name The Banyan VINES naming convention used to identify allitems on the network. Chapter 12.
Subnetwork One of several small networks that are joined together into asingle large network.
Subnet Mask A TCP/IP method of dividing a network into several smallersubnetworks. pp. 4-18, 4-20, 4-21.
Symbiont Software that handles job queuing and printing on an operatingsystem.
SYSCON A NetWare utility for managing file servers from a clientworkstation.

D-16 Glossary and Index
TCP/IP Transmission Control Protocol/Internet Protocol, the de factostandard for Internet communications that is widely used on local areanetworks. Technically, this means the TCP and IP protocols, but the termhas come to encompass all of the related protocols, such as TELNET,FTP, lpd, etc. pp. 1-1 to 1-2, Chapter 4, Chapter 7, 14-7 to 14-11, A-13to A-14.
TCP Port A method of accessing a TCP/IP service, where a device witha single IP address can have multiple TCP ports. For example, TELNETis port 23, lpd is port 515, etc.; to access a service, you would specify theIP address of the device plus the TCP port number of the service. p. 4-23through 4-25.
TCPware A popular VMS TCP/IP software package sold by ProcessSoftware. p. 4-10.
TELNET A TCP/IP protocol that allows two devices to communicateover a LAN. One of the devices appears as if it were a dumb serialterminal that is hardwired to the other device. TELNET is used by TROYXCD print servers to allow devices like PCs to access the print serverremote console. pp. 6-3, A-1 to A-3.
TELNET interpretation In the TELNET protocol, certain characters areintercepted and handled in a special manner, rather than being sentdirectly to the device. p. 4-23.
Text file A file that contains ASCII formatted information, with each lineof text usually separated by a line feed and/or carriage return.
tftp Trivial File Transfer Protocol, a simple method of transferringinformation between two TCP/IP devices. pp. C-3 to C-5.
TGV Multinet A TCP/IP software package that runs on VMS. pp. 4-11.
Thin Ethernet See 10base2.
Transport layer Layer 4 of the OSI Reference Model; provides end-to-end data integrity. TCP is an example of this layer.
Transceiver In Ethernet networks, a small box that plugs into the AUIport of a device to allow that device to connect to the Ethernet cable.Many Ethernet devices have one or more built-in transceivers, whicheliminate need for the AUI port.

Glossary and Index D-17
UCX The old name for DEC's TCP/IP services for VMS. pp. 4-10.
ULTRIX The original DEC UNIX. ULTRIX supports both TCP/IP andLAT printing. 4-4; 14-18, 14-19..UNIX A general-purpose computer operating system used on manydifferent kinds of computers. pp. 1-1 to 1-2; Chapter 4.
VAP Value Added Process, a program that runs on a NetWare 2.xx fileserver and performs a specific function such as communications.
VAX Digital Equipment Corporation's family of 32-bit computers thatruns either VMS or some variation of UNIX (ULTRIX, OSF/1, or DigitalUNIX). Chapter 11.
VINES An network operating system developed by Banyan SystemsIncorporated. pp. 1-1 to 1-2; Chapter 12; 14-22, 14-23, A-8, A-9.
VINES IP The protocol used with Banyan VINES. Chapter 12.
VMS An operating system used on Digital Equipment Corporationcomputers. pp. 1-1 to 1-2, Chapter 11
WAN Wide Area Network, a network that interconnects computers andother devices over large distances, most often via telephone companyfacilities but also via private networks, public data networks, and satellites.
Warp IBM's latest version of the OS/2 operating system.
Web JetAdmin A Hewlett-Packard software program for Windows NTthat allows HP, TROY XCD, and other print servers to be configured andmanaged over the network using a web browser. pp. 1-2, 3-8.
WebXAdmin A feature of new TROY XCD print servers that allowsconfiguration and management via a web browser. pp. 1-2, 3-4, 3-5, 5-12,5-13, 5-18, 5-20
Windows 95 and Windows 98 Microsoft's PC operating systems thatfeature built-in peer-to-peer networking. pp. 1-1 to 1-2; Chapter 8.
Windows NT Microsoft's multitasking operating system that can be usedeither as a client or as a server (Windows NT Advanced Server). pp. 1-1to 1-2; chapter 7.

D-18 Glossary and Index
WINSOCK A popular applications program interface for TCP/IPnetworking using Windows operating systems. pp. 13-2 through 13-5.
Wollongong PATHWAY A TCP/IP software package for VMS. pp. 4-11.
XAdmin TROY XCD's Windows-based utility for managing andconfiguring print servers. pp 1-2; pp. 3-1 through 3-4; 5-12 through 5-14;5-18 through 5-21, 12-6 to 12-8.
XAdmin32 The 32-bit version of TROY XCD's Windows configurationutility. pp. 1-2; pp. 3-1 through 3-4; 4-14; 5-6 through 5-9; 5-18 through5-21, 7-3.
XIO Expanded I/O; the internal bus on HP LaserJet II and III printers thatconnects to network interface cards like the TROY XCD XJet III.
Zone In AppleTalk, a zone is a subnetwork; that is, a given network canbe subdivided into multiple zones. pp. 6-3, A-7.