Trash to Treasure Club - kidsrkids.com · art station for supplies. Instructions: 1. Talk with...
40
1 Kids ‘R’ Kids International © Copyright 2020 All Rights Reserved Trash to Treasures Club Kids ‘R’ Kids Mini Camp
Transcript of Trash to Treasure Club - kidsrkids.com · art station for supplies. Instructions: 1. Talk with...

1
Kids ‘R’ Kids International © Copyright 2020 All Rights Reserved
Trash to Treasures Club
Kids ‘R’ Kids Mini Camp

2
Kids ‘R’ Kids International © Copyright 2020 All Rights Reserved
Welcome to the Trash to Treasures Club! We are excited for you to join this club. At the end of it, you will have many new art creations. Who knows, you may even get discovered! The greatest keepsake will be seeing how your imagination and creativity grew each week.
Discussion Why do you like art? What do you think
makes art special? What do you hope to learn by the end of this club?
Teachers Have each camper in the group go
around and talk about how he/she enjoys creating art. Write the answers down on chart paper so the entire group can see. Discuss how someone’s trash can be recycled into a great masterpiece.
Each week, we will use a recyclable
item to create our masterpiece. Some of these art projects can be done as a group while others as individuals. Each week, we
will concentrate on a certain recyclable item but many of these items will be used each week.
You can decide which projects you will introduce for the week depending on your supplies and interest.
Make sure you are displaying the campers’ artwork, have them come up with names for their artwork, and allow them to use their imagination and personal touches.
Week Themes (remember you choose what week or weeks and projects you want to do):
• Recyclable Material for the Week: Paper Towel Roll, Wrapping Paper Roll
• Recyclable Material for the Week: Tin Cans and Soda Cans
• Recyclable Material for the Week: Plastic Water Bottles and Caps
• Recyclable Material for the Week: Cereal Boxes and Jar Lids
• Recyclable Material for the Week: Cardboard Boxes
• Recyclable Material for the Week: Yarn
Welcome

3
Kids ‘R’ Kids International © Copyright 2020 All Rights Reserved
• aluminum foil • balloons • birdseed or food • bottle tops • brownie boxes • buttons • carboard boxes and
cut up pieces from boxes
• cereal boxes • chalk • cloth • clothes pins • construction paper
(variety of colors) • corn starch • craft sticks • crayons • dowels: wooden
dowel 7/8 inch in diameter and 48 inches long
• felt • foam brushes • foam sheets
(variety of colors) • glitter • glue (school, tacky
glue, fabric glue, glue
• glue gun (teacher only)
• handheld can opener
• handheld hole punch
• hot glue gun (low temp)
• marbles • markers (variety of
colors and felt tip sizes- permanent and non-permanent)
• metal screw top jar lids
• modeling clay • paint (acrylic and
classroom paints) • paintbrushes
(variety of sizes) • paper plates • paper towel rolls • ping-pong balls • pipe cleaners • pizza boxes • plastic cups
(variety of sizes) • plastic straws
(green flexible and straight- any colors
• pom poms (variety of colors and sizes)
• ribbon (variety of colors)
• rubber bands • rulers • soda cans (empty) • spools (empty of
thread) • sticks (real) • string
• tape- {all listed are needed} (double sided tape, masking tape, duct tape, painters’ tape- blue and green, craft tape-variety of colors)
• tea light candle foils (empty)
• tin cans (cleaned- variety of sizes-small-i.e. tomato paste/tuna fish, medium-i.e. peas)
• tissue paper • tool to punch holes
in cans (like a screwdriver to be done by teacher)
• Vaseline® • washers (various
sizes) • waxed paper • wiggly eyes
(variety of sizes) • wooden lacing
beads (variety of colors and sizes)
• wrapping paper rolls
• yarn (variety of colors)
• yogurt cups (clean and empty)
Material List for all Projects

4
Kids ‘R’ Kids International © Copyright 2020 All Rights Reserved
My Flute Materials: crayons, markers, paper towel roll, markers, rubber bands, wax paper, internet access, scissors, https://www.youtube.com/watch?v=9XDmFKFPXTM (Video Melissa.Flutes) Preparation: Gather materials and cut wax paper into 3-inch squares (1 for each camper). Preview video. For the 5 to 6-year old’s, you may want to poke the holes through the tube for them Instructions:
1. Gather your campers and talk about the musical instrument, the flute. Show pictures or even a show them a video with Melissa Jefferson, also known as Melissa.Flutes, playing the theme song from Frozen, “Let It Go”, on her flute. Discuss how she must blow air into her mouthpiece to make the music along with moving her fingers along the finger pads.
2. Give each camper a paper towel roll, 1 square of wax paper, 2 rubber bands and encourage them to decorate their flutes using crayons or markers.
3. Once the flutes are decorated, have the campers cut a small rectangle shape hole from about six inches from the top and then 4 to 6 holes down the tube. (Use your judgement on if you need to do this for the campers.)
4. Then, have each camper take their square of wax paper and rubber band placing it on the end of the tube and securing it.
5. Now, have each camper hum into the
flute. They can move their fingers up and down on the finger pads (holes) to see if their sounds change. They will know they are doing it correctly when they hear the vibrations from the wax paper.
Recyclable Material for the Week: Paper Towel Roll, Wrapping Paper Roll

5
Kids ‘R’ Kids International © Copyright 2020 All Rights Reserved
Flower Art Materials: chalk, 2-paper towel rolls (per student), glue, paint, paintbrushes or foam brush, scissors, pencil, ruler Preparation: Gather materials. Instructions:
1. Give each camper 2 to 3 paper towel rolls.
2. Have the campers choose a color or colors they would like to paint their tubes to make flowers. They will need to paint one side and allow to dry and then roll over and paint the other side.
3. The campers will paint the tubes and allow to dry. Once they are dry, have campers take a ruler and measure ¾” to a 1” (which may be an easier mark for them) using a piece of chalk or marker.
4. After cutting the tubes, then campers can play around with bending each piece to the shape of a petal. Usually 5 petals make it look like a flower.
5. Have campers glue the petals to each other and let it dry. (You, as the teacher, can use a glue gun to make these adhere stronger, but glue does work if it is left to dry).
Recyclable Material for the Week: Paper Towel Roll, Wrapping Paper Roll

6
Kids ‘R’ Kids International © Copyright 2020 All Rights Reserved
Paper Towel Sculptures Materials: cardboard piece, chalk, paper towel rolls, markers, paint, paintbrushes Preparation: Gather materials. Instructions:
1. Give each camper a paper towel tube and encourage them to paint or decorate it. (If they are painting, they need to paint one side allow it to dry and then the other side. Remind them they will be cutting the tubes into circle like shapes.)
2. Once the paint or markers have dried, encourage campers to cut the tubes making circle-like shapes. Have the campers draw lines using chalk about 1” apart all the way around the tube to make it easier for cutting. The easiest way to cut the tube is to flatten out your roll, creasing the two folds. You may need to demonstrate this to the campers.
3. Once campers have all their pieces, have them begin to glue and make their sculpture.
4. Have the campers name their creations and make a sign for it. Display their sculptures.
Recyclable Material for the Week: Paper Towel Roll, Wrapping Paper Roll

7
Kids ‘R’ Kids International © Copyright 2020 All Rights Reserved
Cardboard Twisted Tube Sculptures Materials: cardboard piece, glue, paper towel rolls, markers, paint, paintbrushes Preparation: Gather materials. Instructions:
1. Give each camper a paper towel tube and encourage them to paint or decorate it using markers.
2. Once the paint or markers has dried, then encourage the campers to twist their tube (gently) to the shape they would like.
3. Then, have campers glue their twisted creation on cardboard if they need a base.
4. Have the campers name their creation and then display their creations.
Recyclable Material for the Week: Paper Towel Roll, Wrapping Paper Roll

8
Kids ‘R’ Kids International © Copyright 2020 All Rights Reserved
City Skylines (ages 7 and up) - This can be a 2 to 3-day project. Materials: markers, paper towel rolls (lots), wrapping paper tubes, poster board or cardboard, scissors, glue pictures of skylines from various cities Preparation: Gather materials and find pictures of various skylines of cities (if you live in a city have campers describe what they see). Talk about how each skyline looks different in the daytime and nighttime. Instructions:
1. Talk with campers, especially if they are not in big cities, about the various skylines. Show them different pictures of various skylines in the U.S. or around the world.
2. Encourage campers to envision their city and design it. This can be done as individuals or in a group.
3. Have campers gather their materials and begin their city buildings.
4. Once completed, have the campers give each city a name and display artwork.
Recyclable Material for the Week: Paper Towel Roll, Wrapping Paper Roll

9
Kids ‘R’ Kids International © Copyright 2020 All Rights Reserved
Tin Can Bird Feeders Materials: tin cans, paint (acrylic or tempera paints), paintbrush, ribbon (about 2 feet per student), ½” dowel or stick or craft stick, glue (teacher can use a hot glue gun to glue on stick), birdseed or food for the birds Preparation: Gather and set out materials. Instructions:
1. Talk with campers about how birds must look for their food.
2. Encourage campers to envision themselves having to look for food instead of being able to go to the grocery store or gardening our own food. Allow this discussion to continue if campers want to talk.
3. Then give each camper a can and paintbrush and allow them to choose what color they would like to paint their tin can. If they want to add other designs or colors, they will let the first color dry and then paint on other colors or making designs such as flowers, dots, etc.
4. Once the can is decorated and dry, help campers glue the stick inside the can leaving part of it outside, creating a perch for the bird.
5. Then, have each camper choose a ribbon for the birdhouse. Help them wrap it around the can and tie a bow at one end. You may want to tack the ribbon to the can with a glue gun so that it will stay put (but you could also use regular white glue and let it dry thoroughly).
6. Fill up the birdfeeders and hang
outside your classrooms or send them home for families to enjoy in their yards. You can also make your own for the class and hang on a tree outside where campers can see the birds eating.
Recyclable Material for the Week: Tin Cans and Soda Cans

10
Kids ‘R’ Kids International © Copyright 2020 All Rights Reserved
Class Tin Can Totem Pole (This activity is for everyone in your club - TRASH TO TREASURES CLUB FAMILY or you can do the whole class for this - Bonding as a School Family!) *This will take multiple days due to allowing paint to dry before adding another color. Materials: tin cans, paint (acrylic or tempera paints), paintbrush or foam brush, Wooden dowel 7/8 inch in diameter, handheld can opener, totem pole pictures, stickers (flowers, letters), wiggly eyes, foam sheets (variety of colors), construction paper (colors), glue Preparation: gather materials, take the other end off the tin cans (except one- maybe the teacher or director of the school can make a can to be used as the top can), print or locate pictures of totem poles (use internet and show on computer/tablet or print pictures) Instructions:
1. Talk with campers about how we are a school family. Then, talk about how the “Totem Poles” came into existence. Show pictures of various totem poles to the campers. Say, “The original totem poles were created by only six tribes of the western part of North America: Haida (say "hydah"), the Nuxalt (say "nu-halk"), the Kwakwaka'wakw (say "kwak-wak-ya-wak"), the Tlingit (say "kling-kit"), the Tsimshian (say "sim-she-an"), and the Coast Salish
(say "say-lish") people. Sometimes, the symbols on a Totem Pole are arranged so that higher symbols have more importance and lower symbols have less significance. This arrangement is where we get the saying "low man on the totem pole", which means that the person is at the bottom of the hierarchy and everyone above him is more important. But there are different kinds of totem poles that have other meanings. Some are used to welcome or scare off strangers, some celebrate a special occasion like a wedding, some are memorials to remember an important member of the tribe, and some are made to shame a person or another tribe who has done something wrong.”
2. Tell campers that each of them is going to design a can to represent something about them. It can be their favorite color, favorite cartoon figure, favorite thing to do, etc. Let them know we will build the totem pole representing the club or the class.
3. Encourage them to design on paper what they would like their can to look like.
4. Encourage campers to choose their colors and they may need multiple colors so this will be a project that will continue throughout the week. Also, allow them to choose other supplies like wiggly eyes, foam sheets, etc. that they may want to use. Open your art station to their imagination.
5. Then give each camper a can and
paintbrush/foam brush and allow
Recyclable Material for the Week: Tin Cans and Soda Cans

11
Kids ‘R’ Kids International © Copyright 2020 All Rights Reserved
them to choose what color they would like to paint their tin can. If they want to add other designs or colors, they will let the first color dry and then paint on other colors or make designs such as flowers, drawing faces, adding wiggly eyes, etc.
6. Once the can is decorated and dry, help campers place their cans on the pole stacking one can on top of the other. Place yours or directors on top.
7. Have each camper share what his/her can represents about them. Remind the campers this is our Class Family or Club Family Totem pole.
8. Praise campers for a great job and put on display in the classroom for all to see.

12
Kids ‘R’ Kids International © Copyright 2020 All Rights Reserved
Smashed Farm Can Animals (choice of 2 animals) Materials: aluminum soda or cola cans, matte spray paint (peach, white), (optional)-acrylic paints (peach, lavender, turquoise, rose, yellow, white), paintbrushes, cotton swabs, scraps of felt (off-white, tan, brown, rose, red, black, pink, white), tacky glue, scrap (black paper), 2 wiggle eyes (3/8”), 1/16” wide satin ribbon- variety of colors, fine-tip permanent black marker, pattern (attached on separate sheet), scissors Preparation: Gather materials. *Teachers will spray paint cans with 1 coat of paint and let dry. Children can shape the cans prior to painting or after. (Read below instructions before beginning project.) If you are going to use the pattern templates, copy on cardstock and cut out for children to trace on felt. Instructions: Teacher Prep Before Project: Referring to photo for shapes, use your hands to gently flatten 1 can across the center, keeping the opening on top in position for mouth. Then, use your foot to slowly crush top and bottom of the can being sure to maintain proper positioning of opening. Repeat with remaining can. Spray paint each can with 1 coat of spray paint. Spray paint the cow with white paint and the pig with peach. (You can choose other colors, i.e. pig- pink and the cow – black.) Let dry. For Cow:
1. Once the crushed can is dry, cut out the parts for the cow. Black felt - Cut out a variety of small shapes for the cow’s spots (5) and using the pattern provided trace and cut out a tail, 4 hooves, and a tail. Pink felt - Trace the pattern for cheeks and 2 inner earpieces to place inside the ears. Cut out. White felt -
Trace the cow horn, ear, and legs and cut out. Also, campers can cut out a shape to make the face 3-D and draw on the eyes and nostrils using your marker, or you can cut out small felt circle pieces or draw directly on the can.
2. Assemble the cow by gluing on the parts and then adding characteristics using a marker for the eyes and nostrils, if not drawing on the white felt.
For Pig: 1. Once the crushed can is dry, cut out
parts for the pig. Off-white felt - cut 1 tail, 1 legs piece, 2 ears, and 1 nose; Tan felt - cut 4 hooves.
2. For the pig’s tail take the felt and wrap around a pencil, marker, or crayon tightly to create a curl.
3. Glue all the parts on to the pig including eyes. On the nose piece add nostrils using your marker or you can cut out small felt circle pieces. You can make it a girl with sassy eyes by adding eyelashes. Also, add your own decorations using the back of the paintbrushes with paint to make flower patterns or just leave him/her peach color.
Recyclable Material for the Week: Tin Cans and Soda Cans

13
Kids ‘R’ Kids International © Copyright 2020 All Rights Reserved
Tin Can Puppets - This project is best for Senior Campers Materials: tin cans (small and medium sizes), string, plastic drinking straws, double sided tape, empty tea light foils, sticks (i.e. craft sticks, sticks from yard, dowels), wiggly eyes, aluminum foil, silver pipe cleaner, yarn, glue, felt, foam sheets, stickers, blunt end darning needle (teacher) Preparation: Gather materials. Make one hole on the top of each can using a screwdriver (it can be a two-person job) or another instrument such as a hammer and nail before beginning this project. (You can even use a small drill bit.) Then, make two holes where the shoulder and hip joints need to be. Do this on the small can. Cut pieces of string (3 to 5 per camper) using your hand to elbow as a guide for the length for the marionette. Also, if you do not have empty tea light foils, you can make other feet using aluminum foil, foam sheets, or even construction paper. Let the students come up with other alternatives. Instructions: 1. First, talk with the campers about
marionette puppets. Say, “Marionette is a puppet controlled by a hidden puppeteer using strings. A marionette's puppeteer is called a marionettist. We are going to use tin cans and other supplies to make our own and then put on a show.”
2. Encourage campers to design their puppet on paper to help with their vision.
3. Have campers choose one or two cans to make their puppets.
4. Campers can glue on the eyes and other features they choose. Aluminum foil can be used for clothing, i.e. skirt, and yarn for hair, felt or foam sheets for a mustache, etc.
5. Use the double-sided tape to connect the two cans together.
6. Encourage campers to take the straws and put them in the holes of the can and cut to the lengths they want. They will have two parts for each joint (arms elbow – elbow to hand, thigh to knee – knee to feet) and then thread string through to connect them.
7. Help the campers thread the head and bodies together first (using a blunt-ended darning needle- teacher) leaving about 20cm of string to attach to the operating stick.
8. Then, thread the arm-and-leg strings to each of the joint holes in the cans and then, connect the tea-light container (feet), and thread on the hands and feet. You can start off in a couple of areas and connect to the craft sticks to see what movement you get and then add from there.
9. Once all puppets are assembled, have campers practice moving their tin marionette puppet. Plan a puppet show.
Recyclable Material for the Week: Tin Cans and Soda Cans
14
Kids ‘R’ Kids International © Copyright 2020 All Rights Reserved
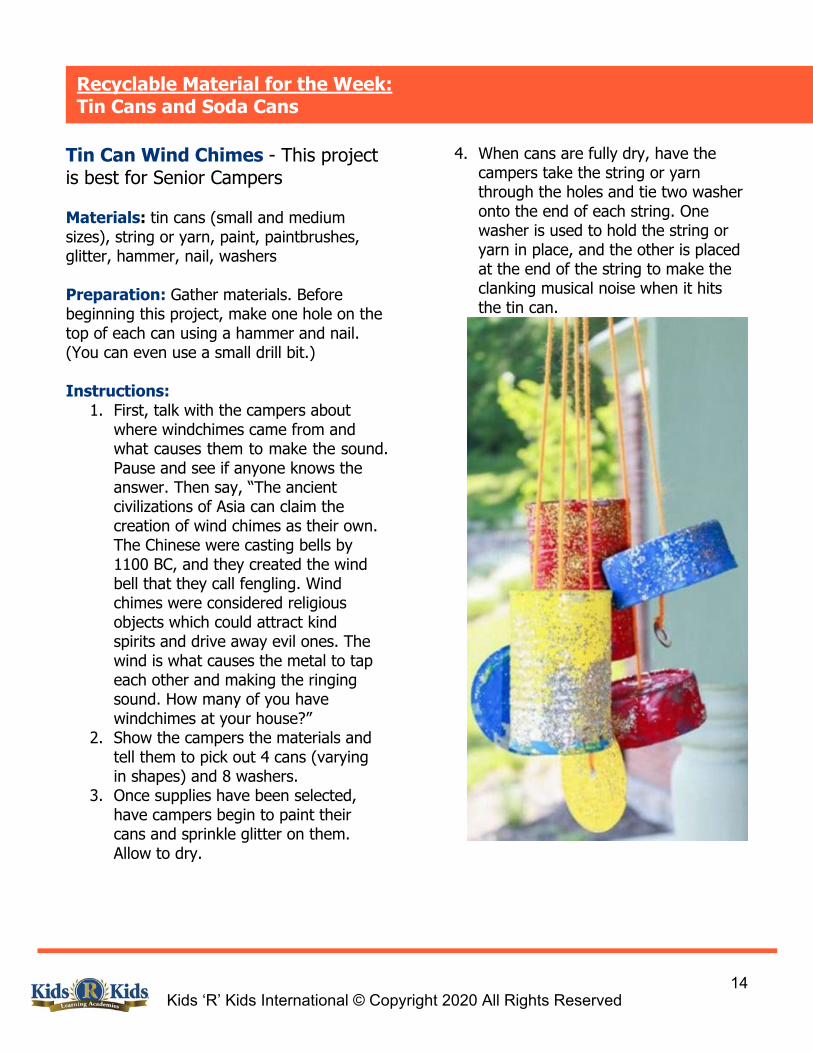
Tin Can Wind Chimes - This project is best for Senior Campers Materials: tin cans (small and medium sizes), string or yarn, paint, paintbrushes, glitter, hammer, nail, washers Preparation: Gather materials. Before beginning this project, make one hole on the top of each can using a hammer and nail. (You can even use a small drill bit.) Instructions:
1. First, talk with the campers about where windchimes came from and what causes them to make the sound. Pause and see if anyone knows the answer. Then say, “The ancient civilizations of Asia can claim the creation of wind chimes as their own. The Chinese were casting bells by 1100 BC, and they created the wind bell that they call fengling. Wind chimes were considered religious objects which could attract kind spirits and drive away evil ones. The wind is what causes the metal to tap each other and making the ringing sound. How many of you have windchimes at your house?”
2. Show the campers the materials and tell them to pick out 4 cans (varying in shapes) and 8 washers.
3. Once supplies have been selected, have campers begin to paint their cans and sprinkle glitter on them. Allow to dry.
4. When cans are fully dry, have the
campers take the string or yarn through the holes and tie two washer onto the end of each string. One washer is used to hold the string or yarn in place, and the other is placed at the end of the string to make the clanking musical noise when it hits the tin can.
Recyclable Material for the Week: Tin Cans and Soda Cans

15
Kids ‘R’ Kids International © Copyright 2020 All Rights Reserved
Materials: plastic water bottle, permanent markers (variety of colors), string (1- 24” piece per student), large wooden lacing beads (1 per student), scissors Preparation: Gather materials. Cut bottom off the water bottles off leaving the cap on the top of the bottle. Cut string 24”- 1 for each student. *Save the bottoms for the flower craft. Instructions:
1. Gather the campers and say, “We are going to make a game for you to keep, but first, let us learn some history of where it actually came from. Cup-and-ball (or ball in a cup) is a traditional children's toy. It is generally a wooden handle, to which a small ball is attached by a string, and which has one or two cups, or a spike, upon which the player tries to catch the ball. It is popular in Spanish-speaking countries, where it is called by a wide number of names (including boliche in Spain and balero in most of Hispanic America) and was historically popular in France as the bilboquet. A similar toy with three cups and a spike called kendama is very popular in Japan and has spread globally in popularity. Show them the picture of the Cup-and-ball (see picture on separate sheet).
2. Give each camper a water bottle and allow them to decorate however they want but remind them to color the inside of the water bottle so that when they are holding it, they do not have the markers fade onto their hands.
3. Once the bottles are decorated, give
out the string and beads (one to each student). Encourage them to tie the string around the neck just above the top and knot it. Teachers, you may need to help with this task. Once it is tight, then have them thread the wooden bead through and tie it close to the end tightly. Double knotting will help it remain knotted with all the movement of tossing.
4. Enjoy watching them play their new game. Have them count how many times they make it into the cup.
Recyclable Material for the Week: Plastic Water Bottles and Caps Bottle-and-ball

16
Kids ‘R’ Kids International © Copyright 2020 All Rights Reserved
Bottle Cap Animals Materials: bottle tops, construction paper, foam sheets, wiggly eyes, paint, glue, pom poms, craft sticks, tissue paper, and (let your art station get well loved) Preparation: Gather bottle tops and check art station for supplies. Instructions:
1. Talk with campers about how bottle caps are usually thrown in the trash, but they can create a masterpiece.
2. Encourage them to envision what they would like to create and gather their supplies.
3. Display the bottle art throughout the school. Let the students come up with catchy names for their creations.
Recyclable Material for the Week: Plastic Water Bottles and Caps Bottle-and-ball

17
Kids ‘R’ Kids International © Copyright 2020 All Rights Reserved
Water Bottle Flowers Materials: plastic water bottle, scissors, glitter, paint (variety of colors), paint brushes, ½” pom poms (variety of colors), straws, Tacky glue or glue gun (teacher use only), green straws (flexible), green construction paper Preparation: Gather materials. Cut bottom off the water bottles (2-3 per camper). Instructions:
1. Talk with campers about how they are going to recycle the water bottles by giving them a new purpose by making flowers.
2. Give out the water bottle bottoms and encourage the campers to paint them and sprinkle glitter inside, if desired. Allow to dry completely.
3. While the flowers are drying have campers cut out leaves from the green construction paper.
4. Then, have campers trim their bendy straws to the desired length and glue to the back of the bottle. (Make sure the flower is completely dry.) If you tell them to put the glue in the middle, this may help guide them. Allow to dry.
5. Now have the campers add a colorful pom-pom to the center of the flower.
Recyclable Material for the Week: Plastic Water Bottles and Caps Bottle-and-ball

18
Kids ‘R’ Kids International © Copyright 2020 All Rights Reserved
Jamming Cereal Box Guitar Materials: cereal boxes, wrapping paper tubes, paint, rubber bands (5-rubber bands per child), scissors, yarn or ribbon, masking or duct tape, dowels (3-per child), paint (variety of colors), paintbrush, picture of parts of guitar, internet access, https://www.youtube.com/watch?v=z0NUFXdeqJE *If you do not have enough cereal boxes, you can use shoeboxes. Preparation: Gather materials. Preview video about parts of the guitar. Instructions:
1. Show video to campers about the parts of the guitar and/or picture
2. Give each campers a cereal box, 5 rubber bands, and 1 paper towel tube.
3. Have the campers glue the top of the box closed.
4. Then have the campers paint the cereal box and allow to dry.
5. Trace a large circle in the center of the cereal box and cut it out carefully.
6. Next, trace a circle onto to the top of the cereal box, using the cardboard tube as a guide. Insert the cardboard tube into the hole using gentle pressure if necessary. Use the tape to seal the top of the box around the tube and to secure the tube to the box.
7. Stretch rubber bands of various sizes around the box. Tape the bands in place on the top and bottom of the box.
8. Poke 3 holes through the tube the
size of the dowels and insert dowels to represent “frets.” Secure with glue and allow to dry or use a hot glue gun (teachers only).
9. Add a long ribbon or yarn for a shoulder strap, if desired.
Recyclable Material for the Week: Cereal Boxes and Jar Lids

19
Kids ‘R’ Kids International © Copyright 2020 All Rights Reserved
Lid Banjos Materials: metal screw top jar lids (1 per child), craft sticks (1 per child), rubber bands (4 per child), duct tape, glue, decorative craft tape, art center supplies, internet access, https://www.youtube.com/watch?v=AGSQsxxEtJM and picture of parts of banjo Preparation: Gather materials. Preview video about parts of a banjo. Instructions:
1. Show the video to campers about the parts of the banjo and/or picture.
2. Give each camper a lid, craft stick, 4 rubber bands, and 2 pieces of duct tape.
3. Have the campers place the rubber bands over the lid and secure in place on the back of the lid with duct tape.
4. Then, cut off one end of the craft stick and secure it on the back with duct tape.
5. Now, let the campers decorate their banjo using their imagination.
6. Once completed, encourage the campers to experiment with the different sounds by holding down the rubber bands.
Recyclable Material for the Week: Cereal Boxes and Jar Lids

20
Kids ‘R’ Kids International © Copyright 2020 All Rights Reserved
Box Sailboat Materials: cereal or brownie box, construction paper (variety of colors), crayons, markers, colored pencils, wooden dowel, modeling clay, white paint and variety of colors of paint (acrylic or poster paint), paintbrushes, glue, scissors, stapler, tap Preparation: Gather materials. Instructions:
1. Give each camper an empty box and have them draw an arc from end to end (make sure the box’s wide side is facing up).
2. Then, have the campers cut the box along the arc and staple the side of flaps to make it secure.
3. Now, have the campers create a prime coat by painting the box with white acrylic paint. This layer will help hide the writing and coloring on the box. Once dried, have them paint the boat the desired color.
4. While waiting for the boat to dry, have the campers cut two right triangles on construction paper or regular copy paper. These two triangles will be your boat's sails - one sail should be slightly smaller than the other. Make them in proportion to the boat's box hull.
5. Decorate both sides of the sail with crayons, markers, or colored pencils.
6. Then, campers need to glue the large sail
to the mast. Say, “A ship's mast is a straight post where the sails are attached.” Have campers make one with a wooden dowel. The mast should be 3-4 inches taller than the large sail. If the dowel is not long enough, tape two together and then trim to the desired height. Glue the mast along the straight edge of the large sail.
7. Roll the mast. While
holding the mast on both ends, carefully roll it once to glue the edge of the sail around the mast.
8. Glue the small sail on the
mast. This sail should be pointing in the opposite direction.
9. In order to attach the mast to the hull,
you will need an anchoring material using clay. Roll a small chunk of modeling clay into a ball. Glue this at the center of the boat's hull.
10. Stick the mast into
the clay
11. Once all sailboats are completed, have campers come up with a name for their boat and make a name tag for it. Display boats. Remind campers these boats are not made to sail on water.
Recyclable Material for the Week: Cereal Boxes and Jar Lids

21
Kids ‘R’ Kids International © Copyright 2020 All Rights Reserved
Recycled Suspension Bridge - *This can be a group project (Sr. Campers Ages 8 and up) Materials: internet access, https://www.youtube.com/watch?v=tzxPMb9-eeA , cereal box, paper towel tubes - 2 cut in half, blue and green painters tape, string, small rubber bands, hole punch, scissors Preparation: Gather materials. Instructions:
1. Have the campers join you and talk about what a suspension bridge is with the facts listed below. You can also let them see the short video on suspension bridges around the world.
A suspension bridge is a bridge in which the deck (the part that you drive across) is hung below suspension cables on vertical suspender cables. Typically, suspension bridges are built with two tall towers and a cable that travels from one shore, through the two towers, and to the other shore. Vertical suspender cables hang from the main horizontal cable and hold the weight of the deck.
The weight of the deck is supported by carefully balanced forces on the two towers. The force pulling inwards on the towers is equal to the force pulling outwards on the towers towards land. Because the forces are balanced, the weight pulls straight down into the towers and into the ground.
Each cable is made up of thousands
of individual steel wires that are bound together. Steel’s tensile strength improves as it is stretched into wires, so these flexible cables are stronger than a solid piece of steel of the same size.
Suspension style design allows for longer spans, reduced construction costs because of reduced materials, and improved flexibility and structural integrity during earthquakes.
Some of the famous suspension bridges are located and you will see in the video:
• Golden Gate Bridge- San Francisco, GA
• Akashi-Kaikyo (Pearl) Bridge- Kobe-Naruto, Japan
• Tsing-Ma Bridge (Hong Kong, China)
• Tacoma Narrows Bridge (Tacoma, WA)
2. Cut a strip of cardboard out of a flattened cereal box to make your bridge. You can tape on extra sections if you want to make a long bridge.
3. Punch holes along the sides of the
cardboard leaving a few inches on each end without holes. The un-holed section serves as the ramp to the “ground.” Try to approximately line up the holes across the cardboard to help increase stability in the bridge.
Recyclable Material for the Week: Cereal Boxes and Jar Lids

22
Kids ‘R’ Kids International © Copyright 2020 All Rights Reserved
4. Thread a rubber band through each
hole and loop back through itself to hold in place.
5. Cut 2 paper towel tubes in even
halves. Create bridge towers by cutting two 1/2″ slits in one end of each tube. The slits should be slightly off the center and across from each other. See the blue lines in the picture below.
6. Start taping your racetrack and river.
Your river should be a bit narrower than the length of your bridge so the bridge ends can touch the “ground.”
7. Tape down your towers. This can be
tricky because these towers support all the weight on the bridge just like a real suspension bridge. Also, be sure that the slits line up with the direction of the bridge.
8. Cut your cables out of a length of string. Cut them about twice as long as your bridge because you can always cut the extra off later.
9. Feed each piece first through the slits
in the towers and then through each of the rubber bands. Then, pull the string taught until the rubber bands stretch some and the bridge feels secure. Tape the ends of the string to the floor.
10. Tape your road connectors over the
bridge.
11. Try out cars on your bridge.

23
Kids ‘R’ Kids International © Copyright 2020 All Rights Reserved
Pizza Box Masterpiece Materials: aluminum foil, glue, construction paper (variety of colors), fabric (variety scraps), markers (variety), paints (variety of colors), paintbrushes, pizza box or cardboard box cut down, scissors Preparation: Gather materials. Cut off top from pizza box and glue flaps in place. Instructions:
1. Give each camper a pizza box and ask them to think about what they would like to create. Encourage them to think outside the box and to make it 3D using aluminum foil.
2. Have each camper paint the inside of the box a background color and allow to dry.
3. Once the paint is dry, allow campers to begin painting, gluing, cutting, etc. to make their artwork. This could be over a couple of days or more if needed.
4. Once complete, have an art museum display and allow the campers to come up with a fancy name for their art projects and the museum.
Recyclable Material for the Week: Cardboard Boxes

24
Kids ‘R’ Kids International © Copyright 2020 All Rights Reserved
My Cardboard Maze Materials: pizza boxes or cardboard boxes, shoe boxes, straws, wooden bits like small wooden beads, mini blocks and spools, glue (teachers can use glue gun to help make objects more permanent if glue does not work), scissors, pencil, marbles or wooden beads, paint, paint brushes, pencil Preparation: Gather materials. Cut off top from pizza box and glue flaps in place. Instructions:
1. Encourage campers to paint their boxes inside and outside. Allow to dry.
2. Then, have them use a pencil to draw out their maze.
3. Next, cut out straws and glue onto their penciled maze.
4. Then, have them glue a variety of beads, spools, and other items they find to use as stoppers.
5. Once it is dry, have campers use a marble or wooden bead to see how well their maze works. Allow them to add items if they would like. This is a STEAM trial and error so keep encouraging them to change it up if necessary.
Recyclable Material for the Week: Cardboard Boxes

25
Kids ‘R’ Kids International © Copyright 2020 All Rights Reserved
My Cardboard Foosball Table Materials: shoe boxes, dowels (4 per child), 10 clothespins, marker, chalk, paint, paintbrushes, ping-pong balls, ruler, X-acto knife (Teacher only), scissors Preparation: Gather materials. Instructions:
1. Encourage campers to paint their boxes inside and outside and choose two colors to paint their clothes pins. Allow to dry.
2. Then, have them use a marker or chalk to draw the field.
3. Next, install doweling rods by punching holes on sides of box. Then, punch a hole on the opposite side of the box using the same dowel. Leave dowel inserted into both holes. Be aware of spacing of the dowels. A ruler may be useful in making them spaced evenly.
4. Then, have campers cut a goal on each end of the box or the teacher can use the X-acto knife to cut them for the campers.
5. Place 10 clothespins on dowels. Two clothespins on the dowels closest to each goal and 3 clothespins on the 2 middle dowels.
6. Now, “Let the Games Begin!”
Recyclable Material for the Week: Cardboard Boxes

26
Kids ‘R’ Kids International © Copyright 2020 All Rights Reserved
My Cardboard Marble Run Materials: shoe boxes or shoe box lids (1 per child), craft sticks, marbles (1 per child), glue, paper, pencil Preparation: Gather materials. Instructions:
1. Encourage campers to design their marble run on paper before beginning to layout the pattern.
2. Then, have them layout their pattern and cut their craft sticks to desired lengths. The campers may want to draw their pattern in the box to give an actual visual how it will be set up.
3. Next, let the gluing begin. If craft sticks are having a hard time sticking, you (the teacher) can use the hot glue gun - low heat to help glue them to the box.
4. When craft sticks have dried, give the campers marbles to try out their new marble run.
5. Now, “Let the Marble Maze begin!” This is a STEAM trial and error so keep encouraging campers to change it up if necessary.
Recyclable Material for the Week: Cardboard Boxes

27
Kids ‘R’ Kids International © Copyright 2020 All Rights Reserved
My Cardboard Creations Materials: cardboard pieces (various sizes and thicknesses), cardboard boxes (variety of sizes), scissors, glue, art station supplies Preparation: Gather materials. Instructions:
1. Encourage campers to create their own cardboard design, structure, or masterpiece using the materials given and their imagination.
2. Allow campers time to think and design their creations.
3. Once completed, have each of them share what they made and their inspiration.
Recyclable Material for the Week: Cardboard Boxes

28
Kids ‘R’ Kids International © Copyright 2020 All Rights Reserved
Yarn Butterfly Materials: yarn (various colors), craft sticks (2 per butterfly), pipe cleaners (1 per butterfly), beads (2 small, 1 large per butterfly) Preparation: Gather materials. Practice making the butterfly yourself first. Instructions:
1. Demonostrate for the campers how to place their craftsticks into an uneven “X shape” and wind their first color of yarn around and around, crosing over and winding in the other direction so the yarn holds the sticks in place securely. Then they will be ready to begin weaving. *This may be a trial and error, but don’t let them give up.
2. Wind the yarn up the sticks a bit,
switching into a figure 8 pattern as soon as you get to the gap between the sticks. To tie the thread off mid-weave, simply tuck it into the winding so it pokes through like in the image below. It gets packed so tightly that the loose end stays in place once you begin winding on the next color.
3. Begin your next color and commence
the figure 8 weave again. Below, you can see what the ‘figure 8’ looks like.
4. For the final tie off, make a double knot at the end of the last color.
5. To create the butterfly’s body, bend
in half a pipe cleaner and wind it around the centre of the ‘X’ shape and twist it as shown below. Then, thread two small beads onto the bottom and one larger bead onto the top.
6. Finally, curl the top of the pipe
cleaner to create two antennae, and you’re done.
Recyclable Material for the Week: Yarn

29
Kids ‘R’ Kids International © Copyright 2020 All Rights Reserved
Color Yarn Popping Bracelets Materials: paper towel roll, tape, yarn (various colors) Preparation: Gather materials. Cut paper towel roll into 6 equal slices and cut an opening to fit on each camper’s wrist. Instructions:
1. Have campers choose their main yarn color and tape the yarn inside the tube before starting the wrapping around.
2. Then, have the campers wrap around the yarn until the entire surface is covered.
3. If they would like to weave in another color of yarn, have them choose the color and place a piece of tape on the end of the yarn. It can be a straight pattern or an X pattern.
Recyclable Material for the Week: Yarn

30
Kids ‘R’ Kids International © Copyright 2020 All Rights Reserved
Yarn Dream Catcher Materials: cardboard, yarn (variety of colors), wooden beads Preparation: Gather materials. Cut out ring (large circle) shapes with an opening in the middle for the dream catcher.
Instructions:
1. Talk to campers about what a dream catcher is. Say, “In many Native American tribes, a dream catcher is a handmade willow hoop woven to a web or literally, a net. A dream catcher also includes such features as feathers and beads. They are traditionally suspended on cradles as a form of armor and protection. Dream catchers are considered a symbol of oneness among numerous indigenous cultures and regions. The web absorbs terrible dreams at night and discharges them during the day. The feathers act like ladders allowing good dreams to descend on the infant or adult who is sleeping.”
2. Have campers choose their yarn colors.
3. Then, have the campers to start wrapping the yarn around the ring shape. If they would like to use different colors, encourage them to stop in spots on their ring. Then, tie the piece off and begin with another color doing the same thing.
4. Once all colors have been completed
and tied off, begin making a web pattern. Make sure to wrap twice around to secure the yarn.
5. Add beads to the yarn as you make
your patterns.
6. Then, add yarn to the bottom of the
circle. Be creative and have fun.
7. Make a hanging loop with yarn and a
bead.
Recyclable Material for the Week: Yarn

31
Kids ‘R’ Kids International © Copyright 2020 All Rights Reserved
Yarn Sticks of Color Materials: sticks from a tree (same length - 2 per camper), rubber bands (1 per camper), yarn (variety of colors) Preparation: Gather materials. Maybe have campers bring in their own sticks. Practice the techniques before introducing to the campers. Instructions:
1. Encourage campers to make an “X” with their sticks and then fasten their sticks together with a rubber band. The sticks also can be fastened together with a hot glue gun.
2. Hold the end of the yarn on top of the
wood and wrap yarn around the stick catching the end.
3. Wrap all the way around the stick
then move under the next stick. Wrap all the way around that stick then move to the next stick. Always bring the yarn under the stick before wrapping around.
4. When you want to change colors,
simply cut the yarn and tie on a new color and begin wrapping again. When finished, tie the end of the yarn to the stick where you ended. Push any end pieces where two colors were tied together to the back.
5. Allow campers to show their work and
maybe discuss why they chose certain colors.
Recyclable Material for the Week: Yarn

32
Kids ‘R’ Kids International © Copyright 2020 All Rights Reserved
Yarn Coasters Materials: paper plates, scissors, yarn (variety of colors), ruler, pencil, tape Preparation: Gather materials. Practice the techniques before introducing to the campers. Instructions:
1. Have campers measure 1 inch on their plates all the way around making a straight line on the rim of the plate.
2. Then, have the campers cut slits into the paper plate about 1 inch deep.
3. Next, have them choose their colors of yarn and begin with one color and wrap it around the plate in a circle. (They can tape down the first piece of yarn to keep it secure.) Make spokes of a wheel - they circle the plate and put yarn into each of the slits. Colors can be changed if they want or leave it all one color.
4. When finished, knot the wheel loom to itself and tape to give a little more security.
5. Now, rip the paper plate out from the back of your coaster and discard plate. Cut the strings and knot each string “end” to the string next to it. Do not pull too tightly or your coaster will bubble.
Recyclable Material for the Week: Yarn

33
Kids ‘R’ Kids International © Copyright 2020 All Rights Reserved
My Braided Octopus Materials: yarn (variety of colors - 22 feet of one color per child, 4 feet of the another color), wiggly eyes, scraps of material, cotton balls, glue, scissors, rulers Preparation: Gather materials. Instructions:
1. Have campers select their colors. Measure and cut their yarn. (Primary color cut out twenty-four 12” pieces of the primary color of yarn and eight 4” and one 12” pieces of the second color of yarn.)
2. Then, have campers lay the yarn on a
flat surface so it looks like the spokes of a wheel, with the middle of each piece of yarn crossing all the other yarn pieces at the center of the wheel. It is best to lay out two or three pieces of yarn together as you go around the wheel.
3. Put a small wad of cotton, about 1" in
size, in the center of the wheel. To form the octopus' head, gather the pieces of yarn up around the cotton and tie them together with a 12"
piece of the second color yarn. Make sure to tie a secure knot. Adjust the pieces of yarn to cover the cotton completely. *Tip: Get a friend to help with the tying.
4. Separate the yarn into eight groups of
six. Braid each group tying the ends with a piece of the second color yarn. You will end up with eight braids that form the octopus's eight legs. *Tip: Gently hold the octopus's head between your knees as you braid.
5. Glue two wiggly eyes onto the head.
Use yarn or felt to make a mouth for your octopus and glue it on the head. *Tip: Slip a length of yarn under a few strands of yarn on the octopus's head to form a hanger. Tie a tight knot close to the head and hook on your backpack.
Recyclable Material for the Week: Yarn

34
Kids ‘R’ Kids International © Copyright 2020 All Rights Reserved
Yarn Chandelier Materials: yarn (variety of colors), glue, corn starch, Vaseline, scissors, balloons, bowl for mixing, dowels Preparation: Gather materials. Set up a long pole or dowels between chairs for a drying area with plastic underneath. This will be to hang the balloons on. Instructions:
1. Have campers blow up their balloons to form a circular shape - probably about halfway full.
2. Tie yarn around the balloon’s stem and hang from the rod. Make sure that no balloons are touching each other.
3. Have campers cover their balloons
with a light coating of petroleum jelly. (This is to keep the yarn from sticking to the balloon once it is dried and popped.)
4. Mix the glue (about ½ of the bottle) with approximately ½ cup of cornstarch and approximately ¼ cup water. If you need a thicker consistency, add more cornstarch slowly until you get the desired texture.
5. Have the campers dip their yarn into
the glue mixture, squeeze out excess, and begin wrapping around the balloon vertically and then switch to horizontally. Once they have covered a good part of their balloon, cut the yarn and tie to a surrounding piece. It is best to do this near the stem of the balloon so it would not be as obvious when hanging.
6. Allow yarn chandeliers to hang for 24
hours in a dry area. Do not try to shorten the process. Then, pop the balloons. *The yarn will have dried glue crystals, but this can easily flake off when tapped. Now they are ready to hang.
Recyclable Material for the Week: Yarn

35
Kids ‘R’ Kids International © Copyright 2020 All Rights Reserved
Ombre Yarn Canvas Materials: yarn (variety of colors), paint (variety of colors), paintbrushes, foam brushes, cardboard (rectangle shaped- can be from a box, shoebox lid, etc.), tape Preparation: Gather materials. Instructions:
1. Have campers decide what colors their canvas will be painted - up to three colors.
2. Then, have campers tape a piece of the string on the back of the canvas at one of the corners to create a pattern. When satisfied with the pattern, cut the yarn and tape to the back (make sure to leave enough to tape to the back).
3. Now for the fun! Have campers use their chosen paint colors and paint on their canvas over the yarn. Allow to dry completely.
4. Have the campers unwrap the yarn and see their masterpiece.
Recyclable Material for the Week: Yarn

Smashed Farm Can Animals Pattern (run off copies and trace on
to cardstock)

Cup‐and‐ball

Jamming Cereal Box Guitar:
Parts of the Guitar (Parts of the Guitar video https://www.youtube.com/watch?v=z0NUFXdeqJE)

Lid Banjos
Parts of the Banjo (Parts of the Banjo video
https://www.youtube.com/watch?v=AGSQsxxEtJM )

Box Sailboat
Parts of a Sailboat