
TRAINING GUIDE - Oxford Immunotec
42
TB-UK-TRG-MPN527-0001 V1 TRAINING GUIDE For In Vitro Diagnostic Use Only This Training Guide covers use of: T-SPOT ® .TB8 (Multi-use 8-Well Strip Plate Format. Catalogue number: TB.300) To be used in conjunction with the T-SPOT.TB Package Insert [PI-TB-IVD-UK-V3]
Transcript of TRAINING GUIDE - Oxford Immunotec

TB-UK-TRG-MPN527-0001 V1
TRAINING GUIDE
For In Vitro Diagnostic Use Only
This Training Guide covers use of: T-SPOT
®.TB8 (Multi-use 8-Well Strip Plate Format. Catalogue number: TB.300)
To be used in conjunction with the T-SPOT.TB Package Insert
[PI-TB-IVD-UK-V3]

2 TB-UK-TRG-MPN527-0001 V1
INTRODUCTION This training guide is intended to give guidance and information to the operator in preparing and running the T-SPOT.TB test. This guide explains sample collection, separation of Peripheral Blood Mononuclear Cells (PBMCs) prior to running the assay, performing the T-SPOT.TB test, interpreting test results and troubleshooting.
Using this documentInstructions on performing the T-SPOT.TB test are provided in the top section of each relevant page. Additional information such as notes, corresponding visual aids and examples are shown in blue text
Table of Contents Page
Introduction 2
Reagent & Storage 3
Materials provided 4
Storage & stability 4
Equipment and materials required, but not provided 5
Sample Collection and Handling 6
Blood collection tubes 7
Blood draw volumes 8
T-Cell Xtend® procedure 8
Cell Isolation 9
Leucosep procedure 9
Standard FICOLL procedure 9
Cell preparation tube (BD vacutainer CPT) procedure 9
PBMC removal 12
Cell washing 13
Cell Counting and Dilution 14
Manual counting of PBMCs 15
Automated counting of PBMCs 17
Plate Setup and Incubation 19
Spot Development and Counting 23
Spot development 24
Spot Interpretation 26
Quality Control 32
Nil controls 33
Positive controls 33
Results Interpretation 34
Results interpretation and assay criteria 35
Borderline & invalid results 35
Spot Interpretation: Panel A & B Antigen 36
Troubleshooting Images 38

3 TB-UK-TRG-MPN527-0001 V1
REAGENT & STORAGE

4 TB-UK-TRG-MPN527-0001 V1
MATERIALS PROVIDED
T-SPOT.TB8 (Multi-use 12 x 8-well strip) contains:
1 microtiter plate: 96 wells, supplied as 12 x 8-well strips in a frame, coated with amouse monoclonal antibody to the cytokine interferon gamma (IFN-γ)
2 vials (0.8mL each) Panel A: contains ESAT-6 antigens, bovine serum albumin andantimicrobial agents
2 vials (0.8mL each) Panel B: contains CFP10 antigens, bovine serum albumin andantimicrobial agents
2 vials (0.8mL each) Positive Control: contains phytohaemagglutinin (PHA), for use asa cell functionality control, bovine serum albumin and antimicrobial agents
1 vial (50µL) 200 x concentrated Conjugate Reagent: mouse monoclonal antibody tothe cytokine IFN-γ conjugated to alkaline phosphatase
1 bottle (25mL) Substrate Solution: ready-to-use BCIP/NBTplus
solution
CD containing the package insert and other information.
STORAGE & STABILITY
Store the unopened kit at 2-8°C. The components of the kit are stable up to the expiration date printed on the kit box, when stored and handled under the recommended conditions. The kit must not be used beyond the expiration date on the kit label.
Store opened kit components at 2-8°C. Opened components must be used within 8 weeks of opening, such period ending no later than the expiration date on the kit label. Do not mix compo-nents between different kits.
Avoid prolonged exposure of the Substrate Solution to light.
Instructions For Use

5 TB-UK-TRG-MPN527-0001 V1
EQUIPMENT AND MATERIALS REQUIRED BUT NOT PROVIDED
8-well strip plate frame (available from Oxford Immunotec).
Class II microbiological cabinet (recommended but not necessary)
Blood collection tubes, such as Vacutainer®, CPT™ or Heparin Tubes (Note: CPT tubes are
available from Oxford Immunotec).
T-Cell Xtend if processing blood stored for longer than 8 hours post collection.
*FICOLL-PAQUE PLUS or alternative PBMC separation material (such as Leucosep tubes,also available from Oxford Immunotec) if not using CPT tubes.
A centrifuge for separation of PBMCs (capable of at least 1800 RCF (g) and able to maintainthe samples at room temperature (18-25°C) if using density centrifugation methods to separate the PBMCs.
15ml centrifuge tubes.
Equipment and reagents to enable counting of PBMCs; either manually using Trypan Blue(or other appropriate stain) and a haemocytometer on a microscope or automatically using asuitable haematology analyser.
A humidified incubator capable of 37 ± 1°C with a 5% CO2 supply.
An automatic microtiter plate washer or an 8 channel or stepper pipette to manually washplates.
Adjustable pipettes to cover a range of volumes from 1-1000µL (such as four Gilson pipettescapable of delivering volumes of 1-10µL, 2-20µL, 20-200µL and 100-1000µL) and sterilepipette tips. Pasteur Pipettes may also be used where appropriate.
Sterile D-PBS solution: such as GIBCO® 1x D-PBS (Invitrogen; catalogue number
14040-091).
Distilled or deionised water.
A means of visualising the wells, or capturing a digital image of the well, such as astereomicroscope, magnifying glass or plate imager to allow counting of spots.
Sterile cell culture medium such as GIBCO AIM V
® (Invitrogen; catalogue number
31035-025 research grade). (Note: AIM-V medium is available from Oxford Immunotec).The use of this serum free medium for the incubation step is strongly recommended. RPMI1640 (Invitrogen; catalogue number 21875-034) may be used in the initial sample prepara-tion steps only (Other culture media can be used but must be validated by the laboratory). Itis recommended that cell culture media are stored in appropriate aliquots and excess mate-rial is discarded after use. Cell culture media should be pre-warmed to 37°C before use withthe T-SPOT.TB test.
Instructions For Use

6 TB-UK-TRG-MPN527-0001 V1
SAMPLE COLLECTION & HANDLING

7 TB-UK-TRG-MPN527-0001 V1
BLOOD COLLECTION TUBES
Oxford Immunotec Ltd have validated three FICOLL* based cell separation methods; Standard Method, Leucosep tubes, and Cell Preparation Tubes (CPT™). Individual laboratories should validate their procedures for collection and separation of PBMCs for use in the T-SPOT.TB assay.
Blood samples can be collected in heparin or citrate blood collection tubes with PBMCs being subsequently separated using standard separation techniques. Alternatively, blood samples can be collected in CPTs from Becton Dickinson (BD).
Patient’s cells can be pooled if necessary to obtain sufficient cells from multiple tubes of blood that are collected and processed concurrently.
Note: EDTA tubes are NOT recommended.
BD Heparin & Citrate Vacutainer
® CPT™
Greiner Bio-One Heparin Vacuette
®
BD Vacutainer®
Heparin PST™
Greiner Bio-one EDTA Vacuette
®
BD EDTA Vacutainer
®
BD CAT Vacutainer
®
Figure 2: Examples of blood collection tubes which are unsuitable for use in the T-SPOT.TB assay.
Note: Tubes from alternative suppliers that do not contain heparin or citrate should not be used for specimen collection.
Figure 1: Examples of blood collection tubes which are suitable for use in the T-SPOT.TB assay.
Note: Tubes from alternative suppliers that contain heparin or citrate should be validated before being used for specimen collectio n.
Blood collection tubes which are NOT suitable for use with the T-SPOT.TB assay are highlighted in Figure 2.
Blood collection tubes which are suitable for use with the T-SPOT.TB assay are highlighted in Figure 1.
Sarstedt Heparin Monovette
®
Instructions For Use
Training Notes and Visual Aids

8 TB-UK-TRG-MPN527-0001 V1
BLOOD DRAW VOLUMES
Typically, for an immunocompetent patient, sufficient PBMCs to run the assay can be obtained from venous blood samples according to the following guidelines:
Adults and children 10 years old and over: one 6mL heparin tube, or one 8mL CPT, or two 4mL CPT.
Children 2-9 years old: one 4mL heparin tube or 4ml CPT.
Children up to 2 years old: one 2mL heparin tube.
Blood samples should be collected according to the instructions supplied with the collection device. Immediately after the blood is drawn, the tube must be inverted (8-10 times) to ensure that the blood is mixed thoroughly with the anticoagulant. Do NOT refrigerate or freeze blood samples.
If a low cell yield is suspected, then collect: 2 x 8mL CPTs, 2 x 6mL Heparin Vacutainer tubes or similar. This will ensure sufficient PBMC yield to run the assay.
Blood samples to be processed with the T-SPOT.TB test must be used within 8 hours post venepuncture. Samples can be used up to 32 hours post venepuncture with the addition of the T-Cell Xtend reagent prior to running the T-SPOT.TB test. Whole blood samples should be maintained between 18°C and 25°C until pro-cessed.
T-Cell Xtend PROCEDURE
To allow greater flexibility of the T-SPOT.TB test, the T-Cell Xtend reagent can be used in conjunction with the T-SPOT.TB test allowing samples to be used up to 32 hours post venepuncture.
The T-Cell Xtend reagent is an antibody complex which cross links cell surface markers on inhibitory white blood cells and red blood cells. This cross-linking increases the density of inhibitory white blood cells so that they pellet when a density gradient is applied.
T-Cell Xtend reagent should be added to the sample immediatelyprior to processing. The blood should be poured into a 15mlcentrifuge tube, and the volume checked. Add 25µL of T-CellXtend reagent per mL of whole blood and pipette up and down tomix (Figure 4).
Replace the cap of the centrifuge tube and invert 8-10 times tomix (Figure 5).
Incubate the whole blood with T-Cell Xtend reagent for 20 ± 5minutes at room temperature (18-25°C).
Continue with normal cell isolation procedures such as FICOLLor Leucosep density centrifugation methods (detailed on page 9of this document).
Figure 4: Adding 25µL of T-Cell Xtend reagent per mL of blood
Figure 5: Mixing blood and incubating at Room Temperature for 20 minutes before proceeding to the
T-SPOT.TB test
Instructions For Use
Figure 3: T-Cell Xtend reagent

9 TB-UK-TRG-MPN527-0001 V1
CELL ISOLATION
LEUCOSEP PROCEDURE
Leucosep tubes (available from Oxford Immunotec Ltd) facilitate the collection and separation of peripheral blood mononuclear cells (PBMC) from whole blood. They are more convenient and easier to use than the traditional FICOLL gradients methods. These tubes contain a frit or porous barrier above the FICOLL-PAQUE PLUS, thereby eliminating the need to gently layer the sample.
Ensure the FICOLL-PAQUE PLUS is below the frit. If not, centrifuge for one minute at 350 RCF (g).
Add 3mL of pre-warmed (37oC) RPMI 1640 to 5mL of whole blood and invert the tube 3 times to mix.
Pour the diluted blood into the Leucosep tube.
Centrifuge, in a swing out rotor, at 1000 RCF (g) for 10 minutes at room temperature (18-25oC), with
the brake off.
Ensure the tubes are balanced before centrifugation in an aerosol-resistant bucket.
STANDARD FICOLL PROCEDURE
Dilute blood 1:1 with RPMI 1640 (pre-warmed to 37oC) and invert the tube 3 times to mix.
Carefully layer diluted blood sample onto the FICOLL at a ratio of 3 volumes of diluted blood to 1volume FICOLL. Do not allow the layers to mix.
Centrifuge, in a swing out rotor, at 1000 RCF (g) for 22 minutes at room temperature (18-25oC), with
the brake off.
Ensure the tubes are balanced before centrifugation in an aerosol-resistant bucket.
CELL PREPERATION TUBE (BD VACUTAINER CPT) PROCEDURE*
Collect blood in 4mL or 8mL CPTs following the manufacturer’s instructions.
8mL CPT tubes should be centrifuged in a swing out rotor, at 1600 RCF (g) for 28 minutes at roomtemperature (18-25
oC).
4mL CPT tubes should be centrifuged in a swing out rotor, at 1800 RCF (g) for 30 minutes at roomtemperature (18-25
oC).
Ensure the tubes are balanced before centrifugation in an aerosol-resistant bucket.
* The T-Cell Xtend reagent is NOT compatible with the BD CPT system.
Instructions For Use

10 TB-UK-TRG-MPN527-0001 V1
Notes: # RCF (g)= Relative Centrifugal Force. The term RCF, and not RPM, is used throughout this document. A refrigerated centrifuge is not essential; if a refrigerated centrifuge is not available take additional care to ensure the rotor is well balanced as any slight vibration will cause a build up of heat which will alter the density of the gel layer in the CPT and the PBMCs will migrate into the red cell layer. To simplify patient identification, after cell separation label tubes towards the top to allow easy viewing of labels above the Red Blood Cell and PBMC layers. Warning: It is recommended that PBMC separation steps are performed in a BL II Safety Cabinet to protect the user and prevent contamination of the samples.
CPT Method (8 mL) Standard FICOLL Method Leucosep Method
Plasma
Cloudy PBMC layer
FICOLL
Porous Frit
Red Blood Cells
Plasma
Cloudy PBMC layer
FICOLL
Red Blood Cells
Brake OFF
Brake OFF
Plasma
Cloudy PBMC layer
Gel Layer
Red Blood Cells
Training Notes and Visual Aids
Figure 6: Images showing the validated cell separation methods

11 TB-UK-TRG-MPN527-0001 V1
If correct separation has not been achieved, it may be caused by the use of the wrong centrifugation speed. If the centrifuge was set to RPM instead of RCF (as required), centrifuge again using the correct RCF.
Where separation is still not achieved, the following should also be checked:
Were the appropriate blood collection tubes used and were the tubes stored appropriately before use? Were the blood samples stored at room temperature (18-25oC)? Were the tubes inverted to mix the samples thoroughly with anticoagulant when the blood was drawn? Was the FICOLL gradient set up according to the method described in this section? Was the appropriate centrifugation speed used and was the centrifuge brake turned off? Was the blood sample processed on the day of blood collection (within 8 hours) or within 32 hours if using the T-Cell Xtend reagent?
Plasma
Poorly separat-ed cells
Un-separated cells
Separation gel
Red blood cells
Incorrect separation
Plasma
Un-separated cells
Figure 7: Incorrectly separated Leucosep, FICOLL and CPT methodologies
CPT Method Standard FICOLL Method Leucosep Method
Note: Please consult the electronic T-SPOT.TB Centrifuge Speed Calculator available on the CD provided with each kit (Figure 8). Or use the manual slide calculator (Figure 9) available from Oxford Immunotec upon request.
Figure 8: T-SPOT.TB Centrifuge Speed Calculator Figure 9: T-SPOT.TB Manual Slide Calculator
12 TB-UK-TRG-MPN527-0001 V1
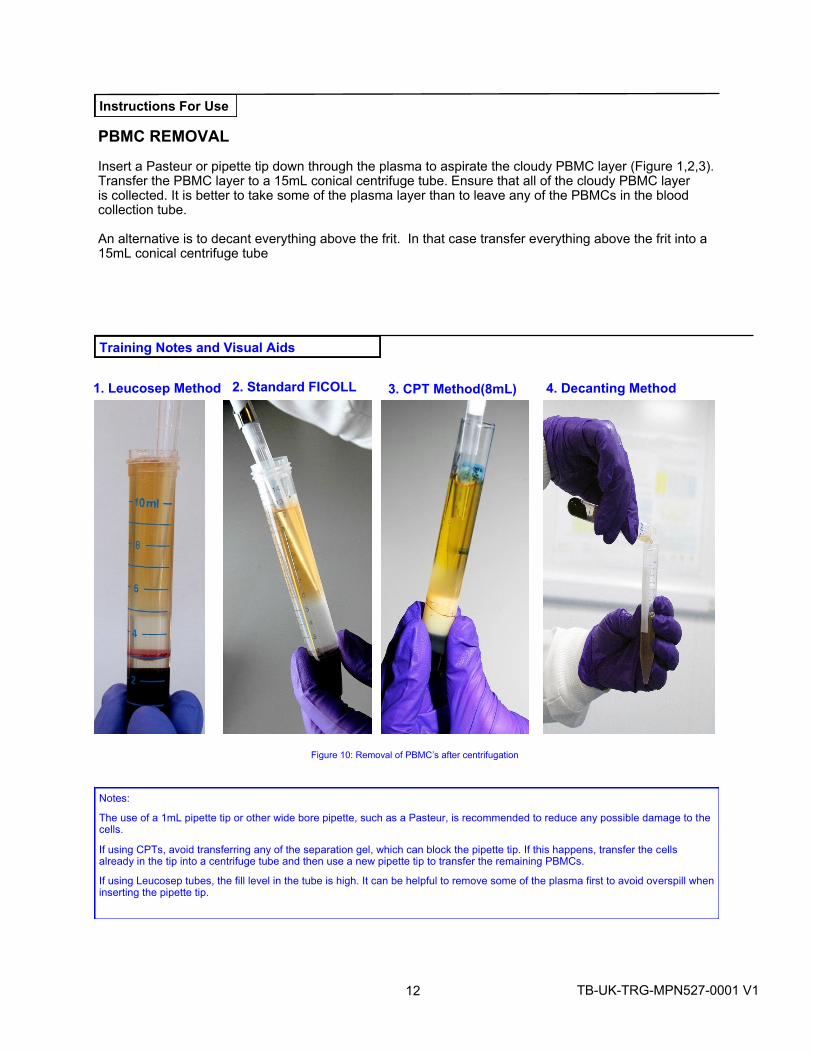
Insert a Pasteur or pipette tip down through the plasma to aspirate the cloudy PBMC layer (Figure 1,2,3). Transfer the PBMC layer to a 15mL conical centrifuge tube. Ensure that all of the cloudy PBMC layer is collected. It is better to take some of the plasma layer than to leave any of the PBMCs in the blood collection tube.
An alternative is to decant everything above the frit. In that case transfer everything above the frit into a 15mL conical centrifuge tube
Notes:
The use of a 1mL pipette tip or other wide bore pipette, such as a Pasteur, is recommended to reduce any possible damage to the cells.
If using CPTs, avoid transferring any of the separation gel, which can block the pipette tip. If this happens, transfer the cells already in the tip into a centrifuge tube and then use a new pipette tip to transfer the remaining PBMCs.
If using Leucosep tubes, the fill level in the tube is high. It can be helpful to remove some of the plasma first to avoid overspill when inserting the pipette tip.
3. CPT Method(8mL)2. Standard FICOLL1. Leucosep Method
PBMC REMOVAL
Instructions For Use
Training Notes and Visual Aids
Figure 10: Removal of PBMC’s after centrifugation
4. Decanting Method

13 TB-UK-TRG-MPN527-0001 V1
Figure 11. Fill the 15mL tube up to 10mL with culture medium.
Important notes for washing PBMCs
Cell culture medium for the washing steps should be pre-warmed to 37°Cfor at least 1 hour before contact with PBMCs.
RPMI 1640 is less expensive than AIM V and so is more cost effective forthe PBMC washing steps.
It is strongly recommended that cells are resuspended in AIM V for theovernight incubation (Note: Although RPMI 1640 is suitable for washingPBMCs, it should not be used for overnight incubation).
Cells should be mixed by gently pipetting up and down several times. Thiswill ensure that the cells are evenly distributed.
Different media can be used in this step, but each must be validated bythe user laboratory for use in the T-SPOT.TB assay.
Notes: To avoid problems with contaminated media, dispense 500mL bottles of AIM-V or RPMI 1640 aseptically into smaller aliquots. If preferred, the set-up of the plate can be started during the centrifugation steps (see page 18 Plate Set Up and Incubation).
After centrifugation, check for a cell pellet at the bottom of the tube. If a pellet hasn’t formed check that the correct centrifugation speed was used and repeat the step (see page 11 for further information on calculating centrifuge speeds).
Use a 1mL pipette to resuspend the cells. Expel 1mL of media with force, with the tip aimed at the wall near the pellet. This will create a vortex which should break up the pellet. If this fails to break up the pellet, media can be aspirated and expelled using the same pipette tip.
Figure 12: Resuspending the cell pellet in AIM V
Cell washing with medium is performed to remove any extra-cellular cytokine and therefore reduce background.
WASH 1
Make the volume up to 10mL using AIM V or RPMI 1640 (Figure 11).
Centrifuge in a swing out rotor at 600x RCF (g) for 7 minutes at 18-25°C.
After removal from the centrifuge, carefully pour off the supernatant andgently resuspend the pellet in 1mL AIM V or RPMI 1640.
WASH 2
Make the volume up to 10mL again using AIM V or RPMI 1640.
Centrifuge in a swing out rotor at 350x RCF (g) for 7 minutes at 18-25°C.
After removal from the centrifuge, pour off the supernatant and gentlyresuspend the pellet in 0.7mL of AIM V (do NOT use RPMI 1640 for thisstep).
Note: For immunocompromised patients, cells may be resuspended in 0.5mL of AIM V to increase cell concentration.
CELL WASHING
Instructions For Use
Training Notes and Visual Aids

14 TB-UK-TRG-MPN527-0001 V1
CELL COUNTING AND DILUTION

15 TB-UK-TRG-MPN527-0001 V1
CELL COUNTING AND DILUTION
The T-SPOT.TB assay requires 250,000 ± 50,000 PBMCs per well. A total of four wells are required for each patient sample; thus 1 x 10
6 PBMCs are required per patient. The number of M. tuberculosis responsive T cells
in the specimen is normalised to a fixed number of PBMCs.
Perform a PBMC count. Cells can be counted by a variety of methods, including manual counting usingTrypan Blue (or other appropriate stain) and a haemocytometer, or using an automated haematology ana-lyser.
Briefly, for manual counting with a Neubauer haemocytometer using Trypan Blue, add 10µL of the finalcell suspension to 40µL 0.4%(w/v) Trypan Blue solution. Place an appropriate aliquot onto the haemocy-tometer and count the cells in the grid. For other types of haemocytometer and for automated devices,follow the manufacturers’ instructions.
MANUAL COUNTING OF PBMC’s Cell concentration can be determined by counting the number of cells within a defined volume. A Neubauer haemocytometer contains two chambers, which are divided into nine major squares (Figure 13 (a)). These have a volume of 0.1mm
3 or 1 x 10
-4mL each. Disposable counting slides are an optically clear plastic slide
consisting of 10 separate counting chambers with integral coverslip. Each of these counting areas consists of ten major squares that have a volume of 0.1mm
3 or 1 x 10
-4mL each (Figure 13 (b)).
Count the cells in one major square (highlighted in red in Figure 13) of the counting grid using the low-power (x10) objective to count the number of cells within the appropriately defined area. When counting the cells that touch the perimeter lines, count only those cells that touch the left and upper outside lines and disregard those that touch the right and lower lines. This is to avoid counting the same cells twice. An example of cells that have been stained with Trypan blue is shown in Figure 13 (c).
Neubauer Haemocytometer Disposable Counting Slide (FAST-READ)
(a) (b)
(c)
Figure 13: Sample chamber and counting areas of (a) Neubauer haemocytometer and (b) Disposable Counting Slide. Cells stained with Trypan Blue as seen under a microscope using the x10 objective (c) NB: counting area representations not to scale.
Ignore blue cells
Count white cells Ignore
Platelets
Instructions For Use
Training Notes and Visual Aids

16 TB-UK-TRG-MPN527-0001 V1
Calculate the concentration of PBMCs present in the stock cell suspension.
Prepare 500µL of the final cell suspension at a concentration of 2.5 x 10⁶ cells/mL.
Notes:
Care should be taken to ensure that the cell suspension is well mixed immediately prior to removal of aliquots for dilution or for counting. Cells can settle towards the bottom of the tube leading to a misinterpretation of the true cell number. Mixing should be carried out by either gentle swirling of the tube by hand, or by gently agitating the suspension by pipetting the suspension up and down several times.
Ensure the calculation is correct for the cell counting system used as the use of either insufficient or excess cells may lead to an incorrect interpretation of the result.
PBMC numbers between 200,000 and 300,000 per well have been shown to give consistent T-SPOT.TB test results.
Manual Counting example
Calculate the concentration of PBMCs in the stock cell suspension by using the following equation:
Volume of cell suspension = 25 required to prepare cell Number of cells counted dilution (mL)
This can only be used when the dilution factor is 5 and the volume of the area counted is 0.1µL.
Example:
For a cell count of 125: 25 = 200µL cell suspension 125
Bring this volume of cell suspension to the required volume of 500µL by adding 300µL AIM V medium or other serum-free cell culture medium. This gives a final solution of 250,000 cells/100µL for use in the assay.
Note: For assistance please consult the electronic T-SPOT.TB cell dilution calculator (manual) available on the CD provided with each kit (Figure 14). Or use the manual slide calculator (Figure 15) available from Oxford Immunotec upon request.
Instructions For Use
Training Notes and Visual Aids
Figure 14: (left) T-SPOT.TB
electronic cell dilution calculator (manual counting)
Figure 15: (right) T-SPOT.TB manual
slide calculator

17 TB-UK-TRG-MPN527-0001 V1
AUTOMATED COUNTING OF PBMC’s
A haematology analyser (automated cell counter) can be used to calculate the number of White Blood Cells (WBC) per mL (cells/mL) in the stock cell suspension in order to determine cell concentration.
The following equation should be used when using a haematology analyzer:
Volume of cell suspension = 1.25 required to prepare cell N dilution (mL)
where N is the initial cell concentration represented as millions of cells/mL.
Example:
For a cell concentration of 10 million cells/mL:
1.25 = 125µL cell suspension 10
Bring this volume of cell suspension to the required volume of 500µL by adding 375µL AIM V medium. This gives a final solution of 250,000 cells/100µL for use in the assay.
Notes: When using a haematology analyzer, check the length of the probe on the analyzer. It may not be long enough to reach the cell suspension in the centrifuge tube. In this case, transfer some of the liquid into a small vial (ideally with a capacity of 2 – 5mL) for sampling on the analyzer. Ensure that the analyzer is programmed to count white blood cells only.
Check the volume of sample that the haematology analyzer requires. Analyzers typically use between 100L and 400L. 4 x 100L of cell
suspension will be added to the microtiter plate wells when running the assay so if the analyzer uses 400L, at least 900L of cellsuspension will be needed, allowing for some dead volume. In this case, the final volume of the cell suspension should be 1mL rather than 0.7mL.
Figure 16: T-SPOT.TB electronic cell dilution calculator (automated counting) Figure 17: T-SPOT.TB manual slide calculator
Note: For assistance, please consult the electronic T-SPOT.TB cell dilution calculator (automated) available on the CD provided with each kit (Figure 16). Or use the manual slide calculator (Figure 17) available from Oxford Immunotec upon request.

18 TB-UK-TRG-MPN527-0001 V1
Please see table below for cell counts out of range:
Cell counts out of range
Manual count
[cells]
Automatic
count
[cells{mL]
Action Cell count after re-
spin/dilution
40-50 2-2.5 x10⁶
Plate neat n/a
<40 <2.0x10⁶ Re-spin sample on final spin set-
tings.
Re-suspend in minimum volume
(400ml).
Re-check cell count on cell counter
or on the Microscope (If counting
manually). If cell count after re-spin
is <2x10⁶ cells/ml, discard sample
and report result as ‘Non-reportable
due to insufficient cells’ with appro-
priate comments.
>60 cells dilute as neces-
sary. (manual count)
>2.5x10⁶ cells/mL dilute as
necessary. (automated
count)
40-50 cells, plate neat
(manual count)
2.0—2.5x10⁶
cells/mL, plate
neat (automated count)
< 40 cells. Discard sample
and report result as ‘Non-
reportable due to insufficient
cells’ with appropriate com-
ments. (manual count)
< 2.0x10⁶ cells/mL. Discard
sample and report result as
‘Non-reportable due to insuf-
ficient cells’ with appropriate
comments. (automated
count)
For cell counts >20x10
6 cells/mL on
cell counter dilute
sample andre-count the re-
diluted sample.
For cell counts >200 on Microscope, dilute sample by 500µl increments until cell count <200 is obtained.
Rescan and re-count the diluted sample on cell counter. If re-count is >3.0x10⁶ cells/mL,
re-dilute the sample as per the re-count. If re-count is 2-2.5x10⁶ cells/mL, plate cells neat.
If sample is over diluted (i.e. re-count is <2x10⁶ cells/ml), go back to neat cells and dilute
with AIM-V in 500µl increments to re-count until cell counts within specification is obtained.

19 TB-UK-TRG-MPN527-0001 V1
PLATE SET UP AND INCUBATION

20 TB-UK-TRG-MPN527-0001 V1
PLATE SET UP AND INCUBATION
The T-SPOT.TB assay requires four wells to be used for each sample. A Nil Control and a Positive Control should be run with each individual sample. It is recommended that the samples be arranged vertically on the plate as illustrated below.
Each 96-well plate can process up to 24 patient samples. Use the number of plates required for the numbers of samples that are to be processed. Each strip will process 2 samples, use only the number of strips that is re-quired.
The T-SPOT.TB assay measures T cell function; no standard curves are required. Therefore, each patient will only require 4 wells to be used for each sample. The recommended plate layout for 24 samples is shown below:
Remove the pre-coated 8-well strips from the packaging, clip into a plate frame (available from OxfordImmunotec) and allow to equilibrate to room temperature. Remove the required number of strips only,reseal any remaining unused strips and the desiccant pouch in the outer foil packaging and return tostorage at 2-8ºC. Add the Panels and the Controls;
Add 50µL AIM V cell culture medium to each Nil Control well
Add 50µL Panel A solution to each well required
Add 50µL Panel B solution to each well required
Add 50µL Positive Control solution to each cell functionality control well.
Do not allow the pipette tip to touch the membrane. Indentations in the membrane caused by pipette tips may cause artifacts in the wells. (See example 5 on page 38)
Key: N=nil control, A=Panel A, B=Panel B, M=Mitogen Positive Control)
Row 1 2 3 4 5 6 7 8 9 10 11 12
A 1N 3N 5N 7N 9N 11N 13N 15N 17N 19N 21N 23N
B 1A 3A 5A 7A 9A 11A 13A 15A 17A 19A 21A 23A
C 1B 3B 5B 7B 9B 11B 13B 15B 17B 19B 21B 23B
D 1M 3M 5M 7M 9M 11M 13M 15M 17M 19M 21M 23M
E 2N 4N 6N 8N 10N 12N 14N 16N 18N 20N 22N 24N
F 2A 4A 6A 8A 10A 12A 14A 16A 18A 20A 22A 24A
G 2B 4B 6B 8B 10B 12B 14B 16B 18B 20B 22B 24B
H 2M 4M 6M 8M 10M 12M 14M 16M 18M 20M 22M 24M
The plate orientation should be as shown (Figure 18). Position the A1 well at the top left hand corner. This corner is clearly distinguishable by the flattened section shown in the blue circle. The column numbers are positioned along the top edge of the plate, shown in the red circle. The row letters are shown in the green circle down the left hand side of the plate. Figure 18 shows 4 wells used for one patient sample positioned in the top four wells on the first strip of an 8 well strip plate. The suggested orientation of wells to be used are shown e.g. A1 Nil Control, B1 Panel A, C1 Panel B and D1 Posi-tive Control. Patient wells should be arranged in this order to avoid cross con-tamination when adding the positive control and patient cells.
Note: Label opened items with the date. After 8 weeks, remaining components should be discarded.
Figure 18: 4 wells used for one patient. A1 to D1, Nil Control, Panel A, Panel B and Positive control respectively
Nil Control
Panel A (ESAT-6)
Panel B (CFP10)
Positive Control
Instructions For Use
Training Notes and Visual Aids

21 TB-UK-TRG-MPN527-0001 V1
To each of the 4 wells to be used for a patient sample, add 100µL of the patient’s final cell suspension(containing 250,000 cells). Use a new tip for the addition of each individual patient’s cells to avoidcross-contamination between patients.
Note: Take care not to contaminate adjacent wells, by passing liquid from one well to another if pipette tips are reused for multiple wells.
Clip the strips to be used into an empty plate frame fitted with a bottom plate and lid. Figure 19 (left), shows a breakdown of the 8 well strip plate (TB.300) containing 2 strips: Plate frame (A), Lid (B), bottom plate (C), and the 2x 8 well strips (D). Figure 19 (right), shows the complete frame containing 2 strips (16 wells) sufficient for 4 patient samples. The frames, bottom plate, and lids can be retained and reused.
Plate, Panel A, Panel B, and Positive Control (PHA) should all be at room temperature (18-25oC). AIM V must
be pre-warmed to 37oC.
Prior to pipetting, gently swirl cell suspension or gently pipette up and down to ensure cells are evenly distributed.
Do NOT allow the pipette tip to touch the membrane. Indentations in the membrane caused by pipette tips may cause damage to the wells. If necessary, rest the tip on the side of the well.
Change tip when changing from one reagent to the next.
Figure 19: Left: Breakdown of the 8 well strip plate. Right: Final assembly with 2 strips. Enough wells for 4 patient samples (e.g. 16 wells).
A
C
B
D
Instructions For Use
Training Notes and Visual Aids

22 TB-UK-TRG-MPN527-0001 V1
Figure 20: Place plate into incubator for 16-20 hours
Incubate the plate with the lid on in a humidified incubator at 37°C ± 1°C with 5% CO2 supply for 16-20hours. Avoid disturbing the plate once in the incubator. Do not stack plates as this may lead to uneventemperature distribution and ventilation.
Incubate plate in a humidified incubator at 37°C ± 1°C with 5% CO2 supply (Figure 20). Check the water dish for sufficient water to ensure that a humid atmosphere is achieved throughout the incubation period.
Instructions For Use
Training Notes and Visual Aids

23 TB-UK-TRG-MPN527-0001 V1
SPOT DEVELOPMENT AND COUNTING

24 TB-UK-TRG-MPN527-0001 V1
SPOT DEVELOPMENT
Remove the plate from the incubator and discard the cell culture medium by flicking the contents into an appro-priate container.
Note: At this point, remove the Substrate Solution from the kit and allow to equilibrate to room temperature for 1 hour.
Add, with force, 200µL Dulbecco’s Phosphate Buffered Saline (D-PBS) solution to each well. Do not usePBS containing Tween
® or other detergents, as this causes high background counts.
Discard the D-PBS solution. Repeat the well washing an additional 3 times with fresh D-PBS solution foreach wash.
Note: For washing, an 8 channel or stepper pipette and a plastic reservoir to hold D-PBS may be used as shown in Figure 21.
Figure 21: Aspirate 200µL of D-PBS from a reagent tray
Figure 22: Dispense 200µL of D-PBS into each well
Note: With force, dispense 200µL in to each well to wash thoroughly (Figure 22).
If using a plate washer, ensure the manifold is adjusted so that the tips do not touch the membrane. After the final wash, tap the plate on lint-free towel to ensure all D-PBS is removed – any excess left will further dilute the Conjugate Reagent.
When washing the plate, ensure that all the wells are full between washes.
Note:
Do not use pipettes to remove the D-PBS as this risks damaging the membrane.
Discard D-PBS by inverting the plate over a suitable container after each wash (Figure 23).
Figure 23: Invert plate into a container
Instructions For Use
Training Notes and Visual Aids

25 TB-UK-TRG-MPN527-0001 V1
Before opening the Conjugate Reagent vial, ensure all liquid is at the bottom of the tube. Centrifuge ifnecessary.
Dilute concentrated Conjugate Reagent 200 x in D-PBS to create the working strength solution.
Add 50µL working strength Conjugate Reagent solution to each well and incubate at 2-8°C for 1 hour.
Discard the Conjugate Reagent and perform four 200µL D-PBS washes as described on the previouspage.
Add 50µL Substrate Solution to each well and incubate at room temperature for 7 minutes.
Wash the plate thoroughly with distilled or deionised water to stop the detection reaction.
Allow the plate to dry in a well ventilated area or in an oven at up to 37°C. Spots become more visible asthe plate dries; therefore ensure that the plate is thoroughly dry before reading. Allow up to 4 hours dryingtime at 37°C or overnight if left at room temperature.
Note:
In order to load all wells quickly, a multi-channel pipette and a plastic reservoir is recommended. Ensure all residual D-PBS is removed prior to adding the Substrate Solution. It is recommended that an aliquot of Substrate Solution be removed from the reagent bottle to avoid risk of contamination.
Example Dilution:
Each patient sample will have 4 wells. 50L diluted Conjugate Reagent will be added to each well. Thus,
for one strip (2 samples, 8 wells), prepare 500L of working strength solution by adding 2.5L of
concentrated Conjugate Reagent (use a 1-20 µL pipette) to 497.5L D-PBS. Mix by inverting 5-6 times.
For one 96-well plate (24 samples) prepare 5mL of working strength solution by adding 25L of concentrated Conjugate Reagent to 4975µL D-PBS.
Note: Twice as much Conjugate Reagent than is required is provided with each kit. Care should be taken to limit the amount of excess solution prepared (for wastage) to avoid running out of Conjugate Reagent.
Care should be taken to ensure that the Conjugate Reagent is added to every well as the solution is clear and colourless.
Note: Use of an 8 channel or stepper pipette is recommended for pipetting the Substrate Solution (Figure 25).
The Substrate Solution should be used at room temperature and is supplied ready to use.
Figure 24: Perform Conjugate Reagent dilution (1:200)
Figure 25: Add Substrate Solution and incubate at
18-25oC for 7 mins
After washing the plate with distilled or deionised water (Figure 26), tap out any residual liquid onto absorbent paper. As the wells dry, the background decreases and the spots become more sharply defined and thereby, easier to count. Ensure the plate is thoroughly dry before reading.
Figure 26: Wash wells with distilled or deionised water
Instructions For Use
Training Notes and Visual Aids

26 TB-UK-TRG-MPN527-0001 V1
SPOT INTERPRETATION
27 TB-UK-TRG-MPN527-0001 V1
Instructions For Use
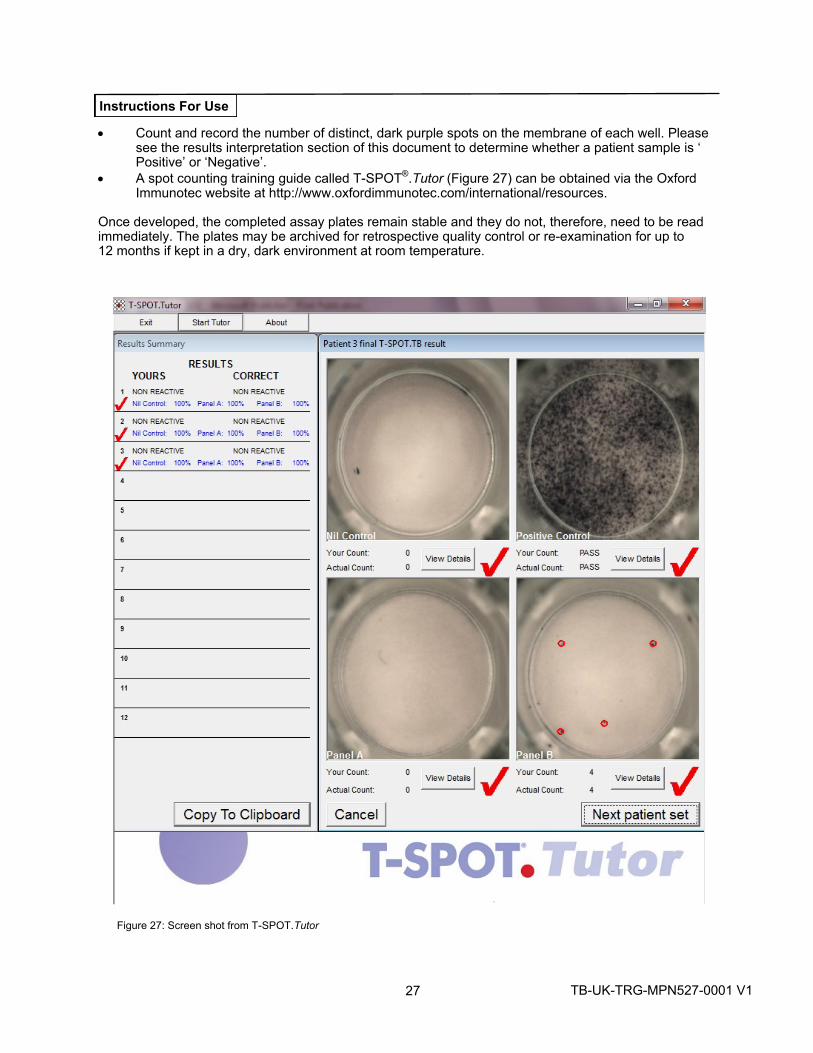
Count and record the number of distinct, dark purple spots on the membrane of each well. Pleasesee the results interpretation section of this document to determine whether a patient sample is ‘Positive’ or ‘Negative’.
A spot counting training guide called T-SPOT®.Tutor (Figure 27) can be obtained via the Oxford
Immunotec website at http://www.oxfordimmunotec.com/international/resources.
Once developed, the completed assay plates remain stable and they do not, therefore, need to be read immediately. The plates may be archived for retrospective quality control or re-examination for up to 12 months if kept in a dry, dark environment at room temperature.
Figure 27: Screen shot from T-SPOT.Tutor

28 TB-UK-TRG-MPN527-0001 V1
Training Notes and Visual Aids
What are the recommended methodologies for interpreting T-SPOT.TB test results? A USB microscope is an excellent option for visualising spots produced by the T-SPOT.TB test, but other validated manual methods may also be used, such as the use of a magnifying glass or stereomicroscope. Where available, an automated ELISPOT plate imager can be used to visualise the spots. A variety of automated imagers are available to aid in the counting of spots formed in the T-SPOT.TB assay. Examples of suppliers include BIO-SYS, AID, CTL™, and Zeiss™. All plate imagers should be validated before being used for diagnostic purposes and have a calibration routine established.
Must I count every spot? Wells that clearly contain either sufficient spots or an absence of spots, such that the assay result can be determined with confidence, do not need to be counted accurately. Based on results from our clinical data, we concluded that most of the results are clearly positive (Panel - Nil Control is more than 10 spots) or negative (Panel - Nil Control is 2 or less spots). In these cases, you may report a result as being positive or negative without individual spot enumeration. The Positive Control well does not require individual spot enumeration provided it passes the quality control criteria (please see quality control section on page 31).
How do I differentiate between valid spots and non-specific artefacts that may appear in the well? The spots produced as a result of antigen-stimulation appear as large, round, dark spots, and often a gradient effect can be observed with a darker centre and a more diffused periphery (halo). In comparison to these valid spots, non-specific artefacts appear to be either smaller or lighter in colour, and may be irregular in shape.
How do I count spots? Ensure the plate is dry before beginning the interpretation, as spots become more visible as the plate dries. Drying can take place in an oven at up to 37°C, or in a well ventilated area at room temperature. Allow up to 4 hour drying time at 37°C or overnight at room temperature.
Count and record the number of large, round, dark spots on the membrane of each well. This should be performed blind (i.e. without patient details). The results for all four wells (i.e. Nil Control, Panel A, Panel B, and Positive Control) must be recorded, with the reporting of results following the guidelines set out in the T-SPOT.TB Package Insert. We recommend the use of T-SPOT
®.Reporter if you count spots manually
(contained on the CD accompanying each T-SPOT.TB kit). This software implements the T-SPOT.TB algorithmto determine the result of a sample.
In the following pictures, the spots which should be counted in Nil Control, Panel A and Panel B wells are shown. Pictures were taken using a USB powered Microscope and an automated plate imager. Valid spots are indicated with a black ring, invalid spots are indicated by a red ring.

29 TB-UK-TRG-MPN527-0001 V1
Training Notes and Visual Aids
Nil Control Panel A
Panel B Positive Control
Nil Control Panel A
Panel B Positive Control
Nil Control Panel A
Panel B Positive Control
Nil Control Panel A
Panel B Positive Control
Figure 28: Patient 1 viewed with a USB Microscope (invalid spots shown in red)
Figure 29: Patient 1 viewed with an AID plate reader (invalid spots shown in red)

30 TB-UK-TRG-MPN527-0001 V1
Training Notes and Visual Aids
Nil Control Panel A
Panel B Positive Control
Nil Control Panel A
Panel B Positive Control
Nil Control Panel A
Panel B Positive Control
Nil Control Panel A
Panel B Positive Control
Figure 31: Patient 2 viewed with an AID plate reader (invalid spots shown in red)
Figure 30: Patient 2 viewed with a USB Microscope (invalid spots shown in red)

31 TB-UK-TRG-MPN527-0001 V1
Training Notes and Visual Aids
Figure 32: Images taken with a USB microscope showing a well with seven valid spots, (Black Ring) three weak invalid spots (Red Ring) and
Figure 33: Images taken with a USB microscope showing a well with twenty six valid spots (Black Ring) and fifteen weak invalid spots (Red

32 TB-UK-TRG-MPN527-0001 V1
QUALITY CONTROL

33 TB-UK-TRG-MPN527-0001 V1
QUALITY CONTROL
A typical result would be expected to have few or no spots in the Nil Control and 20 or more spots in the Positive Control.
NIL CONTROLS
High numbers of spots in the Nil Control may occur. In addition, high background staining in one or more wells may occur which makes counting of spots difficult. If high background staining occurs such that discrimination of the spots from the background is hindered, the test should be considered “indeterminate” These results are usually due to operator issues such as: sub-optimal plate washing, medium contamination or inappropriate specimen handling and PBMC separation methods. It is, however, possible that the state of health of the patient may produce this effect in a small number of cases.
A Nil Control spot count in excess of 10 spots should be considered as “ Indeterminate ” .
POSITIVE CONTROLS
Typically, the cell functionality Positive Control spot count should be ≥ 20 or show saturation (too many spots
to count). A small proportion of patients may have T cells which show only a limited response to PHA1. Where
the Positive Control spot count is < 20 spots, it should be considered as “Indeterminate”, unless either Panel A or Panel B are ‘Positive’ as described in the Results Interpretation and Assay Criteria (see below), in which case the result is valid.
(a) (b)
(a) (b)
(c)
Figure 34: Typical images from Nil Control wells: (a) shows a well with 0 spots (b) shows a well with 1 spot and (c) shows an invalid Nil Control well of >10 spots
Figure 35: Typical images from Positive Control wells (a) (b) and (c) all shown acceptable responses for patient samples. Figure (d) shows an invalid Positive Control well due to having <20 spots.
(d)
Instructions For Use
Training Notes and Visual Aids
(c)

34 TB-UK-TRG-MPN527-0001 V1
RESULTS INTERPRETATION
35 TB-UK-TRG-MPN527-0001 V1
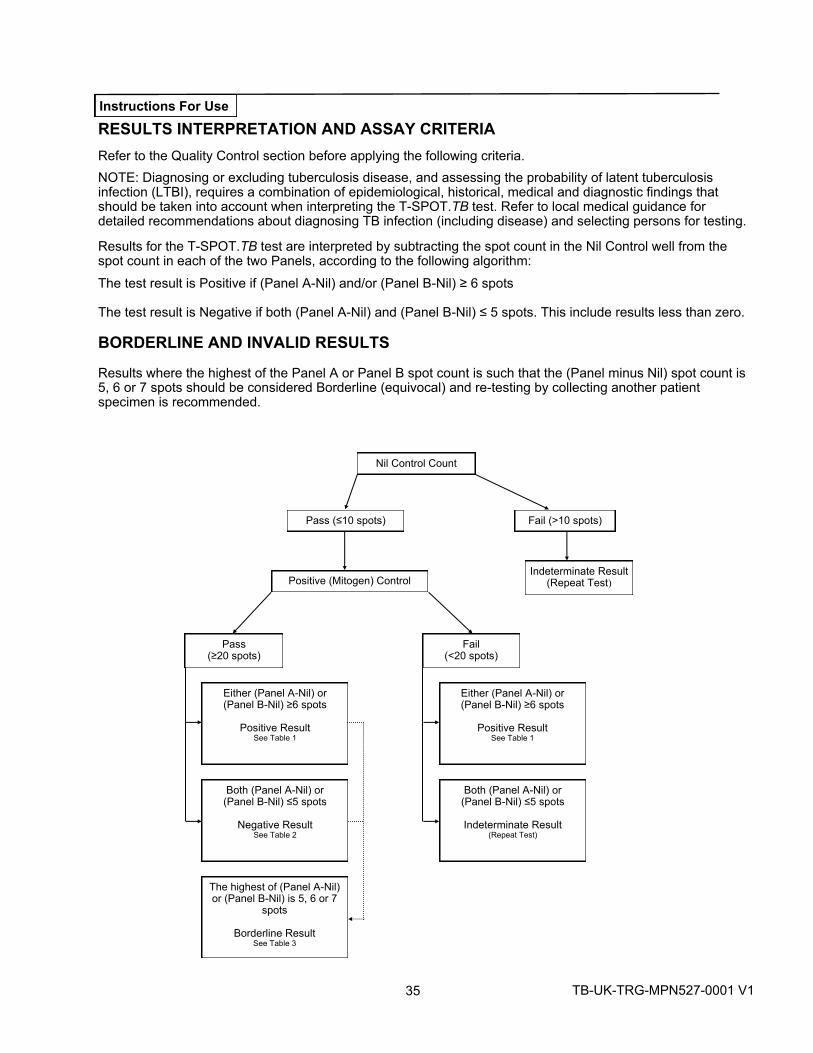
RESULTS INTERPRETATION AND ASSAY CRITERIA
Refer to the Quality Control section before applying the following criteria.
NOTE: Diagnosing or excluding tuberculosis disease, and assessing the probability of latent tuberculosis infection (LTBI), requires a combination of epidemiological, historical, medical and diagnostic findings that should be taken into account when interpreting the T-SPOT.TB test. Refer to local medical guidance for detailed recommendations about diagnosing TB infection (including disease) and selecting persons for testing.
Results for the T-SPOT.TB test are interpreted by subtracting the spot count in the Nil Control well from the spot count in each of the two Panels, according to the following algorithm:
The test result is Positive if (Panel A-Nil) and/or (Panel B-Nil) ≥ 6 spots
The test result is Negative if both (Panel A-Nil) and (Panel B-Nil) ≤ 5 spots. This include results less than zero.
BORDERLINE AND INVALID RESULTS
Results where the highest of the Panel A or Panel B spot count is such that the (Panel minus Nil) spot count is 5, 6 or 7 spots should be considered Borderline (equivocal) and re-testing by collecting another patient specimen is recommended.
Instructions For Use
Nil Control Count
Pass (≤10 spots) Fail (>10 spots)
Positive (Mitogen) Control Indeterminate Result
(Repeat Test)
Pass (≥20 spots)
Fail (<20 spots)
Either (Panel A-Nil) or (Panel B-Nil) ≥6 spots
Positive Result See Table 1
Either (Panel A-Nil) or (Panel B-Nil) ≥6 spots
Positive Result See Table 1
The highest of (Panel A-Nil) or (Panel B-Nil) is 5, 6 or 7
spots
Borderline Result See Table 3
Both (Panel A-Nil) or (Panel B-Nil) ≤5 spots
Negative Result See Table 2
Both (Panel A-Nil) or (Panel B-Nil) ≤5 spots
Indeterminate Result (Repeat Test)

36 TB-UK-TRG-MPN527-0001 V1
SPOT INTERPRETATION PANEL A & B ANTIGEN

37 TB-UK-TRG-MPN527-0001 V1
Table 1: Positive Interpretation: Either (Panel A-Nil) or (Panel B-Nil) ≥6 spots
†Note: The Panel with the
highest number of spots is used for the calculation.
Table 2: Negative Interpretation: Both (Panel A-Nil) and (Panel B-Nil) ≤5 spots
Table 3: Borderline (equivocal) Interpretation: The highest of (Panel A-Nil) or (Panel B-Nil) is 5, 6 or 7 spots
*Results where the highest of the Panel A or Panel B spot count is such that the (Panel minus Nil) spot countis 5,6 or 7 spots should be considered Borderline (equivocal) and re-testing by collecting another patientspecimen is recommended.** In the case of “Indeterminate” results, these should be reported as “Indeterminate” and it is recommendedto collect another sample and re-test the individual.
Nil Control Well Count
Both Panel A and Panel B has the following number of spots Result Interpretation
0 ≤5 Negative
1 ≤6 Negative
2 ≤7 Negative
3 ≤8 Negative
4 ≤9 Negative
5 ≤10 Negative
6 ≤11 Negative
7 ≤12 Negative
8 ≤13 Negative
9 ≤14 Negative
10 ≤15 Negative
>10 spots n/a Indeterminate**
Nil Control Well Count
Either Panel A or Panel B has the following number of spots† Result Interpretation
0 ≥6 Positive
1 ≥7 Positive
2 ≥8 Positive
3 ≥9 Positive
4 ≥10 Positive
5 ≥11 Positive
6 ≥12 Positive
7 ≥13 Positive
8 ≥14 Positive
9 ≥15 Positive
10 ≥16 Positive
>10 spots n/a Indeterminate**
Nil Control Well Count
The highest of Panel A or Panel B has the following number of spots Result Interpretation
0 5, 6 or 7 Borderline (equivocal)*
1 6, 7 or 8 Borderline (equivocal)*
2 7, 8 or 9 Borderline (equivocal)*
3 8, 9 or 10 Borderline (equivocal)*
4 9, 10 or 11 Borderline (equivocal)*
5 10, 11 or 12 Borderline (equivocal)*
6 11, 12 or 13 Borderline (equivocal)*
7 12, 13 or 14 Borderline (equivocal)*
8 13, 14 or 15 Borderline (equivocal)*
9 14, 15 or 16 Borderline (equivocal)*
10 15, 16 or 17 Borderline (equivocal)*
>10 spots n/a Indeterminate**
Instructions For Use

38 TB-UK-TRG-MPN527-0001 V1
TROUBLE SHOOTING IMAGES

39 TB-UK-TRG-MPN527-0001 V1
TROUBLESHOOTING
This assay should be performed using the principles of Good Laboratory Practice and by strictly adhering to these instructions for Use.
Borderline (equivocal) Results
Borderline (equivocal) results are those where the maximum of the two (Panel minus Nil) spot count results are within ±1 spots from the ROC-determined assay cut-off of ≥6 spots. Borderline (equivocal) results, alt-hough valid, are less reliable than results where the spot count is further from the cut-off. Re-testing of the patient, using a new sample, is therefore recommended. If the result is still Borderline (equivocal) on re-testing, then other diagnostic tests and/or epidemiologic information should be used to help determine TB infection status of the patient.
Invalid Results
Invalid results are uncommon and may be related to the immune status of the individual being tested2&3
. They may also be related to a number of technical factors, potentially resulting in “high background”, “low mitogen”, and “high nil” results such as:
Use of inappropriate blood collection tubes
Storage of blood greater than 8 hours (greater than 32 hours using the T-Cell Xtend reagent) prior toprocessing
Storage of blood outside the recommended temperature range (18-25ºC prior to processing)
Contamination of the cell culture media
Incomplete plate washing
Repeating the test using a new patient sample is recommended for invalid results. Technical documents are available covering key troubleshooting points. These are available by contacting Oxford Immunotec.
For Product Support contact: +44 (0) 810 100245.
Instructions For Use

40 TB-UK-TRG-MPN527-0001 V1
Panel A and B Antigens The number of spots in the antigen wells can vary from zero to several hundred. High spot numbers will be difficult and time-consuming to count so may be recorded as >20 spots. Examples of typical wells are shown in Figure 34-36
(a) (b) (c) (d)
Figure 36: Typical images from Panel A and B antigen wells, (a) Positive sample (>20 spots); (b) Positive sample (>20 spots); (c) Positive sample (8 spots) and (d) Negative sample (0 spots)
SPOT INTERPRETATION — ADDITIONAL INFORMATION
Example patient interpretations:
Well Spot count Valid?
Patient 1. Nil Control = 2
Panel A = 11
Panel B = 1
Positive Control = >20
Panel A value subtract the Nil Control value = 9 (9 ≥6) therefore: Result = Positive
Patient 2. Nil Control = 1
Panel A = 0
Panel B = 2
Positive Control = >20
Panel B value subtract the Nil Control value = 1 (1 ≤5 therefore: Result = Negative
Patient 3. Nil Control = 11 X Panel A = 13
Panel B = 12
Positive Control = >20
Nil Control value >10 therefore: Result = Indeterminate (Repeat Test)
Patient 4. Nil Control = 0
Panel A = 13
Panel B = 12
Positive Control = 18 X
Positive Control fail BUT Panel A & B (subtract Nil 0) = 13 & 12 (>6) therefore: Result = Positive
Training Notes and Visual Aids

41 TB-UK-TRG-MPN527-0001 V1
SPOT INTERPRETATION — TROUBLESHOOTING If wells contain debris or have a high background care should be taken when counting spots. See the examples below:
Example 1: 4 Mark Effect. These marks can be attributed to excessive pressure on the back of the plate caused when tapping solutions out of the plate during the plate washing steps. [In this case the spot count = 0].
Example 2: High background in Panel well. Although a high background is uncommon with the T-SPOT.TB test, spots can still be seen over background. [In this case the spot count ≥20].
Example 3: Excessively high background can be produced, possibly due to: suboptimal plate washing, medium contamination or inappropriate specimen handling and PBMC separation. It is also possible that the state of health of the patient may produce this effect in a small number of cases. [In this case, the result for this Nil control well was invalid]
Example 4: Debris in well may be visible e.g. a hair. However, spots will still be evident. [In this case the spot count = 0]. Care should be taken when pipetting cells and reagents to not allow debris to fall into the assay wells.
Example 5: Pipette tips can cause dark marks on the membrane. However spots will still be evident. [In this case the spot count = 0]. Care should be taken when pipetting reagents and cells to not touch the membrane with pipette tips.
Example 9: Broken membrane. Spots are still evident in this well. Care should be taken when pipetting into the wells to ensure that the membranes are not damaged.
Example 8: Debris in well. Spots if present will still be evident. [In this case spot count = 0]. Care should be taken when pipetting cells and reagents into the plates to not allow environmental debris to fall into the assay wells.
Example 7: Fungal contamination in the well (media). These growths are not round in shape. Rather they appear as non-uniform and have fibrous edges. They are also much larger than ELISPOT spots. [In this case spot count = 0]. Care should be taken not to allow contamination to occur.
Example 6: Automated Washer tips can also cause dark marks on the membrane. However spots will still be evident. [In this case the spot count = 0]. Care should be taken that the tips do not touch the membrane during operation.

42 TB-UK-TRG-MPN527-0001 V1
References
1. Köller MD et al., Functional and molecular aspects of transient T cell unresponsiveness: role ofselective Interleukin-2 deficiency. Clin Exp Immunol. 2003 May;132(2):225-31.
2. NCCLS. Performance of single cell immune response assays; approved guideline. NCCLS documentI/LA26-A.
3. Meier T et al. Sensitivity of a new commercial enzyme-linked immunospot assay (T SPOT-TB) fordiagnosis of tuberculosis in clinical practice. Eur. J. Clin. Microbiol. Infect. Dis., 2005; 24: 529-536.
T-SPOT and T-Cell Xtend are registered trademarks of Oxford Immunotec Ltd.The Oxford Immunotec logo is a registered trademark of Oxford Immunotec Ltd.AIM V and GIBCO are trademarks of InvitrogenPST, CPT and Vacutainer are trademarks of Becton Dickinson*FICOLL and FICOLL-PAQUE are trademarks of GE companiesTween is a trademark of Uniqema Americas LLCVacuette is a trademark of Greiner Bio-OneCTL is a trademark of Cellular Technologies LimitedZeiss is a trademark of Carl Zeiss AGMonovette is a trademark of Sarstedt
Fast-Read Disposable Counting Slides are supplied by Immune Systems Limited
The T-SPOT.TB assay is protected by the following patents and patents pending:
US7575870, US8617821, US9360480, EP941478, JP4094674, AU728357, CA2272881; US7115361; US7632646, EP1144447, JP4633931, ZA2001-3356; US7901898, US8216795, US8507211, US9005902; US7579141, US8021832, US9238066, US9482671, US 15/019,532, EP1214088, EP2087906, JP4820489, AU773268, CA2372583
The use of the T-Cell Xtend reagent is protected by the following patents and patents pending: EP2084508; US9090871, CN101529221,
AU2007-303994, JP5992393, IN2165/DELNP/2009, CA2665205.
T-SPOT.TB incorporates patented technology under license from the Statens Serum Institut, Copenhagen, Denmark and Isis InnovationLimited, Oxford, UK.
© 2021 Oxford Immunotec. All rights reserved.
Oxford Immunotec, Ltd. 94C Innovation Drive, Milton Park, Abingdon, Oxfordshire, OX14 4RZ, UK Tel: +44 (0) 1235 442780 Fax: +44 (0) 1235 442781 Email: [email protected] www.oxfordimmunotec.com


