TouchDown for Android Installation and Configuration...
34
© 2013 NitroDesk Inc. All Rights Reserved. Unauthorized reproduction prohibited. TouchDown Version 8.1 - April 2013 • • • • • • TouchDown for Android Installation • • • • • • and Configuration Guide
Transcript of TouchDown for Android Installation and Configuration...

TouchDown for Android Installation
• • • • • •and Configuration Guide
© 2013 NitroDesk Inc. All Rights Reserved. Unauthorized reproduction prohibited.
TouchDown Version 8.1 - April 2013• • • •••

• • • •••
• • • • • • Table of Contents
Download and Install 1
Trial Version 1Licensed Version 1
Installing TouchDown 2
Configuring 5
Quick Configuration 5
Quick Configuration, Connection Details Screen 9Quick Configuration, Security Settings 10Quick Configuration, Protocols to Check For Screen 11Configuration Progress: Connecting and Configuring 11
Manually Configuring TouchDown 13
Account Information Tab 14Connection Tab 15
Manual Configuration (No ActiveSync) 17
Performing the Configuration 20Setting the Client Certificate 21
Recommended Next steps 22
Email Checking Frequency 22Emails to Synchronize 23Appointments to Synchronize 24Choose Folders 25
Activating 27
Purchasing from Your Device 27Purchasing from www.nitrodesk.com 28Activating on a Factory-Reset Device 29Purchased from www.nitrodesk.com 29
Table of Contents i
• • • •••

ii Tab
• • • •••
le of Contents

Chapter 1
• • • • • • Download and Install
This chapter describes how to download and install TouchDown™ for Android devices. It also includes how to activate your copy of TouchDown.
NOTE: TouchDown cannot be installed on an SD card and must be installed directly on the device.
Trial VersionWhen you install TouchDown for the first time, it enables full functionality for a period of 30 days from your installation time. The only option that is disabled during the 30 day trial is the ability to change your outgoing message signature. You can use this trial period to ensure that all the features work as expected with your Microsoft® Exchange server.
Licensed VersionThis is not a separately downloadable product. You activate the trial version and convert the installation to a licensed version by activating the product. Once activated, all the features are available for use.
It is highly recommended that you use the trial version before purchasing a license. If you purchase from the Google Play Store, there is only a 15-minute return period, so please make sure the application works as expected before buying a license key.
1
• • • •••

2 Ch
• • • •••
Installing TouchDown
To install TouchDown from the Google Play Store,
1 On your device, go to the Google Play Store.
2 Tap the Search button, type NitroDesk and Tap Search.
3 Navigate to TouchDown for Smartphones or TouchDown HD (for ICS/JB) and select the version depending on your device.
This will open the product information screen.
4 Tap Install and Tap Accept & Download to accept permissions.
TouchDown will be downloaded and installed. When installation is complete, a notification on the top bar will indicate that it has finished.
TouchDown requires the following permissions:
STORAGE permission is required to modify/delete SD card contents. It allows an application to write to the SD card.
YOUR MESSAGES permission is used to receive SMS. It allows an application to receive and process SMS messages.
SYSTEMS TOOLS is used to change WI-FI state, network connectivity, prevent the device from sleeping and write sync settings. This enables automatic polling for new messages. It will not change your network configuration or attempt to roam. When polling for new messages, the device will wake up at scheduled intervals.
NETWORK COMMUNICATION is required to connect with your Microsoft® Exchange server over the internet.
PHONE CALLS permission is needed to read device state and identity.
YOUR ACCOUNTS allows the application to act as an account authenticator. This allows the application to use the account authentication capabilities of the Account Manager, including creating accounts and getting and setting their passwords. This is required to manage the accounts list that allows an application to perform operations like adding and removing accounts and deleting the password.
YOUR SOCIAL INFORMATION allows the application to read contact data and write contact data. This permission is required for TouchDown to modify your contacts, read call log and read your contacts.
apter 1

Follow these steps only if you are unable to install TouchDown using the Google Play Store.
1 Open the web browser on the device.
• If your device is running Android version 3.0 or later (Motorola Xoom, LG G-Slate), type in the link http://nitrodesk.com/tddownloads/nitroid-honey.apk
• If your device is running Android version 2.0 or later (Incredible, Nexus, Motorola Droid etc), type in the link http://nitrodesk.com/tddownloads/nitroid-droid.apk
2 The download will start once you Tap Go.
Wait for the download to finish.
3 Tap on the file that was downloaded.
4 Follow the prompts to install TouchDown.
NOTE: You may have to enable the "Unknown sources" option in Android settings to complete the installation.
Download and Install 3
• • • •••

4 Ch
• • • •••
apter 1
Chapter 2
• • • • • • Configuring
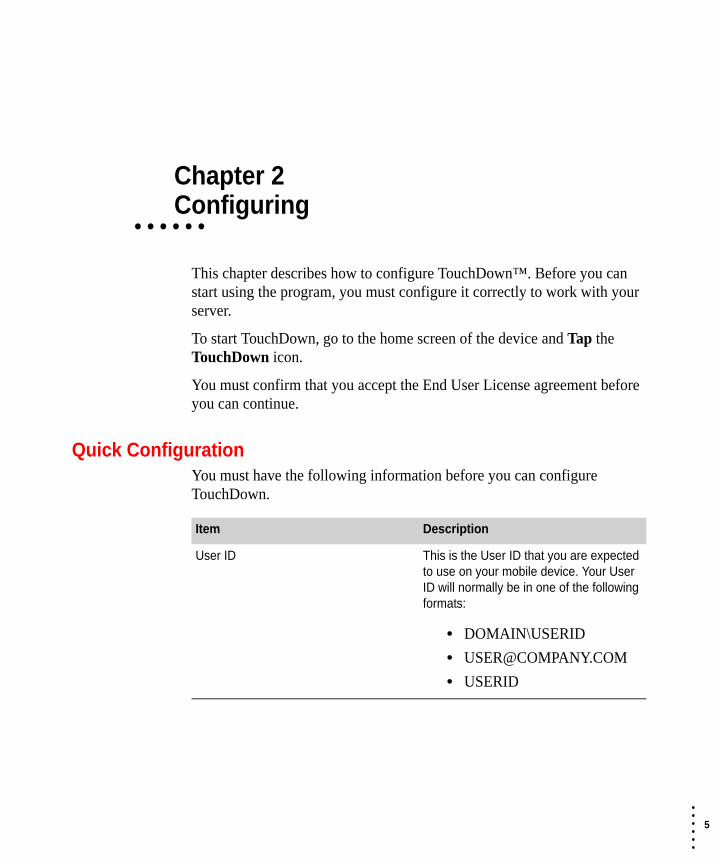
This chapter describes how to configure TouchDown™. Before you can start using the program, you must configure it correctly to work with your server.
To start TouchDown, go to the home screen of the device and Tap the TouchDown icon.
You must confirm that you accept the End User License agreement before you can continue.
Quick ConfigurationYou must have the following information before you can configure TouchDown.
Item Description
User ID This is the User ID that you are expected to use on your mobile device. Your User ID will normally be in one of the following formats:
• DOMAIN\USERID
• USERID
5
• • • •••

6 Ch
• • • •••
When you launch TouchDown for the first time, the following screen will appear. Tap “Configure Your Account” if you want to perform quick configuration.
Password This is the password you use to connect your mobile device to your Microsoft® Exchange server. Note that if your password changes or expires, it will not be updated automatically in TouchDown. You must manually update it in TouchDown.
Server Name This is the name of the server that your mobile device connects to. For some organizations, this may be different from the Outlook Web Access server. Below is just an example:
MOBILE.MYCOMPANY.COM
Client Certificates Sometimes your administrator may require your device to provide a client certificate to be able to connect to the server. See “Setting the Client Certificate” on page 21.
Item Description
apter 2

Quick Configuration Screen
If your settings are already present in TouchDown, you can still perform a quick Configuration by tapping the “Quick Configuration” button on the Account tab of the Settings screen.
To access the Account tab,
1 Open TouchDown.
The Main screen displayed.
2 Tap the Menu button and select Settings. The Account tab is displayed.
Configuring 7
• • • •••

8 Ch
• • • •••
Once you start quick configuration, you will be prompted with the following screen.
AutoDiscovery Prompt
AutoDiscovery will only work in certain cases. You can safely skip this step, if you wish.
If AutoDiscovery was successful, you will receive the following message:
AutoDiscovery succeeded. Please Click the Next button to review the discovered settings on each page and complete the configuration.
3 Tap Next.
apter 2

The following screen will appear:
Connection Details Screen
Quick Configuration, Connection Details ScreenUSER ID can be your alias (jsmith) or your email address, depending on the server configuration. If you do not know your User ID, you should check with your Administrator.
DOMAIN may be different than your company’s web site domain. Again, check with your Administrator if you are uncertain what to enter here.
EMAIL ADDRESS is entered here if it is different from your User ID.
PASSWORD is entered here.
SERVER is the address of the Microsoft® Exchange server. Enter only the server name, as in mail.mycompany.com. You should enter the server name as you access it from outside your company network, from the internet.
Configuring 9
• • • •••
10 C
• • • •••
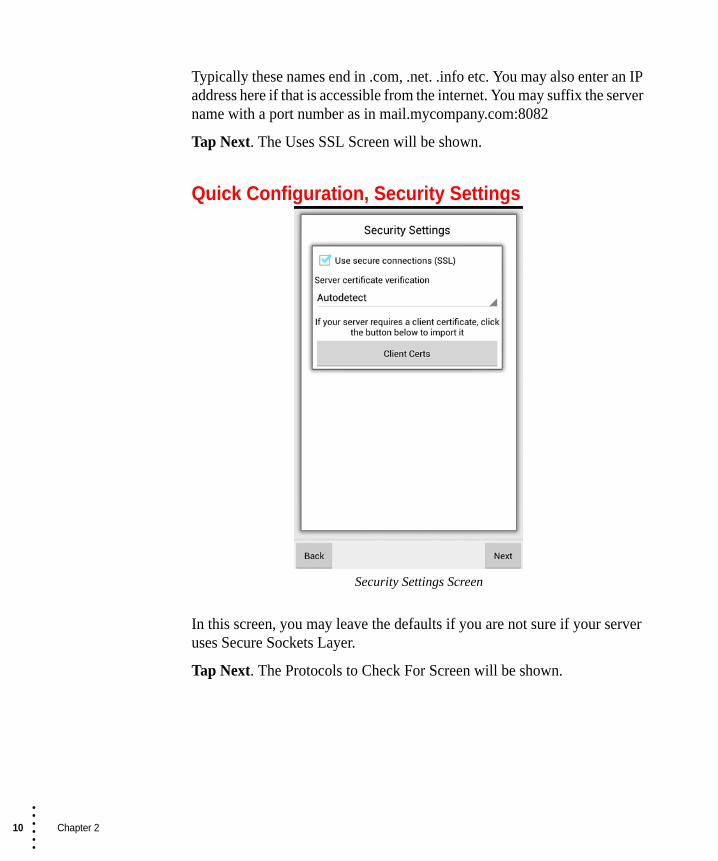
Typically these names end in .com, .net. .info etc. You may also enter an IP address here if that is accessible from the internet. You may suffix the server name with a port number as in mail.mycompany.com:8082
Tap Next. The Uses SSL Screen will be shown.
Quick Configuration, Security Settings
Security Settings Screen
In this screen, you may leave the defaults if you are not sure if your server uses Secure Sockets Layer.
Tap Next. The Protocols to Check For Screen will be shown.
hapter 2

Quick Configuration, Protocols to Check For Screen
Protocols to Check For Screen
In this screen you select the protocols the program should look for. If you are uncertain what is available, it is advised to leave the defaults as they are.
Tap Next. The Start Configuration Screen will be shown.
Configuration Progress: Connecting and ConfiguringTap Next on the Start Configuration screen if you are ready to start the configuration process.
WARNING Starting this process will delete and re-sync all existing data from TouchDown.
Configuring 11
• • • •••

12 C
• • • •••
The following screen will appear after the configuration is completed. It will display the result of the configuration process. If the result does not show SUCCESS, it will show the reason for failure in the log below.
Configuration Progress Result Screen
Once completed, you can Tap the Close button, which will take you to the Activation screen. You can either activate your account or Tap Close to continue with the trial version.
NOTE: Depending on how much data you have, it may take a few minutes until TouchDown automatically updates the data to the device.
Your device will be configured at this time. You can proceed to “Recommended Next steps” on page 22 to see the different configuration options you can change.
hapter 2
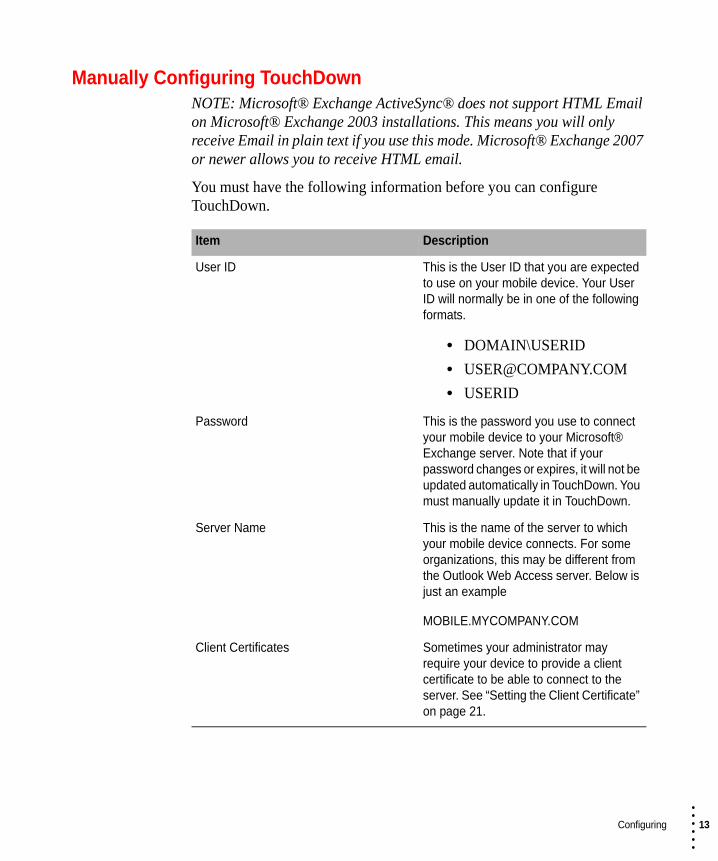
Manually Configuring TouchDownNOTE: Microsoft® Exchange ActiveSync® does not support HTML Email on Microsoft® Exchange 2003 installations. This means you will only receive Email in plain text if you use this mode. Microsoft® Exchange 2007 or newer allows you to receive HTML email.
You must have the following information before you can configure TouchDown.
Item Description
User ID This is the User ID that you are expected to use on your mobile device. Your User ID will normally be in one of the following formats.
• DOMAIN\USERID
• USERID
Password This is the password you use to connect your mobile device to your Microsoft® Exchange server. Note that if your password changes or expires, it will not be updated automatically in TouchDown. You must manually update it in TouchDown.
Server Name This is the name of the server to which your mobile device connects. For some organizations, this may be different from the Outlook Web Access server. Below is just an example
MOBILE.MYCOMPANY.COM
Client Certificates Sometimes your administrator may require your device to provide a client certificate to be able to connect to the server. See “Setting the Client Certificate” on page 21.
Configuring 13
• • • •••

14 C
• • • •••
To configure TouchDown,
1 Open TouchDown. The Main screen displayed.
2 Tap Menu button and select Settings.
Account Information TabThe first tab looks as follows
Tab 1: Account Settings
In this tab, you should enter the following values:
LOGIN ID is your Microsoft® Exchange login ID. The following are some examples of a login ID:
• DOMAIN\USERID
• USERID
hapter 2
THIS IS MY EMAIL ADDRESS should be checked if the login ID is the same as your email address.
EMAIL ADDRESS should be filled in only if you do not select the This is My Email Address check box.
REPLY-TO ADDRESSES NEW update
PASSWORD is entered here.
NOTE: If your password changes or expires, it will not be updated automatically in TouchDown. You must manually update it in TouchDown.
FOLDER LANGUAGE is used if your server uses a folder language other than English, you can select the correct language here.
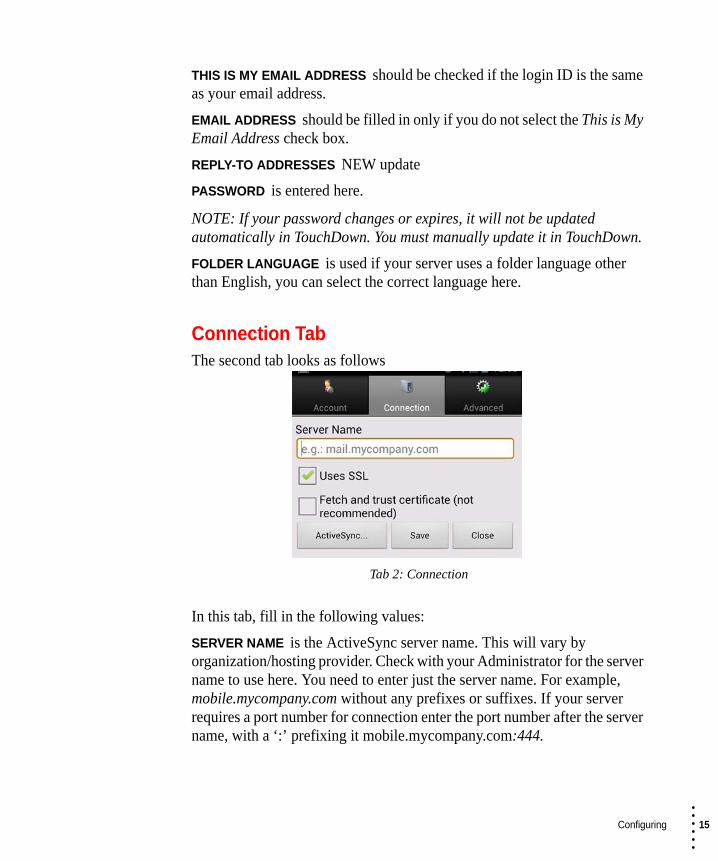
Connection TabThe second tab looks as follows
Tab 2: Connection
In this tab, fill in the following values:
SERVER NAME is the ActiveSync server name. This will vary by organization/hosting provider. Check with your Administrator for the server name to use here. You need to enter just the server name. For example, mobile.mycompany.com without any prefixes or suffixes. If your server requires a port number for connection enter the port number after the server name, with a ‘:’ prefixing it mobile.mycompany.com:444.
Configuring 15
• • • •••

16 C
• • • •••
USES SSL is normally used. If your server does not require HTTPS / SSL for connectivity, you should uncheck this.
FETCH AND TRUST CERTIFICATES may be required to be checked if your server is signed with a self-issued certificate or with a certificate that is not recognized by the Android device. After you select this, please wait a few moments until the “Certificate installed successfully” popup shows on the screen.
ACTIVESYNC is used if your Microsoft® Exchange server supports Microsoft® Exchange ActiveSync®. You should configure using the “Quick Configuration” on page 5 instructions if this is supported.
SAVE will save the above settings. This will cause ActiveSync to be initialized and the folder list to be updated on the device. After initialization if the Save button is still enabled, Tap it again.
If for some reason, you wish to check if ActiveSync is available and working with your server, you can Tap this button. When you do so, a popup as shown below will be displayed.
ActiveSync Popup Window
hapter 2

On this window, Tap the Refresh ActiveSync Settings button. This will have TouchDown check the status of ActiveSync on your server and initialize the security policies and folder list. After initialization the screen should look as follows,
ActiveSync Status
If the versions does not contain 2.5, this means your server is running a version older than Microsoft® Exchange 2003 SP2, and TouchDown cannot support this server in ActiveSync mode.
If the above box says Policies: SET or Policies: NONE, it means TouchDown will be able to work with the server. If it says Policies: NOT INITIALIZED, it means there has been some error connecting with the server. If this happens it is best to run the quick configuration process (described in the earlier section) and see the content of the log generated at the end of the process.
Manual Configuration (No ActiveSync)This section applies to devices that cannot use ActiveSync with their servers.
Correct configuration requires knowledge of some aspects of your Microsoft® Exchange server. If you are not sure about this information, your Administrator may be able to provide these to you. You can also use
Configuring 17
• • • •••

18 C
• • • •••
the table below to help gather the information necessary to configure TouchDown.
Item Description
Server Name Open a browser on a computer and go to the login page of your server. Observe the link/URL of the browser page. It will look something like this: https://yourmail.yourservername.com/Exchange/..
The part in bold will be the SERVER_NAME you should use. Yours may look different from the one shown above.
Microsoft® Exchange 2007 Mode
Type https://SERVER_NAME/ews/Exchange.asmx in a browser. If a login screen appears and allows you to login with your credentials, and if it successfully shows an XML document in the browser, it means you can use Microsoft® Exchange 2007 Mode.
If this gives you an error, it means you need to use Microsoft® Exchange 2003 Mode.
ISA Server Settings Open a browser on a computer and go to the login page of your server. Observe the link/URL of the browser page. It will look something like this: https://yourmail.yourservername.com/Exchange/..
If anywhere on the link/URL, you find “cookieauth.dll”, this means your company is using an ISA server. In this case, you MUST turn on Uses ISA in settings.
If you do have an ISA server, the server URL will look like this: https://yourmail.yourservername.com/CookieAuth.dll?GetLogon?curl=Z2FExchangFE2F&reason=0&formdir=1
Write the highlighted part down (your values may be different), and replace reason with flags. This will be your ISA Flags setting. It may look like the following:
curl=Z2FExchang10/Z2F&flags=0&formdir=1
hapter 2

User ID This is the User ID that you are expected to use on your mobile device. Your User ID will normally be in one of the following formats.
• DOMAIN\USERID
• USERID
Microsoft® Exchange 2010 Server Alias
This step is only for those users who use Microsoft® Exchange 2003 mode.
Login to Outlook Web Access (OWA)
Tap on any email to open it in a separate window.
In some cases, your link may look as follows:
https://yourmail.yourservername.com/Exchange/ALIAS/.....
https://yourmail.yourservername.com/owa/ALIAS/....
If you have an ALIAS showing up as shown above, it may either be an abbreviated ID, your User ID, your full name, or an email address. Write this down.
Item Description
Configuring 19
• • • •••

20 C
• • • •••
Performing the ConfigurationUsing the information in the above table, you are ready to start configuring your account.
To perform a manual configuration,
1 Start TouchDown
2 Tap Settings
• On the first tab (Account), enter the following
• User ID
• This is my email address
• Email address (if this is my email address is unchecked)
• Password
• On the second tab (Connection) enter the following
• Microsoft® Exchange 2003 Mode
• Uses ISA
• ISA Flags
• Full Email Address
• Server Type (Non-Editable)
• Server Name
• Uses SSL
• Fetch and Trust: (Leave this off. Check this ONLY if you face a Trusted Certificate error when performing a refresh)
• On the third tab (Advanced)
• If you are using the free version, you don’t need to enter anything here.
• These are advanced options available only in the commercial version.
3 Save Settings
4 Close Settings
5 In the main screen, Tap the Menu button and select Refresh.
6 Go to the contacts view and Tap Menu/Refresh All and confirm.
This will download the initial list of contacts to the device.
hapter 2

Setting the Client CertificateSome organizations require a client certificate to be installed on the device for secure connection with the server. If that is your case, please follow the steps below to get the certificate on the device.
If your organization does not require the use of a client cert, you can skip this step.
1 Get the client certificate file (this will be a file with .cer or .pfx as the extension).
2 On the computer rename it to client.cer (or client.pfx).
3 Connect your device to the computer and mount the SD card on the computer.
4 Copy the client.cer file to the top level directory of the SD card.
5 Disconnect the device from the computer.
6 Open TouchDown and go into Settings and Tap on the Advanced tab.
7 Tap the “Client Certs” button.
The following screen will pop up.
Client Certificate
8 Tap the Set... button.
This will copy the client certificate to TouchDown. Once the process is completed, you should delete the Client.cer (or client.pfx) file from the SD card.
If the certificate was exported with a password, TouchDown will prompt you for the password before importing the certificate file.
Configuring 21
• • • •••

22 C
• • • •••
Recommended Next stepsOnce you have successfully configured TouchDown, here are some configurations which you may want to consider doing in order to get the full benefit from TouchDown.
Refer to the User Guide, Chapter 10, “Advanced Settings” for more information on the options listed below.
Email Checking FrequencyYou can set the email checking frequency to check for emails.
Email Checking Frequency
AS ITEMS ARRIVE (PUSH) is available if you connect to the server using Microsoft Exchange ActiveSync® mode. If this is turned on, any new emails or changes appearing on the server will be downloaded almost immediately to the device. This provides real time notification of new emails and other changes.
hapter 2

POLLING INTERVAL (MINUTES and HOURS) specifies the interval that TouchDown will query the server for changes in the selected folders. The following choices are available:
• Every minute
• Every 5 minutes
• Every 10 minutes
• Every 15 minutes
• Every 30 minutes
• Every hour
• Every 2 hours
• Every 4 hours
• Custom
NOTE: Setting too low a value can have an adverse effect on battery life. 15 minutes is recommended and has been found to be a good trade off with battery life.
ENABLE PUSH periodically contacts the server to check for new emails or other changes. If this option is turned on, the option Polling Interval (minutes) is enabled. You have to set a value for the polling interval. Even if the device is asleep, having this enabled will cause it to connect to the server periodically and download any available changes.
POLL DURING OFF-PEAK TIMES periodically polls for changes even during off-peak times.
Emails to SynchronizeThis entry specifies how many days of past emails TouchDown keeps on the device. The default is 3 days. Setting too large a value can potentially slow down some operations if you have a lot of emails stored on the device.
Configuring 23
• • • •••

24 C
• • • •••
The following choices are available:
• 1 day
• 3 days
• 1 week
• 2 weeks
• 1 month
• All
• Custom
Only the ActiveSync connection mode will fetch emails from earlier days on initialization. Other modes will fetch emails that arrive after initial configuration. In all cases, TouchDown will delete emails on the device that are older than the specified email history to conserve space.
Appointments to SynchronizeThis entry specifies how many days of appointments TouchDown keeps on the device. The default is 2 weeks. Appointments from the past will only be visible after you’ve begun synch appointments with TouchDown.
The following choices are available:
• 2 weeks
• 1 month
• 3 months
• 6 months
• All
Selecting All for appointments, just as with emails, will cause your database to increase in size and can affect the speed and performance of the TouchDown application.
hapter 2

Choose FoldersBefore TouchDown can synchronize data from the server, you must select the folders to synchronize. You can Tap any folder to toggle the selected state. When selected for synchronizing, the icon for the folder will display a blue refresh indicator.
Choose Folders
NOTE: TouchDown does not support the Outbox folder for synchronization.
Configuring 25
• • • •••

26 C
• • • •••
hapter 2

Chapter 3
• • • • • • Activating
You can purchase a TouchDown license at any time. If you have paid apps enabled in your area, and if you are interested in a single copy for your own device, you can purchase directly from the device. If you wish to purchase licenses for multiple devices, you might want to consider purchasing from www.nitrodesk.com.
EXCHANGE BY TOUCHDOWN KEY is not the TouchDown application, but the application that unlocks the trial version of TouchDown. This application is purchased and run on the device to license TouchDown.
Purchasing from Your DeviceTo purchase a license from your device, Tap on the Activate button on the main screen of TouchDown. This will open a window where you select the last option titled “I want to purchase a license”. When you do this, it will take you to the Google Play Store, to the product titled “Exchange by TouchDown Key”. You can follow the prompts in the Google Play Store to purchase that product. Once purchased, install the license product and run it once.
27
• • • •••

28 C
• • • •••
After you run “Exchange by TouchDown Key”, your main TouchDown program will be activated and will stay active as long as you have the license installed on the device. See “Activating on a Factory-Reset Device” on page 29 for more information on how to get your license when you change or reset your device.
NOTE: When you purchase a license from the device through the Google Play Store, you do not receive a serial number. This is because the Exchange by TouchDown Key contains your serial number and is designed to be portable without having to remember the serial number.
Purchasing from www.nitrodesk.comIf you do not have Paid Apps available on the Google Play Store, you can still purchase a serial number from www.nitrodesk.com that you can use to activate your copy of the product. For this, you must follow these steps.
1 Go to http://www.nitrodesk.com/purchase and select the “Click here to purchase” button under the Purchasing TouchDown from NitroDesk section.
2 Check out the number of licenses you wish to purchase.
3 Once you confirm the purchase, and if the credit card verification is successful, you receive and email with an order confirmation that contains an 11 digit serial number.
4 Save the serial number for future reference, you will need it to reactivate the product if you reset the device.
5 On the TouchDown product, Tap on the Activate button on the main screen.
6 Select “I have a license key”.
7 Enter the serial number in the box. It is not case-sensitive.
8 Tap the Go! button.
Your copy of TouchDown will be activated.
hapter 3

Activating on a Factory-Reset DeviceIf you reset your device, you can reactivate your license on the device. Depending on how you originally purchased, follow the steps in the appropriate sections below.
If you purchased your original license from the Google Play Store, you can reactivate your license by following the steps below. Note that this will work only if you have used the same Google Email address when initializing the new device.
To activate on a new or factory reset device,
1 Go to the Google Play Store application on the device.
2 Go to My Downloads.
3 Find and install the “Exchange by TouchDown Key” app (it may take up to 48 hours from the time you start using the device for you to be able to successfully download it).
4 Once installed, run the application once.
Your copy of TouchDown should now be activated.
Purchased from www.nitrodesk.com
If you purchased a serial number from www.nitrodesk.com, you can follow these steps to activate your copy on the new device,
1 On the TouchDown product, Tap on the Activate button on the main screen.
2 Select “I have a license key”.
3 Enter the serial number correctly in the box below.
4 Tap the Go! button.
5 Your copy of TouchDown will now be activated.
Activating 29
• • • •••

30 C
• • • •••
© 2013 NitroDesk Inc. All Rights Reserved. Unauthorized reproduction prohibited.
TouchDown Version 8.1 - April 2013
hapter 3