TOS COIN WALLETMANUAL
17
TOS COIN WALLET MANUAL
Transcript of TOS COIN WALLETMANUAL

TOS COIN WALLETMANUAL

This manual may be modified.

Open TOS wallet to see the initial screen as shown on the left.
If you are a new user, select ‘CREATE A NEW
WALLET’, and if you are a returning user with a
passphrase, select ‘RESTORE A WALLET’.
2) Check Recovery Phrase
Select ‘CREATE A NEW WALLET’ to see therecovery phrase in yellow as shown on theleft.
Do not share your recovery phrase with
anyone, and keep a copy in a secure place
(email or SNS account that is available only to
you) in case of an emergency.
1) Open
1. Create

3) Copy and Check Recovery Phrase
Press the COPY button to automatically copythe recovery phrase in your clipboard, and theShare function through which you can sendyour recovery phrase to another app appears.Choose an app and send your recovery phrase.(We recommend you to send it to your email.)
After saving your recovery phrase in anotherapp, check the box at the bottom of thescreen as shown on the left and press theNEXT button.
1. Create

4) Check Recovery Phrase
Enter your recovery phrase in the entry field as shown on the left.
Press the entry field and hold.
PASTE option pops up. Select PASTE to enterthe recovery phrase that was automaticallycopied in your clipboard.
1. Create

5) BIP39
TOS Wallet is equipped with the BIP39 functionfor stronger protection of your recovery phrase.Check ‘Use a BIP39 passphrase’ to see an entryfield where you can enter a BIP39 passphrase.
If you enter your BIP39 passphrase in this entryfield to use the BIP39 function, you will have toenter both your recovery phrase and the BIP39passphrase in order to restore your wallet. Ifyou restore your wallet without entering yourBIP39 passphrase, a new empty wallet will becreated and the TOS balance in your old walletwill not be displayed. Thus, please make sureyou remember or store your BIP39 passphrase.
1. Create

1. Create
6) Set Your Wallet Password
Check your recovery phrase and type yourBIP39 passphrase. Press the NEXT button tosee a screen where you can set your password.
The wallet password is needed in order tosend TOS coins.Your wallet password must be 10 or morecharacters. Enter your password and pressthe NEXT button to create a new wallet.

1) Check Transaction History
Select ‘balance’ to see the total balance and transaction history of your wallet.
The ‘balance’ menu has three options as shown on the top left of the screen.
2. Balance

2. Balance
Select ‘Refresh’ to load your transactionhistory.It will take a few minutes for loading yourbalance and transaction history and until then,the balance will be shown as 0.
Select ‘Account details’ to check the public keyof your wallet. Sharing your public key willallow anybody to view your balance andtransaction history.
Please refer to ‘4. Settings’ for ‘Settings’ on themenu.
3. Receive
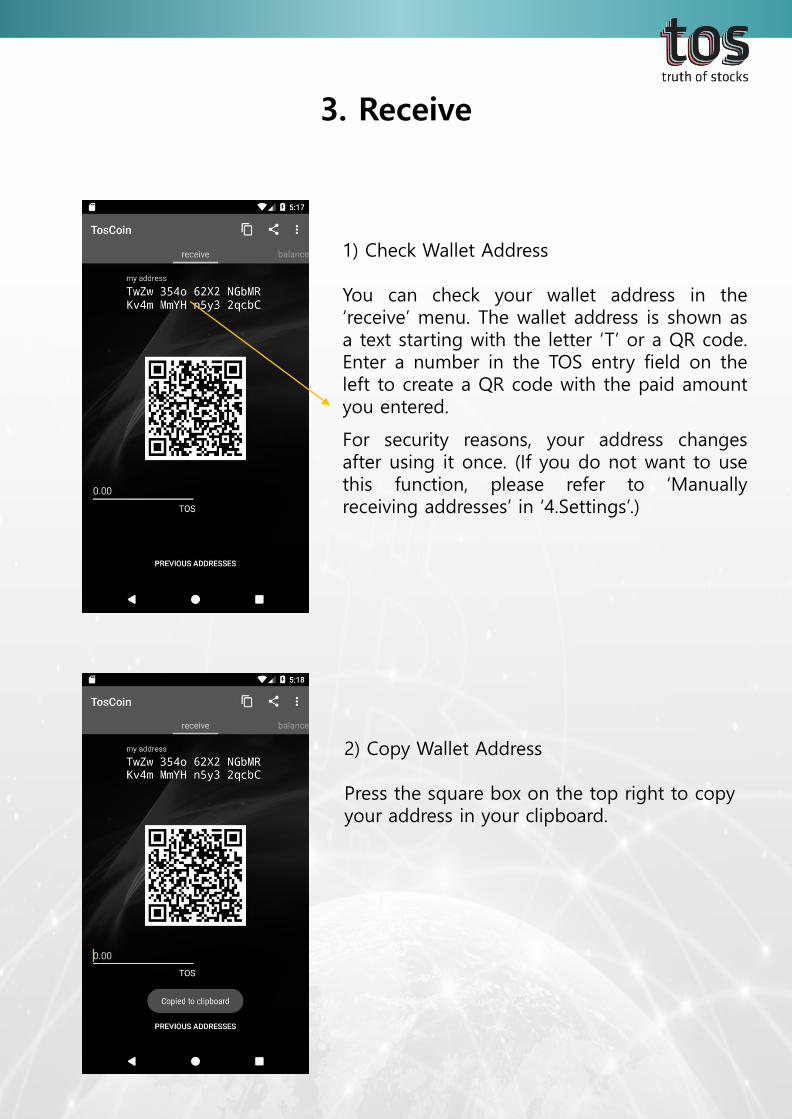
1) Check Wallet Address
You can check your wallet address in the‘receive’ menu. The wallet address is shown asa text starting with the letter ‘T’ or a QR code.Enter a number in the TOS entry field on theleft to create a QR code with the paid amountyou entered.
For security reasons, your address changesafter using it once. (If you do not want to usethis function, please refer to ‘Manuallyreceiving addresses’ in ‘4.Settings’.)
2) Copy Wallet Address
Press the square box on the top right to copy your address in your clipboard.

3) Share Wallet Address
Press the ‘Share’ icon on the top right to see agroup of apps to which you can send yourwallet address. Choose an app to send yourwallet address.
3. Receive

Labeling
TOS Wallet allows you to label your address.Press the ‘Others’ icon on the top right to seethree options including ‘Edit label’, ‘Newaddress’, and ‘Settings’.
A. Edit label
Select ‘Edit label’ to see your address and ablank field where you can label your address.Enter a name in the blank field and press theSave button.
3. Receive

B. New addressSelect ‘New address’ to create and label a newaddress.
C. SettingsPlease refer to ‘4. Settings’ for ‘Settings’ on the menu.
3. Receive

PREVIOUS ADDRESS
Press ‘PREVIOUS ADDRESSES’ at the bottom tocheck your previous addresses.
3. Receive

4. Settings
Select ‘Settings’ to see three options as shown on the left.
1) Show Recovery Phrase
Enter your password to see the recovery phrase. Here, the BIP39 passphrase will not be shown.

2) Restore Wallet
Press the Restore Wallet button to see options‘Create A New Wallet’ and ‘Restore A Wallet’ asshown on the left. Please refer to ‘1. Create’ forboth options.
4. Settings
3) Manual Receiving Addresses
For security reasons, TOS wallet creates a new address every time you receive TOS. If you do not need this function, check this field to stop creating new wallets.