TOMB RAIDER NEXT GENERATION - TR Level · PDF fileTOMB RAIDER NEXT GENERATION SCRIPT REFERENCE...
685
TOMB RAIDER NEXT GENERATION SCRIPT REFERENCE MANUAL TOMB RAIDER NEXT GENERATION SCRIPT REFERENCE MANUAL Page 1
-
Upload
phungxuyen -
Category
Documents
-
view
302 -
download
31
Transcript of TOMB RAIDER NEXT GENERATION - TR Level · PDF fileTOMB RAIDER NEXT GENERATION SCRIPT REFERENCE...
TOMB RAIDER NEXT GENERATION SCRIPT REFERENCE MANUAL
TOMB RAIDER NEXT GENERATION
SCRIPT REFERENCE
MANUAL
Page 1
TOMB RAIDER NEXT GENERATION SCRIPT REFERENCE MANUAL
PREFACE INTRODUCTIONTHE INFORMATION FOR THE TRNG SCRIPT REFERENCE MANUAL HAS BEEN SOURCED AS FOLLOWS:
THE STRINGS SECTION IN THE NG CENTERTHE REFERENCE SECTIONS IN THE NG CENTERTHE NG CONSTANTS.TXT FILE IN THE TRLE DIRECTORYTHE SOUNDS.TXT FILE IN Core Design/trle/sound/levelSFX Creator DIRECTORY
THE NGLE MANUAL AVAILABLE ON THE SKRIBBLERZ WEBSITE http://www.skribblerz.com.
THE NG PROJECTS SECTION AVAILABLE ON THE SKRIBBLERZ WEBSITE http://www.skribblerz.com.
ADDITIONAL INFORMATION HAS BEEN SOURCED FROM THE INTERNET.
TYPING ERRORS AND SPELLING MISTAKES HAVE BEEN REMOVED.THE ENGLISH GRAMMER HAS BEEN CORRECTED AND THE FORMAT HAS BEEN IMPROVED FROM THE SOURCE FILES IN THE NG CENTER TO MAKE THE DOCUMENT EASY TO READ AND UNDERSTAND.
THE TECHNICAL CONTENT i.e. FIELD NAMES, SCRIPT COMMANDS etc. HAS BEEN KEPT THE SAME AS THE ORIGINAL SOURCE FILES IN THE NG CENTER.
NOTE:
THE ORIGINAL TOMB RAIDER LEVEL EDITOR (THE TRLE) WAS RELEASED BY CORE IN 2000. THE TRLE WAS THE LEVEL EDITOR CORE USED TO MAKE THE LAST REVELATION.
IN EARLY 2008, PAOLONE RELEASED A NEW TOMB RAIDER LEVEL EDITOR, THE NEXT GENERATION LEVEL EDITOR (THE NGLE).
TO POWER THIS NEW EDITOR, PAOLONE ALSO DEVELOPED THE TOMB RAIDER NEXT GENERATION GAME ENGINE (THE TRNG).
THE NGLE IS THE EDITOR AND THE TRNG IS THE GAME ENGINE THAT POWERS IT.
Page 2
TOMB RAIDER NEXT GENERATION SCRIPT REFERENCE MANUAL
TRNG 1.2.2.7 UPDATES MARKED IN GREEN TRNG 1.2.2.6 SCRIPT MARKED IN BLUE
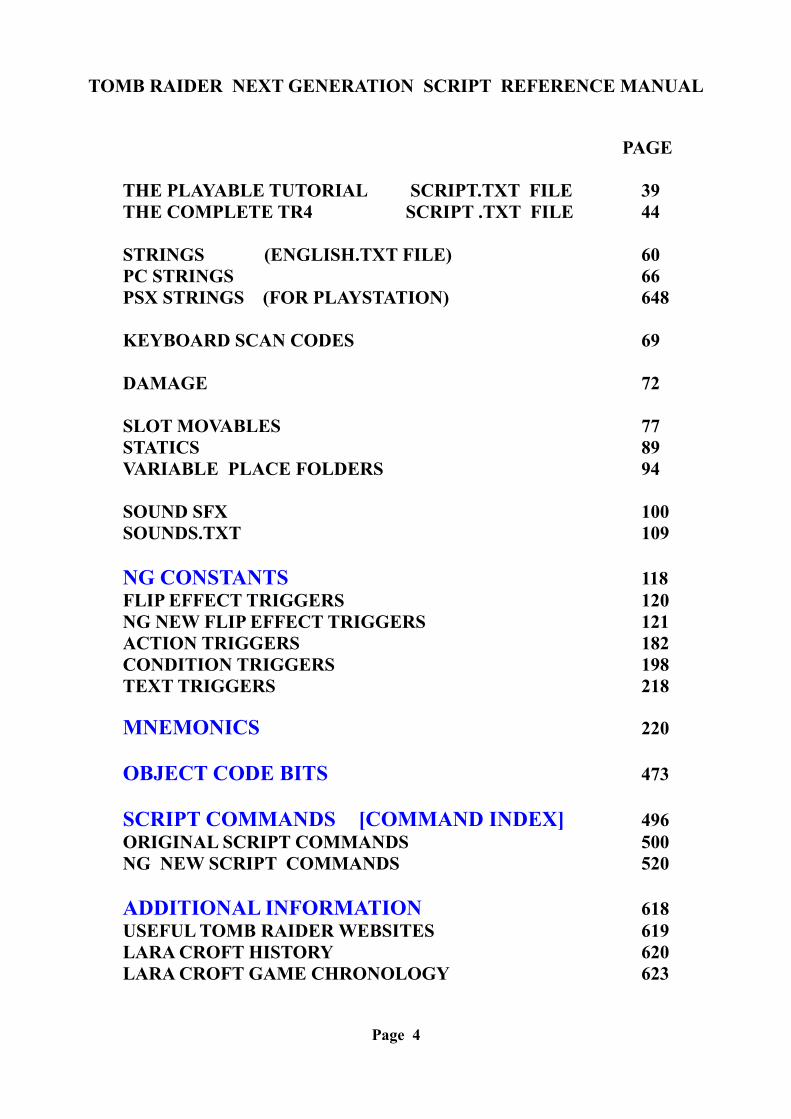
CONTENTS PAGE
THE NG SCRIPTER 6INSTALLATION 7INPUTTING AND EDITING THE SCRIPT FILES 8
NEW LEVELS PART 1 THE BASICS 11
STEP 1 THE CONCEPTION FOR THE GAME 11STEP 2 MAKING THE [LEVEL] BLOCK 11STEP 3 CREATING YOUR WAD FILE 12STEP 4 CREATING A FOLDER FOR THE PROJECT 13STEP 5 CREATING YOUR TGA FILE 13STEP 6 STARTING YOUR PROJECT 14STEP 7 TRYING YOUR LEVEL IN THE GAME 15
NEW LEVELS PART 2 ADVANCED BUILDERS 16
MAKING THE WAD 17TYPES OF OBJECTS 18MAKING THE TGA 34ARRANGING OTHER FILES 36
TITLE FEATURES 37
TOMB RAIDER LOGO 37
LOAD CAMERA COMMAND 38
Page 3
TOMB RAIDER NEXT GENERATION SCRIPT REFERENCE MANUAL
PAGE
THE PLAYABLE TUTORIAL SCRIPT.TXT FILE 39THE COMPLETE TR4 SCRIPT .TXT FILE 44
STRINGS (ENGLISH.TXT FILE) 60PC STRINGS 66PSX STRINGS (FOR PLAYSTATION) 648
KEYBOARD SCAN CODES 69
DAMAGE 72
SLOT MOVABLES 77STATICS 89VARIABLE PLACE FOLDERS 94
SOUND SFX 100SOUNDS.TXT 109
NG CONSTANTS 118FLIP EFFECT TRIGGERS 120NG NEW FLIP EFFECT TRIGGERS 121ACTION TRIGGERS 182CONDITION TRIGGERS 198TEXT TRIGGERS 218
MNEMONICS 220
OBJECT CODE BITS 473
SCRIPT COMMANDS [COMMAND INDEX] 496ORIGINAL SCRIPT COMMANDS 500 NG NEW SCRIPT COMMANDS 520
ADDITIONAL INFORMATION 618USEFUL TOMB RAIDER WEBSITES 619LARA CROFT HISTORY 620LARA CROFT GAME CHRONOLOGY 623
Page 4

TOMB RAIDER NEXT GENERATION SCRIPT REFERENCE MANUAL
NG CENTER TOOLS AND TOOLS2 PAGE
NG FONT EDITOR 627REMAP LARA SKIN 634WMF ENCODER 642TEXTURING DXF FILE 646
TRNG 1.2.2.7PAGE
TRNG 1.2.2.7 UPDATES 652TRNG 1.2.2.7 HISTORY 653HELP BUTTONS WINDOW 666APPENDIX A: PRE SET BUTTON NAMES 672APPENDIX B: EXAMPLES OF BUTTON DEFINITIONS 674APPENDIX C: CODE NUMBERS FOR KEYBOARD COMMANDS 675 EXAMPLE OF BUTTON WINDOW FOR NET BOOK 677EXAMPLE OF BUTTON WINDOW FOR WIDE SCREEN 679
KEYBOARD COMMANDS FOR NGLE WINROOMEDIT V 1.2.2.7 682
Note: For Additional Information See THE NGLE MANUALhttp://www.skribblerz.com
Page 5
TOMB RAIDER NEXT GENERATION SCRIPT REFERENCE MANUAL
TOMB RAIDER NEXT GENERATION
THE NG SCRIPTER
Page 6
TOMB RAIDER NEXT GENERATION SCRIPT REFERENCE MANUAL
USING THE NG SCRIPTER
PLEASE NOTE THAT THE NG SCRIPTER IS REQUIRED TO PRODUCE WORKING DAT FILES FOR THE TRNG ENGINE. IF YOU CONVERT YOUR SCRIPTS MANUALLY THE NEW FEATURES WILL NOT WORK IN THE NEW GAME ENGINE.
INSTALLATIONThese are the minimum requirements to start building a new level in the Next Generation Level Editor (NGLE) For extra information See the NGLE Manual:
1. Install the official Tomb Raider Level Editor, TRLE.2. Install the official TRLE Manual to help you to make the copy of the tutorial project in the
TRLE to understand the basics of editing levels.3. Install the NGMk*full_ installer on the TRLE to “transform” it into the Next Generation
Level Editor, NGLE.4. Update the NGLE with the latest TRNG (Tomb Raider Next Generation) patch.
All of these programs are available on the Skribblerz Tools page at http://www.skribblerz.com.
Some of the original TRLE WAD files have to be updated to work properly. So download and install the updated WAD pack into your Level Editor main folder. These are available from the Resources page on the Skribblerz website http://www.skribblerz.com.
These are the most important parts of the NGLE:
Tomb4.exe: This is the TRNG engine that starts the game.
Room Editor (ngle.exe): Use it instead of the Room Editor of TRLE (winroomedit.exe).When you open the NGLE Room Editor you can see the look of it and the TRLE Room Editor are almost the same. That is why if you have mastered the basics of TRLE then you will not have problems using the NGLE Room Editor.
In the Drop Down Menu Bar of the NGLE Room Editor, choose Help\NGLE Help to download the basic tutorial of NGLE.
Level Converter NG_Tom2Pc.exe : Used instead of the Level Converter of TRLE (tom2pc.exe).
NG Center: If you have tried script editing in TRLE using the Script.bat in the Script folder then forget it. In NGLE use the NG Center a part of the NGLE to edit the script. Use the Script section of the NG Center to edit the Script.txt and the Strings section to edit the english.txt file. When you have finished editing save the script and build it with the buttons in the Script section.
Page 7
TOMB RAIDER NEXT GENERATION SCRIPT REFERENCE MANUAL
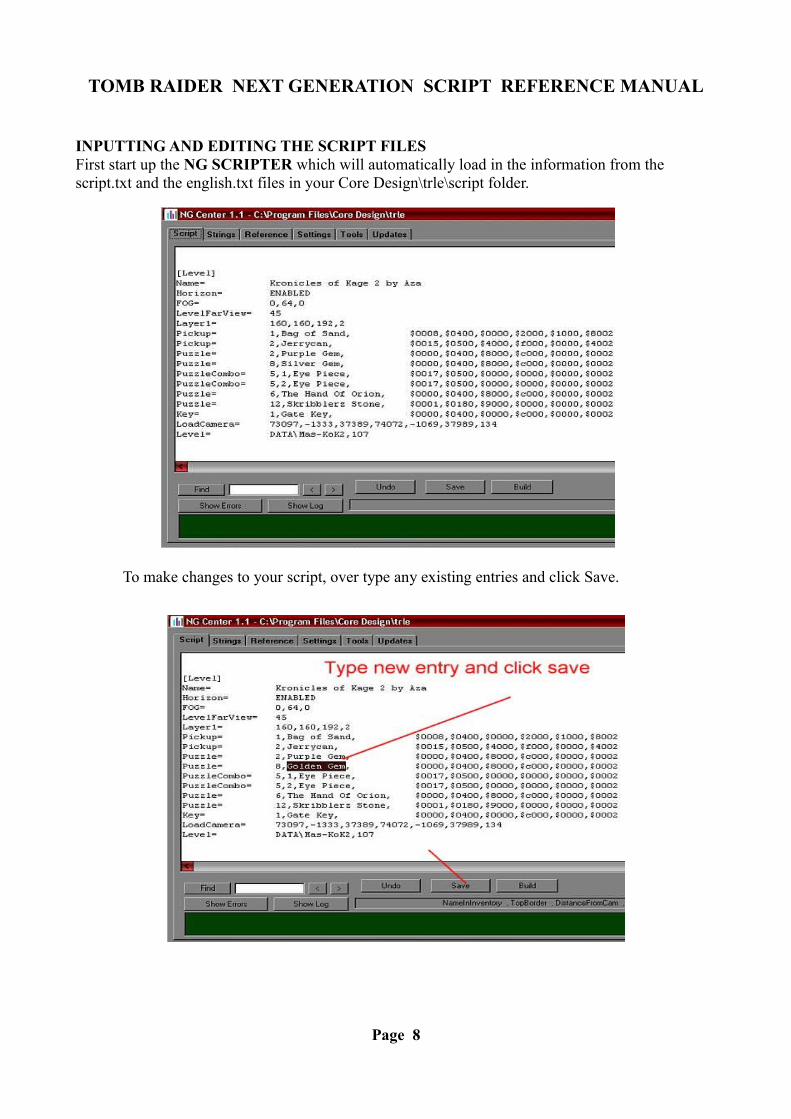
INPUTTING AND EDITING THE SCRIPT FILESFirst start up the NG SCRIPTER which will automatically load in the information from the script.txt and the english.txt files in your Core Design\trle\script folder.
To make changes to your script, over type any existing entries and click Save.
Page 8
TOMB RAIDER NEXT GENERATION SCRIPT REFERENCE MANUAL
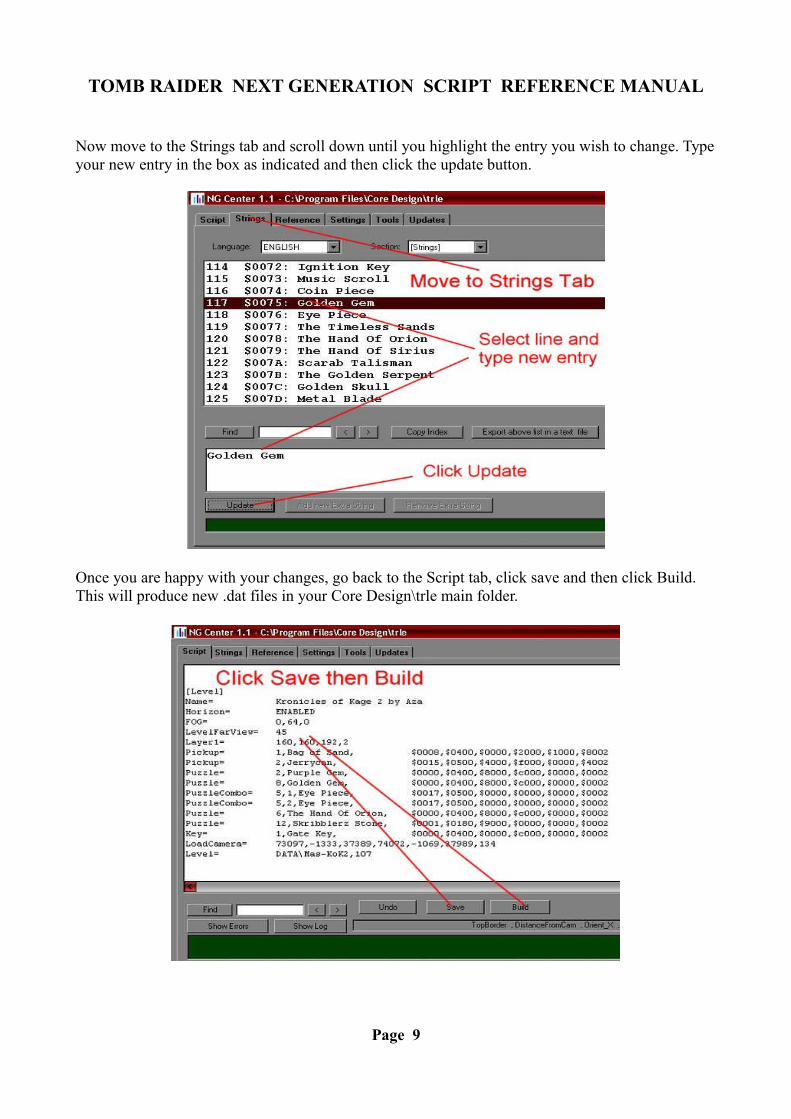
Now move to the Strings tab and scroll down until you highlight the entry you wish to change. Type your new entry in the box as indicated and then click the update button.
Once you are happy with your changes, go back to the Script tab, click save and then click Build. This will produce new .dat files in your Core Design\trle main folder.
Page 9
TOMB RAIDER NEXT GENERATION SCRIPT REFERENCE MANUAL
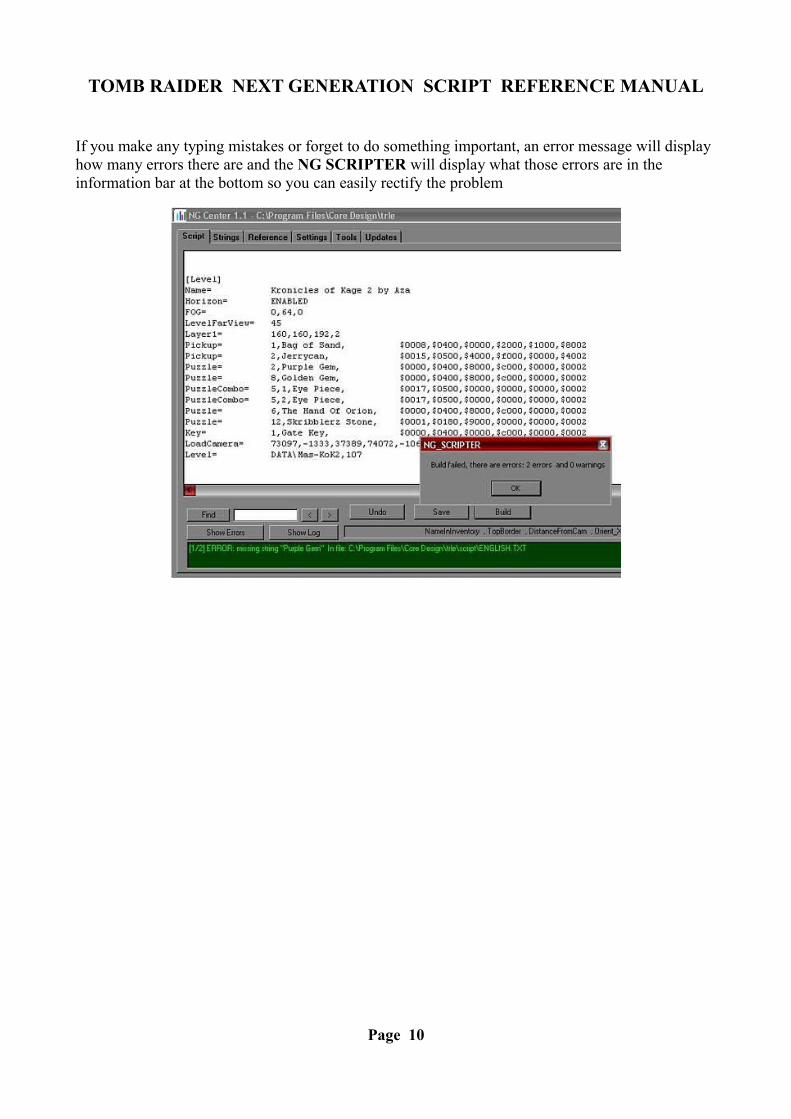
If you make any typing mistakes or forget to do something important, an error message will display how many errors there are and the NG SCRIPTER will display what those errors are in the information bar at the bottom so you can easily rectify the problem
Page 10
TOMB RAIDER NEXT GENERATION SCRIPT REFERENCE MANUAL
USING THE NG SCRIPTER
NEW LEVELS PART 1 THE BASICS
STEP 1 THE CONCEPTION FOR THE GAME
Before you start editing make some conception for your level (what the story is etc.). Write it down, or imagine it in your head.
Decide on a the name for your level. For example “The Great Castle”. You need a short, easy Id for your level. Every important attachment of the level will use this Id as a name. For example in the maps folder you can find a coastal folder. It contains the project file for the Coastal Ruins level. Grcastle is a good Id for The Great Castle level.
STEP 2 MAKING THE [LEVEL] BLOCK
Each level must have a [Level] block in the NG Center\script. A [Level] block starts from a [Level] entry and ends at the next [Level] entry.
You can place several entries in the block of a level. Every entry has two parts: a command that indicates we define a value for some feature and the value itself. For example the entry that starts with the “Name” command always defines the name of your level.
As you are a beginner the easiest way to create a [Level] block is to copy an existing block.For example copy the original [Level] block of the TRLE level “Temple Of Karnak”:
[Level]Name= Temple Of KarnakHorizon= ENABLEDLayer1= 128,96,64,7Puzzle= 2,Canopic Jar 1, $0001,$0320,$0000,$0000,$0000,$0002Puzzle= 3,Canopic Jar 2, $0001,$0320,$0000,$0000,$0000,$0002Puzzle= 1,Sun Talisman, $0000,$0500,$0000,$0000,$0000,$0002PuzzleCombo= 1,1,Sun Disk, $0000,$0180,$0000,$0000,$0000,$0002PuzzleCombo= 1,2,Sun Goddess, $0000,$04b0,$0000,$0000,$0000,$0002Puzzle= 5,Golden Vraeus, $0003,$0300,$0000,$0000,$0000,$0002Puzzle= 7,Guardian Key, $0009,$0300,$0000,$0000,$0000,$0002Key= 2,Hypostyle Key, $0000,$0400,$0000,$c000,$0000,$0002LoadCamera= 89366,-258,48077,88372,-1300,45701,0Level= DATA\KARNAK,110
Paste it between two other [Level] blocks or before the first or after the last [Level] block.
It is important where you place this [Level] block NOW:
Page 11
TOMB RAIDER NEXT GENERATION SCRIPT REFERENCE MANUAL
For example: If you place this block between the third and the fourth block then your block becomes the new fourth [Level] block in the Script. In this case if you type 4 in the window of a Level-jumping (FINISH) trigger in another level then the game will load LARA into the level that has the fourth block when the trigger has been activated. In the New Game list of the game the level name of the fourth block is in the fourth position.
Ensure that the three following commands Name=, LoadCamera=, Level= are in the block when you start building your new level and they should not be deleted.
1. Change the value of the “Name” command because your level name is not “Temple Of Karnak” but “The Great Castle”:
Name= The Great Castle
If a text that is to display on the screen in the game is typed in the NG Center\Script then it also has to be typed in the NG Center\Strings. Generally into the [Strings] section of Strings. In the case of [Strings] entries for level names, it does not matter where you type them. Do not forget: there are blocks for the entry types. For example in the [Strings] you will find all of the level names in the first part of the list.
You have typed The Great Castle name in the Script so you also have to type it in the Strings. You can type it anywhere in the first part of the [Strings] so update the name of a level that is not used in your game.
2. The LoadCamera= command defines the still picture you will see when the game leaves “The Great Castle” level.
You cannot adjust the values for this command yet. You will do that later by collecting data for the values in the game. The present values are not a problem, so leave the “89366, -258, 48077, 88372,-1300, 45701, 0” values for the Temple of Karnak for now. The still picture for the Temple of Karnak and The Great Castle are not the same. So you may get a strange still picture or maybe the whole screen could be black during jumping from The Great Castle level until you adjust the Load Camera values for the level.
3. Take a look at the Level= DATA\X, Y entry:
You can find the TR4 files in the data folder. Each TR4 file will be loaded by the game as one level. In fact the title.tr4 means the title sequence of the game. The DATA\X means the game will use X.tr4 file for the level of the actual [Level] block. Write “GRCASTLE” as X in the [Level] block of The Great Castle level instead of KARNAK so that the game will load the grcastle.tr4 file as a level for the level named “The Great Castle” in the Script. Grcastle.tr4 does not exist yet as you will create that later.
The Y value is the starting background audio for the level. When the TRNG engine starts this level then it also starts the Y audio file in the audio folder in a loop mode. The audio file used is 110.wav but you can write any audio file Id from audio folder instead of 110. You can change this audio at any time.
Page 12
TOMB RAIDER NEXT GENERATION SCRIPT REFERENCE MANUAL
Save the Script and then build it. If you find that some of the entries are unnecessary then change or delete them. Also you can type new entries. To learn more about the syntax see the information for Old Script Commands, New Script Commands.
STEP 3 CREATING YOUR WAD FILE
Each WAD file contains the objects the game will use in one level. If you want to define your object set (i.e. your WAD) for your level then you have to use the WAD Merger program. The easiest way to create your WAD is to copy an existing original TRLE WAD from your graphics\wads folder to a temporary folder. Rename the files and then copy them to the graphics\wads folder.
Load a WAS (!) file from wads folder into the left window of the WAD Merger program. The WAS file is a list of the contents of the WAD file with the same name. The list appears in the left window, and if you click on an object name (object slot) of the list then you can see an image in the smaller window. Clicking the buttons on the top you can change between the parts of the list to examine them: list of Moveable objects (M), Static objects (S) or sprite-taking objects (2D).
It is important to know that the “object slot” notion is not the same as the “object”. If you have an object slot called A you can have X, Y or Z object in this slot. For example, an object called ARCHITECTURE7 can be a statue, plant, column etc. One WAD has only one object in any object slot, so ARCHITECTURE7 is a column now but in another WAD it could be something else. However each slot can only contains an object of the sane type.
After that, save the WAD. Saving the WAD means you create a WAS file in the wads folder. Using grcastle.was as a name. Do not worry it also creates grcastle.wad.
STEP 4 CREATING A FOLDER FOR YOUR PROJECT
Create a new folder in the maps folder. Name it grcastle. You will put the project file for “The Great Castle” level in this folder later.
STEP 5 CREATING YOUR TGA FILE
Each TGA file contains the square-shaped texture tiles you will place in the rooms of your project.
If you want to define your tile set (i.e. your TGA) for your level then use the TBuilder program. See the Tools page on the Skribblerz website.
The easiest way to create your TGA is to copy an existing original TRLE TGA file from a maps folder into your project folder and rename it. You have a TGA file in the maps\grcastle folder now using grcastle.tga as a name. As you can see the TGA file for the Temple Of Karnak is not karnak.tga but karntext.tga. So if you want you can name your TGA file grcasttext.tga.
Page 13
TOMB RAIDER NEXT GENERATION SCRIPT REFERENCE MANUAL
STEP 6 STARTING YOUR PROJECT
There is not a “start a new project” button or menu entry in the NG Room Editor. If you want to start a new project then all you have to do is to start the Room Editor with no project loaded. You can see a new unsaved project only one big unedited room without a texture and an object set attached to the project.
To attach your texture set to the project click on the Load TGA button in the Room Editor or choose Texture\Load TGA in the Drop Down Menu Bar. Go to the maps\grcastle folder and click on gracstle.tga to load its tiles into the black window on the right of the screen for the texture panel.
Then to attach your object set to the project, hit SHIFT+O or choose Objects\Load Objects in the Drop Down Menu Bar of the Room Editor. Go to the graphics\wads folder and click on the gracstle.was to load the slots with their objects in grcastle.wad into the object panel.
If you attach the object set before the texture set then you will notice your objects have strange colours. It is easy to prevent this problem: just load your project after you save it.
Save your project in the maps\grcastle folder. The saved projects are files with PRJ extension. Your project name will be grcastle.prj.
Click on the Settings button to adjust the backup savings for your project. Backup projects could be very useful if your project gets corrupted accidentally!
Page 14
TOMB RAIDER NEXT GENERATION SCRIPT REFERENCE MANUAL
STEP 7 TRYING YOUR LEVEL IN THE GAME
Try your first NG level in the game. Make the first room in the Room Editor and use the “Move LARA here” button (or hit CTRL+H) to place LARA in that room. Make the playable version of your level. To make the playable version you can use the usual method : save the project, doing an “Output WAD” operation, converting the level by the NGLE Level Converter and starting the game. Or use two special methods that NGLE gave us:
These are the “Exit&Play” or the “Play” method.
Click on the Exit&Play or Play buttons on the object panel to start one of the methods, and these things happen automatically, one after another:
1. The NGLE Room Editor saves the project overwriting grcastle.prj.2. The NGLE Room Editor accomplishes an “Output WAD” operation. It creates a
grcastle.tom file in the wads folder if it does not exist or updates it if it does.TOM files contain information about your project.
3. The NGLE Level Converter opens to convert your project. The TOM file of your project into a grcastle.tr4 level file. It creates this file if it does not exist or updates it if it does. The NGLE Level Converter then closes.
4. The TRNG engine Tomb4.exe then starts.5. The NGLE Room Editor is closed if you used Exit&Play or just minimized on the Tray if
you used Play.
So all you have to do to try your level in the game is one click. Find The Great Castle name in the New Game list then select it so that the game will load The Great Castle level and you can test what you have edited in this level. Then quit the game and go on editing your level.
If the value of the PlayAnyLevel command (in [Options] block of Script) is DISABLED then the game always starts with the level that has the first [Level] block, if you choose New Game entry.
General Notes
1. If you start your level in the game, but the level shows its former state, then maybe you have forgotten to build the Script or made the playable version of the level.
2. Do not adjust the still picture (See the Load Camera Script command) until you have finished editing the level. If you adjust the values too early, then maybe you will notice that the still picture is not a good display.
3. You should enable the flying cheat and use it when testing your new level. See the Fly Cheat Script command.
Page 15
TOMB RAIDER NEXT GENERATION SCRIPT REFERENCE MANUAL
USING THE NG SCRIPTER
NEW LEVELS PART 2 FOR ADVANCED BUILDERS
Now you can try other cheats to test your new level. See the Diagnostic Type Script command in NG NEW SCRIPT COMMANDS section and DGX_CHEATS in the Mnemonics Section.
MAKING THE WAD
1. The “Output WAD” operation creates a TEXT file and if it exists it is updated in the wads folder with the same name of the WAD. This TEXT file shows the slots of the WAS and how many pieces of the object of each slot are placed in the map.
2. Maybe you want to create a grcastle.wad as a brand new set of objects or maybe you want to re-edit the grcastle.wad now or any time during the editing of the level. If you want to do this then do some of the things below:
2a. Load the source WAD into the right hand window of the WAD Merger. Select an object slot then use Copy button to put the selected slot into the left hand window, i.e. to the object slots of grcastle.was. The object that belongs to this slot will be copied into the grcastle.wad in the left window.
Be careful with the Smart Copy (“electric bulb”) button. If it is on then some of the object slot-groups that have Id numbers in the name will use the first free number if you create a slot in the group. For example if you copy a SWITCH_TYPE4 from the source WAD into the left window, but there are only SWITCH_TYPE1 and 2 of the SWITCH_TYPE1-8 Group in the grcastle.wad, then this switch name will automatically be named SWITCH_TYPE3 in the grcastle.wad if the Smart Copy is on. These are the groups where it works:
SWITCH_TYPEDOOR_TYPEANIMATING (except the MIP s)
All of the Statics as an Organic Group except the SHATTER s and EXTRA s.
The order of the Static partial groups are: PLANT0-9, FURNITURE0-9, ROCK0-9, ARCHITECTURE0-9, DEBRIS0-9.
So for example if a ROCK7 is to be copied into the grcastle.wad and there is no Statics there then this new Static will be PLANT0 if the Smart Copy is on.
2b. Select an object slot in the left window then click on the Delete button to delete it and its object from the WAS/WAD.
2c. Select an object slot in the left window then click on the Rename button to rename it into another, but existing slot name in the WAS.
Page 16

TOMB RAIDER NEXT GENERATION SCRIPT REFERENCE MANUAL
But be careful with renaming: object slots cannot always easily take any kind of object. Because any slot has its own properties. For example the ANIMATING objects can take any type of Moveable object, but their intelligent is very low. While the creature objects can only take a few objects but their intelligent is higher. For example you cannot place a cupboard in a CROCODILE slot, can you? You can use the Copy operation to take an object into another slot: hit SHIFT when you copy an object.
The Rename or Copy+SHIFT operation eliminates any risk if the properties of the original slot and the new slot are the same. For example, non-SHATTER Statics have the same intelligence. If you have a statue in the FURNITURE5 slot then you can rename or copy it without any problem into the DEBRIS2 slot.
3. When you create the grcastle.was then these files will be created in the wads folder:
grcastle.sam: The list of the sounds in the grcastle.sfx.grcastle.sfx: The sound files that are attached to the objects in the grcastle.wad.grcastle.swd: The information for the sprites attached to the objects in the
grcastle.wad.grcastle.was: The list of the objects in the grcastle.wad.grcastle.wad: The objects you can use in The Great Castle level.
Notes: Open the SAM and WAS file as if it is a TXT file. If you refresh the contents of your grcastle.wad later by saving the existing WAD in WAD Merger then all these five grcastle files will be updated.
4. When you have your WAD attached to your level and refresh its contents in WAD Merger then you have to refresh it in your projects after that using one of these methods:
Attach the WAD again. Room Editor offers to refresh the WAD of your project, if you hit CTRL+O.
Load the project.
DO NOT delete or rename an object in the WAD if that object is referred to in the project script for your level. The deleted object will disappear from the map after refreshing the WAD in the project with its triggers. The Script entries and other triggers will stay and can cause problems. You can do all these things intentionally, but do not forget to prevent the malfunction problems. For example: you activate a BADDY_1 with an ACTION trigger. If the BADDY_1 slot is deleted then the ACTION will remain in the map without anything to activate so you have to delete this trigger.
5. Because the TRLE and the NGLE use the TRNG engine, you can use any TRLR object in your WAD without problems. There are many ways to get all of the TRLR WAD files. For example you can download some TRLR WADs from the Skribblerz\Resources.
You can also rip objects using WAD Merger directly from the TRLR level files (also with TR4 extension) loading them into the right window.
Page 17
TOMB RAIDER NEXT GENERATION SCRIPT REFERENCE MANUAL
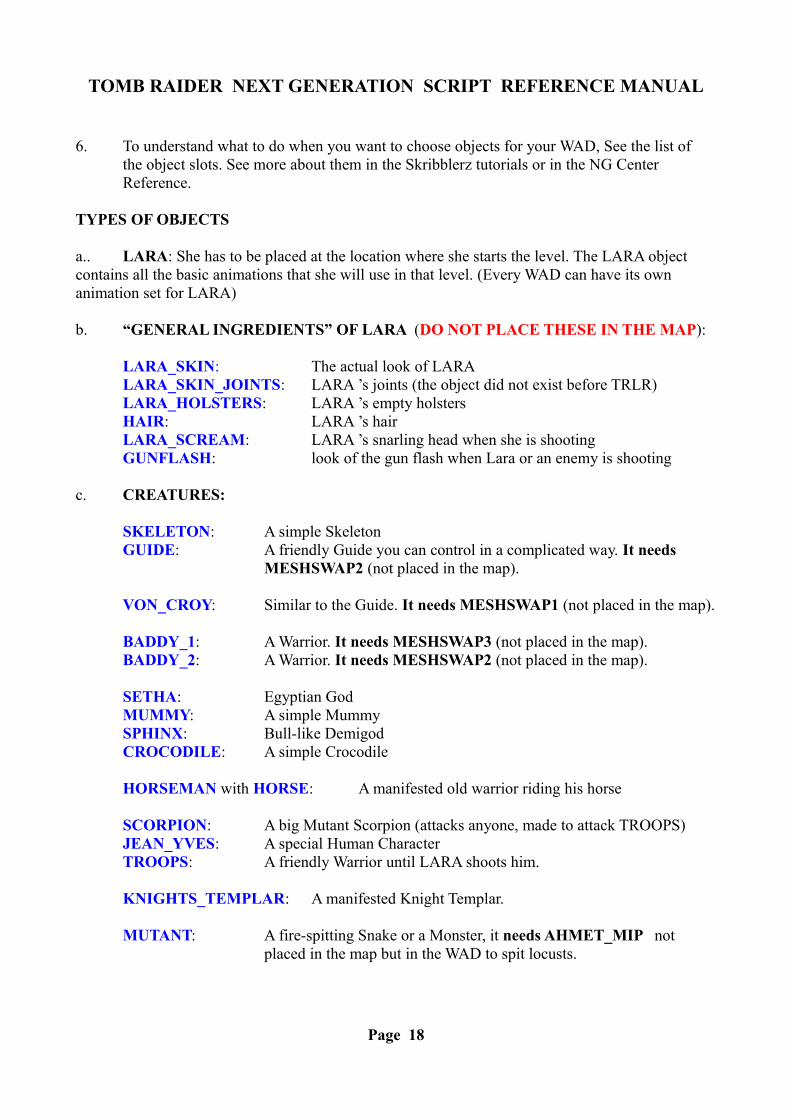
6. To understand what to do when you want to choose objects for your WAD, See the list of the object slots. See more about them in the Skribblerz tutorials or in the NG Center Reference.
TYPES OF OBJECTS
a.. LARA: She has to be placed at the location where she starts the level. The LARA object contains all the basic animations that she will use in that level. (Every WAD can have its own animation set for LARA)
b. “GENERAL INGREDIENTS” OF LARA (DO NOT PLACE THESE IN THE MAP):
LARA_SKIN: The actual look of LARALARA_SKIN_JOINTS: LARA ’s joints (the object did not exist before TRLR)LARA_HOLSTERS: LARA ’s empty holstersHAIR: LARA ’s hairLARA_SCREAM: LARA ’s snarling head when she is shootingGUNFLASH: look of the gun flash when Lara or an enemy is shooting
c. CREATURES:
SKELETON: A simple SkeletonGUIDE: A friendly Guide you can control in a complicated way. It needs
MESHSWAP2 (not placed in the map).
VON_CROY: Similar to the Guide. It needs MESHSWAP1 (not placed in the map).
BADDY_1: A Warrior. It needs MESHSWAP3 (not placed in the map).BADDY_2: A Warrior. It needs MESHSWAP2 (not placed in the map).
SETHA: Egyptian GodMUMMY: A simple MummySPHINX: Bull-like DemigodCROCODILE: A simple Crocodile
HORSEMAN with HORSE: A manifested old warrior riding his horse
SCORPION: A big Mutant Scorpion (attacks anyone, made to attack TROOPS)JEAN_YVES: A special Human CharacterTROOPS: A friendly Warrior until LARA shoots him.
KNIGHTS_TEMPLAR: A manifested Knight Templar.
MUTANT: A fire-spitting Snake or a Monster, it needs AHMET_MIP not placed in the map but in the WAD to spit locusts.
Page 18
TOMB RAIDER NEXT GENERATION SCRIPT REFERENCE MANUAL
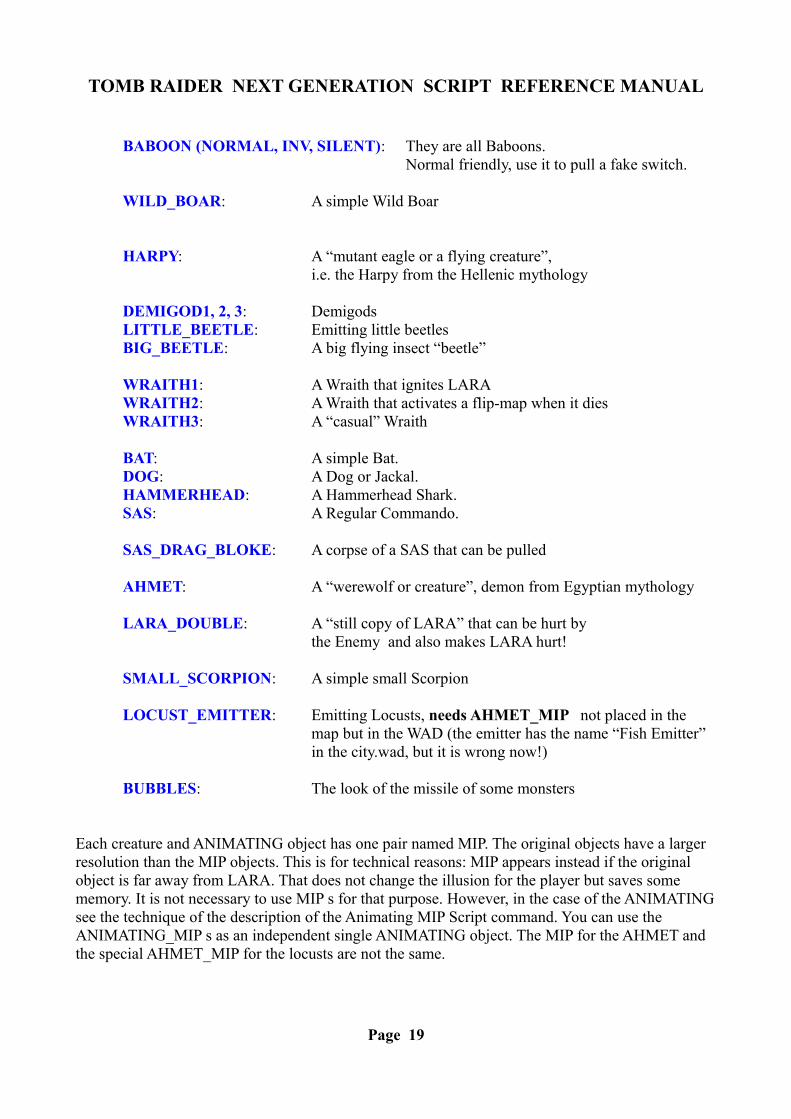
BABOON (NORMAL, INV, SILENT): They are all Baboons. Normal friendly, use it to pull a fake switch.
WILD_BOAR: A simple Wild Boar
HARPY: A “mutant eagle or a flying creature”, i.e. the Harpy from the Hellenic mythology
DEMIGOD1, 2, 3: DemigodsLITTLE_BEETLE: Emitting little beetlesBIG_BEETLE: A big flying insect “beetle”
WRAITH1: A Wraith that ignites LARAWRAITH2: A Wraith that activates a flip-map when it diesWRAITH3: A “casual” Wraith
BAT: A simple Bat.DOG: A Dog or Jackal.HAMMERHEAD: A Hammerhead Shark.SAS: A Regular Commando.
SAS_DRAG_BLOKE: A corpse of a SAS that can be pulled
AHMET: A “werewolf or creature”, demon from Egyptian mythology
LARA_DOUBLE: A “still copy of LARA” that can be hurt by the Enemy and also makes LARA hurt!
SMALL_SCORPION: A simple small Scorpion
LOCUST_EMITTER: Emitting Locusts, needs AHMET_MIP not placed in the map but in the WAD (the emitter has the name “Fish Emitter” in the city.wad, but it is wrong now!)
BUBBLES: The look of the missile of some monsters
Each creature and ANIMATING object has one pair named MIP. The original objects have a larger resolution than the MIP objects. This is for technical reasons: MIP appears instead if the original object is far away from LARA. That does not change the illusion for the player but saves some memory. It is not necessary to use MIP s for that purpose. However, in the case of the ANIMATING see the technique of the description of the Animating MIP Script command. You can use the ANIMATING_MIP s as an independent single ANIMATING object. The MIP for the AHMET and the special AHMET_MIP for the locusts are not the same.
Page 19
TOMB RAIDER NEXT GENERATION SCRIPT REFERENCE MANUAL
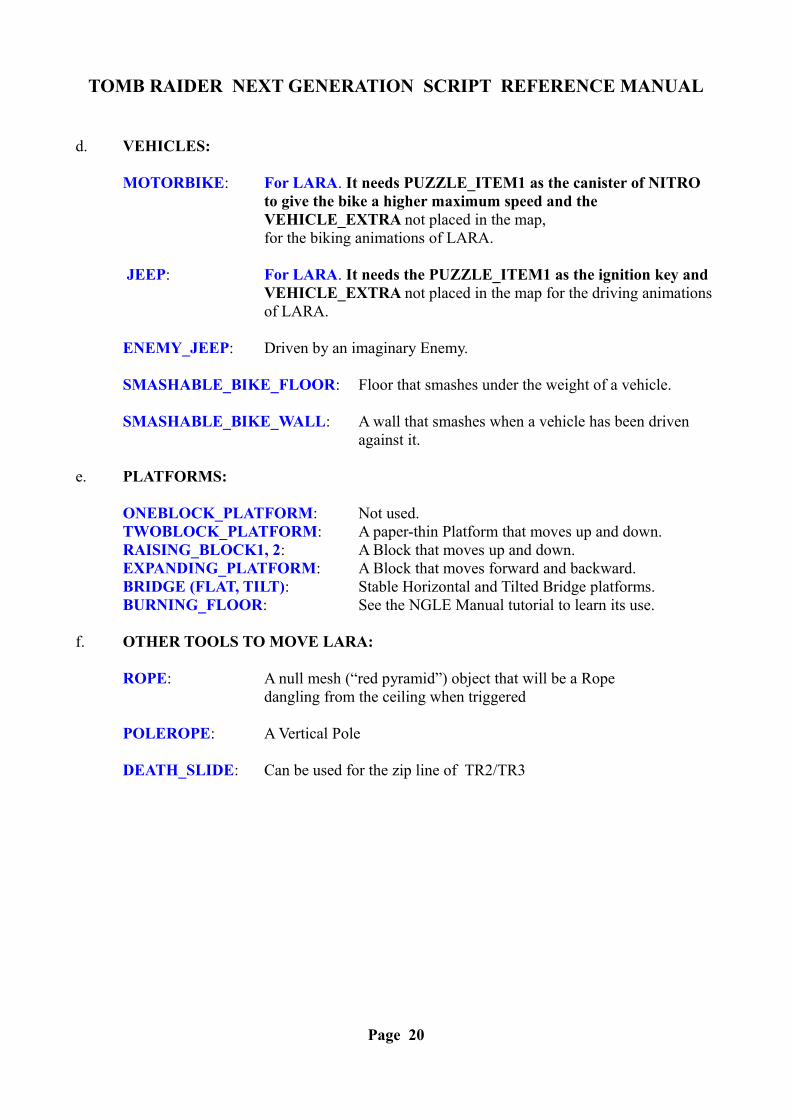
d. VEHICLES:
MOTORBIKE: For LARA. It needs PUZZLE_ITEM1 as the canister of NITRO to give the bike a higher maximum speed and the VEHICLE_EXTRA not placed in the map, for the biking animations of LARA.
JEEP: For LARA. It needs the PUZZLE_ITEM1 as the ignition key and VEHICLE_EXTRA not placed in the map for the driving animations of LARA.
ENEMY_JEEP: Driven by an imaginary Enemy.
SMASHABLE_BIKE_FLOOR: Floor that smashes under the weight of a vehicle.
SMASHABLE_BIKE_WALL: A wall that smashes when a vehicle has been driven against it.
e. PLATFORMS:
ONEBLOCK_PLATFORM: Not used.TWOBLOCK_PLATFORM: A paper-thin Platform that moves up and down.RAISING_BLOCK1, 2: A Block that moves up and down.EXPANDING_PLATFORM: A Block that moves forward and backward.BRIDGE (FLAT, TILT): Stable Horizontal and Tilted Bridge platforms.BURNING_FLOOR: See the NGLE Manual tutorial to learn its use.
f. OTHER TOOLS TO MOVE LARA:
ROPE: A null mesh (“red pyramid”) object that will be a Rope dangling from the ceiling when triggered
POLEROPE: A Vertical Pole
DEATH_SLIDE: Can be used for the zip line of TR2/TR3
Page 20
TOMB RAIDER NEXT GENERATION SCRIPT REFERENCE MANUAL
g. TRAPS:
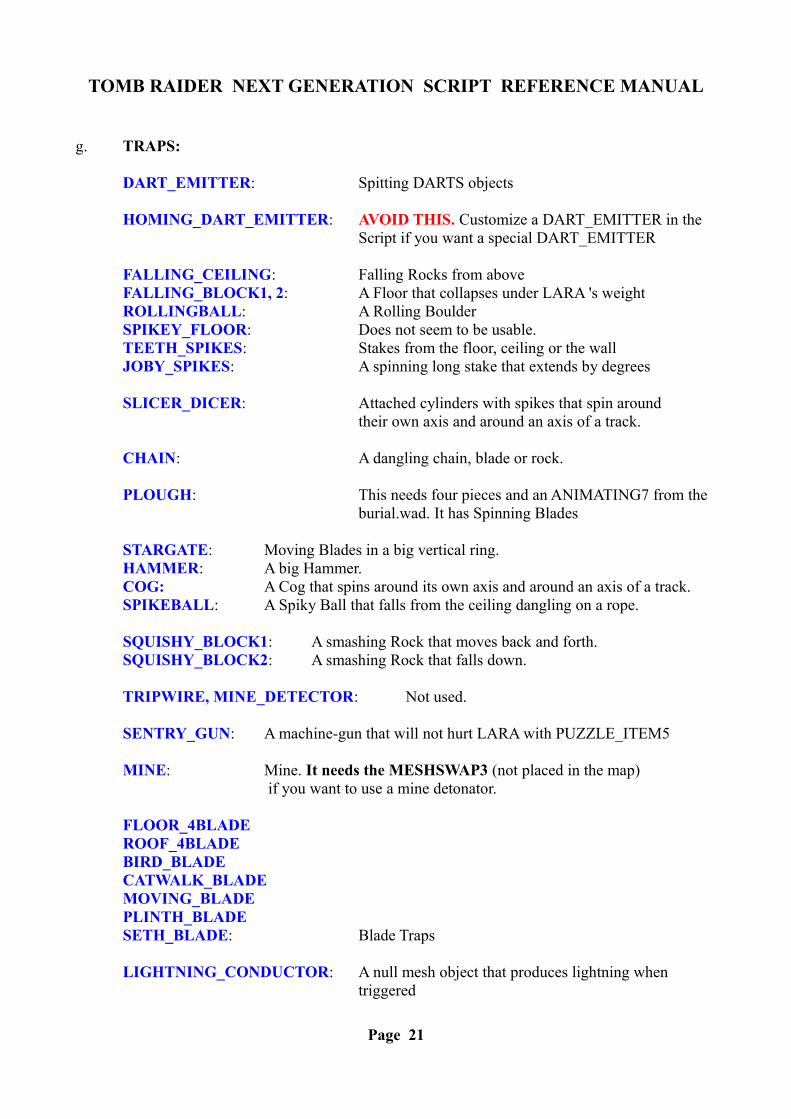
DART_EMITTER: Spitting DARTS objects
HOMING_DART_EMITTER: AVOID THIS. Customize a DART_EMITTER in the Script if you want a special DART_EMITTER
FALLING_CEILING: Falling Rocks from aboveFALLING_BLOCK1, 2: A Floor that collapses under LARA 's weightROLLINGBALL: A Rolling BoulderSPIKEY_FLOOR: Does not seem to be usable.TEETH_SPIKES: Stakes from the floor, ceiling or the wallJOBY_SPIKES: A spinning long stake that extends by degrees
SLICER_DICER: Attached cylinders with spikes that spin aroundtheir own axis and around an axis of a track.
CHAIN: A dangling chain, blade or rock.
PLOUGH: This needs four pieces and an ANIMATING7 from the burial.wad. It has Spinning Blades
STARGATE: Moving Blades in a big vertical ring.HAMMER: A big Hammer.COG: A Cog that spins around its own axis and around an axis of a track.SPIKEBALL: A Spiky Ball that falls from the ceiling dangling on a rope.
SQUISHY_BLOCK1: A smashing Rock that moves back and forth.SQUISHY_BLOCK2: A smashing Rock that falls down.
TRIPWIRE, MINE_DETECTOR: Not used.
SENTRY_GUN: A machine-gun that will not hurt LARA with PUZZLE_ITEM5
MINE: Mine. It needs the MESHSWAP3 (not placed in the map) if you want to use a mine detonator.
FLOOR_4BLADE ROOF_4BLADE BIRD_BLADE CATWALK_BLADE MOVING_BLADE PLINTH_BLADE SETH_BLADE: Blade Traps
LIGHTNING_CONDUCTOR: A null mesh object that produces lightning when triggered
Page 21
TOMB RAIDER NEXT GENERATION SCRIPT REFERENCE MANUAL
h. FLAMES (NULL MESHES):
FLAME: Placed anywhere. LARA takes fire when the object has been triggered
FLAME_EMITTER: Harmful for LARA. Behaviour can be modified by the OCB
FLAME_EMITTER2: Harmless for LARA. Size can be modified by the OCB
FLAME_EMITTER3: Harmful for LARA. Not a compact flame. Using the OCB it becomes an Electric Arc.
i. LARA ’S PICKABLE SUPPLIES:
PISTOLS_ITEM: Pistols. It needs PISTOLS_ANIM (not in the map) that contains LARA ’s pistol shooting animations and LARA ’s “hands with pistols” meshes and LARA_HOLSTERS_PISTOLS that shows pistols in the holsters and GUNSHELL that shows the flying shells
UZI_ITEM: Uzis. It needs UZI_ANIM (not placed in the map) that contains LARA ’s UZI shooting animations and LARA ’s “hands with UZIS” meshes and LARA_HOLSTERS_UZIS that show UZIS in the holsters and GUNSHELL that shows the flying gun shells
SHOTGUN_ITEM: Shotgun. It needs the SHOTGUN_ANIM (not in the map) that contains LARA ’s shotgun shooting animations and LARA ’s “hands with shotgun” meshes and SHOTGUN SHELL that shows the flying shotgun shells.
CROSSBOW_ITEM: Crossbow. It needs the CROSSBOW_ANIM (not in the map) that contains LARA ’s crossbow shooting animations and LARA ’s “hands with crossbow” meshes and the CROSSBOW_BOLT that shows the flying arrow that has been shot.
GRENADE_GUN_ITEM: Grenade gun. It needs the GRENADE_GUN_ANIM (not in the map) that contains LARA ’s Grenade gun shooting animations and LARA ’s “hands with Grenade gun” meshes and GRENADE that shows the flying grenade that has just been shot.
SIXSHOOTER_ITEM: Revolver. It needs the SIXSHOOTER_ANIM (not in the map) that contains LARA ’s revolver shooting animations and LARA ’s “hands with revolver” and LARA_HOLSTERS_SIXSHOOTER showing revolver in the holsters
Page 22
TOMB RAIDER NEXT GENERATION SCRIPT REFERENCE MANUAL
PISTOLS_AMMO_ITEM: Unlimited Pistol Ammo. Does not need to be placed in the map but it does not mean it can be missed from the WAD.
UZI_AMMO_ITEM: Clip of UZI bullets
SHOTGUN_AMMO1/2_ITEM: Pack of Normal/Wide shot Shotgun ammo
CROSSBOW_AMMO1/2/3_ITEM: Pack of Normal/Poison/Explosive Crossbow arrows
GRENADE_GUN_AMMO1/2/3_ITEM: Pack of Normal/Super/Flash Grenade Gun Grenades.
SIXSHOOTER_AMMO_ITEM: Pack of Revolver bullets
BIGMEDI_ITEM: Pack that gives maximal health
SMALLMEDI_ITEM: Pack that gives 50 % health
LASERSIGHT_ITEM: Laser sight for the Crossbow or Revolver. It needs theTARGET_GRAPHICS (not placed in the map) that shows the screen you will see if LARA uses the Laser sight and LARA_CROSSBOW_LASER or LARA_REVOLVER_LASER that contain LARA ’s “hand with the Crossbow/Revolver and the attached Laser sight” mesh.
FLARE_INV_ITEM: Pack of Flares. It needs the FLARE_ANIM (not in the map) that contains LARA ’s flare using animations and LARA ’s “hand with flare” mesh and FLARE_ITEM that means a flare that LARA has dropped can be picked up again.
BINOCULARS_ITEM: Binoculars item in the WAD but not in the map. It is in the inventory automatically when the game starts. It needs the BINOCULAR_GRAPHICS and MESHSWAP2 (not in the map) that shows the screen you will see if LARA uses the Binoculars .
COMPASS_ITEM: Compass item in the WAD not in the map. It is in the inventory automatically when the game starts.
MAP, SECRET_MAP: Not used
DIARY_ITEM: Not used. DO NOT USE this even if you use the Diary Script command.
Page 23
TOMB RAIDER NEXT GENERATION SCRIPT REFERENCE MANUAL
Some objects have a name in the game but do not have one in the Script. These objects must be named only in Strings, always using the same entries for them. For example the name of SMALLMEDI_ITEM in the inventory is Small Medipack, because the value of #74 [Strings] entry is the Small Medipack. If you want to see another name in the game then change and update it. Use the same method when you want to change the name of the “USE” inventory command under the Small Medipack.
j. PICKABLE KEYS AND PUZZLES:
KEY_ITEM1-12: LARA can pick up a Key to use in its hole, KEY_HOLE1-12. There are KEY_ITEM_COMBO1-8 slots without TRLR/TRLE objects in them. If you place an item in ITEMX_COMBO1 slot and another one in ITEMX_COMBO2 slot then you can combine them in the game into ITEMX
PUZZLE_ITEM1-12: LARA can pick up a puzzle (a key but it does not look like a key) to use in its hole, PUZZLE_HOLE1-12. There are PUZZLE_ITEM_COMBO1-8 slots, some of them without the TRLR/TRLE objects in them. You can combine the ITEMX_COMBO1 slot and ITEMX_COMBO2 slot in the game into ITEMX. YOU HAVE TO PLACE THE PUZZLE_DONE OBJECTS IN THE WAD BUT NOT IN THE MAP:They show the hole when the puzzle is done.
Use the Script command to give a name to the key/puzzle/combo that will show in the inventory in the game.
k. OTHER PICKABLE OBJECTS:
PICKUP_ITEM1-4: Items that LARA picks up to carry in the inventory. There are some NGLE triggers to make these objects more useful. There are PICKUP_ITEM_COMBO slots without TRLR/TRLE objects in them. If you place an item in the ITEMX_COMBO1 slot and another one in the ITEMX_COMBO2 slot then you can combine them in the game into ITEMX.
If you use the BAG OF SAND (PICKUP_ITEM1) for the element puzzle (see the tutorial) then it needs the LARA_DIRT_MESH (not in the map) that contains LARA ’s “hand with bag” mesh.
If you use the JERRYCAN (PICKUP_ITEM2) for the element puzzle (see the tutorial) then it needs the LARA_PETROL_MESH (not in the map) that contains LARA ’s “hand with JERRYCAN” mesh.
Page 24
TOMB RAIDER NEXT GENERATION SCRIPT REFERENCE MANUAL
EXAMINE1-3: Items that LARA picks up to examine from the inventory.
EXAMINE1: Only the object texture shows the information.
EXAMINE2: [Strings] #201 and 202 contains the text that will be printed on the screen.
EXAMINE3: The [Strings] #203 contains the text that will be printed on the screen.
QUEST_ITEM1-6: These are Pick up items that had a special task in the TRLR
WATERSKIN: LARA can pick up a small Waterskin (WATERSKIN1_EMPTY),with 3 litres capacity.
LARA can pick up a big Waterskin (WATERSKIN2_EMPTY), with 5 litres capacity.
WATERSKIN1_1, 2, 3 and WATERSKIN2_1, 2, 3, 4, 5 objects should be placed in the WAD but not in the map: these objects are to indicate the actual amount of water in the Waterskin. It needs the LARA_WATER_MESH (not in the map) that contains LARA ’s “hand with the Waterskin” mesh.
CROWBAR_ITEM: Crowbar. It needs the CROWBAR_ANIM (not in the map) that contains LARA ’s “hand with crowbar” mesh.
BURNING_TORCH_ITEM: A torch that can be ignited. It needs the TORCH_ANIM (not in the map) that contains some of LARA ’s torch using animations and LARA ’s “hand with torch” mesh.
CLOCKWORK_BEETLE: A mechanical Scarab that can be combined from COMBO1 and COMBO2 object. See its use in the Cleopatra’s Palaces level: you have to send the scarab a maximum of three times on tracks (once per track). Tracks are indicated by the MAPPER objects. DO NOT FORGET TO PLACE A FRAME UNDER THE SQUARE OF A MAPPER CLICKING ON THE B BUTTON OF THE ROOM EDITOR.
Except Pick ups, Pick up Combos and Examines, there are no commands for these items to name them in the Script file.
Page 25
TOMB RAIDER NEXT GENERATION SCRIPT REFERENCE MANUAL
l. OTHER INVENTORY ITEMS:
MEMCARD_LOAD_INV_ITEM: DO NOT PLACE IT IN THE MAP. It indicates the point in the inventory where to load the save game.
MEMCARD_SAVE_INV_ITEM: DO NOT PLACE IT IN THE MAP. It indicates the point in the inventory where to save the game.
m. SWITCHES:
SWITCH_TYPE1-6: A Lever on the wall, a button etc.
SWITCH_TYPE7: Could be anything.. If LARA shoots the mesh with the highest Id then the mesh will shatter, activating the SWITCH trigger
SWITCH_TYPE8: Could be anything. If LARA shoots the mesh with the highest Id then it will activate the SWITCH trigger
UNDERWATER_SWITCH1: A lever on the wall in the water.
UNDERWATER_SWITCH2: A Lever on the ceiling in the water,
COG_SWITCH: A vertical Wheel that LARA must rotate grabbing the handles on the wheel.
JUMP_SWITCH: A small Lever on the wall. LARA jumps towards it and pulls it down.
CROWBAR_SWITCH: LARA places the Crowbar and uses it as a Lever for the switch.
PULLEY: A vertical cord that LARA pulls down. A Static object is required to create the illusion of the cord: See the settomb.prj.
TURN_SWITCH: A pedestal-like switch that LARA will turn around its vertical axis.
SEQUENCE_SWITCH1, 2, 3: Big buttons in a special set up with SEQUENCE_DOOR1 objects.
Page 26
TOMB RAIDER NEXT GENERATION SCRIPT REFERENCE MANUAL
n. DOORS:
TRAPDOOR1, 2, 3: A Trapdoor that can be opened or closed by triggers
FLOOR_TRAPDOOR1, 2: A Trapdoor on the floor level. that LARA can open manually
CEILING_TRAPDOOR1, 2: A Trapdoor on the ceiling that LARA can open it manually
SCALING_TRAPDOOR: Not used.
DOOR_TYPE1-8: Many types of Doors that can be opened or closed by triggers. You can also use doors to be opened with the crowbar.
PUSHPULL_DOOR1, 2: Doors that need a frame. LARA can open them manually by grabbing the doorknob.
KICK_DOOR1, 2: Doors that need a frame. LARA can open them manually by grabbing the doorknob or kicking them.
UNDERWATER_DOOR: Doors in the water that LARA can open manually.
DOUBLE_DOORS: One object with two door wings. LARA can open them manually.
o. EFFECTS AND OTHER NULL MESHES:
SMOKE_EMITTER_WHITE: A null mesh. Emitting white smoke when triggered
SMOKE_EMITTER_BLACK: A null mesh. Emitting black smoke when triggered
STEAM_EMITTER: A null mesh. Emitting steam when triggered or bubbles in the water. The behaviour can be modified by the OCB.
EARTHQUAKE: A null mesh. Placed anywhere. It simulates Earthquake “shaking the level” when triggered.
WATERFALLMIST: A null mesh. It simulates the Waterfall Mist where it hits the pool below.
RED_LIGHT: Does not have any object in TRLR/TRLE. Copy any null mesh and it will emit Red light when triggered.
GREEN_LIGHT: Does not have any object in TRLR/TRLE. Copy any null mesh and it will emit Green light when triggered.
Page 27
TOMB RAIDER NEXT GENERATION SCRIPT REFERENCE MANUAL
BLUE_LIGHT: Does not have any object in TRLR/TRLE. Copy any null mesh and it will emit Blue light when triggered.
AMBER_LIGHT: A null mesh. Emitting Pulsing Amber Light when triggered
WHITE_LIGHT: Does not have any object in TRLR/TRLE. Copy any null mesh and it will simulate a Vibrating Neon Light when triggered.
BLINKING_LIGHT: Does not have any object in TRLR/TRLE. Copy any null mesh and it will emit a Blinking Light when triggered. (Use Empty button of WAD Merger on it.)
LENS_FLARE: A null mesh that simulates “the Sun shine on the lens of the camera” effect.
LARA_START_POS: A null mesh. When LARA goes back into a level then she will continue the level from here and not the position of the LARA object. In the NGLE it can have more tasks. For example, it can transport an ENEMY in a level from its position to a LARA_START_POS.
KILL_ALL_TRIGGERS: A null mesh. Does not seem to be usable.
TRIGGER_TRIGGERER: A null mesh. Place it on a square that is marked by clicking on the T button of the Room Editor, making it framed with a blue line. The trigger of this square cannot be activated until you trigger this TRIGGER_TRIGGERER.
CAMERA_TARGET: A null mesh. Attach a trigger to it with the subject TARGET. If LARA activates the trigger then she will look where the object is. If the activation is overlapped by a camera trigger then the target of a camera will be this object.
WATERFALL1, 2, 3: Simulates the “streaming things”: Water, Sand etc.
PLANET_EFFECT: A special effect. See THE NGLE MANUAL.
Page 28
TOMB RAIDER NEXT GENERATION SCRIPT REFERENCE MANUAL
p. ARTIFICIAL INTELLIGENCE (NULL MESHES):
AI_GUARD: Place it on the square of a creature. If the creature is triggered it will turn its head but it will not move and not notice LARA until she is bothering.
AI_AMBUSH: Place it on the square of a creature and place another one somewhere else. If the creature has been triggered it will run to the other AMBUSH.
AI_PATROL1, 2: Place an AI_PATROL1 on the square of a creature and place another one somewhere else and an AI_PATROL2 somewhere else. If the creature has been triggered it will run to the other PATROL1 then PATROL2. After that it will move back and forth between PATROL2 and the second PATROL1.
AI_MODIFY: Use it instead of an AI_GUARD. In this case the creature has a smaller chance to notice LARA because of fewer or no head turnings. Sometimes you must have one on a square of a SAS because of technical reasons.
AI_FOLLOW: Indicates the track of some moving object. See more in the Guide set up example.
AI_X1 and X2: Read about them in the official TRLE Manual. They are doing special SAS behaviour. X1 can also be used in the train levels
q. ANIMATING OBJECTS:
ANIMATING1-16: A very simple Moveable object. Sometimes it is only a still decoration., sometimes it will do its own animation when triggered, but with no intelligence.
ANIMATING OBJECTS 11-16 HAVE NO COLLISION.
Page 29
TOMB RAIDER NEXT GENERATION SCRIPT REFERENCE MANUAL
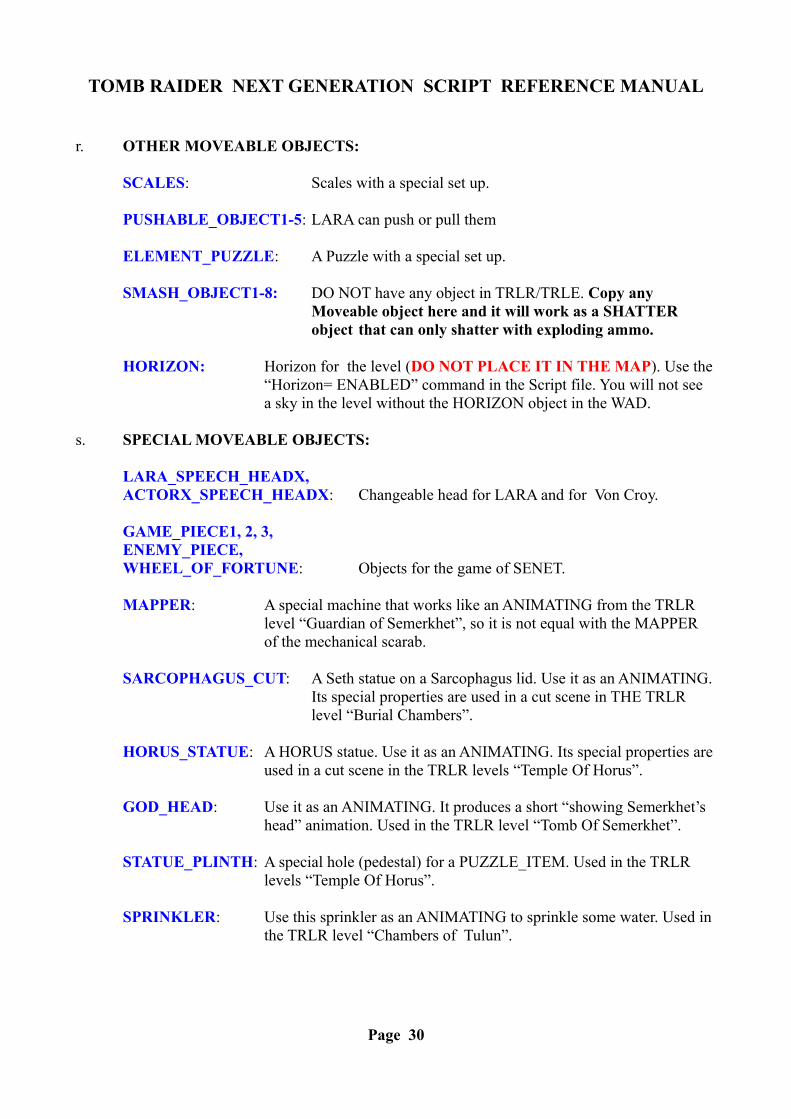
r. OTHER MOVEABLE OBJECTS:
SCALES: Scales with a special set up.
PUSHABLE_OBJECT1-5: LARA can push or pull them
ELEMENT_PUZZLE: A Puzzle with a special set up.
SMASH_OBJECT1-8: DO NOT have any object in TRLR/TRLE. Copy any Moveable object here and it will work as a SHATTER object that can only shatter with exploding ammo.
HORIZON: Horizon for the level (DO NOT PLACE IT IN THE MAP). Use the “Horizon= ENABLED” command in the Script file. You will not see a sky in the level without the HORIZON object in the WAD.
s. SPECIAL MOVEABLE OBJECTS:
LARA_SPEECH_HEADX,ACTORX_SPEECH_HEADX: Changeable head for LARA and for Von Croy.
GAME_PIECE1, 2, 3, ENEMY_PIECE, WHEEL_OF_FORTUNE: Objects for the game of SENET.
MAPPER: A special machine that works like an ANIMATING from the TRLR level “Guardian of Semerkhet”, so it is not equal with the MAPPERof the mechanical scarab.
SARCOPHAGUS_CUT: A Seth statue on a Sarcophagus lid. Use it as an ANIMATING. Its special properties are used in a cut scene in THE TRLR level “Burial Chambers”.
HORUS_STATUE: A HORUS statue. Use it as an ANIMATING. Its special properties are used in a cut scene in the TRLR levels “Temple Of Horus”.
GOD_HEAD: Use it as an ANIMATING. It produces a short “showing Semerkhet’s head” animation. Used in the TRLR level “Tomb Of Semerkhet”.
STATUE_PLINTH: A special hole (pedestal) for a PUZZLE_ITEM. Used in the TRLR levels “Temple Of Horus”.
SPRINKLER: Use this sprinkler as an ANIMATING to sprinkle some water. Used in the TRLR level “Chambers of Tulun”.
Page 30
TOMB RAIDER NEXT GENERATION SCRIPT REFERENCE MANUAL
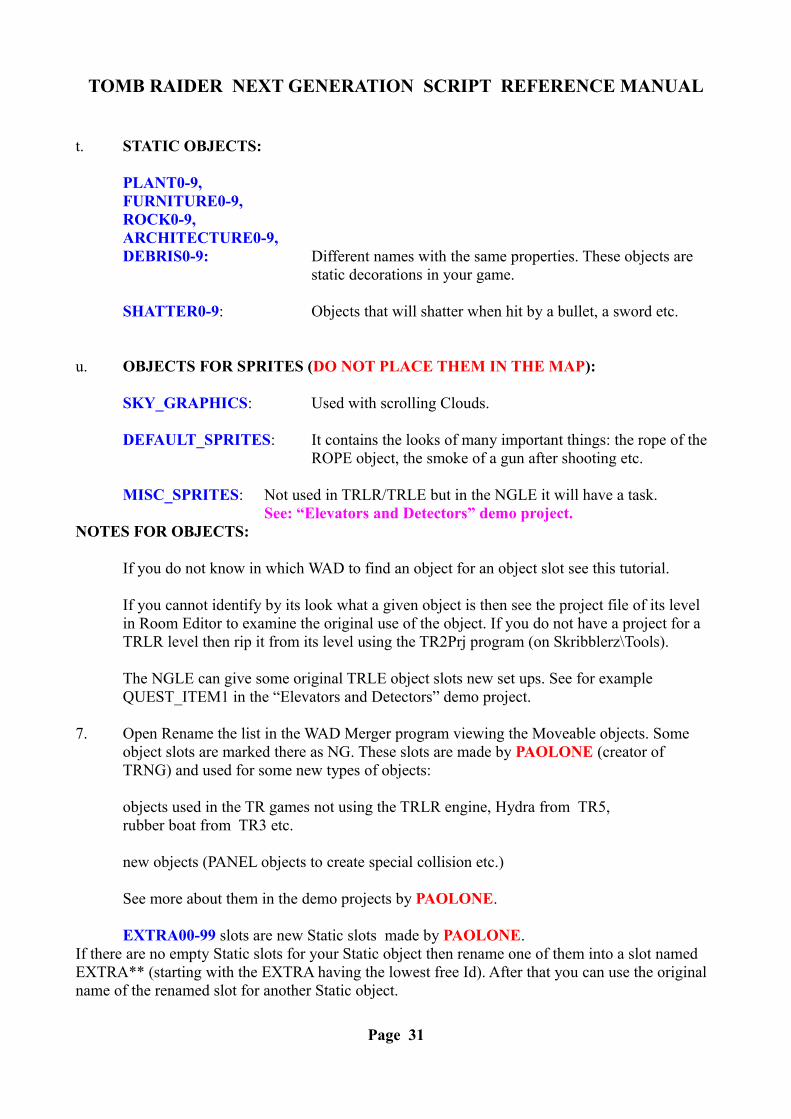
t. STATIC OBJECTS:
PLANT0-9, FURNITURE0-9, ROCK0-9, ARCHITECTURE0-9, DEBRIS0-9: Different names with the same properties. These objects are
static decorations in your game.
SHATTER0-9: Objects that will shatter when hit by a bullet, a sword etc.
u. OBJECTS FOR SPRITES (DO NOT PLACE THEM IN THE MAP):
SKY_GRAPHICS: Used with scrolling Clouds.
DEFAULT_SPRITES: It contains the looks of many important things: the rope of the ROPE object, the smoke of a gun after shooting etc.
MISC_SPRITES: Not used in TRLR/TRLE but in the NGLE it will have a task.See: “Elevators and Detectors” demo project.
NOTES FOR OBJECTS:
If you do not know in which WAD to find an object for an object slot see this tutorial.
If you cannot identify by its look what a given object is then see the project file of its level in Room Editor to examine the original use of the object. If you do not have a project for a TRLR level then rip it from its level using the TR2Prj program (on Skribblerz\Tools).
The NGLE can give some original TRLE object slots new set ups. See for example QUEST_ITEM1 in the “Elevators and Detectors” demo project.
7. Open Rename the list in the WAD Merger program viewing the Moveable objects. Some object slots are marked there as NG. These slots are made by PAOLONE (creator of TRNG) and used for some new types of objects:
objects used in the TR games not using the TRLR engine, Hydra from TR5, rubber boat from TR3 etc.
new objects (PANEL objects to create special collision etc.)
See more about them in the demo projects by PAOLONE.
EXTRA00-99 slots are new Static slots made by PAOLONE.If there are no empty Static slots for your Static object then rename one of them into a slot named EXTRA** (starting with the EXTRA having the lowest free Id). After that you can use the original name of the renamed slot for another Static object.
Page 31
TOMB RAIDER NEXT GENERATION SCRIPT REFERENCE MANUAL
8. If you want to use fan-made objects in your level then you can find many smaller or bigger fan-made WAD files on the net (not using them for a level but only using them as an object source) that are TRLR compatible. See the Objects page on Skribblerz or TRSearch.
9. You can find many WAD s here that are not used by TRLR but other official Tomb Raider games. You can use any Static object from these WAD s in any Static slot of your WAD but be careful with the Moveable objects of these WAD s. For example you can find a tiger object in a TR3 WAD. But there is no tiger object slot in TRLR WAD s. What should you do? Maybe the best you can do is to find a fan-made tiger on the net that is in a strange TRLR slot (for example, DOG) in a TRLR compatible WAD, but tested to work properly.The objects of non TRLR engined WAD s can appear as bad TRLR slots in WAD Merger. So ignore those slots and try to identify the object – or see item #10 just below.
10. You can rip objects using WAD Merger directly not only from TRLR level files but the level files of other old-generation Tomb Raider games (PHD, TR2, TRC files). Maybe this operation is necessary. For example if you want to use a TR3 object in your WAD (a so-called v130 WAD), with its original (i.e. TR3 and not TR4) sound slots. (See this tutorial.)These ripped objects appear not in the TRLR slots in WAD Merger but using the slots of their own games. It makes the identification of the object easier.
11. DO NOT forget to place the sound files that the level will use in the sound\Samples folder. If there is a sound file in that folder it does not mean that the file is usable in your level. To make a sound usable there it is necessary to put an object that uses that sound into the WAD or to add the sound to the WAD without putting an object into it. You can do the “non-object method” with these tools: the original TRLE tool (pcwadsfx), the Sound Manager function of WAD Merger or (see Skribblerz, Tools page) Screamer. With these tools you can also update SAM and SFX files. It means SAM and SFX can contain sound files that are not attached to any object.
12. You can find the STRPIX program on the Tools page of the Skribblerz website. With this program you can edit the texture of the objects. If you want to edit a v130 WAD with STRPIX then do not forget to use StrPix3_v130.exe. See the Tools folder created by the NGLE installation instead of the original StrPix3.exe.
13. You can find Meta2tr program on the Skribblerz website and Metasequoia on its home website. With these programs you can make your own objects or edit objects.
14. You can edit the sprites of the WAD with the Sprite Editor tool of the NG Center\Tools.There are some ways in the Script to customize fonts. Some properties of the fonts are handled as sprites of the FONT_GRAPHICS object. You can edit these sprites using the NG Center\NG Font Editor.
15. There are some more methods to edit or customize your objects. See for example Switch Manager or the Animation Editor tools of WAD Merger or some Script entries or triggers of NGLE. Some tools for editing objects in the NG Center\Tools2: Fast 3D or Texturize DXF File.
Page 32
TOMB RAIDER NEXT GENERATION SCRIPT REFERENCE MANUAL
16. You can create an “encyclopedia” of your objects if you use the Object Manager tool in NG Center\Tools2. In this case you will need the TRViewer program but change its original EXE with the one in Tools folder.
17. Give a new name to a slot if you want: Open the “Select Object” panel of the Room Editor (for example, clicking on object slot window in object panel), select the slot, then click the Rename button. The new name is valid only in the Room Editor and grcastle.txt file. grcastle.was always shows the original name when you open it directly or in WAD Merger.
Page 33
TOMB RAIDER NEXT GENERATION SCRIPT REFERENCE MANUAL
MAKING THE TGA
1. Maybe you want to create the grcastle.tga as a brand new set of texture tiles or maybe you want to re-edit grcastle.tga (now or any time during editing the level). If you want to do this: Load the source TGA into the left window of TBuilder. Click with the square-shaped cursor on a tile here to select it then go to the right window and click to put the selected tile here, i.e. to the tiles of grcastle.tga. Check TBuilder to understand the other easy features of editing TGA files.
2. When you have your TGA attached to your level and you refresh its contents in TBuilder then you also have to refresh it in your projects after that with one of these methods:
You attach the TGA again.You load the project.
You can have problems if you overdraw a tile in the TGA if that tile is placed/referred to in the project/script of your level. The description of the problem is similar to the problem of refreshing a WAD. See above.
3. The TRLE gave us other TGA files to get tiles from: See the Extra Textures folder.
4. Feel free to use the TGA texture set of any other Tomb Raider game as tile source.If you want, you can load old-generation Tomb Raider level files into TBuilder to rip the texture tiles from them.
5. If you want, feel free to make your own tiles for your own TGA. You can use any picture (or some part of it) to use as a tile in your TGA.
6. Load your project into the Room Editor and see the texture panel. The texture tiles are arranged into four columns there. If you click one of the tiles then a red square-shaped cursor will appear around it. Click on Big Texture button of Room Editor making it yellow. It means you switched on the big texture function: if you click on a tile now then the red square-shaped cursor will appear around it, the tile next to it and the two tiles above/below them. One tile is 64×64 pixel size, so this “multi-tile” of the four tiles is 128×128 pixels. Click in the map to place the 128×128 picture there instead of a 64×64 picture.
This method is not perfect. It would be perfect if we could say “tile” when we see a 128×128 picture. There are some reasons to say that. See one of them: just think about it, you need to place whole tiles into each animation range. So you cannot place a 128×128 multi-tile into any range, only if it is a 128×128 tile.
If a project uses 64×64 tiles then we call this project “v49”.If a project uses 128×128 tiles then we call this project “v50”.Check if your project is v49 or v50: See it on the title bar of Room Editor.
Page 34
TOMB RAIDER NEXT GENERATION SCRIPT REFERENCE MANUAL
If you want to build your TGA using 128×128 tiles and not 64×64 tiles in TBuilder then you can find many 128×128 tiles on the Textures page of the Skribblerz website. You can find the tiles of all the original Tomb Raider games here and the tiles of some fan-made games. The original tiles of older Tomb Raider games are 64×64 originally but are converted into 128×128.
If you want to use a TGA file with 128×128 tiles in your project then you must convert your project with the TGA attached to it before from v49 into v50. You can find the tool for the conversion in the Tools folder: MapConverter2.exe (not the MapConverter.exe). DO NOT forget to check “Modify ONLY…” option before the conversion.
After the conversion:
Big Texture button becomes Red “forever”, indicating: “you cannot switch me off ”.
Feel free to go on editing the TGA. See the basic tutorial for the NGLE to read more about “big” texture tiles.
Page 35
TOMB RAIDER NEXT GENERATION SCRIPT REFERENCE MANUAL
ARRANGING OTHER FILES
1. If you want to use sky for your level then you need not only a HORIZON in the WAD but also a RAW file in wads folder to show the pattern of the sky and a Layer1 command in the Script to adjust the exact colour of the sky. You can find more RAW files in the wads folder. They belong to the WAD with the same name. For example the city.raw belongs to the city.wad. Pcsky.raw is a special RAW automatically used for a level with a HORIZON and Layer1 but without its own RAW. Copy a RAW then paste it with a new name. This new name is grcastle.raw. You can adjust Layer1 later.
Notes: This sky thing could be specific if you use a special (TR3 type) HORIZON object. In this case the sky is drawn on the top of the HORIZON so you do not need RAW and Layer1. pcsky.raw is not the only specific file in the wads folder: font.pc defines the default font type for all the levels. You can see many LAR files in the wads folder with the same names as the WAD s there. LAR files were used for LARA ’s animations but they do not have tasks now. LARA ’s animations are in the WAD s now.
2. If you have done the tutorial project then you know that you can play audio files. Some of them only as background “music” (noise) and the other ones are the “foreground” music in the audio folder with WAV extension and 000-111 Ids if you use a CD trigger. With the NGLE you can use more Ids (000-255) that are not only WAV s and each Id can be used either as a background or as a foreground using not CD triggers but “Sound. (CD)”
FLIP EFFECT triggers. Read NG NEW COMMANDS Import File to use special files as audio\sound. In NGLE you can use 256 audio slots in the audio folder and more with the Import File to create your own audio set for your game. Feel free to overwrite the original audio files in the folder.
See the CUST_NEW_SOUND_ENGINE in the Mnemonics SectionIf you still do not know the mood of the level then you can define your audio files later.
Notes: Use cm.exe with the start_me.exe in the Tools folder to convert the MP3 files into WAV s.When the “Output WAD” operation is done then a file with a CD extension will be created or, if it exists: will be updated in wads folder with the same name as the WAD. Open this file as if it was a text file. This CD file shows some information of the CD triggers that are placed in the map. The file will not show anything about the “Sound. (CD)” triggers.
Maybe you want to use a feature that needs files to be attached. See for example the Image Script command. In this case place the required files in the required folders. If you do not know what these files are or what “with attached files” feature you will use then you can place those files later.
If you place some of the files mentioned in the tutorial in their folders for example when you are creating a new font.pc then you need to do a “making a playable version of the level” operation to add/refresh that file to/in your level/game.
Page 36
TOMB RAIDER NEXT GENERATION SCRIPT REFERENCE MANUAL
TITLE FEATURES
The title sequence of the game is a level: you have a title.prj project file you can edit and convert into TR4 file. You have to know some special things when you edit the title.prj. There are some editing steps that belong to the title and some other editing steps are not the same in the title and the “real” projects. However, when I say you can create your own, new level it also means you can create a new title, instead of the old one. See the NGLE MANUAL for information on how to do this.
TOMB RAIDER LOGO
To define the name of your game you have to draw your own Tomb Raider logo that will appear in the title of the game:
1. Create your logo in the Logo folder or get one and customize it. This logo is a BMP (named uklogo.bmp) with 512×256 pixels. The Black colour in the picture will be transparent in the game.
2. Open the picture with a simple program that can take RAW files. For example BmpToRaw.
3. Use the program to overwrite the uklogo.raw in to the Logo folder.
4. Run the logo.bat file in the Logo folder to overwrite the logo.pak in the data folder.
5. Start the game to admire your new logo.
Page 37
TOMB RAIDER NEXT GENERATION SCRIPT REFERENCE MANUAL
LOAD CAMERA COMMANDYou can find the Load Camera command not only in the [Level] blocks but also in the [Title] block of the Script.txt file. The value for the Load Camera in the [Title] block defines the still picture you will see when the game leaves the title sequence. To redefine that value:
1. Copy the whole [Title] block to the [Level] blocks, naming this copied block [Level] instead of [Title].
2. Give a Name command to this new [Level] block. There is a “Title Load Screen” entry in [Strings]. It seems obvious as a name now.
3. Save and build the script.
4. Start the game and start the Title Load Screen level from New Game menu.
5. Now you know how to get the Load Camera value for a “real” level. Use the method now reading the numbers from the screen. Then quit the game.
6. Type the numbers into the Load Camera command of the [Title] block overwriting the values.
7. Delete the whole block of the Title Load Screen level.
8. Save and build the script using the NG Center SCRIPTER.
After you have clicked on the tomb4.exe, you will see a still picture on the screen before the game starts showing the title sequence. This still picture is 640×480 pixels and it is named load.bmp. You can find it in the main folder. Swap it for another picture with the same properties if you want to see another picture after clicking on the tomb4.exe.
Page 38
TOMB RAIDER NEXT GENERATION SCRIPT REFERENCE MANUAL
TOMB RAIDER NEXT GENERATION
THE PLAYABLE TUTORIALSCRIPT.TXT FILE
Page 39
TOMB RAIDER NEXT GENERATION SCRIPT REFERENCE MANUAL
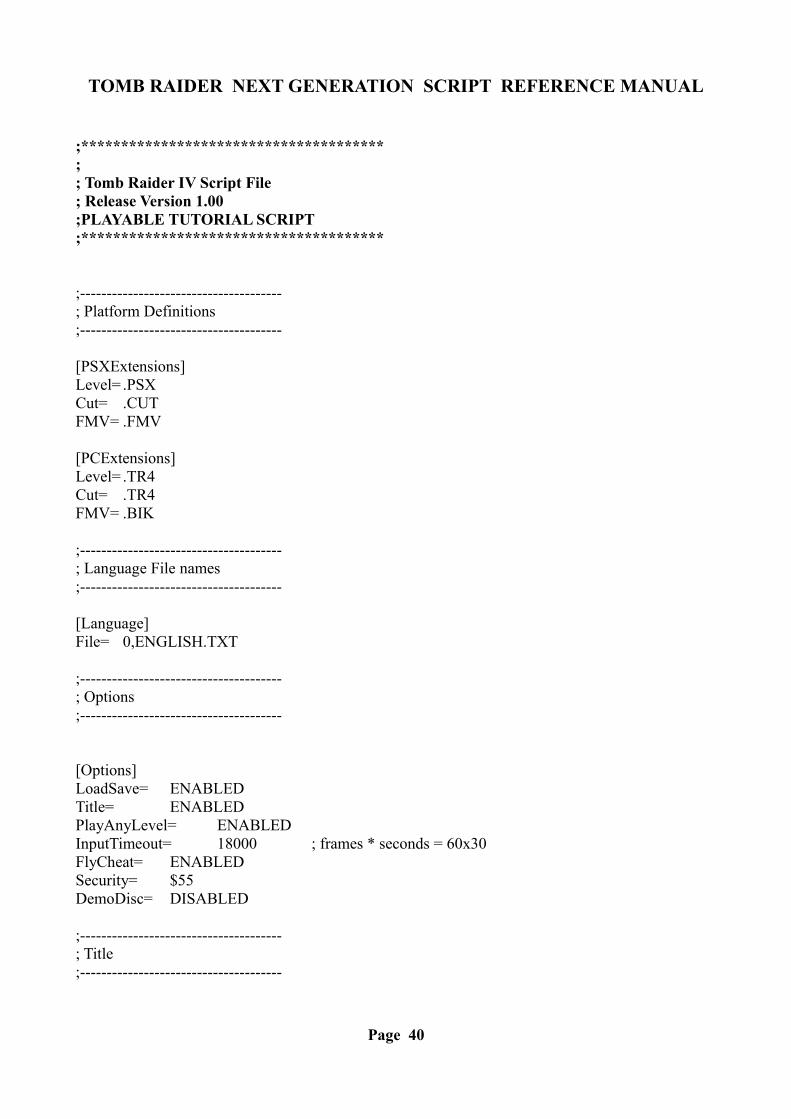
;**************************************;; Tomb Raider IV Script File; Release Version 1.00;PLAYABLE TUTORIAL SCRIPT ;**************************************
;--------------------------------------; Platform Definitions;--------------------------------------
[PSXExtensions]Level= .PSXCut= .CUTFMV= .FMV
[PCExtensions]Level= .TR4Cut= .TR4FMV= .BIK
;--------------------------------------; Language File names;--------------------------------------
[Language]File= 0,ENGLISH.TXT
;--------------------------------------; Options;--------------------------------------
[Options]LoadSave= ENABLEDTitle= ENABLEDPlayAnyLevel= ENABLEDInputTimeout= 18000 ; frames * seconds = 60x30FlyCheat= ENABLEDSecurity= $55DemoDisc= DISABLED
;--------------------------------------; Title;--------------------------------------
Page 40

TOMB RAIDER NEXT GENERATION SCRIPT REFERENCE MANUAL
[Title]
LoadCamera= 84246,-533,78233,81622,-1514,78208,40 ;src x,y,z target x,y,z, roomLevel= DATA\TITLE,104
;--------------------------------------; Levels;--------------------------------------
[Level]Name= My Project LevelLegend= The year 2012, somewhere in Egypt...Horizon= ENABLEDLayer1= 84,114,255,-4ColAddHorizon= ENABLEDPuzzleCombo= 3,1,Cartouche Piece 1, $0000,$0400,$0000,$0000,$0000,$0002PuzzleCombo= 3,2,Cartouche Piece 2, $0000,$0400,$0000,$0000,$0000,$0002Puzzle= 3,Ba Cartouche, $0000,$0400,$0000,$0000,$0000,$0002Puzzle= 1,Eye Of Horus, $0017,$0500,$0000,$0000,$0000,$0002PuzzleCombo= 1,1,Eye Piece, $0017,$0500,$0000,$0000,$0000,$0002PuzzleCombo= 1,2,Eye Piece, $0017,$0500,$0000,$0000,$0000,$0002Puzzle= 6,The Hand Of Orion, $0000,$0400,$8000,$c000,$0000,$0002Puzzle= 8,The Hand Of Sirius, $0000,$0400,$8000,$c000,$0000,$0002LoadCamera= 11088,-1100,28896,11119,-1399,31486,0Level= DATA\TUT1,107
[Level]Name= The Tomb Of SethPuzzle= 1,Eye Of Horus, $0017,$0500,$0000,$0000,$0000,$0002PuzzleCombo= 1,1,Eye Piece, $0017,$0500,$0000,$0000,$0000,$0002PuzzleCombo= 1,2,Eye Piece, $0017,$0500,$0000,$0000,$0000,$0002Puzzle= 2,The Timeless Sands, $0018,$0300,$0000,$0000,$0000,$0002PuzzleCombo= 3,1,Cartouche Piece 1, $0000,$0400,$0000,$0000,$0000,$0002PuzzleCombo= 3,2,Cartouche Piece 2, $0000,$0400,$0000,$0000,$0000,$0002Puzzle= 3,Ba Cartouche, $0000,$0400,$0000,$0000,$0000,$0002Puzzle= 4,Ra Cartouche, $0000,$0400,$0000,$0000,$0000,$0002Puzzle= 7,Guardian Key, $0009,$0300,$0000,$0000,$0000,$0002LoadCamera= 87075,-14188,26581,89090,-15443,25670,29Level= DATA\SETTOMB,107
[Level]Name= Temple Of KarnakHorizon= ENABLEDLayer1= 128,96,64,7Puzzle= 2,Canopic Jar 1, $0001,$0320,$0000,$0000,$0000,$0002Puzzle= 3,Canopic Jar 2, $0001,$0320,$0000,$0000,$0000,$0002Puzzle= 1,Sun Talisman, $0000,$0500,$0000,$0000,$0000,$0002
Page 41
TOMB RAIDER NEXT GENERATION SCRIPT REFERENCE MANUAL
PuzzleCombo= 1,1,Sun Disk, $0000,$0180,$0000,$0000,$0000,$0002PuzzleCombo= 1,2,Sun Goddess, $0000,$04b0,$0000,$0000,$0000,$0002Puzzle= 5,Golden Vraeus, $0003,$0300,$0000,$0000,$0000,$0002Puzzle= 7,Guardian Key, $0009,$0300,$0000,$0000,$0000,$0002Key= 2,Hypostyle Key, $0000,$0400,$0000,$c000,$0000,$0002LoadCamera= 89366,-258,48077,88372,-1300,45701,0Level= DATA\KARNAK,110
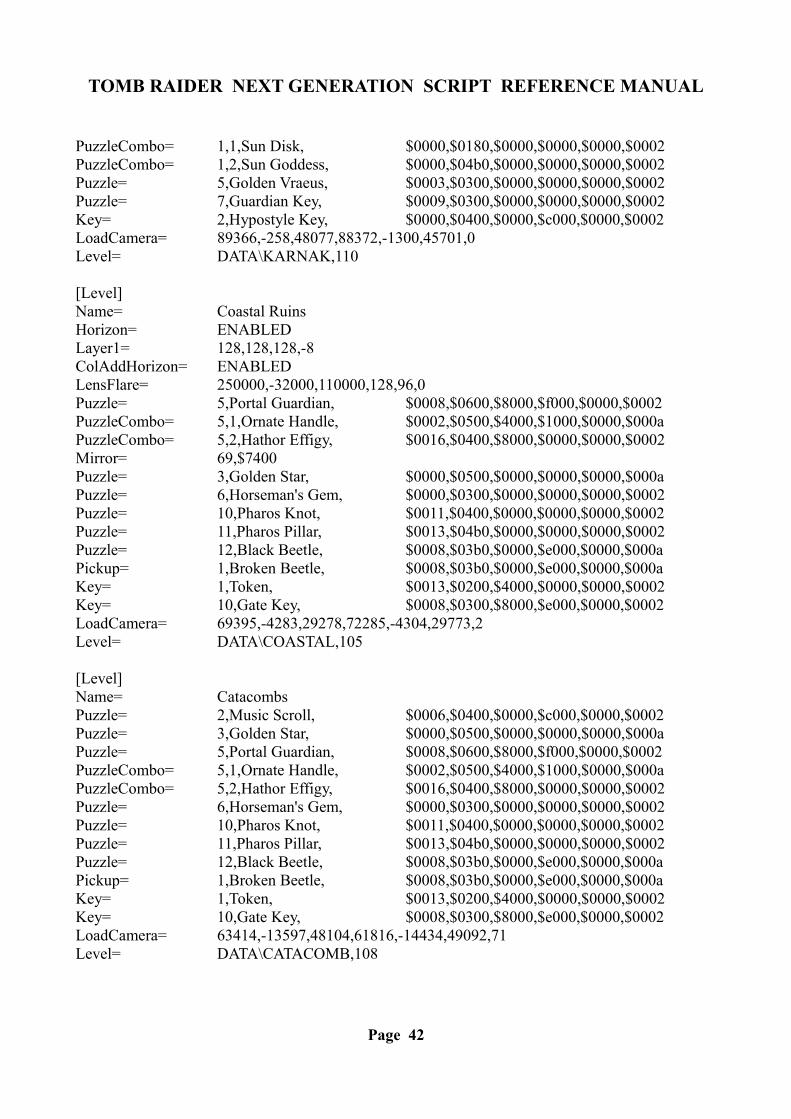
[Level]Name= Coastal RuinsHorizon= ENABLEDLayer1= 128,128,128,-8ColAddHorizon= ENABLEDLensFlare= 250000,-32000,110000,128,96,0Puzzle= 5,Portal Guardian, $0008,$0600,$8000,$f000,$0000,$0002PuzzleCombo= 5,1,Ornate Handle, $0002,$0500,$4000,$1000,$0000,$000aPuzzleCombo= 5,2,Hathor Effigy, $0016,$0400,$8000,$0000,$0000,$0002Mirror= 69,$7400Puzzle= 3,Golden Star, $0000,$0500,$0000,$0000,$0000,$000aPuzzle= 6,Horseman's Gem, $0000,$0300,$0000,$0000,$0000,$0002Puzzle= 10,Pharos Knot, $0011,$0400,$0000,$0000,$0000,$0002Puzzle= 11,Pharos Pillar, $0013,$04b0,$0000,$0000,$0000,$0002Puzzle= 12,Black Beetle, $0008,$03b0,$0000,$e000,$0000,$000aPickup= 1,Broken Beetle, $0008,$03b0,$0000,$e000,$0000,$000aKey= 1,Token, $0013,$0200,$4000,$0000,$0000,$0002Key= 10,Gate Key, $0008,$0300,$8000,$e000,$0000,$0002LoadCamera= 69395,-4283,29278,72285,-4304,29773,2Level= DATA\COASTAL,105
[Level]Name= CatacombsPuzzle= 2,Music Scroll, $0006,$0400,$0000,$c000,$0000,$0002Puzzle= 3,Golden Star, $0000,$0500,$0000,$0000,$0000,$000aPuzzle= 5,Portal Guardian, $0008,$0600,$8000,$f000,$0000,$0002PuzzleCombo= 5,1,Ornate Handle, $0002,$0500,$4000,$1000,$0000,$000aPuzzleCombo= 5,2,Hathor Effigy, $0016,$0400,$8000,$0000,$0000,$0002Puzzle= 6,Horseman's Gem, $0000,$0300,$0000,$0000,$0000,$0002Puzzle= 10,Pharos Knot, $0011,$0400,$0000,$0000,$0000,$0002Puzzle= 11,Pharos Pillar, $0013,$04b0,$0000,$0000,$0000,$0002Puzzle= 12,Black Beetle, $0008,$03b0,$0000,$e000,$0000,$000aPickup= 1,Broken Beetle, $0008,$03b0,$0000,$e000,$0000,$000aKey= 1,Token, $0013,$0200,$4000,$0000,$0000,$0002Key= 10,Gate Key, $0008,$0300,$8000,$e000,$0000,$0002LoadCamera= 63414,-13597,48104,61816,-14434,49092,71Level= DATA\CATACOMB,108
Page 42
TOMB RAIDER NEXT GENERATION SCRIPT REFERENCE MANUAL
[Level]Name= Cleopatra's PalacesPuzzle= 2,Music Scroll, $0006,$0400,$0000,$c000,$0000,$0002Puzzle= 5,Portal Guardian, $0008,$0600,$8000,$f000,$0000,$0002PuzzleCombo= 5,1,Ornate Handle, $0002,$0500,$4000,$1000,$0000,$000aPuzzleCombo= 5,2,Hathor Effigy, $0016,$0400,$8000,$0000,$0000,$0002Puzzle= 6,Horseman's Gem, $0000,$0300,$0000,$0000,$0000,$0002Puzzle= 10,Pharos Knot, $0011,$0400,$0000,$0000,$0000,$0002Puzzle= 12,Black Beetle, $0008,$03b0,$0000,$e000,$0000,$000aPickup= 1,Broken Beetle, $0008,$03b0,$0000,$e000,$0000,$000aPickup= 2,Broken Glasses, $0008,$0150,$0000,$0000,$0000,$0002LoadCamera= 37674,-6560,48511,37886,-6404,47204,18Level= DATA\CLEOPAL,107
[Level]Name= City Of The DeadHorizon= ENABLEDLayer1= 56,72,8,16Puzzle= 1,Nitrous Oxide Feeder, $0004,$0300,$0000,$0000,$0000,$0002Puzzle= 2,Car-Jack, $0000,$0400,$4000,$8000,$4000,$0002Puzzle= 4,Roof Key, $0000,$0300,$4000,$d000,$b000,$0002Puzzle= 5,Weapon Code Key, $0000,$0200,$8000,$c000,$0000,$0002Puzzle= 8,Mine Detonator, $0008,$0400,$8000,$0000,$0000,$2002PuzzleCombo= 1,1,Valve Pipe, $0004,$0300,$0000,$0000,$0000,$000aPuzzleCombo= 1,2,Nitrous Oxide Cannister, $0002,$0300,$0000,$0000,$0000,$0002PuzzleCombo= 2,1,Car-Jack Body, $0000,$0400,$4000,$8000,$4000,$0002PuzzleCombo= 2,2,Handle, $0000,$0300,$4000,$8000,$4000,$0002PuzzleCombo= 8,1,Mine Detonator Body, $0008,$0400,$8000,$0000,$0000,$0002PuzzleCombo= 8,2,Mine Position Data, $0004,$0280,$8000,$c000,$0000,$0002Puzzle= 1,Nitrous Oxide Feeder, $0004,$0300,$0000,$0000,$0000,$0002LoadCamera= 40900,498,36177,42256,-666,37727,51Level= DATA\CITY,102
Page 43
TOMB RAIDER NEXT GENERATION SCRIPT REFERENCE MANUAL
TOMB RAIDER NEXT GENERATION
THE COMPLETE TR4SCRIPT.TXT FILE
Page 44
TOMB RAIDER NEXT GENERATION SCRIPT REFERENCE MANUAL
;**************************************;; Tomb Raider IV Script File; Release Version 1.00; All the TR4 Scripts;**************************************
;--------------------------------------; Platform Definitions;--------------------------------------
[PSXExtensions]Level=.PSXCut=.CUTFMV=.FMV
[PCExtensions]Level=.TR4Cut=.TR4FMV=.BIK
;--------------------------------------; Language Filenames;--------------------------------------
[Language]File=0,ENGLISH.TXTFile=1,FRENCH.TXTFile=2,GERMAN.TXTFile=3,ITALIAN.TXTFile=4,SPANISH.TXTFile=5,US.TXTFile=6,JAPAN.TXTFile=7,DUTCH.TXT
;--------------------------------------; Options;--------------------------------------
[Options]LoadSave=ENABLEDTitle=ENABLEDPlayAnyLevel=ENABLEDInputTimeout=18000; frames * seconds = 60x30FlyCheat=ENABLEDSecurity=$55DemoDisc=DISABLED
Page 45
TOMB RAIDER NEXT GENERATION SCRIPT REFERENCE MANUAL
;--------------------------------------; Title;--------------------------------------
[Title]
LoadCamera=84246,-533,78233,81622,-1514,78208,40;src x,y,z target x,y,z, roomLevel=DATA\TITLE,104
;--------------------------------------; Levels;--------------------------------------[PSXExtensions] Level= .PSX Cut= .CUT FMV= .FMV
[PCExtensions] Level= .TR4 Cut= .TR4 FMV= .BIK
[Language] File= 0,ENGLISH.TXT File= 1,FRENCH.TXT File= 2,GERMAN.TXT File= 3,ITALIAN.TXT File= 4,SPANISH.TXT File= 5,US.TXT File= 6,JAPAN.TXT File= 7,DUTCH.TXT
[Options] LoadSave= ENABLED Title= ENABLED PlayAnyLevel= ENABLED InputTimeout= 18000 FlyCheat= ENABLED Security= $55 DemoDisc= DISABLED
[Title] ResidentCut= 1,28 ResidentCut= 2,29 ResidentCut= 3,30 LoadCamera= 68096,1152,90624,68032,703,91542,1
Page 46
TOMB RAIDER NEXT GENERATION SCRIPT REFERENCE MANUAL
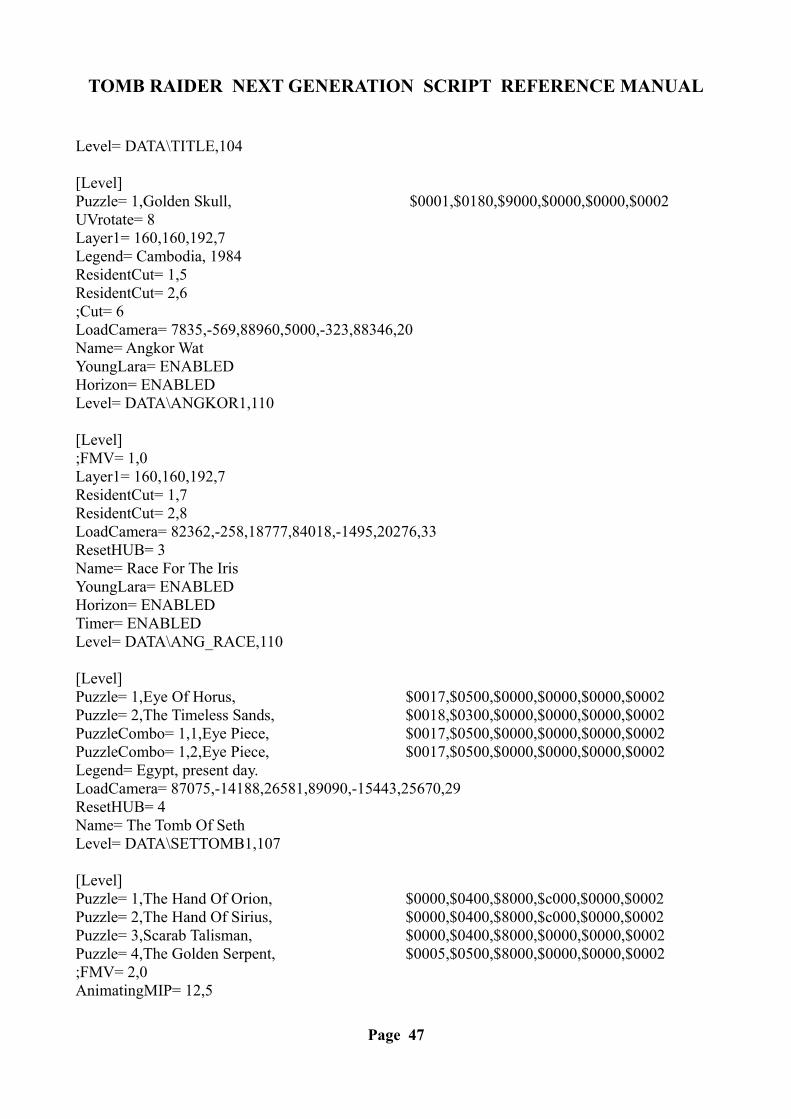
Level= DATA\TITLE,104
[Level] Puzzle= 1,Golden Skull, $0001,$0180,$9000,$0000,$0000,$0002 UVrotate= 8 Layer1= 160,160,192,7 Legend= Cambodia, 1984 ResidentCut= 1,5 ResidentCut= 2,6 ;Cut= 6 LoadCamera= 7835,-569,88960,5000,-323,88346,20 Name= Angkor Wat YoungLara= ENABLED Horizon= ENABLED Level= DATA\ANGKOR1,110
[Level] ;FMV= 1,0 Layer1= 160,160,192,7 ResidentCut= 1,7 ResidentCut= 2,8 LoadCamera= 82362,-258,18777,84018,-1495,20276,33 ResetHUB= 3 Name= Race For The Iris YoungLara= ENABLED Horizon= ENABLED Timer= ENABLED Level= DATA\ANG_RACE,110
[Level] Puzzle= 1,Eye Of Horus, $0017,$0500,$0000,$0000,$0000,$0002 Puzzle= 2,The Timeless Sands, $0018,$0300,$0000,$0000,$0000,$0002 PuzzleCombo= 1,1,Eye Piece, $0017,$0500,$0000,$0000,$0000,$0002 PuzzleCombo= 1,2,Eye Piece, $0017,$0500,$0000,$0000,$0000,$0002 Legend= Egypt, present day. LoadCamera= 87075,-14188,26581,89090,-15443,25670,29 ResetHUB= 4 Name= The Tomb Of Seth Level= DATA\SETTOMB1,107
[Level] Puzzle= 1,The Hand Of Orion, $0000,$0400,$8000,$c000,$0000,$0002 Puzzle= 2,The Hand Of Sirius, $0000,$0400,$8000,$c000,$0000,$0002 Puzzle= 3,Scarab Talisman, $0000,$0400,$8000,$0000,$0000,$0002 Puzzle= 4,The Golden Serpent, $0005,$0500,$8000,$0000,$0000,$0002 ;FMV= 2,0 AnimatingMIP= 12,5
Page 47
TOMB RAIDER NEXT GENERATION SCRIPT REFERENCE MANUAL
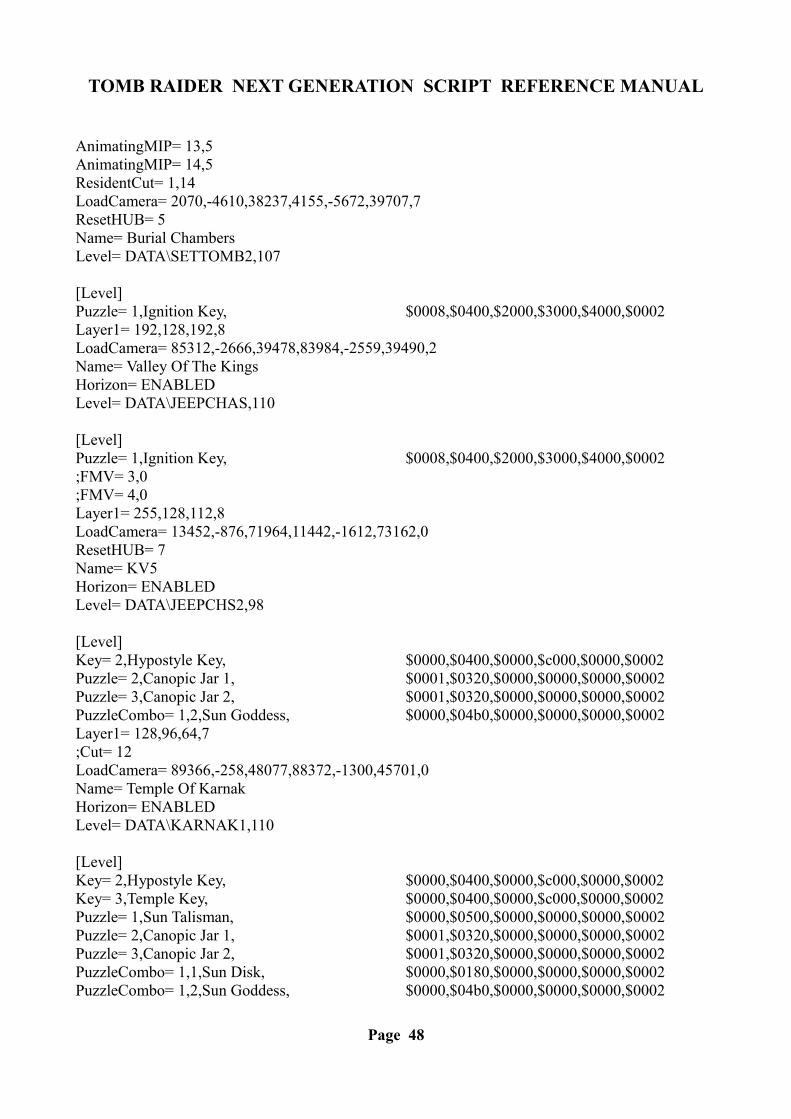
AnimatingMIP= 13,5 AnimatingMIP= 14,5 ResidentCut= 1,14 LoadCamera= 2070,-4610,38237,4155,-5672,39707,7 ResetHUB= 5 Name= Burial Chambers Level= DATA\SETTOMB2,107
[Level] Puzzle= 1,Ignition Key, $0008,$0400,$2000,$3000,$4000,$0002 Layer1= 192,128,192,8 LoadCamera= 85312,-2666,39478,83984,-2559,39490,2 Name= Valley Of The Kings Horizon= ENABLED Level= DATA\JEEPCHAS,110
[Level] Puzzle= 1,Ignition Key, $0008,$0400,$2000,$3000,$4000,$0002 ;FMV= 3,0 ;FMV= 4,0 Layer1= 255,128,112,8 LoadCamera= 13452,-876,71964,11442,-1612,73162,0 ResetHUB= 7 Name= KV5 Horizon= ENABLED Level= DATA\JEEPCHS2,98
[Level] Key= 2,Hypostyle Key, $0000,$0400,$0000,$c000,$0000,$0002 Puzzle= 2,Canopic Jar 1, $0001,$0320,$0000,$0000,$0000,$0002 Puzzle= 3,Canopic Jar 2, $0001,$0320,$0000,$0000,$0000,$0002 PuzzleCombo= 1,2,Sun Goddess, $0000,$04b0,$0000,$0000,$0000,$0002 Layer1= 128,96,64,7 ;Cut= 12 LoadCamera= 89366,-258,48077,88372,-1300,45701,0 Name= Temple Of Karnak Horizon= ENABLED Level= DATA\KARNAK1,110
[Level] Key= 2,Hypostyle Key, $0000,$0400,$0000,$c000,$0000,$0002 Key= 3,Temple Key, $0000,$0400,$0000,$c000,$0000,$0002 Puzzle= 1,Sun Talisman, $0000,$0500,$0000,$0000,$0000,$0002 Puzzle= 2,Canopic Jar 1, $0001,$0320,$0000,$0000,$0000,$0002 Puzzle= 3,Canopic Jar 2, $0001,$0320,$0000,$0000,$0000,$0002 PuzzleCombo= 1,1,Sun Disk, $0000,$0180,$0000,$0000,$0000,$0002 PuzzleCombo= 1,2,Sun Goddess, $0000,$04b0,$0000,$0000,$0000,$0002
Page 48
TOMB RAIDER NEXT GENERATION SCRIPT REFERENCE MANUAL
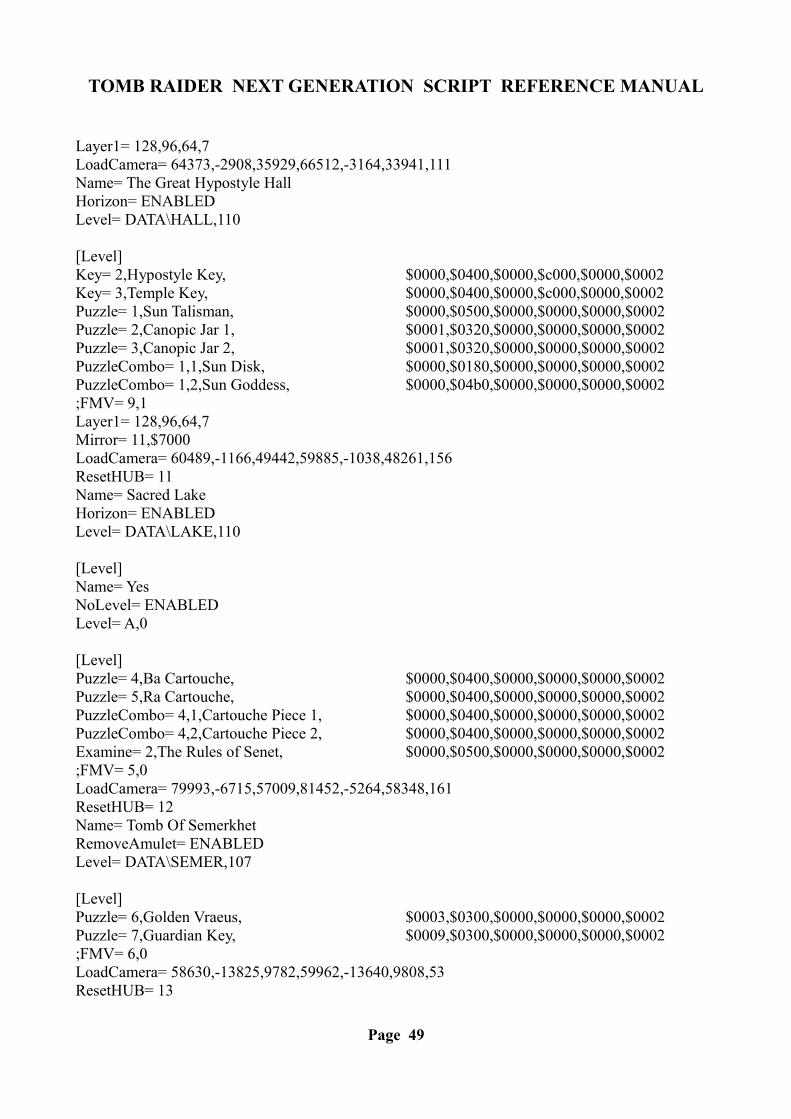
Layer1= 128,96,64,7 LoadCamera= 64373,-2908,35929,66512,-3164,33941,111 Name= The Great Hypostyle Hall Horizon= ENABLED Level= DATA\HALL,110
[Level] Key= 2,Hypostyle Key, $0000,$0400,$0000,$c000,$0000,$0002 Key= 3,Temple Key, $0000,$0400,$0000,$c000,$0000,$0002 Puzzle= 1,Sun Talisman, $0000,$0500,$0000,$0000,$0000,$0002 Puzzle= 2,Canopic Jar 1, $0001,$0320,$0000,$0000,$0000,$0002 Puzzle= 3,Canopic Jar 2, $0001,$0320,$0000,$0000,$0000,$0002 PuzzleCombo= 1,1,Sun Disk, $0000,$0180,$0000,$0000,$0000,$0002 PuzzleCombo= 1,2,Sun Goddess, $0000,$04b0,$0000,$0000,$0000,$0002 ;FMV= 9,1 Layer1= 128,96,64,7 Mirror= 11,$7000 LoadCamera= 60489,-1166,49442,59885,-1038,48261,156 ResetHUB= 11 Name= Sacred Lake Horizon= ENABLED Level= DATA\LAKE,110
[Level] Name= Yes NoLevel= ENABLED Level= A,0
[Level] Puzzle= 4,Ba Cartouche, $0000,$0400,$0000,$0000,$0000,$0002 Puzzle= 5,Ra Cartouche, $0000,$0400,$0000,$0000,$0000,$0002 PuzzleCombo= 4,1,Cartouche Piece 1, $0000,$0400,$0000,$0000,$0000,$0002 PuzzleCombo= 4,2,Cartouche Piece 2, $0000,$0400,$0000,$0000,$0000,$0002 Examine= 2,The Rules of Senet, $0000,$0500,$0000,$0000,$0000,$0002 ;FMV= 5,0 LoadCamera= 79993,-6715,57009,81452,-5264,58348,161 ResetHUB= 12 Name= Tomb Of Semerkhet RemoveAmulet= ENABLED Level= DATA\SEMER,107
[Level] Puzzle= 6,Golden Vraeus, $0003,$0300,$0000,$0000,$0000,$0002 Puzzle= 7,Guardian Key, $0009,$0300,$0000,$0000,$0000,$0002 ;FMV= 6,0 LoadCamera= 58630,-13825,9782,59962,-13640,9808,53 ResetHUB= 13
Page 49
TOMB RAIDER NEXT GENERATION SCRIPT REFERENCE MANUAL
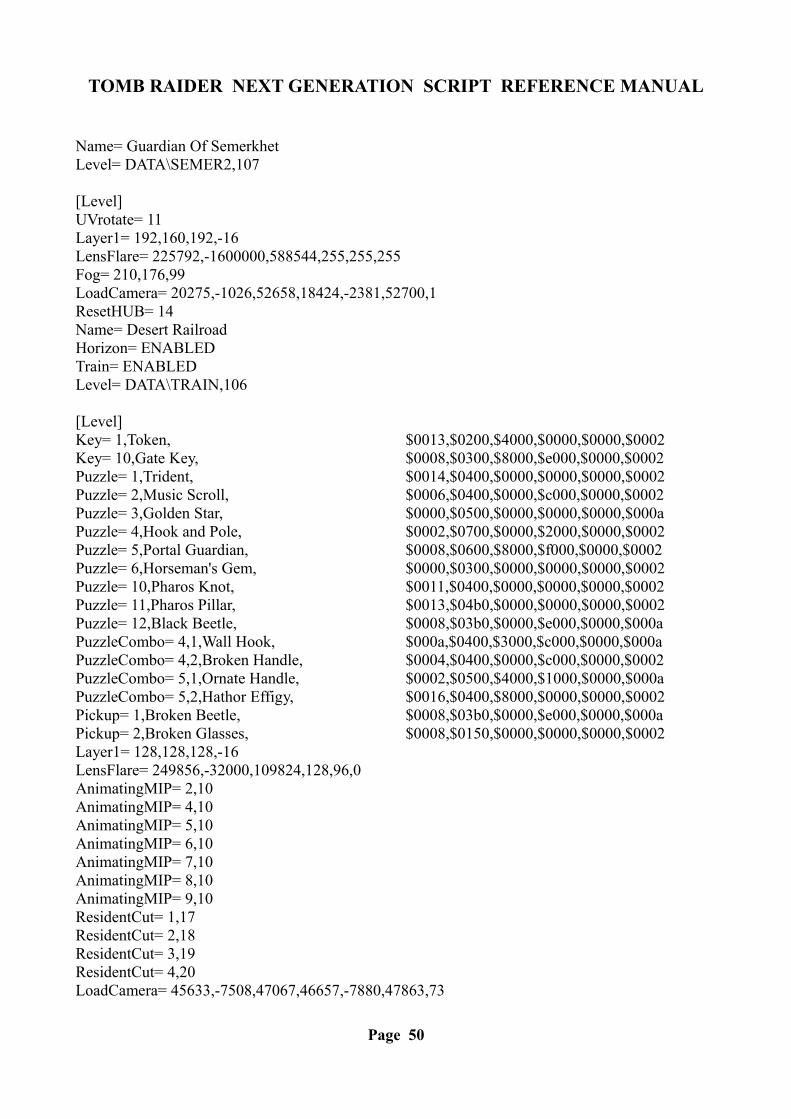
Name= Guardian Of Semerkhet Level= DATA\SEMER2,107
[Level] UVrotate= 11 Layer1= 192,160,192,-16 LensFlare= 225792,-1600000,588544,255,255,255 Fog= 210,176,99 LoadCamera= 20275,-1026,52658,18424,-2381,52700,1 ResetHUB= 14 Name= Desert Railroad Horizon= ENABLED Train= ENABLED Level= DATA\TRAIN,106
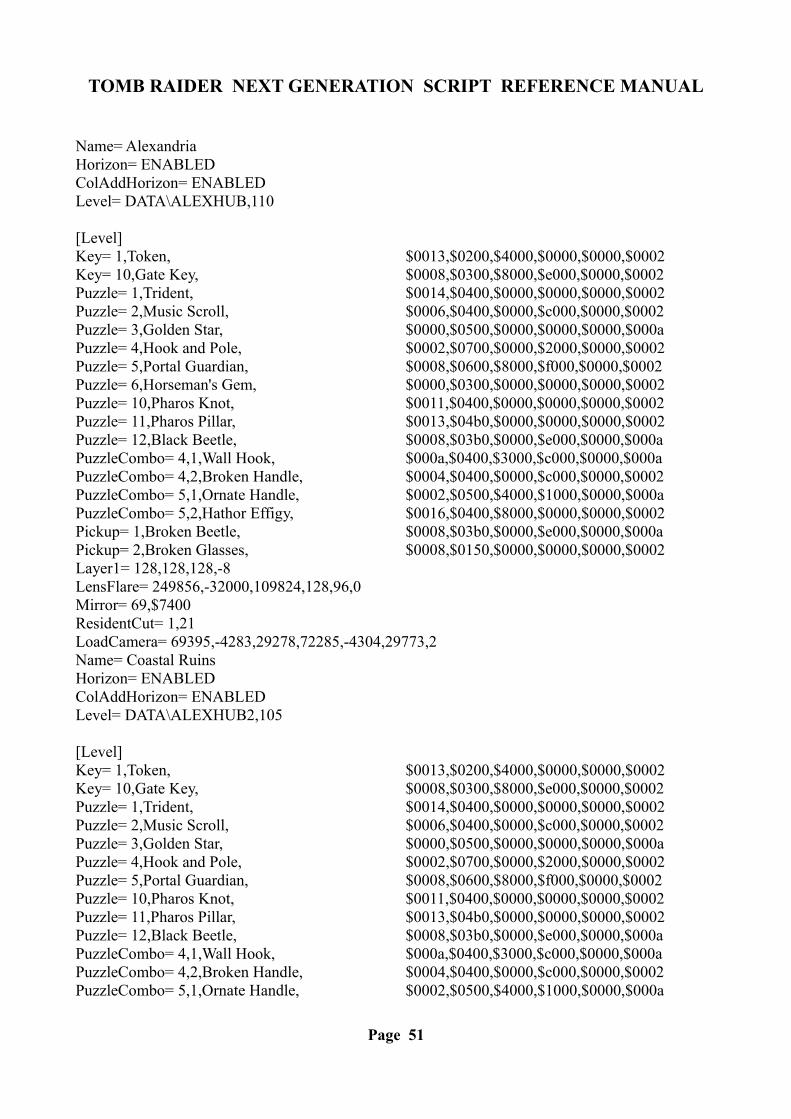
[Level] Key= 1,Token, $0013,$0200,$4000,$0000,$0000,$0002Key= 10,Gate Key, $0008,$0300,$8000,$e000,$0000,$0002 Puzzle= 1,Trident, $0014,$0400,$0000,$0000,$0000,$0002 Puzzle= 2,Music Scroll, $0006,$0400,$0000,$c000,$0000,$0002 Puzzle= 3,Golden Star, $0000,$0500,$0000,$0000,$0000,$000a Puzzle= 4,Hook and Pole, $0002,$0700,$0000,$2000,$0000,$0002 Puzzle= 5,Portal Guardian, $0008,$0600,$8000,$f000,$0000,$0002 Puzzle= 6,Horseman's Gem, $0000,$0300,$0000,$0000,$0000,$0002 Puzzle= 10,Pharos Knot, $0011,$0400,$0000,$0000,$0000,$0002 Puzzle= 11,Pharos Pillar, $0013,$04b0,$0000,$0000,$0000,$0002 Puzzle= 12,Black Beetle, $0008,$03b0,$0000,$e000,$0000,$000a PuzzleCombo= 4,1,Wall Hook, $000a,$0400,$3000,$c000,$0000,$000a PuzzleCombo= 4,2,Broken Handle, $0004,$0400,$0000,$c000,$0000,$0002 PuzzleCombo= 5,1,Ornate Handle, $0002,$0500,$4000,$1000,$0000,$000a PuzzleCombo= 5,2,Hathor Effigy, $0016,$0400,$8000,$0000,$0000,$0002 Pickup= 1,Broken Beetle, $0008,$03b0,$0000,$e000,$0000,$000a Pickup= 2,Broken Glasses, $0008,$0150,$0000,$0000,$0000,$0002 Layer1= 128,128,128,-16 LensFlare= 249856,-32000,109824,128,96,0 AnimatingMIP= 2,10 AnimatingMIP= 4,10 AnimatingMIP= 5,10 AnimatingMIP= 6,10 AnimatingMIP= 7,10 AnimatingMIP= 8,10 AnimatingMIP= 9,10 ResidentCut= 1,17 ResidentCut= 2,18 ResidentCut= 3,19 ResidentCut= 4,20 LoadCamera= 45633,-7508,47067,46657,-7880,47863,73
Page 50
TOMB RAIDER NEXT GENERATION SCRIPT REFERENCE MANUAL
Name= Alexandria Horizon= ENABLED ColAddHorizon= ENABLED Level= DATA\ALEXHUB,110
[Level] Key= 1,Token, $0013,$0200,$4000,$0000,$0000,$0002Key= 10,Gate Key, $0008,$0300,$8000,$e000,$0000,$0002 Puzzle= 1,Trident, $0014,$0400,$0000,$0000,$0000,$0002 Puzzle= 2,Music Scroll, $0006,$0400,$0000,$c000,$0000,$0002 Puzzle= 3,Golden Star, $0000,$0500,$0000,$0000,$0000,$000a Puzzle= 4,Hook and Pole, $0002,$0700,$0000,$2000,$0000,$0002 Puzzle= 5,Portal Guardian, $0008,$0600,$8000,$f000,$0000,$0002 Puzzle= 6,Horseman's Gem, $0000,$0300,$0000,$0000,$0000,$0002 Puzzle= 10,Pharos Knot, $0011,$0400,$0000,$0000,$0000,$0002 Puzzle= 11,Pharos Pillar, $0013,$04b0,$0000,$0000,$0000,$0002 Puzzle= 12,Black Beetle, $0008,$03b0,$0000,$e000,$0000,$000a PuzzleCombo= 4,1,Wall Hook, $000a,$0400,$3000,$c000,$0000,$000a PuzzleCombo= 4,2,Broken Handle, $0004,$0400,$0000,$c000,$0000,$0002 PuzzleCombo= 5,1,Ornate Handle, $0002,$0500,$4000,$1000,$0000,$000a PuzzleCombo= 5,2,Hathor Effigy, $0016,$0400,$8000,$0000,$0000,$0002 Pickup= 1,Broken Beetle, $0008,$03b0,$0000,$e000,$0000,$000a Pickup= 2,Broken Glasses, $0008,$0150,$0000,$0000,$0000,$0002 Layer1= 128,128,128,-8 LensFlare= 249856,-32000,109824,128,96,0 Mirror= 69,$7400 ResidentCut= 1,21 LoadCamera= 69395,-4283,29278,72285,-4304,29773,2 Name= Coastal Ruins Horizon= ENABLED ColAddHorizon= ENABLED Level= DATA\ALEXHUB2,105
[Level] Key= 1,Token, $0013,$0200,$4000,$0000,$0000,$0002Key= 10,Gate Key, $0008,$0300,$8000,$e000,$0000,$0002 Puzzle= 1,Trident, $0014,$0400,$0000,$0000,$0000,$0002 Puzzle= 2,Music Scroll, $0006,$0400,$0000,$c000,$0000,$0002 Puzzle= 3,Golden Star, $0000,$0500,$0000,$0000,$0000,$000a Puzzle= 4,Hook and Pole, $0002,$0700,$0000,$2000,$0000,$0002 Puzzle= 5,Portal Guardian, $0008,$0600,$8000,$f000,$0000,$0002 Puzzle= 10,Pharos Knot, $0011,$0400,$0000,$0000,$0000,$0002 Puzzle= 11,Pharos Pillar, $0013,$04b0,$0000,$0000,$0000,$0002 Puzzle= 12,Black Beetle, $0008,$03b0,$0000,$e000,$0000,$000a PuzzleCombo= 4,1,Wall Hook, $000a,$0400,$3000,$c000,$0000,$000a PuzzleCombo= 4,2,Broken Handle, $0004,$0400,$0000,$c000,$0000,$0002 PuzzleCombo= 5,1,Ornate Handle, $0002,$0500,$4000,$1000,$0000,$000a
Page 51
TOMB RAIDER NEXT GENERATION SCRIPT REFERENCE MANUAL
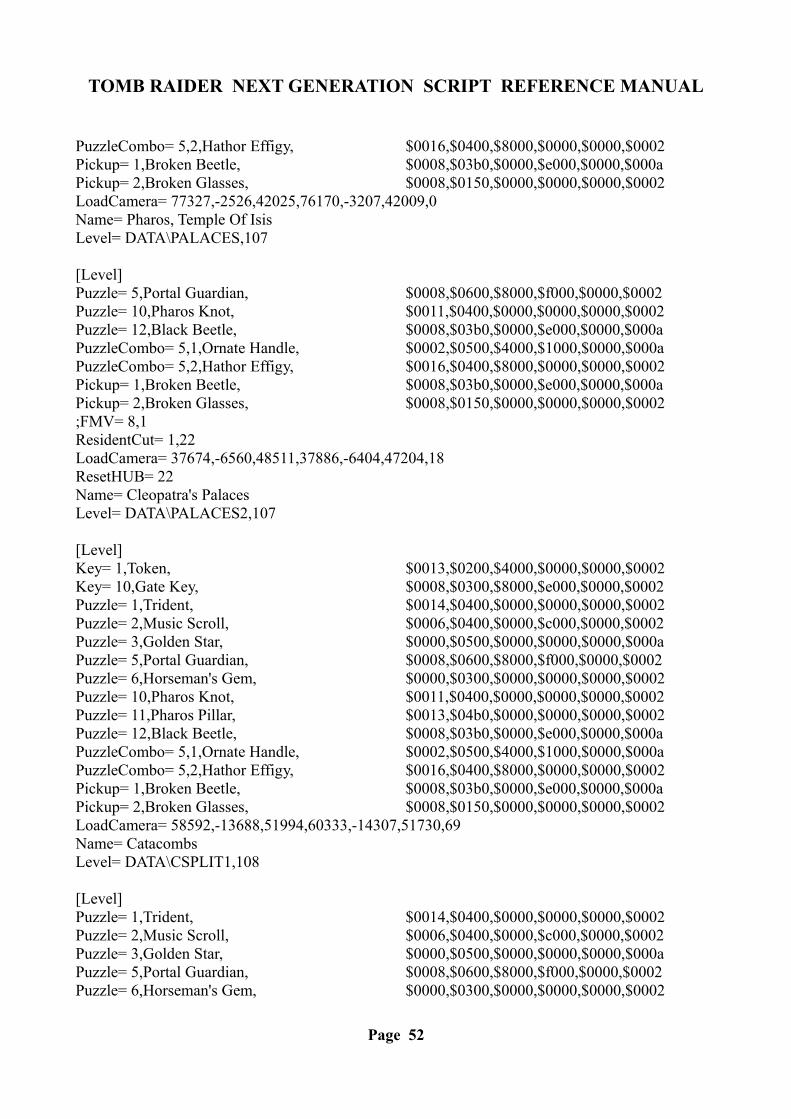
PuzzleCombo= 5,2,Hathor Effigy, $0016,$0400,$8000,$0000,$0000,$0002 Pickup= 1,Broken Beetle, $0008,$03b0,$0000,$e000,$0000,$000a Pickup= 2,Broken Glasses, $0008,$0150,$0000,$0000,$0000,$0002 LoadCamera= 77327,-2526,42025,76170,-3207,42009,0 Name= Pharos, Temple Of Isis Level= DATA\PALACES,107
[Level] Puzzle= 5,Portal Guardian, $0008,$0600,$8000,$f000,$0000,$0002 Puzzle= 10,Pharos Knot, $0011,$0400,$0000,$0000,$0000,$0002 Puzzle= 12,Black Beetle, $0008,$03b0,$0000,$e000,$0000,$000a PuzzleCombo= 5,1,Ornate Handle, $0002,$0500,$4000,$1000,$0000,$000a PuzzleCombo= 5,2,Hathor Effigy, $0016,$0400,$8000,$0000,$0000,$0002 Pickup= 1,Broken Beetle, $0008,$03b0,$0000,$e000,$0000,$000a Pickup= 2,Broken Glasses, $0008,$0150,$0000,$0000,$0000,$0002 ;FMV= 8,1 ResidentCut= 1,22 LoadCamera= 37674,-6560,48511,37886,-6404,47204,18 ResetHUB= 22 Name= Cleopatra's Palaces Level= DATA\PALACES2,107
[Level] Key= 1,Token, $0013,$0200,$4000,$0000,$0000,$0002Key= 10,Gate Key, $0008,$0300,$8000,$e000,$0000,$0002 Puzzle= 1,Trident, $0014,$0400,$0000,$0000,$0000,$0002 Puzzle= 2,Music Scroll, $0006,$0400,$0000,$c000,$0000,$0002 Puzzle= 3,Golden Star, $0000,$0500,$0000,$0000,$0000,$000a Puzzle= 5,Portal Guardian, $0008,$0600,$8000,$f000,$0000,$0002 Puzzle= 6,Horseman's Gem, $0000,$0300,$0000,$0000,$0000,$0002 Puzzle= 10,Pharos Knot, $0011,$0400,$0000,$0000,$0000,$0002 Puzzle= 11,Pharos Pillar, $0013,$04b0,$0000,$0000,$0000,$0002 Puzzle= 12,Black Beetle, $0008,$03b0,$0000,$e000,$0000,$000a PuzzleCombo= 5,1,Ornate Handle, $0002,$0500,$4000,$1000,$0000,$000a PuzzleCombo= 5,2,Hathor Effigy, $0016,$0400,$8000,$0000,$0000,$0002 Pickup= 1,Broken Beetle, $0008,$03b0,$0000,$e000,$0000,$000a Pickup= 2,Broken Glasses, $0008,$0150,$0000,$0000,$0000,$0002 LoadCamera= 58592,-13688,51994,60333,-14307,51730,69 Name= Catacombs Level= DATA\CSPLIT1,108
[Level] Puzzle= 1,Trident, $0014,$0400,$0000,$0000,$0000,$0002 Puzzle= 2,Music Scroll, $0006,$0400,$0000,$c000,$0000,$0002 Puzzle= 3,Golden Star, $0000,$0500,$0000,$0000,$0000,$000a Puzzle= 5,Portal Guardian, $0008,$0600,$8000,$f000,$0000,$0002 Puzzle= 6,Horseman's Gem, $0000,$0300,$0000,$0000,$0000,$0002
Page 52
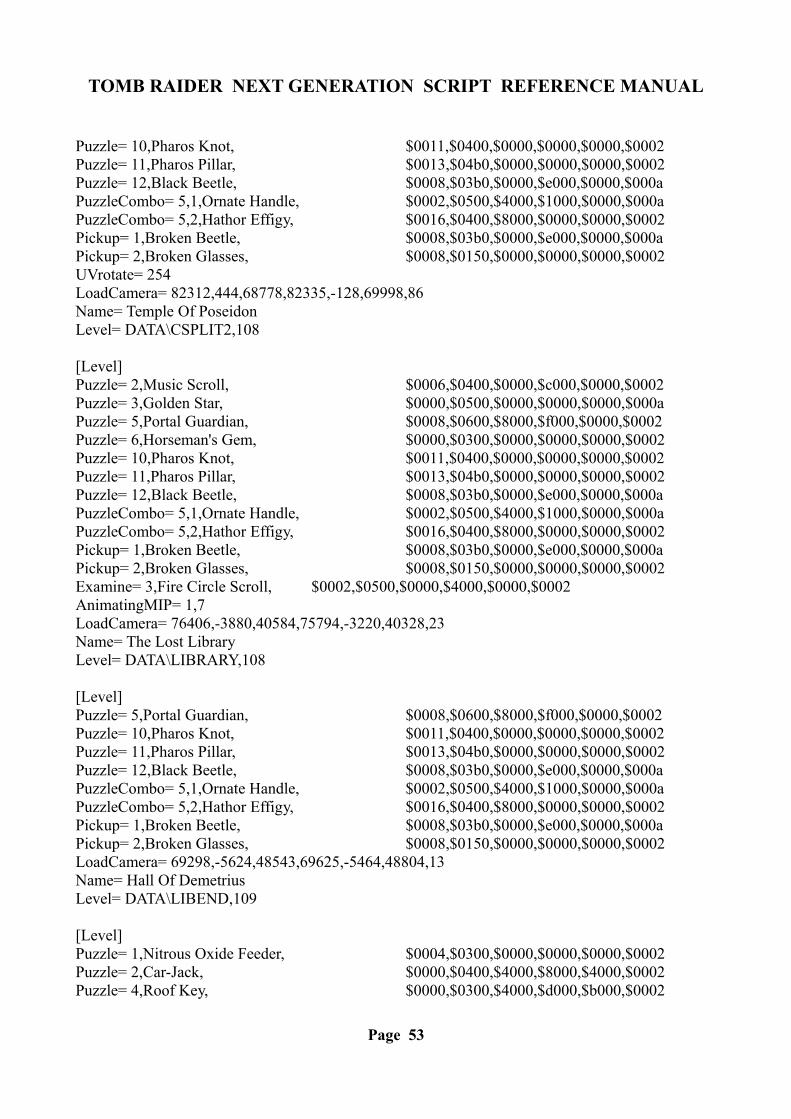
TOMB RAIDER NEXT GENERATION SCRIPT REFERENCE MANUAL
Puzzle= 10,Pharos Knot, $0011,$0400,$0000,$0000,$0000,$0002 Puzzle= 11,Pharos Pillar, $0013,$04b0,$0000,$0000,$0000,$0002 Puzzle= 12,Black Beetle, $0008,$03b0,$0000,$e000,$0000,$000a PuzzleCombo= 5,1,Ornate Handle, $0002,$0500,$4000,$1000,$0000,$000a PuzzleCombo= 5,2,Hathor Effigy, $0016,$0400,$8000,$0000,$0000,$0002 Pickup= 1,Broken Beetle, $0008,$03b0,$0000,$e000,$0000,$000a Pickup= 2,Broken Glasses, $0008,$0150,$0000,$0000,$0000,$0002 UVrotate= 254 LoadCamera= 82312,444,68778,82335,-128,69998,86 Name= Temple Of Poseidon Level= DATA\CSPLIT2,108
[Level] Puzzle= 2,Music Scroll, $0006,$0400,$0000,$c000,$0000,$0002 Puzzle= 3,Golden Star, $0000,$0500,$0000,$0000,$0000,$000a Puzzle= 5,Portal Guardian, $0008,$0600,$8000,$f000,$0000,$0002 Puzzle= 6,Horseman's Gem, $0000,$0300,$0000,$0000,$0000,$0002 Puzzle= 10,Pharos Knot, $0011,$0400,$0000,$0000,$0000,$0002 Puzzle= 11,Pharos Pillar, $0013,$04b0,$0000,$0000,$0000,$0002 Puzzle= 12,Black Beetle, $0008,$03b0,$0000,$e000,$0000,$000a PuzzleCombo= 5,1,Ornate Handle, $0002,$0500,$4000,$1000,$0000,$000a PuzzleCombo= 5,2,Hathor Effigy, $0016,$0400,$8000,$0000,$0000,$0002 Pickup= 1,Broken Beetle, $0008,$03b0,$0000,$e000,$0000,$000a Pickup= 2,Broken Glasses, $0008,$0150,$0000,$0000,$0000,$0002 Examine= 3,Fire Circle Scroll, $0002,$0500,$0000,$4000,$0000,$0002 AnimatingMIP= 1,7 LoadCamera= 76406,-3880,40584,75794,-3220,40328,23 Name= The Lost Library Level= DATA\LIBRARY,108
[Level] Puzzle= 5,Portal Guardian, $0008,$0600,$8000,$f000,$0000,$0002 Puzzle= 10,Pharos Knot, $0011,$0400,$0000,$0000,$0000,$0002 Puzzle= 11,Pharos Pillar, $0013,$04b0,$0000,$0000,$0000,$0002 Puzzle= 12,Black Beetle, $0008,$03b0,$0000,$e000,$0000,$000a PuzzleCombo= 5,1,Ornate Handle, $0002,$0500,$4000,$1000,$0000,$000a PuzzleCombo= 5,2,Hathor Effigy, $0016,$0400,$8000,$0000,$0000,$0002 Pickup= 1,Broken Beetle, $0008,$03b0,$0000,$e000,$0000,$000a Pickup= 2,Broken Glasses, $0008,$0150,$0000,$0000,$0000,$0002 LoadCamera= 69298,-5624,48543,69625,-5464,48804,13 Name= Hall Of Demetrius Level= DATA\LIBEND,109
[Level] Puzzle= 1,Nitrous Oxide Feeder, $0004,$0300,$0000,$0000,$0000,$0002 Puzzle= 2,Car-Jack, $0000,$0400,$4000,$8000,$4000,$0002 Puzzle= 4,Roof Key, $0000,$0300,$4000,$d000,$b000,$0002
Page 53
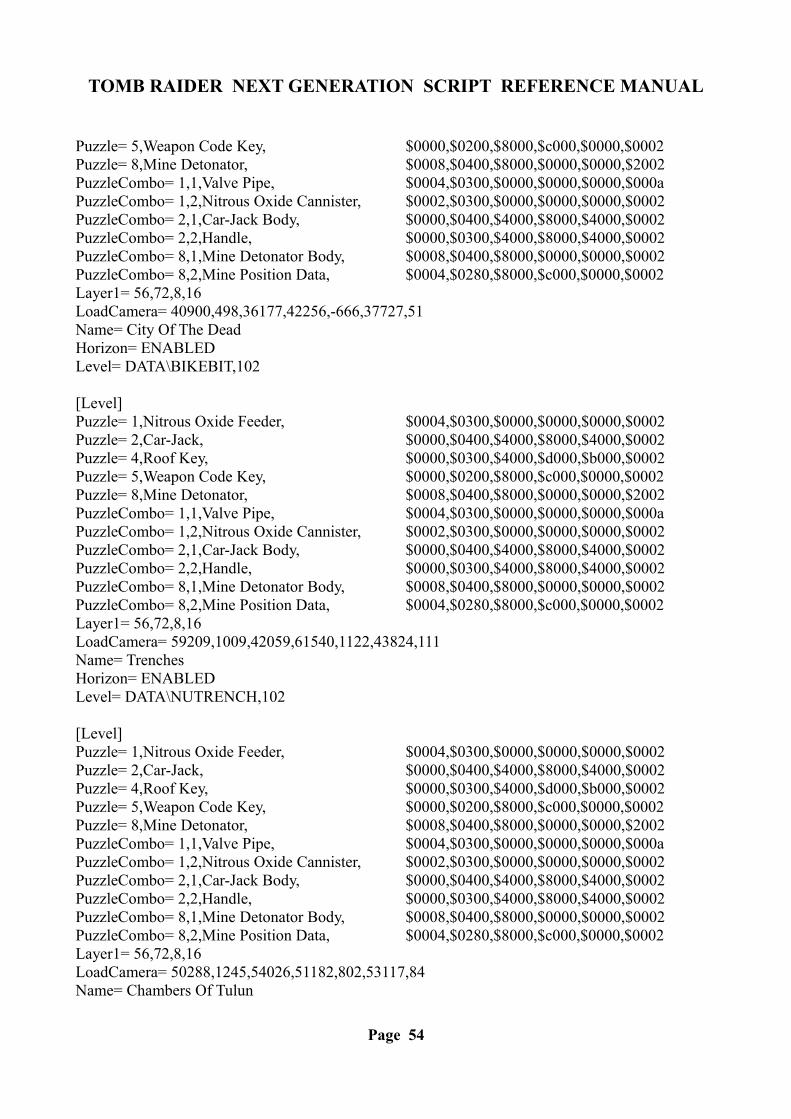
TOMB RAIDER NEXT GENERATION SCRIPT REFERENCE MANUAL
Puzzle= 5,Weapon Code Key, $0000,$0200,$8000,$c000,$0000,$0002 Puzzle= 8,Mine Detonator, $0008,$0400,$8000,$0000,$0000,$2002 PuzzleCombo= 1,1,Valve Pipe, $0004,$0300,$0000,$0000,$0000,$000a PuzzleCombo= 1,2,Nitrous Oxide Cannister, $0002,$0300,$0000,$0000,$0000,$0002 PuzzleCombo= 2,1,Car-Jack Body, $0000,$0400,$4000,$8000,$4000,$0002 PuzzleCombo= 2,2,Handle, $0000,$0300,$4000,$8000,$4000,$0002 PuzzleCombo= 8,1,Mine Detonator Body, $0008,$0400,$8000,$0000,$0000,$0002 PuzzleCombo= 8,2,Mine Position Data, $0004,$0280,$8000,$c000,$0000,$0002 Layer1= 56,72,8,16 LoadCamera= 40900,498,36177,42256,-666,37727,51 Name= City Of The Dead Horizon= ENABLED Level= DATA\BIKEBIT,102
[Level] Puzzle= 1,Nitrous Oxide Feeder, $0004,$0300,$0000,$0000,$0000,$0002 Puzzle= 2,Car-Jack, $0000,$0400,$4000,$8000,$4000,$0002 Puzzle= 4,Roof Key, $0000,$0300,$4000,$d000,$b000,$0002 Puzzle= 5,Weapon Code Key, $0000,$0200,$8000,$c000,$0000,$0002 Puzzle= 8,Mine Detonator, $0008,$0400,$8000,$0000,$0000,$2002 PuzzleCombo= 1,1,Valve Pipe, $0004,$0300,$0000,$0000,$0000,$000a PuzzleCombo= 1,2,Nitrous Oxide Cannister, $0002,$0300,$0000,$0000,$0000,$0002 PuzzleCombo= 2,1,Car-Jack Body, $0000,$0400,$4000,$8000,$4000,$0002 PuzzleCombo= 2,2,Handle, $0000,$0300,$4000,$8000,$4000,$0002 PuzzleCombo= 8,1,Mine Detonator Body, $0008,$0400,$8000,$0000,$0000,$0002 PuzzleCombo= 8,2,Mine Position Data, $0004,$0280,$8000,$c000,$0000,$0002 Layer1= 56,72,8,16 LoadCamera= 59209,1009,42059,61540,1122,43824,111 Name= Trenches Horizon= ENABLED Level= DATA\NUTRENCH,102
[Level] Puzzle= 1,Nitrous Oxide Feeder, $0004,$0300,$0000,$0000,$0000,$0002 Puzzle= 2,Car-Jack, $0000,$0400,$4000,$8000,$4000,$0002 Puzzle= 4,Roof Key, $0000,$0300,$4000,$d000,$b000,$0002 Puzzle= 5,Weapon Code Key, $0000,$0200,$8000,$c000,$0000,$0002 Puzzle= 8,Mine Detonator, $0008,$0400,$8000,$0000,$0000,$2002 PuzzleCombo= 1,1,Valve Pipe, $0004,$0300,$0000,$0000,$0000,$000a PuzzleCombo= 1,2,Nitrous Oxide Cannister, $0002,$0300,$0000,$0000,$0000,$0002 PuzzleCombo= 2,1,Car-Jack Body, $0000,$0400,$4000,$8000,$4000,$0002 PuzzleCombo= 2,2,Handle, $0000,$0300,$4000,$8000,$4000,$0002 PuzzleCombo= 8,1,Mine Detonator Body, $0008,$0400,$8000,$0000,$0000,$0002 PuzzleCombo= 8,2,Mine Position Data, $0004,$0280,$8000,$c000,$0000,$0002 Layer1= 56,72,8,16 LoadCamera= 50288,1245,54026,51182,802,53117,84 Name= Chambers Of Tulun
Page 54

TOMB RAIDER NEXT GENERATION SCRIPT REFERENCE MANUAL
Horizon= ENABLED Level= DATA\CORTYARD,102
[Level] Puzzle= 1,Nitrous Oxide Feeder, $0004,$0300,$0000,$0000,$0000,$0002 Puzzle= 2,Car-Jack, $0000,$0400,$4000,$8000,$4000,$0002 Puzzle= 4,Roof Key, $0000,$0300,$4000,$d000,$b000,$0002 Puzzle= 5,Weapon Code Key, $0000,$0200,$8000,$c000,$0000,$0002 Puzzle= 8,Mine Detonator, $0008,$0400,$8000,$0000,$0000,$2002 PuzzleCombo= 1,1,Valve Pipe, $0004,$0300,$0000,$0000,$0000,$000a PuzzleCombo= 1,2,Nitrous Oxide Cannister, $0002,$0300,$0000,$0000,$0000,$0002 PuzzleCombo= 2,1,Car-Jack Body, $0000,$0400,$4000,$8000,$4000,$0002 PuzzleCombo= 2,2,Handle, $0000,$0300,$4000,$8000,$4000,$0002 PuzzleCombo= 8,1,Mine Detonator Body, $0008,$0400,$8000,$0000,$0000,$0002 PuzzleCombo= 8,2,Mine Position Data, $0004,$0280,$8000,$c000,$0000,$0002 Layer1= 56,72,8,16 LoadCamera= 53811,-328,48582,54914,-1207,51046,106 Name= Street Bazaar Horizon= ENABLED Lightning= ENABLED Level= DATA\LOWSTRT,102
[Level] Puzzle= 1,Nitrous Oxide Feeder, $0004,$0300,$0000,$0000,$0000,$0002 Puzzle= 2,Car-Jack, $0000,$0400,$4000,$8000,$4000,$0002 Puzzle= 4,Roof Key, $0000,$0300,$4000,$d000,$b000,$0002 Puzzle= 5,Weapon Code Key, $0000,$0200,$8000,$c000,$0000,$0002 Puzzle= 8,Mine Detonator, $0008,$0400,$8000,$0000,$0000,$2002 PuzzleCombo= 1,1,Valve Pipe, $0004,$0300,$0000,$0000,$0000,$000a PuzzleCombo= 1,2,Nitrous Oxide Cannister, $0002,$0300,$0000,$0000,$0000,$0002 PuzzleCombo= 2,1,Car-Jack Body, $0000,$0400,$4000,$8000,$4000,$0002 PuzzleCombo= 2,2,Handle, $0000,$0300,$4000,$8000,$4000,$0002 PuzzleCombo= 8,1,Mine Detonator Body, $0008,$0400,$8000,$0000,$0000,$0002 PuzzleCombo= 8,2,Mine Position Data, $0004,$0280,$8000,$c000,$0000,$0002 Layer1= 56,72,8,16 LoadCamera= 62359,-4966,62296,63155,-4380,63208,3 ResetHUB= 27 Name= Citadel Gate Horizon= ENABLED Level= DATA\HIGHSTRT,102
[Level] Layer1= 56,72,8,16 LoadCamera= 61661,-1738,27605,63773,-2536,28079,144 ResetHUB= 28 Name= Citadel Horizon= ENABLED
Page 55
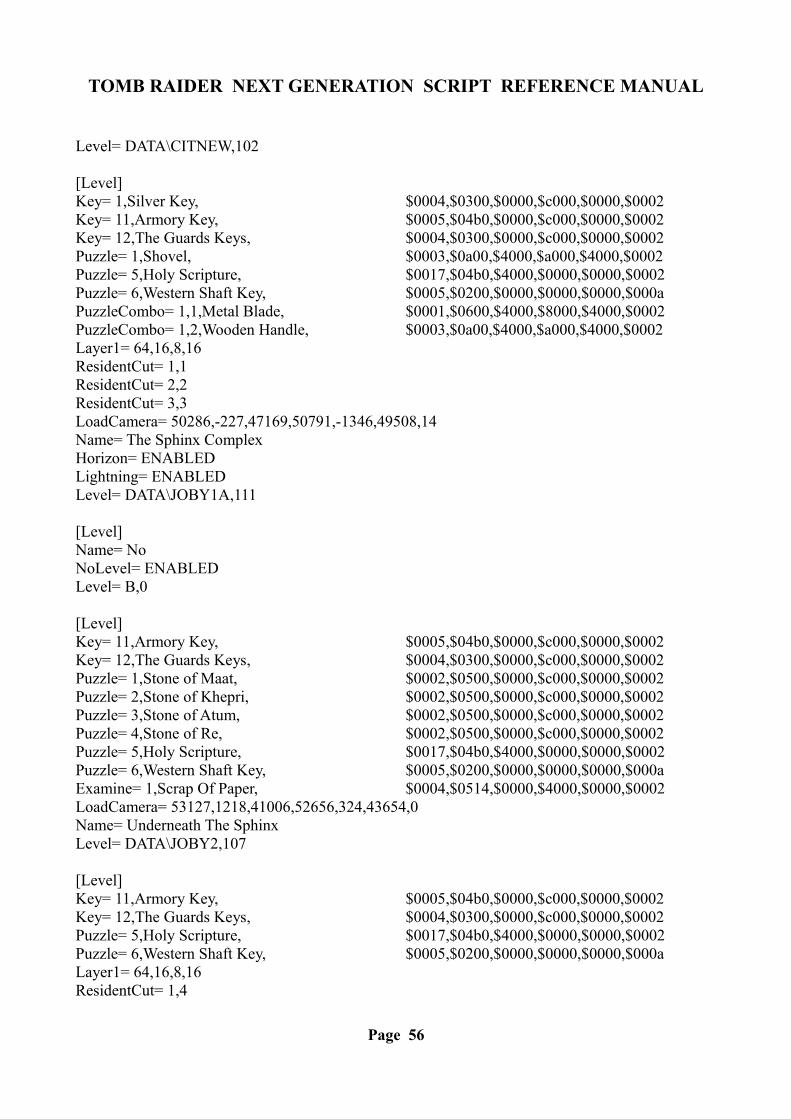
TOMB RAIDER NEXT GENERATION SCRIPT REFERENCE MANUAL
Level= DATA\CITNEW,102
[Level] Key= 1,Silver Key, $0004,$0300,$0000,$c000,$0000,$0002 Key= 11,Armory Key, $0005,$04b0,$0000,$c000,$0000,$0002 Key= 12,The Guards Keys, $0004,$0300,$0000,$c000,$0000,$0002 Puzzle= 1,Shovel, $0003,$0a00,$4000,$a000,$4000,$0002 Puzzle= 5,Holy Scripture, $0017,$04b0,$4000,$0000,$0000,$0002 Puzzle= 6,Western Shaft Key, $0005,$0200,$0000,$0000,$0000,$000a PuzzleCombo= 1,1,Metal Blade, $0001,$0600,$4000,$8000,$4000,$0002 PuzzleCombo= 1,2,Wooden Handle, $0003,$0a00,$4000,$a000,$4000,$0002 Layer1= 64,16,8,16 ResidentCut= 1,1 ResidentCut= 2,2 ResidentCut= 3,3 LoadCamera= 50286,-227,47169,50791,-1346,49508,14 Name= The Sphinx Complex Horizon= ENABLED Lightning= ENABLED Level= DATA\JOBY1A,111
[Level] Name= No NoLevel= ENABLED Level= B,0
[Level] Key= 11,Armory Key, $0005,$04b0,$0000,$c000,$0000,$0002 Key= 12,The Guards Keys, $0004,$0300,$0000,$c000,$0000,$0002 Puzzle= 1,Stone of Maat, $0002,$0500,$0000,$c000,$0000,$0002 Puzzle= 2,Stone of Khepri, $0002,$0500,$0000,$c000,$0000,$0002 Puzzle= 3,Stone of Atum, $0002,$0500,$0000,$c000,$0000,$0002 Puzzle= 4,Stone of Re, $0002,$0500,$0000,$c000,$0000,$0002 Puzzle= 5,Holy Scripture, $0017,$04b0,$4000,$0000,$0000,$0002 Puzzle= 6,Western Shaft Key, $0005,$0200,$0000,$0000,$0000,$000a Examine= 1,Scrap Of Paper, $0004,$0514,$0000,$4000,$0000,$0002 LoadCamera= 53127,1218,41006,52656,324,43654,0 Name= Underneath The Sphinx Level= DATA\JOBY2,107
[Level] Key= 11,Armory Key, $0005,$04b0,$0000,$c000,$0000,$0002 Key= 12,The Guards Keys, $0004,$0300,$0000,$c000,$0000,$0002 Puzzle= 5,Holy Scripture, $0017,$04b0,$4000,$0000,$0000,$0002 Puzzle= 6,Western Shaft Key, $0005,$0200,$0000,$0000,$0000,$000a Layer1= 64,16,8,16 ResidentCut= 1,4
Page 56
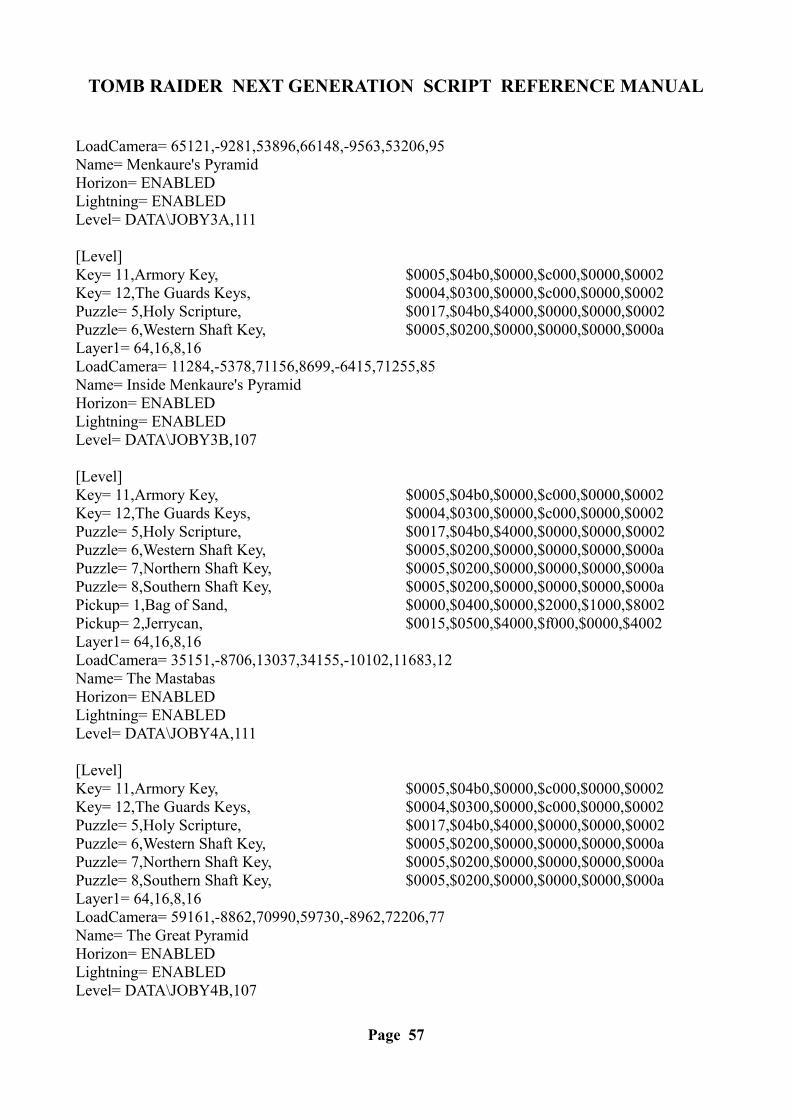
TOMB RAIDER NEXT GENERATION SCRIPT REFERENCE MANUAL
LoadCamera= 65121,-9281,53896,66148,-9563,53206,95 Name= Menkaure's Pyramid Horizon= ENABLED Lightning= ENABLED Level= DATA\JOBY3A,111
[Level] Key= 11,Armory Key, $0005,$04b0,$0000,$c000,$0000,$0002 Key= 12,The Guards Keys, $0004,$0300,$0000,$c000,$0000,$0002 Puzzle= 5,Holy Scripture, $0017,$04b0,$4000,$0000,$0000,$0002 Puzzle= 6,Western Shaft Key, $0005,$0200,$0000,$0000,$0000,$000a Layer1= 64,16,8,16 LoadCamera= 11284,-5378,71156,8699,-6415,71255,85 Name= Inside Menkaure's Pyramid Horizon= ENABLED Lightning= ENABLED Level= DATA\JOBY3B,107
[Level] Key= 11,Armory Key, $0005,$04b0,$0000,$c000,$0000,$0002 Key= 12,The Guards Keys, $0004,$0300,$0000,$c000,$0000,$0002 Puzzle= 5,Holy Scripture, $0017,$04b0,$4000,$0000,$0000,$0002 Puzzle= 6,Western Shaft Key, $0005,$0200,$0000,$0000,$0000,$000a Puzzle= 7,Northern Shaft Key, $0005,$0200,$0000,$0000,$0000,$000a Puzzle= 8,Southern Shaft Key, $0005,$0200,$0000,$0000,$0000,$000a Pickup= 1,Bag of Sand, $0000,$0400,$0000,$2000,$1000,$8002 Pickup= 2,Jerrycan, $0015,$0500,$4000,$f000,$0000,$4002 Layer1= 64,16,8,16 LoadCamera= 35151,-8706,13037,34155,-10102,11683,12 Name= The Mastabas Horizon= ENABLED Lightning= ENABLED Level= DATA\JOBY4A,111
[Level] Key= 11,Armory Key, $0005,$04b0,$0000,$c000,$0000,$0002 Key= 12,The Guards Keys, $0004,$0300,$0000,$c000,$0000,$0002 Puzzle= 5,Holy Scripture, $0017,$04b0,$4000,$0000,$0000,$0002 Puzzle= 6,Western Shaft Key, $0005,$0200,$0000,$0000,$0000,$000a Puzzle= 7,Northern Shaft Key, $0005,$0200,$0000,$0000,$0000,$000a Puzzle= 8,Southern Shaft Key, $0005,$0200,$0000,$0000,$0000,$000a Layer1= 64,16,8,16 LoadCamera= 59161,-8862,70990,59730,-8962,72206,77 Name= The Great Pyramid Horizon= ENABLED Lightning= ENABLED Level= DATA\JOBY4B,107
Page 57
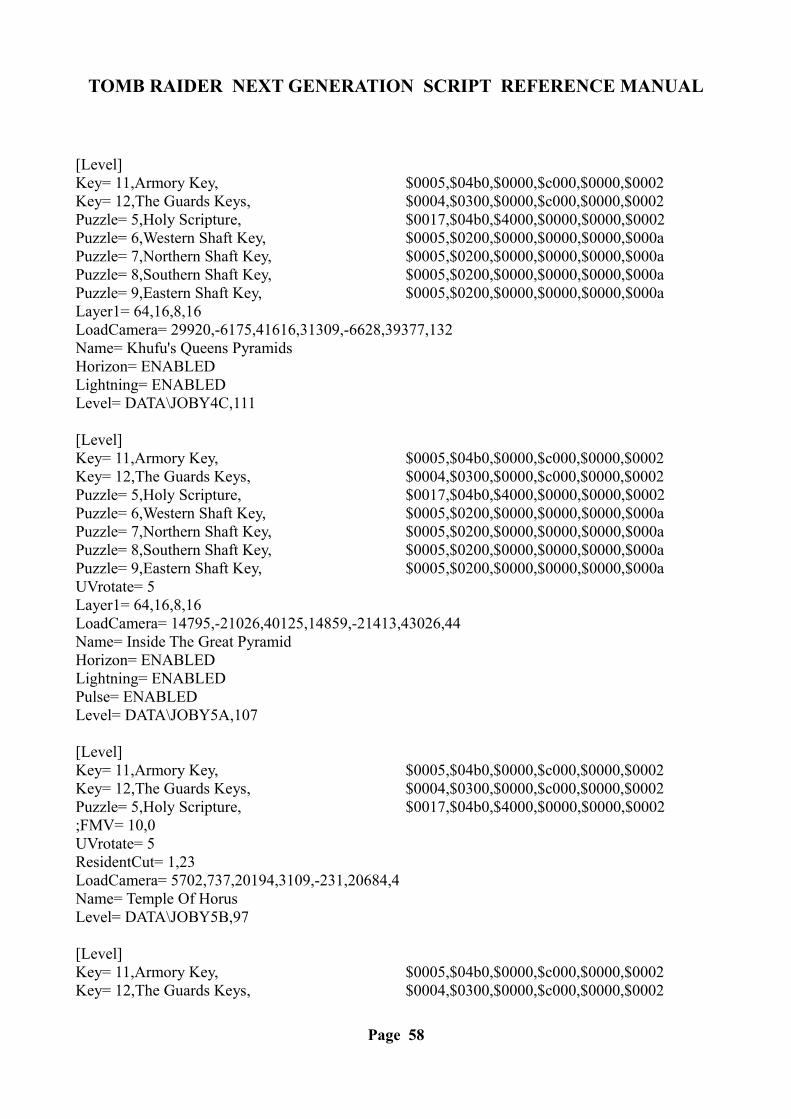
TOMB RAIDER NEXT GENERATION SCRIPT REFERENCE MANUAL
[Level] Key= 11,Armory Key, $0005,$04b0,$0000,$c000,$0000,$0002 Key= 12,The Guards Keys, $0004,$0300,$0000,$c000,$0000,$0002 Puzzle= 5,Holy Scripture, $0017,$04b0,$4000,$0000,$0000,$0002 Puzzle= 6,Western Shaft Key, $0005,$0200,$0000,$0000,$0000,$000a Puzzle= 7,Northern Shaft Key, $0005,$0200,$0000,$0000,$0000,$000a Puzzle= 8,Southern Shaft Key, $0005,$0200,$0000,$0000,$0000,$000a Puzzle= 9,Eastern Shaft Key, $0005,$0200,$0000,$0000,$0000,$000a Layer1= 64,16,8,16 LoadCamera= 29920,-6175,41616,31309,-6628,39377,132 Name= Khufu's Queens Pyramids Horizon= ENABLED Lightning= ENABLED Level= DATA\JOBY4C,111
[Level] Key= 11,Armory Key, $0005,$04b0,$0000,$c000,$0000,$0002 Key= 12,The Guards Keys, $0004,$0300,$0000,$c000,$0000,$0002 Puzzle= 5,Holy Scripture, $0017,$04b0,$4000,$0000,$0000,$0002 Puzzle= 6,Western Shaft Key, $0005,$0200,$0000,$0000,$0000,$000a Puzzle= 7,Northern Shaft Key, $0005,$0200,$0000,$0000,$0000,$000a Puzzle= 8,Southern Shaft Key, $0005,$0200,$0000,$0000,$0000,$000a Puzzle= 9,Eastern Shaft Key, $0005,$0200,$0000,$0000,$0000,$000a UVrotate= 5 Layer1= 64,16,8,16 LoadCamera= 14795,-21026,40125,14859,-21413,43026,44 Name= Inside The Great Pyramid Horizon= ENABLED Lightning= ENABLED Pulse= ENABLED Level= DATA\JOBY5A,107
[Level] Key= 11,Armory Key, $0005,$04b0,$0000,$c000,$0000,$0002 Key= 12,The Guards Keys, $0004,$0300,$0000,$c000,$0000,$0002 Puzzle= 5,Holy Scripture, $0017,$04b0,$4000,$0000,$0000,$0002 ;FMV= 10,0 UVrotate= 5 ResidentCut= 1,23 LoadCamera= 5702,737,20194,3109,-231,20684,4 Name= Temple Of Horus Level= DATA\JOBY5B,97
[Level] Key= 11,Armory Key, $0005,$04b0,$0000,$c000,$0000,$0002 Key= 12,The Guards Keys, $0004,$0300,$0000,$c000,$0000,$0002
Page 58
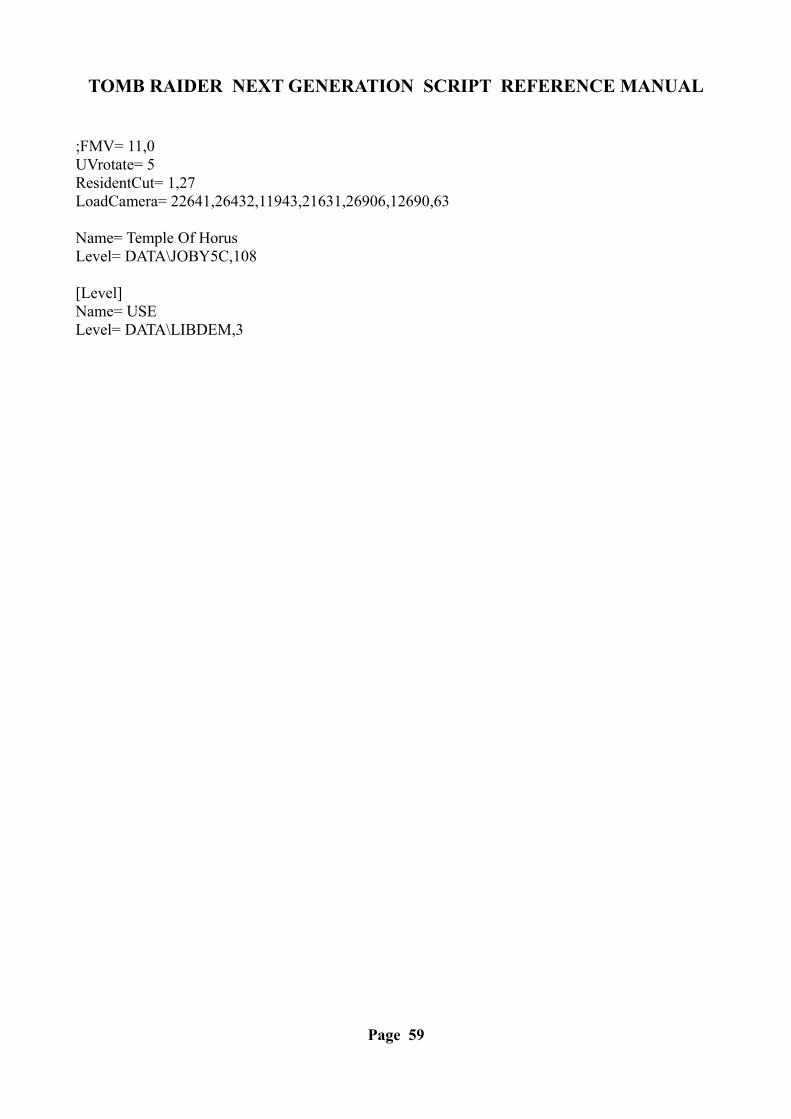
TOMB RAIDER NEXT GENERATION SCRIPT REFERENCE MANUAL
;FMV= 11,0 UVrotate= 5 ResidentCut= 1,27 LoadCamera= 22641,26432,11943,21631,26906,12690,63
Name= Temple Of Horus Level= DATA\JOBY5C,108
[Level] Name= USE Level= DATA\LIBDEM,3
Page 59
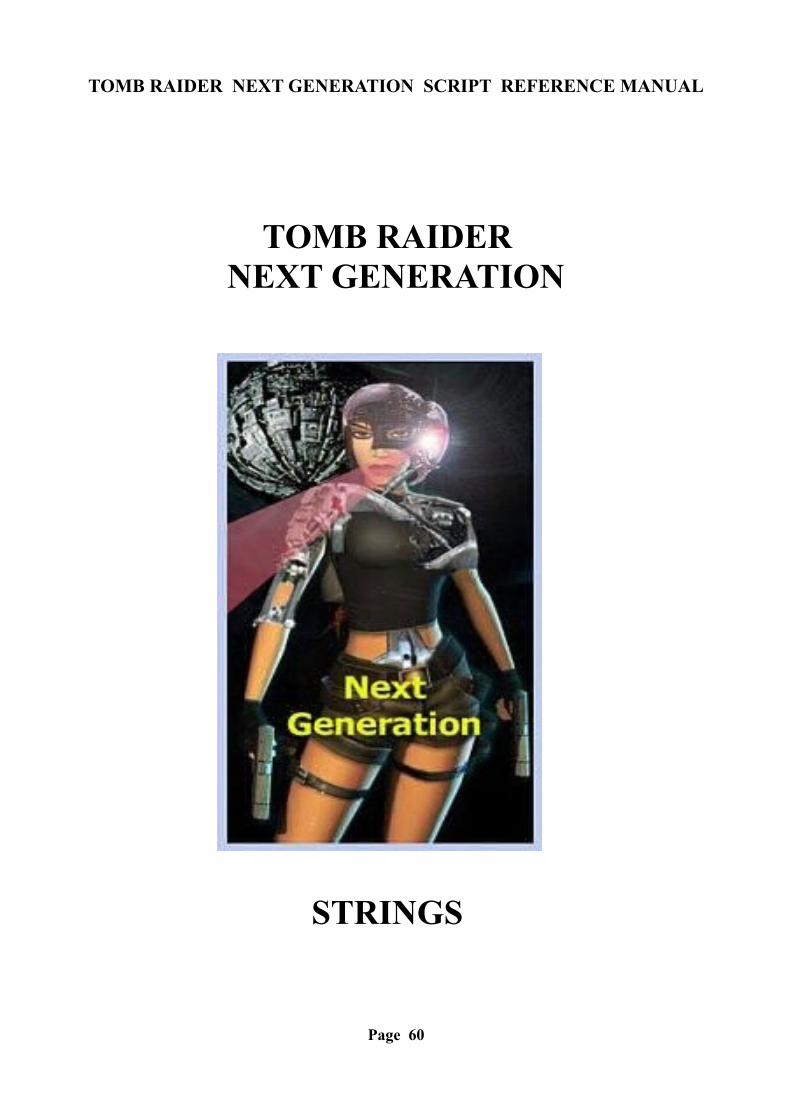
TOMB RAIDER NEXT GENERATION SCRIPT REFERENCE MANUAL
TOMB RAIDER NEXT GENERATION
STRINGS
Page 60
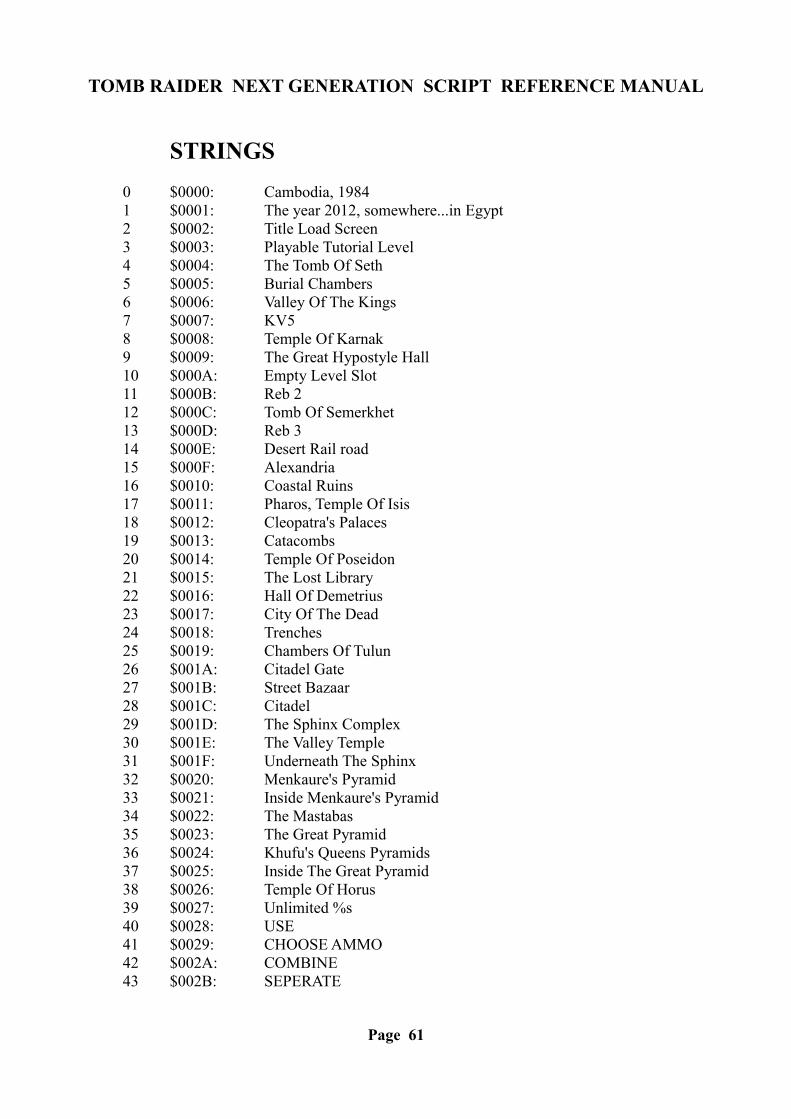
TOMB RAIDER NEXT GENERATION SCRIPT REFERENCE MANUAL
STRINGS 0 $0000: Cambodia, 1984 1 $0001: The year 2012, somewhere...in Egypt 2 $0002: Title Load Screen 3 $0003: Playable Tutorial Level 4 $0004: The Tomb Of Seth 5 $0005: Burial Chambers 6 $0006: Valley Of The Kings 7 $0007: KV5 8 $0008: Temple Of Karnak 9 $0009: The Great Hypostyle Hall 10 $000A: Empty Level Slot 11 $000B: Reb 2 12 $000C: Tomb Of Semerkhet 13 $000D: Reb 3 14 $000E: Desert Rail road 15 $000F: Alexandria 16 $0010: Coastal Ruins 17 $0011: Pharos, Temple Of Isis 18 $0012: Cleopatra's Palaces 19 $0013: Catacombs 20 $0014: Temple Of Poseidon 21 $0015: The Lost Library 22 $0016: Hall Of Demetrius 23 $0017: City Of The Dead 24 $0018: Trenches 25 $0019: Chambers Of Tulun 26 $001A: Citadel Gate 27 $001B: Street Bazaar 28 $001C: Citadel 29 $001D: The Sphinx Complex 30 $001E: The Valley Temple 31 $001F: Underneath The Sphinx 32 $0020: Menkaure's Pyramid 33 $0021: Inside Menkaure's Pyramid 34 $0022: The Mastabas 35 $0023: The Great Pyramid 36 $0024: Khufu's Queens Pyramids 37 $0025: Inside The Great Pyramid 38 $0026: Temple Of Horus 39 $0027: Unlimited %s 40 $0028: USE 41 $0029: CHOOSE AMMO 42 $002A: COMBINE 43 $002B: SEPERATE
Page 61
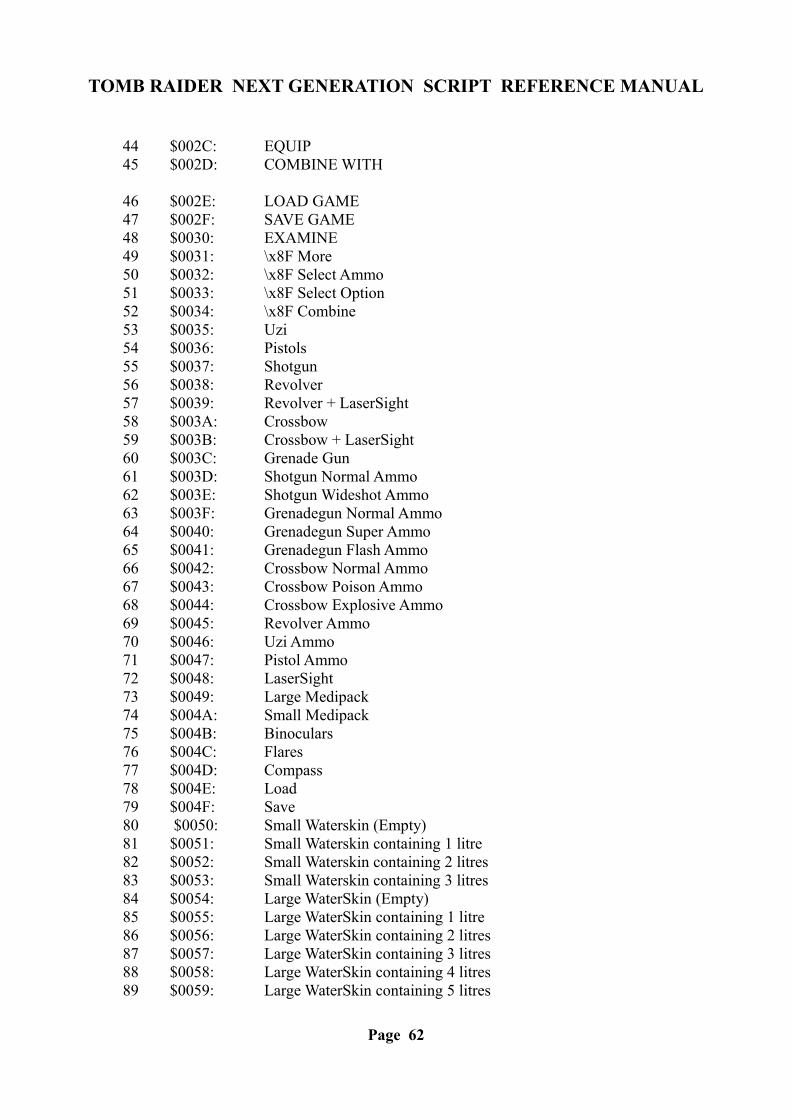
TOMB RAIDER NEXT GENERATION SCRIPT REFERENCE MANUAL
44 $002C: EQUIP 45 $002D: COMBINE WITH 46 $002E: LOAD GAME 47 $002F: SAVE GAME 48 $0030: EXAMINE 49 $0031: \x8F More 50 $0032: \x8F Select Ammo 51 $0033: \x8F Select Option 52 $0034: \x8F Combine 53 $0035: Uzi 54 $0036: Pistols 55 $0037: Shotgun 56 $0038: Revolver 57 $0039: Revolver + LaserSight 58 $003A: Crossbow 59 $003B: Crossbow + LaserSight 60 $003C: Grenade Gun 61 $003D: Shotgun Normal Ammo 62 $003E: Shotgun Wideshot Ammo 63 $003F: Grenadegun Normal Ammo
64 $0040: Grenadegun Super Ammo 65 $0041: Grenadegun Flash Ammo 66 $0042: Crossbow Normal Ammo 67 $0043: Crossbow Poison Ammo 68 $0044: Crossbow Explosive Ammo 69 $0045: Revolver Ammo 70 $0046: Uzi Ammo 71 $0047: Pistol Ammo 72 $0048: LaserSight 73 $0049: Large Medipack 74 $004A: Small Medipack 75 $004B: Binoculars 76 $004C: Flares 77 $004D: Compass 78 $004E: Load 79 $004F: Save 80 $0050: Small Waterskin (Empty) 81 $0051: Small Waterskin containing 1 litre 82 $0052: Small Waterskin containing 2 litres
83 $0053: Small Waterskin containing 3 litres 84 $0054: Large WaterSkin (Empty) 85 $0055: Large WaterSkin containing 1 litre 86 $0056: Large WaterSkin containing 2 litres 87 $0057: Large WaterSkin containing 3 litres 88 $0058: Large WaterSkin containing 4 litres 89 $0059: Large WaterSkin containing 5 litres
Page 62
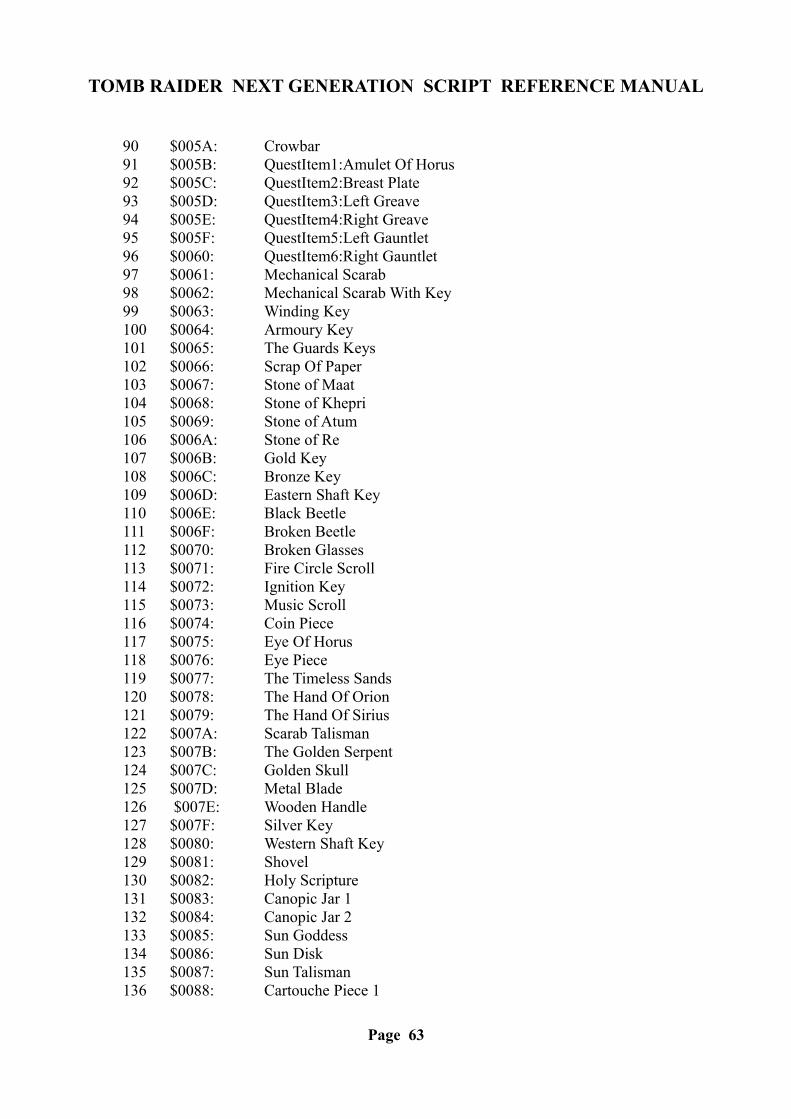
TOMB RAIDER NEXT GENERATION SCRIPT REFERENCE MANUAL
90 $005A: Crowbar 91 $005B: QuestItem1:Amulet Of Horus 92 $005C: QuestItem2:Breast Plate
93 $005D: QuestItem3:Left Greave 94 $005E: QuestItem4:Right Greave 95 $005F: QuestItem5:Left Gauntlet 96 $0060: QuestItem6:Right Gauntlet
97 $0061: Mechanical Scarab 98 $0062: Mechanical Scarab With Key 99 $0063: Winding Key
100 $0064: Armoury Key101 $0065: The Guards Keys102 $0066: Scrap Of Paper103 $0067: Stone of Maat104 $0068: Stone of Khepri105 $0069: Stone of Atum106 $006A: Stone of Re107 $006B: Gold Key108 $006C: Bronze Key109 $006D: Eastern Shaft Key110 $006E: Black Beetle111 $006F: Broken Beetle112 $0070: Broken Glasses113 $0071: Fire Circle Scroll114 $0072: Ignition Key115 $0073: Music Scroll116 $0074: Coin Piece117 $0075: Eye Of Horus118 $0076: Eye Piece119 $0077: The Timeless Sands120 $0078: The Hand Of Orion121 $0079: The Hand Of Sirius122 $007A: Scarab Talisman123 $007B: The Golden Serpent124 $007C: Golden Skull125 $007D: Metal Blade126 $007E: Wooden Handle127 $007F: Silver Key128 $0080: Western Shaft Key129 $0081: Shovel130 $0082: Holy Scripture131 $0083: Canopic Jar 1132 $0084: Canopic Jar 2133 $0085: Sun Goddess134 $0086: Sun Disk135 $0087: Sun Talisman136 $0088: Cartouche Piece 1
Page 63
TOMB RAIDER NEXT GENERATION SCRIPT REFERENCE MANUAL
137 $0089: Cartouche Piece 2138 $008A: Ba Cartouche139 $008B: Ra Cartouche140 $008C: Golden Vraeus141 $008D: Guardian Key
142 $008E: Hypostyle Key143 $008F: Temple Key144 $0090: Nitrous Oxide Feeder145 $0091: Valve Pipe146 $0092: Nitrous Oxide Cannister147 $0093: Car-Jack148 $0094: Car-Jack Body149 $0095: Handle150 $0096: Roof Key151 $0097: Weapon Code Key152 $0098: Mine Detonator153 $0099: Mine Detonator Body154 $009A: Mine Position Data155 $009B: Trident156 $009C: Golden Star157 $009D: Hook and Pole158 $009E: Wall Hook159 $009F: Broken Handle160 $00A0: Hathor Effigy161 $00A1: Ornate Handle162 $00A2: Portal Guardian163 $00A3: Horseman's Gem164 $00A4: Pharos Knot165 $00A5: Pharos Pillar166 $00A6: Token167 $00A7: Gate Key168 $00A8: The Rules of Senet169 $00A9: Bag of Sand170 $00AA: Jerrycan171 $00AB: Yes172 $00AC: No173 $00AD: Load Game174 $00AE: New Game175 $00AF: Paused176 $00B0: Select Game To Load177 $00B1: Select Game To Save178 $00B2: GAME OVER179 $00B3: Save Game180 $00B4: Exit to Title181 $00B5: DEMO MODE182 $00B6: Current Location
Page 64
TOMB RAIDER NEXT GENERATION SCRIPT REFERENCE MANUAL
183 $00B7: Statistics184 $00B8: Distance Travelled185 $00B9: Ammo Used186 $00BA: Secrets Found187 $00BB: Location188 $00BC: Health Packs Used189 $00BD: Time Taken
190 $00BE: days191 $00BF: of192 $00C0: Action193 $00C1: Draw Weapon194 $00C2: Jump195 $00C3: Roll196 $00C4: Walk197 $00C5: Look198 $00C6: Duck199 $00C7: Dash200 $00C8: Inventory
201 $00C9: RULES1:To win the game, get all your pieces off the\nboard by landing them on the final ankh\nsquare. On your turn spin the sticks. Your\n throw is the number of white sides showing.
202 $00CA: RULES2:If no white sides show, your throw is a six.\nIf you throw a six or land on an ankh square\nyou get an extra turn. If you land on an\nopponent's piece, it is returned to the start
203 $00CB: PETEPOO:For the serpents to live,\nall must first be stilled.\nprovoke each in turn,\nand the circle will burn\ncomplete.
Page 65
TOMB RAIDER NEXT GENERATION SCRIPT REFERENCE MANUAL
TOMB RAIDER NEXT GENERATION
PC STRINGS
Page 66
TOMB RAIDER NEXT GENERATION SCRIPT REFERENCE MANUAL
PC STRINGS300 $012C: PC Programmer301 $012D: Programmers302 $012E: Additional Programming303 $012F: Resume304 $0130: Options305 $0131: Empty Slot306 $0132: Music Volume307 $0133: SFX Volume308 $0134: Sound Quality309 $0135: Low310 $0136: Medium311 $0137: High312 $0138: Targeting313 $0139: Manual314 $013A: Automatic315 $013B: Graphics Adapter316 $013C: Output Settings317 $013D: Output Resolution318 $013E: Texture Bit Depth319 $013F: OK320 $0140: Cancel321 $0141: Hardware Acceleration322 $0142: Software Mode323 $0143: Volumetric FX324 $0144: Bilinear Filtering325 $0145: Bump Mapping326 $0146: Low Resolution Textures327 $0147: Low Resolution Bump Maps328 $0148: Sound Device329 $0149: Disable330 $014A: Bit\t\t\t; As In 16 Bit331 $014B: Full Screen332 $014C: Windowed333 $014D: Render Options334 $014E: No Sound Card Installed335 $014F: Failed To Setup DirectX336 $0150: Exit337 $0151: Control Configuration338 $0152: Use Flare339 $0153: Control Method340 $0154: Mouse341 $0155: Keyboard342 $0156: Joystick343 $0157: Waiting
Page 67
TOMB RAIDER NEXT GENERATION SCRIPT REFERENCE MANUAL
344 $0158: Reset345 $0159: Save Settings346 $015A: Saved OK347 $015B: Step Left348 $015C: Step Right349 $015D: Play350 $015E: Setup351 $015F: Install352 $0160: Uninstall353 $0161: ReadMe354 $0162: Demo Mode - Esc To Exit355 $0163: Select Level356 $0164: No FMV
357 $0165: OEM1:\n\n\nCongratulations on reaching the end\nof this special version of the game.\nIf you want to continue Lara's adventure,\nyou need to purchase the full version.\nRemember to keep your save game files,\nto continue from where you are now.\nFor details of transferring your save game\nfiles refer to the readme file,\nthis is accessed via the task bar.
358 $0166: THE LAST STRING ENTRY
Page 68
TOMB RAIDER NEXT GENERATION SCRIPT REFERENCE MANUAL
TOMB RAIDER NEXT GENERATION
KEYBOARD SCAN CODES
Page 69
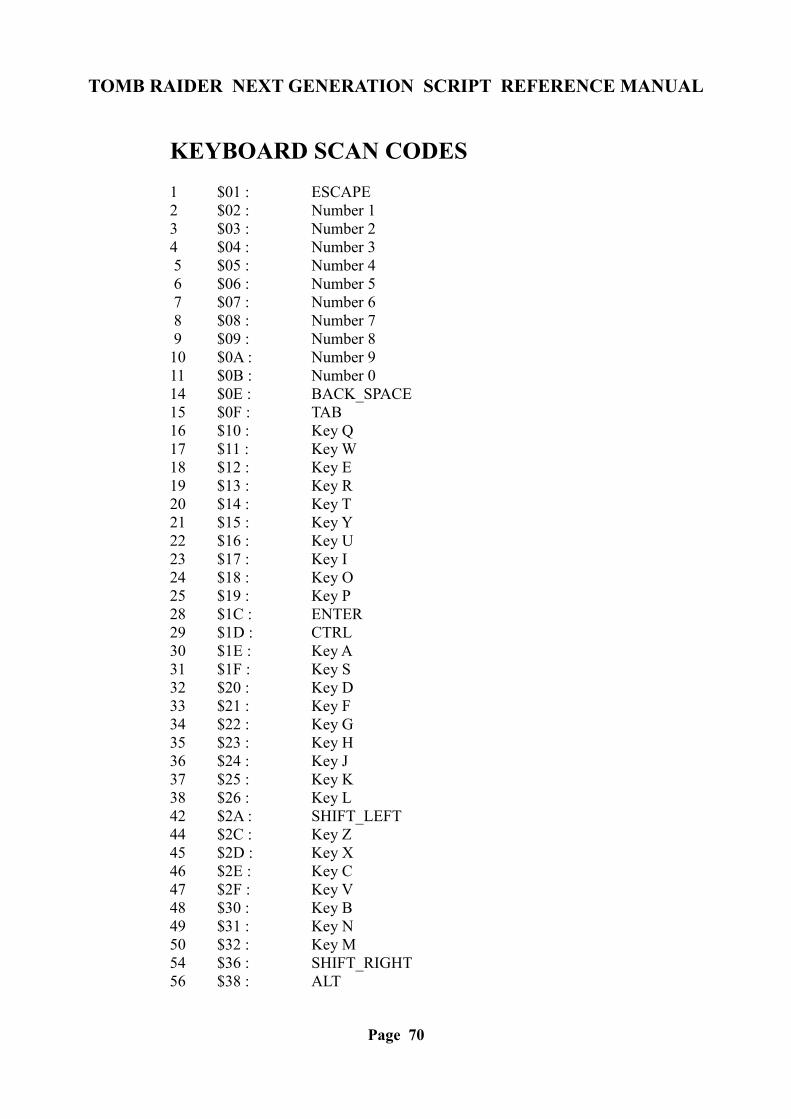
TOMB RAIDER NEXT GENERATION SCRIPT REFERENCE MANUAL
KEYBOARD SCAN CODES 1 $01 : ESCAPE
2 $02 : Number 13 $03 : Number 24 $04 : Number 3 5 $05 : Number 4 6 $06 : Number 5 7 $07 : Number 6
8 $08 : Number 7 9 $09 : Number 8
10 $0A : Number 911 $0B : Number 014 $0E : BACK_SPACE15 $0F : TAB16 $10 : Key Q17 $11 : Key W18 $12 : Key E19 $13 : Key R20 $14 : Key T21 $15 : Key Y22 $16 : Key U23 $17 : Key I24 $18 : Key O25 $19 : Key P28 $1C : ENTER29 $1D : CTRL30 $1E : Key A31 $1F : Key S32 $20 : Key D33 $21 : Key F34 $22 : Key G35 $23 : Key H36 $24 : Key J37 $25 : Key K38 $26 : Key L42 $2A : SHIFT_LEFT44 $2C : Key Z45 $2D : Key X46 $2E : Key C47 $2F : Key V48 $30 : Key B49 $31 : Key N50 $32 : Key M54 $36 : SHIFT_RIGHT56 $38 : ALT
Page 70
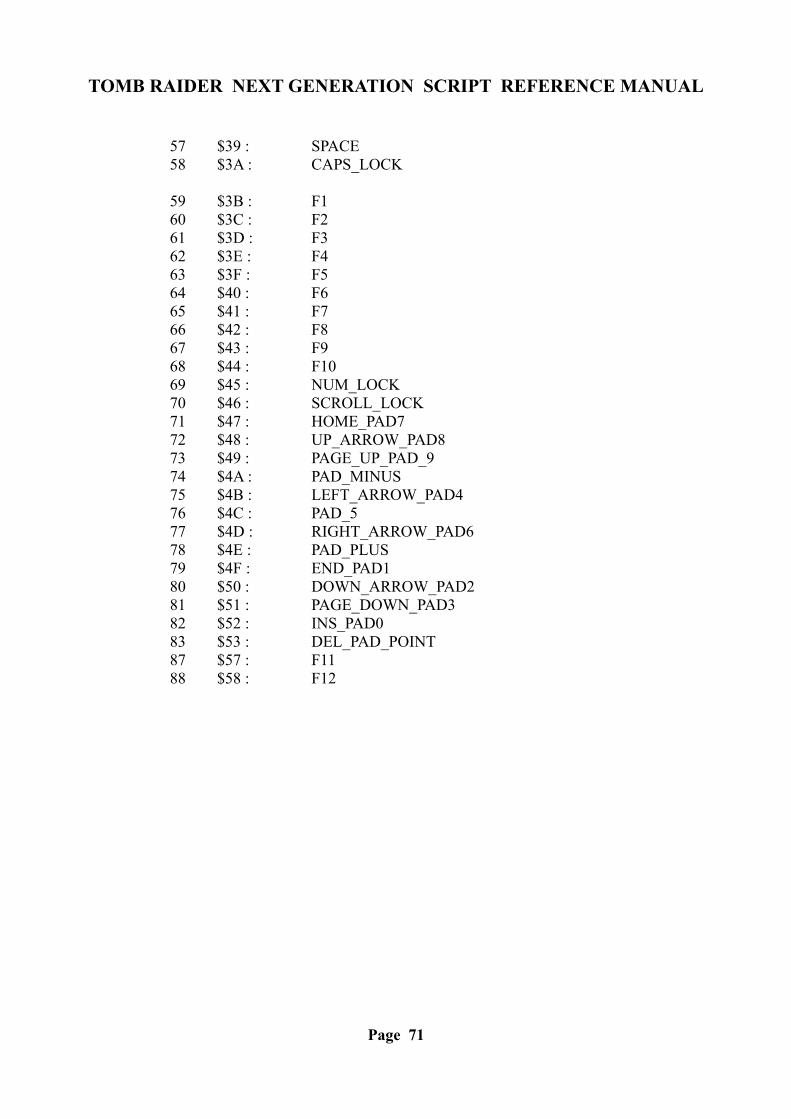
TOMB RAIDER NEXT GENERATION SCRIPT REFERENCE MANUAL
57 $39 : SPACE58 $3A : CAPS_LOCK
59 $3B : F160 $3C : F261 $3D : F362 $3E : F463 $3F : F564 $40 : F665 $41 : F766 $42 : F867 $43 : F968 $44 : F1069 $45 : NUM_LOCK70 $46 : SCROLL_LOCK71 $47 : HOME_PAD772 $48 : UP_ARROW_PAD873 $49 : PAGE_UP_PAD_974 $4A : PAD_MINUS75 $4B : LEFT_ARROW_PAD476 $4C : PAD_577 $4D : RIGHT_ARROW_PAD678 $4E : PAD_PLUS79 $4F : END_PAD180 $50 : DOWN_ARROW_PAD281 $51 : PAGE_DOWN_PAD382 $52 : INS_PAD083 $53 : DEL_PAD_POINT87 $57 : F1188 $58 : F12
Page 71
TOMB RAIDER NEXT GENERATION SCRIPT REFERENCE MANUAL
TOMB RAIDER NEXT GENERATION
DAMAGE
Page 72
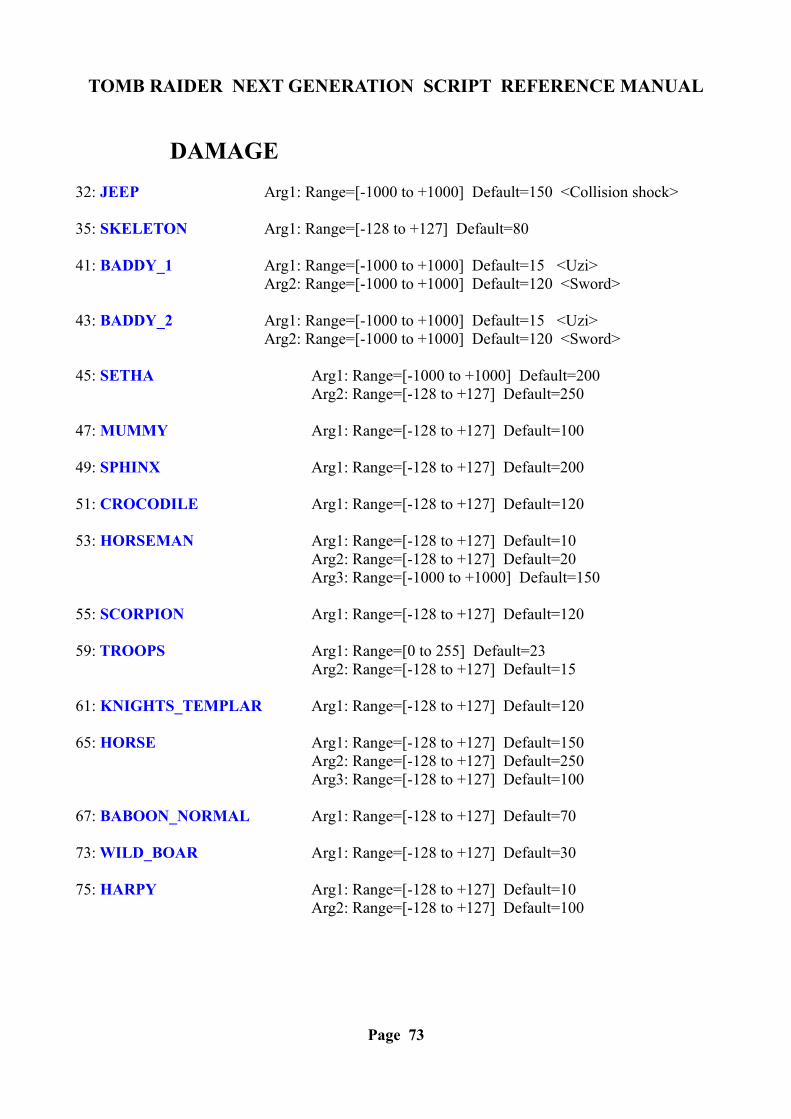
TOMB RAIDER NEXT GENERATION SCRIPT REFERENCE MANUAL
DAMAGE32: JEEP Arg1: Range=[-1000 to +1000] Default=150 <Collision shock>
35: SKELETON Arg1: Range=[-128 to +127] Default=80
41: BADDY_1 Arg1: Range=[-1000 to +1000] Default=15 <Uzi>Arg2: Range=[-1000 to +1000] Default=120 <Sword>
43: BADDY_2 Arg1: Range=[-1000 to +1000] Default=15 <Uzi>Arg2: Range=[-1000 to +1000] Default=120 <Sword>
45: SETHA Arg1: Range=[-1000 to +1000] Default=200Arg2: Range=[-128 to +127] Default=250
47: MUMMY Arg1: Range=[-128 to +127] Default=100
49: SPHINX Arg1: Range=[-128 to +127] Default=200
51: CROCODILE Arg1: Range=[-128 to +127] Default=120
53: HORSEMAN Arg1: Range=[-128 to +127] Default=10Arg2: Range=[-128 to +127] Default=20Arg3: Range=[-1000 to +1000] Default=150
55: SCORPION Arg1: Range=[-128 to +127] Default=120
59: TROOPS Arg1: Range=[0 to 255] Default=23Arg2: Range=[-128 to +127] Default=15
61: KNIGHTS_TEMPLAR Arg1: Range=[-128 to +127] Default=120
65: HORSE Arg1: Range=[-128 to +127] Default=150Arg2: Range=[-128 to +127] Default=250Arg3: Range=[-128 to +127] Default=100
67: BABOON_NORMAL Arg1: Range=[-128 to +127] Default=70
73: WILD_BOAR Arg1: Range=[-128 to +127] Default=30
75: HARPY Arg1: Range=[-128 to +127] Default=10Arg2: Range=[-128 to +127] Default=100
Page 73
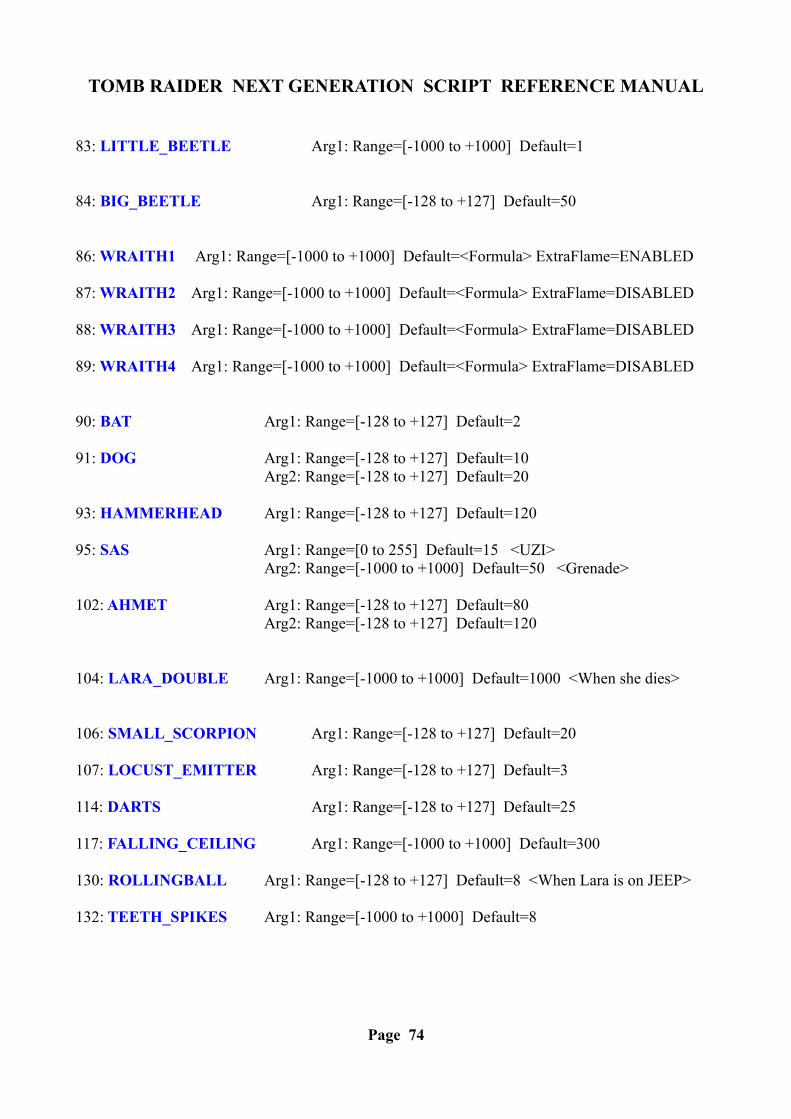
TOMB RAIDER NEXT GENERATION SCRIPT REFERENCE MANUAL
83: LITTLE_BEETLE Arg1: Range=[-1000 to +1000] Default=1
84: BIG_BEETLE Arg1: Range=[-128 to +127] Default=50
86: WRAITH1 Arg1: Range=[-1000 to +1000] Default=<Formula> ExtraFlame=ENABLED
87: WRAITH2 Arg1: Range=[-1000 to +1000] Default=<Formula> ExtraFlame=DISABLED
88: WRAITH3 Arg1: Range=[-1000 to +1000] Default=<Formula> ExtraFlame=DISABLED
89: WRAITH4 Arg1: Range=[-1000 to +1000] Default=<Formula> ExtraFlame=DISABLED
90: BAT Arg1: Range=[-128 to +127] Default=2
91: DOG Arg1: Range=[-128 to +127] Default=10Arg2: Range=[-128 to +127] Default=20
93: HAMMERHEAD Arg1: Range=[-128 to +127] Default=120
95: SAS Arg1: Range=[0 to 255] Default=15 <UZI>Arg2: Range=[-1000 to +1000] Default=50 <Grenade>
102: AHMET Arg1: Range=[-128 to +127] Default=80Arg2: Range=[-128 to +127] Default=120
104: LARA_DOUBLE Arg1: Range=[-1000 to +1000] Default=1000 <When she dies>
106: SMALL_SCORPION Arg1: Range=[-128 to +127] Default=20
107: LOCUST_EMITTER Arg1: Range=[-128 to +127] Default=3
114: DARTS Arg1: Range=[-128 to +127] Default=25
117: FALLING_CEILING Arg1: Range=[-1000 to +1000] Default=300
130: ROLLINGBALL Arg1: Range=[-128 to +127] Default=8 <When Lara is on JEEP>
132: TEETH_SPIKES Arg1: Range=[-1000 to +1000] Default=8
Page 74
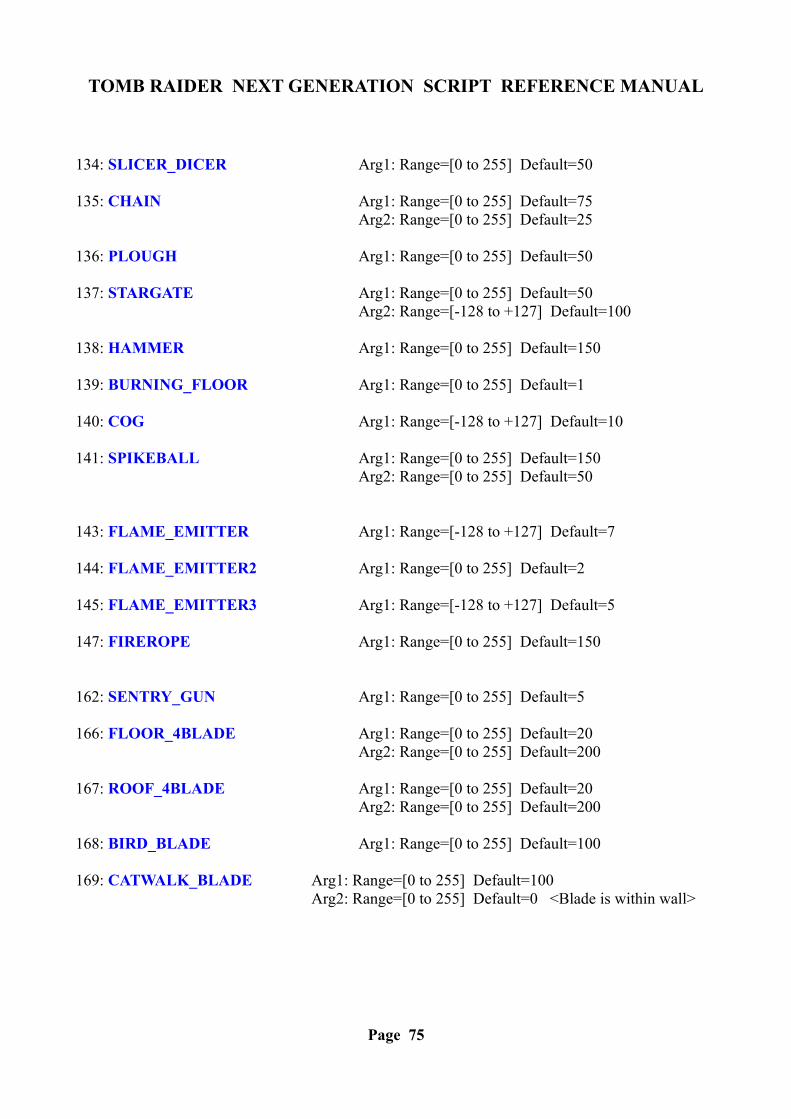
TOMB RAIDER NEXT GENERATION SCRIPT REFERENCE MANUAL
134: SLICER_DICER Arg1: Range=[0 to 255] Default=50
135: CHAIN Arg1: Range=[0 to 255] Default=75Arg2: Range=[0 to 255] Default=25
136: PLOUGH Arg1: Range=[0 to 255] Default=50
137: STARGATE Arg1: Range=[0 to 255] Default=50Arg2: Range=[-128 to +127] Default=100
138: HAMMER Arg1: Range=[0 to 255] Default=150
139: BURNING_FLOOR Arg1: Range=[0 to 255] Default=1
140: COG Arg1: Range=[-128 to +127] Default=10
141: SPIKEBALL Arg1: Range=[0 to 255] Default=150Arg2: Range=[0 to 255] Default=50
143: FLAME_EMITTER Arg1: Range=[-128 to +127] Default=7
144: FLAME_EMITTER2 Arg1: Range=[0 to 255] Default=2
145: FLAME_EMITTER3 Arg1: Range=[-128 to +127] Default=5
147: FIREROPE Arg1: Range=[0 to 255] Default=150
162: SENTRY_GUN Arg1: Range=[0 to 255] Default=5
166: FLOOR_4BLADE Arg1: Range=[0 to 255] Default=20Arg2: Range=[0 to 255] Default=200
167: ROOF_4BLADE Arg1: Range=[0 to 255] Default=20Arg2: Range=[0 to 255] Default=200
168: BIRD_BLADE Arg1: Range=[0 to 255] Default=100
169: CATWALK_BLADE Arg1: Range=[0 to 255] Default=100Arg2: Range=[0 to 255] Default=0 <Blade is within wall>
Page 75

TOMB RAIDER NEXT GENERATION SCRIPT REFERENCE MANUAL
170: MOVING_BLADE Arg1: Range=[0 to 255] Default=50
171: PLINTH_BLADE Arg1: Range=[0 to 255] Default=0 <Blade is within wall>Arg2: Range=[0 to 255] Default=200
172: SETH_BLADE Arg1: Range=[-1000 to +1000] Default=0Arg2: Range=[-1000 to +1000] Default=1000
174: ELEMENT_PUZZLE Arg1: Range=[0 to 255] Default=90
372: FLARE_ITEM Arg1: Range=[0 to 255] Default=1 <Lara picks up burning flare>
382: STEAM_EMITTER Arg1: Range=[-128 to +127] Default=2
484: HYDRA Arg1: Range=[0 to 1000] Default=120 <Hydra hits with its beak>
488: SUB_MARINE_MISSILE Arg1: Range=[0 to 1000] Default=100
490: FROG_MAN_HARPOON Arg1: Range=[0 to 1000] Default=120
491: FISH_EMITTER Arg1: Range=[0 to 1000] Default=5 <Damage of single fish>
Page 76
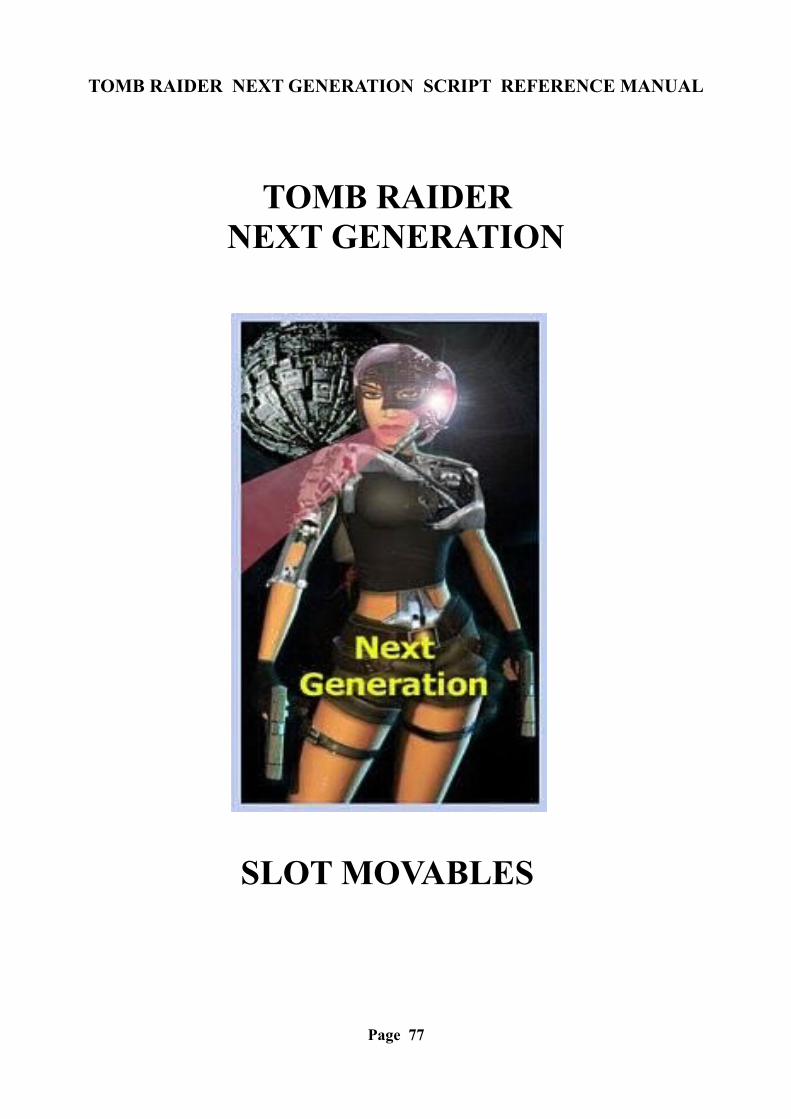
TOMB RAIDER NEXT GENERATION SCRIPT REFERENCE MANUAL
TOMB RAIDER NEXT GENERATION
SLOT MOVABLES
Page 77
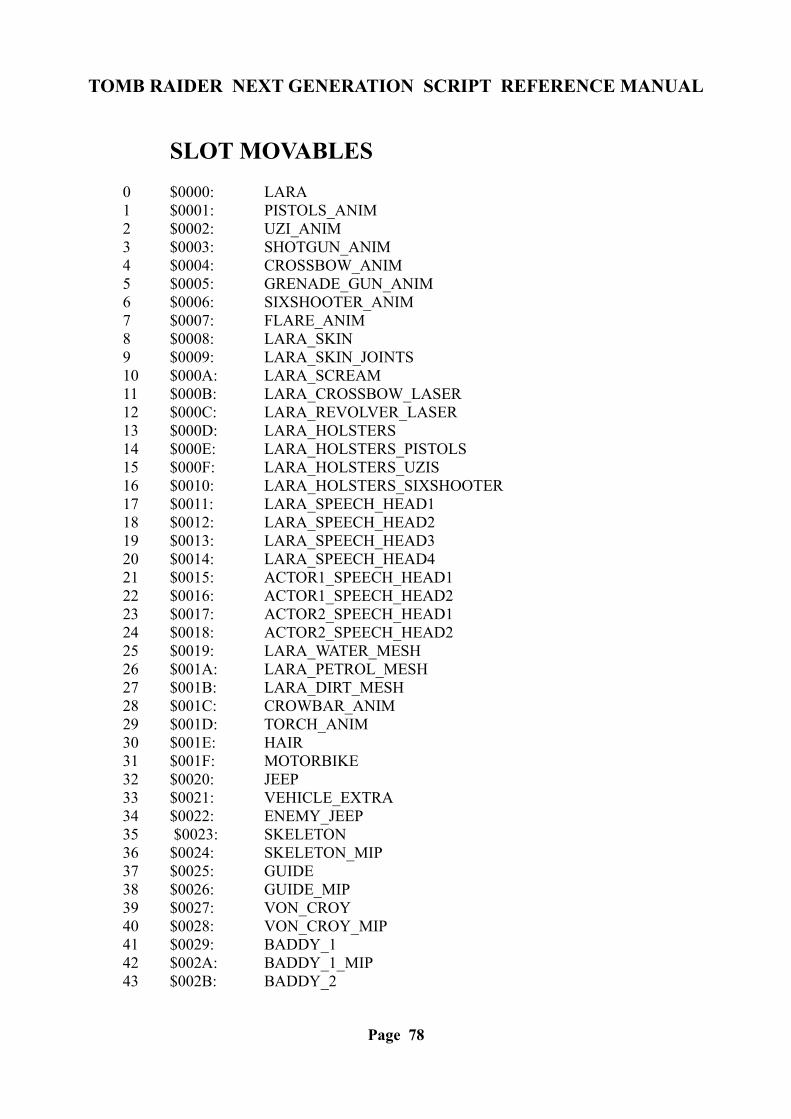
TOMB RAIDER NEXT GENERATION SCRIPT REFERENCE MANUAL
SLOT MOVABLES 0 $0000: LARA 1 $0001: PISTOLS_ANIM 2 $0002: UZI_ANIM 3 $0003: SHOTGUN_ANIM 4 $0004: CROSSBOW_ANIM 5 $0005: GRENADE_GUN_ANIM 6 $0006: SIXSHOOTER_ANIM 7 $0007: FLARE_ANIM 8 $0008: LARA_SKIN 9 $0009: LARA_SKIN_JOINTS 10 $000A: LARA_SCREAM 11 $000B: LARA_CROSSBOW_LASER 12 $000C: LARA_REVOLVER_LASER 13 $000D: LARA_HOLSTERS 14 $000E: LARA_HOLSTERS_PISTOLS 15 $000F: LARA_HOLSTERS_UZIS 16 $0010: LARA_HOLSTERS_SIXSHOOTER 17 $0011: LARA_SPEECH_HEAD1 18 $0012: LARA_SPEECH_HEAD2 19 $0013: LARA_SPEECH_HEAD3 20 $0014: LARA_SPEECH_HEAD4 21 $0015: ACTOR1_SPEECH_HEAD1 22 $0016: ACTOR1_SPEECH_HEAD2 23 $0017: ACTOR2_SPEECH_HEAD1 24 $0018: ACTOR2_SPEECH_HEAD2 25 $0019: LARA_WATER_MESH 26 $001A: LARA_PETROL_MESH 27 $001B: LARA_DIRT_MESH 28 $001C: CROWBAR_ANIM 29 $001D: TORCH_ANIM 30 $001E: HAIR 31 $001F: MOTORBIKE 32 $0020: JEEP 33 $0021: VEHICLE_EXTRA 34 $0022: ENEMY_JEEP 35 $0023: SKELETON 36 $0024: SKELETON_MIP 37 $0025: GUIDE 38 $0026: GUIDE_MIP 39 $0027: VON_CROY 40 $0028: VON_CROY_MIP 41 $0029: BADDY_1 42 $002A: BADDY_1_MIP 43 $002B: BADDY_2
Page 78
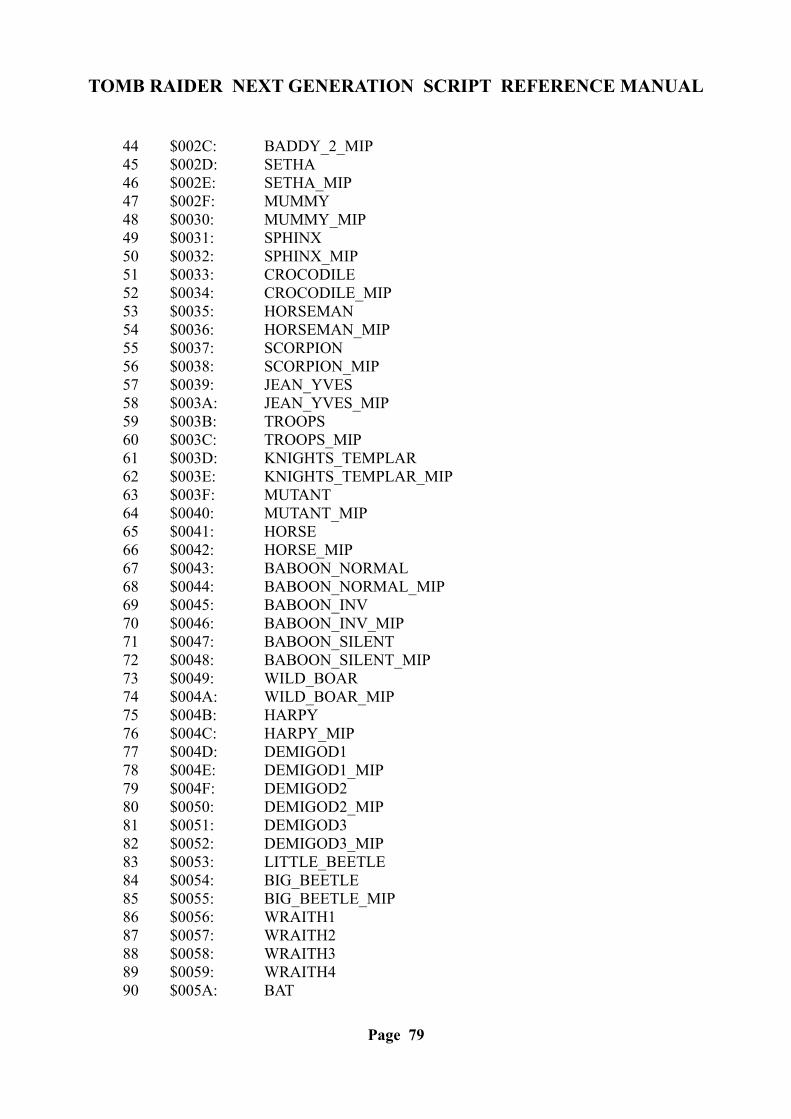
TOMB RAIDER NEXT GENERATION SCRIPT REFERENCE MANUAL
44 $002C: BADDY_2_MIP 45 $002D: SETHA 46 $002E: SETHA_MIP 47 $002F: MUMMY 48 $0030: MUMMY_MIP 49 $0031: SPHINX 50 $0032: SPHINX_MIP 51 $0033: CROCODILE 52 $0034: CROCODILE_MIP 53 $0035: HORSEMAN 54 $0036: HORSEMAN_MIP 55 $0037: SCORPION 56 $0038: SCORPION_MIP 57 $0039: JEAN_YVES 58 $003A: JEAN_YVES_MIP 59 $003B: TROOPS 60 $003C: TROOPS_MIP 61 $003D: KNIGHTS_TEMPLAR 62 $003E: KNIGHTS_TEMPLAR_MIP 63 $003F: MUTANT 64 $0040: MUTANT_MIP 65 $0041: HORSE 66 $0042: HORSE_MIP 67 $0043: BABOON_NORMAL 68 $0044: BABOON_NORMAL_MIP 69 $0045: BABOON_INV 70 $0046: BABOON_INV_MIP 71 $0047: BABOON_SILENT 72 $0048: BABOON_SILENT_MIP 73 $0049: WILD_BOAR 74 $004A: WILD_BOAR_MIP 75 $004B: HARPY 76 $004C: HARPY_MIP 77 $004D: DEMIGOD1 78 $004E: DEMIGOD1_MIP 79 $004F: DEMIGOD2 80 $0050: DEMIGOD2_MIP 81 $0051: DEMIGOD3 82 $0052: DEMIGOD3_MIP 83 $0053: LITTLE_BEETLE 84 $0054: BIG_BEETLE 85 $0055: BIG_BEETLE_MIP 86 $0056: WRAITH1 87 $0057: WRAITH2 88 $0058: WRAITH3 89 $0059: WRAITH4 90 $005A: BAT
Page 79
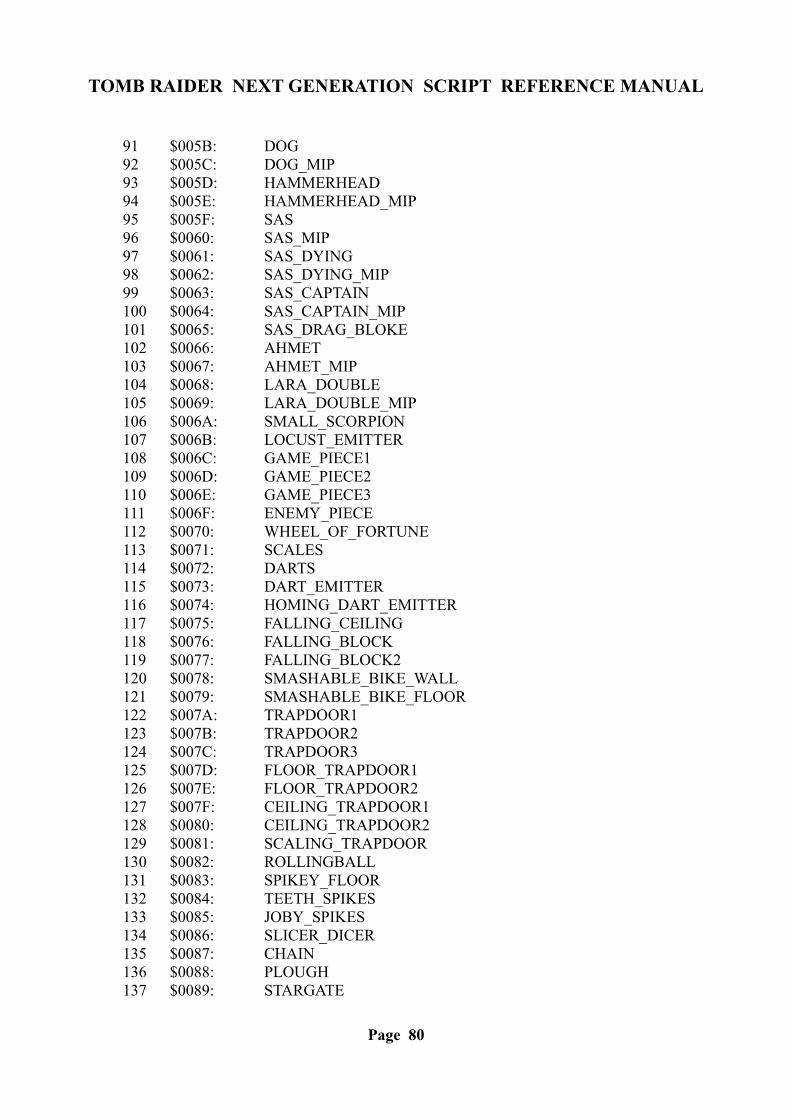
TOMB RAIDER NEXT GENERATION SCRIPT REFERENCE MANUAL
91 $005B: DOG 92 $005C: DOG_MIP 93 $005D: HAMMERHEAD 94 $005E: HAMMERHEAD_MIP 95 $005F: SAS 96 $0060: SAS_MIP 97 $0061: SAS_DYING 98 $0062: SAS_DYING_MIP 99 $0063: SAS_CAPTAIN
100 $0064: SAS_CAPTAIN_MIP101 $0065: SAS_DRAG_BLOKE102 $0066: AHMET103 $0067: AHMET_MIP104 $0068: LARA_DOUBLE105 $0069: LARA_DOUBLE_MIP106 $006A: SMALL_SCORPION107 $006B: LOCUST_EMITTER108 $006C: GAME_PIECE1109 $006D: GAME_PIECE2110 $006E: GAME_PIECE3111 $006F: ENEMY_PIECE112 $0070: WHEEL_OF_FORTUNE113 $0071: SCALES114 $0072: DARTS115 $0073: DART_EMITTER116 $0074: HOMING_DART_EMITTER117 $0075: FALLING_CEILING118 $0076: FALLING_BLOCK119 $0077: FALLING_BLOCK2120 $0078: SMASHABLE_BIKE_WALL121 $0079: SMASHABLE_BIKE_FLOOR122 $007A: TRAPDOOR1123 $007B: TRAPDOOR2124 $007C: TRAPDOOR3125 $007D: FLOOR_TRAPDOOR1126 $007E: FLOOR_TRAPDOOR2127 $007F: CEILING_TRAPDOOR1128 $0080: CEILING_TRAPDOOR2129 $0081: SCALING_TRAPDOOR130 $0082: ROLLINGBALL131 $0083: SPIKEY_FLOOR132 $0084: TEETH_SPIKES133 $0085: JOBY_SPIKES134 $0086: SLICER_DICER135 $0087: CHAIN136 $0088: PLOUGH137 $0089: STARGATE
Page 80
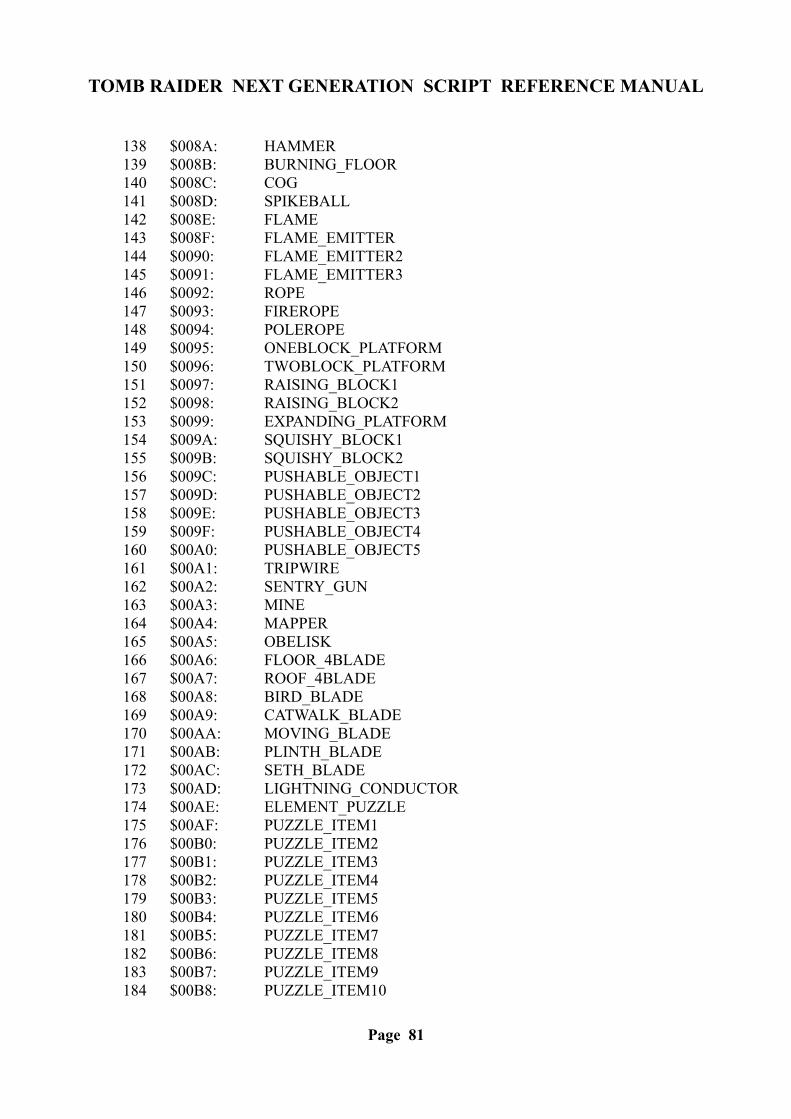
TOMB RAIDER NEXT GENERATION SCRIPT REFERENCE MANUAL
138 $008A: HAMMER139 $008B: BURNING_FLOOR140 $008C: COG141 $008D: SPIKEBALL142 $008E: FLAME143 $008F: FLAME_EMITTER144 $0090: FLAME_EMITTER2145 $0091: FLAME_EMITTER3146 $0092: ROPE147 $0093: FIREROPE148 $0094: POLEROPE149 $0095: ONEBLOCK_PLATFORM150 $0096: TWOBLOCK_PLATFORM151 $0097: RAISING_BLOCK1152 $0098: RAISING_BLOCK2153 $0099: EXPANDING_PLATFORM154 $009A: SQUISHY_BLOCK1155 $009B: SQUISHY_BLOCK2156 $009C: PUSHABLE_OBJECT1157 $009D: PUSHABLE_OBJECT2158 $009E: PUSHABLE_OBJECT3159 $009F: PUSHABLE_OBJECT4160 $00A0: PUSHABLE_OBJECT5161 $00A1: TRIPWIRE162 $00A2: SENTRY_GUN163 $00A3: MINE164 $00A4: MAPPER165 $00A5: OBELISK166 $00A6: FLOOR_4BLADE167 $00A7: ROOF_4BLADE168 $00A8: BIRD_BLADE169 $00A9: CATWALK_BLADE170 $00AA: MOVING_BLADE171 $00AB: PLINTH_BLADE172 $00AC: SETH_BLADE173 $00AD: LIGHTNING_CONDUCTOR174 $00AE: ELEMENT_PUZZLE175 $00AF: PUZZLE_ITEM1176 $00B0: PUZZLE_ITEM2177 $00B1: PUZZLE_ITEM3178 $00B2: PUZZLE_ITEM4179 $00B3: PUZZLE_ITEM5180 $00B4: PUZZLE_ITEM6181 $00B5: PUZZLE_ITEM7182 $00B6: PUZZLE_ITEM8183 $00B7: PUZZLE_ITEM9184 $00B8: PUZZLE_ITEM10
Page 81
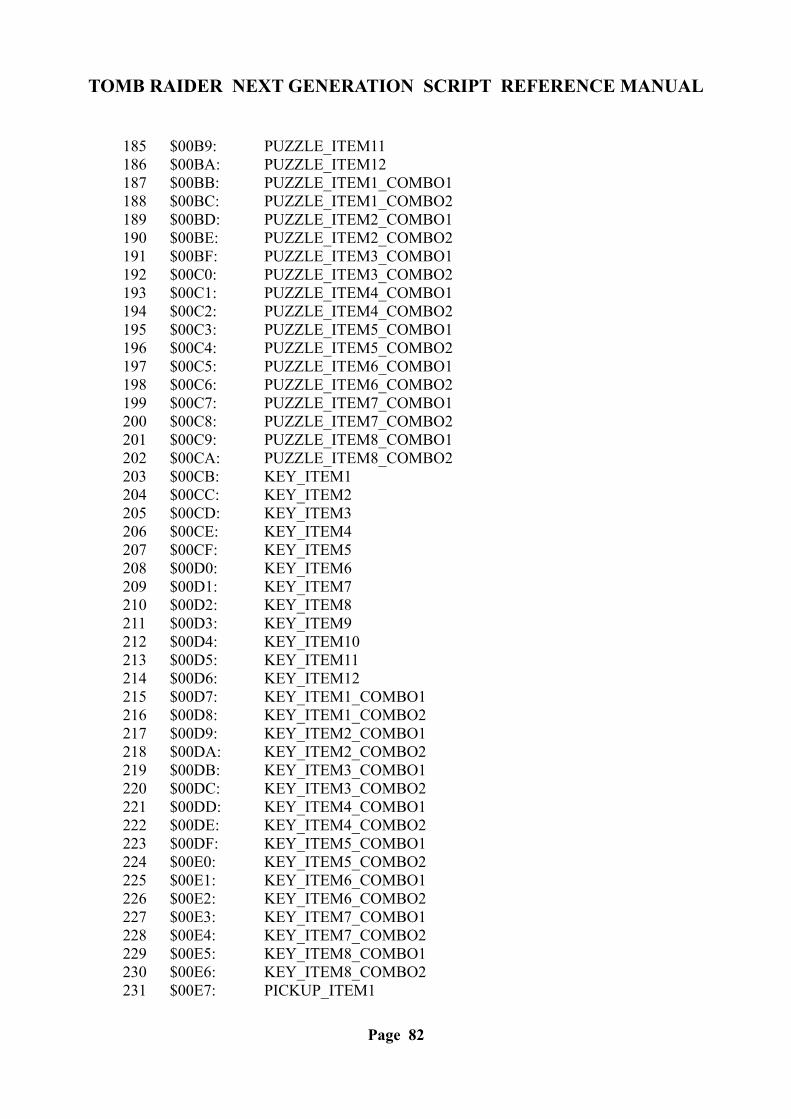
TOMB RAIDER NEXT GENERATION SCRIPT REFERENCE MANUAL
185 $00B9: PUZZLE_ITEM11186 $00BA: PUZZLE_ITEM12187 $00BB: PUZZLE_ITEM1_COMBO1188 $00BC: PUZZLE_ITEM1_COMBO2189 $00BD: PUZZLE_ITEM2_COMBO1190 $00BE: PUZZLE_ITEM2_COMBO2191 $00BF: PUZZLE_ITEM3_COMBO1192 $00C0: PUZZLE_ITEM3_COMBO2193 $00C1: PUZZLE_ITEM4_COMBO1194 $00C2: PUZZLE_ITEM4_COMBO2195 $00C3: PUZZLE_ITEM5_COMBO1196 $00C4: PUZZLE_ITEM5_COMBO2197 $00C5: PUZZLE_ITEM6_COMBO1198 $00C6: PUZZLE_ITEM6_COMBO2199 $00C7: PUZZLE_ITEM7_COMBO1200 $00C8: PUZZLE_ITEM7_COMBO2201 $00C9: PUZZLE_ITEM8_COMBO1202 $00CA: PUZZLE_ITEM8_COMBO2203 $00CB: KEY_ITEM1204 $00CC: KEY_ITEM2205 $00CD: KEY_ITEM3206 $00CE: KEY_ITEM4207 $00CF: KEY_ITEM5208 $00D0: KEY_ITEM6209 $00D1: KEY_ITEM7210 $00D2: KEY_ITEM8211 $00D3: KEY_ITEM9212 $00D4: KEY_ITEM10213 $00D5: KEY_ITEM11214 $00D6: KEY_ITEM12215 $00D7: KEY_ITEM1_COMBO1216 $00D8: KEY_ITEM1_COMBO2217 $00D9: KEY_ITEM2_COMBO1218 $00DA: KEY_ITEM2_COMBO2219 $00DB: KEY_ITEM3_COMBO1220 $00DC: KEY_ITEM3_COMBO2221 $00DD: KEY_ITEM4_COMBO1222 $00DE: KEY_ITEM4_COMBO2223 $00DF: KEY_ITEM5_COMBO1224 $00E0: KEY_ITEM5_COMBO2225 $00E1: KEY_ITEM6_COMBO1226 $00E2: KEY_ITEM6_COMBO2227 $00E3: KEY_ITEM7_COMBO1228 $00E4: KEY_ITEM7_COMBO2229 $00E5: KEY_ITEM8_COMBO1230 $00E6: KEY_ITEM8_COMBO2231 $00E7: PICKUP_ITEM1
Page 82
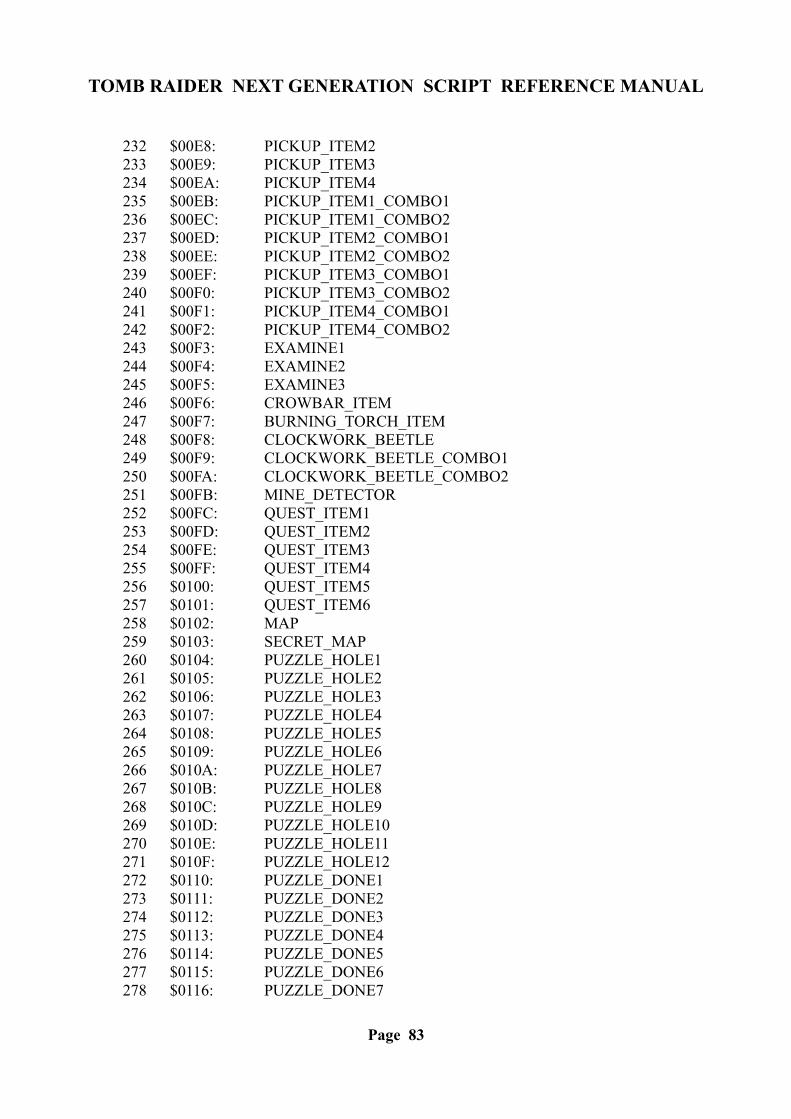
TOMB RAIDER NEXT GENERATION SCRIPT REFERENCE MANUAL
232 $00E8: PICKUP_ITEM2233 $00E9: PICKUP_ITEM3234 $00EA: PICKUP_ITEM4235 $00EB: PICKUP_ITEM1_COMBO1236 $00EC: PICKUP_ITEM1_COMBO2237 $00ED: PICKUP_ITEM2_COMBO1238 $00EE: PICKUP_ITEM2_COMBO2239 $00EF: PICKUP_ITEM3_COMBO1240 $00F0: PICKUP_ITEM3_COMBO2241 $00F1: PICKUP_ITEM4_COMBO1242 $00F2: PICKUP_ITEM4_COMBO2243 $00F3: EXAMINE1244 $00F4: EXAMINE2245 $00F5: EXAMINE3246 $00F6: CROWBAR_ITEM247 $00F7: BURNING_TORCH_ITEM248 $00F8: CLOCKWORK_BEETLE249 $00F9: CLOCKWORK_BEETLE_COMBO1250 $00FA: CLOCKWORK_BEETLE_COMBO2251 $00FB: MINE_DETECTOR252 $00FC: QUEST_ITEM1253 $00FD: QUEST_ITEM2254 $00FE: QUEST_ITEM3255 $00FF: QUEST_ITEM4256 $0100: QUEST_ITEM5257 $0101: QUEST_ITEM6258 $0102: MAP259 $0103: SECRET_MAP260 $0104: PUZZLE_HOLE1261 $0105: PUZZLE_HOLE2262 $0106: PUZZLE_HOLE3263 $0107: PUZZLE_HOLE4264 $0108: PUZZLE_HOLE5265 $0109: PUZZLE_HOLE6266 $010A: PUZZLE_HOLE7267 $010B: PUZZLE_HOLE8268 $010C: PUZZLE_HOLE9269 $010D: PUZZLE_HOLE10270 $010E: PUZZLE_HOLE11271 $010F: PUZZLE_HOLE12272 $0110: PUZZLE_DONE1273 $0111: PUZZLE_DONE2274 $0112: PUZZLE_DONE3275 $0113: PUZZLE_DONE4276 $0114: PUZZLE_DONE5277 $0115: PUZZLE_DONE6278 $0116: PUZZLE_DONE7
Page 83
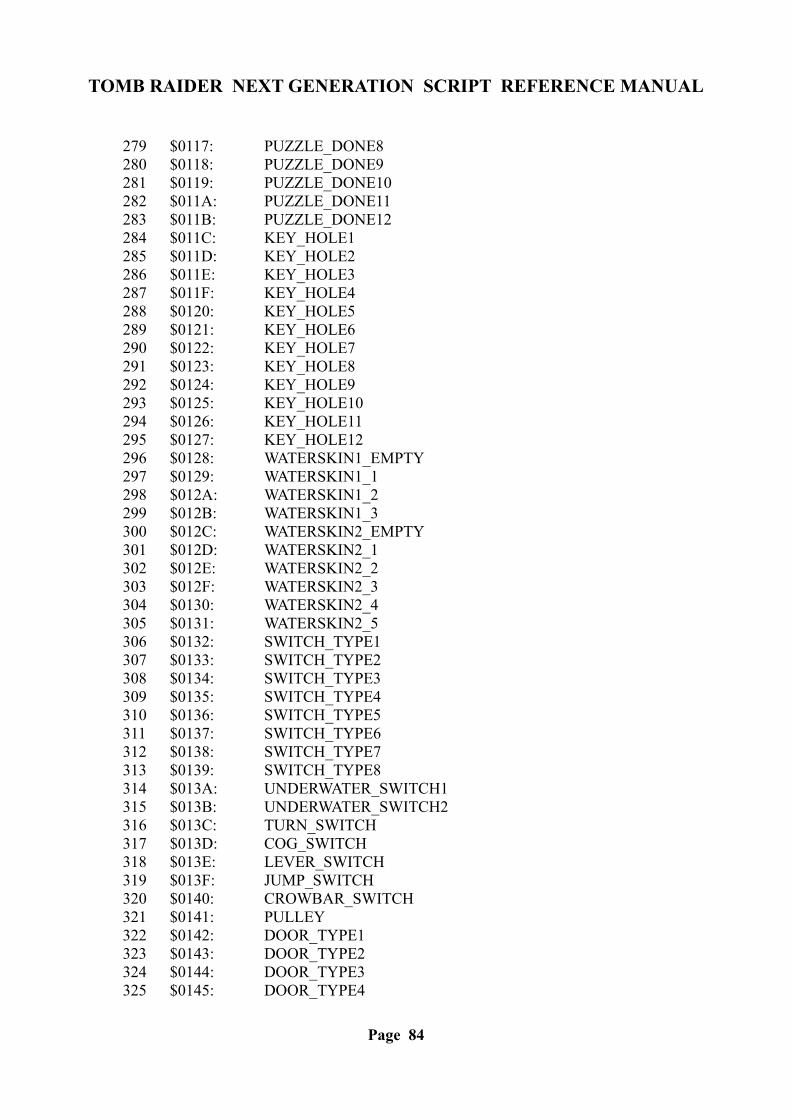
TOMB RAIDER NEXT GENERATION SCRIPT REFERENCE MANUAL
279 $0117: PUZZLE_DONE8280 $0118: PUZZLE_DONE9281 $0119: PUZZLE_DONE10282 $011A: PUZZLE_DONE11283 $011B: PUZZLE_DONE12284 $011C: KEY_HOLE1285 $011D: KEY_HOLE2286 $011E: KEY_HOLE3287 $011F: KEY_HOLE4288 $0120: KEY_HOLE5289 $0121: KEY_HOLE6290 $0122: KEY_HOLE7291 $0123: KEY_HOLE8292 $0124: KEY_HOLE9293 $0125: KEY_HOLE10294 $0126: KEY_HOLE11295 $0127: KEY_HOLE12296 $0128: WATERSKIN1_EMPTY297 $0129: WATERSKIN1_1298 $012A: WATERSKIN1_2299 $012B: WATERSKIN1_3300 $012C: WATERSKIN2_EMPTY301 $012D: WATERSKIN2_1302 $012E: WATERSKIN2_2303 $012F: WATERSKIN2_3304 $0130: WATERSKIN2_4305 $0131: WATERSKIN2_5306 $0132: SWITCH_TYPE1307 $0133: SWITCH_TYPE2308 $0134: SWITCH_TYPE3309 $0135: SWITCH_TYPE4310 $0136: SWITCH_TYPE5311 $0137: SWITCH_TYPE6312 $0138: SWITCH_TYPE7313 $0139: SWITCH_TYPE8314 $013A: UNDERWATER_SWITCH1315 $013B: UNDERWATER_SWITCH2316 $013C: TURN_SWITCH317 $013D: COG_SWITCH318 $013E: LEVER_SWITCH319 $013F: JUMP_SWITCH320 $0140: CROWBAR_SWITCH321 $0141: PULLEY322 $0142: DOOR_TYPE1323 $0143: DOOR_TYPE2324 $0144: DOOR_TYPE3325 $0145: DOOR_TYPE4
Page 84
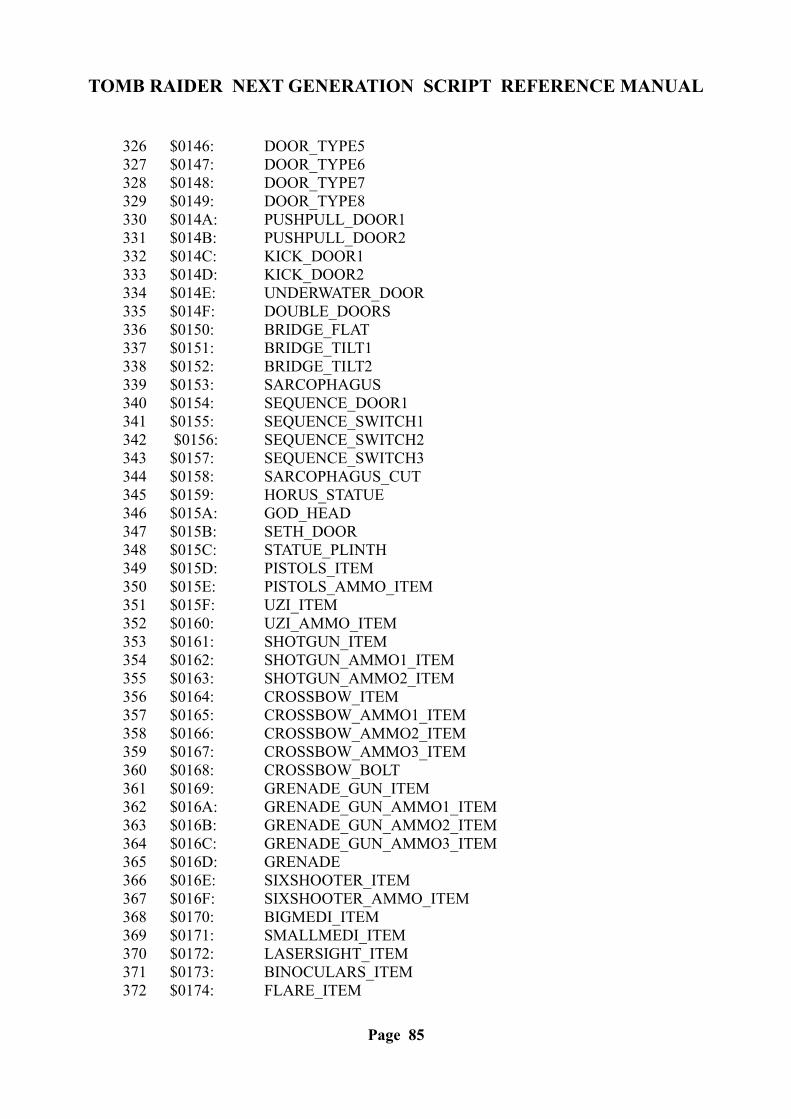
TOMB RAIDER NEXT GENERATION SCRIPT REFERENCE MANUAL
326 $0146: DOOR_TYPE5327 $0147: DOOR_TYPE6328 $0148: DOOR_TYPE7329 $0149: DOOR_TYPE8330 $014A: PUSHPULL_DOOR1331 $014B: PUSHPULL_DOOR2332 $014C: KICK_DOOR1333 $014D: KICK_DOOR2334 $014E: UNDERWATER_DOOR335 $014F: DOUBLE_DOORS336 $0150: BRIDGE_FLAT337 $0151: BRIDGE_TILT1338 $0152: BRIDGE_TILT2339 $0153: SARCOPHAGUS340 $0154: SEQUENCE_DOOR1341 $0155: SEQUENCE_SWITCH1342 $0156: SEQUENCE_SWITCH2343 $0157: SEQUENCE_SWITCH3344 $0158: SARCOPHAGUS_CUT345 $0159: HORUS_STATUE346 $015A: GOD_HEAD347 $015B: SETH_DOOR348 $015C: STATUE_PLINTH349 $015D: PISTOLS_ITEM350 $015E: PISTOLS_AMMO_ITEM351 $015F: UZI_ITEM352 $0160: UZI_AMMO_ITEM353 $0161: SHOTGUN_ITEM354 $0162: SHOTGUN_AMMO1_ITEM355 $0163: SHOTGUN_AMMO2_ITEM356 $0164: CROSSBOW_ITEM357 $0165: CROSSBOW_AMMO1_ITEM358 $0166: CROSSBOW_AMMO2_ITEM359 $0167: CROSSBOW_AMMO3_ITEM360 $0168: CROSSBOW_BOLT361 $0169: GRENADE_GUN_ITEM362 $016A: GRENADE_GUN_AMMO1_ITEM363 $016B: GRENADE_GUN_AMMO2_ITEM364 $016C: GRENADE_GUN_AMMO3_ITEM365 $016D: GRENADE366 $016E: SIXSHOOTER_ITEM367 $016F: SIXSHOOTER_AMMO_ITEM368 $0170: BIGMEDI_ITEM369 $0171: SMALLMEDI_ITEM370 $0172: LASERSIGHT_ITEM371 $0173: BINOCULARS_ITEM372 $0174: FLARE_ITEM
Page 85
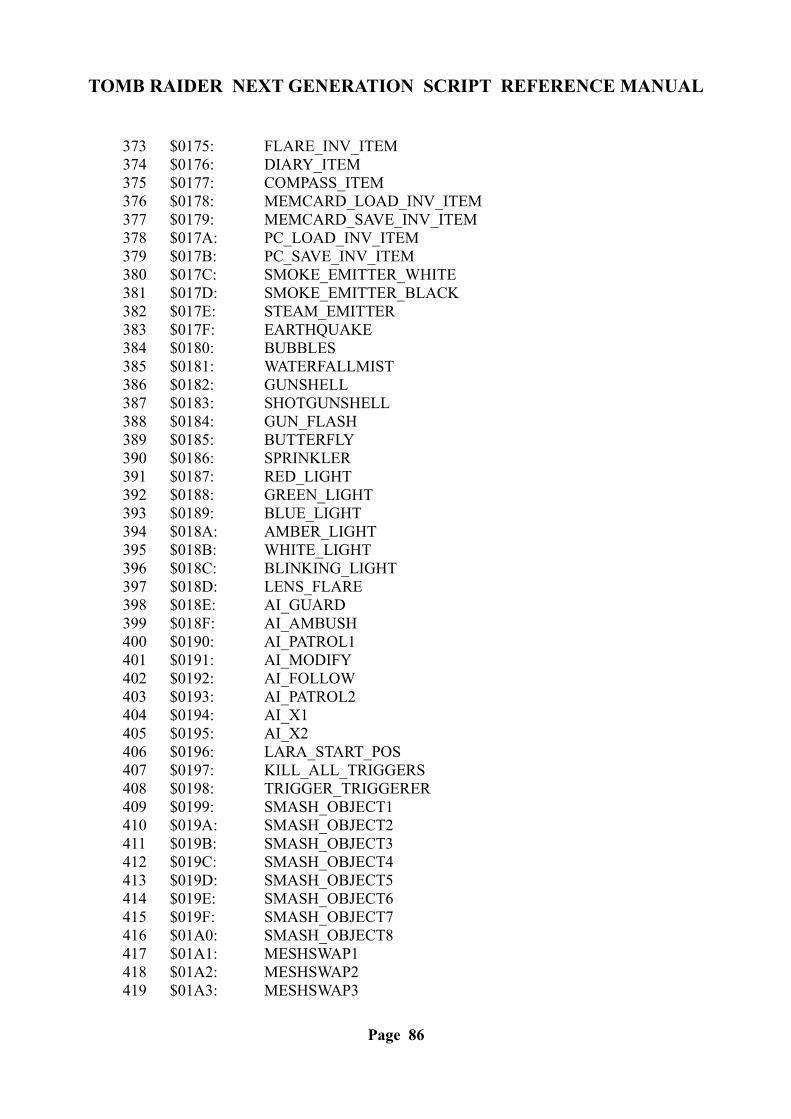
TOMB RAIDER NEXT GENERATION SCRIPT REFERENCE MANUAL
373 $0175: FLARE_INV_ITEM374 $0176: DIARY_ITEM375 $0177: COMPASS_ITEM376 $0178: MEMCARD_LOAD_INV_ITEM377 $0179: MEMCARD_SAVE_INV_ITEM378 $017A: PC_LOAD_INV_ITEM379 $017B: PC_SAVE_INV_ITEM380 $017C: SMOKE_EMITTER_WHITE381 $017D: SMOKE_EMITTER_BLACK382 $017E: STEAM_EMITTER383 $017F: EARTHQUAKE384 $0180: BUBBLES385 $0181: WATERFALLMIST386 $0182: GUNSHELL387 $0183: SHOTGUNSHELL388 $0184: GUN_FLASH389 $0185: BUTTERFLY390 $0186: SPRINKLER391 $0187: RED_LIGHT392 $0188: GREEN_LIGHT393 $0189: BLUE_LIGHT394 $018A: AMBER_LIGHT395 $018B: WHITE_LIGHT396 $018C: BLINKING_LIGHT397 $018D: LENS_FLARE398 $018E: AI_GUARD399 $018F: AI_AMBUSH400 $0190: AI_PATROL1401 $0191: AI_MODIFY402 $0192: AI_FOLLOW403 $0193: AI_PATROL2404 $0194: AI_X1405 $0195: AI_X2406 $0196: LARA_START_POS407 $0197: KILL_ALL_TRIGGERS408 $0198: TRIGGER_TRIGGERER409 $0199: SMASH_OBJECT1410 $019A: SMASH_OBJECT2411 $019B: SMASH_OBJECT3412 $019C: SMASH_OBJECT4413 $019D: SMASH_OBJECT5414 $019E: SMASH_OBJECT6415 $019F: SMASH_OBJECT7416 $01A0: SMASH_OBJECT8417 $01A1: MESHSWAP1418 $01A2: MESHSWAP2419 $01A3: MESHSWAP3
Page 86
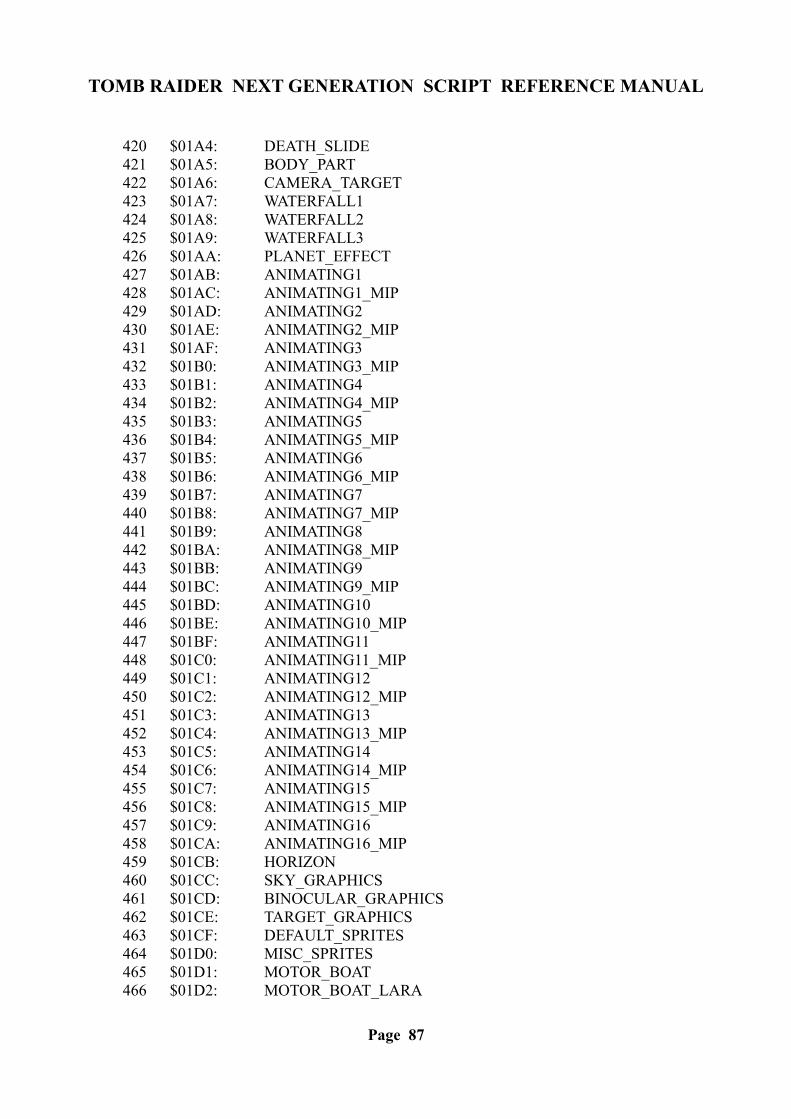
TOMB RAIDER NEXT GENERATION SCRIPT REFERENCE MANUAL
420 $01A4: DEATH_SLIDE421 $01A5: BODY_PART422 $01A6: CAMERA_TARGET423 $01A7: WATERFALL1424 $01A8: WATERFALL2425 $01A9: WATERFALL3426 $01AA: PLANET_EFFECT427 $01AB: ANIMATING1428 $01AC: ANIMATING1_MIP429 $01AD: ANIMATING2430 $01AE: ANIMATING2_MIP431 $01AF: ANIMATING3432 $01B0: ANIMATING3_MIP433 $01B1: ANIMATING4434 $01B2: ANIMATING4_MIP435 $01B3: ANIMATING5436 $01B4: ANIMATING5_MIP437 $01B5: ANIMATING6438 $01B6: ANIMATING6_MIP439 $01B7: ANIMATING7440 $01B8: ANIMATING7_MIP441 $01B9: ANIMATING8442 $01BA: ANIMATING8_MIP443 $01BB: ANIMATING9444 $01BC: ANIMATING9_MIP445 $01BD: ANIMATING10446 $01BE: ANIMATING10_MIP447 $01BF: ANIMATING11448 $01C0: ANIMATING11_MIP449 $01C1: ANIMATING12450 $01C2: ANIMATING12_MIP451 $01C3: ANIMATING13452 $01C4: ANIMATING13_MIP453 $01C5: ANIMATING14454 $01C6: ANIMATING14_MIP455 $01C7: ANIMATING15456 $01C8: ANIMATING15_MIP457 $01C9: ANIMATING16458 $01CA: ANIMATING16_MIP459 $01CB: HORIZON460 $01CC: SKY_GRAPHICS461 $01CD: BINOCULAR_GRAPHICS462 $01CE: TARGET_GRAPHICS463 $01CF: DEFAULT_SPRITES464 $01D0: MISC_SPRITES465 $01D1: MOTOR_BOAT466 $01D2: MOTOR_BOAT_LARA
Page 87
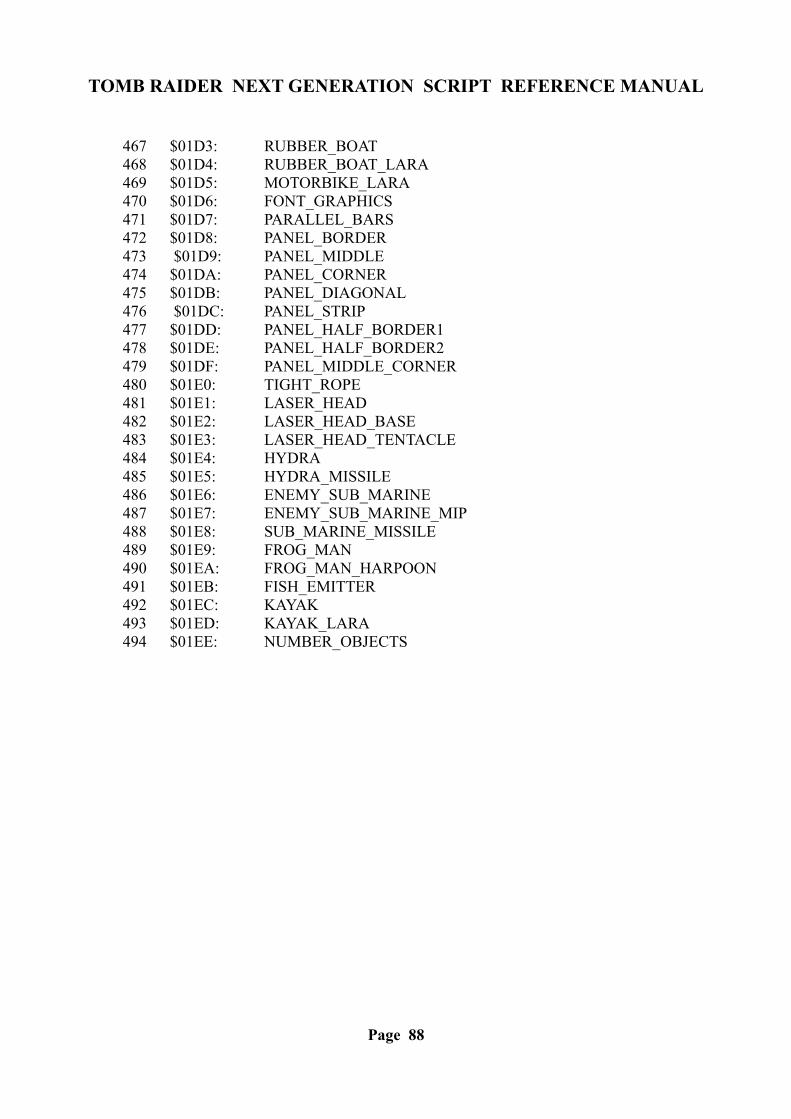
TOMB RAIDER NEXT GENERATION SCRIPT REFERENCE MANUAL
467 $01D3: RUBBER_BOAT468 $01D4: RUBBER_BOAT_LARA469 $01D5: MOTORBIKE_LARA470 $01D6: FONT_GRAPHICS471 $01D7: PARALLEL_BARS472 $01D8: PANEL_BORDER473 $01D9: PANEL_MIDDLE474 $01DA: PANEL_CORNER475 $01DB: PANEL_DIAGONAL476 $01DC: PANEL_STRIP477 $01DD: PANEL_HALF_BORDER1478 $01DE: PANEL_HALF_BORDER2479 $01DF: PANEL_MIDDLE_CORNER480 $01E0: TIGHT_ROPE481 $01E1: LASER_HEAD482 $01E2: LASER_HEAD_BASE483 $01E3: LASER_HEAD_TENTACLE484 $01E4: HYDRA485 $01E5: HYDRA_MISSILE486 $01E6: ENEMY_SUB_MARINE487 $01E7: ENEMY_SUB_MARINE_MIP488 $01E8: SUB_MARINE_MISSILE489 $01E9: FROG_MAN490 $01EA: FROG_MAN_HARPOON491 $01EB: FISH_EMITTER492 $01EC: KAYAK493 $01ED: KAYAK_LARA494 $01EE: NUMBER_OBJECTS
Page 88
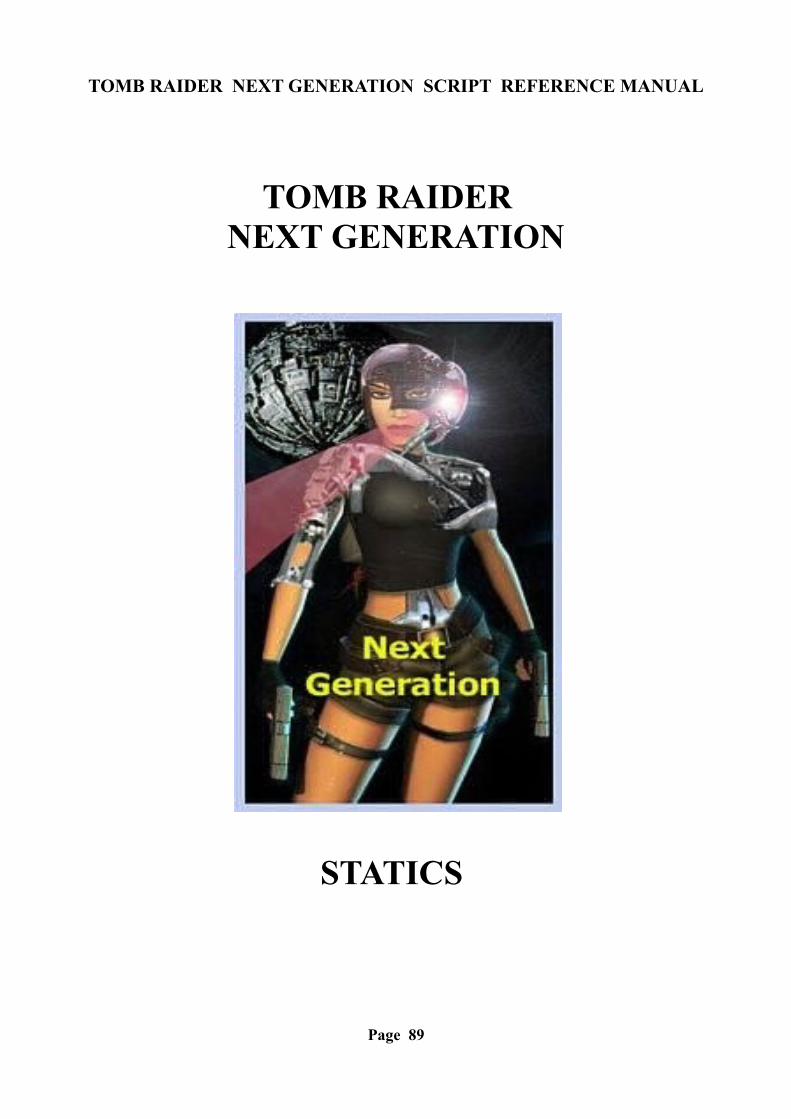
TOMB RAIDER NEXT GENERATION SCRIPT REFERENCE MANUAL
TOMB RAIDER NEXT GENERATION
STATICS
Page 89

TOMB RAIDER NEXT GENERATION SCRIPT REFERENCE MANUAL
STATICS 0 $0000: PLANT0 1 $0001: PLANT1 2 $0002: PLANT2 3 $0003: PLANT3 4 $0004: PLANT4 5 $0005: PLANT5 6 $0006: PLANT6 7 $0007: PLANT7 8 $0008: PLANT8 9 $0009: PLANT9
10 $000A: FURNITURE0 11 $000B: FURNITURE1 12 $000C: FURNITURE2 13 $000D: FURNITURE3 14 $000E: FURNITURE4 15 $000F: FURNITURE5 16 $0010: FURNITURE6 17 $0011: FURNITURE7 18 $0012: FURNITURE8 19 $0013: FURNITURE9
20 $0014: ROCK0 21 $0015: ROCK1 22 $0016: ROCK2 23 $0017: ROCK3 24 $0018: ROCK4 25 $0019: ROCK5 26 $001A: ROCK6 27 $001B: ROCK7 28 $001C: ROCK8 29 $001D: ROCK9
30 $001E: ARCHITECTURE0 31 $001F: ARCHITECTURE1 32 $0020: ARCHITECTURE2 33 $0021: ARCHITECTURE3 34 $0022: ARCHITECTURE4 35 $0023: ARCHITECTURE5 36 $0024: ARCHITECTURE6 37 $0025: ARCHITECTURE7 38 $0026: ARCHITECTURE8 39 $0027: ARCHITECTURE9
Page 90
TOMB RAIDER NEXT GENERATION SCRIPT REFERENCE MANUAL
40 $0028: DEBRIS0 41 $0029: DEBRIS1 42 $002A: DEBRIS2 43 $002B: DEBRIS3 44 $002C: DEBRIS4 45 $002D: DEBRIS5 46 $002E: DEBRIS6 47 $002F: DEBRIS7 48 $0030: DEBRIS8 49 $0031: DEBRIS9
50 $0032: SHATTER0 51 $0033: SHATTER1 52 $0034: SHATTER2 53 $0035: SHATTER3 54 $0036: SHATTER4 55 $0037: SHATTER5 56 $0038: SHATTER6 57 $0039: SHATTER7 58 $003A: SHATTER8 59 $003B: SHATTER9
60 $003C: EXTRA00 61 $003D: EXTRA01 62 $003E: EXTRA02 63 $003F: EXTRA03 64 $0040: EXTRA04 65 $0041: EXTRA05 66 $0042: EXTRA06 67 $0043: EXTRA07 68 $0044: EXTRA08 69 $0045: EXTRA09 70 $0046: EXTRA10 71 $0047: EXTRA11 72 $0048: EXTRA12 73 $0049: EXTRA13 74 $004A: EXTRA14 75 $004B: EXTRA15 76 $004C: EXTRA16 77 $004D: EXTRA17 78 $004E: EXTRA18 79 $004F: EXTRA19 80 $0050: EXTRA20 81 $0051: EXTRA21 82 $0052: EXTRA22 83 $0053: EXTRA23
Page 91
TOMB RAIDER NEXT GENERATION SCRIPT REFERENCE MANUAL
84 $0054: EXTRA24 85 $0055: EXTRA25 86 $0056: EXTRA26 87 $0057: EXTRA27 88 $0058: EXTRA28 89 $0059: EXTRA29 90 $005A: EXTRA30 91 $005B: EXTRA31 92 $005C: EXTRA32 93 $005D: EXTRA33 94 $005E: EXTRA34 95 $005F: EXTRA35 96 $0060: EXTRA36 97 $0061: EXTRA37 98 $0062: EXTRA38 99 $0063: EXTRA39
100 $0064: EXTRA40101 $0065: EXTRA41102 $0066: EXTRA42103 $0067: EXTRA43104 $0068: EXTRA44105 $0069: EXTRA45106 $006A: EXTRA46107 $006B: EXTRA47108 $006C: EXTRA48109 $006D: EXTRA49110 $006E: EXTRA50111 $006F: EXTRA51112 $0070: EXTRA52113 $0071: EXTRA53114 $0072: EXTRA54115 $0073: EXTRA55116 $0074: EXTRA56117 $0075: EXTRA57118 $0076: EXTRA58119 $0077: EXTRA59120 $0078: EXTRA60121 $0079: EXTRA61122 $007A: EXTRA62123 $007B: EXTRA63124 $007C: EXTRA64125 $007D: EXTRA65126 $007E: EXTRA66127 $007F: EXTRA67128 $0080: EXTRA68129 $0081: EXTRA69130 $0082: EXTRA70
Page 92
TOMB RAIDER NEXT GENERATION SCRIPT REFERENCE MANUAL
131 $0083: EXTRA71132 $0084: EXTRA72133 $0085: EXTRA73134 $0086: EXTRA74135 $0087: EXTRA75136 $0088: EXTRA76137 $0089: EXTRA77138 $008A: EXTRA78139 $008B: EXTRA79140 $008C: EXTRA80141 $008D: EXTRA81142 $008E: EXTRA82143 $008F: EXTRA83144 $0090: EXTRA84145 $0091: EXTRA85146 $0092: EXTRA86147 $0093: EXTRA87148 $0094: EXTRA88149 $0095: EXTRA89150 $0096: EXTRA90151 $0097: EXTRA91152 $0098: EXTRA92153 $0099: EXTRA93154 $009A: EXTRA94155 $009B: EXTRA95156 $009C: EXTRA96157 $009D: EXTRA97158 $009E: EXTRA98159 $009F: EXTRA99
Page 93
TOMB RAIDER NEXT GENERATION SCRIPT REFERENCE MANUAL
TOMB RAIDER NEXT GENERATION
VARIABLE PLACE FOLDERS
Page 94
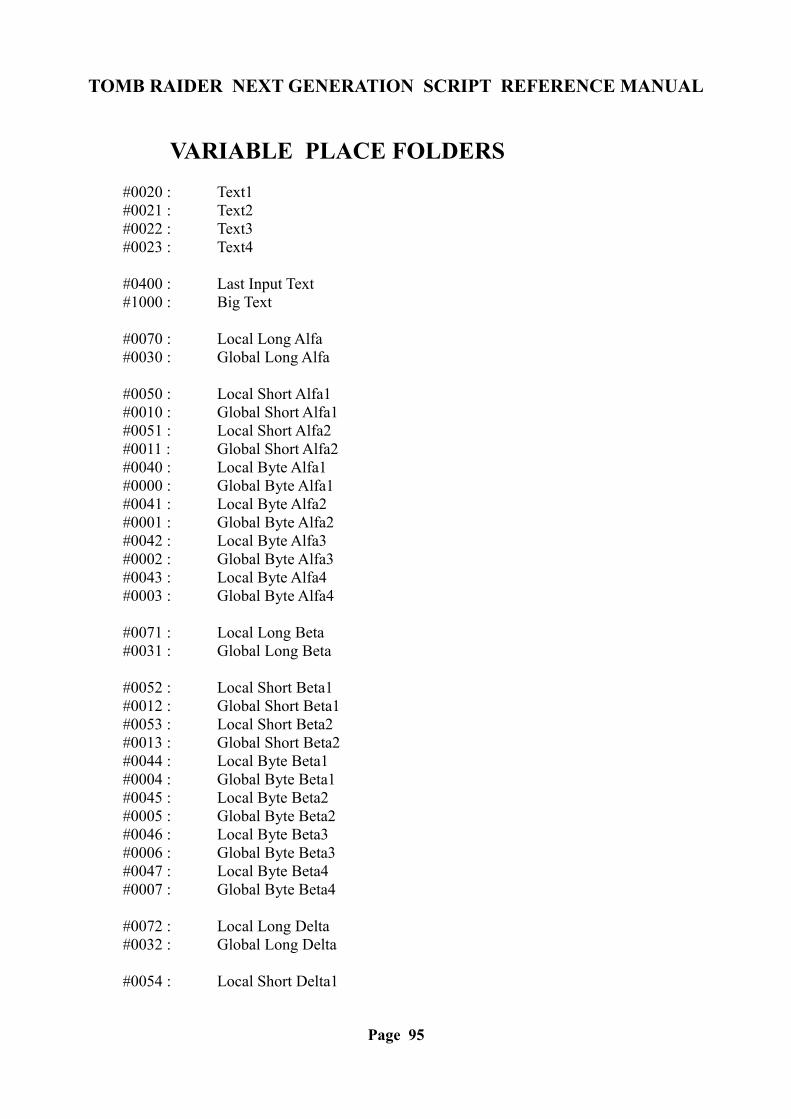
TOMB RAIDER NEXT GENERATION SCRIPT REFERENCE MANUAL
VARIABLE PLACE FOLDERS#0020 : Text1#0021 : Text2#0022 : Text3#0023 : Text4
#0400 : Last Input Text#1000 : Big Text
#0070 : Local Long Alfa#0030 : Global Long Alfa
#0050 : Local Short Alfa1#0010 : Global Short Alfa1#0051 : Local Short Alfa2#0011 : Global Short Alfa2#0040 : Local Byte Alfa1#0000 : Global Byte Alfa1#0041 : Local Byte Alfa2#0001 : Global Byte Alfa2#0042 : Local Byte Alfa3#0002 : Global Byte Alfa3#0043 : Local Byte Alfa4#0003 : Global Byte Alfa4
#0071 : Local Long Beta#0031 : Global Long Beta
#0052 : Local Short Beta1#0012 : Global Short Beta1#0053 : Local Short Beta2#0013 : Global Short Beta2#0044 : Local Byte Beta1#0004 : Global Byte Beta1#0045 : Local Byte Beta2#0005 : Global Byte Beta2#0046 : Local Byte Beta3#0006 : Global Byte Beta3#0047 : Local Byte Beta4#0007 : Global Byte Beta4
#0072 : Local Long Delta#0032 : Global Long Delta
#0054 : Local Short Delta1
Page 95
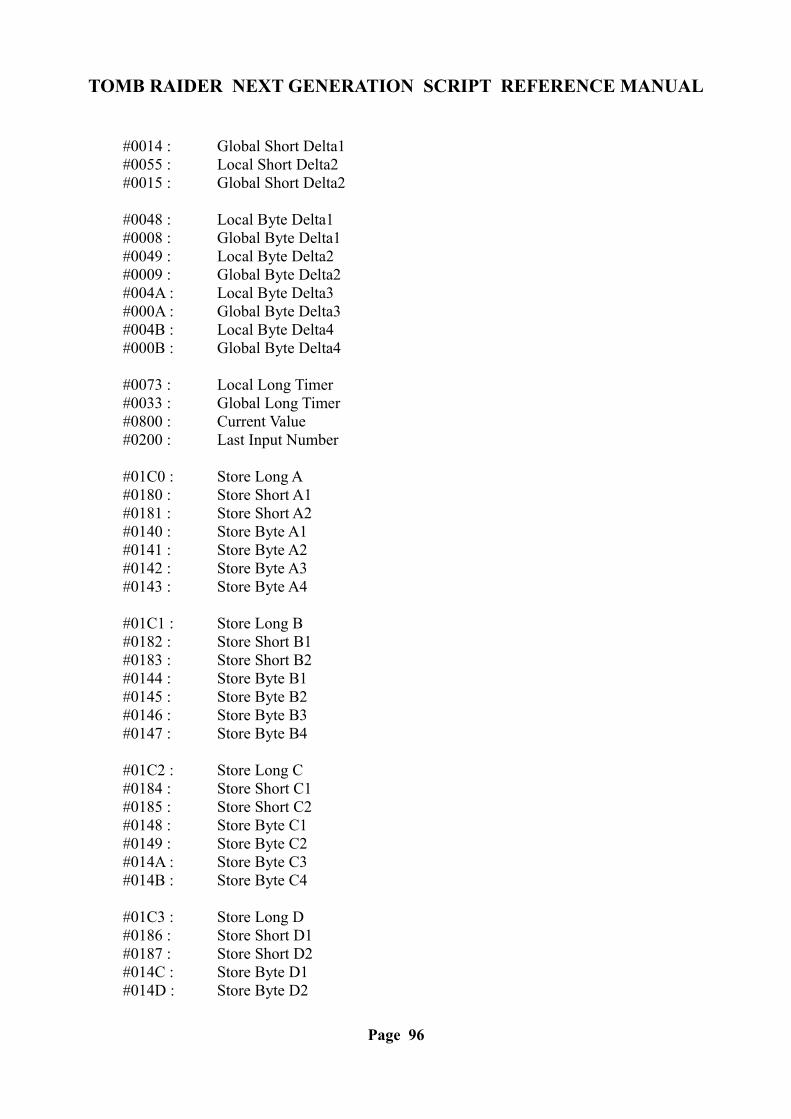
TOMB RAIDER NEXT GENERATION SCRIPT REFERENCE MANUAL
#0014 : Global Short Delta1#0055 : Local Short Delta2#0015 : Global Short Delta2
#0048 : Local Byte Delta1#0008 : Global Byte Delta1#0049 : Local Byte Delta2#0009 : Global Byte Delta2#004A : Local Byte Delta3#000A : Global Byte Delta3#004B : Local Byte Delta4#000B : Global Byte Delta4
#0073 : Local Long Timer#0033 : Global Long Timer#0800 : Current Value#0200 : Last Input Number
#01C0 : Store Long A#0180 : Store Short A1#0181 : Store Short A2#0140 : Store Byte A1#0141 : Store Byte A2#0142 : Store Byte A3#0143 : Store Byte A4
#01C1 : Store Long B#0182 : Store Short B1#0183 : Store Short B2#0144 : Store Byte B1#0145 : Store Byte B2#0146 : Store Byte B3#0147 : Store Byte B4
#01C2 : Store Long C#0184 : Store Short C1#0185 : Store Short C2#0148 : Store Byte C1#0149 : Store Byte C2#014A : Store Byte C3#014B : Store Byte C4
#01C3 : Store Long D#0186 : Store Short D1#0187 : Store Short D2#014C : Store Byte D1#014D : Store Byte D2
Page 96
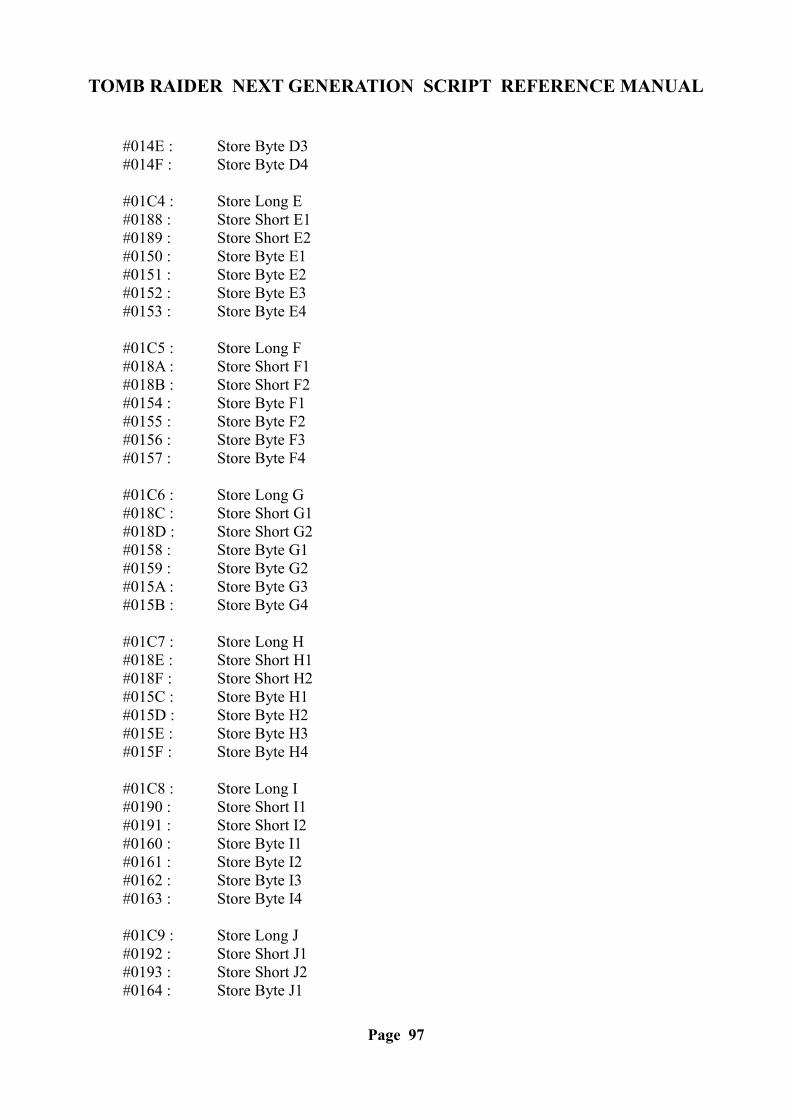
TOMB RAIDER NEXT GENERATION SCRIPT REFERENCE MANUAL
#014E : Store Byte D3#014F : Store Byte D4
#01C4 : Store Long E#0188 : Store Short E1#0189 : Store Short E2#0150 : Store Byte E1#0151 : Store Byte E2#0152 : Store Byte E3#0153 : Store Byte E4
#01C5 : Store Long F#018A : Store Short F1#018B : Store Short F2#0154 : Store Byte F1#0155 : Store Byte F2#0156 : Store Byte F3#0157 : Store Byte F4
#01C6 : Store Long G#018C : Store Short G1#018D : Store Short G2#0158 : Store Byte G1#0159 : Store Byte G2#015A : Store Byte G3#015B : Store Byte G4
#01C7 : Store Long H#018E : Store Short H1#018F : Store Short H2#015C : Store Byte H1#015D : Store Byte H2#015E : Store Byte H3#015F : Store Byte H4
#01C8 : Store Long I#0190 : Store Short I1#0191 : Store Short I2#0160 : Store Byte I1#0161 : Store Byte I2#0162 : Store Byte I3#0163 : Store Byte I4
#01C9 : Store Long J#0192 : Store Short J1#0193 : Store Short J2#0164 : Store Byte J1
Page 97
TOMB RAIDER NEXT GENERATION SCRIPT REFERENCE MANUAL
#0165 : Store Byte J2#0166 : Store Byte J3#0167 : Store Byte J4
#01CA : Store Long K#0194 : Store Short K1#0195 : Store Short K2#0168 : Store Byte K1#0169 : Store Byte K2#016A : Store Byte K3#016B : Store Byte K4
#01CB : Store Long L#0196 : Store Short L1#0197 : Store Short L2#016C : Store Byte L1#016D : Store Byte L2#016E : Store Byte L3#016F : Store Byte L4
#01CC : Store Long M#0198 : Store Short M1#0199 : Store Short M2#0170 : Store Byte M1#0171 : Store Byte M2#0172 : Store Byte M3#0173 : Store Byte M4
#01CD : Store Long N#019A : Store Short N1#019B : Store Short N2#0174 : Store Byte N1#0175 : Store Byte N2#0176 : Store Byte N3#0177 : Store Byte N4
#01CE : Store Long O#019C : Store Short O1#019D : Store Short O2#0178 : Store Byte O1#0179 : Store Byte O2#017A : Store Byte O3#017B : Store Byte O4
#01CF : Store Long P#019E : Store Short P1#019F : Store Short P2
Page 98
TOMB RAIDER NEXT GENERATION SCRIPT REFERENCE MANUAL
#017C : Store Byte P1#017D : Store Byte P2#017E : Store Byte P3#017F : Store Byte P4
Page 99
TOMB RAIDER NEXT GENERATION SCRIPT REFERENCE MANUAL
TOMB RAIDER NEXT GENERATION
SOUND SFX
OBTAINED FROM NG CENTER REFERENCE SECTION
Page 100
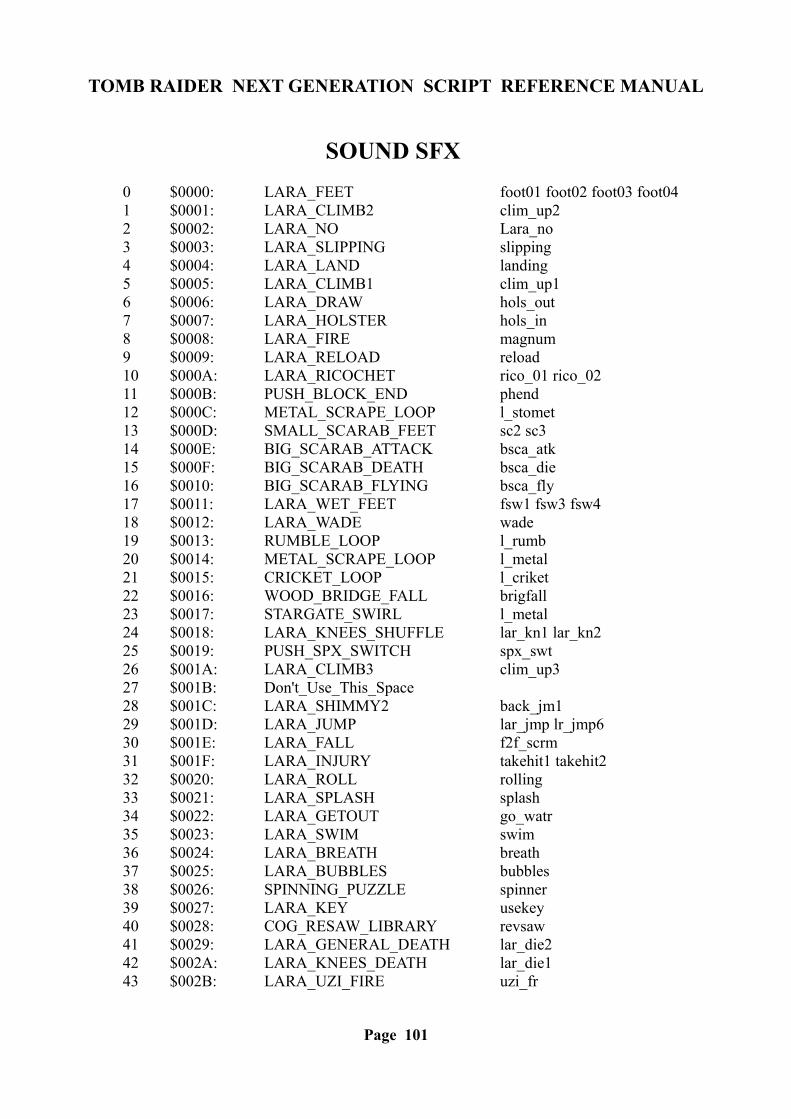
TOMB RAIDER NEXT GENERATION SCRIPT REFERENCE MANUAL
SOUND SFX 0 $0000: LARA_FEET foot01 foot02 foot03 foot04 1 $0001: LARA_CLIMB2 clim_up2 2 $0002: LARA_NO Lara_no 3 $0003: LARA_SLIPPING slipping 4 $0004: LARA_LAND landing 5 $0005: LARA_CLIMB1 clim_up1 6 $0006: LARA_DRAW hols_out 7 $0007: LARA_HOLSTER hols_in 8 $0008: LARA_FIRE magnum 9 $0009: LARA_RELOAD reload 10 $000A: LARA_RICOCHET rico_01 rico_02 11 $000B: PUSH_BLOCK_END phend 12 $000C: METAL_SCRAPE_LOOP l_stomet 13 $000D: SMALL_SCARAB_FEET sc2 sc3 14 $000E: BIG_SCARAB_ATTACK bsca_atk 15 $000F: BIG_SCARAB_DEATH bsca_die 16 $0010: BIG_SCARAB_FLYING bsca_fly 17 $0011: LARA_WET_FEET fsw1 fsw3 fsw4 18 $0012: LARA_WADE wade 19 $0013: RUMBLE_LOOP l_rumb 20 $0014: METAL_SCRAPE_LOOP l_metal 21 $0015: CRICKET_LOOP l_criket 22 $0016: WOOD_BRIDGE_FALL brigfall 23 $0017: STARGATE_SWIRL l_metal 24 $0018: LARA_KNEES_SHUFFLE lar_kn1 lar_kn2 25 $0019: PUSH_SPX_SWITCH spx_swt 26 $001A: LARA_CLIMB3 clim_up3 27 $001B: Don't_Use_This_Space 28 $001C: LARA_SHIMMY2 back_jm1 29 $001D: LARA_JUMP lar_jmp lr_jmp6 30 $001E: LARA_FALL f2f_scrm 31 $001F: LARA_INJURY takehit1 takehit2 32 $0020: LARA_ROLL rolling 33 $0021: LARA_SPLASH splash 34 $0022: LARA_GETOUT go_watr 35 $0023: LARA_SWIM swim 36 $0024: LARA_BREATH breath 37 $0025: LARA_BUBBLES bubbles 38 $0026: SPINNING_PUZZLE spinner 39 $0027: LARA_KEY usekey 40 $0028: COG_RESAW_LIBRARY revsaw 41 $0029: LARA_GENERAL_DEATH lar_die2 42 $002A: LARA_KNEES_DEATH lar_die1 43 $002B: LARA_UZI_FIRE uzi_fr
Page 101
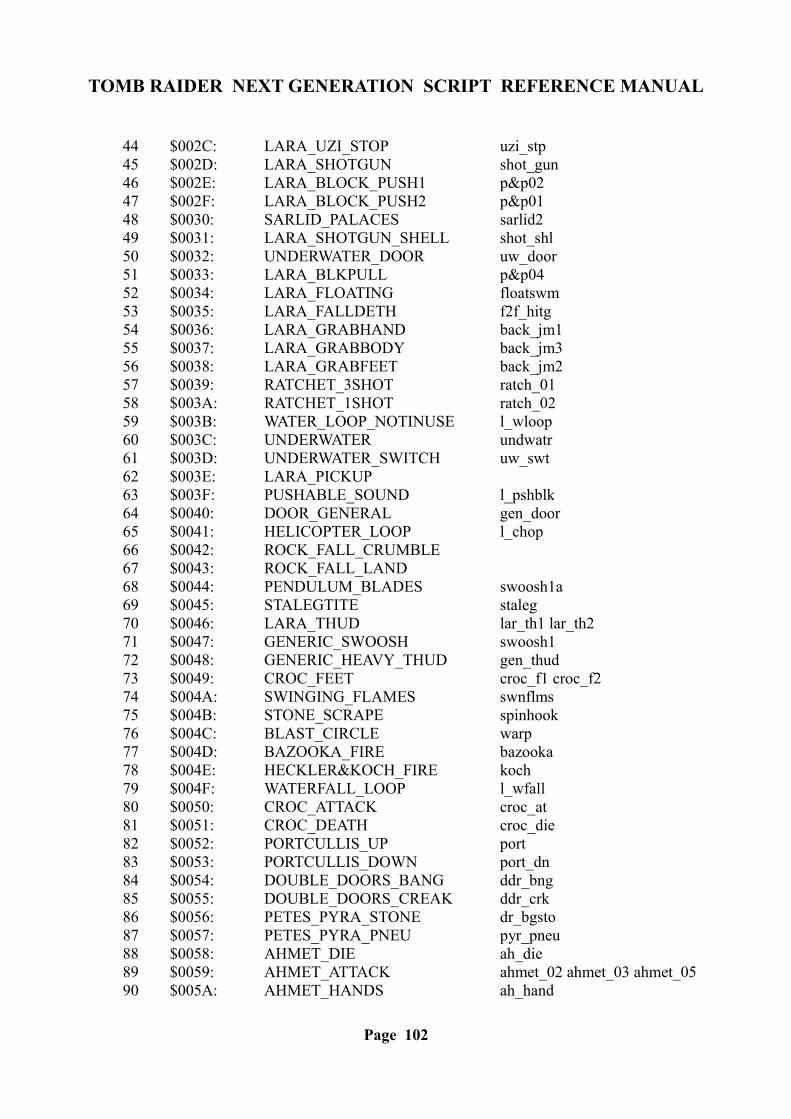
TOMB RAIDER NEXT GENERATION SCRIPT REFERENCE MANUAL
44 $002C: LARA_UZI_STOP uzi_stp 45 $002D: LARA_SHOTGUN shot_gun 46 $002E: LARA_BLOCK_PUSH1 p&p02 47 $002F: LARA_BLOCK_PUSH2 p&p01 48 $0030: SARLID_PALACES sarlid2 49 $0031: LARA_SHOTGUN_SHELL shot_shl 50 $0032: UNDERWATER_DOOR uw_door 51 $0033: LARA_BLKPULL p&p04 52 $0034: LARA_FLOATING floatswm 53 $0035: LARA_FALLDETH f2f_hitg 54 $0036: LARA_GRABHAND back_jm1 55 $0037: LARA_GRABBODY back_jm3 56 $0038: LARA_GRABFEET back_jm2 57 $0039: RATCHET_3SHOT ratch_01 58 $003A: RATCHET_1SHOT ratch_02 59 $003B: WATER_LOOP_NOTINUSE l_wloop 60 $003C: UNDERWATER undwatr 61 $003D: UNDERWATER_SWITCH uw_swt 62 $003E: LARA_PICKUP 63 $003F: PUSHABLE_SOUND l_pshblk 64 $0040: DOOR_GENERAL gen_door 65 $0041: HELICOPTER_LOOP l_chop 66 $0042: ROCK_FALL_CRUMBLE 67 $0043: ROCK_FALL_LAND 68 $0044: PENDULUM_BLADES swoosh1a 69 $0045: STALEGTITE staleg 70 $0046: LARA_THUD lar_th1 lar_th2 71 $0047: GENERIC_SWOOSH swoosh1 72 $0048: GENERIC_HEAVY_THUD gen_thud 73 $0049: CROC_FEET croc_f1 croc_f2 74 $004A: SWINGING_FLAMES swnflms 75 $004B: STONE_SCRAPE spinhook 76 $004C: BLAST_CIRCLE warp 77 $004D: BAZOOKA_FIRE bazooka 78 $004E: HECKLER&KOCH_FIRE koch 79 $004F: WATERFALL_LOOP l_wfall 80 $0050: CROC_ATTACK croc_at 81 $0051: CROC_DEATH croc_die 82 $0052: PORTCULLIS_UP port 83 $0053: PORTCULLIS_DOWN port_dn 84 $0054: DOUBLE_DOORS_BANG ddr_bng 85 $0055: DOUBLE_DOORS_CREAK ddr_crk 86 $0056: PETES_PYRA_STONE dr_bgsto 87 $0057: PETES_PYRA_PNEU pyr_pneu 88 $0058: AHMET_DIE ah_die 89 $0059: AHMET_ATTACK ahmet_02 ahmet_03 ahmet_05 90 $005A: AHMET_HANDS ah_hand
Page 102

TOMB RAIDER NEXT GENERATION SCRIPT REFERENCE MANUAL
91 $005B: AHMET_FEET ah_feet ah_feet2 92 $005C: AHMET_SWIPE swipe_01 swipe_02 93 $005D: AHMET_WAIT ahmet_06 94 $005E: GUIDE_JUMP guid_huh 95 $005F: GENERAL_FOOTSTEPS1 asmg_ft1 asmg_ft2 96 $0060: GUIDE_LAND_USENOT gd_ugh1 97 $0061: POUR pourwtr 98 $0062: SCALE1 scale1 99 $0063: SCALE2 scale2 100 $0064: BEETLARA_WINDUP beetwind 101 $0065: BEETLE_CLK_WHIRR l_toy1 102 $0066: BEETLE_CLK_EXP beet_exp 103 $0067: MINE_EXP_OVERLAY mine_exp 104 $0068: HECKLER&KOCH_STOP kochstop 105 $0069: EXPLOSION1 explos1 106 $006A: EXPLOSION2_VOLWAS80 explos2 107 $006B: EARTHQUAKE_LOOP l_quake 108 $006C: MENU_ROTATE m_rotat 109 $006D: MENU_SELECT m_select 110 $006E: Menu_Empty 111 $006F: MENU_CHOOSE m_choose 112 $0070: TICK_TOCK tick 113 $0071: Menu_Empty 114 $0072: MENU_COMBINE m_comb 115 $0073: Menu_Empty 116 $0074: MENU_MEDI medi_fix 117 $0075: LARA_CLIMB_WALLS_NOISE back_jm2 118 $0076: WATER_LOOP l_wloop 119 $0077: VONCROY_JUMP vc_jmp2 120 $0078: LOCUSTS_LOOP locusts 121 $0079: DESSERT_EAGLE_FIRE d_eagle 122 $007A: BOULDER_FALL bouldlnd 123 $007B: LARA_MINI_LOAD mini_lo 124 $007C: LARA_MINI_LOCK mini_lck 125 $007D: LARA_MINI_FIRE mini_fr 126 $007E: GATE_OPENING gate 127 $007F: LARA_ELECTRIC_LOOP l_larel 128 $0080: LARA_ELECTRIC_CRACKLES lar_el2 lar_el3 lar_el4 129 $0081: BLOOD_LOOP l_blood 130 $0082: BIKE_START bike_stt 131 $0083: BIKE_IDLE bike_idl 132 $0084: BIKE_ACCELERATE bike_rev 133 $0085: BIKE_MOVING bike_mve 134 $0086: BIKE_SIDE_IMPACT bike_si 135 $0087: BIKE_FRONT_IMPACT bike_fi 136 $0088: SOFT_WIND_LOOP l_wind 137 $0089: BIKE_LAND bike_lnd
Page 103
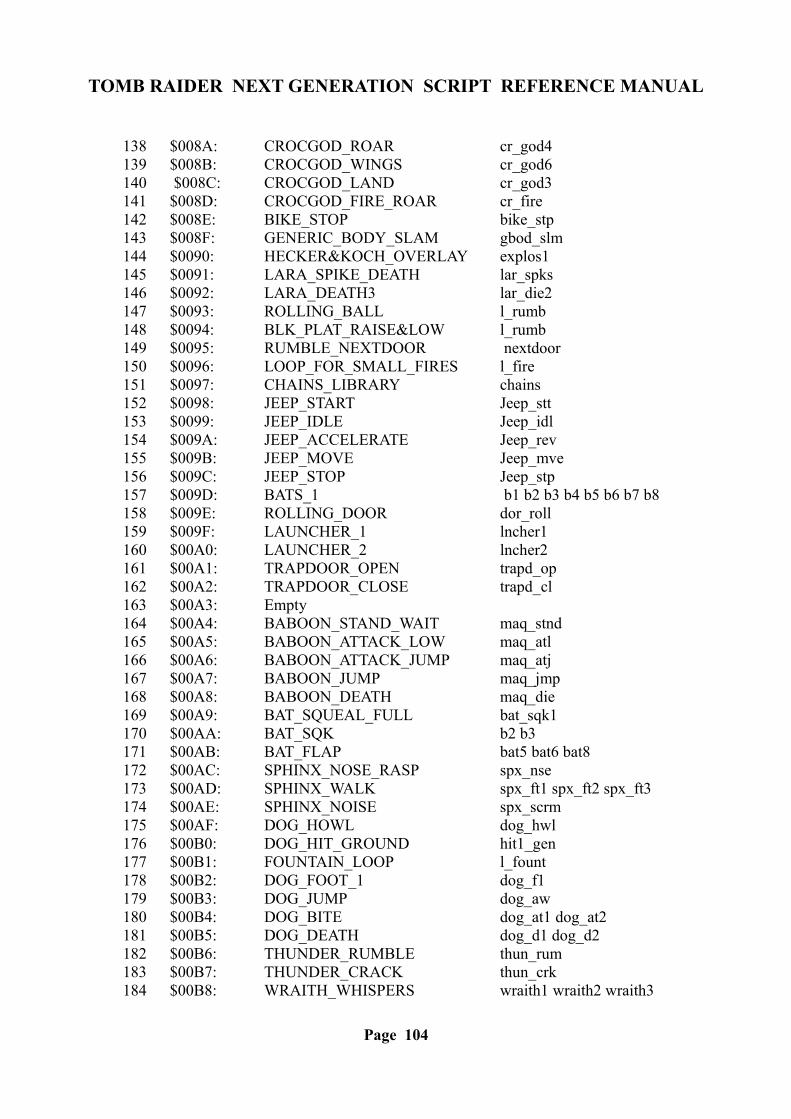
TOMB RAIDER NEXT GENERATION SCRIPT REFERENCE MANUAL
138 $008A: CROCGOD_ROAR cr_god4 139 $008B: CROCGOD_WINGS cr_god6 140 $008C: CROCGOD_LAND cr_god3 141 $008D: CROCGOD_FIRE_ROAR cr_fire 142 $008E: BIKE_STOP bike_stp 143 $008F: GENERIC_BODY_SLAM gbod_slm 144 $0090: HECKER&KOCH_OVERLAY explos1 145 $0091: LARA_SPIKE_DEATH lar_spks 146 $0092: LARA_DEATH3 lar_die2 147 $0093: ROLLING_BALL l_rumb 148 $0094: BLK_PLAT_RAISE&LOW l_rumb 149 $0095: RUMBLE_NEXTDOOR nextdoor 150 $0096: LOOP_FOR_SMALL_FIRES l_fire 151 $0097: CHAINS_LIBRARY chains 152 $0098: JEEP_START Jeep_stt 153 $0099: JEEP_IDLE Jeep_idl 154 $009A: JEEP_ACCELERATE Jeep_rev 155 $009B: JEEP_MOVE Jeep_mve 156 $009C: JEEP_STOP Jeep_stp 157 $009D: BATS_1 b1 b2 b3 b4 b5 b6 b7 b8 158 $009E: ROLLING_DOOR dor_roll 159 $009F: LAUNCHER_1 lncher1 160 $00A0: LAUNCHER_2 lncher2 161 $00A1: TRAPDOOR_OPEN trapd_op 162 $00A2: TRAPDOOR_CLOSE trapd_cl 163 $00A3: Empty 164 $00A4: BABOON_STAND_WAIT maq_stnd 165 $00A5: BABOON_ATTACK_LOW maq_atl 166 $00A6: BABOON_ATTACK_JUMP maq_atj 167 $00A7: BABOON_JUMP maq_jmp 168 $00A8: BABOON_DEATH maq_die 169 $00A9: BAT_SQUEAL_FULL bat_sqk1 170 $00AA: BAT_SQK b2 b3 171 $00AB: BAT_FLAP bat5 bat6 bat8 172 $00AC: SPHINX_NOSE_RASP spx_nse 173 $00AD: SPHINX_WALK spx_ft1 spx_ft2 spx_ft3 174 $00AE: SPHINX_NOISE spx_scrm 175 $00AF: DOG_HOWL dog_hwl 176 $00B0: DOG_HIT_GROUND hit1_gen 177 $00B1: FOUNTAIN_LOOP l_fount 178 $00B2: DOG_FOOT_1 dog_f1 179 $00B3: DOG_JUMP dog_aw 180 $00B4: DOG_BITE dog_at1 dog_at2 181 $00B5: DOG_DEATH dog_d1 dog_d2 182 $00B6: THUNDER_RUMBLE thun_rum 183 $00B7: THUNDER_CRACK thun_crk 184 $00B8: WRAITH_WHISPERS wraith1 wraith2 wraith3
Page 104
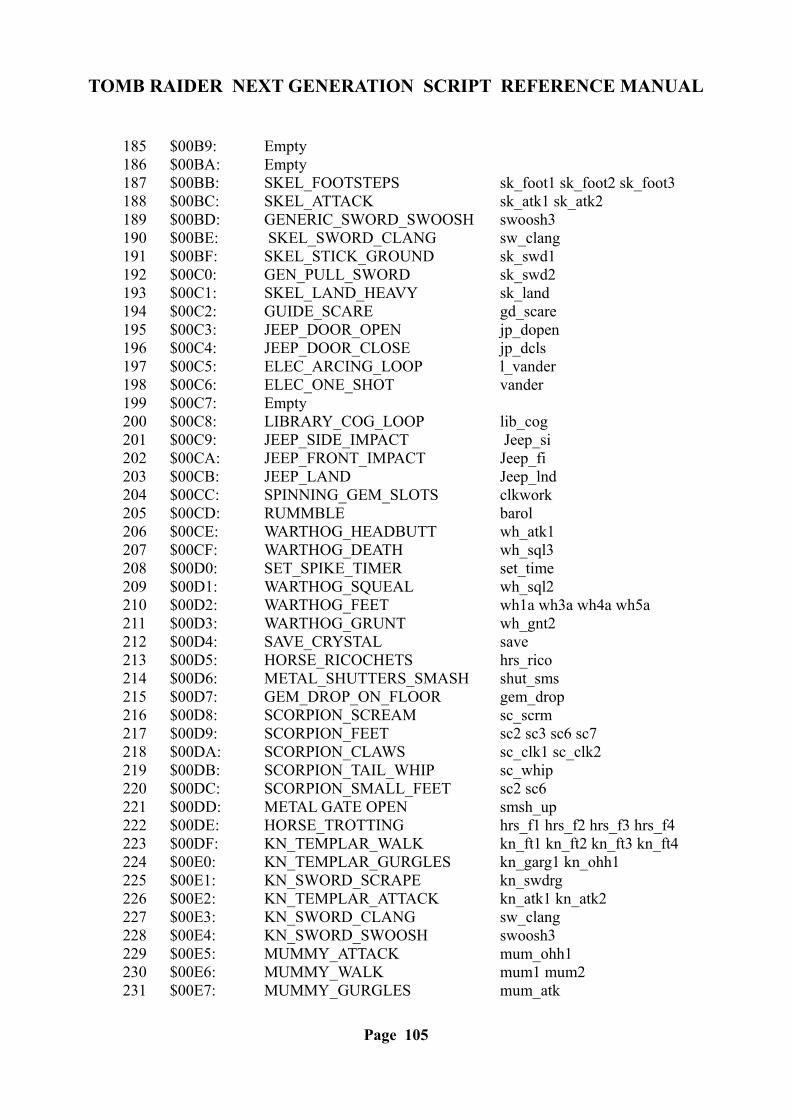
TOMB RAIDER NEXT GENERATION SCRIPT REFERENCE MANUAL
185 $00B9: Empty 186 $00BA: Empty 187 $00BB: SKEL_FOOTSTEPS sk_foot1 sk_foot2 sk_foot3 188 $00BC: SKEL_ATTACK sk_atk1 sk_atk2 189 $00BD: GENERIC_SWORD_SWOOSH swoosh3 190 $00BE: SKEL_SWORD_CLANG sw_clang 191 $00BF: SKEL_STICK_GROUND sk_swd1 192 $00C0: GEN_PULL_SWORD sk_swd2 193 $00C1: SKEL_LAND_HEAVY sk_land 194 $00C2: GUIDE_SCARE gd_scare 195 $00C3: JEEP_DOOR_OPEN jp_dopen 196 $00C4: JEEP_DOOR_CLOSE jp_dcls 197 $00C5: ELEC_ARCING_LOOP l_vander 198 $00C6: ELEC_ONE_SHOT vander 199 $00C7: Empty 200 $00C8: LIBRARY_COG_LOOP lib_cog 201 $00C9: JEEP_SIDE_IMPACT Jeep_si 202 $00CA: JEEP_FRONT_IMPACT Jeep_fi 203 $00CB: JEEP_LAND Jeep_lnd 204 $00CC: SPINNING_GEM_SLOTS clkwork 205 $00CD: RUMMBLE barol 206 $00CE: WARTHOG_HEADBUTT wh_atk1 207 $00CF: WARTHOG_DEATH wh_sql3 208 $00D0: SET_SPIKE_TIMER set_time 209 $00D1: WARTHOG_SQUEAL wh_sql2 210 $00D2: WARTHOG_FEET wh1a wh3a wh4a wh5a 211 $00D3: WARTHOG_GRUNT wh_gnt2 212 $00D4: SAVE_CRYSTAL save 213 $00D5: HORSE_RICOCHETS hrs_rico 214 $00D6: METAL_SHUTTERS_SMASH shut_sms 215 $00D7: GEM_DROP_ON_FLOOR gem_drop 216 $00D8: SCORPION_SCREAM sc_scrm 217 $00D9: SCORPION_FEET sc2 sc3 sc6 sc7 218 $00DA: SCORPION_CLAWS sc_clk1 sc_clk2 219 $00DB: SCORPION_TAIL_WHIP sc_whip 220 $00DC: SCORPION_SMALL_FEET sc2 sc6 221 $00DD: METAL GATE OPEN smsh_up 222 $00DE: HORSE_TROTTING hrs_f1 hrs_f2 hrs_f3 hrs_f4 223 $00DF: KN_TEMPLAR_WALK kn_ft1 kn_ft2 kn_ft3 kn_ft4 224 $00E0: KN_TEMPLAR_GURGLES kn_garg1 kn_ohh1 225 $00E1: KN_SWORD_SCRAPE kn_swdrg 226 $00E2: KN_TEMPLAR_ATTACK kn_atk1 kn_atk2 227 $00E3: KN_SWORD_CLANG sw_clang 228 $00E4: KN_SWORD_SWOOSH swoosh3 229 $00E5: MUMMY_ATTACK mum_ohh1 230 $00E6: MUMMY_WALK mum1 mum2 231 $00E7: MUMMY_GURGLES mum_atk
Page 105
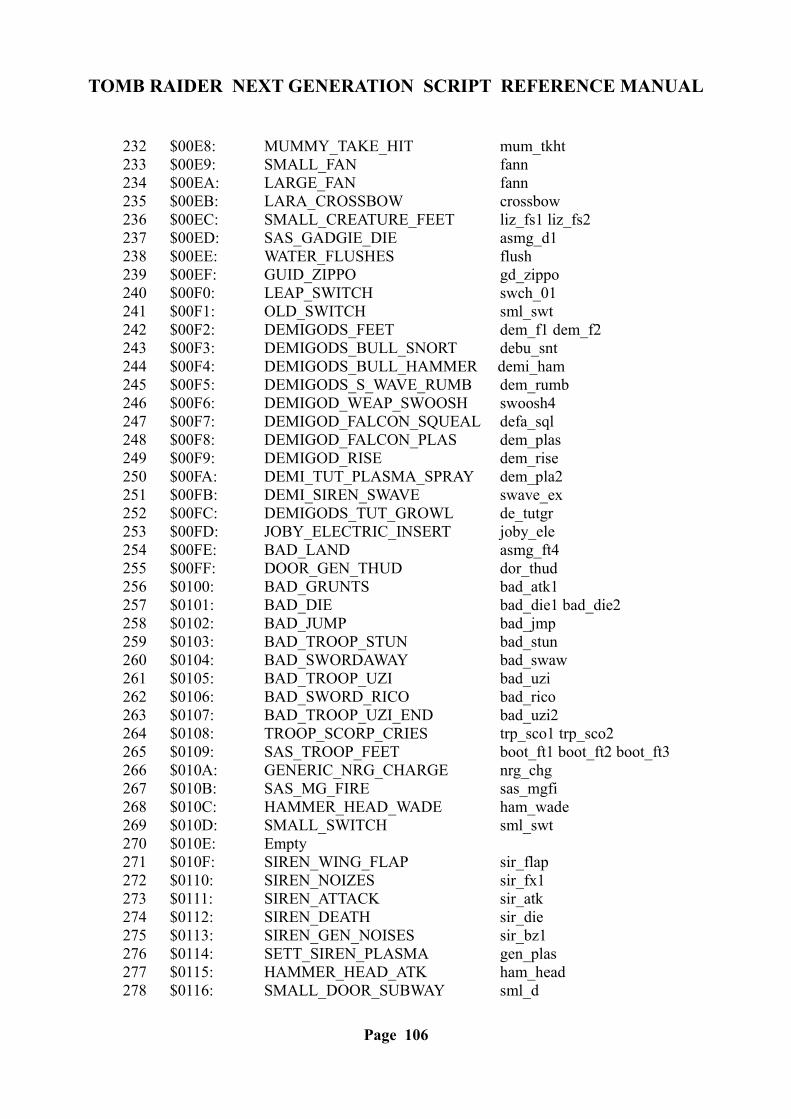
TOMB RAIDER NEXT GENERATION SCRIPT REFERENCE MANUAL
232 $00E8: MUMMY_TAKE_HIT mum_tkht 233 $00E9: SMALL_FAN fann 234 $00EA: LARGE_FAN fann 235 $00EB: LARA_CROSSBOW crossbow 236 $00EC: SMALL_CREATURE_FEET liz_fs1 liz_fs2 237 $00ED: SAS_GADGIE_DIE asmg_d1 238 $00EE: WATER_FLUSHES flush 239 $00EF: GUID_ZIPPO gd_zippo 240 $00F0: LEAP_SWITCH swch_01 241 $00F1: OLD_SWITCH sml_swt 242 $00F2: DEMIGODS_FEET dem_f1 dem_f2 243 $00F3: DEMIGODS_BULL_SNORT debu_snt 244 $00F4: DEMIGODS_BULL_HAMMER demi_ham 245 $00F5: DEMIGODS_S_WAVE_RUMB dem_rumb 246 $00F6: DEMIGOD_WEAP_SWOOSH swoosh4 247 $00F7: DEMIGOD_FALCON_SQUEAL defa_sql 248 $00F8: DEMIGOD_FALCON_PLAS dem_plas 249 $00F9: DEMIGOD_RISE dem_rise 250 $00FA: DEMI_TUT_PLASMA_SPRAY dem_pla2 251 $00FB: DEMI_SIREN_SWAVE swave_ex 252 $00FC: DEMIGODS_TUT_GROWL de_tutgr 253 $00FD: JOBY_ELECTRIC_INSERT joby_ele 254 $00FE: BAD_LAND asmg_ft4 255 $00FF: DOOR_GEN_THUD dor_thud 256 $0100: BAD_GRUNTS bad_atk1 257 $0101: BAD_DIE bad_die1 bad_die2 258 $0102: BAD_JUMP bad_jmp 259 $0103: BAD_TROOP_STUN bad_stun 260 $0104: BAD_SWORDAWAY bad_swaw 261 $0105: BAD_TROOP_UZI bad_uzi 262 $0106: BAD_SWORD_RICO bad_rico 263 $0107: BAD_TROOP_UZI_END bad_uzi2 264 $0108: TROOP_SCORP_CRIES trp_sco1 trp_sco2 265 $0109: SAS_TROOP_FEET boot_ft1 boot_ft2 boot_ft3 266 $010A: GENERIC_NRG_CHARGE nrg_chg 267 $010B: SAS_MG_FIRE sas_mgfi 268 $010C: HAMMER_HEAD_WADE ham_wade 269 $010D: SMALL_SWITCH sml_swt 270 $010E: Empty 271 $010F: SIREN_WING_FLAP sir_flap 272 $0110: SIREN_NOIZES sir_fx1 273 $0111: SIREN_ATTACK sir_atk 274 $0112: SIREN_DEATH sir_die 275 $0113: SIREN_GEN_NOISES sir_bz1 276 $0114: SETT_SIREN_PLASMA gen_plas 277 $0115: HAMMER_HEAD_ATK ham_head 278 $0116: SMALL_DOOR_SUBWAY sml_d
Page 106
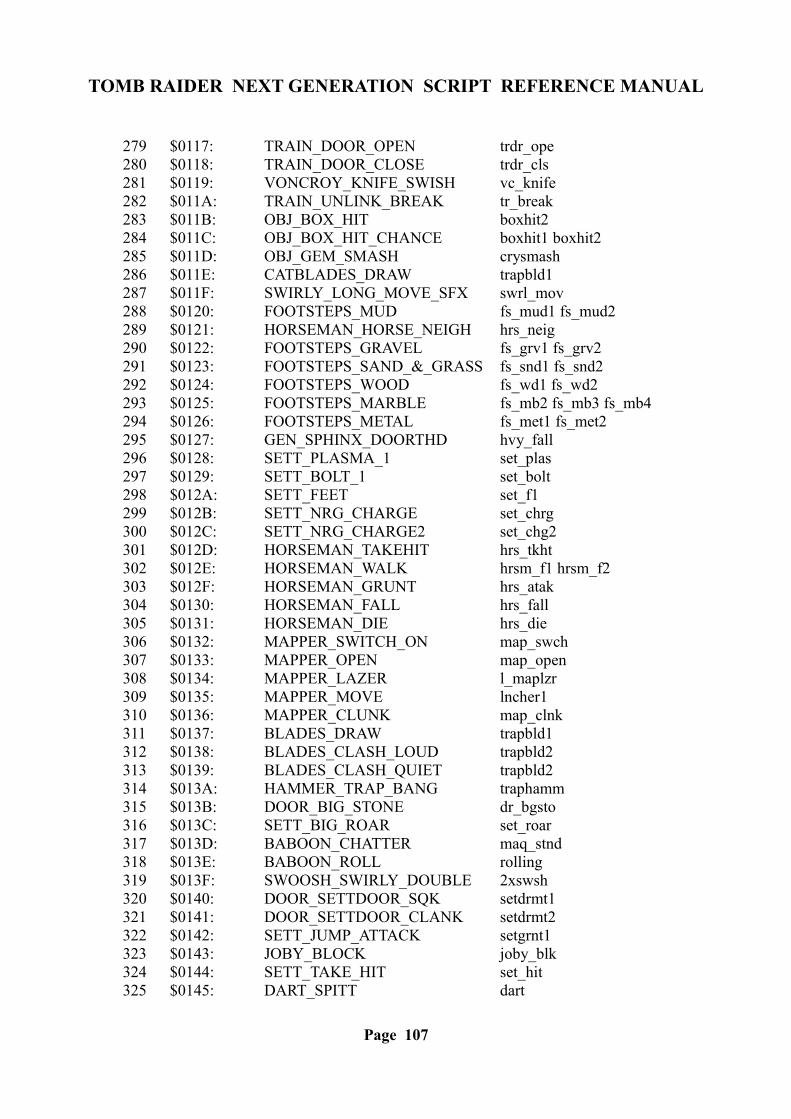
TOMB RAIDER NEXT GENERATION SCRIPT REFERENCE MANUAL
279 $0117: TRAIN_DOOR_OPEN trdr_ope 280 $0118: TRAIN_DOOR_CLOSE trdr_cls 281 $0119: VONCROY_KNIFE_SWISH vc_knife 282 $011A: TRAIN_UNLINK_BREAK tr_break 283 $011B: OBJ_BOX_HIT boxhit2 284 $011C: OBJ_BOX_HIT_CHANCE boxhit1 boxhit2 285 $011D: OBJ_GEM_SMASH crysmash 286 $011E: CATBLADES_DRAW trapbld1 287 $011F: SWIRLY_LONG_MOVE_SFX swrl_mov 288 $0120: FOOTSTEPS_MUD fs_mud1 fs_mud2 289 $0121: HORSEMAN_HORSE_NEIGH hrs_neig 290 $0122: FOOTSTEPS_GRAVEL fs_grv1 fs_grv2 291 $0123: FOOTSTEPS_SAND_&_GRASS fs_snd1 fs_snd2 292 $0124: FOOTSTEPS_WOOD fs_wd1 fs_wd2 293 $0125: FOOTSTEPS_MARBLE fs_mb2 fs_mb3 fs_mb4 294 $0126: FOOTSTEPS_METAL fs_met1 fs_met2 295 $0127: GEN_SPHINX_DOORTHD hvy_fall 296 $0128: SETT_PLASMA_1 set_plas 297 $0129: SETT_BOLT_1 set_bolt 298 $012A: SETT_FEET set_f1 299 $012B: SETT_NRG_CHARGE set_chrg 300 $012C: SETT_NRG_CHARGE2 set_chg2 301 $012D: HORSEMAN_TAKEHIT hrs_tkht 302 $012E: HORSEMAN_WALK hrsm_f1 hrsm_f2 303 $012F: HORSEMAN_GRUNT hrs_atak 304 $0130: HORSEMAN_FALL hrs_fall 305 $0131: HORSEMAN_DIE hrs_die 306 $0132: MAPPER_SWITCH_ON map_swch 307 $0133: MAPPER_OPEN map_open 308 $0134: MAPPER_LAZER l_maplzr 309 $0135: MAPPER_MOVE lncher1 310 $0136: MAPPER_CLUNK map_clnk 311 $0137: BLADES_DRAW trapbld1 312 $0138: BLADES_CLASH_LOUD trapbld2 313 $0139: BLADES_CLASH_QUIET trapbld2 314 $013A: HAMMER_TRAP_BANG traphamm 315 $013B: DOOR_BIG_STONE dr_bgsto 316 $013C: SETT_BIG_ROAR set_roar 317 $013D: BABOON_CHATTER maq_stnd 318 $013E: BABOON_ROLL rolling 319 $013F: SWOOSH_SWIRLY_DOUBLE 2xswsh 320 $0140: DOOR_SETTDOOR_SQK setdrmt1 321 $0141: DOOR_SETTDOOR_CLANK setdrmt2 322 $0142: SETT_JUMP_ATTACK setgrnt1 323 $0143: JOBY_BLOCK joby_blk 324 $0144: SETT_TAKE_HIT set_hit 325 $0145: DART_SPITT dart
Page 107
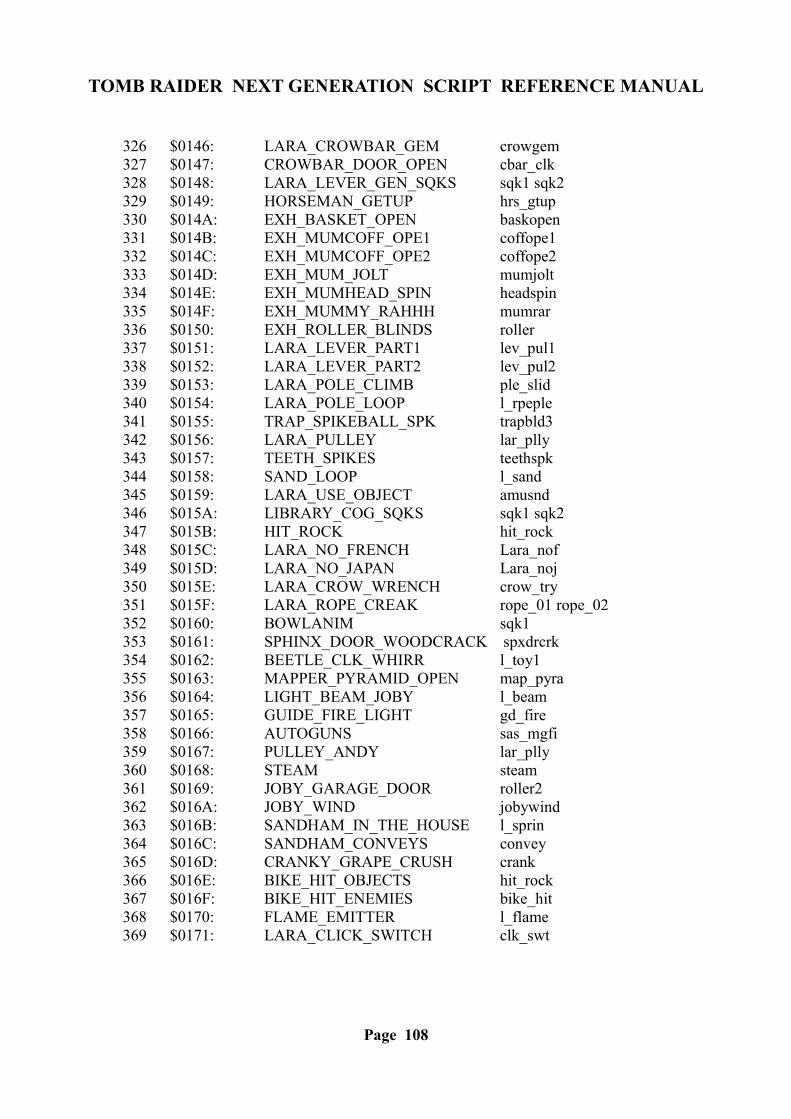
TOMB RAIDER NEXT GENERATION SCRIPT REFERENCE MANUAL
326 $0146: LARA_CROWBAR_GEM crowgem 327 $0147: CROWBAR_DOOR_OPEN cbar_clk 328 $0148: LARA_LEVER_GEN_SQKS sqk1 sqk2 329 $0149: HORSEMAN_GETUP hrs_gtup 330 $014A: EXH_BASKET_OPEN baskopen 331 $014B: EXH_MUMCOFF_OPE1 coffope1 332 $014C: EXH_MUMCOFF_OPE2 coffope2 333 $014D: EXH_MUM_JOLT mumjolt 334 $014E: EXH_MUMHEAD_SPIN headspin 335 $014F: EXH_MUMMY_RAHHH mumrar 336 $0150: EXH_ROLLER_BLINDS roller 337 $0151: LARA_LEVER_PART1 lev_pul1 338 $0152: LARA_LEVER_PART2 lev_pul2 339 $0153: LARA_POLE_CLIMB ple_slid 340 $0154: LARA_POLE_LOOP l_rpeple 341 $0155: TRAP_SPIKEBALL_SPK trapbld3 342 $0156: LARA_PULLEY lar_plly 343 $0157: TEETH_SPIKES teethspk 344 $0158: SAND_LOOP l_sand 345 $0159: LARA_USE_OBJECT amusnd 346 $015A: LIBRARY_COG_SQKS sqk1 sqk2 347 $015B: HIT_ROCK hit_rock 348 $015C: LARA_NO_FRENCH Lara_nof 349 $015D: LARA_NO_JAPAN Lara_noj 350 $015E: LARA_CROW_WRENCH crow_try 351 $015F: LARA_ROPE_CREAK rope_01 rope_02 352 $0160: BOWLANIM sqk1 353 $0161: SPHINX_DOOR_WOODCRACK spxdrcrk 354 $0162: BEETLE_CLK_WHIRR l_toy1 355 $0163: MAPPER_PYRAMID_OPEN map_pyra 356 $0164: LIGHT_BEAM_JOBY l_beam 357 $0165: GUIDE_FIRE_LIGHT gd_fire 358 $0166: AUTOGUNS sas_mgfi 359 $0167: PULLEY_ANDY lar_plly 360 $0168: STEAM steam 361 $0169: JOBY_GARAGE_DOOR roller2 362 $016A: JOBY_WIND jobywind 363 $016B: SANDHAM_IN_THE_HOUSE l_sprin 364 $016C: SANDHAM_CONVEYS convey 365 $016D: CRANKY_GRAPE_CRUSH crank 366 $016E: BIKE_HIT_OBJECTS hit_rock 367 $016F: BIKE_HIT_ENEMIES bike_hit 368 $0170: FLAME_EMITTER l_flame 369 $0171: LARA_CLICK_SWITCH clk_swt
Page 108
TOMB RAIDER NEXT GENERATION SCRIPT REFERENCE MANUAL
TOMB RAIDER NEXT GENERATION
SOUNDS.TXT
OBTAINED FROM Core Design/trle/sound/levelSFX Creator folder
Page 109
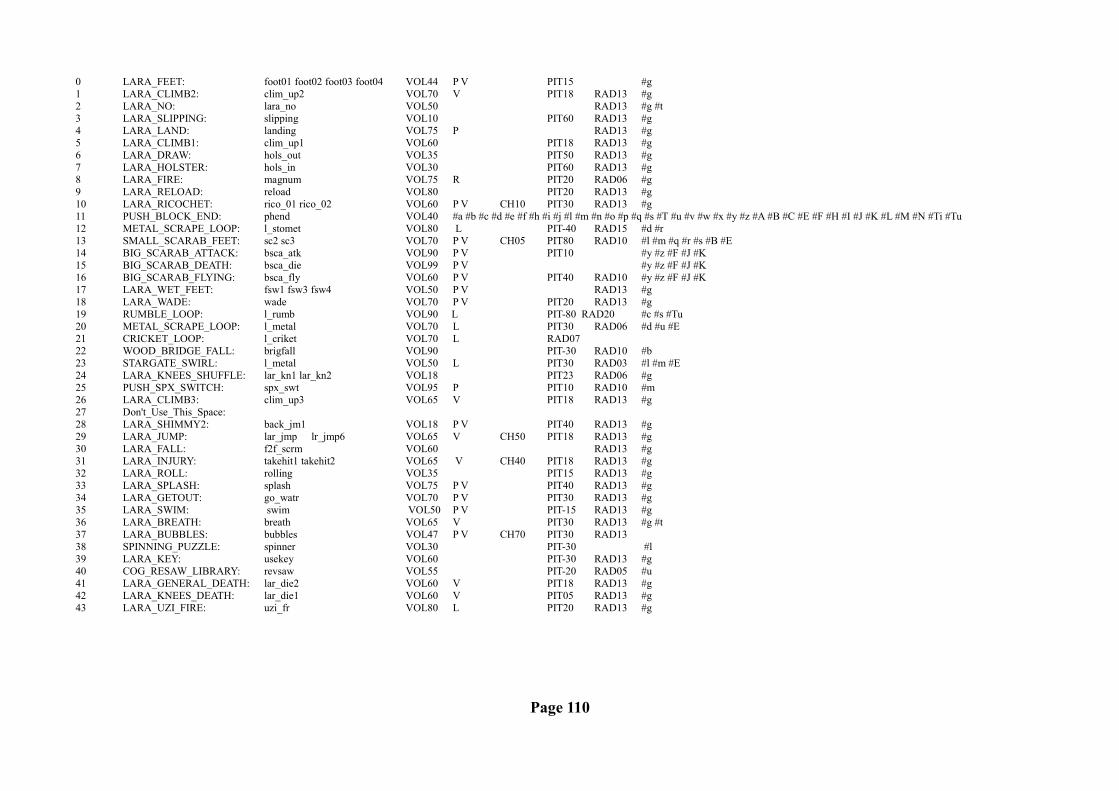
0 LARA_FEET: foot01 foot02 foot03 foot04 VOL44 P V PIT15 #g1 LARA_CLIMB2: clim_up2 VOL70 V PIT18 RAD13 #g2 LARA_NO: lara_no VOL50 RAD13 #g #t3 LARA_SLIPPING: slipping VOL10 PIT60 RAD13 #g4 LARA_LAND: landing VOL75 P RAD13 #g5 LARA_CLIMB1: clim_up1 VOL60 PIT18 RAD13 #g6 LARA_DRAW: hols_out VOL35 PIT50 RAD13 #g7 LARA_HOLSTER: hols_in VOL30 PIT60 RAD13 #g8 LARA_FIRE: magnum VOL75 R PIT20 RAD06 #g9 LARA_RELOAD: reload VOL80 PIT20 RAD13 #g10 LARA_RICOCHET: rico_01 rico_02 VOL60 P V CH10 PIT30 RAD13 #g11 PUSH_BLOCK_END: phend VOL40 #a #b #c #d #e #f #h #i #j #l #m #n #o #p #q #s #T #u #v #w #x #y #z #A #B #C #E #F #H #I #J #K #L #M #N #Ti #Tu12 METAL_SCRAPE_LOOP: l_stomet VOL80 L PIT-40 RAD15 #d #r13 SMALL_SCARAB_FEET: sc2 sc3 VOL70 P V CH05 PIT80 RAD10 #l #m #q #r #s #B #E14 BIG_SCARAB_ATTACK: bsca_atk VOL90 P V PIT10 #y #z #F #J #K15 BIG_SCARAB_DEATH: bsca_die VOL99 P V #y #z #F #J #K16 BIG_SCARAB_FLYING: bsca_fly VOL60 P V PIT40 RAD10 #y #z #F #J #K17 LARA_WET_FEET: fsw1 fsw3 fsw4 VOL50 P V RAD13 #g18 LARA_WADE: wade VOL70 P V PIT20 RAD13 #g19 RUMBLE_LOOP: l_rumb VOL90 L PIT-80 RAD20 #c #s #Tu20 METAL_SCRAPE_LOOP: l_metal VOL70 L PIT30 RAD06 #d #u #E21 CRICKET_LOOP: l_criket VOL70 L RAD0722 WOOD_BRIDGE_FALL: brigfall VOL90 PIT-30 RAD10 #b23 STARGATE_SWIRL: l_metal VOL50 L PIT30 RAD03 #l #m #E24 LARA_KNEES_SHUFFLE: lar_kn1 lar_kn2 VOL18 PIT23 RAD06 #g25 PUSH_SPX_SWITCH: spx_swt VOL95 P PIT10 RAD10 #m26 LARA_CLIMB3: clim_up3 VOL65 V PIT18 RAD13 #g27 Don't_Use_This_Space:28 LARA_SHIMMY2: back_jm1 VOL18 P V PIT40 RAD13 #g29 LARA_JUMP: lar_jmp lr_jmp6 VOL65 V CH50 PIT18 RAD13 #g30 LARA_FALL: f2f_scrm VOL60 RAD13 #g31 LARA_INJURY: takehit1 takehit2 VOL65 V CH40 PIT18 RAD13 #g32 LARA_ROLL: rolling VOL35 PIT15 RAD13 #g33 LARA_SPLASH: splash VOL75 P V PIT40 RAD13 #g34 LARA_GETOUT: go_watr VOL70 P V PIT30 RAD13 #g35 LARA_SWIM: swim VOL50 P V PIT-15 RAD13 #g36 LARA_BREATH: breath VOL65 V PIT30 RAD13 #g #t37 LARA_BUBBLES: bubbles VOL47 P V CH70 PIT30 RAD1338 SPINNING_PUZZLE: spinner VOL30 PIT-30 #l39 LARA_KEY: usekey VOL60 PIT-30 RAD13 #g40 COG_RESAW_LIBRARY: revsaw VOL55 PIT-20 RAD05 #u41 LARA_GENERAL_DEATH: lar_die2 VOL60 V PIT18 RAD13 #g42 LARA_KNEES_DEATH: lar_die1 VOL60 V PIT05 RAD13 #g43 LARA_UZI_FIRE: uzi_fr VOL80 L PIT20 RAD13 #g
Page 110
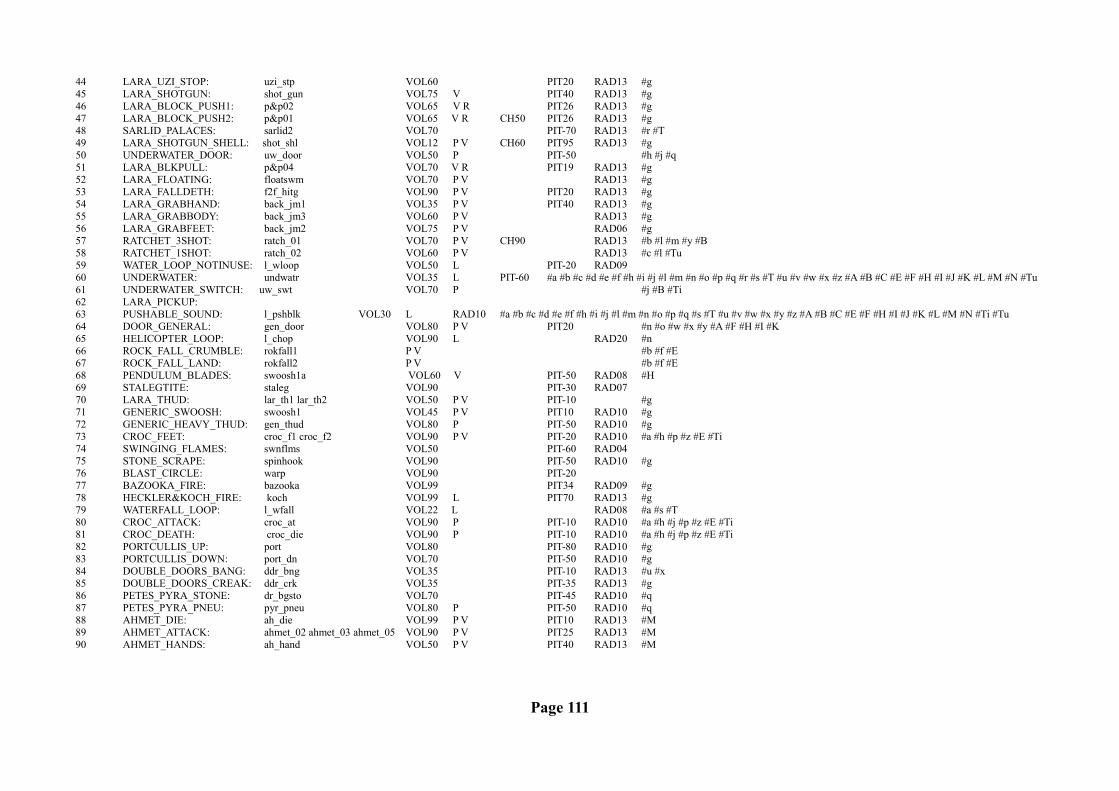
44 LARA_UZI_STOP: uzi_stp VOL60 PIT20 RAD13 #g45 LARA_SHOTGUN: shot_gun VOL75 V PIT40 RAD13 #g46 LARA_BLOCK_PUSH1: p&p02 VOL65 V R PIT26 RAD13 #g47 LARA_BLOCK_PUSH2: p&p01 VOL65 V R CH50 PIT26 RAD13 #g48 SARLID_PALACES: sarlid2 VOL70 PIT-70 RAD13 #r #T49 LARA_SHOTGUN_SHELL: shot_shl VOL12 P V CH60 PIT95 RAD13 #g50 UNDERWATER_DOOR: uw_door VOL50 P PIT-50 #h #j #q51 LARA_BLKPULL: p&p04 VOL70 V R PIT19 RAD13 #g52 LARA_FLOATING: floatswm VOL70 P V RAD13 #g53 LARA_FALLDETH: f2f_hitg VOL90 P V PIT20 RAD13 #g54 LARA_GRABHAND: back_jm1 VOL35 P V PIT40 RAD13 #g55 LARA_GRABBODY: back_jm3 VOL60 P V RAD13 #g56 LARA_GRABFEET: back_jm2 VOL75 P V RAD06 #g57 RATCHET_3SHOT: ratch_01 VOL70 P V CH90 RAD13 #b #l #m #y #B 58 RATCHET_1SHOT: ratch_02 VOL60 P V RAD13 #c #l #Tu59 WATER_LOOP_NOTINUSE: l_wloop VOL50 L PIT-20 RAD0960 UNDERWATER: undwatr VOL35 L PIT-60 #a #b #c #d #e #f #h #i #j #l #m #n #o #p #q #r #s #T #u #v #w #x #z #A #B #C #E #F #H #I #J #K #L #M #N #Tu61 UNDERWATER_SWITCH: uw_swt VOL70 P #j #B #Ti62 LARA_PICKUP: 63 PUSHABLE_SOUND: l_pshblk VOL30 L RAD10 #a #b #c #d #e #f #h #i #j #l #m #n #o #p #q #s #T #u #v #w #x #y #z #A #B #C #E #F #H #I #J #K #L #M #N #Ti #Tu64 DOOR_GENERAL: gen_door VOL80 P V PIT20 #n #o #w #x #y #A #F #H #I #K65 HELICOPTER_LOOP: l_chop VOL90 L RAD20 #n66 ROCK_FALL_CRUMBLE: rokfall1 P V #b #f #E67 ROCK_FALL_LAND: rokfall2 P V #b #f #E68 PENDULUM_BLADES: swoosh1a VOL60 V PIT-50 RAD08 #H69 STALEGTITE: staleg VOL90 PIT-30 RAD07 70 LARA_THUD: lar_th1 lar_th2 VOL50 P V PIT-10 #g71 GENERIC_SWOOSH: swoosh1 VOL45 P V PIT10 RAD10 #g72 GENERIC_HEAVY_THUD: gen_thud VOL80 P PIT-50 RAD10 #g73 CROC_FEET: croc_f1 croc_f2 VOL90 P V PIT-20 RAD10 #a #h #p #z #E #Ti74 SWINGING_FLAMES: swnflms VOL50 PIT-60 RAD0475 STONE_SCRAPE: spinhook VOL90 PIT-50 RAD10 #g76 BLAST_CIRCLE: warp VOL90 PIT-2077 BAZOOKA_FIRE: bazooka VOL99 PIT34 RAD09 #g78 HECKLER&KOCH_FIRE: koch VOL99 L PIT70 RAD13 #g79 WATERFALL_LOOP: l_wfall VOL22 L RAD08 #a #s #T80 CROC_ATTACK: croc_at VOL90 P PIT-10 RAD10 #a #h #j #p #z #E #Ti81 CROC_DEATH: croc_die VOL90 P PIT-10 RAD10 #a #h #j #p #z #E #Ti82 PORTCULLIS_UP: port VOL80 PIT-80 RAD10 #g83 PORTCULLIS_DOWN: port_dn VOL70 PIT-50 RAD10 #g84 DOUBLE_DOORS_BANG: ddr_bng VOL35 PIT-10 RAD13 #u #x85 DOUBLE_DOORS_CREAK: ddr_crk VOL35 PIT-35 RAD13 #g86 PETES_PYRA_STONE: dr_bgsto VOL70 PIT-45 RAD10 #q87 PETES_PYRA_PNEU: pyr_pneu VOL80 P PIT-50 RAD10 #q88 AHMET_DIE: ah_die VOL99 P V PIT10 RAD13 #M89 AHMET_ATTACK: ahmet_02 ahmet_03 ahmet_05 VOL90 P V PIT25 RAD13 #M90 AHMET_HANDS: ah_hand VOL50 P V PIT40 RAD13 #M
Page 111
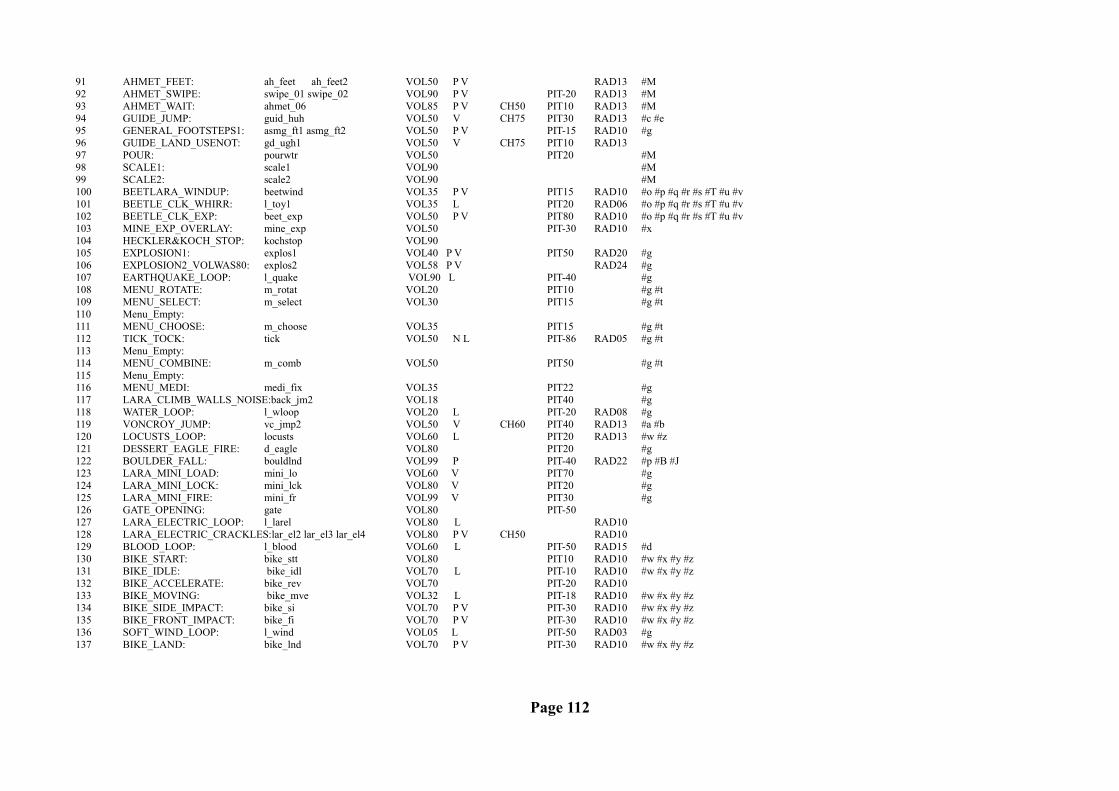
91 AHMET_FEET: ah_feet ah_feet2 VOL50 P V RAD13 #M92 AHMET_SWIPE: swipe_01 swipe_02 VOL90 P V PIT-20 RAD13 #M93 AHMET_WAIT: ahmet_06 VOL85 P V CH50 PIT10 RAD13 #M94 GUIDE_JUMP: guid_huh VOL50 V CH75 PIT30 RAD13 #c #e95 GENERAL_FOOTSTEPS1: asmg_ft1 asmg_ft2 VOL50 P V PIT-15 RAD10 #g96 GUIDE_LAND_USENOT: gd_ugh1 VOL50 V CH75 PIT10 RAD1397 POUR: pourwtr VOL50 PIT20 #M98 SCALE1: scale1 VOL90 #M99 SCALE2: scale2 VOL90 #M100 BEETLARA_WINDUP: beetwind VOL35 P V PIT15 RAD10 #o #p #q #r #s #T #u #v101 BEETLE_CLK_WHIRR: l_toy1 VOL35 L PIT20 RAD06 #o #p #q #r #s #T #u #v102 BEETLE_CLK_EXP: beet_exp VOL50 P V PIT80 RAD10 #o #p #q #r #s #T #u #v103 MINE_EXP_OVERLAY: mine_exp VOL50 PIT-30 RAD10 #x104 HECKLER&KOCH_STOP: kochstop VOL90105 EXPLOSION1: explos1 VOL40 P V PIT50 RAD20 #g106 EXPLOSION2_VOLWAS80: explos2 VOL58 P V RAD24 #g107 EARTHQUAKE_LOOP: l_quake VOL90 L PIT-40 #g108 MENU_ROTATE: m_rotat VOL20 PIT10 #g #t109 MENU_SELECT: m_select VOL30 PIT15 #g #t110 Menu_Empty:111 MENU_CHOOSE: m_choose VOL35 PIT15 #g #t112 TICK_TOCK: tick VOL50 N L PIT-86 RAD05 #g #t113 Menu_Empty:114 MENU_COMBINE: m_comb VOL50 PIT50 #g #t115 Menu_Empty:116 MENU_MEDI: medi_fix VOL35 PIT22 #g 117 LARA_CLIMB_WALLS_NOISE:back_jm2 VOL18 PIT40 #g 118 WATER_LOOP: l_wloop VOL20 L PIT-20 RAD08 #g119 VONCROY_JUMP: vc_jmp2 VOL50 V CH60 PIT40 RAD13 #a #b120 LOCUSTS_LOOP: locusts VOL60 L PIT20 RAD13 #w #z121 DESSERT_EAGLE_FIRE: d_eagle VOL80 PIT20 #g122 BOULDER_FALL: bouldlnd VOL99 P PIT-40 RAD22 #p #B #J 123 LARA_MINI_LOAD: mini_lo VOL60 V PIT70 #g124 LARA_MINI_LOCK: mini_lck VOL80 V PIT20 #g125 LARA_MINI_FIRE: mini_fr VOL99 V PIT30 #g126 GATE_OPENING: gate VOL80 PIT-50127 LARA_ELECTRIC_LOOP: l_larel VOL80 L RAD10 128 LARA_ELECTRIC_CRACKLES:lar_el2 lar_el3 lar_el4 VOL80 P V CH50 RAD10129 BLOOD_LOOP: l_blood VOL60 L PIT-50 RAD15 #d130 BIKE_START: bike_stt VOL80 PIT10 RAD10 #w #x #y #z131 BIKE_IDLE: bike_idl VOL70 L PIT-10 RAD10 #w #x #y #z132 BIKE_ACCELERATE: bike_rev VOL70 PIT-20 RAD10133 BIKE_MOVING: bike_mve VOL32 L PIT-18 RAD10 #w #x #y #z134 BIKE_SIDE_IMPACT: bike_si VOL70 P V PIT-30 RAD10 #w #x #y #z135 BIKE_FRONT_IMPACT: bike_fi VOL70 P V PIT-30 RAD10 #w #x #y #z136 SOFT_WIND_LOOP: l_wind VOL05 L PIT-50 RAD03 #g137 BIKE_LAND: bike_lnd VOL70 P V PIT-30 RAD10 #w #x #y #z
Page 112
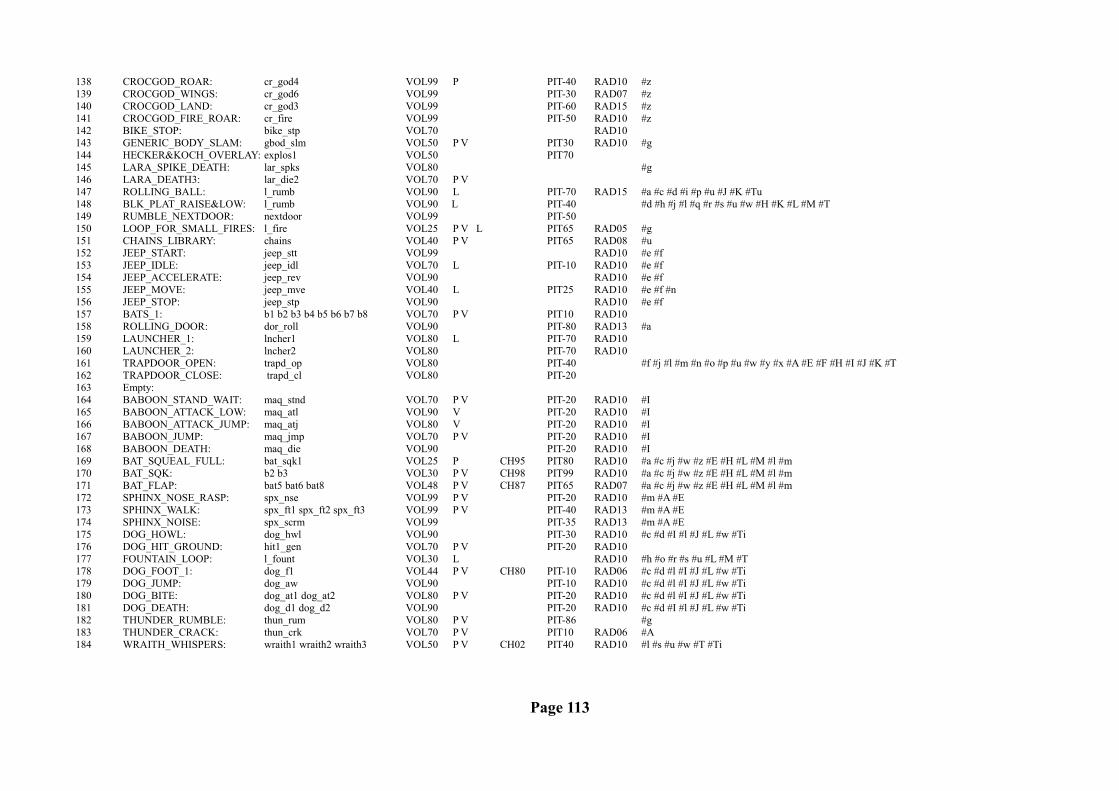
138 CROCGOD_ROAR: cr_god4 VOL99 P PIT-40 RAD10 #z139 CROCGOD_WINGS: cr_god6 VOL99 PIT-30 RAD07 #z140 CROCGOD_LAND: cr_god3 VOL99 PIT-60 RAD15 #z141 CROCGOD_FIRE_ROAR: cr_fire VOL99 PIT-50 RAD10 #z142 BIKE_STOP: bike_stp VOL70 RAD10143 GENERIC_BODY_SLAM: gbod_slm VOL50 P V PIT30 RAD10 #g144 HECKER&KOCH_OVERLAY: explos1 VOL50 PIT70145 LARA_SPIKE_DEATH: lar_spks VOL80 #g146 LARA_DEATH3: lar_die2 VOL70 P V147 ROLLING_BALL: l_rumb VOL90 L PIT-70 RAD15 #a #c #d #i #p #u #J #K #Tu148 BLK_PLAT_RAISE&LOW: l_rumb VOL90 L PIT-40 #d #h #j #l #q #r #s #u #w #H #K #L #M #T149 RUMBLE_NEXTDOOR: nextdoor VOL99 PIT-50150 LOOP_FOR_SMALL_FIRES: l_fire VOL25 P V L PIT65 RAD05 #g151 CHAINS_LIBRARY: chains VOL40 P V PIT65 RAD08 #u152 JEEP_START: jeep_stt VOL99 RAD10 #e #f153 JEEP_IDLE: jeep_idl VOL70 L PIT-10 RAD10 #e #f154 JEEP_ACCELERATE: jeep_rev VOL90 RAD10 #e #f155 JEEP_MOVE: jeep_mve VOL40 L PIT25 RAD10 #e #f #n156 JEEP_STOP: jeep_stp VOL90 RAD10 #e #f157 BATS_1: b1 b2 b3 b4 b5 b6 b7 b8 VOL70 P V PIT10 RAD10 158 ROLLING_DOOR: dor_roll VOL90 PIT-80 RAD13 #a159 LAUNCHER_1: lncher1 VOL80 L PIT-70 RAD10160 LAUNCHER_2: lncher2 VOL80 PIT-70 RAD10161 TRAPDOOR_OPEN: trapd_op VOL80 PIT-40 #f #j #l #m #n #o #p #u #w #y #x #A #E #F #H #I #J #K #T162 TRAPDOOR_CLOSE: trapd_cl VOL80 PIT-20 163 Empty:164 BABOON_STAND_WAIT: maq_stnd VOL70 P V PIT-20 RAD10 #I165 BABOON_ATTACK_LOW: maq_atl VOL90 V PIT-20 RAD10 #I166 BABOON_ATTACK_JUMP: maq_atj VOL80 V PIT-20 RAD10 #I167 BABOON_JUMP: maq_jmp VOL70 P V PIT-20 RAD10 #I168 BABOON_DEATH: maq_die VOL90 PIT-20 RAD10 #I169 BAT_SQUEAL_FULL: bat_sqk1 VOL25 P CH95 PIT80 RAD10 #a #c #j #w #z #E #H #L #M #l #m170 BAT_SQK: b2 b3 VOL30 P V CH98 PIT99 RAD10 #a #c #j #w #z #E #H #L #M #l #m171 BAT_FLAP: bat5 bat6 bat8 VOL48 P V CH87 PIT65 RAD07 #a #c #j #w #z #E #H #L #M #l #m172 SPHINX_NOSE_RASP: spx_nse VOL99 P V PIT-20 RAD10 #m #A #E173 SPHINX_WALK: spx_ft1 spx_ft2 spx_ft3 VOL99 P V PIT-40 RAD13 #m #A #E174 SPHINX_NOISE: spx_scrm VOL99 PIT-35 RAD13 #m #A #E175 DOG_HOWL: dog_hwl VOL90 PIT-30 RAD10 #c #d #I #l #J #L #w #Ti 176 DOG_HIT_GROUND: hit1_gen VOL70 P V PIT-20 RAD10177 FOUNTAIN_LOOP: l_fount VOL30 L RAD10 #h #o #r #s #u #L #M #T178 DOG_FOOT_1: dog_f1 VOL44 P V CH80 PIT-10 RAD06 #c #d #l #I #J #L #w #Ti 179 DOG_JUMP: dog_aw VOL90 PIT-10 RAD10 #c #d #l #I #J #L #w #Ti 180 DOG_BITE: dog_at1 dog_at2 VOL80 P V PIT-20 RAD10 #c #d #l #I #J #L #w #Ti 181 DOG_DEATH: dog_d1 dog_d2 VOL90 PIT-20 RAD10 #c #d #I #l #J #L #w #Ti 182 THUNDER_RUMBLE: thun_rum VOL80 P V PIT-86 #g183 THUNDER_CRACK: thun_crk VOL70 P V PIT10 RAD06 #A184 WRAITH_WHISPERS: wraith1 wraith2 wraith3 VOL50 P V CH02 PIT40 RAD10 #l #s #u #w #T #Ti
Page 113
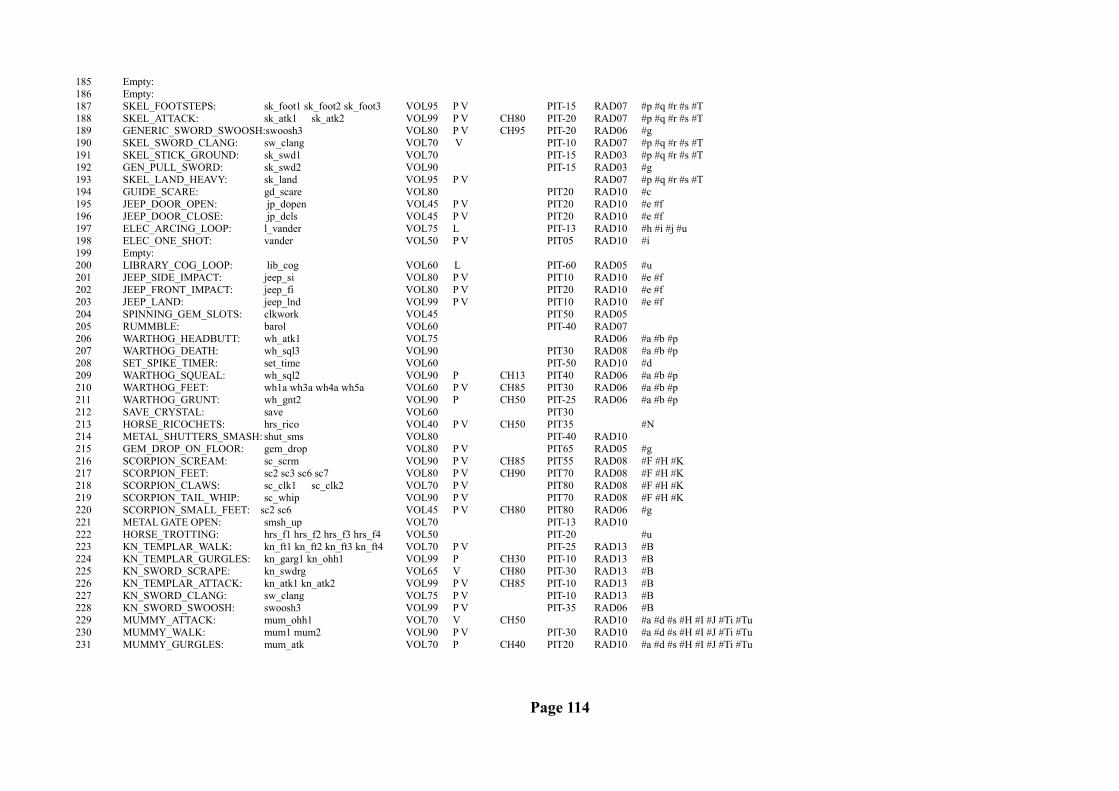
185 Empty:186 Empty:187 SKEL_FOOTSTEPS: sk_foot1 sk_foot2 sk_foot3 VOL95 P V PIT-15 RAD07 #p #q #r #s #T188 SKEL_ATTACK: sk_atk1 sk_atk2 VOL99 P V CH80 PIT-20 RAD07 #p #q #r #s #T189 GENERIC_SWORD_SWOOSH:swoosh3 VOL80 P V CH95 PIT-20 RAD06 #g190 SKEL_SWORD_CLANG: sw_clang VOL70 V PIT-10 RAD07 #p #q #r #s #T191 SKEL_STICK_GROUND: sk_swd1 VOL70 PIT-15 RAD03 #p #q #r #s #T192 GEN_PULL_SWORD: sk_swd2 VOL90 PIT-15 RAD03 #g193 SKEL_LAND_HEAVY: sk_land VOL95 P V RAD07 #p #q #r #s #T194 GUIDE_SCARE: gd_scare VOL80 PIT20 RAD10 #c195 JEEP_DOOR_OPEN: jp_dopen VOL45 P V PIT20 RAD10 #e #f196 JEEP_DOOR_CLOSE: jp_dcls VOL45 P V PIT20 RAD10 #e #f197 ELEC_ARCING_LOOP: l_vander VOL75 L PIT-13 RAD10 #h #i #j #u198 ELEC_ONE_SHOT: vander VOL50 P V PIT05 RAD10 #i199 Empty: 200 LIBRARY_COG_LOOP: lib_cog VOL60 L PIT-60 RAD05 #u201 JEEP_SIDE_IMPACT: jeep_si VOL80 P V PIT10 RAD10 #e #f202 JEEP_FRONT_IMPACT: jeep_fi VOL80 P V PIT20 RAD10 #e #f203 JEEP_LAND: jeep_lnd VOL99 P V PIT10 RAD10 #e #f204 SPINNING_GEM_SLOTS: clkwork VOL45 PIT50 RAD05205 RUMMBLE: barol VOL60 PIT-40 RAD07206 WARTHOG_HEADBUTT: wh_atk1 VOL75 RAD06 #a #b #p207 WARTHOG_DEATH: wh_sql3 VOL90 PIT30 RAD08 #a #b #p208 SET_SPIKE_TIMER: set_time VOL60 PIT-50 RAD10 #d209 WARTHOG_SQUEAL: wh_sql2 VOL90 P CH13 PIT40 RAD06 #a #b #p210 WARTHOG_FEET: wh1a wh3a wh4a wh5a VOL60 P V CH85 PIT30 RAD06 #a #b #p211 WARTHOG_GRUNT: wh_gnt2 VOL90 P CH50 PIT-25 RAD06 #a #b #p212 SAVE_CRYSTAL: save VOL60 PIT30213 HORSE_RICOCHETS: hrs_rico VOL40 P V CH50 PIT35 #N214 METAL_SHUTTERS_SMASH: shut_sms VOL80 PIT-40 RAD10215 GEM_DROP_ON_FLOOR: gem_drop VOL80 P V PIT65 RAD05 #g216 SCORPION_SCREAM: sc_scrm VOL90 P V CH85 PIT55 RAD08 #F #H #K217 SCORPION_FEET: sc2 sc3 sc6 sc7 VOL80 P V CH90 PIT70 RAD08 #F #H #K218 SCORPION_CLAWS: sc_clk1 sc_clk2 VOL70 P V PIT80 RAD08 #F #H #K219 SCORPION_TAIL_WHIP: sc_whip VOL90 P V PIT70 RAD08 #F #H #K220 SCORPION_SMALL_FEET: sc2 sc6 VOL45 P V CH80 PIT80 RAD06 #g221 METAL GATE OPEN: smsh_up VOL70 PIT-13 RAD10222 HORSE_TROTTING: hrs_f1 hrs_f2 hrs_f3 hrs_f4 VOL50 PIT-20 #u223 KN_TEMPLAR_WALK: kn_ft1 kn_ft2 kn_ft3 kn_ft4 VOL70 P V PIT-25 RAD13 #B 224 KN_TEMPLAR_GURGLES: kn_garg1 kn_ohh1 VOL99 P CH30 PIT-10 RAD13 #B225 KN_SWORD_SCRAPE: kn_swdrg VOL65 V CH80 PIT-30 RAD13 #B226 KN_TEMPLAR_ATTACK: kn_atk1 kn_atk2 VOL99 P V CH85 PIT-10 RAD13 #B227 KN_SWORD_CLANG: sw_clang VOL75 P V PIT-10 RAD13 #B228 KN_SWORD_SWOOSH: swoosh3 VOL99 P V PIT-35 RAD06 #B229 MUMMY_ATTACK: mum_ohh1 VOL70 V CH50 RAD10 #a #d #s #H #I #J #Ti #Tu230 MUMMY_WALK: mum1 mum2 VOL90 P V PIT-30 RAD10 #a #d #s #H #I #J #Ti #Tu231 MUMMY_GURGLES: mum_atk VOL70 P CH40 PIT20 RAD10 #a #d #s #H #I #J #Ti #Tu
Page 114
232 MUMMY_TAKE_HIT: mum_tkht VOL63 PIT-05 RAD10 #a #d #s #H #I #J #Ti #Tu233 SMALL_FAN: fann VOL70 RAD08234 LARGE_FAN: fann VOL99 PIT-50 RAD10 #b235 LARA_CROSSBOW: crossbow VOL45 PIT45 RAD10 #g236 SMALL_CREATURE_FEET: liz_fs1 liz_fs2 VOL99 P V RAD05 #b 237 SAS_GADGIE_DIE: asmg_d1 VOL85 P RAD08 #w #x #y #A238 WATER_FLUSHES: flush VOL80 P PIT-56 #T239 GUID_ZIPPO: gd_zippo VOL80 PIT60 #c240 LEAP_SWITCH: swch_01 VOL50 PIT20 RAD05 #f #l #q #r #w241 OLD_SWITCH: sml_swt VOL50 PIT20 RAD05242 DEMIGODS_FEET: dem_f1 dem_f2 VOL80 PIT-10 RAD14 #r #y #H #K243 DEMIGODS_BULL_SNORT: debu_snt VOL97 CH50 PIT30 RAD15 #y244 DEMIGODS_BULL_HAMMER:demi_ham VOL85 PIT35 RAD06 #y245 DEMIGODS_S_WAVE_RUMB:dem_rumb VOL95 PIT-82 RAD07 #y246 DEMIGOD_WEAP_SWOOSH: swoosh4 VOL99 CH95 PIT-40 RAD10 #r #H #K247 DEMIGOD_FALCON_SQUEAL:defa_sql VOL85 P V CH60 RAD08 #H #K248 DEMIGOD_FALCON_PLAS: dem_plas VOL85 PIT70 RAD13 #H #K249 DEMIGOD_RISE: dem_rise VOL95 PIT-70 RAD15 #r #H #K250 DEMI_TUT_PLASMA_SPRAY:dem_pla2 VOL65 P PIT45 RAD10 #r251 DEMI_SIREN_SWAVE: swave_ex VOL57 P V CH95 PIT-40 RAD08 #g252 DEMIGODS_TUT_GROWL: de_tutgr VOL80 P CH60 PIT-10 RAD08 #r253 JOBY_ELECTRIC_INSERT: joby_ele VOL50 PIT50 RAD05 #L254 BAD_LAND: asmg_ft4 VOL99 P V RAD10 #e #f #h #i #m #n #o #v #B #C #J #L #Tu255 DOOR_GEN_THUD: dor_thud VOL80 P V PIT-50 RAD15 #g256 BAD_GRUNTS: bad_atk1 VOL87 P V CH50 PIT20 RAD10 #e #f #h #i #m #n #o #v #B #C #J #L #Tu257 BAD_DIE: bad_die1 bad_die2 VOL99 PIT25 RAD10 #e #f #h #i #m #n #o #v #B #C #J #L #Tu 258 BAD_JUMP: bad_jmp VOL73 P V CH50 PIT-05 RAD10 #e #f #h #i #m #n #o #v #B #C #J #L #Tu 259 BAD_TROOP_STUN: bad_stun VOL70 CH50 PIT20 RAD10 #e #f #h #i #m #n #o #v #B #C #F #J #K #L #Tu260 BAD_SWORDAWAY: bad_swaw VOL65 PIT-20 RAD10 #e #f #h #i #m #n #o #v #B #C #J #L #Tu 261 BAD_TROOP_UZI: bad_uzi VOL42 PIT70 RAD13 #e #f #h #i #m #n #o #v #B #C #F #J #K #L #Tu262 BAD_SWORD_RICO: bad_rico VOL85 P V CH90 PIT30 RAD10 #e #f #h #i #m #n #o #v #B #C #J #L #Tu 263 BAD_TROOP_UZI_END: bad_uzi2 VOL42 PIT70 RAD13 #e #f #h #i #m #n #o #v #B #C #F #J #K #L #Tu264 TROOP_SCORP_CRIES: trp_sco1 trp_sco2 VOL80 P V CH50 PIT20 RAD10265 SAS_TROOP_FEET: boot_ft1 boot_ft2 boot_ft3 VOL40 P V PIT-30 RAD10 #w #x #y #A #F #K266 GENERIC_NRG_CHARGE: nrg_chg VOL70 PIT80 RAD15 #q #r #N267 SAS_MG_FIRE: sas_mgfi VOL35 PIT90 RAD10 #w #x #y #A268 HAMMER_HEAD_WADE: ham_wade VOL87 P V PIT-70 RAD05 #q269 SMALL_SWITCH: sml_swt VOL55 PIT10 RAD10 #g270 Empty:271 SIREN_WING_FLAP: sir_flap VOL75 V PIT-50 RAD15 #q #r272 SIREN_NOIZES: sir_fx1 VOL99 P V CH25 PIT30 RAD15 #q #r273 SIREN_ATTACK: sir_atk VOL99 PIT20 RAD13 #q #r274 SIREN_DEATH: sir_die VOL99 P PIT40 RAD13 #q #r275 SIREN_GEN_NOISES: sir_bz1 VOL99 P V CH90 PIT90 RAD13 #q #r276 SETT_SIREN_PLASMA: gen_plas VOL99 P RAD20 #q #r #N277 HAMMER_HEAD_ATK: ham_head VOL88 V PIT-30 RAD05 #q278 SMALL_DOOR_SUBWAY: sml_d VOL50 PIT-20 RAD20 #y
Page 115
279 TRAIN_DOOR_OPEN: trdr_ope VOL85 P PIT05 RAD12 #n280 TRAIN_DOOR_CLOSE: trdr_cls VOL85 P PIT05 RAD12 #n281 VONCROY_KNIFE_SWISH: vc_knife VOL65 P V PIT40 RAD10 #a #b282 TRAIN_UNLINK_BREAK: tr_break VOL80 PIT30 #n283 OBJ_BOX_HIT: boxhit2 VOL99 P PIT20 RAD10 #A284 OBJ_BOX_HIT_CHANCE: boxhit1 boxhit2 VOL99 P V CH80 PIT30 RAD10 #A285 OBJ_GEM_SMASH: crysmash VOL66 PIT60 RAD10 #g286 CATBLADES_DRAW: trapbld1 VOL60 P V PIT20 RAD13 #m287 SWIRLY_LONG_MOVE_SFX: swrl_mov VOL40 PIT-55 RAD15 #d288 FOOTSTEPS_MUD: fs_mud1 fs_mud2 VOL12 P V PIT-20 #g289 HORSEMAN_HORSE_NEIGH:hrs_neig VOL74 P PIT20 #u290 FOOTSTEPS_GRAVEL: fs_grv1 fs_grv2 VOL20 P V PIT-20 #g291 FOOTSTEPS_SAND_&_GRASS: fs_snd1 fs_snd2 VOL20 P V PIT50 #g292 FOOTSTEPS_WOOD: fs_wd1 fs_wd2 VOL20 V PIT-20 #g293 FOOTSTEPS_MARBLE: fs_mb2 fs_mb3 fs_mb4 VOL18 P PIT55294 FOOTSTEPS_METAL: fs_met1 fs_met2 VOL25 V PIT-15 RAD06 #g295 GEN_SPHINX_DOORTHD: hvy_fall VOL60 P PIT-25 RAD10 #m296 SETT_PLASMA_1: set_plas VOL90 P PIT-30 RAD20 #N297 SETT_BOLT_1: set_bolt VOL99 PIT50 RAD20 #N298 SETT_FEET: set_f1 VOL55 P V PIT40 RAD13 #u #N299 SETT_NRG_CHARGE: set_chrg VOL99 PIT60 RAD20 #N300 SETT_NRG_CHARGE2: set_chg2 VOL99 PIT50 RAD20 #N301 HORSEMAN_TAKEHIT: hrs_tkht VOL88 P V PIT20 RAD13 #u302 HORSEMAN_WALK: hrsm_f1 hrsm_f2 VOL50 P V PIT30 RAD10 #u303 HORSEMAN_GRUNT: hrs_atak VOL97 V CH50 PIT10 RAD13 #u304 HORSEMAN_FALL: hrs_fall VOL90 P PIT10 RAD13 #u305 HORSEMAN_DIE: hrs_die VOL87 PIT10 RAD15 #u306 MAPPER_SWITCH_ON: map_swch VOL80 PIT-10 #m307 MAPPER_OPEN: map_open VOL99 PIT-50 #m308 MAPPER_LAZER: l_maplzr VOL90 L PIT50 #m309 MAPPER_MOVE: lncher1 VOL99 PIT-50 #m310 MAPPER_CLUNK: map_clnk VOL80 PIT-20 #m311 BLADES_DRAW: trapbld1 VOL80 P V PIT60 RAD13 #c #l #m #r #E #H312 BLADES_CLASH_LOUD: trapbld2 VOL95 P PIT60 RAD13 #c #l #m #r #E #H313 BLADES_CLASH_QUIET: trapbld2 VOL25 P PIT60 RAD13 #c #l #m #r314 HAMMER_TRAP_BANG: traphamm VOL99 p PIT-50 RAD15 #i #l #B315 DOOR_BIG_STONE: dr_bgsto VOL60 PIT-50 RAD08 #g316 SETT_BIG_ROAR: set_roar VOL98 P V CH70 RAD25317 BABOON_CHATTER: maq_stnd VOL50 CH30 PIT-50 RAD10 #I318 BABOON_ROLL: rolling VOL30 PIT30 RAD10 #I319 SWOOSH_SWIRLY_DOUBLE:2xswsh VOL50 V PIT-10 RAD10 #d320 DOOR_SETTDOOR_SQK: setdrmt1 VOL85 PIT-55 RAD10 #N321 DOOR_SETTDOOR_CLANK: setdrmt2 VOL95 PIT10 RAD10 #N322 SETT_JUMP_ATTACK: setgrnt1 VOL99 P CH70 PIT-50 RAD25 #N323 JOBY_BLOCK: joby_blk VOL60 PIT46 RAD08 #L #N324 SETT_TAKE_HIT: set_hit VOL99 P PIT-20 RAD25 #N325 DART_SPITT: dart VOL50 P V PIT50 RAD03 #a #b #c #d #o #Tu
Page 116
326 LARA_CROWBAR_GEM: crowgem VOL35 P V PIT35 RAD05 #g327 CROWBAR_DOOR_OPEN: cbar_clk VOL80 P V PIT-15 RAD05 #g328 LARA_LEVER_GEN_SQKS: sqk1 sqk2 VOL30 P V CH80 PIT30 RAD05 #a #c #d #l #m #n #s #w #z #B #C #T #Tu329 HORSEMAN_GETUP: hrs_gtup VOL65 P V PIT10 RAD13 #u330 EXH_BASKET_OPEN: baskopen VOL77 PIT10 RAD10 #p331 EXH_MUMCOFF_OPE1: coffope1 VOL99 PIT-10 RAD10 #p332 EXH_MUMCOFF_OPE2: coffope2 VOL99 PIT-10 RAD10 #p333 EXH_MUM_JOLT: mumjolt VOL99 PIT-10 RAD10 #p334 EXH_MUMHEAD_SPIN: headspin VOL80 RAD04 #p335 EXH_MUMMY_RAHHH: mumrar VOL99 PIT-60 RAD15 #p336 EXH_ROLLER_BLINDS: roller VOL65 PIT-50 RAD10 #p337 LARA_LEVER_PART1: lev_pul1 VOL95 P PIT-20 RAD10 #a #c #d #l #m #n #s #w #y #z #B #C #Tu338 LARA_LEVER_PART2: lev_pul2 VOL95 P PIT-10 RAD10 #a #c #d #l #m #n #s #w #y #z #B #C #I #Tu339 LARA_POLE_CLIMB: ple_slid VOL70 P V CH90 PIT-15 RAD08 #g340 LARA_POLE_LOOP: l_rpeple VOL50 L PIT-25 RAD05 #g341 TRAP_SPIKEBALL_SPK: trapbld3 VOL60 P V PIT70 RAD10 #a #m #E342 LARA_PULLEY: lar_plly VOL70 P V PIT30 RAD05 #c #d #i #r #z #B #Tu343 TEETH_SPIKES: teethspk VOL50 P PIT20 RAD08 #a #b #c #d #o #p #q #r #E #H #M #Tu344 SAND_LOOP: l_sand VOL70 L PIT20 RAD10 #c #d #Ti345 LARA_USE_OBJECT: amusnd VOL50 PIT50 RAD05 #g346 LIBRARY_COG_SQKS: sqk1 sqk2 VOL50 P V CH80 PIT-30 RAD05 #c #u #Tu347 HIT_ROCK: hit_rock VOL90 P V PIT10 RAD10 #g348 LARA_NO_FRENCH: lara_nof VOL46 RAD13 #g349 LARA_NO_JAPAN: lara_noj VOL46 RAD13 #g350 LARA_CROW_WRENCH: crow_try VOL50 P V CH90 PIT45 RAD05 #g351 LARA_ROPE_CREAK: rope_01 rope_02 VOL50 P V PIT30 #g352 BOWLANIM: sqk1 VOL70 PIT-45 RAD05 #h 353 SPHINX_DOOR_WOODCRACK:spxdrcrk VOL90 PIT50 #m #A354 BEETLE_CLK_WHIRR: l_toy1 VOL40 PIT20 RAD06355 MAPPER_PYRAMID_OPEN: map_pyra VOL70 PIT50 #m356 LIGHT_BEAM_JOBY: l_beam VOL50 L PIT50 RAD16 #L #M #N357 GUIDE_FIRE_LIGHT: gd_fire VOL50 PIT-15 RAD10 #c358 AUTOGUNS: sas_mgfi VOL75 PIT40 RAD15 #w #x359 PULLEY_ANDY: lar_plly VOL70 V PIT-20 RAD10 #y360 STEAM: steam VOL60 P V PIT-50 RAD10 #x361 JOBY_GARAGE_DOOR: roller2 VOL60 PIT-50 RAD10 #C #Tu362 JOBY_WIND: jobywind VOL90 PIT-50 RAD15 #I363 SANDHAM_IN_THE_HOUSE: l_sprin VOL90 L PIT40 RAD10 #y364 SANDHAM_CONVEYS: convey VOL90 #y365 CRANKY_GRAPE_CRUSH: crank VOL90 PIT02 #A366 BIKE_HIT_OBJECTS: hit_rock VOL60 P V PIT10 RAD10 #w #x #y #z367 BIKE_HIT_ENEMIES: bike_hit VOL50 P V PIT05 RAD10 #w #x #y #z368 FLAME_EMITTER: l_flame VOL50 L PIT-15 RAD05 #l #m #B369 LARA_CLICK_SWITCH: clk_swt VOL60 PIT-20 RAD05 #g
Page 117
TOMB RAIDER NEXT GENERATION SCRIPT REFERENCE MANUAL
TOMB RAIDER NEXT GENERATION
NG CONSTANTS
Page 118

TOMB RAIDER NEXT GENERATION SCRIPT REFERENCE MANUAL
NG CONSTANTS
TRNG 1.2.2.7 UPDATES MARKED IN GREEN
PAGE
FLIP EFFECTS (OLD FLIP) 1 TO 46 120
NEW NG FLIP EFFECTS 47 TO 82 121NEW NG FLIP EFFECTS 83 TO 116 122NEW NG FLIP EFFECTS 117 TO 152 123NEW NG FLIP EFFECTS 153 TO 192 124NEW NG FLIP EFFECTS 193 TO 229 125NEW NG FLIP EFFECTS 230 TO 274 126NEW NG FLIP EFFECTS 275 TO 315 127NEW NG FLIP EFFECTS 316 TO 353 128NEW NG FLIP EFFECTS 354 TO 365 129
ACTION TRIGGERS 1 TO 41 182ACTION TRIGGERS 42 TO 85 183
CONDITION TRIGGERS 1 TO 32 198CONDITION TRIGGERS 33 TO 67 199CONDITION TRIGGERS 68 TO 85 200
TEXT TRIGGERS 0 TO 40 218
Page 119
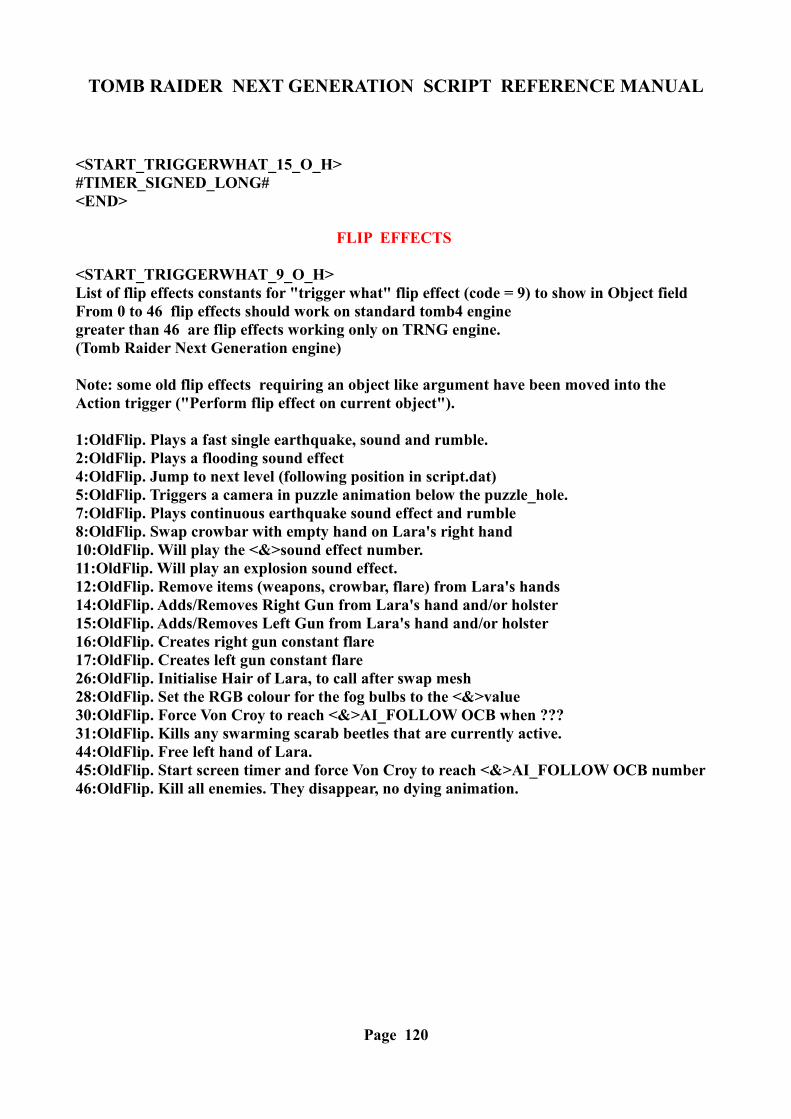
TOMB RAIDER NEXT GENERATION SCRIPT REFERENCE MANUAL
<START_TRIGGERWHAT_15_O_H>#TIMER_SIGNED_LONG#<END>
FLIP EFFECTS
<START_TRIGGERWHAT_9_O_H>List of flip effects constants for "trigger what" flip effect (code = 9) to show in Object fieldFrom 0 to 46 flip effects should work on standard tomb4 enginegreater than 46 are flip effects working only on TRNG engine.(Tomb Raider Next Generation engine)
Note: some old flip effects requiring an object like argument have been moved into the Action trigger ("Perform flip effect on current object").
1:OldFlip. Plays a fast single earthquake, sound and rumble.2:OldFlip. Plays a flooding sound effect4:OldFlip. Jump to next level (following position in script.dat)5:OldFlip. Triggers a camera in puzzle animation below the puzzle_hole.7:OldFlip. Plays continuous earthquake sound effect and rumble8:OldFlip. Swap crowbar with empty hand on Lara's right hand10:OldFlip. Will play the <&>sound effect number.11:OldFlip. Will play an explosion sound effect.12:OldFlip. Remove items (weapons, crowbar, flare) from Lara's hands14:OldFlip. Adds/Removes Right Gun from Lara's hand and/or holster15:OldFlip. Adds/Removes Left Gun from Lara's hand and/or holster16:OldFlip. Creates right gun constant flare17:OldFlip. Creates left gun constant flare26:OldFlip. Initialise Hair of Lara, to call after swap mesh28:OldFlip. Set the RGB colour for the fog bulbs to the <&>value30:OldFlip. Force Von Croy to reach <&>AI_FOLLOW OCB when ???31:OldFlip. Kills any swarming scarab beetles that are currently active.44:OldFlip. Free left hand of Lara.45:OldFlip. Start screen timer and force Von Croy to reach <&>AI_FOLLOW OCB number46:OldFlip. Kill all enemies. They disappear, no dying animation.
Page 120
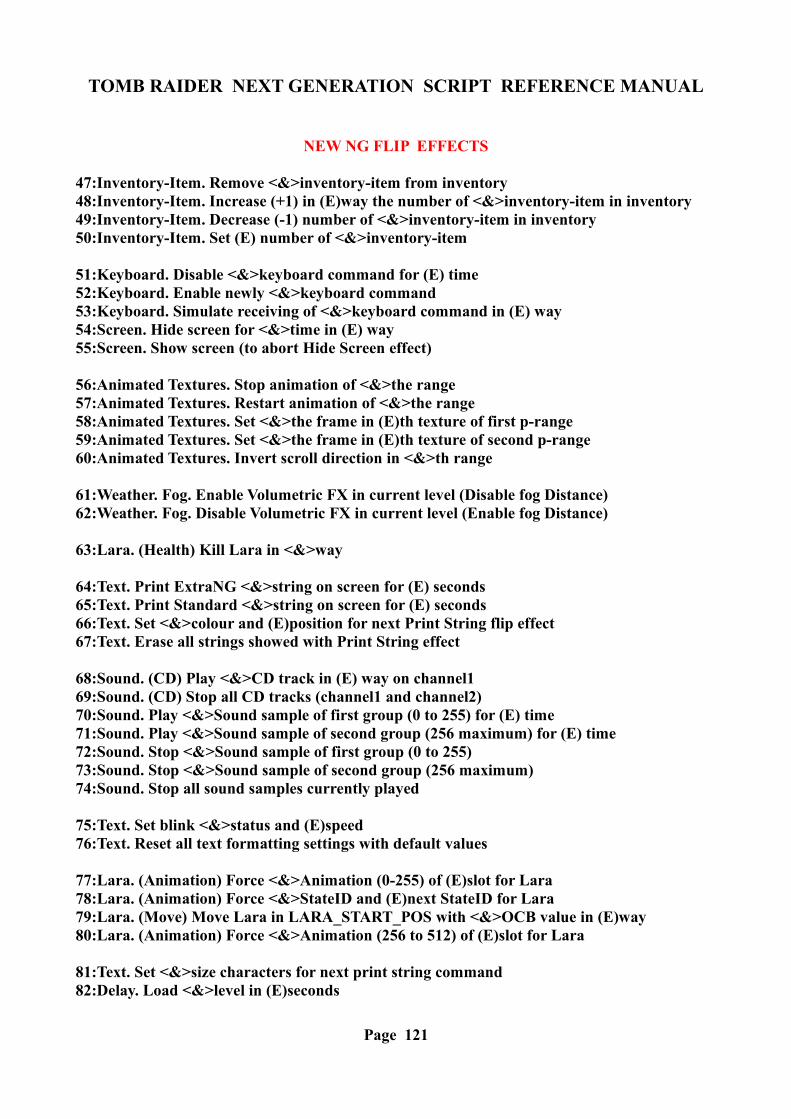
TOMB RAIDER NEXT GENERATION SCRIPT REFERENCE MANUAL
NEW NG FLIP EFFECTS
47:Inventory-Item. Remove <&>inventory-item from inventory48:Inventory-Item. Increase (+1) in (E)way the number of <&>inventory-item in inventory49:Inventory-Item. Decrease (-1) number of <&>inventory-item in inventory50:Inventory-Item. Set (E) number of <&>inventory-item
51:Keyboard. Disable <&>keyboard command for (E) time52:Keyboard. Enable newly <&>keyboard command53:Keyboard. Simulate receiving of <&>keyboard command in (E) way54:Screen. Hide screen for <&>time in (E) way55:Screen. Show screen (to abort Hide Screen effect)
56:Animated Textures. Stop animation of <&>the range57:Animated Textures. Restart animation of <&>the range58:Animated Textures. Set <&>the frame in (E)th texture of first p-range59:Animated Textures. Set <&>the frame in (E)th texture of second p-range60:Animated Textures. Invert scroll direction in <&>th range
61:Weather. Fog. Enable Volumetric FX in current level (Disable fog Distance)62:Weather. Fog. Disable Volumetric FX in current level (Enable fog Distance)
63:Lara. (Health) Kill Lara in <&>way
64:Text. Print ExtraNG <&>string on screen for (E) seconds65:Text. Print Standard <&>string on screen for (E) seconds66:Text. Set <&>colour and (E)position for next Print String flip effect67:Text. Erase all strings showed with Print String effect
68:Sound. (CD) Play <&>CD track in (E) way on channel169:Sound. (CD) Stop all CD tracks (channel1 and channel2)70:Sound. Play <&>Sound sample of first group (0 to 255) for (E) time71:Sound. Play <&>Sound sample of second group (256 maximum) for (E) time72:Sound. Stop <&>Sound sample of first group (0 to 255)73:Sound. Stop <&>Sound sample of second group (256 maximum)74:Sound. Stop all sound samples currently played
75:Text. Set blink <&>status and (E)speed76:Text. Reset all text formatting settings with default values
77:Lara. (Animation) Force <&>Animation (0-255) of (E)slot for Lara78:Lara. (Animation) Force <&>StateID and (E)next StateID for Lara79:Lara. (Move) Move Lara in LARA_START_POS with <&>OCB value in (E)way80:Lara. (Animation) Force <&>Animation (256 to 512) of (E)slot for Lara
81:Text. Set <&>size characters for next print string command82:Delay. Load <&>level in (E)seconds
Page 121
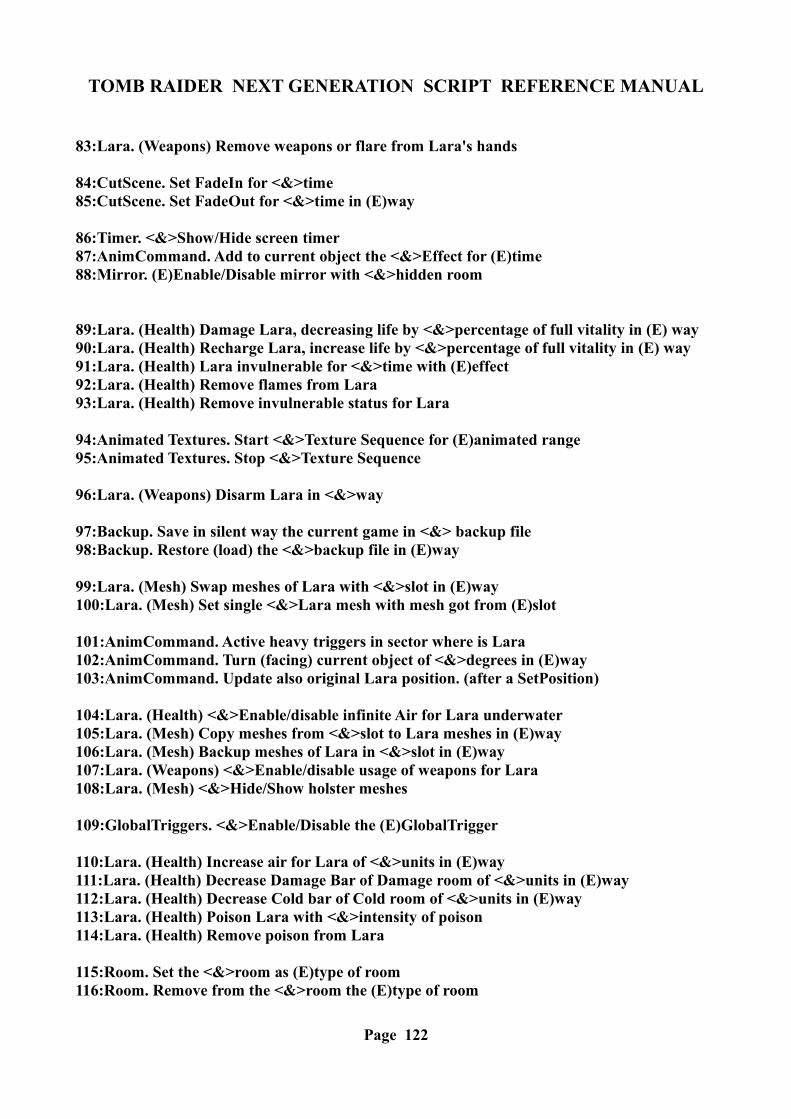
TOMB RAIDER NEXT GENERATION SCRIPT REFERENCE MANUAL
83:Lara. (Weapons) Remove weapons or flare from Lara's hands
84:CutScene. Set FadeIn for <&>time85:CutScene. Set FadeOut for <&>time in (E)way
86:Timer. <&>Show/Hide screen timer87:AnimCommand. Add to current object the <&>Effect for (E)time88:Mirror. (E)Enable/Disable mirror with <&>hidden room
89:Lara. (Health) Damage Lara, decreasing life by <&>percentage of full vitality in (E) way90:Lara. (Health) Recharge Lara, increase life by <&>percentage of full vitality in (E) way91:Lara. (Health) Lara invulnerable for <&>time with (E)effect92:Lara. (Health) Remove flames from Lara93:Lara. (Health) Remove invulnerable status for Lara
94:Animated Textures. Start <&>Texture Sequence for (E)animated range95:Animated Textures. Stop <&>Texture Sequence
96:Lara. (Weapons) Disarm Lara in <&>way
97:Backup. Save in silent way the current game in <&> backup file98:Backup. Restore (load) the <&>backup file in (E)way
99:Lara. (Mesh) Swap meshes of Lara with <&>slot in (E)way100:Lara. (Mesh) Set single <&>Lara mesh with mesh got from (E)slot
101:AnimCommand. Active heavy triggers in sector where is Lara102:AnimCommand. Turn (facing) current object of <&>degrees in (E)way103:AnimCommand. Update also original Lara position. (after a SetPosition)
104:Lara. (Health) <&>Enable/disable infinite Air for Lara underwater105:Lara. (Mesh) Copy meshes from <&>slot to Lara meshes in (E)way106:Lara. (Mesh) Backup meshes of Lara in <&>slot in (E)way107:Lara. (Weapons) <&>Enable/disable usage of weapons for Lara108:Lara. (Mesh) <&>Hide/Show holster meshes
109:GlobalTriggers. <&>Enable/Disable the (E)GlobalTrigger
110:Lara. (Health) Increase air for Lara of <&>units in (E)way111:Lara. (Health) Decrease Damage Bar of Damage room of <&>units in (E)way112:Lara. (Health) Decrease Cold bar of Cold room of <&>units in (E)way113:Lara. (Health) Poison Lara with <&>intensity of poison114:Lara. (Health) Remove poison from Lara
115:Room. Set the <&>room as (E)type of room116:Room. Remove from the <&>room the (E)type of room
Page 122
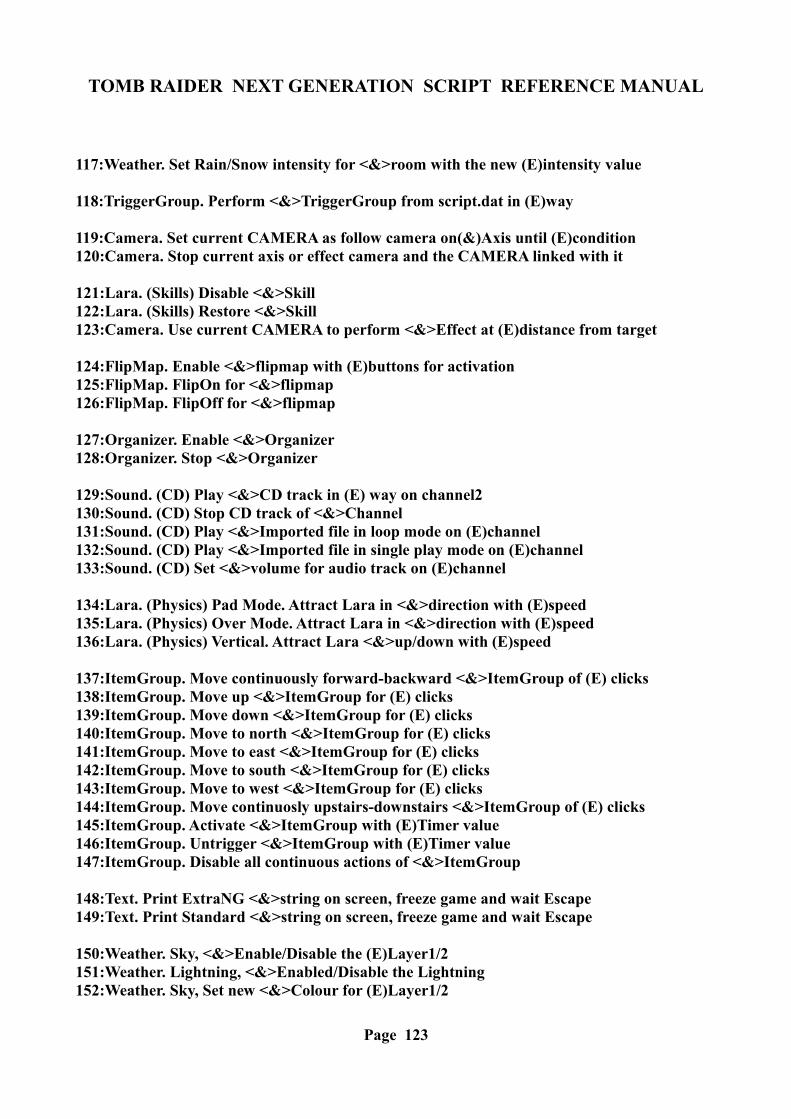
TOMB RAIDER NEXT GENERATION SCRIPT REFERENCE MANUAL
117:Weather. Set Rain/Snow intensity for <&>room with the new (E)intensity value
118:TriggerGroup. Perform <&>TriggerGroup from script.dat in (E)way
119:Camera. Set current CAMERA as follow camera on(&)Axis until (E)condition120:Camera. Stop current axis or effect camera and the CAMERA linked with it
121:Lara. (Skills) Disable <&>Skill122:Lara. (Skills) Restore <&>Skill123:Camera. Use current CAMERA to perform <&>Effect at (E)distance from target
124:FlipMap. Enable <&>flipmap with (E)buttons for activation125:FlipMap. FlipOn for <&>flipmap 126:FlipMap. FlipOff for <&>flipmap
127:Organizer. Enable <&>Organizer128:Organizer. Stop <&>Organizer
129:Sound. (CD) Play <&>CD track in (E) way on channel2130:Sound. (CD) Stop CD track of <&>Channel131:Sound. (CD) Play <&>Imported file in loop mode on (E)channel132:Sound. (CD) Play <&>Imported file in single play mode on (E)channel133:Sound. (CD) Set <&>volume for audio track on (E)channel
134:Lara. (Physics) Pad Mode. Attract Lara in <&>direction with (E)speed135:Lara. (Physics) Over Mode. Attract Lara in <&>direction with (E)speed136:Lara. (Physics) Vertical. Attract Lara <&>up/down with (E)speed
137:ItemGroup. Move continuously forward-backward <&>ItemGroup of (E) clicks138:ItemGroup. Move up <&>ItemGroup for (E) clicks139:ItemGroup. Move down <&>ItemGroup for (E) clicks140:ItemGroup. Move to north <&>ItemGroup for (E) clicks141:ItemGroup. Move to east <&>ItemGroup for (E) clicks142:ItemGroup. Move to south <&>ItemGroup for (E) clicks143:ItemGroup. Move to west <&>ItemGroup for (E) clicks144:ItemGroup. Move continuosly upstairs-downstairs <&>ItemGroup of (E) clicks145:ItemGroup. Activate <&>ItemGroup with (E)Timer value146:ItemGroup. Untrigger <&>ItemGroup with (E)Timer value147:ItemGroup. Disable all continuous actions of <&>ItemGroup
148:Text. Print ExtraNG <&>string on screen, freeze game and wait Escape149:Text. Print Standard <&>string on screen, freeze game and wait Escape
150:Weather. Sky, <&>Enable/Disable the (E)Layer1/2151:Weather. Lightning, <&>Enabled/Disable the Lightning152:Weather. Sky, Set new <&>Colour for (E)Layer1/2
Page 123
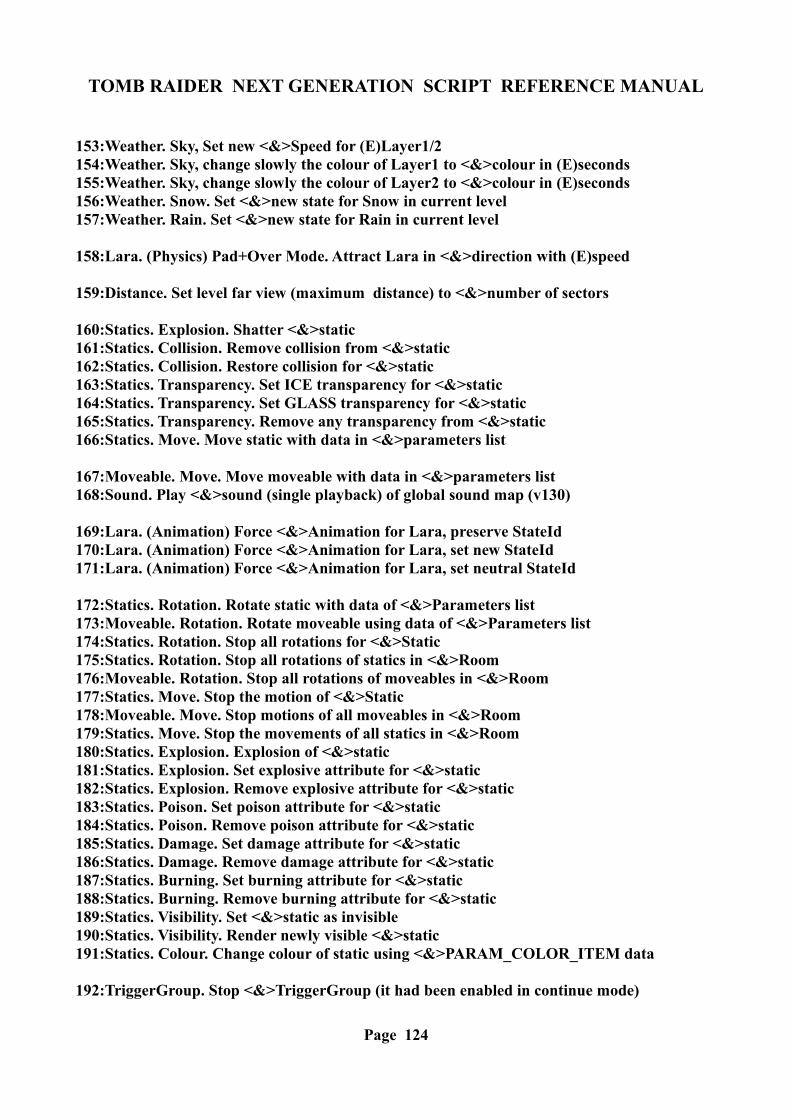
TOMB RAIDER NEXT GENERATION SCRIPT REFERENCE MANUAL
153:Weather. Sky, Set new <&>Speed for (E)Layer1/2154:Weather. Sky, change slowly the colour of Layer1 to <&>colour in (E)seconds155:Weather. Sky, change slowly the colour of Layer2 to <&>colour in (E)seconds156:Weather. Snow. Set <&>new state for Snow in current level157:Weather. Rain. Set <&>new state for Rain in current level
158:Lara. (Physics) Pad+Over Mode. Attract Lara in <&>direction with (E)speed
159:Distance. Set level far view (maximum distance) to <&>number of sectors
160:Statics. Explosion. Shatter <&>static161:Statics. Collision. Remove collision from <&>static162:Statics. Collision. Restore collision for <&>static163:Statics. Transparency. Set ICE transparency for <&>static164:Statics. Transparency. Set GLASS transparency for <&>static165:Statics. Transparency. Remove any transparency from <&>static166:Statics. Move. Move static with data in <&>parameters list
167:Moveable. Move. Move moveable with data in <&>parameters list168:Sound. Play <&>sound (single playback) of global sound map (v130)
169:Lara. (Animation) Force <&>Animation for Lara, preserve StateId170:Lara. (Animation) Force <&>Animation for Lara, set new StateId171:Lara. (Animation) Force <&>Animation for Lara, set neutral StateId
172:Statics. Rotation. Rotate static with data of <&>Parameters list173:Moveable. Rotation. Rotate moveable using data of <&>Parameters list174:Statics. Rotation. Stop all rotations for <&>Static175:Statics. Rotation. Stop all rotations of statics in <&>Room176:Moveable. Rotation. Stop all rotations of moveables in <&>Room177:Statics. Move. Stop the motion of <&>Static178:Moveable. Move. Stop motions of all moveables in <&>Room179:Statics. Move. Stop the movements of all statics in <&>Room180:Statics. Explosion. Explosion of <&>static181:Statics. Explosion. Set explosive attribute for <&>static182:Statics. Explosion. Remove explosive attribute for <&>static183:Statics. Poison. Set poison attribute for <&>static184:Statics. Poison. Remove poison attribute for <&>static185:Statics. Damage. Set damage attribute for <&>static186:Statics. Damage. Remove damage attribute for <&>static187:Statics. Burning. Set burning attribute for <&>static188:Statics. Burning. Remove burning attribute for <&>static189:Statics. Visibility. Set <&>static as invisible190:Statics. Visibility. Render newly visible <&>static191:Statics. Colour. Change colour of static using <&>PARAM_COLOR_ITEM data
192:TriggerGroup. Stop <&>TriggerGroup (it had been enabled in continue mode)
Page 124
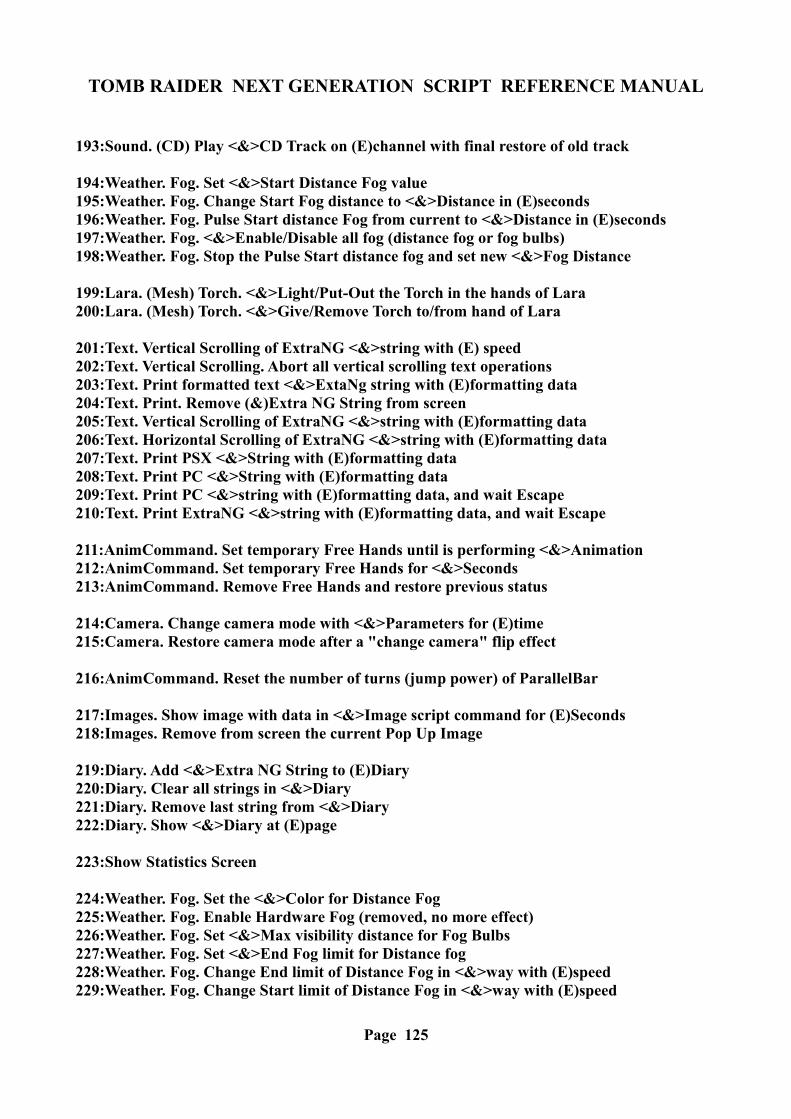
TOMB RAIDER NEXT GENERATION SCRIPT REFERENCE MANUAL
193:Sound. (CD) Play <&>CD Track on (E)channel with final restore of old track
194:Weather. Fog. Set <&>Start Distance Fog value195:Weather. Fog. Change Start Fog distance to <&>Distance in (E)seconds196:Weather. Fog. Pulse Start distance Fog from current to <&>Distance in (E)seconds197:Weather. Fog. <&>Enable/Disable all fog (distance fog or fog bulbs)198:Weather. Fog. Stop the Pulse Start distance fog and set new <&>Fog Distance
199:Lara. (Mesh) Torch. <&>Light/Put-Out the Torch in the hands of Lara200:Lara. (Mesh) Torch. <&>Give/Remove Torch to/from hand of Lara
201:Text. Vertical Scrolling of ExtraNG <&>string with (E) speed202:Text. Vertical Scrolling. Abort all vertical scrolling text operations203:Text. Print formatted text <&>ExtaNg string with (E)formatting data204:Text. Print. Remove (&)Extra NG String from screen205:Text. Vertical Scrolling of ExtraNG <&>string with (E)formatting data206:Text. Horizontal Scrolling of ExtraNG <&>string with (E)formatting data207:Text. Print PSX <&>String with (E)formatting data208:Text. Print PC <&>String with (E)formatting data209:Text. Print PC <&>string with (E)formatting data, and wait Escape 210:Text. Print ExtraNG <&>string with (E)formatting data, and wait Escape
211:AnimCommand. Set temporary Free Hands until is performing <&>Animation212:AnimCommand. Set temporary Free Hands for <&>Seconds213:AnimCommand. Remove Free Hands and restore previous status
214:Camera. Change camera mode with <&>Parameters for (E)time215:Camera. Restore camera mode after a "change camera" flip effect
216:AnimCommand. Reset the number of turns (jump power) of ParallelBar
217:Images. Show image with data in <&>Image script command for (E)Seconds218:Images. Remove from screen the current Pop Up Image
219:Diary. Add <&>Extra NG String to (E)Diary220:Diary. Clear all strings in <&>Diary221:Diary. Remove last string from <&>Diary222:Diary. Show <&>Diary at (E)page
223:Show Statistics Screen
224:Weather. Fog. Set the <&>Color for Distance Fog225:Weather. Fog. Enable Hardware Fog (removed, no more effect)226:Weather. Fog. Set <&>Max visibility distance for Fog Bulbs227:Weather. Fog. Set <&>End Fog limit for Distance fog228:Weather. Fog. Change End limit of Distance Fog in <&>way with (E)speed229:Weather. Fog. Change Start limit of Distance Fog in <&>way with (E)speed
Page 125
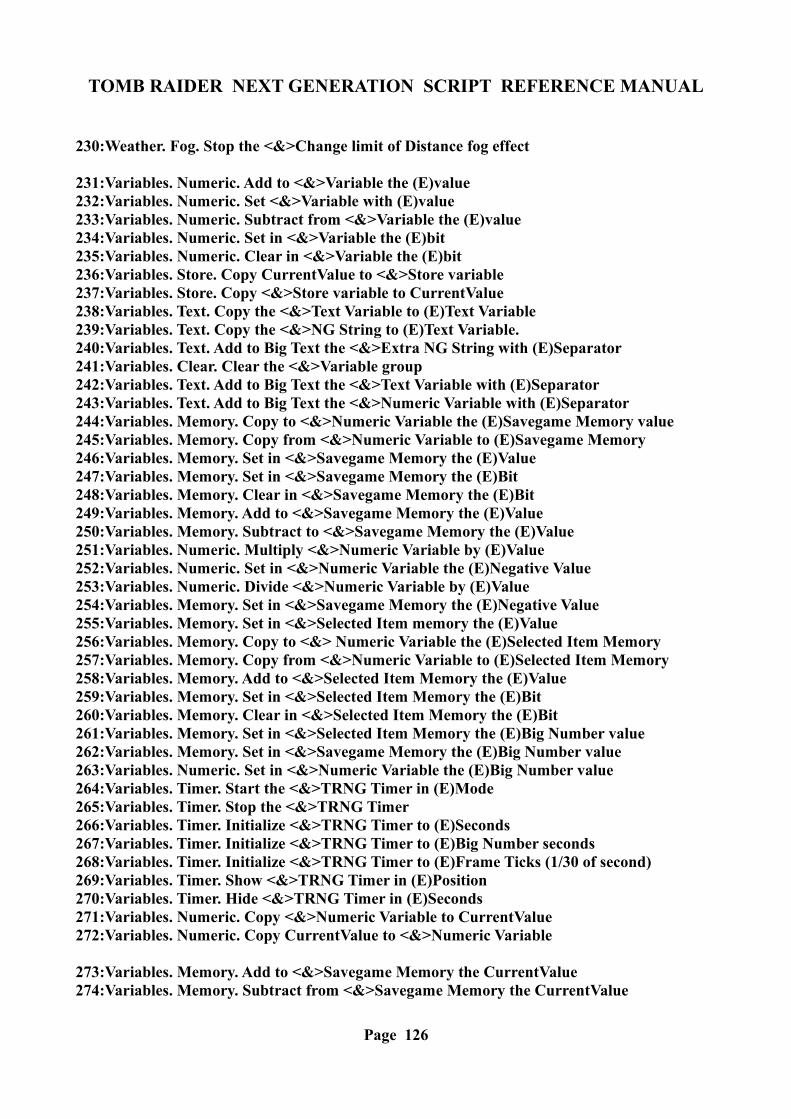
TOMB RAIDER NEXT GENERATION SCRIPT REFERENCE MANUAL
230:Weather. Fog. Stop the <&>Change limit of Distance fog effect
231:Variables. Numeric. Add to <&>Variable the (E)value232:Variables. Numeric. Set <&>Variable with (E)value233:Variables. Numeric. Subtract from <&>Variable the (E)value234:Variables. Numeric. Set in <&>Variable the (E)bit235:Variables. Numeric. Clear in <&>Variable the (E)bit236:Variables. Store. Copy CurrentValue to <&>Store variable237:Variables. Store. Copy <&>Store variable to CurrentValue238:Variables. Text. Copy the <&>Text Variable to (E)Text Variable239:Variables. Text. Copy the <&>NG String to (E)Text Variable.240:Variables. Text. Add to Big Text the <&>Extra NG String with (E)Separator241:Variables. Clear. Clear the <&>Variable group242:Variables. Text. Add to Big Text the <&>Text Variable with (E)Separator243:Variables. Text. Add to Big Text the <&>Numeric Variable with (E)Separator244:Variables. Memory. Copy to <&>Numeric Variable the (E)Savegame Memory value245:Variables. Memory. Copy from <&>Numeric Variable to (E)Savegame Memory246:Variables. Memory. Set in <&>Savegame Memory the (E)Value247:Variables. Memory. Set in <&>Savegame Memory the (E)Bit248:Variables. Memory. Clear in <&>Savegame Memory the (E)Bit249:Variables. Memory. Add to <&>Savegame Memory the (E)Value250:Variables. Memory. Subtract to <&>Savegame Memory the (E)Value251:Variables. Numeric. Multiply <&>Numeric Variable by (E)Value252:Variables. Numeric. Set in <&>Numeric Variable the (E)Negative Value253:Variables. Numeric. Divide <&>Numeric Variable by (E)Value254:Variables. Memory. Set in <&>Savegame Memory the (E)Negative Value255:Variables. Memory. Set in <&>Selected Item memory the (E)Value256:Variables. Memory. Copy to <&> Numeric Variable the (E)Selected Item Memory 257:Variables. Memory. Copy from <&>Numeric Variable to (E)Selected Item Memory258:Variables. Memory. Add to <&>Selected Item Memory the (E)Value259:Variables. Memory. Set in <&>Selected Item Memory the (E)Bit260:Variables. Memory. Clear in <&>Selected Item Memory the (E)Bit261:Variables. Memory. Set in <&>Selected Item Memory the (E)Big Number value262:Variables. Memory. Set in <&>Savegame Memory the (E)Big Number value263:Variables. Numeric. Set in <&>Numeric Variable the (E)Big Number value264:Variables. Timer. Start the <&>TRNG Timer in (E)Mode265:Variables. Timer. Stop the <&>TRNG Timer266:Variables. Timer. Initialize <&>TRNG Timer to (E)Seconds267:Variables. Timer. Initialize <&>TRNG Timer to (E)Big Number seconds268:Variables. Timer. Initialize <&>TRNG Timer to (E)Frame Ticks (1/30 of second)269:Variables. Timer. Show <&>TRNG Timer in (E)Position270:Variables. Timer. Hide <&>TRNG Timer in (E)Seconds271:Variables. Numeric. Copy <&>Numeric Variable to CurrentValue272:Variables. Numeric. Copy CurrentValue to <&>Numeric Variable
273:Variables. Memory. Add to <&>Savegame Memory the CurrentValue274:Variables. Memory. Subtract from <&>Savegame Memory the CurrentValue
Page 126
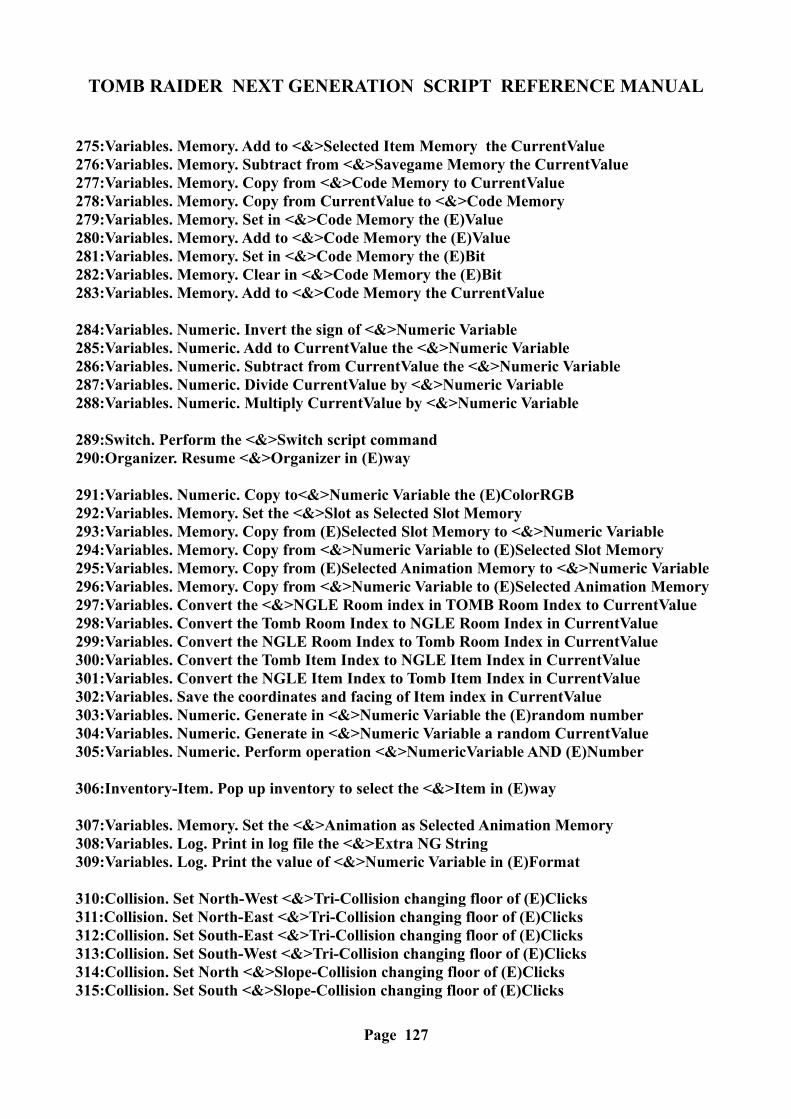
TOMB RAIDER NEXT GENERATION SCRIPT REFERENCE MANUAL
275:Variables. Memory. Add to <&>Selected Item Memory the CurrentValue276:Variables. Memory. Subtract from <&>Savegame Memory the CurrentValue277:Variables. Memory. Copy from <&>Code Memory to CurrentValue278:Variables. Memory. Copy from CurrentValue to <&>Code Memory279:Variables. Memory. Set in <&>Code Memory the (E)Value280:Variables. Memory. Add to <&>Code Memory the (E)Value281:Variables. Memory. Set in <&>Code Memory the (E)Bit 282:Variables. Memory. Clear in <&>Code Memory the (E)Bit283:Variables. Memory. Add to <&>Code Memory the CurrentValue
284:Variables. Numeric. Invert the sign of <&>Numeric Variable285:Variables. Numeric. Add to CurrentValue the <&>Numeric Variable286:Variables. Numeric. Subtract from CurrentValue the <&>Numeric Variable287:Variables. Numeric. Divide CurrentValue by <&>Numeric Variable288:Variables. Numeric. Multiply CurrentValue by <&>Numeric Variable
289:Switch. Perform the <&>Switch script command290:Organizer. Resume <&>Organizer in (E)way
291:Variables. Numeric. Copy to<&>Numeric Variable the (E)ColorRGB292:Variables. Memory. Set the <&>Slot as Selected Slot Memory293:Variables. Memory. Copy from (E)Selected Slot Memory to <&>Numeric Variable294:Variables. Memory. Copy from <&>Numeric Variable to (E)Selected Slot Memory295:Variables. Memory. Copy from (E)Selected Animation Memory to <&>Numeric Variable296:Variables. Memory. Copy from <&>Numeric Variable to (E)Selected Animation Memory297:Variables. Convert the <&>NGLE Room index in TOMB Room Index to CurrentValue298:Variables. Convert the Tomb Room Index to NGLE Room Index in CurrentValue299:Variables. Convert the NGLE Room Index to Tomb Room Index in CurrentValue300:Variables. Convert the Tomb Item Index to NGLE Item Index in CurrentValue301:Variables. Convert the NGLE Item Index to Tomb Item Index in CurrentValue302:Variables. Save the coordinates and facing of Item index in CurrentValue303:Variables. Numeric. Generate in <&>Numeric Variable the (E)random number304:Variables. Numeric. Generate in <&>Numeric Variable a random CurrentValue305:Variables. Numeric. Perform operation <&>NumericVariable AND (E)Number
306:Inventory-Item. Pop up inventory to select the <&>Item in (E)way
307:Variables. Memory. Set the <&>Animation as Selected Animation Memory308:Variables. Log. Print in log file the <&>Extra NG String309:Variables. Log. Print the value of <&>Numeric Variable in (E)Format
310:Collision. Set North-West <&>Tri-Collision changing floor of (E)Clicks311:Collision. Set North-East <&>Tri-Collision changing floor of (E)Clicks312:Collision. Set South-East <&>Tri-Collision changing floor of (E)Clicks313:Collision. Set South-West <&>Tri-Collision changing floor of (E)Clicks314:Collision. Set North <&>Slope-Collision changing floor of (E)Clicks315:Collision. Set South <&>Slope-Collision changing floor of (E)Clicks
Page 127
TOMB RAIDER NEXT GENERATION SCRIPT REFERENCE MANUAL
316:Collision. Set East <&>Slope-Collision changing floor of (E)Clicks317:Collision. Set West <&>Slope-Collision changing floor of (E)Clicks318:Collision. Set North <&>Ceiling-Slope-Collision changing ceiling of (E)Clicks319:Collision. Set South <&>Ceiling-Slope-Collision changing ceiling of (E)Clicks320:Collision. Set East <&>Ceiling-Slope-Collision changing ceiling of (E)Clicks321:Collision. Set West <&>Ceiling-Slope-Collision changing ceiling of (E)Clicks322:Collision. Set North-West <&>Ceiling-Tri-Collision changing ceiling of (E)Clicks323:Collision. Set North-East <&>Ceiling-Tri-Collision changing ceiling of (E)Clicks324:Collision. Set South-West <&>Ceiling-Tri-Collision changing ceiling of (E)Clicks325:Collision. Set South-East <&>Ceiling-Tri-Collision changing ceiling of (E)Clicks326:Collision. Set North-West <&>Tri-Split-Collision changing floor of (E)Clicks327:Collision. Set North-East <&>Tri-Split-Collision changing floor of (E)Clicks328:Collision. Set South-East <&>Tri-Split-Collision changing floor of (E)Clicks329:Collision. Set South-West <&>Tri-Split-Collision changing floor of (E)Clicks330:Collision. Set the <&>Side of closed sector as non-hangable from Lara
331:Custom Bar. Show the <&>Custom bar on screen for (E)Seconds332:Custom Bar. Hide the <&>Custom bar
333:Flipmap. Alternate continuously the <&>flip map with the (E)Frame interval334:Flipmap. Stop the alternate of <&>flip map letting the (E)Flip map type
335:Variables. Memory. Set the <&>Inventory item as Selected Inventory Memory336:Variables. Memory. Copy from <&>Numeric Variable to (E)Inventory Memory337:Variables. Memory. Set in <&>Inventory Memory the (E)Value338:Variables. Memory. Set in <&>Inventory Memory the (E)Big Number value339:Variables. Memory. Copy to <&>Numeric Variable the (E)Inventory Memory340:Lara. (Mesh) Swap Mesh of <&>Extra Lara Slots with that of (E)Slot
341:Swap Mesh. Swap mesh of <&>Slot with mesh of (E)Slot
342:Variables. Memory. Set in <&>Code Memory the (E)Negative number343:Fish. Clear (disable) all fish of <&>fish Type344:Swap Mesh. Swap mesh of current Horizontal object with <&>Slot mesh345:TriggerGroup. Enable newly the one-shot <&>TriggerGroup already performed346:Camera. Enable the <&>StandBy camera effect for (E)seconds347:Enemy. Freeze all enemies for <&>seconds in (E)way348:Enemy. Remove the "freeze all enemies" mode
349:Lara. (Physics) Trigger clockwise whirl at <&>centre and (E)Diameter350:Lara. (Physics) Trigger unclockwise whirl at <&>centre and (E)Diameter
351:Variables. Memory. Convert from item address to item index the value in Current Value variable
352:Statics. Scale a static item using the data in <&>Parameters command353:Statics. Stop the endless scaling of the static started with the <&>Parameters command
Page 128

TOMB RAIDER NEXT GENERATION SCRIPT REFERENCE MANUAL
354:ItemGroup. Statics. Perform <&>trigger with (E)ItemGroup of statics
355:Screen. Flash screen with the <&>Light colour for (E)Duration356:Screen. Remove Infinite Flash effect
357:Sprite. Show sprite with data in <&>Parameters for (E)Duration358:Sprite. Remove from the screen the sprite with data in <&>Parameters
359:Weather. Enable lightning with data in <&>Parameters for (E)Duration360:Text. Print unlimited <&>Extra NG String with current settings for infinite time361:Weather. Set in advance the rain setting using the intensity of <&>Room
359:Weather. Perform a lightning with data in <&>Parameters for (E)Durate in Tick frames (1/30 second) [See Note ABOUT LIGHTNING on page 180]
360:Text. Print unlimited <&>Extra NG String with current settings for infinite time361:Weather. Set in advance the rain setting using the intensity of <&>Room362:Weather. Stop the endless lightning effect with <&>Parameters
[See Note ABOUT LIGHTNING on page 180]363:Text. Print ExtraNG <&>string with windows font and formatting data in the (E)Parameters command 364:Text. Remove print ExtraNG<&>string with windows font that used data in the (E)Parameters command365:Camera. Increase the zoom factor (enable Super Zoom mode) for Binocular
<END>
<START_EFFECT_10_T> SOUNDS0:Sound for little beetle 1:Elevator or cable way 2:Electric motor 3:Vibrating only while Lara is walking.4:Helicopter5:Strong electric motor (like a drill) 6:Electric motor (acute) like chain pulley 7:Electric motor (more acute than the above) 8:Electric motor (more near (high volume) than the above) 9:Electric motor (more far, low volume)
Page 129
TOMB RAIDER NEXT GENERATION SCRIPT REFERENCE MANUAL
10:Exchange of shots, whistling of shots (cool) 11:Motor in neutral (car) 18:Chains or a fall of pebbles 19:Low buzzing 24:Sea surf 26:Like effect 5 28:Like buzz of electricity 29:Metal sound, chaotic 30:Despairing scream. (Cool) 31:Short scream of Lara when she touches enemies (ugly) 32:Like effect 11 33:Landslip 34:Like above but more acute 35:Thunders (cool) 36:Like effect 1 39:Ticking of clock work. <END>
FOG BULB COLORS for flip effect 28<START_EFFECT_28_T>#COLORS#<END>
<START_EFFECT_47_T_H>#INVENTORY-ITEM-INDEX#<END>
<START_EFFECT_48_T_H>#INVENTORY-ITEM-INDEX#<END>
<START_EFFECT_48_E_H>0: Hidden way (change number of items with no visible effect)1: Show animation of item (like it was picked up)<END>
<START_EFFECT_49_T_H>#INVENTORY-ITEM-INDEX#<END>
<START_EFFECT_50_T_H>#INVENTORY-ITEM-INDEX#<END>
<START_EFFECT_50_E_H>#SEQUENCE_128#<END>
Page 130

TOMB RAIDER NEXT GENERATION SCRIPT REFERENCE MANUAL
<START_EFFECT_51_T_H>
0: All keyboard commands1: Up2: Down3: Left4: Right5: Duck6: Dash7: Walk8: Jump9: Action (and Enter)10: Draw Weapon11: Use Flare12: Look13: Roll14: Inventory15: Step Left16: Step Right17: Pause18: Save the game (special)19: Load the game (special)20: Select weapon keys (all fast weapon selectors)<END>
<START_EFFECT_51_E_H>#TIME_LIST_128#<END>
<START_EFFECT_52_T_H>#SAME_OF#=EFFECT_51_T<END>
<START_EFFECT_53_T_H>#SAME_OF#=EFFECT_51_T<END>
Page 131

TOMB RAIDER NEXT GENERATION SCRIPT REFERENCE MANUAL
<START_EFFECT_53_E_H>0:Single sending1:Send command for 0.2 seconds2:Send command for 0.3 seconds3:Send command for 0.4 seconds4:Send command for 0.5 seconds5:Send command for 0.7 seconds6:Send command for 1 second7:Send command for 2 seconds8:Send command for 3 seconds9:Send command for 4 seconds10:Send command for 5 seconds11:Send command for 6 seconds12:Send command for 7 seconds13:Send command for 8 seconds14:Send command for 9 seconds15:Send command for 10 seconds16:Send command for 15 seconds17:Send command for 20 seconds18:Send command for 25 seconds19:Send command for 30 seconds20:Send command for 35 seconds<END>
<START_EFFECT_54_T_H>#TIME_LIST_128#<END>
<START_EFFECT_54_E_H>0:Black screen1:Let current frame<END>
<START_EFFECT_56_T_H>#ANIMATION_RANGE#<END>
<START_EFFECT_57_T_H>#ANIMATION_RANGE#<END>
Page 132
TOMB RAIDER NEXT GENERATION SCRIPT REFERENCE MANUAL
<START_EFFECT_58_T_H>0: 1th Frame1: 2th Frame2: 3th Frame3: 4th Frame4: 5th Frame5: 6th Frame6: 7th Frame7: 8th Frame8: 9th Frame9: 10th Frame10: 11th Frame11: 12th Frame12: 13th Frame13: 14th Frame14: 15th Frame15: 16th Frame<END>
<START_EFFECT_58_E_H>0: 1th Position1: 2th Position2: 3th Position3: 4th Position4: 5th Position5: 6th Position6: 7th Position7: 8th Position8: 9th Position9: 10th Position10: 11th Position11: 12th Position12: 13th Position13: 14th Position14: 15th Position15: 16th Position<END>
<START_EFFECT_59_T_H>#SAME_OF#=EFFECT_58_T<END>
<START_EFFECT_59_E_H>#SAME_OF#=EFFECT_58_E<END>
Page 133

TOMB RAIDER NEXT GENERATION SCRIPT REFERENCE MANUAL
<START_EFFECT_60_T_H>#ANIMATION_RANGE#<END>
<START_EFFECT_63_T_H>0: Default death (vitality=0)1: Burning and immediate death2: Burning and decrease vitality<END>
<START_EFFECT_64_T_H>#NG_STRING_LIST_255#<END>
<START_EFFECT_64_E_H>#TIME_LIST_128#<END>
<START_EFFECT_65_T_H>#STRING_LIST_255#<END>
<START_EFFECT_65_E_H>#TIME_LIST_128#<END>
<START_EFFECT_66_T_H>1:Blinking White2:White3:Red4:Blue5:Metal (White + Gray)6:Gold (White + Yellow)7:Dark Metal (Dark Gray + Light Gray)8:Yellow<END>
Page 134
TOMB RAIDER NEXT GENERATION SCRIPT REFERENCE MANUAL
<START_EFFECT_66_E_H>1:Bottom line, central alignment2:Top line, central alignment3:Central line, central alignment4:Top line, left alignment5:Top line, right alignment6:Bottom line, left alignment7:Bottom line, right alignment10:Under left default bars11:Under right default bars<END>
<START_EFFECT_68_T_H>#CD_TRACK_LIST#<END>
<START_EFFECT_68_E_H>0:Single playback1:Looped playback<END>
<START_EFFECT_70_T_H>#SOUND_EFFECT_A#<END><START_EFFECT_70_E_H>#TIME_LIST_32#<END>
<START_EFFECT_71_T_H>#SOUND_EFFECT_B#<END>
<START_EFFECT_71_E_H>#TIME_LIST_32#<END>
<START_EFFECT_72_T_H>#SOUND_EFFECT_A#<END>
<START_EFFECT_73_T_H>#SOUND_EFFECT_B#<END>
Page 135
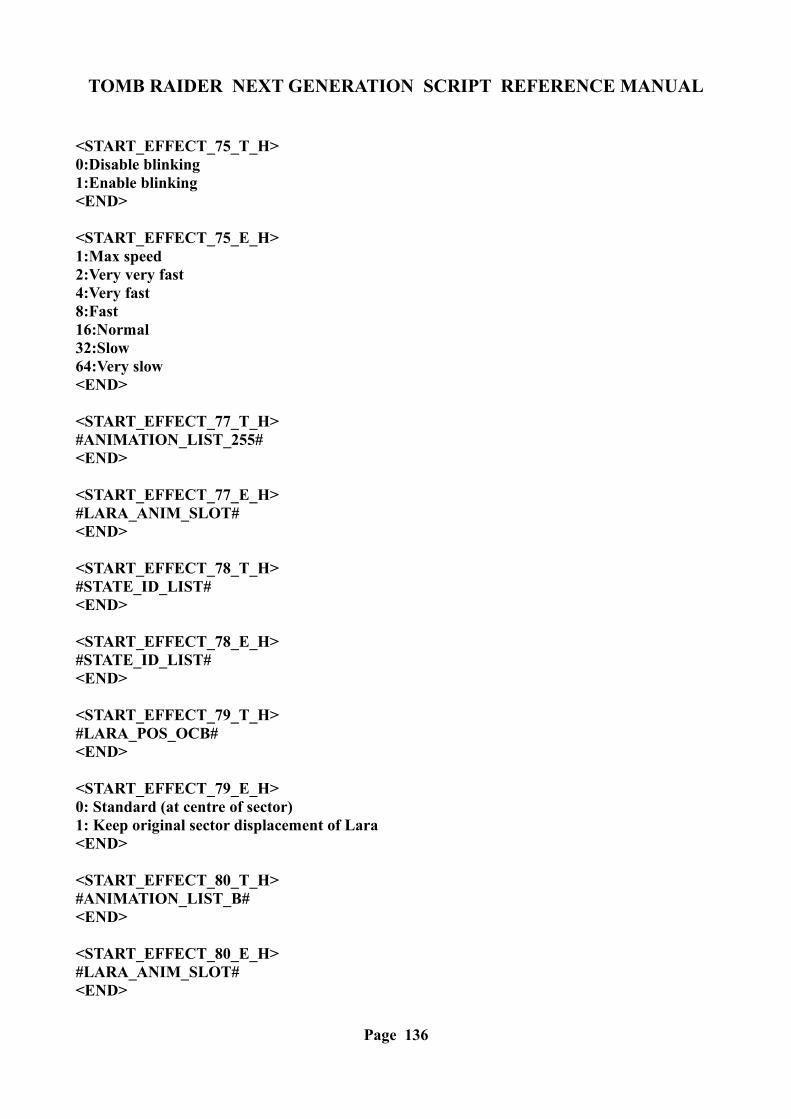
TOMB RAIDER NEXT GENERATION SCRIPT REFERENCE MANUAL
<START_EFFECT_75_T_H>0:Disable blinking1:Enable blinking<END>
<START_EFFECT_75_E_H>1:Max speed 2:Very very fast4:Very fast8:Fast16:Normal32:Slow64:Very slow<END>
<START_EFFECT_77_T_H>#ANIMATION_LIST_255#<END>
<START_EFFECT_77_E_H>#LARA_ANIM_SLOT#<END>
<START_EFFECT_78_T_H>#STATE_ID_LIST#<END>
<START_EFFECT_78_E_H>#STATE_ID_LIST#<END>
<START_EFFECT_79_T_H>#LARA_POS_OCB#<END>
<START_EFFECT_79_E_H>0: Standard (at centre of sector)1: Keep original sector displacement of Lara<END>
<START_EFFECT_80_T_H>#ANIMATION_LIST_B#<END>
<START_EFFECT_80_E_H>#LARA_ANIM_SLOT#<END>
Page 136

TOMB RAIDER NEXT GENERATION SCRIPT REFERENCE MANUAL
<START_EFFECT_81_T_H>0:Standard Size1:Half Width2:Half Height3:Half Width and Height4:Double Width5:Double Height6:Double Width and Height7:Half Width and Height and no borders8:Micro Characters, always squared of 'keypad' type9:Atomic Characters, the little available characters<END>
<START_EFFECT_82_T_H>#SEQUENCE_128#<END>
<START_EFFECT_82_E_H>#TIME_LIST_32#<END>
<START_EFFECT_84_T_H>3:Very long time8:Long16:Default22:Fast25:Very fast<END>
<START_EFFECT_85_T_H>#SAME_OF#=EFFECT_84_T<END>
<START_EFFECT_85_E_H>0: Fade Out standard (screen becomes black)1: Fade Out and Fade In (screen becomes black and then come back the light)<END>
<START_EFFECT_86_T_H>0:Hide screen timer1:Show screen timer<END>
<START_EFFECT_87_T_H>#ADD_EFFECT_255#<END>
Page 137

TOMB RAIDER NEXT GENERATION SCRIPT REFERENCE MANUAL
<START_EFFECT_87_E_H>#TIME_LIST_128#<END>
<START_EFFECT_88_T_H>#ROOMS_255#<END>
<START_EFFECT_88_E_H>0:Disable Mirror 1:Enable Mirror2:Enable Mirror with blinking effect<END>
<START_EFFECT_89_T_H>#PERCENTAGE#<END>
<START_EFFECT_89_E_H>0:Immediately, one-shot1:Continuously, until Lara is over current trigger<END>
<START_EFFECT_90_T_H>#PERCENTAGE#<END><START_EFFECT_90_E_H>0:Immediately, one-shot1:Continuously, until Lara is over current trigger<END>
<START_EFFECT_91_T_H>#TIME_LIST_128#<END>
<START_EFFECT_91_E_H>0:No effect1:Transparency2:Blinking transparency - fast3:Blinking transparency - middle4:Blinking transparency - slow5:Blinking transparency - very slow<END>
<START_EFFECT_94_T_H>#TEX_SEQUENCE#<END>
Page 138
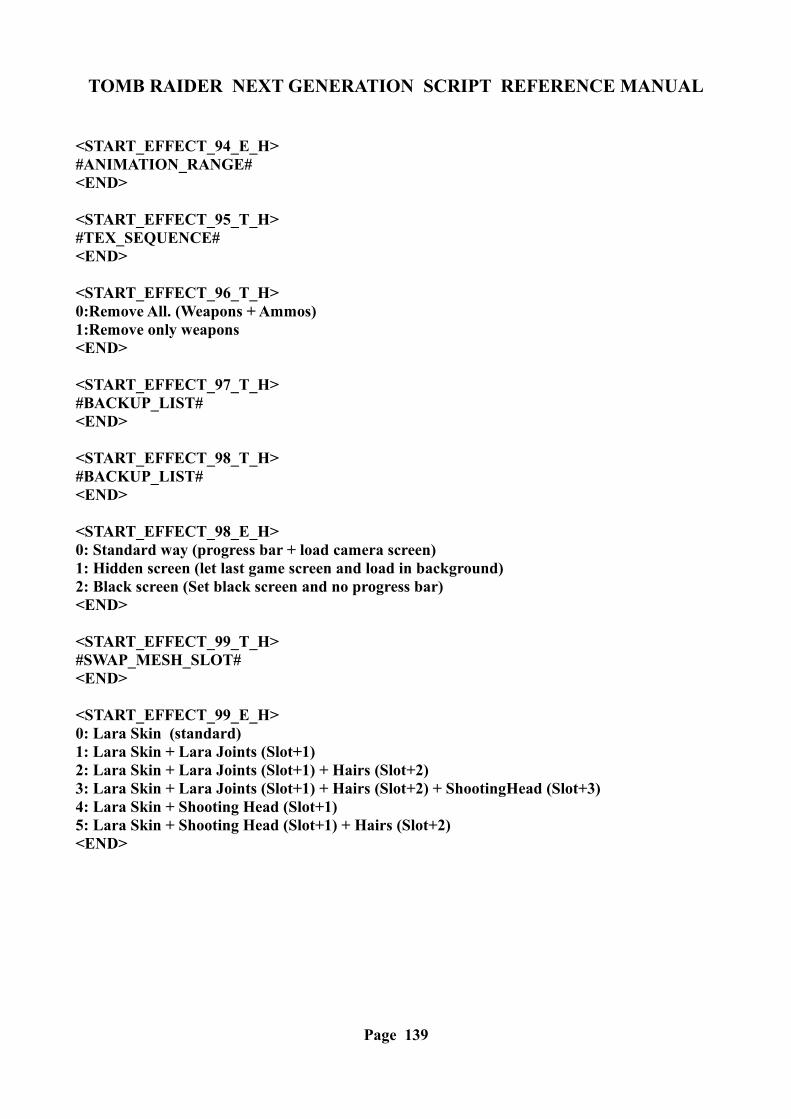
TOMB RAIDER NEXT GENERATION SCRIPT REFERENCE MANUAL
<START_EFFECT_94_E_H>#ANIMATION_RANGE#<END>
<START_EFFECT_95_T_H>#TEX_SEQUENCE#<END>
<START_EFFECT_96_T_H>0:Remove All. (Weapons + Ammos)1:Remove only weapons<END>
<START_EFFECT_97_T_H>#BACKUP_LIST#<END>
<START_EFFECT_98_T_H>#BACKUP_LIST#<END>
<START_EFFECT_98_E_H>0: Standard way (progress bar + load camera screen)1: Hidden screen (let last game screen and load in background)2: Black screen (Set black screen and no progress bar)<END>
<START_EFFECT_99_T_H>#SWAP_MESH_SLOT#<END>
<START_EFFECT_99_E_H>0: Lara Skin (standard)1: Lara Skin + Lara Joints (Slot+1)2: Lara Skin + Lara Joints (Slot+1) + Hairs (Slot+2)3: Lara Skin + Lara Joints (Slot+1) + Hairs (Slot+2) + ShootingHead (Slot+3)4: Lara Skin + Shooting Head (Slot+1)5: Lara Skin + Shooting Head (Slot+1) + Hairs (Slot+2)<END>
Page 139
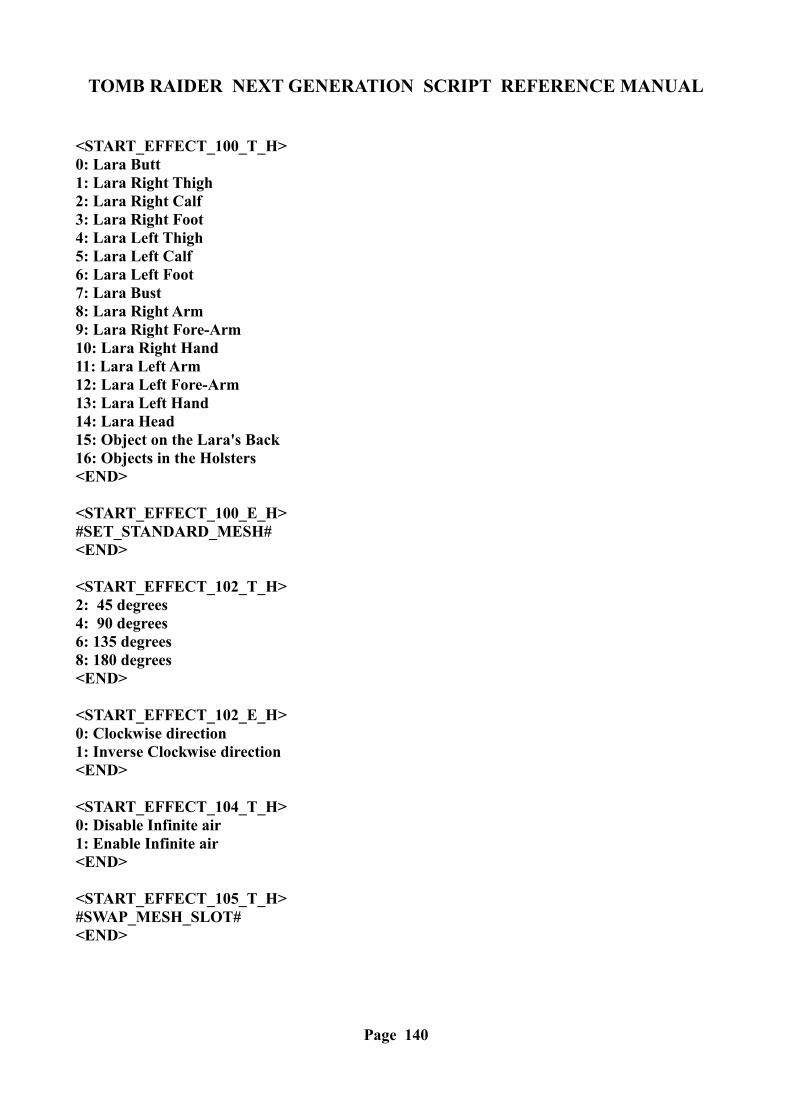
TOMB RAIDER NEXT GENERATION SCRIPT REFERENCE MANUAL
<START_EFFECT_100_T_H>0: Lara Butt1: Lara Right Thigh2: Lara Right Calf3: Lara Right Foot4: Lara Left Thigh5: Lara Left Calf6: Lara Left Foot7: Lara Bust8: Lara Right Arm9: Lara Right Fore-Arm10: Lara Right Hand11: Lara Left Arm12: Lara Left Fore-Arm13: Lara Left Hand14: Lara Head15: Object on the Lara's Back16: Objects in the Holsters<END>
<START_EFFECT_100_E_H>#SET_STANDARD_MESH#<END>
<START_EFFECT_102_T_H>2: 45 degrees 4: 90 degrees6: 135 degrees8: 180 degrees<END>
<START_EFFECT_102_E_H>0: Clockwise direction1: Inverse Clockwise direction<END>
<START_EFFECT_104_T_H>0: Disable Infinite air1: Enable Infinite air<END>
<START_EFFECT_105_T_H>#SWAP_MESH_SLOT#<END>
Page 140
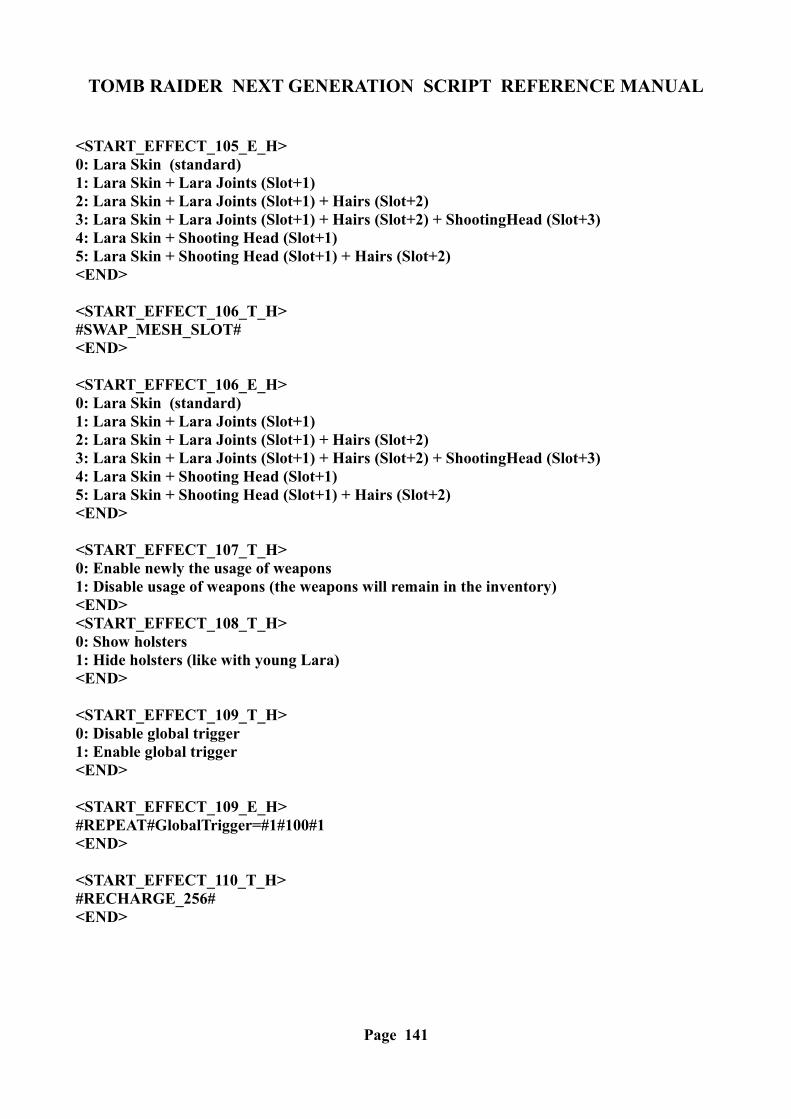
TOMB RAIDER NEXT GENERATION SCRIPT REFERENCE MANUAL
<START_EFFECT_105_E_H>0: Lara Skin (standard)1: Lara Skin + Lara Joints (Slot+1)2: Lara Skin + Lara Joints (Slot+1) + Hairs (Slot+2)3: Lara Skin + Lara Joints (Slot+1) + Hairs (Slot+2) + ShootingHead (Slot+3)4: Lara Skin + Shooting Head (Slot+1)5: Lara Skin + Shooting Head (Slot+1) + Hairs (Slot+2)<END>
<START_EFFECT_106_T_H>#SWAP_MESH_SLOT#<END>
<START_EFFECT_106_E_H>0: Lara Skin (standard)1: Lara Skin + Lara Joints (Slot+1)2: Lara Skin + Lara Joints (Slot+1) + Hairs (Slot+2)3: Lara Skin + Lara Joints (Slot+1) + Hairs (Slot+2) + ShootingHead (Slot+3)4: Lara Skin + Shooting Head (Slot+1)5: Lara Skin + Shooting Head (Slot+1) + Hairs (Slot+2)<END>
<START_EFFECT_107_T_H>0: Enable newly the usage of weapons1: Disable usage of weapons (the weapons will remain in the inventory)<END><START_EFFECT_108_T_H>0: Show holsters1: Hide holsters (like with young Lara)<END>
<START_EFFECT_109_T_H>0: Disable global trigger1: Enable global trigger<END>
<START_EFFECT_109_E_H>#REPEAT#GlobalTrigger=#1#100#1<END>
<START_EFFECT_110_T_H>#RECHARGE_256#<END>
Page 141
TOMB RAIDER NEXT GENERATION SCRIPT REFERENCE MANUAL
<START_EFFECT_110_E_H>0: Continue, until Lara remains in current sector (30 times for second)1: Single recharge. (You can use One-shot button to forbid further charging)<END>
<START_EFFECT_111_T_H>#RECHARGE_256#<END>
<START_EFFECT_111_E_H>0: Continue, until Lara remains in current sector (30 times for second)1: Single recharge. (You can use One-shot button to forbid further charging)<END>
<START_EFFECT_112_T_H>#RECHARGE_256#<END>
<START_EFFECT_112_E_H>0: Continue, until Lara remains in current sector (30 times for second)1: Single recharge. (You can use One-shot button to forbid further charging)<END>
<START_EFFECT_113_T_H>0: Intensity 1 (Very low, it requires some seconds to see effects)1: Intensity 2 (Little)2: Intensity 3 (Like Darts)3: Intensity 4 (Like little scorpion)4: Intensity 5 (Like Harpy)5: Intensity 6 (Max level, immediate and huge screen deformation)<END>
<START_EFFECT_115_T_H>#ROOMS_255#<END>
<START_EFFECT_115_E_H>0:Water room2:Quick Sand room4:Damage room5:Outside room10:Snow room11:Rain room 12:Cold water room<END>
Page 142
TOMB RAIDER NEXT GENERATION SCRIPT REFERENCE MANUAL
<START_EFFECT_116_T_H>#ROOMS_255#<END>
<START_EFFECT_116_E_H>#SAME_OF#=EFFECT_115_E<END>
<START_EFFECT_117_T_H>#ROOMS_255#<END>
<START_EFFECT_117_E_H>0: Intensity 11: Intensity 22: Intensity 33: Intensity 4<END>
<START_EFFECT_118_T_H>#REPEAT#TriggerGroup=#1#255<END>
<START_EFFECT_118_E_H>0: Multiple performing (to use when in TriggerGroup there is some condition)1: Single performing (to use when in TriggerGroup there are only commands)2: Continue performing (it will be always performed until you stop it)<END>
<START_EFFECT_119_T_H>0:North-South (in NGLE) fixed other East-West and Up-Down coordinates1:East-West (in NGLE) fixed other North-South and Up-Down coordinates2:Up-Down (3d space) fixed North-South and East-West coordinates3:Horizontal axes fixed the Up-Down coordinate.4:North-South (in NGLE) preserving East-West distance and fixed Up-Down coordinates5:East-West (in NGLE) preserving North-South distance and fixed Up-Down coordinates6:Up-Down (3d space) preserving North-South distance fixed East-West coordinates7:Up-Down (3d space) preserving East-West distance and fixed North-South coordinates8:Horizontal axes preserving Up-Down distance.9:North-South (in NGLE) preserving Up-Down distance and fixed East-West coordinates10:East-West (in NGLE) preserving Up-Down distance and North-South coordinates<END>
Page 143
TOMB RAIDER NEXT GENERATION SCRIPT REFERENCE MANUAL
<START_EFFECT_119_E_H>0:Forever (forces CAMERA to be enabled until you perform flip to stop it)1:Until Lara is in current room (where she enabled this trigger)2:Same time set in current CAMERA<END>
<START_EFFECT_121_T_H>0:Disable LOOK feature1:Disable Combat Camera<END>
<START_EFFECT_122_T_H>#SAME_OF#=EFFECT_121_T<END>
<START_EFFECT_123_T_H>0: Matrix effect, slow speed1: Matrix effect, normal speed2: Matrix effect, fast speed3: Matrix effect, very fast speed4: Portrait effect on target (Lara or enemy), preserve Up/down distance5: Enemy effect, from back like for Lara, preserve Up/Down distance6: Portrait effect on target (Lara or enemy), same Up/Down coordinate7: Enemy effect, from back like for Lara, same Up/Down coordinate8: Portrait effect on target (Lara or enemy), Upper than target of 1 click9: Enemy effect, from back like for Lara, Upper than target of 1 click10: Portrait effect on target (Lara or enemy), Upper than target of 2 clicks11: Enemy effect, from back like for Lara, Upper than target of 2 clicks12: Portrait effect on target (Lara or enemy), Upper than target of 3 clicks13: Enemy effect, from back like for Lara, Upper than target of 3 clicks14: Portrait effect on target (Lara or enemy), Upper than target of 4 clicks (1 sector)15: Enemy effect, from back like for Lara, Upper than target of 4 clicks (1 sector)<END>
<START_EFFECT_123_E_H>#CLICK_DISTANCE_32#<END>
<START_EFFECT_124_T_H>#REPEAT#FlipMap=#0#31<END>
<START_EFFECT_124_E_H>#BUTTONS_LIST#<END>
Page 144
TOMB RAIDER NEXT GENERATION SCRIPT REFERENCE MANUAL
<START_EFFECT_125_T_H>#REPEAT#FlipMap=#0#31<END><START_EFFECT_126_T_H>#REPEAT#FlipMap=#0#31<END>
<START_EFFECT_127_T_H>#REPEAT#Organizer=#1#100<END>
<START_EFFECT_128_T_H>#REPEAT#Organizer=#1#100<END>
<START_EFFECT_129_T_H>#CD_TRACK_LIST#<END>
<START_EFFECT_129_E_H>0:Single playback1:Looped playback<END>
<START_EFFECT_130_T_H>0:Channel 1 (Background track)1:Channel 2 (Foreground track)<END><START_EFFECT_131_T_H>#REPEAT#ImportFile=#1#200<END>
<START_EFFECT_131_E_H>0:Channel 1 (Background track)1:Channel 2 (Foreground track)<END>
<START_EFFECT_132_T_H>#REPEAT#ImportFile=#1#200<END>
<START_EFFECT_132_E_H>0:Channel 1 (Background track)1:Channel 2 (Foreground track)<END>
Page 145
TOMB RAIDER NEXT GENERATION SCRIPT REFERENCE MANUAL
<START_EFFECT_133_T_H>#REPEAT#Volume="#1#100<END>
<START_EFFECT_133_E_H>0:Channel 1 (Background track)1:Channel 2 (Foreground track)<END>
<START_EFFECT_134_T_H>0: North1: North-East2: East3: South-East4: South5: South-West6: West7: North-West<END>
<START_EFFECT_134_E_H>#REPEAT#Speed=#1#127<END>
<START_EFFECT_135_T_H>0: North1: North-East2: East3: South-East4: South5: South-West6: West7: North-West<END>
<START_EFFECT_135_E_H>#REPEAT#Speed=#1#127<END>
Page 146
TOMB RAIDER NEXT GENERATION SCRIPT REFERENCE MANUAL
<START_EFFECT_136_T_H>0:Upward (Only during upward jumping phase)1:Down (Only during falling phase)2:Upward (Always, jumping/falling phase)3:Down (Always, jumping/falling phase)4:Upward Proportional (Only during upward jumping phase)5:Down Proportional (Only during falling phase)6:Upward Proportional (Always, jumping/falling phase)7:Down Proportional (Always, jumping/falling phase)<END>
<START_EFFECT_136_E_H>#REPEAT#Speed=#1#127<END>
<START_EFFECT_137_T_H>#REPEAT#ItemGroup=#1#100<END>
<START_EFFECT_137_E_H>#CLICK_DISTANCE_32#<END>
<START_EFFECT_138_T_H>#REPEAT#ItemGroup=#1#100<END>
<START_EFFECT_138_E_H>#CLICK_DISTANCE_32#<END>
<START_EFFECT_139_T_H>#REPEAT#ItemGroup=#1#100<END>
<START_EFFECT_139_E_H>#CLICK_DISTANCE_32#<END>
<START_EFFECT_140_T_H>#REPEAT#ItemGroup=#1#100<END>
<START_EFFECT_140_E_H>#CLICK_DISTANCE_32#<END>
Page 147
TOMB RAIDER NEXT GENERATION SCRIPT REFERENCE MANUAL
<START_EFFECT_141_T_H>#REPEAT#ItemGroup=#1#100<END>
<START_EFFECT_141_E_H>#CLICK_DISTANCE_32#<END>
<START_EFFECT_142_T_H>#REPEAT#ItemGroup=#1#100<END>
<START_EFFECT_142_E_H>#CLICK_DISTANCE_32#<END>
<START_EFFECT_143_T_H>#REPEAT#ItemGroup=#1#100<END>
<START_EFFECT_143_E_H>#CLICK_DISTANCE_32#<END>
<START_EFFECT_144_T_H>#REPEAT#ItemGroup=#1#100<END>
<START_EFFECT_144_E_H>#CLICK_DISTANCE_32#<END>
<START_EFFECT_145_T_H>#REPEAT#ItemGroup=#1#100<END>
<START_EFFECT_145_E_H>#TIMER_SIGNED#<END>
<START_EFFECT_146_T_H>#REPEAT#ItemGroup=#1#100<END>
<START_EFFECT_146_E_H>#TIMER_SIGNED#<END>
Page 148
TOMB RAIDER NEXT GENERATION SCRIPT REFERENCE MANUAL
<START_EFFECT_147_T_H>#REPEAT#ItemGroup=#1#100<END>
<START_EFFECT_148_T_H>#NG_STRING_LIST_255#<END>
<START_EFFECT_149_T_H>#STRING_LIST_255#<END>
<START_EFFECT_150_T_H>0: Disable1: Enable<END>
<START_EFFECT_150_E_H>0: Layer11: Layer2<END>
<START_EFFECT_151_T_H>0: Disable Lightning1: Enable Lightning<END>
<START_EFFECT_152_T_H>#REPEAT#ColorRBG=#1#200<END>
<START_EFFECT_152_E_H>0: Layer11: Layer2<END>
<START_EFFECT_153_T_H>#REPEAT#Speed=#0#255<END>
<START_EFFECT_153_E_H>0: Layer11: Layer2<END>
Page 149
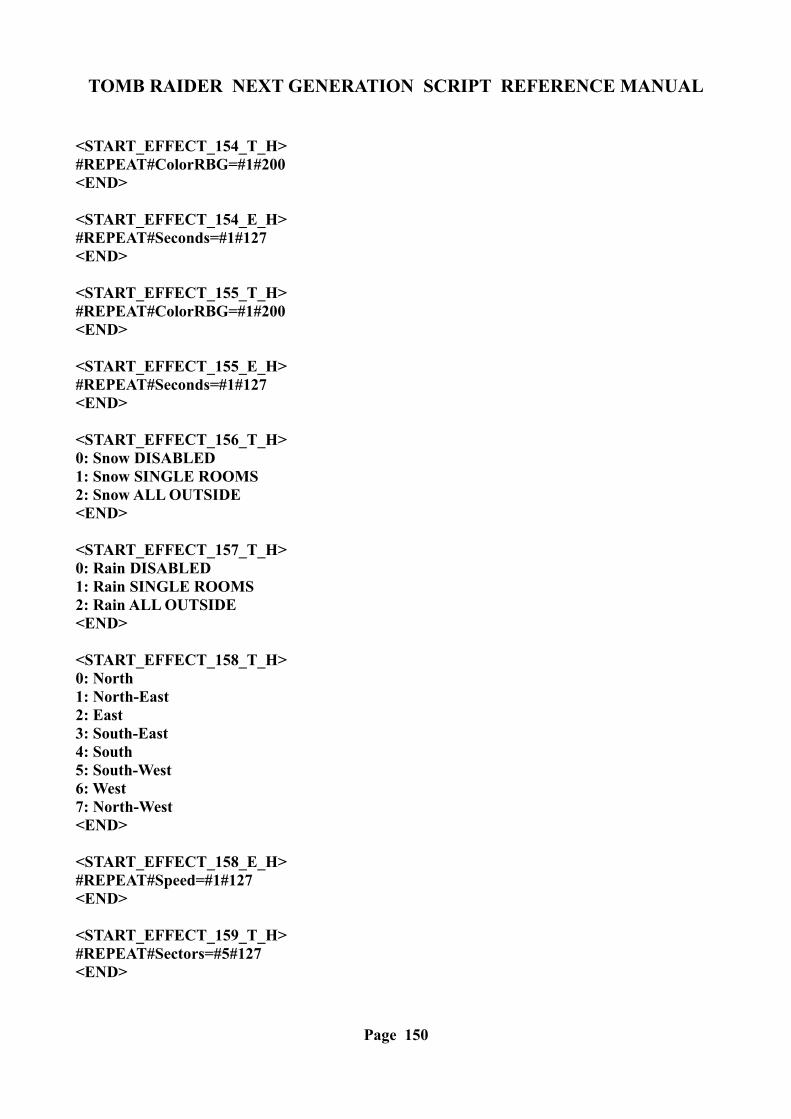
TOMB RAIDER NEXT GENERATION SCRIPT REFERENCE MANUAL
<START_EFFECT_154_T_H>#REPEAT#ColorRBG=#1#200<END>
<START_EFFECT_154_E_H>#REPEAT#Seconds=#1#127<END>
<START_EFFECT_155_T_H>#REPEAT#ColorRBG=#1#200<END>
<START_EFFECT_155_E_H>#REPEAT#Seconds=#1#127<END>
<START_EFFECT_156_T_H>0: Snow DISABLED1: Snow SINGLE ROOMS2: Snow ALL OUTSIDE<END>
<START_EFFECT_157_T_H>0: Rain DISABLED1: Rain SINGLE ROOMS2: Rain ALL OUTSIDE<END>
<START_EFFECT_158_T_H>0: North1: North-East2: East3: South-East4: South5: South-West6: West7: North-West<END>
<START_EFFECT_158_E_H>#REPEAT#Speed=#1#127<END>
<START_EFFECT_159_T_H>#REPEAT#Sectors=#5#127<END>
Page 150
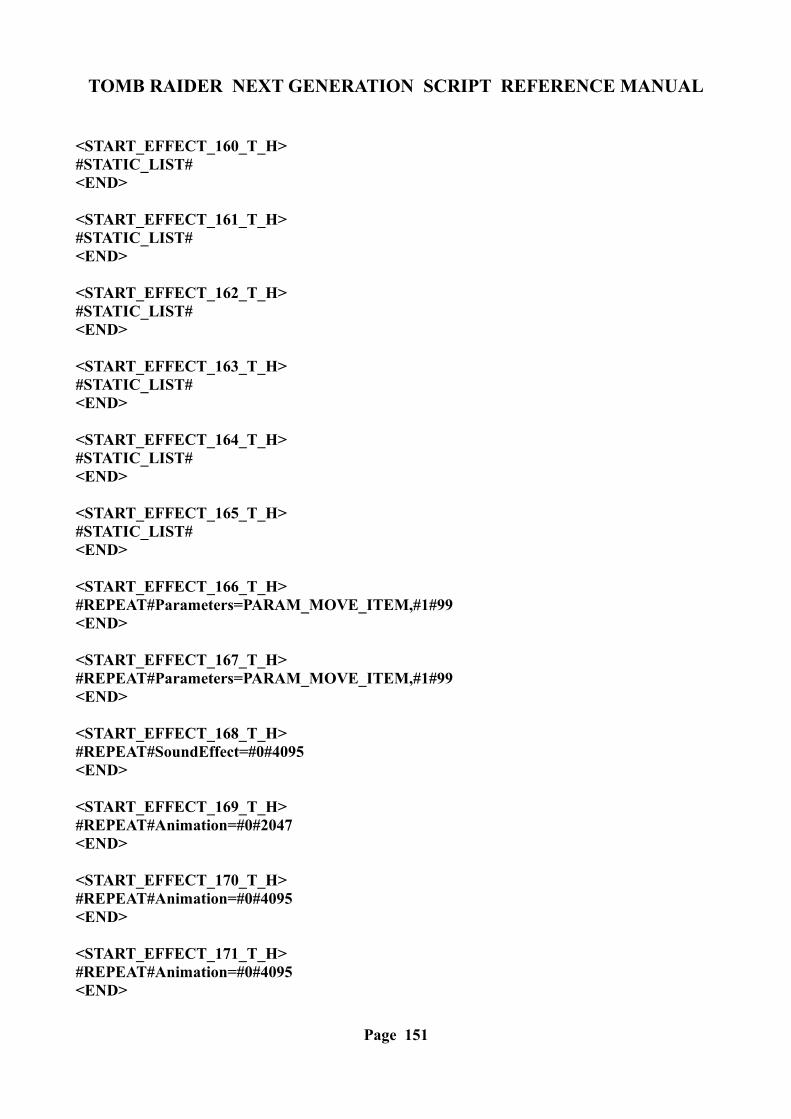
TOMB RAIDER NEXT GENERATION SCRIPT REFERENCE MANUAL
<START_EFFECT_160_T_H>#STATIC_LIST#<END>
<START_EFFECT_161_T_H>#STATIC_LIST#<END>
<START_EFFECT_162_T_H>#STATIC_LIST#<END>
<START_EFFECT_163_T_H>#STATIC_LIST#<END>
<START_EFFECT_164_T_H>#STATIC_LIST#<END>
<START_EFFECT_165_T_H>#STATIC_LIST#<END>
<START_EFFECT_166_T_H>#REPEAT#Parameters=PARAM_MOVE_ITEM,#1#99<END>
<START_EFFECT_167_T_H>#REPEAT#Parameters=PARAM_MOVE_ITEM,#1#99<END>
<START_EFFECT_168_T_H>#REPEAT#SoundEffect=#0#4095<END>
<START_EFFECT_169_T_H>#REPEAT#Animation=#0#2047<END>
<START_EFFECT_170_T_H>#REPEAT#Animation=#0#4095<END>
<START_EFFECT_171_T_H>#REPEAT#Animation=#0#4095<END>
Page 151
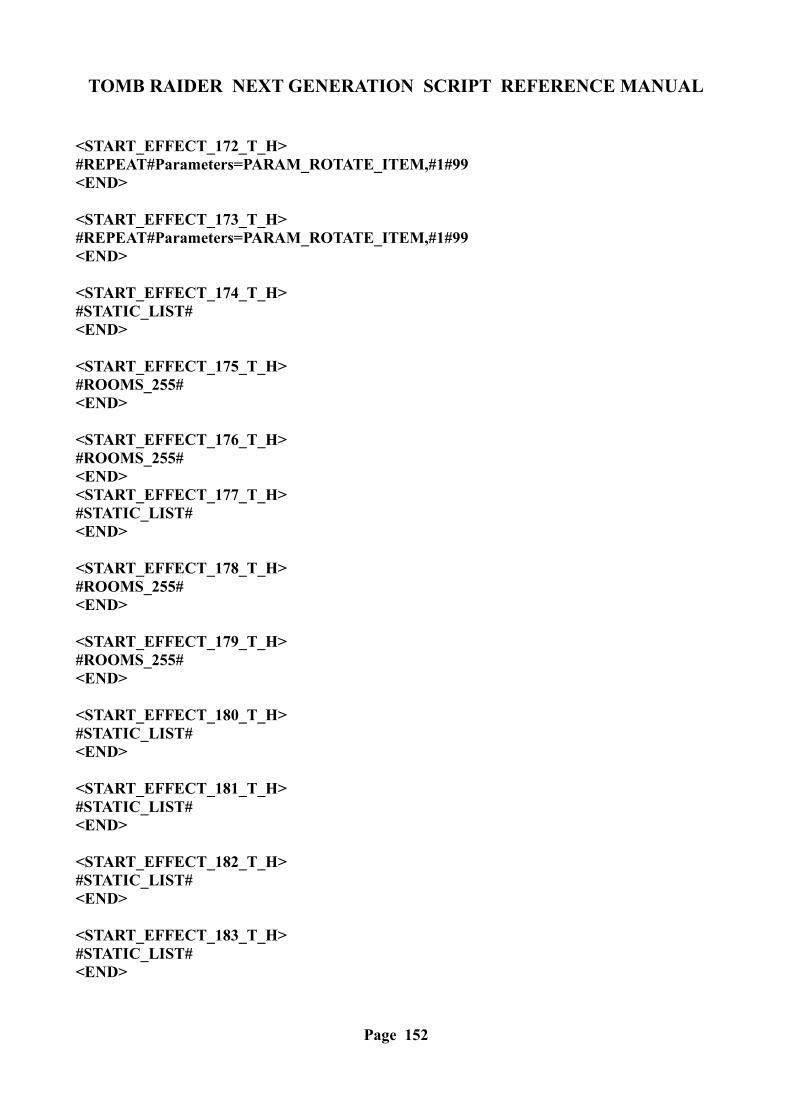
TOMB RAIDER NEXT GENERATION SCRIPT REFERENCE MANUAL
<START_EFFECT_172_T_H>#REPEAT#Parameters=PARAM_ROTATE_ITEM,#1#99<END>
<START_EFFECT_173_T_H>#REPEAT#Parameters=PARAM_ROTATE_ITEM,#1#99<END>
<START_EFFECT_174_T_H>#STATIC_LIST#<END>
<START_EFFECT_175_T_H>#ROOMS_255#<END>
<START_EFFECT_176_T_H>#ROOMS_255#<END><START_EFFECT_177_T_H>#STATIC_LIST#<END>
<START_EFFECT_178_T_H>#ROOMS_255#<END>
<START_EFFECT_179_T_H>#ROOMS_255#<END>
<START_EFFECT_180_T_H>#STATIC_LIST#<END>
<START_EFFECT_181_T_H>#STATIC_LIST#<END>
<START_EFFECT_182_T_H>#STATIC_LIST#<END>
<START_EFFECT_183_T_H>#STATIC_LIST#<END>
Page 152
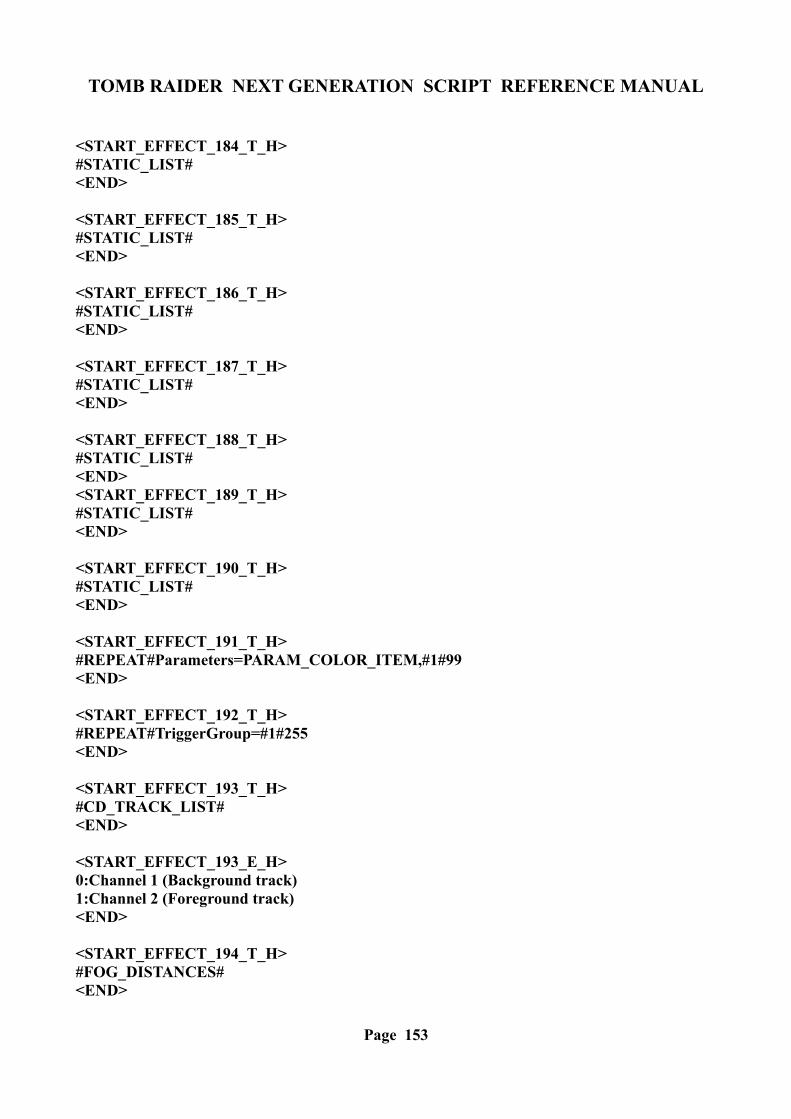
TOMB RAIDER NEXT GENERATION SCRIPT REFERENCE MANUAL
<START_EFFECT_184_T_H>#STATIC_LIST#<END>
<START_EFFECT_185_T_H>#STATIC_LIST#<END>
<START_EFFECT_186_T_H>#STATIC_LIST#<END>
<START_EFFECT_187_T_H>#STATIC_LIST#<END>
<START_EFFECT_188_T_H>#STATIC_LIST#<END><START_EFFECT_189_T_H>#STATIC_LIST#<END>
<START_EFFECT_190_T_H>#STATIC_LIST#<END>
<START_EFFECT_191_T_H>#REPEAT#Parameters=PARAM_COLOR_ITEM,#1#99<END>
<START_EFFECT_192_T_H>#REPEAT#TriggerGroup=#1#255<END>
<START_EFFECT_193_T_H>#CD_TRACK_LIST#<END>
<START_EFFECT_193_E_H>0:Channel 1 (Background track)1:Channel 2 (Foreground track)<END>
<START_EFFECT_194_T_H>#FOG_DISTANCES#<END>
Page 153
TOMB RAIDER NEXT GENERATION SCRIPT REFERENCE MANUAL
<START_EFFECT_195_T_H>#FOG_DISTANCES#<END>
<START_EFFECT_195_E_H>#REPEAT#Seconds=#1#127<END>
<START_EFFECT_196_T_H>#FOG_DISTANCES#<END>
<START_EFFECT_196_E_H>#REPEAT#Seconds=#1#127<END>
<START_EFFECT_197_T_H>0:ENABLE fog1:DISABLE fog<END>
<START_EFFECT_198_T_H>#FOG_DISTANCES#<END>
<START_EFFECT_199_T_H>0:Put out the Torch1:Light the Torch<END>
<START_EFFECT_200_T_H>0:Remove Torch from hand of Lara1:Give to Lara the Torch in her hand<END>
<START_EFFECT_201_T_H>#NG_STRING_LIST_255#<END>
Page 154
TOMB RAIDER NEXT GENERATION SCRIPT REFERENCE MANUAL
<START_EFFECT_201_E_H>0: Abs. Normal Speed (30 fps)1: Abs. Slow Speed (15 fps)2: Abs. Very Slow Speed (10 fps)3: Abs. Fast Speed (60 fps)4: Abs. Very Fast Speed (90 fps)5: Prop. Normal Speed (30 fps)6: Prop. Slow Speed (15 fps)7: Prop. Very Slow Speed (10 fps)8: Prop. Fast Speed (60 fps)9: Prop. Very Fast Speed (90 fps)<END>
<START_EFFECT_203_T_H>#NG_STRING_LIST_255#<END>
<START_EFFECT_203_E_H>#REPEAT#Parameters=PARAM_PRINT_TEXT, #1#100<END>
<START_EFFECT_204_T_H>#NG_STRING_LIST_ALL#<END><START_EFFECT_205_T_H>#NG_STRING_LIST_255#<END>
<START_EFFECT_205_E_H>#REPEAT#Parameters=PARAM_PRINT_TEXT, #1#100<END>
<START_EFFECT_206_T_H>#NG_STRING_LIST_255#<END>
<START_EFFECT_206_E_H>#REPEAT#Parameters=PARAM_PRINT_TEXT, #1#100<END>
<START_EFFECT_207_T_H>#PSX_STRING_LIST#<END>
<START_EFFECT_207_E_H>#REPEAT#Parameters=PARAM_PRINT_TEXT, #1#100<END>
Page 155
TOMB RAIDER NEXT GENERATION SCRIPT REFERENCE MANUAL
<START_EFFECT_208_T_H>#PC_STRING_LIST#<END>
<START_EFFECT_208_E_H>#REPEAT#Parameters=PARAM_PRINT_TEXT, #1#100<END>
<START_EFFECT_209_T_H>#PC_STRING_LIST#<END>
<START_EFFECT_209_E_H>#REPEAT#Parameters=PARAM_PRINT_TEXT, #1#100<END>
<START_EFFECT_210_T_H>#NG_STRING_LIST_255#<END>
<START_EFFECT_210_E_H>#REPEAT#Parameters=PARAM_PRINT_TEXT, #1#100<END><START_EFFECT_211_T_H>#REPEAT#Animation_#0#1000<END>
<START_EFFECT_212_T_H>#TIME_LIST_128#<END>
<START_EFFECT_214_T_H>#REPEAT#Parameters=PARAM_SET_CAMERA,#1#100<END>
<START_EFFECT_214_E_H>#TIME_LIST_128#<END>
<START_EFFECT_217_T_H>#REPEAT#Image=#1#200<END>
<START_EFFECT_217_E_H>#TIME_LIST_128#<END>
Page 156
TOMB RAIDER NEXT GENERATION SCRIPT REFERENCE MANUAL
<START_EFFECT_219_T_H>#NG_STRING_LIST_255#<END>
<START_EFFECT_219_E_H>#REPEAT#Diary=#1#100<END>
<START_EFFECT_220_T_H>#REPEAT#Diary=#1#100<END>
<START_EFFECT_221_T_H>#REPEAT#Diary=#1#100<END>
<START_EFFECT_222_T_H>#REPEAT#Diary=#1#100<END>
<START_EFFECT_222_E_H>0:Last Page1:Page 12:Page 23:Page 34:Page 45:Page 56:Page 67:Page 78:Page 89:Page 910:Page 1011:Page 1112:Page 1213:Page 1314:Page 1415:Page 1516:Page 1617:Page 1718:Page 1819:Page 1920:Page 20<END>
<START_EFFECT_224_T_H>#COLORS#<END>
Page 157
TOMB RAIDER NEXT GENERATION SCRIPT REFERENCE MANUAL
<START_EFFECT_226_T_H>#FOG_DISTANCES#<END>
<START_EFFECT_227_T_H>#FOG_DISTANCES#<END>
<START_EFFECT_228_T_H>0: 1 RANDOM way - Low Intensity (1 sector)1: 2 RANDOM way - Middle Intensity (2 sectors)2: 4 RANDOM way - High Intensity (4 sectors)3: 8 RANDOM way - Very high Intensity (8 sectors)4:16 RANDOM way - Huge Intensity (16 sectors)5:32 RANDOM way - Max Intensity (32 sectors)8: 1 PULSE way - Low Intensity (1 sector)9: 2 PULSE way - Middle Intensity (2 sectors)10: 4 PULSE way - High Intensity (4 sectors)11: 8 PULSE way - Very high Intensity (8 sectors)12:16 PULSE way - Huge Intensity (16 sectors)13:32 PULSE way - Max Intensity (32 sector)<END>
<START_EFFECT_228_E_H>0:6.0 Very Slow (6 seconds)1:4.0 Slow (4 seconds)2:3.0 Middle (3 seconds)3:2.0 Fast (2 seconds)4:1.0 Very Fast (1 second)5:0.5 Ultra Fast (0.5 seconds)<END>
<START_EFFECT_229_T_H>#SAME_OF#=EFFECT_228_T<END>
<START_EFFECT_229_E_H>#SAME_OF#=EFFECT_228_E<END>
<START_EFFECT_230_T_H>1:Stop the [Change END LIMIT fog distance] effect2:Stop the [Change START LIMIT fog distance] effect<END>
Page 158
TOMB RAIDER NEXT GENERATION SCRIPT REFERENCE MANUAL
<START_EFFECT_231_T_H>#VAR_NORMALS#<END>
<START_EFFECT_231_E_H>#REPEAT#Value #0#127<END>
<START_EFFECT_232_T_H>#VAR_NORMALS#<END>
<START_EFFECT_232_E_H>#REPEAT#Value #0#127<END>
<START_EFFECT_233_T_H>#VAR_NORMALS#<END>
<START_EFFECT_233_E_H>#REPEAT#Value #0#127<END>
<START_EFFECT_234_T_H>#VAR_NORMALS#<END>
<START_EFFECT_234_E_H>#BIT_LIST#<END>
<START_EFFECT_235_T_H>#VAR_NORMALS#<END>
<START_EFFECT_235_E_H>#BIT_LIST#<END>
<START_EFFECT_236_T_H>#VAR_STORES#<END>
<START_EFFECT_237_T_H>#VAR_STORES#<END>
Page 159
TOMB RAIDER NEXT GENERATION SCRIPT REFERENCE MANUAL
<START_EFFECT_238_T_H>#VAR_TEXT#<END>
<START_EFFECT_238_E_H>#VAR_TEXT#<END><START_EFFECT_239_T_H>#NG_STRING_LIST_255#<END>
<START_EFFECT_239_E_H>#VAR_TEXT#<END>
<START_EFFECT_240_T_H>#NG_STRING_LIST_255#<END>
<START_EFFECT_240_E_H>0: Use a space as separator1: Use a comma + space as separator2: Use a full stop + space as separator3: Use a full stop + new line character4: Use a full stop + 2 new line characters<END>
<START_EFFECT_241_T_H>0: Clear ALL variables1: Clear All Common Numeric Variables2: Clear Store Variables3: Clear Text Variables4: Clear Common Numeric Local Variables5: Clear Common Numeric Global Variables<END>
<START_EFFECT_242_T_H>#VAR_TEXT#<END>
<START_EFFECT_242_E_H>#SAME_OF#=EFFECT_240_E<END>
<START_EFFECT_243_T_H>#VAR_NORMALS#<END>
Page 160
TOMB RAIDER NEXT GENERATION SCRIPT REFERENCE MANUAL
<START_EFFECT_243_E_H>#SAME_OF#=EFFECT_240_E<END>
<START_EFFECT_244_T_H>#VAR_NORMALS#<END>
<START_EFFECT_244_E_H>#MEMORY_SAVE#<END>
<START_EFFECT_245_T_H>#VAR_NORMALS#<END>
<START_EFFECT_245_E_H>#MEMORY_SAVE#<END>
<START_EFFECT_246_T_H>#MEMORY_SAVE#<END>
<START_EFFECT_246_E_H>#REPEAT#Value #0#127<END>
<START_EFFECT_247_T_H>#MEMORY_SAVE#<END>
<START_EFFECT_247_E_H>#BIT_LIST#<END>
<START_EFFECT_248_T_H>#MEMORY_SAVE#<END>
<START_EFFECT_248_E_H>#BIT_LIST#<END>
<START_EFFECT_249_T_H>#MEMORY_SAVE#<END>
Page 161
TOMB RAIDER NEXT GENERATION SCRIPT REFERENCE MANUAL
<START_EFFECT_249_E_H>#REPEAT#Value #0#127<END><START_EFFECT_250_T_H>#MEMORY_SAVE#<END>
<START_EFFECT_250_E_H>#REPEAT#Value #0#127<END>
<START_EFFECT_251_T_H>#VAR_NORMALS#<END>
<START_EFFECT_251_E_H>#REPEAT#Value #0#127<END>
<START_EFFECT_252_T_H>#VAR_NORMALS#<END>
<START_EFFECT_252_E_H>#NEGATIVE_NUMBERS#<END>
<START_EFFECT_253_T_H>#VAR_NORMALS#<END>
<START_EFFECT_253_E_H>#REPEAT#Value #0#127<END>
<START_EFFECT_254_T_H>#MEMORY_SAVE#<END>
<START_EFFECT_254_E_H>#NEGATIVE_NUMBERS#<END>
<START_EFFECT_255_T_H>#MEMORY_ITEM#<END>
Page 162
TOMB RAIDER NEXT GENERATION SCRIPT REFERENCE MANUAL
<START_EFFECT_255_E_H>#REPEAT#Value #0#127<END><START_EFFECT_256_T_H>#VAR_NORMALS#<END>
<START_EFFECT_256_E_H>#MEMORY_ITEM#<END>
<START_EFFECT_257_T_H>#VAR_NORMALS#<END>
<START_EFFECT_257_E_H>#MEMORY_ITEM#<END>
<START_EFFECT_258_T_H>#MEMORY_ITEM#<END>
<START_EFFECT_258_E_H>#REPEAT#Value #0#127<END>
<START_EFFECT_259_T_H>#MEMORY_ITEM#<END>
<START_EFFECT_259_E_H>#BIT_LIST#<END>
<START_EFFECT_260_T_H>#MEMORY_ITEM#<END>
<START_EFFECT_260_E_H>#BIT_LIST#<END>
<START_EFFECT_261_T_H>#MEMORY_ITEM#<END>
Page 163

TOMB RAIDER NEXT GENERATION SCRIPT REFERENCE MANUAL
<START_EFFECT_261_E_H>#REPEAT#Value of Parameters=PARAM_BIG_NUMBERS at index=#0#127<END><START_EFFECT_262_T_H>#MEMORY_SAVE#<END>
<START_EFFECT_262_E_H>#REPEAT#Value of Parameters=PARAM_BIG_NUMBERS at index=#0#127<END>
<START_EFFECT_263_T_H>#VAR_NORMALS#<END>
<START_EFFECT_263_E_H>#REPEAT#Value of Parameters=PARAM_BIG_NUMBERS at index=#0#127<END>
<START_EFFECT_264_T_H>0:Local Timer1:Global Timer<END>
<START_EFFECT_264_E_H>0:Increasing Timer1:Decreasing Timer (Countdown)<END>
<START_EFFECT_265_T_H>0:Local Timer1:Global Timer<END>
<START_EFFECT_266_T_H>0:Local Timer1:Global Timer<END>
<START_EFFECT_266_E_H>#REPEAT#Seconds=#0#127<END>
<START_EFFECT_267_T_H>0:Local Timer1:Global Timer<END>
Page 164
TOMB RAIDER NEXT GENERATION SCRIPT REFERENCE MANUAL
<START_EFFECT_267_E_H>#REPEAT#Value of Parameters=PARAM_BIG_NUMBERS at index=#0#127<END>
<START_EFFECT_268_T_H>0:Local Timer1:Global Timer<END>
<START_EFFECT_268_E_H>#REPEAT#Frame Ticks=#0#127<END>
<START_EFFECT_269_T_H>0:Local Timer1:Global Timer<END>
<START_EFFECT_269_E_H>1:POSITION_BOTTOM_CENTER2:POSITION_TOP_CENTER3:POSITION_CENTER_CENTER4:POSITION_TOP_LEFT5:POSITION_TOP_RIGHT6:POSITION_BOTTOM_LEFT7:POSITION_BOTTOM_RIGHT8:POSITION_DOWN_DAMAGE_BAR9:POSITION_DOWN_COLD_BAR10:POSITION_DOWN_LEFT_BARS11:POSITION_DOWN_RIGHT_BARS<END>
<START_EFFECT_270_T_H>0:Local Timer1:Global Timer<END>
<START_EFFECT_270_E_H>#REPEAT#Seconds=#0#127<END>
<START_EFFECT_271_T_H>#VAR_NORMALS#<END>
Page 165
TOMB RAIDER NEXT GENERATION SCRIPT REFERENCE MANUAL
<START_EFFECT_272_T_H>#VAR_NORMALS#<END>
<START_EFFECT_273_T_H>#MEMORY_SAVE#<END>
<START_EFFECT_274_T_H>#MEMORY_SAVE#<END>
<START_EFFECT_275_T_H>#MEMORY_ITEM#<END>
<START_EFFECT_276_T_H>#MEMORY_ITEM#<END>
<START_EFFECT_277_T_H>#MEMORY_CODE#<END>
<START_EFFECT_278_T_H>#MEMORY_CODE#<END>
<START_EFFECT_279_T_H>#MEMORY_CODE#<END>
<START_EFFECT_279_E_H>#REPEAT#Value #0#127<END>
<START_EFFECT_280_T_H>#MEMORY_CODE#<END>
<START_EFFECT_280_E_H>#REPEAT#Value #0#127<END>
<START_EFFECT_281_T_H>#MEMORY_CODE#<END>
Page 166
TOMB RAIDER NEXT GENERATION SCRIPT REFERENCE MANUAL
<START_EFFECT_281_E_H>#BIT_LIST#<END>
<START_EFFECT_282_T_H>#MEMORY_CODE#<END>
<START_EFFECT_282_E_H>#BIT_LIST#<END>
<START_EFFECT_283_T_H>#MEMORY_CODE#<END>
<START_EFFECT_284_T_H>#VAR_NORMALS#<END>
<START_EFFECT_285_T_H>#VAR_NORMALS#<END>
<START_EFFECT_286_T_H>#VAR_NORMALS#<END><START_EFFECT_287_T_H>#VAR_NORMALS#<END>
<START_EFFECT_288_T_H>#VAR_NORMALS#<END>
<START_EFFECT_289_T_H>#REPEAT#Switch=#1#127<END>
<START_EFFECT_290_T_H>#REPEAT#Organizer=#1#100<END>
Page 167
TOMB RAIDER NEXT GENERATION SCRIPT REFERENCE MANUAL
<START_EFFECT_290_E_H>0:Resume from first command (like a new Enabling)1:Resume from next command immediately2:Resume from next command in required time set in next command<END>
<START_EFFECT_291_T_H>#VAR_NORMALS#<END>
<START_EFFECT_291_E_H>#REPEAT#ColorRBG=#1#127<END>
<START_EFFECT_292_T_H>#WAD-SLOTS#<END>
<START_EFFECT_293_T_H>#VAR_NORMALS#<END>
<START_EFFECT_293_E_H>#MEMORY_SLOT#<END>
<START_EFFECT_294_T_H>#VAR_NORMALS#<END>
<START_EFFECT_294_E_H>#MEMORY_SLOT#<END><START_EFFECT_295_T_H>#VAR_NORMALS#<END>
<START_EFFECT_295_E_H>#MEMORY_ANIMATION#<END>
<START_EFFECT_296_T_H>#VAR_NORMALS#<END>
Page 168
TOMB RAIDER NEXT GENERATION SCRIPT REFERENCE MANUAL
<START_EFFECT_296_E_H>#MEMORY_ANIMATION#<END>
<START_EFFECT_297_T_H>#ROOMS_255#<END>
<START_EFFECT_303_T_H>#VAR_NORMALS#<END>
<START_EFFECT_303_E_H>#REPEAT#Random Number between 0 and #1#126<END>
<START_EFFECT_304_T_H>#VAR_NORMALS#<END>
<START_EFFECT_305_T_H>#VAR_NORMALS#<END>
<START_EFFECT_305_E_H>#REPEAT#Number=#1#127<END>
<START_EFFECT_306_T_H>#INVENTORY-ITEM-INDEX#<END>
<START_EFFECT_306_E_H>0:Silent way1:If item is missing play LARA_SAY_NO sound<END>
<START_EFFECT_307_T_H>#REPEAT#Animation=#0#999<END>
<START_EFFECT_308_T_H>#NG_STRING_LIST_255#<END>
Page 169
TOMB RAIDER NEXT GENERATION SCRIPT REFERENCE MANUAL
<START_EFFECT_309_T_H>#VAR_NORMALS#<END>
<START_EFFECT_309_E_H>1:Decimal2:Hexadecimal4:Binary3:Decimal and Hexadecimal5:Decimal and Binary6:Hexadecimal and Binary7:Decimal, Hexadecimal and Binary<END>
<START_EFFECT_310_T_H>#REPEAT#Triangular collision with height=#0#15<END>
<START_EFFECT_310_E_H>#COLLISION_FLOOR#<END>
<START_EFFECT_311_T_H>#REPEAT#Triangular collision with height=#0#15<END>
<START_EFFECT_311_E_H>#COLLISION_FLOOR#<END>
<START_EFFECT_312_T_H>#REPEAT#Triangular collision with height=#0#15<END>
<START_EFFECT_312_E_H>#COLLISION_FLOOR#<END>
<START_EFFECT_313_T_H>#REPEAT#Triangular collision with height=#0#15<END><START_EFFECT_313_E_H>#COLLISION_FLOOR#<END>
Page 170
TOMB RAIDER NEXT GENERATION SCRIPT REFERENCE MANUAL
<START_EFFECT_314_T_H>#REPEAT#Slope Collision with height=#0#15<END>
<START_EFFECT_314_E_H>#COLLISION_FLOOR#<END>
<START_EFFECT_315_T_H>#REPEAT#Slope Collision with height=#0#15<END>
<START_EFFECT_315_E_H>#COLLISION_FLOOR#<END>
<START_EFFECT_316_T_H>#REPEAT#Slope Collision with height=#0#15<END>
<START_EFFECT_316_E_H>#COLLISION_FLOOR#<END>
<START_EFFECT_317_T_H>#REPEAT#Slope Collision with height=#0#15<END>
<START_EFFECT_317_E_H>#COLLISION_FLOOR#<END>
<START_EFFECT_318_T_H>#REPEAT#Slope Collision with height=#0#15<END>
<START_EFFECT_318_E_H>#COLLISION_CEILING#<END>
<START_EFFECT_319_T_H>#REPEAT#Slope Collision with height=#0#15<END>
<START_EFFECT_319_E_H>#COLLISION_CEILING#<END>
Page 171
TOMB RAIDER NEXT GENERATION SCRIPT REFERENCE MANUAL
<START_EFFECT_320_T_H>#REPEAT#Slope Collision with height=#0#15<END>
<START_EFFECT_320_E_H>#COLLISION_CEILING#<END>
<START_EFFECT_321_T_H>#REPEAT#Slope Collision with height=#0#15<END>
<START_EFFECT_321_E_H>#COLLISION_CEILING#<END>
<START_EFFECT_322_T_H>#REPEAT#Slope Collision with height=#0#15<END>
<START_EFFECT_322_E_H>#COLLISION_CEILING#<END>
<START_EFFECT_323_T_H>#REPEAT#Slope Collision with height=#0#15<END><START_EFFECT_323_E_H>#COLLISION_CEILING#<END>
<START_EFFECT_324_T_H>#REPEAT#Slope Collision with height=#0#15<END>
<START_EFFECT_324_E_H>#COLLISION_CEILING#<END>
<START_EFFECT_325_T_H>#REPEAT#Slope Collision with height=#0#15<END>
<START_EFFECT_325_E_H>#COLLISION_CEILING#<END>
Page 172
TOMB RAIDER NEXT GENERATION SCRIPT REFERENCE MANUAL
<START_EFFECT_326_T_H>#REPEAT#Triangular split collision with height=#0#15<END>
<START_EFFECT_326_E_H>#COLLISION_FLOOR#<END>
<START_EFFECT_327_T_H>#REPEAT#Triangular split collision with height=#0#15<END>
<START_EFFECT_327_E_H>#COLLISION_FLOOR#<END>
<START_EFFECT_328_T_H>#REPEAT#Triangular split collision with height=#0#15<END>
<START_EFFECT_328_E_H>#COLLISION_FLOOR#<END>
<START_EFFECT_329_T_H>#REPEAT#Triangular split collision with height=#0#15<END><START_EFFECT_329_E_H>#COLLISION_FLOOR#<END>
<START_EFFECT_330_T_H>0:North Side1:East Side2:South Side3:West Side<END>
<START_EFFECT_331_T_H>4:BAR_CUSTOM15:BAR_CUSTOM26:BAR_CUSTOM37:BAR_CUSTOM4<END>
Page 173
TOMB RAIDER NEXT GENERATION SCRIPT REFERENCE MANUAL
<START_EFFECT_331_E_H>#TIME_LIST_128#<END>
<START_EFFECT_332_T_H>4:BAR_CUSTOM15:BAR_CUSTOM26:BAR_CUSTOM37:BAR_CUSTOM4<END>
<START_EFFECT_333_T_H>#REPEAT#FlipMap=#0#31<END>
<START_EFFECT_333_E_H>#REPEAT#Frames=#1#127<END>
<START_EFFECT_334_T_H>#REPEAT#FlipMap=#0#31<END>
<START_EFFECT_334_E_H>0:Let the main room1:Let the flipped room<END>
<START_EFFECT_335_T_H>#MEM_INVENTORY_INDICES#<END>
<START_EFFECT_336_T_H>#VAR_NORMALS#<END>
<START_EFFECT_336_E_H>#MEMORY_INVENTORY#<END>
<START_EFFECT_337_T_H>#MEMORY_INVENTORY#<END>
<START_EFFECT_337_E_H>#REPEAT#Value=#0#127<END>
Page 174

TOMB RAIDER NEXT GENERATION SCRIPT REFERENCE MANUAL
<START_EFFECT_338_T_H>#MEMORY_INVENTORY#<END>
<START_EFFECT_338_E_H>#REPEAT#Value of Parameters=PARAM_BIG_NUMBERS at index=#0#127<END>
<START_EFFECT_339_T_H>#VAR_NORMALS#<END>
<START_EFFECT_339_E_H>#MEMORY_INVENTORY#<END>
<START_EFFECT_340_T_H>#LARA_OTHER_SLOTS#<END>
<START_EFFECT_340_E_H>#SWAP_MESH_SLOT#<END>
<START_EFFECT_341_T_H>#SLOT_MESH_MOVEABLES#<END><START_EFFECT_341_E_H>#SLOT_MESH_MOVEABLES#<END>
<START_EFFECT_342_T_H>#MEMORY_CODE#<END>
<START_EFFECT_342_E_H>#NEGATIVE_NUMBERS#<END>
Page 175
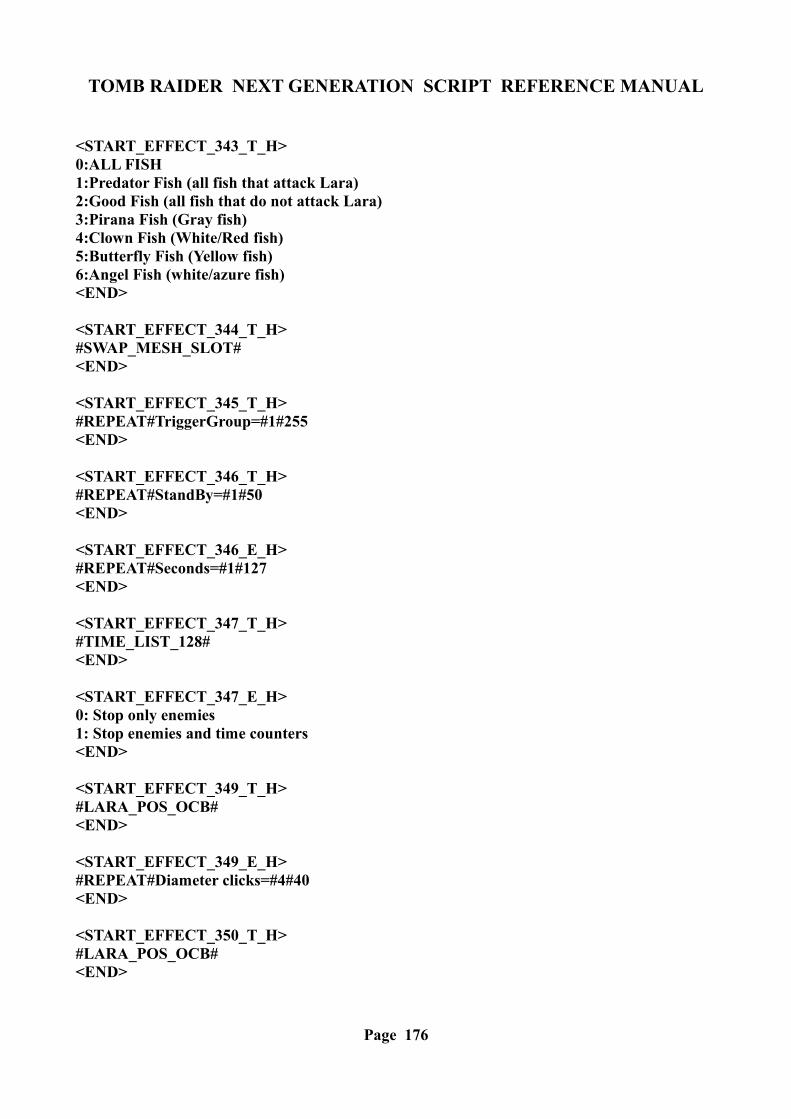
TOMB RAIDER NEXT GENERATION SCRIPT REFERENCE MANUAL
<START_EFFECT_343_T_H>0:ALL FISH1:Predator Fish (all fish that attack Lara)2:Good Fish (all fish that do not attack Lara)3:Pirana Fish (Gray fish)4:Clown Fish (White/Red fish)5:Butterfly Fish (Yellow fish)6:Angel Fish (white/azure fish)<END>
<START_EFFECT_344_T_H>#SWAP_MESH_SLOT#<END>
<START_EFFECT_345_T_H>#REPEAT#TriggerGroup=#1#255<END>
<START_EFFECT_346_T_H>#REPEAT#StandBy=#1#50<END>
<START_EFFECT_346_E_H>#REPEAT#Seconds=#1#127<END>
<START_EFFECT_347_T_H>#TIME_LIST_128#<END>
<START_EFFECT_347_E_H>0: Stop only enemies1: Stop enemies and time counters<END>
<START_EFFECT_349_T_H>#LARA_POS_OCB#<END>
<START_EFFECT_349_E_H>#REPEAT#Diameter clicks=#4#40<END>
<START_EFFECT_350_T_H>#LARA_POS_OCB#<END>
Page 176
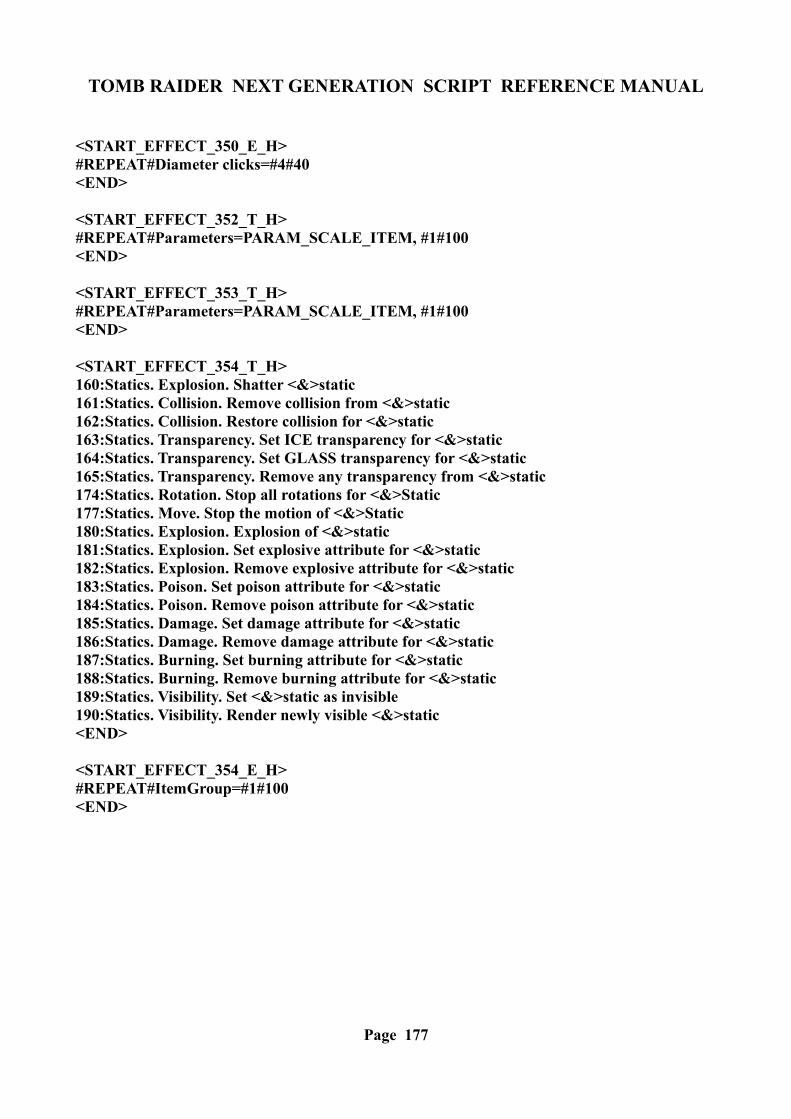
TOMB RAIDER NEXT GENERATION SCRIPT REFERENCE MANUAL
<START_EFFECT_350_E_H>#REPEAT#Diameter clicks=#4#40<END>
<START_EFFECT_352_T_H>#REPEAT#Parameters=PARAM_SCALE_ITEM, #1#100<END>
<START_EFFECT_353_T_H>#REPEAT#Parameters=PARAM_SCALE_ITEM, #1#100<END>
<START_EFFECT_354_T_H>160:Statics. Explosion. Shatter <&>static161:Statics. Collision. Remove collision from <&>static162:Statics. Collision. Restore collision for <&>static163:Statics. Transparency. Set ICE transparency for <&>static164:Statics. Transparency. Set GLASS transparency for <&>static165:Statics. Transparency. Remove any transparency from <&>static174:Statics. Rotation. Stop all rotations for <&>Static177:Statics. Move. Stop the motion of <&>Static180:Statics. Explosion. Explosion of <&>static181:Statics. Explosion. Set explosive attribute for <&>static182:Statics. Explosion. Remove explosive attribute for <&>static183:Statics. Poison. Set poison attribute for <&>static184:Statics. Poison. Remove poison attribute for <&>static185:Statics. Damage. Set damage attribute for <&>static186:Statics. Damage. Remove damage attribute for <&>static187:Statics. Burning. Set burning attribute for <&>static188:Statics. Burning. Remove burning attribute for <&>static189:Statics. Visibility. Set <&>static as invisible190:Statics. Visibility. Render newly visible <&>static<END>
<START_EFFECT_354_E_H>#REPEAT#ItemGroup=#1#100<END>
Page 177
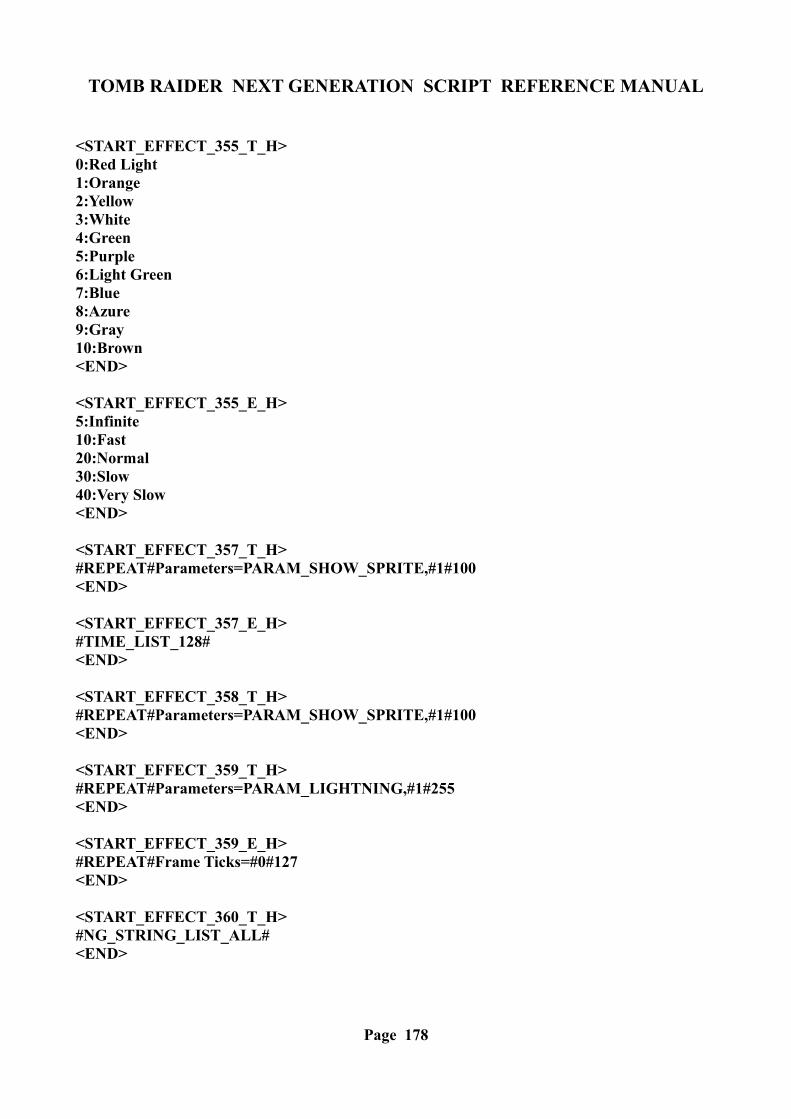
TOMB RAIDER NEXT GENERATION SCRIPT REFERENCE MANUAL
<START_EFFECT_355_T_H>0:Red Light1:Orange2:Yellow3:White4:Green 5:Purple6:Light Green7:Blue8:Azure9:Gray10:Brown<END>
<START_EFFECT_355_E_H>5:Infinite10:Fast 20:Normal30:Slow40:Very Slow<END>
<START_EFFECT_357_T_H>#REPEAT#Parameters=PARAM_SHOW_SPRITE,#1#100<END>
<START_EFFECT_357_E_H>#TIME_LIST_128#<END>
<START_EFFECT_358_T_H>#REPEAT#Parameters=PARAM_SHOW_SPRITE,#1#100<END>
<START_EFFECT_359_T_H>#REPEAT#Parameters=PARAM_LIGHTNING,#1#255<END>
<START_EFFECT_359_E_H>#REPEAT#Frame Ticks=#0#127<END>
<START_EFFECT_360_T_H>#NG_STRING_LIST_ALL#<END>
Page 178
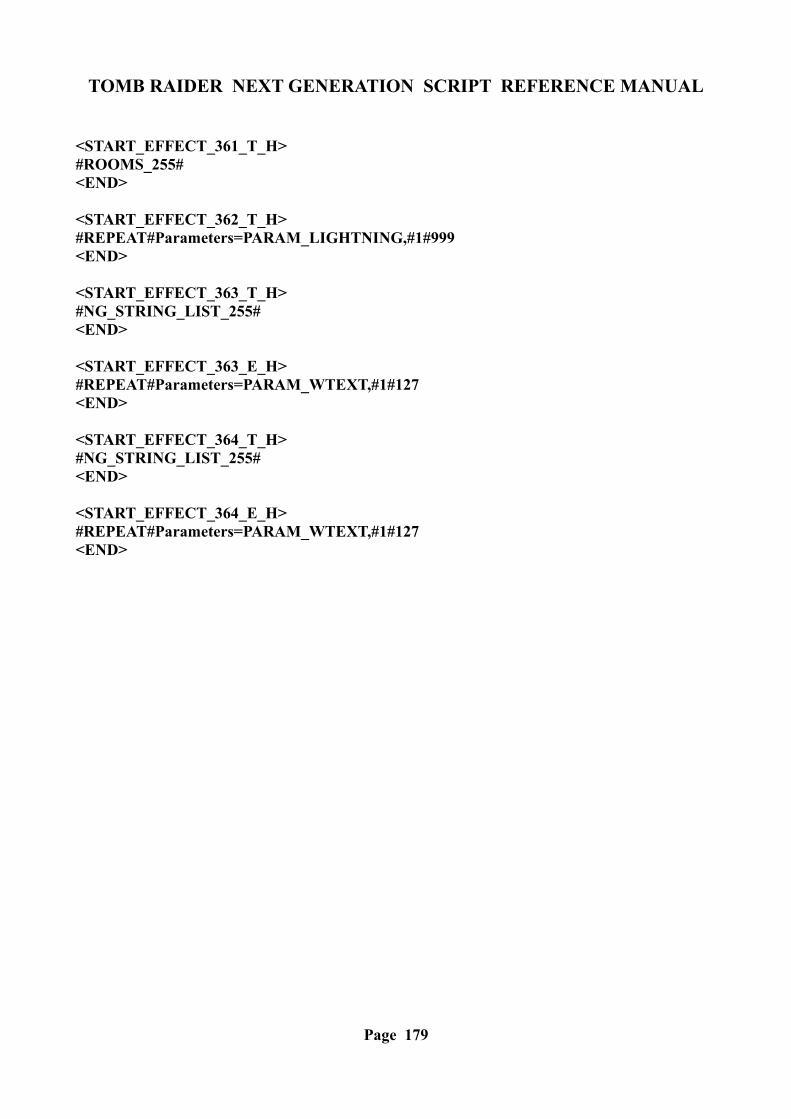
TOMB RAIDER NEXT GENERATION SCRIPT REFERENCE MANUAL
<START_EFFECT_361_T_H>#ROOMS_255#<END>
<START_EFFECT_362_T_H>#REPEAT#Parameters=PARAM_LIGHTNING,#1#999<END>
<START_EFFECT_363_T_H>#NG_STRING_LIST_255#<END>
<START_EFFECT_363_E_H>#REPEAT#Parameters=PARAM_WTEXT,#1#127<END>
<START_EFFECT_364_T_H>#NG_STRING_LIST_255#<END>
<START_EFFECT_364_E_H>#REPEAT#Parameters=PARAM_WTEXT,#1#127<END>
Page 179
TOMB RAIDER NEXT GENERATION SCRIPT REFERENCE MANUAL
Note for NG Flip Effect 359: The new flip effect trigger: "Weather. Perform a lightning with data in <&>Parameters for (E)Durate in Tick frames (1/30 second)" allows to simulate lightning from the sky (using a very short time), and the lightning conductor between two objects, (using infinite durate).Customize the lightning with the linked PARAM_LIGHTNING Parameters script command. There are many parameters to set and if you choose incompatible values you could get bad results. Suggested settings:
To simulate a lightning conductor like in the "planet effect" of the library level use these settings: In the trigger set "0 tick frame" (it means: "infinite durate")
In the script type: ColorRGB= 1, 0, 208, 208Parameters= PARAM_LIGHTNING, 1, > LGTN_ADD_GLOVE_LIGHT + LGTN_RANDOM_COLOR+ LGTN_PLAY_SOUND, > [SourcePosition], [targetPosition], 1, 32, 197, 32, 24, 4, 1, 5
In place of the [SourcePosition] type the index of the item to set the source position for the lightning and in place of the [targetPosition] type the index of an item to set as the target position (read the description of PARAM_LIGHTNING constant)
To simulate a lightning from the sky use these settings:Set in the trigger a small number of tick frames, 3 for example.Then in the script type commands: ColorRGB= 1, 255, 255, 200Parameters= PARAM_LIGHTNING, 1, LGTN_ADD_GLOVE_LIGHT + LGTN_PLAY_SOUND + LGTN_INCLINED_RANDOM + > LGTN_FLASH_SCREEN + LGTN_HEARTHQUAKE, IGNORE, [targetposition], 1, 32, 183, 32, 24, IGNORE, 1, 5
In place of the [targetPosition] type the index of the item to set as the target position (read the description of the PARAM_LIGHTNING constant)
Note: With lightning you can kill (or burn) LARA and kill enemies or explode shatter.
TO STOP THE ENDLESS LIGHTNING USE NG FLIP EFFECT 362
Page 180

TOMB RAIDER NEXT GENERATION SCRIPT REFERENCE MANUAL
Page 181
TOMB RAIDER NEXT GENERATION SCRIPT REFERENCE MANUAL
ACTION TRIGGERS<START_TRIGGERWHAT_11_T_H>list of actions for trigger what ACTION (code = 11) to show in Timer field
1:Turn <#>ANIMATING moving slowly in clockwise of (E) degrees2:Turn <#>ANIMATING moving slowly in inverse clockwise of (E) degrees3:Turn <#>ANIMATING moving fast in clockwise of (E) degrees4:Turn <#>ANIMATING moving fast in inverse clockwise of (E) degrees5:Turn <#>ANIMATING moving endless in (E) way 6:Turn vertically <#>ANIMATING moving slowly in clockwise of (E) degrees7:Turn vertically <#>ANIMATING moving slowly in inverse clockwise of (E) degrees8:Turn vertically <#>ANIMATING moving fast in clockwise of (E) degrees9:Turn vertically <#>ANIMATING moving fast in inverse clockwise of (E) degrees10:Turn vertically <#>ANIMATING moving endless in (E) way 11:Turn immediately <#>object of (E) degrees in clockwise 12:Turn immediately <#>object of (E) degrees in inverse clockwise13:Perform (E) flip effect on <#>object14:Enemy. Kill <#>object in (E) way15:Force (E) animation (0-31) for <#>object 16:Force (E) animation (32-63) for <#>object 17:Force (E) animation (64-95) for <#>object
18:Turn <#>ANIMATING moving slowly in clockwise until (E) facing19:Turn <#>ANIMATING moving slowly in inverse clockwise until (E) facing20:Turn <#>ANIMATING moving fast in clockwise until (E) facing21:Turn <#>ANIMATING moving fast in inverse clockwise until (E) facing22:Turn vertically <#>ANIMATING moving slowly in clockwise until (E) facing23:Turn vertically <#>ANIMATING moving slowly in inverse clockwise until (E) facing24:Turn vertically <#>ANIMATING moving fast in clockwise until (E) facing25:Turn vertically <#>ANIMATING moving fast in inverse clockwise until (E)facing
26:Trigger. (Door) (E)Open/Close <#>door27:Elevator. Move <#>elevator to (E) floor28:Elevator. Move <#>elevator to floor number set in last keypad operation29:Move. Move continuously forward-backward <#>animating of (E) clicks30:Move. Move up <#>animating for (E) clicks31:Move. Move down <#>animating for (E) clicks32:Move. Move to north <#>animating for (E) clicks33:Move. Move to east <#>animating for (E) clicks34:Move. Move to south <#>animating for (E) clicks35:Move. Move to west <#>animating for (E) clicks36:Move. Move continuously upstairs-downstairs <#>animating of (E) clicks37:Swap Mesh of <#>moveable with (E)Slot38:Enemy. Hurt <#>enemy removing (E)Vitality points39:Enemy. Set (E)Next State Id for <#>enemy40:Enemy. Move immediately <#>enemy in LARA_START_POS with (E)OCB setting41:Trigger. (Camera) Activate <#>Camera or fixed camera with (E)Timer value
Page 182

TOMB RAIDER NEXT GENERATION SCRIPT REFERENCE MANUAL
42:Trigger. (Target) Set <#>Moveable as Target for camera or fixed camera43:Trigger. (Moveable) Activate <#>Object with (E)Timer value44:Trigger. (Moveable) Untrigger <#>Object with (E)Timer value45:Trigger. (FlyBy) (E)Activate or Untrigger the <#>FlyBy camera sequence46:Trigger. (Sink) Activate the <#>Sink47:Disable. Disable all continuous actions on <#>Moveable48:Effect. Add to <#>Enemy the (E)AddEffect from script.txt49:Effect. Remove from <#>Enemy the (E)AddEffect from script.txt50:Enemy. Mesh. Set for <#>enemy the (E)mesh as invisible51:Enemy. Mesh. Set for <#>enemy the (E)mesh as visible52:Enemy. Timer. Show the trigger count-down for <#>enemy using (E)format53:Enemy. Mesh. Set for <#>enemy the (E)transparency level54:Variables. Set the index of <#>moveable as Selected Item55:Variables. Save the position of <#>Moveable from (E)Store Variable (x,y,z,room)56:Variables. Move <#>Moveable to position saved from (E)Store Variable57:Variables. Move <#>Moveable to position saved from (E)Store Variable (centre)58:Enemy. Freeze. Freeze <#>Enemy for (E)Seconds59:Enemy. Freeze. Remove freeze for <#>Enemy in (E)way60:Enemy. Save the coordinates and facing of <#>Moveable in savegame61:Collision. Disable the collisions of <#>Moveable62:Collision. Enable newly the collisions of <#>Moveable63:Move. Move up <#>animating for (E)units (one sector = 1024)64:Move. Move down <#>animating for (E)units (one sector = 1024)65:Move. Move to north <#>animating for (E)units (one sector = 1024)66:Move. Move to east <#>animating for (E)units (one sector = 1024)67:Move. Move to south <#>animating for (E)units (one sector = 1024)68:Move. Move to west <#>animating for (E)units (one sector = 1024)
69:Enemy. (Physics) OVER Mode. Attract to North <#>Moveable with (E)speed70:Enemy. (Physics) OVER Mode. Attract to South <#>Moveable with (E)speed71:Enemy. (Physics) OVER Mode. Attract to East <#>Moveable with (E)speed72:Enemy. (Physics) OVER Mode. Attract to West <#>Moveable with (E)speed73:Enemy. (Physics) PAD Mode. Attract to North <#>Moveable with (E)speed74:Enemy. (Physics) PAD Mode. Attract to South <#>Moveable with (E)speed75:Enemy. (Physics) PAD Mode. Attract to East <#>Moveable with (E)speed76:Enemy. (Physics) PAD Mode. Attract to West <#>Moveable with (E)speed
77:Trigger. (Tight-Rope) Disable <#>Tight-Rope78:Trigger. (Tight-Rope) Enable newly <#>Tight-Rope (previously disabled)79:Enemy. (OCB) Change the OCB value of <#>Moveable with (E)Big Number value80:Turn. Turn <#>Animating around the centre at North (E)Distance in circular way81:Turn. Stop circular turning for <#>Animating item in (E)way82:Effect. Apply on the <#>Moveable the (E)pre set effect83:Statics. Apply on <#>static the (E)Add Effect from script file84:Statics. Remove from <#>static the (E)Add Effect of script file85:Turn. Resume circular turning of <#>Animating previously put in Pause<END>
Page 183
TOMB RAIDER NEXT GENERATION SCRIPT REFERENCE MANUAL
<START_ACTION_1_E_H>#DEGREES#<END>
<START_ACTION_2_E_H>#DEGREES#<END>
<START_ACTION_3_E_H>#DEGREES#<END>
<START_ACTION_4_E_H>#DEGREES#<END>
<START_ACTION_5_E_H>0:Clockwise slowly1:Clockwise fast2:Inverse Clockwise slowly3:Inverse Clockwise fast<END>
<START_ACTION_6_E_H>#DEGREES#<END>
<START_ACTION_7_E_H>#DEGREES#<END>
<START_ACTION_8_E_H>#DEGREES#<END>
<START_ACTION_9_E_H>#DEGREES#<END>
<START_ACTION_10_E_H>#SAME_OF#=ACTION_5_E<END>
<START_ACTION_11_E_H>#DEGREES#<END>
Page 184

TOMB RAIDER NEXT GENERATION SCRIPT REFERENCE MANUAL
<START_ACTION_12_E_H>#DEGREES#<END>
<START_ACTION_13_E>0:Make the <&>object turn around 180 degrees.1:Floor shake effect closed to <&>Moveable3:Makes bubbles in position of <&>moveable (LARA_START_POS)6:Activates key triggers of <&>key switch object.18:Swaps meshes of #object with meshswap1. 19:Swaps meshes of #object with meshswap2.20:Swaps meshes of #object with meshswap3.21:Hide object. Makes #ANIMATING invisible22:Show object. Makes #ANIMATING visible29:Ghost trap in position #LARA_START_POS for Wraith3 32:Create floor shadow for #moveable (futile)43:(?) Put in left hand of Lara some (?) mesh of #moveable <END>
<START_ACTION_14_E_H>0:Default death animation (only for mortal creatures, removing vitality)1:Remove immediately (disappear any item)2:Exploding moveable on ground/sky3:Exploding moveable underwater4:Exploding creature5:Kill Creature6:Hide Creature (when other ways don't work)7:Anti-trigger Item (like if it was never enabled)8:Disable emitter<END>
<START_ACTION_15_E>#ANIMATION_LIST_32A#<END>
<START_ACTION_16_E>#ANIMATION_LIST_32B#<END>
<START_ACTION_17_E>#ANIMATION_LIST_32C#<END>
Page 185
TOMB RAIDER NEXT GENERATION SCRIPT REFERENCE MANUAL
<START_ACTION_18_E_H>0: North2: North-East4: East6: South-East8: South10: South-West12: West14: North-West<END>
<START_ACTION_19_E_H>#SAME_OF#=ACTION_18_E<END>
<START_ACTION_20_E_H>#SAME_OF#=ACTION_18_E<END>
<START_ACTION_21_E_H>#SAME_OF#=ACTION_18_E<END>
<START_ACTION_22_E_H>#SAME_OF#=ACTION_18_E<END>
<START_ACTION_23_E_H>#SAME_OF#=ACTION_18_E<END>
<START_ACTION_24_E_H>#SAME_OF#=ACTION_18_E<END>
<START_ACTION_25_E_H>#SAME_OF#=ACTION_18_E<END>
<START_ACTION_26_E_H>0:Close the door1:Open the door<END>
Page 186
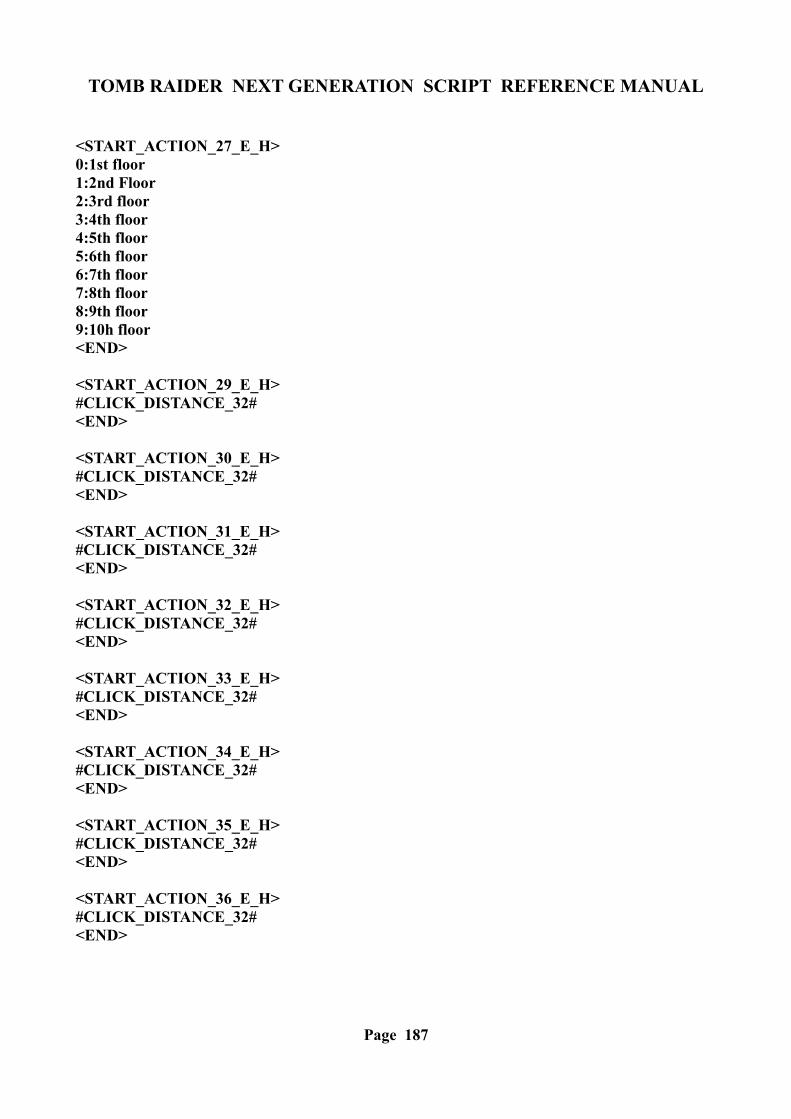
TOMB RAIDER NEXT GENERATION SCRIPT REFERENCE MANUAL
<START_ACTION_27_E_H>0:1st floor1:2nd Floor2:3rd floor3:4th floor4:5th floor5:6th floor6:7th floor7:8th floor8:9th floor9:10h floor<END>
<START_ACTION_29_E_H>#CLICK_DISTANCE_32#<END>
<START_ACTION_30_E_H>#CLICK_DISTANCE_32#<END>
<START_ACTION_31_E_H>#CLICK_DISTANCE_32#<END>
<START_ACTION_32_E_H>#CLICK_DISTANCE_32#<END>
<START_ACTION_33_E_H>#CLICK_DISTANCE_32#<END>
<START_ACTION_34_E_H>#CLICK_DISTANCE_32#<END>
<START_ACTION_35_E_H>#CLICK_DISTANCE_32#<END>
<START_ACTION_36_E_H>#CLICK_DISTANCE_32#<END>
Page 187
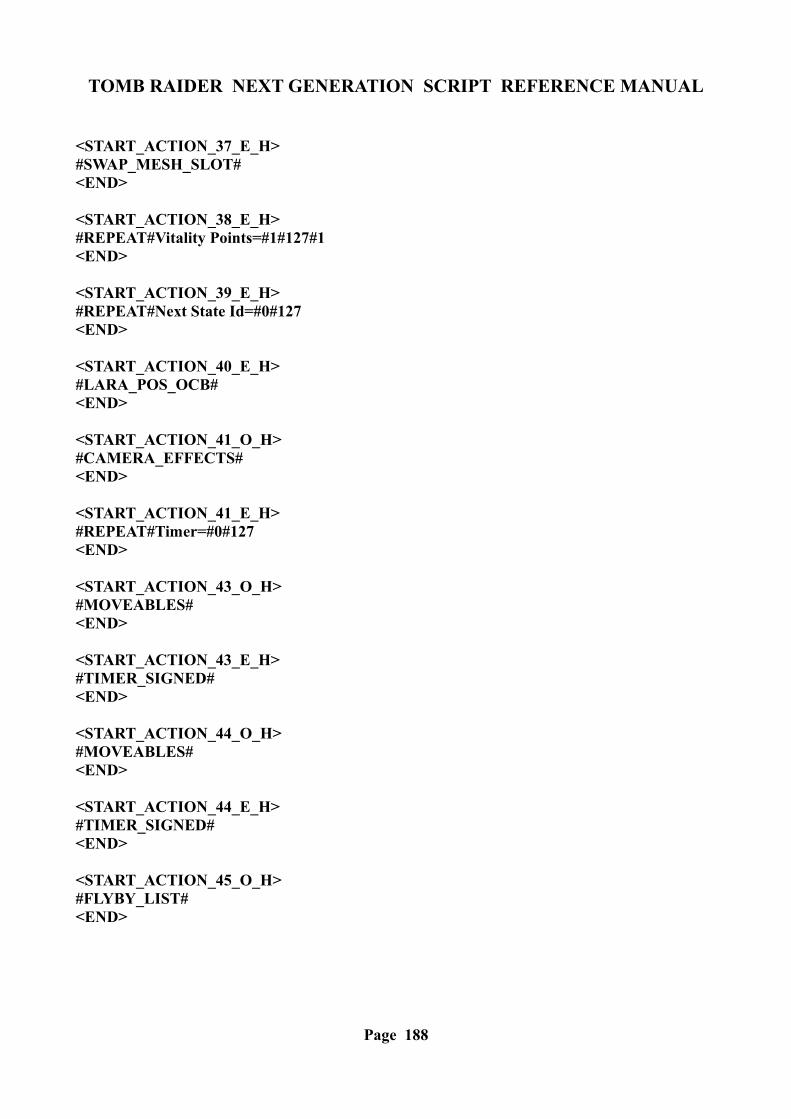
TOMB RAIDER NEXT GENERATION SCRIPT REFERENCE MANUAL
<START_ACTION_37_E_H>#SWAP_MESH_SLOT#<END>
<START_ACTION_38_E_H>#REPEAT#Vitality Points=#1#127#1<END>
<START_ACTION_39_E_H>#REPEAT#Next State Id=#0#127<END>
<START_ACTION_40_E_H>#LARA_POS_OCB#<END>
<START_ACTION_41_O_H>#CAMERA_EFFECTS#<END>
<START_ACTION_41_E_H>#REPEAT#Timer=#0#127<END>
<START_ACTION_43_O_H>#MOVEABLES#<END>
<START_ACTION_43_E_H>#TIMER_SIGNED#<END>
<START_ACTION_44_O_H>#MOVEABLES#<END>
<START_ACTION_44_E_H>#TIMER_SIGNED#<END>
<START_ACTION_45_O_H>#FLYBY_LIST#<END>
Page 188
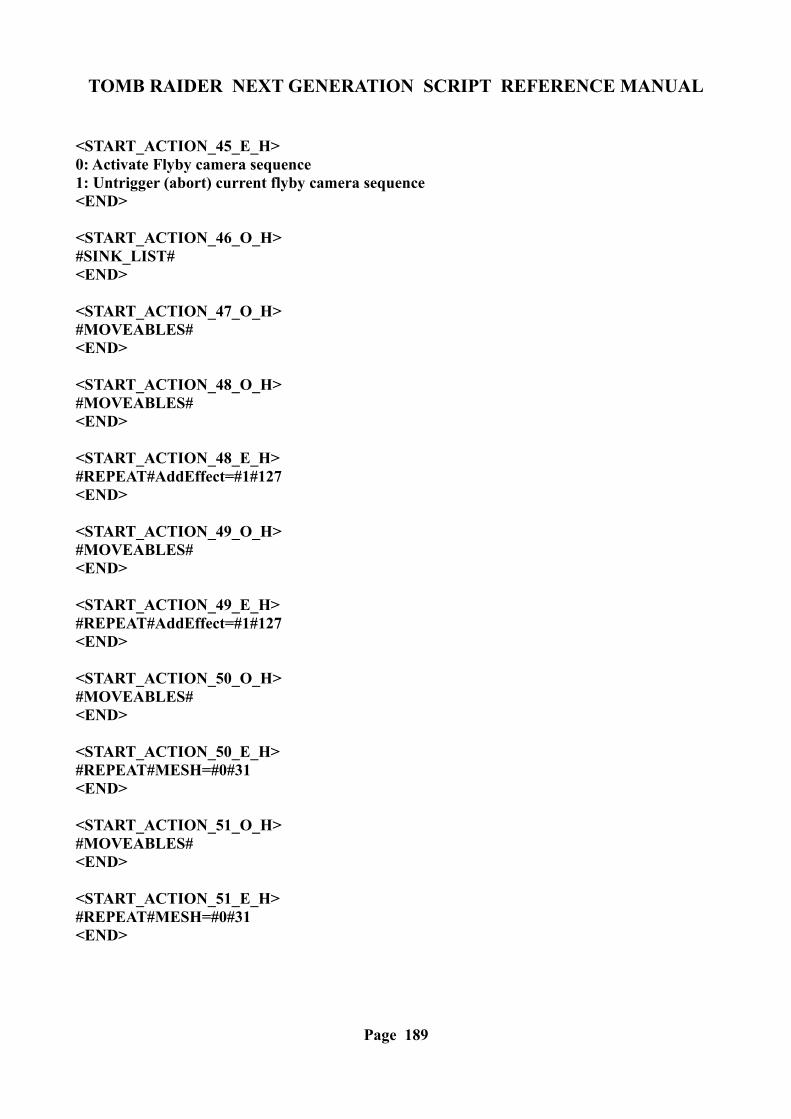
TOMB RAIDER NEXT GENERATION SCRIPT REFERENCE MANUAL
<START_ACTION_45_E_H>0: Activate Flyby camera sequence1: Untrigger (abort) current flyby camera sequence<END>
<START_ACTION_46_O_H>#SINK_LIST#<END>
<START_ACTION_47_O_H>#MOVEABLES#<END>
<START_ACTION_48_O_H>#MOVEABLES#<END>
<START_ACTION_48_E_H>#REPEAT#AddEffect=#1#127<END>
<START_ACTION_49_O_H>#MOVEABLES#<END>
<START_ACTION_49_E_H>#REPEAT#AddEffect=#1#127<END>
<START_ACTION_50_O_H>#MOVEABLES#<END>
<START_ACTION_50_E_H>#REPEAT#MESH=#0#31<END>
<START_ACTION_51_O_H>#MOVEABLES#<END>
<START_ACTION_51_E_H>#REPEAT#MESH=#0#31<END>
Page 189

TOMB RAIDER NEXT GENERATION SCRIPT REFERENCE MANUAL
<START_ACTION_52_O_H>#MOVEABLES#<END>
<START_ACTION_52_E_H>0: Only seconds. Example "13"1: Seconds and one decimal digit. Point separator. Example "13.4"2: Seconds and two decimal digit. Point separator. Example "13.46"3: Seconds and one decimal digit. Colon separator. Example "13;4"4: Seconds and two decimal digit. Colon separator. Example "13;46"5: Only seconds with three noughts format. Example "013" or "001"<END>
<START_ACTION_53_O_H>#MOVEABLES#<END>
<START_ACTION_53_E_H>#REPEAT#Transparency Level=#0#126<END>
<START_ACTION_54_O_H>#MOVEABLES#<END>
<START_ACTION_55_O_H>#MOVEABLES#<END>
<START_ACTION_55_E_H>#VAR_LONG_STORE#<END>
<START_ACTION_56_O_H>#MOVEABLES#<END>
<START_ACTION_56_E_H>#VAR_LONG_STORE#<END>
<START_ACTION_57_O_H>#MOVEABLES#<END>
Page 190
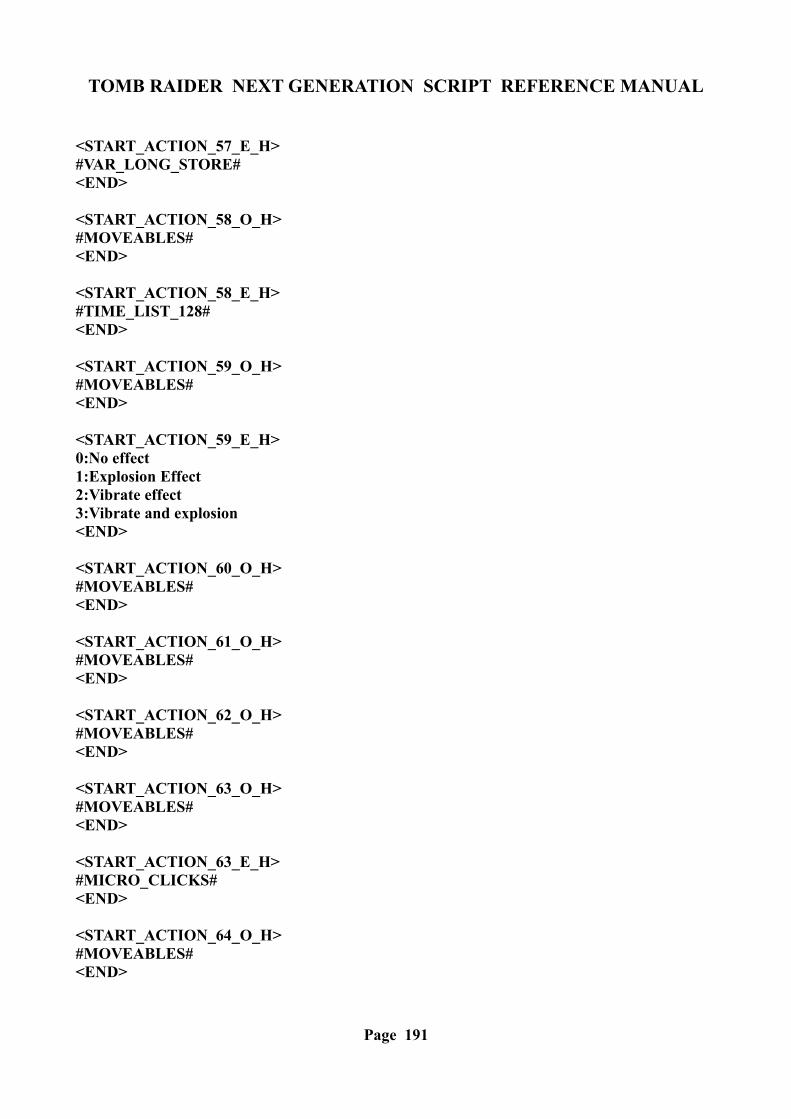
TOMB RAIDER NEXT GENERATION SCRIPT REFERENCE MANUAL
<START_ACTION_57_E_H>#VAR_LONG_STORE#<END>
<START_ACTION_58_O_H>#MOVEABLES#<END>
<START_ACTION_58_E_H>#TIME_LIST_128#<END>
<START_ACTION_59_O_H>#MOVEABLES#<END>
<START_ACTION_59_E_H>0:No effect1:Explosion Effect2:Vibrate effect3:Vibrate and explosion <END>
<START_ACTION_60_O_H>#MOVEABLES#<END>
<START_ACTION_61_O_H>#MOVEABLES#<END>
<START_ACTION_62_O_H>#MOVEABLES#<END>
<START_ACTION_63_O_H>#MOVEABLES#<END>
<START_ACTION_63_E_H>#MICRO_CLICKS#<END>
<START_ACTION_64_O_H>#MOVEABLES#<END>
Page 191
TOMB RAIDER NEXT GENERATION SCRIPT REFERENCE MANUAL
<START_ACTION_64_E_H>#MICRO_CLICKS#<END>
<START_ACTION_65_O_H>#MOVEABLES#<END>
<START_ACTION_65_E_H>#MICRO_CLICKS#<END>
<START_ACTION_66_O_H>#MOVEABLES#<END>
<START_ACTION_66_E_H>#MICRO_CLICKS#<END>
<START_ACTION_67_O_H>#MOVEABLES#<END>
<START_ACTION_67_E_H>#MICRO_CLICKS#<END>
<START_ACTION_68_O_H>#MOVEABLES#<END>
<START_ACTION_68_E_H>#MICRO_CLICKS#<END>
<START_ACTION_69_O_H>#MOVEABLES#<END>
<START_ACTION_69_E_H>#REPEAT#Speed=#1#127<END>
<START_ACTION_70_O_H>#MOVEABLES#<END>
Page 192
TOMB RAIDER NEXT GENERATION SCRIPT REFERENCE MANUAL
<START_ACTION_71_E_H>#REPEAT#Speed=#1#127<END>
<START_ACTION_72_O_H>#MOVEABLES#<END>
<START_ACTION_72_E_H>#REPEAT#Speed=#1#127<END>
<START_ACTION_73_O_H>#MOVEABLES#<END>
<START_ACTION_73_E_H>#REPEAT#Speed=#1#127<END>
<START_ACTION_74_O_H>#MOVEABLES#<END>
<START_ACTION_74_E_H>#REPEAT#Speed=#1#127<END>
<START_ACTION_75_O_H>#MOVEABLES#<END>
<START_ACTION_75_E_H>#REPEAT#Speed=#1#127<END>
<START_ACTION_76_O_H>#MOVEABLES#<END>
<START_ACTION_76_E_H>#REPEAT#Speed=#1#127<END>
Page 193
TOMB RAIDER NEXT GENERATION SCRIPT REFERENCE MANUAL
FMV trigger what list
<START_TRIGGERWHAT_14_O_H>#FMV_LIST#<END>
<START_ACTION_77_O_H>#MOVEABLES#<END>
<START_ACTION_78_O_H>#MOVEABLES#<END>
<START_ACTION_79_O_H>#MOVEABLES#<END>
<START_ACTION_79_E_H>#REPEAT#Value of Parameters=PARAM_BIG_NUMBERS at index=#0#127<END><START_ACTION_80_O_H>#MOVEABLES#<END>
<START_ACTION_80_E_H>#REPEAT#Sectors=#1#127<END>
<START_ACTION_81_O_H>#MOVEABLES#<END>
<START_ACTION_81_E_H>1:Immediately2:Slow down until stopping3:Stop to next east,west,south or north of the centre4:Stop when it reaches NORTH of the centre5:Stop when it reaches SOUTH of the centre6:Stop when it reaches EAST of the centre7:Stop when it reaches WEST of the centre8:Pause. Stop temporary its movement<END>
Page 194
TOMB RAIDER NEXT GENERATION SCRIPT REFERENCE MANUAL
<START_ACTION_82_O_H>#MOVEABLES#<END>
<START_ACTION_82_E_H>0:Baboon Teleport (Untrigger moveable)1:Helicopter Explosion2:Baboon Teleport (Trigger moveable)3:Harpy (loading by power)<END>
<START_ACTION_83_O_H>#STATIC_LIST#<END>
<START_ACTION_83_E_H>#REPEAT#AddEffect=#1#127<END>
<START_ACTION_84_O_H>#STATIC_LIST#<END>
<START_ACTION_84_E_H>#REPEAT#AddEffect=#1#127<END><START_ACTION_85_O_H>#MOVEABLES#<END>
Page 195

TOMB RAIDER NEXT GENERATION SCRIPT REFERENCE MANUAL
Page 196
TOMB RAIDER NEXT GENERATION SCRIPT REFERENCE MANUAL
Page 197
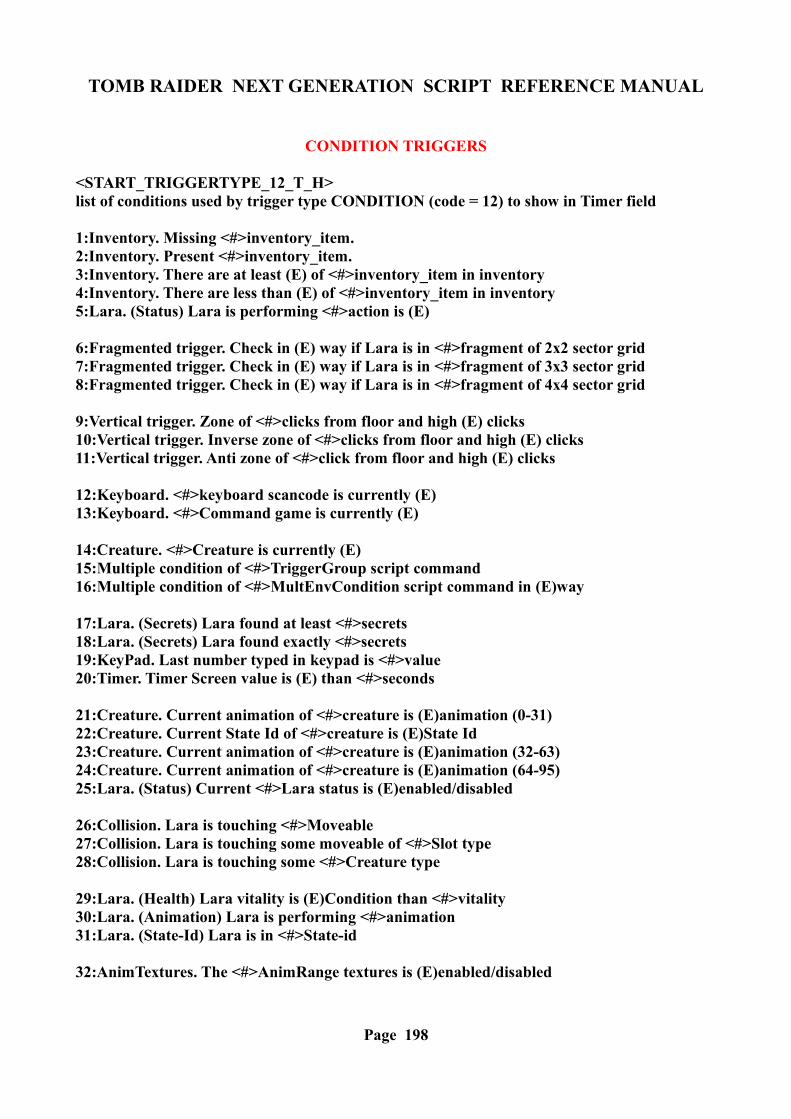
TOMB RAIDER NEXT GENERATION SCRIPT REFERENCE MANUAL
CONDITION TRIGGERS
<START_TRIGGERTYPE_12_T_H>list of conditions used by trigger type CONDITION (code = 12) to show in Timer field
1:Inventory. Missing <#>inventory_item. 2:Inventory. Present <#>inventory_item.3:Inventory. There are at least (E) of <#>inventory_item in inventory4:Inventory. There are less than (E) of <#>inventory_item in inventory5:Lara. (Status) Lara is performing <#>action is (E)
6:Fragmented trigger. Check in (E) way if Lara is in <#>fragment of 2x2 sector grid7:Fragmented trigger. Check in (E) way if Lara is in <#>fragment of 3x3 sector grid8:Fragmented trigger. Check in (E) way if Lara is in <#>fragment of 4x4 sector grid
9:Vertical trigger. Zone of <#>clicks from floor and high (E) clicks10:Vertical trigger. Inverse zone of <#>clicks from floor and high (E) clicks11:Vertical trigger. Anti zone of <#>click from floor and high (E) clicks
12:Keyboard. <#>keyboard scancode is currently (E)13:Keyboard. <#>Command game is currently (E)
14:Creature. <#>Creature is currently (E)15:Multiple condition of <#>TriggerGroup script command16:Multiple condition of <#>MultEnvCondition script command in (E)way
17:Lara. (Secrets) Lara found at least <#>secrets18:Lara. (Secrets) Lara found exactly <#>secrets19:KeyPad. Last number typed in keypad is <#>value20:Timer. Timer Screen value is (E) than <#>seconds
21:Creature. Current animation of <#>creature is (E)animation (0-31)22:Creature. Current State Id of <#>creature is (E)State Id23:Creature. Current animation of <#>creature is (E)animation (32-63)24:Creature. Current animation of <#>creature is (E)animation (64-95)25:Lara. (Status) Current <#>Lara status is (E)enabled/disabled
26:Collision. Lara is touching <#>Moveable27:Collision. Lara is touching some moveable of <#>Slot type28:Collision. Lara is touching some <#>Creature type
29:Lara. (Health) Lara vitality is (E)Condition than <#>vitality30:Lara. (Animation) Lara is performing <#>animation31:Lara. (State-Id) Lara is in <#>State-id
32:AnimTextures. The <#>AnimRange textures is (E)enabled/disabled
Page 198

TOMB RAIDER NEXT GENERATION SCRIPT REFERENCE MANUAL
33:Collision. Lara is touching some static of <#>Slot static type34:Collision. Lara is touching the <#>Static item35:Lara. (Holds) Lara is holding/driving the <#>item36:Random. Condition is true with <#>chances on 64 computed in (E)way37:Creature. The <#>creature has the (E)Transparency level
38:Variables. The <#>Numeric Variable is >= than (E)Big Number value39:Variables. The <#>Numeric Variable is < than (E)Big Number value40:Variables. The <#>Numeric Variable is = than (E)Big Number value41:Variables. The <#>Numeric Variable is >= than (E)Value42:Variables. The <#>Numeric Variable is < than (E)Value43:Variables. The <#>Numeric Variable is = than (E)Value44:Variables. The <#>Numeric Variable has the (E)Bit set45:Variables. The <#>Numeric Variable has the (E)Bit clear46:Variables. The Current Value variable is >= than <#>Value47:Variables. The Current Value variable is < than <#>Value48:Variables. The Current Value variable is = than <#>Value49:Variables. The <#>Code Memory is = than Current Value50:Variables. The <#>Code Memory is >= than Current Value51:Variables. The <#>Code Memory is < than Current Value52:Variables. The <#>Code Memory has the (E)Bit set53:Variables. The <#>Code Memory has the (E)Bit clear
54:Lara. Distance. Lara is distant by <#>Moveable less or even than (E)Clicks55:Lara. Distance. Lara is distant by <#>Moveable less or even than (E)Units
56:Variables. CurrentValue is >= than <#>Variable57:Variables. CurrentValue is = than <#>Variable58:Variables. CurrentValues is < than <#>Variable
59:Inventory. The just selected item from inventory is <#>Item
60:Fragmented trigger. Check in (E) way if Lara is in the <#>circle61:Fragmented trigger. Check in (E) way if Lara is in the sector with centre in North-West corner and <#>Radius62:Fragmented trigger. Check in (E) way if Lara is in the sector with centre in North-East corner and <#>Radius63:Fragmented trigger. Check in (E) way if Lara is in the sector with centre in South-East corner and <#>Radius64:Fragmented trigger. Check in (E) way if Lara is in the sector with centre in South-West corner and <#>Radius65:Fragmented trigger. Check in (E) way if Lara is in the sector with centre in middle-North side and <#>Radius66:Fragmented trigger. Check in (E) way if Lara is in the sector with centre in middle-South side and <#>Radius67:Fragmented trigger. Check in (E) way if Lara is in the sector with centre in middle-East side and <#>Radius
Page 199
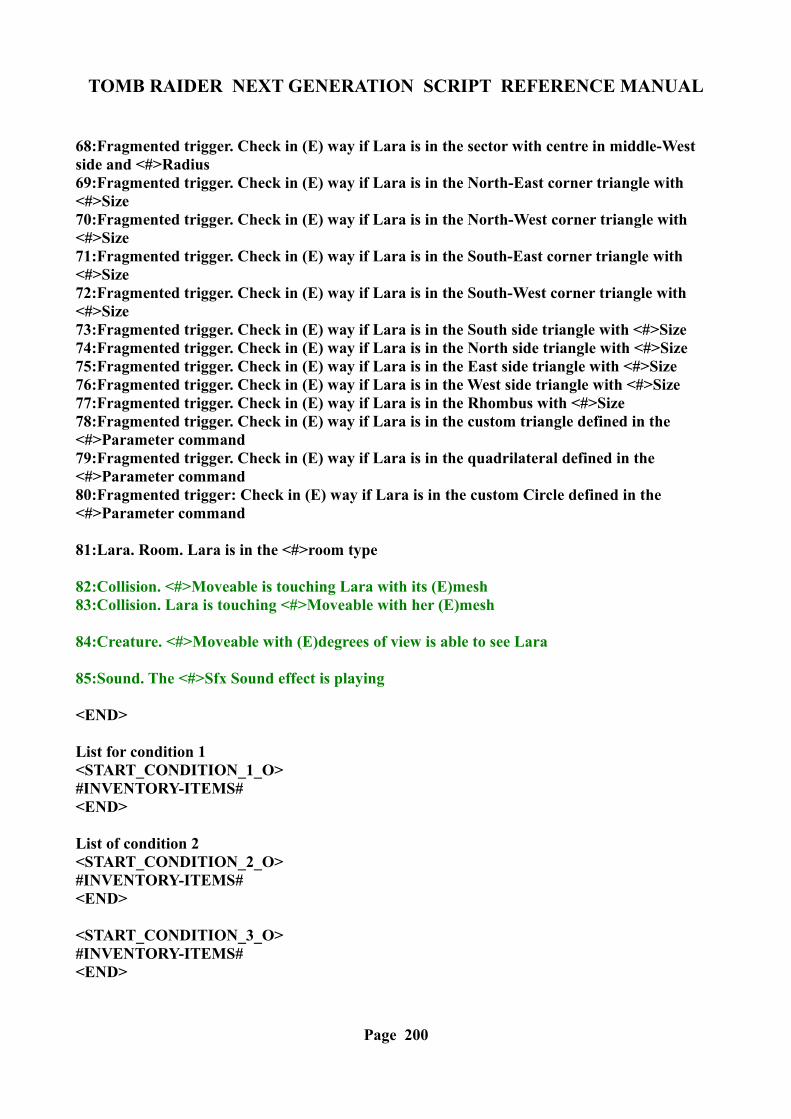
TOMB RAIDER NEXT GENERATION SCRIPT REFERENCE MANUAL
68:Fragmented trigger. Check in (E) way if Lara is in the sector with centre in middle-West side and <#>Radius69:Fragmented trigger. Check in (E) way if Lara is in the North-East corner triangle with <#>Size70:Fragmented trigger. Check in (E) way if Lara is in the North-West corner triangle with <#>Size71:Fragmented trigger. Check in (E) way if Lara is in the South-East corner triangle with <#>Size72:Fragmented trigger. Check in (E) way if Lara is in the South-West corner triangle with <#>Size73:Fragmented trigger. Check in (E) way if Lara is in the South side triangle with <#>Size74:Fragmented trigger. Check in (E) way if Lara is in the North side triangle with <#>Size75:Fragmented trigger. Check in (E) way if Lara is in the East side triangle with <#>Size76:Fragmented trigger. Check in (E) way if Lara is in the West side triangle with <#>Size77:Fragmented trigger. Check in (E) way if Lara is in the Rhombus with <#>Size78:Fragmented trigger. Check in (E) way if Lara is in the custom triangle defined in the <#>Parameter command79:Fragmented trigger. Check in (E) way if Lara is in the quadrilateral defined in the <#>Parameter command80:Fragmented trigger: Check in (E) way if Lara is in the custom Circle defined in the <#>Parameter command
81:Lara. Room. Lara is in the <#>room type
82:Collision. <#>Moveable is touching Lara with its (E)mesh83:Collision. Lara is touching <#>Moveable with her (E)mesh
84:Creature. <#>Moveable with (E)degrees of view is able to see Lara
85:Sound. The <#>Sfx Sound effect is playing
<END>
List for condition 1 <START_CONDITION_1_O>#INVENTORY-ITEMS#<END>
List of condition 2<START_CONDITION_2_O>#INVENTORY-ITEMS#<END>
<START_CONDITION_3_O>#INVENTORY-ITEMS#<END>
Page 200
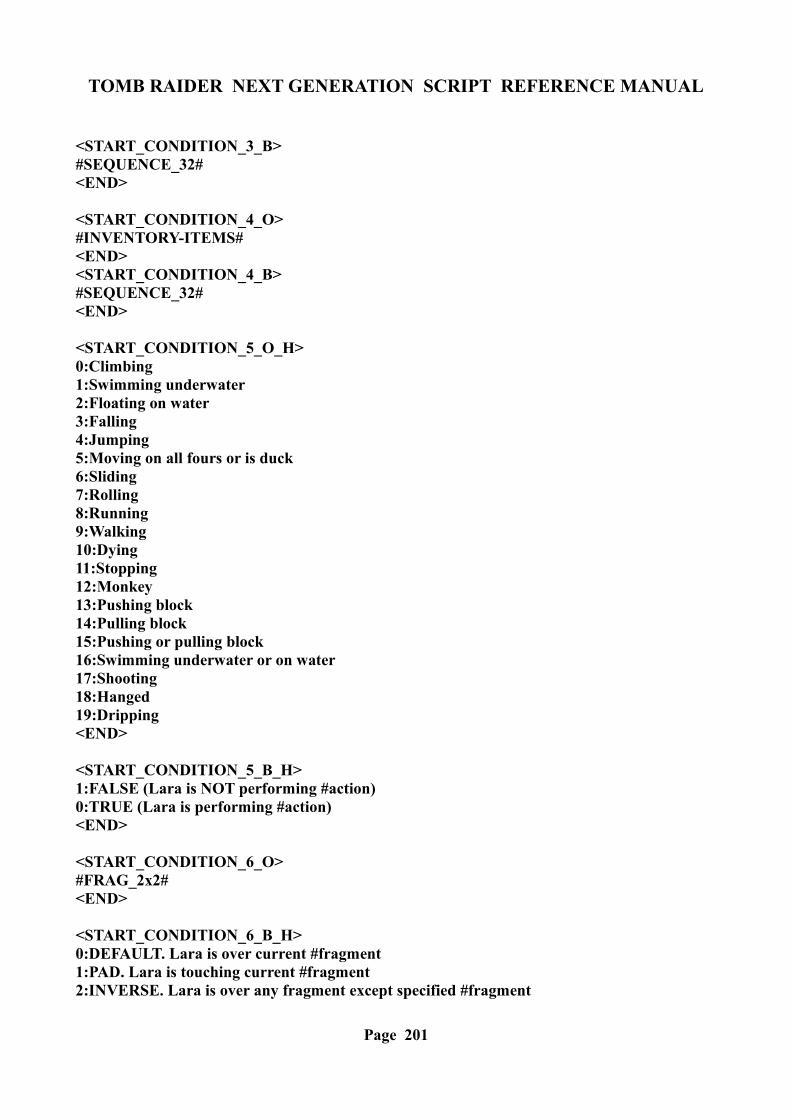
TOMB RAIDER NEXT GENERATION SCRIPT REFERENCE MANUAL
<START_CONDITION_3_B>#SEQUENCE_32#<END>
<START_CONDITION_4_O>#INVENTORY-ITEMS#<END><START_CONDITION_4_B>#SEQUENCE_32#<END>
<START_CONDITION_5_O_H>0:Climbing1:Swimming underwater2:Floating on water3:Falling 4:Jumping5:Moving on all fours or is duck6:Sliding7:Rolling8:Running 9:Walking10:Dying11:Stopping12:Monkey13:Pushing block14:Pulling block15:Pushing or pulling block16:Swimming underwater or on water17:Shooting18:Hanged19:Dripping<END>
<START_CONDITION_5_B_H>1:FALSE (Lara is NOT performing #action)0:TRUE (Lara is performing #action)<END>
<START_CONDITION_6_O>#FRAG_2x2#<END>
<START_CONDITION_6_B_H>0:DEFAULT. Lara is over current #fragment1:PAD. Lara is touching current #fragment2:INVERSE. Lara is over any fragment except specified #fragment
Page 201
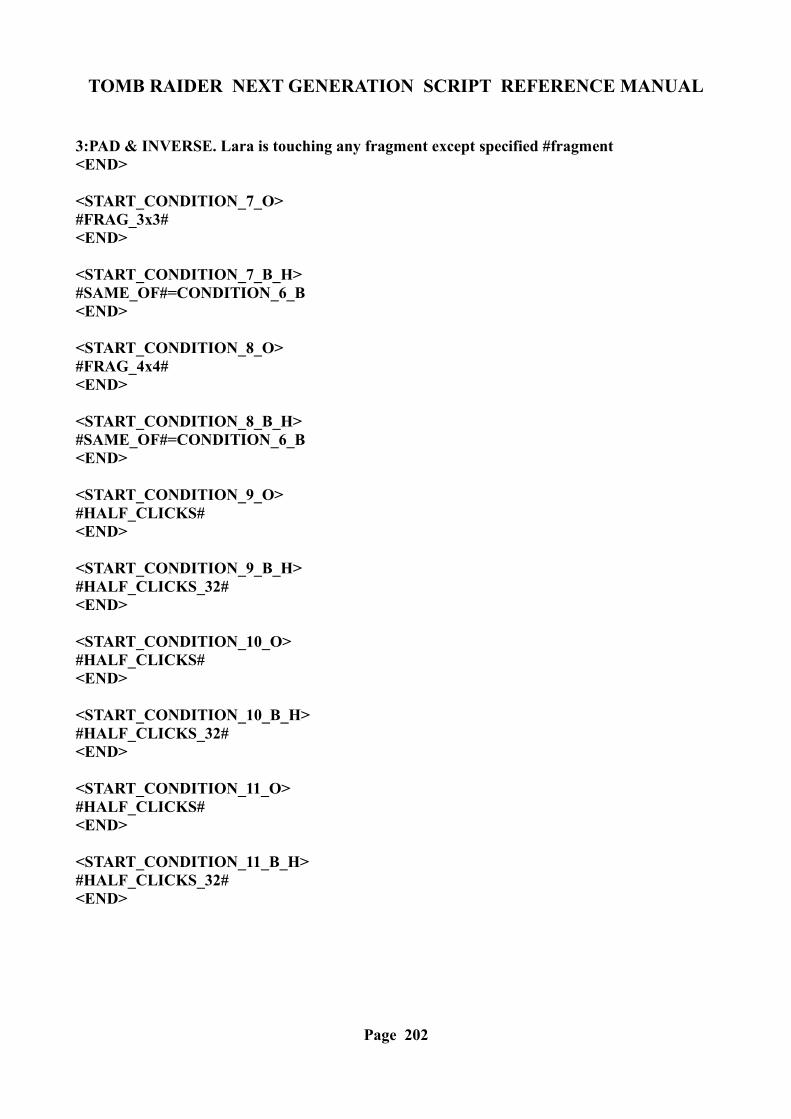
TOMB RAIDER NEXT GENERATION SCRIPT REFERENCE MANUAL
3:PAD & INVERSE. Lara is touching any fragment except specified #fragment<END>
<START_CONDITION_7_O>#FRAG_3x3#<END>
<START_CONDITION_7_B_H>#SAME_OF#=CONDITION_6_B<END>
<START_CONDITION_8_O>#FRAG_4x4#<END>
<START_CONDITION_8_B_H>#SAME_OF#=CONDITION_6_B<END>
<START_CONDITION_9_O>#HALF_CLICKS#<END>
<START_CONDITION_9_B_H>#HALF_CLICKS_32#<END>
<START_CONDITION_10_O>#HALF_CLICKS#<END>
<START_CONDITION_10_B_H>#HALF_CLICKS_32#<END>
<START_CONDITION_11_O>#HALF_CLICKS#<END>
<START_CONDITION_11_B_H>#HALF_CLICKS_32#<END>
Page 202
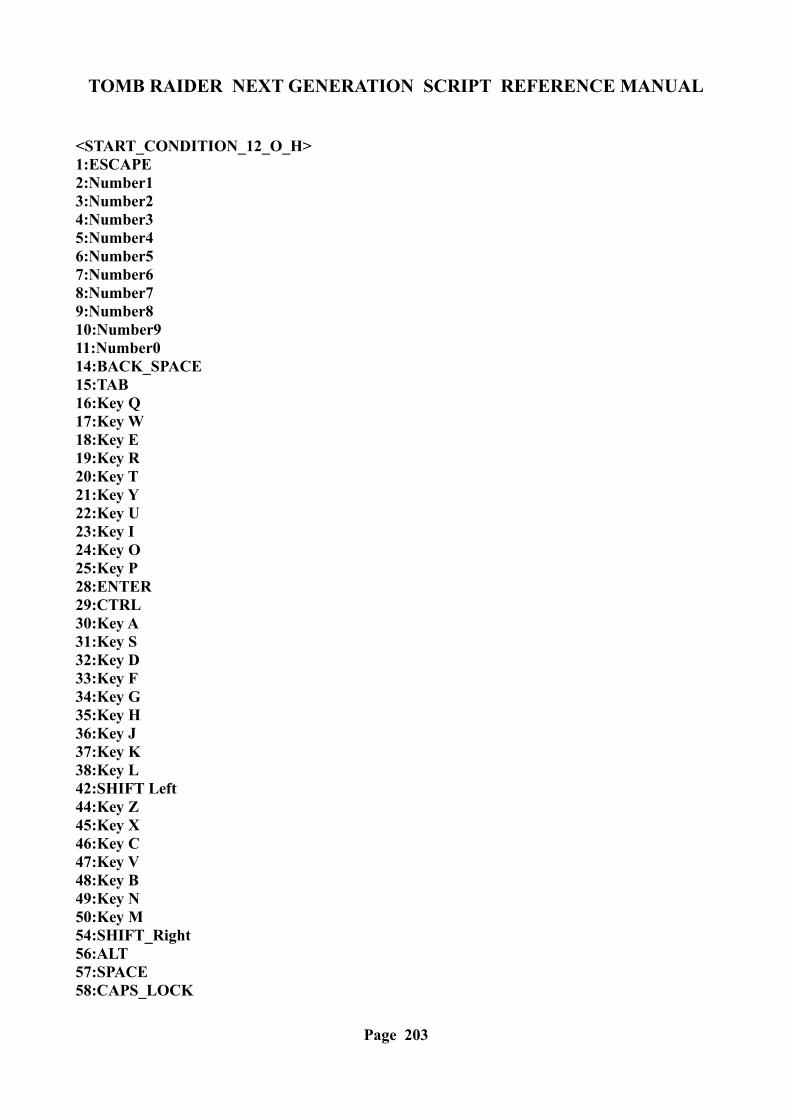
TOMB RAIDER NEXT GENERATION SCRIPT REFERENCE MANUAL
<START_CONDITION_12_O_H>1:ESCAPE2:Number13:Number24:Number35:Number46:Number57:Number68:Number79:Number810:Number911:Number014:BACK_SPACE15:TAB16:Key Q17:Key W18:Key E19:Key R20:Key T21:Key Y22:Key U23:Key I24:Key O25:Key P28:ENTER29:CTRL30:Key A31:Key S32:Key D33:Key F34:Key G35:Key H36:Key J37:Key K38:Key L42:SHIFT Left44:Key Z45:Key X46:Key C47:Key V48:Key B49:Key N50:Key M 54:SHIFT_Right56:ALT57:SPACE58:CAPS_LOCK
Page 203
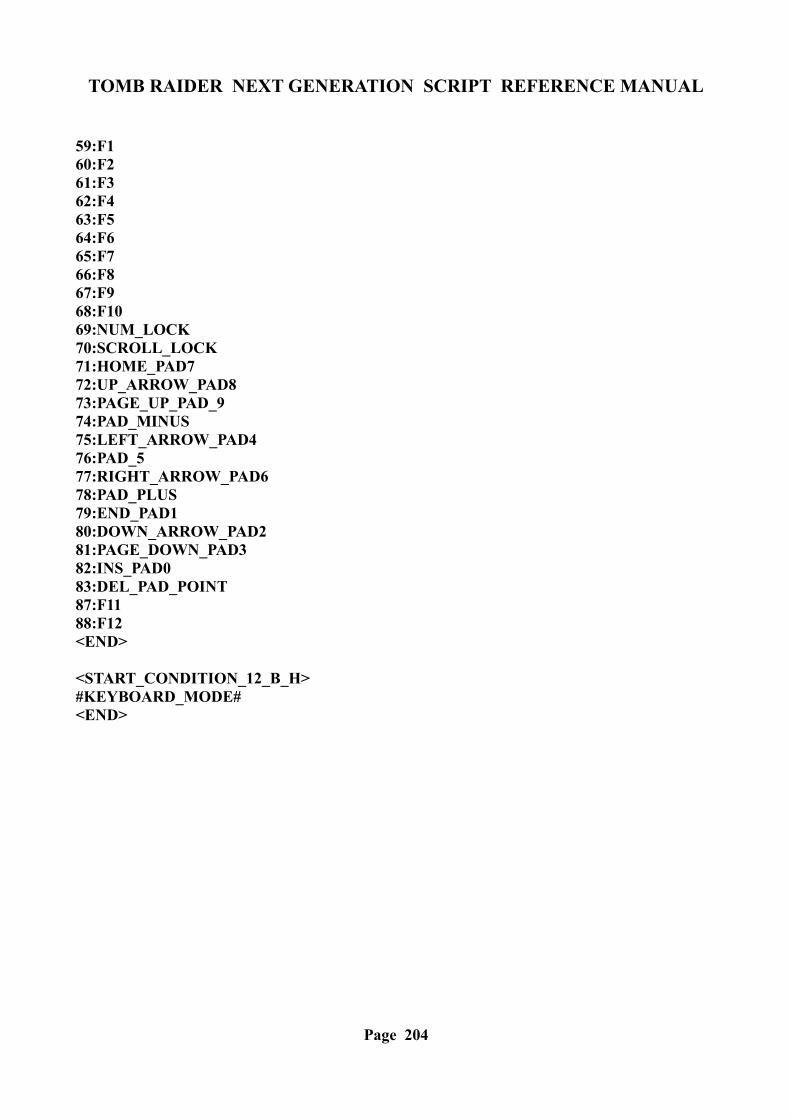
TOMB RAIDER NEXT GENERATION SCRIPT REFERENCE MANUAL
59:F160:F261:F362:F463:F564:F665:F766:F867:F968:F1069:NUM_LOCK70:SCROLL_LOCK71:HOME_PAD772:UP_ARROW_PAD873:PAGE_UP_PAD_974:PAD_MINUS75:LEFT_ARROW_PAD476:PAD_577:RIGHT_ARROW_PAD678:PAD_PLUS79:END_PAD180:DOWN_ARROW_PAD281:PAGE_DOWN_PAD382:INS_PAD083:DEL_PAD_POINT87:F1188:F12<END>
<START_CONDITION_12_B_H>#KEYBOARD_MODE#<END>
Page 204
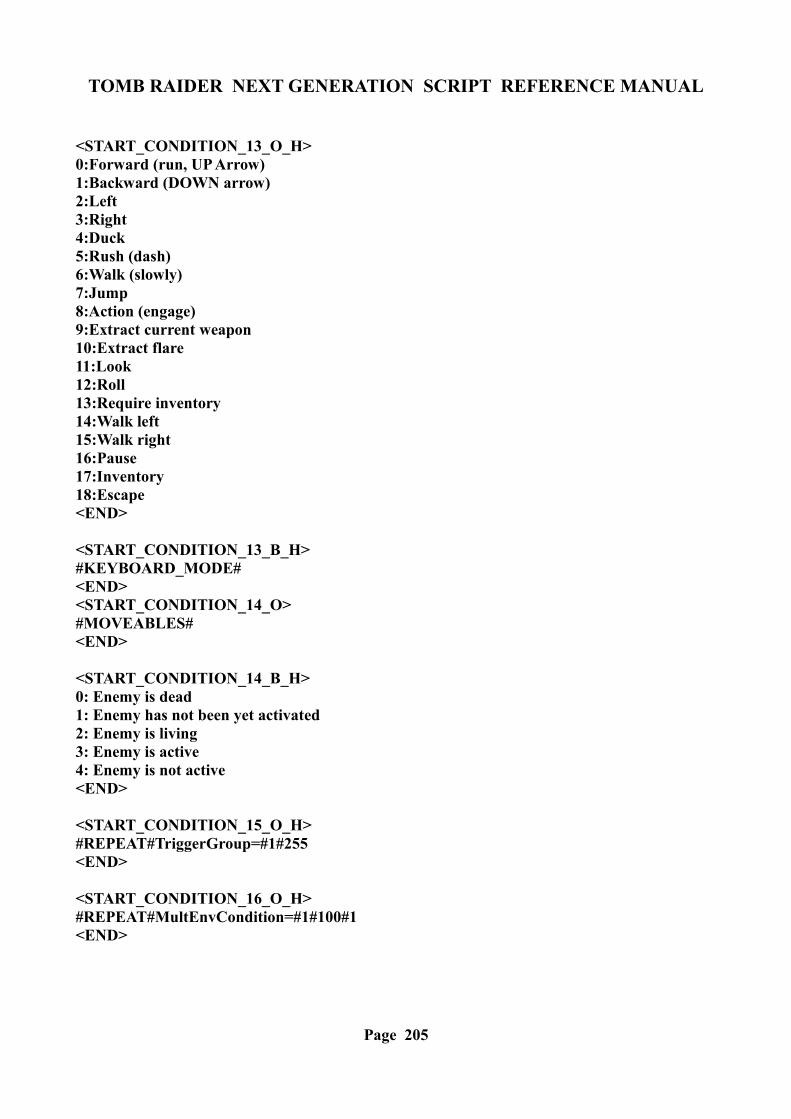
TOMB RAIDER NEXT GENERATION SCRIPT REFERENCE MANUAL
<START_CONDITION_13_O_H>0:Forward (run, UP Arrow)1:Backward (DOWN arrow)2:Left3:Right4:Duck5:Rush (dash)6:Walk (slowly)7:Jump8:Action (engage)9:Extract current weapon10:Extract flare11:Look12:Roll13:Require inventory14:Walk left15:Walk right16:Pause17:Inventory18:Escape<END>
<START_CONDITION_13_B_H>#KEYBOARD_MODE#<END><START_CONDITION_14_O>#MOVEABLES#<END>
<START_CONDITION_14_B_H>0: Enemy is dead1: Enemy has not been yet activated2: Enemy is living3: Enemy is active4: Enemy is not active<END>
<START_CONDITION_15_O_H>#REPEAT#TriggerGroup=#1#255<END>
<START_CONDITION_16_O_H>#REPEAT#MultEnvCondition=#1#100#1<END>
Page 205
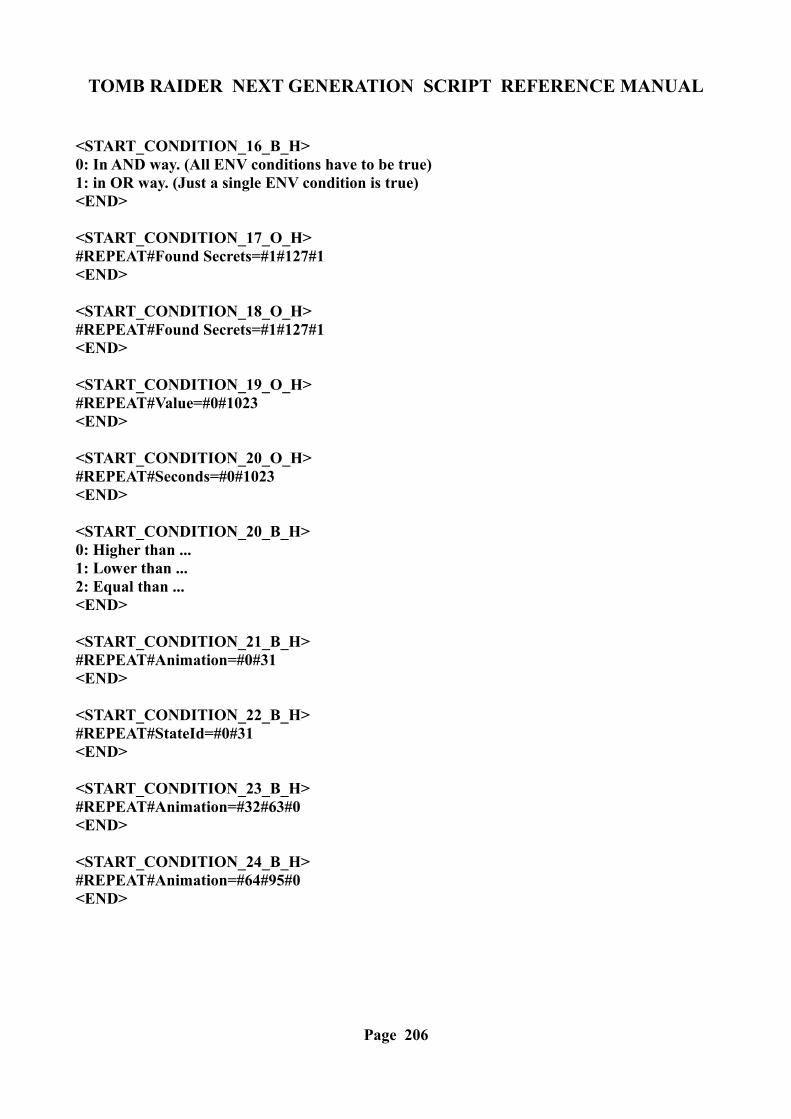
TOMB RAIDER NEXT GENERATION SCRIPT REFERENCE MANUAL
<START_CONDITION_16_B_H>0: In AND way. (All ENV conditions have to be true)1: in OR way. (Just a single ENV condition is true)<END>
<START_CONDITION_17_O_H>#REPEAT#Found Secrets=#1#127#1<END>
<START_CONDITION_18_O_H>#REPEAT#Found Secrets=#1#127#1<END>
<START_CONDITION_19_O_H>#REPEAT#Value=#0#1023<END>
<START_CONDITION_20_O_H>#REPEAT#Seconds=#0#1023<END>
<START_CONDITION_20_B_H>0: Higher than ...1: Lower than ...2: Equal than ...<END>
<START_CONDITION_21_B_H>#REPEAT#Animation=#0#31<END>
<START_CONDITION_22_B_H>#REPEAT#StateId=#0#31<END>
<START_CONDITION_23_B_H>#REPEAT#Animation=#32#63#0<END>
<START_CONDITION_24_B_H>#REPEAT#Animation=#64#95#0<END>
Page 206
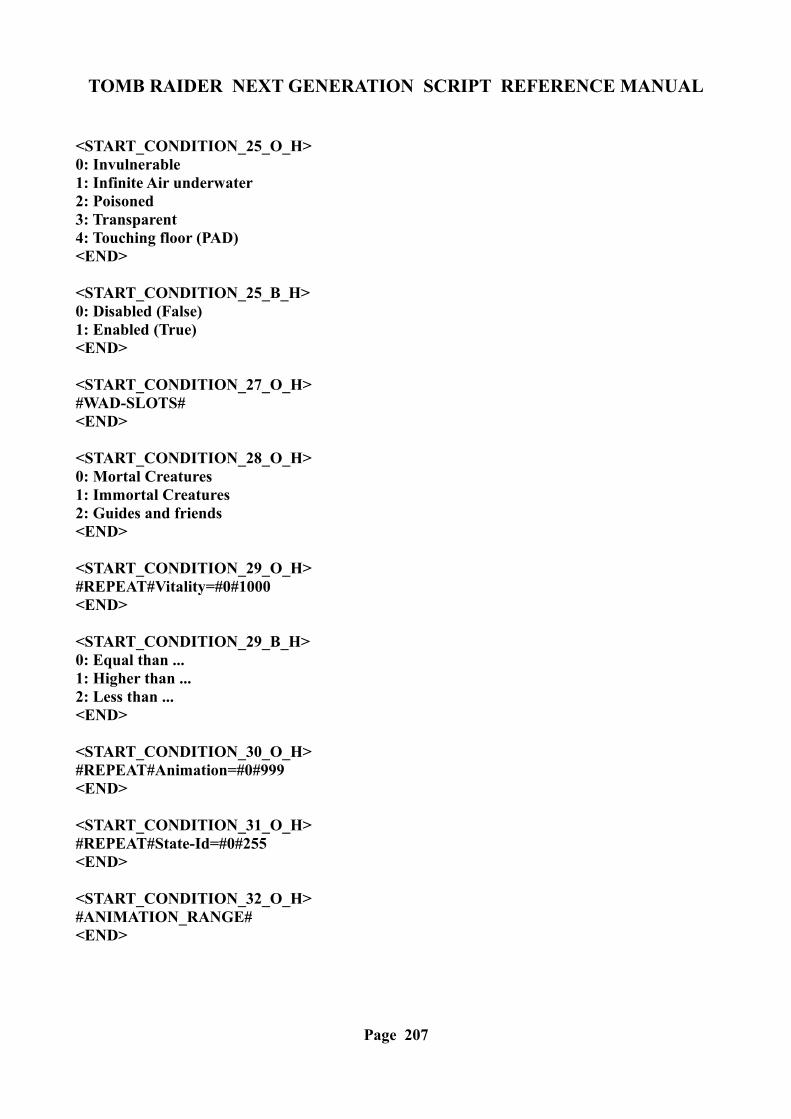
TOMB RAIDER NEXT GENERATION SCRIPT REFERENCE MANUAL
<START_CONDITION_25_O_H>0: Invulnerable1: Infinite Air underwater2: Poisoned3: Transparent4: Touching floor (PAD)<END>
<START_CONDITION_25_B_H>0: Disabled (False)1: Enabled (True)<END>
<START_CONDITION_27_O_H>#WAD-SLOTS#<END>
<START_CONDITION_28_O_H>0: Mortal Creatures1: Immortal Creatures2: Guides and friends<END>
<START_CONDITION_29_O_H>#REPEAT#Vitality=#0#1000<END>
<START_CONDITION_29_B_H>0: Equal than ...1: Higher than ...2: Less than ...<END>
<START_CONDITION_30_O_H>#REPEAT#Animation=#0#999<END>
<START_CONDITION_31_O_H>#REPEAT#State-Id=#0#255<END>
<START_CONDITION_32_O_H>#ANIMATION_RANGE#<END>
Page 207
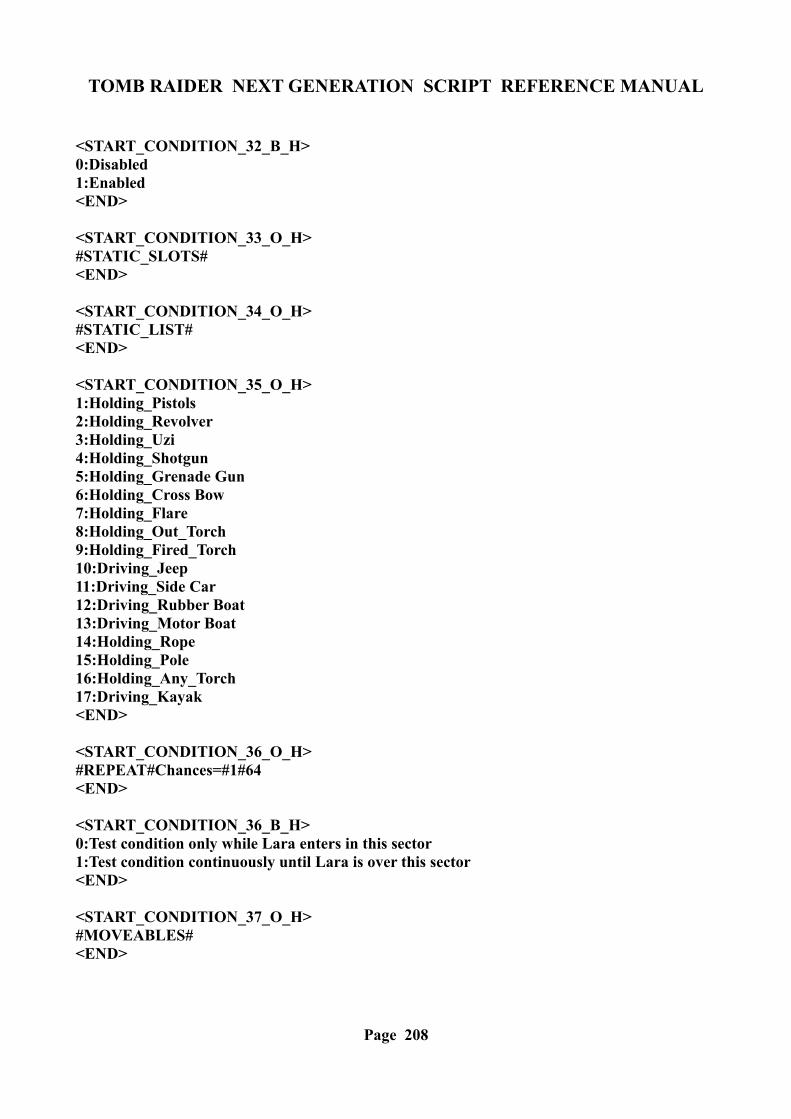
TOMB RAIDER NEXT GENERATION SCRIPT REFERENCE MANUAL
<START_CONDITION_32_B_H>0:Disabled1:Enabled<END>
<START_CONDITION_33_O_H>#STATIC_SLOTS#<END>
<START_CONDITION_34_O_H>#STATIC_LIST#<END>
<START_CONDITION_35_O_H>1:Holding_Pistols2:Holding_Revolver3:Holding_Uzi4:Holding_Shotgun5:Holding_Grenade Gun6:Holding_Cross Bow7:Holding_Flare8:Holding_Out_Torch9:Holding_Fired_Torch10:Driving_Jeep11:Driving_Side Car12:Driving_Rubber Boat13:Driving_Motor Boat14:Holding_Rope15:Holding_Pole16:Holding_Any_Torch17:Driving_Kayak<END>
<START_CONDITION_36_O_H>#REPEAT#Chances=#1#64<END>
<START_CONDITION_36_B_H>0:Test condition only while Lara enters in this sector1:Test condition continuously until Lara is over this sector<END>
<START_CONDITION_37_O_H>#MOVEABLES#<END>
Page 208
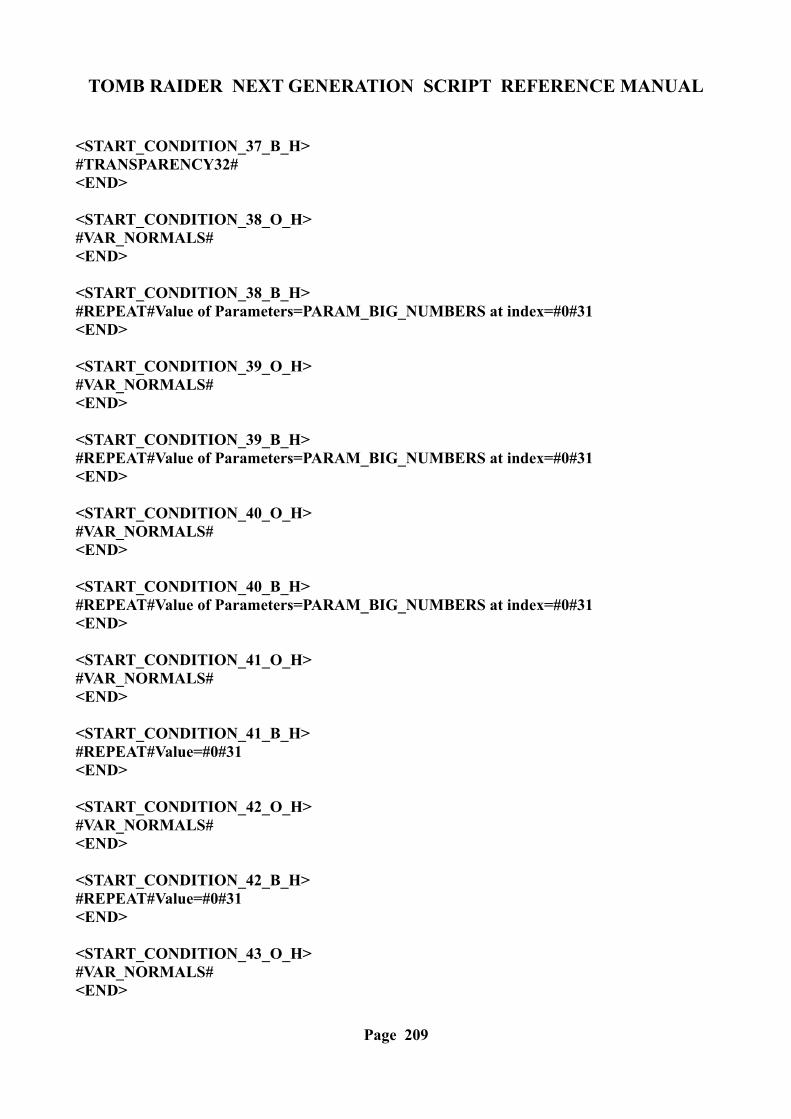
TOMB RAIDER NEXT GENERATION SCRIPT REFERENCE MANUAL
<START_CONDITION_37_B_H>#TRANSPARENCY32#<END>
<START_CONDITION_38_O_H>#VAR_NORMALS#<END>
<START_CONDITION_38_B_H>#REPEAT#Value of Parameters=PARAM_BIG_NUMBERS at index=#0#31<END>
<START_CONDITION_39_O_H>#VAR_NORMALS#<END>
<START_CONDITION_39_B_H>#REPEAT#Value of Parameters=PARAM_BIG_NUMBERS at index=#0#31<END>
<START_CONDITION_40_O_H>#VAR_NORMALS#<END>
<START_CONDITION_40_B_H>#REPEAT#Value of Parameters=PARAM_BIG_NUMBERS at index=#0#31<END>
<START_CONDITION_41_O_H>#VAR_NORMALS#<END>
<START_CONDITION_41_B_H>#REPEAT#Value=#0#31<END>
<START_CONDITION_42_O_H>#VAR_NORMALS#<END>
<START_CONDITION_42_B_H>#REPEAT#Value=#0#31<END>
<START_CONDITION_43_O_H>#VAR_NORMALS#<END>
Page 209
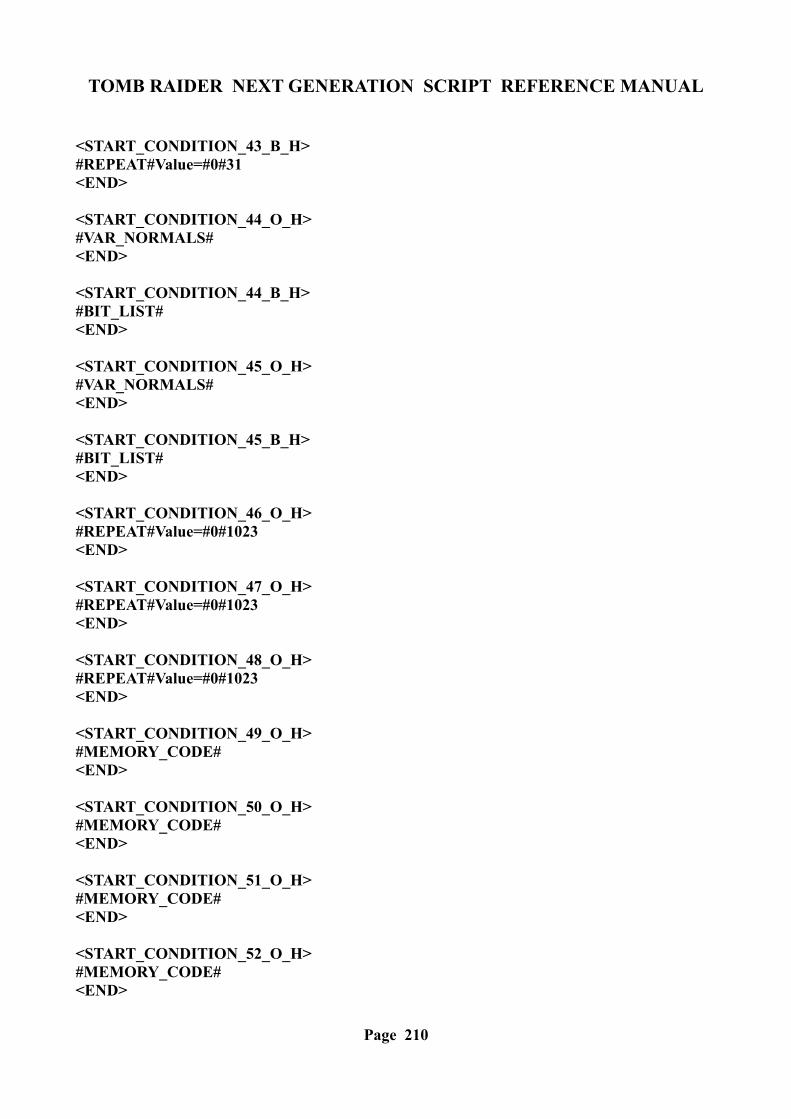
TOMB RAIDER NEXT GENERATION SCRIPT REFERENCE MANUAL
<START_CONDITION_43_B_H>#REPEAT#Value=#0#31<END>
<START_CONDITION_44_O_H>#VAR_NORMALS#<END>
<START_CONDITION_44_B_H>#BIT_LIST#<END>
<START_CONDITION_45_O_H>#VAR_NORMALS#<END>
<START_CONDITION_45_B_H>#BIT_LIST#<END>
<START_CONDITION_46_O_H>#REPEAT#Value=#0#1023<END>
<START_CONDITION_47_O_H>#REPEAT#Value=#0#1023<END>
<START_CONDITION_48_O_H>#REPEAT#Value=#0#1023<END>
<START_CONDITION_49_O_H>#MEMORY_CODE#<END>
<START_CONDITION_50_O_H>#MEMORY_CODE#<END>
<START_CONDITION_51_O_H>#MEMORY_CODE#<END>
<START_CONDITION_52_O_H>#MEMORY_CODE#<END>
Page 210
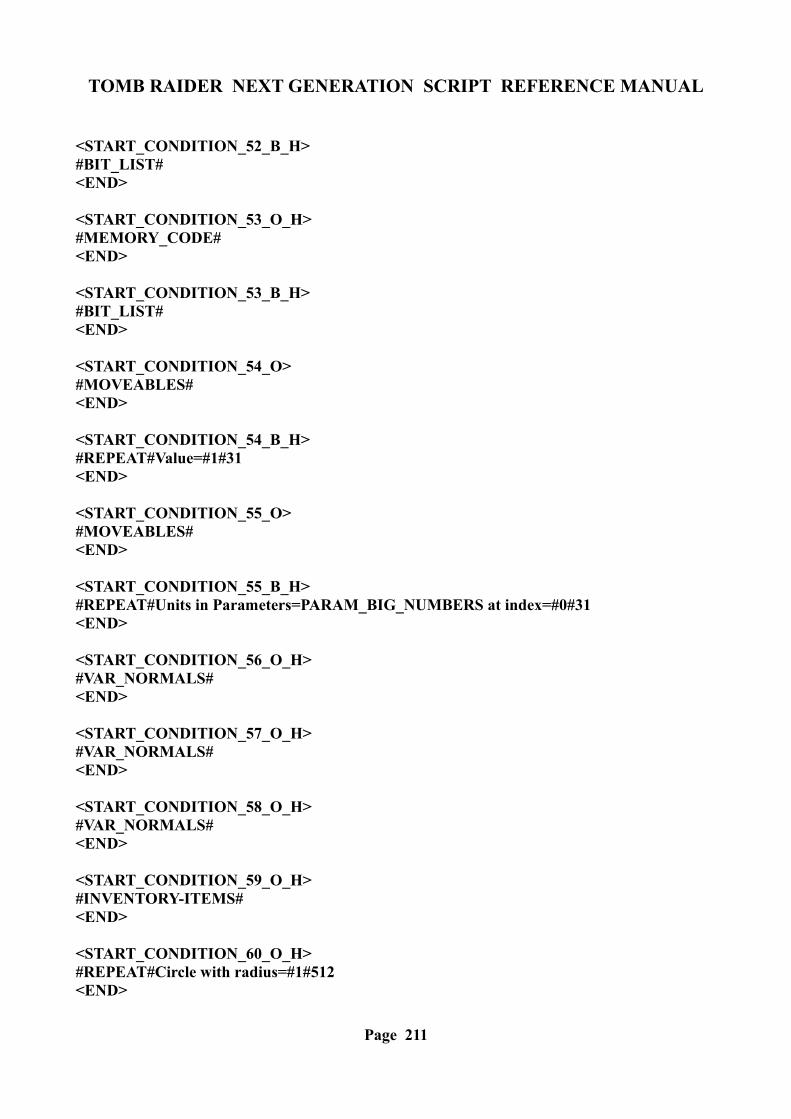
TOMB RAIDER NEXT GENERATION SCRIPT REFERENCE MANUAL
<START_CONDITION_52_B_H>#BIT_LIST#<END>
<START_CONDITION_53_O_H>#MEMORY_CODE#<END>
<START_CONDITION_53_B_H>#BIT_LIST#<END>
<START_CONDITION_54_O>#MOVEABLES#<END>
<START_CONDITION_54_B_H>#REPEAT#Value=#1#31<END>
<START_CONDITION_55_O>#MOVEABLES#<END>
<START_CONDITION_55_B_H>#REPEAT#Units in Parameters=PARAM_BIG_NUMBERS at index=#0#31<END>
<START_CONDITION_56_O_H>#VAR_NORMALS#<END>
<START_CONDITION_57_O_H>#VAR_NORMALS#<END>
<START_CONDITION_58_O_H>#VAR_NORMALS#<END>
<START_CONDITION_59_O_H>#INVENTORY-ITEMS#<END>
<START_CONDITION_60_O_H>#REPEAT#Circle with radius=#1#512<END>
Page 211
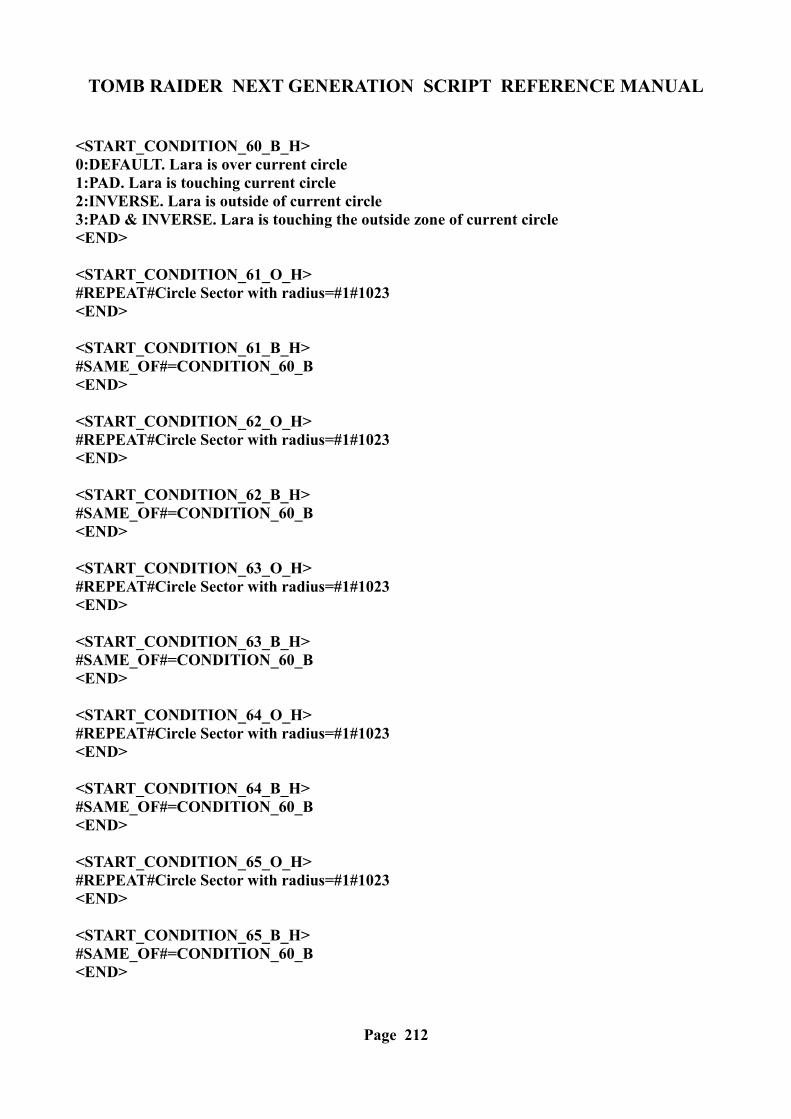
TOMB RAIDER NEXT GENERATION SCRIPT REFERENCE MANUAL
<START_CONDITION_60_B_H>0:DEFAULT. Lara is over current circle1:PAD. Lara is touching current circle2:INVERSE. Lara is outside of current circle3:PAD & INVERSE. Lara is touching the outside zone of current circle<END>
<START_CONDITION_61_O_H>#REPEAT#Circle Sector with radius=#1#1023<END>
<START_CONDITION_61_B_H>#SAME_OF#=CONDITION_60_B<END>
<START_CONDITION_62_O_H>#REPEAT#Circle Sector with radius=#1#1023<END>
<START_CONDITION_62_B_H>#SAME_OF#=CONDITION_60_B<END>
<START_CONDITION_63_O_H>#REPEAT#Circle Sector with radius=#1#1023<END>
<START_CONDITION_63_B_H>#SAME_OF#=CONDITION_60_B<END>
<START_CONDITION_64_O_H>#REPEAT#Circle Sector with radius=#1#1023<END>
<START_CONDITION_64_B_H>#SAME_OF#=CONDITION_60_B<END>
<START_CONDITION_65_O_H>#REPEAT#Circle Sector with radius=#1#1023<END>
<START_CONDITION_65_B_H>#SAME_OF#=CONDITION_60_B<END>
Page 212
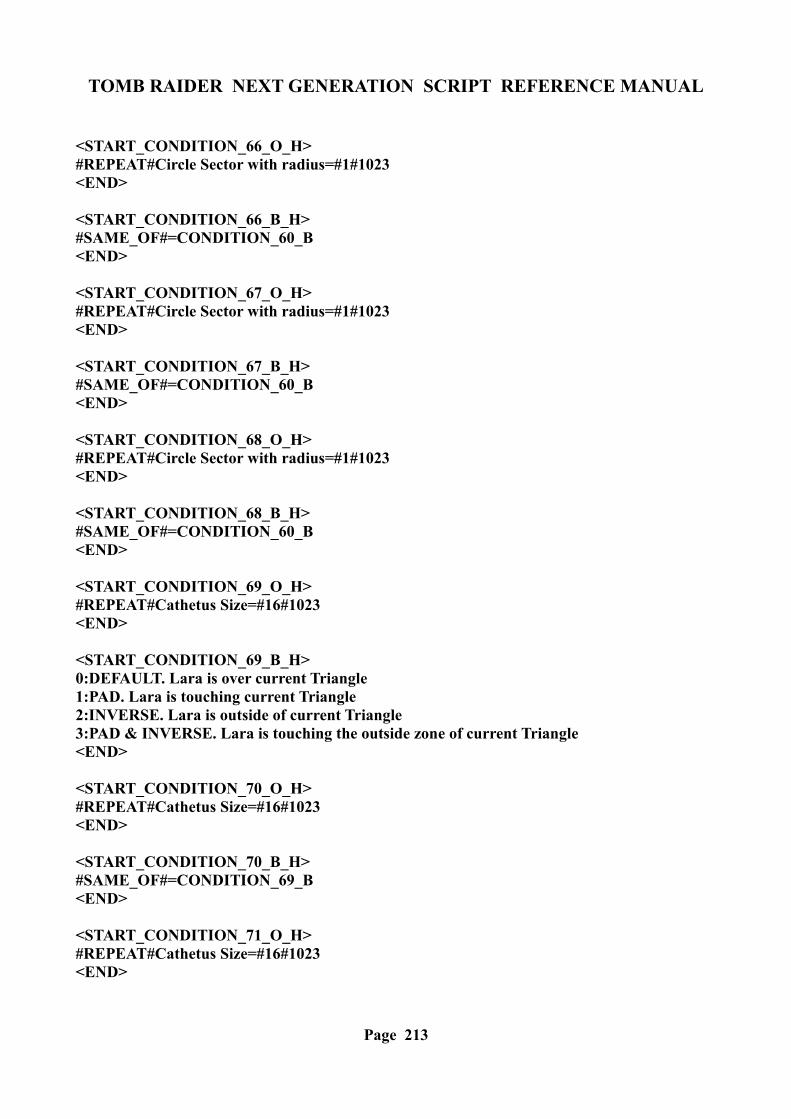
TOMB RAIDER NEXT GENERATION SCRIPT REFERENCE MANUAL
<START_CONDITION_66_O_H>#REPEAT#Circle Sector with radius=#1#1023<END>
<START_CONDITION_66_B_H>#SAME_OF#=CONDITION_60_B<END>
<START_CONDITION_67_O_H>#REPEAT#Circle Sector with radius=#1#1023<END>
<START_CONDITION_67_B_H>#SAME_OF#=CONDITION_60_B<END>
<START_CONDITION_68_O_H>#REPEAT#Circle Sector with radius=#1#1023<END>
<START_CONDITION_68_B_H>#SAME_OF#=CONDITION_60_B<END>
<START_CONDITION_69_O_H>#REPEAT#Cathetus Size=#16#1023<END>
<START_CONDITION_69_B_H>0:DEFAULT. Lara is over current Triangle1:PAD. Lara is touching current Triangle2:INVERSE. Lara is outside of current Triangle3:PAD & INVERSE. Lara is touching the outside zone of current Triangle<END>
<START_CONDITION_70_O_H>#REPEAT#Cathetus Size=#16#1023<END>
<START_CONDITION_70_B_H>#SAME_OF#=CONDITION_69_B<END>
<START_CONDITION_71_O_H>#REPEAT#Cathetus Size=#16#1023<END>
Page 213
TOMB RAIDER NEXT GENERATION SCRIPT REFERENCE MANUAL
<START_CONDITION_71_B_H>#SAME_OF#=CONDITION_69_B<END>
<START_CONDITION_72_O_H>#REPEAT#Cathetus Size=#16#1023<END>
<START_CONDITION_72_B_H>#SAME_OF#=CONDITION_69_B<END>
<START_CONDITION_73_O_H>#REPEAT#Side Size=#16#1023<END>
<START_CONDITION_73_B_H>#SAME_OF#=CONDITION_69_B<END>
<START_CONDITION_74_O_H>#REPEAT#Side Size=#16#1023<END>
<START_CONDITION_74_B_H>#SAME_OF#=CONDITION_69_B<END>
<START_CONDITION_75_O_H>#REPEAT#Side Size=#16#1023<END>
<START_CONDITION_75_B_H>#SAME_OF#=CONDITION_69_B<END>
<START_CONDITION_76_O_H>#REPEAT#Side Size=#16#1023<END>
<START_CONDITION_76_B_H>#SAME_OF#=CONDITION_69_B<END>
<START_CONDITION_77_O_H>#REPEAT#Diagonal Size=#16#1023<END>
Page 214

TOMB RAIDER NEXT GENERATION SCRIPT REFERENCE MANUAL
<START_CONDITION_77_B_H>0:DEFAULT. Lara is over current Rhombus1:PAD. Lara is touching current Rhombus2:INVERSE. Lara is outside of current Rhombus3:PAD & INVERSE. Lara is touching the outside zone of current Rhombus<END>
<START_CONDITION_78_O_H>#REPEAT#Parameters=PARAM_TRIANGLE, #1#255<END>
<START_CONDITION_78_B_H>#SAME_OF#=CONDITION_69_B<END>
<START_CONDITION_79_O_H>#REPEAT#Parameters=PARAM_QUADRILATERAL, #1#255<END>
<START_CONDITION_79_B_H>0:DEFAULT. Lara is over current Quadrilateral1:PAD. Lara is touching current Quadrilateral2:INVERSE. Lara is outside of current Quadrilateral3:PAD & INVERSE. Lara is touching the outside zone of current Quadrilateral<END>
<START_CONDITION_80_O_H>#REPEAT#Parameters=PARAM_CIRCLE, #1#255<END>
<START_CONDITION_80_B_H>#SAME_OF#=CONDITION_60_B<END>
<START_CONDITION_81_O_H>0:Water room2:Quick Sand room4:Damage room5:Outside room10:Snow room11:Rain room 12:Cold water room<END>
<START_CONDITION_82_O>#MOVEABLES#<END>
Page 215
TOMB RAIDER NEXT GENERATION SCRIPT REFERENCE MANUAL
<START_CONDITION_82_B_H>#REPEAT#Mesh #0#31<END>
<START_CONDITION_83_O>#MOVEABLES#<END>
<START_CONDITION_83_B_H>#REPEAT#Mesh #0#31<END>
<START_CONDITION_84_O>#MOVEABLES#<END>
<START_CONDITION_84_B_H>1: 22.5 degrees2: 45 degrees3: 67.5 degrees4: 90 degrees5:112.5 degrees6:135 degrees7:157.5 degrees8:180 degrees9:202.5 degrees10:225 degrees11:247.5 degrees12:270 degrees<END>
<START_CONDITION_85_O>#SFX_1024#<END>
Page 216

TOMB RAIDER NEXT GENERATION SCRIPT REFERENCE MANUAL
Page 217
TOMB RAIDER NEXT GENERATION SCRIPT REFERENCE MANUAL
TEXT TRIGGERS [ USED FOR PRE-SET LIST IN TRIGGER TYPE WINDOW ]
<START_TEXTS_1_T_H>0:Strip fragment %dth %s strip1:Two crossed stripes at point (%d,%d)2:horizontal3:vertical4:bottom-up5:top-down6:Percentage7:Transparency8:Value9:No change10:Decrease floor collision by %2d clicks11:Decrease ceiling collision by %2d clicks12:Increase ceiling collision by %2d clicks13:Units14:Sequence15:Sectors16:Game Backup17:%s seconds (Wait <#> seconds before activating)18:%s seconds (Activate and wait <#> seconds before deactivating)19:(NULL. No timer operation) 0 timer20:Recharge of %3d units21:Recharge with %3d %% of full bar22:Moved of %3d degrees23:%2d] %s (Red=%d Green=%d Blue=%d)24:Square fragment25:Diagonal %s passing at point (%d,%d)26:Two crossed diagonals passing at point (%d,%d)27:Clicks = %5s (Half-Clicks=%d)28:Forever (use other action/effect to disable it)29:seconds30:%2dth Animation Range31:Perform one single time32:DON'T CHANGE33:OCB=%3d of LARA_START_POS(%d) in sector (%d,%d) of %s34:ACTIVE35:INACTIVE36:Multi shot for positive condition37:Single shot for positive condition38:%-26s ID %-6d in sector (%d,%d) of %s39:%s=%3d FlyByCamera(%d) Room %d Sector=(%d,%d)40:Increase floor collision by %2d clicks<END>
Page 218

TOMB RAIDER NEXT GENERATION SCRIPT REFERENCE MANUAL
Page 219
TOMB RAIDER NEXT GENERATION SCRIPT REFERENCE MANUAL
TOMB RAIDER NEXT GENERATION
MNEMONICS
Page 220

TOMB RAIDER NEXT GENERATION SCRIPT REFERENCE MANUAL
MNEMONICS PAGE
ADD_BLOOD 244 ADD_constantsADD_FLAMEADD_LIGHT_BLINKADD_LIGHT_FLATADD_LIGHT_GLOVEADD_LIGHT_SPOTADD_MISTADD_SMOKEAMMO_ADD_GUN_SHELL 246 AMMO_constantsAMMO_ADD_SHOTGUN_SHELLAMMO_PUSH_LARAAMMO_PUSH_TARGETAMMO_REMOVE_SHOTGUN_SHELLAMMO_SET_GRENADE_TIMERBAR_AIR 247 BAR_constantsBAR_CUSTOM1BAR_CUSTOM2BAR_CUSTOM3BAR_CUSTOM4BAR_DASHBAR_HEALTHBAR_LOAD_LEVELBINF_COMPASS 248 BINF_constantsBINF_LIGHT_SWITCHBINF_LIGHTNESSBINF_NOTATION_EXTENDEDBINF_PROGRESSIVE_ZOOMBINF_SEXTANTBINF_SUPER_ZOOMBINF_SWING_COMPASSBINF_SWING_SEXTANTBINF_ZOOMBINT_BAR 250 BINT_constantsBINT_NUMERICBINT_PATTERN_BARBINT_ROUNDBINT_STRIPBKGDF_COLORIZE 251 BKGDF_constantsBKGDF_HIDE_LOADING_BARBKGDF_HIDE_SPRITE_LASER_SIGHTBKGDF_KEEP_GAME_SCREENBKGDF_MINIMAL_LOADING_TIME
Page 221
TOMB RAIDER NEXT GENERATION SCRIPT REFERENCE MANUAL
PAGE
BKGDT_BINOCULAR 252 BKGDT_constantsBKGDT_INVENTORYBKGDT_LASER_SIGHTBKGDT_LOADING_LEVELBKGDT_TITLECDM_NO_SAVE 253 CDM_constantsCDM_RESTORE_FROM_BEGINCDM_RESTORE_FROM_MIDDLECL_BLINKING_WHITE 254 CL_constantsCL_BLUECL_DARKMETALCL_GOLDCL_METALCL_REDCL_WHITECL_YELLOWCOLL_ANIMATINGS 255 COLL_constantsCOLL_DOORSCOLL_FAKE_WALLSCOLL_FAST_TURNINGCOLL_NO_SLIDINGCOLL_NO_SPLATCOLL_PANELSCOLL_STATICSCOLL_STOP_ON_45_DEGREESCOLL_VEHICLESCOLTYPE_SET_COLOR 257 COLTYPE_constantsCOLTYPE_SET_PULSECOLTYPE_SHADE_COLORSCUST_ADD_DEATH_ANIMATION 258 CUST_constantsCUST_AMMOCUST_BACKGROUNDCUST_BARCUST_BIKE_VS_ENEMIESCUST_BINOCULARS CUST_CAMERACUST_CD_SINGLE_PLAYBACKCUST_DARTSCUST_DISABLE_FORCING_ANIM_96CUST_DISABLE_MISSING_SOUNDSCUST_DISABLE_PUSH_AWAY_ANIMATIONCUST_DISABLE_SCREAMING_HEADCUST_ESCAPE_FLY_CAMERACUST_FIX_WATER_FOG_BUG
Page 222
TOMB RAIDER NEXT GENERATION SCRIPT REFERENCE MANUAL
PAGE
CUST_FLARECUST_FMV_CUTSCENECUST_HAIR_TYPECUST_HARPOONCUST_INNER_SCREENSHOTCUST_KEEP_DEAD_ENEMIESCUST_KEEP_LARA_HPCUST_LIGHT_OBJECTCUST_LOOK_TRANSPARENTCUST_NEW_SOUND_ENGINECUST_NO_TIME_IN_SAVELISTCUST_PARALLEL_BARSCUST_PAUSE_FLY_CAMERACUST_RAINCUST_ROLLING_BOATCUST_ROLLINGBALL_PUSHINGCUST_SAVE_LOCUSTCUST_SCREENSHOT_CAPTURECUST_SET_CREDITS_LEVELCUST_SET_INV_ITEMCUST_SET_JEEP_KEY_SLOTCUST_SET_OLD_CD_TRIGGERCUST_SET_SECRET_NUMBERCUST_SET_STATIC_DAMAGECUST_SET_STILL_COLLISIONCUST_SET_TEXT_COLORCUST_SFXCUST_SHATTER_RANGECUST_SHOW_AMMO_COUNTERCUST_SPEED_MOVINGCUST_STATIC_TRANSPARENCYCUST_TEXT_ON_FLY_SCREENCUST_TITLE_FMVCUST_TR5_UNDERWATER_COLLISIONSCUST_WATERFALL_SPEEDCUST_WEAPONDENV_FLAG_FACE2BACK 299 DENV_constantsDENV_FLAG_FACE2FACEDGX_ADJUSTMENT_MODE 300 DGX_constantsDGX_ANIMATIONDGX_AUDIO_TRACKSDGX_CHEATSDGX_COMMON_VARIABLES
Page 223
TOMB RAIDER NEXT GENERATION SCRIPT REFERENCE MANUAL
PAGE
DGX_ERRORSDGX_FAR_VIEWDGX_FLYBYDGX_FOGDGX_FPSDGX_LARADGX_LOG_SCRIPT_COMMANDSDGX_SFX_SOUNDSDGX_STORE_VARIABLESDGX_TEXT_VARIABLESDGX_WEAPON_ANIMATIONDIR_DOWN 305 DIR_constantsDIR_EASTDIR_NORTHDIR_SOUTHDIR_UPDIR_WESTDISABLED 305 DISABLEDDMG_ALERT_BEEP 306 DMG_constantsDMG_BURNING_DEATHDMG_BURNING_SCREAMDMG_COLD_WATERDMG_INCREASE_BARDMG_INDIRECT_BARDMG_LITTLE_TEXTDMG_ONLY_PADDMG_POISON_LARADMG_SLOW_DISAPPEARINGDRT_ADD_EFFECT 308 DRT_constantsDRT_FIX_POISON_BUGDRT_HIDE_DARTDRT_NO_POISONDRT_NO_SMOKEDRT_PERFORM_TRIGGERGROUPDTF_ENGAGE_ALWAYS 310 DTF_constantsDTF_ENGAGE_IN_RANGEDTF_ENGAGE_INVENTORYDTF_FAST_RADAR_SCANDTF_INVERSE_VPOINTERDTF_NONEDTF_RADAR_MODEDTF_REQUIRED_ITEMDTF_SWINGING_POINTER
Page 224
TOMB RAIDER NEXT GENERATION SCRIPT REFERENCE MANUAL
PAGE
EDGX_CONCISE_SCRIPT_LOG 312 EDGX_constantsEDGX_LARA_CORD_IN_LOGEDGX_EDGX_SLOW_MOTIONEDGX_SWAP_VIEWEF_DOUBLE_DOOR 313 EF_constantsEF_INNER_KEYPADEF_MODE_STOP_AND_GOEF_MODE_YO_YOEF_MULTI_DOORSEF_NONEEF_SINGLE_DOORENABLED 315 ENABLEDENV_ANIM_COMPLETE 316 ENV_constantsENV_CLIMB_LEFT_IN_CORNERENV_CLIMB_LEFT_OUT_CORNERENV_CLIMB_LEFT_SPACEENV_CLIMB_RIGHT_IN_CORNERENV_CLIMB_RIGHT_OUT_CORNERENV_CLIMB_RIGHT_SPACE ENV_CLIMB_WALL_AT_LEFTENV_CLIMB_WALL_AT_RIGHTENV_CLIMB_WALL_BACKENV_CLIMB_WALL_IN_FRONTENV_CONDITION_TRIGGER_GROUPENV_DISTANCE_CEILINGENV_DISTANCE_EAST_WALLENV_DISTANCE_FLOORENV_DISTANCE_NORTH_WALLENV_DISTANCE_SOUTH_WALLENV_DISTANCE_WEST_WALLENV_ENEMY_SEE_LARAENV_FLOATINGENV_FLYING_DOWNENV_FLYING_UPENV_FRAME_NUMBERENV_FREE_HANDSENV_HANG_LEFT_IN_CORNERENV_HANG_LEFT_OUT_CORNERENV_HANG_LEFT_SPACEENV_HANG_RIGHT_IN_CORNERENV_HANG_RIGHT_OUT_CORNERENV_HANG_RIGHT_SPACEENV_HANG_WITH_FEET
Page 225
TOMB RAIDER NEXT GENERATION SCRIPT REFERENCE MANUAL
PAGE
ENV_HOLD_EXTRA_ITEM_IN_HANDSENV_HOLE_BACK_CEILING_CLIMBENV_HOLE_FLOOR_AT_LEFTENV_HOLE_FLOOR_AT_RIGHTENV_HOLE_FLOOR_BACKENV_HOLE_FLOOR_IN_FRONTENV_HOLE_IN_FRONT_CEILING_CLIMBENV_IN_LEFT_SIDE_SECTORENV_IN_RIGHT_SIDE_SECTORENV_IS_STILLENV_ITEM_EXTRA_AT_LEFTENV_ITEM_EXTRA_AT_RIGHTENV_ITEM_EXTRA_IN_FRONTENV_ITEM_EXTRA_OVERENV_ITEM_EXTRA_UNDERENV_ITEM_TEST_POSITIONENV_LARA_IN_MICRO_STRIPENV_MONKEY_CEILINGENV_MULT_CONDITIONENV_MULT_OR_CONDITIONENV_NO_BLOCK_AT_LEFTENV_NO_BLOCK_AT_RIGHTENV_NO_BLOCK_BACKENV_NO_BLOCK_IN_FRONTENV_NO_BOX_AT_LEFTENV_NO_BOX_AT_RIGHTENV_NO_BOX_BACKENV_NO_BOX_IN_FRONTENV_NON_TRUEENV_ON_VEHICLEENV_ONLANDENV_PLAYER_IS_SLEEPINGENV_PLAYER_WOKE_UPENV_POS_CENTRALENV_POS_HORTOGONALENV_POS_IN_THE_MIDDLEENV_POS_LEFT_CORNERENV_POS_RIGHT_CORNERENV_POS_STRIP_1ENV_POS_STRIP_2ENV_POS_STRIP_3ENV_ROOM_ISENV_SUPPORT_IN_BACK_WALLENV_SUPPORT_IN_FRONT_WALL
Page 226

TOMB RAIDER NEXT GENERATION SCRIPT REFERENCE MANUAL
PAGE
ENV_SUPPORT_IN_LEFT_WALLENV_SUPPORT_IN_RIGHT_WALLENV_UNDERWATERENV_VERTICAL_ORIENTENV_WALL_HOLE_IN_FRONTEXTRA_MUTANT_NO_LOCUSTS 329 EXTRA_constantsEXTRA_TEETH_NO_DAMAGE_ON_WALKINGEXTRA_WRAITH_BURN_LARAFADD_CONTINUE_EMIT 330 FADD_constantsFADD_DURATE_ANIMATIONFADD_DURATE_SINGLE_FRAMEFADD_DURATE_STATEIDFADD_FIRE_STRIPFADD_IGNORE_STATUSFADD_NO_SOUNDFADD_NONEFADD_ROTATE_180FADD_ROTATE_270FADD_ROTATE_90FADD_SMOKE_EXHAUSTFADD_VORIENT_180FADD_VORIENT_270FADD_VORIENT_90FAN_ALIGN_TO_ENV_POS 332 FAN_constantsFAN_DISABLE_GRAVITYFAN__DISABLE_PUSH_AWAYFAN_ENABLE_GRAVITYFAN_KEEP_NEXT_STATEIDFAN_KEYS_AS_SCANCODEFAN_PERFORM_TRIGGER_GROUPFAN_RANDOMFAN_SET_ADDEFFECTFAN_SET_BUSY_HANDSFAN_SET_FREE_HANDSFAN_SET_FREE_HANDS_TEMPFAN_SET_LARA_PLACEFAN_SET_NEUTRAL_STATE_IDFAN_START_FROM_EXTRA_FRAMEFBAR_SHOW_BAR_NAME 336 FBAR_constantsFBAR_SOUND_BAR_ANIMFCAM_DISABLE_COMBAT_CAM 337 FCAM_constantsFCAM_INVISIBLE_LARA_ON_LOOK_CAMFFL_ADD_FIRE 338 FFL_constantsFFL_ADD_GLOW_LIGHT
Page 227

TOMB RAIDER NEXT GENERATION SCRIPT REFERENCE MANUAL
PAGE
FFL_ADD_SMOKE_TO_SPARKSFFL_ADD_SPARKSFFL_FLAT_LIGHTFGT_DISABLED 339 FGT_constantsFGT_HIDE_IN_DEBUGFGT_NOT_TRUEFGT_PUSHING_COLLISIONFGT_REMOVE_INPUTFGT_REPLACE_MANAGEMENTFGT_SINGLE_SHOTFGT_SINGLE_SHOT_RESUMEDFLI_SHOW_BOUND 341 FLI_constantsFLI_SHOW_DIFFERENCESFMIR_ADJUST_X 342 FMIR_constantsFMIR_ADJUST_ZFMIR_ALTERNATE_REFLEXFMOV_HEAVY_ALL 343 FMOV_constantsFMOV_HEAVY_AT_ENDFMOV_INFINITE_LOOPFMOV_TRIGGERS_ALLFMV_FADE_OUT 344 FMV_constantsFMV_LONG_BLACK_RESTARTFMV_NO_AUDIO_RESTARTFMV_PRE_CACHEFMV_SHORT_BLACK_RESTARTFO_ENABLED 346 FO_constantsFO_LOOPFO_TICK_TIMEFR_ADD_DRIPS_TO_LARA 346 FR_constantsFR_CORRECT_SPRINKLERSFR_PLAY_SFXFRB_ALLOW_DRIFT 347 FRB_constantsFRB_PITCHING_HIGHFRB_PITCHING_LOWFRB_PITCHING_NORMALFRB_SWINGING_HIGHFRB_SWINGING_LOWFRB_SWINGING_NORMALFROT_LOOP 348 FROT_constantsFSB_DISABLE_ON_COMBAT 349 FSB_constantsFSB_DISABLE_ON_CRAMPED_SPACEFSB_EXIT_ON_ATTACKFSB_FLIP_DISTANCEFSB_FLIP_H_ORIENT
Page 228

TOMB RAIDER NEXT GENERATION SCRIPT REFERENCE MANUAL
PAGE
FSB_FLIP_SPEEDFSB_FLIP_V_ANGLEFSB_FREEZE_ENEMIESFSB_FREEZE_LARAFSB_IMMEDIATEFSB_OVERLAP_AUDIOFSCA_ENDLESS 351 FSCA_constantsFSCA_IMMEDIATEFSCA_ITEMGROUP_INDEXFSCAM_DISABLE_COMBAT_CAM 352 FSCAM_constantsFSCAM_DISABLE_LOOK_CAMFSS_ANIMATE 353 FSS_constantsFSS_ANIMATE_FOR_BACKFSS_CLONE_SPRITEFSS_EFFECT_FROM_BOTTOMFSS_EFFECT_FROM_LEFTFSS_EFFECT_FROM_RIGHTFSS_EFFECT_FROM_TOPFSS_EFFECT_ZOOMFSS_SHOW_SPRITE_GRIDFSS_TRANSPARENTFT_BLINK_CHARS 355 FT_constantsFT_BOTTOM_CENTERFT_BOTTOM_LEFTFT_BOTTOM_RIGHTFT_CENTER_CENTERFT_NARROW_CHARSFT_SIZE_ATOMIC_CHARFT_SIZE_DOUBLE_CHARFT_SIZE_DOUBLE_HEIGHTFT_SIZE_DOUBLE_WIDTHFT_SIZE_HALF_CHARFT_SIZE_HALF_HEIGHTFT_SIZE_HALF_WIDTHFT_SIZE_MICRO_CHARFT_SIZE_NO_BORDERFT_TOP_CENTERFT_TOP_LEFTFT_TOP_RIGHTFT_UNDER_LEFT_BARSFT_UNDER_RIGHT_BARSFTYPE_SETTINGS 356 FTYPE_constantsFTYPE_SOUNDFTYPE_USERFILE
Page 229
TOMB RAIDER NEXT GENERATION SCRIPT REFERENCE MANUAL
PAGE
GT_AFTER_RELOADING_VARIABLES 357 GT_constantsGT_ALWAYSGT_BEFORE_SAVING_VARIABLESGT_COLLIDE_CREATUREGT_COLLIDE_ITEMGT_COLLIDE_SLOTGT_COLLIDE_STATIC_SLOTGT_COMPLETED_SCALING_ON_ITEMGT_CONDITION_GROUPGT_DAMAGE_BAR_LESS_THANGT_DISTANCE_FROM_ITEMGT_DISTANCE_FROM_STATICGT_ELEVATOR_STARTS_FROM_FLOORGT_ELEVATOR_STOPS_AT_FLOORGT_ENEMY_KILLEDGT_FMV_COMPLETEDGT_GAME_KEY1_COMMANDGT_GAME_KEY2_COMMANDGT_KEYBOARD_CODEGT_KEYPAD_REMOVEDGT_KEYPAD_SHOWEDGT_LARA_HOLDS_ITEMGT_LARA_HP_HIGHER_THANGT_LARA_HP_LESS_THANGT_LARA_POISONEDGT_LOADED_SAVEGAMEGT_NO_ACTION_ON_ITEMGT_SAVED_SAVEGAMEGT_SCREEN_TIMER_REACHEDGT_SELECTED_INVENTORY_ITEMGT_TITLE_SCREENGT_TRNG_G_TIMER_EQUALSGT_TRNG_L_TIMER_EQUALSGT_USED_BIG_MEDIPACKGT_USED_INVENTORY_ITEMGT_USED_LITTLE_MEDIPACKGT_USING_BINOCULARGT_VSCROLL_COMPLETEGT_VSCROLL_LAST_VISIBLEGTD_IGNORE_HEIGHT 367 GTD_constantsHAIR_ONE_PONYTAIL 367 HAIR_constantsHAIR_ONE_TR5_PONYTAILHAIR_PAGE_BOYHAIR_TWO_PLAITS
Page 230
TOMB RAIDER NEXT GENERATION SCRIPT REFERENCE MANUAL
PAGE
HIT_BIKE_EXPLODE 368 HIT_constantsHIT_EXPLODEHIT_HURTHIT_KILLHIT_PUSH_AWAYHIT_WALLHOLD_ANY_TORCH 370 HOLD_constantsHOLD_CROSSBOWHOLD_FIRED_TORCHHOLD_FLAREHOLD_GRENADEGUNHOLD_JEEPHOLD_KAYAKHOLD_MOTOR_BOATHOLD_OUT_TORCHHOLD_PISTOLSHOLD_POLEHOLD_REVOLVERHOLD_ROPEHOLD_RUBBER_BOATHOLD_SHOTGUNHOLD_SIDECARHOLD_UZIHRP_DISABLE_LASER_SIGHT 371 HRP_constantsHRP_DOUBLE_AMMOHRP_NO_SWIM_UNDERWATERHRP_SINGLE_AMMOIF_CRYPTIC 372 IF_constantsIF_EFFECT_CROSS_FADEIF_EFFECT_FROM_BOTTOMIF_EFFECT_FROM_LEFTIF_EFFECT_FROM_RIGHTIF_EFFECT_FROM_TOPIF_EFFECT_ZOOMIF_FULL_SCREENIF_LOOP_AUDIO_TRACK IF_OVER_FIXED_CAMERAIF_OVER_FLYBYIF_PLAY_AUDIO_TRACKIF_POP_IMAGEIF_PRELOADIF_QUIT_ESCAPEIF_TRANSPARENCE
Page 231
TOMB RAIDER NEXT GENERATION SCRIPT REFERENCE MANUAL
PAGE
IGNORE 375 IGNOREIMPORT_MEMORY 375 IMPORT_constantsIMPORT_TEMPORARYJOINT_ABDOMEN 377 JOINT_constantsJOINT_LEFT_ANCKLEJOINT_LEFT_ELBOWJOINT_LEFT_KNEEJOINT_LEFT_SHOULDERJOINT_LEFT_THIGHJOINT_LEFT_WRISTJOINT_NECKJOINT_PUBISJOINT_RIGHT_ANCKLEJOINT_RIGHT_ELBOWJOINT_RIGHT_KNEEJOINT_RIGHT_SHOULDERJOINT_RIGHT_THIGHJOINT_RIGHT_WRISTJOINT_SINGLE_MESHKEY1_ACTION 378 KEY_constantsKEY1_DOWNKEY1_DRAW_WEAPONKEY1_JUMPKEY1_LEFTKEY1_LOOKKEY1_RELEASEDKEY1_RIGHTKEY1_ROLLKEY1_UPKEY1_WALKKEY2_DASHKEY2_DUCKKEY2_USE_FLAREKLH_ALL_LEVELS 379 KLH_constantsLDF_CONTINUE_DIARY 379 LDF_constantsLDF_PLAY_TRACKLDF_SILENTLDF_SOUND_EFFECTSLDF_TRANSPARENT_BKGLDF_ZOOM_STARTLGTN_ADD_GLOVE_LIGHT 381 LGTN_constantsLGTN_EXPLODE TARGETLTGN_FIRE_LARA
Page 232
TOMB RAIDER NEXT GENERATION SCRIPT REFERENCE MANUAL
PAGE
LGTN_FLASH_SCREENLGTN_GLOBAL_SOUNDLGTN_HEARTHQUAKELGTN_INCLINED_RANDOMLGTN_KILL_TARGETLGTN_LARA_SCREAMLGTN_PLAY_SOUNDLGTN_RANDOM_COLORLOAD_AMMO_TYPE1 383 LOAD_constantsLOAD_AMMO_TYPE2LOAD_AMMO_TYPE3LOAD_LASERSIGHTMIR_CEILING 384 MIR_constantsMIR_EAST_WALLMIR_FLOORMIR_INVERSE_WESTMIR_NORTH_WALLMIR_SOUTH_WALLMIR_WEST_WALLMIST_COL_AZURE 385 MIST_COL_constantsMIST_COL_BLUEMIST_COL_GREENMIST_COL_PURPLEMIST_COL_REDMIST_COL_WHITEMIST_COL_YELLOWNEF_EASY_HEAVY_ENABLING 386 NEF_constantsNEF_EXPLODENEF_EXPLODE_AFTERNEF_HIT_BLOODNEF_HIT_DEFAULTNEF_HIT_FRAGMENTSNEF_HIT_SMOKENEF_NON_TARGETNEF_NONENEF_ONLY_EXPLODENEF_SAVE_MESH_VISIBILITYNEF_SET_AS_BRIDGE_FLATNEF_SET_AS_BRIDGE_TILT1NEF_SET_AS_BRIDGE_TILT2NEF_SET_AS_CREATURENEF_SET_AS_MORTAL
Page 233
TOMB RAIDER NEXT GENERATION SCRIPT REFERENCE MANUAL
PAGE
OBJ_MOTOR_BOAT 388 OBJ_constantsOBJ_MOTOR_BOAT_ANIMOBJ_RUBBER_BOATOBJ_RUBBER_BOAT_ANIMOTYPE_AI_DATA 388 OTYPE_constantsOTYPE_MOVEABLEOTYPE_STATICPARAM_BIG_NUMBERS 389 PARAM_constantsPARAM_CIRCLEPARAM_COLOR_ITEMPARAM_LIGHTNINGPARAM_MOVE_ITEMPARAM_PRINT_TEXTPARAM_QUADRILATERALPARAM_RECTPARAM_ROTATE_ITEMPARAM_SCALE_ITEMPARAM_SET_CAMERAPARAM_SHOW_SPRITEPARAM_TRIANGLEPARAM_WTEXTPB_DOUBLE_FACE 404 PB_constantsPB_LARA_CAN_SLIDEPB_MULTIPLE_ENDINGSPB_PROGRESSIVE_CHARGEPB_SHOW_CHARGE_BARPB_SHOW_CHARGE_COUNTERPL_ADD_INFO_BAR 406 PL_constantsPL_CENTRAL_IMAGEPL_CUSTOM_LAYOUTPL_DOUBLE_PAGEPL_FIX_WIDE_SCREENPL_LEFT_IMAGEPL_LEFT_IMAGE_LOGOPL_RIGHT_IMAGEPL_RIGHT_IMAGE_LOGOPL_WIDE_IMAGEPLACE_FLOATING 409 PLACE_constantsPLACE_GROUNDPLACE_LOW_WATERPLACE_SPECIALPLACE_UNDERWATER
Page 234
TOMB RAIDER NEXT GENERATION SCRIPT REFERENCE MANUAL
PAGE
QSF_SIZE_260x200 410 QSF_constantsQSF_SIZE_320x240QSF_SIZE_390x300QSF_SIZE_468x360QSF_SIZE_520x400QSF_SIZE_640x480QSF_TRUE_COLORRAIN_ALL_OUTSIDE 411 RAIN_constantsRAIN_DISABLEDRAIN_SINGLE_ROOMSROOM_COLD 412 ROOM_constantsROOM_DAMAGEROOM_MISTROOM_OUTSIDEROOM_QUICKSANDROOM_RAINROOM_REFLEXROOM_SNOWROOM_WATERROTH_CLOCKWISE 413 ROTH_constantsROTH_INV_CLOCKWISEROTH_NONEROTV_BACKWARD 413 ROTV_constantsROTV_FORWARDROTV_NONESC_DOUBLE_HEIGHT 414 SC_constantsSC_DOUBLE_SIZESC_DOUBLE_WIDTHSC_HALF_HEIGHTSC_HALF_SIZESC_HALF_WIDTHSC_NORMALSEQ_LOOP 415 SEQ_constantsSEQ_LOOP_INVERSESEQ_STOP_AT_FIRSTSET_ACCEPT_EXTRA_TAILINFOS 416 SET_constantsSET_BLIND_SAVEGAMESSET_CRYPT_SCRIPTSET_DISABLE_CHEATSSET_FORCE_NO_WAITING_REFRESH SET_FORCE_SOFT_FULL_SCREENSET_PERFORM_FROM_CDSET_SOFT_FULL_SCREEN
Page 235

TOMB RAIDER NEXT GENERATION SCRIPT REFERENCE MANUAL
PAGE
SEXT_AIFF 419 SEXT_constantsSEXT_MP1SEXT_MP2SEXT_MP3SEXT_MULTIPLESEXT_OGGSEXT_WAVSHOWC_OMIT_AMMO_NAME 420 SHOWC_constantsSHOWC_USE_GRAPHIC_AMMOSHOWC_USE_GRAPHIC_WEAPONSNOW_ALL_OUTSIDE 421 SNOW_constantsSNOW_DISABLEDSNOW_SINGLE_ROOMSPF_BLINK_SELECTED 422 SPF_constantsSPF_NO_PANEL_TITLESPF_NO_TIME_IN_LISTSPF_PRELOAD_BKG_IMAGESPF_SCROLL_PAGESPL_CENTRAL_IMAGE 423 SPL_constantsSPL_LEFT_IMAGE_BOTTOM_INFOSPL_LEFT_IMAGE_NO_INFOSPL_LEFT_IMAGE_RIGHT_INFOSPL_RIGHT_IMAGE_BOTTOM_INFOSPL_RIGHT_IMAGE_LEFT_INFOSPL_RIGHT_IMAGE_NO_INFOSQ_HIGH_QUALITY 424 SQ_constantsSQ_LOW_QUALITYSQ_MEDIUM_QUALITYSTATE_BACK 425 STATE_constantsSTATE_BACK_JUMPSTATE_CLIMB_DOWNSTATE_CLIMB_ENDSTATE_CLIMB_LEFTSTATE_CLIMB_RIGHTSTATE_CLIMB_START_AND_STANDINGSTATE_CLIMB_UPSTATE_COMPRESSSTATE_CONTROLLEDSTATE_CONTROLLED_117STATE_CONTROLLED_92STATE_CONTROLLED_93STATE_CONTROLLED_94STATE_CONTROLLED_97
Page 236
TOMB RAIDER NEXT GENERATION SCRIPT REFERENCE MANUAL
PAGE
STATE_CONTROLLED_LETSTATE_CONTROLLED_LET_96STATE_DASHSTATE_DASH_DIVESTATE_DEATHSTATE_DEATH_SLIDESTATE_DIVESTATE_DUCKSTATE_DUCK_72STATE_DUCK_LEFTSTATE_DUCK_RIGHTSTATE_EXTERNAL_CORNER_LEFTSTATE_EXTERNAL_CORNER_RIGHTSTATE_FALL_BACKSTATE_FAST_BACKSTATE_FAST_DIVESTATE_FAST_FALLSTATE_FAST_TURNSTATE_FAST_TURN_14STATE_FORWARD_JUMPSTATE_GLIDESTATE_HANGSTATE_HANG_LEFTSTATE_HANG_RIGHTSTATE_HANG_TURN_LEFTSTATE_HANG_TURN_RIGHTSTATE_INTERNAL_CORNER_LEFTSTATE_INTERNAL_CORNER_RIGHTSTATE_LEFT_JUMPSTATE_MONKEY_180STATE_MONKEY_FORWARDSTATE_MONKEY_LEFTSTATE_MONKEY_RIGHTSTATE_MONKEY_STILL_OR_HANG_SWINGSTATE_NULL_116STATE_NULL_19STATE_NULL_50STATE_NULL_51STATE_NULL_54STATE_NULL_62STATE_NULL_63STATE_NULL_64STATE_NULL_68
Page 237
TOMB RAIDER NEXT GENERATION SCRIPT REFERENCE MANUAL
PAGE
STATE_NULL_69STATE_NULL_87STATE_ON_ALL_FOURS_BACKSTATE_ON_ALL_FOURS_FORWARDSTATE_ON_ALL_FOURS_STANDINGSTATE_ON_ALL_FOURS_TO_HANGSTATE_ON_ALL_FOURS_TURN_LEFTSTATE_ON_ALL_FOURS_TURN_RIGHTSTATE_PB_HANGINGSTATE_PB_LEAP_OFFSTATE_PICK_UPSTATE_PICK_UP_98STATE_PICK_UP_FLARESTATE_POLE_DOWNSTATE_POLE_LEFTSTATE_POLE_RIGHTSTATE_POLE_STATIC_99STATE_POLE_UPSTATE_PULL_BLOCKSTATE_PULLEYSTATE_PUSH_BLOCKSTATE_PUSH_PULL_READYSTATE_REACHSTATE_RIGHT_JUMPSTATE_ROLL_23STATE_ROLL_45STATE_ROPESTATE_ROPE_114STATE_ROPE_115STATE_ROPE_CLIMB_DOWNSTATE_ROPE_CLIMB_UPSTATE_ROPE_LEFTSTATE_ROPE_RIGHTSTATE_RUNSTATE_SLIDESTATE_SLIDE_BACKSTATE_SPECIALSTATE_SPLATSTATE_STEP_LEFTSTATE_STEP_RIGHTSTATE_STOPSTATE_SURF_BACKSTATE_SURF_LEFT
Page 238

TOMB RAIDER NEXT GENERATION SCRIPT REFERENCE MANUAL
PAGE
STATE_SURF_RIGHTSTATE_SURF_SWIMSTATE_SURF_TREADSTATE_SWAN_DIVESTATE_SWIMSTATE_SWITCH_ONSTATE_SWITCH_ON_126STATE_SWITCH_ON_41STATE_TR_FALL_122STATE_TR_FALL_123STATE_TR_POSESTATE_TR_WALKSTATE_TREADSTATE_TURN_LEFTSTATE_TURN_RIGHTSTATE_UNDERWATER_DEATHSTATE_UP_JUMPSTATE_USE_KEYSTATE_USE_PUZZLESTATE_WADESTATE_WALKSTATE_WATER_OUTSTATE_WATER_ROLLSWT_BASE_ZERO 448 SWT_constantsSWT_RANDOM_MODETCF_CREATURE 448 TCF_constantsTCF_LAND_CREATURETCF_ONLY_EXPLODETCF_SAVEPOSTGROUP_AND 449 TGROUP_constantsTGROUP_ELSETGROUP_NOTTGROUP_ORTGROUP_SINGLE_SHOTTGROUP_SINGLE_SHOT_RESUMEDTGROUP_USE_EXECUTOR_ITEM_INDEXTGROUP_USE_FOUND_ITEM_INDEXTGROUP_USE_ITEM_USED_BY_LARA_INDEXTGROUP_USE_OWNER_ANIM_ITEM_INDEXTGROUP_USE_TRIGGER_ITEM_INDEXTPOS_DOUBLE_HORIENT 453 TPOS_constantsTPOS_FAST_ALIGNMENTTPOS_FOUR_HORIENT
Page 239
TOMB RAIDER NEXT GENERATION SCRIPT REFERENCE MANUAL
PAGE
TPOS_OPPOSITE_FACINGTPOS_TEST_ITEM_INDEXTRB_ADAPTIVE_FARVIEW 455 TRB_constantsTRB_ASYNC_FRAMESTRB_HIGH_PRIORITYTRB_OPTIMIZE_SORTINGTRB_SELECTIVE_VIEWTS_AFTER_FALLING_AS_INVULNERABLE 457 TS_constantsTS_ANIMATING_DOOR_CLOSETS_ANIMATING_DOOR_OPENTS_BINOCULAR_LIGHTTS_BINOCULAR_ZOOMTS_DAMAGE_ROOM_BEEP_ALERTTS_DAMAGE_ROOM_SCREAM_BURNINGTS_DETECTOR_SHOWTS_DIARY_CHANGE_PAGETS_DIARY_NO_PAGETS_DIARY_ZOOM_STARTTS_ELEVATOR_SQUASHED_LARATS_MISSING_REQUIRED_ITEMTS_MIST_EMITTER_WITH_OCBTS_PUSHED_ITEM_IMPACTTS_SAVEGAME_PANEL_SELECTEDTS_SCREENSHOT_CAPTURETS_VIBRATE_RESUME_FROM_FROZENTS_WHIRLPOOL_SINKED_LARATSB_MATRIX 459 TSB_constantsTSB_NO_CHANGE_CAMERATSB_PANORAMATSB_PORTRAITTSCR_LOAD_GAME 459 TSCR_constantsTSCR_MAIN_TITLESTSCR_NEW_GAMETSCR_OPTIONSTT_ACTION_INVENTORY_MENU_OFF 460 TT_constantsTT_ACTION_INVENTORY_MENU_ONTT_AMMOTT_CAMERA_VIEWTT_CREDITSTT_EXAMINE1_BOTTOMTT_EXAMINE1_TOPTT_EXAMINE3TT_ITEM_NAME
Page 240
TOMB RAIDER NEXT GENERATION SCRIPT REFERENCE MANUAL
PAGE
TT_LEGENDTT_LEVEL_NAME_OFFTT_LEVEL_NAME_ONTT_MAIN_MENU_OFFTT_MAIN_MENU_ONTT_NEW_LEVEL_ARROWSTT_OPTION_DESCRIPTIONSTT_OPTION_VALUESTT_PAUSED_MENU_ITEMSTT_PAUSED_MENU_TITLETT_SAVEGAME_DESCRIPTION_OFFTT_SAVEGAME_DESCRIPTION_ONTT_SAVEGAME_PANEL_TITLETT_SCREEN_TIMERTT_SELECT_LEVELTT_STATISTICS_DESCRIPTIONSTT_STATISTICS_VALUESWEAP_DISABLE_AUTO_SHOT 462 WEAP_constantsWEAP_DISABLE_CHANGE_WEAPONWFF_BOLD 463 WFF_constantsWFF_CENTER_ALIGNWFF_FORCE_FIXED_PITCHWFF_FROM_RIGHT_TO_LEFTWFF_ITALICWFF_LEFT_ALIGNWFF_LIGHTWFF_RIGHT_ALIGNWFF_ROTATE_90WFF_ROTATE_INV_90WFF_SHADOWWFF_ULTRA_BOLDWFF_UNDERLINEWTF_CHANGE_COLOR 467 WTF_constantsWTF_FLYING_TEXTWTF_OVER_BINOCULARWTF_OVER_FIXCAMERAWTF_OVER_FLYCAMERAWTF_OVER_IMAGEWTF_OVER_INVENTORY WTF_OVER_LASER_SIGHTWTF_PULSING_TEXT
Page 241

TOMB RAIDER NEXT GENERATION SCRIPT REFERENCE MANUAL
Page 242

TOMB RAIDER NEXT GENERATION SCRIPT REFERENCE MANUAL
Page 243
TOMB RAIDER NEXT GENERATION SCRIPT REFERENCE MANUAL
ADD_ constants
3 $0003: ADD_BLOODUsed in the AddEffect commandUse this value to add blood (vlady) to the current object.
1 $0001: ADD_FLAMEUsed in the AddEffect commandUse this value to add fire to the current object
6 $0006: ADD_LIGHT_BLINKUsed in the AddEffect commandUse this value to add a blinking light to some moveable.The blinking light is the same as a flare light, where the intensity of the light changes a bit in a random way.
5 $0005: ADD_LIGHT_FLATUsed in the AddEffect commandUse this value to add a color light to some moveable.For "flat light" we mean a common non-blinking, non-spot light.It is like a light-bulb.
8 $0008: ADD_LIGHT_GLOVEUsed in the AddEffect commandThis light has the shape of a sphere. This glove light is opaque, i.e. not transparent, like the yellow halo around the lights in a fogged night.
7 $0007: ADD_LIGHT_SPOTUsed in the AddEffect commandThis light works like a light-spot, i.e. it generates a cone of light following a given direction like the headlight of the SIDECAR. For this light type it is important to choose the facing direction of the light cone. The default facing is that of the moveable where you add this effect. Change this facing using the FADD_ flags in the FlagsEffect (FADD_) field.
Remarks: You could have trouble if the JEEP or boats use the header light, because this add effect uses the same light resources to generate this light-spot.With this kind of light type a very high Intensity value, about 200.You cannot change the standard yellow-white color for the spot light.
Page 244
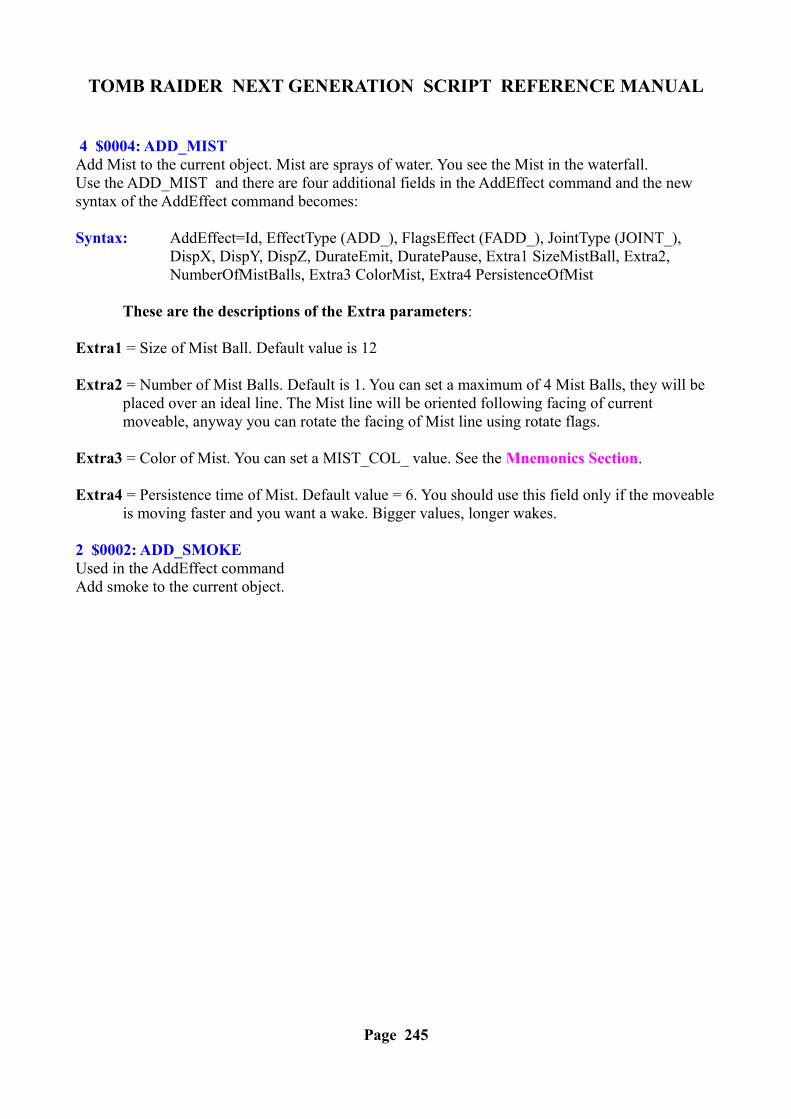
TOMB RAIDER NEXT GENERATION SCRIPT REFERENCE MANUAL
4 $0004: ADD_MISTAdd Mist to the current object. Mist are sprays of water. You see the Mist in the waterfall. Use the ADD_MIST and there are four additional fields in the AddEffect command and the new syntax of the AddEffect command becomes:
Syntax: AddEffect=Id, EffectType (ADD_), FlagsEffect (FADD_), JointType (JOINT_), DispX, DispY, DispZ, DurateEmit, DuratePause, Extra1 SizeMistBall, Extra2,NumberOfMistBalls, Extra3 ColorMist, Extra4 PersistenceOfMist
These are the descriptions of the Extra parameters:
Extra1 = Size of Mist Ball. Default value is 12
Extra2 = Number of Mist Balls. Default is 1. You can set a maximum of 4 Mist Balls, they will be placed over an ideal line. The Mist line will be oriented following facing of current moveable, anyway you can rotate the facing of Mist line using rotate flags.
Extra3 = Color of Mist. You can set a MIST_COL_ value. See the Mnemonics Section.
Extra4 = Persistence time of Mist. Default value = 6. You should use this field only if the moveable is moving faster and you want a wake. Bigger values, longer wakes.
2 $0002: ADD_SMOKEUsed in the AddEffect commandAdd smoke to the current object.
Page 245
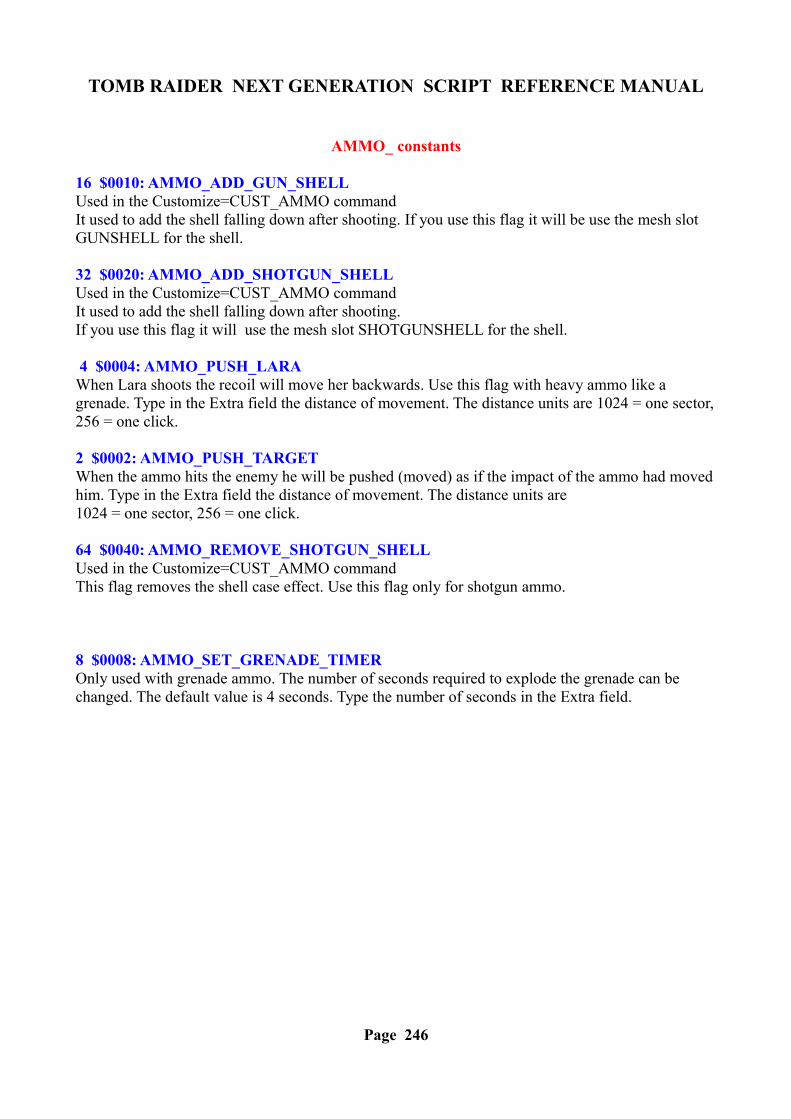
TOMB RAIDER NEXT GENERATION SCRIPT REFERENCE MANUAL
AMMO_ constants
16 $0010: AMMO_ADD_GUN_SHELLUsed in the Customize=CUST_AMMO commandIt used to add the shell falling down after shooting. If you use this flag it will be use the mesh slot GUNSHELL for the shell.
32 $0020: AMMO_ADD_SHOTGUN_SHELLUsed in the Customize=CUST_AMMO commandIt used to add the shell falling down after shooting.If you use this flag it will use the mesh slot SHOTGUNSHELL for the shell.
4 $0004: AMMO_PUSH_LARAWhen Lara shoots the recoil will move her backwards. Use this flag with heavy ammo like a grenade. Type in the Extra field the distance of movement. The distance units are 1024 = one sector, 256 = one click.
2 $0002: AMMO_PUSH_TARGETWhen the ammo hits the enemy he will be pushed (moved) as if the impact of the ammo had moved him. Type in the Extra field the distance of movement. The distance units are 1024 = one sector, 256 = one click.
64 $0040: AMMO_REMOVE_SHOTGUN_SHELLUsed in the Customize=CUST_AMMO commandThis flag removes the shell case effect. Use this flag only for shotgun ammo.
8 $0008: AMMO_SET_GRENADE_TIMEROnly used with grenade ammo. The number of seconds required to explode the grenade can be changed. The default value is 4 seconds. Type the number of seconds in the Extra field.
Page 246
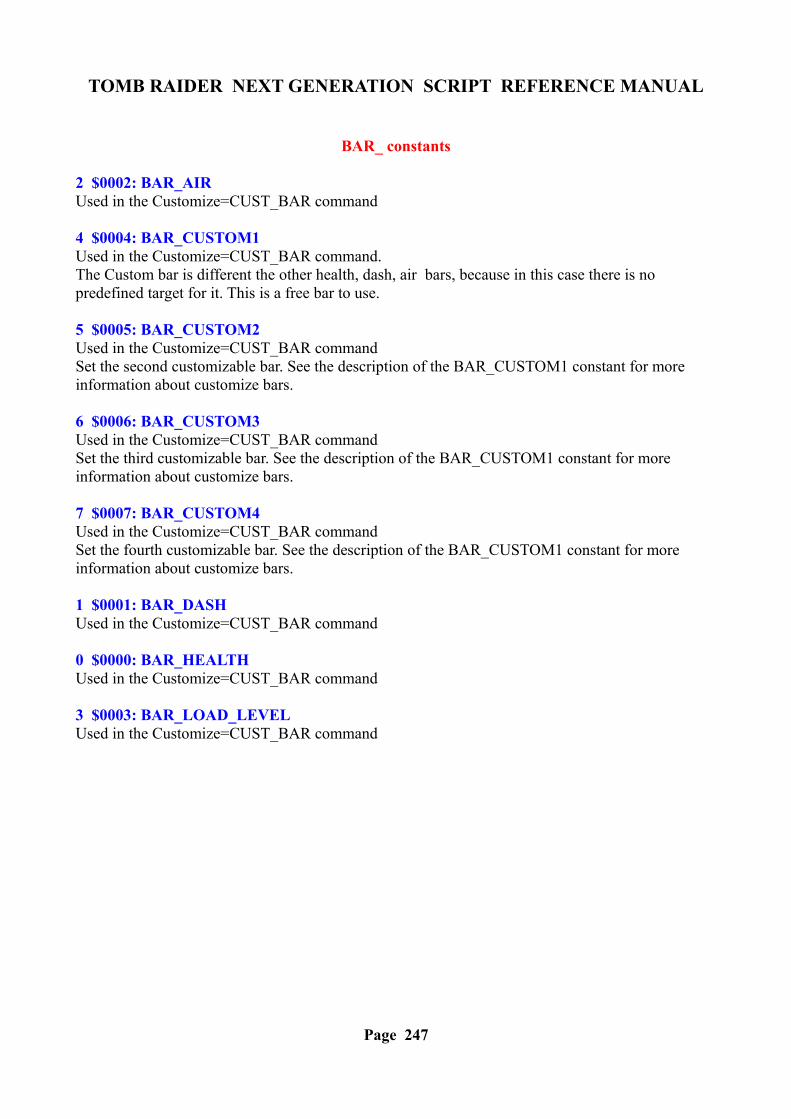
TOMB RAIDER NEXT GENERATION SCRIPT REFERENCE MANUAL
BAR_ constants
2 $0002: BAR_AIRUsed in the Customize=CUST_BAR command
4 $0004: BAR_CUSTOM1Used in the Customize=CUST_BAR command.The Custom bar is different the other health, dash, air bars, because in this case there is no predefined target for it. This is a free bar to use.
5 $0005: BAR_CUSTOM2Used in the Customize=CUST_BAR commandSet the second customizable bar. See the description of the BAR_CUSTOM1 constant for more information about customize bars.
6 $0006: BAR_CUSTOM3Used in the Customize=CUST_BAR commandSet the third customizable bar. See the description of the BAR_CUSTOM1 constant for more information about customize bars.
7 $0007: BAR_CUSTOM4Used in the Customize=CUST_BAR commandSet the fourth customizable bar. See the description of the BAR_CUSTOM1 constant for more information about customize bars.
1 $0001: BAR_DASHUsed in the Customize=CUST_BAR command
0 $0000: BAR_HEALTHUsed in the Customize=CUST_BAR command
3 $0003: BAR_LOAD_LEVELUsed in the Customize=CUST_BAR command
Page 247
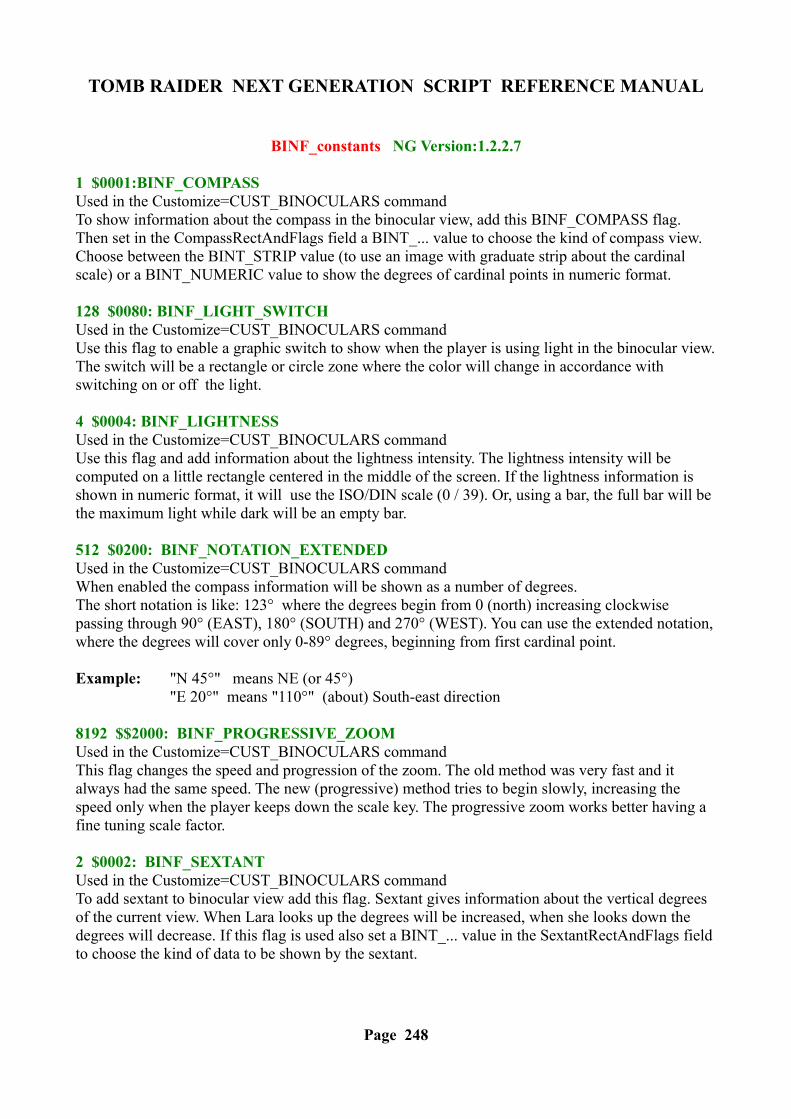
TOMB RAIDER NEXT GENERATION SCRIPT REFERENCE MANUAL
BINF_constants NG Version:1.2.2.7
1 $0001:BINF_COMPASSUsed in the Customize=CUST_BINOCULARS commandTo show information about the compass in the binocular view, add this BINF_COMPASS flag. Then set in the CompassRectAndFlags field a BINT_... value to choose the kind of compass view. Choose between the BINT_STRIP value (to use an image with graduate strip about the cardinal scale) or a BINT_NUMERIC value to show the degrees of cardinal points in numeric format.
128 $0080: BINF_LIGHT_SWITCHUsed in the Customize=CUST_BINOCULARS commandUse this flag to enable a graphic switch to show when the player is using light in the binocular view. The switch will be a rectangle or circle zone where the color will change in accordance with switching on or off the light.
4 $0004: BINF_LIGHTNESSUsed in the Customize=CUST_BINOCULARS commandUse this flag and add information about the lightness intensity. The lightness intensity will be computed on a little rectangle centered in the middle of the screen. If the lightness information is shown in numeric format, it will use the ISO/DIN scale (0 / 39). Or, using a bar, the full bar will be the maximum light while dark will be an empty bar.
512 $0200: BINF_NOTATION_EXTENDEDUsed in the Customize=CUST_BINOCULARS commandWhen enabled the compass information will be shown as a number of degrees.The short notation is like: 123° where the degrees begin from 0 (north) increasing clockwise passing through 90° (EAST), 180° (SOUTH) and 270° (WEST). You can use the extended notation, where the degrees will cover only 0-89° degrees, beginning from first cardinal point.
Example: "N 45°" means NE (or 45°)"E 20°" means "110°" (about) South-east direction
8192 $$2000: BINF_PROGRESSIVE_ZOOMUsed in the Customize=CUST_BINOCULARS commandThis flag changes the speed and progression of the zoom. The old method was very fast and it always had the same speed. The new (progressive) method tries to begin slowly, increasing the speed only when the player keeps down the scale key. The progressive zoom works better having a fine tuning scale factor.
2 $0002: BINF_SEXTANTUsed in the Customize=CUST_BINOCULARS commandTo add sextant to binocular view add this flag. Sextant gives information about the vertical degrees of the current view. When Lara looks up the degrees will be increased, when she looks down the degrees will decrease. If this flag is used also set a BINT_... value in the SextantRectAndFlags field to choose the kind of data to be shown by the sextant.
Page 248
TOMB RAIDER NEXT GENERATION SCRIPT REFERENCE MANUAL
4096 $1000: BINF_SUPER_ZOOMUsed in the Customize=CUST_BINOCULARS commandThis flag improves the zoom-in factor of the binoculars. The maximum magnification will be from 4.2x to about 8.4 (double).
Note: This flag can be omitted from the script and enabled by using a flip effect. This method may be useful in the game to simulate a change to the binoculars to improve them to some target reached by Lara in the game. This means that it is possible to improve the binoculars in the game, but it is not possible to do the opposite i.e. removing the super_zoom once it has been supplied.
1024 $0400: BINF_SWING_COMPASSUsed in the Customize=CUST_BINOCULARS commandWhen the compass strip is used add the BINF_SWING_COMPASS flag, to simulate a random swinging of the compass every time the player moves the binoculars.
2048 $0800: BINF_SWING_SEXTANTUsed in the Customize=CUST_BINOCULARS commandWith this flag you enable a simulation of swinging for the sextant value (in strip mode) when the player moves the binoculars
8 $0008: BINF_ZOOMUsed in the Customize=CUST_BINOCULARS commandThis enables showing of information about the current zoom-in factor.See the description of the ZoomRectAndFlags field.
Page 249
TOMB RAIDER NEXT GENERATION SCRIPT REFERENCE MANUAL
BINT_constants NG Version:1.2.2.7
16384 $4000: BINT_BARUsed in the Customize=CUST_BINOCULARS commandFor a solid bar to measure the intensity of some value in the binoculars screen, use the BINT_BAR value in the field with an Id for the rectangle.
Note: Remember that when you use a bar, it is necessary to set in the PARAM_RECT command (linked with the current binoculars information to show...) the values for the Foreground color (the main color of the bar) and the BackGround color (the empty color of the bar).
8192 $2000: BINT_NUMERICUsed in the Customize=CUST_BINOCULARS commandTo show information about the compass in numeric format use the BINT_NUMERIC type in the CompassRectAndFlags field. The default format is a simple number of degrees from 0 to 359.You can also use the extended format adding to the FLAGS (BINF_...) field the BINF_NOTATION_EXTENDED flag. See the description of the BINF_NOTATION_EXTENDED flag for more information
4096 $1000: BINT_PATTERN_BARUsed in the Customize=CUST_BINOCULARS commandA pattern bar is like a bar, where the level of some value will be shown as a length of a solid bar, but with a pattern bar you can use a pattern instead of a solid color. To draw your pattern bar just draw it in the binoculars screen, at full size, then in the rectangle (in the script) to set the size of the bar type in the BackGround color field of the PARAM_RECT command, the color below the pattern bar, i.e. the color used to erase the pattern to simulate a shorter bar.
For example: If the pattern bar is above a black zone set a black color in the background field.
2048 $0800: BINT_ROUNDUsed in the Customize=CUST_BINOCULARS commandCurrently this type works only in the LightnessRectAndFlags field to force the light switch to have a circle shape.
32768 $8000: BINT_STRIPUsed in the Customize=CUST_BINOCULARS commandYou can show data as a strip for the compass and sextant. A strip is a slim image with a graduate scale. The strip for the compass should always have the size of 1400 x 64 Use the compass strip in the lightning demo level as a reference for position of the cardinal points and degrees.
Page 250
TOMB RAIDER NEXT GENERATION SCRIPT REFERENCE MANUAL
BKGDF_constants NG Version:1.2.2.7
8 $0008: BKGDF_COLORIZEUsed in the Customize=CUST_BACKGROUND commandThis flag only works with BKGDT_BINOCULAR and BKGDT_LASER_SIGHT types.You can add a color to the screen when Lara is looking through the binoculars or lasersight.Type in the Parameter field the Id of a ColorRGB= command for the color to use.
1 $0001: BKGDF_HIDE_LOADING_BARUsed in the Customize=CUST_BACKGROUND commandIf you are customizing the BKGDT_LOADING_LEVEL screen use this flag to hide the loading bar.
4 $0004:BKGDF_HIDE_SPRITE_LASER_SIGHTUsed in the Customize=CUST_BACKGROUND commandThis flag works in accordance with the BKGDT_LASER_SIGHT type. If you want to remove that little red point ( a sprite), add this flag.
16 $0010: BKGDF_KEEP_GAME_SCREENUsed in the Customize=CUST_BACKGROUND commandIf you do not want a custom image for the background but the current game screen, i.e. the last image in the game add this flag. When the BKGDF_KEEP_GAME_SCREEN flag is used the image number in the image field can be omitted..
Note: This setting only works where there is a good game image, as happens for the inventory, but it is not advisable for the Title and neither enabled for the binoculars or lasersight types.
2 $0002:BKGDF_MINIMAL_LOADING_TIMEUsed in the Customize=CUST_BACKGROUND commandThis flag works in accordance with the BKGDT_LOADING_LEVEL type. If you want the image to be shown for a given time, add the BKGDF_MINIMAL_LOADING_TIME flag and set in the Parameter field the number of seconds that the image will be shown.
Note: In the case of loading the next level it will require a longer time to load You cannot reduce this loading time with this setting. You should use this flag only to be sure that the player was able to see the image used for the loading screen.
For example: Because there is text to read before the next level begins.
Page 251
TOMB RAIDER NEXT GENERATION SCRIPT REFERENCE MANUAL
BKGDT_constants NG Version:1.2.2.7
4 $0004: BKGDT_BINOCULARUsed in the Customize=CUST_BACKGROUND commandReplace the old binocular mask with the image supplied in the Image command linked with the CUST_BACKGROUND script command. Since the image has to be in full screen (other settings will be ignored) transparent settings for the image must be used.
1 $0001: BKGDT_INVENTORYUsed in the Customize=CUST_BACKGROUND commandUsed to set the image for the inventory screen and all intermediate screens in the game: pause menu, options screen, statistic screen, load game and save game screens.
5 $0005: BKGDT_LASER_SIGHTUsed in the Customize=CUST_BACKGROUND commandReplace the mask of the laser-sight with the Image command linked with the CUST_BACKGROUND script command. Since the image has to be in full screen (other settings will be ignored) transparent settings for the image must be used.
2 $0002: BKGDT_LOADING_LEVELUsed in the Customize=CUST_BACKGROUND commandUsed to set an image for the loading level phase. Please note this is not the load game screen where you see the save games to load, but it is when there is the progress bar and next level loading.
3 $0003: BKGDT_TITLE NOT YET WORKING. DO NOT USE!Used in the Customize=CUST_BACKGROUND commandUsed to change the title fly camera with a fixed image. This setting will also affect all other sub-screens that the user can reach from the title: new game, load game and options.
Note: The setting does not stop the fly camera but the image will cover it. If you want to have an image with some transparent zones from those zones it will be shown below the fly camera.
Page 252
TOMB RAIDER NEXT GENERATION SCRIPT REFERENCE MANUAL
CDM_ constants
1 $0001: CDM_NO_SAVEUsed by the Customize=CUST_CD_SINGLE_PLAYBACK.Using this setting the further single-playback CD will be ignored in the saving game and when the player reloads the save game the single CD will not be played.
3 $0003: CDM_RESTORE_FROM_BEGINUsed by the Customize=CUST_CD_SINGLE_PLAYBACKThis setting forces the TRNG engine to save the single-playback CD and restore it from the start and not from the effective position it had in the game when it was saved. This setting is advisable for a small audio track like a sound where Lara was speaking.
2 $0002: CDM_RESTORE_FROM_MIDDLEUsed by the Customize=CUST_CD_SINGLE_PLAYBACK.This is the default behaviour. If you do not set any CUST_CD_SINGLE_PLAYBACK customize in the script.dat the TRNG engine will work using the CDM_RESTORE_FROM_MIDDLE. With this setting the sound will be saved remembering its current position and it will restore playing from that precise position.
Page 253

TOMB RAIDER NEXT GENERATION SCRIPT REFERENCE MANUAL
CL_ constants
1 $0001: CL_BLINKING_WHITE
4 $0004: CL_BLUE
7 $0007: CL_DARKMETAL
6 $0006: CL_GOLD
5 $0005: CL_METAL
3 $0003: CL_RED
2 $0002: CL_WHITE
8 $0008: CL_YELLOW
Page 254
TOMB RAIDER NEXT GENERATION SCRIPT REFERENCE MANUAL
COLL_ constants
4 $0004: COLL_ANIMATINGSUsed with the Customize=CUST_SET_STILL_COLLISION command.It enables the still collision when Lara touches an ANIMATING slot item.
2 $0002: COLL_DOORSUsed with the Customize=CUST_SET_STILL_COLLISION command.It enables the still collision when Lara touches a door.
Remark: This does not work with underwater doors or trap-doors.
32 $0020: COLL_FAKE_WALLSUsed with the Customize=CUST_SET_STILL_COLLISION command.This flag enables the still collision on some moveables used in the game to simulate walls, ceiling or floor:
SMASHABLE_BIKE_WALL, SMASHABLE_BIKE_FLOOR, FALLING_CEILING, FALLING_BLOCK, FALLING_BLOCK2, BURNING_FLOOR, ONEBLOCK_PLATFORM, TWOBLOCK_PLATFORM, RAISING_BLOCK1, RAISING_BLOCK1, EXPANDING_PLATFORM, BRIDGE_FLAT, BRIDGE_TILT1, BRIDGE_TILT2 and all PUSHABLE OBJECTS.
Remark: Some moveable used as "floor" or "ceiling", the still collision will be applied only in the horizontal movement.
For example: When Lara splats her face on the edge of a bridge.
128 $0080: COLL_FAST_TURNINGUsed with the Customize=CUST_SET_STILL_COLLISION command.When collision is enabled and Lara touches an item with an acute angle, she will not be stopped but only turned to continue her race in the correct direction to avoid the obstacle. Using the COLL_FAST_TURNING flag the rotation speed in the above situation can be increased.
Remark: The fast turning could be suggested when static items are placed with an intermediate facing of 45 degrees with respect to room walls.
1024 $0400: COLL_NO_SLIDINGUsed with the Customize=CUST_SET_STILL_COLLISION command.This sets a very drastic collision mode: removing all sliding features so Lara will be stopped with the current angle of impact with the item.
512 $0200: COLL_NO_SPLATUsed with the Customize=CUST_SET_STILL_COLLISION command.The still collision tries to emulate the normal collision of Lara with the walls. When Lara touches an item with the correct height the "splat" animation will be performed. To disable the splat and only have an immediate frozen Lara add the COLL_NO_SPLAT flag.
Page 255
TOMB RAIDER NEXT GENERATION SCRIPT REFERENCE MANUAL
8 $0008: COLL_PANELSUsed with the Customize=CUST_SET_STILL_COLLISION command.It enables the still collision when Lara touches some moveable PANEL item.
Remarks:
1) The PANEL_... items have been added with the TRNG engine. They are invisible moveables used only to set a specific collision in some side of the rooms.They have a slot in the range 472 to 479 and names like PANEL_BORDER, PANEL_CORNER etc.
2) The still collisions has a problem when it is necessary to decide about sliding/stopping with an item having a diagonal facing (with 45 degrees angle). This is because of the difficulty to correctly value the diagonal shape of the item.
Using the specific items: PANEL_DIAGONAL or PANEL_MIDDLE_CORNER, use a specific code to manage these diagonal items correctly. Therefore, if there is trouble with a diagonal item (when Lara continues to move her legs and arms) try to solve the problem in this way:
- Disable the collision for the item- Place in the same position a PANEL_DIAGONAL item to cover the same collision position
1 $0001: COLL_STATICSUsed with the Customize=CUST_SET_STILL_COLLISION command.It enables the still collision when Lara touches a static item.
64 $0040: COLL_STOP_ON_45_DEGREESUsed with the Customize=CUST_SET_STILL_COLLISION command.The still collision method tries to simulate the same behaviour as a wall collision. In the still collision in some circumstances Lara will be turned to orient in the correct direction.
16 $0010: COLL_VEHICLESUsed with the Customize=CUST_SET_STILL_COLLISION command.It enables the still collision when Lara touches some earth vehicle like a JEEP or a SIDECAR.
Remark: This setting has no effect on water vehicles like boats.
Page 256
TOMB RAIDER NEXT GENERATION SCRIPT REFERENCE MANUAL
COLTYPE_ constants
1 $0001: COLTYPE_SET_COLORUsed in the Parameters=PARAM_COLOR_ITEM. Use this to change the color of the item using the first color pointed to by the Index1ColorRGB field.
2 $0002: COLTYPE_SET_PULSEUsed in the Parameters=PARAM_COLOR_ITEM. The pulse only uses the first color in the Index1ColorRGB field. The TRNG engine will light up and down the color Index1ColorRGB. It is advisable to set a base color that is not too light because the TRNG engine will increase the lighting and then reduce it.
For example: Using White (bad choice) as a color will give no result because it has maximum lighting. Set the speed of the pulse with a value in the SpeedChange field.
3 $0003: COLTYPE_SHADE_COLORSUsed in the Parameters=PARAM_COLOR_ITEM. The shade colors shade from the first color (Index1ColorRGB) to the second color (Index2ColorRGB) and vice versa.Set the speed of shading by a value in the SpeedChange field.
Page 257
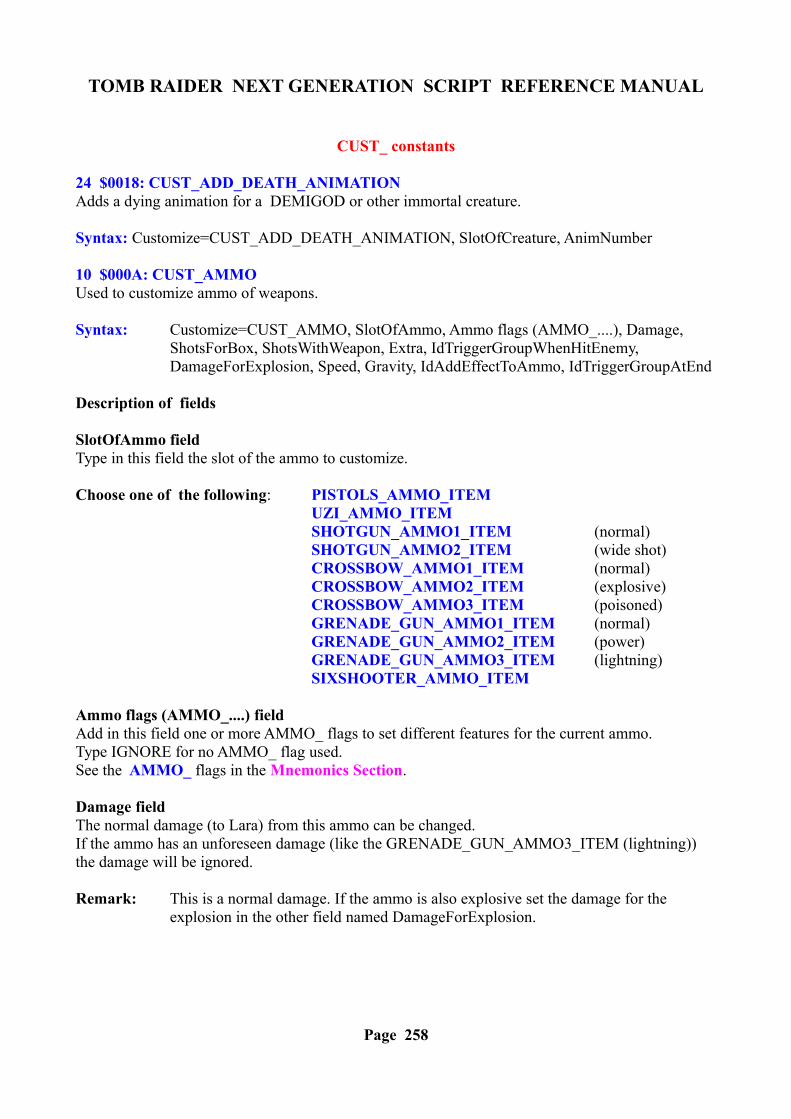
TOMB RAIDER NEXT GENERATION SCRIPT REFERENCE MANUAL
CUST_ constants
24 $0018: CUST_ADD_DEATH_ANIMATIONAdds a dying animation for a DEMIGOD or other immortal creature.
Syntax: Customize=CUST_ADD_DEATH_ANIMATION, SlotOfCreature, AnimNumber
10 $000A: CUST_AMMOUsed to customize ammo of weapons.
Syntax: Customize=CUST_AMMO, SlotOfAmmo, Ammo flags (AMMO_....), Damage, ShotsForBox, ShotsWithWeapon, Extra, IdTriggerGroupWhenHitEnemy, DamageForExplosion, Speed, Gravity, IdAddEffectToAmmo, IdTriggerGroupAtEnd
Description of fields
SlotOfAmmo fieldType in this field the slot of the ammo to customize.
Choose one of the following: PISTOLS_AMMO_ITEMUZI_AMMO_ITEMSHOTGUN_AMMO1_ITEM (normal)SHOTGUN_AMMO2_ITEM (wide shot)CROSSBOW_AMMO1_ITEM (normal)CROSSBOW_AMMO2_ITEM (explosive)CROSSBOW_AMMO3_ITEM (poisoned)GRENADE_GUN_AMMO1_ITEM (normal)GRENADE_GUN_AMMO2_ITEM (power)GRENADE_GUN_AMMO3_ITEM (lightning)SIXSHOOTER_AMMO_ITEM
Ammo flags (AMMO_....) fieldAdd in this field one or more AMMO_ flags to set different features for the current ammo.Type IGNORE for no AMMO_ flag used.See the AMMO_ flags in the Mnemonics Section.
Damage fieldThe normal damage (to Lara) from this ammo can be changed.If the ammo has an unforeseen damage (like the GRENADE_GUN_AMMO3_ITEM (lightning)) the damage will be ignored.
Remark: This is a normal damage. If the ammo is also explosive set the damage for the explosion in the other field named DamageForExplosion.
Page 258
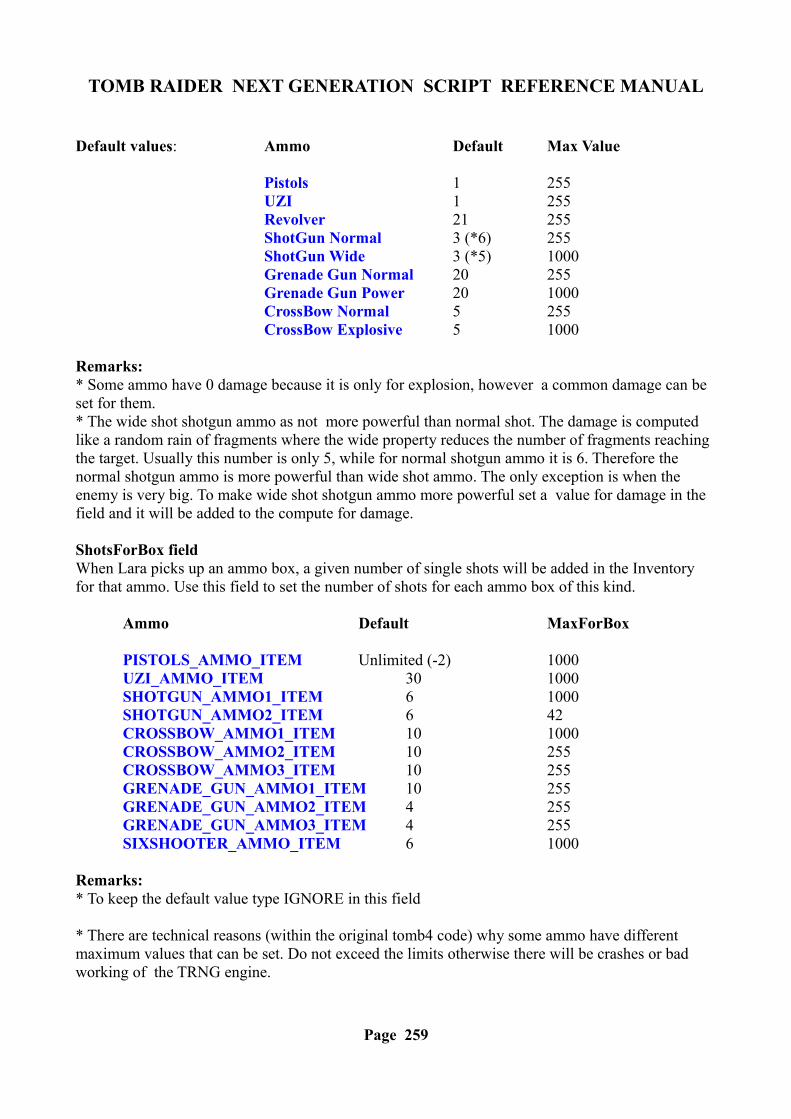
TOMB RAIDER NEXT GENERATION SCRIPT REFERENCE MANUAL
Default values: Ammo Default Max Value
Pistols 1 255UZI 1 255Revolver 21 255ShotGun Normal 3 (*6) 255ShotGun Wide 3 (*5) 1000Grenade Gun Normal 20 255Grenade Gun Power 20 1000CrossBow Normal 5 255CrossBow Explosive 5 1000
Remarks: * Some ammo have 0 damage because it is only for explosion, however a common damage can be set for them.* The wide shot shotgun ammo as not more powerful than normal shot. The damage is computed like a random rain of fragments where the wide property reduces the number of fragments reaching the target. Usually this number is only 5, while for normal shotgun ammo it is 6. Therefore the normal shotgun ammo is more powerful than wide shot ammo. The only exception is when the enemy is very big. To make wide shot shotgun ammo more powerful set a value for damage in the field and it will be added to the compute for damage.
ShotsForBox fieldWhen Lara picks up an ammo box, a given number of single shots will be added in the Inventory for that ammo. Use this field to set the number of shots for each ammo box of this kind.
Ammo Default MaxForBox
PISTOLS_AMMO_ITEM Unlimited (-2) 1000UZI_AMMO_ITEM 30 1000SHOTGUN_AMMO1_ITEM 6 1000SHOTGUN_AMMO2_ITEM 6 42CROSSBOW_AMMO1_ITEM 10 1000CROSSBOW_AMMO2_ITEM 10 255 CROSSBOW_AMMO3_ITEM 10 255GRENADE_GUN_AMMO1_ITEM 10 255GRENADE_GUN_AMMO2_ITEM 4 255GRENADE_GUN_AMMO3_ITEM 4 255SIXSHOOTER_AMMO_ITEM 6 1000
Remarks:* To keep the default value type IGNORE in this field
* There are technical reasons (within the original tomb4 code) why some ammo have different maximum values that can be set. Do not exceed the limits otherwise there will be crashes or bad working of the TRNG engine.
Page 259
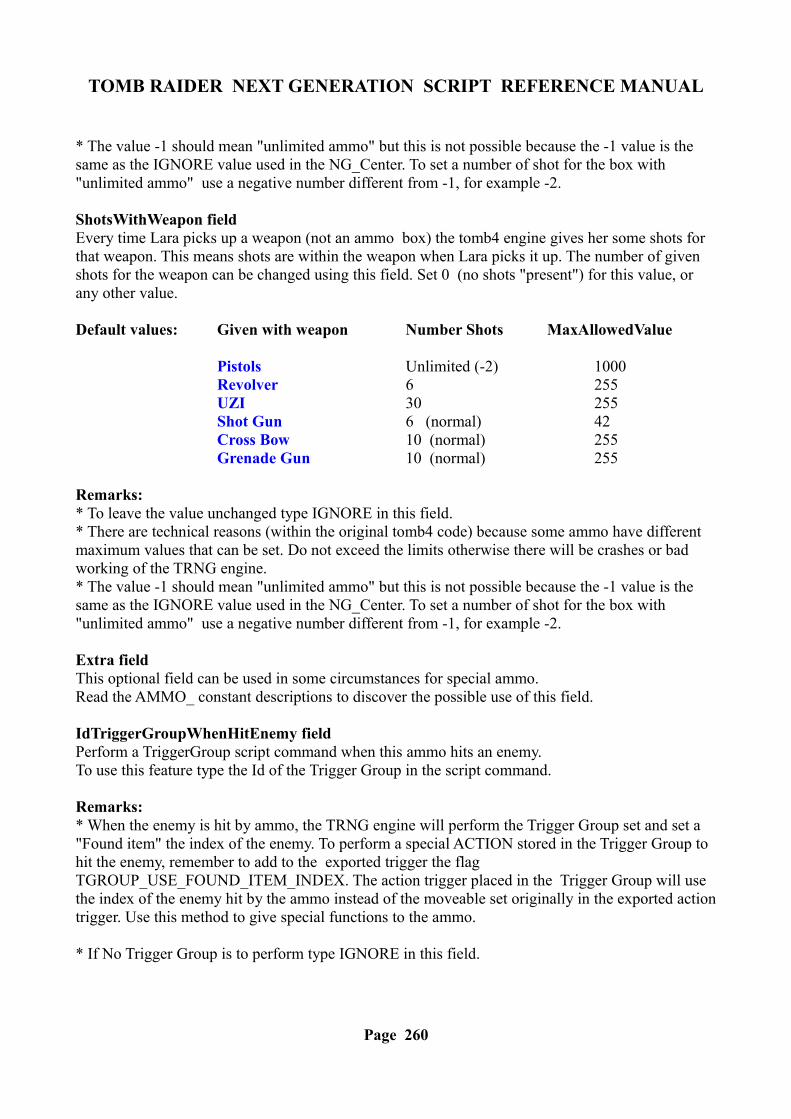
TOMB RAIDER NEXT GENERATION SCRIPT REFERENCE MANUAL
* The value -1 should mean "unlimited ammo" but this is not possible because the -1 value is the same as the IGNORE value used in the NG_Center. To set a number of shot for the box with "unlimited ammo" use a negative number different from -1, for example -2.
ShotsWithWeapon fieldEvery time Lara picks up a weapon (not an ammo box) the tomb4 engine gives her some shots for that weapon. This means shots are within the weapon when Lara picks it up. The number of given shots for the weapon can be changed using this field. Set 0 (no shots "present") for this value, or any other value.
Default values: Given with weapon Number Shots MaxAllowedValue
Pistols Unlimited (-2) 1000Revolver 6 255UZI 30 255Shot Gun 6 (normal) 42Cross Bow 10 (normal) 255Grenade Gun 10 (normal) 255
Remarks:* To leave the value unchanged type IGNORE in this field. * There are technical reasons (within the original tomb4 code) because some ammo have different maximum values that can be set. Do not exceed the limits otherwise there will be crashes or bad working of the TRNG engine.* The value -1 should mean "unlimited ammo" but this is not possible because the -1 value is the same as the IGNORE value used in the NG_Center. To set a number of shot for the box with "unlimited ammo" use a negative number different from -1, for example -2.
Extra fieldThis optional field can be used in some circumstances for special ammo.Read the AMMO_ constant descriptions to discover the possible use of this field.
IdTriggerGroupWhenHitEnemy fieldPerform a TriggerGroup script command when this ammo hits an enemy.To use this feature type the Id of the Trigger Group in the script command.
Remarks: * When the enemy is hit by ammo, the TRNG engine will perform the Trigger Group set and set a "Found item" the index of the enemy. To perform a special ACTION stored in the Trigger Group to hit the enemy, remember to add to the exported trigger the flag TGROUP_USE_FOUND_ITEM_INDEX. The action trigger placed in the Trigger Group will use the index of the enemy hit by the ammo instead of the moveable set originally in the exported action trigger. Use this method to give special functions to the ammo.
* If No Trigger Group is to perform type IGNORE in this field.
Page 260
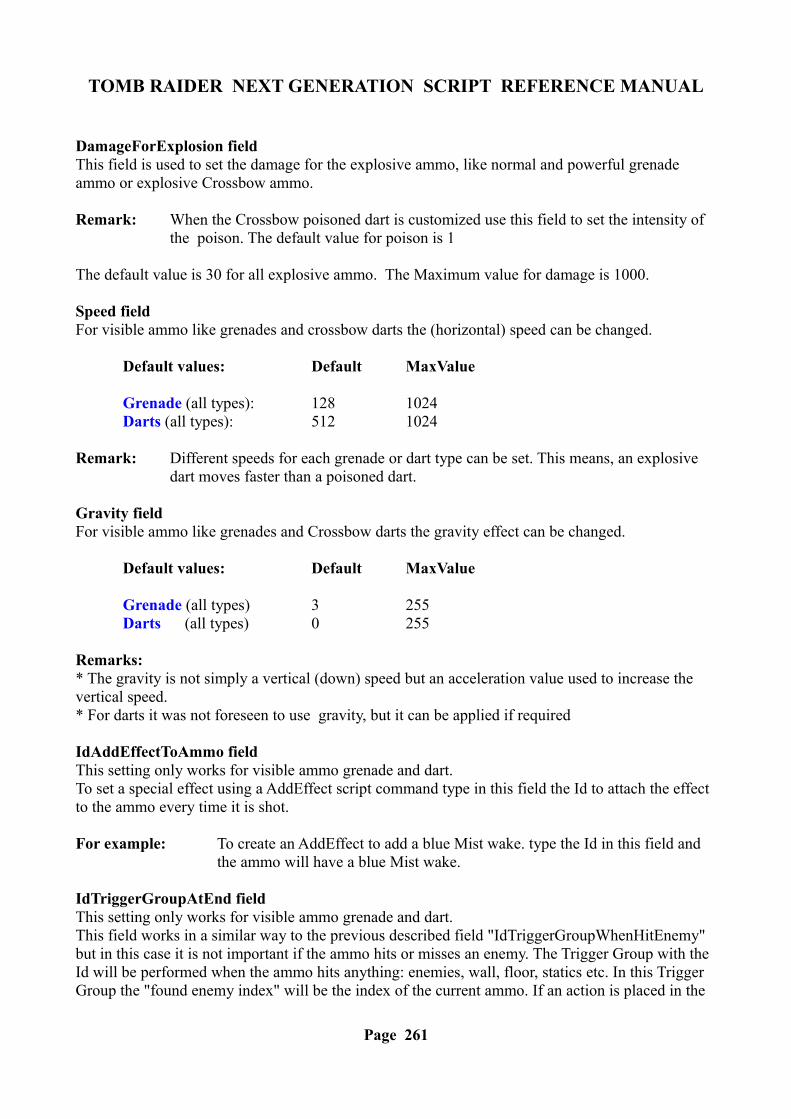
TOMB RAIDER NEXT GENERATION SCRIPT REFERENCE MANUAL
DamageForExplosion fieldThis field is used to set the damage for the explosive ammo, like normal and powerful grenade ammo or explosive Crossbow ammo.
Remark: When the Crossbow poisoned dart is customized use this field to set the intensity of the poison. The default value for poison is 1
The default value is 30 for all explosive ammo. The Maximum value for damage is 1000.
Speed fieldFor visible ammo like grenades and crossbow darts the (horizontal) speed can be changed.
Default values: Default MaxValue
Grenade (all types): 128 1024Darts (all types): 512 1024
Remark: Different speeds for each grenade or dart type can be set. This means, an explosive dart moves faster than a poisoned dart.
Gravity fieldFor visible ammo like grenades and Crossbow darts the gravity effect can be changed.
Default values: Default MaxValue
Grenade (all types) 3 255Darts (all types) 0 255
Remarks:* The gravity is not simply a vertical (down) speed but an acceleration value used to increase the vertical speed.* For darts it was not foreseen to use gravity, but it can be applied if required
IdAddEffectToAmmo fieldThis setting only works for visible ammo grenade and dart.To set a special effect using a AddEffect script command type in this field the Id to attach the effect to the ammo every time it is shot.
For example: To create an AddEffect to add a blue Mist wake. type the Id in this field and the ammo will have a blue Mist wake.
IdTriggerGroupAtEnd fieldThis setting only works for visible ammo grenade and dart. This field works in a similar way to the previous described field "IdTriggerGroupWhenHitEnemy" but in this case it is not important if the ammo hits or misses an enemy. The Trigger Group with the Id will be performed when the ammo hits anything: enemies, wall, floor, statics etc. In this Trigger Group the "found enemy index" will be the index of the current ammo. If an action is placed in the
Page 261
TOMB RAIDER NEXT GENERATION SCRIPT REFERENCE MANUAL
Trigger Group it can be forced to perform this action on the ammo item (in final position) using the constant TGROUP_USE_FOUND_ITEM_INDEX.
49 $0031: CUST_BACKGROUNDUsed with the Customize command
Syntax: Customize= CUST_BACKGROUND, BackGroundType (BKGDT_...), Flags (BKGDF_...), Parameter, ImageId
You can customize the background used for different game phases, using an image from the pix folder.
BackGroundType (BKGDT_...) fieldType in this field the type of background to customize.See the BKGDT_ values in the Mnemonics Section.
Flags (BKGDF_...) fieldAdd one or more flags to modify some feature of the chosen backgroundIf you do not wish to use the flags type IGNORE in this field. See the BKGDF_ flags in the Mnemonics Section.
Parameter fieldThis is a field that can have different meanings in accordance with some flag set in the Flags field.See the BKGDF_ flags in the Mnemonics Section.
ImageId fieldType the Id of the Image= command to use as a background.Type an Image= command first above the Customize=CUST_BACKGROUND.It is suggested to use the IF_PRELOAD flag in the Image command, to have a faster display in the game.
Note: Many fields and flags of the Image command will be ignored, like those about effects. In some background types you can set in the Image command the use of an audio track and the background will use that value as background music.
Example:
Image= 3, 4, IF_PRELOAD+IF_PLAY_AUDIO_TRACK+IF_LOOP_AUDIO_TRACK, IGNORE, 105, IGNORE, IGNORE, IGNORE, IGNORE
Customize= CUST_BACKGROUND, BKGDT_INVENTORY, IGNORE, IGNORE, 3The above commands will set the "image4.bmp" (from "trle\pix" folder) as new background for inventory/pause/load game/save game, and it will be played the audio track 105 in loop mode.
Page 262
TOMB RAIDER NEXT GENERATION SCRIPT REFERENCE MANUAL
25 $0019: CUST_BARCustomize all the default TRNG engine Bars like the Air Bar, Health Points Bar,Loading Bar etc. setting the position, size, colors and animation mode.
Syntax: Customize=CUST_BAR, BarType (BAR_...), FlagsBar (FBAR_...), XOrigin, YOrigin, XSize, YSize, IdColor1, IdColor2, Extra
BarType (BAR_...) fieldIn this field type a BAR_ constant to specify what bar is to be customized.See the BAR_ constants in the Mnemonics Section.
FlagsBar (FBAR_...) fieldAdd two or more FBAR_ flags to specify some animation mode (the variation of color in dynamic bars). For no flag type IGNORE in this field
XOrigin, YOrigin, XSize, YSize fieldsThese four fields change the position and size of the current bar on the screen. To preserve the original position and size of the bar type four IGNORE values in these fields.
All values typed in these fields are in pixels and are computed to work with a game screen of 640x480. This method is necessary since it is not known what the effective game screen size is when the game is be played (the player could change the settings in the set up). So compute the position and size using a reference when the game is working at 640x480 pixels, then, when the game change its size, the TRNG engine will adapt in a proportional way the coordinates set.
The default values are:
TypeBar OrgX OrgY SizeX SizeY
HealthBar 8 8 150 12DashBar 481 8 150 12AirBar 481 26 150 12LoadBar 20 444 600 15
Remark: There is some rounding in the change between full screen and windowed mode, usually with gaps of 1 or 2 pixels.
IdColor1 fieldIn this field type an Id to identify a ColorRGB= script command with a RGB color to use as the main color for the bar. For example: to have pure Red type: ColorRGB=3, 255,0,0
The Id is 3, so type the value 3 in the IdColor1 field to set RED as the main color (the main color is the color of the full bar).
Page 263
TOMB RAIDER NEXT GENERATION SCRIPT REFERENCE MANUAL
WARNING: For the ColorRGB command referenced with IdColor it is necessary to type it FIRST in the Customize=CUST_BAR command otherwise when the TRNG engine is parsing the CUST_BAR command the ColorRGB (if it is typed lower down) will result in a error “missing” and a black color will be set.
The main color defaults: BarType Red Green Blue
Health Bar 255 0 0Dash Bar 0 255 0Air Bar 0 0 255
IdColor2 fieldThis field works like the IdColor1 (See the above description) but it sets the background color of the bar The default value is Black (0,0,0)
Extra fieldThis field accepts different values in accordance with further FBAR_ flags.See the FBAR_ constants in the Mnemonics Section.
48 $0030: CUST_BIKE_VS_ENEMIESUsed with the Customize command
Syntax: Customize=CUST_BIKE_VS_ENEMIES, Slot+HIT_ flag array
This customize chooses what will happen when the bike collides with a specific slot. In the past the bike killed all mortal enemies and it passed across immortals like they were made of air. From 1.2.2.5 version there is a new collision management to choose what happens to enemies: killed, pushed away, hurt etc.
Use the HIT_.. flags to set the behaviour of the impact with the slot item.
For example: If the SKELETON was killed type the command:
Customize=CUST_BIKE_VS_ENEMIES, SKELETON + HIT_KILL
also place two or more flags:
Customize=CUST_BIKE_VS_ENEMIES, SKELETON+HIT_KILL+HIT_PUSH_AWAY
in above case, the SKELETON will be pushed away and killed at the same time.Many slots can be customized with the same CUST_BIKE_VS_ENEMIES command.
For example: Customize=CUST_BIKE_VS_ENEMIES, SKELETON + HIT_KILL, KNIGHTS_TEMPLAR+HIT_PUSH_AWAY
Note: If the CUST_BIKE_VS_ENEMIES customization is omitted the default behaviour will be:
Page 264
TOMB RAIDER NEXT GENERATION SCRIPT REFERENCE MANUAL
HIT_PUSH_AWAY, // SKELETON HIT_PUSH_AWAY, // GUIDEHIT_PUSH_AWAY, // VON_CROYHIT_PUSH_AWAY , //SETHAHIT_PUSH_AWAY, // MUMMYHIT_WALL, // SPHINX HIT_WALL, // HORSEMANHIT_WALL, // SCORPIONHIT_PUSH_AWAY, // JEAN_YVESHIT_WALL, // KNIGHTS_TEMPLARHIT_PUSH_AWAY, // MUTANTHIT_WALL, // HORSEHIT_PUSH_AWAY | HIT_HURT, // DEMIGOD1HIT_PUSH_AWAY | HIT_HURT, // DEMIGOD2HIT_PUSH_AWAY | HIT_HURT, // DEMIGODHIT_PUSH_AWAY | HIT_HURT, // AHMETHIT_WALL, // LASER_HEADHIT_WALL, // LASER_HEAD_BASEHIT_WALL, // LASER_HEAD_TENTACLEHIT_HURT, // HYDRA
All other enemies will be killed at the first impact.
Note: The HIT_HURT cannot be used for immortal enemies, but the HIT_KILL+HIT_EXPLODE flags can and they will be killed by an explosion.
See the HIT_ flags in the Mnemonics Section..
51 $0033: CUST_BINOCULARSUsed with the Customize command
Syntax: Customize=CUST_BINOCULARS, FLAGS (BINF_...), Parameter, CompassImage, CompassRectAndFlags, SextantImage, SextantRectAndFlags, LightnessRectAndFlags, ZoomRectAndFlags, LightSwitchRectAndFlags, FontID
This customize allows you to set many new features for binoculars management but it only works in accordance with the use of the Customize= CUST_BACKGROUND, BKGDT_BINOCULAR ... command.
Once CUST_BACKGROUND is added for the binoculars, you can further customize the binoculars with the CUST_BINOCULARS command. If the customized background flag is omitted for the binoculars the CUST_BACKGROUND will have no effect.
IMPORTANT NOTE: When you use the CUST_BACKGROUND command with binoculars the
Page 265
TOMB RAIDER NEXT GENERATION SCRIPT REFERENCE MANUAL
image for the background can have any size. When you want to customize the advanced features for the binoculars with the CUST_BINOCULARS command use a background image size of 1024 x 768. This requirement is necessary to give correct alignment between the background and the different values, bars or strips that will be added to it.
FLAGS (BINF_...) fieldIn this field add the BINF_... flags to set the work mode of the binoculars. Most of these flags are to set special features for the binoculars.
Parameter fieldIn this field there could be an extra setting in accordance with the BINF_.. flag.See the BINF_ flags in the Mnemonics Section.
CompassImage fieldIf the BINF_COMPASS flag is used in the Flags field then in the next CompassRectAndFlags field set the BINT_STRIP type. Also set in the current CompassImage field the number of images to use for the compass strip.
Note: If the BINF_COMPASS flag is not used or the BINT_NUMERIC type is used for the compass, type IGNORE in this field.
The number of the image to type in this field is NOT an Id of some Image script command but the number of the image in the trle\pix folder.
For example: If the image with the compass strip is "image13.bmp", type 13 in this field.The compass strip image has to be exactly 1400x64 pixels. It is easy to understand how it should be drawn if you look at the example of the lightning demo where it is used. Pratically the compass strip will be a graduated scale with cardinal points (north, east, west, south) and different degrees, that will be used, moving it, to indicate where the binoculars are aiming at that moment.
Note: The compass strip has a double scale to preserve infinite rotation because it is necessary to have two instances for each cardinal point and degrees. Look at the example of the demo lightning to study how it works.
CompassRectAndFlags fieldIf the BINF_COMPASS flag is enabled, type the id of the PARAM_RECT command where the position is stored and the size of the rectangle where the compass data will be drawn. Then add to this rect Id, a BINT_ type to set the compass data as showing. Only use the BINT_STRIP or BINT_NUMERIC types for the compass.
Set the origin and size of the rectangle using as a reference a screen of 1024x768 pixels.The shape of the rectangle should be a wide rectangle (the base wider than the height) when a BINT_STRIP type is used for the compass. For the BINT_NUMERIC type the difference between the base and the height should be less but remember that in the BINT_NUMERIC type the compass data will be printed with a format such as "NE 32" and therefore the characters require more space in the base of the rectangle.
Page 266

TOMB RAIDER NEXT GENERATION SCRIPT REFERENCE MANUAL
Notes:- This field is not for the use of the BINT_BAR type.- The size of the font used to print the text when the BINT_NUMERIC type is used is given by the height of the PARAM_RECT ractangle. For this reason, if a bigger character for the compass data is required increase the height field in the PARAM_RECT command.
SextantImage fieldTo show a sextant with vertical degress where the binoculars are looking set the BINT_STRIP type for the sextant data. Type in this field the number of the image for the sextant strip.The number of the image to type in this field is NOT an Id of some Image script command but it is the number of the image in the trle\pix folder. The sextant strip image has to be 64x1520 pixels. The compass strip image and the sextant image always have a vertical shape.
Note: Create a sextant image of resolution (64x1520) , in the game you can show a slimer strip. Define in the SextantRect a rectangle with a width less than 64 pixels and in this case the left strip of the original image will be taken.
For the look of the image and how it works study the lightnings demo on the trng official website ( http://www.trlevelmanager.net/ng.htm ) in the demo section.
SextantRectAndFlags fieldTo use a sextant type in this field the Id of the PARAM_RECT command where the position and size of the rectangle is stored that has the sextant data. Also add to the rectangle Id the BINT_ type about how to show the sextant data. Choose the BINT_STRIP or BINT_NUMERIC types.
LightnessRectAndFlags fieldIf the data about lightness is enabled, type in this field the Id of the PARAM_RECT command with the position and size where it will be drawn. Remember that the binoculars background is always 1024x768 pixels and the data of the rectangle should work in accordance with this resolution.Also add to the rect Id the BINT_ type about how to show the sextant data. Choose BINT_BAR or BINT_NUMERIC types.
Note: If the BINT_NUMERIC is chosen, the lightness level will be described in the ISO/DIN scale with values in the range between 1 and 39, where 39 is sunlight and 1 is dark.
ZoomRectAndFlags fieldTo have information about the current zoom-in factor shown, add in the Flags field the BINF_ZOOM flag and type in the ZoomRectAndFlags field the Id of the PARAM_RECT where to show values about the current zoom factor. This field can only be a BINT_NUMERIC type.
LightSwitchRectAndFlags fieldIf the BINF_LIGHT_SWITCH flag is added to the flags field, set the LightSwitchRectAndFlags field with the Id of the PARAM_RECT command with the information about the position for the switch light. The light switch is a button with two states, on and off to show on the screen when the player enabled the illuminator in the binoculars view. In the PARAM_RECT use the ForeColor field to set the "on" color of the button and the backcolor for the "off" state. This button is a box of a given size, the only change is to add the BINT_ROUND type,to convert the box into a circle.
Page 267
TOMB RAIDER NEXT GENERATION SCRIPT REFERENCE MANUAL
FontID fieldWhen a literal or numeric information is shown, choose the font to use for the text typing.
Note: The size of the font will be stretched or enlarged to be compatible with the height field of the rectangle for the given text.
28 $001C: CUST_CAMERAChange the properties of the Game Camera with this customize setting.
Syntax: Customize=CUST_CAMERA, Flags (FCAM_...), DistanceChaseCam, VOrientChaseCam, HOrientChaseCam, DistanceCombatCam, VOrientCombatCam, DistanceLookCam, HeightLookCam, SpeedCamera
Remark: The camera modes can be customized: the "chase" camera that follows Lara, the "combat" camera that works like the "chase" camera but is engaged when Lara extracts the weapons and the "look" camera where Lara looks by her self in the chosen direction. The combat camera has some settings different from the "chase" camera.
Flags (FCAM_...) fieldType in this field one or more FCAM_ flags to change some behaviour for the Camera.See the FCAM_ values in the Mnemonics Section.
Remark: Type IGNORE in this field if no flag is set.
DistanceChaseCam fieldThis value works for the "chase" (or "follow me") camera. This field is the distance that the camera is behind Lara.The default value is 1536 ($600), where 1024 ($400) is one game sector.If this value is reduced the camera will be closer to Lara. If the value is increased Lara will appear further away.
Remark: If a negative value is typed in this field the camera will be in front of Lara instead of behind her. It is interesting to note the HOrientChaseCam field with $8000 value and the DistanceChaseCam with a negative value give the same target but only by using one of them at a time.
Type IGNORE in this field to keep the default value.
VOrientChaseCam fieldThis field works for the "chase" camera and it is the vertical difference of orientation (facing) of the camera with respect to Lara. To understand "vertical orientation" try to look at the tutorial for animation and TestPosition commands.
The default value is -1820 and it is a difference (like degrees difference with respect to a line parallel to the floor). This means the camera is a bit higher than Lara.
Page 268
TOMB RAIDER NEXT GENERATION SCRIPT REFERENCE MANUAL
If +1820 is chosen the camera will be a bit lower than Lara.
For -16384 the camera is exactly over the top of Lara (90 degrees with respect to the line parallel to floor).
For +16384 the camera is below Lara at a 90 degrees angle, but this setting will only work when Lara is monkey swinging or falling down.For a 0 (zero) value the camera will have the same Y origin as Lara, because the camera and Lara are on the same line parallel to the floor.
Remark: Some settings in this field could be ignored when the value is large ( in absolute value) because it shows Lara upside down. For example, the value -32767 should put a camera looking Lara in the face but with her appearing upside down. Using this value (-32767) or -16384 gives the same result and this happens because the TRNG game engine uses a cut-off function to stop Lara being shown upside down. The valid range for this field is from -16384 to +16384
Type IGNORE in this field to use the default value.
HOrientChaseCam fieldThis works like the HOrientDifference for the TestPosition command and it changes the facing of the Chase Camera .The orientation is named "facing" i.e. where an object is looking.
The values used could be: $0 default, the camera looks at Lara from the back $4000 the camera looks at Lara from her left $C000 the camera looks at Lara from her right $8000 the camera looks at Lara from the front.
Type IGNORE in this field for the default value.
DistanceCombatCam fieldThis field sets the distance where Lara is in modality with the combat camera.The description about the concept of the "cam distance" is the same as the above field about the DistanceChaseCam field. The default value is $600
VOrientCombatCam fieldThis field works like the VOrientChaseCam field. The default value is -2730See the description for the VOrientChaseCam field to understand how it works.
Remark: There is no "HOrientCombatCam" field for the Combat camera because in "combat camera" mode the HOrientCombatCam will be set by the TRNG engine in accordance with the position of the selected enemy and Lara. No good result can be obtained by forcing the combat camera mode.
DistanceLookCam field
Page 269
TOMB RAIDER NEXT GENERATION SCRIPT REFERENCE MANUAL
This field works like the other "Distance ..." fields but with an opposite sign.For example, the default value for the DistanceLookCam is -1024 and this means that the camera is exactly one sector behind Lara. If +1204 is used he Look camera will be forward of Lara and she will not be shown in the game screen.
HeightLookCam fieldType a Y displacement from Lara's neck The default value is +16, and this means that the Y position of the camera is a bit lower than the centre of Lara's neck.
Remark: DO NOT change this value. Using small values does give a noticeable difference while big values does not give good results.
SpeedCamera fieldThis sets the time required to move the camera from the current (any) position to an ideal position set by the field. If a high speed is set the camera will move fast to reach the ideal position but the disadvantage could be a jerky movement. Type IGNORE in this field to use the default value.
Remark: DO NOT modify this value because the default setting is an ideal value and the camera speed changes every time the TRNG engine requires to pass from one camera mode to another.
23 $0017: CUST_CD_SINGLE_PLAYBACKCustomize the management of the CD audio track performed for a single playback.
Syntax: Customize=CUST_CD_SINGLE_PLAYBACK, CdMode value (CDM_...)
This customize only works for saving/reloading a single-playback audio track in progress when the player saved the game. See the different choices by looking at the CDM_.. constant descriptions.
39 $0027: CUST_DARTSUsed by the Customize= command.
Syntax: Customize=CUST_DARTS, IdCustDarts, Dart Flags (DRT_ ...), IdAddEffect, Speed, EmittingTimer, PrimaryColorIDRgb, SecondaryColorIDRgb, IdTriggerGroup
This customize changes the speed and color of the darts. The darts are not very visible because they are fast. Reduce the speed and change the color to see them better. Use this customize to restyle the dart by adding an effect or use them like a laser sensory ray.
IdCustDarts fieldTwo or more customize profiles for darts can be set and then enabled at the same time by typing in the OCB field of the dart emitter object the IdCustDarts value to locate the customization to use.
For example: Create a command like: Customize=CUST_DARTS, 3, ....
When you want to customize a dart emitter in NGLE with these settings type in the OCB field of this emitter the number "3"
Page 270
TOMB RAIDER NEXT GENERATION SCRIPT REFERENCE MANUAL
Remark: The IdCustDarts value should be greater than 0 because 0 in the OCB field will mean: "No customize for this dart emitter"
Dart Flags (DRT_ ...) fieldAdd one or more DRT_ flags to enable different features for the darts. For no flag type IGNORE in this field.See the DRT_ constants in the Mnemonics Section.
IdAddEffect fieldIf the DRT_ADD_EFFECT flag is used, type in the IdAddEffect field the Id of the AddEffect script command to add to each dart.
Speed fieldThe speed value sets the value to add to the coordinates of the dart to move it in space. Bigger values give higher speed. The default value is 256 ($100) and this is a very fast speed. So, decrease the value to see the darts. Type IGNORE in this field to use the unchanged speed.
EmittingTimer fieldThis value is in tick frames, where one second = 30 tick frames.The default value is 24 tick frames and this means the TRNG engine waits 24 tick frames (a bit less than one second) before shooting another dart. Increase this value and there will be more time between shooting a dart and the next one. Type IGNORE in this field to use the default value.
PrimaryColorIDRgb fieldTo change the main color of the dart type in this field the Id of a ColorRGB= command with the RGB values to use. The default color is cream. Type IGNORE in this field to use the standard color.
SecondaryColorIDRgb fieldTo change the secondary color of the dart type in this field the Id of a ColorRGB= command with the RGB values to use. The secondary color is black and it is used for the borders. It is a good color for the border. If the dart is used in a very dark room use white to give the idea of brightness to the darts. Type IGNORE in this field to use the standard color.
IdTriggerGroup fieldIf the DRT_PERFOM_TRIGGERGROUP flag is used type in the IdTriggerGroup field the Id of the Trigger Group to perform when a dart touches Lara.See the description of the DRT_PERFOM_TRIGGERGROUP flag for more information.
Page 271
TOMB RAIDER NEXT GENERATION SCRIPT REFERENCE MANUAL
4 $0004: CUST_DISABLE_FORCING_ANIM_96By default, when Lara is moving left or right in hang mode and reaches a corner the TRNG engine forces animation 96.
Syntax: Customize=CUST_DISABLE_FORCING_ANIM_96
This behaviour is good, but if you are writing a new hanging animation the forcing of animation 96 could create trouble for your new hanging animation. Using this custom value the TRNG engine will not force ANIM_96, allowing a custom animation to round the corner
29 $001D: CUST_DISABLE_MISSING_SOUNDSUsed in the Customize command.
Syntax: Customize=CUST_DISABLE_MISSING_SOUNDS
This setting is disabled in the old tomb4 code for playing obsolete sound effects like the sound for bubbles (37 - LARA_BUBBLES) and that for pick up item (62 – LARA_PICKUP).
Use this setting when you use Boats or other new objects that use some of the above old sounds. In fact, in an old example about boats on the TRNG website there was a boring bad sound when Lara swims underwater, and also when she picked up some item. The reason is the new boat object requires to use a new sounds but there was no way to add a new sound slot. Unfortunately these missing sounds had a code in tomb4 to play them so when the sounds for boats is added, the TRNG engine played these sounds as bubbles or pick up.
Setting CUST_DISABLE_MISSING_SOUNDS the old codes for bubbles and pick up will no longer play sound 62 and 37, but new objects like boats or other will be able to play the new sounds assigned to the above sound slots.
50 $0032: CUST_DISABLE_PUSH_AWAY_ANIMATIONUsed in the Customize=CUST_BACKGROUND commandThis customize disables forever in the current level, the push-away animation of Lara, when she has been touched and moved from enemies.The push-away animations are the 125, 126, 127 and 128 animations in the Lara slot.
1 $0001: CUST_DISABLE_SCREAMING_HEADThe CUST_DISABLE_SCREAMING_HEAD disables the change from the normal Lara head (from Lara Skin slot) with the screaming head when she is shooting (from the Lara Scream slot).
Syntax: Customize=CUST_DISABLE_SCREAMING_HEAD
The reason to disable the change of heads could be when you perform a standard swap mesh for Lara but the screaming head remain untouched. In this circumstance when a player shoots, the new Lara Head will be replaced with the old screaming head of Lara ruining the new mesh. If this CUST value is set, Lara will have a single head avoiding the above problem after a swap mesh operation.
Page 272
TOMB RAIDER NEXT GENERATION SCRIPT REFERENCE MANUAL
Remark: Another way to solve the problem is to use an advanced Swap mesh also replacing the mesh in the Lara Scream slot, using a swap mesh where a "Shooting Head" is present.
20 $0014: CUST_ESCAPE_FLY_CAMERAUsed to allow a player to break a Flyby camera sequence by hitting the ESC key.
Syntax: Customize=CUST_ESCAPE_FLY_CAMERA, ENABLED/DISABLED, KeyBoardScanCode
To allow the break of a Flyby sequence set this customize as ENABLED.The KeyBoardScancode value will be the code of the keystroke used to exit the Flyby sequence. Find the list of scan codes in the KEYBOARD SCAN CODES Section.
Type IGNORE in this field and the default value will be the ESCAPE key.
Remark: To permit skipping of the flyby cameras it is advisable to set some print text in the level to inform the player about this new change, otherwise nobody will try to hit Escape during the Flyby sequences.
32 $0020: CUST_FIX_WATER_FOG_BUGUsed to fix the bug in the water textures when there is Distance Fog enabled in the level.
Syntax: Customize=CUST_FIX_WATER_FOG_BUG, ENABLED/DISABLED
When this fix is enabled the water textures will ignore the Fog density. Use it when the level has a depth fog. This fix could create some trouble with fog bulbs close to the water.
40 $0028: CUST_FLAREUsed in the Customize= command.
Syntax: Customize=CUST_FLARE, Flags for Flare (FFL_....), SecondsOfLifeTime, Red, Green, Blue, Intensity
Flags for Flare (FFL_....) fieldAdd one or more FFL_ flags to enable special features about the flare.Type IGNORE in this field to not set flags.See the FFL_ constants in the Mnemonics Section.
SecondsOfLifeTime fieldTo override the duration of the flare type in this field a value in seconds for the life-time of the lightning flare. The default value is 30 seconds. Type IGNORE in this field to use the default value.
Red, Green, Blue fieldsIn these three fields set the middle color for the flare light.
Page 273
TOMB RAIDER NEXT GENERATION SCRIPT REFERENCE MANUAL
Remark: This color will not be applied in the first and last phase of the life-time of the flare: the switching on and the switching off phases. Type IGNORE in these three fields to use their default values (Red = 128 , Green = 192, Blue=0)
Intensity fieldChange the middle light intensity of the flare. The default value is 16.Type IGNORE in this field to use the default value.
31 $001F: CUST_FMV_CUTSCENEUsed to enable the customize viewing of FMV s (cut scenes based on videos).
Syntax: Customize=CUST_FMV_CUTSCENE, FMV_ flags
Type one or more FMV_... flags to set some features about the showing of videos (FMV) in the game. See the FMV_ constants in the Mnemonics Section.
17 $0011: CUST_HAIR_TYPEUsed to force the hair type of Lara in the game.
Syntax: Customize=CUST_HAIR_TYPE, HairType (HAIR_...)
Choose the kind of hair by setting a HAIR_ constant value.See the HAIR_ constants in the Mnemonics Section..
Remark: This command is not able to change the mesh of the hair but it is used to inform the TRNG engine about what kind of hair object is copied in the wad file.
For example: A Young Lara ( from angkor wat) can be used but do not set it in the script.dat with the command YoungLara=ENABLED. Young Lara will be set with the correct hair type (using CUST_HAIR_TYPE) and the weapons for the adult Lara because the TRNG engine will consider Lara as adult because there is no YoungLara=ENABLED command Practically, this customize value (CUST_HAIR_TYPE) is useful to divide the setting about hair from that about weapons. If the old command Young Lara is used the setting for hair cannot be separated from the setting for weapons.
Page 274
TOMB RAIDER NEXT GENERATION SCRIPT REFERENCE MANUAL
35 $0023: CUST_HARPOONUsed in the Customize command.
Syntax: Customize=CUST_HARPOON, HarpoonFlags (HRP_...), TopBorder,DistanceFromCam,Orient_X, Orient_Y, Orient_Z, HarpoonSpeed, HarpoonGravity
This customize changes the Crossbow to get a Harpoon weapon like the Raider 3 adventure. To use this customize it is necessary to copy in the wad file the CROSSBOW_ANIM slot found in the harpoon.wad That slot has been changed from the original HARPOON_ANIM in the Tomb Raider 3 level.
HarpoonFlags (HRP_...) fieldAdd one or more HRP_ flags to enable specific settings for the new Harpoon gun.
TopBorder fieldAdjust the position of the Harpoon moving up or down in the 2d view. To move the Harpoon UP decrease this number, to move the Harpoon DOWN increase this number. Type IGNORE in this field for the default value =0.
DistanceFromCam fieldDistance from the (virtual) camera.This argument is useful to increase or reduce the size of the object in the Inventory.If the distance is increased the object will become smallerIf the distance is decreased the object will become bigger.This value is in game units where one square = 1024 units.
Type IGNORE in this field to use the default value: $400
Orient_X, Orient_Y, Orient_Z fieldsThese 3 fields set the orientation of the camera on the X, Y and Z axis. The values for this argument could go from $0000 to $FFFF but usually only four values will be used:
$0000 = North (top view)$4000 = East (right view)$8000 = South (bottom view)$C000 = West (left view)
Type IGNORE in these fields to use the default values: Orient_X = $B000Orient_Y = $C000Orient_Z = $C000
HarpoonSpeed fieldThe speed of the Harpoon can be changed. Type IGNORE in this field to use the default value, that is in accordance with the current inclination with respect to the ground. Reasonable values for this field are 100 to 300.
The speed will be different when the Harpoon travels in air or in water.The speed in water will be a 1/4 less than the value used for air.
Page 275
TOMB RAIDER NEXT GENERATION SCRIPT REFERENCE MANUAL
For example: For a value of 200 in this field, the speed in air will be 200, while underwater it will be 150
HarpoonGravity fieldThe gravity is an increment to move the Harpoon down, to simulate gravity.The value is used in a different way if the harpoon is moving in air or in water.When the harpoon is in air it will use the original HarpoonGravity value.When the harpoon is travelling in water the gravity will be divided by 2 before using it.
For example: Type 16 in this field, the gravity in air is 16, while in water it is 8.Type 0 in this field and the Harpoon will not be affected by gravity.
Type IGNORE in this field to use the default value of 24.
30 $001E: CUST_INNER_SCREENSHOTUsed to enable the saving of the game image in all save games
Syntax: Customize=CUST_INNER_SCREENSHOT, QualityScreenshotFlags (QSF_...)
When the CUST_INNER_SCREENSHOT is set in a level section all savegames will be saved with a little image of the current game image. This option is used by TRLM2009 to see an image corresponding to all save games, and also for the new save game panel to set the quality of inner images.
QualityScreenshot (QSF_...) fieldSet in this field two QSF_ flags. One QSF_SIZE_... flag and (optional) a QSF_TRUE_COLOR flag. The settings to use for the inner screen shots should be a good quality with a big size of save game, or a low quality with a small save game.See the QSF_ constants in the Mnemonics Section.
18 $0012: CUST_KEEP_DEAD_ENEMIESBy default when an enemy dies, his body disappears. To keep his body forever like in previous Raider adventures enable this command
Syntax: Customize=CUST_KEEP_DEAD_ENEMIES, ENABLED/DISABLED
Remark: The bodies killed by explosion will NOT be preserved for obvious reasons.
Page 276
TOMB RAIDER NEXT GENERATION SCRIPT REFERENCE MANUAL
47 $002F: CUST_KEEP_LARA_HPUsed with the Customize command.
Syntax: Customize=CUST_KEEP_LARA_HP, TargetLevel
This customize stops the automatic recharging of Lara Health Points when she jumps to another level from the current level.
TargetLevel fieldType in this field the index of the target level where Lara will arrive keeping a previous Health Points value.
Example: Suppose that your adventure has three levels, where level 1 and level 2 are the two halves of a wide environment and Lara jumps in and back from these two levels many times. Then there is a level 3 where Lara will go only after solving all the puzzles of the first two levels. In this situation Lara should not be able to recharge her Health Points by going in and out through the gate between level 1 and level 2. To keep the same Health Points in this situation place in the [Level] section of level 1 the command:
Customize=CUST_KEEP_LARA_HP, 2
While the in the [Level] section of level 2:
Customize=CUST_KEEP_LARA_HP, 1
For level 3 it is not necessary to type anything since this command is missing by default, Lara will be recharged when she jumps to level 3
Remark: To keep the Health Points of Lara, i.e. no recharge for all levels, use the special constants KLH_ALL_LEVELS instead of the target level:
Customize=CUST_KEEP_LARA_HP, KLH_ALL_LEVELS
For any level where Lara jumps, starting from the current, she will keep the old Health Points value.
Page 277
TOMB RAIDER NEXT GENERATION SCRIPT REFERENCE MANUAL
34 $0022: CUST_LIGHT_OBJECTUsed in the Customize command.
Syntax: Customize=CUST_LIGHT_OBJECT 34, SlotLight, Red, Green, Blue, Intensity, Time
The colors and light intensity of these light objects can be modified: AMBER_LIGHTWHITE_LIGHTBLINKING_LIGHT
Change the main color of these objects, their light intensity and in some circumstances the blinking time or other timing parameter.
SlotLight fieldIn this field type the slot name or number of the light object to customize.Currently the only light objects allowed are: AMBER_LIGHT,
WHITE_LIGHT, BLINKING_LIGHT
Red, Green, Blue fieldsType in these three fields the intensity of the RED, GREEN and BLUE.Each color intensity works in the range 0 to 255, where 255 is maximum intensity and 0 is null.
Intensity fieldThis field sets the brightness and width of the light.Type IGNORE in this field to use the default value of 18.
Time fieldAll lights have some blinking and this field changes the time of the blinking.
The default values for the light objects: AMBER_LIGHT = -2048WHITE_LIGHT = 160BLINKING_LIGHT = 30
16 $0010: CUST_LOOK_TRASPARENTENABLE or Disable the transparency of Lara when she is Looking.
Syntax: Customize=CUST_LOOK_TRASPARENT, ENABLED/DISABLED
To remove the transparency for Lara use DISABLED
Page 278
TOMB RAIDER NEXT GENERATION SCRIPT REFERENCE MANUAL
6 $0006: CUST_NEW_SOUND_ENGINE
Syntax: Customize=CUST_NEW_SOUND_ENGINE, NewSoundEngine flags (NSE_...), SoundExtension (SEXT_...), LongFadeOut, ShortFadeOut
To customize some features of the New Sound Engine based on the bass.dll created by Un4seen Developments Ltd and supported by the TRNG engine. Remember that the new sound engine will be enabled as default, disable it using the script command: NewSoundEngine= DISABLED
Field description for CUST_NEW_SOUND_ENGINE: NewSoundEngine flags (NSE_...) field
Change some features of the New Sound Engine by adding one or more NSE_ flags.See the NSE_ constants in the Mnemonics Section.
Remark: Currently there are no NSE_ values available, but some new NSE_ values will be added in the future. For now type IGNORE in this field
SoundExtension (SEXT_...) fieldThis field is now obsolete and typing a value in this field will have no effect.In TRNG previous to 1.2.0.2, in this field it was possible to choose the extension of the audio track (.wav, .mp3, .ogg). Now the TRNG engine uses an automatic method to detect the audio tracks to play. The TRNG engine checks for each track number (the first three digits "020" ...) and what extension is available. If there is a single file with that track number that audio track will be played.When there are two or more audio files for the same track number, the TRNG engine will play the first file in the following extension sequence: ".ogg", ".mp3", ".wav" ... all other supported audio format from bass.dll
For example: If in the audio folder there are the following files: 034.wav034_Interlude.mp3159_FlyBy.mp3159_TopView.ogg005.wav
the TRNG engine will play the audio files: 034_Interlude.mp3159_TopView.ogg005.wav
This happens because the priority is for ".ogg" files, if the .ogg file is missing it will search for a .mp3 file, if it is missing the .wav file or other audio extensions (.mp2, .aiff etc.) will be played.
Remark: When there are two audio tracks with the same number and the same .wav extension, the TRNG engine will play the long name audio track.
For example: If in the audio folder there are the following files: 005.wav005_Secret.wav
the TRNG engine will play the file "005_Secret.wav"
Page 279
TOMB RAIDER NEXT GENERATION SCRIPT REFERENCE MANUAL
LongFadeOut fieldFor "Fade out" there is a gradual reduction of volume to the null volume.The fade out is used to stop a sound in a sweet way.The value typed in this field is in microsecond units and it should be the time required to pass from the current volume to zero volume. The "long" fade out is used when a sound is stopped for some change in the game like loading of a new level. The default value for a long fade out is 1000 ms, i.e. one second. Type IGNORE in this field to use the default value.
ShortFadeOut fieldFor the meaning of "Fade out" read the above description for the LongFadeOut field.The "short" fade out is used when a CD sound is stopped to permit another CD sound to start in the same channel. In this situation the fade out should be shorter and the default value is of 300 ms.Type IGNORE in this field to use the default value.
Remark: This customize command like all other customize commands, works for all levels if it is placed in the [Title] section
The Customize=CUST_NEW_SOUND_ENGINE can be placed in different levels. It is better not to change the default extension for audio files otherwise there could be trouble. The values for the fadeout can be changed , level for level. To use different NSE_ flags in different levels read the specific description for the NSE_ flags.
26 $001A: CUST_NO_TIME_IN_SAVELISTThis setting disables the text about the game time in the save game list screen.
Syntax: Customize=CUST_NO_TIME_IN_SAVELIST, ENABLED/DISABLED
To remove the time game information type:Customize=CUST_NO_TIME_IN_SAVELIST, ENABLED
This option is useful only when very big (in width size) text is set, when the font is too big the level name could overlap the time information with a very nasty effect. If the time information is removed you will be able to use wider characters
Page 280
TOMB RAIDER NEXT GENERATION SCRIPT REFERENCE MANUAL
27 $001B: CUST_PARALLEL_BARSThe PARALLEL_BARS item in the current level can be customized.
Syntax: Customize=CUST_PARALLEL_BARS, FlagsParallelBar (PB_...), SpeedForSlide, MaxTurns
FlagsParallelBar (PB_...) fieldAdd one or more PB_ flags to customize all parallel bars in the level.See the PB_ constants in the Mnemonics Section.
SpeedForSlide fieldIf the flag PB_LARA_CAN_SLIDE is used, set the speed for sliding left/right for Lara. The value has a unit for one block = 1024. The default value is 6. To use the default value type IGNORE in this field.
MaxTurns fieldBy default the maximum meaningful number of turns is 10.To increase the maximum power add turns. Reasonable values are in the range 3 to 10To use the default value type IGNORE in this field.
21 $0015: CUST_PAUSE_FLY_CAMERAUsed to allow a player to stop the Flyby sequence temporary by pressing a key.
Syntax: Customize=CUST_PAUSE_FLY_CAMERA, ENABLED/DISABLED, KeyBoardScanCode
The KeyBoardScancode value will be the code of the keystroke to use to freeze a flyby sequence. Find the list of scan codes in the KEYBOARD SCAN CODES Section.
Type IGNORE in this field to use the default value 25 (Key P)
Remark: It is necessary to continuously press the key to freeze the Flyby camera.
Page 281

TOMB RAIDER NEXT GENERATION SCRIPT REFERENCE MANUAL
37 $0025: CUST_RAINUsed in the Customize= command.
Syntax: Customize=CUST_RAIN, FlagsForRain (FR_...), DropSize, SprinklerAmount, MaxRain, MinRain, Float1, Float4, Float8, Float16, Extra
This command is not necessary to work the Rain. This command can be omitted.Use the CUST_RAIN only when the RAIN_ALL_OUTSIDE is set in the Rain= command and you omit to type the [Rain] intensity in rooms of the level. In this situation use the CUST_RAIN customize to set the features of the rain for the level. Remember that if the CUST_RAIN is used and there are different settings for rain in different rooms (RAIN_SINGLE_ROOMS mode, with intensities 1/4 closed to [Rain] button) these differences will be very little or absent because the custom rain overrides the individual settings for a room.
FlagsForRain (FR_...) fieldIn this field type one or more FR_constants. To omit the FR_ flags type IGNORE in this field.
DropSize fieldThis value is the width of a water drop. Each drop is like a triangle where the base is the DropSize value. Type IGNORE in this field to use the default value 2.
SprinklerAmount fieldThis field should be the number of Sprinkles for each drop when it touches the ground.Type IGNORE in this field to use the default value 1.
Remark: Increase in this value could create trouble with other particle resources like smoke and flames.
MaxRain and MinRain fieldsA range to set the density of rain, i.e. the number of drops (MinRain) in a given space (MaxRain). When the MaxRain, is decreased the space covered by the rain in front of Lara will be reduced, when the MinRain is increased the number of single drops will be increased. Remember that if you try to get a wide space covered by thicker rain could give bad results. Balance these two values: when one is increased, decrease the other and vice-versa.
Type IGNORE in these fields to use the default values: MaxRain = $800, MinRain = $80
Float1 fieldUnknown
Float4 fieldUnknown
Float8 fieldUnknown
Page 282
TOMB RAIDER NEXT GENERATION SCRIPT REFERENCE MANUAL
Float16 fieldUnknown
Extra fieldSet in this field an extra value required by some FR_ flags.See the description of the FR_ constants to discover how to use the Extra field.
44 $002C: CUST_ROLLING_BOATUsed with the Customize = command.
Syntax: Customize=CUST_ROLLING_BOAT, SlotBoat, FlagsRollingBoats (FRB_), SwingingSpeed, PitchingSpeed, RollingSFX
By default, all boats when Lara is not on board are fully still, this is not very normal when there are waves on the water surface. With this customize set a swinging and/or pitching movement to get more realistic boats on water. Use one or more Customize=CUST_ROLLING_BOAT commands in the same level section to have different rolling for different boats.
SlotBoat fieldIn this field type the slot of the boat to roll.
Remark: Theoretically a slot different from boats can be used, for example, create a fake boat in an animating slot and move it in a realistic way.
Note: When the KAYAK is set in the SlotBoat remember that the rolling will only be performed when the kayak is on the water.
FlagsRollingBoats (FRB_) fieldAdd two or more FRB_ flags to set the level of the rolling movement.The FRB flags set the width of the rolling movement for pitching or sliding.
For example: Using the FRB_PITCHING_HIGH flag the boat will move above the peak above the water surface more than the FRB_PITCHING_LOW flag, where the peak will move only a bit over the water surface. See the description of the FRB_ constants for more information.
SwingingSpeed fieldThe swinging rolls the boat for the waves that hit the boat on the sides.For no swinging type 0 in this field. The speed value in this field works like degrees but in a specific format of tomb4 where 90 degrees = $4000. Type a value that will be added (or subtracted) by the current facing 30 times a second. Reasonable values are in the range $08 to $100 ( 8 to 256).
Tips: * When a LOW value is set for swinging it is better to reduce the swing speed to compensate the reduction of "distance" covered in the swinging. * Normally the swinging is less visible than pitching because the shape of the boat is slim. It is better to set higher values for swing speed.
Page 283
TOMB RAIDER NEXT GENERATION SCRIPT REFERENCE MANUAL
PitchingSpeed fieldThe pitching rolls the boat for the waves that hit the boat on the peakFor no pitching type 0 in this field. For values read the description of the SwingingSpeed field
RollingSFX fieldType in this field the number for a SFX sound. This sound will be played when the rolling is at a maximum value, creating the effect of a boat touching other boats or water surf. For no sound type IGNORE in this field.
5 $0005: CUST_ROLLINGBALL_PUSHINGChange features activated with OCB = 4 or OCB = 8 for the Rolling Ball.Use OCB = 4 or OCB = 8 to enable Lara to move the Rolling Ball pushing it like it was a moveable object.
With the CUST_ROLLINGBALL_PUSHING customize the effects : used animations time for moving,
distance for activation of pushing etc.
Syntax: Customize=CUST_ROLLINGBALL_PUSHING, Distance, PushAnim, FailedAnim, FrameOfMoving, FrameOfActivation, FramesOfInvulnerability, Speed
Remark: Type IGNORE in the field and the TRNG engine will use the default value in the hard-coded mode.
Description of fields:
DistanceThe distance between Lara and the centre of the Rolling Ball. Only when Lara is at the correct distance will she be able to push it. The default value for distance is 600, where 1024 is the size of a single sector of the game and one click is 256 units. The default distance (600) is good for a Spiked Rolling Ball found in the tut1.wad. If a non spiked rolling ball is used increase the distance because Lara will be farther away from the Rolling Ball.
PushAnimUse this field to change the animation used to show Lara pushing the Rolling Ball. By default the animation is ANIM_316, i.e. the same used to push the big pushable button used as a switch.
FailedAnimThis is another animation number. It is used when Lara is not able to move the Rolling Ball because there is some obstacle on the opposite side of the Rolling Ball. The default value for the FailedAnim is animation 120
FrameOfMovingFrameOfMoving is the frame number of the PushAnim animation from the TRNG engine that will move the Rolling Ball in a passive way. For "passive way" the Rolling Ball is not moved by itself but is pushed by Lara. The default value is 20th frame for the PushAnim animation. The interval
Page 284
TOMB RAIDER NEXT GENERATION SCRIPT REFERENCE MANUAL
when the Rolling Ball is be moved in a passive way is the range between the FrameOfMoving and the FrameOfActivation. Type a FrameOfMoving number bigger than FrameOfActivation and the Rolling Ball will never be moved.
FrameOfActivationFrameOfActivation is the frame number of the PushAnim animation when the rolling is enabled and it will begin to move by itself. The default value is 50th frame.
FramesOfInvulnerabilityFramesOfInvulnerability is the number of frames of animation following the PushAnim animation, when Lara will be invulnerable. This invulnerability is necessary because Lara would be killed by rolling because she is very close to the Rolling Ball. So to give Lara time to get away from the Rolling Ball there is a time of invulnerability. The default value is 30 frames where 1 second = 30 frames.
Remark: While Lara is performing the PushAnim animation she is always invulnerable.
SpeedThe "speed" is the increment used to move the Rolling Ball when Lara pushes it. Each frame will be added to the "speed" increment to correct the coordinate (X or Z). The default value is 6. Increase this value and the pushable will be moved faster by Lara.
For example: If there is trouble seeing Lara in the Rolling Ball pushing phase this means you should reduce the FrameOfMoving value to move the Rolling Ball, and/or, increase the speed to move the rolling faster.
33 $0021: CUST_SAVE_LOCUSTUsed in the Customize script command.
Syntax: Customize= CUST_SAVE_LOCUST, ENABLED
This customize fixes an old bug of the tomb4 engine: when the locust swarm has been enabled and the player saved the game; at reload the locusts are missing. The reason for this bug is that the Eidos' programmers probably preferred to omit the saving of data about the locusts. Now you can save all the data about the current particle of the LOCUST_EMITTER slot, just add in the [Title] (for all levels) or in a specific [Level] section: Customize=CUST_SAVE_LOCUST, ENABLED
Remark: The save game will be bigger by about 2000 bytes to enable the saving of locusts.
Page 285
TOMB RAIDER NEXT GENERATION SCRIPT REFERENCE MANUAL
36 $0024: CUST_SCREENSHOT_CAPTUREUsed in the the Customize command.
Syntax: Customize=CUST_SCREENSHOT_CAPTURE, SecondsOfDurate, FrameGap, QualityScreenshotFlag (QSF_...)
This command should only be used in a temporary way since it could slow down the game.By default when the F3 key (or "." key on US keyboards) is pressed the game saves the current screen in an image file with progressive names "shot1.bmp", "shot2.bmp" etc. Using the CUST_SCREENSHOT_CAPTURE setting a long series of captured frames can be made instead of a single image like in the past. This feature is useful when it is difficult to find the best image in a very fast action in the game.
SecondsOfDurate fieldIn this field set how much time the capture sequence will work for.
For example: Type 3 in this field, the game screen will capture for 3 seconds continuously.
FrameGap fieldTo reduce the number of captured images set in this field an interval in the capture phase.Type 0 in this field, the game will create images for each frame (so, no gap in this case)Type 1 and it will capture one frame every two.Type 2 and it will capture one frame every three, etc.
QualityScreenshotFlag (QSF_...) fieldAnother reason to capture a sequence of images is to show dynamic action without using a movie.In this situation, sending many images via the internet it is advisable to reduce the size.Type in this field a QSF_ value to reduce the size or the quality (omitting the QSF_TRUE_COLOR flag) of the captured images.
Remark: To get a full screen image with maximum quality type IGNORE in this field.
3 $0003: CUST_SET_CREDITS_LEVELThe credit level should be the last level of your adventure. In The Last Revelation the number was 39. The target to reach is to have scrolling text with credits at the end of your level.Substitute the credit texts with your custom texts. Find this text in the [PSXString] of the language text file. The first text is "Programmers" (index =246)and the credit list continues until the end of the [PSXString] section.
Syntax: Customize=CUST_SET_CREDITS_LEVEL, NumberOfEndLevel
Page 286
TOMB RAIDER NEXT GENERATION SCRIPT REFERENCE MANUAL
12 $000C: CUST_SET_INV_ITEMSets Inventory items like INVARIABLE items, i.e. items that will remain in the inventory after it is used, like the Binoculars.
Syntax: Customize= CUST_SET_INV_ITEM, SlotOfItem
Remark: Place one or more "Customize=CUST_SET_INV_ITEM" commands in the same level section so to assign the invariable property to many inventory items.
13 $000D: CUST_SET_JEEP_KEY_SLOTChanges the slot used to store the JEEP key.
Syntax: Customize= CUST_SET_JEEP_KEY_SLOT, SlotForJeepKey
The reason to modify the default slot (default slot was number 175, corresponding to PUZZLE_ITEM1) JEEP key, when the JEEP and the SIDECAR are used in the same level, using the new features added in TRNG (from version 1.1.8.6).
When the SIDECAR and the JEEP is used in the same level:* Use the last version of wad merger (version 1.98.0.103 or higher, released in may 2008), and copy in its installation folder the new "TR4Objects.dat" file you find in the Multiple Vehicles sample zip file.* Copy the JEEP slots (JEEP and VEHICLE_EXTRA) in to the wad* Copy the motorbike slot in to the wad* Copy the VEHICLE_EXTRA slot from the wad with the SIDECAR to a new slot MOTORBIKE_LARA in your wad.
To perform this operation click on the [Copy] button (in wad merger) keeping down the SHIFT key. It will show a list of all available slots and at the bottom of this list you will see the slot named MOTORBIKE_LARA. It is the new slot created for the Lara's animations for the motorbike.
Performing the above operation you can have the JEEP and the SIDECAR in the same level, but there is a small problem. The slot used for the JEEP key is the same one used for the "Nitrous Oxide Feeder" used to enhance the speed of the SIDECAR. Since both objects (JEEP key and Feeder) are in the slot PUZZLE_ITEM1, there is a conflict. To solve this problem use this customize command to set another slot for the JEEP key. The PUZZLE_ITEM1 will only work for the Nitrous Oxide Feeder, while the key to switch on the JEEP will be stored in another slot with this custom command.
For example: To store the JEEP key in the PUZZLE_ITEM2 (slot 176) type in the [Level] section of the level the following script command: Customize= CUST_SET_JEEP_KEY_SLOT, 176
or (same result): Customize= CUST_SET_JEEP_KEY_SLOT, PUZZLE_ITEM2
Page 287
TOMB RAIDER NEXT GENERATION SCRIPT REFERENCE MANUAL
19 $0013: CUST_SET_OLD_CD_TRIGGERUsed to restore the old behaviour of the CD trigger.
Syntax: Customize=CUST_SET_OLD_CD_TRIGGER, ENABLED/DISABLED
Using the new bass sound engine the CD trigger changes its behaviour. The looped sounds play on channel1 while the single-shot CD (track number less than 105) play on channel2, allowingchannel 1 to play the previous audio track. To restore the old default method set the following command in your [Level] section: Customize=CUST_SET_OLD_CD_TRIGGER, ENABLED
The old method played all CD trigger sounds on channel1. When a single-playback sound stopped the previous looped audio track is restored on channel1 from the start.
2 $0002: CUST_SET_SECRET_NUMBERArguments: NumberOfSecretsWith this customize substitute text in the Statics screen of the game in the row: Secrets Found ".. / 70". The value for NumberOfSecrets will substitute the default "70" for the maximum amount of secrets.
To use this customize first way:* To show a different maximum amount of secrets, levels for levels, i.e. each level has a different amount of secrets for that level.
Syntax: Customize=CUST_SET_SECRET_NUMBER, NumberOfSecrets
In each level of the script dat (excluding Title level)
To use this customize second way:* Modify the Global amount of secrets and it will be the same for all levels.In this case use a single Customize line and place it in the level section of the Title level.Typing a single CUST_SET_SECRET_NUMBER in the title level will affect the setting for all levels.
15 $000F: CUST_SET_STATIC_DAMAGEChanges the value of damage or poison occurring to Lara when she touches a static with OCB= 32 or OCB= 256
Syntax: Customize=CUST_SET_STATIC_DAMAGE, Damage, PoisonIntensity
Damage fieldType a value between 1 and 999. If 999 is set Lara will be killed immediately.The default value is 10.
PoisonIntensityType any value for poison. Reasonable values are in the range 10 to 4096A big scorpion and Harpy have a poison intensity of 2048, while a little scorpion is 512.The default is 256.
Page 288
TOMB RAIDER NEXT GENERATION SCRIPT REFERENCE MANUAL
42 $002A: CUST_SET_STILL_COLLISIONUsed in the Customize= command.
Syntax: Customize=CUST_SET_STILL_COLLISION, Collision Flags (COLL_...), LowerHeight, MoveableArray
This customize enables a still collision method when Lara touches static or moveable items.
Remark: Some people call the "still" collision "hard" collision.
By default, when Lara touches an item she continues to move her legs and arms. This behaviour is different from Lara touching a wall, where she stops immediately. Use the CUST_SET_STILL_COLLISION to give the item the same collision behaviour seen in the wall collision.
CollisionFlags (COLL_....) fieldIn this field type, one, two or more COLL_ flags to enable the still collision with different types of items. See the COLL_constants in the Mnemonics Section.
LowerHeight fieldIn this field type the lower (acceptable) height that an item has to have to enable the still collision. Theoretically it can have 0 in this field and all selected items will enable the still collision.
Think about the problem: when Lara touches a small (low) item with her feet, a one-click height item, it would be weird to see her stop immediately like the item was an impassable obstacle. In this situation perhaps it is better to have the old "sliding" collision, used with items. When a low obstacle is moved up like a low wall, Lara should be able to walk over it, while with statics and moveables this is not possible. Therefore there is a problem to solve about the realism.
Type IGNORE in this field to use the (reasonable) value of 300 units as a lower acceptable height.
Remark: Remember the units used in this field are: one click = 256 units, one sector = 1024 units.
MoveableArray fieldType one or more moveable slots using the still collision. This field can also be left empty.Remember that different moveable classes can be selected using the COLL_ flag, so use these COLL_ flags. When some moveable is not enclosed in the COLL_ flags use the MoveableArray.
For example: For still collision with the moveable POLEROPE and with the ROLLINGBALL type a customize command like this:
Customize=CUST_SET_STILL_COLLISION, COLL_STATICS+COLL_DOORS, IGNORE, POLEROPE, ROLLINGBALL
To have still collision with statics and doors and still have collision with the pole rope and Rolling Ball.
Page 289
TOMB RAIDER NEXT GENERATION SCRIPT REFERENCE MANUAL
Another use of the MoveableArray is when some moveable must be excluded from the still collision. This trick will have a sense only when some COLL_ moveable types are input.
For example: Suppose the still collision for all doors (COLL_DOORS) is enabled but it is discovered that there is a problem with a door used for a "race verses time". In this situation when Lara touches the door while it is closing, Lara froze immediately. To let the player "slide" over the closing door disable the still collision only for that type of door, preserving the other doors. In this case type the number of the slot to exclude as a negative number.
For example: To exclude the DOOR_TYPE4 with slot number 325, type this script command:Customize=CUST_SET_STILL_COLLISION, COLL_STATICS+COLL_DOORS, IGNORE, -325
Remark: It is better not to use the syntax "-DOOR_TYPE4" because the mixing of mnemonic constant and arithmetic sign "-" minus, could confuse the NG_Center in some circumstances.
41 $0029: CUST_SET_TEXT_COLORUsed in the Customize= command.
Syntax: Customize=CUST_SET_TEXT_COLOR, Text Type (TT_ ...), Color for Text (CL_ …)
This customize changes the default color for text in the menu, options screen, inventory mode, statistics screen etc. Set a new color for the text type by typing the text to change, with a TT_ constant value, and typing the CL_ .. color.
For example: To have the main menu drawn in a red color type in the [Level] section this command: Customize=CUST_SET_TEXT_COLOR, TT_MAIN_MENU, CL_RED
Type two or more Customize=CUST_SET_TEXT_COLOR commands in the same [Level] or [Title] section if required.
Remark: It is advisable to place this customize in the [Title] level when you want to change text in the main menu, option or a new level screen. The customize typed in the [Title] section will work for all levels until you place another specific customize in a [Level] section.
Page 290

TOMB RAIDER NEXT GENERATION SCRIPT REFERENCE MANUAL
45 $002D: CUST_SFXUsed with the Customize = command.
Syntax: Customize=CUST_SFX, TypeSound (TS_...), Sound Effect Number
The CUST_SFX customize overrides the sound effect used in some TRNG features, like the Diary. Use many Customize=CUST_SFX commands in the same [Level] section if required.
TypeSound (TS_...) fieldChoose a TS_ constant to set what sound type to change. See the TS_ constants.
Sound Effect Number fieldType the number of a new sound to use. See the SFX Sound Section for numbers.
8 $0008: CUST_SHATTER_RANGE
Syntax: Customize=CUST_SHATTER_RANGE, FirstStaticAsShatter, LastStaticAsShatter
By default there are only 10 statics with shatter attributes (from SHATTER0 to SHATTER9) but using this custom setting the number of shatter statics can be enlarged.
Default values are: FirstStaticAsShatter = 50 (SHATTER0)LastStaticAsShatter = 59 (SHATTER9)
Look at the "Static list" in the Reference panel to see the name (and Ids) of all the static meshes.
For example: To have another 10 static meshes as shatter type this command:Customize=CUST_SHATTER_RANGE, 50, 69
The 10 following statics (from EXTRA00 to EXTRA09) will become shatter objects.
If you do not want to change EXTRA to statics and prefer to use standard statics s shatter type the following command: Customize=CUST_SHATTER_RANGE, 40, 59All statics from DEBRIS0 to DEBRIS9 will become shatters.
Use the following short list as a reference for the above examples:
40 $0029 DEBRIS0 50 $0032: SHATTER0 60 $003C: EXTRA00 41 $0029: DEBRIS1 51 $0033: SHATTER1 61 $003D: EXTRA01 42 $002A: DEBRIS2 52 $0034: SHATTER2 62 $003E: EXTRA02 43 $002B: DEBRIS3 53 $0035: SHATTER3 63 $003F: EXTRA03 44 $002C: DEBRIS4 54 $0036: SHATTER4 64 $0040: EXTRA04 45 $002D: DEBRIS5 55 $0037: SHATTER5 65 $0041: EXTRA05 46 $002E: DEBRIS6 56 $0038: SHATTER6 66 $0042: EXTRA06 47 $002F: DEBRIS7 57 $0039: SHATTER7 67 $0043: EXTRA07 48 $0030: DEBRIS8 58 $003A: SHATTER8 68 $0044: EXTRA08 49 $0031: DEBRIS9 59 $003B: SHATTER9 69 $0045: EXTRA09
Page 291
TOMB RAIDER NEXT GENERATION SCRIPT REFERENCE MANUAL
11 $000B: CUST_SHOW_AMMO_COUNTERUse this value to show the counter for the current ammo.
Syntax: Customize=CUST_SHOW_AMMO_COUNTER, Color, FormatFlags (FT_...) , BlinkTime, SizeCharacter (SC_...), ShowCounterFlags (SHOWC_...)
If the CUST_SHOW_AMMO_COUNTER is set, there will be a counter for the ammo for the current weapon on the screen shown in real-time.
Remark: The ammo counter will only show when Lara holds a weapon.
Color, FormatFlags (FT_...) , BlinkTime, SizeCharacter (SC_...) fieldsAll the fields have the same use and target of fields in the TextFormat= script command. So read the description of the above field in the section NG NEW SCRIPT COMMANDS. The fields set color, size and position of the text for the ammo.
ShowCounterFlags (SHOWC_...) fieldIn this field set some SHOWC_ constant flags to customize the showing of the ammo counter.See the SHOWC_constants in the Mnemonics Section.
7 $0007: CUST_SPEED_MOVING
Syntax: Customize=CUST_SPEED_MOVING, Speed
When an ACTION trigger is used to move an animating or other moveables, the TRNG engine uses a default speed value of 32. To use a different speed type in the OCB of the object. This method only works for Animating objects because other moveables have (or could have) some use for the OCB field. For this reason the TRNG engine will ignore the OCB field of the object that is not an Animating .To modify the default speed used by all moveables other than Animating use the CUST_SPEED_MOVING constant.
For example: Customize=CUST_SPEED_MOVING, 50 will set 50 as the default speed.
Page 292
TOMB RAIDER NEXT GENERATION SCRIPT REFERENCE MANUAL
14 $000E: CUST_STATIC_TRANSPARENCYChange the value for transparency of a static that can be assigned to a static with the new flipeffect trigger "Static. Transparency. .."
Syntax: Customize=CUST_STATIC_TRANSPARENCY, GlassOpacity, IceOpacity
To set the transparency set the value of opacity. The values set for GlassOpacity and/or IceOpacity are a percentage from 0 to 100 where: 0 = the object is fully invisible
100 = No transparency for the object
Using 50 % the object and background should be semi-transparentUsing 90 % the object is almost Normal (full opacity) but there is a light transparencyUsing 10 % the object is almost invisible, it is seen like a ghost.
The default values used if there is no Customize=CUST_STATIC_TRANSPARENCY command are: GlassOpacity = 50
IceOpacity = 81
22 $0016: CUST_TEXT_ON_FLY_SCREENEnables the printing of text on the screen during the Flyby Camera sequence.
Syntax: Customize=CUST_TEXT_ON_FLY_SCREEN, ENABLED/DISABLED
Page 293
TOMB RAIDER NEXT GENERATION SCRIPT REFERENCE MANUAL
46 $002E: CUST_TITLE_FMVUsed with the Customize command.
Syntax: Customize= CUST_TITLE_FMV, FmvNumber, TestMultiPlay
FmvNumber fieldType the number of the FMV to play. This is the same number in the file name of the FMV.
For example: To play the file fmv5.wmv movie, type 5.
TestMultiPlay fieldThis field may be 0 (FALSE) or 1 (TRUE). Type 0, the FMV will only be shown the first time the player launches the game. Type 1, the FMV will be played every time the control passes to the title phase. i.e., at the start of the game and when Lara dies or the player exits from the game to go back to the title.
Example:To have a FMV at the boot-strap of the game, i.e. before beginning the title level, place in the [title] section the following commands: FMV= 8, 1
Customize=CUST_TITLE_FMV, 8, 0
In the above example the FMV to show at the boot is fmv8, Enable the Escape for this FMV and it is played only once at the start of the game. Remember to place the FMV file in the sub-folder of trle named "FMV s" or “Store” and set in the script.txt in the [PCExtensions] section the extension used for the FMV.
For : "fmv8.wmv" type the line: FMV= WMV"fmv8.avi" type the line: FMV= AVI"fmv8.mpg" type the line: FMV= MPG
See the NEW SCRIPT COMMANDS SECTION.
38 $0026: CUST_TR5_UNDERWATER_COLLISIONSUsed by the Customize= command.
Syntax: Customize=CUST_TR5_UNDERWATER_COLLISIONS
Adding this customize in the level enables the collision method used in Tomb Raider Chronicles for the underwater collisions of Lara. The difference from the tr4 collision is that in the tr5 engine Lara will be not stopped when she touches a wall, but will move or rotate going on in a different direction. In tomb4 any contact will stop Lara.
Page 294
TOMB RAIDER NEXT GENERATION SCRIPT REFERENCE MANUAL
43 $002B: CUST_WATERFALL_SPEEDUsed with the Customize= command.
Syntax: Customize=CUST_WATERFALL_SPEED, PixelScroll
This changes the speed of the waterfall textures. The default value is -7, set higher absolute values like -12 and the speed will be increased. Use a positive value and the scrolling will be inverted (from down to up). The maximum values are -63 to +63 but the meaningful maximum values are -31 to +31
9 $0009: CUST_WEAPONCustomize a specific weapon.
Syntax: Customize= CUST_WEAPON, SlotOfWeapon, Weapon flags (WEAP_..) , SoundForShot, FramesForRecharge, DurateFlash, Extra, MaxDistanceForAiming, FrameToTakeWeapon, FrameToLetWeapon, Random, VPositionOfWeapon, Unknown, FrameCounter, FrameMinRange, FrameMaxRange, OrigX, OrigY, OrigZ, OrigOrient
Remarks: *Omit the last fields of this command and all omitted fields will be seen as IGNORE fields by the TRNG engine, i.e. the omitted fields will keep the default values. This feature is present in all Customize commands from 1.1.8.1 dll version.
*Customize some features of the weapon using the CUST constant named CUST_AMMO. The current CUST_WEAPON only works for specific weapons, while CUST_AMMO is used to customize single ammos.
Description of fields
SlotOfWeapon fieldIn this field set the slot corresponding to the weapon to customize.Choose between following slot values: PISTOLS_ITEM
UZI_ITEMSHOTGUN_ITEMCROSSBOW_ITEMGRENADE_GUN_ITEMSIXSHOOTER_ITEM
Weapon flags (WEAP_..) fieldAdd none, one or more WEAP_ flags to set a special features for the current weapon.For no flag type IGNORE in this field. See the WEAP_ constants in the Mnemonics Section.
SoundForShot fieldThis field changes the default sound effect for the weapon. This is the sound used when the weapon fires and not the sound when the shot hits some target. Type IGNORE to keep the default value.
Page 295
TOMB RAIDER NEXT GENERATION SCRIPT REFERENCE MANUAL
Default values: PISTOLS_ITEM = 8UZI_ITEM = 43SHOTGUN_ITEM = 45CROSSBOW_ITEM = 235SIXSHOOTER_ITEM = 121GRENADE_GUN_ITEM (sounds are in shooting animation
with playflip anim command)FramesForRecharge fieldThis value is the number of frames (30 per second) used for the auto-shot. When a player continuously presses the action key the FramesForRecharge value will be used to set the pause between shots. Bigger values will cause a longer pause time and hence less shots per second.
Default values: PISTOLS_ITEM = 9UZI_ITEM = 3SHOTGUN_ITEM = 9SIXSHOOTER_ITEM = 16CROSSBOW_ITEM Fixed valuesGRENADE_GUN_ITEM Fixed value.
DurateFlash fieldTo change the number of frames (30 per second) of duration for fire flash when the weapon shots.
Default values: PISTOLS_ITEM = 3UZI_ITEM = 3SHOTGUN_ITEM = 3SIXSHOOTER_ITEM = 3GRENADE_GUN_ITEM = 2CROSSBOW_ITEM = 2
Extra fieldThis field can have different values according to the WEAP_ constant flag.Read the descriptions of the WEAP_ constants to discover the value to type in this field.
MaxDistanceForAiming fieldThe automatic aiming allows Lara to point at an enemy when he is (about) in front of her and within a specific maximum aiming distance. The default value for all weapons is 8 sectors. Different aiming distances can be set for each weapon.If zero is set the weapon will not have automatic aiming at enemies. If 3 (sectors) are set the weapon will work with automatic aiming on enemies within 3 sectors of 3d distance.
Remark: Increasing this value could compromise the speed of the game engine because the compute to locate enemies will be enlarged to very wide zones wasting CPU time.
FrameToTakeWeapon and FrameToLetWeapon fieldsThese two fields set the number of frames to get on, get off in Lara' s hands animation.Change these values only when trying to change the animation to extract weapons.For pistols, UZI and six shooter set the same frame for both fields and the TRNG engine will use
Page 296

TOMB RAIDER NEXT GENERATION SCRIPT REFERENCE MANUAL
that frame -1 to place the weapon in the holster and the frame +1 to place the weapon in Lara's hands. The reason for this method is because the TRNG engine will use the same animation to extract the weapon or place it in holsters, only the frame will change +1 or -1 according to the extract or place-in animation.
Big weapons like the shotgun, grenade-gun and crossbow have two different frames to extract or the place-in holders operation.
The following table shows the default values:
PlaceWeaponInHand RemoveWeaponFromHand
Pistols 13 (it becomes 14) 13 (it becomes 12)Revolver 15 (it becomes 16) 15 (it becomes 14)UZI 13 (it becomes 14) 13 (it becomes 12)Shotgun 10 21 Grenade Gun 10 21 Cross Bow 10 21
Remark: Looking at the original animations to extract weapons it seems weird the above numbers of frames because they are bigger than the total number of frames of the above animations. It is a hard-coded value.
Random fieldI am not sure about the meaning of this field. It used to change. I presume it could be used to set randomly the direction or intensity for some shooting effect but I have not had the time to verify its usage [PAOLONE].
Default values: Pistols = 1456Revolver = 728UZI = 1456Shotgun = 0 Grenade Gun = 1456Cross Bow = 1456
VPositionOfWeapon fieldThis field is a Coordinate Y value (up/down in the 3d world) to compute the height of the weapon in Lara 's hands. When the TRNG engine detects that water is touching the weapon it will holster the weapon.
Default values : Pistols = 650Revolver = 650UZI = 650Shotgun = 500Grenade Gun = 500Cross Bow = 500
Page 297

TOMB RAIDER NEXT GENERATION SCRIPT REFERENCE MANUAL
Unknown fieldI have no any idea about this field. This value is not used when Lara extracts the weapon and neither when she is shooting. Perhaps it works about aiming ? For all weapons the default value is 1820. [PAOLONE].
FrameCounter fieldThis value is a number of frames and it will be decremented by 1 for each game cycle. It is a sort of "frame rate" field to multiply the Duration of the animation to slow down the extract weapon animation. This field is only used for Pistol, UZI and revolver.
Default values: Pistols = 4Revolver = 7UZI = 4
FrameMinRange and FrameMaxRange fieldsThese two values are used like the minimum and maximum values of a range. They are only used for Pistols, Revolver and UZI. If the frame to extract the weapon is changed (see the above fields FrameToTakeWeapon and FrameToLetWeapon fields) remember that the number to change the weapon has to be within the range of FrameMinRange and FrameMaxRange fields, otherwise the animation will not change the weapon in the correct way.
Default values: Pistols = minimum: 5 maximum: 24Revolver = minimum: 8 maximum: 29UZI = minimum: 5 maximum: 24
OrigX, OrigY, OrigZ, OrigOrient fieldThese fields only work for weapons launching visible ammo like the Grenade Gun and Cross Bow. If the animation or the shape of the weapon meshes is changed it may be required to change the origin of the bullets at the start of the movement. The OrigX, OrigY and OrigZ are + or - values and they will be added to the default current position for the bullet.
To understand how to set these three values read the description of the AddEffect script command about the DispX, DispY, and DispZ field that works in the same way.
The OrigOrient field sets the degrees for the direction of the bullet.Set 0 and the direction will not change from the default value.Set a positive or negative value and the horizontal direction will be changed.
The way to set degrees is particular: 90 degrees to East will be 16384 ($4000)90 degrees to West will be -16384 ($C000)
Intermediate values can be set,. Study the above to understand how to compute other values.
Page 298
TOMB RAIDER NEXT GENERATION SCRIPT REFERENCE MANUAL
DENV_ constants
16384 $4000: DENV_FLAG_FACE2BACKWorks in the same way as the DENV_FLAG_FACE2FACE flag but in this case the condition is TRUE when Lara is behind the object. See the description of the DENV_FLAG_FACE2FACE flag for more information.
32768 $8000: DENV_FLAG_FACE2FACEWorks with the ENV_ITEM_EXTRA... conditions, but adds this flag to the DistanceForEnv field and not to the EnvCondition field. Use it to acquire a specific couple of Orientation (facing) for Lara and the object.
For example: To start the animation only when Lara is face to face with the SKELETON (slot id = 35) and about a half sector (512) distance from it type:
In the ENV Condition field : ENV_ITEM_EXTRA_IN_FRONT In the DistanceForENV : 512 +DENV_FLAG_FACE2FACEIn the Extra field : 35
Remark: The DENV_constants are DistanceENV flags to add to the distance value to set some other settings.
For the ENV_ITEM_EXTRA conditions add two DENV_ constants to the Distance for ENV to set the position about the orientation of Lara and the object.
Choose from two DENV_ constants: DENV_FLAG_FACE2FACE (Lara and object are looking face to face)
DENV_FLAG_FACE2BACK (Lara is looking at the back of the object )
Remark: If no DENV_constant is added to the distance the facing will be IGNORED.
Page 299
TOMB RAIDER NEXT GENERATION SCRIPT REFERENCE MANUAL
DGX_ constants
8192 $2000: DGX_ADJUSTMENT_MODEUsed in the Diagnostic Type script command. This DGX_ADJUSTMENT_MODE allows the alignment of TRNG objects like the Detector and the Keypad to have the correct coupling between the object and the text. In some circumstances, when the game screen has a high resolution it could give some misplacement between the object and the text or the radar detector and the sprites of detected targets. Use this adjustment when some misalignment is discovered with a higher resolution except those already adjusted by PAOLONE.
It is better to enable in the adjusting phase the DGX_ADJUSTMENT_MODE, so type the following command in the [Option] section of the script file: Diagnostic = ENABLED
DiagnosticType= DGX_ADJUSTMENT_MODE, 0
In the game many variables will be printed on the screen about the position and text formatting of TRNG objects.
Keyboard commands in adjustment modeTo choose the variable to change use the: [R] and [F] keysTo change the value of the current selected variable use the keys: [Y] and [U] keysAnother keyboard command in the adjustment mode is the [S] key. If the TOMB4_log utility (you find it in "tools" sub-folder of trle folder) is launched, when [S] is pressed all current variables and values will be printed in a log file. Always perform this operation at the end of the adjustment phase. To locate the correct data in the log file for "ADJUSTMENT DATA" text, copy and paste all text between the "adjustment data" and "end adjustment" For example:
6985: --------- ADJUSTMENT DATA (640 x 480) --------- 6985: RADAR DETECTOR: 6985: TargetX=1587 6985: TargetY=13669 6985: SizeTextX=128.00 6985: SizeTextY=170.67 6985: VLineX=2624 6985: VLineY=13715 6985: GapX=112 6985: GapY=149.33 6985: TextX=736 6985: TextY=15541 6985: COMPASS DETECTOR: 6985: VLineY=13845 6985: KEYPAD: 6985: OrgX=11056 6985: OrgY=17685 6985: TextY=2304 6985: --------- END ADJUSTMENT ----------Remember to enclose the first line because I need to know the resolution used in the game during your adjustment. [PAOLONE].
Page 300
TOMB RAIDER NEXT GENERATION SCRIPT REFERENCE MANUAL
Remarks:* The adjustment mode only allows a temporary fix for the problem. At the next game restart the values will come back to the original (bad) values. The adjustment should be done with the final target to send the correct adjusted value to [PAOLONE] and I will insert the new best values in the next version of trng dll. The reason that I have not performed this job is because to have a correct adjustment it is necessary to set the game resolution, but I can only use 1024 x 768 pixels with my notebook and only 1280 x 1024 with my desktop. If you have a powerful computer with an higher resolution you can create adjusted values for these extra resolutions.
* In the radar detector section many values can be changed but it is advisable to change only three values: TargetY Sets the Y position of detected objects on the main (planar) panel
VLineY Sets the Y position of detected objects on the secondary (vertical) panelTextY Sets the Y position of text (distance xx metres)
2 $0002: DGX_ANIMATIONUsed in the Diagnostic Type script command.Shows the debug data about the Animation script command. The Animation command works in the Debug mode with a negative animation number. In this situation the diagnostic will show if the conditions to enable the animation are correct and when this is true it will show "YES".
16 $0010: DGX_AUDIO_TRACKSUsed in the Diagnostic Type script command. It enables the viewing of information about audio tracks: the enabled channel and the number of the CD track that is playing.
32 $0020: DGX_CHEATSUsed in the Diagnostic Type script command.Shows the current typed keystrokes to set some TRNG cheats.The cheats allowed in TRNG are all based on four characters words:
KILL kill all enemiesROOM reverse all flip ROOM sIAIR Infinite AIRGODS set Lara as invulnerable i.e. she becomes a DEMIGODDOOR open all DOORS of the levelSTAR gives Lara a constant and she glows like a STAR
Remark: The cheats work every time the Diagnostic mode is enabled (Diagnostic=ENABLED) and the FlyCheat=ENABLED.
128 $0080: DGX_COMMON_VARIABLESUsed in the Diagnostic Type script command.Shows on screen the values of the TRNG variables. This flag enables the viewing for common variables, i.e. all variables except the Store variables.
Page 301
TOMB RAIDER NEXT GENERATION SCRIPT REFERENCE MANUAL
32768 $8000: DGX_ERRORSUsed in the DiagnosticType script command.By default the TRNG engine is able to give many error messages when it detects some problem with script commands, wrong indices of moveables (in some trigger) and other directx stuff.Unfortunately most level designers ignore them because to see these messages they should launch the tomb4_log.exe program (in the "tools" sub-folder of trle) and then at the end of the game show the log that has been caught from the logger. Perhaps it is a boring procedure, anyway now there is an easier way to have the error messages shown on the game display in real time. Add the DGX_ERRORS flag to the DiagnosticType command.
Note: Since in the game the errors could be so many as to cover all of the screen, TRNG uses a buffering method: it will keep on the screen an error messages for five seconds only and it will ignore it when a new error message is the same as one already printed on the screen. At the end of the game you will find a text file named "error_parsing_log.txt" in the trle folder with all of the error messages.
If at the end of playing there is no "error_parsing_log.txt" file this means that there has been No Errors.
Remark: Some error messages could be very long. To keep them all on the screen use a small font..In the error_parsing_log file all of the errors will be recorded with no trunkation..
8 $0008: DGX_FAR_VIEWUsed in the Diagnostic Type script command.This flag enables the viewing of the current World Far View distance applied in the game.
Remark: This information requires a Turbo script command in the current level using the AdaptiveFarView, otherwise it will not be shown.
512 $0200: DGX_FLYBYUsed in the Diagnostic Type script command.Enables the information about the current Fly By sequence.
Remark: The information will be shown only when a Fly By sequence is running.
64 $0040: DGX_FOGUsed in the Diagnostic Type script command.Shows the information about the Fog Distance: StartFog, EndFog and ColorFog.
Remark: To see the information set the DGX_FOG flag and it is also necessary that in the current [Level] section there is a FogRange= command.
Page 302
TOMB RAIDER NEXT GENERATION SCRIPT REFERENCE MANUAL
16384 $4000: DGX_FPSUsed in DiagnosticType script command.Shows the current FPS (frame per second).
Note: It will show a couple of values: the first is the async frame rate while the second (in round parenthesis) is the sync frame rate.
1 $0001: DGX_LARAUsed in the Diagnostic Type script command.Shows in the Diagnostic the information about Lara: coordinates, orientation, room, flags
2048 $0800: DGX_LOG_SCRIPT_COMMANDSUsed in the Diagnostic Type script command.This Diagnostic mode works in a different way with respect to other DGX_ modes.It does not show anything on screen but it creates a full log using the TOMB4_LOG.exe utility found in the trle\Tools folder. This Diagnostic mode enables a Debug mode for the Global Trigger, Organizer and Trigger Group commands showing all further variables changed by the above commands. It is advisable to have Raider in windowed mode to have a chance to see the tomb4_log window with the latest messages. Consult the full log at the end of tomb4 running using the command in the tomb4_log program [Show/Last tomb.log]
Tips & Tricks:1) Add in the Extra field of the DiagnosticType command the constant EDGX_CONCISE_SCRIPT_LOG to reduce the quantity of messages in the log.See the description of the EDGX_CONCISE_SCRIPT_LOG constant for more information.
2) Use the function Key F9 to suspend/resume the log about script commands. Use this feature to suspend temporary the log when Lara is far from the "zone" you want to check and then resume the log when ready. This trick is useful to reduce the size of the log file and get the correct portion of log you are interested in.
3) The debug mode of script could slow down the game, so remember to disable it when you want to play normally.
4 $0004: DGX_SFX_SOUNDSUsed in the Diagnostic Type script command.This enables the viewing on screen of the current sound sample played and information about the missing sound samples.
256 $0100: DGX_STORE_VARIABLESUsed in the Diagnostic Type script command.Shows on screen the values of all the Store variables.
1024 $0400: DGX_TEXT_VARIABLESUsed in the Diagnostic Type script command.Shows on screen the content of test variables.
Page 303
TOMB RAIDER NEXT GENERATION SCRIPT REFERENCE MANUAL
4096 $1000: DGX_WEAPON_ANIMATIONUsed in the Diagnostic Type script command.Adding this flag will display on screen the information about the current weapon animation.The animations and state Id for weapon management are not visible in Lara 's information because the weapon works on specific slots like the SHOTGUN_ANIM, GRENADE_GUN_ANIM etc.
Page 304
TOMB RAIDER NEXT GENERATION SCRIPT REFERENCE MANUAL
DIR_ constants
17 $0011: DIR_DOWNAbsolute moving down
1 $0001: DIR_EASTAbsolute moving to east.
0 $0000: DIR_NORTHAbsolute moving to north.
2 $0002: DIR_SOUTHAbsolute moving to south.
16 $0010: DIR_UPAbsolute moving up
3 $0003: DIR_WESTAbsolute moving to west
DISABLED
0 $0000: DISABLED
Page 305
TOMB RAIDER NEXT GENERATION SCRIPT REFERENCE MANUAL
DMG_ constants
256 $0100: DMG_ALERT_BEEPTo only use with the DMG_INDIRECT_BAR flag.Set this flag. When the bar goes down to 15 % (or less) the bar will blink and a little "beep" sound will be performed.
Remark: When this flag is absent the bar will blink but no sound will be performed.
32 $0020: DMG_BURNING_DEATHWhen the time for Damage Bar is complete Lara will be killed burning with fire.Use only for waterless Damage rooms.Use this flag to simulate a room where the temperature increases until Lara burns.
If the flag is enabled, Lara will burn when:The indirect Bar is empty The Health Points bar is empty (The indirect Bar for Damage room is not enabled)
128 $0080: DMG_BURNING_SCREAMTo only use with the DMG_BURNING_DEATH flag.If the DMG_BURNING_DEATH flag is set, set this flag to force Lara to scream when she takes fire.
Remark: This flag only works with the indirect Bar because when the indirect bar is not set Lara burns and dies and has no time to scream.
8 $0008: DMG_COLD_WATERSpecify the command to set the default behaviour for all Cold Water Rooms in the current level.
4 $0004: DMG_INCREASE_BARBy default, the Damage Bar (only shown using the DMG_INDIRECT_BAR) starts full and decreases it until it is empty. When it reaches the empty status Lara will be damaged faster.To change this behaviour to have a progress bar that grows, starting from empty to reach full use this flag.
D1 $0001: DMG_INDIRECT_BARTo have a progress bar on the screen to signal the level of the current damage in the current room it is necessary to use this flag. With the indirect bar the vitality of Lara remains untouched until the indirect bar is empty (or full if the DMG_INCREASE_BAR flag is set)
512 $0200: DMG_LITTLE_TEXTWhen a BarName is used in the Damage= command choose the flag to use small text to show the string with the Bar Name.
2 $0002: DMG_ONLY_PADLara is only damaged while her feet touch the floor of the current room. Use this for simulation of an electric floor or a very hot floor.
Page 306
TOMB RAIDER NEXT GENERATION SCRIPT REFERENCE MANUAL
16 $0010: DMG_POISON_LARALara enters the current room and she will be poisoned with a deforming effect of the screen and life bar with a yellow color.
64 $0040: DMG_SLOW_DISAPPEARINGSet the behaviour of the damage bar when Lara goes from a Damage Room to a safe room. If this flag is omitted the Damage Bar will disappear. While using the flag DMG_SLOW_DISAPPEARING the Damage Bar will invert its direction of filling/emptying and it will disappear when it reaches the full state (like at the start of entry in the Damage Room)
Page 307
TOMB RAIDER NEXT GENERATION SCRIPT REFERENCE MANUAL
DRT_ constants
2 $0002: DRT_ADD_EFFECTUsed in the Customize=CUST_DARTS command
Add an effect for each dart When this flag is used type in the IdAddEffect field the Id of the AddEffect script command where the effect to add to the dart is stored.
Remarks: Warning, this feature could be CPU intensive. If there are many dart emitters in the level disable the emitters already visited by Lara, using an Untrigger to free the resource. Another suggestion is to set a big Emitting timer (to slow down the emitting) and/or a high Speed value to avoid having too many darts enabled at the same time.
In the AddEffect command pointed to by the IdAddEffect field some fields will be ignored: DurateEmit and DuratePause. While other fields should have the same value: the JointType should be set to a JOINT_SINGLE_MESH value. Practically the TRNG engine will only be interested in the type of effect, while the emitting time will be constant for the life-time of the dart.
32 $0020: DRT_FIX_POISON_BUGUsed in the Customize=CUST_DARTS commandIn the default Tomb4 there was a bug about poisoning with darts. While the poison of Scorpion and Harpies worked correctly with the screen deformation and Lara losing Health Points, the poison of the dart remained only for an instant and was removed. To fix this bug add the DRT_FIX_POISON_BUG flag.
16 $0010: DRT_HIDE_DARTUsed in the Customize=CUST_DARTS commandThis flag makes the dart invisible. The only case where this setting could be used is when a effect is added to the dart with the DRT_ADD_EFFECT flag and only the effect like Mist or fire is to be visible. This setting helps to free the CPU from 3d graphic operations.
1 $0001: DRT_NO_POISONUsed in the Customize=CUST_DARTS commandBy default when Lara is hit by a dart she is poisoned. Use the DRT_NO_POISON to disable this feature.
8 $0008: DRT_NO_SMOKEUsed in the Customize=CUST_DARTS commandThis flag removes the smoke when the dart hits the wall and also the sound of the crash.Use this flag when the dart looks like a laser ray.
4 $0004: DRT_PERFORM_TRIGGERGROUPUsed in the Customize=CUST_DARTS commandAdd this flag to transform the dart emitter to a sensor line. When a dart touches Lara it will perform a trigger. Practically it could be an electronic alarm. In this case type in the IdTriggerGroup field the Id of the Trigger Group to perform.
Page 308

TOMB RAIDER NEXT GENERATION SCRIPT REFERENCE MANUAL
Remarks: Reduce the speed and change the color (for example Red or Green) of the dart emitting to look like a laser ray.
If the dart emitter is used like a sensory line it is advisable to disable the poison with the DRT_NO_POISON flag. It makes no sense poisoning by a laser ray. Also disable the smoke and crash sound with the DRT_NO_SMOKE flag.
When a dart touches Lara the Trigger Group will perform and the index of the dart emitter will be stored in the internal variable [Found item index]. Then insert in the Trigger Group an action trigger using the TGROUP_USE_FOUND_ITEM_INDEX flag to disable the dart emitter with this action trigger:
; Exporting: TRIGGER(44:0) for ACTION(0); <# : LARA ID:0 in sector:(8,7) of Room3; <&
: Trigger. (Moveable) Untrigger <#
Object with (E)Timer value; (E) : Timer= +00; Values to add in script command: $5000, 0, $2C
and the values will be added in the Trigger Group command in this way:
TriggerGroup= .... ,$5000 + TGROUP_USE_FOUND_ITEM_INDEX, 0, $2C
to use the found index instead of that set in the original trigger (it was Lara)
- The best way to have a realistic laser sensory line avoiding at the same time the slow down of the engine, disable the showing of darts with the DRT_HIDE_DART flag to free CPU time. Disable smoke and crash sounds with the DRT_NO_SMOKE. Disable the poisoning with DRT_NO_POISON flag.
Now decrease the emitting timer to show the dart. This is necessary to avoid Lara passing the sensory line without touching the darts. Now the only problem is that the sensory line is invisible. We can solve this problem using a static object with no collision built like the tight-rope bar and adding to it the same texture used for the waterfall to give it a pulse/flushing effect. Then in NGLE place the dart emitting in a direction and hight and place the static sensory bar in the same position where the darts should be emitted to have a pulsing semi-transparent laser sensory in the level. Each sensory line could be used like a trigger to activate enemies, doors, flip maps etc.
Page 309
TOMB RAIDER NEXT GENERATION SCRIPT REFERENCE MANUAL
DTF_ constants
32 $0020: DTF_ENGAGE_ALWAYSThe detector will be present on screen until the targets exit the level.
8 $0008: DTF_ENGAGE_IN_RANGEThe detector will be automatically shown when Lara is close to a target, within the given range. With the ENGAGE_IN_RANGE set for example 50 metres the detector will be shown when Lara is 50 metres or less from the nearest target. When Lara is further away the detector will be hidden.
4 $0004: DTF_ENGAGE_INVENTORYLara has to pick up the Detector object and engage it in the inventory to select it
64 $0040: DTF_FAST_RADAR_SCANThe pointer will turn very fast
128 $0080: DTF_INVERSE_VPOINTERThe current flag only works in pointer mode. You can invert the position of the line in the vertical scale (at the right of the detector)By default when you do not use this flag the floating line shows where Lara is, while the fixed red pointed line at the centre shows the position of the target. If you think it is not logical you can use this flag to invert the situation. With the DTF_INVERSE_VPOINTER flag the floating point is the vertical position of the target, while the fixed red line is the vertical position of Lara.
0 $0000: DTF_NONE
2 $0002: DTF_RADAR_MODEThis flag sets the Detector in Radar Mode. If this flag is omitted the detector will work in Pointer mode. There are big differences between the two modes and some fields and flags will only work for a specific detector mode.
In Pointer Mode: The detector has a pointer like a compass that shows where the current target is. The Current target is the first target in the list present in the game. Pointer Mode only works on one target at a time: when the first target has been picked up (or killed) the detector will start to point at the second target in the list and go on.
In Radar Mode: The detector is able to scan all targets at the same time that are in the range of the radar.
Note: Remember that the range of radar is different from the range for activation. The range of radar is given by a formula 6 * MetricScale, where the digit "6" is the (fixed) number of grid sectors of radar.
For example: Set 2 metres for the metric scale and the target will be shown on radar only when it is 12 metres or less from Lara.
.
Page 310
TOMB RAIDER NEXT GENERATION SCRIPT REFERENCE MANUAL
To understand Radar Mode is more difficult than Pointer Mode, because the target in Radar Mode will be shown with up side = north. In Pointer Mode the pointer is always relative to where Lara is looking. In Pointer Mode when the pointer is on the red sign this means Lara is looking at the target, while in Radar Mode it is advisable that Lara looks North to understand if targets are on her left or right.
16 $0010: DTF_REQUIRED_ITEMThe Detector will only work if Lara picked it up, or she has it from the start of the level in the Inventory
1 $0001: DTF_SWINGING_POINTERThis flag only works in Pointer Mode.By default the pointer points to the target. This flag adds a swinging simulation to the pointer like the compass in the Inventory to get a more realistic detector.
Page 311
TOMB RAIDER NEXT GENERATION SCRIPT REFERENCE MANUAL
EDGX_ constants
1 $0001: EDGX_CONCISE_SCRIPT_LOGUsed in the Diagnostic Type script command.Add this flag in the Extra field of the Diagnostic Type command to create a shorter debugging log.When this flag is omitted the log will be very large with messages about false conditions, frame for frame. If this full log is too much create a concise log with the EDGX_CONCISE_SCRIPT_LOG flag.
8 $0008: EDGX_LARA_CORD_IN_LOGUsed in the Diagnostic Type script command.This extra flag only works when the DGX_LARA is enabled to have Lara 's data (animations, state Ids) on the screen. If the EDGX_LARA_CORD_IN_LOG is added in the ExtraDgxFlags of the Diagnostic Type command. the log will show the coordinates of Lara.
2 $0002: EDGX_SLOW_MOTIONUsed in the Diagnostic Type script command.Use this flag with any combination of the DGX_ diagnostic type.Slow down the frame rate in the game by using the F11 key.
Press F11 once to enable the slow-motion. To have an extreme slow motion press the F11 key again.To disable the slow-motion hit the ESC key.
The slow motion is useful to study custom animations or other dynamic movements where you want to view all details of the action.
4 $0004: EDGX_SWAP_VIEWUsed in the Diagnostic Type script command. Use this flag to enable a change of view when the F12 key is pressed. The view is from the direction where Lara looked. This feature is useful to study an animation or mesh of Lara that is not visible from the back view.
Page 312
TOMB RAIDER NEXT GENERATION SCRIPT REFERENCE MANUAL
EF_ constants
32 $0020: EF_DOUBLE_DOORUsed in the Elevator command.Do Not confuse this flag with EF_SINGLE_DOOR or EF_MULTI_DOORS.Those flags specify the number of doors to use. If a single door or multiple doors move up and down with the elevator and there a door one for each floor, the double door specify the TYPE of single (or multi) door.
The double door is a door composed of two separate doors. The double door is able to cover two sectors width, like the width of the elevator. The reason to use this flag is to have two doors opening at the same time when the elevator reaches a floor to be able to cover the width of the elevator. This flag has been added to the target and it requires some attention to make it work correctly. If the EF_DOUBLE_DOOR flag is set, it is necessary that the secondary door has a NGLE index higher by 1 from the main door.
The "main" door has the index typed in the Elevator= command. The "secondary" door is the door paired to the main door to open and close at the same time. This second door has to have an index exactly +1 of the main door. For example, if the main door on the first floor in a multi-door elevator has an index = 23, the secondary door should have an index = 24 (+1 of main door).If this rule is violated the double doors will not work in the game. If there is a problem to having two consecutive indices use this simple trick: Place a door in a free zone of your room, this zone is not in front of the elevator, it will only be a "store" temporary zone. Continue to place doors in this zone, checking the index assigned from NGLE for each new door. When there are two doors with consecutive indices delete the two doors and place the two doors in the correct position in front of the elevator. Place other double doors for the other floors of the elevator if there is a multi-door elevator. When the placement of the double doors is completed, come back to the temporary zone and delete all of the doors placed to realize this trick.
Remark: If a "single-door" animating is used to place a door with the correct collisions, the behaviour of this animating door will be different according to the use of the EF_DOUBLE_DOOR flag.
If the EF_DOUBLE_DOOR flag is missing the animating door will be moved sliding in an internal direction, i.e. the door will open moving the door over the other panel of the elevator. When the EF_DOUBLE_DOOR flag is used, the two doors will be opened with an external movement: the left door will be moved to the left, while the right door will be moved to the right. For animating doors use the rule of consecutive indices: the secondary door should have the index of main door plus one. In the case of animating double doors it is also important that the two doors should have the same orientation (facing). Another rule about animating doors is that the door set as the main door (the index you type in Elevator command), should be the door on the left of the elevator, looking at the elevator from the door side. This last rule is not important when you use real doors.
Page 313
TOMB RAIDER NEXT GENERATION SCRIPT REFERENCE MANUAL
4 $0004: EF_INNER_KEYPADTo insert the keypad to choose the floor inside the elevator and in NGLE place the keypad oriented on the elevator wall. Type the index of the keypad in the InnerKeyPadIndex field.
Remember to use the "fake" keypad found in ANIMATING16_MIP of ng.wad or ng2.wad and not the real keypad in SWITCH_TYPE1. The reason for this choice is given by a technical problem: the SWITCH_TYPE requires a switch trigger to work, but the elevator floor has dummy triggers and for this reason it is not possible place both special triggers in some sectors. The management of "fake" keypad (of ANIMATING16_MIP) will be performed in the hard-coded mode by the TRNG engine. The keypad will work in the same way with SWITCH_TYPE1 but with no need of a special trigger to handle it.
16 $0010: EF_MODE_STOP_AND_GOSTOP_AND_GO mode is similar to YO_YO mode, but in this case the elevator stops and stays for some time (2 seconds for an elevator with no doors, 3 seconds for an elevator with doors) at each floor. Use STOP_AND_GO mode and place the doors (multi or single) and set a number of floors. STOP_AND_GO mode may hurt Lara (like all elevators)
8 $0008: EF_MODE_YO_YOYO_YO mode is a elevator that will move UP and DOWN endlessly without any stops at floors.Using this mode doors cannot be used, because there is no time to open and close them. Lara will have to jump in and out of the elevator. An interesting application of YO_YO mode is to give elevators the role of a trap, because if Lara is touched by the elevator she will be killed if she is under the elevator moving down, or over the elevator when it moves up and above Lara there is a ceiling or she is "disturbed" climbing the wall when the elevator touches her.
Remarks:1) YO_YO mode and STOP_AND_GO mode cannot be mixed together.2) If the elevator is set for YO_YO mode the number of floors will always be two (2) and the distance between floors will be the height of the whole movement that the elevator covers before changing direction.
1 $0001: EF_MULTI_DOORSFor the TRNG engine to handle all doors on any floor set this flag and then set in the IndexFirstDoor the index of the door on the first floor. The management of the TRNG engine is very simple. When the elevator reaches a floor the door on that floor will be opened. When the elevator leaves a floor the door on that floor will be closed. If multi-doors handling is used it is important to place all doors in the project at the same vertical distance set in the ClickFloorDistance field. It is important, because if a door is placed at a different distance that door will be not found by the TRNG engine. Practically place each door at the same height where the elevator will stop, floor for floor.
0 $0000: EF_NONE
Page 314
TOMB RAIDER NEXT GENERATION SCRIPT REFERENCE MANUAL
2 $0002: EF_SINGLE_DOORIf a single door mode is used set the flag.In single door mode the elevator has a single door linked with the elevator cage. This door will move up and down with the elevator movement. When the elevator reaches a floor the door will be opened. When the elevator leaves a floor the door will be closed. If a flag is set type in the FirstDoorIndex field the index for the door placed near the elevator.
Remark: Use a "fake" door found in the slot Animating2 in the ng2.wad This animating will be moved, sliding horizontally like a door by the TRNG engine. If the single-door mode is used set its index in the FirstDoorIndex field. There is a reason to use a fake door like this: when a real door is used,in fact, in some circumstances (it depends by door type and by position of door with respect to rooms linking) the engine will add an invisible sector collision in front of the door when it is closed.
ENABLED1 $0001: ENABLED
Page 315
TOMB RAIDER NEXT GENERATION SCRIPT REFERENCE MANUAL
ENV_ constants
48 $0030: ENV_ANIM_COMPLETEWorks on the current animation of Lara, the condition is true only if the current animation is at the last frame.
32 $0020: ENV_CLIMB_LEFT_IN_CORNERVerify if Lara is near to at an internal corner on the left. See the description of ENV_HANG_LEFT_IN_CORNER constant to understand the difference between internal and outside corners.
33 $0021: ENV_CLIMB_LEFT_OUT_CORNERSame meaning as the ENV_CLIMB_LEFT_IN_CORNER but for the outside corner.
36 $0024: ENV_CLIMB_LEFT_SPACEWorks like ENV_HANG_LEFT_SPACE but it should be used when Lara is in climb mode
34 $0022: ENV_CLIMB_RIGHT_IN_CORNERSame meaning as the ENV_CLIMB_LEFT_IN_CORNER but for the right side.
35 $0023: ENV_CLIMB_RIGHT_OUT_CORNERSame meaning as the ENV_CLIMB_RIGHT_IN_CORNER but for the outside corner.
37 $0025: ENV_CLIMB_RIGHT_SPACEWorks like the ENV_HANG_RIGHT_SPACE but it should be used when Lara is in climb mode
7 $0007: ENV_CLIMB_WALL_AT_LEFTCondition is true when the specific wall in the same sector with Lara is climbable.
6 $0006: ENV_CLIMB_WALL_AT_RIGHTCondition is true when the specific wall in the same sector with Lara is climbable.
16 $0010: ENV_CLIMB_WALL_BACKCondition is true when the specific wall in the same sector with Lara is climbable.
5 $0005: ENV_CLIMB_WALL_IN_FRONTCondition is true when the specific wall in the same sector with Lara is climbable.
58 $003A: ENV_CONDITION_TRIGGER_GROUPThis ENV condition allows a Trigger Group to perform when an exported condition is true In the DistanceForEnv type the IdTriggerGroup to check. If the final condition of the Trigger Group is true the ENV condition for the Animation command is true.
31 $001F: ENV_DISTANCE_CEILINGCondition is true if the distance from Lara to the ceiling is greater or equal to the value typed in the DistanceForEnv.
Page 316
TOMB RAIDER NEXT GENERATION SCRIPT REFERENCE MANUAL
For example: Type in the DistanceForEnv the value $300 (3 clicks). The condition will be true if the coordinate Y of Lara (on her feet when she is standing up) is 3 clicks or more
from the ceiling in the current sector.
64 $0040: ENV_DISTANCE_EAST_WALLUsed in the Animation command. This condition will verify if there is a wall within the DistanceForEnv field to the East of Lara.
39 $0027: ENV_DISTANCE_FLOORVerify if the distance between Lara and the floor is greater or equal to the value set in the DistanceForEnv field
Remark: For the opposite condition, i.e. the distance from the floor is less or equal to the DistanceForField add to the ENV_DISTANCE_FLOOR the special flag ENV_NON_TRUE. This method works for all other conditions where it is required to invert the condition.
62 $003E: ENV_DISTANCE_NORTH_WALLUsed in the Animation command. This condition will verify if there is a wall within the DistanceForEnv field to the North of Lara.
WARNING: This condition works in an absolute way looking only at the cardinal point, ignoring the current facing of Lara so it should only be used with other ENV conditions to apply to a specific room in a hard-coded way. This condition considers a "wall" on any floor higher than the current position of Lara..
63 $003F: ENV_DISTANCE_SOUTH_WALLUsed in the Animation command. This condition will verify if there is a wall within the DistanceForEnv field to the South of Lara..
65 $0041: ENV_DISTANCE_WEST_WALLUsed in the Animation command. This condition will verify if there is a wall within the DistanceForEnv field to the West of Lara.
71 $0047: ENV_ENEMY_SEE_LARAUsed in AnimationSlot commandIt checks if the current enemy is able to see Lara.In the DistanceForEnv field type the angle of view of the enemy.Type the view angle in degrees, where 180 means the enemy is able to control an emicycle in front of him. If you type 360 this means that the facing (orienting of enemy) will not be used to verify the chance to see Lara but only the presence of obstacles (walls, items) in the line between the enemy and Lara. A reasonable value for the human view angle is 160 degrees.
Remark: The angle of view works for the horizontal view. The vertical view will use the prefixed value of 90 degrees. This means that if Lara is higher or lower than an enemy he will not be able to see her. Another prefixed limitation is the distance. The enemy will never be able to see Lara when she is at 0 sectors or too far away.
Page 317
TOMB RAIDER NEXT GENERATION SCRIPT REFERENCE MANUAL
45 $002D: ENV_FLOATINGPerforms an animation only if Lara is floating over the water surface
50 $0032: ENV_FLYING_DOWNPerform an animation only when Lara is jumping and she is in a fall down phase
49 $0031: ENV_FLYING_UPPerform an animation only when Lara is jumping and she is in an upward phase
40 $0028: ENV_FRAME_NUMBERSet in the StateId Animation array a negative number for the current animation to specify the precise frame when the condition will be true.
For example: For a special animation to start only when Lara is performing frame number 21 of the animation 325, type "-325" in the state-Id animation array (last field of Animation command) and set frame 21 in the envelope condition ENV_FRAME_NUMBER while in the DistanceForEnv field type 21.
43 $002B: ENV_FREE_HANDSThe animation will only be started when Lara has no object in her hands. If she is taking weapons, crowbar or she is hanging on wall, climbing or monkey swinging the animation will NOT be performed
Note: This flag ignores the flare, because when Lara has it in her hand the game engine considers Lara has free hands.
25 $0019: ENV_HANG_LEFT_IN_CORNERVerify if Lara is near to a corner on her left when she is in hang mode. In the DistanceForEnv type the minimum distance from the corner for the condition to be true.
Remark: The "_IN_" means internal corner. The internal corner are found inside a box, while the "_OUT_" (outside) corners are outside a box.
26 $001A: ENV_HANG_LEFT_OUT_CORNERSame meaning as the ENV_HANG_LEFT_IN_CORNER but for an Outside corner. See the description of the ENV_HANG_LEFT_IN_CORNER for more information about internal and outside corners.
29 $001D: ENV_HANG_LEFT_SPACEVerify if there is space on the left of Lara in hang mode. In the DistanceForEnv type the space required on the left for a true condition.
Remark: A value cannot be specified for the distance that passes over the current sector. If the value is too big the TRNG engine will reduce it to reach the left border of the current sector.
Page 318
TOMB RAIDER NEXT GENERATION SCRIPT REFERENCE MANUAL
27 $001B: ENV_HANG_RIGHT_IN_CORNERThe Same meaning as the ENV_HANG_LEFT_IN_CORNER but for the right side. See the description of the ENV_HANG_LEFT_IN_CORNER constant.
28 $001C: ENV_HANG_RIGHT_OUT_CORNERSame meaning as the ENV_HANG_RIGHT_IN_CORNER but for the outside corners. See the description of the ENV_HANG_LEFT_IN_CORNER constant
30 $001E: ENV_HANG_RIGHT_SPACESame as the ENV_HANG_LEFT_SPACE but for the right side. See the description of the ENV_HANG_LEFT_SPACE for more information.
2 $0002: ENV_HANG_WITH_FEETTo use only when Lara is hanging on the wall corner. The condition is only true when the wall where Lara hangs is high enough. In the Distance field change the height of the wall. The default value is $300 (3 clicks) but in some circumstances it is better to use a lower Distance value, like $200 (2 clicks)
57 $0039: ENV_HOLD_EXTRA_ITEM_IN_HANDSThe condition is true when Lara holds in her hands the HOLD_... item typed in the Extra field.See the HOLD_ constants in the Mnemonics Section.
9 $0009: ENV_HOLE_BACK_CEILING_CLIMBUse the condition only when Lara is monkey swinging on the ceiling and an animation is to be created so that Lara can pass from the current ceiling to a higher climbable wall, passing directly from the ceiling to a climbable wall.
13 $000D: ENV_HOLE_FLOOR_AT_LEFTThe condition is true when there is a hole on the left, i.e. a zone where Lara is able to go down or fall. In the Distance field set the depth of the hole.
12 $000C: ENV_HOLE_FLOOR_AT_RIGHTThe condition is true when there is a hole to the right, i.e. a zone where Lara is able to go down or fall. In the Distance field set the depth of the hole.
14 $000E: ENV_HOLE_FLOOR-BACKThe condition is true when there is a hole behind Lara, i.e. a zone where Lara is able to go down or fall. In the Distance field set the depth of the hole.
3 $0003: ENV_HOLE_FLOOR_IN_FRONTThe condition is true when there is a hole in front of Lara, i.e. a zone where Lara is able to go down or fall. In the Distance field set the depth of the hole.
8 $0008: ENV_HOLE_IN_FRONT_CEILING_CLIMBUse this condition only when Lara is monkey swinging on the ceiling and an animation is to be created so that Lara can pass from the current ceiling to a higher climbable wall, passing directly from the ceiling to a climbable wall.
Page 319
TOMB RAIDER NEXT GENERATION SCRIPT REFERENCE MANUAL
52 $0034: ENV_IN_LEFT_SIDE_SECTORThis condition checks only the position of Lara with respect to the current sector. If Lara is near to the left border of the current sector the condition is true. This means the condition is true when Lara is (virtually) touching with her left arm the wall in the sector on the left. In the DistanceForEnv fields change the compute for distance. If a big value is set the condition is true when Lara is not close to the left border of the current sector. If a small value is set the condition is only true when Lara is close to the left border of the current sector.
Remark: Use this condition together with others because alone it is not very useful. It does not check if the sector on the left of the current sector has a wall that Lara could touch. So use this condition with the [ENV_NON_TRUE+ENV_NO_BLOCK_AT_LEFT] condition to verify if Lara could touch the wall on the left side.
Remark: The default value for DistanceForEnv is 128 (1024 = one sector), this is a good value to compute touching of the left wall when Lara is in the stand up position. Type IGNORE in the DistanceForEnv field for a default value of 128.
53 $0035: ENV_IN_RIGHT_SIDE_SECTORThis condition works in a similar way to the ENV_IN_LEFT_SIDE_SECTOR condition but in this case it works for the right side. Read the description of the ENV_IN_LEFT_SIDE_SECTOR constant to understand the logic of this condition.
47 $002F: ENV_IS_STILLPerform an animation only when Lara has no horizontal or vertical speed
54 $0036: ENV_ITEM_EXTRA_AT_LEFTThis condition works like the ENV_ITEM_EXTRA_IN_FRONT but it analyses for an item at the left of Lara. Insert the slot for the wanted item in the Extra field and the distance in the DistanceForEnv field.
55 $0037: ENV_ITEM_EXTRA_AT_RIGHTThis condition works like the ENV_ITEM_EXTRA_IN_FRONT but it analyses for an item at the right of Lara. Insert the slot for the wanted item in the Extra field and the distance in the DistanceForEnv field.
21 $0015: ENV_ITEM_EXTRA_IN_FRONTVerify if there is an object (moveable) with a slot number equal to the number set in the ExtraSlot field of the Animation command. In the DistanceForEnv field type the distance where the object is wanted. (1024 = sector).
22 $0016: ENV_ITEM_EXTRA_OVERSimilar to the ENV_ITEM_EXTRA_IN_FRONT but in this case the object should be over Lara on the same sector. In the DistanceForEnv field type the height above Lara. See the description of the ENV_ITEM_EXTRA_IN_FRONT for more information.
Page 320
TOMB RAIDER NEXT GENERATION SCRIPT REFERENCE MANUAL
23 $0017: ENV_ITEM_EXTRA_UNDERSimilar to the ENV_ITEM_EXTRA_OVER but in this case the object sis below Lara. If the DistanceForEnv field is set to 0 the object is near to the feet of Lara.
56 $0038: ENV_ITEM_TEST_POSITIONThis condition is used to detect if there is an object of given TestPosition in the correct position with respect to Lara.
The ENV_ITEM_TEST_POSITION has the same target in the ENV_ITEM_EXTRA_.... conditions but in this case it can accurately compare for an item in any position with respect to Lara and in absolute precise mode. The other ENV conditions have some problems to detect the exact distance when the pivot of Lara and the item are different. To use the ENV_ITEM_TEST_POSITION type in the script a "TestPosition=" script command with all the necessary data for the detection and then type in the DistanceForEnv field of Animation= or MultEnvCondition= commands the IdTestPosition (first argument of TestPosition).
Remark: The ENV_ITEM_TEST_POSITION condition (like the other ENV_ITEM_EXTRA_condition) is limited to check only for items in the same room as Lara. To detect an item in a room away from Lara set in the TestPosition command the flag TPOS_TEST_ITEM_INDEX.. Set in the Slot field of TestPosition an index of a specific item instead of a generic slot type.
See the Test Position script command in the NG NEW SCRIPT COMMANDS Section.
66 $0042: ENV_LARA_IN_MICRO_STRIPUsed in the Animation commandThis environment condition works in a similar way to the ENV_POS_STRIP_1/2/3 flags, but (IMPORTANT) remember that it is a condition and not an ENV_POS flag so it cannot add the ENV_LARA_IN_MICRO_STRIP value to another ENV_ condition. Place this ENV_LARA_IN_MICRO_STRIP condition in a MultEnvCondition script command and add to this condition an ENV_POS_ flag like the ENV_POS_HORTOGONAL flag.
The ENV_LARA_IN_MICRO_STRIP allows with respect to the ENV_POS_STRIP_1/2/3 flags a best fine precision, since the ENV_POS_STRIP_1/2/3 flags can choose between three "fat" strips, while the ENV_LARA_IN_MICRO_STRIP can choose any specific range within the sector where Lara should be to get a true for this condition.
When the ENV_LARA_IN_MICRO_STRIP condition is used type in the DistanceForEnv field the range (minimum and maximum) in micro-strips units where Lara should be enclosed. The value to type in the DistanceForEnv field is given by the following formula: Max*256 + MinWhere Min and Max have values in the range 0 to 31. Practically imagine a sector divided by 32 strips in the direction where Lara is looking and choose in what range of 32th strips should give a true condition for Lara.
For example: To have Lara close to the outside border for a condition to touch a wall in the next sector choose the range 0 to 2, the condition is true when Lara is in 0,1 or 2 micro strip.
Remember that the first strip (value= 0) is close to the border where Lara is looking, while the last
Page 321

TOMB RAIDER NEXT GENERATION SCRIPT REFERENCE MANUAL
strip (value = 31) is close to the border at the back of Lara.
4 $0004: ENV_MONKEY_CEILINGThe condition is true when Lara is below a monkey ceiling. In the Distance field set the range of the distance of the monkey ceiling. The Distance is given by the formula : MinClick + MaxClick * 256
For example: For the condition to be true when the monkey ceiling is in the range 5 clicks to 7 clicks type in the distance field the value (7*256 + 5) = 1797
Remark: In hexadecimal (with '$' sign) it is easier to understand the Min and Max value. For example the number 1797 in hexadecimal is $0705 where the Max click is ("07) and the Min click is ("05"). If Lara is under the monkey ceiling but the height is outside the range set in the distance field the condition will be FALSE and the animation will not be performed.
24 $0018: ENV_MULT_CONDITIONThis signals a multiple condition. The effective ENV condition flags are stored in a MultEnvCondition script command. In the DistanceForEnv field type the Id of the MultEnvCondition command that will be used. The final condition will be true only if all the conditions in the MultEnvCondition command are true at the same time.
To set in the animation command two ENV conditions, like: ENV_CEILING_HEIGHT with a height distance ENV = $300 (3 clicks) + another condition:
ENV_HOLE_FLOOR_AT_LEFT with depth (distance ENV) = $400 (4 clicks)
create this Multi Envelope Condition command:
MultEnvCondition= 1, ENV_CEILING_HEIGHT, $300, ENV_HOLE_FLOOR_AT_LEFT, $400
and then type in the Animation command the reference Id of the above MultEnvCondition (1) and the ENV_ condition: ENV_MULT_CONDITION
For example: Animation=447, KEY1_LEFT, IGNORE,IGNORE,ENV_MULT_CONDITION, 1,IGNORE,-445, -448
38 $0026: ENV_MULT_OR_CONDITIONWorks like the ENV_MULT_CONDITION but the final condition will be true if a single condition of the Multi Envelope Condition command is true. See the description of the ENV_MULT_CONDITION for more information.
11 $000B: ENV_NO_BLOCK_AT_LEFTThe condition is true only if there is no wall in the sector on the left of Lara.In the Distance (next field) type the height of the wall. See the DistanceForEnv field
10 $000A: ENV_NO_BLOCK_AT_RIGHTThe condition is true only if there is no wall in the sector on the right of Lara.In the Distance (next field) type the height of the wall. See the DistanceForEnv field
Page 322
TOMB RAIDER NEXT GENERATION SCRIPT REFERENCE MANUAL
15 $000F: ENV_NO_BLOCK_BACKThe condition is true only if there is no wall in the sector behind Lara.In the Distance (next field) type the height of the wall. See the DistanceForEnv field
1 $0001: ENV_NO_BLOCK_IN_FRONTPerform a special animation only if Lara has NO block in front of her face. In the DistanceForEnv field set the height of the block.
For example: To set 1024 (height of one sector) the TRNG engine will consider true the condition "no block in front" if the floor hight in front of Lara is less than 1024 units with respect to the current floor where Lara is standing. If the floor in front of Lara is higher than 1024 units a block will be detected in front of Lara.
68 $0044:: ENV_NO_BOX_AT_LEFTUsed in the AnimationSlot commandCheck to the left of the current enemy for NO grey box sector.See the description of the ENV_NO_BOX_IN_FRONT constant for more information.
69 $0045: ENV_NO_BOX_AT_RIGHTUsed in the AnimationSlot commandCheck to the right of the current enemy for NO grey box sector..See the description of the ENV_NO_BOX_IN_FRONT constant for more information.
70 $0046: ENV_NO_BOX_BACKUsed in AnimationSlot commandCheck to the back of the current enemy for NO grey box sector.See the description of the ENV_NO_BOX_IN_FRONT constant for more information.
67 $0043: ENV_NO_BOX_IN_FRONTUsed in the AnimationSlot commandCheck to the front of the current enemy for NO grey box sector.This condition detects the gray boxes used in NGLE to stop the moving of enemies. In the DistanceForEnv field set the distance to check in front of the enemy.The "BOX" are the gray box sectors placed in NGLE to inhibit the enemies movement. See the TRLE Manual.
Note: The _NO_BOX_ conditions should be used with the AnimationSlot command on some enemy. The usage with Lara is theoretically possible but not very useful.
128 $0080: ENV_NON_TRUEInvert the current ENV condition. Add this value to an ENV condition when to make the condition true when it is false and vice versa.
Page 323
TOMB RAIDER NEXT GENERATION SCRIPT REFERENCE MANUAL
For example: Looking at the ENV conditions find the ENV_NO_BLOCK_IN_FRONT condition. If this is used on its own it means "perform the special animation only if Lara has NO Block in front of her face". To perform an animation requiring a block in front of Lara use the same condition (ENV_NO_BLOCK_IN_FRONT) linked with + ENV_NON_TRUE to invert the condition.
In this combination (ENV_NON_TRUE + ENV_NO_BLOCK_IN_FRONT) there is a double negative that means: "when Lara HAS a block in front.. . perform the special animation".Add the ENV_NON_TRUE flag to any ENV condition and remember that the ENV_NON_TRUE flag has NO effect on the ENV_POS ... flags.
42 $002A: ENV_ON_VEHICLEBy default the start of the animation cannot happen if Lara is driving a vehicle. To create a new animation for Lara while she is on a vehicle use this ENV condition and type in the Extra field the Slot number of the vehicle.
Remark: The name of the slot cannot be put in the Extra field. Input the number read on the left of the slot name in the Slot moveable list.
46 $002E: ENV_ONLANDPerform an animation only if Lara is on land
60 $003C: ENV_PLAYER_IS_SLEEPINGUsed in the Animation= command.This is an original condition. Practically it verifies how much time there is between keyboard commands.
Type in the DistanceForEnv field the number of tick frames (one second= 30 tick frames) required to enable this condition.
For example: For a true condition when the player does not perform a game command for 3 seconds, type in the DistanceForEnv field the value 90 (because 3 * 30 = 90). This condition could be used to start an animation in stand-by mode, i.e. when the player is not active (no keyboard signals). The Standby animation could be Lara scratches her head, or turns her face to look at the player saying: "Are you sleeping?"
To use this animation in standby mode remember to set in this animation a state Id different from the standard state-Ids. For example, use the state Id STATE_CONTROLLED to avoid a new game command causing a bad change between a current custom animation and a new standard animation. Using the state Id neutral, the new animation will be performed until Lara comes back to a standard state Id.
Create an animation with a state Id = STATE_CONTROLLED and as a next animation the default animation of still stand-up. Create a custom animation where Lara starts from a stand-up position, performs this move and then come back to the stand-up animation with the next animation having the standard stand-up animation.
Page 324
TOMB RAIDER NEXT GENERATION SCRIPT REFERENCE MANUAL
61 $003D: ENV_PLAYER_WOKE_UPUsed in the Animation= command.This ENV condition is the opposite of the ENV_PLAYER_IS_SLEEPING. It happens when there is any game command. In the ENV_PLAYER_IS_SLEEPING description is a way to create a stand-by animation for death times in the game. There is also another method and it is this situation you need for the ENV_PLAYER_WOKE_UP.
To perform a custom animation when there is no game commands (player is sleeping) put Lara in a new position in continue mode. For example, she sits down and waits. In this situation, since you used a non-standard state-Id, no keyboard command will be accepted, so it should be your Animation command and condition the ENV_PLAYER_WOKE_UP, to force another custom animation having the target move Lara from the sit down position to the stand-up position. In this new animation set the next animation, the standard still stand-up animation. Lara will now be able to receive game commands . In the game the player could see this little show: Lara (bored) sit down and look left and right then, when the player hits a game command, for example the JUMP. Lara will not jump, but she will come back to a stand-up position and if the player hits the jump key (or another commands) she will come back to respond to these commands.
ENV_POS_CENTRAL Please do not confuse this flag with the previous ENV_POS_IN_THE_MIDDLE.
The ENV_POS_CENTRAL works fine together with some ENV_POS_STRIP.. field, to set a central position in the specific strip you choose.While the ENV_POS_IN_THE_MIDDLE cannot be used with the ENV_POS_STRIP because that flag sets the position in the sector (at the centre).
1024 $0400: ENV_POS_CENTRAL
2048 $0800: ENV_POS_HORTOGONALHortogonal means :non diagonal. For many animation it is necessary that Lara is facing a wall otherwise she will be not able to climb, hang etc. Add this ENV_POS flag and the condition will be FALSE if Lara is diagonal to the wall lines.
4096 $1000: ENV_POS_IN_THE_MIDDLELara is (almost) exactly at the centre of the current sector. This is the position for Lara when she is able to jump over a rope, for example.
256 $0100: ENV_POS_LEFT_CORNERWorks like the ENV_POS_RIGHT_CORNER but for the left side. See the description of the ENV_POS_RIGHT_CORNER for more information.
512 $0200: ENV_POS_RIGHT_CORNERThis condition is true when Lara is in the right corner of the current sector using as a reference the direction where she is looking.
Page 325
TOMB RAIDER NEXT GENERATION SCRIPT REFERENCE MANUAL
32768 $8000: ENV_POS_STRIP_1Lara is in the first (more forward) strip of three ideal strips of the current sector in respect where she is looking. Use this flag if you want Lara to be near a switch or door or other items attached to a wall in front of her.
Remark: Add to the current ENV condition one or more ENV_POS_ flags to specify the position of Lara with respect to the current sector.
16384 $4000: ENV_POS_STRIP_2Like the above, but in this case Lara is in the middle strip of three stripes of the current sector. See the description of the ENV_POS_STRIP_1 for more information.
8192 $2000: ENV_POS_STRIP_3Like the above, but in this case Lara is in the third strip. See the description of the ENV_POS_STRIP_1 for more information.
59 $003B: ENV_ROOM_ISUsed in the Animation= command.This condition checks if the current room (where Lara is) is the same number typed in the DistanceForEnv field. Using this condition a custom animation can be created that will work in a room for the level. To check for more than one room insert the ENV_ROOM condition list in a MultEnvCondition command. Type one of the ROOM_... constants to test if Lara is in the wanted room type. See the ROOM_constants in the Mnemonics Section.
Remark: In the DistanceForEnv type the room number to check.
20 $0014: ENV_SUPPORT_IN_BACK_WALLSee the description for the ENV_SUPPORT_IN_FRONT_WALL
17 $0011: ENV_SUPPORT-IN_FRONT_WALLAll the ENV_SUPPORT_... check where Lara could hang on the wall in front (or back, left, right) Use this condition to start an animation where Lara jumps and hangs on a wall in front of her. Verify if there is a wall with the correct height in front of Lara.
For example: By default the TRNG engine allows Lara to hang on a wall if it has a height in the range 4 clicks to 7 clicks. If the wall is higher (from 8 clicks) Lara will not be able to hang with an up jump. To set the same condition insert in the Distance for ENV_ field this value: $0174
For the ENV_SUPPORT condition the distance ENV is complex..
The values to set are: The minimum acceptable height (4 clicks in the example)The maximum acceptable height (7 clicks in the example)The minimum space over the support to place Lara hands (1 click)
The formula is: MinHeight + MaxHeight*16 + ClickSPace * 256
Page 326
TOMB RAIDER NEXT GENERATION SCRIPT REFERENCE MANUAL
In decimal this value is : 4 + 7 * 16 + 1*256 = 372
The hexadecimal format it is easy to understand the position of each sub-field: 372 decimal = $174 in hexadecimal. i.e. in hexadecimal the digits are:
$0BCA where: 'A' is click of minimum height required'B' is click of minimum height acceptable'C' is number of clicks of space over the support
Hexadecimal numbers use a single digit: 0, 1, 2, 3, 4, 5, 6, 7, 8, 9, A (10 decimal), B (11 decimal), C (12 decimal), D (13 decimal), E (14 decimal) and F (15 decimal).
Another example: To verify if Lara hangs and has enough space to move up over the new floor. Use a distance like $333 because: 3 clicks for minimum and maximum height because the support has to be in a specific position, i.e. where Lara 's hands are.
The value 3 is the distance from Lara 's feet.The last "3", is the space necessary for Lara to stand up.The above condition will be true only if the height of the space over the support where Lara hangs is at least 3 clicks high.
19 $0013: ENV_SUPPORT_IN_LEFT_WALLSee the description for the ENV_SUPPORT_IN_FRONT_WALL
18 $0012: ENV_SUPPORT_IN_RIGHT_WALLSee the description for the ENV_SUPPORT_IN_FRONT_WALL
44 $002C: ENV_UNDERWATERPerform the animation only if Lara is underwater
Page 327
TOMB RAIDER NEXT GENERATION SCRIPT REFERENCE MANUAL
41 $0029: ENV_VERTICAL_ORIENTSet a condition in accordance with the current vertical orientation of Lara. Normally Lara has zero vertical orientation but in some animations this value could change.
Set a condition about the current vertical orientation using the condition:
ENV_VERTICAL_ORIENT and set in the "DistanceForEnv" field the range of orienting values computed in this way: MinValue + MaxValue * 256
For example: To set a range from 3 to 8, type $83
Remark: For a range enclosing the zero (0) invert the maximum and minimum values.
For example: To enable a range accepting the following values: 13, 14, 15, 0, 1, 2, 3 type 13 minimum value and 3 maximum value, i.e. in hexadecimal: $D3 (D = 13)
51 $0033: ENV_WALL_HOLE_IN_FRONTThis condition works in a similar way to the ENV_SUPPORT_IN_FRONT_WALL condition, but in this case checks for a support in the front wall. The TRNG engine will also check the height of the hole in the wall to set the minimum and the maximum height limits for the hole.
Page 328
TOMB RAIDER NEXT GENERATION SCRIPT REFERENCE MANUAL
EXTRA_ constants
1 $0001: EXTRA_MUTANT_NO_LOCUSTSUsed in the Enemy= command.To customize the MUTANT slot with an Enemy script command to disable the swarm locust attack add this flag in the Extra field of the Enemy command.
1 $0001: EXTRA_TEETH_NO_DAMAGE_ON_WALKINGUsed in the Enemy= command.Enable the NO Damage for Lara when she moves slowly (walking). Set in the Extra field of Enemy= command with the TEETH_SPIKES slot. Lara will be able to walk in teeth spikes with no damage.
1 $0001: EXTRA_WRAITH_BURN_LARAUsed in the Enemy= command.Type in the Enemy script command to customize a Wraith slot. Enable this flag to burn Lara when a Wraith touches her.
Page 329
TOMB RAIDER NEXT GENERATION SCRIPT REFERENCE MANUAL
FADD_ constants
256 $0100: FADD_CONTINUE_EMITIf this flag is set the values in the DurateEmit and DuratePause will be ignored.Use this flag for effect types requiring a continuous emission, like Mist and flames.
32768 $8000: FADD_DURATE_ANIMATIONThis flag works in a similar way to the flag FADD_DURATE_STATEID, but in this case the value check for the condition emit/disable is the animation number.
4096 $1000: FADD_DURATE_SINGLE_FRAMEThis flag forces the emitting to only work for a single frame. Then the effect will be disabled. Only Blood can work with this flag.
4096 $1000: FADD_DURATE_STATEIDKeeps the effect active until a moveable is in the current state Id.Using this flag the time Durate set in the trigger window will be ignored and the effect will be removed only when the moveable changes its state Id with a value different from that used at the start of the effect.
4 $0004: FADD_FIRE_STRIPUsed in the AddEffect command.This flag is used together with the ADD_FLAME type.By default the ADD_FLAME shows a little fire, while if the FADD_FIRE_STRIP flag is used it will create a horizontal strip of fire like the flames shot from a dragon or from a air-jet (from the back using the FADD_ROTATE_180 flag).
2 $0002: FADD_IGNORE_STATUSUsed in the AddEffect command.By default the AddEffect trigger will ignore the command of the AddEffect if the moveable has not been enabled in the game or it has already been killed or removed. In some circumstance this compute could be wrong and with some special items the result could be to fail the adding effect operation.
For special items like some pick ups add the FADD_IGNORE_STATUS flag. Then the TRNG engine will ignore the status of the moveable and apply the effect if the item is invisible or disabled.
1 $0001: FADD_NO_SOUNDUsed in the AddEffect command. This flag disables the sound linked with effects like Mist or fire.
0 $0000: FADD_NONEIf no FADD_ constant is used set the FADD_NONE constant in the FADD field.
16384 $4000: FADD_ROTATE_180This works like the FADD_ROTATE_90 flag but using a rotation of 180 degrees. See the FADD_ROTATE_90 flag in the Mnemonics Section.
Page 330

TOMB RAIDER NEXT GENERATION SCRIPT REFERENCE MANUAL
2048 $0800: FADD_ROTATE_270This works like the FADD_ROTATE_90 flag but using a rotation of 270 degrees. See the FADD_ROTATE_90 flag in the Mnemonics Section.
8192 $2000: FADD-ROTATE_90The FADD_ROTATE flags are only used in circumstances when an effect type that uses the horizontal orientation of object to compute the direction of emitting. For example, for the Mist strip to be oriented to the side instead of in front of the object use the FADD_ROTATE_90 flag.
1024 $0400: FADD_SMOKE_EXHAUSTThis flag is only used to ADD_SMOKE effect. There are two different smoke emitters: the default is smoke that goes up and disappears, the other is the exhaust smoke seen with the JEEP or SIDECAR. For exhaust smoke set this flag.
16 $0010: FADD_VORIENT_180Used in the AddEffect command. This changes the vertical orientation of the moveable by 180 degrees before applying the compute of DispX, DispY, DispZ. See the description of the FADD_VORIENT_90 flag to understand the situation when this flag should be used.
32 $0020: FADD_VORIENT_270Used in the AddEffect command. This changes the vertical orientation of the moveable by 270 degrees before applying the compute of DispX, DispY, DispZ. See the description for FADD_VORIENT_90 flag to understand the situation when this flag should be used.
8 $0008: FADD-VORIENT_90Used in the AddEffect command. This flag rotates the item 90 degrees in a clockwise direction on the vertical axis.
This temporary change is useful with some moveables where the position of the meshes has a different vertical orientation with respect to the position in the first animation. This situation can be discovered by using Wad Merger and verifying the mesh when there is no animation selected.
It is important to understand that all FADD_VORIENT... flags are different from the FADD_ROTATE... flags, since the FADD_ROTATE flags are used to give a horizontal direction (facing) for those effects moving on an ideal line like the Mist strip or fire strip. The direction of effects cannot be changed by using the FADD_VORIENT flags but these flags can fix the bad vertical orientation of some moveables like the JEEP for example.
Page 331
TOMB RAIDER NEXT GENERATION SCRIPT REFERENCE MANUAL
FAN_ constants
2048 $0800: FAN_ALIGN_TO_ENV_POSFrom version 1.1.9.8 this FAN has new properties. When this flag is added and a valid ENV_POS_.constant flags is set in the Environment field (see following description) the position of Lara will be forced to the ideal position in accordance with the ENV_POS_ values before performing the custom animation.
For example: If the ENV_POS_HORTOGONAL is set before starting the special animation the Lara orientation will be aligned with the Hortogonal axis.
Remark: By default the alignment operation is poor, because the TRNG engine moves Lara to an ideal position without any progressive movement.
From versions 1.1.9.8, when the FAN_ALIGN_TO_ENV_POS is set in accordance with the ENV_ITEM_TEST_POSITION condition, there is a progressive self adjustment in the game like you see in the default tomb4 when Lara opens a door or pushes a pushable object. This feature will use the data set in the TestPosition command and extracts from it the ideal position to reach, using intermediate values for each difference range set. This feature does not work if Lara is performing a state Id different from the stand-up position or swimming underwater.
Warning: When the ENV_ITEM_TEST_POSITION is set and the FAN_ALIGN_TO_ENV_POS orientation information will be read from the TestPosition command, so further ENV_POS_constant flags added in the EnvCondition will be ignored.
128 $0080: FAN_DISABLE_GRAVITYThis flag works in a similar way to the FAN_ENABLE_GRAVITY but in this case it disables the gravity compute. See the description of the FAN_ENABLE_GRAVITY for more information.
16 $0010: FAN_DISABLE_PUSHAWAYUsed in the Animation command.If Lara is not to change her (and your) animation when she has been touched by enemies, add this flag. The push-away animation is a hard coded animation, where Lara suspends a previous animation and moves herself slowly while the enemy is pushing her away.These push-away animations have numbers: 125 126 127 128
Note: This flag disables the pushaway animation only when the animation of Lara is the same as set in the current Animation command. If an animation chain is used, where after the first animation there is another custom animation you could see Lara with a push-away animation while there is this second animation. To avoid this problem create another Animation command for the second animation with the FAN_DISABLE_PUSH_AWAY flag. The trick is that the other animation could never be performed but just uses a non existing stateid as a condition. Store the animation numbers about when the disabling push away animation for Lara is used.
Another method to solve the problem is to disable the push away animation forever and for all of Lara 's animations with the CUST_DISABLE_PUSH_AWAY_ANIMATION customize command.
Page 332
TOMB RAIDER NEXT GENERATION SCRIPT REFERENCE MANUAL
64 $0040: FAN_ENABLE_GRAVITYThis flag enables the gravity compute for the animation. When Lara is flying or falling the TRNG engine stores a flag to remember to apply the gravity rules. Some circumstances need to enable gravity for the animation by using this flag.
32 $0020: FAN_KEEP_NEXT_STATEIDThis is a very technical flag. My suggestion to use it or not is simply to try..At the start create an Animation command without using this flag, because it is more common not to use it. If you see that it does not work, try adding this flag to see the result. Technically use this flag when your animation is for a single execution and then Lara will come back to a standard animation. Do Not use this flag when the animation has to be performed in a loop like an upward jump and many other fluid animations.
8 $0008: FAN_KEYS_AS_SCANCODETo use the KeyBoard scan code in the Key1 and Key2 fields, add this flag FAN_KEYS_AS_SCANCODE in the FAN_ fields.
When you do not use this flag the value typed in the Key1 and Key2 fields will be interpreted like a Game command, i.e. mnemonic constants KEY1_.. and KEY2_...
Remark: This behaviour is the opposite from the first version of the NG_Center. In previous versions the flag is set to specify use in game commands but now the game commands are the default setting.
256 $0100: FAN_PERFORM_TRIGGER_GROUPThis flag changes the working mode of the Animation command. When this flag is added the value typed in the first field of the Animation command, i.e. the field named "AnimIndex", will be seen as an IdTriggerGroup to perform when all of the conditions set in the Animation command are true.
This means a custom animation could start by typing in a Trigger Group a flip effect to start a specific animation for Lara, adding in the same Trigger Group many other effects and then use an Animation command to start the Trigger Group when the player hits the correct key and all conditions are true.
In many circumstances it is required to perform a custom animation and then some special effect to change something in the game to add new skills to Lara. A way to realize this target is to create a custom animation where you set in some frame a NG AnimCommand to perform these "special effects" (i.e. exported triggers to perform somewhat). When the animation command starts the custom animation, the NG Animation will be performed and it could perform many changes in the game. Using the FAN_PERFORM_TRIGGER_GROUP flag you can get the same result in a different way. You can create a trigger group with many exported triggers to change some situation in game and then in same trigger group have a flip effect to perform the wanted custom animation. The difference between the two methods is that, using the Trigger Group method, you can perform something before the animation is started, while with NGAnimCommand in the custom animation these effects could only be done when the custom animation has been started.
Page 333
TOMB RAIDER NEXT GENERATION SCRIPT REFERENCE MANUAL
Remark: Theoretically you could not add any "perform animation" flip effect in the Trigger Group. Use the Animation command to perform some operations when the player hits some keystrokes.Remember to find a way to avoid the Trigger Group from continuously performing until the conditions are true. The TRNG engine uses a method to avoid multiple performing, so disable this Animation/Trigger Group until the key used to perform it is pressed. It is better if a trigger is placed in the Trigger Group to change some condition to avoid repetitions of the Trigger Group.
8192 $2000: FAN_RANDOMUsed by the Animation script command. Use this flag to perform different animations in a random way. Type in the Extra field the number of random animations.
For example: To perform one of the following animations: 512, 513 or 514, when all of the conditions in the animation command are true, type in the AnimIndex field the first animation 512, while in the Extra field type 3 to inform there is a block of three random animations, starting from animation 512. When all conditions are true the animation 512 or 513 or 514 will be performed. The target of this feature is to create a simulation of random events in animations for Lara. For example, to create a falling animation create different kinds of falling to choose in a random way.
4096 $1000: FAN_SET_ADDEFFECTAdd a particle effect when the animation is performed. Create an AddEffect= script command to specify what particle effect to use. Then add the current flag FAN_SET_ADDEFFECT in the FAN field and type the number of the AddEffect command in the Extra field of the Animation= command.
Remark: By default the effect will have an infinite duration. To override this setting use the correct flag in the AddEffect= command to have the DurateOfEffect only when some state Id or animation number is on.
1024 $0400: FAN_SET_BUSY_HANDSThis flag works in a similar way to FAN_SET_FREE_HANDS flag but with an opposite target.If this flag is used the animation will be performed and the TRNG engine will be informed that the hands of Lara are busy and she is not able to grab a wall.
Remark: This flag is rarely used because by default when the animation has the correct state-Id, for example climbing or monkey swinging the TRNG engine will set this flag itself.
1 $0001: FAN_SET_FREE_HANDSThe current flag FAN_SET_FREE_HANDS performs a specific action to inform the TRNG engine that the hands of Lara are free and she is able to hang, climb and pick up objects or weapons.
Remark: The operation to free hands will be performed ONLY if the special animation has been started.
Page 334
TOMB RAIDER NEXT GENERATION SCRIPT REFERENCE MANUAL
Use this flag only when a special animation starts from a position where Lara had busy hands, climbing, or hanging, but the animation moves her from a wall to do a jump. In this situation inform the TRNG engine she has free hands, otherwise Lara will not be able to grab or climb a wall after the jump.
512 $0200: FAN_SET_FREE_HANDS_TEMPThis flag works like the FAN_SET_FREE_HANDS but in this case it only sets the "Free Hands" status. The previous status (when Lara was hanging) will be restored at the end of the custom animation. The "free hands" is necessary when a custom animation is performed when Lara holds a weapon or torch. When "Free hands" is missing the arms of Lara will not follow the custom animation. Another difference about the old FAN_SET_FREE_HANDS is that the FAN_SET_FREE_HANDS_TEMP fixes a bug where the "free hands" command did not work when Lara held the Torch.
16384 $4000: FAN_SET_LARA_PLACEUsed in the Animation command. This FAN flag is be used when the custom animation moves Lara between two different places, like from "ground" to "water", or vice-versa. Type the new place where Lara should be at the end of the animation in the Extra field. Type one PLACE_ constant in the EXTRA field to set the new environment for Lara.
Remark: When an animation is created to move Lara between different places it is possible to add a standard [SetPosition] command to move Lara to a new position and also adjust the pivot position used in accordance with ground, underwater, floating etc.
4 $0004: FAN_SET_NEUTRAL_STATE_IDThis value forces the TRNG engine to change the real state-Id number of the animation, replacing it with a neutral state-Id. Use this FAN_ value when the special animation is stopped before reaching the last frame, because Lara is in a empty or has problems with collisions or status (water, falling, climbing). When an animation is performed with a neutral state Id (69 number) the TRNG engine checks for basic collisions but it does not perform any specific control about what Lara is doing and where she is.
2 $0002: FAN_START_FROM_EXTRA_FRAMETo start an animation from some specific frame number add the FAN_START_FROM_EXTRA_FRAME flag in the FAN_ field and type in the Extra field the frame number to begin the animation.
Page 335
TOMB RAIDER NEXT GENERATION SCRIPT REFERENCE MANUAL
FBAR_ constants
2 $0002: FBAR_SHOW_BAR_NAMEUsed in the Customize=CUST_BAR commandThis flag only works for the custom bars (BAR_CUSTOM1/2/3/4)Add this flag to the FBAR field of the customize command and the TRNG engine will draw the bar with the text under it.
The texts to use are prefixed: BAR_CUSTOM1 : Extra NG String with index = 301BAR_CUSTOM2 : Extra NG String with index = 302BAR_CUSTOM3 : Extra NG String with index = 303BAR_CUSTOM4 : Extra NG String with index = 304
For example: To add text for the BAR_CUSTOM1 add the FBAR_SHOW_BAR_NAME flag in the customize command for BAR_CUSTOM1 and the in the Extra NG list add text like this:
301: Jumping Power
The previous index text is removed when you click on the [Add string] button.
1 $0001: FBAR_SOUND_BAR_ANIMUsed in the Customize=CUST_BAR command. This flag creates floating colors in the current bar like the audio bar in the Options screen.
When using this flag type in the Extra field an IdColor (pointing to a ColorRGB= command) to set the mask color.
The audio bar works in a particular way: There is a floating effect using two colors, the Main Color (IdColor1) and the background color (IdColor2). The mask color will be used to paint the side of the bar.
For example: Use the flag with the BAR_HEALTH and Lara has 50 % Health Points, the left half of the bar will be colored with the Mask Color to differentiate the right (empty) half. The mask color does not fully paint the bar but it will be added to the current floating effect.
For example: Setting the Mask Color with RGB values 0,0,0 gives no difference between the left and right side of the bar because adding the 0,0,0 changes nothing. If the mask color is White with RGB values 255,255,255 the side of the bar will be white losing the floating effect. It is complicated to set a good mask color. Try a mask color where the RGB value is not 0 or 255.
For example: A color like: 128,128,128 (this is the default mask color if IGNORE is used in the Extra field), or 63,63,63 (used in tomb4 for the audio bar)
Page 336

TOMB RAIDER NEXT GENERATION SCRIPT REFERENCE MANUAL
FCAM_ costants
1 $0001: FCAM_DISABLE_COMBAT_CAMUsed in the Customize=CUST_CAMERA command.This flag disables the combat camera mode and it does not affect the automatic aiming feature. The arms of Lara will point to the furthest enemy, but the Chase camera or other camera mode that was working at the time is kept.
2 $0002: FCAM_INVISIBLE_LARA_ON_LOOK_CAMUsed in the Customize=CUST_CAMERA command.This flag makes Lara invisible when the player is using the Look camera.By default Lara is semi-transparent in that situation.
Page 337

TOMB RAIDER NEXT GENERATION SCRIPT REFERENCE MANUAL
FFL_ constants
2 $0002: FFL_ADD_FIREUsed in the Customize=CUST_FLARE command. Adds a little flame to the flare.
8 $0008: FFL_ADD_GLOW_LIGHTUsed in the Customize=CUST_FLARE command. Adds a colored light bulb to the flare.
Remark: The glow light has the same color set in the Customize=CUST_FLARE command.
4 $0004: FFL_ADD_SMOKE_TO_SPARKSUsed in the Customize=CUST_FLARE command This flag adds a little smoke when adding sparks to the flare. Practically this flag only has an effect when used with the FFL_ADD_SPARKS flag.
1 $0001: FFL_ADD_SPARKSUsed in the Customize=CUST_FLARE command. Adds emission Sparks to the flare.
16 $0010: FFL_FLAT_LIGHTUsed in the Customize=CUST_FLARE command. By default the flare light is blinking. To have a stable common light add this flag.
Page 338
TOMB RAIDER NEXT GENERATION SCRIPT REFERENCE MANUAL
FGT_ constants
8 $0008: FGT_DISABLEDBy default a Global Trigger works from the beginning of the current level until it is performed with a flag FGT_SINGLE_SHOT to disable it. The Global Trigger can be disabled at the start of the level and then enabled by using the flip effect "Enable/Disable the Global Trigger...".
8192 $2000: FGT_HIDE_IN_DEBUGUsed in the Global Trigger command.This flag does not change the behaviour of the Global Trigger at runtime but it removes the debugging messages in the debug mode (DGX_LOG_SCRIPT_COMMANDS diagnostic) for the Global Trigger. The reason to use this flag is when you are studying another script command and a Global Trigger continues to fill the log with messages you are not interested in.
2 $0002: FGT_NOT_TRUEUse this flag to invert the Global Trigger condition.
For example: To have a Global Trigger engaged when Lara is NOT poisoned type a Global Trigger command script like:
GlobalTrigger=1, FGT_NOT_TRUE, GT_LARA_POISONED, 0, ....
Remark: This flag does not affect the further Condition Trigger Group. In the Trigger Group there is a similar flag to invert the single condition triggers.
4 $0004: FGT_PUSHING_COLLISIONThis flag only works when used with Global Triggers: GT_COLLIDE_ITEM or GT_COLLIDE_SLOT
The TRNG engine computes three types of collision:
Bound Box Collision: This collision is easy to compute but not very precise. The TRNG engine compares two collision boxes for the current frame for both moveables and gives a positive esite if the two boxes are overlapped in some 3d space position. This is the default collision used for Global Triggers GT_COLLIDE_ITEM or GT_COLLIDE_SLOT.
Pushing item collision: This collision works like the Bound Box Collision but in this case it is necessary that an object pushes other object to give a positive esite. Theoretically this collision could be considered more precise than the common Bound Box Collision. If the FGT_MOVING_COLLISION flag is added the Global Trigger will use this type of "pushing" collision.
Mesh on Mesh collision: This is the most complex and precise computes for collisions: each mesh of the first moveable will be compared (using a sphere mesh) with each mesh of the second moveable to detect a collision. It is performed only in very rare circumstances
For example: A collision of Lara with some traps, like blades and swords.
Page 339
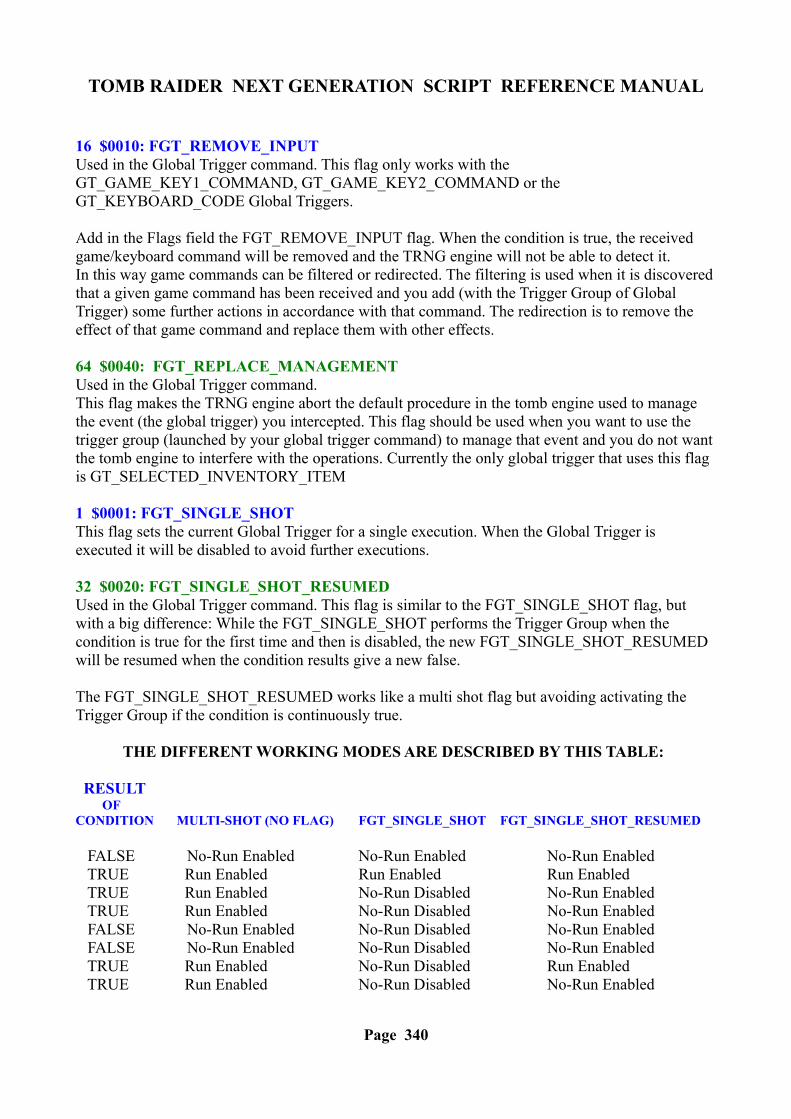
TOMB RAIDER NEXT GENERATION SCRIPT REFERENCE MANUAL
16 $0010: FGT_REMOVE_INPUTUsed in the Global Trigger command. This flag only works with the GT_GAME_KEY1_COMMAND, GT_GAME_KEY2_COMMAND or the GT_KEYBOARD_CODE Global Triggers.
Add in the Flags field the FGT_REMOVE_INPUT flag. When the condition is true, the received game/keyboard command will be removed and the TRNG engine will not be able to detect it.In this way game commands can be filtered or redirected. The filtering is used when it is discovered that a given game command has been received and you add (with the Trigger Group of Global Trigger) some further actions in accordance with that command. The redirection is to remove the effect of that game command and replace them with other effects.
64 $0040: FGT_REPLACE_MANAGEMENTUsed in the Global Trigger command.This flag makes the TRNG engine abort the default procedure in the tomb engine used to manage the event (the global trigger) you intercepted. This flag should be used when you want to use the trigger group (launched by your global trigger command) to manage that event and you do not want the tomb engine to interfere with the operations. Currently the only global trigger that uses this flag is GT_SELECTED_INVENTORY_ITEM
1 $0001: FGT_SINGLE_SHOTThis flag sets the current Global Trigger for a single execution. When the Global Trigger is executed it will be disabled to avoid further executions.
32 $0020: FGT_SINGLE_SHOT_RESUMEDUsed in the Global Trigger command. This flag is similar to the FGT_SINGLE_SHOT flag, but with a big difference: While the FGT_SINGLE_SHOT performs the Trigger Group when the condition is true for the first time and then is disabled, the new FGT_SINGLE_SHOT_RESUMED will be resumed when the condition results give a new false.
The FGT_SINGLE_SHOT_RESUMED works like a multi shot flag but avoiding activating the Trigger Group if the condition is continuously true.
THE DIFFERENT WORKING MODES ARE DESCRIBED BY THIS TABLE:
RESULT OFCONDITION MULTI-SHOT (NO FLAG) FGT_SINGLE_SHOT FGT_SINGLE_SHOT_RESUMED
FALSE No-Run Enabled No-Run Enabled No-Run Enabled TRUE Run Enabled Run Enabled Run Enabled TRUE Run Enabled No-Run Disabled No-Run Enabled TRUE Run Enabled No-Run Disabled No-Run Enabled FALSE No-Run Enabled No-Run Disabled No-Run Enabled FALSE No-Run Enabled No-Run Disabled No-Run Enabled TRUE Run Enabled No-Run Disabled Run Enabled TRUE Run Enabled No-Run Disabled No-Run Enabled
Page 340
TOMB RAIDER NEXT GENERATION SCRIPT REFERENCE MANUAL
FLI_ constants
2 $0002: FLI_SHOW_BOUNDUsed in the LogItem= command. With this flag the data of the item has the current size and coordinates of the 3d bounding box of the Item added. This information is useful when you are not sure about the size of an item you are testing.
1 $0001: FLI_SHOW_DIFFERENCESUsed in the LogItem= command. Set this flag to displays on screen the difference between Lara and the item of the LogItem. The values are similar to those required in the TestPosition command so use these values as a reference to type reasonable ranges in to the TestPosition command.
Remark: The differences for Orienting are the same as used in the TestPosition command. The coordinate distances (X ,Y, Z) the values shown on screen do not consider the relative axis used in the TestPosition but will show as absolute differences. The difference between absolute and relative distance is the orientation of Lara. If Lara and an item are both on the same axis (for example Z axis) the absolute difference for Z will be the same as the relative difference.
See the description of the TestPosition command for more information.
Page 341
TOMB RAIDER NEXT GENERATION SCRIPT REFERENCE MANUAL
FMIR_ constants
8192 $2000: FMIR_ADJUST_XUsed in the MirrorEffect command. Add this flag to the index of an animating when the reflex of the item has a bad position. This could happen in the floor mirror when the animating does not have the pivot at the centre of the mesh but in a corner or on a side. This problem happens with doors. When this flag is used the TRNG engine tries to analyse the collision box of the item and then adjusts the X coordinate of the reflex.
Note: The X axis is in the South/North direction in the NGLE view.
16384 $4000: FMIR_ADJUST_ZUsed in the MirrorEffect command Add this flag to the index of an animating when the reflex of the item has a bad position. This could happen in the floor mirror when the animating does not have the pivot at the centre of the mesh but in a corner or on a side. This problem happens with doors.When this flag is used the TRNG engine tries to analyse the collision box of the item and then adjusts the Z coordinate of the reflex.
Note: The Z axis is in West/East direction in the NGLE view.
4096 $1000: FMIR_ALTERNATE_REFLEXUsed in the MirrorEffect command This flag may be added to the index of an animating when in a first attempt you remained displeased about its reflex. The technical explanation is that there are two different ways to simulate the reflex of an item. If the first method (less FMIR_ALTERNATE_REFLEX) is bad, add the FMIR_ALTERNATE_REFLEX, and rebuild the script to see if it is better. The general rule for animating with a good reflex is to have at least two opposite sides that are specular between them.
Page 342
TOMB RAIDER NEXT GENERATION SCRIPT REFERENCE MANUAL
FMOV_ constants
8 $0008: FMOV_HEAVY_ALLEnable all the heavy triggers that an item meets in its path. Use this feature to create a chain of events in the game.
2 $0002: FMOV_HEAVY_AT_ENDEnable a heavy trigger in the final sector of the path.
1 $0001: FMOV_INFINITE_LOOPThe movement will be repeated in a endless loop.
4 $0004: FMOV_TRIGGERS_ALLEnable all of the common triggers that an item meets in its path. The "common" triggers are the triggers enabled by Lara. Use this flag to work an item like the Mechanical Scarab to enable some trap.
Page 343
TOMB RAIDER NEXT GENERATION SCRIPT REFERENCE MANUAL
FMV_ constants
1 $0001: FMV_FADE_OUTUsed in the Customize=CUST_FMV_CUTSCENE command.For a Fade Out before the start of the FMV add the FMV_FADE_OUT in the Flags FMV field of the Customize=CUST_FMV_CUTSCENE command.
Remark: Fade-Out means the game screen becomes darker to black and after this change the video is played.
4 $0004: FMV_LONG_BLACK_RESTARTUsed in the Customize=CUST_FMV_CUTSCENE command. This flag is like the FMV_SHORT_BLACK_RESTART, so read the description for that flag for more information. The long version of the black restart gives a black screen for one second after the end of the FMV. There are some reasons to use this long black restart instead of the shorter version. Some changes in the game require time to be engaged. For example a rope enabled will have a starting animation, a change of position of Lara will require a moving of the follow-me camera to look at Lara correctly. If the changes performed after the FMV require some time use the long black screen to set a stable game position.
8 $0008: FMV_NO_AUDIO_RESTARTUsed in the Customize=CUST_FMV_CUTSCENE command. To stop the restart of the CD track at the end of the FMV. By default the TRNG engine stops the CD track before starting the FMV and restarts the same CD in the same position when the FMV is completed.
For example: To change the CD track at the end of a FMV or load another level. In this situation the CD track restarted should be stopped to start a new track. Use the FMV_NO_AUDIO_RESTART flag to obtain silence at the end of the FMV.
16 $0010: FMV_PRE_CACHEUsed in the Customize=CUST_FMV_CUTSCENE command. This flag tries to fast start the first FMV played in the current game session. It is used like a PRELOAD flag for images, but in this case the FMV will NOT be loaded in memory, but inserted in the Windows cache. Practically a file (like a FMV file) has to be loaded from a folder, Windows spends time to scan the folder and locate the file. So, to insert the trle\FMV s folder in the windows cache use this flag and the TRNG engine will perform a first access to the FMV s folder when the current level is loaded.
2 $0002: FMV_SHORT_BLACK_RESTARTUsed in the Customize=CUST_FMV_CUTSCENE command. When the FMV is completed the screen is black for two frames (less than 1/10 of second). In some circumstances it is useful to have a black screen to stop the player seeing the game image on the screen before the FMV playback.
This situation could be a problem for a game situation after the FMV.Using the FMV_SHORT_BLACK_RESTART in accordance with a Global Trigger GT_FMV_COMPLETED, perform a trigger to change the game situation after the movie, stopping the player seeing the old game screen.
Page 344
TOMB RAIDER NEXT GENERATION SCRIPT REFERENCE MANUAL
Remark: In spite of the GT_FMV_COMPLETED Global Trigger, if a black restart is omitted the old screen game could be visible for 1/30 of second. Therefore to modify the game screen after a FMV it is necessary to add a BLACK RESTART flag, short or long.
Page 345
TOMB RAIDER NEXT GENERATION SCRIPT REFERENCE MANUAL
FO_ constants
1 $0001: FO_ENABLEDBy default the organizer is disabled at the start and a flip effect is called to enable it. To enable the organizer from the start of the level add the FO_ENABLED flag.
2 $0002: FO_LOOPAdding the FO_LOOP flag the list of (time + PerformGroup) will be performed in an endless loop. After the last PerformGroup has been performed, the Organizer will restart from the first PerformGroup. Using this flag perform a PerformGroup every "number of seconds". Remember to use a flipeffect to start or stop an Organizer. This feature is useful when you want to perform in a loop mode an organizer for a specific section of the game or for some time interval.
4 $0004: FO_TICK_TIMEChanges the time unit measure. By default, i.e. if you Do Not use this flag, the time is in seconds, but if more precise units of time are required add this flag in the "Flags Organizer" field of the Organizer and the time will be interpreted as frame ticks, i.e. the minimum time unit.A tick frame is 1/30 of second, so to set a time type the number of seconds * 30.
For example: 15 = half second300 = 10 seconds
Page 346
TOMB RAIDER NEXT GENERATION SCRIPT REFERENCE MANUAL
FR_ constants
2 $0002: FR_ADD_DRIPS_TO_LARAUsed in the Customize=CUST_RAIN command. Set this flag to Enable the drips on Lara after she has been in the rain. By default there are no drips when Lara is in the rain but only after she has been in a pool.
4 $0004: FR_CORRECT_SPRINKLERSUsed in the Customize=CUST_RAIN command. By default the code for elaboration of the sprinklers (when the rain drop touches the ground) was a leak. If the room had an irregular floor (not flat at same height) many sprinklers were not visible because they were generated underground. To correct this bug add the FR_CORRECT_SPRINKLERS flag.
1 $0001: FR_PLAY_SFXUsed in the Customize=CUST_RAIN command. Enables the playing of a sound effect when the rain drops hit the floor. Type the number of the sound effect to play in the Extra field of the Customize=CUST_RAIN command.
Remarks: By default there is no sound for Rain.It is advisable to use a sound sample to set the loop mode.
Page 347
TOMB RAIDER NEXT GENERATION SCRIPT REFERENCE MANUAL
FRB_ constants
16 $0010: FRB_ALLOW_DRIFTUsed with the Customize=CUST_ROLLING_BOAT command When the swinging or pitching on some boat is enabled the drift effect can be enabled. The drift is when the boat moves by itself from its position in time, sliding in some direction. This effect is a simulation of real behaviour of the non-moored boats. Take care using this effect because the boat moves from the start position placed in the level map. It could move a distance from the start point in the time necessary for the player to reach it. In this case place some barrier to stop the drift movement from the start point. It is not easy to know or set the direction of the drift, because this movement is like a collateral effect of pitching and swinging of the original tr2/3 code. Changing the value of the pitch and swing speed and the height of the rolling changes the direction of the boat.
Remark: For rubber boats and motor boats there is a native procedure for drift. For the Kayak and further fake boats in animating slots the drift procedure has been created in the TRNG engine.This drift simulation, avoids risks to move the kayak in to positions not reachable by Lara. To go to the new kayak avoid problems by keeping the kayak at least one sector from walls or beach and avoid shallow water.
Knowing the above features an invisible barrier can be created to stop drift from the start position by having shallow water around the kayak, or walls on at least three sides around the kayak.
8 $0008: FRB_PITCHING_HIGHUsed with the Customize=CUST_ROLLING_BOAT commandSet a high level for the boat pitching. The boat will have a large movement.
4 $0004: FRB_PITCHING_LOWUsed with the Customize=CUST_ROLLING_BOAT command Set a low level for boat pitching. The boat will have very little movement.
0 $0000: FRB_PITCHING_NORMALUsed with the Customize=CUST_ROLLING_BOAT command Normal level for pitching.
Remark: If a FRB_PITCHING_constant is omitted, the NORMAL will be used by default.
2 $0002: FRB_SWINGING_HIGHUsed with the Customize=CUST_ROLLING_BOAT command Set a high level for the boat swinging. The boat will have large movements.
1 $0001: FRB_SWINGING_LOWUsed with the Customize=CUST_ROLLING_BOAT command Set a low level for the boat swinging. The boat will have very little movement.
0 $0000: FRB_SWINGING_NORMALUsed with the Customize=CUST_ROLLING_BOAT command Normal level for swinging.
Remark: If a FRB_PITCHING_constant is omitted, the NORMAL will be used by default..
Page 348
TOMB RAIDER NEXT GENERATION SCRIPT REFERENCE MANUAL
FROT_ constant
1 $0001: FROT_LOOPPerforms an infinite rotation. When this flag is set the Angle of rotation value will be ignored because the item will rotate continuously.
Page 349

TOMB RAIDER NEXT GENERATION SCRIPT REFERENCE MANUAL
FSB_ constants
2 $0002: FSB_DISABLE_ON_COMBATUsed in the StandBy command. When this flag is used the stand-by will not be enabled while Lara is in combat mode, i.e. when she holds weapons. A reason to use this flag is to give the player a chance to disable the stand-by when he does not like it. Just keep the weapons in Lara 's hands to disable the Stand-By.
1 $0001: FSB_DISABLE_ON_CRAMPED_SPACEUsed in the StandBy command. This flag is strongly suggested when the stand-by is used in the native mode, i.e. with automatic activation after a time of inactivity. Since it is not known where Lara will be when the stand-by starts, it could happen that Lara is in a cramped space. In this situation the rotation of the camera could be difficult. To avoid this problem set the FSB_DISABLE_ON_CRAMPED_SPACE flag and the stand-by will NOT begin while Lara is too close to a wall.
Remark: This method only works when the distance set is less than 2048, while for higher values some distant wall could not be correctly computed and it could create problems.
4 $0004: FSB_EXIT_ON_ATTACKUsed in the StandBy command. This setting will quit the Standby mode when Lara is hurt by some enemies or traps.
8 $0008: FSB_FLIP_DISTANCEUsed in the StandBy command. This flag influences the matrix and portrait modes to change the distance in a sweet way. The distance will be increased and decreased with a floating range from (Distance - 50%) to (Distance + 50%).
32 $0020: FSB_FLIP_H_ORIENTUsed in the StandBy command. This flag slides the horizontal orientation of the camera in a range from -45 degrees to +45 degrees.
Remark: This setting could only be used with portrait mode, since it makes no sense using it with a matrix effect because the matrix changes the horizontal orientation continuously.
64 $0040: FSB_FLIP_SPEEDUsed in the StandBy command. This setting changes the rotation speed in a random way. The RotateSpeed range will be between - 50% to + 50% It is better to use this setting with the matrix effect.
16 $0010: FSB_FLIP_V_ANGLEUsed in the StandBy command. This flag slowly changes the vertical angle moving it from a minimum of (VAngle - 50%) to a maximum of (VAngle + 50%).
Page 350
TOMB RAIDER NEXT GENERATION SCRIPT REFERENCE MANUAL
128 $0080: FSB_FREEZE_ENEMIESUsed in the StandBy command. To avoid Lara being attacked during the stand-by mode use the FSB_FREEZE_ENEMIES flag to stop the activity of all enemies. The BADDY is frozen while the Stand By is on.
256 $0100: FSB_FREEZE_LARAUsed in the StandBy command. With this setting game input is stopped during the Standby mode.Since the player will have no chance to move Lara to exit from Standby mode this setting should be used only with a Standby started with the flip effect trigger "Perform <&StandBy mode for (E)seconds"
1024 $0400: FSB_IMMEDIATEUsed in the StandBy command. Usually the camera will start from the current standard position and will slowly to reach the position required by the settings for the StandBy command. To start the camera in a new position use the FSB_IMMEDIATE flag and the camera will move immediately to the new position.
512 $0200: FSB_OVERLAP_AUDIOUsed in the StandBy command. When a valid value is set in the AudioTrack field, decide if the Standby audio will replace the current audio track, or if the new audio will overlap the old audio without stopping it. When the Standby audio overlaps the old audio track add the FSB_OVERLAP_AUDIO flag. If the old audio track was stopped before playing the new Standby audio track omit the FSB_OVERLAP_AUDIO flag.
Remark: Use the FSB_OVERLAP_AUDIO flag only when the audio track in the level is only a list of environment sounds, like wind, sea song etc. If the level audio is a music, it is better to stop it before playing the Standby audio because two music sounds at the same time could be chaotic.
Page 351
TOMB RAIDER NEXT GENERATION SCRIPT REFERENCE MANUAL
FSCA_ constants
2 $0002: FSCA_ENDLESSUsed with the Parameters=PARAM_SCALE_ITEM This flag should only be used with dynamic effects. Add the FSCA_ENDLESS flag to create a continuous inflating/deflating of the item, like a pulse effect. Once the item has reached the final size, its size will go back to the BeginSizePercentage and go on, forever.
1 $0001: FSCA_IMMEDIATEUsed with the Parameters=PARAM_SCALE_ITEM With this flag set an immediate scaling with no dynamic effect. In this situation the BeginSizePercentage and the PercentageSpeed fields will be ignored (you can type IGNORE in them) and the item it will be resized to the size set in the FinalSizePercentage field.
4 $0004: FSCA_ITEMGROUP_INDEXUsed with the Parameters=PARAM_SCALE_ITEM Adding this flag performs the scaling effect on a item group instead of a single item. When using the FSCA_ITEMGROUP_INDEX flag, the ItemIndex field of the PARAM_SCALE_ITEM command will be used like an Id for a GroupItem present in the same [level] section. For example, two script commands in the [Level] section:
ItemGroup= 5, -143,-144,-154,-155 ;remember to have negative indices for static items
Parameters=PARAM_SCALE_ITEM, 1, 5, FSCA_ITEMGROUP_INDEX+FSCA_IMMEDIATE, IGNORE, 85, IGNOREWhen the trigger performs to engage above Parameters command all four items with indices: 143, 144, 154 and 155, will be resized to 80 % of their original size.
The use of the FSCA_ITEMGROUP_INDEX flag is advisable when creating a forest with trees and a group of trees with 80% of the size of the original and others with 120 % size of the original are required.
FSCAM_ constants
1 $0001: FSCAM_DISABLE_COMBAT_CAMUsed in the Parameters=PARAM_SET_CAMERAThis flag disables the combat camera until the PARAM_SET_CAMERA is working.
2 $0002: FSCAM_DISABLE_LOOK_CAMUsed in the Parameters=PARAM_SET_CAMERAThis flag disables the Look camera until the PARAM_SET_CAMERA is working.
Page 352

TOMB RAIDER NEXT GENERATION SCRIPT REFERENCE MANUAL
FSS_ constants
16 $0010: FSS_ANIMATEUsed with the Parameters=PARAM_SHOW_SPRITE script command.Add the FFS_ANIMATE flag to create an animated sprite where a sequence of sprites will be shown to create the effect of the animation. Use the Extra Value field to customize the animation.
The number to type in the Extra Value is given from the formula:FrameDurate * 245 + NumberOfSprites
Where: FrameDurate is the number that each frame will remain on the screen. NumberOfSprites is the number of sprites that form the animation.
For example: If the animation uses 8 sprites from the index = 4 and the animation has the maximum speed, where each sprite will remain on the screen for only one frame,
Type 4 in the SpriteIndex field.In the Extra Value field type: 1*256 + 8 = 264 ($0108)
Remark: There are two kinds of sequence: Standard sequence, where the indices will grow to the maximum and then repeat from the minimum index. Like: 123412341234
and the for-back sequence, where the index reaches the maximum then decreases back to the minimum: 1234321234321
To use the for-back sequence add the FFS_ANIMATE_FOR_BACK flag
32 $0020: FSS_ANIMATE_FOR_BACKUsed with the Parameters=PARAM_SHOW_SPRITE script command.Used together with the FFS_ANIMATE flag to create an animated sprite with forward-backward sequence, where the sprite index will increase to the maximum and then decrease to the minimum, like: 1234321234 Read the FFS_ANIMATE flag for more information.
4 $0004: FSS_CLONE_SPRITEUsed with the Parameters=PARAM_SHOW_SPRITE script command. This flag only works with the FSS_SHOW_SPRITE_GRID flag. To show the same sprite many times, place it in a grid and use both flags FSS_SHOW_SPRITE_GRID + FSS_CLONE_SPRITE.
64 $0040: FSS_EFFECT_FROM_BOTTOMUsed with the Parameters=PARAM_SHOW_SPRITE script command. This is an effect to move the sprite from the bottom of the screen to the final position set in the OriginX, OriginY field. In the Extra Value field type the number of frames required to complete the movement. A small value gives a fast movement.
256 $0100: FSS_EFFECT_FROM_LEFTUsed with the Parameters=PARAM_SHOW_SPRITE script command. This is an effect to move the sprite from the left of the screen to the final position set in the OriginX, OriginY field. In the Extra Value field type the number of frames required to complete the movement.
Page 353
TOMB RAIDER NEXT GENERATION SCRIPT REFERENCE MANUAL
512 $0200: FSS_EFFECT_FROM_RIGHTUsed with the Parameters=PARAM_SHOW_SPRITE script command. This is an effect to move the sprite from the right of the screen to the final position set in the OriginX, OriginY field. In the Extra Value field type the number of frames required to complete the movement.
128 $0080: FSS_EFFECT_FROM_TOPUsed with the Parameters=PARAM_SHOW_SPRITE script command. This is an effect to move the sprite from top of the screen to the final position set in the OriginX, OriginY field. In the Extra Value field type the number of frames required to complete the movement.
8 $0008: FSS_EFFECT_ZOOMUsed with the Parameters=PARAM_SHOW_SPRITE script command. With this effect the sprite will be shown with a zoom effect. At the start the sprite will be drawn at 1/10 of its size, then in the [Extra Value] frames it will be magnified to reach the size and position chosen in the OriginX, OriginY, Width, Height fields. In the Extra Value field set the number of frames (1/32 of second) required to complete the zoom effect. A small value makes a fast zoom.
1 $0001: FSS_SHOW_SPRITE_GRIDUsed with the Parameters=PARAM_SHOW_SPRITE script command. Each sprite has as maximum size of 256 x 256 pixels but practically, because Wad Merger is not able to manage 256x256 sprites the maximum size is 128x128 pixels.
2 $0002: FSS_TRANSPARENTUsed with the Parameters=PARAM_SHOW_SPRITE script command. To have a semi-transparent image add the FSS_TRANSPARENT flag. Remember that only transparent sprites can use the add color feature.
Page 354
TOMB RAIDER NEXT GENERATION SCRIPT REFERENCE MANUAL
FT_ constants
8192 $2000: FT_BLINK_CHARS
1 $0001: FT_BOTTOM_CENTER
6 $0006: FT_BOTTOM_LEFT
7 $0007: FT_BOTTOM_RIGHT
3 $0003: FT_CENTER_CENTER
4096 $1000: FT_NARROW_CHARS
2048 $0800: FT_SIZE-ATOMIC_CHAR
192 $00C0: FT_SIZE_DOUBLE_CHAR
128 $0080: FT_SIZE_DOUBLE_HEIGHT
64 $0040: FT_SIZE_DOUBLE_WIDTH
48 $0030: FT_SIZE_HALF_CHAR
32 $0020: FT_SIZE_HALF_HEIGHT
16 $0010: FT_SIZE_HALF_WIDTH
256 $0100: FT_SIZE_MICRO_CHARDifferent from the other FT_SIZE_ constants this setting ignores all the shape and pre-set size of the current font and forces characters of the same size: squared and small. The same font size is used to show digits in the Keypad switch
1024 $0400: FT_SIZE-NO_BORDER Unused in 1.2.2.7 .worked with an old print for special national characters but now it has no effect.
2 $0002: FT_TOP_CENTER
4 $0004: FT_TOP_LEFT
5 $0005: FT_TOP_RIGHT
10 $000A: FT_UNDER_LEFT_BARSThe text will start from the top left corner of the screen, under the lowest bar (Damage bar)
11 $000B: FT_UNDER_RIGHT_BARSThe text will start from the top right corner of the screen, under the lowest bar (Cold bar)
Page 355
TOMB RAIDER NEXT GENERATION SCRIPT REFERENCE MANUAL
FTYPE_ constants
3 $0003:FTYPE_SETTINGSUsed in the Import File command.This type is used from some script commands to have an external binary setting file, when the required settings for that command are too much to be hosted by the usual command arguments.
Note: The FTYPE_SETTINGS type always require as ImportType the IMPORT_MEMORY setting.
2 $0002: FTYPE_SOUNDUsed in the Import File command. Use the FTYPE_SOUND value for all sound files with extensions .wav, .mp3, .ogg, .aiff, .mp2, .mp1 (i.e. all sound files supported in the new sound engine implemented in TRNG) that are to be used in the game with the specific flip effect trigger : "Play imported sound with <&Id ....".
1 $0001: FTYPE_USERFILEUsed in the Import File command. Use the FTYPE_USERFILE type for each file not recognized by the TRNG engine, or each file that will not be used directly by the game engine. When the TRNG engine finds an imported file of the FTYPE_USERFILE, it will ignore it and the only operation it will perform will be to export it saving it in the correct folder. It is not logical to use the import mode IMPORT_MEMORY for FTYPE_USERFILE files because the player will not be able to see them in the game.
For example: To give the player some .html files like an introduction for the adventure, or .txt files, or an image to be viewed then use the type FTYPE_USERFILE.
Page 356
TOMB RAIDER NEXT GENERATION SCRIPT REFERENCE MANUAL
GT_ constants
31 $001F: GT_AFTER_RELOADING_VARIABLESUsed in the GlobalTrigger= command. This condition is true when the player has loaded a save game, or when Lara enters a new level using a finish trigger with no ResetHub command. If some variables have been saved in memory using the GT_BEFORE_SAVING_VARIABLES Global Trigger, they can now be restored. When the variables have been reloaded the same situation is created in the game prior to saving. In the Parameter field type the level number after the reloading of the game, about when to perform this Global Trigger. So, if Lara in level 1 touches a finish trigger and she goes to level 2, type "2" to reload from the beginning of the level.
32 $0020: GT_ALWAYSUsed in the GlobalTrigger= command. This is a special Global Trigger. Usually a Global Trigger performs the Trigger Group when a specific Global condition is true in the game. The GT_ALWAYS Global Trigger will be performed if it is enabled, frame by frame during the game. Use this Global Trigger to have a Trigger Group working continuously.
30 $001E: GT_BEFORE_SAVING_VARIABLESUsed in the GlobalTrigger= command. This Global Trigger is enabled before the TRNG engine saves the variables in the save game or in the HUB section which is used when Lara steps to a new level with a finish trigger. In the Parameter field type the level number where this trigger performs. It is important to set the correct level number because the operation to save and restore could be valid for some levels but not others. Remember that the store variables are all global variables and they will be changed and reloaded for all levels. See the tutorial for TRNG variables in the zip file: trng_variables.zip
For example: If some variables modify a moveable in level 1 it is important to save the value in a specific variable, different from level 2 where this moveable could be missing.
Use this Global Trigger to save the variables previously typed to change the moveables or physics of the game. This operation is necessary only when the "poke" operation in some critical memory is only temporary and it will be lost when the player reloads a save game. In this case use the Global Trigger to save some variable changes and then restore them with another Global Trigger: GT_AFTER_RELOADING_VARIABLES
15 $000F: GT_COLLIDE_CREATUREThis Global Trigger works like the GT_COLLIDE_SLOT but in this case the condition will be true for each moveable that is a "creature" type. A creature is a moveable following AI rules that is able to move by itself. This Global Trigger will ignore the value typed in the Parameter field.
13 $000D: GT_COLLIDE_ITEMThis detects if Lara touches a moveable with an index set in the Parameter field. For more information read the description of the GT_COLLIDE_SLOT Global Trigger and the FGT_PUSHING_COLLISION flag
Page 357
TOMB RAIDER NEXT GENERATION SCRIPT REFERENCE MANUAL
14 $000E: GT_COLLIDE_SLOTThis Global Trigger works like the GT_COLLIDE_ITEM but in this case type a slot number and a specific item index. Practically use the GT_COLLIDE_SLOT to test the collision of Lara with any item for a given slot.
For example: Create this Global Trigger: GlobalTrigger=1, IGNORE, GT_COLLIDE_SLOT, 41, … Since 41 is the slot for the BADDY_1 object, every time Lara collides with any BADDY_1 object the Global Trigger will be engaged.
Remark: When the collision is detected the item of the moveable colliding with Lara will be saved to be used with triggers stored in the Trigger Group. Use the flag TGROUP_USE_FOUND_ITEM_INDEX together with a trigger that works on some
moveable.
For example: If the Global Trigger detects a collision with a moveable in slot 41 and this moveable has the index = 132, this index will be used for each trigger in the Trigger Group where the flag is set for TGROUP_USE_FOUND_ITEM_INDEX.
See the description of the TGROUP_USE_FOUND_ITEM_INDEX flag for more information.This is an example how the TGROUP_USE_FOUND_ITEM_INDEX flag works together with the GT_COLLIDE_SLOT Global Trigger:
For the following lines in the script.txt file:
TriggerGroup = 1, $5000+TGROUP_USE_FOUND_ITEM_INDEX, 749, $EGlobalTrigger = 1, IGNORE, GT_COLLIDE_SLOT, 43, IGNORE, 1
Lara will kill each BADDY_2 enemy by touching him. The number 43 is the slot for BADDY_2, while the flag TGROUP_USE_FOUND_ITEM_INDEX in the Trigger Group command has been used to substitute the original target of that trigger (it was an Action trigger to kill a crocodile) with the index of the moveable found in the Global Trigger GT_COLLIDE_SLOT, i.e. the BADDY_2 was colliding with Lara.
18 $0012: GT_COLLIDE_STATIC_SLOTThe condition is true when Lara touches a static of a given static slot kind defined in the Parameter field.
Remarks: * Do not confuse the moveable slots with static slots. Find the static slots in the "Statics indices" list of the "Reference" panel * To perform a Trigger Group when Lara touches a specific static, it is not necessary to use a Global Trigger. Add in the OCB of that static the value 2048 and then place a heavy trigger in the sector under that static. When Lara touches the static the heavy trigger will be performed.
Page 358
TOMB RAIDER NEXT GENERATION SCRIPT REFERENCE MANUAL
38 $0026: GT_COMPLETED_SCALING_ON_ITEMUsed in the GlobalTrigger= command This Global Trigger is enabled when the static or moveable item with the index in the Parameter field of the Global Trigger command has been resized and its rescaling is complete.
Note: This Global Trigger only works for dynamic (but not endless) rescaling. Practically when yyou perform a dynamic rescaling from percentage to percentage with a given resizing speed.
11 $000B: GT_CONDITION_GROUPIf a GT_ Global Trigger is not wanted to test the condition, but some common CONDITION triggers stored in a Trigger Group command script, use the value GT_CONDITION_GROUP for the Global Trigger field. With this value the TRNG engine will only check the conditions in the Trigger Group in the IdConditionGroup field.
Remark: Do Not confuse the use of the GT_CONDITION_GROUP value. This value cannot be added to other GT_ Global Trigger values. This value is only used when you do not want to type any specific Global Trigger but only want to use conditions of the Trigger Group. If a Global Trigger (like GT_USED_LITTLE_MEDIPACK for example) is used and it is required to add a condition group set a valid IdTriggerGroup value in the IdConditionGroup field.
Practically the GT_CONDITION_GROUP is only used to set a null Global Trigger with a condition Trigger Group because if IGNORE is in the Global Trigger field the Global Trigger will never be performed and any IdConditionGroup will be ignored.
9 $0009: GT_DAMAGE_BAR_LESS_THANThis Global Trigger checks the level for damage only when Lara is in a Damage room. Type the value to compare in the Parameter field. This condition will check the value of damage in this way: when Lara enters the Damage room the value of Damage Bar is 1000. If she remains in the Damage room the damage level will go down to 0, then Lara will be damaged or burned.
12 $000C: GT_DISTANCE_FROM_ITEMThis Global Trigger verifies the distance between Lara and a moveable. When the distance is less than that set in the Parameter field the trigger will be engaged.
Remark: The value to type in the Parameter field is a combination of two values: the index of the moveable to check and the distance (in real units) to compare.
Note: From 1.2.2.4 version the formula is different.
The new formula to use is: MoveableIndex + (RealUnitDistance * 8192)
RealUnitDistance is the units used in the game, instead use the number of sectors or clicks.
For example: One sector = 1024, and one click = 256, so to check the distance for two sectors the value will be 2048 and so the formula for the Parameter: ItemIndex + 8192 * 2048
Page 359
TOMB RAIDER NEXT GENERATION SCRIPT REFERENCE MANUAL
say the ItemIndex = 307, the result will be: 307 + 8192*2048 = 16777523
The maximum value to use as a distance is 130048, which is 127 sectors.
This distance will be computed with trigonometric precision as the distance between the two 3d points X, Y, Z for Lara and the X2, Y2, Z2 for the Item.
If the different height (Y coordinates) is ignored add to the formula the constant value GTD_IGNORE_HEIGHT The above example will become: 130048 + GTD_IGNORE_HEIGHT
A possible reason to use the GTD_IGNORE_HEIGHT mode is when a fine precision on the whole side of an object is required like a column. In this case, if the GTD_IGNORE_HEIGHT value is omitted and the compute encloses the Y value, when Lara is above the column she will seem further from it because there is the distance between the Y coordinate of Lara and the Y coordinate of the column on the base of the floor.
If the GTD_IGNORE_HEIGHT value is used the distance will be computed in a planar way.
Remark: When the GTD_IGNORE_HEIGHT value is used a conditional Trigger Group is used to verify if Lara is in the correct room or at the correct height limit (vertical condition trigger). This avoids the condition is true when Lara is in a room above or below the item but on the same X, Z position in the planar view.
19 $0013: GT_DISTANCE_FROM_STATICThis Global Trigger verifies the distance between Lara and a specific static object. When the distance is less than the value set in the Parameter field the trigger will be engaged. In the Parameter field type the result of the formula for the static index and the distance. See the formula in the GT_DISTANCE_FROM_ITEM in the Mnemonics Section.
29 $001D: GT_ELEVATOR_STARTS_FROM_FLOORUsed in the GlobalTrigger= command. This condition verifies when the given elevator has left the given floor. Type the elevator index and floor number in the Parameter field. The mode compacts these two numbers in to a single number. See the GT_ELEVATOR_STOPS_AT_FLOOR Global Trigger in the Mnemonics Section.
28 $001C: GT_ELEVATOR_STOPS_AT_FLOORUsed in the GlobalTrigger= command. This Global Trigger is enabled when the given elevator has stopped at a given floor. Use this trigger to open a door in front of the elevator. Type the elevator index and the floor number in the Parameter field. To put two numbers in to a single field it is necessary to compact the two numbers. The formula is: (FloorNumber * 4096) + ElevatorIndex
For example: To verify when the elevator with Index = 137, reaches the first floor floornumber= 1, the compute will be: (1 * 4096) + 137 = 4233
Remarks: 1) At the start of the level all elevators will give the GT_ELEVATOR_STOPS_AT_FLOOR event
Page 360
TOMB RAIDER NEXT GENERATION SCRIPT REFERENCE MANUAL
with the floor number = 1, because all elevators have to begin with the cage at the first floor. If a Global Trigger is used to have a door open in front of the floor where the elevator is it will work from the start of the level.
2) There is a limitation for both values to set in parameter field: The elevator index cannot be greater than 4095The floor number cannot be greater than 15
3 $0003: GT_ENEMY_KILLEDSpecify in the Parameter field the index of the moveable to monitor. When the given moveable is killed the Global Trigger will activate.
Remarks:* Read the index of the moveable in the NGLE program when you perform a single mouse click on the object,. The index will be shown in a yellow box.* Theoretically you can get a trigger activation when a creature dies with a local (common) trigger Switch. If the enemy is triggered with a switch trigger and then add to this trigger some common trigger to enable doors, enemies etc., when the creature dies the trigger will be activated. The problem with this method is that you have to cover a big surface with triggers because it is necessary to know where the creature dies. Using a Global Trigger GT_ENEMY_KILLED the trigger will be activated for any position of the enemy.* For this Global Trigger it is strongly suggested to use the flag FGT_SINGLE_SHOT, otherwise when the condition becomes true it will be performed 30 times per second forever.
26 $001A: GT_FMV_COMPLETEDUsed in the GlobalTrigger= command. This Global Trigger is engaged when the FMV with the number in the Parameter field is finished. This Global Trigger is useful when something in the game changes at the end of a video cut scene (FMV). Use a FMV to show some fact or actions about Lara and at the end of the movie something in the game changes: like loading a new level, or enabling a flip map or moving Lara in the level. In all the above circumstances use this Global Trigger to be sure that the triggers (stored in a Trigger Group called by this Global Trigger command is performed in the first frame following the ending of the given FMV.
23 $0017: GT_GAME_KEY1_COMMANDThe condition is true when the game command (jump, action, look etc.) set in the Parameter field is activated by the Player. Type in the Parameter field the KEY1_.. game command to detect.
To detect a KEY2_ command use the twin GlobalTtrigger GT_GAME_KEY2_COMMAND.
Remark: This condition is true when the game command has been sent. This means that the command has not been elaborated by the TRNG engine when the condition is true.
For example: If the command is KEY1_JUMP, Lara is not jumping yet. If you want to remove the game command to prevent the game engine receiving it, use the flag FGT_REMOVE_INPUT
See the FGT_REMOVE_INPUT in the Mnemonics Section.
Page 361
TOMB RAIDER NEXT GENERATION SCRIPT REFERENCE MANUAL
24 $0018: GT_GAME_KEY2_COMMANDThis Global Trigger works in the same way as the GT_GAME_KEY1_COMMAND, but in this case set in the Parameter field a KEY2_.. game command.See the GT_GAME_KEY1_COMMAND for more information.
25 $0019: GT_KEYBOARD_CODEThis Global Trigger detects when a player hits a specific key. Type the scan code value in the Parameter field. All valid scan codes are in the KEYBOARD SCANCODES Section.
Remark: This command should not be used to detect standard game commands, use the GT_GAME_KEY1_COMMAND or GT_GAME_KEY2_COMMAND Global Triggers for the target. Remember that the keystrokes linked with the game commands could be changed in the Options screen by the player, so you cannot be sure that a given scan code is always the same to jump or roll. Use the GT_KEYBOARD_CODE trigger to have a custom hot key to start some extra feature. The scan code chosen should be different from all other keyboard commands that the player could choose in the Options screen. For example select some unused function keys like F7 or F8 to start the operation.
36 $0024: GT_KEYPAD_REMOVEDUsed in the GlobalTrigger= command. This Global Trigger is the opposite of the GT_KEYPAD_SHOWED flag. When the editable keypad is removed this Global Trigger is enabled. Use this Global Trigger to remove the text shown by the Global Trigger: GT_KEYPAD_SHOWED.
35 $0023: GT_KEYPAD_SHOWEDUsed in the GlobalTrigger= command. This Trigger is enabled when the Key Pad with the index in the Parameter field is shown. Use this Global Trigger to show text at the same time as the big editable keypad is shown to describe to the player what the target is.
20 $0014: GT_LARA_HOLDS_ITEMThis Global Trigger is true when Lara is holding in her hands the item specified in the Parameter field. The value set in the Parameter could be a vehicle, pole or rope. The Parameter field cannot hold a SLOT value but a HOLD_ constant. See the HOLD_ values in the Mnemonics Section.
5 $0005: GT_LARA_HP_HIGHER_THANThis Global Trigger is enabled when the life value for Lara is higher than the value in the Parameter field. The valid range for Lara 's vitality is from 0 to 999
4 $0004: GT_LARA_HP_LESS_THANThis Global Trigger is enabled when the life bar for Lara (Health Points) is less than the value set in the Parameter field. Remember that the health value for Lara is in the range 0 (she dies) to1000 (full line and no bar shown in the game).
For example: To reduce some capability of Lara when she has less than 100 Health Points type a Global Trigger:GlobalTrigger=1, FGT_SINGLE_SHOT, GT_LARA_HP_LESS_THAN, 100, ...
Page 362
TOMB RAIDER NEXT GENERATION SCRIPT REFERENCE MANUAL
Use a trigger like the one above to remove some capability from Lara. Remember to set some way to return this capability to Lara when her Health Points recover over the limit (100), for example use GT_LARA_HP_HIGHER_THAN or GT_USED_BIG_MEDIPACK or GT_USED_LITTLE_MEDIPACK.
10 $000A: GT_LARA_POISONEDA poisoned condition for Lara. When Lara is poisoned the Life Bar becomes yellow and the screen will be deformed. Use this Global Trigger to perform an action, for example show text when Lara is poisoned.
In the Parameter field type the value used for comparison. The formula used is "IF POISON_IN_LARA is greater than the PARAMTER then ..." perform Global Trigger. To enable the Global Trigger for any poison value type 0 (zero) in the parameter field. If the activation is only when the poison level is higher type a value, like 400 or more.
The Potency of Poison is:
Darts = 160Little scorpion = 512 Big scorpion = 2048Start screen Harpy = 2048
Deforming screen when the poison is higher than 256Max level for poison = 4096
16 $0010: GT_LOADED_SAVEGAMEThe condition is true when the player has started the loading of a save game from the Load Game screen.
37 $0025: GT_NO_ACTION_ON_ITEMUsed in the GlobalTrigger= command. This Global Trigger is true when the supplied item has no TRNG action enabled on it. Type the index of the item to check in the "Parameter" field of the Global Trigger command. The TRNG actions are procedures used to turn, move and other time consuming effects on moveables. Many Action triggers found in the Set Trigger Type window begin a progressive action on that moveable. This Global Trigger is useful to discover the exact moment when an item completes its movement, for example play a sound effect, to synchronize another action starting when the first action has been completed.
Remark: This Global Trigger verifies if the item has no action enabled on it.
Use the following flags for this Global Trigger:
FGT_DISABLED flag, to avoid it being engaged at the beginning of the level, since in that moment the item has no action in progress.
Page 363
TOMB RAIDER NEXT GENERATION SCRIPT REFERENCE MANUAL
FGT_SINGLE_SHOT or FGT_SINGLE_SHOT_RESUMED flags, otherwise the Trigger Group linked with this global trigger will be continuously performed after the last progressive action has been completed on the item.
17 $0011: GT_SAVED_SAVEGAMEThe condition is true when the player has saved the current game in some save game.
2 $0002: GT_SCREEN_TIMER_REACHEDStart the Global Trigger when the screen timer reaches the specified number of seconds in the Parameter field.
For example: To start the trigger when the timer screen reaches 240 seconds (4 minutes) type: "GlobalTrigger=1, IGNORE, GT_SCREEN_TIMER_REACHED, 240, …"
Remark: * For this Global Trigger it is strongly suggested to use the flag FGT_SINGLE_SHOT, otherwise when the condition becomes true it will perform 30 times per second..
39 $0027: GT_SELECTED_INVENTORY_ITEMUsed in the GlobalTrigger= commandThis global trigger is similar to GT_USED_INVENTORY_ITEM but there are important differences. The GT_USED_INVENTORY_ITEM works only with inventory items where there is no hard coded feature and only when Lara is still in the stand up position. With the GT_SELECTED_INVENTORY_ITEM global trigger you detect the usage of the item, whose slot had been typed first in the Parameter field so that it is the first that the tomb4 engine processes
This fact implies some situations to remember:
1) Since there is no check about the current animation of Lara or environment (ground, underwater, floating) it should be you, with some conditional trigger group, to verify if it is possible in that moment to really use the item.
For example: If your item should perform an animation where Lara takes the item in her hand, you should verify with the right conditions if Lara has free hands and she is in a reasonable state-id to manage this situation.
2) The global trigger will be engaged when there is an hard coded management like for the Binoculars, Medipack, Weapons, or when there is no management but, usually the tomb refuses to manage directly that item, like the Lasersight item.
In the case you want to replace the default management of that hard coded item, add in the flags of the GlobalTrigger command the FGT_REPLACE_MANAGEMENT flag.See the description of the FGT_REPLACE_MANAGEMENT flag for more information.
Page 364
TOMB RAIDER NEXT GENERATION SCRIPT REFERENCE MANUAL
27 $001B: GT_TITLE_SCREENUsed in the GlobalTrigger= command. This Global Trigger is only used in the [Title] section.Use the GT_TITLE_SCREEN to discover what screen is shown in the title phase: main titles, new game, load game, or options. Type in the Parameter field a TSCR_ value for the wanted screen type.
33 $0021: GT_TRNG_G_TIMER_EQUALSUsed in the GlobalTrigger= command. Enabled when the Global TRNG timer has the same value set in the Parameter field. The value in the Parameter field is in frame ticks, where 1 second = 30 frame ticks. So to detect when a timer reaches 40 seconds type "1200" , since 40 * 30 = 1200.
Remark: This Global Trigger only works when the respective timer is running, this means it is not necessary to use the FGT_SINGLE_SHOT or FGT_SINGLE_SHOT_RESUMED flags.To check the variation of the TRNG timer performed in a different way from the standard flip effect "Variables. Timer. Start the <& TRNG Timer in (E)Mode" avoid these Global Triggers and use instead the GT_CONDITION_GROUP Global Trigger placing in the Condition Trigger Group the Id of a Trigger Group with exported CONDITION triggers to test the content of the variable TIMER.
34 $0022: GT_TRNG_L_TIMER_EQUALSUsed in the GlobalTrigger= command. Enabled when the Local TRNG timer has the same value set in the Parameter field. Read the GT_TRNG_G_TIMER_EQUALS Global Trigger for more information.
6 $0006: GT_USED_BIG_MEDIPACKTrigger enabled when Lara selects and uses a Big medipack.
Remark: If Lara has a full life and the player selects a Big medipack from the inventory the condition will be false, because in this situation the medipack will not be used.
1 $0001: GT_USED_INVENTORY_ITEMThis Global Trigger detects when the player chooses a specific item from the inventory. Specify the slot Id in the Parameter field.
For example: To enable a Global Trigger when a player selects the QUEST_ITEM2 with slotId = 253, type "GlobalTrigger=1, IGNORE, GT_USED_INVENTORY_ITEM , 253, ...".
Remark: If you want to remove the chosen item from the inventory when the Global Trigger has been engaged insert in the Trigger Group the specific flip effect "Inventory-Item. Remove <&inventory-item from inventory". If you do not use this flip effect the selected item will remain in the inventory for further activations.
Please, try to avoid the use of QUEST_ITEM1 for the Global Trigger because QUEST_ITEM1 is used for the Detector activation.
Page 365

TOMB RAIDER NEXT GENERATION SCRIPT REFERENCE MANUAL
7 $0007: GT_USED_LITTLE_MEDIPACKThe Trigger is enabled when Lara selects and uses a Small Medipack.
Remark: If Lara has full life and a player selects a Small Medipack from the inventory the condition will be false, because in this situation the Medipack will not be used.
8 $0008: GT_USING_BINOCULARThe Trigger is enabled when Lara is using the Binoculars.
WARNING: Place the correct value in the Parameter field. To check the condition for Lara using the Binoculars type "128" or "$80" in the Parameter field. To check the condition for Lara NOT using the Binoculars type the value 0 (zero) in the Parameter field.
21 $0015: GT_VSCROLL_COMPLETEThis Global Trigger is true when the vertical scrolling text of a given string index has been completed. In the Parameter field type the index of the EXTRA_NG string used for the vertical scrolling text to monitor.
Remark: The most common use for this Global Trigger is to create the following operation: Show a long scrolling text on the screen and freeze Lara disabling the keyboard input. In this situation use the Global Trigger to enable new keyboard input when the scrolling text is complete.
22 $0016: GT_VSCROLL_LAST_VISIBLEThis Global Trigger is true when last row of the vertical scroll text is fully visible on the screen.Different from GT_VSCROLL_COMPLETE, with GT_VSCROLL_LAST_VISIBLE the condition is true when the vertical scroll is not complete but the last row of text enters the visible area of the screen. In the Parameter field type the index of the NG string used for the scrolling operation to check. Use this Global Trigger to create a chain of different scrolling operations with different size and character color.
For example: Create text with a singe row using very big characters. Use this single row as a title for the following scrolling text with a small text size. In this situation use a GT_VSCROLL_LAST_VISIBLE Global Trigger linked to the title scrolling to show the remaining text (other scrolling text) when the title is visible on the screen. The final effect will be to watch a single long text using different size or color of character but in reality it will be two different scrolling texts working at the same time.
Page 366
TOMB RAIDER NEXT GENERATION SCRIPT REFERENCE MANUAL
GTD_ constant
1073741824 $40000000: GTD_IGNORE_HEIGHTUsed in the Parameter field of the Global Trigger command when the GT_DISTANCE_FROM_ITEM or GT_DISTANCE_FROM_STATIC Global Triggers are used.See the Global Triggers in the Mnemonics Section.
HAIR_ constants
3 $0003: HAIR_ONE_PONYTAILSet the hair look for the adult Lara with a single ponytail from her nape.
4 $0004: HAIR_ONE_TR5_PONYTAILSet the hair of the adult Lara of Raider chronicle type. In the Raider chronicle the pony tail has its hook in a position a bit different than that of the Raider last revelation.
Remark: In Raider Chronicles there are three models of Lara: young Lara, adult Lara1 and adult Lara2. The adult Lara1 has the same joints as Lara of the last revelation, while Lara2 has a different joint for her ponytail.
1 $0001: HAIR_PAGE_BOYThis hair mode disables any type of plaits or ponytails. Practically this hair mode disables floating hair for Lara. If you set this value cover the hole that Lara has on her nape-neck, changing the mesh of Lara's head and the screaming head.
2 $0002: HAIR_TWO_PLAITSSet the hair look of young Lara in Angkor Wat. The only reason to use this value is to have Young Lara with all weapons. To do this::
1) Type in the corresponding [Level] section these two commands:Customize= CUST_HAIR_TYPE, HAIR_TWO_PLAITSCustomize= CUST_DISABLE_SCREAMING_HEAD
2) DO NOT type any YoungLara= command, otherwise Lara will have no weapons, we want the TRNG engine to believe that Lara is adult Lara
.3) Start wad merger and load in the left side your main wad that you are using for your level. It is
important that this level had all slots for adult Lara.
4) Now load in the right side the wad angkor.wad.
5) Copy ONLY these two slots: LARA_SKIN and LARA_SKIN_JOINTS
Now the level will have young Lara with all weapons, flares and crowbar animations working..
Page 367
TOMB RAIDER NEXT GENERATION SCRIPT REFERENCE MANUAL
HIT_ constants
32768 $8000: HIT_BIKE_EXPLODEUsed with the CUST_BIKE_VS_ENEMIES customization. In this case it will be the bike that explodes and Lara will be killed. You can mix this flag with the HIT_EXPLODE flag to have a double explosion: of the item and the bike
16384 $4000: HIT_EXPLODEUsed with the CUST_BIKE_VS_ENEMIES customization. With this customize the enemy hit by the vehicle will explode at first impact. Use this flag only when you kill an immortal enemy that has no dying animation.
4096 $1000: HIT_HURTUsed with the CUST_BIKE_VS_ENEMIES customization. The enemy hit by the bike will be injured. The grade of damage will depend on the speed of the bike at the moment of the impact. This flag does not work with immortal creatures.
1024 $0400: HIT_KILLUsed with the CUST_BIKE_VS_ENEMIES customization. The enemy touched by the bike will be killed
2048 $0800: HIT_PUSH_AWAYUsed with the CUST_BIKE_VS_ENEMIES customization. The enemy will be pushed away from the bike. When the bike is very fast the enemy will fly for some distance. The distance and speed of the pushed enemy will depend on many factors: the speed of the bike, the angle of impact and the size of the object. When the object is bigger it will be moved a shorter distance.
Remarks: This flag can be used with a moveable that is not an enemy. For example use it with animations.
Usage with Other Special Moveables
Take care about the possible results.
Pickups: Could have trouble to pick up items after the pushing away because the position will not be at the centre of the sector.
Pushable objects: If they lose the alignment with the sector grid Lara could not be able to push them in a common way.
Rolling ball: It is activated in the direction of the impact but aligned with in the hortogonal directions. The activation of the Rolling ball with the HIT_PUSH_AWAY flag will work with the OCB codes typed in the Rolling ball. Another effect that the HIT_PUSH_AWAY flag will have on the activated Rolling balls is to injure Lara when it is moving in an collisional direction.
Page 368
TOMB RAIDER NEXT GENERATION SCRIPT REFERENCE MANUAL
8192 $2000: HIT_WALLUsed with the CUST_BIKE_VS_ENEMIES customization. The enemy will remain imperturbable to the impact with the bike. Use this flag when the enemy is very big or very powerful.The bike will crash on it like it was a wall.
Note: It is important that the enemy is not too fast in his movements to use this flag, otherwise he could enter the collision box of the bike with weird results.
Page 369
TOMB RAIDER NEXT GENERATION SCRIPT REFERENCE MANUAL
HOLD_ constants
16 $0010: HOLD_ANY_TORCHWorks for fired or unlit torch at the same time
6 $0006: HOLD_CROSSBOW
9 $0009: HOLD_FIRED_TORCH
7 $0007: HOLD_FLARE
5 $0005: HOLD_GRENADEGUN
10 $000A: HOLD_JEEP
17 $0011: HOLD_KAYAK
13 $000D: HOLD_MOTOR_BOAT
8 $0008: HOLD_CUT_TORCH
1 $0001: HOLD_PISTOLS
15 $000F: HOLD_POLE
2 $0002: HOLD_REVOLVER
14 $000E: HOLD_ROPE
12 $000C: HOLD_RUBBER_BOAT
4 $0004: HOLD_SHOTGUN
11 $000B: HOLD_SIDECAR
3 $0003: HOLD_UZI
Page 370
TOMB RAIDER NEXT GENERATION SCRIPT REFERENCE MANUAL
HRP_ constants
8 $0008: HRP_DISABLE_LASER_SIGHTUsed in the Customize=CUST_HARPOON command. To disable the use of the laser sight with the harpoon gun add this flag.
4 $0004: HRP_DOUBLE_AMMOUsed in the Customize=CUST_HARPOON command. Since the harpoon weapon uses the slot for the crossbow, by default the harpoon has three different ammo types (normal, poison, explosive). To have only two ammo: normal and explosive, use this flag.
1 $0001: HRP_NO_SWIM_UNDERWATERUsed in the Customize=CUST_HARPOON command. Set this flag and Lara will not be able to swim when she holds the harpoon in her hands. This setting could be more realistic when Lara has busy hands it is not logical she is able to swim underwater.
2 $0002: HRP_SINGLE_AMMOUsed in the Customize=CUST_HARPOON command. Since the harpoon weapon uses the slot for the crossbow, by default the harpoon has three different ammo types (normal, poison, explosive). To have the harpoon gun classic use this flag to have a single type of ammo in the inventory for this weapon.
Page 371
TOMB RAIDER NEXT GENERATION SCRIPT REFERENCE MANUAL
IF_ constants
16384 $4000: IF_CRYPTICUsed in the Image= command.If you add this flag to your Image command, the corresponding image will be crypted and its name will be changed from: Image#.bmp to @Image#.bmpOnce the image has been encrypted (and you recognize the encrypted images from the "@" character in front of their name), it will not be possible to load and view the image in a common way. Only playing the level, the TRNG engine will decrypt at-fly the image to show it in the game.This encrypting feature has been thought of to stop the "old-fox" player looking at the images in the Pix folder to look at secret maps and other stuff while playing the level.
Notes:* It is suggested to perform a backup in another folder of your original (not yet encrypted) images, because, once they have been encrypted, there is no way to decrypt them, and therefore you will lose any chance to modify them.
* No decrypting tool has been supplied in the NG_CENTER, because the (above) old-fox player, could download NG_CENTER to decrypt the images of the level he is playing. But this chance has not been foreseen. When you crypt an image it will always be yours.
* In spite of the decrypting phase, performed in game is very faster than the encrypting process, performed into NG_Center. Also the decrypting will require a bit of time, so it is better using cryptic images and the IF_PRELOAD flag. In this way the decrypting phase will happen at the launch of the game, while in the game when the image is triggered it will have been decrypted and therefore it will be shown faster.
128 $0080: IF_EFFECT_FROM_BOTTOMUsed in the Image= command. This effect is similar to IF_EFFECT_FROM_TOP effect but in this case the image will enter in the screen from the bottom. See the description of the IF_EFFECT_FROM_TOP flag for more information.
256 $0100: IF_EFFECT_FROM_LEFTUsed in the Image= command. This effect is similar to IF_EFFECT_FROM_TOP effect but in this case the image will enter the screen from the left side.See the description of the IF_EFFECT_FROM_TOP flag for more information.
512 $0200: IF_EFFECT_FROM_RIGHTUsed in the Image= command. This effect is similar to IF_EFFECT_FROM_TOP effect but in this case the image will enter the screen from right side.See the description of the IF_EFFECT_FROM_TOP flag for more information.
64 $0040: IF_EFFECT_FROM_TOPUsed in the Image= command. This effect moves the image from the top of the screen to reach the final position set in the fields PosX, PosY, SizeX and SizeY.
Page 372
TOMB RAIDER NEXT GENERATION SCRIPT REFERENCE MANUAL
The whole moving effect is performed in the frames set in the EffectTime field.Small values in the EffectTime field will produce a fast moving image.
Remark: At the start of this effect the image will be outside the screen, so apply this effect for images to show in full screen size.
32 $0020: IF_EFFECT_ZOOMUsed in the Image= command. With this effect the image will show with a zoom effect.At the start the image will be drawn at 1/10 of its size, then in the EffectTime frames it will be magnified to reach the size and position chosen with XPos, YPos, SizeX and SizeY fields.
In the EffectTime field set the number of frames (1/32 of second) required for the zoom effect. If a low EffectTime is set the zoom will be very fast, if the EffectTime is high the effect will be slow.
Remark: This effect could slow down the game when applied to pop up images.
4 $0004: IF_FULL_SCREENUsed in the Image= command. This setting will show the image resizing it to cover whole game screen. When this flag is present the fields are used to set the origin and size of the image.XPosition, YPosition, SizeX, SizeX will be ignored, so fill them with four IGNORE values.
8192 $2000: IF_LOOP_AUDIO_TRACKUsed in Image= command.If a background audio track is enabled for the image, using the IF_PLAY_AUDIO_TRACK flag, the audio track can be played in a loop (infinite) way by adding the IF_LOOP_AUDIO_TRACK flag.
4096 $1000: IF_OVER_FIXED_CAMERAUsed in the Image= command. By default the images will be hidden when there is a fixed camera. To keep this image on the game screen when there is a fixed camera add the IF_OVER_FIXED_CAMERA flag.
8 $0008: IF_OVER_FLYBYUsed in the Image= command. This flag only works with pop up images. By default when a Flyby sequence begins the pop up image will be hidden like other special objects (keypad, detector or picked up items), but if a pop up image is to be shown over a Flyby sequence add this flag to the ImageFlags field.
1024 $0400: IF_PLAY_AUDIO_TRACKUsed in the Image= command. To have a sound start at the same time as the image viewing add this flag and type in the AudioTrack field a number between 0 and 255 to locate an audio track in the audio folder.
For example: To play the track "034.wav" type 34 in the AudioTrack field.
Page 373
TOMB RAIDER NEXT GENERATION SCRIPT REFERENCE MANUAL
2 $0002: IF_POP_IMAGEUsed in the Image= command. This flag will change the work mode fort viewing the image.A pop up image will be drawn over the game screen as the game goes on. A non pop up image will be drawn over the game screen when the game is paused. Te pop up image will usually be smaller than the game screen used as a sort of TV logo. While the non pop up image could be drawn covering the whole game screen and stopping when the view time is complete.
2048 $0800: IF_PRELOADUsed in the Image= command. By default the image will be loaded from the disk at the same time it should be drawn on the screen. This operation requires some time and the game remains frozen for a short period. To avoid this stop force the TRNG engine to pre-load the image while it is loading other data for the current level (when you see the loading bar on screen). The image will be in the RAM memory and it will be displayed immediately.
Remark: Since the bmp images could be very big (one MB or more) it is advisable not to have a large number of preloaded images for the same level. I suggest to stay within the limit of 15 Mb of preloaded images. The size of images preloaded in different levels is not cumulative because the TRNG engine will discard them when a level has been discarded.
16 $0010: IF_QUIT_ESCAPEUsed in the Image= command. This flag only works for NON pop up images. When an image is shown that freezes the game, set this flag to permit a player to skip the image with Escape/Inventory keystroke.
1 $0001: IF_TRANSPARENCEUsed in the Image= command. To apply a transparency effect on the current image add this flag.The transparent zone will be where there are pixels with RGB color = $FF00FF (red = 255; green=0; blue=255), this is the “traditional” transparent color for Raider textures. With transparent images you can create, for example,a round image over the game screen, where the non visible squared corners have been filled with transparent color.
Remarks: * The transparency effect is a slow to realize so it is advisable to use it with moderation.
* If you want place the CONVERTER.exe utility in your level files to develop the images in jpg format, you should not supply the transparent image in .jpg format, because of the double conversion bmp-jpg (when you place the images in your zip file) and the final re-conversion jpg-bmp (before playing your level) could alternate the transparent color, ruining the final effect of transparency. In this situation supply the images in .jpg format, while the image with transparency will be in the original .bmp format. The CONVERTER.exe (or trlm2009) will convert only the jpg images, leaving the transparent (bmp) image untouched.
* When you create your transparent image disable the anti-aliasing feature in PHOTOSHOP because the line between solid color and transparent color could be altered with colors similar to transparent color but not the same. Only the precise color 255,0,255 will be transparent.
Page 374
TOMB RAIDER NEXT GENERATION SCRIPT REFERENCE MANUAL
IGNORE
-1 $FFFF: IGNORE
IMPORT_ constants
1 $0001: IMPORT_MEMORYUsed in the ImportFile command. Select the ImportType value IMPORT_MEMORY, the corresponding file will be loaded in to the RAM memory and it will be used only from memory. The advantage is that the file will be started faster because it will not require disc access to find and load it in memory. This could be very important for sound files, where the access from hard disc could create a slow down in frame rate of the game. The problem is the use of RAM memory and this could be a real problem if too many big files are loaded using the IMPORT_MEMORY mode.
For example: Import in memory all audio files from the audio folder (from 000.wav to 111.wav) it will use about 110 Mb of RAM memory, then adding the memory used for the TRNG engine and other memory for other level files the risk is to have leak performances because Windows will be forced to use virtual memory to run the game. It is obvious that this problem changes according with the quantity of the RAM memory installed on the current PC. Anyway using a medium/low value PC with 256 MB of RAM, I suggest to limit the total amount of memory of imported files to less than 20 Mb. My suggestion is to use memory imported files only when it is strictly necessary, i.e. when you want to start sound files or images quickly.
In other circumstances it is better to avoid the IMPORT_MEMORY, preferring the IMPORT_TEMPORARY import mode. See the description of IMPORT_TEMPORARY value to compare the differences.
Remark: Up to 200 files can be supported in the IMPORT_MEMORY mode.
2 $0002: IMPORT_TEMPORARYUsed in the Import File command. When you import a file in script.dat using this import type (IMPORT_TEMPORARY) the file will be stored in the script.dat in a temporary mode and it will be immediately exported at the start of the game. For "exported" we mean that the file will create a new file with the original name and folder.
For example: To import a file use the following Import File command:
ImportFile=1, Help\Start.htm , FTYPE_USERFILE, IMPORT_TEMPORARY
The content of "Start.htm" file in the sub-folder "help" of the trle folder will be imported in the script.dat file. When the game is started (for example in another PC where the sub-folder "Help" and the file "Start.htm" are missing) the TRNG (tomb4) engine will create a new sub-folder named "help" and it will save the file with the name "start.htm" Practically the temporary import mode works using the script.dat like a simple "container" store and then retry files to install in the trle folder before the game starts.
Page 375
TOMB RAIDER NEXT GENERATION SCRIPT REFERENCE MANUAL
Temporary Import: The advantage consists of having a raw installer for the trle folder, removing further problems with special files (like .ogg or images) using level manager. The disadvantage is that there is a lower speed in starting these imported files because they will be used in the game loading them in a common way from the hard disk. There is no limit for the number or the size of imported files in IMPORT_TEMPORARY mode.
Page 376
TOMB RAIDER NEXT GENERATION SCRIPT REFERENCE MANUAL
JOINT_ constants
7 $0007: JOINT_ABDOMEN
3 $0003: JOINT_LEFT_ANCKLE
10 $000A: JOINT_LEFT_ELBOW
2 $0002: JOINT_LEFT_KNEE
9 $0009: JOINT_LEFT_SHOULDER
1 $0001: JOINT_LEFT_THIGH
11 $000B: JOINT_LEFT_WRIST
8 $0008: JOINT_NECK
0 $0000: JOINT_PUBIS
6 $0006: JOINT_RIGHT_ANCKLE
13 $000D: JOINT_RIGHT_ELBOW
5 $0005: JOINT_RIGHT_KNEE
12 $000C: JOINT_RIGHT_SHOULDER
4 $0004: JOINT_RIGHT_THIGH
14 $000E: JOINT_RIGHT_WRIST
0 $0000: JOINT_SINGLE_MESHJOINT_LEFT_ANCKLE
Page 377

TOMB RAIDER NEXT GENERATION SCRIPT REFERENCE MANUAL
KEY_constants
64 $0040: KEY1_ACTION
2 $0002: KEY1_DOWN
32 $0020: KEY1_DRAW_WEAPON
16 $0010: KEY1_JUMP
4 $0004: KEY1_LEFT
512 $0200: KEY1_LOOK
32768 $8000: KEY1_RELEASED
8 $0008: KEY1_RIGHT
4096 $1000: KEY1_ROLL
1 $0001: KEY1_UP
128 $0080: KEY1_WALK
16384 $4000: KEY2_DASH
8192 $2000: KEY2_DUCK
8 $0008: KEY2_USE_FLAREKEY1_ACTION
Page 378
TOMB RAIDER NEXT GENERATION SCRIPT REFERENCE MANUAL
KLH_ constant
-2 $FFFE: KLH_ALL_LEVELSUsed in the Customize=CUST_KEEP_LARA_HP command Use this constant to force the keeping of the current HP value for all levels where Lara could jump from the current level.See the CUST_KEEP_LARA_HP constant for more information.
LDF_ constants
512 $0200: LDF_PLAY_TRACKUsed in the Diary= command For a new background music for the Diary, use this flag adding to it a value in the range 0 to 255 to choose the audio track in the audio folder.
For example: To have as background music the audio track 104.wav (or 104.mp3/.ogg) type in the DiarySoundFlags of the Diary command this text: LDF_PLAY_TRACK + 104
Remark: The LDF_PLAY_TRACK flag does not stop the game audio track but overlaps the new audio track for the Diary. It could be useful when the LDF_PLAY_TRACK flag is used to add the LDF_SILENT flag to stop the game audio track: LDF_PLAY_TRACK + 104 + LDF_SILENT
Remark: When the diary quits, the previous audio track for the game will be restored
256 $0100: LDF_SILENTUsed in the Diary= command Set this flag when Lara 's Diary is shown, the background audio track for the game will be suspended. This setting could be useful when custom audio tracks are used for single pages of Lara 's Diary.
Remark: When the Diary quits, the previous audio track for the game will be restored
1024 $0400: LDF_SOUND_EFFECTSUsed in the Diary= command This flag is used to enable some sound effect in the Diary viewing.
The sound effects are: Click on page changing (71: GENERIC_SWOOSH) Sound for starting zoom phase (356: LIGHT_BEAM_JOBY) Sound for non valid change of page (2: LARA_NO)
Remark: To use these sounds remember to add the sound 356 ( LIGHT_BEAM_JOBY) in your wad. The two other sounds should always be present.
8192 $2000: LDF_TRANSPARENT_BKGUsed in the Diary command. This flag informs the TRNG engine that the background images could be transparent zones. The transparent color is the standard one used in tomb4: $FF00FF(red = 255; green=0; blue=255) Use this setting if the Diary is not a rectangular shape. For example, to have a rounded shape place transparent color in the four corners of the screen.
Page 379
TOMB RAIDER NEXT GENERATION SCRIPT REFERENCE MANUAL
Remarks: - This setting has no effect on pop up images shown in small frames on a page. The pop up images are always shown supporting the transparent color.
- The LDF_TRANSPARENT_BKG flag does not work correctly with the PL_FIX_WIDE_SCREEN flag for the page layout. When there is a wide-screen the background image will be stretched in the transparent zones.
- If the LDF_TRANSPARENT_BKG flag is used with the LDF_ZOOM_START flag, for technical reasons, the image shown in the zoom effect will have no text and no pop-up images. Practically the TRNG engine will zoom only the first background image for the Diary and when the zoom effect is complete, text and pop up images may be added.
- To set a transparent zone in the background of the Diary it is necessary that all (further) background images (the background can be changed for each page) have the transparency in the same zones. Otherwise the transparency zone from the previous page will be shown on the screen.
2048 $0800: LDF_ZOOM_STARTUsed in the Diary= command Starts the Diary image with a zoom effect.
Page 380
TOMB RAIDER NEXT GENERATION SCRIPT REFERENCE MANUAL
LGTN_constants NG Version:1.2.2.7
4 $0004: LGTN_ADD_GLOVE_LIGHTUsed with the Parameters=PARAM_LIGHTNING script commandThere will be a glove light around the target position while the lightning is working.
8 $0008: LGTN_EXPLODE_TARGETUsed with the Parameters=PARAM_LIGHTNING script commandIf the target position is set using a moveable index (different than Lara) or a static item, you can destroy it with an explosion.
16 $0010: LGTN_FIRE_LARAUsed with the Parameters=PARAM_LIGHTNING script commandIf the target position is set using Lara index, you can burn her by adding this flag.
Note: The fire will kill her in a few seconds if you also set the LGTN_KILL_TARGET flag .If it is missing Lara will be damaged but she will have the chance to survive diving in the water.
2 $0002: LGTN_FLASH_SCREENUsed with the Parameters=PARAM_LIGHTNING script commandAdd this flag for a flash in the level while the lightning is running.
128 $0080: LGTN_GLOBAL_SOUNDUsed with the Parameters=PARAM_LIGHTNING script commandBy default, if this flag is omitted the sound will be local, i.e. it will be played in the target position and when Lara is far away from the point the sound will be faint. The global sound will always have the same (maximum) volume from any point of the level. Add the LGTN_GLOBAL_SOUND flag only for a random target from the sky (lightening). Do Not use it for the electric conductor.
16384 $4000: LGTN_HARTHQUAKEUsed with the Parameters=PARAM_LIGHTNING script commandAdd a short heartquake effect when Lara is close to the target position of the lightning.The distance to enable the earthquake is about 6 sectors or less.
8192 $2000: LGTN_INCLINED_RANDOMUsed with the Parameters=PARAM_LIGHTNING script commandWhen you set IGNORE as source position, TRNG will choose a random position over the target position. By default TRNG tries to set a source point almost perpendicular with the floor (and the target item). To see a more inclined lightning (in a random way), add the LGTN_INCLINED_RANDOM flag.
Note: Use this flag only when the target item is far from a wall and another obstacle, otherwise the lightning could pass through the walls.
Page 381
TOMB RAIDER NEXT GENERATION SCRIPT REFERENCE MANUAL
64 $0040: LGTN_KILL_TARGETUsed with the Parameters=PARAM_LIGHTNING script commandIf the target position is set with a moveable index, you can kill him/her, by adding this flag.
32 $0020: LGTN_LARA_SCREAMUsed with the Parameters=PARAM_LIGHTNING script commandThis flag works only if the target item is Lara. There are two kinds of scream: the long scream, if you set the LGTN_FIRE_LARA or a simple "moan" if the flag is missing.
1 $0001: LGTN_PLAY_SOUNDUsed in the PARAM_LIGHTNING script commandEnable the playing of a SFX sound typed in the SoundEffect field.
4096 $1000: LGTN_RANDOM_COLORUsed with the Parameters=PARAM_LIGHTNING script commandIf you use this flag, the color will be lightly changed, adding a value floating between 0 + 47, to each gradient (red, green, blue) different from 0 and less than 208. The 0 and 208 limitations are useful to avoid so that the random changes do not modify too dramatically the main color chosen.To avoid this problem set to 0 or greater than 208 the gradient that is not to be changed and set in the interval 1 to 208 the gradients allowed to change.
Page 382
TOMB RAIDER NEXT GENERATION SCRIPT REFERENCE MANUAL
LOAD_ constants
8 $0008: LOAD_AMMO_TYPE1Used in the Equipment command. If the equipment command is working on a weapon slot (weapon, not ammo), add to the Amount field the LOAD_AMMO_TYPE1 flag to set the ammo currently loaded is Normal ammo (ammo type 1)
Remark: Pistol, revolver and UZI can only use AMMO_TYPE1. For Shotgun the AMMO_TYPE1 is the Normal ammo.
Example: To set the shotgun in the inventory and load Normal ammo:Equipment=SHOTGUN_ITEM, 1+LOAD_AMMO_TYPE1
If the ammo type currently loaded in the weapon is omitted the engine will use the default AMMO_TYPE1 for that weapon.
16 $0010: LOAD_AMMO_TYPE2Used in the Equipment command. If the equipment command is working on a weapon slot (weapon, not ammo), add to the Amount field the LOAD_AMMO_TYPE2 flag to set the ammo currently loaded with AMMO_TYPE 2 The shotgun, crossbow and grenade gun can use AMMO_TYPE2
32 $0020: LOAD_AMMO_TYPE3Used in the Equipment command. If the equipment command is working on a weapon slot (weapon, not ammo), add to the Amount field the LOAD_AMMO_TYPE3 flag to set the ammo currently loaded to AMMO_TYPE3 The crossbow and grenade gun can use AMMO_TYPE3.
4 $0004: LOAD_LASERSIGHTUsed in the Equipment command. If the equipment command is working on a weapon slot (weapon, not ammo), add to the Amount field the LOAD_LASERSIGHT flag to set that the ammo has loaded the Laser sight.
Note: Only the revolver and the crossbow can use the Laser sight.
Page 383
TOMB RAIDER NEXT GENERATION SCRIPT REFERENCE MANUAL
MIR_ constants
2 $0002: MIR_CEILINGMirror on the ceiling.
Remark: To see the reflected Lara on the ceiling use a room with limited height or a fixed camera. Otherwise Lara is not able to rotate her neck enough to see the reflected Lara.
4 $0004: MIR_EAST_WALLMirror on the East wall
1 $0001: MIR_FLOORMirror on the floor
3 $0003: MIR_INVERSE_WESTMirror on West wall but every movement and displacement of Lara or other moveables will be inverted like in Tomb Raider 1 when Lara meets an alien.
6 $0006: MIR_NORTH_WALLMirror on the North wall
5 $0005: MIR_SOUTH_WALLMirror on South wall
0 $0000: MIR_WEST_WALLMirror on the West wall of the current room. This was the default and only setting in the old tomb4 engine.
Page 384
TOMB RAIDER NEXT GENERATION SCRIPT REFERENCE MANUAL
MIST_COL constants
5 $0005: MIST_COL_AZURESet the Mist color Azure
3 $0003: MIST_COL_BLUESet the Mist color Blue
2 $0002: MIST_COL_GREENSet the Mist color Green
6 $0006: MIST_COL_PURPLESet the Mist color Purple
1 $0001: MIST_COL_REDSet the Mist color Red
0 $0000: MIST_COL_WHITESet the Mist color White
4 $0004: MIST_COL_YELLOWSet the Mist color Yellow
Page 385
TOMB RAIDER NEXT GENERATION SCRIPT REFERENCE MANUAL
NEF_ constants
256 $0100: NEF_EASY_HEAVY_ENABLINGUsed in the Enemy command. This flag gives the current enemy the ability to enable heavy triggers.By default only some moveables enable heavy triggers and it is necessary to place an AI_ object in the target sector with the heavy trigger to enable it. When the enemy moves over the heavy trigger it is activated.
1 $0001: NEF_EXPLODEWhen the enemy has no health vitality it will explode
2 $0002: NEF_EXPLODE_AFTERPerform a death animation and at the end explode.
1024 $0400: NEF_HIT_BLOODShow Blood when it has been hit.
8 $0008: NEF_HIT_DEFAULTUse standard behaviour.
3072 $0C00: NEF_HIT_FRAGMENTSShow fragments when it has been hit.
2048 $0800: NEF_HIT_SMOKEShow smoke when it has been hit
4 $0004: NEF_NON_TARGETLara will be not able to aim at this moveable.
0 $0000: NEF_NONE
4096 $1000: NEF_ONLY_EXPLODEThe enemy will become like a skeleton or mummy. The common ammos will have no effect but explosive ammos can destroy it.
16384 $4000: NEF_SAVE_MESH_VISIBILITYUsed in the Enemy command Use the action trigger to get an invisible mesh for a moveable. This forces the TRNG engine to save and restore from a save game the visibility status of each mesh for the moveable.
32 $0020: NEF_SET_AS_BRIDGE_FLATUsed in the Enemy command. This forces the specified animating to work like a BRIDGE_FLAT item. Place below the BRIDGE_FLAT item a dummy trigger and Lara will be able to walk over it.
Remark: It is advisable to use an Animating item with this flag. Some moveables will not work because they have more than a mesh or a pivot for a first frame that is not compatible to work like a bridge item. A good way to avoid these problems is to copy an original BRIDGE_FLAT object in an
Page 386

TOMB RAIDER NEXT GENERATION SCRIPT REFERENCE MANUAL
animating slot with Wad Merger (Copy button + SHIFT key to reassign the target slot). Once copied into the original BRIDGE_FLAT the object can be modified with Metasequoia..
64 $0040: NEF_SET_AS_BRIDGE_TILT1Used in the Enemy command. This forces the specified animating to work like a BRIDGE_TILT1 item. The TILT1 has a slope with a difference of one click between opposite sides.See the description for the NEF_SET_AS_BRIDGE_FLAT flag for more information.
128 $0080: NEF_SET_AS_BRIDGE_TILT2Used in the Enemy command. This forces the specified animating to work like a BRIDGE_TILT2 item. The TILT2 has a slope with a difference of two clicks between opposite sides.See the description for the NEF_SET_AS_BRIDGE_FLAT flag for more information.
16 $0010: NEF_SET_AS_CREATUREThis is experimental: Used to give to a common moveable some features of creatures
8192 $2000: NEF-SET_AS_MORTALThis flag is used with the slot of a demigod to transform it in to a mortal enemy. When this flag is set the enemy can be killed with common ammos.
Page 387
TOMB RAIDER NEXT GENERATION SCRIPT REFERENCE MANUAL
OBJ_ constants
2 $0002: OBJ_MOTOR_BOATDefine the slot with the motor boat OBJECT.
6 $0006: OBJ_MOTOR_BOAT-ANIMDefine the slot with Lara ANIMATIONS for the motor boat.
1 $0001: OBJ_RUBBER_BOATDefine the slot with rubber boat OBJECT.
5 $0005: OBJ_RUBBER_BOAT_ANIMDefine the slot with Lara ANIMATIONS for the rubber boat.
OTYPE_constants NG Version:1.2.2.7
16384 $4000: OTYPE_AI_DATAUsed with the Parameters=PARAM_LIGHTNING script command.Add this value to the OCB value stored in the null mesh object used, to inform TRNG that is an AI_DATA item.
0 $0000: OTYPE_MOVEABLEUsed with the Parameters=PARAM_LIGHTNING script command.Add this value to a moveables index to inform TRNG that it is a Moveable item.
8192 $2000: OTYPE_STATICUsed with the Parameters=PARAM_LIGHTNING script command.Add this value to a static index to inform TRNG that it is a Static item.
Page 388
TOMB RAIDER NEXT GENERATION SCRIPT REFERENCE MANUAL
PARAM_ constants
7 $0007: PARAM_BIG_NUMBERSUsed in the Parameters= command to store big numbers to use in some flip effects.
Syntax: Parameters=PARAM_BIG_NUMBERS, Numbers are separated by commas
For technical reasons it is not possible to type in the trigger type window a number greater than 255. Use the script command with the PARAM_BIG_NUMBERS value to store big numbers to use in some flip effects or actions.
The trigger uses these big numbers and they have a description like this:
Value 0 index in Parameters=PARAM_BIG_NUMBERS script commandValue 1 index in Parameters=PARAM_BIG_NUMBERS script commandValue 2 index in Parameters=PARAM_BIG_NUMBERS script command
So to use in the trigger the value 23430 type the script command:Parameters=PARAM_BIG_NUMBERS, 23430
In the trigger window select the index =0 for the PARAM_BIG_NUMBERS command.Up to 254 numbers can be stored in the same PARAM_BIG_NUMBERS command.Choose a number by its index, where the first number has index= 0, the second = 1`, the third = 2 etc.
Remark: Numbers bigger than 65536 or $FFFF cannot be input. All numbers used must have positive values.
12 $000C: PARAM_CIRCLEUsed to store the circle data to use with a fragmented trigger
Syntax: Parameters=PARAM_CIRCLE, IdParamList, xCenter, yCenter, Radius
IdParamList fieldDefine an Id number, different from other Parameters=PARAM_CIRCLE in the same [Level] section.
xCenter and yCenter fieldIn these two fields type the centre of the circle. Remember that the origin of the current square game sector is (0,0) and it is in the top-left corner.
The coordinates of the game square go from 0 to 1023.The X axis in the NGLE view is the West to East direction.The Y axis in the NGLE view is North to South direction.
Page 389
TOMB RAIDER NEXT GENERATION SCRIPT REFERENCE MANUAL
Tips & Tricks: Place the centre outside the current game sector but the effect will only work inside the current game square. A reason to place the centre outside is when you want to have a very light bend. In this case having a light bend in the south side of the current sector could set the centre of the circle in the sector south of the current sector. Say, at (512, 1600). Then to have a zone in the current sector set a big radius for example 800
Note: Negative numbers can be used for the centre and it is necessary when the centre is placed outside and in a sector west or north of the current game square.
Radius fieldThe radius uses game units. So a circle centred in the current square sector to touch all sides will have a radius of 512.
4 $0004: PARAM_COLOR_ITEMUsed as the first value in the Parameters script command. It is used by a trigger to change the color of some item.
Syntax: Parameters=PARAM_COLOR_ITEM, IdParamList, ColorType (COLTYPE_...), ItemIndex, Index1ColorRGB, Index2ColorRGB, SpeedChange
IdParamList fieldThis is a progressive number to identify this "Parameters=PARAM_COLOR_ITEM" command script in the trigger window of NGLE..
ColorType (COLTYPE_...) fieldChoose a COLTYPE_ constant to set the work mode of this PARAM_COLOR_ITEM.Read the description for COLTYPE_constants.
Remark: Only a single COLTYPE_ constant can be chosen, two or more values cannot be added.
ItemIndex fieldThe index of the static or moveable that you want change the color.This value is displayed in a yellow box in NGLE when you click on a item.
Index1ColorRGB fieldType the IdColor of the ColorRGB= with the RGB value used as a first color.The ColorRGB= have to be in the same [Level] section where the Parameters=PARAM_COLOR_ITEM command has been placed.
Index2ColorRGB fieldIf the COLTYPE_ requires two colors, type the IdColor of the ColorRGB= command.
SpeedChange fieldTo use a COLTYPE_ requiring a dynamic effect (like PULSE or SHADE) type in the SpeedChange field the number of the frame for each cycle.
Remember that 30 frames = 1 second. So for a pulse from a dark color to a light color in two
Page 390
TOMB RAIDER NEXT GENERATION SCRIPT REFERENCE MANUAL
seconds type 60.
Remark: The valid range for speed is minimum= 1, maximum= 255 (about 8 seconds)
13 $000D: PARAM_LIGHTNINGUsed to store data to shoot a lightning bolt
Syntax: Parameters=PARAM_LIGHTNING, IdParamList, Lightning flags (LGTN_...), SourcePosItem, TargetPosItem, IdColorRGB, Intensity, SoundEffect, Size, ParticleDurate, IntervalTime, Alfa, Beta
IdParamList fieldDefine an univocal Id number, different from other Parameters=PARAM_LIGHTNING in the same [Level] section. Then use this Id to pass to the trigger to set the current parameters.
Lightning flags (LGTN_...) fieldType one or more LGTN_ flags to customize the lightning effect. Type IGNORE in this field to set no flag. See the meaning of the LGTN_ flags.
SourcePosItem fieldTo set a position supply an item and TRNG will use the position of that item for the source position. Type IGNORE in this field and TRNG will use a random position in the sky above the target position as source position.
To set a precise source position type in this field:
A moveable index + the OTYPE_MOVEABLE flag
Note: In reality it can be omitted because missing the other OTYPE_ flags the moveable type will be used
A null mesh item OCB value (the null mesh items are like the AI_ objects or the LARA_START_POS item) + the OTYPE_AI_DATA flag
Remark: Read the above line: To use a LARA_START_POS, type its OCB value and NOT the index. This means you should set in the null mesh object an OCB value different from any other in your level.
A static object index + the OTYPE_STATIC flag
TargetPosItem fieldTo set a position supply an item and TRNG will use the position of that item as the target position.
Type in this field: A moveable index + the OTYPE_MOVEABLE flag
Note: In reality the flag can be omitted because missing other OTYPE_ flags the moveable type will be used as a default
Page 391
TOMB RAIDER NEXT GENERATION SCRIPT REFERENCE MANUAL
A null mesh item OCB value (the null mesh items are like the AI_ objects or the LARA_START_POS item) + the OTYPE_AI_DATA flag
Remark: Read the above line: To use a LARA_START_POS, type its OCB value and NOT the index. This means set in the null mesh object an OCB value different from any other in the level. A trick, to keep different OCB values for the whole level, is to compute the OCB value, multiplying the room number by 10 and then use this as the first OCB value for items in that room.
A static object index + the OTYPE_STATIC flag
IGNORE can also be typed in this field and in this case gives a random (far) lightning.Use IGNORE in the TargetPosItem field when Lara is in a wide outside landscape.With IGNORE, the TRNG engine will choose a random target placed far away from Lara from 8 to 20 sectors, choosing the side where Lara is able to see it.
IdColorRGB fieldType the Id of a ColorRBG= command where the color to use for the lightning is stored.Type IGNORE in this field to use the white color.
Intensity fieldType values that are in the range from 30 to 100. The intensity increases the light of the lightning and its durate. Type IGNORE in this field and TRNG will use the most common value for this setting
SoundEffect fieldType the number of the sound effect to play when the lightning is performed.
Note: To supply a sound effect add to the Lightning field the LGTN_PLAY_SOUND flag.
Size fieldThis should be the diameter size of the lightning but it does not have a precise reference to the effective size. It was a magnifying factor about the "lighting" sprite used to create this effect.Reasonable values for this field are in the range from 20 to 40. Type IGNORE in this field and TRNG will use the most common value for this setting
ParticleDurate fieldThis value is the persistence of particles used to create the lightning.Reasonable values are in the range from 20 to 40. Type IGNORE in this field and TRNG will use the most common value for this setting
IntervalTime fieldThis field is a bit complicated to explain but it is very important to simulate the lightning conductor. Type 0 (or IGNORE) in this field to simulate the sky lightning. The value in this field will be used to compute a pause between a shooting of a lightning and the next, when you set (in the trigger) a long delay time ( 30 tick frames (one second) or more). The problem is that lightning uses a lot of particles and when set to show lightning for some time, in reality it will be a big number of
Page 392
TOMB RAIDER NEXT GENERATION SCRIPT REFERENCE MANUAL
lightnings, one for each frame. If a pause is not set between a lightning and the following one something evil happens that you do not want to see in your level. To avoid this collapse of the particle system and lightning skill, it is necessary to set a pause that should be about the time used from the particles for the previous lightning to let them to vanish in the normal way. The value typed in this field will work in inverse mode with the ParticleDurate field. In this field type the denominator of a fraction where we have "1" as the numerator. This will be the time that the lightning will be shot, while the other time will be a pause.
For example: 1/4 means it will be shot once every four times.
A further complication, only choose for this field powers by 2, like 2,4 ,8, 16, 32 etc.
A reasonable value for this field is 4 or 8, but it depends on the value typed in the Intensity field and in the ParticleDurate field. Bigger values for those fields should have bigger IntervalTime.
Note: If a huge value (the maximum value is 128), the collapsing problem is solved and a long pause between a lightning and the next one is obtained.
To compute the pause time perform the computation: IntervalTime / 30, to get the seconds of pause between a shot and another. For example typing 32, gives a lightning every second, in spite of that a lightning goes on for about half a second so the time with no lightning effect on the screen will be shorter
Alfa fieldThe generic name "alfa" is because the meaning of this argument is not yet known.It always has small values (0,1,3 are the most used). Perhaps they are flags rather than a quantity. [PAOLONE]. You can experiment to discover what changes by modifying this argument, or you can type IGNORE in this field and it will use the most common value
Beta fieldThe generic name "beta" is because the meaning of this argument is not yet known.In this case it appears as if it is the intensity of some sharpening, blurring effect of the lightning. Increasing this value, it becomes like smoke and increasing it more it becomes transparent until it disappears. This argument usually has 3 or 5 values.Type IGNORE in this field and TRNG will use the most common value
Page 393
TOMB RAIDER NEXT GENERATION SCRIPT REFERENCE MANUAL
2 $0002: PARAM_MOVE_ITEMUsed as a first value in the Parameters script command. Set the values used to move a moveable or a static using the specific "Move." flip effect.
Syntax: Parameters=PARAM_MOVE_ITEM, IdParamList, Flags (FMOV_...), IndexItem, Direction (DIR_...), Distance, Speed, MovingSound, FinalSound
Field descriptions:
IdParamList fieldThis is a progressive number to identify the "Parameters=PARAM_MOVE_ITEM" command script in the trigger window of NGLE.
Type 1, for the first PARAM_MOVE_ITEM command, 2 for second etc.
Flags (FMOV_...) fieldSet one or more FMOV_ values linked with + (plus) signSee the FMOV_ constants in the Mnemonics Section.
Remark: Type IGNORE in this field if you do not want to use any flag.
IndexItem fieldThis is the index read in the yellow frame when you click on an item in the NGLE program.
Remark: Use static or moveables and use the correct flip effect in accordance with the static or moveable nature of the item. Remember the static is owned by the room and for this reason avoid moving a static out of its room.
Direction (DIR_...) fieldChoose one DIR_ constant to set the direction of moving.See the DIR_ list in the Mnemonics Section.
Distance fieldIn this field set the distance of moving. The units are 1 sector = 1024, half-sector = 512, quarter-sector = 256 etc. Always use multiples of 256 (one click) to avoid trouble. The maximum value for distance is 64512, corresponding to 63 sectors.
Speed fieldThe speed value is the number of units that will be added to the current position to move the item.The used units are the same as the Distance field: 1 click = 256 units. Remember that this speed will be added 30 times per second, so it is better not to set big values for speed. A reasonable speed is enclosed in the range from 8 to 64.
Remark: It is advisable to set a speed value that is a perfect multiple of distance, otherwise there will be an error in the compute for the final distance.
Page 394

TOMB RAIDER NEXT GENERATION SCRIPT REFERENCE MANUAL
Moving sound fieldOptional. To play a sound effect in a looped mode while the item is moving type the number of a sound effect. The list of sound effects is in the Reference panel of the NG Center in the section "SOUND SFX indices list" For no sound type IGNORE in this field.
Final sound fieldOptional. To play a sound effect when the item reaches the final position type a number for the sound effect. The list of sound effects is in the Reference panel of the NG Center in the section "SOUND SFX indices list".and SFX Sounds Section For No sound type IGNORE in this field.
5 $0005: PARAM_PRINT_TEXTUsed to store all information used to print text.
Syntax: Parameters=PARAM_PRINT_TEXT, IdPrintText, Color (CL_...), FontType (FT_...), BlinkTime, DurateTime, X_Position, Y_Position
This parameter list is required by the new flip effect trigger "Text. Print formatted ... string"
IdPrintText fieldThis is the number chosen in the Set Trigger Window for the "print formatted text" trigger.
Color (CL_...) fieldThe color for the text.See the CL_constants in the Mnemonics Section.
FontType (FT_...) fieldIn this field set two or more FT_constants to describe the size or the preassigned position for the text.
Remark: Omit the FT_ value to set the position in pixel coordinates typing two valid values in fields: X_Position and Y_Position. See the description of these fields.
BlinkTime fieldA numeric value to signal the interval for blinking when the FT_BLINK_CHARS flag is set in the FontType field. For the blink time use only power of 2 values : 1, 2, 4, 8, 16, 32, 64, 128 etc.
DurateTime fieldThe number of seconds to show the text on the screen.To set a time "forever" type -1 or IGNORE in this field.
Remarks: (1) If forever (IGNORE) is set for durate, then remove the string from screen using the flip effect "Text. Print. Remove (&)Extra NG String from screen"(2) If this parameter data is used for vertical or horizontal scrolling text, the value typed in the DurateTime field will be interpreted by the TRNG engine as the speed value used for scrolling text.
Page 395
TOMB RAIDER NEXT GENERATION SCRIPT REFERENCE MANUAL
THE VALUES FOR SCROLLING SPEED ARE AS FOLLOWS:
0: Abs. Normal Speed (30 fps)1: Abs. Slow Speed (15 fps)2: Abs. Very Slow Speed (10 fps)3: Abs. Fast Speed (60 fps)4: Abs. Very Fast Speed (90 fps)5: Prop. Normal Speed (30 fps)6: Prop. Slow Speed (15 fps)7: Prop. Very Slow Speed (10 fps)8: Prop. Fast Speed (60 fps)9: Prop. Very Fast Speed (90 fps)
Set IGNORE in this field (used by scrolling text) to use the default value 0 i.e. "Abs. Normal Speed (30 fps)"
X_Position and Y_Position fieldsSet two valid values in these two fields the further FT_ value to set the position will be ignored.To use a FT_ prefixed position type IGNORE in the X_Position and Y_Position fields.The values typed in these fields are in pixels, because the resolution in game is unknown (each player could set a different resolution). Set the coordinates as if the screen is 1024x768 pixels resolution. Then if the game has a different resolution the TRNG engine will change the position proportionally in accordance with the real resolution.
For example: Set the Y_Position value 384 (i.e. 768 / 2) the text will be shown in the vertical half on the screen.
Remark: The Y_Position is not the top pixel of the character but the baseline character. This means that the Y_Position for the 0 value of the character will not be visible.
11 $000B: PARAM_QUADRILATERALUsed to store the four vertices to define a quadrilateral to use with a fragmented trigger.
Syntax: Parameters=PARAM_QUADRILATERAL, IdParamList, Xa, Ya, Xb, Yb, Xc, Yc, Xd, Yd
A quadrilateral could be a rectangle, a square but also a trapezium or a rhombus. If it has four sides it is a quadrilateral. It is not important what first point is used for the A(x,y) vertex, but it is necessary to type the vertices following the perimeter in a clockwise order.
Define a quadrilateral with four 2D vertices.Each vertex is a point of a game square of 1024x1024 units.The origin is the top-left corner (North-West corner in the planar view in the NGLE program)The X axis moves from 0 (West side of the square) to 1023 (East side of the square)The Y axis moves from 0 (North side of the square) to 1023 (South side of the square)
Page 396
TOMB RAIDER NEXT GENERATION SCRIPT REFERENCE MANUAL
IdParamList fieldDefine an Id number, different from other Parameters=PARAM_QUADRILATERAL in the same [Level] section. Use the Id number to use the data with the fragmented trigger for the quadrilateral
Xa, Ya fieldsDefine the A(x,y) vertex
Xb, Yb fieldsDefine the B(x,y) vertex
Xc, Yc fieldsDefine the C(x,y) vertex
Xd, Yd fieldsDefine the D(x,y) vertex
15 $000F: PARAM_RECTUsed with the Parameters= script command
Syntax: Parameters=PARAM_RECT, RectId, XOrigin, YOrigin, Width, Height, ForeColor, BackColor
This parameter could be used to store information about the screen rectangle.
RectId fieldId to identify the PARAM_RECT parameters. Use this value to reference the rectangle in the script commands or triggers that require it.
XOrigin fieldThis is the X origin of the rectangle, it is the left side of rectangle.
YOrigin fieldThis is the Y origin of the rectangle, it is the top side of the rectangle
Width fieldThis is the x size, the width of the rectangle
Height fieldThis is the y size, the height of the rectangle
ForeColor fieldOptional field. Where it is required type the Id of a ColorRGB command to set the foreground color of the rectangle If it is not foreseen to supply a Foreground color type IGNORE in this field.
Note: Usually the foreground color is the frame that bounds the rectangle
Page 397

TOMB RAIDER NEXT GENERATION SCRIPT REFERENCE MANUAL
BackColor fieldOptional field. Where it is required type the Id of a ColorRGB command to set the background color of the rectangle. If it is not foreseen to supply a Background color type IGNORE in this field.
Note: Usually the Background color is the inside (and wider) zone of the rectangle
3 $0003: PARAM_ROTATE_ITEMUsed as a first value in the Parameters script command for rotating of items, moveables or statics.
Syntax: Parameters=PARAM_ROTATE_ITEM, IdParamList, FlagsRotation (FROT_), ItemIndex, DirHRotation (ROTH_...), HRotationAngle, SpeedHRotation, DirVRotation (ROTV_..), VRotationAngle, SpeedVRotation, MovingSound, FinalSound
Description of fields:
IdParamList fieldThis is a progressive number to identify the "Parameters=PARAM_ROTATE_ITEM" command script in the trigger window of NGLE. Type 1, for the first PARAM_ROTATE_ITEM command, 2 for second etc. Use numbers from 1 to 99.
FlagsRotation (FROT_) fieldType one or more FROT_ constants linked with + (plus) sign.See the description for the FROT_ constants.
ItemIndex fieldThis is the index of the item to rotate. Read it in the yellow frame that appears when you click on a item in the NGLE program. Choose a moveable or static but remember to perform the correct flip effect in accordance with nature of the static or moveable item.
DirHRotation (ROTH_...) fieldTo have a horizontal rotation type in this field a ROTH_ value to set the direction of rotation (clockwise or opposite).
HRotationAngle fieldSet the wanted horizontal angle rotation. The unit of measurement for this field is a bit weird but it was used in the tomb4 engine. These are the references: $2000 = 45 degrees
$4000 = 90 degrees$8000 = 180 degrees
For example: To rotate an object by 90 degrees type in the field the value $4000 ( 16384).
Remark: If the FROT_ flag is set for endless rotation the HRorationAngle field will be ignored, as the item will rotate continuously.
Page 398
TOMB RAIDER NEXT GENERATION SCRIPT REFERENCE MANUAL
SpeedHRotation fieldThe speed is a value that will be added to the current horizontal orientation. The unit of measurement is the same as the horizontal or vertical RotationAngle, but in this field type a value smaller than the final angle. Remember that the value of speed will be added to the current orientation 30 times per second. It is advisable to use a speed value that is a multiple of the power by 2. In hexadecimal it is easy to remember good speeds: $80 , $100 , $180, $200, $280, $300 etc.If these values are not used there is the risk that the speed value is NOT a multiple of the final Rotation Angle and the object may not be not positioned correctly. To discover if a value for the RotationAngle and Speed is good, divide the Rotation by Speed. DirVRotation (ROTV_..) fieldTo have a vertical rotation type in this field a ROTV_ value to set the direction of rotation (forward or backward)
Remark: Unfortunately statics cannot have a vertical rotation, so a vertical rotation can only be applied to moveable items.
VRotationAngle fieldSet the vertical rotation angle. The unit of measurement for this field is a bit weird but it is used in tomb4 engine. The unit of measurement for this field is a bit weird but it was used in the tomb4 engine.
These are the references: $2000 = 45 degrees$4000 = 90 degrees
For example: To rotate an object by 90 degrees type in the field the value $4000 ( 16384).
Remark: If the FROT_ flag is set for endless rotation the VRorationAngle field will be ignored, as the item will rotate continuously.
SpeedVRotation fieldThe speed is a value that will be added to the current vertical orientation.The unit of measurement is the same as the vertical RotationAngle, but in this field type a value smaller than the final angle. Remember that the value of speed will be added to the current orientation 30 times per second.
MovingSound fieldOptional field. To assign a sound item while it is rotating type a number for the sound SFX.For No sound set IGNORE in this field.
FinalSound fieldOptional field. To perform a sound when the rotation is complete type a sound SFX in this field For No final sound set IGNORE in this field.
Page 399
TOMB RAIDER NEXT GENERATION SCRIPT REFERENCE MANUAL
8 $0008: PARAM_SCALE_ITEMUsed in the Parameters= command to store data for scaling effects
Syntax: Parameters=PARAM_SCALE_ITEM, IdScaling, ItemIndex, Flags Scaling (FSCA_...), BeginSizePercentage, FinalSizePercentage, PercentageSpeed
IdScaling fieldUsed to locate the specific command in the script. To use the data choose the number in the set Trigger Type window to choose the Parameters with the scaling data.
ItemIndex fieldType the index of the item to resize. This is an index in the NGLE program given by performing a right mouse click on the item placed in the map. Read the index in the yellow frame in the rounded parenthesis.
Flags Scaling (FSCA_...) fieldThis is the flag to customize the scaling effect. Type IGNORE if the flag is not used.See the FSCFA_constants in the Mnemonics Section.
BeginSizePercentage and FinalSizePercentage fieldsThe dynamic scaling effect works by dynamically changing the size of an item from one size to another. The BeginSizePercentage is the start size of the item in the game. The FinalSizePercentage is the finish size of the item to complete the effect. The values are in percentage, where 100 = the original size (in the wad file) of the item.
For example: To double the size of the item from the original size use:
BeginSizePercentage = 100 and FinalSizePercentage = 200
Remark: Type IGNORE in the BeginSizePercentage field when using this script command to resize an item to the new size (of FinalSizePercentage field) with no dynamic effect.
PercentageSpeed fieldIn this field add or subtract the value to the BeginSizePercentage at each frame to reach the FinalSizePercentage value. Larger values will give a faster dynamic resize effect.
Important: The value is not given in 100th but in 1000th, i.e. one unit = 1/1000. So a very slow speed can be set.
Page 400
TOMB RAIDER NEXT GENERATION SCRIPT REFERENCE MANUAL
6 $0006: PARAM_SET_CAMERAUse to store information in the Parameters command to use with the flip effect to change the camera mode.
Syntax: Parameters=PARAM_SET_CAMERA, IdSetCamera, Flags (FSCAM_... ), DistanceCam, VOrientCam, HOrientCam, SpeedCamera
IdSetCamera fieldThis is an identifier to locate the Parameters in the [Level] section using the value in the flip effect trigger to temporary set a new camera mode.
Flags (FSCAM_... ) fieldType one or more FSCAM_constants to affect the behaviour of the command. Type IGNORE for no flag.
DistanceCam fieldThis is the distance of the camera from Lara. A reasonable value is +1600. To keep the default value type IGNORE and the standard distance value set for "chase" (follow-me) camera will be used.For more information about the concept of "cam distance" see the description of the CUST_CAMERA
VOrientCam fieldThis is the degrees of difference computed on the horizontal line (parallel to floor) between the camera and Lara. Type IGNORE in this field to use the VOrientCam value set for the "chase" camera.. See the CUST_CAMERA description to read more information about the Vertical Orientation field.
HOrientCam fieldSet the horizontal orientation (facing) of the camera with respect to Lara. Type IGNORE in this field and the TRNG the engine will use the HOrient value set for the "chase" camera. See the CUST_CAMERA description to read more information about the Horizontal Orientation field.
SpeedCamera fieldThis value sets the speed of the camera to pass from a previous camera mode and position to the current new position. The speed works in an opposite way: large values = slow movements,
small values = fast movement.
Type a small value and the camera will reach the new position faster but the movement could be jerkily and not good to see. Type a big value and the camera will take more time to reach the new position. A reasonable value for fast movement is 1, while for slow movement is 10.Type IGNORE in this field and the TRNG engine will use the default speed value 10.
Page 401
TOMB RAIDER NEXT GENERATION SCRIPT REFERENCE MANUAL
9 $0009: PARAM_SHOW_SPRITEUsed with the Parameters command to store data to show sprites on the screen with the flip effect show sprite.
Syntax: Parameters=PARAM_SHOW_SPRITE, IdParamShowSprite, Flags Show Sprites (FSS_...), OriginX, OriginY, Width, Height, SlotSprite, SpriteIndex, IdColorRGB, GridX, GridY, Extra Value
IdParamShowSprite fieldType a progressive number to distinguish the "Parameters=PARAM_SHOW_SPRITE" command from others in same level section. Use the number in this field to signal the flip effect Trigger to look for the sprite show data.
Flags Show Sprites (FSS_...) fieldType in this field the FSS_.. constant values to customize the feature for showing the sprite operation. See the FSS_ constants in the Mnemonics Section.
OriginX and OriginY fieldsIn these two field type the origin of (top-left corner) the sprite. Both values are in micro units so use the [Get Screen Frames] tool found in the [Tools] panel of the NG_Center program.
Width and Height fieldsSet the size that the sprite will have on the game screen. Type these values in micro units so use the [Get Screen Frames] tool to choose a rectangle on the screen and then copy both four values in micro units in the OriginX, OriginY, Width and Height fields.
Remark: Use a sprite grid (with the FSS_SHOW_SPRITE_GRID flag) choose the width and height of a single sprite and not the final size of the sprite grid.
SlotSprite fieldType the sprite slot for the sprite to use. For example, type the DEFAULT_SPRITES, MISC_SPRITES or another slot that contain sprites.
SpriteIndex fieldType the index of the sprite to use within the given SlotSprite. The first sprite has an index = 0
IdColorRGB fieldType in this field the Id number of a previous ColorRbg= script command to add color to the sprite. The add color feature only works when the transparent feature for the sprite is enabled by adding the FSS_TRANSPARENT flag. For full opaque sprites the IdColorRbg will be ignored.
GridX and GridY fieldsThese fields are only used with the FSS_SHOW_SPRITE_GRID flag.
Page 402
TOMB RAIDER NEXT GENERATION SCRIPT REFERENCE MANUAL
For example: To show an image created with 2x1 sprites type 2 in the GridX and 1 in the GridY.
See the description of the FSS_SHOW_SPRITE_GRID flag for more information.If no FSS_SHOW_SPRITE_GRID flag is set the GridX, GridY will be ignored.
Extra Value fieldThis field is used according to the FSS_ constant. See the descriptions of the FSS_constants to discover when this field is used.
10 $000A: PARAM_TRIANGLEUsed to store the three vertices to define a triangle to use as a fragmented trigger.
Syntax: Parameters=PARAM_TRIANGLE, IdParamList, Xa, Ya, Xb, Yb, Xc, Yc
Define a triangle with three 2D vertices.Each vertex is a point of a game square of 1024x1024 units.The origin is the top-left corner (North-West corner in planar view in the NGLE program)The X axis moves from 0 (West side of the square) to 1023 (East side of the square)The Y axis moves from 0 (North side of the square) to 1023 (South side of the square)
IdParamList fieldDefine an Id number, different from other Parameters=PARAM_TRIANGLE in the same [Level] section. Use this number to use the data with the fragmented trigger for custom triangles
Xa, Ya fieldsDefine the A(x,y) vertex
Xb, Yb fieldsDefine the B(x,y) vertex
Xc, Yc fieldsDefine the C(x,y) vertex
Example: To define a triangle corresponding to a North-East corner triangle with a size of 512, use the following command: Parameters=PARAM_TRIANGLE, IdParamList, 512, 0, 1023, 0, 1023, 512
Using the custom triangles and exporting the condition triggers that use them in to a conditional trigger group, can cover any shape for the trigger. To create a detailed shape add different triangles and use the TGROUP_OR flag in the Trigger Group command to link the different triangle triggers.Mix the triangles with other shapes, like circle or grid triggers, linked with the (default) TGROUP_AND, to have a trigger zone where all fragmented triggers are true at the same time.
Page 403
TOMB RAIDER NEXT GENERATION SCRIPT REFERENCE MANUAL
PB_ constants
8 $0008: PB_DOUBLE_FACEUsed in the Customize=CUST_PARALLEL_BARS. By default, the Chronicles parallel bar has a weird property: it works with long jumps only from one side, while from the opposite side the jump is disabled. Lara performs a single pirouette and remains in the closed sector. Probably this behaviour has been made to stop the parallel bars being used to go backwards in the level in some situations. To make the parallel bar work the same for both directions, customize it with the PB_DOUBLE_FACE flag.
2 $0002: PB_LARA_CAN_SLIDEUsed in the Customize=CUST_PARALLEL_BARS. By default Lara is not able to move when she hangs on the bar. She can only to turn. Adding the PB_LARA_CAN_SLIDE value in the CUST_PARALLEL_BARS Lara will be able to slide to the left or to the right.
Remarks: * Place two or more PARALLEL_BARS items in the NGLE to create a long bar and Lara will be able to move along all this path.* The power of the jump will be affected by the last parallel bar item touched by Lara before leaving the bar to perform the jump. For a long bar using different parallel_bars set different OCB values in these items and Lara will jump with different power according to the OCB value stored in the parallel bar..
4 $0004: PB_MULTIPLE_ENDINGSUsed in the Customize=CUST_PARALLEL_BARS. By default Lara will perform a correct jump when she lets go of the bar. It is not possible to go wrong because the jump is always the same.Use the PB_MULTIPLE_ENDINGS flag for situation changes: now Lara could go wrong, turning, falling vertically, headlong or a stand-up position.
Remarks:* This option is not perfect because the state Id change should require a correct, specific, next animation to continue the source animation of turning, frame for frame, while I tried to link source animation with some default animations like that of headlong diving and fast falling (with Lara screaming).* Theoretically add the new custom animation and link them to animation 462 state Id = 128, by the change state Id editor of wad merger program.To create a new animation where Lara loses the hanging at a different point of the turn, just create a change state-Id and set the range of frames for 462 animation where Lara can let go of the bar. Then set the state Id = 129 and the number of the new animation.To perform this attempt do not use the PB_MULTIPLE_ENDINGS value because this flag performs a change of state Id in hard-coded mode and this could interfere with the changes of state Id.
Technically the code performs this computes: - When it detects that Lara lets go the Action key: set as next state Id = 129- This change doe snot happen immediately but only when the infinite animation 462 finds a correct frame range in the state Id change.
Page 404
TOMB RAIDER NEXT GENERATION SCRIPT REFERENCE MANUAL
- By default this happens between frame 8 and 9 of animation 462 and the next animation will be animation 463Add the new animation starting from some intermediate position of rotation and then apply to the specific frame range where Lara has her starting position.
1 $0001: PB_PROGRESSIVE_CHARGEUsed in the Customize=CUST_PARALLEL_BARS. By default the power of the jump is given by the OCB value set in the parallel bar object in the NGLE program. If the PB_PROGRESSIVE_CHARGE flag is added the power of the jump will depend on the number of full turns around the bar. For each turn the power of the jump will be increased by a number in the OCB value. The maximum power is 10 turns, over this limit the power will not be increased.
For example: Type 50 in the OCB field and Lara performs 3 full turns before letting go (the Action key), the power will be 50 * 3 = 150
Remark: Also use the PB_LARA_CAN_SLIDE flag to move Lara left/right on the hanged bar. Every time Lara moves left/right the counting of the jump power will be cleared, restarting from the OCB Value. This is useful when the player needs to perform a correct number of turns but also has to move Lara to a different position on the bar. It is possible to set the correct number of turns: when the player passes over the correct number of turns move Lara left/right to reset and restart the counting.
16 $0010: PB_SHOW_CHARGE_BARUsed in the Customize=CUST_PARALLEL_BARS. This flag only works when the PB_PROGRESSIVE_CHARGE flag is set.. When the PB_PROGRESSIVE_CHARGE flag is enabled, Lara is able to increase the power of her jump turning many times. It is advisable to add this feature because the player could have some difficulty to understand how many turns were made.
32 $0020: PB_SHOW_CHARGE_COUNTERUsed in the Customize=CUST_PARALLEL_BARS. This flag only works when the PB_PROGRESSIVE_CHARGE f;lag is set. The charge counter is text showing the current number of turns. Use this flag and the counter text will be printed on the screen while Lara is turning on the bar. Use this flag together with PB_SHOW_CHARGE_BAR if required.
Remark: The source of the charge counter text is always the PSX string with index = 220.To change the text or create another language version remember to use the PSX 220 string and use the formatter "%02d" at some point in the text because that formatter will be replaced with the current number of turns.
Page 405
TOMB RAIDER NEXT GENERATION SCRIPT REFERENCE MANUAL
PL_ constants
256 $0100: PL_ADD_INFO_BARUsed in the Diary= command. Different from other PL_ flags, add the PL_ADD_INFO_BAR to another (but only one) PL_ flag. Adding the PL_ADD_INFO_BAR to some other layout informs the TRNG engine that the current layout on the bottom row of the screen should be reserved and no Diary text should be typed over it. Use this flag to use the bottom strip of the background image to show arrows or some short information about the keyboard commands to manage Lara 's DIARY. Practically when the TRNG engine detects this flag it formats the text avoiding the bottom row of the screen so it can be a dedicated zone for small icons or text information.
Remark: The information to insert in the Information Bar are the description of the keyboard commands accepted by Lara 's Diary:
RIGHT ARROW = Show next pageLEFT ARROW = Show previous pageHOME = Show first page of diaryEND = Show last page of diaryESCAPE = Exit from DiarySPACE = Zoom Image (show a small image at full screen).
[SPACE to come back to original size].
6 $0006: PL_CENTRAL_IMAGEUsed in the Diary= command. In this layout the image will be shown at the centre of the screen in the top-half side. Three widths of image in this layout is a bit larger than the left/right layouts: the 60% of screen versus the 40% of the previous layouts
512 $0200: PL_CUSTOM_LAYOUTUsed in the Diary= command. If you are not satisfied with the pre-set layouts create your own layout using this flag. Set the PL_CUSTOM_LAYOUT (omitting all other PL_ layouts) and the TRNG engine will expect to find in the text to show information about the layout to use.
In the <FORMAT section of text place these three tag formatters:
#FRAME_IMG#=XPos,YPos,SizeX,SizeY#FRAME_T1#=XPos,YPos,SizeX,SizeY#FRAME_T2#=XPos,YPos,SizeX,SizeY
and the TRNG engine will use these frames to show the text and further images.
All values are in micro units. Use the utility [Get Screen Frames] in the Tools panel of the NG_Center program to get the correct values to type (XPos,YPos,SizeX,SizeY)
A different layout can be set for each page. When the TRNG engine shows a page there is no custom layout. Set a PL_ layout in the Diary command and also a format tag on the page, that page will display using the format tag, while the following pages with no format tag will be shown in the PL_ layout set in the Diary command.
Page 406
TOMB RAIDER NEXT GENERATION SCRIPT REFERENCE MANUAL
To know all tags see <FORMAT section of text.
See the description of the Diary= command in the NG NEW SCRIPT COMMANDS section.
1 $0001: PL_DOUBLE_PAGEUsed in the Diary= command. This layout divides the screen in to two ideal pages. The text will be formatted in two columns: first the left column (left half of screen) and then the right column (the right half of screen)
IMAGE: If there is a small image to show in this layout it will be placed at the top of the left page and it will fit across the whole width of the left page
TITLE: If there is a title for this page it will be placed at the top of the left page. If there is also an image the sorting (in left page) will be: [Image]
[Title]..text ..
Remark: If a long image is used that covers the left side, the right side can contain only text .
1024 $0400: PL_FIX_WIDE_SCREENUsed in the Diary= command. When the game is played at full screen on a wide-screen monitor the images of the Diary will be stretched and Lara will become an obese dwarf. To avoid this deformation set this flag. When the TRNG engine finds the PL_FIX_WIDE_SCREEN flag it will show the background image of the Diary at full-screen but with a width smaller than the screen to preserve the normal ratio between width-height. [ ratio of 1.3 [width] divided by [height] = 1.3]
Viewing the Diary, at the left and right there will be two empty columns. This look could be good for a background image drawn in the style of a book.
2 $0002: PL_LEFT_IMAGEUsed in the Diary= command. This layout works like a single wide page. The image will be shown in the top left corner of the screen and its size will be about 40% of the Tomb Raider screen. The title will be at the top of the top-right corner and below it will be the common text
In this layout the text will be shown in two frames: A first frame in the top-right corner of the screen with same height of the image at the left.A second and final frame in the bottom half of screen. This last frame will have the width of the whole Raider screen.
3 $0003: PL_LEFT_IMAGE_LOGOUsed in the Diary= command This layout is like the PL_LEFT_IMAGE layout about the size and position of the small image, but in this layout there is a single text frame in the bottom half of the screen, while the top-right zone will be empty. This "hole" in the top-right corner could seem "ugly" but it depends on the image set as background for the Diary. Create a fixed image in the top-right corner of the background image to show a logo of the adventure like Tomb Raider 2 and 3.
Page 407
TOMB RAIDER NEXT GENERATION SCRIPT REFERENCE MANUAL
4 $0004: PL_RIGHT_IMAGEUsed in the Diary= command. In this layout the image will be shown in the top-right corner, while the text will be formatted in two frames: the first frame is at the top-left corner of the screen
the second frame will fit the bottom half of the Raider screen.
Remark: The title will be shown at the top of the top-right frame before showing common text.
5 $0005: PL_RIGHT_IMAGE_LOGOUsed in the Diary= command. This layout is similar to the PL_RIGHT_IMAGE layout, but in this case there is a single text frame in the bottom half size of the Raider screen, while the frame at the top-left of the screen will be left empty. Like the PL_LEFT_IMAGE_LOGO use this layout to use this "empty" top-left frame for the logo for the adventure, drawing the image in the background image for the Diary.
Remark: When the PL_LEFT_IMAGE_LOGO or PL_RIGHT_IMAGE_LOGO layout is selected, and a page has no small image to show, the whole top-half of the Raider screen will be left empty to avoid text on the logo zone.
7 $0007: PL_WIDE_IMAGEUsed in the Diary= command. This layout is very similar to the PL_CENTRAL_IMAGE layout, but in this case the image will fit 90% of the screen. Use this layout and create a wide image, otherwise it could cover the whole Raider screen. The use of this layout could be useful to show two small images in each page, the trick is to create a unique image where there are two pictures one on the left and the other on the right.
Page 408
TOMB RAIDER NEXT GENERATION SCRIPT REFERENCE MANUAL
PLACE_ constants
2 $0002: PLACE_FLOATINGUsed in the Animation command. Lara is floating on a water surface.
0 $0000: PLACE_GROUND Used in the Animation command. Lara is on the ground, i.e. she is out of water. For ground we could mean Lara is falling down, climbing, monkey, jumping. i.e. "ground" is: "not in water"
4 $0004: PLACE_LOW_WATERUsed in the Animation command. Lara is in low water. Low water is when Lara can wade with her feet on the bottom.
3 $0003: PLACE_SPECIALUsed in the Animation command. Lara is in a vehicle or she is in DOZY mode. Probably this status means: Lara is performing hard-coded animations where the physic rules about gravity or water floats will be ignored.
1 $0001: PLACE_UNDERWATERUsed in the Animation command. Lara is underwater, please do not confuse this situation with PLACE_FLOATING. Lara is only underwater when she is under the water surface and she is not able to breathe.
Page 409
TOMB RAIDER NEXT GENERATION SCRIPT REFERENCE MANUAL
QSF_ constants
0 $0000: QSF_SIZE_260x200Used with the Customize=CUST_INNER_SCREENSHOT. The size of the image with this resolution is 153 Kb for true color, while (about) 53 Kb for compressed 256 colors (non true color)
1 $0001: QSF_SIZE_320x240Used with the Customize=CUST_INNER_SCREENSHOT. The size of the image with this resolution is 225 Kb for true color, while (about) 77 Kb for compressed 256 colors (non true color)
2 $0002: QSF_SIZE_390x300Used with the Customize=CUST_INNER_SCREENSHOT. The size of the image with this resolution is 343 Kb for true color, while (about) 115 Kb for compressed 256 colors (non true color)
3 $0003: QSF_SIZE_468x360Used with the Customize=CUST_INNER_SCREENSHOT. The size of the image with this resolution is 493 Kb for true color, while (about) 163 Kb for compressed 256 colors (non true color)
4 $0004: QSF_SIZE_520x400Used with the Customize=CUST_INNER_SCREENSHOT. The size of the image with this resolution is 609 Kb for true color, while (about) 199 Kb for compressed 256 colors (non true color)
5 $0005: QSF_SIZE_640x480Used with the Customize=CUST_INNER_SCREENSHOT. The size of image with this resolution is 900 Kb for true color, while (about) 288 Kb for compressed 256 colors (non true color)
256 $0100: QSF_TRUE_COLORUsed with the Customize=CUST_INNER_SCREENSHOT. Adding this flag to the QSF_SIZE set a true color 24 bits for the inner image. By default, when this flag is missing, the image will be saved at 256 colors in compressed format. The RGB images are better than 256 compressed, but the size of RGB images is large and fora mix of true color with a large save game could reach 1 Mb and this is not a good choice because the players often want to exchange save games and large save games could not be good for exchanges on-line.
Page 410
TOMB RAIDER NEXT GENERATION SCRIPT REFERENCE MANUAL
RAIN_ constants
2 $0002: RAIN_ALL_OUTSIDETo have rain in all outside rooms without the set "Rain" button for each room in NGLE use this command setting.
Remarks:(1) To use the RAIN_ALL_OUTSIDE setting the trick is to set the rain intensity is to enable the "Rain" button in the first room that will be visited by Lara and set in the Water Intensity field (at right of the multi state button water/rain/snow...) the intensity (from 1 to 4). The intensity for all the level will be set by that room. If another "rain" room has different intensity, when Lara enters the room the rain intensity will change.
(2) If no rain is used it is better to use the command "Rain=RAIN_DISABLED" (or omit to type Rain= command) to inform the TRNG engine not to compute to locate further rain rooms.
0 $0000: RAIN_DISABLEDUse Rain=RAIN_DISABLED in the scriptThe same result can be obtained by not using the Rain= command in the script
1 $0001: RAIN_SINGLE_ROOMSWith this setting the rain will be shown only in specific rooms signed as "Rain" in the NGLE and with outside status.
Page 411
TOMB RAIDER NEXT GENERATION SCRIPT REFERENCE MANUAL
ROOM_ constants
-4 $FFFC: ROOM_COLDUsed in accordance with the ENV_ROOM condition in the Animation or MultEnvCondition commands. Lara is in a Cold Room.
-3 $FFFD: ROOM_DAMAGEUsed in accordance with the ENV_ROOM condition in the Animation or MultEnvCondition commands. Lara is in a Damage Room.
-9 $FFF7: ROOM_MISTUsed in accordance with the ENV_ROOM condition in the Animation or MultEnvCondition commands. Lara is in a room marked as a Mist Room (the [M] button in 2d plane)
-7 $FFF9: ROOM_OUTSIDEUsed in accordance with the ENV_ROOM condition in the Animation or MultEnvCondition commands. Lara is outside (ponytail flies in the wind)
-2 $FFFE: ROOM_QUICKSANDUsed in accordance with the ENV_ROOM condition in the Animation or MultEnvCondition commands. Lara is in a Quicksand Room.
-5 $FFFB: ROOM_RAINUsed in accordance with the ENV_ROOM condition in the Animation or MultEnvCondition commands. Lara is in a Rain Room.
-8 $FFF8: ROOM_REFLEXUsed in accordance with the ENV_ROOM condition in Animation or MultEnvCondition commands. Lara is in a room with water light reflex (the [R] button in 2d plane).Usually the Reflex Rooms are those over the Water Room.
-6 $FFFA: ROOM_SNOWUsed in accordance with the ENV_ROOM condition in the Animation or MultEnvCondition commands. Lara is in a Snow Room
-1 $FFFF: ROOM_WATERUsed in accordance with the ENV_ROOM condition in the Animation or MultEnvCondition commands. Lara is in a Water Room. Please note that Lara is in a Water Room when she is floating on the water, or when she is swimming underwater, but she is NOT in water when she is walking in shallow water.
Page 412
TOMB RAIDER NEXT GENERATION SCRIPT REFERENCE MANUAL
ROTH_ constants
1 $0001: ROTH_CLOCKWISERotate in a horizontal clockwise direction
2 $0002: ROTH_INV_CLOCKWISERotate in a horizontal anti-clockwise direction
65535 $FFFF: ROTH_NONEDisable the horizontal rotation
ROTV_ constants
2 $0002: ROTV_BACKWARDVertical backward rotation
1 $0001: ROTV_FORWARDVertical forward rotation
65535 $FFFF: ROTV_NONEDisable the vertical rotation
Page 413
TOMB RAIDER NEXT GENERATION SCRIPT REFERENCE MANUAL
SC_ constants
5 $0005: SC_DOUBLE_HEIGHTSet the double height for characters, the width remains the same.
6 $0006: SC_DOUBLE_SIZESet double width and double height for characters.
4 $0004: SC_DOUBLE_WIDTHSet double width for characters, the height remains the same.
2 $0002: SC_HALF_HEIGHTReduced the height of characters by half, while the width will remain the same.
3 $0003: SC_HALF_SIZEReduce by half the width and height of characters
1 $0001: SC_HALF_WIDTHReduce by half the width of characters, while the height will remain the same.
0 $0000: SC_NORMAL
Page 414
TOMB RAIDER NEXT GENERATION SCRIPT REFERENCE MANUAL
SEQ_ constants
1 $0001: SEQ_LOOPThe sequence will be performed in an endless way. Use this flag and use the specific flip effect to stop the sequence, otherwise it will be performed continuously.
2 $0002: SEQ_LOOP_INVERSEThis flag only works when the SEQ_LOOP flag is set.The single SEQ_LOOP flag sets an infinite loop with this sequence,
For example: Suppose 4 textures from 0 to 3: 0 1 2 3 0 1 2 3 0 1 2 3 ....
When the SEQ_LOOP_INVERSE flag is also set, the sequence will be: 0 1 2 3 2 1 0 1 2 3 2 1 0 ..
4 $0004: SEQ_STOP_AT_FIRSTSet this flag to force the TRNG engine to set the first texture of the range when the animation is completed. If this flag is omitted the last texture shown will depend on the type of animation.If no loop is set, the last texture shown will be the texture of the last index of the array sequence.If a loop is set, the texture shown will depend on the time when the Stop texture sequence flip effect is activated.
Page 415
TOMB RAIDER NEXT GENERATION SCRIPT REFERENCE MANUAL
SET_ constants
32 $0020: SET_ACCEPT_EXTRA_TAILINFOSUsed in the Settings= command. This setting forces the TRNG engine to accept up to 32767 tail informations in the tr4 files. Using this setting the limit for NGLE remains the old limit of 1024 tail informations, therefore the only reason to use this setting is to use the meta2tr program to replace the room meshes in the tr4 file. Since Meta2tr increases the number of tail informations use this setting to support the new extra tail information.
2 $0002: SET_BLIND_SAVEGAMESTo stop players of the game using a save game editor to change save games, add this flag in the Settings command. Any attempt by players to modify save games will cause a crash at reload.
8 $0008: SET_CRYPT_SCRIPTSetting this flag the script.dat file will be encrypted to stop decompilation with by utilities.If security issues like SET_DISABLE_CHEATS are set it is advisable to set encrypting of the script.dat, otherwise the file can be decompiled and recompiled to remove the SET_DISABLE_CHEATS flag.
1 $0001: SET_DISABLE_CHEATSDisable the hidden cheats to skip the level to get infinite weapons or items.
Remark: To disable the Fly Cheat use the old command FlyCheat = DISABLED.
64 $0040: SET_FORCE_NO_WAITING_REFRESHUsed in the Settings= command.This setting, together with the SET_FORCE_SOFT_FULL_SCREEN setting, changes the setting of the tomb raider game to solve the problem with FMV playing or flickering images. See the SET_FORCE_SOFT_FULL_SCREEN description: Since the player is now able to set this option it is better not to use this setting in the script.
Technically this setting disables the waiting setting in the flip DIRECTX method.Some experiment demonstrates that this disabling is able to remove the flickering of images from exclusive full screen resolution.
16 $000F: SET_FORCE_SOFT_FULL_SCREENUsed in the Settings= command.
Note: From 1.2.2.7 version the previous SET_SOFT_FULL_SCREEN has been removed. The current SET_FORCE_SOFT_FULL_SCREEN constant performs the same job. So, the real news, now the player is able to set or remove the soft full screen setting because this setting has been included in tomb raider set up window. For this reason the name of the SET_SOFT_FULL_SCREEN is different from that in past versions. Now any soft full screen setting can be omitted and the player will be able to enable or disable it. For this reason, it should be better not to use this forcing of soft full screen, because if you use it in the script, the player will not able to disable it from the set up window. It is more logical that the player can choose to use or disable this option, since he knows his computer.
Page 416
TOMB RAIDER NEXT GENERATION SCRIPT REFERENCE MANUAL
When the game (tomb4) works in full screen it is difficult for TRNG to start a movie (FMV) because the screen mode, known as "full screen", is an Exclusive mode, i.e. the game catches the screen and does not release it to other directx tasks (like the FMV viewer). From version 1.2.0.9 tried to make tomb4 release the screen to play the FMV but this fight is complicated and so on some computers you could see blinking at the start and at the end of FMV viewing.
If you think that the blinking is annoying use the SET_FORCE_SOFT_FULL_SCREEN setting in the Settings= command.. With this setting the Exclusive Full Screen Video Mode will be converted at fly into a Software (cooperative) Full Screen mode. Practically the game will be shown in full screen, but the directx mode will not be exclusive and therefore the FMV will be shown. So no blinking or slow time at the start or end of the FMV.
Remark: This setting will have no effect if the user sets tomb4 to work in windowed mode. This setting only works when tomb raider is set to work in full screen mode.
4 $0004: SET_PERFORM_FROM_CDWith this constant the game will be able to be played from the CD / DVD and generally with only read storage support. Practically the reason to use this setting is to give the game to a friend, stored on CD and played directly from the CD with no need of installation of the level editor (TRLE) folder on the local disk. When this setting is present the TRNG engine will save and load the savegame from a new folder on the local drive C: with the name of the first level.
For example: With this option a level described in the script.txt "City Of The Dead", the TRNG engine will create a folder named: C:\City_Of_The_Dead and it will save and load save games in this folder.
Remark: The start.exe and autorun.inf files should be in the root of the CD, i.e. outside the trle folder. To create an autostart CD in this way perform the following steps:
1) Add in the script.txt file in the [Options] section : Settings = SET_PERFORM_FROM_CD 2) Build the script.txt3) When the trle folder has all the level files (.dat , .tr4) necessary to play the game, save the trle folder including the name of the trle folder in the CD image to burn on to CD.4) Before burning the image add to the image the following files found in the Extra_NG_File.zip:
START.exeautorun.inf
5) Now burn the CD and at the end browse the new created CD to check the format:
START.exeautorun.infotrle (Folder)
6) Now insert the CD in a CD ROM drive and the game will start and play by itself.
Page 417
TOMB RAIDER NEXT GENERATION SCRIPT REFERENCE MANUAL
16 $0010: SET_SOFT_FULL_SCREENUsed in the Settings= command. There are complicated questions about this setting. When the TRNG engine works in full screen it is difficult to start a movie (FMV) because this screen mode, is an Exclusive Full Screen mode, i.e. the game catches the screen and will not release it to other Directx tasks like the FMV viewer. With this setting the Exclusive Full Screen Mode is converted in to a Software (cooperative) Full Screen mode. Practically the game will be shown in full screen, but the Directx mode will not be exclusive so the FMV can be shown. This setting will have no effect if the TRNG engine is set to windowed mode. See the SET_FORCE_SOFT_FULL_SCREEN
Page 418
TOMB RAIDER NEXT GENERATION SCRIPT REFERENCE MANUAL
SEXT_ constants
5 $0005: SEXT_AIFF Obsolete.See the description for the CUST_CUST_NEW_SOUND_ENGINE customize flag.
4 $0004: SEXT_MP1 Obsolete.See the description for the CUST_CUST_NEW_SOUND_ENGINE customize flag.
3 $0003: SEXT_MP2 Obsolete.See the description for the CUST_CUST_NEW_SOUND_ENGINE customize flag.
2 $0002: SEXT_MP3 Obsolete.See the description for the CUST_CUST_NEW_SOUND_ENGINE customize flag.
100 $0064: SEXT_MULTIPLE Obsolete.See the description for the CUST_CUST_NEW_SOUND_ENGINE customize flag.
1 $0001: SEXT_OGG Obsolete.See the description for the CUST_CUST_NEW_SOUND_ENGINE customize flag.
0 $0000: SEXT_WAV Obsolete.See the description for the CUST_CUST_NEW_SOUND_ENGINE customize flag.
Page 419
TOMB RAIDER NEXT GENERATION SCRIPT REFERENCE MANUAL
SHOWC_ constants
1 $0001: SHOWC_OMIT_AMMO_NAMEUsed in the Customize=CUST_SHOW_AMMO_COUNTER command. With this setting the current name of the selected weapon/ammo will be omitted.
For example: Instead of displaying "Normal Cross Bow Ammo 12" it will only display "12".
2 $0002: SHOWC_USE_GRAPHIC_AMMOUsed in the Customize=CUST_SHOW_AMMO_COUNTER command. This setting removes the literal name of the ammo and replaces it with a single graphic character. Use the TRNG engine and select characters from the font set. One single character for each kind of ammo will be displayed on the screen. The graphic characters used for each ammo is in the following list:
Name_in_font_Editor Ammo_Type
127: [GRAPHIC] Pistol Ammo129: [GRAPHIC] Revolver Ammo138: S Uzi Ammo140: OE Shotgun Normal Ammo141: [GRAPHIC] Shotgun Wide shot Ammo142: Z Grenade gun Normal Ammo143: [GRAPHIC] Grenade gun Super Ammo144: [GRAPHIC] Grenade gun Flash Ammo154: s Crossbow Normal Ammo156: oe Crossbow Poison Ammo157: [GRAPHIC] Crossbow Explosive Ammo
Remark: To add icons in the NG font character set, perform the following operations:
1) Go in to the [Tools] panel of the NG_Center2) Click on the [NG Font Editor] button3) In the NG Font Editor window click on the [Choose Wad] button4) Select a wad where there is a NG font object.5) Select in the combo box (below the [START IMPORTING] button) a character, taking care to choose the correct number read from the above list.6) Now click on the [Import BMP] button close to the small single character image and select the bmp file where the image for that char/ammo is stored.7) Select in the [Type] list the voice "Graphic" and click the button [Recompute]8) Repeat points 5, 6 and 7 until all images for all ammo are assigned.9) Click on the [Exit and Save wad] button.
4 $0004: SHOWC_USE_GRAPHIC_WEAPONUsed in the Customize=CUST_SHOW_AMMO_COUNTER command. This setting removes the name of the ammo type and replaces it with a graphic character to signal the current weapon.
Page 420
TOMB RAIDER NEXT GENERATION SCRIPT REFERENCE MANUAL
SNOW_ constants
2 $0002: SNOW_ALL_OUTSIDEThe snow is shown in all outside rooms, ignoring the multi state button. This means that a room without "snow" will have snow if it is not a Water Room and it has the [O] outside status.
Remarks:(1) For the SNOW_ALL_OUTSIDE set a single room with the "Snow" attribute in NGLE and set the value for snow intensity. That value will be used for the whole level.
(2) If no snow it is better to use the command "Snow=SNOW_DISABLED" to inform the TRNG engine to avoid a lot of computes to locate snow rooms.
0 $0000: SNOW-DISABLEDThis setting is the same as not inserting the Snow= command.
1 $0001: SNOW_SINGLE_ROOMOnly the room with the "Snow" label in the NGLE with [O] (outside) status will have the snow in the game. Each room will have its own snow intensity read from the field Water Intensity at the right of the multi state button Water/Rain/Snow ...
Page 421
TOMB RAIDER NEXT GENERATION SCRIPT REFERENCE MANUAL
SPF_ constants
4 $0004: SPF_BLINK_SELECTEDUsed in the SavegamePanel= script command. By default the selected save game in the list will be highlighted with a constant inversion of colors. To have a blink of this highlighting use the SPF_BLINK_SELECTED flag.
8 $0008: SPF_NO_PANEL_TITLEUsed in the SavegamePanel= script command. By default it is in a central position on the first row of the title panel, save game: “Load Game” or “Save Game”. To omit the text use this flag. The only reason to omit the title of the panel is when a title is on the background image.
1 $0001: SPF_NO_TIME_IN_LISTUsed in the SavegamePanel= script command. By default the save game list will be shown in the old Raider format: 002 Name of Level 1 days 02:41:11
The game time is “1 days 02:41:11” part. Using the SPF_NO_TIME_IN_LIST flag the game time will be omitted and the width required for the list will be less. Use this flag when the layout requires a save game list in the left or right half of the screen.
16 $0010: SPF_PRELOAD_BKG_IMAGEUsed in the SavegamePanel= script command. By default the TRNG engine will load and show the background image of the save game panel when the player requires the save/load panel. The operation to load from disk is a delay. To avoid this add the SPF_PRELOAD_BKG_IMAGE flag and the background image is loaded into memory in advance when the level is loaded.
Remark: The only reason to omit this flag is when there are a lot of preloaded images in a level, or when a bug is detected in the preloaded background image. In very seldom circumstances the preloaded image of the save game panel could appear damaged.
This problem disappears on exiting and entering in game but it is probable that this problem happens when there is a preloaded image that damages the memory where the image has been stored.
2 $0002: SPF_SCROLL_PAGEUsed in the SavegamePanel= script command. When the save game list is only partly shown the player will be able to scroll the save games.
Page 422
TOMB RAIDER NEXT GENERATION SCRIPT REFERENCE MANUAL
SPL_constants
7 $0007: SPL_CENTRAL_IMAGEUsed in the SavegamePanel= script command. In this layout the image is at the centre in the top half of the screen. The image will be wider than other layout formats, so this layout gives more scene to the image and works in wide screen mode. The save game list will be shown in the bottom half of the screen.
2 $0002: SPL_LEFT_IMAGE_BOTTTOM_INFOUsed in the SavegamePanel= script command. In this layout the image is at the top left corner, while the information frame is below the image. The save game list will be in the right half of screen.
3 $0003: SPL_LEFT_IMAGE_NO_INFOUsed in the SavegamePanel= script command. This layout ha no information frame. The image will be in the top left corner while the save game list will be in the bottom half of the screen. With this layout the top-right corner will be an "empty” zone, so a logo of the adventure could be placed here in the background image.
1 $0001: SPL_LEFT_IMAGE_RIGHT_INFOUsed in the SavegamePanel= script command. The image is in the top-left side while the information frame is at the right of the image. The list of save games will be in the bottom half of the screen.
5 $0005: SPL_RIGHT_IMAGE_BOTTOM_INFOUsed in the SavegamePanel= script command. In this layout the image is at the top right corner. The information frame will be under the image and the save games list will be on the left side of the screen.
4 $0004: SPL_RIGHT_IMAGE_LEFT_INFOUsed in the SavegamePanel= script command. In this layout the image will be in the top-right corner. The information frame is left of the image and the save games list is in the bottom half of the screen.
6 $0006: SPL_RIGHT_IMAGE_NO_INFOUsed in the SavegamePanel= script command. In this layout the image is in the top-right corner, there is no information frame and the save games list is in the bottom half of screen. In this layout the top-left corner is empty so insert in this space a logo for the adventure drawing it in the background image.
Page 423
TOMB RAIDER NEXT GENERATION SCRIPT REFERENCE MANUAL
SQ_ constants
44100 $AC44: SQ_HIGH_QUALITY
11025 $2B11: SQ_LOW_QUALITY
22050 $5622: SQ_MEDIUM_QUALITY
Page 424
TOMB RAIDER NEXT GENERATION SCRIPT REFERENCE MANUAL
STATE_ constants
16 $0010: STATE_BACKState-Id for animations16 - STATE_BACK038 - Walk backwards › stand (right foot moved first)039 - Walk backwards › stand (left foot moved first)040 - Walk backwards041 - Stand › walk backwards061 - Descend block (1 click high) walking backwards (left foot moved first)062 - Descend block (1 click high) walking backwards (right foot moved first)
25 $0019: STATE_BACK_JUMPState-Id for animations25 - STATE_BACK_JUMP074 - Take off for backward jump075 - Jump backwards182 - Hang still on ladder › jump backwards off ladder, first part › 183183 - Jump backwards off ladder, second part › jump backwards (from 182)209 - Jump forwards with back twist (after running take off), second part (from 207)211 - Jump forwards with back twist (after standing take off), second part (from 210)212 - Jump backwards with forward twist, first part › 213
61 $003D: STATE_CLIMB_DOWNState-Id for animations61 - STATE_CLIMB_DOWN168 - Descend ladder169 - Hang still on ladder › descend ladder
59 $003B: STATE_CLIMB_ENDState-Id for animations59 - STATE_CLIMB_ENDNot used.
58 $003A: STATE_CLIMB_LEFTState-Id for animations58 - STATE_CLIMB_LEFT171 - Climb sideways left on ladder
60 $003C: STATE_CLIMB_RIGHTState-Id for animations60 - STATE_CLIMB_RIGHT170 - Climb sideways right on ladder
Page 425
TOMB RAIDER NEXT GENERATION SCRIPT REFERENCE MANUAL
56 $0038: STATE_CLIMB_START_AND_STANDINGState-Id for animations56 - STATE_CLIMB_START_AND_STANDING162 - Ascend ladder › hang still on ladder (right foot higher)163 - Ascend ladder › hang still on ladder (left foot higher)164 - Hang still on ladder166 - Descend ladder › hang still on ladder (left foot higher)167 - Descend ladder › hang still on ladder (right foot higher)172 - Hang by the hands on ladder173 - Hang by the hands on ladder › gain footing on ladder
57 $0039: STATE_CLIMB_UPState-Id for animations57 - STATE_CLIMB_UP160 - Stand in water or under low ceiling › ascend ladder (without the jump and grab)161 - Ascend ladder165 - Hang still on ladder › ascend ladder
15 $000F: STATE_COMPRESSState-Id for animations15 - STATE_COMPRESS073 - Stand › take off for jump in all directions
89 $0059: STATE_CONTROLLEDState-Id for animations89 - STATE_CONTROLLED313 - Use doorknob to open door and push it open314 - Use doorknob to open door and pull it open315 - Kick door open400 - Empty waterskin401 - Fill waterskin402 - Pour waterskin on scale403 - Open door with crowbar417 - Push pushable › stand418 - Pull pushable › stand422 - Play harp (The Lost Library)423 - Place trident on Poseidon statue (Temple of Poseidon)426 - Play game of senet (Tomb of Semerkhet)427 - Light torch with flame 0-1 clicks high428 - Light torch with flame 2-3 clicks high429 - Light torch with flame 4-5 clicks high430 - Light torch with flame 6-7 clicks high431 - Light torch with flame higher than 7 clicks432 - use mine detector439 - Pickup from sarcophagus443 – Lara painfully gets to her feet after fall in elevator (VCI-levels)444 - Wind up beetle › put beetle on floor
Page 426
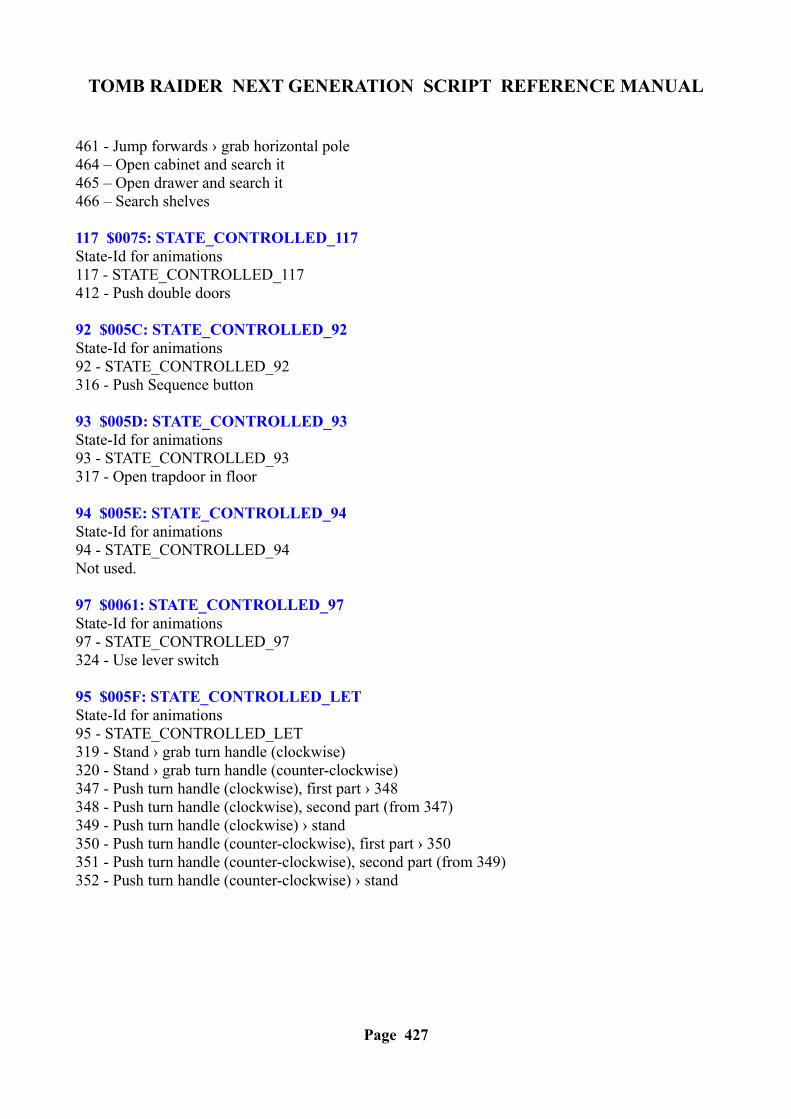
TOMB RAIDER NEXT GENERATION SCRIPT REFERENCE MANUAL
461 - Jump forwards › grab horizontal pole464 – Open cabinet and search it465 – Open drawer and search it466 – Search shelves
117 $0075: STATE_CONTROLLED_117State-Id for animations117 - STATE_CONTROLLED_117412 - Push double doors
92 $005C: STATE_CONTROLLED_92State-Id for animations92 - STATE_CONTROLLED_92316 - Push Sequence button
93 $005D: STATE_CONTROLLED_93State-Id for animations93 - STATE_CONTROLLED_93317 - Open trapdoor in floor
94 $005E: STATE_CONTROLLED_94State-Id for animations94 - STATE_CONTROLLED_94Not used.
97 $0061: STATE_CONTROLLED_97State-Id for animations97 - STATE_CONTROLLED_97324 - Use lever switch
95 $005F: STATE_CONTROLLED_LETState-Id for animations95 - STATE_CONTROLLED_LET319 - Stand › grab turn handle (clockwise)320 - Stand › grab turn handle (counter-clockwise)347 - Push turn handle (clockwise), first part › 348348 - Push turn handle (clockwise), second part (from 347)349 - Push turn handle (clockwise) › stand350 - Push turn handle (counter-clockwise), first part › 350351 - Push turn handle (counter-clockwise), second part (from 349)352 - Push turn handle (counter-clockwise) › stand
Page 427
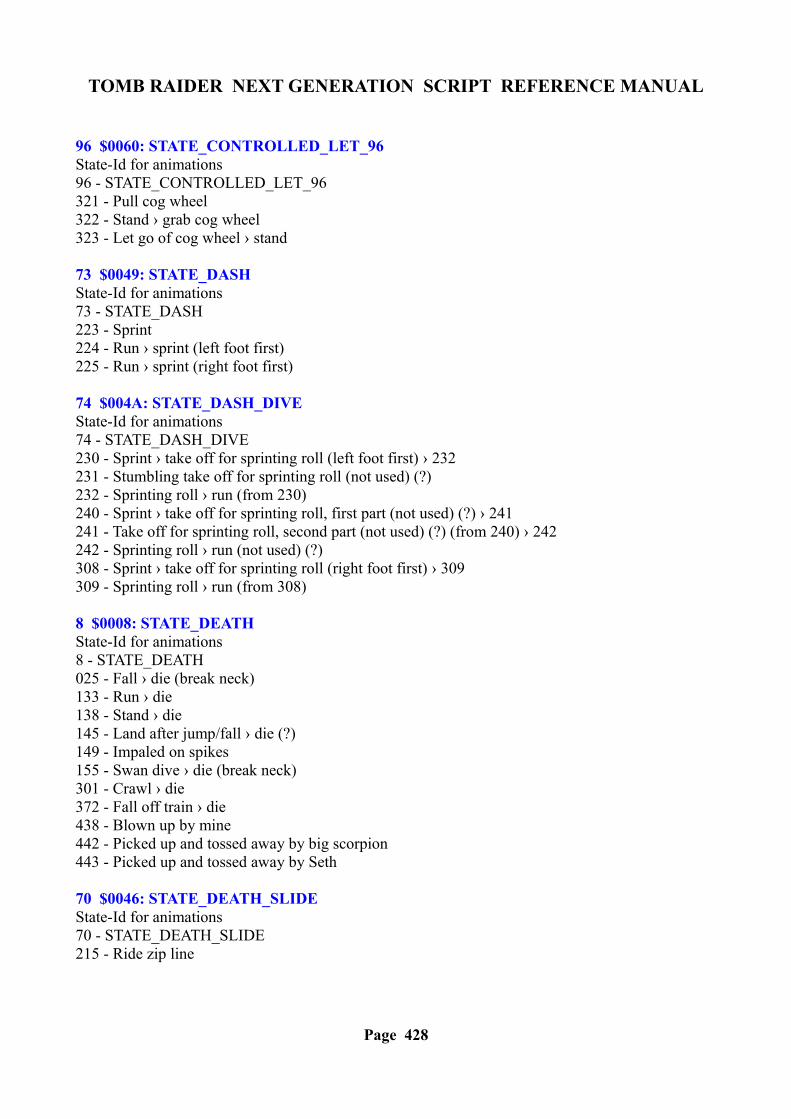
TOMB RAIDER NEXT GENERATION SCRIPT REFERENCE MANUAL
96 $0060: STATE_CONTROLLED_LET_96State-Id for animations96 - STATE_CONTROLLED_LET_96321 - Pull cog wheel322 - Stand › grab cog wheel323 - Let go of cog wheel › stand
73 $0049: STATE_DASHState-Id for animations73 - STATE_DASH223 - Sprint224 - Run › sprint (left foot first)225 - Run › sprint (right foot first)
74 $004A: STATE_DASH_DIVEState-Id for animations74 - STATE_DASH_DIVE230 - Sprint › take off for sprinting roll (left foot first) › 232231 - Stumbling take off for sprinting roll (not used) (?)232 - Sprinting roll › run (from 230)240 - Sprint › take off for sprinting roll, first part (not used) (?) › 241241 - Take off for sprinting roll, second part (not used) (?) (from 240) › 242242 - Sprinting roll › run (not used) (?)308 - Sprint › take off for sprinting roll (right foot first) › 309309 - Sprinting roll › run (from 308)
8 $0008: STATE_DEATHState-Id for animations8 - STATE_DEATH025 - Fall › die (break neck)133 - Run › die138 - Stand › die145 - Land after jump/fall › die (?)149 - Impaled on spikes155 - Swan dive › die (break neck)301 - Crawl › die372 - Fall off train › die438 - Blown up by mine442 - Picked up and tossed away by big scorpion443 - Picked up and tossed away by Seth
70 $0046: STATE_DEATH_SLIDEState-Id for animations70 - STATE_DEATH_SLIDE215 - Ride zip line
Page 428
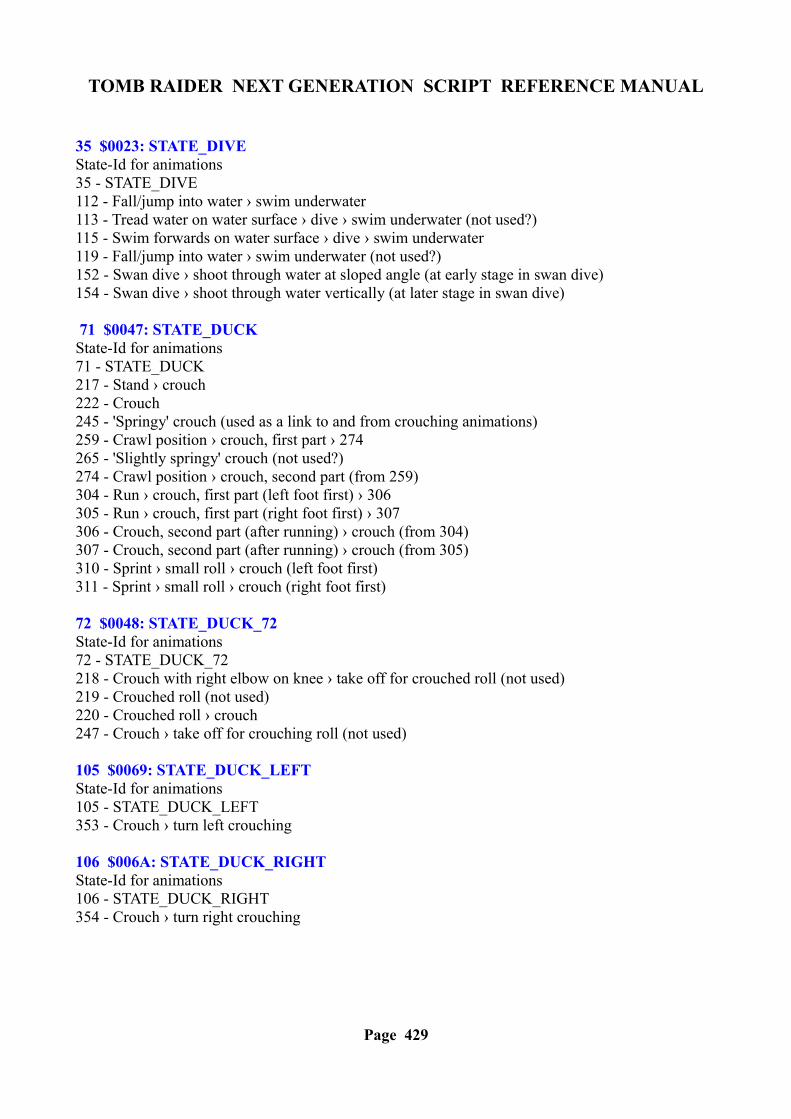
TOMB RAIDER NEXT GENERATION SCRIPT REFERENCE MANUAL
35 $0023: STATE_DIVEState-Id for animations35 - STATE_DIVE112 - Fall/jump into water › swim underwater113 - Tread water on water surface › dive › swim underwater (not used?)115 - Swim forwards on water surface › dive › swim underwater119 - Fall/jump into water › swim underwater (not used?)152 - Swan dive › shoot through water at sloped angle (at early stage in swan dive)154 - Swan dive › shoot through water vertically (at later stage in swan dive)
71 $0047: STATE_DUCKState-Id for animations71 - STATE_DUCK217 - Stand › crouch222 - Crouch245 - 'Springy' crouch (used as a link to and from crouching animations)259 - Crawl position › crouch, first part › 274265 - 'Slightly springy' crouch (not used?)274 - Crawl position › crouch, second part (from 259)304 - Run › crouch, first part (left foot first) › 306305 - Run › crouch, first part (right foot first) › 307306 - Crouch, second part (after running) › crouch (from 304)307 - Crouch, second part (after running) › crouch (from 305)310 - Sprint › small roll › crouch (left foot first)311 - Sprint › small roll › crouch (right foot first)
72 $0048: STATE_DUCK_72State-Id for animations72 - STATE_DUCK_72218 - Crouch with right elbow on knee › take off for crouched roll (not used)219 - Crouched roll (not used)220 - Crouched roll › crouch247 - Crouch › take off for crouching roll (not used)
105 $0069: STATE_DUCK_LEFTState-Id for animations105 - STATE_DUCK_LEFT353 - Crouch › turn left crouching
106 $006A: STATE_DUCK_RIGHTState-Id for animations106 - STATE_DUCK_RIGHT354 - Crouch › turn right crouching
Page 429
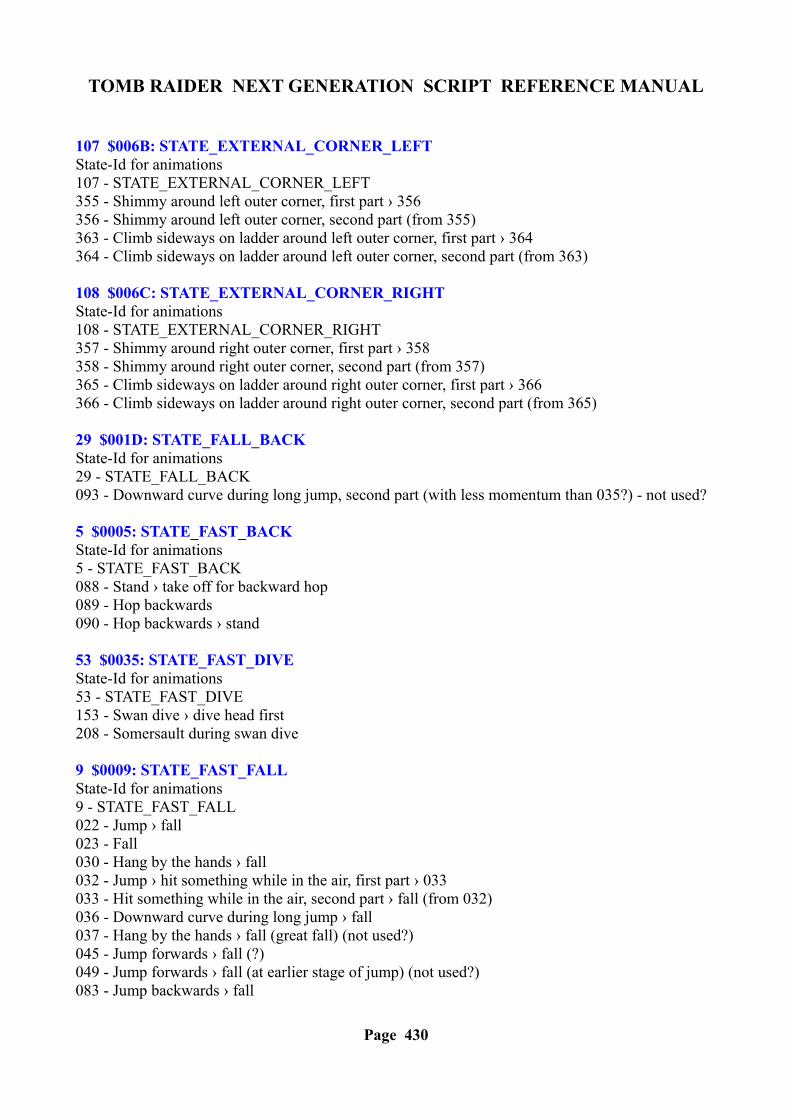
TOMB RAIDER NEXT GENERATION SCRIPT REFERENCE MANUAL
107 $006B: STATE_EXTERNAL_CORNER_LEFTState-Id for animations107 - STATE_EXTERNAL_CORNER_LEFT355 - Shimmy around left outer corner, first part › 356356 - Shimmy around left outer corner, second part (from 355)363 - Climb sideways on ladder around left outer corner, first part › 364364 - Climb sideways on ladder around left outer corner, second part (from 363)
108 $006C: STATE_EXTERNAL_CORNER_RIGHTState-Id for animations108 - STATE_EXTERNAL_CORNER_RIGHT357 - Shimmy around right outer corner, first part › 358358 - Shimmy around right outer corner, second part (from 357)365 - Climb sideways on ladder around right outer corner, first part › 366366 - Climb sideways on ladder around right outer corner, second part (from 365)
29 $001D: STATE_FALL_BACKState-Id for animations29 - STATE_FALL_BACK093 - Downward curve during long jump, second part (with less momentum than 035?) - not used?
5 $0005: STATE_FAST_BACKState-Id for animations5 - STATE_FAST_BACK088 - Stand › take off for backward hop089 - Hop backwards090 - Hop backwards › stand
53 $0035: STATE_FAST_DIVEState-Id for animations53 - STATE_FAST_DIVE153 - Swan dive › dive head first208 - Somersault during swan dive
9 $0009: STATE_FAST_FALLState-Id for animations9 - STATE_FAST_FALL022 - Jump › fall023 - Fall030 - Hang by the hands › fall032 - Jump › hit something while in the air, first part › 033033 - Hit something while in the air, second part › fall (from 032)036 - Downward curve during long jump › fall037 - Hang by the hands › fall (great fall) (not used?)045 - Jump forwards › fall (?)049 - Jump forwards › fall (at earlier stage of jump) (not used?)083 - Jump backwards › fall
Page 430
TOMB RAIDER NEXT GENERATION SCRIPT REFERENCE MANUAL
084 - Jump sideways left › fall085 - Jump sideways right › fall098 - Failed attempt to grab during forward jump › fall318 - Grab (after upward jump) and open trapdoor in ceiling330 - Hang still on vertical pole › fall
4 $0004: STATE_FAST_TURNState-Id for animations4 – STATE_FAST_TURNNot used.
20 $0014: STATE_FAST_TURNState-Id for animations20 - STATE_FAST_TURN044 - Turn right on the spot, large turn069 - Turn left on the spot, large turn
14 $000E: STATE_FAST_TURN_14State-Id for animations14 - STATE_FAST_TURN_14378 - Have just grabbed rope › fall (?)
3 $0003: STATE_FORWARD_JUMPState-Id for animations3 - STATE_FORWARD_JUMP016 - Run › take off for forward jump (right foot first) › 017017 - Running take off for forward jump (left foot first) › forward jump018 - Run › take off for forward jump (left foot first) › 019019 - Running take off for forward jump (right foot first) › forward jump034 - Downward curve during long jump, first part (not used?) › 035035 - Downward curve during long jump, second part (not used?) (from 034)046 - Forward jump trying to grab › land (not used?)076 - Standing take off for forward jump077 - Jump forwards207 - Jump forwards with back twist (after running take off), first part › 209210 - Jump forwards with back twist (after standing take off), first part › 211213 - Jump backwards with forward twist, second part (from 212)216 - Fall off zip line
18 $0012: STATE_GLIDEState-Id for animations18 - STATE_GLIDE087 - Motionless underwater (driven only by momentum)087 – Motionless underwater (driven only by momentum) in deep sea suit (used as a link between swimming animations) (Deep sea Dive)198 - Swim underwater (huddled up position during the stroke) › drift underwater198 – Stop swimming underwater in deep sea suit (in middle stage of float-swimming animation) ?
Page 431
TOMB RAIDER NEXT GENERATION SCRIPT REFERENCE MANUAL
drift underwater (Deep sea Dive)199 - Swim underwater (sprawling position during the stroke) › drift underwater199 – Stop swimming underwater in deep sea suit (in late stage of float-swimming animation) ? drift underwater (Deep sea Dive)200 - Swim underwater (medium position during the stroke) › drift underwater200 – Stop swimming underwater in deep sea suit (in early stage of float-swimming animation) ? drift underwater (Deep sea Dive)
10 $000A: STATE_HANGState-Id for animations10 - STATE_HANG029 - Grab (after upward jump to grab) › hang by the hands096 - Grab in mid-air › hang by the hands at wall187 - Hang by the hands on ladder › ascend ladder with the the hands only188 - Hang by the hands on ladder › descend ladder with the hands only194 - Hang still on ladder › descend ladder › hang by the hands201 - Climb sideways right on ladder › hang by the hands202 - Climb sideways left on ladder › hang by the hands
30 $001E: STATE_HANG_LEFTState-Id for animations30 - STATE_HANG_LEFT136 - Shimmy left
31 $001F: STATE_HANG_RIGHTState-Id for animations31 - STATE_HANG_RIGHT137 - Shimmy right
82 $0052: STATE_HANG_TURN_LEFTState-Id for animations82 - STATE_HANG_TURN_LEFT271 - Hang still from monkey-bars › turn left hanging from monkey-bars
83 $0053: STATE_HANG_TURN_RIGHTState-Id for animations83 - STATE_HANG_TURN_RIGHT272 - Hang still from monkey-bars › turn right hanging from monkey-bars
109 $006D: STATE_INTERNAL_CORNER_LEFTState-Id for animations109 - STATE_INTERNAL_CORNER_LEFT359 - Shimmy around left inner corner, first part › 360360 - Shimmy around left inner corner, second part (from 359)367 - Climb sideways on ladder around left inner corner, first part › 368368 - Climb sideways on ladder around left inner corner, second part (from 367)
Page 432
TOMB RAIDER NEXT GENERATION SCRIPT REFERENCE MANUAL
110 $006E: STATE_INTERNAL_CORNER_RIGHTState-Id for animations110 - STATE_INTERNAL_CORNER_RIGHT361 - Shimmy around right inner corner, first part › 362362 - Shimmy around right inner corner, second part (from 361)369 - Climb sideways on ladder around right inner corner, first part › 370370 - Climb sideways on ladder around right inner corner, second part (from 369)
27 $001B: STATE_LEFT_JUMPState-Id for animations27 - STATE_LEFT_JUMP078 - Take off for sideways jump left079 - Jump sideways left
79 $004F: STATE_MONKEY_180State-Id for animations79 - STATE_MONKEY_180257 - Turn around at the spot while hanging from monkey-bars (not used) (?)
76 $004C: STATE_MONKEY_FORWARDState-Id for animations76 - STATE_MONKEY_FORWARD236 - Monkey-swing forwards237 - Monkey-swing forwards › hang still from monkey-bars (left hand first)238 - Monkey-swing forwards › hang still from monkey-bars (right hand first)239 - Hang still from monkey-bars › monkey-swing forwards (left hand moved first)252 - Hang still from monkey-bars › monkey-swing forwards (right hand moved first)
77 $004D: STATE_MONKEY_LEFTState-Id for animations77 - STATE_MONKEY_LEFT253 - Shimmy left
78 $004E: STATE_MONKEY_RIGHTState-Id for animations78 - STATE_MONKEY_RIGHT255 - Shimmy right
75 $004B: STATE_MONKEY_STILL_OR_HANG_SWINGState-Id for animations75 - STATE_MONKEY_STILL_OR_HANG_SWING150 - Grab in mid-air › hang by the hands in free air (swinging forth and back)233 - Grab monkey-bars during jump234 - Hang still by the hands in free air (from monkey-bars or wafer thin ledge)235 - Hang still by the hands in free air (from monkey-bars or wafer thin ledge) › fall254 - Shimmy (left) › hang still by the hands (?)256 - Shimmy (right) › hang still by the hands (not used) (?)
Page 433
TOMB RAIDER NEXT GENERATION SCRIPT REFERENCE MANUAL
283 - Turn left hanging from monkey-bars › hang still from monkey-bars (at early stage during turn)284 - Turn left hanging from monkey-bars › hang still from monkey-bars (at late stage during turn)285 - Turn right hanging from monkey-bars › hang still from monkey-bars (early stage during turn)286 - Turn right hanging from monkey-bars › hang still from monkey-bars (at late stage during turn)
116 $0074: STATE_NULL_116State-Id for animations116 - STATE_NULL_116399 - Swing forwards on rope with little momentum (?)433 - Small steps forward to correct Lara 's position (hard-coded, used to put line up Lara in front of switches and puzzles)434 - Small steps to the left to corrects Lara 's position435 - Small steps to the right to correct Lara 's position
19 $0013: STATE_NULL_19State-Id for animations19 - STATE_NULL_19026 - Stand › take off for upward jump to grab097 - Hang by the hands › pull up › stand102 - Pull up (after hanging by the hands) › stand174 - Hang still on ladder › pull up › stand214 - Stand › grab zip line342 - Hang still on vertical pole › put feet on floor › stand473 – Climb wall ? pull up in crawlspace
50 $0032: STATE_NULL_50State-Id for animations50 - STATE_NULL_50Not used.
51 $0033: STATE_NULL_51State-Id for animations51 - STATE_NULL_51Not used.
54 $0036: STATE_NULL_54State-Id for animations54 - STATE_NULL_54159 - Hang by the hands › hand stand › stand
62 $003E: STATE_NULL_62State-Id for animations62 - STATE_NULL_62Not used.
Page 434
TOMB RAIDER NEXT GENERATION SCRIPT REFERENCE MANUAL
63 $003F: STATE_NULL_63State-Id for animations63 - STATE_NULL_63Not used.
64 $0040: STATE_NULL_64State-Id for animations64 - STATE_NULL_64Not used.
68 $0044: STATE_NULL_68State-Id for animations68 - STATE_NULL_68Not used.
69 $0045: STATE_NULL_69State-Id for animations69 - STATE_NULL_69Not used.
87 $0057: STATE_NULL_87State-Id for animations87 - STATE_NULL_87287 - Hang by the hands › pull up › crouch, first part › 288288 - Crouch, second part (after pulling up from hanging by the hands) (from 287)
86 $0056: STATE_ON_ALL_FOURS_BACKState-Id for animations86 - STATE_ON_ALL_FOURS_BACK275 - Crawl › crawl backwards276 - Crawl backwards
81 $0051: STATE_ON_ALL_FOURS_FORWARDState-Id for animations81 - STATE_ON_ALL_FOURS_FORWARD260 - Crawl forwards261 - Crawl position › crawl forwards262 - Crawl forwards › crawl position, first part (right foot first) › 266267 - Crawl forwards › crawl position, first part (left foot first) › 268
Page 435

TOMB RAIDER NEXT GENERATION SCRIPT REFERENCE MANUAL
80 $0050: STATE_ON_ALL_FOURS_STANDINGState-Id for animations80 - STATE_ON_ALL_FOURS_STANDING258 - Crouch › crawl position, first part › 273263 - Crawl position264 - Crouch › crawl position, third part (from 273)266 - Crawl forwards › crawl position, second part (from 262)268 - Crawl forwards › crawl position, second part (from 267)273 - Crouch › crawl position, second part (from 258) › 264277 - Crawl backwards › crawl position, first part (right foot moved first) › 278278 - Crawl backwards › crawl position, second part (from 277)279 - Crawl backwards › crawl position, first part (left foot moved first) › 280280 - Crawl backwards › crawl position, second part (from 279)281 - Turn left crawling › crawl position282 - Turn right crawling › crawl position
88 $0058: STATE_ON_ALL_FOURS_TO_HANGState-Id for animations88 - STATE_ON_ALL_FOURS_TO_HANG289 - Crawl position › climb down › hang by the hands, first part ›290290 - Hang by the hands, second part (after climbing down from crawl position) (from 289) › 302302 - Hang by the hands (after climbing down from crawl position), third part (from 290)
84 $0054: STATE_ON_ALL_FOURS_TURN_LEFTState-Id for animations84 - STATE_ON_ALL_FOURS_TURN_LEFT269 - Crawl position › turn left crawling
85 $0055: STATE_ON_ALL_FOURS_TURN_RIGHTState-Id for animations85 - STATE_ON_ALL_FOURS_TURN_RIGHT270 - Crawl position › turn right crawling
128 $0080: STATE_PB_HANGINGState-Id Parallel Bar128 - STATE_PB_HANGING462 - Swing around horizontal pole
129 $0081: STATE_PB_LEAP_OFFState-Id Parallel Bar129 - STATE_PB_LEAP_OFF463 - Jump off horizontal pole
Page 436
TOMB RAIDER NEXT GENERATION SCRIPT REFERENCE MANUAL
39 $0027: STATE_PICK_UPState-Id for animations39 - STATE_PICK_UP130 - Swimming pick up (right hand)130 – Swimming pick up in deep sea suit (right hand) (Deep sea Dive)135 - Standing pick up from floor (right hand)291 - Crouching pick up (right hand)292 - Crawling pick up (not used)419 - Use crowbar to get puzzle item from wall424 - Standing pick up from high pedestal (Lara 's height)425 - Standing pick up from low pedestal (waist-height)471 – Pull object off wall (to use as crowbar)
98 $0062: STATE_PICK_UP_98State-Id for animations98 - STATE_PICK_UP_98325 - Use hole-in-wall switch/pick up
67 $0043: STATE_PICK_UP_FLAREState-Id for animations67 - STATE_PICK_UP_FLARE204 - Pick up flare from floor while standing (left hand)206 - Pick up flare while swimming (left hand)206 – Pick up flare while swimming in deep sea suit (left hand) (Russia-levels)312 - Pick up flare while crouching (left hand)
101 $0065: STATE_POLE_DOWNState-Id for animations101 - STATE_POLE_DOWN334 - Hang still on vertical pole › slide down vertical pole335 - Slide down vertical pole336 - Slide down vertical pole › hang still on vertical pole
102 $0066: STATE_POLE_LEFTState-Id for animations102 - STATE_POLE_LEFT332 - Hang still on vertical pole › turn clockwise on vertical pole343 - Turn clockwise on vertical pole (not used?)344 - Turn clockwise on vertical pole › hang still on vertical pole
103 $0067: STATE_POLE_RIGHTState-Id for animations103 - STATE_POLE_RIGHT333 - Hang still on vertical pole › turn counter-clockwise on vertical pole345 - Turn counter-clockwise on vertical pole (not used?)346 - Turn counter-clockwise on vertical pole › hang still on vertical pole
Page 437
TOMB RAIDER NEXT GENERATION SCRIPT REFERENCE MANUAL
99 $0063: STATE_POLE_STATIC_99State-Id for animations99 - STATE_POLE_STATIC_99326 - Stand › climb onto vertical pole327 - Jump off vertical pole328 - Hang still on vertical pole331 - Jump forwards › grab and climb onto vertical pole337 - Jump upwards › grab and climb onto vertical pole
100 $0064: STATE_POLE_UPState-Id for animations100 - STATE_POLE_UP329 - Climb vertical pole338 - Climb vertical pole › hang still on vertical pole
37 $0025: STATE_PULL_BLOCKState-Id for animations37 - STATE_PULL_BLOCK122 - Pull pushable
104 $0068: STATE_PULLEYState-Id for animations104 - STATE_PULLEY339 - Stand › grab pulley340 - Pull pulley341 - Let go of pulley
36 $0024: STATE_PUSH_BLOCKState-Id for animations36 - STATE_PUSH_BLOCK123 - Push pushable
38 $0026: STATE_PUSH_PULL_READYState-Id for animations38 - STATE_PUSH_PULL_READY120 - Stand › ready to push/pull pushable121 - Ready to push/pull pushable › stand
Page 438
TOMB RAIDER NEXT GENERATION SCRIPT REFERENCE MANUAL
11 $000B: STATE_REACHState-Id for animations11 - STATE_REACH094 - Jump forwards (at late stage during jump) › grab095 - Grab during forward jump100 - Downward curve during long jump › grab~101 - Downward curve during long jump (with less momentum than 100) › grab (not used?)248 - Jump forwards › grab (at early stage during jump)249 - Jump forwards › grab (at middle stage during jump)250 - Grab during running take off (right foot first) (?)251 - Grab during running take off (left foot first) (?)386 - Swing on rope › jump off to grab ledge (when Lara is in the back end of the swing)406 - Swing on rope › jump off to grab ledge (when Lara is in the fore end of the swing - 4 o'clock)407 - Swing on rope › jump off to grab ledge (when Lara is right in the middle of the swing)409 - Swing on rope › jump off to grab ledge (when Lara is just before the middle of the swing)410 - Swing on rope › jump off to grab ledge (when Lara is in the fore end of the swing - 5 o'clock)411 - Swing on rope › jump off to grab ledge (when Lara is in the fore end of the swing - 3 o'clock)
26 $001A: STATE_RIGHT_JUMPState-Id for animations26 - STATE_RIGHT_JUMP080 - Take off for sideways jump right081 - Jump sideways right
23 $0017: STATE_ROLL_23State-Id for animations23 - STATE_ROLL_23147 - Roll, second part (from 146) › 148
45 $002D: STATE_ROLL_45State-Id for animations45 - STATE_ROLL_45047 - Roll (not used?)048 - Roll › stand (not used?)146 - Stand › roll, first part › 147151 - Swan dive › rolling landing
111 $006F: STATE_ROPEState-Id for animations111 - STATE_ROPE371 - Hang from monkey-bars/jump upwards › grab rope (?)373 - Loose momentum on rope › wrap legs around rope › hang still on rope374 - Hang still on rope377 - Hang still on rope › begin to swing with still some momentum left (no kick necessary)(?)379 - Jump forwards › grab rope408 - Swing forth and back with almost no momentum (Lara is too high on the rope?)
Page 439
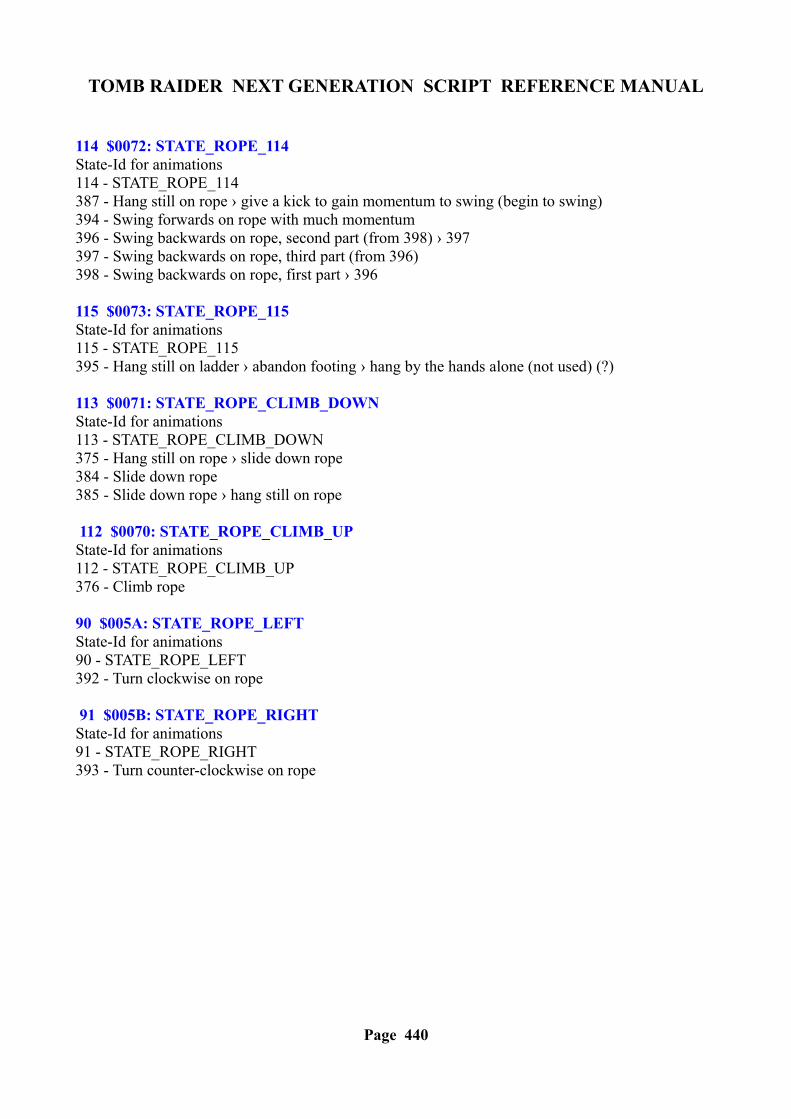
TOMB RAIDER NEXT GENERATION SCRIPT REFERENCE MANUAL
114 $0072: STATE_ROPE_114State-Id for animations114 - STATE_ROPE_114387 - Hang still on rope › give a kick to gain momentum to swing (begin to swing)394 - Swing forwards on rope with much momentum396 - Swing backwards on rope, second part (from 398) › 397397 - Swing backwards on rope, third part (from 396)398 - Swing backwards on rope, first part › 396
115 $0073: STATE_ROPE_115State-Id for animations115 - STATE_ROPE_115395 - Hang still on ladder › abandon footing › hang by the hands alone (not used) (?)
113 $0071: STATE_ROPE_CLIMB_DOWNState-Id for animations113 - STATE_ROPE_CLIMB_DOWN375 - Hang still on rope › slide down rope384 - Slide down rope385 - Slide down rope › hang still on rope
112 $0070: STATE_ROPE_CLIMB_UPState-Id for animations112 - STATE_ROPE_CLIMB_UP376 - Climb rope
90 $005A: STATE_ROPE_LEFTState-Id for animations90 - STATE_ROPE_LEFT392 - Turn clockwise on rope
91 $005B: STATE_ROPE_RIGHTState-Id for animations91 - STATE_ROPE_RIGHT393 - Turn counter-clockwise on rope
Page 440
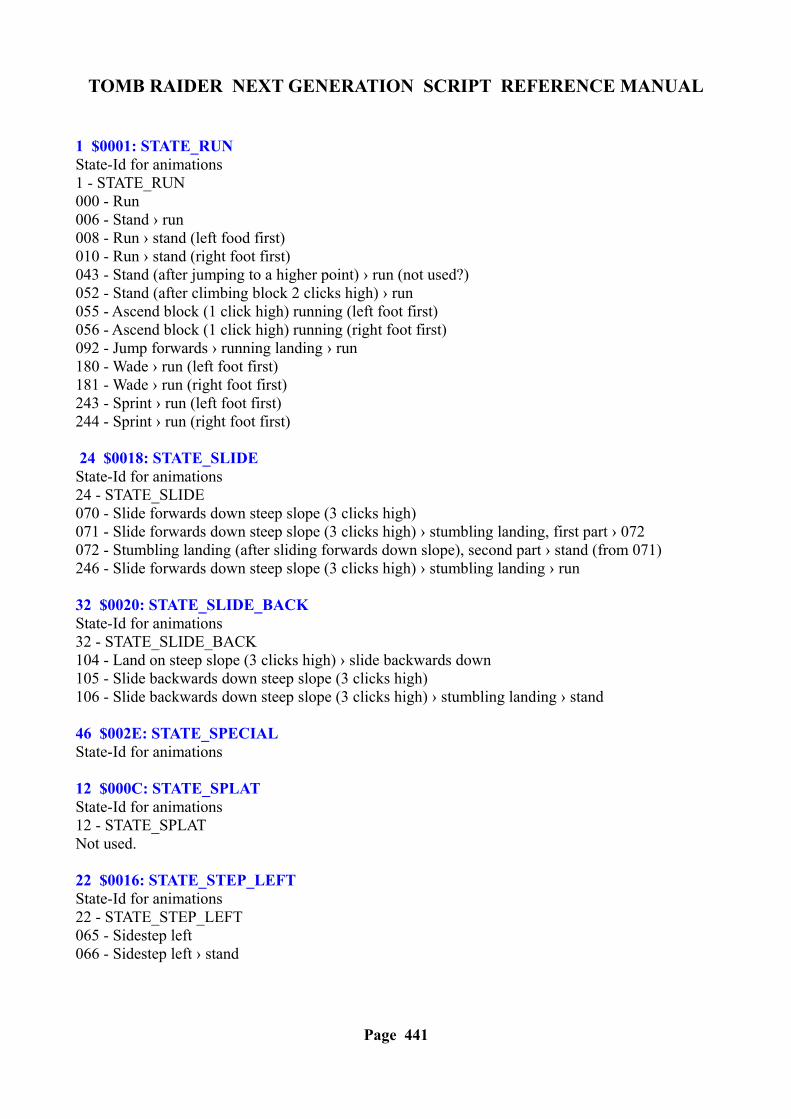
TOMB RAIDER NEXT GENERATION SCRIPT REFERENCE MANUAL
1 $0001: STATE_RUNState-Id for animations1 - STATE_RUN000 - Run006 - Stand › run008 - Run › stand (left food first)010 - Run › stand (right foot first)043 - Stand (after jumping to a higher point) › run (not used?)052 - Stand (after climbing block 2 clicks high) › run055 - Ascend block (1 click high) running (left foot first)056 - Ascend block (1 click high) running (right foot first)092 - Jump forwards › running landing › run180 - Wade › run (left foot first)181 - Wade › run (right foot first)243 - Sprint › run (left foot first)244 - Sprint › run (right foot first)
24 $0018: STATE_SLIDEState-Id for animations24 - STATE_SLIDE070 - Slide forwards down steep slope (3 clicks high)071 - Slide forwards down steep slope (3 clicks high) › stumbling landing, first part › 072072 - Stumbling landing (after sliding forwards down slope), second part › stand (from 071)246 - Slide forwards down steep slope (3 clicks high) › stumbling landing › run
32 $0020: STATE_SLIDE_BACKState-Id for animations32 - STATE_SLIDE_BACK104 - Land on steep slope (3 clicks high) › slide backwards down105 - Slide backwards down steep slope (3 clicks high)106 - Slide backwards down steep slope (3 clicks high) › stumbling landing › stand
46 $002E: STATE_SPECIALState-Id for animations
12 $000C: STATE_SPLATState-Id for animations12 - STATE_SPLATNot used.
22 $0016: STATE_STEP_LEFTState-Id for animations22 - STATE_STEP_LEFT065 - Sidestep left066 - Sidestep left › stand
Page 441

TOMB RAIDER NEXT GENERATION SCRIPT REFERENCE MANUAL
21 $0015: STATE_STEP_RIGHTState-Id for animations21 - STATE_STEP_RIGHT067 - Sidestep right068 - Sidestep right › stand
2 $0002: STATE_STOPState-Id for animations2 - STATE_STOP011 - Stand still (used as a link between many standing animations)014 - Forward jump/fall (less than 7 clicks high) › land (to a standstill), first part › 015015 - Land (after jump/fall less that 7 clicks high), second part › stand still (from 014)024 - Jump/fall (more than 7 clicks) › crouching landing › stand031 - Land after upward jump › stand042 - Climb block (3 clicks high)050 - Climb block (2 clicks high)051 - Climb block (2 clicks high) › stand053 - Run › hit wall (left foot first) › stand054 - Run › hit wall (right foot first) › stand082 - Crouching landing after jump in all directions › stand099 - Fall › crouching landing103 - Stand still (breathing)148 - Roll, third part › stand (from 147)175 - ??? › stand still184 - Wade › stand (right foot first)185 - Wade › stand (left foot first)221 - Crouch › stand226 - Sprint › skidding halt › stand (right foot first)227 - ??? › stand (right foot first) (not used)228 - Sprint › skidding halt › stand (left foot first)229 - ??? › stand (left foot first) (not used)303 - About to crouch › stand (cancelling a stand › crouch command)
47 $002F: STATE_SURF_BACKState-Id for animations47 - STATE_SURF_BACK140 - Tread water on water surface › swim backwards on water surface141 - Swim backwards on water surface142 - Swim backwards on water surface › tread water on water surface
48 $0030: STATE_SURF_LEFTState-Id for animations48 - STATE_SURF_LEFT143 - Swim sideways left on water surface
Page 442
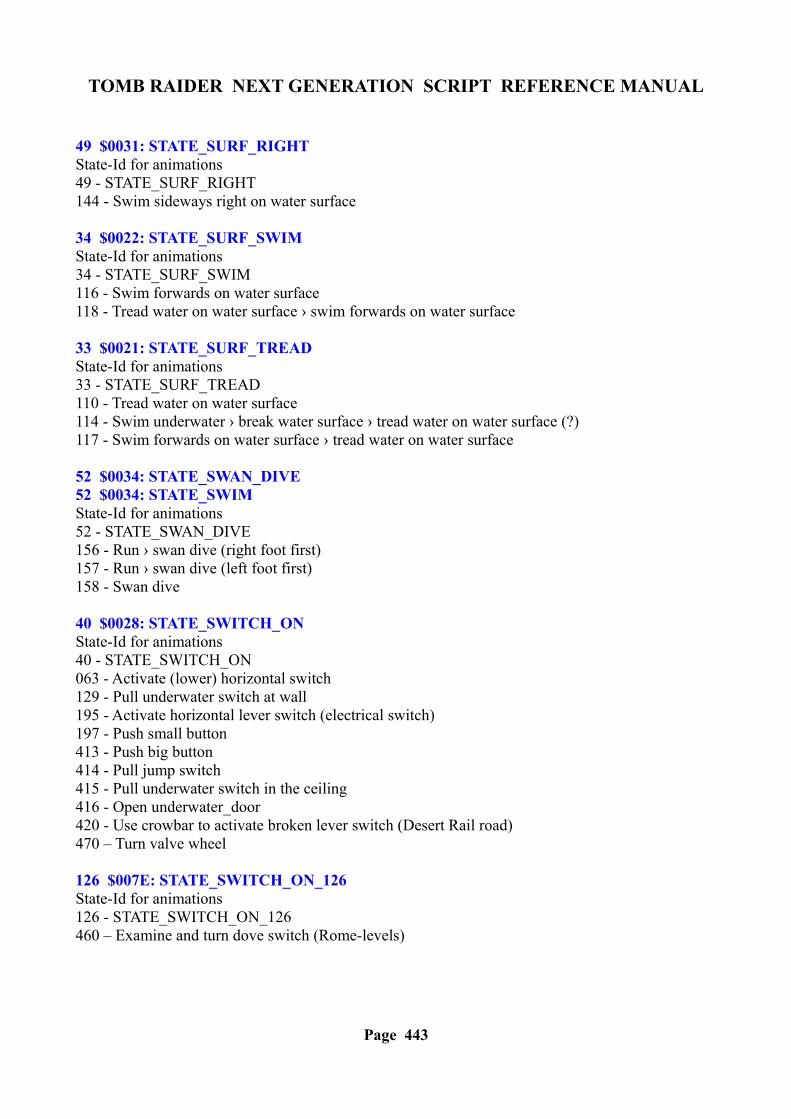
TOMB RAIDER NEXT GENERATION SCRIPT REFERENCE MANUAL
49 $0031: STATE_SURF_RIGHTState-Id for animations49 - STATE_SURF_RIGHT144 - Swim sideways right on water surface
34 $0022: STATE_SURF_SWIMState-Id for animations34 - STATE_SURF_SWIM116 - Swim forwards on water surface118 - Tread water on water surface › swim forwards on water surface
33 $0021: STATE_SURF_TREADState-Id for animations33 - STATE_SURF_TREAD110 - Tread water on water surface114 - Swim underwater › break water surface › tread water on water surface (?)117 - Swim forwards on water surface › tread water on water surface
52 $0034: STATE_SWAN_DIVE52 $0034: STATE_SWIMState-Id for animations52 - STATE_SWAN_DIVE156 - Run › swan dive (right foot first)157 - Run › swan dive (left foot first)158 - Swan dive
40 $0028: STATE_SWITCH_ONState-Id for animations40 - STATE_SWITCH_ON063 - Activate (lower) horizontal switch129 - Pull underwater switch at wall195 - Activate horizontal lever switch (electrical switch)197 - Push small button413 - Push big button414 - Pull jump switch415 - Pull underwater switch in the ceiling416 - Open underwater_door420 - Use crowbar to activate broken lever switch (Desert Rail road)470 – Turn valve wheel
126 $007E: STATE_SWITCH_ON_126State-Id for animations126 - STATE_SWITCH_ON_126460 – Examine and turn dove switch (Rome-levels)
Page 443
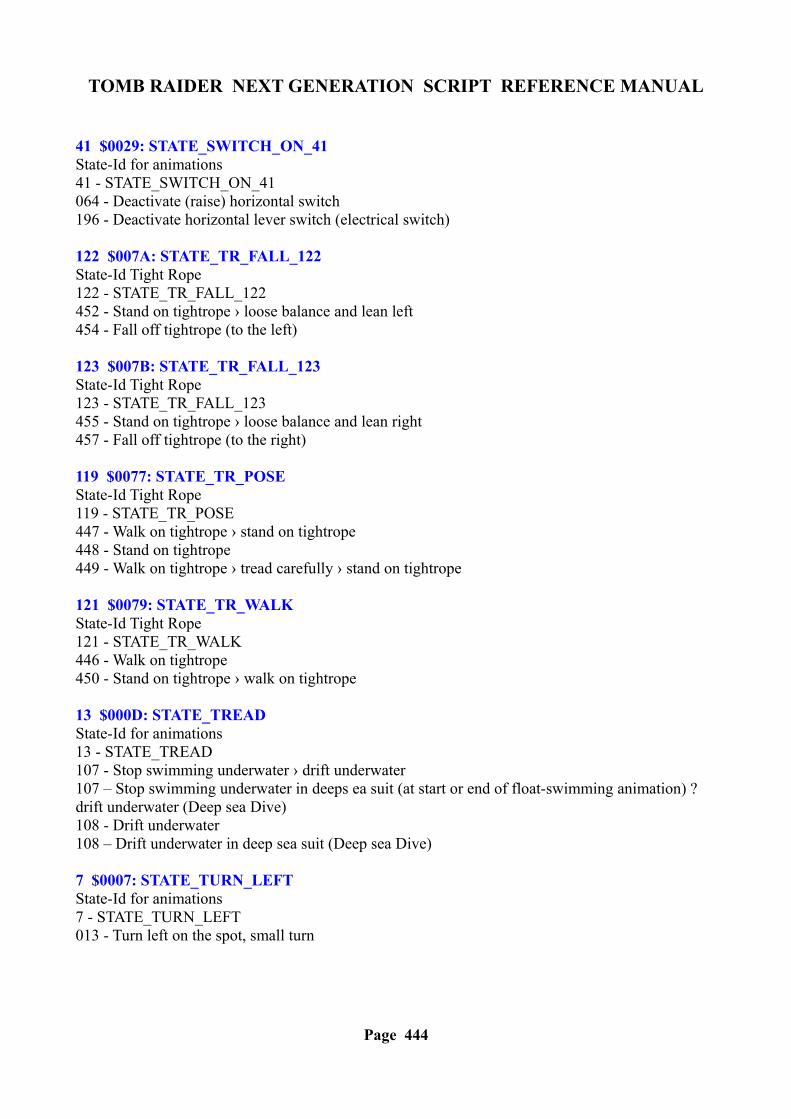
TOMB RAIDER NEXT GENERATION SCRIPT REFERENCE MANUAL
41 $0029: STATE_SWITCH_ON_41State-Id for animations41 - STATE_SWITCH_ON_41064 - Deactivate (raise) horizontal switch196 - Deactivate horizontal lever switch (electrical switch)
122 $007A: STATE_TR_FALL_122State-Id Tight Rope122 - STATE_TR_FALL_122452 - Stand on tightrope › loose balance and lean left454 - Fall off tightrope (to the left)
123 $007B: STATE_TR_FALL_123State-Id Tight Rope123 - STATE_TR_FALL_123455 - Stand on tightrope › loose balance and lean right457 - Fall off tightrope (to the right)
119 $0077: STATE_TR_POSEState-Id Tight Rope119 - STATE_TR_POSE447 - Walk on tightrope › stand on tightrope448 - Stand on tightrope449 - Walk on tightrope › tread carefully › stand on tightrope
121 $0079: STATE_TR_WALKState-Id Tight Rope121 - STATE_TR_WALK446 - Walk on tightrope450 - Stand on tightrope › walk on tightrope
13 $000D: STATE_TREADState-Id for animations13 - STATE_TREAD107 - Stop swimming underwater › drift underwater107 – Stop swimming underwater in deeps ea suit (at start or end of float-swimming animation) ? drift underwater (Deep sea Dive)108 - Drift underwater108 – Drift underwater in deep sea suit (Deep sea Dive)
7 $0007: STATE_TURN_LEFTState-Id for animations7 - STATE_TURN_LEFT013 - Turn left on the spot, small turn
Page 444

TOMB RAIDER NEXT GENERATION SCRIPT REFERENCE MANUAL
6 $0006: STATE_TURN_RIGHTState-Id for animations6 - STATE_TURN_RIGHT012 - Turn right on the spot, small turn
44 $002C: STATE_UNDERWATER_DEATHState-Id for animations44 - STATE_UNDERWATER_DEATH124 - Drown/die underwater - with convulsions124 – Drown/die underwater – with convulsions (Deep sea Dive)132 - Die on the water surface (less dramatic than 124)
28 $001C: STATE_UP_JUMPState-Id for animations28 - STATE_UP_JUMP027 - Jump upwards to grab028 - Jump upwards091 - Take off for upward jump
42 $002A: STATE_USE_KEYState-Id for animations42 - STATE_USE_KEY131 - Use key437 – Use swipe card
43 $002B: STATE_USE_PUZZLEState-Id for animations43 - STATE_USE_PUZZLE134 - Insert puzzle item
65 $0041: STATE_WADEState-Id for animations65 - STATE_WADE176 - Swim forwards on water surface › wade (the depth change is very small) (?)177 - Wade178 - Run › wade (left foot first)179 - Run › wade (right foot first)186 - Stand › wade
Page 445
TOMB RAIDER NEXT GENERATION SCRIPT REFERENCE MANUAL
0 $0000: STATE_WALKState-Id for animations0 - STATE_WALK001 - Walk002 - Walk › stand (right foot moved first)003 - Walk › stand (left foot moved first)004 - Walk › Run (right foot moved first)005 - Walk › Run (left foot moved first)007 - Run › walk (left foot first)009 - Run › walk (right foot first)020 - Stand › walk forwards, first part › 021021 - Walk forwards, second part › walk (from 020)057 - Ascend block (1 click high) walking (left foot first)058 - Ascend block (1 click high) walking (right foot first)059 - Descend block (1 click high) walking (right foot moved first)060 - Descend block (1 click high) walking (left foot moved first)125 - Jerk backwards hurt (standing)126 - Jerk forwards hurt (standing)127 - Jerk right hurt (standing)128 - Jerk left hurt (standing)189 - Throw flare away (standing)293 - Jerk forwards hurt (crouching)294 - Jerk backwards hurt (crouching)295 - Jerk right hurt (crouching)296 - Jerk left hurt (crouching)297 - Jerk forwards hurt (crawling)298 - Jerk backwards hurt (crawling)299 - Jerk right hurt (crawling)300 - Jerk left hurt (crawling)380 - Somersault from rope to ledge? (not used)381 - Swing on rope › fall (when Lara is in the fore end of the swing - haft past four o'clock)(?)382 - Swing on rope› fall (when Lara is in the middle of the swing) (?)383 - Swing on rope › fall (when Lara is in the back end of the swing) (?)388 - Swing on rope› fall (when Lara is just before the middle of the swing - 7 o'clock) (?)389 - Swing on rope› fall (when Lara is just before the middle of the swing - half past six o'clock) ?)390 - Swing on rope › fall (when Lara is in the fore end of the swing - 5 o'clock) (?)391 - Have just grabbed rope › fall (same animation as 378?) (?)404 - Reach fore end of swing on rope with very much momentum405 - Swing on rope and grab a new rope? (not used?)421 - Roll forwards out of crawlspace (not used)436 - Use crowbar to break train link? (not used)437 - Picked up and tossed away by ???440 - Dragging dead body (City of the Dead)441 - Look through binoculars (not used)
Page 446
TOMB RAIDER NEXT GENERATION SCRIPT REFERENCE MANUAL
55 $0037: STATE_WATER_OUTState-Id for animations55 - STATE_WATER_OUT111 - Pull out of water (onto ledge 1 click above the water surface) › stand190 - Swim forwards on water surface › wade (the depth transition is greater) (?)191 - Pull out of water (onto ledge even with the water surface) › stand192 - Swim underwater › stand in shallow water193 - Tread water on water surface › stand in shallow water
66 $0042: STATE_WATER_ROLLState-Id for animations66 - STATE_WATER_ROLL203 - Roll underwater, first part › 205205 - Roll underwater, second part › drift underwater (from 203)
Page 447
TOMB RAIDER NEXT GENERATION SCRIPT REFERENCE MANUAL
SWT_ constants
1 $0001: SWT_BASE_ZEROUsed in the Switch script command. By default the Switch command performs the first Trigger Group in the list when the PlaceFolderVariable value is "1", it performs the second when the variable = 2, etc. If the first value is "0" for the first Trigger Group then use this flag.
2 $0002: SWT_RANDOM_MODEUsed in the Switch script command. To introduce random elements in the adventure use this flag to perform different triggers in a random way. When the SWT_RANDOM_MODE flag is set the field VariablePlaceFolder will be ignored and the number used to select the Trigger Group to perform will be generated in a random way.
For example: Place three Trigger Group Ids in a list, the TRNG engine will generate a random number in the range (1 to 3) (or 0 to 2 if the BASE_ZERO flag is set) and then perform the Trigger Group using the random number.
TCF_ constants
2 $0002: TCF_CREATUREA creature is a moveable that lives and dies. It has AI to move itself
16 $0010: TCF_LAND_CREATURE
4096 $1000: TCF_ONLY_EXPLODEThis moveable can only be killed by an explosion, like a mummy or a skeleton.
8 $0008: TCF_SAVEPOSSave information about the current moveable in the save game file
Page 448
TOMB RAIDER NEXT GENERATION SCRIPT REFERENCE MANUAL
TGROUP_ constants
8 $0008: TGROUP_ANDSet a operator for the current condition with the AND operator. This operator will be kept for the following condition trigger if no other TGROUP_ flag for boolean operators is to be used. The AND operation is the default operation if no TGROUP flags set operators in the Trigger Group. That is all condition will be linked with AND operators When other operators like OR or NOT are set it could be necessary use the TGROUP_AND flag to force a new AND operator to link the different conditions.
Example of list of conditions + boolean operators:
Condition1 TGROUP_OR + Condition2 TGROUP_AND + Condition3 TGROUP_NOT + Condition4
The above list of condition triggers is read in this way:
If (Condition1 OR Condition2) is TRUE ANDCondition3 is true AND Condition4 is NOT true then ... perform the following (non-conditional) trigger sequence
64 $0040: TGROUP_ELSESet the start of a ELSE group in the current Trigger Group. The ELSE is important to perform an alternative trigger when the first condition was false.
For example: Create a Trigger Group with conditions to load a different level according to some condition. like the following:
Condition1 is truePerform trigger "Load level 4"
ElsePerform trigger "Load title level"
The above conditional sentence could be use to perform a bonus level (4) only when some condition (condition1) is true, while if the condition is false (else) it will load the title level, to complete the adventure with no bonus level.
Place one, two or more ELSE in the Trigger Group.
The rule to follow to understand how the Trigger Group will work is:
If the first conditions are true: perform the first group non conditional trigger following the first conditions. While if the first conditions are false, skip all following non conditional triggers, until an ELSE flag is reached.
Page 449
TOMB RAIDER NEXT GENERATION SCRIPT REFERENCE MANUAL
If an ELSE flag has been found, the parsing will start from that condition/trigger as if it was the start of the whole Trigger Group. The trigger with the ELSE flag could also be another conditionIf the conditions are true perform the following non conditional triggers, while if the conditions are false, skip all triggers up to another ELSE flag.
Using multiple ELSE perform different triggers according to different conditions.
For example: Open different doors according to the last number typed in the Keypad switch:
Condition: If KeyPad Value = 1Trigger: Open door 12
ELSE Condition: If KeyPad Value=2
Trigger: Open door 7 ELSE
Condition: If keypad Value =3Trigger: Open door 18
32 $0020: TGROUP_NOTSet as an operator to link the current condition with previous conditions use the NOT operator.The NOT operator is read as "AND NOT" because it requires the previous condition is TRUE and that the current condition is NOT true ( i.e. FALSE). Use the NOT operator to invert a condition. This is very useful to create a condition not in the trigger condition list.
For example: If there is in the trigger window the condition "Lara collide with object <# " but it is missing the inverse condition "Lara is NOT colliding with object <# ",
use the condition for collide and then add a TGROUP_NOT flag to the first value of that exported condition to transform it in to "Lara is NOT colliding with object"
See the description of the TGROUP_AND flag for more information about the use of boolean operators in the Trigger Group.
16 $0010: TGROUP_ORTGROUP_ORSet as an operator to link the current condition with previous conditions using the OR operator. When the OR operator is used the previous condition or the current condition is true to get a true condition. See the description of the TGROUP_AND flag for more information about the use of boolean operators in the Trigger Group.
1024 $0400: TGROUP_SINGLE_SHOTUsed in the Trigger Group command. Add this flag in the first number of the first trigger of the Trigger Group to create a single-shot Trigger Group. Practically this Trigger Group will be performed only once in the current level. The single-shot trigger groups are very important to fix the limitation about the trigger zone where the same trigger is placed in two or more closed sectors in the map. When all of this trigger zone works like a single-shot trigger there is a problem because each trigger will work in a one-shot way but individually and this means that Lara could engage the same trigger when she touches another sector in that trigger zone. Currently the only way to avoid
Page 450

TOMB RAIDER NEXT GENERATION SCRIPT REFERENCE MANUAL
this problem is to export the trigger in script format and copy it in a Trigger Group command. Then add to first number the TGROUP_SINGLE_SHOT flag and at the end replace in the level the original trigger with a "perform trigger group" flip effect. The Trigger Group will be performed only once and when Lara passes over another trigger sector of that same zone nothing will happen.
Remark: There is also a new flip effect used when a new a single-shot Trigger Group already performed can be reset.
8 $0008: TGROUP_SINGLE_SHOT_RESUMEDUsed in the Trigger Group commandThis flag works like the TGROUP_SINGLE_SHOT flag (see its description) but in this case it is not necessary to use the flip effect 345 to newly enable it. In fact, a trigger group with the TGROUP_SINGLE_SHOT_RESUMED in (first) flags word, will be newly enabled not just the current trigger group stops to be performed. This means that the "single shot" attribute will work only in continuous triggered sectors, but also when Lara goes out from this trigger zone, the trigger will be ready for further actions.
256 $0100: TGROUP_USE_EXECUTOR_ITEM_INDEXUsed in the Trigger Group command. Add this flag to the first triplex parameter of the exported trigger data. This will replace the index that performs some action with the item that executes the trigger and enables the Trigger Group. Use this flag when a heavy trigger is used to perform the Trigger Group and all the action triggers will be redirect to a moveable that has enabled the Trigger Group.
For example: Export an action trigger to kill a moveable and then perform this Trigger Group with an heavy trigger. When any moveable moves on it the action (to kill) will be applied on this moveable. Practically with this method create a trigger to kill enemies (or another action on them) where it will be the same moveable to enable it.
Remark: To do this trick use an Enemy= command with the NEF_EASY_HEAVY_ENABLING to permit different moveables to enable all heavy triggers they meet in their path.
1 $0001: TGROUP_USE_FOUND_ITEM_INDEXUsed to force the use of the index of the last moveable detected by some condition. The found index will be used in all following triggers or conditions of the Trigger Group that require an index for the moveable. Practically using this flag the index found from some condition will become the index to use for the following condition and triggers, ignoring further moveable index for those triggers. This overriding of original indices will be stopped only when it is found that another TGROUP_ flag is used to change the default index of the moveable to use.
Other TGROUP_ flags to change the default index for moveable are:
TGROUP_USE_OWNER_ANIM_ITEM_INDEX TGROUP_USE_TRIGGER_ITEM_INDEX
See the descriptions for the above flags.
Page 451
TOMB RAIDER NEXT GENERATION SCRIPT REFERENCE MANUAL
Remark: Not all condition trigger may be used to set a moveable index. Add the flag TGROUP_USE_FOUND_ITEM_INDEX to the first value of the exported condition. Only verify the presence of some moveable on the condition.
For example: The condition trigger "Lara collides with moveable with [&] slot" or the ENV condition "Lara has in front the object with slot = ExtraSlot"
This forces another index to use with the following triggers to handle the situation where it is not known WHAT moveable Lara will collide with or have in front of her.
For example: Build a Trigger Group to handle fighting:
Conditions: "When right hand of Lara touches head of [&] slot moveable" then: (above condition is true) Toggle vitality of the current enemy moveable
In the above Trigger Group, when the condition trigger is built set the slot of the moveable for the condition.
For example: Use the slot "95 SAS", but when in game Lara hits a SAS moveable it could be one of many SAS in the level and its index is unknown when the condition trigger is built. For an unknown index it is not possible to toggle the vitality.
To solve the above problem there are some TGROUP_ flags used to get the index of the moveable to use in a dynamic way: when the TRNG engine with some condition detects a moveable it uses that index for the following trigger.
2048 $0800: TGROUP_USE_ITEM_USED_BY_LARA_INDEXUsed in the Trigger Group command Use this flag to override the original item index of the exported action trigger with the index of the last item that Lara used (or is using) in the interactive mode.
4 $0004: TGROUP_USE_OWNER_ANIM_ITEM_INDEXSet the moveable index to use in the following (and current) triggers the index of the moveable animation command performed. This flag could only be used when the current Trigger Group command has been started by an animation command. In this situation the flag for the index of the moveable to use will be the index of the moveable that owns the animation that started the current Trigger Group. See the description of TGROUP_USE_FOUND_ITEM_INDEX flag for more information about the mechanism of changing of moveable index
2 $0002: TGROUP_USE_TRIGGER_ITEM_INDEXSet as index of the moveable to use for the following (and current) triggers,.the real source index set in exported trigger. This flag requires to be used only when the default index is changed in previous triggers or conditions. If no TGROUP flag is set to modify the index to use it is not necessary use this flag. See the description for the TGROUP_USE_FOUND_ITEM_INDEX flag for more information about the mechanism for changing the moveable index
Page 452
TOMB RAIDER NEXT GENERATION SCRIPT REFERENCE MANUAL
TPOS_ constants
1 $0001: TPOS_DOUBLE_HORIENTUsed in the Test Position command. To detect that the correct position could be in front of the object (with given H Orient) but also on the opposite side set this flag. When in Test Position there is the TPOS_DOUBLE_HORIENT flag. The Test Position condition will be true if Lara is on the opposite side from what is set in the range of Test Position.
For example: Using an item like a gate, use the TPOS_DOUBLE_HORIENT to allow Lara to be in a correct position for both sides of the gate.
Remark: This flag only works if the item has its pivot in the same position of the visible mesh. Unfortunately, in many circumstances the pivot (origin x,y,z of the object) is not at the centre of its mesh but in a corner of the sector where it will be placed.
8 $0008: TPOS_FAST_ALIGNMENTUsed in the Test Position command. In reality this flag affects the alignment phase when the FAN_ALIGN_TO_ENV_POS constant is used in the Animation command that called the Test Position command.
Use an Animation command and use the FAN_ALIGN_TO_ENV_POS . When Lara is in a good position for the Test Position command she will be moved to perfect ideal position before performing the animation.
The old method used to move Lara to an ideal position had a problem of continuous loop when she was too close to the target position. To solve this problem use in the Test Position command the TPOS_FAST_ALIGNMENT flag and Lara will be moved to the correct position avoiding the risk of looping.
Remark: Use the fast alignment only when a small tolerance is set in the Test Position command, i.e. when the condition of Test Position is true when Lara is very close to an ideal position.
2 $0002: TPOS_FOUR_HORIENTUsed in the Test Position command With this flag the correct position will be set for each side of the object. For example, a square pushable object, where Lara is able to interact with every side of the pushable. To work it is necessary that the object had its pivot (origin x,y,z of object) in the centre position of the object mesh.
16 $0010: TPOS_OPPOSITE_FACINGUsed in the Test Position command. The alignment with some objects could fail because the main mesh has an opposite facing with respect to the animation 0 displacement. Discover this situation with the Animation Editor of Wad Merger: when the position of the mesh with "No Animation" is the opposite of the mesh in "Animation 0" the self alignment could fail. To fix this bug use the TPOS_OPPOSITE_FACING flag in the Test Position command used by the Animation command.
Page 453
TOMB RAIDER NEXT GENERATION SCRIPT REFERENCE MANUAL
4 $0004: TPOS_TEST_ITEM_INDEXUsed in the Test Position command. Add this value in the Flags of the Test Position to change the mean of the "Slot Moveable" field. Use the TPOS_TEST_ITEM_INDEX flag and the TRNG engine will consider the value in the "Slot Moveable" field like an index of the item to check. Find the index in the NGLE program by clicking on the wanted item and see the index in a yellow frame. The advantage to using an index is that it can test a moveable if it is external to Lara 's room. While in other cases (checking for slot) the Test Position only detects items in the same room as Lara. The disadvantage to using this flag is that it cannot detect all objects in a general way.
Page 454
TOMB RAIDER NEXT GENERATION SCRIPT REFERENCE MANUAL
TRB_ constants
16 $0010: TRB_ADAPTIVE_FARVIEWUsed in Turbo command. TRB_ADAPTIVE_FARVIEW enables a complex compute to adapt the maximum far view (really the level far view) in the current level in accordance with the current performances. Practically, when TRNG discovers that it is not able to keep the medium value of 30 FPS (Frame per second), it will reduce progressively the level far view until it can keep 30 fps. When it reaches the optimal frame rate and keeps it for three seconds, it will try to increase level far view very slowly to reach the value for LevelFarView set in the script.dat file. This method allows a variable distance to show far objects to always preserve a good frame rate.
Remark: The TRB_ADAPTIVE_FARVIEW setting could not work with the TRB_ASYNC_FRAMES setting because this last setting creates an irregular response in the internal frame rate as TRB_ADAPTIVE_FARVIEW uses its own frame rate value to perform the changes in far view it could be confused by the TRB_ASYNC_FRAMES To use the TRB_ADAPTIVE_FARVIEW it is advisable not to exaggerate the setting for the LevelFarView in the level. Many level builders set the LevelFarView = 127 because it is the maximum value. This number is huge because it is very seldom that more than 60 sectors are visible in a direct line. By setting 127 when a bad frame rate happens the TRNG engine will spend time decreasing the far view from 127 sectors to a meaningful value like 20 or 30 sectors. When the far view has been dramatically reduced and then recovers the TRNG engine will spend time to increase the far view to 127 sectors. An ideal value for adaptive FarView is to set the LevelFarView = 60 while the required fps to set is (about) 24 fps.
4 $0004: TRB_ASYNC_FRAMESUsed in the Turbo command. TRB_ASYNC_FRAMES remove the double synchronization of the frames keeping only a single synchronization. This setting could be advantage to the game engine with some modern video cards and it permits some time gain with the fast frame to invest in the following frames requiring a longer time. When using this setting the FPS value seen on the screen in Diagnostic mode is not very meaningful because when the FPS are very high (for example 80 FPS) the game will always be in the correct limits to avoid fast movement. Discover the advantage of this setting by looking at the game to recognize a more fluid movement.
Remark: This setting does not work in the Title level because the input synchronization for moving in title menu does not allow the use of an asynchronous frame rate.
From 1.2.2.7 version, this setting works in a different way. Now when the game loses some frame, the turbo command perform two or more frames in a shorter time to recover the previously lost frame. The result in this situation is that Lara will cover same distance in same time as in full frame rate but the movements will not always be fluid. In spite this solution not being perfect it is better than the big slowdown you can see when the engine is not able to support the standard 30 frames per second.
Page 455
TOMB RAIDER NEXT GENERATION SCRIPT REFERENCE MANUAL
2 $0002: TRB_HIGH_PRIORITYUsed in the Turbo command. TRB_HIGH_PRIORITY sets a higher class priority for the whole tomb4 process to increase the time supplied to tomb4 with respect to the other processes. Theoretically this setting could be an advantage in the game engine when in the PC there are other programs working, or some background services like anti-virus.
8 $0008: TRB_OPTIMIZE_SORTINGUsed in the Turbo command. TRB_OPTIMIZE_SORTING optimizes the sorting of the polygons list used by the TRNG engine before performing draw operations. Usually this optimizing gives a gain of about 5 or 6 fps (frames per second)
1 $0001: TRB_SELECTIVE_VIEWUsed in the Turbo command. TRB_SELECTIVE_VIEW excludes all computes about static objects not visible in the game because they are behind the current camera view. Theoretically the DIRECTX functions perform this cut off, but looking at the source code it appears that many computes have been performed in spite of these statics object being outside the visible world. Hence, this setting allows time to be saved that would otherwise be wasted in useless computes.
Page 456
TOMB RAIDER NEXT GENERATION SCRIPT REFERENCE MANUAL
TS_ constants
6 $0006: TS_AFTER_FALLING_AS_INVULNERABLEUsed with the Customize=CUST_SFX command. When Lara is invulnerable and she falls from a great height, she will not die but touches the floor and comes back to a stand up position after a short animation.
13 $000D: TS_ANIMATING_DOOR_CLOSEUsed with the Customize=CUST_SFX command. When an animating (fake) door for the elevator is used this is the sound made when it closes.
12 $000C: TS_ANIMATING_DOOR_OPENUsed with the Customize=CUST_SFX command. When an animating (fake) door for the elevator is used this is the sound made when it opens.
19 $0013: TS_BINOCULAR_LIGHTUsed with the Customize=CUST_SFX commandThis is a single-shot sound played when the player switches on or off the illumination for the binoculars. Default value is 369 LARA_CLICK_SWITCH
18 $0012: TS_BINOCULAR_ZOOMUsed with the Customize=CUST_SFX commandThis is the sound when the customized binoculars is zooming in or out.Default value is 309 MAPPER_MOVE
9 $0009: TS_DAMAGE_ROOM_BEEP_ALERTUsed with the Customize=CUST_SFX command. When in a damage room the time (bar) is almost terminated the beep sounds for the blinking bar ending time.
8 $0008: TS_DAMAGE_ROOM_SCREAM_BURNINGUsed with the Customize=CUST_SFX command. When in a damage room and the bar is empty Lara will burn and scream.
14 $000E: TS_DETECTOR_SHOWUsed with the Customize=CUST_SFX command. When the detector is shown on the screen for the first time.
1 $0001: TS_DIARY_CHANGE_PAGEUsed with the Customize=CUST_SFX command. This sound is played when the user changes the page of the Diary with the next or previous page.
2 $0002: TS_DIARY_NO_PAGEUsed with the Customize=CUST_SFX command. This sound will be played when the player tries to change a page of the Diary but there is no more pages in that direction (next or previous).
Page 457
TOMB RAIDER NEXT GENERATION SCRIPT REFERENCE MANUAL
3 $0003: TS_DIARY_ZOOM_STARTUsed with the Customize=CUST_SFX command. This sound is played when the zoom effect is enabled at first activation of the Diary.
15 $000F: TS_ELEVATOR_SQUASHED_LARAUsed with the Customize=CUST_SFX command. This sound is played when an elevator has squashed and killed Lara.
11 $000B: TS_MISSING_REQUIRED_ITEMUsed with Customize=CUST_SFX command. This sound is played when the trigger "Inventory-Item. Pop up inventory screen to select the <& Item" has been performed and the required item is missing. (by default Lara says "No").
16 $0010: TS_MIST_EMITTER_WITH_OCBUsed with the Customize=CUST_SFX command. This is the sound of the Mist emitter but only when it is customized with an OCB value different from 0.
17 $0011: TS_PUSHED_ITEM_IMPACTUsed with the Customize=CUST_SFX command This is the sound that is played when an item has been pushed away from the bike and it hits the wall or another object. The default value is 72 GENERIC_HEAVY_THUD
7 $0007: TS_SAVEGAME_PANEL_SELECTEDUsed with the Customize=CUST_SFX command. This is the sound played when the user changes the selected save game in a customized save game panel.
4 $0004: TS_SCREENSHOT_CAPTUREUsed with the Customize=CUST_SFX command. This sound is played when the F3 key is pressed to capture the game screen image.
5 $0005: TS_VIBRATE_RESUME_FROM_FROZENUsed with the Customize=CUST_SFX command. This is the short sound, repeated many times, when an enemy previously frozen is thawed out
10 $000A: TS_WHIRLPOOL_SINKED_LARAUsed with the Customize=CUST_SFX command. The sound is played when Lara and the boat is sunk in the whirlpool.
Page 458

TOMB RAIDER NEXT GENERATION SCRIPT REFERENCE MANUAL
TSB_ constants
1 $0001: TSB_MATRIXUsed in the Stand By command. The matrix effect creates a camera turning around Lara.
0 $0000: TSB_NO_CHANGE_CAMERAUsed in the Stand By command. This standby type disables any changes for the Look camera. Use this type only when the Trigger Group is used to customize the Standby mode.
3 $0003: TSB_PANORAMAUsed in the Stand By command. The Panorama type works like a matrix type but the distance, the vertical angle and the speed of rotation will continue to change in a random way. With Panorama create a large range for distance while with the Matrix type the maximum difference between minimum and maximum limits are only +/- 50% of the given distance. In the Panorama type some settings of the Stand By command will be interpreted in a particular way: The further settings for the FSB_FLIP_DISTANCE, FSB_FLIP_SPEED and FSB_FLIP_V_ANGLE flags is ignored, because the Panorama type flips the distance and the vertical angle. The value in the "Distance" field is used like a Maximum Distance, while the minimum distance will always be 400 (near to Lara). The value in the "VAngle" field is used like the MaxVerticalAngle allowed. Remember that negative numbers in VAngle mean "the camera is above and looking at Lara". When a large maximum distance is set avoid large positive values for VAngle because the risk is that the camera tries to go underground. The only exception is when Lara is on the top of a pyramid where the ground around her is lower than her position.
2 $0002: TSB_PORTRAITUsed in the Stand By command. In this Standby type the camera remains in front of Lara.In this mode use a short distance value to look at the beauty of Lara's eyes.
TSCR_ constants
2 $0002: TSCR_LOAD_GAMEUsed with the GT_TITLE_SCREEN Global Trigger. Detects the [Load Game] screen.
0 $0000: TSCR_MAIN_TITLESUsed with the GT_TITLE_SCREEN Global Trigger. Detects the main title screen, i.e. the screen where the "New Game", "Load Game", "Options" and "Exit" is displayed.
1 $0001: TSCR_NEW_GAMEUsed with the GT_TITLE_SCREEN Global Trigger. Detects the [New Game] screen, where a specific level name can be selected.
3 $0003: TSCR_OPTIONSUsed with the GT_TITLE_SCREEN Global Trigger. Detects the [Options] screen
Page 459
TOMB RAIDER NEXT GENERATION SCRIPT REFERENCE MANUAL
TT_ constants
1 $0001: TT_ACTION_INVENTORY_MENU_OFFSwitch off the Inventory Menu, Combine Examine Separate etc.
2 $0002: TT_ACTION_INVENTORY_MENU_ONSwitch on the Inventory menu, Combine Examine Separate etc.
3 $0003: TT_AMMOText for the ammo quantity
27 $001B: TT_CAMERA_VIEWText shown when the user hits the F1 key to see the LoadCamera values in the game
13 $000D: TT_CREDITSCredit texts shown at the end of the adventure
5 $0005: TT_EXAMINE1_BOTTOMThe Bottom side of the text for the EXAMINE1 item
4 $0004: TT_EXAMINE1_TOPThe top side of the text for the EXAMINE1 item
6 $0006: TT_EXAMINE3Text for the EXAMINE3 item
0 $0000: TT_ITEM_NAMEThe name of an item selected in the Inventory
12 $000C: TT_LEGENDText for the Legend at the start of a level
9 $0009: TT_LEVEL_NAME_OFFTurn off the name of a level in the New Game screen
10 $000A: TT_LEVEL_NAME_ONTurn on the name of the level in the New Game screen
11 $000B: TT_MAIN_MENU_OFFTurn off the Menu text for the main menu, New Game/ Load Game/ Options / Exit
26 $001A: TT_MAIN_MENU_ONTurn on the Menu text for the main menu, New Game/ Load Game/ Options / Exit
8 $0008: TT_NEW_LEVEL_ARROWSScroll up/down arrows for the new game screen
Page 460
TOMB RAIDER NEXT GENERATION SCRIPT REFERENCE MANUAL
20 $0014: TT_OPTION_DESCRIPTIONSText used to describe the option, like the "Control Method"
21 $0015: TT_OPTION_VALUESText for the possible value for options, like "Joystick/Keyboard"
25 $0019: TT_PAUSED_MENU_ITEMSText for the paused menu, "Statistics", "Options", "Exit to Title"
24 $0018: TT_PAUSED_MENU_TITLETitle for the "Paused" menu. This text is the "Paused" word
16 $0010: TT_SAVEGAME_DESCRIPTION_OFFTurn off the text for the descriptive line for the save game i.e. "012 Coastal Ruins 3 day 22:13"
17 $0011: TT_SAVEGAME_DESCRIPTION_ONTurn on the current selected save game description.
15 $000F: TT_SAVEGAME_PANEL_TITLETitle for the save game panel. "Load Game" or "Save Game"
14 $000E: TT_SCREEN_TIMERText for the screen timer like the Angkor Wat level
7 $0007: TT_SELECT_LEVELTitle "Select Level" for the new game screen
22 $0016: TT_STATISTICS_DESCRIPTIONSText used to describe the statistics, like "Distance Travelled"
23 $0017: TT_STATISTICS_VALUESText for statistic values, like "43m"
Page 461
TOMB RAIDER NEXT GENERATION SCRIPT REFERENCE MANUAL
WEAP_ constants
1 $0001: WEAP_DISABLE_AUTO_SHOTDisables the repeat function for shooting. By default when the player presses the action key the weapon will continue to shoot, while, using this flag the weapon will shot once and the player will have to release the action key to shoot again.
2 $0002: WEAP_DISABLE_CHANGE_WEAPONBy default, the TRNG engine will change the current weapon with pistols when the current weapon runs out of ammo. Add this flag to disable the changing of the weapon when the ammo runs out.
Page 462
TOMB RAIDER NEXT GENERATION SCRIPT REFERENCE MANUAL
WFF_ constants
1 $0001: WFF_BOLDUsed in the WindowsFont= command. A Bold character has a "heavy" layout, practically the depth drawn is larger than the normal or light character. If the background where the text is shown is not a solid tint, it is better to use a Bold or ultra_bold character otherwise in some combinations of text color - background color the border is not easily visible.
512 $0200: WFF_CENTER_ALIGNUsed in the WindowsFont= command. This will centre the text at half the text frame.This align mode is suggested for titles.
1024 $0400: WFF_FORCE_FIXED_PITCHUsed in the WindowsFont= command. This flag forces the TRNG engine to choose a font with fixed pitch characters. Theoretically it should be sufficient to choose a font name of fixed pitch like "courier" but in reality, the windows font procedure prefers to choose a different face name font for parameters like size of font. To avoid this doubt add the WFF_FORCE_FIXED_PITCH flag. The fixed pitch (all characters will have the same width) is very useful when text tables are created like the save game panel.
8192 $2000: WFF_FROM_RIGHT_TO_LEFTUsed in the WindowsFont= commandThe text will be displayed from right to left.
Example: The string: "ABCDEF" will be shown in this way: "FEDCBA"
Note: This flag Only works with Hebrew and Arabic computers and you also have to set the correct character set value in the WindowsFont.
16 $0010: WFF_ITALICUsed in the WindowsFont= command. Sets the italic font.
128 $0080: WFF_LEFT_ALIGNUsed in the WindowsFont= command. The text will be aligned on the left margin of the text frame.This is the default value and it is used if type IGNORE is typed in the WindowFontFlags field
4 $0004: WFF_LIGHTUsed in the WindowsFont= command. This setting generates slim characters. Use this setting only when the background is a solid tint, otherwise the border of the characters will be difficult to see on a multi colored background.
256 $0100: WFF_RIGHT_ALIGNUsed in the WindowsFont= command. The text will be aligned on the right margin of the text frame.
Page 463
TOMB RAIDER NEXT GENERATION SCRIPT REFERENCE MANUAL
2048 $0800: WFF_ROTATE_90Used in the WindowsFont= command.The text will be turned by 90 degrees in clockwise mode.
Note: There are some limitations for this flag.
4096 $1000: WFF_ROTATE_INV_90Used in the WindowsFont= commandThe text will be turned by 90 degrees in inverted clockwise mode.Using this flag there are some limitation and technical requirements. See the description of WFF_ROTATE_90 flag for more information
8 $0008: WFF_SHADOWUsed in the WindowsFont= command. Add this flag in the WindowsFontFlags field and each character will have a shadow. Technically this effect requires the same text to be printed twice, moving the second by a few pixels and using two different colors. By default the shadow is black, but it can be changed by using the ShadowColorRgbId field. The shadow has two targets: create a similar-border to get a more visible text on multi colored backgrounds and to give a 3d effect.This effect works fine with bold or ultra-bold characters, while less well with small/light characters.
2 $0002: WFF_ULTRA_BOLDUsed in the WindowsFont= command. This is the maximum heavy for characters: the depth drawn will be the maximum available. To have "fat" characters this is the ideal setting but it works when the size set for this font is big. Using a small font an ultra bold could cause a very leaky text.
32 $0020: WFF_UNDERLINEUsed in the WindowsFont= command. Add the WFF_UNDERLINE flag and all of the text will be underlined. This setting is useful for text used as a title etc..
16384 $4000: WFF_UNICODEUsed in the WindowsFont= commandTo show a text with an eastern character set, set this flag to correctly show your string.Unicode is UTF16, a fixed 2 bytes (16 bits), encoding method. To use uni-code type your string using the "binary hex string" format. This is a necessary "trick" to get around the problem that NG_Center program does not support uni-code texts.
To add a uni-code string in the string panel of the NG_Center:
1) Open block notes or other (simple) text editor of your computer2) Type the original text in your language, included in two "$$$$" markers.
Example:If your text is "MyText" type into the block notes: $$$$MyText$$$$
3) Save this text in a file on disk4) Go to the String panel of the NG_Center and enable [ExtraNG] section.5) Click to [Add new string]
Page 464
TOMB RAIDER NEXT GENERATION SCRIPT REFERENCE MANUAL
6) Now click on [Import Binary String] button7) Choose the file where you saved your original text8) Now you can choose if you wish keep this text in an external file ("@FileName.txt") or you want to keep the binary string directly in hex format.
32768 $8000: WFF_UTF8Used in the WindowsFont= commandTo print text with eastern fonts, add this flag to inform TRNG that the text is encoded with multi-bytes format. When the WFF_UTF8 flag is set the TRNG engine will manage the text to print as if it was an UTF8 text. This means that the TRNG will convert it (at fly) into uni-code before printing it.
For this reason when you add the WFF_UTF8 flag do not add the WFF_UNICODE flag, since this operation will be performed by the TRNG. for the choice between UTF8 and UNICODE, see if the NG_Center with the correct character set is able to support your language. To set a character set for the NG_Center different from the default ANSI/western character set, use the translation file. If you do not have a translation file for the NG_Center, create a fake translation file in this way:
1) Open block notes, and type this text with your LanguageName and CharsetNumber:
[START_CONFIGURATION]Version=LanguageNameCharset=CharSetNumberPropFont=ArialFixedFont=Courier[END]
Note: In the above text, replace the "[" character with the "less than" character, and the "]" character, with the "greater than" character.
2) Now save this text in the NG_Center folder, giving the name "my_scripter_constants.txt"
3) Now, close the NG_Center, and launch it.
4) Now in the Settings panel set your language (you typed in Version= command).If it is not selected, select it now
5) Now the NG_Center will support the character set you typed (CharSetNumber) and the font.You have to try to type text in the [Strings] section, in your language. After saving, quit the program and launch new.
In the case where your language is not yet supported by the NG_Center you will have to use binary strings. A binary string is a sequence of hex values with the codes used to print a text.Read the description of the WFF_UNICODE flag to understand how to get a binary string from your original text.
Page 465

TOMB RAIDER NEXT GENERATION SCRIPT REFERENCE MANUAL
The choice between UTF8 and UNICODE (it should be UTF16) depends on your language.Languages like Chinese and Japanese work with UNICODE, while other middle-east languages, like Russian, Turkish or Greek, could work with UTF8. There are also simplified versions of Chinese and Japanese that may be supported by UTF.8.
EXPERIMENT TO DISCOVER THE BEST SETTINGS FOR YOUR LANGUAGE.
Page 466
TOMB RAIDER NEXT GENERATION SCRIPT REFERENCE MANUAL
WTF_constants NG Version:1.2.2.7
4 $0004: WTF_CHANGE_COLORUsed with the Parameters=PARAM_WTEXT script commandThe color of text will change between the foreground color and the color of the shadow mask slowly, giving the look of a blinking text.
1 $0001: WTF_FLYING_TEXTUsed with the Parameters=PARAM_WTEXT script command
This flag generates a flying/zoom effect, where the text at begin is very little, and it will be magnified quickly, until it reaches the bigger size set. The final position of the text will be given by the rectangle (left, top, right, bottom fields) you set in the PARAM_WTEXT parameters script command.
To have a text at the center of the screen that will fit the whole screen and the end of the flying set 0,0,1000,1000 as values for the rectangle.
Notes:
* The time (tick frames, 30th of seconds) set in the TimeDurate field of the PARAM_WTEXT command, will be used to set the time that the text will remain on the screen after it reached the final size. If you type IGNORE or 0 in the TimeDurate the text will remain forever and flip effect F364 trigger is used to remove the text. The smallest time to set in the TimeDurate field for this effect is 2 (1/15th of second). If 1 is set the effect will fail.
* It is advisable to always use the WFF_CENTER_ALIGN flag in the WindowsFont command, for this effect type.
* This effect works better with single row texts, i.e. text where there is no new line character. If new line characters are used in the text, this effect will work in a different way: the text will not be vertically centered at the start of its flying but will appear in the top side of screen, like it was coming from the sky.
* The same PARAM_WTEXT command cannot be used for two (or more) flying effects (also if they are using different texts) at the same time.
Note: The Size typed in the WindowsFont command linked with the current PARAM_WTEXT command will be used as the ending (and larger) size, while the start size is set by default to be so small as to look like a distant row.
128 $0080: WTF_OVER_BINOCULARUsed with the Parameters=PARAM_WTEXT script commandKeep the text over the binoculars view
Page 467
TOMB RAIDER NEXT GENERATION SCRIPT REFERENCE MANUAL
64 $0040: WTF_OVER_FIXCAMERAUsed with the Parameters=PARAM_WTEXT script commandKeep the text when there is a fixed camera
32 $0020: WTF_OVER_FLYCAMERAUsed with the Parameters=PARAM_WTEXT script commandKeep the text when there is a flyby camera
16 $0010: WTF_OVER_IMAGEUsed with the Parameters=PARAM_WTEXT script commandThis flag allows windows text to stand over the full screen image that is currently drawn on the screen. By default, omitting this flag, the text will be disabled when a full screen image has been shown on the screen.
8 $0008: WTF_OVER_INVENTORYUsed with the Parameters=PARAM_WTEXT script commandThis text will be shown over the inventory and pause screen. If this flag is omitted, when the inventory pops up, the text will be removed and then it will be shown again when the inventory screen quits.
256 $0100: WTF_OVER_LASER_SIGHTUsed with the Parameters=PARAM_WTEXT script commandKeep the text over the laser sight view
2 $0002: WTF_PULSING_TEXTUsed with the Parameters=PARAM_WTEXT script commandThis flag generates a text where the size will change from a maximum to a minimum size, giving the idea of a pulsing heart.
Note: The Size typed in the WindowsFont command linked with the current PARAM_WTEXT command will be used as the smallest size while the larger size will be the current font size + 30 %.
It is advisable to always use the WFF_CENTER_ALIGN flag in the WindowsFont command for this effect type.
Page 468
TOMB RAIDER NEXT GENERATION SCRIPT REFERENCE MANUAL
Page 469

TOMB RAIDER NEXT GENERATION SCRIPT REFERENCE MANUAL
Page 470

TOMB RAIDER NEXT GENERATION SCRIPT REFERENCE MANUAL
Page 471

TOMB RAIDER NEXT GENERATION SCRIPT REFERENCE MANUAL
Page 472
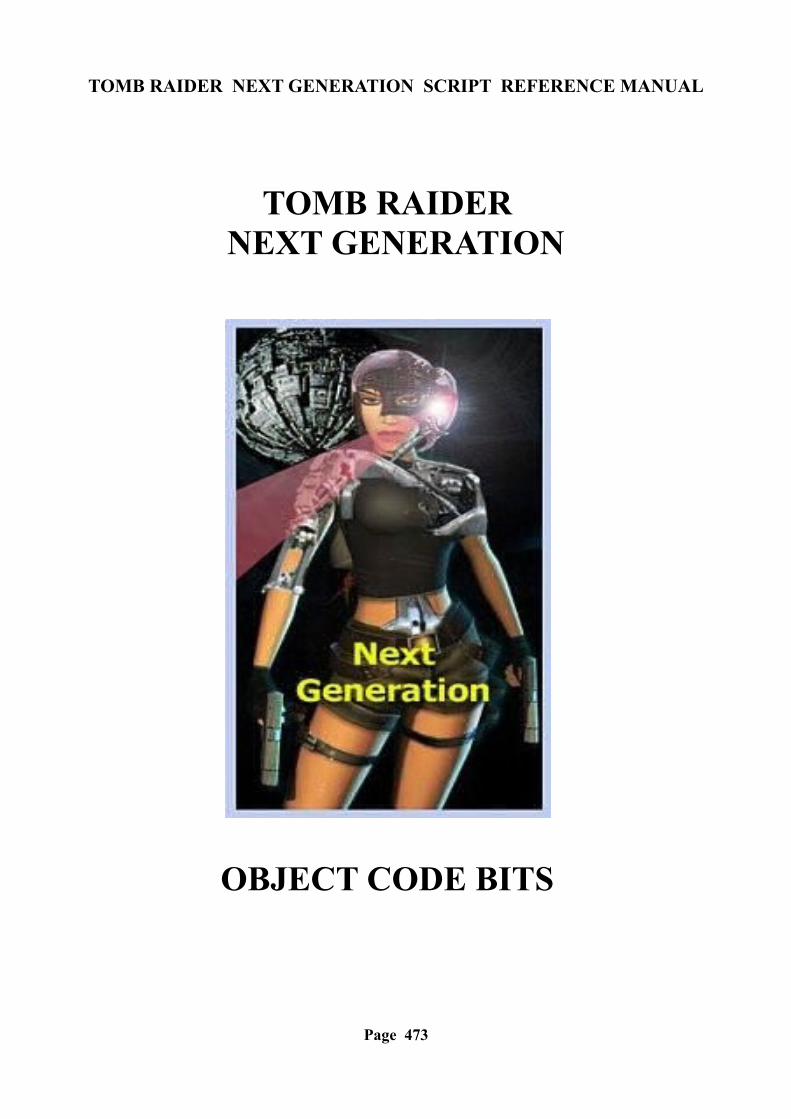
TOMB RAIDER NEXT GENERATION SCRIPT REFERENCE MANUAL
TOMB RAIDER NEXT GENERATION
OBJECT CODE BITS
Page 473
TOMB RAIDER NEXT GENERATION SCRIPT REFERENCE MANUAL
OBJECT CODE BITS PAGE
NEW_ANIMATING 477NEW_BOATSNEW_BRIDGESNEW_FISH_EMITTER 478NEW_GUARDIANNEW_HYDRAOCB_FOR_MISSILE_TYPENEW_JEEP 479NEW_KAYAKNEW_KEYPADNEW_PARALLEL_BARSNEW_PUSHABLE_OBJECT 480NEW_ROLLING_BALLNEW_SIDECAR 481NEW_STATIC_OBJECTS 482NEW_SUBMARINENEW_SWITCH_1/2/3 483NEW_TEETH_SPIKESNEW_TIGHT_ROPENEW_WATERFALL_MIST 484AI_FOLLOWAMBER_LIGHTANIMATED_OBJECTS 485BADDY_1 BADDY_2BLINKING_LIGHTCHAINCLOCKWORK_BEETLEDOGDOOR_TYPE1DOOR_TYPE2 486DOOR_TYPE3EARTH_QUAKEEMITTERSENEMY_JEEP
Page 474
TOMB RAIDER NEXT GENERATION SCRIPT REFERENCE MANUAL
PAGE
FALLING_BLOCKSFLAME_EMITTER 1FLAME_EMITTER2 487FLAME_EMITTER3FLYBY_CAMERA 488GUIDEHAMMER 489HELICOPTER_(FLYING)HELICOPTER_(MINE)HORSEMANHORSEJUMP_SWITCHLIGHTNING_CONDUCTOR 490LITTLE_BEETLESMUMMYMUSIC_SCROLLSPICKUP_ITEMS 491PULLEYPUZZLE_HOLESRAISING_BLOCK1RAISING_BLOCK2SCORPIONSENTRY_GUN 492SETH_BLADESKELETONSMASHABLE_BIKE_WALLSPHINXSTEAM_EMITTERSWITCH_TYPE7TEETH_SPIKES 493TRAPDOOR1TROOPTWO_BLOCK_PLATFORMWALL_SCARAB 494WATERFALLSWHITE_LIGHTWRAITH2
Page 475

TOMB RAIDER NEXT GENERATION SCRIPT REFERENCE MANUAL
Page 476
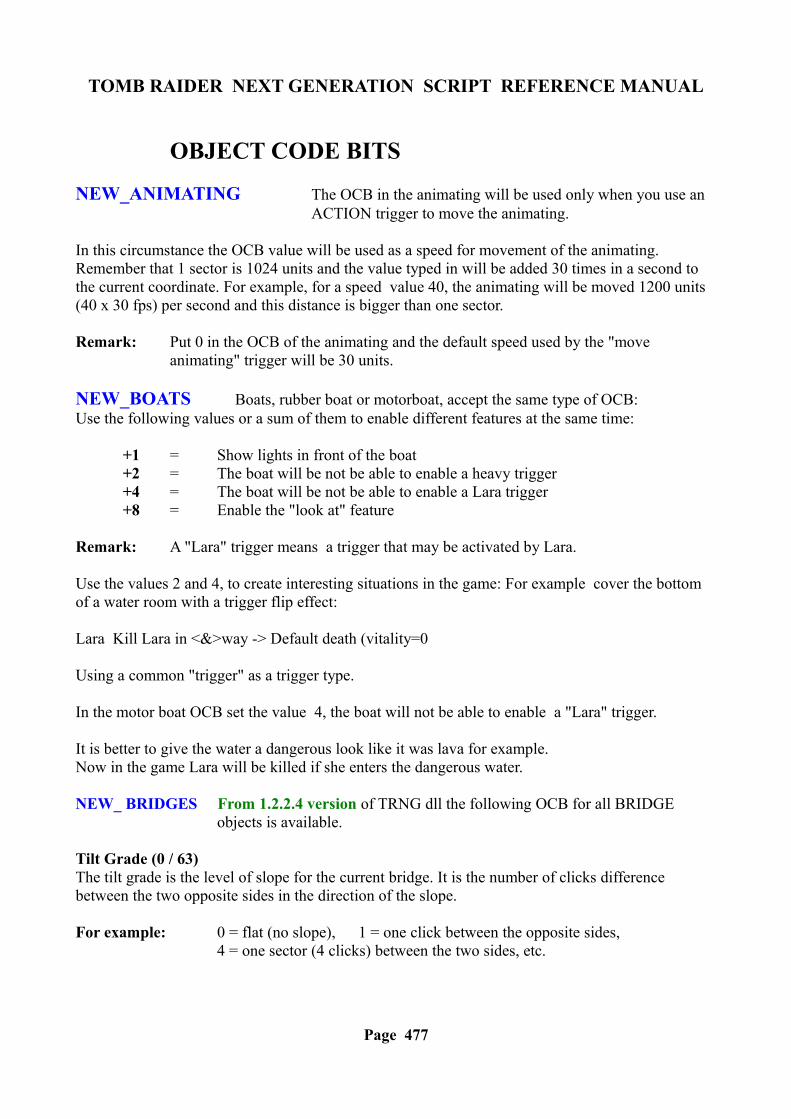
TOMB RAIDER NEXT GENERATION SCRIPT REFERENCE MANUAL
OBJECT CODE BITS
NEW_ANIMATING The OCB in the animating will be used only when you use an ACTION trigger to move the animating.
In this circumstance the OCB value will be used as a speed for movement of the animating. Remember that 1 sector is 1024 units and the value typed in will be added 30 times in a second to the current coordinate. For example, for a speed value 40, the animating will be moved 1200 units (40 x 30 fps) per second and this distance is bigger than one sector.
Remark: Put 0 in the OCB of the animating and the default speed used by the "move animating" trigger will be 30 units.
NEW_BOATS Boats, rubber boat or motorboat, accept the same type of OCB:Use the following values or a sum of them to enable different features at the same time:
+1 = Show lights in front of the boat+2 = The boat will be not be able to enable a heavy trigger +4 = The boat will be not be able to enable a Lara trigger+8 = Enable the "look at" feature
Remark: A "Lara" trigger means a trigger that may be activated by Lara.
Use the values 2 and 4, to create interesting situations in the game: For example cover the bottom of a water room with a trigger flip effect:
Lara Kill Lara in <&>way -> Default death (vitality=0
Using a common "trigger" as a trigger type.
In the motor boat OCB set the value 4, the boat will not be able to enable a "Lara" trigger.
It is better to give the water a dangerous look like it was lava for example.Now in the game Lara will be killed if she enters the dangerous water. NEW_ BRIDGES From 1.2.2.4 version of TRNG dll the following OCB for all BRIDGE
objects is available.
Tilt Grade (0 / 63)The tilt grade is the level of slope for the current bridge. It is the number of clicks difference between the two opposite sides in the direction of the slope.
For example: 0 = flat (no slope), 1 = one click between the opposite sides, 4 = one sector (4 clicks) between the two sides, etc.
Page 477
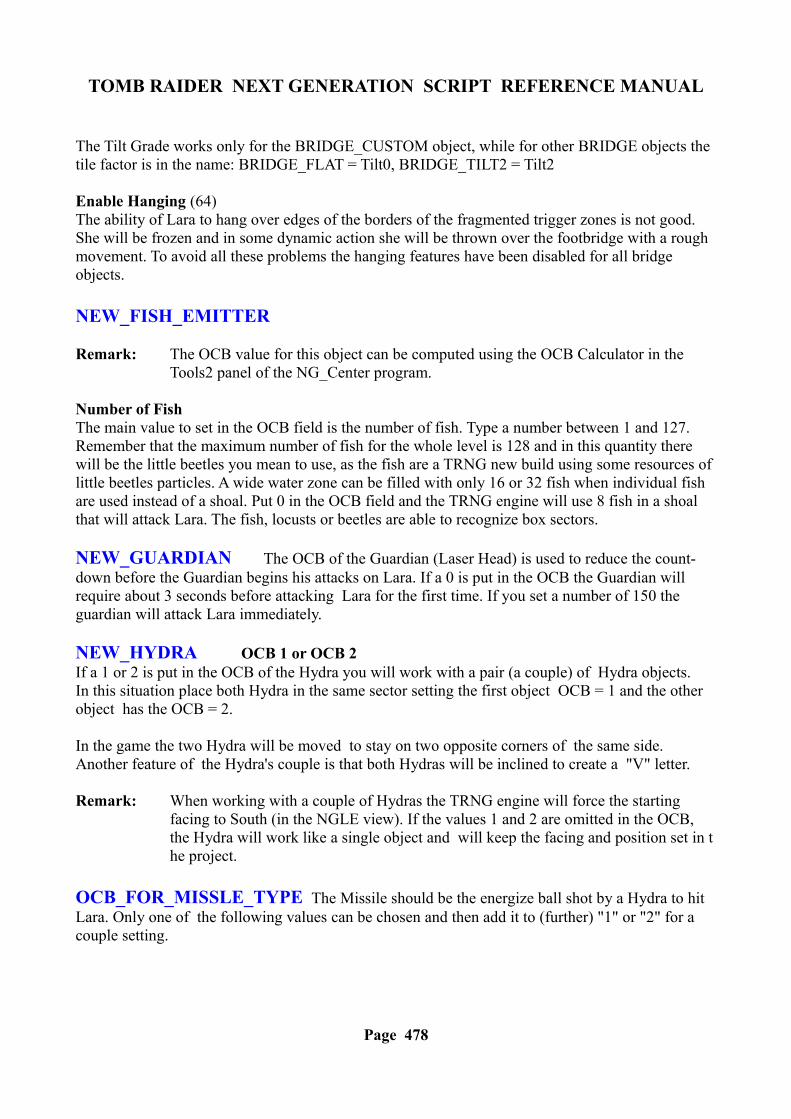
TOMB RAIDER NEXT GENERATION SCRIPT REFERENCE MANUAL
The Tilt Grade works only for the BRIDGE_CUSTOM object, while for other BRIDGE objects the tile factor is in the name: BRIDGE_FLAT = Tilt0, BRIDGE_TILT2 = Tilt2
Enable Hanging (64)The ability of Lara to hang over edges of the borders of the fragmented trigger zones is not good. She will be frozen and in some dynamic action she will be thrown over the footbridge with a rough movement. To avoid all these problems the hanging features have been disabled for all bridge objects.
NEW_FISH_EMITTER
Remark: The OCB value for this object can be computed using the OCB Calculator in the Tools2 panel of the NG_Center program.
Number of FishThe main value to set in the OCB field is the number of fish. Type a number between 1 and 127.Remember that the maximum number of fish for the whole level is 128 and in this quantity there will be the little beetles you mean to use, as the fish are a TRNG new build using some resources of little beetles particles. A wide water zone can be filled with only 16 or 32 fish when individual fish are used instead of a shoal. Put 0 in the OCB field and the TRNG engine will use 8 fish in a shoal that will attack Lara. The fish, locusts or beetles are able to recognize box sectors.
NEW_GUARDIAN The OCB of the Guardian (Laser Head) is used to reduce the count-down before the Guardian begins his attacks on Lara. If a 0 is put in the OCB the Guardian will require about 3 seconds before attacking Lara for the first time. If you set a number of 150 the guardian will attack Lara immediately.
NEW_HYDRA OCB 1 or OCB 2 If a 1 or 2 is put in the OCB of the Hydra you will work with a pair (a couple) of Hydra objects.In this situation place both Hydra in the same sector setting the first object OCB = 1 and the other object has the OCB = 2.
In the game the two Hydra will be moved to stay on two opposite corners of the same side.Another feature of the Hydra's couple is that both Hydras will be inclined to create a "V" letter.
Remark: When working with a couple of Hydras the TRNG engine will force the starting facing to South (in the NGLE view). If the values 1 and 2 are omitted in the OCB, the Hydra will work like a single object and will keep the facing and position set in the project.
OCB_FOR_MISSLE_TYPE The Missile should be the energize ball shot by a Hydra to hit Lara. Only one of the following values can be chosen and then add it to (further) "1" or "2" for a couple setting.
Page 478
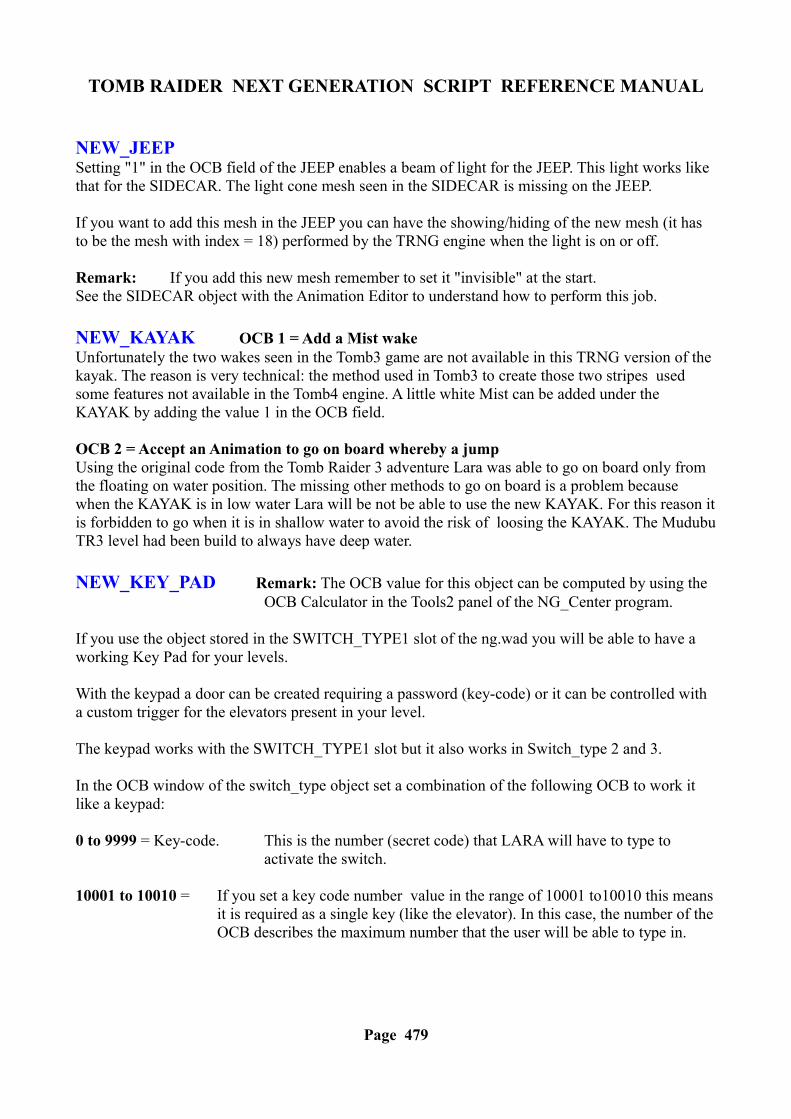
TOMB RAIDER NEXT GENERATION SCRIPT REFERENCE MANUAL
NEW_JEEP Setting "1" in the OCB field of the JEEP enables a beam of light for the JEEP. This light works like that for the SIDECAR. The light cone mesh seen in the SIDECAR is missing on the JEEP.
If you want to add this mesh in the JEEP you can have the showing/hiding of the new mesh (it has to be the mesh with index = 18) performed by the TRNG engine when the light is on or off.
Remark: If you add this new mesh remember to set it "invisible" at the start.See the SIDECAR object with the Animation Editor to understand how to perform this job.
NEW_KAYAK OCB 1 = Add a Mist wakeUnfortunately the two wakes seen in the Tomb3 game are not available in this TRNG version of the kayak. The reason is very technical: the method used in Tomb3 to create those two stripes used some features not available in the Tomb4 engine. A little white Mist can be added under the KAYAK by adding the value 1 in the OCB field.
OCB 2 = Accept an Animation to go on board whereby a jumpUsing the original code from the Tomb Raider 3 adventure Lara was able to go on board only from the floating on water position. The missing other methods to go on board is a problem because when the KAYAK is in low water Lara will be not be able to use the new KAYAK. For this reason it is forbidden to go when it is in shallow water to avoid the risk of loosing the KAYAK. The Mudubu TR3 level had been build to always have deep water.
NEW_KEY_PAD Remark: The OCB value for this object can be computed by using the OCB Calculator in the Tools2 panel of the NG_Center program.
If you use the object stored in the SWITCH_TYPE1 slot of the ng.wad you will be able to have a working Key Pad for your levels.
With the keypad a door can be created requiring a password (key-code) or it can be controlled with a custom trigger for the elevators present in your level.
The keypad works with the SWITCH_TYPE1 slot but it also works in Switch_type 2 and 3.
In the OCB window of the switch_type object set a combination of the following OCB to work it like a keypad:
0 to 9999 = Key-code. This is the number (secret code) that LARA will have to type to activate the switch.
10001 to 10010 = If you set a key code number value in the range of 10001 to10010 this means it is required as a single key (like the elevator). In this case, the number of the OCB describes the maximum number that the user will be able to type in.
Page 479
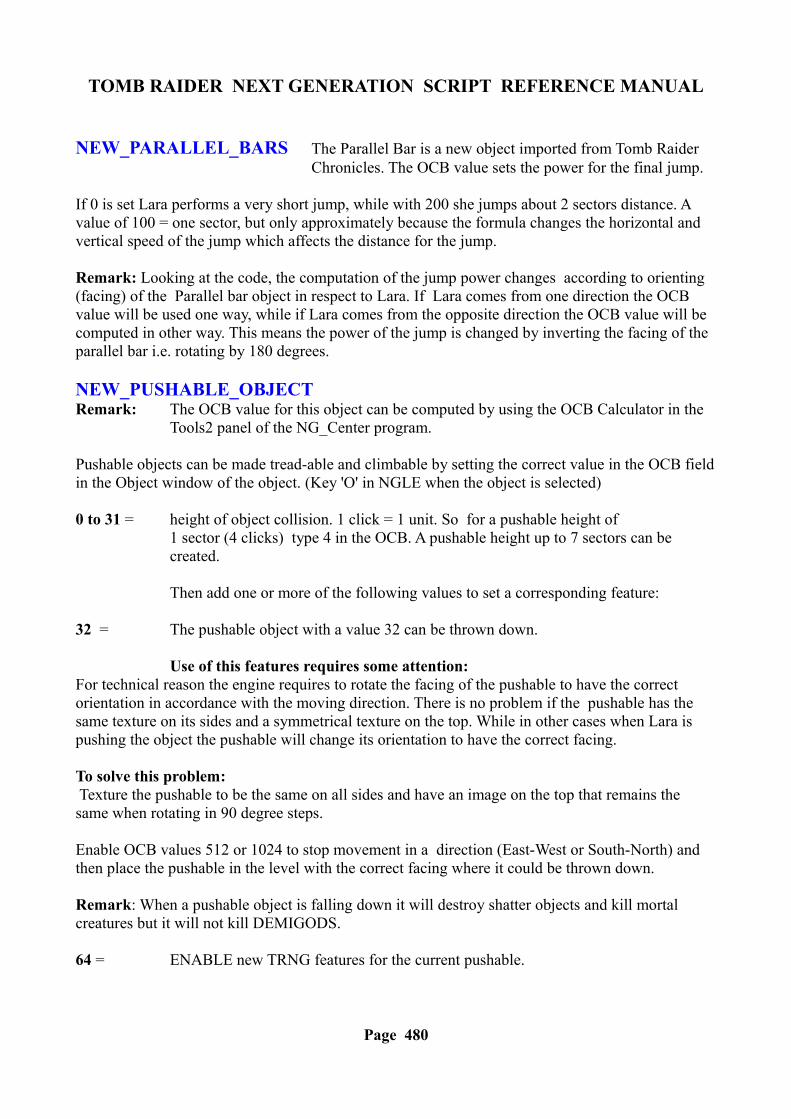
TOMB RAIDER NEXT GENERATION SCRIPT REFERENCE MANUAL
NEW_PARALLEL_BARS The Parallel Bar is a new object imported from Tomb Raider Chronicles. The OCB value sets the power for the final jump.
If 0 is set Lara performs a very short jump, while with 200 she jumps about 2 sectors distance. A value of 100 = one sector, but only approximately because the formula changes the horizontal and vertical speed of the jump which affects the distance for the jump.
Remark: Looking at the code, the computation of the jump power changes according to orienting (facing) of the Parallel bar object in respect to Lara. If Lara comes from one direction the OCB value will be used one way, while if Lara comes from the opposite direction the OCB value will be computed in other way. This means the power of the jump is changed by inverting the facing of the parallel bar i.e. rotating by 180 degrees.
NEW_PUSHABLE_OBJECT Remark: The OCB value for this object can be computed by using the OCB Calculator in the
Tools2 panel of the NG_Center program.
Pushable objects can be made tread-able and climbable by setting the correct value in the OCB field in the Object window of the object. (Key 'O' in NGLE when the object is selected)
0 to 31 = height of object collision. 1 click = 1 unit. So for a pushable height of 1 sector (4 clicks) type 4 in the OCB. A pushable height up to 7 sectors can be created.
Then add one or more of the following values to set a corresponding feature:
32 = The pushable object with a value 32 can be thrown down.
Use of this features requires some attention:For technical reason the engine requires to rotate the facing of the pushable to have the correct orientation in accordance with the moving direction. There is no problem if the pushable has the same texture on its sides and a symmetrical texture on the top. While in other cases when Lara is pushing the object the pushable will change its orientation to have the correct facing.
To solve this problem: Texture the pushable to be the same on all sides and have an image on the top that remains the same when rotating in 90 degree steps.
Enable OCB values 512 or 1024 to stop movement in a direction (East-West or South-North) and then place the pushable in the level with the correct facing where it could be thrown down.
Remark: When a pushable object is falling down it will destroy shatter objects and kill mortal creatures but it will not kill DEMIGODS.
64 = ENABLE new TRNG features for the current pushable.
Page 480
TOMB RAIDER NEXT GENERATION SCRIPT REFERENCE MANUAL
When a new special feature for the pushable is required add 64 to the other OCB values.
128 = Forbid Pulling 256 = Forbid Pushing 512 = Forbid movement in the East-West direction 1024 = Forbid movement in the South-North direction2048 = Allow climbing on the West face4096 = Allow climbing on the North face8192 = Allow climbing on the East face16384 = Allow Climbing on the South face
The climbing feature should only be be used for a pushable with a height of at least 8 clicks.
8 clicks = 32 units value set in the OCB for height.
Remarks:
*For a traditional pushable (tomb4 old style) omit to add the value 64 in the OCB.*To have special features like forbid pushing/pulling in some direction and to stop the pushable object being walked on use the height value 0 (zero) and then add the other OCB values to set the wanted features.
NEW_ROLLING_BALL Now you can set the OCB field of the Rolling-Ball with one or more (adding them) of the following values:
1 = Silent mode. Disable sound and earthquake. A useful trick to hide Rolling-Ball to enable more special triggers in sequence, avoiding sound and moving view.
2 = Kill Enemies. Rolling-Ball will kill all creatures it touches while it is moving.
4 = Active with pushing. Adding the value 4, rolling will be activated when Lara pushes it.In this situation it is not necessary to place any trigger for the Rolling-Ball. With OCB 4 place the Rolling-Ball on a flat sector (non-sloped sector) and Lara will be able to choose the direction to move it.
Remark: This OCB requires Lara 's animation number 316 in your wad. Not all standard wads have this animation. It can be found in the Catacomb.wad.
NEW_SIDE_CAR By default the SIDECAR has a beam of light when is working.The light beam can be disabled by typing "1" in the OCB field of the SIDECAR object.
Page 481
TOMB RAIDER NEXT GENERATION SCRIPT REFERENCE MANUAL
NEW_STATIC_OBJECTS FROM_TRNG_version_1.1.8.7
The following static object OCB codes can be set for the following features:
4 = Disable collision. Lara can pass through the static
8 = Set Glass Transparency. The static will have a glass transparency effect
16 = Set Ice Transparency. The static will look like ice.
32 = Damage Lara on physical contact. The static injures Lara if she touches it. The damage removes 10 health points from LARA (full vitality= 1000). Change this value using CUST_SET_STATIC_DAMAGE in the Customize script command.
Remark: Remember that this damage will be continuously applied while Lara is touching the static. This means that a little damage could kill Lara after a while.
64 = Burns Lara on physical contact. Lara will be burned but she will have some time to search in the water to save herself.
128 = Explodes killing Lara on physical contact. This OCB value transforms this static into a mine.
NEW_SUBMARINE The OCB with a value less than 4096 (0 to 4095) will indicate the time duration pause between the shooting of a missile and the following.
The value is in tick frames, where one second = 30 tick frames. If a value of 0 is set in the OCB the TRNG engine will use a value of 120 (4 seconds) in the OCB.
Remark: It is not advisable to type a number less than 3 seconds (OCB = 90) because when this time has been completed the previous torpedo will be destroyed and another will be launched. If too short a time is used the missile will not be able to hit Lara.
Another OCB value that can be added to the shooting time:
4096 = It allows submarine to shoot its missile out of the water room. By default the missile explodes on the water surface. Avoiding it allows it to go off from the water room.
8192 = Disables the Bubbles from the back of the submarine.
Page 482
TOMB RAIDER NEXT GENERATION SCRIPT REFERENCE MANUAL
NEW_SWITCH_1/2/3 New TRNG engine OCB valuesFrom 1.2.2.3 version, an animation number can be typed into the Switch1/2/3 objects. This animation will be performed when LARA is engaging the switch. The correct range for the animation number is: 4 to 4095
When using this custom TRNG animation feature one or more of the following flags can be added to the animation number:
8192 (Flip/Flop switch)Adding 8192 to the animation number enables the flip/flop (or on/off) feature, where Lara will be able to activate/deactivate the switch. In this situation create two custom animations in two closed animation slots and then type the number of the first animation.
For example: If your custom animation to engage (first time) the switch is the number 386, you should type 8192 + 386 into the OCB and also create the inverse animation (for the anti-triggering of the switch) to place in the animation slot number 387, i.e. the following to 386.
NEW_TEETH_SPIKES The OCB to set the TEETH_SPIKES are the same as the old TR4 engine. To enable Teeth_Spikes like Tomb Raider 1 where Lara is able to cross if she moves slowly, insert the value 20 into the OCB. This gives static spikes pointing to the north. Add this line in the script.txt file in the [Level] section: Enemy= TEETH_SPIKES, IGNORE, IGNORE, IGNORE,
EXTRA_TEETH_NO_DAMAGE_ON_WALKING
The EXTRA_TEETH_NO_DAMAGE_ON_WALKING means: the teeth work like TR1 spikes.
NEW_TIGHT_ROPE The OCB values set the difficulty for Lara to pass the tight-rope.
OCB 0Sets the Default mode. A value of 0 works in same way as in TR Chronicles. In this mode the player has to set the direction opposite to further unbalance of Lara. For example, when Lara is falling to the right the player has to hit the Left command and vice-versa.
OCB 1Sets the Hard mode. With a value of 1 Lara could fall if the player hits the right or the left command while Lara is in perfect balance. With an OCB of 0 default mode, the game engines ignores the futile direction commands In the Hard mode the player has to set the correct command faster and the random unbalance could happen more often.
OCB 2Sets Very Hard Mode. It works like the "Hard Mode" but in this case the response time required to correct the unbalance of Lara has to be faster than "Hard Mode".
OCB 3Sets Impossible Mode. With this OCB value Lara will always fall down.
Page 483
TOMB RAIDER NEXT GENERATION SCRIPT REFERENCE MANUAL
NEW_WATERFALL_MIST The OCB value for this object can be computed by using the OCB Calculator in the Tools2 panel of the NG_Center program.
By default the WATERFALLMIST emitter does not accept OCB values but in the TRNG engine the OCB can be set for the different features of Mist emitting.
Remark: A "0" in the OCB field will use the old default Mist emitter.
Do Not confuse the WaterfallMist with the WATERFALL1/2 objects. The emitter is a red cone in the NGLE, while the waterfall1/2 are objects with a scrolling texture applied on them.
The formula to compute the value to type in the OCB field is complicated because the different values are summed using the following formula:
(NumberOfBalls-1) + EmitMode * 4 + (SizeBall-1) * 16 + (EmitDurate-1) * 256 + ColorIndex * 4096 + CenterSquare
NumberOfBalls value (Default=4)
AI_FOLLOW If you put two or more AI_FOLLOW set the same OCB value for the start AI_FOLLOW and the next AI_FOLLOW.
The following AI_FOLLOW objects will increase the OCB value of 1.
For example: First AI_FOLLOW = OCB 1 (below the moveable you want move)Second AI_FOLLOW = OCB 1 (where moveable will go)Third AI_FOLLOW = OCB 2 (further target)Fourth AI_FOLLOW = OCB 3 (etc.)
Remark: AI_FOLLOW is used to move the ENEMY JEEP and should start from a value of -2 and follow the above rule.
AMBER_LIGHT
1 = Enables an earthquake effect and plays sound effects BOULDER_FALL and EXPLOSION2_VOLWAS80
2 = Plays sound effect MAPPER_PYRAMID_OPEN and if the object is in an outside room it enables a volumetric explosion effect.
This object could be affected by the Pulse= script command. If in the current level there is a Pulse=ENABLED command the Amber light will never be enabled with the exception that the flip-map 4 is currently enabled.
Page 484
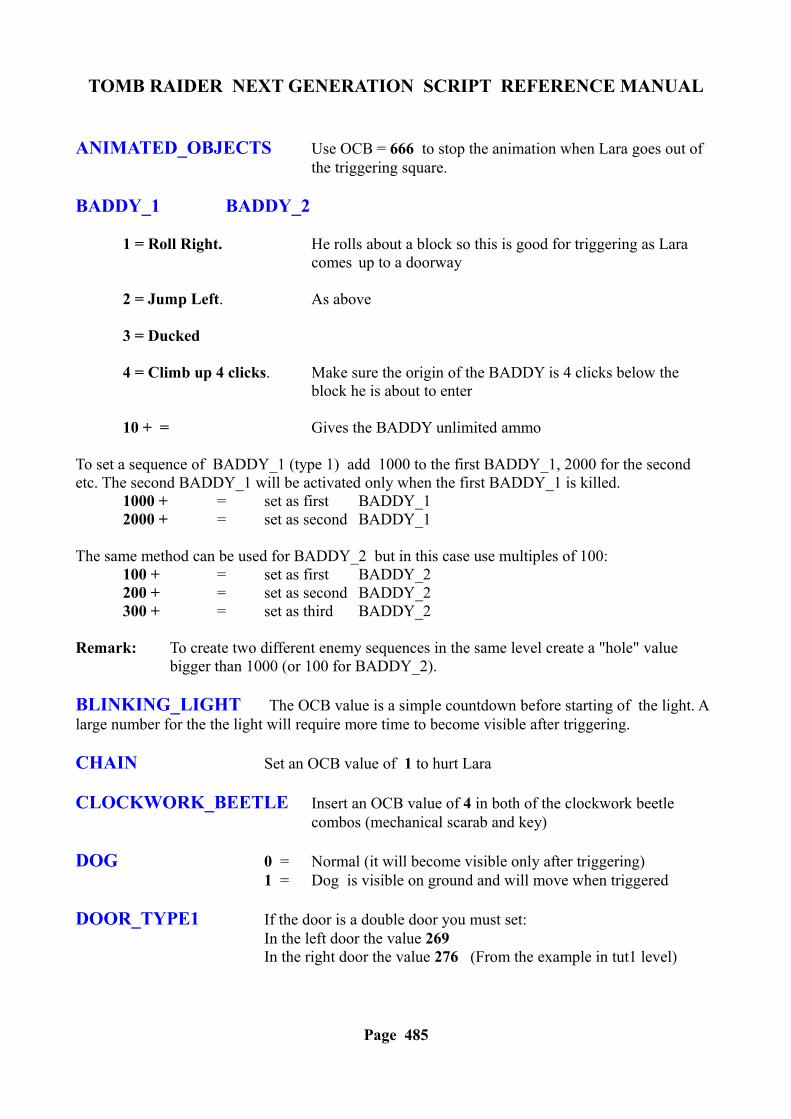
TOMB RAIDER NEXT GENERATION SCRIPT REFERENCE MANUAL
ANIMATED_OBJECTS Use OCB = 666 to stop the animation when Lara goes out of the triggering square.
BADDY_1 BADDY_2
1 = Roll Right. He rolls about a block so this is good for triggering as Lara comes up to a doorway
2 = Jump Left. As above
3 = Ducked
4 = Climb up 4 clicks. Make sure the origin of the BADDY is 4 clicks below the block he is about to enter
10 + = Gives the BADDY unlimited ammo
To set a sequence of BADDY_1 (type 1) add 1000 to the first BADDY_1, 2000 for the second etc. The second BADDY_1 will be activated only when the first BADDY_1 is killed.
1000 + = set as first BADDY_12000 + = set as second BADDY_1
The same method can be used for BADDY_2 but in this case use multiples of 100:100 + = set as first BADDY_2200 + = set as second BADDY_2300 + = set as third BADDY_2
Remark: To create two different enemy sequences in the same level create a "hole" value bigger than 1000 (or 100 for BADDY_2).
BLINKING_LIGHT The OCB value is a simple countdown before starting of the light. A large number for the the light will require more time to become visible after triggering.
CHAIN Set an OCB value of 1 to hurt Lara
CLOCKWORK_BEETLE Insert an OCB value of 4 in both of the clockwork beetle combos (mechanical scarab and key)
DOG 0 = Normal (it will become visible only after triggering)1 = Dog is visible on ground and will move when triggered
DOOR_TYPE1 If the door is a double door you must set:In the left door the value 269In the right door the value 276 (From the example in tut1 level)
Page 485
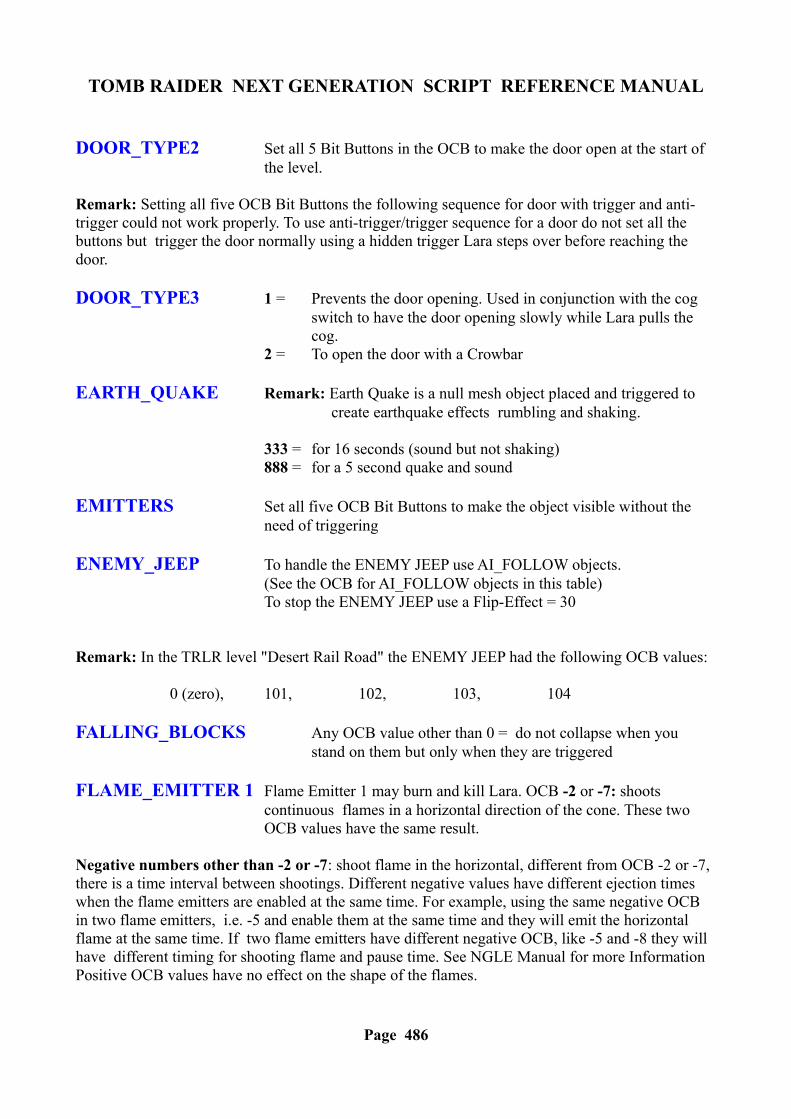
TOMB RAIDER NEXT GENERATION SCRIPT REFERENCE MANUAL
DOOR_TYPE2 Set all 5 Bit Buttons in the OCB to make the door open at the start of the level.
Remark: Setting all five OCB Bit Buttons the following sequence for door with trigger and anti-trigger could not work properly. To use anti-trigger/trigger sequence for a door do not set all the buttons but trigger the door normally using a hidden trigger Lara steps over before reaching the door.
DOOR_TYPE3 1 = Prevents the door opening. Used in conjunction with the cog switch to have the door opening slowly while Lara pulls the cog.
2 = To open the door with a Crowbar
EARTH_QUAKE Remark: Earth Quake is a null mesh object placed and triggered to create earthquake effects rumbling and shaking.
333 = for 16 seconds (sound but not shaking)888 = for a 5 second quake and sound
EMITTERS Set all five OCB Bit Buttons to make the object visible without the need of triggering
ENEMY_JEEP To handle the ENEMY JEEP use AI_FOLLOW objects. (See the OCB for AI_FOLLOW objects in this table)To stop the ENEMY JEEP use a Flip-Effect = 30
Remark: In the TRLR level "Desert Rail Road" the ENEMY JEEP had the following OCB values:
0 (zero), 101, 102, 103, 104
FALLING_BLOCKS Any OCB value other than 0 = do not collapse when you stand on them but only when they are triggered
FLAME_EMITTER 1 Flame Emitter 1 may burn and kill Lara. OCB -2 or -7: shoots continuous flames in a horizontal direction of the cone. These two OCB values have the same result.
Negative numbers other than -2 or -7: shoot flame in the horizontal, different from OCB -2 or -7, there is a time interval between shootings. Different negative values have different ejection times when the flame emitters are enabled at the same time. For example, using the same negative OCB in two flame emitters, i.e. -5 and enable them at the same time and they will emit the horizontal flame at the same time. If two flame emitters have different negative OCB, like -5 and -8 they will have different timing for shooting flame and pause time. See NGLE Manual for more InformationPositive OCB values have no effect on the shape of the flames.
Page 486
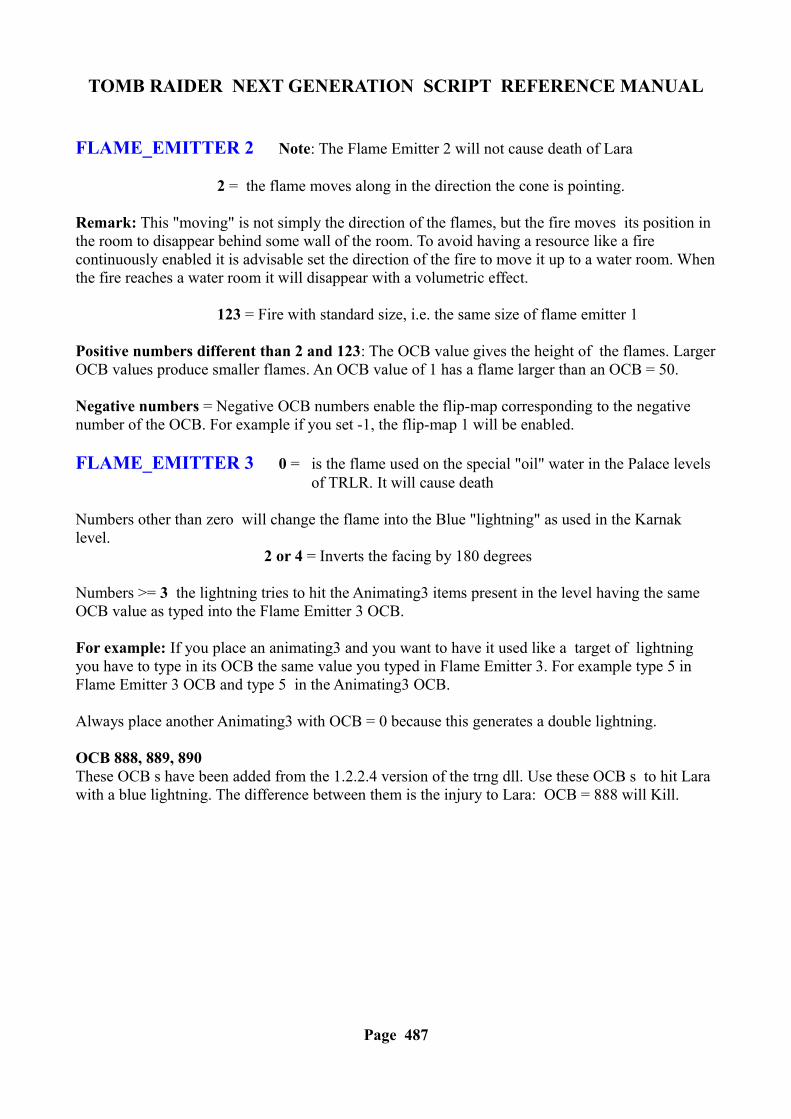
TOMB RAIDER NEXT GENERATION SCRIPT REFERENCE MANUAL
FLAME_EMITTER 2 Note: The Flame Emitter 2 will not cause death of Lara
2 = the flame moves along in the direction the cone is pointing.
Remark: This "moving" is not simply the direction of the flames, but the fire moves its position in the room to disappear behind some wall of the room. To avoid having a resource like a fire continuously enabled it is advisable set the direction of the fire to move it up to a water room. When the fire reaches a water room it will disappear with a volumetric effect.
123 = Fire with standard size, i.e. the same size of flame emitter 1
Positive numbers different than 2 and 123: The OCB value gives the height of the flames. Larger OCB values produce smaller flames. An OCB value of 1 has a flame larger than an OCB = 50.
Negative numbers = Negative OCB numbers enable the flip-map corresponding to the negative number of the OCB. For example if you set -1, the flip-map 1 will be enabled.
FLAME_EMITTER 3 0 = is the flame used on the special "oil" water in the Palace levels of TRLR. It will cause death
Numbers other than zero will change the flame into the Blue "lightning" as used in the Karnak level.
2 or 4 = Inverts the facing by 180 degrees
Numbers >= 3 the lightning tries to hit the Animating3 items present in the level having the same OCB value as typed into the Flame Emitter 3 OCB.
For example: If you place an animating3 and you want to have it used like a target of lightning you have to type in its OCB the same value you typed in Flame Emitter 3. For example type 5 in Flame Emitter 3 OCB and type 5 in the Animating3 OCB.
Always place another Animating3 with OCB = 0 because this generates a double lightning.
OCB 888, 889, 890These OCB s have been added from the 1.2.2.4 version of the trng dll. Use these OCB s to hit Lara with a blue lightning. The difference between them is the injury to Lara: OCB = 888 will Kill.
Page 487
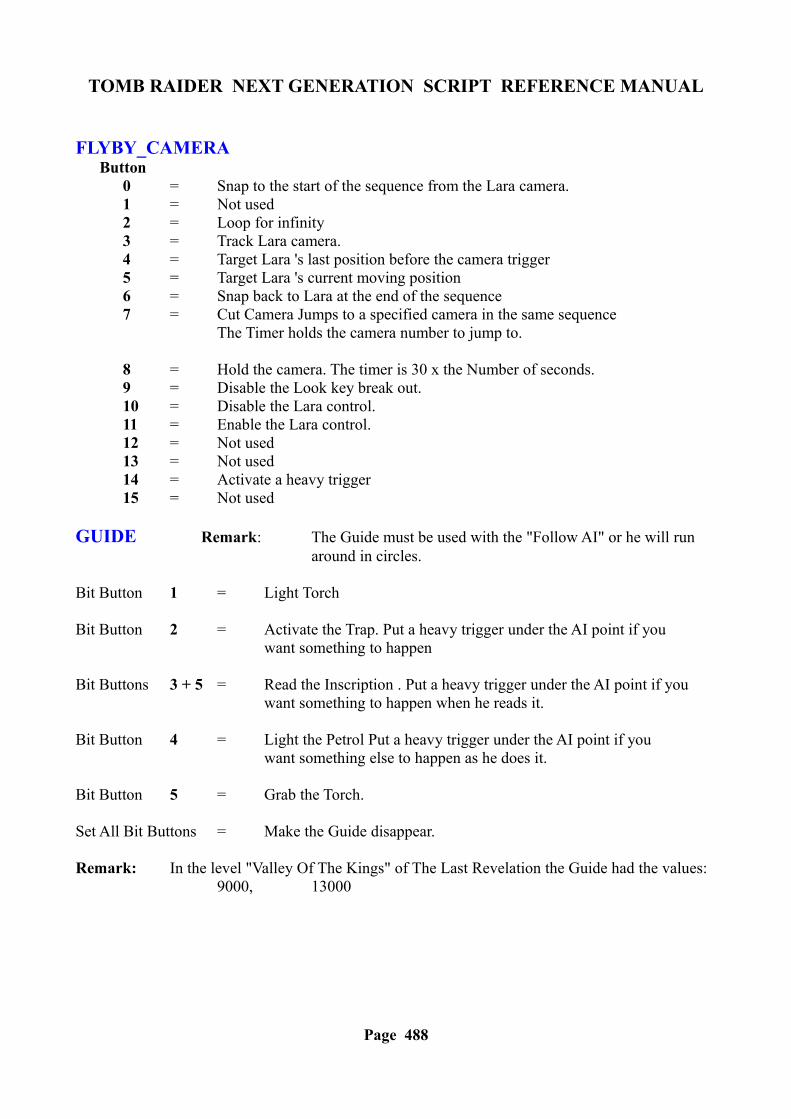
TOMB RAIDER NEXT GENERATION SCRIPT REFERENCE MANUAL
FLYBY_CAMERA Button
0 = Snap to the start of the sequence from the Lara camera.1 = Not used2 = Loop for infinity3 = Track Lara camera.4 = Target Lara 's last position before the camera trigger5 = Target Lara 's current moving position6 = Snap back to Lara at the end of the sequence7 = Cut Camera Jumps to a specified camera in the same sequence
The Timer holds the camera number to jump to.
8 = Hold the camera. The timer is 30 x the Number of seconds.9 = Disable the Look key break out.10 = Disable the Lara control.11 = Enable the Lara control.12 = Not used13 = Not used14 = Activate a heavy trigger15 = Not used
GUIDE Remark: The Guide must be used with the "Follow AI" or he will run around in circles.
Bit Button 1 = Light Torch
Bit Button 2 = Activate the Trap. Put a heavy trigger under the AI point if you want something to happen
Bit Buttons 3 + 5 = Read the Inscription . Put a heavy trigger under the AI point if you want something to happen when he reads it.
Bit Button 4 = Light the Petrol Put a heavy trigger under the AI point if you want something else to happen as he does it.
Bit Button 5 = Grab the Torch.
Set All Bit Buttons = Make the Guide disappear.
Remark: In the level "Valley Of The Kings" of The Last Revelation the Guide had the values:9000, 13000
Page 488
TOMB RAIDER NEXT GENERATION SCRIPT REFERENCE MANUAL
HAMMER 1 = Normal the Hammer smashes down the chain lifts it then smashes again.
2 = Hammer smashes down when Lara stands on the trigger. When she steps off, the Hammer will remain in its position. If it was lifted up it will stop and stay there. It makes an explosive sound when it smashes down.
3 = Hammer smashes down when Lara stands on the trigger. When Lara gets off the trigger the Hammer gets lifted to the ceiling and then stops.
HELICOPTER_(FLYING) The Flying helicopter has an internal name "Animation 1" and is found in the "Desert Rail road" of The Last Revelation. To fly it set the OCB = 666 and use AI_FOLLOW in the same way as the ENEMY JEEP. See the AI_FOLLOW and ENEMY JEEP descriptions.
HELICOPTER_(MINE) "Mine" Helicopter is the "static" half (only a side of the meshes are visible) The Helicopter is found in the Death City TRLR. Lara can destroy it by shooting.
Enter a 1 in the OCB of the Helicopter. To make it explode use SHATTER3 and set it up as per room 73. The fuel can does not sit directly on the trigger as it will not activate the heavy trigger if it does. Enter 0 in the OCB of the helicopter to use only the "mined field" feature. The helicopter will be invisible and at its placement will create a mine field of 6 x 6 sectors. If Lara walks over the mine field she will explode and die.
Remark: The mined field is not correctly aligned with the sector bounding. Practically it has a size of 5 x 5 sectors zone + a border of 1/2 sector of width.
HORSEMAN HORSETo have two or more couples of HORSEMAN-HORSE set up each couple with the same OCB value.
For example: HORSEMAN1 = OCB 1HORSEMAN2 = OCB 2HORSE1 = OCB 1HORSE2 = OCB 2
JUMP_SWITCH Set the OCB value 1 to reuse the lever after the 'timer' seconds. For example in the switch trigger insert the value 12 in the timer field and put '1' in the OCB of the jump switch trigger for a door. It will be activated for 12 seconds. After this time the door will close and the lever will reset.
Remark: Not all 'jump switches' have a reset function,. Use the jump switch found in the guard.wad file.
Page 489
TOMB RAIDER NEXT GENERATION SCRIPT REFERENCE MANUAL
LIGHTNING_CONDUCTOR
0 = No damage1 = It can burn Lara2 = The TRNG engine looks for the ANIMATING8 item.
If it is present the Lightning conductor will use as a target the ANIMATING8 item.
The OCB 2 value causes a computation when the lightning conductor is in Flip-map 1 and the Flip-map has been enabled. It will use the sound effect ELEC_ARCING_LOOP
LITTLE_BEETLES 0 to 28 = Total number of Scarab you want1000 + = Scarab appears from the floor2000 + = Scarab appears from the ceiling4000 + = Scarab slow release followed by a gush
Remark: To clear all of the active Scarabs use a Flip-effect trigger with a value of 31.
The beetle swarm is used in conjunction with either PUZZLE_ITEM12 or PICKUP_ITEM1, both of which are scarabs that attach to the wall and require a crowbar to pick them off. The swarm of beetles sometimes shoots out of the "hole" behind the wall scarab. A special texture tile is used to create the illusion that they come out of the hole in the wall. To do this designate the trigger for PUZZLE_ITEM12 or PICKUP_ITEM1 as a key trigger and type in an OCB setting of 2 to position it on the wall in-game. Then trigger the LITTLE_BEETLE to the same square. Raise the LITTLE_BEETLE up to the height of the "hole". Make sure of the correct settings in the OCB menu for the LITTLE_BEETLE and that there is a Crowbar available for Lara.
LOCUST_EMITTER It can mean death for Lara for a large value in the OCB data field. Somewhere around 96 is the limit. The OCB value defines the number of locusts. The OCB values used in the last revelation were: 12, 20 and 25.
Remark: The Locust swarm can set heavy triggers in the motorbike path or release a swarm from a shatter object.
MUMMY Visible on the ground. It will be activated after it is triggered and when Lara goes near it.Set OCB = 2
MUSIC_SCROLLS Lara will place the scroll on the "PUZZLE_HOLE 2" and play the Lyre. Put the Lyre to the left of the puzzle hole. Set a value of -422 in the PUZZLE_HOLE 2 object. i.e. Set OCB = - 422
Page 490
TOMB RAIDER NEXT GENERATION SCRIPT REFERENCE MANUAL
PICKUP_ITEMS 0 = The object is on the floor (pick up in an old style)
1 = The object is `hidden'. Lara plays a stick hand in wall animation.
2 = The object is attached to a wall. Lara has to use the Crowbar
3 = The object is on a high pedestal.
4 = The object is on a low pedestal.
64 + = Add 64 to any of the above if you want the item to activate a Pick up trigger.
Remark: Also the flag value: 128 + is used in The Last Revelation.
PULLEY OCB value sets how many times Lara will pull the rope to trigger something.
Example: 1 = Pull one time to trigger.2 = Pull twice to trigger3 = Pull three times to trigger 4 = Pull four times to trigger..... etc.
PUZZLE_HOLES An OCB value of 999 will turn off the `collision' from the “PUZZLE_DONE” object. Without it an `invisible' door will prevent Lara from going through.
RAISING_BLOCK1 OCB 1 = Activate the rumble effectEnter 1-5 in the OCB Bit Buttons to elevate.
RAISING_BLOCK2 Enter "2" in the OCB to lower the block Press all five Bit Buttons in the OCB to lower.
SCORPION Old OCB : The standard OCB s for the Scorpion are not very useful because they should work linked with a internal cut scene. Placing a value in the range 1 to 6 the Scorpion looks for a TROOP BADDY with OCB = 1. If it finds the TROOP its AI is disabled and it can be manipulated with custom animations to simulate the fighting with the Scorpion.
OCB = 33 (Attack only Lara) : This new OCB has been added to force the Scorpion to only attack Lara. By default the Scorpion attacks any BADDY it finds and only after killing them will it attack Lara.
Page 491
TOMB RAIDER NEXT GENERATION SCRIPT REFERENCE MANUAL
SENTRY_GUN Enter 1 in the OCB to jam the gun. On entry the gun fires at Lara as long as she is "in range". Place a SMOKE_EMMITER_BLACK on the same square for added effect. No trigger is necessary.
SETH_BLADE Enter a negative number in the OCB to delay the triggering. Adding increments of 10 will give a delay of one second for each 10 units.
SKELETON Change the initial animations by setting the trigger flags as listed below. If the trigger flags are not set the skeleton will come up out of the ground as normal. When placed the skeleton is 20 clicks below the floor elevation.Put an AI_GUARD object on the skeleton to put him on guard.
OCB 1 = Jump Right. He jumps about a blockOCB 2 = Jump Left. As aboveOCB 3 = Playing dead. The skeleton is visible lying down before being
triggered and gets up when triggered
SMASHABLE_BIKE_WALL Set all of the OCB Bit Buttons to activate it.
SPHINX Set an OCB value of 1 to get an immediate attack on Lara
STEAM_EMITTER An OCB value of 888 to make the steam escape sideways in the direction of the cone. Will cause death.
SWITCH_TYPE7 Switch type 7 is a shatterable switch. The action will be triggered when Lara shoots it. Set all Bit Buttons in OCB.
Page 492
TOMB RAIDER NEXT GENERATION SCRIPT REFERENCE MANUAL
TEETH_SPIKES Remark: Vertical in Room Edit above view Horizontal
0 = Pointing South 1 = Pointing South West 2 = Pointing West3 = Pointing North West4 = Pointing North5 = Pointing North East6 = Pointing East7 = Pointing South East8 = Pointing South9 = Pointing South West10 = Pointing West11 = Pointing North West12 = Pointing North13 = Pointing North East14 = Pointing East15 = Pointing South East16 + = Add a value of 16 to the above to make the spikes stick out
constantly (like the old TR spikes) 32 + = Add 32 to the above to force the spikes out once and then retract.
Remark: To use Teeth Spikes in conjunction with the Mapper or Clock Work Beetle set the OCB = 4 (pointing North).
TRAPDOOR1 Set the all OCB Bit Buttons to make the door open then close. Set the trigger timer to the number of seconds for the trapdoor to be open.
TROOP 1 = Start TROOP animation 27, the other OCB begins with animation 12
TWO_BLOCK_PLATFORM The OCB formula for raising the two block platform is as follows:
(16 x the No of clicks to be raised) + Speed it travels (1-15)
For Example: To raise 4 clicks very slowly would be: (4 x 16) + 1 = 65To raise 12 clicks very fast would be: (12 x 16) + 15 = 207
Press 1-5 Bit buttons in the OCB to make it go slowly down when Lara stands on it. Enter 207 in OCB to make it rise. You need a Dummy trigger below the platform to prevent conflicts with triggers. Place a small room below the platform (1 click high), use it toggle opacity 2 on the portal. Place the Dummy Trigger in the room below and the other triggers above.
Page 493
TOMB RAIDER NEXT GENERATION SCRIPT REFERENCE MANUAL
WALL_SCARAB Used with the Scarab Beetle swarm and it can be part of the four large beetles needed for the Pyramid Puzzle in Cleopatra's Palaces. Place it on the walls. Do not forget to place the Crowbar for Lara. Set an OCB value of 2 .
WATERFALLLS Use an OCB value of 668 cancel the anti-trigger. Set the [Invisible] button to get a trigger/anti-trigger for the waterfall. An OCB value of "2" is used to slow down the start effect. It has been used in the level "The Tomb of Semerkhet" to simulate the Yellow Laser Ray. An OCB value of 777 is used in the Tomb Raider Last Revelation.
WHITE_LIGHT The OCB value is a color in compact format, where each color (RED, GREEN, BLUE) has only 5 bits. The first 5 bits (lowest bits) is the RED, then the GREEN and the highest 5 bits is the BLUE.
Example: 31 = Full RED992 = Full GREEN31744 = Full BLUE
Add the above values or use other values to obtain other colors.
Example: 31 + 992 = (RED + GREEN = 1023 = YELLOW
WRAITH2 Set the OCB with a value of 2 . The Wraith 2 dies on contact with water.
Page 494

TOMB RAIDER NEXT GENERATION SCRIPT REFERENCE MANUAL
Page 495
TOMB RAIDER NEXT GENERATION SCRIPT REFERENCE MANUAL
TOMB RAIDER NEXT GENERATION
SCRIPT COMMANDS
Page 496
TOMB RAIDER NEXT GENERATION SCRIPT REFERENCE MANUAL
SCRIPT COMMANDS
Note: ORIGINAL SCRIPT COMMANDS (Original Tomb4 engine) marked with a *
NG 1.2.2.6 SCRIPT COMMANDS IN BLUENG 1.2.2.7 UPDATES MARKED IN GREEN
PAGE#DEFINE 521#FIRST_ID 522#INCLUDE 525
ADD_EFFECT 526ANIMATING_MIP * 504ANIMATION 530ANIMATION_SLOT 533ASSIGN_SLOT 535COL_ADD_HORIZON * 505COLOUR_RGB 537COMBINE_ITEMS 538DEMO_DISC * 505CRS 539CUSTOMIZE 540CUT_SCENE 540DAMAGE 541DEFAULT_WINDOWS_FONT 614DETECTOR 544DIAGNOSTIC 548DIAGNOSTIC_TYPE 548DIARY 549ELEVATOR 555ENEMY 558EQUIPMENT 560EXAMINE * 506FLY_CHEAT * 507FMV 561FOG * 507FOG_RANGE 566
Page 497

TOMB RAIDER NEXT GENERATION SCRIPT REFERENCE MANUAL
PAGE
FORCE_BUMP_MAPPING 567FORCE_VOLUMETRIC_FX 567GLOBAL_TRIGGER 568HORIZON * 507IMAGE 570IMPORT_FILE 572INPUT_TIME_OUT * 508ITEM_GROUP 574KEY * 508KEY_COMBO * 508KEY_PAD 575LANGUAGE * 501LAYER 1 * 509LAYER 2 * 509LEGEND * 510LENS_FLARE * 510[ LEVEL ] * 502LEVEL * 511LEVEL_FAR_VIEW 576LIGHTNING * 511LOAD_CAMERA * 511LOAD_SAVE * 512LOG_ITEM 576MIRROR * 512MIRROR_EFFECT 577MULTI_ENVELOPE_CONDITION 577NAME * 513NEW_SOUND_ENGINE 581NO_LEVEL * 519OPTIONS * 502ORGANIZER 582PARAMETERS 584PC_EXTENSIONS * 503PICKUP * 513PICKUP_COMBO * 513PLAY_ANY_LEVEL * 513
Page 498
TOMB RAIDER NEXT GENERATION SCRIPT REFERENCE MANUAL
PAGE
PRESERVE_INVENTORY 585PSX _EXTENSIONS * 503PUZZLE * 514PUZZLE_COMBO * 514RAIN 585REMOVE_AMULET * 516RESET_HUB * 516RESIDENT_CUT * 516SAVE_GAME_PANEL 586SECURITY * 519SETTINGS 590SHOW_LARA_IN_TITLE 592SNOW 592SOUND_SETTINGS 593STAND_BY 594STAR_FIELD * 517SWITCH 596TEST_POSITION 597TEXT_FORMAT 601TEXTURE_SEQUENCE 602TIMER * 517[ TITLE ] * 504TITLE * 517TRAIN * 518TRIGGER_GROUP 605TURBO 609UV_ROTATE * 518WINDOW_FONT 611WINDOW_TITLE 613WORLD_FAR_VIEW 613YOUNG_LARA * 518
Page 499
TOMB RAIDER NEXT GENERATION SCRIPT REFERENCE MANUAL
TOMB RAIDER NEXT GENERATION
SCRIPT ORIGINAL COMMANDS
Page 500
TOMB RAIDER NEXT GENERATION SCRIPT REFERENCE MANUAL
SCRIPT ORIGINAL COMMANDS
LANGUAGE
Start of the Language section.
List of language.txt files with different languages.For each File= statement, a language.dat file will be output (for example JAPAN.DAT file)
Syntax:
[Language]File= 0,ENGLISH.TXTFile= 1,FRENCH.TXTFile= 2,GERMAN.TXTFile= 3,ITALIAN.TXTFile= 4,SPANISH.TXTFile= 5,US.TXTFile= 6,JAPAN.TXTFile= 7,DUTCH.TXT
Arguments:
1. Index number ("0,") Sort position for the language.txt file. The first file listed is important because the Level names and Puzzle item names in this file must be the same as the script.txt file.
2 Text file name ("ENGLISH.TXT") The Source text file to get the text for the language.Other language.txt files can be added at the bottom of the list.
Page 501
TOMB RAIDER NEXT GENERATION SCRIPT REFERENCE MANUAL
[ LEVEL ]
Start of the Level section. Each tr4 file must have its own [level] section where the audio track, level name, puzzle items etc. are defined.
Syntax:
[Level]Name= Playable Tutorial LevelLegend= The year 2012, somewhere in Egypt...Horizon= ENABLEDLayer1= 160,160,192,7PuzzleCombo= 3,1,Cartouche Piece 1, $0000,$0400,$0000,$0000,$0000,$0002PuzzleCombo= 3,2,Cartouche Piece 2, $0000,$0400,$0000,$0000,$0000,$0002Puzzle= 3,Ba Cartouche, $0000,$0400,$0000,$c000,$8000,$0002Puzzle= 5,Eye Of Horus, $0017,$0500,$0000,$0000,$0000,$0002PuzzleCombo= 5,1,Eye Piece, $0017,$0500,$0000,$0000,$0000,$0002PuzzleCombo= 5,2,Eye Piece, $0017,$0500,$0000,$0000,$0000,$0002Puzzle= 6,The Hand Of Orion, $0000,$0400,$8000,$c000,$0000,$0002Puzzle= 8,The Hand Of Sirius, $0000,$0400,$8000,$c000,$0000,$0002LoadCamera= 0,0,0,0,0,0,255LoadCamera= 11088,-1100,28896,11119,-1399,31486,0Level= DATA\TUT1,107
For descriptions of the [Level] statements See the SCRIPT COMMANDS Section.
OPTIONS
The start of the Options section.
Syntax:
[Options]LoadSave= ENABLEDTitle= ENABLEDPlayAnyLevel= ENABLEDInputTimeout= 18000 ; frames * seconds = 60x30FlyCheat= ENABLEDSecurity= $55DemoDisc= DISABLED
For descriptions of the above statements See the SCRIPT COMMANDS Section.
Page 502
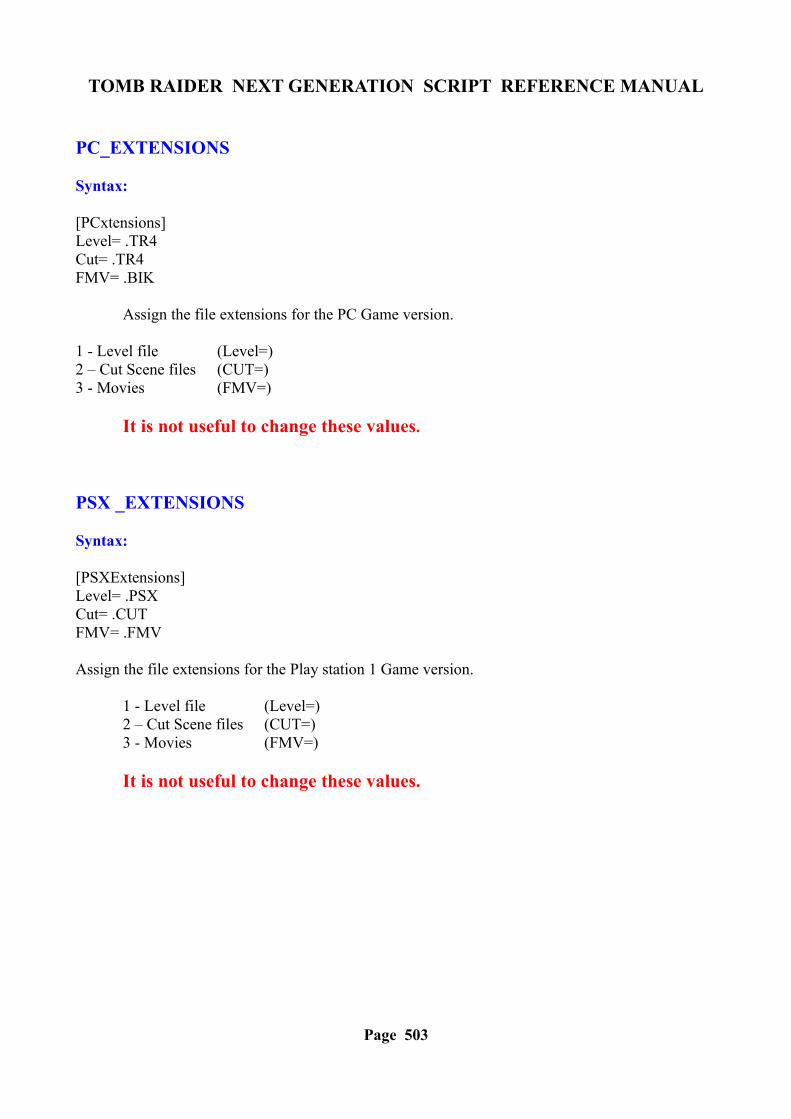
TOMB RAIDER NEXT GENERATION SCRIPT REFERENCE MANUAL
PC_EXTENSIONS
Syntax:
[PCxtensions]Level= .TR4Cut= .TR4FMV= .BIK
Assign the file extensions for the PC Game version.
1 - Level file (Level=)2 – Cut Scene files (CUT=)3 - Movies (FMV=)
It is not useful to change these values.
PSX _EXTENSIONS
Syntax:
[PSXExtensions]Level= .PSXCut= .CUTFMV= .FMV
Assign the file extensions for the Play station 1 Game version.
1 - Level file (Level=)2 – Cut Scene files (CUT=)3 - Movies (FMV=)
It is not useful to change these values.
Page 503

TOMB RAIDER NEXT GENERATION SCRIPT REFERENCE MANUAL
[ TITLE ]
Start of the Title section.The Title section defines the title.tr4 file that will be shown at the Start of the Game when the menu : [New game] [Load game] [Options] etc. is on the screen.
Statements in the [Title] section are the same as the [Level] sections but in the [Title] section has no statements for puzzle items.
For description of the [Title] statements See the SCRIPT COMMANDS Section.
[Title]
LoadCamera= 84246,-533,78233,81622,-1514,78208,40 ;source x,y,z target x,y,z, roomLevel= DATA\TITLE,104
ANIMATING_MIP
AnimatingMIP=
Syntax: AnimatingMIP= Slot , SectorDistance
Scope: To use in the [Level] section
This command enables the use of lower quality animation (MIP) when it is seen from a given distance. This is useful to reduce the job of the TRNG engine.
Arguments:
1. Slot=Index of the main Slot that will use a MIP version.This is number seen in the name of the animation in a wad file.For example that name could be: "Animating 13"
2 . The SectorDistance: Distance that activate the use of the MIP object rather than the full model animation.
Page 504
TOMB RAIDER NEXT GENERATION SCRIPT REFERENCE MANUAL
COL_ADD_HORIZON ColAddHorizon=
Syntax: ColAddHorizon= ENABLED/DISABLED
Scope: To use in the [Level] section
This command pastes the Sky texture with a horizon object. It avoids the Black line between the Sky and the Horizon. It works better if a Layer1= command to set to the correct Sky Color value.
DEMO_DISC DemoDisc=
Syntax: DemoDisc=DISABLED/ENABLED
Scope: To use in the [Options] section.
This command is set if the current game is only a demo. If the argument is ENABLED it will be played only as first level.
Page 505
TOMB RAIDER NEXT GENERATION SCRIPT REFERENCE MANUAL
EXAMINE Examine=
Syntax: Examine= NumberOfExamine,NameInInventory,TopBorder,DistanceFromCam,Orient_X, Orient_Y, Orient_Z, RotationFlag
Scope: To use in the [Level] section
The Examine command sets data for a pick-able item that the player can examine. When the player clicks on Examine Object in the inventory it will show the image of the object in full screen and above this background will be shown the text found in the language.txt file.
Three Examine Objects have different behaviour for displaying text:
Examine 1 Object This has no text it is a graphic image. It could be used to show maps and special symbols. To change this map use STRPIX to put new (high definition) textures on the Examine 1 Object because it will show these textures on a full screen.
Examine 2 Object This has two different texts:
The First Text This starts in the "language.txt" file after the header "Rules1:" and it will be shown in the top half of the screen.
The Second Text This starts in the "language.txt" file after the header "Rules2:" and it will be shown in the bottom half of screen.
The Object of Examine 2 will be shown at a reduced size in the centre of the screen.
Examine 3 ObjectThis is the most common Examine Object. The text starts after the header "PETEPOO:" and object will be shown full screen as a background while in the foreground there will be the common text found after the "PETEPOO:" tag.
For the argument descriptions of the Examine= command See the description for the Puzzle= command. It has the same syntax and meaning.
Page 506
TOMB RAIDER NEXT GENERATION SCRIPT REFERENCE MANUAL
FLY_CHEAT FlyCheat=
Syntax: FlyCheat= ENABLED/DISABLED
Scope: To use in the [Options] section.
This command Enables or Disables the possibility to fly Lara by typing the letters: D O Z Y on the Keyboard. Use Control key and arrow keys to move. Use Shift key to return to walk mode.
Usually is useful to Enable this option only for the debugging phase to easily check all of the room structure (and textures) of the level. Before developing the level this command is set to DISABLED
FOG FOG=
Syntax: FOG= Red,Green,Blue
Scope: To use in the [Level] section
Set the Fog Color for the current level. The FOG in the script.txt sets a Fog effect enabled everywhere in the current level and it will be more visible in big spaces. Fog is a good way to avoid the Black Color distance problem in very big zones (over 18 squares).
Arguments: 1. Red intensity of fog ("210")2. Green Intensity of fog ("176")3. Blue intensity of fog ("99")
Remark: To see fog in the game the Volumetric FX must be DISABLED in the Set-up menu.
HORIZON Horizon=
Syntax: Horizon= ENABLED/DISABLED
Scope: To use in the [Level] section
Sets the use of a Horizon for the current level.If the horizon is ENABLED it will be visible.If the horizon is DISABLED the distant view will be Black.
Page 507
TOMB RAIDER NEXT GENERATION SCRIPT REFERENCE MANUAL
INPUT_TIME_OUT InputTimeOut=
Syntax: InputTimeout=FramesBy60
Scope: To use in the [Options] section.
This sets the frame rate for the game. The argument is computed as Frames * seconds.
For example: 1800 = 60 x 30 (30 frame per second)
DO NOT change this value because old and slow computers could have trouble with higher frame rates.
KEY Key=
Syntax:: Key= NumberOfKey,NameInInventory, TopBorder,DistanceFromCam,Orient_X, Orient_Y, Orient_Z, RotationFlag
Scope: To use in the [Level] section
The arguments and the meanings are the same as "Puzzle=" and "Examine=" commands, but in this case will define a "Key". See the description for the PuzzleCombo= command.
KEY_COMBO KeyCombo=
Syntax: KeyCombo=NumberOfCombo,NumberOfPart, NameInInventory, TopBorder,DistanceFromCam,Orient_X, Orient_Y, Orient_Z, RotationFlag
Scope: To use in the [Level] section.
This is used to set data about the parts of a key. It works like the PuzzleCombo= command and it describes a part of the key item. For a description of the arguments See the PuzzleCombo= command.
Page 508
TOMB RAIDER NEXT GENERATION SCRIPT REFERENCE MANUAL
LAYER1 Layer1=
Syntax: Layer1= Red,Green,Blue,Speed
Scope: To use in the [Level] section when the Horizon=ENABLED
This command sets the color of the Sky texture and the speed of movement of the Sky texture
Arguments: 1. Red Color ("160") Set the intensity of the Red color for the sky.2. Green Color ("150") Set the intensity of the Green color for the sky.3. Blue Color ("192") Set the intensity of the Blue color for the sky.4 . Set the Speed of movement for the Sky texture ("7")
Range values: -16 to +16 Use Negative values to reverse the movement of the animation.
LAYER2 Layer2=
Syntax: Layer2= Red,Green,Blue,Speed
Scope: To use in the [Level] section when the Horizon=ENABLED
This command sets the second layer if required for the color of the Sky texture and the speed of movement of the Sky texture
Arguments: 1. Red Color ("160") Set the intensity of the Red color for the sky.2. Green Color ("150") Set the intensity of the Green color for the sky.3. Blue Color ("192") Set the intensity of the Blue color for the sky.4 . Set the Speed of movement for the Sky texture ("7")
Range values: -16 to +16 Use Negative values to reverse the movement of the animation.
Page 509
TOMB RAIDER NEXT GENERATION SCRIPT REFERENCE MANUAL
LEGEND Legend=
Syntax: Legend= TextToShowAtLevelBegin
Scope: To use in the [Level] section AFTER {Name=} statement
Set the text that will be shown at the start of the current level. This message will be shown for about 4 seconds. This statement is optional.
LENS_FLARE LensFlare=
Syntax: LensFlare=OrigX,OrigY,OrigZ,Red,Green, Blue
Scope: To use in the [Level] section
It is used to create a light effect like a shining Sunlight on the lens of a camera. This command can create different effects.
Arguments: 1. Reflex origin in the X axis2. Reflex origin in the Y axis3. Reflex origin in the Z axis4. Red color Intensity of the reflex light5. Green color Intensity of the reflex light6. Blue color Intensity of the reflex light
To set a value for the Origin it is advisable to use same method that is used for the LoadCamera settings. Use the F1 key and then experiment.
Page 510
TOMB RAIDER NEXT GENERATION SCRIPT REFERENCE MANUAL
LEVEL Level=
Syntax: Level= FileName, NumberOfCdTrack
Scope: To use in the [Level] section
Arguments: 1. Level file ("DATA\KARNAK") Path of the .tr4 file, without the .tr4 extension.
2. The default Audio Track ("110") Number of the .wav file in the audio folder to use for the background sound for the current level
LIGHTNING Lightning=
Syntax: Lightning= ENABLED/DISABLED
Scope: To use in the [Level] section
Enables or disables the Thunder (sound) and Lightning (white flashes) on the sky. Enable this effect for levels where there is a storm.
LOAD_CAMERA LoadCamera=
Syntax: LoadCamera= SourceX,SourceY,SourceZ,TargetX,TargetY,TargetZ,SourceRoom
To set the position of the camera to create an image to use in the 'load game' screen.
Scope: To use in the [Level] section
Arguments: 1. Source X position of the camera in game units ("76406")2. Source Y position of the camera in game units ("-3880")3. Source Z position of the camera in game units ("40584")4. Target that the camera is pointing at X position ("75794")5. Target that the camera is pointing at Y position ("-3220")6 . Target that the camera is pointing at Z position ("40328")7. The Number of the room where the camera is located ("23")
DO NOT try and set these values manually. Read them using the F1 key in the game and then copy the values in to the script.txt file. The top left corner of screen will show the numbers that are in accordance with the current view in the game. The F1 feature only works when the command FlyCheat = ENABLED is in the script.txt file.
Page 511
TOMB RAIDER NEXT GENERATION SCRIPT REFERENCE MANUAL
LOAD_SAVE LoadSave=
Syntax: LoadSave= ENABLED/DISABLED
Scope: To use in the [Options] section
This command Enables or Disables the load / save operation in the game. If DISABLED is set in this command the load and save function is prohibited in the game.
MIRROR Mirror=
Syntax: Mirror= RoomNumber, XOriginRoomBy1024
Scope: To use in the [Level] section
This command sets a mirror effect.
Arguments:
1. RoomNumber. This is the number of the room where Lara can see the mirror. It is the room in front of the mirror (hidden) room.
2. XOriginRoomBy1024 = X Origin of the room units. This is a hexadecimal format number.Read this value in the Information Panel below the 3d panel. To get the final value to type in to the Mirror= command add 1 to the X Origin and then multiply this value by 1024.
For example: If the X origin of the room in front of the mirror is 12 (decimal)
The hexadecimal number is obtained in following way:
12 + 1 = 1313 * 1024 = 1331213312 = $3400 hexadecimal.
Remark: The mirror in the room edit must always be the left wall of the room in front of the mirror.
Page 512

TOMB RAIDER NEXT GENERATION SCRIPT REFERENCE MANUAL
NAME Name=
Syntax: Name= NameForNewGameScreen
Scope: Use at the start of the [Level] section
Sets the name for the level. This name will be shown in the New Game screen. If this name is changed in the script.txt file it must also be changed in the english.txt file.
PICKUP Pickup=
Syntax: Pickup= NumberOfPickup, NameInInventory, TopBorder, DistanceFromCam,Orient_X, Orient_Y, Orient_Z, RotationFlag
Scope: To use in the [ Level] section
The arguments and the meanings are the same as the "Puzzle=" and "Examine=" commands but will define a generic Pickable item. See the description of arguments for the PuzzleCombo= command.
PICKUP_COMBO PickupCombo=
Syntax: PickupCombo=NumberOfPickup, NumberOfPart, NameInInventory, TopBorder, DistanceFromCam, Orient_X, Orient_Y, Orient_Z, RotationFlag
Scope: To use in the [Level] section.
To set the data about parts of the pickable (not puzzles) items. It works the same as the PuzzleCombo= but describes part of the generic pickup item. For a description of the arguments see the PuzzleCombo= command.
PLAY_ANY_LEVEL PlayAnyLevel=
Syntax: PlayAnyLevel= ENABLED/DISABLED
Scope: To use in the [Options] section
This command is set and will enable the player to choose any level to play in any order. If this command is disabled the TRNG engine will only allow playing levels in the order defined in the script.txt file.
The adventure should always set this command as DISABLED so it starts from the first level and then goes on to level 2, level 3 etc.
Page 513
TOMB RAIDER NEXT GENERATION SCRIPT REFERENCE MANUAL
PUZZLE Puzzle=
Syntax: Puzzle=NumberOfPuzzle, NameInInventory, TopBorder, DistanceFromCam,Orient_X, Orient_Y, Orient_Z, RotationFlag
Scope: To use in the [Level] section
This command sets the data for a pickable item. For a description see the "PuzzleCombo=" command. The arguments are the same, the only difference is that in the Puzzle= command is missing the "Index of part" of the argument.
PUZZLE_COMBO PuzzleCombo=
Syntax: PuzzleCombo= NumberOfPuzzle, NumberOfPart, NameInInventory, TopBorder, DistanceFromCam, Orient_X, Orient_Y, Orient_Z, RotationFlag
Scope: To use in the [Level] section
This command sets the data for the puzzle combo object used in the current level.
Note: Combo is a Combined Object. It is part of an object that has two or more parts.Before using it (putting it in hole item) the different parts will have been pasted together.
Arguments:
1. Index of Object ("1") This number is the same as the "puzzle done" object name in the wad file. For example if the current combo puzzle is part of puzzle item 4, in this field there will be the number "4". Also the other commands (pick up, key etc.) values follow the same rule.
For example: Puzzle Item 3 will have "3" in this field.Key 5 will have "5" in this field.
2. Index of the part of the object ("1"). For example if the combo item has 3 parts there will be three PuzzleCombo statements in the script.txt file. The first PuzzleCombo part will be "1", the second part "2" and the third part "3"
3. Name of the Object ("Sun Disk") This name will be shown in the inventory when the player picks up the item. If the name is changed in the script.txt file the SAME change must be made in the english.txt file.
Following are six hexadecimal values to set the view of the object in the inventory$0000, $0180, $0000, $0000, $0000, $0002
Page 514

TOMB RAIDER NEXT GENERATION SCRIPT REFERENCE MANUAL
To explain name them:
A Number, B Number, C Number, D Number, E Number and F Number
A Number ($0000)This is the position (in pixels) from the top border of the screen. The origin of the object not always at the top-left visible point. The origin depends on the position of the object in the 3d structure. Sometimes it is useful to increase or decrease this A number to have the object at same height of other inventory objects. Negative numbers can be entered and must be in hexadecimal format. For an example to set -10 (10 pixels over the top border) type the number $FFF6.
B Number ($0180)This is the distance from the virtual camera. This argument is useful to increase or reduce the size of the object in the inventory. Increase the value and the object will display smaller. Decrease the value and the object will display bigger. The value is in game units (1 square = 512 units). For example set the value $0200 (512 in decimal) to see the object as if it was one square away in the game. Setting $0000 in this field the object will be huge because it will be in front of the camera and will cover the whole screen. Usually the value is in the range: $0200 - $0500
C Number ("$0000")This value sets the orientation of the camera on the X axis. The values for this argument could be from $0000 to $FFFF but generally only four values are used:
$0000 = North (top view)$4000 = East (right view)$8000 = South (bottom view)$C000 = West (left view)
D Number ("$0000")This value sets the orientation of the camera on the Y axis. The values for this argument could be from $0000 to $FFFF
E Number ("$0000")This value sets the orientation of the camera on the Z axis. The values for this argument could be from $0000 to $FFFF
F Number ("$0002")This is a Bit mask to Enable/Disable special functions.$0002 = Enable the rotation of the object.$0008 = Forces the rotation centrer of the object to the centre of its bounding box.
Page 515
TOMB RAIDER NEXT GENERATION SCRIPT REFERENCE MANUAL
REMOVE _AMULET RemoveAmulet=
Syntax: RemoveAmulet = ENABLED/DISABLED
Scope: To use in the [Level] action
If the RemoveAmulet = ENABLED the Amulet will be removed from the inventory in the current level.
RESET_HUB ResetHUB=
Syntax: ResetHUB= NumberOfLevel
Scope: To use in the [Level] section
This command Forces the TRNG engine to reload default meshes like Lara ,SIDECAR, JEEP etc.Use this command if in next level Lara will have different mesh structures.
Arguments:
The Level number that to reload Lara meshes ("3"). For example if in level 2 young Lara is used while in level 3 "old" Lara is used, type in the [Level] section of level 2 the command:
ResetHUB= 3 to force reloading before loading the third level.
Different textures (skin) do not require a ResetHUB command.
RESIDENT_CUT ResidentCut=
Syntax: ResidentCut= NumberOfCutscene, RoomNumber
Scope: To use in the [Level] section
This command declares an internal Cut Scene in the current level.
Arguments:1. The Index of the internal cut scene ("1"). This index starts from 12. The Room number ("5"). The room number is where to start the Cut Scene.
Page 516
TOMB RAIDER NEXT GENERATION SCRIPT REFERENCE MANUAL
STAR_FIELD StarField=
Syntax: StarField= ENABLED
Scope: To use in the [Level] section REQUIRES TREP
It will set unlimited air supply for Lara. You can create an underwater episode with Lara using Scuba Gear or Extreme Depth Diving Suit and so on.
TIMER Timer=
Syntax: Timer= ENABLED/DISABLED
Scope: To use in the [Level] section
This command Enables or Disables the overlapped timer used in the Race for the Iris
To start the timer over the screen you must: Put the Von Croy object in the level. Set a Trigger to make Von Croy visible.Activate a Trigger flip effect 45
To stop the timer in the traditional (game) is not easy. However with Media Manager use an equipment media to set the save game field named "Screen timer" to 0. This method works correctly only if FIRST this media has been triggered by the flip effect 45 with the timer -1 (to stop movements of Von Croy) or flip effect 46 (to kill Von Croy) in the game.
TITLE Title=
Syntax: Title= ENABLED/DISABLED
Scope: To use in the [Options] section
Set this command to use the title.tr4 level as a background for the introduction screen.The title.tr4 is a common level but with a flyby camera sequence. It is used only for 'decorative' effects.
Page 517
TOMB RAIDER NEXT GENERATION SCRIPT REFERENCE MANUAL
TRAIN Train=
Syntax: Train= ENABLED/DISABLED
Scope: To use in the [Level] section
This command Enables / Disables the train effect. With the train effect the train is stationary while the horizon moves in loop to give the impression of a train going along a track.
If the Train=ENABLED also use the AddColHorizon and Layer1 command.
UV_ROTATE UVRotate=
Syntax: UVrotate= SpeedOfScrollingTextures
Scope: To use in the [Level] section.
This command sets the speed of the UV Scrolling textures.
Arguments: The Speed of the texture animation ("8") This number is a single byte (8 bit)This means that -2 or 254 give the same result. Range: -16 to +16
If the number is negative or bigger than 127 the direction of the animation will be reversed.
YOUNG_LARA YoungLara=
Syntax: YoungLara = ENABLED/DISABLED
Scope: To use in the [Level] section
This command is used to "inform" the TRNG engine that in the current level the Young Lara will be used. Young Lara is different from Lara as she does not have weapons and she has two pigtails in her hair
Page 518
TOMB RAIDER NEXT GENERATION SCRIPT REFERENCE MANUAL
SECURITY Security=This command is in the [Options] section and has the value: $55 ( 85 decimal) This was used inTR2 and TR3 to stop hacking but not implemented into TR4
PULSE Pulse= REQUIRES TREP Probably the syntax is: Pulse=ENABLED/DISABLEDA single pulse for a gun.
NO_LEVEL NoLevel=
It is very strange, but this command is used in Tomb Raider in the Last Revelation.This is the [level] section where it has been used:
[Level] Name= Yes NoLevel= ENABLED Level= A,0
There is no A.tr4 level available. It may be a hard coded method to handle the conditional tests.
Page 519

TOMB RAIDER NEXT GENERATION SCRIPT REFERENCE MANUAL
TOMB RAIDER NEXT GENERATION
SCRIPT NG NEW COMMANDS
Page 520

TOMB RAIDER NEXT GENERATION SCRIPT REFERENCE MANUAL
SCRIPT NG NEW COMMANDS
#DEFINE #DEFINE
Syntax: #DEFINE CONSTANT VALUE
Scope: Any
The define directive creates a temporary mnemonic constant with the wished value.
The main use of the #define directive is to easily get the remapping of a group of script commands.Since some commands require to have an uni-vocal Id, when you insert in your script a block of commands there is the risk to have conflicts with the Ids. To solve these conflicts in a fast way you can build your script using a mnemonic constant defined by #define directive to use as a base of the Id's of your commands.
For example:
TriggerGroup= 4, $8000, 112, $2CTriggerGroup= 5, $2000, 271, $52TriggerGroup= 6, $2000, 235, $70, $2000, 232, $52GlobalTrigger= 2, IGNORE, GT_CONDITION_GROUP, IGNORE, 4, 5, IGNORE GlobalTrigger= 3, IGNORE, GT_TRNG_L_TIMER_EQUALS, 45, IGNORE, 6, INGORE
The above code shows the links between different commands using their Id's
The Global Trigger 2, "calls" the trigger groups with indices 4 and 5, while the global trigger 3 calls the trigger group 6.
When the commands are more it also becomes slow to find all of the Id's to change to move the Id range with higher numbers to avoid conflicts preserving their links. Using the #define directive the above code can be changed in this way:
#DEFINE BS_TG 4 ;the first TriggerGroup index#DEFINE BS_GT 2 ;the first GlobalTrigger index
TriggerGroup= BS_TG, $8000, 112, $2CTriggerGroup= BS_TG+1, $2000, 271, $52TriggerGroup= BS_TG+2, $2000, 235, $70, $2000, 232, $52GlobalTrigger= BS_GT, IGNORE, GT_CONDITION_GROUP, IGNORE, BS_TG, BS_TG+1, IGNORE GlobalTrigger= BS_GT+1, IGNORE, GT_TRNG_L_TIMER_EQUALS, 45, IGNORE, BS_TG+2, IGNORE
In this case the final compiled code will be exactly the same, but the advantage of a second version is that when you find a conflict and you have to change all trigger group and global trigger indices,
Page 521
TOMB RAIDER NEXT GENERATION SCRIPT REFERENCE MANUAL
preserving the internal links between them, just you change only the two directive:
#DEFINE BS_TG 10#DEFINE BS_GT 8
All Id's will be moved higher keeping the correct inner links.
These problems of Id's remapping are very usual when the level builders exchange blocks of commands to explain how to create some features. So, your code sample will be easily adapted to any script if you always use the #define directive to set all Id numbers
Remark: See the #FIRST_ID directive to complete in an easy way the above target.
Other uses of the #define directive are less useful, anyway some idea could be:to use a define to use a single word for a group of official mnemonic constants you use very often:
#define DEBUG DGX_LOG_SCRIPT_COMMANDS+DGX_COMMON_VARIABLES+DGX_LARA
and
#define USUAL DGX_LARA+DGX_SFX_SOUNDS +DGX_CHEATS
In this way you can change easily the Diagnostic command typing:
Diagnostic= DEBUG, 0orDiagnostic= USUAL, 0
Some notes about the #define directive:
The #define directive is local and it works only inside the current source. If you use include files, and therefore different sources, any directive will work only in the source where it is. The advantage to divide the script in different sources is that in this way you can use the same directive in any source with different values.
You cannot use the same CONSTANT name twice in the same source.
Example: #DEFINE MYNAME 12#DEFINE MYNAME FT_BOTTOM_CENTER+FT_SIZE_ATOMIC_CHAR
You can use in the formula (to get the VALUE) the CONSTANT name set in another define directive of same source but these directives have to be placed before the define that will use them:
Page 522
TOMB RAIDER NEXT GENERATION SCRIPT REFERENCE MANUAL
This code is correct: #DEFINE BS_ALL 10#DEFINE BS_TG BS_ALL+30#DEFINE BS_GT BS_TG+15
while this is wrong: #DEFINE BS_ALL 10#DEFINE BS_GT BS_TG+15#DEFINE BS_TG BS_ALL+30
Because the value of BS_TG is not yet defined when the #DEFINE BS_GT directive will be parsed.You cannot have blanks (spaces) between operands of the VALUE field.
This is wrong: #DEFINE MYSUM ALFA +BETA
This is correct: #DEFINE MYSUM ALFA+BETA
Page 523
TOMB RAIDER NEXT GENERATION SCRIPT REFERENCE MANUAL
#FIRST_ID #FIRST_ID
Syntax: #FIRST_ID CommandName=FirstId
Scope: Any
This directive has been studied to be used in the include files of the script.The only disadvantage using include files is the problem of Id's conflicts.Many script commands have an Id as a first argument and these Id's have to be uni-voque for the same type of command. The NG_Center is able to discover these conflicts and signal them as errors after the compiling. It should be OK to use in an include files Id's in a range of values that is different than that used in the main script or in other include files.
The #FIRST_ID directive tries to reach this target.When you create an include file type in the first row one or more directives like the following:
#FIRST_ID TriggerGroup=40#FIRST_ID GlobalTrigger=30
Thanks to the above directives, when you are typing a new script command and you hit F1 to discover the first available Id for that command, NG_Center will compute the first available Id starting the count from the value typed in the specific FIRST_ID directive. So, looking at the above example, if the first Trigger Group command is typed in this include file (but many others could exist in the main script or in other include files) the NG_Center will give the value "40" as the first Id for the Trigger Group. When typing a second trigger group the first Id will be "41". In this way you can decide from what Id to start all script commands in the include files, reducing the risk of conflicts between different include files and/or the main script file. The FIRST_ID directives place at the top of the include files also have an informative value when in the future you mean to use that feature to discover the Id ranges used in the old include file. You can use define with the Mnemonic constant: #DEFINE BS_TG 30
#FIRST_ID TriggerGroup=BS_TG+10Do not put spaces between the operands to the right of the "=" sign:
This is Wrong: #FIRST_ID TriggerGroup=BS_TG+ 10
The #FIRST_ID directive is local. This means it only works in the same source file.To enhance the Id range swapping see the description of the #define directive.
Page 524
TOMB RAIDER NEXT GENERATION SCRIPT REFERENCE MANUAL
#INCLUDE #INCLUDE
Syntax: #INCLUDE "ExternalScriptTextFile.txt"
Scope: Any
The #include directive is not a script command, it does not perform any change to the final script.dat. It is used only to divide and to put in order a long script.txt moving some specific blocks of commands from the main script to another text file in the SCRIPT folder. When the NG_Center finds a #INCLUDE directive, it temporary loads the content of the given include file and pastes it with the main script in same position where that include directive was. For this reason the response in the compiling is always the same. The use of include directives is useful to put in order the script, dividing it in logical blocks. For example when you create many script commands to realize a custom animation or other effect, you can copy all commands for that target in a separated text file with a meaning full name. In this way your script could become like this:
#INCLUDE "LaraHome.txt"
#INCLUDE "AnimClimbFromWater.txt"
#INCLUDE "DistanceSensory.txt"
There are advantages in this job planning. When you are not interested in some completed feature, you do not have all those script commands in the main script file to create confusion. When you work on that feature you can load (F5 key) the include file in the NG_Center and have the meaningful commands in the editor to study and edit.
If you work with the include files read the description of the directive #FIRST_ID. It is very useful to reduce the risk of Id's conflicts of the commands stored in the main script and include files
Remarks: Theoretically you could use an #include directive in another included source, up to 19 levels of depth. I do not suggest to use this because the F1 command to find the free Id could not work and it becomes difficult to navigate between the sources since the F6 command only allows you to come back to the main script.txt. Remember that you can load an include file in the editor hitting the F5 key while the caret is over the #include line.
Page 525
TOMB RAIDER NEXT GENERATION SCRIPT REFERENCE MANUAL
ADD_EFFECT AddEffect=
Syntax: AddEffect=Id, EffectType (ADD_), FlagsEffect (FADD_), JointType (JOINT_), DispX, DispY, DispZ, DurateEmit, DuratePause, Extra param array
Scope: To use in the [Level] section
The Add Effect command is suggested only for advanced level builders. Its more common use is to have animation commands to use in the animation editor of the wad merger program to add particles effects to moveable only in specific frames of animation. You can add: blood, flame, smoke and Mist (like waterfall Mist). you can use an add effect like common triggers. The better use is to convert the trigger in the animation command and then add it in the animation of the moveable.
Arguments:
Id FieldThis is a simple identifier for the add effect command in the script file. It works like the first argument of the PuzzleItem or PuzzleCombo commands. For example if you type "1" this means l refer to the add effect in the trigger window choosing one effect to add.
EffectTypeSet in this field the ADD_ constant to choose the effect type to add.
FlagsEffect (FADD_...) fieldUse flag effects (FADD_) to override other settings about duration or behaviour of the effect.See the description of FADD_ constants.
JointType (JOINT_...) fieldSpecify the type of effect to set also the exact position where to show the effect. This computation is complicated and starts from a point corresponding to some joint of the moveable and then (see the following fields DispX, DispY and DispZ) sets the displacement from this chosen joint.
One of the the following joints can be chosen:
JOINT_SINGLE_MESH:0JOINT_PUBIS:0JOINT_LEFT_THIGH:1JOINT_LEFT_KNEE:2JOINT_LEFT_ANCKLE:3JOINT_RIGHT_THIGH:4JOINT_RIGHT_KNEE:5JOINT_RIGHT_ANCKLE:6JOINT_ABDOMEN:7JOINT_NECK:8JOINT_LEFT_SHOULDER:9
Page 526
TOMB RAIDER NEXT GENERATION SCRIPT REFERENCE MANUAL
JOINT_LEFT_ELBOW:10JOINT_LEFT_WRIST:11JOINT_RIGHT_SHOULDER:12JOINT_RIGHT_ELBOW:13JOINT_RIGHT_WRIST:14
The value JOINT_SINGLE_MESH (0), will be used for the moveable using a single mesh. In this situation the origin of the effect will be the centre of the mesh. The pivot is often the centre of single meshes. When a particle effect is added to the multi-mesh moveables set a joint like an origin and then modify this origin with DispX, DispY and DispZ fields to create the effect at the required position. See the following field descriptions for more information.
DispX, DispY, DispZ fields.The three values DispX, DispY and DispZ are the distance between the origin of the effect set in the Joint field. To understand how to set these three values read the example.
To add smoke to Lara's mouth (as breath) choose a joint near to the target point. Choose the neck,.i.e. the JOINT_NECK is typed in the joint field. Then move this origin. The smoke is not in the neck but in a higher and more forward position. To understand the axes X, Y, Z imagine watching Lara when she has her face in front of you. Now the X, Y and Z axes have the following orientation:
X values will be negative at the right hand of Lara and the X values will be positive going to the left hand of Lara.
Y values will be negative when moving to Lara 's head (upwards) and the Y values will be positive when moving to Lara 's feet (downwards)
Z values will be positive in front of Lara and the Z values will become negative behind Lara.
From the above orientation use the values to move the smoke in front of Lara 's mouth. from Lara 's Neck as the origin: Move the smoke forwards, because the mouth is ahead of her Neck. So from the Z co-ordinate use a positive value because the smoke will be in front of Lara. The . DispZ = +70
Move the smoke up because the Neck is below the mouth. The Y axis has negative values for upward and positive values for downward. Use the value: DispY = -70
DispX can be set at 0 because the Neck and the mouth are on the same vertical line. This gives:JOINT_NECK, 0, -70, 70 The smoke should now be in front of Lara 's mouth.
DurateEmit and DuratePause fieldsFor some effects, Smoke and Blood, it is necessary to alternate a phase of emitting particles with a pause phase to permit the particles to decay. The values to type in the above fields is the number of frames.
Page 527

TOMB RAIDER NEXT GENERATION SCRIPT REFERENCE MANUAL
For example: The DurateEmit has a value of 3 and DuratePause has a value of 10. The effect will be emitted for 3 consecutive frames and will be suspended for 10 frames. Chaining these two values sets the required intensity of the effect.
To set these two fields:
Fire and Smoke: Use the flag FADD_CONTINUE_EMIT to have continuous emission. In this case the values in DurateEmit and DuratePause fields will be ignored.
For Blood: Set 1 for DurateEmit and 30 for DuratePause.
For Mist: Depends on the result wanted. In some circumstances Mist works fine with the FADD_CONTINUE_EMIT flag. To simulate sprays use DurateEmit = 1 and DuratePause = 3. .
Extra Param array fieldsFrom this field there are optional fields changing in accordance with the effect type.Currently there are extra parameters only for Mist and Light effects.
Extra parameters for Mist:
Extra1 = The Size of the Mist Ball. The default value is 12
Extra2 = Number of Mist Balls. The default value is 1. A maximum of 4 Mist Balls can be set. They will be placed over an ideal line. The Mist line will be oriented following the facing of the current moveable. The facing of the Mist line can be rotated using rotate flags.
Extra3 = Color of the Mist. Set a MIST_COL_ value.
Extra4 = Persistence time of the Mist. The default value = 6. Use this field only if the moveable is moving faster and a wake is required. Bigger values, longer wakes.
Extra Parameters for light effects:
Extra1 = Intensity of the light. Bigger values will have more intensity and width of light. The light of flares has intensity = 16 and you should use values close to this reference. This value works for flat light and blinking light but has no effect with the spot-light.
Extra2 = The maximum distance for the spot-light. This value works only for ADD_LIGHT_SPOT effect. The spot-light uses two 3d points: the begin point and the end point of the light cone. The first 3d point is the moveable where the spot is added, while the final point is the last zone lighted by the spot-light. Computing Source + Distance in given direction (facing). The distance should be typed in sectors. For example the headlight of the SIDECAR has a default of 20 sectors in the old tomb4 and it was the World Far View. If a super power light is not required reduce this distance. If IGNORE is typed in this field the TRNG engine will use 12 sectors.
Extra3 = Color of the light. Use the same MIST_COL constants for the Mist effect.
Page 528
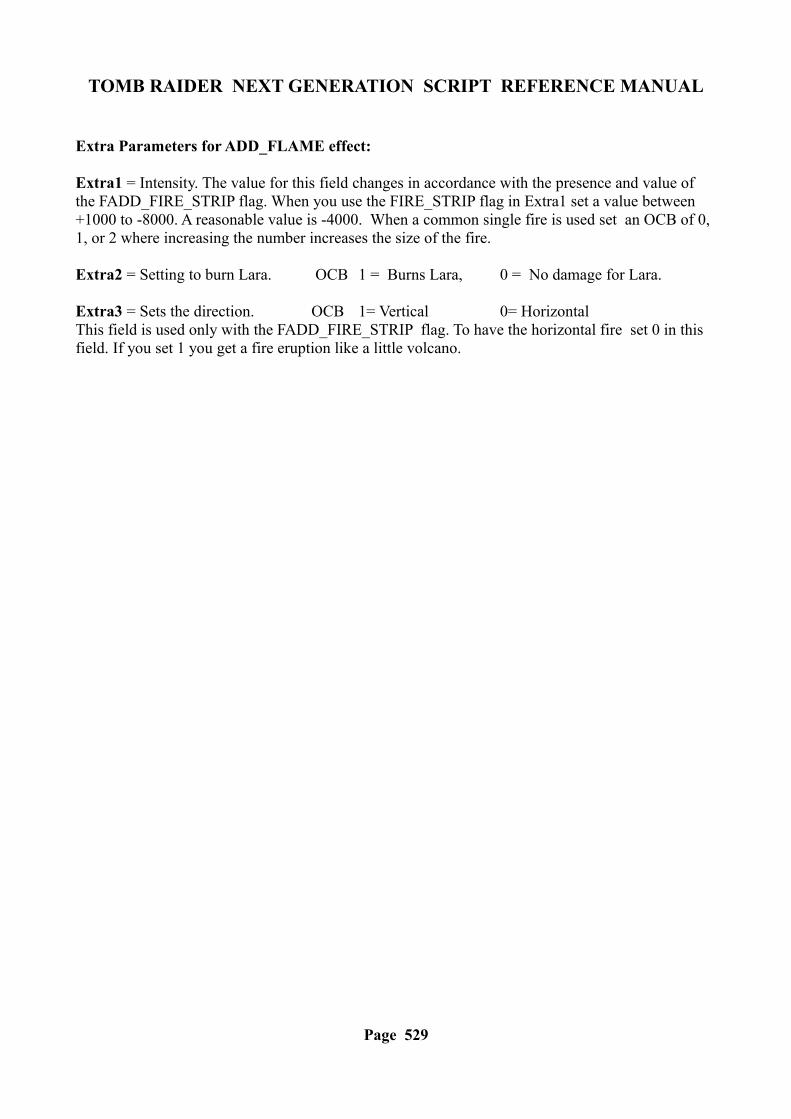
TOMB RAIDER NEXT GENERATION SCRIPT REFERENCE MANUAL
Extra Parameters for ADD_FLAME effect:
Extra1 = Intensity. The value for this field changes in accordance with the presence and value of the FADD_FIRE_STRIP flag. When you use the FIRE_STRIP flag in Extra1 set a value between +1000 to -8000. A reasonable value is -4000. When a common single fire is used set an OCB of 0, 1, or 2 where increasing the number increases the size of the fire.
Extra2 = Setting to burn Lara. OCB 1 = Burns Lara, 0 = No damage for Lara.
Extra3 = Sets the direction. OCB 1= Vertical 0= HorizontalThis field is used only with the FADD_FIRE_STRIP flag. To have the horizontal fire set 0 in this field. If you set 1 you get a fire eruption like a little volcano.
Page 529
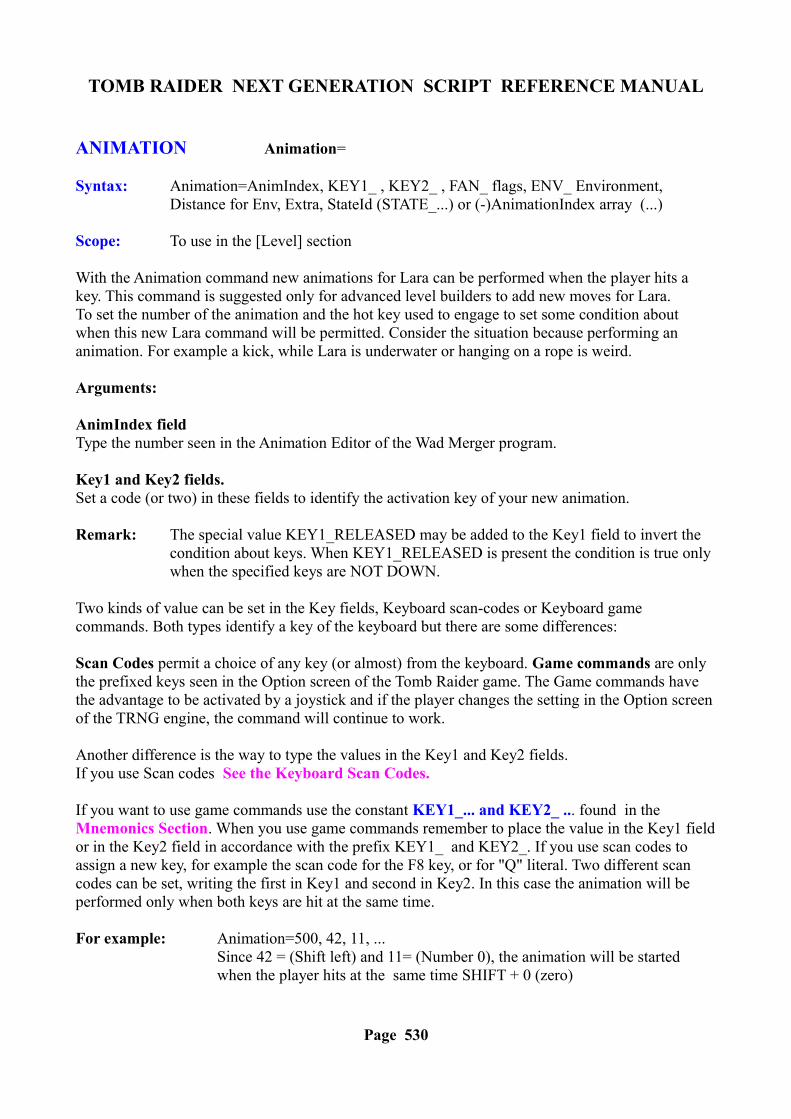
TOMB RAIDER NEXT GENERATION SCRIPT REFERENCE MANUAL
ANIMATION Animation=
Syntax: Animation=AnimIndex, KEY1_ , KEY2_ , FAN_ flags, ENV_ Environment, Distance for Env, Extra, StateId (STATE_...) or (-)AnimationIndex array (...)
Scope: To use in the [Level] section
With the Animation command new animations for Lara can be performed when the player hits a key. This command is suggested only for advanced level builders to add new moves for Lara.To set the number of the animation and the hot key used to engage to set some condition about when this new Lara command will be permitted. Consider the situation because performing an animation. For example a kick, while Lara is underwater or hanging on a rope is weird.
Arguments:
AnimIndex fieldType the number seen in the Animation Editor of the Wad Merger program.
Key1 and Key2 fields.Set a code (or two) in these fields to identify the activation key of your new animation.
Remark: The special value KEY1_RELEASED may be added to the Key1 field to invert the condition about keys. When KEY1_RELEASED is present the condition is true only when the specified keys are NOT DOWN.
Two kinds of value can be set in the Key fields, Keyboard scan-codes or Keyboard game commands. Both types identify a key of the keyboard but there are some differences:
Scan Codes permit a choice of any key (or almost) from the keyboard. Game commands are only the prefixed keys seen in the Option screen of the Tomb Raider game. The Game commands have the advantage to be activated by a joystick and if the player changes the setting in the Option screen of the TRNG engine, the command will continue to work.
Another difference is the way to type the values in the Key1 and Key2 fields.If you use Scan codes See the Keyboard Scan Codes.
If you want to use game commands use the constant KEY1_... and KEY2_ ... found in the Mnemonics Section. When you use game commands remember to place the value in the Key1 field or in the Key2 field in accordance with the prefix KEY1_ and KEY2_. If you use scan codes to assign a new key, for example the scan code for the F8 key, or for "Q" literal. Two different scan codes can be set, writing the first in Key1 and second in Key2. In this case the animation will be performed only when both keys are hit at the same time.
For example: Animation=500, 42, 11, ...Since 42 = (Shift left) and 11= (Number 0), the animation will be started when the player hits at the same time SHIFT + 0 (zero)
Page 530
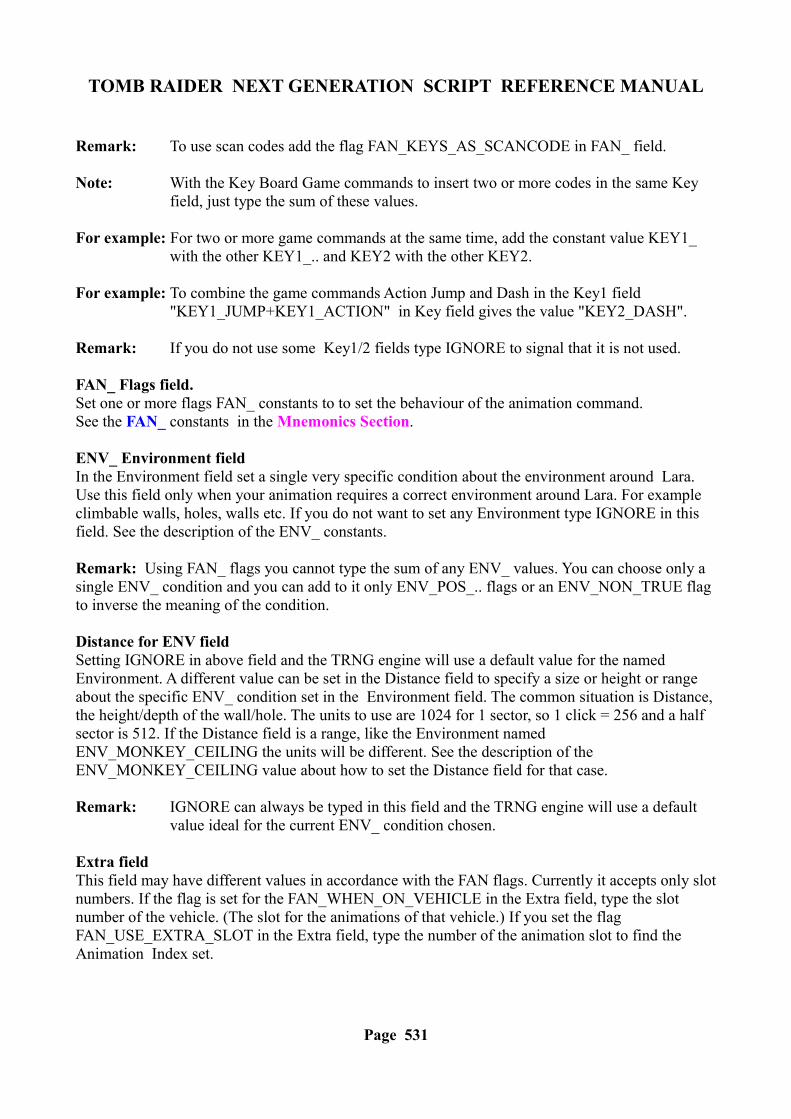
TOMB RAIDER NEXT GENERATION SCRIPT REFERENCE MANUAL
Remark: To use scan codes add the flag FAN_KEYS_AS_SCANCODE in FAN_ field.
Note: With the Key Board Game commands to insert two or more codes in the same Key field, just type the sum of these values.
For example: For two or more game commands at the same time, add the constant value KEY1_ with the other KEY1_.. and KEY2 with the other KEY2.
For example: To combine the game commands Action Jump and Dash in the Key1 field "KEY1_JUMP+KEY1_ACTION" in Key field gives the value "KEY2_DASH".
Remark: If you do not use some Key1/2 fields type IGNORE to signal that it is not used.
FAN_ Flags field.Set one or more flags FAN_ constants to to set the behaviour of the animation command. See the FAN_ constants in the Mnemonics Section.
ENV_ Environment fieldIn the Environment field set a single very specific condition about the environment around Lara. Use this field only when your animation requires a correct environment around Lara. For example climbable walls, holes, walls etc. If you do not want to set any Environment type IGNORE in this field. See the description of the ENV_ constants.
Remark: Using FAN_ flags you cannot type the sum of any ENV_ values. You can choose only a single ENV_ condition and you can add to it only ENV_POS_.. flags or an ENV_NON_TRUE flag to inverse the meaning of the condition.
Distance for ENV fieldSetting IGNORE in above field and the TRNG engine will use a default value for the named Environment. A different value can be set in the Distance field to specify a size or height or range about the specific ENV_ condition set in the Environment field. The common situation is Distance, the height/depth of the wall/hole. The units to use are 1024 for 1 sector, so 1 click = 256 and a half sector is 512. If the Distance field is a range, like the Environment named ENV_MONKEY_CEILING the units will be different. See the description of the ENV_MONKEY_CEILING value about how to set the Distance field for that case.
Remark: IGNORE can always be typed in this field and the TRNG engine will use a default value ideal for the current ENV_ condition chosen.
Extra fieldThis field may have different values in accordance with the FAN flags. Currently it accepts only slot numbers. If the flag is set for the FAN_WHEN_ON_VEHICLE in the Extra field, type the slot number of the vehicle. (The slot for the animations of that vehicle.) If you set the flag FAN_USE_EXTRA_SLOT in the Extra field, type the number of the animation slot to find the Animation Index set.
Page 531
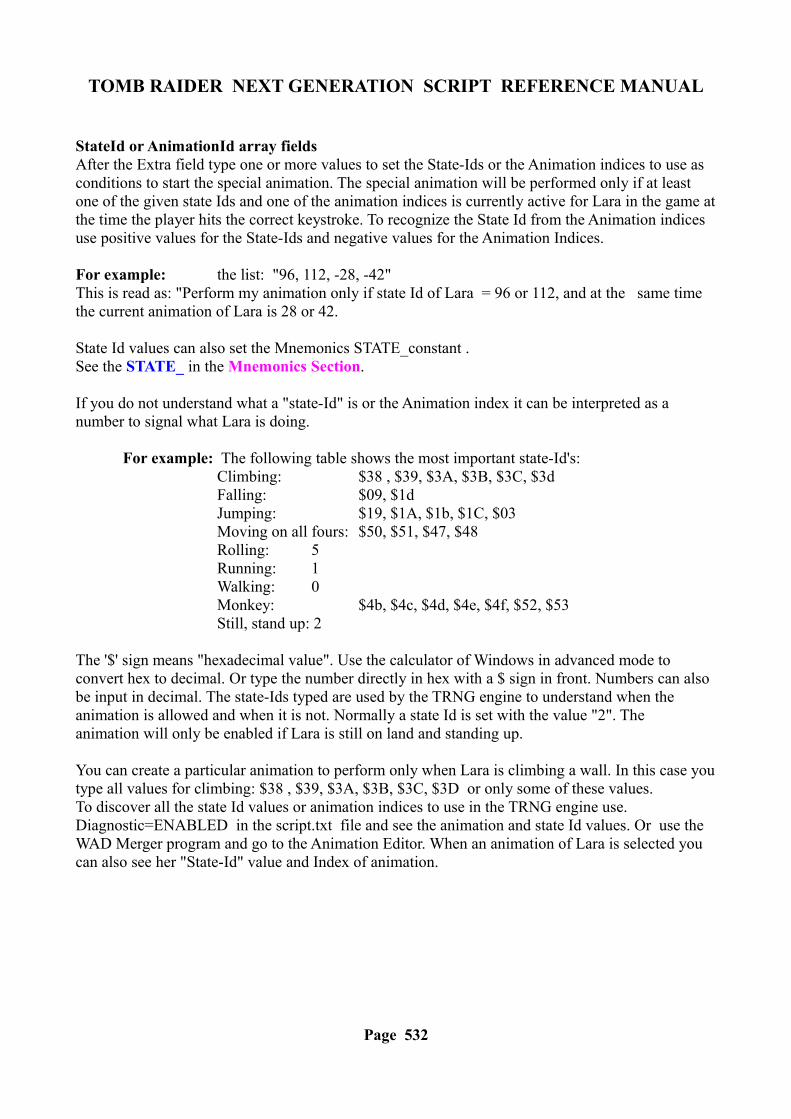
TOMB RAIDER NEXT GENERATION SCRIPT REFERENCE MANUAL
StateId or AnimationId array fieldsAfter the Extra field type one or more values to set the State-Ids or the Animation indices to use as conditions to start the special animation. The special animation will be performed only if at least one of the given state Ids and one of the animation indices is currently active for Lara in the game at the time the player hits the correct keystroke. To recognize the State Id from the Animation indices use positive values for the State-Ids and negative values for the Animation Indices.
For example: the list: "96, 112, -28, -42"This is read as: "Perform my animation only if state Id of Lara = 96 or 112, and at the same time the current animation of Lara is 28 or 42.
State Id values can also set the Mnemonics STATE_constant . See the STATE_ in the Mnemonics Section.
If you do not understand what a "state-Id" is or the Animation index it can be interpreted as a number to signal what Lara is doing.
For example: The following table shows the most important state-Id's:Climbing: $38 , $39, $3A, $3B, $3C, $3dFalling: $09, $1dJumping: $19, $1A, $1b, $1C, $03Moving on all fours: $50, $51, $47, $48Rolling: 5Running: 1Walking: 0Monkey: $4b, $4c, $4d, $4e, $4f, $52, $53Still, stand up: 2
The '$' sign means "hexadecimal value". Use the calculator of Windows in advanced mode to convert hex to decimal. Or type the number directly in hex with a $ sign in front. Numbers can also be input in decimal. The state-Ids typed are used by the TRNG engine to understand when the animation is allowed and when it is not. Normally a state Id is set with the value "2". The animation will only be enabled if Lara is still on land and standing up.
You can create a particular animation to perform only when Lara is climbing a wall. In this case you type all values for climbing: $38 , $39, $3A, $3B, $3C, $3D or only some of these values.To discover all the state Id values or animation indices to use in the TRNG engine use. Diagnostic=ENABLED in the script.txt file and see the animation and state Id values. Or use the WAD Merger program and go to the Animation Editor. When an animation of Lara is selected you can also see her "State-Id" value and Index of animation.
Page 532

TOMB RAIDER NEXT GENERATION SCRIPT REFERENCE MANUAL
ANIMATION_SLOT AnimationSlot=
Syntax: AnimationSlot= Slot, ActionType (AXT_...), AnimIndex, Key1, Key2, FAN_ flags, ENV_ Environment, Distance For Env_, Extra, StateId (STATE_...) or (-)AnimationIndex array (...)
Scope: To use in [Level] section
The AnimationSlot is very alike the Animation command with the difference that the AnimationSlot works on a moveable differently with Lara. Use it to create a new moveable or vehicle, or to change the animations of some already existing moveable.
Most of the fields and flags of the AnimationSlot are the same as the Animation command, therefore only the difference between the two commands will be explained. To get information about the common fields read the description of the Animation command.
Slot fieldIn this field type the slot number or mnemonic constant (BADDY_1, MUMMY) of the slot to change or create.
ActionType (AXT_...) fieldIn the ActionType field type an AXT_ value to specify the meaning of the action or a negative number for the animation to replace.
For example the Action Type for a new moveable will have values like:
AXT_MOVING_FORWARD, AXT_TURN_LEFT, AXT_JUMPING, AXT_SHOOTING etc.
To modify an already existing enemy or vehicle type in this field the negative value of the animation to change. It is important to understand that it is not the same thing as using the AnimationSlot to replace an old animation with a new one, or using the Animation Editor program to replace the old animation with the new one, because with the AnimationSlot the new animation will be performed ONLY when the conditions set in the command are true but in all other cases the old animation will be performed. Therefore, with the AnimationSlot command add new animations to the object, to be performed in the cases you want. Practically with this method, you can also remove an old animation you do not want, avoiding a crash which could happen if you removed the animation with the Animation Editor. To remove an animation just replace it with another compatible old animation and that moveable will never perform the animation replaced.
Remarks: It is not possible to modify the moving features of old vehicles. All AXT_ settings always work with new moveables. You can set two or more AnimationSlot commands for the same AXT_ value or negative animation, just the conditions were different to give a sense to these duplicates. When you use a negative animation index to replace an old animation, the check will be performed when the old animation is at its first frame and has not been shown in the game. For this reason the other conditions, for example about the current state-id should always be set at the state-id used by the old animation replaced.
Page 533
TOMB RAIDER NEXT GENERATION SCRIPT REFERENCE MANUAL
Other fields (common to Animation command)All fields following the (above) ActionType field, are the same as the Animation command, so read the description of the Animation command to have information about those fields.
The difference between the two commands:
(1) Since the AnimationSlot works on a specific slot the animation numbers and state-ids in the final State_id, AnimIndex array will regard the animation and state Id's of that slot.
(2) Except for Vehicles, Key1 and Key2 fields are unused in the AnimationSlot, since it is not the player who controls the enemies.
(3) When building a vehicle you work on two different slots: the slot of the vehicle, and the slot with Lara 's animation used for the vehicle. Since Lara and the vehicle will always have the same animation number at the same moment (until Lara is driving it), it is not a problem to set in the AnimIndex field the animation number. It is not the same to type in the Slot field (the first field of the AnimationSlot command)of the vehicle slot or the Lara 's animation slot, because the condition about environment and distance will regard one or other moveable in accordance with this choice. For this reason, set the vehicle slot for animation type about the moving of the vehicle, since it has a bigger collision box and that is the most important. Lara 's animation slot is used to compute other particular situations like the further injury of Lara from enemies.
Remark: When a condition is set for Lara 's animations the effective object that will be used will be owned by Lara, with the only differences about the animations used that they will be those of the specific Lara 's animation slot.
(4) When the ENV condition: ENV_CONDITION_TRIGGER_GROUP flag is used, the actions and conditions triggers stored in that trigger group can be redirected to work on our enemy, vehicle, or Lara 's animation slot by using one of following trigger group flags:
TGROUP_USE_ITEM_USED_BY_LARA_INDEX This is the vehicle driven by Lara
TGROUP_USE_EXECUTOR_ITEM_INDEX This is the index of Lara while she is driving, or it is the index of the enemy you are changing/creating with the AnimationSlot command
TGROUP_USE_FOUND_ITEM_INDEX (this is, as usual, the furthest item that has been found with a test position condition in the AnimationSlot command).
(5) For the ENV_ conditions that check distance or height of a floor or ceiling, when the slot of the AnimationSlot is that of the vehicle the compute will happen of collision box of the vehicle. When the conditions regard the free space in front of the vehicle, three controls will be performed: two on the forward edges of the the vehicle and the third in the middle forward side. This is necessary because a vehicle is wider than Lara and a single check could be not enough to be sure.
This means: It is not necessary to duplicate or triplicate the checks on all the width of the vehicle because this will be done when working on a new vehicle. Similarly, for creating an enemy with a very wide collision box.
Page 534
TOMB RAIDER NEXT GENERATION SCRIPT REFERENCE MANUAL
ASSIGN_SLOT AssignSlot=
Syntax: AssignSlot=MyUsedSlot , SlotType
Scope: To use in the [Level] section
Remark: From version 1.2.2.2 the Assign Slot has new features so read the following updated description.
MyUsedSlot fieldNumber or constant name to identify a slot position of the standard tomb4 wads (example: "ENEMY_JEEP" or 34) This slot identifies where you placed your object in the slot list.
SlotType fieldIn this field type from where the features to assign to your object are taken. In the new mode type as a Slot Type any slot and all of the features of this slot will be forced to the object you place in My Used Slot slot.
For example: If you place a restyled crocodile in the Animating1 slot and you want to give him the features of a real crocodile just type in the [Level] section the following:
AssignSlot= ANIMATING1, CROCODILE
You can use the Assign Slot to have different enemies with the same features but different looks, like two or more types of crocodile, or a different BADDY_1 enemy with different layouts, etc.
Remark: Not all slots will accept a reassignment. The doors, waterfalls, switches and some emitters will have trouble in a reassigned slot. Use this command only to work with enemies. When a slot is reassigned it is necessary that both of the slots are present in the wad.
For example: In the command: AssignSlot= ANIMATING1, CROCODILE
It is necessary that there is at least one real crocodile in the CROCODILE slot.
Some enemies like BADDY_1, BADDY_2, Von Croy and the Guide require an alternative skin slot. By default the alternative skins are present in following slots:
Alternate skin of BADDY_1 in MESHSWAP3 Alternate skin of BADDY_2 in MESHSWAP2Alternate skin of Von Croy in MESHSWAP1Alternate skin of the Guide in MESHSWAP2
When re-assigning some of the above enemies you have to supply a new alternative skin but you cannot place it in the mesh-swap slots. Place the alternative skin in the slot immediately following the one used.
Page 535
TOMB RAIDER NEXT GENERATION SCRIPT REFERENCE MANUAL
For example: If you use the script command: AssignSlot= ANIMATING4, BADDY_1the TRNG engine looks for the alternative skin for BADDY_1 in the ANIMATING4_MIP slot since this is the slot that follows the ANIMATING4 slot with the main object (reassigned) to BADDY_1. You can assign to new re-assigned enemies a new Health Points (vitality) different from the other Health Points of the original object.
In the above example:AssignSlot= ANIMATING4, BADDY_1
You can force the BADDY_1 in the ANIMATING4 slot to have Health Points different from the other BADDY_1 slots, using the ENEMY= command:
Enemy= ANIMATING4, 1400, IGNORE, IGNORE, IGNORE, IGNORE, IGNORE
A different damage to Lara for ANIMATING4 cannot be set. A different value in an enemy command for damage will be ignored. The damage of the reassigned enemy will be the same for the source assigned slot. In the example it will be the same damage for all other BADDY_1 objects. If you want to change the damage affected by a reassigned enemy you will have to use the ENEMY script command to modify the damage of the original object from where you got the re-assignment.The reassigned enemies do not support a MIP version The reassigned enemies cannot have animations different from those of the original enemy. In reality the animations of the reassigned slot will not be used in any other way.
Trick: The only way to overcome the above limitation is to insert in some animation of the original enemy an exported flip-effect used to call a Trigger Group in the script.txt file. If you type in this trigger-group a starting condition about the slot Id of the current item (see TRNG Variables demo), you could perform some animation command only when that animation will be performed by the reassigned enemy. In this animation command you could place the performing of another different animation. This new animation should always be added to the original enemy and never to the reassigned enemy slot.
Page 536
TOMB RAIDER NEXT GENERATION SCRIPT REFERENCE MANUAL
COLOUR_RGB ColorRGB=
Syntax: ColorRGB=IdColor, Red, Green, Blue
Scope: To use in [Level] section
With ColorRGB you can insert a RGB value to use later with some flip-effect or actions using the IdColor as a reference to locate it.
IdColor fieldEnter a progressive number to identify this color from other colors set in the same [Level] section. When you use a flip-effect or action requiring a script color insert this IdColor number in the trigger to locate the color.
Red fieldIntensity of the Red. Type a value between 0 and 255
Green fieldIntensity of the Green. Type a value between 0 and 255
Blue fieldIntensity of the Blue. Type a value between 0 and 255
Page 537
TOMB RAIDER NEXT GENERATION SCRIPT REFERENCE MANUAL
COMBINE_ITEMS CombineItems=
Syntax: CombineItems=FirstItem (slot), SecondItem (slot), FinalItem (slot)
Scope: To use in the [Level] section
FirstItem, SecondItem, FinalItem fieldsAll fields accept a slot value that can be found in the SLOT MOVEABLES section..
Remark: DO NOT use ANY slot but only the slot corresponding to the inventory items. You can recognize these slots because they have in their name the word "_ITEM". For example you cannot use PISTOLS_ANIM or LARA_HOLSTERS_PISTOLS but you can use PISTOLS_ITEM or PISTOLS_AMMO_ITEM.
DescriptionThis command allows the creation of a new combining rule about inventory items to get a new item.The TRNG engine allows the combination of two items such as "PUZZLE_ITEM1_COMBO1" with "PUZZLE_ITEM1_COMBO2" to get the new item "PUZZLE_ITEM1" in the inventory. Or combine the "LASERSIGHT_ITEM" with the "CROSSBOW_ITEM" to get the Crossbow with Laser-sight. Using the Combine Items command get other targets such as:
1) To create any coupling and not only with specific "combo" items or with laser_sight + weapon.For example: Combine "Puzzle1" with "Key2" to get any other new item.
2) Set as a final item not only the Puzzles items but also weapons, medipacks, examine items and all other inventory items.
It is possible to build a weapon allowing the player to pick up different pieces and only when all the pieces are picked up will the working weapon be built.
An example for a final item that has 2 , 3, 4, 5 and more pieces.To realize this target type two or more Combine Items command in the same [Level] section. For example if the final weapon was the Grenade Gun and there are three pieces to build it type the following script commands:
CombineItem= PUZZLE_ITEM1, PUZZLE_ITEM2, PUZZLE_ITEM3CombineItem = PUZZLE_ITEM3, PUZZLE_ITEM4, GRENADE_GUN_ITEM
In the above commands use the PUZZLE_ITEM3 only as an intermediate item. The three pieces to build the Grenade Gun will be:
(PUZZLE_ITEM1 + PUZZLE_ITEM2) + PUZZLE_ITEM4 = GRENADE_GUN_ITEM
Remark: It is not logical for a Puzzle_Item3 with Puzzle_item1+PuzzleItem2, since there are already two combos to build a Puzzle Item. The above example is given to show the method. It would be more logical to have our three pieces of the weapon using some default combo items, for example:
Page 538
TOMB RAIDER NEXT GENERATION SCRIPT REFERENCE MANUAL
PUZZLE_ITEM1_COMBO1 + PUZZLE_ITEM1_COMBO2 + KEY_ITEM1_COMBO1
Use the combine rule to get the PUZZLE_ITEM1 from (PUZZLE_ITEM1_COMBO1 + PUZZLE_ITEM1_COMBO2) type this command:
CombineItem= PUZZLE_ITEM1, KEY_ITEM1_COMBO1, GRENADE_GUN_ITEM
Lara will pick-up COMBO1 and COMBO2 for PUZZLE_ITEM1. Lara will pick-up the third piece, the KEY_ITEM1_COMBO1 and at the end when combined (with the standard combine rule) the COMBO1+COMBO2 for PUZZLE_ITEM1. Then Lara will be able to combine the new PUZZLE1 item with the third piece of the weapon stored in the KEY_ITEM1_COMBO1 item.
Remarks: DO NOT use IGNORE in this command. If invalid slot values are typed the corresponding Combine Items command will be ignored by the TRNG engine. The maximum number of Combine Items in the same [Level] section is 67 instances.
CRS CRS=
Syntax: CRS=ENABLED/DISABLED
Scope: To use in the [Options] section
CRS means Crash Resume System and it works in the same way as the CRS settings of the NGLE program. When CRS is enabled it is very improbable the game was stopped by a crash.
The use of CRS is to disable CRS (CRS=DISABLED) while you are building your level (because it is better to know if somewhat does not work). ENABLE CRS only when developing your final release to avoid further crashes.
Remark: When CRS is disabled if a crash occurs a file named Last_Crash#.txt will be created in the current trle folder. Another little file (always the same) will show that the game has been closed and what happened in the crash and where the Last_Crash file with the crash log is located.
Page 539
TOMB RAIDER NEXT GENERATION SCRIPT REFERENCE MANUAL
CUSTOMIZE Customize=
Syntax: Customize= CUST_ Customize Type, Arguments
Scope: To use in the Level] section.
The Customize command permits changes for many settings, replacing the old default values and behaviour of the standard tomb4 engine. You can type Customize commands in the same [Level] section. By default the settings will work only for the current level. To have a setting working for all levels insert the Customize= command in the [Level] section of the Title level.
CUST_ Customize Type fieldIn this field type a CUST_constant to specify what type of customizing is required. See the CUST_ constants in the Mnemonics Section.
Arguments fieldsThe arguments that are typed after the CUST_ type are variable numbers (in some circumstances they are absent) and are different in accordance with the current CUST_ type. Read the description of each specific CUST_ value to know its use. See the CUST_ constants in the Mnemonics Section.
CUT_SCENE CutScene=
Syntax: CutScene=ENABLED
Scope: To use in the [Level] section
The Cut Scene command permits a signal to the current level like a Cut Scene level.The operations performed by this command are only two:
1. All keyboard/joystick input will be disabled for the whole of the Cut Scene level.2. If Lara has weapons or a flare in her hand it forces Lara to get a free hand. This operation to
free hands will be performed at the start of the Cut Scene level.
Page 540
TOMB RAIDER NEXT GENERATION SCRIPT REFERENCE MANUAL
DAMAGE Damage=
Syntax: Damage=Flags DMG_ , SecondsForDeath, SecondsForBarRestore, BarColor, BarName, BlinkPercentage
Scope: To use in the [Level] section
The Damage command allows the customized appearance and behaviour of the Damage feature in Damage Rooms and Cold Water Rooms in the game.
Remark: Do Not use any Damage command in the script.txt and Damage Rooms and Cold Water Rooms will work using the default settings (see below).
Arguments:
FlagsDMG_ = One or more constant values to set the behaviour of Damage. Add different DMG_ values using plus '+' sign to sum them. See the DMG_ flags in the Mnemonics Section.
Currently there are the following DMG flags:
DMG_INDIRECT_BAR Enable progress Bar for indirect Damage. When this flag is present the Damage works in this way: The Damage Bar decrease but not until it is empty is there any damage for Lara.When the Damage Bar is empty, the Health Points of Lara start to decrease.If you do not set this flag the Damage will directly affect the Health Points Bar of Lara.
DMG_ONLY_PADRestricts the Damage only when Lara is touching the floor of the current Damage Room. For this reason this flag will be IGNORED in Cold Water Rooms. Use this flag to simulate a burning electric floor in a room.
DMG_INCREASE_BARTo use only with DMG_INDIRECT_BAR flag. By default the Damage Bar starts full and decreases with time. Using this flag you force the Damage Bar to start empty and increase over time. Use this flag to simulate an increase of temperature in the current room.
DMG_COLD_WATERSet this flag to customize the Cold Water Room feature. If you do not use this flag, the setting will effect Damage Rooms.
DMG_POISON_LARASetting this flag forces a poisoning of Lara in the Damage Rooms.
Page 541

TOMB RAIDER NEXT GENERATION SCRIPT REFERENCE MANUAL
DMG_BURNING_DEATHTo use only for waterless Damage Rooms. If this flag is ENABLED Lara will burn when:The indirect Bar is empty (if the indirect Bar is present).The Health Points Bar is empty if you do not enable the indirect Bar for Damage Room.This flag can be used to simulate a room where the temperature increases until Lara burns.
DMG_BURNING_SCREAMTo use only with the DMG_BURNING_DEATH flag. If you set the DMG_BURNING_DEATH flag set this flag to force Lara to scream when she burns. This flag only works with the indirect Bar, because when the indirect Bar is not set Lara burns and dies immediately and so has no time to scream.
DMG_SLOW_DISAPPEARINGTo use only with DMG_INDIRECT_BAR flag. With this flag when Lara goes off from the Damage/Cold Water Room the Bar will increase slowly until it is full and then it will be removed from the screen. If you do not set this flag the indirect Bar will disappear immediately, not when Lara exits from the Damage Room.
DMG_ALERT_BEEPTo use only with the DMG_INDIRECT_BAR flag. If you set this flag, when the Bar goes down to 15 % (or less),the bar will blink and a little "beep" sound will be performed together with blinking.If this flag is absent the Bar will Blink but no sound will be made.
SecondsForDeath = Damage procedure use seconds as unit for Damage and speed of the Bar. The number set in this field is the number of seconds necessary to fully decrease the whole bar. So, if a large number is set (for example 40 seconds) the damage is very small. If a small number of seconds is set the damage will be large and Lara will be killed quickly.
SecondsForBarRestore = This field works like the above field (SecondsForDeath) but in this case it controls the speed to fully restore the Health Bar when Lara goes from the Cold Water or Damage Room.
BarColor = In this field type a RGB value to set the main color of the Bar. The Red Green Blue value is in hexadecimal format (use '$' prefix for hexadecimal values) is: $RRGGBB
Where: RR = RED, GG=GREEN and BB=BLUE intensity. Some possible values are:
$f924f1 PINK (default color for the Cold Water Rooms.)$F6F923 YELLOW (default color for the Damage Rooms.)$fb8953 ORANGE$FF0000 RED$00FF00 GREEN$0000FF BLUE
BarName = Set in this field a string to describe the Bar in the game.
Page 542
TOMB RAIDER NEXT GENERATION SCRIPT REFERENCE MANUAL
For example: If you type in this field the string "Temperature", this text will be shown in the game at the bottom of the Damage Bar.
Remark: The text typed in this field must be present in the english.txt file in standard strings or in the ExtraNG strings sections. A way around this limitation is to type directly the index value of the string instead of typing the real text. To know indices of strings use the Strings Panel of the NG Center program.
The index must be typed in the following way:
#12 For standard string with index = 12 present in [Strings] section!12 For ExtraNG string with index = 12 present in [ExtraNG] section
If you use the index of the string is not necessary that the string was also present in the english.txt but only in the specific language.dat file used in the game.
Remark: If you do not want to show a name for the Bar you can type in this file "IGNORE" or null sign for strings * (asterisk).
BlinkPercentage fieldSet from what percentage the Bar will start to blink. For example if you set 30 as BlinkPercentage, the Bar will blink when it 30 % or less of the full Bar. If you type IGNORE in this field, it will use the default value of 20%
Default values: If you do not set a Damage command in the script for the current level the settings will be the following:
Damage Rooms: Damage=DMG_INDIRECT_BAR + DMG_SLOW_DISAPPEARING + DMG_ALERT_BEEP, 16, 6, $F6F923, IGNORE
Cold Water Rooms: Damage=DMG_INDIRECT_BAR + DMG_SLOW_DISAPPEARING + DMG_ALERT_BEEP, 10, 5, $f924f1, IGNORE
Page 543
TOMB RAIDER NEXT GENERATION SCRIPT REFERENCE MANUAL
DETECTOR Detector=
Syntax: Detector= Flags (DTF_..), MetricScale, MetersOfRange, Target Items array
Scope: To use in the [Level] section.
In the TRNG engine there is a new object called the "Detector". With the Detector Lara is able to locate the position of targets in real time. There are two models of Detector: The Pointer Detector that is found in the ng2.wad and the Radar Detector that is found in ng.wad. For both Detectors set a Detector script command in the script.txt to enable it and set its features.
Fields of Detector script command:
Flags (DTF_..) fieldAdd different DTF_ constants in first field of the Detector command to set its features.
Currently there are the following DTF_ flags: DTF_ENGAGE_ALWAYSDTF_ENGAGE_IN_RANGEDTF_ENGAGE_INVENTORY
The DTF flags starting with "ENGAGE" set what way to start the Detector in the game. Choose only one of the above flags.
If you set DTF_ENGAGE_ALWAYS the Detector will always be present on the screen.
Using DTF_ENGAGE_IN_RANGE the Detector will automatically be shown when Lara is close to some target within the given range (see the following fields). With the ENGAGE_IN_RANGE set for example at 50 metres and the Detector will be shown when Lara is 50 metres or less from the nearest target. When Lara is further away the Detector will be hidden.
The engage mode DTF_ENGAGE_INVENTORY sets the Detector like the other equipment of Lara. She has to pick it up. The Detector is in the AMULET OF HORUS slot, i.e. QUEST1 and select it in the inventory. When Lara selects it in the Inventory the Detector will be shown. To remove it from the screen select it in the inventory choosing "Cancel".
DTF_REQUIRED_ITEMThis flag may work together with the above to en-gauge the flags to set the QUEST1 item as necessary to ENABLE the Detector. For example if you use the flags DTF_ENGAGE_ALWAYS + DTF_REQUIRED_ITEM the Detector will always be shown if Lara has picked up it. If it is absent from the inventory it will not be shown. If you choose as the engage mode the DTF_ENGAGE_INVENTORY flags it is not necessary to also set the DTF_REQUIRED_ITEM flag because it will be added by the TRNG engine. Used with engage DTF_ENGAGE_IN_RANGE, the flag DTF_REQUIRED_ITEM requires two conditions to show the Detector: the QUEST1 item has to be in the inventory (Lara picked it up) and some Target item is within the specified range.
Page 544
TOMB RAIDER NEXT GENERATION SCRIPT REFERENCE MANUAL
DTF_RADAR_MODEThis flag sets the Detector in Radar Mode. If you omit to set this flag the Detector will work in Pointer Mode. There are big differences between the two modes and some fields and flags will only work for a specific Detector mode.
In the Pointer Mode: The Detector has a pointer like a compass that shows the current target. The current target is the first target in the list present in the game. The Pointer Mode only works on one target at a time: when the first target has been picked up (or killed) the Detector will start to point to the second target in the list and go on.
In the Radar Mode: The Detector is able to scan all of the targets at the same time that are in the range of the radar.
Note: Remember that the range of the radar is different to the range for activation. The range of radar is given by the formula 6 * MetricScale, where the digit "6" is the (fixed) number of grid sectors of radar. For example if you set 2 metres for the metric scale the target will be shown on the radar only when it is 12 metres or less from Lara. Radar Mode is more difficult than Pointer Mode to understand because the target in Radar Mode will always be shown with upwards = north, while in the Pointer Mode the pointer is always relative to where Lara is looking. In Pointer Mode when the pointer is on the red sign this means Lara is looking in the correct direction of the target. In Radar Mode it is advisable that Lara looks to the north to understand if the targets are at her left or right.
DTF_FAST_RADAR_SCANThis flag is used only with the Detector in the Radar Mode. If you set DTF_FAST_RADAR_SCAN flag the scanning of targets will be faster. In Radar Mode the position and distance of targets will be updated only when the hand of the radar "touches" the target.
DTF_SWINGING_POINTERThis flag works only in the Pointer Mode. By default the pointer points at the target. It adds a swinging simulation of the pointer like the compass in the inventory to get a more realistic Detector.
DTF_INVERSE_VPOINTERThe current flag works only in Pointer Mode. You can invert the position of the line on the vertical scale at the right of the detector. By default when you DO NOT use this flag the floating line shows where Lara is. The fixed red pointed line at the centre shows the position of the target. If you think it is not logical use this flag invert the situation. With the DTF_INVERSE_VPOINTER flag the floating point is the vertical position of the target. The fixed red line is the vertical position of Lara.
DTF_NONEIf you do not want to set any flag in this field you can use a DTF_NONE flag.
MetricScale fieldIn this field set a value in metres that will be used to assign the distance for each sign of the vertical scale or grid table for the Radar. If you set IGNORE in this field the default value used will be 2 metres. Since a block in the game is 2 metres, setting 2 as metric scale each line in the Detector will define a distance of 1 block ( 2 metres). For example in the Radar mode the Detector shows a target
Page 545
TOMB RAIDER NEXT GENERATION SCRIPT REFERENCE MANUAL
at 3 squares (Radar) from Lara (centre of the Radar panel). This means that the target is 3 sectors and 6 metres from Lara.
In the Pointer Mode the metric scale works only for the vertical panel. The vertical strip at the right of the Detector. In Radar Mode it is very important that the value set is a metric scale because only targets in the radius of 6 * MetricScale metres are valid. The six value is the number of squares of radius of the Detector.
For example: If the Radar shows targets at 100 metres distance (50 blocks) set a metric scale (100 / 6) = (about) 16 metres. So for the Pointer Mode it is better to use a low value for the metric scale (the default value "2" is good). with Radar Mode it is better to use big values.
MetersOfRange field.This field is used only if you set the flag DTF_ENGAGE_IN_RANGE as engage mode. When you use engage in the range on activation mode the value in this field is the distance (in metres) of the targets necessary to show in the game Detector. If you use the Radar Detector it should have a reasonable range set with the value of range visibility computed by the MetricScale.
For example: If you set 2 (default) as the Metric Scale this means targets are shown when they are (2*6) 12 metres from Lara. Now set the same value (12) for the Meters of Range so the Detector will be shown only when there is something to show (a target in the visible range).
Target Items array fieldsIn the field of Target Items Array, type one or more indices of items (only moveables) seen in the NGLE program. If you type two or more indices you have to split them with commas.
Example: Detector = DTF_REQUIRED_ITEM+DTF_ENGAGE_IN_RANGE+DTF_SWINGING_POINTER + DTF_INVERSE_VPOINTER, 2, 30, 365, 372, 373, 375, 377
In the above row the "2" value is the Metric Scale, the "30" is the MetersOfRange, while all the other numeric values (365, 372, 373, 375, 377 ) are indices of the moveables to monitor.
Remark:The list of item array works in a different way when using Radar or Pointer Mode.
Pointer Mode.In Pointer Mode the Detector will show the position of only one item at a time. In the above example the first position shown will be that of the target with the index 365. Only when the first index (365 in above sample) is picked up or killed (if it is a BADDY) the Detector will start to follow the second item (372 index in the above example). Knowing this mode of working it is clear that you should not use non-killable/pick-able items (like a door or an animating) because the next item in the list will never be followed by the Detector. If you want set a non killable/pickable item as a target do the following: Use the Radar Mode Detector because it works on all targets of the list at the same time. Or place the index of the non killable item at the end of the list.
Page 546
TOMB RAIDER NEXT GENERATION SCRIPT REFERENCE MANUAL
There is also another chance: use an ACTION trigger (in the special trigger of NGLE) to remove (kill) this item when Lara reaches it by walking on a square with a kill trigger.
Radar ModeIn the Radar Mode all targets will be followed at the same time. Only targets within the visibility range (MetricScale * 6), will be shown on the RADAR screen. The radar panel show targets in different ways according to their vertical position. When a target is at same height (floor) as Lara the target will be shown as a little blinking circle. When a target is ahead of Lara ( 4 or more metres) it will be shown as a triangle with the apex pointing to north. When a target is behind Lara (4 metres or more) the triangle will point to south. Same shapes will be shown in the vertical panel (the row at the right of the Detector). Targets at the same height of Lara (+2 to -2 sectors) will be shown as a circle..
Page 547

TOMB RAIDER NEXT GENERATION SCRIPT REFERENCE MANUAL
DIAGNOSTIC Diagnostic=
Syntax: Diagnostic= ENABLED/DISABLED
Scope: To use in the [Options] section
Enable the diagnostic with Diagnostic=ENABLED. In the game information will be shown on the screen in real time about the number of the current Lara animation, the current State-Id of Lara and the current effective frame rate in the game. This information is useful to discover the number of some animation. Then you can use this number to locate the animation in the wad file using the Animation Editor of the WAD Merger program.
If there are problems reading the information in real-time remember to use the Tomb4_Logger.exe program to catch all of the diagnostic messages and store them in a text file. If you start the Tomb4_Logger.exe before starting the TRNG engine with DIAGNOSTIC ENABLED you will have a log file. To get information about the Load Camera in the log file press the the F1 key. This is a sample of text you can get in this way:
21656: LoadCamera= 6656, -2817, 14123, 6656, -2631, 12800, 2 21672: Animation=103 StateId=2 ($2)
DIAGNOSTIC_TYPE DiagnosticType=
Syntax: DiagnosticType =DiagnosticType (DGX_...), Extra Dgx flags (EDGX_...)
Scope: To use in the[Options] section
This command works with Diagnostic=ENABLED.To enable the diagnostic set the type of Diagnostic information to show using the DiagnosticType command.
DiagnosticType (DGX_...) fieldIn this field type one or more DGX_ constant to enable the specific Diagnostic information you want to see.
Extra Dgx flags (EDGX_...) fieldThis extra filed is required by the EDGX_ constant to customize the Diagnostic type chosen.See the DGX_ constants in the Mnemonics Section to know if they accept some EDGX value in this field.
Page 548
TOMB RAIDER NEXT GENERATION SCRIPT REFERENCE MANUAL
DIARY Diary=
Syntax: Diary= Id Diary, SlotDiaryItem, LaraDiaryFlags (LDF_...), BackGroundImageId, Default PageLayout (PL_...), FirstString, TitleWFontId, CommonTextWFontId
Scope: To use in the [Level] section
This command ENABLES Lara 's Diary and permits the setting for the Diary.Lara 's Diary should be a Log where there are texts and images to describe the adventure that is going on. There are flip-effects to add new pages to Lara 's Diary, to update the Diary in accordance with the evolution of the adventure. The player is able to select this item in the inventory like it was an Examine object, going into the Diary mode where the player can browse and read an unlimited number of pages, texts and images.
Remark: At the bottom of the description of Diary= command, there is a description about the special text formatters used to insert text to show in the Diary.
Id Diary fieldThere can be up to 10 different Diaries in the same level. To distinguish the Diary to use specify its Id in a flip-effect trigger.
Remark: The chance to have a Diary in the permits the use of an advanced Examine item with information and images that can be continuously updated.
SlotDiaryItem fieldIn this field type the slot corresponding to Lara 's Diary item. The slot has to be an inventory item, and it is suggested to use a QUEST Item. Do not USE QUEST_ITEM1 as this is used for the Detector : QUEST_ITEM1
QUEST_ITEM2QUEST_ITEM3QUEST_ITEM4QUEST_ITEM5QUEST_ITEM6
In the example "Lara's Diary" on the TRNG website uses the QUEST_ITEM2.
LaraDiaryFlags (LDF_...) fieldIn this field type one or more LDF_ flags set the Background audio track when the Diary is displayed. If IGNORE is typed, no change will be made and the audio track of the game will continue as the Diary is displayed in the Inventory. To stop the game audio track and set another custom background music while the player is watching the Diary set the correct LDF_ flags. An important flag is the LDF_CONTINUE_DIARY. Use a unique meaningful value when a Diary is started from a previous level/s. See the LDF_ constants in the Mnemonics Section.
Page 549
TOMB RAIDER NEXT GENERATION SCRIPT REFERENCE MANUAL
BackGroundImageId fieldLara 's Diary in Examine mode is a bi-dimensional item and it is necessary to set the image for the background. In this field type a number for a bmp image in this format: IMAGE4.bmp
For example: To use the above image as a background type the value 4 into the BackGroundImageId field.
Remark: The bitmap image can have any size and it will be resized to fit the screen. However use an image of at least 640x480 pixels, or better i.e. 800 x 600 pixels or higher
If the TRNG engine detects a wide-screen monitor, the background image will NOT be resized to the full screen but will be enlarged to fit the height of the screen. The width will be set to preserve the size ratio to avoid distortions of the image. It could happen there are two vertical columns at the sides of the Diary image. Supply the image#.bmp file with the level files. The TRNG engine is able to find images in these folders: trle folder (i.e. in same folder as the tomb4.exe)
trle\PIX sub-folder
Currently the TRNG engine supports only images in a bitmap (.bmp) format. Images in jpg format can be converted to bmp using the utility CONVERTER.exe
Default PageLayout (PL_...) fieldIn this field type the PL_ flags to choose the default layout for the Diary. "layout" means the positions of text, title and images to display on the same page. Different layouts are set t display the above elements. Ty to create a background image in accordance with the required layout. See the PL_ constants in the Mnemonics Section.
FirstString fieldTo initialize the Diary with the first text string. The text typed in this field has to be the same as that in an ExtraNG string.
Remark: Type in the ExtraNG string a file-string in the form: "@MyText.txt" and then type the text in a file named "MyText.txt" and save it in the Script folder. If no first string is required type IGNORE in this field.
Remark: Add strings to the Diary using the flip-effect "Diary. Add (&)NG String to Diary" . It can type one or more pages at the same time. In the ExtraNG string there is a #END_PAGE# tag to separate the pages.
TitleWFontId and CommonTextWFontId fieldsTo set the color and size of the text type a WindowsFont= command script and then place an Identifier for that WindowsFont command in the Diary. The WindowsFont commands used by the Diary command have to be typed before the Diary command. In the TitleWFontId field type the Id for the title. The title will have a larger font size than the common text. Type the Id for the common text in the CommonTextWFontId field.
Page 550
TOMB RAIDER NEXT GENERATION SCRIPT REFERENCE MANUAL
The Text Formatters to use in text pages:The settings typed in the Diary command will work as the default values. All of these settings can be changed for each page. In each page insert special formatters used to inform the TRNG engine about the settings to change in the Diary. The text used for these settings will not be displayed on the screen. All of the textual settings have to be enclosed in a couple of tags <FORMAT> and <END_FORMAT>. Type only one <FORMAT> tag for each page. Type a FORMAT section in each page. If you omit to type a FORMAT section on a page that page will use the default settings typed in the Diary command and NOT the FORMAT setting of the previous page. In the FORMAT section type one or more of the following text tags:
#TITLE_FONT# = Id of WindowsFont for title#TEXT_FONT# = Id of WindowsFont for common text#PAGE_LAYOUT# = PL_.. CONSTANTS#BG_AUDIO# = Identifier of the audio track to play as background for this page#BG_IMAGE# = Identifier of the image to use as a new background#POP_IMAGE# = Identifier of the image to show in this page#TITLE# = Text to show at the start of this page as a Title
How set the end page signal:A very important tag to use in the Diary text is the end of page tag. Type the text and indicate the page end and the page start position. Type in the text the tag :#END_PAGE#. It is important to place the #END_PAGE# on a empty line. This means DO NOT END A PAGE LIKE THIS:
-------------- WRONG METHOD --------The key is yet in bottomless pit. #END_PAGE#Now Lara should find the key but to reach the pit she has to search...------------------------------------------------------
The above position is wrong. The correct mode is to place the end page like this:
-------------- RIGHT METHOD -----------The key is yet in bottomless pit.
#END_PAGE#Now Lara should find the key but to reach the pit she has to search...--------------------------------------------------- To give an idea about how to use the Diary see the following example:-------- Example of text used for Diary ---------
<FORMAT>#TITLE_FONT#=1#TEXT_FONT#=2#PAGE_LAYOUT#=PL_WIDE_IMAGE+PL_ADD_INFO_BAR#BG_IMAGE#=1#POP_IMAGE#=2#TITLE#=Mission Organizer<END_FORMAT>
Page 551
TOMB RAIDER NEXT GENERATION SCRIPT REFERENCE MANUAL
This is the Mission Organizer of LaraIn this pages you can verify the targets Lara has to reach.New pages will be added while the mission goes on, so remember to come back to read this document also in future, you could get important information.#END_PAGE#<FORMAT>#TITLE_FONT#=3#PAGE_LAYOUT#=PL_DOUBLE_PAGE+PL_ADD_INFO_BAR#BG_IMAGE#=3#POP_IMAGE#=4#TITLE#=Beginning...#BG_AUDIO#=56#FRAME_IMG#=20,10,400,500#FRAME_T1#=520,10,400,500#FRAME_T2#=20,600,400,400<END_FORMAT>Lara has to find the man who stole the security key.Last time he was seen in the dark castle on the hill.... other text ....The man is very dangerous because he has a mysterious power...#END_PAGE#
------------- End of Example of text for Lara 's Diary ------------
Above is a short sample of a Diary with two pages and different tag formatters. Looking at the above text, in the first page is:
<FORMAT>#TITLE_FONT#=1#TEXT_FONT#=2#PAGE_LAYOUT#=PL_WIDE_IMAGE+PL_ADD_INFO_BAR#BG_IMAGE#=1#POP_IMAGE#=2#TITLE#=Mission Organizer<END_FORMAT>
Read the above settings in this way:
"#TITLE_FONT#=1" Print the title using font setting stored in the script command:WindowsFont=1, ....
"#TEXT_FONT#=2"Print the common text using the settings stored in the script command:
WindowsFont=2, ...
"#PAGE_LAYOUT#=PL_WIDE_IMAGE+PL_ADD_INFO_BAR"For the first page use a layout with a wide image at the top of the screen in the central position. At the bottom of the screen use the space for information Bar drawn on the background image for this
Page 552
TOMB RAIDER NEXT GENERATION SCRIPT REFERENCE MANUAL
first page.
"#BG_IMAGE#=1" As a background image use the file:IMAGE1.BMP"#POP_IMAGE#=2" Display in the top half of the screen the wide image of the file:IMAGE2.BMP"#TITLE#=Mission Organizer" At top of the wide IMAGE2.BMP, place the Title:Mission Organizer
Then display in the text:<<This is the Mission Organizer of Lara
In these pages verify the targets Lara has to reach. New pages will be added while the mission goes on. remember to come back to read this document to get important information.
>>All of the above are the introduction page for Lara 's Diary.
Then there is the #END_PAGE# tag and the TRNG engine will wait until the player hits the RIGHT arrow key to go to the second page. The settings for the second page are:
<FORMAT>#TITLE_FONT#=3#PAGE_LAYOUT#=PL_DOUBLE_PAGE+PL_ADD_INFO_BAR#BG_IMAGE#=3#POP_IMAGE#=4#TITLE#=Beginning...#BG_AUDIO#=56#FRAME_IMG#=20,10,400,500#FRAME_T1#=520,10,400,500#FRAME_T2#=20,600,400,400<END_FORMAT>
The meanings are:
"#TITLE_FONT#=3" Display the title using font (color and size) set in script command:WindowsFont=3"#PAGE_LAYOUT#=PL_DOUBLE_PAGE+PL_ADD_INFO_BAR"
The layout will be a double page where the next image is shown at the top of the left page. Keep the information bar at the bottom of the screen.
"#BG_IMAGE#=3" Use this image as a background.IMAGE3.BMP"#POP_IMAGE#=4" Show at top of the left page the image:
` IMAGE4.BMP"#TITLE#=Beginning..." Show over the IMAGE4.BMP the title:Beginning..."#BG_AUDIO#=56" Play the audio track stored in the file:trle\audio\056.wav (but it could also be 056.mp3 or 056.ogg )
Page 553
TOMB RAIDER NEXT GENERATION SCRIPT REFERENCE MANUAL
"#FRAME_IMG#=20,10,400,500" Set the position and size where to displaythe image on the page.
In the Diary Layout Page flags set the PL_CUSTOM_LAYOUT. This setting will apply to following pages. If another PL_ LAYOUT is set this setting of "#FRAME_IMG#=" will only be used for this page. Other pages will use the PL_ LAYOUT set in the Diary command.
The values for this tag (20,10,400,500) are in micro units, where 1 = 1/1000 of width or height of the screen size. To compute these values use the utility [Get Screen Frames] found in the Tools Panel of the NG_Center program.
"#FRAME_T1#=520,10,400,500"
Set the position and size of the first frame used for the text on the page. The "first" frame is where the first block of text is placed on the page. In the layout there can be two text frames. In this case the "#FRAME_T1#=" tag sets the first of two text frames. This tag requires micro units. See the description of the "#FRAME_IMG#=" tag for more information.
"#FRAME_T2#=20,600,400,400"
Set the position and size for the second text frame. When the layout has two text frames use the #FRAME_T2#= tag to set the position of the second block of text on the page. This tag requires micro units. See the description for the "#FRAME_IMG#=" tag for more information.
Remarks:
1. The background sounds in the Diary mode will work only if the BASS features in your level are ENABLED.
2. If an #END_PAGE# is placed too low to make the text visible on the screen the player will not be able to view some of the current page and no extra text will be shown over the information Bar
3. When a tag formatter is missing the TRNG engine will use the default setting of the Diary script command
4. To stop a background sound set in a previous page, but not start another audio track, type the tag formatter: #BG_AUDIO#=-1The previous audio track will stop and the default audio track in the Diary script command will be played.
5. To use large text in the NG_Center use the trick to set in the ExtraNG strings the file reference: 45 @FirstPages.txt Then the NG_Center inserts as "ExtaNG string number 45" all the text present in the file "FirstPages.txt". The "FirstPages.txt" has to be in the Script folder when the script.txt is built. Once the script.txt and english.dat are built the "FirstPages.txt" file is not necessary as its contents are compiled into the english.dat or other language file.
Page 554
TOMB RAIDER NEXT GENERATION SCRIPT REFERENCE MANUAL
ELEVATOR Elevator=
Syntax: Elevator=ElevatorIndex, ClickFloorDistance, NumberOfFloors, Elevator flags (EF_...), FirstDoorIndex, InnerKeyPadIndex, Speed, Frame items array
Scope: To use in the [Level] section.
Arguments:
ElevatorIndex= Index you see in the NGLE in the yellow box when you click on the elevator item.
ClickFloorDistance = Number of clicks for the height of each floor. For example if there are three blocks between each floor type "12" in the field as each block is 4 clicks.
NumberOfFloors = The number of floors for the elevator. For example if you type 3 it means the elevator will move to 3 different floors.
ElevatorFlagsLook in the EF_constants for the Elevator flags information. Place one or more flags using the "+" sign or type the sum of the values. Remember that some flags are incompatible to use at the same time, like Multi-doors and single-door flags.
$0001 EF_MULTI_DOORS If the TRNG engine has to handle all doors on any floor set this flag and then set in the IndexFirstDoor the index of the door at the first floor.
The management of the TRNG engine is very simple. When the elevator reaches a floor the door opens. When the elevator leaves a floor the door on that floor will close. If you use the multi-doors handling it is important to place all of the doors at the same vertical distance set in the ClickFloorDistance field. It is important because if a door is at a different height it will not be found by the TRNG engine and there will be problems. Place each door at the same height where the elevator stops floor for floor.
$002 EF_SINGLE_DOOR Using SINGLE_DOOR mode cannot set the multi-door flag. In the SINGLE_DOOR mode the elevator has a single door linked with the elevator cage. This door will be moved up and down with the elevator. When the elevator reaches a floor the door will open. When the elevator starts from a floor the door will close. If this flag is set in the FirstDoorIndex field the index for the door is placed near to the elevator.
Remark: Use a "fake" door found in the slot ANIMATING2 in the ng2.wad This animating will , slide horizontally like a door if the SINGLE _DOOR mode is used and its index is set in the FirstDoorIndex field. There is a reason to use a fake door like this. When you use a real door in some circumstances (it depends by door type and by position of door in respect to linking rooms ) the TRNG engine will add an invisible sector collision in front of the door when it is closed. The fake animating door avoids this problem.
Page 555
TOMB RAIDER NEXT GENERATION SCRIPT REFERENCE MANUAL
$004 EF_INNER_KEYPAD To insert the keypad to choose the floor inside the elevator set this flag and in NGLE place the keypad oriented on the elevator wall. Then type the index of the keypad in the InnerKeyPadIndex field. Remember to use the "fake" keypad found in the ANIMATING16_MIP of the ng.wad or ng2.wad and not the real keypad in the SWITCH_TYPE1. The reason for this is because of a technical problem. The SWITCH_TYPE requires a switch trigger to work but on the elevator floor you have to place dummy triggers. For this reason the management of the "fake" keypad of ANIMATING16_MIP will be performed in a hard-coded mode by the TRNG engine. The keypad will work in the same way as a SWITCH_TYPE1 but with no need for a special trigger.
$0008 EF_MODE_YO_YO YO_YO mode is a bit curious. The elevator will move up and down without stopping at the floors.Using this mode there are NO DOORS as there is no time to open and close them. Lara will have to jump in and out of the elevator. An interesting application of the YO_YO mode is to give the elevator the role of a Trap. Lara can be killed if she is under the elevator when it moves down, or over the elevator when it moves up to the ceiling.
Remark: Do NOT mix YO_YO mode and STOP_AND_GO mode. If the elevator is set for YO_YO mode the number of floors will always be two (2) and the distance between the floors will be the height of the whole movement that the elevator will cover before reversing direction.
$0010 EF_MODE_STOP_AND_GOSTOP_AND_GO mode is similar to YO_YO mode, but the elevator stops and stays for some time at each floor. Two seconds for an elevator with no doors and three seconds for an elevator with doors. Use the STOP_AND_GO mode and place the doors (multi or single) and set a number of floors. STOP_AND_GO mode may hurt Lara.
$0000 EF_NONEIf you do set any flag type EF_NONE or 0 (zero)
FirstDoorIndex= Index of the first door. Place in this field the index for the single door or multi-door.
InnerKeyPadIndex = Index of the keypad inserted in the elevator. Remember to set the EF_INNER_KEYPAD flag when there is an inner keypad
Speed= Set the speed for the elevator. Typing IGNORE in this field sets the default speed of 20. Remember Speed units are 1/1024 of sector. i.e. : 1024 = 1 sector, 256 = 1 click. Each second will change the position 30 times, so DO NOT exaggerate the speed value. The maximum value suggested is 50. Larger values will give trouble with collision when the elevator hits Lara.
Page 556
TOMB RAIDER NEXT GENERATION SCRIPT REFERENCE MANUAL
Frame Items arrayAfter the Speed field there is an optional list of item indices. It is optional, so you do not have to type anything after the Speed field. Te frame array is useful for many targets. All items typed in this array will move up and down with the elevator movement, giving the impression of being linked to the elevator cage. For example a chain can be created to place over the ceiling of the elevator to get a more realistic movement of the elevator. In the ng2.wad ANIMATING5 is used in the samples for the YO_YO and STOP_AND_GO Elevators. Place different instances of this chain to cover all of the height for the elevator moving. Then type all the indices of the chains in the elevator script command. When the elevator is moved in the game the chain will be moved.
Another use of the frame array is to place invisible collision panels around the elevator. The collision panel is found in the ANIMATING1 of the ng2.wad (1x2 sectors) and the ANIMATING1_MIP (1x1 sector to use when a little door for the elevator cage is set up). Use the collision panels only if the elevator is outdoors, i.e. without room walls around it.
If the elevator is at the centre of a large environment it is necessary to place collision panels. Otherwise Lara will be able to walk through the elevator walls of the cage. In the YO_YO and STOP_AND_GO elevator samples collision panels are used. Place the collision panel over each elevator wall. Cover all of the walls except the door of the elevator cage. Then type all of the indices of the collision panels in the Frame Array and the collision will move up ad down making the elevator cage a real closed box. Place about 23 frame indices in the Frame array. Collision panels can have a maximum of 8 items.
Remarks:1. When you place the elevator and other items for the elevator -keypad,
SINGLE_DOOOR, chain, collision panel etc. in the project the elevator must be at the first floor. To have the elevator at another floor at the start of the level use the elevator flip-effect to move it to the required floor. Te elevator MUST BE on the first floor in the project phase.
2. The maximum number of floors is 10. Lara selects the 10th floor with the keypad the value "0"
3. There can be up to 20 elevators for a level working with different modes in accordance with the different Elevator script commands
Page 557
TOMB RAIDER NEXT GENERATION SCRIPT REFERENCE MANUAL
ENEMY Enemy=
Syntax: Enemy=Slot, HP (vitality), NEF_ flags, TombFlags, EXTRA_ flags, DAMAGE1, DAMAGE2, DAMAGE3
Scope: To use in the [Level] section
This command permits different settings for the specific Slot objects. Set the Health Points (vitality, i.e. resistance to shot by Lara), the Damage they give to Lara (DAMAGE1, DAMAGE2 ..).Using flags, like NG Enemy Flags (NEF_...) or Tomb Enemy Flags set a particular behaviour of the slot. Use this command only for Slot = moveable enemies (BADDY) or Traps. This command can be used to change all of the moveables but many settings have no effect.
Arguments:
Slot field Wad slot to modify with this command. See the Slot Moveable list
HP (vitality) fieldSet the resistance of this enemy to Lara's shots. For example setting a Large value (1000) will make the enemy difficult to kill. Set a small value (20) and it will be killed with a few revolver shots.
NEF_ flags fieldThis field accepts values of NEF_ constant See the NEF_ constants in the Mnemonics Section.
Currently these are the NEF_ flags:
NEF_EXPLODE When the creature is killed it explodes.
NEF_EXPLODE_AFTER When the creature is killed the body will explode only after the death animation is complete.
NEF_HIT_BLOOD Can only be set once.NEF_HIT_DEFAULT NEF_HIT_FRAGMENTS Can only be set once.NEF_HIT_SMOKE Can only be set once.
The NEF_HIT flags set the behaviour of Lara 's shots on the creature.
Using the NEF_HIT_DEFAULT the response to shots will be not changed. If you do not set any NEF_HIT ... flag, the shots will have no effect
NEF_NON_TARGET Enemy becomes non-target from Lara and it will be immortal.
Page 558
TOMB RAIDER NEXT GENERATION SCRIPT REFERENCE MANUAL
NEF_NONE Reserved, do not use. If you want to omit set NEF_ flags you must type IGNORE in this field.
NEF_ONLY_EXPLODE The enemy will become like a Skeleton or Mummy. Common ammunition will have no effect but Explosive ammunition can destroy it.
NEF_SET_AS_CREATURE Experimental. You can use non-enemy and non-trap slots and use this flag to transform it into an ENEMY. Lara will aim at this object and kill it.
NEF_SET_AS_MORTAL This flag is be used with slot for the Demi-God to transform it into a MORTAL ENEMY. When you set this flag the ENEMY can be killed with common ammunition.
TombFlags fieldThis field is only for experiment. It corresponds to Flags field of the slot structure. Wrong values in this field can cause problems. Set this field to IGNORE and use only the NEF flags to modify the behaviour of the object (other NEF flags will be added soon).
If you want to experiment with the TombFlags field here are some values for well-known slots:
$3A7B = Used for SKELETON.$327B = Used for Von Croy$3072 = Used for GUIDE$267B = Used for BADDY_1$0472 = Used for Big SCORPION
EXTRA_ flags fieldFor most slots set this field to IGNORE. There are some slots that require an extra value to be typed into this field. Each EXTRA_ constant works only for one specific SLOT. See the EXTRA_ constants in the the Mnemonics Section.
Damage1/2/3 fieldsType NONE, one or more values for the Damage that the current enemy causes to Lara. The reason to accept a variable number of values is because some Slots do not damage Lara, while other moveables can damage Lara in different ways. BADDY_1 can hurt Lara using a UZI or a sword. In this situation type a different damage value, one for each type of damage. To know when an ENEMY has one, two, three or NO DAMAGE effect see the DAMAGE Section.
Remark: To modify only one damage value but no others use the IGNORE null value to specify "do not change this damage kind". For example to change only the Grenade Damage for the SAS but not change the UZI Damage type the following line:
Enemy=SAS, IGNORE, IGNORE, IGNORE, 0, IGNORE, 1000The above command does not change Health Points, NEF_ flags, TombFlags.
Page 559
TOMB RAIDER NEXT GENERATION SCRIPT REFERENCE MANUAL
Set the EXTRA to 0 and IGNORE for the UZI Damage, change the Grenade Damage to 1000.
Remark: In the Damage1/2/3 fields type only positive values. In some circumstances type Negative values but the result will be to recharge Lara 's vitality instead of hurting her. Follow the Range limits read in the Damage Enemy list. Setting a value outside of the range could give unpredictable results.
EQUIPMENT Equipment=
Syntax: Equipment= SLOT item, Amount
Scope: To use in the [Level] section
Equipment forces the amount of the specific Slot item in the inventory. By default Lara starts the first level or a level after a Reset-Hub command with the same equipment for MEDIPACK, WEAPONS, BINOCULARS etc. Using the Equipment command can force a different amount for each inventory item.
SLOT Item fieldType in this field a value to identify the slot corresponding to the item to set. The full list of slot items can be found in the SLOT MOVEABLES section.
Remark: Not all slot names will be accepted so use only slot names with the word "_ITEM".
Amount fieldIn the amount field set the quantity of the specific item in the inventory.
For example: For NO MEDIPACK for Lara at the start of the current level use these two commands: Equipment= BIGMEDI_ITEM, 0
Equipment= SMALLMEDI_ITEM, 0
Page 560
TOMB RAIDER NEXT GENERATION SCRIPT REFERENCE MANUAL
FMV FMV=
Syntax: FMV= NumberFmv, EnableEscape
Scope: To use in the [Level] section.
NumberFmv is the number of the FMV file.
EnableEscape can have a value of 0 or 1. Value 1 means: "permit player to skip the movie using the Escape key" The FVV file name must have the following syntax: "FMV" + [Number] + [Extension]
For example: The following names are correct for FMV files: fmv4.wmvfmv1.mpgfmv43.avi
It is WRONG TO USE: fmv04.wmv There is a no meaningful "0" in front of "4"fmv0.avi Numbering starts from "1"fmv41 Missing extensionfmv5.bik “.Bik" extension is not supported by NGLE
In the script command "Fmv=" first number (NumberFmv) is the number within the FMV file name. For example working with the file name "fmv3.wmv" it should be written in the script as a command : FMV=3, 0
Remember to set the extension with the command "FMV=" used in the [PCExtensions] section. This "FMV=" command has the same name but DO NOT CONFUSE IT as it is a different script command.
The FMV= command is not a new Next Generation command as it was present in the standard script.exe. The TRNG engine can now show a FMV in the game. The TRNG engine will look for the FMV file in the following sub-folders:
Current folder (the folder where the TRNG engine is, usually named "trle")Folder named "FMVs" in the current (trle) folder "trle\FMVs\... fmv files"Folder named "Store" in the current (trle) folder "trle\store\... fmv files
The TRNG engine can play .AVI, .MPG, .WMV files.Note: Use .AVI it works with no problems.
General Notes for Setting up FMV files
Use the SET_SOFT_FULL_SCREEN command in the script in the [Options] section. It permits a non-exclusive full screen mode. It is the "exclusive" mode that stops FMV s from playing. See SET_FORCE_SOFT_FULL_SCREEN from version 1.2.2.7
Page 561
TOMB RAIDER NEXT GENERATION SCRIPT REFERENCE MANUAL
[Options]
Settings= SET_SOFT_FULL_SCREEN
In the Level block type the FMV= command as defined in the section above.Place the video files in one of the following sub folders FMV s OR store.The video can be customized by the script command:
Customize= CUST_FMV_CUTSCENE, FMV_SHORT_BLACK_RESTART + FMV_FADE_OUT
placed in the Level Block of the script.txt file.
Playing a video at the start of the LevelIf you want to have a Video at the start of a level set on the same square as Lara the FMV Trigger to start the video and a Flip-Effect Trigger to "hide the screen". This stops the game being visible before playing the FMV.
Playing a video during the LevelSet an FMV Trigger with a Flip-Effect Trigger to hide the screen. Define the FMV in the level section for the script.
Perform a change in game when a FMV has been completedIn most cases we use a video to illustrate some important facts in game. At the end of the FMV we should set some change in the game to give sense to our FMV. In this case the problem is when to perform the triggers to get these changes. If these triggers are on the same square as the FMV Trigger the changes could be visible for an instant before the FMV starts playing. This could be bad. To solve this problem use a new Global Trigger named GT_FMV_COMPLETED. When you use this Global Trigger command you have to specify the number of the FMV to detect and then type the id of the Trigger Group to perform when that condition is True (the FMV has finished).
Global Trigger + Trigger Group used to move Lara 's position at the end of FMV2
Exporting: TRIGGER(257:0) for FLIPEFFECT(79)
<#> : Lara. (Move) Move Lara in LARA_START_POS with <&>OCB value in (E)way <&> : OCB= 1 of LARA_START_POS(517) in sector:(3,1) of Room19 (E) : Keep original sector displacement of Lara Values to add in script command: $2000, 79, $101 Exporting: TRIGGER(296:0) for ACTION(623) <#> : JEEP Id:623 in sector:(7,10) of Room0 <&> : Enemy. Move immediately <#>enemy in LARA_START_POS with (E)OCB setting (E) : OCB= 1 of LARA_START_POS(517) in sector:(5,2) of Room19
Values to add in the script command: $5000, 623, $128
Page 562
TOMB RAIDER NEXT GENERATION SCRIPT REFERENCE MANUAL
TriggerGroup= 1, $2000, 79, $101, $5000, 623, $128GlobalTrigger= 1, IGNORE, GT_FMV_COMPLETED, 2, IGNORE, 1
The Trigger Group will move Lara and the JEEP. In the video Lara drives her JEEP to reach a far place. See the NG Projects section FMV Video.
Play a video at the end of the Level and load another Level.
There is a final FMV for the level and then at the end of the FMV the next level loads :
Use another Global Trigger GT_FMV_COMPLETED, where a Trigger Group loads the next level. The only issue is the NG Flip Effect Trigger to load a level with delay:
"Delay. Load <&>level in (E)seconds" - "Forever (use other action/effect to disable it)"Use this Flip-Effect because is not possible to export a common "FINISH" trigger.
Global Trigger + Trigger Group to load next level
Exporting: TRIGGER(2:1) for FLIPEFFECT(82) <#> : Delay. Load <&>level in (E)seconds
<&> : 2 (E) : Forever (use other action/effect to disable it)
Values to add in the script command: $2000, 82, $2
TriggerGroup= 2, $2000, 82, $2GlobalTrigger= 2, IGNORE, GT_FMV_COMPLETED, 3, IGNORE, 2
For an Export TRIGGER Hiding the ScreenExporting: TRIGGER(0:0) for FLIPEFFECT(54)
<#> : Screen. Hide screen for <&>time in (E) way <&> : Forever (use other action/effect to disable it) (E) : Black screen
Values to add in script command: $2000, 54, $0
EXAMPLE SCRIPT.TXT FILE FROM NG PROJECTS FMV Video.
[PCExtensions]Level= .TR4Cut= .TR4FMV=.WMV
;--------------------------------------; Options
Page 563
TOMB RAIDER NEXT GENERATION SCRIPT REFERENCE MANUAL
;--------------------------------------
[Options]LoadSave= ENABLEDTitle= ENABLEDPlayAnyLevel= ENABLEDInputTimeout= 18000 ; frames * seconds = 60x30FlyCheat= DISABLEDSecurity= $55DemoDisc= DISABLEDWorldFarView= 45Settings= SET_FORCE_SOFT_FULL_SCREEN Diagnostic= DISABLEDCRS=DISABLED
;--------------------------------------; Levels;--------------------------------------[Level]Name= Video FMV Cut SceneHorizon= ENABLEDLayer1= 128,96,64,7Puzzle= 1,Ignition Key, $0008,$0400,$2000,$3000,$4000,$0002 Puzzle= 3,Canopic Jar 2, $0001,$0320,$0000,$0000,$0000,$0002PuzzleCombo= 1,1,Sun Disk, $0000,$0180,$0000,$0000,$0000,$0002PuzzleCombo= 1,2,Sun Goddess, $0000,$04b0,$0000,$0000,$0000,$0002Puzzle= 5,Golden Vraeus, $0003,$0300,$0000,$0000,$0000,$0002Puzzle= 7,Guardian Key, $0009,$0300,$0000,$0000,$0000,$0002Key= 2,Hypostyle Key, $0000,$0400,$0000,$c000,$0000,$0002;commands for FMV s: -------------Customize= CUST_FMV_CUTSCENE, FMV_SHORT_BLACK_RESTART + FMV_FADE_OUTFMV= 1, 1FMV= 2, 1FMV= 3, 0 ; forbid skipping of fmv with escape
; this Global Trigger + Trigger Group has been used to move Lara position at end of fmv2; Exporting: TRIGGER(257:0) for FLIPEFFECT(79); <#> : Lara. (Move) Move Lara in LARA_START_POS with <&>OCB value in (E)way; <&> : OCB= 1 of LARA_START_POS(517) in sector:(3,1) of Room19; (E) : Keep original sector displacement of Lara; Values to add in script command: $2000, 79, $101; Exporting: TRIGGER(296:0) for ACTION(623); <#> : JEEP Id:623 in sector:(7,10) of Room0; <&> : Enemy. Move immediately <#>enemy in LARA_START_POS with (E)OCB setting; (E) : OCB= 1 of LARA_START_POS(517) in sector:(5,2) of Room19; Values to add in script command: $5000, 623, $128
Page 564
TOMB RAIDER NEXT GENERATION SCRIPT REFERENCE MANUAL
TriggerGroup= 1, $2000, 79, $101, $5000, 623, $128GlobalTrigger= 1, IGNORE, GT_FMV_COMPLETED, 2, IGNORE, 1,IGNORE
;Global Trigger + Trigger Group to load next Level ; Exporting: TRIGGER(2:1) for FLIPEFFECT(82); <#> : Delay. Load <&>level in (E)seconds; <&> : 2 ; (E) : Forever (use other action/effect to disable it); Values to add in script command: $2000, 82, $2
TriggerGroup= 2, $2000, 82, $2GlobalTrigger= 2, IGNORE, GT_FMV_COMPLETED, 3, IGNORE, 2,IGNORE
;end commands for FMV ----------LoadCamera= 89366,-258,48077,88372,-1300,45701,0Level= DATA\VIDEOFMV,110
Page 565
TOMB RAIDER NEXT GENERATION SCRIPT REFERENCE MANUAL
FOG_RANGE FogRange=
Syntax: FogRange=StartLimitDistanceFog, EndLimitDistanceFog
Scope: To use in the [Level] section
Default values in tomb4: StartLimitDistanceFog = 12 sectorsEndLimitDistanceFog = 20 sectors (or LevelFarView)
With the FogRange= command change the limits for the Distance Fog changing the position and density of the Fog. The Distance Fog is ONLY VISIBLE when Volumetric FX is DISABLED.
StartLimitDistanceFog fieldThe Start Limit Distance Fog value is the number of sectors from where the fog will be visible. It is used only for Distance Fog. To increase the effect of the Fog type a negative number in this field. The larger the number the stronger the Fog density.
Remark: It is not good using negative values because you get an abnormal intensity of Fog color in the transparent texture of the level (like water) or objects (transparent or shining textures).
In some circumstances it is better to reduce the EndLimitDistanceFog field when a Distance Fog with high density is required. In this case set the StartLimitDistanceFog field to 0 avoiding negative values.
EndLimitDistanceFog fieldThis value is set with the same value of World Far View (or Level Far View).For thick Fog reduce this value. The value is the number of sectors that Lara can see.
The formula for the Fog Distance works in this way:
It begins a Fog effect from the Start Limit Distance Fog sector from Lara and the Fog effect increases up to the 100% density at the End Limit Distance Fog.
Setting a large value for the End Limit Distance Fog will allow Lara to see to the Far Distance. Set a small value in the End Limit Distance Fog to only see to the End Limit Distance Fog distance.
Page 566

TOMB RAIDER NEXT GENERATION SCRIPT REFERENCE MANUAL
FORCE_ BUMP_ MAPPING ForceBumpMapping=
Syntax: ForceBumpMapping=ENABLED/DISABLED
Scope: To use in the [Options] section
For prepared Bump Map textures use this command to override the settings in the tomb4 set-up and force enabling of the Bump Map in the game.
FORCE_VOLUMETRIC_FX ForceVolumetricFX=
Syntax: ForceVolumetricFX=ENABLED/DISABLED
Scope: To use in the [Level] section
Force Volumetric FX command enables or disables the Volumetric FX setting in the current level. This command is useful to mix Fog bulbs with Distance Fog.
Remark: Enable or disable the Volumetric FX in a dynamic way using new flip-effects with the NGLE in the game. This trick is interesting, "switch off" the fog bulb and "switch on" when an effect of gas or smoke is to be created after an explosion. If no Force Volumetric FX command is used for the current level then the Set up Menu for TRNG engine should be used.
Page 567
TOMB RAIDER NEXT GENERATION SCRIPT REFERENCE MANUAL
GLOBAL_TRIGGER GlobalTrigger=
Syntax: GlobalTrigger=IdGlobalTrigger, Flags Global Trigger (FGT_...), Global Trigger (GT_..), Parameter, IdConditionTriggerGroup, IdPerformTriggerGroup, IdOnFalseTriggerGroup
Scope: To use in the [Level ] section
Global Trigger enables some Triggers when a Global event occurs. To understand the meaning of Global Trigger start from the local Triggers. The local Triggers are the common Triggers used in NGLE ( HEAVY, PAD, FLIPON, FLYBY ). These triggers are local because they work only in the located space. The Global Trigger works for the whole level and will be enabled when some Global event happens.
Arguments:
IdGlobalTrigger fieldIn this field type a progressive number, 1 for the first Global Trigger of the level, "2" for the second and so on. It is used to identify the Global Trigger when a flip effect is used to enabled/disable a Global Trigger.
Flags Global Trigger (FGT_...) fieldSet options for the behaviour of the Global Trigger command.
Currently there is only a FGT_ constant flag:
FGT_SINGLE_SHOT: This flag sets the current Global Trigger for a single execution. When the Global Trigger is executed it is disabled to avoid further executions.
Remark: If you do not set any FGT_ flags type IGNORE in this field.
Global Trigger (GT_..) fieldType a constant value starting with GT_ prefix to choose the required Global Trigger.
See the GT_ constants in the Mnemonics Section.
Current Global Triggers:
GT_ENEMY_KILLED: Specify in the Parameter field the index of the moveable to monitor. When the given moveable is killed the Global Trigger will be started.
Remarks: Read the index of the moveable when in the NGLE program and single mouse click on that item. The index will be shown in a yellow box. You can get a trigger activation when a creature dies also with a local (common) trigger Switch. If you trigger the enemy with a switch trigger and then add to this trigger some common trigger to enable doors, enemies etc., when the creature dies the trigger will be activated. The problem of this method is that you have to cover a
Page 568
TOMB RAIDER NEXT GENERATION SCRIPT REFERENCE MANUAL
big surface with triggers. Using a Global Trigger GT_ENEMY_KILLED the trigger will be ACTIVATED WITH ANY POSITION OF THE ENEMY.
GT_SCREEN_TIMER_REACHED: Start the Global Trigger when the screen timer reaches the supplied number of seconds. Type the number of seconds in the following field named Parameter.
For example: To start the trigger when the timer screen reaches 240 seconds (4 minutes) type: "GlobalTrigger=1, IGNORE, GT_SCREEN_TIMER_REACHED, 240, ..."
GT_USED_INVENTORY_ITEM: This Global Trigger is used to detect when Lara chooses a specific item from the inventory. Specify the slot Id in the following field named Parameter.For example to enable a Global Trigger when Lara selects the QUEST_ITEM2 with slot Id = 253, type "GlobalTrigger=1, IGNORE, GT_USED_INVENTORY_ITEM , 253, ...".
Remarks: If you want to remove the chosen item from the inventory when the Global Trigger has been engaged insert in the Trigger Group the specific flip-effect "Inventory-Item Remove <&inventory-item from inventory". If you do not use this flip-effect the selected item will remain in the inventory for further activations.
*Please, try to avoid using QUEST_ITEM1 for your Global Trigger because QUEST_ITEM1 is used for the Detector activation.
Remark: There are many other Global Trigger GT_ constants. See the NG CONSTANTS Section.
Parameter fieldThe value to type in this field depends on the type of the Global Trigger chosen in the previous field "GT_ Global Trigger". Read the description for the specific Global Trigger to get more information.
IdConditionTriggerGroup fieldThis field is optional. By default the GT_ Global Trigger sets a Global condition. To perform the final IdPerformTriggerGroup only when further conditions are true create a conditional TriggerGroup script command. Then set in this field the Id of that conditional Trigger Group to perform another condition. When you use a conditional Trigger Group, the final condition will be true only when the other conditions set in the Global Trigger and the conditional Trigger Group are true. If you do not want to set additional conditions type IGNORE in this field.
IdPerformTriggerGroup fieldIn this field type the Id of the Trigger Group command that will be performed when the Global condition of the GT_ TRIGGER is true. The Trigger Group can have condition triggers. These further condition triggers will be verified only if the GT_ GLOGAL Trigger is true.
IdOnFalseTriggerGroup fieldIf you want a Trigger Group when the Global condition is false, type in the field the Id of the Trigger Group to perform on a false condition.
Page 569
TOMB RAIDER NEXT GENERATION SCRIPT REFERENCE MANUAL
IMAGE Image=
Syntax: Image=IdImageCommand, IdImageFile, ImageFlags (IF_...), EffectTime, AudioTrack, XPosition, YPosition, SizeX, SizeY
Scope: To use in the [Level] section
The Image command sets data to be used for the flip-effect trigger "Show Image ..."
IdImageCommand fieldIn this field type a progressive number that will be used to identify this Image command from some flip-effect trigger.
IdImageFile fieldIn this field typed the number of the image to show.This number (or Id) refers to the image in the format: "IMAGE<ID>.BMP"For example: Type 5 in this field to show the image: IMAGE5.BMP
The TRNG engine will look for the images in the trle\PIX folder and if it is missing in the PIX folder the TRNG engine will look for the image in the trle folder, i.e. the folder where the tomb4.exe program is located.
Remark: The TRLM2009 program will copy all of the IMAGEN.BMP images into the trle\PIX folder.
ImageFlags (IF_...) fieldSpecify the IF_ flags to set features for the image or about the mode to view it. Type IGNORE in this field and the image will be shown freezing the game in the position and size set in the following fields of the command.
EffectTime fieldThis field ONLY works for further effects chosen for the image. If NO EFFECTS are to be applied to the image this field will be IGNORED. The time is typed in tick frame units the internal time of the TRNG engine. One tick frame value is 1/30 of second. Set an effect for the current image and the Effect Time will inform the TRNG engine about how many frames will be necessary to complete the effect. Small values and the effect is fast. Large values and the effect will will be slower. Type IGNORE in this field to use the default value of 30 ticks, i.e. one second.
AudioTrack fieldType a number between 0 and 255 to choose the audio track in the audio folder to play. For example typing 35 the sound 035.wav will be played.
XPosition and YPosition fieldsIn these two fields type the origin with respect to the Tomb Raider screen where the image is placed. It is important to understand that the units used for position and size are NOT in pixels. The reason is because of the difficulty of knowing in advance the current Tomb Raider screen resolution. When a level is created the script.txt does not know if the game will be played at 640x480, 800x600
Page 570
TOMB RAIDER NEXT GENERATION SCRIPT REFERENCE MANUAL
or 1024x768 etc. For this reason setting the origin of the image or its size in pixels will be a problem. The origin and size of the image is given in proportional units named "micro units" (1/1000 of screen). For example to locate the centre of the game screen the values will be XPosition = 500 and YPosition=500. The whole width and height of the game screen will be 1000 x 1000 micro units.
SizeX and SizeY fieldsIn these two fields set the size of the image once it has been drawn on the game screen. The values are in micro units (see description of the XPosition and YPosition fields). There may be a problem to set the current ratio of the image because the height of the screen (about Y size) will be computed in micro units (1/1000).
For example: If the source image is 100 x 100 pixels, it cannot set a target size 200 x 200 micro units, because the size Y 200 computed on Screen Y should be bigger than computed on Screen X as the screen usually has a ratio of 1.3 (4:3). To solve this problem use a new utility in the Tools Panel of the NG_Center program: Get Screen Frames With this utility using the mouse select a rectangular region and get the four values XPos, YPos, SizeX and SizeY in micro units.
Page 571
TOMB RAIDER NEXT GENERATION SCRIPT REFERENCE MANUAL
IMPORT_FILE ImportFile=
Syntax: ImportFile= IdImport, PathFile, FileType (FTYPE_...) , ImportType (IMPORT_...)
Scope: To use in [Options] section
Use the Import File command to insert in the script.txt file the Binary image of any file.
There are two advantages to using Import File:
1. To have a fast starting of some files in the game, like sounds. In this case use a memory import to force the TRNG engine to load the file into the RAM.
2. To use the script.txt like a container for some special files that would be copied in some folder in the target trle folder.
For example: To have a "help" sub-folder in the trle folder with files like "start.htm" and some images, use the import file in temporary mode to have the installation at the start of the tomb4 program.
Arguments:
IdImport fieldThe progressive number is used to locate the Import Slot. The location is important when some new flip-effect is used to import the file. For example to import a file like "wagner.mp3" in the memory mode in order to be able to play the audio file using the flip-effect "Sound (CD) Play <&>imported file ..." and the "imported file" select the IdImport number.
PathFile fieldThe path to import the file. It is NOT Possible to use an absolute path like "c:\trle\audio\003.wav". The path has to be relative using the current trle folder as the ROOT. For example to import the wav file “003.wav” located in the audio folder type a path like this: audio\003.wav
To import the load.bmp file into the trle folder type a path: load.bmp
Remark: To import the file in the temporary mode (IMPORT_TEMPORARY value) the file will be exported (extracted) at the first start of the tomb4.exe and written in some relative path typed in the script.txt. This is important when some of the files are in sub-folders with non-standard names.
For example: For a sub-folder "Mp3" inside the trle folder import a file from this sub-folder in this way:ImportFile=1, mp3\bach.mp3, FTYPE_SOUND, IMPORT_TEMPORARY
The above command will work in the importing phase but it give an error when the TRNG engine exports the file because when it is extracted it creates the sub-folder "mp3" and then copies the file with the name "bach.mp3". The problem is that the TRNG engine is not able to read audio tracks from folders different from the audio sub-folder.
Page 572
TOMB RAIDER NEXT GENERATION SCRIPT REFERENCE MANUAL
To avoid this problem you have two choices:
Always put the sound files to import in the audio folder of trle together with the other common adpmc wav files. or...
Import the file using a memory import. When a file is imported by the IMPORT_MEMORY mode, the folder name it is not important, since this file will never be exported. The files imported in memory will be loaded in their Binary image and will be played directly from memory. In this case the path name will be used only in the importing phase and the name will be ignored when the game is played on the target computer.
FileType (FTYPE_...) fieldType a FTYPE_ value to inform the TRNG engine about the nature of the file. Currently there only two values, but others will be added in the future.See the FTYPE_constants in the Mnemonics Section.
ImportType (IMPORT_...) fieldChoose an import mode: IMPORT_MEMORY or IMPORT_TEMPORARY
IMPORT_MEMORYIn this case the file will be loaded directly into the memory at the start of the game. The advantage is fast start for the file avoiding the delay to access the hard disk. Reading the file from disc the game will be stopped for a short period. Reading from memory (pre-load and start from the script.txt file) the audio track will start with no slow-down.
See the Mnemonics Section.
IMPORT_TEMPORARYIn the temporary mode the file will be stored in the script.dat file but it will be extracted from the disc at the start of the game. This means it will be used in the game in the traditional way: reading it from disc. The advantage to using a file imported in Temporary Mode (rather than enclose the specific separated file) is that it avoids confusing the program Level Manager during the installation phase.
Files like .ogg will be ignored by the Level Manager and also by many beginners in the Level Editor world. mp3 files are handled by the Level Manager with the result they will be converted into .wav format. To play a sound file directly in .mp3 format avoiding the automatic conversion to wav of TRLM, import the mp3 file so the Level Manager will not be able to see it in the installation phase, but the TRNG engine will export it at the start of the game.
See the Mnemonics Section.
Page 573
TOMB RAIDER NEXT GENERATION SCRIPT REFERENCE MANUAL
ITEM_GROUP ItemGroup=
Syntax: ItemGroup=IdGroup, FirstIndexItem, Other indices for the items
Scope: To Use in the [Level] section
Item Group permits a storage of a group of moveable indices. These indices are from the NGLE when you click on an object to see its index shown as the first number in a yellow box. Once a list of moveable indices is set in an Item Group operations can be performed on all of the objects referenced by the Item Group with a single trigger. Flip-effects starting with the description: "ItemGroup. ....". The advantage of working with an Item Group are as follows:
1. Multiple items can be used like a single moveable. For example moving, enabling, rotating or hiding all of the items at the same time with a single trigger.
2 To perform a particular operation activation sequence with doors or enemies.See the specific flip-effect triggers starting with the "Item Group. " descriptive text.
Field description:
IdGroup fieldThis first field is not an object index but the Id used to locate the Item Group command script when it is required to perform an operation activated by a trigger. Start with a "1" for the first Item Group in the [Level] and increase the Ids: 2, 3, 4 etc.
FirstIndexItem, Other indices for items fieldsAfter the Id field type one or more indices for the moveables as read in the NGLE. Type a maximum of 83 indices for each Item Group.
Page 574
TOMB RAIDER NEXT GENERATION SCRIPT REFERENCE MANUAL
KEY_PAD KeyPad=
Syntax: KeyPad=AtStartAnimation, FrameStartPopUp, AtEndAnimation, ClickSound
Scope: To use in the [Level] section
The Key Pad command is optional and it is used to change the default animations and sounds for the Key pad SWITCH_TYPE1 found in the ng.wad Use this command only to modify the animations or sounds to enable when Lara activates the key-pad switch in the game.
Parameters:AtStartAnimation= The number of the Lara animation to show when Lara engages with the Action command for the keypad. If you do not want any animation at the start type IGNORE in this field. The default value is 197.
FrameStartPopUp= Used only if a valid value is set in the above field AtStartAnimation. In this case the keypad image will be shown only when the start animation reaches this frame number. For example typing 20 in this field the keypad will be shown 20 frames after the start animation is started.
Remarks: If No value is set for AtStartAnimation this field will be ignored. If a valid value is set for the AtStartAnimation field, a valid value must be set in the FrameStartPopUp field, it cannot be set with IGNORE.
AtEndAnimation= The number of the animation to show when the keypad is closed.
Remarks: If a final animation is not required type IGNORE in the field. The AtEndAnimation will be shown only if the player goes off from the keypad with the Enter/[*] key, if an EXIT is made using the Escape key no final animation will be performed.
ClickSound=The number of the sound effect to play when the player hits the key on the keypad.
Remarks: If a sound is not required type IGNORE in this field. The list of sound effects can be found in the SOUNDS SFX section.
Page 575
TOMB RAIDER NEXT GENERATION SCRIPT REFERENCE MANUAL
LEVEL_FAR_VIEW LevelFarView=
Syntax: LevelFarView=NumberOfBlocks
Scope: To use in the [Level] section
NumberOfBlocks = The number of sectors shown in the game view. The default value in the old tomb4 was 20 sectors. This means that a mesh more than 20 sectors away from Lara becomes Black. Valid range: Minimum = 1 Maximum = 127
The Number of Blocks set with this command should be less or equal to the value set in the [Options] section with the "WorldFarView=" command, otherwise it will be ignored. Insert in the [Options] section a WordFarView= command with a large number and then for the different levels set a smaller value with the LevelFarView= in accordance with the speed of the game. Remember that not only the Far View Distance affects the speed of the game but also the number of meshes, transparent textures and moveables present in the level. For this reason you could be forced to reduce the Level Far View for levels with wide spaces and many moveables/meshes/transparent textures to enhance the speed. In other levels you could use a larger value for the Level Far View with no problem because the scene is simpler to draw for the TRNG game engine.
LOG_ITEM LogItem=
Syntax: LogItem=FlagsLogItem (FLI_...), IndexOfItem
Scope: To use in the [Options] section
This command works only when the Diagnostic is ENABLED with the command:Diagnostic=ENABLED in the [Options] section.
The Log Item permits to have on screen the same information as seen for Lara but in this case it is for another moveable. The main target for this command is to get the information for a TestPosition command.
FlagsLogItem (FLI_...) fieldType one or more FLI_ flags in this field. If No flags are set type IGNORE in this field.See the FLI_ flags in the Mnemonics Section.
IndexOfItem fieldIn this field type the index of the moveable to monitor. You can find this index in the NGLE map by performing a left mouse click on the item to see it in a yellow frame index box.
Page 576
TOMB RAIDER NEXT GENERATION SCRIPT REFERENCE MANUAL
MIRROR_EFFECT MirrorEffect=
Syntax: MirrorEffect= InFrontRoom, HiddenRoom, MirrorType (MIR_), Animating array
Scope: To use in the [Level] section
The Mirror Effect replaces the old Mirror= command. The old Mirror script command is working. The New Mirror type CANNOT be used with the Old Mirror command.
Arguments:
InFrontRoomThe room number in front of the Mirror. This is a real room where Lara will be able to enter and move about.
HiddenRoomThe room number placed behind the Mirror where Lara cannot enter.
MirrorTypeSpecify a MIR_constant to set the Mirror type. See the MIR_ constants in the Mnemonics Section.
Currently the following values can be used:
MIR_WEST_WALLWest wall is the setting used for the Old Mirror. West is the position of the mirror from Lara 's position looking at the room in the NGLE.
MIR_FLOORThe mirror is on the floor of the InFrontRoom.
MIR_CEILINGThe Mirror is on the ceiling of the InFrontRoom. To use a ceiling mirror it is advisable to use a low ceiling room, otherwise Lara will not be able to look at the reflected Lara on the ceiling.
MIR_INVERSE_WESTInverse west is a horizontal Mirror on the west side of the InFrontRoom. It is like the MIR_WEST_WALL but in the inverse mirror Lara and the other objects will be inverted like in the Old Tomb Raider 1.
Animating arrayFrom this field can be set one or more indices of animating present in the InFrontRoom. Using this array the TRNG engine will place all of the animating in the correct position and orientation in the hidden room to simulate their mirror image in accordance with the mirror type. A couple of animating have to be placed: The main animating is placed in the required position in the InFrontRoom and the clone of this animating is placed in the hidden room. It is not necessary to place the clone animating in the correct position but it is useful to place it in the same vertical or
Page 577
TOMB RAIDER NEXT GENERATION SCRIPT REFERENCE MANUAL
horizontal line according to the mirror type.
If a Vertical Mirror is used place the main animation in the InFrontRoom with the correct orientation. Then place another animating of the same type in the hidden room. In this situation it is important to carefully place the clone animating in the same vertical line (i.e. same 2d visual sector). The height is not as important for the clone animating or its orientation because these settings will be set by the TRNG engine at run-time.
For a Horizontal Mirror (like MIR_WEST_WALL) place the clone animating in the same sector row as the main animating. See the help file for more information about the correct position for clone animating.
Remark: Type indices for other moveables in the Animating array, in this circumstance the moveable will dynamically update. To work the moveables like ENEMY place them in a hidden room and the trigger to enable them will be in the InFrontRoom where it is also the trigger to enable the enemy in the front room.
The room numbers for the InFrontRoom and the HiddenRoom field can be found in the room list of the NGLE. Remember to choose the smaller number when the numbers in round squares are different. For example if the text for the Hidden ( InFrontRoom) is:
Mirror Hall (34:30) In above case the real room number is "30" ,type this value in the MirrorEffect command.
Page 578
TOMB RAIDER NEXT GENERATION SCRIPT REFERENCE MANUAL
MULTI_ENVELOPE_CONDITION MultEnvCondition=
Syntax: MultEnvCondition=IdMultCondition, ENV_ condition, DistanceForEnv, Extra field, array of tripled of {ENV_ Condition, DistanceForEnv, Extra field}
Scope: To use in the [Level] section
This command is used to store multiple ENV_ Environment conditions for the Animation script command. To set two or more ENV conditions for the Animation command create a MultEnvCondition command with all of the ENV conditions and then set the Id of the current MultEnvCondition in the field "DistanceForEnv" for the Animation command. In the field "Env Condition" of the Animation command type the value of the ENV_MULT_CONDITION to inform the TRNG engine that the real conditions are stored in the MultEnvCondition command with an Id = Distance for Env in the Animation command.
IdMultCondition fieldIn this field type a number to identify the command. Use the "DistanceForEnv" field for the Animation command to link it with the Animation command.
ENV_ condition fieldThis field works in same way as the "Env Condition" field in the Animation command. Type an ENV_ condition value + (optionally) some ENV_POS_ flags. See the description of the "Env condition field" in the Animation command Chapter for more information.
DistanceForEnv fieldThis field works in the same way as the "DistanceForEnv" field in the Animation command. Type a value in this field to set the distance about the current (previous) ENV_ condition.See the description of "Distance for Env field" in the Animation command for more information.
Extra fieldThis field has the same use as the Extra Slot in the Animation command. If an ENV condition is used requiring a value in the ExtraSlot field type this value in the Extra field.
Array of Triples of {ENV_ Condition, DistanceForEnv, Extra} fieldsType multiple triples of fields in the "EnvCondition","DistanceForEnv", "Extra" up to a maximum of 125 couples.
Examples:
To set in the Animation command two ENV conditions, like: ENV_CEILING_HEIGHT with a height (distance ENV) = $300 (3 clicks) + other condition: ENV_HOLE_FLOOR_AT_LEFT with a depth (distance ENV) = $400 (4 clicks) as a first step create this MultEnvCondition command:
MultEnvCondition= 1, ENV_CEILING_HEIGHT, $300, IGNORE, ENV_HOLE_FLOOR_AT_LEFT, $400, IGNORE
Page 579
TOMB RAIDER NEXT GENERATION SCRIPT REFERENCE MANUAL
and then type in the Animation command the reference for the Id of the above MultEnvCondition (1) and the ENV_ condition: ENV_MULT_CONDITION
For example: Animation=447, KEY1_LEFT, IGNORE,IGNORE,ENV_MULT_CONDITION, 1,IGNORE,-445, -448
Page 580
TOMB RAIDER NEXT GENERATION SCRIPT REFERENCE MANUAL
NEW_SOUND_ENGINE NewSoundEngine=
Syntax: NewSoundEngine=ENABLED/DISABLED
Scope: To use in the [Option] section
The new sound engine should be the BASS 2.4 sound library created by Un4seen Developments Ltd. This new engine is based on Bass.dll and permits two channels for the CD audio sound (background and foreground or channel1 and channel2) at the same time.
Other features supported are:Play a sound file different than .wav like .mp3 or .ogg filesFade out effect to close sweetly the previous sound before starting another CD trackDynamic change of frequency or volume in the game using new flip-effect triggers.
ENABLED/DISABLED field The New Sound engine is ENABLED by default. You should only use this command to DISABLE it with the command: NewSoundEngine=DISABLED
Remarks: It is not necessary to change the sound format when the new sound engine is used. The bass.dll is able to support the common ADPCM wav files found in the audio folder. It is not advisable to add the bass.dll library to the level because the TRNG engine uses a build-in bass.dll library. Another bass.dll library could create conflicts. The bass.dll used by the TRNG engine is nextgeneration.dll and the version is 2.4.0.1.It is better to use this version. The internal bass.dll library will be extracted at-fly when the TRNG engine is started.
Page 581
TOMB RAIDER NEXT GENERATION SCRIPT REFERENCE MANUAL
ORGANIZER Organizer=
Syntax: Organizer=IdOrganizer, Flags Organizer (FO_..), Parameter, FirstTime, PerformFirstIdTriggerGroup, SecondTime, PerformSecondIdTriggerGroup, {Time and TriggerGroup Array }
Scope: To use in the [Level] section
The Organizer performs a list of triggers, organized in Trigger Group script commands, at a specific time. For example a list of Trigger Group can be created, organized with the Organizer command so to open a door and after 4 seconds activate a BADDY then after other 22 seconds enable a flip-map etc.
Parameters:
IdOrganizer fieldSpecify the Id of the current organizer. This number will be used to locate the Organizer command with the flip-effects to enable or disable the Organizer. Assign 1 tot the first Organizer in the level section and 2 for the second Organizer, etc.
Flags Organizer (FO_..) fieldIn this field add one or more FO_ constant to control the behaviour of the Organizer command. See the FO_ constants in the Mnemonics Section.
Parameter fieldCurrently unused. It could be used in future versions. Type IGNORE in this field.
Couples of Time + IdTriggerGroupAfter the Parameter field store one or more couples of fields: Time to wait before starting ...
Trigger GroupYou can imagine these as Appointment information.At this hour remember to do this, at other hour do this etc...In this case the seconds will be used.
Page 582
TOMB RAIDER NEXT GENERATION SCRIPT REFERENCE MANUAL
For example: Create this Organizer command: Organizer=1, IGNORE, IGNORE, 6, 1, 5, 2, 4, 3
Read the above data in following way:
After 6 seconds from enabling of the Organizer perform the Trigger Group 1After another 5 seconds perform the Trigger,Group 2After another 4 seconds perform the Trigger Group 3
We can understand this data using a table:<PRE>
Time Trigger Group
6 Trigger Group = 15 Trigger Group = 24 Trigger Group = 3
</PRE>
Remark: In the time field input a number up to 65535, i.e. about 18 hours.
Page 583
TOMB RAIDER NEXT GENERATION SCRIPT REFERENCE MANUAL
PARAMETERS Parameters=
Syntax: Parameters= Type of parameters (PARAM_...), IdParameterList, parameter array
Scope: To use in the [Level] section
The Parameters command is a general purpose command for parameters used by some triggers.Since the trigger window is able to display only one or two parameters, when a trigger requires many parameters it could require a Parameters= command in the script.txt file to get all of the needed parameters for its operations.
Type of parameters (PARAM_...) fieldIn this field type a PARAM_ constant to describe what the trigger is. See the PARAM_ constants in the Mnemonics Section.
IdParameterList fieldThis is a progressive number to identify the "Parameters=" command script in the trigger window of the NGLE. Type 1 for the first Parameter command, 2 for second etc. Use the same IdParameterList when two Parameters are used in the command with a different PARAM_ constant. It is necessary to set different Id's ONLY for the Parameters with the same PARAM_ constant.
Parameter array fieldsFrom the third parameter are the parameters used by the Trigger. The number and meaning of these parameters change according to the PARAM_ TYPE. See the PARAM_ constants in the Mnemonics Section.
Page 584
TOMB RAIDER NEXT GENERATION SCRIPT REFERENCE MANUAL
PRESERVE_INVENTORY PreserveInventory=
Syntax: PreserveInventory= ENABLED
Scope: To use in the [Level] section
The Preserve Inventory command can be used when a ResetHUB= command is used in the same [Level] section. With the ResetHUB command the level number is set that will be started from the current level with a FINISH trigger. If Lara 's meshes need to be reloaded or there is a change of vehicle use the ResetHUB. The problem with the ResetHUB is that the Pickup items will be cleared from the ResetHUB command. If a ResetHUB is used and it is required to preserve the Pickup items from previous levels add it in the [Level] section of the command:
PreserveInventory=ENABLED
RAIN Rain=
Syntax: Rain= RAIN_... constant
Scope: To use in [Level] section
A Rain Room in the current [Level] section is only allowed with a command "Rain=" in the script.txt file, otherwise the setting for the Rain in the NGLE will be ignored.
Argument::
RAIN_ Constant: Choose one of following constants:
RAIN_DISABLEDThis is the same as the NO Rain= command in the script.txt file
RAIN_SINGLE_ROOMS This setting will show for specific rooms signed as "Rain" in the NGLE with outside status.
RAIN_ALL_OUTSIDEFor Rain in all outside rooms without setting the "Rain" button for each room in the NGLE use this command in the script.txt file. To enable the RAIN_ALL_OUTSIDE setting ENABLE the "Rain" button in the First Room that will be visited by Lara and set the Water Intensity field at the right of the multi-state button water/rain/snow intensity (from 1 to 4). The intensity for all of the level will then be set. If rain rooms are not required in the current level use the command "Rain=RAIN_DISABLED" or omit the Rain= command in the script.txt file to inform the TRNG engine.
Page 585
TOMB RAIDER NEXT GENERATION SCRIPT REFERENCE MANUAL
SAVE_GAME_PANEL SavegamePanel=
Syntax: SavegamePanel=SavegamePanelFlags (SPF_...), BackGroundImageId, NumberOfSave, NumberOfVisibleSave, SavegamePanelLayout (SPL_...), InfoFormatString, IdListWindowsFont, IdInfoWindowsFont, InTitleWindowsFont
Scope: To use in [Level] section
The Save Game Panel command allows the customization of a new Save Game Panel to load or save the game. Type this command in a [Level] section and the old load/save screen will be replaced by this new save game panel. The advantage of this new Save Game Panel is to be able to view the inner image of each save game to give a better choice of the correct save game to load. The panel helps the player avoid overwriting important save games. Use this new Save Game Panel together with the customize to enable the saving of the image inside the screen shot. Add the following to the script.txt file:
Customize=CUST_INNER_SCREENSHOT, QSF_SIZE_320x240+QSF_TRUE_COLOR
The QSF_ flags could be different . Add a Customize=CUST_INNER_SCREENSHOT command in the level section to enable the creation of a screen shot image for each save game of the adventure.The number of save games can be customized (in the old Raider panel this was 15 save games). Also the information to show when a save game is selected can be customized..
SavegamePanelFlags (SPF_...) fieldIn this field add two or more SPF_ flags to customize a feature of the Save Game Panel. If No flags are required type IGNORE in this field. See the SPF_ flags in the. Mnemonics Section.
BackGroundImageId fieldSupply a background image for the Save Game Panel. Type the number of the image located in the PIX sub-folder. For example for a background image using the file "Image8.bmp" type 8 in the field.
NumberOfSave fieldIn this field type the quantity of save games that the Save Game Panel will handle. In the Old Tomb4 this was 15 (from save game.0 to save game.14). The maximum number that can be set is 100. A reasonable value could be 30, but use 15 save games in case IGNORE is typed in this field.
NumberOfVisibleSave fieldThe number of visible save games is different from the previous field "NumberOfSave". When a large number of save games is set in the "NumberOfSave" field it is not possible to show all of the list on the screen. To solve this problem the TRNG engine is able to show a few save games on the screen and then allow the scrolling of the list to show another "page" of save games. The Number of Visible Save field is the number of save games displayed for each visible page on the screen. For example the Old Save Game Panel showed 15 save games. If it is required to handle 50 save games set the number of visible save games to 15 and then the TRNG engine will show the first 15 save games. When the player hits the DOWN key the TRNG engine will show the next group of 15 save
Page 586
TOMB RAIDER NEXT GENERATION SCRIPT REFERENCE MANUAL
games and go on.
Remark: The TRNG engine will page if a specific SPF_ flag is set. Otherwise it will slowly scroll through the list.
Note: If IGNORE is typed in this field the TRNG engine will consider that all of the "NumberOfSave" will be shown on the screen at the same time, i.e. the "NumberOfVisibleSave" and "NumberOfSave" fields are the same value.
The general rule to follow is this: first set the fonts, image and layout for the Save Game Panel and test it in the game to see how it looks on the screen. Then set the number in the "NumberOfVisibleSave" field.
WARNING: If you do not set a correct number in NumberOfVisibleSave field there is a big mess because the TRNG engine will not verify if all of the required save games will fit on the screen.
SavegamePanelLayout (SPL_...) fieldType a single SPL_ value to set the position of the different frames on the screen. Choose where to place the image on the screen (left , right or centre) and the list of save games. See the SPL_ flags in the Mnemonics Section.
There is also another (optional) frame: The information frame.The information frame shows data about the currently selected save games. For example, show the number of secrets, or the weapons available in that selected save game. See the description of the next field about the choice.
InfoFormatString fieldUse a Savegame Panel Layout with the Information frame type in the InfoFormatString field. The string is used to format the information to show the selected save game. The information frame is a zone of the screen where it will show information about the save game currently selected. Use the trick of external NG strings to store the format text, i.e. type the text in a text file, save it in the Script folder and then link this text in ExtraNG strings using "@" + "name.txt". For example type the format text in a file named "Info_savegames.txt" and add a new ExtraNG string and type the text "@Info_savegames.txt" into it.
In this text form type what is required to display on screen. Remember to use a special place-folder to signal a specific value in the save game. All place folders are enclosed in round parenthesis "()" and have fixed names that the TRNG engine will be able to recognize and replace with real values read from the save game.
Page 587
TOMB RAIDER NEXT GENERATION SCRIPT REFERENCE MANUAL
For example: Type in information format text following:
Found Secrets (SECRETS)Large Medipacks (L-PACKS)Small Medipacks (S-PACKS)
Then in the game when the player selects a save game from list on the screen it will show the values in that save game. So for example it could read:
Found Secrets 5Large Medipacks 3Small Medipacks 12
Remark: To have a good alignment it is advisable to select an information text windows font with a fixed width, like "courier" or "new courier". Proportional fonts (like "Arial") could give a bad alignment:
Found Secrets 5Large Medipacks 3
Small Medipacks 12
The full list of place-folders is as follows:
LEVEL-NAME The name of the level in the save gameSAVE-NUMBER The progressive inner number of the save gameSECRETS The found secretsL-PACKS The number of Large MedipacksS-PACKS The number of Small MedipacksFLARES The number of flaresWEAPONS Show a list of the weapons in the save game.
See (1) note in following remark section.GAME-TIME The game time.
See (2) note in following remark sectionDATE-TIME The date when the current save game was created or the last time it
was changed. The format is DD/MM/YYYY (HH:MM:SS)KM-DISTANCE Number of Km of distanceMETERS-DISTANCE Number of remaining metres of distance (See (3) note)
1. Since the weapon list could be long, it is better to let a whole line display this value using a format text like this:
----- Example of information format text ----Available Weapons:(WEAPONS)---- end information format text sample -----
The list will have a row of information frame
Page 588
TOMB RAIDER NEXT GENERATION SCRIPT REFERENCE MANUAL
2. The game-time will be shown in the save game list as in the default Save Game Panel. The game time can be removed from the save game list with the SPF_NO_TIME_IN_LIST flag and then add the value in the specific description of the selected save game with a place folder (GAME_TIME). The advantage of this method is to be able to display the save game list in a short frame.
3. The reason to have two different values for KM and metres is to allow the words "km" and "metres" in the language or a different language, one for each language file. For example type the information format text:
Distanza: (KM-DISTANCE) chilometrie (METERS-DISTANCE) metri.
The above example shows the description of distance in Italian, using the words "chilometri" and "metri" instead of "kilometres" and "metres". In the game it would read: Distanza: 2 chilometrie 43 metri
IdListWindowsFont fieldType the Id of the WindowsFont=IdNumber command where the style of text used is set for the save game list. It is important to place the WindowsFont command before the SavegamePanel command that uses it.
IdInfoWindowsFont fieldType the Id of the WindowsFont=IdNumber command to set the style of text used for the information shown for the selected save game. Since there could be a lot of information use a small font.
Remark: It is important to place the WindowsFont command first in the SavegamePanel command that uses it in the script.txt file.
InTitleWindowsFont fieldType the Id of the WindowsFont=IdNumber command to set the style of the text used to display the Title of the Panel, i.e. the text "Save Game" or "Load Game" in accordance with the current language.
Remark: It is important to place the WindowsFont command before the Save game Panel command that uses it in the script.txt file.
Page 589
TOMB RAIDER NEXT GENERATION SCRIPT REFERENCE MANUAL
SETTINGS Settings=
Syntax: Settings= SET_ constants
Scope: To use in the [Options] section
This command will be placed in the [Options] section to set some Global settings.
Arguments:
SET_ constants fieldType one or more SET_ constants separated by plus (+) sign. Currently these are the SET_ constants available:
SET_DISABLE_CHEATSDisable all of the hidden cheats to skip a level and get infinite weapons or items.
Remark: To disable the Fly Cheat use the old command FlyCheat = DISABLED
SET_BLIND_SAVEGAMESTo stop players using a Save Game Editor to change save games add this flag in the Settings command. Any attempt by players to modify save games will cause an immediate crash at reload.
SET_CRYPT_SCRIPTBy setting this flag the script.txt file will be encrypted to forbid decompilation with some utilities.If security issues are set, like SET_DISABLE_CHEATS, it is advisable to set encrypting of the script.txt. Otherwise anyone can decompile the script.txt and recompile it removing the SET_DISABLE_CHEATS flag.
SET_PERFORM_FROM_CD With this constant the game will be able to be run from a CD / DVD and generally from read only storage. The reason to use this setting is to give the game to a friend stored on a CD and played directly from the CD with no need of installation of the level editor (trle) folder. When this setting is present the TRNG engine will save and load the save game not from the current trle folder where is has been stored, but from a new folder on the local drive C: with the same name as the first level of the game. For example if this option is used with a level described in the script.txt as "City Of The Dead", the TRNG engine will create a folder named: C:\City_Of_The_Dead and thesave-games will be stored in this folder.
Remark: To create an auto-start CD perform the following steps:
1. Add to the script.txt file in the [Options] section the command:Settings = SET_PERFORM_FROM_CD
2. Build the script.txt file to create the script.dat file
Page 590
TOMB RAIDER NEXT GENERATION SCRIPT REFERENCE MANUAL
3. When all of the files to play the game are in the trle folder save the whole trle folder including the name of the trle folder in the CD image to burn on CD.
4. Before burning the image add to the image the following files found in ExtraNG_File.zip:
START.exeautorun.inf
5. Burn the CD and get the following list browsing the CD:
START.exeautorun.infotrle (Folder)
Insert the CD in the ROM drive and the game will start and play.
Remark: The START.exe and autorun.inf files should be in the root of the CD, i.e. outside of the trle folder.
SET_SOFT_FULL_SCREENUsed in the Settings= command. There are complicated questions about this setting. When the TRNG engine works in full screen it is difficult to start a movie (FMV) because this screen mode, is an Exclusive Full Screen mode, i.e. the game catches the screen and will not release it to other DIRECTX tasks like the FMV viewer. With this setting the Exclusive Full Screen Mode is converted in to a Software (cooperative) Full Screen mode. Practically the game will be shown in full screen, but the DIRECTX mode will not be exclusive so the FMV can be shown. This setting will have no effect if the TRNG engine is set to windowed mode.
SET_FORCE_SOFT_FULL_SCREENUsed in the Settings= command.
From 1.2.2.7 version the previous SET_SOFT_FULL_SCREEN has been removed. The SET_FORCE_SOFT_FULL_SCREEN performs the same job. Now the player is able to set or remove the soft full screen setting because it has been included in tomb raider set up window. For this reason the name of the SET_SOFT_FULL_SCREEN is different from that in past versions. Now any soft full screen setting can be omitted and the player will be able to enable or disable it. It is better not to use this forcing of soft full screen in the script as the player will not be able to disable it from the set up window.
SET_FORCE_NO_WAITING_REFRESHUsed in the Settings= command.This setting used with the SET_FORCE_SOFT_FULL_SCREEN setting changes the setting of the tomb raider game to solve the problem with FMV playing or flickering images.
Page 591
TOMB RAIDER NEXT GENERATION SCRIPT REFERENCE MANUAL
SHOW_LARA_IN_TITLE ShowLaraInTitle=
Syntax: ShowLaraInTitle=ENABLED/DISABLED
Scope: To use in the [Options] section
By default Lara is not visible in the Title level but using this command:ShowLaraInTitle=ENABLED in [Options] section, Lara will be drawn.
SNOW Snow=
Syntax: Snow= SNOW_ constant
Scope: To use in [the Level] section
The snow will be shown in the current level ONLY if the current [Level] section has the command "Snow=SNOW_SINGLE_ROOM" or "Snow=SNOW_ALL_OUTSIDE"
SNOW_DISABLEDThis setting is the same as omitting the Snow= command. Rooms labelled as "Snow" room in the NGLE will be ignored, i.e. no snow effect will be shown.
SNOW_SINGLE_ROOMOnly the room with a "Snow" label in NGLE and with [O] (outside) status will have the snow in the game. Each room will have its own snow intensity read from the field Water Intensity at the right of the multi-state button Water/Rain/Snow ...
SNOW_ALL_OUTSIDEThe snow is shown in all outside rooms, ignoring the multi-state button. A room without "snow" will have snow if it is not a Water room and has the [O] outside status.
Remark: If the SNOW_ALL_OUTSIDE setting is used to set the intensity for snow in all of the level set a single room with the "Snow" attribute in the NGLE and set the value for snow intensity. That value will be used for the whole level. For No snow in the current level use the command "Snow=SNOW_DISABLED".
Page 592
TOMB RAIDER NEXT GENERATION SCRIPT REFERENCE MANUAL
SOUND_SETTINGS SoundSettings=
Syntax: SoundSettings=Sound Quality (SQ_...), MusicVolume, SoundEffectVolume
Scope: To use in the [Options] section
Sound Settings allows setting the music quality, Volume and the sound effects (SFX) volume.
Sound Quality field Choose three different Qualities for music:
SQ_LOW_QUALITY (11025 Hz)SQ_MEDIUM_QUALITY (22050 Hz)SQ_HIGH_QUALITY (44100 Hz)
Type SCRIPT_IGNORE and the quality will be not change and it will use the value currently set in the game.
MusicVolume fieldType values between 0 (silent) and 100 (maximum volume). Type SCRIPT_IGNORE in this field and the music volume will not change from the value currently set in the game.
SoundEffectVolume fieldType values between 0 (silent) and 100 (maximum volume). Type SCRIPT_IGNORE in this field and the SFX volume will not change from the value currently set in game.
Page 593
TOMB RAIDER NEXT GENERATION SCRIPT REFERENCE MANUAL
STAND_BY StandBy=
Syntax: StandBy= IdStandBY, Type StandBy (TSB_..), WaitTime, Flags StandBy (FSB_...), Text, NumTexts, AudioTrack, VAngle, RotateSpeed, Distance, IdTriggerGroupBegin, IdTriggerGroupEnd
Scope: To use in the [Level] section
The Stand By command enables an automatic Pause-mode in the game. The Stand By will begin when the player does not press any key for a time that is set in the WaitTime field. Choose what will happen in the game: The main effect is a matrix effect where the camera turns around Lara. Add text and a new audio track to underline the Stand By mode.
IdStandBY fieldThe Stand By starts when the correct conditions are met. It is added as a flip-effect to execute a Stand By mode. With this flip-effect the settings of the Stand By command perform an in game camera effect. To select the Stand By choose the corresponding IdStandBY value. IdStandBy value = 1.
StandBy (TSB_..) fieldType a single TSB_ value in this field to set the main effect for the Stand By. See the TSB_ constants in the Mnemonics Section.
WaitTime fieldSet the time of NO KEY INPUT to activate the Stand By. Type in the number of seconds.
Flags StandBy (FSB_...) fieldSet the FSB_ flags to customize the main method set with the TSB_ value. Type IGNORE in this field to omit any FSB_ flag. See the FSB_ constants in the Mnemonics Section.
Text fieldType the text that will be printed on the screen when the Stand By is on. For example show text like "Hit a Key To continue".
NumTexts fieldSet the number of texts to show during the Stand By mode. Usually it will be "1" to show the single string typed in the previous "text" field. Show different strings in sequence. When a number greater than "1" is set, the game will show the string typed in the "Text" field and after 4 seconds the following string in the ExtraNG strings list.
For example: Type in the [NG Strings] section of the script the following strings:
23: Pause - Hit a Key24: The longest Night25: Created by PAOLONE
Page 594
TOMB RAIDER NEXT GENERATION SCRIPT REFERENCE MANUAL
To show the sequence on screen, type in the "Text" field of the first string, followed by the "NumTexts" field the number of strings to show ("3"):
StandBy= .... , Pause - Hit a Key, 3, ....
AudioTrack fieldFor a new audio track to play during the Stand By mode type in the number of the CD track to play.For no audio type IGNORE in this field.
VAngle fieldThis field is set if the camera is looking at Lara from down or up. Positive values place the camera BELOW Lara and therefore the camera will look up. Negative values move the camera up to look at Lara. With a zero value the camera will have the same height as Lara. The valid range of values is from -16384 to +16384 but it is better to avoid the 16384 value. It is advisable to use zero or negative values for this field because large positive values make the camera go under the floor. Type IGNORE in this field to set the default value. Note: 16384 = 90 degrees, 8192 = 45 degrees.
RotateSpeed fieldThe speed of the camera turning around Lara has units like degrees. A full revolution will be 65536 ($10000). Since the value typed in the field will be added to the current angle 30 times per second you can compute the value to type to reach the target. For example for the camera to perform a quarter of a revolution (90 degrees) in one second type 16384 (i.e. 90 degrees) / 30 (i.e. one second) = 546. Setting too high a value for the rotation speed will make it difficult to watch the Stand By.
Distance fieldThis is the distance between the camera looking at Lara and Lara. One sector is 1024 units, one click = 256 units. The reasonable range of values could be 256 / 4096. High values (higher than 2048) should be avoided as the camera could have problems turning around Lara and colliding with walls.
IdTriggerGroupBegin fieldThe Stand By command supplies many features, camera effects, background audio and printing of texts. To customize the Stand By further use this field to set a Trigger Group to perform when it starts. In the Trigger Group for example call an Organizer where scrolling or sliding texts will be shown, or a Trigger that starts a Fly By sequence. For no Trigger Group type IGNORE in this field.
IdTriggerGroupEnd fieldWhen a Trigger Group is set at the start of the Stand By mode it is possible to use another Trigger Group to remove the effect added by the first Trigger Group. For example for text displayed on the screen for an infinite time use the End Trigger Group to clear the screen.
Page 595
TOMB RAIDER NEXT GENERATION SCRIPT REFERENCE MANUAL
SWITCH Switch=
Syntax: Switch= SwitchId, VariablePlaceFolder, FlagsSwitch (SWT_....), TriggerGroupIndices
Scope: To use in the [Level] section.
IntroductionThe Switch command permits a choice between a list of Trigger Group indices in accordance with the value in a variable. For example input a number from the Key Pad and then perform different Trigger Groups according to the number chosen by Lara. The same result can be obtained with a Trigger Group filled with a list of condition trigger and ELSE TGROUP_ flags. Using the switch obtains the result in an easier and faster way,
SwitchId fieldThis is the Id chosen in the flip-effect to perform a Switch command. Type different progressive numbers for the Ids in the same [Level] section.
VariablePlaceFolder fieldIn this field type the Place Folder to identify a specific TRNG Variable. See the list of Place Folders in the VARIABLE PLACEFOLDERS section. For example to use the variable "Local Short Beta1" type the Place Folder: #0052. Type IGNORE in this field and the Switch will use the variable "Last Input Number", since that is the variable that receives the value typed with the Key Pad object.
FlagsSwitch (SWT_....) fieldIn this field type one or more SWT_ constants to affect the working mode of the Switch command. Type IGNORE in this field if the flag is not set. See the SWT_ constants in the Mnemonics Section.
Trigger Group Indices fieldsFrom this field type indices of Trigger Group commands. The first Trigger Group will be performed when the variable is "1", the second when it is "2", etc. If IGNORE is typed in the field there will be NO Trigger Group for that number. For example if NO Trigger Group is required when the variable is "2" type a list like this: ..., 4, IGNORE, 7, 8
When the variable is "1" it will perform the Trigger Group=4.When the variable is "2" nothing will be performed.When the variable is "3" it will perform the Trigger Group=7When the variable is "4" it will perform the Trigger Group=8Up to 120 indices can be put in this array.
Page 596
TOMB RAIDER NEXT GENERATION SCRIPT REFERENCE MANUAL
TEST_POSITION TestPosition=
Syntax: TestPosition= IdTestPosition, Flags (TPOS_...), Slot Moveable, XDistanceMin, XDistanceMax, YDistanceMin, YDistanceMax, ZDistanceMin, ZDistanceMax, HOrientDiffMin, HOrientDiffMax, VOrientDiffMin, VOrientDiffMax, ROrientDiffMin, ROrientDiffMax
Scope: To use in the [Level] section
Use the Test Position to verify if Lara is in the correct position with respect to other items (all moveables in the given Slot). Type the IdTestPosition and the Extra field of Animation= or MultEnvConditon= script commands to transform it into an effective condition.
The TestPosition= is a complicated command. There is an example zip file to understand how to use TestPosition. The zip file is called "AnimationTestPosition.zip" and it contains some images to understand the following explanations. The zip file also contains a project + script to test the ENV condition with the TestPosition command.
Descriptions of TestPosition fields:
IdTestPosition fieldIn this field type an Identifier number to call this TestPosition command from the other commands like Animation= or MultEnvConditions= (type this Id in the Extra field). Each TestPosition command input for the [Level] section should have a progressive Id number.
Flags (TPOS_...) fieldType one or more TPOS_ constant values in this field to set some special features. If the TPOS_ flag is not required type IGNORE in this field. See the TPOS_ values in the Mnemonics Section.
Slot Moveable fieldIn this field type the slot (the number or the name) of items to check.
Remark: If the Flags field of the TPOS_TEST_ITEM_INDEX has a value in the "Slot Moveable" field type the index of the item to check. See the description of TPOS_TEST_ITEM_INDEX flag for more information.
XDistanceMin and XdistanceMax fieldsIn these two fields type the minimum and the maximum valid distance from the X origin of Lara and the X origin of the item to test. To understand what the X axis is, look at the image "ExTestPosition_Axis.jpg" found in the "AnimationTestPosition.zip" zip file.
The X axis and its orientation is in a Light Blue color.The effective difference to compare from these two fields is given by: X_Lara_origin – X_Item_Origin.
Page 597
TOMB RAIDER NEXT GENERATION SCRIPT REFERENCE MANUAL
The range to type is always a negative value for XDistanceMin and a positive value for XDistanceMax
For example: XDistanceMin = -256XDistanceMax = +256
This means a tolerance of one click (a sector is 1024 units, so a click is 256 units) of difference between Lara and the item on X axis.Example: Set 0 for the minimum and maximum X distance. This means that Lara 's nose is on the other item (for example a Ninja).
Example: For X difference range: The item to test is a coffee cup and the cup gives a difference on the X axis of +100 . This means that the cup would be close to the left hand of Lara. If the difference was -100 the cup would be near the right hand of Lara.
When the valid range for the X axis (or others) is computed keep in mind the concept of "Relative axis" used in the Test Position comparison.
RELATIVE AXIS descriptionThe axes are relative to the current orientation of Lara, while usually in the 3d world we think of fixed x, y, z coordinates. When the difference for the x relative axis is computed the TRNG engine fixes the origin of the 3d world to the origin of Lara and it rotates the 3d world to have Lara looking in the same direction as the required axis
If a Z difference of 256 units is set (Z axis, see the ExTestPosition_Axis.jpg picture) and the condition is true, means that the item will be one click in front of Lara. For example, in the 3d world Lara is to the left or right of an item on the screen. The position of the origin will be changed before performing the comparison to have Lara at 0,0,0 and then look along the axis at the item. Where Lara is looking will now become the new Z axis direction. This method has been created by EIDOS programmers.
YDistanceMin and YDistanceMax fieldsThese couple of values set the range for the distance on the Y axis. See the image "ExTestPosition_Axis.jpg" found in the "AnimationTestPosition.zip" zip file. The Y axis has a White color.
The description for the X difference range are valid for the Y range. In this case there is a further complication because while the X and Z origin of Lara are always the same at half of her body height, the Y origin of Lara changes according to the current animation. Use the Diagnostic to understand what the Y origin of Lara is set at in the animation. Then it will give the value to launch your custom animation.
Type in the [Options] section of the script.txt file the command: Diagnostic= ENABLED In the game the values for Lara will be displayed.
Page 598
TOMB RAIDER NEXT GENERATION SCRIPT REFERENCE MANUAL
Look at the "Cy=..." value.To understand this, build a sample project where the floor is at 0 clicks, then extrude some sector to have 4 clicks of height and a hole in the floor of 4 clicks. The basis of these test will be to see what the Cy of Lara is when she is on the floor. The Cy should be "0" if the floor of the room is 0 click.
When Lara moves up a sector 4 clicks high the Cy should be Cy = -1024 because upward the Y axis in negative.
If Lara goes down in a hole 4 clicks deep the Cy should become +1024 because there are 4 clicks of difference up to the floor.This experiment is simple because the results are known. However it shows the method to discover the reference of the Y origin of Lara for all animations. For example if Lara hangs on the edge of an elevated 4 click block, we have another animation (that of hanging) and we could discover that in this animation the Y origin is not Lara 's feet but her knees.
Creating a sample project with the floor at 0 clicks and a pool room we could discover other Y origins for particular standard animations. For example when Lara is floating on the water surface the Y origin of Lara is the same as the Y coordinate of the water surface. When Lara is floating up and down on the waves the Cy value remains the same. In this case the Y origin is the neck of Lara.
When a Test Position command is used to verify what point of Lara is used for the Y origin of the animation where the custom animation is launched. Build the Y range on this reference.
Now perform an example using the stand-up position of Lara when the Y origin is on her feet.If the item is a small ball and it is in front of Lara and the ball is as high as the head of Lara, the difference will (about) + 600. If the difference is negative, for example - 1024 means the ball is in a hole below Lara.
For example: To put a ball in front of Lara 's head set Y ranges: YDistanceMin = 550YDistanceMax = 650
There is no negative value in the above values. This is because Lara's height is about 3 clicks, so 256*3 = 768 units (exactly 800 units in the 3d world). To put the ball in front of Lara 's head, the ball cannot be lower than Lara 's neck which is about 512 units from the her feet (Y origin). So set a minimum Y distance of 550, because if it was less than that it would mean the ball is closer to Lara 's feet. The ball should also be less than 768 so that it is not above her head.
Remember that the axes are relative (see above paragraph) so it is not important if the Y origin of Lara or the item are positive or negative. The difference will work in the correct way. When the Y difference (in the example of the ball) is 0 means the ball is in front of her feet.
SIZE of Lara: The following sizes can be used for Lara:Height in stand-up position = 800Width stand-up, from hand to hand = 320Depth of Lara by profile = 130Height in all fours position = 320Height in climb position = 600
Page 599
TOMB RAIDER NEXT GENERATION SCRIPT REFERENCE MANUAL
ZDistanceMin and ZDistanceMax fieldsWith these two fields set the distance range on the Z axis. The Z axis is the direction where Lara is looking. When the Z difference (Lara.Z - Item.Z) is negative this means that the item is in front of Lara. If the difference is positive Lara has passed over the item and it is behind her.
HOrientDiffMin and HOrientDiffMax fieldsThese two fields set the acceptable range for the Horizontal relative difference between Lara and the Item. The horizontal orientation is given by Lara.HorizonalOrient – Item.HorizontalOrient. To understand "Horizontal" facing you could look at the picture "ExTestPosition_H_Orienting.jpg" that is found in the "AnimationTestPosition.zip" zip file. The default H facing of items (Lara or others) is 0 and this is the position you see in the NGLE when an item is placed in the level map. To understand how the difference between the orientation changes see the project in the AnimationTestPosition.zip file.
If the correct distance ranges are set but were wrong on the horizontal orientation Lara gets closer to the item but the item is not shown on the correct side of Lara.
For example::Create a cabinet and an animation where Lara forces the lock to open it. It is necessary not only for Lara to be close to the cabinet, but also to be at the front to open the lock. If Lara has the back or the side of the cabinet in front of her, the distance could be correct but the animation would make no sense. Find the ideal difference between the H orientation and then create a range where there is at least some tolerance. For example with the cabinet the difference could be $8000 (32768) (face to face) and the range should have a Minimum, for example $7f00 while the maximum is bigger than the same tolerance ( +/- $100 ) i.e. $8100.
VOrientDiffMin and VOrientDiffMax fieldsThese two values set the range for the difference of the Vertical Orientation.See the image "ExTestPosition_vOrienting.jpg" to understand how the V Orientation works.
This range is not so important because 99 times out of 100 both items, Lara and the other item will have VOrientation = 0 Set a range Min= -200 and Max = +200
A rare case where Lara has a different VOrient is the run with dash, when she swims underwater or diving. See the sample project in AnimationTestPosition.zip file to verify this situation.
ROrientDiffMin and ROrientDiffMax fieldsThese two fields set the valid range for the difference of the Rotating Orientation between Lara and an item. The value seldom changes. It should always be 0, so the difference between Lara and the item should be zero. This value changes when Lara is running with dash and she is turning left or right. You can type as a range -200 +200 but you can type 0 and 0 for most situations.
Page 600
TOMB RAIDER NEXT GENERATION SCRIPT REFERENCE MANUAL
TEXT_FORMAT TextFormat=
Syntax: TextFormat=Color (CL_...), FormatFlags (FT_...) , BlinkTime, SizeCharacterMenu (SC_...)
Scope: To use in the [Level] section or [Title] section
Arguments:Color = CL_constant to set the default color for the print string flip-effect
FormatFlags = FT_.constant to set the default position of text, default size and further blink or stretch characters
Note: Add to the FT values for the text position the two flags FT_NARROW_CHARS and FT_BLINK_CHARS and all the FT_SIZE.. flags using the '+' character.
Example: Set text in Gold at the Top aligned Central with Blinking characters.: FormatText= CL_GOLD, FT_TOP_CENTER + FT_BLINK_CHARS, 16
Remark: Remember this setting only works for text printed using the print text flip-effect. To change the size of the TRNG characters set a SC_ constant in the SizeCharacters field..
BlinkTime = Numeric value to signal the interval for the Blinking when the FT_BLINK_CHARS flag is set in FormatFlags parameter. For the Blink time use only power of 2 values, like: 1, 2, 4, 8, 16, 32, 64, 128
SizeCharacterMenu = Constant value SC_ TYPE to change default size of the characters in the TRNG menu.
Remark: Values of FT_ flags, is the value set in the SizeCharacter field and will effect only the TRNG Default texts (Menu, Options, but not the Legend string). This setting will have no effect on the flip-effect print text. Use this field only in the [Title] section in this way:
TextFormat= IGNORE, IGNORE,IGNORE, SC_HALF_HEIGHT
To use the TextFormat in the [Level] section type IGNORE in this field, otherwise the text for the TRNG menu will change in an irregular way according to the last level played.
Currently ONLY ONE one of the following values in this field can be selected:
SC_NORMAL Do not change anything. The characters will have default size
SC_HALF_WIDTH Text will be reduced by half the width of the characters, while the height will be not changed
Page 601
TOMB RAIDER NEXT GENERATION SCRIPT REFERENCE MANUAL
SC_HALF_HEIGHT Text will be reduced by half the height of the characters, while the width will be not changed
SC_HALF_SIZE This value reduce by half both the width and height of the characters
SC_DOUBLE_WIDTH Set double width for the characters, untouched height
SC_DOUBLE_HEIGHT:5 Set double height for the characters, untouched width
SC_DOUBLE_SIZE Set double width and double height for the characters.
Default values for the Text Format command:
TextFormat= CL_WHITE, FT_BOTTOM_CENTER, 16, SC_NORMAL
If no Text Format command is set for the current level the default values will be used:
Remarks:
1. Change the settings for the text in the game with flip-effects. It is better to use this script command to set default values.
2. Use some FT_... value to set the position of text to add to a specific string some format characters to change the position of the text on the screen. For example a FT_TOP_LEFT is used but the text overlaps into the Vitality Bar. Start the text with a character couple: "\n" (n = newline). A empty line will be printed and the visible text will start in a lower position.
3. To move a LEFT aligned text to the right, start each line with a character couple: "\t" (t = tabulation).
Example: \tHi world\n\tI am very Happy to be here
Page 602
TOMB RAIDER NEXT GENERATION SCRIPT REFERENCE MANUAL
TEXTURE_SEQUENCE TextureSequence=
Syntax: TextureSequence=IdTexSeq, FramePerSec, SEQ_ flags, Tex Indices array {...}
Scope: To use in the [Level] section
IdTexSeq fieldA number to identify the Texture Sequence when it is enabled using the flip-effect trigger. Use "1" for the first Texture Sequence command, "2" for the second Texture Sequence command, etc.
FramePerSec fieldSet the speed of the sequence. The value is in frames per second. The maximum value is 30, i.e. 30 frame for second, the smallest value is 1.
SEQ_ flags fieldSet two or more SEQ_ flags.
Currently there are the following flags:
SEQ_LOOPThe sequence will be performed in a loop. If this flag is set use a specific flip-effect to stop the sequence, otherwise it will be performed continuously.
SEQ_LOOP_INVERSEThis flag works only if the SEQ_LOOP flag is set. When the single SEQ_LOOP flag is set an infinite loop with four textures (from 0 to 3): 0 1 2 3 0 1 2 3 0 1 2 3 ....When the SEQ_LOOP_INVERSE flag is set the sequence will be: 0 1 2 3 2 1 0 1 2 3 2 1 0 ...
SEQ_STOP_AT_FIRSTIf this flag is set the TRNG engine is forced to set the first texture of the range when the animation is completed. If this flag is OMITTED the last texture shown depends on the type of animation. If NO LOOP is set the last texture shown will be the texture of the last index of the array sequence. If a LOOP is set the texture shown will depend on the time when the Stop texture sequence flip-effect is activated.
Text Indices array {...} fieldsThe text indices array can have up to 1000 different indices. Separate the value with commas ',' .Each index will describe the index position for each texture within the specific animation range.For example if four textures are set in the TGA map, each texture shows "A" the first then "B", "C" and "D" When frame displayed is "A" type 0 (zero), when "B" is wanted type 1, etc.
Page 603
TOMB RAIDER NEXT GENERATION SCRIPT REFERENCE MANUAL
For example: TextureSequence= 1, 4, IGNORE, 3, 2, 1, 0 The sequence has Id = 1.This is the number set in the flip-effect trigger to start/stop this sequence.
The animation will be be slow because it is set at 4 frames per second.NO LOOP, because the IGNORE for SEQ_ flag is setThe sequence shown in the game will be with the following images: D (3)
C (2)B (1)A (0)
Remarks: The ranges animated with a Texture Sequence command have to be set like "P-Frames" in the NGLE. The maximum number of textures to animate with the Texture Sequence is 16. This means a number in the range 0 to 15 in the Indices Array fields. The same P-Frame range can be animated with different Texture Sequence commands. The Id of the P-Frame range to animate will be set in the flip effect trigger.
Page 604
TOMB RAIDER NEXT GENERATION SCRIPT REFERENCE MANUAL
TRIGGER_GROUP TriggerGroup=
Syntax: TriggerGroup= IdGroup, ExportValue1 + TGROUP_ flags, ExportValue2, ExportValue3, {Other Values 1/2/3 of exported triggers or conditions)
Scope: To use in the [Level] section
The Trigger Group permits two or more Triggers to perform at the same time using a single flip effect called "Perform TriggerGroup..".
A Trigger Group can be activated using a condition trigger "Check condition of <&>TriggerGroup". In this case the condition will be true if all of the conditions typed in the Trigger Group command are true. To obtain data to type in the Trigger Group command use the Trigger Window of the NGLE program by clicking on the button named "Export Script Trigger". If no button displays with that name it means that the specific trigger cannot be exported in script format.
The following triggers can be exported: Flip-effects, Actions, Conditions.
A Trigger is exported as a script trigger to give a text file containing information like this:---- Begin file ---------Add following three values in your script command:... , $2000, 96, $0Information about exported trigger--------------------------------------Type: FLIPEFFECT<#> : Lara. Disarm Lara in <&>way<&> : Remove All. (Weapons + Ammos)(E) : ----------------------------------------- End file ----
In the above example the values to add to the Trigger Group command are the values: "$2000, 96, $0" Other information read in the text files are given only for reference, so remember that the above three numbers perform the trigger "Lara. Disarm Lara" .
Arguments:
IdGroupThis is a number typed in to recognize the Trigger Group from other Trigger Group commands in the same [Level] section. Use the IdGroup number to start via a Trigger the Trigger Group. In the trigger window select a flip-effect "Perform <&>Trigger Group" in the "<&>" field. Choose a Trigger Group from the Trigger Groups listed and set a different IdGroup value. Start with "1" for the first Trigger Group and continue with "2" and then "3" when you add another Trigger Groups to the [Level] section.
Page 605
TOMB RAIDER NEXT GENERATION SCRIPT REFERENCE MANUAL
Exported Trigger valuesAfter the IdGroup field type a list of triple values. Each Group of three values is obtained from an "Export Script Trigger" operation. Type these three values in the same order seen in the text from the "Export Script Trigger" button.
The general syntax for the Trigger Group becomes:
TriggerGroup= IdGroup, {Alfa1, Alfa2, Alfa3}, {Beta1, Beta2, Beta3}, {...}, {Omega1, Omega2, Omega3}
Remark: The "{" "}" parenthesis do not have to be written. They are only shown to identify the optional grouping of the Trigger Data that can be added in the Trigger Group command.
In the above the "Alfa", "Beta" and "Omega" are specific exported triggers and the numbers "1/2/3" are the three values for each exported trigger.
DO NOT modify the values obtained from the exporting. It is possible to add to the first value (like "Alfa1", "Beta1" or "Omega1" in above example)
Some TGROUP_ flags give specific meaning to the current trigger.Add the following TGROUP to the first value of each exported trigger:
TGROUP_ANDTGROUP_NOTTGROUP_OR
The above flags are Boolean operators. They are used to link Condition Triggers. If NO Boolean operator is used the Default value is always AND. This means all conditions typed in sequence should all be True to get a True final condition.
For example: For a final True condition when "Lara is climbing" OR "Lara is monkey" use the TGROUP_OR operator in this way:
Condition1 (For Lara is climbing) TGROUP_OR + Condition2 (For Lara is monkey)
If one condition is True then the Final condition is True.
TGROUP_NOTThe TGROUP_NOT works in a different way. It is like "AND NOT" because it is linked with a previous condition. An AND NOT inverts the meaning of the current condition. Use the NOT when you do not find the required condition but only the opposite in the list of the Trigger Window. Using this opposite condition with a NOT to invert the meaning of that condition.
Page 606

TOMB RAIDER NEXT GENERATION SCRIPT REFERENCE MANUAL
TGROUP_ELSEAdd TGROUP_ELSE to conditions or common triggers. When this flag is added an "ELSE block" is started. The ELSE block is performed ONLY if a previous condition block gave a Negative condition. Use ELSE to perform one of two different triggers (or block of triggers).
For example: For a Bonus level. If Lara has found all of the secrets DO the Bonus level. If Lara has missed some of the secrets GO TO the Title level to end the adventure. Use an ELSE in this way:
Condition (Lara found <&> secrets) (if true) Perform trigger (Load bonus level) TGROUP_ELSE + Trigger (Perform title level)
If Lara found all secrets the Bonus level will be loaded, else, the Title level.
None, two or more ELSE flags can be placed in the Trigger Group making very complex conditions. A way to use ELSE is to test the conditions and perform a different trigger depending on the result.
For example: Condition: "Lara found 1 secret" Trigger: Load Level 5 ELSE Condition: "Lara found 2 secrets" Trigger: Load Level 6 ELSE Condition: "Lara found 3 secrets" Trigger: Load level 7
In the above example ELSE is attached to the conditions. The rule used by the game to scan a trigger group is: IF current_trigger is a condition: verify if the condition is True
IF it is True verify the other conditions. If there are no other conditions perform the first non- condition trigger found and all the following non-condition triggers until the end of the Trigger Group or up to the first ELSE flag found.
IF the current trigger is not a condition: perform it and all the following and then stop at the first ELSE flag found.
IF the current_trigger is a condition and the condition is FALSE, skip the current condition block and skip the following non-condition block. Continue parsing to find an ELSE flag and start to verify the conditions or perform a trigger from this ELSE flag.
TGROUP_USE_FOUND_ITEM_INDEXTGROUP_USE_OWNER_ANIM_ITEM_INDEXTGROUP_USE_TRIGGER_ITEM_INDEX
The above TGROUP flag modifies the "ITEM_INDEX". The "item index" is the index of the moveable used by the Trigger like Action or conditions. By default each Trigger has an index when Exported. Sometimes we need to perform actions (triggers) on a moveable not yet known.
Page 607
TOMB RAIDER NEXT GENERATION SCRIPT REFERENCE MANUAL
Example for a Fight Situation: "When Lara hits an enemy the enemy will lose vitality"The problem is to identify the index of an ENEMY because it could exist as different ENEMY TYPES for that slot type in the level. When typing a trigger it is not known what ENEMY will meet Lara first. To solve this problem use the above flags to specify the index to use for the following triggers or conditions.
This method is possible when there is a way to locate dynamically a moveable. for a condition like "Lara collides with moveable of <&>slot", when the condition is True the TRNG engine will find the index of the moveable that is touching Lara if the condition is attached with the flag TGROUP_USE_FOUND_ITEM_INDEX . The found index in the current condition will be used in the following triggers or conditions to perform a specific trigger over this ENEMY to Damage it. "Remove vitality to <#> ENEMY"
When using the above flag type the source trigger choosing any object because it will use another index of the object to perform that action.
The flag TGROUP_USE_OWNER_ANIM_ITEM_INDEX is easy to use. Use this flag when the current Trigger Group is performed by an animation command inserted in some animation of a moveable. In this circumstance the TGROUP_USE_OWNER_ANIM_ITEM_INDEX flag will force an index to use the index of the moveable where this animation command has been inserted.
The TGROUP_USE_TRIGGER_ITEM_INDEX flag, resets the Index of the moveable forcing it back to its original value. If a previous trigger or condition used a flag like TGROUP_USE_OWNER_ANIM_ITEM_INDEX or TGROUP_USE_FOUND_ITEM_INDEX, use the real source indices in the current level and the following trigger or conditions using the flag TGROUP_USE_TRIGGER_ITEM_INDEX.
With this flag the TRNG engine is informed to use the effective index typed originally in that trigger.
See the TGROUP_ constants in the Mnemonics Section.
Page 608
TOMB RAIDER NEXT GENERATION SCRIPT REFERENCE MANUAL
TURBO Turbo=
Syntax: Turbo=Flags (TRB_..), FPStoKeep
Scope: To use in the [Level] section
The Turbo command allows tricks to be set to enhance the speed of the TRNG engine. Use this command only when the level has a problem with the frame rate, i.e. when the Frames Per Second goes below 29 FPS.
Remark: At the bottom of the description for the Turbo command are some suggestions to enhance the speed of the level using some tricks in the project phase.
Description of fields:
Flags (TRB_..) fieldSet one or more (linking with +) TRB_ constant values. See the TRB_ values in the Mnemonics Section.
FPStoKeep fieldThis field is used ONLY if the TRB_ADAPTIVE_FARVIEW is set in the Flags field. Type the FPS to Keep value. If IGNORE is typed the Default value is 29 FPS. This means that when the frame rate goes below 29 fps the TRNG engine will reduce the Far View Distance until the frame rate recovers to 29 fps. If the level has a very low frame rate, for example 15 fps, it is better not to set a high frame rate in the FPS to Keep field. Otherwise the Far View Distance will be decreased too much. For example if you type 20 FPS, the TRNG engine will reduce the distance of the Far View Distance ONLY when the frame rate goes down to 20 FPS.
How important is the best frame rate and the maximum far view distance? If the best frame rate is essential type 29 (the maximum value) and the TRNG engine will keep this frame rate but reduce the Far View Distance. If the Far View Distance is important then type a low value like 20 FPS. The Far View Distance will be preserved except when the game frame rate is very low.
Remark: If the TRB_ADAPTIVE_FARVIEW setting is not used type IGNORE in this field.
Some tips to enhance the speed of your levelIf the Turbo command is not enough to get the result, use some tricks while building the level to enhance the speed.
The problem of statics...The static objects require more time to be shown than moveable objects. For this reason many "slow down" problems are made because there are too many statics in the same room or nearby. To solve this problem replace the static objects with moveable objects that look the same.
For example: Replace the static copying its meshes and textures with the STRPIX program. Use "Export dxf" on the original static object and the command "Import dxf".
Page 609
TOMB RAIDER NEXT GENERATION SCRIPT REFERENCE MANUAL
The transparency problem...For complex reasons the TRNG game engine performs extra computes when an object has transparent textures. Hence it is not always possible to give up this usage, in some circumstances replace the transparent texture with some more detailed opaque mesh. For example to simulate a circle, use a square mesh with a transparent texture where the circle is the opaque side. Create a real circular mesh using some triangles. This avoids the use of transparent texture without giving up the shape required.
An alternative to Adaptive frame rate settingIf the working of the Adaptive frame rate is not satisfactory using the Turbo command, set in the level some specific zones that have a reduced Far View Distance. Use a new flip-effect trigger to set dynamically a larger Far View Distance in the current level. Using this method disable the Adaptive Far View in the turbo command otherwise there will be conflicts. Study the level to understand what zones are important to have a gain in frame rate reducing the Level Far View.
For example: If the level has a wood with trees very close together it is possible to have a problem with the frame rate speed. In this case place a strip of triggers to enable the Far View Distance to be reduced when Lara enters the wood. Another strip of triggers is set to give a larger Far View Distance when Lara leaves the wood.
Page 610
TOMB RAIDER NEXT GENERATION SCRIPT REFERENCE MANUAL
WINDOWS_FONT WindowsFont=
Syntax: WindowsFont= IdWindowFont, WindowFontName, WindowsFontFlags (WFF_...), SizeFont, ColorRbgId, ShadowColorRgbId
Scope: To use in the [Level] section
The Windows Font permits the choice for the settings for the Windows Font. Do not confuse the common game font used in Tomb Raider with the Windows Font. The Windows Fonts can be used only in the TRNG engine special page layout like Lara 's Diary. Other TRNG engine features will be added in the future.
IdWindowFont fieldIn this field type a progressive number used as an identifier to reference this font setting from other script commands.
WindowFontName fieldType a standard Font name. There are many Windows Fonts. Use a common Font otherwise there is the risk that the font chosen is missing on a player's computer.
The most common font names are: ArialComic Sans MSCourierCourier NewMs Sans SerifTimes New RomanVerdana
Remark: The name in this field is also in the Strings section.
For example: To use the "Courier New" Font for the text in this field:
WindowsFont= 1, Courier New, ...
and then type this text into the [Strings] or [ExtraNG] strings section.
Remark: If the font name is omitted by typing IGNORE the TRNG engine will find a generic font responding to other settings, like bold and size. To get the best results it is better to type a font name.
WindowsFontFlags (WFF_...) fieldIn this field type one or more WFF_ flags linked with "+" sign.If IGNORE is typed in this field the TRNG engine will use the Default setting: WFF_BOLD+WFF_SHADOW+WFF_LEFT_ALIGN for common text settings. The Title setting is: WFF_CENTER_ALIGN+WFF_UNDERLINE+WFF_ULTRA_BOLDSee the WFF_ flags in the Mnemonics Section.
Page 611
TOMB RAIDER NEXT GENERATION SCRIPT REFERENCE MANUAL
SizeFont fieldThis value is the height in pixels of a large character at a screen resolution 1024 x 768, where the width of the char is 50 % of the SizeFont typed. This size is stretched according to the current effective resolution of the game screen.
Remark: Be aware of the size of the text for different screen resolutions. It is important to set a couple of [Size Font] and [Frame Size for the text] to have some free space available in the frame text to minimize any further adjustment.
ColorRbgId and ShadowColorRgbId fieldsThese two fields can set the color for the font (ColorRbgId) and for a shadow color (ShadowColorRgbId). The value typed is the identifier of the ColorRGB in the [Level] section.Choose a shadow color different from the text color. For example if the text color is White choose Black for the shadow color and vice-versa. The ColorRGB commands are typed BEFORE the Windows Font command that uses them. Otherwise the TRNG engine cannot locate the correct ColorRGB command.
Page 612
TOMB RAIDER NEXT GENERATION SCRIPT REFERENCE MANUAL
WINDOW_TITLE WindowTitle=
Syntax: WindowTitle= NameOfCurrentLevel
Scope: To use in the [Level] or the [Title] section.
With this command text can be set that will be shown in the Window Title Bar of the game. This command works only when the game is in a Windowed mode.
Example: WindowTitle= The Last Revenge by PAOLONE
Remark: Remember to add the same text in the english.txt file. For different language versions type the text in the English section and then click on the different language combo box and overwrite the text shown in the selected position.
WORLD_FAR_VIEW WorldFarView=
Syntax: WorldFarView=MaxSectorDistance
Scope: To use in the [Options] section
The default value in original tomb4 engine: WorldFarView=MaxSectorDistance = 20 sectors
Valid range: Minimum = 1 Maximum = 127
The World Far View sets the maximum distance to use in any level of the game. Set a larger number with the World Far View and smaller values in the Level Far View for different levels according to the problem with frame rate for wide and complex scenes. See the Level Far View command and the Fog Range command for more information.
Page 613
TOMB RAIDER NEXT GENERATION SCRIPT REFERENCE MANUAL
DEFAULT_WINDOWS_FONT DefaultWindowsFont=
Syntax: DefaultWindowsFont= IdWindowsFont, FLAGS (DWF_...), LineSpacing, MainMenuOffsets, NewGameTitle, LoadGameTitle, NewGameList, LoadGameList, OptionSettings, OptionCmdList, PauseScreen, StatList, InventoryItemName, ExamineText
Scope: To use in [Title] section
Type this command in the Title section of the script to force the tomb4 engine to use Windows font characters to show any text in the game. All menu titles (New game/Load game/Options etc.) will be drawn using windows functions and a windows font set in the given WindowsFont= command.
Remark:The advantage to use a windows font is to be able to support different character sets (different from the default western character set). Practically using windows fonts it should be able to show texts in eastern languages. There are some problems in windows font management. Since the displaying of a windows font is based on the API windows function (and not DIRECTX functions), the drawing will be slower than the default DIRECTX management used in tomb raider. This means there will be a light "flickering" of windows texts on screen. Another risk is that the font chosen for the windows font could be missing in some computers and in that case the TRNG engine will try to locate a similar font but as it is a different format in the game it could be a bad display.
For above reasons use the DefaultWindwsFont= only when an eastern language not supported in tomb raider defaults is used,. For western level builders and their players continue using the default font management because it grants better performances and compatible issues with all computers.
IdWindowsFont fieldType in this field the Id of the WindowsFont script command with the settings for the windows font to use as a default for all system strings. It is important to place in the script first the WindowsFont= command and then (below it) the DefaultWindowsFont that it uses.
Example: ColorRGB= 1, 255,255,255ColorRGB= 2, 0,0,0WindowsFont= 1, Arial, WFF_BOLD+WFF_SHADOW, 40, 1, 2DefaultWindowsFont= 1, IGNORE
Remark: Many settings in the WindowsFont command will be ignored in the game because it will be the game engine that decides when to use a blink text or a primary color (white), or a secondary color (yellow). The size, font name and bold, italic (etc.) settings will be used.
Note: From 1.2.2.7 version the WindowsFont allows the FontName field (in the string, pointed by that field) to be typed in, also the character set in the format: Charset:FontName
Page 614
TOMB RAIDER NEXT GENERATION SCRIPT REFERENCE MANUAL
Example: 128:Arial Where 128 is the character set for eastern languages like Japanese and Chinese.
Other character set codes are: Greek = 161Turkish = 162Russian = 204
The western character set is 0 but it is not necessary to type it because when it is missing another character set will always be used as a default in the western character set.
Flags (DWF_...) fieldIn this field add the DWF_ flags to customize the command.Type IGNORE in this field for no customize.
LineSpacing fieldLine spacing means the vertical distance between a character row and the following one.Reduce or increase the space with this field. The value is expressed in hundredths on the original value set by the tomb raider engine.
For example: For 100, there will be no change. To increase the line spacing by 20 % type 120, while to reduce it to half (50% ) type 50.
Type IGNORE in this field to keep the original value.
Offset modifiers fields...From the MainMenuOffsets field and following, there are fields to move up/down the position of some system text used in the tomb raider menus. The value typed is in pixels but since there are great differences according to the current resolution of te tomb raider screen, type the values working on a 1024 x 768 resolution. Then the TRNG will adapt the offsets in accordance with the actual screen resolution.
Note: Remember that to move test Up set a negative value, for example -10 to move the text 10 pixels higher than original position.
The names of the fields are self-explicatives, anyway remember the strings they change:
MainMenuOffsets: First screen with "New Game", "Load Game", "Options", "Exit"
NewGameTitle: The title of "New Game" screen
LoadGameTitle: The title of "Load Game" screen
NewGameList: The list of levels in the new level screen
LoadGameList: The list of save game information in the load game screen
Page 615
TOMB RAIDER NEXT GENERATION SCRIPT REFERENCE MANUAL
OptionSettings: All texts in main option screen: "Options", "Control Configuration", "Music Volume", "SF|X Volume", "Sound Quality", "Targeting" and their settings.
OptionCmdList: "Option", "Control method" and all the list of game commands and their settings.
PauseScreen: All texts of pause menu: "Paused", "Statistics", "Options", "Exit to title"
StatList: All texts of Statistics screen, except own the title "Statistics"
InventoryItemName: The name of the currently selected item.
ExamineText: The position of the text linked with an examine item that you see after choosing "Examining" command
Remember that IGNORE can be typed in all the above fields to keep the default values.
Page 616

TOMB RAIDER NEXT GENERATION SCRIPT REFERENCE MANUAL
Page 617
TOMB RAIDER NEXT GENERATION SCRIPT REFERENCE MANUAL
TOMB RAIDER NEXT GENERATION
ADDITIONAL INFORMATION
Page 618
TOMB RAIDER NEXT GENERATION SCRIPT REFERENCE MANUAL
ADDITIONAL INFORMATION
USEFUL TOMB RAIDER WEBSITES
http://www.skribblerz.com
Email: [email protected]
http://www.tombraiderchronicles.com
http://tombraiders.net/stella
http://www.trle.net
http://laraslevelbase.org
www.aspidetr.com
http://www.trsearch.org
http://levelworld.org
http://Metaseq.net/
http://www.tombraiderforums.com
http://www.trlevelmanager.net/ng.htm
http://www.webalice.it/paolone2011/ng.htm
Email: [email protected]
Page 619
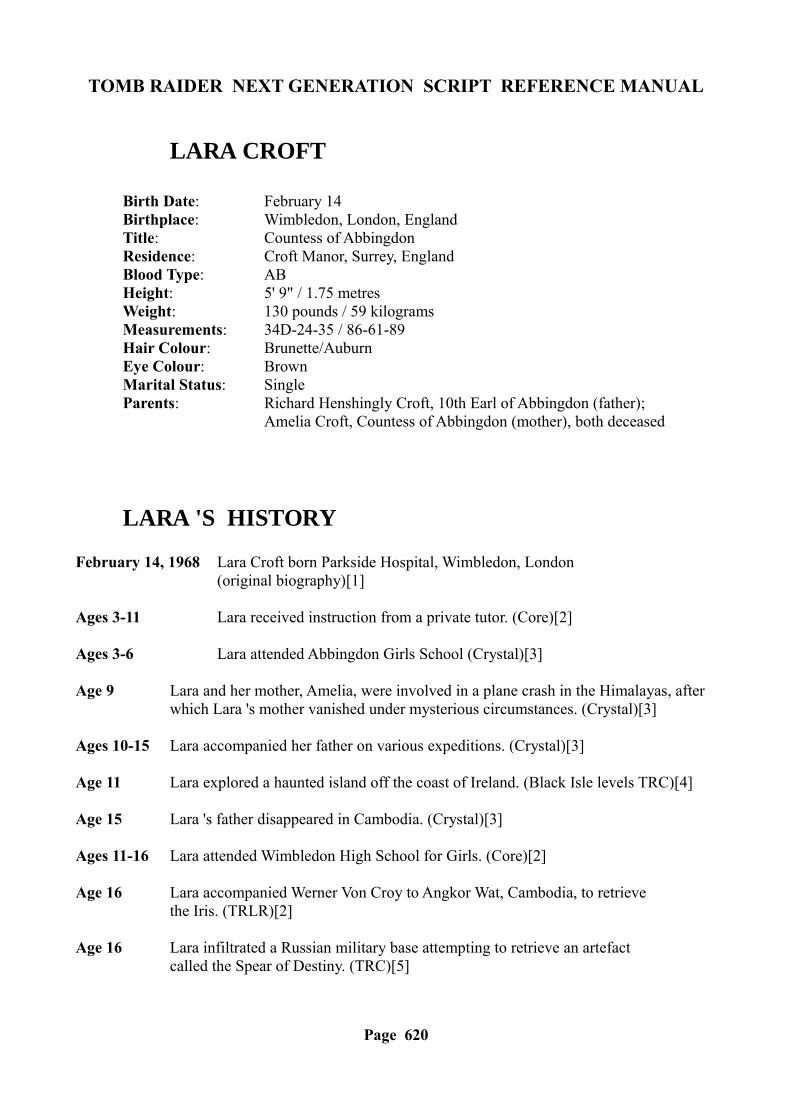
TOMB RAIDER NEXT GENERATION SCRIPT REFERENCE MANUAL
LARA CROFT
Birth Date: February 14Birthplace: Wimbledon, London, EnglandTitle: Countess of AbbingdonResidence: Croft Manor, Surrey, EnglandBlood Type: ABHeight: 5' 9" / 1.75 metresWeight: 130 pounds / 59 kilogramsMeasurements: 34D-24-35 / 86-61-89Hair Colour: Brunette/AuburnEye Colour: BrownMarital Status: SingleParents: Richard Henshingly Croft, 10th Earl of Abbingdon (father);
Amelia Croft, Countess of Abbingdon (mother), both deceased
LARA 'S HISTORY
February 14, 1968 Lara Croft born Parkside Hospital, Wimbledon, London(original biography)[1]
Ages 3-11 Lara received instruction from a private tutor. (Core)[2]
Ages 3-6 Lara attended Abbingdon Girls School (Crystal)[3]
Age 9 Lara and her mother, Amelia, were involved in a plane crash in the Himalayas, after which Lara 's mother vanished under mysterious circumstances. (Crystal)[3]
Ages 10-15 Lara accompanied her father on various expeditions. (Crystal)[3]
Age 11 Lara explored a haunted island off the coast of Ireland. (Black Isle levels TRC)[4]
Age 15 Lara 's father disappeared in Cambodia. (Crystal)[3]
Ages 11-16 Lara attended Wimbledon High School for Girls. (Core)[2]
Age 16 Lara accompanied Werner Von Croy to Angkor Wat, Cambodia, to retrievethe Iris. (TRLR)[2]
Age 16 Lara infiltrated a Russian military base attempting to retrieve an artefactcalled the Spear of Destiny. (TRC)[5]
Page 620
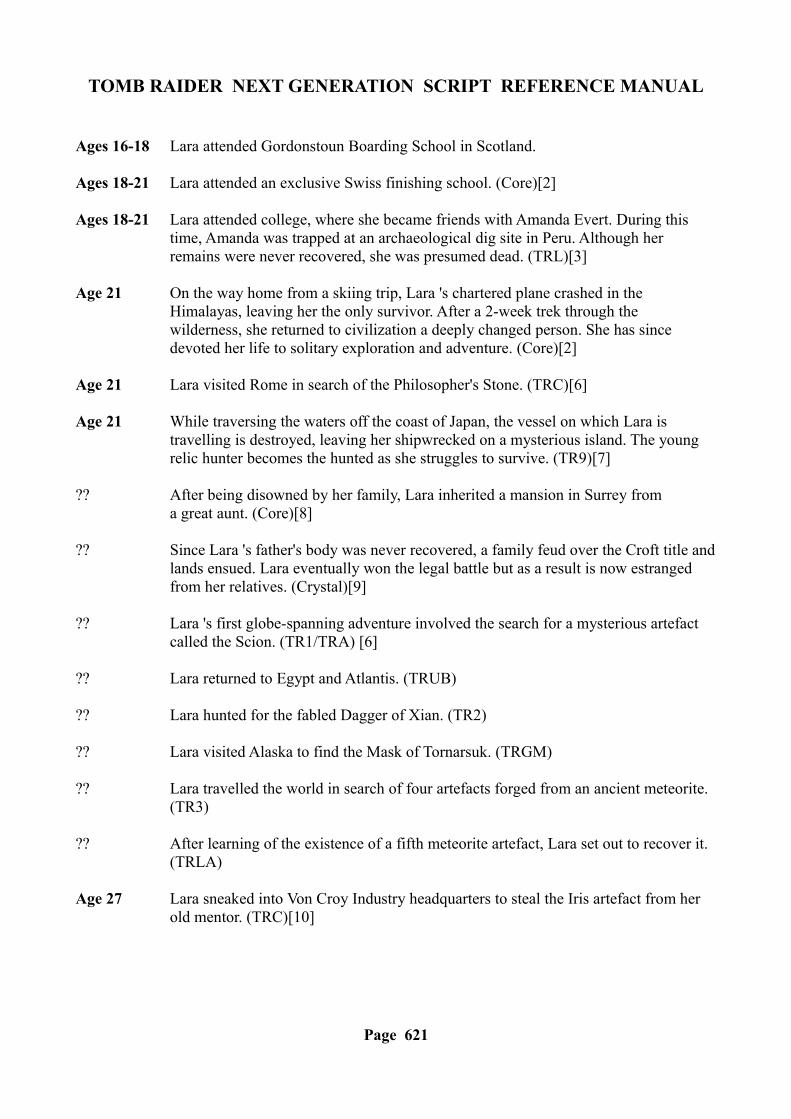
TOMB RAIDER NEXT GENERATION SCRIPT REFERENCE MANUAL
Ages 16-18 Lara attended Gordonstoun Boarding School in Scotland.
Ages 18-21 Lara attended an exclusive Swiss finishing school. (Core)[2]
Ages 18-21 Lara attended college, where she became friends with Amanda Evert. During this time, Amanda was trapped at an archaeological dig site in Peru. Although her remains were never recovered, she was presumed dead. (TRL)[3]
Age 21 On the way home from a skiing trip, Lara 's chartered plane crashed in theHimalayas, leaving her the only survivor. After a 2-week trek through thewilderness, she returned to civilization a deeply changed person. She has since devoted her life to solitary exploration and adventure. (Core)[2]
Age 21 Lara visited Rome in search of the Philosopher's Stone. (TRC)[6]
Age 21 While traversing the waters off the coast of Japan, the vessel on which Lara istravelling is destroyed, leaving her shipwrecked on a mysterious island. The young relic hunter becomes the hunted as she struggles to survive. (TR9)[7]
?? After being disowned by her family, Lara inherited a mansion in Surrey froma great aunt. (Core)[8]
?? Since Lara 's father's body was never recovered, a family feud over the Croft title and lands ensued. Lara eventually won the legal battle but as a result is now estranged from her relatives. (Crystal)[9]
?? Lara 's first globe-spanning adventure involved the search for a mysterious artefact called the Scion. (TR1/TRA) [6]
?? Lara returned to Egypt and Atlantis. (TRUB)
?? Lara hunted for the fabled Dagger of Xian. (TR2)
?? Lara visited Alaska to find the Mask of Tornarsuk. (TRGM)
?? Lara travelled the world in search of four artefacts forged from an ancient meteorite. (TR3)
?? After learning of the existence of a fifth meteorite artefact, Lara set out to recover it. (TRLA)
Age 27 Lara sneaked into Von Croy Industry headquarters to steal the Iris artefact from her old mentor. (TRC)[10]
Page 621
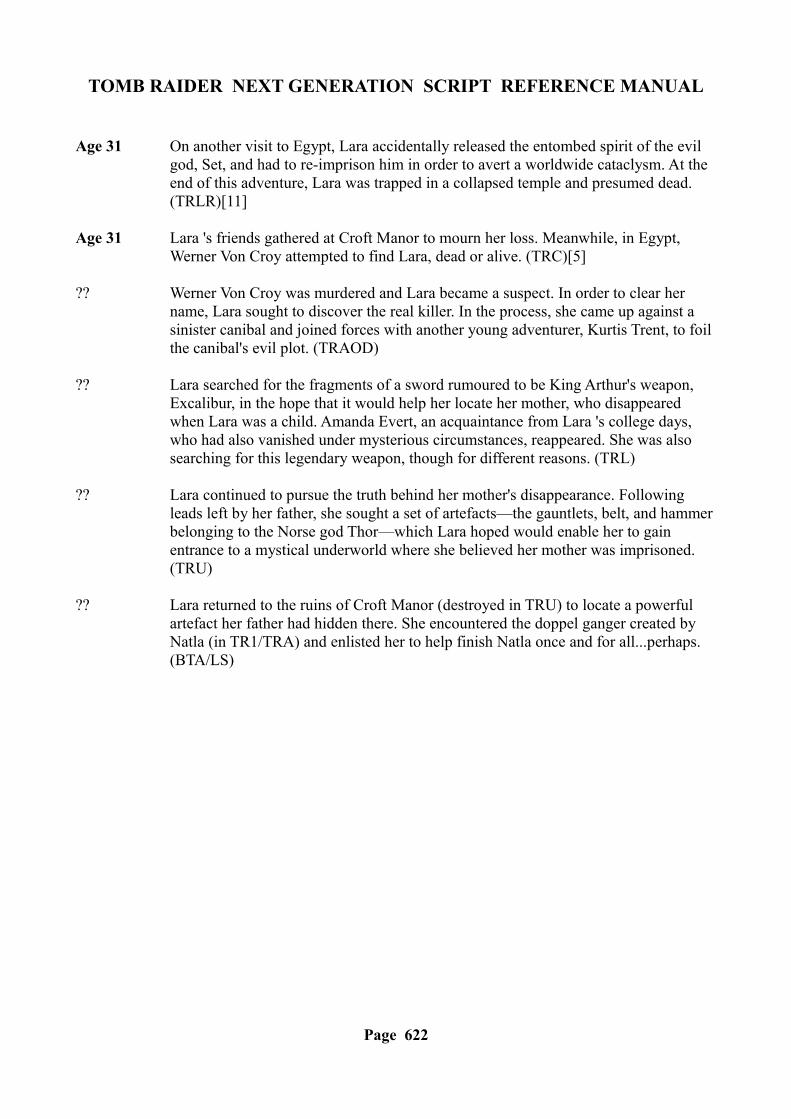
TOMB RAIDER NEXT GENERATION SCRIPT REFERENCE MANUAL
Age 31 On another visit to Egypt, Lara accidentally released the entombed spirit of the evil god, Set, and had to re-imprison him in order to avert a worldwide cataclysm. At the end of this adventure, Lara was trapped in a collapsed temple and presumed dead. (TRLR)[11]
Age 31 Lara 's friends gathered at Croft Manor to mourn her loss. Meanwhile, in Egypt, Werner Von Croy attempted to find Lara, dead or alive. (TRC)[5]
?? Werner Von Croy was murdered and Lara became a suspect. In order to clear her name, Lara sought to discover the real killer. In the process, she came up against a sinister canibal and joined forces with another young adventurer, Kurtis Trent, to foil the canibal's evil plot. (TRAOD)
?? Lara searched for the fragments of a sword rumoured to be King Arthur's weapon, Excalibur, in the hope that it would help her locate her mother, who disappeared when Lara was a child. Amanda Evert, an acquaintance from Lara 's college days, who had also vanished under mysterious circumstances, reappeared. She was also searching for this legendary weapon, though for different reasons. (TRL)
?? Lara continued to pursue the truth behind her mother's disappearance. Following leads left by her father, she sought a set of artefacts—the gauntlets, belt, and hammer belonging to the Norse god Thor—which Lara hoped would enable her to gain entrance to a mystical underworld where she believed her mother was imprisoned. (TRU)
?? Lara returned to the ruins of Croft Manor (destroyed in TRU) to locate a powerful artefact her father had hidden there. She encountered the doppel ganger created by Natla (in TR1/TRA) and enlisted her to help finish Natla once and for all...perhaps. (BTA/LS)
Page 622
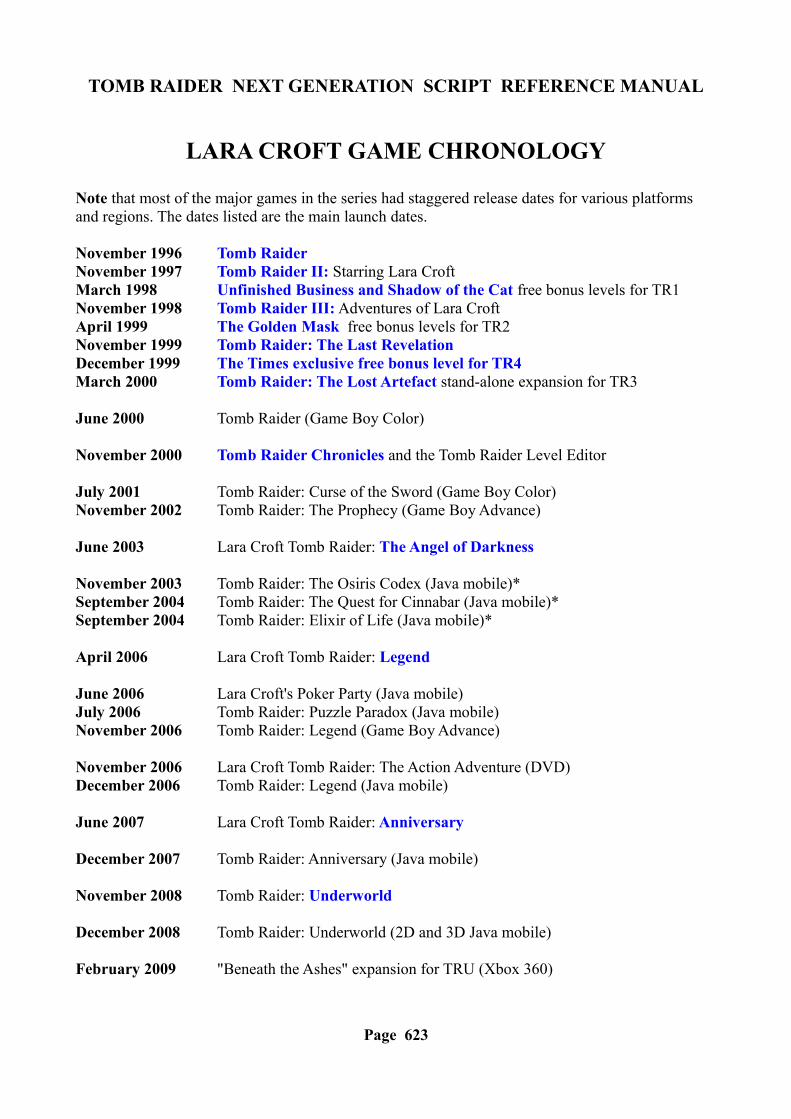
TOMB RAIDER NEXT GENERATION SCRIPT REFERENCE MANUAL
LARA CROFT GAME CHRONOLOGY
Note that most of the major games in the series had staggered release dates for various platformsand regions. The dates listed are the main launch dates.
November 1996 Tomb RaiderNovember 1997 Tomb Raider II: Starring Lara CroftMarch 1998 Unfinished Business and Shadow of the Cat free bonus levels for TR1November 1998 Tomb Raider III: Adventures of Lara CroftApril 1999 The Golden Mask free bonus levels for TR2November 1999 Tomb Raider: The Last RevelationDecember 1999 The Times exclusive free bonus level for TR4March 2000 Tomb Raider: The Lost Artefact stand-alone expansion for TR3
June 2000 Tomb Raider (Game Boy Color)
November 2000 Tomb Raider Chronicles and the Tomb Raider Level Editor
July 2001 Tomb Raider: Curse of the Sword (Game Boy Color)November 2002 Tomb Raider: The Prophecy (Game Boy Advance)
June 2003 Lara Croft Tomb Raider: The Angel of Darkness
November 2003 Tomb Raider: The Osiris Codex (Java mobile)*September 2004 Tomb Raider: The Quest for Cinnabar (Java mobile)*September 2004 Tomb Raider: Elixir of Life (Java mobile)*
April 2006 Lara Croft Tomb Raider: Legend
June 2006 Lara Croft's Poker Party (Java mobile)July 2006 Tomb Raider: Puzzle Paradox (Java mobile)November 2006 Tomb Raider: Legend (Game Boy Advance)
November 2006 Lara Croft Tomb Raider: The Action Adventure (DVD)December 2006 Tomb Raider: Legend (Java mobile)
June 2007 Lara Croft Tomb Raider: Anniversary
December 2007 Tomb Raider: Anniversary (Java mobile)
November 2008 Tomb Raider: Underworld
December 2008 Tomb Raider: Underworld (2D and 3D Java mobile)
February 2009 "Beneath the Ashes" expansion for TRU (Xbox 360)
Page 623
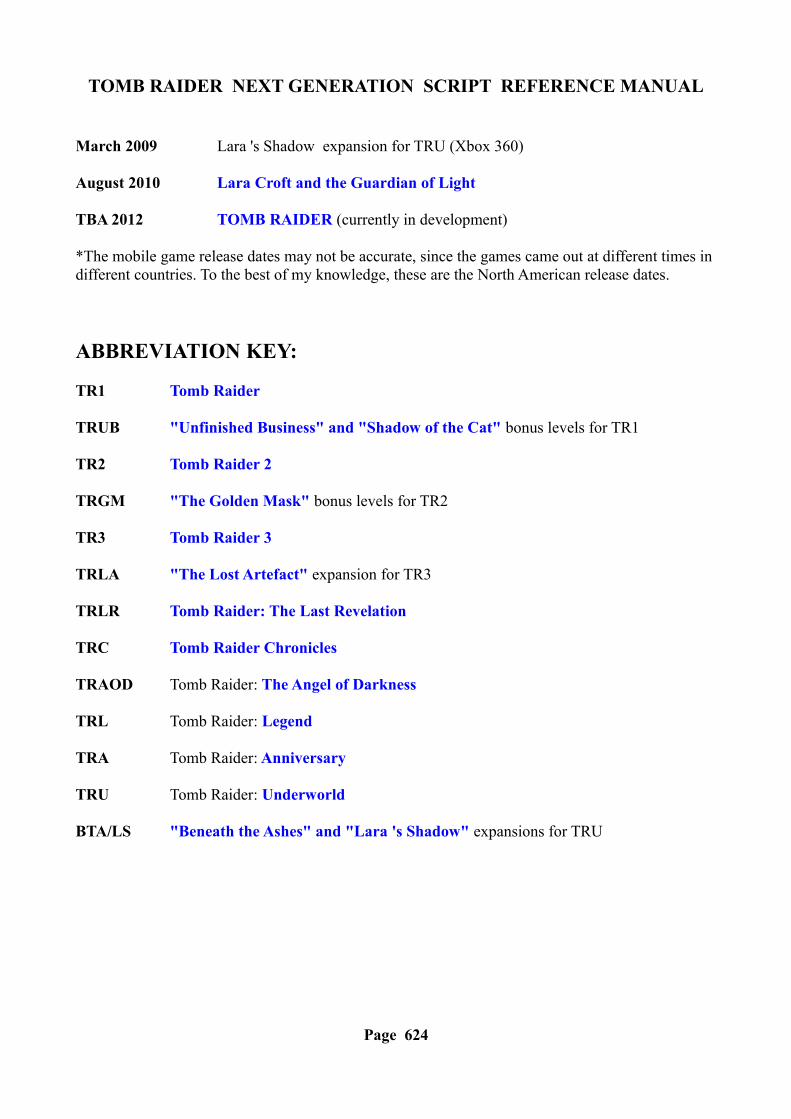
TOMB RAIDER NEXT GENERATION SCRIPT REFERENCE MANUAL
March 2009 Lara 's Shadow expansion for TRU (Xbox 360)
August 2010 Lara Croft and the Guardian of Light
TBA 2012 TOMB RAIDER (currently in development)
*The mobile game release dates may not be accurate, since the games came out at different times indifferent countries. To the best of my knowledge, these are the North American release dates.
ABBREVIATION KEY:
TR1 Tomb Raider
TRUB "Unfinished Business" and "Shadow of the Cat" bonus levels for TR1
TR2 Tomb Raider 2
TRGM "The Golden Mask" bonus levels for TR2
TR3 Tomb Raider 3
TRLA "The Lost Artefact" expansion for TR3
TRLR Tomb Raider: The Last Revelation
TRC Tomb Raider Chronicles
TRAOD Tomb Raider: The Angel of Darkness
TRL Tomb Raider: Legend
TRA Tomb Raider: Anniversary
TRU Tomb Raider: Underworld
BTA/LS "Beneath the Ashes" and "Lara 's Shadow" expansions for TRU
Page 624
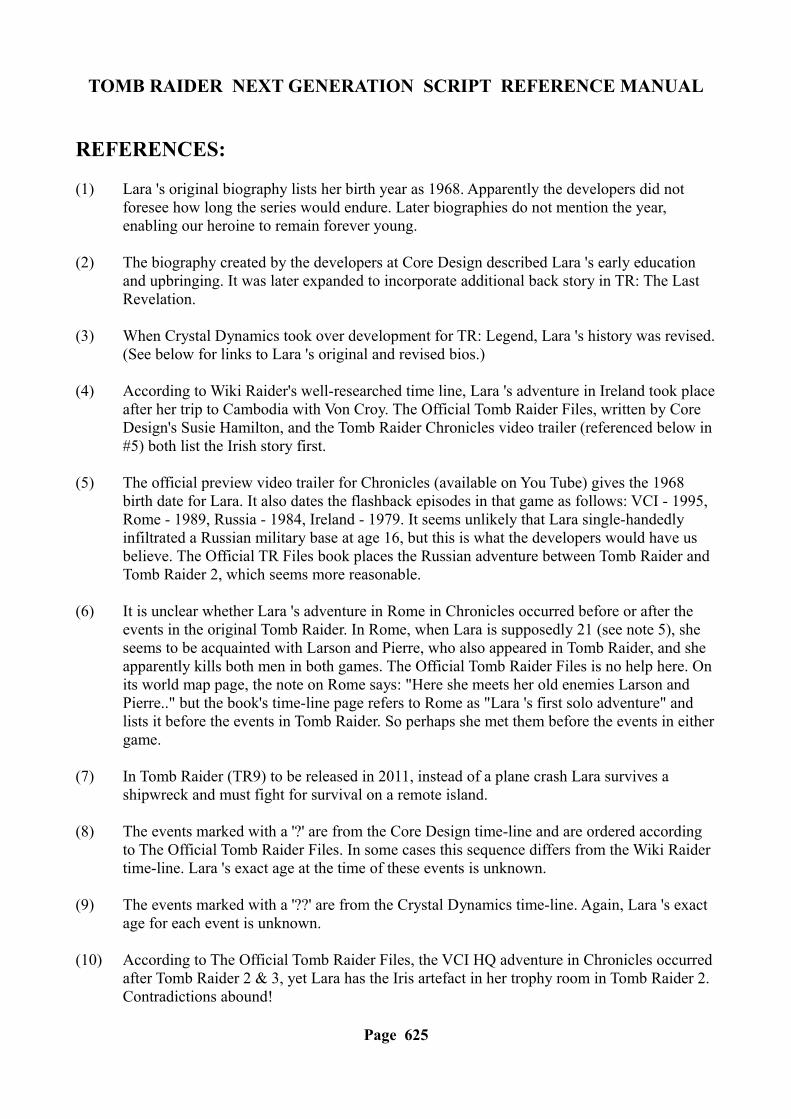
TOMB RAIDER NEXT GENERATION SCRIPT REFERENCE MANUAL
REFERENCES:
(1) Lara 's original biography lists her birth year as 1968. Apparently the developers did notforesee how long the series would endure. Later biographies do not mention the year,enabling our heroine to remain forever young.
(2) The biography created by the developers at Core Design described Lara 's early educationand upbringing. It was later expanded to incorporate additional back story in TR: The LastRevelation.
(3) When Crystal Dynamics took over development for TR: Legend, Lara 's history was revised.(See below for links to Lara 's original and revised bios.)
(4) According to Wiki Raider's well-researched time line, Lara 's adventure in Ireland took placeafter her trip to Cambodia with Von Croy. The Official Tomb Raider Files, written by CoreDesign's Susie Hamilton, and the Tomb Raider Chronicles video trailer (referenced below in#5) both list the Irish story first.
(5) The official preview video trailer for Chronicles (available on You Tube) gives the 1968 birth date for Lara. It also dates the flashback episodes in that game as follows: VCI - 1995, Rome - 1989, Russia - 1984, Ireland - 1979. It seems unlikely that Lara single-handedly infiltrated a Russian military base at age 16, but this is what the developers would have us believe. The Official TR Files book places the Russian adventure between Tomb Raider and Tomb Raider 2, which seems more reasonable.
(6) It is unclear whether Lara 's adventure in Rome in Chronicles occurred before or after theevents in the original Tomb Raider. In Rome, when Lara is supposedly 21 (see note 5), sheseems to be acquainted with Larson and Pierre, who also appeared in Tomb Raider, and sheapparently kills both men in both games. The Official Tomb Raider Files is no help here. Onits world map page, the note on Rome says: "Here she meets her old enemies Larson andPierre.." but the book's time-line page refers to Rome as "Lara 's first solo adventure" andlists it before the events in Tomb Raider. So perhaps she met them before the events in eithergame.
(7) In Tomb Raider (TR9) to be released in 2011, instead of a plane crash Lara survives ashipwreck and must fight for survival on a remote island.
(8) The events marked with a '?' are from the Core Design time-line and are ordered accordingto The Official Tomb Raider Files. In some cases this sequence differs from the Wiki Raidertime-line. Lara 's exact age at the time of these events is unknown.
(9) The events marked with a '??' are from the Crystal Dynamics time-line. Again, Lara 's exactage for each event is unknown.
(10) According to The Official Tomb Raider Files, the VCI HQ adventure in Chronicles occurredafter Tomb Raider 2 & 3, yet Lara has the Iris artefact in her trophy room in Tomb Raider 2.Contradictions abound!
Page 625
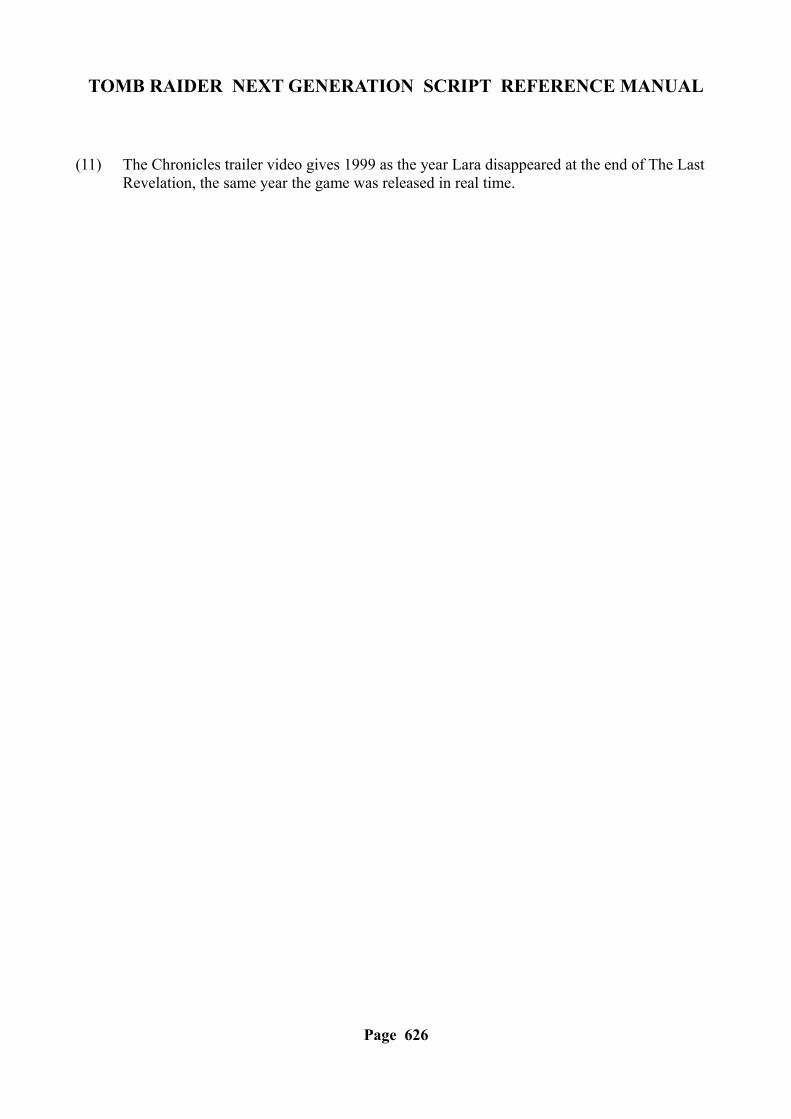
TOMB RAIDER NEXT GENERATION SCRIPT REFERENCE MANUAL
(11) The Chronicles trailer video gives 1999 as the year Lara disappeared at the end of The LastRevelation, the same year the game was released in real time.
Page 626
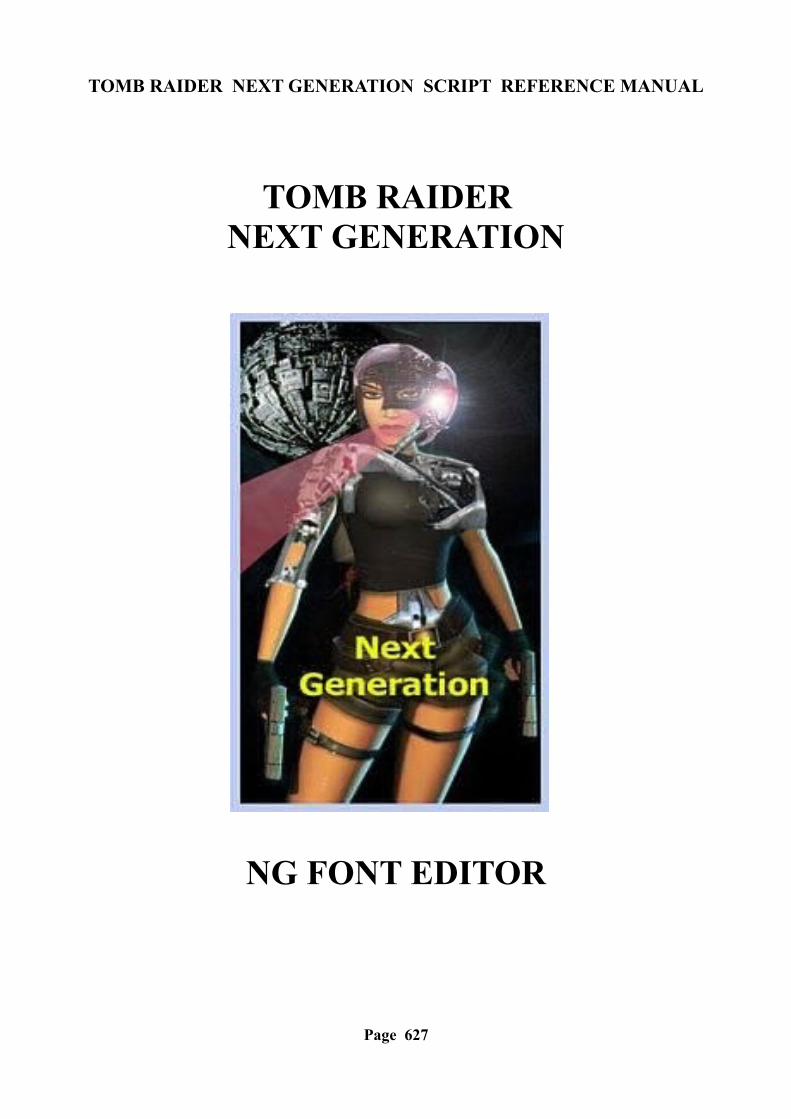
TOMB RAIDER NEXT GENERATION SCRIPT REFERENCE MANUAL
TOMB RAIDER NEXT GENERATION
NG FONT EDITOR
Page 627

TOMB RAIDER NEXT GENERATION SCRIPT REFERENCE MANUAL
NG FONT EDITOR Suggestions about the operation of changing a font.
Using the "NG Font Editor" window, you can perform a change of font in a very easy and fully automatic way.
Importing a font
A font can be copied directly from a Windows fonts to your new Raider font.
To perform this import follow these rules:
1) Choose the windows font by clicking on the [Choose Font] button
2) Select the wad file where there is a (*) FONT_GRAPHICS object.
3) Click the button [Start Importing]
4) At the end click on [Exit and Save Wad] to complete the operation
(*) You can find the new FONT_GRAPHICS object downloading the "Font_Sample.zip" project. In this zip file there is also the file "TR4Objects.dat" used by WAD Merger. Copy this file in to the folder where the WAD Merger program is installed to see the new FONT_GRAPHICS object in the list. In the same zip file is also the new objects.h file. Copy the "objects.h" file into the WAD Merger folder and also in to the trle folder.
Advanced features
The other buttons and frames in the "NG Font Editor" window should only be used for particular situations:
TO USE A WINDOWS FONT WHERE THERE ARE SOME MISSING CHARACTERS.
In this case perform the same operation shown in the "Set a new font" chapter, but before clicking on the [Start Importing] button, set the Rules for importing.
Click on the [Import only following character types] and then click on one or more options (squared white boxes). Click on all options except those that refer to characters not present in the chosen font.
For example: If in the chosen windows font the "Mark Characters" are missing check all options except the (Mark Characters) to preserve the old Mark Character in the FONT_GRAPCHIS object, while being able to replace other character types.
Page 628
TOMB RAIDER NEXT GENERATION SCRIPT REFERENCE MANUAL
TO CREATE YOUR OWN FONT CHARACTERS IGNORING WINDOWS FONTS
To create your own font use the buttons for import/export to transfer bitmap images for the characters.
Two methods can be used to perform this operation:
1) Use the export/import of character pages, i.e. bigger images where there are 9 characters for an image.
2) Use the export/import of single characters, i.e. using an image for a single character.
Although it seems easier to do 1) , using this method you cannot move the position of the character because there are is information about the relative position of the single character within the character square. If you move the position of a previous character, without updating, one for one, the "Formatting" data for each character, the position of the printed character in the game could be wrong.
The "Formatting" frame contains data you can see and change ( left click in the dark green frame).These values are computed when you perform a [Start Importing], but if you use the method to import/export images of a font, you could find it useful to modify the formatting data for many characters.
When you perform an [<-Import bmp] for a single character, click on the [Recompute] button to set many values and this is an advantage to use the import/export with the font page (big image at right). This automatic updating will leave the value named "BaseY" unchanged.
Read the description for the Formatting field. The button [Show Zone] will show the effective character zone pointed to by the OffX OffY SizeX SizeY fields.
REMAP SOME SPECIAL CHARACTER OR ADD GRAPHICAL DATA
The (new) default font used in the FONT_GRAPHICS is Arial, Bold, size=28It is a good font and you should keep it for the game. You can modify some special characters to show in the game. Symbols drawn to replace simple letters.
The default tomb4 used this method: Symbols showing the images of Play Station keypad keys are stored like graphical characters and it was possible to show them by "printing" that ascii character code. Other graphical characters used in the PC version are the white arrows used in the list of levels screen. If wanted, import an image and then show it on the screen by printing that ascii code.
To perform this operation:
Load a wad with the FONT_GRAPHICS slotSelect in the character combo box a character that is not used, or not yet assigned a Graphic character and remember its ASC II code (the first number in the combo)
Page 629
TOMB RAIDER NEXT GENERATION SCRIPT REFERENCE MANUAL
If a Common character is chosen, modify its "Type" in the "Graphic"Now click on the [Import BMP] button near to little image box.Select the bmp with the image you created.Now click on the [Exit and Save wad]
In the game the graphic symbol can be printed by typing in the text the "\x" to introduce the decimal number for the character code.
For example: To use the code 140 (it is a curious mixing between an 'O' and 'E' letter) for your image a little green hand. When the image is to printed on the on screen mixed with other common text, type in the Strings panel of the NG_Center, the following string:
<<When you see the symbol: \x8C on screen this means you can interact with that object.>>
Printing the text "\x8C" will be replaced with the "little green hand" image.The "\x" introduces an hexadecimal value and 8C is 140 in hexadecimal format.
MODIFY FORMATTING OF CURRENT FONT
To change the formatting data for some characters you should understand how this formatting works. To modify a value perform a click on the dark green zone, or the combo box, to use the usual down arrow to open the list.
In the formatting frame are the following fields:
Type FieldThe Type informs the TRNG engine about this character. While the common letters have no specific status, named "COMMON", there are some ascii codes marked with special types.
The full list of types is:
"Graphic" : These are not letter/digit/mark characters but special graphic symbols. The "Graphic" character will be ignored when you import a windows font into your font.
"Redirect" : When a character is almost the same as another symbol the "Redirect" is used to show the redirected character instead of the original ASC II code. For example, a character with ASC II 185 should be a little "1" but this ASC II code (185) is redirected to ASC II code 49, i.e. a common "1"
"Space" : This character has no real image and it will shown in game like a space moving the next position of printing to the right.
"Command": This character has no real image but it will be perform to move the position of printing for the next character. For example the ASC II 10 is Line Feed to go to the next line, ASC II 9 is a Tabulation character to move the next character some spaces of distance.
Page 630
TOMB RAIDER NEXT GENERATION SCRIPT REFERENCE MANUAL
"Ignore": This character will be ignored: no image, no command.
"Binary" : There is a single character with this type, it is the ASC II code 0 and you should avoid changing it. The binary character is a fake character since it contains under the form of an image the binary data for the settings. In this first image is all the formatting data for all of the characters for the current font. The TRNG engine will load from this image all of the data to format the characters, so it is important not to change it in any way.
Remark: The check box named "Use default settings (do not read formatting from sprite", forces the Font Editor to ignore the binary character with formatting data and use the default settings. Check this option ONLY when there is an error message "Overflow error" when you try to load a FONT_GRAPHICS. If you get this error then the binary data stored in the first image has been damaged and it is unreadable. In this situation to recover the font the last chance is to check the option "Use default settings" and load the other font images. Normally you should always read the settings from the FONT_GRAPHICS you are loading, so leave that option unchecked.
"Common" : This character will normally be shown and it will receive a new character when you work in the Importing phase.
You should avoid modifying the Type of character.
There are only a few operations you can perform:
You can change a "Common" type in the "Graphic" type to store the little image.You can change a "Redirect" type in another "Redirect" type changing the ASC II value as a target redirection, but you cannot assign to redirect a common or graphic character.You can change a "Common" or "Graphic" type with a "Space" or "Ignore" type to avoid the showing of that character.
OffX and OffY fieldsThese two fields show the number of pixels from the square border to the first top and left meaningful pixel for the character.
The OffX is the number of pixels from the left border.The OffY is the number of pixels from the top border.If these values are changed, you could create more space between different characters, by decreasing the OffX and increasing the SizeX field, for example.
SizeX and SizeY fieldsThese two fields show the size of the meaningful area of a character.
For example: If a character is a little point "." the size is small, like SizeX=2 SizeY=2, while a big character like "W" will have a SizeX=36 SizeY=27
Increasing these values gives space around the character, but decreasing these values will only give a half drawn character.
Page 631
TOMB RAIDER NEXT GENERATION SCRIPT REFERENCE MANUAL
BaseY fieldThis is the "Base Line Adjustment on the Y Origin" and it is usually a negative value to move the print position of the character up or down. Sometimes it is necessary to move the character up or down to align it within the character square of 42x42 pixels.
To understand this look at the letters "Ñ" and "g". The Ñ has pixels in the top, while the "g" is down. If big characters are used with the same baseline the "g" could be below the bottom border, or the "Ñ" could be above the top border.
Using the "moving" method all characters are moved up or down in the character square of 42x42 pixels to get them within the square. The only problem is to remember how many pixels the character is moved up or down to correct the position it prints on the screen.
The "BaseY" value has this target. When the program centres a character by moving it up 3 pixels the BaseY will be -3. because adding "-3" to a fixed value on the screen will make the character 3 pixels higher.
If a character is lower than the others, set a negative BaseY value for that character.If a character is higher than the others set a positive BaseY value for that character
Redirect fieldThis field only shows a value when the character is a Redirect type.The value in this field is the new ascii code to use instead of the Original ascii code.
Show Zone buttonTo check the effective zone pointed to by fields: OffX, OffY, SizeX, SizeY, click on the [Show Zone] button and the effective zone will be highlighted.
Recompute buttonThe [Recompute] button should only be used after a character is imported using the [<- Import Bmp] button. The recomputing will set the OffX, OffY, SizeX and SizeY field by scanning the imported image looking for the effective pixel zone, i.e. the rectangle with pixels different from the transparent color (Red=255, Green=0, Blue=255)
FONT SETTINGSThe settings in this frame modify the layout (shape rapport) and size for the whole font. These settings work as the default size of the font and it is a way to modify the layout or shape of the font in the title/options/pause/inventory screens. The changes that are set using the TextFormat command in the [Level] sections do not modify the font for the above screens. You can place a TextFormat command in the [Title] section and type in the SizeCharacterMenu (SC_) field a value to modify the size for these system screens.
The changes performed in the Font Editor are more precise and more stable since they are stored directly in the FONT_GRAPHICS object.
Remark: To preserve the same layout and size as the old Raider font set a "Tomb default" value for both settings.
Page 632

TOMB RAIDER NEXT GENERATION SCRIPT REFERENCE MANUAL
Page 633

TOMB RAIDER NEXT GENERATION SCRIPT REFERENCE MANUAL
TOMB RAIDER NEXT GENERATION
REMAP LARA SKIN
Page 634
TOMB RAIDER NEXT GENERATION SCRIPT REFERENCE MANUAL
REMAP LARA SKINMANUAL LOCATING OF THE VERTICES OF THE HAIR HOLE
ALIGN OTHER MESHES OF LARA IN MANUAL WAY
SUGGESTED SETTINGS FOR AUTOMATIC REMAPPING AND ALIGNMENT
REMAPPING OF NEW OTHER LARA_SKIN FOR FUTURE SWAPPING IN GAME
WHEN THE REMAP FAILS... WHAT WE SHOULD DO
MANUAL LOCATING OF THE VERTICES OF THE HAIR HOLE
For manual remapping of the hair hole (on the head) vertices click on the [Tools for the manual remapping] button and use the new window "Manual Settings of Critical Hair Vertices] as a reference for the following descriptions.
Locate the vertices shown in the picture like A,B, C, and D (or up to ... H for Young Lara)The target is to discover the number of vertex [N] for any one of the above vertices.
Do this in the following way:
1) Select the slot of LARA_SKIN in the window
2) Click on the [Show StrPix Indices of Meshes] to get the indices used in StrPix
3) Read the index for S14 mesh (the head of Lara)
4) Start the StrPix program, load the wad and select in the [Meshes] frame of the StrPix program the index read in the above [3] point
5) Now select the menu command in the [File->Export DXF] and choose a file name, for example "head_lara.dxf"
6) Now start the Metasequoia program and choose the menu File->Open and select the dxf file you exported in [5] point ("head_lara.dxf" in our example)
7) Now set in "Import DXF" window the settings read in the image shown by the button [Show Suggested Settings for Metasequoia]
8) Set the setting for “Set View” and “Set Grid” (this operation may be done only once)
9) Now rotate and zoom the mesh to locate the hair hole in the head of Lara
Page 635

TOMB RAIDER NEXT GENERATION SCRIPT REFERENCE MANUAL
10) Now repeat the following operation for all of the critical vertices (A, B, C, D) of the hair hole:
11) Click one of these vertices
12) Click (in left panel) on the [Move] button
13) In the "move" window click on the [Abs] button
14) Now read the values in the X, Y, Z fields and copy them together with the A, B, C, or D letter. For example you could copy in block-notes: “A: x=123 y=-34 z=12”
15) Repeat point from [11] to [14] to get information for all critical vertices
16) Now Go to the NG_Center->Tools2->Remap Lara Skin->Tool for Manual Remapping
17) Click on the button [Show Vertices of Lara’s head]
18) Set in the “Sorting Mode” the item “Growing Y axis coordinate". This is useful to easily locate the tripled coordinate x,y,z for each point
19) Now look at the list and scroll it to get the vertices, for example if the information from Metasequoia was “A: x=123 y=-34 z=12”, look at the “Y=...” column to see “-34” and then look at what point the exact coordinates “A: x=123 y=-34 z=12”. Now sign in your notes the number of the vertex in this row, i.e. the number in squared parenthesis [ ].
Suppose it was: [33] x=123 y=-34 z=12
Now we know the number to type in the “A[37]” field is “33”. i.e. the A vertex is the 33th vertex.
20) Repeat operation [19] for all A, B, C, D points
21) When all A/B/C/D fields are filled in the “Manual Settings of Critical Hair Vertices” click the [OK] button.
Remark: If the hair slot mesh is modified, the vertices of the ponytail should be remapped. The "Remap Lara Skin" tool is able to perform this remapping in an automatic way, just align the vertices in the hair mesh in a correct way:
The side that will be joined with the head should all have Z=0 coordinates. The mesh has to be correctly centred, i.e. the X coordinate will have values paired like N -N , for example 10 and -10, or 20 and -20
Note: This tool is able to correct some small displacements with respect to the above rules
Page 636
TOMB RAIDER NEXT GENERATION SCRIPT REFERENCE MANUAL
ALIGN OTHER MESHES OF LARA IN MANUAL WAY
Theoretically some tools for the “Manual Settings of Critical Hair Vertices” window also have information to manually perform the matching of skin meshes with joint meshes but this is not necessary since the [Remap Lara Skin] tool is able to perform in an automatic way if the skin and joint meshes are not too far away from the aligned position. The maximum distance allowed is set in the "Max Tolerance" field.
WARNING: When the automatic alignment of Lara skin fails with low tolerance try to increase the tolerance. In this situation there is the risk that the remap tool will catch a non-edge vertex (inner joint or mesh) to the link. Theoretically there is a procedure in the remap tool to avoid this problem but when the tolerance is too big it could fail.
Rebuild the whole body of Lara to change the skin keeping a full view on Lara. Use the [Show Lara’s Meshes Placement Table] to discover the position where to move the single mesh skin/joint in Metasequoia in 3d space to rebuild the whole original body of Lara.
1) Open in StrPix your wad
2) Export all meshes of LARA_SKIN. It is better to use the names “mesh_s0.dxf”, “mesh_s1.dxf” etc.
3) Import the first mesh with the Metasequoia menu command “File->Insert”
4) In Import DXF use the suggested settings from TRNG
5) Now select with [Rect] the whole mesh imported, click on the [Move] and in the new “move” window click on the [Rel] button
6) Type in the X, Y, Z values found in the table created with the [Show Lara's Meshes Placement Table] button.
For example: If the S7 mesh is imported read in the table the following values:
S7 and J7 meshes: X= -1 Y= 49 Z= 11
So type in Metasequoia: X [ -1]Y [ 49]Z [ 11]
And click the [OK] button
7) Now repeat the operation from point 3 for all meshes, using the different placement according to the mesh type.
8) Do the same operation with the other LARA_SKIN_JOINTS
Page 637
TOMB RAIDER NEXT GENERATION SCRIPT REFERENCE MANUAL
9) When a mesh is saved remember to move the original position before saving the dxf.To get this target you should:
10) Select that mesh (and only that mesh, remove temporary the others)
11) Click on the [Move] button
12) Click on the [Rel] button of the “Move” window
13) And now type in X, Y, Z fields the values read in the placement table. but this time with all signs inverted.
For example: To replace in original position the S13 mesh (left hand), since in the placement table the value for S13 mesh are:
S13 and J13 meshes: X = - 68, Y = - 5, Z = - 4
Type in the [Move] window the above values but with inverted signs therefore:
X = [ 68]Y = [ 5]Z = [ 4]
SUGGESTED SETTINGS FOR AUTOMATIC REMAPPING AND ALIGNMENT
The automatic remapping works fine when the joints and the meshes are not too far away.The maximum distance is set in [Max Tolerance] field. Theoretically you can increase the Max Tolerance value. Increasing the tolerance too much may risk that some joint vertices will be linked with vertices of meshes not on the edge.
Remarks:
When the procedure finds two vertices (one for the joint and another for the mesh) closed, it moves the mesh vertex to have the same position as the joint vertex.
My suggestion about use of automatic alignment is to keep a low number for the tolerance (like 8 or 10) and try in the construction phase of the new skin/joint to have at least a good approximation between the joint and mesh vertices.
When a new skin is created for Lara and you want to enable it in the game with a flipeffect trigger, it is important that the new LARA_SKIN has the same LARA_SKIN_JOINT as the Lara at the beginning of the level. You can change the texture, of course, but the shape and position of the new LARA_SKIN_JOINT has to be exactly the same.
Page 638
TOMB RAIDER NEXT GENERATION SCRIPT REFERENCE MANUAL
REMAP OF NEW (OTHER) LARA_SKIN FOR FUTURE SWAPPING IN GAME
This topic is complicated anyway the good news is that the Remap Lara Skin tool is able to solve all these problems in AN automatic way. In spite of this "automatic" feature it is necessary to understand the correct order of operations and settings to set, to create the new LARA_SKIN to swap in the game.
Restyling of the LARA_SKIN could be done in one of following situations:
1) The LARA_SKIN slot and LARA_SKIN_JOINTS slot are changed but there is no further swapping of Lara in the level. In this situation simply use the default settings and click on the [Start Remapping]. Then you can avoid this chapter of the help file, because it describes the problems about swapping of the new LARA_SKIN.
2) There is a swap mesh of Lara in the game and for this reason there is two different LARA_SKIN slots in the same wad and two LARA_SKIN_JOINTS slots.
In this situation consider two other things:
A) You used exactly same meshes of first LARA_SKIN/JOINTS and you copied them in some other slot using Wad Merger program. Then, you applied different textures to the "swap" lara skin.In this case (2A) you should have no problem. Just you perform a remapping/alignment of default LARA_SKIN and then you duplicate this (already remapped/aligned) LARA_SKIN in the new slot to do at end the modifying of its textures.In this situation you have NOT to remap also the new "swap" lara_skin/joint because it has been already done in original lara_skin that then you had duplicated to get the new "swap" lara_skin.
B) The "swap" LARA_SKIN you stored in some slot (for example int the BADDY1_MIP slot) is different also like "shape" respect to default Lara_skin. Practically you used Metasequoia or other 3d program to change the shape of some mesh of new (swap) LARA_SKIN.In this situation (2B) the swapping in game will take problems about the joints.The reason for this problem is because the game engine had already built the couples of Joint/Mesh vertices and after the swap mesh the engine will continue to use the old coupling but the vertex order of vertices in new (swap) LARA_SKIN will be different because Metasequoia changed all sorting of the vertices.The "Remap Lara Skin" tool is able to correct this problem, resorting all vertices in new swap LARA_SKIN to have the critical vertices in some position order of default LARA_SKIN slot.
Perform the following operations EXACTLY in this order:
1) Create the default (starting) LARA_SKIN and LARA_SKIN_JOINTS in the ALFA wad.
2) When it is completed, copy it from the ALFA wad to a BETA (temporary) wad and from this BETA wad change the meshes and textures of Lara.
Page 639
TOMB RAIDER NEXT GENERATION SCRIPT REFERENCE MANUAL
For example: Add a Scuba tank on her back and flippers on her feet and change her skin color and joints to black.
3) Now using WAD Merger copy from the BETA wad to the ALFA wad the "submarine" Lara using the [Rename] button to copy her into a different slot from the LARA_SKIN slot. For example copy it in the BADDY1_MIP slot.
4) Also copy the LARA_SKIN_JOINTS from the BETA wad to the ALFA wad in a slot immediately following that used for the "swap" LARA_SKIN, so in this example it will be the BADDY2 slot.
5) Now load the ALFA wad in the [Remap Lara Skin] tool and perform the remapping/alignment using the DEFAULT settings. This is how to remap and align the vertices for the default LARA_SKIN and LARA_JOINTS slots
6) Now reload the ALFA wad (it is better to quit the tool and reload)
7) Now change the settings in this way:
Set as: "Lara Skin to remap is in Slot:"
the slot: [BADDY1_MIP]
i.e. the slot where the new LARA_SKIN is stored to use with the swap mesh flipeffect
Now check the voice: "Remap swap LARA joint stored in slot:"
and select the slot: [BADDY2]
i.e. the slot where the new LARA_SKIN_JOINTS to use in the swap mesh together with the new LARA_SKIN is stored.
8) Now click on the [Start Remapping] button
This remapping operation could require some time.
9) In the game the mesh swap will be performed by using the flip effect:
; <#> : Lara. (Mesh) Copy meshes from <&>slot to Lara meshes in (E)way; <&> : SLOT xx BADDY_1_MIP; (E) : Lara Skin + Lara Joints (Slot+1)
Page 640
TOMB RAIDER NEXT GENERATION SCRIPT REFERENCE MANUAL
Remarks:Use another couple of slots to store the new LARA_SKIN and JOINT
It is important to follow the above order of operations to get the right result
This operation could fail if in the new (swap) LARA_SKIN/JOINTS, is changed and also the position of edge vertices used to link joints with the meshes. Always keep these critical vertices in the same position as the starting Lara (in the LARA_SKIN/JOINTS slot) and only change the meshes in zones different from the edges of the joints.
The LARA_SCREAM slot used for future swap can be remapped. Just select "Remap LARA_SCREAM stored in slot:" field a slot different from the "LARA_SCREAM". The remap tool will remap an extra swap LARA_SCREAM slot synchronizing it with the default LARA_SCREAM slot.
WHEN THE REMAP FAILS ... WHAT TO DO
Remapping with error messagesIf there are errors it is important to read the log file to read these error messagesIn some circumstances you will find suggestions together with error messages, while, if the error is the missing matching between joint/skin vertices, you could retry the remapping increasing the tolerance.
Problems in game: No errors from the [Remap Lara Skin] tool If in the game you see Lara with weird skin rope floating in space this means that some vertex has not been aligned or remapped correctly. The distance between the skin vertices and joint vertices was too large. In this case try to increase the [Max Tolerance] field.
Page 641
TOMB RAIDER NEXT GENERATION SCRIPT REFERENCE MANUAL
TOMB RAIDER NEXT GENERATION
WMV ENCODER
Page 642
TOMB RAIDER NEXT GENERATION SCRIPT REFERENCE MANUAL
WMV ENCODERINTRODUCTION
This document only gives some suggestions about the settings for EMV encoding.
Many people believe that the wmv format was very leaky, but in my humble opinion the real problem is in the "leak" settings used very often to encode the videos in WMV format.
Many "video maker" programs do not give many options to set parameters for wmv encoding and if you mistake (or omit) some settings the final WMV video could be very leaky.
If all advanced settings of the WMV Encoder ((C) Microsoft) are used better results can be obtained than the MPG1 format: smaller files and better video quality.
So I suggest to use, at least as a first attempt, the WMV format for the FMV because these video codecs are always present on Windows XP and Vista operative systems.
THE BEST ENCODING SETTINGS
In spite of the big number of settings modify only the [Bit Rate] value in the main settings window, and the fields: [Image Quality] and the [Key frame distance] field in the Advanced Encoding settings window.
The target will be to get a WMV video with a good quality and a small MB size.
To get the best results follow these steps:
When creating the (source) .AVI file use an AVI format uncompressed or with a very low compression method. Practically try to keep the maximum quality in the AVI file. A good choice is the "CinePak Radius Codec" with a quality of 100%
Remark: If no compression is used in the source AVI file there could be a larger file size than that supported by the front-end tool for WMV encoding. The source AVI file should not be bigger than one gigabyte (1 GB).
If it is necessary add the audio track to the video. This operation is not comfortable in WMV format so it is better to add or change the audio track when it is in .AVI format
Now encode the AVI. .Load the AVI file in the [Source Avi Movie] field
Change the [Bit rate] value until the value seen in the [Prevision] field agrees with the Size_file and Video_Quality. Advisable values for [Bit Rate] are in the range: 384.000 (it reduces the video file size, with a ratio of about 20 seconds for MB) and 768.000 (high video quality, about 10 seconds for MB)
Page 643

TOMB RAIDER NEXT GENERATION SCRIPT REFERENCE MANUAL
If the Size_file is too big, reduce the value for the [Bit Rate] and read the new prevision. If the Video_Quality is too poor, increase the value of the [Bit_Rate] field and then read the new previsionReasonable values for the Size_File are in the range of 10 - 20 seconds per MBAcceptable values for Video_Quality are from 850 to 1000 (the best).
When you get good [Prevision] values start the effective encoding by clicking on the [Encode] button.
Remark: If "Double Step" is chosen as the [Encoding Method] there will be a latency time with no progress bar while the encoder is studying the video to choose the best encoding for variable frame rate. At the end of this first step it will start the effective encoding. In some circumstance the encoding could require several minutes to be completed. When a good quality is obtained pass to other advanced settings.
OTHER INTERESTING SETTINGS
The most important setting for the rapport Quality/Size is the [Bit Rate] field, but, clicking on the [Set Advanced Options] button, can improve the quality of the video.
To understand the meaning of [Image Quality] and [Key Frame Distance] it is necessary to understand how the WMV compression works.
To avoid complications only say this: There are main frames used as a base image and some computes applied to these main frames to get the intermediate frames with interpolation techniques to reach the next main frame. When the [Image Quality] field is increased, you want the encoder to well define the Main Frames, while changing the [Key Frame Distance] tells the encoder how many frames there are between two main frames.
If the video has a slow camera that looks at the scene and the scenes have almost the same tone colors, then increase the [Image Quality]This will give very good static images, while there will be a loss with fast changes between different scenes.
If the video has many very fast changes of scene with explosions and different background colors it is better to reduce the quality of the [Image Quality].
Set a high quality for the video image when the scene moves slowly, but when a video has many fast changes in the background image it is better to reduce the video quality of the image to increase the performances about frame variations.
The other setting [Key Frame Distance] ,do not change it but at least not far from the ideal value of frames. When you reduce the key frame distance you get the best quality in moving video (avoiding flickering) but you can lose frame rate and single image quality.Try to change only +1 -1 in your experiment to find the best value.
Page 644

TOMB RAIDER NEXT GENERATION SCRIPT REFERENCE MANUAL
The [Buffering Time] does not affect the video quality or size, but it influences the speed to show the FMV. If a long time is used for buffering, it means the video player will load the data required to show data time, before starting the playback of video. Theoretically when the fmv is in local (on the disk, like it happens in games) it should not be necessary to have a big buffering time. Because some problem (disk access, slow computers) could exist it is better to have at least one second for buffering time.
Page 645
TOMB RAIDER NEXT GENERATION SCRIPT REFERENCE MANUAL
TOMB RAIDER NEXT GENERATION
TEXTURIZING DXF FILE
Page 646
TOMB RAIDER NEXT GENERATION SCRIPT REFERENCE MANUAL
TEXTURIZING DXF This tool works fine when only a single aspect of the original (textured) object is changed.
For example: Adding some detail (like another mesh) or removing some mesh. In this situation restore the original texturing for all faces that have not been hanged in Metasequoia
This tool will fail when the object is rotated or when it is scaled (magnifying or reducing its size).
Remark: If the object is only increased/reduced on a single axis you could get a good number of textured faces but in this case check the setting: [Try to texturize the unsure faces].
The object can be moved in 3d space (but avoiding rotations or scaling) and the tool will be able to re-texture the object correctly, but in this case check the setting. [The object has been moved in 3d space].
To move the object and also change some part of it, it is better to perform two different operations : First move the object with no other changes: export / move it with Metasequoia and import it into strpix with the restored textures using this tool.
In a second operation export the already moved object and modify it with Metasequoia.
Two different objects can be mixed into a single object by enabling the setting [Merging of two objects] and choose the second dxf file generated by StrPix to have the meshes of both objects restored in the final object
Remark: Use the suggested settings for import/export with the Metasequoia program. Find the suggested settings in the picture shown in the : [Remap Lara Skin / Tools for manual remapping / Show suggested settings for Metasequoia] button
Page 647
TOMB RAIDER NEXT GENERATION SCRIPT REFERENCE MANUAL
TOMB RAIDER NEXT GENERATION
PSX STRINGS (FOR PLAYSTATION)
Page 648
TOMB RAIDER NEXT GENERATION SCRIPT REFERENCE MANUAL
PSX STRINGS (FOR PLAYSTATION)204 $00CC: BSELECT:\x14 Select205 $00CD: BCANCEL:\x17 Cancel206 $00CE: BGOBACK:Back \x17207 $00CF: BOK:\x14 Ok208 $00D0: CANCELB:Cancel \x17209 $00D1: MEMCARD:BESLES-02238210 $00D2: INSERT:Insert a Memory Card\ninto Memory Card slot 1211 $00D3: CHECKING:Checking Memory Card212 $00D4: FORMAT:Memory Card is unformatted\nFormat Memory Card ?213 $00D5: LOADING:Loading data\nDo not remove Memory Card214 $00D6: SAVING:Saving data\nDo not remove Memory Card215 $00D7: FORMATTING:Formatting Memory Card\nDo not remove Memory Card216 $00D8: OVERWRITE:Overwrite data on Memory Card ?217 $00D9: UNFORMATTED:Memory Card is unformatted\nInsert a formatted Memory Card218 $00DA: NOSPACE:Memory Card has insufficient free blocks\n\nInsert a Memory Card with at least\ntwo free blocks219 $00DB: NOGAMES:There are no Tomb Raider IV\nsave games on the Memory Card\nin Memory Card slot 1220 $00DC: LOADING221 $00DD: Load OK222 $00DE: Saved OK223 $00DF: Format OK224 $00E0: Load Failed225 $00E1: Save Failed226 $00E2: Format Failed227 $00E3: Empty228 $00E4: Controller Removed229 $00E5: Resume230 $00E6: Quit231 $00E7: Game Settings232 $00E8: Control Options233 $00E9: Are you sure you want to quit ?234 $00EA: Screen Adjust235 $00EB: FXVOL:SFX Volume\t\t\t236 $00EC: MUSICVOL:Music Volume\t\t\t237 $00ED: Use directional buttons\nto adjust the screen238 $00EE: Configure Controls239 $00EF: Configuration n240 $00F0: Vibration On241 $00F1: Vibration Off242 $00F2: Manual Targeting243 $00F3: Automatic Targeting244 $00F4: PAD:\t\t\t\t\t\t\t\t\n\n\n\n\n
Page 649
TOMB RAIDER NEXT GENERATION SCRIPT REFERENCE MANUAL
245 $00F5: PAD2:\t\t\t\t\t\t\t\t\t\n\n\n\n\n\n\n\n\n246 $00F6: Programmers247 $00F7: Additional Programmers248 $00F8: AI Programming249 $00F9: Animators250 $00FA: Level Designers251 $00FB: FMV Sequences252 $00FC: Additional Artwork253 $00FD: Music & Sound FX254 $00FE: Original Story255 $00FF: Script256 $0100: Producer257 $0101: QA258 $0102: Executive Producers259 $0103: Additional Sound FX260 $0104: TEAM1:Chris Coupe261 $0105: TEAM2:Martin Gibbins262 $0106: TEAM3:Derek Leigh-Gilchrist263 $0107: TEAM4:Tom Scutt264 $0108: TEAM5:Richard Flower265 $0109: TEAM6:Martin Jensen266 $010A: TEAM8:Phil Chapman267 $010B: TEAM7:Jerr O'Carroll268 $010C: TEAM9:Joby Wood269 $010D: TEAM10:Andrea Cordella270 $010E: TEAM11:Pete Duncan271 $010F: TEAM12:Jamie Morton272 $0110: TEAM13:Richard Morton273 $0111: TEAM14:Andy Sandham274 $0112: TEAM15:Peter Barnard275 $0113: TEAM16:David Reading276 $0114: TEAM17:Matt Furniss277 $0115: TEAM18:Simeon Furniss278 $0116: TEAM19:John Lilley279 $0117: TEAM20:Damon Godley280 $0118: TEAM21:Mark Hazelton281 $0119: TEAM22:Steve Huckle282 $011A: TEAM23:Steve Hawkes283 $011B: TEAM24:Darren Wakeman284 $011C: TEAM25:Peter Connelly285 $011D: TEAM26:Martin Iveson286 $011E: TEAM27:Hope Canton287 $011F: TEAM28:Dr Kieron O'Hara288 $0120: TEAM29:Troy Horton289 $0121: TEAM30:Tiziano Cirillo290 $0122: TEAM31:Nick Connolly291 $0123: TEAM32:Hayos Fatunmbi
Page 650
TOMB RAIDER NEXT GENERATION SCRIPT REFERENCE MANUAL
292 $0124: TEAM33:Paul Field293 $0125: TEAM34:Steve Wakeman294 $0126: TEAM35:Dave Ward295 $0127: TEAM36:Jason Churchman296 $0128: TEAM37:Jeremy H. Smith297 $0129: TEAM38:Adrian Smith298 $012A: TEAM39:Clint Nembhard299 $012B: TEAM40:Benjamin Twose
Page 651
TOMB RAIDER NEXT GENERATION SCRIPT REFERENCE MANUAL
TOMB RAIDER NEXT GENERATION
TRNG 1.2.2.7 UPDATES
Page 652
TOMB RAIDER NEXT GENERATION SCRIPT REFERENCE MANUAL
HISTORY Note: if you had tried the beta release of 1.2.2.7 version, you have to check [x] Install Always.
History:
Added new window in NGLE programNow it is possible to have an extra window with buttons to invoke all NGLE commands.With button windows you can create your custom buttons linked to menu and keyboard commands other that other default buttons, renaming them as you wish.See the document "help_ButtonsWindow.txt" in NG_Center folder and the samples in trle folder named "NetBook_ButtonsWindow.txt" and "WideScreen_ButtonsWindow.txt" for more information.
Added new keyboard command in NGLENow with CTRL 9 you can open the current TGA file with the default program for TGA type, set in Windows
Added new keyboard command in NGLENow with ALT T you can reload the current TGA (texture) file avoiding to be prompted for the TGA name to be loaded.
Added in NG_SCRIPTER the #include directiveThe usage of include directive is useful to put in order the script dividing it in logical blocks.For example when you create some script commands to realize a custom animation or other special effect, you can copy all commands for that target in a separate text file with a suitable name.
In this way, the script could become like this:
#INCLUDE "LaraHome.txt"
#INCLUDE "AnimClimbFromWater.txt"
#INCLUDE "DistanceSensory.txt"
There are advantages in this job planning.When you are not interested in some already completed features, you can have all those script commands in the main script. When you work own on that feature you can load (F5 key) the include file in the NG_CENTER and have only the meaningful commands in the editor to study and edit.
Added in NG_CENTER program the #FIRST_ID directiveThis directive has been studied to be used in the include files of the script to set the start of the Id s range for each script command in that include file. The target is to reduce the risk of Id conflicts between commands in the include file and those in the main script file. The #first_Id directive works with the F1 command to get the first free Id for the current command. With a first_Id directive the F1 command will return the first free Id with a value greater or equal to that typed in the #first_Id directive.
Page 653
TOMB RAIDER NEXT GENERATION SCRIPT REFERENCE MANUAL
See the New Script Commands "#FIRST_ID" in the Mnemonics section.
Enhanced the F1 keyboard command in NG_CENTERNow the feature to locate the first free Id for the current command, other to support the #first_id directive (see above) is able to say in advance if there are two commands with the same Id value.
Added in NG_CENTER the new #DEFINE directiveWith #define you can create a temporary mnemonic variable with the value that can be used in all numeric arguments of the commands in that include file, also mixed with arithmetic formulas with [+] or [-] to link mnemonic constants or numeric values.
The main use of this feature is to create a method to change all Id s of different commands in the include file by changing only a single value, that of the #define directive.See the #define directive in the Mnemonics section.
Fixed a problem of backward compatibility with Global Trigger commandIn the 1.2.1.9 version a new argument was added to the Global Trigger command. The IdPerformTriggerGroupOnFalse field. This change generated the error message "ERROR: missing arguments for Global Trigger" in all previous scripts. Now the NG_CENTER is able to recognize this particular situation and it omits the error message, adding a new null (ignore) field to cover the new IdPerformTriggerGroupOnFalse field.
Improved the exporting of animation (trng) commands in the NGLE programWhen the current trigger is exported from the Trigger Type window, using the Export Animation Command button, choose as a Frame Number the value -1. When you choose -1 the exported trigger will be performed in all frames of the animation where it has been placed. This chance is useful for conditional trigger groups where you test each frame if a condition is true. It could be useful also for some add effects.
Added new condition trigger for collision[Find Trigger Number] C82The new conditional trigger "Collision. <#>Moveable is touching Lara with its (E)mesh" allows to verify if there is collision with a specific mesh of a given moveable and Lara.This collision method is useful for fighting or traps.For example : It can detect if the right hand of an enemy is touching LARA. If you place this condition in a trigger group called by an animation command in the animation of an enemy where he is trying to hit LARA, you can add a damage to LARA only when the collision right-hand of the enemy and LARA is true. This feature uses the sphere mesh to detect the collision so it works better with meshes having a spherical shape.
Added new condition trigger for collision[Find Trigger Number] C83The new condition "Collision. Lara is touching <#>Moveable with her (E)mesh" is alike the previous C82 condition, but in this case the detection happens when LARA 's mesh is touching the moveable. You can use this to detect if it is LARAhitting the enemy with a fist.
Page 654
TOMB RAIDER NEXT GENERATION SCRIPT REFERENCE MANUAL
The unused flag for Text Format script commandThe FT_SIZE_NO_BORDER flag has no more effect. It is a reuse of old print text management for special characters but the new TRNG code bypassed the management of that flag.
Added new script command: AnimationSlotThe AnimationSlot command is very much like the Animation command but in this case the animation is not LARA but a generic moveable of the Slot. With the AnimationSlot command you can replace, remove or add new animations for existing enemies.
Added new ENV_ conditions.There are new ENV_ condition created for the AnimationSlot command.
ENV_NO_BOX_IN_FRONTENV_NO_BOX_AT_LEFTENV_NO_BOX_AT_RIGHTENV_NO_BOX_BACK
The "BOX" is the grey box sectors placed in NGLE to inhibit some zone to the enemies.
Added new condition about detection of LARA by some enemy[Find Trigger Number] C84The new condition "Creature. <#>Moveable with (E)degrees of view is able to see Lara" checks if a moveable is able to see LARA. This condition works better than the common detection in tomb4, where an enemy discovers the presence of LARA when she is behind him. In this condition set the angle of view of the enemy and if LARA is in the hidden zone of his view he will not be able to see her. The condition is able to manage moveables or statics that stop the sight of the enemy where LARA could hide. This condition is also available like an ENV condition. It works on all moveables not only enemies. Take care about the facing of the eyes position. In the "lightning" demo you can find a room to check how it works.
Note: Unfortunately, until new AI skills are developed this condition trigger is not able to change the common behaviour of enemies Anyway you can set an enemy with AI_GUARD or AI_PATROL1/2 and trigger when he will be able to see LARA, to activate other enemies to attack her (the guard gives the alarm...) Or you can use as "guard" a CCTV like in the lightning demo (I used a sentry gun instead of a CCTV)
Added new ENV condition for the AnimationSlot command.The new envelope condition ENV_ENEMY_SEE_LARA, works like the above trigger condition (C84). Use the ENV_ENEMY_SEE_LARA in the AnimationSlot command to start the attack of the enemy and Lara.See the ENV_ENEMY_SEE_LARA constant in the Mnemonics Section.
Fixed the problem with the condition to check seconds of screen timer[Find Trigger Number] C20In previous versions the condition texts "Lower" and "Higher" had the opposite effect.
Page 655
TOMB RAIDER NEXT GENERATION SCRIPT REFERENCE MANUAL
Fixed the bug in the Equipment command.In the 1.2.2.4 version the Equipment command failed with many pick ups when they had an Id number different than 1: Key, Puzzle, pick up. This fixing has been already done in the previous (1.2.2.6) version
Fixed the bug about the extension of the dynamic lights numberIn the previous version the increasing of the dynamic light from 32 to 128 had a bug and the limit stayed at 32. Now this bug has been fixed, technical requirements the maximum number of the contemporary light is now 127.
Fixed the bug about the activation of some triggers in contiguous sectorsThis bug is about all flip effects or action triggers. It happened when two or more actions (or flip effects but not mixed between them) are in contiguous sectors and LARA moves in these sectors always keeping her body in some trigger sector. The problem was that a trigger already enabled was not active after LARA went out of that sector and then came back onto it.
Added a new flag for the Trigger Group commandThe TGROUP_SINGLE_SHOT_RESUMED flag has been added.This flag works like the TGROUP_SINGLE_SHOT flag but in this case it is not necessary to use the flip effect 345 to newly enable it. In fact, a trigger group with the TGROUP_SINGLE_SHOT_RESUMED in (first) flags word, will be newly enabled not just when the current trigger group stops to be performed. This means that the "single shot" attribute will work only in continuous triggered sectors when LARA goes out from this trigger zone, the trigger will be newly ready for further activations.
Note: Since there was no more available bits (value to use) for TGROUP_ flags, I had to use the (futile) TGROUP_AND value as this new TGROUP_SINGLE_SHOT_RESUMED flag.The TGROUP_AND flag was futile because in the missing of other operators (OR and NOT) the AND was the default. I let the mnemonic constant TGROUP_AND only to avoid error messages from the NG_CENTER with old scripts, but now its value is 0, so it has no effect placing it in the TGROUP_ flags field. The only situation where this remapping could create trouble is if you use the new dll with an old script.dat file compiled by a previous NG_CENTER version, but this is always a bad practice: when you use a new dll you should always recompile all files with the new updated tools. The files are: script.dat, .tom and .tr4 file other that save game files
Removed error message "Error Decompressing Data" in the tomb4 log file every time the engine decompressed a tr4 file.
Fixed the bug in the NG_Center program.In previous version it was visible a little grey box over the main window. It was a little (useless) button. Now it has been removed
Added a new DGX parameter for the Diagnostic Type command.The DGX_FPS flag has been added. With this flag the current FPS (Frame Per Second) will be displayed in the diagnostic on screen. The DGX_FPS diagnostic is useful when checking for slowdown in the level and you are trying to fix the problem with different settings of the Turbo script command.
Page 656
TOMB RAIDER NEXT GENERATION SCRIPT REFERENCE MANUAL
There are two FPS values: the sync and the async frame rate. See the DGX_FPS constant in the Mnemonics Section
Changed the management of the TRB_ASYNC_FRAMES mode of the Turbo script commandThe previous management of the TRB_ASYNC_FRAMES mode did not work well. Now the TRB_ASYNC_FRAMES mode tries to reach the full frame rate (30 fps) performing in the same frame time two or more frame movements. See the TRB_ASYNC_FRAMES in the Mnemonics Section
NG_Tom2pc program: Extended the memory to manage sprite textures.With previous wideness of sprite memory, someone got a crash converting its wads files to build the tr4 level file.
Added new flip effect trigger to perform lightning[Find Trigger Number] F359The new flip effect trigger: "Weather. Perform a lightning with data in <&>Parameters for (E)Durate in Tick frames (1/30 second)" allows simulation of lightning from the sky (using a very short time) and the lightning conductor between two objects, (using infinite durate).Customize the lightning with the linked PARAM_LIGHTNING Parameters script command.
There are many parameters to set and if you choose incompatible values you could get bad results.You could experiment, anyway I suggest some settings:
To simulate a lightning conductor like in the "planet effect" of the library level use these settings:In the trigger set "0 tick frame" (it means: "infinite durate")
While in the script type:ColorRGB= 1, 0, 208, 208Parameters= PARAM_LIGHTNING, 1, > LGTN_ADD_GLOVE_LIGHT + LGTN_RANDOM_COLOR+ LGTN_PLAY_SOUND, > [SourcePosition], [targetPosition], 1, 32, 197, 32, 24, 4, 1, 5
Where, in place of [SourcePosition], you type the index of item to set source position for the lightning and, in place of [targetPosition] you type the index of item to set as the target position See the PARAM_LIGHTNING constant in the Mnemonics Section.
To simulate a lightning from the sky use these settings:Set in the trigger a very low number of tick frames, 3 for example.Then in the script type commands like these:
ColorRGB= 1, 255, 255, 200Parameters= PARAM_LIGHTNING, 1, LGTN_ADD_GLOVE_LIGHT + LGTN_PLAY_SOUND + LGTN_INCLINED_RANDOM + > LGTN_FLASH_SCREEN + LGTN_HEARTHQUAKE, IGNORE, [targetposition], 1, 32, 183, 32, 24, IGNORE, 1, 5
Page 657
TOMB RAIDER NEXT GENERATION SCRIPT REFERENCE MANUAL
Where, in place of [targetPosition] type the index of the item to set as the target positionSee the PARAM_LIGHTNING constant in the Mnemonics Section.
Note: With the lightning you can kill (or burn) LARA and kill enemies or explode shatters (and baddies).
Added a new flip effect to stop an endless lightning.[Find Trigger Number] F362The new "Weather. Stop the endless lightning effect with <&>Parameters" flip effect, stops a previous lightning performed with f359 trigger that used a "0 tick frame" for endless durate.
Note: Since the lightning is a limited resource it is always better to stop it when Lara goes away from their visible zone.
Fixed bug in NG_Center.In the SCRIPTER program it sometimes happened that a row with a command was ignored because in a previous row there was a "linker" character (the ">" character) in the comment.Example:
TriggerGroup= 1, $2000, 359, $101 ;Weather. Perform a lightning with data in <&>Parameters for (E)Durate in Tick frames (1/30 second)Organizer= 1, FO_LOOP, IGNORE, 2, 1, 4, 1, 1, 1 , 6, 1
In above example, the "Organizer" row was skipped, because TRNG used the ">" character of the text "...in <&>Parameters.." like it was a linker character to continue to read second half of the row (trigger group) in the next row. Now the linker characters ">", placed in the comments, will be ignored.
Added new research type in NGLE.Now in the Advanced Search, you can look for an index of (generic) item of the level map.This feature is useful when you know an index (for example you read it in a script command) and you want to know where and what it is.
Added a new flag for the Image command.The new IF_LOOP_AUDIO_TRACK flag, allows to play in loop (infinite) mode the audio track chosen as background music for the image.
Added a new customize constant: CUST_BACKGROUND With this customize you can use an image as background for some game phases like loading level, pause, inventory etc. Type the Id of an Image command to choose the image to use as background.For Example:
Image= 1, 1, IF_PRELOAD+IF_TRANSPARENCE+IF_LOOP_AUDIO_TRACK+IF_PLAY_AUDIO_TRACK,IGNORE, 119, IGNORE, IGNORE, IGNORE, IGNORECustomize= CUST_BACKGROUND, BKGDT_INVENTORY, IGNORE, IGNORE, 1
Page 658
TOMB RAIDER NEXT GENERATION SCRIPT REFERENCE MANUAL
In the example the image1.bmp in the trle\pix folder is used as background and the 119.wav audio track is used as background music.See the CUST_BACKGROUND variable in the Mnemonics Section.
Added a new condition trigger [Find Trigger Number] C85The new condition trigger: "Sound. The <#>Sfx Sound effect is playing" detects when a sound effect is playing" detects when a sfx sound is currently playing
Increased the maximum number of Trigger Group commands from 256 to 1000.Now you can have up to 1000 trigger group commands in a level section of your script.About the Id s used with trigger group the maximum value to use is 10000 (the number of trigger groups * 10) This rule acts for all command scripts, where the maximum number of Id is the maximum number of occurrences of that command multiplied by 10
Increased the maximum number of Global Trigger commands from 100 to 500.Now you can have 500 Global Trigger commands in same level section. The maximum value for Id is 5000 (number of global trigger * 10)
Increased the maximum number of Organizer commands from 100 to 500Now you can have up to 500 Organizer commands in the same level section. The maximum value for the Id s is 5000
Increased the maximum number of MultEnvCondition commands from 20 to 256Now you can have up to 100 MultEnvCondition commands in the same level section. The maximum value for Id s is 1000
Increased the maximum number of Animation commands from 128 to 256
Improved the WindowsFont commandNow you can set in the WindowsFont command the character set of the character font.Type the code of the character set linked with the font name using the colon ":" character.Example: WindowsFont= 1, 128:MS Gothic, ...
When the font name is modified with the character set prefix type the same syntax in the extra ng string for that font name. In above example type in NG string: 128:MS Gothic
Added a new WFF_ flags for the WindowsFont commandNow there are three new WFF_... flags for the WindowsFont command:
WFF_ROTATE_90 : rotate the text of 90 degreesWFF_ROTATE_INV_90 : rotate the text of -90 degreesWFF_FROM_RIGHT_TO_LEFT : print text from right to left. This works only with HEBREW and ARABIC character sets on nationalized computers.
Page 659

TOMB RAIDER NEXT GENERATION SCRIPT REFERENCE MANUAL
Added a new script command: DefaultWindowsFontIf you type this command in the Title section of your script, the TRNG engine is forced to use the Windows font characters to show any text in the game. All menu titles (New game/Load game/Options etc.) will be drawn whereby windows functions using the windows font set in the given WindowsFont= command.
Remark:The advantage to use a windows font is to be able to support different character sets (different from the default western character set). Using windows fonts you should be able to show texts in eastern languages. To set the character set type the character set code linked with the face name font typed in the WindowsFont command used by the DefaultWindowsFont.
For example:ColorRGB= 1, 255,0,0ColorRGB= 2, 0,0,0WindowsFont= 1, 204:Arial, WFF_BOLD+WFF_SHADOW, 40, 1, 2DefaultWindowsFont= 1, IGNORE, 75, IGNORE, 20, 20, 20, 20, 10, 20, IGNORE, IGNORE, 10, IGNORE
The above commands are used in the "lightning" sample. The "204" is the RUSSIAN character set.
See the Windows Font command for the list of character set codes.
It is not necessary to type a character set number for western characters. Just omit the character set number and it will use the ANSI character set that is good for most of Western European languages (ENGLISH, FRENCH, SPANISH, GERMAN, ITALIAN)
There are some problems in windows font management. Since the displaying of a windows font is based on API windows functions (and not the DIRECTX functions), the drawing will be slower than the default DIRECTX management used in tomb raider. This means there will be a loss of performance when windows management is used for the texts.
Another risk is that the font chosen for the windows font could be missing in some computers and in that case the TRNG engine will try to locate a similar font but since it is different the format in the game could be worse. For above reasons use the DefaultWindwsFont= only when using an Eastern language (not supported by the tomb raider default). For western level builders (and their players) use the default font management because it gives better performance with all computers.
Added a new flip effect trigger to show the windows font strings[Find Trigger Number] F363This flip effect allows an extrang string to show on the screen using a new windows font management. This flip effect is not linked with the use of the DefaultWindowsFont command.This flip effect works with the new PARAM_WTEXT parameter command to set all of the required settings for the printing.
Page 660

TOMB RAIDER NEXT GENERATION SCRIPT REFERENCE MANUAL
Added a new flip effect to remove a string printed in the windows font mode.[Find Trigger Number] F364Use this flip effect when a previously printed string in the windows font mode has an endless duration.
Added a new button to the NG_CENTER programIn the Strings panel, there is the new button [Import Binary String]It is not sure if this feature will be used, anyway it allows typing text in the NG_CENTER in Eastern characters. In the case use the windows print features with the eastern characters and if you are not able to type this text in the common way use [Import Binary String].When you use this button you will be prompted to choose a .rtf (rich text file, typed with the WRITE.exe program) or .doc (created with Words program) where you typed your eastern text. Once the right file is selected , the NG_CENTER will convert the Eastern characters in to a hexadecimal string, like: "&CB30E530FC30B230FC30E030". Then you will be able to use this hex string with the flip effect print string and in the game the TRNG will convert the string in the original text to print it.
Remarks:* If you use this method to store your texts in the NG_CENTER remember to include the text in two mark block so: "$$$$" If the text is "Hello world", type in .rtf or .doc document:$$$$Hello World$$$$
* There is the chance that you will be able to store the Eastern texts in the NG_CENTER. It depends on the language and the character set in the NG_CENTER. The character set of the NG_CENTER program can be changed by using a translation file in its main folder.If you do not have a translation file for the NG_CENTER, create a fake translation file in this way:
1) Open block notes, and type this text, replacing "Japanese" with the name of your language, and "128" with the number of the character set code.
<START_CONFIGURATION>Version=JapaneseCharset=128PropFont=ArialFixedFont=Courier<END>
2) Now save this text in the NG_Center folder, giving the name "my_scripter_constants.txt"
3) Now, close the NG_Center, and launch it newly.
4) Now in the Settings panel you should see your language (you typed in Version= command).If it is not selected, select it now
5) Now the NG_CENTER will support the character set typed (CharSetNumber) and the required font. Try to type the text in the [Strings] section, in your language . After saving, quit the program and launch newly the program and the text should be there.
Page 661
TOMB RAIDER NEXT GENERATION SCRIPT REFERENCE MANUAL
Fixed the bug about the elevatorIn previous versions (from the first, with the new TNRG elevator) there was a problem with the inner (fake) keypad, when the game was saved/reloaded. The keypad, after reload, appeared flickering or moved in a bad position, a bit outside of elevator where LARA was not able to align with it to select the floor.
Fixed the bug in the management of the CUST_KEEP_DEAD_ENEMIESIn circumstances, when an enemy has been killed by an explosion and it was enabled the CUST_KEEP_DEAD_ENEMIES customize, the collision of that invisible enemy remained in the game.
Fixed the bug about the aiming killed (with explosion) enemyIn past versions when an enemy was killed by an explosion or with a helicopter explosion effect (Action 82), LARA was able to aim at the enemy in spite of him being dead and not visible in the game.
Fixed the bug about the explosion of the dog and mummyThis is a native bug of The Last RevelationWhen Lara shots with explosive ammos to the frozen dog (ocb=1) or the sleeping mummy (ocb=2) the game had a crash
Added a new flag for the Image command.The new IF_CRYPTIC flag has been added .When an image is set with this flag it will be encrypted and it will be possible watch it only in the game where it will be decrypted at-fly by the TRNG engine.You can recognize an encrypted image by the "@" character in front of its name.Example: @image3.bmpis the encrypted version of the image3.bmp
Since the encrypting is irreversible, you should make a backup of your images in a folder different from the trle\pix folder, before enable the encrypting, otherwise you will not be able to modify them. It is advisable to only encrypt images that contain "secrets" you do not want the player to see in advance, while for other generic image the encrypting is a futile losing of time.See the IF_CRYPTIC flag in the Mnemonics Section.
Fixed the bug about the leak memory with image management.In previous versions, when images were used in the level and the IF_PRELOAD flag is set for them, the memory required to load them was not freed correctly, wasting the global memory for the program and Windows.
Fixed the bugs in the binoculars about game commandsIn tomb4 there was a bug about keyboard commands when it enabled the binoculars. If the player hit the Escape command for the inventory the game entered in the inventory enabled the binoculars.The same kind of bug when the player hit P for pause screen. The pause screen came shown with the binocular screen. Now the TRNG quits the binoculars before entering the inventory or pause screen.
Page 662
TOMB RAIDER NEXT GENERATION SCRIPT REFERENCE MANUAL
Fixed the bug in the binoculars about the view of LaraIn previous versions, where LARA was looking downstairs (with binoculars) she was visible on the screen.
Fixed the bug in the DiaryIn previous version the font used for the right page of the diary was always a bit different than that in the left page.
Fixed the bug in showing images, custom save game panel and DiaryIn previous version, on some computers, when the game was set in full screen the images and the custom save game panel and LARA 's diary, did not work.
Fixed bug in the lasersight modeIn the past, also with standard tomb4, when LARA is aiming using the lasersight, if the player used a short cut to change the weapon (1,2,3,4,5,6) key, the lasersight can also be used with this new weapon.
Added new flag for image command.Added the new IF_EFFECT_CROSS_FADE flag to enable a cross fade to show current image.The IF_EFFECT_CROSS_FADE flag only works alone. It is not allowed a zoom effect or moving from side effects and neither transparent images. You can use it only with overlapped full screen images.
Fixed the bug about the SET_SOFT_FULL_SCREEN settingIn the previous versions, when you used the SET_SOFT_FULL_SCREEN setting, the game was forced to 16 bit textures getting leak quality about textures. Now it will be forced to work with 32 bit textures.
Added a new global trigger type.This global trigger is similar to GT_USED_INVENTORY_ITEM but there are important differences. While GT_USED_INVENTORY_ITEM works only with inventory items where there is no hard-coded feature and only when LARA is still in stand up position, with the GT_SELECTED_INVENTORY_ITEM global trigger, you detect the usage of the item, whose slot had been typed in the Parameter field, first that tomb4 engine processes it. If you use this global trigger with some hard-coded item you can replace the default management with yours, adding the new FGT_REPLACE_MANAGEMENT flag.
Added new address for Code Memory variablesIt has been added the reference to read/change the "Index of current vehicle or -1 if LARA 's not using a vehicle". You can change it using variables flip effects
Page 663
TOMB RAIDER NEXT GENERATION SCRIPT REFERENCE MANUAL
Changed operative mode of soft full screenThe old SET_SOFT_FULL_SCREEN for Setting= script command has been removed and the new SET_FORCE_SOFT_FULL_SCREEN setting has been added. The new SET_FORCE_SOFT_FULL_SCREEN setting works like the old SET_SOFT_FULL_SCREEN setting but it has been necessary to change its name because now the player will be able to set the soft full screen directly in the tomb4 set up window.For this reason do not set the soft full screen in the script, since the player will not be able to change that option.
Added a new constant for Settings script command.The SET_FORCE_NO_WAITING_REFRESH setting has been added.The "no waiting refresh" mode allows to remove the (further) flickering of images, and improve the FPS (frame per second) of the game. It works only when the game has been set in exclusive full screen (the common full screen, i.e. no "windowed" setting). Please, remember that the player will be able to set this option using the tomb raider set up, for this reason do not use this setting in the script, allowing the player the chance to enable it or not according to the performances of his computer.
Changed the tomb raider set up window.Now, from 1.2.2.7 version, the set up window will have new settings, stored in a frame named "Emergency settings" Above settings, in fact, should be used by the player when he has some problem playing the level. The player will be able to choose between "soft full screen" and "No waiting for refresh" modes. Both modes solves problems about flickering images, while only "soft full screen" could fix problems about FMV videos. On the other hand, the "no waiting for refresh" allows use of a a real exclusive full screen, that should give better performances with FPS.
Fixed the bug about tomb raider set up windowIn the tomb raider the set up window it did not keep the previous setting but showed only the default settings. Now the set up window will show the previous current settings you set.
Added a new method to show Set up WindowNow, at first launch, tomb raider will show a little pop up window with the message "Press CTRL key for SETUP". If the player immediately hits the CTRL key, the set up window will be shown, otherwise it will begin the game. The old method, using a link with "-setup" option in the command line still works. Anyway that method was a bit problematic in some circumstances since a link file keeps an absolute path and placing it in a zip file did not work on target computers. With this new method beginners will be able to enter set up mode easily.
IMPORTANT WARNING: The new set up window is stored in the tomb4 executable, this means that this new set up window will be visible only using the new TRNG tomb4.exe file you find in 1.2.2.7 TRNG update. To easily recognize this new tomb4 program it has a changed icon that shows LARA with sunglasses and a microphone (64x64 icon version) or LARA with a red background (32x32 icon version)
Page 664
TOMB RAIDER NEXT GENERATION SCRIPT REFERENCE MANUAL
Fixed the bug about the description of the flip effect trigger F276[Find Trigger Number] F276In previous versions the description of flip effect trigger 276 was:Variables. Memory. Subtract from <&>Savegame Memory the CurrentValueWhile the correct description now is:Variables. Memory. Subtract from <&>Item Memory the CurrentValue
Added new customize command for BinocularsThe CUST_BINOCULARS constant has been added to the Customize command.The CUST_BINOCULARS can show in binocular view: compass data, sextant data, zoom factor data and sensory of lightness data. You can also set the super-zoom mode where the zoom factor passes from (old) 4.3x to 40x
Added a new flip effect trigger to enable in game the super zoom factor.[Find Trigger Number] F365The "Camera. Increase the zoom factor (enable Super Zoom mode) for Binocular" flip effect, allows to enable the zoom factor from a trigger in game rather using a constant flag in the script.dat.
Page 665
TOMB RAIDER NEXT GENERATION SCRIPT REFERENCE MANUAL
HELP BUTTON WINDOW
INTRODUCTION
The buttons window is a new feature of NGLE program.You can have an extra window to store buttons to enable the commands of NGLE program.There are different reasons to have these duplications of old NGLE commands:
* If you have a screen resolution wider than 1024x768 (the size of NGLE window) you can use the button window to have more button short cuts of menu commands or keyboard commands and place this extra window at right of the NGLE window. Usually it's more fast the usage of buttons both menu commands. While for the keyboard commands the problem is that you could forget the precise keys to use, while with a button with its meaningful name, the problem doesn't exist.
* If you have a screen resolution littler than 1024x768, like it happens on some net books (1024x600) or some very old PCs, you can use the button window to host the default buttons hidden and place the button window over the texture frame, while you are editing other matters, and minimize it when you have to select textures.Note: remember that you can show newly the minimized (or previously closed) button window, using the short cut CTRL + 0 (0 is zero digit)
* Another chance is to use the button window to have the most of the commands typed in your language or described in better way, or typed with a bigger character. These solutions could be interesting for non English people or beginners. Examples of the Button Window
In the trle folder you will find two examples of button windows:
NetBook_ButtonsWindow.txt and WideScreen_ButtonsWindow.txt
To enable one of these you have to rename it as "ButtonsWindow.txt".The NGLE will create a button window only when it finds a file named "ButtonsWindow.txt" in the trle folder.
The above windows are only examples that you can change if you want to.
The NetBook_ButtonsWindow.txt contains all lower buttons of the NGLE window since they will be hidden in a resolution of 1024x600 used by many net books.
The WideScreen_ButtonsWindow.txt contains buttons to reproduce menu commands and keyboard commands.
If the width of the WideScreen window is too large (or too slim for your taste) you can change it typing another value in the @COLUMNS tag.
Page 666
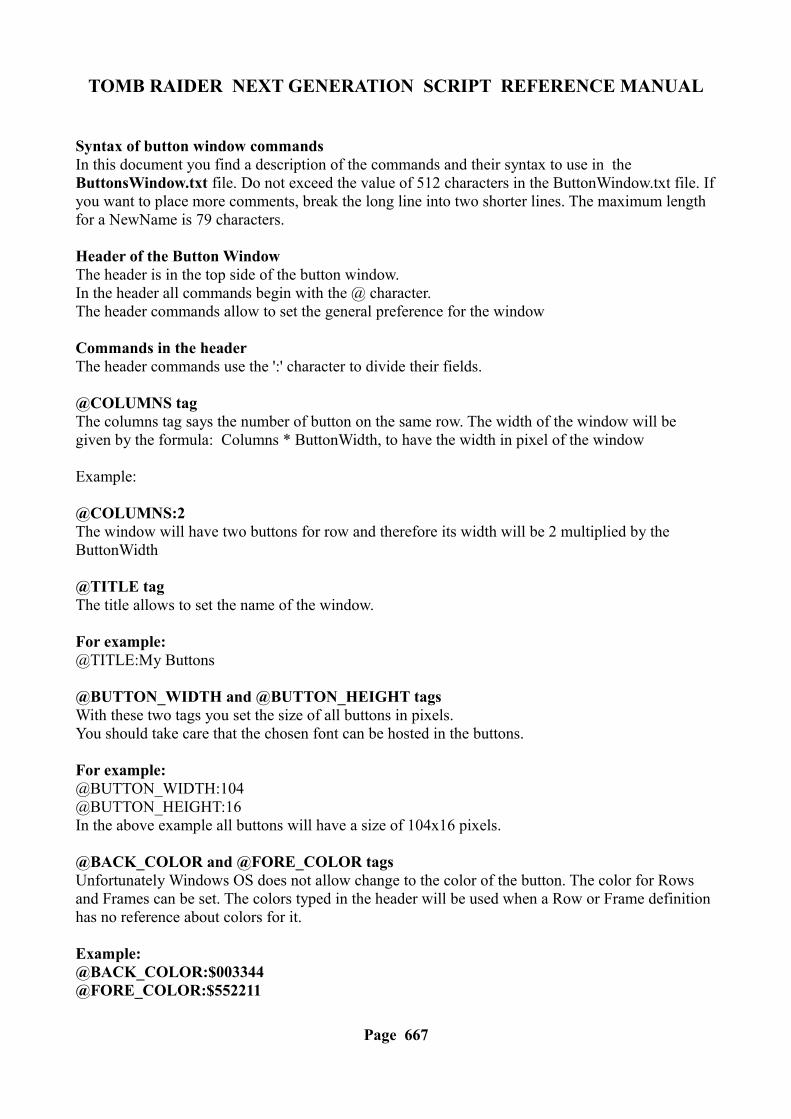
TOMB RAIDER NEXT GENERATION SCRIPT REFERENCE MANUAL
Syntax of button window commandsIn this document you find a description of the commands and their syntax to use in the ButtonsWindow.txt file. Do not exceed the value of 512 characters in the ButtonWindow.txt file. If you want to place more comments, break the long line into two shorter lines. The maximum length for a NewName is 79 characters.
Header of the Button WindowThe header is in the top side of the button window.In the header all commands begin with the @ character.The header commands allow to set the general preference for the window
Commands in the headerThe header commands use the ':' character to divide their fields.
@COLUMNS tagThe columns tag says the number of button on the same row. The width of the window will be given by the formula: Columns * ButtonWidth, to have the width in pixel of the window
Example:
@COLUMNS:2The window will have two buttons for row and therefore its width will be 2 multiplied by the ButtonWidth
@TITLE tagThe title allows to set the name of the window.
For example:@TITLE:My Buttons
@BUTTON_WIDTH and @BUTTON_HEIGHT tagsWith these two tags you set the size of all buttons in pixels.You should take care that the chosen font can be hosted in the buttons.
For example:@BUTTON_WIDTH:104@BUTTON_HEIGHT:16In the above example all buttons will have a size of 104x16 pixels.
@BACK_COLOR and @FORE_COLOR tagsUnfortunately Windows OS does not allow change to the color of the button. The color for Rows and Frames can be set. The colors typed in the header will be used when a Row or Frame definition has no reference about colors for it.
Example:@BACK_COLOR:$003344@FORE_COLOR:$552211
Page 667
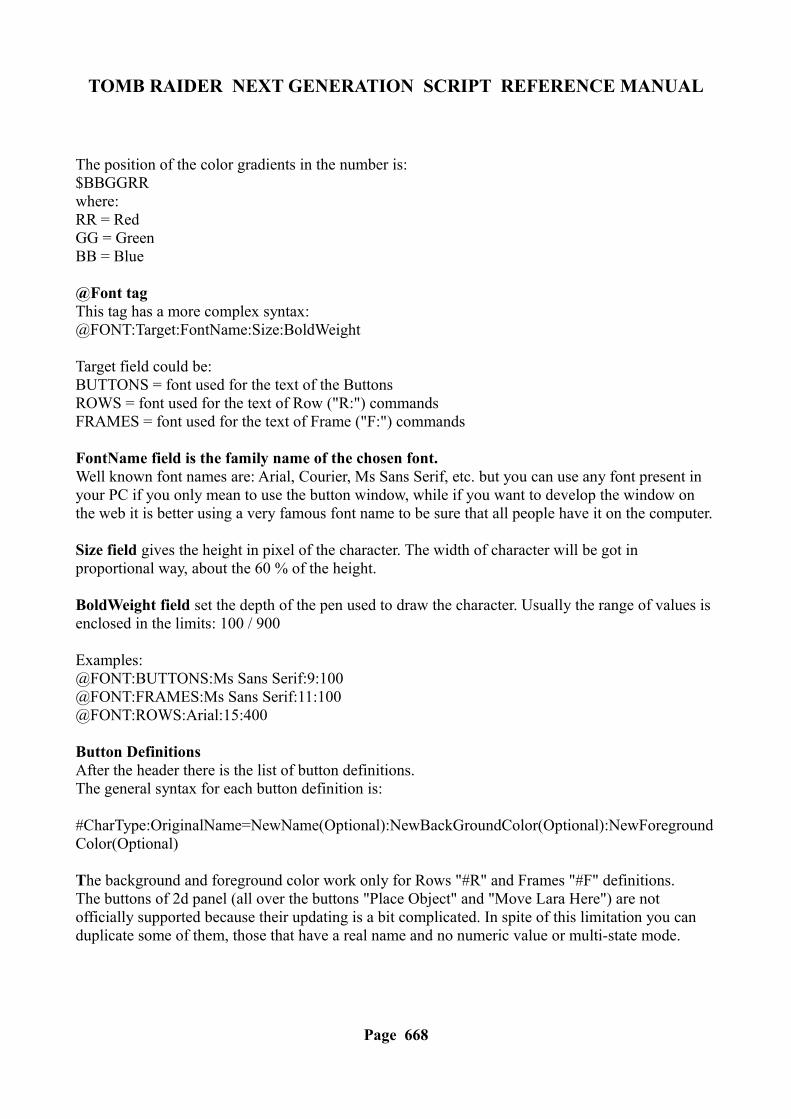
TOMB RAIDER NEXT GENERATION SCRIPT REFERENCE MANUAL
The position of the color gradients in the number is:$BBGGRRwhere: RR = RedGG = GreenBB = Blue
@Font tagThis tag has a more complex syntax:@FONT:Target:FontName:Size:BoldWeight
Target field could be:BUTTONS = font used for the text of the ButtonsROWS = font used for the text of Row ("R:") commandsFRAMES = font used for the text of Frame ("F:") commands
FontName field is the family name of the chosen font.Well known font names are: Arial, Courier, Ms Sans Serif, etc. but you can use any font present in your PC if you only mean to use the button window, while if you want to develop the window on the web it is better using a very famous font name to be sure that all people have it on the computer.
Size field gives the height in pixel of the character. The width of character will be got in proportional way, about the 60 % of the height.
BoldWeight field set the depth of the pen used to draw the character. Usually the range of values is enclosed in the limits: 100 / 900
Examples:@FONT:BUTTONS:Ms Sans Serif:9:100@FONT:FRAMES:Ms Sans Serif:11:100@FONT:ROWS:Arial:15:400
Button DefinitionsAfter the header there is the list of button definitions.The general syntax for each button definition is:
#CharType:OriginalName=NewName(Optional):NewBackGroundColor(Optional):NewForegroundColor(Optional)
The background and foreground color work only for Rows "#R" and Frames "#F" definitions.The buttons of 2d panel (all over the buttons "Place Object" and "Move Lara Here") are not officially supported because their updating is a bit complicated. In spite of this limitation you can duplicate some of them, those that have a real name and no numeric value or multi-state mode.
Page 668

TOMB RAIDER NEXT GENERATION SCRIPT REFERENCE MANUAL
CharType field
"#B" Button. This is the duplicate of a common button, where the "OriginalName" is the same seen in some buttons of the NGLE window.
"#M" Menu. This is the duplicate of a Menu command, where the "OriginalName" it's the same you read in NGLE menu.
The short cut part of the menu name hasto be excluded in your OriginalName for old menu, while you should keep it for the new menu created in NGLE
For example:in the menu item of "Room" menu:"Center Shift C" set the name as "Center" because it is an old menuwhile for the menu item of "Shapes" menu:"Pyramid Floor CTRL F5" type all above text, but it is not important you computethe precise spaces, so you can use the name: "Pyramid Floor CTRL F5
The new menus are those from, and at the right of the , "Shapes" menu title.
"#R" Row. This is not a button but only a separator row with text you can use to divide your button windows in different panels, each of them with its descriptive name and colors. The name will be what you type as OriginalName.
For example:#R:Lighting Buttons:$000000:$A0A000The width of the above row will be the whole width of the button window.
"#F" Frame. This is not a button but a frame (rectangular zone) where it will be drawn variable text. Currentlyit used only with INFO_BOX as original name and it will show the infos about editing (selection, height floor, ceiling etc.) and level (used items, triggers, moveables etc)
In the NewName field type the number of the button rows of this frame, to set its height
For example: if this frame had an height of 4 buttons type:#F:INFO_BOX=4:$505050:$000000The width of the information box is always the same as the button window, i.e. the width of a single button multiplied by @COLUMNS value
"#C" Colors. This type is not a common button but a series of very little buttons, simulating the first 15 colors of the palette of NGLE. The width for each coloured little button will be the size of the width of the button window divided by 15
In this type it will be ignored by all fields but you have to type the originalname field. You can use the name COLOR_PALETTE
Page 669

TOMB RAIDER NEXT GENERATION SCRIPT REFERENCE MANUAL
For example:#C:COLOR_PALETTE
"#P" Preset. This is a duplicate of a button using a preset name to distinguish it from others with same real text. For example there are many little buttons marked as [+] or [-] for different light parameters or other buttons that have no name but only an outer descriptive text.
For these buttons you have to use the preset names to identify them in univoque mode.See the Appendix with the list of preset names you can use.
If you want to duplicate a button that is not enclosed in the above list you can identify it typing in the OriginalName field the couple of (x,y) coordinates of its origin.
For example: Since the pink button, to place a trigger in the map, has the origin in (265,412) coordinates, you can have this button in your window with a definition like this:#P:(265,412)=Add Trigger
Remember that the origin of the button has to be computed like the distance between the top/left pixel of the button with the top/left origin of the NGLE window when it is maximized, therefore excluding the title bar and borders. When you use the generic definition always supply a NewName.
"#K" Keyboard. This command creates a button used to send a keyboard short cut to invoke some command. Some commands in NGLE are present only as short cuts, with no button or menu present for them. When you want to create a #K button you have to type in the OriginalName field the hexadecimal number with the scan code of the main key + further bit status for SHIFT, CTRL, ALT in high order byte.
So the format of the number will be:$YXX (where XX is the scan code of main character and Y are the status keys.)Status keys can be:$8.. ALT$4.. CTRL$2.. SHIFT (of left side, if the $1.. is missing)$1.. SHIFT (of right side together with $2..)You can sum them as hex numbers. For example if you wish use ALT and CTRL in same moment, it will become $800 + $400 = $C00
The scan codes are the same as the Keyboard Scan Codes. See Keyboard Scan Codes.See Appendix C: Code Numbers for Keyboard commands
OriginalName fieldIn the OriginalName field type the same text you see inside the original buttons or menu you wish replicated in your button window. The exceptions about above rules are when you work with:
#P : In the Original name type one of preset texts you find in the Preset buttons Appendix#K : Type an hexadecimal number to describe the keyboard command to invoke.
Page 670

TOMB RAIDER NEXT GENERATION SCRIPT REFERENCE MANUAL
#F : Type always INFO_BOX as Original name#C : Type always COLOR_PALETTE as Original name#R : Type the text you wish printed in this row
NewName fieldYou use the OriginalName to locate the source button to duplicate but then another name (descriptive text)can be assigned for it This NewName field is optional, so it can be omitted and in this case the button will have the same name as the original button.
Examples:#B:Trigger -> ObjectThe button will have the same text of original: "Trigger -> Object"while to rename it type:#B:Trigger -> Object=Find From Trigger
In the above case the name in the button window will be "Find From Trigger"
NewBackGroundColor fieldThis field works only for Rows and Frame text. If this row had a background color different fromthe default back color set it with the @BACK_COLOR header definition.type a new rgb color for the background. If in hexadecimal use the "$" sign in front followed by a hexadecimal number. The NewBackGroundColor field is optional, so it can be omitted and the row will have the default color set with @BACK_COLOR header definition.Remember that if the NewBackGroundColor color is omitted then the following NewForegroundColor is omitted to avoid ambiguity in the parsing of the command.
NewForegroundColor fieldTo change the foreground color i.e. the color of the text, type in this field the rgb value for the text of this button. If the NewForegroundColor field is typed in then the NewBackGroundColor field must be typed too.
Page 671
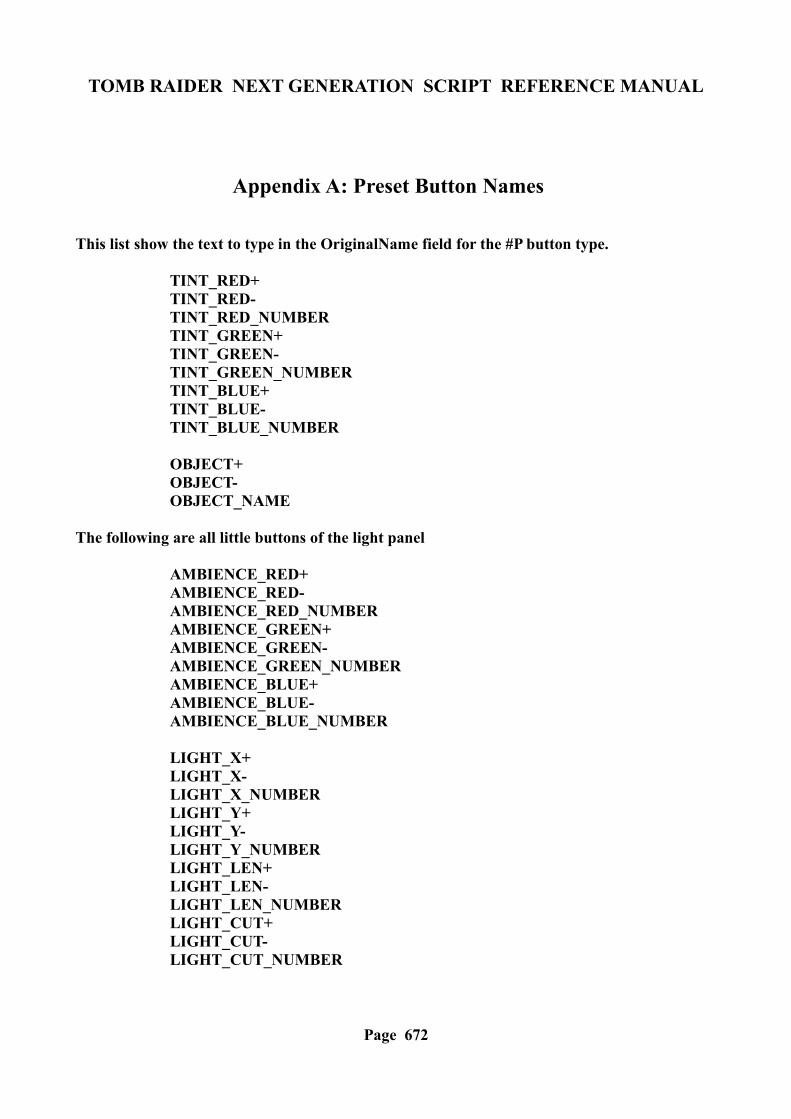
TOMB RAIDER NEXT GENERATION SCRIPT REFERENCE MANUAL
Appendix A: Preset Button Names
This list show the text to type in the OriginalName field for the #P button type.
TINT_RED+TINT_RED-TINT_RED_NUMBERTINT_GREEN+TINT_GREEN-TINT_GREEN_NUMBERTINT_BLUE+TINT_BLUE-TINT_BLUE_NUMBER
OBJECT+OBJECT-OBJECT_NAME
The following are all little buttons of the light panel
AMBIENCE_RED+AMBIENCE_RED-AMBIENCE_RED_NUMBERAMBIENCE_GREEN+AMBIENCE_GREEN-AMBIENCE_GREEN_NUMBERAMBIENCE_BLUE+AMBIENCE_BLUE-AMBIENCE_BLUE_NUMBER
LIGHT_X+LIGHT_X-LIGHT_X_NUMBERLIGHT_Y+LIGHT_Y-LIGHT_Y_NUMBERLIGHT_LEN+LIGHT_LEN-LIGHT_LEN_NUMBERLIGHT_CUT+LIGHT_CUT-LIGHT_CUT_NUMBER
Page 672
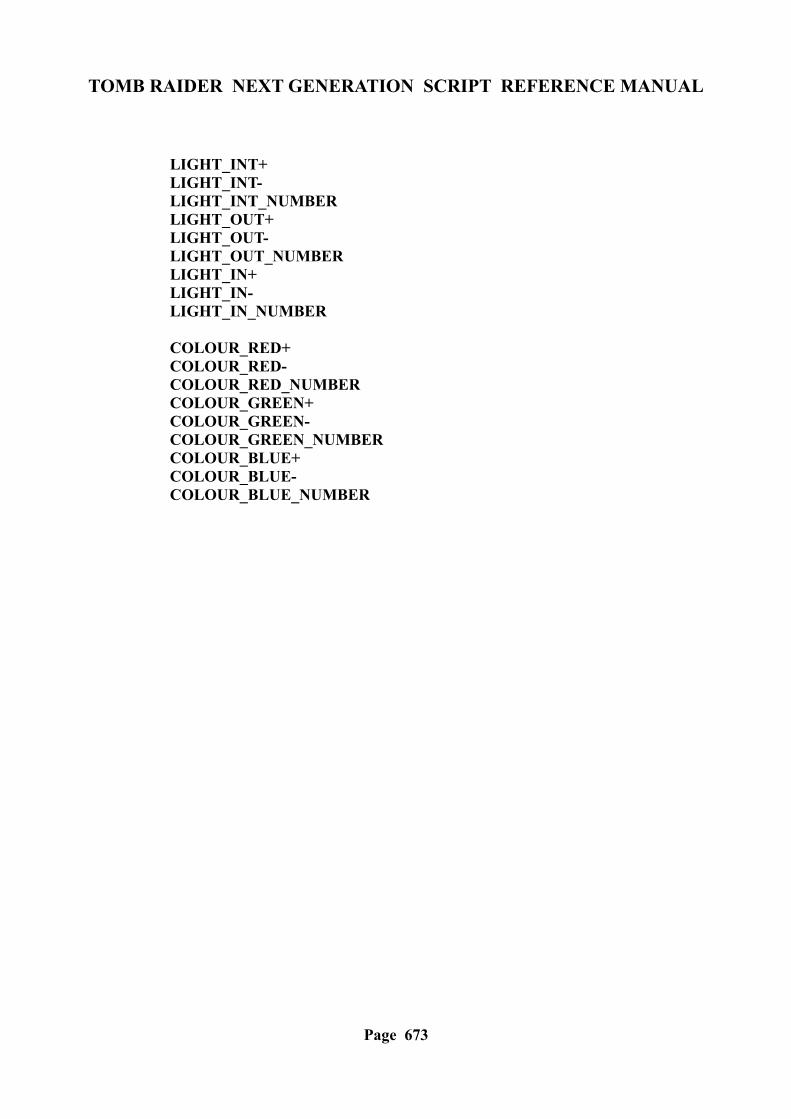
TOMB RAIDER NEXT GENERATION SCRIPT REFERENCE MANUAL
LIGHT_INT+LIGHT_INT-LIGHT_INT_NUMBERLIGHT_OUT+LIGHT_OUT-LIGHT_OUT_NUMBERLIGHT_IN+LIGHT_IN-LIGHT_IN_NUMBER
COLOUR_RED+COLOUR_RED-COLOUR_RED_NUMBERCOLOUR_GREEN+COLOUR_GREEN-COLOUR_GREEN_NUMBERCOLOUR_BLUE+COLOUR_BLUE-COLOUR_BLUE_NUMBER
Page 673
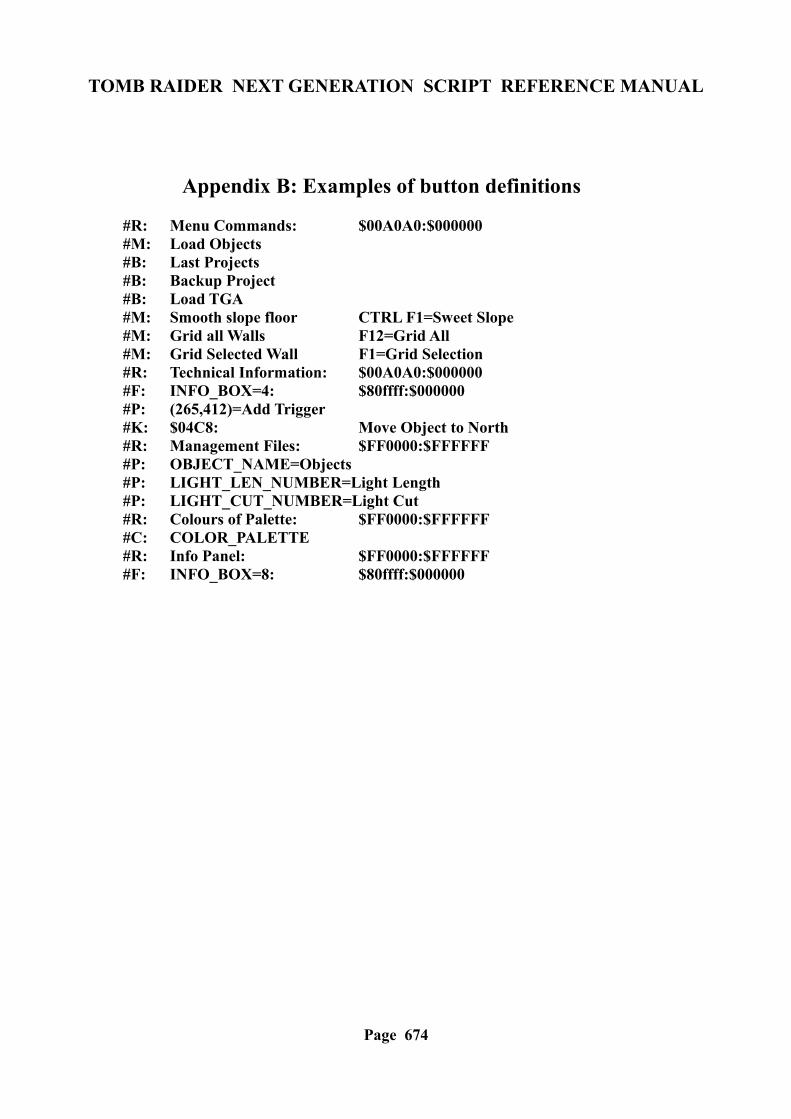
TOMB RAIDER NEXT GENERATION SCRIPT REFERENCE MANUAL
Appendix B: Examples of button definitions
#R: Menu Commands: $00A0A0:$000000#M: Load Objects#B: Last Projects#B: Backup Project#B: Load TGA#M: Smooth slope floor CTRL F1=Sweet Slope#M: Grid all Walls F12=Grid All#M: Grid Selected Wall F1=Grid Selection#R: Technical Information: $00A0A0:$000000#F: INFO_BOX=4: $80ffff:$000000#P: (265,412)=Add Trigger#K: $04C8: Move Object to North#R: Management Files: $FF0000:$FFFFFF#P: OBJECT_NAME=Objects#P: LIGHT_LEN_NUMBER=Light Length#P: LIGHT_CUT_NUMBER=Light Cut#R: Colours of Palette: $FF0000:$FFFFFF#C: COLOR_PALETTE#R: Info Panel: $FF0000:$FFFFFF#F: INFO_BOX=8: $80ffff:$000000
Page 674
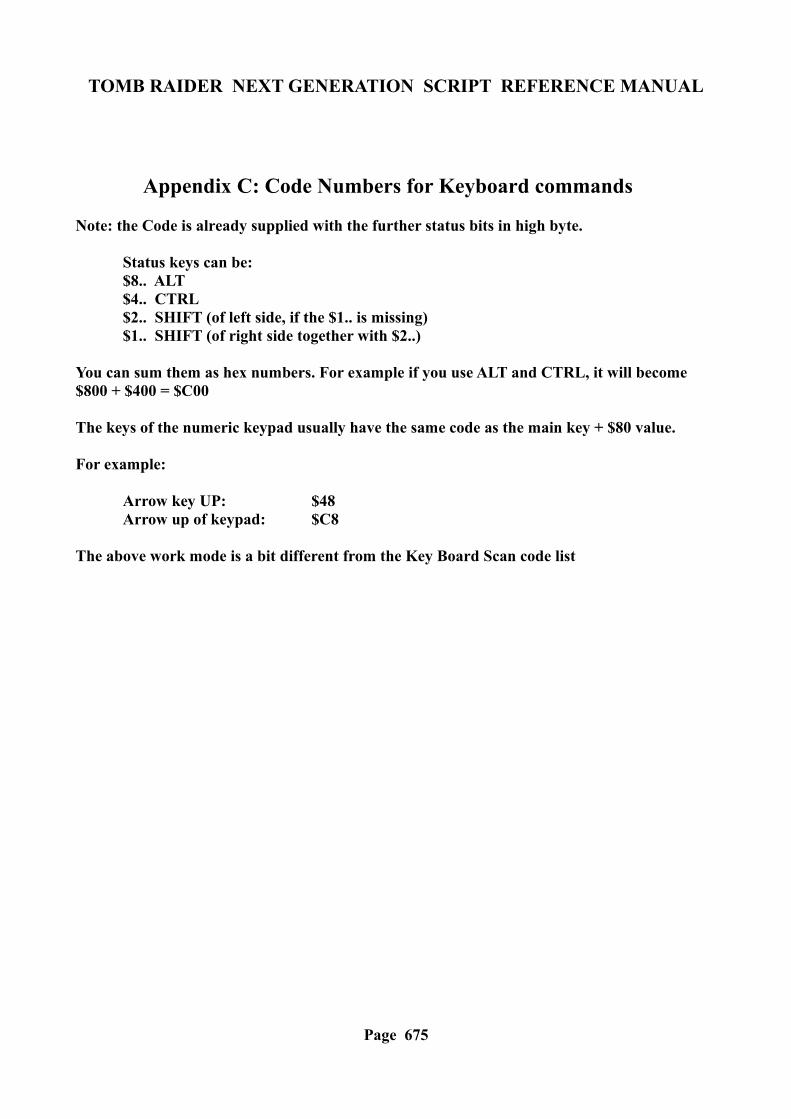
TOMB RAIDER NEXT GENERATION SCRIPT REFERENCE MANUAL
Appendix C: Code Numbers for Keyboard commands
Note: the Code is already supplied with the further status bits in high byte.
Status keys can be:$8.. ALT$4.. CTRL$2.. SHIFT (of left side, if the $1.. is missing)$1.. SHIFT (of right side together with $2..)
You can sum them as hex numbers. For example if you use ALT and CTRL, it will become $800 + $400 = $C00
The keys of the numeric keypad usually have the same code as the main key + $80 value.
For example:
Arrow key UP: $48Arrow up of keypad: $C8
The above work mode is a bit different from the Key Board Scan code list
Page 675
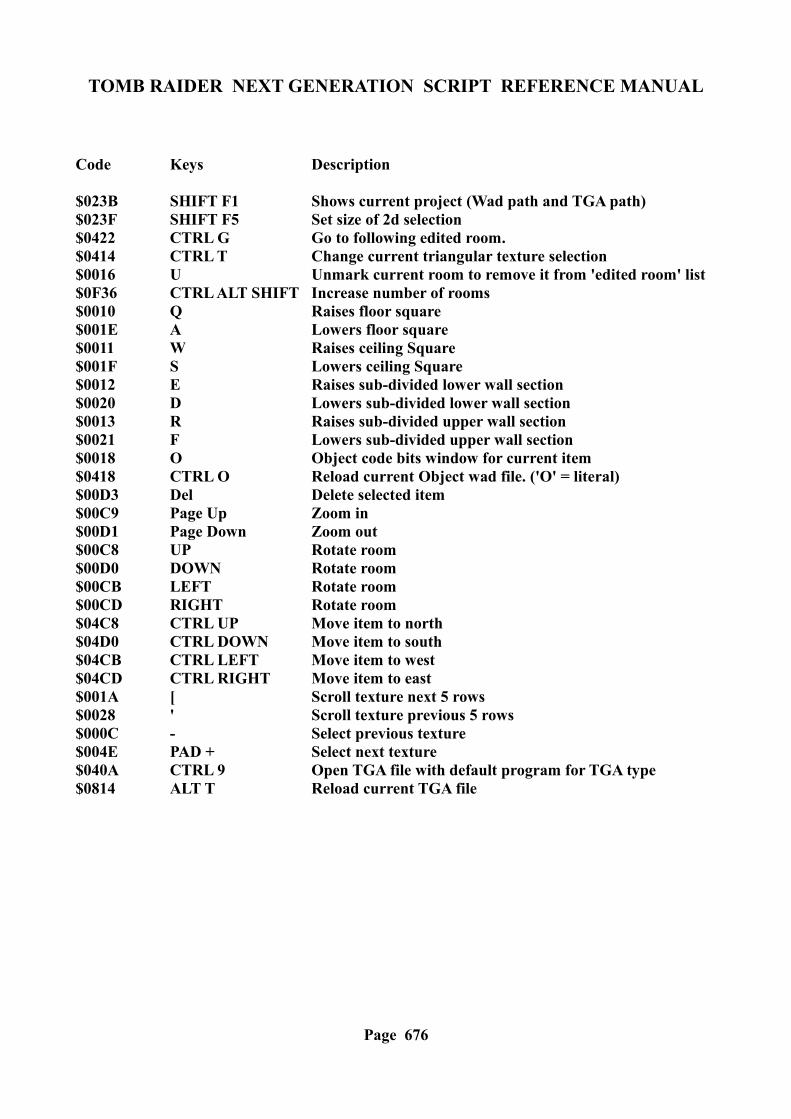
TOMB RAIDER NEXT GENERATION SCRIPT REFERENCE MANUAL
Code Keys Description
$023B SHIFT F1 Shows current project (Wad path and TGA path)$023F SHIFT F5 Set size of 2d selection $0422 CTRL G Go to following edited room.$0414 CTRL T Change current triangular texture selection$0016 U Unmark current room to remove it from 'edited room' list$0F36 CTRL ALT SHIFT Increase number of rooms$0010 Q Raises floor square$001E A Lowers floor square$0011 W Raises ceiling Square$001F S Lowers ceiling Square$0012 E Raises sub-divided lower wall section$0020 D Lowers sub-divided lower wall section$0013 R Raises sub-divided upper wall section$0021 F Lowers sub-divided upper wall section$0018 O Object code bits window for current item$0418 CTRL O Reload current Object wad file. ('O' = literal)$00D3 Del Delete selected item$00C9 Page Up Zoom in$00D1 Page Down Zoom out$00C8 UP Rotate room$00D0 DOWN Rotate room$00CB LEFT Rotate room$00CD RIGHT Rotate room$04C8 CTRL UP Move item to north$04D0 CTRL DOWN Move item to south$04CB CTRL LEFT Move item to west$04CD CTRL RIGHT Move item to east$001A [ Scroll texture next 5 rows$0028 ' Scroll texture previous 5 rows$000C - Select previous texture$004E PAD + Select next texture$040A CTRL 9 Open TGA file with default program for TGA type$0814 ALT T Reload current TGA file
Page 676
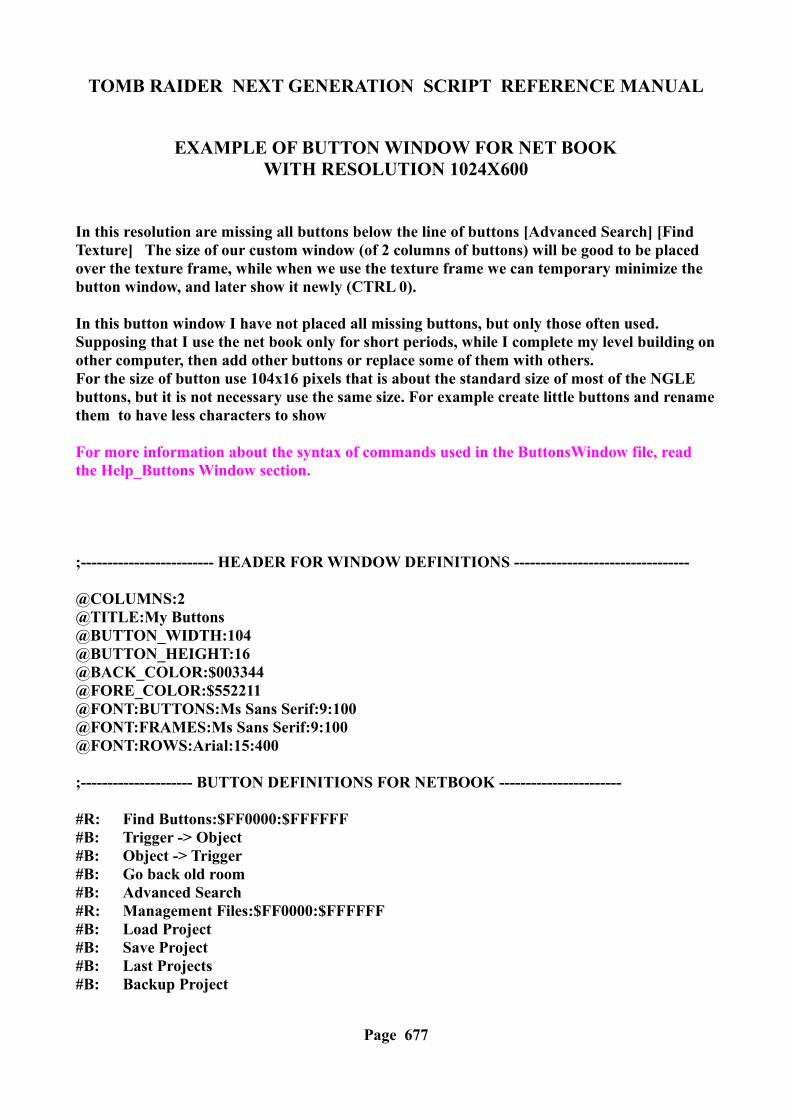
TOMB RAIDER NEXT GENERATION SCRIPT REFERENCE MANUAL
EXAMPLE OF BUTTON WINDOW FOR NET BOOK WITH RESOLUTION 1024X600
In this resolution are missing all buttons below the line of buttons [Advanced Search] [Find Texture] The size of our custom window (of 2 columns of buttons) will be good to be placed over the texture frame, while when we use the texture frame we can temporary minimize the button window, and later show it newly (CTRL 0).
In this button window I have not placed all missing buttons, but only those often used. Supposing that I use the net book only for short periods, while I complete my level building on other computer, then add other buttons or replace some of them with others. For the size of button use 104x16 pixels that is about the standard size of most of the NGLE buttons, but it is not necessary use the same size. For example create little buttons and rename them to have less characters to show
For more information about the syntax of commands used in the ButtonsWindow file, read the Help_Buttons Window section.
;------------------------- HEADER FOR WINDOW DEFINITIONS ---------------------------------
@COLUMNS:2@TITLE:My Buttons@BUTTON_WIDTH:104@BUTTON_HEIGHT:16@BACK_COLOR:$003344@FORE_COLOR:$552211@FONT:BUTTONS:Ms Sans Serif:9:100@FONT:FRAMES:Ms Sans Serif:9:100@FONT:ROWS:Arial:15:400
;--------------------- BUTTON DEFINITIONS FOR NETBOOK -----------------------
#R: Find Buttons:$FF0000:$FFFFFF#B: Trigger -> Object#B: Object -> Trigger#B: Go back old room#B: Advanced Search#R: Management Files:$FF0000:$FFFFFF#B: Load Project#B: Save Project#B: Last Projects#B: Backup Project
Page 677
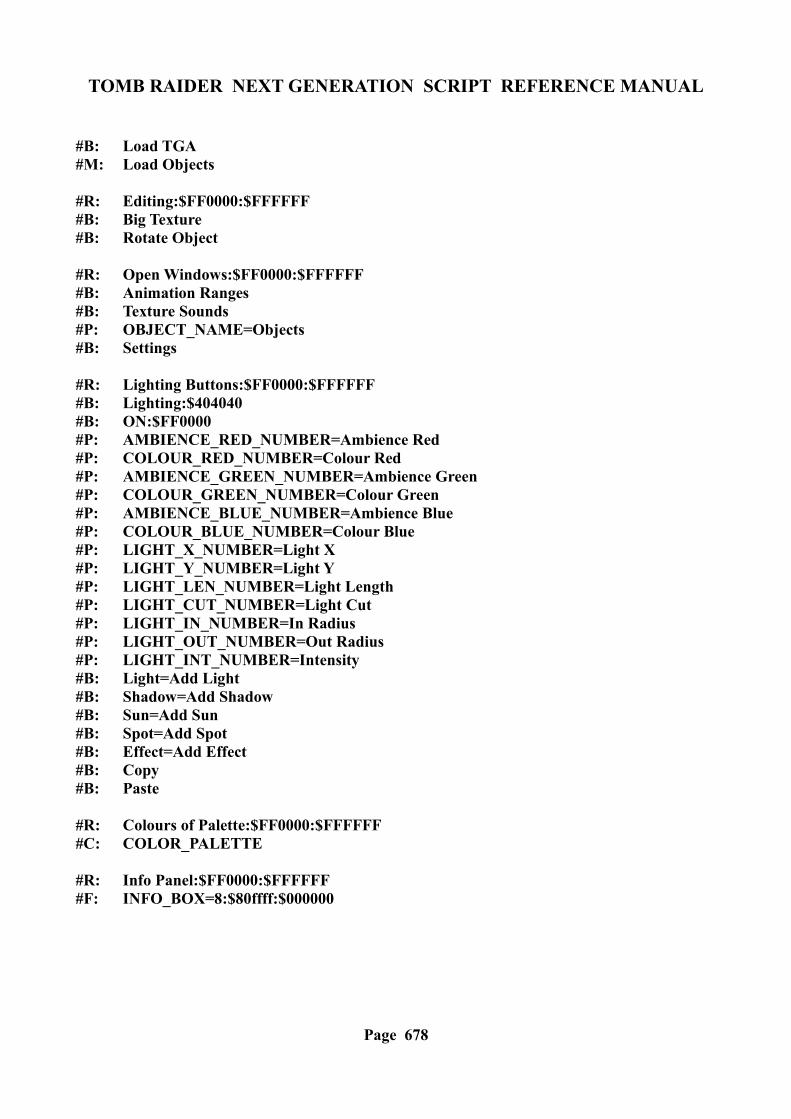
TOMB RAIDER NEXT GENERATION SCRIPT REFERENCE MANUAL
#B: Load TGA#M: Load Objects
#R: Editing:$FF0000:$FFFFFF#B: Big Texture#B: Rotate Object
#R: Open Windows:$FF0000:$FFFFFF#B: Animation Ranges#B: Texture Sounds#P: OBJECT_NAME=Objects#B: Settings
#R: Lighting Buttons:$FF0000:$FFFFFF#B: Lighting:$404040#B: ON:$FF0000#P: AMBIENCE_RED_NUMBER=Ambience Red#P: COLOUR_RED_NUMBER=Colour Red#P: AMBIENCE_GREEN_NUMBER=Ambience Green#P: COLOUR_GREEN_NUMBER=Colour Green#P: AMBIENCE_BLUE_NUMBER=Ambience Blue#P: COLOUR_BLUE_NUMBER=Colour Blue#P: LIGHT_X_NUMBER=Light X#P: LIGHT_Y_NUMBER=Light Y#P: LIGHT_LEN_NUMBER=Light Length#P: LIGHT_CUT_NUMBER=Light Cut#P: LIGHT_IN_NUMBER=In Radius#P: LIGHT_OUT_NUMBER=Out Radius#P: LIGHT_INT_NUMBER=Intensity#B: Light=Add Light#B: Shadow=Add Shadow#B: Sun=Add Sun#B: Spot=Add Spot#B: Effect=Add Effect#B: Copy#B: Paste
#R: Colours of Palette:$FF0000:$FFFFFF#C: COLOR_PALETTE
#R: Info Panel:$FF0000:$FFFFFF#F: INFO_BOX=8:$80ffff:$000000
Page 678
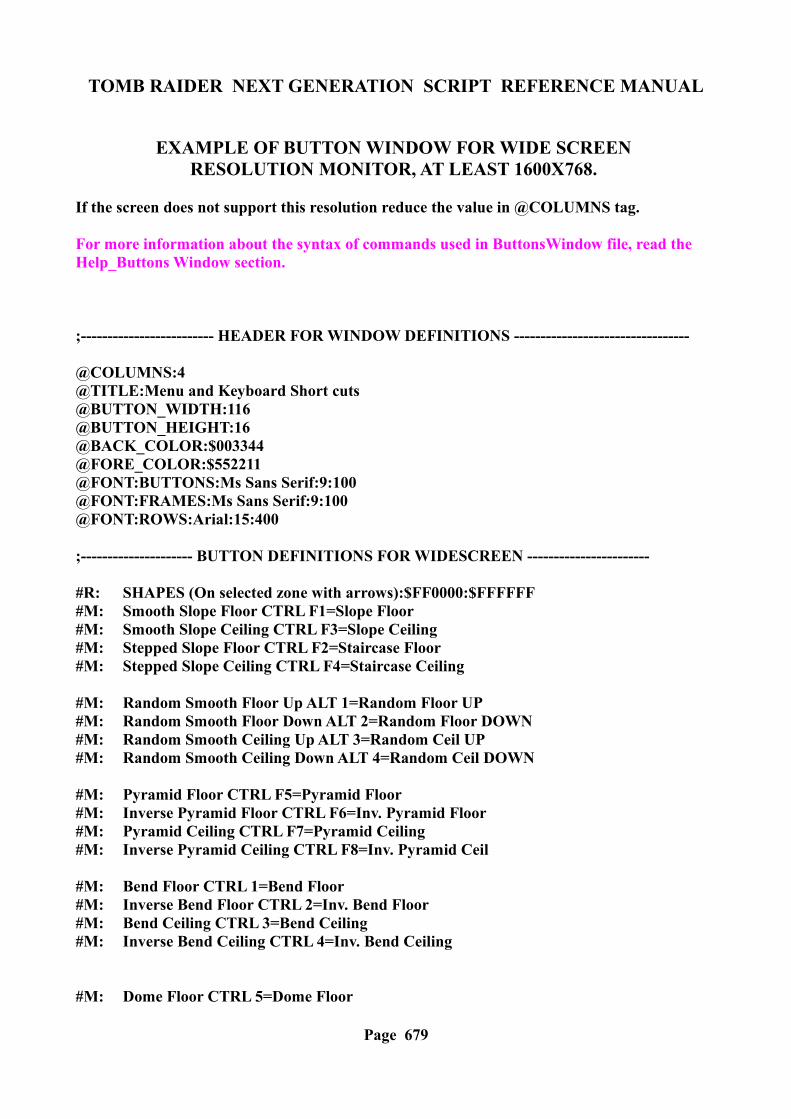
TOMB RAIDER NEXT GENERATION SCRIPT REFERENCE MANUAL
EXAMPLE OF BUTTON WINDOW FOR WIDE SCREEN RESOLUTION MONITOR, AT LEAST 1600X768.
If the screen does not support this resolution reduce the value in @COLUMNS tag.
For more information about the syntax of commands used in ButtonsWindow file, read the Help_Buttons Window section.
;------------------------- HEADER FOR WINDOW DEFINITIONS ---------------------------------
@COLUMNS:4@TITLE:Menu and Keyboard Short cuts@BUTTON_WIDTH:116@BUTTON_HEIGHT:16@BACK_COLOR:$003344@FORE_COLOR:$552211@FONT:BUTTONS:Ms Sans Serif:9:100@FONT:FRAMES:Ms Sans Serif:9:100@FONT:ROWS:Arial:15:400
;--------------------- BUTTON DEFINITIONS FOR WIDESCREEN -----------------------
#R: SHAPES (On selected zone with arrows):$FF0000:$FFFFFF#M: Smooth Slope Floor CTRL F1=Slope Floor#M: Smooth Slope Ceiling CTRL F3=Slope Ceiling#M: Stepped Slope Floor CTRL F2=Staircase Floor#M: Stepped Slope Ceiling CTRL F4=Staircase Ceiling
#M: Random Smooth Floor Up ALT 1=Random Floor UP#M: Random Smooth Floor Down ALT 2=Random Floor DOWN#M: Random Smooth Ceiling Up ALT 3=Random Ceil UP#M: Random Smooth Ceiling Down ALT 4=Random Ceil DOWN
#M: Pyramid Floor CTRL F5=Pyramid Floor#M: Inverse Pyramid Floor CTRL F6=Inv. Pyramid Floor#M: Pyramid Ceiling CTRL F7=Pyramid Ceiling#M: Inverse Pyramid Ceiling CTRL F8=Inv. Pyramid Ceil
#M: Bend Floor CTRL 1=Bend Floor#M: Inverse Bend Floor CTRL 2=Inv. Bend Floor#M: Bend Ceiling CTRL 3=Bend Ceiling#M: Inverse Bend Ceiling CTRL 4=Inv. Bend Ceiling
#M: Dome Floor CTRL 5=Dome Floor
Page 679
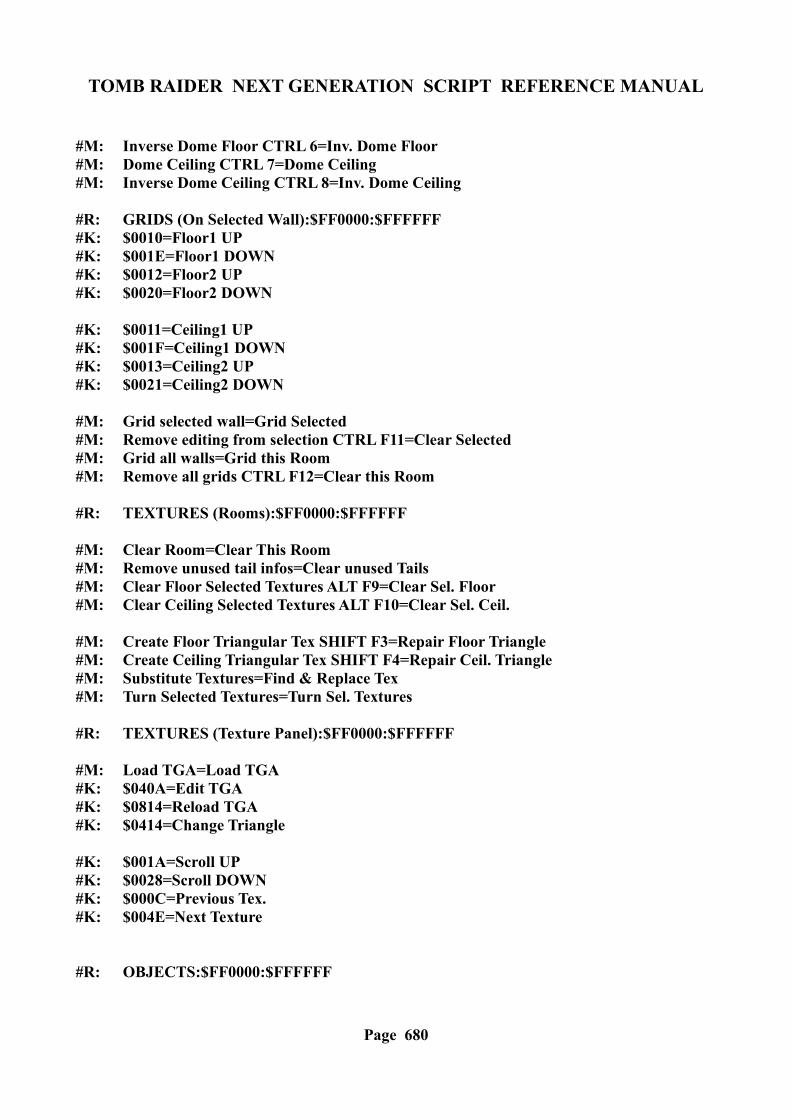
TOMB RAIDER NEXT GENERATION SCRIPT REFERENCE MANUAL
#M: Inverse Dome Floor CTRL 6=Inv. Dome Floor#M: Dome Ceiling CTRL 7=Dome Ceiling#M: Inverse Dome Ceiling CTRL 8=Inv. Dome Ceiling
#R: GRIDS (On Selected Wall):$FF0000:$FFFFFF#K: $0010=Floor1 UP#K: $001E=Floor1 DOWN#K: $0012=Floor2 UP#K: $0020=Floor2 DOWN
#K: $0011=Ceiling1 UP#K: $001F=Ceiling1 DOWN#K: $0013=Ceiling2 UP#K: $0021=Ceiling2 DOWN
#M: Grid selected wall=Grid Selected#M: Remove editing from selection CTRL F11=Clear Selected#M: Grid all walls=Grid this Room#M: Remove all grids CTRL F12=Clear this Room
#R: TEXTURES (Rooms):$FF0000:$FFFFFF
#M: Clear Room=Clear This Room#M: Remove unused tail infos=Clear unused Tails#M: Clear Floor Selected Textures ALT F9=Clear Sel. Floor#M: Clear Ceiling Selected Textures ALT F10=Clear Sel. Ceil.
#M: Create Floor Triangular Tex SHIFT F3=Repair Floor Triangle#M: Create Ceiling Triangular Tex SHIFT F4=Repair Ceil. Triangle#M: Substitute Textures=Find & Replace Tex#M: Turn Selected Textures=Turn Sel. Textures
#R: TEXTURES (Texture Panel):$FF0000:$FFFFFF
#M: Load TGA=Load TGA#K: $040A=Edit TGA#K: $0814=Reload TGA#K: $0414=Change Triangle
#K: $001A=Scroll UP#K: $0028=Scroll DOWN#K: $000C=Previous Tex.#K: $004E=Next Texture
#R: OBJECTS:$FF0000:$FFFFFF
Page 680
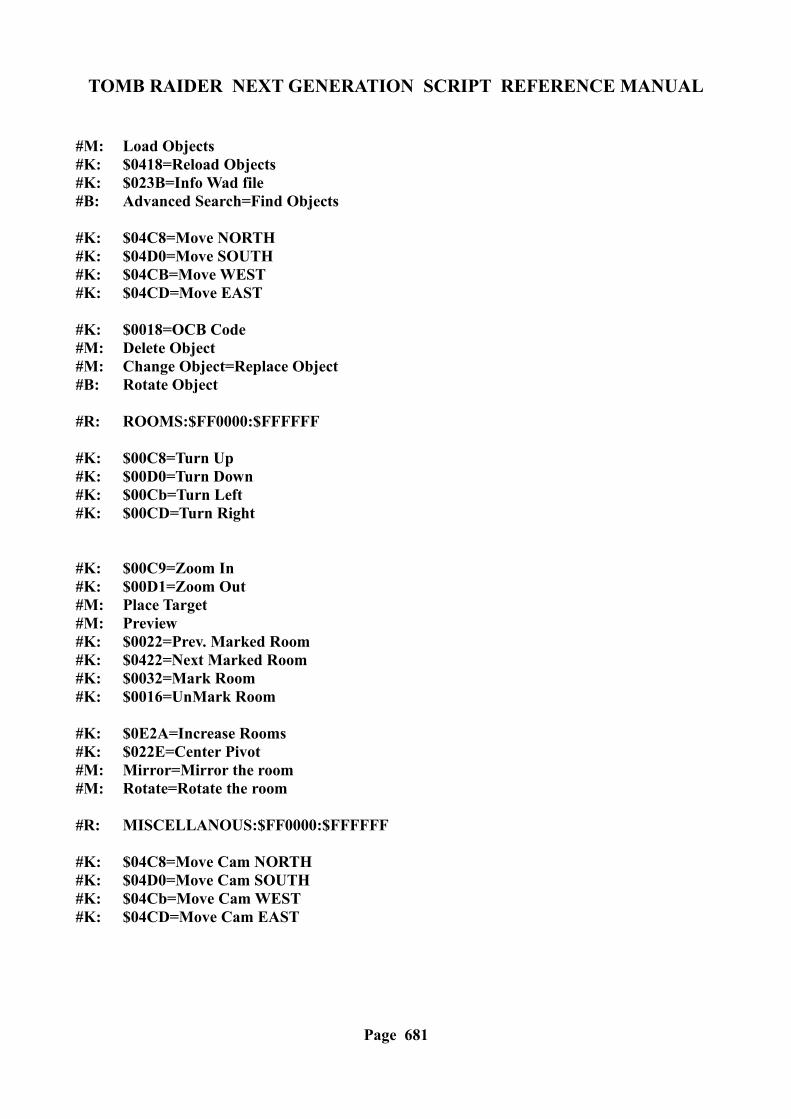
TOMB RAIDER NEXT GENERATION SCRIPT REFERENCE MANUAL
#M: Load Objects#K: $0418=Reload Objects#K: $023B=Info Wad file#B: Advanced Search=Find Objects
#K: $04C8=Move NORTH#K: $04D0=Move SOUTH#K: $04CB=Move WEST#K: $04CD=Move EAST
#K: $0018=OCB Code#M: Delete Object#M: Change Object=Replace Object#B: Rotate Object
#R: ROOMS:$FF0000:$FFFFFF
#K: $00C8=Turn Up#K: $00D0=Turn Down#K: $00Cb=Turn Left#K: $00CD=Turn Right
#K: $00C9=Zoom In#K: $00D1=Zoom Out#M: Place Target#M: Preview#K: $0022=Prev. Marked Room#K: $0422=Next Marked Room#K: $0032=Mark Room#K: $0016=UnMark Room
#K: $0E2A=Increase Rooms#K: $022E=Center Pivot#M: Mirror=Mirror the room#M: Rotate=Rotate the room
#R: MISCELLANOUS:$FF0000:$FFFFFF
#K: $04C8=Move Cam NORTH#K: $04D0=Move Cam SOUTH#K: $04Cb=Move Cam WEST#K: $04CD=Move Cam EAST
Page 681
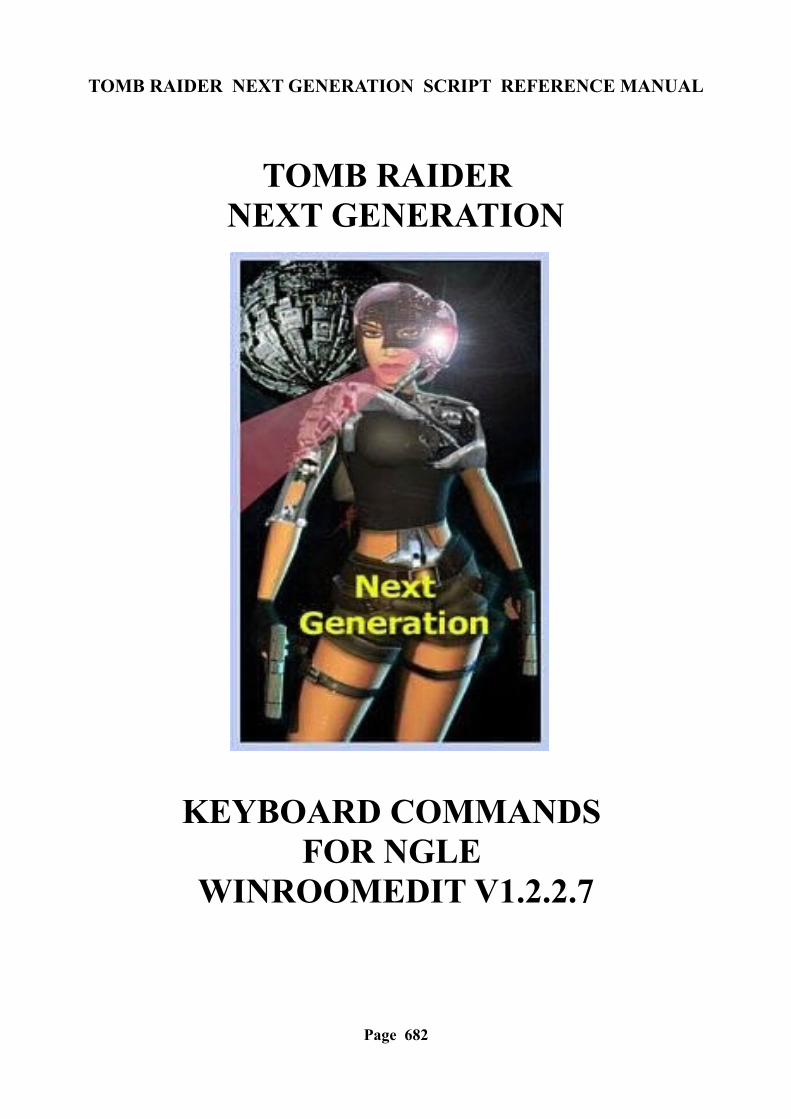
TOMB RAIDER NEXT GENERATION SCRIPT REFERENCE MANUAL
TOMB RAIDER NEXT GENERATION
KEYBOARD COMMANDS FOR NGLE
WINROOMEDIT V1.2.2.7
Page 682
TOMB RAIDER NEXT GENERATION SCRIPT REFERENCE MANUAL
KEYBOARD COMMMANDS OF NEXT GENERATION WINROOMEDIT v1.2.2.7
left SHIFT Slow down rotations and zoom in 3d view panel.
Note: Keep the left Shift key down to get slowdown function
CTRL B Enable/Disable big texture mode. Like [Big Texture] button.SHIFT C Center the rotation pivot at centre of room.
(Like menu command [Room->Centre])
CTRL F Rotate selected object. Like [Rotate Object] button.
SHIFT F1 Show information about current project (Wad path and TGA path)SHIFT F2 Invoke Settings window to customize NGLE parameters
SHIFT F3 Texture missing triangular floor facesSHIFT F4 Texture missing triangular ceiling faces
SHIFT F5 Set size of 2d selection
CTRL F1 Floor smooth slopeCTRL F2 Floor stepped slopeCTRL F3 Ceiling smooth slopeCTRL F4 Ceiling stepped slope
CTRL F5 Floor PyramidCTRL F6 Inverse Floor PyramidCTRL F7 Ceiling PyramidCTRL F8 Inverse Ceiling Pyramid
ALT F9 Clear Floor Selected TexturesALT F10 Clear Ceiling Selected Textures
F11 Create grid in selected wall squares. Like [Grid selected wall] menuCTRL F11 Remove all editing from selected wallF12 Create grid in all wall squares. Like [Grid all walls] menuCTRL F12 Remove all wall grids
ALT 1 Random smooth floor upALT 2 Random smooth floor downALT 3 Random smooth ceiling upALT 4 Random smooth ceiling down
ALT 5 Save screen shot of room edit windowALT 6 Save screen shot of 2D panelALT 7 Save screen shot of 3D panelALT 8 Save screen shot of preview area
Page 683
TOMB RAIDER NEXT GENERATION SCRIPT REFERENCE MANUAL
ALT 9 Save RGB screen shot of preview areaALT 0 Save screen shot of texture panelALT F11 Save screen shot of Info Room PanelALT F12 Save screen shot of Light Panel
ALT T Reload current TGA file from disk
CTRL 0 Show/Restore the Buttons Window '0' = digit zero
CTRL 1 Bend FloorCTRL 2 Inverse Bend FloorCTRL 3 Bend CeilingCTRL 4 Inverse Bend CeilingCTRL 5 Dome FloorCTRL 6 Inverse Dome FloorCTRL 7 Dome CeilingCTRL 8 Inverse Dome Ceiling
CTRL 9 Open TGA file with default graphical program set in Windows
G Go to previous edited room. Like [Go back old room] button.CTRL G Go to following edited room.CTRL H Move Lara to selected square in current room. Like [Move Lara Here] button
CTRL+SHIFT+I Interrupt program with simulated crash, to use when NGLE freezes to save backup and get crash report
CTRL J Swap information shown in Title bar of NGLE: you can show current Project information or current room information.
CTRL L Load last projects. Show list of last projects. Like [Load Last Projects] buttonCTRL M Minimize main window
M Mark current room as 'edited room' to reach it using G command
CTRL O Reload current Object wad file. ('O' = literal)SHIFT O Permit to choose a new Object wad file.
Like old (and removed) button [Load Objects]
CTRL S Write in log file message '--- CTRL S --' for reference
CTRL T Change current triangular texture selection
U Unmark current room to remove it from 'edited room' list
CTRL ALT SHIFT Increase number of rooms
Page 684

TOMB RAIDER NEXT GENERATION SCRIPT REFERENCE MANUAL
Page 685