To View the Critical Path
61
59 Chapter 2 1. Identify the critical path p. 60 2. Create a Work Breakdown Structure p. 62 3. Create and assign project resources p. 70 4. Change task durations by adding resources p. 76 5. View resource assignments in the Team Planner view p. 83 6. Enhance a project schedule with elapsed duration and recurring tasks p. 84 7. Share project information p. 88 8. Copy and paste project information to other applications p. 91 9. Share project information with Microsoft Excel p. 96 10. Use and create Project templates p. 108 Student data files needed for this workshop: You will save your files as: pm01ch02CharityGolfTournament_LastFirst.mpp pm01ch02CharityGolfTournament_LastFirst.docx pm01ch02CharityGolfTournament_LastFirst.xlsx pm01ch02CharityGolfTournamentGanttChart_ LastFirst.docx pm01ch02CharityGolfTournament.mpp Painted Paradise Golf Resort— First Annual Charity Golf Tournament The Painted Paradise Golf Resort will be holding its first annual charity golf tournament to raise money for the purchase of textbooks to be donated to the elementary schools in Santa Fe, New Mexico. Patti Rochelle, the project manager of this event, has assigned you to start an initial list of project tasks using Microsoft Project 2016 to organize this event. She has looked over your list of tasks and made a few adjustments. Now Patti is asking you to develop a more detailed project plan by creating a Work Breakdown Structure for this project and assigning resources to individual tasks. OBJECTIVES Microsoft Project 2016 pm01ch02CharityGolfTournamentTimeline_LastFirst.docx pm01ch02CharityGolfTournamentExport_LastFirst.xlsx pm01ch02SimpleProjectPlan_LastFirst.mpp pm01ch02EventTemplate_LastFirst.mpt pm01ch02EventTemplate_LastFirst.mpp Prepare Case Information Technology CREATING A DETAILED PROJECT PLAN Microgen/fotolia pm01ch02CharityGolfTournamentTasks.xlsx
Transcript of To View the Critical Path

59
C h a p t e r 2
1. Identify the critical path p. 60
2. Create a Work Breakdown Structure p. 62
3. Create and assign project resources p. 70
4. Change task durations by adding resources p. 76
5. View resource assignments in the Team Planner view p. 83
6. Enhance a project schedule with elapsed duration and recurring tasks p. 84
7. Share project information p. 88
8. Copy and paste project information to other applications p. 91
9. Share project information with Microsoft Excel p. 96
10. Use and create Project templates p. 108
Student data files needed for this workshop:
You will save your files as:
pm01ch02CharityGolfTournament_LastFirst.mpp
pm01ch02CharityGolfTournament_LastFirst.docx
pm01ch02CharityGolfTournament_LastFirst.xlsx
pm01ch02CharityGolfTournamentGanttChart_LastFirst.docx
pm01ch02CharityGolfTournament.mpp
Painted Paradise Golf Resort— First Annual Charity Golf Tournament
The Painted Paradise Golf Resort will be holding its first annual charity golf
tournament to raise money for the purchase of textbooks to be donated to the
elementary schools in Santa Fe, New Mexico. Patti Rochelle, the project manager
of this event, has assigned you to start an initial list of project tasks using Microsoft
Project 2016 to organize this event. She has looked over your list of tasks and
made a few adjustments. Now Patti is asking you to
develop a more detailed project plan by creating
a Work Breakdown Structure for this project and
assigning resources to individual tasks.
OBJECTIVES
Microsoft Project 2016
pm01ch02CharityGolfTournamentTimeline_LastFirst.docx
pm01ch02CharityGolfTournamentExport_LastFirst.xlsx
pm01ch02SimpleProjectPlan_LastFirst.mpp
pm01ch02EventTemplate_LastFirst.mpt
pm01ch02EventTemplate_LastFirst.mpp
Prepare Case Information Technology
CREATING A DETAILED PROJECT PLAN
Microgen/fotolia
pm01ch02CharityGolfTournamentTasks.xlsx
BK-PED-707292-JACOBSON-160388-Chp02.indd 59 24/11/16 3:16 PM

60 CHAPTER 2 | Microsoft Project 2016
Detailing a Project PlanProject managers may choose to use Microsoft Project 2016 to assist them in planning and achieving project success. Project 2016 can provide project managers with an orderly way of creating a project schedule. To determine a project’s schedule, project managers must adjust a project’s calendar to reflect available working time, determine a project’s schedul-ing method of automatic or manual, identify the project’s tasks, define task relationships, and set task resources. Once this has been accomplished, project managers will have an idea of when the project should start or when the project should finish. However, project managers should not rely on the software to make all the scheduling decisions for a proj-ect. After all, Project 2016 is an application used to assist project managers in meeting the project goal, but it should not be the decision-making authority on the project plan.
Identify the Critical PathProject managers create a project plan by setting task dependencies (relationships). By setting task dependencies, Project 2016 will create the critical path. The critical path consists of tasks that must be completed on time in order for a project to stay on track and come to a successful completion.
Creating task dependencies changes the start and finish dates of tasks. Creating task dependencies also creates the project’s critical path. The critical path consists of tasks (or a single task) that determine the project’s finish date (or start date). It is a list of tasks that must be completed on time for the project to meet the project timeline. Tasks on the critical path are critical tasks. Critical tasks do not have slack. Slack is the time a task can be delayed from its scheduled start date without delaying the project.
The best way to view the critical path is in Network Diagram view. In Network Diagram view, the critical path is represented by red task boxes and red link lines. This view can help project managers analyze the critical path and critical tasks and make informed project deci-sions. The critical path is not visible in Calendar view. By default, it is also not displayed in Gantt Chart view, but you can add it to Gantt Chart view if desired.
Identifying the Critical Path
You want to view your project’s critical path so you are aware of which tasks are critical tasks and therefore must be completed on time. You want to view the project’s critical path in both the Network Diagram and Gantt Chart views.
In this exercise, you will view the critical path.
To View the Critical Patha. Open Microsoft Project 2016. Click Open Other Projects. Navigate to the loca-
tion of your student data files and browse for pm01ch02CharityGolfTournament.mpp, and then click Open.
PM02.00
SIDE NOTE Project CalendarIt is important to review a project’s calendar to understand how Project is scheduling tasks.
b. Click the File tab, and then click Save As. Click This PC, and then if necessary click Browse and navigate to the location where you are storing your files. Click in the File name box and type pm01ch02CharityGolfTournament_LastFirst, using your last and first name. Click Save.
SIDE NOTE Noncritical TasksTasks not displayed in red are noncritical tasks. Project determines the critical path by task relationships and task constraints.
c. Click the Project tab. In the Properties group, click Change Working Time to view the project’s calendar. Note the working days, nonworking days, and calendar exceptions. Click OK.
d. Click Network Diagram view from the View Bar. Scroll through Network Diagram view to view the project’s tasks. The tasks in red are critical tasks. The tasks that do not appear in red are considered noncritical tasks.
BK-PED-707292-JACOBSON-160388-Chp02.indd 60 24/11/16 3:16 PM

CH
AP
TE
R 1
Detailing a Project Plan 61
CH
AP
TE
R 2
If the View Bar is not visible on the left-hand side of the Project window, as shown in Figure 1, right-click the vertical text GANTT CHART on the left-hand side of the Project window, and then click View Bar.
Troubleshooting
Critical task
Figure 1 Critical path in Network Diagram view
If you do not see the same number of tasks on your screen, you can use the Zoom Slider in the lower right corner of the Project window to adjust the zoom in all Project views.
Troubleshooting
e. Return to Gantt Chart view, and then click the Gantt Chart Tools Format tab.
f. In the Bar Styles group, click the Critical Tasks check box to add the critical path to Gantt Chart view. Notice the critical path on the Gantt chart.
Micr
osof
t Pro
ject
201
6, W
indo
ws 1
0, M
icros
oft C
orpo
ratio
n
BK-PED-707292-JACOBSON-160388-Chp02.indd 61 24/11/16 3:16 PM

62 CHAPTER 2 | Microsoft Project 2016
Critical Taskscheck box
Figure 2 Gantt Chart view with critical path
g. Click the Critical Tasks check box again to remove the critical path from the Gantt chart.
h. Save the project.
Entering tasks, defining task relationships, assigning project resources, and adjusting the project calendar all a�ect how Project determines the critical path. However, project managers still have control over the project’s critical path and should be the final decision makers of the project plan. If Project predicts a project’s finish date (or a project’s start date) that is later than what you had in mind, you can shorten the critical path by doing the following:
• Changing task relationships (for example, change Finish-to-Start relationship to a Start-to-Start relationship)
• Adding additional resource assignments to tasks
• Removing task relationships
• Adjusting task durations
• Adjusting the available working time in the project calendar
• Creating a task calendar
REAL WORLD ADVICE Adjusting the Critical Path
Create a Work Breakdown StructureAn important step to project planning success is to organize the project tasks in a logi-cal way. A method of organizing tasks in a hierarchical structure is by creating a Work Breakdown Structure. A Work Breakdown Structure (WBS) creates a project plan
Micr
osof
t Pro
ject
201
6, W
indo
ws 1
0, M
icros
oft C
orpo
ratio
n
BK-PED-707292-JACOBSON-160388-Chp02.indd 62 24/11/16 3:16 PM
CH
AP
TE
R 1
Detailing a Project Plan 63
CH
AP
TE
R 2
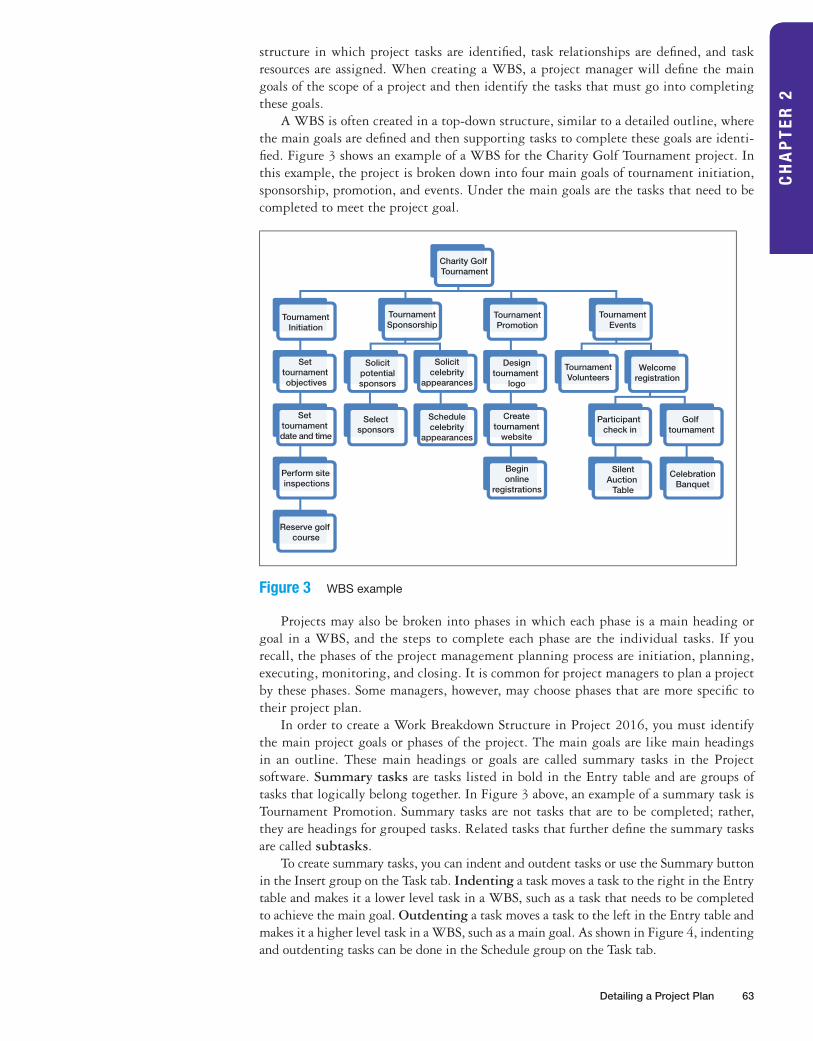
structure in which project tasks are identified, task relationships are defined, and task resources are assigned. When creating a WBS, a project manager will define the main goals of the scope of a project and then identify the tasks that must go into completing these goals.
A WBS is often created in a top-down structure, similar to a detailed outline, where the main goals are defined and then supporting tasks to complete these goals are identi-fied. Figure 3 shows an example of a WBS for the Charity Golf Tournament project. In this example, the project is broken down into four main goals of tournament initiation, sponsorship, promotion, and events. Under the main goals are the tasks that need to be completed to meet the project goal.
Charity Golf Tournament
TournamentInitiation
TournamentSponsorship
TournamentPromotion
TournamentEvents
Set tournament objectives
Solicitpotentialsponsors
Solicitcelebrity
appearances
TournamentVolunteers
Welcomeregistration
Golf tournament
Participant check in
SilentAuction
Table
CelebrationBanquet
Set tournament date and time
Selectsponsors
Schedulecelebrity
appearances
Designtournament
logo
Createtournament
website
Beginonline
registrations
Perform site inspections
Reserve golf course
Figure 3 WBS example
Projects may also be broken into phases in which each phase is a main heading or goal in a WBS, and the steps to complete each phase are the individual tasks. If you recall, the phases of the project management planning process are initiation, planning, executing, monitoring, and closing. It is common for project managers to plan a project by these phases. Some managers, however, may choose phases that are more specific to their project plan.
In order to create a Work Breakdown Structure in Project 2016, you must identify the main project goals or phases of the project. The main goals are like main headings in an outline. These main headings or goals are called summary tasks in the Project software. Summary tasks are tasks listed in bold in the Entry table and are groups of tasks that logically belong together. In Figure 3 above, an example of a summary task is Tournament Promotion. Summary tasks are not tasks that are to be completed; rather, they are headings for grouped tasks. Related tasks that further define the summary tasks are called subtasks.
To create summary tasks, you can indent and outdent tasks or use the Summary button in the Insert group on the Task tab. Indenting a task moves a task to the right in the Entry table and makes it a lower level task in a WBS, such as a task that needs to be completed to achieve the main goal. Outdenting a task moves a task to the left in the Entry table and makes it a higher level task in a WBS, such as a main goal. As shown in Figure 4, indenting and outdenting tasks can be done in the Schedule group on the Task tab.
BK-PED-707292-JACOBSON-160388-Chp02.indd 63 24/11/16 3:16 PM

64 CHAPTER 2 | Microsoft Project 2016
Schedule groupOutdent Tasks
Indent Tasks
Figure 4 Task tab Schedule group
Microsoft Project 2016, Windows 10, Microsoft Corporation
Creating a Work Breakdown Structure
You can add new tasks to create summary tasks as well. Once a new task is added and given a main goal title, the related tasks would be indented to make the newly added task the summary task. Due to the flexibility of Project 2016, you can change the level of any task by outdenting or indenting the task or group of tasks. Project 2016 will adjust the project schedule accordingly.
In this exercise, to create a hierarchical structure to your project plan, you will create a WBS for the charity golf tournament.
To Create a WBSa. Click Gantt Chart on the View Bar if necessary.
b. Select Set tournament objectives (Task 1). Press I to insert a new blank task. Enter the task name Tournament Initiation. Press T but do not set a task duration.
c. Using the row selectors, select Tasks 2–5, and then click the Task tab. In the Schedule group, click Indent Task . Notice the new task, Tournament Initiation (Task 1), becomes bold to identify it as a summary task. The duration of the summary task is determined by the durations of the subtasks (Tasks 2–5).
PM02.01
SIDE NOTE Insert TaskIf you do not have an Insert key, use the Task
button in the Insert group on the Task tab.
SIDE NOTE Summary TasksDo not adjust the duration of a summary task; it is determined by subtasks. To adjust summary task durations, adjust subtask durations or relationships.
Summary taskSubtasks
Figure 5 Summary task and subtasks
Micr
osof
t Pro
ject
201
6, W
indo
ws 1
0, M
icros
oft C
orpo
ratio
n
BK-PED-707292-JACOBSON-160388-Chp02.indd 64 24/11/16 3:16 PM

CH
AP
TE
R 1
Detailing a Project Plan 65
CH
AP
TE
R 2
d. Select Reserve golf course (Task 6). Press A + S + r to indent Task 6. Task 6 is now a subtask of Tournament Initiation.
Figure 6 Task 6 as a subtask.
e. Select Solicit potential tournament sponsors (Task 7).
f. On the Task tab, in the Insert group, click Task to insert a new blank task.
g. Type the task name Tournament Promotion, and then press T but do not add a duration. Notice Tournament Promotion (Task 7) becomes a subtask of Tournament Initiation (Task 1).
h. On the Task tab, in the Schedule group, click Outdent Task to promote Tournament Promotion (Task 7).
i. Select Tasks 8–11, and then in the Schedule group, click Indent Task to make Tasks 8–11 subtasks of Tournament Promotion (Task 7).
j. If necessary, select the task names for Tasks 1–11, click the Gantt Chart Tools Format tab, and then in the Columns group, click Wrap Text twice.
Summary task
Subtasks
Figure 7 Tournament Promotion summary task and subtasks Microsoft Project 2016, Windows 10, Microsoft Corporation
k. Select Task 12 through Task 14. Click the Task tab, if necessary, and then in the Insert group, click Summary to insert a summary task. Type the summary task name Tournament Website, and then press T.
Micr
osof
t Pro
ject
201
6, W
indo
ws 1
0, M
icros
oft C
orpo
ratio
n
BK-PED-707292-JACOBSON-160388-Chp02.indd 65 24/11/16 3:17 PM

66 CHAPTER 2 | Microsoft Project 2016
Figure 8 Project Work Breakdown Structure
l. Save the project.
CONSIDER THIS Why Create a Work Breakdown Structure?
Have you ever written a report or a research paper? Did you create an outline to keep track of large amounts of information or to show a logical ordering of information before you actually started writing your paper? An outline for a written report is similar to a Work Breakdown Structure for a project plan.
Filtering a WBS in Gantt Chart and Network Diagram Views
Once a Work Breakdown Structure is created, you may want to temporarily hide project tasks. For example, if you organized your project by phases, you may only want the phase you are currently working in showing. In this case, you could collapse all other phases of the WBS to only view the tasks in the current phase. You can also perform a filter of the WBS to only show certain tasks.
In this exercise, you will hide tasks in the WBS.
To Hide Tasks in a WBSa. Click Tournament Promotion (Task 7). Click the Collapse arrow in the left-
hand side of the Task Name cell. The subtasks of Tournament Promotion (Task 7) are now hidden.
PM02.02
Micr
osof
t Pro
ject
201
6, W
indo
ws 1
0, M
icros
oft C
orpo
ratio
n
BK-PED-707292-JACOBSON-160388-Chp02.indd 66 24/11/16 3:17 PM

CH
AP
TE
R 1
Detailing a Project Plan 67
CH
AP
TE
R 2
Collapsed summary task
Figure 9 Work Breakdown Structure with summary task collapsed Microsoft Project 2016, Windows 10, Microsoft Corporation
b. Click the Expand arrow on the left-hand side of the Task Name cell for Tournament Promotion (Task 7). The Tournament Promotion subtasks reappear.
Expanded summary task
Figure 10 Work Breakdown Structure with summary task expanded
Microsoft Project 2016, Windows 10, Microsoft Corporation
c. To filter Gantt Chart view, select the View tab. In the Data group, click the Filter arrow, and then click Summary Tasks. Gantt Chart view is now filtered to show only summary tasks.
Gantt Chart filter
Figure 11 Filtered Gantt Chart
Microsoft Project 2016, Windows 10, Microsoft Corporation
d. Click the Task tab. Select the summary tasks by highlighting the row selectors.
e. In the Properties group, click Add to Timeline to add the summary tasks to the Timeline.
BK-PED-707292-JACOBSON-160388-Chp02.indd 67 24/11/16 3:17 PM

68 CHAPTER 2 | Microsoft Project 2016
Timeline
Add to Timeline
Figure 12 Summary tasks added to Timeline Microsoft Project 2016, Windows 10, Microsoft Corporation
f. Click the View tab. In the Data group, click the Filter arrow, and then click [No Filter]. All summary tasks and subtasks are now visible.
g. Save the project.
Displaying WBS Code in the Entry Table
When you create a WBS by including summary tasks, Project can assign a WBS code for each task. If you want to refer to tasks by a WBS code, which will give you more definition than using the task row, you can define the code and then add the code to the Entry table.
In this exercise, you will define and display a Work Breakdown Structure code.
To Define and Display a WBS Codea. Click the Task tab, and then right-click the Task Mode column. Click Hide
Column.
b. Right-click the Task Name column, and then click Insert Column.
c. Type w, and then click WBS.
d. Double-click the WBS right column border to resize the column width as necessary.
e. Click the Project tab. In the Properties group, click WBS, and then click Define Code to display the WBS Code Definition dialog box.
Figure 13 WBS Code Definition dialog box
PM02.03
SIDE NOTE Alternate MethodYou can also point to the right edge of a column title and then click and drag to the left or right to adjust the column width.
BK-PED-707292-JACOBSON-160388-Chp02.indd 68 24/11/16 3:17 PM

CH
AP
TE
R 1
Detailing a Project Plan 69
CH
AP
TE
R 2
f. To define the WBS code, in the first row of the table of the dialog box, click the Sequence list arrow, and then select Uppercase Letters (ordered). Click in the second row, and then click Numbers (ordered). Click in the third row, and then click Lowercase Letters (ordered).
Figure 14 WBS Code Definition dialog box with code defined
g. Click OK.
WBS column
Figure 15 Gantt Chart view with WBS column added
h. Save the project.
Micr
osof
t Pro
ject
201
6, W
indo
ws 1
0, M
icros
oft C
orpo
ratio
nM
icros
oft P
roje
ct 2
016,
Win
dows
10,
Micr
osof
t Cor
pora
tion
BK-PED-707292-JACOBSON-160388-Chp02.indd 69 24/11/16 3:17 PM

70 CHAPTER 2 | Microsoft Project 2016
Create and Assign Project ResourcesOne of the main advantages of using project planning software such as Project 2016 is the ability to assign and track resources. Resources are the people, materials, or costs needed to complete project tasks. When you add resources in Project 2016, you are making them available to assign them to project tasks. Resources can be added in many views in Project 2016. However, the most common way of adding resources is by using Resource Sheet view, as shown in Figure 16.
Figure 16 Resource Sheet view
Microsoft Project 2016, Windows 10, Microsoft Corporation
In Resource Sheet view, you can enter resource information in columns and rows to include information such as resource name, resource type, and resource cost, and you can assign a calendar to a resource.
In the Resource Name column, you identify the name of the resource. For example, a resource could be Your Name. In the Type column, you identify whether a resource is a work, material, or cost resource. A work resource is the person and equipment that needs to be used to complete a project task. For example, a chef hired to prepare the meal for the golf charity tournament is a resource; the equipment rented to prepare the meal is also a work resource. A material resource is a consumable resource such as supplies that gets used up as a project progresses. For example, golf tees would be a material resource. A cost resource includes costs that are not based on work, such as equipment needed to complete a task or airfare or lodging for travel. For example, you may have to rent a tent for the staging area o� the first tee of the golf course. The tent rental would be assigned as a cost resource.
The Initials column allows you to assign initials to a resource for identification instead of a longer resource name. For example, you could assign the initials of YN for Your Name and then display the initials in the Gantt chart to save space versus using the entire resource name. In the Group column, you can assign a group name to like resources. For example, you could assign the group name “Caddy” and then add this group name to all resources that are tournament caddies. You can then use the group name to sort or filter resources by the group name.
The Max column determines the maximum percentage of capacity a resource is avail-able to work. By default, the Max unit is 100%, which means the resource is available to work 100% of the time when assigned to a task. If you are only available to work half of the time on a project because you are assigned to other tasks at the resort, you would assign yourself a Max unit of 50%.
The Std. Rate, Ovt. Rate, and Cost/Use columns are associated with costs assigned to a resource. A cost is an expense associated with completing a task. Variable costs are costs that change based on amount used. For example, labor (work resource) is a variable cost because the amount earned may vary from person to person. Fixed costs can be related to resources but do not vary with use. For example, a fixed cost would be a one-time fee for renting an outdoor tent.
The Accrue column determines how costs will be applied to a task. Start means the cost would be paid at the start of the project. End means the cost would be paid at the end of the project. Prorated is the default, and if assigned, costs would be accrued as the resource was working on the project task(s).
BK-PED-707292-JACOBSON-160388-Chp02.indd 70 24/11/16 3:17 PM

CH
AP
TE
R 1
Detailing a Project Plan 71
CH
AP
TE
R 2
The Base column determines which calendar your resource will be assigned. From this calendar assignment, Project will determine working time and nonworking time of a resource. The Standard calendar is the default base calendar.
QUICK REFERENCE
To create a resource calendar, select the resource and then:
1. Click the Resource tab.
2. Click Information in the Properties group.
3. On the General tab of the Resource Information dialog box, click Change Working Time.
4. Click the Work Weeks tab, and then click Details.
5. In the Details dialog box, select the Working times or Nonworking times button. Edit the From and To times as necessary. Click OK in the three dialog boxes to accept the change to the resource calendar.
The availability of the selected resource will now reflect the resource calendar.
Creating a Resource Calendar
Creating Project Resources
To keep track of who will help you complete the charity golf tournament project tasks, you have decided to add project team members into the Resource Sheet. You will add the project team members in Resource Sheet view and then assign resources to your project tasks. Since all project team members’ tasks are part of their general job duties, you will not assign a resource cost to the tasks.
In this exercise, you will create project resources.
To Create Project Resourcesa. Click the Task tab. In the View group, click the Gantt Chart arrow.
PM02.04
Gantt Chart arrow
Figure 17 Resource Sheet selection
b. Click Resource Sheet to open the Resource Sheet. In the first row of the Resource Sheet table, in the Resource Name column, enter your first and last name. Press T to assign the Type Work to the resource. Press T two more times,
Micr
osof
t Pro
ject
201
6, W
indo
ws 1
0, M
icros
oft C
orpo
ratio
n
BK-PED-707292-JACOBSON-160388-Chp02.indd 71 24/11/16 3:17 PM

72 CHAPTER 2 | Microsoft Project 2016
and then add your initials in the Initials column. Press T, and then enter the title Events in the Group column.
c. Add the resources into the indicated columns as follows:
Resource Name Type Initials GroupPatti Rochelle Work PR Events
Lesa Martin Work LM Events
Thomas Vance Work TV Events
Rosalinda Hill Work RH Events
Barry Cheney Work BC Golf
John Schilling Work JS Golf
Jorge Cruz Work JC Golf
Robin Sanchez Work RS Chef
SIDE NOTE Grouping ResourcesGrouping resources can assist project manag-ers in understanding resource allocations.
Figure 18 Resource Sheet view with resources added
d. Click the View tab. In the Data group, click the Group by arrow, and then select Resource Group.
Group column inResource Sheet
Group by arrow
Figure 19 Resource Sheet with grouped resources
e. Save the project.
Micr
osof
t Pro
ject
201
6, W
indo
ws 1
0, M
icros
oft C
orpo
ratio
nM
icros
oft P
roje
ct 2
016,
Win
dows
10,
Micr
osof
t Cor
pora
tion
BK-PED-707292-JACOBSON-160388-Chp02.indd 72 24/11/16 3:17 PM
CH
AP
TE
R 1
Detailing a Project Plan 73
CH
AP
TE
R 2
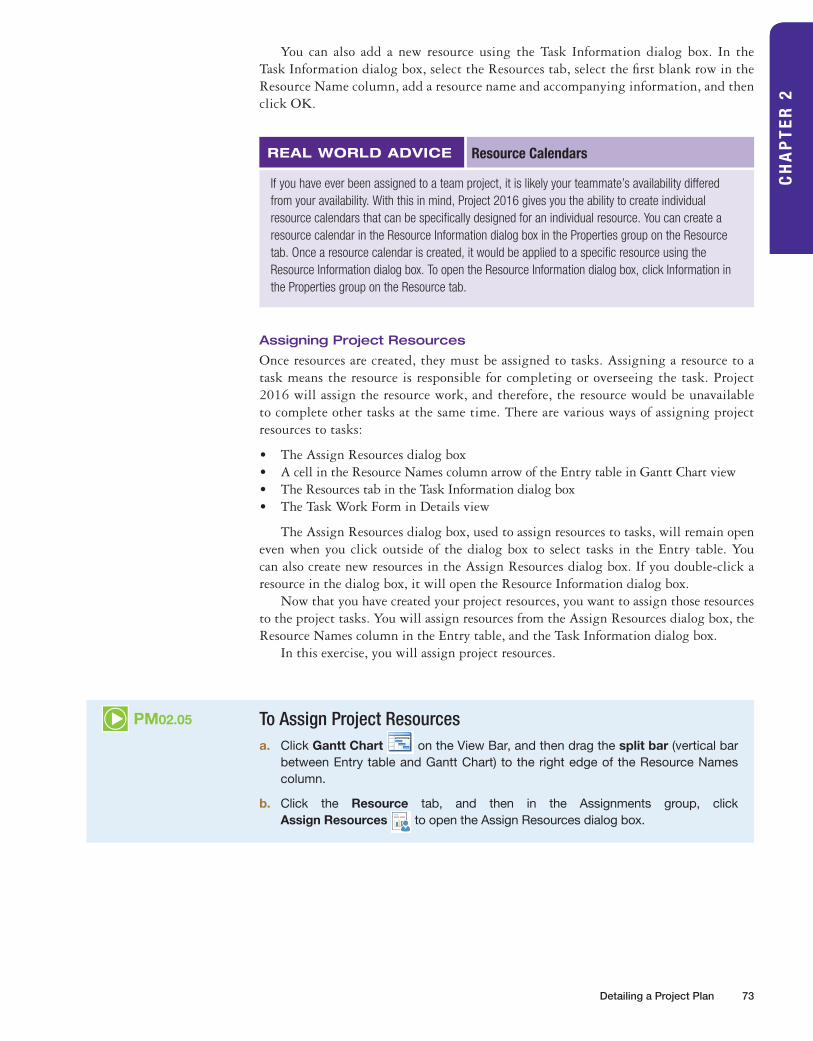
You can also add a new resource using the Task Information dialog box. In the Task Information dialog box, select the Resources tab, select the first blank row in the Resource Name column, add a resource name and accompanying information, and then click OK.
If you have ever been assigned to a team project, it is likely your teammate’s availability di�ered from your availability. With this in mind, Project 2016 gives you the ability to create individual resource calendars that can be specifically designed for an individual resource. You can create a resource calendar in the Resource Information dialog box in the Properties group on the Resource tab. Once a resource calendar is created, it would be applied to a specific resource using the Resource Information dialog box. To open the Resource Information dialog box, click Information in the Properties group on the Resource tab.
REAL WORLD ADVICE Resource Calendars
Assigning Project Resources
Once resources are created, they must be assigned to tasks. Assigning a resource to a task means the resource is responsible for completing or overseeing the task. Project 2016 will assign the resource work, and therefore, the resource would be unavailable to complete other tasks at the same time. There are various ways of assigning project resources to tasks:
• The Assign Resources dialog box• A cell in the Resource Names column arrow of the Entry table in Gantt Chart view• The Resources tab in the Task Information dialog box• The Task Work Form in Details view
The Assign Resources dialog box, used to assign resources to tasks, will remain open even when you click outside of the dialog box to select tasks in the Entry table. You can also create new resources in the Assign Resources dialog box. If you double-click a resource in the dialog box, it will open the Resource Information dialog box.
Now that you have created your project resources, you want to assign those resources to the project tasks. You will assign resources from the Assign Resources dialog box, the Resource Names column in the Entry table, and the Task Information dialog box.
In this exercise, you will assign project resources.
To Assign Project Resourcesa. Click Gantt Chart on the View Bar, and then drag the split bar (vertical bar
between Entry table and Gantt Chart) to the right edge of the Resource Names column.
b. Click the Resource tab, and then in the Assignments group, click Assign Resources to open the Assign Resources dialog box.
PM02.05
BK-PED-707292-JACOBSON-160388-Chp02.indd 73 24/11/16 3:17 PM

74 CHAPTER 2 | Microsoft Project 2016
Assign Resources button Assign Resourcesdialog box
Figure 20 Assign Resources dialog box
c. With the Assign Resources dialog box still open, select Set tournament objectives (Task 2) in the Entry table. Click Patti Rochelle in the Assign Resources dialog box, and then click Assign.
d. Select Set tournament date and time (Task 3). Click Patti Rochelle in the Assign Resources dialog box, if necessary, and then click Assign.
e. Select Prepare preliminary budget (Task 4). Again, click Patti Rochelle in the Assign Resources dialog box, if necessary, and then click Assign.
SIDE NOTE Resource Names in Gantt ChartWhen you assign resources to tasks, notice the resource name will appear next to the Gantt bar in the Gantt chart.
Figure 21 Resources assigned to tasks
Micr
osof
t Pro
ject
201
6, W
indo
ws 1
0, M
icros
oft C
orpo
ratio
nM
icros
oft P
roje
ct 2
016,
Win
dows
10,
Micr
osof
t Cor
pora
tion
BK-PED-707292-JACOBSON-160388-Chp02.indd 74 24/11/16 3:18 PM

CH
AP
TE
R 1
Detailing a Project Plan 75
CH
AP
TE
R 2
f. Use the same procedure you used in step e to make the following assignments.
Task 5 Perform site inspections Your Name
Task 6 Reserve golf course Your Name
g. Click Close in the Assign Resources dialog box.
SIDE NOTE Alternate MethodIf you are assigning the same resource to con-secutive tasks, you can select the consecutive tasks and then use the Assign Resources dialog box to assign the resource to all the selected tasks at one time.
Figure 22 Gantt chart with resource assignments
Microsoft Project 2016, Windows 10, Microsoft Corporation
h. Click Solicit potential tournament sponsors (Task 8) in the Resource Names cell. On the right-hand side of the cell, click the arrow, and then select the check box for Lesa Martin.
Figure 23 Assigning resources using the Resources Names column Microsoft Project 2016, Windows 10, Microsoft Corporation
i. Press J to assign Lesa Martin to the task.
j. Click Select tournament sponsors (Task 9) in the Resource Names cell. Click the arrow, and then select the check box for Patti Rochelle. Press J to assign Patti Rochelle to the task.
k. Save the project.
BK-PED-707292-JACOBSON-160388-Chp02.indd 75 24/11/16 3:18 PM

76 CHAPTER 2 | Microsoft Project 2016
Change Task Durations by Adding ResourcesTask durations may change when resources are added. Therefore, you must understand how work is calculated in Project 2016. How Project 2016 calculates the duration of a task depends on whether the task is e�ort driven or fixed duration. E�ort driven scheduling is a method of scheduling in Project 2016 in which the duration of a task is shortened as resources are added or lengthened as resources are removed from a task; however, the amount of e�ort (work) nec-essary to complete a task remains unchanged. In other words, the more e�ort assigned to a task (units), the shorter the duration will be (even though the total work does not change). When you remove a resource from an e�ort driven task, Project 2016 will lengthen the duration of the task. With e�ort driven scheduling, Project 2016 calculates work using the following formula: W=D*U [Work (W)=Duration (D)*Units (U)].
Imagine a task that takes 8 hours to complete. If you add a resource to the task, Project 2016 will assign that resource 8 hours of work. But what if you assign two resources to complete the same task? The amount of work hours stays the same (8 hours); however, the calendar time needed to complete the task (duration) will shorten the duration by 4 hours because the two resources (units) will be working together to get the task done faster. This scenario is based on the assumption that the task is e�ort driven.
• W=D*U or D=W/U• 8=4*2 or 4=8/2
There is an exception to this rule, however. If you assign multiple resources to a task at the same time, Project 2016 will not change the duration even if a task is set to e�ort driven.
E�ort driven scheduling is typically not a default setting in Project 2016. To turn on e�ort driven scheduling when starting a project, on the File tab, click Options, and then click Schedule. Individual tasks can also be set to e�ort driven scheduling by using the Task Information dialog box for each task. For example, in an e�ort driven project schedule, you may want to change one task to non-e�ort driven because the duration of a task may actually stay the same even if additional resources are added.
If a project is not set to e�ort driven scheduling, Project 2016 will calculate work dif-ferently when resources are added. Imagine a task that takes 8 hours to complete. If you add a resource to the task, Project 2016 will assign the resources 8 hours of work. But what if you assign two resources to complete the same task? The amount of work hours increases to 16 hours (8 hours for resource 1 and 8 hours for resource 2). In projects that are not set for tasks to default to e�ort driven, if you add an additional resource to a task, Project 2016 will o�er you the following options:
• Reduce duration but keep the same amount of work• Increase the amount of work but keep the same duration• Reduce the resources’ work hours per day (units) but keep the same duration and
work (For example, assign each resource 50% of the task work not to be completed consecutively.)
To understand these choices, refer to Table 1, which is based on a task with an 8-hour duration using W=D*U (U1=first resource, U2=second resource).
8-Hour Task Duration W D U1 U2Reduce duration but keep the same amount of work (e£ort driven) 8h 4h 4h 4h
Increase the amount of work but keep the same duration (work consecutively)
16h 8h 8h 8h
Reduce the hours resources work per day (units) but keep the same duration and work (work separately)
8h 8h 4h 4h
Table 1 Calculating task work for effort driven tasks
BK-PED-707292-JACOBSON-160388-Chp02.indd 76 24/11/16 3:18 PM

CH
AP
TE
R 1
Detailing a Project Plan 77
CH
AP
TE
R 2
When a resource is assigned to more work than available working hours, the resource will be overallocated. Project managers know that overallocating resources may lead to project failure because the work will likely not get done in the time it was scheduled. Therefore, Project provides a leveling tool. Leveling is a process of correcting overallo-cated resources to ensure no resource is assigned more hours than available work hours.
If a project’s team members are assigned more work than they have time for, not only may they have poor performance or burnout, but it is also likely they won’t be able to finish all the work assigned. If work doesn’t get done on time, the project may not meet the schedule deadline and may also go over budget. Project managers may choose to manually level resources by changing resource assignments, removing resource assignments, shortening task durations, adjusting the work of a resource on a task, or adding additional resource assignments to tasks. Project managers may also decide to allow Project to level the resources using Project’s leveling tools on the Resource tab.
REAL WORLD ADVICE Leveling of Resources
Another way of leveling a project is by adding additional resources to a project to be sure the project is still completed on time. Adding additional resources to the project is called crashing. A project manager may also decide to crash a project to complete tasks faster than predicted to shorten the project’s duration. Crashing a project may help to level a project or complete a project faster but may also cause the project to go over budget.
CONSIDER THIS What Would You Do?
Have you ever fallen behind on studying for a test? If so, what did you do, pull an all-nighter? What if your project has fallen behind schedule? Or what if you want to finish the project earlier than predicted to get a jump on the competition? Project managers may decide to add additional resources to the project, knowing this will likely increase the project’s budget.
Setting Your Project to E�ort Driven
For the golf charity tournament, you believe your tasks will take less time to complete (duration) if you add additional resources to your tasks. Therefore, you want to set your project to schedule all tasks as e�ort driven unless otherwise specified.
In this exercise, you will set new project tasks to e�ort driven.
To Set New Project Tasks to E�ort Drivena. Click the File tab, and then click Options.
b. In the Project Options dialog box, click Schedule in the left pane.
c. Scroll down until you see the Scheduling options for this project section. If neces-sary, click to select the New tasks are e�ort driven check box to set all new tasks as e£ort driven tasks.
PM02.06
SIDE NOTE E�ort Driven TasksMaking new tasks e�ort driven does not change existing tasks to e�ort driven.
BK-PED-707292-JACOBSON-160388-Chp02.indd 77 24/11/16 3:18 PM

78 CHAPTER 2 | Microsoft Project 2016
E�ort drivencheck box
Figure 24 Project Options scheduling dialog box
d. Click OK.
e. Save the project.
Changing Task Durations with Resource Assignments
Now that new project tasks will be scheduled as e�ort driven, you will continue resource assignments for the remaining project tasks.
In this exercise, you will change task durations by adding resources.
To Change Task Durations by Adding Resourcesa. Click Gantt Chart if necessary, and then click Design tournament logo
(Task 13). Assign Rosalinda Hill to Task 13.
b. Double-click Create tournament website (Task 14) to open the Task Information dialog box. Click the Resources tab. Notice the duration on this task is two weeks (80 hours).
c. Click the first cell under the Resource Name heading, and then click the Resource Name arrow. Click Thomas Vance to add him as a resource to this task, and then click OK. Thomas is now assigned 80 hours of work on Create tournament website (Task 14).
d. In the Resource Names column of Create tournament website (Task 14), click the Resource Names arrow to also select Rosalinda Hill. Click Rosalinda Hill, and then press J.
PM02.07
Micr
osof
t Pro
ject
201
6, W
indo
ws 1
0, M
icros
oft C
orpo
ratio
n
BK-PED-707292-JACOBSON-160388-Chp02.indd 78 24/11/16 3:18 PM

CH
AP
TE
R 1
Detailing a Project Plan 79
CH
AP
TE
R 2
Schedule warning symbol
Figure 25 Resource assignment warning Microsoft Project 2016, Windows 10, Microsoft Corporation
f. Select Reduce duration but keep the same amount of work. Note the change of the duration of Task 14 to one week versus the original two-week duration. The total work is still 80 hours, but the time (duration) needed to complete the work is cut in half because two resources are assigned.
SIDE NOTE OverallocationNote the overallocation symbol (red) in the Indicators column. You will adjust the overallocation of the resource in a later exercise.
Duration change due toresource assignment
Figure 26 Duration changed with resource assignment Microsoft Project 2016, Windows 10, Microsoft Corporation
g. Click Begin online registrations (Task 15), and then assign Patti Rochelle to the task.
h. Double-click Solicit celebrity appearances (Task 10), and then click the Advanced tab. Click to select the E�ort driven check box to set the task to e£ort driven. Click OK.
i. With Task 10 still selected, click the Resource tab, and then in the Assignments group, click Assign Resources .
j. Using the Assign Resources dialog box, click Your Name, and then click Assign. Click Patti Rochelle, and then click Assign. Note the change in the duration of Task 10 from three weeks to one and a half weeks due to the task being e£ort driven.
SIDE NOTE Resource AssignmentsIt is good practice to assign a resource to a milestone task. The assignment ensures someone is responsible for overseeing the task.
e. Project will give an informational warning symbol in the upper left corner of the Resource Names cell. Click on the warning symbol to reveal the three selections for assigning the additional resource.
BK-PED-707292-JACOBSON-160388-Chp02.indd 79 24/11/16 3:18 PM

80 CHAPTER 2 | Microsoft Project 2016
k. Click Close in the Assign Resources dialog box.
l. Click the Warning arrow in the upper left corner of the Task Name cell of Task 10, and then click Reduce duration but keep the same amount of work.
Duration change due toresource assignment
Figure 27 Task duration change
m. Save the project.SIDE NOTE E�ort Driven TaskKeep in mind that if resources are assigned to a task at the same time the duration will not change, even on an e�ort driven task.
If the duration of Task 10 did not change to 1.5 weeks, make sure the task is set to e�ort driven by double-clicking the task, clicking the Advanced tab, and placing a check mark in front of E�ort driven.
TroubleshootingM
icros
oft P
roje
ct 2
016,
Win
dows
10,
Micr
osof
t Cor
pora
tion
BK-PED-707292-JACOBSON-160388-Chp02.indd 80 24/11/16 3:18 PM

CH
AP
TE
R 1
Detailing a Project Plan 81
CH
AP
TE
R 2
Details check box
Task Details Form in Split View
Figure 28 Task Details Form in Split View
Using the Work Task Form in Split View
Understanding how Project 2016 is calculating task durations and task work can be confusing. Project managers often find it useful to use the Task Details Form in split screen view. The Task Details Form in Split View allows you to see exactly how Project is distributing the work on a task as shown in Figure 28.
To Change a Duration Using the Work Form in Split Viewa. Click Solicit celebrity appearances (Task 10) if necessary, and then click the
View tab. In the Split View group, select the Details check box.
b. Right-click the Task Details Form in the lower pane of Gantt Chart view, and then click Work. You see that you are assigned 60 hours of work and Patti Rochelle is also assigned 60 hours of work. You also note the task has a check mark in the E£ort driven check box.
PM02.08
SIDE NOTE Split ViewWhen selecting Details, Project may default to Resources & Predecessors form split view. Right-clicking the form allows you to change to Work form view.
In this exercise, you will change a duration of a task by using the Work form in Split view.
Micr
osof
t Pro
ject
201
6, W
indo
ws 1
0, M
icros
oft C
orpo
ratio
n
BK-PED-707292-JACOBSON-160388-Chp02.indd 81 24/11/16 3:18 PM

82 CHAPTER 2 | Microsoft Project 2016
Work Form in Split View
Next button
Resource Work column
E�ort driven check box
Figure 29 Work Form in Split View
c. In the Work form, click the Next button. Schedule celebrity appearances (Task 11) is now selected. Note the task has a 1-week duration (or 40 hours).
d. In the Resource Name column of the Work form, click in the first blank row in the Resource Name column. Click the arrow, and then click Your Name. Click in the blank row below Your Name, and then click Barry Cheney.
e. Click OK to assign both resources to this task. Notice in the Work form that both resources are assigned 40 hours of work. Although the task duration remains 1 week, the total of work hours has doubled to 80 hours because the task is not e£ort driven.
SIDE NOTE Timeline in Split ViewProject 2016 will not display the Timeline in Split View.
Task not e�ort driven
Figure 30 Work form with task not effort driven
f. With Task 11 still selected, click in the Work cell of Your Name row in the Work form. Type 10h, and then press J to change your work hours to 10 hours.
Micr
osof
t Pro
ject
201
6, W
indo
ws 1
0, M
icros
oft C
orpo
ratio
nM
icros
oft P
roje
ct 2
016,
Win
dows
10,
Micr
osof
t Cor
pora
tion
BK-PED-707292-JACOBSON-160388-Chp02.indd 82 24/11/16 3:18 PM

CH
AP
TE
R 1
Detailing a Project Plan 83
CH
AP
TE
R 2
g. Next, click in the Work cell for Barry Cheney. Type 30h to change Barry’s work hours to 30 hours. Click OK.
Adjusted work hours
Figure 31 Resource work hours manually adjusted Microsoft Project 2016, Windows 10, Microsoft Corporation
h. Note the change in the duration from 1 week to .75 weeks. By manually changing the work hours, you are creating an assignment similar to an e£ort driven task. Click Next five times to select Task 16.
i. Assign Rosalinda Hill to Create volunteer list (Task 16), and then click OK.
j. Click Next to move to Sign volunteer contract agreements (Task 17). Assign Rosalinda Hill to Task 17, and then click OK.
k. On the View tab, in the Split View group, click the Details check box to close the split view.
l. Save the project.
SIDE NOTE Removing Split ViewTo remove the Split View group, you can also double-click the split bar between the Entry table and the Work form.
View Resource Assignments in the Team Planner ViewAfter assigning resources, project managers may want to view how project team members are being assigned at a point in the project. This can be done by using Project’s team plan-ner. Team Planner is a Project view that shows a project’s resources and tasks assigned to each resource. Each resource name appears on a separate row. In Team Planner view, you can drag task assignments from one resource to another resource to make adjustments to the resource assignment(s). Tasks associated with the individual resources appear on the same row as the resource name. Unassigned tasks appear at the bottom of the Team Planner view window. Resources identified in red are overallocated resources.
Viewing Resource Assignments in Team Planner ViewYou now want to view the resource assignments in your project plan. You will view all tasks assigned to you and view tasks assigned to other resources.
In this exercise, you will view resource assignments in the Team Planner view.
To View Resource Assignments in Team Planner Viewa. On the View tab, in the Resource Views group, click Team Planner to open
Team Planner view.
b. Right-click Your Name, and then click Scroll to Task .
PM02.09
SIDE NOTE Resource Assignments in Team Planner ViewYou can adjust resource assignments by clicking on a task in Team Planner view and dragging the task to a new resource.
BK-PED-707292-JACOBSON-160388-Chp02.indd 83 24/11/16 3:18 PM

84 CHAPTER 2 | Microsoft Project 2016
Overallocated tasks
Overallocatedresource in red
Figure 32 Team Planner view Microsoft Project 2016, Windows 10, Microsoft Corporation
c. View the tasks assigned to you in Team Planner view. Use the horizontal scroll bar to view all tasks to which you are assigned. View the tasks assigned to others in Team Planner view.
d. Click Gantt Chart on the View Bar.
e. Save the project.
As you have learned, a project’s schedule is calculated by Project based on things such as a project’s calendar, task durations, task relationships, and resource assignments. However, project managers have the ultimate decision-making authority on the project’s overall schedule. If Project is not creating a project schedule that makes sense to the project’s needs, a project manager should review how the schedule is being created and make adjustments to the project calendar, task durations, task relationships, or resource assignments accordingly.
REAL WORLD ADVICE Project Schedule and Resource Assignments
Enhance a Project Schedule with Elapsed Duration and Recurring TasksIf you assign a task a duration of 48 hours, Project will schedule that task for 6 days of work (48 hours divided by an 8-hour work day). However, assume a task in your project needs 48 hours total without regard to the Project calendar. If this is the case, Project 2016 allows you to assign elapsed duration times. Elapsed durations ignore any project or resources working and nonworking times and schedules the task(s) to 24 hours a day.
Adding Elapsed Durations
You want to allow the online registration to be open for 6 weeks. Therefore, you will add the task and assign the task a 6-week duration to give participants time to register for the event. However, the project calendar allows for only 16 hours of work each week and does not account for the fact that participants can register any time of the day. Therefore, a 6-week duration will assign the task to last over 3 months, but you only want the registration open for 6 weeks. You decide to change the duration to elapsed time to accurately reflect how long you want online registration to remain open.
In this exercise, you will set a task duration to elapsed time.
To Set a Task Duration to Elapsed Timea. Click Create volunteer list (Task 16), and then press I to insert a new task row.
Add the task name Accept online registrations. Press T, and then type 10w to
PM02.10
BK-PED-707292-JACOBSON-160388-Chp02.indd 84 24/11/16 3:18 PM

CH
AP
TE
R 1
Detailing a Project Plan 85
CH
AP
TE
R 2
Task duration
Figure 33 Task duration Microsoft Project 2016, Windows 10, Microsoft Corporation
b. Click in the Duration column of Task 16, and then type 10ew to change the duration of the task to 10 elapsed weeks. Press J. Note the change to task Finish date of this task. Making the duration an elapsed time more accurately reflects the assignment of that task.
Elapsed duration added
Figure 34 Elapsed duration assigned to a task
Microsoft Project 2016, Windows 10, Microsoft Corporation
c. Add Your Name as the resource to Task 16. The icon in the Indicators column shows overallocation. By assigning yourself to this task, you have overallocated yourself.
SIDE NOTE OverallocationThe overallocated indicator will appear on all tasks assigned to an overallocated resource.
Overallocation indicator
Figure 35 Entry table with overallocated resources
enter a task duration of 10 weeks. Press T three times, and then type 15 to assign a predecessor of Task 15. Press T. Note this task takes nearly 6 months to complete.
Micr
osof
t Pro
ject
201
6, W
indo
ws 1
0, M
icros
oft C
orpo
ratio
n
BK-PED-707292-JACOBSON-160388-Chp02.indd 85 24/11/16 3:19 PM

86 CHAPTER 2 | Microsoft Project 2016
d. With Task 16 still selected, open the Work form in Split View by clicking the View tab, and then in the Split View group, click Details. Note you are assigned to 1,680 hours of work on Task 16.
Work hours
Figure 36 Work Form in Split View
e. In the Split form, click in the Work column, and then type 0 since you do not need to spend time actually completing the task. Click OK. Note the overallocation on Task 16 is removed.
SIDE NOTE Elapsed DurationA task assigned an elapsed duration is displayed as a dotted line in the Gantt chart.
Adjusted Work hours
Figure 37 Overallocation removed Microsoft Project 2016, Windows 10, Microsoft Corporation
f. On the View tab, in the Split View group, click Details again to remove the split form.
g. Save the project.
Micr
osof
t Pro
ject
201
6, W
indo
ws 1
0, M
icros
oft C
orpo
ratio
n
BK-PED-707292-JACOBSON-160388-Chp02.indd 86 24/11/16 3:19 PM

CH
AP
TE
R 1
Detailing a Project Plan 87
CH
AP
TE
R 2
Adding a Recurring Task
There are also circumstances where you may do the same task over and over, such as a weekly status meeting. Tasks that have a regular occurrence can be entered into the Project software as recurring tasks. A recurring task is a task that repeats at regular intervals. For example, you may want to monitor online registrations every Wednesday to be sure the tournament is receiving enough registrations. Instead of setting up separate tasks each week, you could create a recurring task.
In this exercise, you will create a recurring task.
To Create a Recurring Taska. Click in the Task Name column of row 19, the first blank row of the Entry
table.
b. Click the Task tab, and then in the Insert group, click the Task button arrow. Click Recurring Task to open the Recurring Task Information dialog box.
Figure 38 Recurring Task Information dialog box
c. Type the Task Name Monitor online registrations. Enter a duration of 1h.
d. If necessary, click Weekly under the Recurrence pattern. Set the task to recur every 1 week on Wednesday. Set the Range of recurrence to start on May 29, 2019 and end on July 24, 2019. Apply the Standard Calendar to the task.
Figure 39 Recurring Task Information dialog box with task information
e. Click OK. A Recurring Task indicator appears in the Indicators column.
PM02.11
SIDE NOTE Recurring TaskRecurring tasks are inserted as a summary task with the recurring tasks as individual task bars.
BK-PED-707292-JACOBSON-160388-Chp02.indd 87 24/11/16 3:19 PM

88 CHAPTER 2 | Microsoft Project 2016
Recurring tasks
Recurringtask added
Figure 40 Entry table with recurring task information
f. Click the Collapse button in the upper left-hand corner of the name box of the recurring task in row 19 to collapse the individual tasks.
Recurring taskcollapsed
Figure 41 Recurring task collapsed
g. Click the View tab, and then in the Zoom group, click Entire Project to view the entire project plan in the Gantt chart.
h. Save the project.
Share Project InformationCommunication is an integral part of a project manager’s duties when managing projects. If a project manager is using Project 2016, project reports can be created. Project 2016 infor-mation can also be copied and pasted into other applications such as an Excel spreadsheet or
Micr
osof
t Pro
ject
201
6, W
indo
ws 1
0, M
icros
oft C
orpo
ratio
nM
icros
oft P
roje
ct 2
016,
Win
dows
10,
Micr
osof
t Cor
pora
tion
BK-PED-707292-JACOBSON-160388-Chp02.indd 88 24/11/16 3:19 PM

CH
AP
TE
R 1
Detailing a Project Plan 89
CH
AP
TE
R 2
a Word table. Information can also be exported to other applications or imported from other applications. Projects can be linked to other projects as well. Regardless of which method a project manager decides to use to share information, frequent project communication is good practice to be sure the entire project and project team stay on task.
The reporting features of Project 2016 have a new graphical appearance and many formatting capabilities. The reports now feature charts and images that better represent your project at a glance. You can add or remove elements in reports to fit your reporting needs. Project 2016 gives project managers dozens of pre-loaded reports that can be used immediately. Not only are these reports available, but they can also be customized to meet the project reporting needs. If a project manager does not find a report that works for a project, custom reports can also be created. Project allows for individual control of reports, from black and white to colors as well as chart e�ects.
Most of the reports available in Project are based on project status. To display the status of a project, a baseline must be set and the project is tracked. A baseline is a record of each task at a point in time from which you will track project progress. Tracking is recording the actual prog-ress of the project’s tasks (for example, identifying a task as completed or partially done). Baselines are set on the Project tab, and task tracking is done in the Schedule group on the Task tab.
If your supervisor asks you how the project is going, you want to be sure to have an answer. Project managers who want the ability to run project reports to update the project status and determine where the project is compared to where the project should be will set a project baseline. As a snapshot of the original plan of the project, a baseline allows you to compare what should be happening with your project versus what is actually happening with your project.
REAL WORLD ADVICE Setting a Project Baseline
Project 2016 includes five Dashboard reports. Dashboard reports display project progress relevant to an objective or process. Table 2 defines the five pre-determined Dashboard reports.
Report Name DescriptionBurndown This reports how much work you have completed and how much
work you have left to complete.
Cost Overview This report displays the current cost status of your project and its top level (Summary) to help you determine if your project is staying on budget.
Project Overview This report displays how much of the project is complete as well as any upcoming milestones and tasks that are past due (late tasks).
Upcoming Tasks This report displays the work that has been done during the current week, the status of any remaining tasks that were due, and which tasks may be starting in the next week.
Work Overview This report displays how much work you have completed and how much you have left (such as burndown) as well as remaining availability of work resources.
Table 2 Dashboard reports
Creating Project Reports
In addition to Dashboard reports , there are also Resources , Costs , In
Progress , and Custom reports. Although you have not set a project baseline and
therefore have not started tracking your project, you still can explore the available reports for your project.
In this exercise, you will view reports in Project 2016.
BK-PED-707292-JACOBSON-160388-Chp02.indd 89 24/11/16 3:19 PM

90 CHAPTER 2 | Microsoft Project 2016
To View Reports in Projecta. Click the Report tab. In the View Reports group, click the Resources arrow,
and then select Resource Overview. Notice the graphical nature of the report and the features available to customize reports on the Report Tools Design tab.
PM02.12
Figure 42 Resource Overview report
b. Click the Report tab. In the View Reports group, click the Resources arrow, and then select Overallocated Resources to view the overallocation for Rosalinda Hill.
Figure 43 Overallocated Resources report
Micr
osof
t Pro
ject
201
6, W
indo
ws 1
0, M
icros
oft C
orpo
ratio
nM
icros
oft P
roje
ct 2
016,
Win
dows
10,
Micr
osof
t Cor
pora
tion
BK-PED-707292-JACOBSON-160388-Chp02.indd 90 24/11/16 3:19 PM

CH
AP
TE
R 1
Detailing a Project Plan 91
CH
AP
TE
R 2
c. In the Overallocated Resources report, click the Team Planner View link to view the overallocation. You will see the overallocation occurs between the Design tourna-ment logo task and the Create tournament website task.
d. Click Gantt Chart on the View Bar, and then select Create tournament web-site (Task 14) if necessary. Since there is a Start-to-Start relationship between Tasks 13 and 14, Rosalinda is being scheduled to work on two tasks as the same time. This is causing the overallocation.
e. Click in the Predecessors column of Task 14. Type 13, and then press J to remove the overallocation of Rosalinda.
If the overallocation is still present, make sure you delete the Start-to-Start relationship and the only predecessor for Task 14 is Task 13.
Troubleshooting
f. Click the Report tab. In the View Reports group, click the Resources arrow, and then select Overallocated Resources. You note there are no longer overallocated resources.
g. Click Gantt Chart on the View Bar.
h. Save the project.
Copy and Paste Project Information to Other ApplicationsA project manager is not limited to sharing project information through Project’s reports. Project 2016 information can be shared by copying and pasting project information into another application such as Excel or Word. Since Excel is similar to Project’s Entry table, pasting information into Excel will create a worksheet with columns and rows of data. When you paste information into Word, however, project information will be pasted into a table format.
Copying and Pasting Project Information to Excel and Word
You want to share your project information with other project team members who do not have knowledge of Project 2016. To make it easier for them to view the project’s informa-tion, you will copy the information and then paste into Excel and Word.
In this exercise, you will copy data into an Excel workbook and into a Word document.
To Copy Data into an Excel Workbook and a Word Documenta. Click the Select All button in the upper left-hand corner of the Entry table.
PM02.13
BK-PED-707292-JACOBSON-160388-Chp02.indd 91 24/11/16 3:19 PM

92 CHAPTER 2 | Microsoft Project 2016
Select All
Figure 44 Entry table Select All button
b. Click the Task tab, and then in the Clipboard group, click Copy .
c. While keeping your Project 2016 file open, locate and open Excel 2016. Select Blank workbook to create a blank Excel workbook.
d. If necessary, click in cell A1, and then press C + to paste the project’s Entry table data into Excel.
e. To adjust the width of Column B, right-click the column header for Column B. Click Column Width, and then type 35. Click OK.
V
SIDE NOTE Microsoft PowerPointYou could also paste a picture of your proj-ect into a PowerPoint presentation.
Figure 45 Project data pasted into an Excel workbook
Micr
osof
t Pro
ject
201
6, W
indo
ws 1
0, M
icros
oft C
orpo
ratio
nM
icros
oft P
roje
ct 2
016,
Win
dows
10,
Micr
osof
t Cor
pora
tion
BK-PED-707292-JACOBSON-160388-Chp02.indd 92 24/11/16 3:19 PM

CH
AP
TE
R 1
Detailing a Project Plan 93
CH
AP
TE
R 2
f. Click the File tab, and then click Save. Click This PC, and then click Browse. Navigate to the location where you are storing your files.
g. In the Save As dialog box, click in the File name box, and then type pm01ch02 CharityGolfTournament_LastFirst, using your last and first name. Click Save to save the project task data in Excel format.
h. Click Close to close Excel 2016.
i. Locate and open Microsoft Word 2016. Select Blank document to create a blank Word document.
j. On the Home tab, in the Clipboard group, click Paste to paste your project’s data into the document. Notice the project data is formatted as a Word table.
k. Click the File tab, and then click Save. Click This PC, and then click Browse. Navigate to the location where you store your files. In the Save As dialog box, click in the File name box, and then type pm01ch02CharityGolfTournament_LastFirst, using your last and first name. Click Save to save the project task data in Word format.
Figure 46 Project data pasted into a Word document as a table
l. Click Close to close Word, and return to your pm01ch02CharityGolf Tournament_LastFirst.mpp project file.
Copying Project Information as a Picture
Copying and pasting data from the Entry table works well since the Entry table is similar to Excel’s column and row format. However, copying and pasting project data does not work well in all views. In this case, you may want to copy and paste a picture of the view into another application such as Microsoft Word or PowerPoint.
In this exercise, you will copy and paste a picture of the Gantt chart and the Timeline view in Project 2016 to Word 2016.
Micr
osof
t Pro
ject
201
6, W
indo
ws 1
0, M
icros
oft C
orpo
ratio
n
BK-PED-707292-JACOBSON-160388-Chp02.indd 93 24/11/16 3:19 PM

94 CHAPTER 2 | Microsoft Project 2016
To Copy and Paste a Picture of the Gantt Chart and Timeline Views into Worda. If necessary, click the Gantt Chart button on the View Bar. On the Task tab,
in the Clipboard group, click the Copy arrow, and then select Copy Picture. The Copy Picture dialog box opens.
b. Verify For screen is selected, and then click OK.
c. Locate and open Microsoft Word 2016. Select Blank document to create a blank Word document.
d. On the Home tab, in the Clipboard group, click Paste to paste your project’s data into the document.
PM02.14
Figure 47 Picture of Gantt chart pasted into a Word document
e. Click the File tab, and then click Save As. Click This PC, and then click Browse. Navigate to the location where you store your files. Click in the File name box, and then type pm01ch02CharityGolfTournamentGanttChart_LastFirst using your last and first name. Click Save to save the Gantt chart picture in Word.
f. Click Close to close the Word document.
g. On the Task tab, in the View group, click the Gantt Chart button arrow, and then click Timeline. This will display the Timeline view.
h. Click the Timeline Tools Format tab. In the Copy group, click Copy Timeline.
Micr
osof
t Pro
ject
201
6, W
indo
ws 1
0, M
icros
oft C
orpo
ratio
n
BK-PED-707292-JACOBSON-160388-Chp02.indd 94 24/11/16 3:19 PM

CH
AP
TE
R 1
Detailing a Project Plan 95
CH
AP
TE
R 2
Timeline Tools Format tab
Copy Timeline button
Figure 48 Timeline Tools Format tab
i. Select Full Size.
j. Once again, open Microsoft Word 2016, and then select Blank document to create a blank Word document.
k. In Microsoft Word, click the Layout tab. In the Page Setup group, click the Orientation button, and then select Landscape.
l. In the Page Setup group, click the Size button, and then select Legal.
m. Press C + to paste a copy of the Timeline into Word.V
Orientation button
Size button
Figure 49 Picture of Timeline pasted into a Word document
Micr
osof
t Pro
ject
201
6, W
indo
ws 1
0, M
icros
oft C
orpo
ratio
nM
icros
oft P
roje
ct 2
016,
Win
dows
10,
Micr
osof
t Cor
pora
tion
BK-PED-707292-JACOBSON-160388-Chp02.indd 95 24/11/16 3:20 PM

96 CHAPTER 2 | Microsoft Project 2016
n. Click the File tab, and then click Save As. Click This PC, and then click Browse. Navigate to the location where you store your files. Click in the File name box, and then type pm01ch02CharityGolfTournamentTimeline_LastFirst using your last and first name.
o. Click Save to save the Timeline data in Word, and then click Close to close Word.
p. Return to the Gantt Chart view.
Share Project Information with Microsoft ExcelThere may be situations in which you need to share project information with other mem-bers of your project team or organization who do not have access to Project 2016. In this case, you can export your project data into Excel. When you begin the exporting process, the Export Wizard will take you through a series of steps to export all fields for project categories into a new format.
Microsoft Excel 2016 is spreadsheet software that can be used for storing and analyzing data. Since projects often contain large amounts of data, project managers often find it useful to export project data into Excel and then use Excel’s data analysis tools, such as PivotTables and advanced database management, to analyze a project’s data. Data analyzed in Excel can be shared with project team members and/or project stakeholders and can be used to make strategic project decisions.
REAL WORLD ADVICE Analyzing Project Data with Excel
Exporting Project Information to Excel
You want to share your project information with your project team, but you have been informed some do not have access to Project 2016 software. Therefore, you decide to export your project data into Excel so that your project team can also see the project’s tasks.
In this exercise, you will export your project information into Excel.
To Export Project Information into Excela. Click Gantt Chart on the View Bar to return to Gantt Chart view.
b. Click the File tab, and then click Save As.
c. Click This PC, and then click Browse. Navigate to the location where you store your files. In the File name section, enter the project name pm01ch02Charity GolfTournamentExport_LastFirst. Click the Save as type arrow, and then click Excel Workbook(*.xlsx).
d. Click Save. The Export Wizard dialog box opens.
PM02.15
SIDE NOTE Save as PDFYou can also save your Project file as a PDF by clicking the File tab, click-ing Save As, and then in the Save as type: box, selecting PDF Files (.pdf).
BK-PED-707292-JACOBSON-160388-Chp02.indd 96 24/11/16 3:20 PM

CH
AP
TE
R 1
Detailing a Project Plan 97
CH
AP
TE
R 2
Figure 50 Export Wizard dialog box
Micr
osof
t Pro
ject
201
6, W
indo
ws 1
0, M
icros
oft C
orpo
ratio
n
e. Click the Next button. Click the Project Excel Template button.
Figure 51 Export Wizard – Data dialog box
Micr
osof
t Pro
ject
201
6, W
indo
ws 1
0, M
icros
oft C
orpo
ratio
n
f. Click Finish. Your project data is exported to Excel.
g. Use File Explorer to navigate to the location where you store your data files. Double-click pm01ch02CharityGolfTournamentExport_LastFirst.xlsx to open the charity golf tournament file in Excel.
BK-PED-707292-JACOBSON-160388-Chp02.indd 97 24/11/16 3:20 PM

98 CHAPTER 2 | Microsoft Project 2016
Figure 52 Excel workbook with exported Project 2016 data
h. Explore the sheet tabs, adjust column widths as desired, and then Close Excel. Return to your pm01ch02CharityGolfTournament_LastFirst.mpp project file.
Importing Project Information from Excel
Although information can be copied into Project from another application such as Excel, importing information into Project is more flexible by allowing for data to be imported that does not exactly match. By importing data from Excel, you can use the Import/Export Wizard to assist in bringing in field data into a new project or a current project.
QUICK REFERENCE
1. Select the File tab, and then click Save As.
2. Click This PC and then click Browse to navigate to where you store your files.
3. Click in the File name box, and then enter a name for the exported data.
4. Click the Save as type arrow, and then click Excel Workbook.
5. Click Save to open the Export Wizard dialog box.
6. Click the Next button.
7. Click the Project Excel Template button.
8. Click Finish.
Exporting Project Data to Excel 2016
Micr
osof
t Pro
ject
201
6, W
indo
ws 1
0, M
icros
oft C
orpo
ratio
n
BK-PED-707292-JACOBSON-160388-Chp02.indd 98 24/11/16 3:20 PM

CH
AP
TE
R 1
Detailing a Project Plan 99
CH
AP
TE
R 2
If an external vendor is using Project 2016 for its schedule needs, the vendor may not want to give you its entire project schedule because it may contain costing and salary information that is private to its organization. If this is the case, you can request an Excel file with tasks and start and finish dates that you can then import directly into your project plan. If the vendor is also using Project 2016, it may actually be exporting the data from Project 2016 to Excel to get you an Excel file, which you can then import back into Project 2016.
In this exercise, you will import project information from Excel.
It is not uncommon for projects to be a collaboration of e�orts between more than one organization or project team. For example, a project may rely on collaboration with an external vendor. Whenever working with someone outside your organization, it may be di¡cult to obtain their project schedule in a format that works with your project, especially if they are not using Project 2016.
REAL WORLD ADVICE Sharing Data with Project Partners
To Import Project Information from Excela. With your Project file open, click the File tab, and then click Open.
b. Click Browse, and then navigate to the location of your student data files. Click the file type list arrow next to the File name box, and then click Excel Workbook. Click pm01ch02CharityGolfTournamentTasks.xlsx, and then click Open to open the Import Wizard dialog box.
Figure 53 Import Wizard dialog box
PM02.16
Micr
osof
t Pro
ject
201
6, W
indo
ws 1
0, M
icros
oft C
orpo
ratio
n
c. Click Next to open the Import Wizard – Map dialog box, and then if necessary, click New map.
BK-PED-707292-JACOBSON-160388-Chp02.indd 99 24/11/16 3:20 PM

100 CHAPTER 2 | Microsoft Project 2016
Figure 54 Import Wizard – Map dialog box
d. Click Next to open the Import Wizard – Import Mode dialog box. Click Append the data to the active project.
Figure 55 Import Wizard – Import Mode dialog box
e. Click Next to open the Import Wizard – Map Options dialog box. Click to select Tasks, and then if necessary, click to select Import includes headers.
Figure 56 Import Wizard – Map Options dialog box
Micr
osof
t Pro
ject
201
6, W
indo
ws 1
0, M
icros
oft C
orpo
ratio
nM
icros
oft P
roje
ct 2
016,
Win
dows
10,
Micr
osof
t Cor
pora
tion
Micr
osof
t Pro
ject
201
6, W
indo
ws 1
0, M
icros
oft C
orpo
ratio
n
BK-PED-707292-JACOBSON-160388-Chp02.indd 100 24/11/16 3:20 PM

CH
AP
TE
R 1
Detailing a Project Plan 101
CH
AP
TE
R 2
f. Click Next to open the Import Wizard – Task Mapping dialog box.
g. In the Import Wizard – Task Mapping dialog box, click the Source worksheet name arrow, and then click TaskData.
Excel sheet mappedto TaskData
Figure 57 Import Wizard – Task Mapping dialog box
h. In the To: Microsoft Project Field, view the Task Name row that has the text (not mapped). Click the (not mapped) field list arrow, and then scroll until you see Name. Click Name. The Duration and Predecessors were automatically mapped.
Mapping task name
Figure 58 Import Wizard – Task Mapping dialog box with tasks mapped
i. Click Finish. Tasks from Excel have been imported into your project starting at row 29.
SIDE NOTE Finding Column NamesWhen searching for column names, you can type the first letter of a column name to filter for only columns starting with that letter.
Micr
osof
t Pro
ject
201
6, W
indo
ws 1
0, M
icros
oft C
orpo
ratio
n
Micr
osof
t Pro
ject
201
6, W
indo
ws 1
0, M
icros
oft C
orpo
ratio
n
BK-PED-707292-JACOBSON-160388-Chp02.indd 101 24/11/16 3:20 PM

102 CHAPTER 2 | Microsoft Project 2016
Imported
Figure 59 Entry table with tasks imported
j. Save the project.
If the appended tasks do not start with a WBS code of G, click the Project tab. In the Properties group, click WBS, and then click Renumber.
Troubleshooting
QUICK REFERENCE
1. With a Project file open, click the File tab, and then click Open.
2. Click Browse, and then navigate to the location where you store your files. Click the file type list arrow in the Open dialog box, and then click Excel Workbook.
3. Click the Excel workbook from which you want to import data, and then click Open.
4. Click Next.
5. In the Import Wizard – Map dialog box, click the New map option button, and then click Next.
6. In the Import Wizard – Import Mode dialog box, click Append the data to the active project, and then click Next.
7. In the Import Wizard – Map Options dialog box, click Tasks, and if necessary, click Import includes headers, and then click Next.
8. In the Import Wizard – Task Mapping dialog box, click the arrow on the Source worksheet name, and then click Sheet1—or other sheet name that contains the data you wish to import.
9. Verify or edit how you want to map the data portion. All tasks should be mapped.
10. Click Finish.
Importing Excel 2016 Data into Project
Micr
osof
t Pro
ject
201
6, W
indo
ws 1
0, M
icros
oft C
orpo
ratio
n
BK-PED-707292-JACOBSON-160388-Chp02.indd 102 24/11/16 3:20 PM

CH
AP
TE
R 1
Detailing a Project Plan 103
CH
AP
TE
R 2
Adjusting Imported Project Tasks
Imported tasks may not have the proper formatting, task relationships, or resource assignments. Therefore, you will modify the imported tasks to meet your project’s needs.
In this exercise, you will adjust the imported tasks from Excel.
To Adjust the Imported Tasks from Excela. Select the task names in rows 29–50. Click the Gantt Chart Tools Format tab,
and then in the Columns group, click Wrap Text twice.
b. Click the Task tab. Select Tasks 31–34, and then in the Schedule group, click Indent Task to make the tasks subtasks of Decorations (Task 30).
c. Select Tasks 36–40, and then in the Schedule group, click Indent Task to make the tasks subtasks of Food and Menus (Task 35).
d. Select Tasks 42–49, and then in the Schedule group, click Indent Task to make the tasks subtasks of Event Day Setup (Task 41).
e. Click Food and Menus (Task 35). Note the WBS code is inaccurate.
f. Click the Project tab, and then click WBS. Click Renumber, be sure Entire project is selected, and then click OK.
g. Click Yes.
PM02.17
SIDE NOTE E�ort Driven TasksRemember, new tasks have been set to e�ort-driven scheduling.
Figure 60 Imported tasks in a Work Breakdown Structure
Micr
osof
t Pro
ject
201
6, W
indo
ws 1
0, M
icros
oft C
orpo
ratio
n
BK-PED-707292-JACOBSON-160388-Chp02.indd 103 24/11/16 3:20 PM

104 CHAPTER 2 | Microsoft Project 2016
h. Assign resources to the imported tasks as shown below.
Row WBS Code Task Name ResourceDecorations
31 H.1 Flowers for 18 holes Your Name
32 H.2 Centerpieces for banquet tables Your Name
33 H.3 Banners for welcome and silent auction tables
Your Name
34 H.4 Order decorations Your Name
Food and Menus
36 I.1 Breakfast, lunch, and snack menus
Robin Sanchez
37 I.2 Water and refreshments for 18 holes
Thomas Vance
38 I.3 Banquet menu Robin Sanchez
39 I.4 Beverage cart Thomas Vance
40 I.5 Order food and beverage Robin Sanchez
Event Day Setup
42 J.1 Set up silent auction tables John Schilling
43 J.2 Place silent auction items and bid sheets on tables
Lesa Martin
44 J.3 Set up auction item tracking at payment table
Patti Rochelle
45 J.4 Set up registration and payment welcome table
John Schilling
46 J.5 Set up banquet tables and chairs John Schilling
47 J.6 Decorate banquet tables Patti Rochelle
48 J.7 Put up decorations Rosalinda Hill
49 J.8 Water and refreshments placed at 18 holes for the golfers
Jorge Cruz
Table 3 Resource Assignments
i. Double-click Order decorations (Task 34). Click the Advanced tab. Set a Constraint date of 8/2/19.
Constraint date
Figure 61 Task Information dialog box
j. Click OK. Double-click Order food and beverage (Task 40). Click the Advanced tab. Set a Constraint date of 8/2/19, and then click OK. Note the calendar indicators in the Indicators column.
Micr
osof
t Pro
ject
201
6, W
indo
ws 1
0, M
icros
oft C
orpo
ratio
n
BK-PED-707292-JACOBSON-160388-Chp02.indd 104 24/11/16 3:20 PM

CH
AP
TE
R 1
Detailing a Project Plan 105
CH
AP
TE
R 2
k. Click in the Resource Names column for Gather items for silent auction (Task 29). Assign Lesa Martin and Your Name. Notice the duration of the task does not change when you assign two resources at the same time even though the task is an e£ort driven task.
l. Select the View tab, and then click the Details check box to add Split form view. Since you are only monitoring the silent auction donations, set the Work hours to 0 for Your Name resource. Click OK. This removes your overallocation.
Adjusted workhours in split view
Figure 62 Work form in Split View
m. Lesa Martin is still overallocated because the work for Tasks 29 and 43 is scheduled on the same day. Scroll down, and then select Place silent auction items and bid sheets on tables (Task 43). Click in the Predecessors column, and then type 42. This will remove Lesa’s overallocation.
n. Select the View tab, and then in the Split View group click Details to remove the split view.
o. Save the project.
QUICK REFERENCE
1. With your project plan open, click the Task tab.
2. In the Insert group, click the Task button arrow.
3. Click Import Outlook Tasks.
4. In the Import Outlook Tasks dialog box, click the expand button for the Folder: Tasks to display tasks in Outlook.
5. Click the check box for each task you want to import (or click Select all to select all tasks).
6. Click OK.
Micr
osof
t Pro
ject
201
6, W
indo
ws 1
0, M
icros
oft C
orpo
ratio
n
BK-PED-707292-JACOBSON-160388-Chp02.indd 105 24/11/16 3:20 PM

106 CHAPTER 2 | Microsoft Project 2016
Adding a Project Summary Task
Once project tasks have been added, a WBS has been created, and project resources are assigned, project managers may want to view overall project information. It is often help-ful for project managers to see the overall start and finish date of a project as well as the entire project duration. This information can be displayed at the top of the Entry table by adding a project summary task bar. A Project Summary Task summarizes the timeline of your project and displays the total duration of your project. The same information can be found in the Project Information dialog box.
In this exercise, you will add a project summary task.
To Add a Project Summary Taska. In Gantt Chart view, click the Gantt Chart Tools Format tab. In the Show/Hide
group, click to select Project Summary Task. View the Project Summary Task bar (Task 0) in the Entry table and the Gantt chart.
PM02.18
SIDE NOTE Project Summary TaskThe total duration of the project summary task is total hours worked repre-sented in days, not total calendar days.
If you do not see the Project Summary Task, you may need to scroll up until you see row 0.
Troubleshooting
b. Click in the Task Name cell of Task 0 to select it, and then press 2 on your keyboard to switch into Edit mode. Delete the summary task name and enter the new name of Charity Golf Tournament, and then press J.
Project summary task
Project SummaryTask check box
Figure 63 Project summary task
c. Click the Project tab. In the Properties group, click Project Information to open the Project Information dialog box.
d. Click the Statistics button. View the project statistics and note they are the same as those displayed on the project summary task.
Micr
osof
t Pro
ject
201
6, W
indo
ws 1
0, M
icros
oft C
orpo
ratio
n
BK-PED-707292-JACOBSON-160388-Chp02.indd 106 24/11/16 3:20 PM

CH
AP
TE
R 1
Detailing a Project Plan 107
CH
AP
TE
R 2
Figure 64 Project Statistics
e. Click Close on the Project Statistics dialog box. Click Save , and then close your Project 2016 file but leave Project open.
Linking Excel Data to Project
Instead of copying, pasting, importing, or exporting data, there may be situations in which you want to link data to Project 2016 so you do not create a copy of the data. Another advantage of linking data is that if the data is updated in the source document (such as Excel), it is automatically updated in the destination file (such as Project) or vice versa. If data is updated in the source document but the destination document is closed, the destination document will be updated the next time it is opened.
A disadvantage of linking files is that the source file and the destination file must accompany each other if they are emailed, moved, or shared. Otherwise, you will “break a link” and get an error in the destination file. Another disadvantage is that you cannot create a map as you can when you import data into Project.
QUICK REFERENCE
1. Select and copy the data in Excel you want to link to Project.
2. In Project, click a cell in the Entry table where you wish to insert the data.
3. Select the Task tab.
4. In the Clipboard group on the Task tab, click the Paste button list arrow, and then click Paste Special.
5. Click Paste Link, and then select Microsoft Excel Worksheet.
6. Click OK.
Data linked to another source is indicated by a link graphic in the lower right-hand corner of a cell.
Linking Excel Data to Project
Micr
osof
t Pro
ject
201
6, W
indo
ws 1
0, M
icros
oft C
orpo
ratio
n
BK-PED-707292-JACOBSON-160388-Chp02.indd 107 24/11/16 3:21 PM

108 CHAPTER 2 | Microsoft Project 2016
Use and Create Project TemplatesA Project template is a Project file that contains sample project information such as tasks, durations, resources, and other project data. Templates can help you get started with your project if you are new to the Project 2016 software or the project management process. Templates can also help create consistency in your organization if projects are based on a standard template.
Creating a Project Plan from an Existing Project Template
When you opened a blank project in Chapter 1, you were opening the Blank Project template. This template has standards (defaults) in place such as project Start date, project manually scheduled, etc.
In this exercise, you will begin a project from a Project 2016 template.
To Begin a Project from a Project Templatea. Click File if necessary, and then click New.
PM02.19
If the Project 2016 software is closed, you will need to reopen Project 2016.
Troubleshooting
b. In the right pane of the New window, click in the Search box, and then enter simple project plan. Press J. The Simple project plan template appears.
Search box
Project template
Figure 65 New project window with Simple project plan template
c. Click Simple project plan to open the Simple project plan template window.
Note how you can preview the template before downloading it.
Micr
osof
t Pro
ject
201
6, W
indo
ws 1
0, M
icros
oft C
orpo
ratio
n
BK-PED-707292-JACOBSON-160388-Chp02.indd 108 24/11/16 3:21 PM

CH
AP
TE
R 1
Detailing a Project Plan 109
CH
AP
TE
R 2If you double-clicked the Simple project plan icon, you will go directly to a new
project and not to the template preview window.
Troubleshooting
Create button
Figure 66 Simple project plan template preview window
d. In the Simple project plan window, click Create.
Figure 67 Simple project plan in Gantt Chart view
Micr
osof
t Pro
ject
201
6, W
indo
ws 1
0, M
icros
oft C
orpo
ratio
nM
icros
oft P
roje
ct 2
016,
Win
dows
10,
Micr
osof
t Cor
pora
tion
BK-PED-707292-JACOBSON-160388-Chp02.indd 109 24/11/16 3:21 PM

110 CHAPTER 2 | Microsoft Project 2016
e. Explore the newly created project plan. Note the Summary task and subtask struc-ture. Also view the notes in the Indicators column. Note some tasks are set to sched-ule manually while others are set to auto scheduled.
f. Click the File tab, and then click Save As. Click This PC, and then click Browse. Navigate to the location where you are saving your files.
g. In the Save As dialog box, click in the File name box, and then type pm01ch02 SimpleProjectPlan_LastFirst using your last and first name. Click Save, and then close the project file.
Creating a Custom Project Template
Although there are many Project templates to choose from, they may not fit your project needs. Therefore, you can create a project plan and then save your plan as a template to use on future projects.
CONSIDER THIS Would You Like to Save Time Planning a Project?
Do you have a routine for doing something such as getting ready for school? Or do you take the same route to work each day because it is the quickest way with the least amount of tra¡c? It is likely you follow the routine or take the same route to save yourself time. Think of a Project template as a fast route to beginning a project.
Since Painted Paradise Resort does a lot of event planning, you have decided to create a project template for planning events.
In this exercise, you will create a project template.
To Create a Project Templatea. Click File if necessary, and then click New.
b. Click Blank Project to open a new blank project.
c. Click the Project tab, and then in the Properties group, click Project Information to verify the project is set to Schedule from Project Start
Date. Click OK.
d. On the Status bar, click New Tasks: Manually Scheduled, and then click Auto Scheduled - Tasks dates are calculated by Microsoft Project.
e. If necessary, set the new project window to display the View Bar and the Timeline.
f. Enter in the following summary tasks and subtasks, but do not supply durations.
PM02.20
BK-PED-707292-JACOBSON-160388-Chp02.indd 110 24/11/16 3:21 PM

CH
AP
TE
R 1
Detailing a Project Plan 111
CH
AP
TE
R 2
Figure 68 Template tasks
g. Click the File tab, and then click Save As. Click This PC, and then click Browse and navigate to where you store your files. In the File name box, enter pm01ch02 EventTemplate_LastFirst.
h. Click the Save as type arrow, and then click Project Template.
Figure 69 Save As dialog box
Micr
osof
t Pro
ject
201
6, W
indo
ws 1
0, M
icros
oft C
orpo
ratio
n
Micr
osof
t Pro
ject
201
6, W
indo
ws 1
0, M
icros
oft C
orpo
ratio
n
BK-PED-707292-JACOBSON-160388-Chp02.indd 111 24/11/16 3:21 PM

112 CHAPTER 2 | Microsoft Project 2016
QUICK REFERENCE
1. Start Project, and then select Blank Project.
2. Determine and select the scheduling standard of Start or Finish date.
3. Select project scheduling of manual or automatic.
4. Enter in the main headings (summary tasks) and other structure in the WBS that may be common among projects.
5. Click the File tab, and then click Save As.
6. Browse to the location where you store your files.
7. Type a name for the template in the File name box.
8. Click the Save as type arrow, and then click the Project Template option.
9. Click Save, and then click Save again.
Create a Project Template
Using a Custom Project Template
Once a custom template is created, you can use it to begin a future project plan. The tem-plate can also be shared with other members of your organization for project plan consis-tency. Templates can be stored in locations specified by the creator or a Templates folder that is usually located in the Users\username\AppData\Roaming\Microsoft\Templates folder on your computer’s hard drive or company network drive. The AppData folder is hidden by default. If you want to save to this location, you will need to display Hidden items in File Explorer.
In this exercise, you will use a custom Project 2016 template.
To Use a Custom Project Templatea. Click the File tab, and then click Open.
PM02.21
If Project 2016 is not open, open Project 2016, and then in the left pane, click the Open Other Projects link.
Troubleshooting
b. Click This PC, and then browse to the location where you store your files. Click the file type arrow, and then click Project Templates.
i. Click Save to open the Save As Template dialog box. Since you have only added the summary task information, you do not need to check any of the boxes on the Save As Template dialog box.
j. Click Save. The template is now saved and the template .mpt file extension should appear in the title bar.
k. Click the File tab, and then click Close to close the template.
BK-PED-707292-JACOBSON-160388-Chp02.indd 112 24/11/16 3:21 PM

CH
AP
TE
R 1
Detailing a Project Plan 113
CH
AP
TE
R 2
File type
Figure 70 Open dialog box for Project Template search
c. Click pm01ch02EventTemplate_LastFirst.mpt from the available templates list, and then click Open.
d. Click File, and then click Save As. Click This PC, and then navigate to the location where you store your files. Verify the Save as type is Project, and then click Save. A new project file named pm01ch02EventTemplate_LastFirst.mpp is created.
If the Save as type is Project Template, click the Save as type arrow, and then select Project.
Troubleshooting
e. Close the template, and then click Close to close Project.
f. Submit your files as directed by your instructor.
Micr
osof
t Pro
ject
201
6, W
indo
ws 1
0, M
icros
oft C
orpo
ratio
n
BK-PED-707292-JACOBSON-160388-Chp02.indd 113 24/11/16 3:21 PM

114 CHAPTER 2 | Microsoft Project 2016
1. What is the best Project view for identifying the critical path?
2. What is a Work Breakdown Structure?
3. Define a work resource, material resource, and cost resource.
4. What is the purpose of the Team Planner view?
5. Explain how resource assignments can change task durations.
6. How is elapsed time di�erent than duration?
7. What is the purpose of the Overallocated Resources report?
8. When copying Project 2016 data to paste in other applications, what is the di�erence between selecting Copy from the Clipboard group of the Task tab and Copy Picture from the Clipboard group of the Task tab?
9. Identify at least two ways of sharing information between Project 2016 and Excel 2016.
10. Why would a project manager use a Project 2016 template to begin a project?
Cost resource 70Crashing 77E�ort driven scheduling 76Elapsed duration 84Indenting 63Leveling 77Material resource 70
Outdenting 63Overallocated 77Project Summary Task 106Project template 108Recurring task 87Resource Sheet view 70Slack 60
Subtask 63Summary task 63Team Planner 83Tracking 89Work Breakdown Structure
(WBS) 62Work resource 70
Concept Check
Key Terms
Visual Summary
Figure 71
Identifying the Critical Path
Using the Work taskform in Split view
Changing taskdurations withresourceassignments
Creating a Work Breakdown Structure
Creatingprojectresources
Setting aproject toe�ort-driven
Displaying WBS codein the Entry Table
Adding a Project Summary Task
Filtering a WBS in Gantt Chart and Network Diagram ViewsViewing resource assignments in Team Planner view
Assigning project resources
Micr
osof
t Pro
ject
201
6, W
indo
ws 1
0, M
icros
oft C
orpo
ratio
n
BK-PED-707292-JACOBSON-160388-Chp02.indd 114 24/11/16 3:21 PM
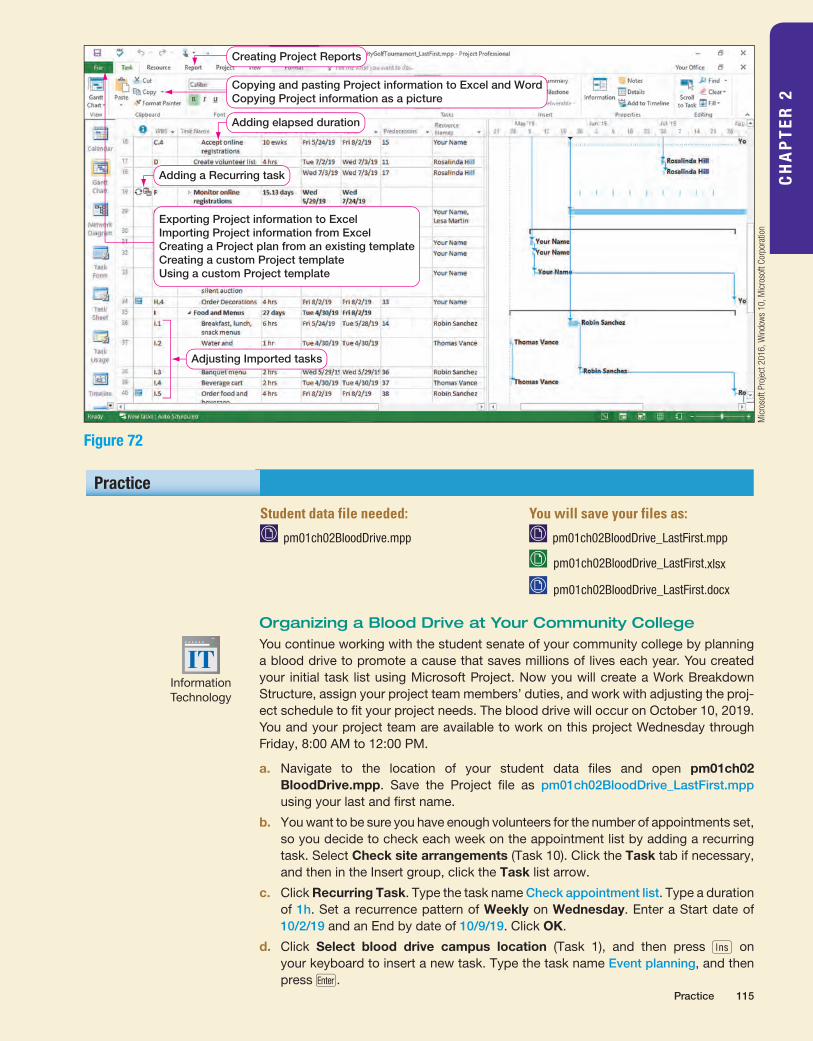
Practice 115
CH
AP
TE
R 2
Student data file needed:
pm01ch02BloodDrive.mpp
Organizing a Blood Drive at Your Community CollegeYou continue working with the student senate of your community college by planning a blood drive to promote a cause that saves millions of lives each year. You created your initial task list using Microsoft Project. Now you will create a Work Breakdown Structure, assign your project team members’ duties, and work with adjusting the proj-ect schedule to fit your project needs. The blood drive will occur on October 10, 2019. You and your project team are available to work on this project Wednesday through Friday, 8:00 AM to 12:00 PM.
a. Navigate to the location of your student data files and open pm01ch02 BloodDrive.mpp. Save the Project file as pm01ch02BloodDrive_LastFirst.mpp using your last and first name.
b. You want to be sure you have enough volunteers for the number of appointments set, so you decide to check each week on the appointment list by adding a recurring task. Select Check site arrangements (Task 10). Click the Task tab if necessary, and then in the Insert group, click the Task list arrow.
c. Click Recurring Task. Type the task name Check appointment list. Type a duration of 1h. Set a recurrence pattern of Weekly on Wednesday. Enter a Start date of 10/2/19 and an End by date of 10/9/19. Click OK.
d. Click Select blood drive campus location (Task 1), and then press I on your keyboard to insert a new task. Type the task name Event planning, and then press J.
Practice
You will save your files as:
pm01ch02BloodDrive_LastFirst.mpp
pm01ch02BloodDrive_LastFirst.xlsx
pm01ch02BloodDrive_LastFirst.docx
Information Technology
Adding elapsed duration
Adjusting Imported tasks
Adding a Recurring task
Creating Project Reports
Exporting Project information to ExcelImporting Project information from ExcelCreating a Project plan from an existing templateCreating a custom Project templateUsing a custom Project template
Copying and pasting Project information to Excel and WordCopying Project information as a picture
Figure 72
Micr
osof
t Pro
ject
201
6, W
indo
ws 1
0, M
icros
oft C
orpo
ratio
n
BK-PED-707292-JACOBSON-160388-Chp02.indd 115 24/11/16 3:21 PM

116 CHAPTER 2 | Microsoft Project 2016
e. Select Tasks 2–5, and then on the Task tab, in the Schedule group, click Indent Task. Tasks 2–5 become subtasks of Event planning (Task 1).
f. Click Plan promotional strategies (Task 6). On the Task tab, in the Insert group, click the Task button to insert a new task. Type the task name Event preparation, and then press J.
g. Click Event preparation (Task 6), and then on the Task tab, in the Schedule group, click Outdent Task.
h. Select Tasks 7–18, and then on the Task tab, in the Schedule group, click Indent Task. Tasks 7–18 become subtasks of Event preparation (Task 6).
i. Click Post directional arrows and posters around campus (Task 19). On the Task tab, in the Insert group, click Task to insert a new task. Type the task name Event day, and then press J.
j. Select Event Day (Task 19), and selected, on the Task tab, in the Schedule group, click Outdent Task.
k. Select Tasks 20–21. On the Task tab, in the Schedule group, click Indent Task.
l. Click the row selector for Task 1. Press and hold the C key, and then click the row selectors for Task 6 and Task 19. On the Task tab, in the Properties group, click Add to Timeline to add the summary tasks to the timeline.
m. On the Task tab, in the View group, click the Gantt Chart list arrow, and then click Resource Sheet to switch to Resource Sheet view. Add the following resources.
Resource Name Type Initials
Your Name Work YN
Emma Jones Work EJ
Joseph Ramirez Work JR
n. Click Gantt Chart on the View Bar to return to Gantt Chart view. Click the Resource tab, and then in the Assignments group, click Assign Resources. Using the Assign Resources dialog box, assign the resources to the tasks as follows.
Task Name Resource Names
Event planning
Select blood drive campus location Your Name
Set blood drive goal Your Name
Form a recruitment team Your Name
Divide team roles and duties Joseph Ramirez, Your Name
Event preparation
Plan promotional strategies Joseph Ramirez
Create promotional materials Joseph Ramirez
Contact local businesses Joseph Ramirez
Publicize the blood drive Joseph Ramirez, Your Name
Schedule appointments Emma Jones
Check appointment list Your Name
Check site arrangements Joseph Ramirez
Get visitor parking passes Your Name
Email visitor parking passes Your Name
Email appointment reminder messages Your Name
Event day
Post directional arrows and posters around campus
Your Name
BK-PED-707292-JACOBSON-160388-Chp02.indd 116 24/11/16 3:21 PM

Problem Solve 1 117
CH
AP
TE
R 2
o. Next, you need to remove your overallocation. Click Email appointment reminder messages (Task 18).
p. Click the View tab. In the Split View group, click Details. Right-click the split form, and then select Work. In the Work column, change your work hours to 0h. On the View tab, in the Split View group, click Details again to remove the split view.
q. Click the Gantt Chart Tools Format tab, and then click Project Summary Task to add a project summary task (Task 0). Change the name of the project summary task (Task 0) to Blood Drive.
r. Right-click the Task Name column, and then click Insert Column. Scroll through the list, and then click WBS. Adjust the WBS column width as necessary.
s. Click the Project tab, and then click WBS-Define Code. Define the code with Level 1) Numbers; Level 2) Uppercase Letters; Level 3) Lowercase Letters.
t. Right-click the Task Mode column, and then click Hide Column.
u. Select the Task Name column. Click the Gantt Chart Tools Format tab, and then in the Columns group, click Wrap Text twice.
v. Click the Select All button in the upper left of the Entry table. On the Task tab, in the Clipboard group, click Copy. Open a blank Excel workbook, and then on the Home tab, in the Clipboard group, click Paste.
w. If necessary, select the columns in the Excel workbook containing pasted data. On the Home tab, in the Cells group, click Format, and then click AutoFit Column Width. Increase the width of Column B as desired.
x. Save the workbook in the location where you store your files as pm01ch02 BloodDrive_LastFirst. Close Excel.
y. In Gantt Chart view, click the Task tab. In the Clipboard group, click the Copy arrow, and then select Copy Picture. Ensure For screen and Selected rows are selected. Click OK. Open a blank Word Document, and then press C + to paste a picture of the Gantt Chart view into Word. Save the document in the loca-tion where you store your files as pm01ch02BloodDrive_LastFirst. Close Word.
z. Save your project, exit Project 2016, and then submit your files as directed by your instructor.
Student data files needed:
pm01ch02JobSearchPortfolio.mpp
pm01ch02JobSearchPortfolio.xlsx
You will save your files as:
pm01ch02JobSearchPortfolio_LastFirst.mpp
pm01ch02JobSearchPortfolio_LastFirst.xlsx
Planning Your Job Search PortfolioYou have started planning your professional portfolio to use during the interview pro-cess since you will be graduating in May 2019 from your program of study at your local college. You have an initial list of tasks already added into a Project file. Now you will add summary tasks, import tasks from Excel, and assign resources to your project to complete your project plan.
a. Navigate to the location of your student data files and open pm01ch02JobSearch Portfolio.mpp. Save the Project file as pm01ch02JobSearchPortfolio_LastFirst.mpp.
b. Select Purchase portfolio supplies (Task 1), and then insert a new task. Name the new task Portfolio planning. Indent Tasks 2–11 to make them subtasks of Task 1.
c. Select (Task 12). Insert a new task, and then name the task Interview planning. Outdent Task 12.
d. Indent Tasks 13–16 to make them subtasks of Interview planning (Task 12).
Problem Solve 1
Sales & Marketing
Grader Project
V
BK-PED-707292-JACOBSON-160388-Chp02.indd 117 24/11/16 3:21 PM

118 CHAPTER 2 | Microsoft Project 2016
If Send resumes to potential employers (Task 9) did not become a subtask of Task 5, then select the task and indent it.
Troubleshooting
g. Your project resources are saved in an Excel workbook. Import the resources from the pm01ch02JobSearchPortfolio.xlsx data file. (Hint: Select File, Open, and look for the Excel data file. Select New map; Append the data to the active project; select Resources as the type of data to import; for the Map Resources Data, select Sheet1; for the Resource Name field, select Name.)
h. Switch to Resource Sheet view to view the added resources. Change the “Your Name” resource to your first and last name.
i. Return to Gantt Chart view, and then in a method of your choice, assign the resources as shown.
Task Name Resource NamesPortfolio Planning
Purchase portfolio supplies Your Name
Get an uno®cial transcript Your Name
Identify references Your Name
Resume
Write resume Your Name
Edit resume James Yang, Your Name
Create a resume in PDF format Your Name
Send resumes to potential employers Your Name
Conduct online job search Your Name
Write a cover letter Your Name
Gather work examples for portfolio Your Name
Compile portfolio Your Name
Interview Planning
Obtain interview attire Your Name
Obtain brief case for interviewing Your Name
Conduct a mock interview Career Resource Center
j. The resource assignments have resulted in overallocation. To remove the overal-location, view the Team Planner. If necessary, right-click Your Name, and then select Scroll to Task. From the Team Planner view, you can see the overallocation is occurring on April 4.
k. Return to Gantt Chart view. Double-click Obtain interview attire (Task 15), and then set a Start No Earlier Than Constraint date of 2/13/19.
l. Click Obtain brief case for interviewing (Task 16). If necessary, click the Task tab. In the Properties group, click Details.
m. Right-click the Split View, and then click Work. Change your work hours of Obtain brief case for interviewing to 0 hours. The overallocation has now been corrected.
n. Insert a WBS column to the left of the Task Name column. Adjust the WBS column width as necessary.
e. Select Write resume (Task 5), and then insert a new task. Name the task Resume. Outdent Task 5.
f. Move Send resumes to potential employers (Task 14) to the Task 9 position. Note how the task becomes a subtask of Task 5.
BK-PED-707292-JACOBSON-160388-Chp02.indd 118 24/11/16 3:21 PM

Perform 1: Perform in Your Career 119
CH
AP
TE
R 2
Perform 1: Perform in Your Career
Student data file needed:
pm01ch02BusinessPlan.mpp
You will save your files as:
pm01ch02BusinessPlan_LastFirst.mpp
pm01ch02BusinessPlan_LastFirst.docx or
pm01ch02BusinessPlan_LastFirst.xlsx
Preparing a Business PlanYou have a start to your new virtual assistant business plan in Project 2016. You have decided to add more detail to your plan by creating a Work Breakdown Structure and adding project resources. You also want to share your data with family members who do not have Project 2016 software, so you will export the project into Word or Excel.
a. Navigate to the location of your student data files and open pm01ch02 BusinessPlan.mpp. Save the Project file as pm01ch02BusinessPlan_LastFirst.mpp.
b. Create a minimum of two work resources. Assign resources to each of your subtasks.
c. If necessary, correct any overallocation of your resources by changing resource assignments, modifying task relationships, setting task constraints, or modifying work hours.
d. Create a Work Breakdown Structure with a minimum of three logical summary tasks.
e. Add a WBS column, and then define a WBS code.
f. If necessary, hide the Task Mode column.
g. Add the project’s summary tasks to the Timeline.
h. Share your data in a Word document or Excel workbook. As directed by your instructor, explain why you chose Word or Excel and what steps you took to share the project’s data.
i. Save your project, and then submit your files as directed by your instructor.
o. Define the WBS code with Level 1) Numbers (ordered); Level 2) Uppercase Letters (ordered); Level 3) Lowercase Letters (ordered).
p. View the critical path in the Network Diagram view, and then return to Gantt Chart view.
q. Export the project data to an Excel workbook, using the Project Excel Template, with the file name pm01ch02JobSearchPortfolio_LastFirst.
r. If necessary, return to your pm01ch02JobSearchPortfolio_LastFirst.mpp project file. Filter the project to display Summary Tasks. Select the summary tasks, and then add them to the Timeline.
s. Save your project with the Entry table filtered, exit Project 2016, and then submit the project files as directed by your instructor.
BK-PED-707292-JACOBSON-160388-Chp02.indd 119 24/11/16 3:21 PM