MS-28 Handbook - Maintenance of Electrical Switchgear TL-4, May ...

ELECTRICAL SYSTEMS TL 3.26
Issue 2 5 October 2017
TL 3.26 Electrical sytems Page 1 of 42
INTRODUCTION This Technical Leaflet is intended to provide guidance to builders and owners of LAA aircraft on the installation and modification of their aircraft’s electrical system. It is not intended to be comprehensive or exhaustive, but be a guide to some of the issues that need consideration. Any comments or contributions to help improve the document are welcome. Detailed discussions of the topics covered can be found in the documents referenced in Section 7: Bob Nuckolls’s book ‘AeroElectric Connection’ is particularly recommended as not only is it a great source of information but can be downloaded for free from the internet. The purpose of an aircraft’s electrical system is to supply the electrical equipment fitted to the aircraft with an electrical supply of correct voltage and sufficient current. The system can also transmit data from one piece of equipment to another, usually using low voltage signals separate from the power distribution. For aircraft flying in day VMC, the primary design driver for the system is aircraft safety: generally, it doesn’t or shouldn’t matter if there is a total electrical power failure as it should be possible to land the aircraft without those systems. The electrical system should therefore be designed with maximum safety in mind, and in this context generally means that appropriate circuit protection is included such that if a particular part of the circuit tries to draw more current than the cables can safely carry, the circuit breakers or fuses act to prevent a fire. Where aircraft are more dependent on their electrical systems, such as those with electrically dependent engines (Rotax 912iS, UL Power, etc), those with electronic primary instruments, or those operating at night or in IMC, then clearly much more thought needs to go into the design of the electrical system to provide redundancy and alternative modes of operation. This Technical Leaflet assumes that the reader has a basic understanding of electricity, and references are given to enable further reading on the subject. The document is divided into five main sections: system design, detail design, maintenance and inspection, tools and techniques, and further reading and references. Our thanks go to Mark Castle-Smith and Graham Elvis for their assistance in creating this document.

ELECTRICAL SYSTEMS TL 3.26
Issue 2 5 October 2017
TL 3.26 Electrical sytems Page 2 of 42
CONTENTS 1 BACKGROUND .......................................................................................................... 4 2 DESIGN BASIS ......................................................................................................... 5 3 SYSTEM DESIGN AND ARCHITECTURE ......................................................................... 5
3.1 Purpose ............................................................................................................. 5 3.2 Design .............................................................................................................. 5 3.3 Aircraft approved for flight at night and/or under IFR .............................................. 6 3.4 Designing for maximum redundancy ..................................................................... 6 3.5 Software-controlled systems ................................................................................ 7 3.6 Load analysis ..................................................................................................... 8 3.7 Circuit protection ................................................................................................ 9
3.7.1 Over Voltage Protection (OVP) ....................................................................... 9 3.7.2 Circuit breakers & fuses ................................................................................ 9
3.8 Electrical system monitoring .............................................................................. 10 3.9 Documentation ................................................................................................. 11 3.10 Example circuits ............................................................................................... 11
3.10.1 Engines with an integrated alternator ........................................................... 11 3.10.2 Minimal power system with integrated alternator............................................ 12 3.10.3 Complex power system with integrated alternator .......................................... 13 3.10.4 Basic power system with a wound field alternator ........................................... 14 3.10.5 More complex power system with wound field alternator ................................. 15 3.10.6 Minimal distribution system ......................................................................... 16 3.10.7 More complex distribution system ................................................................ 17
4 DETAIL DESIGN ...................................................................................................... 18 4.1 Alternators ...................................................................................................... 18 4.2 Batteries ......................................................................................................... 18
4.2.1 Types of batteries ....................................................................................... 18 4.2.2 Installation ................................................................................................ 19
4.3 Earthing .......................................................................................................... 19 4.4 Wires and cables .............................................................................................. 20
4.4.1 Insulation type ........................................................................................... 20 4.4.2 Wire sizing ................................................................................................ 20 4.4.3 Coaxial (“Coax”) cable ................................................................................ 20 4.4.4 Wire marking ............................................................................................. 21 4.4.5 Wire & cable protection ............................................................................... 21 4.4.6 Firewall penetration .................................................................................... 23 4.4.7 Harnesses ................................................................................................. 23 4.4.8 Routing ..................................................................................................... 24 4.4.9 Avionics and shielded cable ......................................................................... 24

ELECTRICAL SYSTEMS TL 3.26
Issue 2 5 October 2017
TL 3.26 Electrical sytems Page 3 of 42
4.4.10 Minimum bend radius ................................................................................. 25 4.4.11 Potential single point failures ....................................................................... 25 4.4.12 Minimise multiple connections on one threaded terminal ................................. 25 4.4.13 Engine earth cable ...................................................................................... 25 4.4.14 Electric trim, flaps and undercarriage ............................................................ 25 4.4.15 Voltage drop .............................................................................................. 25
4.5 Connectors ...................................................................................................... 25 4.6 Switches ......................................................................................................... 27
4.6.1 Switch quality ............................................................................................ 27 4.6.2 De-rating .................................................................................................. 27 4.6.3 Contact material ........................................................................................ 27 4.6.4 Sense of operation ..................................................................................... 27 4.6.5 Labelling ................................................................................................... 27 4.6.6 Multi-pole switches ..................................................................................... 27 4.6.7 Micro switch adjustment .............................................................................. 28
4.7 Relays ............................................................................................................. 28 4.8 Buses .............................................................................................................. 29 4.9 Circuit protection .............................................................................................. 30 4.10 Warning lights .................................................................................................. 31 4.11 Instrument panels ............................................................................................ 31 4.12 Sensors ........................................................................................................... 31 4.13 Power outlets ................................................................................................... 31
5 MAINTENANCE AND INSPECTION .............................................................................. 32 5.1 Maintenance .................................................................................................... 32
5.1.1 Daily ......................................................................................................... 32 5.1.2 Annually .................................................................................................... 32
5.2 Inspection checklist .......................................................................................... 32 6 TOOLS AND TECHNIQUES ........................................................................................ 34
6.1 Mulitmeters ..................................................................................................... 34 6.2 System testing ................................................................................................. 34 6.3 Supplied wiring harnesses for avionics ................................................................ 35 6.4 Wire stripping .................................................................................................. 35 6.5 Soldering ......................................................................................................... 36 6.6 Crimping ......................................................................................................... 38
7 FURTHER READING AND REFERENCE ......................................................................... 40 7.1 Publications ..................................................................................................... 40 7.2 Wiring diagram symbols .................................................................................... 41 7.3 Sources of components and tools ....................................................................... 41

ELECTRICAL SYSTEMS TL 3.26
Issue 2 5 October 2017
TL 3.26 Electrical sytems Page 4 of 42
1 BACKGROUND Aircraft form a particularly difficult environment for electrical systems. The levels of vibration are much more severe than that found in motor cars and the consequences of failure in critical components can be severe. Early microlights were very simple aircraft with two-stroke engines and limited electrical systems. The obvious source for wiring components and crimp tools was the local car accessories shop. Early amateur-built aircraft such as Turbulents and Volksplanes were similarly basic. Both microlights and light aircraft have since moved on a long way: four stroke engines with electric starters (and associated big batteries), electric trim and flaps, variable pitch propellers and retractable undercarriage are quite common. The approach applied to electrics has not always kept pace with the complexity of the systems. Electrical problems are real: in the October 2013 edition of Light Aviation, the Safety Spot article discussed an ignition switch failure that resulted in an unexpected engine firing causing an injury: the switch was a low-end automotive type which failed. Electrical systems need just as careful consideration as structures and control systems.
Figure 1 Photo of poor quality switch from October 2013 Light Aviation

ELECTRICAL SYSTEMS TL 3.26
Issue 2 5 October 2017
TL 3.26 Electrical sytems Page 5 of 42
2 DESIGN BASIS LAA aircraft are usually assessed against standard certification requirements. These should be used as guidance and as an appropriate benchmark in determining whether the design is likely to be acceptable. These design codes are referenced from the LAA’s website:
- BCAR Section S, for microlights - BCAR Section T, for gyroplanes - CS-VLA or CS-LSA, for light aircraft (CS-23 for heavier aircraft also has useful material).
Section 7 gives a more detailed guide as to which paragraphs may be useful. Older aircraft often pre-date the above codes, but they should be used as a starting point even if some concessions to the age of the aircraft can be agreed with LAA Engineering. 3 SYSTEM DESIGN AND ARCHITECTURE 3.1 Purpose Before examining specifics, let’s think about what the electrical system is trying to do. In its simplest form, the purpose of an electrical system is to take electrical energy from a battery or alternator to equipment that requires the energy to operate, in a safe and reliable manner. Crafting a suitable system for a homebuilt aeroplane is not difficult and is certainly within the capability of anyone who has built an airframe, although it does require a slightly different approach. 3.2 Design Before starting to layout an electrical system it is necessary to think about what the aircraft will be required to do. For example, is this a basic VFR aircraft with basic engine instrumentation, a radio and power for a hand held GPS, or something more complex? Be honest with yourself to create a system appropriate for your needs. Don’t worry if there are some aspects that remain undecided, it is always wise to add 20% extra capacity for future expansion. The design process follows the general outline as follows:

ELECTRICAL SYSTEMS TL 3.26
Issue 2 5 October 2017
TL 3.26 Electrical sytems Page 6 of 42
Figure 2 Design process outline
3.3 Aircraft approved for flight at night and/or under IFR Some LAA aircraft are approved to fly at night or under IFR. These aircraft generally have more electrical equipment which is essential to the continued safe operation of flight in these conditions. When aircraft are being assessed for these roles, the design and installation of the electrical system will be reviewed. Refer to Technical Leaflets 2.27 and 2.28 for further details of the process and requirements. 3.4 Designing for maximum redundancy Engines with electronic management systems (e.g. Rotax 912iS and UL Power), electronic ignition (e.g. dual Lightspeed) or relying totally on electric fuel pumps (e.g. Rotax 914-UL) generally require more electrical power and system integrity than the traditional engine systems. Dual or redundant systems are usually essential, together with the best quality wiring. It is essential to follow the manufacturer’s instructions to the letter. “AeroElectric Connection” by Bob Nuckolls is an excellent reference for these more demanding requirements. Unless the engine and its control equipment are supplied as an accepted part of an LAA registered kit, its implementation will require involvement from LAA Engineering. Modern Permit aircraft are often electrically dependant for many of their systems. If this applies to your aircraft, it is recommended that you consider thinking about some basic electrical fault scenarios when designing your electrical system and how they might affect your ability to safely land if various electrical faults occur; a basic ‘what if’ series of questions. For example you could go through your electrical design and for each wire or device ask yourself “what if this fails?” (either open or short circuit). In most instances it will make no difference to the safe conclusion of your flight and you can therefore decide that no further redundancy or amendment to the design needs to occur. However if the answer to the question is ‘that will stop my engine and I do not have a backup’, you should consider adding additional redundancy. You might be limited in your ability to add such redundancy, for example if the engine is electrically dependant and
Decide what equipment is needed
Work out the current required to operate these (with some spare capactiy)
Check that the alternator can supply this capacity.
Design the details of the system (cables, switches,
circuit protection, etc)
Check the system meets the appropriate design
requirements
ELECTRICAL SYSTEMS TL 3.26
Issue 2 5 October 2017
TL 3.26 Electrical sytems Page 7 of 42
only has one engine management computer. Sometimes the additional complexities and components required to provide a back-up system (e.g. a big changeover electro-mechanical relay bringing in a backup electronic ECU) introduce additional risks that may outweigh that the risk of primary system failure. In other words it may be better overall to follow the ‘keep it simple’ philosophy. However you should have at least thought about the issues, analysed them and made firm decisions about how your aircraft will work in the case of various electrical faults. When designing systems with redundant features, thought needs to go into how failures will be detected. Failures need to be flagged up automatically or identified during routine checks: the magneto drop check is a good example of checking redundant ignition systems each flight. Remember your earth paths too: to get the full value of a backup electric fuel pump it needs its own earth connection and not share the same earth connection as the primary pump. Should the reason for the primary fuel pump failure be the failure of its earth connection then this will also affect the secondary pump. Avoid, as far as is possible, the wiring to primary and back-up systems being routed via the same plugs and sockets. A Europa fitted with an electrically dependent engine had an engine failure on take-off because the single high-quality NATO plug that carried both the primary and backup fuel pump wiring had not been properly engaged, and fell out through engine vibration. Note that CAA Generic Requirement 18 (CAP 747) recommends that for aircraft fitted with two radios, no likely single failure (e.g. of a switch or fuse) should result in both radios being unavailable. 3.5 Software-controlled systems Power distribution systems which can replace a myriad of switches and circuit breakers such as the “EXPBUS” and “Vertical Power” systems have been gaining popularity particularly in the USA and more recently in the UK. Such systems can be of particular interest to builders of aircraft with complex electrical and avionics systems. They can also offer a number of advantages over a traditional power distribution architecture including the integration of the following functions: programmable circuit protection, device switching, runaway trim protection, automatic fuel boost pump activation, wig-wag landing lights, notification of electrical faults both visually and audibly via an audio panel, automatic load shedding, remote controls, etc. Similarly, some autopilot systems can be configured to control functions such as pitch trim and trim motor speed. The way the systems are integrated with other parts of the electrical and avionics system can be quite convoluted and obscure: extreme care is required in testing and setting up such systems, taking into account possible failure modes. As with many software-controlled devices fitted to light aircraft, the software is unlikely to have been developed and tested to certificated aircraft standards and so you should assume that the unit will fail at some point. Software failures can take many forms, from not providing any output at all, to providing output when it’s not required. Some systems offer protection against trim or flap motor runaway whereby the software-controlled switches can be used to halt the motors; however, since the function is software-controlled, the function cannot be relied upon to function under all conditions. For this reason, circuits essential to flight safety (trim, flaps, etc) must have a means of isolating them from the software controller and consideration might also be given to providing them with an alternate power supply and switching (see Figure 3). The need for this would be driven by how critical the related system is: if the aircraft is very difficult to land with the flaps stuck in the retracted position, you might want to provide an alternative switch that allows you to manually override the computer and extend the flaps. Of course, this alternative power supply would also need circuit protection, and so you might find that a software controlled power system when

ELECTRICAL SYSTEMS TL 3.26
Issue 2 5 October 2017
TL 3.26 Electrical sytems Page 8 of 42
supplemented by the necessary backups/overrides becomes heavier and more complex than a ‘traditional’ system.
Figure 3 Possible backup power supply switch arrangement
In some cases, the speed at which a control system operates is critical. For instance, on Sportcruiser and Bristell types the pitch response is quite sensitive and so these types are mandated to be fitted with devices which slow down the rate of pitch trim. Where software-controlled systems control the pitch trim on these types, a device or means of slowing the pitch trim system down needs to be installed ‘downstream’ of the part of the system that is software-controlled, so that even if the software causes the trim motor to run uncommanded, trim change will be at the reduced rate. Where a software-controlled system controls essential flight systems (trim, flaps, etc), advice and agreement from LAA Engineering must be sought. 3.6 Load analysis Once the desired equipment has been specified, the system can be analysed to determine how much generating capacity is required and to help size circuit protection devices and wires. It can also be used to help estimate how long the battery might last should the alternator fail. Spreadsheets are useful tools for this: as you adjust the parameters it will keep track of the totals. Figure 4 below gives an example of this.
Figure 4 A typical spreadsheet analysis for a simple aircraft system with main and avionics buses
Off
On (auto)
On (backup)
To equipment
From software- controlled unit
From battery Fuse
ELECTRICAL SYSTEMS TL 3.26
Issue 2 5 October 2017
TL 3.26 Electrical sytems Page 9 of 42
From Figure 4, it can be seen that the wire and fuse/CB feeding the “main” loads should be rated at 10A, with 6A for the avionics. The alternator should be capable of at least 20A. This spreadsheet may be expanded as required to cover more complex systems with as many sub-sections as desired. 3.7 Circuit protection 3.7.1 Over Voltage Protection (OVP) One, thankfully rare, failure mode of the voltage regulator is to allow the full voltage output of the alternator to be put across the electrical system without regulation. This would result in the alternator producing several times its rated voltage at higher engine speeds. The battery will hold this down briefly but, at some point, the battery voltage will rise to dangerous levels possibly damaging it and any connected equipment. Fuses and circuit breakers will not help here; they only protect against high currents. If expensive equipment is installed then protection against over voltage should be considered good insurance. Manufacturers’ guarantees are unlikely to extend to damage by over-voltage. Two protection strategies are available:
1. “Crowbar” – creates a short circuit across the alternator field supply thus opening the field circuit breaker. No output will be generated without the magnetic field. See Figure 9.
2. Series switch – the alternator field current passes through the monitoring device and is switched off when over voltage is detected.
The strategies above apply only to a wound-field alternator; for Rotax and Jabiru regulators the device should drive a relay that, in turn, breaks the alternating current circuit of the alternator. See Figure 7. 3.7.2 Circuit breakers & fuses The primary function of a fuse or circuit breaker (CB) is to prevent excess current (and therefore heat and the attendant fire hazard) in part of the system. The source of this excess current is due to short-circuit: where a ‘live’ wire comes into contact with an earth wire, for instance where a wire has chafed and come into contact with the earthed structure. Generally this will be in the aircraft’s wiring loom, but faults can also occur within items of electrical equipment that will cause the equipment to draw excess current. Some equipment will incorporate some form of internal current protection, but this is not always true, particularly on equipment that hasn’t be certificated for aircraft use. For this reason, all items of electrical equipment must be protected by an external fuse or circuit breaker of a rating in accordance with the manufacturer’s instructions, if available, or else using a rating judged to be the lowest possible without causing it to blow/trip in normal use. There has been a long running debate regarding the relative advantages and disadvantages of circuit breakers v fuses. The LAA does not take any particular position regarding this debate and the builder is free to fit either circuit breakers or fuses as long as they meet the requirements for the protection of the wiring and devices as detailed in this leaflet. The following table provides some insight into some of the advantages and disadvantages of both fuses and circuit breakers.

ELECTRICAL SYSTEMS TL 3.26
Issue 2 5 October 2017
TL 3.26 Electrical sytems Page 10 of 42
Advantages Disadvantages
Circuit Breakers
• Traditional, well-known aircraft architecture
• Can fit combined circuit breaker/switches to reduce panel space
• Can be reset in flight
• Expensive • Time to construct bus bars • Heavy
Fuses • Low cost • Easy to implement (available
with built-in bus bar) • Light • Highly reliable
• Cannot be used in all situations, particularly in conjunction with alternator crow bar over-voltage protection
• Cannot be easily reset in flight (it can of course be argued that this is an advantage!)
3.8 Electrical system monitoring A yellow/amber “charge fault” lamp can be included (driven by the voltage regulator) mounted in a prominent position, so that the pilot is alerted to the fact that the alternator is no longer powering the electrical system and can take appropriate action. A voltmeter (or voltage monitor function in a glass cockpit) should always be included. This will assist the pilot in monitoring the system: a voltage of about 14 V shows that the alternator is charging the battery; a voltage of about 12 V shows that the battery is powering the electrical system. This could be supplemented by a low-voltage warning light. An ammeter can be useful but is less easy to interpret. Ammeters use shunts to enable the current to be measured.
Figure 5 Ammeter shunt
Figure 5 shows a typical shunt – it is merely a very low value resistance. A sensitive meter connected across it will sense the voltage drop which is proportional to current. Arrowed are two wires connecting to the meter. Each of these must have a fuse mounted as close to the shunt as possible. A flashing low volt warning can be used to warn the pilot if the bus bar voltage falls below a pre-set level, usually indicating a failure of the charging system and prompting the pilot to carry out load-shedding actions and that electrical services will only remain available for a limited time. While a good idea, this is not required for simple day-VFR aircraft unless they rely on electrical power to keep the engine running or to lower the undercarriage or other essential services.

ELECTRICAL SYSTEMS TL 3.26
Issue 2 5 October 2017
TL 3.26 Electrical sytems Page 11 of 42
A starter-engaged warning light is considered mandatory by the LAA, in order to warn the pilot of a failure of the starter motor to disengage. The starter-engaged warning light used to be mandated by the CAA on most certified aircraft by way of an Airworthiness Notice which has since been withdrawn. This is not because CAA no longer considers these devices important but rather that where necessary they are nowadays specified by way of the basic design certification codes. A low voltage warning light is still mandated on certain UK aircraft with Certificates of Airworthiness by means of Generic Requirement 6 in CAP 747. 3.9 Documentation When documenting your system the LAA recommends that as a minimum you:
1. Produce one overall diagram that shows the power distribution system in your aircraft including the battery, contactors, starter motor, alternator and power distribution buses.
2. In addition, produce one diagram per system starting from the power bus. So for example you would include one diagram for your flap system, one for landing lights, one for your transponder.
3. Include as much detail as possible on each diagram to include such items as: a. Wire and connector marking. b. Wire sizes. c. Connector pin numbers. d. Any intermediate connectors or crimps. e. Notes on wire routeing within the aircraft. f. Avionics default settings.
Note that a wiring diagram shows you how the components connect together (e.g. which wires of the loom connect to which terminal of a component), whilst a circuit diagram or schematic shows how the circuit works. Both can be combined into one diagram but for more complex systems, the information might be more clearly shown on two separate diagrams. On more complex systems, pilot notes should be put together for appending to the operating manual (or equivalent documentation). These should outline how the system works and should include emergency actions (what to do when a warning light comes on, what to do in the event of an electrical fire, failure of major components, etc) and normal operations (e.g. the normal engine startup procedure). A good description of how the system works will help the pilot to understand how the various parts of the system fit together so that he’s got a chance to work out what to do if something happens that’s not covered by the pilot notes. It also helps when it comes to maintenance and fault-finding: remember that you may not be the only pilot or owner of this aircraft going into the future. 3.10 Example circuits 3.10.1 Engines with an integrated alternator Engines with integrated alternators, such as Rotax and Jabiru engines, are provided with recommended circuit diagrams which should be considered the minimum requirement. Deviations from these diagrams should be made only after extremely careful thought and research, as they’ve been put together from a great deal of experience from the manufacturer.

ELECTRICAL SYSTEMS TL 3.26
Issue 2 5 October 2017
TL 3.26 Electrical sytems Page 12 of 42
3.10.2 Minimal power system with integrated alternator
Figure 6 Minimal power system with integrated alternator
The diagram above is based on a simple aircraft with a Rotax or Jabiru engine where a permanent magnet alternator is integral to the engine. It is improved over the engine manufacturers’ suggested circuits by the use of a two pole master switch that positively disconnects both battery and alternator. The LAA recommends that a “Master Switch” should do what it says – all power is removed when the switch is OFF, although it is acceptable to have a ‘split’ master switch with one side isolating the alternator supply and the other side isolating the battery supply. Note that the Jabiru regulator is similar but has a separate common connection (the Rotax regulator’s common is its case) and the fault lamp is connected between the regulator and common. • The master switch must be rated to carry at least the maximum alternator/regulator output. • Fuse F1 should be sized such that fuse F2 would open first in the event of a short circuit in
the wiring protected by F2 (so that power is maintained by the battery). It could be a higher current rating or be a slow-blow type.
• F1 should be mounted as close as possible to the connection with the heavy battery/starter cable. It could, alternatively, be connected directly to the positive battery terminal.
• F2 should be sized to match the alternator output and as close as possible to the master switch. It protects the alternator wiring and regulator against short circuits.
• The starter contactor (and Rotax regulator) are earthed through their casings so both need to be bolted to the firewall (be sure that no paint or anodising impairs the electrical bond).
• Contactor/relay coils should always be protected with a suppression diode D1 (see Section Relays). It is possible to suppress the starter motor but, although desirable, this is rarely done.
• The starter engaged (“Stuck Starter”) indicator is required; it indicates to the pilot that the starter contactor is stuck ON. This condition would cause damage to the starter motor and

ELECTRICAL SYSTEMS TL 3.26
Issue 2 5 October 2017
TL 3.26 Electrical sytems Page 13 of 42
engine. The Rotax engine starter is unique in driving via a “sprag clutch” and will not suffer harm from this condition.
• C1 is an optional electrolytic capacitor which smooths the electrically noisy output of these permanent magnet alternator regulators. It is important to choose a capacitor with a sufficiently high ripple current rating to avoid overheating. This capacitor is required in order for the Rotax/Jabiru regulators to function if the battery is disconnected.
• Over Voltage Protection is not included. See section 3.7.1 and 0.
3.10.3 Complex power system with integrated alternator
Figure 7 Complex power system with integrated alternator
In the above system, Over Voltage Protection has been added that disconnects the alternator AC supply using relay RLY1 (which is preferable to breaking the DC current). The system now protects against all the possible alternator faults. So that the alternator may be turned off with the battery still connected, a 3 position switch has been included:
• Left = OFF (note that physically, the switch must be arranged so that it follows the convention ‘down’ is ‘off’)
• Centre = Battery ON • Right = Battery + Alternator ON
The diode for RLY1 is included in the OVP module.

ELECTRICAL SYSTEMS TL 3.26
Issue 2 5 October 2017
TL 3.26 Electrical sytems Page 14 of 42
3.10.4 Basic power system with a wound field alternator
Figure 8 Basic power system with a wound field alternator
Above is shown a 3-phase alternator with a separate “diode pack”. The regulator and diode pack may be incorporated into lower cost, automotive style alternators.
• A Master Contactor has been included with the following advantages: o The Master Switch carries a small current; switches are not normally designed to
carry high currents. o The battery may be isolated in the case of a stuck starter contactor (otherwise the
engine will be cranking until the battery is flat). o With the master contactor de-energised, the amount of live and unprotected wiring
is minimised, reducing the risk of a fire starting after a crash. To get maximum benefit, the contactor can (and should) be sited close to the battery.
• The Master Switch is a “two pole” type that switches both battery and field power. • A CB protects each wire connecting to the Bus. Each one has a lower rated current than
the fuse which should be a “slow blow” type. In the event of a short circuit in the alternator feed or sense wiring, the system will be powered by the battery.
• The aircraft style Starter Contactor has a specific output to indicate that it is stuck in the closed position (usually due to the contacts welding together). This contactor should be positioned as close as possible to the master contactor.

ELECTRICAL SYSTEMS TL 3.26
Issue 2 5 October 2017
TL 3.26 Electrical sytems Page 15 of 42
3.10.5 More complex power system with wound field alternator
Figure 9 More complex power system with wound field alternator
In the system shown above, a “crowbar” over voltage protection (OVP) system is incorporated: when the unit senses overvoltage it “shorts” its two terminals together thus clearing (“blowing”) the circuit breaker CB2. This removes power from the alternator field, disabling it. The master switch has been changed to “progressive”:
• Left = OFF (note that physically, the switch must be arranged so that it follows the convention ‘down’ is ‘off’)
• Centre = Battery ON • Right = Battery + Alternator ON
The system now protects against all the possible alternator faults.

ELECTRICAL SYSTEMS TL 3.26
Issue 2 5 October 2017
TL 3.26 Electrical sytems Page 16 of 42
3.10.6 Minimal distribution system
Figure 10 Minimal distribution system
In the diagram shown above, the power supply and starter circuit are as shown in Figure 6 to Figure 9. Loads are all fed directly from the Master Bus:
• The single master fuse is the absolute minimum protection required. If the fuse blows, all power will be lost.
• With only one fuse, all wiring must be rated to carry the nominal master fuse current. • A voltmeter should be included so that the charging system can be monitored. • Some loads will not require separate switches if they have one incorporated (such as a
panel-mounted radio). • The pilot must check that both radio and transponder are off before starting, in order to
avoid voltage spikes damaging them.
All earth connections should be to a common point on the firewall, close to the regulator. A “forest of earths” or “earth bus” is an excellent method.

ELECTRICAL SYSTEMS TL 3.26
Issue 2 5 October 2017
TL 3.26 Electrical sytems Page 17 of 42
3.10.7 More complex distribution system
Figure 11 More complex distribution system
In the above diagram: • Each load has a dedicated CB (each of lower rating than the master fuse). This means that
in the event of, say, the radio circuit failing, the transponder will continue to operate. • The trim motor may be isolated in case of runaway. • A separate Avionics Bus has been added so that a single switch can ensure that avionics
remain off whilst starting. Note, however, that modern electronics should be able to tolerate transient voltages experienced during engine start, and adding a switch adds a single point of failure that would disable all the avionics.
Far more complex and sophisticated systems are possible but are beyond the scope of this document. For instance, an ‘essential’ or ‘emergency’ bus could be incorporated that maximises the availability of power to key loads, and might incorporate an alternative switchable connection direct to the battery.

ELECTRICAL SYSTEMS TL 3.26
Issue 2 5 October 2017
TL 3.26 Electrical sytems Page 18 of 42
4 DETAIL DESIGN 4.1 Alternators In all alternators, electrical power is generated by passing a coil of wire through a magnetic field. The output of an alternator, as the name suggests, is an alternating current (AC - like that at a domestic wall socket). This must be “rectified” or turned into DC (Direct Current) for use in an aeroplane. This is done by a “diode pack” inside the regulator or alternator. Alternators are specified as either “1-phase” or “3-phase”; given a choice, “3-phase” is preferred since it produces a smoother output. The alternator is driven by the engine but this means that the voltage produced changes with engine speed, whereas we need a constant 14V to charge a 12V battery correctly (and 28V for a 24V battery). There are two methods of providing the field:
1. A permanent magnet, used mainly in small engines with an integral alternator. This requires a voltage regulator that controls the rectification process using SCRs (Silicon Controlled Rectifiers).
2. A “wound field”, universally used in larger, stand-alone, alternators. A second coil of wire is fed from the battery. A regulator controls the current through this coil to adjust the alternator output as required. The advantage is that the regulator need only handle around 1A to control an output of 50A+.
There are several potential fault modes to consider:
1. Not charging: if fitted, the fault indictor driven by the regulator alerts the pilot in this case. A voltmeter or low voltage warning light would also show that the system is no longer being supplied by the alternator.
2. Over voltage charging: protection is optional but recommended – see section 3.7.1. 3. Internal short circuit to common: the fuse required to protect the feed wire will also cover
this event. 4. Overload or external short circuit: alternators are inherently self-current-limiting – no
action required.
4.2 Batteries 4.2.1 Types of batteries The LAA accepts lead-acid batteries and “recombinant gas” types are recommended as very safe and having excellent cranking ability, i.e. the ability to pass very high currents. When an electric starter is fitted, cranking ability is as important as electrical capacity, especially with engines such as the Jabiru which will only start if spun over rapidly. The minimum required capacity of the battery (i.e. amp-hour rating) will normally be stated by the engine manufacturer, but is also dependent on your electrical load analysis and the duration you want to be able to keep the system alive following an alternator failure. Batteries certified for aircraft use are designed to standards of robustness intended to prevent them exploding if they are overcharged or short circuited, showering the vicinity with corrosive acids and choking fumes. Batteries from automotive sources are not designed or certified to the same standards, which is part of the reason why they are so much cheaper. The risk of overcharging varies from installation to installation, for example depending on the type of alternator and regulator fitted, and whether protected from over-voltage. The extra security provided by a certified aircraft battery, or one that has otherwise proven itself fit for purpose makes a good safety investment.

ELECTRICAL SYSTEMS TL 3.26
Issue 2 5 October 2017
TL 3.26 Electrical sytems Page 19 of 42
All lithium-based battery installations require a mod application, to check that the batteries are of a type designed to avoid excessive dangers in the event of short-circuit, overcharging or mechanical distress. The LAA has approved a number of types of LiFePO4 (lithium iron phosphate) battery and their installations (see Standard Modification SM14337), but would not approve a lithium polymer or lithium cobalt installation due to the fire and fume risks associated with these types of batteries. 4.2.2 Installation Batteries are a significant weight, often contain corrosive chemicals and contain sufficient electrical energy to start a major fire if short circuited. If mounted in the cockpit, they could do serious injury in a crash situation if freed from their mountings. Wherever the battery is mounted, it needs be done securely so that it does not come loose in normal flight or landing, or in an emergency landing situation. The integrity of the battery restraint needs to be maintained over time, so fabric straps or similar should be avoided and positive restraints such as metal straps or bars used instead. Batteries are best mounted in purpose-built boxes. Those batteries that can vent explosive or corrosive gases need to be in a sealed box and externally vented, to prevent fume build-up or damaging fluid release onto the airframe. Every care should be taken to prevent short circuits, for example by fitting rubber boots onto all live terminals. Metal battery boxes should include insulating plates (e.g. of nylon or even plywood) over the battery terminals to prevent the box lid itself short circuiting the terminals in the event of the box getting crushed or buckled in a crash. Avoid mounting batteries where they are not easily accessible for maintenance, where corrosion caused by leaking battery acid could damage critical structure and write off the aircraft, or where long leads will be needed between the battery and starter motor which will cause a significant voltage drop. To minimise the risk of short circuit, the positive leads from the battery that don’t have circuit protection should be as short as possible. Ideally battery contactors/relays should be mounted on the battery box itself. Batteries should also be kept cool – if mounted forward of the firewall they may need additional cooling arrangements. When disconnecting the battery, disconnect the negative (earth) terminal first. When connecting the battery, connect the positive terminal first. This is because if a spanner accidentally connects between the fuselage and positive terminal while the negative terminal is connected to earth, damage and/or injury could result. Connecting the negative terminal to earth has no effect. 4.3 Earthing “Ground” and “common” are used interchangeably with “earth”. Correct earthing is always important and becomes critical when complex systems are installed. The aim should be to bring all common connections to a single earth point, usually mounted on the firewall. This reduces ground-loops, which cause noise on radios. The structure of metal aircraft can be used as an earth return, although a good electrical connection between components needs to be ensured. This obviously isn’t as easily achieved on wooden and composite aircraft.
• The battery common and the engine block must be earthed to the common point with heavy duty cable.
• All earth connections must be clean and tight. • No structural bolt or screw may be used for an earth connection. • A “forest of earths” is a good solution to connecting the smaller gauge wires.
ELECTRICAL SYSTEMS TL 3.26
Issue 2 5 October 2017
TL 3.26 Electrical sytems Page 20 of 42
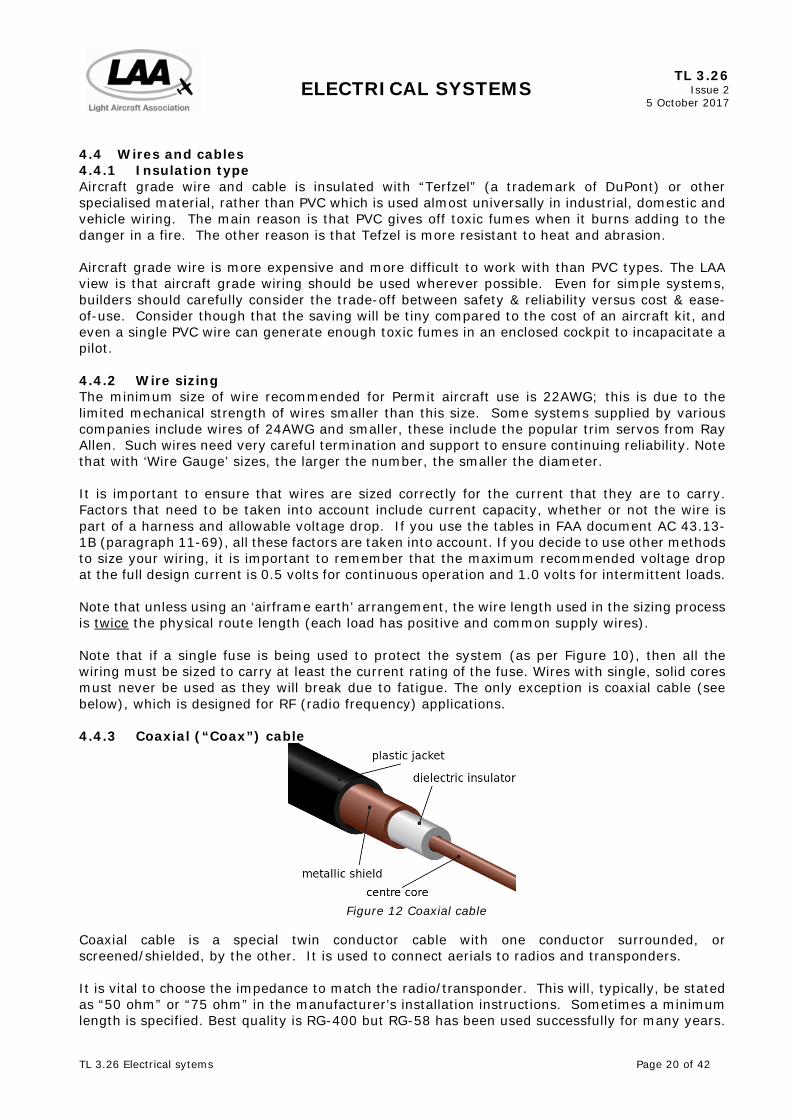
4.4 Wires and cables 4.4.1 Insulation type Aircraft grade wire and cable is insulated with “Terfzel” (a trademark of DuPont) or other specialised material, rather than PVC which is used almost universally in industrial, domestic and vehicle wiring. The main reason is that PVC gives off toxic fumes when it burns adding to the danger in a fire. The other reason is that Tefzel is more resistant to heat and abrasion. Aircraft grade wire is more expensive and more difficult to work with than PVC types. The LAA view is that aircraft grade wiring should be used wherever possible. Even for simple systems, builders should carefully consider the trade-off between safety & reliability versus cost & ease-of-use. Consider though that the saving will be tiny compared to the cost of an aircraft kit, and even a single PVC wire can generate enough toxic fumes in an enclosed cockpit to incapacitate a pilot. 4.4.2 Wire sizing The minimum size of wire recommended for Permit aircraft use is 22AWG; this is due to the limited mechanical strength of wires smaller than this size. Some systems supplied by various companies include wires of 24AWG and smaller, these include the popular trim servos from Ray Allen. Such wires need very careful termination and support to ensure continuing reliability. Note that with ‘Wire Gauge’ sizes, the larger the number, the smaller the diameter. It is important to ensure that wires are sized correctly for the current that they are to carry. Factors that need to be taken into account include current capacity, whether or not the wire is part of a harness and allowable voltage drop. If you use the tables in FAA document AC 43.13-1B (paragraph 11-69), all these factors are taken into account. If you decide to use other methods to size your wiring, it is important to remember that the maximum recommended voltage drop at the full design current is 0.5 volts for continuous operation and 1.0 volts for intermittent loads. Note that unless using an ‘airframe earth’ arrangement, the wire length used in the sizing process is twice the physical route length (each load has positive and common supply wires). Note that if a single fuse is being used to protect the system (as per Figure 10), then all the wiring must be sized to carry at least the current rating of the fuse. Wires with single, solid cores must never be used as they will break due to fatigue. The only exception is coaxial cable (see below), which is designed for RF (radio frequency) applications. 4.4.3 Coaxial (“Coax”) cable
Figure 12 Coaxial cable
Coaxial cable is a special twin conductor cable with one conductor surrounded, or screened/shielded, by the other. It is used to connect aerials to radios and transponders. It is vital to choose the impedance to match the radio/transponder. This will, typically, be stated as “50 ohm” or “75 ohm” in the manufacturer’s installation instructions. Sometimes a minimum length is specified. Best quality is RG-400 but RG-58 has been used successfully for many years.
ELECTRICAL SYSTEMS TL 3.26
Issue 2 5 October 2017
TL 3.26 Electrical sytems Page 21 of 42
Clamp-style connectors are especially tricky to mount: if you have not made them up before, your chances of success are slim! The best type of connector is crimped but these require special tooling. The best advice is to buy ready-made cables: a number of companies can supply cables made to order. 4.4.4 Wire marking In addition to documenting your aircraft’s electrical system, the LAA also highly recommends the practice of marking your aircraft wires and connectors. There are many reasons for this including:
1. Fault finding is extremely difficult without having a circuit diagram and labelled wires/connectors.
2. Upgrading your instruments will be made more difficult without wiring diagrams and marked wires.
3. Having wiring diagrams in your aircraft's documentation gives your Inspector confidence in your electrical installation and labelling helps him to check that the installation reflects the drawing. In the future this can also make your aircraft more saleable.
There are many ways of marking your wires from simple slip-on sleeves, to individual heat shrink letters and numbers, to printed heat shrink labels. How wires are labelled is entirely up to the individual builder. What is not so important is HOW you label your wires, rather that they ARE labelled. There is normally very limited advantage in trying to label wires along their length for homebuilt aircraft; normally marking each wire at their connections is acceptable. Colour-coded aircraft wire is now available in the UK at a very small increase in price over the standard white, however the range of colours is limited. It is very strongly recommended to use red for positive supply and black for common, with other colours for signals. 4.4.5 Wire & cable protection The insulation can be damaged by:
• Abrasion • Bending (due to vibration) • Heat (including that caused by electrical over-load)
Failure of the insulation may cause a short circuit and tripping of the overload device (or fire if no such device is fitted!)

ELECTRICAL SYSTEMS TL 3.26
Issue 2 5 October 2017
TL 3.26 Electrical sytems Page 22 of 42
Abrasion
Figure 13 Examples of grommets
The insulation of any wire lying across a hard or sharp surface will eventually be penetrated. Use rubber grommets when passing through sheet metal and tie down at contact points. Conduit is a useful way of protecting wires and cables over a long run through multiple panels, e.g. wingtip lighting wiring. Holes should be drilled at intervals on the underside of the conduit to allow condensation to drain away. Deburring the inside of these holes is a challenge – this special tool may help (search for “deburring tool” online).
Figure 14 Deburring tool
Bending Unsupported loops will resonate with the vibration causing bending stress in the copper conductors which risks failure due to fatigue. Tie down the cable at the shortest practical interval, especially on the engine. It is especially important to tie down the wire close to its exit from a connector. Bundling wires usefully increases their stiffness. Heat – external
Figure 15 Fireproof sleeving (as part of a firewall penetration kit)
Various sleeving products are available to protect wire bundles from heat and abrasion. These are strongly recommended forward of the firewall, especially for magneto/ignition switch wiring (an engine fire may break the wire so that the engine cannot be stopped or short the wire to earth stopping it anyway).

ELECTRICAL SYSTEMS TL 3.26
Issue 2 5 October 2017
TL 3.26 Electrical sytems Page 23 of 42
Heat - electrical over-load Fuses and/or circuit breakers will only protect the wiring “downstream” of themselves. A short circuit occurs when:
• A bare conductor (caused by abrasion, bending or heat) contacts grounded metal. • A component fails “short circuit” (rare but not impossible).
A “short” will almost always cause an insulation fire in an unprotected wire. It is therefore absolutely vital that no wire is unprotected by a fuse/CB. The only exception to this is the heavy cable between battery, battery contactor, starter solenoid and starter motor. It is generally considered impractical to protect this wiring but the results of a short circuit would be catastrophic due to the extreme currents involved. This means that your only defence is to be super-rigorous when protecting the insulation and strapping down the cable. It is important that no bare metal carrying the supply voltage can be touched by any metallic object that may be inadvertently dropped on it. Terminal boots and heat shrink sleeving are very useful here. To shrink the latter, a hair dryer on maximum heat and low speed will suffice but a heat gun is quicker.
Figure 16 Terminal boot
Corrosion As with airframes, corrosion is the long-term enemy of electrical systems. Gold plated connectors are common in aerospace but are never going to make it to the mid-range instruments and devices that the simpler systems typically comprise. Treat connectors like any airframe assembly – an appropriate anti-corrosion compound such as “Contralube” should help. 4.4.6 Firewall penetration A firewall’s integrity is compromised if cables and wiring pass through rubber grommets as is common practice. A “Stainless Steel Firewall Penetration Kit” is available from aerospace suppliers, see Figure 15. The tubular stack plus fire resistant sleeve make for a long path between engine compartment and cockpit. The sleeve should be bound closely around the wire bundle to prevent fumes penetrating. A DIY equivalent should not be difficult to create. 4.4.7 Harnesses Bundles of wires and cables should be bound up into a harness. Plastic cable ties are convenient but should only be tightened sufficient to create a firm grip – never allow the tie to deform the insulation. Boeing and NASA use Nomex tape to bind harnesses. Harness lace can also be used effectively. P-clips with rubber liners (as in the picture below) make ideal supports for cables and harnesses. They should be used at close intervals and should be oriented so that the fastener is above the wire bundle where possible. Spiral wrap is useful but it offers no protection against liquids. Braided sleeving makes a very professional job but, again, it offers no protection against liquids. For firewall-forward harnesses, a heat and abrasion resistant sleeve is preferred.

ELECTRICAL SYSTEMS TL 3.26
Issue 2 5 October 2017
TL 3.26 Electrical sytems Page 24 of 42
Figure 17 Spriral wrapped bundle supported with P-clips
4.4.8 Routing When routing near to fluid-carrying pipes, run the wiring above the pipes to avoid leakage onto the wiring. Engines can rotate through a significant angle on their mountings – wiring should be routed close to the mountings (to minimise bending) with a small loop to allow for movement. Attaching wiring to fuel or oil pipes is strongly discouraged. Only do so when there is no alternative. Where possible, separate power and signal wire runs to avoid electrical noise transfer. Provide enough slack in the cables behind the instrument panel to allow individual instruments to be withdrawn without having to first disconnect them behind the panel. You’ll be glad you did, later! Where possible, avoid putting connections in the wires at ‘low points’ which will tend to accumulate any moisture that has condensed onto the length of the wire, encouraging corrosion of the joint. A nicety practised by the professionals is to create a local dip in the routing where the wire is insulated to make a safe ‘dripping off’ point.
Figure 18 Drip loop
4.4.9 Avionics and shielded cable Avionics manufacturers use different methods of interference rejection: some specify and provide unshielded twisted pair cable whilst others specify shielded cable. If shielded cable is specified it is extremely important to follow the manufacturer's instructions regarding the method of termination of the shield itself.

ELECTRICAL SYSTEMS TL 3.26
Issue 2 5 October 2017
TL 3.26 Electrical sytems Page 25 of 42
4.4.10 Minimum bend radius When you bend a wire or bundle you should be careful to make sure that the bend radius is not too tight otherwise you can induce stresses in the wires that can cause them to break, perhaps at a much later date, under very small and constant vibrations:
1. Minimum Bend Radius for single or multiple wires: 8 times the overall cable diameter. 2. Minimum Bend Radius at a terminal where each end of the bend is supported: 3 times
the overall cable diameter. 3. Co-axial cable: check the manufacturer’s specification.
4.4.11 Potential single point failures These should be avoided, e.g. avoid use of a common plug for main and backup systems. 4.4.12 Minimise multiple connections on one threaded terminal The maximum number of wires connected to a single threaded terminal such as a stud or bolt is four. Increasing this number can lead to unreliable connections. If more are required use a terminal strip with multiple studs. 4.4.13 Engine earth cable If equipped with an electric starter or alternator, it is absolutely essential that the engine earth wire is substantial and reliable. Failure of the engine earth connection will mean the massive starter current trying to find an alternative path to earth, perhaps via the throttle or mixture cables or the CHT wiring. This will almost certainly start a fire, seize control cables or wreck expensive equipment. Use a dedicated connection for the engine earth wire to the battery negative terminal or to the firewall, and if a wood or composite fuselage structure, make sure the grounding of the firewall itself to the airframe earth system is to the same standard. 4.4.14 Electric trim, flaps and undercarriage Un-commanded movement of electrically operated trim, flap or undercarriage systems could cause significant problems in flight. As far as possible, route the wiring to the servos separately from live wiring that could activate the service if the wiring were to touch, for example, if both wires chafed through their insulation where a grommet has fallen out of a hole through a rib. You will not be able to halt a runaway trim servo if it is being miss-fed power at a point downstream from your trim circuit breaker. 4.4.15 Voltage drop The copper connecting wire itself has resistance, albeit small, and this will produce a “voltage drop”.
Voltage Drop = Current x wire resistance For example, if the voltage drop in a wire is 1 volt in a 14 volt system then only 13 volts are available for the load. If the load were a VHF radio then its transmission power would be reduced below its advertised value by around 14%, significantly reducing its effective range. Wire resistance is proportional to the length of the wire and inversely proportional to the cross sectional area of the wire. Greater diameter wire = lower resistance. Longer wire = increased resistance. Thus, when selecting wire gauge, voltage drop should be considered as well as current carrying ability. 4.5 Connectors Various types of connector are available:
• Crimping - requires good tools and some skill. • Soldering - requires greater skill and more practice than crimping. • Screw terminals – must use a crimped ring terminal and anti-vibration washer.

ELECTRICAL SYSTEMS TL 3.26
Issue 2 5 October 2017
TL 3.26 Electrical sytems Page 26 of 42
• Chocolate block terminal strips (or any screw clamp terminal) – should be avoided as much as possible – the screw will mash up the wire strands leaving the wire very vulnerable to fracture. Tinning the wire ends with solder will not help as the solder will “relax” in time. If a screw clamp terminal absolutely must be used, crimp or solder a pin (ferrule) to the wire end.
Figure 19 Chocolate block terminals - not to be used!
• Blade type (“Faston”, “Lucar”) - common and resistant to vibration. Tinned or plated are preferred to plain brass. Uninsulated crimp (left) – not recommended as these are unreliable. Pre-insulated, closed barrel, crimp (right) – very reliable if used with a high quality crimp tool.
Figure 20 Blade type connectors
• D-type multi-pin connectors - Gold plated pins are not expensive and well worthwhile.
Solder terminals are tricky and require significant skill and practice to get right. Crimp terminals require a special crimp tool.
Figure 21 D-type connector
• “Forest of Earths” or “Ground Block” - an excellent way to ensure a common earth
connection for all circuits. Loose blade terminals are available and can be used to make a low cost “Forest of Earths” (forest of “grounds” or “tabs” in the USA).
Figure 22 Forest of earths

ELECTRICAL SYSTEMS TL 3.26
Issue 2 5 October 2017
TL 3.26 Electrical sytems Page 27 of 42
4.6 Switches 4.6.1 Switch quality Surprisingly, there are no “aircraft certified” switches, only those that are deemed to be certified by their inclusion in certified aircraft. What we specifically need for light aircraft is a high tolerance of vibration and resistance to moisture ingress. Vibration performance is quoted in a number of different units which makes comparison difficult but the fact that a manufacturer quotes these parameters generally means that they have designed against them. As in life generally, “one gets what one pays for”, so a good guide is price. Good quality switches must be used for safety critical functions such as:
1. Magneto switches 2. Variable pitch propeller operation 3. Retractable gear selection and feedback 4. Master switch
4.6.2 De-rating The switch current rating may need to be higher than the nominal load current depending on the type of load (some are more stressful to the switch than others):
• Resistive loads (pitot heaters, LED lamps, avionics, etc) x1 • Motors (Flaps, undercarriage, etc) x2 • Incandescent lamps (landing light, etc) x5
For example, a switch to operate a motor which requires a nominal 10A current should have a rating of at least 20A. 4.6.3 Contact material It is recommended that the switch contact materials are chosen as follows:
• Switches with a current load of greater than 0.5 amps: silver contacts. • Switches with current loads less than 0.5 amps: gold contacts.
4.6.4 Sense of operation Switches must conform to standard UK aviation practice:
• Up or Forward = ON • Down or Rearward = OFF
4.6.5 Labelling All switches must be labelled for identification and sense of operation:
• Identification: e.g. ‘Nav Lights’, ‘Fuel Pump’. • Sense of operation: e.g. ‘On’, ‘Manual’, Off’, ‘Auto’, ‘Up’, ‘Down’, etc.
4.6.6 Multi-pole switches These can prove useful in aircraft as it allows a single switch to operate more than one device. However, consider:
1. It implies that the failure of a single switch means the failure of more than one system. Consider your fault analysis as described in Section 3.4.
2. The practice of using a multi pole switch to try and artificially increase the current rating of a switch is dangerous: e.g. using a 10 amp switch to control a 20 amp landing light by wiring the light through two contacts in parallel. This is because only a very slight difference in contact resistance will cause unequal current sharing (leading to heating and failure).
3. Similarly, paralleling two contacts will not add much to reliability; both are subject to the same stresses and there will be no indication that one has failed.

ELECTRICAL SYSTEMS TL 3.26
Issue 2 5 October 2017
TL 3.26 Electrical sytems Page 28 of 42
4.6.7 Micro switch adjustment Micro switches are commonly used to feed back to the pilot the mechanical state of critical components, e.g. that all three gear legs are down and locked. However everything mechanical wears and it is possible that a switch that was set to just trip could stop indicating simply because the monitored item is no longer quite reaching the switch’s trip point. Each switch assembly will have two critical positions:
1. The point at which the switch trips. 2. The end-of-travel position beyond which the switch may be damaged.
The most reliable setting is halfway between them. This allows the maximum amount of wear before false indications are experienced. 4.7 Relays
Figure 23 Electromagnet
A relay is, simply, a switch that is operated electrically instead of manually. At the heart of a relay is an electromagnet. In Figure 23, as current flows in the coil (blue) it created a magnetic field which attracts the armature (red).
Figure 24 Relay
In the relay, the electromagnet is used to operate the switch contacts. A spring (not shown) returns the armature to the “open” position. Relays are also available with the contacts ‘normally closed’ and energising the electromagnet causes the contacts to open. In this way a small current may control a large current. In the case of a starter contactor, 1 amp in the coil may be switching several hundred amps through the contacts. A contactor is simply a high-current version of a relay; both work on the same principle. An “inductive load” is one that contains a coil of wire such as relay and contactor coils (as well as motor windings). Whereas a resistor resists the flow of current, the primary characteristic of inductance is that it resists the change of current. If a DC voltage is applied across a resistor, the current rises instantly to the level set by voltage and resistance. If it is applied across a coil of wire, the current rises slowly (actually exponentially) to a value set by the voltage and the wire’s resistance. The problem arises when the load in the coil is switched off: the inductance will not allow the current to fall instantly even though the contacts are opening. A voltage will be generated by

ELECTRICAL SYSTEMS TL 3.26
Issue 2 5 October 2017
TL 3.26 Electrical sytems Page 29 of 42
the inductance to maintain the current, albeit very briefly, causing very high voltages to be generated, sometimes hundreds of volts. These have two bad effects:
1. The resulting spark erodes the contacts. 2. The voltage “spike” can cause equipment to malfunction or even be damaged. This is the
reason for the advice to switch off radios and other expensive or vulnerable equipment before starting the engine (both starter contactor and starter motor are highly inductive).
This damaging spike can be eliminated by the use of a diode suppressor. Consider the following example:
Figure 25 Steady current flowing through coil
With 12V applied, the coil takes a constant 1.2A.
Figure 26 Switch opens, voltage spike generated
Just after the switch opens, the inductance forces the current to continue by generating a high voltage. This quickly collapses but the harm, if any, is done.
Figure 27 Diode allows current to flow
With a diode in circuit, the current is able to circulate harmlessly. With the switch closed, the diode is “reverse biased” (blocks the current) so has no effect. 4.8 Buses From “omnibus” meaning “everything”. In this case, it refers to a copper or brass bar that feeds all the switches or fuses or CBs for a group of loads.

ELECTRICAL SYSTEMS TL 3.26
Issue 2 5 October 2017
TL 3.26 Electrical sytems Page 30 of 42
The white plastic housings in the picture below are circuit breakers.
Figure 28 Circuit breakers on a bus
4.9 Circuit protection Automotive fuses and their holders are reliable. The comments in Section 4.6 for switches apply equally to circuit breakers (CBs). “Trip free” CBs cannot be reset as long as a fault persists and are recommended. If any wire carrying the supply voltage accidentally contacts the airframe metalwork, current will flow directly to earth with little resistance to limit it. This is known as a short circuit and will usually result in melted and burning insulation: a significant fire and fume hazard. Fuses and circuit breakers (CBs) are provided to prevent this happening. A fuse is a short length of thin wire that will melt when the current exceeds its rated value. By melting it breaks the circuit thus stopping the potentially damaging current. Any associated wiring must be able to withstand the same current without damage. A magnetic circuit breaker is a form of relay where the coil carries the circuit current and pulls in the armature at the rated current thus opening the contacts. Without a return spring, the contacts remain open until the device is reset manually. This type is fast-acting.
Figure 29 Magnetic circuit breaker
A thermal circuit breaker utilises a bi-metallic strip (two dissimilar metals bonded together) which, when heated by the current, bends thus opening the contacts when the rated current is reached. The contacts are latched open and must be reset manually. This type is slower-acting.

ELECTRICAL SYSTEMS TL 3.26
Issue 2 5 October 2017
TL 3.26 Electrical sytems Page 31 of 42
Figure 30 Thermal circuit breaker
4.10 Warning lights Automotive types tend to be of poor quality. LED types intended for industrial applications are strongly recommended. When warning lights are used to indicate the position of a system which is electrically operated (e.g. an electrically retractable undercarriage), avoid connecting the indicator lights to the same circuits as the motors or servos that drive the system – make them an independent system so that a single failure which affects the operation of the system is not masked by the same fault affecting the indicating system. For example, the ‘undercarriage down and locked’ light should be activated by a separate microswitch from the one that stops the retraction motor when it reaches the ‘wheels down’ position. 4.11 Instrument panels When cutting holes in instrument panels, large diameter drills tend to snag and pull through violently – better to drill a pilot hole then open out with a “step drill”. Note that on some aircraft types, the instrument panel forms part of the aircraft structure and must not be significantly altered without reference to LAA Engineering. 4.12 Sensors Some temperature monitoring instruments use thermocouples to sense temperature. These rely on the voltage generated by two dissimilar metals in contact when heated. The voltage is small (approximately 4mV at 100ºC for a type-K thermocouple) and will be easily disrupted by unintended resistance. Since any joint in the circuit is liable to introduce its own thermoelectric voltage it is vital to follow the manufacturer’s instructions to the letter. Do not splice or use different connectors or solder or even shorten the wire unless it is specifically allowed. 4.13 Power outlets The rise of the tablet computer and similar devices has brought about the requirement for USB charging sockets to power the devices from the aircraft system. These are invariably dc/dc converters which use high speed switching techniques to convert from the system power voltage to 5V. The big problem is that some of these devices emit enough radio frequency interference to swamp the aircraft’s VHF radio and most manufacturers do not indicate the level of interference produced. There are EASA certified devices available but they are very expensive (e.g. True Blue Power TA102 dual USB Socket £250). A solution that usually works (but not always) is to solder a 0.1 microfarad ceramic capacitor across the input terminals. PilotAware recommend the use of Anker PowerCore 20100 or 10000 as USB power supplies for their units, and these may be worth trying.

ELECTRICAL SYSTEMS TL 3.26
Issue 2 5 October 2017
TL 3.26 Electrical sytems Page 32 of 42
5 MAINTENANCE AND INSPECTION 5.1 Maintenance 5.1.1 Daily
• Whilst checking oil level, control cables, etc, look at any visible wiring and connectors for signs of damage.
• Check the voltage indication: o Before starting – in a nominally 12 volt system, less than 12.5V may indicate a
weak or discharged battery. Check the charge fault lamp is illuminated. o While cranking – check for significant deviation from the norm. o Running – 13.6 to 14.2V is the normal range but deviation from norm is the primary
interest. Check the charge fault lamp is not illuminated
5.1.2 Annually • Very carefully check the insulation of the unprotected (by fuse or CB) cabling between
battery and starter. Undo ties, if necessary, to see hidden areas then re-attach. • Check all other insulation as closely as practical. • Undo the connections of the heavy starter cables, engine and battery earth straps. Check
for cleanliness and signs of corrosion – light corrosion should be cleaned off and anti-corrosion fluid applied before re-connecting. Heavy corrosion indicates that the connector should be replaced. Note that this also applies to items that are earthed via their mounting e.g. alternator, starter motor, Rotax voltage regulator.
• Check for signs of corrosion at all connections. • Check for signs of distress in all wiring insulation, especially near connections, for cracking
or discolouration (which may indicate heating). • Check at connectors for signs of broken wire strands. • Check all connectors are fully engaged. • Check for any movement between connector blades and the item they are attached to.
Sometimes a riveted or staked blade can work loose. • Battery capacity check – It is the LAA’s view that a battery capacity check is not
required as part of the annual maintenance schedule of a VFR only aircraft. The owner must determine when the battery is coming to the end of its useful life and should be replaced.
5.2 Inspection checklist Recommended minimum for VFR daytime flight
1. Battery secure. 2. High current cabling well protected and lashed down securely. Boots on live terminals. 3. All wiring must be suitable quality. 4. Engine earth strap present and secure – good connection to battery negative. 5. Appropriate fuse mounted as close as possibly to the point of connection between
battery/high current cabling and the power distribution system. 6. All wiring (except battery/starter cable) protected by appropriate fuses or circuit breakers.
As a minimum if, say, all wiring is rated at 20A then a single 20A fuse (as in Figure 10) will suffice. Any wiring rated below 20A would require further protection.
7. Safety-critical switches (such as ignition/mag, landing gear, variable pitch propeller) a. High quality, specifically designed to withstand vibration and moisture ingress. b. Connections to a high standard.
8. Switch sense – down/aft = OFF 9. Wiring

ELECTRICAL SYSTEMS TL 3.26
Issue 2 5 October 2017
TL 3.26 Electrical sytems Page 33 of 42
a. Firewall forward – closely supported against vibration and protected from heat and abrasion. Avoid oil traps.
b. Firewall aft - supported against vibration and protected from abrasion.

ELECTRICAL SYSTEMS TL 3.26
Issue 2 5 October 2017
TL 3.26 Electrical sytems Page 34 of 42
6 TOOLS AND TECHNIQUES As with any construction task, an investment in a few good quality tools will pay dividends in the long run. 6.1 Mulitmeters
Figure 31 Multimeter
A multimeter is an essential diagnostic tool when dealing with electrical systems.
With the range set to DC Volts , if the red lead is touched to a battery’s positive terminal (“+”) and the black lead to its negative terminal (“-“) the reading will be “+12” (approximately). Reverse the leads and the reading will be “-12”. This is a “polarity” check. If equipment is connected with the wrong polarity it may be badly damaged. By always having the black lead connected to the common earth point, all voltages in the system should read a positive value.
The resistance range is used to check continuity, that is, a continuous copper wire route via switches etc. With the leads not connected, infinite ohms is indicated (typically displayed as “O.L.”). With leads touched together or measuring continuity, a very low resistance is shown: typically well under 1 ohm (1W). 6.2 System testing It is entirely possible to switch on your completed system for the first time only to find your expensive glass cockpit “goes up in smoke”. Wiring errors are common especially if the builder is new to this work. Thorough checking is essential before powering up. Procedure: A multimeter with a resistance measurement function is needed.
1. Disconnect the battery negative lead. 2. Disconnect any expensive electronic equipment.
3. Set the multi-meter to its resistance range .

ELECTRICAL SYSTEMS TL 3.26
Issue 2 5 October 2017
TL 3.26 Electrical sytems Page 35 of 42
4. Select all switches “OFF”. 5. Check between the battery positive connecting cable and the common earth point that
infinite ohms is displayed. 6. Select all switches “ON”. 7. For every load:
a. Check between its common terminal and the common earth point that zero ohms is displayed1.
b. Check between its positive terminal and the master/power bus that zero ohms is displayed.1
c. Check that a much higher reading is seen between its common terminal and its positive terminal (typically a few ohms).
8. Check between the master/power bus and the battery positive connecting cable that zero ohms is displayed.
9. Select all switches “OFF”. 10. For the radio and transponder aerial cables:
a. Check for zero resistance between the connector centre pins at each end. b. Check for zero resistance between the connector bodies at each end. c. Check for infinite ohms between connector centre pin and body at one end.
11. Set the multi-meter to its DC Voltage range . 12. Reconnect the battery negative.
Note: Do not power the radio or transponder without the correct aerial connected as damage may result.
13. Select the Master Switch “ON”. 14. For each expensive load, check for the correct supply voltage and polarity at the plug
before connecting it. 15. Check each connected load for correct function.
6.3 Supplied wiring harnesses for avionics Many companies offer pre-made wiring harnesses. These normally take the form of a pre-wired connector with coloured or marked wires cut to a length that would suit most aircraft and can save significant time in making up your own harnesses. However:
• Never assume that the connectors have been wired correctly. Always use a multi-meter to ‘pin out’ your pre made harness to ensure that it has been wired up correctly. It is rare to find a mistake in these harnesses but if you are the unfortunate recipient it could cause very expensive smoke to emanate from your new avionics and take a long time to locate.
• Many pre-made harnesses do not include every pin in the connector that has potential functionality: some manufacturers only include the most commonly used pins and functions. You may therefore have to add additional wires to such connectors to implement all the functionality of your avionics.
6.4 Wire stripping The object is to remove a length of insulation without damaging the copper conductors inside. Any nick in the copper will be a stress raiser which may lead to premature failure. 1 If the load is connected by a plug, remove the plug and measure at the appropriate pins.

ELECTRICAL SYSTEMS TL 3.26
Issue 2 5 October 2017
TL 3.26 Electrical sytems Page 36 of 42
Automatic stripper: medium cost but can break strands if not carefully adjusted. Works well with PVC insulation but tends to skid on Terfzel.
Traditional stripper: medium cost and works well with careful adjustment (needs careful re-setting to each wire size)
Expensive but the best: used by the aerospace industry and the military.
Bad strip indications:
1. Cut strands 2. Nicked strands 3. Incorrect length 4. Strands sticking out 5. Tinning layer scraped off exposing bare copper
Stripping Terfzel insulation can be quite challenging but with some practice a good job can be achieved. Bob Nuckolls has a good article on the subject on his website.
6.5 Soldering There are many guides to soldering on the web, both documents and video. It is worth viewing a selection to get a feel for what is required. Good soldering requires skill which can be developed with practice. Don’t practice on your aeroplane! When soldering wire it is easy to cause the wire to become solid rather than flexible introducing a stress point than can break with vibration of continual flexing. For this reason crimping is preferred by aerospace manufacturers. Crimping is also produces more repeatable results and is a safer process (no heat involved). Lead solder is easier to use and more reliable than “lead free” solder. The aerospace industry has an exemption for this reason. It can still be obtained and is strongly recommended. Avoid inhaling the fumes and wash hands after use. Temperature controlled soldering irons are relatively expensive but highly recommended: most soldering problems are due to the wrong iron temperature (usually too little heat).

ELECTRICAL SYSTEMS TL 3.26
Issue 2 5 October 2017
TL 3.26 Electrical sytems Page 37 of 42
Figure 32 Temperature controlled soldering iron
A 50W rating is adequate for most aircraft wiring if temperature controlled.
Figure 33 Gas soldering iron
Gas powered irons are useful on the airfield and double up as heat guns for heat shrink tubing. They are not temperature controlled so are only recommended for on-site repairs. Soldering method:
1. Pre-tinning: plain copper or brass (both wire and terminals) should be tinned before attempting to solder. Coat each in flux paste then feed a little solder onto the tip of the iron then apply the molten blob to the metal to be tinned. Wait for 2 or 3 seconds – the solder should start to “wet” the metal. Then apply a little more solder as required, moving the iron if necessary to ensure coverage. Stranded copper wire will “wick” the solder towards the insulated section.
o Any trace of oil, grease or corrosion will make this process difficult or impossible. o Old copper wire may have oxidised making it very difficult to tin.
2. Positioning: if the two parts to be joined are allowed to move while the solder solidifies a “dry” joint will result (a matt grey surface indicates this condition). It is important to bend the wire around or through the terminal (or twist two wires together) to create a mechanical joint to avoid such movement.
3. Soldering: touch the iron against the joint area and feed in a little solder. Wait around 3 seconds before removing the heat. A good joint will display a shiny, silver colour.
Bad joint indications: • Solder not “wetting” • Not enough solder – wire strands clearly visible • Too much solder (may be acceptable if it causes no problem) • Wire strands “escaped” • Matt grey surface (either the joint moved or the iron is not hot/powerful enough) • Solder “wicked” under wire insulation

ELECTRICAL SYSTEMS TL 3.26
Issue 2 5 October 2017
TL 3.26 Electrical sytems Page 38 of 42
• Wire insulation burned or melted • Excessive bare wire between joint and insulation • Wire separates with a moderate pull
For the novice, soldering is a skill that needs to be well practised before attempting work on an aircraft. 6.6 Crimping The object of crimping is to crush the copper conductors inside a brass ring to the point where there are no gaps and the metal fuses into a homogenous mass. This requires a specialised tool: it is not acceptable to squeeze the connector with pliers. Never tin the wire end before crimping as solder “relaxes” over time. The use of aerospace quality (typically translucent) crimp terminations is encouraged over automotive opaque types. The advantage of a typical crimp termination is that the insulation is also crimped to prevent bare wire being visible Crimp tools – “pre insulated” connectors:
Cheap but not so cheerful when the crimp fails in flight.
More expensive but note the toggle action that increases the squeeze pressure and ratchet that forces the operator to complete the crimp cycle.
Method:
1. Select the connector colour appropriate to the wire gauge. 2. Strip the correct length – the wire ends should just show through the inner end of crimped
section and the insulation should butt up to the outer end (inside the outer sleeve). 3. Place the connector in the crimp tool in the correct orientation and grip lightly. 4. Insert the wire fully holding it gently in place. 5. Close the handles fully.
A maximum of two wires may be inserted into each connector – make sure that the crimp is suitable for the total cross sectional area.

ELECTRICAL SYSTEMS TL 3.26
Issue 2 5 October 2017
TL 3.26 Electrical sytems Page 39 of 42
Bad crimp indications: 1. Wire end not visible 2. Wire end extends too far (interfering with connection) 3. Wire visible between insulation and connector 4. Wire strands “escaped” 5. Crimp impression not central 6. Insulation not gripped 7. Wire separates with a moderate pull
Figure 34 Poor crimp connection
These wires were stripped too far back. Once set up correctly, crimping requires less skill than soldering but practice is still required.
Figure 35 Good crimp connection
Checking the crimp size: make a trial crimp, cut off the insulation and check for bad indicators, as above. Cut across the crimp with a fine saw then polish the cut with fine emery paper. Using a strong magnifying glass, check that there are no voids.

ELECTRICAL SYSTEMS TL 3.26
Issue 2 5 October 2017
TL 3.26 Electrical sytems Page 40 of 42
7 FURTHER READING AND REFERENCE 7.1 Publications LAA Technical Leaflets:
• TL 1.10 List of aircraft parts/materials suppliers • TL 3.03 Avionics installations • TL 3.14 Radio interference • TL 3.18 Aircraft ELT installations • TL 3.20 EFIS in LAA aircraft • TL 3.21 Cockpit controls
LAA Standard Modification (Europa) 10404 Over-voltage Crowbar Unit Installation Books:
• Crane, Dale. (2011). Aviation Mechanic Handbook. Sixth edition. ISBN 978-1-56027-898-6
• Nuckolls, Robert L. (2014). AeroElectric Connection. Twelfth edition. Certification standards: CS-VLA This is a comprehensive document which should be consulted by anyone
building or operating a permit aircraft other than a microlight. Paragraph 1351 “Electrical Systems and Equipment” is the part of interest here but is too big to include in this document.
CAP 482 BCAR Section S
This is a comprehensive document which should be consulted by anyone building or operating a microlight aircraft. The following relevant items are extracted from various pages of the document for convenience (Issue 631 May2013). S779 a) Switch sense – down for OFF S901 c) Engine must be electrically bonded to aircraft structure (if conductive) S1145 c) Ignition switches must be guarded against inadvertent operation. S1145 d) Ignition switches must not be used as the master switch for other circuits S1365 a) Each cable must be of adequate capacity and correctly routed, attached and connected so as to minimise possibility of shorts and fire hazards. S1365 b) Overload protection must be provided for each item of equipment. No protective device may protect more than one circuit essential to flight safety.
ASTM F2639 Standard practice for design, alteration and certification of airplane electrical wiring systems
ASTM F2490 Standard guide for aircraft electrical load and power source capacity analysis
ASTM F2696 Standard practice for inspection of airplane electrical wiring systems ASTM F2799 Standard practice for maintenance of airplane electrical wiring systems
Miscellaneous:
• IPC standards IPC DRM-WHA-A • CAA CAP 562, Civil Aircraft Airworthiness Information and Procedures, contains a huge
amount of technical and procedural information - Chapter 24 “Electrical Power” is of most relevance here.
• FAA AC 43.13-1B, Chapter 11.

ELECTRICAL SYSTEMS TL 3.26
Issue 2 5 October 2017
TL 3.26 Electrical sytems Page 41 of 42
7.2 Wiring diagram symbols There is no universal set of symbols for electrical diagrams but most are self-explanatory. A selection of symbols is shown below to cover the diagrams ion this document. Note that “NO” = Normally Open and “NC” = Normally Closed.
7.3 Sources of components and tools These are offered as starting points – the LAA has no connection with any of the listed companies and cannot endorse them. Aircraft Spruce (USA) http://www.aircraftspruce.com Aircraft Spruce (Germany) http://www.aircraftspruce.eu Sandalwood Services http://sandalwoodservices.com LAS Aerospace http://www.lasaero.com GEM Cable Solutions http://www.gemcable.co.uk Vehicle Wiring Products http://www.vehicle-wiring-products.eu Sharpmark Solutions http://www.sharpmark.com RS Components http://uk.rs-online.com Farnell Electronics http://uk.farnell.com Perihelion Design http://www.periheliondesign.com B&C Speciality Products http://www.bandc.biz Holden Vintage & Classic http://www.holden.co.uk Rapid Online http://www.rapidonline.com

ELECTRICAL SYSTEMS TL 3.26
Issue 2 5 October 2017
TL 3.26 Electrical sytems Page 42 of 42
Ideal Industries http://www.idealindustries.co.uk Mouser Electronics http://www.mouser.co.uk Gloster Air Parts http://www.glosterairparts.co.uk