TIENet™ 360 LaserFlow™ Velocity Sensor - teledyneisco.com Meter... · Foreword This instruction...
136
TIENet™ 360 LaserFlow™ Velocity Sensor Installation and Operation Guide Part #69-4363-043 Copyright © 2012. All rights reserved, Teledyne Isco Revision D, February 2015
-
Upload
duongtuong -
Category
Documents
-
view
220 -
download
0
Transcript of TIENet™ 360 LaserFlow™ Velocity Sensor - teledyneisco.com Meter... · Foreword This instruction...

TIENet™ 360 LaserFlow™Velocity Sensor
Installation and Operation Guide
Part #69-4363-043Copyright © 2012. All rights reserved, Teledyne IscoRevision D, February 2015


Foreword
This instruction manual is designed to help you gain a thorough understanding of the operation ofthe equipment. Teledyne Isco recommends that you read this manual completely before placing theequipment in service.
Although Teledyne Isco designs reliability into all equipment, there is always the possibility of amalfunction. This manual may help in diagnosing and repairing the malfunction.
If a problem persists, call or e-mail Teledyne Isco technical support for assistance. Simple difficul-ties can often be diagnosed over the phone. For faster service, please have your serial numberready.
If it is necessary to return the equipment to the factory for service, please follow the shippinginstructions provided by technical support, including the use of the Return Merchandise Authori-zation (RMA) specified. Be sure to include a note describing the malfunction. This will aid inthe prompt repair and return of the equipment.
Teledyne Isco welcomes suggestions that would improve the information presented in this manualor enhance the operation of the equipment itself.
Teledyne Isco is continually improving its products and reserves the right to change productspecifications, replacement parts, schematics, and instructions without notice.
Contact Information
Customer Service
Phone: (800) 228-4373 (USA, Canada, Mexico)
(402) 464-0231 (Outside North America)
Fax: (402) 465-3022
Email: [email protected]
Technical Support
Phone: Toll Free (866) 298-6174 (Samplers, Flow Meters and Multi-parameter Probes)
Toll Free (800) 775-2965 (Syringe Pumps and Liquid Chromatography)
Email: [email protected]
Return equipment to: 4700 Superior Street, Lincoln, NE 68504-1398
Other Correspondence
Mail to: P.O. Box 82531, Lincoln, NE 68501-2531
Email: [email protected]
Revised April 2014

TIENet™ 360 LaserFlow™ Velocity SensorSafety
v
TIENet™ 360 LaserFlow™ Velocity SensorSafety
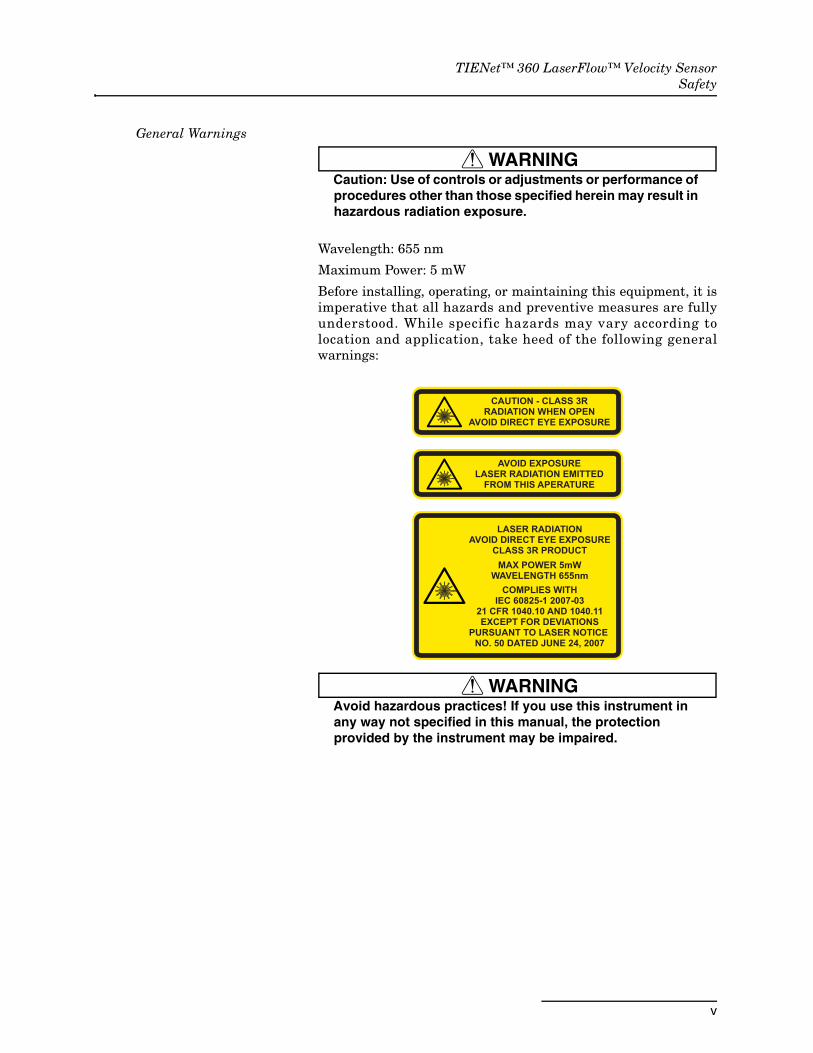
General Warnings
WARNINGCaution: Use of controls or adjustments or performance of procedures other than those specified herein may result in hazardous radiation exposure.
Wavelength: 655 nm
Maximum Power: 5 mW
Before installing, operating, or maintaining this equipment, it isimperative that all hazards and preventive measures are fullyunderstood. While specific hazards may vary according tolocation and application, take heed of the following generalwarnings:
WARNINGAvoid hazardous practices! If you use this instrument in any way not specified in this manual, the protection provided by the instrument may be impaired.

TIENet™ 360 LaserFlow™ Velocity SensorSafety
vi
Hazard Severity Levels This manual applies Hazard Severity Levels to the safety alerts,These three levels are described in the sample alerts below.
CAUTIONCautions identify a potential hazard, which if not avoided, mayresult in minor or moderate injury. This category can also warnyou of unsafe practices, or conditions that may cause propertydamage.
WARNINGWarnings identify a potentially hazardous condition, which if not avoided, could result in death or serious injury.
DANGERDANGER – limited to the most extreme situations to identify an imminent hazard, which if not avoided, will result in death or serious injury.

TIENet™ 360 LaserFlow™ Velocity SensorSafety
vii
Hazard Symbols The equipment and this manual use symbols used to warn ofhazards. The symbols are explained below.
Hazard Symbols
Warnings and Cautions
The exclamation point within the triangle is a warning sign alerting you of important instructions in the instrument’s technical reference manual.
The lightning flash and arrowhead within the triangle is a warning sign alert-ing you of “dangerous voltage” inside the product.
Symboles de sécurité
Ce symbole signale l’existence d’instructions importantes relatives au produit dans ce manuel.
Ce symbole signale la présence d’un danger d’électocution.
Warnungen und Vorsichtshinweise
Das Ausrufezeichen in Dreieck ist ein Warnzeichen, das Sie darauf aufmerksam macht, daß wichtige Anleitungen zu diesem Handbuch gehören.
Der gepfeilte Blitz im Dreieck ist ein Warnzeichen, das Sei vor “gefährlichen Spannungen” im Inneren des Produkts warnt.
Advertencias y Precauciones
Esta señal le advierte sobre la importancia de las instrucciones del manual que acompañan a este producto.
Esta señal alerta sobre la presencia de alto voltaje en el interior del producto.

TIENet™ 360 LaserFlow™ Velocity SensorSafety
viii

vii
TIENet™ 360 LaserFlow™Velocity Sensor
Table of Contents
Section 1 Introduction
1.1 Description. . . . . . . . . . . . . . . . . . . . . . . . . . . . . . . . . . . . . . . . . . . . . . . . . . . . . . . . . 1-11.2 Design . . . . . . . . . . . . . . . . . . . . . . . . . . . . . . . . . . . . . . . . . . . . . . . . . . . . . . . . . . . . 1-2
1.2.1 Measurement Technology . . . . . . . . . . . . . . . . . . . . . . . . . . . . . . . . . . . . . . . 1-21.2.2 Cabling . . . . . . . . . . . . . . . . . . . . . . . . . . . . . . . . . . . . . . . . . . . . . . . . . . . . . . 1-2
1.3 Operation . . . . . . . . . . . . . . . . . . . . . . . . . . . . . . . . . . . . . . . . . . . . . . . . . . . . . . . . . . 1-21.4 Optional Submerged Functionality . . . . . . . . . . . . . . . . . . . . . . . . . . . . . . . . . . . . . 1-31.5 Technical Specifications . . . . . . . . . . . . . . . . . . . . . . . . . . . . . . . . . . . . . . . . . . . . . . 1-41.6 Accessories . . . . . . . . . . . . . . . . . . . . . . . . . . . . . . . . . . . . . . . . . . . . . . . . . . . . . . . . . 1-6
1.6.1 Ordering Information . . . . . . . . . . . . . . . . . . . . . . . . . . . . . . . . . . . . . . . . . . 1-61.7 Unpacking Instructions . . . . . . . . . . . . . . . . . . . . . . . . . . . . . . . . . . . . . . . . . . . . . . 1-8
1.7.1 Protective Window Cap . . . . . . . . . . . . . . . . . . . . . . . . . . . . . . . . . . . . . . . . . 1-8
Section 2 Preparation and Installation
2.1 Safety . . . . . . . . . . . . . . . . . . . . . . . . . . . . . . . . . . . . . . . . . . . . . . . . . . . . . . . . . . . . . 2-12.1.1 Site Conditions . . . . . . . . . . . . . . . . . . . . . . . . . . . . . . . . . . . . . . . . . . . . . . . . 2-1
2.2 Sensor Installation Considerations . . . . . . . . . . . . . . . . . . . . . . . . . . . . . . . . . . . . . 2-22.2.1 Ultrasonic Beam Angle . . . . . . . . . . . . . . . . . . . . . . . . . . . . . . . . . . . . . . . . . 2-22.2.2 High Water Levels . . . . . . . . . . . . . . . . . . . . . . . . . . . . . . . . . . . . . . . . . . . . . 2-22.2.3 Submersion and Fouling . . . . . . . . . . . . . . . . . . . . . . . . . . . . . . . . . . . . . . . . 2-22.2.4 Humidity . . . . . . . . . . . . . . . . . . . . . . . . . . . . . . . . . . . . . . . . . . . . . . . . . . . . 2-22.2.5 Surface . . . . . . . . . . . . . . . . . . . . . . . . . . . . . . . . . . . . . . . . . . . . . . . . . . . . . . 2-32.2.6 Temperature . . . . . . . . . . . . . . . . . . . . . . . . . . . . . . . . . . . . . . . . . . . . . . . . . 2-32.2.7 Waves . . . . . . . . . . . . . . . . . . . . . . . . . . . . . . . . . . . . . . . . . . . . . . . . . . . . . . . 2-32.2.8 Wind . . . . . . . . . . . . . . . . . . . . . . . . . . . . . . . . . . . . . . . . . . . . . . . . . . . . . . . . 2-3
2.3 Installation Checklist . . . . . . . . . . . . . . . . . . . . . . . . . . . . . . . . . . . . . . . . . . . . . . . . 2-32.4 Connecting the Cable . . . . . . . . . . . . . . . . . . . . . . . . . . . . . . . . . . . . . . . . . . . . . . . . 2-3
2.4.1 Cable Connection: Signature Flow Meter . . . . . . . . . . . . . . . . . . . . . . . . . . 2-32.4.2 Remote Ultrasonic Cable Connection:
310 Ultrasonic Sensor . . . . . . . . . . . . . . . . . . . . . . . . . . . . . . . . . . . . . . . . . . 2-82.4.3 Cable Connection: 2160 LaserFlow Module . . . . . . . . . . . . . . . . . . . . . . . . . 2-9
2.5 Sensor Installation Tools and Requirements. . . . . . . . . . . . . . . . . . . . . . . . . . . . . 2-102.5.1 Tools Required . . . . . . . . . . . . . . . . . . . . . . . . . . . . . . . . . . . . . . . . . . . . . . . 2-102.5.2 Sensor and Mounting Equipment Dimensions . . . . . . . . . . . . . . . . . . . . . 2-102.5.3 Sensor Positioning and Requirements . . . . . . . . . . . . . . . . . . . . . . . . . . . . 2-15
2.6 Wall Mounting Kit . . . . . . . . . . . . . . . . . . . . . . . . . . . . . . . . . . . . . . . . . . . . . . . . . 2-172.6.1 Wall Mount Installation . . . . . . . . . . . . . . . . . . . . . . . . . . . . . . . . . . . . . . . 2-18
2.7 Temporary Mounting Kit . . . . . . . . . . . . . . . . . . . . . . . . . . . . . . . . . . . . . . . . . . . . 2-222.7.1 Temporary Mounting Installation . . . . . . . . . . . . . . . . . . . . . . . . . . . . . . . 2-232.7.2 Offset Carrier from Cargo Bar . . . . . . . . . . . . . . . . . . . . . . . . . . . . . . . . . . 2-27
2.8 Optional Sensor Retrieval Arm . . . . . . . . . . . . . . . . . . . . . . . . . . . . . . . . . . . . . . . 2-282.9 Optional Sunshade . . . . . . . . . . . . . . . . . . . . . . . . . . . . . . . . . . . . . . . . . . . . . . . . . 2-302.10 Remote TIENet™ Model 310 Ultrasonic Level Sensor . . . . . . . . . . . . . . . . . . . . 2-31

TIENet™ 360 LaserFlow™ Velocity SensorTable of Contents
viii
Section 3 Setup with Signature® Flow Meter
3.1 Configuring the System . . . . . . . . . . . . . . . . . . . . . . . . . . . . . . . . . . . . . . . . . . . . . . 3-13.1.1 Updating the Device List . . . . . . . . . . . . . . . . . . . . . . . . . . . . . . . . . . . . . . . . 3-1
3.2 Measurement Setup . . . . . . . . . . . . . . . . . . . . . . . . . . . . . . . . . . . . . . . . . . . . . . . . . 3-43.2.1 360 Level . . . . . . . . . . . . . . . . . . . . . . . . . . . . . . . . . . . . . . . . . . . . . . . . . . . . 3-53.2.2 360 Velocity . . . . . . . . . . . . . . . . . . . . . . . . . . . . . . . . . . . . . . . . . . . . . . . . . . 3-53.2.3 LaserFlow Velocity Advanced Settings . . . . . . . . . . . . . . . . . . . . . . . . . . . . 3-53.2.4 Adjust 350 Level (Optional) . . . . . . . . . . . . . . . . . . . . . . . . . . . . . . . . . . . . . 3-83.2.5 350 Velocity (Optional) . . . . . . . . . . . . . . . . . . . . . . . . . . . . . . . . . . . . . . . . . 3-93.2.6 350 Advanced Settings (Optional) . . . . . . . . . . . . . . . . . . . . . . . . . . . . . . . 3-10
3.3 360 Velocity Grid. . . . . . . . . . . . . . . . . . . . . . . . . . . . . . . . . . . . . . . . . . . . . . . . . . . 3-123.4 Sensor Positioning and Adjustment. . . . . . . . . . . . . . . . . . . . . . . . . . . . . . . . . . . . 3-13
3.4.1 Centering the LaserFlow Sensor . . . . . . . . . . . . . . . . . . . . . . . . . . . . . . . . 3-133.4.2 Laser Velocity Measurement Point Selection . . . . . . . . . . . . . . . . . . . . . . 3-133.4.3 Ultrasonic Level Adjustment . . . . . . . . . . . . . . . . . . . . . . . . . . . . . . . . . . . 3-14
3.5 Contact Teledyne Isco . . . . . . . . . . . . . . . . . . . . . . . . . . . . . . . . . . . . . . . . . . . . . . . 3-15
Section 4 Setup with 2160 LaserFlow Module
4.1 Activating Connected Sensors . . . . . . . . . . . . . . . . . . . . . . . . . . . . . . . . . . . . . . . . . 4-14.2 Measurement Display and Settings . . . . . . . . . . . . . . . . . . . . . . . . . . . . . . . . . . . . . 4-3
4.2.1 360 Level . . . . . . . . . . . . . . . . . . . . . . . . . . . . . . . . . . . . . . . . . . . . . . . . . . . . 4-54.2.2 360 Velocity . . . . . . . . . . . . . . . . . . . . . . . . . . . . . . . . . . . . . . . . . . . . . . . . . . 4-74.2.3 Advanced Settings . . . . . . . . . . . . . . . . . . . . . . . . . . . . . . . . . . . . . . . . . . . . . 4-84.2.4 350 Level (Optional) . . . . . . . . . . . . . . . . . . . . . . . . . . . . . . . . . . . . . . . . . . 4-144.2.5 350 Velocity (Optional) . . . . . . . . . . . . . . . . . . . . . . . . . . . . . . . . . . . . . . . . 4-16
4.3 Sensor Positioning and Adjustment. . . . . . . . . . . . . . . . . . . . . . . . . . . . . . . . . . . . 4-174.3.1 Centering the LaserFlow Sensor . . . . . . . . . . . . . . . . . . . . . . . . . . . . . . . . 4-174.3.2 Laser Velocity Measurement Point Selection . . . . . . . . . . . . . . . . . . . . . . 4-18
Section 5 Maintenance and Optional Kits
5.1 Maintenance . . . . . . . . . . . . . . . . . . . . . . . . . . . . . . . . . . . . . . . . . . . . . . . . . . . . . . . 5-15.2 Firmware Updates . . . . . . . . . . . . . . . . . . . . . . . . . . . . . . . . . . . . . . . . . . . . . . . . . . 5-2
5.2.1 With Signature Flow Meter . . . . . . . . . . . . . . . . . . . . . . . . . . . . . . . . . . . . . 5-25.2.2 With 2160 LaserFlow Module . . . . . . . . . . . . . . . . . . . . . . . . . . . . . . . . . . . . 5-2
5.3 Cleaning the Sensor Housing . . . . . . . . . . . . . . . . . . . . . . . . . . . . . . . . . . . . . . . . . . 5-25.4 Accessing the LaserFlow’s Nose Piece . . . . . . . . . . . . . . . . . . . . . . . . . . . . . . . . . . . 5-2
5.4.1 Removing the Nose Piece . . . . . . . . . . . . . . . . . . . . . . . . . . . . . . . . . . . . . . . 5-35.4.2 Replacing the Nose Piece . . . . . . . . . . . . . . . . . . . . . . . . . . . . . . . . . . . . . . . . 5-4
5.5 Velocity Readings and the Laser Window . . . . . . . . . . . . . . . . . . . . . . . . . . . . . . . . 5-55.6 Cleaning the Laser Window . . . . . . . . . . . . . . . . . . . . . . . . . . . . . . . . . . . . . . . . . . . 5-55.7 Installing the Optional Submerged Measurement Kit . . . . . . . . . . . . . . . . . . . . . . 5-7
5.7.1 Installation Procedure . . . . . . . . . . . . . . . . . . . . . . . . . . . . . . . . . . . . . . . . . . 5-75.8 Installing the Remote TIENet™ 310 Ultrasonic Level Sensor. . . . . . . . . . . . . . . 5-10
Appendix A Replacement Parts
A.1 Replacement Parts Diagrams and Listings . . . . . . . . . . . . . . . . . . . . . . . . . . . . . . A-1A.2 LaserFlow Sensor . . . . . . . . . . . . . . . . . . . . . . . . . . . . . . . . . . . . . . . . . . . . . . . . . . . A-2A.3 Wall Mounting Hardware . . . . . . . . . . . . . . . . . . . . . . . . . . . . . . . . . . . . . . . . . . . . A-8A.4 Temporary Mounting Hardware . . . . . . . . . . . . . . . . . . . . . . . . . . . . . . . . . . . . . . A-10A.5 Replacement Sensors . . . . . . . . . . . . . . . . . . . . . . . . . . . . . . . . . . . . . . . . . . . . . . . A-12A.6 Sensor Accessories . . . . . . . . . . . . . . . . . . . . . . . . . . . . . . . . . . . . . . . . . . . . . . . . . A-12
Appendix B Installation Checklist
TIENet™ 360 LaserFlow™ Velocity SensorTable of Contents
ix
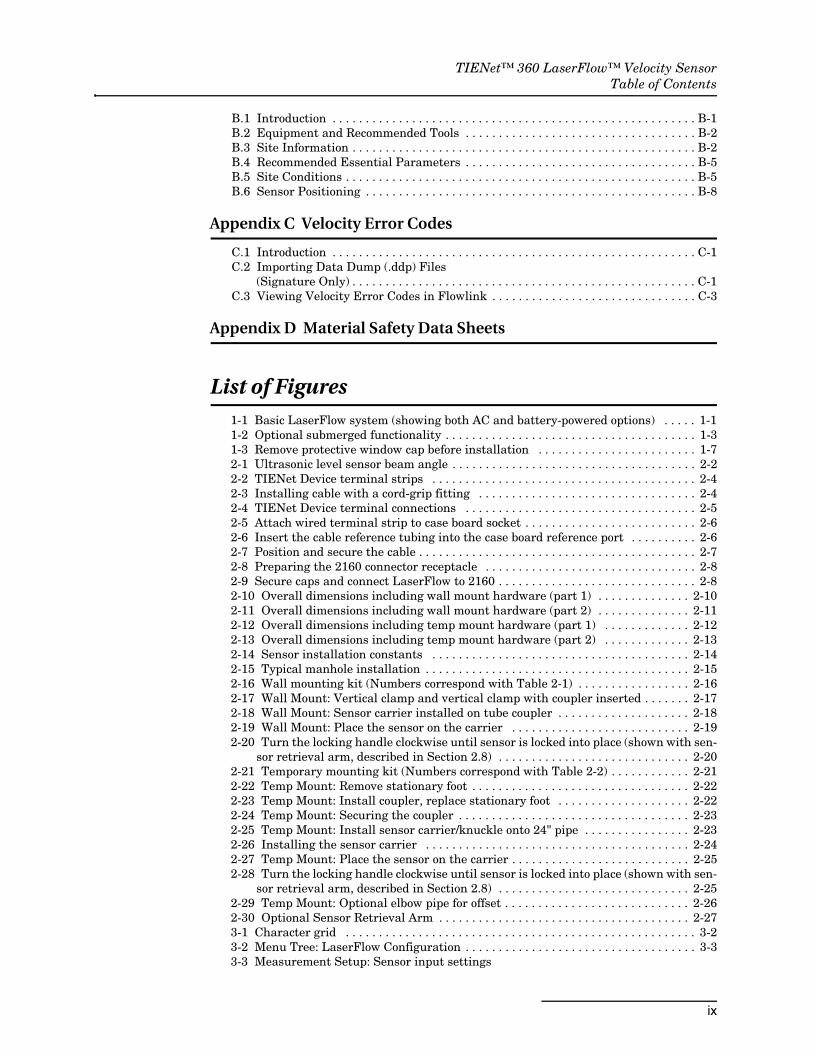
B.1 Introduction . . . . . . . . . . . . . . . . . . . . . . . . . . . . . . . . . . . . . . . . . . . . . . . . . . . . . . . B-1B.2 Equipment and Recommended Tools . . . . . . . . . . . . . . . . . . . . . . . . . . . . . . . . . . . B-2B.3 Site Information . . . . . . . . . . . . . . . . . . . . . . . . . . . . . . . . . . . . . . . . . . . . . . . . . . . . B-2B.4 Recommended Essential Parameters . . . . . . . . . . . . . . . . . . . . . . . . . . . . . . . . . . . B-5B.5 Site Conditions . . . . . . . . . . . . . . . . . . . . . . . . . . . . . . . . . . . . . . . . . . . . . . . . . . . . . B-5B.6 Sensor Positioning . . . . . . . . . . . . . . . . . . . . . . . . . . . . . . . . . . . . . . . . . . . . . . . . . . B-8
Appendix C Velocity Error Codes
C.1 Introduction . . . . . . . . . . . . . . . . . . . . . . . . . . . . . . . . . . . . . . . . . . . . . . . . . . . . . . . C-1C.2 Importing Data Dump (.ddp) Files
(Signature Only) . . . . . . . . . . . . . . . . . . . . . . . . . . . . . . . . . . . . . . . . . . . . . . . . . . . . C-1C.3 Viewing Velocity Error Codes in Flowlink . . . . . . . . . . . . . . . . . . . . . . . . . . . . . . . C-3
Appendix D Material Safety Data Sheets
List of Figures1-1 Basic LaserFlow system (showing both AC and battery-powered options) . . . . . 1-11-2 Optional submerged functionality . . . . . . . . . . . . . . . . . . . . . . . . . . . . . . . . . . . . . . 1-31-3 Remove protective window cap before installation . . . . . . . . . . . . . . . . . . . . . . . . 1-72-1 Ultrasonic level sensor beam angle . . . . . . . . . . . . . . . . . . . . . . . . . . . . . . . . . . . . . 2-22-2 TIENet Device terminal strips . . . . . . . . . . . . . . . . . . . . . . . . . . . . . . . . . . . . . . . . 2-42-3 Installing cable with a cord-grip fitting . . . . . . . . . . . . . . . . . . . . . . . . . . . . . . . . . 2-42-4 TIENet Device terminal connections . . . . . . . . . . . . . . . . . . . . . . . . . . . . . . . . . . . 2-52-5 Attach wired terminal strip to case board socket . . . . . . . . . . . . . . . . . . . . . . . . . . 2-62-6 Insert the cable reference tubing into the case board reference port . . . . . . . . . . 2-62-7 Position and secure the cable . . . . . . . . . . . . . . . . . . . . . . . . . . . . . . . . . . . . . . . . . . 2-72-8 Preparing the 2160 connector receptacle . . . . . . . . . . . . . . . . . . . . . . . . . . . . . . . . 2-82-9 Secure caps and connect LaserFlow to 2160 . . . . . . . . . . . . . . . . . . . . . . . . . . . . . . 2-82-10 Overall dimensions including wall mount hardware (part 1) . . . . . . . . . . . . . . 2-102-11 Overall dimensions including wall mount hardware (part 2) . . . . . . . . . . . . . . 2-112-12 Overall dimensions including temp mount hardware (part 1) . . . . . . . . . . . . . 2-122-13 Overall dimensions including temp mount hardware (part 2) . . . . . . . . . . . . . 2-132-14 Sensor installation constants . . . . . . . . . . . . . . . . . . . . . . . . . . . . . . . . . . . . . . . 2-142-15 Typical manhole installation . . . . . . . . . . . . . . . . . . . . . . . . . . . . . . . . . . . . . . . . 2-152-16 Wall mounting kit (Numbers correspond with Table 2-1) . . . . . . . . . . . . . . . . . 2-162-17 Wall Mount: Vertical clamp and vertical clamp with coupler inserted . . . . . . . 2-172-18 Wall Mount: Sensor carrier installed on tube coupler . . . . . . . . . . . . . . . . . . . . 2-182-19 Wall Mount: Place the sensor on the carrier . . . . . . . . . . . . . . . . . . . . . . . . . . . 2-192-20 Turn the locking handle clockwise until sensor is locked into place (shown with sen-
sor retrieval arm, described in Section 2.8) . . . . . . . . . . . . . . . . . . . . . . . . . . . . . 2-202-21 Temporary mounting kit (Numbers correspond with Table 2-2) . . . . . . . . . . . . 2-212-22 Temp Mount: Remove stationary foot . . . . . . . . . . . . . . . . . . . . . . . . . . . . . . . . . 2-222-23 Temp Mount: Install coupler, replace stationary foot . . . . . . . . . . . . . . . . . . . . 2-222-24 Temp Mount: Securing the coupler . . . . . . . . . . . . . . . . . . . . . . . . . . . . . . . . . . . 2-232-25 Temp Mount: Install sensor carrier/knuckle onto 24" pipe . . . . . . . . . . . . . . . . 2-232-26 Installing the sensor carrier . . . . . . . . . . . . . . . . . . . . . . . . . . . . . . . . . . . . . . . . 2-242-27 Temp Mount: Place the sensor on the carrier . . . . . . . . . . . . . . . . . . . . . . . . . . . 2-252-28 Turn the locking handle clockwise until sensor is locked into place (shown with sen-
sor retrieval arm, described in Section 2.8) . . . . . . . . . . . . . . . . . . . . . . . . . . . . . 2-252-29 Temp Mount: Optional elbow pipe for offset . . . . . . . . . . . . . . . . . . . . . . . . . . . . 2-262-30 Optional Sensor Retrieval Arm . . . . . . . . . . . . . . . . . . . . . . . . . . . . . . . . . . . . . . 2-273-1 Character grid . . . . . . . . . . . . . . . . . . . . . . . . . . . . . . . . . . . . . . . . . . . . . . . . . . . . . 3-23-2 Menu Tree: LaserFlow Configuration . . . . . . . . . . . . . . . . . . . . . . . . . . . . . . . . . . . 3-33-3 Measurement Setup: Sensor input settings

TIENet™ 360 LaserFlow™ Velocity SensorTable of Contents
x
(optional 350 AV Sensor also shown) . . . . . . . . . . . . . . . . . . . . . . . . . . . . . . . . . . . 3-43-4 LaserFlow Ultrasonic Level: Determine blanking distances . . . . . . . . . . . . . . . . . 3-53-5 Measurement setup: Advanced settings for LaserFlow sensor . . . . . . . . . . . . . . . 3-73-6 350 Level adjustment screen . . . . . . . . . . . . . . . . . . . . . . . . . . . . . . . . . . . . . . . . . . 3-73-7 Submerged functionality: Initial 350 Level setting . . . . . . . . . . . . . . . . . . . . . . . . 3-83-8 Measurement setup: Advanced settings for 350 AV sensor . . . . . . . . . . . . . . . . . . 3-93-9 360 Velocity grid . . . . . . . . . . . . . . . . . . . . . . . . . . . . . . . . . . . . . . . . . . . . . . . . . . . 3-103-10 Laser velocity adjustment and positioning - Signature . . . . . . . . . . . . . . . . . . . 3-123-11 Selection of velocity measurement points . . . . . . . . . . . . . . . . . . . . . . . . . . . . . . 3-133-12 Ultrasonic level adjustment . . . . . . . . . . . . . . . . . . . . . . . . . . . . . . . . . . . . . . . . . 3-144-1 Activating connected sensors in Flowlink . . . . . . . . . . . . . . . . . . . . . . . . . . . . . . . . 4-24-2 Measurements Tab: Displays all real-time measurements . . . . . . . . . . . . . . . . . . 4-34-3 Drop down list of measurements for 2160 Module . . . . . . . . . . . . . . . . . . . . . . . . . 4-44-4 360 Level Measurement tab in Flowlink . . . . . . . . . . . . . . . . . . . . . . . . . . . . . . . . 4-54-5 360 Level: Setting blanking distances . . . . . . . . . . . . . . . . . . . . . . . . . . . . . . . . . . 4-64-6 360 Velocity Measurement tab in Flowlink . . . . . . . . . . . . . . . . . . . . . . . . . . . . . . 4-74-7 360 Velocity Tab: Advanced settings . . . . . . . . . . . . . . . . . . . . . . . . . . . . . . . . . . . . 4-84-8 350 Level Measurement tab in Flowlink . . . . . . . . . . . . . . . . . . . . . . . . . . . . . . . . 4-94-9 Submerged functionality: Initial 350 Level setting . . . . . . . . . . . . . . . . . . . . . . . 4-104-10 350 Velocity Measurement tab in Flowlink . . . . . . . . . . . . . . . . . . . . . . . . . . . . 4-114-11 350 Velocity tab: Advanced settings for optional TIENet 350 AV sensor . . . . . 4-124-12 Laser velocity adjustment and positioning - 2160 . . . . . . . . . . . . . . . . . . . . . . . 4-134-13 Selection of velocity measurement points . . . . . . . . . . . . . . . . . . . . . . . . . . . . . . 4-135-1 Remove dome plugs (Bolts located underneath) . . . . . . . . . . . . . . . . . . . . . . . . . . . 5-25-2 Remove large screws and nose piece (3 on each side) . . . . . . . . . . . . . . . . . . . . . . 5-25-3 Location and orientation of cross-pins for mounting block installation . . . . . . . . 5-35-4 Cleaning the laser window: Moisten Kimwipe tissue w/ Rain-X . . . . . . . . . . . . . . 5-55-5 Gas tubing: Remove connector fitting . . . . . . . . . . . . . . . . . . . . . . . . . . . . . . . . . . . 5-75-6 Unscrew cap from gas inlet . . . . . . . . . . . . . . . . . . . . . . . . . . . . . . . . . . . . . . . . . . . 5-75-7 Attach gas tubing to inlet . . . . . . . . . . . . . . . . . . . . . . . . . . . . . . . . . . . . . . . . . . . . 5-85-8 Reassembling LaserFlow: Tubing exits through cable slot . . . . . . . . . . . . . . . . . . 5-95-9 Prepare tubing gas connector for swaging . . . . . . . . . . . . . . . . . . . . . . . . . . . . . . . 5-95-10 Swaging the gas connector on tubing . . . . . . . . . . . . . . . . . . . . . . . . . . . . . . . . . 5-105-11 Swaged connector, ready to attach to gas tank. . . . . . . . . . . . . . . . . . . . . . . . . . 5-105-12 350 AV sensor with mounting plate . . . . . . . . . . . . . . . . . . . . . . . . . . . . . . . . . . 5-115-13 Mounting the integrated 350 AV sensor on the LaserFlow . . . . . . . . . . . . . . . . 5-125-14 Connecting the 350 AV sensor to the LaserFlow . . . . . . . . . . . . . . . . . . . . . . . . 5-135-15 Reassembling the LaserFlow w/ AV sensor installed . . . . . . . . . . . . . . . . . . . . . 5-14C-1 Signature flow data: Selecting the .ddp file(s) . . . . . . . . . . . . . . . . . . . . . . . . . . . . C-1C-2 Signature flow data: Importing the .ddp file . . . . . . . . . . . . . . . . . . . . . . . . . . . . . C-2C-3 Identifying error codes in the 360 Velocity data set . . . . . . . . . . . . . . . . . . . . . . . C-3

1-1
TIENet™ 360 LaserFlow™Velocity Sensor
Section 1 Introduction
1.1 Description The TIENet™ 360 LaserFlow sensor is an Area Velocity flowmeasurement device that remotely measures flow in openchannels with non-contact Laser Doppler Velocity Sensing andnon-contact Ultrasonic Level Sensing technologies. The sensoruses advanced technology to measure velocity with a laser beamat single or multiple points below the surface of the wastewaterstream.
0612 Laser Flow Module
ORAC Powered Sites Battery Powered Sites
Area Velocity
Level
2160 ModuleSignature Meter
The LaserFlow sensor is ideal for abroad range o f wastewatermonitoring applications. It iscompatible with both the TeledyneIsco Signature® Flow Meter andthe Teledyne Isco 2160 LaserFlowModule, depending on the type ofinstallation.
To operate with the LaserFlow, theSignature requires so f twareversion 1.21 or later.

TIENet™ 360 LaserFlow™ Velocity SensorSection 1 Introduction
1-2
Figure 1-1 Basic LaserFlow system (showing both AC and battery-powered options)
1.2 Design The LaserFlow sensor consists of a housing with two mea-surement technologies working together.
1.2.1 Measurement Technology
The laser velocimeter has a laser diode that serves as bothtransmitter and rece iver o f a laser l i ght beam. TheDoppler-shifted signal frequency is used to determine flowstream velocity.
The ultrasonic level transducer determines the stream’s levelby emitting an ultrasonic pulse and measuring the time it takesfor the echo to return from the stream’s surface. The transduceris both pulse transmitter and echo receiver.
1.2.2 Cabling The LaserFlow sensor is available with a 10m or 23m standardlength cable. Custom cable length is also available. For greaterdistances, external connection via conduit, and connection ofadditional TIENet™ devices, the TIENet™ Expansion Box isavailable.
Distance can be increased by installing the TIENet™ ExpansionBox closer to the installed sensor and adding a custom-lengthTIENet™ cable between the box and the Signature® flow meter.The maximum recommended distance between the LaserFlowand the Signature® flow meter is 45.7 meters (150 feet). Themaximum recommended distance between the LaserFlow andthe 2160 LaserFlow module is 22.9 meters (75 feet).
1.3 Operation The laser velocimeter uses a laser beam to generate a sourcefrequency light, which is focused at points below the surface ofthe flow stream. The light is scattered back to the laser. Thereturned light is frequency shifted due to the Doppler effect andthe motion of the flow. The lens that focused the laser light belowthe surface of the flow stream now focuses the returned lightback into the laser. The source light and shifted light frequenciesare mixed to determine a Doppler shift, which is then used to cal-culate flow stream velocity.
The LaserFlow is able to move the laser beam transverse to theflow in order to obtain readings at multiple points in the flow,with automatic compensation to maintain precise focus at alltimes.
The ultrasonic level transducer emits multiple ultrasonicpulses per second. Between pulses, the transducer switches fromtransmitter to receiver. When the transducer receives the echofrom the water’s surface, the sound energy is converted into anelectrical signal. The signal is then amplified and processed bythe flow meter into an “echo-received” signal. The time betweenthe transmitted pulse and the echo-received signal is propor-tional to the distance between the transducer and the liquidsurface, which is then translated into a level reading. Becausethe speed of the pulse through the air varies with temperature,compensation is built-in. A temperature sensor inside the

TIENet™ 360 LaserFlow™ Velocity SensorSection 1 Introduction
1-3
LaserFlow measures ambient temperature. The microprocessorprogram automatically compensates for speed-of-sound changescaused by air-temperature changes.
The LaserFlow operates with no deadband from the mea-surement point for both level and velocity measurement.
1.4 Optional Submerged Functionality
During submerged conditions, flow measurement continueswithout interruption with the optional TIENet™ 350 AV sensor,which combines continuous wave Doppler to measure areavelocity with a differential pressure transducer to measure level.
The 350 AV sensor is factory-installed on the bottom of theLaserFlow sensor, and is also available as a kit for installation inan existing system. Refer to Section 5.7 for kit installationinstructions.
Figure 1-2 Optional submerged functionality
Level(pressure transducer)
Area Velocity(CWD)

TIENet™ 360 LaserFlow™ Velocity SensorSection 1 Introduction
1-4
1.5 Technical Specifications
Table 1-1 provides technical specifications for the LaserFlow.
Table 1-1 LaserFlow Sensor Specificationsa
Size (H x W x D) 38.01 x 26.21 x 56.7 cm 14.96 x 10.3 x 22.32 in
Cable Lengthsb 10 or 23 m 32.8 or 75.5 ftThe maximum recommended distance between the Laser-Flow and the Signature® flow meter is 45.7 meters (150 feet). The maximum recommended distance between the LaserFlow and the 2160 LaserFlow module is 23 meters (75.5 feet).
Weight (LaserFlow w/ built-in sensor, 10 m cable)Sensor w/o built-in sensor, 10 m cableLaserFlow w/ built-in sensor, 350 AV Sensor
8.7 kg 19.2 lbs8.25 kg 18.2 lbs9 kg 20 lbs
Materials Conductive Carbon Filled ABS Plastic, SST, Conductive Kynar®c, Anodized Aluminum, UV Rated PVC
Enclosure (self-certified) IP68 (Submerged @ 2 m depth for 72 hrs)
Certifications CE EN61326; FDA CDRH 21CFR1040; IEC 60825-1
Laser Class Class 3R
Laser Wavelength 655 nm
Laser Exit Angle 45° ±3°
Power (from connected flow meter/module) Input voltage range: 8 to 26VDC; 12VDC Nominal
Electrical Connections Signature Flow Meter Screw Terminal2160 LaserFlow Module TIENet™ Plug
Temperature Range Operating: -20 to 60 °C -4 to 140 °FStorage: -40 to 60 °C -40 to 140 °F
Flow Accuracy ±4% of Reading (Typical under normal flow conditions)
Velocity Measurement
Technology Non-Contact, Subsurface Laser Doppler Velocity(U.S. patent 8,339,584 and patents pending)
Measurement Range -4.6 to + 4.6 m/sec -15 to +15 ft/sec
Number of velocity readings per measurement 1 to 15 (selectable measurement points)
Maximum distance: liquid surface to bottom of sensor 3m (10 ft)
Minimum depth for velocity measurement 0.01m (0.5 in)
Direction Selectable Bi-Directional Measurementd
Minimum Velocity 0.15 m/s 0.5 ft/s
Deadband Zero deadband from bottom of LaserFlow sensord
Accuracy ±0.5% of reading ±0.03 m/s (0.1 ft/s)

TIENet™ 360 LaserFlow™ Velocity SensorSection 1 Introduction
1-5
Level Measurement
Technology Non-Contact Ultrasonic Signal
Measurement Range 0 to 3 m (0 to 10 ft) from measurement point
Accuracy @ 22 °C ±0.006m (0.02 ft) at < 1ft level change;±0.012m (0.04 ft) at > 1ft level change
Ultrasonic Temperature Coefficient ± 0.0002 x D (m) per °C (± 0.00011 x D (ft) per °F)(Where D is the distance from transducer to liquid surface)
Ultrasonic Beam Angle 10° (5° from center line)
Ultrasonic Signal 50KHz
Deadband Zero deadband from bottom of LaserFlow sensore
a. All specifications are subject to change without notice.
b. Custom cable lengths also available.
c. Kynar® is a registered trademark of Arkema, Inc.d. Turbidity > 20 NTU. Distance < 48 inches.
e. Deadband for 310 remote ultrasonic sensor varies due to the type of mounting hardware.
Table 1-1 LaserFlow Sensor Specificationsa (Continued)

TIENet™ 360 LaserFlow™ Velocity SensorSection 1 Introduction
1-6
1.6 Accessories Accessories used in sensor installation are briefly describedbelow. Refer to the next section for ordering information.
1.6.1 Ordering Information Options and accessories can be purchased by contacting TeledyneIsco’s Customer Service Department.
Teledyne IscoCustomer Service Dept.P.O. Box 82531Lincoln, NE 68501 USA
Phone: 800 228-4373402 464-0231
FAX: 402 465-3022
E-mail: [email protected]
TIENet™ Expansion Box......................................................................................................... 60-4307-023
Cord grip fitting, 3/4" NPT, for TIENet™ cable ....................................................................... 209-0073-12Integrated 350 AV Kit for surcharge functionality................................................................. 60-4354-017Signature Flow Meter Exterior desiccator
(required for use with 330 and 350 TIENet™ devices)....................................................... 60-4354-019Silica gel desiccant, 1.5-lb container ....................................................................................... 099-0011-03
NoteGuidelines for Area Velocity reference line support and net-working with the expansion box can be downloaded in theTeledyne Isco application note Signature Flow Meter Expan-sion Box, available on the company website. Contact the fac-tory for more information.
LaserFlow Instruction Manual................................................................................................ 69-4363-043Signature Flow Meter Instruction Manual............................................................................. 69-4303-070Signature Bubbler Flow Meter Instruction Manual .............................................................. 69-4333-004
Permanent Wall Mounting Hardware Kit............................................................................... 60-4364-003Refer to Section 2.6.1 Wall Mount Installation for additional information.
Temp Mount Cargo Bar, 48-55" Variable Range..................................................................... 60-4364-032Temp Mount Cargo Bar, 54-66" Variable Range..................................................................... 60-4364-034Temp Mount Cargo Bar, 63-84" Variable Range..................................................................... 60-4364-035Temp Mount Cargo Bar, 83-114" Variable Range................................................................... 60-4364-036Temp Mount Hardware Assembly........................................................................................... 60-4364-038Temp Mount Kit, 48-55" Variable Range ................................................................................ 62-4364-032Temp Mount Kit, 54-66" Variable Range ................................................................................ 62-4364-034Temp Mount Kit, 63-84" Variable Range ................................................................................ 62-4364-035Temp Mount Kit, 83-114" Variable Range .............................................................................. 62-4364-036Temp Mount Elbow Pipe for Offset ......................................................................................... 60-4368-016
Refer to Section 2.7.1 Temporary Mounting Installation for additional information.
Horizontal Sensor Mount Bracket........................................................................................... 60-4368-020Sensor retrieval arm for sensor retrieval, replacement, and locking
(Maximum extension of 23 feet) ....................................................................................... 60-4364-033

TIENet™ 360 LaserFlow™ Velocity SensorSection 1 Introduction
1-7
ProHanger SST Bracket for suspending equipment in manhole(Up to 24 inches) .............................................................................................................. 69-2003-599
NoteTeledyne Isco uses FreeRTOS version 5.4.2 in its TIENet™devices. In accordance with the FreeRTOS license, FreeRTOSsource code is available on request. For more information, visitwww.FreeRTOS.org.

TIENet™ 360 LaserFlow™ Velocity SensorSection 1 Introduction
1-8
1.7 Unpacking Instructions
When the system arrives, inspect the outside packing for anydamage. Then carefully inspect the contents for damage. If thereis damage, contact the delivery company and Teledyne Isco (or itsagent) immediately.
WARNINGIf there is any evidence that any items may have been damaged in shipping, do not attempt to install the unit. Please contact Teledyne Isco (or its agent) for assistance.
When you unpack the system, check the items against thepacking list. If any parts are missing, contact the deliverycompany and Teledyne Isco’s Customer Service Department.When you report missing part(s), please indicate them by partnumber. In addition to the main packing list, there may be otherpacking lists for various sub-components.
It is recommended that you retain the shipping cartons as theycan be used to ship the unit in the event that it is necessary totransport the system. Please complete the registration card andreturn it to Teledyne Isco.
1.7.1 Protective Window Cap
Leave the protective window cap in place until the sensor isready to be installed.
Before installation, remove the cap. The sensor will not be able tomeasure velocity with the cap in place. Retain the cap for useduring cleaning, storage, or shipment, to protect the laserwindow from damage.
CAUTIONBe sure the protective window cap is installed during cleaning,storage, or shipment.
Figure 1-3 Remove protective window cap before installation

2-1
TIENet™ 360 LaserFlow™Velocity Sensor
Section 2 Preparation and Installation
2.1 Safety Before installing, operating, or maintaining this equipment, it isimperative that all hazards and preventive measures are fullyunderstood.
2.1.1 Site Conditions Components are often installed in confined spaces. Someexamples of confined spaces include manholes, pipelines,digesters, and storage tanks. These spaces may become haz-ardous environments that can prove fatal for those unprepared.These spaces are governed by OSHA 1910.146 and require apermit before entering.
WARNINGThe installation and use of this product may subject you to hazardous working conditions that can cause you serious or fatal injuries. Take any necessary precautions before entering a worksite. Install and operate this product in accordance with all applicable safety and health regulations, and local ordinances.

TIENet™ 360 LaserFlow™ Velocity SensorSection 2 Preparation and Installation
2-2
2.2 Sensor Installation Considerations
Measurement accuracy can be affected by a number of sitefactors that should be taken into consideration when selectingthe location for the sensor.
These factors may affect the laser velocity or the ultrasonic level,or both.
If the laser velocimeter or ultrasonic transducer cannot obtain avalid reading at any measurement point, an asterisk (*) willappear next to the displayed reading, indicating there is an error.
2.2.1 Ultrasonic Beam Angle The ultrasonic level transducer has a 10° beam angle (5° fromcenter line), forming a cone in which the apex is the transducer.The transducer can only detect surfaces within this cone.
Figure 2-1 Ultrasonic level sensor beam angle
The ultrasonic beam narrows as elevation decreases, which canincrease difficulty in detecting the return echo. Narrow channelscan result in false echoes and incorrect level readings from thewalls and sides of the channel.
The beam widens as elevation increases. If the beam is too wide,the sensor may pick up signals from unwanted surfaces, such asthe walls of the channel.
2.2.2 High Water Levels In most open channel installations where the level may exceedone-half of the full pipe, mount the sensor as near as possible tothe midpoint between the entrance and exit to measure over theleast turbulent flow.
2.2.3 Submersion and Fouling
Fouling by grease or solids can cause the LaserFlow sensor tomalfunction. The LaserFlow is sealed, so unless it is exposed tocorrosive substances, submersion will not harm it. Uponretrieval, ensure that the surfaces of the laser window and ultra-sonic sensor are clean.
Cleaning instructions are provided in Section 5.
2.2.4 Humidity Conditions of extremely high or low humidity can cause ultra-sonic level detection to occur either earlier or later than normalconditions. A drop in water level, normally compensated for bythe sensor’s interval-based amplifier, may produce errors in echodetection.
10°
5°

TIENet™ 360 LaserFlow™ Velocity SensorSection 2 Preparation and Installation
2-3
2.2.5 Surface Solids, foam, oil, and turbulence can all absorb or weaken theultrasonic and laser signals, causing errors in detection. Foam oroil on the surface of the stream can also produce false levelreadings.
2.2.6 Temperature Changes in ambient temperature significantly affect the velocityof sound. If ambient temperature changes rapidly, there may be adelay before the temperature sensor of the ultrasonic transducercan activate temperature compensation.
NoteIf the sensor will be installed outdoors in direct sunlight, use asunshade to prevent heating of the sensor housing.
2.2.7 Waves Waves on the surface of the flow stream can deflect the ultrasonicsignal, causing erroneous readings or total loss of signal. Theflow meter software rejects occasional readings that deviate sub-stantially from normal.
2.2.8 Wind Strong winds can significantly reduce the strength of the ultra-sonic return echo. Narrow beams can result in the sound beingblown away; likewise, greater distances to the flow streamsurface are more subject to distortion in strong winds.
2.3 Installation Checklist Prior to installing the system, ensure that you have all suppliesand site information readily available.
To assist you in this preparation, this manual includes theInstallation Checklist, page B-1. Teledyne Isco recommends thatyou print this appendix and fill in the relevant information.
2.4 Connecting the Cable The LaserFlow cable will have one of two different connectortypes : Unterminated for the Signature® Flow Meter(Section 2.4.1), and TIENet plug for the 2160 LaserFlow Module(Section 2.4.3).
Distance can be increased by installing the TIENet ExpansionBox closer to the installed sensor and adding a custom-lengthTIENet cable between the box and the Signature® flow meter.The maximum recommended distance between the LaserFlowand the Signature® flow meter is 45.7 meters (150 feet). Themaximum recommended distance between the LaserFlow andthe 2160 LaserFlow module is 23 meters (75.5 feet).
2.4.1 Cable Connection: Signature Flow Meter
External TIENet devices such as the LaserFlow sensor are con-nected to the Signature flow meter in the same manner, usuallyusing conduit or cord-grip cable fittings. Multiple externalTIENet devices can be connected simultaneously.
Refer to the Signature flow meter manual for instructions onaccessing the instrument’s interior components.

TIENet™ 360 LaserFlow™ Velocity SensorSection 2 Preparation and Installation
2-4
WARNINGBefore proceeding, ensure that the flow meter has been disconnected from mains power.
NoteThe following steps include instructions for installing cord-gripfittings. Some applications may use user-supplied 3/4" ID con-duit for cable routing.
1. Remove one of the 6-position plug-in terminal strip connec-tors from the case board.
Figure 2-2 TIENet Device terminal strips
2. If using a cord-grip fitting, install the cable nut in the appropriate opening on the bottom of the Signature enclo-sure, securing it to the wall with the lock nut (concave side facing wall).
Figure 2-3 Installing cable with a cord-grip fitting
Lock Nut(concave side facing wall)
Cable NutSeal
(color may vary)
Sealing Nut

TIENet™ 360 LaserFlow™ Velocity SensorSection 2 Preparation and Installation
2-5
3. Feed the TIENet device cable end through the sealing nut and seal and through the cable nut. Lightly tighten the sealing nut, just enough to hold the cable in place while installing the connector.
4. Attach the wire ends to the terminal strip as shown in Figure 2-4), then press the terminal strip back down into its socket on the case board, as shown in Figure 2-5, ensur-ing no wire connections are strained. Gently tug each wire when finished, to verify secure connection to the screw ter-minals.
NoteThe SHIELD wire is the bare drain emerging from the foilshie ld around the YELLOW and BROWN wires. TheBRAID-DRAIN wire is the bare drain emerging from the sur-rounding braided shield inside the cable jacket. It is not neces-sary to prevent the two braids from coming into contact witheach other.
Figure 2-4 TIENet Device terminal connections
Braid-Drain
Shield
TIENet™ 360 LaserFlow™ Velocity SensorSection 2 Preparation and Installation
2-6
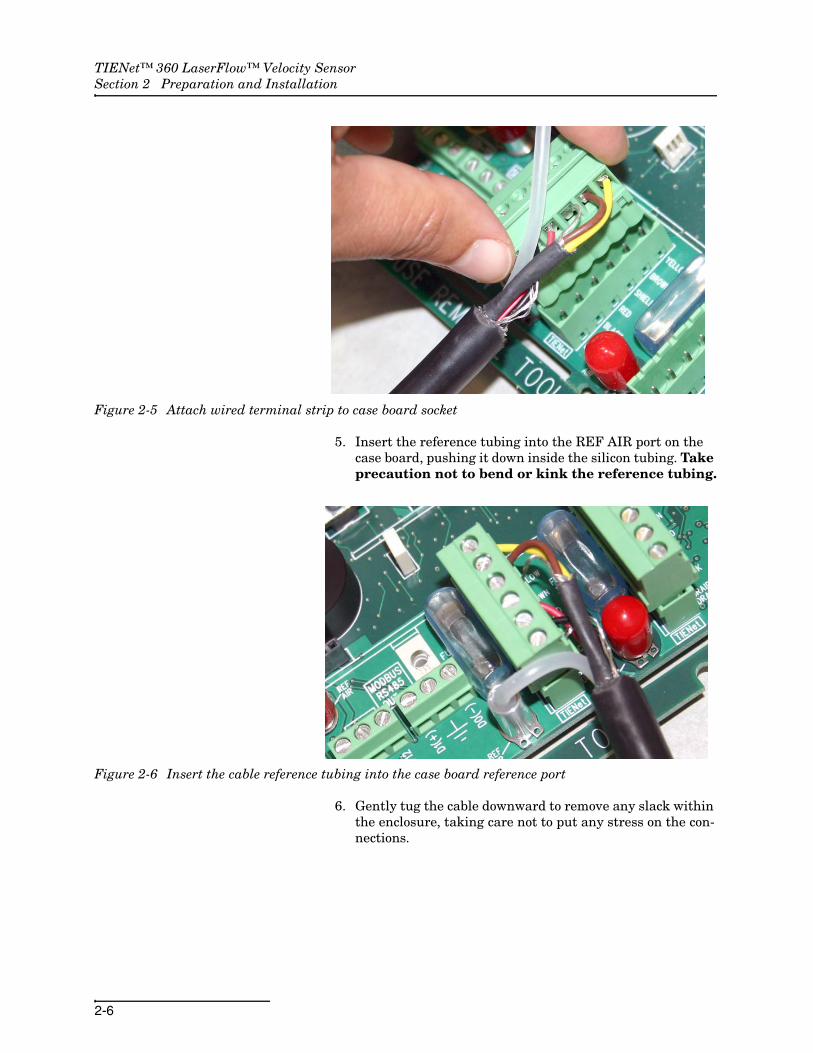
Figure 2-5 Attach wired terminal strip to case board socket
5. Insert the reference tubing into the REF AIR port on the case board, pushing it down inside the silicon tubing. Take precaution not to bend or kink the reference tubing.
Figure 2-6 Insert the cable reference tubing into the case board reference port
6. Gently tug the cable downward to remove any slack within the enclosure, taking care not to put any stress on the con-nections.

TIENet™ 360 LaserFlow™ Velocity SensorSection 2 Preparation and Installation
2-7
7. Tighten the cord grip sealing nut (Figure 2-7).
Figure 2-7 Position and secure the cable
CAUTIONIf using conduit instead of the cord-grip fitting, the conduit mustbe sealed to prevent harmful gases and moisture from enteringthe Signature enclosure. Failure to seal the conduit mayreduce equipment life.
8. Close the front panel and fasten with the two Phillips screws.

TIENet™ 360 LaserFlow™ Velocity SensorSection 2 Preparation and Installation
2-8
2.4.2 Remote Ultrasonic Cable Connection:310 Ultrasonic Sensor
1. Prepare the LaserFlow connector receptacle by removing the cap (press down on the spring clip and pull out the cap).
Figure 2-8 Preparing the LaserFlow connector receptacle
2. Remove the stainless steel cap from the 310 ultrasonic plug and push the protective caps from the LaserFlow module and ultrasonic together.
3. Aligning the pins on the 310 ultrasonic plug with those in the connector receptacle, push the ultrasonic plug into the receptacle until the spring release "clicks."
Figure 2-9 Secure caps and connect 310 ultrasonic plug to LaserFlow
To be certain that the connectors are locked, lightly pull on thecable connector; the cable should be held in place by the springrelease clip.

TIENet™ 360 LaserFlow™ Velocity SensorSection 2 Preparation and Installation
2-9
2.4.3 Cable Connection: 2160 LaserFlow Module
1. Prepare the 2160 receptacle by removing the cap (press down on the spring clip and pull out the cap).
Figure 2-10 Preparing the 2160 connector receptacle
2. Remove the cap from the LaserFlow TIENet plug and push the protective caps on the module and sensor together.
3. Aligning the pins on the LaserFlow cable with those in the connector receptacle, push the sensor connector into the receptacle until the spring release "clicks."
Figure 2-11 Secure caps and connect LaserFlow to 2160
4. To be certain that the connectors are locked, lightly pull on the cable connector; the cable should be held in place by the spring release clip.

TIENet™ 360 LaserFlow™ Velocity SensorSection 2 Preparation and Installation
2-10
2.5 Sensor Installation Tools and Requirements
The Signature flow meter or 2160 LaserFlow Module does nothave to be mounted near the flow stream. The flow meter can beinstalled at a convenient, protected location and the sensor cablecan be routed through user-provided conduit back to the flowmeter.
Proper installation of the LaserFlow is critical for accurate mea-surement.
2.5.1 Tools Required See Appendix B.2 Equipment and Recommended Tools.
2.5.2 Sensor and Mounting Equipment Dimensions
Complete mounting assembly dimensions are provided inFigures 2-12 through 2-15.
Refer to the appropriate drawing(s) when planning the instal-lation and adjusting the mounting hardware.

TIENet™ 360 LaserFlow™ Velocity SensorSection 2 Preparation and Installation
2-11
Figure 2-12 Overall dimensions including wall mounting hardware (part 1)
13.875[35.24]
recommended
TIENet™ 360 LaserFlow™ Velocity SensorSection 2 Preparation and Installation
2-12
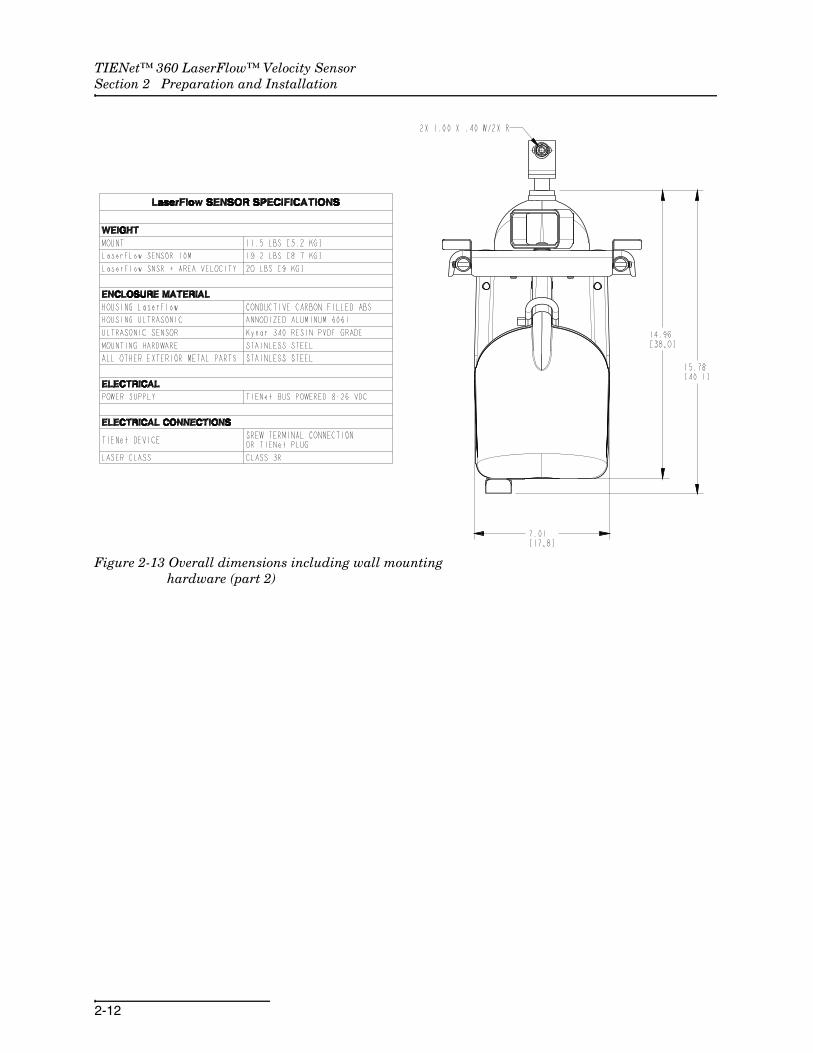
Figure 2-13 Overall dimensions including wall mounting hardware (part 2)

TIENet™ 360 LaserFlow™ Velocity SensorSection 2 Preparation and Installation
2-13
Figure 2-14 Overall dimensions including temporary mounting hardware (part 1)

TIENet™ 360 LaserFlow™ Velocity SensorSection 2 Preparation and Installation
2-14
Figure 2-15 Overall dimensions including temporary mounting hardware (part 2)

TIENet™ 360 LaserFlow™ Velocity SensorSection 2 Preparation and Installation
2-15
2.5.3 Sensor Positioning and Requirements
Figure 2-16, at left, shows constants that serve as referencepoints when planning the positioning of the sensor.
Figure 2-17, shows a typical LaserFlow manhole installation.
CAUTIONFor proper function, the requirements listed here must be fol-lowed exactly.
Requirements:
• Permanent Installation: Install the wall bracket perpen-dicular to the x-axis.Temporary Installation: Install the cargo bar perpen-dicular to the y-axis.
• Always center the LaserFlow (and middle laser beam) relative to the pipe walls, and always use the attached circular bubble level for vertical alignment.
• Mount the LaserFlow sensor with the bottom parallel with the water surface.
• Align the bottom of the LaserFlow with the top of the inside wall of the inlet pipe, and as close as possible to the pipe mouth without obstructing the laser.To accomplish this, refer to Figure 2-16 at left, Figure 2-17 on the next page, and the following important figures:
· The point at which the laser exits the sensor mouth is 3.3" (8.4 cm) from the front tip of the sensor, or the center of the opening.
· The distance from the bottom of the Laserflow sensor to the center of the coupling tube is 10.375" (26.35 cm).
· The laser beam exits the sensor mouth at a 45° angle.(If the sensor bottom is parallel with the water surface, the laser beam will also strike the water surface at a 45° angle.)
Figure 2-16 Sensor installation constants
a a
*3.3”
Center of the pipe
Top of pipe inside wall
Distance from sensor tip to laser beam exit point (vertex of 45° angle)

TIENet™ 360 LaserFlow™ Velocity SensorSection 2 Preparation and Installation
2-16
Figure 2-17 Typical manhole installation
flow
45°
3.3”
flow
10.375”
Coupling
Tube13.875”
(recommended)
y
x
x = y

TIENet™ 360 LaserFlow™ Velocity SensorSection 2 Preparation and Installation
2-17
2.6 Wall Mounting Kit For wall mounting, identify the components listed in Figure 2-18and Table 2-1, and perform the steps that follow. Order numbersfor parts and fasteners are provided in Appendix A.
Figure 2-18 Wall mounting kit (Numbers correspond with Table 2-1)
4
5
2
3
1
Table 2-1 Wall Mounting Kit
Item (Callout #) Description
1 Tube Coupler (short)
2 Tube Coupler (long)
3 Bottom Wall Mount Angle Bracket (adjustable)
4 Mounting Shaft
5 Sensor Carrier
SST Anchor Stud Assembly & Spring Lock Washers(for fastening brackets to wall)

TIENet™ 360 LaserFlow™ Velocity SensorSection 2 Preparation and Installation
2-18
2.6.1 Wall Mount Installation
Refer to the dimensions and requirements in Figure 2-17 whileperforming the following steps.
NoteStud anchors for concrete are provided in the mounting kit. It isrecommended to drill a hole 2" (5.08 cm) deep, leaving 1"(2.54 cm) of the stud exposed.
Figure 2-19 Wall Mount: Vertical clamp and vertical clamp with tube coupler inserted
Tube Coupler
1. Bolt or anchor the bottom angle bracket to the wall.
2. Slide the mounting shaft into the bottom angle bracket and bolt or anchor the mounting shaft to the wall.
3. Insert either the long or short tube coupler into the hole formed by the vertical clamp. Adjust the clamps to the desired height and cross-tighten the four bolts evenly until the clamp and tube coupler are firmly attached.
Mounting Shaft
Vertical Clamp
Bottom Angle Bracket

TIENet™ 360 LaserFlow™ Velocity SensorSection 2 Preparation and Installation
2-19
Figure 2-20 Wall Mount: Sensor carrier installed on tube coupler
NoteAfter initial installation and sensor alignment, the remainingsteps are often possible to perform from above ground, withthe optional sensor retrieval arm.
WARNINGIf lowering the LaserFlow from above ground, ensure that it does not become dislodged while being lowered, possibly endangering any personnel who may still be below ground.
End of Tube Coupler
4. Push the sensor carrier clamp onto the tube coupler until the coupler appears on the other side of the clamp. Align the carrier with both arms parallel to the flow sur-face and cross-tighten the bolts so the carrier is held firmly in position. Ensure the alignment tabs are fac-ing up (see Figure 2-20).
Note that some realignment will be necessary following installation of the LaserFlow sensor; ensure that all hard-ware is tightened following final alignment.
Sensor Carrier Clamp
Alignment Tabs

TIENet™ 360 LaserFlow™ Velocity SensorSection 2 Preparation and Installation
2-20
Figure 2-21 Wall Mount: Place the sensor on the carrier
5. Lower the LaserFlow sensor onto the mounting bracket between the front and rear alignment tabs, with the two mounting block grooves rest-ing on the two carrier arms.The sensor can be installed on the carrier facing inward or outward, depending on installation requirements.

TIENet™ 360 LaserFlow™ Velocity SensorSection 2 Preparation and Installation
2-21
6. Turn the locking handle clockwise until it locks the sensor in place.
Figure 2-22 Turn the locking handle clockwise until sensor is locked into place (shown with optional sensor retrieval arm, described in Section 2.8)
7. Using the bubble level on top of the sensor as a guide, adjust the carrier by loosening the appropriate bolts in the sensor carrier clamp so that the bubble in the level falls within the concentric rings.
8. Turn the laser on to make final adjustments so that the laser beam hits the flow stream at the exact center of the pipe (refer to Section 3.4 for Signature or Section 4.3 for 2160).
NoteAdditional assistance in adjusting the sensor’s position may beobtained by activating and observing the 360 X-Axis (roll) and360 Y-Axis (pitch) parameters.
9. Following final adjustments, ensure that all mounting bracket fasteners are tightened.

TIENet™ 360 LaserFlow™ Velocity SensorSection 2 Preparation and Installation
2-22
2.7 Temporary Mounting Kit
For temporary applications, refer to the components listed inFigure 2-23 and Table 2-2, and perform the steps that follow.Parts can be ordered separately or as a kit. Order numbers forparts and fasteners are provided in Appendix A.
Figure 2-23 Temporary mounting kit (Numbers correspond with Table 2-2)
1
2
3
5
4
6
Table 2-2 Temporary Mounting Kit
Item (Callout #) Description
1 Cargo Bar
2 Coupler Assembly
3 Sensor Carrier
4 24" Pipe
5 Cap (2)
6 Knuckle Assembly

TIENet™ 360 LaserFlow™ Velocity SensorSection 2 Preparation and Installation
2-23
2.7.1 Temporary Mounting Installation
The temporary mounting kit is rated for up to 45 lbs (20.5 kg).
When installing the sensor with the temporary mounting kit,ensure that the sensor carrier is positioned for easy installationand removal of the sensor.
1. Slide the foot out of the stationary end of the cargo bar.
Figure 2-24 Temporary Mount: Remove stationary foot
2. Slide the coupler onto the bar, tightening the two coupler bolts (see Figure 2-26) enough to prevent it from sliding around during the rest of the installation.
3. Reinsert the foot in the stationary end of the cargo bar.
Figure 2-25 Temporary Mount: Install coupler, replace stationary foot
4. In the manhole or vault, position the cargo bar for installa-tion. Place the mobile end against the wall. and extend the stationary end as far as possible.
5. Pump the handle fully up and down approximately 10 times, until the hydraulic tension presses the stationary foot firmly against the opposite wall.
NoteTo release the hydraulic pressure, press the red rubber buttonnext to the pump handle.
Mobile End
Stationary End
Release Button
Pump Handle

TIENet™ 360 LaserFlow™ Velocity SensorSection 2 Preparation and Installation
2-24
6. Position the coupler over the center of the flow stream and tighten the coupler bolts on the back and bottom.
Figure 2-26 Temp Mount: Securing the coupler
7. Remove the end caps from the 24" pipe and slide one end through the knuckle on the sensor carrier.
8. Reinstall the cap on the bottom end. Turn the assembly top-side up and slide the knuckle down to rest on the bot-tom cap.
Figure 2-27 Temporary Mount: Install sensor carrier/knuckle onto 24" pipe
Tighten coupler bolts (2)

TIENet™ 360 LaserFlow™ Velocity SensorSection 2 Preparation and Installation
2-25
9. Slide the pipe up through the coupler tube. Replace the other pipe cap.
10. Rotate the carrier to proper orientation and tighten the 4 bolts on the coupler tube.
11. Fine-tune the carrier orientation and tighten the 2 bolts on the carrier knuckle.
Figure 2-28 Installing the sensor carrier
NoteAfter initial installation and sensor alignment, the remainingsteps are often possible to perform from above ground with theoptional sensor retrieval arm.
WARNINGIf lowering the LaserFlow from above ground, ensure that it does not become dislodged while being lowered, possibly endangering any personnel who may still be below ground.
12. Lower the LaserFlow sensor onto the mounting bracket between the front and rear alignment tabs, with the two mounting block grooves resting on the two carrier arms.The sensor can be installed on the carrier facing inward or outward, depending on installation requirements.
Adjust carrier, tighten bolts (4)
Finely adjust carrier, tighten bolts (2)

TIENet™ 360 LaserFlow™ Velocity SensorSection 2 Preparation and Installation
2-26
Figure 2-29 Temporary Mount: Place the sensor on the carrier
13. Turn the locking handle clockwise until it locks the sensor in place.
Figure 2-30 Turn the locking handle clockwise until sensor is locked into place (shown with the optional sensor retrieval arm, described in Section 2.8)

TIENet™ 360 LaserFlow™ Velocity SensorSection 2 Preparation and Installation
2-27
14. Using the bubble level on top of the sensor as a guide, adjust the carrier by loosening the appropriate bolts in the sensor carrier clamp such that the bubble in the level falls within the concentric rings.
15. Turn the laser on to make final adjustments so that the laser beam hits the flow stream at the exact center of the pipe (refer to Section 3.4 for Signature or Section 4.3 for 2160).
16. Following final adjustments, ensure that all mounting bracket fasteners are tightened.
2.7.2 Offset Carrier from Cargo Bar
For installations where the temporary mount assembly alonecannot suspend the sensor directly over the center of the flow, anoptional elbow pipe is available to create an offset of 6" from thecargo arm.
Simply install it between the 24" pipe and the knuckle, as shownbelow.
Figure 2-31 Temporary Mount: Optional elbow pipe for offset

TIENet™ 360 LaserFlow™ Velocity SensorSection 2 Preparation and Installation
2-28
2.8 Optional Sensor Retrieval Arm
Following initial installation and adjustment, the sensor can beinstalled or removed as needed without manhole entry in mostsituations, using the optional retrieval arm to grasp the handle.See Figure 2-33.
The sensor retrieval arm can extend to a maximum of 23 ft.
When using temporary mounting hardware with the sensorretrieval arm, Teledyne Isco recommends mounting theLaserFlow module at a 45º angle to lessen the effective rotationaltorque applied to the mounting feet of the cargo bar. See Figure2-32.
DANGERExplosion hazard. The retrieval arm is not intrinsically safe. Do not use in hazardous locations.
DANGERElectrocution hazard. Maintain a minimum of 10 feet from power lines.
Figure 2-32 Suggested placement of Laserflow sensor when using temporary mounting hardware and the sensor retrieval bar
flow

TIENet™ 360 LaserFlow™ Velocity SensorSection 2 Preparation and Installation
2-29
Figure 2-33 Optional Sensor Retrieval Arm

TIENet™ 360 LaserFlow™ Velocity SensorSection 2 Preparation and Installation
2-30
2.9 Optional Sunshade The sunshade is an optional accessory for use when theLaserflow sensor is installed in an outdoor location in direct sun-light. The purpose of the sunshade is to prevent sunlight fromstriking the case of the sensor directly and heating it to a highertemperature than that of the surrounding air.
This heating, caused by the absorption of sunlight, should beavoided, as it introduces an error factor into the flow meter’slevel calculations.
1. Loosen the four tee knobs (two on each side of the sun-shade) and slide the two adjustable mounting blocks to the rear of the slots on each side of the sunshade.
2. Position the sunshade on top of the Laserflow sensor mount and slide the sunshade toward the rear until the four stationary mounting blocks (two on each side of the sunshade) fit under the two front alignment tabs of the Laserflow sensor carrier. See Figure 2-34.
Figure 2-34 Mounting the sunshade
3. Slide the two adjustable mounting blocks (connected to the tee knobs) until they fit under the rear alignment tabs of the Laserflow sensor carrier. See Figure 2-34.

TIENet™ 360 LaserFlow™ Velocity SensorSection 2 Preparation and Installation
2-31
Figure 2-35 Mounted sunshade
4. Tighten the four tee knobs.
2.10 Remote TIENet™ Model 310 Ultrasonic Level Sensor
Refer to the TIENet™ 310 Ultrasonic Level Sensor Installationand Operation Guide for details.

TIENet™ 360 LaserFlow™ Velocity SensorSection 2 Preparation and Installation
2-32

3-1
TIENet™ 360 LaserFlow™Velocity Sensor
Section 3 Setup with Signature® Flow Meter
The LaserFlow velocity sensor is compatible with both theTeledyne Isco Signature Flow Meter and the Teledyne Isco 2160LaserFlow Module. For 2160 setup instructions, refer toSection 4. For complete information about the Signature FlowMeter, refer to the Signature Flow Meter user manual.
3.1 Configuring the System
To configure the Signature flow meter for operation with the
LaserFlow sensor, press the “Menu” button ( ) to access thetop menu, and then select “Hardware Setup”. For all TIENetdevices including the LaserFlow sensor, select “Smart SensorSetup (TIENet)”.
3.1.1 Updating the Device List
When the LaserFlow sensor has been physically added to thesystem, select “Perform Scan” so that the flow meter detects it.When the scan is complete, the LaserFlow sensor (model number360) appears in the list of connected devices, ready to be con-figured with the steps shown in Figure 3-2.
NoteFrom the Hardware Setup menu, “Configure Measurements”refers to defining and selecting the parameters for each con-nected device.
The LaserFlow sensor parameters are:
360 Distance – Distance between the bottom of the sensor and the surface of the flow stream (refer to Section 3.2.2).
360 Level – Level of the flow stream surface
360 Velocity – Average velocity of the flow stream 360 Case Temperature – Internal temperature of theLaserFlow sensor housing
360 Laser Temperature – Temperature of the laser assembly
360 X-Axis – Tilt about the ‘x’ axis (roll)
360 Y-Axis – Tilt about the ‘y’ axis (pitch) 360 Laser Diode Current – Current draw of the laser diode
360 Ultrasonic Signal – Strength of the ultrasonic return echo
360 Temperature – Temperature of the window
360 Sense Voltage – Measurement o f w indowclarity (under 100 mV) –
360 Air Temperature – Temperature of surrounding (ambient) air
360 Doppler Power – Strength of the laser Dop-pler signal for velocity
360 Window Temp – Temperature of the window

TIENet™ 360 LaserFlow™ Velocity SensorSection 3 Setup with Signature® Flow Meter
3-2
If your system includes the optional submerged functionality forredundant measurement, the TIENet 350 Area Velocity sensor isalso displayed in the list of connected devices, with its own list ofparameters.
The name of any parameter can be customized by highlighting it
and pressing the “Enter” button ( ) to display the charactergrid. Navigate the grid using the arrow keys. Select charactersby pressing the “Enter” button and clear characters by pressing
the “Delete” button ( ).
Figure 3-1 Character grid
Done Cancel360 Distance
A B C D E F G H I J K L M NbaZYXWVUTSRQPO
c d e f g h i j k l m n o p!:/zyxwvutsrq
@ # $ % ^ & * ( ) - _ + = <> ? , .

TIENet™ 360 LaserFlow™ Velocity SensorSection 3 Setup with Signature® Flow Meter
3-3
Figure 3-2 Menu Tree: LaserFlow Configuration
Configure Measurements
Smart Sensor Setup (TIENet)• Perform Scan • Configure Measurements
360 Distance
360 Velocity
360 Ultrasonic Signal
Menu1. Hardware Setup2. Configure Options3. Administration4. Home
LaserFlow Sensor
360 Case Temperature
360 X-Axis
360 Sense Voltage
360 Doppler Power
360 Laser Temperature
360 Y-Axis
360 Level
360 Laser Diode Current
360 Temperature
360 Air Temperature
Configure Measurements
Smart Sensor ConfigurationThe sensors are beingconfigured. Please wait...
Smart Sensor Setup (TIENet)The sensors have been configured.
XXX Parameter
XXX Parameter
XXX Parameter
1 - XXX
Hardware Setup1. Smart Sensor Setup (TIENet)2. SDI-12 Setup3. MODBUS Input Setup4. MODBUS Output Setup5. Modem Setup
Press the “Enter” buttonto d isp lay the l i s t o fsensors. Scroll to the 360LaserFlow and press the“Enter” button to select.
Scroll with arrowkeys to highlight /select / deselect anydisp layedparameter or editits name.
Press NEXT toconfirm configu-rat ion . Theremay be a slightdelay.
With in i t ia l connect ion,perform a hardware scan toadd the 360 LaserFlowsensor.

TIENet™ 360 LaserFlow™ Velocity SensorSection 3 Setup with Signature® Flow Meter
3-4
3.2 Measurement Setup From Measurement Setup (Figure 3-3), select Level Input Setupto define the blanking distances and Velocity Input Setup to setvelocity direction and access advanced settings.
NoteRefer to the Signature user manual for information about FlowRate Input Setup and Volume Input Setup.
Figure 3-3 Measurement Setup: Sensor input settings(optional 350 AV Sensor also shown)
Level Input Setup
Measurement Setup1. Level Input Setup2. Velocity Input Setup3. Flow Rate Input Setup4. Volume Input Setup
1. 360 Level
Velocity Input Setup1. 360 Velocity2. 350 Velocity
360 Level
LEVEL
ft
ft
Blanking DistanceMinimum:Blanking DistanceMaximum:
0
3
360 Velocity
VELOCITYMeasure positive velocity only
1. Site Setup2. Measurement Setup3. Adjust4. Equation/Trigger Setup
5. Data Storage/Push Setup6. Sampler Setup7. Outputs/Alarms Setup8. Reset Totalizers9. Reports/History Setup
1.
1.
2.
Press the “Next” button twice.
350 Velocity
VELOCITY
Advanced
Advanced
Distance from bottom of sensor tomaximum expected liquid level
Distance from bottom ofsensor to bottom of channel
Set flow rate to zero if no velocity data
Measure positive velocity onlySet flow rate to zero if no velocity data

TIENet™ 360 LaserFlow™ Velocity SensorSection 3 Setup with Signature® Flow Meter
3-5
3.2.1 360 Level The Minimum Blanking Distance is the distance from thebottom of the sensor to the liquid surface at the highest expectedlevel. Depending on the elevation of your sensor, this value maybe increased to help ensure that echoes read by the flow metercome only from the surface of the flow stream, and not off thewalls or sides of the channel.
The Maximum Blanking Distance is the distance between thebottom of the sensor and the bottom of the channel (i.e., zerolevel). A larger value than calculated can be entered.
If using the LaserFlow module with the 310 remote ultrasonicsensor and horizontal sensor mounting bracket, the maximumblanking distance is the distance between the bottom of themounting bracket and the bottom of the channel.
Figure 3-4 Blanking distance for LaserFlow with built-in sensor or with remote ultrasonic sensor
3.2.2 360 Velocity When the Measure Positive Velocity only option is selected,the LaserFlow will not attempt to determine flow direction andnegative readings are discarded in the average velocity calcu-lation. Selecting this setting will save power. By default, thisoptions is selected.
When the Positive Velocity option is deselected, a second velocitymeasurement is taken to determine the direction of the flow.
3.2.3 LaserFlow Velocity Advanced Settings
The LaserFlow Advanced Settings are pre-programmed intothe sensor. However, if your application requires any custom con-figuration, the Advanced button opens the Advanced settingswindow (refer to Figure 3-5).
Input Velocity Coefficients – The relationship of the threeInput Velocity Coefficients A, B and C can be expressed as:
V = A (offset) + B*(Measured Velocity) + C*(Measured Velocity)2
Bottom of Channel
Maximum Expected Level
Minimum Blanking
Maximum Blanking

TIENet™ 360 LaserFlow™ Velocity SensorSection 3 Setup with Signature® Flow Meter
3-6
Coefficient A is an additive offset value to correct the MeasuredVelocity for any additive bias. The value for A must be expressedin units of meters/second. The default is “0”.Coefficient B is a multiplicative scalar for correcting the Mea-sured Velocity for any linear multiplicative bias. The value for Bis unitless. The default is “0.9”.
Coefficient C is another scalar to correct the Measured Velocityfor any nonlinear bias. The value for C must be expressed inunits of seconds/meter, so that the resulting value for theReported Velocity Reading will be in units of meters/second. Thedefault is “0”.
Spectral Averages – The value for Spectral Averages may beused to reduce noise and improve signal strength. The default is“5000”. If persistent low signal strength or velocity dropouts areindicated, enter a high value, such as 10000. If signal quality andmeasurement improve, try entering a lower value, such as 7500,observing the signal quality. The lower the value for SpectralAverage, the less time required for each complete measurement,reducing power usage. Adjust the value to determine a numberthat balances power usage with satisfactory signal quality andreadings.
Re-home Count – For testing purposes only. For more infor-mation, contact Environmental Products Support.
Peak Detect – The Peak Detect function scans across theuser-defined row to locate the peak velocity. To enable PeakDetect functionality, select the “Peak Detect” box.
Adaptive Focus – Adaptive Focus enables the LaserFlowmodule to scan above and below the standard focus point, thenadjust the focus to the point with the best signal strength. Toenable Adaptive Focus functionality, select the “AdaptiveFocus” box.
Positive Downstream – Select the “Positive Downstream”box when the LaserFlow sensor is pointed downstream.
Maximum Distance – The Maximum Distance is the greatestdistance (e.g., inches) the LaserFlow sensor will take a direc-tional velocity reading. The default is “48”. Units of mea-surement are based on user settings.
Maximum Velocity – The Maximum Velocity is the greatestvelocity (e.g., ft/s) the LaserFlow sensor will take a directionalvelocity reading. The default is “1”. Units of measurement arebased on user settings.
Steep Slope LaserFlow Focusing – If the pipe is on a slopegreater than 1%, select the “Enable Slope Setting” box. Bydefault, this option is disabled.
Parallel to Channel Slope – If the sensor is parallel to thechannel slope, select “Parallel to Channel Slope”. Measurefrom the front of the sensor carrier to the bottom of the channel.Then measure from the back of the sensor carrier to the bottomof the channel. Ensure the distance is equal. Adjust the sensor

TIENet™ 360 LaserFlow™ Velocity SensorSection 3 Setup with Signature® Flow Meter
3-7
carrier as necessary. By default, this option is enabled when the“Enable Slope Setting” box is selected. See Figure 4-11 in Section4.
Slope Percentage – If the slope of the pipe is known, mountthe sensor level with the Earth, using the bubble level mountedon the top of the sensor and then enter the Slope Percentage inthe field. By default, this option is disabled when the “EnableSlope Setting” box is selected. See Figure 4-12 in Section 4.
Optical Clarity – Sense voltage detects fog on the window of theLaserFlow sensor. When the sense voltage is greater than 100mV, the defogger is activated. The defogger is enabled from 1 to 5minutes, depending on the severity of the fog.
NoteIn locations with severe fogging potential, Teledyne Isco rec-ommends increasing battery capacity or monitoring the sitemore frequently.
To enable Optical Clarity, select “Active”. To disable OpticalClarity, select “Passive”. The default is “Active”.
Figure 3-5 Measurement setup: Advanced settings for LaserFlow sensor
Advanced
Input Velocity Coefficients
A (default=0):
B (default=0.9):
C (default=0):
Spectral Averages
Warning: Any changes to thefollowing data can adverselyaffect the performance of thisInstrument!Select BACK to cancel or NEXT tocontinue.
A + (B * v) + (C * v2)
0.9
0
0
5000
100(default=5000):
Re-home Count(default=100):
Peak Detect
Adaptive Focus
Enable Slope Setting
Parallel to Channel Slope
Slope Percentage: %
Positive Downstream
m/s
s/m
Maximum Distance ft
Maximum Velocity 0 ft/s

TIENet™ 360 LaserFlow™ Velocity SensorSection 3 Setup with Signature® Flow Meter
3-8
3.2.4 Adjust 350 Level (Optional)
If your system includes the optional surcharge sensor, it is alsocapable of measuring level with a pressure differential trans-ducer.
The Level Adjustment screen is accessed via the Shortcuts menuon the Signature. From this screen, you can also update thedisplay to show the current level of the stream.
Press SHORTCUTS ( ) and select Adjust Level.
Figure 3-6 350 Level adjustment screen
To set an initial or new level, enter the value in the field next toLevel, and select Adjust. To update the current reading, selectUpdate.
Following installation, measure the distance between the bottomof the channel and the bottom of the LaserFlow to obtain theinitial value for 350 Level (Figure 3-7).
It is recommended that the variable data storage rate function beused to trigger 350 velocity and level measurement based on aLevel threshold.
Alarm setup and activation are explained in the Signature usermanual under Outputs/Alarms Setup.
350 LevelLEVEL ADJUSTMENT
Last reading: X.XXX ft
Time of lastadjustment: MM/DD/YYYY TT:TT:TT
Level:
Update
Adjustft

TIENet™ 360 LaserFlow™ Velocity SensorSection 3 Setup with Signature® Flow Meter
3-9
Figure 3-7 Submerged functionality: Initial 350 Level setting
3.2.5 350 Velocity (Optional) If your system includes the optional submerged functionality orredundant measurement, it is also capable of measuring velocitywith a continuous wave Doppler sensor.
The Measure positive velocity only setting causes any negativereadings to be discarded in the average velocity calculation. Ifthis is set to false, both positive and negative readings are used.
Init
ial 3
50 L
evel
Bottom of Channel
Bottom of LaserFlow

TIENet™ 360 LaserFlow™ Velocity SensorSection 3 Setup with Signature® Flow Meter
3-10
3.2.6 350 Advanced Settings (Optional)
The LaserFlow Advanced Settings are pre-programmed intothe sensor. However, if your application requires any custom con-figuration, the Advanced button opens the Advanced settingswindow (refer to Figure 3-5).
Input Velocity Coefficients – The relationship of the threeInput Velocity Coefficients A, B and C can be expressed as:
V = A (offset) + B*(Measured Velocity) + C*(Measured Velocity)2
Coefficient A is an additive offset value to correct the MeasuredVelocity for any additive bias. The value for A must be expressedin units of meters/second. The default is “0”.Coefficient B is a multiplicative scalar for correcting the Mea-sured Velocity for any linear multiplicative bias. The value for Bis unitless. The default is “0.9”.
Coefficient C is another scalar to correct the Measured Velocityfor any nonlinear bias. The value for C must be expressed inunits of seconds/meter, so that the resulting value for theReported Velocity Reading will be in units of meters/second. Thedefault is “0”.

TIENet™ 360 LaserFlow™ Velocity SensorSection 3 Setup with Signature® Flow Meter
3-11
The sensor is pre-programmed at the factory with the AdvancedSettings for your application. Should your application requirethe addition of any correction factors, the Advanced button opensthe Advanced settings window (Figure 3-8).
Input velocity coefficients can be adjusted for A, B, and C, where:
V = A (offset) + BV (slope) + CV2 (second-order parameter).
Figure 3-8 Measurement setup: Advanced settings for 350 AV sensor
Advanced
Input Velocity Coefficients
A:
B:
C:
Warning: Any changes to thefollowing data can adverselyaffect the performance of thisInstrument!Select BACK to cancel or NEXT tocontinue.
A + (B * v) + (C * v2)
1
0
0

TIENet™ 360 LaserFlow™ Velocity SensorSection 3 Setup with Signature® Flow Meter
3-12
3.3 360 Velocity Grid The 360 Velocity screen has a grid containing 15 possible mea-surement points. Use the Shortcuts > Adjust function to navigateto this screen (refer to Figure 3-9).
The measurement points are activated and deactivated with thearrow and Enter keys. To save the measurement settings, high-light Update and press Enter.
As the LaserFlow begins to take readings, the grid becomes pop-ulated with a velocity reading and time stamp for each activemeasurement point (points where a valid reading could not beobtained will display the word “invalid”).
Prior to operation, the LaserFlow sensor must be set up for mea-surement using the 360 Velocity grid. Refer to Section 3.4.
Figure 3-9 360 Velocity grid
360 Velocity
Measurements are displayed in [UOM].
Laser On Laser Off Update
1.017/17/123:30:27 PM
0.977/17/123:30:44 PM
0.917/17/123:31:01 PM
0.727/17/123:33:35 PM
0.997/17/123:31:52PM
0.807/17/123:31:18PM
Configure Options1. Site Setup2. Measurement Setup3. Adjust4. Equation/Trigger Setup
5. Data Storage/Push Setup6. Sampler Setup7. Outputs/Alarms Setup8. Reset Totalizers9. Reports/History Setup
Adjust1. Level2. Velocity
Adjust Velocity1. 360 Velocity

TIENet™ 360 LaserFlow™ Velocity SensorSection 3 Setup with Signature® Flow Meter
3-13
3.4 Sensor Positioning and Adjustment
3.4.1 Centering the LaserFlow Sensor
Proper positioning of the LaserFlow sensor is critical for optimalvelocity measurement. In center position, the laser beam muststrike the flow stream precisely in the center.
The beam automatically moves to the top center position.
Laser On Select Laser On and press Enter. This will keep the laser beamon continuously for 10 minutes or until Laser Off is selected,allowing the beam to be used for fine-tuning the sensor’sposition.
NoteWhen sensor positioning is completed, securely tighten allmounting hardware.
3.4.2 Laser Velocity Measurement Point Selection
Once the LaserFlow sensor is installed over the flow stream,some installations may only require the center laser position forvelocity measurement.
For installations requiring multiple measurement points, thenext step is to determine which points will be used. To do so,activate all 15 points and wait for all of them to display theirreadings. This process may take up to 15 minutes.
Each point will display a velocity reading and time stamp, or“Invalid.” Deselect “Invalid” and undesired points. The fewerpoints selected, the less time required to complete one velocitymeasurement.

TIENet™ 360 LaserFlow™ Velocity SensorSection 3 Setup with Signature® Flow Meter
3-14
Figure 3-10 Selection of velocity measurement points
3.4.3 Ultrasonic Level Adjustment
Once the LaserFlow sensor is installed over the flow stream,measure the present liquid level from the bottom of the channel(if there is a difference between the bottom of the channel andzero level, save this value for reference in flow calculation) andenter this value for Level, under Adjust options. Then highlightAdjust and press Enter to confirm.
From this screen, you can also update the display to show thecurrent level of the stream.
NoteLevel adjustment of a newly installed and activated sensorshould be performed only after the sensor is allowed to stabi-lize under site conditions (allow approximately one hour per 10°F difference between storage and operating environments).
360 Velocity
Measurements are displayed in [UOM].
Laser On Laser Off Update
Invalid
Invalid Invalid
Invalid
Invalid
InvalidInvalid
1.017/17/123:30:27 PM
0.977/17/123:30:44 PM
0.917/17/123:31:01 PM
0.727/17/123:33:35 PM
0.997/17/123:31:52PM
0.807/17/123:31:18PM
Invalid
Invalid
360 Velocity
Measurements are displayed in [UOM].
Laser On Laser Off Update
1.017/17/123:30:27 PM
0.977/17/123:30:44 PM
0.917/17/123:31:01 PM
0.727/17/123:33:35 PM
0.997/17/123:31:52PM
0.807/17/123:31:18PM
Select al l 15 mea-surement points andUpdate.
Dese lec t inval id(and undes i red )points and Update.
Level
Difference from bottom(silt level)
1.000.00

TIENet™ 360 LaserFlow™ Velocity SensorSection 3 Setup with Signature® Flow Meter
3-15
Figure 3-11 Ultrasonic level adjustment
3.5 Contact Teledyne Isco If you have further questions about the installation, operation,and maintenance of your TIENet device, please contact Environ-mental Product Support at:
Teledyne Isco4700 Superior St.Lincoln, NE 68504
Phone: 866 298-6174 or 402 464-0231Fax: 402 465-3022E-mail: [email protected]
Configure Options
Adjust1. Level2. Velocity
360 LevelLEVEL ADJUSTMENT
Adjust Level1. 360 Level2. 350 Level
Last reading: X.XXX ft
Time of lastadjustment: MM/DD/YYYY TT:TT:TT
Update
AdjustftLevel:
1. Site Setup2. Measurement Setup3. Adjust4. Equation/Trigger Setup
5. Data Storage/Push Setup6. Sampler Setup7. Outputs/Alarms Setup8. Reset Totalizers9. Reports/History Setup
Display currentreal-time level
Reset/adjustlevel

TIENet™ 360 LaserFlow™ Velocity SensorSection 3 Setup with Signature® Flow Meter
3-16

4-1
TIENet™ 360 LaserFlow™Velocity Sensor
Section 4 Setup with 2160 LaserFlow Module
The LaserFlow sensor is compatible with both the Teledyne Isco2160 LaserFlow Module and the Teledyne Isco Signature FlowMeter. For Signature setup instructions, refer to Section 3.
The 2160 module is programmed and set up using Teledyne IscoFlowlink® software. This section of the manual describes acti-vation of connected sensors, and basic LaserFlow and optionalTIENet 350 level and velocity measurement setup.
This section of the manual assumes the 2160 site is already con-figured in Flowlink, and the 2160 module is connected toFlowlink. Detailed Flowlink instructions are available in theFlowlink Windows Help and also in the Flowlink software usermanual. For complete information about the 2160 LaserFlowModule, refer to the 2160 LaserFlow Module Installation andOperation Guide.
4.1 Activating Connected Sensors
To add an available (connected) LaserFlow sensor or optional 350AV sensor and to activate in Flowlink, select the TIENet tab(Figure 4-1), then highlight the appropriate LaserFlow module2160 module, and click the “Configure” button.
Figure 4-1 Activate connected sensors in Flowlink

TIENet™ 360 LaserFlow™ Velocity SensorSection 4 Setup with 2160 LaserFlow Module
4-2
A box is displayed, listing active and available TIENet Devices. Click the “Scan” button to detect any newly connected LaserFlow or 350 Area Velocity sensors. Devices will appear in the Available TIENet Devices pane.
Highlight the appropriate device(s) and click the “Add” button toactivate. Active TIENet devices will appear in the Active TIENetDevices pane. Click the “OK” button.
Figure 4-2 Activating connected sensors in Flowlink

TIENet™ 360 LaserFlow™ Velocity SensorSection 4 Setup with 2160 LaserFlow Module
4-3
4.2 Measurement Display and Settings
The Measurements tab in the Site window lists the data typesbeing measured by the 2160 module and displays real-time mea-surements.
Figure 4-3 Measurements tab: Displays real-time measurements

TIENet™ 360 LaserFlow™ Velocity SensorSection 4 Setup with 2160 LaserFlow Module
4-4
To select and configure any parameter for your connecteddevices, click the “Jump to measurement tab” button at thetop of the Site window and hover over the 2160 LaserFlowModule. If your system includes the optional submerged func-tionality for redundant measurement, additional parametersmay appear for the connected TIENet 350 Area Velocity sensor.Explanations for the listed measurements are provided inFigure 4-4.
Figure 4-4 Drop down list of measurements for 2160 Module
Click on any parameter on the Measurements tab or in the Jumpto Measurements tab list to open a dedicated tab to view detailsor set up data storage.
To prevent a parameter from being displayed on the Measure-ments tab, select the Hide in Measurements box.
The settings for level and velocity input are defined on theirrespective tabs in Flowlink. To save any changes made to the set-tings, click the “Apply” button.
360 Distance
Distance between the bottom of the sen-sor and the surface of the flow stream.
360 Laser Diode Current
Current draw of the laser diode
360 Level
Level of the flow stream surface
360 Ultrasonic Signal
Strength of the ultrasonic return echo
360 Velocity
Average velocity of the flow stream
Sense Voltage
Measurement of window clarity (under 100 mV)
360 Case Temperature
Internal temperature of the LaserFlow sen-sor housing
360 Air Temperature
Temperature of surrounding (ambient) air
360 Laser Temperature
Temperature of the laser assembly
360 Doppler Power
Strength of the laser return Doppler signal
360 X-Axis
Tilt about the ‘x’ axis (roll)
360 Window Temp
Temperature of the window
360 Y-Axis
Tilt about the ‘y’ axis (pitch)

TIENet™ 360 LaserFlow™ Velocity SensorSection 4 Setup with 2160 LaserFlow Module
4-5
4.2.1 360 Level The Measurement field displays the most recent level reading.
Ultrasonic Level Adjustment
Once the LaserFlow sensor is installed over the flow stream,measure the present liquid level from the bottom of the channel(if there is a difference between the bottom of the channel andzero level, save this value for reference in flow calculation). Enterthis value in the Adjust level field. After the “Apply” button isclicked, the level you entered will appear in the Measurementfield.
NoteLevel adjustment of a newly installed and activated sensorshould be performed only after the sensor is allowed to stabi-lize under site conditions (allow approximately one hour per 10°F difference between storage and operating environments).
Figure 4-5 360 Level Measurement tab in Flowlink
Level
Difference from bottom(silt level)
1.000.00

TIENet™ 360 LaserFlow™ Velocity SensorSection 4 Setup with 2160 LaserFlow Module
4-6
The Minimum Blanking Distance is the distance from thebottom of the sensor to the liquid surface at the highest expectedlevel. Depending on the elevation of the sensor, this value may beincreased to help ensure that echoes read by the flow meter comeonly from the surface of the flow stream, and not off the walls orsides of the channel.
The Maximum Blanking Distance is the distance between thebottom of the sensor and the bottom of the channel (i.e., zerolevel). A larger value than calculated can be entered.
If using the LaserFlow module with the 310 remote ultrasonicsensor and horizontal sensor mounting bracket, the maximumblanking distance is the distance between the bottom of themounting bracket and the bottom of the channel.
Figure 4-6 Blanking distance for LaserFlow with built-in sensor or 310 remote ultrasonic sensor
Bottom of Channel
Maximum Expected Level
Minimum Blanking
Maximum Blanking

TIENet™ 360 LaserFlow™ Velocity SensorSection 4 Setup with 2160 LaserFlow Module
4-7
4.2.2 360 Velocity The 360 Velocity measurement tab has a grid containing 15 pos-sible measurement points. The measurement points are acti-vated and deactivated by selecting or deselecting the appropriatecheck box. To save the measurement settings, click the “Apply”button (F9).
As the LaserFlow begins to take readings, the grid becomes pop-ulated with a velocity reading and time stamp for each activemeasurement point (points where a valid reading could not beobtained will display the word “invalid”).
Prior to operation, the LaserFlow sensor must be set up for mea-surement using the 360 Velocity grid. Refer to Section 4.3Sensor Positioning and Adjustment
When the Positive Velocity option is “true”, the LaserFlow willnot attempt to determine flow direction and negative readingsare discarded in the average velocity calculation. Selecting thissetting will save power. The default is “true”.
When the Positive Velocity option is “false”, a second velocitymeasurement is taken to determine the direction of the flow.
Figure 4-7 360 Velocity Measurement tab in Flowlink

TIENet™ 360 LaserFlow™ Velocity SensorSection 4 Setup with 2160 LaserFlow Module
4-8
4.2.3 Advanced Settings The LaserFlow Advanced Settings are pre-programmed into thesensor. However, if your application requires the any custom con-figuration, the “Advanced” button opens the Velocity Coeffi-cients window (refer to Figure 4-8).
Figure 4-8 360 Velocity Tab: Advanced settings
Input Velocity Coefficients – The relationship of the threeInput Velocity Coefficients A, B and C can be expressed as:
V = A (offset) + B*(Measured Velocity) + C*(Measured Velocity)2
Coefficient A is an additive offset value to correct the MeasuredVelocity for any additive bias. The value for A must be expressedin units of meters/second. The default is “0”.Coefficient B is a multiplicative scalar for correcting the Mea-sured Velocity for any linear multiplicative bias. The value for Bis unitless. The default is “0.9”.
A
B
C
D
E
F
G
H
A - Input Velocity Coefficients
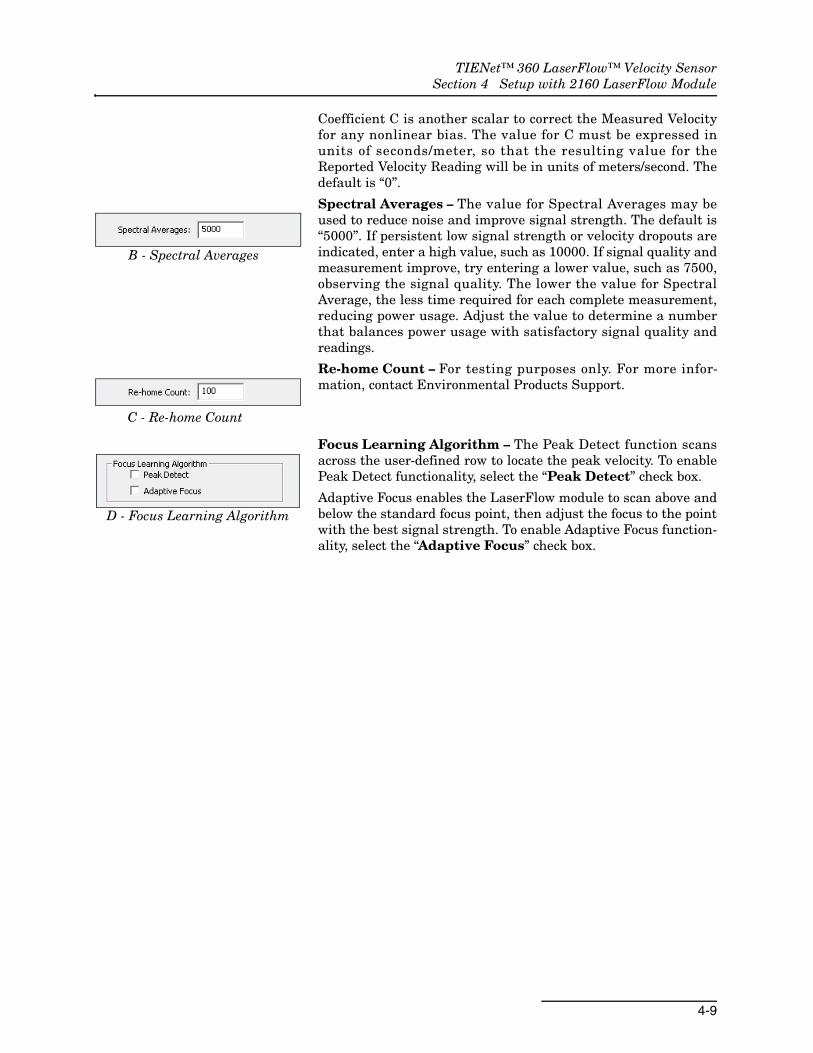
TIENet™ 360 LaserFlow™ Velocity SensorSection 4 Setup with 2160 LaserFlow Module
4-9
Coefficient C is another scalar to correct the Measured Velocityfor any nonlinear bias. The value for C must be expressed inunits of seconds/meter, so that the resulting value for theReported Velocity Reading will be in units of meters/second. Thedefault is “0”.
Spectral Averages – The value for Spectral Averages may beused to reduce noise and improve signal strength. The default is“5000”. If persistent low signal strength or velocity dropouts areindicated, enter a high value, such as 10000. If signal quality andmeasurement improve, try entering a lower value, such as 7500,observing the signal quality. The lower the value for SpectralAverage, the less time required for each complete measurement,reducing power usage. Adjust the value to determine a numberthat balances power usage with satisfactory signal quality andreadings.
Re-home Count – For testing purposes only. For more infor-mation, contact Environmental Products Support.
Focus Learning Algorithm – The Peak Detect function scansacross the user-defined row to locate the peak velocity. To enablePeak Detect functionality, select the “Peak Detect” check box.
Adaptive Focus enables the LaserFlow module to scan above andbelow the standard focus point, then adjust the focus to the pointwith the best signal strength. To enable Adaptive Focus function-ality, select the “Adaptive Focus” check box.
B - Spectral Averages
C - Re-home Count
D - Focus Learning Algorithm
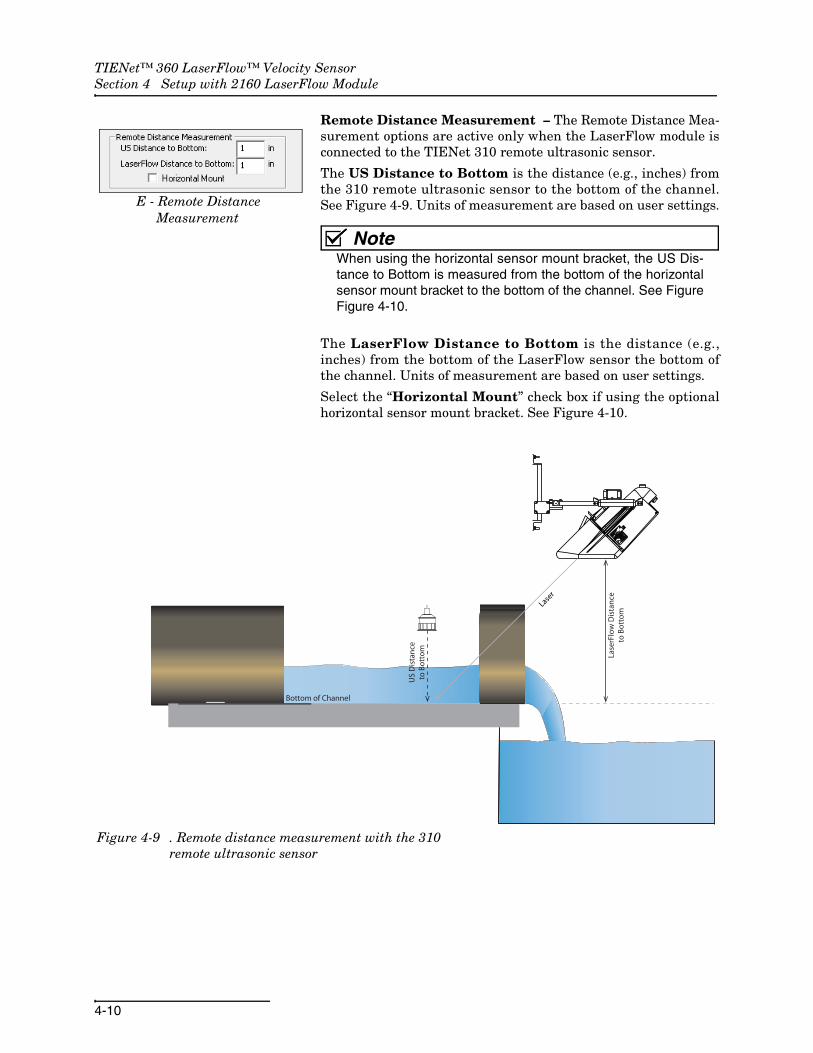
TIENet™ 360 LaserFlow™ Velocity SensorSection 4 Setup with 2160 LaserFlow Module
4-10
Remote Distance Measurement – The Remote Distance Mea-surement options are active only when the LaserFlow module isconnected to the TIENet 310 remote ultrasonic sensor.
The US Distance to Bottom is the distance (e.g., inches) fromthe 310 remote ultrasonic sensor to the bottom of the channel.See Figure 4-9. Units of measurement are based on user settings.
NoteWhen using the horizontal sensor mount bracket, the US Dis-tance to Bottom is measured from the bottom of the horizontalsensor mount bracket to the bottom of the channel. See FigureFigure 4-10.
The LaserFlow Distance to Bottom is the distance (e.g.,inches) from the bottom of the LaserFlow sensor the bottom ofthe channel. Units of measurement are based on user settings.
Select the “Horizontal Mount” check box if using the optionalhorizontal sensor mount bracket. See Figure 4-10.
Figure 4-9 . Remote distance measurement with the 310 remote ultrasonic sensor
E - Remote DistanceMeasurement
Lase
rFlo
w D
ista
nce
to B
otto
m
Bottom of Channel
Laser
US
Dis
tanc
eto
Bot
tom

TIENet™ 360 LaserFlow™ Velocity SensorSection 4 Setup with 2160 LaserFlow Module
4-11
Figure 4-10 Remote distance measurement with the 310 remote ultrasonic sensor and horizontal sensor mount bracket
Bottom of Channel
Laser
SoundPulse
HorizontalMounting Bracket
US
Dis
tanc
eto
Bot
tom
Lase
rFlo
w D
ista
nce
to B
otto
m

TIENet™ 360 LaserFlow™ Velocity SensorSection 4 Setup with 2160 LaserFlow Module
4-12
LaserFlow Directional Velocity – The LaserFlow DirectionalVelocity options are active only when the Positive Velocity optionis “false”.
Select the “Focus Downstream” check box when the LaserFlowsensor is pointed downstream.
The Maximum Distance is the greatest distance (e.g., inches)the LaserFlow sensor will take a directional velocity reading. Thedefault is “48”. Units of measurement are based on user settings.
The Maximum Velocity is the greatest velocity (e.g., ft/s) theLaserFlow sensor will take a directional velocity reading. Thedefault is “1”. Units of measurement are based on user settings.
Steep Slope LaserFlow Focusing – If the sensor is on a slopegreater than 1%, select the “Enable Slope Setting” check box.By default, this option is disabled.
If the sensor is parallel to the channel slope, select “Parallel toChannel Slope”. Measure from the front of the sensor carrier tothe bottom of the channel. Then measure from the back of thesensor carrier to the bottom of the channel. Ensure the distanceis equal. Adjust the sensor carrier as necessary. See Figure 4-11.By default, this option is enabled.
If the slope of the pipe is known, mount the sensor level with theEarth, using the bubble level mounted on the top of the sensorand then enter the Slope Percentage in the field. See Figure4-12. By default, this option is disabled.
Figure 4-11 LaserFlow placement using Parallel to Channel Slope option
F - LaserFlow DirectionalVelocity
G - Steep Slope LaserFlowFocusing
flowflow
xy
x = y

TIENet™ 360 LaserFlow™ Velocity SensorSection 4 Setup with 2160 LaserFlow Module
4-13
Figure 4-12 LaserFlow placement using Slope Percentage option
Optical Clarity – Sense voltage detects fog on the window of theLaserFlow sensor. When the sense voltage is greater than 100mV, the defogger is activated. The defogger is enabled from 1 to 5minutes, depending on the severity of the fog.
NoteIn locations with severe fogging potential, Teledyne Isco rec-ommends increasing battery capacity or monitoring the sitemore frequently.
To enable Optical Clarity, click “Active”. To disable OpticalClarity, click “Passive”. The default is “Active”.
flowflow
2%slope
H - Optical Clarity

TIENet™ 360 LaserFlow™ Velocity SensorSection 4 Setup with 2160 LaserFlow Module
4-14
4.2.4 350 Level (Optional) If your system includes the optional surcharge sensor, it is alsocapable of measuring level with a pressure differential trans-ducer. To set an initial or new level, enter the value in the Adjustlevel field. After you click Apply, the level you entered willappear in the Measurement field.
During setup for the optional surcharge functionality, measurethe distance from the bottom of the channel to the bottom of theLaserFlow to set the initial level reading. Refer to Figure 4-14.
Figure 4-13 350 Level Measurement tab in Flowlink

TIENet™ 360 LaserFlow™ Velocity SensorSection 4 Setup with 2160 LaserFlow Module
4-15
Figure 4-14 Submerged functionality: Initial 350 Level setting
Surcharge alarming It is recommended that the variable data storage rate function beused to trigger 350 velocity and level measurement based on aLevel threshold.
Alarm setup and activation are explained in the Flowlinksoftware user manual and help windows, under EquationBuilder, Condition Builder, and Threshold.
Init
ial 3
50 L
evel
Bottom of Channel
Bottom of LaserFlow

TIENet™ 360 LaserFlow™ Velocity SensorSection 4 Setup with 2160 LaserFlow Module
4-16
4.2.5 350 Velocity (Optional) If your system includes the optional submerged functionality orredundant measurement, it is also capable of measuring velocitywith a continuous wave Doppler sensor.
In the case of the submerged functionality, measure the distancebetween the bottom of the channel and the face of the pressuretransducer (bottom of the LaserFlow) to obtain the initial valuefor 350 Level.
Figure 4-15 350 Velocity Measurement tab in Flowlink
The Positive Velocity setting, when set to “true”, the LaserFlowwill not attempt to determine flow direction and negativereadings are discarded in the average velocity calculation.Selecting this setting will save power. This setting is set to “true”by default.
The 350 Advanced Settings are pre-programmed into thesensor. However, if your application requires the addition of anycorrection factors, the Advanced button opens the Advanced set-tings window (refer to Figure 4-16).
Input velocity coefficients can be adjusted for A, B, and C, where:
V = A (offset) + B*(Measured Velocity) + C*(Measured Velocity)2
Coefficient A is an additive offset value to correct the MeasuredVelocity for any additive bias. The value for A must be expressedin units of meters/second. Coefficient B is a multiplicative scalar for correcting the Mea-sured Velocity for any linear multiplicative bias. The value for Bis unitless.
Coefficient C is another scalar to correct the Measured Velocityfor any nonlinear bias. The value for C must be expressed inunits of seconds/meter, so that the resulting value for theReported Velocity Reading will be in units of meters/second.

TIENet™ 360 LaserFlow™ Velocity SensorSection 4 Setup with 2160 LaserFlow Module
4-17
Figure 4-16 350 Velocity tab: Advanced settings for optional TIENet 350 AV sensor
4.3 Sensor Positioning and Adjustment
To set the initial level values, refer to Sections 4.2.1 (LaserFlow)and 4.2.4 (optional 350).
4.3.1 Centering the LaserFlow Sensor
Proper positioning of the LaserFlow sensor is critical for optimalvelocity measurement. In center position, the laser beam muststrike the flow stream precisely in the center.
The beam automatically moves to the top center position.
Laser on Select the “Laser on” button and click the “Apply” button. Thiswill keep the laser beam on continuously for 10 minutes or untilthe “Laser off” button is clicked, allowing the beam to be usedfor fine-tuning the sensor’s position.

TIENet™ 360 LaserFlow™ Velocity SensorSection 4 Setup with 2160 LaserFlow Module
4-18
NoteWhen sensor positioning is completed, securely tighten allmounting hardware.
4.3.2 Laser Velocity Measurement Point Selection
Once the LaserFlow sensor is installed over the flow stream,some installations may only require the center laser position forvelocity measurement.
For installations requiring multiple measurement points,determine which points will be used. To do so, activate all 15points and wait for all of them to display their readings. Thisprocess may take up to 15 minutes.
Each point will display a velocity reading and time stamp, or“Invalid.” Deselect “Invalid” and undesired points. The fewerpoints selected, the less time required to complete one velocitymeasurement.
Figure 4-17 Selection of velocity measurement points
Select the “Select All” check box to activate all 15 points, then click the “Apply” button.
Deselect “Invalid” and undesired points,then click the “Apply” button.

5-1
TIENet™ 360 LaserFlow™Velocity Sensor
Section 5 Maintenance and Optional Kits
5.1 Maintenance The following tables are recommended maintenance checks toensure proper operation. As site conditions may vary, increasethe frequency of inspections as needed.
Table 5-1 Recommended Maintenance (Accessible Locations)
ActionRecommended Frequency
Location
Check Ultrasonic level sensor (built-in or remote) for obstructions (e.g., spider webs, debris)
Monthly On-site
Check Horn for obstructions (e.g., spider webs, debris) Monthly On-site
Check 350 Area Velocity sensor (if applicable) for debris Monthly or following surcharge event
On-site
Ensure suitable alignment - check x-axis (roll) and y-axis (pitch) Weekly Via Flowlink application or Signature™ flow meter
Check Doppler Power and assess historical trend Weekly Via Flowlink application or Signature™ flow meter
Check Ultrasonic Signal and assess historical trend Weekly Via Flowlink application or Signature™ flow meter
Table 5-2 Recommended Maintenance (Difficult-to-Access Locations)
ActionRecommended Frequency
Location
Check Ultrasonic level sensor (built-in or remote) for obstructions (e.g., spider webs, debris)
Every 6 months or following surcharge event
On-site
Check Horn for obstructions (e.g., spider webs, debris) Every 6 months or following surcharge event
On-site
Check 350 Area Velocity sensor (if applicable) for debris Every 6 months or following surcharge event
On-site
Ensure suitable alignment - check x-axis (roll) and y-axis (pitch) Weekly Via Flowlink application or Signature™ flow meter
Check Doppler Power and assess historical trend Weekly Via Flowlink application or Signature™ flow meter
Check Ultrasonic Signal and assess historical trend Weekly Via Flowlink application or Signature™ flow meter

TIENet™ 360 LaserFlow™ Velocity SensorSection 5 Maintenance and Optional Kits
5-2
5.2 Firmware Updates When firmware updates become available, they can be down-loaded from www.isco.com or via email from the factory.
5.2.1 With Signature Flow Meter
The TIENet device’s firmware is updated via the USB port on thefront panel of the Signature Flow Meter. Step-by-step instruc-tions for updating the firmware can be found in Section 2 of theSignature user manual.
5.2.2 With 2160 LaserFlow Module
The TIENet device’s firmware is updated via the “Update IscoInstrument Software” tool from Flowlink for the 2160 module.Step-by-step instructions for updating the firmware can be foundin the Help text of the update application.
5.3 Cleaning the Sensor Housing
The LaserFlow sensor’s outer housing and ultrasonic transducercan be cleaned with warm water, mild soap, and a soft, lint-freecloth. Do not spray water on the laser window; install the pro-tective window cap prior to cleaning.
CAUTIONNever use ordinary cloth or abrasives to clean the LaserFlow.
CAUTIONBe sure the protective window cap is installed during cleaning,storage, or shipment (refer to Section 1.7.1).
5.4 Accessing the LaserFlow’s Nose Piece
Several procedures for maintenance and options requireaccessing the interior of the sensor by separating the nose piecefrom the body, and subsequent reassembly. Refer back to thissection when performing these procedures.
WARNINGDisconnect power from the LaserFlow sensor before opening the sensor housing.
Tools required • #2 Phillips straight screwdriver less than 4" (right-angled if available)

TIENet™ 360 LaserFlow™ Velocity SensorSection 5 Maintenance and Optional Kits
5-3
5.4.1 Removing the Nose Piece
The screws that attach the nose piece to the body are difficult toaccess with a straight screwdriver, being somewhat obstructed bythe mounting block.
1. Remove the 6 large Phillips screws on the LaserFlow nose piece, and separate the nose from the body. Do not remove any other screws.
Figure 5-1 Remove large screws and nose piece (3 on each side)

TIENet™ 360 LaserFlow™ Velocity SensorSection 5 Maintenance and Optional Kits
5-4
5.4.2 Replacing the Nose Piece
1. Fasten the sensor back together by cross-tightening the 6 large Phillips screws in diagonal order until the two sec-tions are flush against each other.
CAUTIONWhen reinstalling all self-tapping screws, avoid destroying theplastic threads. First seat each screw in its hole and, withoutpressing down, rotate the screw counter-clockwise until it fallsinto its thread groove with a "click". Then tighten the screw.
2. If applicable, reinstall the mounting block, ensuring that both flat and split washers are included.
Figure 5-2 Location and orientation of cross-pins for mounting block installation
Side cross-pin(1 of 2)
Center cross-pin

TIENet™ 360 LaserFlow™ Velocity SensorSection 5 Maintenance and Optional Kits
5-5
5.5 Velocity Readings and the Laser Window
Invalid or inconsistent velocity readings may indicate debris ormoisture condensation on the window protecting the laser.
The laser window is crucial for focusing and should never betouched. Smudging or scratches can degrade the performance ofthe sensor. For these reasons, cleaning the window is NOTrecommended unless absolutely necessary.
If cleaning must be performed, follow the instructions providedin Section 5.6 exactly.
5.6 Cleaning the Laser Window
The laser window is crucial for focusing and should never betouched. Smudging or scratches can degrade the performance ofthe sensor. For these reasons, cleaning the window is NOTrecommended unless absolutely necessary.
CAUTIONNever touch the laser window. Never use ordinary cloth orwater to clean the surface of the laser window.
Items required for cleaning • Pre-packaged, pre-IPA-moistened, single-use, lint-free tissue, such as Zeiss Lens Cleaning Wipes or Bausch & Lomb Sight Savers®1 Pre-Moistened Lens Cleaning Tissues.
• Kimwipes®2 dry tissues
• Rain-X®3 Original Glass Treatment
CAUTIONNever moisten the tissue with IPA or other solution after remov-ing it from its package.
Procedure You must access the LaserFlow’s interior to clean the window.Instructions for opening and reassembling the LaserFlow areprovided in Section 5.4 Accessing the LaserFlow’s Nose Piece.
WARNINGDisconnect power from the LaserFlow sensor before opening the sensor housing.
CAUTIONDo not attempt to clean the laser window without opening thesensor housing. Serious damage can result.
1. Remove the folded tissue from its package and use the cor-ners to lightly brush any abrasive material from the sur-face.
1. Sight Savers® is a registered trademark of Bausch & Lomb, Inc.2. Kimwipes® is a registered trademark of Kimberly-Clark Corpo-
ration.3. Rain-X® is a registered trademark of Illinois Tool Works, Inc.

TIENet™ 360 LaserFlow™ Velocity SensorSection 5 Maintenance and Optional Kits
5-6
2. Unfold the tissue and gently clean the surface with down-ward strokes only, keeping the tissue between your finger and the glass at all times.
3. Examine the window closely under good lighting from all directions to ensure there are no smudges, streaks, or film on the surface.If the window is smudged, streaked, or still dirty, get a fresh pre-packaged tissue and repeat.
4. Next, fold a clean, dry Kimwipe tissue four times to rein-force its thickness, and gently clean the window surface with downward strokes only, keeping the tissue between your finger and the glass at all times.
5. Examine the window closely under good lighting from all directions to ensure there are no smudges, streaks, or film on the surface.If the window is smudged, streaked, or still dirty, get a fresh pre-packaged tissue and repeat.
6. Fold a fresh Kimwipe tissue as previously described and spray the closed end of it with Rain-X.
Figure 5-3 Cleaning the laser window: Moisten Kimwipe tissue w/ Rain-X
7. Apply the Rain-X to the entire window surface using down-ward strokes only.
8. After allowing 30 minutes for the Rain-X treatment to dry, wipe the window with another dry Kimwipe tissue, as described in step 4.
9. Carefully examine the window as previously described, and continue polishing the surface with fresh dry tissues until no streaks or film are visible.
Reassemble the sensor, following the steps provided inSection 5.4.2 Replacing the Nose Piece.
Spray this end with Rain-X.

TIENet™ 360 LaserFlow™ Velocity SensorSection 5 Maintenance and Optional Kits
5-7
5.7 Installing the Optional Submerged Measurement Kit
The submerged functionality consists of a TIENet 350 AreaVelocity sensor mounted on the bottom of the LaserFlow sensor.This option is normally pre-assembled and installed at thefactory before shipment. However, it can also be installed by theuser in existing systems.
Tools Required To install the submerged measurement kit, you will need:
• Integrated 350 Kit from Teledyne Isco
· TIENet 350 AV Sensor with 28" cable
· Sensor mounting plate
· 2 Flathead screws
· 2 Lock nuts
· 2 Flat washers
• 1/4" Nut driver or open wrench
5.7.1 Installation Procedure You must access the LaserFlow’s interior to install this option.Instructions for opening and reassembling the LaserFlow areprovided in Section 5.4 Accessing the LaserFlow’s Nose Piece.
WARNINGDisconnect power from the LaserFlow sensor before opening the sensor housing.
CAUTIONNEVER touch the window or get it dirty.
Figure 5-4 350 AV sensor with mounting plate

TIENet™ 360 LaserFlow™ Velocity SensorSection 5 Maintenance and Optional Kits
5-8
1. Using the flat washers and lock nuts, attach the mounting plate to the rectangular mounting holes in the bottom of the LaserFlow interior, with the tip of the 350 sensor fac-ing front.
Figure 5-5 Mounting the integrated 350 AV sensor on the LaserFlow

TIENet™ 360 LaserFlow™ Velocity SensorSection 5 Maintenance and Optional Kits
5-9
Figure 5-6 Connecting the 350 AV sensor to the LaserFlow
2. Prepare the LaserFlow recepta-cle by removing the cap (press down on the spring release and pull out the cap).
3. Remove the cap from the 350 TIENet plug and push the pro-tective caps of the two sensors together.
4. Aligning the pins on the Laser-Flow cable with those in the connector receptacle, push the 350 connector into the recepta-cle on the inner wall of the LaserFlow until the spring release clicks.
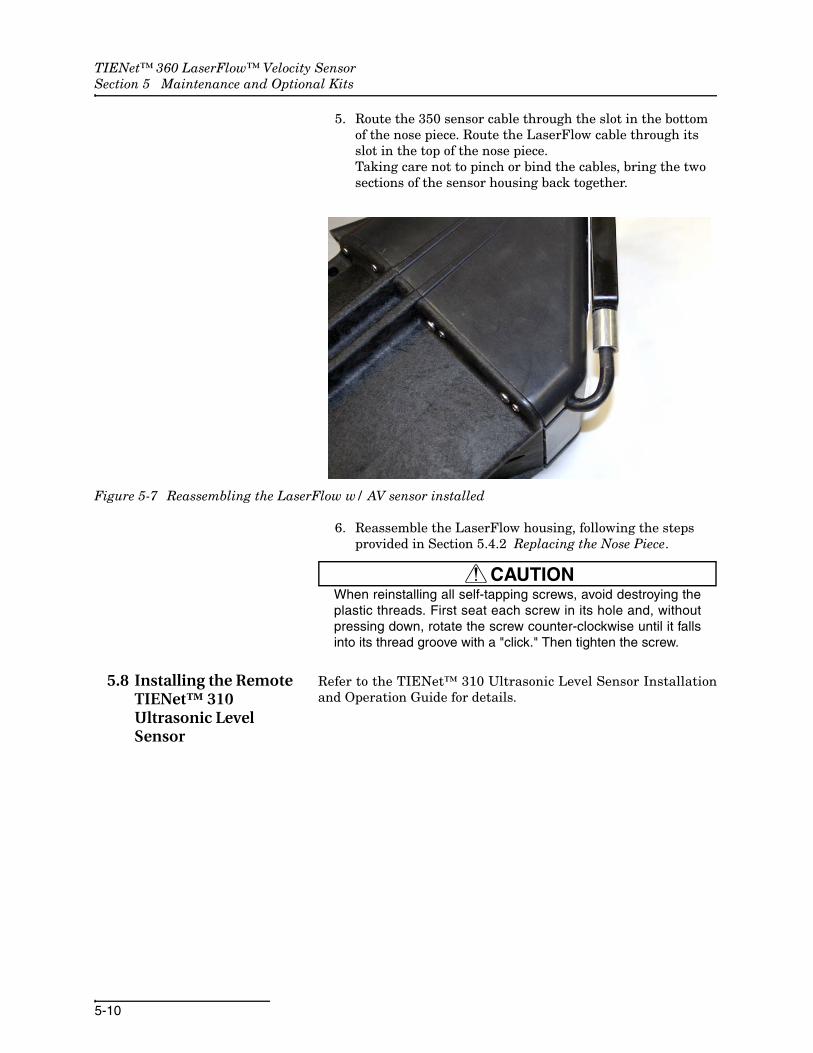
TIENet™ 360 LaserFlow™ Velocity SensorSection 5 Maintenance and Optional Kits
5-10
5. Route the 350 sensor cable through the slot in the bottom of the nose piece. Route the LaserFlow cable through its slot in the top of the nose piece.Taking care not to pinch or bind the cables, bring the two sections of the sensor housing back together.
Figure 5-7 Reassembling the LaserFlow w/ AV sensor installed
6. Reassemble the LaserFlow housing, following the steps provided in Section 5.4.2 Replacing the Nose Piece.
CAUTIONWhen reinstalling all self-tapping screws, avoid destroying theplastic threads. First seat each screw in its hole and, withoutpressing down, rotate the screw counter-clockwise until it fallsinto its thread groove with a "click." Then tighten the screw.
5.8 Installing the Remote TIENet™ 310 Ultrasonic Level Sensor
Refer to the TIENet™ 310 Ultrasonic Level Sensor Installationand Operation Guide for details.

A-1
TIENet™ 360 LaserFlow™Velocity Sensor
Appendix A Replacement Parts
A.1 Replacement Parts Diagrams and Listings
Replacement parts are called out in illustrations in this section.Reference the call-outs in the accompanying tables to determinethe part number for the item.
Replacement parts can be purchased by contacting TeledyneIsco’s Customer Service Department.
Teledyne IscoCustomer Service DepartmentP.O. Box 82531Lincoln, NE 68501 USA
Phone: (800) 228-4373(402) 464-0231FAX:(402) 465-3022
E-mail:[email protected]

TIENet™ 360 LaserFlow™ Velocity SensorAppendix A Replacement Parts
A-2
A.2 LaserFlow Sensor

TIENet™ 360 LaserFlow™ Velocity SensorAppendix A Replacement Parts
A-3

TIENet™ 360 LaserFlow™ Velocity SensorAppendix A Replacement Parts
A-4

TIENet™ 360 LaserFlow™ Velocity SensorAppendix A Replacement Parts
A-5

TIENet™ 360 LaserFlow™ Velocity SensorAppendix A Replacement Parts
A-6

TIENet™ 360 LaserFlow™ Velocity SensorAppendix A Replacement Parts
A-7

TIENet™ 360 LaserFlow™ Velocity SensorAppendix A Replacement Parts
A-8
A.3 Wall Mounting Hardware

TIENet™ 360 LaserFlow™ Velocity SensorAppendix A Replacement Parts
A-9

TIENet™ 360 LaserFlow™ Velocity SensorAppendix A Replacement Parts
A-10
A.4 Temporary Mounting Hardware

TIENet™ 360 LaserFlow™ Velocity SensorAppendix A Replacement Parts
A-11
TIENet™ 360 LaserFlow™ Velocity SensorAppendix A Replacement Parts
A-12
A.5 Replacement Sensors TIENet™ 360 LaserFlow™ Sensor with Built-in UltrasonicLaserFlow Sensor, 10m Cable w/ TIENet™ Plug ................................................................... Call FactoryLaserFlow Sensor, 23m Cable w/ TIENet™ Plug ................................................................... Call FactoryLaserFlow Sensor, 10m Cable w/ TIENet™ Plug, 350 Surcharge Kit................................... Call FactoryLaserFlow Sensor, 23m Cable w/ TIENet™ Plug, 350 Surcharge Kit................................... Call FactoryLaserFlow Sensor, 10m Unterminated Cable ......................................................................... Call FactoryLaserFlow Sensor, 23m Unterminated Cable ......................................................................... Call FactoryLaserFlow Sensor, 10m Unterminated Cable, 350 Surcharge Kit ........................................ Call FactoryLaserFlow Sensor, 23m Unterminated Cable, 350 Surcharge Kit ........................................ Call Factory
Includes TIENet™ 310 Ultrasonic Level SensorLaserFlow Sensor with Remote 310 Ultrasonic, 10m Cable w/ TIENet™ Plug ................... Call FactoryLaserFlow Sensor with Remote 310 Ultrasonic, 23m Cable w/ TIENet™ Plug ................... Call FactoryLaserFlow Sensor with Remote 310 Ultrasonic, 10m Cable w/ TIENet™ Plug, 350 Surcharge Kit................................................................................................................................................... Call FactoryLaserFlow Sensor with Remote 310 Ultrasonic, 23m Cable w/ TIENet™ Plug, 350 Surcharge Kit................................................................................................................................................... Call FactoryLaserFlow Sensor with Remote 310 Ultrasonic, 10m Unterminated Cable ......................... Call FactoryLaserFlow Sensor with Remote 310 Ultrasonic, 23m Unterminated Cable ......................... Call FactoryLaserFlow Sensor with Remote 310 Ultrasonic, 10m Unterminated Cable, 350 Surcharge Kit................................................................................................................................................... Call FactoryLaserFlow Sensor with Remote 310 Ultrasonic, 23m Unterminated Cable, 350 Surcharge Kit................................................................................................................................................... Call Factory
Excludes TIENet™ 310 Ultrasonic Level SensorLaserFlow Sensor with Remote 310 Ultrasonic, 10m Cable w/ TIENet™ Plug................................................................................................................................................... Call FactoryLaserFlow Sensor with Remote 310 Ultrasonic, 23m Cable w/ TIENet™ Plug................................................................................................................................................... Call FactoryLaserFlow Sensor with Remote 310 Ultrasonic, 10m Cable w/ TIENet™ Plug, 350 Surcharge Kit................................................................................................................................................... Call FactoryLaserFlow Sensor with Remote 310 Ultrasonic, 23m Cable w/ TIENet™ Plug, 350 Surcharge Kit................................................................................................................................................... Call FactoryLaserFlow Sensor with Remote 310 Ultrasonic, 10m Unterminated Cable ......................... Call FactoryLaserFlow Sensor with Remote 310 Ultrasonic, 23m Unterminated Cable ......................... Call FactoryLaserFlow Sensor with Remote 310 Ultrasonic, 10m Unterminated Cable, 350 Surcharge Kit................................................................................................................................................... Call FactoryLaserFlow Sensor with Remote 310 Ultrasonic, 23m Unterminated Cable, 350 Surcharge Kit................................................................................................................................................... Call Factory
A.6 Sensor AccessoriesLaserFlow Sunshade................................................................................................................ 60-4364-080

B-1
TIENet™ 360 LaserFlow™Velocity Sensor
Appendix B Installation Checklist
B.1 Introduction This special appendix is to assist you in ensuring that you haveall equipment, supplies, and site information readily availableprior to going to site for installation.
Print these pages and fill out all relevant information.
Once you have established that all of the items listed here are onhand, take this printout to the site to assist in installation andsetup.

TIENet™ 360 LaserFlow™ Velocity SensorAppendix B Installation Checklist
B-2
B.2 Equipment and Recommended Tools
Laptop computer
LaserFlow Sensor
2160 Module or Signature Flow Meter
Flowlink 5.1 Software and Communication Cable
Power source
Tape Measure
Level
Wall Mount Kit, if mounting on wall
7/16" Open or Socket Wrench
9/16" Open or Socket Wrench
Hammer Drill
3/8" Masonry Bit
Hammer
Temporary Mount Kit, if application is temporary
7/16" Open or Socket Wrench
Optional Sensor Retrieval Tool
B.3 Site Information 1. Site Name: ___________________________________________
2. Meter:
2160 Module (Serial Number: _______________________)
Signature Flow Meter (Serial Number: _______________)
LaserFlow Sensor (Serial Number: __________________)
____________________________________________________
3. Meter Location: _______________________________________
4. Channel Shape:
Round
U-Shaped
Rectangular
Trapezoidal
Elliptical

TIENet™ 360 LaserFlow™ Velocity SensorAppendix B Installation Checklist
B-3
5. Channel Dimensions:
6. Number of Velocity Points: _____________________________
7. Expected Level (m or ft)Minimum: __________
Maximum: __________
Average: ___________
8. Expected Velocity (m/s or ft/s)Minimum: __________
Maximum: __________
Average: ___________
9. Distance between bottom of sensor &Maximum Level (m or ft) _________
10. Distance between bottom ofsensor & channel bottom (m or ft): _________
11. Direction sensor is facing:
Upstream
Downstream
12. Site IP Address: _______________________________________
13. Call-In WindowStart: __________
Stop: ___________
14. Server Push Address: __________________________________

TIENet™ 360 LaserFlow™ Velocity SensorAppendix B Installation Checklist
B-4
15. Software RevisionsFlowlink: _______(Help > About Flowlink)
LaserFlow: ________(TIENet/Configure)
2160: __________(Device Tab)
Signature: __________(Menu > Admin > Display SignatureInformation)
16. Data Storage Rate: ____________________________________

TIENet™ 360 LaserFlow™ Velocity SensorAppendix B Installation Checklist
B-5
B.4 Recommended Essential Parameters
The following basic parameters are used in almost every mea-surement site.
In the 2160, parameters are activated in the Jump to Measure-ments tab.
In the Signature, parameters are activated by going to HardwareSetup > Configure Measurements.
After programming, Retrieve Data to download initial diagnosticdata, to verify that this data will be available if/when needed.
B.5 Site Conditions LaserFlow with Built-in Sensor: When using the LaserFlowmodule with the built-in sensor, never install the LaserFlow in afree-flowing outfall or in a drop manhole (see Figure B-1).
Figure B-1 Do not install LaserFlow with built-in sensor in a free-flowing outfall or in a drop manhole.
360 Distance 360 Level
360 Velocity 360 X-Axis
360 Y-Axis 360 Ultrasonic Signal
360 Doppler Power 360 Case Temperature
360 Air Temperature Flow Rate

TIENet™ 360 LaserFlow™ Velocity SensorAppendix B Installation Checklist
B-6
LaserFlow with Remote Ultrasonic Sensor: When using theLaserFlow module with the remote ultrasonic sensor, theLaserFlow sensor can be installed in a free-flowing outfall or in adrop manhole.
Figure B-2 Correct setup when using the LaserFlow module with remote ultrasonic sensor and horizontal mount bracket
Stream Level – The stream level should be the same at both thelaser and ultrasonic measuring points.
Figure B-3 Placement of LaserFlow with built-in sensor
Bottom of Channel
Laser
SoundPulse
HorizontalMounting Bracket
US
Dist
ance
to B
otto
m
Lase
rFlo
w D
istan
ceto
Bot
tom
Correct placement with built-in sensor Correct placement with built-in sensor(Ensure “Adaptive Focus” option is active)
Less than 3”

TIENet™ 360 LaserFlow™ Velocity SensorAppendix B Installation Checklist
B-7
NoteIf the stream level is less than 3” (7.62 cm) when using theLaserFlow with built-in sensor, ensure the Adaptive Focusoption is active. Refer to Section X.X for details.
Figure B-4 Placement of LaserFlow with remote ultrasonic sensor
NoteIf the laser and ultrasonic measuring points differ at the streamlevel by more than 3” (7.62 cm), the remote ultrasonic sensormust be used. Refer to Section X.X for details.
More than 3”

TIENet™ 360 LaserFlow™ Velocity SensorAppendix B Installation Checklist
B-8
Foam or Steam – Never install the LaserFlow over foam orsteam.
B.6 Sensor Positioning For complete installation requirements, refer to Sensor Posi-tioning, page B-8.
Straight Runs – For best performance, place the sensor in thestraightest possible run, at a minimum of 5 channel diametersdownstream from a bend and 2 channel diameters upstreamfrom a bend.

TIENet™ 360 LaserFlow™ Velocity SensorAppendix B Installation Checklist
B-9
Center of Pipe – Center the LaserFlow (and middle laser beam)relative to the pipe walls.
Parallel w/ Flow – Install the LaserFlow parallel with the flow.Never install it at an angle, or perpendicular, to the flow.
> 5 Channel =
> 2 Channel =
FLOW
a aa a
YESNO

TIENet™ 360 LaserFlow™ Velocity SensorAppendix B Installation Checklist
B-10
Incorrect Incorrect
Correct

C-1
TIENet™ 360 LaserFlow™Velocity Sensor
Appendix C Velocity Error Codes
C.1 Introduction Erroneous flow data can result from a number of factors. TheLaserFlow system provides numbered error codes associatedwith the 360 Velocity data to assist in troubleshooting.
If using the 2160 LaserFlow module, error codes are viewableusing Teledyne Isco Flowlink® software. If using the Signatureflow meter, error codes are viewable in the bottom panel of thedisplay. Definitions of the error codes are provided in Table C-1.For further assistance, contact the factory.
C.2 Importing Data Dump (.ddp) Files(Signature Only)
Flow data can be downloaded from the Signature Flow Meteronto a USB flash drive in the form of a .ddp (Data Dump) file.
To download the data:
1. Connect a flash drive to the USB port on the front panel of the Signature flow meter. From the USB Options menu, select Retrieve Data.
2. Select “All data” or specify a start date or date range, and press NEXT. The data will be stored on the connected flash drive in the “ISCO” folder.
3. Connect the flash drive to a computer with Flowlink installed.
4. Launch the Flowlink application.
5. Copy the file using one of the methods below:
a. Select File > Import. When the import window appears, browse to the folder containing the desired .ddp file. Select the file and click Open.
b. Select “Signature Data Transfer” from the File menu and then browse to the appropriate folder.

TIENet™ 360 LaserFlow™ Velocity SensorAppendix C Velocity Error Codes
C-2
Figure C-1 Signature flow data: Selecting the .ddp file(s)
A progress window will appear, displaying the filename, sitename, device type, number of data types in the site file, andprogress of the download.
6. When the two progress bars have completed, click Done to close the window.
Figure C-2 Signature flow data: Importing the .ddp file
Upon completion, a new site file will appear in the Flowlinkworkspace.

TIENet™ 360 LaserFlow™ Velocity SensorAppendix C Velocity Error Codes
C-3
C.3 Viewing Velocity Error Codes in Flowlink
In order to view error codes for velocity readings:
1. In the Flowlink workspace, double-click the 360 Velocity data set. When the graph appears, click the Table View button.
2. When the table appears, click the Edit/View button.
Any error codes will appear in the 360 Velocitycolumn following the words “No Data.” Definitions of the errorcodes are provided in Table C-1.
Figure C-3 Identifying error codes in the 360 Velocity data set
Error codes
Table C-1 Definitions of 360 Error Codes
Error Code Meaning Possible Solutions
1: Low Signal Power Error No laser Doppler signal peak or sufficient strength is found. Mini-mum is 1000.
Ensure the protective window cap is removed. Refer toSection 1.7.1 Protective Window Cap.
Ensure the location of the laser is correct.
Verify the distance is 0 to 10 ft from the bottom of thesensor.
Ensure the input voltage is 10V (minimum).
Ensure the Y-axis (pitch) is accurate (greater or equal to 45º).
2: Flow Direction Error An error occurred while determin-ing flow direction. This error dis-plays only if the “Positive Velocity” option is set to “true” in the Flow-link application.
Call factory.

TIENet™ 360 LaserFlow™ Velocity SensorAppendix C Velocity Error Codes
C-4
3: Ultrasonic Read Error An error occurred during an ultra-sonic reading. This includes com-munication errors with the ultrasonic sensor.
Ensure the blanking distance is correct. Refer to Sec-tion 3.2 Measurement Setup.
Ensure the placement of the sensor is accurate. Refer to Section 2.5.3 Sensor Positioning and Require-ments.
Verify there is no foam or extreme turbulence.
4: Analog-to-Digital Con-verter (ADC) Error
An error occurred during an ADC reading.
Contact factory.
5: Focus Error An error occurred while focusing the laser.
Ensure the input voltage is 10V (minimum).
6: Digital Signal Proces-sor (DSP) Communication Error
An error occurred during commu-nication with the DSP.
Contact factory.
7: Sensor not seen Communication failed between flow meter and sensor. This could be due to the sensor being dis-connected, losing power, etc.
Ensure the sensor is connected to the flow meter.
Ensure the input voltage is 10V (minimum).
Verify the battery is connected or charged.
Table C-1 Definitions of 360 Error Codes
Error Code Meaning Possible Solutions
Table C-2 Definitions of 350 Error Codes
Error Code Meaning Possible Solutions
1: Measurement Error
Unable to generate valid velocity data set.
Contact factory.
3: Velocity Filter Error An error occurred while setting the filter clock.
Ensure there are uniform flow conditions at sensor location.
5: Velocity Gain Error Unable to set gain after maximum attempts.
Ensure there is no debris on the sensor.
6: Level to Low error The absolute level is too low to attempt velocity measurement.
Place sensor in flow with at least 1” deep.
Set storage of velocity to be secondary based on depth of 1”.
7: Timeout/Quality Error
Measurement timed out or did not meet measurement quality requirements.
Contact factory.

D-1
TIENet™ 360 LaserFlow™Velocity Sensor
Appendix D Material Safety Data Sheets
This appendix provides Material Safety Data Sheets for the des-iccant used by the TIENet 360 LaserFlow Sensor.
Teledyne Isco cannot guarantee the accuracy of the data. Specificquestions regarding the use and handling of the products shouldbe directed to the manufacturer listed on the MSDS.
SORB-IT® is a registered trademark of N. T. Gates Company.

TIENet™ 360 LaserFlow™ Velocity Sensor
D-2
101 Christine DriveBelen, New Mexico 87002Phone: (505) 864-6691
Fax: (505) 861-2355
MATERIAL SAFETY DATA SHEET -- September 28, 1998SORB-IT®
Packaged Desiccant
ISO 9002
SECTION I -- PRODUCT IDENTIFICATION
Trade Name and Synonyms: Silica Gel, Synthetic Amorphous Silica,Silicon, Dioxide
Chemical Family: Synthetic Amorphous SilicaFormula: SiO2.x H2O
SECTION II -- HAZARDOUS INGREDIENTS
Components in the Solid MixtureCOMPONENT CAS No % ACGIH/TLV (PPM) OSHA-(PEL)
AmorphousSilica
63231-67-4 >99 PEL - 20 (RESPIRABLE),TLV – 5
LIMIT – NONE,HAZARD -IRRITANT˝
Synthetic amorphous silica is not to be confused with crystalline silica such as quartz,cristobalite or tridymite or with diatomaceous earth or other naturally occurring forms ofamorphous silica that frequently contain crystalline forms.
This product is in granular form and packed in bags for use as a desiccant. Therefore, noexposure to the product is anticipated under normal use of this product. Avoid inhalingdesiccant dust.
SECTION III -- PHYSICAL DATA
Appearance and Odor: White granules; odorless.Melting Point: >1600 Deg C; >2900 Deg FSolubility in Water: Insoluble.Bulk Density: >40 lbs./cu. ft.Percent Volatile by Weight @ 1750 Deg F: <10%.

TIENet™ 360 LaserFlow™ Velocity Sensor
D-3
101 Christine DriveBelen, New Mexico 87002Phone: (505) 864-6691
Fax: (505) 861-2355
MATERIAL SAFETY DATA SHEET -- September 28, 1998SORB-IT®
Packaged Desiccant
ISO 9002
SECTION IV -- FIRE EXPLOSION DATA
Fire and Explosion Hazard - Negligible fire and explosion hazard when exposed to heator flame by reaction with incompatible substances.
Flash Point - Nonflammable.
Firefighting Media - Dry chemical, water spray, or foam. For larger fires, use water sprayfog or foam.
Firefighting - Nonflammable solids, liquids, or gases: Cool containers that are exposedto flames with water from the side until well after fire is out. For massive fire in enclosedarea, use unmanned hose holder or monitor nozzles; if this is impossible, withdraw fromarea and let fire burn. Withdraw immediately in case of rising sound from venting safetydevice or any discoloration of the tank due to fire.
SECTION V -- HEALTH HAZARD DATA
Health hazards may arise from inhalation, ingestion, and/or contact with the skin and/oreyes. Ingestion may result in damage to throat and esophagus and/or gastrointestinaldisorders. Inhalation may cause burning to the upper respiratory tract and/or temporary orpermanent lung damage. Prolonged or repeated contact with the skin, in absence ofproper hygiene, may cause dryness, irritation, and/or dermatitis. Contact with eye tissuemay result in irritation, burns, or conjunctivitis.
First Aid (Inhalation) - Remove to fresh air immediately. If breathing has stopped, giveartificial respiration. Keep affected person warm and at rest. Get medical attentionimmediately.
First Aid (Ingestion) - If large amounts have been ingested, give emetics to causevomiting. Stomach siphon may be applied as well. Milk and fatty acids should beavoided. Get medical attention immediately.
First Aid (Eyes) - Wash eyes immediately and carefully for 30 minutes with running water.

TIENet™ 360 LaserFlow™ Velocity Sensor
D-4
101 Christine DriveBelen, New Mexico 87002Phone: (505) 864-6691
Fax: (505) 861-2355
MATERIAL SAFETY DATA SHEET -- September 28, 1998SORB-IT®
Packaged Desiccant
ISO 9002
NOTE TO PHYSICIAN: This product is a desiccant and generates heat as it adsorbswater. The used product can contain material of hazardous nature. Identify that materialand treat accordingly.
SECTION VI -- REACTIVITY DATA
Reactivity - Silica gel is stable under normal temperatures and pressures in sealedcontainers. Moisture can cause a rise in temperature which may result in a burn.
SECTION VII --SPILL OR LEAK PROCEDURES
Notify safety personnel of spills or leaks. Clean-up personnel need protection againstinhalation of dusts or fumes. Eye protection is required. Vacuuming and/or wet methodsof cleanup are preferred. Place in appropriate containers for disposal, keeping airborneparticulates at a minimum.
SECTION VIII -- SPECIAL PROTECTION INFORMATION
Respiratory Protection - Provide a NIOSH/MSHA jointly approved respirator in theabsence of proper environmental control. Contact your safety equipment supplier forproper mask type.
Ventilation - Provide general and/or local exhaust ventilation to keep exposures belowthe TLV. Ventilation used must be designed to prevent spots of dust accumulation orrecycling of dusts.
Protective Clothing - Wear protective clothing, including long sleeves and gloves, toprevent repeated or prolonged skin contact.
Eye Protection - Chemical splash goggles designed in compliance with OSHAregulations are recommended. Consult your safety equipment supplier.

TIENet™ 360 LaserFlow™ Velocity Sensor
D-5
101 Christine DriveBelen, New Mexico 87002Phone: (505) 864-6691
Fax: (505) 861-2355
MATERIAL SAFETY DATA SHEET -- September 28, 1998SORB-IT®
Packaged Desiccant
ISO 9002
SECTION IX -- SPECIAL PRECAUTIONS
Avoid breathing dust and prolonged contact with skin. Silica gel dust causes eye irritationand breathing dust may be harmful.
* No Information Available
HMIS (Hazardous Materials Identification System) for this product is asfollows:
Health Hazard 0Flammability 0Reactivity 0Personal Protection HMIS assigns choice of personal protective equipment to the
customer, as the raw material supplier is unfamiliar with thecondition of use.
The information contained herein is based upon data considered true and accurate. However, United Desiccants makes no warrantiesexpressed or implied, as to the accuracy or adequacy of the information contained herein or the results to be obtained from the usethereof. This information is offered solely for the user's consideration, investigation and verification. Since the use and conditions ofuse of this information and the material described herein are not within the control of United Desiccants, United Desiccants assumes noresponsibility for injury to the user or third persons. The material described herein is sold only pursuant to United Desiccants' Termsand Conditions of Sale, including those limiting warranties and remedies contained therein. It is the responsibility of the user todetermine whether any use of the data and information is in accordance with applicable federal, state or local laws and regulations.

TIENet™ 360 LaserFlow™ Velocity Sensor
D-6

Index-1
TIENet™ 360 LaserFlow™Velocity Sensor
Index
Symbols.ddp files, C-1
Numerics2160 Laser Module
setup, 4-1350 advanced settings
2160, 4-16Signature, 3-11
350 level2160, 4-14Signature, 3-8
350 velocity2160, 4-16flow direction, 3-9, 4-16Signature, 3-9
360 advanced settings2160, 4-8Signature, 3-5
360 level2160, 4-5Signature, 3-5
360 velocity2160, 4-7flow direction, 3-5Signature, 3-5
Aaccessories, 1-6
Bbeam angle, 2-2bubble level, 2-21, 2-27
Ccable connection, 2-3
2160, 2-8, 2-9Signature, 2-3
character gridSignature, 3-2
cleaninghousing, 5-2laser window, 5-5
configure measurementsSignature, 3-3
contact Teledyne Isco, 3-15
Ddata dump, C-1description, 1-1design, 1-2dimensions
temp mount, 2-13, 2-14wall mount, 2-11, 2-12
Eerror codes, C-1
definitions, C-3
Ffirmware updates, 5-2flow direction, 3-9Flowlink software, 4-1
data dump files, C-1viewing error codes, C-3
Hhardware setup
Signature, 3-3
Iinstallation, 2-10
centering the laser - 2160, 4-17centering the laser - Signature, 3-13constants, 2-15position, 2-15requirements, 2-15, 2-16temp mount, 2-22wall mounting, 2-17
installation checklist, B-1installation considerations, 2-2
Jjump to measurements
2160, 4-4
Llaser on, 3-13, 4-17laser window
cleaning, 5-5

TIENet™ 360 LaserFlow™ Velocity SensorIndex
Index-2
condensation, 5-5fouling, 5-5
level - initial setting, 3-9, 4-15lock handle, 2-21, 2-26
Mmaintenance
cleaning, 5-2firmware, 5-2opening the sensor, 5-2
Material Safety Data Sheets, D-1measurement parameters, 3-1, 4-3measurement points
2160, 4-18Signature, 3-13
measurement setupSignature, 3-4
MSDS, D-1multipoint
2160, 4-18Signature, 3-13
Oopening the sensor, 5-2operating principles, 1-2
Pparts, 1-6, A-1
LaserFlow, A-2
Rreplacement parts, A-1
LaserFlow, A-2retrieval arm, 2-28
Ssafety, 2-1scan
2160, 4-1Signature, 3-1
sensor activation2160, 4-1Signature, 3-1
sensor retrieval, 2-28setup
2160 Laser Module, 4-1Signature Flow Meter, 3-1
Signature Flow Metersetup, 3-1
smart sensor setupSignature, 3-3
specifications, 1-4submerged measurement, 1-3
kit installation, 5-7surcharge alarm, 3-9, 4-15
Ttechnical specifications, 1-4temporary mounting, 2-22
center offset, 2-27dimensions, 2-13, 2-14procedure, 2-23
troubleshooting, C-1
Uultrasonic level
2160, 4-5beam angle, 2-2Signature, 3-14
unpacking instructions, 1-8update device list, 3-1update firmware, 5-2
Vvelocity grid
2160, 4-18Signature, 3-12, 3-13
velocity readingsinvalid or inconsistent, 5-5
Wwall mounting, 2-17
dimensions, 2-11, 2-12procedure, 2-18
window cap, 1-8

Compliance Statements
CE Dec
larat
ion o
f Con
form
ity
DECLARATION OF CONFORMITY
Application of Council Directive: 2004/108/EC -The EMC Directive2012/19/EC– The WEEE Directive2006/95/EC – The Low Voltage Directive
Manufacturer's Name: Teledyne IscoManufacturer's Address:
4700 Superior, Lincoln, Nebraska 68504 USAMailing Address: P.O. Box 82531, Lincoln, NE 68501Phone: +1 (402) 464-0231FAX: +1 (402) 465-3799
Equipment Type/Environment: Laboratory Equipment for Light Industrial/Commercial EnvironmentsTrade Name/Model No: 360 Laser Flow Sensor with 2160 Laser Flow Area Velocity Module and 2191
Battery ModuleYear of Issue: 2012
Standards to which Conformity is Declared: EN 61326:2006 EMC Requirements for Electrical Equipment for Measurement, Control, and Laboratory Use
EN 61010-1 2nd edition Safety Requirements for Electrical Equipment for Measurement, Control, and Laboratory Use
EN60529 Special Protection offered by the Signature’s Enclosure: IP-66 Standard Description Severity Applied Performance Criteria
EN61000-4-2:2008 Electrostatic Discharge Level 2 - 4kV contact dischargeLevel 3 - 8kV air discharge
A
EN61000-4-3:2006 /A1:2007 /A2:2010
Radiated RF Immunity 80 mHz to 2.7gHz 80% AM at 1 kHzLevel 2 - 3V/m A
EN61000-4-4:2004 /A1:2010
Electrical Fast Transient (EFT) onMains and I/O
Level 2 - 1kV on AC lines A
EN61000-4-5:2005 Surge on AC Lines Level 2 - 1kV Line Common Mode Level 2 - 0.5kV Differential Mode
A
EN61000-4-6:2008 Conducted RF Immunity on Mains and I/O
150 kHz to 80 mHzLevel 1 – 1V rms, 80% Modulated
A
EN61000-4-11:2004 Voltage Dips 0% during1 cycle and full cycle70% at 25 cycles
A
CISPR11/EN 55011:2009 /A1:1020
RF Emissions Radiated, below 1GHz and Conducted, AC Mains
Group 1, Class A Industrial, Scientific, and Medical Equipment
PASS
EN61000-3-2:2005/A1:2008 /A2:2009 EN61000-3-3:2008
AC Harmonics, Flicker PASS
We, the undersigned, hereby declare that the design of the equipment specified above conforms to the above Directive(s) and Standards as of September 21. 2012.
USA Representative -
_______________________________ Vikas V. Padhye Ph, D Vice President and General Manager 4700 Superior Street Lincoln, Nebraska 68504 Phone: 402-464-0231 Fax: 402-464-0318
60-4362-017Rev. A


Hazm
at Ta
ble
Hazmat Table LaserFlow and Accessories 60-4362-020 Rev.
Name and amount of Hazardous Substances or Elements in the product
Component Name
Hazardous Substances or Elements
(Pb)
(Hg)
(Cd)
(Cr(VI))
(PBB)
(PBDE)
Circuit Boards X O O O O X
Wiring O O O O O X
Internal Cables O O O O O X
Line Cord O O O O O X
DC Motor X O O O O X
Connectors O O X O O O
Battery X X X O O O
Name and amount of Hazardous Substances or Elements in
the product
O: ST/
O: Represent the concentration of the hazardous substance in this component’s any homogeneous pieces is lower than the ST/ standard limitation.
X ST/
( “X” )
X: Represent the concentration of the hazardous substance in this component’s at least one homogeneous piece is higher than the ST/ standard limitation.
(Manufacturer may give technical reasons to the “X”marks)
The Environmentally Friendly Use Period (EFUP) was determined through experience.
(207 2007 )
A B
The date of Manufacture is in code within the serial number. The first three numbers are the year of
manufacture (207 is year 2007) followed by a letter for the month. "A" is January; "B" is February and so on.

Warranty

Before returning any instrument for repair, please call, fax, or e-mail the Teledyne Isco ServiceDepartment for instructions. Many problems can often be diagnosed and corrected over thephone, or by e-mail, without returning the instrument to the factory.Instruments needing factory repair should be packed carefully, and shipped to the attention ofthe service department. Small, non-fragile items can be sent by insured parcel post. PLEASEBE SURE TO ENCLOSE A NOTE EXPLAINING THE PROBLEM.
Shipping Address: Teledyne Isco - Attention Repair Service4700 Superior StreetLincoln, NE 68504 USA
Mailing Address: Teledyne IscoPO Box 82531Lincoln, NE 68501 USA
Phone: Repair service: (800) 775-2965 (lab instruments)(866) 298-6174 (samplers & flow meters)
Sales & General Information: (800) 228-4373 (USA & Canada)Fax: (402) 465-3001Email: [email protected]
October 11, 2013 P/N 60-1002-040 Rev H
Teledyne Isco One Year Limited Factory Service Warranty*This warranty exclusively covers Teledyne Isco
instruments, providing a one-year limited warranty
covering parts and labor.
Any instrument that fails during the warranty period due to
faulty parts or workmanship will be repaired at the factory
at no charge to the customer. Teledyne Isco�s exclusive
liability is limited to repair or replacement of defective
instruments. Teledyne Isco is not liable for consequential
damages.
Teledyne Isco will pay surface transportation charges both
ways within the 48 contiguous United States if the
instrument proves to be defective within 30 days of
shipment. Throughout the remainder of the warranty period,
the customer will pay to return the instrument to Teledyne
Isco, and Teledyne Isco will pay surface transportation to
return the repaired instrument to the customer. Teledyne
Isco will not pay air freight or customer�s packing and
crating charges. This warranty does not cover loss, damage,
or defects resulting from transportation between the
customer�s facility and the repair facility.
The warranty for any instrument is the one in effect on date
of shipment. The warranty period begins on the shipping
date, unless Teledyne Isco agrees in writing to a different
date.
Excluded from this warranty are normal wear; expendable
items such as pH sensors, charts, ribbon, lamps, tubing, and
glassware; fittings and wetted parts of valves; and damage
due to corrosion, misuse, accident, or lack of proper
maintenance. This warranty does not cover products not
sold under the Teledyne Isco trademark or for which any
other warranty is specifically stated.
No item may be returned for warranty service without a
return authorization number issued by Teledyne Isco.
This warranty is expressly in lieu of all other warranties
and obligations and Teledyne Isco specifically disclaims
any warranty of merchantability or fitness for a
particular purpose.
The warrantor is Teledyne Isco, 4700 Superior, Lincoln, NE
68504, U.S.A.
* This warranty applies to the USA and countries where Teledyne Isco does not have an authorized dealer.
Customers in countries outside the USA, where Teledyne Isco has an authorized dealer, should contact
their Teledyne Isco dealer for warranty service.