Tib Ipe Unix Installation
240
TIBCO iProcess ® Engine for UNIX Installation Software Release 11.3 October 2011
-
Upload
satish-varma -
Category
Documents
-
view
132 -
download
6
Transcript of Tib Ipe Unix Installation

TIBCO iProcess® Engine
for UNIX
InstallationSoftware Release 11.3October 2011

Important Information
SOME TIBCO SOFTWARE EMBEDS OR BUNDLES OTHER TIBCO SOFTWARE. USE OF SUCH EMBEDDED OR BUNDLED TIBCO SOFTWARE IS SOLELY TO ENABLE THE FUNCTIONALITY (OR PROVIDE LIMITED ADD-ON FUNCTIONALITY) OF THE LICENSED TIBCO SOFTWARE. THE EMBEDDED OR BUNDLED SOFTWARE IS NOT LICENSED TO BE USED OR ACCESSED BY ANY OTHER TIBCO SOFTWARE OR FOR ANY OTHER PURPOSE.USE OF TIBCO SOFTWARE AND THIS DOCUMENT IS SUBJECT TO THE TERMS AND CONDITIONS OF A LICENSE AGREEMENT FOUND IN EITHER A SEPARATELY EXECUTED SOFTWARE LICENSE AGREEMENT, OR, IF THERE IS NO SUCH SEPARATE AGREEMENT, THE CLICKWRAP END USER LICENSE AGREEMENT WHICH IS DISPLAYED DURING DOWNLOAD OR INSTALLATION OF THE SOFTWARE (AND WHICH IS DUPLICATED IN THE LICENSE FILE) OR IF THERE IS NO SUCH SOFTWARE LICENSE AGREEMENT OR CLICKWRAP END USER LICENSE AGREEMENT, THE LICENSE(S) LOCATED IN THE “LICENSE” FILE(S) OF THE SOFTWARE. USE OF THIS DOCUMENT IS SUBJECT TO THOSE TERMS AND CONDITIONS, AND YOUR USE HEREOF SHALL CONSTITUTE ACCEPTANCE OF AND AN AGREEMENT TO BE BOUND BY THE SAME.This document contains confidential information that is subject to U.S. and international copyright laws and treaties. No part of this document may be reproduced in any form without the written authorization of TIBCO Software Inc.TIBCO, The Power of Now, TIBCO ActiveMatrix BusinessWorks, TIBCO iProcess, TIBCO iProcess Suite, TIBCO Hawk, TIBCO Business Studio, TIBCO Rendezvous, and TIBCO Enterprise Message Service are either registered trademarks or trademarks of TIBCO Software Inc. in the United States and/or other countries.All other product and company names and marks mentioned in this document are the property of their respective owners and are mentioned for identification purposes only.THIS SOFTWARE MAY BE AVAILABLE ON MULTIPLE OPERATING SYSTEMS. HOWEVER, NOT ALL OPERATING SYSTEM PLATFORMS FOR A SPECIFIC SOFTWARE VERSION ARE RELEASED AT THE SAME TIME. SEE THE README FILE FOR THE AVAILABILITY OF THIS SOFTWARE VERSION ON A SPECIFIC OPERATING SYSTEM PLATFORM.THIS DOCUMENT IS PROVIDED “AS IS” WITHOUT WARRANTY OF ANY KIND, EITHER EXPRESS OR IMPLIED, INCLUDING, BUT NOT LIMITED TO, THE IMPLIED WARRANTIES OF MERCHANTABILITY, FITNESS FOR A PARTICULAR PURPOSE, OR NON-INFRINGEMENT.THIS DOCUMENT COULD INCLUDE TECHNICAL INACCURACIES OR TYPOGRAPHICAL ERRORS. CHANGES ARE PERIODICALLY ADDED TO THE INFORMATION HEREIN; THESE CHANGES WILL BE INCORPORATED IN NEW EDITIONS OF THIS DOCUMENT. TIBCO SOFTWARE INC. MAY MAKE IMPROVEMENTS AND/OR CHANGES IN THE PRODUCT(S) AND/OR THE PROGRAM(S) DESCRIBED IN THIS DOCUMENT AT ANY TIME.THE CONTENTS OF THIS DOCUMENT MAY BE MODIFIED AND/OR QUALIFIED, DIRECTLY OR INDIRECTLY, BY OTHER DOCUMENTATION WHICH ACCOMPANIES THIS SOFTWARE, INCLUDING BUT NOT LIMITED TO ANY RELEASE NOTES AND "READ ME" FILES.Copyright © 2001-2011 TIBCO Software Inc. ALL RIGHTS RESERVED.TIBCO Software Inc. Confidential Information
| iii
Contents
Figures . . . . . . . . . . . . . . . . . . . . . . . . . . . . . . . . . . . . . . . . . . . . . . . . . . . . . . . . . . . . . . . . . . . . . . . . ix
Tables . . . . . . . . . . . . . . . . . . . . . . . . . . . . . . . . . . . . . . . . . . . . . . . . . . . . . . . . . . . . . . . . . . . . . . . . . xi
Preface . . . . . . . . . . . . . . . . . . . . . . . . . . . . . . . . . . . . . . . . . . . . . . . . . . . . . . . . . . . . . . . . . . . . . . . xiii
Related Documentation . . . . . . . . . . . . . . . . . . . . . . . . . . . . . . . . . . . . . . . . . . . . . . . . . . . . . . . . . . . . . . . . . . . . .xivTIBCO iProcess Engine Documentation. . . . . . . . . . . . . . . . . . . . . . . . . . . . . . . . . . . . . . . . . . . . . . . . . . . . .xivOther TIBCO Product Documentation . . . . . . . . . . . . . . . . . . . . . . . . . . . . . . . . . . . . . . . . . . . . . . . . . . . . . .xivThird-party Documentation . . . . . . . . . . . . . . . . . . . . . . . . . . . . . . . . . . . . . . . . . . . . . . . . . . . . . . . . . . . . . . . xv
Typographical Conventions . . . . . . . . . . . . . . . . . . . . . . . . . . . . . . . . . . . . . . . . . . . . . . . . . . . . . . . . . . . . . . . . . .xvi
Connecting with TIBCO Resources . . . . . . . . . . . . . . . . . . . . . . . . . . . . . . . . . . . . . . . . . . . . . . . . . . . . . . . . . . . xviiiHow to Join TIBCOmmunity . . . . . . . . . . . . . . . . . . . . . . . . . . . . . . . . . . . . . . . . . . . . . . . . . . . . . . . . . . . . . xviiiHow to Access All TIBCO Documentation . . . . . . . . . . . . . . . . . . . . . . . . . . . . . . . . . . . . . . . . . . . . . . . . . . xviiiHow to Contact TIBCO Support . . . . . . . . . . . . . . . . . . . . . . . . . . . . . . . . . . . . . . . . . . . . . . . . . . . . . . . . . . xviii
Chapter 1 Introduction. . . . . . . . . . . . . . . . . . . . . . . . . . . . . . . . . . . . . . . . . . . . . . . . . . . . . . . . . . . .1
Installation Overview . . . . . . . . . . . . . . . . . . . . . . . . . . . . . . . . . . . . . . . . . . . . . . . . . . . . . . . . . . . . . . . . . . . . . . . . 2Installation Modes. . . . . . . . . . . . . . . . . . . . . . . . . . . . . . . . . . . . . . . . . . . . . . . . . . . . . . . . . . . . . . . . . . . . . . . 2Organization Roles . . . . . . . . . . . . . . . . . . . . . . . . . . . . . . . . . . . . . . . . . . . . . . . . . . . . . . . . . . . . . . . . . . . . . . 2Installation Types . . . . . . . . . . . . . . . . . . . . . . . . . . . . . . . . . . . . . . . . . . . . . . . . . . . . . . . . . . . . . . . . . . . . . . . 3iProcess Engine Architecture . . . . . . . . . . . . . . . . . . . . . . . . . . . . . . . . . . . . . . . . . . . . . . . . . . . . . . . . . . . . . . 6
Installation Requirements . . . . . . . . . . . . . . . . . . . . . . . . . . . . . . . . . . . . . . . . . . . . . . . . . . . . . . . . . . . . . . . . . . . . 8Basic System Requirements. . . . . . . . . . . . . . . . . . . . . . . . . . . . . . . . . . . . . . . . . . . . . . . . . . . . . . . . . . . . . . . 8Additional System Requirements . . . . . . . . . . . . . . . . . . . . . . . . . . . . . . . . . . . . . . . . . . . . . . . . . . . . . . . . . . . 9Supported Databases. . . . . . . . . . . . . . . . . . . . . . . . . . . . . . . . . . . . . . . . . . . . . . . . . . . . . . . . . . . . . . . . . . . 15
Upgrade Requirements . . . . . . . . . . . . . . . . . . . . . . . . . . . . . . . . . . . . . . . . . . . . . . . . . . . . . . . . . . . . . . . . . . . . . 20
Control File . . . . . . . . . . . . . . . . . . . . . . . . . . . . . . . . . . . . . . . . . . . . . . . . . . . . . . . . . . . . . . . . . . . . . . . . . . . . . . 21How to Use the Control File . . . . . . . . . . . . . . . . . . . . . . . . . . . . . . . . . . . . . . . . . . . . . . . . . . . . . . . . . . . . . . 21Control File Naming Convention. . . . . . . . . . . . . . . . . . . . . . . . . . . . . . . . . . . . . . . . . . . . . . . . . . . . . . . . . . . 22Control File Format . . . . . . . . . . . . . . . . . . . . . . . . . . . . . . . . . . . . . . . . . . . . . . . . . . . . . . . . . . . . . . . . . . . . . 22Control File Keywords. . . . . . . . . . . . . . . . . . . . . . . . . . . . . . . . . . . . . . . . . . . . . . . . . . . . . . . . . . . . . . . . . . . 22
Chapter 2 Installing TIBCO iProcess Engine. . . . . . . . . . . . . . . . . . . . . . . . . . . . . . . . . . . . . . . . .29
Pre-Installation. . . . . . . . . . . . . . . . . . . . . . . . . . . . . . . . . . . . . . . . . . . . . . . . . . . . . . . . . . . . . . . . . . . . . . . . . . . . 30
Installing TIBCO iProcess Engine in Console Mode . . . . . . . . . . . . . . . . . . . . . . . . . . . . . . . . . . . . . . . . . . . . . . . 33
TIBCO iProcess Engine for UNIX Installation

iv | Contents
Installing TIBCO iProcess Engine in Silent Mode . . . . . . . . . . . . . . . . . . . . . . . . . . . . . . . . . . . . . . . . . . . . . . . . . 38Generating a Control File. . . . . . . . . . . . . . . . . . . . . . . . . . . . . . . . . . . . . . . . . . . . . . . . . . . . . . . . . . . . . . . . 38Performing an Installation in Silent Mode. . . . . . . . . . . . . . . . . . . . . . . . . . . . . . . . . . . . . . . . . . . . . . . . . . . . 39
Upgrading TIBCO iProcess Engine. . . . . . . . . . . . . . . . . . . . . . . . . . . . . . . . . . . . . . . . . . . . . . . . . . . . . . . . . . . . 41Upgrade Performance and Timing . . . . . . . . . . . . . . . . . . . . . . . . . . . . . . . . . . . . . . . . . . . . . . . . . . . . . . . . . 41
Using the $SWDIR/logs/TODO File to Complete a Partial Installation . . . . . . . . . . . . . . . . . . . . . . . . . . . . . . . . . 42The $SWDIR/logs/TODO File . . . . . . . . . . . . . . . . . . . . . . . . . . . . . . . . . . . . . . . . . . . . . . . . . . . . . . . . . . . . 42Run the $SWDIR/util/swpostinst Script . . . . . . . . . . . . . . . . . . . . . . . . . . . . . . . . . . . . . . . . . . . . . . . . . . . . . 43Run the $SWDIR/util/upgr Command . . . . . . . . . . . . . . . . . . . . . . . . . . . . . . . . . . . . . . . . . . . . . . . . . . . . . . 44Copy the ssolite Shared Library. . . . . . . . . . . . . . . . . . . . . . . . . . . . . . . . . . . . . . . . . . . . . . . . . . . . . . . . . . . 45Run the $SWDIR/logs/rootscript Script . . . . . . . . . . . . . . . . . . . . . . . . . . . . . . . . . . . . . . . . . . . . . . . . . . . . . 45
Post-Installation. . . . . . . . . . . . . . . . . . . . . . . . . . . . . . . . . . . . . . . . . . . . . . . . . . . . . . . . . . . . . . . . . . . . . . . . . . . 47
Chapter 3 Uninstalling iProcess Engine . . . . . . . . . . . . . . . . . . . . . . . . . . . . . . . . . . . . . . . . . . . 51
Running swdel. . . . . . . . . . . . . . . . . . . . . . . . . . . . . . . . . . . . . . . . . . . . . . . . . . . . . . . . . . . . . . . . . . . . . . . . . . . . 52
Appendix A Pre-Installation Tasks . . . . . . . . . . . . . . . . . . . . . . . . . . . . . . . . . . . . . . . . . . . . . . . . 53
Checking For Any Late-breaking Information . . . . . . . . . . . . . . . . . . . . . . . . . . . . . . . . . . . . . . . . . . . . . . . . . . . . 55
Backing Up the TIBCO iProcess Engine File System . . . . . . . . . . . . . . . . . . . . . . . . . . . . . . . . . . . . . . . . . . . . . . 56
Backing up TIBCO iProcess Engine Database Schema. . . . . . . . . . . . . . . . . . . . . . . . . . . . . . . . . . . . . . . . . . . . 58
Upgrading Your Operating System . . . . . . . . . . . . . . . . . . . . . . . . . . . . . . . . . . . . . . . . . . . . . . . . . . . . . . . . . . . . 59
Upgrading Oracle . . . . . . . . . . . . . . . . . . . . . . . . . . . . . . . . . . . . . . . . . . . . . . . . . . . . . . . . . . . . . . . . . . . . . . . . . 60
Extracting the Installation Set to a Temporary Installation Directory. . . . . . . . . . . . . . . . . . . . . . . . . . . . . . . . . . . 61
Setting the Number of File Descriptors per Process. . . . . . . . . . . . . . . . . . . . . . . . . . . . . . . . . . . . . . . . . . . . . . . 62
Creating iProcess Engine UNIX Users and Groups . . . . . . . . . . . . . . . . . . . . . . . . . . . . . . . . . . . . . . . . . . . . . . . 63
Setting Up the iProcess Engine System Directory . . . . . . . . . . . . . . . . . . . . . . . . . . . . . . . . . . . . . . . . . . . . . . . . 65
Setting Up Database Environment Variables . . . . . . . . . . . . . . . . . . . . . . . . . . . . . . . . . . . . . . . . . . . . . . . . . . . . 67
Creating Oracle Accounts and Tablespaces . . . . . . . . . . . . . . . . . . . . . . . . . . . . . . . . . . . . . . . . . . . . . . . . . . . . . 69
Configuring the Oracle Schema . . . . . . . . . . . . . . . . . . . . . . . . . . . . . . . . . . . . . . . . . . . . . . . . . . . . . . . . . . . . . . 70
Setting up Oracle Transparent Application Failover (TAF). . . . . . . . . . . . . . . . . . . . . . . . . . . . . . . . . . . . . . . . . . . 76
Configuring Oracle OPEN_CURSORS. . . . . . . . . . . . . . . . . . . . . . . . . . . . . . . . . . . . . . . . . . . . . . . . . . . . . . . . . 78
Configuring Oracle Character Set Support . . . . . . . . . . . . . . . . . . . . . . . . . . . . . . . . . . . . . . . . . . . . . . . . . . . . . . 79
Disabling Oracle Flashback Query . . . . . . . . . . . . . . . . . . . . . . . . . . . . . . . . . . . . . . . . . . . . . . . . . . . . . . . . . . . . 80
Creating an Oracle UNDO Tablespace . . . . . . . . . . . . . . . . . . . . . . . . . . . . . . . . . . . . . . . . . . . . . . . . . . . . . . . . . 81
Creating a DB2 Database . . . . . . . . . . . . . . . . . . . . . . . . . . . . . . . . . . . . . . . . . . . . . . . . . . . . . . . . . . . . . . . . . . . 82
Configuring a TCP/IP Connection to the Database . . . . . . . . . . . . . . . . . . . . . . . . . . . . . . . . . . . . . . . . . . . . . . . 83
Configuring DB2 Character Set Support. . . . . . . . . . . . . . . . . . . . . . . . . . . . . . . . . . . . . . . . . . . . . . . . . . . . . . . . 86
Configuring Lock Escalation . . . . . . . . . . . . . . . . . . . . . . . . . . . . . . . . . . . . . . . . . . . . . . . . . . . . . . . . . . . . . . . . . 87
TIBCO iProcess Engine for UNIX Installation

Contents | v
Removing All User-defined Constraints (or Triggers), Indexes, and Statistics from the iProcess Engine Schema Tables. . . . . . . . . . . . . . . . . . . . . . . . . . . . . . . . . . . . . . . . . . . . . . . . . . . . . . . . . . . . . . . . . . . . . . . . . . . . . . . . . . . 89
Appendix B Post-Installation Tasks . . . . . . . . . . . . . . . . . . . . . . . . . . . . . . . . . . . . . . . . . . . . . . .91
Re-implementing Changes to Upgraded Configuration Files. . . . . . . . . . . . . . . . . . . . . . . . . . . . . . . . . . . . . . . . . 92
Configuring Firewall Port Ranges on Slave Servers . . . . . . . . . . . . . . . . . . . . . . . . . . . . . . . . . . . . . . . . . . . . . . . 93
Enabling Oracle Function-based Indexes . . . . . . . . . . . . . . . . . . . . . . . . . . . . . . . . . . . . . . . . . . . . . . . . . . . . . . . 94
Recreating All User-defined Constraints (Or Triggers), Indexes, and Statistics on the iProcess Engine Schema Tables. . . . . . . . . . . . . . . . . . . . . . . . . . . . . . . . . . . . . . . . . . . . . . . . . . . . . . . . . . . . . . . . . . . . . . . . . . . . . . . . . . . 95
Configuring Your Hard and Soft Data Size Limits (AIX Only). . . . . . . . . . . . . . . . . . . . . . . . . . . . . . . . . . . . . . . . . 96
Setting Up the Shared Library Path for the iProcess Engine . . . . . . . . . . . . . . . . . . . . . . . . . . . . . . . . . . . . . . . . . 97
Setting Up iProcess Engine Environment Variables . . . . . . . . . . . . . . . . . . . . . . . . . . . . . . . . . . . . . . . . . . . . . . . 99
Installing the IBM Client for JMS on J2SE with IBM WebSphere Application Server . . . . . . . . . . . . . . . . . . . . . 101
Configuring IAPJMS Security Settings . . . . . . . . . . . . . . . . . . . . . . . . . . . . . . . . . . . . . . . . . . . . . . . . . . . . . . . . 103
Configuring the Default iProcess Engine Installer . . . . . . . . . . . . . . . . . . . . . . . . . . . . . . . . . . . . . . . . . . . . . . . . 104
Updating the iProcess Objects Server Configuration File . . . . . . . . . . . . . . . . . . . . . . . . . . . . . . . . . . . . . . . . . . 105
Recreating Prediction Data . . . . . . . . . . . . . . . . . . . . . . . . . . . . . . . . . . . . . . . . . . . . . . . . . . . . . . . . . . . . . . . . . 107
Disabling or Re-enabling Write Access to WebDav . . . . . . . . . . . . . . . . . . . . . . . . . . . . . . . . . . . . . . . . . . . . . . . 108
Configuring JMX Ports to Run Through a Firewall. . . . . . . . . . . . . . . . . . . . . . . . . . . . . . . . . . . . . . . . . . . . . . . . 109
Enabling Secure Socket Layer (SSL). . . . . . . . . . . . . . . . . . . . . . . . . . . . . . . . . . . . . . . . . . . . . . . . . . . . . . . . . . 110
Starting TIBCO iProcess Engine . . . . . . . . . . . . . . . . . . . . . . . . . . . . . . . . . . . . . . . . . . . . . . . . . . . . . . . . . . . . . 113
Appendix C Configuration Menus for TIBCO iProcess Engine Installation . . . . . . . . . . . . . .114
Overview . . . . . . . . . . . . . . . . . . . . . . . . . . . . . . . . . . . . . . . . . . . . . . . . . . . . . . . . . . . . . . . . . . . . . . . . . . . . . . . 115Using Configuration Menus . . . . . . . . . . . . . . . . . . . . . . . . . . . . . . . . . . . . . . . . . . . . . . . . . . . . . . . . . . . . . 115
Policy to Install Schema and Files Menu . . . . . . . . . . . . . . . . . . . . . . . . . . . . . . . . . . . . . . . . . . . . . . . . . . . . . . . 118Installation Policy . . . . . . . . . . . . . . . . . . . . . . . . . . . . . . . . . . . . . . . . . . . . . . . . . . . . . . . . . . . . . . . . . . . . 119
Location, Identification, and OS Accounts Menu . . . . . . . . . . . . . . . . . . . . . . . . . . . . . . . . . . . . . . . . . . . . . . . . . 121Installation Directory . . . . . . . . . . . . . . . . . . . . . . . . . . . . . . . . . . . . . . . . . . . . . . . . . . . . . . . . . . . . . . . . . . 123iProcess Engine Nodename . . . . . . . . . . . . . . . . . . . . . . . . . . . . . . . . . . . . . . . . . . . . . . . . . . . . . . . . . . . . 124iProcess Engine Licensee Name . . . . . . . . . . . . . . . . . . . . . . . . . . . . . . . . . . . . . . . . . . . . . . . . . . . . . . . . 125iProcess Engine Background User Name . . . . . . . . . . . . . . . . . . . . . . . . . . . . . . . . . . . . . . . . . . . . . . . . . 126iProcess Engine Administration User Name. . . . . . . . . . . . . . . . . . . . . . . . . . . . . . . . . . . . . . . . . . . . . . . . 128iProcess Engine User Group Name . . . . . . . . . . . . . . . . . . . . . . . . . . . . . . . . . . . . . . . . . . . . . . . . . . . . . . 130Redirect Administration Queue. . . . . . . . . . . . . . . . . . . . . . . . . . . . . . . . . . . . . . . . . . . . . . . . . . . . . . . . . . 131
Configuration Options Menu . . . . . . . . . . . . . . . . . . . . . . . . . . . . . . . . . . . . . . . . . . . . . . . . . . . . . . . . . . . . . . . . 132iProcess Engine Client RPC Number . . . . . . . . . . . . . . . . . . . . . . . . . . . . . . . . . . . . . . . . . . . . . . . . . . . . . 134iProcess Engine Client Password Required . . . . . . . . . . . . . . . . . . . . . . . . . . . . . . . . . . . . . . . . . . . . . . . . 135Enable Case Data Normalization . . . . . . . . . . . . . . . . . . . . . . . . . . . . . . . . . . . . . . . . . . . . . . . . . . . . . . . . 136Enable Prediction . . . . . . . . . . . . . . . . . . . . . . . . . . . . . . . . . . . . . . . . . . . . . . . . . . . . . . . . . . . . . . . . . . . . 138
TIBCO iProcess Engine for UNIX Installation

vi | Contents
Enable Autostart . . . . . . . . . . . . . . . . . . . . . . . . . . . . . . . . . . . . . . . . . . . . . . . . . . . . . . . . . . . . . . . . . . . . . 139Enable Activity Publishing . . . . . . . . . . . . . . . . . . . . . . . . . . . . . . . . . . . . . . . . . . . . . . . . . . . . . . . . . . . . . . 140Configure iProcess Email Plug-in . . . . . . . . . . . . . . . . . . . . . . . . . . . . . . . . . . . . . . . . . . . . . . . . . . . . . . . . 142JMX Port Number . . . . . . . . . . . . . . . . . . . . . . . . . . . . . . . . . . . . . . . . . . . . . . . . . . . . . . . . . . . . . . . . . . . . 143Enable iProcess Objects Server . . . . . . . . . . . . . . . . . . . . . . . . . . . . . . . . . . . . . . . . . . . . . . . . . . . . . . . . . 144Enable iProcess Objects Director . . . . . . . . . . . . . . . . . . . . . . . . . . . . . . . . . . . . . . . . . . . . . . . . . . . . . . . . 145Enable Write Access to WebDav . . . . . . . . . . . . . . . . . . . . . . . . . . . . . . . . . . . . . . . . . . . . . . . . . . . . . . . . . 146
IAP Configuration Menu . . . . . . . . . . . . . . . . . . . . . . . . . . . . . . . . . . . . . . . . . . . . . . . . . . . . . . . . . . . . . . . . . . . 147JMS Provider . . . . . . . . . . . . . . . . . . . . . . . . . . . . . . . . . . . . . . . . . . . . . . . . . . . . . . . . . . . . . . . . . . . . . . . . 149Base JAR Files Location . . . . . . . . . . . . . . . . . . . . . . . . . . . . . . . . . . . . . . . . . . . . . . . . . . . . . . . . . . . . . . . 150Additional JAR Files Location . . . . . . . . . . . . . . . . . . . . . . . . . . . . . . . . . . . . . . . . . . . . . . . . . . . . . . . . . . . 151Context Factory Name . . . . . . . . . . . . . . . . . . . . . . . . . . . . . . . . . . . . . . . . . . . . . . . . . . . . . . . . . . . . . . . . . 152URL for JMS Provider . . . . . . . . . . . . . . . . . . . . . . . . . . . . . . . . . . . . . . . . . . . . . . . . . . . . . . . . . . . . . . . . . 153Connection Factory Name . . . . . . . . . . . . . . . . . . . . . . . . . . . . . . . . . . . . . . . . . . . . . . . . . . . . . . . . . . . . . . 154
iProcess Email Plug-in Configuration Menu . . . . . . . . . . . . . . . . . . . . . . . . . . . . . . . . . . . . . . . . . . . . . . . . . . . . 155SMTP Host . . . . . . . . . . . . . . . . . . . . . . . . . . . . . . . . . . . . . . . . . . . . . . . . . . . . . . . . . . . . . . . . . . . . . . . . . 157SMTP Port Number . . . . . . . . . . . . . . . . . . . . . . . . . . . . . . . . . . . . . . . . . . . . . . . . . . . . . . . . . . . . . . . . . . . 158Mail from Address . . . . . . . . . . . . . . . . . . . . . . . . . . . . . . . . . . . . . . . . . . . . . . . . . . . . . . . . . . . . . . . . . . . . 159BACKUP SMTP Host. . . . . . . . . . . . . . . . . . . . . . . . . . . . . . . . . . . . . . . . . . . . . . . . . . . . . . . . . . . . . . . . . . 160BACKUP SMTP Port . . . . . . . . . . . . . . . . . . . . . . . . . . . . . . . . . . . . . . . . . . . . . . . . . . . . . . . . . . . . . . . . . . 161Retry Counts . . . . . . . . . . . . . . . . . . . . . . . . . . . . . . . . . . . . . . . . . . . . . . . . . . . . . . . . . . . . . . . . . . . . . . . . 162
Oracle Database Installation Method Menu . . . . . . . . . . . . . . . . . . . . . . . . . . . . . . . . . . . . . . . . . . . . . . . . . . . . 163Installation Method. . . . . . . . . . . . . . . . . . . . . . . . . . . . . . . . . . . . . . . . . . . . . . . . . . . . . . . . . . . . . . . . . . . . 164
Database Connection and Account Details Menu. . . . . . . . . . . . . . . . . . . . . . . . . . . . . . . . . . . . . . . . . . . . . . . . 165Oracle Database Connection and Account Details Menu . . . . . . . . . . . . . . . . . . . . . . . . . . . . . . . . . . . . . . 165DB2 Database Connection and Account Details Menu . . . . . . . . . . . . . . . . . . . . . . . . . . . . . . . . . . . . . . . . 167Checking DB Connectivity and Users . . . . . . . . . . . . . . . . . . . . . . . . . . . . . . . . . . . . . . . . . . . . . . . . . . . . . 168Oracle DB TNS Identifier . . . . . . . . . . . . . . . . . . . . . . . . . . . . . . . . . . . . . . . . . . . . . . . . . . . . . . . . . . . . . . . 169Oracle DB Administrator Name . . . . . . . . . . . . . . . . . . . . . . . . . . . . . . . . . . . . . . . . . . . . . . . . . . . . . . . . . . 171Oracle DB Administrator Password . . . . . . . . . . . . . . . . . . . . . . . . . . . . . . . . . . . . . . . . . . . . . . . . . . . . . . . 173DB2 Database Alias Name . . . . . . . . . . . . . . . . . . . . . . . . . . . . . . . . . . . . . . . . . . . . . . . . . . . . . . . . . . . . . 174iProcess Engine DB Schema Owner Name. . . . . . . . . . . . . . . . . . . . . . . . . . . . . . . . . . . . . . . . . . . . . . . . . 175iProcess Engine DB Schema Owner Password. . . . . . . . . . . . . . . . . . . . . . . . . . . . . . . . . . . . . . . . . . . . . . 177iProcess Engine DB User Name . . . . . . . . . . . . . . . . . . . . . . . . . . . . . . . . . . . . . . . . . . . . . . . . . . . . . . . . . 178iProcess Engine DB User Password . . . . . . . . . . . . . . . . . . . . . . . . . . . . . . . . . . . . . . . . . . . . . . . . . . . . . . 180Support Unicode Encoding . . . . . . . . . . . . . . . . . . . . . . . . . . . . . . . . . . . . . . . . . . . . . . . . . . . . . . . . . . . . . 181Data Tablespace Name . . . . . . . . . . . . . . . . . . . . . . . . . . . . . . . . . . . . . . . . . . . . . . . . . . . . . . . . . . . . . . . . 182Temporary Tablespace Name . . . . . . . . . . . . . . . . . . . . . . . . . . . . . . . . . . . . . . . . . . . . . . . . . . . . . . . . . . . 184Schema Sizing Configuration. . . . . . . . . . . . . . . . . . . . . . . . . . . . . . . . . . . . . . . . . . . . . . . . . . . . . . . . . . . . 186
Appendix D Usage Profiles for Tablesizes Files . . . . . . . . . . . . . . . . . . . . . . . . . . . . . . . . . . . . 188
tablesizes.med File . . . . . . . . . . . . . . . . . . . . . . . . . . . . . . . . . . . . . . . . . . . . . . . . . . . . . . . . . . . . . . . . . . . . . . . 189
tablesizes.large File . . . . . . . . . . . . . . . . . . . . . . . . . . . . . . . . . . . . . . . . . . . . . . . . . . . . . . . . . . . . . . . . . . . . . . 190
TIBCO iProcess Engine for UNIX Installation

Contents | vii
Appendix E Frequently Asked Questions . . . . . . . . . . . . . . . . . . . . . . . . . . . . . . . . . . . . . . . . . .191
Does the iProcess Engine Database Support UTF-8? . . . . . . . . . . . . . . . . . . . . . . . . . . . . . . . . . . . . . . . . . . . . 192
How Do I Decide Which Oracle Database Creation Method I Should Use? . . . . . . . . . . . . . . . . . . . . . . . . . . . . 193
How Long Will an Upgrade Take? . . . . . . . . . . . . . . . . . . . . . . . . . . . . . . . . . . . . . . . . . . . . . . . . . . . . . . . . . . . . 194
How Do I Upgrade TIBCO EMS?. . . . . . . . . . . . . . . . . . . . . . . . . . . . . . . . . . . . . . . . . . . . . . . . . . . . . . . . . . . . . 195Updating EMS . . . . . . . . . . . . . . . . . . . . . . . . . . . . . . . . . . . . . . . . . . . . . . . . . . . . . . . . . . . . . . . . . . . . . . . 195
Appendix F Troubleshooting . . . . . . . . . . . . . . . . . . . . . . . . . . . . . . . . . . . . . . . . . . . . . . . . . . . .197
The Installer Cannot Find a Required Operating System Utility on the System . . . . . . . . . . . . . . . . . . . . . . . . . 199
The Installer Cannot Find a Required Operating System Utility on the Installing User’s PATH . . . . . . . . . . . . . . 200
Files and Directories Under $SWDIR are Non-writable . . . . . . . . . . . . . . . . . . . . . . . . . . . . . . . . . . . . . . . . . . . . 201
The Installer Cannot Access Oracle . . . . . . . . . . . . . . . . . . . . . . . . . . . . . . . . . . . . . . . . . . . . . . . . . . . . . . . . . . 202
Installing on an Incorrect Platform or Database Version . . . . . . . . . . . . . . . . . . . . . . . . . . . . . . . . . . . . . . . . . . . 203
Installing on an Unvalidated Platform or Database Version . . . . . . . . . . . . . . . . . . . . . . . . . . . . . . . . . . . . . . . . . 204
Oracle DB Administrator Name is Incorrect . . . . . . . . . . . . . . . . . . . . . . . . . . . . . . . . . . . . . . . . . . . . . . . . . . . . . 205
No Oracle UNDO Tablespace . . . . . . . . . . . . . . . . . . . . . . . . . . . . . . . . . . . . . . . . . . . . . . . . . . . . . . . . . . . . . . . 206
Oracle TAF is Not Enabled. . . . . . . . . . . . . . . . . . . . . . . . . . . . . . . . . . . . . . . . . . . . . . . . . . . . . . . . . . . . . . . . . . 207
Oracle Advanced Queuing is Either Not Installed or Not Configured Correctly . . . . . . . . . . . . . . . . . . . . . . . . . . 208
Oracle OPEN_CURSORS Value Is Less Than 200. . . . . . . . . . . . . . . . . . . . . . . . . . . . . . . . . . . . . . . . . . . . . . . 209
Cannot Determine the DB2 Fenced User Name . . . . . . . . . . . . . . . . . . . . . . . . . . . . . . . . . . . . . . . . . . . . . . . . . 210
Errors Occur on Validating the Installation. . . . . . . . . . . . . . . . . . . . . . . . . . . . . . . . . . . . . . . . . . . . . . . . . . . . . . 211
Restoring Your Original System if an Upgrade Fails . . . . . . . . . . . . . . . . . . . . . . . . . . . . . . . . . . . . . . . . . . . . . . 215
Bad Username Or Password . . . . . . . . . . . . . . . . . . . . . . . . . . . . . . . . . . . . . . . . . . . . . . . . . . . . . . . . . . . . . . . . 216
swrpcsvr Crashes When Starting iProcess Engine . . . . . . . . . . . . . . . . . . . . . . . . . . . . . . . . . . . . . . . . . . . . . . . 217
The Installer Fails with an "Unable to Open the File" Warning Dialog . . . . . . . . . . . . . . . . . . . . . . . . . . . . . . . . . 218
iProcess Engine Cannot Start . . . . . . . . . . . . . . . . . . . . . . . . . . . . . . . . . . . . . . . . . . . . . . . . . . . . . . . . . . . . . . . 219
Index . . . . . . . . . . . . . . . . . . . . . . . . . . . . . . . . . . . . . . . . . . . . . . . . . . . . . . . . . . . . . . . . . . . . . . . . .221
TIBCO iProcess Engine for UNIX Installation

viii | Contents
TIBCO iProcess Engine for UNIX Installation

Figures | ix
Figures
Figure 1 Direct Connection. . . . . . . . . . . . . . . . . . . . . . . . . . . . . . . . . . . . . . . . . . . . . . . . . . . . . . . . . . . . . . . 17
Figure 2 TNS Connection. . . . . . . . . . . . . . . . . . . . . . . . . . . . . . . . . . . . . . . . . . . . . . . . . . . . . . . . . . . . . . . . 17
TIBCO iProcess Engine for UNIX Installation

x | Figures
TIBCO iProcess Engine for UNIX Installation

Tables | xi
Tables
Table 1 General Typographical Conventions . . . . . . . . . . . . . . . . . . . . . . . . . . . . . . . . . . . . . . . . . . . . . . . xvi
Table 2 Syntax Typographical Conventions . . . . . . . . . . . . . . . . . . . . . . . . . . . . . . . . . . . . . . . . . . . . . . . . xvii
Table 3 Organization Roles During Installation. . . . . . . . . . . . . . . . . . . . . . . . . . . . . . . . . . . . . . . . . . . . . . . 3
Table 4 Partial Installation Information . . . . . . . . . . . . . . . . . . . . . . . . . . . . . . . . . . . . . . . . . . . . . . . . . . . . . 5
Table 5 Upgrading iProcess Engine on a Node Cluster . . . . . . . . . . . . . . . . . . . . . . . . . . . . . . . . . . . . . . . . 7
Table 6 Basic System Requirements on UNIX Platforms . . . . . . . . . . . . . . . . . . . . . . . . . . . . . . . . . . . . . . . 8
Table 7 Additional Runtime Disk Space Requirements for TIBCO iProcess Objects . . . . . . . . . . . . . . . . . 10
Table 8 JMS Providers . . . . . . . . . . . . . . . . . . . . . . . . . . . . . . . . . . . . . . . . . . . . . . . . . . . . . . . . . . . . . . . . 12
Table 9 JRE Information . . . . . . . . . . . . . . . . . . . . . . . . . . . . . . . . . . . . . . . . . . . . . . . . . . . . . . . . . . . . . . . 14
Table 10 Distributed and Supported Java Virtual Machine (JVM). . . . . . . . . . . . . . . . . . . . . . . . . . . . . . . . . 15
Table 11 Required Oracle Database and Client Versions. . . . . . . . . . . . . . . . . . . . . . . . . . . . . . . . . . . . . . . 18
Table 12 Required DB2 Server and Client Versions. . . . . . . . . . . . . . . . . . . . . . . . . . . . . . . . . . . . . . . . . . . 19
Table 13 Keywords in the Control . . . . . . . . . . . . . . . . . . . . . . . . . . . . . . . . . . . . . . . . . . . . . . . . . . . . . . . . . 23
Table 14 Pre-Installation Tasks Checklist . . . . . . . . . . . . . . . . . . . . . . . . . . . . . . . . . . . . . . . . . . . . . . . . . . . 30
Table 15 Post-Installation Tasks Checklist . . . . . . . . . . . . . . . . . . . . . . . . . . . . . . . . . . . . . . . . . . . . . . . . . . 47
Table 16 Creating Oracle Accounts and Tablespaces . . . . . . . . . . . . . . . . . . . . . . . . . . . . . . . . . . . . . . . . . 69
Table 17 SIZE Categories. . . . . . . . . . . . . . . . . . . . . . . . . . . . . . . . . . . . . . . . . . . . . . . . . . . . . . . . . . . . . . . 71
Table 18 The Commands To Check The Shared Library Path . . . . . . . . . . . . . . . . . . . . . . . . . . . . . . . . . . . 97
Table 19 The Included String in the Shared Licrary Path Variable . . . . . . . . . . . . . . . . . . . . . . . . . . . . . . . . 98
Table 20 Configuration Menus . . . . . . . . . . . . . . . . . . . . . . . . . . . . . . . . . . . . . . . . . . . . . . . . . . . . . . . . . . 115
Table 21 Configuration Items in the Policy to Install Schema and Files Menu . . . . . . . . . . . . . . . . . . . . . . 118
Table 22 Installation Policy Options . . . . . . . . . . . . . . . . . . . . . . . . . . . . . . . . . . . . . . . . . . . . . . . . . . . . . . 119
Table 23 Configuration Items in the Location, Identification, and OS Accounts Menu . . . . . . . . . . . . . . . . 121
Table 24 Configuration Items in the Configuration Options Menu. . . . . . . . . . . . . . . . . . . . . . . . . . . . . . . . 132
Table 25 Configuration Items in the IAP Configuration Menu . . . . . . . . . . . . . . . . . . . . . . . . . . . . . . . . . . . 148
Table 26 Configuration Items in the iProcess Email Plug-in Configuration Menu. . . . . . . . . . . . . . . . . . . . 155
Table 27 Configuration Items in the Oracle Database Installation Method Menu . . . . . . . . . . . . . . . . . . . . 163
Table 28 Installation Method Options . . . . . . . . . . . . . . . . . . . . . . . . . . . . . . . . . . . . . . . . . . . . . . . . . . . . . 164
TIBCO iProcess Engine for UNIX Installation
xii | Tables
Table 29 Configuration Items in the Oracle Database Connection and Account Details Menu . . . . . . . . . . 165
Table 30 Configuration Items in the Oracle Database Connection and Account Details Menu . . . . . . . . . . 167
Table 31 Database-related Information Checklist . . . . . . . . . . . . . . . . . . . . . . . . . . . . . . . . . . . . . . . . . . . . 168
TIBCO iProcess Engine for UNIX Installation
| xiii
Preface
This manual describes how to install TIBCO iProcess Engine on Unix platforms.
Topics
• Related Documentation, page xiv
• Typographical Conventions, page xvi
• Connecting with TIBCO Resources, page xviii
This software may be available on multiple operating systems. However, not all operating system platforms for a specific software version are released at the same time. See the readme file for the availability of this software version on a specific operating system platform.
TIBCO iProcess Engine for UNIX Installation

xiv | Related Documentation
Related Documentation
This section lists documentation resources you may find useful.
TIBCO iProcess Engine DocumentationThe following documents form the TIBCO iProcess Engine documentation set:
• TIBCO iProcess Engine Installation Read this manual for instructions on site preparation and installation. It is available in the \docs directory of the iProcess Engine distribution set.
• TIBCO iProcess Engine Release Notes Read the release notes for a list of new and changed features. This document also contains lists of known issues and closed issues for this release. It is available in the \docs directory of the iProcess Engine distribution set.
• TIBCO iProcess Suite™ Documentation Library This library contains all the manuals for TIBCO iProcess Engine and other TIBCO products in the TIBCO iProcess Suite. The following are the manuals for TIBCO iProcess Engine:
— TIBCO iProcess Engine Architecture Guide
— TIBCO iProcess Engine Administrator’s Guide
— TIBCO iProcess Engine (SQL Server) Administrator's Guide
— TIBCO iProcess Engine (Oracle) Administrator's Guide
— TIBCO iProcess Engine (DB2) Administrator's Guide
— TIBCO iProcess swutil and swbatch Reference Guide
— TIBCO iProcess Engine System Messages Guide
— TIBCO iProcess User Validation API User's Guide
Other TIBCO Product DocumentationYou may find it useful to read the documentation for the following TIBCO products:
• TIBCO Business Studio™
• TIBCO ActiveMatrix BusinessWorks™
• TIBCO Enterprise Message Service™
• TIBCO Hawk®
TIBCO iProcess Engine for UNIX Installation

Preface | xv
• TIBCO Rendezvous®
Third-party DocumentationYou may find it useful to read the documentation for the following third-party products:
• Microsoft® Windows®
• Oracle® Database
• Microsoft SQL Server®
• IBM® WebSphere®
• Oracle WebLogic Server®
• BEA WebLogic Server®
TIBCO iProcess Engine for UNIX Installation

xvi | Typographical Conventions
Typographical Conventions
The following typographical conventions are used in this manual.
Table 1 General Typographical Conventions
Convention Use
$SWDIR TIBCO iProcess Engine installs into a directory. This directory is referenced in documentation as $SWDIR.
For example, if $SWDIR is set to /swerver/staffw_nod1 on a UNIX server, then the full path to the swutil command is /swerver/staffw_nod1/bin/swutil or $SWDIR/bin/swutil.
code font Code font identifies commands, code examples, filenames, pathnames, and output displayed in a command window. For example:
Use MyCommand to start the foo process.
bold code
font Bold code font is used in the following ways:
• In procedures, to indicate what a user types. For example: Type admin.
• In large code samples, to indicate the parts of the sample that are of particular interest.
• In command syntax, to indicate the default parameter for a command. For example, if no parameter is specified, MyCommand is enabled: MyCommand [enable | disable]
italic font Italic font is used in the following ways:
• To indicate a document title. For example: See TIBCO ActiveMatrix BusinessWorks Concepts.
• To introduce new terms. For example: A portal page may contain several portlets. Portlets are mini-applications that run in a portal.
• To indicate a variable in a command or code syntax that you must replace. For example: MyCommand PathName
Key combinations
Key names separated by a plus sign indicate keys pressed simultaneously. For example: Ctrl+C.
Key names separated by a comma and space indicate keys pressed one after the other. For example: Esc, Ctrl+Q.
TIBCO iProcess Engine for UNIX Installation
Preface | xvii
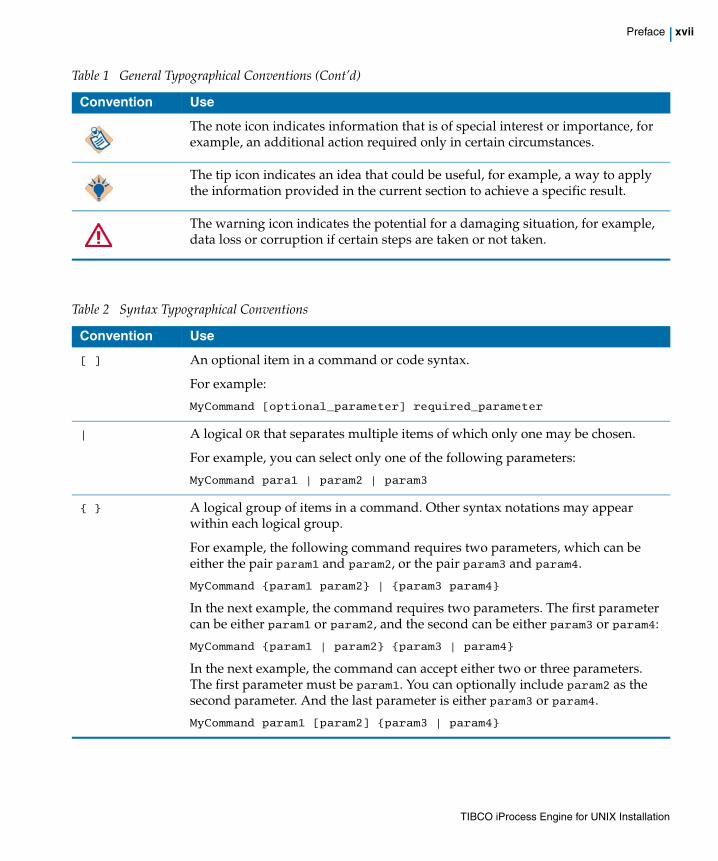
The note icon indicates information that is of special interest or importance, for example, an additional action required only in certain circumstances.
The tip icon indicates an idea that could be useful, for example, a way to apply the information provided in the current section to achieve a specific result.
The warning icon indicates the potential for a damaging situation, for example, data loss or corruption if certain steps are taken or not taken.
Table 1 General Typographical Conventions (Cont’d)
Convention Use
Table 2 Syntax Typographical Conventions
Convention Use
[ ] An optional item in a command or code syntax.
For example:
MyCommand [optional_parameter] required_parameter
| A logical OR that separates multiple items of which only one may be chosen.
For example, you can select only one of the following parameters:
MyCommand para1 | param2 | param3
{ } A logical group of items in a command. Other syntax notations may appear within each logical group.
For example, the following command requires two parameters, which can be either the pair param1 and param2, or the pair param3 and param4.
MyCommand {param1 param2} | {param3 param4}
In the next example, the command requires two parameters. The first parameter can be either param1 or param2, and the second can be either param3 or param4:
MyCommand {param1 | param2} {param3 | param4}
In the next example, the command can accept either two or three parameters. The first parameter must be param1. You can optionally include param2 as the second parameter. And the last parameter is either param3 or param4.
MyCommand param1 [param2] {param3 | param4}
TIBCO iProcess Engine for UNIX Installation

xviii | Connecting with TIBCO Resources
Connecting with TIBCO Resources
How to Join TIBCOmmunityTIBCOmmunity is an online destination for TIBCO customers, partners, and resident experts, a place to share and access the collective experience of the TIBCO community. TIBCOmmunity offers forums, blogs, and access to a variety of resources. To register, go to http://www.tibcommunity.com.
How to Access All TIBCO DocumentationAfter you join TIBCOmmunity, you can access the documentation for all supported product versions here:
http://docs.tibco.com/TibcoDoc
How to Contact TIBCO SupportFor comments or problems with this manual or the software it addresses, contact TIBCO Support as follows:
• For an overview of TIBCO Support, and information about getting started with TIBCO Support, visit this site:
http://www.tibco.com/services/support
• If you already have a valid maintenance or support contract, visit this site:
https://support.tibco.com
Entry to this site requires a username and password. If you do not have a username, you can request one.
TIBCO iProcess Engine for UNIX Installation

| 1
Chapter 1 Introduction
This chapter explains installation modes, requirements, and other options you need to be aware of before starting the installation.
Topics
• Installation Overview, page 2
• Installation Requirements, page 8
• Upgrade Requirements, page 20
• Control File, page 21
TIBCO iProcess Engine for UNIX Installation

2 | Chapter 1 Introduction
Installation Overview
This section provides an overview of the TIBCO iProcess Engine installer.
• Installation Modes, page 2
• Organization Roles, page 2
• Installation Types, page 3
• iProcess Engine Architecture, page 6
Installation ModesThe installer can run in the following modes on Microsoft Windows platforms:
• Console Mode
• Silent Mode
Console Mode
In Console mode, you are allowed to run the installer from the command prompt or terminal window.
For detailed information, see Installing TIBCO iProcess Engine in Console Mode on page 33.
Silent Mode
In Silent mode, the installer uses a control file that was saved during an earlier installation. Silent mode installs without prompting you for information.
For detailed information, see Installing TIBCO iProcess Engine in Silent Mode on page 38.
Organization RolesTo install TIBCO iProcess Engine, you will need to perform a number of pre-installation tasks, run the installer, and perform a number of post-installation tasks.
TIBCO iProcess Engine for UNIX Installation

Installation Overview | 3
Each of these stages requires the involvement of one or more of the organizational roles described in Table 3.
Depending on your operational and security environment, these roles can be performed either by the same person or by different departments or individuals.
Installation TypesThe following three installation types are available:
• Install or upgrade schema and files
If you are an iProcess Files-install Owner as well as an iProcess Schema-install Owner, you can install or upgrade schema and files simultaneously.
• Install or upgrade shema only
If you are only an iProcess Schema-install Owner, you can only install or upgrade schema during the installation.
• Install or upgrade files only
Table 3 Organization Roles During Installation
Role Knowledge Required Permissions Required
iProcess Files-install Owner
iProcess Engine configuration (including all optional iProcess Engine components)
Database configuration
To install and configure iProcess Engine files and directories
iProcess Schema-install Owner
Database configuration To create and configure the iProcess Engine database schema
DBA Database configuration To create table spaces and users for iProcess Engine
root Certain system-wide parameters To run certain commands and set file permissions
TIBCO recommends that, if possible, you run the installer as a root user who also has full DBA-level access. This allows the installer to perform all necessary installation tasks.
If you run the installer without either root or DBA-level access, further manual tasks will be required to complete the installation after the installer has finished. The exact tasks required, and who will need to perform them, will vary according to your installation scenario.
TIBCO iProcess Engine for UNIX Installation

4 | Chapter 1 Introduction
If you are only an iProcess Files-install Owner, you can only install or upgrade files during the installation.
For an iProcess Files-install Owner, two installation types are available when installing iProcess files, Full Installation and Partial Installation.
• Full Installation
If you want to install iProcess Engine in a single automated operation, you can perform a full installation.
To complete a full installation:
— you must run the installer as the root user, and
— the root user must have DBA-level access to the database.
• Partial Installation
If you want to split the installation into separate tasks according to its component roles (as discussed on iProcess Engine Architecture on page 6), you can perform a partial installation. The users acting in the different roles will need to run further commands to complete the installation after the installer has finished.
If a partial installation is performed, the installer creates a $SWDIR/logs/TODO file, which lists the tasks that must be performed manually, the order in which they must be done, and who needs to do them. See The $SWDIR/logs/TODO File on page 42 for more information.
If granting this level of access (for the duration of the installation process) is compatible with your site’s security policies, TIBCO strongly recommends doing so, as this considerably simplifies the installation task.
TIBCO iProcess Engine for UNIX Installation

Installation Overview | 5
Table 4 summarizes the available installation options.
Table 4 Partial Installation Information
If You Run The Installer As
And
You Have DBA-level Access And You Do Not Have DBA Access, Or You Want To Create Or Upgrade The Database Later
You Want The Installer To Create The Database
You Want The Installer To Use An Existing Database
root The installer performs a full installation.
It creates the database and sets all necessary file permissions.
The installer performs a full installation.
It uses the specified database and sets all necessary file permissions.
The installer performs a full installation.
The DBA will need to create or upgrade the database to complete the installation, as specified in the $SWDIR/logs/TODO file.
the iProcess Engine background user
The installer performs a partial installation.
root will need to run certain commands and set file permissions to complete the installation, as specified in the $SWDIR/logs/TODO file.
The installer performs a partial installation.
root will need to run certain commands and set file permissions to complete the installation, as specified in the $SWDIR/logs/TODO file.
The installer performs a partial installation.
To complete the installation:
• The DBA will need to create or upgrade the database.
• root will need to run certain commands and set file permissions as specified in the $SWDIR/logs/TODO file.
For DB2 database users
If you run the installer as a non-root user, the following warning message is displayed:The version of the Database cannot be validated when against DB2 as a non root install.
You can proceed with the installation, provided that your version of DB2 is one of the required versions listed on IBM DB2 Database on page 18. However, to be absolutely certain that the version of DB2 you are using is correct, run the following command as the root user or the DB2 user:/home/db2inst2/sqllib/adm/db2licm -v
TIBCO iProcess Engine for UNIX Installation

6 | Chapter 1 Introduction
For example, suppose that you want to install a new iProcess Engine, and the iProcess Files-install Owner, iProcess Schema-install Owner, DBA, and root user roles are each performed by different users. In this case, the following sequence is required to perform the installation:
1. The iProcess Files-install Owner:
a. logs in as the iProcess Engine background user and runs the installer.
b. enters all the necessary configuration information except for the database details.
c. accepts the prompt to perform a partial installation.
The installer installs iProcess Engine files, performs basic configuration tasks, and creates a $SWDIR/logs/TODO file.
2. The iProcess Schema-install Owner runs the $SWDIR/util/swinitora script to supply the database configuration information and create the iProcess Engine database schema.
3. The DBA runs the $SWDIR/util/swpostinst script to populate the database with the appropriate initial values.
4. The root user runs the $SWDIR/logs/rootscript script, to set file permissions and perform any other configuration activities that require root access.
iProcess Engine ArchitectureThe iProcess Engine can be installed using either of the following architectures:
• Single Server—The iProcess Engine node is installed and run on a single server.
• Node Cluster—The iProcess Engine node is distributed across multiple servers, each of which runs iProcess Engine processes. One server acts as the master server, while all other servers in the cluster are slave servers.
The master server and all slave servers use the same iProcess Engine database schema. The schema can be hosted on an Oracle instance or on a SQL Server database that is either local (to one of the servers in the iProcess node cluster) or remote.
The iProcess Engine architecture is scalable. You can convert from a single server to a node cluster at any time simply by adding another server to the installation. See TIBCO iProcess Engine Architecture Guide for more information about the iProcess Engine architecture.
TIBCO iProcess Engine for UNIX Installation

Installation Overview | 7
Installing the iProcess Engine on a Node Cluster
If you want to install a new iProcess Engine using a node cluster architecture, you must:
1. Install the iProcess Engine on the master server (to create the iProcess Engine database schema).
2. Install the iProcess Engine on each slave server (to add the server to the node cluster, using the same database schema).
Upgrading the iProcess Engine on a Node Cluster
If you want to upgrade an existing iProcess Engine, either from or to a node cluster architecture, follow the appropriate instructions shown in Table 5.
You must use the same properties, such as nodename, database name, RPC numbers, and UNIX account names, on each slave server as you did on the master server. Any specific differences in the installation process for a slave server are noted in the text.
Table 5 Upgrading iProcess Engine on a Node Cluster
To Upgrade...Do this...
From To
single server single server Upgrade the iProcess Engine on the single (master) server, using the instructions in this documentation.
node cluster node cluster Upgrade the iProcess Engine on the master server, using the instructions in this documentation.
Upgrade the iProcess Engine on each slave server, using the instructions in this documentation.
single server node cluster Upgrade the iProcess Engine on the single (master) server, using the instructions in this documentation.
Install the iProcess Engine on each slave server that you want to add to the node, using the instructions in this documentation.
node cluster single server Remove the iProcess Engine on each slave server, using the instructions in the Installation guide for that version.
Upgrade the iProcess Engine on the master server, using the instructions in this documentation.
TIBCO iProcess Engine for UNIX Installation
8 | Chapter 1 Introduction
Installation Requirements
This section describes the installation requirements for this product.
• Basic System Requirements, page 8
• Additional System Requirements, page 9
• Supported Databases, page 15
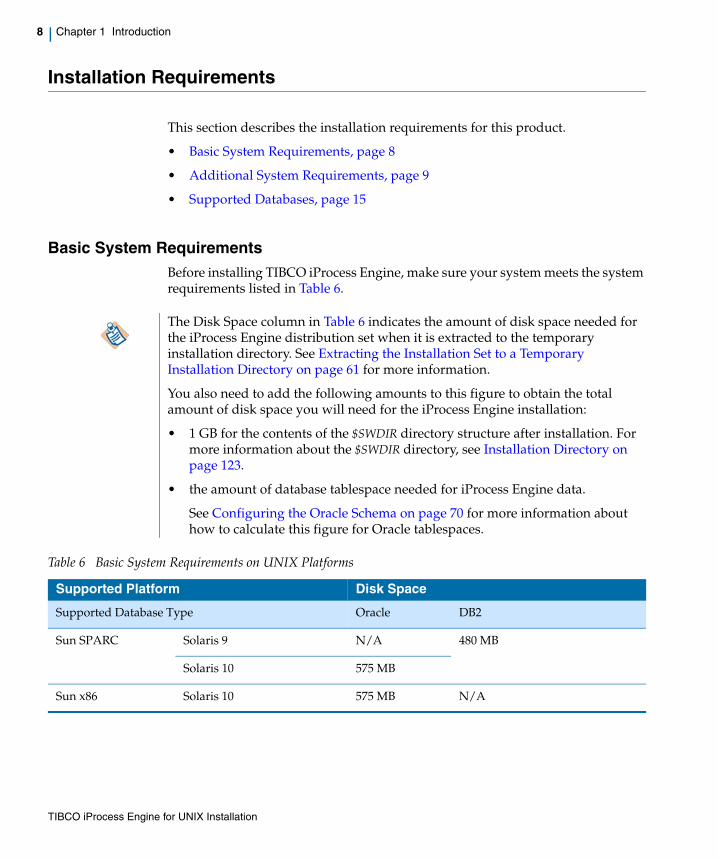
Basic System RequirementsBefore installing TIBCO iProcess Engine, make sure your system meets the system requirements listed in Table 6.
The Disk Space column in Table 6 indicates the amount of disk space needed for the iProcess Engine distribution set when it is extracted to the temporary installation directory. See Extracting the Installation Set to a Temporary Installation Directory on page 61 for more information.
You also need to add the following amounts to this figure to obtain the total amount of disk space you will need for the iProcess Engine installation:
• 1 GB for the contents of the $SWDIR directory structure after installation. For more information about the $SWDIR directory, see Installation Directory on page 123.
• the amount of database tablespace needed for iProcess Engine data.
See Configuring the Oracle Schema on page 70 for more information about how to calculate this figure for Oracle tablespaces.
Table 6 Basic System Requirements on UNIX Platforms
Supported Platform Disk Space
Supported Database Type Oracle DB2
Sun SPARC Solaris 9 N/A 480 MB
Solaris 10 575 MB
Sun x86 Solaris 10 575 MB N/A
TIBCO iProcess Engine for UNIX Installation

Installation Requirements | 9
Additional System RequirementsAdditional system requirements are described below:
• TIBCO iProcess Objects, page 10
• iProcess Server Manager, page 11
• Activity Publishing and Work Queue Delta Publication, page 12
• Java Runtime Environment (JRE), page 13
HP-UX on Itanium HP-UX 11i Version 2 (B.11.23 or later)
1065 MB N/A
HP-UX 11i Version 3 (B.11.31)
IBM AIX AIX 5L Version 5.3 635 MB 555 MB
AIX 5L Version 6.1
Linux Novell SUSE Linux Enterprise 10.x
510 MB 420 MB
Novell SUSE Linux Enterprise 11
Red Hat Enterprise Linux AS/ES 4.x
Red Hat Enterprise Linux AS/ES 5.x
Red Hat Enterprise Linux AS/ES 5.x with SELINUX enabled
Other Linux implementation with Kernel Base 2.4 and Libraries glibc 2.4
Table 6 Basic System Requirements on UNIX Platforms (Cont’d)
Supported Platform Disk Space
Supported Database Type Oracle DB2
TIBCO iProcess Engine for UNIX Installation

10 | Chapter 1 Introduction
TIBCO iProcess Objects
The iProcess Objects Server receives requests for services or data from TIBCO iProcess Objects (COM, JAVA, or C++) or TIBCO iProcess Server Objects (JAVA or .NET). The iProcess Objects Server processes the request, then makes the appropriate call to an iProcess Engine to initiate the desired service or obtain the desired information.
The iProcess Objects Director is a stand-alone program that maintains a list of iProcess Objects Servers that are configured in a node cluster. When a client needs access to an iProcess Objects Server, it first establishes a connection to the iProcess Objects Director. The iProcess Objects Director then decides, based on a pick method, which iProcess Objects Server the client should connect to.
If you want to enable the iProcess Objects Server and/or iProcess Objects Director, see Enable iProcess Objects Server on page 144 and Enable iProcess Objects Director on page 145 for details. You need to take account of additional disk space and memory requirements listed in Table 7.
Table 7 Additional Runtime Disk Space Requirements for TIBCO iProcess Objects
Component Supported Platform
Runtime Disk Space Requirement Memory
iProcess Objects Server Sun SPARC 5 MB +Log N/A
Sun x86 5 MB +Log N/A
HP-UX on Itanium 5 MB +Log N/A
IBM AIX 20 MB +Log N/A
Linux 5 MB +Log N/A
By default, the maximum size of the iProcess Objects Server log file is 15 MB. This can be configured after installation. See TIBCO iProcess Objects Server Administrator’s Guide for more information. The log file is not created during installation. It is created the first time iProcess Objects Server is used.
TIBCO iProcess Engine for UNIX Installation

Installation Requirements | 11
iProcess Server Manager
The iProcess Server Manager is a JSP web client application that you can use to start, stop, restart, and pause iProcess Engine server processes. It utilizes the iProcess Web Server service and TIBCO Hawk to provide a graphical view of iProcess Engine server processes on a machine or a node cluster.
If you are planning to use the iProcess Server Manager, you must have:
• TIBCO Hawk Version 4.9.0 installed on the machine where you intend to install iProcess Engine.
• TIBCO Rendezvous Version 8.1.1 installed on the machine where you intend to install iProcess Engine. (This is the minimum version required to run TIBCO Hawk Version 4.9.0.)
• TIBCO Hawk Version 4.9.0 installed on the machines on which you want to administer iProcess Engine processes.
iProcess Objects Director Sun SPARC 500 MB +Log 50 MB
Sun x86 500 MB +Log 50 MB
HP-UX on Itanium 500 MB +Log 70 MB
IBM AIX 500 MB +Log 20 MB
Linux 500 MB +Log 50 MB
By default, the maximum size of the iProcess Objects Director log file is 15 MB. This can be configured after installation using the LOG_FILE_MAX_SIZE process attribute. (See TIBCO iProcess Objects Director Administrator’s Guide for more information.) The log file is not created during installation. It is created the first time the iProcess Objects Director is used.
Table 7 Additional Runtime Disk Space Requirements for TIBCO iProcess Objects (Cont’d)
Component Supported Platform
Runtime Disk Space Requirement Memory
If you have a version of TIBCO Rendezvous earlier than 8.1.1 already installed, you should either remove TIBCO Rendezvous or upgrade it to Version 8.1.1 before installing iProcess Engine. This is because the installer cannot upgrade an earlier version of TIBCO Rendezvous.
TIBCO iProcess Engine for UNIX Installation
12 | Chapter 1 Introduction
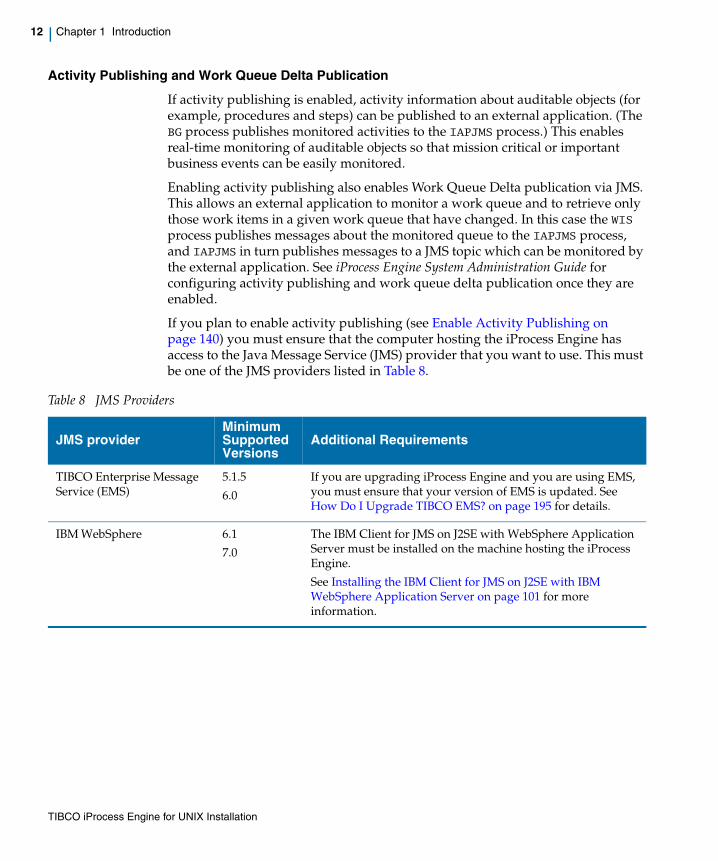
Activity Publishing and Work Queue Delta Publication
If activity publishing is enabled, activity information about auditable objects (for example, procedures and steps) can be published to an external application. (The BG process publishes monitored activities to the IAPJMS process.) This enables real-time monitoring of auditable objects so that mission critical or important business events can be easily monitored.
Enabling activity publishing also enables Work Queue Delta publication via JMS. This allows an external application to monitor a work queue and to retrieve only those work items in a given work queue that have changed. In this case the WIS process publishes messages about the monitored queue to the IAPJMS process, and IAPJMS in turn publishes messages to a JMS topic which can be monitored by the external application. See iProcess Engine System Administration Guide for configuring activity publishing and work queue delta publication once they are enabled.
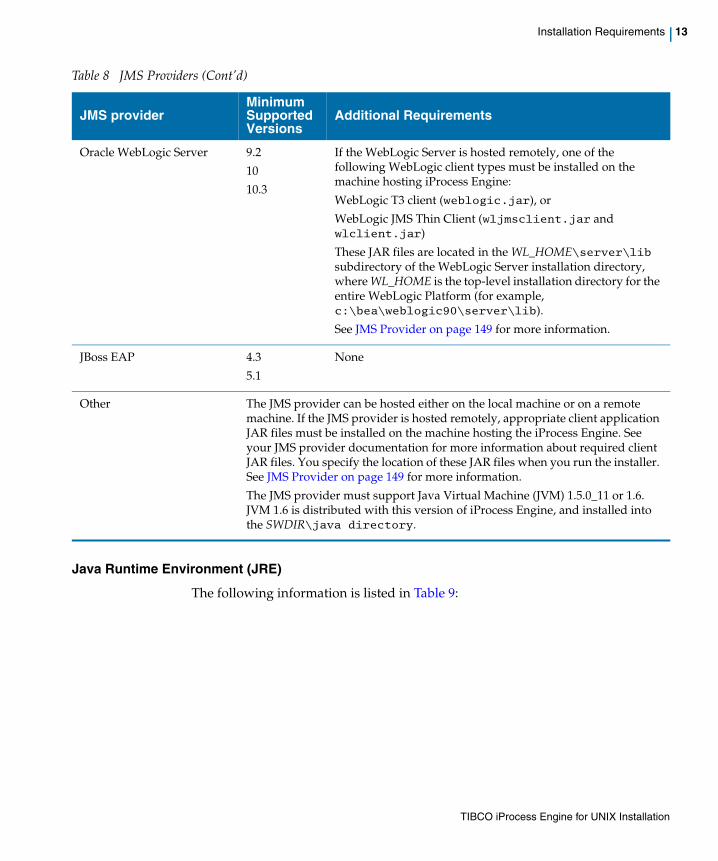
If you plan to enable activity publishing (see Enable Activity Publishing on page 140) you must ensure that the computer hosting the iProcess Engine has access to the Java Message Service (JMS) provider that you want to use. This must be one of the JMS providers listed in Table 8.
Table 8 JMS Providers
JMS providerMinimum Supported Versions
Additional Requirements
TIBCO Enterprise Message Service (EMS)
5.1.5
6.0
If you are upgrading iProcess Engine and you are using EMS, you must ensure that your version of EMS is updated. See How Do I Upgrade TIBCO EMS? on page 195 for details.
IBM WebSphere 6.1
7.0
The IBM Client for JMS on J2SE with WebSphere Application Server must be installed on the machine hosting the iProcess Engine.
See Installing the IBM Client for JMS on J2SE with IBM WebSphere Application Server on page 101 for more information.
TIBCO iProcess Engine for UNIX Installation
Installation Requirements | 13
Java Runtime Environment (JRE)
The following information is listed in Table 9:
Oracle WebLogic Server 9.2
10
10.3
If the WebLogic Server is hosted remotely, one of the following WebLogic client types must be installed on the machine hosting iProcess Engine:
WebLogic T3 client (weblogic.jar), or
WebLogic JMS Thin Client (wljmsclient.jar and wlclient.jar)
These JAR files are located in the WL_HOME\server\lib subdirectory of the WebLogic Server installation directory, where WL_HOME is the top-level installation directory for the entire WebLogic Platform (for example, c:\bea\weblogic90\server\lib).
See JMS Provider on page 149 for more information.
JBoss EAP 4.3
5.1
None
Other The JMS provider can be hosted either on the local machine or on a remote machine. If the JMS provider is hosted remotely, appropriate client application JAR files must be installed on the machine hosting the iProcess Engine. See your JMS provider documentation for more information about required client JAR files. You specify the location of these JAR files when you run the installer. See JMS Provider on page 149 for more information.
The JMS provider must support Java Virtual Machine (JVM) 1.5.0_11 or 1.6. JVM 1.6 is distributed with this version of iProcess Engine, and installed into the SWDIR\java directory.
Table 8 JMS Providers (Cont’d)
JMS providerMinimum Supported Versions
Additional Requirements
TIBCO iProcess Engine for UNIX Installation

14 | Chapter 1 Introduction
• the iProcess Engine components and other dependant iProcess products that use Java, and therefore need access to a Java Virtual Machine (JVM) or other JRE libraries on the computer hosting the iProcess Engine.
• the default JRE that each component or product uses to locate the libraries that it needs.
• the configuration tool provided to allow you to configure the location of the JRE used by each component or product (if applicable).
Table 9 JRE Information
Component or Product Default JRE Location Configuration Tool
IAPJMS process $SWDIR/java SWLIB_PATH process attribute value
See "Administering Process Attributes" in TIBCO iProcess Engine Administrator’s Guide for more information.
iProcess Server Manager $SWDIR/java None
JMX Engine $SWDIR/java None
TIBCO EMS $SWDIR/java None
TIBCO Hawk $SWDIR/java None
TIBCO iProcess BusinessWorks Connector Server Plug-in
Selectable when you install the plug-in
TIBCO iProcess Technology Plug-ins installer
See TIBCO iProcess Technology Plug-ins Installation for more information.
TIBCO iProcess Java Server Plug-in
Selectable when you install the plug-in
TIBCO iProcess Technology Plug-ins installer
See TIBCO iProcess Technology Plug-ins Installation for more information.
Note:
On some platforms, if you are installing iProcess Java Server Plug-in to use with this version of iProcess Engine, you cannot run the installer with Java 1.6. You must use an earlier version, such as Java 1.5. However, you can use Java 1.6 at runtime.
TIBCO iProcess Engine Web Service Server Plug-in
Selectable when you install the plug-in
TIBCO iProcess Engine Web Services Plug-in installer
See TIBCO iProcess Engine Web Services Plug-in Installation for more information.
TIBCO iProcess Engine for UNIX Installation
Installation Requirements | 15
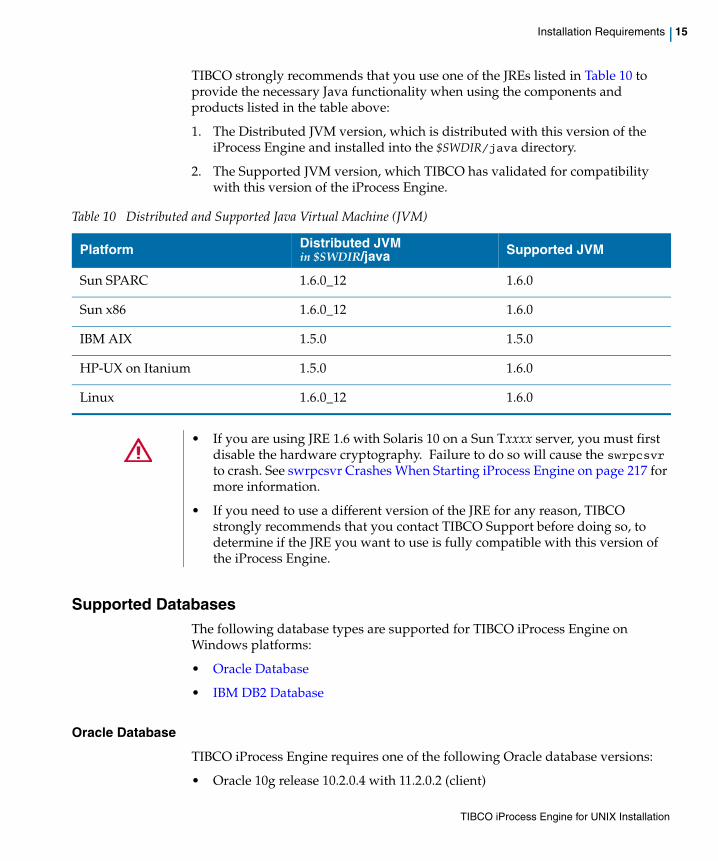
TIBCO strongly recommends that you use one of the JREs listed in Table 10 to provide the necessary Java functionality when using the components and products listed in the table above:
1. The Distributed JVM version, which is distributed with this version of the iProcess Engine and installed into the $SWDIR/java directory.
2. The Supported JVM version, which TIBCO has validated for compatibility with this version of the iProcess Engine.
Supported DatabasesThe following database types are supported for TIBCO iProcess Engine on Windows platforms:
• Oracle Database
• IBM DB2 Database
Oracle Database
TIBCO iProcess Engine requires one of the following Oracle database versions:
• Oracle 10g release 10.2.0.4 with 11.2.0.2 (client)
Table 10 Distributed and Supported Java Virtual Machine (JVM)
Platform Distributed JVMin $SWDIR/java Supported JVM
Sun SPARC 1.6.0_12 1.6.0
Sun x86 1.6.0_12 1.6.0
IBM AIX 1.5.0 1.5.0
HP-UX on Itanium 1.5.0 1.6.0
Linux 1.6.0_12 1.6.0
• If you are using JRE 1.6 with Solaris 10 on a Sun Txxxx server, you must first disable the hardware cryptography. Failure to do so will cause the swrpcsvr to crash. See swrpcsvr Crashes When Starting iProcess Engine on page 217 for more information.
• If you need to use a different version of the JRE for any reason, TIBCO strongly recommends that you contact TIBCO Support before doing so, to determine if the JRE you want to use is fully compatible with this version of the iProcess Engine.
TIBCO iProcess Engine for UNIX Installation
16 | Chapter 1 Introduction
• Oracle 11g release 11.1.0.6 with 11.2.0.2 (client)
• Oracle 11g release 11.2.0.2 with 11.2.0.2 (client)
The exact Oracle version requirements depend on which of the following two types of database connections you intend to use:
• a direct connection to the default database hosted on the computer where you will install or upgrade TIBCO iProcess Engine. For detailed information, see Direct Connection Requirements for Oracle on page 16.
• a Transparent Network Substrate (TNS) connection, connected to either:
— the default database hosted on the computer where you will install or upgrade TIBCO iProcess Engine, or to
— a remote database, meaning a database that is either hosted on a remote computer, or a non-default database on the computer where you will install or upgrade iProcess Engine.
For detailed information, see TNS Connection Requirements for Oracle on page 17.
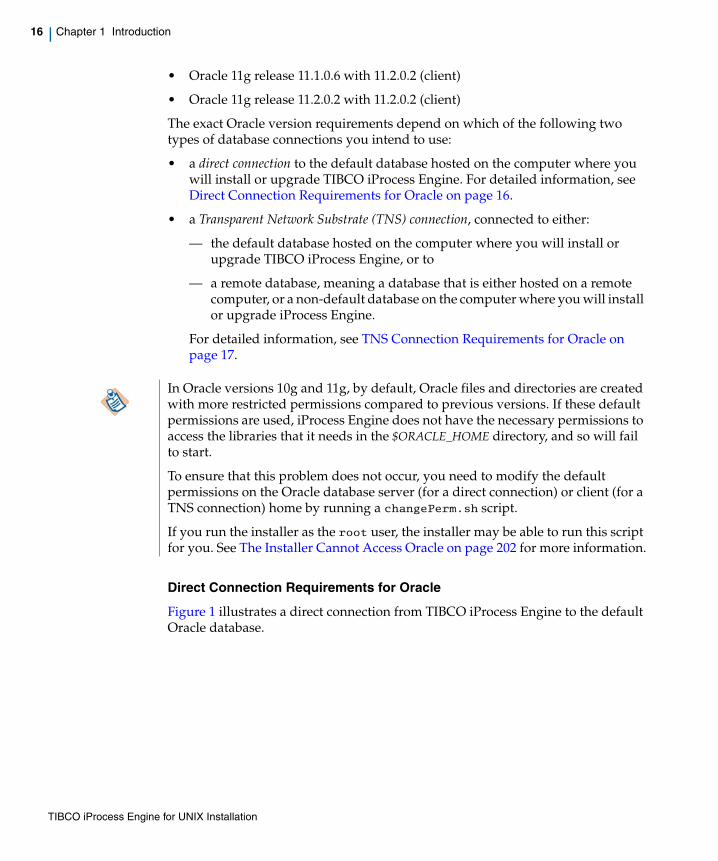
Direct Connection Requirements for Oracle
Figure 1 illustrates a direct connection from TIBCO iProcess Engine to the default Oracle database.
In Oracle versions 10g and 11g, by default, Oracle files and directories are created with more restricted permissions compared to previous versions. If these default permissions are used, iProcess Engine does not have the necessary permissions to access the libraries that it needs in the $ORACLE_HOME directory, and so will fail to start.
To ensure that this problem does not occur, you need to modify the default permissions on the Oracle database server (for a direct connection) or client (for a TNS connection) home by running a changePerm.sh script.
If you run the installer as the root user, the installer may be able to run this script for you. See The Installer Cannot Access Oracle on page 202 for more information.
TIBCO iProcess Engine for UNIX Installation

Installation Requirements | 17
Figure 1 Direct Connection
When using a direct connection, you must set the ORACLE_HOME environment variable to the pathname of the Oracle Database.
TNS Connection Requirements for Oracle
When using a TNS connection, you must:
• ensure that the remote Oracle database uses one of the Oracle Database releases specified in Table 11.
• ensure that the correct Oracle Client release is installed on the computer where you will install or upgrade the iProcess Engine, as described in Table 11.
Figure 2 illustrates a TNS connection from TIBCO iProcess Engine to the default database.
Figure 2 TNS Connection
You need to:
• set the ORACLE_HOME environment variable to the path name of the Oracle Client.
• use the TNS name to connect the iProcess Engine to the Oracle Database. See Oracle Database Connection and Account Details Menu on page 165 for details.
TIBCO iProcess Engine
Oracle Client Libraries Version 11.2.0.2 Oracle Database
Version 10.2.0.4, 11.1.0.6, or
11.2.0.2
Oracle OCI
TIBCO iProcess Engine
Oracle Client Libraries Version 11.2.0.2 Oracle Database
Version 10.2.0.4, 11.1.0.6, or
11.2.0.2
Oracle OCI
Oracle Client Version 11.2.0.2
TIBCO iProcess Engine for UNIX Installation
18 | Chapter 1 Introduction
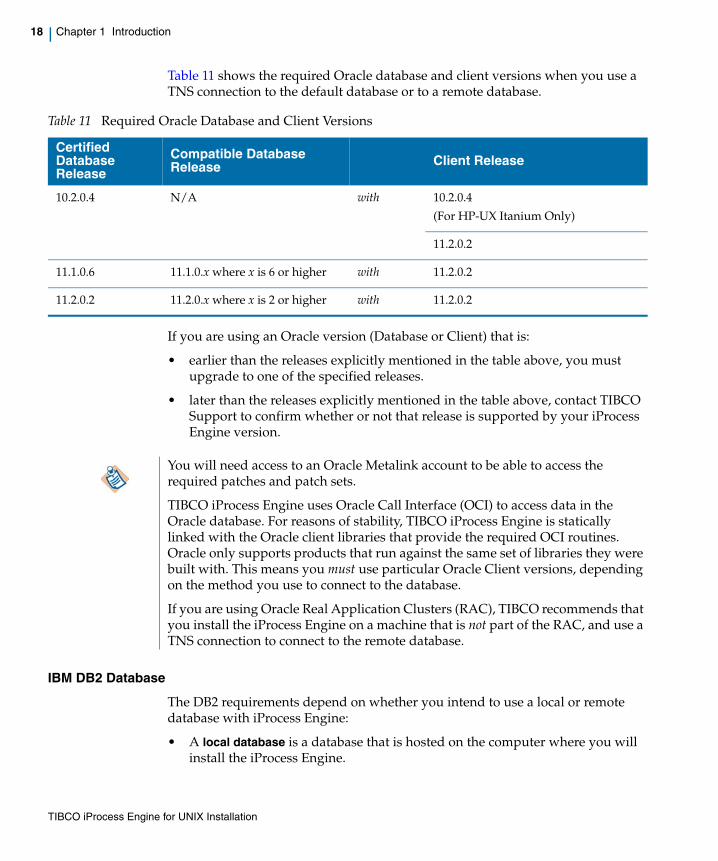
Table 11 shows the required Oracle database and client versions when you use a TNS connection to the default database or to a remote database.
If you are using an Oracle version (Database or Client) that is:
• earlier than the releases explicitly mentioned in the table above, you must upgrade to one of the specified releases.
• later than the releases explicitly mentioned in the table above, contact TIBCO Support to confirm whether or not that release is supported by your iProcess Engine version.
IBM DB2 Database
The DB2 requirements depend on whether you intend to use a local or remote database with iProcess Engine:
• A local database is a database that is hosted on the computer where you will install the iProcess Engine.
Table 11 Required Oracle Database and Client Versions
Certified Database Release
Compatible Database Release Client Release
10.2.0.4 N/A with 10.2.0.4
(For HP-UX Itanium Only)
11.2.0.2
11.1.0.6 11.1.0.x where x is 6 or higher with 11.2.0.2
11.2.0.2 11.2.0.x where x is 2 or higher with 11.2.0.2
You will need access to an Oracle Metalink account to be able to access the required patches and patch sets.
TIBCO iProcess Engine uses Oracle Call Interface (OCI) to access data in the Oracle database. For reasons of stability, TIBCO iProcess Engine is statically linked with the Oracle client libraries that provide the required OCI routines. Oracle only supports products that run against the same set of libraries they were built with. This means you must use particular Oracle Client versions, depending on the method you use to connect to the database.
If you are using Oracle Real Application Clusters (RAC), TIBCO recommends that you install the iProcess Engine on a machine that is not part of the RAC, and use a TNS connection to connect to the remote database.
TIBCO iProcess Engine for UNIX Installation

Installation Requirements | 19
If you intend to use a local database:
— You must have a DB2 Server installed on the computer where you will install or upgrade iProcess Engine.
— The TCP/IP communications protocol must be enabled.
• A remote database is a database that is hosted on a different computer to the one where you will install the iProcess Engine.
If you intend to use a remote database:
— You must have a DB2 Runtime Client or Administration Client installed on the computer where you will install or upgrade the iProcess Engine.
— The DB2 client must be configured to access the remote DB2 server using TCP/IP.
The following table shows the required DB2 server and client versions.
See your DB2 documentation for more information about how to install DB2 servers and clients, and how to configure communications between them.
Table 12 Required DB2 Server and Client Versions
Platform DB2 Version Required Release Level
Solaris DB2 Universal Database for Solaris (Server and/or Client) 9.5 or 9.7
AIX DB2 Universal Database for AIX (Server and/or Client) 9.5 or 9.7
x86 DB2 Universal Database for Linux (Server and/or Client) 9.5 or 9.7
TIBCO iProcess Engine for UNIX Installation

20 | Chapter 1 Introduction
Upgrade Requirements
The iProcess Engine Version 11.3 requires specific operating system and database versions. See Installation Requirements on page 8 for more information.
If your current iProcess Engine is running with an operating system and/or a database version that does not meet these requirements, you will need to upgrade your operating system and/or database to a supported version before you can upgrade the iProcess Engine.
If you are using TIBCO iProcess Engine 11.0 or later, you can directly upgrade it to version 11.3.
If you are using TIBCO Process Engine 9.0, or any earlier version of TIBCO iProcess Engine 11.0, you must upgrade it to TIBCO iProcess Engine 1.0 first. See TIBCO iProcess Engine 11.0 Installation for detailed information.
MBox Queue Priority is added to iProcess Engine in this release (see “Prioritizing the Work Performed by Background Processes“ in TIBCO iProcess Engine 11.3 Release Notes for details).
During an upgrade, the iProcess Schema-install Owner needs to change the default MBox queue. If you have created your own additional MBox queues, you need to contact TIBCO support and manually upgrade your MBox queues.
For Oracle users, make sure that MBoxes are empty before performing an upgrade. If some messages have already existed in MBoxes before an upgrade, you need to deal with them and empty the MBoxes first.
If you are upgrading iProcess Engine, you must ensure that your version of EMS is updated. See How Do I Upgrade TIBCO EMS? on page 195.
TIBCO iProcess Engine for UNIX Installation

Control File | 21
Control File
TIBCO iProcess Engine provides a control file $SWDIR/logs/swinstall.dat to record all the configuration items when completing the installation, either by being allowed to run to completion, or if you quit from any of the configuration menus. For more information about configuration menus, see Configuration Menus for TIBCO iProcess Engine Installation on page 114.
• How to Use the Control File, page 21
• Control File Naming Convention, page 22
• Control File Format, page 22
• Control File Keywords, page 22
How to Use the Control FileThe control file can be used in the following two ways:
• The control file can be used as a short-cut when you run the installer. You can use the control file values to populate the configuration menus.
The following prompts appear during your installation:
or
Enter Y to use the configuration information saved in the control file to continue with the installation.
• The control file can be used as a template to run a similar installation silently. You may want to do this if, for example, you are installing a master server and multiple slave servers. See Installing TIBCO iProcess Engine in Silent Mode on page 38 for more information about silent installation.
If you quit from one of the configuration menus, any changes you have made to items on the current menu are not saved to the control file. If you want to save these changes you must first move to a different menu, then move back before quitting the installation.
An complete version 11.3.0 configuration for an install already exists.
Use this information for the current install (Y/N - default N):
An incomplete version 11.3.0 configuration for an install already exists.
Use this information for the current install (Y/N - default N):
TIBCO iProcess Engine for UNIX Installation
22 | Chapter 1 Introduction
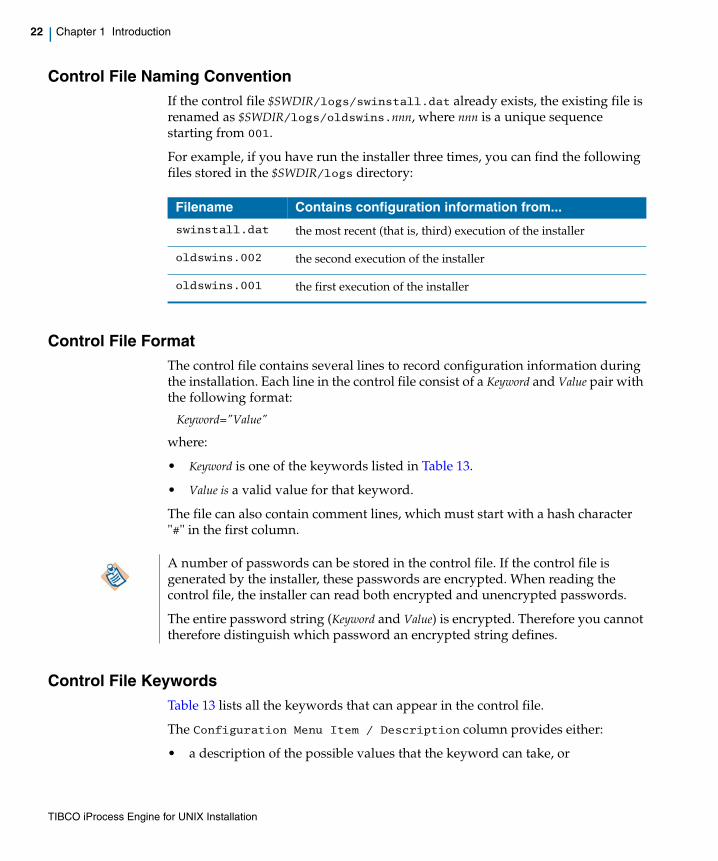
Control File Naming Convention If the control file $SWDIR/logs/swinstall.dat already exists, the existing file is renamed as $SWDIR/logs/oldswins.nnn, where nnn is a unique sequence starting from 001.
For example, if you have run the installer three times, you can find the following files stored in the $SWDIR/logs directory:
Control File FormatThe control file contains several lines to record configuration information during the installation. Each line in the control file consist of a Keyword and Value pair with the following format:
Keyword="Value"
where:
• Keyword is one of the keywords listed in Table 13.
• Value is a valid value for that keyword.
The file can also contain comment lines, which must start with a hash character "#" in the first column.
Control File KeywordsTable 13 lists all the keywords that can appear in the control file.
The Configuration Menu Item / Description column provides either:
• a description of the possible values that the keyword can take, or
Filename Contains configuration information from...
swinstall.dat the most recent (that is, third) execution of the installer
oldswins.002 the second execution of the installer
oldswins.001 the first execution of the installer
A number of passwords can be stored in the control file. If the control file is generated by the installer, these passwords are encrypted. When reading the control file, the installer can read both encrypted and unencrypted passwords.
The entire password string (Keyword and Value) is encrypted. Therefore you cannot therefore distinguish which password an encrypted string defines.
TIBCO iProcess Engine for UNIX Installation

Control File | 23
• a link to the description of the equivalent configuration menu item, which describes the item and its possible values in more detail.
The Status column indicates whether the keyword is:
• M—Mandatory. The keyword must appear in the control file and must have a valid value.
• O—Optional. The keyword can be omitted from the control file, in which case the installer uses the appropriate default value.
• R—Reserved. The keyword is automatically generated by the installer as required. TIBCO recommends that you do not change its value.
Table 13 Keywords in the Control
Keyword Configuration Menu Item / Description Status
General
IPEI_INSTALLUSER Name of the UNIX user account that is running the installer.
Note: This value is written to the control file by the installer for information only. It is not actually used by the installer.
R
IPEI_DEFSYSLANG Default system language O
IPEF_INTERACTIVE "Y" for Interactive installation R
Policy to Install Schema and Files Menu
IPEI_INSPOLICY Installation Policy R
IPEI_UPGRADE_PART0 Installation Policy
Which part (files or schema) has been upgraded first.
O
IPEI_UPGRADE_PART1 Installation Policy
Which part (files or schema) has been upgraded next.
O
Location, Identification and OS Accounts Menu
IPEI_SWDIR Installation Directory M
IPEI_NODENAME iProcess Engine Nodename M
IPEI_LICENSEE iProcess Engine Licensee Name O
IPEI_BGUSER iProcess Engine Background User Name O
TIBCO iProcess Engine for UNIX Installation

24 | Chapter 1 Introduction
IPEI_ADMUSER iProcess Engine Administration User Name O
IPEI_USRGROUP iProcess Engine User Group Name O
IPEF_REDIRADM Redirect Administration Queue O
IPEF_CREATBGUSR Y to Create OS iPE BG User O
IPEF_CREATADMUSR Y to Create OS Admin User O
IPEF_CREATGROUP Y to Create iPE Group O
IPEF_ATGBGUSR Y to add OS iPE BG User to iPE Group R
IPEF_ATGADMUSR Y to add OS Admin User to iPE Group R
Configuration Options Menu
IPEI_RPCNUM iProcess Engine Client RPC Number O
IPEF_CLNTPASSWD iProcess Engine Client Password Required O
IPEF_ENABLECDN Enable Case Data Normalization O
IPEF_PREDICT Enable Prediction O
IPEF_AUTOSTART Enable Autostart O
IPEF_ENABLEIAP Enable Activity Publishing O
IPEF_EAIMAIL_ENABLECONFIG Configure iProcess Email Plug-in O
IPEI_JMX_PORT JMX Port Number O
IPEF_SPOSERVER_ENABLED Enable iProcess Objects Server O
IPEF_SPODIRECTOR_ENABLED Enable iProcess Objects Director O
IPEF_WEBDAV_ENABLED Enable Write Access to WebDav R
IAP Configuration Menu
IPEI_JMSPROVIDER JMS Provider O
IPEI_JMSLOCATION Base JAR Files Location O
IPEI_ADDJARLOC Additional JAR Files Location O
Table 13 Keywords in the Control (Cont’d)
Keyword Configuration Menu Item / Description Status
TIBCO iProcess Engine for UNIX Installation

Control File | 25
IPEI_CTXTFACTORY Context Factory Name O
IPEI_JMSURL URL for JMS Provider O
IPEI_CONNFACTORY Connection Factory Name O
iProcess Email Plug-in Configuration Menu
IPEI_EAIMAIL_SMTPHOST SMTP Host O
IPEI_EAIMAIL_SMTPPORT SMTP Port Number O
IPEI_EAIMAIL_MAILFROM Mail from Address O
IPEI_EAIMAIL_BAKSMTPHOST1 BACKUP SMTP Host O
IPEI_EAIMAIL_BAKSMTPHOST2 BACKUP SMTP Host O
IPEI_EAIMAIL_BAKSMTPHOST3 BACKUP SMTP Host O
IPEI_EAIMAIL_BAKSMTPPORT1 BACKUP SMTP Port O
IPEI_EAIMAIL_BAKSMTPPORT2 BACKUP SMTP Port O
IPEI_EAIMAIL_BAKSMTPPORT3 BACKUP SMTP Port O
IPEI_EAIMAIL_RETRYCOUNTS Retry Counts O
Oracle Database Installation Method Menu
IPEI_DBINSTMODEL Installation Method O
Database Connection and Account Details Menu
IPEI_DBIDSTR Oracle DB TNS Identifier M
DB2 Database Alias Name M
IPEF_USENONTAF "Y" to use an Oracle DB TNS Identifier that does not have TAF enabled (see page 39)
O
IPEI_DBANAME Oracle DB Administrator Name M
IPEI_DBAPASSWD Oracle DB Administrator Password M
IPEI_DBSONAME iProcess Engine DB Schema Owner Name O
Table 13 Keywords in the Control (Cont’d)
Keyword Configuration Menu Item / Description Status
TIBCO iProcess Engine for UNIX Installation

26 | Chapter 1 Introduction
IPEI_DBSOPASSWD iProcess Engine DB Schema Owner Password O
IPEI_DBSBGNAME Reserved for internal use. R
IPEI_DBUSRNAME iProcess Engine DB User Name O
IPEI_DBUSRPASSWD iProcess Engine DB User Password O
IPEI_SUPPORTUNICODE Support Unicode Encoding O
IPEI_DBTABLESPC Data Tablespace Name O
IPEI_DTBLSPCSIZE Size of the IPEI_DBTABLESPC tablespace. (See Data Tablespace Name for more information.)
O
IPEI_DTBLSPCLOC Location of the IPEI_DBTABLESPC tablespace. (See Data Tablespace Name for more information.)
O
IPEI_DBTEMPSPC Temporary Tablespace Name O
IPEI_TTBLSPCSIZE Size of the IPEI_DBTEMPSPC tablespace. (See Temporary Tablespace Name for more information.)
O
IPEI_TTBLSPCLOC Location of the IPEI_DBTEMPSPC tablespace. (See Temporary Tablespace Name for more information.)
O
IPEI_DBSCHEMA_SIZE Size of the tablesizes control file to be used to configure the iProcess Engine database schema. (See Schema Sizing Configuration for more information.)
O
IPEI_DBSCHEMA_CTRLFILE Full pathname to a custom tablesizes control file. (See Schema Sizing Configuration for more information.)
O
IPEI_DB2FENCEUSR DB2 specific Fenced Username O
IPEF_DBSOUCREATE Y to Create iProcess Engine DB Schema Owner account R
IPEF_DBFUCREATE Y to Create iProcess Engine DB User account R
IPEF_DBDTSCREATE Y to Create Database Tablespace R
IPEF_DBTTSCREATE Y to Create Temporary Tablespace R
IPEF_GOTDBINFO Y if DB Information is Complete and Validated R
IPEF_CLUSTERINST Y if sub-node is in existing cluster R
Table 13 Keywords in the Control (Cont’d)
Keyword Configuration Menu Item / Description Status
TIBCO iProcess Engine for UNIX Installation

Control File | 27
IPEF_DELETETABLES Y if existing DB schema is to be deleted R
Table 13 Keywords in the Control (Cont’d)
Keyword Configuration Menu Item / Description Status
TIBCO iProcess Engine for UNIX Installation

28 | Chapter 1 Introduction
TIBCO iProcess Engine for UNIX Installation

| 29
Chapter 2 Installing TIBCO iProcess Engine
This chapter describes how to install TIBCO iProcess Engine on Windows.
Topics
• Pre-Installation, page 30
• Installing TIBCO iProcess Engine in Console Mode, page 33
• Installing TIBCO iProcess Engine in Silent Mode, page 38
• Upgrading TIBCO iProcess Engine, page 41
• Post-Installation, page 47
TIBCO iProcess Engine for UNIX Installation

30 | Chapter 2 Installing TIBCO iProcess Engine
Pre-Installation
The most time-consuming part of a TIBCO iProcess Engine installation is the collection of environment information and parameters. This section helps you complete this process.
Table 14 provides a checklist of the tasks that you must or may need to perform before installing the iProcess Engine. The table shows:
• whether the root, iProcess Files-install Owner, iProcess Schema-install Owner, or DBA user needs to perform the task (see Organization Roles on page 2).
• the status of a task, depending on whether you are installing a new iProcess Engine or upgrading an existing one. This is either:
— Required —You must perform this task before installing the iProcess Engine.
— Check — You may need to perform this task before installing the iProcess Engine, depending on your installation scenario.
— Optional — You may wish to perform this task before installing the iProcess Engine, but it is not essential.
— N/A — You can install the iProcess Engine without performing this task.
For detailed information about each task, see Pre-Installation Tasks on page 53.
You may want to print this table as a useful quick reference when performing the pre-installation tasks. The Done? column in the table provides a place for you to tick off tasks that have been done.
Table 14 Pre-Installation Tasks Checklist
Task DatabaseType To be done by Install
StatusUpgradeStatus Done?
Checking For Any Late-breaking Information
Oracle
DB2
iProcess Files-install Owner
iProcess Schema-install Owner
Required Required
Backing Up the TIBCO iProcess Engine File System
Oracle
DB2
root N/A Required
TIBCO iProcess Engine for UNIX Installation

Pre-Installation | 31
Backing up TIBCO iProcess Engine Database Schema
Oracle
DB2
iProcess Schema-install Owner
N/A Required
Upgrading Your Operating System
Oracle
DB2
root Check Check
Upgrading Oracle Oracle iProcess Schema-install Owner
DBA
Check Check
Extracting the Installation Set to a Temporary Installation Directory
Oracle
DB2
iProcess Files-install Owner
iProcess Schema-install Owner
Required Required
Setting the Number of File Descriptors per Process
Oracle
DB2
root Required Check
Creating iProcess Engine UNIX Users and Groups
Oracle
DB2
root Optional N/A
Setting Up the iProcess Engine System Directory
Oracle
DB2
iProcess Files-install Owner
Optional Check
Setting Up Database Environment Variables
Oracle
DB2
iProcess Schema-install Owner
DBA
Required Check
Creating Oracle Accounts and Tablespaces
Oracle
DB2
DBA Optional N/A
Configuring the Oracle Schema
Oracle iProcess Schema-install Owner
Optional N/A
Setting up Oracle Transparent Application Failover (TAF)
Oracle iProcess Schema-install Owner
DBA
Check Check
Configuring Oracle OPEN_CURSORS
Oracle iProcess Schema-install Owner
DBA
Required Check
Table 14 Pre-Installation Tasks Checklist (Cont’d)
Task DatabaseType To be done by Install
StatusUpgradeStatus Done?
TIBCO iProcess Engine for UNIX Installation
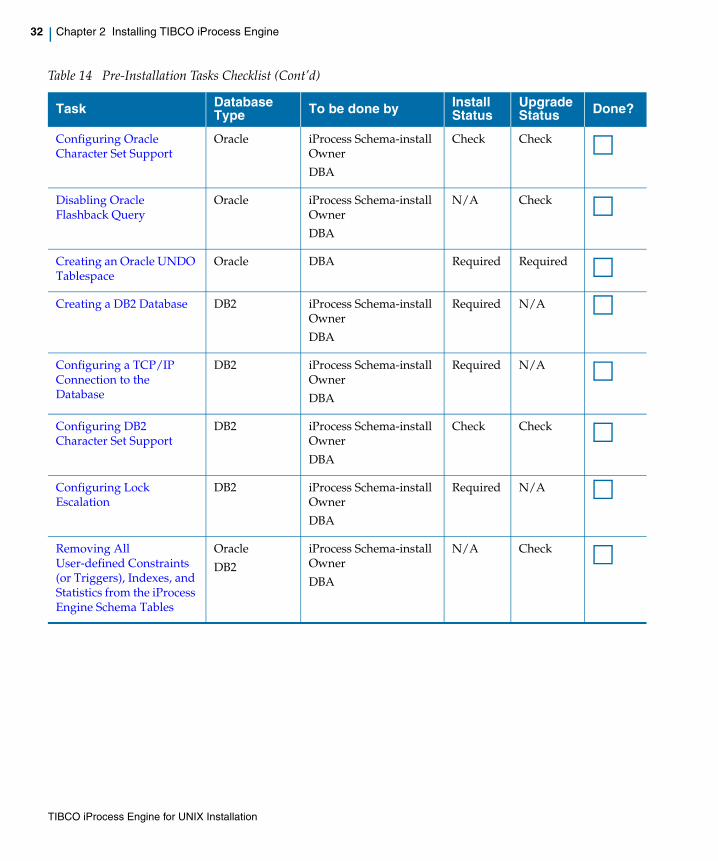
32 | Chapter 2 Installing TIBCO iProcess Engine
Configuring Oracle Character Set Support
Oracle iProcess Schema-install Owner
DBA
Check Check
Disabling Oracle Flashback Query
Oracle iProcess Schema-install Owner
DBA
N/A Check
Creating an Oracle UNDO Tablespace
Oracle DBA Required Required
Creating a DB2 Database DB2 iProcess Schema-install Owner
DBA
Required N/A
Configuring a TCP/IP Connection to the Database
DB2 iProcess Schema-install Owner
DBA
Required N/A
Configuring DB2 Character Set Support
DB2 iProcess Schema-install Owner
DBA
Check Check
Configuring Lock Escalation
DB2 iProcess Schema-install Owner
DBA
Required N/A
Removing All User-defined Constraints (or Triggers), Indexes, and Statistics from the iProcess Engine Schema Tables
Oracle
DB2
iProcess Schema-install Owner
DBA
N/A Check
Table 14 Pre-Installation Tasks Checklist (Cont’d)
Task DatabaseType To be done by Install
StatusUpgradeStatus Done?
TIBCO iProcess Engine for UNIX Installation

Installing TIBCO iProcess Engine in Console Mode | 33
Installing TIBCO iProcess Engine in Console Mode
Before installing TIBCO iProcess Engine in Console mode, you need to read the instructions about Using Configuration Menus on page 115 and be familiar with the options that appear on a menu.
To install TIBCO iProcess Engine in Console mode, complete the following steps:
1. Log in to your operating system as either the root user or as the iProcess Engine background user. For the definition of the iProcess Engine background user, see iProcess Engine Background User Name on page 126.
2. Run the following commands to start the installer:cd DistDir
./swinstall
3. Read TIBCO Software Inc. End User License Agreement. The following prompts appear:To install the TIBCO iProcess Engine, you must accept the preceding agreement.
Do you accept all the terms of the License Agreement? (Y/N - default N):
— Enter Y to accept the terms of the License Agreement and continue with the installation.
— Enter N to abort the installation.
Before running the installer, make sure that iProcess Files-install Owner and iProcess Schema-install Owner have already known the following information:
• node name
• $SWDIR
• the account of background user. iProcess Schema-install Owner needs to use it if iProcess Schema-install Owner can not use the root account during the installation.
where DistDir is the temporary installation directory containing the iProcess Engine distribution set. See Extracting the Installation Set to a Temporary Installation Directory on page 61 for more information.
TIBCO iProcess Engine for UNIX Installation
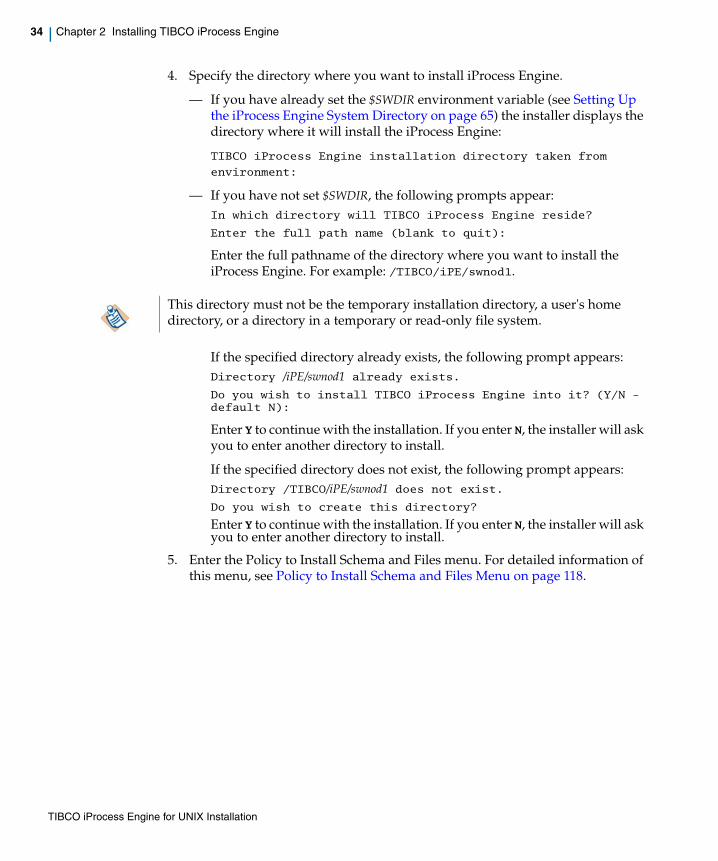
34 | Chapter 2 Installing TIBCO iProcess Engine
4. Specify the directory where you want to install iProcess Engine.
— If you have already set the $SWDIR environment variable (see Setting Up the iProcess Engine System Directory on page 65) the installer displays the directory where it will install the iProcess Engine:
TIBCO iProcess Engine installation directory taken from
environment:
— If you have not set $SWDIR, the following prompts appear:In which directory will TIBCO iProcess Engine reside?
Enter the full path name (blank to quit):
Enter the full pathname of the directory where you want to install the iProcess Engine. For example: /TIBCO/iPE/swnod1.
If the specified directory already exists, the following prompt appears:Directory /iPE/swnod1 already exists.
Do you wish to install TIBCO iProcess Engine into it? (Y/N - default N):
Enter Y to continue with the installation. If you enter N, the installer will ask you to enter another directory to install.
If the specified directory does not exist, the following prompt appears:Directory /TIBCO/iPE/swnod1 does not exist.
Do you wish to create this directory?
Enter Y to continue with the installation. If you enter N, the installer will ask you to enter another directory to install.
5. Enter the Policy to Install Schema and Files menu. For detailed information of this menu, see Policy to Install Schema and Files Menu on page 118.
This directory must not be the temporary installation directory, a user's home directory, or a directory in a temporary or read-only file system.
TIBCO iProcess Engine for UNIX Installation

Installing TIBCO iProcess Engine in Console Mode | 35
In this menu, you can select one of the installation policies. Depending on your choice, you will be led to different menus to configure your installation.
— Install Schema and Files
Choose this option to install or upgrade both iProcess Engine files and schema tables during the current installation.
After you choose this option, you will enter the following menus to complete additional required configurations:
—Location, Identification, and OS Accounts Menu, page 121
—Configuration Options Menu, page 132
—IAP Configuration Menu, page 147
—iProcess Email Plug-in Configuration Menu, page 155
—(For Oracle only) Oracle Database Installation Method Menu, page 163
—Database Connection and Account Details Menu, page 165
— Install Schema Only
iProcess Schema-install Owner chooses this option to install or upgrade iProcess Engine schema tables only during the current installation.
After choosing this option, iProcess Schema-install Owner will enter the following menus to complete additional required configuration:
—(for Oracle only) Oracle Database Installation Method Menu, page 163
—Database Connection and Account Details Menu, page 165
— Install Files Only
iProcess Files-install Owner chooses this option to install or upgrade iProcess Engine files only during the current installation.
After choosing this option, iProcess Files-install Owner will enter the following menus to complete additional required configurations:
—Location, Identification, and OS Accounts Menu, page 121
—Configuration Options Menu, page 132
—IAP Configuration Menu, page 147
—iProcess Email Plug-in Configuration Menu, page 155
For a new installation, iProcess Files-install Owner cannot choose this option. iProcess Schema-install Owner must install the iProcess Engine schema tables first.
TIBCO iProcess Engine for UNIX Installation

36 | Chapter 2 Installing TIBCO iProcess Engine
6. Enter C, the Configuration Summary page appears. Carefully review the Configuration Summary, then you can see the following prompt at the end:
— Enter N to return to Database Connection and Account Details Menu on page 165.
— Enter Y to proceed with the installation. The default option is Y.
7. The installer now performs the necessary installation tasks using the supplied configuration information. A number of messages are displayed informing you of the progress of the installation.
If you are installing a new iProcess Engine, the following prompt appears after the installation complete:
— Enter N, if you want to skip the installation verification test.
— Enter Y, if you want the installer to run tests to verify that the installation has succeeded. If all these tests pass successfully, the following messages are displayed
Ready to install TIBCO iProcess Engine-continue (Y/N-default Y) :
At this point you may run an installation verification test.
Run the verification test now? (Y/N - default Y) :
TIBCO iProcess Engine Nodename ( swnod001 ) checked OK.
TIBCO iProcess Engine RPC Number ( 391875 ) checked OK.
TIBCO iProcess Engine service ports checked OK
TIBCO iProcess Engine process entries OK
TIBCO iProcess Engine for UNIX Installation

Installing TIBCO iProcess Engine in Console Mode | 37
If any of the tests fail, a suitable error message is displayed. See Errors Occur on Validating the Installation on page 211 for more information about possible causes of any problems, and how to resolve them.
8. Exit the installer.
If it has been unable to perform all necessary installation tasks, it displays the following message:
If a $SWDIR/logs/TODO file exists, you must now perform all the commands listed in that file to complete the installation. See Using the $SWDIR/logs/TODO File to Complete a Partial Installation on page 42 for more information.
The installer writes the port numbers used by the iProcess Engine watcher and worker process sentinels to the /etc/services file. The entries are:
• nodename_worker nnn/tcp
• nodename_watcher mmm/tcp
where:
node_name is the nodename of this iProcess Engine.
nnn and mmm are unique numbers in the services file depending on what port numbers are already being used on the server.
For example:• staffw_nod1_watcher 1500/tcp
• staffw_nod1_worker 1501/tcp
===========================================================
** IMPORTANT: See $SWDIR/logs/TODO for outstanding tasks ===========================================================
TIBCO iProcess Engine for UNIX Installation
38 | Chapter 2 Installing TIBCO iProcess Engine
Installing TIBCO iProcess Engine in Silent Mode
If you want to install TIBCO iProcess Engine in silent mode, you must have installed it in Console mode on a computer and generated a control file swinstall.dat that provides all the configuration information. You can subsequently use this control file as a script to run a similar installation automatically, without the need for you to enter values at the prompts. You may want to do this if, for example, you are installing a master server and multiple slave servers. You can run the installer in Console mode for the master server and run it in silent mode using the resulting control file on each slave server.
The following procedures explain how to install TIBCO iProcess Engine in silent mode:
• Generating a Control File, page 38
• Performing an Installation in Silent Mode, page 39
Generating a Control FileTo generate a control file, complete the following steps:
1. Perform all the necessary pre-installation tasks. See Pre-Installation on page 30 for detailed information.
2. Install iProcess Engine in Console mode, entering the required values to all the prompts as normal. See Installing TIBCO iProcess Engine in Console Mode on page 33. The installer writes your configuration information to the $SWDIR/logs/swinstall.dat file.
3. Perform the post-installation tasks. See Post-Installation on page 47 for detailed information.
4. Start iProcess Engine to make sure that it has been correctly installed.
5. Open the $SWDIR/logs/swinstall.dat file in a text editor, and make any changes that you need. Make sure that the file conforms to the required format (see Control File Format on page 22 for more information).
TIBCO iProcess Engine for UNIX Installation
Installing TIBCO iProcess Engine in Silent Mode | 39
Performing an Installation in Silent ModeTo perform an installation in silent mode, complete the following steps:
1. Prepare a control file swinstalldat. For detailed information, see Generating a Control File on page 38.
2. Perform all the necessary pre-installation tasks on each machine where you want to install the iProcess Engine. See Pre-Installation on page 30 for detailed information.
3. Copy the swinstall.dat file from the $SWDIR/logs directory to the DistDir directory.
4. Log in as either root or as the iProcess Engine background user (see iProcess Engine Background User Name on page 126 for more information).
With one exception, the installer performs the same checks and validation, during a silent installation as it does during an interactive one. If it encounters a decision point where the installing user needs to confirm something to continue, and the answer is not provided in the control file, it assumes a default answer of N and quits the installation. This could occur, for example, if an existing iProcess Engine database schema is found when installing a new iProcess Engine.
You must therefore ensure that your control file is complete and accurate.
The exception is that the installer does not check that you are installing on an operating system and/or database version that TIBCO has validated for use with this version of the iProcess Engine (see Installing on an Unvalidated Platform or Database Version on page 204). The following message is displayed on your screen:WARNING: Skipping Platform Validation Tests (silent install)
The silent installation then continues.
If you create a control file from scratch and you are using an Oracle DB TNS Identifier that does not have Oracle TAF enabled, you must add the IPEF_USENONTAF="Y" line to your control file. This is because the install (if run interactively) checks and prompts you to enter Y to continue with the installation if Oracle TAF is not enabled (see Oracle TAF is Not Enabled on page 207 for more information).
TIBCO iProcess Engine for UNIX Installation

40 | Chapter 2 Installing TIBCO iProcess Engine
5. Enter the following commands to run the installer silently:
where:
DistDir is the temporary installation directory containing the iProcess Engine distribution set. See Extracting the Installation Set to a Temporary Installation Directory on page 61 for more information.
6. Check the log file to make sure that the installation succeeded.
7. Perform the post-installation tasks. See Post-Installation on page 47 for detailed information.
8. Start iProcess Engine to make sure that it has been correctly installed.
cd DistDir
./swinstall swinstall.dat
You need to redirect standard output (stdout) and standard error (stderr) from the installer to a log file. Any errors or warnings that will be displayed during the installation will be sent to this log file.
Redirection syntax for stdout and stderr depends on the shell you are using. See your UNIX documentation for information.
I You can run the installer interactively using the values from your control file by using the following command:
./swinstall swinstall.dat -i
It is useful if you want to test or troubleshoot a control file that is intended to be used for an installation in silent mode.
TIBCO iProcess Engine for UNIX Installation

Upgrading TIBCO iProcess Engine | 41
Upgrading TIBCO iProcess Engine
Upgrade Performance and TimingUpgrading to Version 11.3 can involve significant changes to iProcess data and data structures. The upgrade process is therefore complex, and can take a significant amount of time to complete if the system being upgraded has a large amount of case data.
TIBCO cannot provide an estimate of how long the upgrade will take because of the number of customer-specific factors that could have an impact, and the complexity of their interaction, for example, the amount of data in your existing system, the configuration of your database, and the hardware setup you are running.
TIBCO therefore strongly recommends that you test the upgrade before performing it on your target system, either on a representative production environment, or using a copy of your production system. This will allow you to determine how long the upgrade is likely to take, and to identify any specific factors that may affect the success or duration of the upgrade.
If you are using TIBCO iProcess Engine 11.0 or later, you can directly upgrade it to version 11.3. For detailed information of upgrade, see Installing TIBCO iProcess Engine in Console Mode on page 33.
If you are using TIBCO Process Engine 9.0, or any earlier version of TIBCO iProcess Engine 11.0, you must upgrade it to TIBCO iProcess Engine 1.0 first. See TIBCO iProcess Engine 11.0 Installation for detailed information.
MBox Queue Priority is added to iProcess Engine in this release (see "Prioritizing the Work Performed by Background Processes " in TIBCO iProcess Engine 11.3 Release Notes for details).
During an upgrade, the iProcess Schema-install Owner needs to change the default MBox queue. If you have created your own additional MBox queues, you need to contact TIBCO support and manually upgrade your MBox quesues.
For Oracle users, make sure that MBoxes are empty before performing an upgrade. If some messages have already existed in MBoxes before an upgrade, you need to deal with them and empty the MBoxes first.
TIBCO iProcess Engine for UNIX Installation

42 | Chapter 2 Installing TIBCO iProcess Engine
Using the $SWDIR/logs/TODO File to Complete a Partial Installation
This section explains what you need to do to complete a partial iProcess Engine installation, using the information supplied in the $SWDIR/logs/TODO file.
• The $SWDIR/logs/TODO File, page 42
• Run the $SWDIR/util/swpostinst Script, page 43
• Run the $SWDIR/util/upgr Command, page 44
• Copy the ssolite Shared Library, page 45
• Run the $SWDIR/logs/rootscript Script, page 45
The $SWDIR/logs/TODO File
The installer creates a $SWDIR/logs/TODO file if it cannot perform all the tasks necessary to complete the installation itself. This will be the case if you have run the installer as:
• the iProcess Engine background user (see iProcess Engine Background User Name on page 126). In this case the installer cannot run certain commands or set certain file permissions that need root access.
• a user who either does not have DBA access to the database, or does not have complete and/or correct database configuration information. In this case, the installer cannot create (or upgrade) the database, or perform any of the tasks that must be performed after the database has been created or upgraded.
The $SWDIR/logs/TODO file provides a list of all commands that need to be run to complete the installation. Commands are listed in the order that they need to be performed, and the user that needs to run them (either root, the DBA or the user who ran the installer) is identified.
The sections on the following pages describe in more detail each of the tasks that you may need to perform.
You must perform all tasks shown in the $SWDIR/logs/TODO file before moving on to do the Post-Installation Tasks on page 91.
The list of required commands will vary according to your installation scenario, and whether or not the installer has root and/or DBA permissions.
TIBCO iProcess Engine for UNIX Installation

Using the $SWDIR/logs/TODO File to Complete a Partial Installation | 43
Run the $SWDIR/util/swpostinst Script
The $SWDIR/util/swpostinst script is used to populate (or update) the database tables with the necessary iProcess Engine configuration data.
To run swpostinst:
1. Login as the user shown in the $SWDIR/logs/TODO file.
2. Make sure that the database is running.
3. Run the swpostinst command exactly as shown in the $SWDIR/logs/TODO file. For example:
The following prompt is displayed:
This question allows you to choose which set of values swpostinst will use as defaults for the database configuration information that it creates or modifies.
Enter:
— Y, to use the database configuration values saved in the swinstall.dat configuration file. These are the values listed in the Database Connection and Account Details Menu on page 165 when the installer runs.
— N, to use the system default values. These are the values taken either from the distribution set or from the current installation, as appropriate. Appendix C on page 114 describes these default values.
If you are installing:
— on a single-node system, or on a master server in a node cluster, swpostinst sets up a default iProcess Engine system (processes, queues, Mbox sets, and process attributes).
— on a slave server in a node cluster, swpostinst simply adds the server to the node. You will need to manually configure any processes that you want to run on the node later (see Configuring the Default iProcess Engine Installer on page 104).
Only run this script if you are instructed to do so in the $SWDIR/logs/TODO file.
/iProcess/swnod1/util/swpostinst -c
An installation configuration file already exists.
Do you want to proceed using those details (Y/N - default N):
TIBCO iProcess Engine for UNIX Installation

44 | Chapter 2 Installing TIBCO iProcess Engine
4. Exit swpostinst. See the $SWDIR/logs/TODO file for instructions regarding what you need to do next.
Run the $SWDIR/util/upgr Command
The $SWDIR/util/upgr program is used to upgrade the iProcess Engine system.
To run upgr:
1. Log in as the user shown in the $SWDIR/logs/TODO file.
2. Run the upgr command exactly as shown in the $SWDIR/logs/TODO file. For example:
When upgr completes successfully, the following message is displayed.
See the $SWDIR/logs/TODO file for instructions regarding what you need to do next.
Run this script only if you are instructed to do so in the $SWDIR/logs/TODO file.
/iProcess/swnod1/util/upgr "i11.1-o(3.0)" "i11.3-o(0.0)"
Upgrade completed successfully
If upgr encounters an error, it exits. You can find a debug log of the upgr session in the /tmp/upgrfullnnnn.log file (where nnnn is a unique identifier for the log file).
If you terminate the installation at this point, contact TIBCO Support for further assistance in resolving the problem and completing the upgrade.
TIBCO iProcess Engine for UNIX Installation

Using the $SWDIR/logs/TODO File to Complete a Partial Installation | 45
Copy the ssolite Shared Library
The ssolite library is needed by the iProcess Engine SW_GET_SEQ_TRANS() stored procedure, which is used to obtain sequence numbers from the sequences table.
To copy the ssolite library:
1. Log in as the user shown in the $SWDIR/logs/TODO file.
2. If you are using:
— a local DB2 database, run the cp command exactly as shown in the $SWDIR/logs/TODO file. For example:
— a remote DB2 database, copy the ssolite library file shown in the cp command to the indicated destination on the machine hosting the DB2 database.
Run the $SWDIR/logs/rootscript Script
The $SWDIR/logs/rootscript script sets the necessary file permissions in the iProcess Engine directory structure and performs other configuration activities that require root-level access.
To run rootscript:
1. Log in as the root user.
Run this script only if you are instructed to do so in the $SWDIR/logs/TODO file.
This section is only for DB2 users.
cp /iProcess/swnod1/libs/ssolite.so db2inst1/
sqllib/function/ssolite
If the machine that hosts your remote DB2 database uses a different operating system than the machine that hosts the iProcess Engine (for example, AIX instead of Solaris, or a 64-bit version instead of a 32-bit version), you will need to use a different version of the ssolite shared library file. Contact TIBCO Support to obtain the correct version of the file for the operating system that hosts the remote DB2 database.
Run this script only if you are instructed to do so in the $SWDIR/logs/TODO file.
TIBCO iProcess Engine for UNIX Installation

46 | Chapter 2 Installing TIBCO iProcess Engine
2. Run the rootscript command exactly as shown in the $SWDIR/logs/TODO file. For example:
/TIBCO/iPE/ swnod001/logs/rootscript
TIBCO iProcess Engine for UNIX Installation
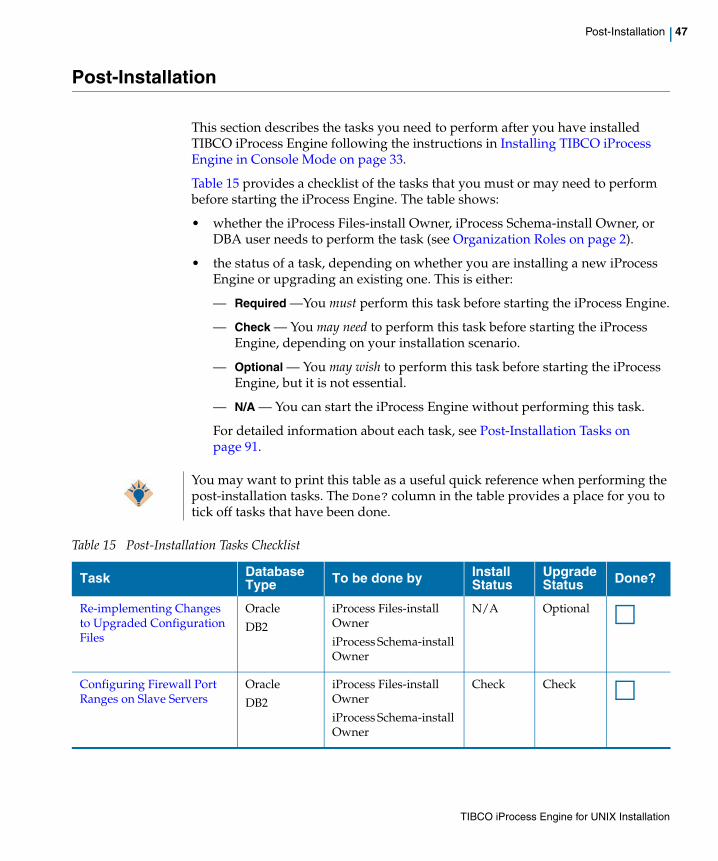
Post-Installation | 47
Post-Installation
This section describes the tasks you need to perform after you have installed TIBCO iProcess Engine following the instructions in Installing TIBCO iProcess Engine in Console Mode on page 33.
Table 15 provides a checklist of the tasks that you must or may need to perform before starting the iProcess Engine. The table shows:
• whether the iProcess Files-install Owner, iProcess Schema-install Owner, or DBA user needs to perform the task (see Organization Roles on page 2).
• the status of a task, depending on whether you are installing a new iProcess Engine or upgrading an existing one. This is either:
— Required —You must perform this task before starting the iProcess Engine.
— Check — You may need to perform this task before starting the iProcess Engine, depending on your installation scenario.
— Optional — You may wish to perform this task before starting the iProcess Engine, but it is not essential.
— N/A — You can start the iProcess Engine without performing this task.
For detailed information about each task, see Post-Installation Tasks on page 91.
You may want to print this table as a useful quick reference when performing the post-installation tasks. The Done? column in the table provides a place for you to tick off tasks that have been done.
Table 15 Post-Installation Tasks Checklist
Task DatabaseType To be done by Install
StatusUpgradeStatus Done?
Re-implementing Changes to Upgraded Configuration Files
Oracle
DB2
iProcess Files-install Owner
iProcess Schema-install Owner
N/A Optional
Configuring Firewall Port Ranges on Slave Servers
Oracle
DB2
iProcess Files-install Owner
iProcess Schema-install Owner
Check Check
TIBCO iProcess Engine for UNIX Installation

48 | Chapter 2 Installing TIBCO iProcess Engine
Enabling Oracle Function-based Indexes
Oracle iProcess Schema-install Owner
DBA
Check Check
Recreating All User-defined Constraints (Or Triggers), Indexes, and Statistics on the iProcess Engine Schema Tables
Oracle
DB2
iProcess Schema-install Owner
DBA
N/A Check
Configuring Your Hard and Soft Data Size Limits (AIX Only)
Oracle
DB2
root Check Check
Setting Up the Shared Library Path for the iProcess Engine
Oracle
DB2
root Required Check
Setting Up iProcess Engine Environment Variables
Oracle
DB2
root Required Check
Installing the IBM Client for JMS on J2SE with IBM WebSphere Application Server
Oracle
DB2
iProcess Files-install Owner
iProcess Schema-install Owner
Check Check
Configuring IAPJMS Security Settings
Oracle
DB2
iProcess Files-install Owner
iProcess Schema-install Owner
Optional Optional
Configuring the Default iProcess Engine Installer
Oracle
DB2
iProcess Files-install Owner
iProcess Schema-install Owner
Optional Optional
Updating the iProcess Objects Server Configuration File
Oracle
DB2
iProcess Files-install Owner
iProcess Schema-install Owner
N/A Optional
Table 15 Post-Installation Tasks Checklist
Task DatabaseType To be done by Install
StatusUpgradeStatus Done?
TIBCO iProcess Engine for UNIX Installation

Post-Installation | 49
Recreating Prediction Data Oracle
DB2
iProcess Files-install Owner
iProcess Schema-install Owner
N/A Optional
Disabling or Re-enabling Write Access to WebDav
Oracle
DB2
iProcess Files-install Owner
iProcess Schema-install Owner
Optional Optional
Configuring JMX Ports to Run Through a Firewall
Oracle
DB2
iProcess Files-install Owner
iProcess Schema-install Owner
Optional Optional
Enabling Secure Socket Layer (SSL)
Oracle
DB2r
iProcess Files-install Owner
iProcess Schema-install Owner
Optional Optional
Starting TIBCO iProcess Engine
Oracle
DB2
iProcess Files-install Owner
iProcess Schema-install Owner
Optional Optional
Table 15 Post-Installation Tasks Checklist
Task DatabaseType To be done by Install
StatusUpgradeStatus Done?
TIBCO iProcess Engine for UNIX Installation

50 | Chapter 2 Installing TIBCO iProcess Engine
TIBCO iProcess Engine for UNIX Installation

| 51
Chapter 3 Uninstalling iProcess Engine
You can use the $SWDIR/bin/swdel utility to uninstall iProcess Engine from your system if it is no longer required.
Topics
• Running swdel on page 52
• If you have a node cluster in which you have iProcess Engine installed on several servers, you will need to run swdel on each server.
• You cannot attempt to delete iProcess Engine files directly, as some may remain on the system, causing problems if you wish to re-install the iProcess Engine later.
• swdel does not remove any configuration changes that were made prior to installation (for example, the number of file descriptors per process). Any changes made must be manually changed back to their original values.
TIBCO iProcess Engine for UNIX Installation

52 | Chapter 3 Uninstalling iProcess Engine
Running swdel
To remove the iProcess Engine installation from your computer:
1. Make sure that all iProcess Engine users are logged out, then stop the iProcess Engine and Process Sentinels. See "Stopping the TIBCO iProcess Engine" in TIBCO iProcess Engine Administrator's Guide for more information about how to do this.
2. Log in as root and make sure that:
— $SWDIR points to the directory containing the iProcess Engine that you want to uninstall.
— $SWDIR/bin is on root's PATH.
— (For DB2 users only) $DB2PATH and $DB2INSTANCE are set up correctly.
— (For Oracle users only) $ORACLE_HOME points to the correct Oracle instance.
3. If necessary, run the cd command to locate a directory that is not under the $SWDIR that you want to remove.
4. Enter the following command to uninstall iProcess Engine:
5. Remove the entries for the Process Sentinel processes from the /etc/services file.
6. Delete the iProcess Engine database and database users from the Oracle Server or DB2 database. See your database documentation for more information about how to do this.
7. Finally, delete the iProcess Engine user accounts from UNIX (unless they are required for other iProcess Engine installations on this computer).
See your UNIX documentation for more information about how to do this.
It is essential that if you have TIBCO iProcess Technology Plug-ins installed, you run the uninstaller for these before deleting $SWDIR via the swdel script. See TIBCO iProcess Technology Plug-ins Installation for information on how to do this.
swdel
TIBCO iProcess Engine for UNIX Installation

| 53
Appendix A Pre-Installation Tasks
This appendix lists the pre-installation tasks.
Topics
• Checking For Any Late-breaking Information, page 55
• Backing Up the TIBCO iProcess Engine File System, page 56
• Backing up TIBCO iProcess Engine Database Schema, page 58
• Upgrading Your Operating System, page 59
• Upgrading Oracle, page 60
• Extracting the Installation Set to a Temporary Installation Directory, page 61
• Setting the Number of File Descriptors per Process, page 62
• Creating iProcess Engine UNIX Users and Groups, page 63
• Setting Up the iProcess Engine System Directory, page 65
• Setting Up Database Environment Variables, page 67
• Creating Oracle Accounts and Tablespaces, page 69
• Configuring the Oracle Schema, page 70
• Setting up Oracle Transparent Application Failover (TAF), page 76
• Configuring Oracle OPEN_CURSORS, page 78
• Configuring Oracle Character Set Support, page 79
• Disabling Oracle Flashback Query, page 80
• Creating an Oracle UNDO Tablespace, page 81
• Creating a DB2 Database, page 82
• Configuring a TCP/IP Connection to the Database, page 83
• Configuring DB2 Character Set Support, page 86
• Configuring Lock Escalation, page 87
TIBCO iProcess Engine for UNIX Installation
54 | Appendix A Pre-Installation Tasks
• Removing All User-defined Constraints (or Triggers), Indexes, and Statistics from the iProcess Engine Schema Tables, page 89
TIBCO iProcess Engine for UNIX Installation

Checking For Any Late-breaking Information | 55
Checking For Any Late-breaking Information
Status
Databse Oracle, DB2
Description Before installing TIBCO iProcess Engine, you need to check if there any restrictions, known issues, or other late-breaking information that may affect your installation.
See TIBCO iProcess Engine Release Notes for detailed information.
Procedure To check for late-breaking information:
1. Read TIBCO iProcess Engine Release Notes and TIBCO iProcess Engine Readme that are supplied with the iProcess Engine software.
2. Visit the TIBCO Support web site at http://www.tibco.com/services/support.
If you are... This task is...
Installing a new iProcess Engine Version 11.3 Required
Upgrading from an iProcess Engine Version 11.0 or later Required
TIBCO iProcess Engine for UNIX Installation

56 | Appendix A Pre-Installation Tasks
Backing Up the TIBCO iProcess Engine File System
Status
Database Oracle, DB2
Description
Procedure Complete the following steps to back up an existing iProcess Engine:
1. Log in your operating system as the root user.
2. Get all users to log out of the iProcess Engine.
3. Run the following command to stop the iProcess Engine processes and Process Sentinels:
If you are... This task is...
Installing a new iProcess Engine Version 11.3 N/A
Upgrading from an iProcess Engine Version 11.0 or later Required
You must back up your iProcess Engine system before an upgrade.
Make sure that you back up the entire SWDIR directory structure, and any other files you want to restore if a failure occurs during upgrade. The upgrade process has no undo capability. If it fails for any reason, you will require a full backup of your SWDIR file system to be able to restore your original iProcess Engine system.
You must also back up your database schema. For detailed information, see Backing up TIBCO iProcess Engine Database Schema on page 58.
$SWDIR/bin/swstop
$SWDIR/bin/swstop -p
TIBCO iProcess Engine for UNIX Installation

Backing Up the TIBCO iProcess Engine File System | 57
4. Back up the entire $SWDIR directory structure and any other files that you want to restore if an installation failure occurs by using your operating system backup utility.
See Also For more information about the procedures, see TIBCO iProcess Engine Administrator's Guide and your operating system documentation.
If you have made any changes to the following files since they were installed, you need to manually re-implement those changes after upgrading the iProcess Engine:
• SWDIR\etc\language.lng\staffico
• SWDIR\etc\language.lng\auditusr.mes
This is because the files are overwritten during the upgrade and any changes to the original files are not automatically merged into the new files. See Re-implementing Changes to Upgraded Configuration Files on page 92 for more information.
TIBCO iProcess Engine for UNIX Installation

58 | Appendix A Pre-Installation Tasks
Backing up TIBCO iProcess Engine Database Schema
Status
Database Oracle, DB2
Description
In some circumstances, an upgrade may fail and leave the iProcess Engine in an unusable condition. If this happens, you need to back up your database schema to restore the system to its previous condition before you can either use it or attempt to upgrade it again.
Procedure See your database documentation for more information about how to back up the iProcess Engine database schema.
If you are... This task is...
Installing a new iProcess Engine Version 11.3 N/A
Upgrading from an iProcess Engine Version 11.0 or later Required
You must back up your iProcess Engine database schema before an upgrade.
TIBCO iProcess Engine for UNIX Installation
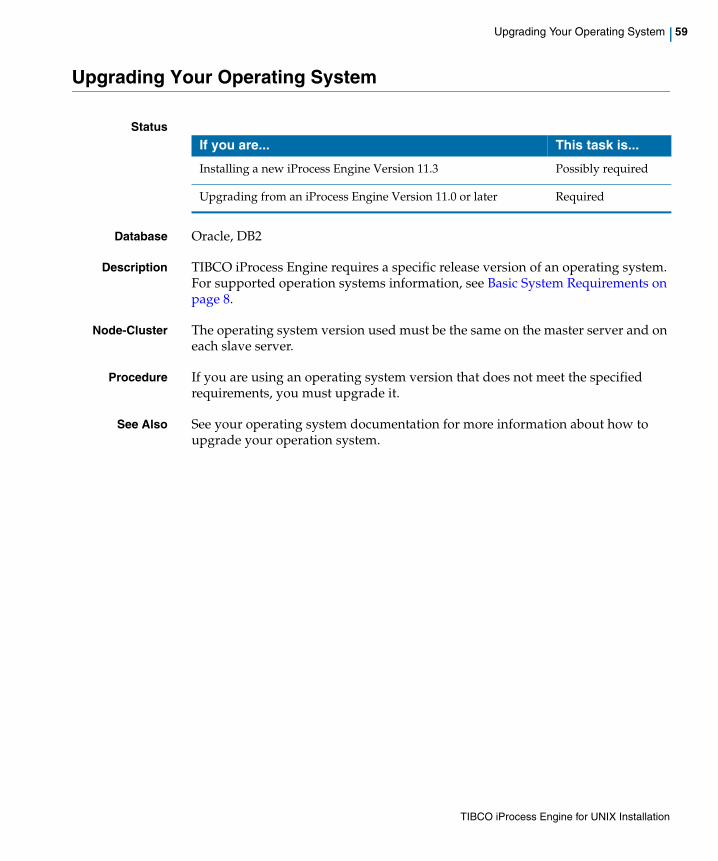
Upgrading Your Operating System | 59
Upgrading Your Operating System
Status
Database Oracle, DB2
Description TIBCO iProcess Engine requires a specific release version of an operating system. For supported operation systems information, see Basic System Requirements on page 8.
Node-Cluster The operating system version used must be the same on the master server and on each slave server.
Procedure If you are using an operating system version that does not meet the specified requirements, you must upgrade it.
See Also See your operating system documentation for more information about how to upgrade your operation system.
If you are... This task is...
Installing a new iProcess Engine Version 11.3 Possibly required
Upgrading from an iProcess Engine Version 11.0 or later Required
TIBCO iProcess Engine for UNIX Installation

60 | Appendix A Pre-Installation Tasks
Upgrading Oracle
Status
Database Oracle
Description TIBCO iProcess Engine requires a specific release level of the Oracle Database and/or Client, depending on whether you are using a local or remote database. For more information, see Oracle Database on page 15 for more information.
Node-Cluster The Oracle version used must be the same on the master server and on each slave server.
Procedure If you are using a version of Oracle that does not meet the specified requirements, you must upgrade it immediately.
See Also See Oracle documentation for more information about how to upgrade Oracle.
If you are... This task is...
Installing a new iProcess Engine Version 11.3 Possibly required
Upgrading from an iProcess Engine Version 11.0 or later Possibly required
TIBCO iProcess Engine for UNIX Installation

Extracting the Installation Set to a Temporary Installation Directory | 61
Extracting the Installation Set to a Temporary Installation Directory
Status
Database Oracle, DB2
Description The installation set for the iProcess Engine is supplied as a TAR file on the physical media. You must extract the installation set from the TAR file before you can run the installer.
Procedure To extract the installation set from the TAR file to a temporary installation directory:
1. Log in as the user who will run the installer. This must be either the root user or the iProcess Engine background user. For the definition of the iProcess Engine background user, see iProcess Engine Background User Name on page 126.
2. Create a temporary installation directory and run the cd command to locate it.
3. Mount the physical media.
4. Copy the staffwar.tar.Z file from the physical media into your temporary installation directory.
5. Run the following command to extract the staffwar.tar file into the temporary installation directory:
6. Use the following TAR command to extract the installation set from the staffwar.tar file into your temporary installation directory:
7. Un-mount the physical media.
See Also For more information about how to mount and un-mount the physical media, see your operating system documentation.
If you are... This task is...
Installing a new iProcess Engine Version 11.3 Required
Upgrading from an iProcess Engine Version 11.0 or later Required
uncompress staffwar.tar.Z
tar xvf staffwar.tar
TIBCO iProcess Engine for UNIX Installation
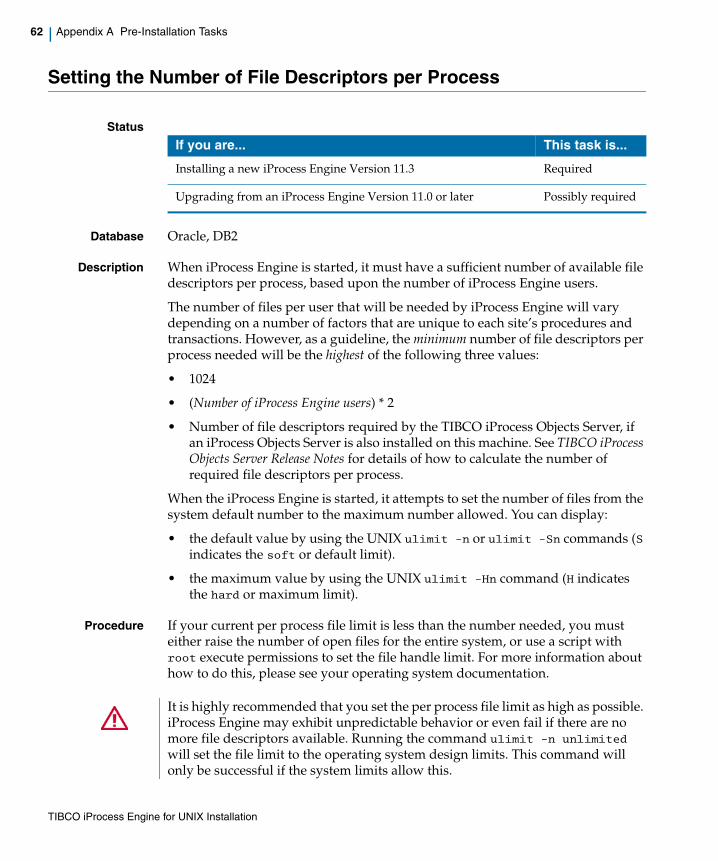
62 | Appendix A Pre-Installation Tasks
Setting the Number of File Descriptors per Process
Status
Database Oracle, DB2
Description When iProcess Engine is started, it must have a sufficient number of available file descriptors per process, based upon the number of iProcess Engine users.
The number of files per user that will be needed by iProcess Engine will vary depending on a number of factors that are unique to each site’s procedures and transactions. However, as a guideline, the minimum number of file descriptors per process needed will be the highest of the following three values:
• 1024
• (Number of iProcess Engine users) * 2
• Number of file descriptors required by the TIBCO iProcess Objects Server, if an iProcess Objects Server is also installed on this machine. See TIBCO iProcess Objects Server Release Notes for details of how to calculate the number of required file descriptors per process.
When the iProcess Engine is started, it attempts to set the number of files from the system default number to the maximum number allowed. You can display:
• the default value by using the UNIX ulimit -n or ulimit -Sn commands (S indicates the soft or default limit).
• the maximum value by using the UNIX ulimit -Hn command (H indicates the hard or maximum limit).
Procedure If your current per process file limit is less than the number needed, you must either raise the number of open files for the entire system, or use a script with root execute permissions to set the file handle limit. For more information about how to do this, please see your operating system documentation.
If you are... This task is...
Installing a new iProcess Engine Version 11.3 Required
Upgrading from an iProcess Engine Version 11.0 or later Possibly required
It is highly recommended that you set the per process file limit as high as possible. iProcess Engine may exhibit unpredictable behavior or even fail if there are no more file descriptors available. Running the command ulimit -n unlimited will set the file limit to the operating system design limits. This command will only be successful if the system limits allow this.
TIBCO iProcess Engine for UNIX Installation

Creating iProcess Engine UNIX Users and Groups | 63
Creating iProcess Engine UNIX Users and Groups
Status
Database Oracle, DB2
Description iProcess Engine needs the following UNIX user accounts and groups:
1. iProcess Engine Background user account. This is the UNIX user account that owns most iProcess Engine files and is used to run the iProcess Engine background processes. See iProcess Engine Background User Name on page 126 for more information. You may choose to create this account before you run the installer. If you choose not to, the installation process will create the account (if you are installing as the root user) or create a script to do so.
2. iProcess Engine Administration user account. This is the UNIX user account that is used to administer iProcess Engine. See iProcess Engine Administration User Name on page 128 for more information. You can either create this account now or let the installer create it for you. You may choose to create this account before you run the installer. If you choose not to, the installation process will create the account (if you are installing as the root user) or create a script to do so.
3. iProcess Engine User group. This is the UNIX group to which all iProcess Engine users must belong. See iProcess Engine User Group Name on page 130 for more information. You may choose to create this group before you run the installer. If you choose not to, the installation process will create the group (if you are installing as the root user) or create a script to do so.
For DB2
The iProcess Engine also needs the following UNIX user accounts to communicate with the DB2 database:
1. iProcess Engine DB Schema Owner account. This is the UNIX user account that owns the iProcess Engine database schema. See iProcess Engine DB Schema Owner Name on page 175 for more information. You must create this account before you run the installer.
If you are... This task is...
Installing a new iProcess Engine Version 11.3 Optional
Upgrading from an iProcess Engine Version 11.0 or later Optional
You can use the same UNIX account as both the iProcess Engine Background user and iProcess Engine Administration user.
TIBCO iProcess Engine for UNIX Installation

64 | Appendix A Pre-Installation Tasks
2. iProcess Engine DB User account. This is the UNIX user account that the iProcess Engine uses to access to the iProcess Engine database schema. This user has the REFERENCES, SELECT, DELETE, and UPDATE permissions. See iProcess Engine DB User Name on page 178 for more information. You must create this account before you run the installer.
Node-Cluster You must use the same UNIX account names on the master server and each slave server.
Procedure To set up these users and groups:
1. Log in as the root user.
2. Create the iProcess Engine Background user account.
3. (Optional) Create the iProcess Engine Administration user account. Make sure that logins are enabled and that the account is password-protected.
4. Create the iProcess Engine User group.
5. Add the following user accounts as members of the Staffware group:
— iProcess Engine Background user account
— iProcess Engine Administration user account
— all other users who will require access to any files under $SWDIR (for example, to run $SWDIR/bin/swutil commands, or to use a SERVERRUN command that accesses a file under $SWDIR).
If you are using the DB2 database, continue with the following two steps:
6. Create the iProcess Engine DB Schema Owner account.
7. Create the iProcess Engine DB User account.
See Also See your operating system documentation for more information about how to create UNIX user accounts and groups.
TIBCO iProcess Engine for UNIX Installation
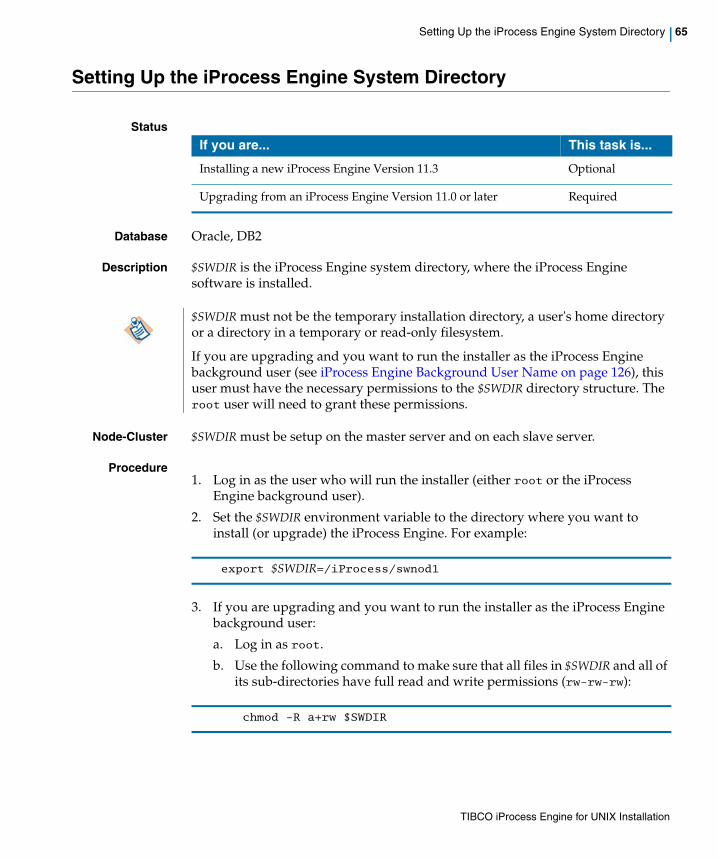
Setting Up the iProcess Engine System Directory | 65
Setting Up the iProcess Engine System Directory
Status
Database Oracle, DB2
Description $SWDIR is the iProcess Engine system directory, where the iProcess Engine software is installed.
Node-Cluster $SWDIR must be setup on the master server and on each slave server.
Procedure1. Log in as the user who will run the installer (either root or the iProcess
Engine background user).
2. Set the $SWDIR environment variable to the directory where you want to install (or upgrade) the iProcess Engine. For example:
3. If you are upgrading and you want to run the installer as the iProcess Engine background user:
a. Log in as root.
b. Use the following command to make sure that all files in $SWDIR and all of its sub-directories have full read and write permissions (rw-rw-rw):
If you are... This task is...
Installing a new iProcess Engine Version 11.3 Optional
Upgrading from an iProcess Engine Version 11.0 or later Required
$SWDIR must not be the temporary installation directory, a user's home directory or a directory in a temporary or read-only filesystem.
If you are upgrading and you want to run the installer as the iProcess Engine background user (see iProcess Engine Background User Name on page 126), this user must have the necessary permissions to the $SWDIR directory structure. The root user will need to grant these permissions.
export $SWDIR=/iProcess/swnod1
chmod -R a+rw $SWDIR
TIBCO iProcess Engine for UNIX Installation

66 | Appendix A Pre-Installation Tasks
c. Use the following commands to change the ownership of certain files under $SWDIR to the iProcess Engine background user.
where pro is the name of the iProcess Engine background user.
See Also See your operating system documentation for more information about how to set environment variables.
chown pro $SWDIR/bin/fixperms
chown pro $SWDIR/util/swinitora
chown pro $SWDIR/util/upgr
chown pro $SWDIR/util/swpostinst
TIBCO iProcess Engine for UNIX Installation
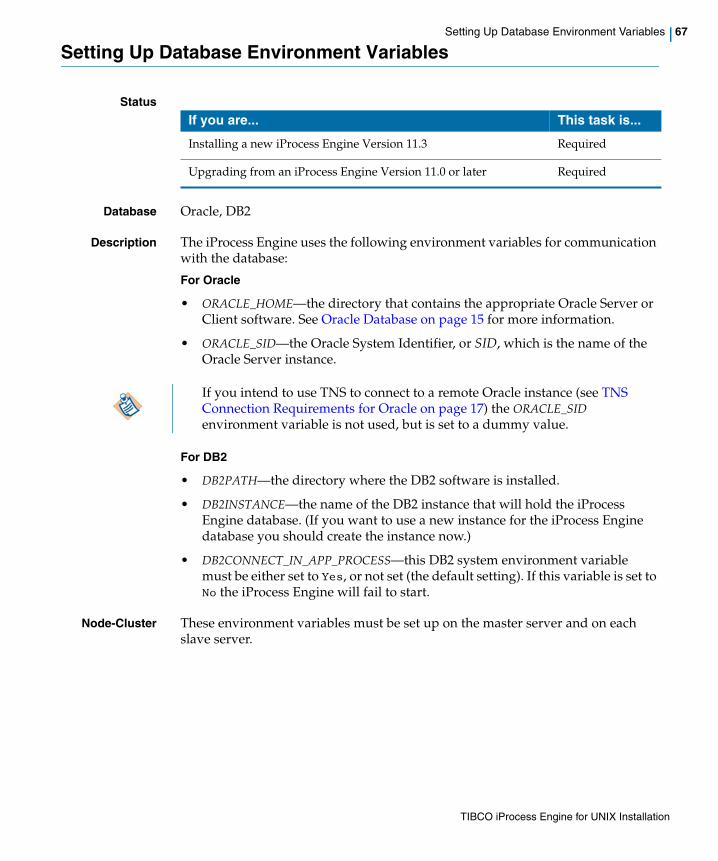
67
Setting Up Database Environment Variables |Setting Up Database Environment VariablesStatus
Database Oracle, DB2
Description The iProcess Engine uses the following environment variables for communication with the database:
For Oracle
• ORACLE_HOME—the directory that contains the appropriate Oracle Server or Client software. See Oracle Database on page 15 for more information.
• ORACLE_SID—the Oracle System Identifier, or SID, which is the name of the Oracle Server instance.
For DB2
• DB2PATH—the directory where the DB2 software is installed.
• DB2INSTANCE—the name of the DB2 instance that will hold the iProcess Engine database. (If you want to use a new instance for the iProcess Engine database you should create the instance now.)
• DB2CONNECT_IN_APP_PROCESS—this DB2 system environment variable must be either set to Yes, or not set (the default setting). If this variable is set to No the iProcess Engine will fail to start.
Node-Cluster These environment variables must be set up on the master server and on each slave server.
If you are... This task is...
Installing a new iProcess Engine Version 11.3 Required
Upgrading from an iProcess Engine Version 11.0 or later Required
If you intend to use TNS to connect to a remote Oracle instance (see TNS Connection Requirements for Oracle on page 17) the ORACLE_SID environment variable is not used, but is set to a dummy value.
TIBCO iProcess Engine for UNIX Installation

68 | Appendix A Pre-Installation Tasks
For Oracle
If you are using the Oracle database and installing iProcess Engine on a slave server in an existing node cluster, you need to add TWO_TASK—the Oracle default connect identifier, which defines the default Oracle database to connect to. This is set to the appropriate Oracle Service Name (that is, the entry in the $ORACLE_HOME/network/admin/tnsnames.ora file for the Oracle instance that holds the iProcess Engine tables).
Procedure Follow the different procedures based on your database type.
For Oracle
Set these environment variables in the shell of the user who is going to run the installer (either root or the iProcess Engine background user).
For DB2
1. Set DB2PATH and DB2INSTANCE in the shell of the user who is going to run the installer (either root or the iProcess Engine background user).
2. Make sure that DB2CONNECT_IN_APP_PROCESS is either set to Yes, or is not set (the default setting). Use the DB2 db2set command to check and, if necessary, reset the value of this variable.
Example For Oracle
For DB2
See Also See your operating system documentation for more information about how to set environment variables.
export ORACLE_HOME=/opt/oracle/product/10.2.0.4
export ORACLE_SID=sw10202
export DB2PATH=/opt/IBM/db2/V8.2
export DB2INSTANCE=db2inst1
TIBCO iProcess Engine for UNIX Installation

Creating Oracle Accounts and Tablespaces | 69
Creating Oracle Accounts and Tablespaces
Status
Database Oracle
Description If you want to run the installer without DBA-level access, you need to create the Oracle accounts, passwords and tablespaces needed by the iProcess Engine before you run the installer.
In other circumstances you do not need to create these entities now.
Procedure Create the Oracle accounts, passwords, and tablespaces needed by the iProcess Engine, as listed in Table 16..
See Also The following sections:
• How Do I Decide Which Oracle Database Creation Method I Should Use?, page 193
• Database Connection and Account Details Menu, page 165
If you are... This task is...
Installing a new iProcess Engine Version 11.3 Optional
Upgrading from an iProcess Engine Version 11.0 or later N/A
Table 16 Creating Oracle Accounts and Tablespaces
Item Description
iProcess Engine DB Schema Owner Name
The name of the Oracle user that owns the iProcess Engine database schema.
iProcess Engine DB Schema Owner Password
The password for the iProcess Engine database schema owner.
iProcess Engine DB User Name The name of the Oracle user that the iProcess Engine uses for read access to the iProcess Engine database schema.
iProcess Engine DB User Password
The password for the iProcess Engine database user.
Data Tablespace Name The tablespace in which to create the iProcess Engine database schema.
Temporary Tablespace Name The temporary tablespace associated with the iProcess Engine database schema and users.
TIBCO iProcess Engine for UNIX Installation

70 | Appendix A Pre-Installation Tasks
Configuring the Oracle Schema
Status
Database Oracle
Description When running the installer, it creates a small database (approximately 50 MB) that is suitable for benchmarking or development purposes by default).
You can modify this default database configuration if you want to optimize it for your Oracle environment, taking into account factors specific to your installation, such as the number of cases, the amount of case data, the life of cases, and so on.
The Default iProcess Engine Schema Configuration
By default, the installer performs the following operations when it creates the iProcess Engine schema:
• It creates the following tablespaces for the Oracle instance. In the non- RAC environment, the default tablespaces location is ORACLE_HOME\database. In a RAC environment, the installer does not specify the datefile value, and RAC determines the tablespaces location automatically.
— a data tablespace (with a default name of staffwar). By default, all iProcess Engine tables, indexes, and Oracle AQ queues are stored in this tablespace.
— a temporary tablespace (with a default name of temp), which is used for sorting.
• It creates the following Oracle users:
— iProcess Engine DB Schema Owner user (with a default name of swpro).
— iProcess Engine DB User (with a default name of swuser).
The staffwar and temp tablespaces are allocated to these users as their default tablespaces.
• It creates the iProcess Engine schema tables, indexes, and Oracle AQ queues in the default staffwar tablespace.
If you are... This task is...
Installing a new iProcess Engine Version 11.3 Optional
Upgrading from an iProcess Engine Version 11.0 or later N/A
The use of the staffwar tablespace is defined in the tablesizes file. See How the Installer Sets Up the Default Configuration on page 71 for details.
TIBCO iProcess Engine for UNIX Installation

Configuring the Oracle Schema | 71
How the Installer Sets Up the Default Configuration
The installer uses the init2Kora_tok.sql file and the tablesizes file as the template files to create the iProcess Engine schema:
• the init2Kora_tok.sql file
The init2Kora_tok.sql file defines the following configuration macros for each iProcess Engine table and index that is to be created:
— SIZETABLESIZE—the initial size (in extents) of a table.
— SIZETABLEPCTINCREASE—the percentage increase to be applied when growing a table.
— SIZETABLESPACE—the tablespace to be used by a table.
— SIZEINDEXSPACE—the tablespace to be used by an index.
where SIZE is one of seven different categories, as shown in Table 17.
Table 17 SIZE Categories
Category Used For Example
TINY Small tables that do not grow. flag_tableprocedure_lock
SMALL Generally static tables that contain small amounts of data.
list_namesdbs_names
MEDIUM Generally static tables that contain more data. user_names user_values
BIG Slightly larger tables that typically hold values for references held in SMALL and MEDIUM tables.
user_valuesdb_str_values
LARGE Most of the tables that contain case-related information, typically ones that only have 1 or 2 rows per case.
case_informationoutstanding_addrstaffo
HUGE Tables that hold multiple rows per case, but not for all cases.
pack_datapack_memo
MASSIVE Tables that hold multiple rows per case for all cases. audit_trailcase_data
See TIBCO iProcess Engine (Oracle) Administrator’s Guide to see which macros are defined for each table and index in the iProcess Engine database.
TIBCO iProcess Engine for UNIX Installation

72 | Appendix A Pre-Installation Tasks
• the tablesizes file
The tablesizes file defines a real value for each configuration macro in the init2Kora_tok.sql file. For example, the default values for the different TABLESIZE macros are shown below:
How the Installer Uses These Template Files
When you run the installer to install the iProcess Engine:
1. The installer copies the following files to the $SWDIR/util directory:
— init2Kora_tok.sql
— swinitora
— the tablesizes file specified in the Schema Sizing Configuration item on the Oracle Database Connection and Account Details Menu on page 165 .
2. The installer calls the $SWDIR/util/swinitora script.
3. The $SWDIR/util/swinitora script pre-processes the $SWDIR/util/init2Kora_tok.sql script to:
— replace the configuration macros with the actual values from the $SWDIR/util/tablesizes file.
— replace occurrences of the default data tablespace name (staffwar) with the name specified in the Data Tablespace Name item on the Oracle Database Connection and Account Details Menu on page 165.
The $SWDIR/util/swinitora script then saves the results as the $SWDIR/util/init2Kora.sql script.
4. The $SWDIR/util/init2Kora.sql script creates the iProcess Engine database schema.
## Initial size (in extents) for each # category of table.#TINYTABLESIZE=1KSMALLTABLESIZE=2KMEDIUMTABLESIZE=40KBIGTABLESIZE=200KLARGETABLESIZE=500KHUGETABLESIZE=500KMASSIVETABLESIZE=1M
TIBCO iProcess Engine for UNIX Installation

Configuring the Oracle Schema | 73
How to Change the Default Configuration
You can change the default configuration of the iProcess Engine schema to match your particular requirements. Depending on the level of configuration control you need, you can use any combination of the following methods:
• Change the Default Data or Temporary Tablespace
There are two ways in which you can change the default data tablespace to be used:
— The installer can automatically create the default data and temporary tablespaces for you. Menu options and prompts allow you to choose:
—the default tablespace names (staffwar and temp), or tablespace names that you specify.
—the default tablespace location ($ORACLE_HOME/dbs), or directories that you specify. You can use the same directory for both tablespaces, or put each tablespace in a different directory as you require.
See Oracle Database Connection and Account Details Menu on page 165 for more information. TIBCO recommends that you use this method where possible.
— Alternatively, you can create the default tablespaces manually before running the installer. You may want to do this if, for example, you want to spread the larger iProcess tables across multiple tablespaces.
To do this:
—Manually create the tablespaces you want to use as the default data (or temporary) tablespaces.
—Edit the tablesizes file that you intend to use. Change the value of each SIZETABLESPACE and SIZEINDEXSPACE macro that you want to use the default data tablespace, from staffwar to your new tablespace name.
If you are using Oracle Real Application Clusters (RAC) you must create all required tablespaces on the RAC shared storage devices before running the installer. If you do not do this, the installer creates the data files for the tablespace in the ORACLE_HOME/dbs directory.
If you allow the installer to create the data tablespace for you, it automatically updates the tablesizes file to use the correct tablespace.
If the tablesizes file is not modified, the iProcess Engine tables, indexes and AQ queues will be created in the wrong tablespace.
TIBCO iProcess Engine for UNIX Installation

74 | Appendix A Pre-Installation Tasks
—When you run the installer, make sure that you specify your new tablespace name as the default value when prompted (See Oracle Database Connection and Account Details Menu on page 165). If you have created multiple tablespaces, simply specify the name of one of these tablespaces.
• Use an Alternative tablesizes File
When you run the installer, you can use the Schema Sizing Configuration option on the Oracle Database Connection and Account Details Menu on page 165 to choose one of the following alternative tablesizes file:
— tablesizes.med—Using this file will create a medium-sized database, requiring at least 2.5 GB of disk space.
— tablesizes.large—Using this file will create a large-sized database, requiring at least 65 GB of disk space.
• Customize Specific Configuration Macros in the tablesizes File
If you require more specific configuration control, you can edit the tablesizes file to change the values assigned to specific configuration macros. For example, you may want to:
— increase the initial size of tables that use the LARGETABLESIZE macro.
— spread the larger iProcess tables across multiple tablespaces or filesystems (to aid i/o performance and reduce contention), by modifying individual SIZETABLESPACE or SIZEINDEXSPACE entries.
To do this:
a. Copy the tablesizes file from the installation directory to a directory of your choice.
b. Edit the file according to your requirements.
c. When you run the installer, use the Schema Sizing Configuration option on the Oracle Database Connection and Account Details Menu on page 165 to choose your customized tablesizes file.
See Appendix D, Usage Profiles for Tablesizes Files, on page 188 for more information about the intended usage profiles of these files.
Remember to create any additional tablespaces before you run the installer.
TIBCO iProcess Engine for UNIX Installation

Configuring the Oracle Schema | 75
• Customize the init2Kora_tok.sql File to Assign Different Configuration Macros or Values to Specific Tables or Indexes
Finally, you can edit the init2Kora_tok.sql file to assign different configuration macros (or hard code specific values) to specific tables and indexes. You can do this when you run the installer.
See Also For more information about how to estimate the size and layout requirements of your iProcess Engine schema, consult the following sources:
• TIBCO iProcess Engine (Oracle) Administrator’s Guide—This guide defines the structure of each table, and provides guidance on the number of records a table should contain depending on the iProcess data.
• the swinitora and init2Kora.sql scripts in the installation directory.
• your TIBCO representative, who can work with you to prepare a detailed sizing and onfiguration estimate.
By default, the predict and predict_lock tables use the SMALL macro values. If you intend to enable background case prediction on your system (using the ENABLE_CASE_PREDICTION process attribute), TIBCO recommends that you change these tables to use a larger value in line with the level of background prediction activity you expect. See "Administering Process Attributes" in TIBCO iProcess Engine Administrator’s Guide for more information.
TIBCO iProcess Engine for UNIX Installation

76 | Appendix A Pre-Installation Tasks
Setting up Oracle Transparent Application Failover (TAF)
Status
Database Oracle
Description Oracle TAF enables an application user (such as the iProcess Engine) to automatically reconnect to a database if the connection fails. If you are running parallel servers, using TAF can allow the iProcess Engine to switch to an alternative instance if the one that it is using fails. Even if you are not using parallel servers, using TAF still means that although the iProcess Engine will not function while the database is down, it can recover immediately and automatically when the database is recovered.
To enable the use of TAF with the iProcess Engine, you need to configure TAF support for the service name that you intend to use to connect to the Oracle database (See Oracle DB TNS Identifier on page 169).
Procedure The procedure you use to set up TAF depends on whether you are using Oracle RAC:
• If you are not using Oracle RAC, you must manually configure a net service name that includes the FAILOVER_MODE parameter included in the CONNECT_DATA section of the connect descriptor.
If you are... This task is...
Installing a new iProcess Engine Version 11.3 Optional or Required (see below)
Upgrading from an iProcess Engine Version 11.0 or later
Optional or Required (see below)
TIBCO strongly recommends the use of Oracle TAF with the iProcess Engine to provide 24*7 resilient operation. If you are deploying the iProcess Engine for user acceptance testing (UAT) or to a production environment, you must enable TAF.
For more information about how the iProcess Engine supports database failover, see TIBCO iProcess Engine Architecture Guide.
You should not use TAF to protect the iProcess Engine from a scheduled Oracle shutdown.
The standard Oracle client connection is not protected by TAF. Therefore, if a failover occurs, iProcess Engine Workspace users may need to log back in.
TIBCO iProcess Engine for UNIX Installation

Setting up Oracle Transparent Application Failover (TAF) | 77
You must specify at least the TYPE and METHOD sub-parameters for the FAILOVER_MODE parameter.
• If you are installing the iProcess Engine on one of the nodes of an Oracle RAC, you can use Oracle's Database Configuration Assistant (DBCA) to create a new service that will use TAF. DBCA will update all the tnsnames.ora files for the instances you choose to be in the Oracle RAC. If your iProcess Engine is connected via an Oracle client to the Oracle RAC, you can copy the changes that DBCA makes to the Oracle database tnsnames.ora file to the client's tnsnames.ora file.
See Also For more information about how to set up TAF, see the following documents in the Oracle documentation set:
• Oracle Net Services Administrator’s Guide
• Oracle Clusterware and Oracle Real Application Clusters Administration and Deployment Guide (if you are using Oracle RAC)
TIBCO iProcess Engine for UNIX Installation

78 | Appendix A Pre-Installation Tasks
Configuring Oracle OPEN_CURSORS
Status
Database Oracle
Description The Oracle OPEN_CURSORS parameter is defined in the initialization parameter file for the Oracle instance. It defines the limit on the maximum number of cursors (active SQL statements) for each session on this Oracle instance.
Procedure Make sure that the Oracle OPEN_CURSORS parameter is set to a value of at least 200.
See Also See the Oracle documentation for more information about the initialization parameter file and the OPEN_CURSORS parameter.
If you are... This task is...
Installing a new iProcess Engine Version 11.3 Required
Upgrading from an iProcess Engine Version 11.0 or later N/A
TIBCO iProcess Engine for UNIX Installation

Configuring Oracle Character Set Support | 79
Configuring Oracle Character Set Support
Status
Database Oracle
Description Oracle’s NLS_LANG parameter sets the language, territory, and character set that the iProcess Engine uses to communicate with the Oracle database. The iProcess Engine requires that NLS_LANG uses an 8-bit character set.
Node-Cluster NLS_LANG must be set to the same value on the master server and on each slave server.
Procedure To set NLS_LANG, complete the following steps:
1. Log in as the user (root, iProcess Files-install Owner, or iProcess Schema-install Owner), see iProcess Engine Architecture on page 6 for more information) who will run the installer.
2. Set the NLS_LANG environment variable to use an 8-bit character set component (charset).
3. If you are using a TNS connection, make sure that the character set component (charset) of the NLS_LANG environment variable for the Oracle client matches the character set component of the NLS_LANG setting on the Oracle database.
The format of the NLS_LANG string is: NLS_LANG = language_territory.charset
Example
See Also For more information about using NLS_LANG, see Oracle Database Globalization Support Guide.
If you are... This task is...
Installing a new iProcess Engine Version 11.3 Possibly required
Upgrading from an iProcess Engine Version 11.0 or later Possibly required
export NLS_LANG=American_America.WE8ISO8859P1
TIBCO iProcess Engine for UNIX Installation

80 | Appendix A Pre-Installation Tasks
Disabling Oracle Flashback Query
Status
Database Oracle
Description Oracle has a flashback query feature, which lets you view and repair historical data. (The initialization parameter, UNDO_RETENTION, provides a means of explicitly specifying the amount of undo information to retain.)
If flashback query is enabled, the amount of undo tablespace required while you are upgrading (see Creating an Oracle UNDO Tablespace on page 81 for details) will increase significantly. Therefore you may want to disable this feature while you are upgrading the iProcess Engine or Process Engine.
However, this may not be possible if there are other applications that use the same database and that may require a flashback query while the upgrade is taking place. If that is the case, you must leave the feature enabled and make sure you have sufficient undo tablespace available.
Procedure To disable flashback query, use the Oracle command:
See Also See your Oracle documentation for more information about flashback query.
If you are... This task is...
Installing a new iProcess Engine Version 11.3 N/A
Upgrading from an iProcess Engine Version 11.0 or later Possibly required
It is possible for undo to reach 100% as the flashback query undo will still be allocated. This will make it difficult to monitor the undo tablespace.
If undo is set to autoextend, it may grow extremely large as all undo transactions for the entire upgrade will be stored.
alter system set UNDO_RETENTION=0
TIBCO iProcess Engine for UNIX Installation

Creating an Oracle UNDO Tablespace | 81
Creating an Oracle UNDO Tablespace
Status
Database Oracle
Description Beginning with Oracle9i, Oracle uses UNDO tablespaces to rollback transactions. Previous versions of Oracle used rollback segments.
Procedure Create an Oracle UNDO tablespace for the iProcess Engine database.
See Also See:
• your Oracle documentation, for more information on how to create and manage UNDO tablespaces.
• Disabling Oracle Flashback Query on page 80, for more information about Oracle’s flashback query feature and its impact on the amount of UNDO tablespace you require.
If you are... This task is...
Installing a new iProcess Engine Version 11.3 Required
Upgrading from an iProcess Engine Version 11.0 or later Required
TIBCO iProcess Engine for UNIX Installation

82 | Appendix A Pre-Installation Tasks
Creating a DB2 Database
Status
Database DB2
Description You must create an empty DB2 database to hold iProcess data before you install iProcess Engine. The installer will populate this database with the necessary iProcess data.
Procedure To create the database:
1. Log in as a user who has the necessary permissions to create a database in the $DB2INSTANCE instance.
2. Make sure that $DB2INSTANCE points to the correct instance.
3. Use the following DB2 command to create the database:
where db_name is the name you want to use for the iProcess Engine database.
Give the iProcess Engine DB Schema Owner account the necessary permissions to create and write to any Explain tables on the database.
See Also See your DB2 documentation for detailed information about how to create a database and the CREATE DATABASE command.
If you are... This task is...
Installing a new iProcess Engine Version 11.3 Required
Upgrading from an iProcess Engine Version 11.0 or later N/A
If you intend to use the SQL Explain facility with the iProcess Engine database, you must ensure that the iProcess Engine DB Schema Owner account (see Creating iProcess Engine UNIX Users and Groups on page 63) has the necessary permissions to create and write to the Explain tables.
If the account does not have these permissions, the installer will not be able to create the iProcess Engine stored procedures when it populates the database. Any application that uses these stored procedures, such as the TIBCO iProcess Web Services Plug-in, will not work.
See your DB2 documentation for more information about explain tables and how to grant create orwrite access to them.
alter system set UNDO_RETENTION=0
TIBCO iProcess Engine for UNIX Installation

Configuring a TCP/IP Connection to the Database | 83
Configuring a TCP/IP Connection to the Database
Status
Database DB2
Description The iProcess Engine, acting as a DB2 client, needs to communicate with the DB2 server over a TCP/IP connection. This applies whether the DB2 database is hosted on a local or remote machine.
Shared memory connections cannot be used for communication with the DB2 server.
Procedure To configure a TCP/IP connection:
1. Add a TCP/IP node entry to the DB2 node directory. This entry defines that the TCP/IP communications protocol is used to access the specified DB2 node. To do this, use the following DB2 command:
where:
— nodename is the name you want to use for this entry.
— hostname is the TCP/IP host name or IP address of the node where the iProcess Engine database resides. If you are using a local database, hostname is the localhost address (127.0.0.1).
— svcename is the Connection Service name used by the DB2 instance where the iProcess Engine database resides.
This name defines the TCP/IP port used by the instance to listen for client requests, and is defined in the /etc/services file. For example:
If you are... This task is...
Installing a new iProcess Engine Version 11.3 Required
Upgrading from an iProcess Engine Version 11.0 or later N/A
db2 catalog tcpip node nodename remote hostname server svcename
db2c_db2inst1 50000/tcp # Connection port for DB2
# instance db2inst1
TIBCO iProcess Engine for UNIX Installation

84 | Appendix A Pre-Installation Tasks
2. Add an alias for the iProcess Engine database to the system database directory. This alias uses the TCP/IP node entry you specified above. To do this, use the following DB2 command:
where:
— db_name is the name of the iProcess Engine database you created earlier (see Creating a DB2 Database on page 82).
— alias is an alternative name for this database. You will use this name to identify the database when you run the installer (see DB2 Database Connection and Account Details Menu on page 167).
— nodename is the TCP/IP node entry you defined above.
3. If the database manager configuration file for this DB2 instance is not already using the svcename Connection Service name you specified above, update it so that it does by using the following command.
4. Enable the use of the TCP/IP protocol for the instance using the following command:
where protocol is either TCPIP or, if the instance needs to use multiple communication protocols, a comma-separated list of the appropriate keywords. See your DB2 documentation for more information.
5. Stop and restart the DB2 instance to apply the configuration changes. Use the following commands:
db2 catalog database db_name as alias at node nodename
db2 update database manager configuration using svcename
svcename
You can use the db2 get database manager configuration command to check what Connection Service name the DB2 instance is currently using.
db2set DB2COMM=protocol
db2stop force
db2start
TIBCO iProcess Engine for UNIX Installation
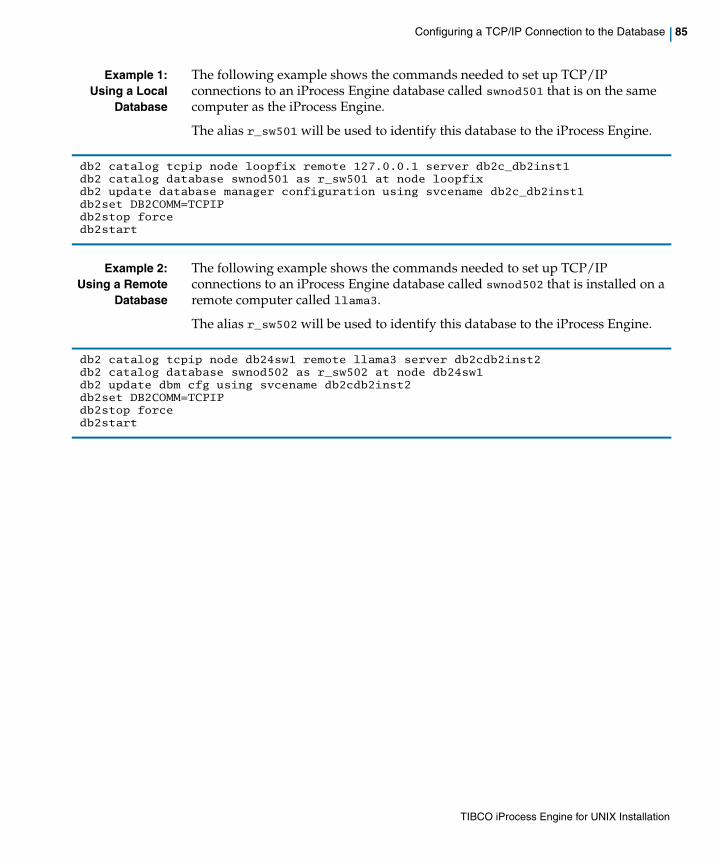
Configuring a TCP/IP Connection to the Database | 85
Example 1:Using a Local
Database
The following example shows the commands needed to set up TCP/IP connections to an iProcess Engine database called swnod501 that is on the same computer as the iProcess Engine.
The alias r_sw501 will be used to identify this database to the iProcess Engine.
Example 2:Using a Remote
Database
The following example shows the commands needed to set up TCP/IP connections to an iProcess Engine database called swnod502 that is installed on a remote computer called llama3.
The alias r_sw502 will be used to identify this database to the iProcess Engine.
db2 catalog tcpip node loopfix remote 127.0.0.1 server db2c_db2inst1db2 catalog database swnod501 as r_sw501 at node loopfix db2 update database manager configuration using svcename db2c_db2inst1db2set DB2COMM=TCPIPdb2stop forcedb2start
db2 catalog tcpip node db24sw1 remote llama3 server db2cdb2inst2db2 catalog database swnod502 as r_sw502 at node db24sw1 db2 update dbm cfg using svcename db2cdb2inst2db2set DB2COMM=TCPIPdb2stop forcedb2start
TIBCO iProcess Engine for UNIX Installation

86 | Appendix A Pre-Installation Tasks
Configuring DB2 Character Set Support
Status
Database DB2
Description Ensure that the language, territory, and character set that iProcess Engine uses to communicate with the DB2 database are set correctly.
See Also For more information about configuring the DB2 Character set, see your DB2 documentation.
If you are... This task is...
Installing a new iProcess Engine Version 11.3 Possibly required
Upgrading from an iProcess Engine Version 11.0 or later Possibly required
TIBCO iProcess Engine for UNIX Installation

Configuring Lock Escalation | 87
Configuring Lock Escalation
Status
Database DB2
Description DB2 maintains a lock list for the iProcess Engine database, which contains the locks held by all applications concurrently connected to the database. Both rows and tables can be locked.
Lock escalation is the process of replacing row locks with table locks, so reducing the total number of locks in the list. The following DB2 database configuration parameters control lock escalation:
• locklist indicates the amount of storage that is allocated to the database lock list.
• maxlocks defines the percentage of the lock list that an application can hold before the database manager performs lock escalation. (Lock escalation also occurs if the lock list runs out of space.)
If you use the default maxlocks and locklist, iProcess Engine performance may be affected. The iProcess Engine Background (BG) process locks multiple rows as part of its normal operations, and the number of locked rows can exceed the maxlocks percentage. Some or all of these row locks are therefore escalated to table locks, which blocks access to those tables by other iProcess Engine processes or applications.
Procedure To prevent row locks from being escalated to table locks, you should increase the values of the locklist and maxlocks parameters. Use the following commands:
where db_name is the name of the iProcess Engine database you created earlier (see Creating a DB2 Database on page 82).
If you are... This task is...
Installing a new iProcess Engine Version 11.3 Required
Upgrading from an iProcess Engine Version 11.0 or later N/A
db2 update database configuration for db_name using maxlocks 40db2 update database configuration for db_name using locklist 1000
TIBCO iProcess Engine for UNIX Installation
88 | Appendix A Pre-Installation Tasks
.
See Also For more information about these parameters and commands, see your DB2 documentation.
TIBCO recommends values of 40 for maxlocks and 1000 for locklist. However, these values are only a guide as the amount of locks in a BG process transaction depends on the amount of data being written to various tables. You should modify these values to suit your particular requirements.
TIBCO iProcess Engine for UNIX Installation

Removing All User-defined Constraints (or Triggers), Indexes, and Statistics from the iProcess Engine Schema Tables |89
Removing All User-defined Constraints (or Triggers), Indexes, and
Statistics from the iProcess Engine Schema Tables
Status
Database Oracle, DB2
Description For an existing iProcess Engine, you have created constraints (or triggers), indexes, and statistics in the iProcess Engine schema tables. As part of an upgrade, the installer needs to modify certain columns in the iProcess Engine schema tables, then recreate constraints (or triggers), indexes, and statistics after the necessary columns have been changed in the upgrade process.
To successfully upgrade an existing iProcess Engine, you need to remove any user-defined constraints (or triggers), indexes, and statistics from the iProcess Engine schema tables manually before running the upgrade installer, because the installer cannot automatically remove them, you need to remove during the upgrade.
Procedure Using an appropriate SQL utility, remove all user-defined constraints (or triggers), indexes, or statistics that you have added to iProcess Engine schema tables.
You can manually recreate them after completing the upgrade. See Recreating All User-defined Constraints (Or Triggers), Indexes, and Statistics on the iProcess Engine Schema Tables on page 95 for more information.
If you are... This task is...
Installing a new iProcess Engine Version 11.3 N/A
Upgrading from an iProcess Engine Version 11.0 or later Possibly required
TIBCO iProcess Engine for UNIX Installation

90 | Appendix A Pre-Installation Tasks
TIBCO iProcess Engine for UNIX Installation

| 91
Appendix B Post-Installation Tasks
This appendix lists the post-installation tasks.
Topics
• Re-implementing Changes to Upgraded Configuration Files, page 92
• Configuring Firewall Port Ranges on Slave Servers, page 93
• Enabling Oracle Function-based Indexes, page 94
• Recreating All User-defined Constraints (Or Triggers), Indexes, and Statistics on the iProcess Engine Schema Tables, page 95
• Configuring Your Hard and Soft Data Size Limits (AIX Only), page 96
• Setting Up the Shared Library Path for the iProcess Engine, page 97
• Setting Up iProcess Engine Environment Variables, page 99
• Installing the IBM Client for JMS on J2SE with IBM WebSphere Application Server, page 101
• Configuring IAPJMS Security Settings, page 103
• Configuring the Default iProcess Engine Installer, page 104
• Updating the iProcess Objects Server Configuration File, page 105
• Recreating Prediction Data, page 107
• Disabling or Re-enabling Write Access to WebDav, page 108
• Configuring JMX Ports to Run Through a Firewall, page 109
• Enabling Secure Socket Layer (SSL), page 110
• Starting TIBCO iProcess Engine, page 113
TIBCO iProcess Engine for UNIX Installation

92 | Appendix B Post-Installation Tasks
Re-implementing Changes to Upgraded Configuration Files
Status
Database Oracle, DB2
Description If you made any changes to the default values in the following files on your original system, you should now manually re-implement any of those changes that you want to keep in the upgraded files:
• SWDIR/etc/language.lng/staffico
• SWDIR/etc/language.lng/auditusr.mes
See Also For more information about the default contents of these files, and how to edit them, see the following references:
If you are... This task is...
Installing a new iProcess Engine Version 11.3 N/A
Upgrading from an iProcess Engine Version 11.0 or later Optional
For information about... See...
SWDIR/etc/language.lng/staffico "Using iProcess Engine Configuration Files" in TIBCO iProcess Engine Administrator’s Guide
SWDIR/etc/language.lng/auditusr.mes "Defining Audit Trail Entries" in TIBCO iProcess swutil and swbatch Reference Guide.
TIBCO iProcess Engine for UNIX Installation

Configuring Firewall Port Ranges on Slave Servers | 93
Configuring Firewall Port Ranges on Slave Servers
Status
Database Oracle, DB2
Description Onwards firewall port range configuration data in TIBCO iProcess Engine Version 11.3 is stored in the port_range database tables, and can be configured by using the $SWDIR/util/swadm utility.
If you are installing or upgrading an iProcess Engine as:
• a slave server in a node-cluster, you must now manually configure any required firewall port range data.
• a master server or single server, you do not need to do anything. The installer automatically creates the necessary port range configuration data in this case, either using default values for a new installation, or using the existing values from the $SWDIR/etc/staffcfg file for an upgrade.
Procedure If you are either:
• installing a new slave server, or
• upgrading an existing slave server,
you should use the swadm utility to create the necessary port range configuration data for your firewall configuration.
See Also See Chapter 9, "Administering Firewall Port Ranges" in TIBCO iProcess Engine Administrator’s Guide, for more information about using the iProcess Engine with a firewall, and how to use the $SWDIR/util/swadm utility to configure firewall port ranges.
If you are... This task is...
Installing a new iProcess Engine Version 11.3 Required
Upgrading from an iProcess Engine Version 11.0 or later Required
TIBCO iProcess Engine for UNIX Installation
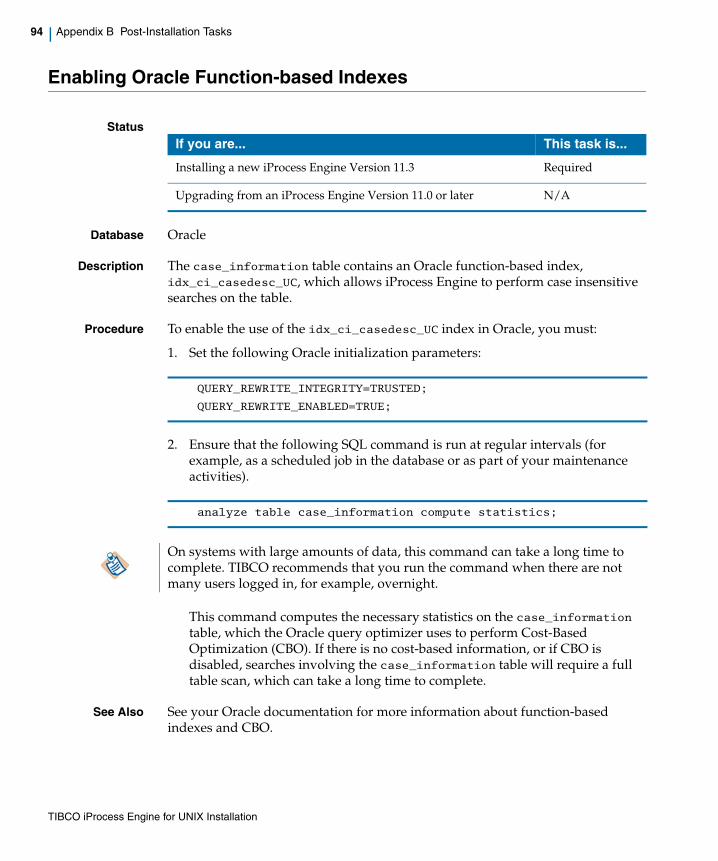
94 | Appendix B Post-Installation Tasks
Enabling Oracle Function-based Indexes
Status
Database Oracle
Description The case_information table contains an Oracle function-based index, idx_ci_casedesc_UC, which allows iProcess Engine to perform case insensitive searches on the table.
Procedure To enable the use of the idx_ci_casedesc_UC index in Oracle, you must:
1. Set the following Oracle initialization parameters:
2. Ensure that the following SQL command is run at regular intervals (for example, as a scheduled job in the database or as part of your maintenance activities).
This command computes the necessary statistics on the case_information table, which the Oracle query optimizer uses to perform Cost-Based Optimization (CBO). If there is no cost-based information, or if CBO is disabled, searches involving the case_information table will require a full table scan, which can take a long time to complete.
See Also See your Oracle documentation for more information about function-based indexes and CBO.
If you are... This task is...
Installing a new iProcess Engine Version 11.3 Required
Upgrading from an iProcess Engine Version 11.0 or later N/A
QUERY_REWRITE_INTEGRITY=TRUSTED;
QUERY_REWRITE_ENABLED=TRUE;
analyze table case_information compute statistics;
On systems with large amounts of data, this command can take a long time to complete. TIBCO recommends that you run the command when there are not many users logged in, for example, overnight.
TIBCO iProcess Engine for UNIX Installation

Recreating All User-defined Constraints (Or Triggers), Indexes, and Statistics on the iProcess Engine Schema Tables |95
Recreating All User-defined Constraints (Or Triggers), Indexes, and
Statistics on the iProcess Engine Schema Tables
Status
Database Oracle, DB2
Description After the upgrade has finished, you need to recreate any user-defined constraints (or triggers), indexes, or statistics that you deleted before upgrading the iProcess Engine. See Removing All User-defined Constraints (or Triggers), Indexes, and Statistics from the iProcess Engine Schema Tables on page 89 for more information.
Procedure Using an appropriate SQL utility, recreate all user-defined constraints (or triggers), indexes, or statistics on iProcess Engine schema tables that you deleted before you upgraded.
If you are... This task is...
Installing a new iProcess Engine N/A
Upgrading from an iProcess Engine 11.1 or later Possibly required
TIBCO iProcess Engine for UNIX Installation

96 | Appendix B Post-Installation Tasks
Configuring Your Hard and Soft Data Size Limits (AIX Only)
Status
Database Oracle, DB2
Description On AIX, the iProcess Engine processes are built to use the large address-space data model, which allows them to access the larger data areas that they require.
When iProcess Engine is started, the system attempts to modify the soft limit on data size to accommodate the requirement for large data. If the modified soft limit is greater than the hard limit, the initial iProcess Engine processes are killed during exec processing. (The only message you receive is killed, which informs you that a process was killed.)
Procedure If this occurs, you must either raise the hard limit, or reduce the soft limit, on data size for the shell that you use to start the iProcess Engine.
See Also For more information about the AIX large address-space data model, see "Large Program Support” in the AIX book General Programming Concepts: Writing and Debugging Programs.
If you are... This task is...
Installing a new iProcess Engine Required
Upgrading from an iProcess Engine 11.1 or later Required
You can display the default value by using the UNIX ulimit -d or ulimit -Sd commands (S indicating the soft or default limit). You can display the maximum value by using the ulimit -Hd command (H indicating the hard or maximum limit).
TIBCO iProcess Engine for UNIX Installation

Setting Up the Shared Library Path for the iProcess Engine | 97
Setting Up the Shared Library Path for the iProcess Engine
Status
Database Oracle, DB2
Description To allow the iProcess Engine to operate correctly, the shared library path environment variable must be correctly set up for the following UNIX users:
• All users who want to use iProcess Engine administration utilities such as $SWDIR/util/swadm.
• The iProcess Engine background user, to allow the BG process to start and function correctly.
You can check the current value of the shared library path variable using the commands listed in Table 18.
Procedure Make sure that the strings listed in Table 19 are included in the shared library path variable for each user that needs it.
If you are... This task is...
Installing a new iProcess Engine Required
Upgrading from an iProcess Engine 11.1 or later Required
Table 18 The Commands To Check The Shared Library Path
Database Platform Command
Oracle HP-UX echo $SHLIB_PATH
Oracle, DB2 IBM AIX echo $LIBPATH
Oracle, DB2 Sun SPARC Solaris echo $LD_LIBRARY_PATH
Oracle, DB2 Sun x86 Solaris echo $LD_LIBRARY_PATH
Oracle, DB2 Linux echo $LD_LIBRARY_PATH
TIBCO iProcess Engine for UNIX Installation

98 | Appendix B Post-Installation Tasks
Table 19 The Included String in the Shared Licrary Path Variable
Database Command
Oracle $ORACLE_HOME/lib:$SWDIR/libs
Note: If you are installing on HP-UX, you may need to ensure that the shared library path includes the locations of TIBCO Hawk and TIBCO Rendezvous. The following is the shared library path by default:/opt/tibco/hawk/ami_api/lib:/opt/tibco/tibrv/lib:
DB2 $DB2PATH/lib:$SWDIR/libs
Note: You must also ensure that the libdb2 library is in a standard directory, such as /usr/lib.
When you use the $SWDIR/bin/swstart -p command to start iProcess Engine, the RPC_UDP_LI process fails to start up if it cannot find the libdb2 library in a standard directory, such as /usr/lib. This is because it is a SUID process, and therefore ignores the LD_LIBRARY_PATH environment variable.
TIBCO iProcess Engine for UNIX Installation
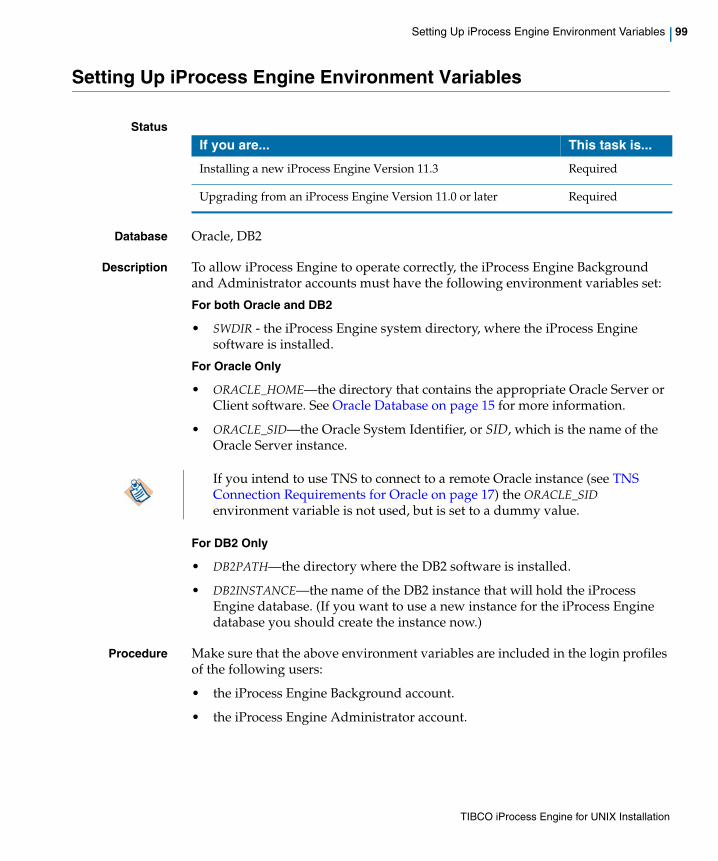
Setting Up iProcess Engine Environment Variables | 99
Setting Up iProcess Engine Environment Variables
Status
Database Oracle, DB2
Description To allow iProcess Engine to operate correctly, the iProcess Engine Background and Administrator accounts must have the following environment variables set:
For both Oracle and DB2
• SWDIR - the iProcess Engine system directory, where the iProcess Engine software is installed.
For Oracle Only
• ORACLE_HOME—the directory that contains the appropriate Oracle Server or Client software. See Oracle Database on page 15 for more information.
• ORACLE_SID—the Oracle System Identifier, or SID, which is the name of the Oracle Server instance.
For DB2 Only
• DB2PATH—the directory where the DB2 software is installed.
• DB2INSTANCE—the name of the DB2 instance that will hold the iProcess Engine database. (If you want to use a new instance for the iProcess Engine database you should create the instance now.)
Procedure Make sure that the above environment variables are included in the login profiles of the following users:
• the iProcess Engine Background account.
• the iProcess Engine Administrator account.
If you are... This task is...
Installing a new iProcess Engine Version 11.3 Required
Upgrading from an iProcess Engine Version 11.0 or later Required
If you intend to use TNS to connect to a remote Oracle instance (see TNS Connection Requirements for Oracle on page 17) the ORACLE_SID environment variable is not used, but is set to a dummy value.
TIBCO iProcess Engine for UNIX Installation

100 | Appendix B Post-Installation Tasks
Example
For Oracle
For DB2
See Also See your operating system documentation for more information about how to set environment variables.
export ORACLE_HOME=/opt/oracle/product/10.2.0.4export ORACLE_SID=sw10202
export DB2PATH=/opt/IBM/db2/V9.1
export DB2INSTANCE=db2inst1
TIBCO iProcess Engine for UNIX Installation

Installing the IBM Client for JMS on J2SE with IBM WebSphere Application Server | 101
Installing the IBM Client for JMS on J2SE with IBM WebSphere
Application Server
Status
Database Oracle, DB2
Description If you intend to use Websphere 6.x as your JMS provider for Activity Publication, and you do not already have the IBM Client for JMS on J2SE with WebSphere Application Server (referred to as the IBM JMS Client in the rest of this section) installed on your system, you must install it now.
The IBM JMS Client is an embeddable technology that provides JMS V1.1 connections to a service integration bus messaging engine in WebSphere Application Server V6.0.2 (or above). It is available from the following IBM URL:
http://www-1.ibm.com/support/docview.wss?uid=swg24012804
Procedure To do this:
1. Download the IBM JMS Client download file (sibc_install-build.jar) from the above URL.
2. Use the following command to install the IBM JMS Client:
java –jar sibc_install-build.jar jms_jndi_platform directory
where:
— platform is ibm if you are installing on AIX, or sun if you are installing on Solaris, HP-UX, or Linux. (jms_jndi_platform is the installation option for JMS + JNDI for the JRE that is distributed with the iProcess Engine.)
If you are... This task is...
Installing a new iProcess Engine Version 11.3 Required if you use Websphere 6.x
Upgrading from an iProcess Engine Version 11.0 or later Required if you use Websphere 6.x
You must install the IBM JMS Client into the directory you specified for it when you ran the installer. See Base JAR Files Location on page 150 for details.
TIBCO iProcess Engine for UNIX Installation

102 | Appendix B Post-Installation Tasks
— directory is the same path name that you entered in the Base JAR Files Location field on the IAP Configuration Menu. You must install to this directory because that is where the iProcess Engine will look for the client JAR files.
TIBCO iProcess Engine for UNIX Installation
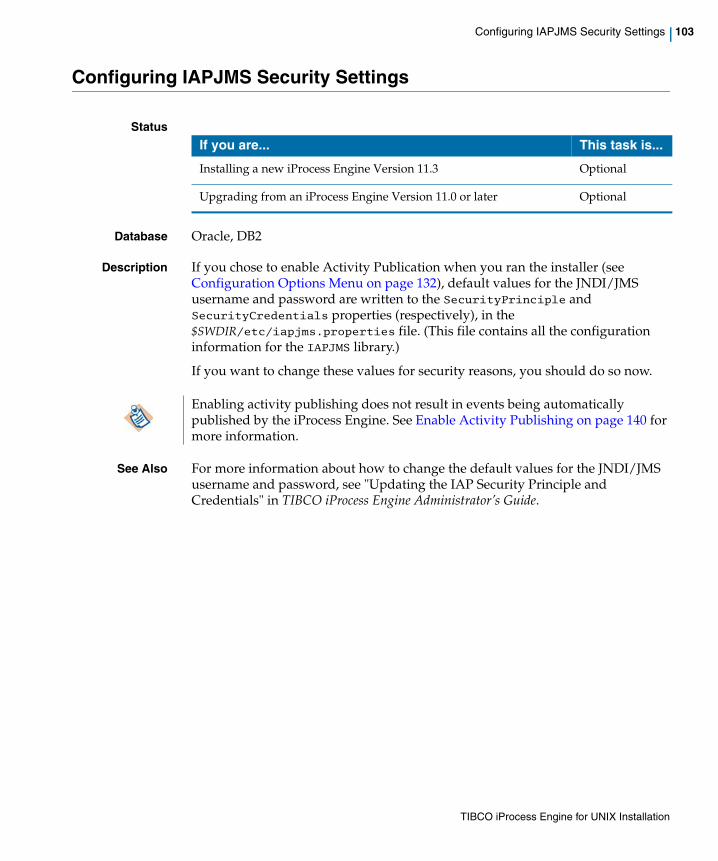
Configuring IAPJMS Security Settings | 103
Configuring IAPJMS Security Settings
Status
Database Oracle, DB2
Description If you chose to enable Activity Publication when you ran the installer (see Configuration Options Menu on page 132), default values for the JNDI/JMS username and password are written to the SecurityPrinciple and SecurityCredentials properties (respectively), in the $SWDIR/etc/iapjms.properties file. (This file contains all the configuration information for the IAPJMS library.)
If you want to change these values for security reasons, you should do so now.
See Also For more information about how to change the default values for the JNDI/JMS username and password, see "Updating the IAP Security Principle and Credentials" in TIBCO iProcess Engine Administrator’s Guide.
If you are... This task is...
Installing a new iProcess Engine Version 11.3 Optional
Upgrading from an iProcess Engine Version 11.0 or later Optional
Enabling activity publishing does not result in events being automatically published by the iProcess Engine. See Enable Activity Publishing on page 140 for more information.
TIBCO iProcess Engine for UNIX Installation

104 | Appendix B Post-Installation Tasks
Configuring the Default iProcess Engine Installer
Status
Database Oracle, DB2
Description The installer creates a default set of server processes, process attributes, message queues, and Mbox sets for the iProcess Engine. You can change this default installer to suit your particular requirements.
Node Cluster The default processes are all set up on the master server. When a slave server is added, no processes are initially configured to run on it.
Procedure Use the $SWDIR/util/swsvrmgr and/or $SWDIR/util/swadm utilities to set up server processes, process attributes, message queues, and Mbox sets according to your requirements.
See Also See the following references in TIBCO iProcess Engine Administrator's Guide for more information.
If you are... This task is...
Installing a new iProcess Engine Version 11.3 Optional
Upgrading from an iProcess Engine Version 11.0 or later Optional
For information about configuring... See this chapter...
processes Administering iProcess Engine Server Processes
process attributes Administering Process Attributes
message queues and Mbox sets Administering Message Queues and Mbox Sets
TIBCO iProcess Engine for UNIX Installation

Updating the iProcess Objects Server Configuration File | 105
Updating the iProcess Objects Server Configuration File
Status
Database Oracle, DB2
Description If you have upgraded an existing iProcess Engine installation, the installer does not overwrite the $SWDIR/seo/data/swentobjsv.cfg iProcess Objects Server configuration file, because you may have customized it for your particular needs. Instead, the installer installs a sample.cfg file in the $SWDIR/seo/data directory.
The newly installed configuration file (swentobjsv.cfg and/or sample.cfg) is the configuration file for the version to which you have upgraded. It may contain new configuration parameters or other changes. See TIBCO iProcess Objects Server Release Notes for more information.
Procedure If the new configuration file contains new or modified information, you can copy that information and paste it into your existing configuration file.
You can use the diff program (diff swentobjsv.cfg sample.cfg) to determine what is different between your configuration file and the new configuration file.
See Also For more information about how to configure and use the iProcess Objects Server, see the following guides:
• TIBCO iProcess Objects Server Administrator’s Guide
If you are... This task is...
Installing a new iProcess Engine Version 11.3 N/A
Upgrading from an iProcess Engine Version 11.0 or later Optional
All configuration parameters in the new configuration files are commented out. If used as is, iProcess Objects Server will use the default values for all parameters.
Whether or not you make any modifications, the $SWDIR/seo/data directory must contain a swentobjsv.cfg file, which will be used to configure the iProcess Objects Server when it is started.
If any of the configuration parameters contain invalid values, the iProcess Objects Server will not start. Since the iProcess Objects Server log file is not opened until after the configuration file is read, if there is an error in the configuration file, it is not written to the log file. Instead, it is written to the $SWDIR/logs/seo_error file. (This file is created when the iProcess Objects Server starts, so the presence of the file does not mean there were errors.)
TIBCO iProcess Engine for UNIX Installation

106 | Appendix B Post-Installation Tasks
• TIBCO iProcess Objects Programmer’s Guide
TIBCO iProcess Engine for UNIX Installation

Recreating Prediction Data | 107
Recreating Prediction Data
Status
Database Oracle, DB2
Description During the upgrade process the predict and predict_lock tables are dropped and then recreated. Accordingly, any prediction data contained in those tables is lost.
Procedure You can recreate the data in these tables (for any procedures that you want to) by using the following command:
where procname is the name of the procedure that you want to recreate prediction data for.
See Also For more information about:
• case prediction, see "Using Case Prediction to Forecast Outstanding Work Items" in TIBCO iProcess Modeler Advanced Design.
• the swutil PREDICT command, see "Updating Prediction for Cases" in TIBCO iProcess swutil and swbatch Reference.
If you are... This task is...
Installing a new iProcess Engine Version 11.3 N/A
Upgrading from an iProcess Engine Version 11.0 or later Optional
$SWDIR/bin/swutil PREDICT procname ALL_CASES
TIBCO iProcess Engine for UNIX Installation

108 | Appendix B Post-Installation Tasks
Disabling or Re-enabling Write Access to WebDav
Status
Database Oracle, DB2
Description You may find, once you have installed or upgraded the iProcess Engine, that you want to disable or re-enable write access to WebDav on the Apache Tomcat Application Server installed with the iProcess Engine. To do this, you must edit the $SWDIR/tomcat/webdav/WEB-INF/web.xml file.
Procedure To disable or re-enable write access to WebDav on the Apache Tomcat Application Server installed with the iProcess Engine, complete the following steps:
1. In a text editor, open the $SWDIR/tomcat/webdav/WEB-INF/web.xml file.
2. Depending on your requirements, either uncomment or comment out the following section:<init-param><param-name>readonly</param-name><param-value>false</param-value></init-param>
3. Save the file.
If you are... This task is...
Installing a new iProcess Engine Version 11.3 Optional
Upgrading from an iProcess Engine Version 11.0 or later Optional
TIBCO iProcess Engine for UNIX Installation

Configuring JMX Ports to Run Through a Firewall | 109
Configuring JMX Ports to Run Through a Firewall
Status
Database Oracle, DB2
Description JMX relies on JAVA technology called RMI, which uses dynamic ports to be able to communicate between a client and a server. Firewalls cannot handle dynamic ports, as they need to know the port number. iProcess overcomes this problem by statically assigning a listening port for the RMI server.
To do this you need to configure the $SWDIR/etc/swjmx.properties file.
Procedure To configure the swjmxproperties file, complete the following steps:
1. Open the $SWDIR/etc/swjmx.properties file and you will see lines similar to the following:SWJMXConfig.location=C:/swserver/staffw_nod1/etc/swjmx_config.xml
SWJMXConfig.port=10025
2. The default port is 10025 but you can change this to a port of your choosing.
The RMI server port number will then be automatically set to the value of SWJMXConfig.port +1.
3. Save the file.
If you are... This task is...
Installing a new iProcess Engine Version 11.3 Optional
Upgrading from an iProcess Engine Version 11.0 or later Optional
TIBCO iProcess Engine for UNIX Installation

110 | Appendix B Post-Installation Tasks
Enabling Secure Socket Layer (SSL)
Status
Database Oracle, DB2
Description SSL provides a secure connection between a client and a server based on the SSL configurations at the client and server sides.
One, or both communicating applications has a public-private key pair. These keys are symmetric. Data encrypted with the public key can be decrypted with the private key, and vice versa.
To use SSL on all supported directory servers, the server's key pair must be pregenerated and configured in the server.
Procedure To enable Secure Socket Layer (SSL), you must set up the connection to the LDAP server:
1. Select the following option from the LDAPCONF menu:
The following prompt is displayed:
2. Enter the name of the machine where the LDAP server is running, either as a host name specified in your local machine’s hosts file, or as an IP address.
The following prompt is displayed:
3. Enter the TCP port number (a valid numeric value greater than 1) to connect to on the specified host. The default value for LDAP servers is 389.
If you are... This task is...
Installing a new iProcess Engine Version 11.3 Optional
Upgrading from an iProcess Engine Version 11.0 or later Optional
[1] Set Connection Information
Enter name of host on which the LDAP server resides
(localhost):
Enter port number on host to connect to (389):
TIBCO iProcess Engine for UNIX Installation

Enabling Secure Socket Layer (SSL) | 111
The following prompt is displayed:
4. Enter the distinguished name (DN) of the entry which will be used to authenticate this connection to the LDAP server. (If you accept the default option LDAPCONF will connect as a default LDAP user.)
The following prompt is displayed:
5. Enter:
— Y, if you want to change the password associated with this entry. You will then be prompted to enter and confirm the new password.
— N, if you want to use the existing password.
or
6. Enter:
— Y, if you want to change the status of SSL.
— N, if you want to keep the current status of SSL.
If you enable SSL, the following prompt is displayed:
7. Enter the path to the Certificate Database.
8. If you have enabled SSL, the following prompt is displayed:
Enter the distinguished name of the entry to bind as (NULL):
Do you wish to change the password (Y/N):
SSL is enabled, do you wish to disable it (Y/N):
SSL is disabled, do you wish to enable it (Y/N):
PATH to the Certificate Database for SSL(/home/certs/):
Is the target LDAP provider Microsoft Active Directory [No]
(Y/N):
TIBCO iProcess Engine for UNIX Installation
112 | Appendix B Post-Installation Tasks
This is necessary because Microsoft Active Directory handles password changes differently from other LDAP providers.
Enter:
— Y, if the LDAP server to which you are connecting uses Microsoft Active Directory.
— N, if the LDAP server does not use Microsoft Active Directory. This is the default value.
The LDAPCONF main menu is re-displayed.
Once you have enabled SSL, iProcess Engine must be restarted for the change to take effect.
See Also For more information about LDAPCONF, see LDAPCONF Utility User's Guide.
TIBCO iProcess Engine for UNIX Installation

Starting TIBCO iProcess Engine | 113
TIBCO iProcess Engine for UNIX Installation
Starting TIBCO iProcess Engine
Status
Database Oracle, DB2
Description The iProcess Engine is now properly installed, configured, and ready to start up.
Node Cluster Install each node in the cluster before trying to start the iProcess Engine.
Procedure To start the iProcess Engine:
1. Log in as the iProcess Engine background user.
2. Enter the following command to start the process sentinels:
If you selected Enable Autostart on the Configuration Options Menu on page 132, the process sentinels automatically start all of the iProcess Engine processes.
3. If you did not select Enable Autostart on the Configuration Options Menu on page 132, enter the following command to start the iProcess Engine processes:
See Also See "Controlling TIBCO iProcess Engine" in TIBCO iProcess Engine Administrator's Guide for more information.
If you are... This task is...
Installing a new iProcess Engine Version 11.3 Optional
Upgrading from an iProcess Engine Version 11.0 or later Optional
$SWDIR/bin/swstart -p
$SWDIR/bin/swstart

114 | Appendix C Configuration Menus for TIBCO iProcess Engine Installation
Appendix C Configuration Menus for TIBCO iProcess Engine Installation
This appendix lists the configuration menus for TIBCO iProcess Engine installation.
Topics
• Overview, page 115
• Policy to Install Schema and Files Menu, page 118
• Location, Identification, and OS Accounts Menu, page 121
• Configuration Options Menu, page 132
• IAP Configuration Menu, page 147
• iProcess Email Plug-in Configuration Menu, page 155
• Oracle Database Installation Method Menu, page 163
• Database Connection and Account Details Menu, page 165
TIBCO iProcess Engine for UNIX Installation

Overview | 115
Overview
When installing TIBCO iProcess Engine, the installer needs you to provide configuration information in each specified menu, as shown in Table 20.
For information about how to use configuration menus, see Using Configuration Menus on page 115.
Using Configuration MenusEach configuration menu has the following basic structure and controls:
Table 20 Configuration Menus
Menu Applied Database Description
Policy to Install Schema and Files Menu
Oracle
DB2
This menu allows you to choose an installation policy to complete the installation.
Location, Identification, and OS Accounts Menu
Oracle
DB2
This menu allows you to define the basic operating system level information needed by the installer.
Configuration Options Menu
Oracle
DB2
This menu allows you to specify basic iProcess Engine configuration details.
IAP Configuration Menu
Oracle
DB2
This menu allows you to configure the necessary Java Message Service (JMS) parameters if Activity Monitoring is enabled.
iProcess Email Plug-in Configuration Menu
Oracle
DB2
This menu allows you to configure the parameters for the SMTP server that the iProcess Email Server Plug-in connects to.
Oracle Database Installation Method Menu
Oracle This menu allows you to configure the method used to install iProcess Engine tablespaces, users, and schema in the Oracle database.
Database Connection and Account Details Menu
Oracle
DB2
This menu allows you to configure the connection parameters and accounts for the iProcess Engine database.
TIBCO iProcess Engine for UNIX Installation

116 | Appendix C Configuration Menus for TIBCO iProcess Engine Installation
Basic Structure
For a new installation, the menu structure is as follows:
For an upgrade installation, the menu structure is as follows:
Basic Control
You can perform the following operations on each menu:
• If you want to change the value of a menu item, enter its number. A prompt for the new value is then displayed. If you want to leave the value unchanged, just press the ENTER key at this prompt.
• Enter C to move to the next menu.
• Enter B to return to the previous menu.
• Enter Q if you want to quit the installation. The following prompt appears:
Installing TIBCO iProcess Engine Version 11.3.0
Menu Title
n. Menu Item : value
Enter Number of Item to Edit, (C)ontinue, (B)ack or (Q)uit:
Upgrading TIBCO iProcess Engine from Version PreviousRelease to Version 11.3.0
Menu Title
n. Menu Item : value
Enter Number of Item to Edit, (C)ontinue, (B)ack or (Q)uit:
Only the new installation menus will be shown as the examples in this manual.
You cannot change the value of a menu item if it is preceded by an asterisk (*) instead of a number.
Configuration information entered will be saved to the control file:/TIBCO/iPE/swnod1/logs/swinstall.dat
Are you sure you want to quit this install ? (Y/N - default N):
TIBCO iProcess Engine for UNIX Installation

Overview | 117
Enter Y to quit the installation. The following prompt appears:
Configuration information entered will be saved to the control file /TIBCO/iPE/swnod1/logs/swinstall.dat, but any changes that you have made to the current menu are lost.
For detailed information about the swinstall.dat control file, see Control File on page 21.
Exiting install. Configuration saved as /TIBCO/iPE/swnod1/logs/swinstall.dat
TIBCO iProcess Engine for UNIX Installation

118 | Appendix C Configuration Menus for TIBCO iProcess Engine Installation
Policy to Install Schema and Files Menu
The Policy To Install Schema And Files menu allows you to choose one of the following options to complete the installation:
• Install Schema and Files
• Install Schema Only
• Install Files Only
For example:
Table 21 lists the configuration items in the Policy To Install Schema And Files Menu.
Installing TIBCO iProcess Engine version 11.3.0
Policy to Install Schema and Files Menu
Select the polciy to install the schema and files of TIBCO iProcess Engine. Choose from :
Install schema and files : You must have access to an Oracle/DB2
DB Administrator account to do this.
Install schema only : You must have access to an Oracle/DB2
DB Administrator account to do this.
Install files only : The schema should been installed already.
See the Installation Guide for more information about these options.
1 ) Installation Policy : Install schema and files
Enter number of item to edit, (C)ontinue or (Q)uit:
Table 21 Configuration Items in the Policy to Install Schema and Files Menu
Item Description
Installation Policy The policy you can choose when installing iProcess Engine.
TIBCO iProcess Engine for UNIX Installation

Installation Policy | 119
Installation PolicyPolicy to Install Schema and Files Menu
Description The policy you can choose when installing or upgrading iProcess Engine.
Database Oracle, DB2
Value Enter 1, the following prompts appear:
or
Table 22 lists the installation policy options.
Select Installation Policy from the following list.
1 ) Install schema and files
2 ) Install schema only
Enter selection, or Q(uit):
Select Installation Policy from the following list.
1 ) Upgrade schema and files
2 ) Upgrade schema only
3 ) Upgrade files only
Enter selection, or Q(uit):
Table 22 Installation Policy Options
Item Description
Install Schema and Files
(Upgrade Schema and Files)
Install or upgrade both iProcess Engine files and schema tables during the current installation.
Note: To choose this option, you must have the DB Administrator account.
Install Schema Only
(Upgrade Schema Only)
Install or upgrade iProcess Engine schema tables only during the current installation.
Note: To choose this option, you must have the DB Administrator account.
TIBCO iProcess Engine for UNIX Installation

120 | Appendix C Configuration Menus for TIBCO iProcess Engine Installation
Control FileKeyword
IPEI_INSPOLICY
IPEI_UPGRADE_PART0
IPEI_UPGRADE_PART1
Install Files Only
(Upgrade Files Only)
Install or upgrade iProcess Engine files only during the current installation
Note: For a new installation, iProcess Files-install owner cannot see this option in the menu because the installer has already selected this option automatically.
Table 22 Installation Policy Options (Cont’d)
Item Description
TIBCO iProcess Engine for UNIX Installation

Location, Identification, and OS Accounts Menu | 121
Location, Identification, and OS Accounts Menu
The Location, Identification, and OS Accounts Menu allows you to define the basic operating system level information needed by the installer.
For example:
Table 23 lists the configuration items in the Location, Identification, and OS Accounts Menu.
Installing TIBCO iProcess Engine version 11.3.0
Location, Identification, and OS Accounts Menu
* ) Installation Directory : /TIBCO/iPE/swnod1
2 ) iProcess Engine Nodename : redhatas5
3 ) iProcess Engine Licensee Name : TIBCO iPE 11.3.0 Install
4 ) iProcess Engine Background User Name : pro
5 ) iProcess Engine Administration User Name : swadmin
6 ) iProcess Engine User Group Name : staffwar
Enter number of item to edit, (C)ontinue, (B)ack or (Q)uit:
Table 23 Configuration Items in the Location, Identification, and OS Accounts Menu
Item Description
Installation Directory The directory where this iProcess Engine is installed.
iProcess Engine Nodename The logical name of this iProcess Engine.
iProcess Engine Licensee Name The descriptive name used to identify this iProcess Engine.
iProcess Engine Background User Name The UNIX account that is used to run the iProcess Engine.
iProcess Engine Administration User Name The UNIX account that is used to administer the iProcess Engine.
iProcess Engine User Group Name The UNIX group to which all iProcess Engine users must belong.
TIBCO iProcess Engine for UNIX Installation

122 | Appendix C Configuration Menus for TIBCO iProcess Engine Installation
Edit the configuration items if needed and then enter C to continue with the installation. The installer now checks whether the operating system users and groups you have specified are valid. The following prompt appears:
The next displayed menu is the Configuration Options Menu on page 132.
Redirect Administration Queue Whether (Y) or not (N) work items from the original Administration User Name is redirected to the new account.
Note: This item is only displayed if you are upgrading and you change the Administration User Name.
Table 23 Configuration Items in the Location, Identification, and OS Accounts Menu (Cont’d)
Item Description
Checking OS User and Group Accounts ...
If either of these users or an iProcess Engine group does not exist, you are prompted to create them.
TIBCO iProcess Engine for UNIX Installation

Installation Directory | 123
Installation DirectoryLocation, Identification, and OS Accounts Menu
Description The directory where the iProcess Engine is to be installed or upgraded.
Database Oracle, DB2
Value
Control FileKeyword
IPEI_SWDIR
Installation Type New Installation Upgrade Installation
Value Either:
– the current $SWDIR value (if set), or
– the directory specified when running the installer.
You cannot change this value.
The current $SWDIR value
You cannot change this value.
TIBCO iProcess Engine for UNIX Installation

124 | Appendix C Configuration Menus for TIBCO iProcess Engine Installation
iProcess Engine NodenameLocation, Identification, and OS Accounts Menu
Description The logical identifier for this iProcess Engine node.
Database Oracle, DB2
Value
Control FileKeyword
IPEI_NODENAME
Installation Type New Installation Upgrade Installation
Value Any name that:
– is between 1 and 24 lowercase, alphanumeric characters long.
– begins with an alpha character (a-z).
– is unique on the network.
The current nodename, as defined on line 2 of the $SWDIR/swdefs file.
You cannot change this value.
Default Value Either:
– the machine name, if this is the first iProcess Engine installation on this computer, or
– swnodnnn, if this is a subsequent iProcess Engine installation on this computer
where nnn is the number of worker or watcher entries in the /etc/services file.
For example, if this is the second iProcess Engine installation on this computer, the default nodename is swnod001.
Node-cluster If you are installing a slave server, the nodename used must be the same name used for the master server.
TIBCO iProcess Engine for UNIX Installation

iProcess Engine Licensee Name | 125
iProcess Engine Licensee NameLocation, Identification, and OS Accounts Menu
Description The descriptive name used to identify this iProcess Engine.
Database Oracle, DB2
Value
Control FileKeyword
IPEI_LICENSEE
Installation Type New Installation Upgrade Installation
Value Any name that:
is between 1 and 30 printable characters long.
The current licensee name.
Default Value TIBCO iPE 11.3.0 installed
TIBCO iProcess Engine for UNIX Installation

126 | Appendix C Configuration Menus for TIBCO iProcess Engine Installation
iProcess Engine Background User NameLocation, Identification, and OS Accounts Menu
Description The UNIX user account that owns most iProcess Engine files and is used to run the iProcess Engine background processes.
Database Oracle, DB2
Value
Notes You can use the same UNIX account for both the iProcess Engine Background User Name and iProcess Engine Administration User Name.
If the account name you specify does not exist, you are prompted to create it. For example:
Installation Type New Installation Upgrade Installation
Value Any name that:
– is between 1 and 8 characters long.
– contains only alphanumeric, period (.), underscore (_), and hyphen (-) characters.
The current account name, taken from line 2 of the $SWDIR/swdefs file.
You cannot change this value.
Default Value The name of the user account that is being used to run the installer.
Note: If you are logged in as the background user, you cannot change this name.
Node-cluster If you are installing a slave server, the account name used must be the same name used on the master server.
TIBCO iProcess Engine for UNIX Installation

iProcess Engine Background User Name | 127
• If you enter Y, the user is flagged for creation and the new username is displayed in the menu.
• If you enter N, the previous name is shown.
Control FileKeyword
IPEI_BGUSER
Installing TIBCO iProcess Engine version 11.3.0
Location, Identification and OS Accounts Menu
* ) Installation Directory : /TIBCO/iPE/swnod1
2 ) iProcess Engine Nodename : redhatas5
3 ) iProcess Engine Licensee Name : TIBCO iPE 11.3.0 Install
4 ) iProcess Engine Background User Name : pro
5 ) iProcess Engine Administration User Name : swadmin
6 ) iProcess Engine User Group Name : staffwar
Enter number of item to edit, (C)ontinue, (B)ack or (Q)uit: 4
Enter new value for iProcess Engine Background User Name: pro1
User (pro1) does not exist on this system.
Create user? (Y/N - default N): y
The user account is not actually created until the installer performs the installation. See Installing TIBCO iProcess Engine in Console Mode, step 7.
TIBCO iProcess Engine for UNIX Installation

128 | Appendix C Configuration Menus for TIBCO iProcess Engine Installation
iProcess Engine Administration User NameLocation, Identification, and OS Accounts Menu
Description The UNIX account that is used to administer the iProcess Engine.
Database Oracle, DB2
Value
Notes You can use the same UNIX account for both the iProcess Engine Background User Name and iProcess Engine Administration User Name.
If the account name you specify does not exist, you are prompted to create it. For example:
Installation Type New Installation Upgrade Installation
Value Any name that:
– is between 1 and 8 characters long.
– contains only alphanumeric, period (.), underscore (_), and hyphen (-) characters.
The current account name, taken from line 3 of the $SWDIR/swdefs file.
Note: If you change this value, the Redirect Administration Queue menu item is displayed.
Default Value swadmin
Node-cluster If you are installing a slave server, the account name used must be the same name used on the master server.
TIBCO iProcess Engine for UNIX Installation

iProcess Engine Administration User Name | 129
• If you enter Y, the user is flagged for creation and the new username is displayed in the menu.
• If you enter N, the previous name is shown.
Control FileKeyword
IPEI_ADMUSER
Installing TIBCO iProcess Engine version 11.3.0
Location, Identification, and OS Accounts Menu
* ) Installation Directory : /TIBCO/iPE/swnod1
2 ) iProcess Engine Nodename : redhatas5
3 ) iProcess Engine Licensee Name : TIBCO iPE 11.3.0 Install
4 ) iProcess Engine Background User Name : pro
5 ) iProcess Engine Administration User Name : swadmin
6 ) iProcess Engine User Group Name : staffwar
Enter number of item to edit, (C)ontinue, (B)ack or (Q)uit: 5
Enter new value for iProcess Engine Administration User Name: swadmin1
User (swadmin1) does not exist on this system.
Create user? (Y/N - default N): y
The user account is not actually created until the installer performs the installation. See Installing TIBCO iProcess Engine in Console Mode, step 7 for more information.
TIBCO iProcess Engine for UNIX Installation

130 | Appendix C Configuration Menus for TIBCO iProcess Engine Installation
iProcess Engine User Group NameLocation, Identification, and OS Accounts Menu
Description The UNIX group to which all iProcess Engine users must belong.
Database Oracle, DB2
Value
Notes You must ensure that all iProcess Engine users are members of this group.
Control FileKeyword
IPEI_USRGROUP
Installation Type New Installation Upgrade Installation
Value Any name that:
– is between 1 and 8 lowercase, alphanumeric characters long.
– begins with an alpha character.
The current iProcess Engine group name, taken from the $SWDIR/etc/staffpms file.
You cannot change this value.
Default Value staffwar
Node-cluster If you are installing a slave server, the group name used must be the same name used on the master server.
The group is not actually created until the installer performs the installation.
TIBCO iProcess Engine for UNIX Installation
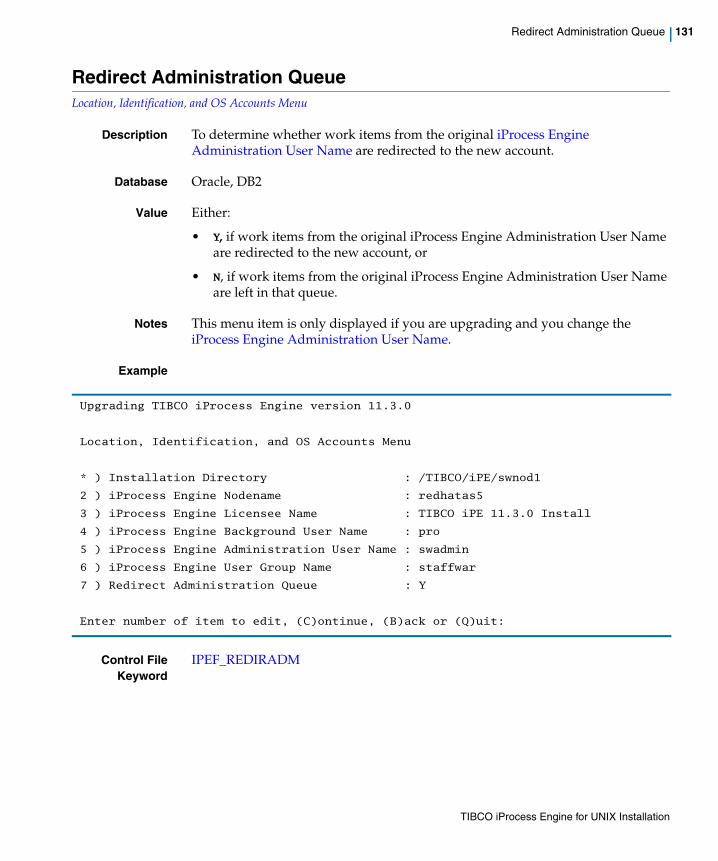
Redirect Administration Queue | 131
Redirect Administration QueueLocation, Identification, and OS Accounts Menu
Description To determine whether work items from the original iProcess Engine Administration User Name are redirected to the new account.
Database Oracle, DB2
Value Either:
• Y, if work items from the original iProcess Engine Administration User Name are redirected to the new account, or
• N, if work items from the original iProcess Engine Administration User Name are left in that queue.
Notes This menu item is only displayed if you are upgrading and you change the iProcess Engine Administration User Name.
Example
Control FileKeyword
IPEF_REDIRADM
Upgrading TIBCO iProcess Engine version 11.3.0
Location, Identification, and OS Accounts Menu
* ) Installation Directory : /TIBCO/iPE/swnod1
2 ) iProcess Engine Nodename : redhatas5
3 ) iProcess Engine Licensee Name : TIBCO iPE 11.3.0 Install
4 ) iProcess Engine Background User Name : pro
5 ) iProcess Engine Administration User Name : swadmin
6 ) iProcess Engine User Group Name : staffwar
7 ) Redirect Administration Queue : Y
Enter number of item to edit, (C)ontinue, (B)ack or (Q)uit:
TIBCO iProcess Engine for UNIX Installation

132 | Appendix C Configuration Menus for TIBCO iProcess Engine Installation
Configuration Options Menu
The Configuration Options Menu allows you to specify basic iProcess Engine configuration details.
For example:
Table 24 lists the configuration items in the Configuration Options Menu.
Installing TIBCO iProcess Engine version 11.3.0
Configuration Options Menu
1 ) iProcess Engine Client RPC Number : 391875
2 ) iProcess Engine Client Password Required : Y
3 ) Enable Case Data Normalization : Y
4 ) Enable Prediction : N
5 ) Enable Autostart : Y
6 ) Enable Activity Publication : N
7 ) Configure iProcess Email Plug-in : Y
8 ) JMX Port Number : 10025
9 ) Enable iProcess Objects Server : Y
10) Enable iProcess Objects Director : N
11) Enable Write access to WebDav : N
Enter number of item to edit, (C)ontinue, (B)ack or (Q)uit:
Table 24 Configuration Items in the Configuration Options Menu
Item Description
iProcess Engine Client RPC Number The RPC number that iProcess Workspaces use to communicate with this iProcess Engine.
iProcess Engine Client Password Required Whether (Y) or not (N) users must supply a password when they log in to this iProcess Engine from an iProcess Workspace.
Enable Case Data Normalization Whether (Y) or not (N) case data normalization is enabled to make case data searching more efficient and faster.
Enable Prediction Whether (Y) or not (N) the case prediction server process (BGPREDICT) is enabled.
TIBCO iProcess Engine for UNIX Installation

Configuration Options Menu | 133
Edit the configuration items if needed, then enter C. Depending on the options you have chosen, the next relevant menu in the following list is displayed:
— the IAP Configuration Menu, page 147.
— the iProcess Email Plug-in Configuration Menu, page 155.
— (For Oracle Only) the Oracle Database Installation Method Menu, page 163.
— (For DB2 Only) the DB2 Database Connection and Account Details Menu, page 167.
Enable Autostart Whether (Y) or not (N) the Process Sentinels automatically start the server processes after the Process Sentinels have started.
Enable Activity Publishing Whether (Y) or not (N) the IAPJMS process is enabled and started. The IAPJMS process is required to enable both iProcess Activity Publication, if configured, and Work Queue Delta Publication if requested. See Enable Activity Publishing on page 140 for more information.
Configure iProcess Email Plug-in Whether (Y) or not (N) you want to configure SMTP server parameters for the iProcess EMail Server Plug-in as part of the installation.
You can configure SMTP server parameters at this point, or you can configure them after you have installed the iProcess Engine.
JMX Port Number The port number on which the Java Management Extensions (JMX) engine runs.
JMX Port Number Whether (Y) or not (N) the iProcess Objects Server process (SPO) is enabled.
Enable iProcess Objects Director Whether (Y) or not (N) the iProcess Objects Director process (DIRECTOR) is enabled.
Enable Write Access to WebDav Whether (Y) or not (N) WebDav is enabled.
Table 24 Configuration Items in the Configuration Options Menu (Cont’d)
Item Description
TIBCO iProcess Engine for UNIX Installation

134 | Appendix C Configuration Menus for TIBCO iProcess Engine Installation
iProcess Engine Client RPC NumberConfiguration Options Menu
Description The RPC service number that iProcess Workspaces use to communicate with this iProcess Engine.
Database Oracle, DB2
Value
Control FileKeyword
IPEI_RPCNUM
Installation Type New Installation Upgrade Installation
Value Any valid 1-6 digit RPC number.
Note: 391875 to 391879 is the reserved iProcess Engine client-server RPC program number range. Using a number in this range should prevent any clash with other applications using the same number, provided that other applications also use legitimate RPC numbers.
The current client RPC number, taken from the $SWDIR/swdefs file.
You cannot change this value.
Default Value 391875 + n
where n is the number of existing iProcess Engine installations on this computer, calculated from the number of worker or watcher entries in the /etc/services file.
For example, if this is the first iProcess Engine installation on this computer, the default client RPC number is 391875.
Node-cluster If you are installing a slave server, the client RPC number used must be the same number used on the master server.
TIBCO iProcess Engine for UNIX Installation

iProcess Engine Client Password Required | 135
iProcess Engine Client Password RequiredConfiguration Options Menu
Description To determine whether iProcess Workspace users must enter their passwords to log in to this iProcess Engine.
Database Oracle, DB2
Value
Control FileKeyword
IPEF_CLNTPASSWD
Installation Type New Installation Upgrade Installation
Value Y, if iProcess Workspace users must enter their passwords to log in to this iProcess Engine.
N, if iProcess Workspace users can log in to this iProcess Engine without supplying their passwords.
The current client RPC number, taken from the line 4 of the $SWDIR/etc/staffpms file.
Default Value Y
TIBCO iProcess Engine for UNIX Installation
136 | Appendix C Configuration Menus for TIBCO iProcess Engine Installation
Enable Case Data NormalizationConfiguration Options Menu
Description To determine whether case data normalization is enabled.
Database Oracle, DB2
Value
Notes Case data normalization is a feature used to make case data searching more efficient, and therefore faster. It uses the field_value_N column in the case_data table in the iProcess Engine database. This column provides a normalized value of the value in the field_value column, allowing the database to do simple string comparisons, instead of having to do type conversions.
For the Oracle database, if you are upgrading, note that creating the data for the field_value_N column can significantly increase the time taken to perform the upgrade if the system has a large number of cases. See How Long Will an Upgrade Take? on page 194 for more information.
For the DB2 database, if you are upgrading, before choosing to enable case data normalization, note that the installer will need to populate the field_value_N column for every row in the case_data table, using the values from the
Installation Type New Installation Upgrade Installation
Value Y, if case data normalization is enabled.
N, if case data normalization is disabled.
The current setting, as defined by the value of the NORMALISE_CASE_DATA process attribute.
If this setting is Y, you cannot change it. If it is N, you can change it to Y if you want.
Default Value Y
If you intend to use iProcess Objects to perform case data searches, TIBCO strongly recommends that you enable case data normalization. If you do not do this, you will be able to view and start procedures, but you will not be able to view the cases until you normalize the data.
You can either enable case data normalization as part of the installation, or upgrade process by setting this menu item. Or, you can do so afterwards by using the Case Data Normalization Utility. See the "Administering Case Data Normalization" section in TIBCO iProcess Engine Administrator's Guide for more information about this utility.
TIBCO iProcess Engine for UNIX Installation

Enable Case Data Normalization | 137
field_value column. This can significantly impact the duration of the upgrade process if there are large numbers of cases on the system. See How Long Will an Upgrade Take? on page 194 for more information.
Control FileKeyword
IPEF_ENABLECDN
TIBCO iProcess Engine for UNIX Installation

138 | Appendix C Configuration Menus for TIBCO iProcess Engine Installation
Enable PredictionConfiguration Options Menu
Description To determine whether the case prediction server process (BGPREDICT) is enabled.
Database Oracle, DB2
Value
Notes The case prediction server process only affects background case prediction. It has no effect on live case prediction or case simulation.
See Also For more information about the use of case prediction, see the "Using Case Prediction to Forecast Outstanding Work Items" section in TIBCO iProcess Modeler Advanced Design Guide.
Control FileKeyword
IPEF_PREDICT
Installation Type New Installation Upgrade Installation
Value Y, if BGPREDICT is enabled.N, if BGPREDICT is disabled.
The current setting, as defined by the value of the ENABLE_CASE_PREDICTION process attribute.
If this setting is Y, you cannot change it. If it is N, you can change it to Y if you want.
Default Value N
TIBCO iProcess Engine for UNIX Installation

Enable Autostart | 139
Enable AutostartConfiguration Options Menu
Description To determine whether the Process Sentinels automatically start the server processes after the Process Sentinels have started.
Database Oracle, DB2
Value
See Also For more information about the PM_AUTO_BOOT process attribute, see the "Administering Process Attributes" section in TIBCO iProcess Engine Administrator’s Guide.
Control FileKeyword
IPEF_AUTOSTART
Installation Type New Installation Upgrade Installation
Value Y, if the server processes is automatically started by the Process Sentinels.N, if the server processes is manually started.
The current setting, as defined by the value of the PM_AUTO_BOOT process attribute.
Default Value Y
TIBCO iProcess Engine for UNIX Installation

140 | Appendix C Configuration Menus for TIBCO iProcess Engine Installation
Enable Activity PublishingConfiguration Options Menu
Description To determine whether the BG process is enabled to publish monitored activities to the IAPJMS process and the WIS process publishes Work Queue Deltas.
Database Oracle, DB2
Value
Node-Cluster If you enable activity publishing on the master server, you must also enable it on each slave server.
Notes The installer writes this value to the IAPJMS_PUBLISH process attribute and enables the IAPJMS process.
If activity publishing is enabled, activity information about auditable objects, for example, procedures and steps, can be published to an external application. This enables real-time monitoring of auditable objects so that mission-critical or important business events can be easily monitored.
To get the iProcess Engine to actually monitor and publish events, you must also:
1. configure the activities and events that you want to monitor and publish. See the "Configuring Activity Monitoring" section in TIBCO iProcess Modeler Integration Techniques Guide for more information about how to do this.
2. configure how the iProcess Engine will handle and publish monitored events. See the "Administering Activity Monitoring" section in TIBCO iProcess Engine Administrator’s Guide for more information about how to do this.
Similarly, details of a work item are provided whenever the work item changes on a queue that the subscribing application is subscribed to.
Installation Type New Installation Upgrade Installation
Value Y, enable publishing of monitored activities and work queue deltas.
N, disable publishing of monitored activities and work queue deltas.
The current setting, as defined by the value of the IAPJMS_PUBLISH process attribute.
If this setting is Y, you cannot change it. If it is N, you can change it to Y if you want.
Default Value N
Enabling activity publishing does not result in events being automatically published by the iProcess Engine.
TIBCO iProcess Engine for UNIX Installation

Enable Activity Publishing | 141
Control FileKeyword
IPEF_ENABLEIAP
TIBCO iProcess Engine for UNIX Installation

142 | Appendix C Configuration Menus for TIBCO iProcess Engine Installation
Configure iProcess Email Plug-inConfiguration Options Menu
Description To determine whether you want to configure SMTP server parameters for the iProcess Email Plug-in as part of the installation.
Datbase Oracle, DB2
Value
Notes You can either configure the SMTP server parameters as part of the installation process, or do so after you have installed the iProcess Engine.
See Also See TIBCO iProcess Email Plug-in User’s Guide for more information about the SMTP server parameters.
Control FileKeyword
IPEF_EAIMAIL_ENABLECONFIG
Installation Type New Installation Upgrade Installation
Value Y, configure SMTP server parameters.
N, do not configure SMTP server parameters.
Default Value Y
TIBCO iProcess Engine for UNIX Installation

JMX Port Number | 143
JMX Port NumberConfiguration Options Menu
Description The port number on which the Java Management Extensions (JMX) engine runs.
Datbase Oracle, DB2
Value
Node-Cluster You must use the same value on the master server and each slave server.
Notes The iProcess Engine includes a JMX engine that enables Business Studio to deploy procedures to the iProcess Engine.
In Business Studio, a Deployment Server can use this port number to deploy processes to this iProcess Engine, using the JMX Remote Method Invocation (RMI) interface.
The port number will be written to the SWJMXConfig.port entry in the $SWDIR/etc/swjmx.properties file, and can be changed after installation if desired. See TIBCO iProcess Engine Administrator’s Guide for more information.
See Also For more information about how to deploy processes from Business Studio, see TIBCO Business Studio Implementation Guide.
Control FileKeyword
IPEI_JMX_PORT
Installation Type New Installation Upgrade Installation
Value The port number must be:
– an integer value between 0 and 65535.
– unique across all iProcess Engine installations on this computer.
The current port number, as defined in the $SWDIR/etc/swjmx.properties file.
Default Value 10025
TIBCO iProcess Engine for UNIX Installation

144 | Appendix C Configuration Menus for TIBCO iProcess Engine Installation
Enable iProcess Objects ServerConfiguration Options Menu
Description To determine whether you want to enable the iProcess Objects Server (SPO) process.
Datbase Oracle, DB2
Value
See Also For more information about how to configure and use the iProcess Objects Server, see the following guides:
• TIBCO iProcess Objects Server Administrator’s Guide
• TIBCO iProcess Objects Programmer’s Guide
Control FileKeyword
IPEF_SPOSERVER_ENABLED
Installation Type New Installation Upgrade Installation
Value Y, enable the SPO process.
N, disable the SPO process.
Y, if the SPO is already installed and enabled.
N, if the SPO is not installed, or is installed but disabled.
Default Value Y
TIBCO iProcess Engine for UNIX Installation

Enable iProcess Objects Director | 145
Enable iProcess Objects DirectorConfiguration Options Menu
Description To determine whether you want to enable the iProcess Objects Director (DIRECTOR) process.
Datbase Oracle, DB2
Value
See Also For more information about how to configure and use the iProcess Objects Director, see TIBCO iProcess Objects Director Administrator’s Guide.
Control FileKeyword
IPEF_SPODIRECTOR_ENABLED
Installation Type New Installation Upgrade Installation
Value Y, enable the DIRECTOR process.
N, disable the DIRECTOR process.
Y, if the DIRECTOR is already installed and enabled.
N, if the DIRECTOR is not installed, or is installed but disabled.
You cannot change this value.
Default Value N
TIBCO iProcess Engine for UNIX Installation

146 | Appendix C Configuration Menus for TIBCO iProcess Engine Installation
Enable Write Access to WebDavConfiguration Options Menu
Description To determine whether or not write access to WebDav is enabled on the Apache Tomcat application server that is installed with iProcess Engine.
Datbase Oracle, DB2
Value
Notes Selecting this option enables you to easily deploy your TIBCO Forms using TIBCO Business Studio. If you want to use TIBCO Forms and do not want to enable this option, then you must install the forms manually on this or your own web server.
There are security issues around enabling WebDav and if you select this option, the following warning message is displayed:You have enabled write access to WebDAV, which allows you to make your own deployed forms for the browser client. This may cause your server potential security issues and/or cause your deployed forms for the browser client to fail. TIBCO Software Inc. is not responsible for these or any other consequences caused by your use of the write access to WebDAV.
If you do not want to use TIBCO Forms, then TIBCO recommends that you do not enable write access to WebDav. See the documentation supplied with Apache Tomcat Application Server for more information about security.
See Also For more information about TIBCO Forms, see TIBCO Forms documentation.
Control FileKeyword
IPEF_WEBDAV_ENABLED
Installation Type New Installation Upgrade Installation
Value Y, enable write access to WebDav.
N, disable write access to WebDav.
Default Value N
TIBCO iProcess Engine for UNIX Installation
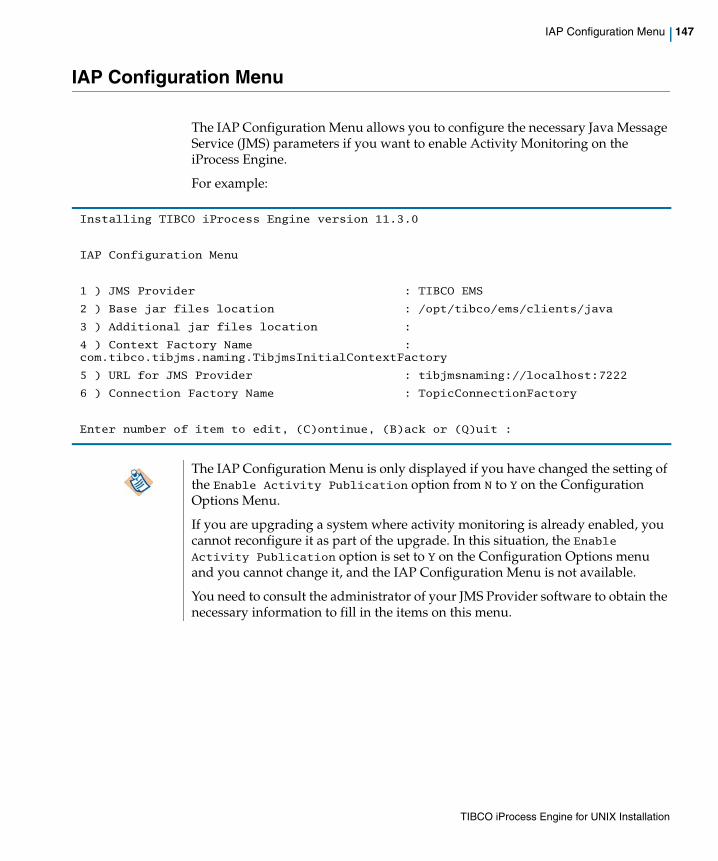
IAP Configuration Menu | 147
IAP Configuration Menu
The IAP Configuration Menu allows you to configure the necessary Java Message Service (JMS) parameters if you want to enable Activity Monitoring on the iProcess Engine.
For example:
Installing TIBCO iProcess Engine version 11.3.0
IAP Configuration Menu
1 ) JMS Provider : TIBCO EMS
2 ) Base jar files location : /opt/tibco/ems/clients/java
3 ) Additional jar files location :
4 ) Context Factory Name : com.tibco.tibjms.naming.TibjmsInitialContextFactory
5 ) URL for JMS Provider : tibjmsnaming://localhost:7222
6 ) Connection Factory Name : TopicConnectionFactory
Enter number of item to edit, (C)ontinue, (B)ack or (Q)uit :
The IAP Configuration Menu is only displayed if you have changed the setting of the Enable Activity Publication option from N to Y on the Configuration Options Menu.
If you are upgrading a system where activity monitoring is already enabled, you cannot reconfigure it as part of the upgrade. In this situation, the Enable Activity Publication option is set to Y on the Configuration Options menu and you cannot change it, and the IAP Configuration Menu is not available.
You need to consult the administrator of your JMS Provider software to obtain the necessary information to fill in the items on this menu.
TIBCO iProcess Engine for UNIX Installation

148 | Appendix C Configuration Menus for TIBCO iProcess Engine Installation
Table 25 lists the configuration items in the IAP Configuration Menu.
Edit the configuration items if needed and then enter C. Depending on the options you have chosen on the Configuration Options Menu on page 132, the next relevant menu in the following list is displayed:
— the iProcess Email Plug-in Configuration Menu, page 155.
— (For Oracle Only) the Oracle Database Installation Method Menu, page 163.
— (For DB2 Only) the DB2 Database Connection and Account Details Menu, page 167.
Table 25 Configuration Items in the IAP Configuration Menu
Item Description
JMS Provider The name of the JMS provider that the iProcess Engine publishes messages to.
Note:
If you change this value, appropriate default values are automatically displayed for all the other items in this menu.
Base JAR Files Location The full path (or comma-separated paths) of the JAR files required by this JMS provider.
Additional JAR Files Location The full path (or comma-separated paths) of any additional JAR files files that are required for your configuration.
Context Factory Name The name of the context factory that produces context instances for this JMS Provider.
URL for JMS Provider The URL that the iProcess Engine uses to connect to this JMS Provider.
Connection Factory Name The name of the object that the iProcess Engine uses to create a connection to this JMS Provider.
TIBCO iProcess Engine for UNIX Installation

JMS Provider | 149
JMS ProviderIAP Configuration Menu
Description The name of the JMS provider that the iProcess Engine publishes messages to.
Datbase Oracle, DB2
Value
Notes If you want to use JBoss 4.0.0, select the JBoss option. If you want to use any other version of JBoss or JBoss Messaging, select the Other option instead.
Similarly, if you want to use BEA WebLogic Server Version, select the BEA WebLogic Server option. If you want to use any other version of WebLogic Server, select the Other option instead.
If you select the Other option for the JMS Provider, no defaults are entered. You must supply appropriate values for the other menu items.
The JMS provider software does not need to be installed on the same machine as the iProcess Engine.
See Also For more information about the use of this parameter, see the "Administering Activity Monitoring" section in TIBCO iProcess Engine Administrator’s Guide.
Control FileKeyword
IPEI_JMSPROVIDER
Installation Type New Installation Upgrade Installation
Value Select one from the following list:
– TIBCO EMS
– IBM WebSphere V5.1.x
– IBM WebSphere V6.x
– BEA Weblogic Server
– JBoss
– Other
If you are upgrading iProcess Engine, you must ensure that your version of EMS is updated. See How Do I Upgrade TIBCO EMS? on page 195 for details.
Default Value TIBCO EMS
TIBCO iProcess Engine for UNIX Installation

150 | Appendix C Configuration Menus for TIBCO iProcess Engine Installation
Base JAR Files LocationIAP Configuration Menu
Description If your chosen JMS provider is
• IBM Websphere 6.x: the full path of the directory containing the IBM Client for JMS on J2SE with WebSphere Application Server. (The iProcess Engine IAPJMS process must use this client to communicate with the WebSphere 6.x Application Server.)
If you do not have this client installed on this computer, TIBCO recommends that you use the default location ($SWDIR/jmsclient). You must then install this client into the specified directory after you have installed the iProcess Engine. See Installing the IBM Client for JMS on J2SE with IBM WebSphere Application Server on page 101 for more information about how to do this.
• anything else: the full path (or comma-separated paths) of the JAR files required by this JMS provider.
Datbase Oracle, DB2
Default Value /opt/tibco/ems/version_number/lib
Notes The default value shown is for the default JMS Provider (which is TIBCO EMS). If you change the JMS Provider, the default value is automatically changed to the appropriate value for that JMS Provider.
The installer writes this value to the IAPJMS configuration file $SWDIR/etc/iapjms_classpath.properties.
See Also For more information about the use of this parameter, see the "Administering Activity Monitoring" section in TIBCO iProcess Engine Administrator’s Guide.
Control FileKeyword
IPEI_JMSLOCATION
TIBCO iProcess Engine for UNIX Installation
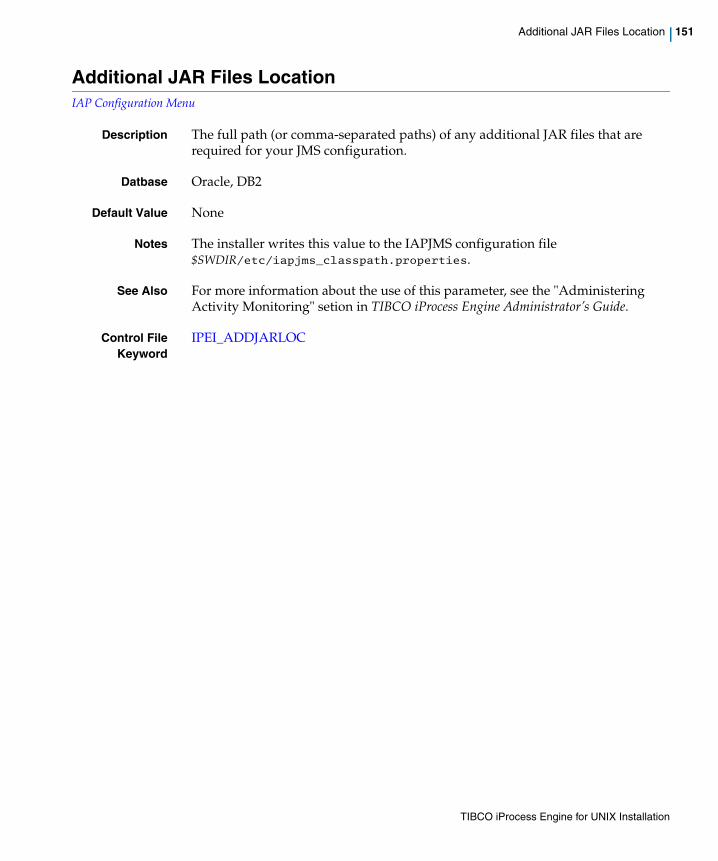
Additional JAR Files Location | 151
Additional JAR Files LocationIAP Configuration Menu
Description The full path (or comma-separated paths) of any additional JAR files that are required for your JMS configuration.
Datbase Oracle, DB2
Default Value None
Notes The installer writes this value to the IAPJMS configuration file $SWDIR/etc/iapjms_classpath.properties.
See Also For more information about the use of this parameter, see the "Administering Activity Monitoring" setion in TIBCO iProcess Engine Administrator’s Guide.
Control FileKeyword
IPEI_ADDJARLOC
TIBCO iProcess Engine for UNIX Installation

152 | Appendix C Configuration Menus for TIBCO iProcess Engine Installation
Context Factory NameIAP Configuration Menu
Description The name of the context factory that produces context instances for this JMS Provider.
Datbase Oracle, DB2
Default Value com.tibco.tibjms.naming.TibjmsInitialContextFactory
Notes The default value shown is for the default JMS Provider (which is TIBCO EMS). If you change the JMS Provider, the default value is automatically changed to the appropriate value for that JMS Provider.
The installer writes this value to the IAPJMSConnect.InitialContextFactory property in the IAPJMS configuration file: $SWDIR/etc/iapjms.properties.
See Also For more information about the use of this parameter, see the "Administering Activity Monitoring" section in TIBCO iProcess Engine Administrator’s Guide.
Control FileKeyword
IPEI_CTXTFACTORY
TIBCO iProcess Engine for UNIX Installation

URL for JMS Provider | 153
URL for JMS ProviderIAP Configuration Menu
Description The URL that the iProcess Engine uses to connect to this JMS Provider.
Datbase Oracle, DB2
Default Value tibjmsnaming://localhost:7222
Notes The default value shown is for the default JMS Provider (which is TIBCO EMS). If you change the JMS Provider, the default value is automatically changed to the appropriate value for that JMS Provider.
The installer writes this value to the IAPJMSConnect.InitialURL property in the IAPJMS configuration file $SWDIR/etc/iapjms.properties.
See Also For more information about the use of this parameter, see the "Administering Activity Monitoring" section in TIBCO iProcess Engine Administrator’s Guide.
Control FileKeyword
IPEI_JMSURL
TIBCO iProcess Engine for UNIX Installation

154 | Appendix C Configuration Menus for TIBCO iProcess Engine Installation
Connection Factory NameIAP Configuration Menu
Description The name of the object that the iProcess Engine uses to create a connection to this JMS Provider.
Datbase Oracle, DB2
Default Value TopicConnectionFactory
Notes The default value shown is for the default JMS Provider (which is TIBCO EMS). If you change the JMS Provider, the default value is automatically changed to the appropriate value for that JMS Provider.
The installer writes this value to the IAPJMSConnect.TopicConnectionFactory property in the IAPJMS configuration file $SWDIR/etc/iapjms.properties.
See Also For more information about the use of this parameter, see the "Administering Activity Monitoring" section in TIBCO iProcess Engine Administrator’s Guide.
Control FileKeyword
IPEI_CONNFACTORY
TIBCO iProcess Engine for UNIX Installation

iProcess Email Plug-in Configuration Menu | 155
iProcess Email Plug-in Configuration Menu
The iProcess Email Plug-in Configuration menu allows you to define the parameters that the iProcess EMail Server Plug-in will use to connect to an SMTP server.
For example:
Table 26 lists the configuration items in the iProcess Email Plug-in Configuration Menu.
The iProcess Email Plug-in Configuration Menu is only displayed if you have set the Configure iProcess Email Plug-in option to Y on the Configuration Options Menu.
Installing TIBCO iProcess Engine version 11.3.0
iProcess Email Plug-in Configuration Menu
1 ) SMTP Host :
2 ) SMTP Port Number : 25
3 ) Mail From Address :
4 ) BACKUP SMTP Host 1 :
5 ) BACKUP SMTP Port 1 : 25
6 ) BACKUP SMTP Host 2 :
7 ) BACKUP SMTP Port 2 : 25
8 ) BACKUP SMTP Host 3 :
9 ) BACKUP SMTP Port 3 : 25
10) Retry Counts : 3
Enter number of item to edit, (C)ontinue, (B)ack or (Q)uit:
Table 26 Configuration Items in the iProcess Email Plug-in Configuration Menu
Item Description
SMTP Host The IP address or the name of the machine hosting your SMTP server.
SMTP Port Number The port number of the SMTP server.
TIBCO iProcess Engine for UNIX Installation

156 | Appendix C Configuration Menus for TIBCO iProcess Engine Installation
Edit the configuration items if needed and then enter C. The next menu in the following list is displayed:
— (For Oracle Only) the Oracle Database Installation Method Menu, page 163.
— (For DB2 Only) the DB2 Database Connection and Account Details Menu, page 167.
Mail from Address The email address that you want to send iProcess Email messages from.
BACKUP SMTP Host
(BACKUP SMTP Host 1, 2, 3)
For each backup server in turn, you can specify the machine name or the IP address of the machine hosting the backup SMTP server. There can be as many backup host entries as there are SMTP servers available for failover.
BACKUP SMTP Port
(BACKUP SMTP Port 1, 2, 3)
The port number on which the preceding backup host is running. There must be one backup port entry for each backup host server.
Retry Counts Specify how many times the plug-in should use a backup server before retrying the primary host. Enter a non-zero numeric value. The default is 3.
Note:
– If a negative value is entered, it is interpreted as 50.
– If zero or a non-numeric value is entered, the configuration of backup servers has no effect and the plug-in reverts to the primary host.
If a successful connection is made on retrying the primary host, the plug-in reverts to using that host. If not, the plug-in continues with the backup server that is currently in use.
Table 26 Configuration Items in the iProcess Email Plug-in Configuration Menu (Cont’d)
Item Description
TIBCO iProcess Engine for UNIX Installation

SMTP Host | 157
SMTP HostiProcess Email Plug-in Configuration Menu
Description The name or IP address of the machine hosting the SMTP server that you want to use.
Datbase Oracle, DB2
Value
Notes The installer writes this value to the global SMTP parameter file $SWDIR/libs/eai_mail.cfg.
See Also For more information about the use of this parameter, see TIBCO iProcess EMail Plug-in User’s Guide.
Control FileKeyword
IPEI_EAIMAIL_SMTPHOST
Installation Type New Installation Upgrade Installation
Value N/A The current value, taken from the $SWDIR/libs/eai_mail.cfg file.
Node-Cluster You must use the same value on the master server and each slave server.
TIBCO iProcess Engine for UNIX Installation

158 | Appendix C Configuration Menus for TIBCO iProcess Engine Installation
SMTP Port NumberiProcess Email Plug-in Configuration Menu
Description The TCP port number on which the SMTP server is running.
Datbase Oracle, DB2
Default Value
Notes The installer writes this value to the global SMTP parameter file $SWDIR/libs/eai_mail.cfg.
See Also For more information about the use of this parameter, see TIBCO iProcess EMail Plug-in User’s Guide.
Control FileKeyword
IPEI_EAIMAIL_SMTPPORT
Installation Type New Installation Upgrade Installation
Default Value 25 The current value, taken from the $SWDIR/libs/eai_mail.cfg file.
Node-Cluster You must use the same value on the master server and each slave server.
TIBCO iProcess Engine for UNIX Installation

Mail from Address | 159
Mail from AddressiProcess Email Plug-in Configuration Menu
Description The default email address that you want to use to send EAI Mail messages from.
Datbase Oracle, DB2
Default Value
Notes The installer writes this value to the global SMTP parameter file $SWDIR/libs/eai_mail.cfg.
See Also For more information about the use of this parameter, see TIBCO iProcess EMail Plug-in User’s Guide.
Control FileKeyword
IPEI_EAIMAIL_MAILFROM
Installation Type New Installation Upgrade Installation
Default Value N/A The current value, taken from the $SWDIR/libs/eai_mail.cfg file.
Node-Cluster You must use the same value on the master server and each slave server.
TIBCO iProcess Engine for UNIX Installation

160 | Appendix C Configuration Menus for TIBCO iProcess Engine Installation
BACKUP SMTP HostiProcess Email Plug-in Configuration Menu
Description Backup Hosts 1 to 3 are the names or IP addresses of the machines hosting the backup SMTP servers that you want to use.
Datbase Oracle, DB2
Default Value
Notes The installer writes this value to the global SMTP parameter file $SWDIR/libs/eai_mail.cfg.
See Also For more information about the use of this parameter, see TIBCO iProcess EMail Plug-in User’s Guide.
Control FileKeyword
IPEI_EAIMAIL_BAKSMTPHOST1IPEI_EAIMAIL_BAKSMTPHOST2IPEI_EAIMAIL_BAKSMTPHOST3
Installation Type New Installation Upgrade Installation
Default Value N/A The current value, taken from the $SWDIR/libs/eai_mail.cfg file.
Node-Cluster You must use the same value on the master server and each slave server.
TIBCO iProcess Engine for UNIX Installation

BACKUP SMTP Port | 161
BACKUP SMTP PortiProcess Email Plug-in Configuration Menu
Description Backup Ports 1 to 3 are the TCP port numbers on which the associated backup SMTP server is running.
Datbase Oracle, DB2
Default Value
Notes The installer writes this value to the global SMTP parameter file $SWDIR/libs/eai_mail.cfg.
See Also For more information about the use of this parameter, see TIBCO iProcess EMail Plug-in User’s Guide.
Control FileKeyword
IPEI_EAIMAIL_BAKSMTPPORT1 IPEI_EAIMAIL_BAKSMTPPORT2IPEI_EAIMAIL_BAKSMTPPORT3
Installation Type New Installation Upgrade Installation
Default Value N/A The current value, taken from the $SWDIR/libs/eai_mail.cfg file.
Node-Cluster You must use the same value on the master server and each slave server.
TIBCO iProcess Engine for UNIX Installation

162 | Appendix C Configuration Menus for TIBCO iProcess Engine Installation
Retry CountsiProcess Email Plug-in Configuration Menu
Description How many times the plug-in should use a backup server before retrying the primary host.
Datbase Oracle, DB2
Default Value
Notes The installer writes this value to the global SMTP parameter file $SWDIR/libs/eai_mail.cfg.
See Also For more information about the use of this parameter, see TIBCO iProcess EMail Plug-in User’s Guide.
Control FileKeyword
IPEI_EAIMAIL_RETRYCOUNTS
Enter a non-zero numeric value.
• If a negative value is entered, it is interpreted as 50.
• If zero or a non-numeric value is entered, the configuration of backup servers has no effect and the plug-in reverts to the primary host.
Installation Type New Installation Upgrade Installation
Default Value 3 3
Node-Cluster You must use the same value on the master server and each slave server.
TIBCO iProcess Engine for UNIX Installation

Oracle Database Installation Method Menu | 163
Oracle Database Installation Method Menu
The Oracle Database Installation Method menu allows you to choose one of the following options to install TIBCO iProcess Engine tablespaces, users, and schema in the Oracle database:
• Install Database Now
• Use Existing Database
For example:
Table 27 lists the configuration items in the Policy To Install Schema And Files menu.
Choose the installation method and then enter C. the Oracle Database Connection and Account Details Menu on page 165 is displayed.
Installing TIBCO iProcess Engine version 11.3.0
Oracle Database Installation Method
Select the method you want to use to install the TIBCO iProcess Engine
tablespaces, users and schema in the Oracle database. Choose from:
Install database now : Let swinstall install the iProcess Engine tablespaces,
users and schema. You must have the privilege to do this.
Use existing database : Let swinstall install the iProcess Engine schema, using
tablespaces and users that have already been
created by an Oracle DB Administrator.
1 ) Installation Method : Install database now
Enter number of item to edit, (C)ontinue, (B)ack or (Q)uit:
Table 27 Configuration Items in the Oracle Database Installation Method Menu
Item Description
Installation Method The method you can choose to install iProcess Engine tablespaces, users, and schema in the Oracle database.
TIBCO iProcess Engine for UNIX Installation

164 | Appendix C Configuration Menus for TIBCO iProcess Engine Installation
Installation MethodOracle Database Installation Method Menu
Description The method you can choose to install iProcess Engine tablespaces, users, and schema in the Oracle database.
Database Oracle
Value
Enter 1, the following prompts appear:
Table 28 lists the installation method options.
Control FileKeyword
IPEI_DBINSTMODEL
Select Installation Method from the following list.
1 ) Install database now
2 ) Use existing database
Enter selection, or Q(uit):
Table 28 Installation Method Options
Item Description
Install Database Now Let the installer to install iProcess Engine tablespaces, users, and schema in the Oracle database.
Note: To choose this opiton, you must have access to an Oracle DB Administrator account.
Use Existing Database Let the installer installs iProcess Engine schema, and use tablespaces and users that have already been created by an Oracle DB Administrator.
TIBCO iProcess Engine for UNIX Installation

Database Connection and Account Details Menu | 165
Database Connection and Account Details Menu
The Database Connection and Account Details Menu allows you to provide the information that the installer needs to be able to communicate with the database.
• Oracle Database Connection and Account Details Menu, page 165
• DB2 Database Connection and Account Details Menu, page 167
Oracle Database Connection and Account Details MenuThe Oracle Database Connection and Account Details menu is shown below:
Table 29 lists the configuration items in the iProcess Email Plug-in Configuration Menu.
Installing TIBCO iProcess Engine version 11.3.0
ORACLE Database Connection and Account Details
1 ) Oracle DB TNS Identifier :
2 ) Oracle DB Administrator Name : system
3 ) Oracle DB Administrator Password :
4 ) iProcess Engine DB Schema Owner Name : swpro
5 ) iProcess Engine DB Schema Owner Password : staffpro1
6 ) iProcess Engine DB User Name : swuser
7 ) iProcess Engine DB User Password : swuser1
8 ) Support Unicode Encoding : N
9 ) Data Tablespace Name : STAFFWAR
10) Temporary Tablespace Name : TEMP
11) Schema Sizing Configuration : Small
Enter number of item to edit, (C)ontinue, (B)ack or (Q)uit:
Table 29 Configuration Items in the Oracle Database Connection and Account Details Menu
Item Description
Oracle DB TNS Identifier The TNS identifier of the Oracle instance that the iProcess Engine will connect to.
TIBCO iProcess Engine for UNIX Installation
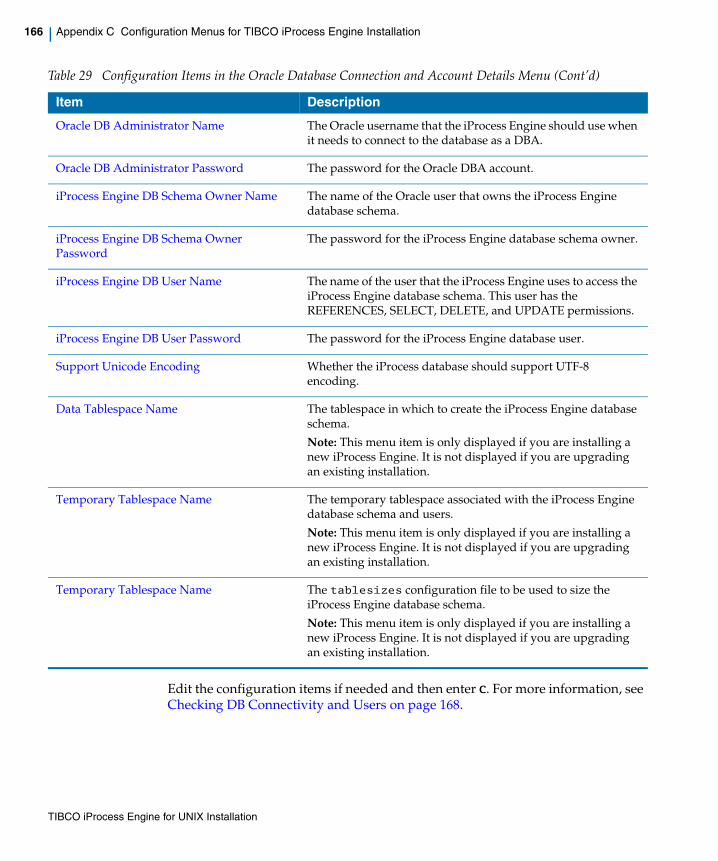
166 | Appendix C Configuration Menus for TIBCO iProcess Engine Installation
Edit the configuration items if needed and then enter C. For more information, see Checking DB Connectivity and Users on page 168.
Oracle DB Administrator Name The Oracle username that the iProcess Engine should use when it needs to connect to the database as a DBA.
Oracle DB Administrator Password The password for the Oracle DBA account.
iProcess Engine DB Schema Owner Name The name of the Oracle user that owns the iProcess Engine database schema.
iProcess Engine DB Schema Owner Password
The password for the iProcess Engine database schema owner.
iProcess Engine DB User Name The name of the user that the iProcess Engine uses to access the iProcess Engine database schema. This user has the REFERENCES, SELECT, DELETE, and UPDATE permissions.
iProcess Engine DB User Password The password for the iProcess Engine database user.
Support Unicode Encoding Whether the iProcess database should support UTF-8 encoding.
Data Tablespace Name The tablespace in which to create the iProcess Engine database schema.
Note: This menu item is only displayed if you are installing a new iProcess Engine. It is not displayed if you are upgrading an existing installation.
Temporary Tablespace Name The temporary tablespace associated with the iProcess Engine database schema and users.
Note: This menu item is only displayed if you are installing a new iProcess Engine. It is not displayed if you are upgrading an existing installation.
Temporary Tablespace Name The tablesizes configuration file to be used to size the iProcess Engine database schema.
Note: This menu item is only displayed if you are installing a new iProcess Engine. It is not displayed if you are upgrading an existing installation.
Table 29 Configuration Items in the Oracle Database Connection and Account Details Menu (Cont’d)
Item Description
TIBCO iProcess Engine for UNIX Installation

Database Connection and Account Details Menu | 167
DB2 Database Connection and Account Details MenuThe Oracle Database Connection and Account Details menu is shown below:
Table 30 lists the configuration items in the iProcess Email Plug-in Configuration Menu.
Installing TIBCO iProcess Engine version 11.3.0
DB2 Database Connection and Account Details
1 ) DB2 Database Alias : DB2917
2 ) iProcess Engine DB Schema Owner Name : swpro
3 ) iProcess Engine DB Schema Owner Password :
4 ) iProcess Engine DB User Name : swuser
5 ) iProcess Engine DB User Password :
6 ) Support Unicode Encoding : N
Enter number of item to edit, (C)ontinue, (B)ack or (Q)uit:
Table 30 Configuration Items in the Oracle Database Connection and Account Details Menu
Item Description
DB2 Database Alias Name The alias of the DB2 iProcess Engine database.
iProcess Engine DB Schema Owner Name The name of the DB2 user that owns the iProcess Engine database schema.
iProcess Engine DB Schema Owner Password
The password for the iProcess Engine database schema owner.
iProcess Engine DB User Name The name of the DB2 user that the iProcess Engine uses to access the iProcess Engine database schema. This user has the REFERENCES, SELECT, DELETE, and UPDATE permissions.
iProcess Engine DB User Password The password for the iProcess Engine database user.
Support Unicode Encoding Whether the iProcess database should support UTF-8 encoding.
TIBCO iProcess Engine for UNIX Installation

168 | Appendix C Configuration Menus for TIBCO iProcess Engine Installation
Checking DB Connectivity and UsersEdit the configuration items if needed and then enter C. The following prompt appears:
The installer automatically checks the following items listed in Table 31 to validate if it can create or upgrade the iProcess Engine database schema using the supplied information.
If the installer encounters any problems, it displays appropriate messages, error codes and/or further prompts. See:
— the relevant sections in Appendix C, Configuration Menus for TIBCO iProcess Engine Installation on page 114 for information about additional prompts on specific menu items.
— Appendix F, Troubleshooting on page 197 for more information about other messages and prompts that may occur.
After the installer checks the information listed in Table 31, the Configuration Summary page is display. Review the Configuration Summary and then start to install iProcess Engine. For detailed information, see Installing TIBCO iProcess Engine in Console Mode, step 6.
Checking DB connectivity and users ...
Table 31 Database-related Information Checklist
Item DBA-level access Required See
NLS_LANG value No Configuring Oracle Character Set Support on page 79
UNDO tablespace No Creating an Oracle UNDO Tablespace on page 81
TAF Yes Setting up Oracle Transparent Application Failover (TAF) on page 76
OPEN_CURSORS value Yes Configuring Oracle OPEN_CURSORS on page 78
Advanced Queuing configuration Yes
Note: If you do not have the name and password of an Oracle DBA account, the installer cannot check the TAF, OPEN_CURSORS, and Advance Queuing configuration, so you need to check these items manually before proceeding.
TIBCO iProcess Engine for UNIX Installation

Oracle DB TNS Identifier | 169
Oracle DB TNS IdentifierDatabase Connection and Account Details Menu
Description The TNS identifier of the Oracle instance that the iProcess Engine will connect to.
Value
Notes You must define a TNS identifier if you intend to use:
• a TNS connection to the Oracle database (whether it is remote or local).
• Oracle’s Transparent Application Failover (TAF) feature (whether the Oracle instance is local or remote).
For more information about TAF and how to set up and configure it, see Setting up Oracle Transparent Application Failover (TAF) on page 76 and your Oracle documentation.
If a TNS identifier is not defined, the iProcess Engine will attempt to connect to the local Oracle instance, and TAF will not be supported.
Installation Type New Installation Upgrade Installation
Value The appropriate Oracle Service Name that is the entry in the $ORACLE_HOME/network/admin/tnsnames.ora file for the Oracle instance that you want to use to hold the iProcess Engine tables.
The current Oracle connect string taken from the fifth entry (after the fourth backslash character) on line 9 of the $SWDIR/etc/staffpms file.
You cannot change this value.
Default Value Either:
—the value of the TWO_TASK environment variable, if that variable is defined in the installing user’s environment.
—no value, if TWO_TASK is not defined.
Note: The TNS Identifier is the only menu item that can be blank (that is, have no value). If this menu item has a value and you want to reset it to have no value, you must type Ctrl + D at the prompt to enter a new value.
Node Cluster If you are installing a slave server, the TNS identifier used must connect to the same database, using the same users, as the master server.
TIBCO iProcess Engine for UNIX Installation

170 | Appendix C Configuration Menus for TIBCO iProcess Engine Installation
Control FileKeyword
IIPEI_DBIDSTR
TIBCO iProcess Engine for UNIX Installation

Oracle DB Administrator Name | 171
Oracle DB Administrator NameDatabase Connection and Account Details Menu
Description The Oracle username that the iProcess Engine should use when it needs to connect to the database as a database administrator (DBA).
Value
Notes The account used must have the necessary permissions to create tablespaces and users in the Oracle instance, that is, it must either have the DBA role assigned or it must have access to the Oracle Data Dictionary.
If you are upgrading, you only need to supply the Oracle DBA name (and password) if you want the installer to perform certain checks to validate that it can upgrade the iProcess Engine database schema. The installer performs these checks when you enter C on the Oracle Database Connection and Account Details Menu, and needs DBA-level access to check the following items:
• TAF (see Setting up Oracle Transparent Application Failover (TAF) on page 76).
• OPEN_CURSORS value (see Configuring Oracle OPEN_CURSORS on page 78).
• Advanced Queuing configuration (see Disabling Oracle Flashback Query on page 80).
If you do not need the installer to check these items, or you do not have access to the Oracle DBA name and/or password, you can leave this field blank. (Make sure that you have checked these items manually before running the installer.) The upgrade can still continue but these checks will be skipped.
Installation Type New Installation Upgrade Installation
Value An Oracle account name that:
—has DBA-level access to the Oracle database.
—is between 1 and 30 characters long.
—contains only lowercase, alphanumeric, and underscore (_) characters.
—has a leading alphanumeric character.
Either:
—the current Oracle DBA account name, or
—no value (that is, leave the field blank)
Default Value system N/A
Node Cluster If you are installing a slave server, the name used must connect to the same database as the master server.
If you are upgrading a slave server, the name used must connect to the same database as the master server.
TIBCO iProcess Engine for UNIX Installation
172 | Appendix C Configuration Menus for TIBCO iProcess Engine Installation
Control FileKeyword
IPEI_DBANAME
TIBCO iProcess Engine for UNIX Installation
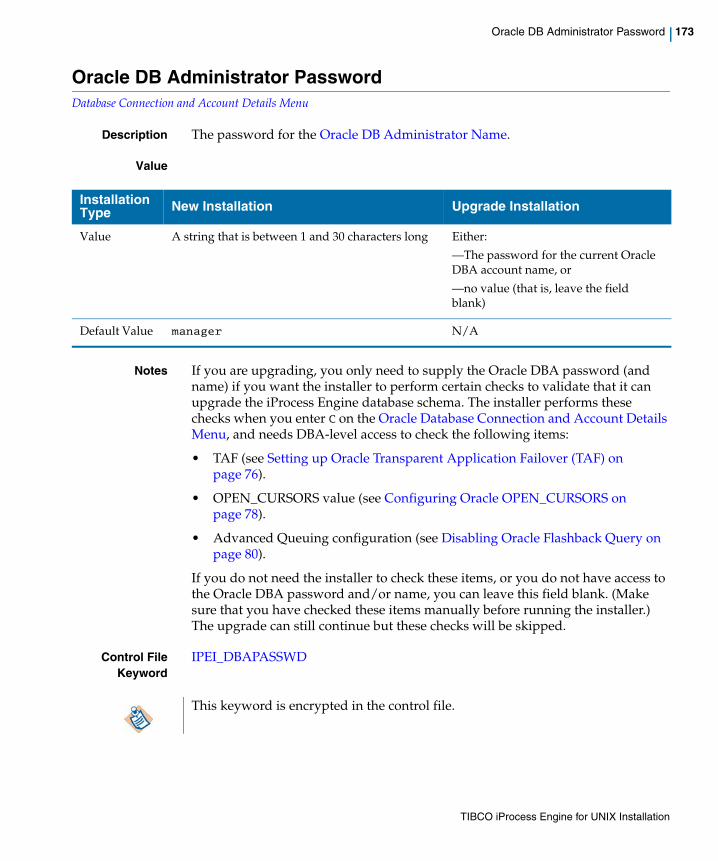
Oracle DB Administrator Password | 173
Oracle DB Administrator PasswordDatabase Connection and Account Details Menu
Description The password for the Oracle DB Administrator Name.
Value
Notes If you are upgrading, you only need to supply the Oracle DBA password (and name) if you want the installer to perform certain checks to validate that it can upgrade the iProcess Engine database schema. The installer performs these checks when you enter C on the Oracle Database Connection and Account Details Menu, and needs DBA-level access to check the following items:
• TAF (see Setting up Oracle Transparent Application Failover (TAF) on page 76).
• OPEN_CURSORS value (see Configuring Oracle OPEN_CURSORS on page 78).
• Advanced Queuing configuration (see Disabling Oracle Flashback Query on page 80).
If you do not need the installer to check these items, or you do not have access to the Oracle DBA password and/or name, you can leave this field blank. (Make sure that you have checked these items manually before running the installer.) The upgrade can still continue but these checks will be skipped.
Control FileKeyword
IPEI_DBAPASSWD
Installation Type New Installation Upgrade Installation
Value A string that is between 1 and 30 characters long Either:
—The password for the current Oracle DBA account name, or
—no value (that is, leave the field blank)
Default Value manager N/A
This keyword is encrypted in the control file.
TIBCO iProcess Engine for UNIX Installation

174 | Appendix C Configuration Menus for TIBCO iProcess Engine Installation
DB2 Database Alias NameDatabase Connection and Account Details Menu
Description The alias of the DB2 iProcess Engine database.
Value
Control FileKeyword
IPEI_DBIDSTR
Installation Type New Installation Upgrade Installation
Value The alias of the DB2 iProcess Engine database you created before running the installer (see page 84). The alias must:
be between 1 and 8 characters long.
contain only alphanumeric and underscore (_) characters.
have a leading alphanumeric character.
The current DB2 iProcess Engine database alias.
You cannot change this value.
Default Value None
Node Cluster If you are installing a slave server, the alias used must be the same number used on the master server.
TIBCO iProcess Engine for UNIX Installation
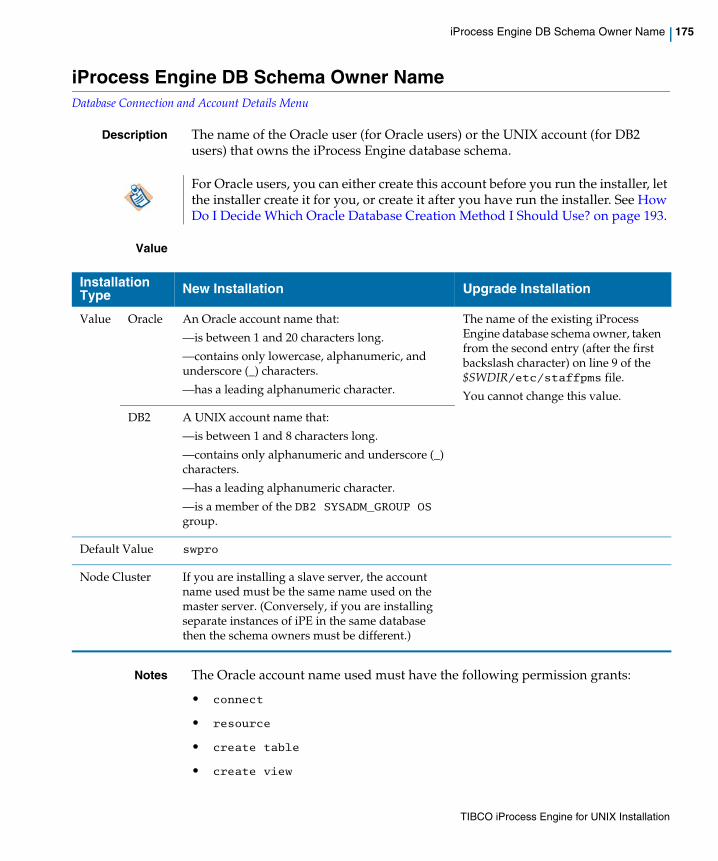
iProcess Engine DB Schema Owner Name | 175
iProcess Engine DB Schema Owner NameDatabase Connection and Account Details Menu
Description The name of the Oracle user (for Oracle users) or the UNIX account (for DB2 users) that owns the iProcess Engine database schema.
Value
Notes The Oracle account name used must have the following permission grants:
• connect
• resource
• create table
• create view
For Oracle users, you can either create this account before you run the installer, let the installer create it for you, or create it after you have run the installer. See How Do I Decide Which Oracle Database Creation Method I Should Use? on page 193.
Installation Type New Installation Upgrade Installation
Value Oracle An Oracle account name that:
—is between 1 and 20 characters long.
—contains only lowercase, alphanumeric, and underscore (_) characters.
—has a leading alphanumeric character.
The name of the existing iProcess Engine database schema owner, taken from the second entry (after the first backslash character) on line 9 of the $SWDIR/etc/staffpms file.
You cannot change this value.
DB2 A UNIX account name that:
—is between 1 and 8 characters long.
—contains only alphanumeric and underscore (_) characters.
—has a leading alphanumeric character.
—is a member of the DB2 SYSADM_GROUP OS group.
Default Value swpro
Node Cluster If you are installing a slave server, the account name used must be the same name used on the master server. (Conversely, if you are installing separate instances of iPE in the same database then the schema owners must be different.)
TIBCO iProcess Engine for UNIX Installation

176 | Appendix C Configuration Menus for TIBCO iProcess Engine Installation
• AQ_ADMINISTRATOR_ROLE
• query rewrite
• execute on dbms_aqadm
• execute on dbms_aq
If the account name you specify does not already exist, you are prompted to create it when you continue from the Oracle Database Connection and Account Details Menu. For example:
If you enter:
• Y, the user is flagged for creation and the new username is displayed in the menu.
• N, the old name is shown.
Control FileKeyword
IPEI_DBSONAME
If you create this Oracle account before running the installer (see Creating Oracle Accounts and Tablespaces on page 69), you must also associate the account with the data tablespace (see Data Tablespace Name on page 182) and temporary tablespace (see Temporary Tablespace Name on page 184) to be used by the iProcess Engine.
iProcess Engine DB Schema Owner (swpro001) does not exist.Create user (Y/N - default N): Y
The account is not actually created until the installer performs the installation. See Performing the Installation on page 69.
TIBCO iProcess Engine for UNIX Installation

iProcess Engine DB Schema Owner Password | 177
iProcess Engine DB Schema Owner PasswordDatabase Connection and Account Details Menu
Description The password for the iProcess Engine DB Schema Owner Name account.
Value
Notes The default value is displayed on initial installation. Once you change this default, asterisks are subsequently displayed.
Control FileKeyword
IPEI_DBSOPASSWD
Installation Type New Installation Upgrade Installation
Value Oracle A string that is between 1 and 30 characters long.
The password for the current iProcess Engine DB Schema Owner Name account.
The value is displayed as a string of asterisks.
DB2 A string that is between 1 and 24 characters long.
Default Value
Oracle staffpro1
DB2 None
This keyword is encrypted in the control file.
TIBCO iProcess Engine for UNIX Installation

178 | Appendix C Configuration Menus for TIBCO iProcess Engine Installation
iProcess Engine DB User NameDatabase Connection and Account Details Menu
Description The name of the Oracle user (for Oracle users) or the UNIX account (for DB2 users) that the iProcess Engine uses to access the iProcess Engine database schema. This user has the the iProcess Engine uses to access the iProcess Engine database schema with the REFERENCES, SELECT, DELETE, and UPDATE permissions
Value
Notes The Oracle account name used must have the following permission grants:
• connect
• resource
• create table
• AQ_ADMINISTRATOR_ROLE
You can either create this account before you run the installer, let the installer create it for you, or create it after you have run the installer. See How Do I Decide Which Oracle Database Creation Method I Should Use? on page 193.
Installation Type New Installation Upgrade Installation
Value Oracle An Oracle account name that:
—is between 1 and 30 characters long.
—contains only lowercase, alphanumeric, and underscore (_) characters.
—has a leading alphanumeric character.
The name of the existing iProcess Engine database user account, taken from the third entry (after the second backslash character) on line 9 of the $SWDIR/etc/staffpms file.
You cannot change this value.
DB2 A UNIX account name that:
—is between 1 and 8 characters long.
—contains only alphanumeric and underscore (_) characters.
—has a leading alphanumeric character.
Default Value swuser
Node Cluster If you are installing a slave server, the account name used must be the same name used on the master server.
TIBCO iProcess Engine for UNIX Installation

iProcess Engine DB User Name | 179
• execute on dbms_aq
If the account name you specify does not already exist, you are prompted to create it when you continue from the Oracle Database Connection and Account Details Menu. For example:
If you enter:
• Y, the user is flagged for creation and the new username is displayed in the menu.
• N, the old name is shown.
Control FileKeyword
IPEI_DBUSRNAME
If you create this Oracle account before running the installer (see Creating Oracle Accounts and Tablespaces on page 69), you must also associate the account with the data tablespace (see Data Tablespace Name on page 182) and temporary tablespace (see Temporary Tablespace Name on page 184) to be used by the iProcess Engine.
iProcess Engine DB Schema Owner (swpro001) does not exist.Create user (Y/N - default N): Y
The account is not actually created until the installer performs the installation. See Performing the Installation on page 69.
TIBCO iProcess Engine for UNIX Installation

180 | Appendix C Configuration Menus for TIBCO iProcess Engine Installation
iProcess Engine DB User PasswordDatabase Connection and Account Details Menu
Description The password for the iProcess Engine DB User Name account.
Value
Notes The default value is displayed on initial installation. Once you change this default, asterisks are subsequently displayed.
Control FileKeyword
IPEI_DBUSRPASSWD
Installation Type New Installation Upgrade Installation
Value Oracle A string that is between 1 and 30 characters long.
The password for the current iProcess Engine DB Schema User Name account.
The value is displayed as a string of asterisks.DB2 A string that is between 1 and 24 characters
long.
Default Value
Oracle swuser1
DB2 None
This keyword is encrypted in the control file.
TIBCO iProcess Engine for UNIX Installation

Support Unicode Encoding | 181
Support Unicode EncodingDatabase Connection and Account Details Menu
Description To determine whether the iProcess database should support Unicode (UTF-8) encoding.
Value Either:
• Y, if you want the iProcess database to support Unicode encoding, or
• N, if you do not want the iProcess database to support Unicode.
Notes The default value is displayed on initial installation.
Control FileKeyword
IPEI_SUPPORTUNICODE
If you want TIBCO iProcess Engine to support Unicode (UTF-8) encoding, run the following command to set the NLS_LANG property before running TIBCO iProcess Engine:export NLS_LANG=Language_Territory.AL32UTF8
For example, export NLS_LANG=American_America.AL32UTF8
TIBCO iProcess Engine for UNIX Installation

182 | Appendix C Configuration Menus for TIBCO iProcess Engine Installation
Data Tablespace NameDatabase Connection and Account Details Menu
Description The tablespace in which to create the iProcess Engine database schema.
Value
Notes This menu item is not displayed if you are upgrading an existing iProcess Engine.
By default, all iProcess Engine tables, indexes, and Oracle AQ queues are stored in this tablespace.
If you are using pre-created multiple tablespaces (see Change the Default Data or Temporary Tablespace on page 73), you should specify the name of one of the pre-created tablespaces.
If you are using Oracle Real Application Clusters (RAC) you must create all required tablespaces on the RAC shared storage device before running the installer. If you do not do this, the installer creates the data file for the tablespace in the $ORACLE_HOME/dbs directory.
For Oracle users, you can either create this account before you run the installer, let the installer create it for you, or create it after you have run the installer. See How Do I Decide Which Oracle Database Creation Method I Should Use? on page 193.
Installation Type New Installation Upgrade Installation
Value A name that:
—is between 1 and 30 characters long.
—contains only lowercase, alphanumeric, and underscore (_) characters.
—has a leading alphanumeric character.
The name of the existing default database tablespace, taken from the $SWDIR/etc/tablespace file.You cannot change this value.
Default Value STAFFWAR
Node Cluster If you are installing a slave server, the tablespace name used must be the same name used on the master server.
TIBCO iProcess Engine for UNIX Installation

Data Tablespace Name | 183
If the tablespace you specify does not already exist, you are prompted to create it when you continue from the Oracle Database Connection and Account Details Menu. For example:
If you enter:
• N, the menu is re-displayed and the old name is shown.
• Y, the tablespace is flagged for creation and you are prompted to enter two further pieces of information:
a. the tablespace size. For example:
Either enter a value or press ENTER to accept the default value.
b. the tablespace location. For example:
Either enter a directory name or press ENTER key to accept the default location, which is $ORACLE_HOME/dbs.
See Also Configuring the Oracle Schema on page 70.
Control FileKeyword
IPEI_DBTABLESPC
Data Tablespace Name (sw961) does not existcreate Tablespace (Y/N - default N): Y
Enter size (in Mb) for tablespace sw961 [default: 50 Mb]:
Enter location for tablespace sw961 files [default "" ]:
The tablespace is not actually created until the installer performs the installation. See Performing the Installation on page 69. The name of the database tablespace is saved in the $SWDIR/etc/tablespace file.
TIBCO iProcess Engine for UNIX Installation

184 | Appendix C Configuration Menus for TIBCO iProcess Engine Installation
Temporary Tablespace NameDatabase Connection and Account Details Menu
Description The temporary tablespace associated with the iProcess Engine database schema and users.
Value
Notes This menu item is not displayed if you are upgrading an existing iProcess Engine.
If the tablespace you specify does not already exist, you are prompted to create it when you continue from the Oracle Database Connection and Account Details Menu. For example:
If you enter:
• N, the menu is re-displayed and the old name is shown.
• Y, the tablespace is flagged for creation and you are prompted to enter two further pieces of information:
For Oracle users, you can either create this account before you run the installer, let the installer create it for you, or create it after you have run the installer. See How Do I Decide Which Oracle Database Creation Method I Should Use? on page 193.
Installation Type New Installation Upgrade Installation
Value A name that:
—is between 1 and 30 characters long.
—contains only lowercase, alphanumeric, and underscore (_) characters.
—has a leading alphanumeric character.
The name of the existing temporary tablespace.You cannot change this value.
Default Value TEMP
Node Cluster If you are installing a slave server, the tablespace name used must be the same name used on the master server.
Temporary Tablespace Name (temp2) does not existcreate Tablespace (Y/N - default N): Y
TIBCO iProcess Engine for UNIX Installation

Temporary Tablespace Name | 185
a. the tablespace size. For example:
Either enter a value or press ENTER to accept the default value.
b. the tablespace location. For example:
Either enter a directory name or press ENTER key to accept the default location, which is $ORACLE_HOME/dbs.
See Also Configuring the Oracle Schema on page 70.
Control FileKeywords
IPEI_DBTEMPSPC
Enter size (in Mb) for tablespace temp2 [default: 25 Mb]:
Enter location for tablespace temp2 files [default "" ]:
The tablespace is not actually created until the installer performs the installation. See Performing the Installation on page 69.
TIBCO iProcess Engine for UNIX Installation

186 | Appendix C Configuration Menus for TIBCO iProcess Engine Installation
Schema Sizing ConfigurationDatabase Connection and Account Details Menu
Description The tablesizes configuration file to be used to size the iProcess Engine database schema.
Value
Notes This menu item is not displayed if you are upgrading an existing iProcess Engine.
If you want to change the default value, edit the Schema Sizing Configuration entry. The following menu is displayed:
Enter the appropriate value for the tablesizes configuration file that you want to use:
• Small—use the default tablesizes file (see The Default iProcess Engine Schema Configuration on page 70). This creates a small database requiring at least 50 MB of disk space.
• Medium —use the alternative tablesizes.med file supplied in the installation directory (see Use an Alternative tablesizes File on page 74). This creates a medium-sized database, requiring at least 2.5 GB of disk space.
Installation Type New Installation Upgrade Installation
Value One of the following:
1—(Small)
2—(Medium)
3—(Large)
4—(Custom)
The name of the existing Tablesizes configuration file.
You cannot change this value.
Default Value 1
Node Cluster If you are installing a slave server, the option chosen must be the same as the one used on the master server.
Select from the list Schema Sizing Configuration
1 ) Small2 ) Medium3 ) Large4 ) Custom
Enter selection, or Q(uit):
TIBCO iProcess Engine for UNIX Installation
Schema Sizing Configuration | 187
• Large—use the alternative tablesizes.large file supplied in the installation directory (see Use an Alternative tablesizes File on page 74). This creates a large-sized database, requiring at least 65 GB of disk space.
• Custom—use a customized version of the tablesize file that you have already created (see Use an Alternative tablesizes File on page 74). This creates a database sized to your specific requirements.
If you enter 4 to use a Custom configuration file, the following prompt is displayed:
Enter the full path name of your customized tablesizes file.
See Also Configuring the Oracle Schema on page 70.
Control FileKeywords
IPEI_DBSCHEMA_SIZE, IPEI_DBSCHEMA_CTRLFILE
Enter name of configuration file (full path):
TIBCO iProcess Engine for UNIX Installation
188 | Appendix D Usage Profiles for Tablesizes Files
Appendix D Usage Profiles for Tablesizes Files
This appendix shows the usage profiles that have been used to calculate the values used in the alternative tablesizes files, tablesizes.med and tablesizes.large.
Topics
• tablesizes.med File, page 189
• tablesizes.large File, page 190
In each file, the sizing of the initial extent is 10% of the maximum estimated tablesize. This means that as the table grows it will expand to fill 10 database extents.
TIBCO iProcess Engine for UNIX Installation

tablesizes.med File | 189
tablesizes.med File
This file defines tablesizes for a medium-sized installation. If you use this file, you must reserve at least 2.5 GB of disk space for the database.
Statistic Value
Number of registered iProcess Engine users 200
Number of iProcess Engine groups 10
Number of user-defined attributes 4
Average number of groups a user belongs to 5
Average number of case starts per day 2000
Average number of days before a case is purged 90
Average number of days before a case is closed 30
Average percentage of steps processed via queues 90%
Average number of assigned fields per case 50
Average number of steps processed per case 10
Average number of CustAudits per case 20
Average number of sub-procedure calls per case 3
Average size of field name 10
Average size of field value 50
TIBCO iProcess Engine for UNIX Installation

190 | Appendix D Usage Profiles for Tablesizes Files
TIBCO iProcess Engine for UNIX Installation
tablesizes.large File
This file defines tablesizes for a large-sized installation. If you use this file, you must reserve at least 65 GB of disk space for the database.
Statistic Value
Number of registered iProcess Engine users 9500
Number of iProcess Engine groups 500
Number of user-defined attributes 12
Average number of groups a user belongs to 15
Average number of case starts per day 20000
Average number of days before a case is purged 90
Average number of days before a case is closed 30
Average percentage of steps processed via queues 90%
Average number of assigned fields per case 150
Average number of steps processed per case 25
Average number of CustAudits per case 50
Average number of sub-procedure calls per case 8
Average size of field name 12
Average size of field value 50
Frequently Asked Questions | 191
Appendix E Frequently Asked Questions
This appendix lists some frequently asked questions.
Topics
• Does the iProcess Engine Database Support UTF-8?, page 192
• How Do I Decide Which Oracle Database Creation Method I Should Use?, page 193
• How Long Will an Upgrade Take?, page 194
• How Do I Upgrade TIBCO EMS?, page 195
TIBCO iProcess Engine for UNIX Installation

192 | Appendix E Frequently Asked Questions
Does the iProcess Engine Database Support UTF-8?
TIBCO iProcess Suite supports Unicode (UTF-8) character encoding natively within its component products. When you install TIBCO iProcess Engine, you have the option to specify whether or not you want your iProcess database to support UTF-8. See Support Unicode Encoding on page 181.
Determining whether or not to support UTF-8 is a major decision. Before you start the installation process, TIBCO recommends that you consult the chapter "Using the TIBCO iProcess Suite in a Multilingual Environment" in TIBCO iProcess Engine: Architecture Guide. This sets out the advantages and costs of using UTF-8, both in new installations, and when upgrading existing iProcess installations.
TIBCO iProcess Engine for UNIX Installation

How Do I Decide Which Oracle Database Creation Method I Should Use? | 193
How Do I Decide Which Oracle Database Creation Method I Should
Use?
When you install a new iProcess Engine, you can use one of the following methods to create the iProcess Engine tablespaces, users, and schema in the Oracle database:
• Let the installer create the iProcess Engine tablespaces, users, and schema. TIBCO recommends using this method wherever possible. However, to do this, you must have access to an Oracle DB Administrator account when you run the installer.
• Get an Oracle DB Administrator to create the iProcess Engine tablespaces and users before you run the installer, as a pre-installation task (see Creating Oracle Accounts and Tablespaces on page 69). Using this method allows you to run the installer without access to an Oracle DB Administrator account.
You can choose the method which best suits the operational, organizational, and security requirements of your particular installation scenario. When you run the installer, you specify which method you are using on the Oracle Database Installation Method Menu on page 163.
TIBCO iProcess Engine for UNIX Installation

194 | Appendix E Frequently Asked Questions
How Long Will an Upgrade Take?
Upgrading to Version 11.3 can involve significant changes to iProcess Engine data and data structures. The upgrade process is therefore complex, and can take a significant amount of time to complete if the system being upgraded has a large amount of case data.
TIBCO cannot provide an estimate of how long the upgrade will take because of the number of customer-specific factors that could have an impact, and the complexity of their interaction, for example, the amount of data in your system, the configuration of your database system, and the hardware setup you are running.
TIBCO therefore strongly recommends that you test the upgrade before performing it on your target system, either on a representative production environment, or using a copy of your production system. This will allow you to determine how long the upgrade is likely to take, and to identify any specific factors that may affect the success or duration of the upgrade. If you require further advice or assistance on this, contact TIBCO Support.
One factor that can significantly impact the duration of an upgrade is enabling case data normalization.
Case data normalization is a feature that is used to make case data searching more efficient, and therefore faster, by enabling the database to do simple string comparisons instead of type conversions.
If you are upgrading from an iProcess Engine version that does not already have case data normalization enabled, you can choose to enable case data normalization when you run the installer (see Enable Case Data Normalization on page 136).
If you choose to enable case data normalization, the upgrade process has to create a value for the field_value_N column for every row in the case_data table. (This column holds a normalized value of the field_value contents.) Because the upgrade process has to perform this operation on every case of every procedure in the database, this operation can take a significant amount of time if there are large numbers of cases on the system.
TIBCO iProcess Engine for UNIX Installation

How Do I Upgrade TIBCO EMS? | 195
How Do I Upgrade TIBCO EMS?
TIBCO iProcess Engine version 10.6.x was shipped with a version of TIBCO EMS that contains a security vulnerability (EMS 4.4.1 or earlier). See the following link for more information:
http://www.tibco.com/resources/mk/ems_security_advisory_20080115.txt
Updating EMSThe EMS installer does not currently offer an upgrade option. The install process removes any queues, topics, factories, or other configurations that have been applied to the EMS server and restores to the default configurations.
In order to back up and restore all your existing EMS queues, factories, topics, queue messages, topic messages, and configurations, use the following process:
1. Stop your EMS applications.
2. Stop tibemsd and tibemsadmin.
3. Make a copy of all .conf files and .db files found under the ems/bin directory and its sub-directories.
4. Uninstall the old EMS version.
5. Install the new EMS version.
6. Replace your .conf files and .db files from step 3.
For more detailed instructions on how to install and uninstall EMS, see TIBCO Enterprise Message Service Installation.
It is important that this configuration is maintained because iProcess features, such as IAPJMS, Technology Plug-ins, and Web Services Plug-in, rely on various EMS queues and topics to function correctly.
IAPJMS-specific Procedure
With a basic iProcess Engine installation, EMS can be used by the IAPJMS process for activity publication.
In order to fix the vulnerability EMS must be updated to version 4.4.2 or later. It is therefore fixed by upgrading EMS to the version required for TIBCO iProcess Engine Version 11.3.
TIBCO iProcess Engine for UNIX Installation

196 | Appendix E Frequently Asked Questions
After the upgrade, IAPJMS will continue to function. IAPJMS uses client JAR files found in the EMS install directory to connect to EMS. As long as the configuration is correct, no other update should be needed.
TIBCO iProcess Web Services Plug-in Specific Procedure
TIBCO iProcess Web Services Plug-in can be configured to use EMS as the JMS provider. In this case, an additional step is required after the EMS upgrade.
Update the tibjms.jar file stored under the $SWDIR/jetty-6.1.1/jms/tibco directory to the new version supplied with the updated EMS server.
TIBCO iProcess Technology Plug-in Specific Procedure
TIBCO iProcess Technology Plug-in uses EMS to communicate with the BusinessWorks Engine when iProcess Engine > BusinessWorks EAI steps are being defined. The following additional step is required after EMS has been updated:
Update the tibjms.jar file stored under the $SWDIR/jmslib/ems directory to the new version supplied with the updated EMS server.
If the new EMS is installed in a different folder to the old one (different versions have different default locations), then you will need to reconfigure the location of the EMS JAR files in $SWDIR/etc/iapjms_classpath.properties). See the entry: classpath.basedir.EMS=/opt/tibco/ems/5.1/lib
TIBCO iProcess Engine for UNIX Installation
Troubleshooting | 197
Appendix F Troubleshooting
This appendix describes how to deal with errors that you may encounter when installing the iProcess Engine.
Topics
• The Installer Cannot Find a Required Operating System Utility on the System, page 199
• The Installer Cannot Find a Required Operating System Utility on the Installing User’s PATH, page 200
• Files and Directories Under $SWDIR are Non-writable, page 201
• The Installer Cannot Access Oracle, page 202
• Installing on an Incorrect Platform or Database Version, page 203
• Installing on an Unvalidated Platform or Database Version, page 204
• Oracle DB Administrator Name is Incorrect, page 205
• No Oracle UNDO Tablespace, page 206
• Oracle TAF is Not Enabled, page 207
• Oracle Advanced Queuing is Either Not Installed or Not Configured Correctly, page 208
• Oracle OPEN_CURSORS Value Is Less Than 200, page 209
• Cannot Determine the DB2 Fenced User Name, page 210
• Errors Occur on Validating the Installation, page 211
• Restoring Your Original System if an Upgrade Fails, page 215
• Bad Username Or Password, page 216
• swrpcsvr Crashes When Starting iProcess Engine, page 217
If the information in this appendix does not help you resolve the problem, or if you are in any way unsure as to how to proceed, contact TIBCO Support for further assistance.
TIBCO iProcess Engine for UNIX Installation

198 | Appendix F Troubleshooting
• The Installer Fails with an "Unable to Open the File" Warning Dialog, page 218
• iProcess Engine Cannot Start, page 219
TIBCO iProcess Engine for UNIX Installation

The Installer Cannot Find a Required Operating System Utility on the System | 199
The Installer Cannot Find a Required Operating System Utility on
the System
ProblemDescription
When you run the installer, it checks to see if it can find all operating system utilities that it needs, either on the installing user’s PATH, or elsewhere on the system. If it cannot find a particular utility, the following message is displayed:
where UtilityName is the name of the missing utility.
The installer then exits.
AffectedDatabase
Oracle, DB2
What To Do To resolve this problem:
1. Make sure that the UtilityName utility is available on the system. Install it if required.
2. If necessary, update the installing user’s PATH to include the location where the UtilityName utility is installed.
3. Restart the installer.
See Also See your operating system documentation for more information.
ERROR: the OS utility 'UtilityName’ cannot be located, and is required for the TIBCO iProcess Engine installer to run.
TIBCO iProcess Engine for UNIX Installation

200 | Appendix F Troubleshooting
The Installer Cannot Find a Required Operating System Utility on
the Installing User’s PATH
ProblemDescription
When you run the installer, it checks to see if it can find all operating system utilities that it needs, either on the installing user’s PATH, or elsewhere on the system. If it cannot find a particular utility on the installing user’s PATH, the following message is displayed:
where UtilityName is the name of the missing utility, and UtilityLocation is the location where the installer has found it.
AffectedDatabase
Oracle, DB2
What To Do No specific action is required to resolve this problem, since the installer has found the utility it needs. Press ENTER to continue with the installation.
WARNING: utility UtilityName is not on the PATH, but has beenlocated as:UtilityLocationPress ENTER to continue.
TIBCO iProcess Engine for UNIX Installation

Files and Directories Under $SWDIR are Non-writable | 201
Files and Directories Under $SWDIR are Non-writable
ProblemDescription
When you run the installer to upgrade iProcess Engine and you are logged in as the background user, messages are displayed informing you that directories and files under $SWDIR cannot be written to.
For example:
AffectedDatabase
Oracle, DB2
What To Do To resolve this problem:
1. Enter Y to see the list of directories and files that the installer cannot write to. If the list includes iProcess Engine system directories or files, you will need to correct the problem before continuing with the upgrade. However, if the list consists of only user data files (for example, .xfr procedure files, user-written utilities, or similar user data files), you can continue, as these will not impact the upgrade.
2. The following prompt is displayed:
3. If you are certain that the non-writable files and directories will not impact the success of the upgrade, enter Y to continue.
4. If you need to correct the problem before continuing:
a. Enter N to quit the installer.
b. Make sure that all directories and files in and under $SWDIR are writable. See Setting Up the iProcess Engine System Directory on page 65 for more information about how to do this.
c. Restart the installer.
There is 1 directory and 98 files under $SWDIRthat cannot be written by the current user.
When running an upgrade as a non-root user, all directories and files that are located under $SWDIR must be writable by the non-root user.
Do you want to view the non-writable directories/files ? (Y/N - default Y):
ERROR: non-writable directories/files under $SWDIR.Please correct and re-run the upgrade.Continue with upgrade anyway? (Y/N - default N):
TIBCO iProcess Engine for UNIX Installation
202 | Appendix F Troubleshooting
The Installer Cannot Access Oracle
ProblemDescription
When you run the installer and you are using a 10.2.0.4 Oracle database, the following message is displayed:
If you are logged in as the background user, the installer now exits (with a return code of 1).
This error message indicates that the 10.2.0.4 Oracle database server home has been installed with permissions that do not allow the iProcess Engine to access the libraries that it needs in the $ORACLE_HOME directory.
AffectedDatabase
Oracle
What To Do To resolve this problem, you need to modify the default permissions on the 10.2.0.4 Oracle database server home by running the changePerm.sh script.
If you are logged in as the root user, the installer can run this script for you. The following prompt is displayed after the error message:
Enter Y to run the changePerm.sh script.
If you are logged in as the background user, you need to run the changePerm.sh script manually and restart the installer.
For more information about this issue, and how to use the changePerm.sh script, see the following Oracle references:
• Oracle Database Patch Set Notes, 10g Release 2 (10.2.0.4) for your hardware platform.
• OracleMetalink document 356850.1.
The Oracle system is not accessible, it may be possible to fix
this problem by running the $ORACLE_HOME/install/changePerm.sh script.
Do you wish to run this script now (Y/N - default N):
TIBCO iProcess Engine for UNIX Installation

Installing on an Incorrect Platform or Database Version | 203
Installing on an Incorrect Platform or Database Version
ProblemDescription
If you try to install or upgrade the iProcess Engine using a distribution set intended for a different operating system and/or database, the installer detects this and displays an appropriate warning message. For example:
The installer then exits.
AffectedDatabase
Oracle, DB2
What To Do Obtain the correct distribution set for your operating system and/or database, and then restart the installer.
This distribution is for SunOS, but is being run on HP-UX.
TIBCO iProcess Engine for UNIX Installation

204 | Appendix F Troubleshooting
Installing on an Unvalidated Platform or Database Version
ProblemDescription
If you try to install or upgrade the iProcess Engine using an operating system and/or database version that TIBCO has not validated for use with this version of the iProcess Engine, the installer detects this and displays an appropriate warning message. For example:
AffectedDatabase
Oracle, DB2
What To Do The following prompt is displayed immediately after the error message:
If you want to continue with the installation, enter Y.
If you do not want to continue with the installation, enter N. The following message is displayed:
The installer then exits. Upgrade your operating system and/or database to a validated version (see Basic System Requirements on page 8) and then restart the installer.
The version of the OS you are running (SunOS 5.7) is not a validated platform for this version of the TIBCO iProcessEngine.
TIBCO recommends that you install iProcess Engine using a validated platform and database version. See Basic System Requirements on page 8 for details of these platforms and versions.
Do you wish to continue with this install (Y/N - default N):
The required pre-requisite conditions for this install have NOTbeen met. Terminating the TIBCO iProcess Engine install.
If you are installing iProcess Engine silently, these message are not displayed. Instead, a warning is displayed to the screen, but you do not need to respond. The silent installation continues. See Installing TIBCO iProcess Engine in Silent Mode on page 38.
TIBCO iProcess Engine for UNIX Installation

Oracle DB Administrator Name is Incorrect | 205
Oracle DB Administrator Name is Incorrect
ProblemDescription
When you enter C to continue from the Oracle Database Connection and Account Details Menu, the installer performs a series of checks to validate that it can create the iProcess Engine database schema using the supplied information.
The installer displays the following message if it detects that the Oracle DB Administrator Name account that you specify does not have the necessary permissions:
The Oracle Database Connection and Account Details Menu is then re-displayed.
AffectedDatabase
Oracle
What To Do To resolve this problem:
1. Either modify the permissions for the specified Oracle DB Administrator Name, or specify a different account to use.
2. Enter C to continue from the Oracle Database Connection and Account Details Menu.
The Oracle user UserName is not an Oracle DB Administrator.
TIBCO iProcess Engine for UNIX Installation
206 | Appendix F Troubleshooting
No Oracle UNDO Tablespace
ProblemDescription
The installer displays the following error message when you enter C to continue from the Oracle Database Connection and Account Details Menu:
The Oracle Database Connection and Account Details Menu is then re-displayed.
The installer cannot create (or upgrade) the iProcess Engine database schema without an UNDO tablespace.
AffectedDatabase
Oracle
What To Do To resolve this problem:
1. Make sure that the Oracle database is running and that your computer has a network connection to it.
2. Make sure that an Oracle UNDO tablespace exists for the iProcess Engine database. Create one if it does not. See:
— your Oracle documentation for more information on how to create and manage UNDO tablespaces.
— Disabling Oracle Flashback Query on page 80 for more information about Oracle’s flashback query feature and its impact on the amount of UNDO tablespace you require.
3. Enter C to continue from the Oracle Database Connection and Account Details Menu.
This Oracle instance does not have an UNDO tablespace defined.You cannot continue the installation without an UNDO tablespace.
TIBCO iProcess Engine for UNIX Installation

Oracle TAF is Not Enabled | 207
Oracle TAF is Not Enabled
ProblemDescription
The installer displays one of the following error messages when you enter C to continue from the Oracle Database Connection and Account Details Menu:
The Oracle Database Connection and Account Details Menu is then re-displayed.
AffectedDatabase
Oracle
What To Do If you want to enable TAF before continuing with the installation:
1. Make sure that the Oracle database is running and that your computer has a network connection to it.
2. Enable TAF for the specified Oracle DB TNS Identifier.
3. Enter C to continue from the Oracle Database Connection and Account Details Menu.
If you want to continue with the installation without enabling TAF, enter Y.
Error Meaning
This Oracle connection does NOT have TAF enabled, you can still continue, but if this installation is to be used in a UAT or Production environment you MUST enable TAF (Failover).
Continue without TAF enabled?
The installer has connected to the Oracle database and determined that Oracle TAF is not enabled for the specified Oracle DB TNS Identifier.
Unable to determine if TAF is enabled for this Oracle connection.
The installer has attempted to connect to the Oracle database to determine if Oracle TAF is enabled, but has been unable to do so.
TIBCO strongly recommends the use of Oracle TAF with the iProcess Engine to provide 24*7 resilient operation.
If you are deploying the iProcess Engine for user acceptance testing (UAT), or to a production environment, you must enable TAF.
TIBCO iProcess Engine for UNIX Installation

208 | Appendix F Troubleshooting
Oracle Advanced Queuing is Either Not Installed or Not Configured Correctly
ProblemDescription
The installer displays one of the following error messages when you enter C to continue from the Oracle Database Connection and Account Details Menu:
The Oracle Database Connection and Account Details Menu is then re-displayed.
Oracle Advanced Queuing provides the message queuing and event handling systems used by the iProcess Engine. The iProcess Engine will not work if Oracle Advanced Queuing is not installed.
AffectedDatabase
Oracle
What To Do To resolve this problem:
1. Make sure that the Oracle database is running and that your computer has a network connection to it.
2. Make sure that Oracle Advanced Queuing is installed. Refer to your Oracle documentation for more information about installing Advanced Queuing.
3. Enter C to continue from the Oracle Database Connection and Account Details Menu.
Error Meaning
This Oracle connection does NOT have Advanced Queuing installed.
Oracle Advanced Queuing (AQ) is required for TIBCO iProcess Engine install.
The installer has connected to the Oracle database and determined that Oracle Advanced Queuing is not installed for the specified Oracle DB TNS Identifier.
A test of Oracle AQ system failed with the following errors: errors
The installer has connected to the Oracle database to determine if Oracle Advanced Queuing is installed, but the test has failed with the specified Oracle errors.
Failed to determine whether Oracle AQ is correctly installed
The installer has attempted to connect to the Oracle database to determine if Oracle Advanced Queuing is installed, but has been unable to do so.
TIBCO iProcess Engine for UNIX Installation

Oracle OPEN_CURSORS Value Is Less Than 200 | 209
Oracle OPEN_CURSORS Value Is Less Than 200
ProblemDescription
The installer displays one of the following error messages when you enter C to continue from the Oracle Database Connection and Account Details Menu:
The Oracle Database Connection and Account Details Menu is then displayed again.
AffectedDatabase
Oracle
What To Do To resolve this problem:
1. Make sure that the Oracle database is running and that your computer has a network connection to it.
2. Make sure that Oracle Advanced Queuing is installed. See your Oracle documentation for more information about installing Advanced Queuing.
3. Enter C to continue from the Oracle Database Connection and Account Details Menu.
Error Meaning
WARNING: This Oracle instance has the OPEN_CURSORS parameter configured as 150. It should be set to 200 or greater before running this install of TIBCO iProcess Engine.
The installer has connected to the Oracle database and determined that its OPEN_CURSORS parameter is configured to a value less than 200.
Failed to get the current value of the Oracle OPEN_CURSORS parameter.Oracle returned the following text : error
The installer has attempted to connect to the Oracle database to determine the value of the Oracle OPEN_CURSORS parameter, but has been unable to do so.
TIBCO iProcess Engine for UNIX Installation

210 | Appendix F Troubleshooting
Cannot Determine the DB2 Fenced User Name
ProblemDescription
The installer displays the following error message and prompt when you enter C to continue from the DB2 Database Connection and Account Details Menu:
The DB2 Database Connection and Account Details Menu is then re-displayed.
The installer has been unable to determine the name of the UNIX account that is used to run fenced stored procedures from the DB2 database, either because it cannot contact the database, or because the database is remote.
AffectedDatabase
DB2
What To Do To resolve this problem:
1. Make sure that the DB2 database is running and that your computer has a network connection to it.
2. Enter the name of the UNIX account that is used to run fenced stored procedures, or press ENTER to accept the default value.
ERROR: Cannot determine the DB2 Fenced User name - check this isconfigured.
If this is a remote DB2 installation, enter the remote FencedUser name (Return if none) :
Fenced stored procedures are run outside of the address space used by the DB2 database, to protect the database if a problem occurs in the stored procedure.
TIBCO iProcess Engine for UNIX Installation

Errors Occur on Validating the Installation | 211
Errors Occur on Validating the Installation
ProblemDescription
The installer displays one or more error messages when it attempts to validate that the installation has succeeded (see Installing TIBCO iProcess Engine in Console Mode, step 7). For example:
AffectedDatabase
Oracle, DB2
What To Do To resolve this problem, locate the error message in the following table and follow the instructions there.
ERROR: process information unobtainable.
Error Message What to Do...
Process information unobtainable.
The installer cannot access the process_config table in the database schema (using the $SWDIR/util/swadm show_processes command), which appears to be incomplete or corrupt.
To resolve this problem:
1. Remove iProcess Engine (see Chapter 3, Uninstalling iProcess Engine, on page 51) or, if you were upgrading, restore the origi-nal version (see Restoring Your Original System if an Upgrade Fails on page 215).
2. Reinstall iProcess Engine.
TIBCO iProcess Engine for UNIX Installation

212 | Appendix F Troubleshooting
Sentinel service port (portNumber) already used, in state state
Another application appears to be using the portNumber service port selected for use by the indicated Sentinel (either Watcher or Worker) Process Sentinel process.
To resolve this error:
1. Restart the UNIX system and check if these ports are still in use. (You can use the system netstat utilities to check which ports are in use.)
2. If the problem persists, assign different port numbers to be used by the iProcess Engine watcher and worker process sentinels by editing the relevant entries in the /etc/services file. The entries are:
nodename_worker nnn/tcp nodename_watcher mmm/tcp
where:
— node_name is the nodename of this iProcess Engine.
— nnn and mmm must be unique numbers in the services file depending on what port numbers are already being used on the server.
For example:
staffw_nod1_watcher 1500/tcpstaffw_nod1_worker 1501/tcp
Failed to find Sentinel entry for this node in the /etc/services file.
The installer has been unable to update the /etc/services file with the port number to be used by the indicated Sentinel (either Watcher or Worker) Process Sentinel process.
This is not a fatal error, as the iProcess Engine can still run without these entries. However, TIBCO recommends that you manually add the port numbers used by the iProcess Engine watcher and worker process sentinels to the /etc/services file before starting the iProcess Engine.
See the entry above for details of the /etc/services file entries you need to add.
Error Message What to Do...
TIBCO iProcess Engine for UNIX Installation

Errors Occur on Validating the Installation | 213
RPC Number <RPCNum> is already registered with the system's portmapper.
The RPCNum RPC service number selected for iProcess Workspaces to use to communicate with this iProcess Engine appears to be in use by another application.
To resolve this problem:
1. Restart the UNIX system and check if the indicated RPCNum is still in use. (You can use the system rpcinfo utility to see which numbers are registered with the portmapper.)
2. If the problem persists, change the RPCNum used by the iPro-cess Engine by editing line 11 of the $SWDIR/swdefs file.
See TIBCO iProcess Engine Administrator’s Guide for more information about the $SWDIR/swdefs file.
Failed to get nodename from Database.
The installer cannot read the iProcess Engine nodename from the nodes table in the database (using the $SWDIR/util/plist -n command).
To resolve this problem:
1. Check that the database is running.
2. Check that the iProcess Engine database users (see iProcess Engine DB Schema Owner Name on page 175) have been cre-ated, and that these users can successfully connect to the data-base using the login credentials given during the installation process. (See Changing Database Connection Passwords on page 214 for more information about how to change the pass-words used by these users to connect to the database.)
Nodenames from Database (nodeName1) and swdefs file (nodeName) do not match.
To resolve this problem:
1. Uninstall the iProcess Engine (see Chapter 3, Uninstalling iPro-cess Engine on page 51), or, if you were upgrading, restore the original version (see Restoring Your Original System if an Upgrade Fails on page 215).
2. Reinstall the iProcess Engine.
If the procedures described above do not resolve the problem, ontact TIBCO Support for assistance.
Error Message What to Do...
TIBCO iProcess Engine for UNIX Installation

214 | Appendix F Troubleshooting
Changing Database Connection Passwords
If you need to change the passwords that the iProcess Engine DB Schema Owner Name account or the iProcess Engine DB User Name account use to connect to the database, follow this procedure:
1. Log in as the iProcess Engine Administration User Name.
2. Enter the following command:
The following prompt is displayed:
3. Enter the new password for the iProcess Engine DB Schema Owner Name account. The following prompt is displayed:
4. Enter the new password for the iProcess Engine DB User Name account.
The swconfig utility terminates and displays the following message:
5. Change the corresponding Oracle (for Oracle users) or UNIX (for DB2 users) passwords for these users. See your Oracle or UNIX documentation for more information about how to do this.
$SWDIR\util\swconfig -u
Please enter a new Background User Password, ('Q' to quit):
Please enter a new Foreground User Password, ('Q' to quit):
Now log onto the Database and change the passwords.
TIBCO iProcess Engine for UNIX Installation

Restoring Your Original System if an Upgrade Fails | 215
Restoring Your Original System if an Upgrade Fails
ProblemDescription
In some circumstances, it is possible that an upgrade can fail and leave the iProcess Engine system in an unusable condition. If this happens:
1. You must restore your original system to its previous condition before you can either use it or attempt to upgrade it again.
2. If you suspect that:
— the error was caused by an external factor (for example, a system hardware failure while the upgrade was in progress), you can, if you wish, attempt to upgrade the system again.
— the error was connected with the upgrade process itself (for example, the installer crashes for unknown reasons), TIBCO recommends that you do not attempt to upgrade again. Instead, you should contact TIBCO Support for further assistance.
AffectedDatabase
Oracle, DB2
What to Do To restore your original system:
1. Restore the backup of the iProcess Engine database schema that you made earlier (see Backing up TIBCO iProcess Engine Database Schema on page 58). See your database documentation for more information about how to do this.
2. Make sure that $SWDIR points to the correct iProcess Engine installation, then delete the $SWDIR directory and its contents. (If you are not logged in as root, you should ask the root user to perform this task.)
3. Restore the backup of the $SWDIR directory structure that you made earlier (see Backing Up the TIBCO iProcess Engine File System on page 56). See your operating system documentation for more information about how to do this.
4. Use the following command to grant appropriate permissions on all files in and under $SWDIR:
Your original system should now be restored to the same state it was in before you attempted to upgrade it.
$SWDIR/bin/fixperms -r -y $SWDIR
TIBCO iProcess Engine for UNIX Installation

216 | Appendix F Troubleshooting
Bad Username Or Password
ProblemDescription
The following message:
is returned on a new installation, even though the username and password specified have been validated as correct.
AffectedDatabase
Oracle, DB2
What to Do Check the permissions of etc/swrpcudp. The setuid flag should be set for both the owner and the group:
-r-sr-s--- 1 root staffwar 484904 Mar 26 2008 swrpcudp
If this is set correctly, also check the mount options of the file system, using the mount -p command. This example shows the mount output for a /tibco file system:
dev/vgtibco/lvtibco /tibco vxfs nosuid,ioerror=mwdisable,delaylog,nodatainlog,dev=40010001 0 0
The file system in this case has disabled the ability of iProcess Engine to use setuid, which is a requirement for password verification on UNIX. Remount the file system without the nosuid limitation to enable iProcess logins with password verification.
L024 SECURITY ERROR: Bad username or password
TIBCO iProcess Engine for UNIX Installation

swrpcsvr Crashes When Starting iProcess Engine | 217
swrpcsvr Crashes When Starting iProcess Engine
ProblemDescription
When starting iProcess Engine using JRE 1.6 with Solaris 10 on a Sun Txxxx server, the swrpcsvr crashes with the following, or similar, messages in the log files:
In the rpc_tcp_li01.log file,
In the swjmx_java.log file,
AffectedDatabase
Oracle
What to Do To resolve this problem, disable the hardware cryptography using the command:
cryptoadm stop
For more information on hardware cryptography, see your operation system documentation.
j004: ==>start_class(com.staffware.core.swjmx.library.IProcessSwjmx, 2)
SWJMXUtils - Creating RMI registry
TIBCO iProcess Engine for UNIX Installation

218 | Appendix F Troubleshooting
The Installer Fails with an "Unable to Open the File" Warning Dialog
ProblemDescription
When you run the installer, a Warning dialog is displayed with the following message:
You can only click the OK button to this dialog, and when you do so, the installer exits.
This error occurs if you do not have the correct Oracle database and/or client releases (along with any additionally required patches or components) installed on the computer where you are trying to install the iProcess Engine.
The fil.dll file requires the Oracle client .dll files to be able to connect to the Oracle database. When the installer starts up, it tries to load the fil.dll file, which in turn attempts to load the required Oracle .dll files. If these files cannot be found, the error occurs.
What to Do Install the required Oracle database and(or) client release on the computer where you are trying to install the iProcess Engine. See Oracle Database on page 15 for more information.
Unable to open the file: fil.dll
Make sure that you have also installed any additional patches or components that are required.
TIBCO iProcess Engine for UNIX Installation

iProcess Engine Cannot Start | 219
iProcess Engine Cannot Start
ProblemDescription
When you install iProcess Engine with the Oracle database 11g, if the Oracle server and client have been installed on an x86 platform and a non-x86 platform respectively, iProcess Engine cannot start after installation.
This is an Oracle defect. See Oracle Documentation 1306192.1 for more information.
What to Do To resolve this problem, complete the following steps:
1. Log in to SQLPlus using the system account.
2. Run the following statement:
alter system set events='10867 trace name context forever, level
1';
TIBCO iProcess Engine for UNIX Installation

220 | Appendix F Troubleshooting
TIBCO iProcess Engine for UNIX Installation

| 221
Index
A
Activity Publishing and Work Queue Delta Publication 12
Additional System Requirements 9
B
Basic System Requirements 8
C
Connecting with TIBCO Resources xviiicustomer support xviii
D
DBA 3Delete
Staffware 52Direct Connection Requirements for Oracle 16
G
Generating a Response File 38
H
How to Access All TIBCO Documentation xviii
How to Join TIBCOmmunity xviii
I
Installation ModeGUI Mode 2Silent Mode 2
Installation Modes 2installation modes
console mode 2Installation Overview 2Installation Requirements 8Installation Types 3Installing the iProcess Engine on a Node Cluster 7Installing TIBCO iProcess Engine 29Installing TIBCO iProcess Engine in GUI Mode 33Installing TIBCO iProcess Engine in Silent Mode 38iProcess Engine Architecture
Node Cluster 6iProcess Files-install Owner 3iProcess Schema-install Owner 3iProcess Server Manager 11
J
Java Runtime Environment (JRE) 13
L
Log Files 21
TIBCO iProcess Engine for UNIX Installation

222 | Index
O
Oracle Database 15Organization Roles 6Other TIBCO Product Documentation xiv
P
Performing an Installation in Silent Mode 39Post-Installation 47Pre-Installation 30Pre-Installation Tasks 53
R
Related Documentation xivroot 3
S
SQL Server Database 18support, contacting xviiiSupported Databases 15swdel 51
T
technical support xviiiThird-Party Documentation xvTIBCO iProcess Engine Documentation xivTIBCO_HOME xvi, xviTNS Connection Requirements for Oracle 17Typographical Conventions xvi
U
Uninstalling TIBCO iProcess Engine 51Upgrade Performance and Timing 41Upgrade Requirements 20Upgrading iProcess Engine on a Node Cluster 7Upgrading TIBCO iProcess Engine 41
TIBCO iProcess Engine for UNIX Installation