Tib Adadb Examples
90
TIBCO ActiveMatrix® Adapter for Database Examples Software Release 6.1 November 2010
-
Upload
venkat-kuttua -
Category
Documents
-
view
68 -
download
2
Transcript of Tib Adadb Examples
TIBCO ActiveMatrix® Adapter for Database
ExamplesSoftware Release 6.1November 2010

Important Information
SOME TIBCO SOFTWARE EMBEDS OR BUNDLES OTHER TIBCO SOFTWARE. USE OF SUCH EMBEDDED OR BUNDLED TIBCO SOFTWARE IS SOLELY TO ENABLE THE FUNCTIONALITY (OR PROVIDE LIMITED ADD-ON FUNCTIONALITY) OF THE LICENSED TIBCO SOFTWARE. THE EMBEDDED OR BUNDLED SOFTWARE IS NOT LICENSED TO BE USED OR ACCESSED BY ANY OTHER TIBCO SOFTWARE OR FOR ANY OTHER PURPOSE.USE OF TIBCO SOFTWARE AND THIS DOCUMENT IS SUBJECT TO THE TERMS AND CONDITIONS OF A LICENSE AGREEMENT FOUND IN EITHER A SEPARATELY EXECUTED SOFTWARE LICENSE AGREEMENT, OR, IF THERE IS NO SUCH SEPARATE AGREEMENT, THE CLICKWRAP END USER LICENSE AGREEMENT WHICH IS DISPLAYED DURING DOWNLOAD OR INSTALLATION OF THE SOFTWARE (AND WHICH IS DUPLICATED IN LICENSE.PDF) OR IF THERE IS NO SUCH SOFTWARE LICENSE AGREEMENT OR CLICKWRAP END USER LICENSE AGREEMENT, THE LICENSE(S) LOCATED IN THE “LICENSE” FILE(S) OF THE SOFTWARE. USE OF THIS DOCUMENT IS SUBJECT TO THOSE TERMS AND CONDITIONS, AND YOUR USE HEREOF SHALL CONSTITUTE ACCEPTANCE OF AND AN AGREEMENT TO BE BOUND BY THE SAME.This document contains confidential information that is subject to U.S. and international copyright laws and treaties. No part of this document may be reproduced in any form without the written authorization of TIBCO Software Inc.TIB, TIBCO, TIBCO Adapter, Predictive Business, Information Bus, The Power of Now, TIBCO ActiveMatrix BusinessWorks, TIBCO Rendezvous, TIBCO Administrator, TIBCO Designer, TIBCO Runtime Agent, TIBCO Hawk, TIBCO Enterprise Message Service, TIBCO Designer Add-in for TIBCO Business Studio, TIBCO ActiveMatrix Service Grid, TIBCO ActiveMatrix Service Bus, TIBCO ActiveMatrix BusinessWorks Service Engine, and TIBCO Business Studio are either registered trademarks or trademarks of TIBCO Software Inc. in the United States and/or other countries.EJB, Java EE, J2EE, and all Java-based trademarks and logos are trademarks or registered trademarks of Sun Microsystems, Inc. in the U.S. and other countries.All other product and company names and marks mentioned in this document are the property of their respective owners and are mentioned for identification purposes only.THIS SOFTWARE MAY BE AVAILABLE ON MULTIPLE OPERATING SYSTEMS. HOWEVER, NOT ALL OPERATING SYSTEM PLATFORMS FOR A SPECIFIC SOFTWARE VERSION ARE RELEASED AT THE SAME TIME. SEE THE README.TXT FILE FOR THE AVAILABILITY OF THIS SOFTWARE VERSION ON A SPECIFIC OPERATING SYSTEM PLATFORM.THIS DOCUMENT IS PROVIDED “AS IS” WITHOUT WARRANTY OF ANY KIND, EITHER EXPRESS OR IMPLIED, INCLUDING, BUT NOT LIMITED TO, THE IMPLIED WARRANTIES OF MERCHANTABILITY, FITNESS FOR A PARTICULAR PURPOSE, OR NON-INFRINGEMENT.THIS DOCUMENT COULD INCLUDE TECHNICAL INACCURACIES OR TYPOGRAPHICAL ERRORS. CHANGES ARE PERIODICALLY ADDED TO THE INFORMATION HEREIN; THESE CHANGES WILL BE INCORPORATED IN NEW EDITIONS OF THIS DOCUMENT. TIBCO SOFTWARE INC. MAY MAKE IMPROVEMENTS AND/OR CHANGES IN THE PRODUCT(S) AND/OR THE PROGRAM(S) DESCRIBED IN THIS DOCUMENT AT ANY TIME.THE CONTENTS OF THIS DOCUMENT MAY BE MODIFIED AND/OR QUALIFIED, DIRECTLY OR INDIRECTLY, BY OTHER DOCUMENTATION WHICH ACCOMPANIES THIS SOFTWARE, INCLUDING BUT NOT LIMITED TO ANY RELEASE NOTES AND "READ ME" FILES.Copyright © 1999-2010 TIBCO Software Inc. ALL RIGHTS RESERVED.
TIBCO Software Inc. Confidential Information
| iii
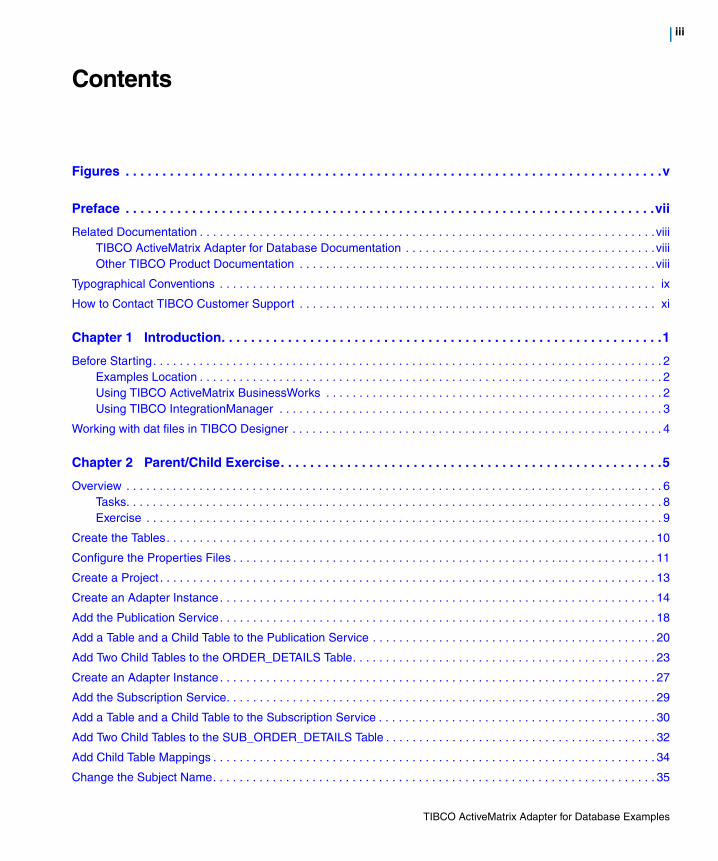
Contents
Figures . . . . . . . . . . . . . . . . . . . . . . . . . . . . . . . . . . . . . . . . . . . . . . . . . . . . . . . . . . . . . . . . . . . . . . . . .v
Preface . . . . . . . . . . . . . . . . . . . . . . . . . . . . . . . . . . . . . . . . . . . . . . . . . . . . . . . . . . . . . . . . . . . . . . . .vii
Related Documentation . . . . . . . . . . . . . . . . . . . . . . . . . . . . . . . . . . . . . . . . . . . . . . . . . . . . . . . . . . . . . . . . . . . . .viiiTIBCO ActiveMatrix Adapter for Database Documentation . . . . . . . . . . . . . . . . . . . . . . . . . . . . . . . . . . . . . .viiiOther TIBCO Product Documentation . . . . . . . . . . . . . . . . . . . . . . . . . . . . . . . . . . . . . . . . . . . . . . . . . . . . . .viii
Typographical Conventions . . . . . . . . . . . . . . . . . . . . . . . . . . . . . . . . . . . . . . . . . . . . . . . . . . . . . . . . . . . . . . . . . . ix
How to Contact TIBCO Customer Support . . . . . . . . . . . . . . . . . . . . . . . . . . . . . . . . . . . . . . . . . . . . . . . . . . . . . . xi
Chapter 1 Introduction. . . . . . . . . . . . . . . . . . . . . . . . . . . . . . . . . . . . . . . . . . . . . . . . . . . . . . . . . . . .1
Before Starting. . . . . . . . . . . . . . . . . . . . . . . . . . . . . . . . . . . . . . . . . . . . . . . . . . . . . . . . . . . . . . . . . . . . . . . . . . . . . 2Examples Location . . . . . . . . . . . . . . . . . . . . . . . . . . . . . . . . . . . . . . . . . . . . . . . . . . . . . . . . . . . . . . . . . . . . . . 2Using TIBCO ActiveMatrix BusinessWorks . . . . . . . . . . . . . . . . . . . . . . . . . . . . . . . . . . . . . . . . . . . . . . . . . . . 2Using TIBCO IntegrationManager . . . . . . . . . . . . . . . . . . . . . . . . . . . . . . . . . . . . . . . . . . . . . . . . . . . . . . . . . . 3
Working with dat files in TIBCO Designer . . . . . . . . . . . . . . . . . . . . . . . . . . . . . . . . . . . . . . . . . . . . . . . . . . . . . . . . 4
Chapter 2 Parent/Child Exercise. . . . . . . . . . . . . . . . . . . . . . . . . . . . . . . . . . . . . . . . . . . . . . . . . . . .5
Overview . . . . . . . . . . . . . . . . . . . . . . . . . . . . . . . . . . . . . . . . . . . . . . . . . . . . . . . . . . . . . . . . . . . . . . . . . . . . . . . . . 6Tasks. . . . . . . . . . . . . . . . . . . . . . . . . . . . . . . . . . . . . . . . . . . . . . . . . . . . . . . . . . . . . . . . . . . . . . . . . . . . . . . . . 8Exercise . . . . . . . . . . . . . . . . . . . . . . . . . . . . . . . . . . . . . . . . . . . . . . . . . . . . . . . . . . . . . . . . . . . . . . . . . . . . . . 9
Create the Tables. . . . . . . . . . . . . . . . . . . . . . . . . . . . . . . . . . . . . . . . . . . . . . . . . . . . . . . . . . . . . . . . . . . . . . . . . . 10
Configure the Properties Files . . . . . . . . . . . . . . . . . . . . . . . . . . . . . . . . . . . . . . . . . . . . . . . . . . . . . . . . . . . . . . . . 11
Create a Project . . . . . . . . . . . . . . . . . . . . . . . . . . . . . . . . . . . . . . . . . . . . . . . . . . . . . . . . . . . . . . . . . . . . . . . . . . . 13
Create an Adapter Instance. . . . . . . . . . . . . . . . . . . . . . . . . . . . . . . . . . . . . . . . . . . . . . . . . . . . . . . . . . . . . . . . . . 14
Add the Publication Service. . . . . . . . . . . . . . . . . . . . . . . . . . . . . . . . . . . . . . . . . . . . . . . . . . . . . . . . . . . . . . . . . . 18
Add a Table and a Child Table to the Publication Service . . . . . . . . . . . . . . . . . . . . . . . . . . . . . . . . . . . . . . . . . . . 20
Add Two Child Tables to the ORDER_DETAILS Table. . . . . . . . . . . . . . . . . . . . . . . . . . . . . . . . . . . . . . . . . . . . . . 23
Create an Adapter Instance. . . . . . . . . . . . . . . . . . . . . . . . . . . . . . . . . . . . . . . . . . . . . . . . . . . . . . . . . . . . . . . . . . 27
Add the Subscription Service. . . . . . . . . . . . . . . . . . . . . . . . . . . . . . . . . . . . . . . . . . . . . . . . . . . . . . . . . . . . . . . . . 29
Add a Table and a Child Table to the Subscription Service . . . . . . . . . . . . . . . . . . . . . . . . . . . . . . . . . . . . . . . . . . 30
Add Two Child Tables to the SUB_ORDER_DETAILS Table . . . . . . . . . . . . . . . . . . . . . . . . . . . . . . . . . . . . . . . . . 32
Add Child Table Mappings . . . . . . . . . . . . . . . . . . . . . . . . . . . . . . . . . . . . . . . . . . . . . . . . . . . . . . . . . . . . . . . . . . . 34
Change the Subject Name. . . . . . . . . . . . . . . . . . . . . . . . . . . . . . . . . . . . . . . . . . . . . . . . . . . . . . . . . . . . . . . . . . . 35
TIBCO ActiveMatrix Adapter for Database Examples
iv | Contents
Export the Project . . . . . . . . . . . . . . . . . . . . . . . . . . . . . . . . . . . . . . . . . . . . . . . . . . . . . . . . . . . . . . . . . . . . . . . . . 36
Start the Adapters and Insert Data into the Database . . . . . . . . . . . . . . . . . . . . . . . . . . . . . . . . . . . . . . . . . . . . . 37
Stop the Adapters and Clean Up . . . . . . . . . . . . . . . . . . . . . . . . . . . . . . . . . . . . . . . . . . . . . . . . . . . . . . . . . . . . . 39
Chapter 3 Request-Response Service Examples . . . . . . . . . . . . . . . . . . . . . . . . . . . . . . . . . . . . 41
Request-Response Exercise. . . . . . . . . . . . . . . . . . . . . . . . . . . . . . . . . . . . . . . . . . . . . . . . . . . . . . . . . . . . . . . . . 42Overview . . . . . . . . . . . . . . . . . . . . . . . . . . . . . . . . . . . . . . . . . . . . . . . . . . . . . . . . . . . . . . . . . . . . . . . . . . . . 42Required Platforms and Software . . . . . . . . . . . . . . . . . . . . . . . . . . . . . . . . . . . . . . . . . . . . . . . . . . . . . . . . . 42Tasks . . . . . . . . . . . . . . . . . . . . . . . . . . . . . . . . . . . . . . . . . . . . . . . . . . . . . . . . . . . . . . . . . . . . . . . . . . . . . . . 42Exercise . . . . . . . . . . . . . . . . . . . . . . . . . . . . . . . . . . . . . . . . . . . . . . . . . . . . . . . . . . . . . . . . . . . . . . . . . . . . . 43
RPC Standard Operation Support Exercise . . . . . . . . . . . . . . . . . . . . . . . . . . . . . . . . . . . . . . . . . . . . . . . . . . . . . 52Overview . . . . . . . . . . . . . . . . . . . . . . . . . . . . . . . . . . . . . . . . . . . . . . . . . . . . . . . . . . . . . . . . . . . . . . . . . . . . 52Required Platforms and Software . . . . . . . . . . . . . . . . . . . . . . . . . . . . . . . . . . . . . . . . . . . . . . . . . . . . . . . . . 52Tasks . . . . . . . . . . . . . . . . . . . . . . . . . . . . . . . . . . . . . . . . . . . . . . . . . . . . . . . . . . . . . . . . . . . . . . . . . . . . . . . 52Exercise . . . . . . . . . . . . . . . . . . . . . . . . . . . . . . . . . . . . . . . . . . . . . . . . . . . . . . . . . . . . . . . . . . . . . . . . . . . . . 53
RPC Custom Operation Support Exercise . . . . . . . . . . . . . . . . . . . . . . . . . . . . . . . . . . . . . . . . . . . . . . . . . . . . . . 62Overview . . . . . . . . . . . . . . . . . . . . . . . . . . . . . . . . . . . . . . . . . . . . . . . . . . . . . . . . . . . . . . . . . . . . . . . . . . . . 62Required Platforms and Software . . . . . . . . . . . . . . . . . . . . . . . . . . . . . . . . . . . . . . . . . . . . . . . . . . . . . . . . . 62Tasks . . . . . . . . . . . . . . . . . . . . . . . . . . . . . . . . . . . . . . . . . . . . . . . . . . . . . . . . . . . . . . . . . . . . . . . . . . . . . . . 62Exercise . . . . . . . . . . . . . . . . . . . . . . . . . . . . . . . . . . . . . . . . . . . . . . . . . . . . . . . . . . . . . . . . . . . . . . . . . . . . . 63
Chapter 4 TIBCO ActiveMatrix BusinessWorks: Processing a Sales Order . . . . . . . . . . . . . . . 71
Example Description . . . . . . . . . . . . . . . . . . . . . . . . . . . . . . . . . . . . . . . . . . . . . . . . . . . . . . . . . . . . . . . . . . . . . . . 72
Setup the Example . . . . . . . . . . . . . . . . . . . . . . . . . . . . . . . . . . . . . . . . . . . . . . . . . . . . . . . . . . . . . . . . . . . . . . . . 73
Test the Example. . . . . . . . . . . . . . . . . . . . . . . . . . . . . . . . . . . . . . . . . . . . . . . . . . . . . . . . . . . . . . . . . . . . . . . . . . 75
Expected Results . . . . . . . . . . . . . . . . . . . . . . . . . . . . . . . . . . . . . . . . . . . . . . . . . . . . . . . . . . . . . . . . . . . . . . . . . 76
Run the Database Clean up Script . . . . . . . . . . . . . . . . . . . . . . . . . . . . . . . . . . . . . . . . . . . . . . . . . . . . . . . . . . . . 77
TIBCO ActiveMatrix Adapter for Database Examples
| v
Figures
Figure 1 Parent/Child Exercise, Publisher Side . . . . . . . . . . . . . . . . . . . . . . . . . . . . . . . . . . . . . . . . . . . . . . . . 7
Figure 2 Parent/Child Exercise, Subscriber Side . . . . . . . . . . . . . . . . . . . . . . . . . . . . . . . . . . . . . . . . . . . . . . . 8
TIBCO ActiveMatrix Adapter for Database Examples

vi | Figures
TIBCO ActiveMatrix Adapter for Database Examples
| vii
Preface
TIBCO ActiveMatrix Adapter for Database software is a bidirectional gateway between databases and applications configured for the TIBCO environment. The software supports both publish-subscribe and request-response interactions. This manual provides a a hands-on introduction to the software.
Topics
• Related Documentation, page viii
• Typographical Conventions, page ix
• How to Contact TIBCO Customer Support, page xi
TIBCO ActiveMatrix Adapter for Database Examples
viii | Related Documentation
Related Documentation
This section lists documentation resources you may find useful.
TIBCO ActiveMatrix Adapter for Database DocumentationThe following documents form the TIBCO ActiveMatrix Adapter for Database documentation set:
• TIBCO ActiveMatrix Adapter for Database Concepts— Read this manual to gain an understanding of adapters in general that you can apply to the various tasks you may undertake.
• TIBCO ActiveMatrix Adapter for Database Installation— Read this manual to learn how to install TIBCO ActiveMatrix Adapter for Database.
• TIBCO ActiveMatrix Adapter for Database Configuration and Deployment— This manual explains how to create and configure adapter projects. Information on deploying adapter projects is also included.
• TIBCO ActiveMatrix Adapter for Database Examples— Read this manual for additional information about new features, closed and open issues.
• TIBCO ActiveMatrix Adapter for Database Release Notes — Read this manual for additional information about new features, closed and open issues.
Other TIBCO Product DocumentationYou may find it useful to read the documentation for the following TIBCO products.
• TIBCO Designer™
• TIBCO Administrator™
• TIBCO ActiveMatrix BusinessWorks™
• TIBCO Rendezvous®
• TIBCO Enterprise Message Service™
• TIBCO Hawk®
• TIBCO Adapter™ SDK
• TIBCO Runtime Agent™
TIBCO ActiveMatrix Adapter for Database Examples
Preface | ix
Typographical Conventions
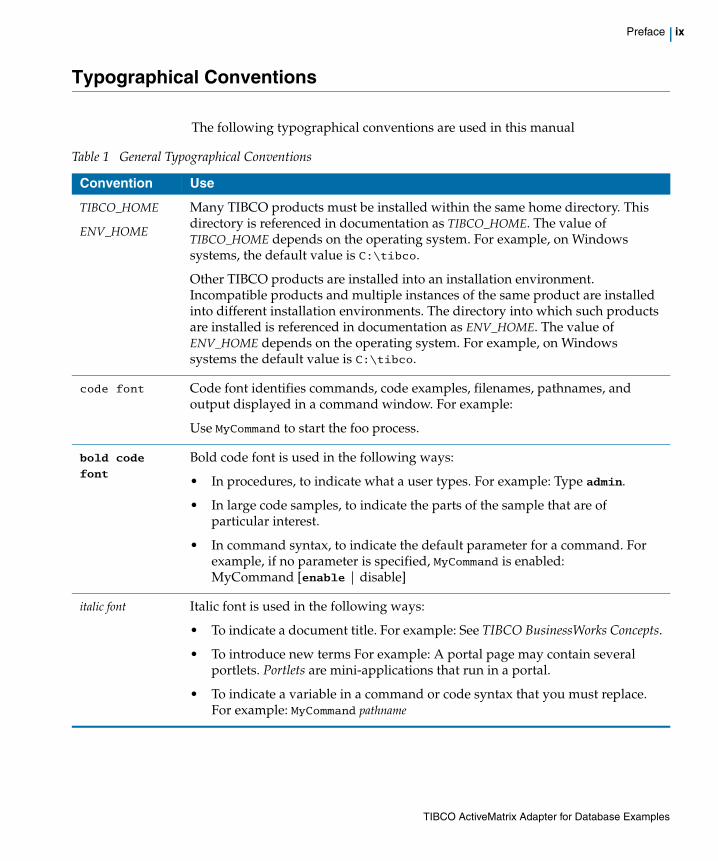
The following typographical conventions are used in this manual
Table 1 General Typographical Conventions
Convention Use
TIBCO_HOME
ENV_HOME
Many TIBCO products must be installed within the same home directory. This directory is referenced in documentation as TIBCO_HOME. The value of TIBCO_HOME depends on the operating system. For example, on Windows systems, the default value is C:\tibco.
Other TIBCO products are installed into an installation environment. Incompatible products and multiple instances of the same product are installed into different installation environments. The directory into which such products are installed is referenced in documentation as ENV_HOME. The value of ENV_HOME depends on the operating system. For example, on Windows systems the default value is C:\tibco.
code font Code font identifies commands, code examples, filenames, pathnames, and output displayed in a command window. For example:
Use MyCommand to start the foo process.
bold code
font Bold code font is used in the following ways:
• In procedures, to indicate what a user types. For example: Type admin.
• In large code samples, to indicate the parts of the sample that are of particular interest.
• In command syntax, to indicate the default parameter for a command. For example, if no parameter is specified, MyCommand is enabled: MyCommand [enable | disable]
italic font Italic font is used in the following ways:
• To indicate a document title. For example: See TIBCO BusinessWorks Concepts.
• To introduce new terms For example: A portal page may contain several portlets. Portlets are mini-applications that run in a portal.
• To indicate a variable in a command or code syntax that you must replace. For example: MyCommand pathname
TIBCO ActiveMatrix Adapter for Database Examples
x | Typographical Conventions
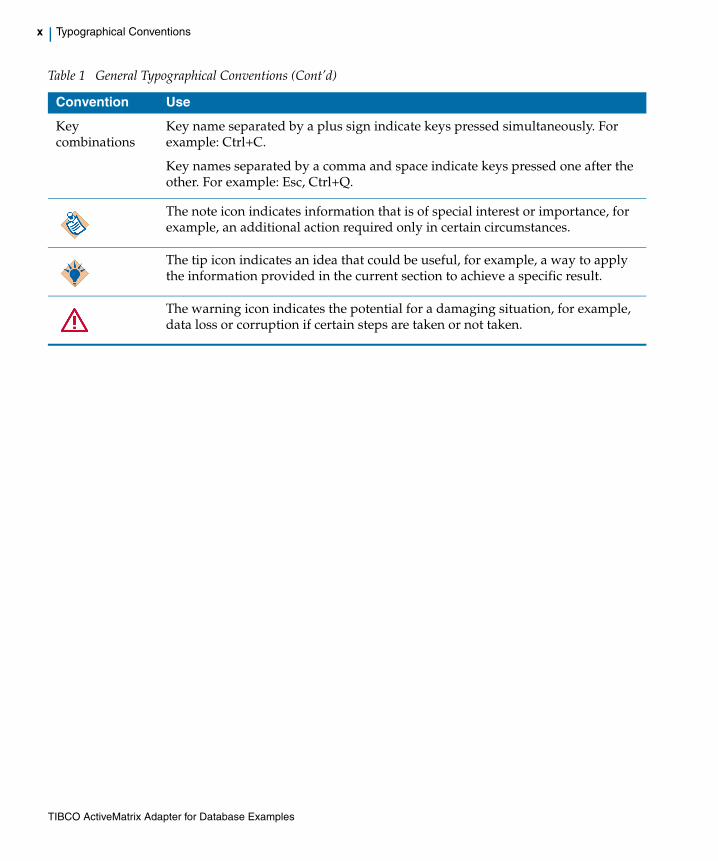
Key combinations
Key name separated by a plus sign indicate keys pressed simultaneously. For example: Ctrl+C.
Key names separated by a comma and space indicate keys pressed one after the other. For example: Esc, Ctrl+Q.
The note icon indicates information that is of special interest or importance, for example, an additional action required only in certain circumstances.
The tip icon indicates an idea that could be useful, for example, a way to apply the information provided in the current section to achieve a specific result.
The warning icon indicates the potential for a damaging situation, for example, data loss or corruption if certain steps are taken or not taken.
Table 1 General Typographical Conventions (Cont’d)
Convention Use
TIBCO ActiveMatrix Adapter for Database Examples
Preface | xi
How to Contact TIBCO Customer Support
For comments or problems with this manual or the software it addresses, please contact TIBCO Support as follows.
• For an overview of TIBCO Support, and information about getting started with TIBCO Support, visit this site:
http://www.tibco.com/services/support
• If you already have a valid maintenance or support contract, visit this site:
https://support.tibco.com
Entry to this site requires a user name and password. If you do not have a user name, you can request one.
TIBCO ActiveMatrix Adapter for Database Examples

xii | How to Contact TIBCO Customer Support
TIBCO ActiveMatrix Adapter for Database Examples
| 1
Chapter 1 Introduction
This chapter lists the prerequisite steps to complete before starting the adapter examples.
Topics
• Before Starting, page 2
• Working with dat files in TIBCO Designer, page 4
TIBCO ActiveMatrix Adapter for Database Examples
2 | Chapter 1 Introduction
Before Starting
Before performing any of these exercises, make sure that TIBCO ActiveMatrix Adapter for Database is installed according to the procedures in the TIBCO ActiveMatrix Adapter for Database Installation Guide. These procedures include creating a database account for the adapter and setting the ODBC data source, among other things.
You should be familiar with using TIBCO Designer to open and close projects and drag and drop resources; see the TIBCO Designer User’s Guide for more information. That document also describes the multiple file format used by TIBCO Designer, and converting to and from the .dat file format used by the run-time adapter. The TIBCO Designer User’s Guide is available from TIBCO Designer by clicking the Help>Designer Help menu choice.
Examples LocationThe examples are in the following location:
<install-path>\tibco\adapter\adadb\<version_number>\demo
Using TIBCO ActiveMatrix BusinessWorksIf you are using the adapter with TIBCO ActiveMatrix BusinessWorks, the following software must be installed to run the examples. Refer to the readme.txt for the supported versions of the following software.
• TIBCO Runtime Agent
• TIBCO ActiveMatrix BusinessWorks
• TIBCO ActiveMatrix Adapter for Database
• Supported database. (See the TIBCO ActiveMatrix Adapter for Database Installation guide.)
• TIBCO Enterprise Message Service 4.x (if you are using the JMS transport)
The TIBCO Enterprise Message Service server must be running and accessible to the machine on which the adapter is installed.
TIBCO ActiveMatrix Adapter for Database Examples
Before Starting | 3
Using TIBCO IntegrationManagerIf you are using the adapter with TIBCO IntegrationManager, the following software must be installed to run the examples.Refer to TIBCO ActiveMatrix Adapter for Database readme.txt for the supported versions of the following software.
• TIBCO Runtime Agent
• TIBCO IntegrationManager
• TIBCO Administrator
• TIBCO ActiveMatrix Adapter for Database
• Supported database. (See the TIBCO ActiveMatrix Adapter for Database Installation Guide.)
• TIBCO Enterprise Message Service 4.x. (if you are using the JMS transport)
If you are using TIBCO Administrator , you deploy by editing the adapter’s properties files and start and stop the adapter on the command line. The TIBCO IntegrationManager examples are deployed using this method.
The TIBCO Enterprise Message Service server must be running and accessible to the machine on which the adapter is installed.
TIBCO ActiveMatrix Adapter for Database Examples
4 | Chapter 1 Introduction
Working with dat files in TIBCO Designer
You cannot directly open a dat file in TIBCO Designer and make modifications to the configurations. To be able to do this, you need to carry out the following steps:
1. Convert the dat file to a multi-file project.
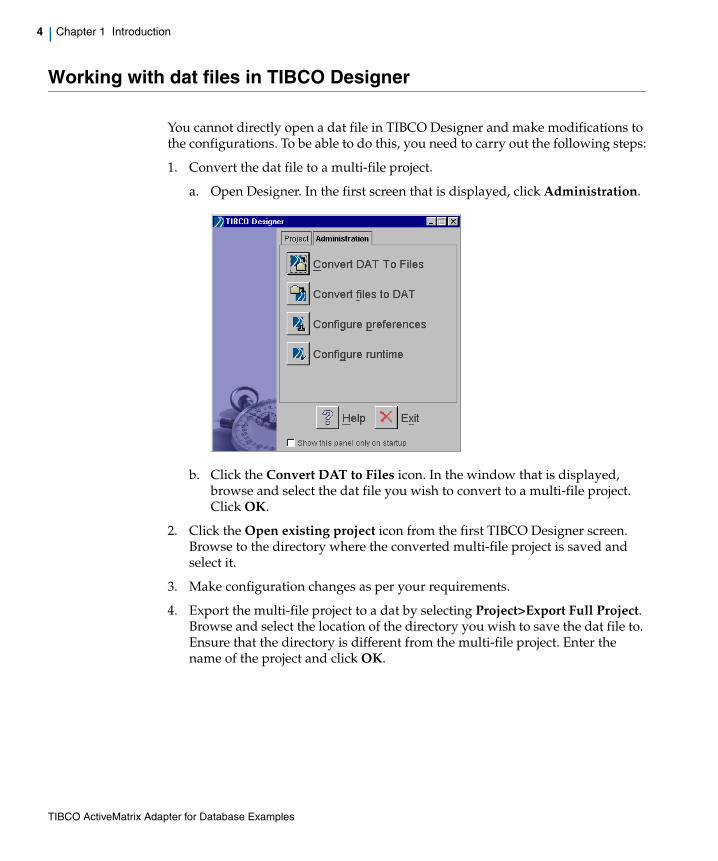
a. Open Designer. In the first screen that is displayed, click Administration.
b. Click the Convert DAT to Files icon. In the window that is displayed, browse and select the dat file you wish to convert to a multi-file project. Click OK.
2. Click the Open existing project icon from the first TIBCO Designer screen. Browse to the directory where the converted multi-file project is saved and select it.
3. Make configuration changes as per your requirements.
4. Export the multi-file project to a dat by selecting Project>Export Full Project. Browse and select the location of the directory you wish to save the dat file to. Ensure that the directory is different from the multi-file project. Enter the name of the project and click OK.
TIBCO ActiveMatrix Adapter for Database Examples
| 5
Chapter 2 Parent/Child Exercise
This chapter explains how to configure an adapter instance to publish and subscribe to data that is stored in related child tables.
Topics
• Overview, page 6
• Create the Tables, page 10
• Configure the Properties Files, page 11
• Create a Project, page 13
• Create an Adapter Instance, page 14
• Add the Publication Service, page 18
• Add a Table and a Child Table to the Publication Service, page 20
• Add Two Child Tables to the ORDER_DETAILS Table, page 23
• Create an Adapter Instance, page 27
• Add a Table and a Child Table to the Subscription Service, page 30
• Add Two Child Tables to the SUB_ORDER_DETAILS Table, page 32
• Add Child Table Mappings, page 34
• Change the Subject Name, page 35
• Start the Adapters and Insert Data into the Database, page 37
• Stop the Adapters and Clean Up, page 39
TIBCO ActiveMatrix Adapter for Database Examples
6 | Chapter 2 Parent/Child Exercise
Overview
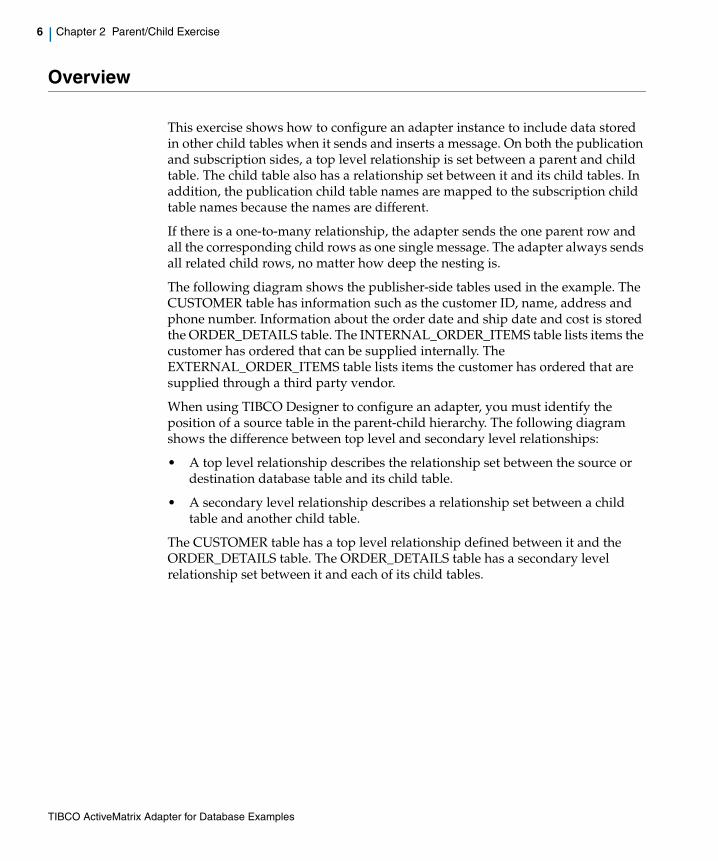
This exercise shows how to configure an adapter instance to include data stored in other child tables when it sends and inserts a message. On both the publication and subscription sides, a top level relationship is set between a parent and child table. The child table also has a relationship set between it and its child tables. In addition, the publication child table names are mapped to the subscription child table names because the names are different.
If there is a one-to-many relationship, the adapter sends the one parent row and all the corresponding child rows as one single message. The adapter always sends all related child rows, no matter how deep the nesting is.
The following diagram shows the publisher-side tables used in the example. The CUSTOMER table has information such as the customer ID, name, address and phone number. Information about the order date and ship date and cost is stored the ORDER_DETAILS table. The INTERNAL_ORDER_ITEMS table lists items the customer has ordered that can be supplied internally. The EXTERNAL_ORDER_ITEMS table lists items the customer has ordered that are supplied through a third party vendor.
When using TIBCO Designer to configure an adapter, you must identify the position of a source table in the parent-child hierarchy. The following diagram shows the difference between top level and secondary level relationships:
• A top level relationship describes the relationship set between the source or destination database table and its child table.
• A secondary level relationship describes a relationship set between a child table and another child table.
The CUSTOMER table has a top level relationship defined between it and the ORDER_DETAILS table. The ORDER_DETAILS table has a secondary level relationship set between it and each of its child tables.
TIBCO ActiveMatrix Adapter for Database Examples
Overview | 7
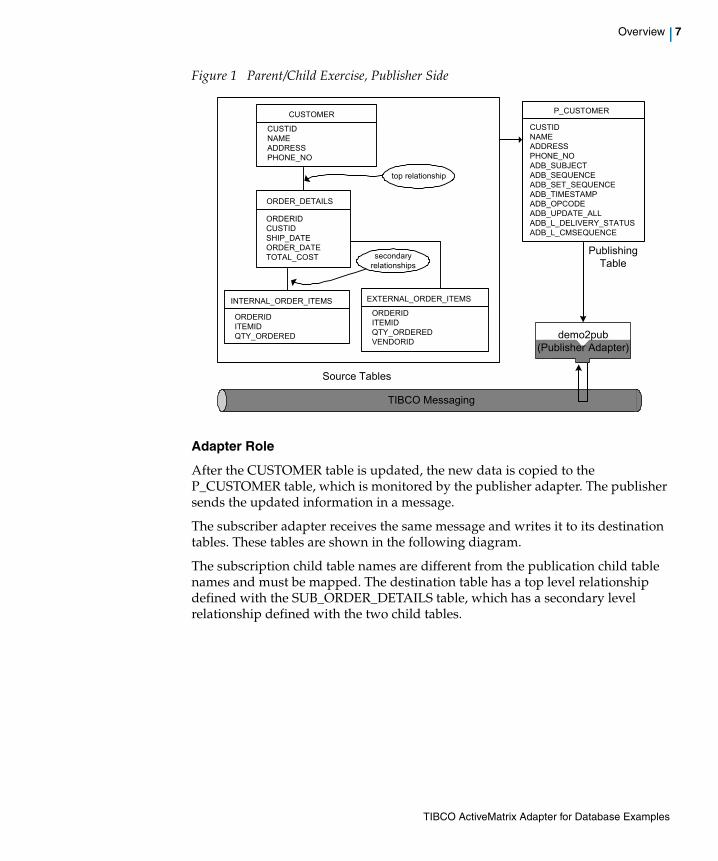
Figure 1 Parent/Child Exercise, Publisher Side
Adapter Role
After the CUSTOMER table is updated, the new data is copied to the P_CUSTOMER table, which is monitored by the publisher adapter. The publisher sends the updated information in a message.
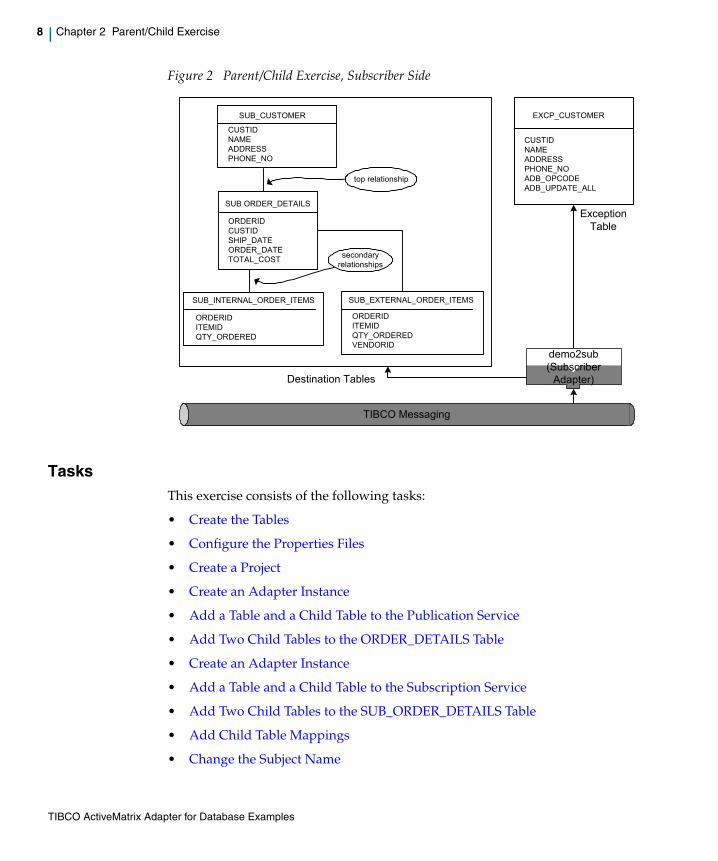
The subscriber adapter receives the same message and writes it to its destination tables. These tables are shown in the following diagram.
The subscription child table names are different from the publication child table names and must be mapped. The destination table has a top level relationship defined with the SUB_ORDER_DETAILS table, which has a secondary level relationship defined with the two child tables.
TIBCO Messaging
Publishing Table
CUSTOMER
CUSTIDNAMEADDRESSPHONE_NO
P_CUSTOMER
CUSTIDNAMEADDRESSPHONE_NOADB_SUBJECTADB_SEQUENCEADB_SET_SEQUENCEADB_TIMESTAMPADB_OPCODEADB_UPDATE_ALLADB_L_DELIVERY_STATUSADB_L_CMSEQUENCE
EXTERNAL_ORDER_ITEMS
ORDERIDITEMIDQTY_ORDEREDVENDORID
INTERNAL_ORDER_ITEMS
ORDERIDITEMIDQTY_ORDERED
ORDER_DETAILS
ORDERIDCUSTIDSHIP_DATEORDER_DATETOTAL_COST
top relationship
secondary relationships
Source Tables
Publishing Table
demo2pub (Publisher Adapter)
TIBCO ActiveMatrix Adapter for Database Examples
8 | Chapter 2 Parent/Child Exercise
Figure 2 Parent/Child Exercise, Subscriber Side
TasksThis exercise consists of the following tasks:
• Create the Tables
• Configure the Properties Files
• Create a Project
• Create an Adapter Instance
• Add a Table and a Child Table to the Publication Service
• Add Two Child Tables to the ORDER_DETAILS Table
• Create an Adapter Instance
• Add a Table and a Child Table to the Subscription Service
• Add Two Child Tables to the SUB_ORDER_DETAILS Table
• Add Child Table Mappings
• Change the Subject Name
Destination Tables
Exception Table
EXCP_CUSTOMER
CUSTIDNAMEADDRESSPHONE_NOADB_OPCODEADB_UPDATE_ALL
SUB_CUSTOMER
CUSTIDNAMEADDRESSPHONE_NO
SUB_EXTERNAL_ORDER_ITEMS
ORDERIDITEMIDQTY_ORDEREDVENDORID
SUB_INTERNAL_ORDER_ITEMS
ORDERIDITEMIDQTY_ORDERED
top relationship
secondary relationships
SUB ORDER_DETAILS
ORDERIDCUSTIDSHIP_DATEORDER_DATETOTAL_COST
TIBCO Messaging
demo2sub (Subscriber
Adapter)
TIBCO ActiveMatrix Adapter for Database Examples
Overview | 9
• Start the Adapters and Insert Data into the Database
• Stop the Adapters and Clean Up
ExerciseThis exercise uses the Oracle database with TIBCO Rendezvous transport as an example. The JMS transport can also be used. When performing this exercise, use the appropriate transport values for your configuration (TIBCO Rendezvous or JMS) and follow the instructions that pertain to your particular database vendor.
You will need the following information, specific to your user environment:
• Database user ID
• Database password
• Database service
TIBCO ActiveMatrix Adapter for Database Examples
10 | Chapter 2 Parent/Child Exercise
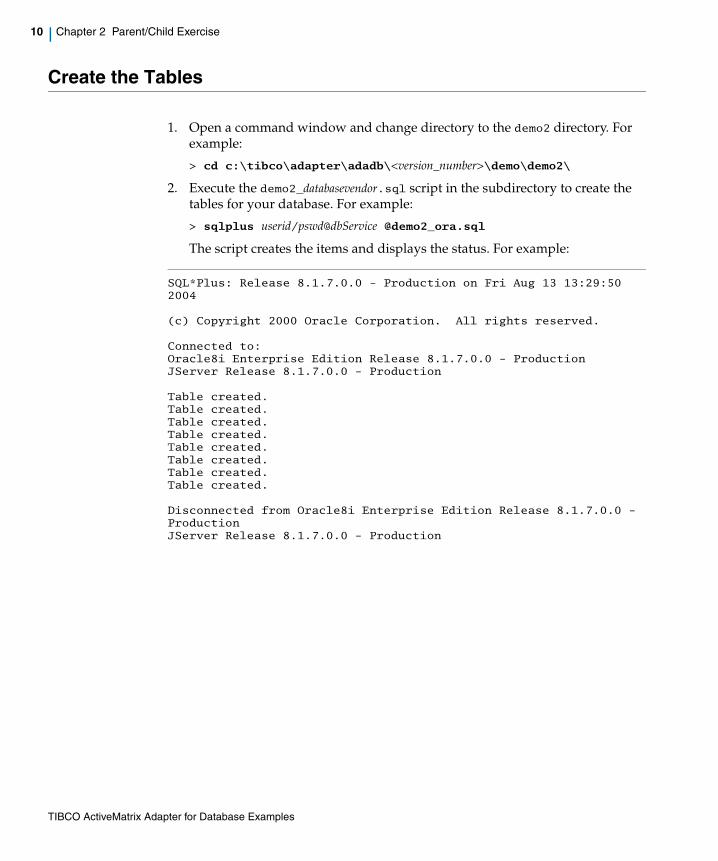
Create the Tables
1. Open a command window and change directory to the demo2 directory. For example:
> cd c:\tibco\adapter\adadb\<version_number>\demo\demo2\
2. Execute the demo2_databasevendor.sql script in the subdirectory to create the tables for your database. For example:
> sqlplus userid/pswd@dbService @demo2_ora.sql
The script creates the items and displays the status. For example:
SQL*Plus: Release 8.1.7.0.0 - Production on Fri Aug 13 13:29:50 2004
(c) Copyright 2000 Oracle Corporation. All rights reserved.
Connected to:Oracle8i Enterprise Edition Release 8.1.7.0.0 - ProductionJServer Release 8.1.7.0.0 - Production
Table created.Table created.Table created.Table created.Table created.Table created.Table created.Table created.
Disconnected from Oracle8i Enterprise Edition Release 8.1.7.0.0 - ProductionJServer Release 8.1.7.0.0 - Production
TIBCO ActiveMatrix Adapter for Database Examples
Configure the Properties Files | 11
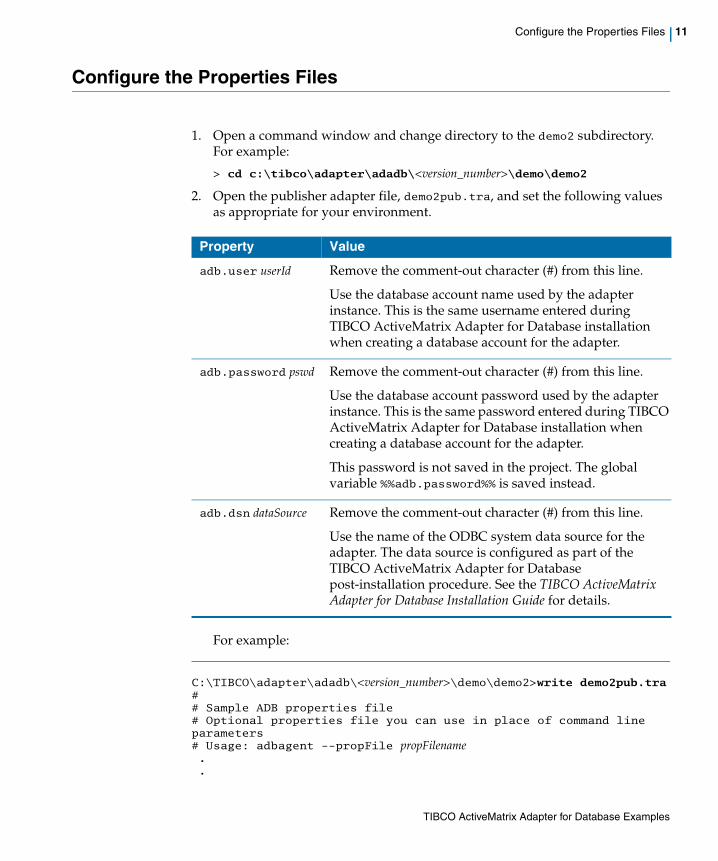
Configure the Properties Files
1. Open a command window and change directory to the demo2 subdirectory. For example:
> cd c:\tibco\adapter\adadb\<version_number>\demo\demo2
2. Open the publisher adapter file, demo2pub.tra, and set the following values as appropriate for your environment.
For example:
C:\TIBCO\adapter\adadb\<version_number>\demo\demo2>write demo2pub.tra## Sample ADB properties file# Optional properties file you can use in place of command line parameters# Usage: adbagent --propFile propFilename..
Property Value
adb.user userId Remove the comment-out character (#) from this line.
Use the database account name used by the adapter instance. This is the same username entered during TIBCO ActiveMatrix Adapter for Database installation when creating a database account for the adapter.
adb.password pswd Remove the comment-out character (#) from this line.
Use the database account password used by the adapter instance. This is the same password entered during TIBCO ActiveMatrix Adapter for Database installation when creating a database account for the adapter.
This password is not saved in the project. The global variable %%adb.password%% is saved instead.
adb.dsn dataSource Remove the comment-out character (#) from this line.
Use the name of the ODBC system data source for the adapter. The data source is configured as part of the TIBCO ActiveMatrix Adapter for Database post-installation procedure. See the TIBCO ActiveMatrix Adapter for Database Installation Guide for details.
TIBCO ActiveMatrix Adapter for Database Examples

12 | Chapter 2 Parent/Child Exercise
.# Change these settings for your login and dsn for Demo2adb.user karladb.password karladb.dsn itaska...
3. Save and close the demo2pub.tra file.
4. Open the subscriber adapter file, demo2sub.tra, and set the same values as appropriate for your environment.
5. Save and close the demo2sub.tra file.
TIBCO ActiveMatrix Adapter for Database Examples
Create a Project | 13
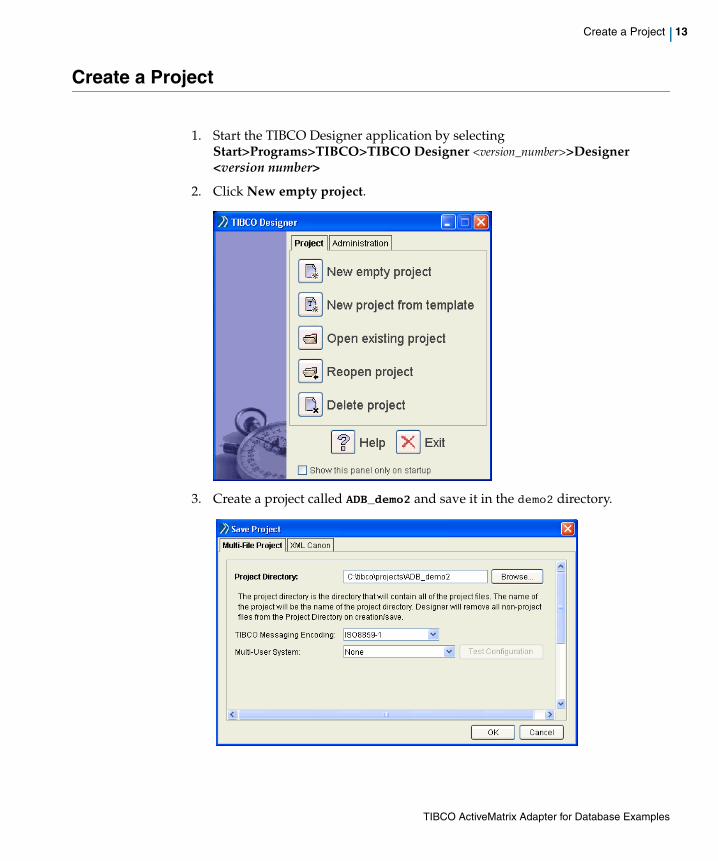
Create a Project
1. Start the TIBCO Designer application by selecting Start>Programs>TIBCO>TIBCO Designer <version_number>>Designer <version number>
2. Click New empty project.
3. Create a project called ADB_demo2 and save it in the demo2 directory.
TIBCO ActiveMatrix Adapter for Database Examples
14 | Chapter 2 Parent/Child Exercise
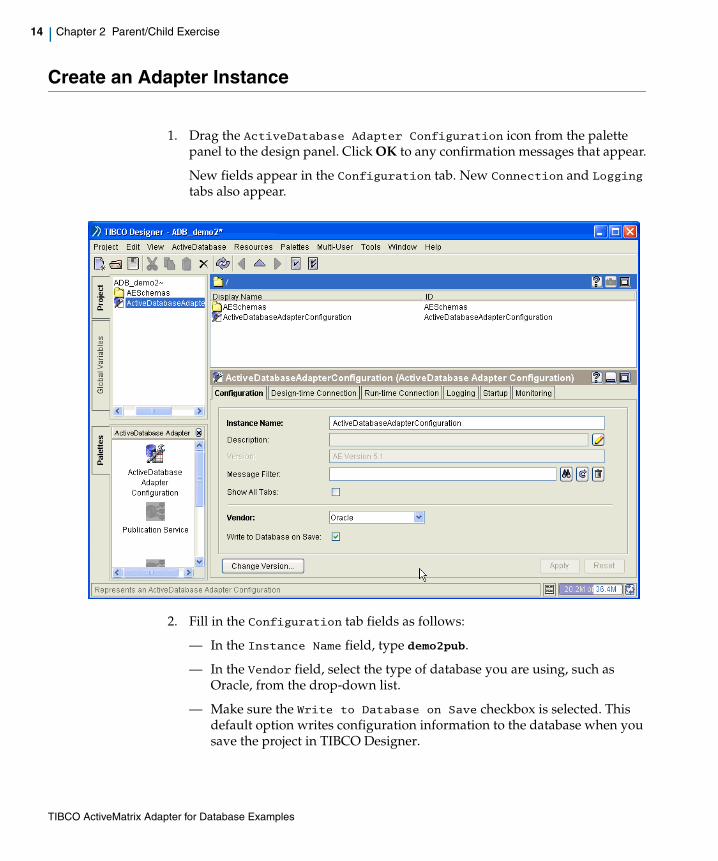
Create an Adapter Instance
1. Drag the ActiveDatabase Adapter Configuration icon from the palette panel to the design panel. Click OK to any confirmation messages that appear.
New fields appear in the Configuration tab. New Connection and Logging tabs also appear.
2. Fill in the Configuration tab fields as follows:
— In the Instance Name field, type demo2pub.
— In the Vendor field, select the type of database you are using, such as Oracle, from the drop-down list.
— Make sure the Write to Database on Save checkbox is selected. This default option writes configuration information to the database when you save the project in TIBCO Designer.
TIBCO ActiveMatrix Adapter for Database Examples
Create an Adapter Instance | 15
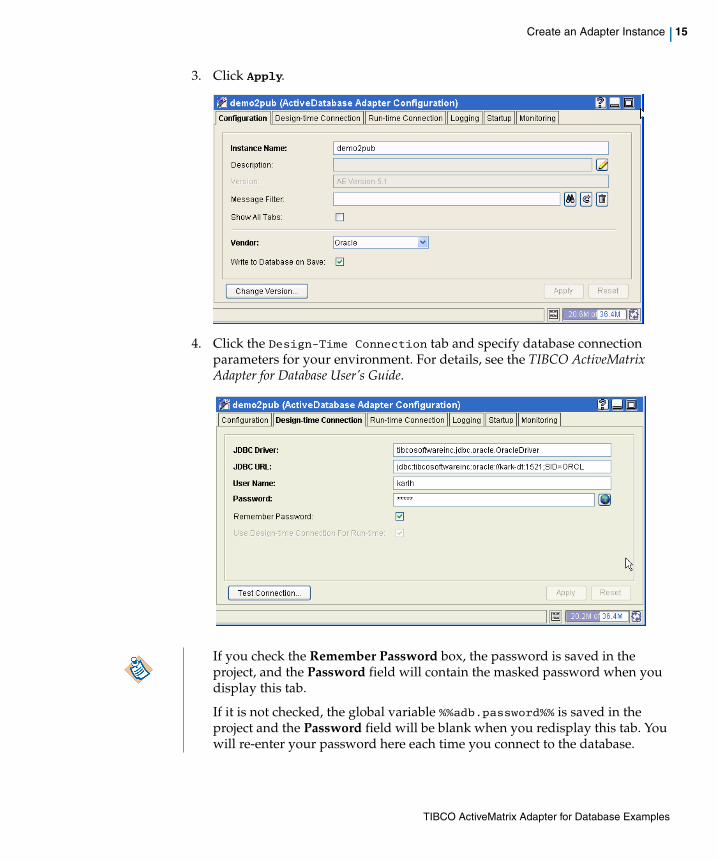
3. Click Apply.
4. Click the Design-Time Connection tab and specify database connection parameters for your environment. For details, see the TIBCO ActiveMatrix Adapter for Database User’s Guide.
If you check the Remember Password box, the password is saved in the project, and the Password field will contain the masked password when you display this tab.
If it is not checked, the global variable %%adb.password%% is saved in the project and the Password field will be blank when you redisplay this tab. You will re-enter your password here each time you connect to the database.
TIBCO ActiveMatrix Adapter for Database Examples
16 | Chapter 2 Parent/Child Exercise
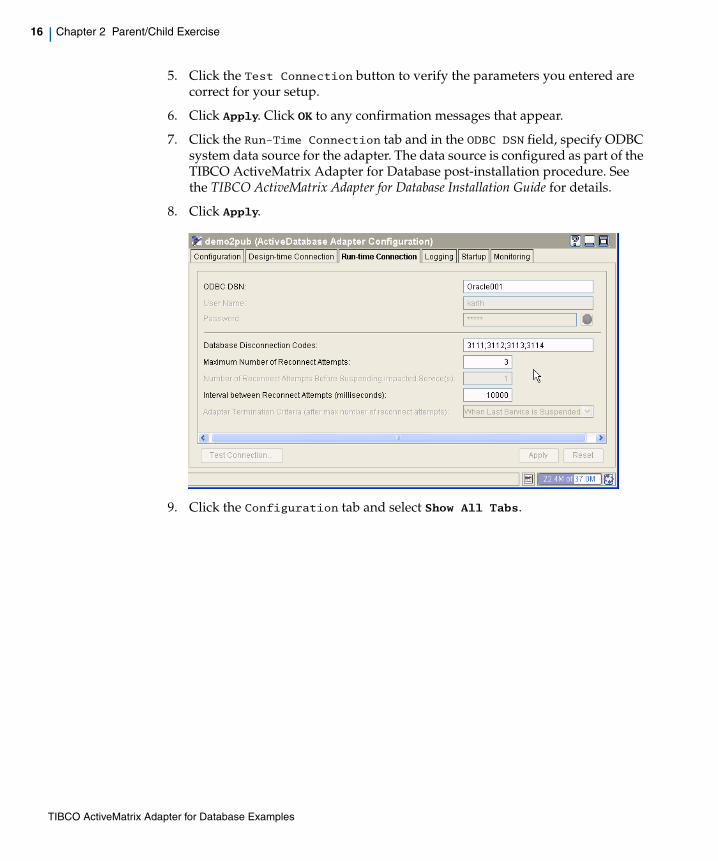
5. Click the Test Connection button to verify the parameters you entered are correct for your setup.
6. Click Apply. Click OK to any confirmation messages that appear.
7. Click the Run-Time Connection tab and in the ODBC DSN field, specify ODBC system data source for the adapter. The data source is configured as part of the TIBCO ActiveMatrix Adapter for Database post-installation procedure. See the TIBCO ActiveMatrix Adapter for Database Installation Guide for details.
8. Click Apply.
9. Click the Configuration tab and select Show All Tabs.
TIBCO ActiveMatrix Adapter for Database Examples
Create an Adapter Instance | 17
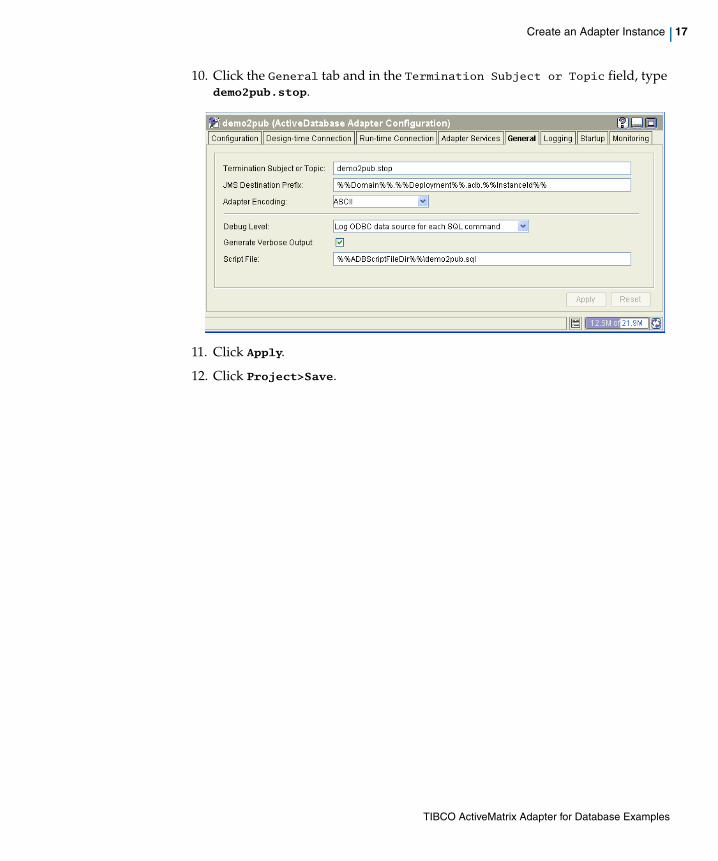
10. Click the General tab and in the Termination Subject or Topic field, type demo2pub.stop.
11. Click Apply.
12. Click Project>Save.
TIBCO ActiveMatrix Adapter for Database Examples

18 | Chapter 2 Parent/Child Exercise
Add the Publication Service
1. In the project panel, expand the demo2pub icon and click the Adapter Services folder.
TIBCO ActiveMatrix Adapter for Database Examples
Add the Publication Service | 19
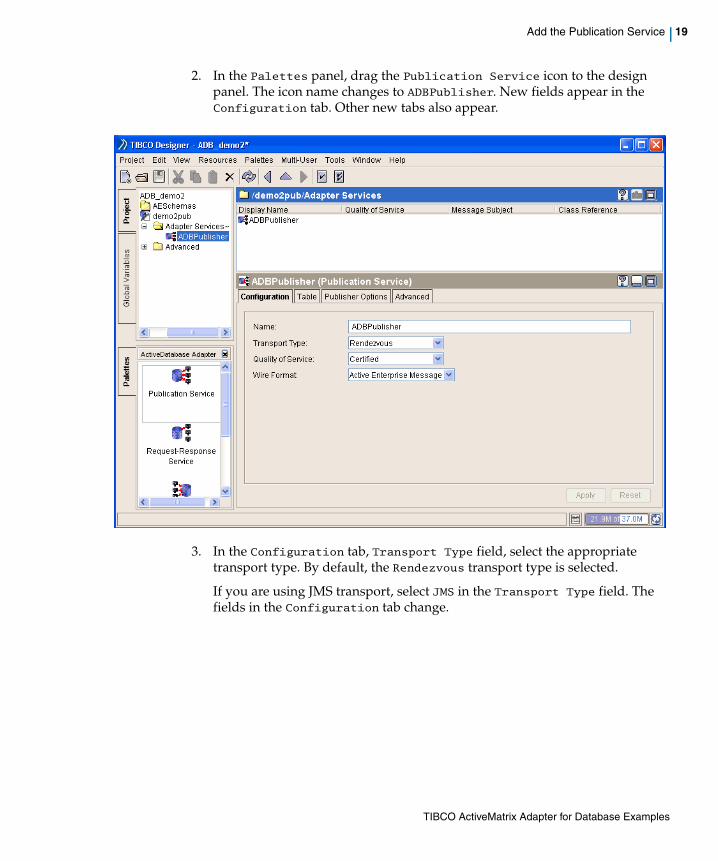
2. In the Palettes panel, drag the Publication Service icon to the design panel. The icon name changes to ADBPublisher. New fields appear in the Configuration tab. Other new tabs also appear.
3. In the Configuration tab, Transport Type field, select the appropriate transport type. By default, the Rendezvous transport type is selected.
If you are using JMS transport, select JMS in the Transport Type field. The fields in the Configuration tab change.
TIBCO ActiveMatrix Adapter for Database Examples
20 | Chapter 2 Parent/Child Exercise
Add a Table and a Child Table to the Publication Service
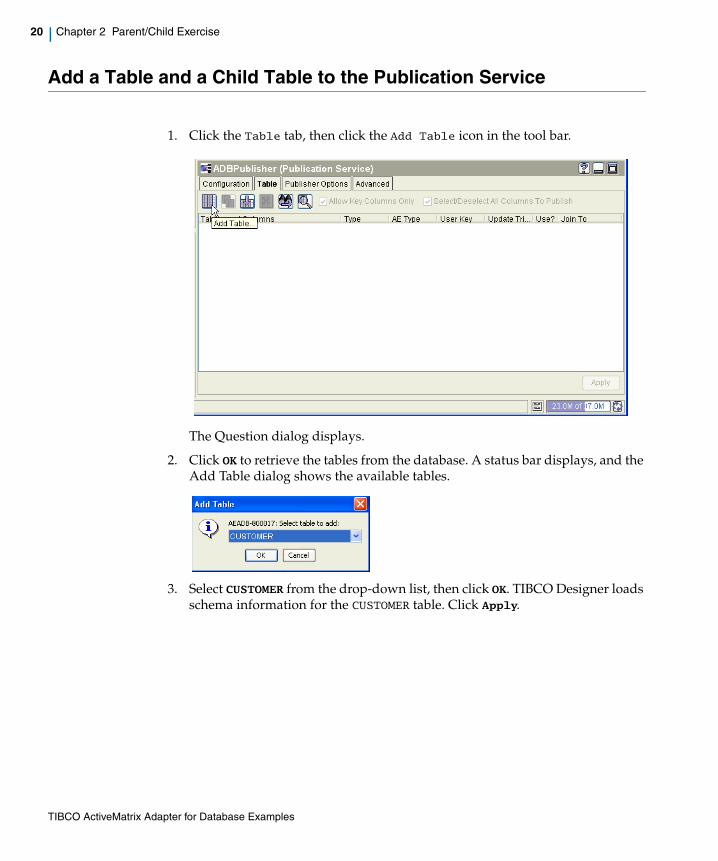
1. Click the Table tab, then click the Add Table icon in the tool bar.
The Question dialog displays.
2. Click OK to retrieve the tables from the database. A status bar displays, and the Add Table dialog shows the available tables.
3. Select CUSTOMER from the drop-down list, then click OK. TIBCO Designer loads schema information for the CUSTOMER table. Click Apply.
TIBCO ActiveMatrix Adapter for Database Examples
Add a Table and a Child Table to the Publication Service | 21
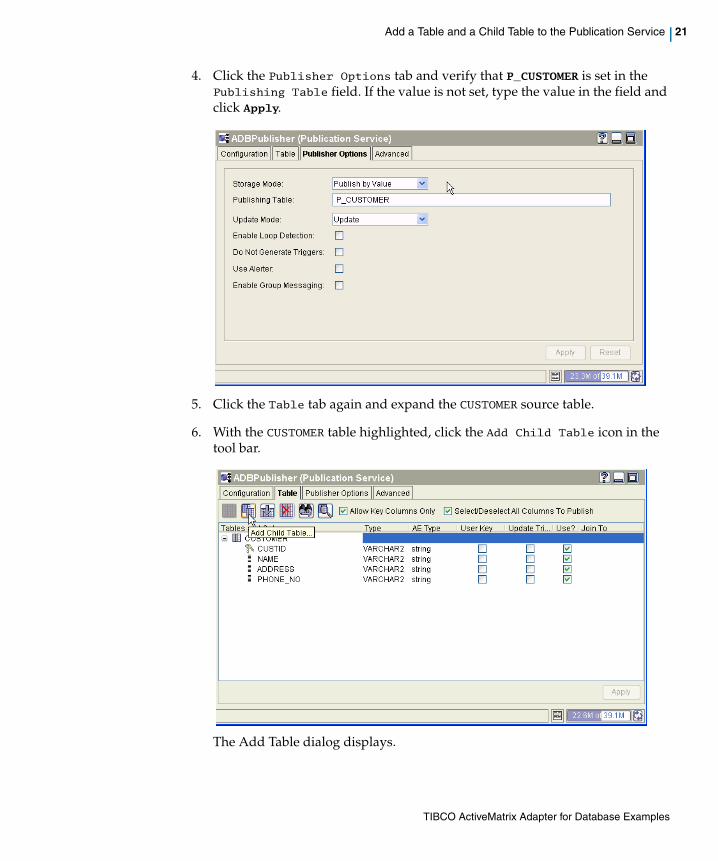
4. Click the Publisher Options tab and verify that P_CUSTOMER is set in the Publishing Table field. If the value is not set, type the value in the field and click Apply.
5. Click the Table tab again and expand the CUSTOMER source table.
6. With the CUSTOMER table highlighted, click the Add Child Table icon in the tool bar.
The Add Table dialog displays.
TIBCO ActiveMatrix Adapter for Database Examples
22 | Chapter 2 Parent/Child Exercise
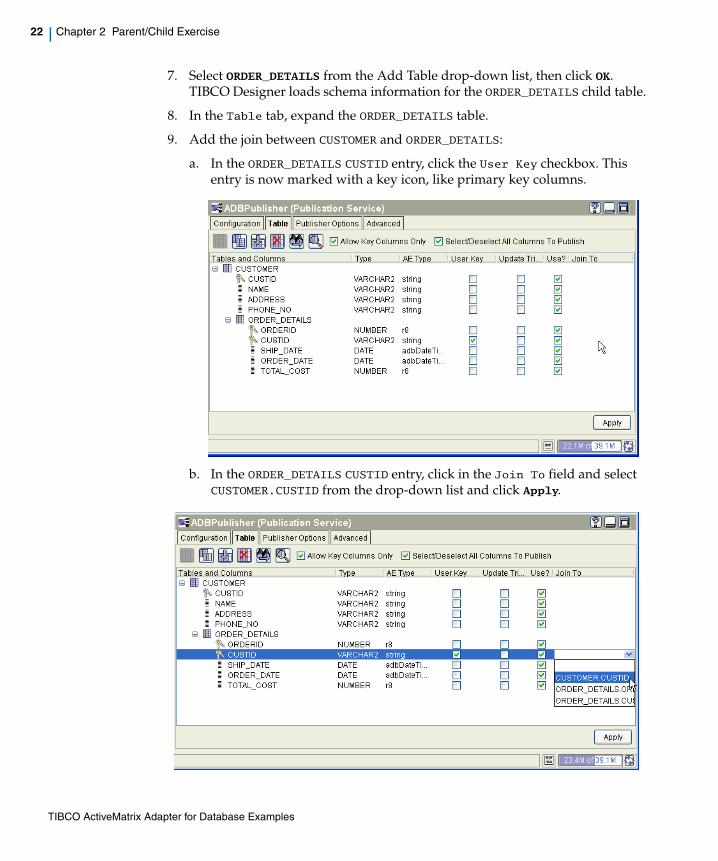
7. Select ORDER_DETAILS from the Add Table drop-down list, then click OK. TIBCO Designer loads schema information for the ORDER_DETAILS child table.
8. In the Table tab, expand the ORDER_DETAILS table.
9. Add the join between CUSTOMER and ORDER_DETAILS:
a. In the ORDER_DETAILS CUSTID entry, click the User Key checkbox. This entry is now marked with a key icon, like primary key columns.
b. In the ORDER_DETAILS CUSTID entry, click in the Join To field and select CUSTOMER.CUSTID from the drop-down list and click Apply.
TIBCO ActiveMatrix Adapter for Database Examples
Add Two Child Tables to the ORDER_DETAILS Table | 23
Add Two Child Tables to the ORDER_DETAILS Table
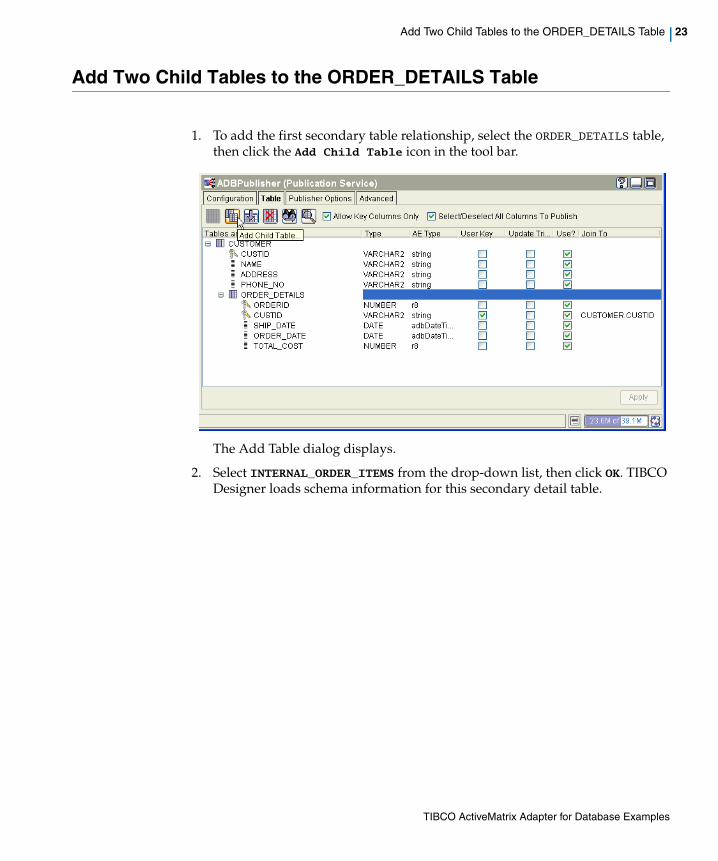
1. To add the first secondary table relationship, select the ORDER_DETAILS table, then click the Add Child Table icon in the tool bar.
The Add Table dialog displays.
2. Select INTERNAL_ORDER_ITEMS from the drop-down list, then click OK. TIBCO Designer loads schema information for this secondary detail table.
TIBCO ActiveMatrix Adapter for Database Examples
24 | Chapter 2 Parent/Child Exercise
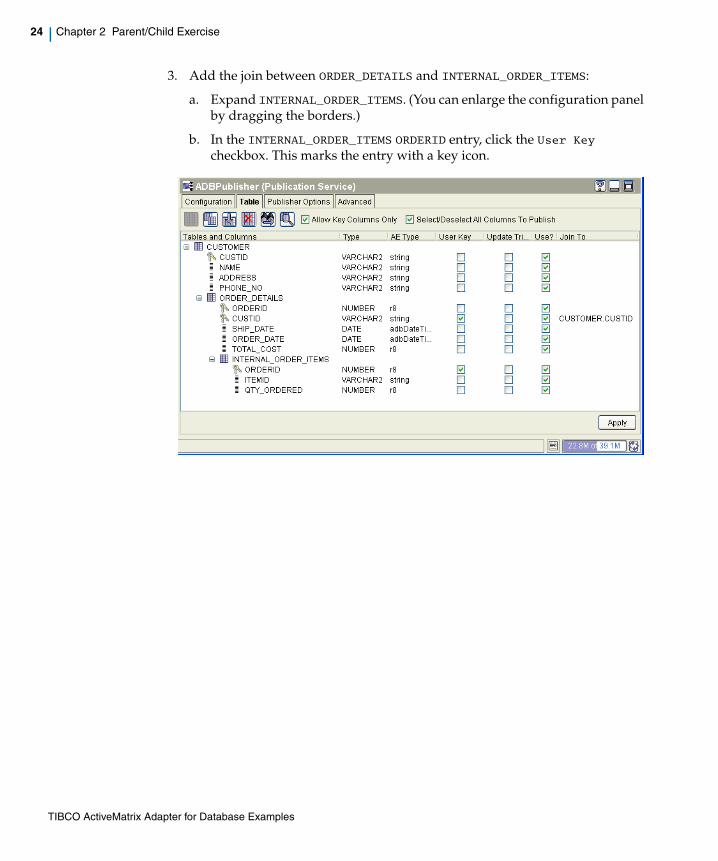
3. Add the join between ORDER_DETAILS and INTERNAL_ORDER_ITEMS:
a. Expand INTERNAL_ORDER_ITEMS. (You can enlarge the configuration panel by dragging the borders.)
b. In the INTERNAL_ORDER_ITEMS ORDERID entry, click the User Key checkbox. This marks the entry with a key icon.
TIBCO ActiveMatrix Adapter for Database Examples
Add Two Child Tables to the ORDER_DETAILS Table | 25
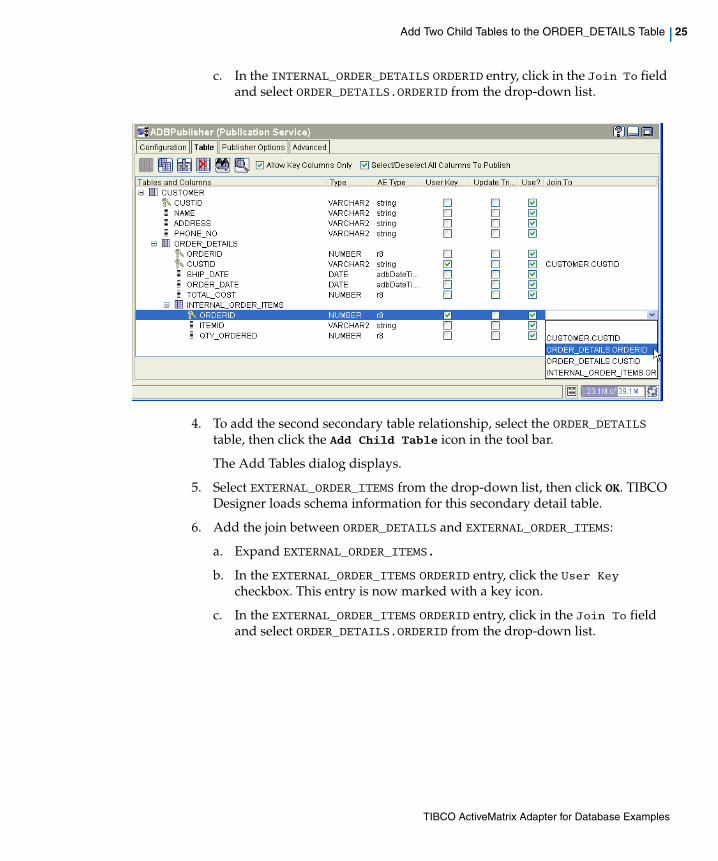
c. In the INTERNAL_ORDER_DETAILS ORDERID entry, click in the Join To field and select ORDER_DETAILS.ORDERID from the drop-down list.
4. To add the second secondary table relationship, select the ORDER_DETAILS table, then click the Add Child Table icon in the tool bar.
The Add Tables dialog displays.
5. Select EXTERNAL_ORDER_ITEMS from the drop-down list, then click OK. TIBCO Designer loads schema information for this secondary detail table.
6. Add the join between ORDER_DETAILS and EXTERNAL_ORDER_ITEMS:
a. Expand EXTERNAL_ORDER_ITEMS.
b. In the EXTERNAL_ORDER_ITEMS ORDERID entry, click the User Key checkbox. This entry is now marked with a key icon.
c. In the EXTERNAL_ORDER_ITEMS ORDERID entry, click in the Join To field and select ORDER_DETAILS.ORDERID from the drop-down list.
TIBCO ActiveMatrix Adapter for Database Examples
26 | Chapter 2 Parent/Child Exercise
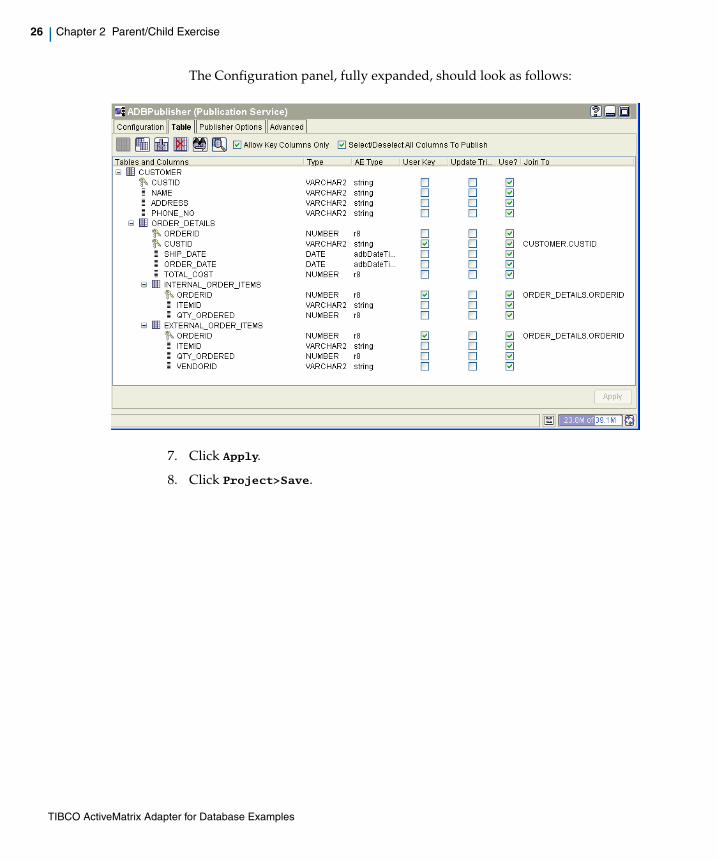
The Configuration panel, fully expanded, should look as follows:
7. Click Apply.
8. Click Project>Save.
TIBCO ActiveMatrix Adapter for Database Examples
Create an Adapter Instance | 27
Create an Adapter Instance
1. Click the ADB_demo2 root folder in the Project panel.
2. Drag the ActiveDatabase Adapter Configuration icon from the palette panel to the design panel. Click OK to any confirmation messages that appear.
New fields and tabs appear.
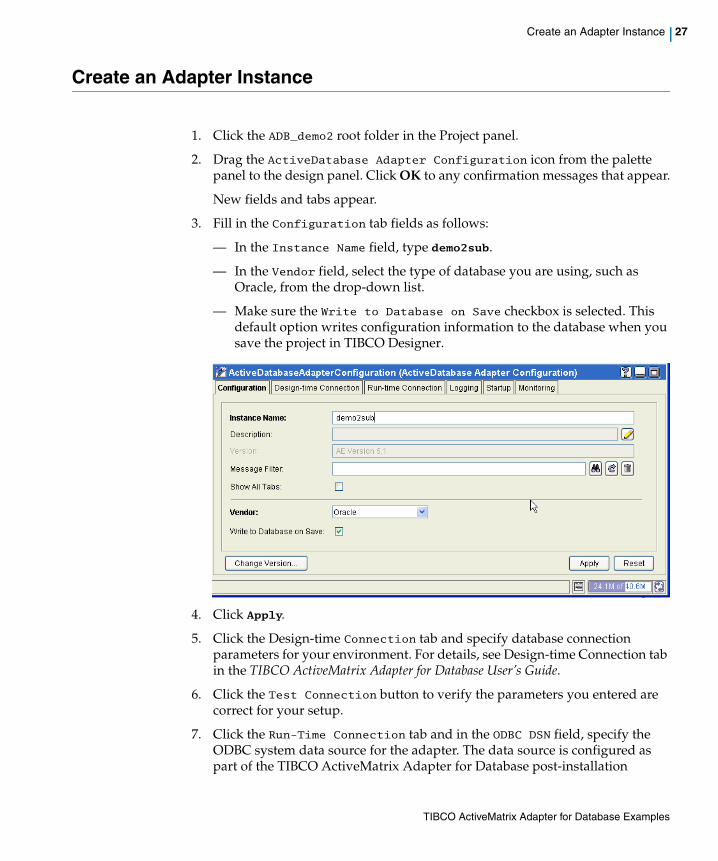
3. Fill in the Configuration tab fields as follows:
— In the Instance Name field, type demo2sub.
— In the Vendor field, select the type of database you are using, such as Oracle, from the drop-down list.
— Make sure the Write to Database on Save checkbox is selected. This default option writes configuration information to the database when you save the project in TIBCO Designer.
4. Click Apply.
5. Click the Design-time Connection tab and specify database connection parameters for your environment. For details, see Design-time Connection tab in the TIBCO ActiveMatrix Adapter for Database User’s Guide.
6. Click the Test Connection button to verify the parameters you entered are correct for your setup.
7. Click the Run-Time Connection tab and in the ODBC DSN field, specify the ODBC system data source for the adapter. The data source is configured as part of the TIBCO ActiveMatrix Adapter for Database post-installation
TIBCO ActiveMatrix Adapter for Database Examples
28 | Chapter 2 Parent/Child Exercise
procedure. See the TIBCO ActiveMatrix Adapter for Database Installation Guide for details.
8. Click Apply.
9. Click the Configuration tab and select Show All Tabs.
10. Click the General tab and in the Termination Subject or Topic field, type demo2sub.stop.
11. Click Apply.
12. Click Project>Save.
TIBCO ActiveMatrix Adapter for Database Examples
Add the Subscription Service | 29
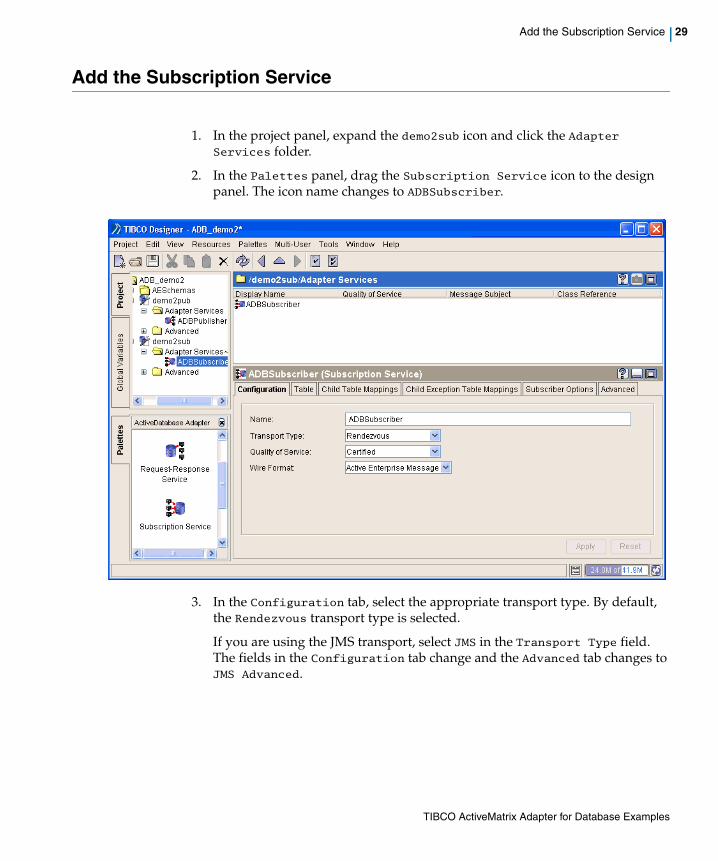
Add the Subscription Service
1. In the project panel, expand the demo2sub icon and click the Adapter Services folder.
2. In the Palettes panel, drag the Subscription Service icon to the design panel. The icon name changes to ADBSubscriber.
3. In the Configuration tab, select the appropriate transport type. By default, the Rendezvous transport type is selected.
If you are using the JMS transport, select JMS in the Transport Type field. The fields in the Configuration tab change and the Advanced tab changes to JMS Advanced.
TIBCO ActiveMatrix Adapter for Database Examples
30 | Chapter 2 Parent/Child Exercise
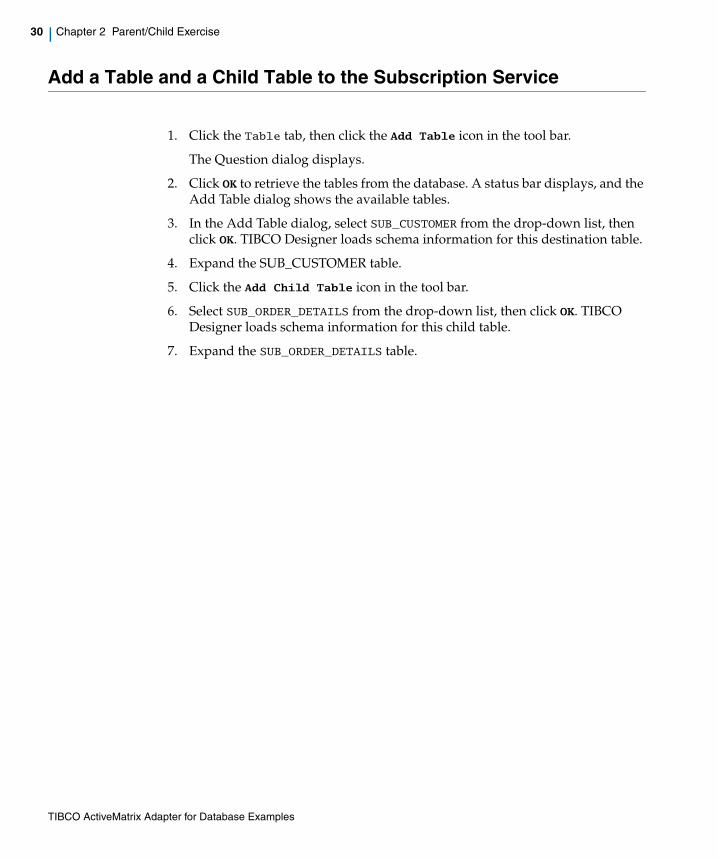
Add a Table and a Child Table to the Subscription Service
1. Click the Table tab, then click the Add Table icon in the tool bar.
The Question dialog displays.
2. Click OK to retrieve the tables from the database. A status bar displays, and the Add Table dialog shows the available tables.
3. In the Add Table dialog, select SUB_CUSTOMER from the drop-down list, then click OK. TIBCO Designer loads schema information for this destination table.
4. Expand the SUB_CUSTOMER table.
5. Click the Add Child Table icon in the tool bar.
6. Select SUB_ORDER_DETAILS from the drop-down list, then click OK. TIBCO Designer loads schema information for this child table.
7. Expand the SUB_ORDER_DETAILS table.
TIBCO ActiveMatrix Adapter for Database Examples
Add a Table and a Child Table to the Subscription Service | 31
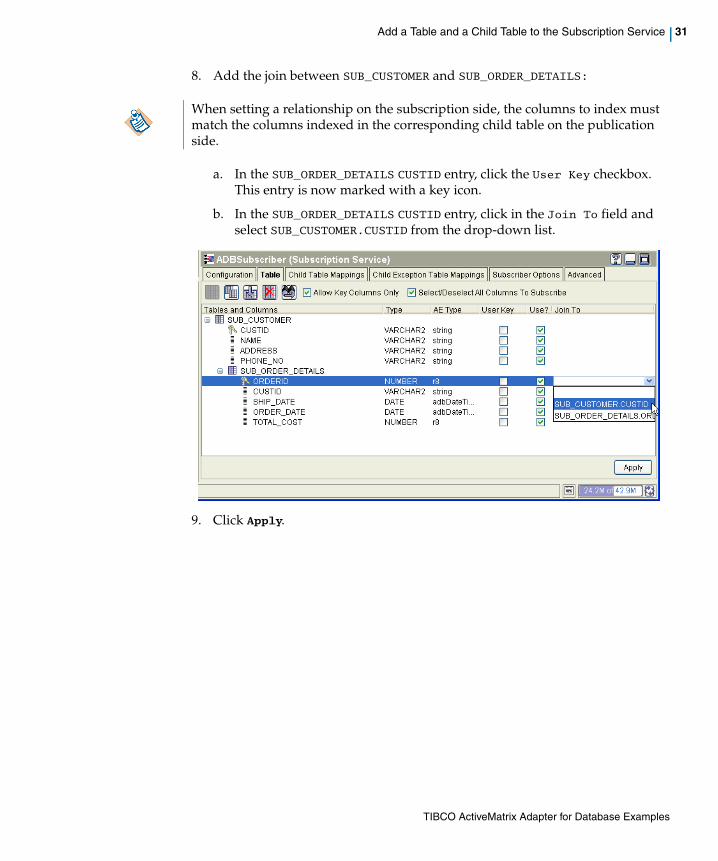
8. Add the join between SUB_CUSTOMER and SUB_ORDER_DETAILS:
a. In the SUB_ORDER_DETAILS CUSTID entry, click the User Key checkbox. This entry is now marked with a key icon.
b. In the SUB_ORDER_DETAILS CUSTID entry, click in the Join To field and select SUB_CUSTOMER.CUSTID from the drop-down list.
9. Click Apply.
When setting a relationship on the subscription side, the columns to index must match the columns indexed in the corresponding child table on the publication side.
TIBCO ActiveMatrix Adapter for Database Examples
32 | Chapter 2 Parent/Child Exercise
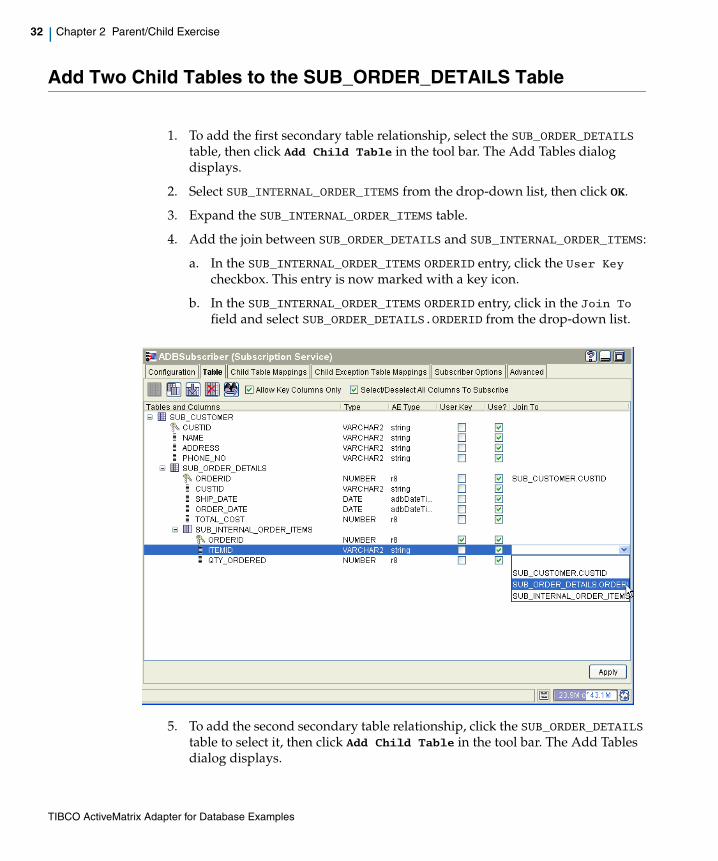
Add Two Child Tables to the SUB_ORDER_DETAILS Table
1. To add the first secondary table relationship, select the SUB_ORDER_DETAILS table, then click Add Child Table in the tool bar. The Add Tables dialog displays.
2. Select SUB_INTERNAL_ORDER_ITEMS from the drop-down list, then click OK.
3. Expand the SUB_INTERNAL_ORDER_ITEMS table.
4. Add the join between SUB_ORDER_DETAILS and SUB_INTERNAL_ORDER_ITEMS:
a. In the SUB_INTERNAL_ORDER_ITEMS ORDERID entry, click the User Key checkbox. This entry is now marked with a key icon.
b. In the SUB_INTERNAL_ORDER_ITEMS ORDERID entry, click in the Join To field and select SUB_ORDER_DETAILS.ORDERID from the drop-down list.
5. To add the second secondary table relationship, click the SUB_ORDER_DETAILS table to select it, then click Add Child Table in the tool bar. The Add Tables dialog displays.
TIBCO ActiveMatrix Adapter for Database Examples
Add Two Child Tables to the SUB_ORDER_DETAILS Table | 33
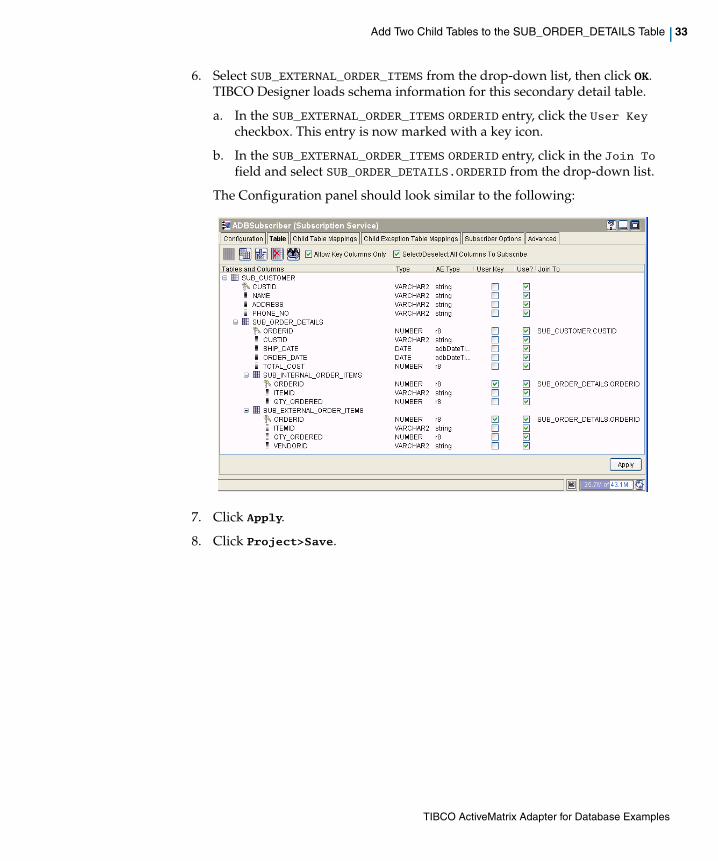
6. Select SUB_EXTERNAL_ORDER_ITEMS from the drop-down list, then click OK. TIBCO Designer loads schema information for this secondary detail table.
a. In the SUB_EXTERNAL_ORDER_ITEMS ORDERID entry, click the User Key checkbox. This entry is now marked with a key icon.
b. In the SUB_EXTERNAL_ORDER_ITEMS ORDERID entry, click in the Join To field and select SUB_ORDER_DETAILS.ORDERID from the drop-down list.
The Configuration panel should look similar to the following:
7. Click Apply.
8. Click Project>Save.
TIBCO ActiveMatrix Adapter for Database Examples

34 | Chapter 2 Parent/Child Exercise
Add Child Table Mappings
This task adds a child table mapping for the relationship between the publishing and subscribing side. Child tables between a publisher and subscriber must be mapped unless the tables have the same name. If the subscriber child tables have the same names as the publisher child tables, you do not need to perform this task.
1. Click the Child Table Mappings tab.
2. Click in the Publisher Child Table Name column and enter the following data:
a. For the SUB_ORDER_DETAILS table, type ORDER_DETAILS.
b. For the SUB_INTERNAL ORDER_ITEMS table, type INTERNAL_ORDER_ITEMS.
c. For the SUB_EXTERNAL_ORDER_ITEMS table, type EXTERNAL_ORDER_ITEMS.
The panel should look similar to the following diagram:
3. Click Apply.
4. Click the Subscriber Options tab. In the Exception Table field, type EXCP_CUSTOMER.
This defines an exception table for use with this subscription. if an error occurs when inserting data, the data will be inserted into this exception table.
5. Click Apply.
TIBCO ActiveMatrix Adapter for Database Examples

Change the Subject Name | 35
Change the Subject Name
The subject name must be the same for both the publication and the subscription service.
1. Click the Advanced tab. Do not change the default subject name. Copy the %%Domain%%.%%Deployment%%.adb.demo2sub.ADBSubscriber subject name.
2. In the project tab, select the ADBPublisher service icon, then click the Advanced tab and paste the subject name copied in the previous step.
3. Click Apply.
4. Save the project using Project>Save.
TIBCO ActiveMatrix Adapter for Database Examples
36 | Chapter 2 Parent/Child Exercise
Export the Project
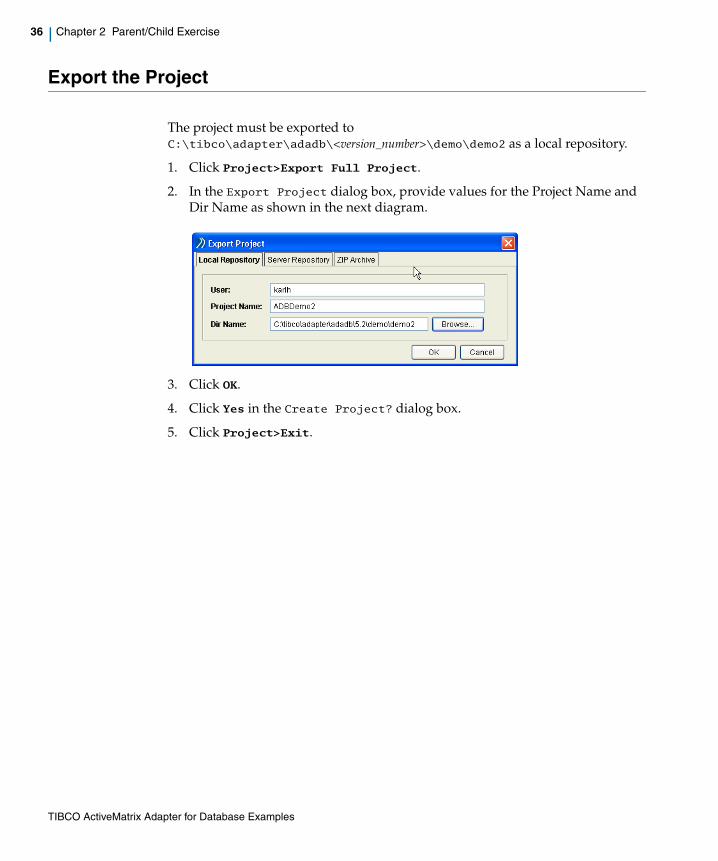
The project must be exported to C:\tibco\adapter\adadb\<version_number>\demo\demo2 as a local repository.
1. Click Project>Export Full Project.
2. In the Export Project dialog box, provide values for the Project Name and Dir Name as shown in the next diagram.
3. Click OK.
4. Click Yes in the Create Project? dialog box.
5. Click Project>Exit.
TIBCO ActiveMatrix Adapter for Database Examples
Start the Adapters and Insert Data into the Database | 37
Start the Adapters and Insert Data into the Database
You are now ready to test the configuration you have just configured. To make it easy, a SQL script that inserts data into database tables for publishing is included with TIBCO ActiveMatrix Adapter for Database.
1. If you are using TIBCO Rendezvous transport, skip to the next step.
If you are using the JMS transport, open a command window and change directory to the <install-path>\tibco\ems\bin directory. Start the server. For example:
c:\tibco\ems\bin>tibemsd
2. Open a new command window and change directory to the bin subdirectory. For example:
> cd c:\tibco\adapter\adadb\<version_number>\bin
3. Start the publisher adapter. For example:
> adbagent --propFileC:\tibco\adapter\adadb\<version_number>\demo\demo2\demo2
pub.tra
Wait until the adapter cold start completes. This can take several minutes. You can continue with the next step when the following message displays:
Publication Cold start completed.
4. In a new command window, start the subscriber adapter. For example:
> cd c:\tibco\adapter\adadb\<version_number>\bin
> adbagent --propFileC:\tibco\adapter\adadb\<version_number>\demo\demo2\demo2
sub.tra
5. In a new command window, execute the demo2ins_databasevendor.sql script. For example:
> cd C:\tibco\adapter\adadb\<version_number>\demo\demo2\
sqlplus userid/pswd@dbService @demo2ins_ora.sql
The script inserts data into the source table and its child tables. The adapter instance detects that data has been added to the source table and publishes it with child table data. Information about the transaction appears in the adapter instance window.
> sqlplus userid/pswd@dbService
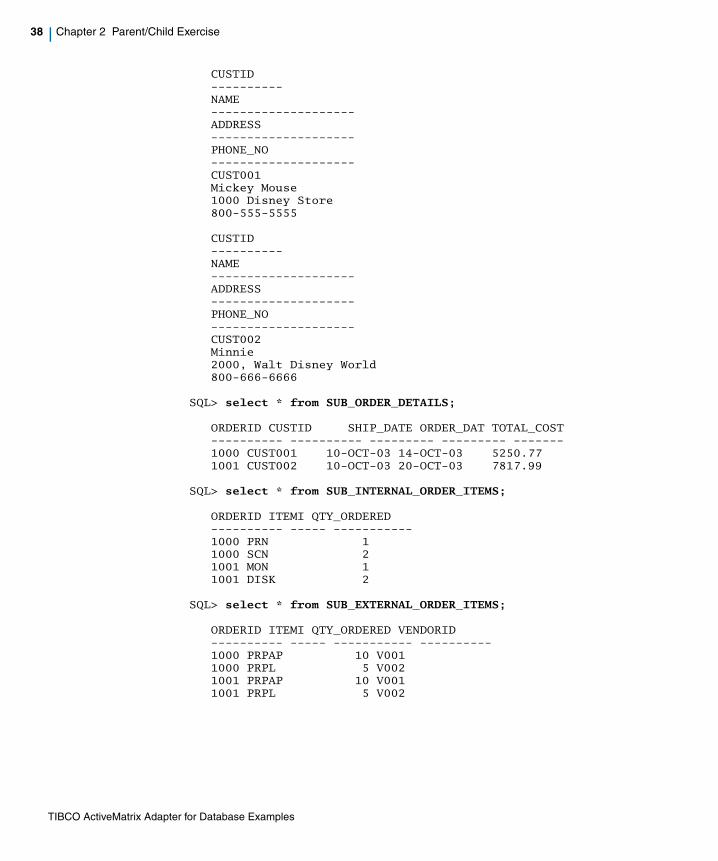
6. Query the database as shown:
SQL> select * from SUB_CUSTOMER;
TIBCO ActiveMatrix Adapter for Database Examples
38 | Chapter 2 Parent/Child Exercise
CUSTID----------NAME--------------------ADDRESS--------------------PHONE_NO--------------------CUST001Mickey Mouse1000 Disney Store800-555-5555
CUSTID----------NAME--------------------ADDRESS--------------------PHONE_NO--------------------CUST002Minnie2000, Walt Disney World800-666-6666
SQL> select * from SUB_ORDER_DETAILS;
ORDERID CUSTID SHIP_DATE ORDER_DAT TOTAL_COST---------- ---------- --------- --------- -------1000 CUST001 10-OCT-03 14-OCT-03 5250.771001 CUST002 10-OCT-03 20-OCT-03 7817.99
SQL> select * from SUB_INTERNAL_ORDER_ITEMS;
ORDERID ITEMI QTY_ORDERED---------- ----- -----------1000 PRN 11000 SCN 21001 MON 11001 DISK 2
SQL> select * from SUB_EXTERNAL_ORDER_ITEMS;
ORDERID ITEMI QTY_ORDERED VENDORID---------- ----- ----------- ----------1000 PRPAP 10 V0011000 PRPL 5 V0021001 PRPAP 10 V0011001 PRPL 5 V002
TIBCO ActiveMatrix Adapter for Database Examples
Stop the Adapters and Clean Up | 39
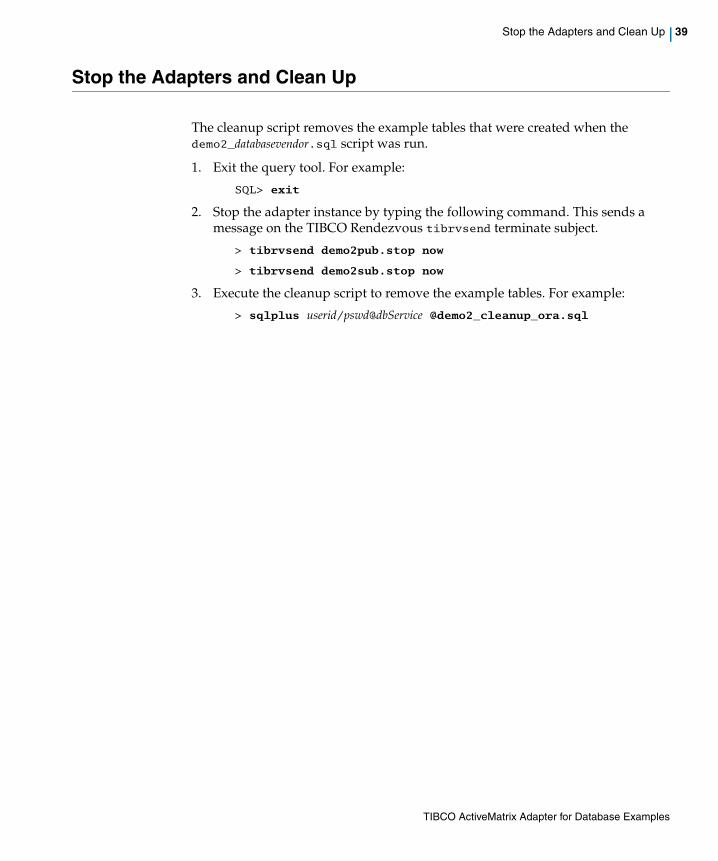
Stop the Adapters and Clean Up
The cleanup script removes the example tables that were created when the demo2_databasevendor.sql script was run.
1. Exit the query tool. For example:
SQL> exit
2. Stop the adapter instance by typing the following command. This sends a message on the TIBCO Rendezvous tibrvsend terminate subject.
> tibrvsend demo2pub.stop now
> tibrvsend demo2sub.stop now
3. Execute the cleanup script to remove the example tables. For example:
> sqlplus userid/pswd@dbService @demo2_cleanup_ora.sql
TIBCO ActiveMatrix Adapter for Database Examples

40 | Chapter 2 Parent/Child Exercise
TIBCO ActiveMatrix Adapter for Database Examples
| 41
Chapter 3 Request-Response Service Examples
This chapter provides request-response exercises that demonstrate how to use the adapter’s request-response service.
Topics
• Request-Response Exercise, page 42
• RPC Standard Operation Support Exercise, page 52
• RPC Custom Operation Support Exercise, page 62
TIBCO ActiveMatrix Adapter for Database Examples
42 | Chapter 3 Request-Response Service Examples
Request-Response Exercise
This exercise uses a sample request program that emulates a request-response application to send requests to an adapter instance for processing.
OverviewThe sample request program acts as a client, sending a request to be processed by an adapter instance. After receiving the request, the adapter processes it and sends a response back on its configured subject. Trace information about the transaction is printed in the console window where the adapter instance was started.
Required Platforms and SoftwareThis exercise can be performed on Microsoft Windows or on UNIX. It can be performed with an Oracle, Microsoft SQL or Sybase database.
You can use the following transport methods and message formats:
• TIBCO Rendezvous transport method using the TIBCO Rendezvous, TIBCO ActiveEnterprise or XML message format
• JMS transport using XML message format
All required example files are provided with the default installation of TIBCO ActiveMatrix Adapter for Database.
Visual C++ is required when using Microsoft Windows.
TasksThis exercise consists of the following tasks:
• Task A, Create the Demo Tables
• Task B, Build the Sample Request Program on Windows (if applicable)
• Task C, Build the Sample Request Program on UNIX (if applicable)
• Task D, Configure the Properties File
• Task E, Start the Adapter
• Task F, Send a Request Message
• Task G, Stop the Adapter Instance and Clean Up
TIBCO ActiveMatrix Adapter for Database Examples
Request-Response Exercise | 43
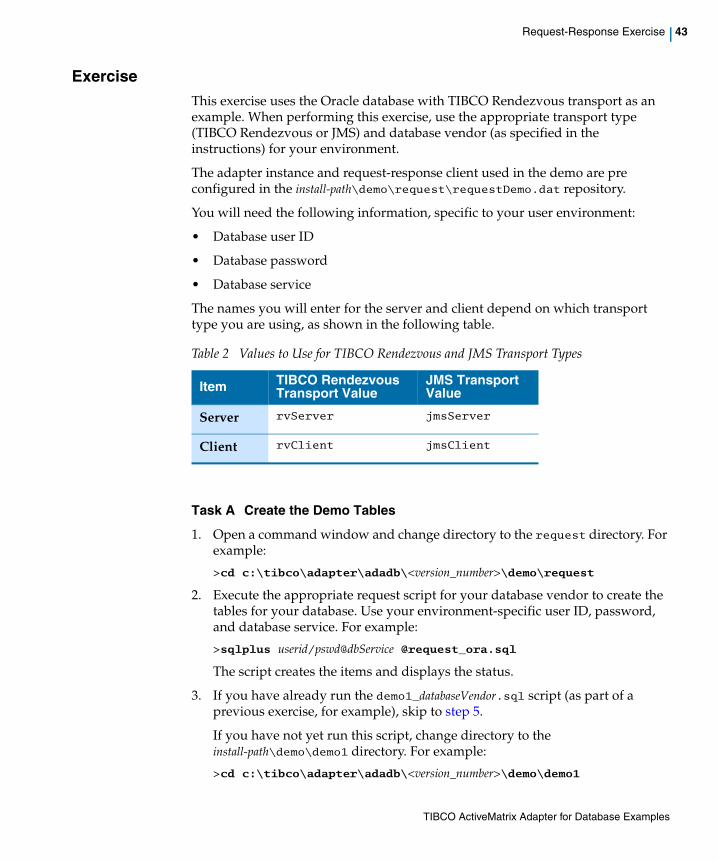
ExerciseThis exercise uses the Oracle database with TIBCO Rendezvous transport as an example. When performing this exercise, use the appropriate transport type (TIBCO Rendezvous or JMS) and database vendor (as specified in the instructions) for your environment.
The adapter instance and request-response client used in the demo are pre configured in the install-path\demo\request\requestDemo.dat repository.
You will need the following information, specific to your user environment:
• Database user ID
• Database password
• Database service
The names you will enter for the server and client depend on which transport type you are using, as shown in the following table.
Task A Create the Demo Tables
1. Open a command window and change directory to the request directory. For example:
>cd c:\tibco\adapter\adadb\<version_number>\demo\request
2. Execute the appropriate request script for your database vendor to create the tables for your database. Use your environment-specific user ID, password, and database service. For example:
>sqlplus userid/pswd@dbService @request_ora.sql
The script creates the items and displays the status.
3. If you have already run the demo1_databaseVendor.sql script (as part of a previous exercise, for example), skip to step 5.
If you have not yet run this script, change directory to the install-path\demo\demo1 directory. For example:
>cd c:\tibco\adapter\adadb\<version_number>\demo\demo1
Table 2 Values to Use for TIBCO Rendezvous and JMS Transport Types
Item TIBCO Rendezvous Transport Value
JMS Transport Value
Server rvServer jmsServer
Client rvClient jmsClient
TIBCO ActiveMatrix Adapter for Database Examples
44 | Chapter 3 Request-Response Service Examples
4. Execute the appropriate demo1_databaseVendor.sql script to create the tables for your database. Use your environment-specific user ID, password, and database service. For example:
> sqlplus userid/pswd@dbService @demo1_ora.sql
The script creates the items and displays the status.
5. Exit the query tool.
SQL> exit
Task B Build the Sample Request Program on Windows (if applicable)
Perform this task if you are running this demo on Windows. If you are running on UNIX, skip this task and go to Task C.
1. Using Visual C++, create a new workspace and insert a new project into the workspace.
2. In the new project, open the appropriate sample request program for your platform as follows:
— For RV transport using TIBCO Rendezvous message format, use request.dsp. For example:
c:\tibco\adapter\adadb\<version_number>\demo\request\request.dsp
— For JMS transport or Rendezvous transport using TIBCO ActiveEnterprise or XML message format, use aerequest.dsp. For example:
c:\tibco\adapter\adadb\<version_number>\demo\request\aerequest.dsp
3. Select Project>Settings.
TIBCO ActiveMatrix Adapter for Database Examples
Request-Response Exercise | 45
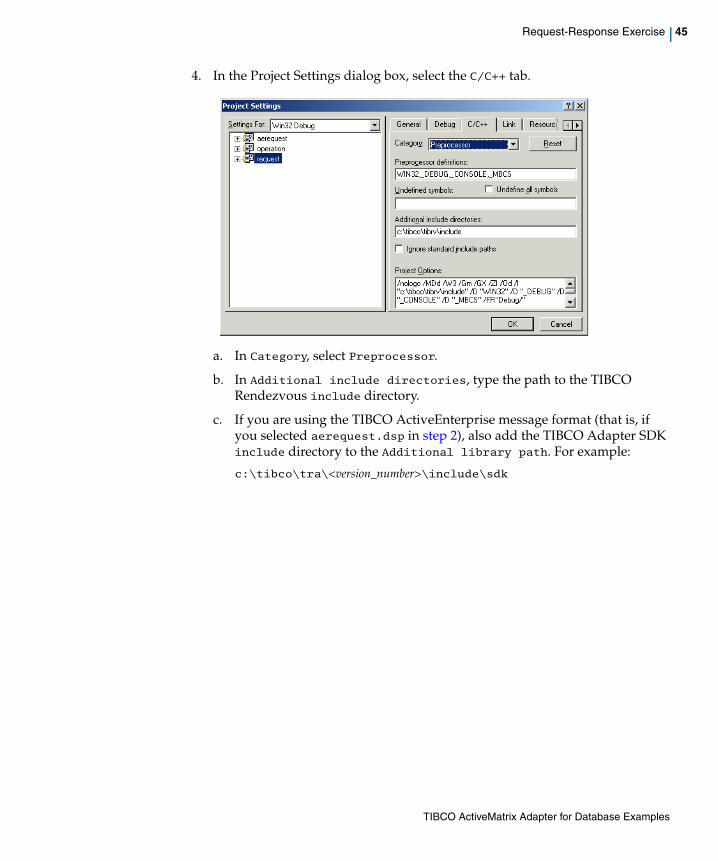
4. In the Project Settings dialog box, select the C/C++ tab.
a. In Category, select Preprocessor.
b. In Additional include directories, type the path to the TIBCO Rendezvous include directory.
c. If you are using the TIBCO ActiveEnterprise message format (that is, if you selected aerequest.dsp in step 2), also add the TIBCO Adapter SDK include directory to the Additional library path. For example:
c:\tibco\tra\<version_number>\include\sdk
TIBCO ActiveMatrix Adapter for Database Examples

46 | Chapter 3 Request-Response Service Examples
5. In the Project Settings dialog box, select the Link tab.
a. In Category, select Input.
b. In Additional library path, type the path to the TIBCO Rendezvous library.
c. If you are using the TIBCO ActiveEnterprise message format (that is, if you selected aerequest.dsp in step 2), also add the TIBCO Adapter SDK library directory to the Additional library path. For example:
c:\tibco\tra\<version_number>\lib
6. Click OK. The Project Settings dialog box closes.
7. Select Build>Build name.exe to create the request executable.
Task C Build the Sample Request Program on UNIX (if applicable)
A sample Makefile for each UNIX platform supported is included with TIBCO ActiveMatrix Adapter for Database. Use this sample Makefile as a starting point for your own Makefile.
1. Using a text editor, open the MakeFile and set the RV_Home and RVLIBS environment variables. For example:
RV_HOME=/usr/tibco/tibrvRVLIBS= -L$(RV_HOME)/lib -ltibrvcpp -ltibrvcmq -ltibrvcm
-ltibrv
TIBCO ActiveMatrix Adapter for Database Examples
Request-Response Exercise | 47
2. If you are using the TIBCO Rendezvous message format, skip to step 3.
If you are using the TIBCO ActiveEnterprise or XML wire format, set the SDK and TPCL environment variables for the TIBCO Adapter SDK. For example:
SDK_HOME=/local/tibco/adapter/sdk/5.6 TPCL_HOME=/local/tibco/tpcl/6.0 SDKLIBS= -L$(SDK_HOME)/lib -L$(TPCL_HOME) -lmaverick50
-lrepowww532 -lcrypto -lssl -lxerces-c2_1
3. Set the system libraries. Different vendor libraries may require different system libraries. (In particular, see SOCKETLIB). The config_make script will configure these for most systems. Change if necessary for your system and configuration. For example:
SYSTEMLIBS= -lthread -lsocket -lnsl -ldl -lm -laio -lc
4. Set the command to invoke your compiler. For example:
CPP= CC
5. Set the options to be passed to your compiler. For example:
CPPOPTIONS= -g
6. Save the MakeFile and execute it using one of the following commands, as appropriate for the message format you are using:
% make request
or
% make aerequest
Task D Configure the Properties File
1. Change directory to the demo\request directory. For example:
>cd c:\tibco\adapter\adadb\<version_number>\demo\request
2. Open rvServer.tra or jmsServer.tra (depending on your transport method) and set the following values as appropriate for your environment.
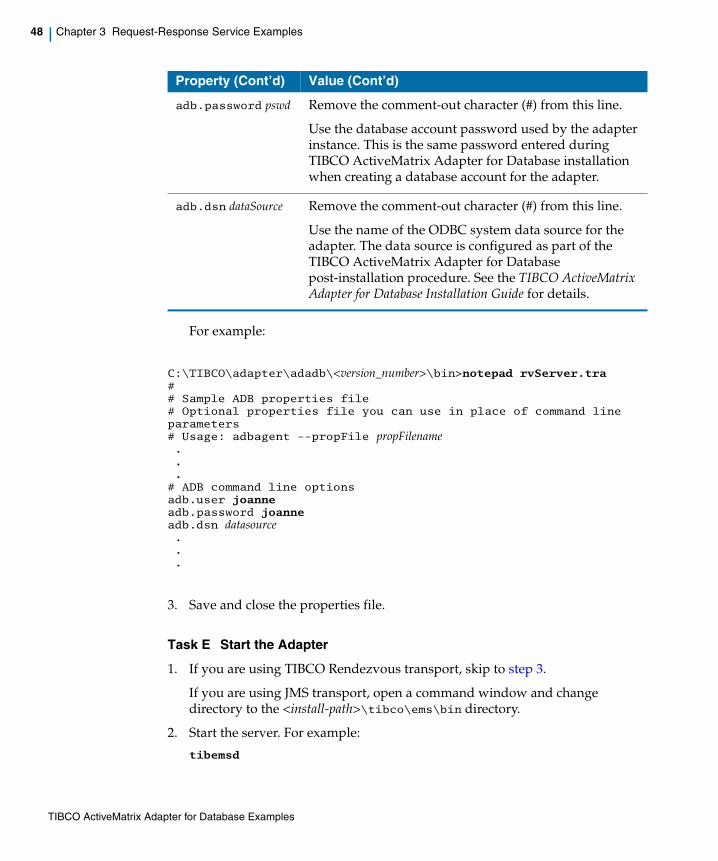
Property Value
adb.user userId Remove the comment-out character (#) from this line.
Use the database account name used by the adapter instance. This is the same username entered during TIBCO ActiveMatrix Adapter for Database installation when creating a database account for the adapter.
TIBCO ActiveMatrix Adapter for Database Examples
48 | Chapter 3 Request-Response Service Examples
For example:
C:\TIBCO\adapter\adadb\<version_number>\bin>notepad rvServer.tra## Sample ADB properties file# Optional properties file you can use in place of command line parameters# Usage: adbagent --propFile propFilename...# ADB command line optionsadb.user joanneadb.password joanneadb.dsn datasource...
3. Save and close the properties file.
Task E Start the Adapter
1. If you are using TIBCO Rendezvous transport, skip to step 3.
If you are using JMS transport, open a command window and change directory to the <install-path>\tibco\ems\bin directory.
2. Start the server. For example:
tibemsd
adb.password pswd Remove the comment-out character (#) from this line.
Use the database account password used by the adapter instance. This is the same password entered during TIBCO ActiveMatrix Adapter for Database installation when creating a database account for the adapter.
adb.dsn dataSource Remove the comment-out character (#) from this line.
Use the name of the ODBC system data source for the adapter. The data source is configured as part of the TIBCO ActiveMatrix Adapter for Database post-installation procedure. See the TIBCO ActiveMatrix Adapter for Database Installation Guide for details.
Property (Cont’d) Value (Cont’d)
TIBCO ActiveMatrix Adapter for Database Examples
Request-Response Exercise | 49
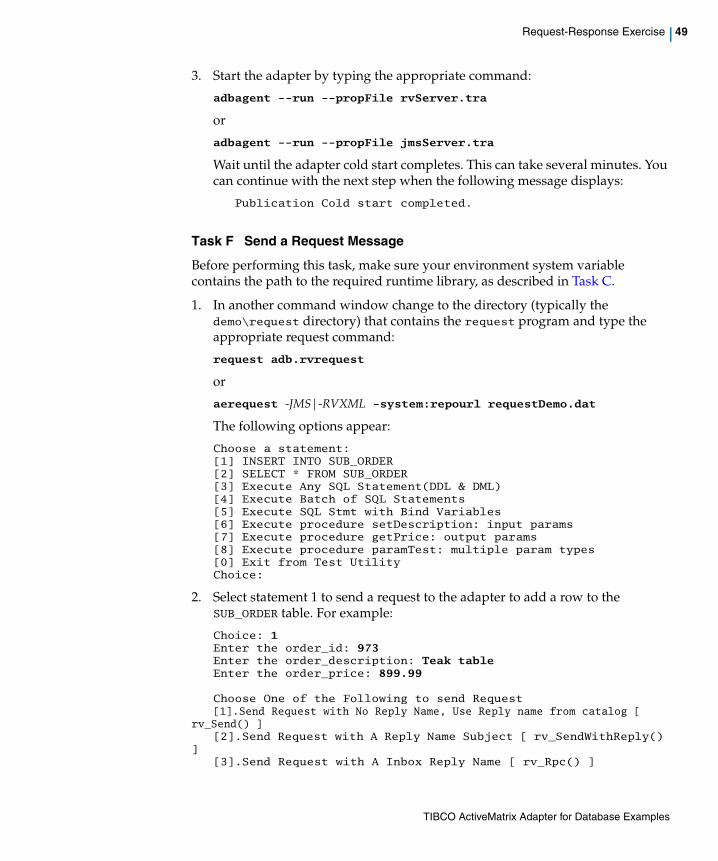
3. Start the adapter by typing the appropriate command:
adbagent --run --propFile rvServer.tra
or
adbagent --run --propFile jmsServer.tra
Wait until the adapter cold start completes. This can take several minutes. You can continue with the next step when the following message displays:
Publication Cold start completed.
Task F Send a Request Message
Before performing this task, make sure your environment system variable contains the path to the required runtime library, as described in Task C.
1. In another command window change to the directory (typically the demo\request directory) that contains the request program and type the appropriate request command:
request adb.rvrequest
or
aerequest -JMS|-RVXML -system:repourl requestDemo.dat
The following options appear:
Choose a statement:[1] INSERT INTO SUB_ORDER[2] SELECT * FROM SUB_ORDER[3] Execute Any SQL Statement(DDL & DML)[4] Execute Batch of SQL Statements[5] Execute SQL Stmt with Bind Variables[6] Execute procedure setDescription: input params[7] Execute procedure getPrice: output params[8] Execute procedure paramTest: multiple param types[0] Exit from Test UtilityChoice:
2. Select statement 1 to send a request to the adapter to add a row to the SUB_ORDER table. For example:
Choice: 1Enter the order_id: 973Enter the order_description: Teak tableEnter the order_price: 899.99
Choose One of the Following to send Request[1].Send Request with No Reply Name, Use Reply name from catalog [
rv_Send() ][2].Send Request with A Reply Name Subject [ rv_SendWithReply()
][3].Send Request with A Inbox Reply Name [ rv_Rpc() ]
TIBCO ActiveMatrix Adapter for Database Examples
50 | Chapter 3 Request-Response Service Examples
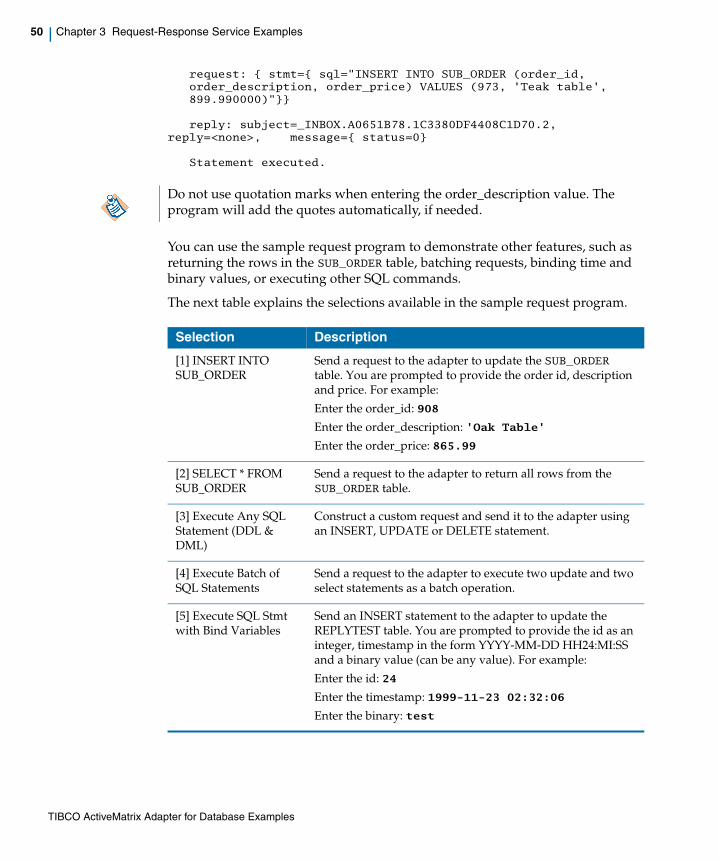
request: { stmt={ sql="INSERT INTO SUB_ORDER (order_id, order_description, order_price) VALUES (973, 'Teak table', 899.990000)"}}
reply: subject=_INBOX.A0651B78.1C3380DF4408C1D70.2, reply=<none>, message={ status=0}
Statement executed.
You can use the sample request program to demonstrate other features, such as returning the rows in the SUB_ORDER table, batching requests, binding time and binary values, or executing other SQL commands.
The next table explains the selections available in the sample request program.
Do not use quotation marks when entering the order_description value. The program will add the quotes automatically, if needed.
Selection Description
[1] INSERT INTO SUB_ORDER
Send a request to the adapter to update the SUB_ORDER table. You are prompted to provide the order id, description and price. For example:
Enter the order_id: 908
Enter the order_description: 'Oak Table'
Enter the order_price: 865.99
[2] SELECT * FROM SUB_ORDER
Send a request to the adapter to return all rows from the SUB_ORDER table.
[3] Execute Any SQL Statement (DDL & DML)
Construct a custom request and send it to the adapter using an INSERT, UPDATE or DELETE statement.
[4] Execute Batch of SQL Statements
Send a request to the adapter to execute two update and two select statements as a batch operation.
[5] Execute SQL Stmt with Bind Variables
Send an INSERT statement to the adapter to update the REPLYTEST table. You are prompted to provide the id as an integer, timestamp in the form YYYY-MM-DD HH24:MI:SS and a binary value (can be any value). For example:
Enter the id: 24
Enter the timestamp: 1999-11-23 02:32:06
Enter the binary: test
TIBCO ActiveMatrix Adapter for Database Examples

Request-Response Exercise | 51
Task G Stop the Adapter Instance and Clean Up
The cleanup script removes only the example tables that were created when the request.sql script was run.
1. Use the TIBCO Rendezvous tibrvsend application to send a message on the terminate subject to stop the adapter instance. Type the following in a command window:
tibrvsend _ADB.rvServer.TERMINATE now
or
tibrvsend _ADB.jmsServer.TERMINATE now
2. Change directory to the install-path\demo\request directory. For example:
cd c:\tibco\adapter\adadb\<version_number>\demo\request
3. Execute the demo cleanup script to remove the example tables. For example:
sqlplus userid/pswd@dbService @request_cleanup_ora.sql
[6] Execute procedure setDescription: input params
Execute the setDescription procedure, which takes an item description as input and writes it to the SUB_ORDER table. For example:
Enter the id: 24
Enter the order_description: ’Pine Chair’
[7] Execute procedure getPrice: output params
Execute the getPrice procedure, which returns an item price for the specified id. For example:
Enter the id: 24
Returns the price value for the specified order.
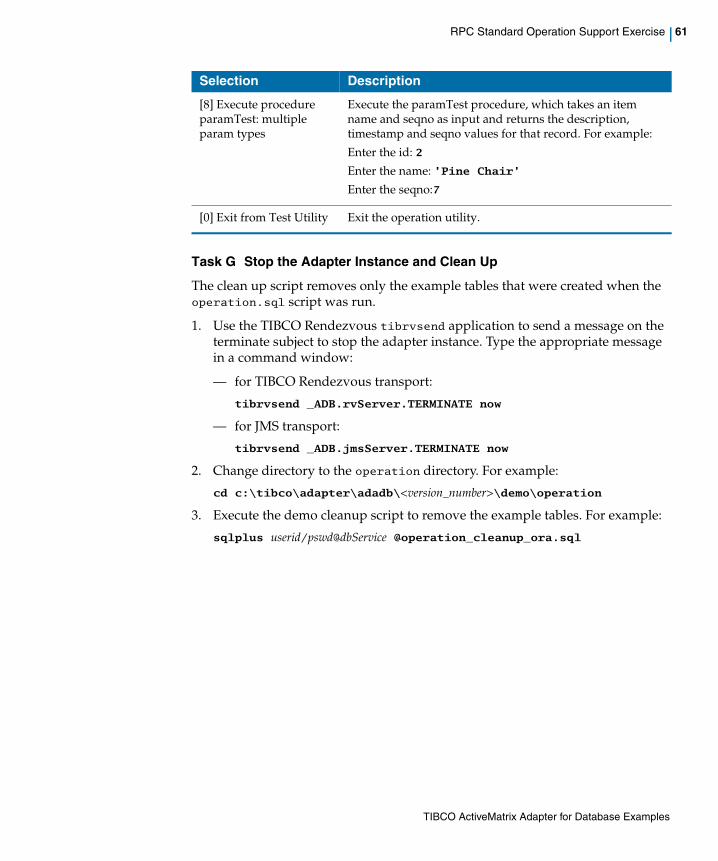
[8] Execute procedure paramTest: multiple param types
Execute the paramTest procedure, which takes an item name and sequence number as input and returns the description, timestamp and sequence number values for that record. For example:
Enter the id: 2
Enter the name: ’Pine Chair’
Enter the seqno:7
[0] Exit from Test Utility
Exit the request utility.
Selection (Cont’d) Description (Cont’d)
TIBCO ActiveMatrix Adapter for Database Examples
52 | Chapter 3 Request-Response Service Examples
RPC Standard Operation Support Exercise
This is the first of two RPC exercises. The second exercise, RPC Custom Operation Support Exercise on page 62, demonstrates custom operation support.
OverviewThis exercise demonstrates standard operation support. It uses a sample operation program that emulates an RPC client application to send requests to an adapter instance for processing.
Required Platforms and SoftwareThis exercise can be performed on Microsoft Windows or on UNIX. It can be performed with an Oracle, Microsoft SQL or Sybase database.
All required files are provided with the default installation of the adapter.
The source code for the sample operation program is included in the install-path\demo\operation directory. The program must be built for your platform. It is similar to the sample request-response program used in the Request-Response Exercise.
The following software is required:
• Visual C++
• TIBCO Designer
• TIBCO IntegrationManager
• TIBCO Adapter SDK
TasksThis exercise consists of the following tasks:
• Task A, Create the Demo Tables
• Task B, Build the Sample Operation Program on Windows (if applicable)
• Task C, Build the Sample Request Program on UNIX (if applicable)
• Task D, Configure the Properties File
• Task E, Start the Adapter
• Task F, Send a Request Message
TIBCO ActiveMatrix Adapter for Database Examples
RPC Standard Operation Support Exercise | 53
• Task G, Stop the Adapter Instance and Clean Up
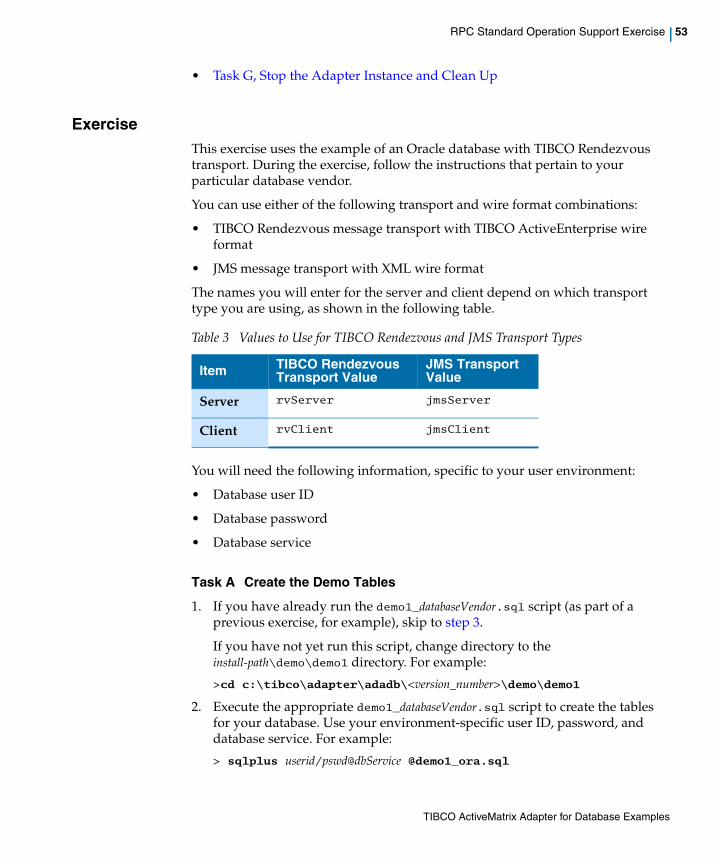
ExerciseThis exercise uses the example of an Oracle database with TIBCO Rendezvous transport. During the exercise, follow the instructions that pertain to your particular database vendor.
You can use either of the following transport and wire format combinations:
• TIBCO Rendezvous message transport with TIBCO ActiveEnterprise wire format
• JMS message transport with XML wire format
The names you will enter for the server and client depend on which transport type you are using, as shown in the following table.
You will need the following information, specific to your user environment:
• Database user ID
• Database password
• Database service
Task A Create the Demo Tables
1. If you have already run the demo1_databaseVendor.sql script (as part of a previous exercise, for example), skip to step 3.
If you have not yet run this script, change directory to the install-path\demo\demo1 directory. For example:
>cd c:\tibco\adapter\adadb\<version_number>\demo\demo1
2. Execute the appropriate demo1_databaseVendor.sql script to create the tables for your database. Use your environment-specific user ID, password, and database service. For example:
> sqlplus userid/pswd@dbService @demo1_ora.sql
Table 3 Values to Use for TIBCO Rendezvous and JMS Transport Types
Item TIBCO Rendezvous Transport Value
JMS Transport Value
Server rvServer jmsServer
Client rvClient jmsClient
TIBCO ActiveMatrix Adapter for Database Examples
54 | Chapter 3 Request-Response Service Examples
The script creates the items and displays the status.
3. Open a command window and change directory to the operation directory. For example:
>cd C:\tibco\adapter\adadb\<version_number>demo\operation
4. Execute the appropriate request script for your database vendor to create the tables for your database. Use your environment-specific user ID, password, and database service. For example:
>sqlplus userid/pswd@dbService @operation_ora.sql
The script creates the items and displays the status.
5. Exit the query tool.
SQL> exit
Task B Build the Sample Operation Program on Windows (if applicable)
Perform this task if you are running this demo on Windows. If you are running on UNIX, skip this task and go to Task C.
1. In Visual C++, create a new workspace and insert a new project into it.
2. In the new project, open the appropriate sample operation program for your platform. For example:
c:\tibco\adapter\adadb\<version_number>\demo\operation\operation.dsp
3. Select Project>Settings.
TIBCO ActiveMatrix Adapter for Database Examples
RPC Standard Operation Support Exercise | 55
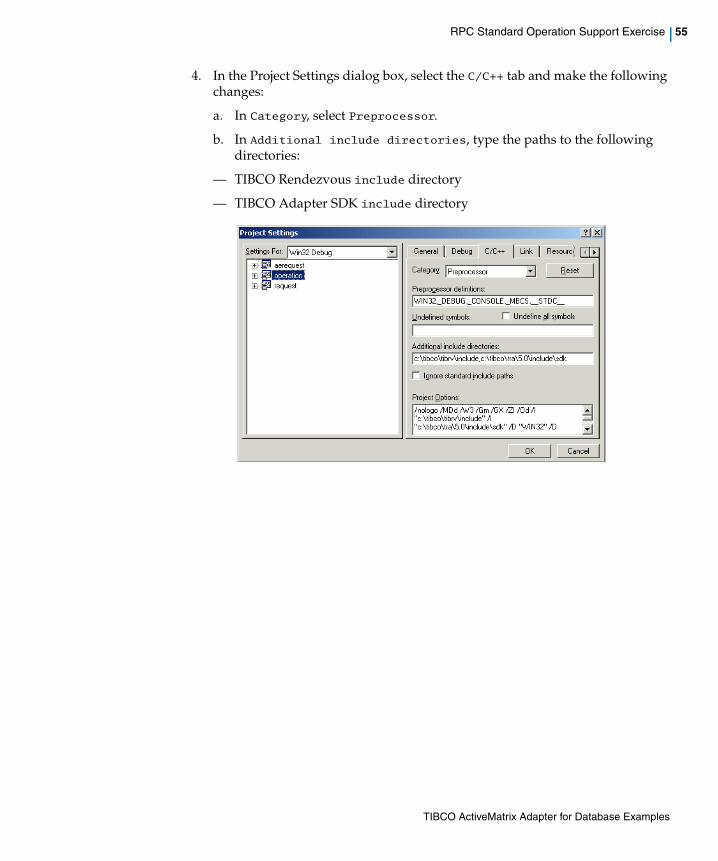
4. In the Project Settings dialog box, select the C/C++ tab and make the following changes:
a. In Category, select Preprocessor.
b. In Additional include directories, type the paths to the following directories:
— TIBCO Rendezvous include directory
— TIBCO Adapter SDK include directory
TIBCO ActiveMatrix Adapter for Database Examples
56 | Chapter 3 Request-Response Service Examples
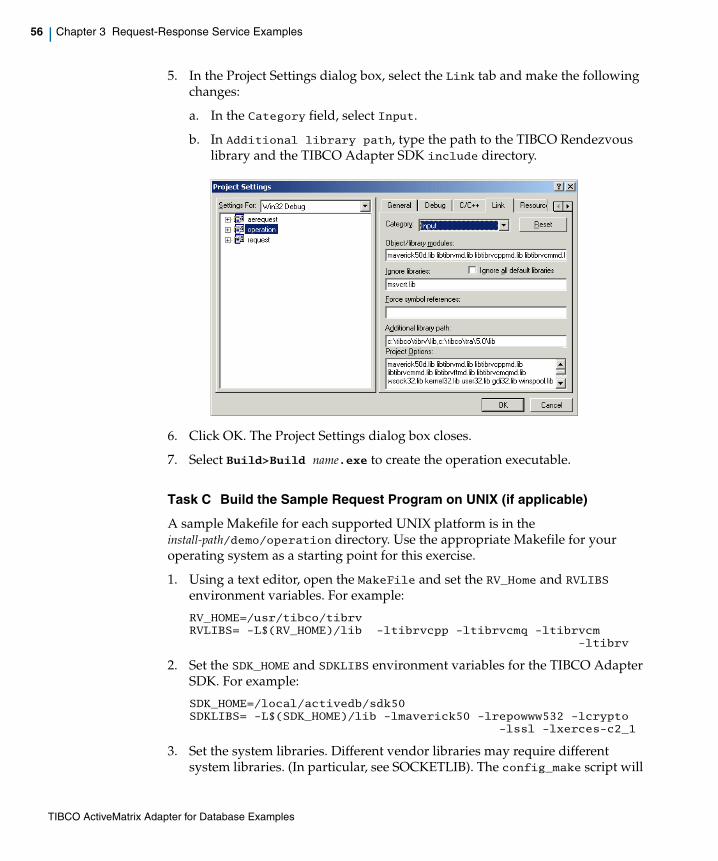
5. In the Project Settings dialog box, select the Link tab and make the following changes:
a. In the Category field, select Input.
b. In Additional library path, type the path to the TIBCO Rendezvous library and the TIBCO Adapter SDK include directory.
6. Click OK. The Project Settings dialog box closes.
7. Select Build>Build name.exe to create the operation executable.
Task C Build the Sample Request Program on UNIX (if applicable)
A sample Makefile for each supported UNIX platform is in the install-path/demo/operation directory. Use the appropriate Makefile for your operating system as a starting point for this exercise.
1. Using a text editor, open the MakeFile and set the RV_Home and RVLIBS environment variables. For example:
RV_HOME=/usr/tibco/tibrvRVLIBS= -L$(RV_HOME)/lib -ltibrvcpp -ltibrvcmq -ltibrvcm
-ltibrv
2. Set the SDK_HOME and SDKLIBS environment variables for the TIBCO Adapter SDK. For example:
SDK_HOME=/local/activedb/sdk50SDKLIBS= -L$(SDK_HOME)/lib -lmaverick50 -lrepowww532 -lcrypto
-lssl -lxerces-c2_1
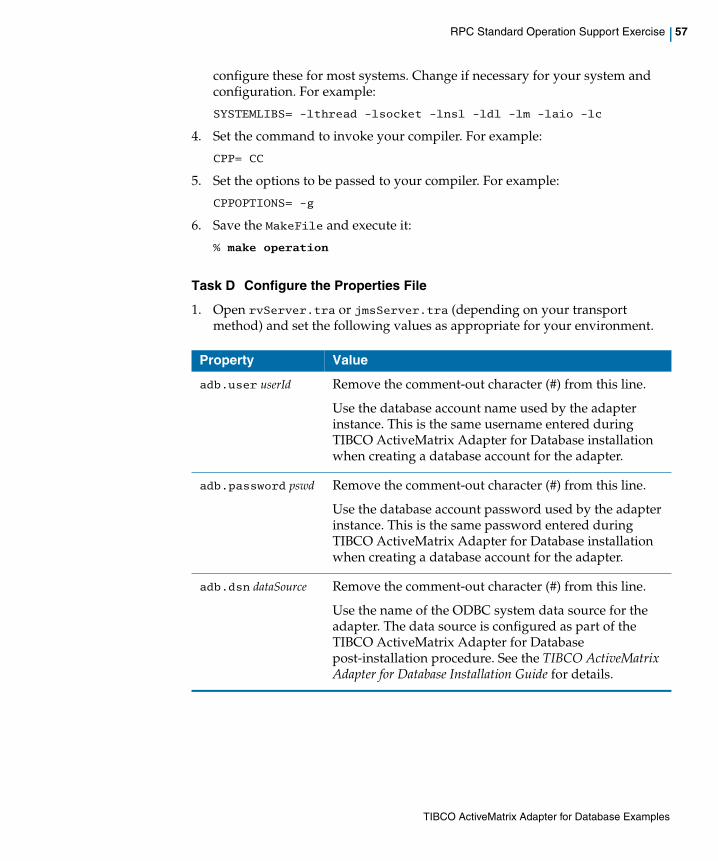
3. Set the system libraries. Different vendor libraries may require different system libraries. (In particular, see SOCKETLIB). The config_make script will
TIBCO ActiveMatrix Adapter for Database Examples
RPC Standard Operation Support Exercise | 57
configure these for most systems. Change if necessary for your system and configuration. For example:
SYSTEMLIBS= -lthread -lsocket -lnsl -ldl -lm -laio -lc
4. Set the command to invoke your compiler. For example:
CPP= CC
5. Set the options to be passed to your compiler. For example:
CPPOPTIONS= -g
6. Save the MakeFile and execute it:
% make operation
Task D Configure the Properties File
1. Open rvServer.tra or jmsServer.tra (depending on your transport method) and set the following values as appropriate for your environment.
Property Value
adb.user userId Remove the comment-out character (#) from this line.
Use the database account name used by the adapter instance. This is the same username entered during TIBCO ActiveMatrix Adapter for Database installation when creating a database account for the adapter.
adb.password pswd Remove the comment-out character (#) from this line.
Use the database account password used by the adapter instance. This is the same password entered during TIBCO ActiveMatrix Adapter for Database installation when creating a database account for the adapter.
adb.dsn dataSource Remove the comment-out character (#) from this line.
Use the name of the ODBC system data source for the adapter. The data source is configured as part of the TIBCO ActiveMatrix Adapter for Database post-installation procedure. See the TIBCO ActiveMatrix Adapter for Database Installation Guide for details.
TIBCO ActiveMatrix Adapter for Database Examples
58 | Chapter 3 Request-Response Service Examples
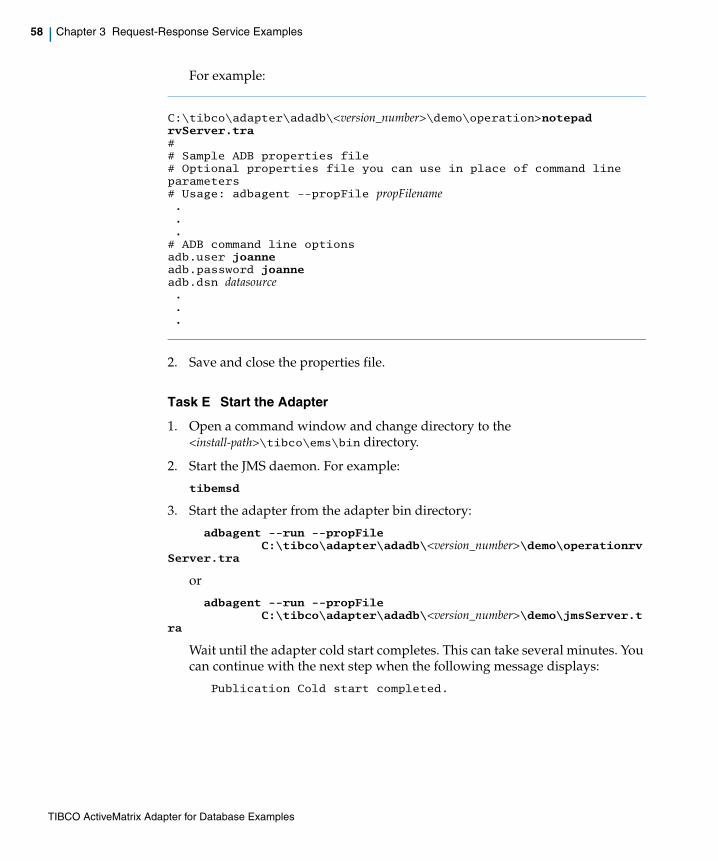
For example:
C:\tibco\adapter\adadb\<version_number>\demo\operation>notepad rvServer.tra## Sample ADB properties file# Optional properties file you can use in place of command line parameters# Usage: adbagent --propFile propFilename...# ADB command line optionsadb.user joanneadb.password joanneadb.dsn datasource...
2. Save and close the properties file.
Task E Start the Adapter
1. Open a command window and change directory to the <install-path>\tibco\ems\bin directory.
2. Start the JMS daemon. For example:
tibemsd
3. Start the adapter from the adapter bin directory:
adbagent --run --propFileC:\tibco\adapter\adadb\<version_number>\demo\operationrv
Server.tra
or
adbagent --run --propFile C:\tibco\adapter\adadb\<version_number>\demo\jmsServer.t
ra
Wait until the adapter cold start completes. This can take several minutes. You can continue with the next step when the following message displays:
Publication Cold start completed.
TIBCO ActiveMatrix Adapter for Database Examples
RPC Standard Operation Support Exercise | 59
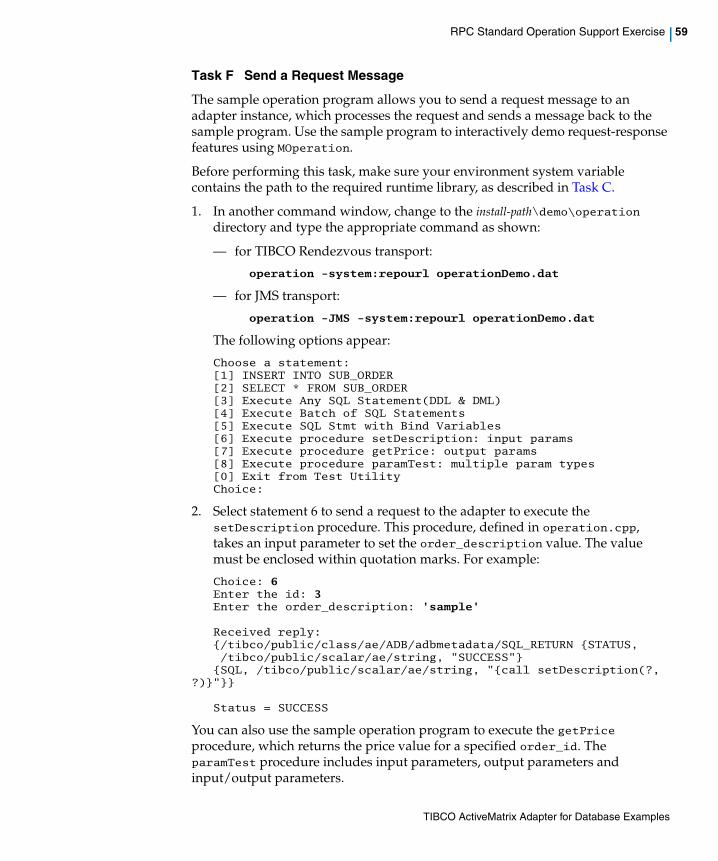
Task F Send a Request Message
The sample operation program allows you to send a request message to an adapter instance, which processes the request and sends a message back to the sample program. Use the sample program to interactively demo request-response features using MOperation.
Before performing this task, make sure your environment system variable contains the path to the required runtime library, as described in Task C.
1. In another command window, change to the install-path\demo\operation directory and type the appropriate command as shown:
— for TIBCO Rendezvous transport:
operation -system:repourl operationDemo.dat
— for JMS transport:
operation -JMS -system:repourl operationDemo.dat
The following options appear:
Choose a statement:[1] INSERT INTO SUB_ORDER[2] SELECT * FROM SUB_ORDER[3] Execute Any SQL Statement(DDL & DML)[4] Execute Batch of SQL Statements[5] Execute SQL Stmt with Bind Variables[6] Execute procedure setDescription: input params[7] Execute procedure getPrice: output params[8] Execute procedure paramTest: multiple param types[0] Exit from Test UtilityChoice:
2. Select statement 6 to send a request to the adapter to execute the setDescription procedure. This procedure, defined in operation.cpp, takes an input parameter to set the order_description value. The value must be enclosed within quotation marks. For example:
Choice: 6Enter the id: 3Enter the order_description: 'sample'
Received reply:{/tibco/public/class/ae/ADB/adbmetadata/SQL_RETURN {STATUS, /tibco/public/scalar/ae/string, "SUCCESS"} {SQL, /tibco/public/scalar/ae/string, "{call setDescription(?,
?)}"}}
Status = SUCCESS
You can also use the sample operation program to execute the getPrice procedure, which returns the price value for a specified order_id. The paramTest procedure includes input parameters, output parameters and input/output parameters.
TIBCO ActiveMatrix Adapter for Database Examples
60 | Chapter 3 Request-Response Service Examples
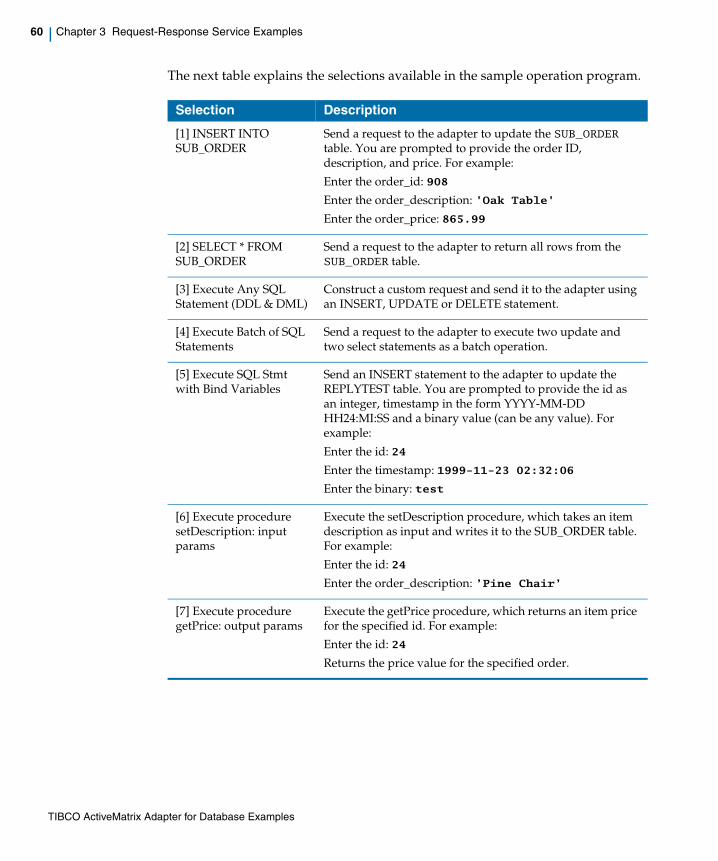
The next table explains the selections available in the sample operation program.
Selection Description
[1] INSERT INTO SUB_ORDER
Send a request to the adapter to update the SUB_ORDER table. You are prompted to provide the order ID, description, and price. For example:
Enter the order_id: 908
Enter the order_description: 'Oak Table'
Enter the order_price: 865.99
[2] SELECT * FROM SUB_ORDER
Send a request to the adapter to return all rows from the SUB_ORDER table.
[3] Execute Any SQL Statement (DDL & DML)
Construct a custom request and send it to the adapter using an INSERT, UPDATE or DELETE statement.
[4] Execute Batch of SQL Statements
Send a request to the adapter to execute two update and two select statements as a batch operation.
[5] Execute SQL Stmt with Bind Variables
Send an INSERT statement to the adapter to update the REPLYTEST table. You are prompted to provide the id as an integer, timestamp in the form YYYY-MM-DD HH24:MI:SS and a binary value (can be any value). For example:
Enter the id: 24
Enter the timestamp: 1999-11-23 02:32:06
Enter the binary: test
[6] Execute procedure setDescription: input params
Execute the setDescription procedure, which takes an item description as input and writes it to the SUB_ORDER table. For example:
Enter the id: 24
Enter the order_description: ’Pine Chair’
[7] Execute procedure getPrice: output params
Execute the getPrice procedure, which returns an item price for the specified id. For example:
Enter the id: 24
Returns the price value for the specified order.
TIBCO ActiveMatrix Adapter for Database Examples
RPC Standard Operation Support Exercise | 61
Task G Stop the Adapter Instance and Clean Up
The clean up script removes only the example tables that were created when the operation.sql script was run.
1. Use the TIBCO Rendezvous tibrvsend application to send a message on the terminate subject to stop the adapter instance. Type the appropriate message in a command window:
— for TIBCO Rendezvous transport:
tibrvsend _ADB.rvServer.TERMINATE now
— for JMS transport:
tibrvsend _ADB.jmsServer.TERMINATE now
2. Change directory to the operation directory. For example:
cd c:\tibco\adapter\adadb\<version_number>\demo\operation
3. Execute the demo cleanup script to remove the example tables. For example:
sqlplus userid/pswd@dbService @operation_cleanup_ora.sql
[8] Execute procedure paramTest: multiple param types
Execute the paramTest procedure, which takes an item name and seqno as input and returns the description, timestamp and seqno values for that record. For example:
Enter the id: 2
Enter the name: ’Pine Chair’
Enter the seqno:7
[0] Exit from Test Utility Exit the operation utility.
Selection Description
TIBCO ActiveMatrix Adapter for Database Examples
62 | Chapter 3 Request-Response Service Examples
RPC Custom Operation Support Exercise
This is the second of two RPC exercises. The previous exercise, RPC Standard Operation Support Exercise on page 52, demonstrates the usage of standard operation support.
OverviewThis exercise demonstrates the usage of custom operation support. It uses TIBCO IntegrationManager as the RPC client to send requests to an adapter instance for processing.
Required Platforms and SoftwareThis exercise can be performed on Microsoft Windows platforms or on UNIX. It can be performed with an Oracle, Microsoft SQL or Sybase database. This exercise uses the TIBCO ActiveEnterprise wire format and the TIBCO Adapter SDK.
All required files are provided with the default installation of TIBCO ActiveMatrix Adapter for Database.
The following software is required:
• TIBCO Designer
• TIBCO IntegrationManager
• TIBCO Adapter SDK
TasksThis exercise consists of the following tasks:
• Task A, Create the Demo Tables
• Task B, Configure the TIBCO IntegrationManager Client
• Task C, Configure the Properties File
• Task D, Start the Adapter
• Task E, Send a Request Message
• Task F, Stop the Adapter Instance and Clean Up
TIBCO ActiveMatrix Adapter for Database Examples
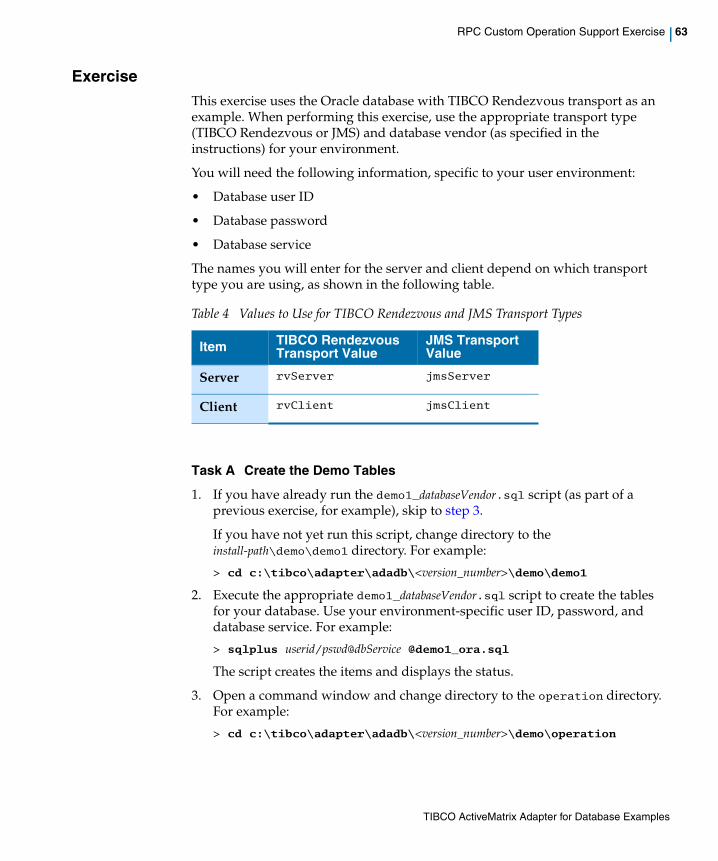
RPC Custom Operation Support Exercise | 63
ExerciseThis exercise uses the Oracle database with TIBCO Rendezvous transport as an example. When performing this exercise, use the appropriate transport type (TIBCO Rendezvous or JMS) and database vendor (as specified in the instructions) for your environment.
You will need the following information, specific to your user environment:
• Database user ID
• Database password
• Database service
The names you will enter for the server and client depend on which transport type you are using, as shown in the following table.
Task A Create the Demo Tables
1. If you have already run the demo1_databaseVendor.sql script (as part of a previous exercise, for example), skip to step 3.
If you have not yet run this script, change directory to the install-path\demo\demo1 directory. For example:
> cd c:\tibco\adapter\adadb\<version_number>\demo\demo1
2. Execute the appropriate demo1_databaseVendor.sql script to create the tables for your database. Use your environment-specific user ID, password, and database service. For example:
> sqlplus userid/pswd@dbService @demo1_ora.sql
The script creates the items and displays the status.
3. Open a command window and change directory to the operation directory. For example:
> cd c:\tibco\adapter\adadb\<version_number>\demo\operation
Table 4 Values to Use for TIBCO Rendezvous and JMS Transport Types
Item TIBCO Rendezvous Transport Value
JMS Transport Value
Server rvServer jmsServer
Client rvClient jmsClient
TIBCO ActiveMatrix Adapter for Database Examples
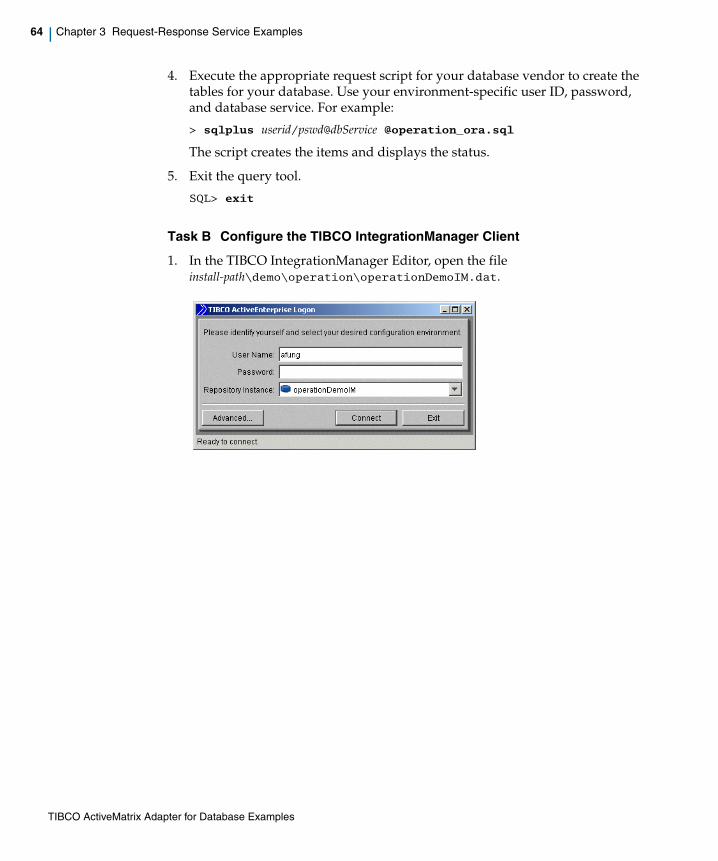
64 | Chapter 3 Request-Response Service Examples
4. Execute the appropriate request script for your database vendor to create the tables for your database. Use your environment-specific user ID, password, and database service. For example:
> sqlplus userid/pswd@dbService @operation_ora.sql
The script creates the items and displays the status.
5. Exit the query tool.
SQL> exit
Task B Configure the TIBCO IntegrationManager Client
1. In the TIBCO IntegrationManager Editor, open the file install-path\demo\operation\operationDemoIM.dat.
TIBCO ActiveMatrix Adapter for Database Examples

RPC Custom Operation Support Exercise | 65
2. Open the Process Diagram named ADBIMProcess.
TIBCO ActiveMatrix Adapter for Database Examples
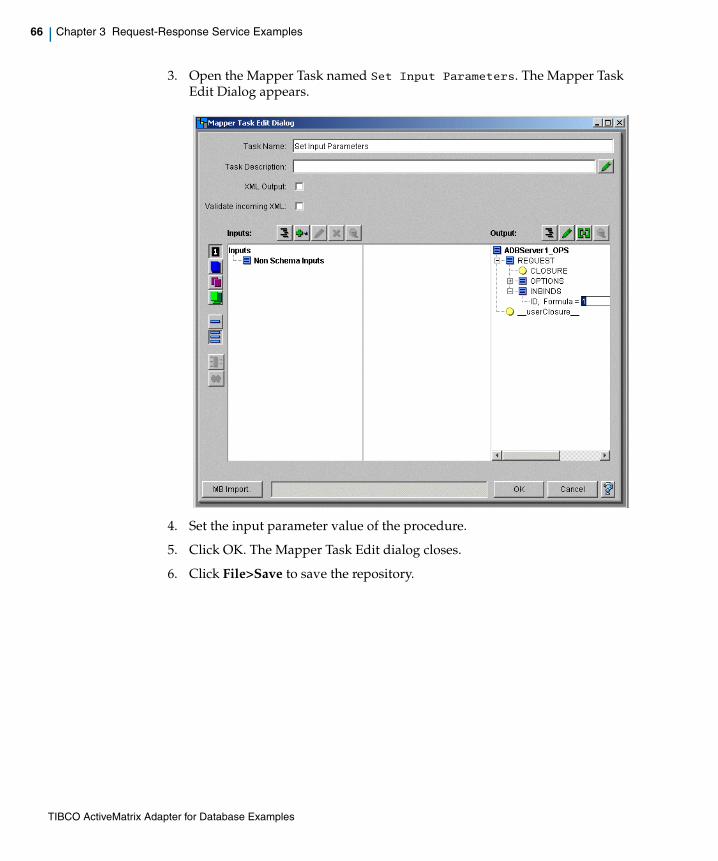
66 | Chapter 3 Request-Response Service Examples
3. Open the Mapper Task named Set Input Parameters. The Mapper Task Edit Dialog appears.
4. Set the input parameter value of the procedure.
5. Click OK. The Mapper Task Edit dialog closes.
6. Click File>Save to save the repository.
TIBCO ActiveMatrix Adapter for Database Examples
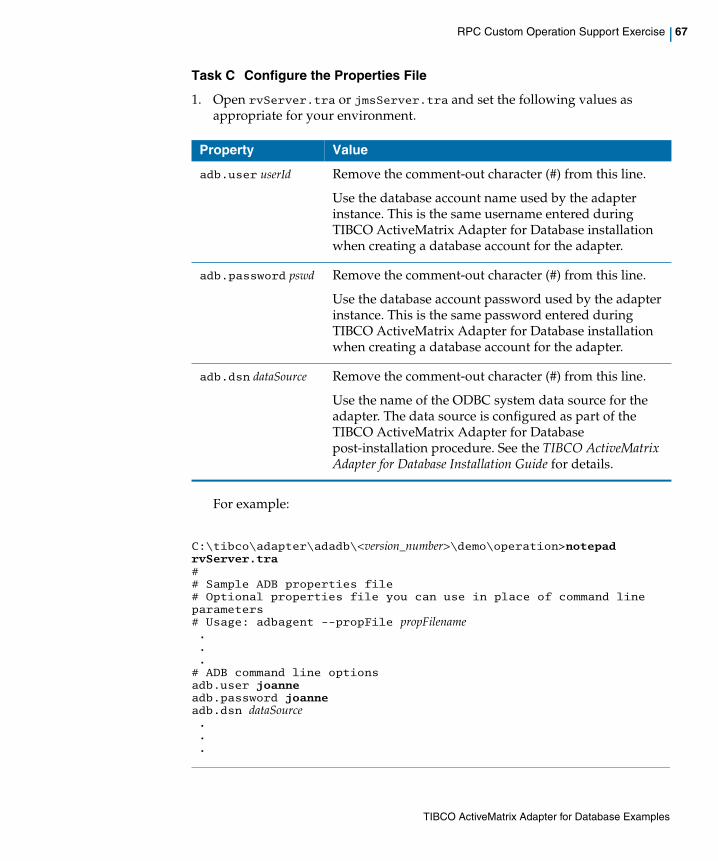
RPC Custom Operation Support Exercise | 67
Task C Configure the Properties File
1. Open rvServer.tra or jmsServer.tra and set the following values as appropriate for your environment.
For example:
C:\tibco\adapter\adadb\<version_number>\demo\operation>notepad rvServer.tra## Sample ADB properties file# Optional properties file you can use in place of command line parameters# Usage: adbagent --propFile propFilename...# ADB command line optionsadb.user joanneadb.password joanneadb.dsn dataSource...
Property Value
adb.user userId Remove the comment-out character (#) from this line.
Use the database account name used by the adapter instance. This is the same username entered during TIBCO ActiveMatrix Adapter for Database installation when creating a database account for the adapter.
adb.password pswd Remove the comment-out character (#) from this line.
Use the database account password used by the adapter instance. This is the same password entered during TIBCO ActiveMatrix Adapter for Database installation when creating a database account for the adapter.
adb.dsn dataSource Remove the comment-out character (#) from this line.
Use the name of the ODBC system data source for the adapter. The data source is configured as part of the TIBCO ActiveMatrix Adapter for Database post-installation procedure. See the TIBCO ActiveMatrix Adapter for Database Installation Guide for details.
TIBCO ActiveMatrix Adapter for Database Examples
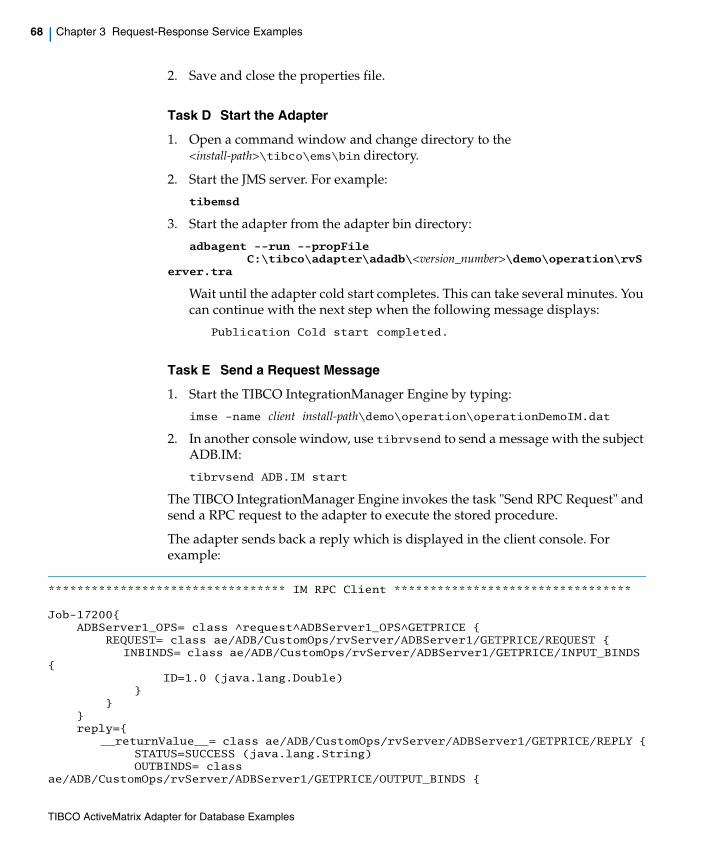
68 | Chapter 3 Request-Response Service Examples
2. Save and close the properties file.
Task D Start the Adapter
1. Open a command window and change directory to the <install-path>\tibco\ems\bin directory.
2. Start the JMS server. For example:
tibemsd
3. Start the adapter from the adapter bin directory:
adbagent --run --propFile C:\tibco\adapter\adadb\<version_number>\demo\operation\rvS
erver.tra
Wait until the adapter cold start completes. This can take several minutes. You can continue with the next step when the following message displays:
Publication Cold start completed.
Task E Send a Request Message
1. Start the TIBCO IntegrationManager Engine by typing:
imse -name client install-path\demo\operation\operationDemoIM.dat
2. In another console window, use tibrvsend to send a message with the subject ADB.IM:
tibrvsend ADB.IM start
The TIBCO IntegrationManager Engine invokes the task "Send RPC Request" and send a RPC request to the adapter to execute the stored procedure.
The adapter sends back a reply which is displayed in the client console. For example:
********************************* IM RPC Client *********************************
Job-17200{ ADBServer1_OPS= class ^request^ADBServer1_OPS^GETPRICE { REQUEST= class ae/ADB/CustomOps/rvServer/ADBServer1/GETPRICE/REQUEST { INBINDS= class ae/ADB/CustomOps/rvServer/ADBServer1/GETPRICE/INPUT_BINDS { ID=1.0 (java.lang.Double) } } } reply={ __returnValue__= class ae/ADB/CustomOps/rvServer/ADBServer1/GETPRICE/REPLY { STATUS=SUCCESS (java.lang.String) OUTBINDS= class ae/ADB/CustomOps/rvServer/ADBServer1/GETPRICE/OUTPUT_BINDS {
TIBCO ActiveMatrix Adapter for Database Examples
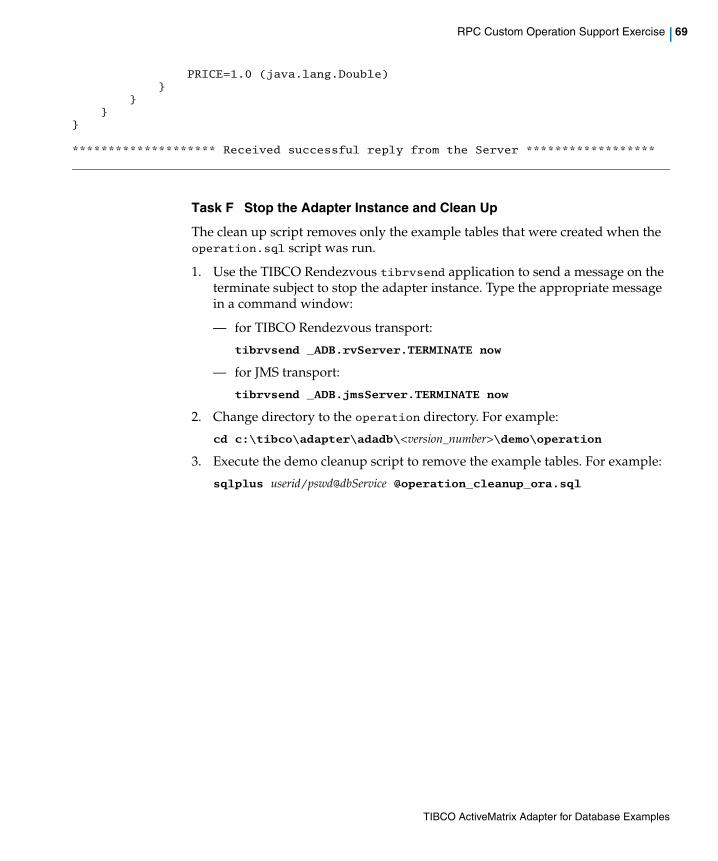
RPC Custom Operation Support Exercise | 69
PRICE=1.0 (java.lang.Double) } } }}
******************** Received successful reply from the Server ******************
Task F Stop the Adapter Instance and Clean Up
The clean up script removes only the example tables that were created when the operation.sql script was run.
1. Use the TIBCO Rendezvous tibrvsend application to send a message on the terminate subject to stop the adapter instance. Type the appropriate message in a command window:
— for TIBCO Rendezvous transport:
tibrvsend _ADB.rvServer.TERMINATE now
— for JMS transport:
tibrvsend _ADB.jmsServer.TERMINATE now
2. Change directory to the operation directory. For example:
cd c:\tibco\adapter\adadb\<version_number>\demo\operation
3. Execute the demo cleanup script to remove the example tables. For example:
sqlplus userid/pswd@dbService @operation_cleanup_ora.sql
TIBCO ActiveMatrix Adapter for Database Examples

70 | Chapter 3 Request-Response Service Examples
TIBCO ActiveMatrix Adapter for Database Examples
| 71
Chapter 4 TIBCO ActiveMatrix BusinessWorks: Processing a Sales Order
This example shows how to use several adapter services within a TIBCO ActiveMatrix BusinessWorks process to process a Sales Order stored in a database.
Topics
• Example Description, page 72
• Setup the Example, page 73
• Test the Example, page 75
• Expected Results, page 76
• Run the Database Clean up Script, page 77
TIBCO ActiveMatrix Adapter for Database Examples
72 | Chapter 4 TIBCO ActiveMatrix BusinessWorks: Processing a Sales Order
Example Description
This example shows how the adapter’s publication, subscription and request-response services can be used in TIBCO ActiveMatrix BusinessWorks to process a sales order. While processing the order, the delivery priority assigned to sales items is changed and sales items are verified to ensure the items are valid.
The BusinessWorks process calls a stored procedure that adjusts the priority of the items on the sales order. The BusinessWorks process also calls a stored procedure that validates each item on the sales order. If an item is invalid, it is rejected and the adapter’s publication service deletes the invalid sales item.
The following BusinessWorks activities are used in the example:
• Subscribe to New Sales Order
The activity receives a message containing a new sales order from the adapter's publication service.
• Insert New Sales Order
The activity uses the adapter's subscription service to insert the new sales order into the database.
• Adjust Sales Order Priority
The activity invokes the ADJUSTPRIORITY operation of the adapter's request-response service to adjust the priority of the sales order.
• Update Sales Order Priority
The activity uses the adapter's subscription service to update the priority and shipping notes of the sales order in the database.
• For each Order Item (Group)
This grouping has two activities. The first activity invokes the VALIDATESALESORDER operation of the adapter's request-response service to validate each sale order item. The second activity use the adapter's subscription service to delete the invalid sales order items from the database.
TIBCO ActiveMatrix Adapter for Database Examples
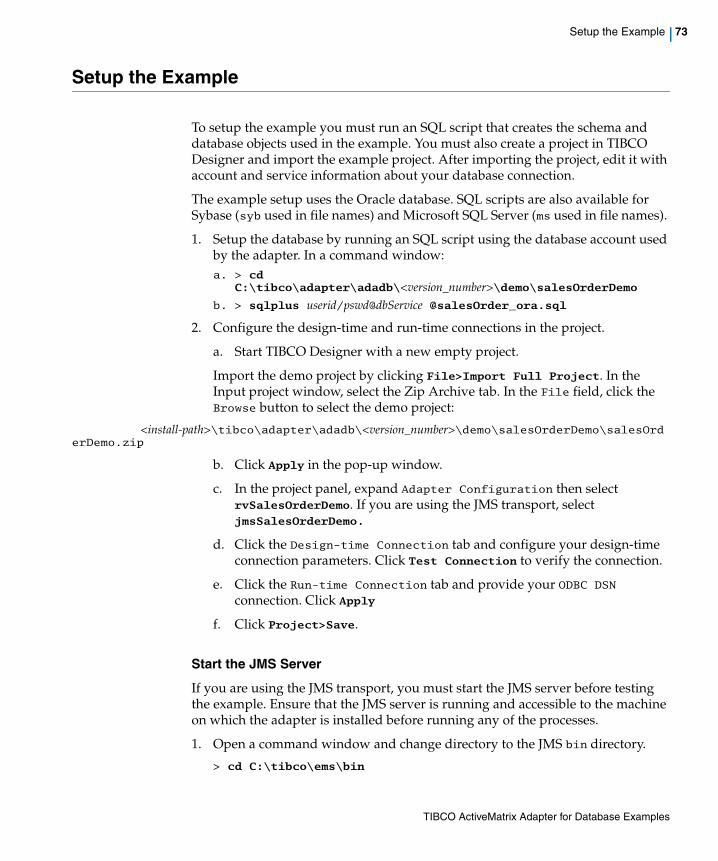
Setup the Example | 73
Setup the Example
To setup the example you must run an SQL script that creates the schema and database objects used in the example. You must also create a project in TIBCO Designer and import the example project. After importing the project, edit it with account and service information about your database connection.
The example setup uses the Oracle database. SQL scripts are also available for Sybase (syb used in file names) and Microsoft SQL Server (ms used in file names).
1. Setup the database by running an SQL script using the database account used by the adapter. In a command window:a. > cd
C:\tibco\adapter\adadb\<version_number>\demo\salesOrderDemo
b. > sqlplus userid/pswd@dbService @salesOrder_ora.sql
2. Configure the design-time and run-time connections in the project.
a. Start TIBCO Designer with a new empty project.
Import the demo project by clicking File>Import Full Project. In the Input project window, select the Zip Archive tab. In the File field, click the Browse button to select the demo project:
<install-path>\tibco\adapter\adadb\<version_number>\demo\salesOrderDemo\salesOrderDemo.zip
b. Click Apply in the pop-up window.
c. In the project panel, expand Adapter Configuration then select rvSalesOrderDemo. If you are using the JMS transport, select jmsSalesOrderDemo.
d. Click the Design-time Connection tab and configure your design-time connection parameters. Click Test Connection to verify the connection.
e. Click the Run-time Connection tab and provide your ODBC DSN connection. Click Apply
f. Click Project>Save.
Start the JMS Server
If you are using the JMS transport, you must start the JMS server before testing the example. Ensure that the JMS server is running and accessible to the machine on which the adapter is installed before running any of the processes.
1. Open a command window and change directory to the JMS bin directory.
> cd C:\tibco\ems\bin
TIBCO ActiveMatrix Adapter for Database Examples

74 | Chapter 4 TIBCO ActiveMatrix BusinessWorks: Processing a Sales Order
2. Start the JMS server. For example: tibemsd
TIBCO ActiveMatrix Adapter for Database Examples
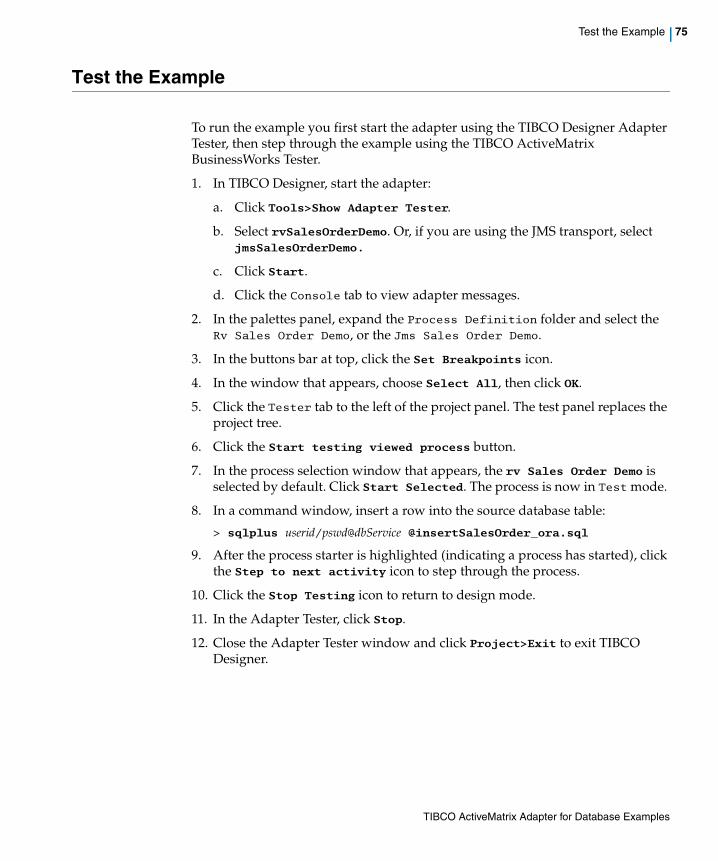
Test the Example | 75
Test the Example
To run the example you first start the adapter using the TIBCO Designer Adapter Tester, then step through the example using the TIBCO ActiveMatrix BusinessWorks Tester.
1. In TIBCO Designer, start the adapter:
a. Click Tools>Show Adapter Tester.
b. Select rvSalesOrderDemo. Or, if you are using the JMS transport, select jmsSalesOrderDemo.
c. Click Start.
d. Click the Console tab to view adapter messages.
2. In the palettes panel, expand the Process Definition folder and select the Rv Sales Order Demo, or the Jms Sales Order Demo.
3. In the buttons bar at top, click the Set Breakpoints icon.
4. In the window that appears, choose Select All, then click OK.
5. Click the Tester tab to the left of the project panel. The test panel replaces the project tree.
6. Click the Start testing viewed process button.
7. In the process selection window that appears, the rv Sales Order Demo is selected by default. Click Start Selected. The process is now in Test mode.
8. In a command window, insert a row into the source database table:
> sqlplus userid/pswd@dbService @insertSalesOrder_ora.sql
9. After the process starter is highlighted (indicating a process has started), click the Step to next activity icon to step through the process.
10. Click the Stop Testing icon to return to design mode.
11. In the Adapter Tester, click Stop.
12. Close the Adapter Tester window and click Project>Exit to exit TIBCO Designer.
TIBCO ActiveMatrix Adapter for Database Examples
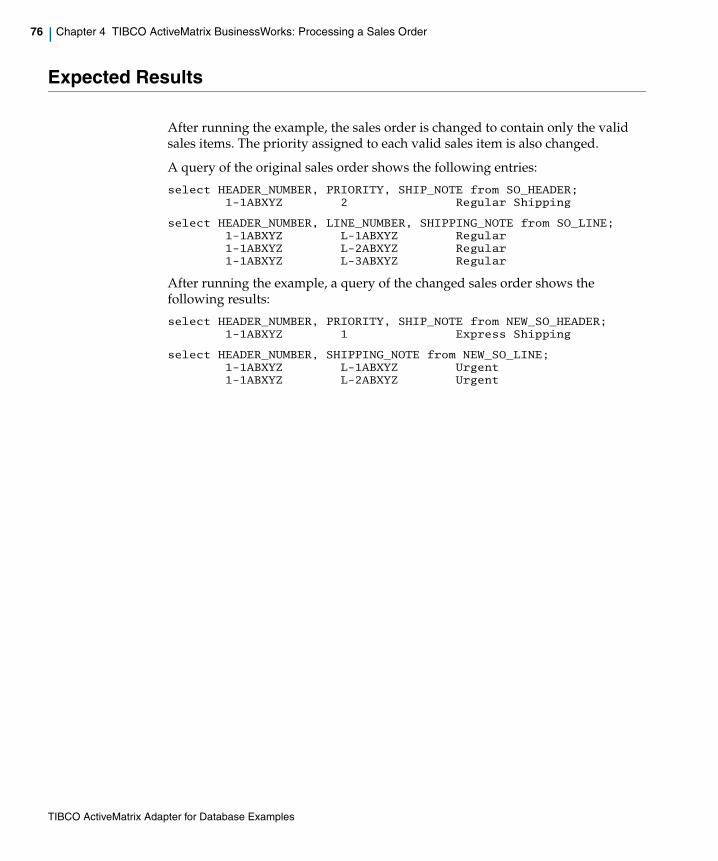
76 | Chapter 4 TIBCO ActiveMatrix BusinessWorks: Processing a Sales Order
Expected Results
After running the example, the sales order is changed to contain only the valid sales items. The priority assigned to each valid sales item is also changed.
A query of the original sales order shows the following entries:
select HEADER_NUMBER, PRIORITY, SHIP_NOTE from SO_HEADER; 1-1ABXYZ 2 Regular Shipping
select HEADER_NUMBER, LINE_NUMBER, SHIPPING_NOTE from SO_LINE; 1-1ABXYZ L-1ABXYZ Regular 1-1ABXYZ L-2ABXYZ Regular 1-1ABXYZ L-3ABXYZ Regular
After running the example, a query of the changed sales order shows the following results:
select HEADER_NUMBER, PRIORITY, SHIP_NOTE from NEW_SO_HEADER; 1-1ABXYZ 1 Express Shipping
select HEADER_NUMBER, SHIPPING_NOTE from NEW_SO_LINE; 1-1ABXYZ L-1ABXYZ Urgent 1-1ABXYZ L-2ABXYZ Urgent
TIBCO ActiveMatrix Adapter for Database Examples
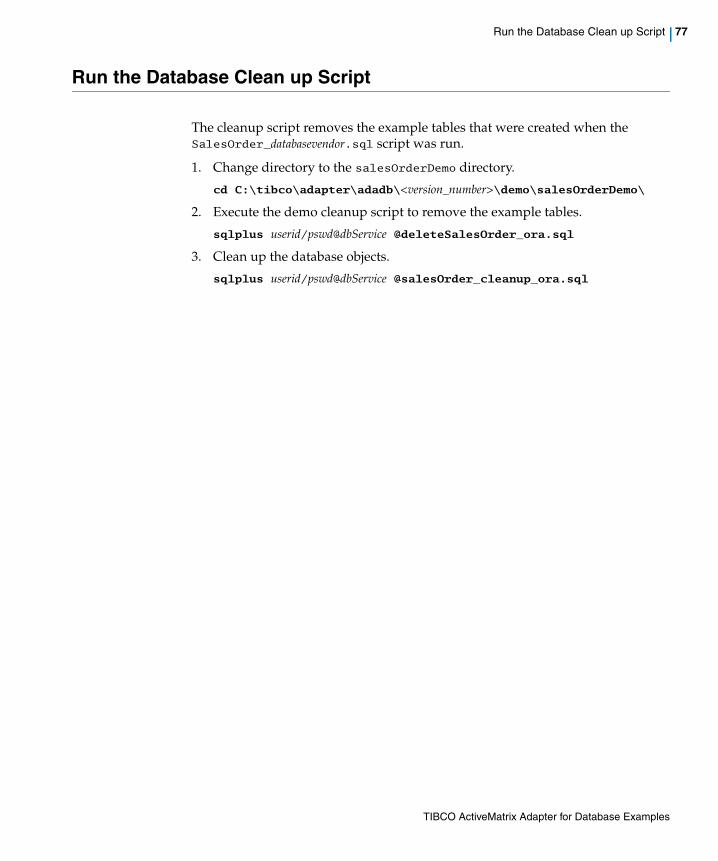
Run the Database Clean up Script | 77
Run the Database Clean up Script
The cleanup script removes the example tables that were created when the SalesOrder_databasevendor.sql script was run.
1. Change directory to the salesOrderDemo directory.
cd C:\tibco\adapter\adadb\<version_number>\demo\salesOrderDemo\
2. Execute the demo cleanup script to remove the example tables.
sqlplus userid/pswd@dbService @deleteSalesOrder_ora.sql
3. Clean up the database objects.
sqlplus userid/pswd@dbService @salesOrder_cleanup_ora.sql
TIBCO ActiveMatrix Adapter for Database Examples

78 | Chapter 4 TIBCO ActiveMatrix BusinessWorks: Processing a Sales Order
TIBCO ActiveMatrix Adapter for Database Examples