This document gives an introduction to Microsoft Access – the - ISS
41
This document gives an introduction to Microsoft Access – the relational database management system. INFORMATION SYSTEMS SERVICES Getting Started With Microsoft Access UNIVERSITY OF LEEDS UG 8 EDITION: 3.0 DATE: June 2004 AUTHOR: Information Systems Services, University of
Transcript of This document gives an introduction to Microsoft Access – the - ISS

This document gives an introduction to Microsoft Access – the relational
database management system.
INFORMATION SYSTEMS SERVICES
Getting Started With Microsoft Access
U
E 0
4
U N I V E R S I T Y O F L E E D S
G 8
AUTHOR: Information Systems Services, University of
DATE: June 200
DITION: 3.

Contents Introduction 3
Fundamentals 3 System Requirements 4 Data Types Supported by Access 4 Restrictions Imposed by Access 5
Running Access 6 Help 7 Creating a New Database 8 Opening an Existing Database 8 Creating Tables within a Database 8 Viewing Data 12 Insert, Spell Check, Delete and Modify Data 14 Using Existing Data 14 Exporting to Other Systems 15 Queries 15 Relationships 23 Forms 24 Reports 31 Pages 34 Macros 34 Modules 35 Concurrent Access to Data 36 Deleting Database Objects 37 Renaming Database Objects 37 Options - Changing Access's Behaviour 37 Different Versions of Access 38
Example Database 39
1

Format Conventions In this document the following format conventions are used:
Commands that you must type in are shown in bold Courier font.
WIN31
Menu items are given in a Bold, Arial font. Windows Applications
Keys that you press are enclosed in angle brackets.
<Enter>
Feedback If you notice any mistakes in this document please contact the Information Officer. Email should be sent to the address [email protected]
Copyright This document is copyright University of Leeds. Permission to use material in this document should be obtained from the Information Officer (email should be sent to the address [email protected])
Print Record This document was printed on 8-Dec-04.
2

Introduction Microsoft Access is a Windows Relational Database Management System (RDBMS). It is a recommended product in this application area and is available on cluster PCs at the University of Leeds.
Since its launch in 1992, several different versions of Microsoft Access have become available. In compiling this document, Access 2003 has been used. In the main, the documented features are available in all versions of Access from version 2000 onwards. However, if you are using version XP or 2000, there may be some minor differences between what is shown herein and what you see or where a particular item appears in the interface. The user interfaces in versions 97 and before vary more – but the principals remain the same.
This document assumes a basic familiarity with relational database management systems and with Microsoft Windows. It describes, in broad terms, the facilities offered by Access and shows how to carry out the most common tasks.
A database based on the operation of a bank is described in the Example section of this document and will be used in examples throughout.
Fundamentals An Access database is made up of a collection of:
Tables: The basic component of a relational database. Tables can be defined and data can be inserted, deleted or modified in a straightforward way.
Queries: Act as a store for (SQL) commands. When run, a query will result in specific data being displayed or modified.
Forms: A medium through which information can be displayed and modified. A form can display related information that is stored in several tables.
Reports: Lay out information – often for inspection in paper form. A report can display related information that is stored in several tables. Reports can also be used to produce mailing labels and simple graphics.
Pages: Introduced in Access version 2000 pages aim to provide integration with the World Wide Web. Pages are not an integral part of a database. A page is either a reference to an existing HTML file or it may be generated by Microsoft Access to enable Web based access to a database. Its working depends on certain infrastructural components being available.
Macros: Used to automate specific, usually high level, tasks.
Modules: A module is a collection of programs: subroutines or functions. It is expressed in Visual Basic - a high level language - and allows a programmer to specify almost any task.
All of the information (except pages) connected with a database can be stored in a single file. The file will have a name of your choice and extension MDB.
3

Access enables its users to: • Create a relational database: that being a set of related tables • Create and utilise queries, forms, reports, macros and modules • Insert, delete, modify, sort and validate data • Manage concurrent access to data • Import data from, and export data to, other database systems or ordinary
files • Interact with other applications e.g. Microsoft Word • Obtain on-line help
System Requirements • Before purchasing any program you are advised to check that the system
you have is capable of running it. The following information is for your guidance only and gives practical minimum requirements to run different versions of Microsoft Access.
• Access 2003: An Intel Pentium 233 MHz processor (a Pentium III is recommended), a monitor with resolution of at least 800x600 with 256 colours, 128Mb RAM, Microsoft Windows 2000 with SP3 or XP, or Windows 98, Me or NT.
• Access XP or 2000: An Intel Pentium 233 MHz processor, a monitor with resolution of at least 800x600 with 256 colours, 64Mb RAM, Windows 98, NT with SP 6a, 2000 with SP2, Me or XP.
• Access 97: An Intel 80486 compatible PC, a VGA monitor, 32Mb RAM, Windows 95, 98, NT version 3.51 with SP5, Windows 2000, Me or XP.
• Access for Windows 95: An Intel 486DX 22MHz, VGA monitor, 8Mb RAM, Windows 95 or later.
• Access 1 or 2: An Intel 80386, EGA or VGA monitor, 6Mb RAM with Windows 3.1 or later.
Data Types Supported by Access The following data types are supported by Access:
• Text: up to 255 alphanumeric characters (Unicode is supported in Access 2000 and later)
• Memo: up to 65535 characters • Number
• Byte: integers in the range 0-255 • Integer: range -32768 - +32767 • Long Integer: range -2147483648 - +2147483647 • Decimal: +-1028-1 (28 decimal places)
Single precision floating point: range ± 1.4*10-45 to ±3.4 * 1038 (7 significant figures)
• Double precision floating point: range ±4.9*10-324 to ±1.79 * 10308 (15 s.f.)
• Currency • Date/Time (from years 100 to 9999)
4

• AutoNumber (An automatically incremented long integer) • Yes/No • OLE Object (binary data) • Hyperlink
Restrictions Imposed by Access Many of the restrictions imposed are not restrictions in any practical sense. The only ones likely to cause problems are:
• Number of fields in a table or query: 255 • Number of bytes entered into a record (excluding Memo and OLE fields) -
2000 • Form/Report - Width: 22", Section Height: 22", Overall height: 200" • Number of levels of nested Forms/Reports: 7 (3 in version 2000 and
earlier)
5

Running Access To run Access, double-click the Access Icon. From the start-up window you can choose to open an existing Access database or create a new one.
The figure below shows a typical Access window after an existing database has been opened.
Tool Bars
Status Bar
Database Window
Object
Action
Menu Bar
Figure 1: The Access Window
• The Menu Bar is a collection of items. Selecting one will reveal a menu. The content of the Menu Bar, and the menus that display, vary according to which window is active (that most recently clicked).
• A Tool Bar is a collection of buttons that provide shortcuts to performing certain common tasks1. When the mouse is moved over a toolbar button, an indication of what will happen when it is clicked appears near the mouse pointer.
• The Status Bar is used to display messages. • The Database Window displays a list of objects: Tables, Queries, Forms,
Reports, Pages, Macros or Modules depending on which one of the Database Object Buttons has been most recently clicked2.
1 More than one toolbar may be displayed at one time. Each toolbar has a name and can be customised.
2 The Object Buttons will be referred to individually as the Tables, Queries, Forms, Reports, Pages, Macros and Modules Button.
6
• The Action Buttons enable a new object to be created, or an existing one to be used or modified3. The icons to the right of the Action Buttons control the format and what is displayed in the Database Window.
Other windows can be displayed in the Access Window. For example, they might show information in tables, forms or the output from queries.
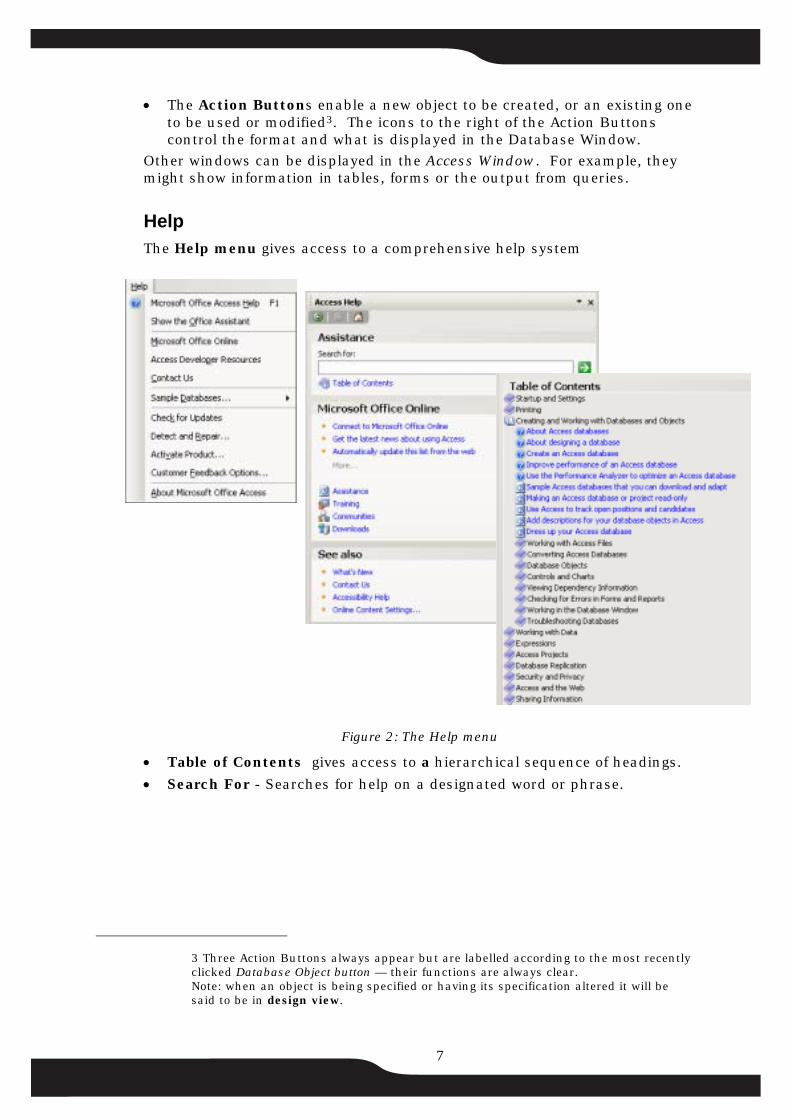
Help The Help menu gives access to a comprehensive help system
Figure 2: The Help menu
• Table of Contents gives access to a hierarchical sequence of headings. • Search For - Searches for help on a designated word or phrase.
7
3 Three Action Buttons always appear but are labelled according to the most recently clicked Database Object button — their functions are always clear. Note: when an object is being specified or having its specification altered it will be said to be in design view.

Creating a New Database To create a new database, select New... from the File menu displayed in the Access start-up window. A form will display – it is illustrated on the right of the figure below.
Figure 3: The File/New Window and the New Database Dialog Box
To create an empty database, choose Blank Database: you will be prompted to specify a Drive, Directory and File Name for the new database. Access also has a set of templates for creating databases for different sorts of application. These are available through General Templates… In electing to use a template you are effectively asking Access to create an outline database which you can then modify.
Opening an Existing Database To open an existing database, select Open... from the File menu in the Access startup window. A dialog box will display in which the Drive, Directory and File Name can be specified.
Alternatively a list of recently opened databases appears towards the bottom of the File menu – click on one to open it.
Creating Tables within a Database
To create a new table, click the Tables button in the Database Window.
Then click the New button.
8

Figure 4: The Table Window(Design View)
Selecting Design View and clicking the OK button causes an empty grid to display in which structure of the new table can be specified as illustrated above. Each field must be given a name and a data type. Entering a description is optional.
Selecting Table Wizard enables the creation of a table starting from one of a number of templates.
Field Properties When a field has been given a name and data type, further properties can be specified in the Field Properties section which displays in the bottom left hand corner of the table window. That displayed in the figure above shows the General properties for a field with data type Number. The properties vary according to the data type. The role of each property is outlined in the Hint box when that property is clicked, and context dependent help is available4.
• Field Size determines the maximum amount of text for Text fields or the type of number (Byte, Integer, Long Integer, Decimal, Single or Double) for Number fields.
• Format determines how the data is formatted for display. A number of options are provided together with the ability to specify custom formats for some data types.
• Decimal Places applies to Number or Currency fields, and determines the number of digits displayed after the decimal point. Its setting does not affect the underlying data.
• Input Mask defines a pattern to which input data must conform.
4 Press the F1 key for context dependent help
9
• Caption determines the label used with the field on forms and reports, and what appears at the top of a column in queries. If caption is not set, the field name is used.
• Default Value determines a default value for this field when new records are created.
• Validation Rule5 can be used to specify a condition or conditions that data must satisfy.
• Validation Text displays on the status bar when data breaks the validation rule.
• Required means that the field must contain valid, non-null, data before a record can be saved.
• Indexed determines whether an index is built for the field - see also Indexes below.
• IME Mode and IME Sentence Mode. Introduced in Office XP IMEs (Input Method Editors) allow users to input Asian text in Office applications, regardless of the language version of their operating system. IME behaviour is modified through these properties.
• Smart Tags: Introduced in Office XP, smart tags offer means of integration with other programs. E.g. Microsoft Outlook could be activated through a smart tag in such a way that the Mail-To… field was pre-filled with an email address stored in a database.
• The Lookup tab can be used to control how data is entered. E.g. For textual data, it can be used to define a set of data values that display as a drop-down list similar to that shown in figure 28
Indexes
Indexes are used by Access when tables are queried to speed that process. They can result in dramatic performance gains on large tables. The indexes that are currently associated with a table can be viewed and modified through a dialog box which displays when the Index button on the toolbar is clicked. Indexes can be based upon a single field or a combination of fields.
The Primary Key6 of a table can be defined by selecting a field, or a set of fields and pressing the key button which appears on the tool bar. Alternatively, the primary key can be specified or modified through the Index dialog box.
There is an overhead in indexing - disk space is required and the index has to be updated whenever the data in that field changes. However, it is generally advisable to index if the table contains a large number of records and if the field will be used frequently in queries.
5 A Validation Rule is absolute. It cannot be overridden by the specification of alternative validation rules on a Form which serve only to further restrict the data that can be entered through it.
6 A field, or a combination of fields, the values of which can be used to uniquely determine a record.
10

Table Properties
The Table Properties dialog box enables a Description to be associated with a table and table wide (as opposed to field specific) validation rules to be specified.
Saving a Table To save a table definition, select the File menu and choose Save7 - you will be prompted for a table name.
Figure 5: Prompt for Table Name
Overtype the suggestion with a name of your choice.
Modifying the Structure of a Table The structure of a table can be modified after it original definition8.
Adding extra fields9 or increasing the size of a text or number field is straightforward.
Changing the name of a field may require you to alter any references to it in Queries, Forms, Reports, Macros and Modules. Name change tracking was introduced in Access 200010 and an option can be set that cascades changes in table and field names in many cases (e.g. to Forms featuring a field): however reference to a field/table in code will not be altered. Try to get names right first time.
Deleting a field will require you to delete all references to it.
Decreasing the size of a field, or converting from one format to another may result in data loss: you will be warned and given the option of quitting, if you attempt it.
7 Follow this procedure to save any object you create (Table, Query, Form, Report, Macro or Module).
8 Tip: take a copy of the table that you are going to change and keep it until you are happy that the modifications you have made have worked. To do so, highlight the table name in the Database Window, press Ctrl+C (copy) followed by Ctrl+V (paste), and indicate in the dialog box that displays that you wish to copy both structure and data.
9 In Table design view: if you want to position the field between existing fields, click Row on the Insert menu, or click on the Insert Rows button on the Table Design toolbar.
10 See Tools | Options + General Tab
11

Viewing Data To display the contents of a table in a table window, click the Tables tab, highlight the table and click the Open button. A window, like that in the figure below, will appear displaying several records. This is referred to as Datasheet View.
Resize
Colum
Record
Scroll Bar
Navigation
Figure 6: Viewing data in a table
The Resize Handles on each corner of the window can be used to resize it.
The Scroll Bar on the left, which appears when there are too many records to fit into the window, can be used to control which block of records currently displays, as can the Navigation Controls at the bottom11.
The grey area to the left of each record is known as the Record Selector. The Record Selector corresponding to the current record (that most recently clicked) contains a symbol. A triangle denotes an unchanged record. A pen indicates a record currently being changed. A no-go sign (a crossed circle) may display to indicate that you are attempting to change a record which is currently locked (and possibly being changed) by another. An asterisk appears in the record selector of an empty record at the bottom of the table.
The Column Selector can be used to resize or re-order the columns.
To resize a column move the mouse to the right hand edge of the column that you wish to resize (the cursor displays as a two headed arrow), click and hold down the mouse and drag the column separator left or right, then release the mouse button.
To re-order columns, select a column by clicking in the Column Selector, the column will highlight, click and hold down the mouse button within the column selector, and drag the small rectangle which appears, dropping it into the column to the left of which you wish the selected column to appear.
To freeze columns, so that they always display, select them using the column selector and choose Freeze Columns from the Format menu.
11 The Navigation Controls (from left to right) cause the current record to change to the first record in the table, the previous record, the next record and the last record respectively. Click the asterisk to enter a new record.
12

Sorting
The information displayed in a table window can be sorted in ascending or descending order based on a single field by clicking one of two Sort Buttons. If a more complex sort is required a query can be used.
Finding a Record in a Table
The Binoculars button appears on the tool bar when a table is opened in datasheet view. It can be used to find a record that contains some specified string or pattern.
Figure 7: Finding a Record
In locating a record the search term (characters or pattern) specified in the Find What box is matched against data in records in the table in which the cursor was positioned when the binoculars were clicked. The target field can be changed by selecting a different field in the Look In box, or there is an option to search all fields in the target table. The attempted match can be against the Whole Field, the Start of the Field or Any Part of the Field depending on the option specified in the Match box. The direction of search can be specified in the Search box All, Up or Down. Specifying Match Case requests a case sensitive search. Specifying Search Fields as Formatted12 compares the search term against the data as formatted, otherwise it is compared against the data as it is stored in the field(s).
Special Characters (Wildcards) Patterns as well as words or phrases can be looked for. Special characters enable a pattern to be specified:
* Means any sequence of characters. ? Means any single character. # Means any digit. [abc] Enclosing several characters in square brackets means any one
of those characters. A range (or ranges) can also be specified [a-z] and negation can be specified: [!abc] is taken to mean any character except those specified.
12 It is normally recommended that you do Search Fields as Formatted.
13

Insert, Spell Check, Delete and Modify Data It is often preferable to enter and alter data through forms, detailed later in this document. However, a new record can be entered by filling in the blank record at the bottom of the table window - evidenced in figure 6 by an asterisk appearing as in its record selector.
Existing records can be changed by appending information to fields, or by deleting or modifying the contents of fields13. Data can be deleted by highlighting it and cutting (or by pressing the Del key) or by positioning the cursor and backspacing over it. Data can be copied and pasted in the normal way14. Changes to the current field can be undone by pressing the Escape key - a second depression will undo any other changes that might have been made to the current record. Alternatively the Edit menu has a number of options that enable changes to the last record edited to be undone.
Data can be checked for spelling mistakes. First select (highlight) the data to be checked and then click the Spelling icon on the toolbar
A record can be deleted by selecting15 it and then pressing the Delete key, or by choosing Delete Record from the Edit menu. By default you will be prompted to confirm deletions.
Using Existing Data One of a number of choices can be exercised if data already exists and you wish to use it with Access.16
• Access is capable of importing data from a number of other systems.17 • Access can import data from ordinary text files provided each record
occupies a single line and fields are delimited by a special character, or alternatively, occupy fixed column positions.
• Database tables in other systems, or in another Access database, can be linked to an Access database18. In this case the data can be altered by Access but are maintained outside the Access database file. For multi-user databases it is often a good idea to have data in one database, and
13 The Tab key, Arrow keys, Home and End keys (amongst others) and the mouse can be used to move from field to field.
14 Position the cursor, hold down the left mouse button and drag the cursor until the wanted portion of data is highlighted. (Cut: Ctrl+X. Copy: Ctrl+C. Paste: Ctrl+V.)
15 Click on its record selector. Note: a contiguous group of records can be selected by clicking on the record selector of the first record and then with the shift key depressed clicking on the record selector of the last record.
16 The options are available under the File menu when the Database Window is current.
17 E.g. dBase, Excel, Lotus, Paradox, another Access database or defined ODBC data sources (e.g. SQL/Server). Use File | Get External Data | Import.
18 Use File | Get External Data | Link Tables…
14

all the objects that operate on it (Queries, Forms, Reports etc.) in another. This enables different versions of interfaces to be built and can enable users of different versions of Access to work against common data.
Exporting to Other Systems Data can be exported to all of those systems from which it can be imported.19
Queries One of the principal tasks of a database system is to enable wanted information to be retrieved. Access queries are designed for this purpose. They can be used to:
• Display records in a table that satisfy stated criteria. • Join related information from two or more tables. • Sort information. • Alter data: delete records or perform global inserts or updates.
Displaying Wanted Data from a Single Table The simplest sort of query involves displaying information from a single table that satisfies specified criteria. For example, to create a query which when executed displays the AccountId, Type, Branch and Balance of all current accounts:
Click the Query button and then click the New button. A window like that illustrated below will appear.
Figure 8: The NewQuery Window
Selecting Design View and clicking on the OK button causes a Query Window to display containing a dialog box entitled Show Table, which displays a list of all the tables and/or queries20 that currently exist in the database.
19 Use File | Export…
20 Queries can be based on existing queries as well as tables - this is one of the most powerful features Access offers.
15

Figure 9: Query creation: selecting the information source(s)
Add21 the tables and/or queries upon which the query is to be based then Close the Add Table dialog box. The figure below shows the Query Window with one table (tbl_Account) added.
Drag
Query Specification
Figure 10: Query Specification
The Query Specification determines the condition(s) records must satisfy to be output, which fields are output, and how output is sorted.
The Fields appearing in the top row of the query specification are those which are needed because they contain data that will be queried and/or displayed. They can be specified by dragging and dropping from the table definition in the upper half of the window.22
The Show boxes are crossed to indicate that the corresponding field should appear as output - if one is blank the corresponding field will not appear.23
21 By clicking the Add button. Hereafter, when there is no confusion, the name of the button will be used like a verb - implying that it should be clicked without specifically saying so.
22 Left-click the field name you wish to appear in the Field: line and, holding down the mouse button, drag it across the window and drop it into the appropriate cell.
23 Click a box to toggle it between crossed and uncrossed.
16

The Criteria are simply typed in (Access will automatically add quotes if they are omitted). Wild card characters can also be used - see Special Characters (Wildcards). Note that Access queries are not case sensitive.
To run a query, click the Datasheet View button on the tool bar.
To return to the design click the Design View button.
Editing Through a Query Information can be edited through a query if certain conditions are met. A query is run and displays a set of records. Alterations can then be made to the underlying information in the tables upon which the query is based by altering the information displayed. If updating is not allowed, a message will display indicating that the query is not updatable.
Sorting Information Records can be sorted in ascending or descending order on specified fields. The sort order is determined by entries in the Sort row of the Query Specification.
Figure 11: Sorting
The output resulting from the above query specification would be sorted in ascending order according to Branch: where records have the same Branch they would appear in descending order of Balance.
Figure 12: Output
Operators The comparison operators (<, <=, >, >=, =, and <>(not equal)) can be used in the usual sense. E.g. Criteria: >2
The like operator is used in conjunction with wild card characters - it will be automatically added by Access if omitted.
The Is operator can be used with the Null keyword to find missing information e.g. Criteria: Is Not Null excludes records with no information in the corresponding field.
AND, OR and NOT The AND, OR and NOT (Boolean) operators can be used, in conjunction with brackets if needs be, in specifying criteria. Complicated OR expressions can
17

be entered by filling in more than one of the Criteria rows. The following query will display details of Accounts that satisfy at least one of the following conditions:
• Managed at Branch 1, have type Savings or Current, and have a Balance of over £100 but below £1000.
• Managed at Branch 2.
Figure 13: A query using comparison and Boolean operators
Expressions In the examples above, fields have been queried and displayed. However Access allows an expression as well as a field to be specified in the Field row of a query specification. The expression is treated in exactly the same way as a field. The query illustrated in the figure below outputs the AccountId, Type (in upper case), Branch, and 5% of the balance labelled as 5pc_balance. UCase and Format are built in Access functions - a complete list of which can be found in the Access Help system.24.
Figure 14: A Query using an Expression and its result Similarly a field (or expression) specified in the Field row can be compared against another field or expression specified in the Criteria Row25.
24 A user -written function can also be designated.
25 The field in the criteria row is designated as such by enclosing its name in square brackets, e.g. [BranchId].
18
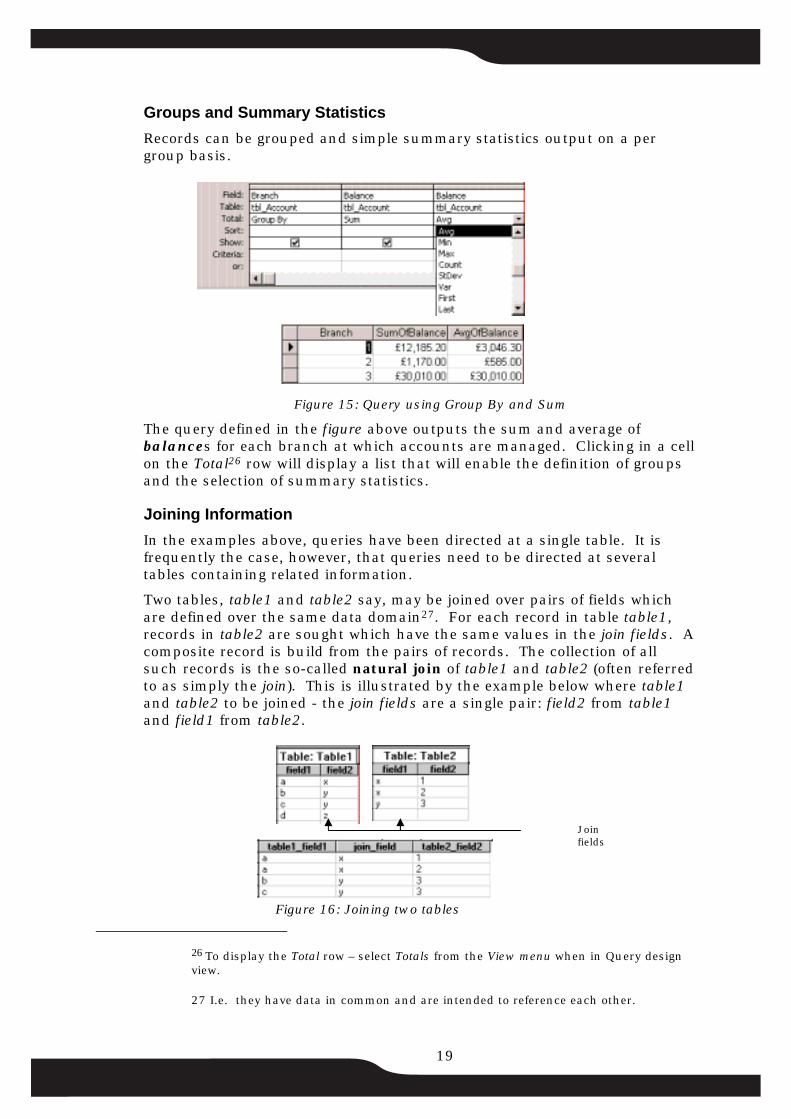
Groups and Summary Statistics Records can be grouped and simple summary statistics output on a per group basis.
Figure 15: Query using Group By and Sum
The query defined in the figure above outputs the sum and average of balances for each branch at which accounts are managed. Clicking in a cell on the Total26 row will display a list that will enable the definition of groups and the selection of summary statistics.
Joining Information In the examples above, queries have been directed at a single table. It is frequently the case, however, that queries need to be directed at several tables containing related information.
Two tables, table1 and table2 say, may be joined over pairs of fields which are defined over the same data domain27. For each record in table table1, records in table2 are sought which have the same values in the join fields. A composite record is build from the pairs of records. The col n of all such records is the so-called natural join of table1 and tabl ften referred to as simply the join). This is illustrated by the example bel here table1 and table2 to be joined - the join fields are a single pair: field om table1 and field1 from table2.
Figure 16: Joining two tables
19
26 To display the Total row – select Totals from the View menu whview.
27 I.e. they have data in common and are intended to reference
lectioe2 (oow w2 fr
Join fields
en in Query design
each other.

A number of different sorts of join have been identified as useful. For example, note that the last record of table1 does not contribute a record to the natural join, because z does not appear as a value in table2 field1: we may want such an entry. A so-called outer join would generate a record – with a null entry in third column of the output.
Access uses queries to join tables and supports both natural and outer joins. This is best illustrated by example. To find out details of Accounts including the address of the Branch at which they are managed it is necessary to join information in the tables tbl_Branch and tbl_Account.
Figure 17: A join in Access
Add the tables tbl_Accounts and tbl_Branches to a new query. The join columns are identified in the figure above by the line running between them. To ‘draw’ the join line, click on the BranchId field in the tbl_Branch, drag it over to tbl_Account table and drop it over the Branch field28. Release the mouse button and the line appears.
Double clicking the join line displays the Join dialog box, shown on the left of the figure above, through which a natural or outer join can be specified.
Figure 18: Output from the Query specified in previous Figure
Query Properties
Associated with each query are a number of properties, the settings of which affect the way it runs and what data is displayed. Those most commonly used are:
20
28 Tables will be joined automatically if a Relationship has been defined (see below).

Output All Fields: outputs all fields irrespective of all other specifications.
Top Values: restricts the number of records displayed.
Unique Values: set to Yes to display unique records only – i.e. duplicates will not display
Run Permissions: Run either with the permission set of the user running the Query or with that of the Query creator.
Figure 19: The Query Properties Window
Field Properties Each field on the query specification has a number of properties that vary depending on its data type. E.g. the Format, Input Mask, and Caption properties are analogous to the properties of field in a table documented above.
Parameters Query parameters enable a query to be specified in general terms. For example, a parameter will enable a query to be constructed to display account details at a Branch which is specified only when the query is run. As in the example below, a parameter is specified by including a word or phrase in square brackets. The Query Parameters Dialog box can be used to constrain the type of data entered.29 When the query is run, the dialog box illustrated to the right of the figure below, displays.
29 To display the Query Parameters Dialog box choose Parameters... from the Query menu.
21

Figure 20: Query Parameters
Global Editing In all the examples above queries have been used to select information - these are termed select queries. Action queries can be used to insert, modify or delete information in database tables. The Query menu is used to specify the type of query and the format of the Query Specification varies according that chosen.
The following is an example of an update query. When executed, it will change the Type from ‘Current’ to ‘Savings’ in all records in tbl_Account for which the value in the Branch field is 2.
Figure 21: An Update Query
To execute an action query click the Run button on the Tool Bar.
22

Relationships
Figure 22: The Relationships Window
Access enables relationships between pairs of tables to be declared.
The primary purpose of a relationship is to enforce referential integrity: stopping a reference being made to a non-existent object. By way of example, in the figure above, there is a relationship defined between the tables tbl_Person and tbl_AccountOwner and referential integrity is enforced30. Any attempt is made to create a record in tbl_AccountOwner, which references a PersonId that does not exist that does not exist, will fail.
The Cascade Update Related Fields and Cascade Delete Related Records options appear when referential integrity is enforced. They control how Access responds when the primary key of a record is updated, or when such a record is deleted. E.g. given the relationship illustrated in the figure above: if it was possible to alter the value of PersonId in tbl_Person, any attempt so to do would fail if a record in tbl_AccountOwner existed with the Person field referencing the old value. Similarly, an attempt to delete a record in tbl_Person would fail if there was a reference to it.
• If Cascade Update Related Fields was selected, the update of the record in tbl_ Person would succeed and any records in tbl_AccountOwner referencing the old value of PersonId would be updated to reference its new value.
• If Cascade Delete Related Records was selected, the deletion of a record in tbl_Person would succeed, and any records in tbl_AccountOwner referencing it would also be deleted.
To create or alter relationships, click the Database Window and choose Relationships... from the Tools menu - the Relationships Window will display and a Relationships menu will appear on the Menu Bar. New Tables can be added through Relationships menu. Relationships are specified in
23
30 Enforce Referential Integrity is selected.

the Relationships Window by dragging a field from the referenced table and dropping it over a field in the referencing table. E.g. to create the relationship between tbl_Branch and tbl_Account, the BranchId of tbl_Branch was dragged and dropped over the Branch field of tbl_Account. A dialog box will appear when a relationship is created, enabling it to be specified31. This dialog box can be re-displayed by double clicking on the line denoting a relationship.
Forms Access Forms are used principally as a means of viewing or editing data in tables. The information appearing on a form is typically from a table or generated by a query. A form can also contain sub-forms that display related information from other tables.
Creating a Form for a Single Table using the Form Wizard To create a form click on the Forms button and click the New button. The New Form dialog box displays. This shows several options, including several AutoForm32 options and the Form Wizard.
Figure 23: New Form Dialog Box
Select the table (or query) upon which the form is to be based, then select the Form Wizard from the list of options and click the OK button. A window like that illustrated in the figure below, will appear, enabling you to specify which fields that will appear on the form. The > button moves the currently highlighted field to the list that will appear on the form, >> moves all of the fields: The < and << buttons work in the opposite sense.
Figure 24: Form Wizards Dialog boxes
Click Next and a window enabling you to determine the form’s layout will appear. It is illustrated on the right of the figure above. The layout determines where fields and labels appear, whether one or many records
31 The join type is used to automatically generate a join in a query when both tables feature in it.
32 Autoform creates a form containing all the fields in the fields in the source Table or Query in a single step
24

display. Choose a layout33 and click the Next button to see a list of styles. The style affects the appearance of fields on the form. Choose a style and click Next. The figures below are as a result of choosing columnar layout and standard style.
Figure 25: Form Wizard (continued)
Give the form a name, select Open the Form to view or enter information to display data through the form, or Modify the Form's design to open the form in design view, and click Finish.
Figure 26: The Form in ‘form view’ and in design view
26
Anatomy of a Form The form illustrated in figure consists of three sections: a Header, Detail and Footer. As is usually the case, data appears in the Detail section. The Header and Footer are empty but the can be used to contain descriptive information, buttons (explained later), and summary information if the Detail section displays a table of records rather than a single record.
Form Properties A Form has a number of properties which affect how it looks and behaves. For example, the Allow Edits property determines whether the form can be used to change records, Allow Deletions and Allow Additions whether records can be added or deleted through the form, Record Locks how
33 The image to the left of the options will alter to give you an idea of the how the layout will look. PivotTable and PivotChart are special and intended for the display of summary information and graphics.
25

information is locked when the form is used. Other properties can be used to determine how the form responds to a particular event.34 Those properties which affect appearance include Navigation Buttons, Record Selectors and Scroll Bars which respectively determine whether a form displays Navigation Controls, a Record Selector or Scroll Bars.
Controls Each section contains a number of controls. Only two sorts appear on the form generated above (Labels are used for annotation, and Text Boxes display information from the table upon which the form is based). Other sorts of control are available. Each control has a (large number) of properties, which affect how it looks, its position, and in the case of some types of control, how it behaves in response to events.
When adding a control, the designer uses the Toolbox – illustrated below - which displays in design view:
Pointer Control
Label Text Box
Option Group Toggle Button
Option Button Check Box
Combo Box List Box
Command Image
Unbound Object Bound Object Frame
Page Break Tab Control
Subform/Subrepor Line
More Controls Rectangle
Figure 27: The Toolbox
• A Label is used for annotation. • A Text box is used to display data from the table or query the form is
based on. • An Option group is made up of two or more Option buttons, Toggle
buttons or Check boxes. By clicking one of the options in the Option group, the value of a field can be set to an integer.
• An Option Button, Toggle Button or Check Box sets the value of a field to -1 (Yes/True) or 0 (No/False). They are used with fields with data type yes/no.
• A Combo Box or List Box is used to set the value of a field is one of a number of choices stored in a table or defined by a query.
34 When you interact with a form certain events occur. For example the form opens, closes, a new record is accessed, a record is deleted, updated, or added. In response to such an event, a code segment (macro or function) can be executed. See the different ‘On’ properties (e.g. On Current).
26

• Tab Control can be used to selectively display data in the same physical space on a form. It is particularly useful when large amounts of data need to be displayed from a single table and/or related tables.
• A Subform enables a master/detail form to be built (see below). • An Object Frame enables the display of an OLE object such as a picture. • Lines and Rectangles are just simple graphics that can enhance the
appearance of the form. • A Page Break enables vertical navigation with the Page Up and Page
Down keys - useful where there are many fields on a form. • A Command Button can be associated with a code segment, or macro
which executes when it is clicked. The rest of the tools determine the behaviour of the Form editing process. Pointer enables controls to be selected rather than added. Control Wizards activates or deactivates the Control Wizards – interfaces which can be used for the specification of Combo Boxes, List Boxes, Option Groups and Command Buttons.
Altering the Design of a Form Once created, a form can be altered. Controls can be added, deleted, resized and their properties changed.
In the form illustrated in figure , for example: it would be better to replace the Text box associated with the Account type with a Combo box which showed all the allowable types, stored in the table tbl_AccountTypes, thus allowing the user to pick from a list. To do so the designer would:
26
• Open the form in Design View • Click on the existing Type control and delete it (press the Del key) • Display the list of fields - the View menu should have Field List... ticked • Click on the Combo box button in the Toolbox35 • Click on the Type field in the Field List and holding the mouse button
down drag and drop it into position on the form
To determine what data will display in the combo box when its drop down arrow is clicked, enter the Row Source property – it can be set to a table, query or an SQL statement. If a Property Sheet is not displaying, click the Properties button on the toolbar or click Properties... on the View menu and if necessary select the Type Combo Box control.
Alternatively, Control Wizards can be used to define the combo box in which case, rather than setting properties by hand, they would be set as a result of a dialog.
35 If the Toolbox is not displayed, select Toolbox in the View menu to see it.
27
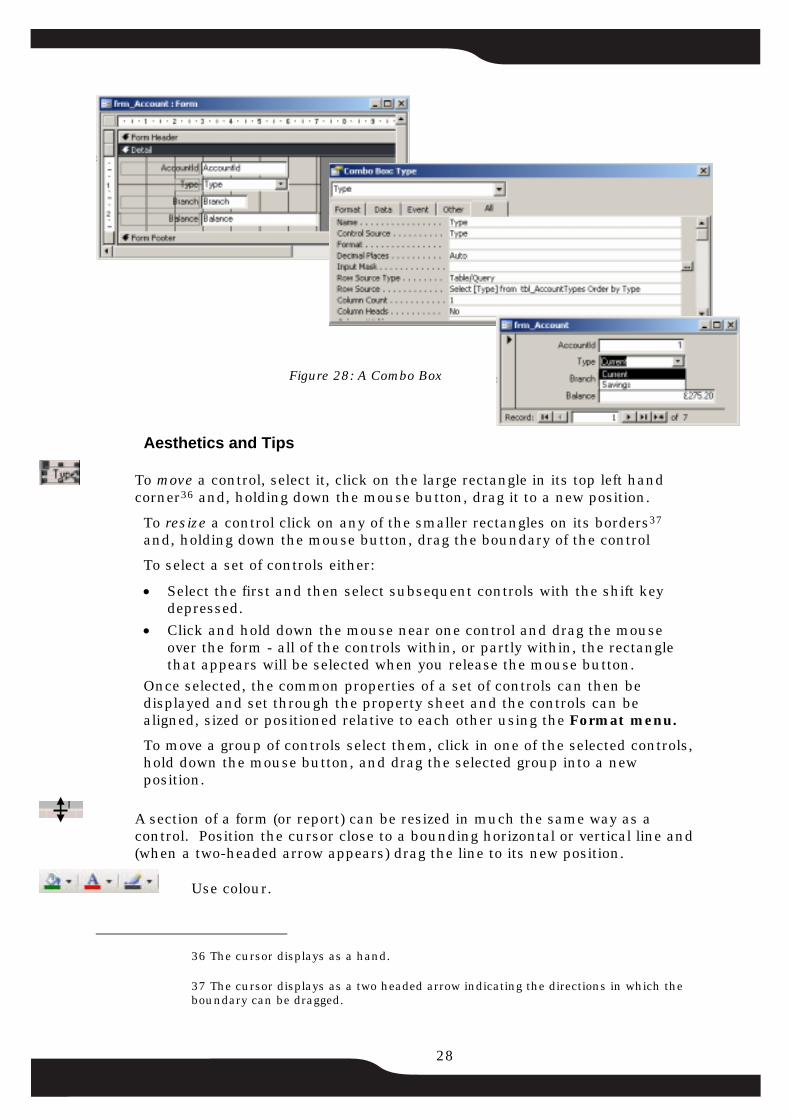
Figure 28: A Combo Box
Aesthetics and Tips
To move a control, select it, click on the large rectangle in its top left hand corner36 and, holding down the mouse button, drag it to a new position.
To resize a control click on any of the smaller rectangles on its borders37 and, holding down the mouse button, drag the boundary of the control
To select a set of controls either:
• Select the first and then select subsequent controls with the shift key depressed.
• Click and hold down the mouse near one control and drag the mouse over the form - all of the controls within, or partly within, the rectangle that appears will be selected when you release the mouse button.
Once selected, the common properties of a set of controls can then be displayed and set through the property sheet and the controls can be aligned, sized or positioned relative to each other using the Format menu. To move a group of controls select them, click in one of the selected controls, hold down the mouse button, and drag the selected group into a new position.
A section of a form (or report) can be resized in much the same way as a control. Position the cursor close to a bounding horizontal or vertical line and (when a two-headed arrow appears) drag the line to its new position.
Use colour.
36 The cursor displays as a hand.
37 The cursor displays as a two headed arrow indicating the directions in which the boundary can be dragged.
28

Filters
By default, when a form is opened, all of the records in the Record Source - underlying Table or Query are viewed through it. It is, however, possible to restrict which records display by applying a filter. From left to right, the three Filter buttons above enable the filter to be altered, turned on and turned off. Essentially, a query is associated with the form and only those records satisfying the query are displayed on the form
Sorting
The information displayed through a form can be sorted in ascending or descending order based on a single field by clicking one of two Sort Buttons. A more complicated sort order can be specified by setting the Order By property of the form, or specifying an order as part of the definition of the Record Source property.
Creating Master-Detail Forms A form can contain another form, so related information from more than one table can be displayed through a single (master) form. For example when displaying Account details the designer might want to display details of the account owners and of the transactions associated with it, as shown below.
Figure 29: A Master-Detail Form
To display the account owners the designer might create a query which displays the Name and Address of a person as well as any account owner details as in the diagram shown below...
Figure 30: Account Owner Summary Query
29

...then create a form to display information from the query in datasheet view. The form illustrated below has a Combo Box associated with the Person38 and a Text Box associated with the Address field.
Figure 31: A Form for the Query Account Ownership Summary
To embed a form as a sub-form in a master form:
• Open the master form in design view • Display Form Objects in the Database Window and drag and drop the
icon corresponding to the sub-form onto the body of the master form. Two properties of the sub-form need to be set to ensure that the information that displays in the sub-form is related to information in the master form - Link Child Fields and Link Master Fields.39 In this case the value of AccountId field in the table tbl_Accounts (upon which the master form is based) and the Account field in query qry_AccountOwnerSummary, upon which the sub-form is based, determine which records display in the sub-form.
38 qry_PersonSortedByName is a query which contains the fields PersonId and Name from the table tbl_Person sorted by Name. Note: the Column Count, Column Widths and Bound Column properties combine to show the Name in the Combo Box but insert the PersonId (a number) into the Person field of the table tbl_AccountOwner.
39 If there is more than one field, separate successive names with semicolons
30

Figure 32: Embedding a Sub-form
Reports Access Reports are primarily intended to generate paper output, but they can also be used effectively for on-screen display. Like a form, the information appearing in a report may be from either a table or a query and a report can contain sub-reports that typically display related information from other tables.
Creating a Report To create a report:
• Click on the Reports button and then click the New button. The New Report dialog box displays.
• Select the table (or query) upon which the form is to be based and click the Report Wizards button. A series of dialog boxes, very similar to those displayed by Form Wizards, determine what information will appear and how it is sorted.
The following outlines the steps involved in creating a report to contain information about each branch and details of accounts managed, including information about the account owners and transactions carried out.
• As illustrated below, a query is created that joins the tables tbl_Branch and tbl_Account, and a report is generated by selecting Reports/New/AutoReport: Columnar, specifying the query as the data source.
31

Figure 33: A query and an automatically generated Report
In the figure below, an additional Group Header has been created for AccountId using the Sorting and Grouping Button on the Toolbar, Text Boxes and Labels have been moved into the appropriate Header sections, and some cosmetic formatting has been done.
Figure 34: Sorting and Grouping in a Report
Just as a form can be included as a sub-form in a master form, so a report can be included as a sub-report in a master report.
Figure 35: The Report rpt_AccountOwnerSummary
The figure above shows a report based on the query qry_AccountOwnerSummary (see figure 30). It will display the Person (identifying number) and Name of Account Owners.
The process of embedding sub-reports in a master report is analogous to that for embedding sub-forms in a master form. To embed this report in the master report shown, open the master report in design view, display Report Objects in the Database Window, drag and drop the icon for the embedded report into the body of the master report, and specify the Link Child Fields and Link Master Fields.
32

Figure 36: Embedding a Sub-Report
In the figure above a sub-report detailing Transactions has also been added.
The Print Preview button on the Tool bar can be used to look at the output at any time in the design process. The top of the first page of output from the report above is illustrated below.
Figure 37: Report Output
33

Expressions and Totals In the above example, Text boxes contain information that comes directly from a table or query - the Control Source property of these controls is a field name. The Control Source can however be:
• An expression (calculation) • A summary statistic calculated over a group or overall (for example
average, count, sum and running sum) For example, to display the sum of all balances of accounts for each branch: create a BranchId Group Footer and put in it a Text Box with its Control Source property set to =Sum([Balance]). See figure .40 36
Pages Introduced in Access version 2000 pages aim to provide integration with the World Wide Web. Pages are not an integral part of a database. A page is either a reference to an existing HTML file or it may be generated by Microsoft Access to enable Web based access to a database. Its working depends on certain infrastructural components being available. A description of pages is beyond the scope of this document - refer to the Help system for more information.
Macros Access has a macro language. Macros and functions (see Modules below) can be executed in response to events generated by the user41. A description of macros is beyond the scope of this document - refer to the Help system for more information. The example which follows shows a one line macro called Autoexec which will open a form when run. In this case the name is special… Microsoft Access will run the Autoexec macro when a database is opened.
Figure38: A Macro
40 The same ideas can be used on forms too.
41 Note that a macro called Autoexec executes on opening a database. This can be useful for setting up a common environment for a shared database.
34

Modules Access has a programming language - Visual Basic for Applications (VBA). A module is a collection of functions (and/or subroutines) which can be executed in response to events generated by the user or called from other functions or subroutines. VBA is an object oriented language. A description of it is beyond the scope of this document. The interested reader should refer to the Visual Basic Help system – available when editing a module - for more information. Two examples follow. The first uses ActiveX Data Objects (ADO) to access and alter data, the second simply closes any forms and reports that are open.
Figure 39: A VBA Subroutine
Figure 40: A VBA Function
35

Concurrent Access to Data An Access database can be accessed by a number of different users concurrently42. Each user must have opened the database in shared mode (the alternative is exclusive mode). How a database is opened user is determined by a setting in the Open Database dialog box.
Security The Access security scheme is built around Users, Groups and Permissions. It is accessed through Tools | Security. Users and Groups can be created and users assigned to groups. Permissions can then be given to users or groups permitting certain types of access to database objects43. The permissions that can be applied to a given database object is given in the table below.
Object → Permission ↓
Table Query Form Report Macro
Open/Run Y Y Y
Read Design Y Y Y Y Y
Modify Design Y Y Y Y Y
Administer Y Y Y Y Y
Read Data Y Y
Update Data Y Y
Insert Data Y Y
Delete Data Y Y
Figure 41 Database Object/Permission Matrix
In addition:
• Database privileges Open/Run , Open/Exclusive and Administer can be set
• An Access database file can be encrypted. • A database password can be set A full explanation of Access security is contained in the Access Help system.
Locked Records When a database is being accessed by more than one concurrent user, records may, whilst they are being changed by one user, appear locked to another user. The locking strategy employed by Access is determined by the
42 Up to 255.
43 Details of Users and Groups are contained in a file apart from a particular database. The location of the active security file is identified in the registry. By default this file is called SYSTEM.MDW. A new security file can be created or the active security file designated by running the Workgroup Administrator which is part of every Microsoft Access installation. In the XP version of Access and later it is run from Tools | Security | Workgroup Administrator… - prior to that it was distributed as a separate executable WRKGADM.EXE,
36

setting of an option - see Tools/Options/Advanced. Forms also have a Record Locks property which determines what happens when data is edited through them.
A locked record is visible but cannot be altered. When a user attempts to change a locked record a no-go sign appears in the record selector and no changes can be made. Depending on the locking strategy, Access may detect that a record has been changed by another user when it is ‘saved’. The user is then given the option of viewing the changed record and/or overwriting it, or cancelling. Similarly, if an action query is run which attempts to alter a locked record, it will not succeed and the user will be given the option of cancelling the query.
Deleting Database Objects To delete a Table, Query, Form, Report, Macro or Module, click the relevant Object button, highlight the object in question and press the Del key44. Before deleting an object, you should be sure that there are no references to it.
Renaming Database Objects To rename a Table, Query, Form, Report, Macro or Module, click the relevant Object button, right-click on the object, select Rename from the options displayed, and enter the new name. Depending on the version of Access, and what options are set, it may be necessary to alter references to the renamed object. Starting with Access 2000 there has been an option to track and correct some name changes45 - i.e. propagate the change in places where the renamed object is referenced. Whilst useful, the propagation does not extend to every reference… e.g. references in Access Basic code will not be altered.
Options - Changing Access's Behaviour Many aspects of the behaviour of Access can be changed to suit individual users. For example, the default database sort order, whether a user is prompted to confirm deletions or action queries, how Access locks records in a multi-user environment, what fonts and font sizes are used by default, keyboard behaviour, how correction of suspected typing mistakes is attempted, and aspects of the screen display. To change an option, use Tools | Options...
44 A delete can be undone by selecting Undo Delete from the Edit menu immediately. Do something else and the chance is gone!
45 See Tools/Options/General – Name AutoCorrect
37

Different Versions of Access It is:
• Always possible to use database created with an earlier version of Access – although such use does not include the ability to change database objects (queries, forms etc.).
• Not possible to use a database created with a later version of Access with the exception of versions XP and 2003 (2002/2003).
• It is always possible to convert an Access database for use with a later version.
• Conversion is normally straightforward – although databases that contain programming (Visual Basic) code may require some manual effort.
• Starting with Access 2000 it has been possible to convert from a later to an earlier version – as far back as Access 97. Clearly, there will be problems if use has been made of features not available in the earlier version.
• In environments where concurrent use to a database is required by users with different versions of Access, the best advice is to keep data in one database and manipulate it through another database in which data tables are linked. That way, different versions of the front-end can be created and used whilst the data remains in a database of the earliest used version.
38

Example Database To illustrate the sort of problem that lends itself to solution using an RDBMS, consider the example of a bank that wishes to maintain details of its branches, staff, customers and accounts (including details of investment and withdrawal).
Four entities can readily be identified:
1. Branches of the bank 2. Persons 3. Accounts 4. Transactions
Relationships exist between these entities:
• A Branch is managed by an employee of the bank (a person). • An Account is owned or partly owned by a customer (a person). • A Transaction is carried out on an account. • A Transaction is overseen by an employee of the bank. • A Transaction is carried out at a branch of the bank. This is represented in the following Entity-Relationship Diagram
Figure 42 Entity Relationship Diagram for a Theoretical Bank
This translates into the following table design in Access46:
46 The table Account Types has been added — it contains a list of valid account types. The design of each table and sample data is shown.
39

40
Figure 43 Table Design for Bank