The NetBeans Ecommerce Tutorial Managing Sessions · PDF fileYou can view a live...
30
1/5/2016 The NetBeans Ecommerce Tutorial Managing Sessions https://netbeans.org/kb/docs/javaee/ecommerce/managesessions.html?print=yes 1/30 Tutorial Contents 1. Introduction 2. Designing the Application 3. Setting up the Development Environment 4. Designing the Data Model 5. Preparing the Page Views and Controller Servlet 6. Connecting the Application to the Database 7. Adding Entity Classes and Session Beans 8. Managing Sessions Handling Session Data Examining Session Data with the Java Debugger Examining Session Tracking Options Handling Session TimeOuts See Also 9. Integrating Transactional Business Logic 10. Adding Language Support 11. Securing the Application 12. Testing and Profiling 13. Conclusion The NetBeans Ecommerce Tutorial Managing Sessions Every ecommerce application that offers some form of shopping cart functionality needs to be able to remember user specific data as users click through the website. Unfortunately for you the developer, the HTTP protocol, over which communication on the Internet takes place, is a stateless protocol. Each request received by your server is an independent piece of information that has no relation to previously received requests. Therefore, if a customer clicks a button to add an item to his or her shopping cart, your application must take measures to ensure not only that the state of the user's cart is updated, but that the action doesn't affect the cart of another user who happens to be browsing the site at the same time. In order to properly handle the abovedescribed scenario, you need to implement functionality so that a session can be created and maintained for the duration of a user's visit to the site. Servlet technology, which is the foundation of all Javabased web applications, provides for this with its HttpSession interface. You also need to define several classes, namely ShoppingCart and ShoppingCartItem, that allow the application to temporarily store user data while the session is being maintained. This tutorial unit takes a different approach from others in the NetBeans Ecommerce Tutorial. Instead of having you create project files and providing steps with code snippets for you to copy and paste into your own project, you open the completed project snapshot for this unit, and examine the code using the IDE's debugger and other tools. In the process, you'll learn how to apply an HttpSession object to your code so that each visit to the website results in a dedicated session. You also learn about scoped variables, and their usage in both Java classes and JSP pages. This unit also discusses HttpSession's default mechanism for maintaining sessions (i.e., cookies) and shows what steps need to be taken in the event that cookies are deactivated in a user's browser. Finally, session timeouts are covered, and the unit demonstrates how to handle them by creating a simple filter that intercepts requests to check whether a session exists. You can view a live demo of the application that you build in this tutorial: NetBeans Ecommerce Tutorial Demo Application. Software or Resource Version Required NetBeans IDE Java bundle, 6.8 or 6.9 Java Development Kit (JDK) version 6 GlassFish server v3 or Open Source Edition 3.0.1 MySQL database server version 5.1 AffableBean project snapshot 5 Notes: The NetBeans IDE requires the Java Development Kit (JDK) to run properly. If you do not have any of the resources listed above, the JDK should be the first item that you download and install. The NetBeans IDE Java Bundle includes Java Web and EE technologies, which are required for the application you build in this tutorial.
Transcript of The NetBeans Ecommerce Tutorial Managing Sessions · PDF fileYou can view a live...

1/5/2016 The NetBeans Ecommerce Tutorial Managing Sessions
https://netbeans.org/kb/docs/javaee/ecommerce/managesessions.html?print=yes 1/30
Tutorial Contents
1. Introduction
2. Designing the Application
3. Setting up the Development Environment
4. Designing the Data Model
5. Preparing the Page Views and Controller Servlet
6. Connecting the Application to the Database
7. Adding Entity Classes and Session Beans
8. Managing Sessions
Handling Session Data
Examining Session Data with the JavaDebugger
Examining Session Tracking Options
Handling Session TimeOuts
See Also
9. Integrating Transactional Business Logic
10. Adding Language Support
11. Securing the Application
12. Testing and Profiling
13. Conclusion
The NetBeans Ecommerce Tutorial Managing Sessions
Every ecommerce application that offerssome form of shopping cart functionalityneeds to be able to remember userspecific data as users click through thewebsite. Unfortunately for you thedeveloper, the HTTP protocol, over whichcommunication on the Internet takes place, is a stateless protocol.Each request received by your server is an independent piece ofinformation that has no relation to previously received requests.Therefore, if a customer clicks a button to add an item to his or hershopping cart, your application must take measures to ensure notonly that the state of the user's cart is updated, but that the actiondoesn't affect the cart of another user who happens to bebrowsing the site at the same time.
In order to properly handle the abovedescribed scenario, youneed to implement functionality so that a session can be createdand maintained for the duration of a user's visit to the site. Servlettechnology, which is the foundation of all Javabased webapplications, provides for this with its HttpSession interface.You also need to define several classes, namelyShoppingCart and ShoppingCartItem, that allow theapplication to temporarily store user data while the session isbeing maintained.
This tutorial unit takes a different approach from others in theNetBeans Ecommerce Tutorial. Instead of having you createproject files and providing steps with code snippets for you tocopy and paste into your own project, you open the completedproject snapshot for this unit, and examine the code using theIDE's debugger and other tools. In the process, you'll learn how toapply an HttpSession object to your code so that each visit to
the website results in a dedicated session. You also learn about scoped variables, and their usage in both Java classes and JSPpages. This unit also discusses HttpSession's default mechanism for maintaining sessions (i.e., cookies) and shows whatsteps need to be taken in the event that cookies are deactivated in a user's browser. Finally, session timeouts are covered, andthe unit demonstrates how to handle them by creating a simple filter that intercepts requests to check whether a session exists.
You can view a live demo of the application that you build in this tutorial: NetBeans Ecommerce Tutorial Demo Application.
Software or Resource Version Required
NetBeans IDE Java bundle, 6.8 or 6.9
Java Development Kit (JDK) version 6
GlassFish server v3 or Open Source Edition 3.0.1
MySQL database server version 5.1
AffableBean project snapshot 5
Notes:
The NetBeans IDE requires the Java Development Kit (JDK) to run properly. If you do not have any of the resources listedabove, the JDK should be the first item that you download and install.
The NetBeans IDE Java Bundle includes Java Web and EE technologies, which are required for the application you buildin this tutorial.
1/5/2016 The NetBeans Ecommerce Tutorial Managing Sessions
https://netbeans.org/kb/docs/javaee/ecommerce/managesessions.html?print=yes 2/30
The NetBeans IDE Java Bundle also includes the GlassFish server, which you require for this tutorial. You could downloadthe GlassFish server independently, but the version provided with the NetBeans download has the added benefit of beingautomatically registered with the IDE.
You can follow this tutorial unit without having completed previous units. To do so, see the setup instructions, whichdescribe how to prepare the database and establish connectivity between the IDE, GlassFish, and MySQL.
Handling Session DataApplications can manage user sessions with the HttpSession object. You can bind userspecific data to the HttpSessionobject, then access this data at a later stage. Both bind and access actions can be done from Java classes, as well as fromsessionscoped variables in EL expressions.
Working with an HttpSession Object
Working with Scoped Variables in Web Applications
Working with an HttpSession ObjectThe AffableBean application uses the HttpSession object to identify users over multiple requests. An HttpSessionobject is obtained using getSession() on a given request:
HttpSession session = request.getSession();
If a session object doesn't yet exist for the request, the method creates and returns a new session object.
You can use the session object as a vehicle for passing data between requests. You use the setAttribute method to bindobjects to the session. Likewise, you use getAttribute to retrieve objects from the session. In the AffableBeanapplication for example, the user's shopping cart is created and bound to the user session in the following manner:
ShoppingCart cart = new ShoppingCart();
session.setAttribute("cart", cart);
In order to retrieve the cart from the session, the getAttribute method is applied:
cart = (ShoppingCart) session.getAttribute("cart");
In JSP pages, you can access objects bound to the session using EL expressions. Continuing with the above example, if aShoppingCart object named 'cart' is bound to the session, you can access the object using the following EL expression:
$cart
Accessing the ShoppingCart object on its own is of little value however. What you really want is a way to access valuesstored in the object. If you explore the new ShoppingCart class in the project snapshot, you'll note that it contains thefollowing properties:
double total
int numberOfItems
List<String, ShoppingCartItem> items
Provided that properties have matching getter methods, you can access values for singular properties using simple dotnotation in an EL expression. If you examine the cart.jsp page, you'll see that this is exactly how the value fornumberOfItems is accessed:
<p>Your shopping cart contains $cart.numberOfItems items.</p>
In order to extract data from properties that contain multiple values, such as the above items list, the cart.jsp page uses a<c:forEach> loop:

1/5/2016 The NetBeans Ecommerce Tutorial Managing Sessions
https://netbeans.org/kb/docs/javaee/ecommerce/managesessions.html?print=yes 3/30
<c:forEach var="cartItem" items="$cart.items" varStatus="iter">
<c:set var="product" value="$cartItem.product"/>
<tr class="$((iter.index % 2) == 0) ? 'lightBlue' : 'white'">
<td>
<img src="$initParam.productImagePath$product.name.png"
alt="$product.name">
</td>
<td>$product.name</td>
<td>
€ $cartItem.total
<br>
<span class="smallText">( € $product.price / unit )</span>
</td>
...
</tr>
</c:forEach>
ShoppingCartItem's product property identifies the product type for a cart item. The above loop takes advantage of thisby first setting a product variable to the expression $cartItem.product. It then uses the variable to obtaininformation about that product (e.g., name, price).
Working with Scoped Variables in Web ApplicationsWhen working with JSP/Servlet technology, there are four scope objects available to you within the realm of the application.JSP technology implements implicit objects that allows you to access classes defined by the Servlet API.
Scope Definition Servlet Class JSP Implicit Object
Application Global memory for a web application javax.servlet.ServletContext applicationScope
Session Data specific to a user session javax.servlet.http.HttpSession sessionScope
RequestData specific to an individual serverrequest
javax.servlet.HttpServletRequest requestScope
PageData that is only valid in the context ofa single page (JSPs only)
[n/a] pageScope
If you open your project's category.jsp file in the editor, you'll see that EL expressions include various scoped variables,including $categories, $selectedCategory and $categoryProducts. The $categories variableis applicationscoped, which is set in the ControllerServlet's init method:
// store category list in servlet context
getServletContext().setAttribute("categories", categoryFacade.findAll());
The other two, $selectedCategory and $categoryProducts, are placed in the application's session scopefrom the ControllerServlet. For example:
// place selected category in session scope
session.setAttribute("selectedCategory", selectedCategory);
Note: If you are continuing from the previous tutorial units, you'll likely note that $selectedCategory and$categoryProducts were originally placed in the request scope. In previous units this was fine, but consider nowwhat happens if a user clicks the 'add to cart' button in a category page. The server responds to an addToCart requestby returning the currently viewed category page. It therefore needs to know the selectedCategory and the

1/5/2016 The NetBeans Ecommerce Tutorial Managing Sessions
https://netbeans.org/kb/docs/javaee/ecommerce/managesessions.html?print=yes 4/30
categoryProducts pertaining to the selected category. Rather than establishing this information for each request,you place it in the session scope from a category request so that it is maintained across multiple requests, and can beaccessed when you need it. Also, examine the functionality provided by the cart page. (A functional description isprovided below.) The 'continue shopping' button returns the user to the previously viewed category. Again, theselectedCategory and the categoryProducts variables are required.
When referencing scoped variables in an EL expression, you do not need to specify the variable's scope (provided that you donot have two variables of the same name in different scopes). The JSP engine checks all four scopes and returns the firstvariable match it finds. In category.jsp for example, you can use the following expression:
$categoryProducts
This expression is shorthand for the following expression:
$sessionScope.categoryProducts
For more information, see the following resources:
Designing Enterprise Applications with the J2EE Platform: State Scopes
Sharing Information > Using Scoped Objects
Unified Expression Language > Implicit Objects
Examining Session Data with the Java DebuggerBegin exploring how the application behaves during runtime. Use the IDE's debugger to step through code and examine how theHttpSession is created, and how other objects can be placed in the session scope to be retrieved at a later point.
1. Open the project snapshot for this tutorial unit in the IDE. Click the Open Project ( ) button and use the wizard tonavigate to the location on your computer where you downloaded the project. If you are proceeding from the previoustutorial unit, note that this project snapshot includes a new cart package, containing ShoppingCart andShoppingCartItem classes. Also, the following files have been modified:
WEBINF/web.xml
css/affablebean.css
WEBINF/jspf/header.jspf
WEBINF/jspf/footer.jspf
WEBINF/view/cart.jsp
WEBINF/view/category.jsp
WEBINF/view/checkout.jsp
controller/ControllerServlet
2. Run the project ( ) to ensure that it is properly configured with your database and application server.
If you receive an error when running the project, revisit the setup instructions, which describe how to prepare thedatabase and establish connectivity between the IDE, GlassFish, and MySQL.
3. Test the application's functionality in your browser. If you are continuing directly from the previous tutorial unit, you'll notethe following enhancements.
category page
Clicking 'add to cart' for the first time enables the shopping cart and 'proceed to checkout' widgets to display in theheader.
Clicking 'add to cart' results in an update to the number of cart items in the header's shopping cart widget.

1/5/2016 The NetBeans Ecommerce Tutorial Managing Sessions
https://netbeans.org/kb/docs/javaee/ecommerce/managesessions.html?print=yes 5/30
Clicking 'view cart' results in the cart page displaying.
Clicking 'proceed to checkout' results in the checkout page displaying.
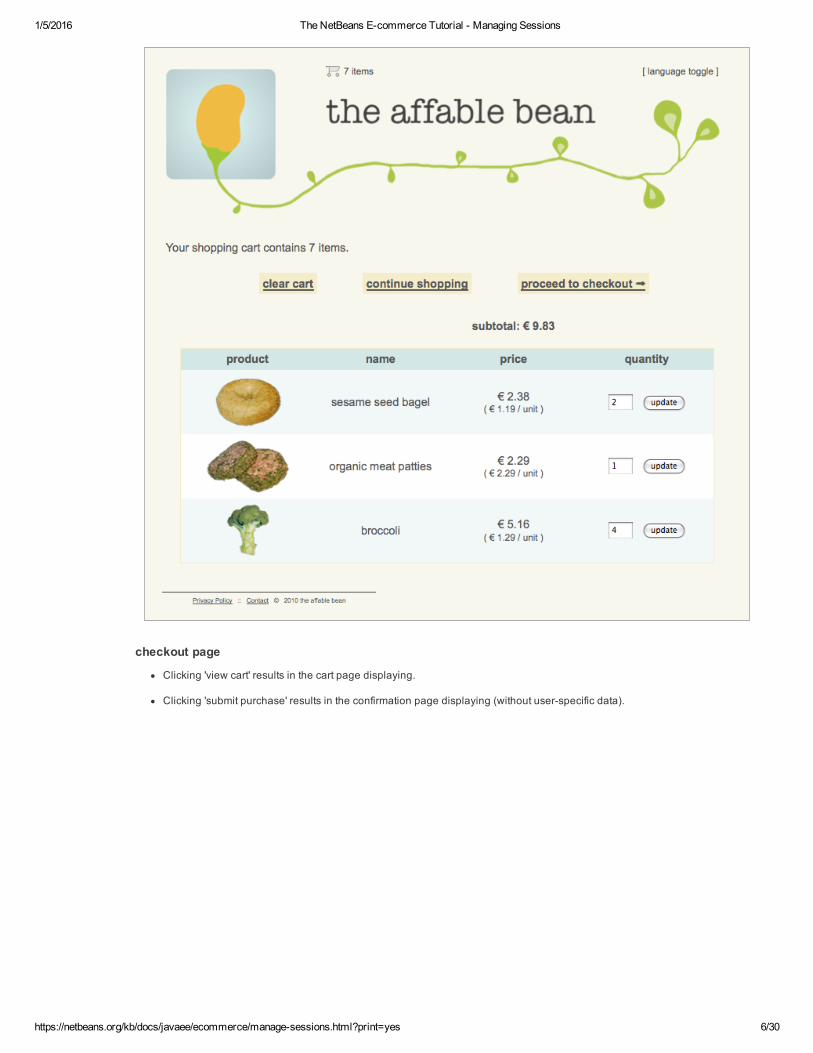
cart page
Clicking 'clear cart' results in shopping cart being emptied of items.
Clicking 'continue shopping' results in a return to the previously viewed category.
Clicking 'proceed to checkout' results in the checkout page displaying.
Entering a number (1 99) in an item's quantity field then clicking 'update' results in a recalculation of the total pricefor the item, and of the subtotal.
Entering zero in an item's quantity field then clicking 'update' results in the item being removed from the displayedtable.
1/5/2016 The NetBeans Ecommerce Tutorial Managing Sessions
https://netbeans.org/kb/docs/javaee/ecommerce/managesessions.html?print=yes 6/30
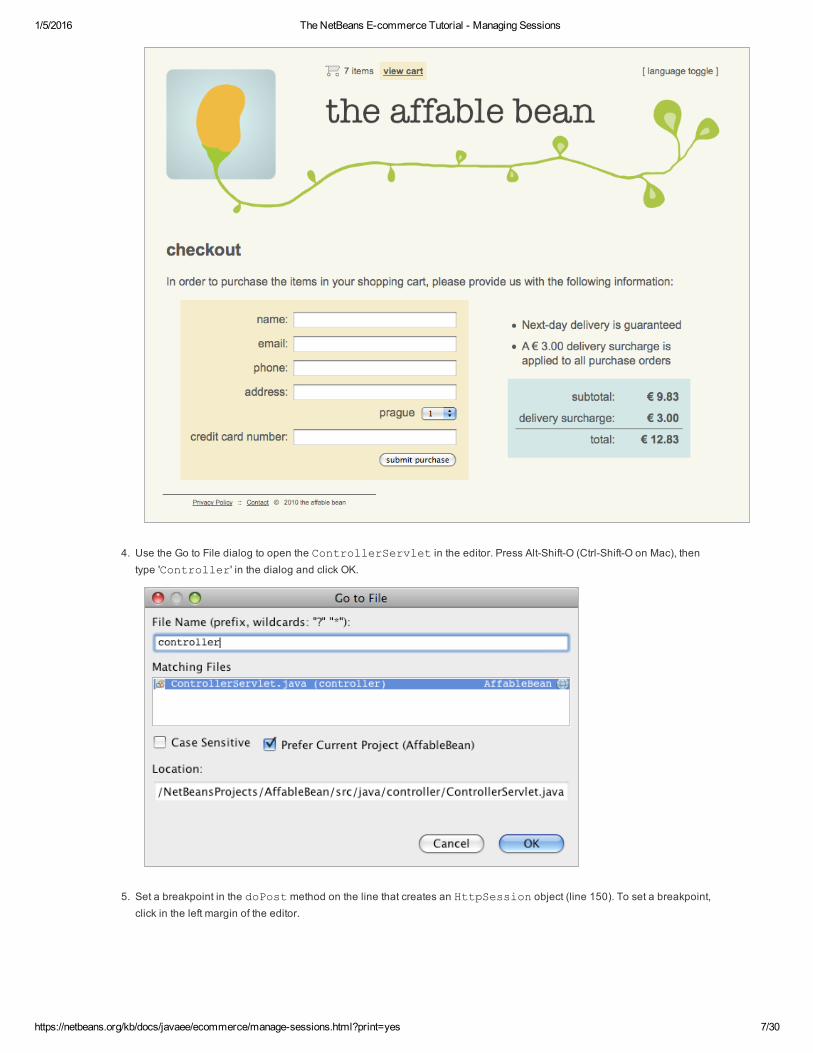
checkout page
Clicking 'view cart' results in the cart page displaying.
Clicking 'submit purchase' results in the confirmation page displaying (without userspecific data).
1/5/2016 The NetBeans Ecommerce Tutorial Managing Sessions
https://netbeans.org/kb/docs/javaee/ecommerce/managesessions.html?print=yes 7/30
4. Use the Go to File dialog to open the ControllerServlet in the editor. Press AltShiftO (CtrlShiftO on Mac), thentype 'Controller' in the dialog and click OK.
5. Set a breakpoint in the doPost method on the line that creates an HttpSession object (line 150). To set a breakpoint,click in the left margin of the editor.

1/5/2016 The NetBeans Ecommerce Tutorial Managing Sessions
https://netbeans.org/kb/docs/javaee/ecommerce/managesessions.html?print=yes 8/30
To toggle line numbers for the editor, rightclick in the left margin and choose Show Line Numbers.
6. Run the debugger. Click the Debug Project ( ) button in the IDE's main toolbar. The GlassFish server starts (or restarts,if it is already running) and opens a socket on its debug port number. The application welcome page opens in yourbrowser.
You can view and modify the debug port number from the Servers window (Tools > Servers). Select the Java tab forthe server you are using. Specify the port number in the 'Address to use' field under Debug Settings.
7. When the application's welcome page displays in the browser, click any category image to navigate to the category page.Recall that clicking the 'add to cart' button sends an addToCart request to the server:
<form action="addToCart" method="post">
As you may recall from Preparing the Page Views and Controller Servlet, the ControllerServlet's doPost methodhandles requests for the /addToCart URL pattern. You can therefore expect that when a user clicks an 'add to cart'button, the doPost method is called.
8. Click 'add to cart' for any product in the category page. Switch back to the IDE and note that the debugger suspends on thebreakpoint.
9. Place your cursor on the call to getSession() and press CtrlSpace to invoke the Javadoc documentation.

1/5/2016 The NetBeans Ecommerce Tutorial Managing Sessions
https://netbeans.org/kb/docs/javaee/ecommerce/managesessions.html?print=yes 9/30
Taking Advantage of the IDE's Javadoc SupportThe IDE provides builtin Javadoc support for Java EE development. The IDE bundles with the Java EE 6 API Specification,which you can open in an external browser by choosing Help > Javadoc References > Java EE 6.
The IDE also includes various other features that enable easy access to API documentation:
Javadoc window: Choose Window > Other > Javadoc. The Javadoc window opens in the bottom region of the IDE, anddisplays API documentation relevant to your cursor's location in the editor.
Javadoc Index Search: Choose Help > Javadoc Index Search (ShiftF1; fnShiftF1 on Mac). Type in the name of theclass you are looking for, then select a class from the listed results. The complete class description from the APISpecification displays in the bottom pane of the window.
Documentation popup in the editor: Javadoc documentation displays in a popup window when you press CtrlSpace
on a given element in the editor. You can click the External Browser ( ) button to have the documentation open inyour browser. If you want to use CtrlSpace for code completion only, you can deactivate the documentation popup byopening the Options window (Tools > Options; NetBeans > Preferences on Mac), then selecting Editor > CodeCompletion. Deselect the 'Auto Popup Documentation Window' option.
When you document your own work, consider adding Javadoc comments to your classes and methods. Open theShoppingCart class and examine the Javadoc comments added to the class methods. Javadoc comments are marked bythe /** ... */ delimiters. For example, the addItem method has the following comment before its signature:
/**
* Adds a <code>ShoppingCartItem</code> to the <code>ShoppingCart</code>'s
* <code>items</code> list. If item of the specified <code>product</code>
* already exists in shopping cart list, the quantity of that item is
* incremented.
*
* @param product the <code>Product</code> that defines the type of shopping
cart item
According to the documentation, getSession() returns the HttpSession currently associated with the request, and ifno session exists, the method creates a new session object.

1/5/2016 The NetBeans Ecommerce Tutorial Managing Sessions
https://netbeans.org/kb/docs/javaee/ecommerce/managesessions.html?print=yes 10/30
* @see ShoppingCartItem
*/
public synchronized void addItem(Product product)
This enables you (and others working on the project) to view Javadoc documentation on the method. To demonstrate, openthe Navigator (Ctrl7; 7 on Mac) and hover your mouse over the addItem method.
You can also use the IDE to generate a set of Javadoc HTML pages. In the Projects window, rightclick your project node andchoose Generate Javadoc. The IDE generates the Javadoc in the dist/javadoc folder of your project's directory andopens the index page in the browser.
For more information on Javadoc, see the following resources:
Javadoc Tool Official Home Page
How to Write Doc Comments for the Javadoc Tool
10. Hover your mouse over the session variable. Note that the debugger suspends on the line it is about to execute. Thevalue returned by getSession() has not yet been saved into the session variable, and you see a popup stating that"session is not a known variable in the current context."
11. Click the Step Over ( ) button in the debugger toolbar located above the editor. The line is executed, and the debuggersteps to the next line in the file.
12. Hover your mouse over the session variable again. Now you see the value currently set to the session variable.
In NetBeans 6.9, you can click the grey pointer ( ) in the popup to expand a list of variable values contained in thehighlighted element.
13. Click the Step Over ( ) button (F8; fnF8 on Mac) to arrive at the if statement (line 154). Because you just clicked the'add to cart' button in the browser, you know that the expression userPath.equals("/addToCart") should

1/5/2016 The NetBeans Ecommerce Tutorial Managing Sessions
https://netbeans.org/kb/docs/javaee/ecommerce/managesessions.html?print=yes 11/30
evaluate to true.
14. Highlight the userPath.equals("/addToCart") expression (by controlclicking with your mouse). This time yousee a popup indicating the value of the expression you highlighted.
15. Press F8 (fnF8 on Mac) to step to the next line (line 158). The application has been designed so that the ShoppingCartobject for the user session is only created when the user adds an item to the cart for the first time. Since this is the first timethe addToCart request has been received in this debug session, you can expect the cart object to equal null.
16. Press F8 (fnF8 on Mac) to step to the next line (line 160). Then, on line 160, where the ShoppingCart object is created,
click the Step Into ( ) button. The debugger steps into the method being called. In this case, you are taken directly to theShoppingCart's constructor.
17. Press CtrlTab to switch back to the ControllerServlet. Note that the IDE provides a Call Stack ( ) badge on line160, indicating that the debugger is currently suspended somewhere on a method higher up in the call stack.
Press AltShift3 (CtrlShift3 on Mac) to open the IDE's Call Stack window.
18. Press F8 (fnF8 on Mac) to continue stepping through code. When the debugger completes the ShoppingCartconstructor, you are taken back to the ControllerServlet.
Line 161 of the ControllerServlet binds the newlycreated cart object to the session.
session.setAttribute("cart", cart);
To witness this, open the debugger's Variables window. Choose Window > Debugging > Variables, or press AltShift1(CtrlShift1 on Mac).

1/5/2016 The NetBeans Ecommerce Tutorial Managing Sessions
https://netbeans.org/kb/docs/javaee/ecommerce/managesessions.html?print=yes 12/30
If you expand the session > session > attributes node, you are able to view the objects that are bound to the session. In theabove image, there are two items currently bound to the session (highlighted). These are selectedCategory andcategoryProducts, instantiated in the ControllerServlet at lines 83 and 89, respectively. Both of these itemswere bound earlier, when you clicked a category image, and the ControllerServlet processed the category pagerequest.
19. Press F8 (fnF8 on Mac) to execute line 161. The cart object is bound to the session, and the Variables window updatesto reflect changes. In the Variables window, note that the session now contains three attributes, the third being the newlyinitialized ShoppingCart object (highlighted below).

1/5/2016 The NetBeans Ecommerce Tutorial Managing Sessions
https://netbeans.org/kb/docs/javaee/ecommerce/managesessions.html?print=yes 13/30
So far, we have not "proven" that the session, as listed in the Variables window, represents an HttpSession. Aspreviously mentioned, HttpSession is actually an interface, so when we talk about an HttpSession object, orsession object, we are in fact referring to any object that implements the HttpSession interface. In the Variableswindow, if you hover your cursor over 'session', a popup displays indicating that the variable represents anHttpSession object. The StandardSessionFacade type, as displayed, is the internal class that GlassFishuses to implement the HttpSession interface. If you are familiar with Tomcat and are puzzled by the'org.apache.catalina' paths that appear in the Value column, this is because the GlassFish web/servletcontainer is in fact a derivative of the Apache Tomcat container.
A new ShoppingCart is added to the session, and the request continues to be processed. In order to completeimplementation of the 'add to cart' functionality, the following actions are taken:
the ID of the selected product is retrieved from the request (line 165)
a Product object is created using the ID (line 169)
a new ShoppingCartItem is created using the product (line 170)
the ShoppingCartItem is added to ShoppingCart's items list (line 170)
20. Press F8 (fnF8 on Mac) to continue stepping through code while being mindful of the abovelisted four actions. Pausewhen the debugger suspends on line 170.
21. Create a watch on the session. This will allow you to view values contained in the session when you step into theaddItem method in the next step. Rightclick the session in the Variables window and choose Create Fixed Watch.
Alternatively, you can place your cursor on the session variable in the editor, then rightclick and choose NewWatch. The New Watch dialog enables you to specify variables or expressions to watch continuously when

1/5/2016 The NetBeans Ecommerce Tutorial Managing Sessions
https://netbeans.org/kb/docs/javaee/ecommerce/managesessions.html?print=yes 14/30
debugging an application. (In the case of expressions, highlight the expression first, then rightclick and choose NewWatch.)
A new watch is created on the session variable and all variables it contains. The watch is visible from the Watches
window (Window > Debugging > Watches) or, if you toggle the Watches ( ) button in the left margin of the Variableswindow, it displays in the top row of the Variables window.
The debugger enables you to keep an eye on variables as it steps through code. This can be helpful, for example if you'dlike to follow changes to specific variable values (and don't want to need to sift through the full list presented in theVariables window with each step), or if you temporarily step into a class that doesn't contain the variables you areinterested in.
22. Click the Step Into ( ) button to step into ShoppingCart's addItem method.
23. Step through the addItem method until you reach line 53. As the Javadoc states, addItem "adds aShoppingCartItem to the ShoppingCart's items list. If item of the specified product already exists in shoppingcart list, the quantity of that item is incremented."
24. Examine the session variable which you created a watch on (step 21 above). The items.add(scItem) statement inline 51 added the new ShoppingCartItem to the items list in the ShoppingCart. This is evident by drilling into thethird attribute (i.e., the cart variable) contained in the session.
At this stage, you can see how an HttpSession is created for the request, how a ShoppingCart object is created andattached to the session, and how a ShoppingCartItem is created based on the user's product choice, then added tothe ShoppingCart's list of items. The only remaining action is to forward the request to the category.jsp view.
25. Open the header JSP fragment (header.jspf) in the editor and place a breakpoint on line 86. This line contains the ELstatement within the shopping cart widget that displays the number of cart items.

1/5/2016 The NetBeans Ecommerce Tutorial Managing Sessions
https://netbeans.org/kb/docs/javaee/ecommerce/managesessions.html?print=yes 15/30
26. Click the Continue ( ) button in the debugger toolbar. The debugger continues until execution completes, or until itreaches another breakpoint. In this case, the debugger suspends on line 86 in the header JSP fragment.
Note: In order to suspend the debugger in a JSP page, you need to set a breakpoint. For example, when theControllerServlet forwards the request to the appropriate view, the debugger will not automatically suspendwithin the JSP page.
27. Open the Variables window (AltShift1; CtrlShift1 on Mac) if it is not already open. Unlike with Java classes, the debuggerdoes not provide tooltips when you hover your mouse over variables or expressions in a JSP page. However, the Variableswindow does enable you to determine variable values as you step through code. So, where can you find the value for$cart.numberOfItems?
28. In the Variables window, expand the Implicit Objects > pageContext > session > session > attributes node. This providesaccess to the session object, just as you saw earlier when working in the ControllerServlet. In fact, you may notethat the session which you created a watch on in step 21 above points to the very same object. Here you can verify that thevalue of $cart.numberOfItems equals '1'.
Maximize the Variables window, or any window in the IDE, by rightclicking the window header, then choosingMaximize Window (ShiftEsc).
The debugger gives you access to the pageContext implicit object. pageContext represents the context of the JSPpage, and offers direct access to various objects including the HttpServletRequest, HttpSession, and

1/5/2016 The NetBeans Ecommerce Tutorial Managing Sessions
https://netbeans.org/kb/docs/javaee/ecommerce/managesessions.html?print=yes 16/30
ServletContext objects. For more information, see the Java EE 5 Tutorial: Implicit Objects.
29. Click the Finish Session ( ) button. The runtime finishes executing, and the debug session terminates. The browserdisplays a fullyrendered category page, and you can see that the shopping cart widget in the page header contains oneitem.
Hopefully you now feel comfortable using the IDE's debugger not only to examine your project when it behaves unexpectedly, butalso as a tool to become more familiar with code. Other useful buttons in the debugger toolbar include:
( ) Step Out: Steps you out of the current method call. Executes and removes the topmost method call in your callstack.
( ) Run to Cursor: Executes up to the line on which your cursor is placed.
( ) Apply Code Changes: After editing a file, you can press this button so that the file is recompiled and changes aretaken into account in the debug session.
( ) Step Over Expression: Enables you to view the input parameters and resulting output values of each method callwithin an expression. You can inspect the output values for the previous method and the input parameters for the nextmethod in the Local Variables window. When there are no further method calls, Step Over Expression behaves like the
Step Over ( ) command.
Examining Session Tracking OptionsThere are three conventional ways of tracking sessions between client and server. By far the most common is with cookies. URLrewriting can be applied in the event that cookies are not supported or disabled. Hidden form fields can also be used as a meansof "maintaining state" over multiple requests, but these are limited to usage within forms.
The AffableBean project includes an example of the hidden field method in both the category and cart pages. The 'add to cart'and 'update' buttons that display for product items contain a hidden field which relays the product ID to the server when the buttonis clicked. If you open the cart.jsp page in the editor, you'll see that the <form> tags contain a hidden field.
<form action="updateCart" method="post">
<input type="hidden" name="productId" value="$product.id"> ...
</form>
In this manner, the product ID is sent as a request parameter which the server uses to identify the item within the user's cart whosequantity needs to be modified.
The Servlet API provides a highlevel mechanism for managing sessions. Essentially, it creates and passes a cookie between theclient and server with each requestresponse cycle. If the client browser doesn't accept cookies, the servlet engine automaticallyreverts to URL rewriting. The following two exercises demonstrate this functionality.
Examining ClientServer Communication with the HTTP Monitor
Maintaining Sessions with URL Rewriting
Examining ClientServer Communication with the HTTP MonitorBy default, the servlet engine uses cookies to maintain and identify sessions between requests. A random, alphanumericnumber is generated for each session object, which serves as a unique identifier. This identifier is passed as a 'JSESSIONID'cookie to the client. When the client makes a request, the servlet engine reads the value of the JSESSIONID cookie todetermine the session which the request belongs to.
To demonstrate this, we'll use the debugger in tandem with the IDE's HTTP Monitor.
1. Begin by activating the HTTP Monitor for the server you are using. Choose Tools > Servers. In the left column of the

1/5/2016 The NetBeans Ecommerce Tutorial Managing Sessions
https://netbeans.org/kb/docs/javaee/ecommerce/managesessions.html?print=yes 17/30
Servers window, select the server you are using (GlassFish). Then, in the main column, select the Enable HTTP Monitoroption.
2. If your server is already running, you need to restart it. However, since we plan to use the debugger, and running the
debugger restarts the server to communicate on a different port, just click the Debug Project ( ) button in the IDE'smain toolbar. The server restarts, a debug session begins and the application's welcome page opens in your browser.The HTTP Monitor displays in the bottom region of the IDE.
3. Click the AffableBean record in the left column (as shown in the above image). When you select records in the leftcolumn, the right (i.e., main) column refreshes to display corresponding data. In the above image, the Request tabdisplays the requested URI (/AffableBean/), the HTTP method (GET), and points out that there was no query stringsent with the request.
4. Select the Session tab. Note that there is a statement, "The session was created as a result of this request." This is dueto the fact that the server has sent a SetCookie header for the JSESSIONID cookie in its response. Also note thatthe new session ID is listed under 'Session properties'. As will later be shown, the session ID is the value of theJSESSIONID cookie.

1/5/2016 The NetBeans Ecommerce Tutorial Managing Sessions
https://netbeans.org/kb/docs/javaee/ecommerce/managesessions.html?print=yes 18/30
You may wonder how a session object was created from a request for the site welcome page. After all, theControllerServlet does not handle the initial request for /AffableBean/, and nowhere does this requestencounter getSession(). Or does it? Recall that JSP pages are compiled into servlets upon deployment. Onceyou've deployed your project to the server, you can actually use the IDE to view the JSP's compiled servlet on yourserver.
5. In the Projects window, rightclick the index.jsp file and choose View Servlet. An index_jsp.java file opens inthe editor. This is the servlet that was automatically compiled from the index.jsp page.
6. Perform a search in the file for getSession. Press CtrlF (F on Mac), type 'getSession' in the search bar, thenpress Enter.
CtrlF (F on Mac) is a keyboard shortcut for Edit > Find.
The getSession method is in fact called. The reason this occurs is because JSP pages include thepageContext.session implicit object by default. If you wanted to deactivate this behavior, you could add thefollowing directive to the top of a JSP file:
<%@page session="false" %>
If you add the directive the getSession method will be removed in the compiled servlet.
To find out the location of the compiled servlet on your server, you can hover your mouse over the servlet's nametab above the editor. A popup displays the path to the file on your computer.
7. In the browser, select a category then add an item to your cart. Switch back to the IDE. Note that the debuggersuspends on the breakpoint in the ControllerServlet you set earlier (line 150). All breakpoints are rememberedbetween sessions. To remove the breakpoint, you could click the breakpoint ( ) badge in the editor's left margin.However, since there are multiple breakpoints already set in the project, open the debugger's Breakpoints window(Window > Debugging > Breakpoints).

1/5/2016 The NetBeans Ecommerce Tutorial Managing Sessions
https://netbeans.org/kb/docs/javaee/ecommerce/managesessions.html?print=yes 19/30
From the Breakpoints window, you can view and call actions on all breakpoints set in projects opened in the IDE.
8. Rightclick the breakpoint set in header.jspf and choose Delete. Then rightclick the breakpoint set in theControllerServlet and choose Disable. (You'll reenable it later in this exercise.)
9. Click the Continue ( ) button. The request finishes executing, and the category page displays in the browser withone item added to the cart.
10. In the HTTP Monitor, search for the addToCart request in the left column, then select it to display details in the maincolumn.
Click the Ascending Sort ( ) button so that the most recent records are listed at the top.
Under the Request tab, note the requested URI (/AffableBean/addToCart), the HTTP method (POST), and therequest parameters (productId and submit).
11. Select the Cookies tab. Here you see that a cookie named JSESSIONID exists, and was sent from the client to theserver. Note that the value for the cookie is the same as the Session ID displayed under the Session tab.
Likewise, if you click the Header tab, you see the cookie listed, since 'Cookie' is a request header that was sent by theclient.

1/5/2016 The NetBeans Ecommerce Tutorial Managing Sessions
https://netbeans.org/kb/docs/javaee/ecommerce/managesessions.html?print=yes 20/30
See Wikipedia's List of HTTP headers for more information on request and response headers.
12. Select the Session tab. There is a statement which indicates, "The session existed before this request." Also note thatthe cart attribute is listed under 'Session attributes after the request'. This makes sense, since we know that the cartobject is bound to the session when the addToCart request is processed for the first time.
In the next few steps, locate the session ID and JSESSIONID cookie in the Variables window.
13. Reenable the breakpoint you set earlier in the ControllerServlet. Press AltShift5 (CtrlShift5 on Mac) to openthe Breakpoints window, then click in the checkbox next to the breakpoint entry to reenable it.
14. In the browser, click the 'add to cart' button for one of the listed products.
15. Switch to the IDE and note that the debugger is suspended on the breakpoint set in the ControllerServlet. Click
the Step Over ( ) button so that the session variable is assigned to the session object.
16. Open the Variables window (AltShift1; CtrlShift1 on Mac) and expand session > session. You'll find the session IDlisted as the value for the id variable.
17. To locate the JSESSIONID cookie, recall that you can normally access cookies from a servlet by calling thegetCookies method on the HttpServletRequest. Therefore, drill into the request object: request > Inherited >request > request > Inherited > cookies. Here you see the cookies ArrayList. If you expand the list, you'll find theJSESSIONID cookie, the value of which is the session ID.
18. Click the Finish Session ( ) button to terminate the debug session.

1/5/2016 The NetBeans Ecommerce Tutorial Managing Sessions
https://netbeans.org/kb/docs/javaee/ecommerce/managesessions.html?print=yes 21/30
Maintaining Sessions with URL RewritingAs mentioned, the servlet engine detects whether cookies are supported for the client browser, and if not, it switches to URLrewriting as a means of maintaining sessions. This all happens transparently for the client. For you, the developer, the processisn't entirely transparent.
You need to ensure that the application is capable of rewriting URLs whenever cookies are disabled. You do this by calling theresponse’s encodeURL method on all URLs returned by servlets in your application. Doing so enables the session ID to beappended to the URL in the event that the use of cookies is not an option; otherwise, it returns the URL unchanged.
For example, the browser sends a request for AffableBean's third category (bakery): category?3. The server respondswith session ID included in the URL:
/AffableBean/category;jsessionid=364b636d75d90a6e4d0085119990?3
As stated above, all URLs returned by your application's servlets must be encoded. Keep in mind that JSP pages are compiledinto servlets. How can you encode URLs in JSP pages? JSTL's <c:url> tag serves this purpose. The following exercisedemonstrates the problem and illustrates a solution.
1. Temporarily disable cookies in your browser. If you are using Firefox, you can choose Tools > Options (Firefox >Preferences on Mac). In the window that displays, select the Privacy tab, then under History, select 'Use custom settingsfor history' in the provided dropdown. Deselect the 'Accept cookies from sites' option.
2. Run the AffableBean project. When the welcome page displays, click into a category, then try adding an item toyour cart. You'll see that the application's functionality is severely compromised in its present state.

1/5/2016 The NetBeans Ecommerce Tutorial Managing Sessions
https://netbeans.org/kb/docs/javaee/ecommerce/managesessions.html?print=yes 22/30
As before, the server generates a session and binds objects to it. This is how the category page is able to display theselected category and products. However, the server has failed in its attempt to set a JSESSIONID cookie. Therefore,when the client makes a second request (when user clicks 'add to cart'), the server has no way of identifying the sessionwhich the request belongs to. It therefore cannot locate any of the attributes previously set in the session, such asselectedCategory and categoryProducts. This why the rendered response lacks the information specifiedby these attributes.
3. Open the project's category.jsp page in the editor. Locate the line that implements the 'add to cart' button (line 58).The <form> element's action attribute determines the request sent to the server.
<form action="addToCart" method="post">
4. Modify the request so that it is passed through the <c:url> tag.
<form action="<c:url value='addToCart'/>" method="post">
5. Press CtrlS (S on Mac) to save changes to the file. Recall that the IDE provides the Deploy on Save feature, whichis enabled by default. This means that any saved changes are automatically deployed to your server.
6. In the browser, select a different category so that the application renders the newly modified category page.
7. Examine the source code for the page. In Firefox, you can press CtrlU (U on Mac). The 'add to cart' button for eachproduct displays with the session ID appended to the URL.
<form action="addToCart;jsessionid=4188657e21d72f364e0782136dde" method="post">
8. Click the 'add to cart' button for any item. You see that the server is now able to determine the session which the requestbelongs to, and renders the response appropriately.
9. Before proceeding, make sure to reenable cookies for your browser.
Again, every link that a user is able to click on within the application, whose response requires some form of sessionrelated

1/5/2016 The NetBeans Ecommerce Tutorial Managing Sessions
https://netbeans.org/kb/docs/javaee/ecommerce/managesessions.html?print=yes 23/30
data, needs to be properly encoded. Sometimes implementation is not as straightforward as the example shown above. Forexample, the 'clear cart' widget used in cart.jsp currently sets a clear parameter to true when the link is clicked.
<% clear cart widget %>
<c:if test="$!empty cart && cart.numberOfItems != 0">
<a href="viewCart?clear=true" class="bubble hMargin">clear cart</a></c:if>
The <c:url> tag can be applied to the URL in the following manner:
<% clear cart widget %>
<c:if test="$!empty cart && cart.numberOfItems != 0">
<c:url var="url" value="viewCart"> <c:param name="clear" value="true"/> </c:url>
<a href="$url" class="bubble hMargin">clear cart</a></c:if>
The clear=true parameter is set by adding a <c:param tag between the <c:url> tags. A variable named 'url' is setusing <c:url>'s var attribute, and var is then accessed in the HTML anchor tag using the $url expression.
You can download and examine snapshot 6 to see how all links in the project have been encoded.
URL rewriting should only be used in the event that cookies are not an available tracking method. URL rewriting isgenerally considered a suboptimal solution because it exposes the session ID in logs, bookmarks, referer headers, andcached HTML, in addition to the browser's address bar. It also requires more serverside resources, as the server needsto perform additional steps for each incoming request in order to extract the session ID from the URL and pair it with anexisting session.
Handling Session TimeOutsSetting Session Time Intervals
Programmatically Handling Session TimeOuts
Setting Session Time IntervalsYou should consider the maximum time interval which your server maintains sessions for. If your website receives heavy traffic,a large number of sessions could expend your server's memory capacity. You might therefore shorten the interval in hopes ofremoving unused sessions. On the other hand, you certainly wouldn't want to cut sessions too short, as this could become ausability issue that might have a negative impact on the business behind the website. Taking the AffableBean applicationas an example, a user proceeds to checkout after filling her shopping cart with items. She then realizes she needs to enter hercredit card details and goes off to find her purse. After returning to her computer with credit card in hand, she fills in thecheckout form and clicks submit. During this time however, her session has expired on the server. The user sees that hershopping cart is empty and is redirected to the homepage. Will she really take the time to step through the process again?
The following steps demonstrate how to set the session timeout interval in the AffableBean project to 10 minutes. Ofcourse, the actual duration ultimately depends on your server resources, the business objectives of the application, and thepopularity of your website.
1. Open the application's deployment descriptor in the editor. Press AltShiftO (CtrlShiftO on Mac) to use the IDE's Go toFile dialog. Type in 'web', then click OK.

1/5/2016 The NetBeans Ecommerce Tutorial Managing Sessions
https://netbeans.org/kb/docs/javaee/ecommerce/managesessions.html?print=yes 24/30
The editor displays the web.xml file in the XML view. The template that NetBeans provides for the web.xml fileincludes a default setting for 30 minutes.
<sessionconfig>
<sessiontimeout>
30
</sessiontimeout>
</sessionconfig>
2. Click the General tab, and type in '10' in the Session Timeout field.
3. Save the file (CtrlS; S on Mac).
If you switch back to the XML view, you'll see that the <sessiontimeout> element has been updated.
<sessionconfig>
<sessiontimeout>10</sessiontimeout>
</sessionconfig>
Note: Alternatively, you could remove the <sessiontimeout> element altogether, and edit the session

1/5/2016 The NetBeans Ecommerce Tutorial Managing Sessions
https://netbeans.org/kb/docs/javaee/ecommerce/managesessions.html?print=yes 25/30
properties element in the GlassFishspecific deployment descriptor (sunweb.xml). This would set the globaltimeout for all applications in the server's web module. See the Oracle GlassFish Server 3.0.1 Application DevelopmentGuide: Creating and Managing Sessions for more details.
Programmatically Handling Session TimeOutsIf your application relies on sessions, you need to take measures to ensure that it can gracefully handle situations in which arequest is received for a session that has timed out or cannot be identified. You can accomplish this in the AffableBeanapplication by creating a simple filter that intercepts requests heading to the ControllerServlet. The filter checks if asession exists, and if not, it forwards the request to the site's welcome page.
1. Start by examining the problem that arises when a session times out midway through a user's visit to the site.Temporarily reset the session timeout interval to one minute. Open the web deployment descriptor (web.xml) andenter '1' between the <sessiontimeout> tags.
<sessionconfig>
<sessiontimeout>1</sessiontimeout></sessionconfig>
2. Run the AffableBean project. In the browser, click into a category page, add several items to your cart, then click'view cart'.
3. Wait at least one full minute.
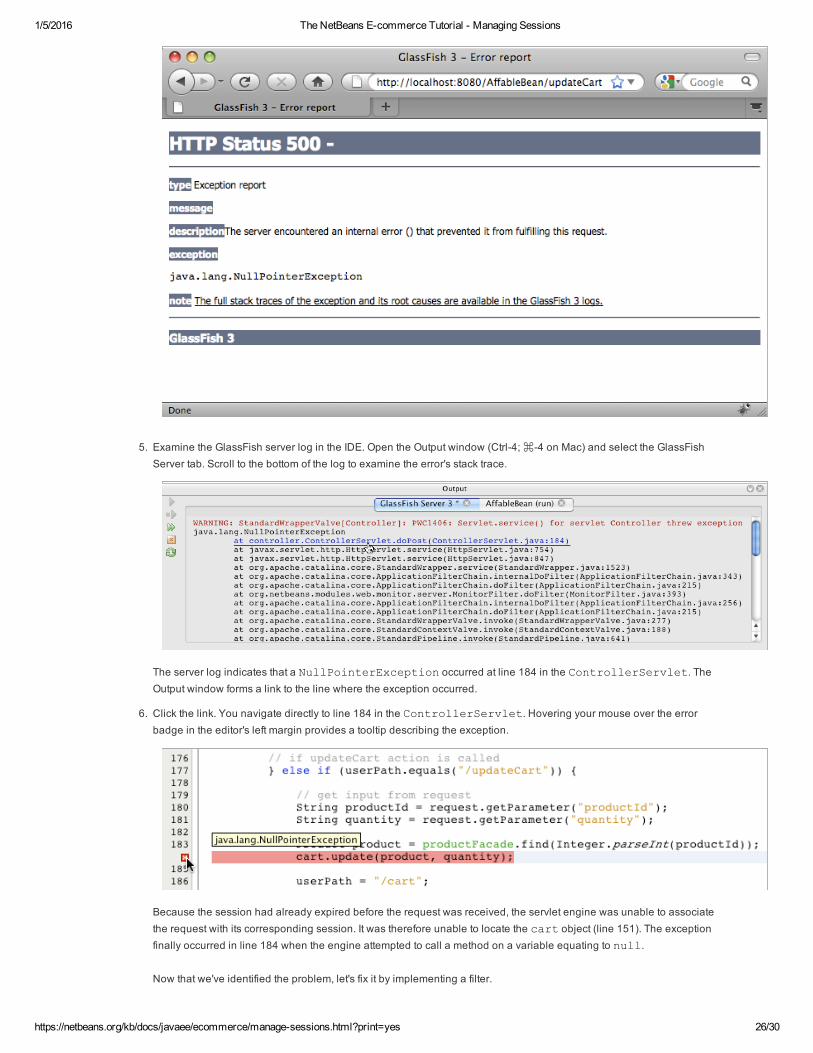
4. Update the quantity for one of the items displayed in the cart page. (Any number between 1 and 99 is acceptable.) Click'update'. The server returns an HTTP Status 500 message.
1/5/2016 The NetBeans Ecommerce Tutorial Managing Sessions
https://netbeans.org/kb/docs/javaee/ecommerce/managesessions.html?print=yes 26/30
5. Examine the GlassFish server log in the IDE. Open the Output window (Ctrl4; 4 on Mac) and select the GlassFishServer tab. Scroll to the bottom of the log to examine the error's stack trace.
The server log indicates that a NullPointerException occurred at line 184 in the ControllerServlet. TheOutput window forms a link to the line where the exception occurred.
6. Click the link. You navigate directly to line 184 in the ControllerServlet. Hovering your mouse over the errorbadge in the editor's left margin provides a tooltip describing the exception.
Because the session had already expired before the request was received, the servlet engine was unable to associatethe request with its corresponding session. It was therefore unable to locate the cart object (line 151). The exceptionfinally occurred in line 184 when the engine attempted to call a method on a variable equating to null.
Now that we've identified the problem, let's fix it by implementing a filter.

1/5/2016 The NetBeans Ecommerce Tutorial Managing Sessions
https://netbeans.org/kb/docs/javaee/ecommerce/managesessions.html?print=yes 27/30
7. Click the New File ( ) button in the IDE's toolbar. (Alternatively, press CtrlN; N on Mac.)
8. Select the Web category, then select Filter and click Next.
9. Name the filter SessionTimeoutFilter. Type filter into the Packages field so that the filter class is placed in anew package when created.
10. Click Next. Accept default settings and click Finish. A template for the SessionTimeoutFilter is generated andopens in the editor.
Note: Currently, in NetBeans 6.9, it isn't possible to use the wizard to set a mapping to a servlet that isn'tregistered in the web deployment descriptor. (ControllerServlet was registered using the @WebServletannotation.) We'll therefore modify the generated code in the next step.
11. Modify the @WebFilter annotation signature so that it appears as follows.
@WebFilter(servletNames = "Controller")public class SessionTimeoutFilter implements Filter
This sets the filter to intercept any requests that are handled by the ControllerServlet. (Alternatively, you couldhave kept the urlPatterns attribute, and listed all patterns that the ControllerServlet handles.)
Note that 'Controller' is the name of the ControllerServlet, as specified in the servlet's @WebServletannotation signature. Also note that you've removed the filterName attribute, since the name of the filter class isused by default.
The IDE's filter template provides a lot of interesting code which is worth inspecting in its own right. However, most of itis not needed for our purposes here. Any filter class must implement the Filter interface, which defines threemethods:
init: performs any actions after the filter is initialized but before it is put into service
destroy: removes the filter from service. This method can also be used to perform any cleanup operations.
doFilter: used to perform operations for each request the filter intercepts
Use the Javadoc Index Search to pull up documentation on the Filter interface. Press ShiftF1 (fnShiftF1 onMac), then type 'Filter' into the search field and hit Enter. Select the 'Interface in javax.servlet' entry. TheJavadoc documentation displays in the lower pane of the index search tool.
12. Replace the body of the SessionTimeoutFilter with the following contents.
@WebFilter(servletNames = "Controller")
public class SessionTimeoutFilter implements Filter
public void doFilter(ServletRequest request, ServletResponse response, FilterChain chain) throws IOException, ServletException
HttpServletRequest req = (HttpServletRequest) request;
HttpSession session = req.getSession(false);
// if session doesn't exist, forward user to welcome page if (session == null) try req.getRequestDispatcher("/index.jsp").forward(request, response); catch (Exception ex) ex.printStackTrace(); return;

1/5/2016 The NetBeans Ecommerce Tutorial Managing Sessions
https://netbeans.org/kb/docs/javaee/ecommerce/managesessions.html?print=yes 28/30
chain.doFilter(request, response);
public void init(FilterConfig filterConfig) throws ServletException
public void destroy()
13. Press CtrlShiftI (ShiftI on Mac) to fix import statements. (Imports need to be added for HttpServletRequestand HttpSession.) Also, use the editor hints to add the @Override annotation to the init, destroy, anddoFilter methods.
In the coming steps, you run the debugger on the project and step through the doFilter method to see how itdetermines whether the request is bound to an existing session.
14. Open the Breakpoints window (AltShift5; CtrlShift5 on Mac) and ensure that you do not have any existingbreakpoints set. To delete a breakpoint, rightclick the breakpoint and choose Delete. (If you completed the aboveexercise, Examining ClientServer Communication with the HTTP Monitor, you may have an outstanding breakpoint setin the ControllerServlet.)
15. Run the debugger. Click the Debug Project ( ) button in the IDE's main toolbar.
16. When the welcome page displays in the browser, select a category, then add several items to your shopping cart.
17. Set a breakpoint on the line in SessionTimeoutFilter's doFilter method that tries to access the session (line32).
18. In the browser, click the 'view cart' button. Switch to the IDE and note that the debugger has suspended on thebreakpoint.
Recall that getSession() creates a new session object if the current one doesn't exist. Here, we usegetSession(false), which refrains from creating a new object if none is found. In other words, the method returnsnull if the session doesn't exist.
19. Click the Step Over ( ) button, then hover your mouse over the session variable. Provided that a minute hasn'tpassed since the previous request was sent, you'll see that the variable has been assigned to aStandardSessionFacade. This represents the session object for the request.
20. Continue stepping through the method until the request is processed. Since session doesn't equal null, you skipthe if statement and chain.doFilter then forwards the request to the ControllerServlet (line 44).
21. In the browser, make sure a full minute has passed, then update a quantity for one of the product items in your cart. Thisis the same procedure we went through earlier in the exercise when the status 500 message was returned. Now that

1/5/2016 The NetBeans Ecommerce Tutorial Managing Sessions
https://netbeans.org/kb/docs/javaee/ecommerce/managesessions.html?print=yes 29/30
Send Us Your Feedback
the filter intercepts requests heading to the ControllerServlet, let's see what happens when a session timeoutoccurs.
22. After clicking 'update', switch to the IDE and note that the debugger is again suspended on the breakpoint set in thefilter.
23. Highlight the req.getSession(false) expression, then hover your mouse over it. Here you see the expressionequates to null, as the session has already expired.
24. Continue stepping through the code. Now that the session variable equals null, the if statement on line 35 isprocessed, and the request is forwarded to /index.jsp. When the debugger finishes executing, you'll see that thebrowser displays the site's welcome page.
25. Click the Finish Session ( ) button to terminate the debug session.
26. Open the project's web.xml file and change the session timeout interval back to 10 minutes.
<sessionconfig>
<sessiontimeout>10</sessiontimeout></sessionconfig>
27. Save (CtrlS; S on Mac) the file.
Snapshot 6 provides you with the completed project version for this tutorial unit. One final topic concerning session managementshould be mentioned. You can explicitly terminate a session by calling the invalidate method on the session object. If thesession is no longer needed, it should be removed in order to conserve the memory available to your server. After you completethe next unit, Integrating Transactional Business Logic, you will see how the ControllerServlet, upon successfullyprocessing a customer order, destroys the user's cart object and terminates the session using the invalidate method.
// if order processed successfully send user to confirmation page
if (orderId != 0)
// dissociate shopping cart from session
cart = null;
// end session
session.invalidate();
...
This is demonstrated in project snapshot 8 (and later snapshots).
See Also
NetBeans ResourcesNetBeans IDE Features: Debugger
Debugging Multithreaded Applications
Video of the Multithreaded Debugging with the NetBeans IDE
Video of Using the Code Snippet Evaluator in the NetBeans Debugger

1/5/2016 The NetBeans Ecommerce Tutorial Managing Sessions
https://netbeans.org/kb/docs/javaee/ecommerce/managesessions.html?print=yes 30/30
Video Tutorials and Demos for NetBeans IDE
Keyboard Shortcuts & Code Templates Card
Getting Started with Java EE Applications
Introduction to Java EE Technology
Java EE & Java Web Learning Trail
GlassFish ResourcesGlassFish Screencasts
GlassFish v3 Documentation
Learning GlassFish for Tomcat Users
Oracle GlassFish Server 3.0.1 Administration Guide
Oracle GlassFish Server 3.0.1 Application Deployment Guide
Oracle GlassFish Server 3.0.1 Application Development Guide
Technical Articles & Miscellaneous ResourcesJava EE Code Samples & Apps
Javadoc Tool [product homepage]
How to Write Doc Comments for the Javadoc Tool
The Essentials of Filters
Core J2EE Patterns Intercepting Filter
Beginning and IntermediateLevel Servlet, JSP, and JDBC Tutorials
Advanced Servlet and JSP Tutorials
Java 5 & Java 6 Tutorials
A JSTL primer, Part 1: The expression language
A JSTL primer, Part 2: Getting down to the core