
Reconnaissance and Surveillance Leader Course Hide and Surveillance Sites.

1
The Blackboard Interface – the Course Window 1. Basic outline ................................................................................................................................................. 1 2. The Course Window in Detail ...................................................................................................................... 2 3. Contextual Menus ........................................................................................................................................ 5 4. Course Availablility ..................................................................................................................................... 10 5. User Management ..................................................................................................................................... 10 6. Tutorials ..................................................................................................................................................... 12
1. BASIC OUTLINE The Course Window consists of 3 basic parts: A. Page header B. Menu Frame with Course Menu (all users) and Control Panel (Instructors, Teaching Assistants etc.) C. Content Frame Between the Menu Frame and the Content Frame there is a small space that becomes a dark line when you point to it: the Menu Puller.
Blackboard offers users the option to hide the Course Menu so that the area of the course you are viewing takes up the entire screen. While this is a helpful feature, it may cause confusion due to the fact that if you "accidentally" hide the Course Menu, by clicking on the arrow directly to the left of the main page, you will not be able to see your Course Menu. Users also have the ability to totally collapse the Course Menu by clicking on the arrows directly to the left of the course name at the top of the Course Menu. 1.1 Hide Course Menu ① Hover and click on the edge of the Course Menu area and a dark line should appear ②The “Hide Course Menu” statement should appear ③To hide the Course Menu click the icon ()
1.2 Show Course Menu 1.Hover on the edge of the screen where the course menu used to be: a dark line should appear 2.The “Show Course Menu” statement appears 3. To show the Course Menu click the icon ()
A
B C
CalibriMen Menu Puller
2
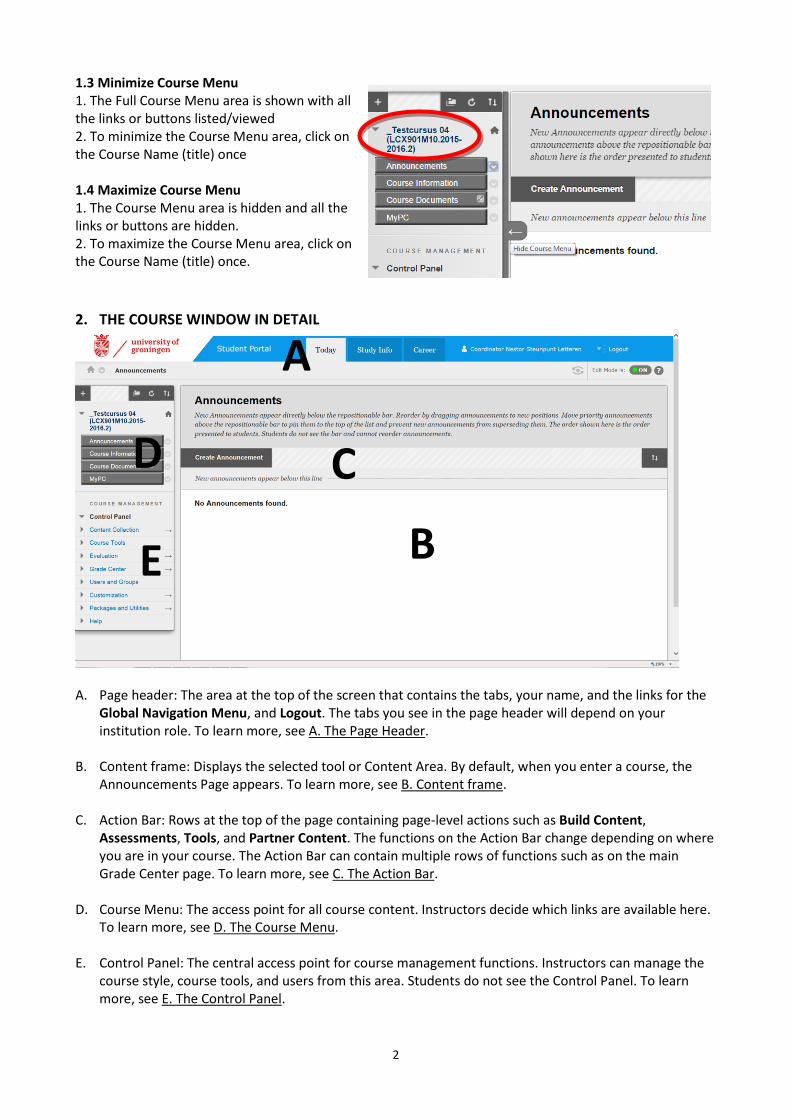
1.3 Minimize Course Menu 1. The Full Course Menu area is shown with all the links or buttons listed/viewed 2. To minimize the Course Menu area, click on the Course Name (title) once 1.4 Maximize Course Menu 1. The Course Menu area is hidden and all the links or buttons are hidden. 2. To maximize the Course Menu area, click on the Course Name (title) once.
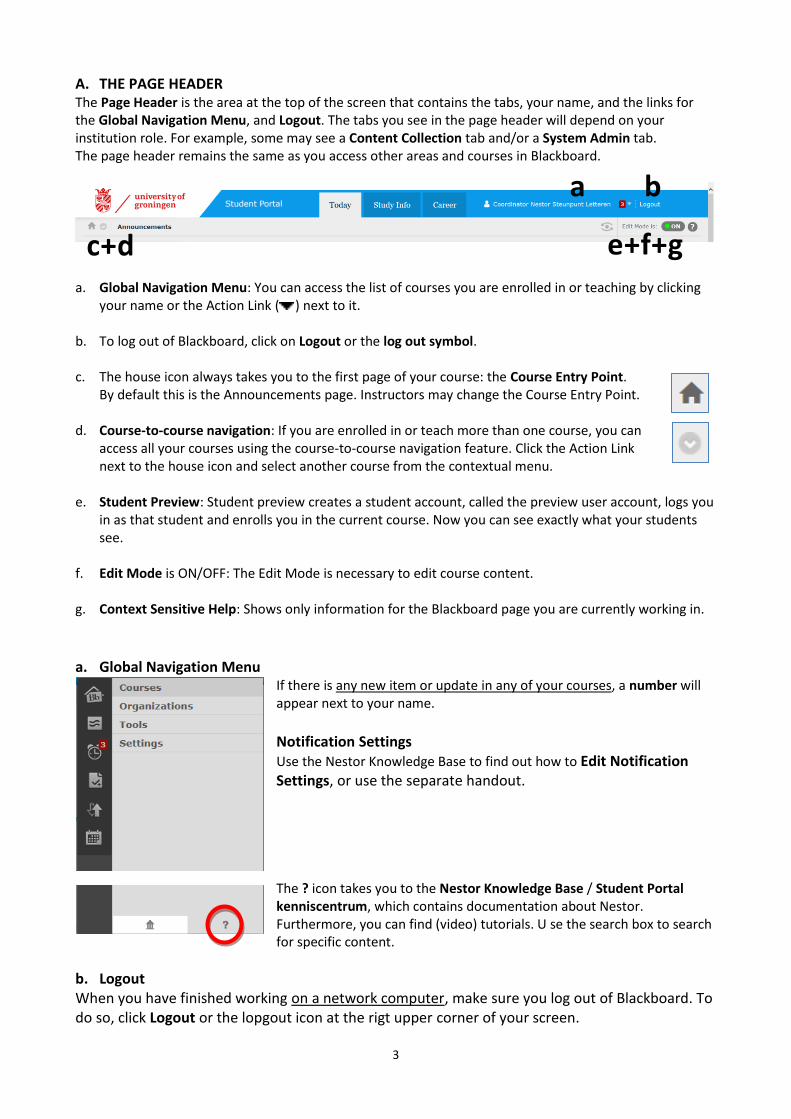
2. THE COURSE WINDOW IN DETAIL
A. Page header: The area at the top of the screen that contains the tabs, your name, and the links for the
Global Navigation Menu, and Logout. The tabs you see in the page header will depend on your institution role. To learn more, see A. The Page Header.
B. Content frame: Displays the selected tool or Content Area. By default, when you enter a course, the
Announcements Page appears. To learn more, see B. Content frame. C. Action Bar: Rows at the top of the page containing page-level actions such as Build Content,
Assessments, Tools, and Partner Content. The functions on the Action Bar change depending on where you are in your course. The Action Bar can contain multiple rows of functions such as on the main Grade Center page. To learn more, see C. The Action Bar.
D. Course Menu: The access point for all course content. Instructors decide which links are available here.
To learn more, see D. The Course Menu. E. Control Panel: The central access point for course management functions. Instructors can manage the
course style, course tools, and users from this area. Students do not see the Control Panel. To learn more, see E. The Control Panel.
A
B
C D
E
3
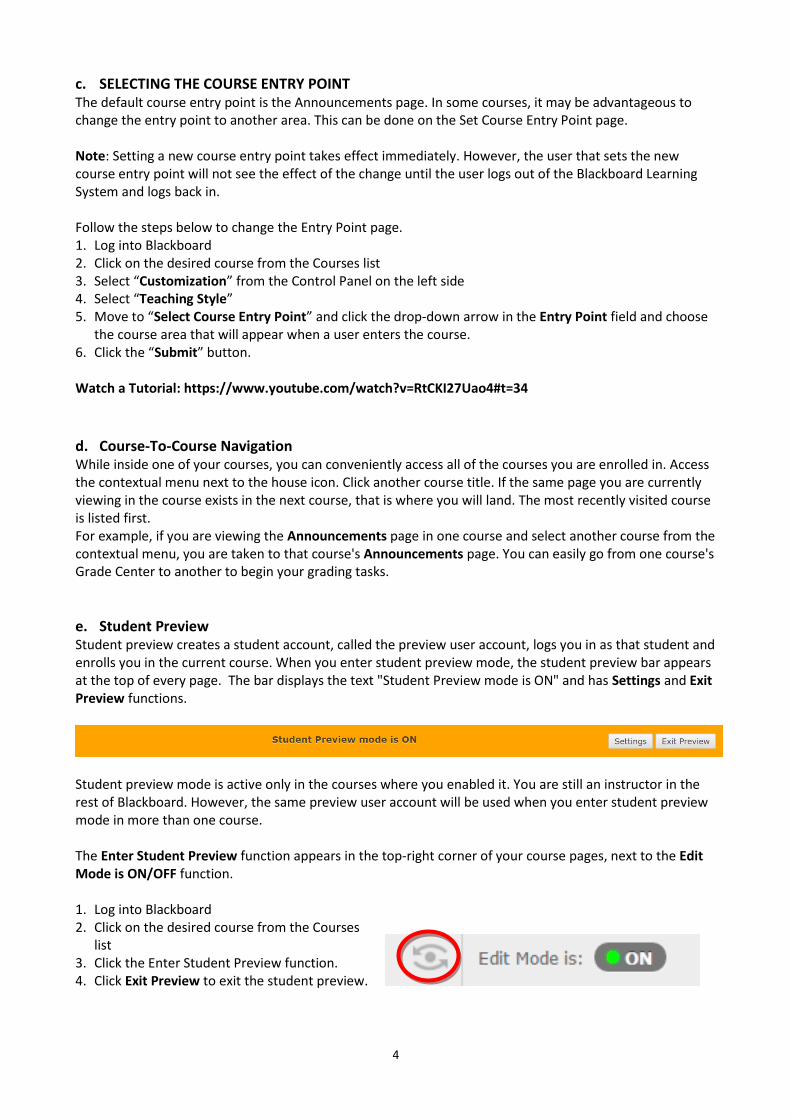
A. THE PAGE HEADER The Page Header is the area at the top of the screen that contains the tabs, your name, and the links for the Global Navigation Menu, and Logout. The tabs you see in the page header will depend on your institution role. For example, some may see a Content Collection tab and/or a System Admin tab. The page header remains the same as you access other areas and courses in Blackboard.
a. Global Navigation Menu: You can access the list of courses you are enrolled in or teaching by clicking
your name or the Action Link ( ) next to it. b. To log out of Blackboard, click on Logout or the log out symbol. c. The house icon always takes you to the first page of your course: the Course Entry Point.
By default this is the Announcements page. Instructors may change the Course Entry Point. d. Course-to-course navigation: If you are enrolled in or teach more than one course, you can
access all your courses using the course-to-course navigation feature. Click the Action Link next to the house icon and select another course from the contextual menu.
e. Student Preview: Student preview creates a student account, called the preview user account, logs you in as that student and enrolls you in the current course. Now you can see exactly what your students see.
f. Edit Mode is ON/OFF: The Edit Mode is necessary to edit course content.
g. Context Sensitive Help: Shows only information for the Blackboard page you are currently working in.
a. Global Navigation Menu
If there is any new item or update in any of your courses, a number will appear next to your name.
Notification Settings Use the Nestor Knowledge Base to find out how to Edit Notification Settings, or use the separate handout. The ? icon takes you to the Nestor Knowledge Base / Student Portal kenniscentrum, which contains documentation about Nestor. Furthermore, you can find (video) tutorials. U se the search box to search for specific content.
b. Logout When you have finished working on a network computer, make sure you log out of Blackboard. To do so, click Logout or the lopgout icon at the rigt upper corner of your screen.
a
c+d
b
e+f+g
4
c. SELECTING THE COURSE ENTRY POINT The default course entry point is the Announcements page. In some courses, it may be advantageous to change the entry point to another area. This can be done on the Set Course Entry Point page. Note: Setting a new course entry point takes effect immediately. However, the user that sets the new course entry point will not see the effect of the change until the user logs out of the Blackboard Learning System and logs back in. Follow the steps below to change the Entry Point page. 1. Log into Blackboard 2. Click on the desired course from the Courses list 3. Select “Customization” from the Control Panel on the left side 4. Select “Teaching Style” 5. Move to “Select Course Entry Point” and click the drop-down arrow in the Entry Point field and choose
the course area that will appear when a user enters the course. 6. Click the “Submit” button. Watch a Tutorial: https://www.youtube.com/watch?v=RtCKI27Uao4#t=34
d. Course-To-Course Navigation While inside one of your courses, you can conveniently access all of the courses you are enrolled in. Access the contextual menu next to the house icon. Click another course title. If the same page you are currently viewing in the course exists in the next course, that is where you will land. The most recently visited course is listed first. For example, if you are viewing the Announcements page in one course and select another course from the contextual menu, you are taken to that course's Announcements page. You can easily go from one course's Grade Center to another to begin your grading tasks.
e. Student Preview Student preview creates a student account, called the preview user account, logs you in as that student and enrolls you in the current course. When you enter student preview mode, the student preview bar appears at the top of every page. The bar displays the text "Student Preview mode is ON" and has Settings and Exit Preview functions.
Student preview mode is active only in the courses where you enabled it. You are still an instructor in the rest of Blackboard. However, the same preview user account will be used when you enter student preview mode in more than one course. The Enter Student Preview function appears in the top-right corner of your course pages, next to the Edit Mode is ON/OFF function. 1. Log into Blackboard 2. Click on the desired course from the Courses
list 3. Click the Enter Student Preview function. 4. Click Exit Preview to exit the student preview.

5
When you exit the student preview, you are prompted to keep or delete the preview user and all its associated data.
5. In the Exit Student Preview dialog, select Delete the preview user and all data (Recommended). 6. If you want, select the Do not ask me check box. The course will automatically complete your choice
each time you exit student preview. Watch a Tutorial: https://youtu.be/JCrAQewg7Is
f. Edit Mode The Edit Mode is ON/OFF function appears in the top-right corner of your course pages.
1. Log into Blackboard 2. Click on the desired course from the Courses list 3. Click the Edit Mode is ON/OFF function to toggle.
When Edit Mode is ON, you see all the course content and the editing controls for each item. Edit Mode OFF hides the editing controls but still displays any content that would normally be hidden from a student. Also, it doesn’t enable you to see student-only content, such as My Grades.
g. Context Sensitive Help The question mark icon next to the Edit Mode is: ON/OFF function provides you with direct access to the available in-context help: it shows only information for the Blackboard page you are working in. Click the icon to hide or show the context sensitive help.
3. CONTEXTUAL MENUS Throughout Blackboard, items that are acted upon by a user have a contextual menu associated with them. The contextual menu is accessed when the Action Link is clicked. Click the down arrow next to an item to access the contextual menu. The options in the contextual menu vary depending on the component. Common Contextual Menu Options The following options are common to many items in Blackboard Learn. If an option does not appear, you cannot perform it on that item.
Open
Edit
Copy
Move
Delete Other Contextual Menu Options These options will vary depending upon the type of item and a user's role. The following list is not comprehensive.
Adaptive Release options
Metadata
Statistics Tracking
User Progress
Manage
Grade
Mark as New
6
B. CONTENT FRAME Set the Default Content View The Default Content View setting determines how content items appear. 1. Log into Blackboard 2. Click on the desired course from the Courses list 3. Select “Customization” from the Control Panel on the left side 4. Select “Teaching Style” 5. Move to “Default Content View” Here you can change how Content Items will be shown.
Icon Only displays content items as titled icons with no descriptions.
Text Only displays content items as titles with short text descriptions only.
Icon and Text, the default option, displays titled icons with descriptions. Changing the default content view affects only new content areas. To change all existing pages as well, select the check box to Apply this view to all existing content.
Select a Banner You can add a banner image to appear at the top of the course entry point. The banner image is automatically centered.
Use Browse My Computer to locate an image file on your computer. A recommended size for banners is approximately 480 by 80 pixels. When choosing a banner image, keep in mind that users can resize their browser windows, expand and collapse the course menu, and use monitors of varying sizes and screen resolutions. After you upload a banner, view it under those varying conditions to be sure that it appears as intended.
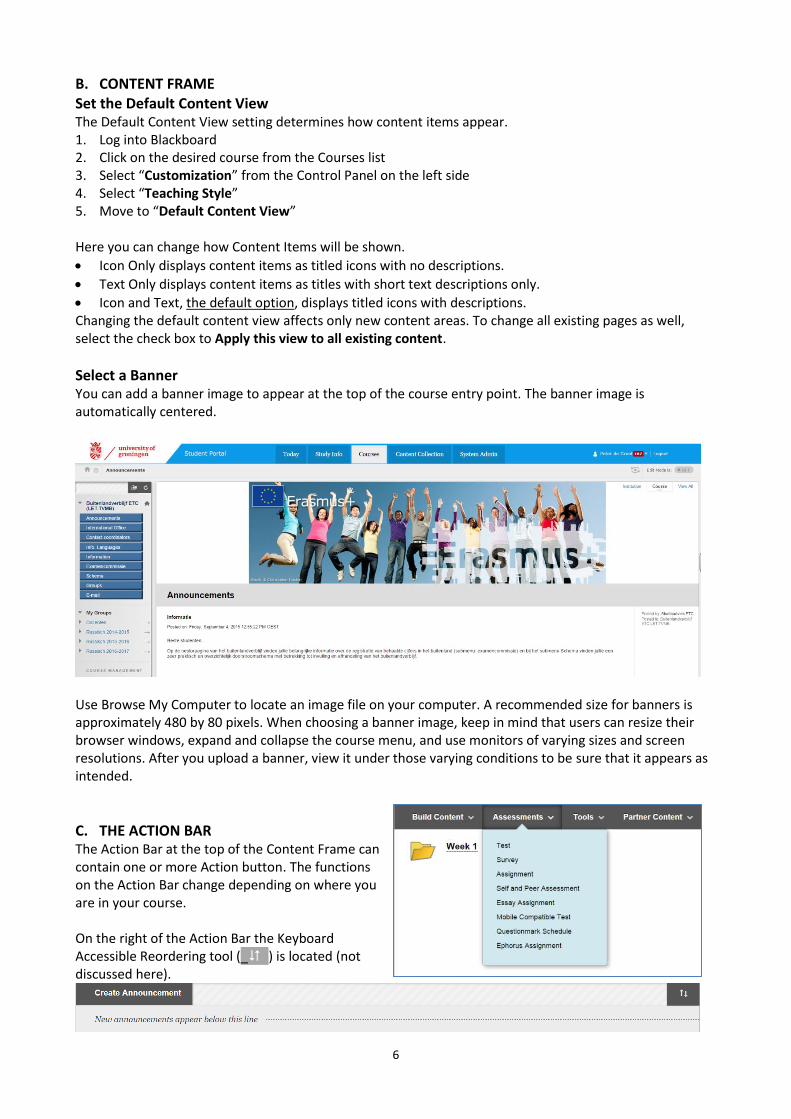
C. THE ACTION BAR The Action Bar at the top of the Content Frame can contain one or more Action button. The functions on the Action Bar change depending on where you are in your course. On the right of the Action Bar the Keyboard Accessible Reordering tool (__) is located (not discussed here).
7
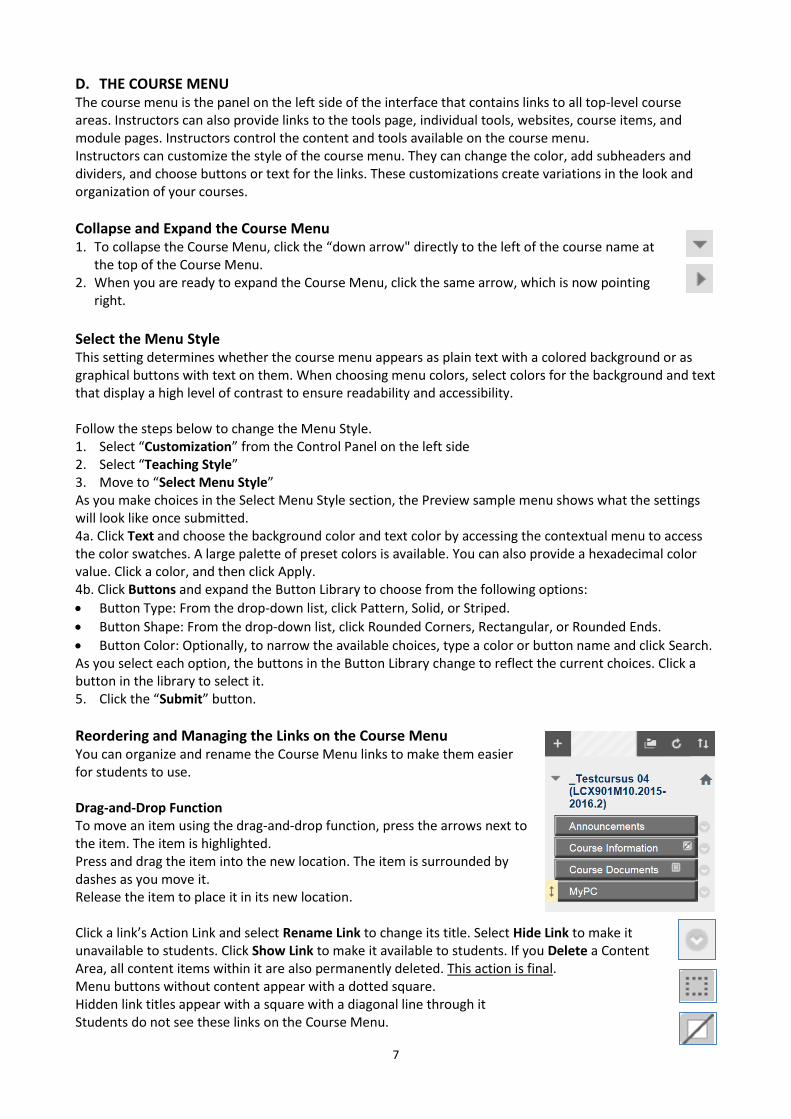
D. THE COURSE MENU The course menu is the panel on the left side of the interface that contains links to all top-level course areas. Instructors can also provide links to the tools page, individual tools, websites, course items, and module pages. Instructors control the content and tools available on the course menu. Instructors can customize the style of the course menu. They can change the color, add subheaders and dividers, and choose buttons or text for the links. These customizations create variations in the look and organization of your courses.
Collapse and Expand the Course Menu 1. To collapse the Course Menu, click the “down arrow" directly to the left of the course name at
the top of the Course Menu. 2. When you are ready to expand the Course Menu, click the same arrow, which is now pointing
right.
Select the Menu Style This setting determines whether the course menu appears as plain text with a colored background or as graphical buttons with text on them. When choosing menu colors, select colors for the background and text that display a high level of contrast to ensure readability and accessibility. Follow the steps below to change the Menu Style. 1. Select “Customization” from the Control Panel on the left side 2. Select “Teaching Style” 3. Move to “Select Menu Style” As you make choices in the Select Menu Style section, the Preview sample menu shows what the settings will look like once submitted. 4a. Click Text and choose the background color and text color by accessing the contextual menu to access the color swatches. A large palette of preset colors is available. You can also provide a hexadecimal color value. Click a color, and then click Apply. 4b. Click Buttons and expand the Button Library to choose from the following options:
Button Type: From the drop-down list, click Pattern, Solid, or Striped.
Button Shape: From the drop-down list, click Rounded Corners, Rectangular, or Rounded Ends.
Button Color: Optionally, to narrow the available choices, type a color or button name and click Search. As you select each option, the buttons in the Button Library change to reflect the current choices. Click a button in the library to select it. 5. Click the “Submit” button.
Reordering and Managing the Links on the Course Menu You can organize and rename the Course Menu links to make them easier for students to use. Drag-and-Drop Function To move an item using the drag-and-drop function, press the arrows next to the item. The item is highlighted. Press and drag the item into the new location. The item is surrounded by dashes as you move it. Release the item to place it in its new location. Click a link’s Action Link and select Rename Link to change its title. Select Hide Link to make it unavailable to students. Click Show Link to make it available to students. If you Delete a Content Area, all content items within it are also permanently deleted. This action is final. Menu buttons without content appear with a dotted square. Hidden link titles appear with a square with a diagonal line through it Students do not see these links on the Course Menu.
8
Creating new buttons/links on the Course Menu Use the following steps to create a button/link on the Course Menu. 1. Change Edit Mode to ON and point to the plus sign above the Course Menu. The Add Menu Item
drop-down list appears. 2. Select the type of content to create. 3. Type a Name for the link. Complete any other required text boxes, such as URL for Web Link. 4. Select the Available to Users check box to enable users to see the link on the Course Menu. You
can create content ahead of time, make it unavailable, and then make it available at the appropriate time.
5. Click Submit. A link to the new content appears on the Course Menu. Tip: Create an uncluttered Course Menu to maintain efficient navigation for your users, and try to limit the number of links included in the Course Menu. Use Content Areas to hold related items and give your course organization and structure. The following table lists the types of content and tools you can include on the Course Menu. You can also include subheaders and divider lines to help visually organize the links for your users.
Type Description
Content Area Content Areas are the top-level course areas. They hold all of your course materials. They are created, linked, and managed on the Course Menu. Typically, courses contain multiple Content Areas. After creating a Content Area, you add content to it, such as online lectures, multimedia, tests, and communication tools.
Module Page Create a module page and select the individual modules to include. The modules you select can be tools, such as a calculator, or the modules can display information, such as grades, alerts, and tasks.
Blank Page The Blank Page tool allows you to include files, images, and text as links on the Course Menu. Include blank pages on the Course Menu for critical information, as too many links on the Course Menu can overwhelm students. Remove blank pages from the Course Menu as soon as the information is no longer needed.
Tool Link Create a link to an available tool in the course, such as the Calendar or Journals. You can also create a link to the Tools page.
Web Link Create a link to a URL to provide quick access to a resource on the Internet.
Course Link Create a shortcut to an existing area, tool, or item in a course.
Subheader A subheader is unlinked text. You can group related links under a subheader to help users find information quickly.
Divider A divider is a line that visually divides the Course Menu to help users find information quickly. After you create it, you can move it to the appropriate position.
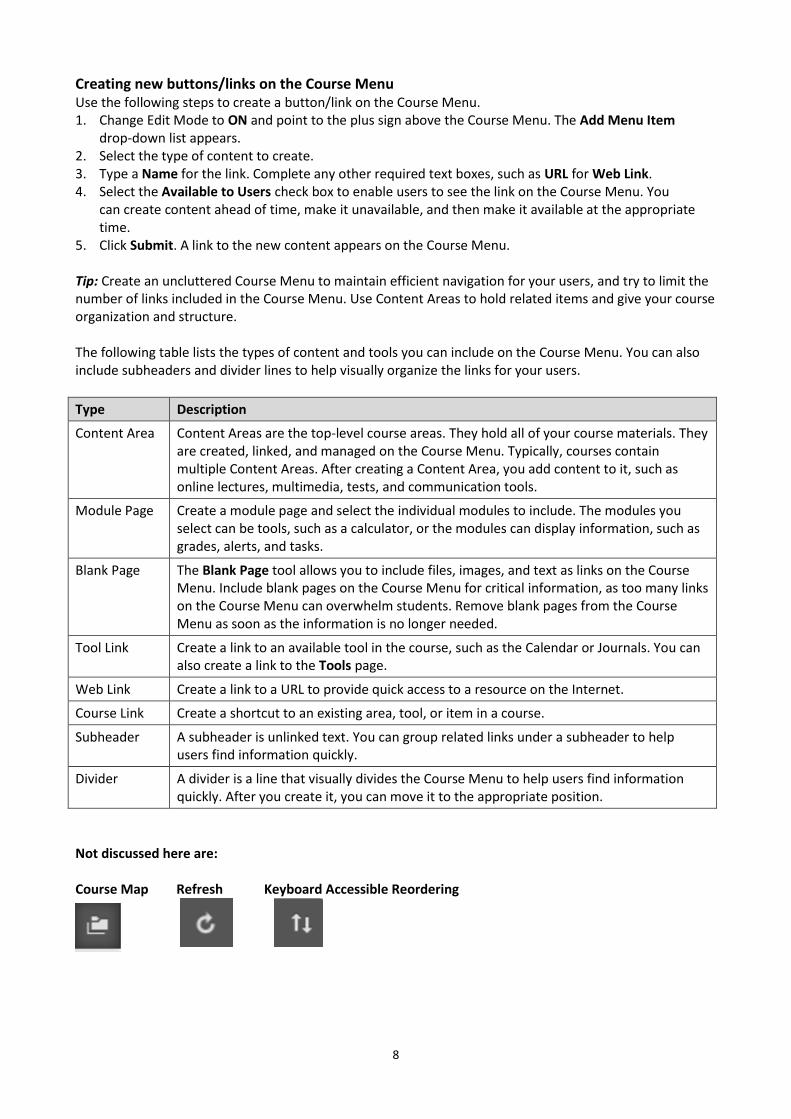
Not discussed here are: Course Map Refresh Keyboard Accessible Reordering
9
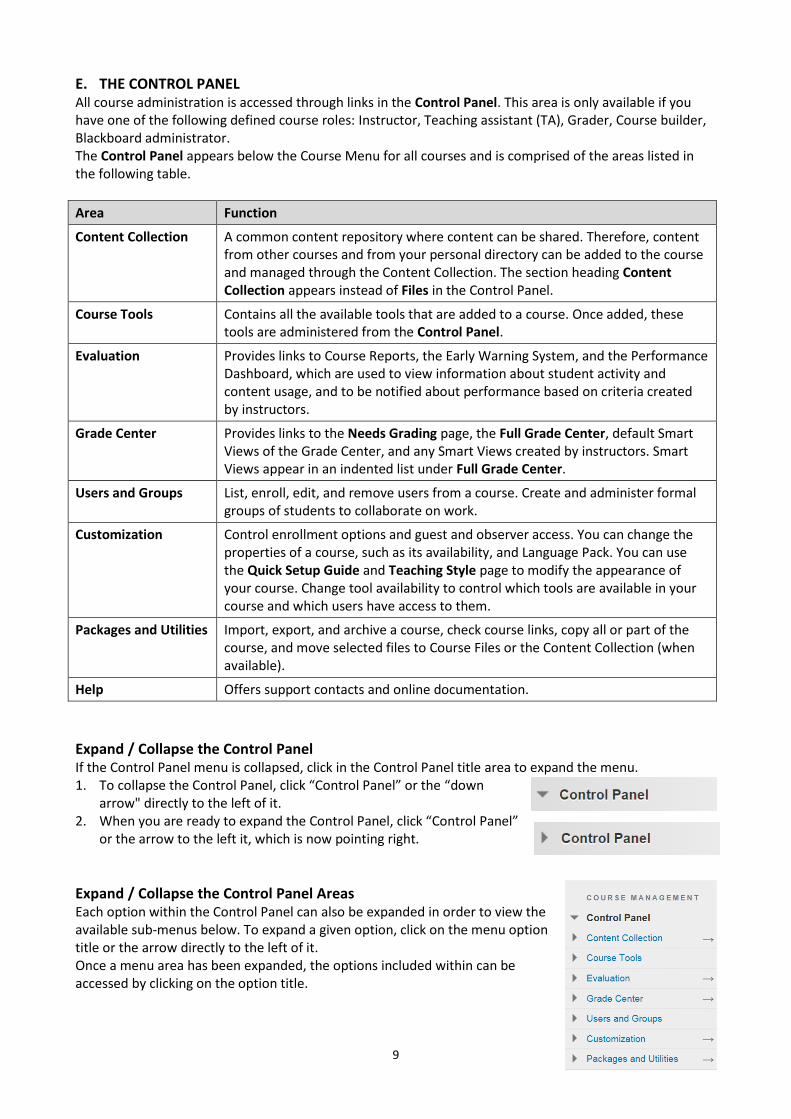
E. THE CONTROL PANEL All course administration is accessed through links in the Control Panel. This area is only available if you have one of the following defined course roles: Instructor, Teaching assistant (TA), Grader, Course builder, Blackboard administrator. The Control Panel appears below the Course Menu for all courses and is comprised of the areas listed in the following table.
Area Function
Content Collection
A common content repository where content can be shared. Therefore, content from other courses and from your personal directory can be added to the course and managed through the Content Collection. The section heading Content Collection appears instead of Files in the Control Panel.
Course Tools Contains all the available tools that are added to a course. Once added, these tools are administered from the Control Panel.
Evaluation Provides links to Course Reports, the Early Warning System, and the Performance Dashboard, which are used to view information about student activity and content usage, and to be notified about performance based on criteria created by instructors.
Grade Center Provides links to the Needs Grading page, the Full Grade Center, default Smart Views of the Grade Center, and any Smart Views created by instructors. Smart Views appear in an indented list under Full Grade Center.
Users and Groups List, enroll, edit, and remove users from a course. Create and administer formal groups of students to collaborate on work.
Customization Control enrollment options and guest and observer access. You can change the properties of a course, such as its availability, and Language Pack. You can use the Quick Setup Guide and Teaching Style page to modify the appearance of your course. Change tool availability to control which tools are available in your course and which users have access to them.
Packages and Utilities
Import, export, and archive a course, check course links, copy all or part of the course, and move selected files to Course Files or the Content Collection (when available).
Help Offers support contacts and online documentation.
Expand / Collapse the Control Panel If the Control Panel menu is collapsed, click in the Control Panel title area to expand the menu. 1. To collapse the Control Panel, click “Control Panel” or the “down
arrow" directly to the left of it. 2. When you are ready to expand the Control Panel, click “Control Panel”
or the arrow to the left it, which is now pointing right.
Expand / Collapse the Control Panel Areas Each option within the Control Panel can also be expanded in order to view the available sub-menus below. To expand a given option, click on the menu option title or the arrow directly to the left of it. Once a menu area has been expanded, the options included within can be accessed by clicking on the option title.

10
Overview Page The Content Collection (if available), Evaluation, Grade Center, Customization, and Packages and Utilities also contain an overview page. To access this overview page, click on the right arrow button () for the options. Once the arrow button is clicked, the options within that menu will appear in the main content frame.
4. COURSE AVAILABILITY How to make a course (Un)Available 1. Open your Blackboard course 2. Switch the Edit Mode to ON 3. Go to Control Panel > Customization > Properties 4. Set the Availabilty of your course in the section Set
Availability 5. Click Submit
5. USER MANAGEMENT See who are enrolled in a course you are teaching 1. Open your Blackboard course 2. Switch the Edit Mode to ON 3. Go to Course Management > Control Panel > Users and Groups > Users 4. Click Show All on the People in this Course page
At the bottom of the page you see “Displaying 1 to x of y items”. By default only 25 users are shown. To see more or all users, use the Edit Paging or Show All button next to it.
How to Enroll other users in a course you are teaching It is possible to enroll other users to a course that you are teaching. While enrolling you need to set the desired Course Role (e.g. “Instructor”, “Teaching Assistant”, “Student”). 1. Open your Blackboard course 2. Switch the Edit Mode to ON 3. Go to Course Management > Control Panel > Users and Groups > Users 4. You enter the People in this Course page 5. Click the button Enroll Users 6. Search the user

11
You can search for the user by typing in his/her Username, Email, Last Name or First Name (select from the first dropdown menu) and by specifying the search method (Starts with, Equal to, Contains – select from the second dropdown menu) 7. Click Go 8. Check the box in fron of the user 9. Select the desired Role 10. Click Enroll to Course Change will take effect immediately.
How to Change the Role of users in a course you teach 1. Open your Blackboard course 2. Switch the Edit Mode to ON 3. Go to Course Management > Control Panel > Users and Groups > Users 4. You enter the People in this Course page 5. Click the button Show All or search the user
You can search for the user by typing in his/her Username, Email, Last Name or First Name (select from the first dropdown menu) and by specifying the search method (Starts with, Equal to, Contains – select from the second dropdown menu)
6. Click Go 7. Check the checkbox of the user 8. Select the desired Role
The Role successfully updated icon will show up Change will take effect immediately. How to Remove users from a course you teach Note: You can’t Remove yourself from a course 1. Open your Blackboard course 2. Switch the Edit Mode to ON 3. Go to Course Management > Control Panel > Users and Groups > Users 4. You enter the People in this Course page 5. Click the button Show All or search the user
You can search for the user by typing in his/her Username, Email, Last Name or First Name (select from the first dropdown menu) and by specifying the search method (Starts with, Equal to, Contains – select from the second dropdown menu), then Click Go
6. Check the checkbox of the user 7. Click Remove from Course Change will take effect immediately.
12
6. BLACKBOARD TUTORIALS EN: https://en-us.help.blackboard.com/Learn/9.1_2014_04 https://en-us.help.blackboard.com/Learn/9.1_2014_04/Instructor https://en-us.help.blackboard.com/Learn/9.1_2014_04/Student NL: http://nl-nl.help.blackboard.com/Learn/9.1_2014_04 http://nl-nl.help.blackboard.com/Learn/9.1_2014_04/Instructor http://nl-nl.help.blackboard.com/Learn/9.1_2014_04/Student bijvoorbeeld: https://en-us.help.blackboard.com/Learn/9.1_2014_04/Instructor/ 050_Course_Customization/030_Course_Style_Options#course_entry_point