The 3CX IP PBX Tutorial - Packt
34
The 3CX IP PBX Tutorial Matthew M. Landis Robert A. Lloyd Chapter No. 5 "Trunks—Connecting to the Outside World"
Transcript of The 3CX IP PBX Tutorial - Packt
The 3CX IP PBX Tutorial
Matthew M. Landis Robert A. Lloyd
Chapter No. 5
"Trunks—Connecting to the
Outside World"
In this package, you will find: A Biography of the authors of the book
A preview chapter from the book, Chapter NO.4 "Call Control: Ring Groups,
Auto-attendants, and Call Queues"
A synopsis of the book’s content
Information on where to buy this book
About the Authors In 1995 Matt Landis started Landis Computer, which has been providing IT services to
small businesses for 14 years and is now a 11 person Microsoft Gold Certified Partner.
Matt has over 14 years of field experience implementing Windows Server, Microsoft &
Dynamics ERP solutions in small business environments. Landis Computer was the first
company in the USA to be designated a 3CX Premium Partner.
Matt is very active in the Windows-based IP PBX community: he is both a 3CX Valued
Professional and pbxnsip Certified, has contributed thousands of posts to the 3CX
community forum, hosts the http://windowspbx.blogspot.com blog, and writes a
monthly Windows IP PBX e-newsletter for VARS.
For More Information: www.PacktPub.com/the-3cx-ip-pbx-tutorial/book
Matt also has various general IT certifications: Microsoft Certified Systems Engineer,
Microsoft Certified Database Administrator, Microsoft Office Certified Expert, Microsoft
Certified Dynamics, and Network+ and A+.
When not working and when he can afford a chance Matt likes to travel internationally
with his wife Rosalyn and is very involved with his church.
First, I would like to thank God for the capability & opportunity to
do interesting things like write this book. And secondly, I would like
to thank my wife Rosalyn for being very supportive in spite of all the
time it took.
I would also like to say thanks to Rob for co-authoring—it was fun!
And of course, I would like to thank the whole 3CX community for
all the time they are willing to share helping others.
Robert Lloyd has been in the IT field for 20 years. He graduated college with a B.S.
degree in Computer Science, and holds many certifications including MCSE 2003:
Security, MCTS on Server 2008, Vista, and Exchange 2007, Small Business Specialist,
A+, Security+, and Cisco CCNA. He has been running his own consulting business,
TechNet Computing, for five years. Before that he worked for a large law firm as the IT
Director for almost eight years, and also developed computer based training software.
Rob also teaches Microsoft, Cisco, and CompTIA certification classes and is a Microsoft
Certified Trainer (MCT). For the past five years he has taught at Today's Tec as the
lead instructor.
Rob has been involved in VoIP for four years and has been using 3CX since version 3.
Rob has contributed to helping others install, configure, and troubleshoot their own
systems online and remotely.
I would like to thank my family and friends for their support and
inspiration in this project. I would also like to thank Matt, without
him this project would not have been done. It was fun working with
you Matt! I'd also like to thank 3CX. They have pioneered VoIP for
the Windows community.
For More Information: www.PacktPub.com/the-3cx-ip-pbx-tutorial/book

The 3CX IP PBX Tutorial 3CX was one of the first Windows-based PBX phone systems in the market. Even today,
there are only a couple out there that work well. Traditional PBX phone systems are
"black boxes" that get mounted to a wall, and you can't do anything with them. If you
want an upgrade, you call the vendor. If you want more features, you call the vendor. If
you want to make a change, you either call the vendor or you learn how to use their
command-line system from a 1000-page manual. Either way, it's expensive and time
consuming. 3CX was created to make phones easy!
3CX will run on any current (XP or higher) Windows platform. It is easy to install, has a
terrific GUI, and changes and upgrades are pretty painless. There are, of course, some
things to look out for that this book will cover but, overall, it's a great product.
What This Book Covers This book is designed to cover everything you need from start to finish and then how to
troubleshoot once you're done.
Chapter 1, Getting Started with the 3CX Phone System, covers what 3CX is, compares
Asterisk with 3CX, and also compares the different versions of 3CX. Then, we get into
the components needed and some capabilities.
Chapter 2, Downloading and Installing 3CX, will teach you what are the requirements to
get 3CX to work well, the hardware requirements, and some points about operating
systems (Windows). We will also cover downloading and installation and some of the
options available. Then, we cover one of the most important parts—how to log in to the
interface.
Chapter 3, Working with Extensions, covers the different types of phones you can
integrate with 3CX. Also, we dive into creating extensions and just about all the features
you can configure.
Chapter 4, Call Control: Ring Groups, Auto-attendants, and Call Queues, teaches you
how to configure 3CX to handle calls once you have your extensions set up. We cover
Digital Receptionists, Dial by Name directories, Call Queues, and Hunt groups.
Chapter 5, Trunks: Connecting to the Outside World, covers SIP trunks, PSTN lines, and
some features to look for while selecting and using both of them.
Chapter 6, Configuration, covers several of the many features available in 3CX, from
creating Music on Hold to prompt sets and dial plans. We also cover DIDs for those
extensions that want the call going right to their phone.
For More Information: www.PacktPub.com/the-3cx-ip-pbx-tutorial/book
Chapter 7, Enterprise Features, covers how to set up and use the enterprise features that
come with the paid license of 3CX. Features like call recording, conference calls, call
reporting, and faxing will be discussed. We will also cover the mystery behind codecs
and how/when to change them.
Chapter 8, Integrating 3CX, covers the various types of integration options available with
3CX. We will cover topics like Exchange 2007, Skype, instant messaging, dialing from
Outlook, and database integrations.
Chapter 9, Hardware, is an important chapter if you are looking to buy hardware. While
we discussed hardware phones before, this chapter breaks them down into a few brands
that we know and use. We will also cover devices to connect to your analog phone lines
and to analog phones.
Chapter 10, Maintenance and Troubleshooting, covers some troubleshooting options that
you will need at some point, once your system is up and running (or maybe not). We will
also go over disaster recovery and backing up your system. Then, we will move on to
deeper networking with firewalls, network services, logging, and finally support options
when you are really stuck.
For More Information: www.PacktPub.com/the-3cx-ip-pbx-tutorial/book
Trunks—Connecting to the Outside World
We now have a working phone system with extensions, voicemail, digital receptionists, call queues, and several other features. This is great! However, what if we want to call home or have a customer call us? For that, we need to connect 3CX outside our internal network. This connection is called a trunk. In this chapter, we will cover the following:
PSTN trunksSIP trunksIntroduction to dial plans (full coverage is in Chapter 6, Confi guration)Hardware needed for analog lines
PSTN trunks A Public Switched Telephone Network (PSTN) trunk is an old-fashioned analog Basic Rate Interface (BRI) ISDN or Primary Rate Interface (PRI) phone line. 3CX can use any of these with the correct analog to SIP gateway. Usually, these come into your home or business through a pair of copper lines. Depending on where you live, this may be the only means of connecting 3CX and communicating outside of your network.
One of the advantages of a PSTN line is reliability and great call quality. Unless the wires break, you will almost always have phone service. However, what about call quality? After all, many people would like to have a comparison between VoIP and PSTN.
•
•
•
•
For More Information: www.PacktPub.com/the-3cx-ip-pbx-tutorial/book
Trunks—Connecting to the Outside World
[ 90 ]
Analog hardware for BRI ISDN and PRIs will be discussed in greater detail in Chapter 9. For using an analog PSTN line, you will need an FXO gateway. There are many external ones available. Until Sangoma introduced a new line at the end of 2008, there had not been any gateway that worked inside a Windows PC with 3CX. There are many manufacturers of analog gateways, such as Linksys, AudioCodes, Patton Electronics, Grandstream, and Sangoma. What these FXO gateways do is convert the analog phone line into IP signaling. Then, the IP signaling gets passed over your network to the 3CX server and your phones.
My personal preference is Patton Electronics. They are probably the most expensive FXOs out there but, in this case, you get what you pay for. I have tried all of them and they all work. Some have issues with echo, which can be hard to get rid of without support or lots of trial and error, whereas some cannot support high demands (40 calls/hour) without needing to be reset every day. So, if you are just testing, get a low-end one. For a high-demand business, my preference is Patton. Not only do they make great products, but their support is top notch, too. We will confi gure a Patton SmartNode SN4114 later in this chapter.
SIP trunks What is a SIP trunk? A SIP trunk is a call that is routed by IP over the Internet through an Internet Telephony Service Provider (ITSP).
For enterprises wanting to make full use of their installed IP PBXs and communicate over IP not only within the enterprise, but also outside the enterprise, a SIP trunk provided by an ITSP that connects to the traditional PSTN network is the solution. Unlike traditional telephony, where bundles of physical wires were once delivered from the service provider to a business, a SIP trunk allows a company to replace traditional fi xed PSTN lines with PSTN connectivity via a SIP trunking service provider on the Internet.
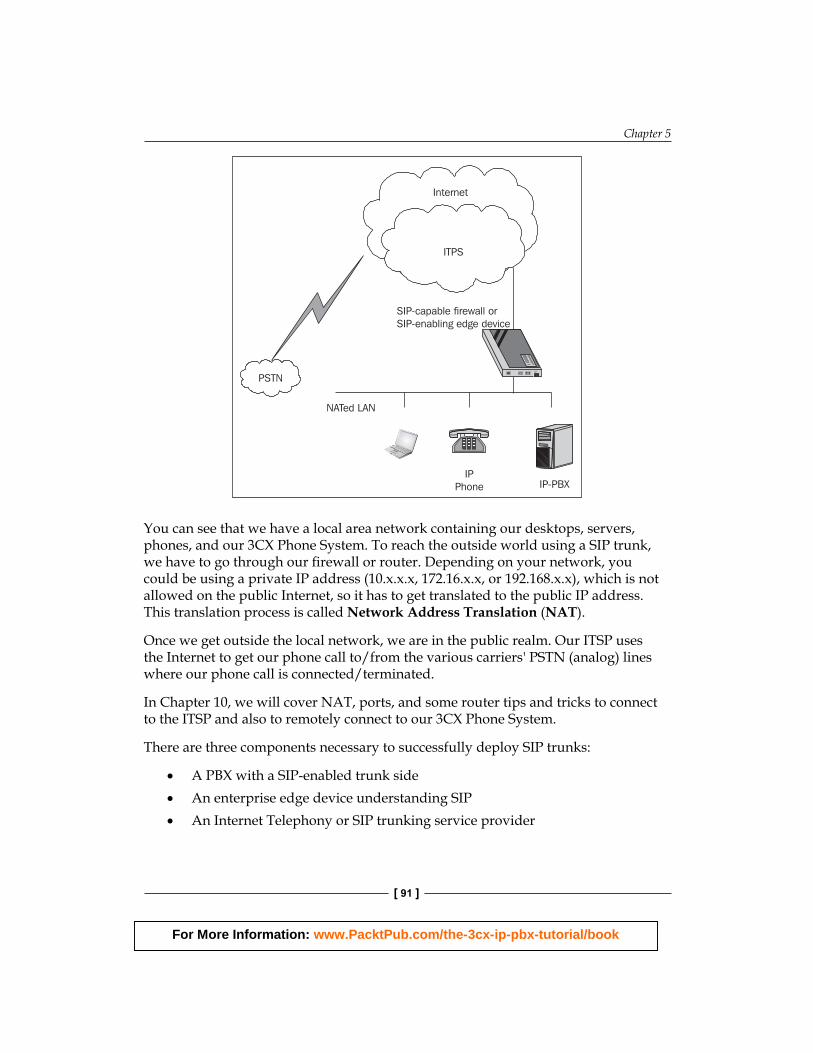
SIP trunks can offer signifi cant cost savings for enterprises, eliminating the need for local PSTN gateways, costly ISDN BRIs or PRIs. The following fi gure is an example of how our phone system operates:
For More Information: www.PacktPub.com/the-3cx-ip-pbx-tutorial/book
Chapter 5
[ 91 ]
Internet
PSTN
NATed LAN
IP
Phone
SIP-capable firewall or
SIP-enabling edge device
IP-PBX
ITPS
You can see that we have a local area network containing our desktops, servers, phones, and our 3CX Phone System. To reach the outside world using a SIP trunk, we have to go through our fi rewall or router. Depending on your network, you could be using a private IP address (10.x.x.x, 172.16.x.x, or 192.168.x.x), which is not allowed on the public Internet, so it has to get translated to the public IP address. This translation process is called Network Address Translation (NAT).
Once we get outside the local network, we are in the public realm. Our ITSP uses the Internet to get our phone call to/from the various carriers' PSTN (analog) lines where our phone call is connected/terminated.
In Chapter 10, we will cover NAT, ports, and some router tips and tricks to connect to the ITSP and also to remotely connect to our 3CX Phone System.
There are three components necessary to successfully deploy SIP trunks:
A PBX with a SIP-enabled trunk sideAn enterprise edge device understanding SIPAn Internet Telephony or SIP trunking service provider
•
•
•
For More Information: www.PacktPub.com/the-3cx-ip-pbx-tutorial/book
Trunks—Connecting to the Outside World
[ 92 ]
The PBXIn most cases, the PBX is an IP-based PBX, communicating with all end points over IP. However, it may just as well be a traditional digital or analog PBX. The sole requirement that has to be available is an interface for SIP trunking connectivity.
The enterprise border elementThe PBX on the LAN connects to the ITSP via the enterprise border element. The enterprise edge component can either be a fi rewall with complete support for SIP or an edge device connected to the fi rewall handling the traversal of the SIP traffi c.
The ITSPOn the Internet, the ITSP provides connectivity to the PSTN for communication with mobile and fi xed phones.
Choosing a VoIP carrier—more than just priceTwo of the most important features to look for when choosing a VoIP carrier are support and call quality. Usually, once you set up and everything is working, you won't need support. I always tell clients that there is no "boxed" solution that I can sell; every installation is a little different. Internet connections are all different even with the same provider. If you have a rock-solid T1 or something better, then this shouldn't be a problem. DSL seems different from building to building, even in the same area.
So how do you test support before giving them your credit card? Call them! Try calling support at the worst times, such as Monday afternoons when everyone is back to work and online. Also, try calling after business hours. See how long it takes to connect to a live person and if you can understand them once you speak to them. Find out where their support is located. Try talking to them and tell them you are thinking about signing up with their service and ask them for help. If they go out of their way before they have your money, chances are they will be good to work with later on. Some carriers only offer chat or e-mail support in favor of lower prices. While this may work fi ne for your business, it certainly won't work for the ones who need answers right away.
For More Information: www.PacktPub.com/the-3cx-ip-pbx-tutorial/book
Chapter 5
[ 93 ]
I know I seem to be stressing a lot on support, but it's for good reason. If your business depends on phone service, and your phone service goes down, then you need answers! I pay more for a product if the support is worth it. Part of this is your Return On Investment (ROI). For example, if you have three lawyers billing at $200/hour and they need phones to work, that's $600/hour of lost time. Does the extra $50 or $100 upfront cover that? Now, back to the topic at hand.
Once you have connected 3CX to the carrier, how is the call quality? If it sounds like a bad cell phone, you probably don't want it, unless the price is so cheap that you can live with the low quality. Certain carriers even change the way your call gets routed through the Internet based on the lowest cost for the particular call. They don't care about quality as long as you get that connection and they make money on it.
Concurrent calls with an ITSP are a feature that you may want to look for when choosing an ITSP. Some accounts are a one-to-one ratio of lines per call. If you want to have fi ve people on the phone at the same time (inbound or outbound), you would need to pay for fi ve lines. This is similar to a PSTN line. You may get some savings here over a PSTN, but that depends on what is available in your area.
Some ITSPs have concurrent calls where you can use more than one line per call. Not many carriers have this feature but, for a small business, this can be a great money-saving feature to look for. I use a couple of different carriers that have this feature.
One carrier that I use lets you have three concurrent calls simultaneously on the same line. If you need more than three calls, you're a higher-use customer, and they want you to buy several lines.
VoIP IP signaling uses special algorithms to compress your voice into IP packets. This compression uses a codec. There are several available, but the most common one is G.711U-law or A-law. T his uses about 80Kpbs of upload and download bandwidth. Another popular codec is G.729, which uses about 36Kpbs. So, for the same bandwidth, you can have twice the number of calls using G.729 than G.711. You will need to check with your ITSP and see what codec they support.
Another carrier I use is based purely on how much Internet bandwidth one has. If you have 1MBps of upload speed (usually the slowest part of your Internet connection), you can support about 10 simultaneous or concurrent calls using G.711. You then pay for the minutes you use. This works very well for a small offi ce as your monthly bill is very low, and you don't have to maintain a bunch of lines that don't get used.
For More Information: www.PacktPub.com/the-3cx-ip-pbx-tutorial/book
Trunks—Connecting to the Outside World
[ 94 ]
Cable Internet providers are also offering VoIP services to your home or business. These are usually single-use lines, but they terminate at your offi ce with an FXS plug. To integrate this with 3CX, you will need an FXO just like it's a PSTN line. It's the same setup, but you get the advantage of a VoIP line.
A nother great benefi t of a SIP trunk is expandability. You can easily start out with one line that can usually be completed in one day. As you grow, you can add more, usually in minutes as you already have the plan set up. Time to consolidate lines? You can even drop them later on without having contracts (most of the time). Try doing that with the local phone company! Call for a new business and it can take 1-2 weeks to get set up, plus contracts to worry about. No wonder they are jumping on the VoIP bandwagon.
Disaster recoveryWhat do you do when your Internet goes down? Some of you might be saying, "Ha! It never goes down." In my experience, it will eventually, and at the worst time. So, what do you do? Go home for the day or plan for a backup? Most VoIP carriers provide some kind of disaster recovery option. They try to send you a call and, when they don't get a connection to your 3CX box, they re-route the call to another phone number. This could be a PSTN line or even a cell phone. It can be a free feature or there can be a small monthly fee on the account. It's worth having, especially if you rely on phones.
O kay, so that covers inbound disaster recovery. What about outbound? Yes, just about everyone has a cell phone these days. If that isn't enough, I'd suggest you invest in a pay-per-use PSTN line. This keeps the monthly cost very low, but it's there when you need it. Whether it's an emergency pizza order for that Friday afternoon party or a true emergency, when someone panics and dials 911, you want that call to go out.
Speaking of emergency numbers, make sure you have your carrier register that phone number to your local address. Let's say you are in New York and you have a Californian phone number to give you some local presence in that part of the country. Your co-worker grabs his chest and falls down and someone dials 911 from the closest phone he/she sees. Emergency services sees your Californian number and contacts California for help for your New York offi ce. That's not what you want when your co-worker is clutching his/her chest, even though it was just heartburn from that pepperoni pizza.
For More Information: www.PacktPub.com/the-3cx-ip-pbx-tutorial/book
Chapter 5
[ 95 ]
Mixing VoIP and PSTNS ome of my clients even mix VoIP and PSTN together. Why would you mix? Local calls and inbound calls use the PSTN lines for the best call quality (and do not use any VoIP minutes if they have to pay for those). Long distance calls use the cheaper rate VoIP line. Another scenario is using PSTN lines for all your incoming and outgoing calls and using VoIP to talk to your other offi ces. Your own offi ce can deal with a lower call quality, and management will appreciate the lower cost.
These types of setups can be controlled using a dial plan discussed in Chapter 6, Confi guration.
Connecting 3CX to your trunkLet's cover the setup for connecting 3CX to a PSTN line using an analog gateway (Patton SN4114) and then connecting 3CX to a SIP/ITSP line.
The fi rst thing you need to know is that every line or port in 3CX is assigned its very own number, just like the Ring Groups, Digital Receptionists, and Call Queues have their own account number assigned. This makes it easier to route calls using a number.
Let's get started with creating an analog trunk:
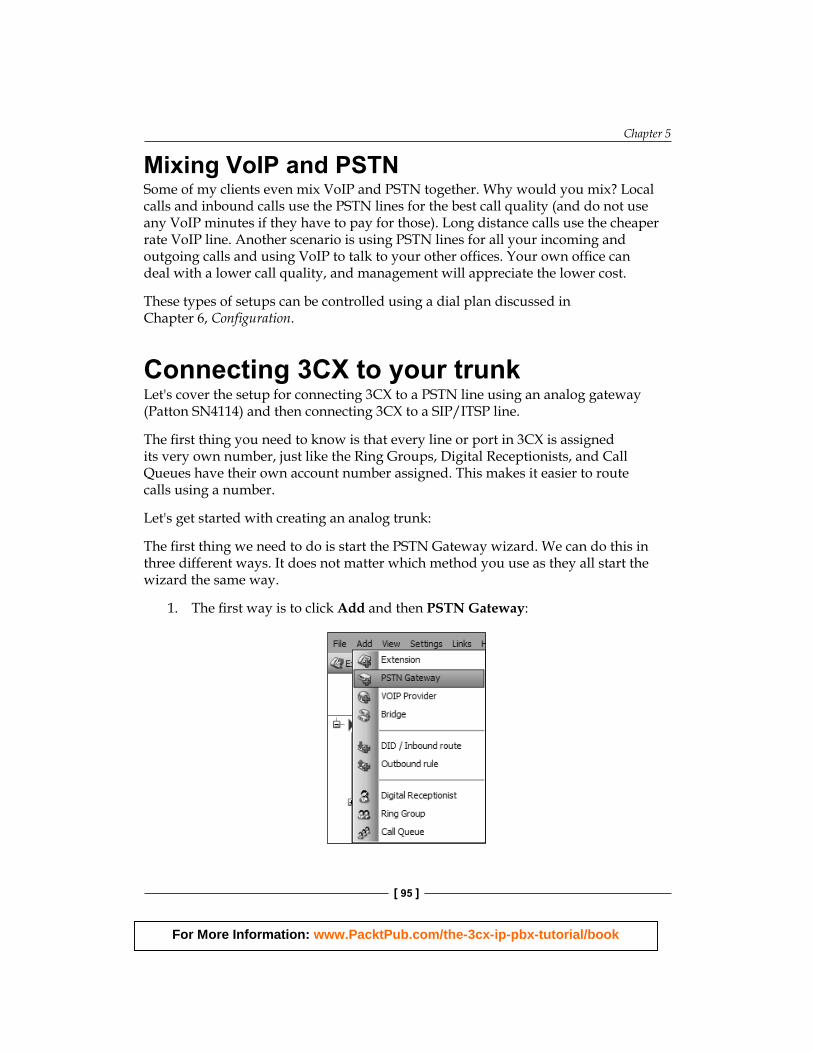
T he fi rst thing we need to do is start the PSTN Gateway wizard. We can do this in three different ways. It does not matter which method you use as they all start the wizard the same way.
1. The fi rst way is to click Add and then PSTN Gateway:
For More Information: www.PacktPub.com/the-3cx-ip-pbx-tutorial/book
Trunks—Connecting to the Outside World
[ 96 ]
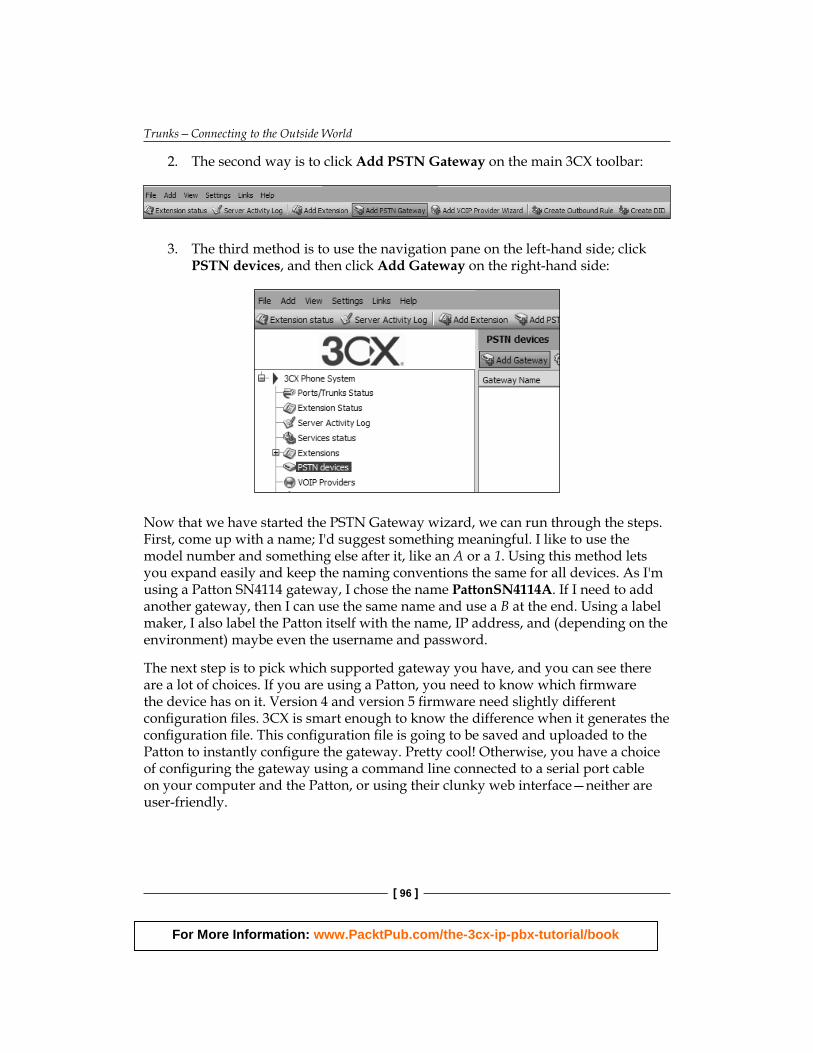
2. The second way is to click Add PSTN Gateway on the main 3CX toolbar:
3. The third method is to use the navigation pane on the left-hand side; click PSTN devices, and then click Add Gateway on the right-hand side:
Now that we have started the PSTN Gateway wizard, we can run through the steps. First, come up with a name; I'd suggest something meaningful. I like to use the model number and something else after it, like an A or a 1. Using this method lets you expand easily and keep the naming conventions the same for all devices. As I'm using a Patton SN4114 gateway, I chose the name PattonSN4114A. If I need to add another gateway, then I can use the same name and use a B at the end. Using a label maker, I also label the Patton itself with the name, IP address, and (depending on the environment) maybe even the username and password.
The next step is to pick which supported gateway you have, and you can see there are a lot of choices. If you are using a Patton, you need to know which fi rmware the device has on it. Version 4 and version 5 fi rmware need slightly different confi guration fi les. 3CX is smart enough to know the difference when it generates the confi guration fi le. This confi guration fi le is going to be saved and uploaded to the Patton to instantly confi gure the gateway. Pretty cool! Otherwise, you have a choice of confi guring the gateway using a command line connected to a serial port cable on your computer and the Patton, or using their clunky web interface—neither are user-friendly.
For More Information: www.PacktPub.com/the-3cx-ip-pbx-tutorial/book
Chapter 5
[ 97 ]
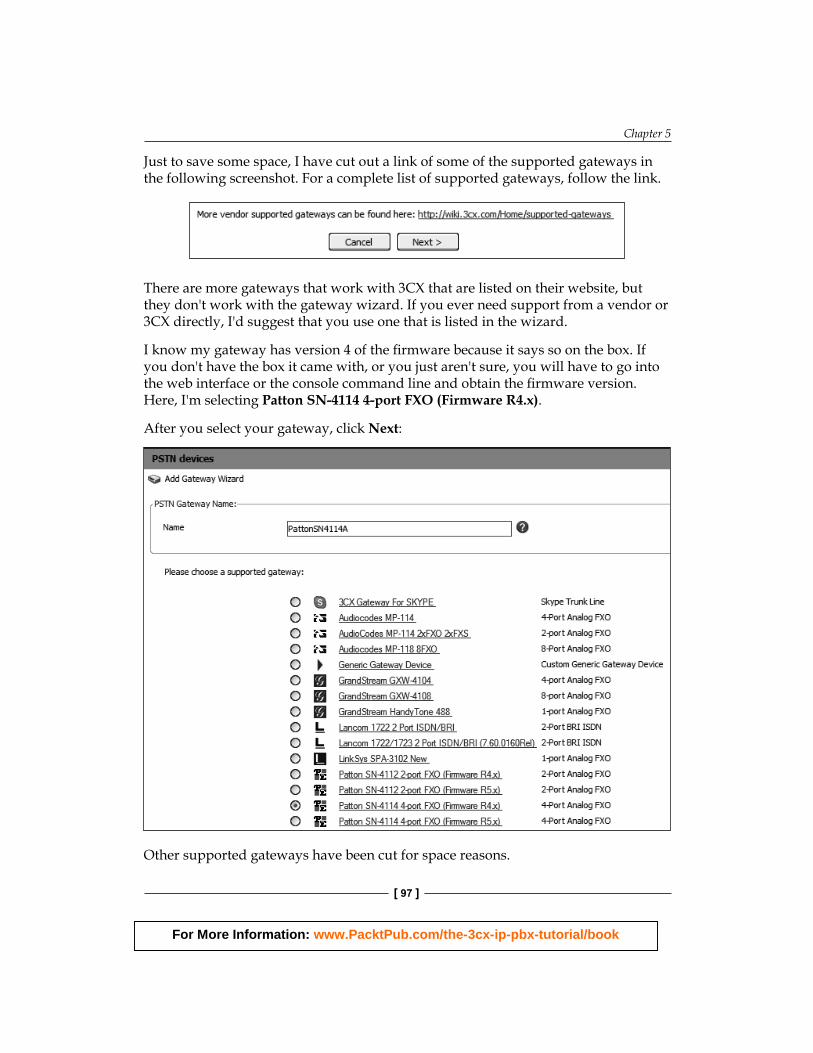
Just to save some space, I have cut out a link of some of the supported gateways in the following screenshot. For a complete list of supported gateways, follow the link.
There are more gateways that work with 3CX that are listed on their website, but they don't work with the gateway wizard. If you ever need support from a vendor or 3CX directly, I'd suggest that you use one that is listed in the wizard.
I know my gateway has version 4 of the fi rmware because it says so on the box. If you don't have the box it came with, or you just aren't sure, you will have to go into the web interface or the console command line and obtain the fi rmware version. Here, I'm selecting Patton SN-4114 4-port FXO (Firmware R4.x).
After you select your gateway, click Next:
Other supported gateways have been cut for space reasons.
For More Information: www.PacktPub.com/the-3cx-ip-pbx-tutorial/book
Trunks—Connecting to the Outside World
[ 98 ]
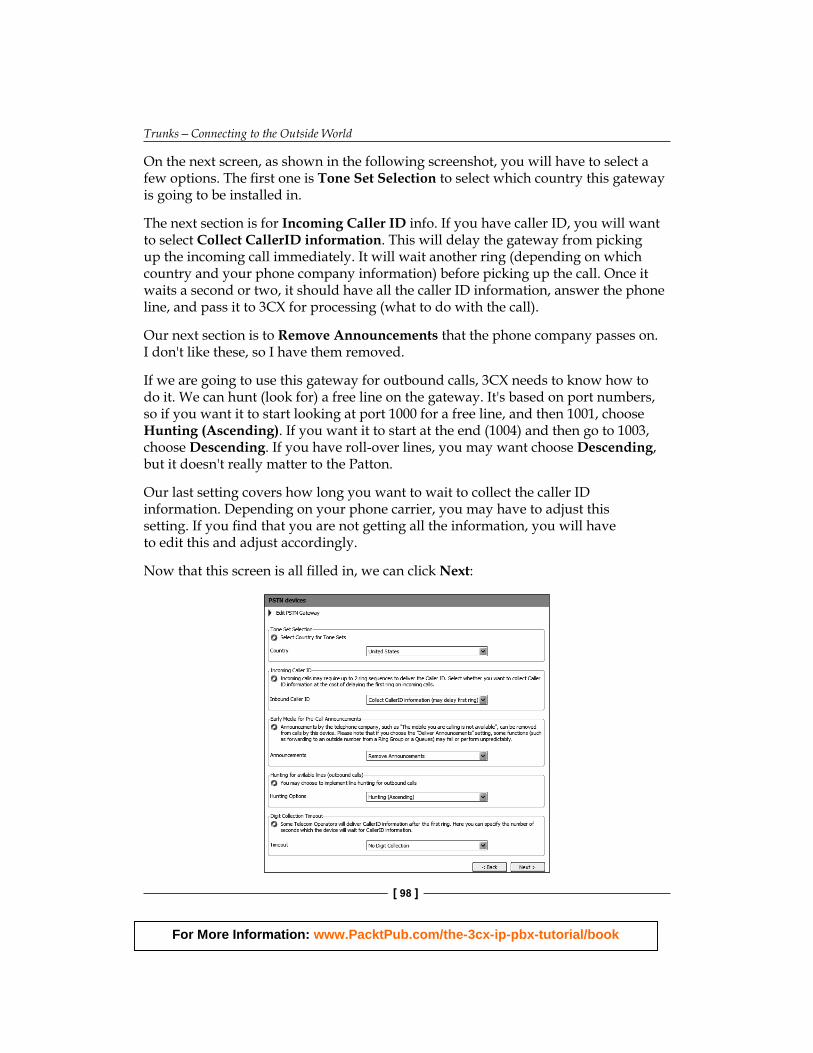
On the next screen, as shown in the following screenshot, you will have to select a few options. The fi rst one is Tone Set Selection to select which country this gateway is going to be installed in.
The next section is for Incoming Caller ID info. If you have caller ID, you will want to select Collect CallerID information. This will delay the gateway from picking up the incoming call immediately. It will wait another ring (depending on which country and your phone company information) before picking up the call. Once it waits a second or two, it should have all the caller ID information, answer the phone line, and pass it to 3CX for processing (what to do with the call).
Our ne xt section is to Remove Announcements that the phone company passes on. I don't like these, so I have them removed.
If we are going to use this gateway for outbound calls, 3CX needs to know how to do it. We can hunt (look for) a free line on the gateway. It's based on port numbers, so if you want it to start looking at port 1000 for a free line, and then 1001, choose Hunting (Ascending). If you want it to start at the end (1004) and then go to 1003, choose Descending. If you have roll-over lines, you may want choose Descending, but it doesn't really matter to the Patton.
Our last setting covers how long you want to wait to collect the caller ID information. Depending on your phone carrier, you may have to adjust this setting. If you fi nd that you are not getting all the information, you will have to edit this and adjust accordingly.
Now that this screen is all fi lled in, we can click Next:
For More Information: www.PacktPub.com/the-3cx-ip-pbx-tutorial/book
Chapter 5
[ 99 ]
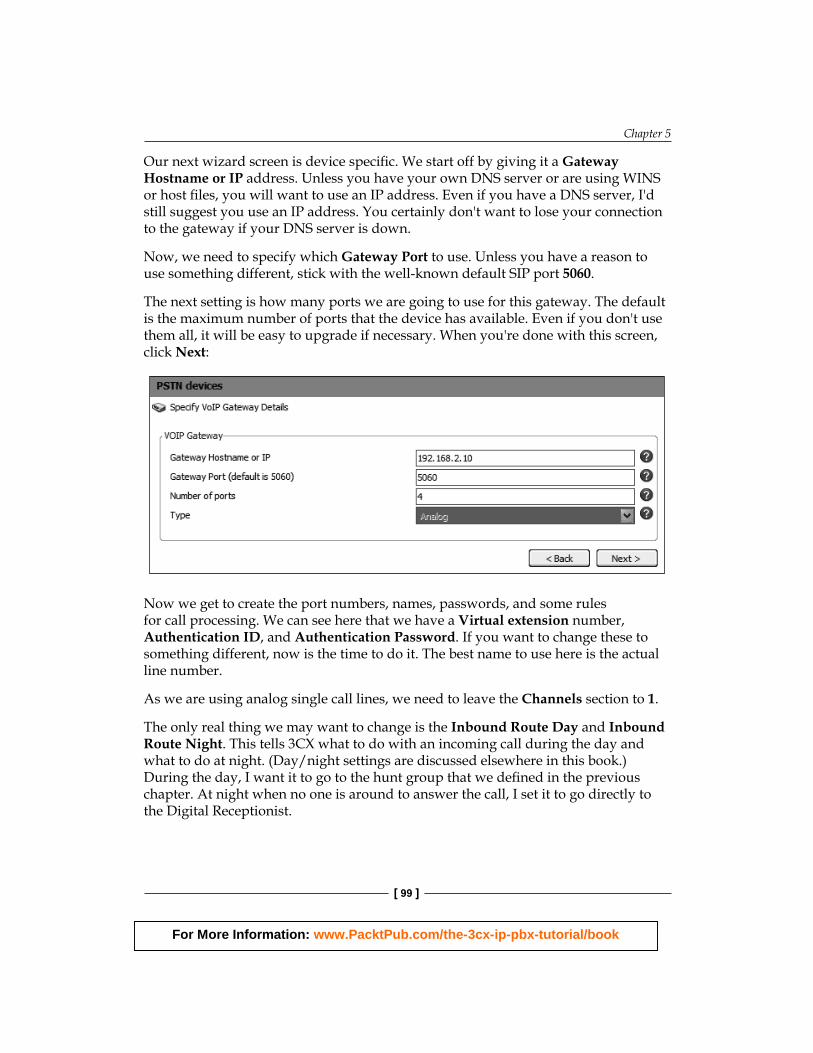
Our nex t wizard screen is device specifi c. We start off by giving it a Gateway Hostname or IP address. Unless you have your own DNS server or are using WINS or host fi les, you will want to use an IP address. Even if you have a DNS server, I'd still suggest you use an IP address. You certainly don't want to lose your connection to the gateway if your DNS server is down.
Now, we need to specify which Gateway Port to use. Unless you have a reason to use something different, stick with the well-known default SIP port 5060.
The next setting is how many ports we are going to use for this gateway. The default is the maximum number of ports that the device has available. Even if you don't use them all, it will be easy to upgrade if necessary. When you're done with this screen, click Next:
Now we g et to create the port numbers, names, passwords, and some rules for call processing. We can see here that we have a Virtual extension number, Authentication ID, and Authentication Password. If you want to change these to something different, now is the time to do it. The best name to use here is the actual line number.
As we are using analog single call lines, we need to leave the Channels section to 1.
The only real thing we may want to change is the Inbound Route Day and Inbound Route Night. This tells 3CX what to do with an incoming call during the day and what to do at night. (Day/night settings are discussed elsewhere in this book.) During the day, I want it to go to the hunt group that we defi ned in the previous chapter. At night when no one is around to answer the call, I set it to go directly to the Digital Receptionist.
For More Information: www.PacktPub.com/the-3cx-ip-pbx-tutorial/book
Trunks—Connecting to the Outside World
[ 100 ]
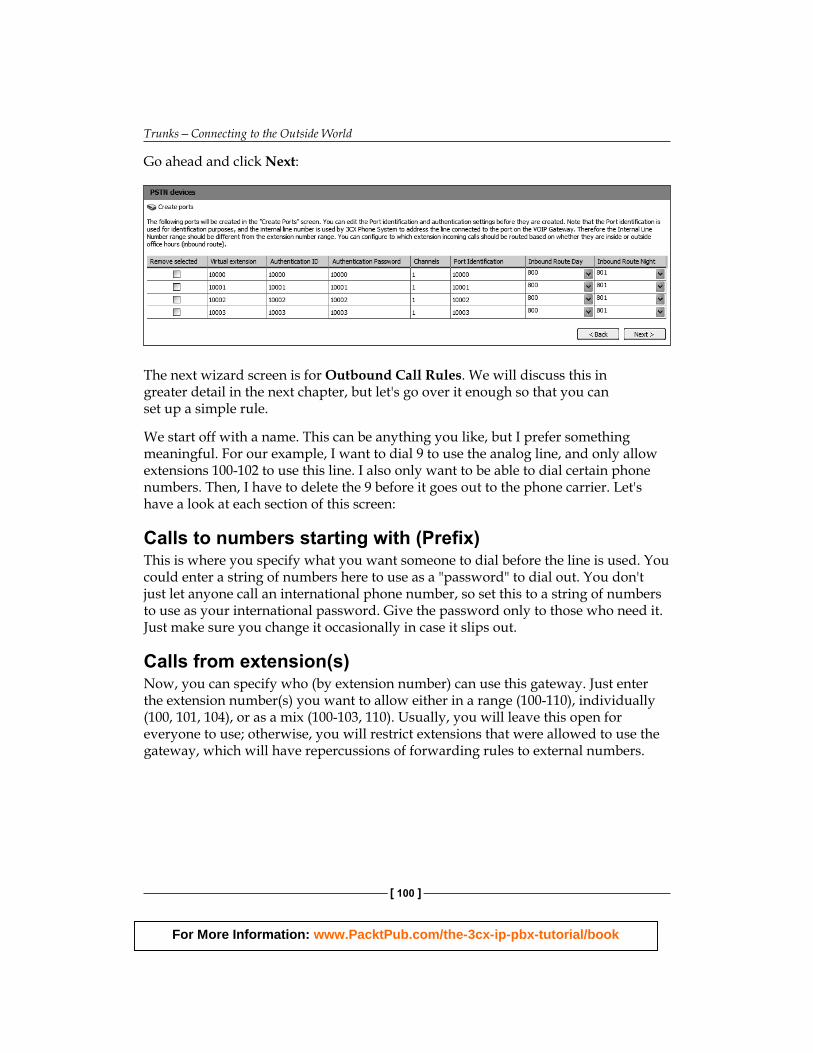
Go ahead and click Next:
T he next wizard screen is for Outbound Call Rules. We will discuss this in greater detail in the next chapter, but let's go over it enough so that you can set up a simple rule.
We start off with a name. This can be anything you like, but I prefer something meaningful. For our example, I want to dial 9 to use the analog line, and only allow extensions 100-102 to use this line. I also only want to be able to dial certain phone numbers. Then, I have to delete the 9 before it goes out to the phone carrier. Let's have a look at each section of this screen:
Calls to numbers starting with (Prefix)This is where you specify what you want someone to dial before the line is used. You could enter a string of numbers here to use as a "password" to dial out. You don't just let anyone call an international phone number, so set this to a string of numbers to use as your international password. Give the password only to those who need it. Just make sure you change it occasionally in case it slips out.
Calls from extension(s)N ow, you can specify who (by extension number) can use this gateway. Just enter the extension number(s) you want to allow either in a range (100-110), individually (100, 101, 104), or as a mix (100-103, 110). Usually, you will leave this open for everyone to use; otherwise, you will restrict extensions that were allowed to use the gateway, which will have repercussions of forwarding rules to external numbers.
For More Information: www.PacktPub.com/the-3cx-ip-pbx-tutorial/book
Chapter 5
[ 101 ]
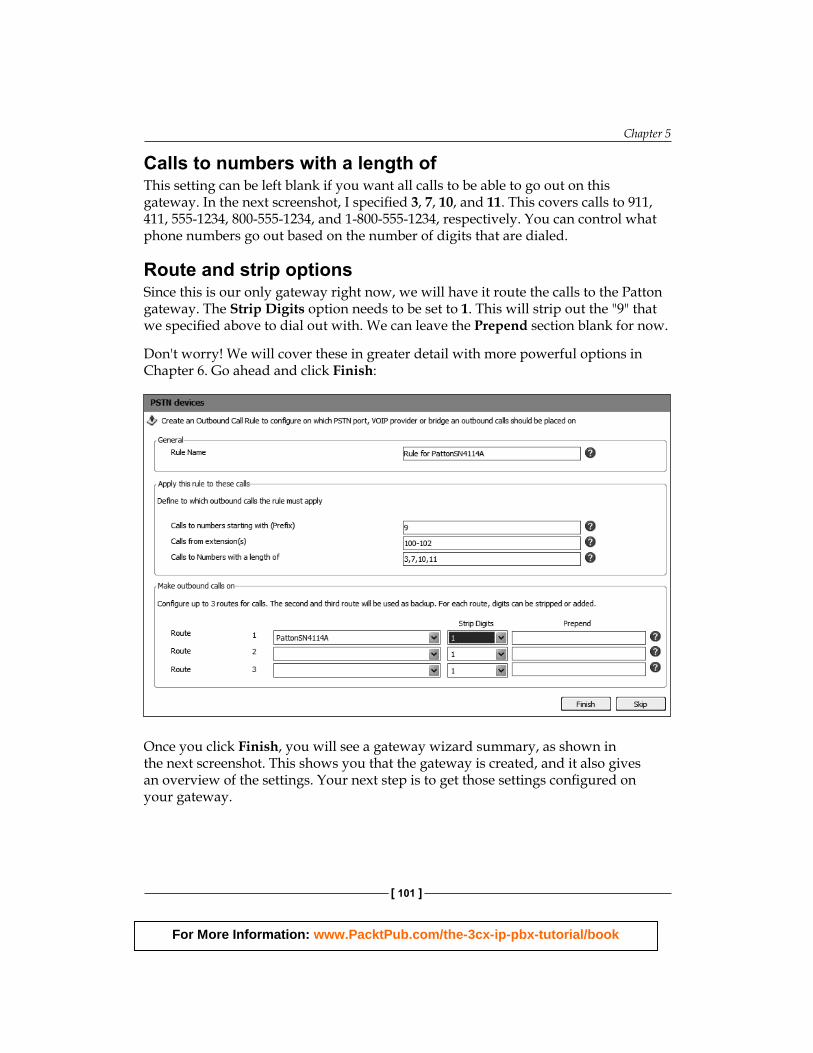
Calls to numbers with a length ofThis setting can be left blank if you want all calls to be able to go out on this gateway. In the next screenshot, I specifi ed 3, 7, 10, and 11. This covers calls to 911, 411, 555-1234, 800-555-1234, and 1-800-555-1234, respectively. You can control what phone numbers go out based on the number of digits that are dialed.
Route and strip optionsSince this is our only gateway right now, we will have it route the calls to the Patton gateway. The Strip Digits option needs to be set to 1. This will strip out the "9" that we specifi ed above to dial out with. We can leave the Prepend section blank for now.
Don't worry! We will cover these in greater detail with more powerful options in Chapter 6. Go ahead and click Finish:
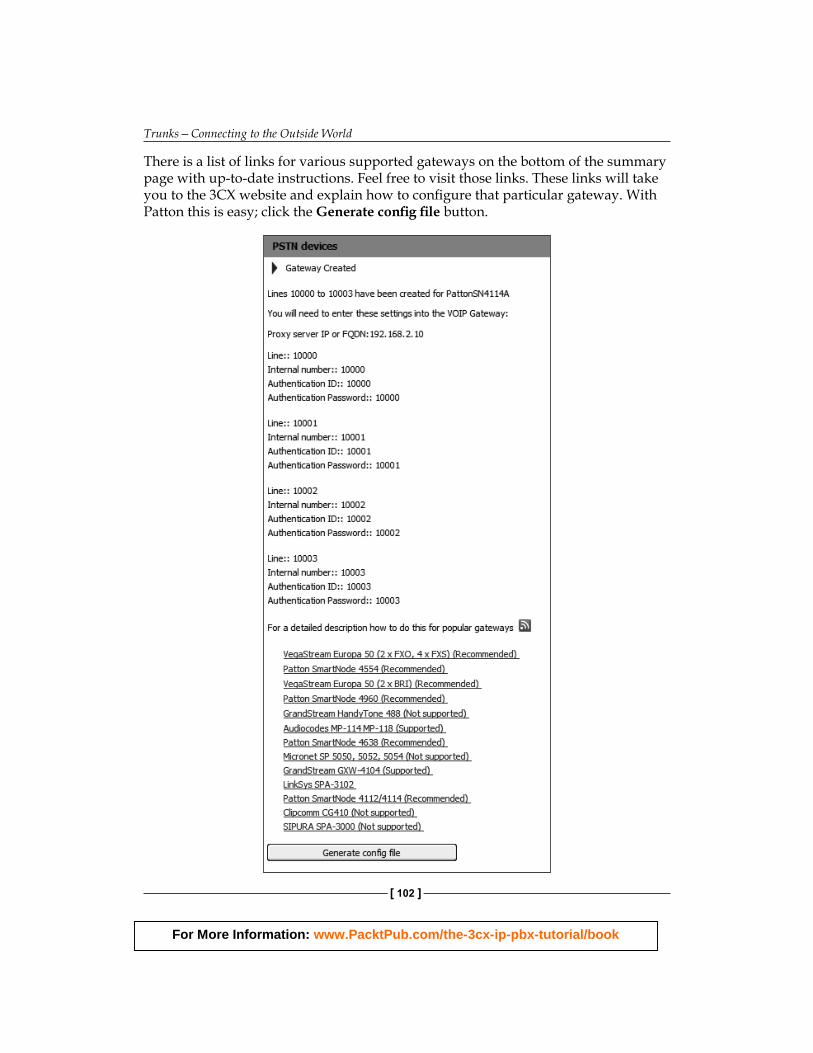
Once you click Finish, you will see a gateway wizard summary, as shown in the next screenshot. This shows you that the gateway is created, and it also gives an overview of the settings. Your next step is to get those settings confi gured on your gateway.
For More Information: www.PacktPub.com/the-3cx-ip-pbx-tutorial/book
Trunks—Connecting to the Outside World
[ 102 ]
There is a list of links for various supported gateways on the bottom of the summary page with up-to-date instructions. Feel free to visit those links. These links will take you to the 3CX website and explain how to confi gure that particular gateway. With Patton this is easy; click the Generate confi g fi le button.
For More Information: www.PacktPub.com/the-3cx-ip-pbx-tutorial/book
Chapter 5
[ 103 ]
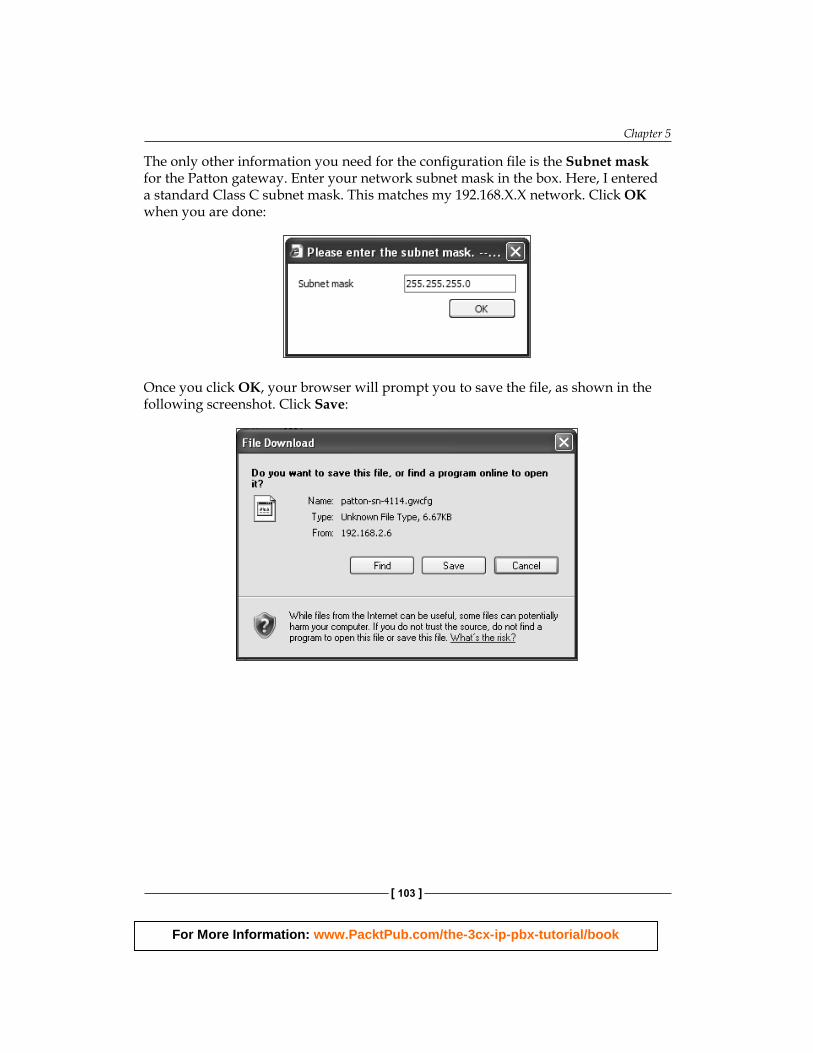
The only other information you need for the confi guration fi le is the Subnet mask for the Patton gateway. Enter your network subnet mask in the box. Here, I entered a standard Class C subnet mask. This matches my 192.168.X.X network. Click OK when you are done:
Once you click OK, your browser will prompt you to save the fi le, as shown in the following screenshot. Click Save:
For More Information: www.PacktPub.com/the-3cx-ip-pbx-tutorial/book
Trunks—Connecting to the Outside World
[ 104 ]
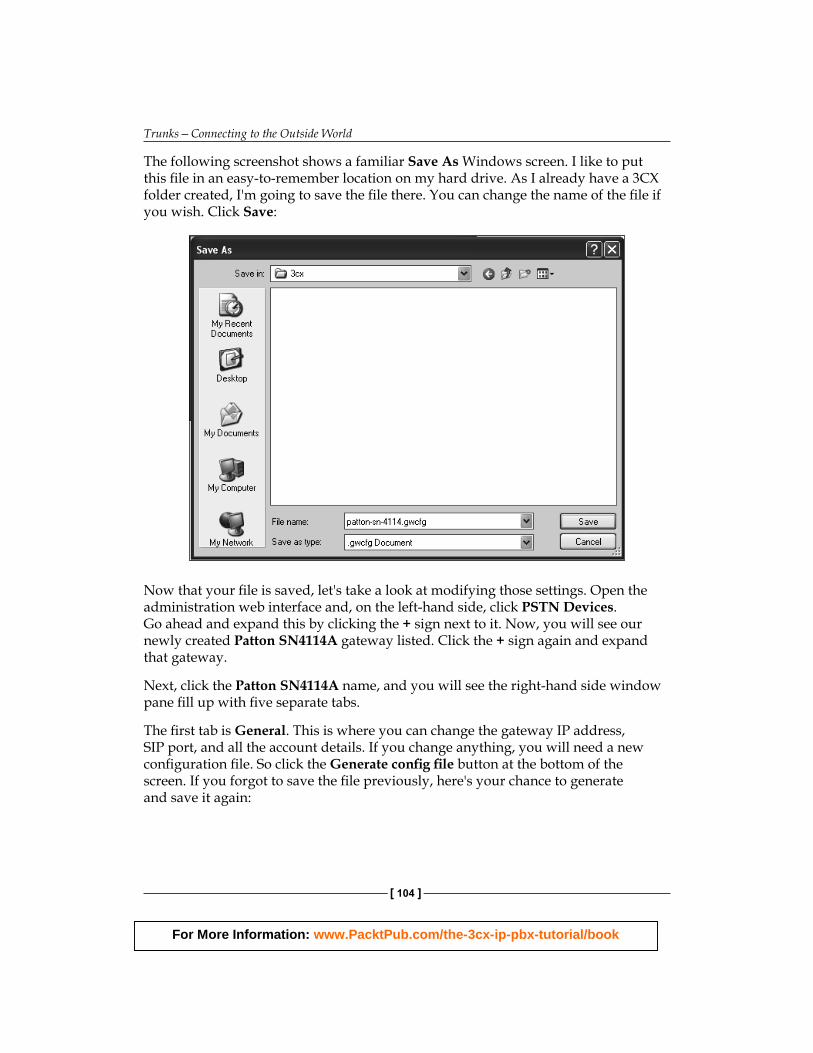
The following screenshot shows a familiar Save As Windows screen. I like to put this fi le in an easy-to-remember location on my hard drive. As I already have a 3CX folder created, I'm going to save the fi le there. You can change the name of the fi le if you wish. Click Save:
Now that your fi le is saved, let's take a look at modifying those settings. Open the administration web interface and, on the left-hand side, click PSTN Devices. Go ahead and expand this by clicking the + sign next to it. Now, you will see our newly created Patton SN4114A gateway listed. Click the + sign again and expand that gateway.
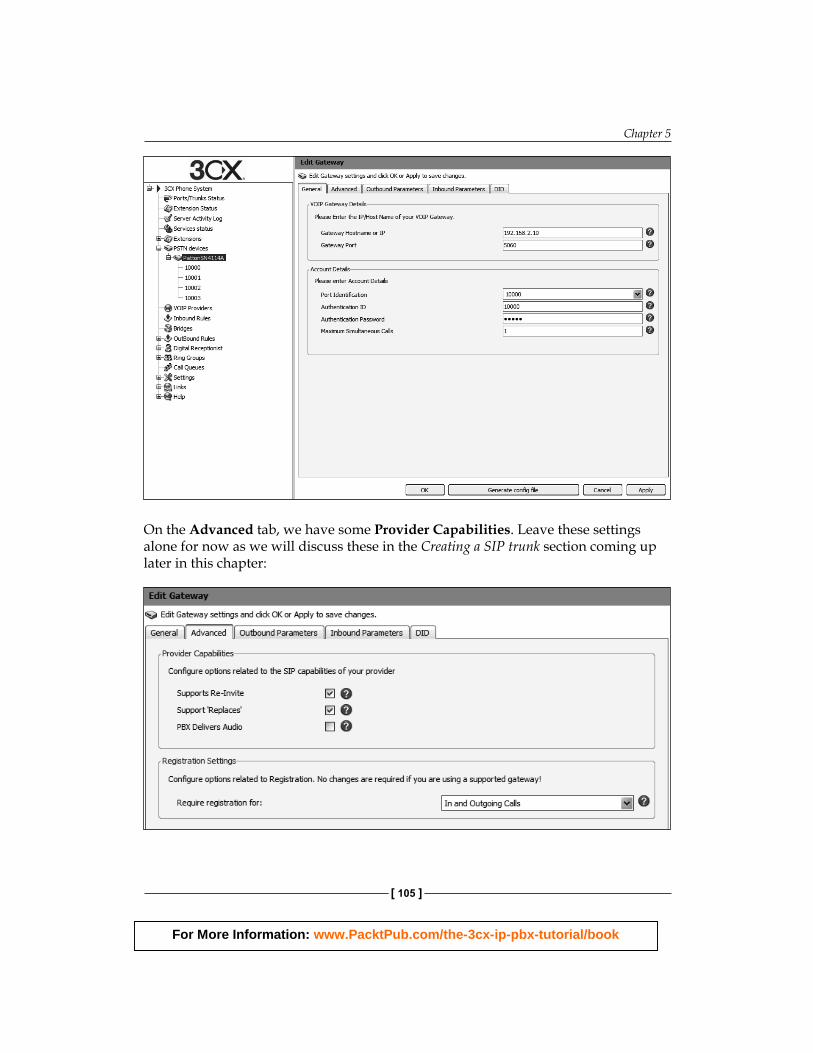
Next, click the Patton SN4114A name, and you will see the right-hand side window pane fi ll up with fi ve separate tabs.
The fi rst tab is General. This is where you can change the gateway IP address, SIP port, and all the account details. If you change anything, you will need a new confi guration fi le. So click the Generate confi g fi le button at the bottom of the screen. If you forgot to save the fi le previously, here's your chance to generate and save it again:
For More Information: www.PacktPub.com/the-3cx-ip-pbx-tutorial/book
Chapter 5
[ 105 ]
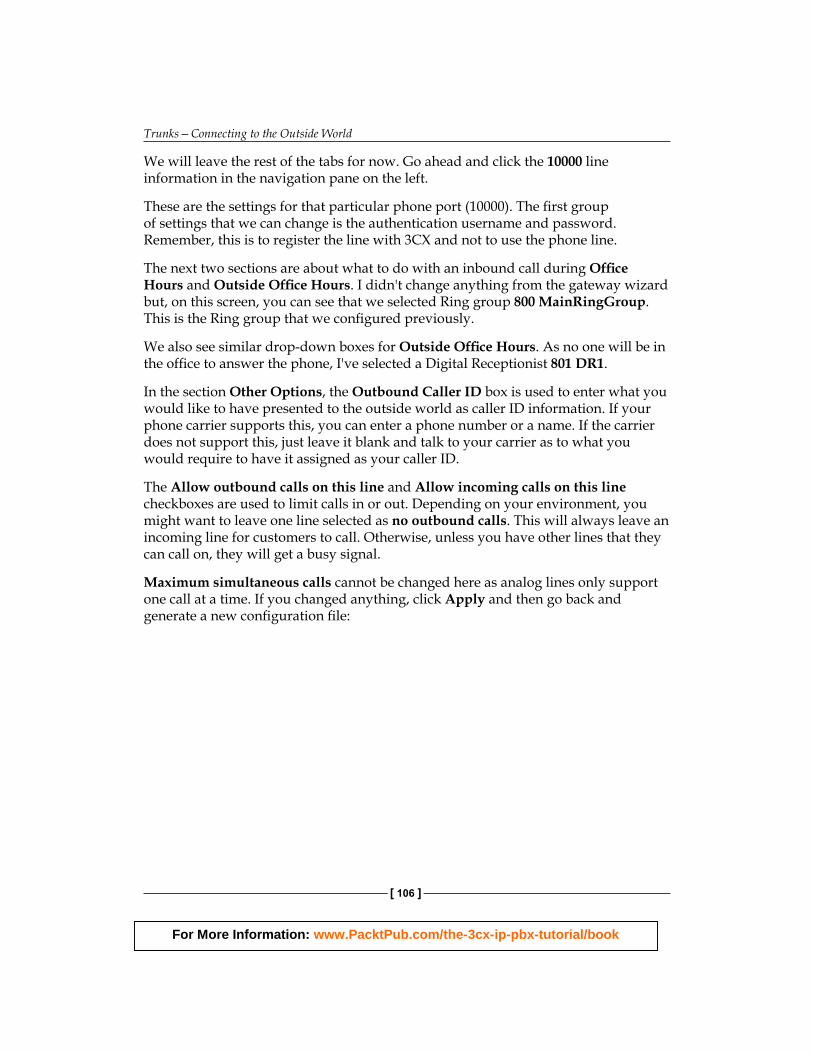
On the Advanced tab, we have some Provider Capabilities. Leave these settings alone for now as we will discuss these in the Creating a SIP trunk section coming up later in this chapter:
For More Information: www.PacktPub.com/the-3cx-ip-pbx-tutorial/book
Trunks—Connecting to the Outside World
[ 106 ]
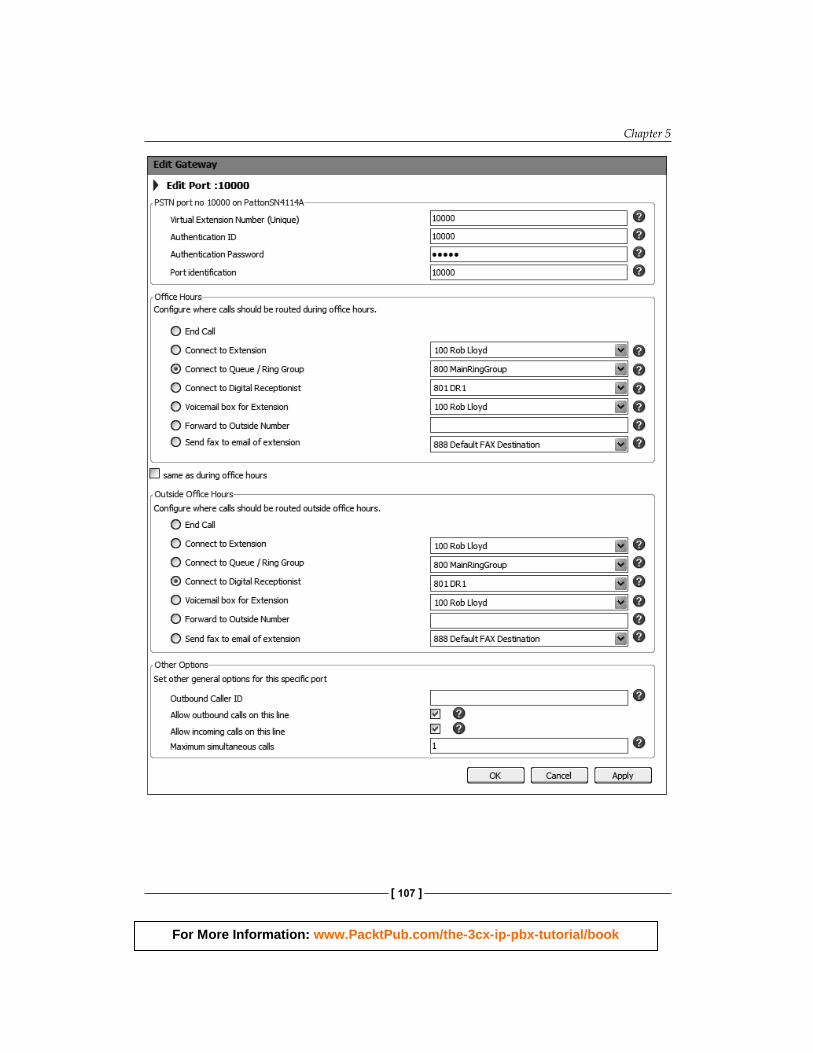
We will leave the rest of the tabs for now. Go ahead and click the 10000 line information in the navigation pane on the left.
These are the settings for that particular phone port (10000). The fi rst group of settings that we can change is the authentication username and password. Remember, this is to register the line with 3CX and not to use the phone line.
The next two sections are about what to do with an inbound call during Offi ce Hours and Outside Offi ce Hours. I didn't change anything from the gateway wizard but, on this screen, you can see that we selected Ring group 800 MainRingGroup. This is the Ring group that we confi gured previously.
We also see similar drop-down boxes for Outside Offi ce Hours. As no one will be in the offi ce to answer the phone, I've selected a Digital Receptionist 801 DR1.
In the s ection Other Options, the Outbound Caller ID box is used to enter what you would like to have presented to the outside world as caller ID information. If your phone carrier supports this, you can enter a phone number or a name. If the carrier does not support this, just leave it blank and talk to your carrier as to what you would require to have it assigned as your caller ID.
The Allow outbound calls on this line and Allow incoming calls on this line checkboxes are used to limit calls in or out. Depending on your environment, you might want to leave one line selected as no outbound calls. This will always leave an incoming line for customers to call. Otherwise, unless you have other lines that they can call on, they will get a busy signal.
Maximum simultaneous calls cannot be changed here as analog lines only support one call at a time. If you changed anything, click Apply and then go back and generate a new confi guration fi le:
For More Information: www.PacktPub.com/the-3cx-ip-pbx-tutorial/book
Chapter 5
[ 107 ]
For More Information: www.PacktPub.com/the-3cx-ip-pbx-tutorial/book
Trunks—Connecting to the Outside World
[ 108 ]
For the most up-to-date information on confi guring your gateway, visit the 3CX site: http://www.3cx.com/voip-gateways/index.html
We will go over a summary of it here:
Since nothing was changed, it is now time to confi gure the Patton device with the confi g fi le that we generated from the 3CX template. If you know the IP address of the device, go ahead and open a browser and navigate to that IP address. Mine would be http://192.168.2.10. If you do not know the IP address of your device, you will need the SmartNode discovery tool. The easiest place to get this tool is the CD that came with the device. You can also download it from http://www.3cx.com/downloads/misc/sndiscovery.zip, or search the Patton website for it.
Go ahead and install the SmartNode discovery tool and run it. You will get a screen that tells you all the SmartNodes on your network with their IP address, MAC address, and fi rmware version. Double-click on the SmartNode to open the web interface in a browser.
The default username is administrator, and the password fi eld is left blank.
Click Import/Export on the left and Import Confi guration on the right. Click Browse to fi nd the confi guration fi le that we generated. Click Import and then Reload to restart the gateway with the new confi guration.
That's it . We can now get incoming calls and make an outbound call.
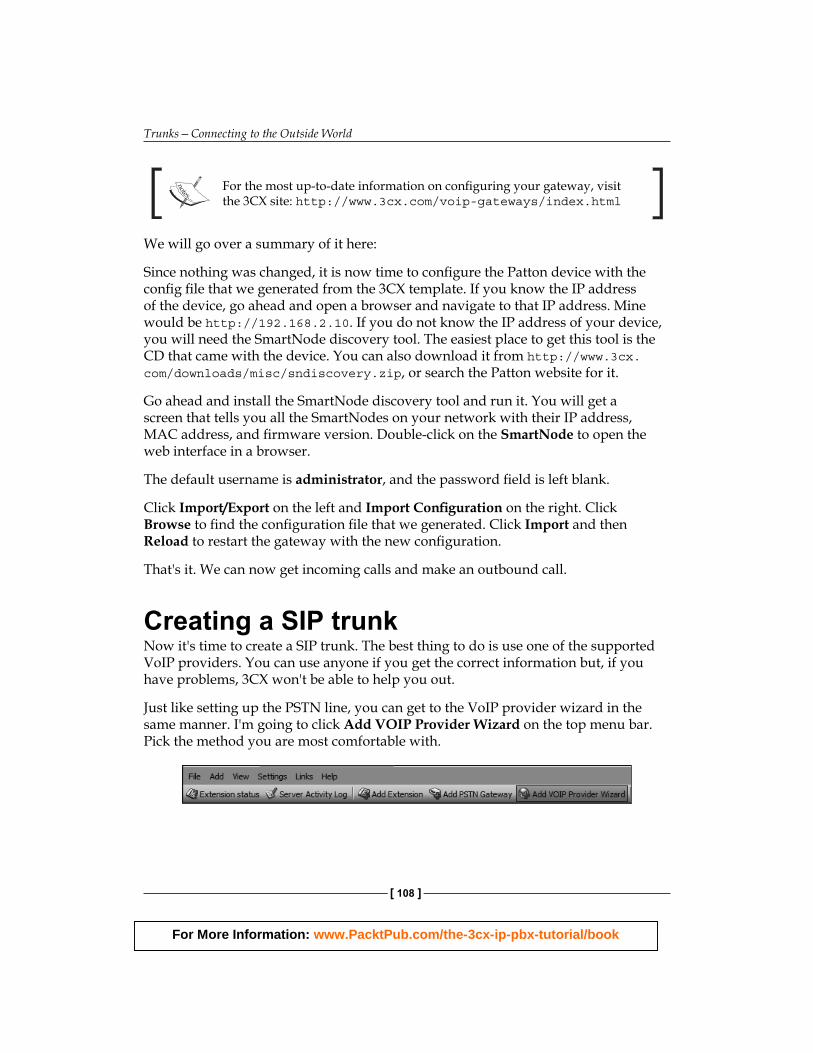
Creating a SIP trunkNow it's time to create a SIP trunk. The best thing to do is use one of the supported VoIP providers. You can use anyone if you get the correct information but, if you have problems, 3CX won't be able to help you out.
Just like setting up the PSTN line, you can get to the VoIP provider wizard in the same manner. I'm going to click Add VOIP Provider Wizard on the top menu bar. Pick the method you are most comfortable with.
For More Information: www.PacktPub.com/the-3cx-ip-pbx-tutorial/book
Chapter 5
[ 109 ]
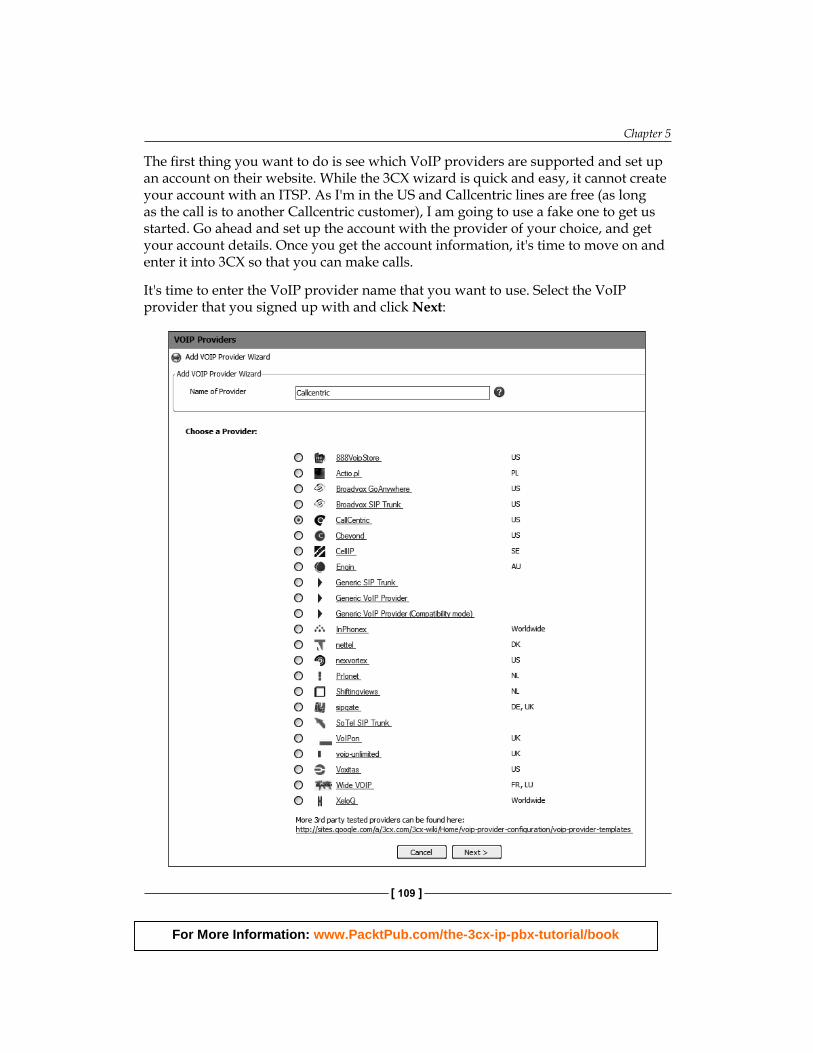
The fi rst thing you want to do is see which VoIP providers are supported and set up an account on their website. While the 3CX wizard is quick and easy, it cannot create your account with an ITSP. As I'm in the US and Callcentric lines are free (as long as the call is to another Callcentric customer), I am going to use a fake one to get us started. Go ahead and set up the account with the provider of your choice, and get your account details. Once you get the account information, it's time to move on and enter it into 3CX so that you can make calls.
It's time to enter the VoIP provider name that you want to use. Select the VoIP provider that you signed up with and click Next:
For More Information: www.PacktPub.com/the-3cx-ip-pbx-tutorial/book
Trunks—Connecting to the Outside World
[ 110 ]
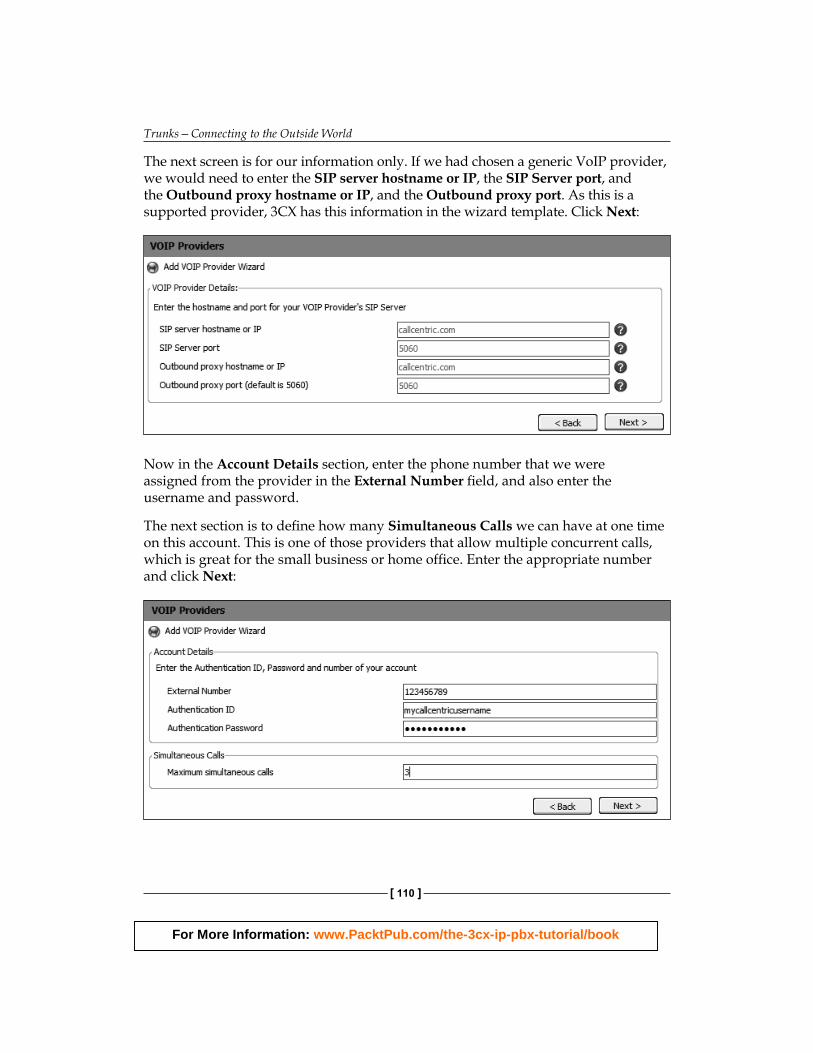
The next sc reen is for our information only. If we had chosen a generic VoIP provider, we would need to enter the SIP server hostname or IP, the SIP Server port, and the Outbound proxy hostname or IP, and the Outbound proxy port. As this is a supported provider, 3CX has this information in the wizard template. Click Next:
Now in the A ccount Details section, enter the phone number that we were assigned from the provider in the External Number fi eld, and also enter the username and password.
The next section is to defi ne how many Simultaneous Calls we can have at one time on this account. This is one of those providers that allow multiple concurrent calls, which is great for the small business or home offi ce. Enter the appropriate number and click Next:
For More Information: www.PacktPub.com/the-3cx-ip-pbx-tutorial/book
Chapter 5
[ 111 ]
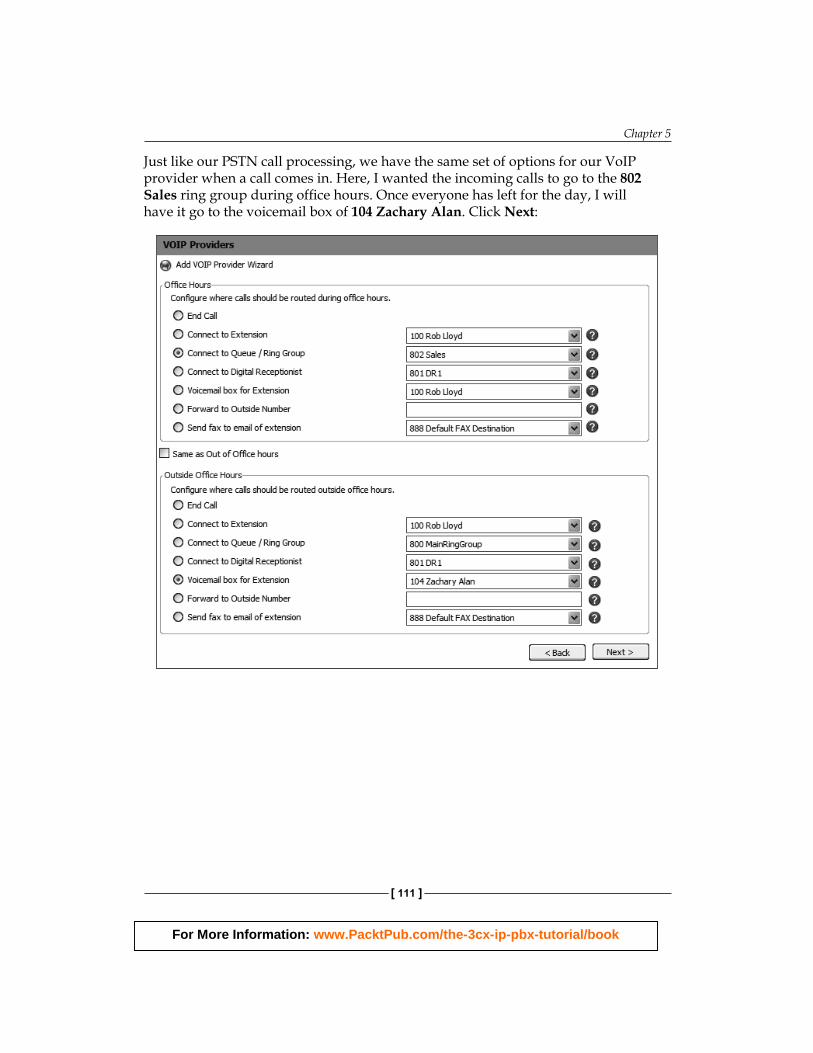
Just like our PSTN call processing, we have the same set of options for our VoIP provider when a call comes in. Here, I wanted the incoming calls to go to the 802 Sales ring group during offi ce hours. Once everyone has left for the day, I will have it go to the voicemail box of 104 Zachary Alan. Click Next:
For More Information: www.PacktPub.com/the-3cx-ip-pbx-tutorial/book
Trunks—Connecting to the Outside World
[ 112 ]
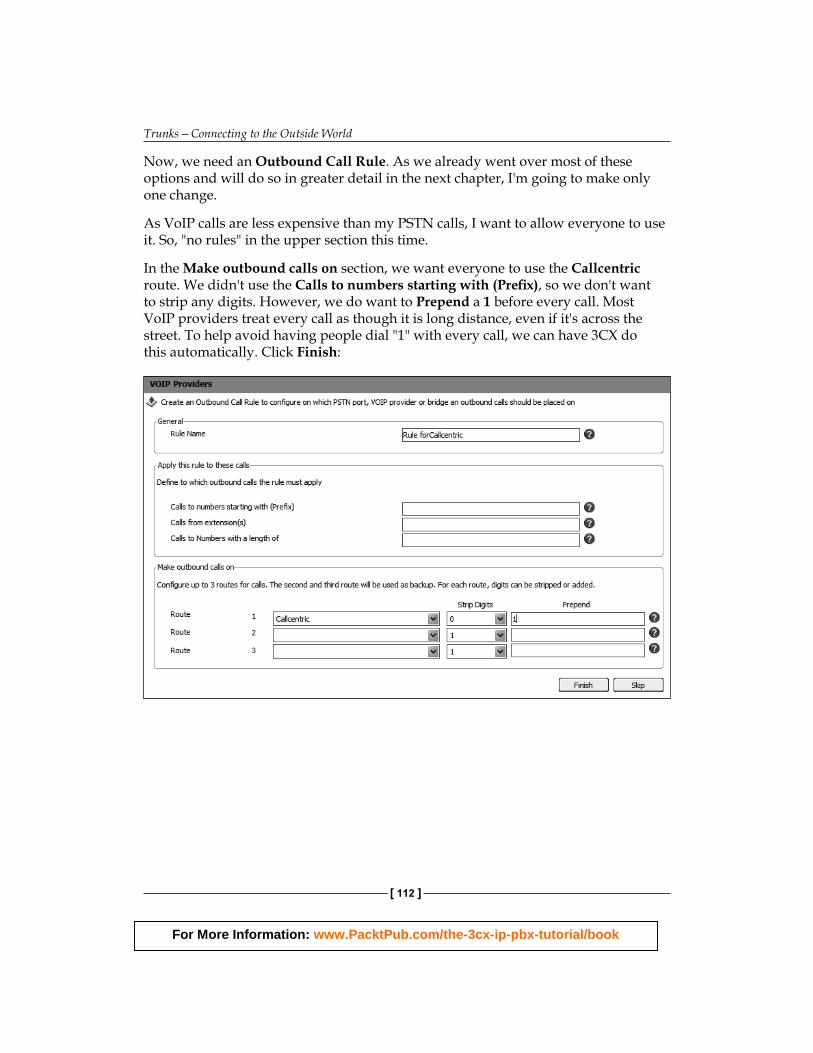
Now, we need an Outbound Call Rule. As we already went over most of these options and will do so in greater detail in the next chapter, I'm going to make only one change.
As VoIP calls are less expensive than my PSTN calls, I want to allow everyone to use it. So, "no rules" in the upper section this time.
In the Make outbound calls on section, we want everyone to use the Callcentric route. We didn't use the Calls to numbers starting with (Prefi x), so we don't want to strip any digits. However, we do want to Prepend a 1 before every call. Most VoIP providers treat every call as though it is long distance, even if it's across the street. To help avoid having people dial "1" with every call, we can have 3CX do this automatically. Click Finish:
For More Information: www.PacktPub.com/the-3cx-ip-pbx-tutorial/book
Chapter 5
[ 113 ]
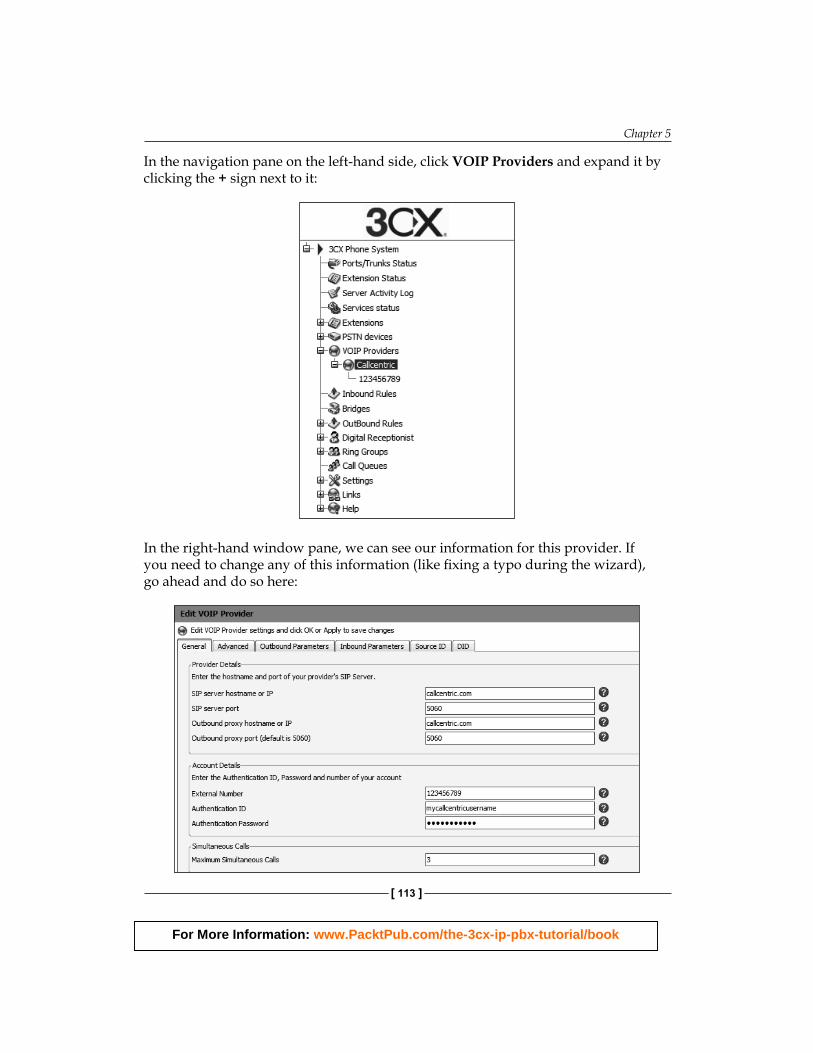
In the navigation pane on the left-hand side, click VOIP Providers and expand it by clicking the + sign next to it:
In the right-hand window pane, we can see our information for this provider. If you need to change any of this information (like fi xing a typo during the wizard), go ahead and do so here:
For More Information: www.PacktPub.com/the-3cx-ip-pbx-tutorial/book
Trunks—Connecting to the Outside World
[ 114 ]
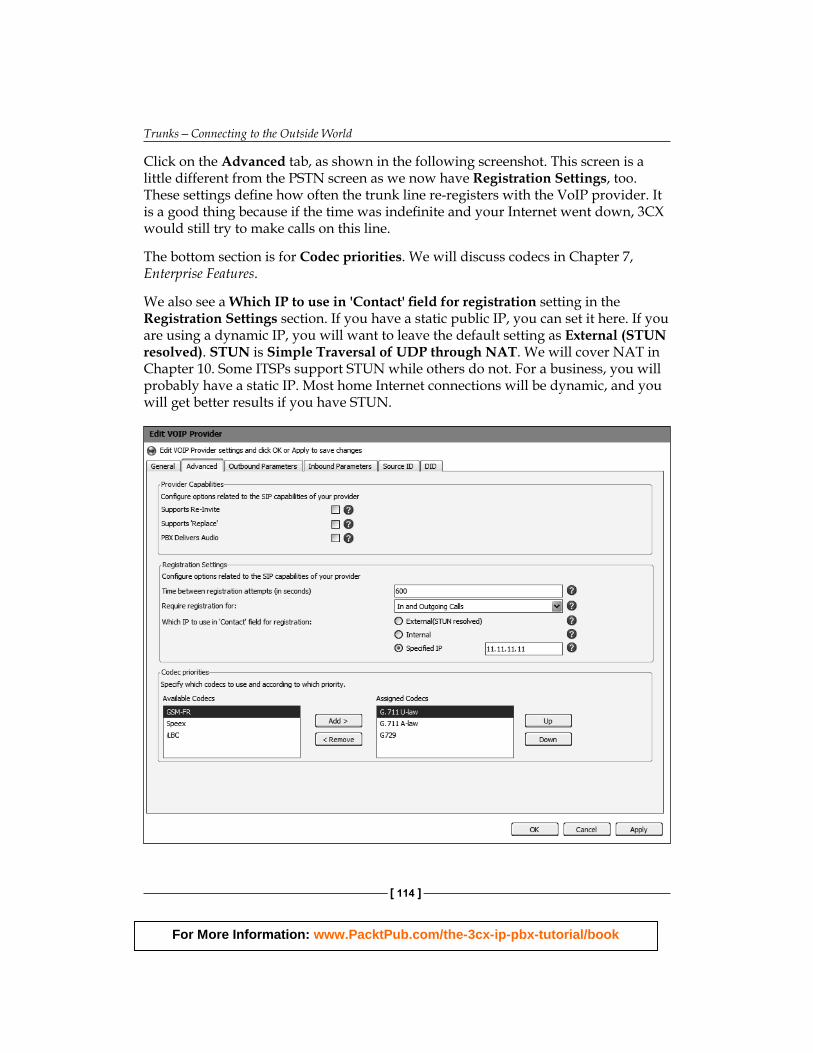
Click on the Adva nced tab, as shown in the following screenshot. This screen is a little different from the PSTN screen as we now have Registration Settings, too. These settings defi ne how often the trunk line re-registers with the VoIP provider. It is a good thing because if the time was indefi nite and your Internet went down, 3CX would still try to make calls on this line.
The bottom section is for Codec priorities. We will discuss codecs in Chapter 7, Enterprise Features.
We also see a Which IP to use in 'Contact' fi eld for registration setting in the Registration Settings section. If you have a static public IP, you can set it here. If you are using a dynamic IP, you will want to leave the default setting as External (STUN resolved). STUN is Simple Tr aversal of UDP through NAT. We will cover NAT in Chapter 10. Some ITSPs support STUN while others do not. For a business, you will probably have a static IP. Most home Internet connections will be dynamic, and you will get better results if you have STUN.
For More Information: www.PacktPub.com/the-3cx-ip-pbx-tutorial/book
Chapter 5
[ 115 ]
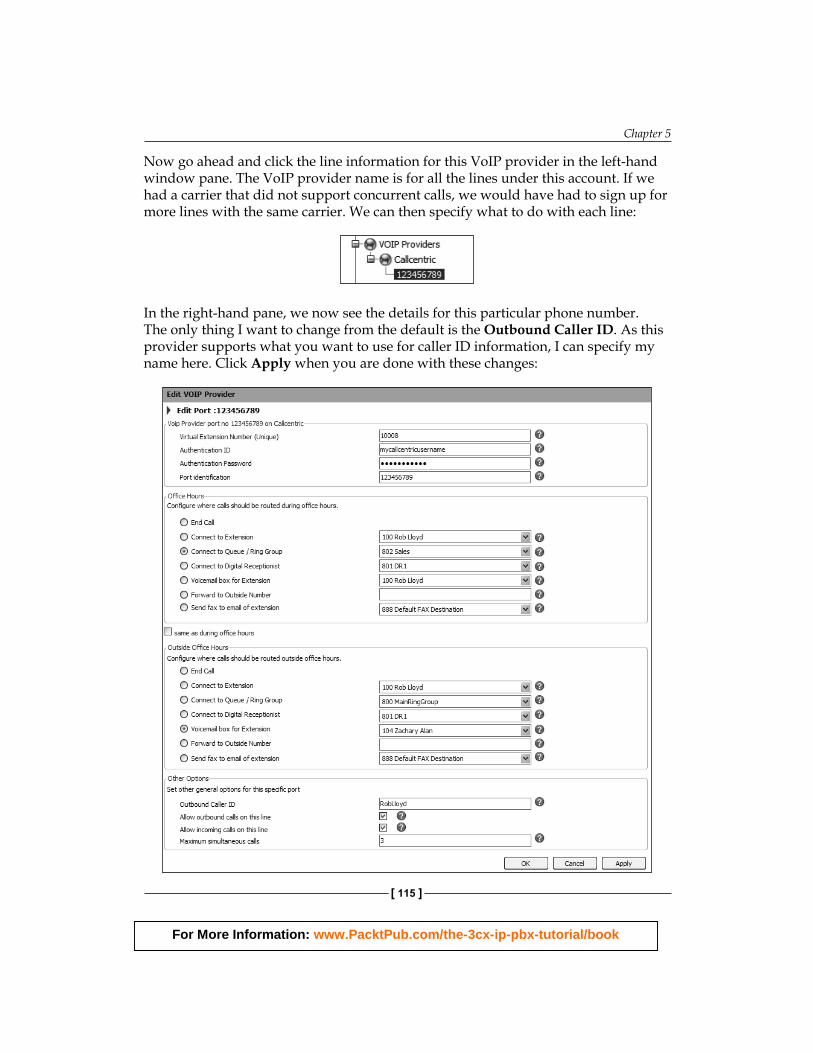
Now go ahead and c lick the line information for this VoIP provider in the left-hand window pane. The VoIP provider name is for all the lines under this account. If we had a carrier that did not support concurrent calls, we would have had to sign up for more lines with the same carrier. We can then specify what to do with each line:
In the right-hand pane, we now see the details for this particular phone number. The only thing I want to change from the default is the Outbound Caller ID. As this provider supports what you want to use for caller ID information, I can specify my name here. Click Apply when you are done with these changes:
For More Information: www.PacktPub.com/the-3cx-ip-pbx-tutorial/book
Trunks—Connecting to the Outside World
[ 116 ]
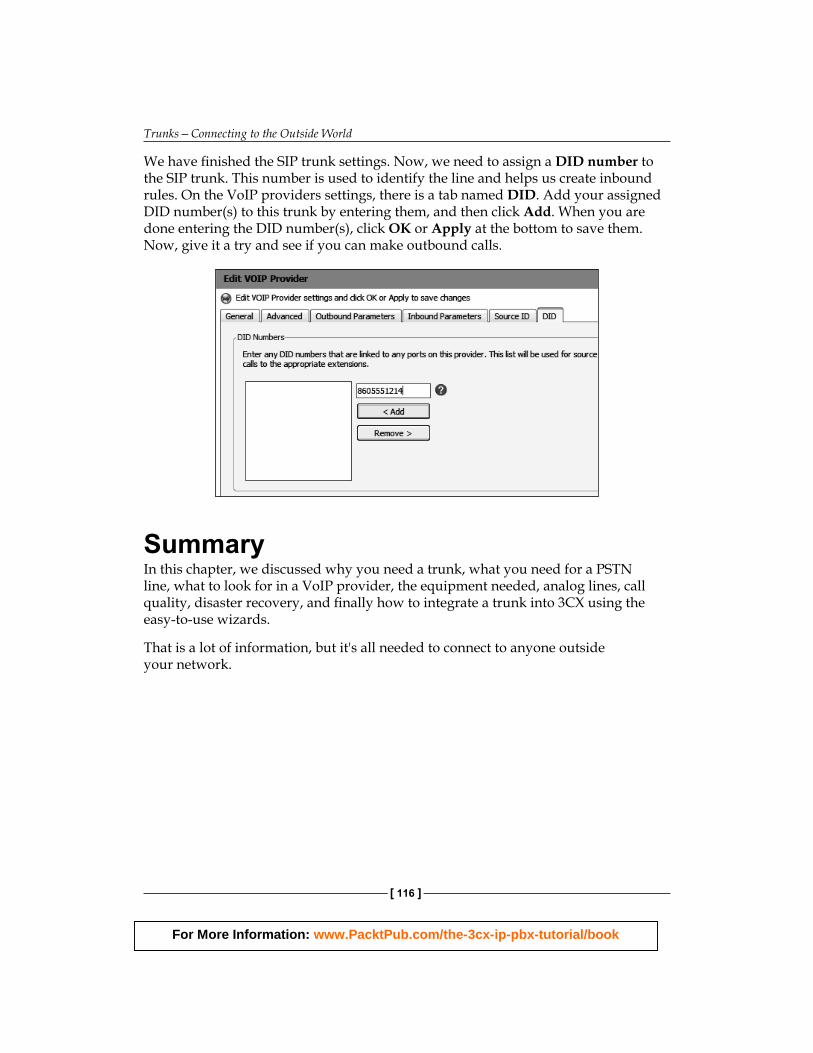
We have fi nished the SIP trunk settings. Now, we need to assign a DID number to the SIP trunk. This number is used to identify the line and helps us create inbound rules. On the VoIP providers settings, there is a tab named DID. Add your assigned DID number(s) to this trunk by entering them, and then click Add. When you are done entering the DID number(s), click OK or Apply at the bottom to save them. Now, give it a try and see if you can make outbound calls.
SummaryIn this chapter, we discussed why you need a trunk, what you need for a PSTN line, what to look for in a VoIP provider, the equipment needed, analog lines, call quality, disaster recovery, and fi nally how to integrate a trunk into 3CX using the easy-to-use wizards.
That is a lot of information, but it's all needed to connect to anyone outside your network.
For More Information: www.PacktPub.com/the-3cx-ip-pbx-tutorial/book
Where to buy this book You can buy The 3CX IP PBX Tutorial from the Packt Publishing website:
http://www.packtpub.com/the-3cx-ip-pbx-tutorial/book.
Free shipping to the US, UK, Europe and selected Asian countries. For more information, please
read our shipping policy.
Alternatively, you can buy the book from Amazon, BN.com, Computer Manuals and
most internet book retailers.
www.PacktPub.com
For More Information: www.PacktPub.com/the-3cx-ip-pbx-tutorial/book