Tehava International is the exclusive importer for … International is the exclusive importer for...
29
Tehava International is the exclusive importer for ISAAC Cycles / www.isaac-cycle.com / [email protected] Instruction manual
Transcript of Tehava International is the exclusive importer for … International is the exclusive importer for...

Tehava International is the exclusive importer for ISAAC Cycles / www.isaac-cycle.com / [email protected]
Instruction manual
2 3
Adjusting and operating the bike 21Adjusting the adjustable stem (optional) 21Adjusting the saddle position 21Adjusting the saddle height 21Operating the gears 21Shimano STI 22Campagnolo Ergopower 23SRAM 24Operating the brakes 24Operating the quick release axle 24Using clipless pedals 28
While cycling 30Faults 30Gears and drivetrain 30Brakes 31Frame 32Wheels and tyres 32
After a fall or accident 33 Transporting your bike 34Fitting and removing wheels 34Fitting and removing seatpost with saddle 37
Cleaning and caring for your bike 40
Storing your bike for an extended period 42
Guarantee and warranty 43
Key to figures 44
About this instruction manual 4Instruction manual 4Scope of application 4Other valid documentation 4Images 4Conventions 4Key 4Orientation 5List of abbreviations/definition of terms 5
For your safety 6Use your bike as it is intended to be used 6Who may ride your bike? 6How may you ride your bike? 6Where may you ride your bike? 6What condition must your bike be in when you ride it? 6What you may not do 7Residual risks 7Risks due to faulty final assembly 7Risks due to improper use 7Risk of burns 8Other risks and safety precautions 8Disposal 8
Product contents, technical data 9Product contents 9Technical data 9Screw/bolt torque 9
Structure and features 10Frame 10Brakes 10Gears 10
ISAAC cycle frame 11
Before first use 12
Before every ride 13Check wheels 13Check assembly 13Check wheel rims 13Check tyres 14Other checks 16Check saddle and seatpost 16Check handlebars and stem 17Check handlebar attachments 18Check headset 18Check brakes 18Check cable-actuated calliper brake(racing bike version) 19Check drivetrain and chain 20
11.11.1.11.1.21.1.3 1.21.2.11.2.21.2.3
22.12.1.12.1.22.1.32.1.4
2.1.52.22.2.12.2.22.2.32.2.42.3
33.13.23.3
44.14.24.3
5
6
77.17.1.17.1.27.1.37.1.47.27.37.47.57.67.6.1
7.7
88.18.28.38.4 8.4.18.4.28.4.38.58.68.7
99.19.1.19.1.29.1.39.1.4
10
1111.111.2
12
13
14
15
Dear customer,We would like to congratulate you on your choice of an ISAAC bike and thank you for your confidence in us.
In buying this bike, you have acquired a high-quality, environmentally-friendly means of transportation which will give you a great deal of pleasure and which will at the same time benefit your health.
In this handbook, we have compiled lots of tips for the operation of the bike and plenty of useful information about cycle technology, maintenance and care.
Please read this brochure thoroughly!
Your ISAAC specialist cycle dealer will remain important for you even after advice and final assembly. This is your point of contact for maintenance, inspections, modifications and repairs of all kinds. If you have any questions about our products, please contact your ISAAC specialist bike dealer.

1
4 5
List of abbreviations/definition of terms1.2.3
Other valid documentation
- enclosed component instruction manuals for the respective manufacturers.
Risk of damage or injury!
- Due to the variety of available cycle components, it is impossible to produce an instruction manual that is generally valid.
- It may be that components have been fitted to this bike which are not described in this instruction manual.
- For this reason, always follow the enclosed component instruction manuals from the respective manufacturer(s).
- Priority should be given to following and observing the instructions and information which these contain!
- Consult your specialist dealer for more information.
Images
You will find the images that go with the descriptions immediately before or after the texts in question.
Conventions
Key
Advice!Highlights information which requires your special attention.
Warning!Alerts you to a risk of minor damage and/or personal injury.
Danger!Alerts you to a risk of serious injury or death.
Risk of burns!Alerts you to temperatures above 45°C (at which protein coagulates), which can cause burns in humans.
Instruction manual
Risk of damage or injury!
If you disregard this instruction manual, this may result in dangerous cycling situations, falls, accidents and damage to your bike.- Read this instruction manual carefully before
you use your bike for the first time.- All the bike parts named below are shown in
the figures.- The figures printed in this instruction manual
are generic and apply to all ISAAC racing bikes and ISAAC racing frames.
- Keep this instruction manual and include it with the bike if you ever sell it or give it away.
- It is your responsibility to check your bike and have any necessary work carried out as stipulated.
- If you do not understand any part of this instruction manual, please consult your specialist dealer.
Scope of application
Risk of damage or injury!
- These are not instructions for riding a bike.- These are not instructions for riding
techniques.
This instruction manual is applicable to:- all Isaac brand racing bikes from model year
2010 supplied new and fully assembled with this manual enclosed (in full).
- all Isaac brand racing bike frames from model year 2010 supplied new with this manual enclosed (as extracts). Please note point 5 in this regard.
Risk of damage or injury!
New technical advances may result in changes to the models and their operation, and even in new models. - Please observe the separate guidelines, if
available.- Consult your specialist dealer on whether this
instruction manual is up-to-date
Consult your specialist dealer regarding which of the points listed here apply to a bike constructed specially for you.
1.1
1.1.1
About this instruction manual
!
1.2
1.2.1
1.2.2
If the wheel rim is out-of-round, this is colloquially referred to as a “buckled wheel”.Usual unit of air pressure Indicates how tightly a bolt is tightened. German Standards InstituteEuropean Norm (often linked to DIN)Specialist dealers and workshops are firms authorised by the competent authorities in the relevant country to refer to themselves as such, and to sell and repair bikes. The ISAAC brand only permits selected specialist dealers to sell and repair its products.Newton metre; unit of torquepounds per square inch; American unit of pressure; 1 psi = 0.06897 barGerman road traffic regulations
German road traffic licensing regulation
The term “bolt correctly fitted” means the condition in which the bolt heads fit tightly to the component over their entire area.
A loose bolt is often recognisable by a protruding bolt head.
Buckle
BarTorque
DINENSpecialist dealer / workshop for bikes
Nm
psi
Road TrafficRegulations(StVO)Road TrafficLicensingRegulation(StVZO)Bolt correctly fitted
Bolt incorrectlyfitted
bolt incorrectly fitted:gap between bolt head and surface
1.1.2
1.1.3
You can find the technical terms for bike parts in the figures in the fold-out pages or beside the individual images.
Laws:STVO and STVZO are laws which apply only in Germany. Before you use your bike for the first time, familiarise yourself with the laws which apply in your country. Consult the competent authorities and your specialist dealer for more information
OrientationWhere this instruction manual refers to “right”, “left”, “front” or “back”, this always refers to the position viewed in the direction of travel (i.e. from the viewpoint of the cyclist when seated on the saddle).
bolt correctly fitted: bolt head touching surface

6 7
Risk of damage or injury!
Stationary bike trainers can damage your bike.- The use of stationary bike trainers which
involve clamping the bike by the fork and/or the chain stays is not permitted.
Residual risks
Risks due to faulty final assembly
Risk of damage or injury!
Improper final assembly of this cycle can result in dangerous cycling situations, falls, accidents and damage.
Have your specialist dealer confirm the correct final assembly and adjustment for the seating position which is appropriate for you.
Use the pre-printed form in this instruction manual for this purpose.
Risks due to improper use
Risk of damage or injury!
If you disregard this instruction manual, this may result in dangerous cycling situations, falls, accidents and damage to your bike.
- Observe the guidelines under point 2.1.- Only carry your baggage in a suitable cycle
rucksack.- The ISAAC brand does not permit the
attachment of any kind of baggage rack.- Do not exceed the maximum permitted weight; see chapter 3.2.
Ascertain the total weight by standing on a calibrated scale while lifting up the bike with its full load and wearing your full cycling clothing.
Observe the maintenance and care guidelines in chapters 11 and 12.
Racing bikes weighing less than 11 kg are exempt from the dynamo requirement.
If you have a racing bike which is except from the dynamo requirement, you must carry reliable battery-powered lighting even in daytime.
While taking part in races, racing bikes are exempt from this requirement.
- white front reflector (often integrated into the front headlamp) and red rear reflector
- two bright yellow reflectors on each wheel; alternatively, tyres with reflective stripes on both sides
- two bright yellow reflectors on each pedal;
All lighting and reflector parts must be approved.
You can recognise approved parts because they will be marked with a “K”, a wave-shaped line and a multi-digit number.
Please consult your specialist dealer on fitting these parts in accordance with regulations.
What you may not do
Risk of damage or injury!
Many cyclists like to modify their bikes to suit their particular requirements. Saddle, handlebars, pedals, brakes, tyres, spring elements – there are many ways to retrofit your bike.
Work on the bike, even work that appears easy, requires proper training, knowledge and experience. Work carried out to your bike by a non-professional can result in dangerous cycling situations, falls, accidents and damage to your bike.
- Use only EN-certified accessories. Exceptions are the bike computer and bottle holder, provided they are chosen and fitted by your specialist dealer.
- Consult your specialist dealer when choosing accessories.
- Any additions, modification, service and other work to your bike should be carried out exclusively by your specialist workshop.
2.1.5
compromise your riding safety and damage your bike.
The manufacturer approves the following uses for the following categories of roads or tracks:- Racing and time trialling: roads, no jumps- Wheels fitted with racing or similar tyres:
roads, no jumps
Cycles which fall into different categories may also be fitted with racing cycle tyres or similar. Such tyres may be recognised by a maximum width of 28 mm, indicated for example by two figures on the tyre, such as 28-622 or 28-559.
Bikes with these tyres may only be used on tarmac roads.
Consult your specialist dealer for more information.
Risk of damage or injury!
At high speeds, there is an inherent risk of falling. Only ride at high speeds if you are in full control of the bike.
What condition must the bike be in when you ride it?
Your new bike is a piece of sports equipment and, in accordance with the German Road Traffic Licensing Regulation (StVZO), it may not be used on public roads without being fitted with additional equipment.
In order to meet current StVZO requirements, your bike must be fitted with the following equipment.
The specifications below have been simplified.For the full wording of the regulations which apply for cycling in Germany, please consult the StVZO or your specialist dealer. For use outside Germany, please observe the traffic regulations which are in force in your country.
Consult your specialist dealer or the competent authority.
- two independently functioning brakes- a bell- dynamo-powered front (white) and rear
(red) lighting
2.1
2 For your safetyUse your bike as it is meantto be used
Who may ride your bike?
Risk of damage or injury!
The rider must be competent to ride a bike, i.e. he/she must have basic knowledge about the use of a bike and have the necessary sense of balance to be able to direct and steer a bike.- The rider must be tall enough to ride this bike
(ask your specialist dealer if you are unsure).- The rider must be physically and mentally
capable of riding this bike in traffic.
How may you ride your bike?
Risk of damage or injury!
Sit on the saddle or stand on one pedal and push off with the other foot.- Hold the left handlebar grip with your left
hand and the right handlebar grip with your right hand.
- To ride the bike, place your left foot on the left pedal and your right foot on the right pedal.
- Use the bike only as a means of transportation.
Where may you ride your bike?
Risk of damage or injury!
All bikes made by this manufacturer are either racing bikes or time trial bikes. The category of your bike is shown on your service card. It will be entered there by your specialist dealer when you buy it (See also chapter 4).
The different types of roads and tracks you may encounter are classified as follows:- Road: tarmac- Track: sand, gravel or similar surface (e.g.
forest track, farm track)- Paved footpath: few if any roots, sleepers,
stones, potholes, etc.- Unpaved footpath: roots, sleepers, stones,
potholes, etc. present- Sports park: track especially designed for free-
riding, downhill, BMX and dirt riding
Please be aware that any road or track can be damaged and/or present obstacles which may
2.1.1
2.1.2
2.1.3
2.1.4
2.2
2.2.1
2.2.2

8 9
3.3 Crew/bolt torqueProduct contents
Complete bike without pedals / frame kit with Isaac instruction manual plus all other relevant instruction manuals from manufacturers whose parts are fitted.
Technical data
3.1Disposal
Dispose of your cycle properly at the end of its useful life. Consult your specialist dealer for more information or use a recycling depot.
Risk of burns
Risk of burns!
After long descents, wheel rims can get very hot.- Do not touch the rim immediately after a descent.- Leave the rim to cool off before you touch it
(test it with the back of your finger).
Other risks and safety precautions
Risk of damage or injury!
If you disregard this instruction manual, this may result in dangerous cycling situations, falls, accidents and damage to your bike.
- Wear a helmet when riding your bike.- Ride defensively, keeping your eyes on the
road ahead.- Do not ride under the influence of alcohol. - Ride in such a way that you always have
your bike under control and will not get into difficulties if a dangerous situation suddenly arises.
- In wet weather, the effectiveness of the brakes may be reduced.
- Only wear suitable cycle clothing which will not impair the operation of the bike or your vision.
- Only wear tightly fitting trousers/leggings. Loose clothing can get caught in the bike and result in serious falls.
- In the dark and when visibility is poor, wear clothing with reflective strips and ride with lights on.
- Heavier loads increase your braking distance.- Bear in mind that certain types of clothing
and/or the use of a rucksack can restrict your mobility.
- Observe the maintenance and care guidelines in chapters 11 and 12.
2.2.3
2.2.4
!2.3
3 Product contents, technical data
3.2
Type of bikeHead tube diameterBuild yearSeatpost diameter
TypeBottom bracket
Rider weight limit [kg]
Ambient temperatures
Racing bike1 1/8 “ aheadfrom 201031.6 mmException: Meson withISAAC Aero seatpostRacing bikeBoson: BSA, 68mmMeson: BB 30Proton, Proton FW: PressfitGraviton: 130 kg
Kaon: 115 kgKaon+: 115 kgBoson: 115 kgMeson: 115 kgProton: 115 kgElement: 115 kg
Photon: 90 kgMuon: 100 kg
Proton XC: 100 kg- 10°C to 50°C
Risk of damage or injury!
Technical advances may lead to changes to the models and their operation, and even to new models- Please observe the separate guidelines,
if available.- Consult your specialist dealer on whether
these technical data are up-to-date.
TypeSeatpost clamp
Seat clamp
ModelProton, ProtonFW, Boson:
Meson:all models
Tightening torque6 - 7 N m
9 - 10 N m4 - 5 N m
Meson, an example of an ISAAC racing bike.

10 11
Risk of damage or injury!
Mistakes in the assembly of your frame can lead to serious falls!
ISAAC frames are also available individually and you can have them set up according to your individual wishes. The following guidelines should be observed in all cases.
- THE ISAAC BRAND ONLY PERMITS ITS AUTHORISED SPECIALIST DEALERS TO BUILD UP ITS FRAMES.
- The person who builds up the frame into a complete bike is deemed to be the manufacturer and is liable for any assembly errors and defects.
- This instruction manual is not an assembly instruction for your bike frame.
- When building up your bike, exclusively use EN-certified branded accessories. You can recognise these by the accompanying documents showing the following information:
• Details of manufacturer including full address• Information about inspections passed and
inspection guidelines with EN number • comprehensive and clear product information
and assembly guidelines in your national language
- Consult your specialist dealer if you have any questions regarding suitable accessories.
Risk of damage or injury!
Only rigid racing bike forks may be fittedto this frame.
Suspension forks may not be fitted.
Gears
Your bike has:- derailleur gears and a chainset with two or
three chainrings
This gear system offers you the optimum gear for every speed and makes managing gradients easier.
You can work out the number of gears as follows:- Derailleur gears: number of chainrings at the
front multiplied by the number of sprockets at the back. E.g. 2 chainrings x 10 sprockets = 20 gears.
This type of bike comes in the following versions.- Classic racer: drop handlebars, two racing bike
calliper brakes- Racing bike in time trial/triathlon design
(from 2011): Aero handlebars, Aero frame
All racing bikes made by this manufacturer are fitted with wired-on tyres as standard. When using wheels with glued tube-type tyres, always follow the instruction manual for the relevant rim/tyre manufacturer. Consult your specialist dealer for more information.
Frame
Your bike is fitted with an unsprung carbon-fibre frame.
Risk of damage or injury!
Carbon is a light material with excellent strength properties in normal and approved use. However, it is sensitive to falls and knocks, and to assembly faults.- Observe the guidelines in chapters 10, 11
and 12.
Brakes
Your bike has two independent calliper brakes.
Risk of damage or injury!
Improper operation of the brakes can result in dangerous cycling situations, falls, accidents and damage to your bike.- Familiarise yourself with the operation of the
brakes.- Establish which brake lever operates the front
brake and which operates the back brake.- To do so, operate each brake lever several
times while stationary. You can watch the brake blocks opening and closing on the relevant wheel rim.
4.1
Structure and features ISAAC bike frame4 5
!
4.2
4.3

12 13
Some racing bikes are fitted with so-called tubular tyres. These have an inner tube sewn into the tyre. The tyre including inner tube is glued to the specially built wheel rim during assembly. In doing so, the assembly instructions of the tyre, glue and rim manufacturers must be observed.
Be sure to observe the guidelines under point 7.1.3.
In StVZO-equipped bikes, rim reflectors may be fitted.
Check assembly
Shake both pedals forcefully perpendicular to the direction of travel.- The wheels must not move in their clamping mechanisms.- No clicking or grating noises must be audible.
Contact your specialist dealer if the check shows up defects of any kind.
Check rims
Risk of damage or injury!
Worn wheel rims and/or significant buckling can result in dangerous cycling situations, falls, accidents and damage to your bike.
Worn rims must be replaced and buckles repaired!
Risk of damage or injury!
If you have calliper brakes: dirty wheel rims can reduce the effectiveness of your brakes.
Dirty wheel rims must be cleaned immediately.
Risk of injury or damage!
A bike that is not in proper working order can result in dangerous cycling situations, falls, accidents and damage to the bike.
Consider the possibility that your bike may have fallen over while it was not in your sight or that someone may have interfered with it.
- Before every ride, check that your bike is safe to ride.
- Memorise the condition of your bike when new to make it easier to spot deviations from the correct condition later (taking your own photos can be a valuable aid).
- Contact your specialist dealer immediately if your bike deviates from its proper condition in any way.
- Only continue riding your bike once it has been properly overhauled by your specialist dealer.
Perform a sight check of the whole bike:
- Check all the attachment bolts to make sure they are correctly bolted (see chapter 1.2.4).
- Check the complete bike for dents, nicks, deep scratches and other mechanical damage.
Contact your specialist dealer if the sight check shows up defects of any kind.
Check wheels
A wheel consists of:- the hub- sprocket(s) (only on the rear wheel hub), also
known as the sprocket cassette, cogset or freewheel
- spokes- wheel rim and - tyres, which in turn consist of
• tyre, • inner tube and • rim tape.
1 Have your specialist dealer confirm that your bike has been assembled correctly and is in full working order.
2 Have your specialist retailer set the correct saddle position.
You can fine-tune your bike and make small adjustments yourself as described in chapter 8.2 and 8.3.
3 Only use this bike after your specialist dealer has talked you through the technology used in a briefing.
4 Seal your cycle with spray wax, see chapter 12.
5 Before use, pay attention to chapter 7.
Risk of damage or injury!
A bike that is not in proper working order can result in dangerous cycling situations, falls, accidents and damage to the bike. The same is true if you are not yet familiar with your new bike and how to operate it.
- Before setting out on your first ride, familiarise yourself with your bike. In particular, determine which brake lever operates the front wheel brake and which brake lever operates the rear brake; see paragraph 8.5.
- Modern brakes have a very strong braking effect. Applying too much force to the brake lever can cause the wheel in question to block and so result in a fall. Take your time to familiarise yourself with the braking effect of your bike on safe terrain.
- With new calliper brakes, or new friction pads, the full braking performance only develops after a certain wearing-in time. For this reason, assume a longer braking distance initially.
- If your cycle is fitted with clipless pedals, which lock your shoes to the pedals: practice getting on and off before you use the bike. Clipless pedals are not safety pedals!
- If you remove the seatpost, front and/or rear wheels for transportation after purchasing your bike, follow the instructions in chapter 11.1 and 11.2.
6 7Before first use Before every ride
!
7.1
!
7.1.1
Rim with groove wear indicator
7.1.2

14 15
Check your tyres for external damage and wear:• The tyre rubber must be present across the
entire surface in the original profile.• The tyre material under the rubber layer must
not be visible.• There must not be any dents or tears.
Check the air pressure:determine what type of tyres you have.
Mountain bikes can be fitted with racing tyres and racing bikes with trekking tyres.
Rule of thumb:
Mountain bike tyres:tyre thickness greater than 40mm
Trekking/cross and fitness bike tyres:tyre thickness 28mm - 40mm
Racing tyres:tyre thickness less than 28mm.
Consult your specialist dealer to determine the type of tyres for your bike.
Guideline values for air pressure:mountain bike tyres 2.5 - 3.5 bartrekking bike tyres 3.5 - 5.0 barracing tyres 6.0 - 10.0 bar
Risk of damage or injury!
If the air pressure is too low, this will result in an increased risk of accidents and above all to poor handling characteristics. The tyre may come loose from the curve of the rim and encourage the tyre to drift on the rim.This can result in dangerous cycling situations, falls, accidents and damage to your bike.
Pump up your tyre to the specified air pressure.
Some air pressure indications are shown in “psi”. You can convert the air pressure with the help of the following table.
Check the air pressure using a tyre air pressure meter. Simple devices are often included with bicycle inner tubes; high-quality devices are available from specialist stores.Either read the relevant operating instructions or ask your specialist dealer to show you how to use it.
If the air pressure is too low: increase the air pressure using a suitable pump.
If the air pressure is too high: allow a suitable amount of air to escape from the valve and then check the air pressure again.
If you use a bicycle pump with a manometer, you can check the air pressure while pumping. First allow some air to escape from the tyre and then increase the air pressure up to the desired level.
There are different types of valves. With a ‘car valve’ or ‘Dunlop valve’/‘Woods valve’ you can attach the pump head directly. With a racer valve, you must first unscrew the small safety nut until it reaches the stop collar and, after inflating, screw the valve back shut. Ask your specialist dealer to show you how to operate the valves.
7.1.3
3 Check your rims for dirt, particularly oil and grease.
4 Dirty wheel rims must be cleaned immediately (see chapter 12).
Check tyres
Check the valve position:
Risk of damage or injury!
If the valve is crooked, it could tear off while you are riding, which will cause a sudden loss of pressure in the tyre. This can lead to dangerous cycling situations, falls, accidents and damage to your bike.
Have the tyre position corrected by a specialist workshop.
You can carry out this work yourself if you are familiar with the fitting and removal of the wheels (Chapter 11.1) and the replacement of tyre and inner tube.
- Remove the valve nut if appropriate.- Check the valve position: the valves must
point to the centre of the wheel.
1 Check the rims for wear: - Rims with wear indicators:
Sight check - Rims without wear indicators:
• Sight check • Fingernail test: draw your fingernail
across the side of the rim. You must not be able to detect any grooves.
- If the wear indicator is no longer visible, or the rim has visible grooves which can be felt with a fingernail, the rim needs to be replaced.
2 Check the rims for buckling: • Lift the bike and turn the front and back
wheels in turn. • Note the distance between rim and brake
blocks. The maximum permissible deviation per revolution is 2 mm.
!
Felge mit Verschleißindikator als Rille
Felge mit Verschleißindikator als Punkt
Felge ohne Verschleißindikator
correct valve position:valve points to centre of wheel
incorrect valve position:valve does not point to centre of wheel
psibar
302,1
402,8
503,5
604,1
704,8
805,5
906,2
1006,9
1107,6
1208,3
1309,0
1409,7
You can ascertain the actual permitted air pressure from the specifications of the tyre and rim manufacturer.The permitted tyre pressure is usually printed on the side of the tyre. Consult your specialist dealer for more information.
!
!
!
Valve types
!
The greater your body weight, the higher the air pressure in the tyres will need to be.

16 17
- You should not be able to twist or move any of the components.
- There should not be any clicking or grating noises.
If the saddle and/or seatpost do move, secure them (see chapter 8.2, 8.3 and 11.2).
Check handlebars and stem
Risk of damage or injury!
The handlebars and stem are very important components for your cycling safety. Damage to these components and errors in fitting can result in serious falls.
If you observe defects to these parts or have doubts about them, you must on no account continue to use your bike. Consult a specialist workshop immediately.
Check the fitting of the handlebars and stem.
- The stem must be aligned parallel to the front wheel rim, while the handlebars must be aligned at right angles to it.
- Hold the front wheel firmly between your legs.- Take hold of the handlebars at both ends.- Try to twist the handlebars in both directions
by hand.- Try to twist the handlebars within the stem
by hand.
7.2
If debris is present:- Remove it if you can do so without exerting
much force.- Check whether your wheels have been
damaged by the debris.- Reattach loose cycle parts such as spoke
reflectors. If you are unable to do so, contact your specialist dealer immediately.
- Please ensure that all reflectors are present, correctly attached and not obscured or dirty, in accordance with StVZO (see chapter 2.1.4).
Check saddle and seatpost
Risk of damage or injury!
If the seatpost has not been inserted far enough, it can come loose. This can result in dangerous cycling situations, falls, accidents and damage. Please ensure that the seatpost is inserted to the correct depth, taking note of chapter 8.3.
If you have the appropriate technical expertise, you may carry out this job yourself, taking note of chapters 8.2, 8.3 and 11.2.
Check that the saddle and seatpost are firmly positioned:- Attempt to twist the saddle and seatpost
within the frame by hand. You should not be able to move the saddle/seatpost.
In tubular tyres:
Some racing cycles are fitted with so-called tubular tyres. These have an inner tube sewn into the tyre. The tyre including inner tube is glued to the specially built wheel rim during assembly. When doing so, the assembly instructions of the tyre, glue and rim manufacturers must be observed.
Risk of damage or injury!
A tyre which has not been properly glued on can come loose from the wheel rim while cycling and cause serious falls.
- Check the fitting of your tyres:- If you can push the tyre away from the rim
by hand, the cycle is not safe for use.- The tyre must be glued on again.
When doing so, observe the instructions of the tyre, glue and rim manufacturers.
- Consult your specialist dealer for more information.
Try to push the inflated tyre away from the wheel rim sideways at various points around the tyre. The tyre must remain attached to the rim.
If you can push the tyre away from the rim by hand, the cycle is not safe for use.
Have the tyre glued back on in a specialist workshop.
A freshly glued tyre needs time to dry. Observe the instructions of the tyre, glue and rim manufacturers.
Other checks
Check your wheels for debris such as pieces of wood, remains of material, loose spoke reflectors, etc.
7.1.4
!
Checking the seatpost
- Attempt to move the clamped saddle by hand by moving the two ends up and down in opposition to each other. You should not be able to move the saddle.
Checking the saddle Checking that the stem is secure
7.3
Checking that the handlebars are secure
Check the fitting of your tyres:• To do so, lift the front and back wheels in turn
and turn them by hand.• The tyre must run true. There may not be any
vertical or horizontal bulging.

18 19
Check the brake cables and make sure they are secure:- The brake cables may not be damaged or
corroded.- The cables in cable-actuated calliper brakes
must be clamped along their entire length.
Check handlebar attachments
Check the gear/brake levers, grips (only on straight handlebars) and time trial/triathlon attachment (only in time trial/triathlon bikes)to ensure that they are properly secured:
7.4
7.5
- Use the handlebars to turn the front wheel and release immediately.
- The front wheel must now automatically re-turn to its original position.- The front wheel must not engage in any one position.
Check brakes
Risk of damage or injury!
Malfunctioning brakes can be fatal. Check your braking system especially carefully.
Checking the gear levers
- Hold the front wheel tightly between your legs or hold the handlebars with one hand.
- Try to twist the gear/brake lever by hand.- Try to pull the grips from the handlebars
(only on straight handlebars).- You should not be able to twist or move any
of these components.- There should not be any clicking or grating
noises.
Check headset
The headset is the interface between the bicycle fork and the bicycle frame itself.
Check the position of your handlebars. It should be easy to steer the front wheel in both direc-tions without play:- Stand beside your bike and hold the handlebar
grips with both hands.- Pull the front brake and keep it engaged.- Move your bike backwards and forwards with
short, jerky movements.- There must be no play in the handlebars and
you should not be able to hear or feel any clicking or grating.
- Lift the whole bike so that the back wheel is higher than the front wheel.
Hecking the handlebar position:turn the handlebars
Checking the handlebar position:turn the handlebars
7.6
!
urs lasting several days, brake blocks can wear significantly.
Take replacement brake blocks with you when you go on tours like this.
Only replace brake blocks yourself if you are used to doing this job. Consult your specialist dealer for more information.
If you are not competent to carry out the replacement work yourself, have an expert do it for you.
Check the operation of your braking system:- While stationary, pull both brake levers until
the brakes engage.
Check that the minimum distance between brake lever and handlebar grip in this position is at least 30 mm.
Checking the brake levers
- Keep the brakes on and try to push the bike along.
- Both wheels must remain blocked.
Check cable-actuated calliper brake(racing bike version)
Racing bike calliper brake
7.6.1
Correct brake cable clamping
Check that the entire braking system is correctly attached and bolted:- Try to pull the brake assembly away from
the fork (front) and from the frame (back) by hand.
Checking that brakes are securely attached
- You should not be able to pull the brake assembly off and there should not be any play.

20 21
- You can find the stipulated tightening torque in the table in 3.3.
- For some seatposts, different tightening torques may be stipulated. Please consult your specialist dealer if they are not listed in the table or shown on the seatpost itself.
Adjusting the saddle height
If your saddle is secured by means of a clamp with a bolt, you will need an appropriately sized Allen key and a torque wrench of the appropriate sizes.1 Loosen the clamp as described in chapter
11.2.2 Bring the saddle with seatpost to the desired
position. When doing so, please observe the guidelines on the insertion depth for the seatpost in chapter 11.2.
3 Secure the seatpost as described in chapter 11.2.
Operating the gears
There are some adjustment jobs on your bike which you may carry out yourself. Only carry out such work if you have appropriate basic technical knowledge and experience, and the right tools for the job.
Adjusting the adjustable stem (optional)
Some bikes are fitted with a stem which can be adjusted for height and tilt. Have these adjustments carried out by a specialist workshop only!
Adjusting the saddle position
Your saddle is attached with either one or two locking bolts. To adjust it you need an appropriately sized Allen key and torque wrench.
This is how to adjust the horizontal position or tilt of your saddle:- Loosen the locking bolt(s) a few turns until
you can easily move the saddle and/or change the tilt.
8.1
Check the positions of the brake blocks.- When the brake is engaged, virtually the entire
surface of the brake blocks must be touching the side of the rim.
7.7 Check drivetrain and chain
1 To do so, twist the right-hand crank anti-clockwise and watch the chainrings and sprockets from above.
- The chainrings and sprockets must not display any sideways movement.
- They must also not contain any foreign objects. Remove any that are present if it is easy to do so.
2 Press the left crank to the chain stay in the position shown.
Correct brake block adjustment
Wear indicator
- The brake blocks must on no account touch the tyre, including when the brake is not engaged.
Check the wear of the friction pads.• The friction pads must not be worn down
beyond the wear indicators.
Check that the brake is centred:• the brake blocks should be the same distance
from the rim on both sides.
Checking the cranks
• You must not be able to feel any bearing play.
• There must not be any clicking or grating noises.
3 Check the chain for damage. • The chain must not be damaged or have
rigid, immobile links at any point due to e.g. bent chain lugs, protruding chain bolts, etc.
4 While stationary, turn the right crank against the direction of drive and watch the chain running over the chain guide on the derailleur mechanism.
5 The chain must run smoothly over the chain guide and must not jump.
8 Adjusting and operating the bike
8.2
Loosening and tightening the saddle
- Bring the saddle to the desired position.- If the saddle is secured with a bolt:
Tighten the locking bolt back up to the prescribed torque. When doing so, ensure that all the loosened parts interlock.
- If the saddle is secured with two screws, alternately tighten them by a quarter to half a turn at a time until you have reached the stipulated torque.
8.3
8.4
Shimano STI
Campagnolo Ergopower
Please use the images to determine which gear system is fitted to your bike. If you are unsure, consult your specialist dealer.

22 23
Dura Ace Di2
This gear change mechanism is electrically actuated.The operation of the gear levers correspondsto that of the mechanical gear levers.
You can obtain more detailed information from the enclosed Shimano operating instructions and/or by consulting your specialist dealer.
This is how you shift to a bigger sprocket:- In order to change gear, you must be
pedalling.- Push lever A beyond the first stop and keep it
pressed in until the desired gear has engaged.- To skip one or more sprockets, push lever
A the desired number of stops and keep it pressed in until the desired gear has engaged.
With derailleur gears, you change gears by shifting the chain to a different cog. At the front (on the chainset), these cogs are called “chainrings”, whereas on the back (on the freewheel, cassette or cogset), they are known as “sprockets” or “rear sprockets”.
Chain lines
Shimano gear/brake grip
Switching to a smaller rear sprocket Switching to the next biggest rear sprocket
- To skip one or more sprockets, push lever A the desired number of stops and keep it pressed in until the desired gear has engaged.
This is how you shift to a smaller sprocket:- In order to change gear, you must be
pedalling.- Press lever B down until you feel it engage
and then release it again immediately.
Switching to larger sprockets skipping several gears
!
Adhere to the stipulated chain position as represented above.
- Avoid: • largest chainring + largest rear sprocket • middle chainring + largest rear sprocket
(applies only to triple chainset) • middle chainring + smallest rear sprocket
(applies only to triple chainset) • smallest chainring + smallest rear sprocket
The left-hand control operates the front derailleur and the right-hand control the rear derailleur mechanism.
Risk of damage to property!
Improper operation of the gear lever can damage your drive components.
!
8.4.1
This is how you shift to a smaller sprocket:- In order to change gear, you must be pedalling.- Press lever B until you feel it engage and then
release it again.
!
Campagnolo Ergopower
Your grip has two separate levers. Lever A switches to a larger chainring or rear sprocket, lever B to a smaller one.
8.4.2
Campagnolo gear/brake grip
Switching to a smaller rear sprocket
- To skip one or more sprockets, push lever A down until the desired gear has engaged, then immediately release it.
Shimano STI
Your grip has two separate levers.Lever A - this is both the brake lever and serves to switch to a larger chainring or rear sprocket; lever B switches to a smaller one.
If your gear lever is not shown in the images, please refer to the enclosed component operating instructions from the gear lever manufacturer or consult your specialist dealer.
Never operate both gear levers or controls at the same time!
Applies to derailleur mechanism on chainset (left-hand control): never change gears while exerting heavy pressure on the pedals!
Sram
This is how you shift to a bigger sprocket:- In order to change gear, you must be
pedalling. - Push lever A beyond the first stop and keep it
pressed in until the desired gear has engaged.

24 25
8.58.4.3 Operating the brakes
Risk of damage or injury!
Improper operation of the brakes can result in dangerous cycling situations, falls, accidents and damage to your bike.
- Familiarise yourself with the operation of the brakes.
- Establish which brake lever operates the front brake and which operates the back brake.
- To do so, operate each brake lever several times while stationary. You can watch the brake blocks opening and closing on the relevant wheel rim.
To operate the brake, pull the lever towards the handlebars.
Sram
On your gear/brake lever is a lever which you can use to change to a lower or a higher gear.
To operate it, push it inwards:
This is how you shift to a larger sprocket:- In order to change gear, you must be
pedalling.- Push the gear lever inwards and keep it
pressed in until the desired gear has engaged.
- To skip several sprockets, push the lever all the way and keep it pressed in until the desired gear has been engaged.
This is how you shift to a smaller sprocket:- In order to change gear, you must be pedalling.- Press lever B until you feel it engage and then
release it again.
Shifting to the next biggest rear sprocket
Operating the brakes
Switching to a smaller rear sprocketQuick release axle broken down into individual components
! The best braking effect is achieved when you operate both brake levers the appropriate amount simultaneously.
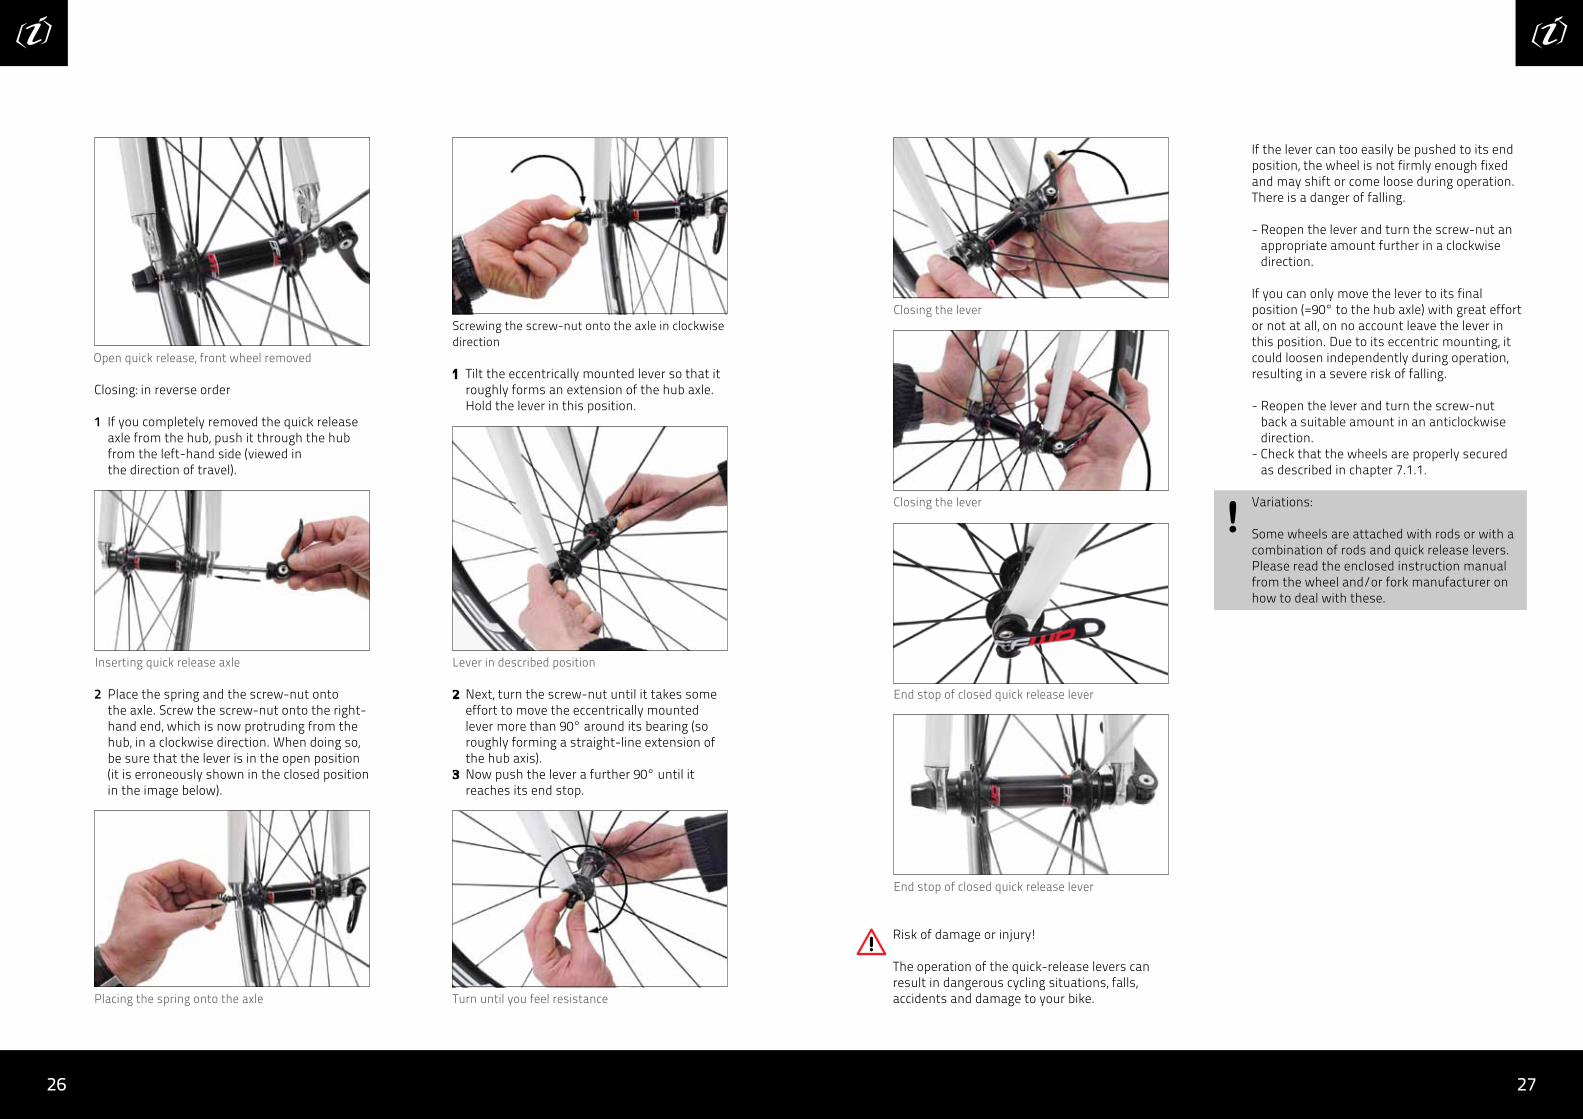
Operating the quick release axle8.6
The hubs of your wheels and possibly also your seatpost clamp are equipped with quick release axles (often called “quick release levers”).
These quick-release levers enable the rapid fitting and removal of these components without tools. This is done by means of:- a long axle with a thread, on one end of
which is a screw nut and on the other end an eccentrically mounted lever.
- Between the screw nut and the hub and between the lever and the hub there are small springs.
- The narrow ends of the springs point towards the hub.
- In the case of quick release levers for the saddle clamp, there is a screw head with a hexagon socket instead of a nut.
This is how you open the quick release axle:- Push the eccentrically mounted lever away
from the hub. It can turn a maximum of 180° around its axis.
Quick release lever closed
Opening quick release lever
Opening quick release lever
Opening quick release lever
Turn the screw-nut anticlockwise until the wheel can be removed from the frame/front wheel fork without much force.
If you take the screw-nut right off the thread, be sure not to lose the small springs.
Loosening screw-nut in anticlockwise direction
26 27
If the lever can too easily be pushed to its end position, the wheel is not firmly enough fixed and may shift or come loose during operation. There is a danger of falling.
- Reopen the lever and turn the screw-nut an appropriate amount further in a clockwise direction.
If you can only move the lever to its final position (=90° to the hub axle) with great effort or not at all, on no account leave the lever in this position. Due to its eccentric mounting, it could loosen independently during operation, resulting in a severe risk of falling.
- Reopen the lever and turn the screw-nut back a suitable amount in an anticlockwise direction.
- Check that the wheels are properly secured as described in chapter 7.1.1.
Variations:
Some wheels are attached with rods or with a combination of rods and quick release levers. Please read the enclosed instruction manual from the wheel and/or fork manufacturer on how to deal with these.
Tilt the eccentrically mounted lever so that it roughly forms an extension of the hub axle. Hold the lever in this position.
Closing: in reverse order
1 If you completely removed the quick release axle from the hub, push it through the hub from the left-hand side (viewed in the direction of travel).
Open quick release, front wheel removed
Inserting quick release axle
2 Place the spring and the screw-nut onto the axle. Screw the screw-nut onto the right-hand end, which is now protruding from the hub, in a clockwise direction. When doing so, be sure that the lever is in the open position (it is erroneously shown in the closed position in the image below).
Placing the spring onto the axle
Screwing the screw-nut onto the axle in clockwise direction
Lever in described position
Turn until you feel resistance
Next, turn the screw-nut until it takes some effort to move the eccentrically mounted lever more than 90° around its bearing (so roughly forming a straight-line extension of the hub axis).
Now push the lever a further 90° until it reaches its end stop.
Closing the lever
Closing the lever
End stop of closed quick release lever
End stop of closed quick release lever
Risk of damage or injury!
The operation of the quick-release levers can result in dangerous cycling situations, falls, accidents and damage to your bike.
!
28 29
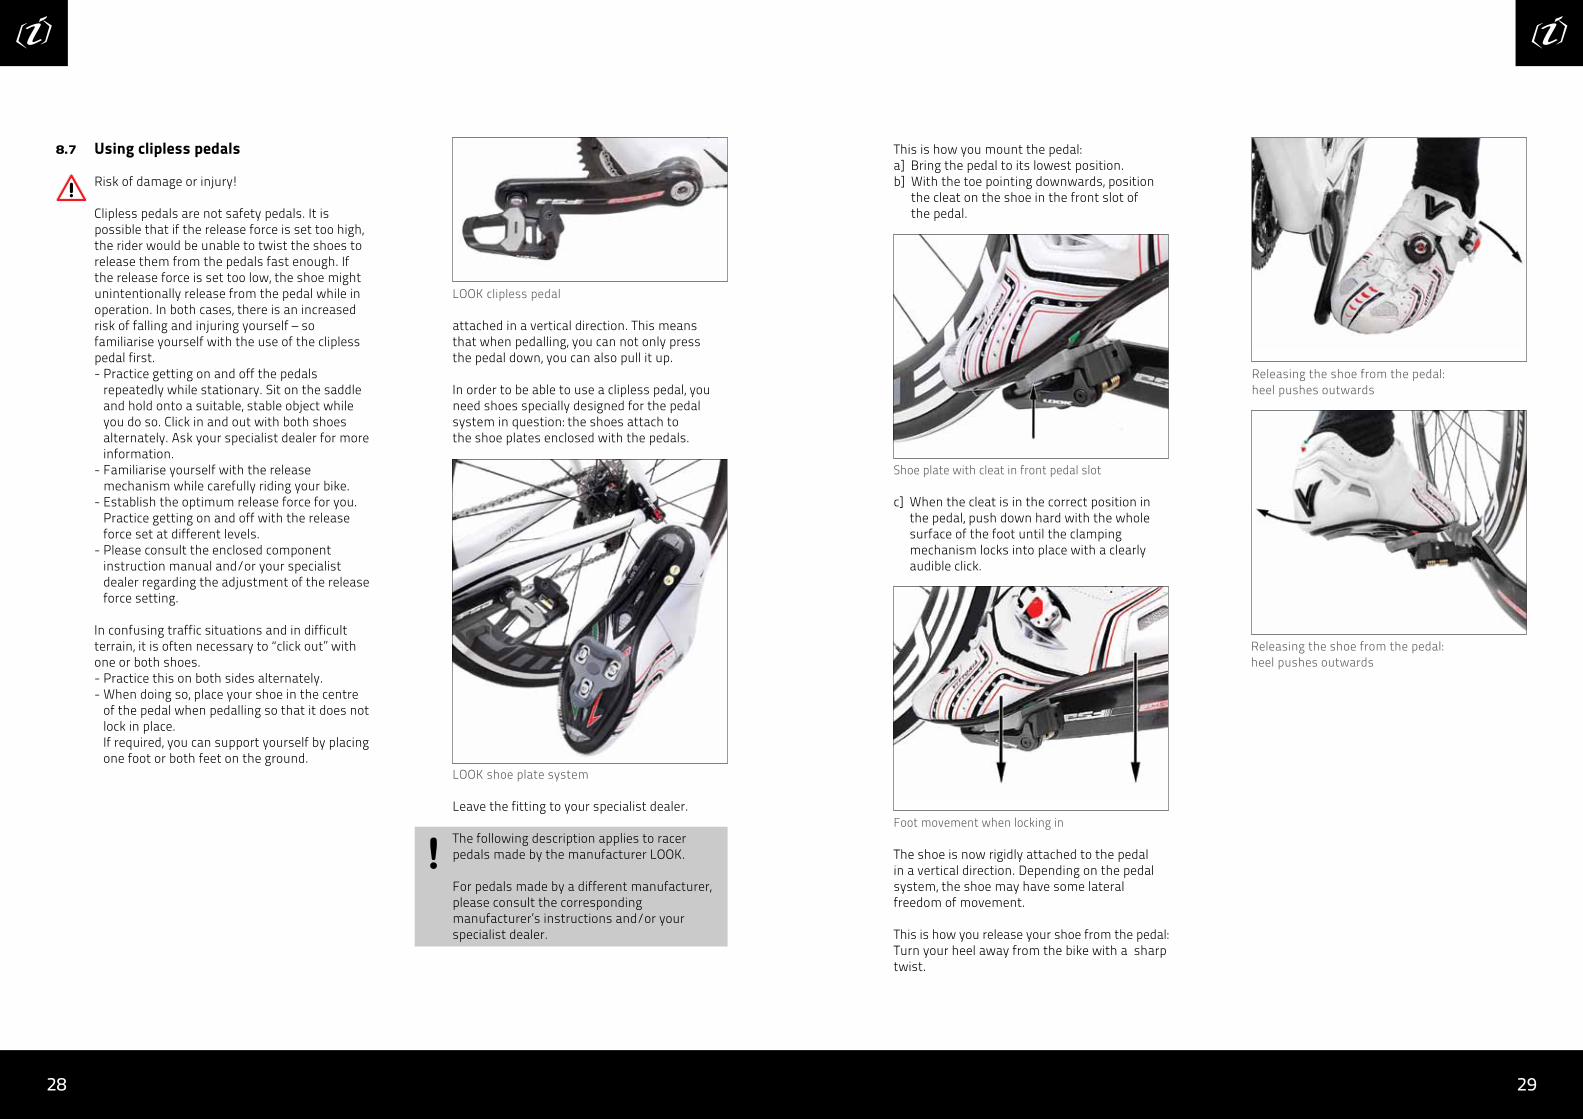
c] When the cleat is in the correct position in the pedal, push down hard with the whole surface of the foot until the clamping mechanism locks into place with a clearly audible click.
The shoe is now rigidly attached to the pedal in a vertical direction. Depending on the pedal system, the shoe may have some lateral freedom of movement.
This is how you release your shoe from the pedal:Turn your heel away from the bike with a sharp twist.
attached in a vertical direction. This means that when pedalling, you can not only press the pedal down, you can also pull it up.
In order to be able to use a clipless pedal, you need shoes specially designed for the pedal system in question: the shoes attach to the shoe plates enclosed with the pedals.
Using clipless pedals
Risk of damage or injury!
Clipless pedals are not safety pedals. It is possible that if the release force is set too high, the rider would be unable to twist the shoes to release them from the pedals fast enough. If the release force is set too low, the shoe might unintentionally release from the pedal while in operation. In both cases, there is an increased risk of falling and injuring yourself – so familiarise yourself with the use of the clipless pedal first.- Practice getting on and off the pedals
repeatedly while stationary. Sit on the saddle and hold onto a suitable, stable object while you do so. Click in and out with both shoes alternately. Ask your specialist dealer for more information.
- Familiarise yourself with the release mechanism while carefully riding your bike.
- Establish the optimum release force for you. Practice getting on and off with the release force set at different levels.
- Please consult the enclosed component instruction manual and/or your specialist dealer regarding the adjustment of the release force setting.
In confusing traffic situations and in difficult terrain, it is often necessary to “click out” with one or both shoes.- Practice this on both sides alternately.- When doing so, place your shoe in the centre
of the pedal when pedalling so that it does not lock in place. If required, you can support yourself by placing one foot or both feet on the ground.
8.7
LOOK clipless pedal
Shoe plate with cleat in front pedal slot
LOOK shoe plate system
Leave the fitting to your specialist dealer.
The following description applies to racer pedals made by the manufacturer LOOK.
For pedals made by a different manufacturer, please consult the corresponding manufacturer’s instructions and/or your specialist dealer.
!Foot movement when locking in
Releasing the shoe from the pedal:heel pushes outwards
Releasing the shoe from the pedal:heel pushes outwards
This is how you mount the pedal:a] Bring the pedal to its lowest position.b] With the toe pointing downwards, position
the cleat on the shoe in the front slot of the pedal.

30 31
- Consult your specialist dealer immediately if you notice the slightest defect or diminished braking effectiveness.
- Only continue riding your bike once it has been properly overhauled by your specialist dealer.
Schaltung, Antrieb9.1.1
Faults
Risk of damage or injury!
If you undertake maintenance work which you are not authorised to carry out, this can result in dangerous cycling situations, falls, accidents and damage to your bike.
Maintenance work not listed in the table below should only be carried out by a specialist dealer.
Risk of damage or injury!
9 While cycling9.1
If you notice unusual handling characteristics, unusual sounds or defects to your bike which are not listed in this chapter, these may result in dangerous cycling situations, falls, accidents and damage to your bike.
Have your specialist dealer investigate and if necessary rectify any abnormality not listed in the table below immediately.
Problem
Gear does not change ordoes not change cleanly
Drive blocks following or during gear change
Unusual sounds suchas clicking, loud grindingand/or knocking
Irregular resistancwhen pedalling
Chain has come off
Possible causes
• Gear lever not operated correctly• Gears misaligned• On steep climbs: too much
pressure on the pedal and/or pedalling too slowly
• Chain is jammed
• Drivetrain/gear change components damaged
• Drivetrain/gear change components damaged
• Incorrect operation of the gears (see chapter 6.4)
• In the worst case, it is quite possible that the gears are misaligned or damaged
Problem
Chain comes off following orduring gear change
Chain keeps coming off
Possible causes
• Incorrect operation of the gears (see chapter 7.6)
• In the worst case, it is quite possible that the gears are misaligned or damaged
• Gears consistently operated incorrectly
• Gears blocked or damaged
Remedial action
• Stop, operate the control in the opposite direction, lift the chain onto the next sprocket by hand, lift the rear wheel, and engage the crank in the drive direction (only if you can do so with minimum effort).
• If this does not solve the problem, seek out a professional workshop immediately.
• Operate the gears exclusively as directed in chapter 8.4.
• If you are correctly operating the gears, seek remedial action from a professional workshop immediately.
Remedial action
• Change gears again• Have gears adjusted in specialist
workshop• Repeat gear change procedure
on flat terrain• Change gear when stationary:
lift rear wheel, engage crank in drive direction until the desired gear has been engaged
• Stop, operate the control in the opposite direction, lift the rear wheel, and turn the crank in the direction opposite the drive direction.
• If you cannot move the crank, on no account should you apply force. Seek out a specialist workshop immediately.
• Seek out a specialist workshop immediately.
• Seek out a specialist workshop immediately.
• Stop, lift the chain onto the next sprocket by hand, lift the rear wheel, and engage the crank in the drive direction (only if you can do so with minimum effort).
• If this does not solve the problem, seek out a professional workshop immediately.
Braking
Risk of damage or injury!
Your brakes are among the most important components for your riding safety.
Brakes which are not functioning properly can result in dangerous cycling situations, falls, accidents and damage to your bike.
9.1.2
Problem
Brakes not functioning
Diminished braking effectiveness, brake levers too slack
Possible causes
• Brake not fitted correctly
• Brake is damaged
• Friction pads/brake lining worn
• Brake cable stretched, worn or clamping damaged
Remedial action
• Check fitting in accordance with chapter 11.1.
• If a brake is not fitted correctly, seek out a specialist workshop immediately.
• Seek out a specialist workshop immediately.
• Have friction pads/brake lining replaced in a professional workshop immediately.
• Seek out a specialist workshop immediately.
32 33
Risk of damage or injury!
Damage following a fall or accident can result in dangerous cycling situations, falls, accidents and damage to your bike.
- Your bike needs to be checked after a fall, an accident or after it has fallen over.
- Consult your specialist dealer after a fall, an accident or after your bike has fallen over.
- Only continue riding your bike once it has been properly overhauled by your specialist dealer.
After a fall, you must be thorough in replacing all affected components such as;• handlebars• triathlon/time-trial attachment• handlebar stem• seatpost (if made of carbon fibre)• saddle (if saddle frame made of carbon fibre)• rims (if made of carbon fibre)• and cranks
All other parts must be checked by a specialist dealer and replaced as appropriate.
Risk of damage or injury!
Your bike has a frame and parts made from carbon fibre.
Carbon fibre parts are very sensitive and can cause dangerous cycling situations and damage to your bike as a result of incorrect assembly, falls, accidents and other minor damage.
- Observe all separate guidelines on fitting, care, maintenance and checks of these parts in accordance with the enclosed component instructions.
- All work involving carbon parts should be carried out in a specialist workshop.
- Always consult your specialist dealer after damage and falls.
- Only use your cycle again when your specialist dealer has replaced the damaged parts or assured you that you can safely resume use.
- Consult your specialist dealer immediately if you notice the slightest defect.
- Only continue riding your bike once it has been properly overhauled by your specialist dealer.
Frame
Risk of damage or injury!
Defects to frame and suspension can result in dangerous cycling situations, falls, accidents and damage to your bike.
9.1.3
Problem
Noises: clicking, knocking, grinding, etc.
Problem
Wheels “hobbling”
Noises: clicking, knocking,grinding, etc.
Sluggish handling
Increasingly sluggish handling, very odd rolling motion(you feel every stone)
Possible causes
• Frame and/or fork damaged
Possible causes
• Damage to tyres• Snapped spoke
• Foreign bodies caught in the wheel
• Damage to wheel
• Air pressure too low
• Slow puncture
Remedial action
• Seek out a specialist workshop immediately.
Remedial action
• Seek out a specialist workshop immediately.
• Remove foreign bodies. Afterwards, only use your cycle with great care. Have your cycle inspected for any consequential damage by a specialist workshop.
• Seek out a specialist workshop immediately.
Increase the tyre pressure (see chapter 7.1.3.). If the same handling characteristics are observed soon afterwards, you have a slow puncture (see next row).
• Replace inner tube, along with tyre and rim tape where appropriate.
• In tubeless systems, replace tyre. Seek out a professional workshop (*) immediately. The bike may not be used until then.
Wheels and tyres
Risk of damage or injury!
Damage to wheels and tyres can result in dangerous cycling situations, falls, accidents and damage to your bike.
- Consult your specialist dealer immediately if you notice the slightest defect.
- Only continue riding your bike once it has been properly overhauled by your specialist dealer.
9.1.4
(*): You can replace the inner tube, tyre and rim tape yourself if you have appropriate experience. Have your stockist show you this procedure and practice it until you are familiar with it. See chapters 8.6 and 11.2 on fitting and removing the wheels.
10 After a fall or accident

34 35
1 On the back wheel, change to the smallest sprocket on the cogset (see chapter 8.4). • To do so, raise the back of the bike, engage the appropriate control and turn the crank by hand in the drive direction until the chain is on the smallest sprocket.
2 On a front wheel with hub dynamo (if present): • Detach the pluggable connector between
dynamo and cable.3 Remove the wheel hub.
• Open the quick release lever on your wheel (see chapter 8.6, quick release lever). • Unscrew the locknut so that it just about
stays on the axle.4 Remove the wheels from the frame and fork. • Front wheel: lift up the bike by the handlebars
and pull the wheel out from the front fork dropouts
• Back wheel: raise the back of the bike slightly and push the chain guide backwards. In this position, lightly push the back wheel in the direction of the dropout opening.
Racing bike brakes:
a] Shimano and SRAM: turn the lever upwards.
Opening the brake Opening the brake
b] Campagnolo: • There is no lever on the brake itself: • In order to open it, press the pin on the
brake lever from the inside to the outside while gently pulling the brake lever.
- Practice this job at least once under his supervision.
- Only remove and fit the wheels if you are sure you are competent to do so.
Risk of burns!
After long descents, wheel rims can get very hot.
- Do not touch the rim immediately after a descent.
- Leave the wheel rim to cool off before you touch it.
- In order to check the temperature, very briefly tap the rim with your bare finger. If it feels hot, wait a few minutes and repeat the test until the rim has cooled off.
Risk of damage or injury!
Applies only to calliper brakes:When fitting and removing the wheels, contact with the tyres can cause the brake blocks to twist out of position.
- After fitting the wheels, ensure that the brake blocks are in the correct position (see chapter 7.6).
- If they are not, consult a specialist workshop immediately.
If your wheels are fitted with quick release axles, you may remove them for transportation and fit them again afterwards.
If your bike has calliper brakes, take care not to alter the position of the brake blocks with the tyre. This is particularly likely to be the case with high-volume tyres. If the tyre does not readily fit through the brake assembly, let out some air until is does. Afterwards, pump your tyre back up to the correct air pressure.
This is how to remove your wheels. First remove the front wheel:
Open the calliper brake.
Risk of damage or injury!
Use of an unsuitable transportation system can result in damage to cycle parts which are important for safety and lead to dangerous cycling situations, falls, accidents and damage to your bike.
Transport this bike or frame only in the interior of your car.
No other objects must be placed on top of this bike or frame.
This bike may not be transported using a rack system (roof carrier, tailgate carrier, etc.).
This bike may only be transported in the interior of your car. Please ensure that the bike is secure and cannot be damaged by other items of luggage, for example.
For transportation, you may remove the front and rear wheels plus the seatpost and saddle, where these are fitted with quick release axles.
Only perform this disassembly if you are sure of being able to reassemble these parts competently. See chapter 8.6.
If your wheels are bolted to the frame (e.g. with hub gears), consult your specialist dealer.
Risk of damage to property!
If your bike is in the interior of the vehicle, heat from the sun may cause the tyres to burst or come loose from the rims.
Before transporting the bike, let the air out of the tyres and pump them back up after transportation (see chapter 7.1.3).
Fitting and removing the wheels
Risk of damage or injury!
Incorrectly fitted wheels can result in dangerous cycling situations, falls, accidents and damage to your bike.
- Have your specialist dealer show you how to remove and fit your wheels.
11 Transporting your bike
!
11.1
Opening the brake
Opening the brake Push chain guide backwards and lift frame upwards
Brake and brake lever ope

36 37
11.2
• Be sure not to open the brake assembly when you do so (in calliper brakes)/There is no need to open the brake assembly when you do so (in calliper brakes).If this action does not lead to any improvement, consult your specialist dealer immediately.
• Ensure that the lighting works (if present). • Ensure that the wheels are not touching
the mud guards or baggage rack (if fitted).
Fitting and removing seatpostand saddle
Risk of damage or injury!
An incorrectly fitted seatpost can result in dangerous cycling situations, falls, accidents and damage to your bike.
Be sure to have your specialist dealer show you how to remove and fit your seatpost.
Practice this job at least once under his supervision. Only remove and fit the seatpost and saddle if you are sure you are competent to do so.
When transporting your bike, you may remove and refit the seatpost and saddle.
In the Proton FW, Proton and Boson models, the seatpost is attached inside the seat tube of the frame with a clamp and secured with a hexagon socket screw.
In the Meson model, the seatpost has a special clamp; the locking screw points backwards.
The use of both clamps is identical.
In order to release and secure the seatpost, you need an appropriately sized Allen key and torque wrench. Consult your specialist dealer for more information.
This is how to remove your seatpost.- Open the seat clamp by undoing the hexagon
socket screw using an appropriately sized Allen key.
b] Campagnolo: • There is no lever on the brake itself. • Proceed in the opposite sequence than
when opening and press the pin on the brake lever from the outside to the inside, having first pulled the brake lever.
1 Ensure that the friction pads correctly cover the side of the rim when the brake is engaged.
b] Fit the front wheel: • Lift up the bike by the handlebars • place the front wheel under the front fork
dropouts • carefully lower the fork until the axle is
positioned against the stops in the left and right dropouts.
1 Secure the wheel hub. • If securing with a quick-release lever: see
chapter 8.6. • If using a different type of clamping
mechanism: attach the hub in accordance with the enclosed component instructions.
2 Close the calliper brakes
In racing bike brakes:
a] Shimano and SRAM: • Move the lever down.
After removing the wheel, carefully lay the bike on its left side.
Risk of damage to property!
Without the back wheel, the frame and/or the derailleur mechanism can get damaged.
After removing the back wheel, lay the bike on its left side or use a suitable work stand.
This is how to fit your wheels.Fit the back wheel first:a] Fit the rear wheel: • Lift up the back of the bike, • place the back wheel underneath it in such
a way that the chain is above the smallest sprocket.
• Carefully lower the back of the bike until the axle is positioned against the stops in the left and right dropouts.
Wheel removed from frame
Placing the hub in the dropouts
Placing the hub in the dropouts Closing the brake
Brake closed
Correct brake block adjustment
2 On a front wheel with a hub dynamo (if present): • Connect the pluggable connector between
hub dynamo and cable.
3 Check that the wheel is fitted correctly: • To do so, operate the brakes. • If a brake block is touching the rim after you
have operated the brakes, this may mean that the hub is incorrectly positioned in the dropouts.
• In this case, release the quick release lever, check and correct the position of the hub and close the quick release lever again.

38 39
• Hold the seatpost beside the seat tube so that your fingertip is again directly above the level of the clamp.
• In this position, the bottom end of the seatpost must be at least 3 cm below the bottom of the top tube.
Do not exceed the maximum insertion depth of your seatpost!
• Only insert your seatpost into the seat tube while you can do so with minimum force.
• The diameter of the seatpost must be appropriate for clamping and the shaft must be straight throughout the clamping range.
• In seatposts on fully-assembled ISAAC bikes, the distance between saddle clamp and seatpost clamp must be at least 8 cm.
For seatposts and/or seat tubes made of carbon fibre:- The seat tube and seatpost must be free
from grease along the insertion range, or use a fitting lubricant specially designed for carbon-fibre parts.
In seatposts on fully-assembled ISAAC bikes:- Push the saddle with seatpost into the seat
tube until you have achieved the desired seat height.
- The “minimum” mark should be inside the seat tube of the frame and no longer be visible.
Seatposts bought separately:- Push the saddle with seatpost into the seat
tube until you have achieved the desired seat height.
- In this position, the bottom end of the seatpost must be at least 3 cm below the bottom of the top tube.
Observe the following guideline.
Do not rely solely on the mark on the seatpost. This is how to check the correct insertion depth:
• Hold a fingertip against the fitted seatpost directly above the clamp.
• Leave your fingertip at this point and pull the seatpost out of the seat tube.
Pull the saddle with seatpost upwards out of the frame.
This is how to fit your seatpost.
For seatposts and seat tubes made of metal:Grease the seat tube down to the seatpost insertion depth.
!
!
Clamp, Meson model
Undoing the locking screw
Greasing the seat tube
Greasing the seatpost
Minimum insertion depth for a seatpost without marking
Mark the minimum insertion depth with your fingers
Leave your fingers in the same position on the seatpost while inserting
Insert the seatpost at least until your fingers touch the clamp
1 Twist the saddle so that the tip points in the direction of travel.
2 Make sure the clamp is attached flush to the frame and that the slits in the seat tube and the clamp are covered.
3 Turn the clamp’s hexagon socket screw using a torque wrench. You can find the specified torque in chapter 3.3.
Risk of damage or injury!
A carbon-fibre seatpost which has been clamped too tightly can break off and result in dangerous cycling situations, falls, accidents and damage to your bike.
Follow the fitting instructions and apply the specified torque.
Mark the position of the seatpost which is right for you with adhesive tape.!
40 41
Type of inspection
Subsequent inspections
Check friction pads/brake blocks
Check wear of chain
Change handlebars and stem
1 Clean all remaining very dirty spots by hand with a clean, lint-free cotton cloth and a suitable cleaning agent.
2 Spray the entire bike with suitable spray wax or a similar preservative.
Exceptions: • Brake blocks • Wheel rims if you have calliper brakes:
3 Polish your bike after the specified application time using a clean, lint-free cotton cloth.
4 Clean brake blocks and wheel rims by hand using a clean, dry lint-free cotton cloth and a suitable degreasing agent.
Clean and lubricate your chain, as described, after every ride in wet weather, every long ride on sandy surfaces and at least every 200 km.
Risk of damage or injury!
If you use too much lubricant, it can drip onto the wheel rims and soil them. This will have the effect of reducing the braking effectiveness. - Remove excess lubricant from the chain using
a clean, dry and lint-free cotton cloth.- Clean the wheel rim and brake disc using
a suitable degreasing agent. Consult your specialist dealer.
Risk of damage or injury!
If spray wax or preservative gets onto the wheel rims and/or the brake blocks, this will reduce the effectiveness of your brakes.- Clean these components with a suitable
degreasing agent. Consult your specialist dealer.
With many cleaning agents, if your bike is not very dirty, simply spraying on and rinsing off after the prescribed application time is sufficient.
After the application time has elapsed, you can loosen stubborn dirt using a radiator brush, for example, before rinsing.
Risk of damage to property!
Cleaning agents, lubricants and preservatives are chemical products. Incorrect application can damage your bike.- Only use products which are expressly
intended for carbon-fibre bikes and components.
- Ensure that the substance used is not corrosive to paint or parts made of rubber, plastic or metal. Consult your specialist dealer for more information.
- Observe the relevant manufacturer’s instructions.
3 Rinse the entire bike with a gentle water jet and leave it to dry
4 Clean the chain: • Drizzle a suitable chain cleaner onto a clean,
lint-free cotton cloth and use it to wipe down the chain.
• When doing so, slowly turn the crank in the direction opposite the drive direction.
• Keep repeating this procedure with clean patches of the cotton cloth until the chain is clean.
• Leave the cleaning agent to evaporate for approximately 1 hour.
If there is any cleaning agent left between the links of the chain, the new lubricant will immediately begin to break down and be rendered ineffective.
• Carefully apply a lubricant which is suitable for bicycle chains to the chain links.
Risk of damage to property!
Lubricants for motorcycle chains will gum up your cycle chain and drive components.
Only use lubricants expressly approved for bicycle chains.
Risk of damage or injury!
Parts which are important for safety can be damaged by corrosion and their strength compromised. Such components could then break during operation, resulting in serious falls.
The following are conducive to corrosion: - salt (e.g. from gritting in winter)- salty air (e.g. near the coast or in
industrial areas)- sweat
So-called rust-proof materials can also be affected by corrosion.
If your cycle is exposed to substances which encourage corrosion, your bike must be- treated to protect it from all contact with
these substances- cleaned and retreated after all contact
with such substances.
Risk of damage to property!
Do not use a steam blaster. The aggressive water jet could damage your bike.
Taking good care of your bike will increase its lifespan and those of its components. Clean and care for your bike regularly.
For wet cleaning, use a gentle water jet or a bucket of water and a sponge.
Only use fresh water or desalinated water.
There are many ways to clean a bike. Below is a tried and tested method for cleaning a very dirty bike:
1 Use a gentle water jet to remove coarse dirt such as soil, stones, sand, etc.
2 Leave the bike to dry a little.3 Spray your entire bike with a suitable
detergent.
Cleaning and caring for your bike12
!
!
!
!
Service plan:Have your bike serviced at the prescribed intervals exclusively by a specialist workshop approved by the manufacturer.
Normal use
• after 200 km or 2 months at the latest
• every 2000 km or 1x per year
• every 400 km
• every 500 km
• after a fall (see chapter 9)• as directed by component
manufacturers or• at least every 5 years
Frequent sporting, competitive or similar use
• after 100 km or 1 month at the latest
• every 500 km or every 2 months
• every 100 km
• every 250 km
• after a fall (see chapter 10)• as directed by component
manufacturers or• at least every 2 years
Under unfavourable conditions, your chain can wear quickly. Changing it at an early change will increase the life of the sprockets.

42 43
Imprint
Manufacturer Tehava International BV
Address Tomeikerweg 31 6161 RB Geleen, Niederlande
Consulting Andreas Zauhar, Publicly appointed and sworn expert on cycle damage and assessment for Munich and Oberbayern Horner Strasse 12d D-83329 Waging - Tettenhausen T + 49 8681/4779284 F + 49 8681/4779284 www.andreas-zauhar.de [email protected]
The claim to guarantee expires:- in case of defects or damage which may
be ascribed to your failure to observe the guidelines in this instruction manual.
- in case of complaints which may be ascribed to the fact that you have failed to use the original replacement parts specified in the instruction manual when replacing bike parts.
- in case of modifications to the bike without prior permission from the manufacturer.
Risk of damage to property!
Incorrect storage of a bike can damage the bearing and tyres as well as encouraging corrosion.
Observe the following guidelines.
Clean and care for your bike as described in chapter 12.
1 Only store your bike in rooms which are dry and not dusty.
2 Use suitable bike stands (e.g. 3-legged stands or wall hooks). Consult your specialist dealer for more information.
3 If one or both wheels are touching the ground:
• Lift your bike every 2-3 weeks and turn the wheels a few revolutions by hand.
• Move the handlebars from side to side a few times.
• Turn the crank a few revolutions by hand in the direction opposite the drive direction.
When you use the bike again, carry out the checks in chapter 7.
13 14Storing your bike for an extended period Guarantee, warranty

44 45
Seatpost clampSeatpost clampSeat tubeSeat railsSeatpostGear/brake leverSpokeHead tubeHeadsetFront derailleurDown tubeValveStemFront wheel
TyresWheel rimCalliper brake (racing bike)Side of rimForkRear wheelChain stayHandlebarsHandlebar tapeHandlebar stemTop tubeFrameSaddleSaddle clamp bolt(s),Seatpost clamp bolt(s)
••••••••••••••••••••••••••••••••••••••••••••••••••••
Hub, rearHub, frontTop tubePedalFrameTyreRear sprocketSaddleSaddleSaddle clamp bolt(s)Saddle tubeSeat staySeatpostSeatpost clampSeatpost clamp bolt(s)Seatpost clampGear/brake leverControllerGear leverDerailleur mechanismChain guideShift cableQuick release axleQuick releaseQuick release leverSeat tubeSeat staySpokeDust capSeat tubeHeadsetTriathlon attachmentFront derailleurDown tubeValveValve capValve nutWear indicator, rimStemFront wheelFront wheel hubSprocketSprocket cassetteTime-trial attachment
Shift cableQuick release axleQuick releaseQuick release leverSeat tubeSeat staySpokeDust capSeat tubeHeadsetTriathlon attachmentFront derailleurDown tubeValveValve capValve nutWear indicator, rimStemFront wheelFront wheel hubSprocketSprocket cassetteTime-trial attachmentDropoutTyresBrakeFriction padBrake leverBrake blockBrake cableWheel rimCalliper brake (racing bike)Side of rimForkSteer tubeRear wheelRear wheel hubChainChainringChainring boltChain pinsChain linkChain lugCranksetChain stayClampClipless pedalCrank Crankset Crank bolt HandlebarsHandlebar extensionHandlebar tapeHandlebar stem
Key to figures
••••••••••••••••••••••••••••••••••••••••••••
Terms
A1A2A3A4A5A6A7A8A9A10A11A12A13A14
A14a
A15A16A17A18A19A20A21A22A23A24A25A26
15

46 47
ChainsetDerailleur mechanismChain guideRear sprocket, sprocket cassette
Gear leverDerailleur chainChainringChainring boltCrank
Brake lever (in Shimano STI: the brake levers are also gear levers)
Figure B Figure C
B1B2B3B4
C1B5B6B7B8
C2

48 49
DropoutRear hubQuick release, quick release lever
Friction padBrake blockBrake cable
Figure D Figure E
D1D2D3
E1E2E3

50 51
Front hubQuick release axleQuick release lever
Valve cap, dust capValve nut
Figure F Figure G
F1F2F3
G1G2

52 53
Wear indicator on wheel rim Clipless pedal, pedal
Figure H Figure I
H1 I1

54 55
Chain lugChain pins
Figure J
J1J2

Tehava International is exclusive importer of ISAAC Cycles / www.isaac-cycle.com / [email protected]