Winscribe Internet Importer User Guide · 3 Contents Contents Welcome to Winscribe Importer ..... 5
56
Copyright ©2013, Winscribe Inc. All rights reserved. Publication Date: October 2013 Winscribe Internet Importer User Guide 4.2
Transcript of Winscribe Internet Importer User Guide · 3 Contents Contents Welcome to Winscribe Importer ..... 5
Copyright ©2013, Winscribe Inc. All rights reserved.
Publication Date: October 2013
Winscribe Internet Importer User Guide
4.2

2
Copyright© 2013 Winscribe Inc. All Rights Reserved.
Portions of the software described in this document Copyright© Microsoft Corporation. All Rights Reserved. Information in this document is subject to change without notice. The software described in this document is furnished under a license agreement or nondisclosure agreement. The software may be used or copied only in accordance with the terms of those agreements. No part of this publication may be reproduced, stored in a retrieval system, or transmitted in any form or any means electronic or mechanical or photocopying and recording for any purpose other than the purchaser's personal use without the written permission of Winscribe Inc.
Winscribe® is a registered trademark of Winscribe Inc. in New Zealand and other countries. Microsoft is a registered trademark, Windows NT and Windows is a trademark of Microsoft Corporation. Dragon NaturallySpeaking® is a trademark of Nuance, Inc. and is used here under license. Other brands and their products are the trademarks or registered trademarks of their respective holder and should be noted as such.
Winscribe Inc. P.O. Box 33-178 Takapuna Auckland New Zealand Email: [email protected] Visit our web page: http://www.winscribe.com

3
Contents
Contents
Welcome to Winscribe Importer ........................................................................................................ 5
Logging On ........................................................................................................................................ 6
Logging In For the First Time ......................................................................................................................................... 6 Logging In After the First Time ...................................................................................................................................... 6
Winscribe Importer Window .............................................................................................................. 7
Getting Help ...................................................................................................................................... 8
Getting Help from the Help Menu ................................................................................................................................ 8 Getting Information from the Winscribe Website ........................................................................................................ 8 Getting Version Information ......................................................................................................................................... 8
Changing Views ................................................................................................................................. 9
Showing and Hiding the Outlook Bar ............................................................................................................................ 9 Showing and Hiding the Status Bar ............................................................................................................................... 9 Changing the Language Setting..................................................................................................................................... 9
Winscribe Importer Log ................................................................................................................... 10
Viewing the Winscribe Importer Log Window ............................................................................................................ 10 Viewing and Printing Log Details ................................................................................................................................ 10 Deleting Log Entries .................................................................................................................................................... 10
Dictation Devices ............................................................................................................................. 11
Supported Dictation Devices ...................................................................................................................................... 11 DSS Pro (.ds2) .............................................................................................................................................................. 11
DS2 Encryption Support ........................................................................................................................................ 12 Dictation Device Setup Requirements ........................................................................................................................ 13
Setting up Winscribe Importer ......................................................................................................... 14
Minimum System Requirements ................................................................................................................................ 14 Getting Importer installed as a service to work with active directory authentication ............................................... 14
Source Definitions ........................................................................................................................... 15
Creating New Source Definitions ................................................................................................................................ 15 Source Folder .............................................................................................................................................................. 16 Changing or Viewing Source Definitions ..................................................................................................................... 17 Deleting Source Definitions ........................................................................................................................................ 18
Input Tag Definitions ....................................................................................................................... 19
Creating New Input Tag Definitions ............................................................................................................................ 19 Get Information by Searching for Specified Characters in the File ....................................................................... 19 Get Information From Specified Locations in the File: .......................................................................................... 20 Get Information From Specified Line Numbers in the File .................................................................................... 21
Changing or Viewing Input Tag Definitions ................................................................................................................. 22 Deleting Input Tag Definitions .................................................................................................................................... 23
Destination Definitions .................................................................................................................... 24
Creating New Destination Definitions ........................................................................................................................ 24 Changing or Viewing Destination Definitions ............................................................................................................. 25 Deleting Destination Definitions ................................................................................................................................. 26 Working With Destination Definitions ........................................................................................................................ 26 Destinations and Multi-Facility ................................................................................................................................... 27 Referencing A Network Share ..................................................................................................................................... 27
Rule Definitions ............................................................................................................................... 29
Creating New Rule Definitions .................................................................................................................................... 29
4
Winscribe Internet Importer User Guide
Changing or Viewing Rule Definitions ......................................................................................................................... 29 Deleting Rule Definitions ............................................................................................................................................ 31 Changing Rule Checking Orders .................................................................................................................................. 31
Script Definitions ............................................................................................................................. 33
Creating New Script Definitions .................................................................................................................................. 33 Changing or Viewing Script Definitions ....................................................................................................................... 33 Deleting Script Definitions .......................................................................................................................................... 34 Working with Scripts ................................................................................................................................................... 34 Send Email .................................................................................................................................................................. 35
Importing Dictation Jobs .................................................................................................................. 36
Source Monitoring ........................................................................................................................... 37
Starting Source Monitoring ......................................................................................................................................... 37 Checking Monitoring Status ........................................................................................................................................ 37 Stopping Source Monitoring ....................................................................................................................................... 37 Changing Source Monitoring Settings......................................................................................................................... 38
Configuring Hardware Devices ......................................................................................................... 40
Olympus ...................................................................................................................................................................... 40 Olympus DS-2000/DS-3000/DS-330/DS-660 ......................................................................................................... 40 Olympus DS-3500/DS-5000/DS-7000 .................................................................................................................... 42
Philips .......................................................................................................................................................................... 42 DPM Date & Time Synchronisation ....................................................................................................................... 42 Philips 9300 ........................................................................................................................................................... 42 Philips 9350 ........................................................................................................................................................... 42 Philips 9600+ ......................................................................................................................................................... 44
Grundig ....................................................................................................................................................................... 44 Lanier VoiceWrite ....................................................................................................................................................... 45
Security ........................................................................................................................................... 46
Changing Your Security Code ...................................................................................................................................... 46 Changing Your User Id................................................................................................................................................. 46
Troubleshooting .............................................................................................................................. 48
Glossary of Terms ............................................................................................................................ 51
Index ............................................................................................................................................... 55
5
Welcome to Winscribe Importer
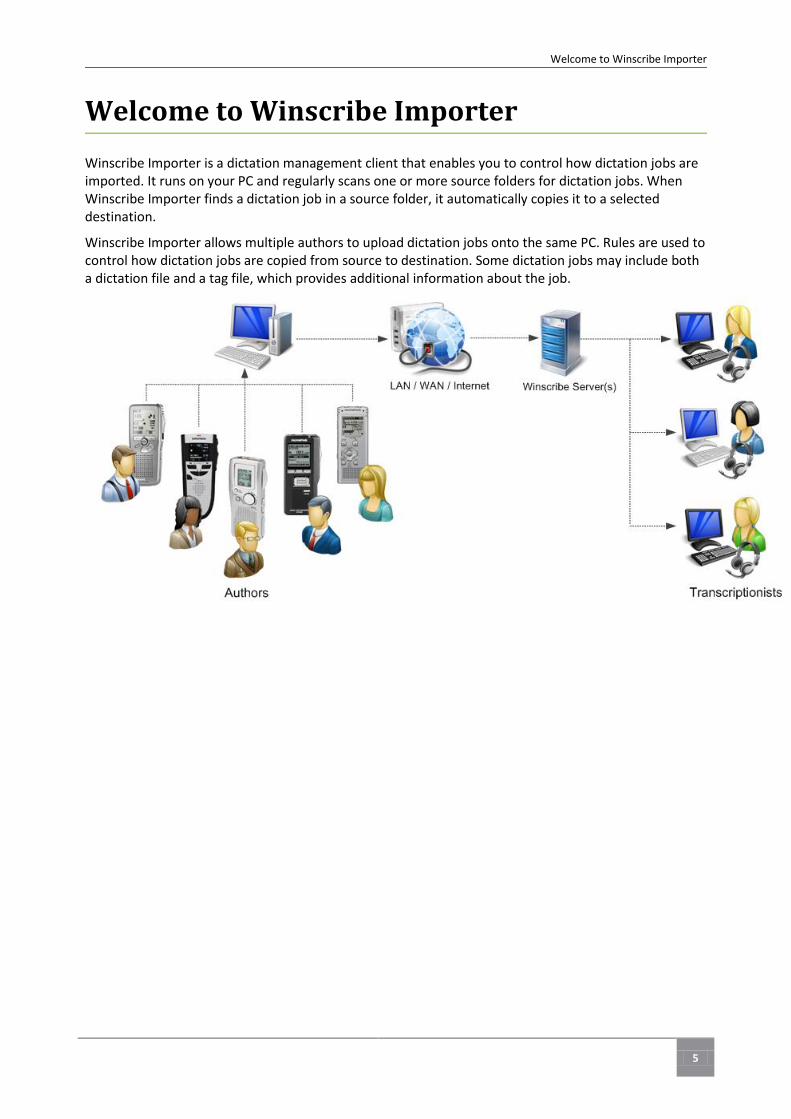
Winscribe Importer is a dictation management client that enables you to control how dictation jobs are imported. It runs on your PC and regularly scans one or more source folders for dictation jobs. When Winscribe Importer finds a dictation job in a source folder, it automatically copies it to a selected destination.
Winscribe Importer allows multiple authors to upload dictation jobs onto the same PC. Rules are used to control how dictation jobs are copied from source to destination. Some dictation jobs may include both a dictation file and a tag file, which provides additional information about the job.
Welcome to Winscribe Importer
6
Winscribe Internet Importer User Guide
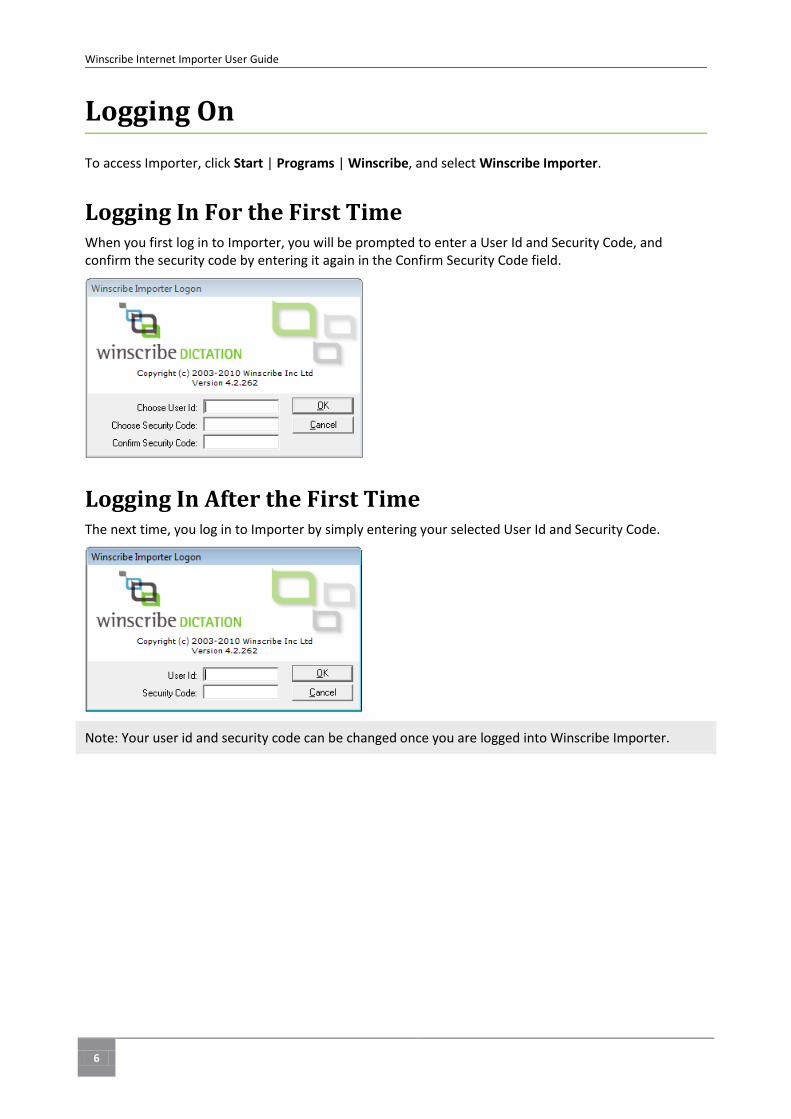
To access Importer, click Start | Programs | Winscribe, and select Winscribe Importer.
Logging In For the First Time When you first log in to Importer, you will be prompted to enter a User Id and Security Code, and confirm the security code by entering it again in the Confirm Security Code field.
Logging In After the First Time The next time, you log in to Importer by simply entering your selected User Id and Security Code.
Note: Your user id and security code can be changed once you are logged into Winscribe Importer.
Logging On
7
Winscribe Importer Window
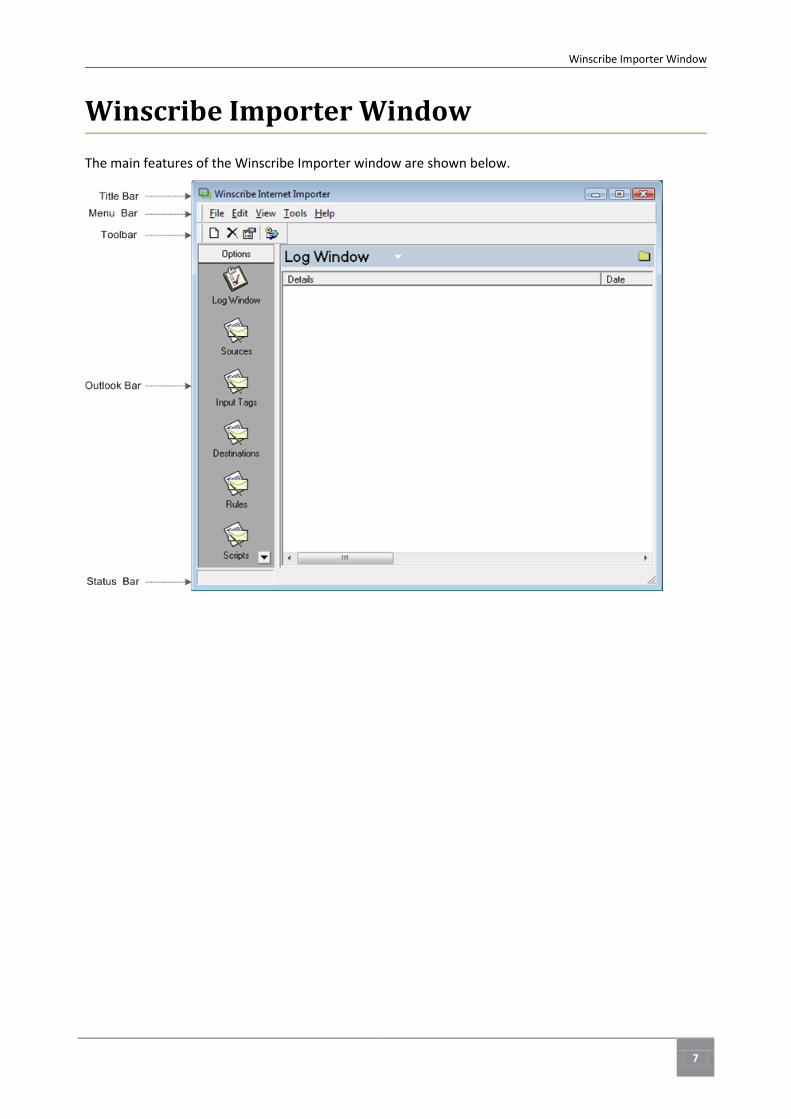
The main features of the Winscribe Importer window are shown below.
Winscribe Importer Window
8
Winscribe Internet Importer User Guide
Getting Help from the Help Menu Just click Help on the Help menu:
To scroll through the Help table of contents, click the Contents tab.
To search the index, click the Index tab.
To search for specific words or phrases, click the Search tab.
Getting Information from the Winscribe Website You can connect to the Winscribe website directly from Winscribe Importer by using the Winscribe on the Web command on the Help menu.
Getting Version Information On the Help menu, click About Winscribe. Program information is displayed in the About Winscribe dialog box.
Getting Help

9
Changing Views
Showing and Hiding the Outlook Bar The Outlook bar shows the icons for the Log Window, Sources, Input Tags, Destinations, and Rules controls.
To show or hide the Outlook bar, on the View menu, click Outlook Bar.
Showing and Hiding the Status Bar The Status bar shows the current monitoring status of Winscribe Importer.
When Winscribe Importer is monitoring the source folders, status is shown as "Monitoring..."
When Winscribe Importer is not monitoring the source folders, status is shown as "Not Monitoring" or blank.
To show or hide the Status bar, on the View menu, click Status Bar.
Changing the Language Setting The language setting controls the language used by the Winscribe Importer.
To change or view the language setting:
1. On the Tools menu, click Options then select the General tab.
2. To change the settings, select the required language from the dropdown menu.
Changing Views
10
Winscribe Internet Importer User Guide
Winscribe Importer always displays the Log Window at startup. The log displays progress, error and warning messages produced by Winscribe Importer when:
Starting and stopping the monitoring of source folders.
Dictation jobs are being copied from source to destination.
Problems arise as dictation jobs are copied from source to destination.
Configuration errors are encountered.
Program errors are encountered.
Viewing the Winscribe Importer Log Window To view the Winscribe Importer log, click the Log Window icon on the Outlook bar. The log window is displayed.
Viewing and Printing Log Details To view and (optionally) print the details of a Winscribe Importer log entry:
1. Make sure that the log window is displayed
2. Double click on the log entry. The Log Window Properties dialog box is displayed.
3. If you wish to print the log entry details:
Click Copy. Details of the entry are copied into the Clipboard.
Start Notepad or a word processor such as Microsoft Word.
Press CTRL+V to copy the entry details into the current document.
Print the document.
Deleting Log Entries Before deleting any Winscribe Importer log entries, make sure that the Log Window is displayed.
To delete one log entry:
1. Click the entry details to select a log entry.
2. Click .
To delete all log entries:
1. Click .
Note: If any entry is selected, only that entry is deleted. To unselect an entry, click to the right of the Details column.
Winscribe Importer Log

11
Dictation Devices
If you plan to use Winscribe Importer to import dictation jobs that have been loaded from a dictation device, you must first set up the dictation device itself. Important: Your dictation device must produce dictation files in a supported format.
Supported Dictation Devices Winscribe Importer supports any dictation device that produces a dictation file in .WMA, .WAV, .DSS, .SPX, .MP3, .MPC, .DS2, .VOX or .AMR format and has software that will copy that file to a source folder. The .WAV and .WMA formats require that suitable CODECs are installed on your PC. The .VOX files must be in Dialogic 8khz adpcm format. The author id, job type id, keyfield and priority of a dictation job can be extracted directly from the dictation file itself for .DSS (Olympus) and .WAV (Philips) files. For details on the .DS2 audio format, refer to the DSS Pro (.ds2) section below.
Dictation devices that have been specifically tested by Winscribe Importer include:
Grundig Digital Recorders:
Digta 410
Digta 420
Digta 4010
Digta 4015
Olymus Digital Recorders:
DS-2000
DS-2200
DS-2300
DS-3000
DS-3300
DS-3400
DS-4000
DS-5000
DS-5000id
DS-330
DS-660
DS-30
DS-40
Philips Digital Pocket Memos:
DPM 9250 *
DPM 9300
DPM 9350 *
DPM 9360 *
DPM 9400 / DPM 9400i *
DPM 9450 / 9450 VC *
DPM 9500
DPM 9600+ *
Sanyo Digital Recorders:
ICR-B50
ICR-B100
ICR-B130
ICR-B150
ICR-B5000
* only supported in standard play mode (SP) and quality play mode (QP). Long Play (LP) mode is not supported.
Includes support of barcode module (model 9824).
Winscribe Importer (Winscribe version 3.3 onwards) supports the importing of BCB, PIKA, ADPCM, .DVI, .PDA, .SPX, .WAV, BWF (.WAV), and Dictaphone VNX files.
DSS Pro (.ds2) The Importer application can support DSS Pro (file extension .ds2) files. DSS Pro files have a sampling rate of 16kHz. If you import a .ds2 file and convert it to GSM, Internet Importer will up-sample the file to 22kHz. If you convert the .ds2 file to VOX, Internet Importer will down-sample the file to 8kHz when uploading it to the Winscribe Server.
Dictation Devices
12
Winscribe Internet Importer User Guide
If the Importer is installed as a service and you want to import files in VOX format, set this up as follows:
1. Open the Run window by clicking on the Windows Start menu and selecting Run.
2. Type services.msc into the Run window and click OK. This opens the Services window.
3. Scroll down in this window until you find Winscribe Importer. Right-click on it and select Properties from the right-click menu.
4. Select the Log-on tab and make sure that the Allow service to interact with desktop checkbox is selected then click OK.
5. Right-click on Winscribe Importer again and select Restart.
The Importer will now be able to import DSS Pro files in VOX format.
DS2 Encryption Support
Importer uses a password to read encrypted DS2 files from Philips, Olympus, and Grundig devices.
Password Configuration
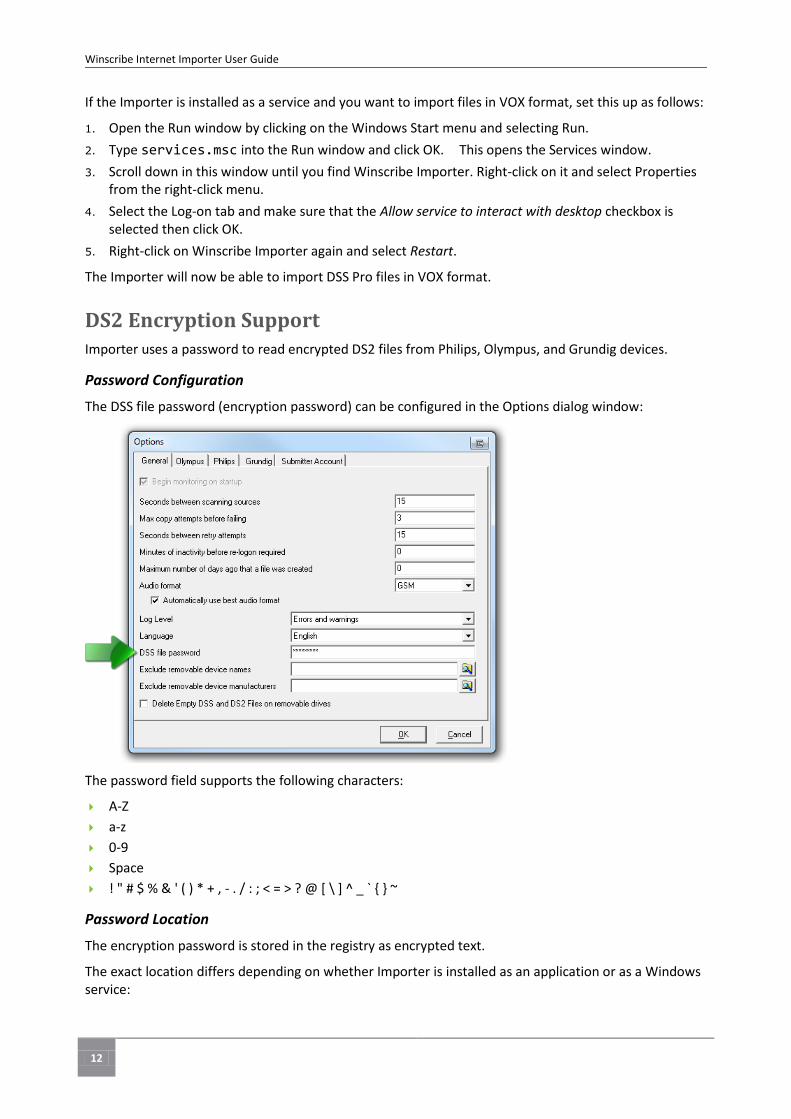
The DSS file password (encryption password) can be configured in the Options dialog window:
The password field supports the following characters:
A-Z
a-z
0-9
Space
! " # $ % & ' ( ) * + , - . / : ; < = > ? @ [ \ ] ^ _ ` { } ~
Password Location
The encryption password is stored in the registry as encrypted text.
The exact location differs depending on whether Importer is installed as an application or as a Windows service:
13
Dictation Devices
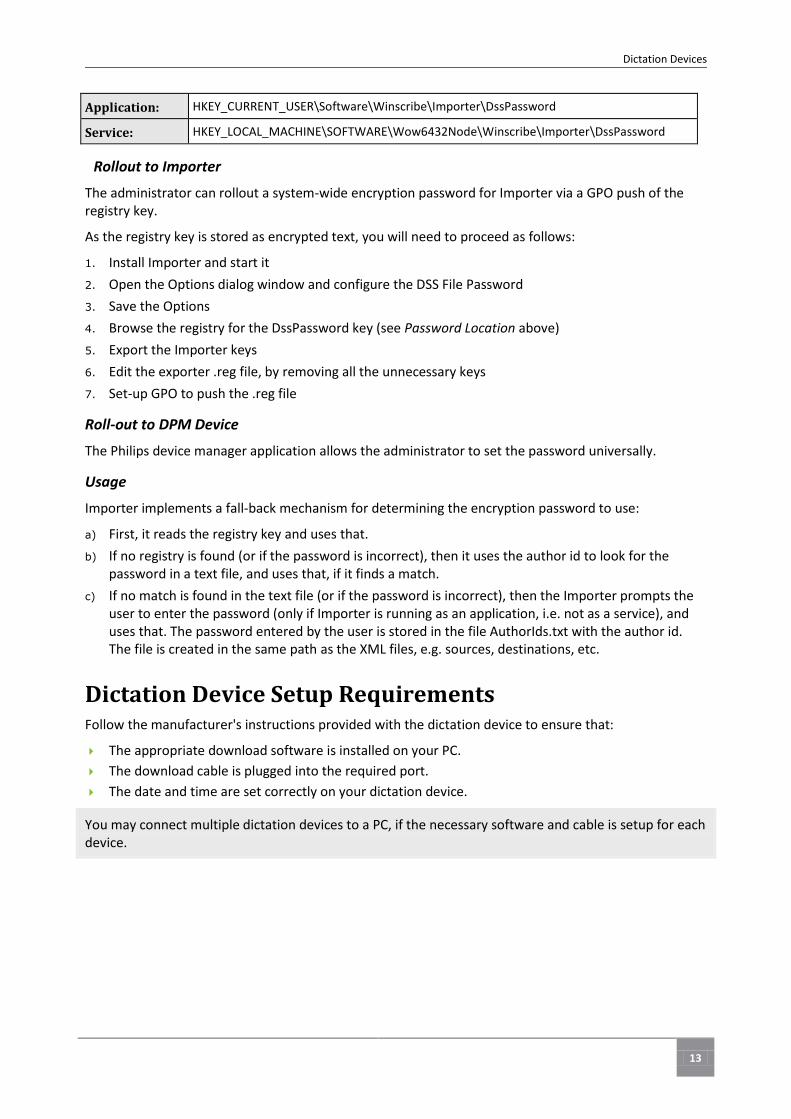
Application: HKEY_CURRENT_USER\Software\Winscribe\Importer\DssPassword
Service: HKEY_LOCAL_MACHINE\SOFTWARE\Wow6432Node\Winscribe\Importer\DssPassword
Rollout to Importer
The administrator can rollout a system-wide encryption password for Importer via a GPO push of the registry key.
As the registry key is stored as encrypted text, you will need to proceed as follows:
1. Install Importer and start it
2. Open the Options dialog window and configure the DSS File Password
3. Save the Options
4. Browse the registry for the DssPassword key (see Password Location above)
5. Export the Importer keys
6. Edit the exporter .reg file, by removing all the unnecessary keys
7. Set-up GPO to push the .reg file
Roll-out to DPM Device
The Philips device manager application allows the administrator to set the password universally.
Usage
Importer implements a fall-back mechanism for determining the encryption password to use:
a) First, it reads the registry key and uses that.
b) If no registry is found (or if the password is incorrect), then it uses the author id to look for the password in a text file, and uses that, if it finds a match.
c) If no match is found in the text file (or if the password is incorrect), then the Importer prompts the user to enter the password (only if Importer is running as an application, i.e. not as a service), and uses that. The password entered by the user is stored in the file AuthorIds.txt with the author id. The file is created in the same path as the XML files, e.g. sources, destinations, etc.
Dictation Device Setup Requirements Follow the manufacturer's instructions provided with the dictation device to ensure that:
The appropriate download software is installed on your PC.
The download cable is plugged into the required port.
The date and time are set correctly on your dictation device.
You may connect multiple dictation devices to a PC, if the necessary software and cable is setup for each device.
14
Winscribe Internet Importer User Guide
Before you can use Winscribe Importer to import dictation jobs, you must define the necessary sources, destinations and rules. If dictation jobs are being imported from other dictation systems, you may also wish to setup input tag definitions. The following topics are included in this section:
Source Definitions.
Input Tag Definitions.
Destination Definitions.
Rule Definitions.
Script Definitions.
Minimum System Requirements Winscribe Importer will operate satisfactorily on any PC that meets the minimum requirements for the operating system in use: Microsoft 2000, 2003, 2008, 2008 R2, XP, Windows Vista, and Windows 7.
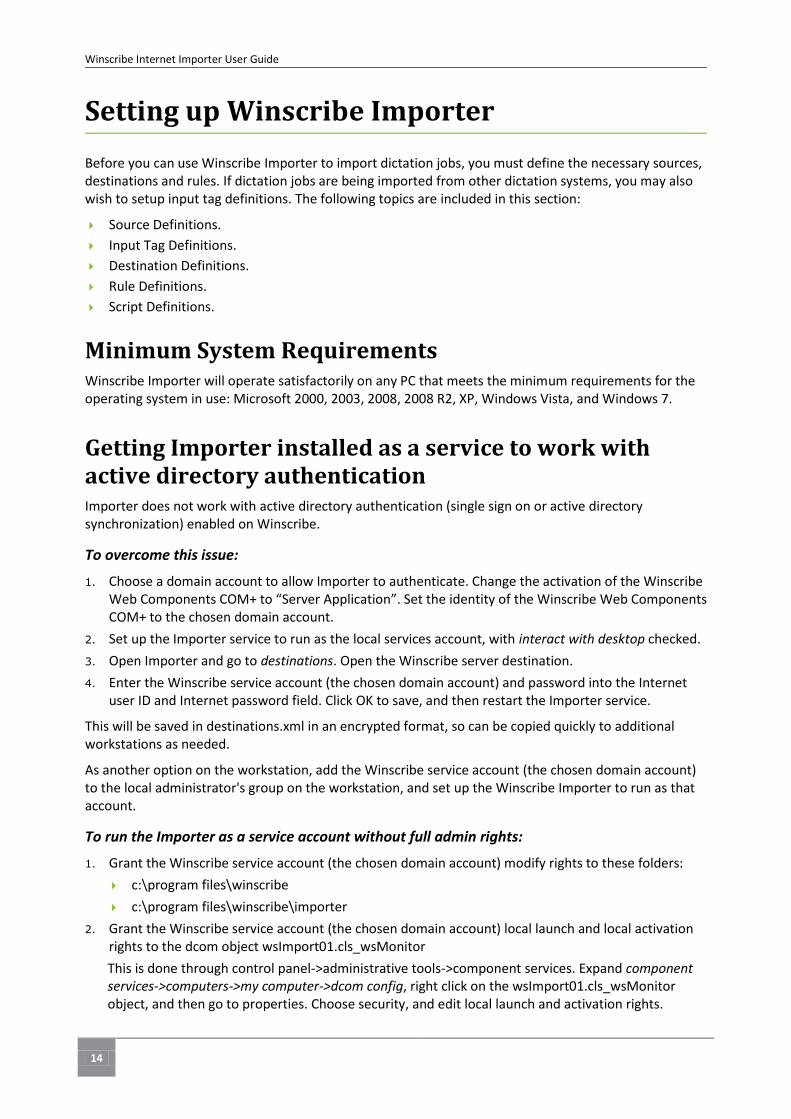
Getting Importer installed as a service to work with active directory authentication Importer does not work with active directory authentication (single sign on or active directory synchronization) enabled on Winscribe.
To overcome this issue:
1. Choose a domain account to allow Importer to authenticate. Change the activation of the Winscribe Web Components COM+ to “Server Application”. Set the identity of the Winscribe Web Components COM+ to the chosen domain account.
2. Set up the Importer service to run as the local services account, with interact with desktop checked.
3. Open Importer and go to destinations. Open the Winscribe server destination.
4. Enter the Winscribe service account (the chosen domain account) and password into the Internet user ID and Internet password field. Click OK to save, and then restart the Importer service.
This will be saved in destinations.xml in an encrypted format, so can be copied quickly to additional workstations as needed.
As another option on the workstation, add the Winscribe service account (the chosen domain account) to the local administrator's group on the workstation, and set up the Winscribe Importer to run as that account.
To run the Importer as a service account without full admin rights:
1. Grant the Winscribe service account (the chosen domain account) modify rights to these folders:
c:\program files\winscribe
c:\program files\winscribe\importer
2. Grant the Winscribe service account (the chosen domain account) local launch and local activation rights to the dcom object wsImport01.cls_wsMonitor
This is done through control panel->administrative tools->component services. Expand component services->computers->my computer->dcom config, right click on the wsImport01.cls_wsMonitor object, and then go to properties. Choose security, and edit local launch and activation rights.
Setting up Winscribe Importer

15
Source Definitions
Winscribe Importer monitors source folders for dictation jobs to be imported. You must define one or more source folders before you can use Winscribe Importer. These folders can be located on your PC or on a file server connected to your organization's LAN. Source folders are scanned every 15 seconds by default (although you can change this), and any dictation jobs found are copied to an appropriate destination.
Creating New Source Definitions
To create a new source definition:
1. If sources are not currently shown in the right-hand pane, click the Sources icon on the Outlook bar. Details of existing source definitions are displayed.
2. On the Toolbar, click the New button . The Source Wizard is displayed. Click Next to continue.
3. Type a descriptive name for the new source, and a brief description of its purpose. Click Next to continue.
4. Type the name of a folder to monitor for this source, choose from the drop-down menu, or use the Browse folder button to choose a folder. Click Next to continue (for further information, please see: Source Folder).
5. The author id, job type id, keyfield, and priority are all extracted from the job, if they are available. They can also be extracted from the filename or a separate file associated with the job. You can determine how this information is extracted, as follows:
6. To extract information from the filename, enter a map in the Filename Map field to indicate the characters that represent each field. (A=Author, D=Delimiter, J=Job Type, K=Keyfield, P=Priority, X=Ignore). For more information on the Filename Map, refer to the Filename Map section in the Glossary.
7. If you have used D (delimiter) in the Filename Map field, you need to also choose the delimiting character to search for (Space, underscore, or dash). Select the required option from the drop down list in the Delimiter Char field.
8. If you want to only import files with a specific prefix, type the filename prefix in the Filename Prefix field. For more information on the Filename Prefix, refer to the Filename Prefix section in the Glossary.
9. If an associated tag file will be available, choose the tag definition from the drop down list in the Input Tag Definition field.
10. Click Next to continue.
11. Provide default values for author id, job type id and priority if they are not able to be determined from the job. Please note the keyfield is an optional value. Click Next to continue.
12. Select whether job files will be archived or deleted, as follows:
13. If you want dictation job files deleted from the source folder once they have been copied to their destination, select the Remove files after copy checkbox.
14. If you want dictation job files copied into a sub-folder once they have been copied to their destination, select the Archive files checkbox and type the number of days you want the archived files to be kept in the Remove Archives after text box (1-99 days).
15. Click Finish.
Source Definitions
16
Winscribe Internet Importer User Guide
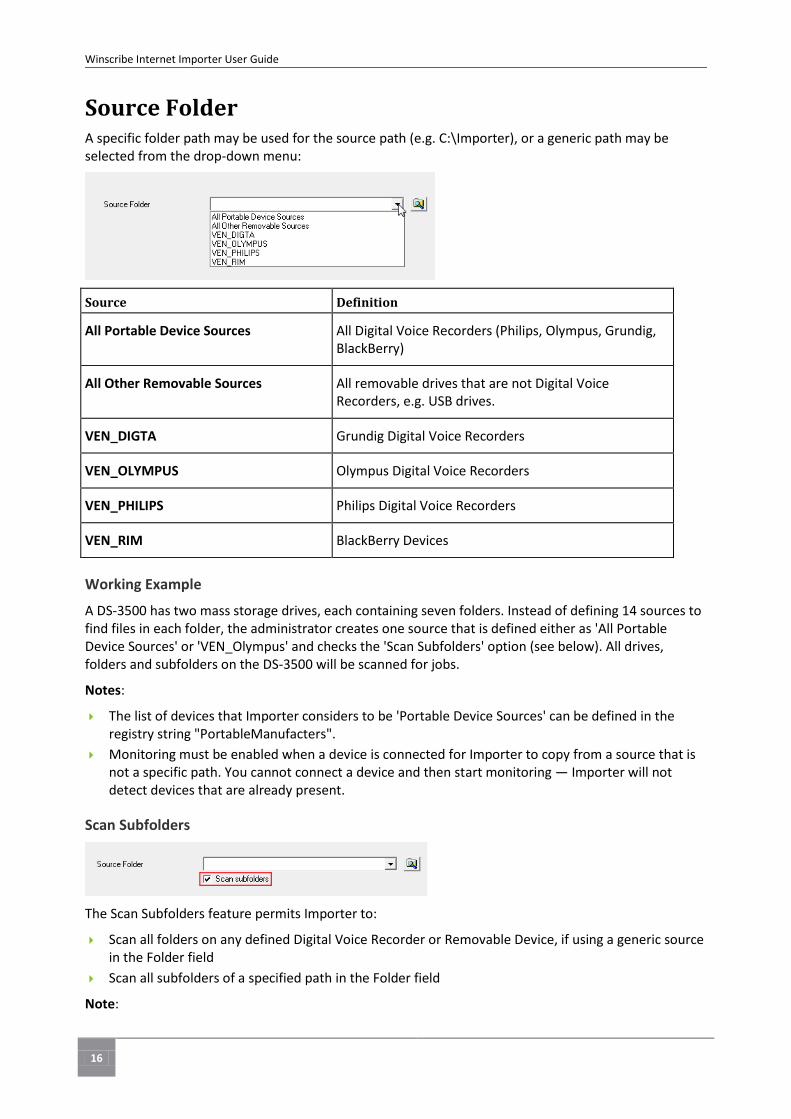
Source Folder A specific folder path may be used for the source path (e.g. C:\Importer), or a generic path may be selected from the drop-down menu:
Source Definition
All Portable Device Sources All Digital Voice Recorders (Philips, Olympus, Grundig, BlackBerry)
All Other Removable Sources All removable drives that are not Digital Voice Recorders, e.g. USB drives.
VEN_DIGTA Grundig Digital Voice Recorders
VEN_OLYMPUS Olympus Digital Voice Recorders
VEN_PHILIPS Philips Digital Voice Recorders
VEN_RIM BlackBerry Devices
Working Example
A DS-3500 has two mass storage drives, each containing seven folders. Instead of defining 14 sources to find files in each folder, the administrator creates one source that is defined either as 'All Portable Device Sources' or 'VEN_Olympus' and checks the 'Scan Subfolders' option (see below). All drives, folders and subfolders on the DS-3500 will be scanned for jobs.
Notes:
The list of devices that Importer considers to be 'Portable Device Sources' can be defined in the registry string "PortableManufacters".
Monitoring must be enabled when a device is connected for Importer to copy from a source that is not a specific path. You cannot connect a device and then start monitoring — Importer will not detect devices that are already present.
Scan Subfolders
The Scan Subfolders feature permits Importer to:
Scan all folders on any defined Digital Voice Recorder or Removable Device, if using a generic source in the Folder field
Scan all subfolders of a specified path in the Folder field
Note:
17
Source Definitions
To permit the "Scan Subfolders" functionality, all archived jobs are marked read-only when they are created.
Changing or Viewing Source Definitions
To change or view a source definition:
1. If sources are not currently shown in the right-hand pane, click the Sources icon on the Outlook bar. Details of existing source definitions are displayed.
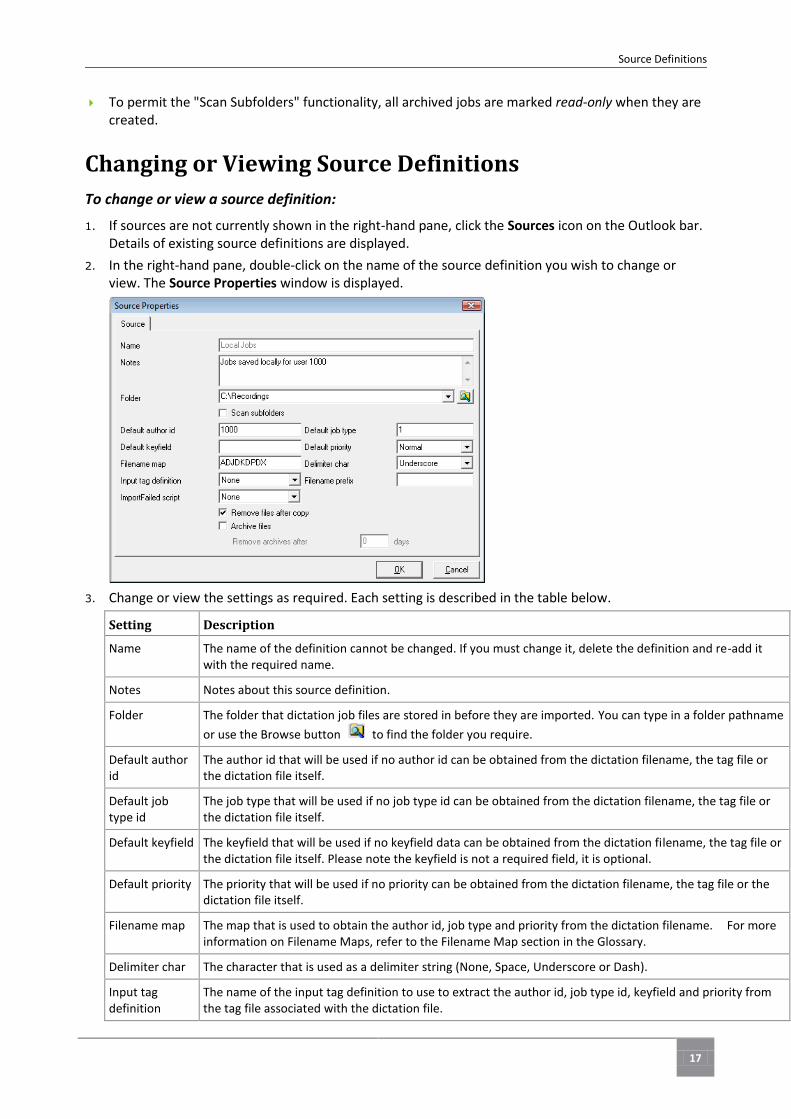
2. In the right-hand pane, double-click on the name of the source definition you wish to change or view. The Source Properties window is displayed.
3. Change or view the settings as required. Each setting is described in the table below.
Setting Description
Name The name of the definition cannot be changed. If you must change it, delete the definition and re-add it with the required name.
Notes Notes about this source definition.
Folder The folder that dictation job files are stored in before they are imported. You can type in a folder pathname
or use the Browse button to find the folder you require.
Default author id
The author id that will be used if no author id can be obtained from the dictation filename, the tag file or the dictation file itself.
Default job type id
The job type that will be used if no job type id can be obtained from the dictation filename, the tag file or the dictation file itself.
Default keyfield The keyfield that will be used if no keyfield data can be obtained from the dictation filename, the tag file or the dictation file itself. Please note the keyfield is not a required field, it is optional.
Default priority The priority that will be used if no priority can be obtained from the dictation filename, the tag file or the dictation file itself.
Filename map The map that is used to obtain the author id, job type and priority from the dictation filename. For more information on Filename Maps, refer to the Filename Map section in the Glossary.
Delimiter char The character that is used as a delimiter string (None, Space, Underscore or Dash).
Input tag definition
The name of the input tag definition to use to extract the author id, job type id, keyfield and priority from the tag file associated with the dictation file.
18
Winscribe Internet Importer User Guide
Setting Description
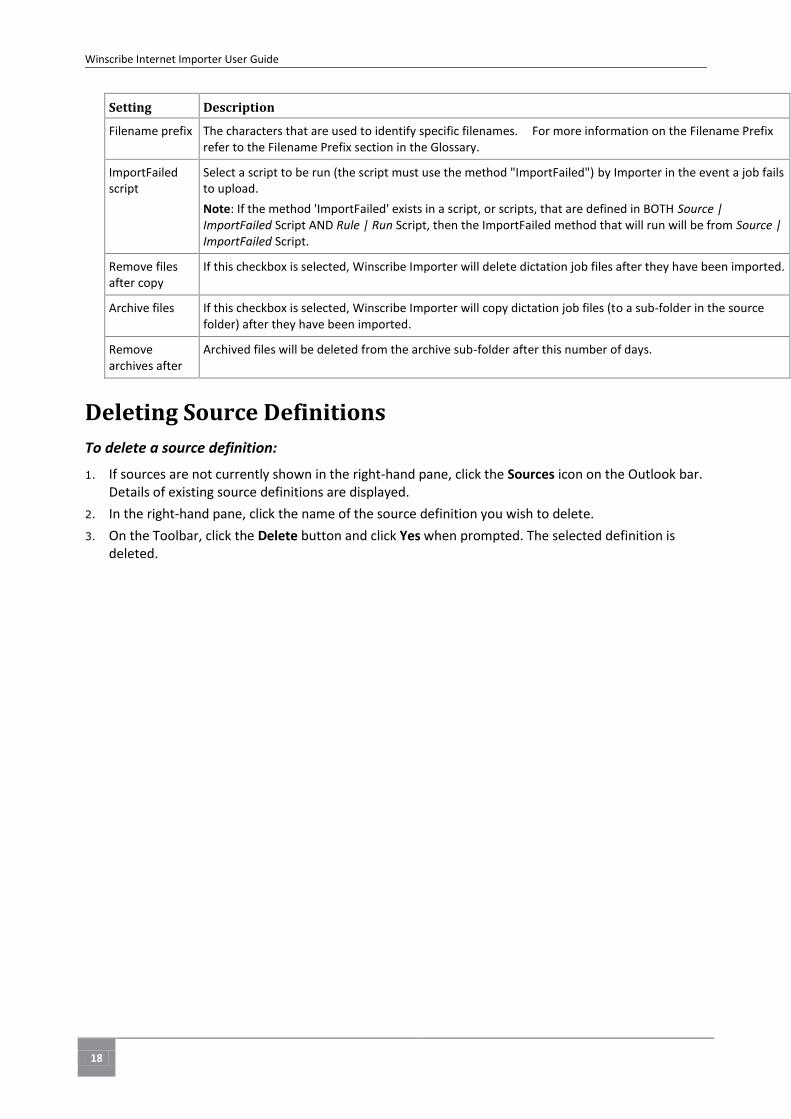
Filename prefix The characters that are used to identify specific filenames. For more information on the Filename Prefix refer to the Filename Prefix section in the Glossary.
ImportFailed script
Select a script to be run (the script must use the method "ImportFailed") by Importer in the event a job fails to upload.
Note: If the method 'ImportFailed' exists in a script, or scripts, that are defined in BOTH Source | ImportFailed Script AND Rule | Run Script, then the ImportFailed method that will run will be from Source | ImportFailed Script.
Remove files after copy
If this checkbox is selected, Winscribe Importer will delete dictation job files after they have been imported.
Archive files If this checkbox is selected, Winscribe Importer will copy dictation job files (to a sub-folder in the source folder) after they have been imported.
Remove archives after
Archived files will be deleted from the archive sub-folder after this number of days.
Deleting Source Definitions
To delete a source definition:
1. If sources are not currently shown in the right-hand pane, click the Sources icon on the Outlook bar. Details of existing source definitions are displayed.
2. In the right-hand pane, click the name of the source definition you wish to delete.
3. On the Toolbar, click the Delete button and click Yes when prompted. The selected definition is deleted.
19
Input Tag Definitions
Some dictation devices create two files for each dictation job:
The dictation file, which contains the dictation information.
The tag file which contains additional information about the dictation job, including its author id, job type id, keyfield and priority.
By creating an input tag definition, you can tell Winscribe Importer how to extract a dictation job's author id, job type id, keyfield and priority from its tag file.
If importing DSS files you do not need tag definitions unless you are importing user field (key field) information. If importing user field (key field) information from Philips 9250/9350/9400 devices the search string fields are: AUTHOR, JOBTYPE, and KEY.
Creating New Input Tag Definitions
To create a new input tag definition:
1. If Input Tags are not currently shown in the right-hand pane, click the Input Tags icon on the Outlook bar. Details of existing input tag definitions (if any) are displayed.
2. On the Toolbar, click the New button . The Input Tag Wizard splash screen is displayed. Click Next to continue.
3. Type a descriptive name for the new input tag definition and some notes on its purpose. Click Next to continue.
4. Select the method to be used to extract the author id, job type id, keyfield and priority from the tag file. You can get information:
By searching for specified characters in the file.
From specified locations in the file.
From specified line numbers in the file.
5. Whichever option you select, a different Wizard will open to guide you through the steps for setting up the selected option. Refer to the sections below for specific information on following each Wizard.
Get Information by Searching for Specified Characters in the File If you have selected the "Get information by searching for specified characters in the file" option (above), use the following steps to set up the required options.
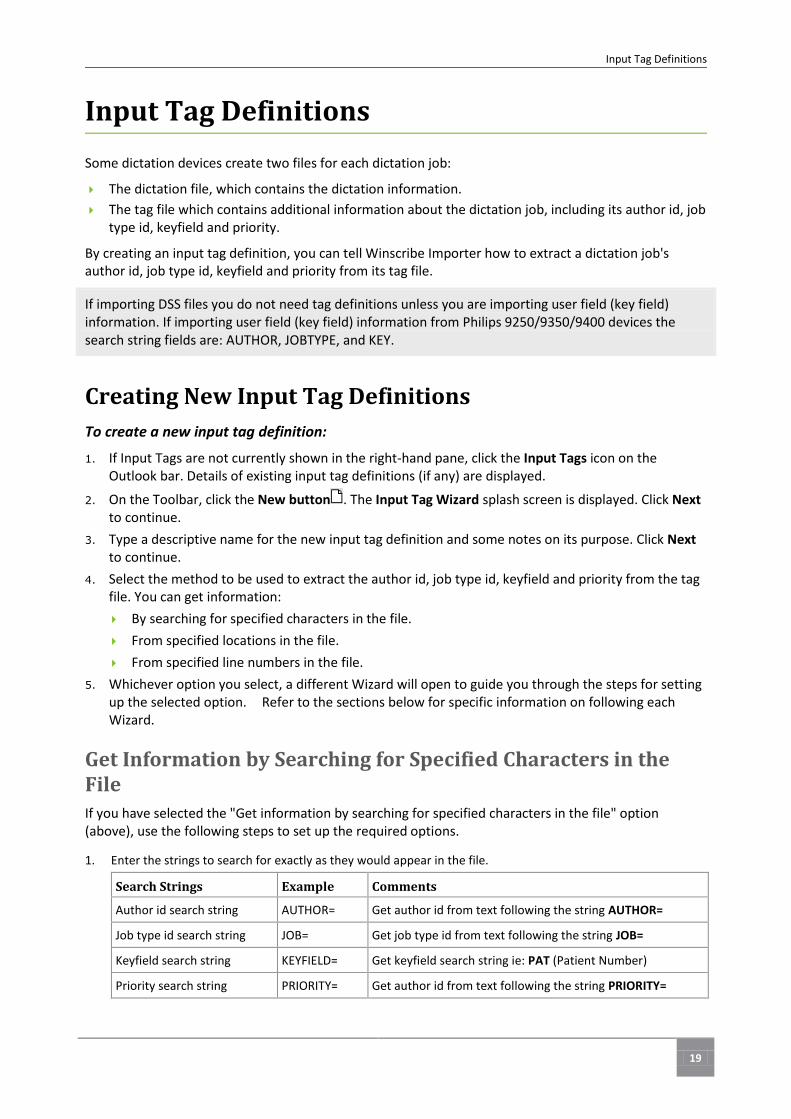
1. Enter the strings to search for exactly as they would appear in the file.
Search Strings Example Comments
Author id search string AUTHOR= Get author id from text following the string AUTHOR=
Job type id search string JOB= Get job type id from text following the string JOB=
Keyfield search string KEYFIELD= Get keyfield search string ie: PAT (Patient Number)
Priority search string PRIORITY= Get author id from text following the string PRIORITY=
Input Tag Definitions
20
Winscribe Internet Importer User Guide
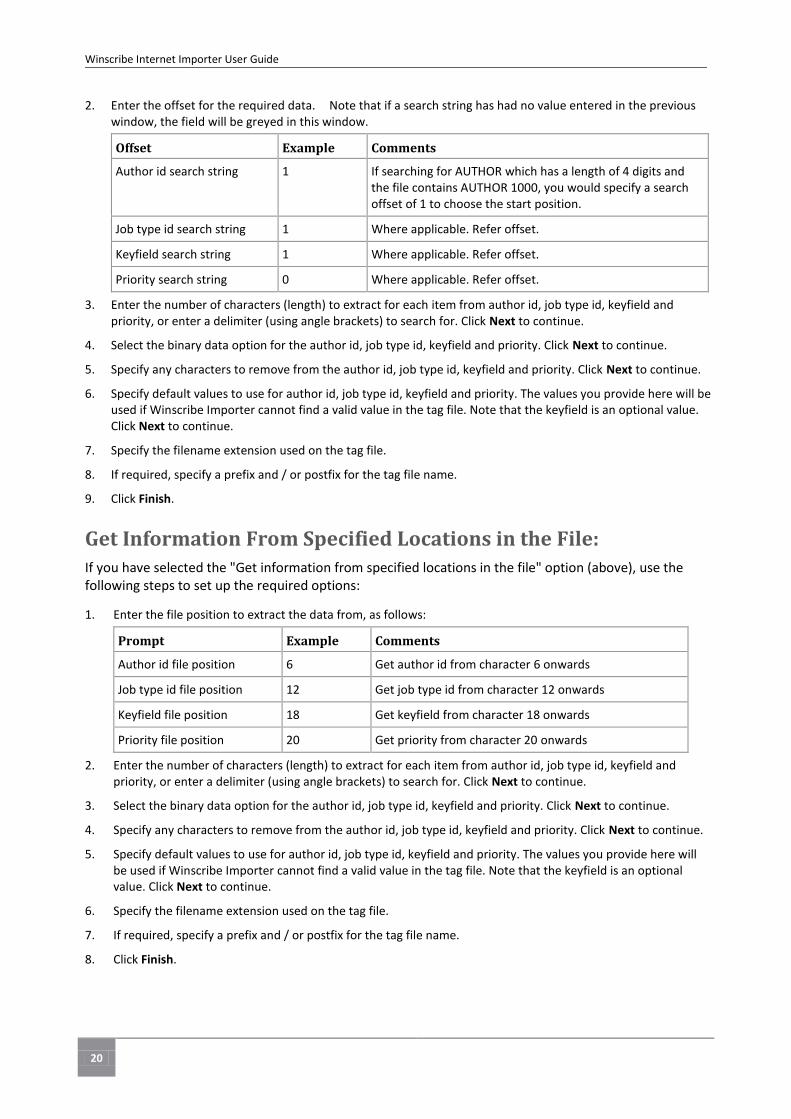
2. Enter the offset for the required data. Note that if a search string has had no value entered in the previous window, the field will be greyed in this window.
Offset Example Comments
Author id search string 1 If searching for AUTHOR which has a length of 4 digits and the file contains AUTHOR 1000, you would specify a search offset of 1 to choose the start position.
Job type id search string 1 Where applicable. Refer offset.
Keyfield search string 1 Where applicable. Refer offset.
Priority search string 0 Where applicable. Refer offset.
3. Enter the number of characters (length) to extract for each item from author id, job type id, keyfield and priority, or enter a delimiter (using angle brackets) to search for. Click Next to continue.
4. Select the binary data option for the author id, job type id, keyfield and priority. Click Next to continue.
5. Specify any characters to remove from the author id, job type id, keyfield and priority. Click Next to continue.
6. Specify default values to use for author id, job type id, keyfield and priority. The values you provide here will be used if Winscribe Importer cannot find a valid value in the tag file. Note that the keyfield is an optional value. Click Next to continue.
7. Specify the filename extension used on the tag file.
8. If required, specify a prefix and / or postfix for the tag file name.
9. Click Finish.
Get Information From Specified Locations in the File: If you have selected the "Get information from specified locations in the file" option (above), use the following steps to set up the required options:
1. Enter the file position to extract the data from, as follows:
Prompt Example Comments
Author id file position 6 Get author id from character 6 onwards
Job type id file position 12 Get job type id from character 12 onwards
Keyfield file position 18 Get keyfield from character 18 onwards
Priority file position 20 Get priority from character 20 onwards
2. Enter the number of characters (length) to extract for each item from author id, job type id, keyfield and priority, or enter a delimiter (using angle brackets) to search for. Click Next to continue.
3. Select the binary data option for the author id, job type id, keyfield and priority. Click Next to continue.
4. Specify any characters to remove from the author id, job type id, keyfield and priority. Click Next to continue.
5. Specify default values to use for author id, job type id, keyfield and priority. The values you provide here will be used if Winscribe Importer cannot find a valid value in the tag file. Note that the keyfield is an optional value. Click Next to continue.
6. Specify the filename extension used on the tag file.
7. If required, specify a prefix and / or postfix for the tag file name.
8. Click Finish.

21
Input Tag Definitions
Get Information From Specified Line Numbers in the File If you have selected the "Get information from specified line numbers in the file" option (above), use the following steps to set up the required options:
1. Enter the Line Number to extract the data from, as follows:
Prompt Example Comments
Author id line number 1 Get author id from line 1
Job type id line number 3 Get job type id from line 3
Keyfield line number 6 Get keyfield from line 6
Priority line number 8 Get priority from line 8
2. Enter the number of characters (length) to extract for each item from author id, job type id, keyfield and priority, or enter a delimiter (using angle brackets) to search for. Click Next to continue.
3. Select the binary data option for the author id, job type id, keyfield and priority. Click Next to continue.
4. Specify any characters to remove from the author id, job type id, keyfield and priority. Click Next to continue.
5. Specify default values to use for author id, job type id, keyfield and priority. The values you provide here will be used if Winscribe Importer cannot find a valid value in the tag file. Note that the keyfield is an optional value. Click Next to continue.
6. Specify the filename extension used on the tag file.
7. If required, specify a prefix and / or postfix for the tag file name.
8. Click Finish.
Notes:
When importing job type user fields, the job type key field is always imported as the importer key field. The rest of the user fields are then imported in order, with the first non-key field becoming user field 1, the next becoming user field 2, and so on.
This is illustrated in the following diagram.
If there is no key field in the Job Type user field list, the Job Type user field 1 will be imported
into the key field. The Job Type user field 2 will be imported into user field 1, and so on.
There is no User Field 0.
If you have a Keyfield defined and also a non-Keyfield User field, then that Non-Keyfield Userfield is JobUserField(1) (NOT 2).
22
Winscribe Internet Importer User Guide
Changing or Viewing Input Tag Definitions
To change or view an input tag definition:
1. If Input Tags are not currently shown in the right-hand pane, click the Input Tags icon on the Outlook bar. Details of existing input tag definitions are displayed.
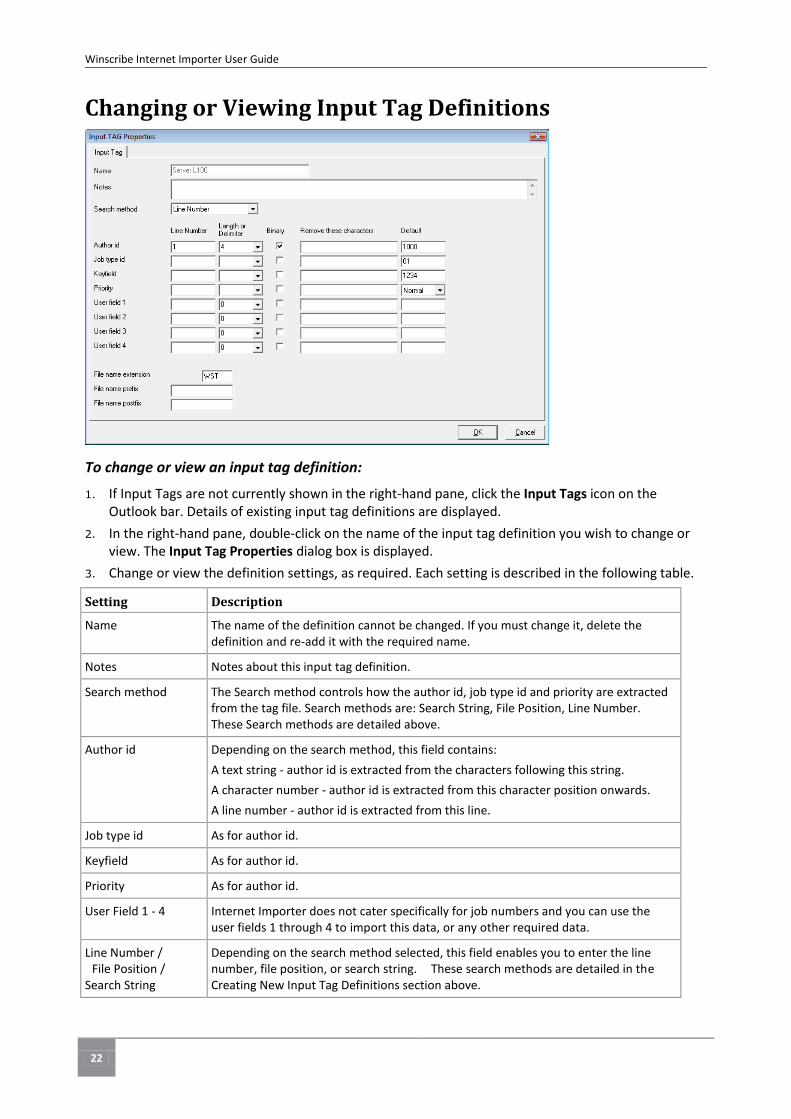
2. In the right-hand pane, double-click on the name of the input tag definition you wish to change or view. The Input Tag Properties dialog box is displayed.
3. Change or view the definition settings, as required. Each setting is described in the following table.
Setting Description
Name The name of the definition cannot be changed. If you must change it, delete the definition and re-add it with the required name.
Notes Notes about this input tag definition.
Search method The Search method controls how the author id, job type id and priority are extracted from the tag file. Search methods are: Search String, File Position, Line Number. These Search methods are detailed above.
Author id Depending on the search method, this field contains:
A text string - author id is extracted from the characters following this string.
A character number - author id is extracted from this character position onwards.
A line number - author id is extracted from this line.
Job type id As for author id.
Keyfield As for author id.
Priority As for author id.
User Field 1 - 4 Internet Importer does not cater specifically for job numbers and you can use the user fields 1 through 4 to import this data, or any other required data.
Line Number / File Position / Search String
Depending on the search method selected, this field enables you to enter the line number, file position, or search string. These search methods are detailed in the Creating New Input Tag Definitions section above.
23
Input Tag Definitions
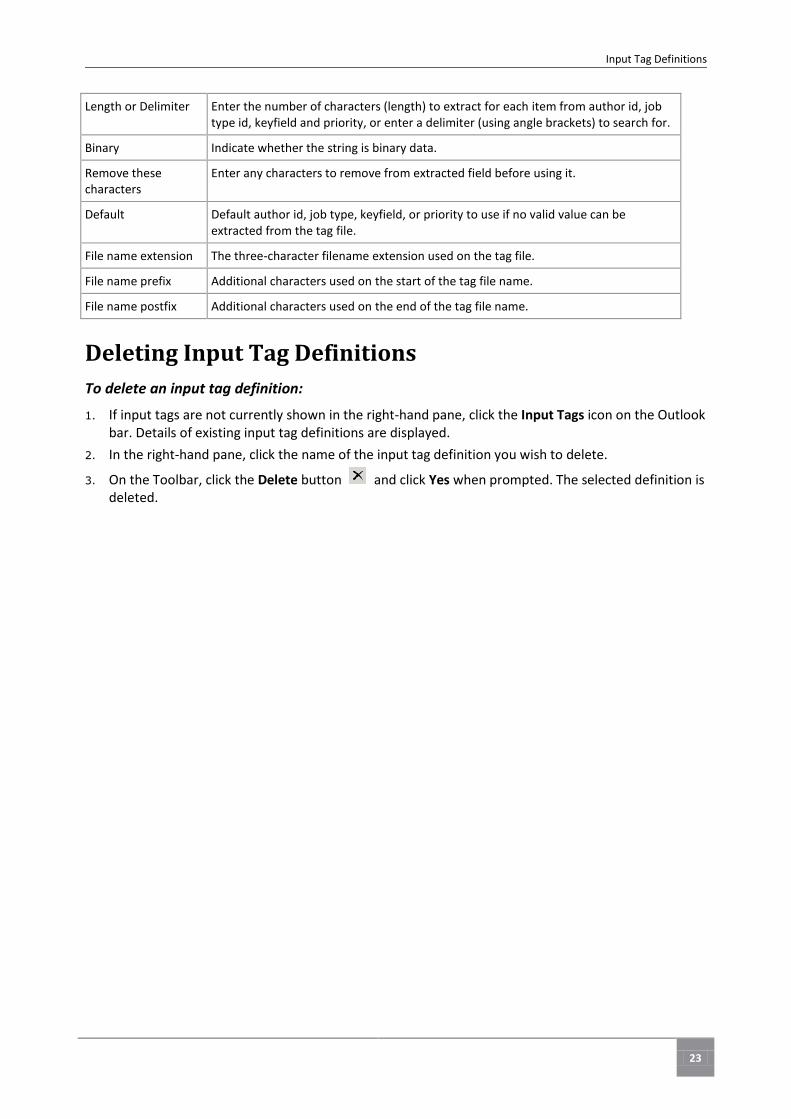
Length or Delimiter Enter the number of characters (length) to extract for each item from author id, job type id, keyfield and priority, or enter a delimiter (using angle brackets) to search for.
Binary Indicate whether the string is binary data.
Remove these characters
Enter any characters to remove from extracted field before using it.
Default Default author id, job type, keyfield, or priority to use if no valid value can be extracted from the tag file.
File name extension The three-character filename extension used on the tag file.
File name prefix Additional characters used on the start of the tag file name.
File name postfix Additional characters used on the end of the tag file name.
Deleting Input Tag Definitions
To delete an input tag definition:
1. If input tags are not currently shown in the right-hand pane, click the Input Tags icon on the Outlook bar. Details of existing input tag definitions are displayed.
2. In the right-hand pane, click the name of the input tag definition you wish to delete.
3. On the Toolbar, click the Delete button and click Yes when prompted. The selected definition is deleted.
24
Winscribe Internet Importer User Guide
Winscribe Importer uses destinations as the targets for dictation jobs copied from sources. You must define one or more destinations before you can use Winscribe Importer. Destinations can be located on:
your own PC.
a file server connected to your organization's LAN.
a file server connected via the Internet.
your organization's intranet.
a Winscribe server.
If you require that absolutely no files are to be stored on the client local machine, you will need to modify the target local machine environment variable "tmp" to reference a network share. Refer to Referencing A Network Share (see page 27) for details.
Creating New Destination Definitions
To create a new destination definition:
1. If destinations are not currently shown in the right-hand pane, click the Destinations icon on the Outlook bar. Details of existing destination definitions are displayed.
2. On the Toolbar, click the New button. The Destination Wizard splash screen is displayed. Click Next to continue.
3. Type in a descriptive name for the new destination definition and any notes describing its purpose. Click Next to continue.
4. Specify whether to:
Copy files to a Winscribe server.
Copy files to a folder.
5. If you have selected to copy jobs to Winscribe server, enter the following information:
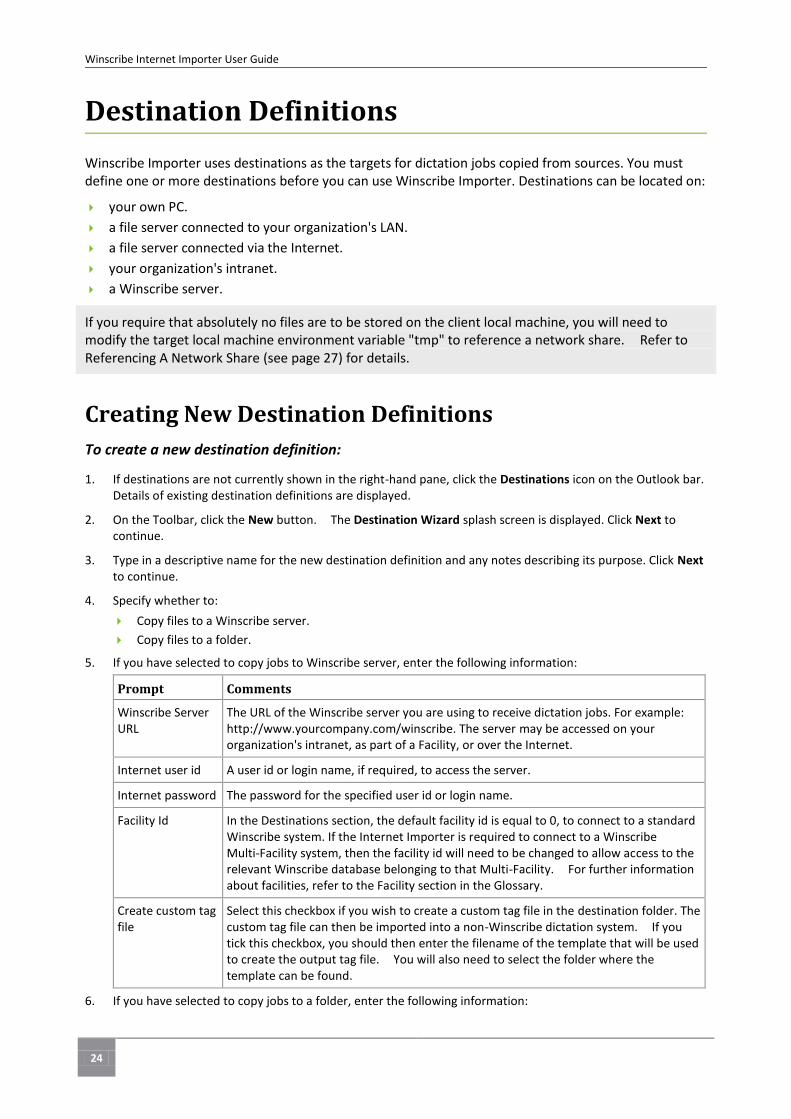
Prompt Comments
Winscribe Server URL
The URL of the Winscribe server you are using to receive dictation jobs. For example: http://www.yourcompany.com/winscribe. The server may be accessed on your organization's intranet, as part of a Facility, or over the Internet.
Internet user id A user id or login name, if required, to access the server.
Internet password The password for the specified user id or login name.
Facility Id In the Destinations section, the default facility id is equal to 0, to connect to a standard Winscribe system. If the Internet Importer is required to connect to a Winscribe Multi-Facility system, then the facility id will need to be changed to allow access to the relevant Winscribe database belonging to that Multi-Facility. For further information about facilities, refer to the Facility section in the Glossary.
Create custom tag file
Select this checkbox if you wish to create a custom tag file in the destination folder. The custom tag file can then be imported into a non-Winscribe dictation system. If you tick this checkbox, you should then enter the filename of the template that will be used to create the output tag file. You will also need to select the folder where the template can be found.
6. If you have selected to copy jobs to a folder, enter the following information:
Destination Definitions
25
Destination Definitions
Prompt Comments
Destination folder The folder you are using to receive dictation jobs. The folder may be another PC or server on your organization's LAN or WAN. Type the name of the folder or use the Browse folders button to locate the required folder.
Create custom tag file
Select this checkbox if you wish to create a custom tag file in the destination folder. The custom tag file can then be imported into a non-Winscribe dictation system.
Template file Type the name of the template file or use the Browse folders button to locate the required file.
Note: If Internet Importer is being used in an Active Directory environment and you are prompted to enter a Windows login ID and password each time a file is sent for upload to the Winscribe server, you must adjust the settings for the Winscribe website and File Upload virtual directories in IIS. Please refer to the the Winscribe Installation Guide and complete the section "Winscribe Server Authentication Methods" in its entirety.
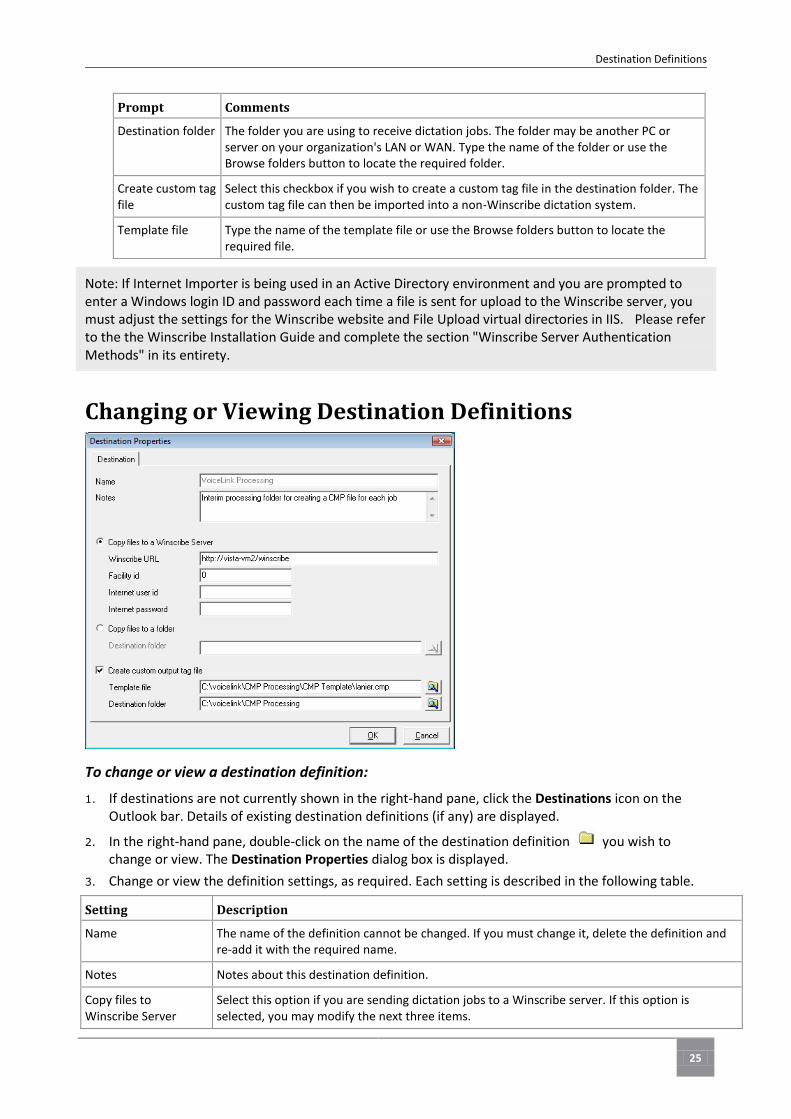
Changing or Viewing Destination Definitions
To change or view a destination definition:
1. If destinations are not currently shown in the right-hand pane, click the Destinations icon on the Outlook bar. Details of existing destination definitions (if any) are displayed.
2. In the right-hand pane, double-click on the name of the destination definition you wish to change or view. The Destination Properties dialog box is displayed.
3. Change or view the definition settings, as required. Each setting is described in the following table.
Setting Description
Name The name of the definition cannot be changed. If you must change it, delete the definition and re-add it with the required name.
Notes Notes about this destination definition.
Copy files to Winscribe Server
Select this option if you are sending dictation jobs to a Winscribe server. If this option is selected, you may modify the next three items.
26
Winscribe Internet Importer User Guide
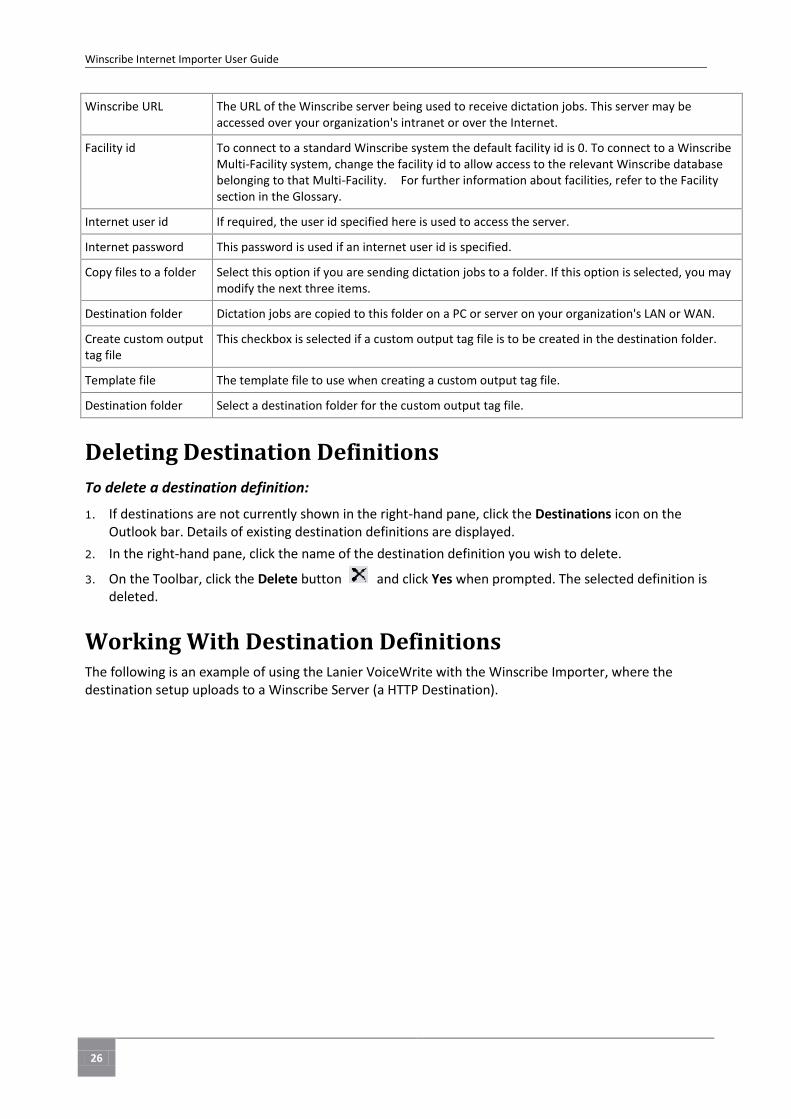
Winscribe URL The URL of the Winscribe server being used to receive dictation jobs. This server may be accessed over your organization's intranet or over the Internet.
Facility id To connect to a standard Winscribe system the default facility id is 0. To connect to a Winscribe Multi-Facility system, change the facility id to allow access to the relevant Winscribe database belonging to that Multi-Facility. For further information about facilities, refer to the Facility section in the Glossary.
Internet user id If required, the user id specified here is used to access the server.
Internet password This password is used if an internet user id is specified.
Copy files to a folder Select this option if you are sending dictation jobs to a folder. If this option is selected, you may modify the next three items.
Destination folder Dictation jobs are copied to this folder on a PC or server on your organization's LAN or WAN.
Create custom output tag file
This checkbox is selected if a custom output tag file is to be created in the destination folder.
Template file The template file to use when creating a custom output tag file.
Destination folder Select a destination folder for the custom output tag file.
Deleting Destination Definitions
To delete a destination definition:
1. If destinations are not currently shown in the right-hand pane, click the Destinations icon on the Outlook bar. Details of existing destination definitions are displayed.
2. In the right-hand pane, click the name of the destination definition you wish to delete.
3. On the Toolbar, click the Delete button and click Yes when prompted. The selected definition is deleted.
Working With Destination Definitions The following is an example of using the Lanier VoiceWrite with the Winscribe Importer, where the destination setup uploads to a Winscribe Server (a HTTP Destination).

27
Destination Definitions
In the example below, a URL of: http://vista-vm2/winscribe is shown, plus there is a secondary Test folder. The real URLs could be similar to: http://www.companyx.com/winscribe, or whatever destination is relevant to your organization.
The VoiceLink application uses the first folder in the Destination folder (in the example above, it is the VoiceLink Processing folder with a URL of http://vista-vm2/winscribe). Jobs will fail to upload to the Winscribe server otherwise.
As shown in the Destination Properties screenshot above, you will also need to create a path where the Lanier CMP files will be copied. The path and filename are: c:\voicelink\cmp processing\cmp template\lanier.cmp. Your path could be anywhere on a LAN which is accessible, so long as appropriate permissions and access are used.
Destinations and Multi-Facility In the Destinations section, the default facility id is equal to 0, to connect to a standard Winscribe system. Importer can import jobs from authors in different facilities, provided Author Ids are unique across facilities. The facility defined in the Destination is treated as the "Default" facility. If the Author Id is not found in that facility then the Importer looks for the same Author Id in all other facilities. If only one user exists with that Author Id then the import will succeed into the correct facility. If more than one user has the same Author Id, then the import fails.
For further information about facilities, refer to the Facility section in the Glossary.
Referencing A Network Share In some cases, there is a requirement that absolutely no files are to be stored on the client local machine. Importer can nominate a destination as either a UNC path or URL path. In either case it uses the target local machine environment variable "tmp" to resolve a local scratch location.
This tmp value can be modified to reference a network share provided the Importer is run as an application and that the user is logged into the domain and has appropriate write persmissions on the folder.
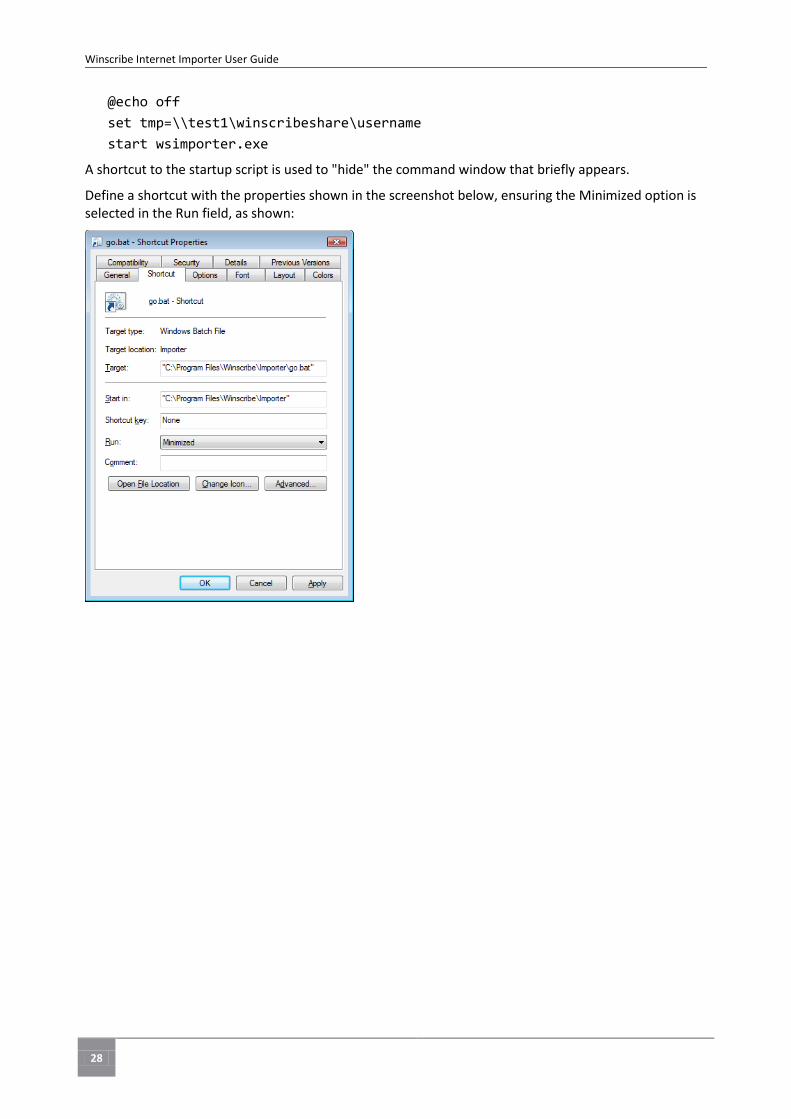
To modify the "tmp" location a startup script is required to launch the Importer.
Startup Script : Importer.BAT
28
Winscribe Internet Importer User Guide
@echo off
set tmp=\\test1\winscribeshare\username
start wsimporter.exe
A shortcut to the startup script is used to "hide" the command window that briefly appears.
Define a shortcut with the properties shown in the screenshot below, ensuring the Minimized option is selected in the Run field, as shown:
29
Rule Definitions
Winscribe Importer uses rules to determine which destination a dictation job, found in a source folder, will be sent to.
Creating New Rule Definitions
To create a new rule definition:
1. If rules are not currently shown in the right-hand pane, click the Rules icon on the Outlook bar. Details of existing rule definitions (if any) are displayed.
2. On the Toolbar, click the New button . The Rule Wizard splash screen is displayed. Click Next to continue.
3. Type a descriptive name for the new rule definition and a brief description of its purpose. Click Next to continue.
4. Select the source, destination, and script for jobs that this rule applies to from the drop-down menu.
Note: There are 4 generic sources: All Sources; All Fixed Sources (all sources from a specified path); All Other Removable Sources (all removable drives); All Portable Device Sources (all Digital Voice Recorders).
5. Tick the Direct Upload from removable drive checkbox if the source is one of the following:
A path that belongs to a removable drive
All Portable Device Sources
All Other Removable Sources
6. Specify a value for any of the following: author id, job type id, keyfield and priority. If all the values for a dictation job match, the job will be transferred to the rule's configured destination. Click Next to continue.
7. If you entered an author id, job tpe id, keyfield or priority, specify how you want to modify the dictation job's job type id, keyfield and priority in the Output Tag file. Click Next to continue.
8. Click Finish to save the definition.
Changing or Viewing Rule Definitions
To change or view a rule definition:
1. If rules are not currently shown in the right-hand pane, click the Rules icon on the Outlook bar. Details of existing rule definitions are displayed.
Rule Definitions

30
Winscribe Internet Importer User Guide
2. In the right-hand pane, double-click on the name of the rule definition you wish to change or view. The Rule Properties dialog box is displayed.
3. Change or view the definition settings, as required. Each setting is described in the following table.
Setting Description
Name The name of the definition cannot be changed. If you must change it, delete the definition and re-add it with the required name.
Notes Notes about this rule definition.
Author id The rule used to match author id.
change to A new value for the author id. If this field is blank, no change is made to the author id in the output tag file.
Job type id The rule used to match job type id.
change to A new value for the job type id. If this field is blank, no change is made to the job type id in the output tag file.
Keyfield The rule used to match keyfield.
change to A new value for the keyfield type. If this field is used, give it a corresponding (but not a blank) value. If this field is not used, it defaults to a value of NO CHANGE in the keyfield type of the output tag file.
Priority The rule used to match priority.
change to A new value for the priority type. If this field is blank, no change is made to the priority type in the output tag file.
Mark jobs as confidential If selected, flags the job as confidential to ensure that only the original author and a chosen typist can access the job.
Note: All authors of confidential jobs must have a preferred typist otherwise their jobs will not be marked as confidential.
Source The rule used to match source definition. If source is shown as None (by setting it to blank in the Rule Wizard), the rule will be valid for all sources.
Note: There are 4 generic sources: All Sources; All Fixed Sources (all sources from a specified
31
Rule Definitions
Setting Description
path); All Other Removable Sources (all removable drives); All Portable Device Sources (all Digital Voice Recorders).
Destination If all elements of a dictation job match the rules set up in this window, the job will be transferred to the rule's configured destination.
Run Script If all elements of a dictation job match the rules set up in this window, the script selected here will run.
Direct upload from removable drive
To use this feature, the Source must be one of the following:
A path that belongs to a removable drive
All Portable Device Sources
All Other Removable Sources
Note: When Importer imports any files from a removable device that has this option checked, the file will not be removed from the device until after it has been successfully imported. If importing fails, the file will be left on the device.
Deleting Rule Definitions
To delete a rule definition:
1. If rules are not currently shown in the right-hand pane, click the Rules icon on the Outlook bar. Details of existing rule definitions are displayed.
2. In the right-hand pane, click the name of the rule definition you wish to delete.
3. On the Toolbar, click the Delete button and click Yes when prompted. The selected definition is deleted.
Changing Rule Checking Orders Rules are checked in the order they are listed in the Rules window. The characteristics of a dictation job are checked against each rule in turn, and the first rule that matches is used to determine the destination of that dictation job.
To change the order that rules are checked in:
1. If rules are not currently shown in the right-hand pane, click the Rules icon on the Outlook bar. Details of existing rule definitions are displayed.
2. In the right-hand pane, click on the rule you wish to move. The rule name is highlighted.
32
Winscribe Internet Importer User Guide
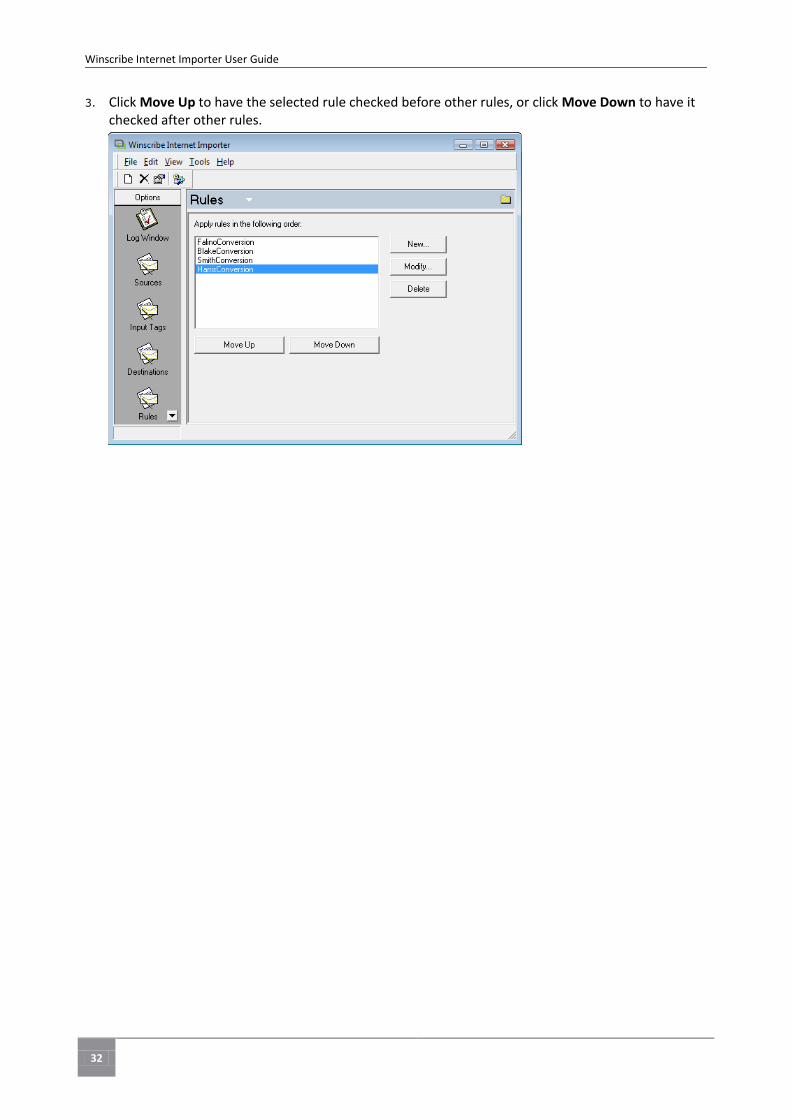
3. Click Move Up to have the selected rule checked before other rules, or click Move Down to have it checked after other rules.

33
Script Definitions
Winscribe Importer uses scripts to perform certain tasks on jobs being submitted to the Winscribe system. Usually, scripts are combined with rule definitions, and are triggered when the criteria for that particular rule is met.
Creating New Script Definitions
To create a new script definition:
1. If scripts are not currently shown in the right-hand pane, click the Scripts icon on the Outlook bar. Details of existing script definitions are displayed.
2. On the Toolbar, click the New button . The Script Properties dialog box is displayed.
3. Type a descriptive script name for the new script definition.
4. Select a script language option (either Jscript or VBscript).
5. Tick the Run Script checkbox if you want the script to be active (it will run when called). If you wish to disable the script, untick this checkbox. Unticking the checkbox enables you to stop a script from running without having to delete the script.
6. Enter a timeout value (default = 5 seconds).
7. Cut and paste your script into the panel immediately below.
8. Click the Test button, to test your script.
9. If successful, click the OK button to finish.
Note: The script will not save if a Main Procedure call is not found.
Changing or Viewing Script Definitions
To change or view a script definition:
1. If scripts are not currently shown in the right-hand pane, click the Scripts icon on the Outlook bar. Details of existing script definitions are displayed.
2. In the right-hand pane, double-click on the name of the script definition you wish to change or view. The Script Properties dialog box is displayed.
Script Definitions
34
Winscribe Internet Importer User Guide
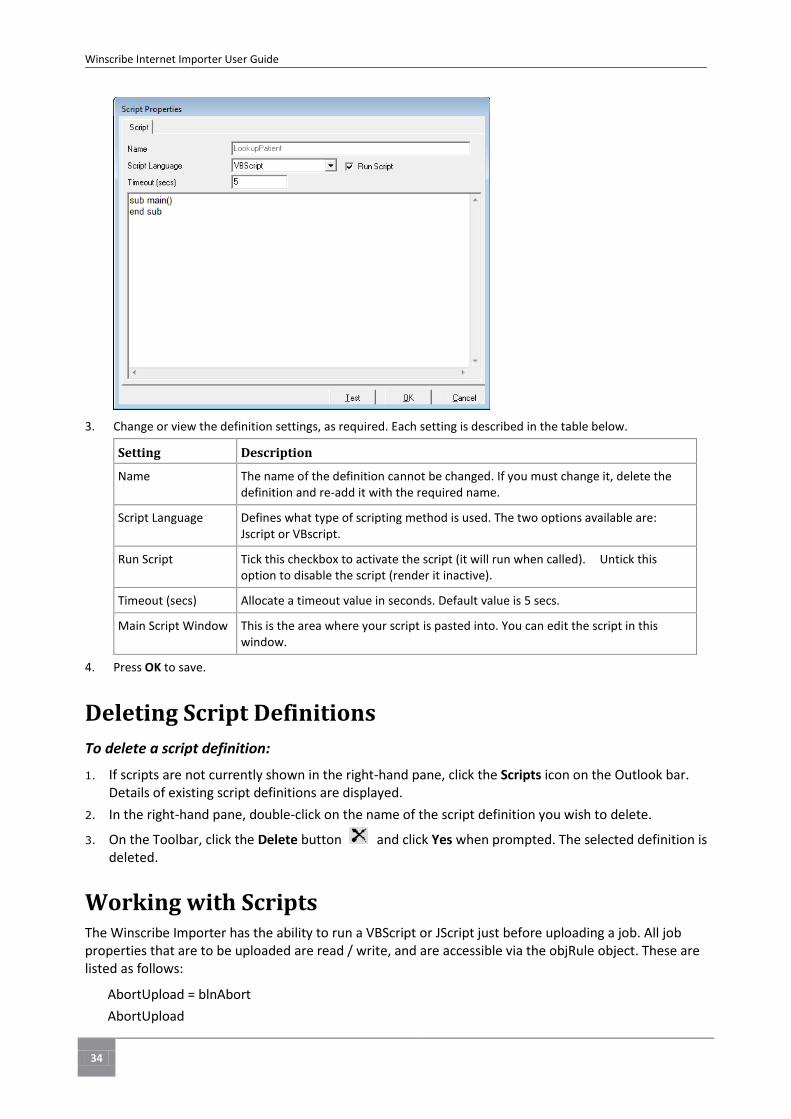
3. Change or view the definition settings, as required. Each setting is described in the table below.
Setting Description
Name The name of the definition cannot be changed. If you must change it, delete the definition and re-add it with the required name.
Script Language Defines what type of scripting method is used. The two options available are: Jscript or VBscript.
Run Script Tick this checkbox to activate the script (it will run when called). Untick this option to disable the script (render it inactive).
Timeout (secs) Allocate a timeout value in seconds. Default value is 5 secs.
Main Script Window This is the area where your script is pasted into. You can edit the script in this window.
4. Press OK to save.
Deleting Script Definitions
To delete a script definition:
1. If scripts are not currently shown in the right-hand pane, click the Scripts icon on the Outlook bar. Details of existing script definitions are displayed.
2. In the right-hand pane, double-click on the name of the script definition you wish to delete.
3. On the Toolbar, click the Delete button and click Yes when prompted. The selected definition is deleted.
Working with Scripts The Winscribe Importer has the ability to run a VBScript or JScript just before uploading a job. All job properties that are to be uploaded are read / write, and are accessible via the objRule object. These are listed as follows:
AbortUpload = blnAbort
AbortUpload
35
Script Definitions
AuthorID = sAuthorID
AuthorID
FileName
Folder
Hidden
JobNotes = sJobNotes
JobNotes
Jobpriority= lJobpriority
Jobpriority
JobType=lJobType
JobType
JobUserField(FieldNo) = sJobUserFieldData
JobUserField(FieldNo)
KeyUserField=sKeyUserField
KeyUserField
As an example, the Winscribe Importer can export Winscribe jobs from one Winscribe system to another, and to close off the original Winscribe job as completed. This is achieved by running a database script just before the job is exported. The objRule.AbortUpload flag allows you to cancel uploading a job at this point if the job criteria does not meet those required for export. e.g. wrong jobtype, etc.
In summary, scripts used in conjunction with the Winscribe Importer can be a powerful tool. They can be used in a number of different ways, either by Javascript or Visual Basic scripting methods. When combined with Winscribe Importer rule definitions, jobs can be filtered, or have information added to them before being submitted into the Winscribe system. Please refer to your local Winscribe representative for further assistance on scripts.
Send Email A Send Email script (that uses SendEmail.exe and an SMTP server) is available that can be run using the ImportFailed script method. Resources for this are located in the "Importer Send Email" folder in the distribution media (additionally, there is an objSystem.sysSendEmail method that can be called in scripts to send emails).
To use Send Email:
1. Create a new script in Importer and copy the example "Send Email" script.
2. Modify the following rows in the script:
a. EmailServer
b. ExeFilePathName
c. EmailTo
d. EmailFrom
3. Place SendEmail.exe into the path defined in ExeFilePathName
Note: Send Email will only function with open SMTP servers. There is no support for authentication.

36
Winscribe Internet Importer User Guide
Before you can use Winscribe Importer to import dictation jobs, you must ensure that:
1. Dictation jobs are being placed into one or more source folders on your PC by setting up
A dictation device.
Winscribe Importer on another PC to place dictation jobs into these folders.
2. The necessary source, destination and rule definitions have been setup in Winscribe Importer.
Importing Dictation Jobs
37
Source Monitoring
Starting Source Monitoring Source folders must be monitored by Winscribe Importer before any dictation jobs found there are imported. You can start source monitoring in two ways:
By changing source monitoring settings to begin monitoring automatically when Winscribe Importer is started.
By starting source monitoring manually. This option is provided to allow you to re-start monitoring after it has been stopped manually.
To start monitoring source folders manually:
1. If the Log Window is not currently shown in the right-hand pane, click the Log Window icon on the Outlook bar. This will allow you to see any error messages produced as monitoring starts.
2. Click the Monitor Sources button on the Toolbar. Startup messages are displayed in the event log window.
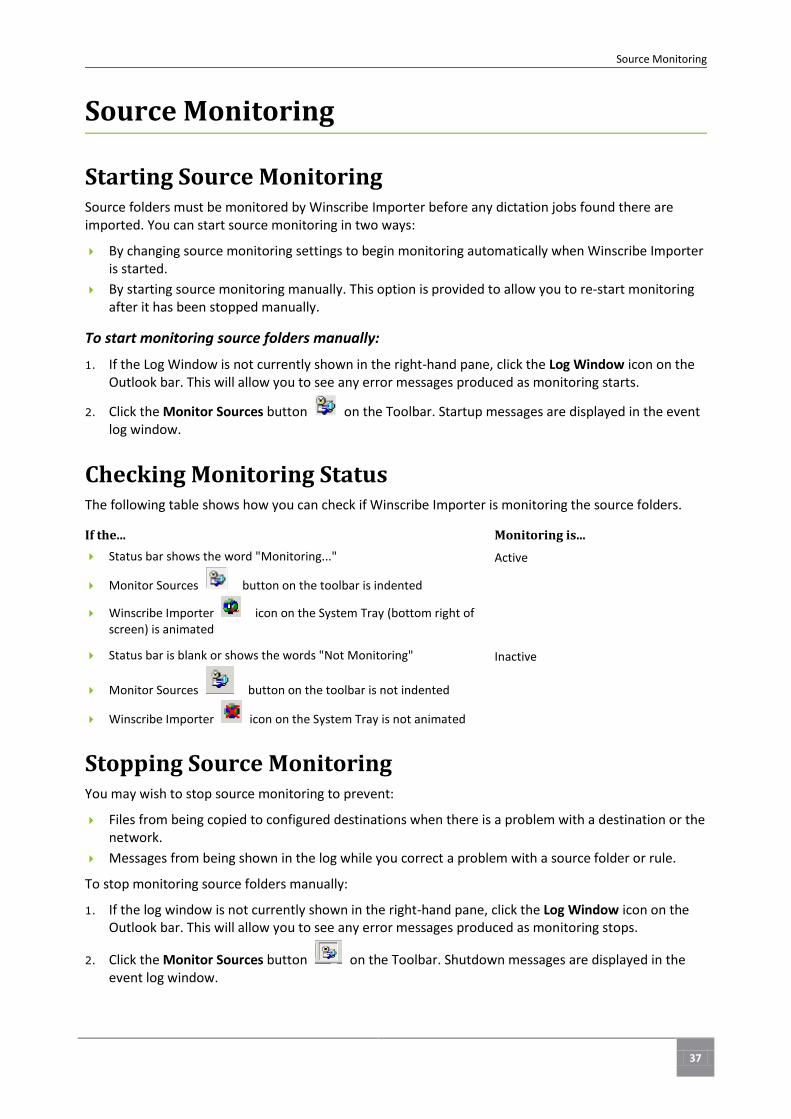
Checking Monitoring Status The following table shows how you can check if Winscribe Importer is monitoring the source folders.
If the... Monitoring is...
Status bar shows the word "Monitoring..."
Monitor Sources button on the toolbar is indented
Winscribe Importer icon on the System Tray (bottom right of screen) is animated
Active
Status bar is blank or shows the words "Not Monitoring"
Monitor Sources button on the toolbar is not indented
Winscribe Importer icon on the System Tray is not animated
Inactive
Stopping Source Monitoring You may wish to stop source monitoring to prevent:
Files from being copied to configured destinations when there is a problem with a destination or the network.
Messages from being shown in the log while you correct a problem with a source folder or rule.
To stop monitoring source folders manually:
1. If the log window is not currently shown in the right-hand pane, click the Log Window icon on the Outlook bar. This will allow you to see any error messages produced as monitoring stops.
2. Click the Monitor Sources button on the Toolbar. Shutdown messages are displayed in the event log window.
Source Monitoring
38
Winscribe Internet Importer User Guide
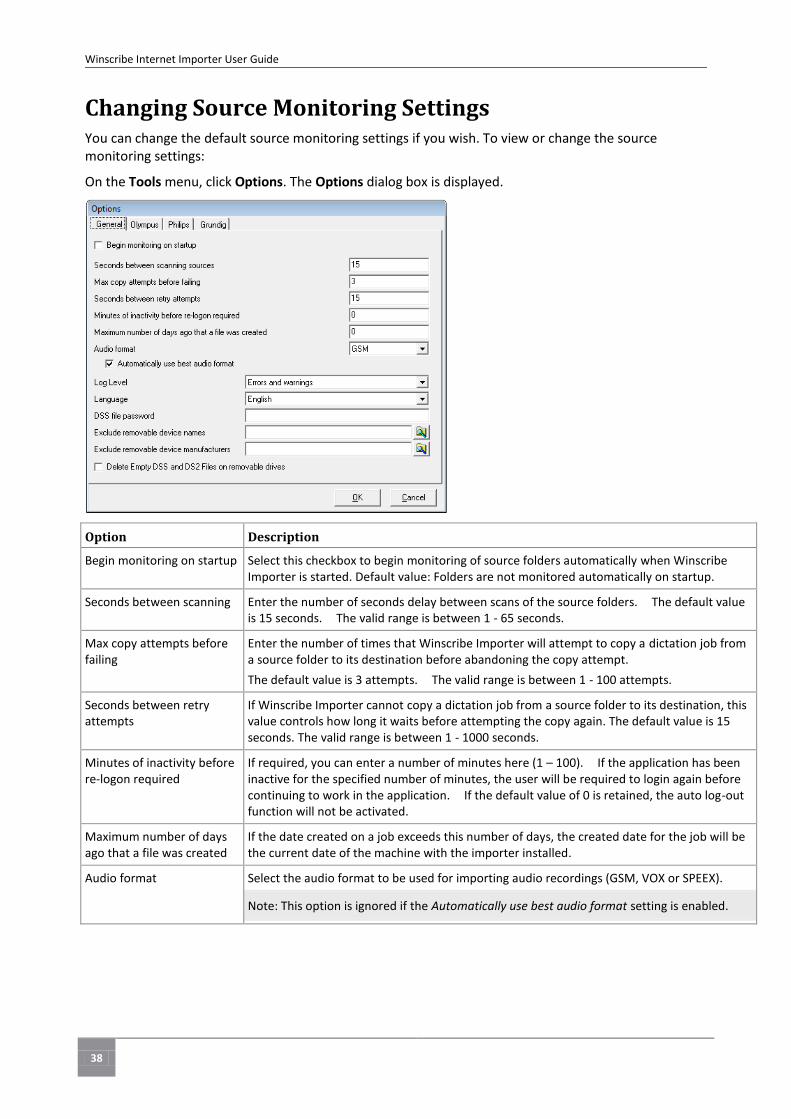
Changing Source Monitoring Settings You can change the default source monitoring settings if you wish. To view or change the source monitoring settings:
On the Tools menu, click Options. The Options dialog box is displayed.
Option Description
Begin monitoring on startup Select this checkbox to begin monitoring of source folders automatically when Winscribe Importer is started. Default value: Folders are not monitored automatically on startup.
Seconds between scanning Enter the number of seconds delay between scans of the source folders. The default value is 15 seconds. The valid range is between 1 - 65 seconds.
Max copy attempts before failing
Enter the number of times that Winscribe Importer will attempt to copy a dictation job from a source folder to its destination before abandoning the copy attempt.
The default value is 3 attempts. The valid range is between 1 - 100 attempts.
Seconds between retry attempts
If Winscribe Importer cannot copy a dictation job from a source folder to its destination, this value controls how long it waits before attempting the copy again. The default value is 15 seconds. The valid range is between 1 - 1000 seconds.
Minutes of inactivity before re-logon required
If required, you can enter a number of minutes here (1 – 100). If the application has been inactive for the specified number of minutes, the user will be required to login again before continuing to work in the application. If the default value of 0 is retained, the auto log-out function will not be activated.
Maximum number of days ago that a file was created
If the date created on a job exceeds this number of days, the created date for the job will be the current date of the machine with the importer installed.
Audio format Select the audio format to be used for importing audio recordings (GSM, VOX or SPEEX).
Note: This option is ignored if the Automatically use best audio format setting is enabled.
39
Source Monitoring
Option Description
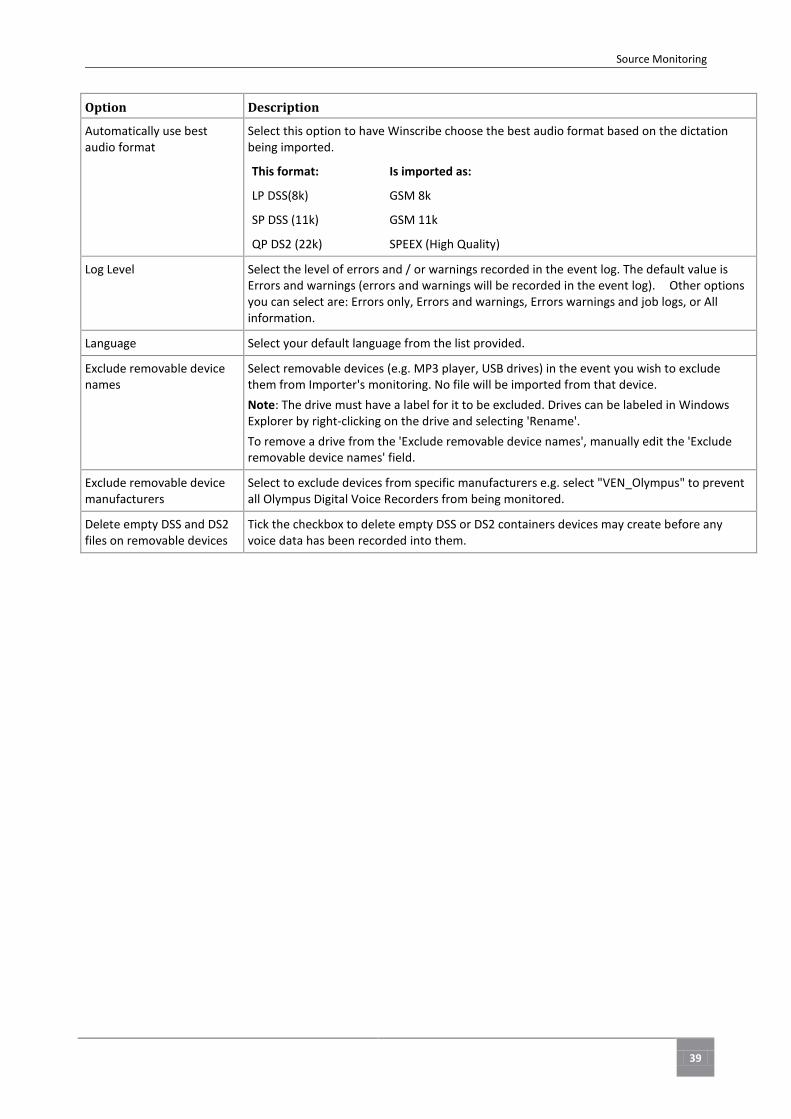
Automatically use best audio format
Select this option to have Winscribe choose the best audio format based on the dictation being imported.
This format: Is imported as:
LP DSS(8k) GSM 8k
SP DSS (11k) GSM 11k
QP DS2 (22k) SPEEX (High Quality)
Log Level Select the level of errors and / or warnings recorded in the event log. The default value is Errors and warnings (errors and warnings will be recorded in the event log). Other options you can select are: Errors only, Errors and warnings, Errors warnings and job logs, or All information.
Language Select your default language from the list provided.
Exclude removable device names
Select removable devices (e.g. MP3 player, USB drives) in the event you wish to exclude them from Importer's monitoring. No file will be imported from that device.
Note: The drive must have a label for it to be excluded. Drives can be labeled in Windows Explorer by right-clicking on the drive and selecting 'Rename'.
To remove a drive from the 'Exclude removable device names', manually edit the 'Exclude removable device names' field.
Exclude removable device manufacturers
Select to exclude devices from specific manufacturers e.g. select "VEN_Olympus" to prevent all Olympus Digital Voice Recorders from being monitored.
Delete empty DSS and DS2 files on removable devices
Tick the checkbox to delete empty DSS or DS2 containers devices may create before any voice data has been recorded into them.
40
Winscribe Internet Importer User Guide
Olympus
Olympus DS-2000/DS-3000/DS-330/DS-660
Setup Requirements
In the Olympus Dictation Module software:
Set the Olympus Device Detector not to automatically detect when the Olympus device is attached to the USB cable supplied with the device. The procedure for doing this is detailed in the Setting No Auto Detect section (below)
Use the Download menu item Create and Send Job Data, to configure the author ids and work type ids (up to 10 users and work types per device) to match the author ids and job types setup in Winscribe System Manager.
Configure Winscribe Importer to:
Delete files on the Olympus device once they have been downloaded to your PC. This will prevent the same files being downloaded more than once.
Copy files from Folders A, B, and / or C on the Olympus device to the copy files to folder on your PC.
Setting No Auto Detect
The Device Detector for DSS Player Pro must not auto-detect when the Olympus device is connected to the USB port. Winscribe Importer performs this function when the Check for Olympus DS2000/DS3000/DS-330/DS-660 checkbox is ticked. To turn Auto Detect off on the Device Detector:
1. Right-click the Device Detector for DSS Player Pro icon in the system tray.
2. Click No Auto Detect.
Changing Settings
Before Winscribe Importer can copy files from your Olympus device to your PC, you must change the default settings. These settings can be changed again whenever you wish. To view or change the Olympus device settings:
Configuring Hardware Devices
41
Configuring Hardware Devices
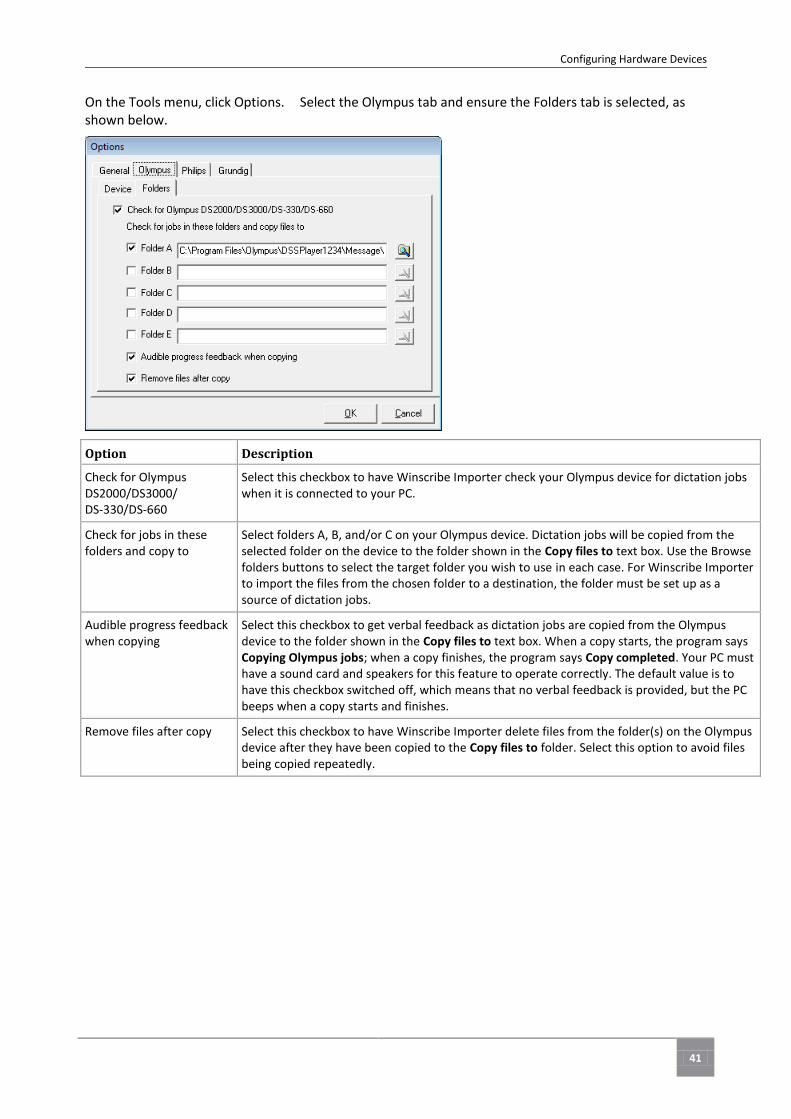
On the Tools menu, click Options. Select the Olympus tab and ensure the Folders tab is selected, as shown below.
Option Description
Check for Olympus DS2000/DS3000/ DS-330/DS-660
Select this checkbox to have Winscribe Importer check your Olympus device for dictation jobs when it is connected to your PC.
Check for jobs in these folders and copy to
Select folders A, B, and/or C on your Olympus device. Dictation jobs will be copied from the selected folder on the device to the folder shown in the Copy files to text box. Use the Browse folders buttons to select the target folder you wish to use in each case. For Winscribe Importer to import the files from the chosen folder to a destination, the folder must be set up as a source of dictation jobs.
Audible progress feedback when copying
Select this checkbox to get verbal feedback as dictation jobs are copied from the Olympus device to the folder shown in the Copy files to text box. When a copy starts, the program says Copying Olympus jobs; when a copy finishes, the program says Copy completed. Your PC must have a sound card and speakers for this feature to operate correctly. The default value is to have this checkbox switched off, which means that no verbal feedback is provided, but the PC beeps when a copy starts and finishes.
Remove files after copy Select this checkbox to have Winscribe Importer delete files from the folder(s) on the Olympus device after they have been copied to the Copy files to folder. Select this option to avoid files being copied repeatedly.
42
Winscribe Internet Importer User Guide
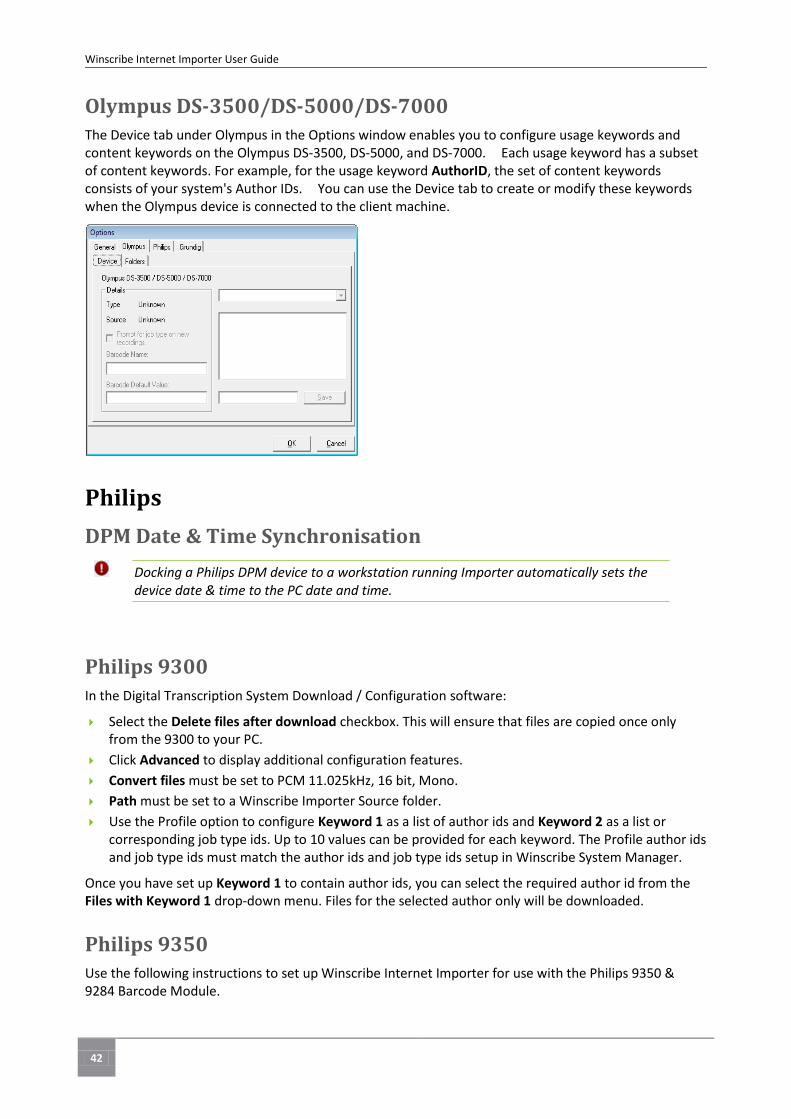
Olympus DS-3500/DS-5000/DS-7000 The Device tab under Olympus in the Options window enables you to configure usage keywords and content keywords on the Olympus DS-3500, DS-5000, and DS-7000. Each usage keyword has a subset of content keywords. For example, for the usage keyword AuthorID, the set of content keywords consists of your system's Author IDs. You can use the Device tab to create or modify these keywords when the Olympus device is connected to the client machine.
Philips
DPM Date & Time Synchronisation
Docking a Philips DPM device to a workstation running Importer automatically sets the device date & time to the PC date and time.
Philips 9300
In the Digital Transcription System Download / Configuration software:
Select the Delete files after download checkbox. This will ensure that files are copied once only from the 9300 to your PC.
Click Advanced to display additional configuration features.
Convert files must be set to PCM 11.025kHz, 16 bit, Mono.
Path must be set to a Winscribe Importer Source folder.
Use the Profile option to configure Keyword 1 as a list of author ids and Keyword 2 as a list or corresponding job type ids. Up to 10 values can be provided for each keyword. The Profile author ids and job type ids must match the author ids and job type ids setup in Winscribe System Manager.
Once you have set up Keyword 1 to contain author ids, you can select the required author id from the Files with Keyword 1 drop-down menu. Files for the selected author only will be downloaded.
Philips 9350 Use the following instructions to set up Winscribe Internet Importer for use with the Philips 9350 & 9284 Barcode Module.

43
Configuring Hardware Devices
1. You may wish to program your Philips recorder with Author ids and Job Types, as detailed in the Philips documentation.
2. Create a new Input Tag, as shown in the screenshot below. In this example the 9350 is recording in standard DSS, and appropriate CODECS exist on the PC running the Internet Importer.
3. Remember to add default Author and Job Type IDs.
4. Your receiving Job Types within Winscribe should be set to accept a Keyfield (AlphaNumeric) – this will allow the barcode to be transferred correctly through to the Winscribe application.
5. On the receiving Winscribe server the "Keyfield length" is set to 15, allowing a range of Barcode lengths to be accepted without truncation.
6. Create a Source, as shown in the screenshot below. The Source should refer to the removable
drive (when the 9350 is plugged into the PC via the USB cable a 'removable drive' will be detected). In the Source you need to reference the Input Tag created in the step above. This will give "audible feedback" to the user when the 9350 is plugged into the USB cable.
7. Create Destinations and Rules as normal.
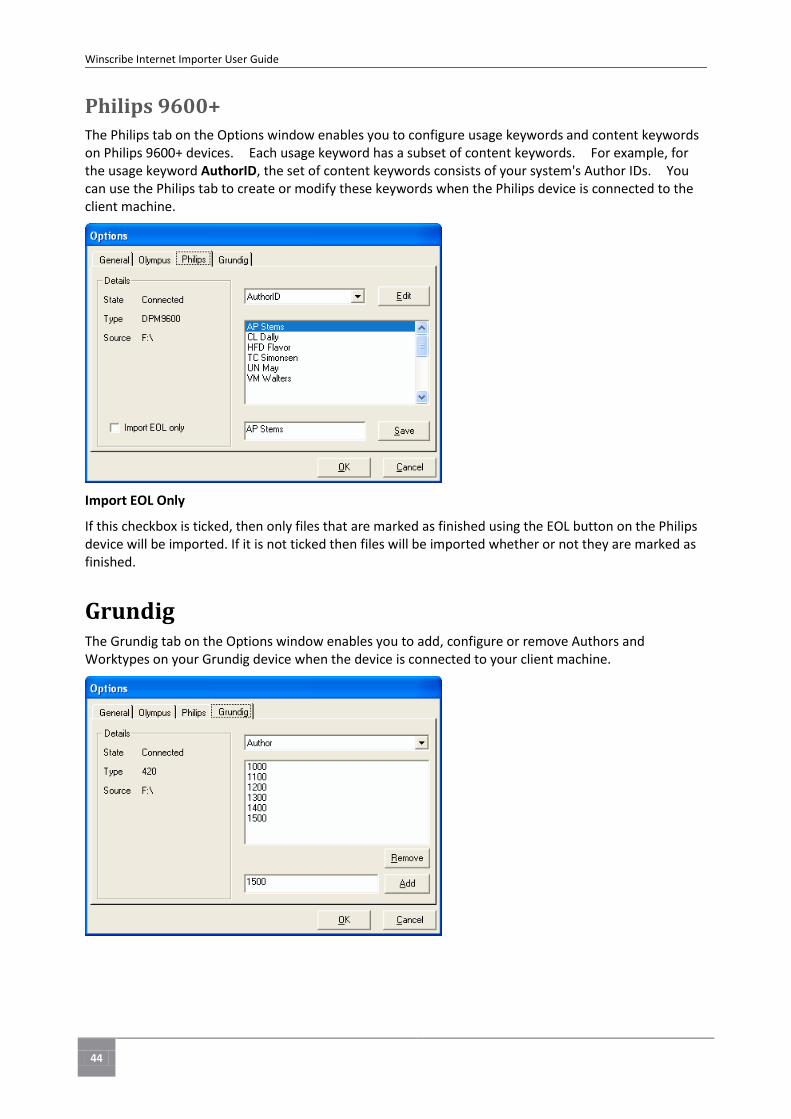
44
Winscribe Internet Importer User Guide
Philips 9600+ The Philips tab on the Options window enables you to configure usage keywords and content keywords on Philips 9600+ devices. Each usage keyword has a subset of content keywords. For example, for the usage keyword AuthorID, the set of content keywords consists of your system's Author IDs. You can use the Philips tab to create or modify these keywords when the Philips device is connected to the client machine.
Import EOL Only
If this checkbox is ticked, then only files that are marked as finished using the EOL button on the Philips device will be imported. If it is not ticked then files will be imported whether or not they are marked as finished.
Grundig The Grundig tab on the Options window enables you to add, configure or remove Authors and Worktypes on your Grundig device when the device is connected to your client machine.
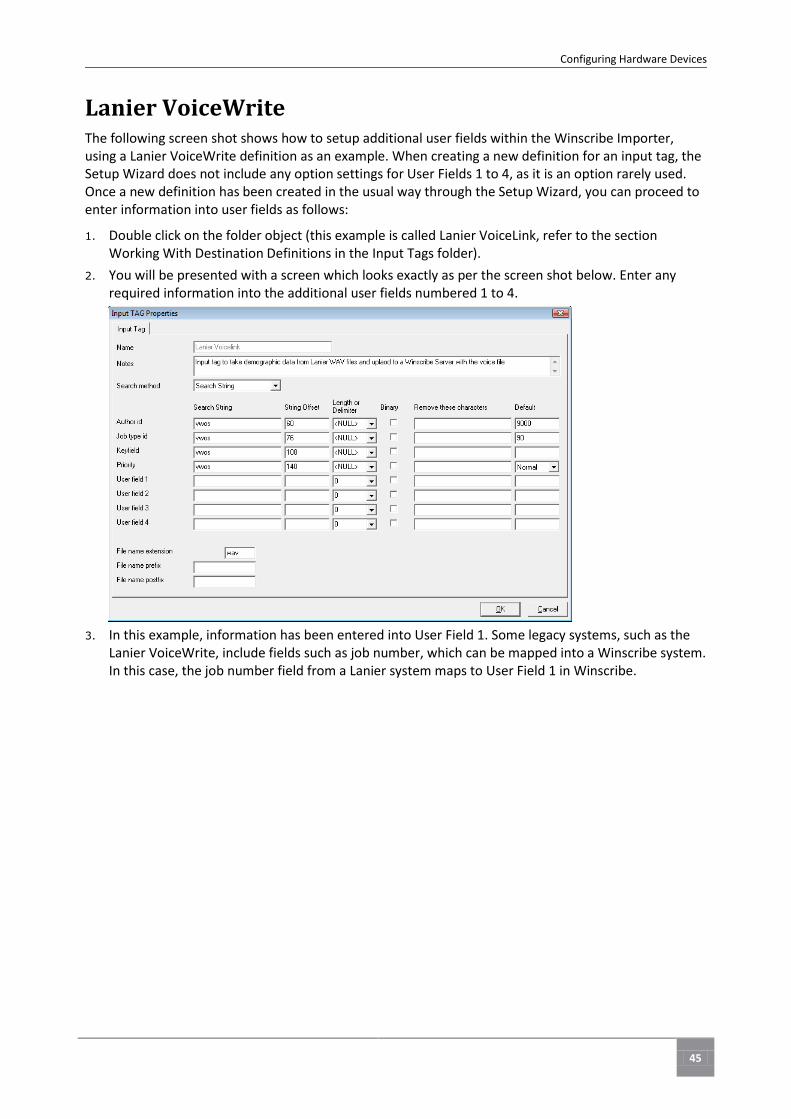
45
Configuring Hardware Devices
Lanier VoiceWrite The following screen shot shows how to setup additional user fields within the Winscribe Importer, using a Lanier VoiceWrite definition as an example. When creating a new definition for an input tag, the Setup Wizard does not include any option settings for User Fields 1 to 4, as it is an option rarely used. Once a new definition has been created in the usual way through the Setup Wizard, you can proceed to enter information into user fields as follows:
1. Double click on the folder object (this example is called Lanier VoiceLink, refer to the section Working With Destination Definitions in the Input Tags folder).
2. You will be presented with a screen which looks exactly as per the screen shot below. Enter any required information into the additional user fields numbered 1 to 4.
3. In this example, information has been entered into User Field 1. Some legacy systems, such as the
Lanier VoiceWrite, include fields such as job number, which can be mapped into a Winscribe system. In this case, the job number field from a Lanier system maps to User Field 1 in Winscribe.
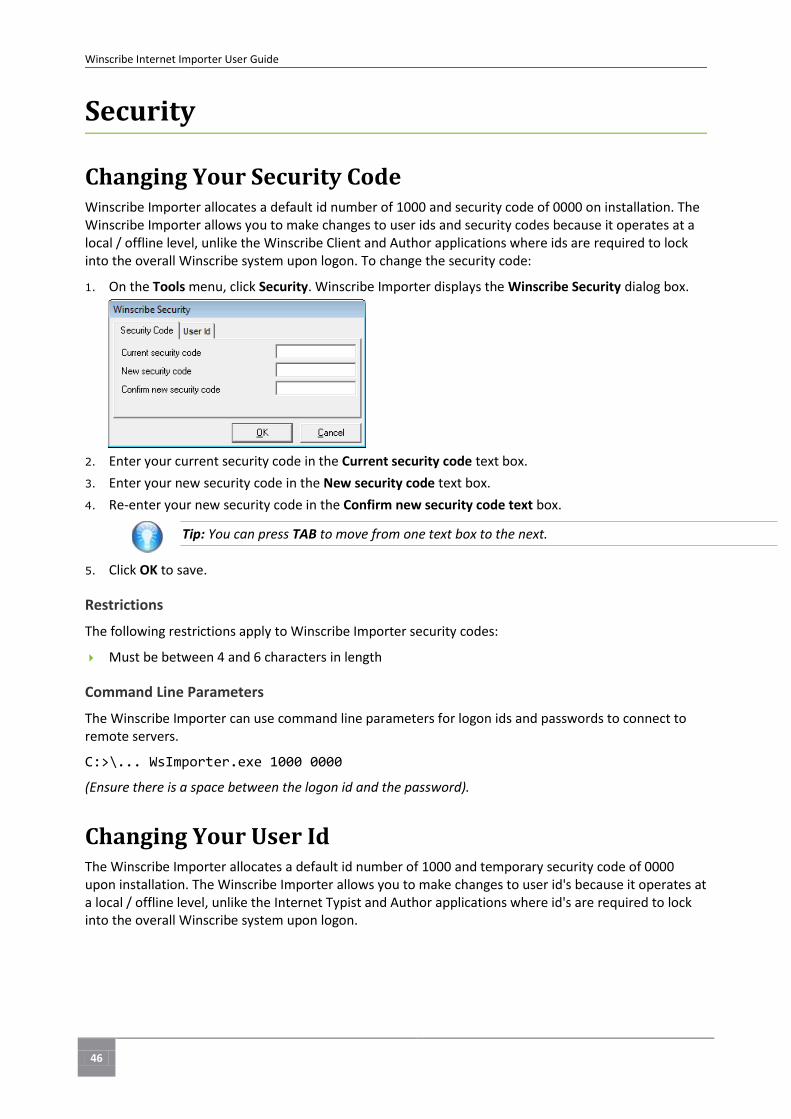
46
Winscribe Internet Importer User Guide
Changing Your Security Code Winscribe Importer allocates a default id number of 1000 and security code of 0000 on installation. The Winscribe Importer allows you to make changes to user ids and security codes because it operates at a local / offline level, unlike the Winscribe Client and Author applications where ids are required to lock into the overall Winscribe system upon logon. To change the security code:
1. On the Tools menu, click Security. Winscribe Importer displays the Winscribe Security dialog box.
2. Enter your current security code in the Current security code text box.
3. Enter your new security code in the New security code text box.
4. Re-enter your new security code in the Confirm new security code text box.
Tip: You can press TAB to move from one text box to the next.
5. Click OK to save.
Restrictions
The following restrictions apply to Winscribe Importer security codes:
Must be between 4 and 6 characters in length
Command Line Parameters
The Winscribe Importer can use command line parameters for logon ids and passwords to connect to remote servers.
C:>\... WsImporter.exe 1000 0000
(Ensure there is a space between the logon id and the password).
Changing Your User Id The Winscribe Importer allocates a default id number of 1000 and temporary security code of 0000 upon installation. The Winscribe Importer allows you to make changes to user id's because it operates at a local / offline level, unlike the Internet Typist and Author applications where id's are required to lock into the overall Winscribe system upon logon.
Security
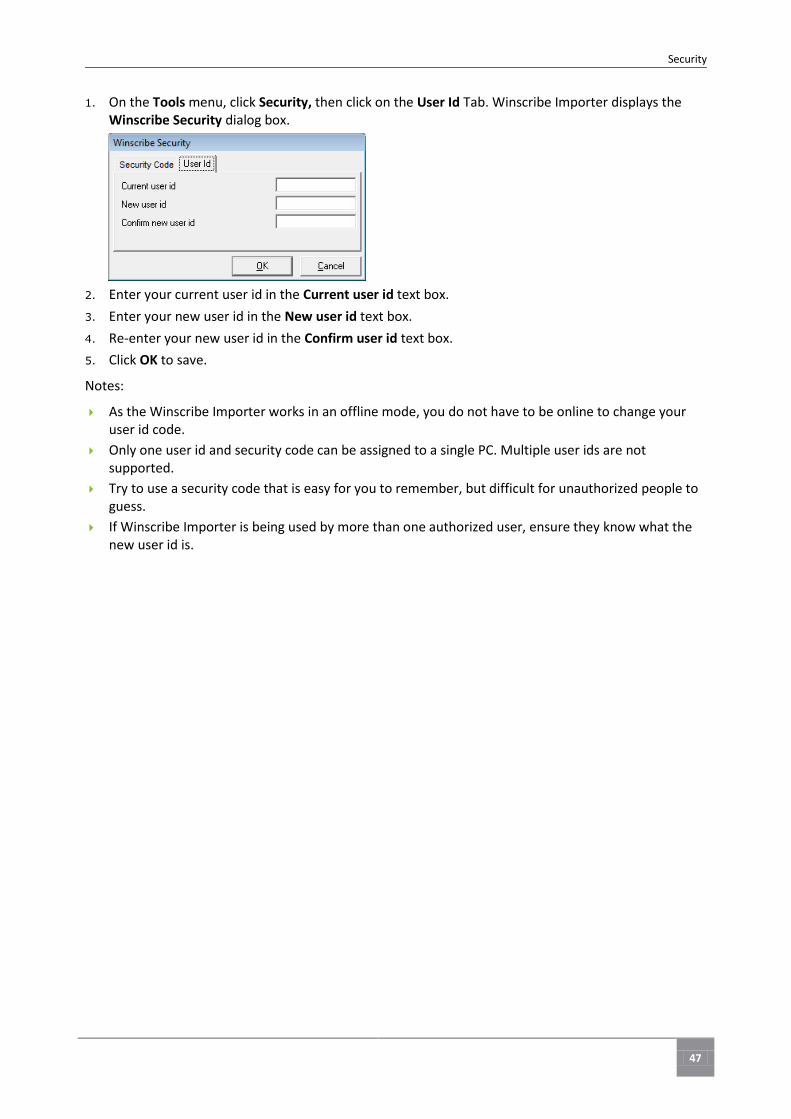
47
Security
1. On the Tools menu, click Security, then click on the User Id Tab. Winscribe Importer displays the Winscribe Security dialog box.
2. Enter your current user id in the Current user id text box.
3. Enter your new user id in the New user id text box.
4. Re-enter your new user id in the Confirm user id text box.
5. Click OK to save.
Notes:
As the Winscribe Importer works in an offline mode, you do not have to be online to change your user id code.
Only one user id and security code can be assigned to a single PC. Multiple user ids are not supported.
Try to use a security code that is easy for you to remember, but difficult for unauthorized people to guess.
If Winscribe Importer is being used by more than one authorized user, ensure they know what the new user id is.
48
Winscribe Internet Importer User Guide
Problems may sometimes arise that prevent dictation jobs from being transferred successfully by Winscribe Importer. Some potential problems and their causes are listed in the following table.
Description of problem Possible cause(s)
One or more dictation job files are not transferred from a source folder, even though Winscribe Importer has transferred other files from that folder.
Files are left in a source folder if the source definition is set not to remove files after copy. If these files have not been transferred, you may need to clear the read-only attribute.
Olympus DSS Player Pro Dictation module starts when the DS-3000 (or other Olympus device) is connected, preventing dictation jobs from being imported.
The Device Detector for DSS Player Pro should be set to No Auto Detect.
Reporting Errors
If an upload fails, the Importer will attempt the import again. The number of times it will try and the seconds between retry attempts depends on your settings on the General tab in the Options window (accessed by selecting Options from the Tools menu).
A fault condition exists in two scenarios:
When the Web Components file upload location is unable to be resolved. The web components are operable but the file upload folder is not available.
-or-
When the connection to the Winscribe Database is unavailable.
If either of those two scenarios occur, the Importer will report an error. The error will be displayed in the Log Window, or in the event log if you have Importer installed as a service. In addition, you can set up a script that will trigger when the error occurs.
Following is an Import Failure Notification script that will automatically generate an email and send it to an email address you nominate. To create this script, click on the Scripts button to open the Scripts window, and click on the New Script button. The script code is given below. Copy this code and paste it into the Script Properties window.
Note that you must modify the objEmail.To variable to be the email address to which you would like the error notification sent.
Troubleshooting
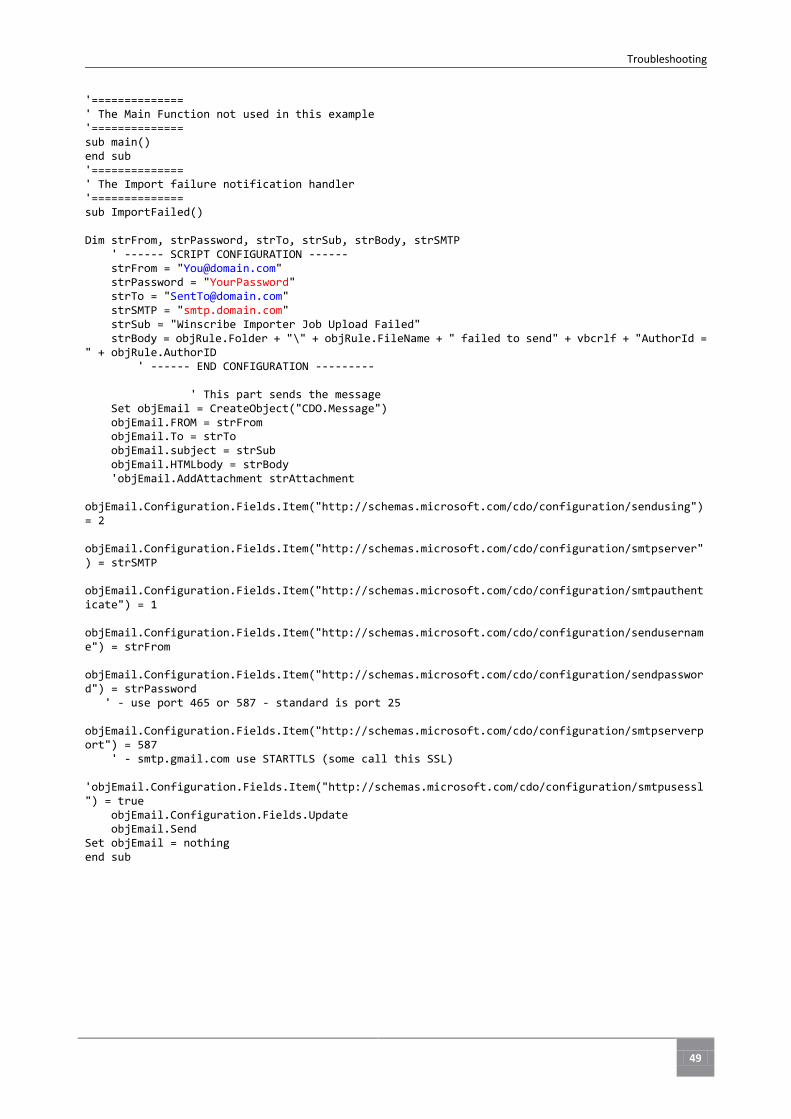
49
Troubleshooting
'============== ' The Main Function not used in this example '============== sub main() end sub '============== ' The Import failure notification handler '============== sub ImportFailed() Dim strFrom, strPassword, strTo, strSub, strBody, strSMTP ' ------ SCRIPT CONFIGURATION ------ strFrom = "[email protected]" strPassword = "YourPassword" strTo = "[email protected]" strSMTP = "smtp.domain.com" strSub = "Winscribe Importer Job Upload Failed" strBody = objRule.Folder + "\" + objRule.FileName + " failed to send" + vbcrlf + "AuthorId = " + objRule.AuthorID ' ------ END CONFIGURATION --------- ' This part sends the message Set objEmail = CreateObject("CDO.Message") objEmail.FROM = strFrom objEmail.To = strTo objEmail.subject = strSub objEmail.HTMLbody = strBody 'objEmail.AddAttachment strAttachment objEmail.Configuration.Fields.Item("http://schemas.microsoft.com/cdo/configuration/sendusing") = 2 objEmail.Configuration.Fields.Item("http://schemas.microsoft.com/cdo/configuration/smtpserver") = strSMTP objEmail.Configuration.Fields.Item("http://schemas.microsoft.com/cdo/configuration/smtpauthenticate") = 1 objEmail.Configuration.Fields.Item("http://schemas.microsoft.com/cdo/configuration/sendusername") = strFrom objEmail.Configuration.Fields.Item("http://schemas.microsoft.com/cdo/configuration/sendpassword") = strPassword ' - use port 465 or 587 - standard is port 25 objEmail.Configuration.Fields.Item("http://schemas.microsoft.com/cdo/configuration/smtpserverport") = 587 ' - smtp.gmail.com use STARTTLS (some call this SSL) 'objEmail.Configuration.Fields.Item("http://schemas.microsoft.com/cdo/configuration/smtpusessl") = true objEmail.Configuration.Fields.Update objEmail.Send Set objEmail = nothing end sub
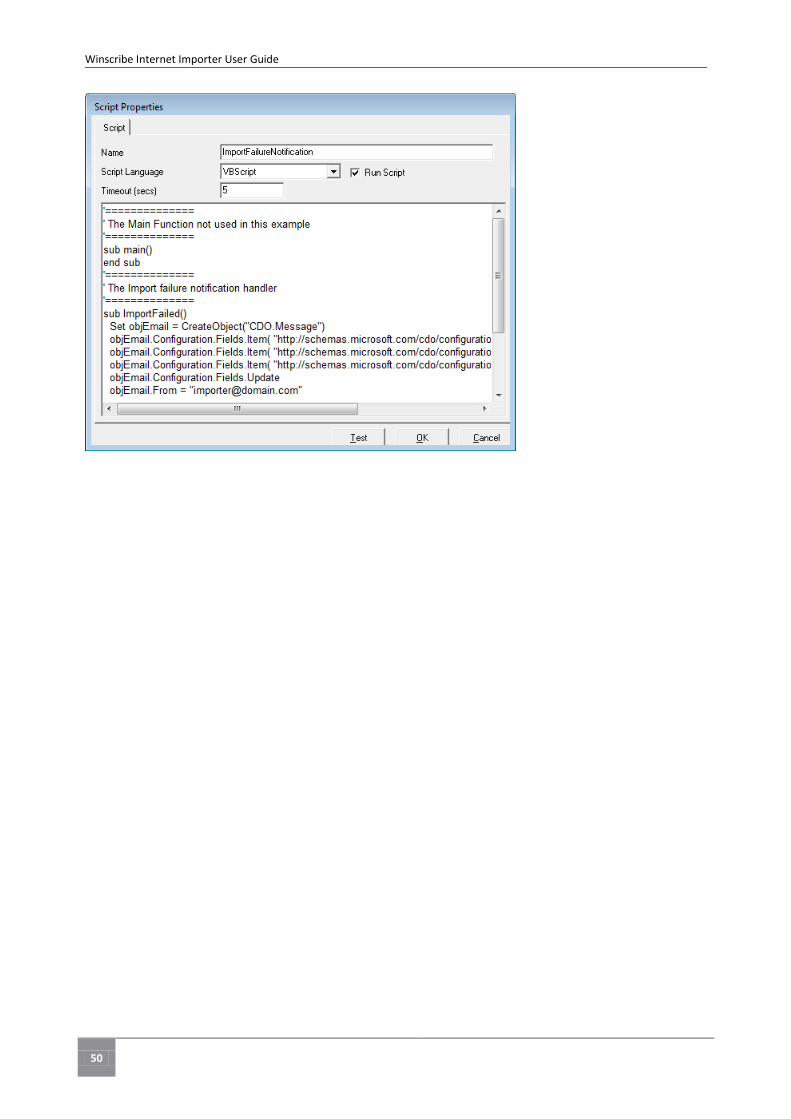
50
Winscribe Internet Importer User Guide

51
Glossary of Terms
Author
A person who creates dictation jobs. Each author is allocated a unique id on Winscribe's servers to ensure that their dictation jobs are routed to the appropriate transcriptionist.
Binary
A file containing binary data, i.e arbitrary bytes or words, as opposed to a text file containing only printable characters (e.g ASCII characters with codes 10, 13, AND 32-126). An example would be sub-chunks of data extracted out of a .WAV file. 4 bytes of data could convert to a long value, which could effectively be the AUTHOR_ID.
Checking which Codecs are installed
Your PC must have the correct Codecs installed to compress and decompress audio information. The procedure shown here is for Windows 2000. Other versions of Windows have similar, but not necessarily identical procedures. To check which Codecs are installed:
1. Select Control Panel from Settings on the Start menu.
2. Double click on Sounds and Multimedia.
3. Click the Hardware tab.
4. Double-click on Audio Codecs.
5. Click the Properties tab. A list of the installed Codecs is displayed.
Default Values
These values will be used if Winscribe Importer cannot obtain the information elsewhere. You must supply a default value for author id, job type id and priority. Please note that the keyfield is not a required value.
Delimiter Source
A delimiter is a character that separates tokens in a string. Delimiter types include: None, Space, Underscore and Dash.
Destination
A location where dictation jobs are stored after they have been imported from your PC. Locations can include:
1. A Winscribe server located on the LAN or connected via the Internet / Intranet.
2. Folders on another PC connected to the LAN or WAN.
Dictation file formats supported
Winscribe Importer supports the following dictation file formats:
1. .WAV (format must be supported by CODECs installed on the PC).
2. BWF (.WAV)
3. .DSS
4. .DS2
5. .VOX (must be in Dialogic 8khz adpcm format).
6. .MP3
7. .RAW
8. .G726
9. .OGG
10. .G721
11. .MPC
12. .MP2
13. .WMA
14. .DPF
15. .SPX
16. .AMR (not encrypted)
Notes:
To import from WMA format Windows Encoder 9 Series must be installed. This is available on the Winscribe CD under utilities (wmfdst.exe).
Glossary of Terms
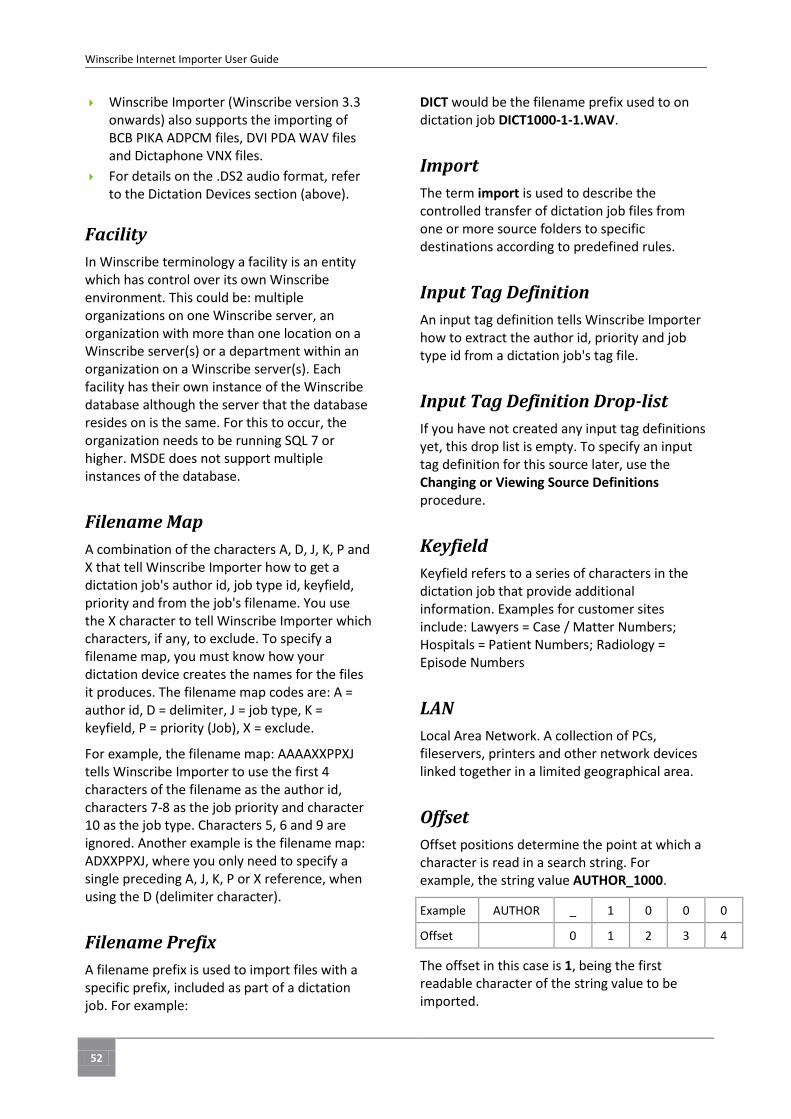
52
Winscribe Internet Importer User Guide
Winscribe Importer (Winscribe version 3.3 onwards) also supports the importing of BCB PIKA ADPCM files, DVI PDA WAV files and Dictaphone VNX files.
For details on the .DS2 audio format, refer to the Dictation Devices section (above).
Facility
In Winscribe terminology a facility is an entity which has control over its own Winscribe environment. This could be: multiple organizations on one Winscribe server, an organization with more than one location on a Winscribe server(s) or a department within an organization on a Winscribe server(s). Each facility has their own instance of the Winscribe database although the server that the database resides on is the same. For this to occur, the organization needs to be running SQL 7 or higher. MSDE does not support multiple instances of the database.
Filename Map
A combination of the characters A, D, J, K, P and X that tell Winscribe Importer how to get a dictation job's author id, job type id, keyfield, priority and from the job's filename. You use the X character to tell Winscribe Importer which characters, if any, to exclude. To specify a filename map, you must know how your dictation device creates the names for the files it produces. The filename map codes are: A = author id, D = delimiter, J = job type, K = keyfield, P = priority (Job), X = exclude.
For example, the filename map: AAAAXXPPXJ tells Winscribe Importer to use the first 4 characters of the filename as the author id, characters 7-8 as the job priority and character 10 as the job type. Characters 5, 6 and 9 are ignored. Another example is the filename map: ADXXPPXJ, where you only need to specify a single preceding A, J, K, P or X reference, when using the D (delimiter character).
Filename Prefix
A filename prefix is used to import files with a specific prefix, included as part of a dictation job. For example:
DICT would be the filename prefix used to on dictation job DICT1000-1-1.WAV.
Import
The term import is used to describe the controlled transfer of dictation job files from one or more source folders to specific destinations according to predefined rules.
Input Tag Definition
An input tag definition tells Winscribe Importer how to extract the author id, priority and job type id from a dictation job's tag file.
Input Tag Definition Drop-list
If you have not created any input tag definitions yet, this drop list is empty. To specify an input tag definition for this source later, use the Changing or Viewing Source Definitions procedure.
Keyfield
Keyfield refers to a series of characters in the dictation job that provide additional information. Examples for customer sites include: Lawyers = Case / Matter Numbers; Hospitals = Patient Numbers; Radiology = Episode Numbers
LAN
Local Area Network. A collection of PCs, fileservers, printers and other network devices linked together in a limited geographical area.
Offset
Offset positions determine the point at which a character is read in a search string. For example, the string value AUTHOR_1000.
Example AUTHOR _ 1 0 0 0
Offset 0 1 2 3 4
The offset in this case is 1, being the first readable character of the string value to be imported.

53
Glossary of Terms
Output Tag File
For each dictation job, Winscribe Importer creates an output tag file in the configured destination. This file contains details of the dictation job's author id, job type id, keyfield and priority and has a .WST filename extension. If using a Lanier VoiceWrite system in conjunction with Winscribe, the Output Tag has a .CMP file extension.
Port
A socket connecting a dictation device to a PC. Dictation devices are normally connected to the Universal Serial Bus (USB) port on the PC.
Read-only attribute
When a file is left in the source folder, Winscribe Importer sets the Read-only attribute on the file to indicate that it has been transferred to its configured destination. Winscribe Importer ignores any files with the Read-only attribute set, so they are not transferred again. In some cases, an incorrect rule definition or other problem can cause a file's Read-only attribute to be set even though the file has not been transferred.
Rule Matching
To determine if a rule applies to a dictation job, the job's author id, job type id, priority and source are compared to the corresponding items in the rule definition. If the non-blank items in rule definition match the items in the job, the rule is applicable and the dictation job is transferred to the rule's configured destination. For example, a rule with author id=1035, job type id=20, priority=5 and source=John Smith will only transfer jobs with all items that match these values. A rule with a blank author id is valid for any author. Similarly, for job type id, priority and source.
Rules
Winscribe Importer uses rules to control which destination the jobs found in a source folder are copied to. Winscribe Importer uses information from each dictation job to identify which author it belongs to and which rules to apply. The characteristics of a dictation job are checked against each rule in turn, and the first rule that applies is used to determine the destination of that dictation job.
Search string
Winscribe Importer searches the tag file for the character string you specify, then reads a set number of characters after that string as the author id, job type id, keyfield or priority. For example if you specify an author id search string of AUTHOR=, and an author id length of 4 characters, Winscribe Importer will extract an author id of 1025 from the following text in the tag file: 10345v34DSAUTHOR=1025D45678
Source
A folder on your PC, LAN or WAN that Winscribe Importer scans to look for dictation jobs. Dictation jobs are placed into source folders:
1. From a dictation device by third party software.
2. By copies of Winscribe Importer running on other computers.
If you wish, you can setup several source folders on your PC.
Source Name
Type in a descriptive name for the source.
Tag file
A tag file is created by some dictation systems in addition to the dictation file itself. You can create an input tag definition to tell Winscribe Importer how to extract the author id, job type id, keyfield and priority from a dictation job's tag file.
54
Winscribe Internet Importer User Guide
Tag filename extension
The tag file normally has the same filename as the dictation job, but with a different extension. For example, if you specify an extension of TGF, Winscribe Importer will search for 10430201.TGF when the dictation job file is 10430201.DSS.
Tag filename prefix / postfix
A prefix of XXX and a postfix of YYY would cause Winscribe Importer to search for a tag file called XXX10430201YYY.TGF when the dictation job file is 10430201.DSS.
Template file
A template file is a text file that contains the template for the tag file to be created in the destination folder. The template file is copied to the destination then searched for markers which indicate where to insert the author id, job type id, keyfield and priority. The markers used in the template file are:
[JobParameters] AuthorId=<AUTHORID> JobtypeId=<JOBTYPEID> Priority=<PRIORITY> Keyfield=<KEYFIELD> Userfield1=<USERFIELD1> Userfield2=<USERFIELD2> Userfield3=<USERFIELD3> Userfield4=<USERFIELD4> Notes=<NOTES> Hidden=<HIDDEN> LastModified=<LASTMODIFIED>
Winscribe Importer replaces these markers with the values relating to the job being copied.
Transcriptionist
A person who takes dictation jobs and transcribes them into a document for printing and checking.
WAN
Wide Area Network. A collection of computers and network devices connected over an extended geographical area.
55
Index
A
Author • 51
B
Binary • 51
C
Changing or Viewing Destination Definitions • 25 Changing or Viewing Input Tag Definitions • 22 Changing or Viewing Rule Definitions • 29 Changing or Viewing Script Definitions • 33 Changing or Viewing Source Definitions • 17 Changing Rule Checking Orders • 31 Changing Settings • 40 Changing Source Monitoring Settings • 38 Changing the Language Setting • 9 Changing Views • 9 Changing Your Security Code • 46 Changing Your User Id • 46 Checking Monitoring Status • 37 Checking which Codecs are installed • 51 Configuring Hardware Devices • 40 Creating New Destination Definitions • 24 Creating New Input Tag Definitions • 19 Creating New Rule Definitions • 29 Creating New Script Definitions • 33 Creating New Source Definitions • 15
D
Default Values • 51 Deleting Destination Definitions • 26 Deleting Input Tag Definitions • 23 Deleting Log Entries • 10 Deleting Rule Definitions • 31 Deleting Script Definitions • 34 Deleting Source Definitions • 18 Delimiter Source • 51 Destination • 51 Destination Definitions • 24 Destinations and Multi-Facility • 27 Dictation Device Setup Requirements • 13 Dictation Devices • 11 Dictation file formats supported • 51 DPM Date & Time Synchronisation • 42 DS2 Encryption Support • 12 DSS Pro (.ds2) • 11
F
Facility • 52 Filename Map • 52 Filename Prefix • 52
G
Get Information by Searching for Specified Characters in the File • 19
Get Information From Specified Line Numbers in the File • 21
Get Information From Specified Locations in the File: • 20
Getting Help • 8 Getting Help from the Help Menu • 8 Getting Importer installed as a service to work with
active directory authentication • 14 Getting Information from the Winscribe Website • 8 Getting Version Information • 8 Grundig • 44
I
Import • 52 Importing Dictation Jobs • 36 Input Tag Definition • 52 Input Tag Definition Drop-list • 52 Input Tag Definitions • 19
K
Keyfield • 52
L
LAN • 52 Lanier VoiceWrite • 45 Logging In After the First Time • 6 Logging In For the First Time • 6 Logging On • 6
M
Minimum System Requirements • 14
O
Offset • 52 Olympus • 40 Olympus DS-2000/DS-3000/DS-330/DS-660 • 40 Olympus DS-3500/DS-5000/DS-7000 • 42 Output Tag File • 53
P
Philips • 42 Philips 9300 • 42 Philips 9350 • 42 Philips 9600+ • 44 Port • 53
R
Read-only attribute • 53 Referencing A Network Share • 27
Index
56
Winscribe Internet Importer User Guide
Rule Definitions • 29 Rule Matching • 53 Rules • 53
S
Script Definitions • 33 Search string • 53 Security • 46 Send Email • 35 Setting No Auto Detect • 40 Setting up Winscribe Importer • 14 Setup Requirements • 40 Showing and Hiding the Outlook Bar • 9 Showing and Hiding the Status Bar • 9 Source • 53 Source Definitions • 15 Source Folder • 16 Source Monitoring • 37 Source Name • 53 Starting Source Monitoring • 37 Stopping Source Monitoring • 37 Supported Dictation Devices • 11
T
Tag file • 53 Tag filename extension • 54 Tag filename prefix / postfix • 54 Template file • 54 Transcriptionist • 54 Troubleshooting • 48
V
Viewing and Printing Log Details • 10 Viewing the Winscribe Importer Log Window • 10
W
WAN • 54 Welcome to Winscribe Importer • 5 Winscribe Importer Log • 10 Winscribe Importer Window • 7 Working With Destination Definitions • 26 Working with Scripts • 34