Technical Guide for Non-Radioactive Nucleic Acid Labeling ... · Technical Guide for...
74
DETECTOR ™ SYSTEMS Technical Guide for Non-Radioactive Nucleic Acid Labeling and Detection www.kpl.com
Transcript of Technical Guide for Non-Radioactive Nucleic Acid Labeling ... · Technical Guide for...

DE
TE
CT
OR
™S
YS
TE
MS
Technical Guide for Non-Radioactive Nucleic Acid Labeling and Detection
w w w . k p l . c o m

1 800-638-3167 • KPL, Inc. • 301-948-7755
Table of Contents Page
Chapter 1 – Overview of Non-Radioactive Labeling and Detection 3
Chapter 2 – Nucleic Acid Probe Labeling 9
Chapter 3 – Southern Blotting 23
Chapter 4 – Northern Blotting 33
Chapter 5 – In-Situ Hybridization 41
Chapter 6 – Troubleshooting Guide 55
Chapter 7 – Appendix 65
Miscellaneous Applications 65
Buffer Recipes 68
Related Products 69
Table of Contents

2www.kpl.com
Preface
Detector™ is a comprehensive line of kits and reagents for non-radioactive labeling
and detection of nucleic acids. These systems have been developed to eliminate the
need for radioisotopes without compromise to the high sensitivity associated with
their use. Additionally, Detector products address the background issues that have
been typical of past chemiluminescent methods through the use of unique
hybridization and blocking solutions and well-defined assay conditions. The result
is an optimized approach to nucleic acid blotting applications that is fast, efficient
and reliable, producing publication quality blots with superior signal:noise ratio.
Included in the Detector product line are kits for:
• Biotin labeling of DNA and RNA probes
– Detector Random Primer DNA Biotinylation Kit
– Detector PCR DNA Biotinylation Kit
– Detector RNA in vitro Transcription Biotinylation Kit
• Southern Blotting
– Detector AP Chemiluminescent Blotting Kit
– Detector HRP Chemiluminescent Blotting Kit
• Northern Blotting
– Detector AP Chemiluminescent Blotting Kit
• In situ Hybridization
– DNADetector™ Chromogenic in situ Hybridization Kit
– DNADetector Fluorescent in situ Hybridization Kit
This Technical Guide to Non-Radioactive Nucleic Acid Labeling and Detection is designed
as a primer for those laboratories evaluating chemiluminescent detection for
the first time; it serves as a resource for comparing techniques, selecting the
appropriate products and conducting experiments. In addition to an overview of
the applications, complete protocols are included along with special notes and
recommendations to ensure maximum performance. For those with more extensive
experience, the guide acts as a quick reference and troubleshooting tool.
3 800-638-3167 • KPL, Inc. • 301-948-7755
Overview of Non-Radioactive Labeling and Detection
Non-rad vs. 32P
A variety of methods have been developed to detect specific nucleic acid
sequences immobilized on membranes (i.e., dot/slot blot, Southern blot,
Northern blot, South-Western blot, colony and plaque lifts) and localized
in situ in cells and tissues. 32P has traditionally been used due to the intensity
of signal it produces and, thus its ability to facilitate the detection of
small amounts of biomolecules on blots. However, 32P is not without its
shortcomings. These include issues associated with handling and disposing
of hazardous material, long exposure times and short half-life, limiting the
stability of probes.
In recent years, non-radioactive nucleic acid labeling and detection method-
ologies have become available in response to a desire by researchers and their
institutions to move away from the use of radioisotopes. Advancements made
in the areas of chemiluminescence and fluorescence have allowed for an easier
transition. In non-radioactive assays, signal is generated through an enzymatic
reaction with a chemiluminescent or chromogenic substrate; alternatively,
detection can occur through the appropriate excitation and emission of a
fluorophore-labeled probe. For those laboratories seeking replacement
technology to 32P without significant investment in instrumentation,
chemiluminescent detection enables equivalent results, easily and quickly
captured on digital imaging systems or X-ray film shortly after exposure.
It is now possible to detect femtogram quantities of nucleic acid in as little
as 10 minutes when a hapten and reporter molecule are used in conjunction
with a chemiluminescent substrate. The hazards and regulatory issues
surrounding 32P-based detection are no longer a trade-off for sensitive,
reproducible results.
Optimal non-isotopic nucleic acid detection depends primarily on three
variables: 1) the molecule or compound used to label the probe,
2) hybridization conditions, and 3) the detection method.
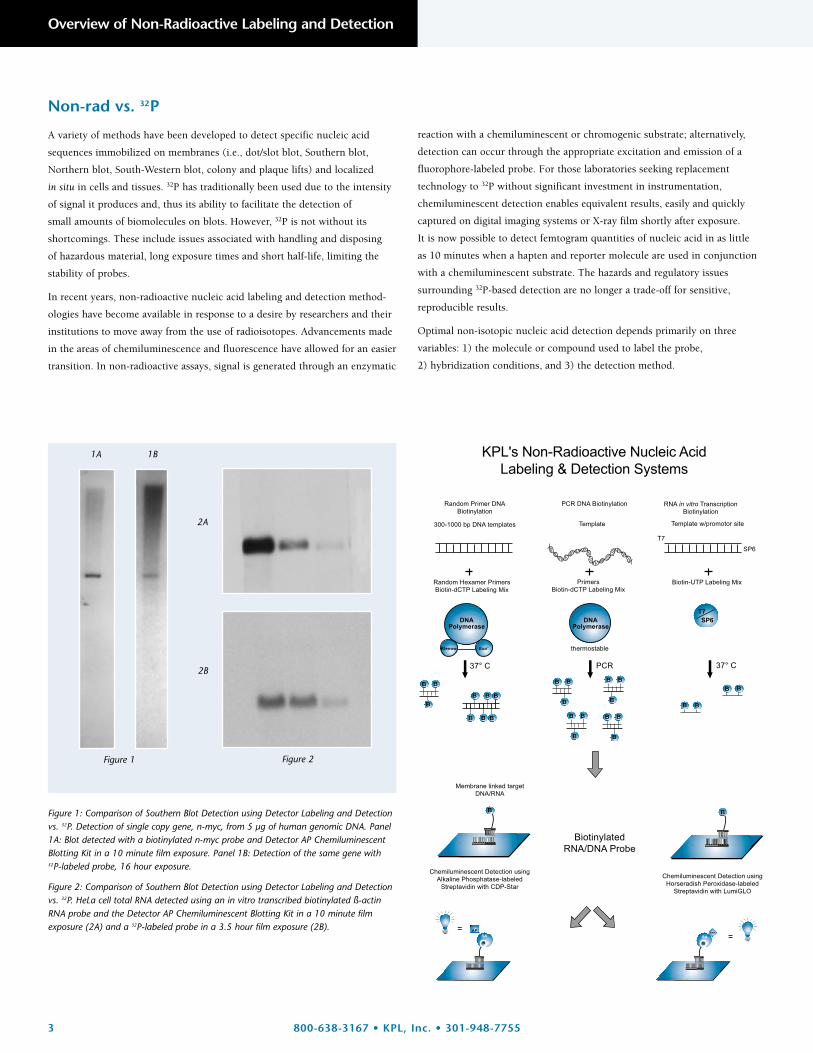
Figure 1: Comparison of Southern Blot Detection using Detector Labeling and Detectionvs. 32P. Detection of single copy gene, n-myc, from 5 µg of human genomic DNA. Panel1A: Blot detected with a biotinylated n-myc probe and Detector AP ChemiluminescentBlotting Kit in a 10 minute film exposure. Panel 1B: Detection of the same gene with32P-labeled probe, 16 hour exposure.
Figure 2: Comparison of Southern Blot Detection using Detector Labeling and Detectionvs. 32P. HeLa cell total RNA detected using an in vitro transcribed biotinylated ß-actinRNA probe and the Detector AP Chemiluminescent Blotting Kit in a 10 minute filmexposure (2A) and a 32P-labeled probe in a 3.5 hour film exposure (2B).
Figure 1
1A
2A
1B
2B
Figure 2
4www.kpl.com
Ch
ap
te
r
1
O
ve
rv
iew
o
f
No
n-
Ra
dio
ac
tiv
e
La
be
ling
a
nd
D
et
ec
tio
n
Probe Labeling
Non-radioactive labeling can be accomplished by direct or indirect labeling
methods. The former includes direct incorporation of fluorescent tags, or
cross-linking enzyme molecules directly to nucleic acid. Indirect labeling
involves the incorporation of nucleotides tagged with a hapten such as biotin
or digoxigenin (DIG) during synthesis of the probe. Used in standard
blotting and hybridization procedures, labeled probes that hybridize to a
target sequence are detected with streptavidin (biotin) or anti-DIG
monoclonal antibody (DIG) conjugated to an enzyme, usually phosphatase
or peroxidase. Enzyme activity can be detected either by a chemiluminescent
reaction whereby results are captured on X-ray film, or through formation of
a color precipitate deposited directly on the membrane. Nucleic acid probes
generated by these means are stable for at least one year, in contrast to the
short half-life of 32P-labeled probes. Additionally, they may be handled and
disposed of without the concerns of hazardous radioactivity.
Biotin is commonly used because it binds to avidin or streptavidin with high
affinity (Kd=10-15 M), the strongest of any non-covalent bond.1 This affinity
constant is significantly higher than that between DIG and an anti-DIG
monoclonal antibody, and contributes to the higher reproducibility of the
biotin/streptavidin system. Biotin can be incorporated into nucleic acid probes
in the form of a biotinylated nucleotide by enzymatic methods. (Details of each
labeling method described in Chapter 2) Biotin may also be attached by direct
means using intercalation or photo-activatable groups. Biotinylation rarely
interferes with biological activity, and linker arms between the biotin and the
probe minimize steric interference. The high affinity association between
biotin and streptavidin enhances sensitivity because greater wash steps can be
carried out reducing subsequent background problems when compared to
DIG (See Figure 3 and Figure 4).
KPL’s line of Detector Kits described in this guide is based on the biotin/
streptavidin system. Because of the high efficiency the Detector Labeling Kits
deliver, the biotinylated probes produced through random priming, PCR and
in vitro transcription can be used to detect single copy genes, low expressed
mRNA, positive clones in bacterial colonies or plaques as well as localized
DNA in tissues and cells.
Hybridization Conditions
Once the probe is labeled and quantitated with an appropriate hapten, it can
be hybridized to the target nucleic acid through complementary base pairing.
The two strands of a DNA double helix are held together by relatively weak
hydrogen bonds that can be broken or denatured by heating or subjecting
them to extremes of pH. When incubated under the appropriate conditions,
the complementary strands will re-associate or re-nature to form a double
stranded structure that results from restoration of the complementary
hydrogen bonds. This process is called hybridization and refers to the
formation of sequence-specific, base-paired double helices. Hybridization
will occur between any two single-stranded nucleic acid chains
(DNA-DNA, DNA-RNA, RNA-RNA) provided that they have complementary
nucleotide sequences.
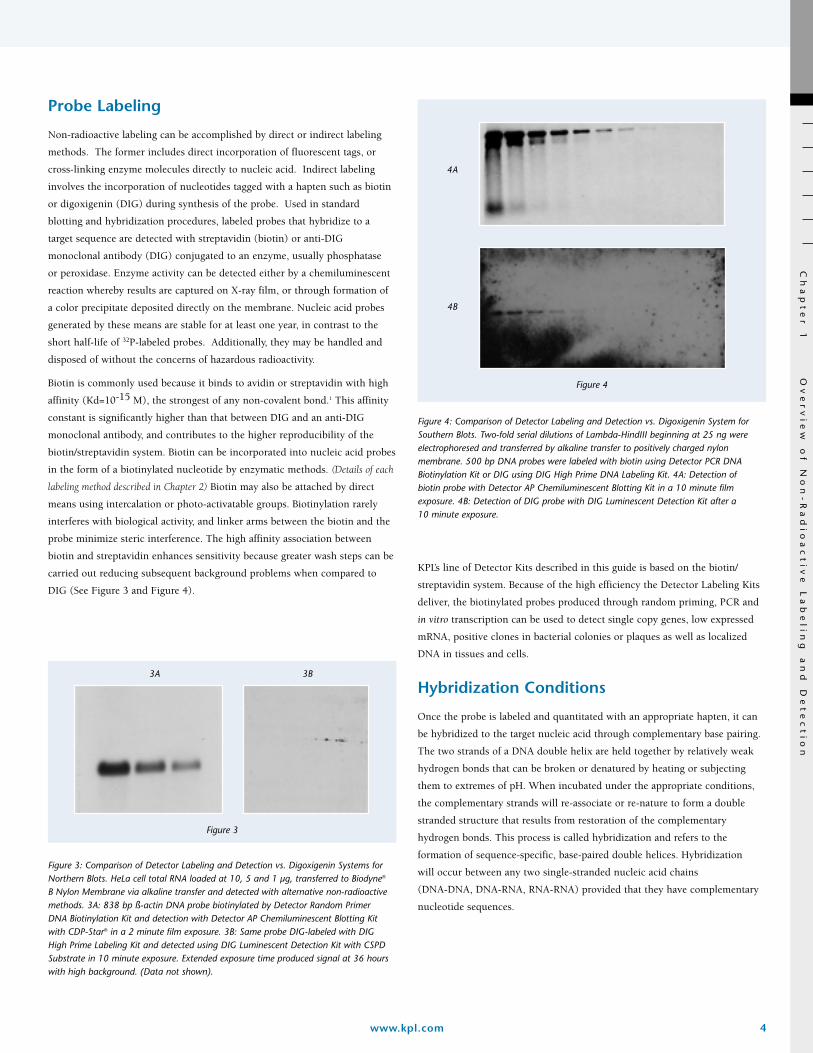
Figure 3: Comparison of Detector Labeling and Detection vs. Digoxigenin Systems forNorthern Blots. HeLa cell total RNA loaded at 10, 5 and 1 µg, transferred to Biodyne®
B Nylon Membrane via alkaline transfer and detected with alternative non-radioactivemethods. 3A: 838 bp ß-actin DNA probe biotinylated by Detector Random Primer DNA Biotinylation Kit and detection with Detector AP Chemiluminescent Blotting Kitwith CDP-Star® in a 2 minute film exposure. 3B: Same probe DIG-labeled with DIG High Prime Labeling Kit and detected using DIG Luminescent Detection Kit with CSPDSubstrate in 10 minute exposure. Extended exposure time produced signal at 36 hourswith high background. (Data not shown).
Figure 4: Comparison of Detector Labeling and Detection vs. Digoxigenin System forSouthern Blots. Two-fold serial dilutions of Lambda-HindIII beginning at 25 ng wereelectrophoresed and transferred by alkaline transfer to positively charged nylonmembrane. 500 bp DNA probes were labeled with biotin using Detector PCR DNABiotinylation Kit or DIG using DIG High Prime DNA Labeling Kit. 4A: Detection of biotin probe with Detector AP Chemiluminescent Blotting Kit in a 10 minute filmexposure. 4B: Detection of DIG probe with DIG Luminescent Detection Kit after a 10 minute exposure.
Figure 3
Figure 4
3A
4A
4B
3B
5 800-638-3167 • KPL, Inc. • 301-948-7755
Overview of Non-Radioactive Labeling and Detection
Component Effect Action
Sodium ion concentration Favors formation of hydrogen bonds Increasing [Na+] increases Tm.
Detergent (SDS, Sarkosyl, Tween) Prevents nonspecific ionic interactions Insufficient detergent may result in background. of probe with the membrane. Excessive detergent may reduce sensitivity.
Nonspecific nucleic acid Blocks nonspecific hybridization of nucleic Addition of nonspecific nucleic acid can decrease (herring or salmon sperm DNA) acid probe. nonspecific background by binding to non-specific regions
on the membrane. Also, if the probe is a whole genomic probe,the herring sperm will block repetitive elements.
Excessive amounts of nonspecific nucleic acid will reduce sensitivity.
Formamide (deionized) Lowers the Tm of the nucleic acid hybridization. Formamide concentration up to 50% decreases the Tm of the nucleic acid hybridization and reduces the optimumhybridization temperatures.
Protein solution (Blotto, Denhardt’s) Blocks nonspecific binding of probe to May reduce or increase background depending on the the membrane. membrane used.
Polymer accelerant Increases probe concentration by lowering May reduce or increase background depending on the (PEG, Dextran sulfate, PVP) the active water content. membrane used.
Tm = melting temperature
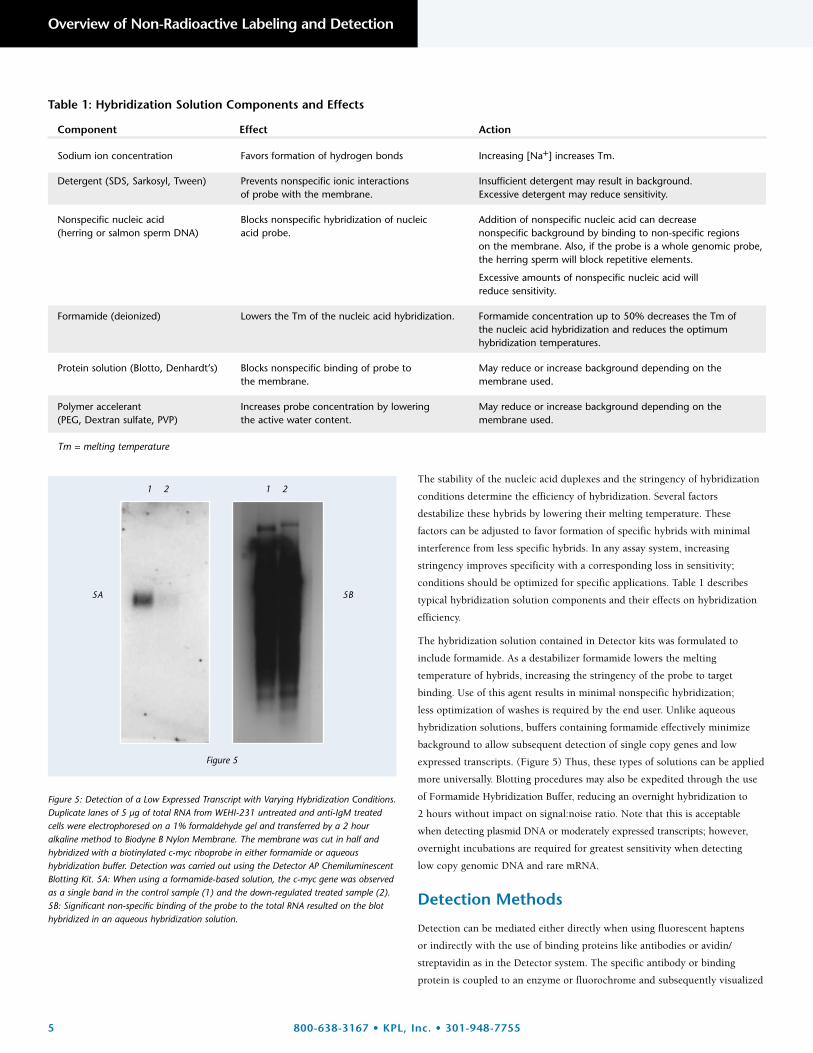
Table 1: Hybridization Solution Components and Effects
Figure 5
The stability of the nucleic acid duplexes and the stringency of hybridization
conditions determine the efficiency of hybridization. Several factors
destabilize these hybrids by lowering their melting temperature. These
factors can be adjusted to favor formation of specific hybrids with minimal
interference from less specific hybrids. In any assay system, increasing
stringency improves specificity with a corresponding loss in sensitivity;
conditions should be optimized for specific applications. Table 1 describes
typical hybridization solution components and their effects on hybridization
efficiency.
The hybridization solution contained in Detector kits was formulated to
include formamide. As a destabilizer formamide lowers the melting
temperature of hybrids, increasing the stringency of the probe to target
binding. Use of this agent results in minimal nonspecific hybridization;
less optimization of washes is required by the end user. Unlike aqueous
hybridization solutions, buffers containing formamide effectively minimize
background to allow subsequent detection of single copy genes and low
expressed transcripts. (Figure 5) Thus, these types of solutions can be applied
more universally. Blotting procedures may also be expedited through the use
of Formamide Hybridization Buffer, reducing an overnight hybridization to
2 hours without impact on signal:noise ratio. Note that this is acceptable
when detecting plasmid DNA or moderately expressed transcripts; however,
overnight incubations are required for greatest sensitivity when detecting
low copy genomic DNA and rare mRNA.
Detection Methods
Detection can be mediated either directly when using fluorescent haptens
or indirectly with the use of binding proteins like antibodies or avidin/
streptavidin as in the Detector system. The specific antibody or binding
protein is coupled to an enzyme or fluorochrome and subsequently visualized
1 2
5A 5B
1 2
Figure 5: Detection of a Low Expressed Transcript with Varying Hybridization Conditions.Duplicate lanes of 5 µg of total RNA from WEHI-231 untreated and anti-IgM treatedcells were electrophoresed on a 1% formaldehyde gel and transferred by a 2 houralkaline method to Biodyne B Nylon Membrane. The membrane was cut in half andhybridized with a biotinylated c-myc riboprobe in either formamide or aqueoushybridization buffer. Detection was carried out using the Detector AP ChemiluminescentBlotting Kit. 5A: When using a formamide-based solution, the c-myc gene was observedas a single band in the control sample (1) and the down-regulated treated sample (2).5B: Significant non-specific binding of the probe to the total RNA resulted on the blothybridized in an aqueous hybridization solution.
Ch
ap
te
r
1
O
ve
rv
iew
o
f
No
n-
Ra
dio
ac
tiv
e
La
be
ling
a
nd
D
et
ec
tio
n
6www.kpl.com
Enzyme Substrate Product/Detection Method
Horseradish Peroxidase TMB Blue color / visual4CN Purple color / visual
DAB Brown color / visualLumiGLO® Light emission/ X-ray film; Digital chemi–imaging systems
Alkaline Phosphatase BCIP/NBT Purple color / visualCDP-STAR® Light emission / digital imaging systems, X-ray film
Table 2: Non-Radioactive Detection Systems for Membrane Hybridization
Enzyme Substrate/Fluorochrome Product/Detection Method
Horseradish Peroxidase DAB Brown color / light microscopyAEC Red color / light microscopyTrueBlue™ Blue color / light microscopy
Alkaline Phosphatase BCIP/NBT Purple color / light microscopyFast Red Red color / light microscopy
Fluorochromes FITC Green fluorescence / fluorescence microscopyTRITC; CY™3; Red fluorescence / fluorescence microscopyTexas Red®
Table 3: Non-Radioactive Detection Systems for in situ Hybridization
through a variety of signal-generating systems. In enzymatic detection, the
enzyme reacts with a specific substrate to produce either a colored or
luminescent product. Tables 2 and 3 provide more detailed information on
alternative enzyme/substrate methods for membrane and in situ hybridization.
Given the advantages outlined in the earlier discussion, Detector is funda-
mentally based on a chemiluminescent detection schema for the visualization
of nucleic acids in blotting applications. Two substrate systems are available
for use with alkaline phosphatase (AP) and horseradish peroxidase (HRP)
enzymes; selection is dependent on the performance requirements
of the assay.
CDP-Star, a chloro-substituted 1,2 dioxetane AP chemiluminescent substrate,
offers the highest sensitivity for detecting even the smallest amounts of
nucleic acids. Single copy genes in genomic DNA and low expressed
messages in as little as 1µg of total RNA are visualized on film in no more
than a 10-minute exposure. Alkaline phosphatase catalyzes the removal of
the phosphate from CDP-Star to yield a moderately stable intermediate,
which then spontaneously decays and emits light at 461 nm. The
chemiluminescent signal persists for days on nylon membranes, permitting
multiple film exposures.
Sensitive detection may also be achieved with LumiGLO‚ Chemiluminescent
Peroxidase Substrate. A luminol-based substrate, LumiGLO is converted to
an excited intermediate dianion by HRP in the presence of hydrogen
peroxide. The dianion emits light on return to its ground state, detecting
positive reaction sites in minutes; signal continues for 1-2 hours. It serves as
an economical alternative to CDP-Star, suitable for plasmid or genomic blots
and ideal for bacterial colony and plaque hybridization where CDP-Star is
not recommended. While production of signal is not at the accelerated rate
of CDP-Star, detection of 0.3 pg DNA can readily be achieved after just
15 minutes on film.
Although a superior non-radioactive method for membrane applications,
chemiluminescence is not practical for the detection of DNA in situ. Rather,
a better approach to visualizing DNA in cells, tissues and metaphase
chromosomes relies on chromogenic and/or fluorescent systems. KPL’s
TrueBlue substrate was developed to react with HRP-streptavidin conjugates,
producing a very fine precipitate versus the large clumps of color often
yielded from BCIP/NBT. As a result, superior resolution of localized DNA is
obtained. The brilliant blue stain gives excellent contrast to red counterstains
used to provide nuclear detail. Sensitivity is equivalent to fluorescent in situ
hybridization and results are permanent.
Fluorescent in situ hybridization (FISH) has grown in prevalence in the
past decade, particularly with the availability of new and more sensitive
fluorescent tags. For instance, cyanine dyes produce bright, intense colors
5-10 times more fluorescent than fluorescein-labeled probes2. CY-labeled
streptavidin conjugates can be used with biotin probes to detect DNA in cells.
KPL’s DNADetector™ Fluorescent in situ Hybridization Kit contains
CY3-Streptavidin; alternatively other cyanine-streptavidin conjugates may be
used. These probes are more photostable than FITC or TRITC with bright
fluorescence observed 6 months after staining. Using the same filters as
TRITC, CY3 excites at 552 nm and emits orange color at 570 nm.

7 800-638-3167 • KPL, Inc. • 301-948-7755
Overview of Non-Radioactive Labeling and Detection
Detector Labeling Kits Catalog Number Kit Size Labeling Method Sensitivity Applications
Random Primer DNA 60-01-00 30 reactions Only 100 ng Biotinylation Kit purified template
needed perreaction.
PCR DNA 60-01-01 30 reactions As little as 1 ng Biotinylation Kit genomic template
DNA can be amplified and labeled.
RNA in vitro 60-01-02 20 reactions One reaction Transcription generates enough Biotinylation Kit probe to hybridize
48-96 blots.
Detector Detection Kits Catalog Number Kit Size Detection Method Sensitivity Applications
AP Chemiluminescent 54-30-01 2000 cm2 AP-SA and CDP-Star Blotting Kit 54-30-02 500 cm2 Chemiluminescent Substrate
HRP Chemiluminescent 54-30-00 2000 cm2 HRP-SA and LumiGLO Blotting Kit Chemiluminescent Substrate
Chromogenic In situ 60-03-00 50 samplesHybridization Kit
Table 4: Choosing KPL Detector Kits
Exo- fragment of Klenow DNA polymerase extendsprimers by catalyzing theaddition of nucleotidetriphosphate to the nascentprobe from a mixture thatincludes biotin-dCTP
Southern, Northern and dotblotting; colony and plaquehybridization and in situhybridization.
Incorporation of biotin-dCTPvia a thermostable DNApolymerase in the polymerasechain reaction.
Southern, Northern, dotblotting; colony and plaquehybridization, and in situhybridization.
DNA located downstream ofthe RNA polymerasepromoter site is copied in astrand – specific manner intoa RNA transcript in thepresence of ribonucleotides(biotin-UTP) and either T7 orSP6 RNA polymerase.
HRP-SA and TrueBlue peroxi-dase substrate: Orcein andEosin Y counterstains
Southern and Northern blotting; mRNA in situhybridization.
Detection of singlecopy genes in 5 µgof genomic DNA,low expressedmessage in 1-5 µgtotal RNA or ß-actinin just 50 ng oftotal RNA after a10-minute filmexposure.
Northern BlottingGenomic Southern blottingof single copy genes, plasmidDNA, dot blots, and PCRproducts.
Detection of 0.3 pg DNA with a 15-minute filmexposure.
Southern blotting, bacterial colony and plaquehybridization dot blots.
Sensitivity equivalent to FISH.
DNA detection in cells, tissues, and metaphase chromosomes.
Fluorescent In situ 60-05-00 50 samplesCY3/DAPI Hybridization Kit
CY3-SA: DAPI counterstain 5-10 times greaterfluorescence thanFITC/TRITC labeledprobes using thesame filters.
The remainder of The Technical Guide to Non-Radioactive Labeling and
Detection of Nucleic Acids consists of the detailed procedures for performing
specific applications employing biotin and Detector kits. The following table
(Table 4) summarizes the properties of the Detector product line, assisting in
the selection of the appropriate system for your needs.
DNA detection in cells,tissues, and metaphasechromosomes.

8www.kpl.com
References
1 Brzofsky, JA (1991) “Antigen and antibody interactions and monoclonal
antibodies,” Fundamentals of Immunology, 3rd Edition, WE Paul.
2 Yurov, Y.B. et.al. Human Genetics, 97, 390-398 (1996).
Ch
ap
te
r
1
O
ve
rv
iew
o
f
No
n-
Ra
dio
ac
tiv
e
La
be
ling
a
nd
D
et
ec
tio
n

9 800-638-3167 • KPL, Inc. • 301-948-7755
Nucleic Acid Probe Labeling
Introduction to KPL’s Detector™ Labeling Kits
KPL offers three labeling approaches to the generation of
biotinylated nucleic acid probes:
• Detector Random Primer DNA Biotinylation Kit
• Detector PCR DNA Biotinylation Kit
• Detector RNA in vitro Transcription Biotinylation Kit
Both random primer and PCR-mediated biotin labeling results in the net
synthesis of DNA and amplification. Random primed labeling is catalyzed by
Klenow polymerase, the large fragment of E. coli DNA polymerase. The
Klenow polymerase lacks 5’�3’ exonuclease activity of the holoenzyme but
still contains the 5’�3’ polymerase as well as the 3’�5’ exonuclease proof-
reading activity. During the polymerization reaction, Klenow polymerase
incorporates not only the non-modified deoxynucleotides but also the
hapten-modified substrates (e.g., biotin-dCTP), resulting in a DNA probe
with high specific activity. PCR-mediated labeling of probes with biotin allows
simultaneous amplification and labeling of DNA. Thermostable Taq DNA
polymerase drives the PCR reaction, incorporating biotin into the PCR
product via modified deoxynucleosite triphosphates. The end product is
homogeneously labeled hybridization probes that can detect sub-picogram
amounts of target sequences on blots.
Probes generated by either random priming or PCR are typically used in
Southern blots; they are also suitable for Northern blots. While DNA probes
are commonly used in the detection of nucleic acids on membranes, RNA
probes are an advantageous alternative and should be considered particularly
when the visualization of low expressed genes is desired. In these cases,
detection with riboprobes can be approximately 10 times more sensitive than
DNA probes. This increase is accounted for by the great affinity of a riboprobe
for the complementary sense strand of the mRNA being detected and the
resulting higher stability of the RNA:RNA bond after hybridization.1
Additionally, single stranded RNA probes are not subject to the self-annealing
that double-stranded DNA probes are, which decreases the availability of the
DNA probes to bind to the immobilized target.
Single-stranded RNA probes can be generated by in vitro transcription from
RNA polymerase promoters such as SP6, T7 or T3. DNA located downstream
of the RNA polymerase promoter site is copied in a strand-specific manner
into an RNA transcript in the presence of ribonucleotides and the appropriate
RNA polymerase. Because of the nature of transcription reactions, many
copies of RNA are produced from the template DNA in a short time.
Transcripts can be labeled during synthesis by incorporation of biotin during
transcription. The incorporation of biotin-UTP by SP6 or T7 polymerase is
very efficient, resulting in highly labeled RNA probes.
The following protocols describe in detail the process of biotin labeling
nucleic acid probes by random priming, PCR labeling and in vitro
transcription using KPL’s Detector Biotin Labeling Kits. For additional
assistance while using these systems, the labeling section of the
Troubleshooting Chapter (Chapter 6) may be referenced.
Detector Random Primer DNA BiotinylationKit (Cat. No. 60-01-00)
The Detector Random Primer DNA Biotinylation Kit provides a method for
biotinylating DNA probes through incorporation of biotin-dCTP during
random-primer extension.2, 3 Six base random sequence oligonucleotides serve
as primers for replication of the template DNA. The Exo- fragment of Klenow
DNA polymerase extends the primers by catalyzing the addition of nucleotide
triphosphate, from a mixture that includes biotin-dCTP, to the nascent probe.
Large quantities of biotinylated DNA probes can be generated from a small
quantity of template DNA. This labeling method results in the net synthesis of
DNA. The use of Exo- Klenow polymerase allows for longer labeling reactions
without the risk of degradation of the oligonucleotides.
The components of this kit are optimized to maximize amplification of
template DNA and sensitivity of target detection.4
Template requirements – Optimal labeling occurs on templates that range from
300-1000 bp. The probe fragments generated vary in length from 100 to
1,000 bases, with the average length being approximately 300 base pairs.
Probe storage – Stable for at least one year when stored at -20°C. Because
biotinylated probes stick to normal microcentrifuge tubes, it is recommended
that probes be stored in low retention or siliconized tubes.
Probe quantitation – A pre-labeled quantitation standard is included for
determining the relative amount of DNA synthesized during the labeling
reaction. The concentration of probe to be used in the hybridization buffer
must be optimized for greatest sensitivity and minimal background.
• Serial dilutions of quantitation standard and newly labeled probe are
fixed to positively charged nylon membrane.
• The standard and probe are detected using enzyme-labeled streptavidin,
and chemiluminescent or chromogenic substrate.
• Endpoint sensitivity of the samples is compared to the standard to
determine the amount of probe generated.
Materials and Equipment
Kit Components Product Code Volume
2.5X Random Primer Solution 600-0001 700 µL
10X dNTP Mixture 600-0002 175 µL
Klenow DNA Polymerase 600-0003 35 µL
(Exo-fragment)
Control Template DNA 600-0004 25 µL
Stop Buffer 600-0005 250 µL
DEPC Treated Water 50-86-03 1.0 mL
Quantitation Standard 600-0007 150 µL
Sufficient reagents are provided to perform 30 labeling reactions when following the protocol described below. Kit components are stable for a minimum of 1 year. Reagents must be stored at –20°C and kept on ice during use. Do not store kits in a frost-free freezer.

10www.kpl.com
Required Supplies and Equipment Not Included
• 37ºC water bath or heat block
• 1X TE (See Appendix for preparation)
• 20X SSC (Catalog No. 50-86-05 or see Appendix for preparation)
• Low retention microcentrifuge tubes
• Microcentrifuge
• UV crosslinker or vacuum oven
• Positively charged nylon (Biodyne B, Catalog No. 60-00-50) or
nitrocellulose membrane
• For Probe Quantitation - Detector™ HRP Chemiluminescent Southern
Blotting Kit (Catalog No. 54-30-00) or Detector AP Chemiluminescent
Blotting Kit (Catalog No. 54-30-01 or 54-30-02) OR individual
detection kit components
NOTES ON…Getting Started
• Avoid contamination of reagents by using new, clean pipette tips for
each pipetting operation.
• Klenow polymerase is heat labile and should be stored at –20°C.
Do not store in a frost-free freezer. Keep in ice or in a portable cold
unit while in use.
• Purity of the template DNA will affect the amount of labeled DNA
generated. The dNTPs in the triphosphate mixture are susceptible
to dephosphorylation by kinase activity, oligonucleotides are
susceptible to nucleases, and Klenow polymerase can be inhibited
by a variety of protein contaminants. Template DNA preparations
should be as pure and free of proteins as possible.
• The buffers contained in and/or recommended for use with this kit
are prepared according to the protocols listed at the end of this
chapter, beginning page 20. Recipes for miscellaneous solutions
can be found in the Appendix.
Detector Random Primer DNA BiotinylationAt A Glance
Mix Template DNA and Random Primers
�Denature at 95°C
5 minutes�
Chill on Ice�
Add dNTPs and Klenow Polymerase
�Mix�
Incubate at 37°C1 – 4 hours
�Stop Reaction
�Quantitate Probe
�Store Probe at -20°C
Steps Critical Points
1. Dissolve 100 – 300 ng of template DNA to a final volume Template purity is extremely important for the labeling efficiency usingof 24 µL in DEPC treated water. If testing the control Klenow. If the template is purified from a gel, make sure to wash thoroughlytemplate DNA, add 5 µL to 19 µL of DEPC treated water. in the purification procedure. Excess salts, phenolic compounds, and
extraneous proteins can reduce or even inhibit Klenow activity. Use theControl Template DNA as an indicator of a pure template. If it is found that your template is reducing the labeling efficiency, additional Klenow (1-2 µL) may be added to overcome the contamination.
2. Add 20 µL 2.5X Random Primer Solution.
3. Heat at 95°C for 5 minutes; snap cool on ice. Denaturation of template DNA must take place to carry out any efficientlabeling. The DNA/primer mix should be heated to 95°C for at least 5 minutes followed by an immediate snap cool on ice.
4. Add: 5 µL 10X dNTP Mixture Subsequent dNTP additions and Klenow should follow quickly, prior to 1 µL Klenow Polymerase renaturation of the double stranded DNA. A-T rich templates may not label
efficiently because a biotinylated dCTP is used in the incorporation by Klenow.
5. Mix gently. Pulse spin in a microcentrifuge for 3 seconds.
Probe Labeling by Random Priming
Ch
ap
te
r
2
N
uc
leic
A
cid
P
ro
be
L
ab
elin
g
11 800-638-3167 • KPL, Inc. • 301-948-7755
Nucleic Acid Probe Labeling
Steps Critical Points
6. Incubate at 37°C for 1 – 4 hours. One hour is sufficient for most applications. For maximum yield of probe,allow the reaction to proceed for 4 hours. Generally, a reaction beginningwith 200-300 ng template DNA generates 5- to 10-fold amplification of the template in an hour, and 10- to 50-fold amplification after 4 hours.
7. Add 5 µL Stop Buffer and mix.
8. Proceed to Probe dilution, dot blotting It is imperative that the probe be quantitated. If too much probe is used in and detection for quantitation. hybridization, background could occur. If too little probe is used, sensitivity
may be reduced.
9. Store at –20°C until ready to quantitate and use. See Probe Quantitation on page 18.
Probe Labeling by Random Priming (continued)
NOTES ON…Probe Purification: • Following biotinylation, the newly labeled probes may be separated from unincorporated nucleotides by either ethanol precipitation or using KPL’s
SpinPure filters (Catalog No. 60-00-53). This is not necessary for use of probes in Southern and Northern blot detection, as unincorporated
nucleotides do not significantly increase background. However, if the probes are to be used for in situ hybridization, we do recommend the removal
of unincorporated nucleotides. See page 17 for Probe Purification using the SpinPure filters.
Detector™ PCR DNA Biotinylation Kit
The Detector™ PCR DNA Biotinylation Kit provides a rapid method for
biotinylating DNA probes through incorporation of biotin-N4-dCTP via a
thermostable DNA polymerase in the polymerase chain reaction*.5-7
Biotinylated probes generated using this kit are highly sensitive and allow for
the identification of low copy target sequences. The process of direct labeling
during PCR results in specific labeling and amplification of the sequence of
interest even from crude DNA samples.
The ratio of biotin dCTP to unlabeled dCTP is optimized to produce probes
with maximal biotin incorporation for detection of low copies or rare targets
in mRNA and plasmid or genomic DNA. Amplification and direct labeling
from small samples of genomic (1 - 100 ng) or plasmid template (10 pg -
1 ng) is most easily achieved by first optimizing the conditions for standard
PCR before attempting to label the probe during the reaction.
Direct detection of a PCR biotin-labeled fragment is also possible. The
biotinylated PCR product is electrophoresed, transferred to membrane and
subsequently detected without a probe using enzyme-labeled streptavidin.
A signal is then generated using the appropriate chromogenic or
chemiluminescent substrate as outlined in any of the detection methods
of the Detector Kits. (See Figure 6)
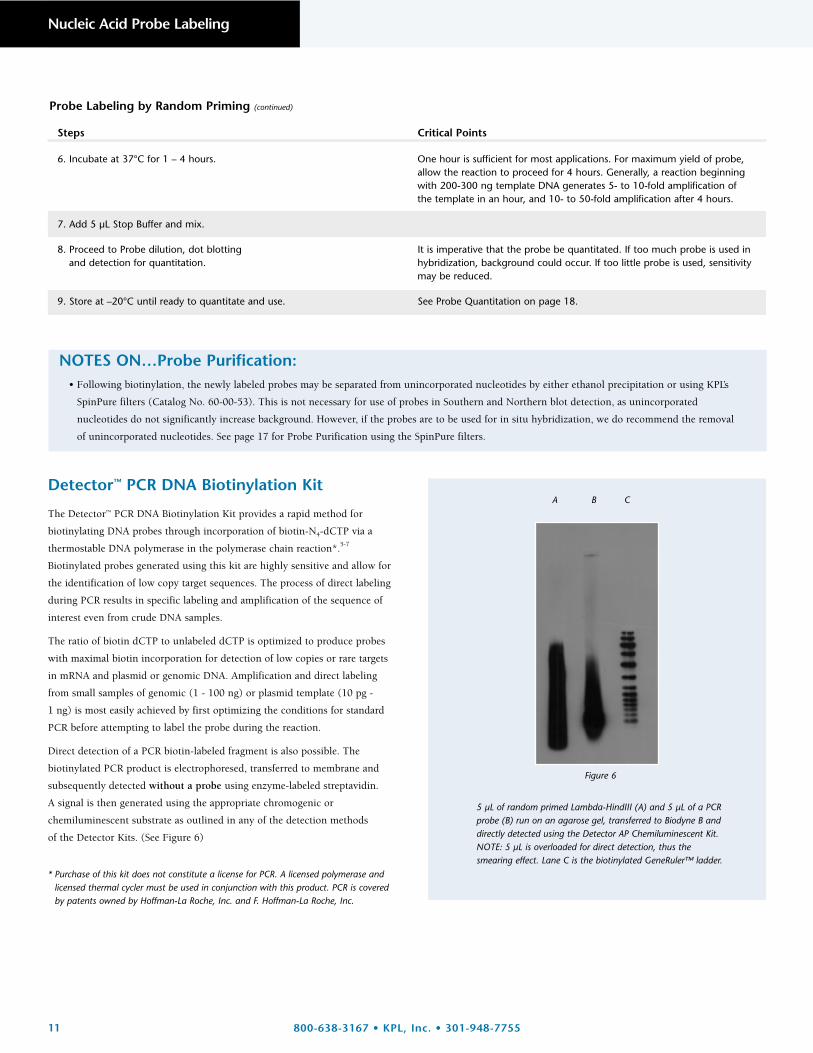
Figure 6
5 µL of random primed Lambda-HindIII (A) and 5 µL of a PCRprobe (B) run on an agarose gel, transferred to Biodyne B anddirectly detected using the Detector AP Chemiluminescent Kit.NOTE: 5 µL is overloaded for direct detection, thus thesmearing effect. Lane C is the biotinylated GeneRuler™ ladder.
CBA
* Purchase of this kit does not constitute a license for PCR. A licensed polymerase andlicensed thermal cycler must be used in conjunction with this product. PCR is coveredby patents owned by Hoffman-La Roche, Inc. and F. Hoffman-La Roche, Inc.

12www.kpl.com
The components of this kit are optimized to maximize amplification of
template DNA and sensitivity of target detection.4, 8
Kit controls - Control primers and template DNA are included as positive
controls to monitor the integrity of the assay and the components of the kit.
Probe quantitation – A biotin-labeled quantitation standard is included to
quantitate the yield of biotin labeled probe. The relative concentration of
probe in the hybridization buffer must be optimized for greatest sensitivity
and minimal background.
• Serial dilutions of quantitation standard and newly labeled probe are
fixed to positively charged nylon membrane.
• The standard and probe are detected using enzyme-labeled streptavidin,
and chemiluminescent or chromogenic substrate.
• Endpoint sensitivity of the samples is compared to the standard to
determine the amount of probe generated.
NOTES ON…Polymerase Selection
• DNA polymerase, 10X PCR reaction buffer and MgCl2 are not
included with this kit. Any thermostable polymerase that routinely
and specifically amplifies the desired product with unmodified
nucleotides are suitable. For complete information on individual
thermostable polymerases, please refer to the specific enzyme supplier.
• This kit has been qualified with a number of thermostable
polymerases including: Taq DNA Polymerase, Native or Recombinant
(MBI Fermentas and Invitrogen), Taq DNA Polymerase (Promega),
Taq Bead™ Hot Start Polymerase (Promega), Tth DNA Polymerase
(Promega), Expand™ High Fidelity Polymerase (Roche Applied
Science).
Materials and Equipment
Kit Components Product Code Volume
10X PCR Labeling Mix 600-0011 150 µL
Control Primers 600-0009 30 µL
Control Template DNA 600-0004 25 µL
DEPC Treated Water 50-86-03 1.0 mL
Quantitation Standard 600-0007 150 µL
Sufficient reagents are provided to perform 30 labeling reactions following the kitprotocol. Reagents must be stored at -20°C and used as directed. Do not store kits ina frost-free freezer. Kit components are stable for a minimum of 1 year from date ofreceipt when stored as instructed.
Required Supplies and Equipment Not Included
• Licensed DNA Polymerase with 10X PCR buffer
• MgCl2 stock solution
• Primers
• 1X TE (See Appendix for preparation)
• Licensed Thermal Cycler
• 20X SSC (Catalog No. 50-86-05) (See Appendix for preparation)
• Low retention or siliconized microcentrifuge tubes autoclaved, DNase free
• Microcentrifuge
• 37°C water bath or heat block
• UV Crosslinker or vacuum oven
• Nylon or nitrocellulose membrane (Biodyne® B, Catalog No. 60-00-50)
• For Probe Quantitation - Detector HRP Chemiluminescent Blotting Kit
(Catalog No. 54-30-00) or Detector AP Chemiluminescent Blotting Kit
(Catalog No. 54-30-01 or 54-30-02) OR individual detection kit
components.
Assay Optimization
Any sequence that can be successfully amplified by PCR may be used with
this protocol. It is highly recommended that the optimal conditions for PCR
be determined with unmodified nucleotides for each individual template and
primers before using this kit to label probe. There are many resources available
for optimization of PCR. (See References 2-5.)
Optimization of the reaction should include the following considerations:
• Quality, purity and concentration of template
• PCR primer design, including melting temperature, secondary structure
• Size of desired amplimer (100 - 1100 bp is optimal for efficient labeling)
• MgCl2 concentration
• Denaturation time/temperature
• Annealing duration/temperature
• Extension duration/temperature
• Enzyme concentration
• Number of cycles
Templates containing a high percentage of AT-rich sequence may label weakly as thebiotin in this kit is coupled to dCTP.
Ch
ap
te
r
2
N
uc
leic
A
cid
P
ro
be
L
ab
elin
g

13 800-638-3167 • KPL, Inc. • 301-948-7755
Nucleic Acid Probe Labeling
Detector PCR DNA Biotinylation At A Glance
Optimize PCR Conditions
With Unmodified dNTPs
�
Prepare PCR Reaction Mix
�
Perform PCR
~25 cycles, 40 minutes
�
Quantitate Probe
�
Store at -20°C
Steps Critical Points
1. Prepare the reaction mix in a sterile PCR tube in Thaw the 10X Labeling Mix on the bench or warm it to room temperature in order as it appears below. Place the tube on ice while pipetting. your hand before use. Improperly thawed dNTPs may result in a failure to
produce amplification product.
Component Volume Final
DEPC Treated Water variable add to 50 µl By adjusting the final concentration of the 10X Labeling Mix included in the 10X PCR Buffer 5 µl 1X kit, probes of up to 1 kb in length may be generated. For probes less than 25 mM MgCl2 4 µl 2.0 µM 500 base pairs, a final concentration of 200 µM of each nucleotide is suggested 10X Labeling Mix 5 µl 200 µM each (5 µL/50 µL PCR reaction), and for probes greater than 500 base pairs, Primers 1 µl 0.5 µM each 350 µM of each nucleotide is suggested (8.75 µL/50 µL PCR reaction).
(if using the control primers)
Taq DNA Polymerase variable 1.25 units/ 50 µl rxn
Template 1 µl 1-10 ng(if using genomic DNA orthe control 10 pg-1 ngtemplate) plasmid DNA
Total Mix 50 µl
2. Mix the tube by tapping gently and centrifuging briefly.
Probe Labeling by PCR
NOTES ON…Getting Started
• The following protocol was designed specifically for the PCR
labeling of the control template included with this kit. PCR
reaction conditions should be optimized for each new
template/primer set with unmodified nucleotides before use
of this kit. Use the following protocol as a guideline only.
• Caution should be taken to minimize introduction of contami-
nating DNA and/or DNases to the PCR reaction that may result in
amplification of non-specific product or no product. Always wear
gloves, wash all work areas appropriately prior to beginning.
• Allow all reagents to thaw out completely, then vortex briefly and
spin down in a microcentrifuge before pipetting. Keep all reagents
on ice while in use except for the 10X Labeling Mix. Pipette
reagents slowly and carefully to avoid errors.
• The buffers contained in and/or recommended for use with this kit
are prepared according to the protocols listed at the end of this
chapter, beginning page 20. Recipes for miscellaneous solutions
can be found in the Appendix.

14www.kpl.com
Steps Critical Points
3. Perform PCR according to the optimized parameters Cycling parameters will vary depending on the respective template, previously determined. Recommended cycling conditions for the primers and the thermocycler used.control labeling reaction is as follows:
Time Temperature Cycles
Initial Step 60 sec. 94°C 1 cycle
Denaturation 15 sec. 94°C 25 cycles
Anneal/Extend 60 sec. 68°C 25 cycles
Final Step 7 min. 72°C
Hold 4°C
Probe Labeling by PCR (continued)
Steps Critical Points
1. Load approximately 5 µl of sample on a 0.8-1% The PCR product is evaluated by agarose gel electrophoresis to verify TBE or TAE agarose gel. expected product size and to estimate the overall yield of the reaction.
If the control DNA template is amplified, a 500 bp product is expected.
2. Electrophorese according to the equipment manufacturer’s recommendations. Stain to visualize product size verification.
3. Transfer the remaining aliquot of sample to a siliconized tube See Probe Quantitation on page 18.and store at 2-8°C until quantitation.
Gel Analysis of PCR Product
• Following biotinylation and analysis of the product on an agarose
gel, separation of the newly labeled probe from unincorporated
nucleotides, primers or non-specific amplimers may be desired if
using the labeled product in hybridization assays. This is usually not
necessary for membrane applications, as unincorporated nucleotides
do not significantly increase background. If non-specific PCR
products are evident in the final reaction, excise the correct band
from an agarose gel and subsequently purify the product using
well-established methods.
• If probes are to be used in in situ applications, the use of Spin-Pure
filters (Catalog No. 60-00-53) is recommended. The use of 5’ � 3’
Select B columns, which have been developed specifically for purifica-
tion of biotinylated probes, is also recommended. G50 Microspin
Purification Columns should not be used because biotin sticks to the
resin resulting in loss of labeled PCR product.
NOTES ON…Removal of non-specific amplimers, primers and unincorporated nucleotides
Ch
ap
te
r
2
N
uc
leic
A
cid
P
ro
be
L
ab
elin
g
Materials and Equipment
Kit Components Product Code Volume
10X Ribonucleotide Labeling Mix 600-0013 60 µL
10X Transcription Buffer 600-0010 60 µL
ß-Actin Template 600-0017 16 µL
RNase Inhibitor 600-0012 13 µL
SP6 RNA Polymerase 600-0015 20 µL
T7 RNA Polymerase 600-0014 20 µL
DNase I 600-0016 20 µL
DEPC Treated Water 50-86-03 1.0 mL
Quantitation Standard 600-0007 150 µL
Spin-Pure Filters 60-00-53 5 filters
Sufficient reagents are provided to perform 20 labeling reactions following theprotocol provided in this manual. All reagents must be stored at -20°C except for theSpin-Pure Filters that should be stored at room temperature. Do not store kits in afrost-free freezer. Kit components are stable for a minimum of 1 year from date ofreceipt when stored as instructed.
15 800-638-3167 • KPL, Inc. • 301-948-7755
Nucleic Acid Probe Labeling
Quantitation of the probe is essential as the concentration of probe used in
the hybridization reaction is critical for greatest sensitivity and minimal
background on a membrane.
• Serial dilutions of quantitation standard and newly labeled probe are
fixed to positively charged nylon membrane.
• The standard and probe are detected using enzyme-labeled
streptavidin, and chemiluminescent or chromogenic substrate.
• Endpoint sensitivity of the samples is compared to the standard to
determine the relative amount of probe generated.
Probe storage – Stable for at least one year when stored at -20°C. Because
biotinylated probes stick to normal microcentrifuge tubes, it is recommended
that probes be stored in low retention or siliconized tubes.
Detector RNA in vitro Transcription BiotinylationAt A Glance
Preparation of DNA Template�
Prepare Labeling reaction mix�
Incubate at 37°C2 hours�
Add DNase I�
Incubate at 37°C15 minutes
�
Quantitate Probe�
Store at –20°C[or -70°C for long-term storage]
NOTES ON…Getting Started• All tubes and pipet tips should be autoclaved or purchased as
RNase free prior to working with RNA.
• All glassware and equipment used should be RNase free.
• Always wear gloves when working with RNA because human skin
contains abundant amounts of RNases.
Detector RNA in vitro TranscriptionBiotinylation Kit
The Detector™ RNA in vitro Transcription Biotinylation Kit provides a method
for synthesizing biotin labeled RNA probes by in vitro transcription through
incorporation of biotin UTP. Strand-specific probes may be generated using
either the T7 or SP6 RNA polymerase.9 The transcript reaction generates full
length, single-stranded RNA probes that can be used in a variety of applica-
tions, including membrane and in situ hybridization. The incorporation of
biotin UTP by SP6 or T7 polymerase is very efficient, resulting in “hot”
labeled RNA probes. These non-isotopic biotin labeled RNA probes are stable
for at least one year. Single-stranded RNA probes hybridize more effectively
to target molecules because they do not self-hybridize as DNA probes do.10
RNA probes offer greater sensitivity than DNA probes because RNA-RNA or
RNA-DNA hybrids are more stable than DNA-DNA duplexes in hybridization.
Direct detection of a biotin-labeled RNA probe is also possible. The
biotinylated transcript can be electrophoresed, transferred to a membrane,
and subsequently detected without a probe using fluorochrome-labeled
streptavidin or enzyme-labeled streptavidin and a chromogenic or
chemiluminescent substrate as directed in any of the detection methods
of the Detector kits.
The components of this kit are optimized to maximize the synthesis of RNA
as well as the sensitivity of target detection.
Template requirements – In order to generate single stranded RNA probes, you
must begin with a DNA template with SP6 or T7 promoter sequences upstream
from the desired template sequence. Two methods to prepare these types of
templates are recommended and further detailed in the protocol:
• Cloning the DNA into a vector with the SP6 and T7 promoter sequences
on either side of the cloning site
• PCR of the DNA template with the promoter sequences built into
the primers.
Kit control – A human ß-Actin DNA template is included in this kit to
serve a two-fold purpose: 1) to act as a control for the integrity of the kit
components, and 2) to generate a control probe for detection of ß-actin
on human or mouse Northern blots. Synthesized in a strand-specific manner,
an antisense transcript may be generated using T7 RNA polymerase and a
sense transcript may be generated using SP6 RNA polymerase. The expected
size of either transcript is ~400 bases. If the control probe is to be used in a
Northern blot, the anti-sense (T7) probe must be used.
Probe quantitation – The second kit control, the Biotinylated Quantitation
Standard is used to quantitate the yield of biotin-labeled RNA probe.

16www.kpl.com
PCR Generated Template
Alternatively, PCR may be used to amplify the DNA fragment flanked by
the SP6 and/or T7 promoter sequences. Using this method, either antisense
or sense RNA transcripts can be generated from a single construct. Design
PCR primers that include the probe specific sequence appended to the 3´
end of the promoter sequence. To place the SP6 or T7 primer at the 5´ end
of the probe specific sequence, design the oligonucleotide to include the
SP6 or T7 sequence listed below, followed at the 3´ end by the sense
(coding) strand of the probe specific sequence reading in the 5´ to 3´
direction. To place the SP6 or T7 primer at the 3´ end of the probe specific
sequence, design the oligonucleotide to include the SP6 or T7 sequence
listed below, followed at the 3´ end by the antisense (noncoding) strand of
the probe specific sequence reading in the 3´ to 5´ direction. The primers
should contain between 6 - 10 bases of probe-specific sequence.
SP6 Promoter: 5´ ACG ATT TAG GTG ACA CTA TAG AA 3´
T7 Promoter: 5´ AGT TAA TAC GAC TCA CTA TAG GGA 3´
The PCR product can be used in the transcription reaction without further
purification. It is necessary, however, to determine the concentration of the
PCR product and verify the expected size of the PCR product before
performing transcription.
Make sure antisense probes are prepared because sense probes will not
hybridize to the mRNA.
NOTES ON…DNA Template Preparation
Templates Cloned in Vectors Containing SP6 or T7 Promoters
To generate template by this method, it is necessary to first place the
desired double stranded DNA sequence under the control of either the
SP6 or T7 promoter. A variety of commercially available vectors have
been constructed to place the SP6 and T7 RNA promoter sequences
opposite each other on either side of the multiple cloning site. To
prepare the template for transcription, linearize the plasmid using the
appropriate restriction enzyme such that transcription is initiated at the
appropriate promoter and is terminated close to the end of the desired
sequence. It is important that the restriction digestion be performed to
completion to eliminate undigested plasmid DNA, which can give rise
to transcripts containing extraneous sequence. It is also important to
digest with an enzyme that leaves a 5´ overhang or blunt end. Enzymes
that cleave leaving a 3´ overhang may give rise to aberrant transcripts
other than what is expected.
Following the restriction enzyme digestion, either ethanol precipitate
or filter purify the template using the Spin-Pure filters provided in this
kit. Resuspend the linear DNA in TE Buffer (See Solution Preparation)
at a concentration of 0.25 - 1.0 µg/µl. See specific section for use of
Spin-Pure filters.
Steps Critical Points
1. Prepare a fresh tube of 0.1 M DTT (see buffer prep section) All tubes and tips should be autoclaved prior to working with RNA. It is alsoessential that any glassware or equipment used be RNase free. Always weargloves when working with RNA as human skin contains abundant amounts of RNases.
Probe Labeling by in vitro Transcription
2. Prepare the reaction mix in a DNase/RNase-free microcentrifugetube at room temperature in the following order:
Component Volume Final
DEPC Treated Water variable add to 30 µL
RNase Inhibitor 0.5 mL 20 units
Linearized DNA Template variable 1 µg(use 2 µL for control DNA)
10X Labeling Mix 3 µL 1X
10X Transcription Buffer 3 µL 1X
0.1M DTT 3 µL 0.01 M(buffer prep section)
Polymerase (SP6 or T7) 1 µL 50 units/µL
Total Volume 30 µL
Place T7 and SP6 RNA Polymerases on ice. Allow all other reagents to thaw completely on the bench. This is especially important for the 10X Transcription Buffer. Vortex reagents briefly and spin down in amicrocentrifuge for a few seconds. Place everything except for the 10X Transcription Buffer on ice.
Keep the 10X Transcription Buffer at room temperature during use.Use of cold 10X Transcription Buffer in the labeling reaction may causeprecipitation of the DNA template and could result in a low yield oftranscript.
Required Supplies and Equipment Not Included
• Low retention or siliconized microcentrifuge tubes
• Microcentrifuge
• 37°C water bath or heat block
• 0.1 M DTT
• 20X SSC (Catalog No. 50-86-05 or see buffer prep section)
• Positively charged nylon membrane (Biodyne B, Catalog No. 60-00-50)
• UV Crosslinker or vacuum oven
• For Probe Quantitation - Detector HRP Chemiluminescent Blotting Kit
(Catalog No. 54-30-00) or Detector AP Chemiluminescent Blotting Kit
(Catalog No. 54-30-01 or 54-30-02) OR individual detection kit
components
Ch
ap
te
r
2
N
uc
leic
A
cid
P
ro
be
L
ab
elin
g
17 800-638-3167 • KPL, Inc. • 301-948-7755
Nucleic Acid Probe Labeling
Steps Critical Points
3. Mix the tube by flicking gently and centrifuge briefly.
4. Place the tube at 37°C for 2 hours.
5. Add 1 µL of DNase I, flick the tube gently, and centrifuge briefly.
6. Incubate 37°C for 15 minutes.
7. Place the tube on ice or store at –20°C until needed for Because of the high concentration of the probe and its susceptibility to quantitation and analysis. RNases, aliquoting of the probe for storage is recommended. For long
term storage, freeze at -70°C.
Probe Labeling by in vitro Transcription (continued)
Steps Critical Points
1. Ensure that the sample reservoir is firmly placed into the filtrate receiver.
2. Add 1XTE to the probe to increase the volume. Do not tear the filter with a pipet tip.Pipette 50 - 500 µL of the sample into the sample reservoir. Cap the Spin-Pure filter and place into a microcentrifuge.
3. Centrifuge at 5,000 x g for 15 minutes at room temperature. Continue centrifugation until filter is dry (a volume of 500 µL can usually be concentrated in 20 minutes).
4. If removing primers and nucleotides from amplified product, centrifuge at 14,000 x g.
5. Recover sample from the filter with DEPC-treated water or 1X TE by rinsing the surface. Highest yields result from two rinses of 20 µL each.
Probe Purification (optional)
Steps Critical Points
1. Pre-heat the probe to 68°C for 5 minutes. The expected size of the transcript will be somewhat different when comparing an RNA probe to a DNA marker lane, but an approximate sizeestimate can still be determined.
2. Run 2-5 µL of the probe on either a 1X TBE agarose gel or a Biotinylated transcripts run larger than their unbiotinylated counterparts.formaldehyde gel containing 0.5 µg/mL ethidium bromide. Include DNA or RNA markers on the gel for proper size.
3. Transfer the remaining aliquot of sample to a siliconized tube See Probe Quantitation on page 18.and store at 2–8ºC until quantitation.
Gel Analysis of Transcript
NOTES ON… Probe Purification:
• Following biotinylation, the newly labeled probes may be separated from unincorporated nucleotides by either ethanol precipitation or using
KPL’s SpinPure filters (Catalog No. 60-00-53). This is not necessary for use of probes in Southern and Northern blot detection, as unincorporated
nucleotides do not significantly increase background. However, if the probes are to be used for in situ hybridization, we do recommend the removal
of unincorporated nucleotides. See below for Probe Purification using the SpinPure filters.

18www.kpl.com
Steps Critical Points
1. Dilute probe 1/200 (1 µL probe to 199 µL 1X TE) Dilute the probe in 1X TE if using low retention tubes. If low retention tubesare not available, use 2X SSC/0.1% SDS as the diluent. Biotin may stick to thestandard microcentrifuge tubes, reducing the concentration of the probe.
2. Prepare a 2-fold serial dilution panel from the 1/200 dilution of Example of 2 fold dilution: Add 10 µL of diluent to 10 tubes. Add 10 µL of probe. (1/2, 1/4, 1/8, 1/16, 1/32, 1/64, 1/128, 1/256, and 1/512) the 1/200 dilution to the diluent in tube 1 and mix. Remove 10 µL from
tube 1 and add it to tube 2 and mix. Repeat for the entire panel.
3. Prepare a 2-fold serial dilution panel from the Quantitation Standard The Quantitation Standard is provided at a set relative specific activity level. as described above. Do NOT prepare an initial 1/200 dilution. No dilution is required prior to the two-fold series.
4. Spot 1 µL of each dilution onto a dry, pretreated membrane Membrane Pre-Treatment - Grid the membrane with a pencil if desired. starting with the 1/2 dilution of each sample. Use the picture Wet membrane in molecular grade water followed by a 10-minute wash inon page 19 as a guide. 5X SSC. Dry the membrane completely before use. Pretreatment need only
be performed one time and may be stored for future use.
5. UV crosslink the damp spotted membrane according to manufacturer’s instructions.
6. Dry the membrane for at least 10 minutes.
7. Detect dots as described below.
Probe Dilution and Dot Blotting
Probe Quantitation
As stated earlier, quantitation of the newly biotinylated nucleic acid probe is
essential to the success of non-isotopic detection, as the concentration of
probe used in the hybridization reaction is critical for greatest sensitivity with
minimal background. For optimal use, the probe must be quantitated for
biotin incorporation, not a spectrophotometric reading. The amount of
biotinylated probe synthesized is influenced by:
• Template purity
• Template concentration
• Incubation time
The following protocol allows for the determination of the amount of
biotinylated DNA or RNA synthesized from the respective labeling reaction.
This is accomplished through dot blot of diluted probe and determination of
relative specific activity (RSA) as compared to the Quantitation Standard
provided in each kit. The Quantitation Standard is provided at a known
concentration of 50 ng/µL. This is a relative concentration based on the
amount of biotin detected. RSA of the labeled probe is defined by the relative
amount of biotin incorporated during labeling. Biotinylated probes need only
be quantitated once; they do not lose activity over time.
See Buffer Preparation Section for buffer details. All steps are to be carried out at room temperature with gentle agitation or rocking.
1. Incubate the spotted membrane in Blocking Solution for 30 minutes.
2. Incubate the membrane for 30 minutes in fresh Blocking Solution withAP-SA diluted 1:10,000.
3. Wash the membrane in 1X Phosphatase Wash Solution 3 times for 5 minutes each.
4. Rinse the membrane 2 times for 2 minutes each in 1X Assay Buffer.
5. Incubate membrane for 5 minutes in CDP-Star substrate. Blot membraneon filter paper to remove excess substrate. Place membrane in a hyb bagor between sheet protectors and expose to X-ray film for a target of 2 minutes – 10 minutes.
6. Proceed to probe RSA determination section.
Probe Quantitation Detection Using AP–Streptavidin and CDP–Star
See Buffer Preparation Section for buffer details. All steps are to becarried out at room temperature with gentle agitation or rocking.
1. Incubate spotted membrane in Blocking Solution for 30 minutes.
2. Incubate membrane for 20 minutes in fresh Blocking Solution with HRP-SA diluted 1:500.
3. Wash the membrane in 1X Biotin Wash Solution 3 times 5 minutes each.
4. Incubate membrane for 1 minute in LumiGLO solution. Blot membraneon filter paper to remove excess substrate. Place membrane in a hyb bag or between sheet protectors and expose to X-ray film for a target of 10 minutes.
5. Proceed to probe RSA determination section.
Probe Quantitation Detection Using HRP-Streptavidin and LumiGLO
Ch
ap
te
r
2
N
uc
leic
A
cid
P
ro
be
L
ab
elin
g

19 800-638-3167 • KPL, Inc. • 301-948-7755
Nucleic Acid Probe Labeling
Steps Critical Point
1. Calculate ratio of probe to standard (P/S): Do not factor in the initial 1/200 dilution of probe, as the standard P/S = probe endpoint dilution ÷ standard endpoint dilution curve concentration has already been adjusted.
2. Calculate probe RSA:Probe RSA = standard RSA x P/S
Examples: (See Figure)
Probe 1 (P1) endpoint dilution = 1/16Standard (S) endpoint dilution = 1/32
1. P/S = 1/32=1/2
2. Probe RSA = 50ng/µL x 1/2 = 25 ng/µL
Probe 2 (P2) endpoint dilution = 1/64
Standard (S) endpoint dilution = 1/32
1. P/S = 64/32 = 2
2. Probe RSA = 50 ng/µL x 4 = 100 ng/µL
EXPECTED PROBE YIELDTotal yield = probe RSA x 55 µL (reaction volume)
Determination of Probe Relative Specific Activity (RSA)
Figure 7
S P1 P2
1/2
1/4
1/8
1/16
1/32
1/64
Quantitation of DNA Probe
Steps Critical Point
Examples: (See Figure) Do not factor in the initial 1/200 dilution of probe, as the standardcurve concentration has already been adjusted.
Probe 1 (P1) endpoint dilution = 1/1024Standard (S) endpoint dilution = 1/16
1. 1024/16
2. Probe RSA = 50 ng/µL x 64 = 3200 ng/µL
(P1) endpoint dilution 1/1024
(S) endpoint dilution 1/16
P/S = 1024/16 = 64 50 ng/mL x 64 = 3200 µg/µL
EXPECTED PROBE YIELDTotal yield = probe RSA x 55 µL (reaction volume)
Figure 8
SP1
1/2
1/4
1/8
1/16
1/32
1/64
1/128
1/256
1/512
1/1024
Quantitation of RNA Probe

20www.kpl.com
Buffer Preparation
The following procedures allow for the preparation of the various buffers supplied with and/or recommended for use with the Detector Labeling Kits –
Random Primer DNA Biotinylation, PCR DNA Biotinylation, and RNA in vitro Transcription Biotinylation. Additional buffer recipes can also be found
in the Appendix, Chapter 7.
Probe Storage and Reuse:
• Once the probe is made and quantitated, it can be stored in the freezer for at least one year. The probe does not need to be requantitated.
• Probes used in hybridization reactions may be reused. Simply store the hybridization solution containing the probe in a polypropylene conical tube at
2-8°C (formamide-based hybridization solutions) or –20°C (aqueous-based hybridization solutions) until future use.
• The probes may be denatured again by heating the solution to 68°C for 10 minutes (formamide based solutions) or boiling (aqueous based solutions)
for 10 minutes before use.
Steps Critical Points
Detector Block Solution – to be prepared fresh daily
1. Based on the total desired 1X Detector Block volume, If the block solution is not prepared daily, sensitivity could be reduced and weigh out 0.2% - 1% w/v Detector Block Powder. For background will increase.detection with AP and CDP-Star, use 0.2% and for detection with HRP and LumiGLO, use 1%. (.2-1g of Detector Block Powder per 100 mL of 1X Solution)
2. Place the Detector Block Powder in a flat-bottom, Conical tubes are not recommended in the preparation of 1X Detector Block.screw cap container and add molecular biology grade water If used, the solution may be vortexed to remove any packed Detector Blockto a volume equivalent to 4/5 of the total desired 1X Detector Powder from the bottom of the tube.Block volume. Shake the container vigorously until the powder is fully solubilized.
3. Dilute the solution with 1:5 v/v 5X Detector Block Solution. Insure that all Detector Block Powder is in solution to avoid speckling Ex., for 50 mL of 1X Detector Block: patterns on the blot or insufficient blocking that may occur as a result of Detector Block Powder 0.1 g (AP/CDP-Star detection only) unsolubilized powder. The amount of powder used can be increased to
or 0.5 g (HRP/LumiGLO detection only) decrease background. However, too much powder may reduce sensitivity.Molecular Biology Grade H20 40 mL5X Detector Block Solution 10 mL
Biotin Wash Solution (HRP and LumiGLO detection only)
1. Dilute 1 part 10X Biotin Wash to 9 parts molecular biology Biotin Wash Solution may be made to 1X in bulk and stored for 1-3 monthsgrade water. Mix well. on the bench.
Phosphatase Wash Solution (AP and CDP-Star detection only)
1. Dilute 1 part 5X Phosphatase Wash to 4 parts molecular SDS may fall out of solution in the 5X concentrate. Simply place the bottlegrade water. Mix well. in a 37°C – 65°C water bath for a few minutes and mix until the solution is
homogenous before diluting.
LumiGLO – to be prepared fresh before its use (HRP and LumiGLO detection only)
1. Mix together 1 part LumiGLO A to 1 part LumiGLO B.
Phosphatase Assay Buffer (AP and CDP-Star detection only)
1. Dilute 1 part 10X Assay Buffer to 9 parts molecular biology grade water. Mix well.
Ch
ap
te
r
2
N
uc
leic
A
cid
P
ro
be
L
ab
elin
g

21 800-638-3167 • KPL, Inc. • 301-948-7755
Nucleic Acid Probe Labeling
References
1 Srivastava, RA. (1998) Analysis of RNA by Northern Blotting Using
Riboprobes, Methods in Molecular Biology, Vol. 86: RNA Isolation and
Characterization Protocol. R. Rapley and DL Manning, ed. Humana Press.
2 Feinberg, A. P., and Vogelstein, B. (1983) A technique for radiolabeling
DNA restriction endonuclease fragments to high specific activity. Anal.
Biochem. 132: 6-13.
3 Feinberg, A. P., and Vogelstein, B. (1984) Addendum to: A technique for
radiolabeling DNA restriction endonuclease fragments to high specific
activity. Anal. Biochem. 137:266-267.
4 Mackey, J., Darfler, M.; Nisson, P.; and Rashtchian, A. (1993) Use of
random primer extension for concurrent amplification and non-radioac-
tive labeling of nucleic acids. Anal. Biochem. 212: 428-435.
5 Innis, M.A., Gelfand, D.H., Sninsky, J.J., Eds. (1995). PCR Strategies.
Academic Press, San Diego, CA.
6 White, B.A. Ed. (1993). PCR Protocols: Current Methods and Applications;
Methods in Molecular Biology, Vol. 15. The Humana Press, Totowa, N.J.
7 Dieffenbach, C.W. and Dveksler, G.S. (1995). PCR Primer – A Laboratory
Manual. CSHL Press, Long Island, N.Y.
8 Syrjanen, S., et. al. (1991). The Use of Polymerase Chain Reaction in
Generation of Biotinylated Human Papillomavirus DNA Probes for in situ
Hybridization. J. of Virological Methods. 31:147-160.
9 Luehrsen, K.R. (1987). Biotechniques, 5, 660.
10 Krieg, P.A. (1987). Methods in Enzym. 155, 397.
11 Rapley, R., and Manning, D. (1998). RNA Isolation and Characterization
Protocols. Humana Press, Inc., Totowa, NJ.
12 Sambrook, J.; Fritsch, E.F.; Maniatis, T. (1989). Molecular Cloning: A
Laboratory Manual, 2nd Edition. Cold Spring Harbor Laboratory, Cold
Spring Harbor, N.Y.
13 Langer, P.R., Waldrop, A.A., and Ward, D.C. (1982). Proc. Natl. Acad. Sci.
USA 78, 6633-6637.

22www.kpl.com
Ch
ap
te
r
2
N
uc
leic
A
cid
P
ro
be
L
ab
elin
g
This page intentionally left blank.

23 800-638-3167 • KPL, Inc. • 301-948-7755
Southern Blotting
Southern Blotting with Detector™
Chemiluminescent Blotting Kits
A commonly used technique by molecular biologists, Southern blotting
involves the transfer and subsequent detection of electrophoretically separated
DNA on membrane. Analysis of the immobilized DNA is facilitated by
hybridization with an appropriately labeled nucleic acid probe, for which
methods have been described earlier in this guide. Visualization of the target
DNA can provide information regarding the quantity of a specific sequence
as well as its size. This type of information serves numerous research goals
such as gene identification, gene cloning, RFLP analysis, VNTR analysis and
gene cloning.
KPL provides two methods for the non-radioactive detection of Southern
blots. Each relies on a different enzyme and substrate system, one being
alkaline phosphatase/CDP-Star‚ Chemiluminescent Substrate (Detector AP
Chemiluminescent Blotting Kit, 54-30-01/02) and the other horseradish
peroxidase/LumiGLO‚ Chemiluminescent Substrate (Detector HRP
Chemiluminescent Blotting Kit, 54-30-00). As such, a variety of DNA
samples in a number of applications can be quickly detected.
Kit selection will depend on the requirements of the assay. Due to its high
sensitivity, the Detector AP Chemiluminescent Blotting Kit is ideal for
detection of single copy genes found in target genomic DNA. In fact, these
genes may be detected in 5 µg of DNA in as little as 10 minutes. This kit is
Detector Southern Blotting At A Glance
Gel Electrophoresis�
Alkaline Transfer�
Hybridization and Detection
AP Chemiluminescent Blotting HRP Chemiluminescent BlottingPrehybridization Prehybridization
1 hour 1 hour� �
Hybridization Hybridization3-18 hours 3-16 hours� �
2X SSPE/0.1% SDS washes 0.5X SSPE2 X 15 min 2 X 10 min
� �0.2X SSPE/0.1% SDS washes 0.5X SSPE elevated temp.
2 X 15 min 2 X 10 min� �
2X SSPE wash Detector Block5 min 30 min� �
Detector Block HRP-Streptavidin45 min 20 min� �
AP-Streptavidin Biotin Wash Solution30 min 3 X 5 min� �
Phosphatase Wash Solution LumiGLO3 X 5 min 1 min� �
Phosphatase Assay Buffer Film Exposure2 X 2 min 10 min-2 hours�
CDP-Star5 min�
Film Exposure2 min - 2 hours

24www.kpl.com
also suitable for rapid detection of plasmid DNA, PCR products and dot blots.
Because of the kinetics of CDP-Star, multiple exposures of the blot may be
performed over a period of several days.
While not as sensitive as the alkaline phosphatase/CDP-Star method, the
Detector HRP Chemiluminescent Blotting Kit offers a cost-effective alternative
to non-radioactive Southern blotting that continues to yield results compa-
rable to 32P in far less time. Sub-picogram detection can be achieved in a
15-minute film exposure. The Detector HRP Chemiluminescent Blotting Kit
is designed for routine Southern blotting applications including analysis of
plasmid DNA on membrane. This kit has also been shown to be the better
approach for bacterial colony lift hybridization and plaque hybridization.
(See Chapter 7 - Appendix: Miscellaneous Applications, page 55) Where
sensitivity is not an issue, LumiGLO Chemiluminescent Substrate may be
replaced by TMB Membrane Substrate (Catalog No. 50-77-03) for colori-
metric detection that saves time and expense of using film and related equip-
ment. This may be particularly useful for control experiments because
variability due to film exposure is eliminated.
Both kits were developed and optimized with Pall Biodyne‚ B Nylon
Membrane for the best signal-to-noise ratio. Exposure to X-ray film produces
a permanent record of chemiluminescent emissions. Detection may also be
accomplished using a chemiluminescent imaging system. While there are
a variety of Southern blotting procedures, the following protocols are
recommended when using the respective Detector kit to deliver the greatest
sensitivity without background.
Materials and EquipmentDetector AP Chemiluminescent Blotting Kit Catalog No. 54-30-01 Catalog No. 54-30-02
2000 cm2 500 cm2
Kit Components Product Code Volume Product Code Volume
Formamide Hybridization Buffer 50-86-12 200 mL 50-86-11 50 mL
Detector Block Solution (5X) 71-83-02 2 x 240 mL 71-83-01 120 mL
Detector Block Powder 72-01-03 10 g 72-01-02 10 g
Phosphatase-labeled 475-3001 0.1 mL 475-3001 0.1 mL
Streptavidin (AP-SA)
Phosphatase Wash Solution 50-63-17 1000 mL 50-63-11 200 mL
Concentrate (5X) 50-63-11 200 mL 50-63-18 100 mL
Phosphatase Assay Buffer (10X) 50-63-12 200 mL 50-63-13 50 mL
CDP-Star Chemiluminescent Substrate 50-60-03 100 mL 50-60-04 30 mL
Sufficient reagents are provided with Catalog No. 54-30-01and Catalog No. 54-30-02 to test approximately 2000 cm2 of membrane (20 each of 10 cm x 10 cm blots) and 500 cm2 of membrane (5 each of 10 cm x 10 cm blots), respectively.
Detector HRP Chemiluminescent Blotting Kit Catalog No. 54-30-00
2000 cm2
Kit Components Product Code Volume
Formamide Hybridization Buffer 50-86-09 120 mL
Detector Block Solution (5X) 71-83-01 120 mL
Detector Block Powder 72-01-01 10 g
Peroxidase-labeled 474-3003 1 mL
Streptavidin (HRP-SA)
Biotin Wash Solution 50-63-05 3 x 100 mL
Concentrate (10X)
LumiGLO Peroxidase 50-59-00 120 mL
Chemiluminescent Substrate Solution A
LumiGLO Peroxidase 50-60-00 120 mL
Chemiluminescent Substrate Solution B
Sufficient reagents are provided with Catalog No. 54-30-00 to test approximately 2000 cm2 of membrane (20 each of 10 cm x 10 cm blots).
Ch
ap
te
r
3
S
ou
th
er
n
Blo
tt
ing
25 800-638-3167 • KPL, Inc. • 301-948-7755
Southern Blotting
NOTES ON…Storage Conditions
• The 5X Phosphatase Wash Solution Concentrate should be removed
from the Detector AP Chemiluminescent Blotting Kit and stored at
room temperature. All other components should be stored at 2-8°C.
• For optimal performance, Formamide Hybridization Buffer should
be warmed (37-50°C) and aliquotted into DNase/RNase free tubes
and then stored at 2-8°C. Do not store Formamide Hybridization
Buffer at -20°C. Prolonged storage of this buffer at -20°C may result
in decreased sensitivity.
• Reagents are stable for a minimum of one year when stored as
instructed.
• Biotin-labeled nucleic acid probe
• Herring Sperm DNA (Catalog No. 60-00-14)
• Ethidium bromide
• 20X SSPE (See Appendix for preparation)
• SDS
• UV Transilluminator
• UV crosslinker or vacuum oven
• Capillary transfer apparatus
• Waterbath or hybridization oven
• Heat-sealed hybridization bags (Catalog No. 60-00-51)
or hybridization bottles
• X-ray film and film cassettes or a chemiluminescent imaging system
• Positively charged nylon membrane (Biodyne B, Catalog No. 60-00-50)
• Molecular biology grade water
• Agarose
• Horizontal electrophoresis tank
• 20X SSC (Catalog No. 50-86-05 or see Appendix for preparation)
• NaOH stock solution
NOTES ON…Warnings and Precautions
• Read ALL instructions thoroughly before using these kits.
• Always wear protective gloves and a lab coat.
• Ultraviolet light is harmful to skin and eyes. Shield skin and eyes
from UV rays using UV-resistant glasses and protective clothing.
• Formamide is a suspected teratogen and its use should be
restricted to a fumehood.
Required Supplies and Equipment Not Included in Detector Kits

26www.kpl.com
Gel Electrophoresis
Steps Critical Points
1. Digest target DNA with the restriction enzyme(s) of choice. High quality, contaminant-free target DNA is crucial to the success ofhybridization experiments. DNA with A260/A280 ratios >1.8, and A270/A260
ratios = 0.8 should be used.
The choice of enzymes is determined by the parameters of the experiment.Follow the manufacturer’s recommendations for using restriction enzymes.
2. Perform gel electrophoresis of DNA according to standard techniques. The percentage of agarose, buffer-system and voltage during electrophoresisInclude 0.5 µg/mL Ethidium bromide in the gel. Load 5-10 µg of should be selected to provide optimal resolution of the samples.genomic DNA for detection of single copy genes.
Ethidium bromide is a powerful mutagen. Handle with extreme care! Do not allow solutions containing ethidium bromide to contact skin or eyes. The gel should not be thicker than 6 mm for efficient transfer.
3. After electrophoresis, place the gel on a UV-transilluminator to view the fluorescent DNA sample. Photograph the gel next to a fluorescent ruler to facilitate determination of the molecular weight of the bands on the blot and the molecular weight of the detected band later.
4. Immediately continue with the transfer.
Alkaline Transfer
Alkaline transfer is highly recommended for transfer of DNA onto positively charged nylon membrane. This method is more reproducible than high salt
overnight transfers or any other method; alkaline transfer occurs within 1-3 hours depending on the amount of DNA to be transferred.
Steps Critical Points
1. Prepare 1 L of 5X SSC/10mM NaOH alkaline transfer buffer. One liter of transfer buffer is sufficient for the transfer of a 12 cm x 14 cm Pre-treat the nylon membrane as recommended by the manufacturer. gel. Positively charged nylon is the preferred membrane for this application,
specifically Pall Biodyne B.
Always use clean forceps to handle membrane.
2. If required, depurinate DNA by incubating the gel in two gel volumes Depurination is not necessary if the target of interest is <10 kb.of 0.25 N HCl for 10 minutes at room temperature with gentle agitation. Continue to the denaturation step.
3. Rinse the gel in molecular biology grade water and denature the DNA by incubating the gel in two gel volumes of 0.5 N NaOH/1.5 M NaCl for 30 minutes.
4. Equilibrate the gel with 2 gel volumes of alkaline transfer buffer for 2 washes 10 minutes each at room temperature.
5. Assemble a capillary transfer according to standard techniques To avoid excessive compression of the gel matrix, the weight placed on topusing the transfer buffer as the solvent. of the transfer should not exceed 2-3 g/cm2 of gel.
6. Transfer time will depend on the amount of DNA loaded on the gel: >5 µg of DNA, transfer 3 hours; < 5 µg of DNA, transfer for 2 hours; <100 ng, transfer for 1 hour.
7. After transfer, neutralize and rinse the membrane for 5 min in a Most manufacturers claim that nucleic acid transferred to positively chargedgenerous amount of 5X SSC. Place membrane on filter paper membrane does not need to be fixed; however, we have found that 2-4 min and fix the DNA to the membrane using a UV crosslinker sensitivity is greatest after cross-linking or baking.or vacuum oven according to manufacturer’s instructions.
8. Store membranes between two pieces of blotting paper and See Hybridization and Detection Procedures: AP, pages 27-28; seal in a hybridization bag. Store bag in a cool and dry place HRP, pages 29-30until detection is performed.
Ch
ap
te
r
3
S
ou
th
er
n
Blo
tt
ing

27 800-638-3167 • KPL, Inc. • 301-948-7755
Southern Blotting
Detector AP Chemiluminescent Blotting Kit Protocol:
Prehybrization and HybridizationSteps Critical Points
1. Place the Formamide Hybridization Buffer bottle in a water bath or incubator at 37°C to solubilize the SDS that has precipitated.
2. Determine the amount of Prehybridization/ Hybridization Buffer Use 10 mL of Formamide Hybridization Buffer per 100 cm2 membrane.that is needed for your particular blot. A volume of 0.1 mL/ cm2 of (For example: a 10 cm X 10 cm membrane = 100 cm2 = 10 mL buffer). Themembrane is recommended. Use the guidelines listed at the right. volume of buffer may be adjusted depending on the size of the membrane
and the vessel used for hybridization. Hybridization bottles are recommendedfor hybridization incubations, alternatively, heat sealed bags may also be used. A minimum volume of 3 mL is required when using a 4 cm diameter x14 cm long hybridization bottle. If less than 3 mL is needed, a hybridizationbag is recommended.
For convenience, 10 mL of Hybridization Buffer regardless of blot size may be used. The hybridization buffer containing probe may be reused, andadditional Formamide Hybridization Buffer is available for individual purchase.
3. Prepare prehybridization solution by adding sheared and denatured If using non-denatured blocking DNA, heat denature for 5 minutes,herring or salmon sperm DNA to a final concentration of 200 µg cool quickly on ice and add to prehybridization solution.per 1 mL of Formamide Hybridization Buffer that is used. If using KPL’s Herring sperm DNA, add 10 µL per mL of Formamide Hybridization Buffer.
4. Place the membrane in a hybridization bottle with the DNA facing If you seal membranes in heat-sealed plastic hybridization bags for toward the middle of the bottle or in a hybridization bag, and add hybridization, remove as much air and bubbles as possible before sealing the the prehybridization solution. bag. For best results, seal bag close to the edge of the membrane.
Do not allow membranes to stick together or to the sides of the hybridization bag.
5. Incubate 1 hour at 42°C with constant agitation.
6. Denature the DNA probe at 95°C for 10 minutes. Do not denature probes by alkaline treatment.Immediately place on ice.
7. Add the probe directly to the Prehybridization Buffer Pipet the probe directly into the buffer and not directly on the blot.at 50 ng per mL of Buffer.
8. Incubate the membrane with gentle agitation for The desired hybridization temperature when using DNA probes is 42°C. 16-18 hours at 42°C. Shorter hybridization time (3 hours) is possible for detection of abundant
target.
9. Prepare post-hybridization washes: 2X SSPE / 0.1%SDS Washes may be modified to contain different concentrations of SSPE and/orand 0.2X SSPE / 0.1% SDS. Place the 2X solution at room SDS to control stringency of the probe-target hybrid. It is recommended thattemperature. The 0.2X solution should be equilibrated to 55°C this be optimized for each individual probe.at least 2 hours prior to use.
• Biotinylated probes may be prepared using the KPL Detector Random
Primer DNA Biotinylation Kit (Catalog No, 60-01-00), Detector PCR
DNA Biotinylation Kit (Catalog No. 60-01-01) or Detector RNA in vitro
Transcription Biotinylation Kit (Catalog No. 60-01-02).
NOTES ON…Preparation of Biotinylated Probes
• Quantitate your probe. The concentration of labeled probe should be
determined by the quantitation procedure described in KPL’s
Biotinylation Kits. Excessive amounts of probe may result in non-
specific signal while the addition of too little probe may result in
insufficient signal.

28www.kpl.com
Detection with AP-SA and CDP-Star
Steps Critical Points
1. Prepare enough 1X Detector Block blocking/ diluent solution Use at least 0.25 mL 1X blocking/diluent solution per cm2 membrane (i.e.,for the blocking step and for the AP-SA conjugate dilution. 10 cm x 10 cm = 100 cm2 = 25 mL blocking/diluent solution per incubation).
See Buffer Preparation Section for instructions on preparation of 1X DetectorBlock. Note that the concentration of Detector Block Powder is dependent onthe enzyme used for detection. Solution preparation for use with AP-SAsystems differs from that used with HRP-SA systems.
2. Incubate Southern blot with 1X Detector Block Solution for All steps are to be carried out at room temperature with gentle agitation 45 minutes in a tray approximately the same size as the blot. or rocking. Decrease the size of the container or increase the volume of the
solution if the block is not free-flowing over the membrane.
3. Dilute AP-SA conjugate at 1:10,000 in fresh 1X Detector Block Use at least 0.25 mL of diluted conjugate per cm2 membrane.(2.5 µL conjugate + 25 mL blocking solution). Mix well.
4. Pour off the blocking/diluent solution (from step 2) from the membrane and add the diluted AP-SA solution. Incubate for 30 minutes.
5. Place membrane in a clean container. Wash the membrane See Buffer Preparation Section for instructions on preparation of in 1X Phosphatase Wash Solution 3 times for 5 minutes each. 1X Phosphatase Wash Solution. Use at least 0.75 mL/cm2.
6. Rinse the membrane 2 times for 2 minutes each in This step is important to remove any detergents from the wash step and to 1X Phosphatase Assay Buffer. increase the pH of the blot prior to addition of the substrate.
See Buffer Preparation Section for instructions on preparation of 1XPhosphatase Wash Solution. Use at least 0.4 mL/cm2.
7. Incubate membrane for 5 minutes in CDP-Star‚ Chemiluminescent Use 0.05 mL CDP-Star per cm2 of membrane (i.e., 10 cm x 10 cm = 100 cm2
Substrate. Blot membrane on filter paper to remove excess substrate. = 5 mL CDP-Star). Gently pipet the substrate directly on the membrane soPlace membrane in a hyb bag or between sheet protectors and expose that the substrate remains on the membrane, not in the tray. Do not to X-ray film for an initial exposure of 2 minutes. Adjust exposure time agitate or rock the membrane.for optimal signal-to-noise ratio.
8. Develop film either manually or by using a mechanical processor.
Prehybrization and Hybridization (continued)
Steps Critical Points
10. Remove the membrane from the Hybridization buffer. The Hybridization buffer with probe can be saved and reused. Save the bufferWash 2 X 15 minutes in a generous volume (at least 1 ml per in a sterile conical tube at 2-8°C. To reuse it, denature the solution at 68°Ccm2 of membrane) of 2X SSPE/0.1% SDS at room temperature. for 10 minutes prior to hybridization. Do not boil.
11. Wash with gentle agitation 2 X 15 minutes at the elevated Completely cover the membrane with the wash solution.temperature in the temperature equilibrated 0.2X SSPE/0.1% SDS wash.
12. Perform the final wash in 2X SSPE for 5 minutes at room temperature. This step is important to eliminate residual SDS carry-over on the membraneto the blocking step, which would cause high background.
13. Continue immediately with detection. Never allow membrane to dry out during hybridization and detection.
Ch
ap
te
r
3
S
ou
th
er
n
Blo
tt
ing
29 800-638-3167 • KPL, Inc. • 301-948-7755
Detector HRP Chemiluminescent Blotting Kit Protocol:
Prehybrization and Hybridization
Steps Critical Points
1. Place the Formamide Hybridization Buffer bottle in a water bath or incubator at 37°C to solubilize the SDS that has precipitated.
2. Determine the amount of Prehybridization/ Hybridization Buffer that Use 0.06 mL of Formamide Hybridization Buffer per cm2 membrane. (Foris needed for your particular blot. A volume of 0.06 mL/cm2 of example: a 10 cm X 10 cm membrane = 100 cm2 = 6 mL buffer). Themembrane is recommended. Use the guidelines listed at the right. volume of buffer may be adjusted depending on the size of the membrane
and the vessel used for hybridization. Hybridization bottles are recommendedfor hybridization incubations, alternatively, heat sealed bags may also be used. A minimum volume of 3 mL is required when using a 4 cm diameter x14 cm long hybridization bottle. If less than 3 mL is needed, a hybridizationbag is recommended.
For convenience, 10 mL of Hybridization Buffer regardless of blot size may be used. Additional Formamide Hybridization Buffer is available for individualpurchase.
3. Prepare prehybridization solution by adding sheared and denatured If using non-denatured blocking DNA, heat denature for 5 minutes, coolherring or salmon sperm DNA to a final concentration of 200 µg per quickly on ice and add to prehybridization solution.1 mL of Formamide Hybridization Buffer that is used. If using KPL’s Herring Sperm DNA, add 10 µL per mL of Formamide Hybridization Buffer.
4. Place the membrane in a hybridization bottle with the DNA facing If you seal membranes in heat-sealed plastic hybridization bags fortoward the middle of the bottle or in a hybridization bag, and add the hybridization, remove as much air and bubbles as possible before sealing theprehybridization solution. bag. For best results, seal bag close to the edge of the membrane.
Do not allow membranes to stick together or to the sides of the hybridization bag.
5. Incubate 1 hour at 42°C with constant agitation.
6. Denature the DNA probe at 95°C for 10 minutes. Do not denature probes by alkaline treatment.Immediately place on ice.
7. Add the probe to the Prehybridization Buffer at 50 ng per mL of buffer. Pipet the probe directly into the buffer and not directly on the blot.
8. Incubate the membrane for 3-16 hours at 42°C with agitation. The desired hybridization temperature when using DNA probes is 42°C.
Southern Blotting
• CDP-Star can be used with nylon and PVDF membranes. Use on
nitrocellulose requires an additional component.
• CDP-Star can be used with Chemiluminescent Imagers.
• CDP-Star reaches peak light emission at 2 to 4 hours persisting several
days, allowing the user multiple film exposures. For most applications,
exposures of one hour or less provide sufficient sensitivity.
• The exposure time to film will enable optimization of the signal-to-
noise ratio. Overexposure will increase background and eventually
result in a black blot.
• If there is background after the initial 5-10 minute film exposure,
re-expose the blot to film for 1 minute.
• If the signal to noise ratio is low after the initial 5-10 minute film
exposure, leave the blot in the film cassette without film for 1-3 hours,
then re-expose to film for 1-10 minutes. Allowing CDP-Star to reach its
maximum light emission before exposure to film may enhance signal
relative to noise.
• Do not allow CDP-Star to contact film. This will cause dark spots to
appear on the film.
NOTES ON…CDP-Star Chemiluminescent Substrate

30www.kpl.com
Prehybrization and Hybridization (continued)
Steps Critical Points
9. Prepare post-hybridization washes: 0.5X SSPE. Place 1/2 of the wash Washes may be modified to contain different concentrations of SSPE tosolution at room temperature. The other half should be equilibrated control stringency of the probe-target hybrid. It is recommended that thisto 55ºC at least 2 hours prior to use. be optimized for each individual probe.
10. Remove the membrane from the Hybridization buffer. Wash The Hybridization buffer with probe can be saved and reused. Save the 2 X 10 minutes in a generous volume (at least 1 ml per cm2 buffer in a sterile conical tube at 2-8°C. To reuse it, denature the solution at of membrane) of 0.5X at room temperature. 68°C for 10 minutes prior to hybridization. Do not boil.
11. Wash with gentle agitation 2 X 10 minutes at 55°C in the Completely cover the membrane with the wash solution. temperature equilibrated 0.5X SSPE wash.
12. Continue immediately with detection. Never allow membrane to dry out during hybridization and detection.
Detection with HRP-SA and LumiGLO
Steps Critical Points
1. Prepare enough 1X Detector Block blocking/diluent solution Use at least 0.3 mL 1X blocking/diluent solution per cm2 membrane.for the block step and for the HRP-SA conjugate dilution. (i.e., 10 cm x 10 cm = 100 cm2 = 30 mL per incubation).
See Buffer Preparation Section for instructions on preparation of 1X DetectorBlock. Note that the concentration of Detector Block Powder is dependent on the enzyme used for detection. Solution preparation for use with AP-SAsystems differs from that used with HRP-SA systems.
2. Incubate Southern blot with 1X Detector Block Solution for All steps are to be carried out at room temperature with gentle agitation 30 minutes in a tray approximately the same size as the blot. or rocking. Decrease the size of the container or increase the volume of the
solution if the block is not free-flowing over the membrane.
3. Dilute HRP-SA conjugate at 1:500 in fresh 1X Detector Block Use at least 0.3 mL of diluted conjugate solution per cm2 membrane.(60 µL conjugate + 30 mL blocking solution). Mix well.
4. Pour off the blocking/diluent solution (from step 2) from the membrane and add the diluted HRP-SA solution. Incubate for 30 minutes.
5. Transfer membrane to a clean container. Wash the membrane in Use 0.4 mL diluted wash solution per cm2 of membrane (i.e., 10 cm x 10 cm 1X Biotin Wash Solution. Perform 3 washes for 5 minutes each. membrane = 100 cm2 = 40 mL wash solution per wash).
See Buffer Preparation Section for instructions on preparation of 1X BiotinWash Solution.
6. Prepare enough LumiGLO Chemiluminescent Substrate to Prepared LumiGLO Substrate is stable for 24 hours when stored at 4°C.completely immerse the membrane by mixing equal volumes of Solutions A and B.
7. Incubate membrane for 1 minute in LumiGLO Chemiluminescent Substrate. Blot membrane on filter paper to remove excess substrate. Place membrane in a hyb bag or between sheet protectors and expose to X-ray film for an initial exposure of 10 minutes. Adjust exposure time for optimal signal-to-noise ratio.
8. Develop film either manually or by using a mechanical processor.
Ch
ap
te
r
3
S
ou
th
er
n
Blo
tt
ing
NOTES ON…LumiGLO ChemiluminescentSubstrate
• LumiGLO can be used with nitrocellulose, nylon, and PVDF
membranes.
• The LumiGLO reaction does not need to be protected from light.
• For maximum signal, expose membrane to film immediately after
incubation with LumiGLO. The reaction and film exposure are
performed at room temperature.
• For most applications, exposures of one hour or less produce
sufficient sensitivity.
• LumiGLO is an extremely sensitive substrate. Insufficient washing
of membranes or contamination of substrate with HRP will result in
non-specific background. Following incubation with HRP-SA, it is
important to transfer membranes to a clean container and wash
thoroughly to remove excess enzyme and prevent background
problems. Always use a clean container for the substrate incubation.
• Do not allow LumiGLO to contact film. LumiGLO solution will case
dark spots to appear on the film.
31 800-638-3167 • KPL, Inc. • 301-948-7755
Southern Blotting
Stripping and Reprobing a Southern Blot
Membranes hybridized with biotinylated probes can be stripped and reprobed
after detection with either CDP-Star or LumiGLO provided the membrane is
never allowed to dry prior to stripping (i.e., store membrane in a covered
container in 1X SSPE).
Stripping a DNA Probe
1. Wash membrane in 1X Wash Solution for 5 minutes at room temperature.
2. Incubate membrane in 0.2N NaOH/0.1% SDS (pre-warmed to 55°C) for
20 minutes at 55°C.
3. Rinse membrane 2 times for 5 minutes each in 2X SSC.
4. Reprobe immediately or store stripped membrane dry at room
temperature or 4°C.
Solutions from Detector AP Chemiluminescent Blotting Kit
Steps Critical Points
1X Detector™ Block Solution– to be prepared fresh daily
1. Based on the total desired 1X Detector Block volume, weigh out If the block solution is not prepared daily, sensitivity could be reduced and 0.2% w/v Detector Block Powder for detection with AP and CDP-Star. background can increase.
2. Place the Detector Block Powder in a flat-bottom, screw cap Conical tubes are not recommended in the preparation of 1X Detector Block. container and add molecular biology grade water to a volume If used, the solution may be vortexed to remove any packed Detector Block equivalent to 4/5 of the total desired 1X Detector Block volume. Powder from the bottom of the tube.Shake the container vigorously until the powder is fully solubilized. (Approximately 30 seconds to 1 minute) Insure that all Detector Block Powder is in solution to avoid speckling
patterns on the blot or insufficient blocking that may occur as a result ofunsolubilized powder. The amount of powder used can be increased todecrease background. However, too much powder will reduce sensitivity.
Do not add the powder to the entire volume of the 1X Detection BlockSolution. This will result in clumps that will be hard to solubilize.
3. Dilute the solution with 1:5 v/v 5X Detector Block Solution.Example, for 50 mL of 1X Detector Block:Detector Block Powder 0.1 gMolecular Biology Grade H20 40 mL5X Detector Block Solution 10 mL
Buffer Preparation
Sufficient reagents are provided in both the DetectorTM AP and HRP Chemiluminescent Blotting Kits when volumes are used as indicated. If desired, increased
working volumes may be used; however, additional reagents will be necessary. Individual components may also be purchased separately. For optimal results in
Southern blotting using this system, recommended preparation of kit buffers is detailed below. Required solutions not provided with the kit can be found in the
Appendix, page 68.

32www.kpl.com
Solutions from Detector AP Chemiluminescent Blotting Kit (continued)
Steps Critical Points
Phosphatase Wash Solution
1. Dilute 1 part 5X Phosphatase Wash with 4 parts molecular SDS may fall out of solution in the 5X concentrate. Simply place the bottle biology grade water. Mix well. in a 37 – 65°C water bath for a few minutes and mix until the solution is
homogenous prior to use.
Phosphatase Assay Buffer
1. Dilute 1 part 10X Assay Buffer with 9 parts molecular biology grade water. Mix well.
Solutions from HRP Chemiluminescent Blotting Kit
Steps Critical Points
1X Detector™ Block Solution – to be prepared fresh daily
1. Based on the total desired 1X Detector Block volume, weigh out 1% If the block solution is not prepared daily, sensitivity could be reduced andw/v Detector Block Powder for detection with HRP and LumiGLO. background can increase.
2. Place the Detector Block Powder in a flat-bottom, screw cap Conical tubes are not recommended in the preparation of 1X Detector Block. container and add molecular biology grade water to a volume If used, the solution may be vortexed to remove any packed Detector Block equivalent to 4/5 of the total desired 1X Detector Block volume. Powder from the bottom of the tube.Shake the container vigorously until the powder is fully solubilized. (Approximately 30 seconds to 1 minute) Insure that all Detector Block Powder is in solution to avoid speckling
patterns on the blot or insufficient blocking that may occur as a result ofunsolubilized powder. The amount of powder used can be increased todecrease background. However, too much powder will reduce sensitivity.
Do not add the powder to the entire volume of the 1X Detection BlockSolution. This will result in clumps that will be hard to solubilize.
3. Dilute the solution with 1:5 v/v 5X Detector Block Solution.Example, for 50 mL of 1X Detector Block:Detector Block Powder 0.5 gMolecular Biology Grade H20 40 mL5X Detector Block Solution 10 mL
1X Biotin Wash Solution
1. Dilute 10X Biotin Wash Solution Concentrate by diluting 1:10 in molecular biology grade water, i.e., 1 part Biotin Wash Solution Concentrate + 9 parts H2O. Mix well.
Ch
ap
te
r
3
S
ou
th
er
n
Blo
tt
ing

33 800-638-3167 • KPL, Inc. • 301-948-7755
Northern Blotting
Northern Blotting with Detector APChemiluminescent Blotting Kit
Northern blotting refers to the transfer of separated RNA from a gel to a
membrane for subsequent detection of the respective RNA transcripts. In the
identification of genes and determination of their function, Northern blotting
is commonly used to measure the levels of mRNA in tissues and cells. The
comparison of these levels to control samples gives insight to relative
expression of genes and the impact of various factors on that expression.
As noted in earlier discussion, the development of improved substrates has
provided the means by which even rare messages can now be detected in total
RNA samples. Chemiluminescent detection using CDP-Star substrate allows
greater sensitivity and permits faster exposure time than peroxidase-based
substrates. For this reason, the Detector™ AP Chemiluminescent Blotting Kit
takes advantage of the superior performance of CDP-Star to offer a system
that surpasses other non-radioactive methods for the analysis of mRNA by
Northern blotting.
Total RNA samples immobilized on solid supports such as nylon membrane
are prehybridized, then hybridized with biotinylated DNA or RNA probes.
The membrane is washed to remove excess probe and blocked to prevent
non-specific binding of a reporter conjugate. The membrane is then incubated
with alkaline phosphatase-labeled streptavidin (AP-SA) which binds biotin
molecules with very high avidity. The membrane is washed again to remove
excess AP-SA and incubated with CDP-Star Chemiluminescent Substrate.
The Detector AP Chemiluminescent Blotting Kit was developed and
optimized with Pall Biodyne B Nylon Membrane for remarkably high
sensitivity and low background. Exposure to X-ray film produces a permanent
record of chemiluminescent emissions. Detection may also be accomplished
using a chemiluminescent imaging system. While there are a variety of
Northern blotting procedures, the protocol described below has been found
to give maximum sensitivity and greatest signal-to-noise when using the
Detector system.
Materials and Equipment Catalog No. 54-30-01 Catalog No. 54-30-02
2000 cm2 500 cm2
Kit Components Product Code Volume Product Code Volume
Formamide Hybridization Buffer 50-86-12 200 mL 50-86-11 50 mL
Detector Block Solution (5X) 71-83-02 2 x 240 mL 71-83-01 120 mL
Detector Block Powder 72-01-03 10 g 72-01-03 10 g
Phosphatase-labeled 475-3001 0.1 mL 475-3001 0.1 mL
Streptavidin (AP-SA)
Phosphatase Wash Solution 50-63-17 1000 mL 50-63-11 200 mL
Concentrate (5X) 50-63-11 200 mL 50-63-18 100 mL
Phosphatase Assay Buffer (10X) 50-63-12 200 mL 50-63-13 50 mL
CDP-Star Chemiluminescent Substrate 50-60-03 100 mL 50-60-04 30 mL
Sufficient reagents are provided with Catalog No. 54-30-01and Catalog No. 54-30-02 to test approximately 2000 cm2 of membrane (20 each of 10 cm x 10 cmblots) and 500 cm2 of membrane (5 each of 10 cm x 10 cm blots), respectively.
NOTES ON…Storage Conditions of Detector AP Chemiluminescent Blotting Kit• The 5X Phosphatase Wash Solution Concentrate should be removed
from the Detector AP Chemiluminescent Blotting Kit and stored at
room temperature. All other components should be stored at 2-8°C.
• For optimal performance, Formamide Hybridization Buffer should be
warmed (37-50°C) and aliquotted into DNase/RNase free tubes and
then stored at 2-8°C. Do not store Formamide Hybridization Buffer
at -20°C. Prolonged storage of this buffer at -20°C may result in
decreased sensitivity.
• Reagents are stable for a minimum of one year when stored as
instructed.

34www.kpl.com
Required Supplies and Equipment Not Included
• Biotin-labeled nucleic acid probe
• Herring Sperm DNA (Catalog No. 60-00-14)
• 20X SSPE (See Appendix for preparation)
• SDS
• UV Transilluminator
• UV crosslinker or vacuum oven
• Capillary transfer apparatus
• Waterbath or hybridization oven
• Heat-sealed hybridization bags (Catalog No. 60-00-51) or
hybridization bottles
• X-ray film and film cassettes or a chemiluminescent imaging system
• Positively charged nylon (Biodyne B, Catalog No. 60-00-50) or
nitrocellulose membrane
• DEPC treated water
• 37% (v/v) Formaldehyde stock solution
• 10X MOPS Buffer (See Appendix for preparation)
• RNA sample loading buffer (See Appendix for preparation)
• Agarose
• Circulating horizontal electrophoresis tank
• 20X SSC (Catalog No. 50-86-05 or see Appendix for preparation)
• NaOH stock solution
NOTES ON…Warnings and Precautions
• Read ALL instructions thoroughly before using the kit.
• Always wear protective gloves and a lab coat.
• Ultraviolet light is harmful to skin and eyes. Shield skin and eyes
from UV rays using UV-resistant glasses and protective clothing.
• Formamide is a suspected teratogen and its use should be restricted
to a fumehood.
• Formaldehyde is a suspected nose, nasopharynx, and liver
carcinogen. It is toxic both through inhalation and ingestion.
Its use should be restricted to a fumehood.
• RNA is extremely susceptible to RNases. All tubes and tips should be
autoclaved prior to use and all glassware, equipment, and trays used
should be cleaned using RNase Away (or something similar) or a
0.2N NaOH solution. Always wear gloves when working with RNA
as human skin contains abundant amounts of RNases.
Detector Northern BlottingAt A Glance
Prehybridization1 hour�
Hybridization3-18 hours�
2X SSPE/0.5% SDS washes2 X 15 min
�0.2X SSPE/0.5% SDS washes
2 X 30 min�
2X SSPE wash5 min �
Detector Block45 min�
AP-Streptavidin30 min�
Phosphatase Wash Solution3 x 5 min�
Phosphatase Assay Buffer2 X 2 min�
CDP-Star5 min �
Film Exposure2 min - 2 hours
Ch
ap
te
r
4
N
or
th
er
n
Blo
tt
ing

35 800-638-3167 • KPL, Inc. • 301-948-7755
Northern Blotting
Steps Critical Points
1. For a 1% agarose gel at 100 mL, mix 1 g agarose with 86 mL Tare the agarose/water prior to boiling. Afterwards, add back any DEPCof DEPC treated water (86% of the final gel volume). treated water that may have boiled off. It is important to maintain accurate
agarose concentration.
2. Boil to dissolve the agarose. Cool to 60°C.
3. In a fume hood, add 10 mL of 10X MOPS buffer to a final concentration of 1X. Swirl to mix.
4. In a fume hood, add 4 mL of 37% Formaldehyde (12.3 M) to a final concentration of 0.45 M. Swirl to mix.
5. In a fume hood, pour the gel into a prepared casting tray For an accurate time estimation for efficient transfer, it is important to to a thickness of 6 mm (approximately 80 mL for the midi maintain the 6 mm thickness of the gel. Do not allow the gel to solidify apparatus). Insert the comb and allow the agarose to solidify longer than 45 minutes.for ~45 minutes.
6. Add RNA sample loading buffer to the RNA at a ratio of 2:1. The RNA loading buffer contains formamide to reduce secondary structure in the RNA and ethidium bromide to visualize the RNA on the gel.
See Appendix for instructions to prepare RNA loading buffer.
7. Denature the samples by incubating at 68°C for 10 min. Immediately place the samples on ice.
8. Prepare running buffer: 100 mL 10X MOPS, 40 mL of 37% Formaldehyde, 860 mL DEPC Treated Water for a final concentration of 1X MOPS and 0.45 M Formaldehyde. Mix well.
9. Fill the tank and pre-electrophorese the solidified gel at 50 V for 10 min.
10. Turn off the power supply and rinse the wells with running buffer. MOPS buffer can concentrate in the wells. They must be rinsed prior toloading of the RNA.
11. Load the denatured RNA and run the gel at 5-7.5 V/cm for The RNA needs to run through 2/3 of the gel to get good separation of the approximately 3 hours (dye front should migrate through rRNA bands to allow analysis of the RNA.two-thirds of the gel).
12. Visualize the RNA on an UV transilluminator. Place a Good quality RNA should appear as two intense bands representative of 18s fluorescent ruler next to the gel and photograph it. rRNA between 1.8 and 2 Kb and 28s rRNA between 4.6 and 5.2 Kb. These
bands should be equal in intensity. If the 18s band is more intense than the28s band, it may be indicative of degradation.
Gel Electrophoresis
For optimal electrophoretic resolution and transfer efficiency, a 1-1.2% agarose gel is recommended. The following instructions are written as an example
of a 1% gel to be cast in a “midi” horizontal gel box (example: Buffer Puffer™, Owl Scientific). Depending on the size of the gel desired, the volume of the
components may be adjusted so that the final concentrations are constant. When pouring the gel, however, the thickness should not exceed 6 mm.

36www.kpl.com
Steps Critical Points
1. Prepare 1 L of 5X SSC/10 mM NaOH alkaline transfer buffer. One liter of transfer buffer is sufficient for the transfer of a 12 cm x 14 cm gel. Pre-treat the nylon membrane as recommended by the manufacturer. Positively charged nylon is the preferred membrane for this application,
specifically Pall Biodyne B.
For Pall Biodyne B, prewet membrane in DEPC treated water followed by a 5 minutes wash in 5X SSC.
2. Treat the gel with 2 gel volumes of alkaline transfer buffer by washing 2 x 10 minutes at room temperature.
3. Assemble a capillary transfer according to standard techniques Always use clean forceps to handle membrane.using the transfer buffer as the solvent.
4. Transfer time will depend on the amount of RNA loaded on To avoid excessive compression of the gel matrix, the weight placed on top the gel. >3 µg of RNA, transfer 3 hours; 100 ng - 3 µg of RNA, of the transfer should not exceed 2-3 g/cm2 of gel.transfer for 2 hours; <100 ng, transfer for 1 hour.
5. After transfer, neutralize and rinse the membrane for 5 min in While most manufacturers claim that nucleic acid transferred to positively a generous volume 5X SSC. Place membrane on filter paper 2-4 charged membrane need not be fixed, KPL has found that sensitivity is min and fix the RNA to the membrane using a UV cross-linker or greatest after cross-linking or baking.vacuum oven according to manufacturer’s instructions.
The 5X SSC wash is important to remove residual NaOH from the blot toprevent increased background.
6. Store membranes between two pieces of blotting paper and seal See Hybridization and Detection Procedures, pages 37-38.in a hybridization bag. Store bag in a cool and dry place until detection is performed.
Akaline Transfer
Alkaline transfer is the preferred method for the transfer of RNA onto positively charged nylon membrane. This method is more reproducible than high salt
overnight transfers, facilitating transfer within 3 hours regardless of the amount of RNA to be transferred.
• Biotinylated probes may be prepared using the KPL Detector Random
Primer DNA Biotinylation Kit (Catalog No. 60-01-00), Detector PCR
DNA Biotinylation Kit (Catalog No. 60-01-01) or Detector RNA in vitro
Transcription Biotinylation Kit (Catalog No. 60-01-02).
NOTES ON…Preparation of Biotinylated Probes• Quantitate your probe. The concentration of labeled probe should
be determined by the quantitation procedure described in KPL’s
Biotinylation Kits. Excessive amounts of probe may result in non-
specific signal while the addition of too little probe may result in
insufficient signal.
Ch
ap
te
r
4
N
or
th
er
n
Blo
tt
ing
37 800-638-3167 • KPL, Inc. • 301-948-7755
Prehybridization and Hybridization
Steps Critical Points
1. Place the Formamide Hybridization Buffer bottle in a water bath or incubator at 37°C to solubilize the SDS that has precipitated.
2. Determine the amount of Prehybridization/ Hybridization Buffer Use 10 mL of Formamide Hybridization Buffer per 100 cm2 membrane. (For that is needed for your particular blot. A volume of 0.1 mL/ cm2 of example: a 10 cm X 10 cm membrane = 100 cm2 = 10 mL buffer). The membrane is recommended. Use the guidelines listed at the right. volume of buffer may be adjusted depending on the size of the membrane
and the vessel used for hybridization. Hybridization bottles are recommendedfor hybridization incubations, alternatively, heat sealed bags may also be used. A minimum volume of 3 mL is required when using a 4 cm diameter x14 cm long hybridization bottle. If less than 3 mL is needed, a hybridizationbag is recommended.
For convenience, 10 mL of Hybridization Buffer regardless of blot size may be used. The hybridization buffer containing probe may be reused, andadditional Formamide Hybridization Buffer is available for individual purchase.
3. Prepare prehybridization solution by adding sheared and denatured If using non-denatured blocking DNA, heat denature for 5 minutes, cool herring or salmon sperm DNA to a final concentration of 100 µg per quickly on ice and add to prehybridization solution.1 mL of Formamide Hybridization Buffer that is used. If using KPL’s Herring sperm DNA, add 5 µL per mL of Formamide Hybridization Buffer.
4. Place the membrane in a hybridization bottle with the RNA If you seal membranes in heat-sealed plastic hybridization bags for facing toward the middle of the bottle or in a hybridization bag, hybridization, remove as much air and bubbles as possible before sealing theand add the prehybridization solution. bag. For best results, seal bag close to the edge of the membrane.
Do not allow membranes to stick together or to the sides of the hybridization bag.
5. Incubate 1 hour with constant agitation at the desired hybridization temperature. For DNA probes, hybridization at 42°C is recommended. For RNA probes, hybridization at 65°C is recommended.
6. Denature probe: DNA probe 95°C for 10 minutes; Do not denature probes by alkaline treatment. Do not pipet less than 1 µL RNA probe 68°C for 10 minutes. Immediately place on ice. of probe. If probe is very concentrated, it may be diluted in small volume
of a Hybridization Buffer for denaturation and added in a larger quantity tothe hybridization.
7. Add the probe directly to the Prehybridization Buffer at Pipet the probe directly into the buffer and not directly on the blot.50 ng per mL of Buffer.
8. Incubate the membrane with gentle agitation 16-18 hours. The desired hybridization temperature when using DNA probes is 42°C.Hybridization of RNA probes should be performed at 65°C - 68°C.
9. Prepare post-hybridization washes: 2X SSPE / 0.5% SDS and Washes may be modified to contain different concentrations of SSPE and/or 0.2X SSPE / 0.5% SDS. Place the 2X solution at room temperature. SDS to control stringency of the probe-target hybrid. It is recommended that The 0.2X solution should be equilibrated to 55°C if washing DNA this be optimized for each individual probe. Equilibrate the 0.2X solution at probes or 65°C if washing RNA. the elevated temperature at least 2 hours prior to use.
10. Remove the membrane from the Hybridization buffer. Wash The Hybridization buffer with probe can be saved and reused. Save the 2 X 15 minutes in a generous volume (at least 1 ml per cm2 buffer in a sterile conical tube at 2-8°C. To reuse it, denature the solution at of membrane) of 2X SSPE/0.5% SDS at room temperature. 68°C for 10 minutes prior to hybridization.
11. Wash with gentle agitation 2 X 30 minutes at the elevated Generously cover the membrane with the wash solution. The elevated temperature in the temperature equilibrated wash. temperature wash should be temperature equilibrated at least 2 hours prior
to use.
12. Perform the final wash in 2X SSPE for 5 minutes at room temperature. This step is important to eliminate residual SDS carry-over on the membraneto the blocking step which would cause high background.
13. Continue immediately with detection. Never allow membrane to dry out during hybridization and detection.
Northern Blotting

www.kpl.com 38
Detection
Steps Critical Points
1. Incubate Northern blot with 1X Detector Block Solution for See Buffer Preparation Section for instructions on preparation of 1X Detector 45 minutes in a tray approximately the same size as the blot. Block. Use at least 0.25 mL per cm2.
All steps are to be carried out at room temperature with gentle agitation orrocking. Decrease the size of the container or increase the volume of thesolution if the block is not free-flowing over the membrane.
2. Incubate membrane for 30 minutes in fresh blocking solution Use at least 0.25 mL of diluted conjugate solution per cm2. with AP-SA diluted 1/10,000.
3. Place membrane in a clean container. Wash the membrane Use at least 0.75 mL per cm2.in 1X Phosphatase Wash Solution 3 times for 5 minutes each.
4. Rinse the membrane 2 times for 2 minutes each in 1X Assay Buffer. This step is important to remove any detergents from the wash step and toincrease the pH of the blot prior to addition of the substrate. Use at least 0.4 mL per cm2.
5. Incubate membrane for 5 minutes in CDP-Star Chemiluminescent Use 0.05 mL CDP-Star per cm2.Substrate. Blot membrane on filter paper to remove excess substrate. Place membrane in a hyb bag or between sheet protectors and expose (i.e. 10 cm x 10 cm = 100 cm2 = 5 mL CDP-Star)to X-ray film for an initial exposure of 1 minute. Adjust exposure time for optimal signal-to-noise ratio.
6. Develop film either manually or by using a mechanical processor.
• CDP-Star can be used with nylon and PVDF membranes. Use on
nitrocellulose requires an additional component.
• CDP-Star can be used with Chemiluminescent Imagers.
• CDP-Star reaches peak light emission at 2 to 4 hours persisting several
days, allowing the user multiple film exposures. For most applications,
exposures of one hour or less provide sufficient sensitivity.
• The exposure time to film will enable optimization of the signal-to-
noise ratio. Overexposure will increase background and eventually
result in a black blot.
NOTES ON…CDP-Star‚ Chemiluminescent Substrate
• If there is background after the initial 5-10 minute film exposure,
re-expose the blot to film for 1 minute.
• If the signal to noise ratio is low after the initial 5-10 minute film
exposure, leave the blot in the film cassette without film for 1-3 hours,
then re-expose to film for 1-10 minutes. Allowing CDP-Star to reach its
maximum light emission before exposure to film may enhance signal
relative to noise.
• Do not allow CDP-Star to contact film. This will cause dark spots to
appear on the film.
Ch
ap
te
r
4
N
or
th
er
n
Blo
tt
ing

39 800-638-3167 • KPL, Inc. • 301-948-7755
Northern Blotting
Stripping and Reprobing a Northern Blot
Membranes hybridized with biotinylated probes can be stripped and reprobed
after detection with CDP-Star provided the membrane is never allowed to dry
prior to stripping (i.e., store membrane in a covered container in 1X SSPE).
It is always easier to strip a Northern blot when using a DNA probe. RNA
probes can be stripped, but it is more difficult to remove the probe in entirety.
Any stripping protocol used with 32P may be used with non-rad detection. Do
not use alkaline methods for stripping Northern Blots. Similar results are
often seen when using 32P.
Method #1
1. Pour a boiling 0.1% SDS solution onto the membrane and shake for
5 minutes.
2. Discard the solution and immediately add fresh boiling 0.1% SDS
solution to the membrane. Continue shaking until the solution comes
to room temperature.
3. Rinse the membrane in 1X SSPE for 5 minutes.
4. Reprobe immediately or store the membrane in 1X SSPE at 4°C
until ready to use.
Method #2
1. Incubate the membrane in the following solution for 1 hour at 65°C:
• 55 mL of formamide (37% solution)
• 10 mL of 20X SSPE
• 5 mL of 20% SDS
• 30 mL of DEPC treated water
2. Rinse the membrane in 1X SSPE for 5 minutes.
3. Reprobe immediately or store the membrane in 1X SSPE at 4°C
until ready to use.
Steps Critical Points
1X Detector™ Block Solution– to be prepared fresh daily
1. Based on the total desired 1X Detector Block volume, weigh out If the block solution is not prepared daily, sensitivity could be reduced and 0.2% w/v Detector Block Powder for detection with AP and CDP-Star. background can increase.
2. Place the Detector Block Powder in a flat-bottom, screw cap Conical tubes are not recommended in the preparation of 1X Detector Block. container and add molecular biology grade water to a volume If used, the solution may be vortexed to remove any packed Detector Block equivalent to 4/5 of the total desired 1X Detector Block volume. Powder from the bottom of the tube.Shake the container vigorously until the powder is fully solubilized. (Approximately 30 seconds to 1 minute) Insure that all Detector Block Powder is in solution to avoid speckling
patterns on the blot or insufficient blocking that may occur as a result ofunsolubilized powder. The amount of powder used can be increased todecrease background. However, too much powder will reduce sensitivity.
Do not add the powder to the entire volume of the 1X Detection BlockSolution. This will result in clumps that will be hard to solubilize.
3. Dilute the solution with 1:5 v/v 5X Detector Block Solution.Example, for 50 mL of 1X Detector Block:Detector Block Powder 0.1 gMolecular Biology Grade H20 40 mL5X Detector Block Solution 10 mL
Buffer Preparation
Sufficient reagents are provided in the Detector™ AP Chemiluminescent Blotting Kit when volumes are used as indicated. If desired, increased working
volumes may be used; however, additional reagents will be necessary. Individual components may also be purchased separately. For optimal results in
Northern blotting using this system, recommended preparation of kit buffers are detailed below. Required solutions not provided with the kit can be
found in the Appendix, page 68.

40www.kpl.com
Steps Critical Points
Phosphatase Wash Solution
1. Dilute 1 part 5X Phosphatase Wash with 4 parts molecular SDS may fall out of solution in the 5X concentrate. Simply place the bottle biology grade water. Mix well. in a 37 – 65°C water bath for a few minutes and mix until the solution is
homogenous prior to use.
Phosphatase Assay Buffer
1. Dilute 1 part 10X Assay Buffer with 9 parts molecular biology grade water. Mix well.
Ch
ap
te
r
4
N
or
th
er
n
Blo
tt
ing
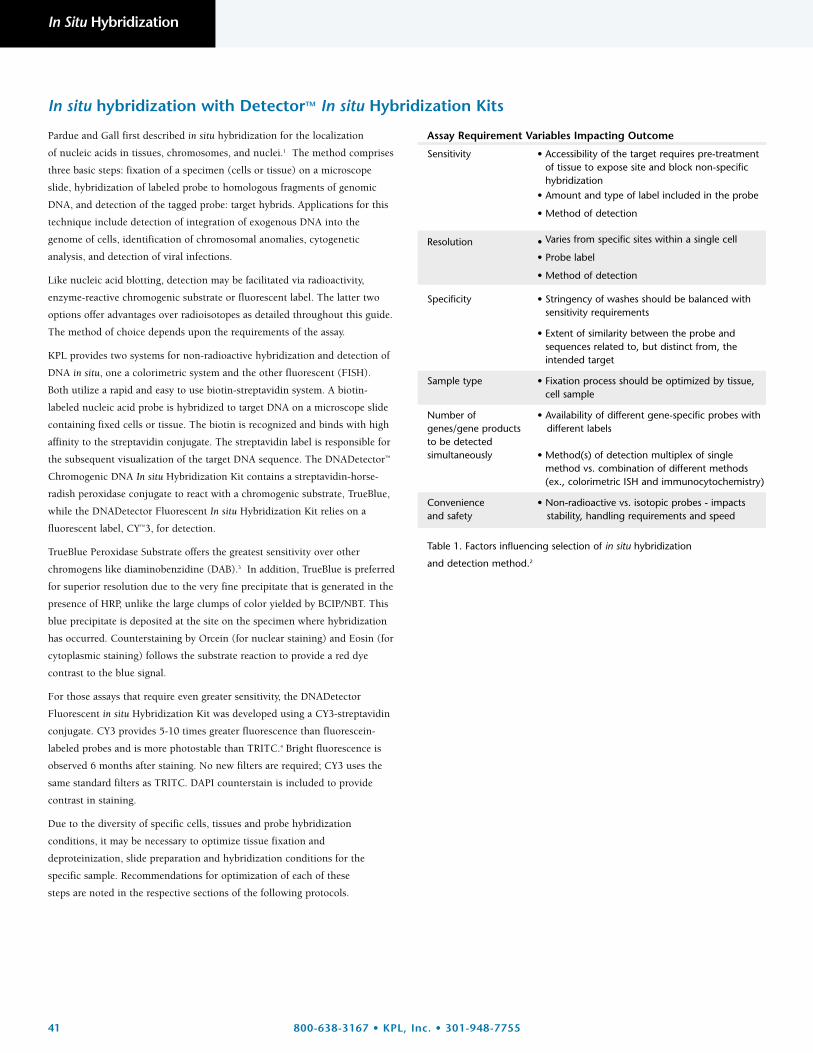
41 800-638-3167 • KPL, Inc. • 301-948-7755
In Situ Hybridization
Pardue and Gall first described in situ hybridization for the localization
of nucleic acids in tissues, chromosomes, and nuclei.1 The method comprises
three basic steps: fixation of a specimen (cells or tissue) on a microscope
slide, hybridization of labeled probe to homologous fragments of genomic
DNA, and detection of the tagged probe: target hybrids. Applications for this
technique include detection of integration of exogenous DNA into the
genome of cells, identification of chromosomal anomalies, cytogenetic
analysis, and detection of viral infections.
Like nucleic acid blotting, detection may be facilitated via radioactivity,
enzyme-reactive chromogenic substrate or fluorescent label. The latter two
options offer advantages over radioisotopes as detailed throughout this guide.
The method of choice depends upon the requirements of the assay.
KPL provides two systems for non-radioactive hybridization and detection of
DNA in situ, one a colorimetric system and the other fluorescent (FISH).
Both utilize a rapid and easy to use biotin-streptavidin system. A biotin-
labeled nucleic acid probe is hybridized to target DNA on a microscope slide
containing fixed cells or tissue. The biotin is recognized and binds with high
affinity to the streptavidin conjugate. The streptavidin label is responsible for
the subsequent visualization of the target DNA sequence. The DNADetector™
Chromogenic DNA In situ Hybridization Kit contains a streptavidin-horse-
radish peroxidase conjugate to react with a chromogenic substrate, TrueBlue,
while the DNADetector Fluorescent In situ Hybridization Kit relies on a
fluorescent label, CY™3, for detection.
TrueBlue Peroxidase Substrate offers the greatest sensitivity over other
chromogens like diaminobenzidine (DAB).3 In addition, TrueBlue is preferred
for superior resolution due to the very fine precipitate that is generated in the
presence of HRP, unlike the large clumps of color yielded by BCIP/NBT. This
blue precipitate is deposited at the site on the specimen where hybridization
has occurred. Counterstaining by Orcein (for nuclear staining) and Eosin (for
cytoplasmic staining) follows the substrate reaction to provide a red dye
contrast to the blue signal.
For those assays that require even greater sensitivity, the DNADetector
Fluorescent in situ Hybridization Kit was developed using a CY3-streptavidin
conjugate. CY3 provides 5-10 times greater fluorescence than fluorescein-
labeled probes and is more photostable than TRITC.4 Bright fluorescence is
observed 6 months after staining. No new filters are required; CY3 uses the
same standard filters as TRITC. DAPI counterstain is included to provide
contrast in staining.
Due to the diversity of specific cells, tissues and probe hybridization
conditions, it may be necessary to optimize tissue fixation and
deproteinization, slide preparation and hybridization conditions for the
specific sample. Recommendations for optimization of each of these
steps are noted in the respective sections of the following protocols.
Assay Requirement Variables Impacting Outcome
Sensitivity • Accessibility of the target requires pre-treatmentof tissue to expose site and block non-specifichybridization
• Amount and type of label included in the probe
• Method of detection
Resolution • Varies from specific sites within a single cell
• Probe label
• Method of detection
Specificity • Stringency of washes should be balanced withsensitivity requirements
• Extent of similarity between the probe andsequences related to, but distinct from, theintended target
Sample type • Fixation process should be optimized by tissue,cell sample
Number of • Availability of different gene-specific probes with genes/gene products different labelsto be detected simultaneously • Method(s) of detection multiplex of single
method vs. combination of different methods(ex., colorimetric ISH and immunocytochemistry)
Convenience • Non-radioactive vs. isotopic probes - impacts and safety stability, handling requirements and speed
Table 1. Factors influencing selection of in situ hybridization
and detection method.2
In situ hybridization with DetectorTM In situ Hybridization Kits
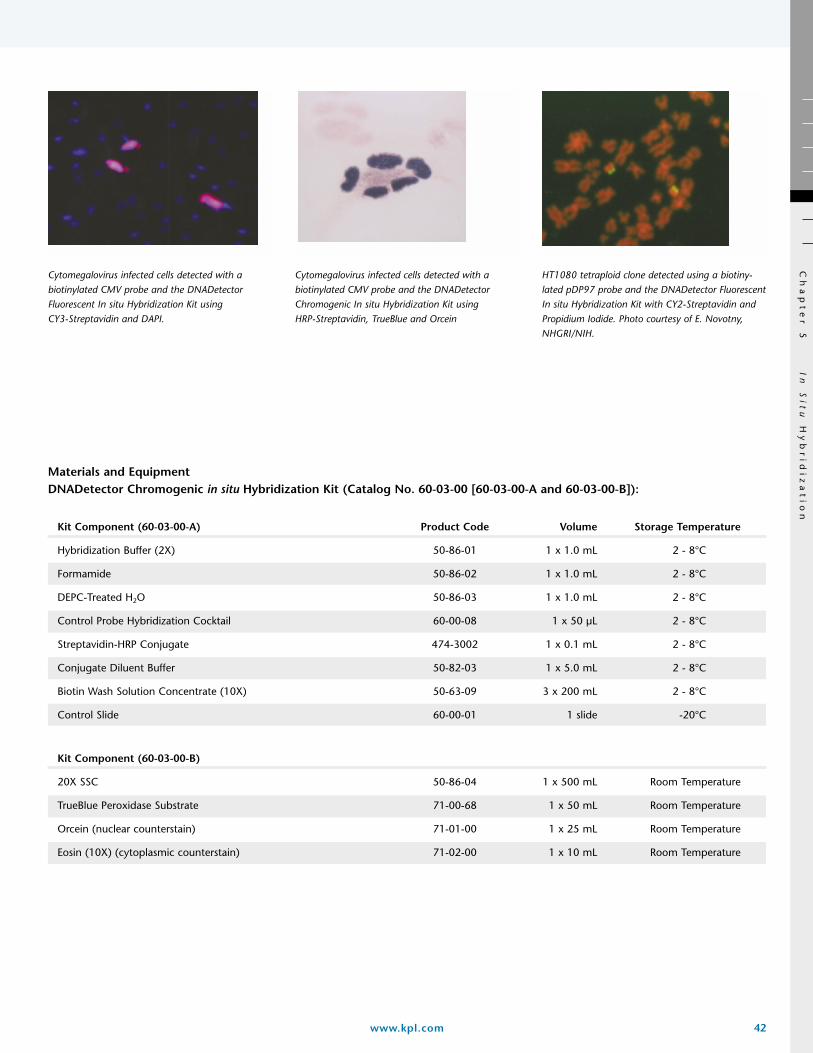
42www.kpl.com
HT1080 tetraploid clone detected using a biotiny-lated pDP97 probe and the DNADetector FluorescentIn situ Hybridization Kit with CY2-Streptavidin andPropidium Iodide. Photo courtesy of E. Novotny,NHGRI/NIH.
Cytomegalovirus infected cells detected with abiotinylated CMV probe and the DNADetectorChromogenic In situ Hybridization Kit using HRP-Streptavidin, TrueBlue and Orcein
Cytomegalovirus infected cells detected with abiotinylated CMV probe and the DNADetectorFluorescent In situ Hybridization Kit using CY3-Streptavidin and DAPI.
Materials and EquipmentDNADetector Chromogenic in situ Hybridization Kit (Catalog No. 60-03-00 [60-03-00-A and 60-03-00-B]):
Kit Component (60-03-00-A) Product Code Volume Storage Temperature
Hybridization Buffer (2X) 50-86-01 1 x 1.0 mL 2 - 8°C
Formamide 50-86-02 1 x 1.0 mL 2 - 8°C
DEPC-Treated H2O 50-86-03 1 x 1.0 mL 2 - 8°C
Control Probe Hybridization Cocktail 60-00-08 1 x 50 µL 2 - 8°C
Streptavidin-HRP Conjugate 474-3002 1 x 0.1 mL 2 - 8°C
Conjugate Diluent Buffer 50-82-03 1 x 5.0 mL 2 - 8°C
Biotin Wash Solution Concentrate (10X) 50-63-09 3 x 200 mL 2 - 8°C
Control Slide 60-00-01 1 slide -20°C
Kit Component (60-03-00-B)
20X SSC 50-86-04 1 x 500 mL Room Temperature
TrueBlue Peroxidase Substrate 71-00-68 1 x 50 mL Room Temperature
Orcein (nuclear counterstain) 71-01-00 1 x 25 mL Room Temperature
Eosin (10X) (cytoplasmic counterstain) 71-02-00 1 x 10 mL Room Temperature
Ch
ap
te
r
5
In
S
itu
Hy
br
idiz
at
ion

43 800-638-3167 • KPL, Inc. • 301-948-7755
In Situ Hybridization
NOTES ON…Storage Conditions:
• Kit components require multiple storage temperatures. Please note
the appropriate storage conditions for each component and place the
components at the recommended temperature immediately upon
receipt of the kit.
• The control slide provided in the kit may be stored at 2-8°C for up
to 2 weeks, for long term stability it should be stored at -20°C.NOTES ON...Warnings and Precautions
• Read ALL instructions thoroughly before using the kit.
• Wear gloves when handling kit components and slides. Some
components of the kit are sensitive to DNA degrading enzymes
such as DNases.
• Some kit components contain hazardous materials (formamide,
microcide, etc.). Handle these reagents using accepted laboratory
safety procedures. Dispose of hazardous chemicals according to
local, state and federal regulations.
• The streptavidin conjugate and counterstain are light sensitive.
Keep caps closed and avoid prolonged exposure to light.
• For slide washes at temperatures above 37°C, the use of glass
Coplin jars is recommended to achieve proper temperature
equilibration of slides.
• Proper temperatures of heat blocks, water baths, and slide warmers
are very important. It is necessary to achieve a temperature of at
least 95°C for the specified time in order to denature the probe
and target DNA.
• Keep all reagents at the designated temperatures stated in this
manual, or on the labels, to maintain and prolong shelf life.
• Do not allow slides to dry out during the hybridization and
detection procedures.
Required Supplies and Equipment Not Included
• Glass Coplin jar, or equivalent, for high temperature incubations
(above 37°C)
• Plastic or glass Coplin jars, or equivalent, for room temperature
incubations
• Forceps
• Humidified chamber
• Water baths at 37°C and 60°C
• Incubator or heat block at 95°C
• Biotin-labeled nucleic acid probe
• Autoclaved 1.5 mL microcentrifuge tubes
• Autoclaved or sterile-filtered (0.2 µm) molecular biology grade water
• Treated microscope slides
• Rubber cement or coverslips and slide holders
• Organic mounting media, such as Permount (Fisher Scientific)
• Glass coverslips and parafilm
• Microscope/Fluorescent Microscope
Additional Supplies Needed for Tissue
• Xylene
• Reagent grade ethanol solutions (100%, 80%, 70%, and 50%)
• PBS
• Proteinase K
Materials and EquipmentDNADetector Fluorescent in situ Hybridization Kit (Catalog No. 60-05-00):
Kit Component Product Code Volume Storage Temperature
Hybridization Buffer (2X) 50-86-01 1 x 1.0 mL 2 - 8°C
Formamide 50-86-02 1 x 1.0 mL 2 - 8°C
DEPC-Treated H2O 50-86-03 1 x 1.0 mL 2 - 8°C
Control Probe Hybridization Cocktail 60-00-08 1 x 50 µL 2 - 8°C
CY3-Streptavidin 078-30-01 1 x 0.1 mg 2 - 8°C
Conjugate Diluent Buffer 50-82-03 1 x 5.0 mL 2 – 8°C
Wash Solution Concentrate (20X) 50-63-03 3 x 100 mL 2 - 8°C
DAPI 71-03-00 1 x 1.0 mg 2 - 8°C
Control Slide 60-00-01 1 slide -20°C
20X SSC 50-86-04 1 x 500 mL Room Temperature
Fluorescent Mounting Media 71-00-16 1 x 15 mL Room Temperature
Each kit contains sufficient reagents for the hybridization and detection of 50 samples. The researcher supplies only the biotinylated probe specific for the targetgene. Reagents are stable for a minimum of one year when stored as directed.

44www.kpl.com
Experimental Design
Slide Preparation:
In order to ensure that specimens will remain attached to the slide during the
in situ hybridization protocol, it is recommended that you pre-treat or “sub”
your slides with an adhesive agent before mounting specimens. Reagents
such as poly-L-lysine5, 3-amino-propyltriethoxysilane (AES) and gelatin6 have
all been successfully used as subbing agents. The outline for AES treatment is
as follows:
a. Incubate clean, dry glass slides in 2% AES (Aldrich) in acetone for
2 minutes.
b. Rinse slides 2 times in molecular biology grade H2O and air dry.
c. Store slides at room temperature in a closed, dust-free container.
Handle slides only by the corners.
Cell Preparation:
Cells can be applied to the slide using different techniques depending on the
amount of sample available, the cell type being used, the applicability of your
system to different slide growth chambers and the availability of cytospin
centrifuges.
Use of chamber slides for growth of cells will allow the optimization of
growth conditions to obtain a well spread and dense monolayer of cells. This
may facilitate the ability to detect multiple in situ hybridization signals in a
sample. Once optimal growth results are obtained, the medium may be
removed and the cells then fixed on the slide.
Cells from cytological samples or cell cultures can be smeared on the slide to
form a thin layer and then fixed on the slide. When only a small amount of
cells are available it may be advantageous to concentrate the cells in a defined
area of the slide using a cytospin centrifuge. Cells are then fixed on the slide.
Slide Fixation:
Optimal fixation conditions are critical for successful in situ hybridization.
The reagents used for fixation, as well as the length of time a specimen is
fixed, must be determined empirically for each sample type, as these
parameters will influence morphological integrity and hybridization signal.
There are two types of fixatives: precipitating fixatives and cross-linking
fixatives. Precipitating fixatives, like ethanol or methanol/acetone, do not
require further treatment with proteolytic enzymes. However, cells fixed by
these methods are susceptible to loss of target nucleic acids. Cross-linking
fixatives like formaldehyde or glutaraldehyde prevent loss of nucleic acids
from their in situ origin, but subsequent proteolytic digestion is required
in order to make the target nucleic acids accessible to probe. Further
information on fixation may be found in references 7 – 9.
Paraffin-Embedded Tissue Sample Preparation:
Paraffin-embedded, formalin/paraformaldehyde fixed tissue sections of
4 - 6 micron thickness may be mounted on slides using the following method:
a. Float paraffin-embedded tissue sections in clean, distilled water.
b. Dip a silanized slide under the tissue section and scoop the section onto
the slide by lifting the slide and attached tissue section out of the water.
c. Gently remove any bubbles that may have become trapped under the
section with a soft brush.
d. Allow the sections to dry on the slides.
e. Bake the slides for 1 – 2 hours at 90°C or overnight at 65°C.
f. Store slides at room temperature in a closed container.
Deparaffinization and Rehydration of Cell or Tissue Sections:
Paraffin-embedded, mounted specimens must be deparaffinized, then
pretreated with agents such as proteases, acids or detergents10 to loosen the
cross-links formed by fixatives and allow efficient access of the probe to the
target. Incubate the slides sequentially in the series of solutions specified
below. All incubations should be performed in Coplin jars. Use fresh reagents
for each batch of slides (8 - 10 slides). Gently agitate the jars every few
minutes during each incubation.
Step Reagent Time (minutes)
1 xylene 10
2 xylene 10
3 95% ethanol 5
4 95% ethanol 5
5 80% ethanol 5
6 70% ethanol 5
7 50% ethanol 5
8 molecular biology grade water 5
After the slides have been rehydrated, continue with protease digestion.
Ch
ap
te
r
5
In
S
itu
Hy
br
idiz
at
ion

45 800-638-3167 • KPL, Inc. • 301-948-7755
In Situ Hybridization
Proteinase K Digestion of Cells and Tissue Sections
Fixed With Cross-linking Fixatives:
Optimal removal of proteins from specimens that have been fixed using
cross-linking fixation methods is necessary to expose target nucleic acids for
hybridization. The degree of deproteinization necessary must be determined
empirically as it depends on the type of tissue used, the method of fixation,
the thickness of the tissue section and whether the nucleic acid target is
nuclear or cytoplasmic. Overdigestion may result in release of the target DNA
from the tissue or loss of tissue morphology, while underdigestion prevents
access of the probe to the target and will result in a weak hybridization signal.
It is recommended that you titrate the amount of protease used and perform a
time course to determine the optimal conditions for your samples.
Proteases used in in situ hybridization include Proteinase K, pronase, trypsin
and 0.2N HCl. Proteinase K is the universal deproteinization agent. Prepare
Proteinase K and digest specimen following manufacturer’s recommendations.
Probe Preparation:
Use of these kits requires a biotin-labeled nucleic acid probe. Any of the
methods described in Chapter 2 of this Technical Guide may be employed for
this purpose. Additionally, fragments of DNA greater than 100 nucleotides in
length may be labeled enzymatically by nick translation. For oligonucleotide
probes, labeling can occur during the synthesis of the oligo by covalent
attachment of a biotin or after synthesis by enzymatic end-labeling. DNA may
also be labeled using a photoactivated biotin analog11.
It is important that the probe generated is between 20-30 bases if it is an
oligo, and 50-1000 base pairs in length if it is a genomic probe. The probe
needs to be labeled in such a way that it has the optimal number of biotin
groups to allow for greatest signal, yet not too many biotins that they interfere
with hybridization or with the binding of streptavidin to the biotin. If high
background is encountered, it may be due to the presence of the labeling
components. G50 Microspin Purification Columns are not recommended to
purify the labeled probe because biotin sticks to the resin resulting in loss
of labeled probe. Instead, Spin-Pure filters (Catalog No. 60-00-53) are
recommended to remove unincorporated nucleotides or primers with
minimal loss of labeled product.
Hybridization:
Due to the unique melting temperatures and hybridization properties of
different probes and target sequences, it will be necessary to optimize
hybridization conditions for each probe and target specimen you use. The use
of formamide lowers the melting temperature of the nucleic acid:nucleic acid
hybrids, so hybridizations may be performed at lower temperatures. When the
formamide concentration is increased and the hybridization temperature
remains stable, the stringency of hybridization is increased. Formamide is
supplied separately from the rest of the hybridization cocktail to allow for the
optimization of hybridization conditions.
In addition to modifying formamide concentration, it may also be necessary
to optimize the temperature at which you perform the hybridization
reactions. Too low or nonstringent hybridization temperatures may result in
high background due to non-specific hybridization or hybridization to shorter
than desired stretches of homology.
Hybridization temperatures that are too high may result in loss of the ability
of the probe to hybridize to the target at all. In addition, prolonged exposure
of cells and tissue specimens to temperatures above 50°C may result in
morphological alterations and structural abnormalities. Also, keep in mind
that detection of single-copy genes is more difficult than detecting multi-copy
genes. The hybridization conditions and probe concentration may need to be
optimized depending upon the abundance of your target gene.

46www.kpl.com
Recommended Controls:
Control for: Determines: Experiment:
Tissue Digestion • Accessibility of the target to the probe. • Prepare a series of specimens at varying digestion • Morphological integrity of specimen. times and concentrations of protease.
Probe Preparation • Probe Specificity • Use a positive control slide known to contain a specifictarget nucleic acid sequence.
• Use a negative control slide known to lack a specifictarget nucleic acid sequence.
• Hybridize a probe that is non-homologous with targetnucleic acid (plasmid or genomic DNA of a differentspecies).
• Use no probe in hybridization cocktail.
• Perform nuclease digestion of target nucleic acid.
• Acetylate tissue with acetic anhydride to reduce theelectrostatic binding of probe to positive charges on the tissue.
Detection • Endogenous Biotin • Omit hybridization step and incubate sample with SA conjugate, then detect.
NOTES ON…Assay Control
• A 2-well Control Slide and Control Hybridization Cocktail are
included to facilitate familiarization with the methodology utilized in
this kit. It will also serve as a test system for the type of results
expected. It is recommended that this control assay be performed
before attempting use of the kit with personal sample specimens.
• There should be no significant background staining. The infected
cells in the (+) wells should be dark blue. If Orcein counterstain was
used, nuclear material not bound by probe should appear light to
dark pink. If Eosin counterstain was used, the cytoplasm should be
stained light to dark red. The (-) well should appear pink to red due
to the absence of probe in the hybridization cocktail.
DNADetector Chromogenic In Situ Hybridization At A Glance
DNADetector in situHYBRIDIZATION AND CHROMOGENIC DETECTION
AT A GLANCETotal time: 3-4 hours for cells
+11–16 hours for tissue
Prehybridization30 minutes
(no prehybridization of tissue)�
Hybridization1-2 hours
(12–18 hours for tissue)�
2X SSC Washes2 X 5 min�
HRP-Streptavidin Incubation20 min�
Wash slides in Biotin Wash3 X 5 min�
Detection2-3 min
(5–10 minutes for tissue)�
Dry Slide5 min.�
Counterstain1-5 min.�
Air Dry30 min.�
Dehydrate�
Mount Samples
Ch
ap
te
r
5
In
S
itu
Hy
br
idiz
at
ion

47 800-638-3167 • KPL, Inc. • 301-948-7755
In Situ Hybridization
Steps Critical Points
1. Prepare cells as described in Experimental Design: Cell Preparation.
2. Prewarm a humidified chamber or water bath to 37°C. Prewarm a water bath to 60°C.
3. Prepare hybridization cocktail. Prepare sufficient reagent See Buffer Preparation on page 52 for instructions on preparation of for both prehybridization and hybridization. Allow 10-50 µL hybridization cocktail. per specimen per treatment.
4. Prehybridization: Apply 10-50 µL hybridization cocktail to each sample. Save the remaining hybridization cocktail for addition of biotin-labeled probe (step 8).
5. Incubate 30 minutes in a 37°C waterbath on top of a foam float or in a humidified chamber.
6. Shake off hybridization cocktail from the slide and blot the slide Be careful not to touch the specimen with the paper.with drying paper.
7. Prewarm an incubator or oven to 95°C.
8. Hybridization: Add biotinylated probe to the remaining hybridization See Buffer Preparation on page 52 for instructions on preparation of probecocktail to a concentration of 1.0 ng/µL. Apply 10-50 µL hybridization hybridization cocktail.cocktail containing probe to each specimen.
9. Cover the slide with a coverslip. Alternatively the slide may be covered with a gasketed coverslip and placed in a slide holder.
10. Place the slide at 95°C and incubate for 2 minutesto denature the target and probe DNA simultaneously.
11. Transfer the slide to a 37°C humidified chamber and incubate 1-2 hours.
12. Immediately after starting hybridization, prepare sufficient See Buffer Preparation on page 52 for instructions on preparation of 2X SSC.volume of 2X SSC for two incubations in Coplin jars. Prewarm 2X SSC to 60°C in one glass Coplin jar in a water bath. Place the remaining 2X SSC in a Coplin jar at room temperature.
13. Following hybridization, remove the cover from the slide and place the slide in the Coplin jar containing prewarmed 2X SSC at 60°C for 5 minutes.
14. Transfer the slide to the Coplin jar containing 2X SSC at room temperature and incubate for 5 minutes.
15. Immediately proceed to chromogenic detection, page 49 orfluorescent detection, page 51.
Cell Hybridization:

48www.kpl.com
Tissue Hybridization
Steps Critical Points
1. Prepare tissue sections as described in Experimental Design: Parrafin-Embedded Tissue Preparation.
2. Prewarm a heat block or oven to 95°C. Prewarm a humidifed chamber or water bath to 37°C.
3. Prepare sufficient hybridization cocktail for each sample. See Buffer Preparation on page 52 for instructions on preparation of Allow about 10-50 µL per specimen per treatment. hybridization cocktail.
4. Add biotinylated probe to the hybridization cocktail to a No prehybridization is required. concentration of 1.0 ng/µL. Apply 10-50 µL hybridization cocktail containing probe to each specimen.
5. Cover the slide with a coverslip and seal the slide around the Alternatively the slide may be covered with a gasketed HybCover and placed edges with rubber cement. in a HybHolder.
6. Place the slide at 95°C and incubate for 10 minutes to denature the target and probe DNA simultaneously.
7. Immediately transfer the slide to a 37°C humidified chamber and incubate 12-18 hours.
8. Following incubation, prewarm a water bath to 60°C. Before See Buffer Preparation on page 52 for instructions on preparation of 2X SSC.proceeding to post-hybridization washes, make sufficient volume of 2X SSC for two incubations in Coplin jars. Prewarm 2X SSC to 60°C in one glass Coplin jar in a water bath. Place the remaining 2X SSC in a Coplin jar at room temperature.
9. Remove the cover or sealed coverslip from the slide and place the slide in the prewarmed Coplin jar containing 2X SSC at 60°C for 5 minutes.
10. Transfer the slide to the Coplin jar containing 2X SSC at room temperature and incubate for 5 minutes.
11. Immediately proceed to chromogenic detection, page 49 orfluorescent detection, page 51.
Ch
ap
te
r
5
In
S
itu
Hy
br
idiz
at
ion

49 800-638-3167 • KPL, Inc. • 301-948-7755
In Situ Hybridization
Steps Critical Points
1. Dilute the HRP-Streptavidin (amber vial, 474-3002) 1:100 in Conjugate Diluent Buffer (i.e. 1.0 µL HRP-SA + 99 µL Conjugate Diluent Buffer). Prepare sufficient volume for 20-50 µL per sample.
2. Shake off the 2X SSC from the slide, and blot the slide with drying paper. Do not allow the slide to dry.Be careful not to touch the specimen with the paper.
3. Immediately add 20-50 µL of the diluted HRP-Streptavidin to each Alternatively the slide may be covered with a coverslip or piece of parafilm.sample. Cover the slide with a coverslip to prevent evaporation. Place slide in a 37°C humidified chamber for 20 minutes.
4. Prepare 1X Biotin Wash Solution. Dispense to 3 Coplin jars See Buffer Preparation on page 52 for instructions on preparing at room temperature. 1X Biotin Wash.
5. Wash slides 5 minutes in each successive Coplin jar. Shake off Biotin Wash Solution from slide and blot dry.
6. Apply TrueBlue to the slide. Make sure that the edges of the specimen are covered.
7. Observe the development of color under the microscope to determine the optimal development time. Development should be optimal within 2-3 minutes for cells and 5-10 minutes for tissue at room temperature.
8. When the signal has reached the desired intensity, stop color development by soaking the slide in a Coplin jar containing picopure water for 5-10 seconds.
9. Air dry the slide for at least 5 minutes.
10. Counterstain the sample as described below, using Orcein to stain nuclei, or Eosin to stain cytoplasm. (page 50)
Counterstaining — Nuclear Counterstain:
Steps Critical Points
1. Apply Orcein to the slide. Make sure that the edges of the specimen are covered.
2. Incubate at room temperature for 3-5 minutes for cells and for 2 minutes for tissue.
3. Rinse 5-10 seconds in a Coplin jar containing picopure water.
4. Air dry slide for 30 minutes.
5. Dehydrate slide and mount as described on page 50.
Chromogenic Detection:

50www.kpl.com
Counterstaining — Cytoplasmic Counterstain:
Steps Critical Points
1. Prepare enough 1X Eosin to cover the specimen See Buffer preparation on page 52 for instructions on preparing 1X Eosin.(approximately 0.5 mL per slide). Mix well and store at room temperature.
2. Apply 1X Eosin to the slide. Make sure that the edges of the specimen are covered.
3. Incubate at room temperature for 1-2 minutes for cells and 3 – 5 minutes for tissue.
4. Rince 5 – 10 seconds in a Coplin Jar containing picopure water.
5. Air dry slide for 30 minutes.
6. Dehydrate slide and mount as described below.
Dehydrate and Mount Slide:
Steps Critical Points
1. Dip slide 5 times in a Coplin jar containing 95% EtOH. Transfer to a second Coplin jar containing 95% EtOH and dip 5 more times. Let the ethanol evaporate.
2. Dip slide in 2 changes of xylene. Blot the excess xylene from the slide.
3. Mount with an organic mounting media, such as Permount, and coverslip.
4. Let the mounted slide dry overnight.
5. View the slide under a microscope.
DNADetector in situ HYBRIDIZATION AND FLUORESCENT DETECTION
AT A GLANCETotal time: 3-4 hours
(+11–16 hours for tissue)
Prehybridization30 minutes
(no prehybridization of tissue)�
Hybridization1-2 hours
(12–18 hours for tissue)�
2X SSC Washes2 X 5 min�
CY3-Streptavidin Incubation20 min�
Wash Slides 5 min
(3 x 5 min for tissue)�
Counterstain3-5 min.�
Mount Samples
Ch
ap
te
r
5
In
S
itu
Hy
br
idiz
at
ion

51 800-638-3167 • KPL, Inc. • 301-948-7755
In Situ Hybridization
Fluorescent Detection Procedure:
While there are differences in the treatment of cells and tissues in preparation and hybridization of such samples, the procedures for detecting DNA
in fixed cells and tissue sections are fundamentally the same.
Steps Critical Points
1. Rehydrate lyophilized CY3-Streptavidin as instructed on page 53. Dilute the stock CY3 (red cap) streptavidin solution 1:100 in Conjugate Diluent Buffer (i.e. 1µL CY-SA + 99 µL Conjugate Diluent Buffer). Prepare 100 µL per sample.
2. Shake off the 2X SSC from the slide, and blot the slide with drying paper. Do not allow the slide to dry. Be careful not to touch the specimen with the paper.
3. Immediately add 20-50 µL of the diluted CY3-Streptavidin to each Alternatively the slide may be covered with a HybCover or piece of parafilm.sample. Cover the slide with a coverslip to prevent evaporation.Place slide in a 37°C humidified chamber for 30 minutes.
4. Dispense 1X Wash Solution to 3 Coplin jars at room temperature. See Buffer Preparation for instructions on preparing 1X Wash Solution.
5. Wash slides 5 minutes in each successive Coplin jar. Shake off Wash Solution from slide.
6. Counterstain the sample with the appropriate fluorescent counterstain as described below.
*For best results, do not allow slides to be exposed to light during detection procedure.
Counterstaining:
Steps Critical Points
1. Incubate specimen with approximately 50 µL of the Intense DAPI staining may mask other fluorescent signals. It is recommendedDAPI counterstain for 3-5 minutes at room temperature that the concentration of DAPI be titrated to determine the optimal dilution.in the dark (cover slide with aluminum foil).
2. Rinse 5-10 seconds in a Coplin jar containing PBS. See page 53 on the Buffer Preperation Section for the CounterstainRehydration.
3. Add a few drops Fluorescent Mounting Media and coverslip the slide.
4. View slides with a fluorescent microscope using the Suggested filters:appropriate excitation and barrier filters. CY3 552/565; DAPI 365/480 For dual color detection, use a triple-bandpass
filter according to your microscope manufacturer.

52www.kpl.com
Ch
ap
te
r
5
In
S
itu
Hy
br
idiz
at
ion
Buffer Preparation:
In Situ Solution Preparation
Steps Critical Points
2X SSC
1. 1 part 20X SSC 2X SSC is to be prepared from a concentrated stock solution. See the9 parts autoclaved or sterile-filtered molecular biology grade water Solution Preparation Section for the 20X SSC formulation.
Hybridization Cocktail
1. 1 part Formamide (50-86-02) 10 – 50 µL is typically sufficient for each sample. 50% Formamide is1 part 2X Hybridization Buffer (50-86-01) recommended by KPL, however, the stringency of hybridization can be
decreased by decreasing the Formamide concentration. 10-20% Formamidecan be prepared by decreasing the amount of formamide added and adjusting the volume with DEPC treated water. i.e. 10 µL Formamide, 40 µL DEPC treated water, and 50 µL of 2X Hybridization Buffer.
Probe Hybridization Cocktail
1. Dilute the quantitated biotinylated probe directly into 10 – 50 µL of When adding the probe, the volume must be no greater than 5% of the Hybridization Cocktail (prepared above) to a final concentration final volume of the cocktail. If your probe is too dilute, concentrate it in a of 1 ng/µL. speed vac or lyophilizer and resuspend it in the Hybridization cocktail.
Hybridization conditions and probe concentrations may need to be optimized depending on the abundance of the target and the probe relative concentration.
CY3-Streptavidin Conjugate (Fluorescent Kit only)
1. Rehydrate the lyophilized conjugate with 0.5 mL of Fluorescent Mounting Media (71-00-16) and 0.5 mL of autoclaved or sterile filtered molecular biology grade water. Mix well.
2. Store this 0.1 mg/mL solution at –20C for 6 months.
DAPI Counterstain (Fluorescent Kit only)
1. Rehydrate the DAPI powder with 1.0 mL of autoclaved or sterile-filtered molecular biology grade water. Store this 1.0 mg/mL stock solution at –20ºC for 6 months.
Humidified Chamber – for a dry incubator
1. Line the bottom of a small box with a stack of paper towels soaked It is important to incubate the slides in a humidified chamber to prevent in water. evaporation of reagents and dehydration of the specimen.
2. Place two pipets or rods in parallel on the towels (to place the slides on).
3. Close the lid and incubate at the appropriate temperature to equilibrate.
Humidified Chamber –for a waterbath with a lid
1. Place a foam block in a tray inside the water bath. Place slides directly on the foam.
1X EOSIN (Chromogenic Kit only)
1. Dilute 1 part 10X Eosin into 9 parts autoclaved or sterile filtered molecular biology grade water. Mix well.
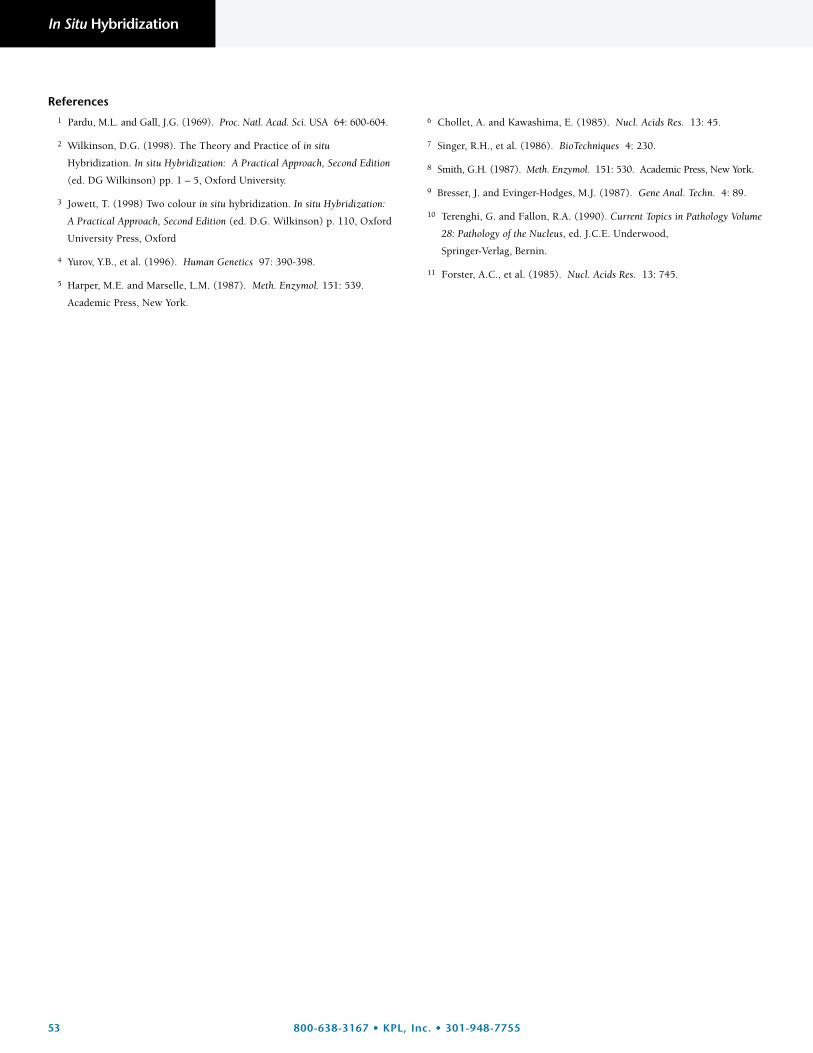
53 800-638-3167 • KPL, Inc. • 301-948-7755
In Situ Hybridization
References1 Pardu, M.L. and Gall, J.G. (1969). Proc. Natl. Acad. Sci. USA 64: 600-604.
2 Wilkinson, D.G. (1998). The Theory and Practice of in situ
Hybridization. In situ Hybridization: A Practical Approach, Second Edition
(ed. DG Wilkinson) pp. 1 – 5, Oxford University.
3 Jowett, T. (1998) Two colour in situ hybridization. In situ Hybridization:
A Practical Approach, Second Edition (ed. D.G. Wilkinson) p. 110, Oxford
University Press, Oxford
4 Yurov, Y.B., et al. (1996). Human Genetics 97: 390-398.
5 Harper, M.E. and Marselle, L.M. (1987). Meth. Enzymol. 151: 539.
Academic Press, New York.
6 Chollet, A. and Kawashima, E. (1985). Nucl. Acids Res. 13: 45.
7 Singer, R.H., et al. (1986). BioTechniques 4: 230.
8 Smith, G.H. (1987). Meth. Enzymol. 151: 530. Academic Press, New York.
9 Bresser, J. and Evinger-Hodges, M.J. (1987). Gene Anal. Techn. 4: 89.
10 Terenghi, G. and Fallon, R.A. (1990). Current Topics in Pathology Volume
28: Pathology of the Nucleus, ed. J.C.E. Underwood,
Springer-Verlag, Bernin.
11 Forster, A.C., et al. (1985). Nucl. Acids Res. 13: 745.

54www.kpl.com
Ch
ap
te
r
5
In
S
itu
Hy
br
idiz
at
ion
This page intentionally left blank.

55 800-638-3167 • KPL, Inc. • 301-948-7755
Troubleshooting Guide
Troubleshooting Guide for Labeling Probes
This Troubleshooting chapter is designed to offer suggestions for overcoming potential issues that may occur during the non-radioactive labeling and detection
of nucleic acids using Detector products. For additional technical support, contact KPL Technical Services at 800-638-3167 or 301-948-7755 or by e-mail at
Problem 1 - Probe does not quantitate or yield is low (<25 ng/µL)
Universal Issues
Possible Cause: Tubes, reagents, template, or tips are contaminated.Corrective Measure: Use only clean, sterile or at least Dnase/Rnase free tips, tubes for each
pipetting operation.
Possible Cause: The polymerases are no longer functioning to their full potential.Corrective Measure: Enzymes are heat labile and must be stored in a non-frost free freezer.
Test the components with the control template to identify compromisedproduct.
Possible Cause: The size of the probe is not appropriate for the type of labeling reaction.Corrective Measure: Use the appropriate biotinylation kit for your size needs:
Random Primer Kit 300 bp – 1000 bpPCR Kit 100 bp – 1100 bpIn vitro Transcription 80 b – 800 b
Possible Cause: A component of the reaction is missing.Corrective Measure: Use the Template DNA included in the kit as a positive control for the
components of the kit.
Random Priming
Possible Cause: The template is not pure. Corrective Measure: Repurify your template. Make sure the nucleic acid template is purified very
well. Kinases, nucleases, salts, ethanol, and protein contaminants will preventthe labeling reaction from occurring. If the labeling efficiency of your probe is unsatisfactory, use the Control Template provided with your kit as ameasure of template purity. Probe yield from inadequately purified templatewill be much less than probe yield from control DNA.
Possible Cause: The template is not pure.Corrective Measure: If the template is not grossly contaminated, it may be overcome by the
addition of 2-4 µl of Klenow polymerase or increasing the incubation time to overnight.
Possible Cause: The template is not denatured.Corrective Measure: Make sure to completely denature the double stranded template by heating
to 95ºC for at least 5 minutes. The DNA must be single stranded to label.
PCR Labeling
Possible Cause: Too few cycles were performed or extension time is too short.Corrective Measure: 25-35 cycles is recommended and increasing the extension time may result
in higher yield.
Possible Cause: Annealing temperature is too high.Corrective Measure: Primer annealing temperature must be optimized empirically. Decrease in
2–4ºC increments.
Possible Cause: Insufficient template has resulted in the inability of the primers to anneal totheir complimentary sequences.
Corrective Measure: Increase the concentration of the template.

56www.kpl.com
PCR Labeling
Possible Cause: Primers may not be optimally designed.Corrective Measure: Design primers that are 22-30 bp in length and a GC content of 45-60%.
Possible Cause: The target template is difficult to amplify.Corrective Measure: The addition of 2-Betaine or DMSO may aid in the amplification of
sequences with unusually high GC content and or secondary structure.
Possible Cause: MgCl2 concentration is too low.Corrective Measure: The optimal Mg2+ concentration varies from 0.5 mM to 5 mM. Make sure
you are using the correct amount for the your particular Taq polymerase.Make sure the MgCl2 is completely thawed and thoroughly vortexed before use.
In vitro Transcription
Possible Cause: The DTT is old.Corrective Measure: Prepare and use fresh DTT.
Possible Cause: The transcription buffer was not warmed to room temperature prior to use.Corrective Measure: The spermidine in the transcription buffer can cause the DNA to precipitate
if it is used cold resulting in a low yield of transcript. Make sure to bring thetranscription buffer to room temperature prior to use.
Possible Cause: The template is not pure.Corrective Measure: Repurify your template. Make sure the nucleic acid template is purified very
well. Kinases, nucleases, salts, ethanol, and protein contaminants will preventthe labeling reaction from occurring. If the labeling efficiency of your probe is unsatisfactory, use the Control Template provided with your kit as ameasure of template purity. Probe yield from inadequately purified templatewill be much less than probe yield from control DNA.
Problem 2 - Multiple products and/or product is smeared (PCR Labeling Kit only)
Possible Cause: Too many cycles are performed.Corrective Measure: Reduce the number of cycles to eliminate non-specific bands.
Possible Cause: Annealing temperature too low.Corrective Measure: Increase the annealing and or extension temperature in 2-3ºC increments.
Possible Cause: The primers may not be optimally designed.Corrective Measure: Design primers that are 22-30 bp in length and a GC content of 45-60%.
Possible Cause: Too much enzyme in the mixture.Corrective Measure: 0.5 to 2.5 units is suitable for most applications.
Possible Cause: Template concentration is too high.Corrective Measure: Too much template can lead to an increase in mispriming events. Reduce
the concentration of template in the reaction.
Ch
ap
te
r
6
T
ro
ub
les
ho
ot
ing
G
uid
e

57 800-638-3167 • KPL, Inc. • 301-948-7755
Problem 3 - Incomplete Transcript (In vitro Transcription Kit only)
Possible Cause: A terminator sequence for SP6 or T7 polymerase lies within the DNA template.
Corrective Measure: Subclone the template behind a different RNA polymerase promoter.
Possible Cause: Low incorporation of the nucleotides.Corrective Measure: Lowering the incubation temperature to room temperature may increase
the amount of full length transcripts.
Problem 4 - Longer transcripts than expected (In vitro Transcription Kit only)
Possible Cause: The plasmid was not digested completely.Corrective Measure: Analyze digested and undigested DNA to make sure the digest is complete.
Possible Cause: A restriction enzyme was used that leaves a 3’ overhang.Corrective Measure: Use an enzyme which leaves a 5’ overhang or a blunt end. The 3’ end may
be filled in using Klenow polymerase.
Troubleshooting Guide
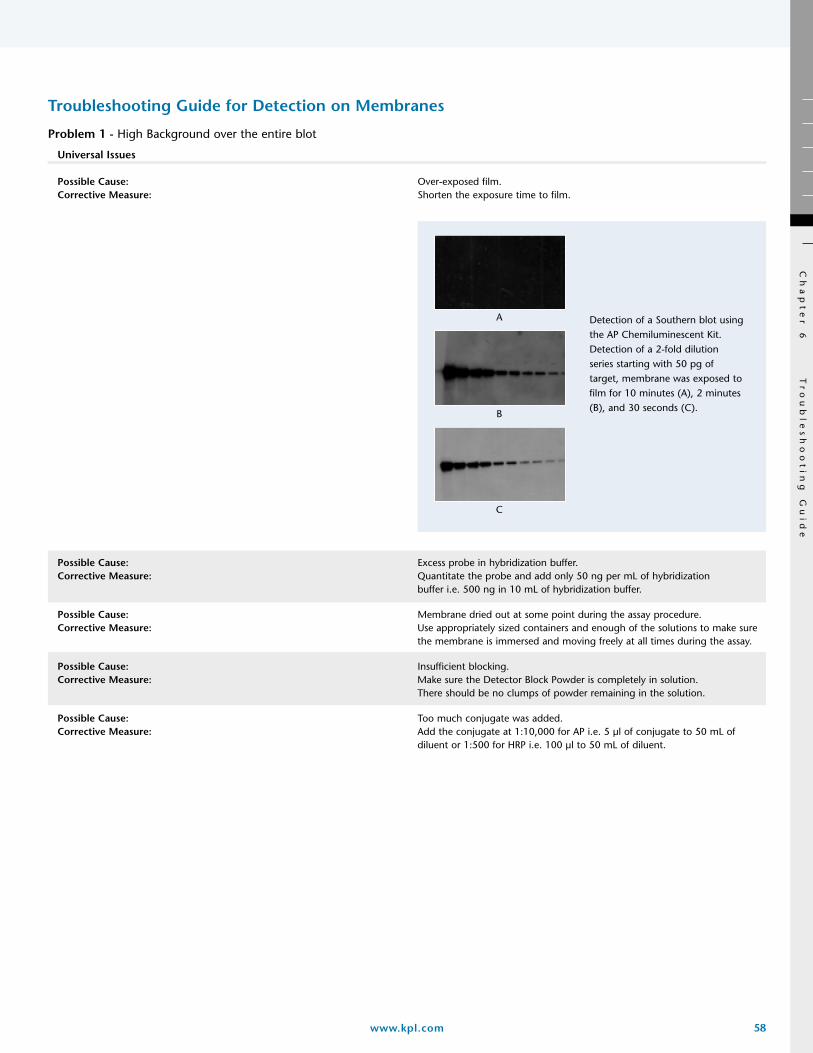
58www.kpl.com
Troubleshooting Guide for Detection on Membranes
Problem 1 - High Background over the entire blot
Universal Issues
Possible Cause: Over-exposed film.Corrective Measure: Shorten the exposure time to film.
Possible Cause: Excess probe in hybridization buffer.Corrective Measure: Quantitate the probe and add only 50 ng per mL of hybridization
buffer i.e. 500 ng in 10 mL of hybridization buffer.
Possible Cause: Membrane dried out at some point during the assay procedure.Corrective Measure: Use appropriately sized containers and enough of the solutions to make sure
the membrane is immersed and moving freely at all times during the assay.
Possible Cause: Insufficient blocking.Corrective Measure: Make sure the Detector Block Powder is completely in solution.
There should be no clumps of powder remaining in the solution.
Possible Cause: Too much conjugate was added.Corrective Measure: Add the conjugate at 1:10,000 for AP i.e. 5 µl of conjugate to 50 mL of
diluent or 1:500 for HRP i.e. 100 µl to 50 mL of diluent.
Detection of a Southern blot usingthe AP Chemiluminescent Kit.Detection of a 2-fold dilutionseries starting with 50 pg oftarget, membrane was exposed tofilm for 10 minutes (A), 2 minutes(B), and 30 seconds (C).
A
B
C
Ch
ap
te
r
6
T
ro
ub
les
ho
ot
ing
G
uid
e

59 800-638-3167 • KPL, Inc. • 301-948-7755
Troubleshooting Guide
Possible Cause: Post-hybridization washes were not stringent enough to wash the probe off of the membrane.
Corrective Measure: Increase the stringency of the washes by decreasing the salt concentration or elevating the wash temperature. Make sure the elevated wash temperatureis equilibrated at the higher temperature prior to use.
Problem 2 - Spotty Background, not all over the blot
Universal Issues
Possible Cause: Particulate in solutions or dusty containers used.Corrective Measure: Make sure all solutions are homogeneous. If there is a precipitate in the
solution warm it prior to use. Use only clean containers free of dust, lint and free of DNase or RNase activity.
Possible Cause: Substrate has come into contact with the X-ray film.Corrective Measure: Seal the membrane in a plastic sheet protector or hybridization bag prior
to exposure to film.
Detection of a 18s rNA on Northernblots. Image A represents detectionwhere with the post-hybridizationbuffer was not temperature equilibratedprior to the wash and Image B isdetected per the standard protocol.
A B
Background on the side of theimage is caused from the substratecoming in contact with the film.

60www.kpl.com
Problem 3 - Smudges or spots on film
Universal Issues
Possible Cause: Fingerprints or dirty forceps have come in contact with the blot.Corrective Measure: Wear gloves and use forceps when handling the membrane. Rinse
forceps before handling the membrane if the forceps have been in the conjugate solution.
Problem 4 - Signal appearing as scratches on film
Universal Issues
Possible Cause: The membrane was scratched or damaged.Corrective Measure: Do not use containers that have rough spots or burrs that might damage
the membrane. When cutting the membrane do not use razor blades orscissors that have rust build up on them.
Possible Cause: Static electricity was exposed to the film.Corrective Measure: Do not wear gloves when handling the film because it can produce
static electricity which can cause the appearance of lightning bolts whendeveloped.
Detection of a Southern blot usingthe HRP Chemiluminescent Kit.Forceps contaminated with conjugatewere used to handle membrane priorto the addition of substrate.
Detection of a dot blot using theHRP Chemiluminescent Kitshowing the effect of staticelectricity that has exposed the film.
Ch
ap
te
r
6
T
ro
ub
les
ho
ot
ing
G
uid
e

Problem 5 - Lane specific background or smears within gel lanes
Universal Issues
Possible Cause: Nucleic acid has degraded.Corrective Measure: Use highly purified nucleic acids so that the DNases and RNases are removed
and nucleic acid is in tact. Avoid shearing the nucleic acid during isolation and purification.
Possible Cause: Non-specific hybridization.Corrective Measure: Increase the stringency of the post hybridization washes by increasing
the temperature or decreasing the salt concentration of the buffer i.e. increase the wash temperature to 55ºC – 60ºC for DNA probes or 68ºC for RNA probes.
61 800-638-3167 • KPL, Inc. • 301-948-7755
Troubleshooting Guide
Possible Cause: Non-specific hybridization.Corrective Measure: Make sure to include sheared, denatured herring sperm DNA in the
hybridization cocktail.
Possible Cause: Probe concentration too high.Corrective Measure: Decrease the probe concentration in the hybridization cocktail.
Southern blot demonstrating lane specificbackground due to low stringent washes.Detection of various digests of humangenomic DNA with biotinylated HPVprobes using the HRP SouthernChemiluminescent Kit.
Detection of c-myc on Northern blots using thestandard recommended conditions – note thedetection of nonspecific signal from the 28srRNA (A). Detection of c-myc after modifyingthe stringency by increasing the hybridizationtemperature and the post-hybridization washesfrom 65ºC – 68ºC to eliminate nonspecificsignal (B).
Detection of a Northern blot with too much18s RNA probe added to the hybridizationbuffer (A) and the correct amount added(B). Both blots were detected with the samestringent wash conditions.
A B
A B

62www.kpl.com
Problem 6 - Low Signal
Universal Issues
Possible Cause: Probe was not denatured.Corrective Measure: Check the temperature of the heating apparatus or use a boiling water
bath to denature the probe.
Possible Cause: Inefficient transferCorrective Measure: Verify the transfer of nucleic acids by viewing the gel and membrane under
UV illumination to check that the nucleic acid has transferred from the gel tothe membrane. Make sure to denature DNA gels in two gel volumes of 0.5 N NaOH/1.5 M NaCl for 45 minutes prior to transfer, even whenperforming an alkaline transfer. If the nucleic acid has not completely transferred, increase the transfer time. (Note: For Northern blotting, all of the 28s ribosomal RNA may not transfer). Transfer too long under alkalineconditions could cause “blow through” in which the nucleic acids couldtransfer through the membrane. Follow the general guidelines in this manual.
Possible Cause: Too much powder was added to the 1X Detector Block Solution.Corrective Measure: Make sure to add the correct amount w/v for the appropriate enzyme.
Use 0.2% for AP and 1% for HRP.
Possible Cause: Hybridization conditions too stringent.Corrective Measure: Decrease the temperature of hybridization.
Possible Cause: Post-hybridization wash conditions are too stringent.Corrective Measure: Decrease the wash stringency by increasing the salt concentration and/or
decreasing the temperature of the washes.
Possible Cause: Insufficient biotinylated probe added to the hybridization.Corrective Measure: Make sure to quantitate your probe using the Quantitation Standard.
50 ng per mL of Hybridization Cocktail should be added. If the background is low, 100 ng per mL may be added.
Possible Cause: Degradation of probe.Corrective Measure: Check the integrity of the probe by running it on an agarose gel. RNA and
PCR probes should be a single size. The random primed probes will appear as a smear with the majority of the probe ~200-300 bp.
Detection of Southern blots usingthe AP Chemiluminescent Kit with1% powder added to the Block(A) and 0.2% added (B). Toomuch powder decreases signal.
A
B
Ch
ap
te
r
6
T
ro
ub
les
ho
ot
ing
G
uid
e

63 800-638-3167 • KPL, Inc. • 301-948-7755
Troubleshooting Guide
Problem 7 - Diffuse Signal
Universal Issues
Possible Cause: Excessive space between the membrane and the film.Corrective Measure: Make sure the film cassette is closed tightly or place a heavy book on top
of it to ensure the membrane is tightly pressed against the film.
Problem 8 - Circular patterns or weak signal in specific places on the blot
Universal Issues
Possible Cause: Air bubbles were trapped between the membrane and gel during the transfer.Corrective Measure: Carefully set up the transfers so that all air bubbles are removed prior to the
transfer.
Problem 9 - Ghost images i.e. faint signal development next to actual bands
Universal Issues
Possible Cause: The film or membrane shifted during the film exposure.Corrective Measure: Avoid repositioning the film or membrane once they come in contact
with one another.
Possible Cause: The DNA side of the membrane faces away from the film.Corrective Measure: Make sure the DNA side of the membrane is facing the film.
Films depicting a cassette that wasnot completely closed during themembrane exposure to film (A) andthe same blot exposed to film with atight closure of the cassette (B).
A B
Detection of a blot of the GeneRulerbioinylated ladder. Note the circularpattern of weak signal due to thepresence of an air bubble duringtransfer.

64www.kpl.com
Problem 2 - High background or nonspecific signal
Universal Issues
Possible Cause: Probe hybridizes to non-homologous DNA.Corrective Measure: Test the probe in a Southern blot to confirm the homology to the DNA.
Possible Cause: Probe was not purified from unincorporated nucleotides prior to use.Corrective Measure: Purify probes with a SpinPure filter or a gel filtration column specifically
designed for purification of biotinylated DNA.
Possible Cause: The post-hybridization washes were not stringent enough.Corrective Measure: Increase the temperature or decrease the salt concentration of the washes
to reduce non-specific hybridization.
Possible Cause: Too much probe was usedCorrective Measure: Make sure to quantitate the probe and use the recommended amount.
If background persists, reduce the probe concentration in the hybridization.
Possible Cause: The hybridization conditions were not stringent enough.Corrective Measure: Increase the temperature of the hybridization step or increase the
concentration of the Formamide in the hybridization cocktail.
Possible Cause: Sample was allowed to dry during detection.Corrective Measure: Keep sample moving through all of the detection steps quickly. Do not let
the sample dry out.
Possible Cause: Endogenous biotin is present in the sample causing non-specific detection.Corrective Measure: Include a control sample in the detection with no probe to identify if this is
the problem. If so, block the specimen with free streptavidin and thensaturate the streptavidin with biotin. Wash the sample well after blocking.
Troubleshooting In Situ Hybridization and Detection
Problem 1 - Low or No Signal
Universal Issues
Possible Cause: The amount of the fluorescent counterstain used is too high (fluorescent kit only).
Corrective Measure: Titrate down the amount of counterstain used. If it is too concentrated, it will mask the fluorescence of the specific signal.
Possible Cause: Target and probe were not completely denatured.Corrective Measure: Check temperature of heating apparatus; adjust temperature accordingly or
increase the heating time.
Possible Cause: Tissue or cells were over-fixed.Corrective Measure: Decrease the length of the fixation step or change to an alternate fixation
methodology.
Possible Cause: Tissue was under-digested.Corrective Measure: Increase temperature, time or concentration of protease in the digestion step.
Possible Cause: Tissue was over-digested resulting in the loss of target specimen from theslide or poor morphology.
Corrective Measure: Decrease temperature, time or concentration of protease in the digestion step.
Possible Cause: Not enough probe in the hybridization reaction.Corrective Measure: Increase the probe concentration.
Possible Cause: Hybridization conditions were too stringent.Corrective Measure: Decrease the temperature of hybridization.
Possible Cause: Hybridization conditions were too stringent.Corrective Measure: Decrease the concentration of the formamide in the hybridization cocktail.
Possible Cause: Post-hybridization wash was too stringent.Corrective Measure: Decrease the temperature or time of the post-hybridization wash.
Possible Cause: Labeling of the probe with biotin was inefficient.Corrective Measure: See the troubleshooting guide for the labeling kits.
Possible Cause: Slide was pretreated improperly.Corrective Measure: Use a different subbing agent such as AES.
Ch
ap
te
r
6
T
ro
ub
les
ho
ot
ing
G
uid
e
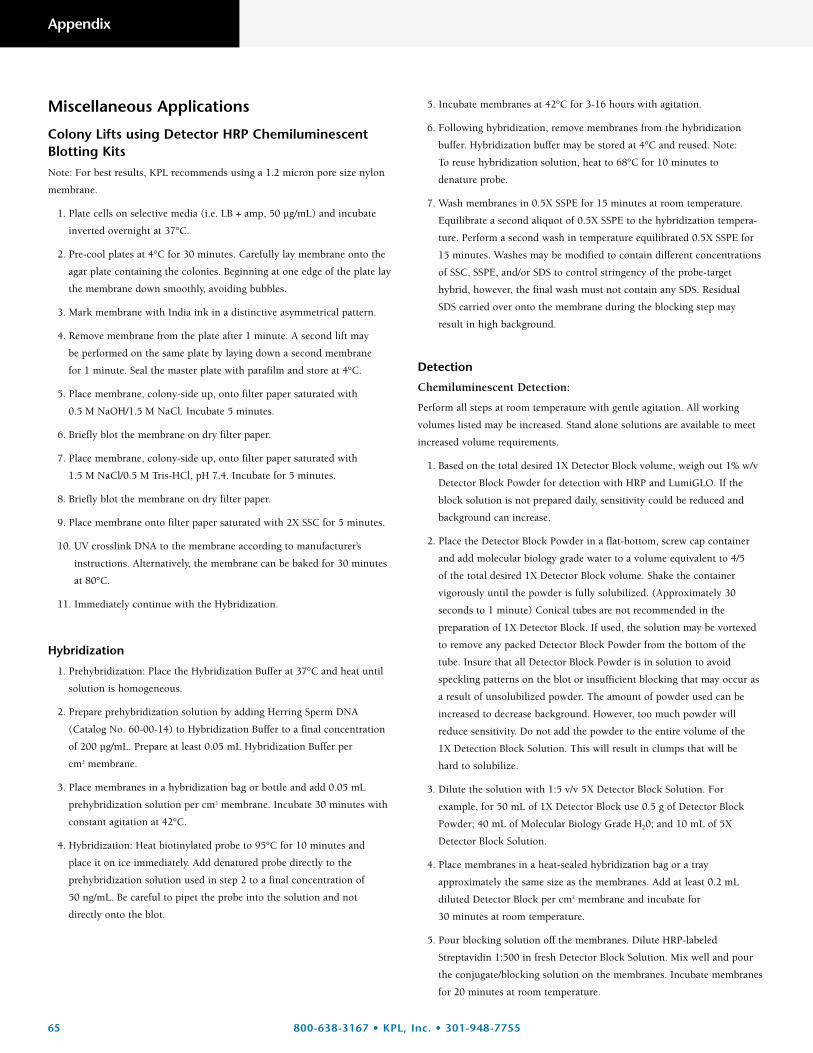
65 800-638-3167 • KPL, Inc. • 301-948-7755
Miscellaneous Applications
Colony Lifts using Detector HRP Chemiluminescent Blotting Kits
Note: For best results, KPL recommends using a 1.2 micron pore size nylon
membrane.
1. Plate cells on selective media (i.e. LB + amp, 50 µg/mL) and incubate
inverted overnight at 37°C.
2. Pre-cool plates at 4°C for 30 minutes. Carefully lay membrane onto the
agar plate containing the colonies. Beginning at one edge of the plate lay
the membrane down smoothly, avoiding bubbles.
3. Mark membrane with India ink in a distinctive asymmetrical pattern.
4. Remove membrane from the plate after 1 minute. A second lift may
be performed on the same plate by laying down a second membrane
for 1 minute. Seal the master plate with parafilm and store at 4°C.
5. Place membrane, colony-side up, onto filter paper saturated with
0.5 M NaOH/1.5 M NaCl. Incubate 5 minutes.
6. Briefly blot the membrane on dry filter paper.
7. Place membrane, colony-side up, onto filter paper saturated with
1.5 M NaCl/0.5 M Tris-HCl, pH 7.4. Incubate for 5 minutes.
8. Briefly blot the membrane on dry filter paper.
9. Place membrane onto filter paper saturated with 2X SSC for 5 minutes.
10. UV crosslink DNA to the membrane according to manufacturer’s
instructions. Alternatively, the membrane can be baked for 30 minutes
at 80°C.
11. Immediately continue with the Hybridization.
Hybridization
1. Prehybridization: Place the Hybridization Buffer at 37°C and heat until
solution is homogeneous.
2. Prepare prehybridization solution by adding Herring Sperm DNA
(Catalog No. 60-00-14) to Hybridization Buffer to a final concentration
of 200 µg/mL. Prepare at least 0.05 mL Hybridization Buffer per
cm2 membrane.
3. Place membranes in a hybridization bag or bottle and add 0.05 mL
prehybridization solution per cm2 membrane. Incubate 30 minutes with
constant agitation at 42°C.
4. Hybridization: Heat biotinylated probe to 95°C for 10 minutes and
place it on ice immediately. Add denatured probe directly to the
prehybridization solution used in step 2 to a final concentration of
50 ng/mL. Be careful to pipet the probe into the solution and not
directly onto the blot.
5. Incubate membranes at 42°C for 3-16 hours with agitation.
6. Following hybridization, remove membranes from the hybridization
buffer. Hybridization buffer may be stored at 4°C and reused. Note:
To reuse hybridization solution, heat to 68°C for 10 minutes to
denature probe.
7. Wash membranes in 0.5X SSPE for 15 minutes at room temperature.
Equilibrate a second aliquot of 0.5X SSPE to the hybridization tempera-
ture. Perform a second wash in temperature equilibrated 0.5X SSPE for
15 minutes. Washes may be modified to contain different concentrations
of SSC, SSPE, and/or SDS to control stringency of the probe-target
hybrid, however, the final wash must not contain any SDS. Residual
SDS carried over onto the membrane during the blocking step may
result in high background.
Detection
Chemiluminescent Detection:
Perform all steps at room temperature with gentle agitation. All working
volumes listed may be increased. Stand alone solutions are available to meet
increased volume requirements.
1. Based on the total desired 1X Detector Block volume, weigh out 1% w/v
Detector Block Powder for detection with HRP and LumiGLO. If the
block solution is not prepared daily, sensitivity could be reduced and
background can increase.
2. Place the Detector Block Powder in a flat-bottom, screw cap container
and add molecular biology grade water to a volume equivalent to 4/5
of the total desired 1X Detector Block volume. Shake the container
vigorously until the powder is fully solubilized. (Approximately 30
seconds to 1 minute) Conical tubes are not recommended in the
preparation of 1X Detector Block. If used, the solution may be vortexed
to remove any packed Detector Block Powder from the bottom of the
tube. Insure that all Detector Block Powder is in solution to avoid
speckling patterns on the blot or insufficient blocking that may occur as
a result of unsolubilized powder. The amount of powder used can be
increased to decrease background. However, too much powder will
reduce sensitivity. Do not add the powder to the entire volume of the
1X Detection Block Solution. This will result in clumps that will be
hard to solubilize.
3. Dilute the solution with 1:5 v/v 5X Detector Block Solution. For
example, for 50 mL of 1X Detector Block use 0.5 g of Detector Block
Powder; 40 mL of Molecular Biology Grade H20; and 10 mL of 5X
Detector Block Solution.
4. Place membranes in a heat-sealed hybridization bag or a tray
approximately the same size as the membranes. Add at least 0.2 mL
diluted Detector Block per cm2 membrane and incubate for
30 minutes at room temperature.
5. Pour blocking solution off the membranes. Dilute HRP-labeled
Streptavidin 1:500 in fresh Detector Block Solution. Mix well and pour
the conjugate/blocking solution on the membranes. Incubate membranes
for 20 minutes at room temperature.
Appendix

66www.kpl.com
6. Dilute Biotin Wash Solution Concentrate 1:10 in molecular biology
grade water. Transfer membranes to a clean container and wash
3 times for 5 minutes each using at least 0.4 mL diluted wash solution
per cm2 membrane.
7. Prepare enough LumiGLO Chemiluminescent Substrate to completely
immerse the membrane by mixing equal volumes of Solutions A and B.
Incubate membrane one minute in the LumiGLO working solution.
8. Remove membranes from LumiGLO and touch a clean piece of filter
paper to absorb excess solution. Place membranes in a hybridization
bag or between plastic sheet protectors or transparency films. Smooth
out bubbles, and place the plastic-covered membranes in an X-ray film
cassette. Make sure no substrate has leaked out from between the
plastic covering onto the film.
9. Expose membrane to X-ray film (DNA-side facing the film) at room
temperature. KPL recommends an initial exposure of 1-2 minutes for
colony lifts. The signal obtained from the first exposure allows the
researcher to determine an exposure time for optimal signal.
Note: It is recommended that various exposure times be taken when
using the colony lift protocol. A short exposure will only show the
positive colonies. With a longer exposure, negative colonies or non-specific
binding (to endogenous proteins in E. coli) will be visualized.
10. Develop film either manually or using a mechanical processor.
Colorimetric Detection with TMB:
Following detection steps 1 - 5, the membrane may also be detected
chromogenically using TMB Membrane Substrate (Catalog No. 50-77-18).
1. Immerse membranes in TMB Membrane Substrate until desired endpoint
is seen (2-10 minutes).
2. Rinse membranes in molecular biology grade water for 1 minute to
stop the reaction, then air dry.
3. Store blots in the dark to avoid rapid fading.
Visit KPL online at www.kpl.com to learn more about kits and reagents for
the sensitive non-radioactive detection of nucleic acids and proteins.
Plaque LiftsBacteriophage DNA fixed to the membrane can be hybridized with a
biotinylated probe to identify recombinant phage containing the target.
1. Plate bacteriophage on a lawn of the appropriate host E. coli strain.
Use NZY + agarose plates for secondary or final screens. Incubate the
plates for 14 to 18 hours at 37°C.
2. Chill plates for 1 hour at 4°C to increase the strength of the top agar.
3. Lay a nylon membrane onto the surface of the plate (KPL recommends
1.2 µm Biodyne A from Pall Gelman Sciences). Wait 5 minutes. Mark
membrane with India ink in a distinctive asymmetrical pattern. Dipping a
syringe needle into ink and punching the needle through the membrane
down into the agar leaves distinct markings on both the membrane and
the plate that are easy to realign upon completion of the procedure.
4. Remove membrane from the plate. Place membrane phage-side-up
onto a piece of filter paper saturated with 0.5 M NaOH/1.5 M NaCl
for 5 minutes.
Note: Filter paper that is too wet will result in diffusion of the phage.
Use just enough solution to evenly wet the filter paper.
5. Briefly blot membrane on dry filter paper.
6. Place membrane onto filter paper saturated with 1.0 M Tris (pH 8.0)/
1.5 M NaCl to neutralize for 5 minutes.
7. Briefly blot membrane on dry filter paper.
8. Place membrane onto filter paper saturated with 2X SSC/0.2 M Tris
(pH 7.5) for 2 min.
9. Fix DNA to the membrane by baking at 80°C for 30 minutes, or by
UV crosslinking.
Prehybridization:
Use at least 0.06 mL Formamide Hybridization Buffer per cm2 membrane.
(For example: 10 cm x 10 cm membrane = 100 cm2; 0.06 mL x 100 =
6 ml of Hybridization Buffer required.) The volume of buffer may be
adjusted depending on the size of the membrane and the vessel used
for hybridization.
a. Prepare prehybridization solution by adding sheared and denatured
herring sperm DNA (Catalog No. 60-00-14) to the Formamide
Hybridization Buffer to a final concentration of 200 µg/mL. If using
non-denatured blocking DNA, heat denature for 5 minutes, cool
quickly on ice and add to prehybridization solution.
b. Place the membrane in a hybridization bag or bottle and add at least
6.0 mL prehybridization solution per 100 cm2 membrane. Incubate
1 hour with constant agitation at 42°C.
Timp-2 plasmid transformed into E. coli. Detected using a biotinylatedtimp-2 probe, HRP-Streptavidin andLumiGLO: 1 minute film exposure.
Ch
ap
te
r
7
A
pp
en
dix

67 800-638-3167 • KPL, Inc. • 301-948-7755
Appendix
5. Prepare enough LumiGLO Chemiluminescent Substrate to completely
immerse the membrane by mixing equal volumes of Solutions A and B.
Incubate membrane one minute in the LumiGLO working solution.
6. Remove membranes from LumiGLO and touch a clean piece of filter
paper to absorb excess solution. Place membranes in a hybridization bag
or between plastic sheet protectors or transparency films. Smooth out
bubbles, and place the plastic-covered membranes in an X-ray film
cassette. Make sure no substrate has leaked out from between the plastic
covering onto the film.
7. Expose membrane to X-ray film (DNA-side facing the film) at room
temperature. KPL recommends an initial exposure of 1-2 minutes for
colony lifts. The signal obtained from the first exposure allows the
researcher to determine an exposure time for optimal signal.
Note: It is recommended that various exposure times be taken when using
the colony lift protocol. A short exposure will only show the positive
colonies. With a longer exposure, negative colonies or non-specific binding
(to endogenous proteins in E. coli) will be visualized.
8. Develop film either manually or using a mechanical processor.
Dot Blots
For fixing samples of target DNA to nylon membranes to be hybridized with
biotinylated probe. Dot blots provide a simple method for determining
optimal hybridization conditions, or for determining whether a probe will
detect homologous sequence in the target sample. The range of detection
which can be expected is 1 ng - 0.1 pg of DNA.
1. With a pencil grid nylon membrane with a matrix of blocks measuring
from 0.5 to 1.0 cm. If using a dot blot filter manifold, follow the
manufacturer’s instructions.
2.Wet nylon membrane with molecular biology grade water for 5 minutes,
then transfer to 5X SSC for 5 minutes. Dry the membrane.
3. Denature target DNA by boiling for 5 minutes, then place on ice
until use.
4. Prepare dilutions of the target sample in 1X TE using silanized tubes or
2X SSC/0.1% SDS using non-silanized tubes.
5. Spot 1 µl of each dilution onto the matrix so that the dots form a series.
Label the matrix with a #2 pencil so that the orientation of the dots are
the DNA-side of the membrane can be identified.
6. Allow dots to dry for at least 10 minutes. UV-crosslink DNA to the
damp membrane according to manufacturers instructions or bake for
30 minutes at 80°C.
7. Hybridization and detection of dot blots follow the same protocols and
guidelines for the HRP Chemiluminescent and AP Chemiluminescent
Detection Kits.
8. Once the dot blots are prepared, follow the hybridization and detection
protocols on page 30 for HRP detection and page 28 for AP detection.
Hybridization:
a. Heat the probe to 95°C for 10 minutes and place it on ice
immediately.
b. Add the biotinylated probe directly into prehybridization solution
to a final concentration of 50 ng/mL. Be careful to pipette the probe
into the solution and not directly onto the blot.
c. Incubate membrane 3 - 16 hours at 42°C with agitation.
Post Hybridization Washes:
a. Following hybridization, remove membrane from the hybridization
buffer. Store the hybridization buffer in a sterile conical polypropylene
tube at 2-8°C for reuse.
b. Wash membrane 2 x 15 minutes in a generous volume (at least 1 mL
per cm2 of membrane) of 2 X SSPE/0.1% SDS at room temperature.
c. Equilibrate a second wash of 0.2X SSPE/0.1% SDS to 55°C. Wash 2 x
15 minutes in temperature equilibrated wash at 55ºC.
d. Perform a final wash for 5 minutes with 2X SSPE at room temperature
to remove residual SDS.
Note: Washes may be modified to contain different concentrations of SSC,
SSPE, and/or SDS to control stringency of the probe-target hybrid. It is
recommended that this be optimized for each individual probe.
Detection:
Perform all steps at room temperature with gentle agitation.
1. Prepare enough 1X blocking/diluent solution for the blocking step and
for the HRP-SA conjugate dilution. Prepare at least 0.3 mL 1X
blocking/diluent solution per cm2 membrane (i.e. 10 cm x 10 cm
membrane = 100 cm2; 0.3 mL x 100 = 30 mL of 1X blocking/diluent
solution). Based on the total desired 1X Detector Block volume, weigh
out 1% w/v Detector Block Powder for detection with HRP and
LumiGLO. If the block solution is not prepared daily, sensitivity could
be reduced and background can increase.
2. Place membrane in a heat sealed hybridization bag or a tray
approximately the same size as the membrane, incubate with 1X
blocking/diluent solution (from step 1) for 30 minutes. Use at least
0.3 mL 1X blocking solution per cm2 membrane (i.e. 10 cm x 10 cm
membrane = 100 cm2; 0.3 mL x 100 = 30 ml of block solution).
3. a. Prepare HRP-SA at 1:500 in fresh Detection Block (60 µl + 30 mL
blocking solution).
b. Incubate membrane for 20 minutes at room temperature in the
conjugate solution.
4. Dilute Biotin Wash Solution Concentrate 1:10 in molecular biology
grade water. Transfer membranes to a clean container and wash 3 times
for 5 minutes each using at least 0.4 mL diluted wash solution per
cm2 membrane.

68www.kpl.com
Additional Buffer Recipes10X MOPS Buffer
1. Mix: 0.2 M MOPS, pH 7.00.05 M Sodium Acetate10 mM EDTA, pH 8.0In 1 liter of DEPC treated Water
2. Sterile filter solution.
RNA Sample Loading Buffer
1. Mix: 62.5% Deionized formamide1.14 M Formaldehyde200 µg/mL Bromophenol blue200 µg/mL Xylene cyanole1.25X MOPS Buffer 50 µg/mL Ethidium Bromide
0.1 M DTT (Dithiothreitol)
1. Prepare a 1 M stock solution by diluting 0.154g of DTT in 1mL of DEPCtreated water.
2. Dilute 0.1 mL of the 1 M solution in 0.9 mL of DEPC treated water. Use the 0.1 M solution in the protocol. For optimal performance, thissolution must be prepared fresh each time.
20X SSC (Catalog No. 50-86-05)
1. Mix:3.0 M NaCl300 mM Sodium Citrate
2. pH to 7.5 with NaOH
3. Sterile filter or autoclave solution.
LB Media
1. Mix:5 g/L bacto-yeast extract10 g/L bacto-tryptone10 g/L NaCl
2. pH to 7.0 with NaOH
3. Autoclave solution.
NZY Media
1. Mix:5 g/L NaCl2 g/L MgSO4 •7H205 g/L yeast extract10 g/L NZ amine (casein hydrolysate)
2. pH to 7.5 with NaOH
3. Autoclave solution.
10X TE (Tris-EDTA) Buffer
1. 100 mM Tris-HCl10 mM EDTA
2. pH to 8.0 with HCl
3. Sterile filter or autoclave solution.
20X SSPE
1. Mix: 3.0 M NaCl0.2 M sodium phosphate (mono-basic)0.02 M EDTA
2. pH to 7.4 with NaOH
3. Sterile filter or autoclave solution.
Ch
ap
te
r
7
A
pp
en
dix

69 800-638-3167 • KPL, Inc. • 301-948-7755
Appendix
Related Products:Nucleic Acid Labeling Kits Catalog No. Size
Detector Random Primer DNA Biotinylation Kit 60-01-00 30 reactions
Detector PCR DNA Biotinylation Kit 60-01-01 30 reactions
Detector RNA in vitro Transcription Biotinylation Kit 60-01-02 20 reactions
Nucleic Acid Detection Kits Catalog No. Size
Detector AP Chemiluminescent Blotting Kit 54-30-01 2000 cm2
Detector AP Chemiluminescent Blotting Kit 54-30-02 500 cm2
Detector HRP Chemiluminescent Blotting Kit 54-30-00 2000 cm2
DNADetector Chromogenic in situ Hybridization Kit 60-03-00 50 slides
DNADetector Fluorescent in situ Hybridization Kit 60-05-00 50 slides
Molecular Biology Support Reagents/Accessories Catalog No. Size
Biodyne B Nylon Membrane 60-00-50 20 cm x 1 m
Hybridization Bags 60-00-51 50 bags
Detector Block, 5X 71-83-00 240 mL
HRP-labeled Streptavidin 474-3000 1 mL
AP-labeled Streptavidin 475-3000 1 mL
Biotin Wash Solution Concentrate, 10X 50-63-06 200 mL
Spin-Pure Filters 60-00-53 5 filters
Membrane Hybridization Buffer 50-86-08 240 mL
Formamide Hybridization Buffer 50-86-10 240 mL
AP Wash Solution Concentrate, 5X 50-63-15 600 mL
AP Assay Buffer 50-63-14 200 mL
Fluorescent Mounting Media 71-00-16 15 mL
Herring Sperm DNA 60-00-14 40 mg
GeneRuler Biotinylated DNA Ladder 600-0008 20-50 lanes
20X SSC 50-86-05 1 L
Silver Enhancer Kit for Microscopy 50-22-01 50 mL
Wash Solution Concentrate Kit 20X 50-63-00 800 mL
AP Substrates Catalog No. Size
CDP-Star Chemiluminescent Substrate 50-60-05 100 mL
BCIP/NBT Phosphatase Substrate Systems 50-81-00 300 mL
BCIP/NBT 1-Component Phosphatase Substrate Kit 50-81-07 6 x 100 mL
BCIP/NBT 1-Component Substrate 50-81-10 1000 mL
BCIP/NBT 1-Component Substrate 50-81-18 100 mL
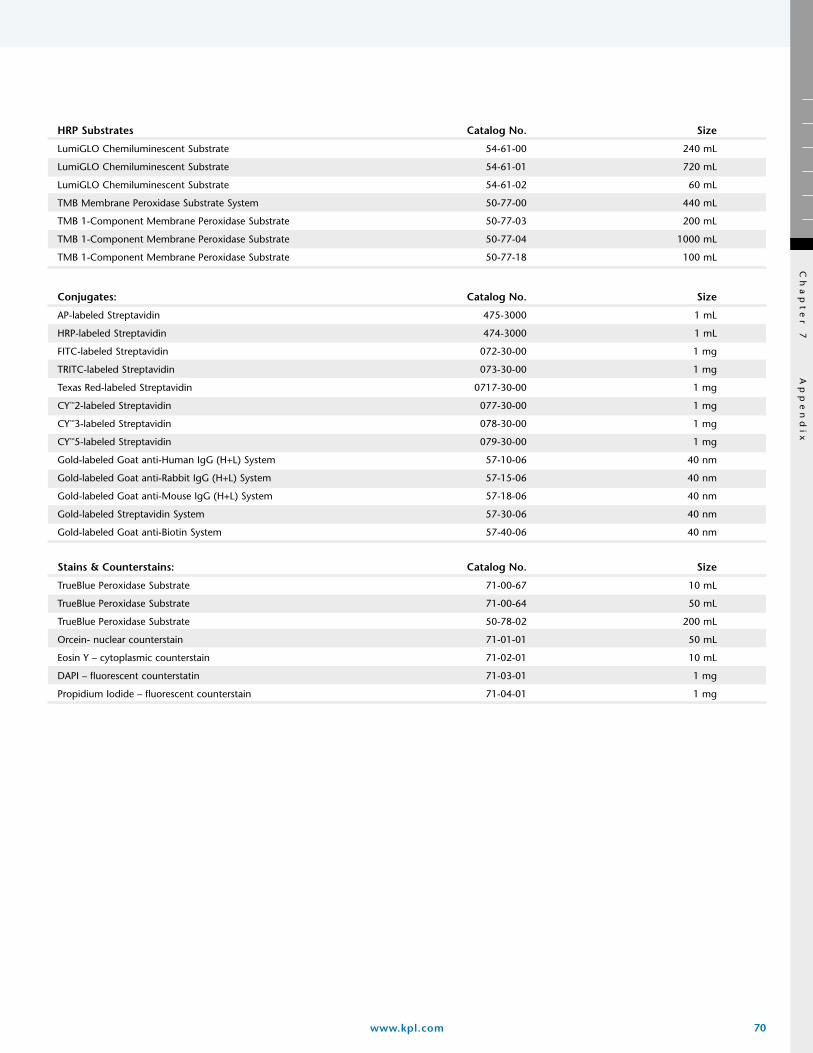
70www.kpl.com
HRP Substrates Catalog No. Size
LumiGLO Chemiluminescent Substrate 54-61-00 240 mL
LumiGLO Chemiluminescent Substrate 54-61-01 720 mL
LumiGLO Chemiluminescent Substrate 54-61-02 60 mL
TMB Membrane Peroxidase Substrate System 50-77-00 440 mL
TMB 1-Component Membrane Peroxidase Substrate 50-77-03 200 mL
TMB 1-Component Membrane Peroxidase Substrate 50-77-04 1000 mL
TMB 1-Component Membrane Peroxidase Substrate 50-77-18 100 mL
Conjugates: Catalog No. Size
AP-labeled Streptavidin 475-3000 1 mL
HRP-labeled Streptavidin 474-3000 1 mL
FITC-labeled Streptavidin 072-30-00 1 mg
TRITC-labeled Streptavidin 073-30-00 1 mg
Texas Red-labeled Streptavidin 0717-30-00 1 mg
CY™2-labeled Streptavidin 077-30-00 1 mg
CY™3-labeled Streptavidin 078-30-00 1 mg
CY™5-labeled Streptavidin 079-30-00 1 mg
Gold-labeled Goat anti-Human IgG (H+L) System 57-10-06 40 nm
Gold-labeled Goat anti-Rabbit IgG (H+L) System 57-15-06 40 nm
Gold-labeled Goat anti-Mouse IgG (H+L) System 57-18-06 40 nm
Gold-labeled Streptavidin System 57-30-06 40 nm
Gold-labeled Goat anti-Biotin System 57-40-06 40 nm
Stains & Counterstains: Catalog No. Size
TrueBlue Peroxidase Substrate 71-00-67 10 mL
TrueBlue Peroxidase Substrate 71-00-64 50 mL
TrueBlue Peroxidase Substrate 50-78-02 200 mL
Orcein- nuclear counterstain 71-01-01 50 mL
Eosin Y – cytoplasmic counterstain 71-02-01 10 mL
DAPI – fluorescent counterstatin 71-03-01 1 mg
Propidium Iodide – fluorescent counterstain 71-04-01 1 mg
Ch
ap
te
r
7
A
pp
en
dix

71 800-638-3167 • KPL, Inc. • 301-948-7755
Trademarks and Licenses:
The following trademarks and registered trademarks used in this guide are the property of KPL, Inc.
Detector
DNADetector
LumiGLO
TrueBlue
The following trademarks are the property of the companies listed below.
Biodyne is a registered trademark of Pall Corporation.
Buffer Puffer is a trademark of Owl Scientific.
CDP-Star is a registered trademark of PerkinElmer Life Sciences.
CY is a trademark of Amersham Biosciences Limited.
GeneRuler is a trademark of Fermentas.
Texas Red is a registered trademark of Molecular Probes, Inc.
Appendix

72www.kpl.com
This page intentionally left blank.

Ordering Information
Two Cessna Court
Gaithersburg, MD 20879
Phone: 301.948.7755
Fax: 301.948.0169
Web: www.kpl.com
To order or for Technical Support,
please contact your KPL
representative at 800.638.3167
or 301.948.7755. By fax at
301.948.0169.
For more information, go to
www.kpl.com or email us at


![Blotting products [407] · Northern blotting as well as colony & plaque lifts and Dot-/Slot-blots. Nytran N is compatible with isotopic and non-isotopic detection methods. Nytran](https://static.fdocuments.in/doc/165x107/600e9877798835596b63e4e6/blotting-products-407-northern-blotting-as-well-as-colony-plaque-lifts-and.jpg)