TeamUp – Tips for using the tool TeamUpteamup.aalto.fi/TeamUp-Manual.pdf · TeamUp – Tips for...
18
TeamUp – Tips for using the tool TeamUp A tool for teachers to form teams based on interests and for students to record teamwork progress. This document describes how to use TeamUp to (A) add and edit learners (B) form teams (C) record teamwork progress Authors: Anna Keune Version 2 – 07 January 2013 This work is licensed under a Creative Commons Attribution-ShareAlike 3.0 Unported License .
Transcript of TeamUp – Tips for using the tool TeamUpteamup.aalto.fi/TeamUp-Manual.pdf · TeamUp – Tips for...

TeamUp – Tips for using the tool
TeamUpA tool for teachers to form teams based on interestsand for students to record teamwork progress.
This document describes how to use TeamUp to (A) add and edit learners(B) form teams(C) record teamwork progress
Authors: Anna KeuneVersion 2 – 07 January 2013
This work is licensed under a Creative Commons Attribution-ShareAlike 3.0 Unported License.
TeamUp – Tips for using the tool
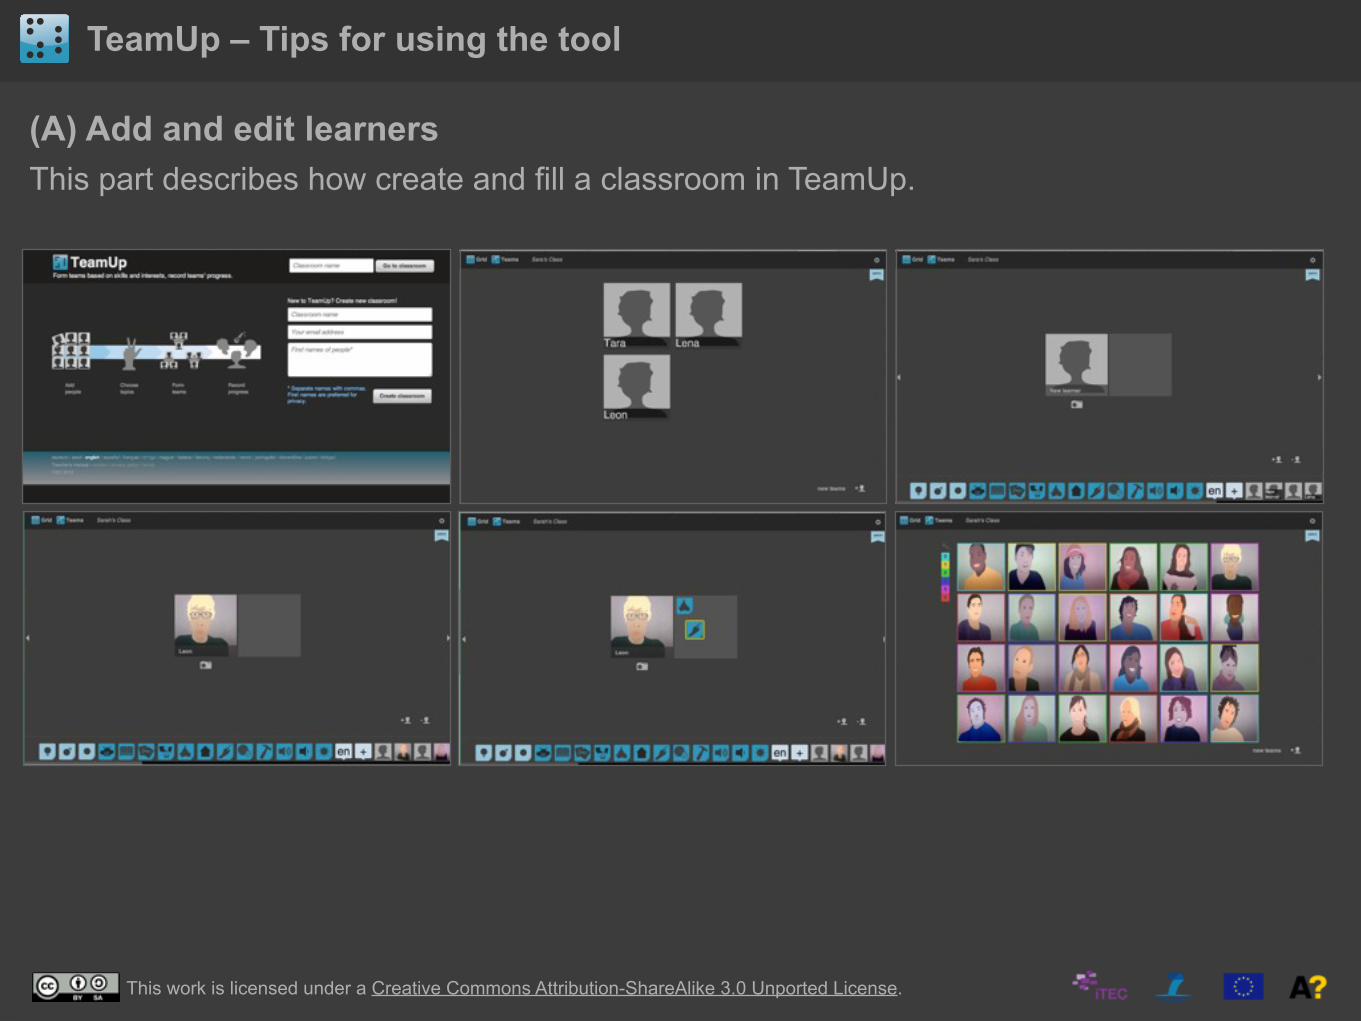
(A) Add and edit learnersThis part describes how create and fill a classroom in TeamUp.
This work is licensed under a Creative Commons Attribution-ShareAlike 3.0 Unported License.

TeamUp – Tips for using the tool
(A) Add and edit learnersThis part describes how create and fill a classroom in TeamUp.
• Navigate to http://teamup.aalto.fi/
• Enter your classroom name and click “Go to classroom”
• If you are new to TeamUp, create a new classroom with a name, your email address and a list of names, e.g. the learners in your class.
• An admin and a non-admin link will be send to your email address for future reference. Please store this message safely.
• Entering the first names of learners in your class during the classroom creation process saves time later. Separate the names with “,”.
• Clicking “Create classroom” directs you to your classroom.
This work is licensed under a Creative Commons Attribution-ShareAlike 3.0 Unported License.

TeamUp – Tips for using the tool
(A) Add and edit learnersThis part describes how create and fill a classroom in TeamUp.
• This is the grid view of a classroom with three learners: Tara, Lena and Leon.
• To add a new learner, click on the icon on the bottom left of the screen.
+
This work is licensed under a Creative Commons Attribution-ShareAlike 3.0 Unported License.

TeamUp – Tips for using the tool
(A) Add and edit learnersThis part describes how create and fill a classroom in TeamUp.
• A new learner was created whom you can name by clicking on the placeholder name “New learner”
• To add further learners, click on the icon on the bottom left of the screen.
• To delete the new learner, click on the icon on the bottom left of the screen.
• Use the arrows on the left and right center of the screen to navigate through the learners in your classroom.
• Return to the grid view to see your entire class including the new learner by clicking on the icon on the top left of the screen.
+
-
This work is licensed under a Creative Commons Attribution-ShareAlike 3.0 Unported License.
TeamUp – Tips for using the tool
(A) Add and edit learnersThis part describes how create and fill a classroom in TeamUp.
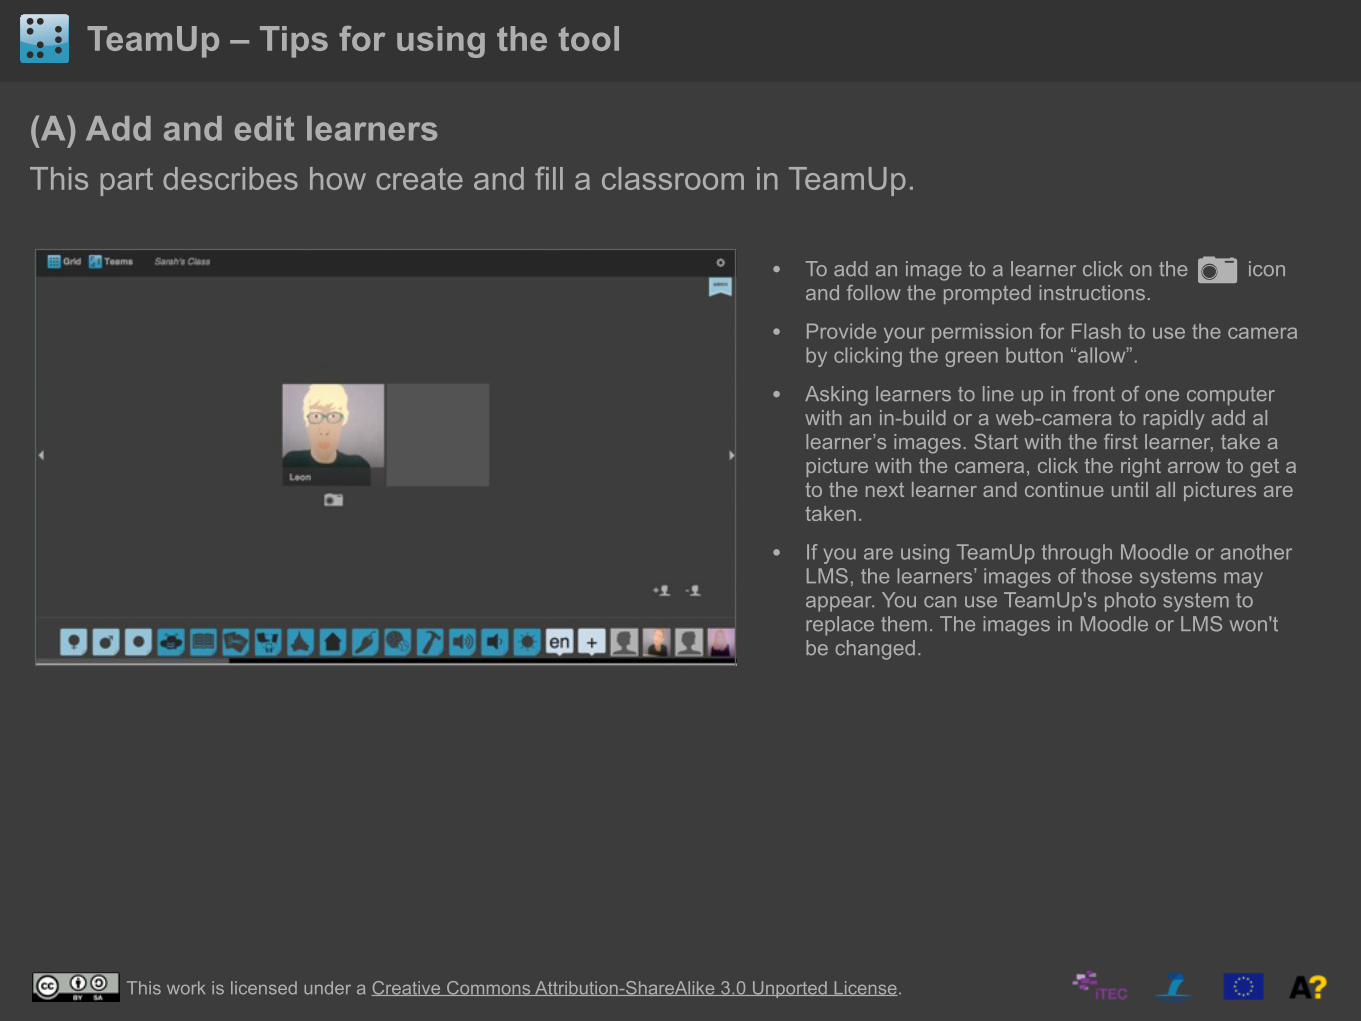
• To add an image to a learner click on the icon and follow the prompted instructions.
• Provide your permission for Flash to use the camera by clicking the green button “allow”.
• Asking learners to line up in front of one computer with an in-build or a web-camera to rapidly add al learner’s images. Start with the first learner, take a picture with the camera, click the right arrow to get a to the next learner and continue until all pictures are taken.
• If you are using TeamUp through Moodle or another LMS, the learners’ images of those systems may appear. You can use TeamUp's photo system to replace them. The images in Moodle or LMS won't be changed.
This work is licensed under a Creative Commons Attribution-ShareAlike 3.0 Unported License.

TeamUp – Tips for using the tool
(A) Add and edit learnersThis part describes how create and fill a classroom in TeamUp.
• Add icons to the learners by dragging them the gray area next to the learners images.
• This is optional. If you want to create teams that are equally split, the icons tell TeamUp about, e.g. interests, language skills or gender of the learners. If you don't plan to split teams based on these characteristics, you don't have to add any icons.
• You can ascribe your personal meaning to the icons.
• To see more languages, click the plus sign next to the language icon.
• The icons you add to the learners are visible for all learners.
• You can add or change icons at any time.
This work is licensed under a Creative Commons Attribution-ShareAlike 3.0 Unported License.

TeamUp – Tips for using the tool
(A) Add and edit learnersThis part describes how create and fill a classroom in TeamUp.
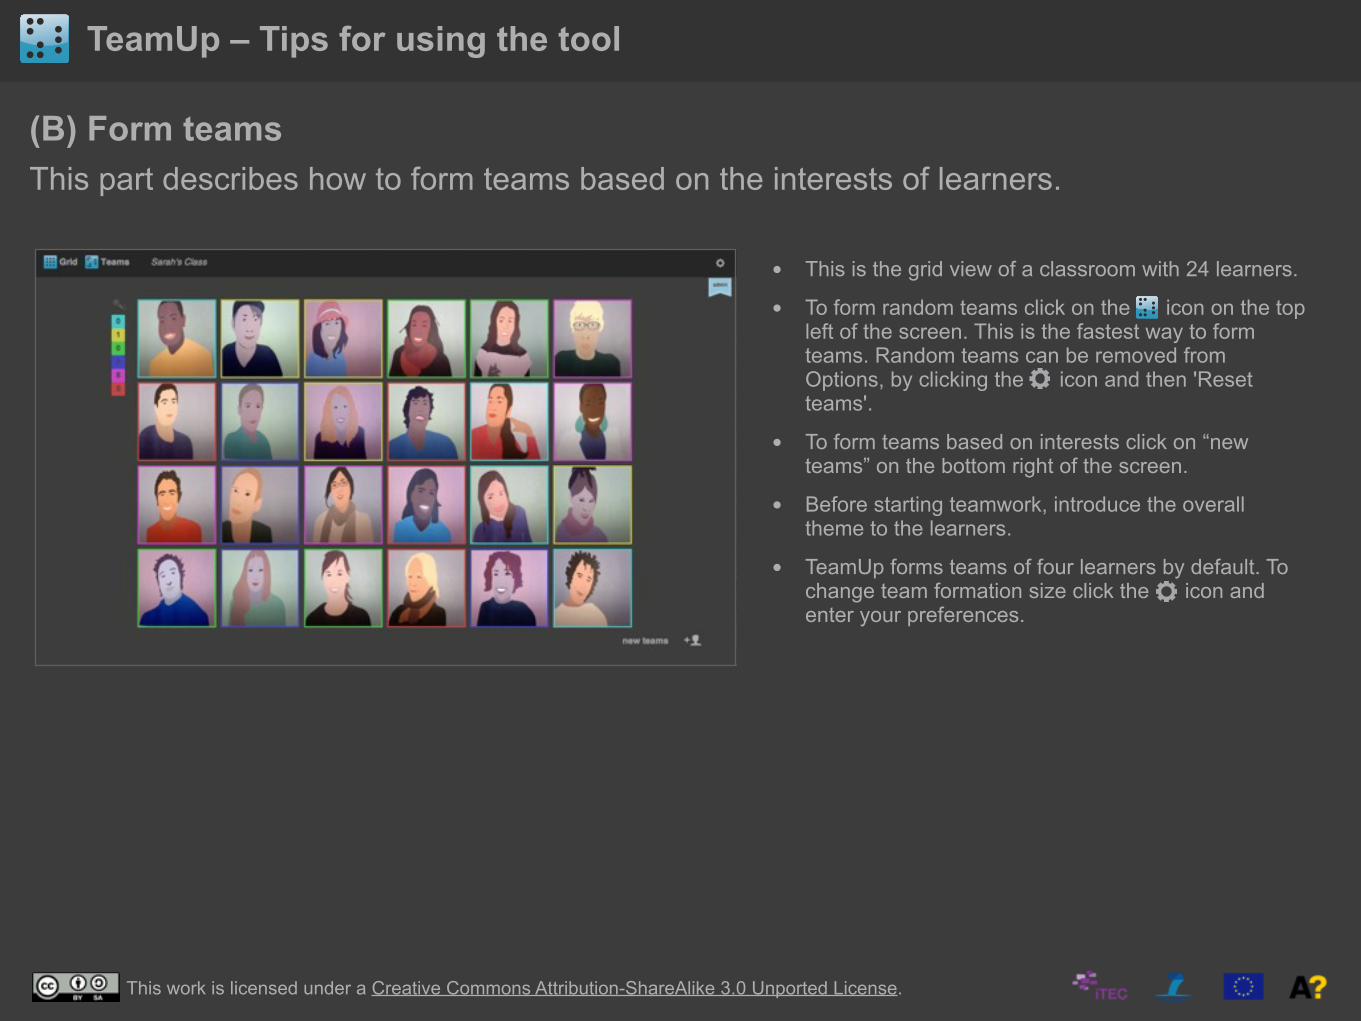
• This is the grid view of a classroom with 24 learners.
• Move on to part (B) of this document to learn more about how to form teams.
• Move on to part (C) of this document to learn more about recording teamwork progress.
This work is licensed under a Creative Commons Attribution-ShareAlike 3.0 Unported License.

TeamUp – Tips for using the tool
(B) Form teamsThis part describes how to form teams based on the interests of learners.
This work is licensed under a Creative Commons Attribution-ShareAlike 3.0 Unported License.
TeamUp – Tips for using the tool
(B) Form teamsThis part describes how to form teams based on the interests of learners.
• This is the grid view of a classroom with 24 learners.
• To form random teams click on the icon on the top left of the screen. This is the fastest way to form teams. Random teams can be removed from Options, by clicking the icon and then 'Reset teams'.
• To form teams based on interests click on “new teams” on the bottom right of the screen.
• Before starting teamwork, introduce the overall theme to the learners.
• TeamUp forms teams of four learners by default. To change team formation size click the icon and enter your preferences.
This work is licensed under a Creative Commons Attribution-ShareAlike 3.0 Unported License.

TeamUp – Tips for using the tool
(B) Form teamsThis part describes how to form teams based on interests.
• Ask learners to suggest topics they are interested in. Modify their suggestions to suit the learning goals and the curriculum.
• Collect up to 10 topics by entering them to the text fields.
• Ask learners to choose their favorite topics by dragging their pictures next to the topic titles. Everyone has three choices.
• Choices can be entered through interactive whiteboards, response systems, personal laptops or smart phones.
• Anyone with access to the classroom can distribute the choices of anyone, e.g. the choices of absent learners can be entered by you or present learners.
• Empty topics, or topics with no name are ignored when creating teams.
• Click “next” to move on.
This work is licensed under a Creative Commons Attribution-ShareAlike 3.0 Unported License.
TeamUp – Tips for using the tool
(B) Form teamsThis part describes how to form teams based on interests.
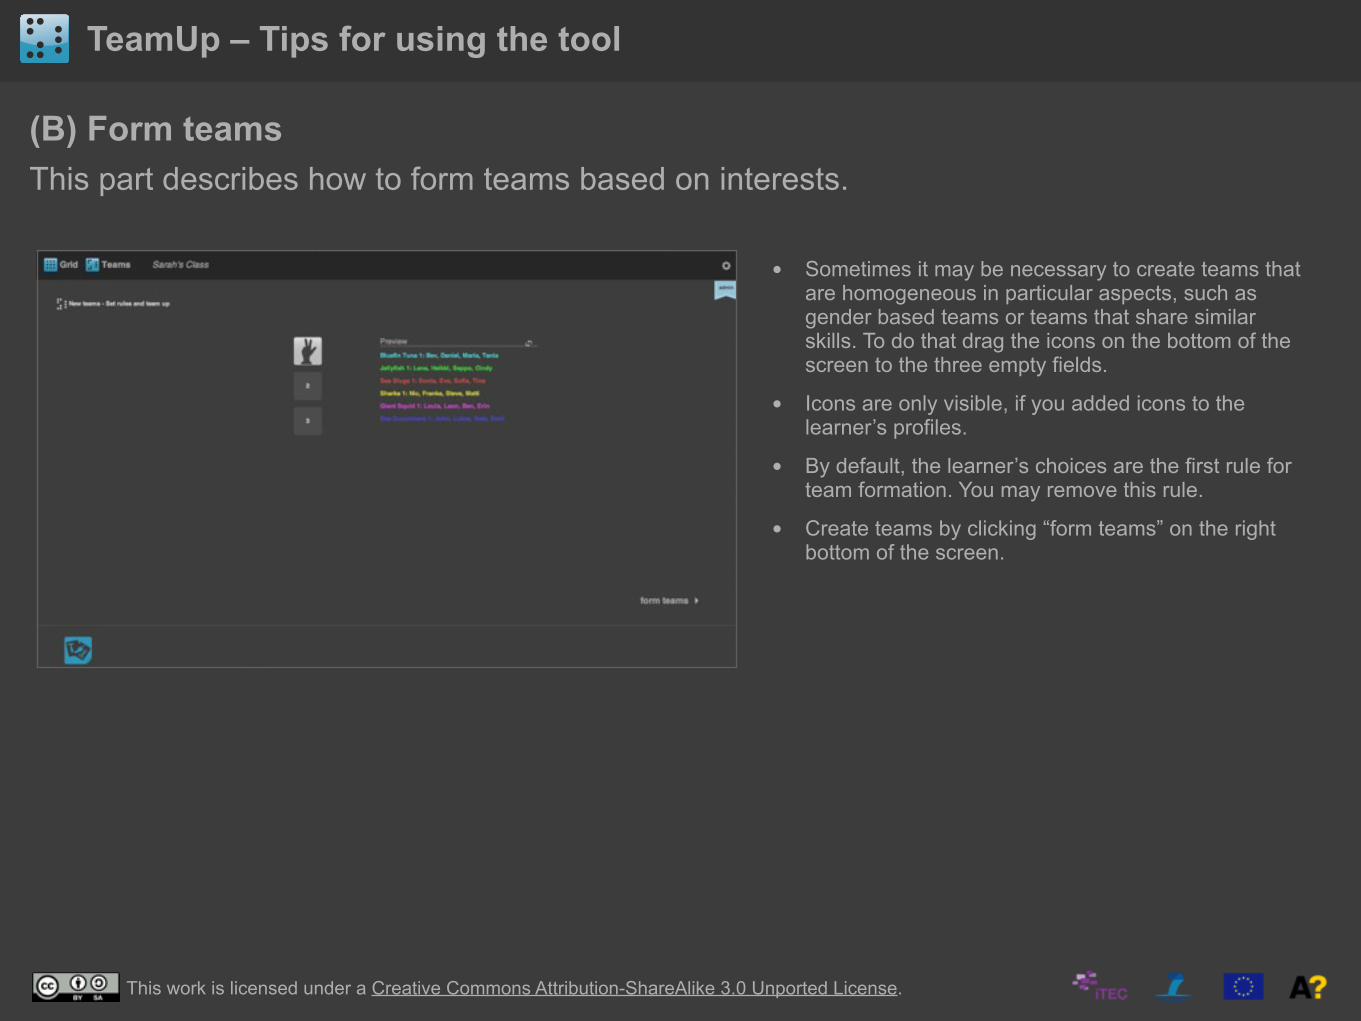
• Sometimes it may be necessary to create teams that are homogeneous in particular aspects, such as gender based teams or teams that share similar skills. To do that drag the icons on the bottom of the screen to the three empty fields.
• Icons are only visible, if you added icons to the learner’s profiles.
• By default, the learner’s choices are the first rule for team formation. You may remove this rule.
• Create teams by clicking “form teams” on the right bottom of the screen.
This work is licensed under a Creative Commons Attribution-ShareAlike 3.0 Unported License.

TeamUp – Tips for using the tool
(B) Form teamsThis part describes how to form teams based on interests.
• This is the team view of TeamUp. To switch between classroom view and team view click on the icons at the top of the screen.
• You can change team formations by dragging learners from one team to another.
• TeamUp displays the most recent team formation when visiting the classroom to allow quick continuation during the next lesson.
• Move on to part (C) of this document to learn more about recording teamwork progress.
This work is licensed under a Creative Commons Attribution-ShareAlike 3.0 Unported License.
TeamUp – Tips for using the tool
(C) Record teamwork processThis part describes how to record and listen to teamwork process.
This work is licensed under a Creative Commons Attribution-ShareAlike 3.0 Unported License.

TeamUp – Tips for using the tool
(C) Record teamwork processThis part describes how to record and listen to teamwork process.
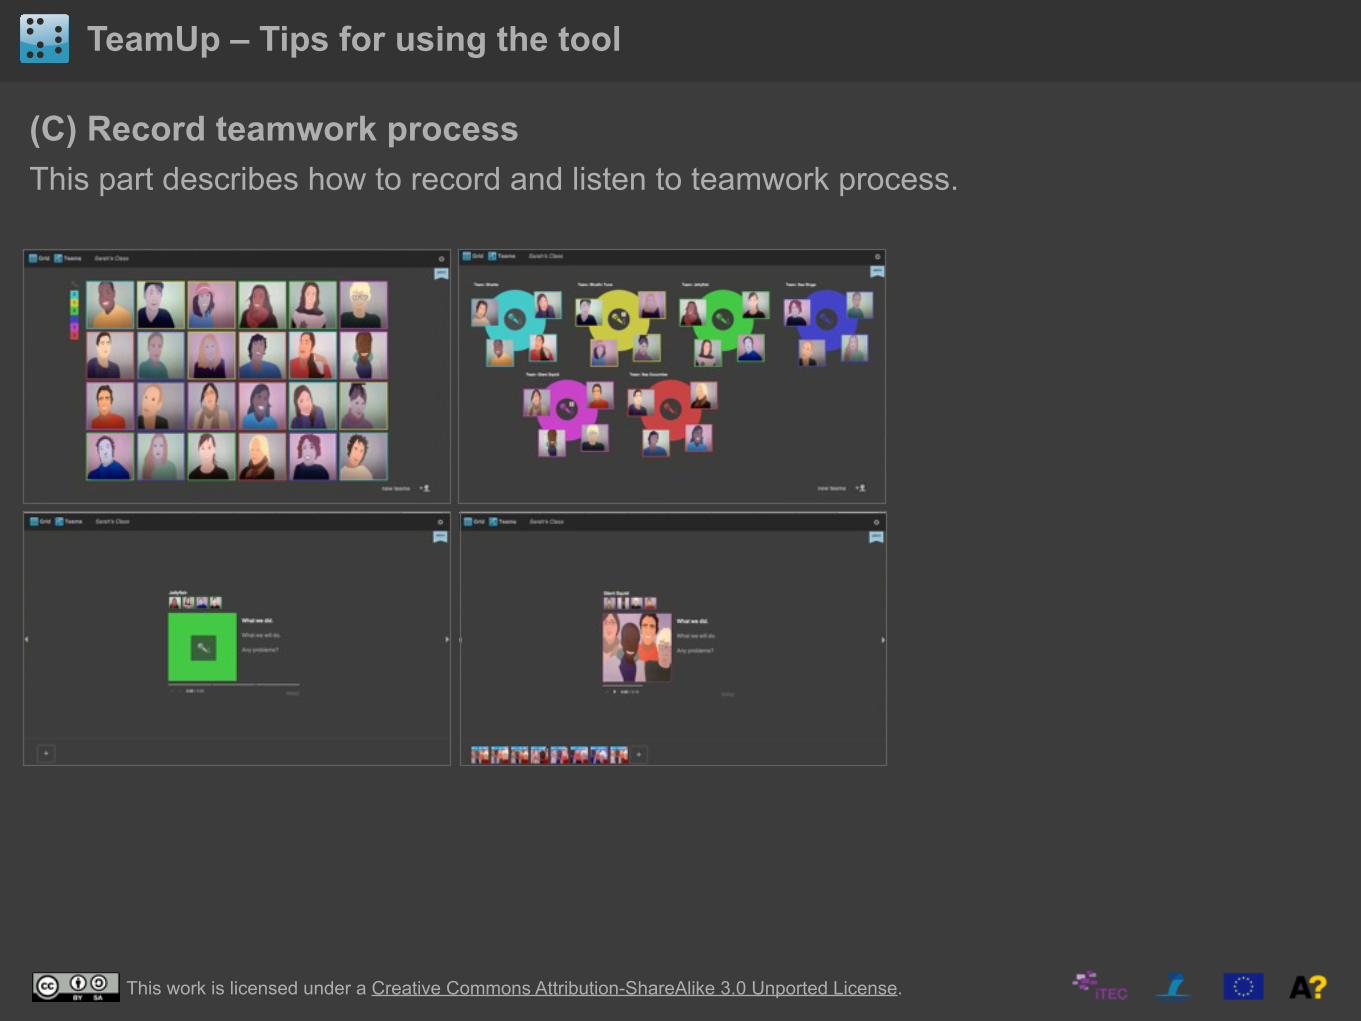
• From the grid view, after teams have been formed, learners can click on the colored squares to the left of their pictures to enter the teamwork recording space of TeamUp.
This work is licensed under a Creative Commons Attribution-ShareAlike 3.0 Unported License.

TeamUp – Tips for using the tool
(C) Record teamwork processThis part describes how to record and listen to teamwork process.
• From the team view learners can click on the icon of their team to to enter the teamwork recording space of TeamUp.
This work is licensed under a Creative Commons Attribution-ShareAlike 3.0 Unported License.

TeamUp – Tips for using the tool
(C) Record teamwork processThis part describes how to record and listen to teamwork process.
• This is the recording space of a team without recordings.
• Click on the icon on the green square and follow the prompted instructions.
• Provide your permission for Flash to use the camera by clicking the green button “allow”. Then, click the icon again to confirm that you want to process.
• After 3 seconds a picture is taken and the recording starts. The teams may take a picture of themselves or of a drawing/object relevant for their recording.
• The recording time is limited to 60 seconds. Learners need to carefully think about what they want to say and how. The time limit ensures that the teacher can review each team's progress quickly.
• Each recording should answer three points: (1) What we did, (2) What we will do, (3) Any problems.
• A recording may be stopped before 60 seconds are up by clicking the icon.
• A recording can be previewed and re-recorded before deciding to “keep” it.
This work is licensed under a Creative Commons Attribution-ShareAlike 3.0 Unported License.
TeamUp – Tips for using the tool
(C) Record teamwork processThis part describes how to record and listen to teamwork process.
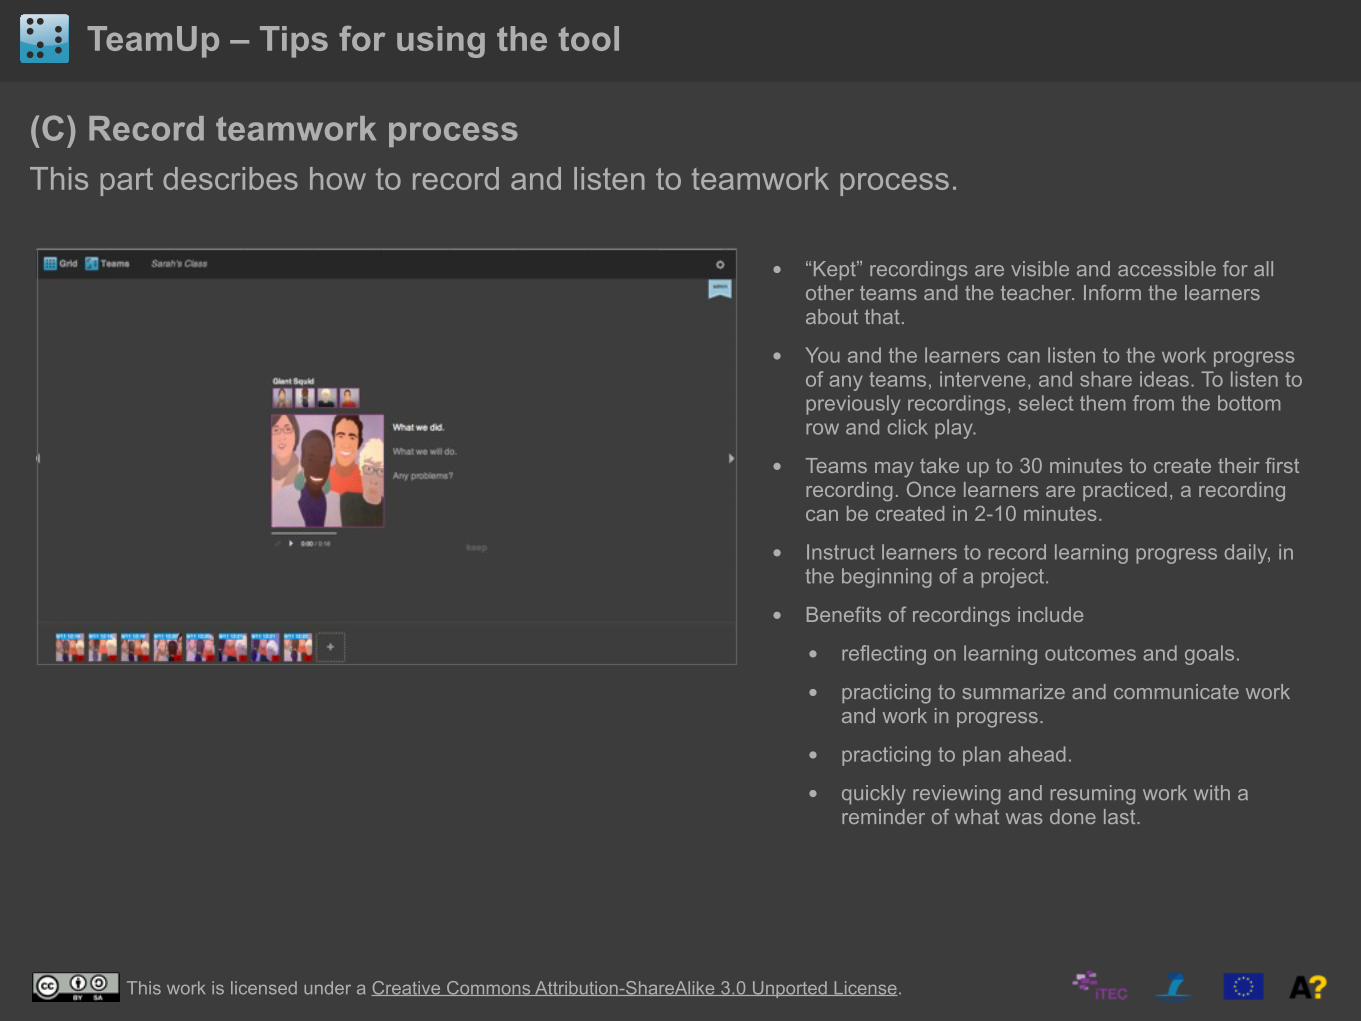
• “Kept” recordings are visible and accessible for all other teams and the teacher. Inform the learners about that.
• You and the learners can listen to the work progress of any teams, intervene, and share ideas. To listen to previously recordings, select them from the bottom row and click play.
• Teams may take up to 30 minutes to create their first recording. Once learners are practiced, a recording can be created in 2-10 minutes.
• Instruct learners to record learning progress daily, in the beginning of a project.
• Benefits of recordings include
• reflecting on learning outcomes and goals.
• practicing to summarize and communicate work and work in progress.
• practicing to plan ahead.
• quickly reviewing and resuming work with a reminder of what was done last.
This work is licensed under a Creative Commons Attribution-ShareAlike 3.0 Unported License.