Talk2M Pro - Account Configuration · eWON Application User Guide AUG 028 / Rev 2.1 Talk2M Pro -...
25
eWON Application User Guide AUG 028 / Rev 4.0 Content This guide explains how to configure your Talk2M Pro account properties including user permissions using eCatcher. Next to basic and advanced account settings, this document is focused on the notions of users, user groups and roles with their relevant permissions, as well as the eWONs and eWON pools. Talk2M Pro Account Configuration
Transcript of Talk2M Pro - Account Configuration · eWON Application User Guide AUG 028 / Rev 2.1 Talk2M Pro -...
eWON Application User Guide
AUG 028 / Rev 4.0
Co
nte
nt This guide explains how to configure your Talk2M Pro account properties including user
permissions using eCatcher. Next to basic and advanced account settings, this document is focused on the notions of users, user groups and roles with their relevant permissions, as well as the eWONs and eWON pools.
Talk2M ProAccount
Configuration
Table of Contents
1. Hardware and software requirements.................................................................................................3 1.1. Hardware requirements.............................................................................................................3 1.2. Software requirements..............................................................................................................3 1.3. eWON Firmware Version..........................................................................................................3
2. Introduction......................................................................................................................................... 4
3. Basic Notions......................................................................................................................................5 3.1. Users, User Groups, eWON Pools and Roles...........................................................................5 3.2. Roles of the Administrators Group............................................................................................6 3.3. Preexisting Groups and Pool.....................................................................................................6
4. Example of a typical organization.......................................................................................................7 4.1. Step 1 - Create the Maintenance Team User Groups...............................................................8 4.2. Step 2 - Create the eWON Pools..............................................................................................9 4.3. Step 3 - Create the Enduser User Groups...............................................................................10 4.4. Step 4 – Allow Maintenance Teams to Manage Enduser Groups...........................................11 4.5. Step 5 – Edit the Custom Field Labels....................................................................................12 4.6. Step 6 – Create the eWONs and Allocate them to their eWON Pools.....................................12 4.7. Step 7 – Create Users and Allocate them to their User Groups..............................................12
5. Appendix A - Automatic eWON Registration.....................................................................................13 5.1. Principle..................................................................................................................................13 5.2. Activation in the Talk2M account.............................................................................................13 5.3. Configuration of the eWON.....................................................................................................15
6. Appendix B - Custom Field Names...................................................................................................17
7. Appendix C - Advanced Account Parameters...................................................................................19 7.1. Reservation of Concurrent Connections..................................................................................19 7.2. Password Policy......................................................................................................................20
Revisions............................................................................................................................................... 21
Hardware and software requirements Chapter 1.
1. Hardware and software requirements
1.1. Hardware requirements
In order to follow this guide you will need: 1 eWON with VPN capabilities (for example : eWON 2005/4005CD, eWON Flexy 101 etc.) 1 PC with Windows OS and an access to the Internet
1.2. Software requirements
eWON configuration software:The eWON is configured through its web server. So all you need is a standard Web Browsersoftware like Internet Exploreri or Firefoxii.
Additionally we suggest you to download the eBuddy utility on our website :http://support.ewon.biz .
This utility allows to list the eWONs on your network and to change the default IP address of aneWON to match your LAN IP address range. With eBuddy you can also easily upgrade thefirmware of your eWON (if required).
Other programming software:eCatcher V 4 or higher – VPN tunneling utility required to access the Talk2M services*. You candownload it here: http://support.ewon.biz/softwares.htm * Note: since the version 3 of eCatcher, the software package to access the Free+ and Proservices of Talk2M is the same. It is the user account that defines which service is actuallyactivated.
.
1.3. eWON Firmware Version
Though applicable with little differences to earlier/later versions, this guide (screen snapshots) isbased upon eWON firmware version 7.0. If your eWON features an earlier version, eBuddy hasa convenient function to upgrade the firmware of your eWON.
Talk2M Pro Account Configuration () Page 3/25
Introduction Chapter 2.
2. Introduction
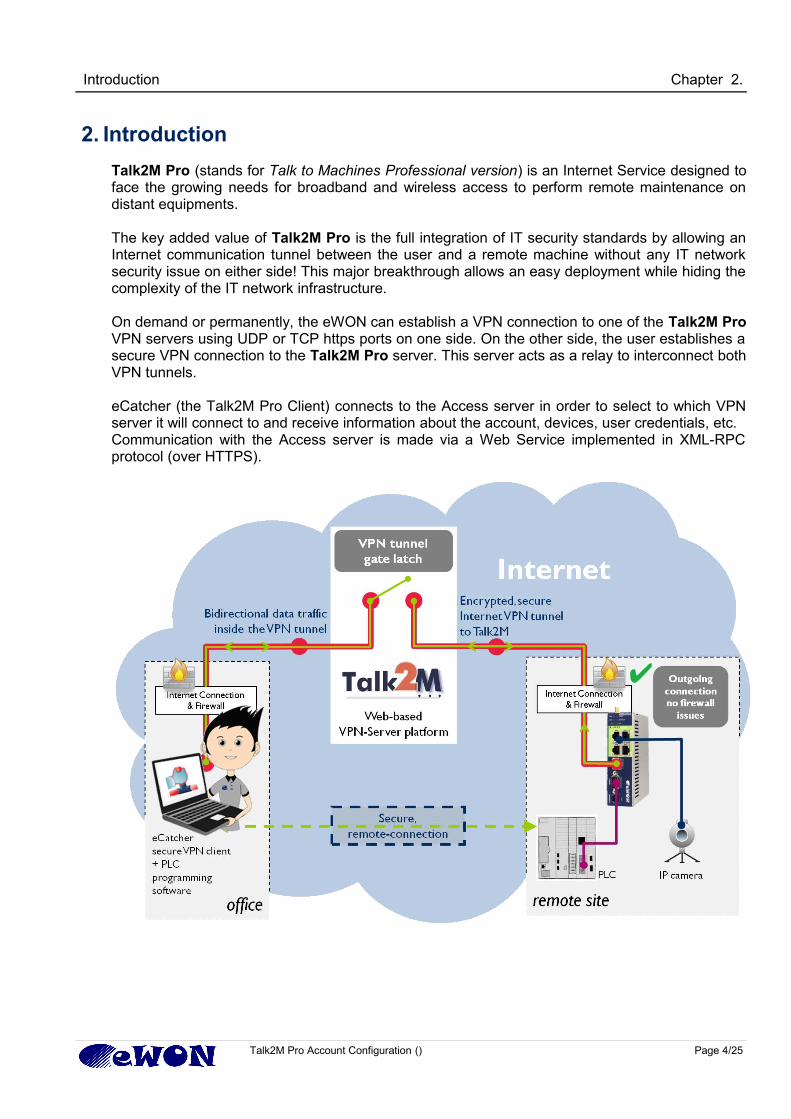
Talk2M Pro (stands for Talk to Machines Professional version) is an Internet Service designed toface the growing needs for broadband and wireless access to perform remote maintenance ondistant equipments.
The key added value of Talk2M Pro is the full integration of IT security standards by allowing anInternet communication tunnel between the user and a remote machine without any IT networksecurity issue on either side! This major breakthrough allows an easy deployment while hiding thecomplexity of the IT network infrastructure.
On demand or permanently, the eWON can establish a VPN connection to one of the Talk2M ProVPN servers using UDP or TCP https ports on one side. On the other side, the user establishes asecure VPN connection to the Talk2M Pro server. This server acts as a relay to interconnect bothVPN tunnels.
eCatcher (the Talk2M Pro Client) connects to the Access server in order to select to which VPNserver it will connect to and receive information about the account, devices, user credentials, etc. Communication with the Access server is made via a Web Service implemented in XML-RPCprotocol (over HTTPS).
Talk2M Pro Account Configuration () Page 4/25

Basic Notions Chapter 3.
3. Basic Notions
3.1. Users, User Groups, eWON Pools and Roles
One of the main difference between the Talk2M free+ version and the Pro version is thatTalk2M Pro offers the possibility for different users to access different eWONs at the same time.With Talk2M Pro it is also possible for example to give a user only access to a certain numbersof eWONs and to define if this user can manage the other users or not, etc.
Talk2M Pro allows to control the user access based upon:• User Groups• eWON Pools
Every eWON is part of 1 or several eWON PoolsEvery user is part of 1 or several User GroupsIt is the User Group that defines the access rights on eWON Pools and on other User Groups
Talk2M Pro Account Configuration () Page 5/25
Basic Notions Chapter 3.
3.2. Roles of the Administrators Group
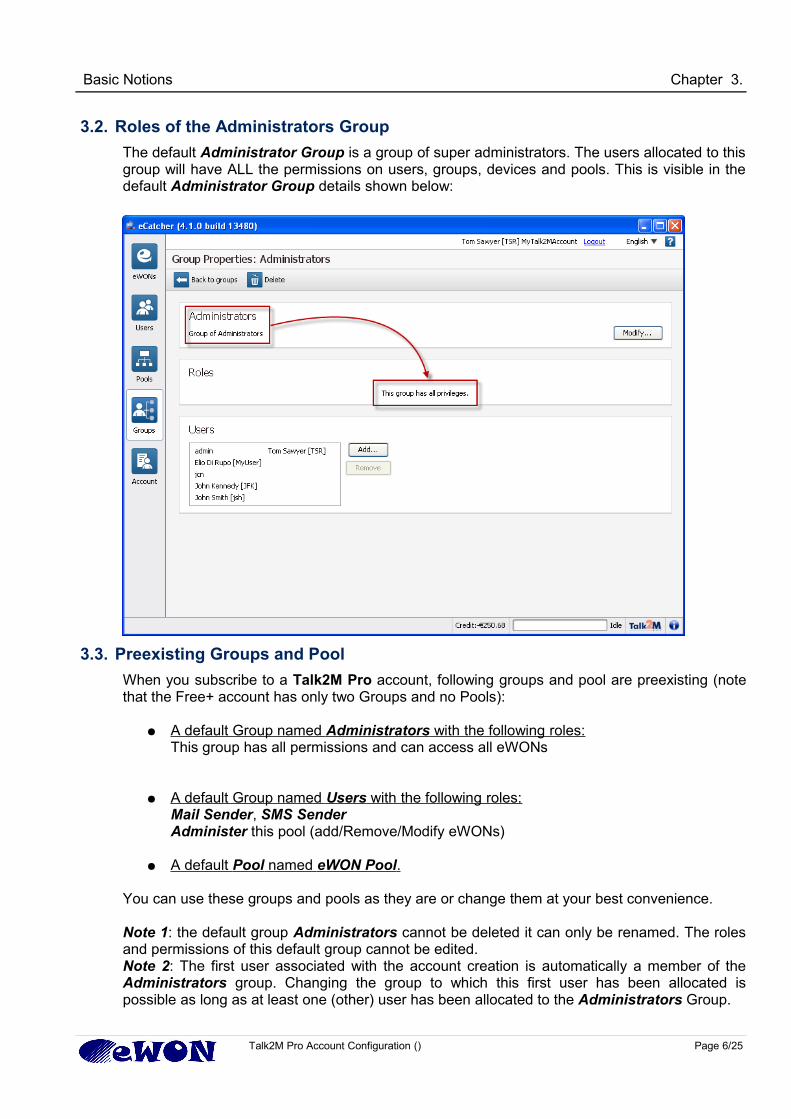
The default Administrator Group is a group of super administrators. The users allocated to thisgroup will have ALL the permissions on users, groups, devices and pools. This is visible in thedefault Administrator Group details shown below:
3.3. Preexisting Groups and Pool
When you subscribe to a Talk2M Pro account, following groups and pool are preexisting (notethat the Free+ account has only two Groups and no Pools):
● A default Group named Administrators with the following roles:This group has all permissions and can access all eWONs
● A default Group named Users with the following roles:Mail Sender, SMS Sender Administer this pool (add/Remove/Modify eWONs)
● A default Pool named eWON Pool .
You can use these groups and pools as they are or change them at your best convenience.
Note 1: the default group Administrators cannot be deleted it can only be renamed. The rolesand permissions of this default group cannot be edited. Note 2: The first user associated with the account creation is automatically a member of theAdministrators group. Changing the group to which this first user has been allocated ispossible as long as at least one (other) user has been allocated to the Administrators Group.
Talk2M Pro Account Configuration () Page 6/25
Example of a typical structure Chapter 4.
4. Example of a typical structure
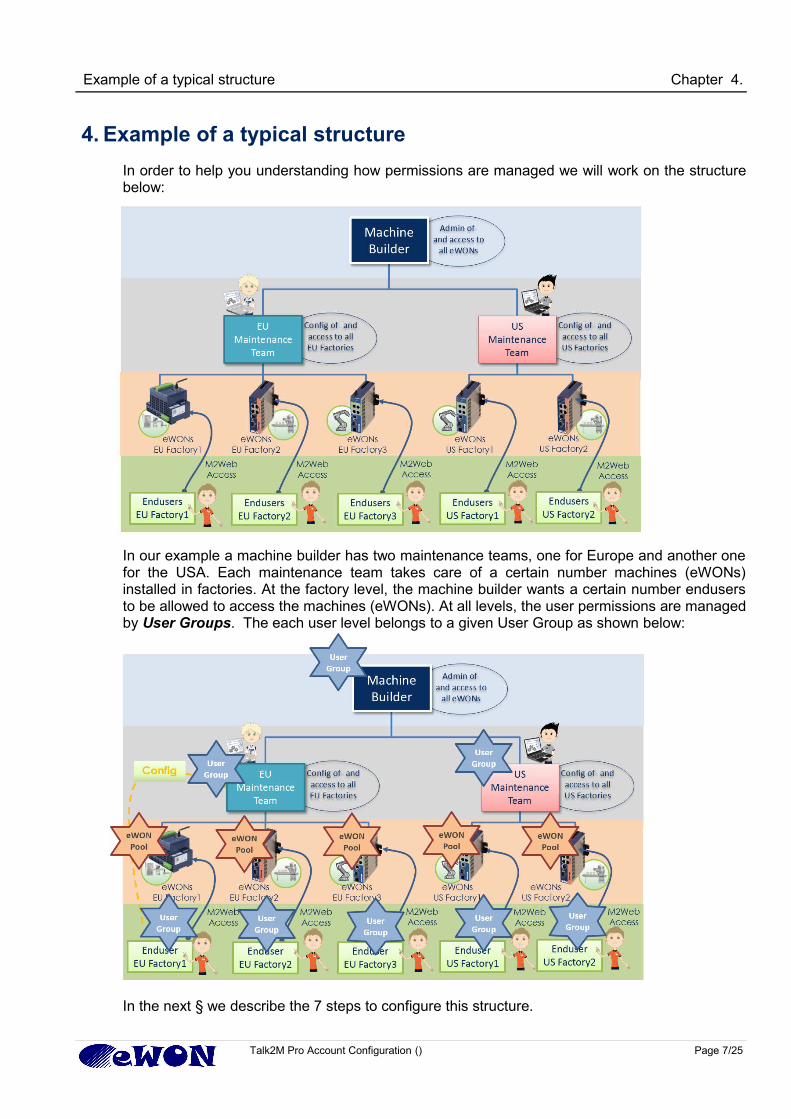
In order to help you understanding how permissions are managed we will work on the structurebelow:
In our example a machine builder has two maintenance teams, one for Europe and another onefor the USA. Each maintenance team takes care of a certain number machines (eWONs)installed in factories. At the factory level, the machine builder wants a certain number endusersto be allowed to access the machines (eWONs). At all levels, the user permissions are managedby User Groups. The each user level belongs to a given User Group as shown below:
In the next § we describe the 7 steps to configure this structure.
Talk2M Pro Account Configuration () Page 7/25
Example of a typical structure Chapter 4.
4.1. Step 1 - Create the Maintenance Team User Groups
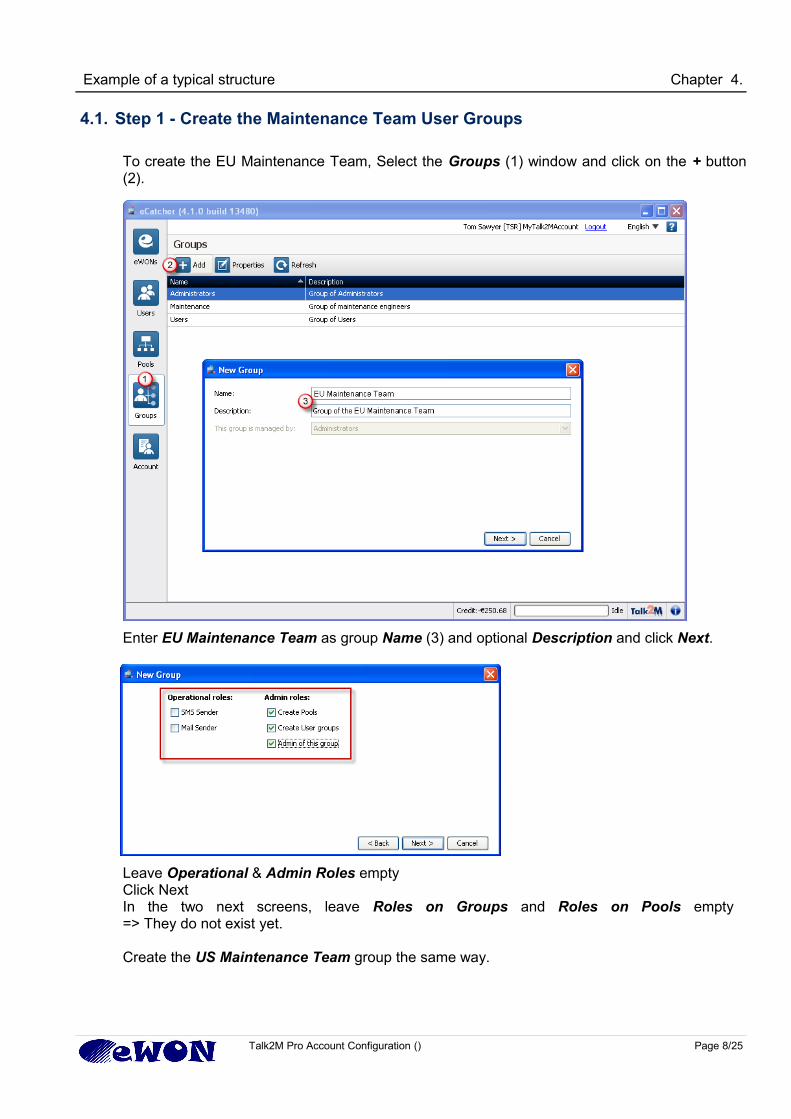
To create the EU Maintenance Team, Select the Groups (1) window and click on the + button(2).
Enter EU Maintenance Team as group Name (3) and optional Description and click Next.
Leave Operational & Admin Roles empty Click NextIn the two next screens, leave Roles on Groups and Roles on Pools empty => They do not exist yet.
Create the US Maintenance Team group the same way.
Talk2M Pro Account Configuration () Page 8/25
Example of a typical structure Chapter 4.
4.2. Step 2 - Create the eWON Pools
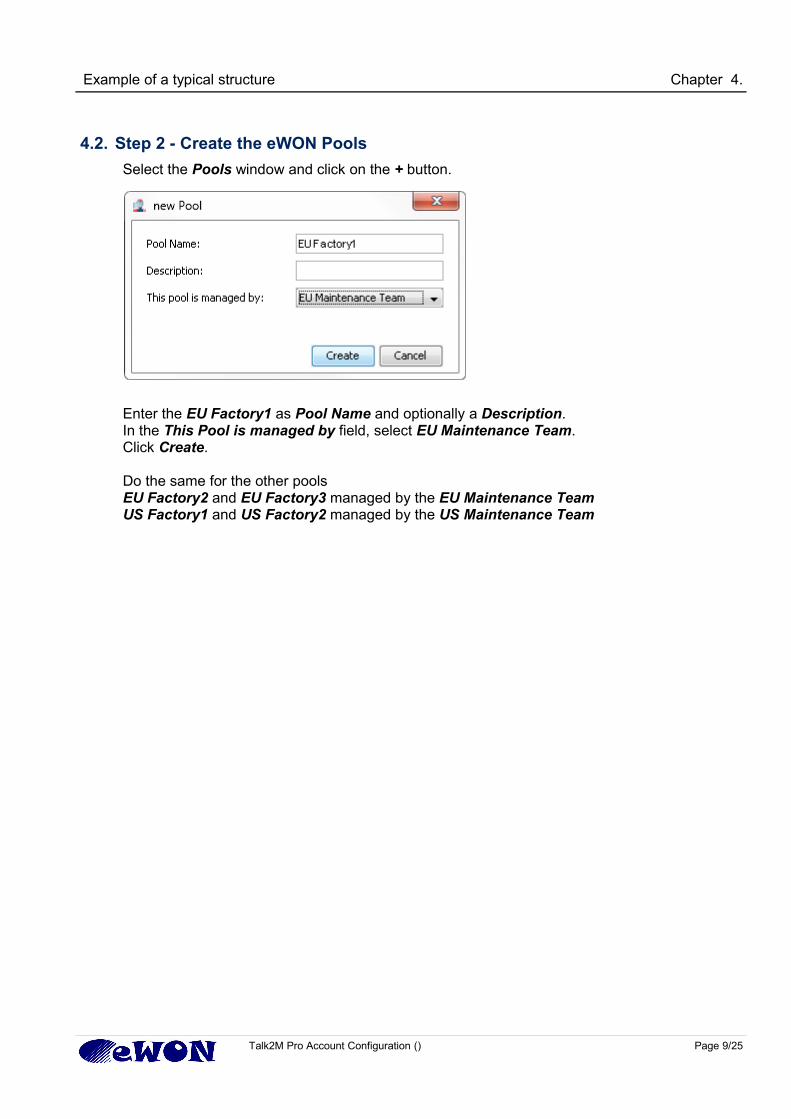
Select the Pools window and click on the + button.
Enter the EU Factory1 as Pool Name and optionally a Description.In the This Pool is managed by field, select EU Maintenance Team. Click Create.
Do the same for the other pools EU Factory2 and EU Factory3 managed by the EU Maintenance TeamUS Factory1 and US Factory2 managed by the US Maintenance Team
Talk2M Pro Account Configuration () Page 9/25
Example of a typical structure Chapter 4.
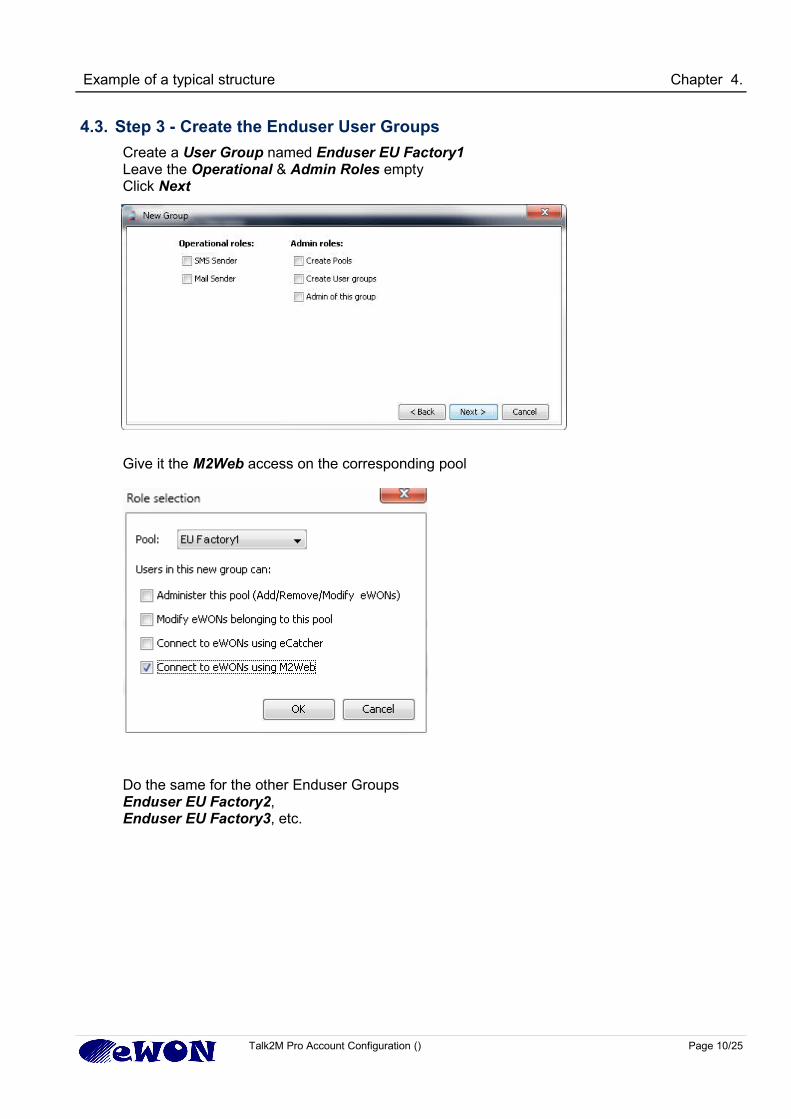
4.3. Step 3 - Create the Enduser User Groups
Create a User Group named Enduser EU Factory1Leave the Operational & Admin Roles emptyClick Next
Give it the M2Web access on the corresponding pool
Do the same for the other Enduser GroupsEnduser EU Factory2,Enduser EU Factory3, etc.
Talk2M Pro Account Configuration () Page 10/25

Example of a typical structure Chapter 4.
4.4. Step 4 – Allow Maintenance Teams to Manage Enduser Groups
Edit the EU Maintenance Group properties.In the Roles on Groups area allow this User Group to manage each Enduser EU Group
Do the same for the US Maintenance TeamOnce completed, the EU Maintenance Team should look as follows:
Talk2M Pro Account Configuration () Page 11/25
Example of a typical structure Chapter 4.
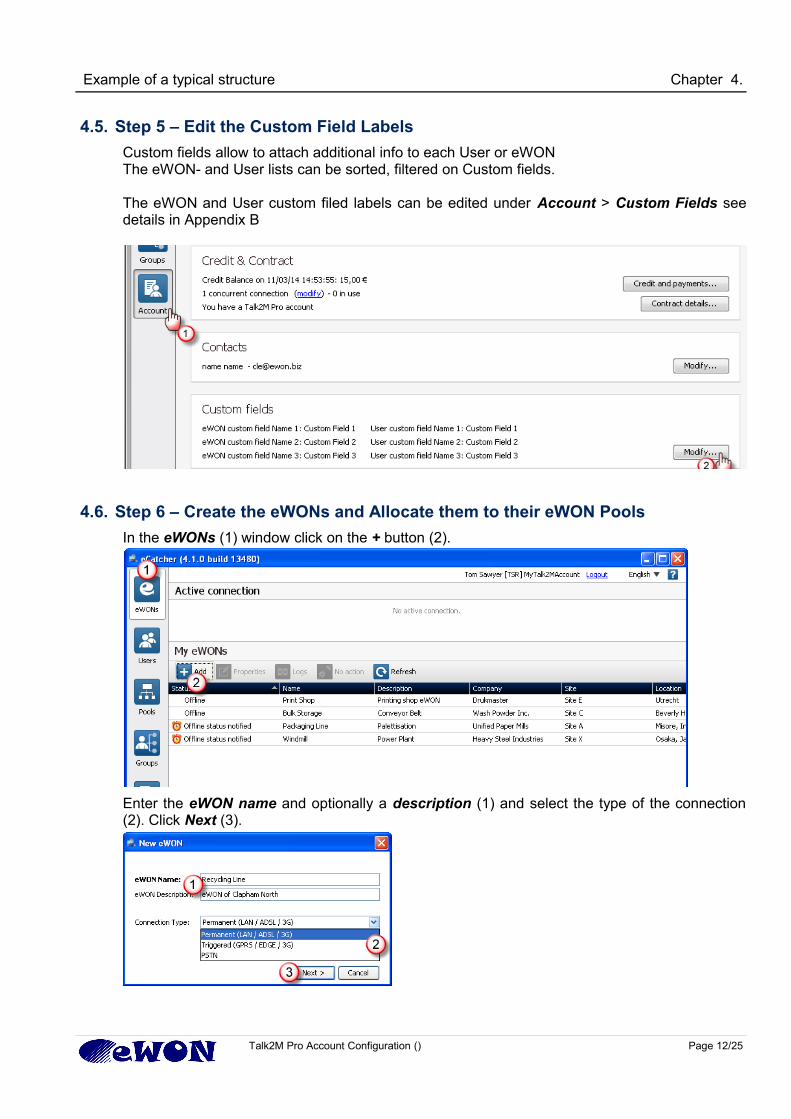
4.5. Step 5 – Edit the Custom Field Labels
Custom fields allow to attach additional info to each User or eWONThe eWON- and User lists can be sorted, filtered on Custom fields.
The eWON and User custom filed labels can be edited under Account > Custom Fields seedetails in Appendix B
4.6. Step 6 – Create the eWONs and Allocate them to their eWON Pools
In the eWONs (1) window click on the + button (2).
Enter the eWON name and optionally a description (1) and select the type of the connection(2). Click Next (3).
Talk2M Pro Account Configuration () Page 12/25
Example of a typical structure Chapter 4.
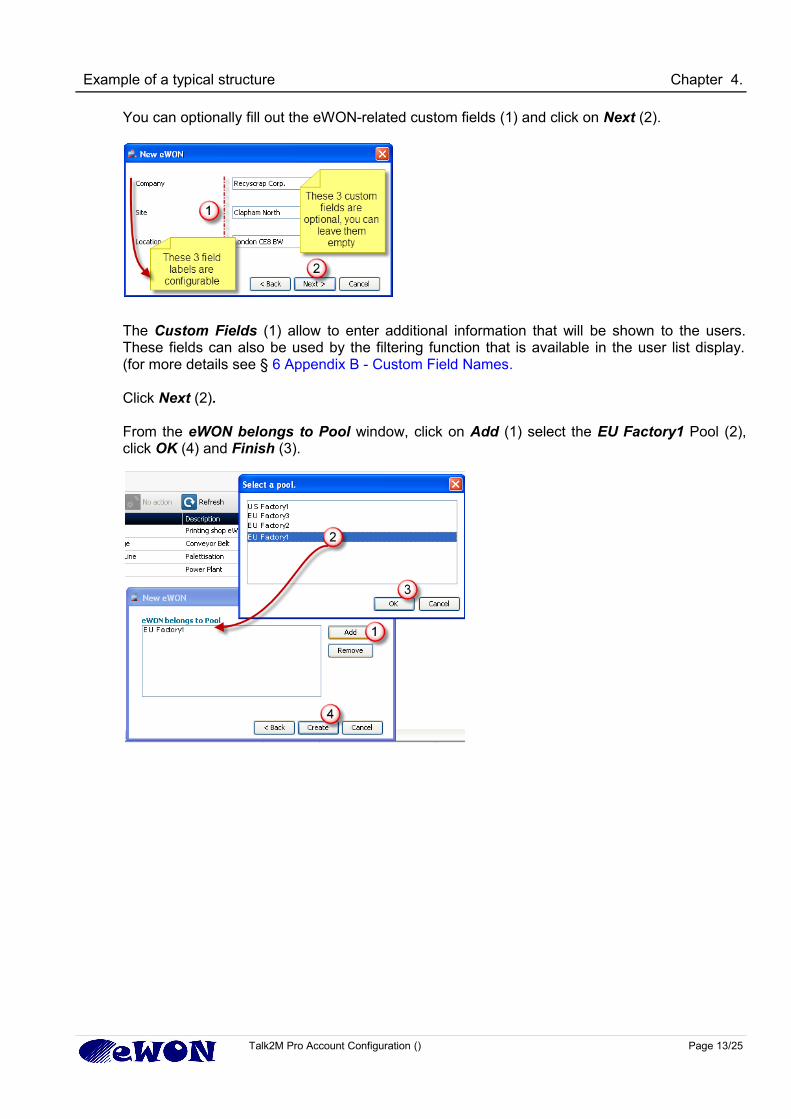
You can optionally fill out the eWON-related custom fields (1) and click on Next (2).
The Custom Fields (1) allow to enter additional information that will be shown to the users.These fields can also be used by the filtering function that is available in the user list display.(for more details see § 6 Appendix B - Custom Field Names.
Click Next (2).
From the eWON belongs to Pool window, click on Add (1) select the EU Factory1 Pool (2),click OK (4) and Finish (3).
Talk2M Pro Account Configuration () Page 13/25
Example of a typical structure Chapter 4.
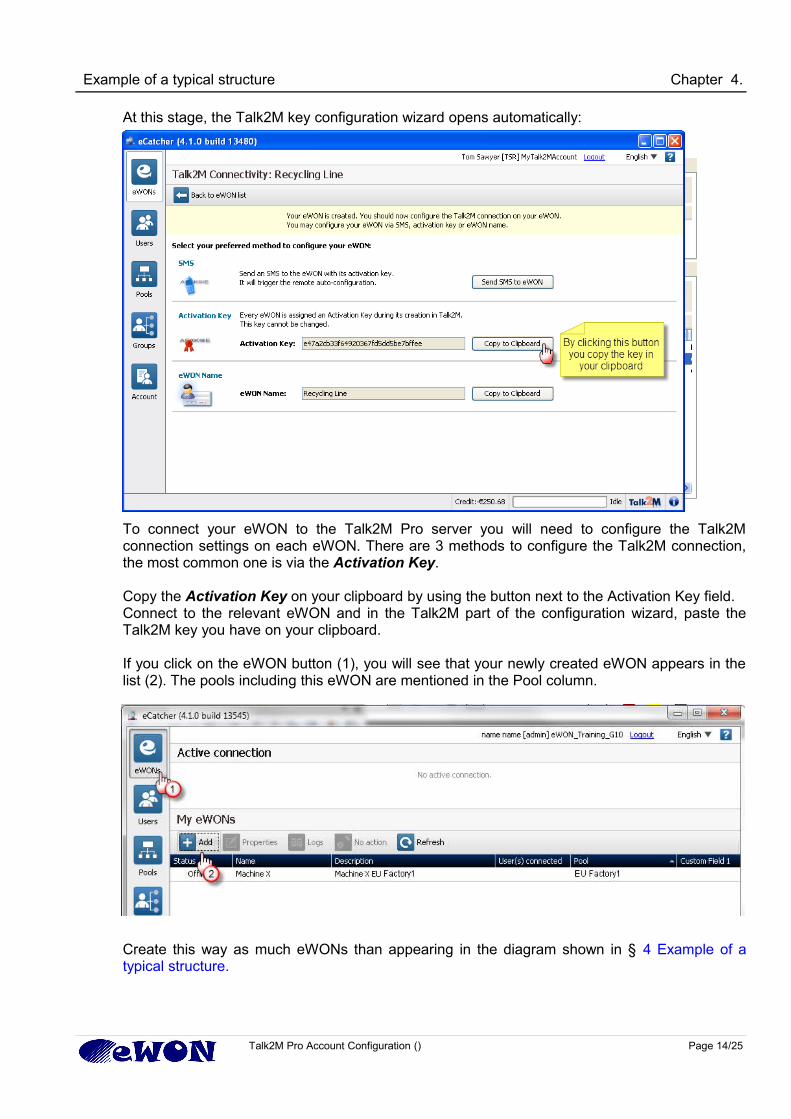
At this stage, the Talk2M key configuration wizard opens automatically:
To connect your eWON to the Talk2M Pro server you will need to configure the Talk2Mconnection settings on each eWON. There are 3 methods to configure the Talk2M connection,the most common one is via the Activation Key.
Copy the Activation Key on your clipboard by using the button next to the Activation Key field.Connect to the relevant eWON and in the Talk2M part of the configuration wizard, paste theTalk2M key you have on your clipboard.
If you click on the eWON button (1), you will see that your newly created eWON appears in thelist (2). The pools including this eWON are mentioned in the Pool column.
Create this way as much eWONs than appearing in the diagram shown in § 4 Example of atypical structure.
Talk2M Pro Account Configuration () Page 14/25

Example of a typical structure Chapter 4.
4.7. Step 7 – Create Users and Allocate them to their User Groups
Select the Users (1) window click on the + button (2). Fill out the User Name, and other fields(3) including the Password. To be accepted, the password must fulfill the (configurable) syntaxrequirements. Next to this conformity check, a password quality gauge indicates the safety levelof the password (for more details see § 7.2 Password Policy).
Click Next (4)
The Custom Fields (1) allow to enter additional information that will be shown to the users.These fields can also be used by the filtering function that is available in the user list display.(more details see § 6 Appendix B - Custom Field Names)
Click Next (2).
Talk2M Pro Account Configuration () Page 15/25
Example of a typical structure Chapter 4.
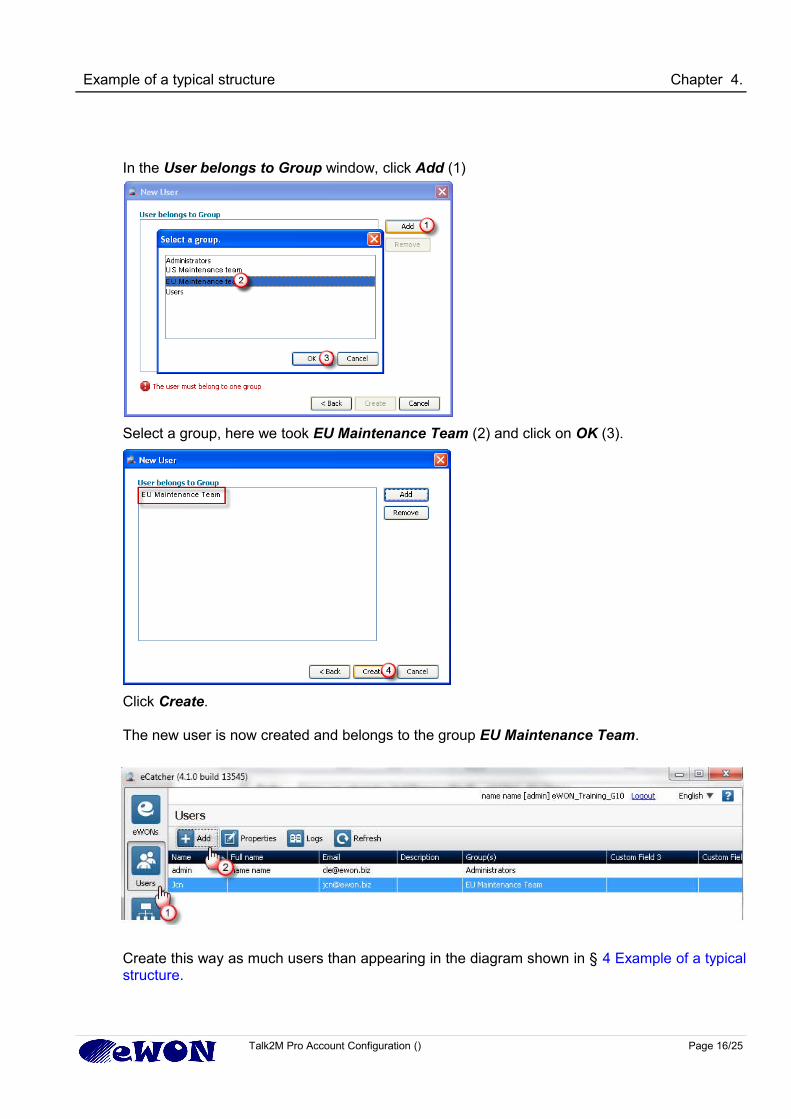
In the User belongs to Group window, click Add (1)
Select a group, here we took EU Maintenance Team (2) and click on OK (3).
Click Create.
The new user is now created and belongs to the group EU Maintenance Team.
Create this way as much users than appearing in the diagram shown in § 4 Example of a typicalstructure.
Talk2M Pro Account Configuration () Page 16/25

Appendix A - Automatic eWON Registration Chapter 5.
5. Appendix A - Automatic eWON Registration
5.1. Principle
It is possible to have an eWON created automatically in Talk2M from the eWON configurationwizard, without using eCatcher.
Note: This method should be used carefully because there is a risk to dump an existing eWONby inadvertently using the same device name. Also one have to make sure that the device nameused is matching a syntax that is understood by the different type of users.
5.2. Activation in the Talk2M account
To activate the Auto-registration function proceed as follows: Open the Talk2M AccountProperties by clicking on the Account button (1). Click on the link Show advanced settings...(2) at the bottom of this window.
Talk2M Pro Account Configuration () Page 17/25
Appendix A - Automatic eWON Registration Chapter 5.
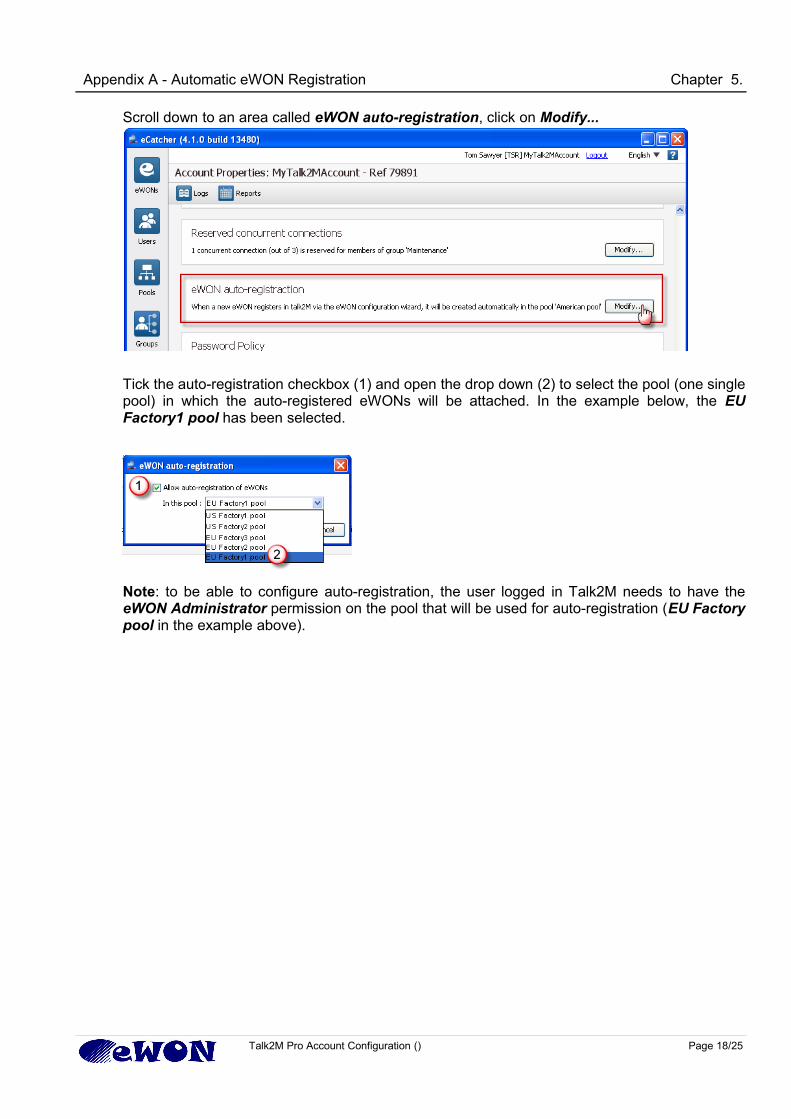
Scroll down to an area called eWON auto-registration, click on Modify...
Tick the auto-registration checkbox (1) and open the drop down (2) to select the pool (one singlepool) in which the auto-registered eWONs will be attached. In the example below, the EUFactory1 pool has been selected.
Note: to be able to configure auto-registration, the user logged in Talk2M needs to have theeWON Administrator permission on the pool that will be used for auto-registration (EU Factorypool in the example above).
Talk2M Pro Account Configuration () Page 18/25
Appendix A - Automatic eWON Registration Chapter 5.
5.3. Configuration of the eWON
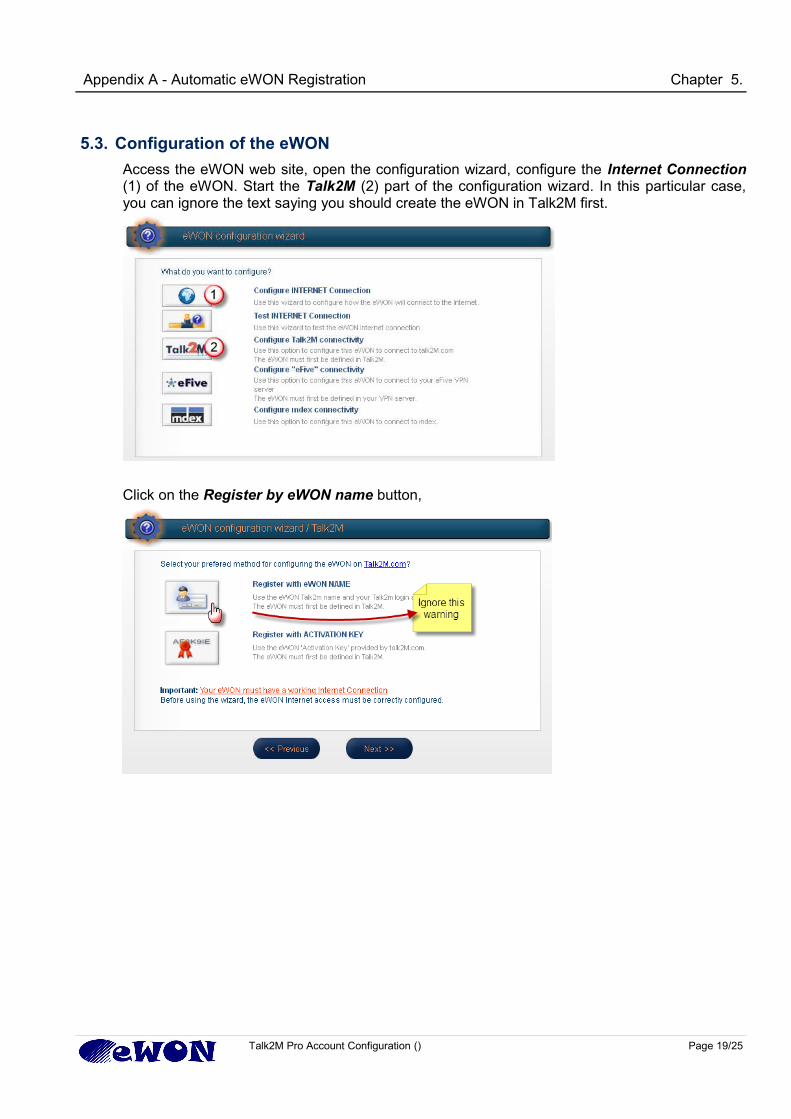
Access the eWON web site, open the configuration wizard, configure the Internet Connection(1) of the eWON. Start the Talk2M (2) part of the configuration wizard. In this particular case,you can ignore the text saying you should create the eWON in Talk2M first.
Click on the Register by eWON name button,
Talk2M Pro Account Configuration () Page 19/25

Appendix A - Automatic eWON Registration Chapter 5.
Fill out the Talk2M registration fields (1) and click Next (2).
Note: Check for correct spelling of your Account Name, User Name ans User Password,otherwise Talk2M will not be able to identify you to complete the auto-registration.
Continue the configuration wizard normally until the test is successful. After completion of thewizard, open your Talk2M account with eCatcher and, in the device list, you will now see theadditional eWON that has Auto created on, date... as description.
If the eWON is not appearing and/or that the test performed during the configuration wizard wasnot successful, it might be for one of the following reasons:
● You did a spelling error either in your Account Name, User Name or User Password● The Talk2M account is not configured to allow Auto-Registration● The registered user does not have the Device Administrator permissions on the group
where new eWONs are supposed to be registered
Talk2M Pro Account Configuration () Page 20/25
Appendix B - Custom Field Names Chapter 6.
6. Appendix B - Custom Field Names
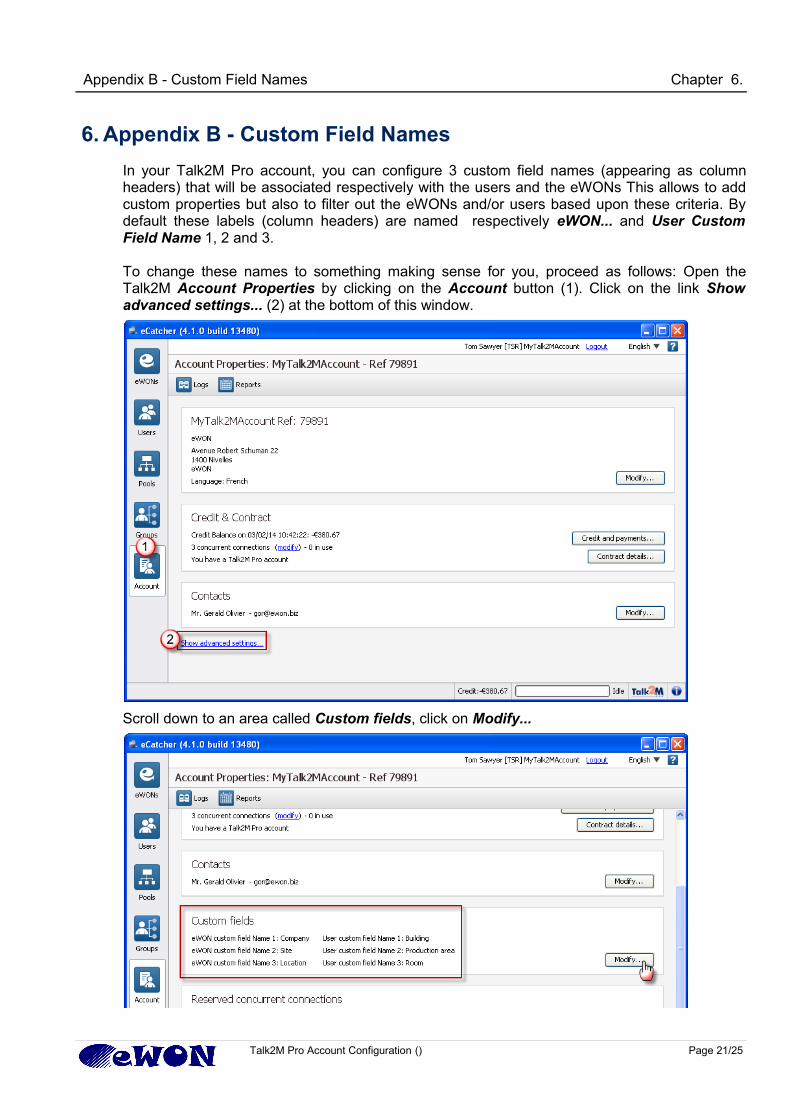
In your Talk2M Pro account, you can configure 3 custom field names (appearing as columnheaders) that will be associated respectively with the users and the eWONs This allows to addcustom properties but also to filter out the eWONs and/or users based upon these criteria. Bydefault these labels (column headers) are named respectively eWON... and User CustomField Name 1, 2 and 3.
To change these names to something making sense for you, proceed as follows: Open theTalk2M Account Properties by clicking on the Account button (1). Click on the link Showadvanced settings... (2) at the bottom of this window.
Scroll down to an area called Custom fields, click on Modify...
Talk2M Pro Account Configuration () Page 21/25
Appendix B - Custom Field Names Chapter 6.
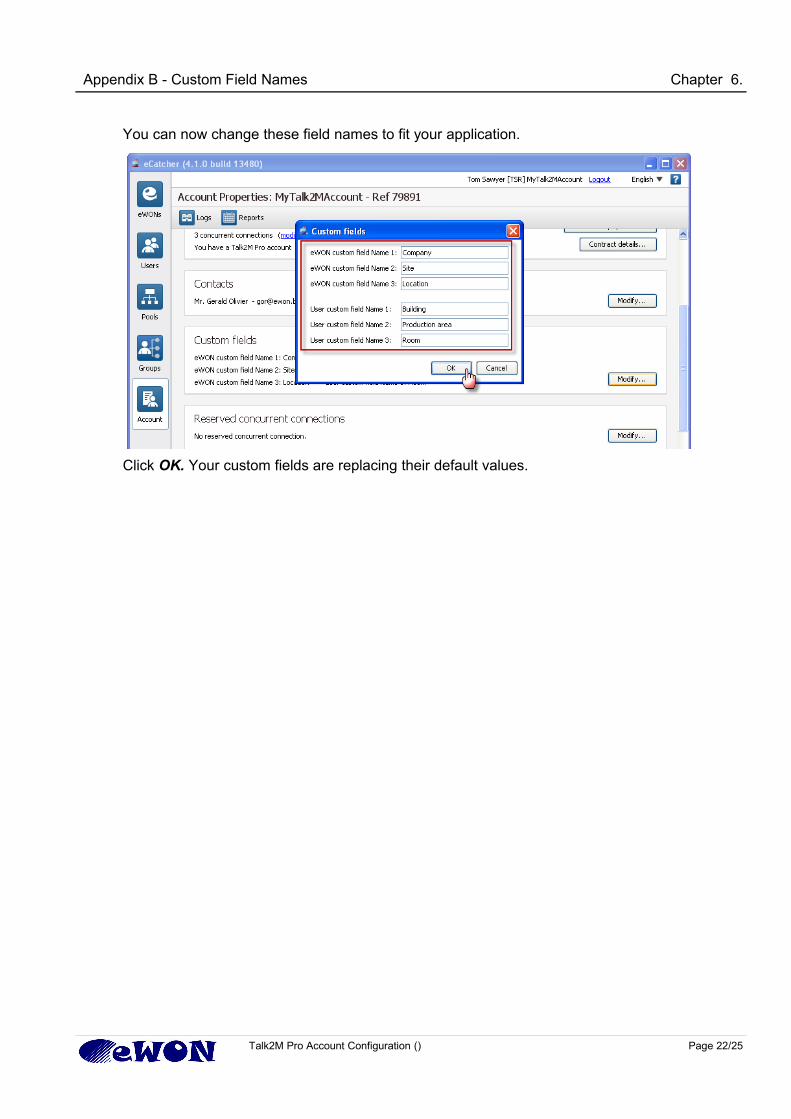
You can now change these field names to fit your application.
Click OK. Your custom fields are replacing their default values.
Talk2M Pro Account Configuration () Page 22/25
Appendix C - Advanced Account Parameters Chapter 7.
7. Appendix C - Advanced Account Parameters
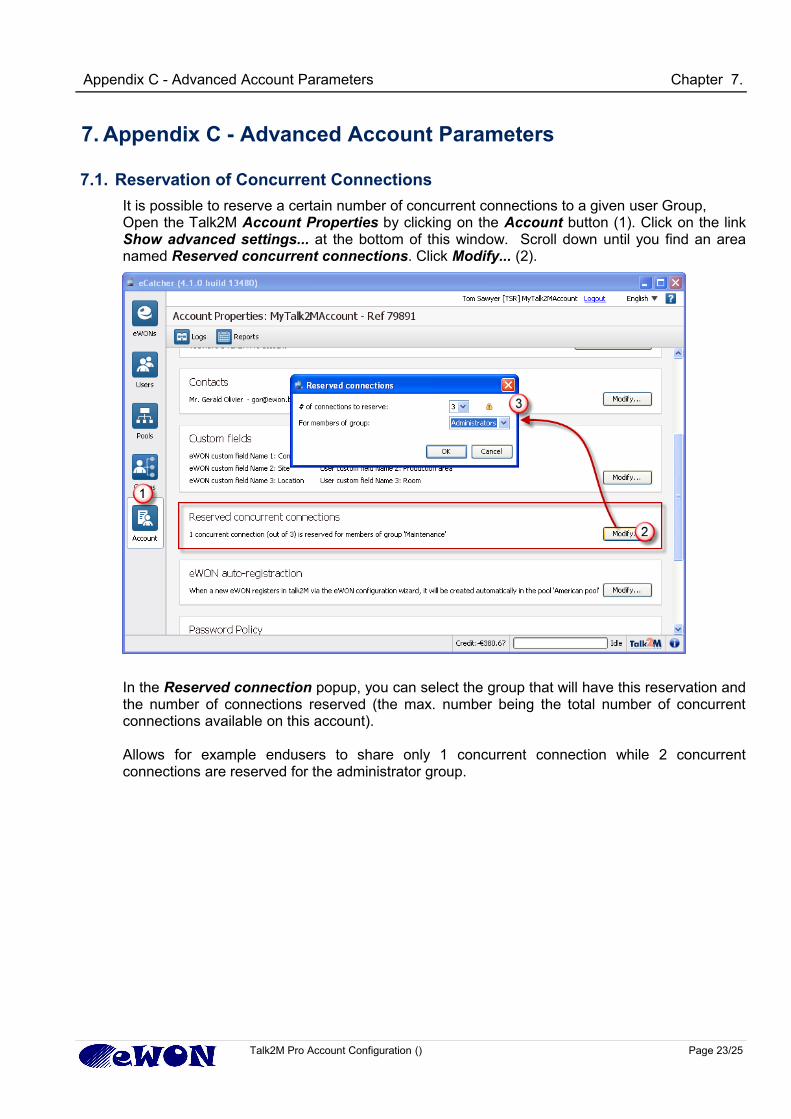
7.1. Reservation of Concurrent Connections
It is possible to reserve a certain number of concurrent connections to a given user Group,Open the Talk2M Account Properties by clicking on the Account button (1). Click on the linkShow advanced settings... at the bottom of this window. Scroll down until you find an areanamed Reserved concurrent connections. Click Modify... (2).
In the Reserved connection popup, you can select the group that will have this reservation andthe number of connections reserved (the max. number being the total number of concurrentconnections available on this account).
Allows for example endusers to share only 1 concurrent connection while 2 concurrentconnections are reserved for the administrator group.
Talk2M Pro Account Configuration () Page 23/25
Appendix C - Advanced Account Parameters Chapter 7.
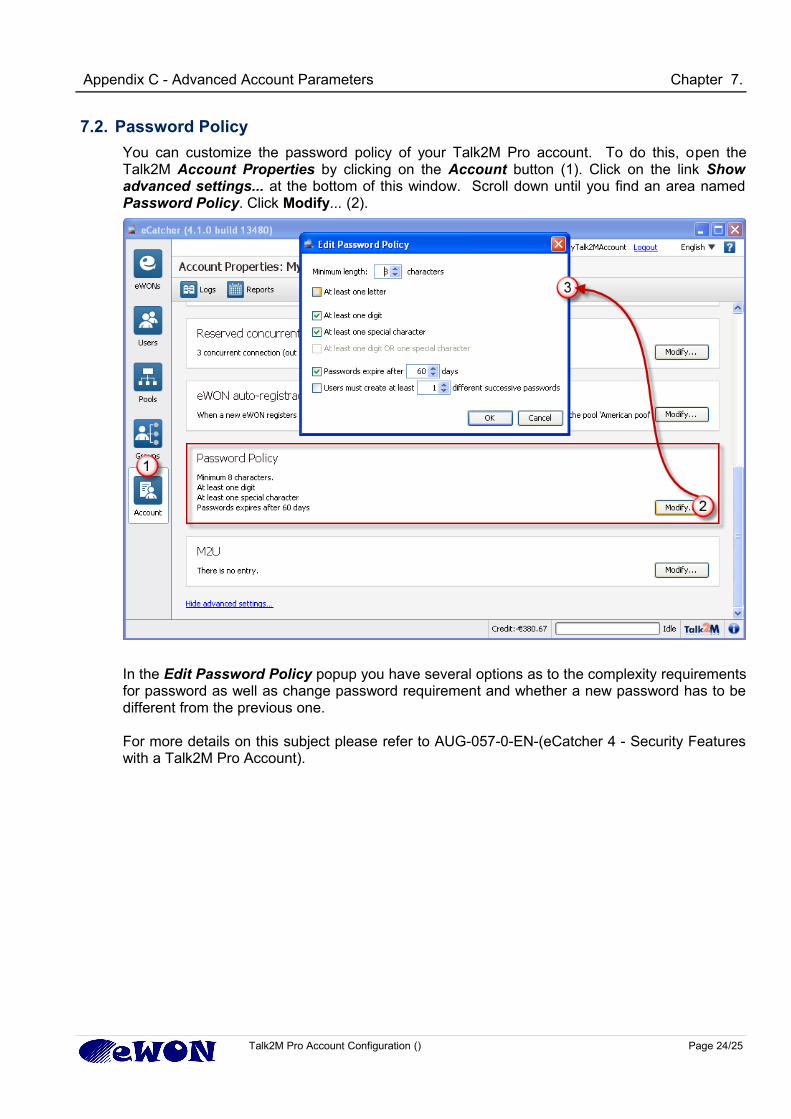
7.2. Password Policy
You can customize the password policy of your Talk2M Pro account. To do this, open theTalk2M Account Properties by clicking on the Account button (1). Click on the link Showadvanced settings... at the bottom of this window. Scroll down until you find an area namedPassword Policy. Click Modify... (2).
In the Edit Password Policy popup you have several options as to the complexity requirementsfor password as well as change password requirement and whether a new password has to bedifferent from the previous one.
For more details on this subject please refer to AUG-057-0-EN-(eCatcher 4 - Security Featureswith a Talk2M Pro Account).
Talk2M Pro Account Configuration () Page 24/25
Revisions
Revision Level Date Description
1.0 04/05/2009 First Release.
2.0 09/07/2012 Update to eCatcher V 3.1
2.1 20/09/2012 Update to eCatcher V 3.2 (roles, screenshots)
3.0 31/01/2014 Update to eCatcher 4
4.0 18/03/2014 Harmonize with the sample structure of TP-RA-014
i Microsoft, Internet Explorer, Windows and Windows XP are either registered trademarks or trademarks of Microsoft Corporation
ii Firefox is a trademark of the Mozilla Foundation
Document build number: 252
Note concerning the warranty and the rights of ownership:
The information contained in this document is subject to modification without notice. The vendor and the authors of this manual are not liable for the errors it may contain, nor for their eventual consequences.
No liability or warranty, explicit or implicit, is made concerning quality, the accuracy and the correctness of the information contained in this document. In no case the manufacturer's responsibility could be called for direct, indirect, accidental or other damage occurring from any defect of the product or errors coming from this document.
The product names are mentioned in this manual for information purposes only. The trade marks and the product names or marks contained in this document are the property of their respective owners.
This document contains materials protected by the International Copyright Laws. All reproduction rights are reserved. No part of this handbook can be reproduced, transmitted or copiedin any way without written consent from the manufacturer and/or the authors of this handbook
eWON sa, Member of ACT'L Group. Subject to change without notice.Talk2M Pro Account Configuration () Page 25/25