Tableau Visual Guidebook - · PDF fileTableau Visual Guidebook ... This document does not...
23
1 Tableau Visual Guidebook Simple Techniques for Making Every Visualization Useful and Beautiful
Transcript of Tableau Visual Guidebook - · PDF fileTableau Visual Guidebook ... This document does not...

1
Tableau Visual Guidebook Simple Techniques for Making Every Visualization Useful and
Beautiful

2
Contents Ask your viz a Question ..............................................................................................................................................3
Perfecting the Big Picture ...........................................................................................................................................4
The power of the dashboard ..................................................................................................................................4
Orienting your views intuitively .............................................................................................................................6
Pie charts – where to and where NOT to use them ...............................................................................................7
Sizing: Making sure your viz is visible .....................................................................................................................8
Emphasize the most important data ................................................................................................................... 10
Make it interactive .................................................................................................................................................. 10
Highlighting your best work ................................................................................................................................ 13
Quick Filters: giving the wheel to your users ...................................................................................................... 13
Actions- filtering in the Major Leagues ............................................................................................................... 14
Hyperlinking and using the power of the web .................................................................................................... 16
Formatting: making your viz shine .......................................................................................................................... 16
Color TV looks better than black and white. So do color vizes ........................................................................... 16
Fonts Can you read this? (Can you read this?) .............................................................................................................. 17
Tooltips tell the story........................................................................................................................................... 18
Make intelligent axes or you’ll just have pretty rectangles ................................................................................ 19
Labeling your viz in all the right places ................................................................................................................ 19
Testing your Masterpiece ........................................................................................................................................ 20
Don’t let your actions get you into trouble ......................................................................................................... 20
Highlighting hijinks .............................................................................................................................................. 21
Wait! Before you publish… ...................................................................................................................................... 21
3
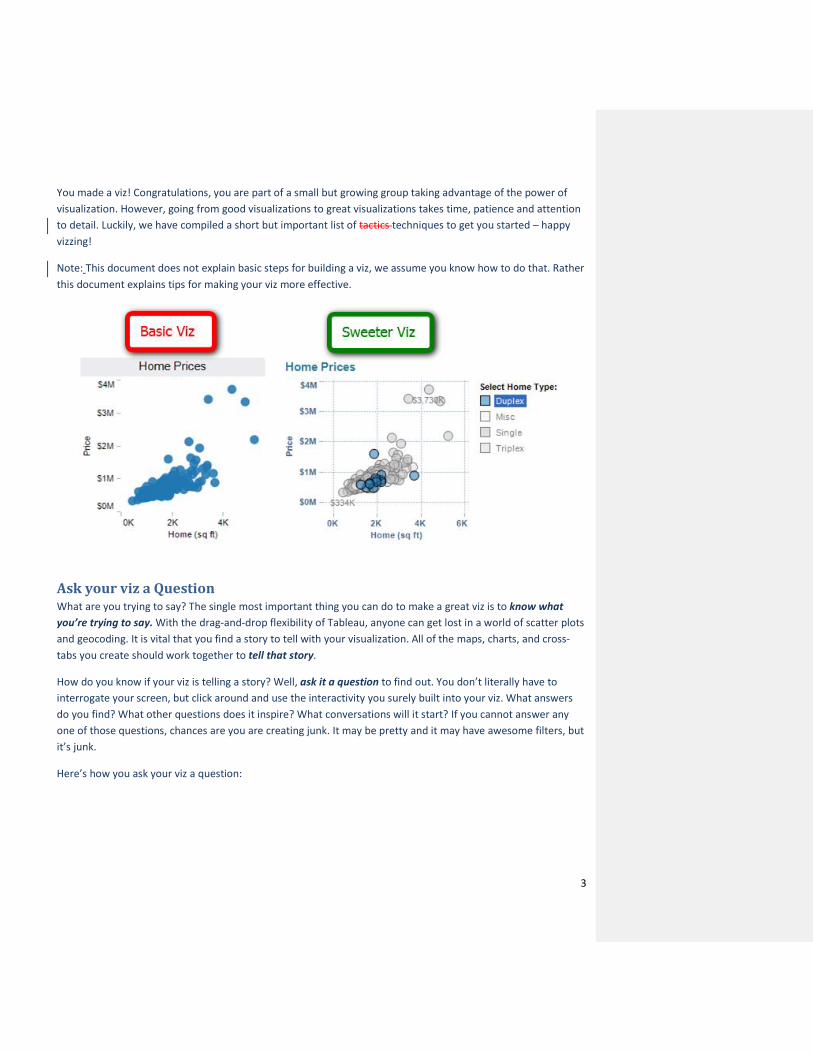
You made a viz! Congratulations, you are part of a small but growing group taking advantage of the power of
visualization. However, going from good visualizations to great visualizations takes time, patience and attention
to detail. Luckily, we have compiled a short but important list of tactics techniques to get you started – happy
vizzing!
Note: This document does not explain basic steps for building a viz, we assume you know how to do that. Rather
this document explains tips for making your viz more effective.
Ask your viz a Question What are you trying to say? The single most important thing you can do to make a great viz is to know what
you’re trying to say. With the drag-and-drop flexibility of Tableau, anyone can get lost in a world of scatter plots
and geocoding. It is vital that you find a story to tell with your visualization. All of the maps, charts, and cross-
tabs you create should work together to tell that story.
How do you know if your viz is telling a story? Well, ask it a question to find out. You don’t literally have to
interrogate your screen, but click around and use the interactivity you surely built into your viz. What answers
do you find? What other questions does it inspire? What conversations will it start? If you cannot answer any
one of those questions, chances are you are creating junk. It may be pretty and it may have awesome filters, but
it’s junk.
Here’s how you ask your viz a question:
4
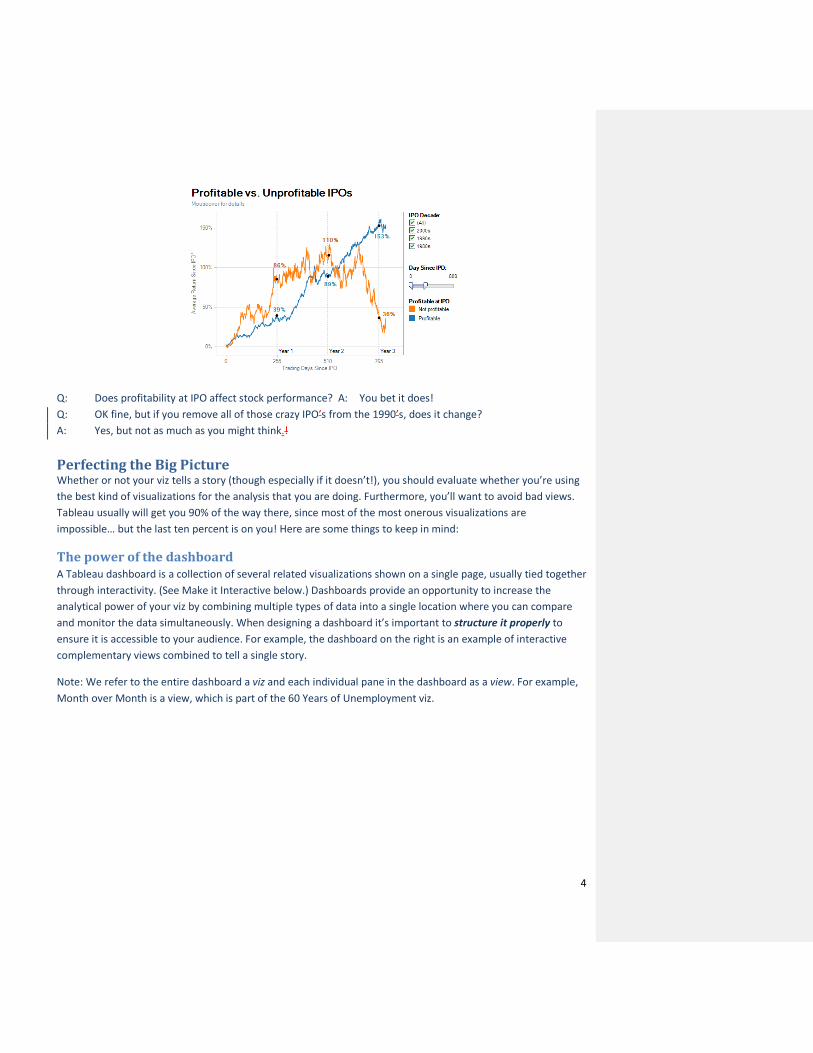
Q: Does profitability at IPO affect stock performance? A: You bet it does!
Q: OK fine, but if you remove all of those crazy IPO’s from the 1990’s, does it change?
A: Yes, but not as much as you might think.!
Perfecting the Big Picture Whether or not your viz tells a story (though especially if it doesn’t!), you should evaluate whether you’re using
the best kind of visualizations for the analysis that you are doing. Furthermore, you’ll want to avoid bad views.
Tableau usually will get you 90% of the way there, since most of the most onerous visualizations are
impossible… but the last ten percent is on you! Here are some things to keep in mind:
The power of the dashboard A Tableau dashboard is a collection of several related visualizations shown on a single page, usually tied together
through interactivity. (See Make it Interactive below.) Dashboards provide an opportunity to increase the
analytical power of your viz by combining multiple types of data into a single location where you can compare
and monitor the data simultaneously. When designing a dashboard it’s important to structure it properly to
ensure it is accessible to your audience. For example, the dashboard on the right is an example of interactive
complementary views combined to tell a single story.
Note: We refer to the entire dashboard a viz and each individual pane in the dashboard as a view. For example,
Month over Month is a view, which is part of the 60 Years of Unemployment viz.

5
Major Guidelines
Think about where you’ve placed the most important view. Generally, when looking at a dashboard,
your eye is first drawn to the upper left corner. Put the most important view or the view that you want
people to interact with at the top or top left if there are two parallel views. In this viz the Home Runs
and Hits view is used to filter the remaining views, so it’s positioned above everything else.

6
Group filters and legends (using a layout container) to the right or bottom of your views. If you have
filters and legends that refer to similar values format the layout container to have a border to increase
the connection between them. For example, the Position, Year, and Games Played filters all refer to
individual player statistics. The light border around these filters adds a subtle visual queue that they are
related.
If your viz has staggered interactivity (first view filters the next view which filters the last view), structure
them top to bottom and left to right so that the final view to be filtered is on the bottom, or bottom
right. For example, because the Home Runs and Hits view filters the others it makes sense it would be
first.
Position legends as close as possible to to the view they describe, unless one color legend applies to the
entire dashboard.
Speaking of color, avoiding using multiple color schemes per dashboard unless there are natural and
independent color schemes in your data.
Generally, keep your dashboards to 2 or 3 views. When you add too many views the big picture can get
lost and it becomes difficult to understand.
Orienting your views intuitively Sometimes, simple changes can go a very long way to making your visualizations easy to interact with. For
example, take a look at the view below:
Did you find it difficult to read? All of the labels are vertically oriented, which is generally difficult to read. If you
find yourself with a view that has long labels that only fit vertically, try rotating the view. You can quickly swap
the fields on the Rows and Columns shelves using the Swap toolbar button.
7
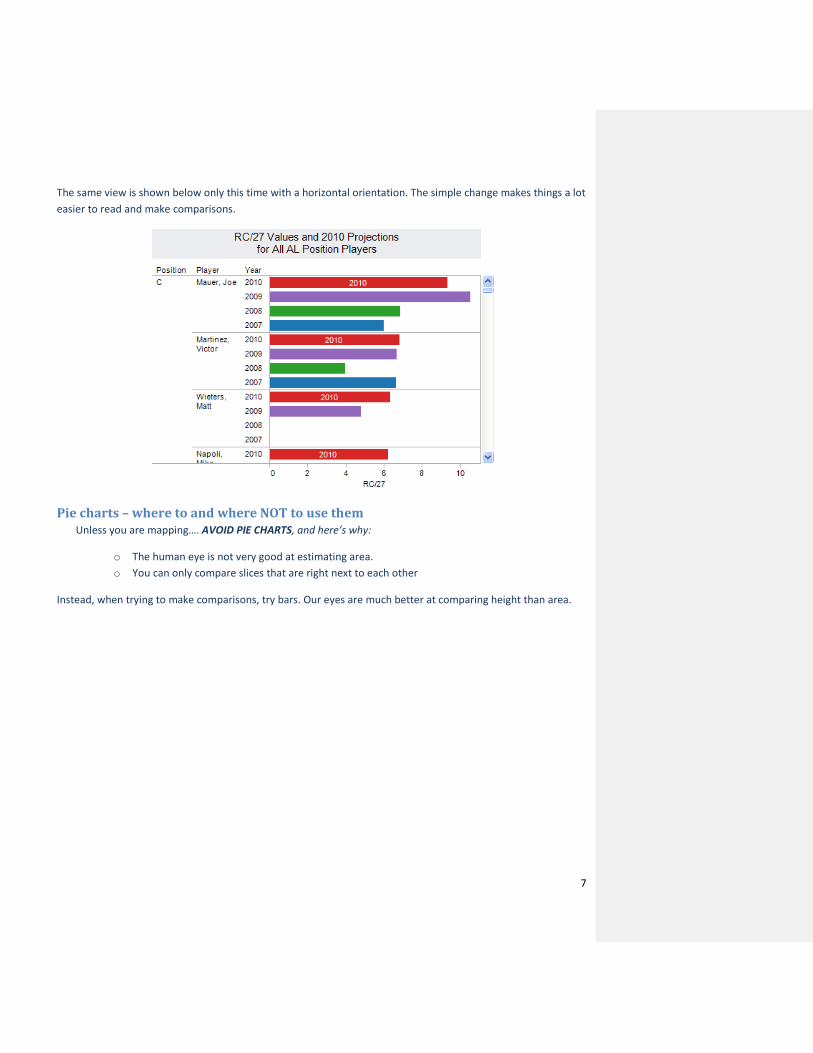
The same view is shown below only this time with a horizontal orientation. The simple change makes things a lot
easier to read and make comparisons.
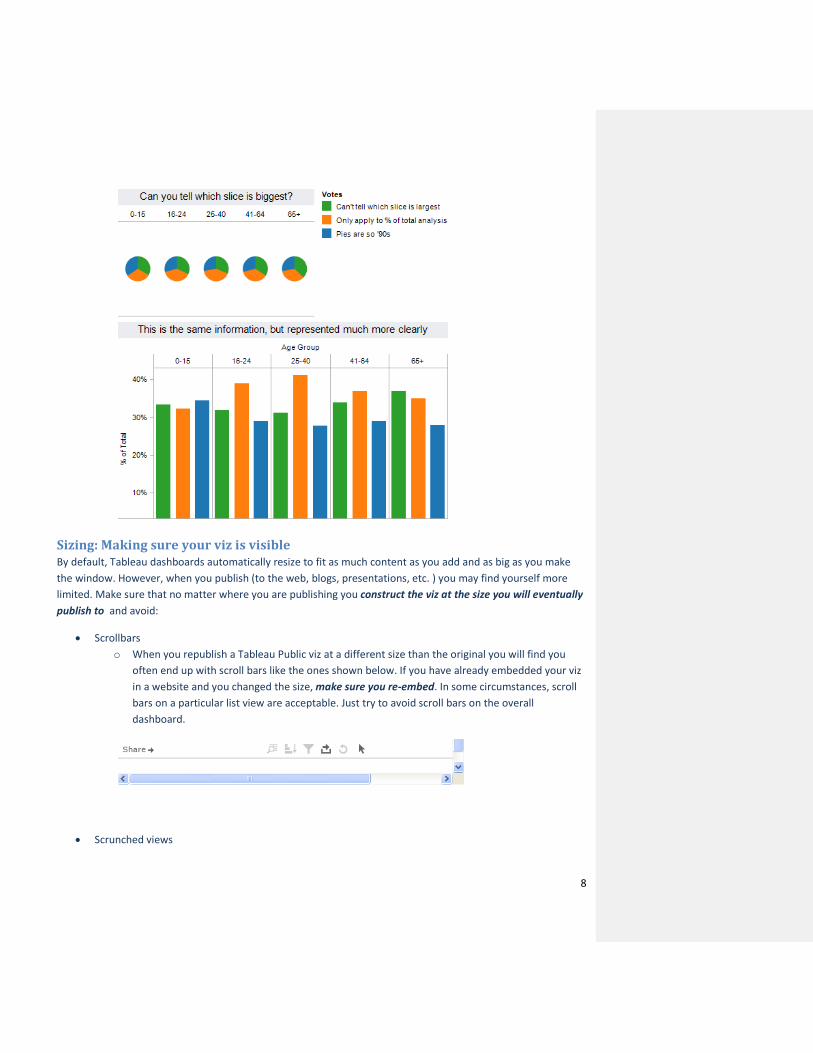
Pie charts – where to and where NOT to use them Unless you are mapping…. AVOID PIE CHARTS, and here’s why:
o The human eye is not very good at estimating area.
o You can only compare slices that are right next to each other
Instead, when trying to make comparisons, try bars. Our eyes are much better at comparing height than area.
8
Sizing: Making sure your viz is visible By default, Tableau dashboards automatically resize to fit as much content as you add and as big as you make
the window. However, when you publish (to the web, blogs, presentations, etc. ) you may find yourself more
limited. Make sure that no matter where you are publishing you construct the viz at the size you will eventually
publish to and avoid:
Scrollbars
o When you republish a Tableau Public viz at a different size than the original you will find you
often end up with scroll bars like the ones shown below. If you have already embedded your viz
in a website and you changed the size, make sure you re-embed. In some circumstances, scroll
bars on a particular list view are acceptable. Just try to avoid scroll bars on the overall
dashboard.
Scrunched views
9
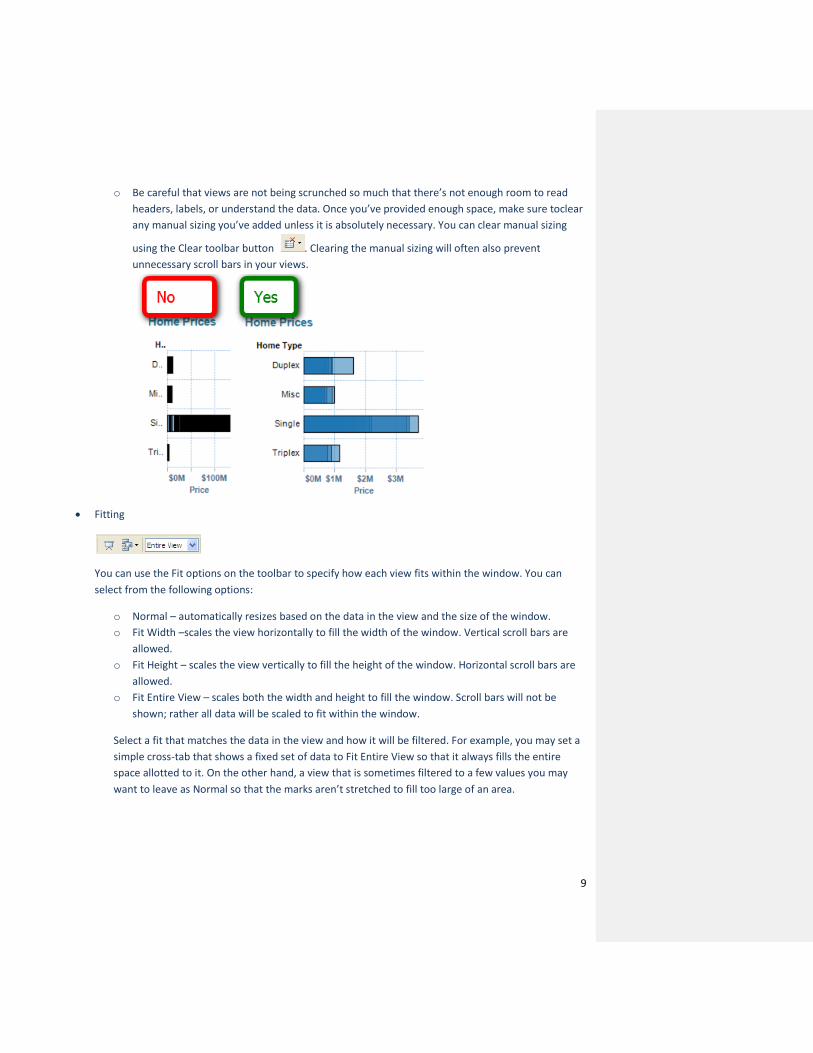
o Be careful that views are not being scrunched so much that there’s not enough room to read
headers, labels, or understand the data. Once you’ve provided enough space, make sure toclear
any manual sizing you’ve added unless it is absolutely necessary. You can clear manual sizing
using the Clear toolbar button . Clearing the manual sizing will often also prevent
unnecessary scroll bars in your views.
Fitting
You can use the Fit options on the toolbar to specify how each view fits within the window. You can
select from the following options:
o Normal – automatically resizes based on the data in the view and the size of the window.
o Fit Width –scales the view horizontally to fill the width of the window. Vertical scroll bars are
allowed.
o Fit Height – scales the view vertically to fill the height of the window. Horizontal scroll bars are
allowed.
o Fit Entire View – scales both the width and height to fill the window. Scroll bars will not be
shown; rather all data will be scaled to fit within the window.
Select a fit that matches the data in the view and how it will be filtered. For example, you may set a
simple cross-tab that shows a fixed set of data to Fit Entire View so that it always fills the entire
space allotted to it. On the other hand, a view that is sometimes filtered to a few values you may
want to leave as Normal so that the marks aren’t stretched to fill too large of an area.
10
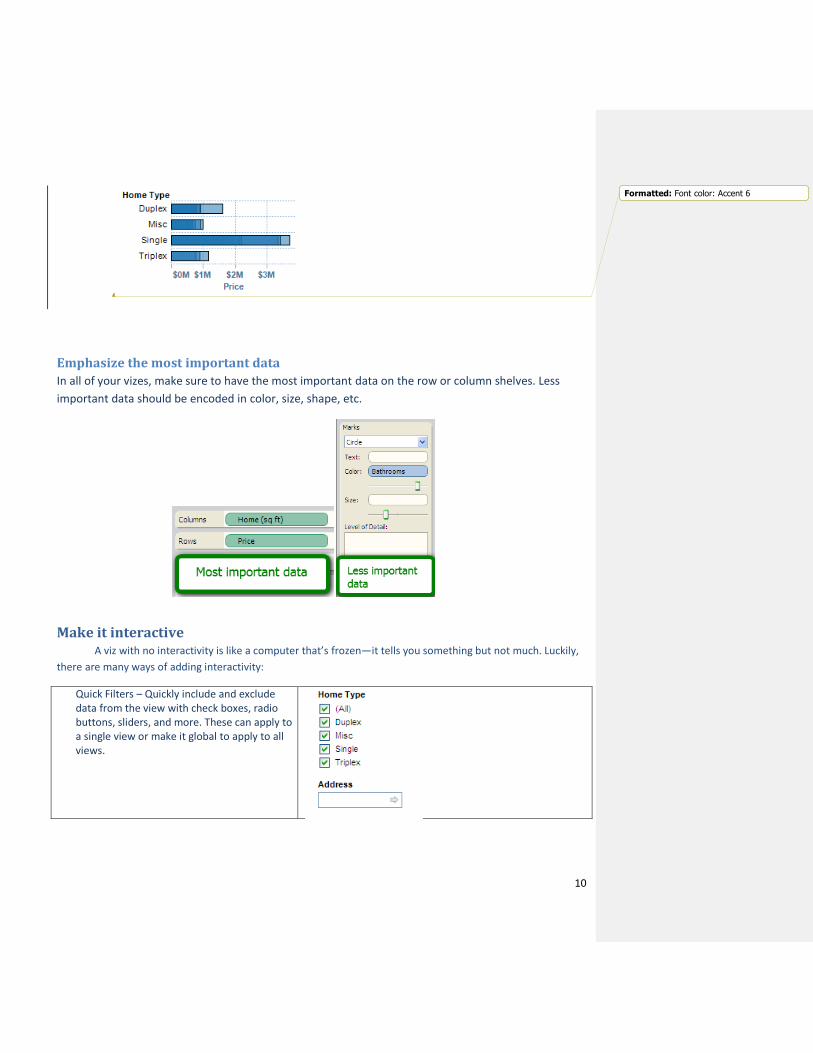
Emphasize the most important data
In all of your vizes, make sure to have the most important data on the row or column shelves. Less
important data should be encoded in color, size, shape, etc.
Make it interactive A viz with no interactivity is like a computer that’s frozen—it tells you something but not much. Luckily,
there are many ways of adding interactivity:
Quick Filters – Quickly include and exclude data from the view with check boxes, radio buttons, sliders, and more. These can apply to a single view or make it global to apply to all views.
Formatted: Font color: Accent 6

11
Color Legend Highlighting - Call attention to specific values by selecting a value in the color legend.
Actions
o Highlighting – highlight related data based on selections in a particular view.
o Filtering - filter views based on selections in a particular view.
o Hyperlinks – link to external
resources and webpages
Tooltips – show more details and instruction in the tooltips
Dynamic Data Labels – label marks based on selections, highlighting, and min/max.
Even the simple visualization below benefits from color legend highlighting.

12
Another thing to note is that the visualization suggests interactivity. The Legend is named “Highlight Decade”,
which informs the viewer that they can interact with it.
Whatever interactivity you have built into your viz, make sure the viewer knows they can interact with it and
understands where to look for the changes their interaction will bring about. The sub-headings of the views
below instruct (“Select”) and inform (“to view details”).

13
Highlighting your best work
Highlighting related data in across multiple views lets you quickly compare values. Think about your
reader: what are they going to be interested in? What parts of your viz will they want to click and
highlight?
Legend highlighting:
o The easiest way to highlight is with legend highlighting. Simply click the icon in
the top right of any color legend on a viz and you can highlight related data
simply by clicking on it anywhere in the viz or legend.
Highlighting:
o Use the Highlight option on the toolbar to select specific data to highlight across
views. Think about what’s most important to highlight.
Quick Filters: give the wheel to your users Tableau allows you to do some amazing (yes, AMAZING) things with filters. However, filters can also be a very
good way of confusing your audience, so make sure to pay attention to the following. Quick filters let your
viewers dig in and engage with the data. They can use them to narrow the scope of the viz or identify changes
and make comparisons. Here are some tips on using quick filters effectively.
Global or local filters
Quick filters can apply to a single view in a dashboard (local) or all of the views at once
(global). Use the card menu for the quick filter to switch between global and local filters.
If you are filtering by country and every view has country as one of its dimensions, then you
should probably use a global filter. It would be confusing to see one portion of the
dashboard filtered down to Austria and New Zealand, but have everything else still showing
the entire world.
14
Not all filters have to be quick filters that are exposed to your audience. For example, a common
way to clean up extraneous data is to exclude null values. That’s a filter that you probably don’t
want to show as a quick filter.
Ordering of values
Make sure the values in the quick filter are in an order that makes sense for the data. Fro
example, instead of listing classes alphabetically, you probably should list them Freshman,
Sophomore, Junior, Senior. You can specify the order of a quick filter by setting the default
sort order for the field.
All and single quick filters
Should users be able to select “All” in your filter? Or just go to one value? Tableau lets you
do both. Figure out which makes sense, and set filter settings accordingly.
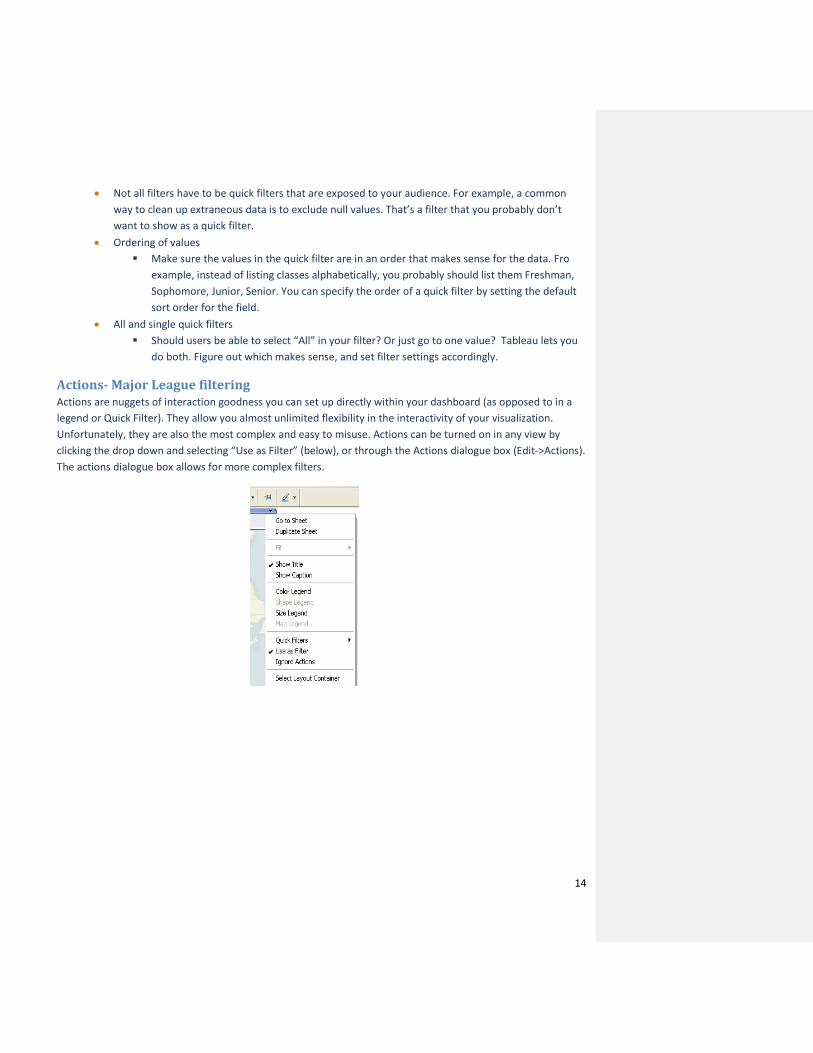
Actions- Major League filtering Actions are nuggets of interaction goodness you can set up directly within your dashboard (as opposed to in a
legend or Quick Filter). They allow you almost unlimited flexibility in the interactivity of your visualization.
Unfortunately, they are also the most complex and easy to misuse. Actions can be turned on in any view by
clicking the drop down and selecting “Use as Filter” (below), or through the Actions dialogue box (Edit->Actions).
The actions dialogue box allows for more complex filters.
15
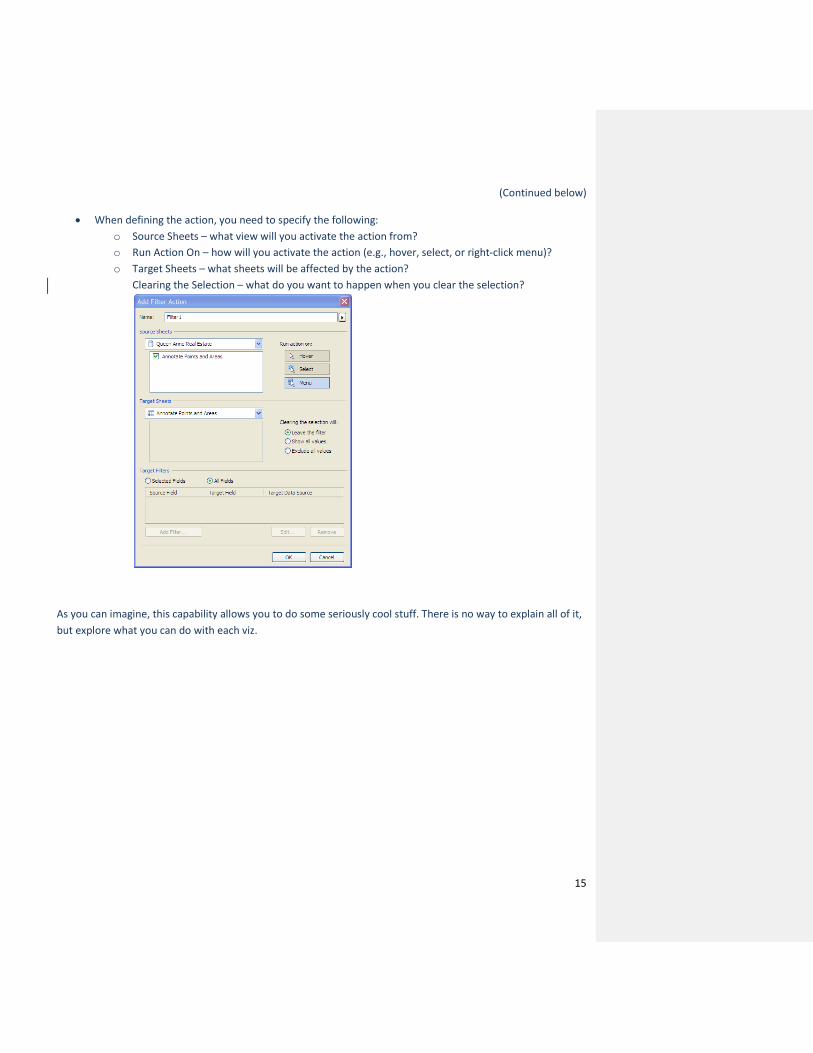
(Continued below)
When defining the action, you need to specify the following:
o Source Sheets – what view will you activate the action from?
o Run Action On – how will you activate the action (e.g., hover, select, or right-click menu)?
o Target Sheets – what sheets will be affected by the action?
Clearing the Selection – what do you want to happen when you clear the selection?
As you can imagine, this capability allows you to do some seriously cool stuff. There is no way to explain all of it,
but explore what you can do with each viz.

16
Hyperlinking and using the power of the web
URL action is a hyperlink that points to a Web page, file, or other web-based resource outside of Tableau. You
can use URL actions to link to more information about your data that may be hosted outside of your data
source. To make the link relevant to your data, you can substitute field values of a selection into the URL as
parameters. For example, say you have a list of Twitter users that are encoded in your data as the field
<username>. You can create a URL Action that points to www.twitter.com/<username> and triggering that
action will open the selected user’s profile in a webpage. The link can open a new webpage or load in a web
object directly in the dashboard. Nice!
Formatting: making your viz shine Although it seems simple, formatting your fonts, colors, tool-tips, viz sizing and the orientation of your
views can change everything. This is also the most nit-picky part of making a viz; oftentimes the only way to
succeed is through trial and error. Rest assured if you put your mind to it and follow these steps, you will have a
great looking viz.
Color TV looks better than black and white. So do color vizes Color can be the difference between a boring viz and an inspiring one.
If you are using color, use one of the default Tableau color schemes. They are custom chosen to match
and not clash.

17
Try to use no more than two color palettes. Make sure to use non-overlapping scales like the ones
shown below.
The default title color (the grey shown below) can be changed to white, or a light color that does not
clash with your other schemes.
When using colors that have an inherent meaning, make sure you’ve assigned them to the correct
values in your database. For example, in many cultures Green is associated with good or positive while
red is associated with bad or negative. Consider whether the colors you’ve assigned have alternate
meanings that do not align with your message.
If the color meaning isn’t obvious (red=hippos?) then make sure to include a legend.
When using a diverging color palette, the midpoint and end points should be meaningful. Zero is often a
meaningful midpoint.
Avoid adding color encodings with more than 12 distinct values.
Fonts Can you read this? (Can you read this?) Although there are dozens of fonts available in Tableau, for best performance on desktop, on server and online,
there are only a few that you will want to use. The following are the winners narrowed down by our resident viz-
wizards:
Trebuchet MS or Verdana o Especially for tables/numbers
Arial
Tahoma Times New Roman
Lucida sans NOT Calibri or Cambria unless in tooltips (See below)
Also, do not forget the color of your fonts. As a general rule, axes and labels should be dark grey as opposed to
the default black so they do not distract from the viz. Quick filter titles should be a different color than the axes
Formatted: Font color: Text 2
18
and bold to indicate that they are common objects but distinct from the view. Try to keep it to 2-3 (Font) colors
per page.
If you use different fonts and styles, make sure to check back over your viz after you are done and verify that
similar parts of your visualization have the same formatting. For instance, all the filters should be the same style,
and all the titles should be the same style (though perhaps different from the filters).
Lastly, never change adjacent fonts by more than one attribute (Size, Bold, Italic, Underline, Color, Serif).
Good Change Bad Change
Tooltips tell the story Tooltips are the text boxes that pop up when you hover over an object and they can make the difference
between a user loving your viz and not understanding it. In Tableau 5.1 and associated products, they can be
formatted in almost any way you can imagine. However, the base tool tip that Tableau displays usually needs a
great deal of work (We know! We’re working on it.). To edit the tooltip, go to edit and then select Tooltip at the
bottom.
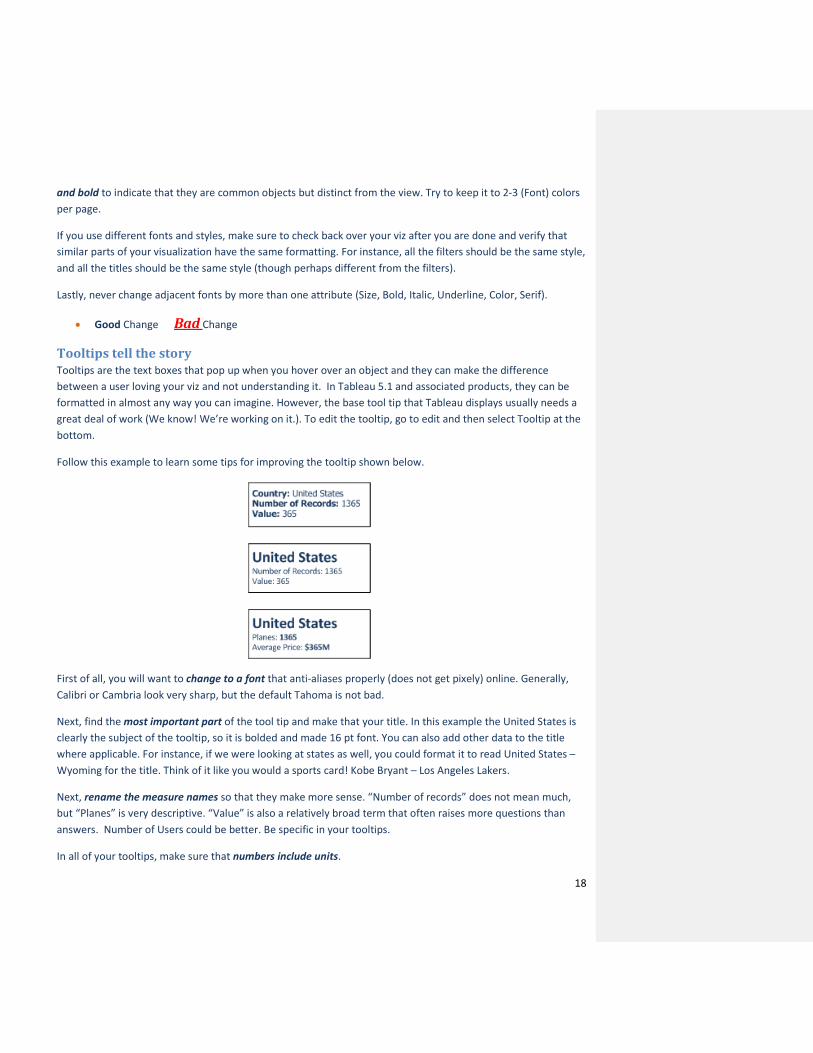
Follow this example to learn some tips for improving the tooltip shown below.
First of all, you will want to change to a font that anti-aliases properly (does not get pixely) online. Generally,
Calibri or Cambria look very sharp, but the default Tahoma is not bad.
Next, find the most important part of the tool tip and make that your title. In this example the United States is
clearly the subject of the tooltip, so it is bolded and made 16 pt font. You can also add other data to the title
where applicable. For instance, if we were looking at states as well, you could format it to read United States –
Wyoming for the title. Think of it like you would a sports card! Kobe Bryant – Los Angeles Lakers.
Next, rename the measure names so that they make more sense. “Number of records” does not mean much,
but “Planes” is very descriptive. “Value” is also a relatively broad term that often raises more questions than
answers. Number of Users could be better. Be specific in your tooltips.
In all of your tooltips, make sure that numbers include units.
19
Tooltips are a great place to add annotations or notes for the viz. (e.g. *This data point for 2009 only) It is best to
format notes slightly different from the rest of your tooltip, perhaps with a lighter shade and slightly smaller
font.
.
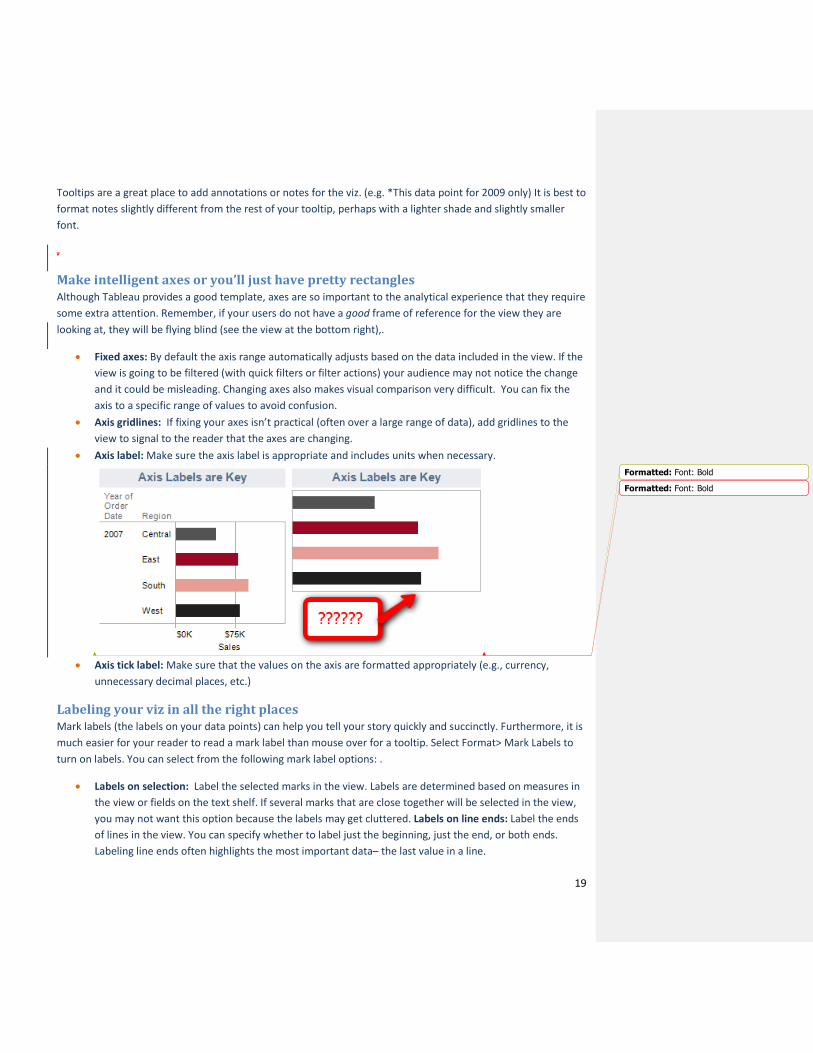
Make intelligent axes or you’ll just have pretty rectangles Although Tableau provides a good template, axes are so important to the analytical experience that they require
some extra attention. Remember, if your users do not have a good frame of reference for the view they are
looking at, they will be flying blind (see the view at the bottom right),.
Fixed axes: By default the axis range automatically adjusts based on the data included in the view. If the
view is going to be filtered (with quick filters or filter actions) your audience may not notice the change
and it could be misleading. Changing axes also makes visual comparison very difficult. You can fix the
axis to a specific range of values to avoid confusion.
Axis gridlines: If fixing your axes isn’t practical (often over a large range of data), add gridlines to the
view to signal to the reader that the axes are changing.
Axis label: Make sure the axis label is appropriate and includes units when necessary.
Axis tick label: Make sure that the values on the axis are formatted appropriately (e.g., currency,
unnecessary decimal places, etc.)
Labeling your viz in all the right places Mark labels (the labels on your data points) can help you tell your story quickly and succinctly. Furthermore, it is
much easier for your reader to read a mark label than mouse over for a tooltip. Select Format> Mark Labels to
turn on labels. You can select from the following mark label options: .
Labels on selection: Label the selected marks in the view. Labels are determined based on measures in
the view or fields on the text shelf. If several marks that are close together will be selected in the view,
you may not want this option because the labels may get cluttered. Labels on line ends: Label the ends
of lines in the view. You can specify whether to label just the beginning, just the end, or both ends.
Labeling line ends often highlights the most important data– the last value in a line.
Formatted: Font: Bold
Formatted: Font: Bold

20
Labels on highlight: Label the highlighted marks in the view. Labels on min/ max: Label the outliers by marking the minimum and maximum values in the view.
Testing your Masterpiece As you have no doubt followed every word of advice in the previous pages, you now have an
interactive, beautiful visualization. However, this great creation comes with a great responsibility…
testing! Beauty means nothing without function in the viz world and you definitely don’t want your
users’ first click to clear everything on the page.
Don’t let your actions get you into trouble
As you learned in the actions section, you can create some seriously complicated interactivity. You will
want to test your viz for the following to avoid leading your users off a cliff:
Does the action perform the task it was intended to?
o Does it filter/highlight sheets it was not intended to?
o Does it filter/highlight fields it was not intended to?
o Does it filter/highlight at all?
Does the view become confusing easily?
o If you have two sheets that both filter each other, often you can get into confusing
views very quick
Generally, make sure your filters go in one direction and don’t conflict with each
other.
o Do pages or views often become blank?
Do you have “Clear on Deselect” checked in the action dialog box?

21
When you publish, there should not be any blank (completely excluded) views
Highlighting hijinks
Although less complex than actions, highlighting can still be very confusing. Click everything to make
sure that your highlighting happens as you expect it to… and that it actually happens at all. One thing
to be especially careful of when publishing to the web is that your color legends have highlighting
turned on, otherwise they will just be legends.
Wait! Before you publish… You thought you were done! Not so fast… now that you have polished your viz to a shine, it deserves
one last look over. This is both to enjoy your handiwork, and make sure that the big picture wasn’t lost
in all of the nitty gritty and also that you remembered the nitty gritty.
Does your view make sense?: Pages 3-4 o Can you “get” the viz in 30 seconds or less, without other explanation? o Can you ask the viz a question? o Is it clear what the reader should do? o Is the purpose of the viz documented in the title or surrounding text? o Do you have legends? o Did you mention your source in your viz and include a link to the website (if applicable)? o Do you describe the data and explain any calculations?
22
o Do you have a title? Is that title simple, informative and eye-catching? Subtitle: Look what journalists do with sub titles! Brilliant! Should we mess with 800
years of careful iteration by the world’s greatest authors? I suggest we follow along. Use a subtitle to explain your viz.
Make sure subtitles are formatted to be subservient (smaller, unbold) than the main title.
Structure: Pages 4-10 o Walk 10 feet away and look at your viz. What stands out?
If your eye is drawn to something that isn’t vital you may be off track o Make sure your most important data is on rows or columns o Do you use a dashboard? If so does it…
Have the most important view in the top left? Have the filters/legends on the bottom or right hand side? Have the views which are meant to be interacted with on the top?
o Three views to a viz max
Interactivity: Pages 10-15 o You should use at least one of the following
Quick Filters Highlighting (almost every view can use highlighting, even if only legend highlighting) Filtering Hyperlinking
o It should be OBVIOUS what interactivity you have added to the viz, and what the user should do to use it.
o Sorting
Make sure your sort order is obvious or explained
If it is a bar chart, make sure there is a column that includes the measure that you
sorted by
Formatting: Pages 16-19 o Do your axes/labels/everything have human-readable names? (NOT “Value” or Sum(Apples)) o Do your axes/labels/everything have a reasonable number of decimals (not 1.00000) o Do your mark labels come on when you expect them to? o Do your mark labels make sense without an explanation? o Do your Quick Filters have titles as commands (“Select a Team:”)? o Does it have color? o Are you using only approved fonts? (No, you can’t fudge this just once and use old English for a
baseball viz! Nice try…) o Have you fixed up your tooltips so they are AMAZING, simple and easy to understand? o Is there a written explanation of what the viewer is looking at? o are all sheets and documents named (NOT Sheet1, etc)? o
Testing: Pages 19-21 o Do all of your actions work as you would expect?
Filters are global/local as they should be Interactivity works as expected Do your annotations go haywire when you try to interact? Click and test for a while…
can you get yourself into crazy views that do not make sense?

23
o When you publish, do all of your tooltips, titles, headers and labels look as you intended them to?
o When you publish, do you get scrollbars in an area you did not expect? o When you publish, is there a blank view that is unexplained? None of your views should be
completely excluded.