Table of Contents - Ink it Up With Jessica
39
Transcript of Table of Contents - Ink it Up With Jessica


©2014 Ink It Up with Jessica Taylor Images © Stampin’ Up!®
1
Table of Contents
CHAPTER 1 – CARDS 1. Fluttering Butterflies Card..........................................................................................................4
2. Floral Happy Mother’s Day Card................................................................................................5
3. Easter Wishes Card.....................................................................................................................6
4. Yellow Tulips Mother’s Day Card...............................................................................................8
5. Framed Tulips Easter Card........................................................................................................10
6. Z-Fold Tulips Easter Card..........................................................................................................11
7. Celebrate Today Oval Frame Card............................................................................................12
CHAPTER 2 – GIFTS AND DÉCOR 1. Papaya Collage Post-It Note Holder.........................................................................................15
2. Wonderful Watercolor Bookmark............................................................................................16
3. SPRING Wreath.........................................................................................................................17
4. “You Make Me HAPPY” Soap Dispenser...................................................................................19
5. This and That Picture Album (Brag Book) ................................................................................20
6. Say “HELLO” to Spring Note Cards in Bag.................................................................................21
7. Blooming Flower Pot (Grandma’s Garden) ..............................................................................23
8. Butterfly Candle........................................................................................................................25
9. Antiqued Picture Frame............................................................................................................26

©2014 Ink It Up with Jessica Taylor Images © Stampin’ Up!®
2
CHAPTER 3 – GIFT BAGS/BOXES
1. Apothecary Art White Gift Bag.................................................................................................28
2. A Friendly “HELLO” Tag a Bag Gift Bag.....................................................................................30
3. “HELLO” Spring Kraft Gift Bag...................................................................................................31
4. Papaya Collage Canvas Bag………………………………………………………………………………………………….32
CHAPTER 4 – EASTER
1. SomeBunny Loves You! S’More Bag.........................................................................................34
2. Bunny Gift Bag..........................................................................................................................36
3. Easter Basket............................................................................................................................37

©2014 Ink It Up with Jessica Taylor Images © Stampin’ Up!®
3
Chapter 1 Cards
©2014 Ink It Up with Jessica Taylor Images © Stampin’ Up!®
4
Fluttering Butterflies Card
Stamps: Papillon Potpourri and Four You Stamp Sets
Ink: VersaMark Pad
Card Stock: Whisper White, Pool Party, So Saffron & Pink Pirouette; Quatrefancy Designer Series Paper
Accessories: Iridescent Ice Stampin’ Embossing Powder, Heat Tool, Elegant Butterfly Punch, Bitty
Butterfly Punch, Jewels Basic Rhinestone, SNAIL Adhesive, Stampin’ Dimensionals
Card Stock Dimensions: Quatrefancy 4”x12”, Whisper White 3 ¾”x5 ¾”, Pool Party 7”x5 ½”
Instructions:
1. Score Pool Party card stock at 3 ½” on the 7” side and fold to create a card base. Stamp “hello” (or
other greeting) in VersaMark on inside of card. Stamp butterflies in VersaMark on front of card.
Adhere Pool Party card to Whisper White card stock using SNAIL Adhesive.
2. Score Quatrefancy at 6” on the 12” side. Adhere Whisper White card stock with Pool Party card to
center of one half of Quatrefancy with SNAIL Adhesive. Fold over Quatrefancy.
3. Stamp large butterfly in VersaMark on So Saffron card stock. Emboss using Iridescent Ice Stampin’
Embossing Powder and Heat Tool. Punch out (after cooling) with Elegant Butterfly Punch. Punch out
another So Saffron butterfly. Use SNAIL Adhesive to attach centers of butterflies. Place three
Rhinestones in center of top butterfly. Attach to front of card with Stampin’ Dimensional.
4. Stamp small butterfly in VersaMark on Pink Pirouette card stock. Embossing using Iridescent Ice and
Heat Tool. Punch out with Bitty Butterfly Punch. Punch out another Pink Pirouette butterfly. Use
SNAIL Adhesive to attach centers of butterflies. Place two Rhinestones in center of top butterfly.
Attach to front of card with Stampin’ Dimensionals.

©2014 Ink It Up with Jessica Taylor Images © Stampin’ Up!®
5
Floral Happy Mother’s Day Card
Stamps: Apothecary Art and Teeny Tiny
Wishes Stamp Sets
Ink: Early Espresso, Calypso Coral, So Saffron
& Garden Green Classic Stampin’ Pad
Card Stock: Very Vanilla, Calypso Coral and So
Saffron
Accessories: Blender Pen, Big Shot, Magnetic
Platform, Labels Collection Framelits,
Beautifully Baroque Embossing Folder,
Stamping Sponge, Victoria 5/8” Crochet Trim,
Stamp-a-ma-jig, Stampin’ Dimensionals, Snail
Adhesive
Dimensions: Calypso Coral 4” x 5-1/4”,
So Saffron 4-1/4” x 11” scored at 5-1/2”
Instructions:
1. Fold So Saffron card stock in half to create card base.
2. Place bottom portion of Calypso Coral card stock in Beautifully Baroque Embossing Folder. Big Shot
Sandwich: Multi-Purpose Platform both tabs open – Cutting Pad – Embossing Folder – Cutting Pad.
3. Wrap Victoria 5/8” Crochet Trim around embossed Calypso Coral card stock to cover seam of
embossing and tape ends to back with Snail Adhesive. Tape Calypso Coral card stock to So Saffron
card front using Snail Adhesive.
4. Stamp Apothecary Art frame in Early Espresso ink on Very Vanilla card stock. Stamp greeting in
center with Early Espresso ink using the Stamp-a-ma-jig for perfect placement. Cut out with the 3rd
Label Framelit from the center. Big Shot Sandwich: Magnetic Platform – Clear Cutting Pad –
Stamped Card Stock – Framelit ridged side down centered around image – Clear Cutting Pad.
5. Color flowers and the lines above and below the greeting in with Calypso Coral, So Saffron and
Garden Green ink. Squeeze the lid of the ink pad down so that ink pools in the lid. Pick up the ink
with the blender pen to color. Clean blender pen off on scratch paper in between colors.
6. Sponge around edges of label with So Saffron ink.
7. Attach label to card front using Stampin’ Dimensionals.

©2014 Ink It Up with Jessica Taylor Images © Stampin’ Up!®
6
Easter Wishes Card
Stamps: Apothecary Art Stamp Set and Blessed Easter Stamp
Ink: Calypso Coral Stampin’ Write Marker; So Saffron Classic Stampin’ Pad
Card Stock: Very Vanilla, Pool Party, Calypso Coral and So Saffron
Accessories: Big Shot, Magnetic Platform, Labels Collection Framelits, Paper-Piercing Tool, Stampin'
Pierce Mat, Festive Paper-Piercing Pack, Stamping Sponge, Victoria 5/8” Crochet Trim, Itty Bitty Shapes
Punch Pack, Subtles Candy Dots, Paper Snips, Craft Scissors, Stamp-a-ma-jig, Stampin’ Dimensionals,
Snail Adhesive, Sticky Strip, Mini Glue Dots
Dimensions: So Saffron 4” x 5-1/4”, Pool Party 5-1/2” x 8-1/2” scored at 4-1/4”
Instructions:
1. Fold Pool Party card stock in half to create card base.
2. Sponge So Saffron ink all over So Saffron card stock using a dabbing motion to create a patterned
background. Sponge So Saffron ink around edges of So Saffron card stock. Adhere to front of Pool
Party card with Snail Adhesive.
3. Trim Victoria Crochet Ribbon down to size with Craft Scissors. Lay a short line of Stick Strip along
center of card to adhere Victoria Crochet Ribbon to front.

©2014 Ink It Up with Jessica Taylor Images © Stampin’ Up!®
7
4. Ink outline of label stamp and flowers up with the brush-tip of the Calypso Coral marker. Stamp on
Very Vanilla card stock. (Note: A marker is used to omit the center lines of the label stamp.)
5. Use the Calypso Coral marker to ink up just the words on the Blessed Easter Stamp. Using the
Stamp-a-ma-jig for perfect placement, stamp in the center of the label.
6. Cut out with the 2nd Label Framelit from the center. Big Shot Sandwich: Magnetic Platform – Clear
Cutting Pad – Stamped Card Stock – Framelit ridged side down centered around image – Clear
Cutting Pad. Sponge edges with So Saffron ink.
7. Cut out Pool Party card stock with the 3rd Label Framelit from the center using the same Big Shot
Sandwich. Lay the Pool Party label down on the Stampin’ Pierce Mat. Center Label Template over
top and use Paper-Piercing Tool to poke holes all around the label.
8. Tape Easter greeting label to Pool Party label using Snail Adhesive. Adhere Pool Party label to card
front with Stampin’ Dimensionals.
9. Punch a small scallop circle out of Calypso Coral card stock. Use your Paper Snips to make small cuts
in between the scallops. Fluff up a bit with your fingers. Adhere to center of floral design on card
with a mini glue dot. Add a So Saffron candy dot to the center of the scallop circle flower.
Simply change the
greeting on any of these
spring cards to use them
for any occasion!

©2014 Ink It Up with Jessica Taylor Images © Stampin’ Up!®
8
Yellow Tulips Mother’s Day Card
Stamps: Teeny Tiny Wishes Stamp Set and Blessed Easter Stamp
Ink: Jet Black StazOn Pad; Basic Gray, Daffodil Delight and Pear Pizzazz Classic Stampin’ Pads
Card Stock: Whisper White, Basic Gray and Daffodil Delight
Accessories: Big Shot, Magnetic Platform, Circles Collection Framelits, Perfect Polka Dots Embossing
Folder, 2-3/8” Scallop Circle Punch, 1” Square Punch, Daffodil Delight ¼” Stitched Grosgrain Ribbon,
Blender Pens, Craft Scissors, Snail Adhesive, Stampin’ Dimensionals
Dimensions: Basic Gray 4”x 5-1/4”, Whisper White 5-1/2” x 8-1/2” scored at 4-1/4”
Instructions:
1. Fold Whisper White card stock in half to create card base.
2. Emboss Basic Gray card stock with Perfect Polka Dot Embossing Folder. Big Shot Sandwich: Multi-
Purpose Platform with both tabs open – Clear Cutting Pad – Embossing Folder – Clear Cutting Pad.
3. Lay Daffodil Delight Ribbon flat across the embossed card stock, wrap ends around to the back and
tape into place with Snail Adhesive. Tape the Basic Gray card stock to the front of the Whisper
White card.
4. Wrap a small piece of Daffodil Delight ribbon around ribbon on front of card and tie around at the
left side of the card. Trim ends neatly with Craft Scissors.

©2014 Ink It Up with Jessica Taylor Images © Stampin’ Up!®
9
5. Stamp greeting in Basic Gray ink on ½” wide Whisper White card stock strip. Clip right end into a
banner with corner of 1” Square Punch or Paper Snips. Tape to front of card above ribbon with Snail
Adhesive.
6. Stamp Tulips in Jet Black StazOn ink on Whisper White card stock. Color in with Daffodil Delight and
Pear Pizzazz ink pads and a blender pen. Squeeze the lid of the ink pad down so that ink pools in the
lid. Pick up the ink with the blender pen to color. Clean blender pen off on scratch paper in between
colors.
7. Cut out tulips with the 4th Circle Framelit from the Center. Big Shot Sandwich: Magnetic Platform –
Clear Cutting Pad – Stamped Card Stock – Framelit ridged side down centered around image – Clear
Cutting Pad.
8. Punch Daffodil Delight card stock with the 2-3/8” Scallop Circle Punch. Tape the tulip circle to the
scallop circle with Snail Adhesive. Adhere to the card front with Stampin’ Dimensionals.
What’s the difference between a
blender pen and an Aqua Painter?
Blender pens have a very controlled amount
of wetness and a very fine point. Best for
using on Whisper White card stock and very
detailed images.
Aqua Painters are like a watercolor brush with
the water right inside! Best for Watercolor
Paper and layering colors.

©2014 Ink It Up with Jessica Taylor Images © Stampin’ Up!®
10
Framed Tulip Card
Stamps: Blessed Easter Stamp
Ink: Jet Black StazOn Pad; Calypso Coral and
Garden Green Classic Stampin’ Pads
Card Stock: Naturals White and Calypso Coral
Accessories: Big Shot, Framed Tulips Embossing
Folder, Aqua Painter, Snail Adhesive
Dimensions: Naturals White 2-3/4” x 4-1/8”,
card base 4-1/4” x 11” scored at 5-1/2”,
Calypso Coral 4” x 5-1/4”
Instructions:
1. Fold Naturals White card stock in half to form card base.
2. Emboss the Calypso Coral card stock with the Framed Tulips Embossing Folder. Big Shot Sandwich:
Multi-Purpose Platform with both tabs open – Clear Cutting Pad – Embossing Folder – Clear Cutting
Pad.
3. Rough up the edges of the embossed Calypso Coral card stock with your finger nail, a bone folder or
a rough edge of some kind. Adhere to front of card with Snail Adhesive.
4. Stamp Blessed Easter stamp in Jet Black StazOn ink on Naturals White card stock.
5. Color in with an Aqua Painter and Calypso Coral and Garden Green ink. Squeeze the lid of the ink
pad down so that ink pools in the lid. Pick up the ink with the AquaPainter to color. Clean
AquaPainter off on scratch paper in between colors.
6. Adhere tulips to card front, centered in tulip border, with Snail Adhesive.

©2014 Ink It Up with Jessica Taylor Images © Stampin’ Up!®
11
Z-Fold Tulips Easter Card
Stamps: Blessed Easter Stamp
Ink: Jet Black StazOn Pad; Strawberry Slush, Pear Pizzazz and Smoky Slate Classic Stampin’ Pads
Card Stock: Naturals White, Strawberry Slush and Pear Pizzazz
Accessories: Big Shot, Magnetic Platform, Ovals Collection Framelits, Decorative Dots Embossing Folder,
Blender Pen, Snail Adhesive, Bone Folder or Scoring Tool
Dimensions: Pear Pizzazz 5-1/2” x 8-1/2”
Instructions:
1. To create the Z-fold card base, fold the Pear Pizzazz card stock in half and crease with the bone
folder. Then fold the front edge back towards the fold and crease with the bone folder again. OR
score at 2-1/8” and 4-1/4” and fold on the score lines.
2. Place the small end fold in the Decorative Dots embossing folder. Big Shot Sandwich: Multi-Purpose
Platform with both tabs open – Clear Cutting Pad – Embossing Folder – Clear Cutting Pad.
3. Stamp Blessed Tulips stamp in Jet Black StazOn ink on Naturals White card stock. Cut out with the 5th
Oval Framelit from the center. Big Shot Sandwich: Magnetic Platform – Clear Cutting Pad – Stamped
Card Stock – Framelit ridged side down centered around image – Clear Cutting Pad.
4. Cut Strawberry Slush card stock with the 6th Oval Framelit from the center using the same Big Shot
sandwich as above.

©2014 Ink It Up with Jessica Taylor Images © Stampin’ Up!®
12
5. Color the tulips in with a blender pen and Strawberry Slush and Pear Pizzazz ink. Squeeze the lid of
the ink pad down so that ink pools in the lid. Pick up the ink with the blender pen to color. Clean
blender pen off on scratch paper in between colors.
6. With the blender pen, lightly color a small line of Smoky Slate underneath each tulip and along the
long right edge of the leaves to give the tulips dimension. Adhere to Strawberry Slush oval with Snail
Adhesive.
7. CAREFULLY use Snail Adhesive to adhere the oval to the front fold of the card. DON’T tape your card
shut!! Use adhesive only on the back left side of the oval.
Celebrate Today Oval Frame Card
Stamps: Perfectly Penned and Petite Petals Stamp Sets
Ink: Basic Gray and Daffodil Delight Classic Stampin’ Pads
Card Stock: Whisper White and Basic Gray
Accessories: Big Shot, Magnetic Platform, Ovals Collection Framelits, Perfect Polka Dots Embossing
Folder, Petite Petals Punch, Paper-Piercing Tool, Stampin’ Pierce Mat, Occasions Paper-Piercing Pack,
Rhinestones, Stamp-a-ma-jig, Snail Adhesive, Stampin’ Dimensionals

©2014 Ink It Up with Jessica Taylor Images © Stampin’ Up!®
13
Dimensions: Basic Gray 4”x 5-1/4”, Whisper White 5-1/2” x 8-1/2” scored at 4-1/4”
Instructions:
1. Fold Whisper White card stock in half to create card base.
2. Cut Oval out of center of Basic Gray card stock with 3rd Oval Framelit from center. Big Shot
Sandwich: Magnetic Platform – Clear Cutting Pad – Card Stock – Framelit ridged side down – Clear
Cutting Pad.
3. Emboss Basic Gray card stock with Perfect Polka Dot Embossing Folder. Big Shot Sandwich: Multi-
Purpose Platform with both tabs open – Clear Cutting Pad – Embossing Folder – Clear Cutting Pad.
Adhere to front of card with Snail Adhesive.
4. Stamp greeting in center of oval in Basic Gray ink, using Stamp-a-ma-jig for perfect placement.
5. Open card and place the front on top of the Stampin’ Pierce Mat. Place oval template over top and
use Paper-Piercing Tool to poke holes around oval. NOTE: The oval template wasn’t as close to the
Basic Gray oval as I wanted it so I moved the template around a bit to get it closer.
6. Stamp 5 flowers in Daffodil Delight ink on Whisper White card stock. Punch out with the Petite
Petals punch. Arrange flowers around oval frame adhering some with Snail Adhesive and some with
Stampin’ Dimensionals to vary height.
7. Add a Rhinestone to the center of each flower.
Is the Magnetic Platform
really necessary?
No, but it sure makes things easier!
If you don’t have a Magnetic
Platform, use the sticky end of a
Post-It® note to hold your framelits
in place.
©2014 Ink It Up with Jessica Taylor Images © Stampin’ Up!®
14
Chapter 2 Gifts
and
Decor

©2014 Ink It Up with Jessica Taylor Images © Stampin’ Up!®
15
Papaya Collage Post-It Note Holder
Stamps: Papaya Collage Stamp Set
Ink: Pistachio Pudding and Coastal Cabana Classic Stampin’ Pads
Card Stock: Whisper White, Pistachio Pudding, Coastal Cabana
Accessories: Post-It® Notes, Stapler, Snail Adhesive
Card Stock Dimensions: Whisper White 2 ½”x2 ½”, Stamped Whisper White 3 ¼”x3 ¼” and 3 ¼”x ¾”,
Coastal Cabana 3 ¼”x10”, Pistachio Pudding 2 ¾”x2 ¾”

©2014 Ink It Up with Jessica Taylor Images © Stampin’ Up!®
16
Instructions:
1. Score Coastal Cabana card stock on the 10” side at 4”, 4 ½” and 9”. Set aside.
2. Stamp bird image in Coastal Cabana ink on 2 ½”x2 ½” Whisper White card stock. Adhere with SNAIL
Adhesive to Pistachio Pudding card stock.
3. Stamp leaves in Pistachio Pudding ink on Whisper White card stock. Clean stamp. Then stamp leaves
in Coastal Cabana on Whisper White card stock. (You could stamp images on card stock before or
after cutting. I stamped the leaves all over Whisper White card stock and then cut card stock into
smaller dimensions.)
4. Adhere Pistachio Pudding card stock (with bird image) to 3 ¼”x3 ¼” Stamped Whisper White card
stock using Snail Adhesive.
5. Crease scores on Coastal Cabana card stock. Attach Post-It Notes with Snail Adhesive (or Sticky Strip)
below the 4 ½” score.
6. Fold up the 9” score and staple near bottom corners. Attach 3 ¼”x ¾” Stamped Whisper White card
stock with Snail Adhesive.
7. Fold Coastal Cabana card stock over Post-It Notes. Adhere 3 ¼”x 3 ¼” Stamped Whisper White card
stock to front of Coastal Cabana card stock. Tuck into bottom piece.
Wonderful Watercolor Bookmark
Stamps: Happy Watercolor Stamp Set
Ink: Coastal Cabana, Basic Gray and So Saffron Classic Stampin’ Pads
Card Stock: Whisper White
Accessories: Scalloped Tag Topper Punch, Basic Gray ¼” Stitched
Grosgrain Ribbon, Blender Pen, 3/16” Corner Punch
Card Stock Dimensions: Whisper White 2”x4 ½”
Instructions:
1. Stamp watercolor image in Coastal Cabana ink on scratch paper
and THEN on Whisper White card stock. Repeat two more times.
2. Stamp flower image in Basic Gray ink on Whisper White card
stock. Use Blender Pen with So Saffron ink (Squeeze So Saffron ink
pad, so ink pools on lid. Dip Blender Pen in ink pool.) to color center
of flower. Use Blender Pen with Coastal Cabana ink to shade flower by
drawing over lines on petals.
3. Use 3/16” Corner Punch to round bottom corners of Whisper
White card stock.
4. Punch out top of bookmark with Scalloped Tag Topper Punch.
Thread both ends of Basic Gray ¼” Stitched Grosgrain Ribbon through
hole and through loop of ribbon. Trim ends.

©2014 Ink It Up with Jessica Taylor Images © Stampin’ Up!®
17
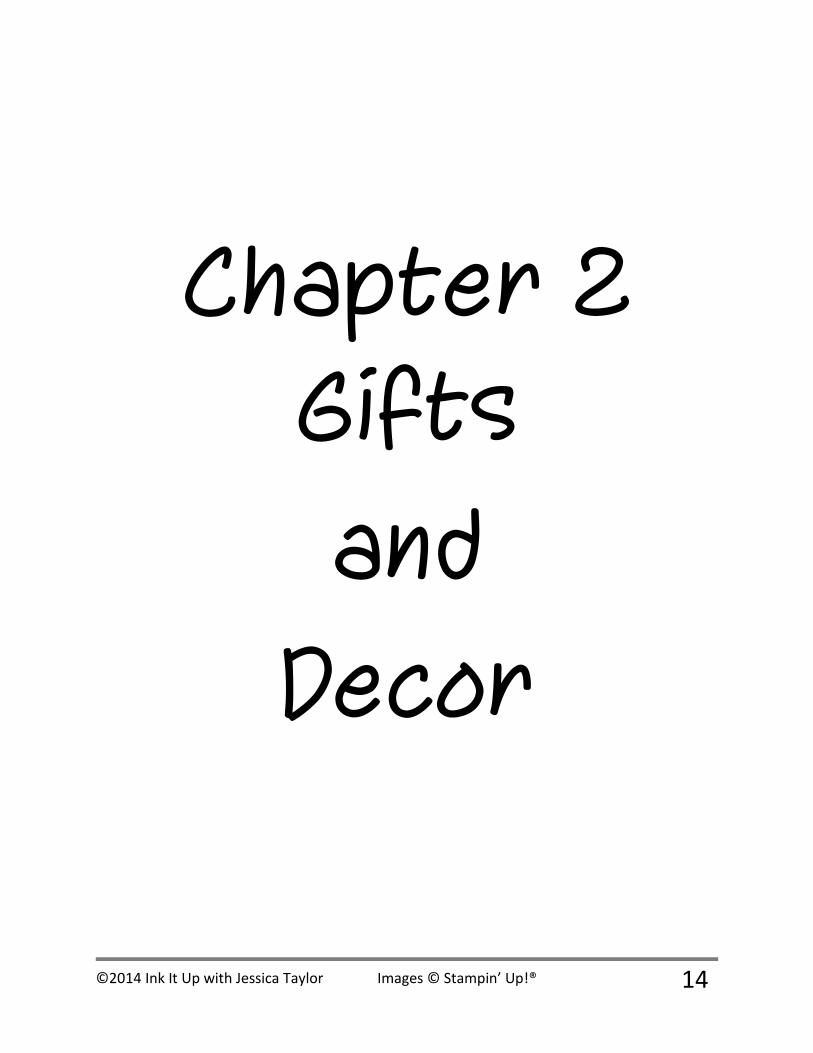
SPRING Wreath
Ink: Calypso Coral Classic Stampin’ Pad
Card Stock: Very Vanilla, Calypso Coral, So Saffron, Crisp Cantaloupe
Accessories: Foam Wreath, 5/8” Natural Chevron Ribbon (2), 5/8” Crochet Trim, Petite Pennants Builder
Punch, Blossom Punch, 2 3/8” Scallop Punch, 7/8” Scallop Punch, In Color Boutique Details
Embellishment, Jewels Basic Pearl, Snail Adhesive, Stampin’ Dimensionals, Paper Snips, straight pins,
hole punch
Instructions:
1. Wrap 5/8” Natural Chevron Ribbon (or 1 ¼” Burlap Ribbon) around foam wreath, securing with
straight pins.
2. Stamp letters (any alphabet set) in Calypso Coral ink or write letters with Calypso Coral Stampin’
Write Marker on Very Vanilla card stock. Punch out with Petite Pennants Builder Punch.
3. Use Petite Pennants Builder Punch on Calypso Coral and So Saffron card stocks to punch out
scalloped pennants (3 of each color). Adhere Very Vanilla pennants to colored pennants with
Stampin’ Dimensionals.
©2014 Ink It Up with Jessica Taylor Images © Stampin’ Up!®
18
4. Punch two small holes at top of each pennant. Tie 5/8” Crochet Trim to one side of wreath. Lace
trim through holes (first hole front to back, second hole back to front) and tie on other side.
5. Use 2 3/8” Scallop Punch on So Saffron card stock to punch out 10 pieces. On four pieces, use Paper
Snips to make cuts every two scallops. Adhere these four pieces together with SNAIL Adhesive to
create base of flower. Fold two other pieces in half and adhere on top of base with SNAIL Adhesive
(or Sticky Strip). Fold last four pieces in fourths and adhere on top with Snail Adhesive (or Sticky
Strip). Attach to wreath with straight pin. Use 7/8” Scallop Punch on Crisp Cantaloupe card stock to
punch out 2 pieces. Use Paper Snips on one piece to make cuts every two scallops. Adhere cut piece
to other piece with Stampin’ Dimensional. Place Jewels Basic Pearl in center of top piece. Attach to
center of flower with Stampin’ Dimensional.
6. Punch out 8 flowers with Blossom Punch on Calypso Coral card stock. Rough up edges of flowers.
Attach flowers in a pile, alternating directions of petals, with Snail Adhesive (or Sticky Strip). Use
Paper Snips to cut petals on top flower for more dimension. Attach to wreath with straight pin.
Adhere In Color Boutique Details Embellishment to center of flower with Stampin’ Dimensional.
7. For easier hanging, tie piece of 5/8” Crochet Trim to top of wreath.

©2014 Ink It Up with Jessica Taylor Images © Stampin’ Up!®
19
“You Make Me HAPPY” Soap Dispenser
Stamps: Happy Watercolor Stamp Set
Ink: Basic Gray, Crisp Cantaloupe and Daffodil Delight Classic
Stampin’ Pads
Card Stock: Whisper White
Accessories: Blender Pen, Big Shot Multipurpose Adhesive
Sheets, Daffodil Delight ¼” Stitched Grosgrain Ribbon, soap
dispenser
Instructions:
1. Cut Whisper White card stock to the dimensions 1 ¼” on
top, 2 ¼” on bottom, 5” on sides. Start with 2 ¼” x 5” card
stock. Keep bottom right corner at cutting line, slide top right
corner to ½” line and make diagonal cut. Repeat on left side.
(It’s easier than it sounds!)
2. Stamp watercolor mark image in Crisp Cantaloupe ink on
scratch paper and THEN on Whisper White card stock. Repeat
three more times. Stamp watercolor image directly on Whisper
White card stock one time.
3. Stamp flower image in Basic Gray ink on Whisper White
card stock (center petals on darker watercolor image). Use
Blender Pen with Daffodil Delight ink (Squeeze Daffodil Delight
ink pad, so ink pools on lid. Dip Blender Pen in ink pool.) to color center of flower. Use Blender Pen
with Crisp Cantaloupe ink to shade flower by drawing over lines on petals.
4. Stamp “you make me HAPPY” in Basic Gray ink at bottom of Whisper White card stock.
5. Use Big Shot Multipurpose Adhesive Sheets (or Sticky Strip) to adhere card stock to front of soap
dispenser.
6. Tie Daffodil Delight ¼” Stitched Grosgrain Ribbon around neck of bottle.

©2014 Ink It Up with Jessica Taylor Images © Stampin’ Up!®
20
This and That Photo Album (Brag Book)
Card Stock: Pool Party, Whisper White, Daffodil Delight; This and That Epic Day Designer Series Paper
Accessories: Elegant Butterfly Punch, Bitty Butterfly Punch, Daffodil Delight ¼” Stitched Grosgrain
Ribbon, Jewels Basic Pearl, Snail Adhesive, Stampin’ Dimensionals, 7 pictures
Card Stock Dimensions: Pool Party 12”x4” (3), Whisper White 3 ¾”x3 ¾” (7), Daffodil Delight 3 ¾”x3 ¾”,
This and That 2”x3 ½”
Instructions:
1. Score 12” side of each Pool Party card stock at 4”, flip and score at 8” (this will help create the
accordion folds). Use Snail Adhesive to adhere the first square of the second strip over the third
square of the first strip and to adhere the first square of the third strip over the third square of the
second strip. (Make sure to make accurate cuts and folds or the accordion book will NOT fold
nicely.)
2. The inside should be 7 pages. Adhere Whisper White card stock to center of each page with Snail
Adhesive. Attach pictures to center of Whisper White card stock with Snail Adhesive.
3. Adhere This and That Epic Day Designer Series paper to Daffodil Delight card stock with Snail
Adhesive. Attach Daffodil Delight card stock to front cover with Snail Adhesive.
4. Wrap Daffodil Delight ¼” Stitched Grosgrain Ribbon around album (secure to front with Snail
Adhesive) and tie in a bow.
5. Use Bitty Butterfly Punch on green This and That paper and Elegant Butterfly Punch on blue This and
That paper for butterflies. Attach small butterfly to large butterfly with half of Stampin’ Dimensional.
Adhere to front with Stampin’ Dimensional. Place two Jewels Basic Pearls in center of small
butterfly.
6. Feel free to add a greeting!

©2014 Ink It Up with Jessica Taylor Images © Stampin’ Up!®
21
Say “HELLO” to Spring Note Cards in Bag
Stamps: Papaya Collage and Four You Stamp Sets
Ink: Crisp Cantaloupe and Coastal Cabana Classic Stampin’ Pads
Card Stock: Whisper White, Crisp Cantaloupe and Coastal Cabana; Whisper White Note Cards and
Envelopes
Accessories: Elegant Butterfly Punch, Natural 7/16” Trim, Jewels Basic Pearl, Snail Adhesive, Stampin’
Dimensionals, Sticky Strip, Paper Snips, hole punch
Card Stock Dimensions: Coastal Cabana 11”x6 ½”, Whisper White 1 ¼”x3 ½”, Crisp Cantaloupe 1”x3 ½”

©2014 Ink It Up with Jessica Taylor Images © Stampin’ Up!®
22
Instructions:
1. Stamp “hello” in Coastal Cabana ink in bottom right corners of Whisper White Note Cards. Stamp
leaves in Coastal Cabana ink on Whisper White Note Cards. Stamp butterflies in Crisp Cantaloupe ink
on Whisper White Note Cards and on bottom left corners of envelopes.
2. Score 6 ½” side of Coastal Cabana card stock at 1 ½”. Score 11” side of Coastal Cabana card stock at
1 ½”, 5 ¼”, 6 ¾” and 10 ½”. Use Paper Snips to cut on the 11” side score lines of 1 ½”, 5 ¼” and 6 ¾”
and to cut on the 6 ½” side score line ONLY from the right edge to the 10 ½” score line.
3. Stamp leaves in Coastal Cabana ink on front of bag (between 1 ½” score and 5 ¼” score).
4. Stamp “hello” in Coastal Cabana ink on Whisper White card stock. Adhere to Crisp Cantaloupe card
stock. Cut into banner using Paper Snips.
5. Assemble bag by folding in bottom pieces and securing with Sticky Strip. Secure side of bag with
Sticky Strip as well.
6. Punch two holes through front of bag. Thread Natural 7/16” Trim through hole and tie knot inside
bag; repeat on other hole. Punch two holes through back of bag and repeat tying trim.
7. Stamp butterfly image in Crisp Cantaloupe ink on Whisper White card stock. Punch out with Elegant
Butterfly Punch. Use same punch on Crisp Cantaloupe card stock. Adhere center of butterflies with
Snail Adhesive. Place three Jewels Basic Pearls to center of top butterfly. Attach to front of bag with
Stampin’ Dimensional.
8. Put cards and envelopes in bag.

©2014 Ink It Up with Jessica Taylor Images © Stampin’ Up!®
23
Blooming Flower Pot (Grandma’s Garden)
Card Stock: Pool Party, Calypso Coral, Daffodil Delight, So Saffron, This and That Epic Day Designer
Series Paper
Accessories: 1 ¼” Circle Punch, Fancy Flower Punch, Large Oval Punch, Full Heart Punch, Daffodil
Delight ¼” Stitched Grosgrain Ribbon, Snail Adhesive, Stampin’ Dimensionals, Paper Snips, Mason
Jar, Styrofoam block, skewers, tape
Card Stock Dimensions:
This and That 10”x4 ¼”
Instructions:
1. Remove lid of Mason Jar. Place Styrofoam block (cut down to size) inside. Wrap This and That
Epic Day Designer Series Paper around block (secure with Snail Adhesive – optional). Replace
the rim and tie Daffodil Delight ¼” Stitched Grosgrain Ribbon around it.
2. Use 1 ¼” Circle Punch to punch out four pictures for center of flowers.

©2014 Ink It Up with Jessica Taylor Images © Stampin’ Up!®
24
3. Punch out four hearts for leaves with Full Heart Punch and This and That paper .
4. Use Fancy Flower Punch on Calypso Coral card stock to punch out four flowers. Use Fancy
Flower Punch on Daffodil Delight card stock to punch out four flowers.
5. Adhere picture to center of Calypso Coral flower with Snail Adhesive. Attach skewer to back of
flower with tape. Use Stampin’ Dimensionals to attach another Calypso Coral flower to back.
Cut apart one Daffodil Delight flower with Paper Snips. Adhere to back with Snail Adhesive. Cut
apart one Calypso Coral flower with Paper Snips. Adhere to back with Snail Adhesive. Attach
This and That heart to skewer with Snail Adhesive at center of folded heart and Stampin’
Dimensional between sides.
6. Adhere picture to center of Daffodil Delight flower with Snail Adhesive. Attach skewer to back
of flower with tape. Use Stampin’ Dimensionals to attach another Daffodil Delight flower to
back. Cut apart one Calypso Coral flower with Paper Snips. Adhere to back with Snail Adhesive.
Cut apart one Daffodil Delight flower with Paper Snips. Adhere to back with Snail Adhesive.
Attach This and That heart to skewer with Snail Adhesive at center of folded heart and
Stampin’ Dimensional between sides.
7. Use Fancy Flower Punch on Pool Party card stock to punch out two flowers and on So Saffron
card stock to punch out two flowers. Use Large Oval Punch on Pool Party card stock to punch
out 10 “petals” and on So Saffron card stock to punch out 10 “petals”.
8. Adhere picture to center of Pool Party flower with Snail Adhesive. Attach skewer to back of
flower with tape. Use Stampin’ Dimensionals to attach another Pool Party flower to back.
Adhere 10 So Saffron petals to back of flower with Snail Adhesive. Attach This and That heart
to skewer with Snail Adhesive at center of folded heart and Stampin’ Dimensional between
sides.
9. Adhere picture to center of So Saffron flower with Snail Adhesive. Attach skewer to back of
flower with tape. Use Stampin’ Dimensionals to attach another So Saffron flower to back.
Adhere 10 Pool Party petals to back of flower with Snail Adhesive. Attach This and That heart
to skewer with Snail Adhesive at center of folded heart and Stampin’ Dimensional between
sides.
10. “Plant” flowers in the garden!

©2014 Ink It Up with Jessica Taylor Images © Stampin’ Up!®
25
Butterfly Candle
Stamps: Papillon Potpourri Stamp Set
Ink: Daffodil Delight and Basic Gray Classic
Stampin’ Pads
Card Stock: Daffodil Delight and Basic Gray
Accessories: Candle, tissue paper, Heat Tool,
Elegant Butterfly Punch, Bitty Butterfly Punch,
Jewels Basic Rhinestone, Basic Gray ¼” Stitched
Grosgrain Ribbon, Snail Adhesive, Stampin’
Dimensionals
Instructions:
1. Stamp large butterfly in Basic Gray ink on white tissue paper (cut to approximate height and
circumference of candle). Stamp small butterfly in Daffodil Delight ink on white tissue paper.
2. Wrap tissue paper around candle and use Heat Tool to adhere.
3. Stamp small butterfly in Daffodil Delight ink on Daffodil Delight card stock. Punch out with
Bitty Butterfly Punch. Place three Jewels Basic Rhinestones in center of butterfly. Attach two
small pieces (or one piece folded over) of Basic Gray ¼” Stitched Grosgrain Ribbon to back of
butterfly with Snail Adhesive.
4. Punch out large butterfly from Basic Gray card stock with Elegant Butterfly Punch. Attach small
butterfly to large butterfly with half of Stampin’ Dimensional. Adhere both butterflies to front
of candle with Stampin’ Dimensional.

©2014 Ink It Up with Jessica Taylor Images © Stampin’ Up!®
26
Antiqued Picture Frame
Stamps: Papaya Collage and Lovely Little
Labels Stamp Sets
Ink: Crumb Cake, Garden Green, Calypso
Coral and Early Espresso Classic Stampin’ Pads
Card Stock: Very Vanilla, Crumb Cake and
Calypso Coral
Accessories: Elegant Butterfly Punch, Sponge,
Vintage Trinkets, Big Shot Die-Cutting
Machine, Beautifully Baroque Embossing
Folder, Snail Adhesive, Stampin’
Dimensionals, Paper Snips, picture frame
Card Stock Dimensions: Crumb Cake 4”x6”,
Calypso Coral 4”x5 ½”
Instructions:
1. Stamp butterfly image in Crumb Cake ink on Very Vanilla card stock. Punch out with Elegant
Butterfly Punch. “Antique” butterfly with sponge and Crumb Cake ink. Put two brads from
Vintage Trinkets at center of butterfly.
2. Stamp frame image in Crumb Cake ink on Very Vanilla card stock. Stamp leaves in Calypso Coral
ink on scratch paper and THEN inside frame. Clean leaves. Stamp leaves in Garden Green ink on
scratch paper and THEN inside frame. Stamp circle-like image in Early Espresso ink at the
overlap of the Calypso Coral and Garden Green leaves. Stamp “LOVE” in Early Espresso ink
twice. Cut out frame image with Paper Snips and antique with sponge and Crumb Cake ink.
3. Stamp bird image in Garden Green ink on scratch paper and THEN on Very Vanilla card stock.
Cut out with Paper Snips and antique with sponge and Crumb Cake ink.
4. Emboss Calypso Coral card stock with Big Shot Die-Cutting Machine and Beautifully Baroque
Embossing Folder. Big Shot Sandwich: Multipurpose Platform opens to Tab 1 – Clear Cutting
Pad – Embossing Folder – Clear Cutting Pad. Rip edges of card stock. Adhere to Crumb Cake
card stock at a slight angle with Snail Adhesive.
5. Adhere frame image to front at an angle with Snail Adhesive. Attach bird with Stampin’
Dimensionals in bottom left corner. Attach butterfly with Stampin’ Dimensional in center of
circle-like image.
6. Place in picture frame WITHOUT glass.

©2014 Ink It Up with Jessica Taylor Images © Stampin’ Up!®
27
Chapter 3 Gift Bags
And Boxes

©2014 Ink It Up with Jessica Taylor Images © Stampin’ Up!®
28
Apothecary Art White Gift Bag
Stamps: Apothecary Art Stamp Set
Ink: Basic Gray, So Saffron and Daffodil Delight Classic
Stampin’ Pads; Basic Gray Stampin’ Write Marker
Card Stock: Whisper White, Basic Gray and Daffodil
Delight
Accessories: Big Shot Die-Cutting Machine, Magnetic
Platform, Framelits Label Collection, Pretty Print
Embossing Folder, Blender Pen, Daffodil Delight ¼”
Stitched Grosgrain Ribbon, White Baker’s Twine,
Jewels Basic Pearl, Snail Adhesive, Paper Snips, white
lunch bag, hole punch
Card Stock Dimensions: Basic Gray 4”x6”
Instructions:
1. Emboss Basic Gray card stock with Big Shot Die-Cutting Machine and Pretty Print Embossing
Folder. Big Shot Sandwich: Multipurpose Platform opens to Tab 1 – Clear Cutting Pad –
Embossing Folder – Clear Cutting Pad. Use Paper Snips to cut card stock into banner.
2. Put gift into white lunch bag and fold over top. Attach Basic Gray banner to front of lunch bag
with Snail Adhesive (just a line at top to hold while punching holes). Use hole punch to make
two holes through Basic Gray banner and lunch bag. Thread Daffodil Delight ¼” Stitched
Grosgrain Ribbon through holes, from back to front, and tie in bow.
3. Stamp flowered image in Basic Gray ink on Whisper White card stock. Cut out image, using the
3rd smallest framelit from the Labels Collection. Big Shot Sandwich: Magnetic Platform – Clear
Cutting Pad – Whisper White card stock – Framelit (Ridged side down) – Clear Cutting Pad.
4. Cut out larger Daffodil Delight label image, using the 4th smallest framelit from the Labels
Collection. Big Shot Sandwich: Magnetic Platform – Clear Cutting Pad – Daffodil Delight card
stock – Framelit (Ridged side down) – Clear Cutting Pad.

©2014 Ink It Up with Jessica Taylor Images © Stampin’ Up!®
29
5. Adhere smaller label to larger label with Snail Adhesive. Use Blender Pen with Daffodil Delight
ink (Squeeze Daffodil Delight ink pad, so ink pools on lid. Dip Blender Pen in ink pool.) to color
in some flowers. Use Blender Pen with So Saffron ink to color in the rest of the flowers. Place
Jewels Basic Pearls in center of flowers. Use Basic Gray Stampin’ Write Marker to address label.
Punch small hole in top center of Daffodil Delight label. Thread White Baker’s Twine through
hole and tie around Daffodil Delight ribbon bow.

©2014 Ink It Up with Jessica Taylor Images © Stampin’ Up!®
30
A Friendly “HELLO” Tag a Bag Gift Bag
Stamps: Four You Stamp Set
Ink: Calypso Coral Classic Stampin’ Pad
Card Stock: Whisper White and Calypso
Coral; This and That Epic Day Designer
Series Paper
Accessories: Tag a Bag Gift Bag, White Tea
Lace Paper Doily, Big Shot Die-Cutting
Machine, Magnetic Platform, Framelits
Label Collection, Hexagon Embossing
Folder, Elegant Butterfly Punch, Vintage
Trinkets, Snail Adhesive, Stampin’
Dimensionals, Paper Snips
Card Stock Dimensions: This and That
(Yellow) ¾”x2”, (Chevron) 1”x3”, (Blue) 1
½”x4”
Instructions:
1. Fold back top of bag. Attach White Tea Lace Paper Doily with Snail Adhesive.
2. Cut Calypso Coral card stock using the 4th smallest framelit from the Labels Collection. Big Shot
Sandwich: Magnetic Platform – Clear Cutting Pad – Calypso Coral card stock – Framelit (Ridged
side down) – Clear Cutting Pad. Emboss Calypso Coral card stock with Big Shot Die-Cutting
Machine and Hexagon Embossing Folder. Big Shot Sandwich: Multipurpose Platform opens to
Tab 1 – Clear Cutting Pad – Embossing Folder – Clear Cutting Pad. Adhere to front with Snail
Adhesive.
3. Cut three pieces of This and That Epic Day Designer Series Paper into banners with Paper Snips.
Adhere to front with Snail Adhesive.
4. Stamp “hello” in Calypso Coral ink on small piece of Whisper White card stock. Cut into banner
with Paper Snips. Attach to front with Stampin’ Dimensionals.
5. Punch out butterfly from This and That paper with Elegant Butterfly Punch. Use pin from
Vintage Trinkets to decorate. Attach to front with Stampin’ Dimensional.

©2014 Ink It Up with Jessica Taylor Images © Stampin’ Up!®
31
“HELLO” Spring Kraft Gift Bag
Stamps: Four You Stamp Set
Ink: Calypso Coral Classic Stampin’ Pad
Card Stock: Pool Party; Etcetera Designer Series
Paper
Accessories: Mosaic Punch, 5/8” Crochet Trim,
Antique Brads, Snail Adhesive, Stampin’
Dimensionals, Paper Snips, Kraft gift bag
Card Stock Dimensions: Etcetera 5”x8”
Instructions:
1. Adhere Etcetera Designer Series Paper to bag
with Snail Adhesive.
2. Cut out label from Etcetera paper. Stamp
“hello” in Calypso Coral ink on label. Attach to bag
with Stampin’ Dimensionals.
3. Punch out “petals” from Etcetera paper with
Mosaic Punch. Overlap and adhere petals to each
other with Snail Adhesive. Attach Antique Brad to
center. Adhere to front of bag with Stampin’
Dimensionals.
4. Tie 5/8” Crochet Trim in bow around handles.
©2014 Ink It Up with Jessica Taylor Images © Stampin’ Up!®
32
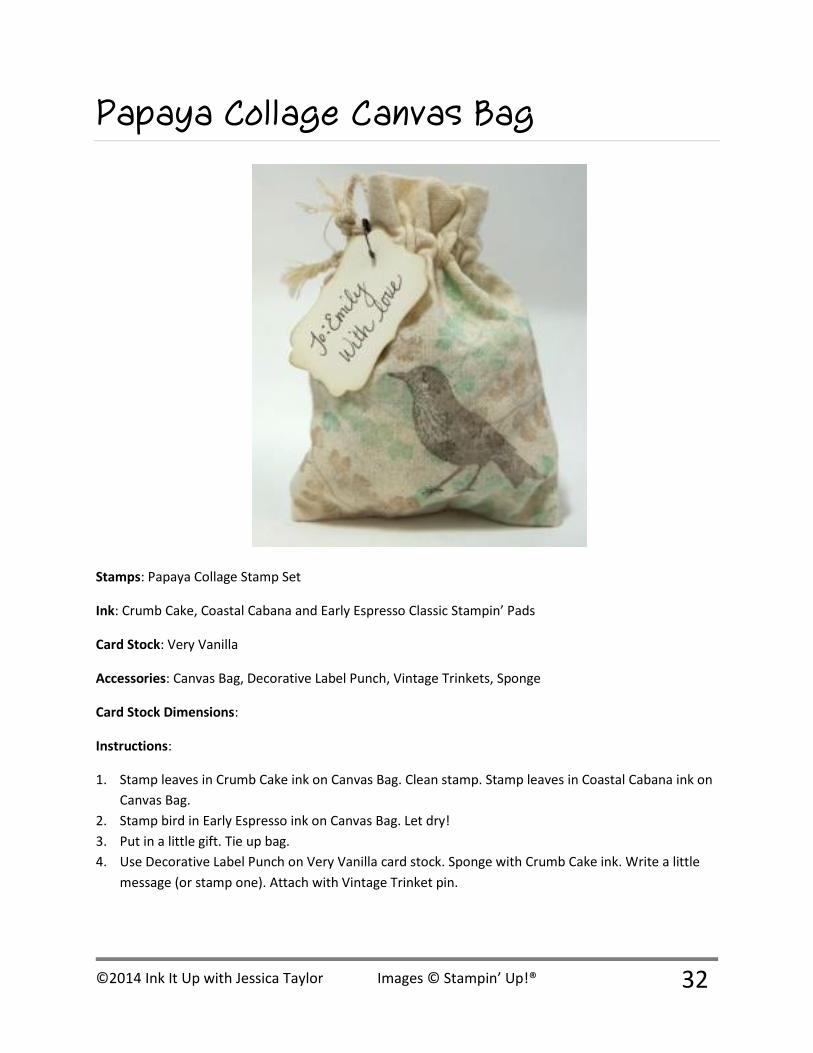
Papaya Collage Canvas Bag
Stamps: Papaya Collage Stamp Set
Ink: Crumb Cake, Coastal Cabana and Early Espresso Classic Stampin’ Pads
Card Stock: Very Vanilla
Accessories: Canvas Bag, Decorative Label Punch, Vintage Trinkets, Sponge
Card Stock Dimensions:
Instructions:
1. Stamp leaves in Crumb Cake ink on Canvas Bag. Clean stamp. Stamp leaves in Coastal Cabana ink on
Canvas Bag.
2. Stamp bird in Early Espresso ink on Canvas Bag. Let dry!
3. Put in a little gift. Tie up bag.
4. Use Decorative Label Punch on Very Vanilla card stock. Sponge with Crumb Cake ink. Write a little
message (or stamp one). Attach with Vintage Trinket pin.

©2014 Ink It Up with Jessica Taylor Images © Stampin’ Up!®
33
Chapter 4 Easter

©2014 Ink It Up with Jessica Taylor Images © Stampin’ Up!®
34
SomeBunny Loves You! S’More Bag
Ink: Strawberry Slush Classic Stampin’ Pad; Basic Black Stampin’ Write Marker
Card Stock: Whisper White, Strawberry Slush, Coastal Cabana
Accessories: Cello Bag, 1 ¾” Circle Punch, ¾” Circle Punch, Large Oval Punch, ½” Circle Punch, Banner
Punch, Sponge, Snail Adhesive, Stampin’ Dimensionals, Paper Snips, stapler
Card Stock Dimensions: Strawberry Slush 5”x6 ½” and 1”x4 ½”, Coastal Cabana 2”x6”
Instructions:
1. Score the 5” side of Strawberry Slush card stock at 2 ½”. Attach Coastal Cabana card stock to one
side with Snail Adhesive.
2. Write or PRINT “SomeBunny loves you!” on white paper or Whisper White card stock. Attach to
smaller piece of Strawberry Slush card stock with Snail Adhesive. Adhere to Coastal Cabana card
stock with Snail Adhesive.

©2014 Ink It Up with Jessica Taylor Images © Stampin’ Up!®
35
3. Use Large Oval Punch on Strawberry Slush card stock to punch out two “ears”. Use 1 ¾” Circle Punch
on Whisper White card stock to punch out “face”. Use ¾” Circle Punch on Whisper White card stock
to punch out two “cheeks”. Use ½” Circle Punch on Strawberry Slush card stock to punch out a
“nose”. Use Banner Punch on Strawberry Slush card stock to make a “bowtie”: punch out banner,
adhere to long thin piece of card stock, put back into banner punch to make bow and remove from
other card stock.
4. Adhere two ears (ovals) to back of face (biggest circle) with Snail Adhesive. Use sponge and
Strawberry Slush ink on cheeks (middle circles). Overlap two cheeks, attaching to each other with
Snail Adhesive. Adhere nose (small circle) to back of cheeks with Snail Adhesive. Cut a small piece of
Whisper White card stock with Paper Snips for a “tooth” and attach to back of cheeks with Snail
Adhesive. Adhere bowtie with Snail Adhesive. Use Basic Black Stampin’ Write Marker to draw eyes,
etc. on face. Attach bunny to bag topper with Stampin’ Dimensionals.
5. Place S’Mores goodies in Cello Bag. Attach bag topper with stapler.
How cute is this little punch art bunny?
Use him on Easter cards, the side of an Easter
basket or wherever you can think of to put him!

©2014 Ink It Up with Jessica Taylor Images © Stampin’ Up!®
36
Bunny Gift Bag
Ink: Crisp Cantaloupe Classic Stampin’ Pad; Basic Black
Stampin’ Write Marker
Card Stock: Whisper White, Basic Black, Crisp
Cantaloupe
Accessories: White lunch bag, 1 3/8” Circle Punch, ¾”
Circle Punch, Large Oval Punch, ½” Circle Punch, Banner
Punch, Sponge, Snail Adhesive, Stampin’ Dimensionals,
Paper Snips
Instructions:
1. Use Large Oval Punch on Crisp Cantaloupe card stock to punch out “ears”. Use 1 3/8” Circle Punch
on Whisper White card stock to punch out two “cheeks”. Use ¾” Circle Punch on Crisp Cantaloupe
card stock to punch out a “nose”. Use ¾” Circle Punch on Whisper White card stock and ½” Circle
Punch on Basic Black card stock to punch out “eyes”. Use Banner Punch on Whisper White card
stock to punch out tooth.
2. Adhere two ears (ovals) to top of bag with Stampin’ Dimensionals. Use sponge and Crisp Cantaloupe
ink on cheeks (biggest circles). Overlap two cheeks, attaching to each other with Snail Adhesive.
Adhere nose to back of cheeks with Snail Adhesive. Adhere tooth to back of cheeks with Snail
Adhesive. Attach cheeks to bag with Stampin’ Dimensionals. Adhere small black circles to slightly
larger white circles with Snail Adhesive. Attach eyes to bag with Stampin’ Dimensionals.
3. Use Basic Black Stampin’ Write Marker to add whiskers.
4. Trim top of bag with Paper Snips to form ears/top of head – optional.

©2014 Ink It Up with Jessica Taylor Images © Stampin’ Up!®
37
Easter Basket
Stamps: Geometrical
Ink: Pool Party Classic Stampin’ Pad
Card Stock: Coastal Cabana
Accessories: Paper Trimmer with Scoring
Blade, 1-1/4” Circle Punch, Scissors,
Strawberry Slush Ruffled Stretch Trim, Sticky
Strip, Paper-Piercing Tool, Basics 3/8”
Glimmer Brads
Dimensions: Coastal Cabana: 6”x6” and 1” x
8-1/2”
Instructions:
1. Score the 6”x6” piece of card stock at 2” on all four sides.
2. Round corners using the 1-1/4” Circle Punch. Insert card stock from the bottom of the punch to just
catch the corner.
3. Stamp circles all over the card stock in Pool Party ink.
4. On two opposite sides of the scored card stock, cut along the score lines up to the score line crossing
it.
5. Place a line of sticky strip down the center of the strip of card stock. Add ruffled stretch trim.
6. Grab both ends of one of the cut sides and bring them together so they overlap. Insert one end of
the card stock handle strip behind the two overlapping sides and in front of the middle section.
Secure by poking a hole through all of the layers with the Paper-Piercing Tool and secure with a
silver glimmer brad. Repeat on the other side.
7. Fill with treats!
See a video of how to make these baskets here: http://inkitupwithjessica.com/make-easter-baskets/
Makes a great May Basket too!

©2014 Ink It Up with Jessica Taylor Images © Stampin’ Up!®
38
Want More Ideas?
We hope that you enjoyed these Spring Craft ideas!
For more paper crafting ideas visit www.inkitupwithjessica.com.
About the Authors
Jessica Taylor became a Stampin' Up! demonstrator in 1999, shortly after discovering a love for
rubber stamping and card making. She especially enjoys helping women who say "I could never
do that, I'm not creative." discover that they CAN make cards that look good. Her "there are no
mistakes in stamping" attitude allows for a fun environment for learning card making. To learn
more about Jessica, her online classes and Stampin’ Up! products, please visit her Ink It Up!
with Jessica site.
Website: www.inkitupwithjessica.com
Facebook: www.facebook.com/inkitup
Johanna Wick has been stamping since the ripe old age of eleven. She loves doing anything
creative, especially capturing a multitude of memories in scrapbooks. Everything in life is better
with an extra crafty touch!