Table of Contents - cnblogs.com & Configure Workflow Manager and Service Bus: SharePoint 2013 relies...
65
Transcript of Table of Contents - cnblogs.com & Configure Workflow Manager and Service Bus: SharePoint 2013 relies...

Creating a SharePoint Server 2013 Environment for Development and Testing Version 10
copy Critical Path Training 2012 All Rights Reserved 1
wwwCriticalPathTrainingcom
Table of Contents
Overview 3
Hardware Requirements amp Recommendations 3
Virtualization Details 4
High-Level View of Creating a SharePoint 2013 Environment 4
Creating a SharePoint Server 2013 Environment for Development amp Testing 5
Exercise 1 Configure Host Computer Hyper-V amp Networking 5
Exercise 2 Install amp Configure a Windows Server 6
Create a New Virtual Machine 7
Install the Windows Server 2008 R2 Operating System 10
Configure Windows Server 2008 R2 11
Configure the Virtual Machinersquos Networking Setup 16
Configure Windows Update and Update the Server 18
Activate Windows Server 2008 R2 19
Apply the DisableLoopbackCheck Registry Fix 20
Exercise 3 Install Active Directory Domain Services 20
Configure Windows Update and Update the Server 23
Exercise 4 Install SQL Server 2012 24
Install SQL Server 2012 24
Exercise 5 Install amp Configure SharePoint Server 2013 28
Create SharePoint Service Accounts amp Grant Rights to SQL Server 2012 28
Install SharePoint Server 2013 Prerequisites 30
Install SharePoint Server 2013 32
Configure SharePoint Server 2013 37
Configure DNS 38
Configure SharePoint Server 2013 for Host-Named Site Collections amp Create Initial Site Collections 40
Configure SharePoint 2013 for Hosting Apps 42
Start the SharePoint 2013 Sandbox Service 44
Configure CRL Verification for Disconnected Environments 44
Update Internet Explorer to Bypass the App URL amp Automatically Login to SharePoint Sites 44
Exercise 6 Configure SharePoint to Host My Sites 45
Exercise 7 Install amp Configure Workflow Manager 10 46
Creating a SharePoint Server 2013 Environment for Development and Testing Version 10
copy Critical Path Training 2012 All Rights Reserved 2
wwwCriticalPathTrainingcom
Verify SQL Server 2012 Network Configuration 46
Configure the Workflow Service Account with the Necessary Rights 47
Download amp Install Workflow Manager and Service Bus 49
Configure Workflow Manager and Service Bus 50
Connect SharePoint 2013 to Workflow Manager 54
Configure SharePoint User Profile Service Application AD Sync 55
Exercise 8 Install the Microsoft Office 2013 Professional Clients 56
Install Microsoft Office Professional Plus 2013 56
Install Microsoft Office Visio 2013 56
Install Microsoft Office 2013 SharePoint Designer 57
Exercise 9 Install Visual Studio 2012 57
Install Office amp SharePoint 2013 Developer Tools 59
Appendix 1 Download Manifest 61
Appendix 2 Windows PowerShell Script Manifest 62
Appendix 3 Create Sample Adventure Works Database 63
Change Log 64
Creating a SharePoint Server 2013 Environment for Development and Testing Version 10
copy Critical Path Training 2012 All Rights Reserved 3
wwwCriticalPathTrainingcom
Overview
This document provides links to Internet resources and step by step instructions for building a Virtual Machine (VM) sample SharePoint Server 2013 environment This VM can be used to complete the lab exercises in SharePoint 2013 training courses authored by Critical Path Training LLC The VM can also be used for general testing and development with SharePoint 2013
This setup guide gives you the option of using free trial software or supplying your own product keys The software products that require product keys include Windows Server 2008 R2 SQL Server 2012 Developer SharePoint Server 2013 and Office 2013 If you plan to use evaluation software to build your VM there are optional steps for downloading Microsoftrsquos free trial VM for Windows Server 2008 R2 so you can use that as your starting point You can alternatively install Windows Server 2008 R2 yourself using your own product key so you do not have to worry about the operating system on the VM expiring after a certain amount of time Further you could use Windows Server 2012 but this setup guide will focus on Windows Server 2008 R2 because the user interface of Windows Server 2012 is so different from the more traditional Windows interface
Note that the requirements for building out a SharePoint 2013 development environment are more relaxed and have fewer requirements compared to building out a SharePoint 2013 production environment Therefore you should not rely on this document as your only resource when you are installing SharePoint 2013 for production use The following list of assumptions has been made
One server
o All-Up Server (everything needed for SharePoint development including Active Directory)
All Application Pools hosting SharePoint Service Applications will be configured to run under a single AD account
All Application Pools hosting SharePoint Web Applications amp Workflow will be configured to run under a single AD account
Hardware Requirements amp Recommendations
SharePoint 2013 has higher hardware requirements than SharePoint 2010 Specifically
Memory The server where SharePoint 2013 is installed should be allocated at least 10GB of memory
Note Pre-release versions of SharePoint 2013 required the Workflow Manager product be installed on a server that was not running Active Directory This has changed and thus to simplify things this guide assumes yoursquoll build everything on one server
To do this you will need a host computer with at least 16GB of RAM Any computer that can support 16GB of RAM
should have an adequate CPU and disk Yoursquoll get the best performance if you use solid state drives (SSD) and ensure
the virtual machines run on a separate drive from the drive where the host operating system is running
Creating a SharePoint Server 2013 Environment for Development and Testing Version 10
copy Critical Path Training 2012 All Rights Reserved 4
wwwCriticalPathTrainingcom
Virtualization Details
This guide assumes you will use Microsoftrsquos Hyper-V virtualization technology Hyper-V is available starting in Windows Server 2008 Windows Server 2008 R2 Windows Server 2012 and Windows 8 Virtualizing a SharePoint installation is not required nor is Hyper-V is required
You can install on physical servers or using a different virtualization technology of your choice such as VMWare or VirtualBox This guide only deals with Hyper-V in the following ways
Create a virtual network
Create two virtual machines
Configure the processors memory and networking on the virtual machines
If you elect to use something other than Hyper-V you can skip the first section of this guide however the remainder of the guide will assume you setup two servers the way they were configured and setup in exercises 2 amp 3
High-Level View of Creating a SharePoint 2013 Environment
The process of creating a SharePoint 2013 environment for development is not a trivial task This guide walks through various required exercises A summary of these exercises are as follows
1 Configure Host Computer Hyper-V amp Networking Before creating a virtual machine you need to configure the host
environment This includes creating a virtual network both machines will communicate on
2 Install amp Configure a Windows Server SharePoint 2013 must run using domain accounts (as opposed to local accounts)
3 Install Active Directory Domain Services With both servers created next you will need to install and configure Active
Directory
4 Install SQL Server 2012 SharePoint needs to install its databases in SQL Server In this exercise you will install SQL Server
5 Install amp Configure SharePoint Server 2013 Obviously you need to install SharePoint 2013 to create a SharePoint 2013
environment
6 Install amp Configure Workflow Manager and Service Bus SharePoint 2013 relies on a new product Workflow Manager to
handle all workflows In this exercise you will install and configure Workflow Manager as well as its prerequisites (such as
Service Bus) and then connect your SharePoint 2013 farm to it Workflow Manager
7 Install the Microsoft Office 2013 Professional Clients In this exercise you will install and configure Office 2013
Professional clients including Visio and SharePoint Designer
8 Install Visual Studio 2012 Finally you install Visual Studio 2012 and the Office and SharePoint 2013 developer tools
Creating a SharePoint Server 2013 Environment for Development and Testing Version 10
copy Critical Path Training 2012 All Rights Reserved 5
wwwCriticalPathTrainingcom
Creating a SharePoint Server 2013 Environment for Development amp
Testing
Lab Time 2-4 hours
Lab Folder CStudentGettingStartedLab
Lab Overview In this lab you will create a new SharePoint environment to use for testing SharePoint 2013 It covers how to install
and configure the host computer for hosting virtual machines networking them together and installing everything needed If you are not interested in doing development you can omit the last exercise which has you install Visual Studio 2012
Exercise 1 Configure Host Computer Hyper-V amp Networking
In this exercise you will configure your host computerrsquos Hyper-V role for hosting multiple networked virtual machines This involves creating a two virtual networks that will be used to connect the virtual machines together and to connect to the Internet
1 Launch the Hyper-V Manager Start Administrative Tools Hyper-V Manager
2 Create a new virtual network to connect to the Internet
a) In the Actions pane on the right-hand side of the screen click Virtual Network Manager
b) In the Virtual Network Manager dialog create a new virtual network by clicking the Add button (it doesnrsquot matter what you select as the network type) Use the following settings to create the network
i) Name External LAN
ii) Connection Type External (select the network card on the host computer thatrsquos connected to the Internet)
This will be used to connect the VM to the Internet
3 Click OK to save your changes
4 Create a new virtual network the virtual machines will use to communicate with each other
a) In the Actions pane on the right-hand side of the screen click Virtual Network Manager
b) In the Virtual Network Manager dialog create a new virtual network by clicking the Add button (it doesnrsquot matter what you select as the network type) Use the following settings to create the network
i) Name Internal LAN
ii) Connection Type Internal Only
Creating a SharePoint Server 2013 Environment for Development and Testing Version 10
copy Critical Path Training 2012 All Rights Reserved 6
wwwCriticalPathTrainingcom
This will be used to connect the two VMs together so they can talk to each other
5 Click OK to save your changes
When you create a virtual Internal Only network Hyper-V creates a virtual network interface card (NIC) in the list of all NICrsquos installed on the host computer (Start [search] ldquoView Network Connectionsrdquo) If you configure the IP of this card to be on the same network with a different IP address than you use for your machines you will be able to login to these machines using the Remote Desktop Connection app in Windows
A Private Virtual Machine Network the other connection type available is similar to an Internal network except that it does not create
the virtual NIC in the host computer
Exercise 2 Install amp Configure a Windows Server
In this exercise you will create install configure and update a new server to act as the Active Directory domain controller for the SharePoint environment using Windows Server 2008 R2 with Service Pack 1
If you are using a different virtualization product other than Hyper-V or if you are creating physical machines you can skip to the section Install the Windows Server 2008 R2 Operating System
1 If it is not open launch the Hyper-V Manager Start Administrative Tools Hyper-V Manager
2 Inside the left-hand side of the Hyper-V Manager locate the node with the name of the local host computer and select it
Creating a SharePoint Server 2013 Environment for Development and Testing Version 10
copy Critical Path Training 2012 All Rights Reserved 7
wwwCriticalPathTrainingcom
Create a New Virtual Machine
In this section you will create a new virtual machine in Hyper-V
1 In the Actions pane select New Virtual Machine When you execute this menu command the Hyper-V Manager will launch the New Virtual machine Wizard
2 In the Specify Name and location dialog enter a Name of WingtipServer and click Next
3 In the Assign Memory dialog enter the amount of Memory to allocate to the virtual machine in MB to 12288 and click Next
Creating a SharePoint Server 2013 Environment for Development and Testing Version 10
copy Critical Path Training 2012 All Rights Reserved 8
wwwCriticalPathTrainingcom
4 In the Configure Networking dialog use the drop down box to assign a Connection value of Internal LAN and click Next
5 In the Connect Virtual Hard Disk dialog accept the default options to create a virtual hard disk amp click Finish
If possible configure the location so that the VHD file for the VM is created on a separate drive than the host computerrsquos operating system
6 In the Hyper-V Manager window right-click the VM you just created and select Settings
7 In the Settings for WingtipServer dialog select Add Hardware select Network Adapter and click Add
Creating a SharePoint Server 2013 Environment for Development and Testing Version 10
copy Critical Path Training 2012 All Rights Reserved 9
wwwCriticalPathTrainingcom
8 Obtain a copy of the Windows Server 2008 R2 with Service Pack 1 install binaries
The install image (ISO) is available to MSDN or TechNet subscribers or as a trial download available here httptechnetmicrosoftcomen-usevalcenterdd459137aspx
Obviously you can also use your own licensed copy of Windows Server 2008 R2 with Service Pack 1
Microsoft also provides a pre-installed 180-day trial Windows Server 2008 R2 Hyper-V VHD file that you can download (httpwwwmicrosoftcomdownloadsdetailsaspxFamilyId=9040a4be-c3cf-44a5-9052-a70314452305) instead of installing it
yourself If you elect to go this route
Make sure you specify the VHD file you downloaded in the following step for the Hard Drive of the VM
Do not specify a DVD Drive in the following step as you will not be installing anything
If you elect to do this step jump down to section Configure Windows Server 2008 R2
9 In the Settings for WingtipServer dialog update the VM to have the following settings When finished click OK
a) Processor 2 Virtual Processors
b) DVD Drive Image File ndash Map to the Windows Server 2008 R2 ISO installer file
c) Network Adapter Internal LAN
d) Network Adapter Not Connected
10 Start up the WingtipServer VM and install Windows Server 2008 R2
a) In the Hyper-V Manager window right-click the VM you just created and select Settings
b) Right-click on the VM named WingtipServer and select the Connecthellip menu
c) In the Virtual Machine Connection window drop down the Action menu and select Start
Creating a SharePoint Server 2013 Environment for Development and Testing Version 10
copy Critical Path Training 2012 All Rights Reserved 10
wwwCriticalPathTrainingcom
If you elected to use the fully installed trial VHD from Microsoft instead of installing your own server skip to the section Configure Windows Server 2008 R2
Install the Windows Server 2008 R2 Operating System
In this section you will install the operating system
1 After the setup program for Windows Server 2008 R2 loads it will prompt you with a dialog asking you to select a language Accept the default of English and click Install to continue
2 At the next dialog click the Install Now button to begin the installation
Creating a SharePoint Server 2013 Environment for Development and Testing Version 10
copy Critical Path Training 2012 All Rights Reserved 11
wwwCriticalPathTrainingcom
3 The next dialog instructs you to select the operating system you want to install Select the operating system named Windows Server 2008 R2 Enterprise (Full Installation) with the x64 architecture Click Next to continue
4 Agree to the licensing terms and click Next
5 Click on Custom (advanced) to select the type of installation
6 The next dialog asks you where you want to install Windows Accept the default configuration which uses a location of Disk 0 Unallocated Space as shown below Click Next to continue
At this point you have given the Windows setup program enough information to install the basic operating system Setup program will now run for a while as it copies and expands files and installs Windows features You now have a few minutes to get a cup of coffee or catch up on email
7 When the setup program completes it will ask you to assign a new password for the built-in Administrator account Click OK to continue
8 Set the password for Administrator account to Password1
9 When you have updated the Administrator password you will get a confirmation that the update was successful Click OK to complete the installation of the operating system
If you elected to use the pre-installed trial VHD Microsoft offers you will pick up the configuration exercise at this point
Configure Windows Server 2008 R2
In this section you will configure the server
1 When you log in Windows Server automatically displays the Initial Configuration Tasks window Click the check box with the caption Do not show this window at logon and then click the Close button
Creating a SharePoint Server 2013 Environment for Development and Testing Version 10
copy Critical Path Training 2012 All Rights Reserved 12
wwwCriticalPathTrainingcom
2 After you close the Initial Configuration Tasks window Windows Server will display the Server Manager
Creating a SharePoint Server 2013 Environment for Development and Testing Version 10
copy Critical Path Training 2012 All Rights Reserved 13
wwwCriticalPathTrainingcom
3 Configure the Administrator account so that its password does not expire
a) Inside the Configuration node of the Server Manager navigate to Local Users and Groups Users (as shown in the following screenshot) and locate the local Administrator account
b) Right-click on the Administrator account and click Properties
c) In the Administrator Properties dialog unselect the option for User must change password at next logon and select the option for Password never expires Click OK
4 Rename the computer name of the VM
a) In the Server Manager navigate to the top-level node to display the Server Summary page Click Change System Properties
b) On the Computer Name tab of the System Properties dialog click the Change button
c) Enter a new computer name of WingtipServer and click OK
Creating a SharePoint Server 2013 Environment for Development and Testing Version 10
copy Critical Path Training 2012 All Rights Reserved 14
wwwCriticalPathTrainingcom
5 After changing the computer name you will be prompted to restart the VM Choose OK to restart After the VM has restarted log in again using [administrator | Password1] (username | password)
6 Disable Windows Firewall and Enhanced Security Configuration
a) In the Server Manager navigate to the top-level node to display the Server Summary page Inside the Security Information section locate the links for Go to Windows Firewall and Configure IE ECS
b) Click on Configure IE ECS link Disable Enhanced Security Configuration for both Administrators and Users by selecting the Off radio buttons and click OK
c) Now click the Go to Windows Firewall link to display the page for the Windows Firewall Click on the Windows Firewall Properties link at the bottom of the Overview section
d) In the Domain Profile tab of the Windows Fire dialog change the Firewall state property setting from On to Off Click to Apply button to save your changes
e) Once you have turned off the firewall in the Domain Profile tab go to the Private profile tab and the Public profile tab and follow the same steps to disable the firewall for these profiles as well
f) Click OK to dismiss the Windows Firewall dialog once you have turned off the firewall for all three profiles
7 Enable Remote Desktop for your VM
a) In the Server Manager navigate to the top-level node to display the Server Summary page Inside the Computer Information section locate and click the link for Configure Remote Desktop
b) In the Remote tab of the System Properties dialog select the last option for Allow connections only from computers running Remote Desktop with Network Level Authentication Click OK to save changes and dismiss the System Properties dialog
Creating a SharePoint Server 2013 Environment for Development and Testing Version 10
copy Critical Path Training 2012 All Rights Reserved 15
wwwCriticalPathTrainingcom
8 Enable the Windows Server Features for the Desktop Experience and the PowerShell Integrated Scripting Environment
a) In Server Manager choose Add Feature to bring up the Add Features Wizard dialog
b) Select the feature Desktop Experience
When you first click the checkbox for the Desktop Experience the wizard will prompt you with the following dialog to add support for Ink and Handwriting Services Click the Add Required Features button to continue
c) Scroll down the list of features in the Add Features Wizard dialog and select the feature Windows PowerShell Integrated Scripting Environment (ISE)
Creating a SharePoint Server 2013 Environment for Development and Testing Version 10
copy Critical Path Training 2012 All Rights Reserved 16
wwwCriticalPathTrainingcom
When you first click the checkbox for the Windows PowerShell Integrated Scripting Environment (ISE) the wizard will prompt you with the following dialog to add support for NET Framework 351 Features Click the Add Required Features button to continue
d) Click the Next button on the Add Features Wizard dialog to continue with the install
e) On the Confirm Installation Selection wizard page click the Install button
f) When you see the Installation Results screen the Add Features Wizard informs you a computer restart is required Click Close button to dismiss this dialog
9 After the VM has restarted log in again using [administrator | Password1] (username | password)
Configure the Virtual Machinersquos Networking Setup
In this section yoursquoll configure the two NICrsquos you added to the VM in previous steps One NIC (Internal LAN) will be used to communicate with other VMs in this environment while the other (External LAN) will be used to connect to the internet
1 Configure the NIC that is linked to the Internal LAN network
a) Open the Network Connections dialog by pressing Start enter view network connections in the search box Click the View Network Connections shortcut
b) Two network connections will be shown but only one will show as connected
The connected one is the one that is connected to the Internal LAN network The other one is currently ldquounpluggedrdquohellip this is why we didnrsquot connect a network to the second network when initially configuring the VM as this makes it easier to see which NIC is which in the VM
c) Rename the two NICrsquos
i) Right-click the connected NIC and select Rename Give it a name of Internal LAN
Creating a SharePoint Server 2013 Environment for Development and Testing Version 10
copy Critical Path Training 2012 All Rights Reserved 17
wwwCriticalPathTrainingcom
ii) Right-click the disconnected NIC and select Rename Give it a name of External LAN
d) Right-click the Internal LAN NIC and select Properties
e) In the Local Area Connection Properties dialog select the Internet Protocol Version 4 (TCPIPv4) item and click Properties
f) Enter the following information into the resulting dialog to configure the NICrsquos IP settings
i) Use the Following IP Address
(1) IP Address 192168150102
(2) Subnet mast 2552552550
(3) Default Gateway 192168150102
ii) Use the Following DNS Server Addresses
(1) Preferred DNS Server 192168150102
g) Click OK to accept the IP settings and Close to accept the changes to the NIC
Why not use 101 as the start NIC When you created the virtual internal network Hyper-V created a virtual NIC on the host computer If you set the IP of that NIC to 192168150101 you can use the Remote Desktop Connection app in Windows to connect to your virtual machines and easily copy-paste amp share drives
2 Configure the NIC that is linked to the External LAN network
a) Open the Network Connections window if it is not still open using the same steps from the previous step
b) Right-click the External LAN NIC and select Properties
c) In the Local Area Connection Properties dialog select the Internet Protocol Version 4 (TCPIPv4) item and click Properties
d) Enter the following information into the resulting dialog to configure the NICrsquos IP settings
i) Obtain an IP Address Automatically
ii) Use the Following DNS Server Addresses
(1) Preferred DNS Server 192168150102
e) Click the Advanced button to open the Advanced TCPIP Settings dialog
f) In the Advanced TCPIP Settings dialog click the DNS tab
i) Uncheck the Register this Connections Address in DNS
Creating a SharePoint Server 2013 Environment for Development and Testing Version 10
copy Critical Path Training 2012 All Rights Reserved 18
wwwCriticalPathTrainingcom
g) In the Advanced TCPIP Settings dialog click the WINS tab
i) Click the Add button and specify a new WINS Server as 192168150102
h) Click OK Close multiple times to accept all TCPIP settings
The external NIC will now obtain an IP dynamically amp will not register itself in the DHCPrsquos DNS server which is a good thing when there are multiple people on the same network this this type of a setup
3 Connect the second NIC to the External LAN network
a) Go back to the host computer and open the Hyper-V Manager
b) In the Hyper-V Manager window right-click the VM WingtipServer and select Settings
c) Select the second NIC the one that is not connected
d) For the Network select External LAN and click OK This will effectively plug the external network into the VM
4 Go back into the WingtipServer VM and if it is not still open open the Network Connections dialog You should now see both connections plugged in
a) To refresh the connection select the connection you just plugged in and click the Disable this Network Device button in the toolbar After the connection is disabled select it and click the Enable this Network Device button
b) After a few seconds the VM should be able to connect to the internet which you can test by browsing to a site such as httpwwwbingcom
Configure Windows Update and Update the Server
In this section you will verify the server is fully patched and updated
1 Verify Service Pack 1 is installed
a) Verify the version of the operating system installed by clicking Start right-click on Computer select Properties
b) If the server simply says Windows Server 2008 R2 Enterprise as shown in the following figure download and install Service Pack 1 from the following location httpwwwmicrosoftcomen-usdownloaddetailsaspxid=5842
Creating a SharePoint Server 2013 Environment for Development and Testing Version 10
copy Critical Path Training 2012 All Rights Reserved 19
wwwCriticalPathTrainingcom
c) If Service Pack 1 is installed it will state it
2 Update the server using Windows Update
a) Selecting Start All Programs Windows Update
b) First disable Windows Update from running automatically
i) Click the link Change Settings
ii) Under the Important Updates list select Never check for updates (not recommended)
This isnrsquot what you would do in a production environment but for a development machine it is ok
c) Now update the server
i) Click the Check for Updates button
ii) If prompted install any updates to the Windows Update dialog
iii) Select the Check for Updates link
iv) Windows Update will the report how many updates are available Select all important and recommended updates and click the Install Updates button
v) If prompted select I accept the license terms for any updates that require it
vi) Keep going through the process of running Windows Update checking for updates and installing them after each reboot until it says there are no updates left to install
This step is likely going to take quite a bit of time so be patient
Activate Windows Server 2008 R2
In this section you will activate the server if you have a product key
1 If you have a product key for Windows Server 2008 R2 use it to activate Windows
a) In the Server Manager window navigate to the top-level node to display the Server Summary page Click Activate Windows
b) You will be prompted to enter your product key
i) Enter your product key and click to button to activate Windows
Creating a SharePoint Server 2013 Environment for Development and Testing Version 10
copy Critical Path Training 2012 All Rights Reserved 20
wwwCriticalPathTrainingcom
ii) After a few seconds your VM should be able to connect to a Microsoft site and successfully activate Windows
At this point you have a fully patched operating system VM created that will act as the Active Directory domain controller
Apply the DisableLoopbackCheck Registry Fix
Configure the DisableLoopbackCheck registry setting (Microsoft KB httpsupportmicrosoftcomkb896861)
The following steps automate creating the registry key outlined as Method 2 in the Microsoft KB article httpsupportmicrosoftcomkb896861 using Windows PowerShell
PowerShell Script Alert You can also find this PowerShell script AddDisableLoopbackCheckRegKeyps1 in the files that
accompany this setup guide
1 Click the Windows PowerShell icon in the Taskbar
2 Run the following PowerShell commands pressing [ENTER] after each one
$regKeyPath = HKLMSystemCurrentControlSetControlLsa $key = DisableLoopbackCheck New-ItemProperty -Path $regKeyPath -Name $key -Value 1 -PropertyType dword
a) Close the Windows PowerShell console by typing EXIT and pressing [ENTER]
Exercise 3 Install Active Directory Domain Services
Now you will promote your WingtipServer VM to a domain controller and create a new domain named wingtipcom
1 Login to the WingtipServer virtual machine using administrator | Password1
2 Add and configure the role for Active Directory Domain Services
a) Launch Server Manager and select the Roles node
b) Click the Add Roles link to start the Add Roles Wizard
c) On the Before you begin page click Next
d) On the Server Roles page select Active Directory Domain Services Click the Add Required Features button if prompted to install prerequisites
e) Click Next
Creating a SharePoint Server 2013 Environment for Development and Testing Version 10
copy Critical Path Training 2012 All Rights Reserved 21
wwwCriticalPathTrainingcom
f) On the next page of the wizard click Next which will bring you to the Confirm Installation Selections page
g) Click Install
After Active Directory Domain Services has been installed you will see the Installation Results page in the Add Roles Wizard
3 Click on the link with the big long caption of Close this wizard and launch the Active Directory Domain Services Installation Wizard (dcpromoexe)
4 On the first page of the Active Directory Domain Services Installation Wizard click the Use Advanced Mode Installation checkbox and click Next
Creating a SharePoint Server 2013 Environment for Development and Testing Version 10
copy Critical Path Training 2012 All Rights Reserved 22
wwwCriticalPathTrainingcom
5 On the Operating System Compatibility page click Next
6 On the Choose a Deployment Configuration select Create a new domain in a new forest and click Next
7 On the Name the Forrest Root Domain enter the following and click Next
a) FQDN of the forest root domain wingtipcom
8 On the Domain NetBIOS Name set it to WINGTIP and click Next
9 On the Set Forest Functional Level page select Windows Server 2008 R2 and click Next
10 On the Additional Domain Controller Options accept the default options and click Next
11 You might be prompted with the dialog shown below providing a warning that This computer has dynamically assigned IP address(es) This is not a problem when you are running your development environment on a domain controller Click Yes to dismiss the dialog
12 At this point the wizard will prompt you with a dialog information you a delegation for the DNS Server cannot be created because it cannot find the authoritative parent zone This is not a problem because the wizard will automatically configure the DNS of the VM to point to itself Click on the Yes button to dismiss this dialog
Creating a SharePoint Server 2013 Environment for Development and Testing Version 10
copy Critical Path Training 2012 All Rights Reserved 23
wwwCriticalPathTrainingcom
13 On the Location for Database Log Files and SYSVOL page accept all the default values and click Next
14 On the Directory Services Restore Mode Administrator Password page enter Password1 in both textboxes and click Next
15 On the Summary page click Next to start the process of configuring the new Active Directory domain
16 The wizard will display the dialog below to show you the progress of the configuration process You will be required to reboot when the configuration has been completed Check the option for Reboot on completion and then wait for the configuration to complete and the machine to reboot
17 After the VM reboots login to the server with wingtipadministrator | Password1
Configure Windows Update and Update the Server
In this section you will verify the server is fully patched and updated
1 Update the server using Windows Update
a) Selecting Start All Programs Windows Update
b) Select the Check for Updates link
c) Windows Update will the report how many updates are available Select all important and recommended updates and click the Install Updates button
d) If prompted select I accept the license terms for any updates that require it
e) Keep running Windows Update after each reboot and update install until it says there are no updates left to install
Creating a SharePoint Server 2013 Environment for Development and Testing Version 10
copy Critical Path Training 2012 All Rights Reserved 24
wwwCriticalPathTrainingcom
This step could take quite a bit of time so be patient
At this point you have a fully installed Active Directory Domain Controller for the Wingtipcom domain hosted on the server WingtipServer
Exercise 4 Install SQL Server 2012
In this exercise you will install SQL Server 2012 that will be used to store all required databases
1 Download the SQL Server 2012 Evaluation Edition specifically the DVD x64 ISO image to the host computer from here httpwwwmicrosoftcombetaexperiencepdSQL2012EvalCTAenusdefaultaspx or you can use your own licensed copy
2 Mount the SQL Server 2012 ISO to the WingtipServer VM
a) On the host computer open the Hyper-V Manager
b) Right-click the VM WingtipServer and select Settings
c) Select DVD Drive in the left-hand panel
d) In the right-hand panel select Image File and browse to the ISO file that contains SQL Server 2012 and click OK
3 Login to the WingtipServer VM as wingtipadministrator | Password1
Install SQL Server 2012
In this section you will install SQL Server 2012
1 If the AutoPlay dialog box is open click Run SETUPEXE If it isnrsquot use Windows Explorer to navigate to the DVD drive and execute the setupexe file in the root of the DVD drive
2 In the SQL Server Installation Center click Installation on the left-hand side
Creating a SharePoint Server 2013 Environment for Development and Testing Version 10
copy Critical Path Training 2012 All Rights Reserved 25
wwwCriticalPathTrainingcom
3 Next select New SQL Server stand-alone installation or add features to an existing installation
4 On the Setup Support Rules page the installer will check for issues before installing Click OK
5 On the Product Key page click the Specify a free edition radio box and select Evaluation then click Next
6 On the License Terms page click the I accept the license terms checkbox and click Next
7 On the Setup Support Rules page the installer will check for any problems with the server you are installing on Click Next when this completes
Creating a SharePoint Server 2013 Environment for Development and Testing Version 10
copy Critical Path Training 2012 All Rights Reserved 26
wwwCriticalPathTrainingcom
8 On the Support Role page select SQL Server Feature Installation and click Next
9 On the Feature Selection page check the following options and click Next
a) Instances Features
i) Database Engine Services
(1) Full-Text and Semantic Extractions for Search
b) Shared Features
i) Management Tools ndash Basic
(1) Management Tools ndash Complete
Creating a SharePoint Server 2013 Environment for Development and Testing Version 10
copy Critical Path Training 2012 All Rights Reserved 27
wwwCriticalPathTrainingcom
10 On the Installation Rules page click Next
11 On the Instance Configuration page click Next
12 On the Disk Space Requirements page click Next
13 On the Server Configuration page do the following and click Next
a) On the Service Account tab change the Startup Type for the SQL Server Agent to Automatic
14 On the Database Engine Configuration page do the following and click Next
a) On the Server Configuration tab click Add Current User
b) On the FILESTREAM tab
i) Check Enable FILESTREAM for Transact-SQL Access
ii) Check Enable FILESTREAM for file IO access
15 On the Error Reporting page click Next
16 On the Installation Configuration Rules page click Next
17 On the Ready to Install page click Install
Installation of SQL Server 2012 will take some time please be patient
18 When the installation completes the Complete page will be shown Click Close
At this point you have now successfully installed SQL Server 2012
Creating a SharePoint Server 2013 Environment for Development and Testing Version 10
copy Critical Path Training 2012 All Rights Reserved 28
wwwCriticalPathTrainingcom
Exercise 5 Install amp Configure SharePoint Server 2013
In this exercise you will install SharePoint 2013
1 Download the SharePoint Server 2013 to the host computer from here httptechnetmicrosoftcomen-USevalcenterhh973397aspx
2 Mount the SharePoint Server 2013 ISO to the WingtipServer VM
a) On the host computer open the Hyper-V Manager
b) Right-click the VM WingtipServer and select Settings
c) Select DVD Drive in the left-hand panel
The file that Microsoft provides is saved in the IMG format Hyper-V Manager wonrsquot allow you to mount an IMG file so rename it to ISO before mounting it
d) In the right-hand panel select Image File and browse to the ISO file that contains SharePoint Server 2013 and click OK
Create SharePoint Service Accounts amp Grant Rights to SQL Server 2012
In this section you will create the necessary service accounts that will be used by SharePoint in Active Directory and grant them necessary rights in SQL Server 2012
PowerShell Script Alert The creation of users and granting them rights to SQL Server 2012 steps in this section are automated in the Windows PowerShell script CreateSpServiceAccountsps1 found in the files that accompany this setup guide Open the script
and read the header for documentation on how to use it
1 Open the Active Directory Users and Computers Start Administrative Tools Active Directory Users and Computers
2 Expand the tree in the left-hand pane to see the Users OU Select the Users OU
3 Create a new user SP_Farm
a) In the toolbar select Action New User
Creating a SharePoint Server 2013 Environment for Development and Testing Version 10
copy Critical Path Training 2012 All Rights Reserved 29
wwwCriticalPathTrainingcom
b) Set the userrsquos Full Name amp User Login Name to SP_Farm and click Next
c) In the password dialog enter the following and click Next
i) Password (and Confirm Password) Password1
ii) User must change password at next login unchecked
iii) User cannot change password unchecked
iv) Password never expires checked
v) Account is disabled unchecked
Creating a SharePoint Server 2013 Environment for Development and Testing Version 10
copy Critical Path Training 2012 All Rights Reserved 30
wwwCriticalPathTrainingcom
vi) Click Finish
4 Repeat the previous step to create two more accounts
a) SP_Content
b) SP_Services
At this point you have created all the necessary service accounts
Install SharePoint Server 2013 Prerequisites
In this section you will install the SharePoint Server 2013 Prerequisites
1 Ensure you are logged into the WingtipServer VM using the account wingtipadministrator | Password1
2 If the AutoPlay dialog box is open click Run splashhta If it isnrsquot use Windows Explorer to navigate to the DVD drive and execute the splashhta file in the root of the DVD drive
Creating a SharePoint Server 2013 Environment for Development and Testing Version 10
copy Critical Path Training 2012 All Rights Reserved 31
wwwCriticalPathTrainingcom
3 Click the Install Software Prerequisites link
4 In the Microsoft SharePoint 2013 Products Preparation Tool window click Next
5 On the License Terms for Software Products page
a) Check I accept the terms of the License Agreement(s)
b) Click Next
6 The tool will download and install all prerequisites for SharePoint Server 2013 This will take some time It may prompt you to reboot the server If so reboot the server and login using wingtipadministrator | Password1
Creating a SharePoint Server 2013 Environment for Development and Testing Version 10
copy Critical Path Training 2012 All Rights Reserved 32
wwwCriticalPathTrainingcom
7 When the prerequisite installer is complete it will present a summary of everything it did
8 Click Finish
9 Restart the WingtipServer VMhellip some additional installations and changes that the prerequisite installer did will require a restart before installing SharePoint Server 2013
At this point all prerequisites required by SharePoint Server 2013 have been installed and any necessary configuration changes have been applied to the server However it is strongly recommend that you run Windows Update and install any pending updates Further Microsoft recommends installing the following hotfixes if they are not already installed
KB2554876 The SharePoint Parsing Process Crashes in Windows Server 2008 R2
KB2708075 IIS 75 Configurations are not Updated when you use the ServerManager Class to Commit Configuration Changes
KB2759112 Hotfix is Available for NET Framework 45 that Resolves an ASPNET Race Condition Issue in Windows Server 2008 R2 Windows Server 2008 R2 SP1
KB2765317 Hotfix is Available for NET Framework 45 that Resolves an ASPNET Race Condition Issue in Windows
8 Windows RT and Windows Server 2012
Install SharePoint Server 2013
In this section you will install SharePoint Server 2013
1 Ensure you are logged into the WingtipServer VM using the account wingtipadministrator | Password1
2 If the AutoPlay dialog box is open click Run splashhta If it isnrsquot use Windows Explorer to navigate to the DVD drive and execute the splashhta file in the root of the DVD drive
Creating a SharePoint Server 2013 Environment for Development and Testing Version 10
copy Critical Path Training 2012 All Rights Reserved 33
wwwCriticalPathTrainingcom
3 Click Install SharePoint Server
4 When prompted to Enter your Product Key enter the key you obtained for the trial install and click Continue
5 On the Read the Microsoft Software License Terms page check the I accept the terms of this agreement checkbox and click Continue
6 On the Choose a file location page click Install Now
Creating a SharePoint Server 2013 Environment for Development and Testing Version 10
copy Critical Path Training 2012 All Rights Reserved 34
wwwCriticalPathTrainingcom
7 When the installation is complete select the Run the SharePoint Products Configuration Wizard checkbox and click Close
8 On the Welcome to SharePoint Products page click Next
a) If prompted to start or reset services click Yes
9 On the Connect to a server farm page select Create a new server farm and click Next
10 On the Specify Configuration Database Settings page use the following to complete the page and click Next
a) Database server WINGTIPSERVER
b) Database name SharePoint_Config
c) Username WINGTIPSP_Farm
d) Password Password1
Creating a SharePoint Server 2013 Environment for Development and Testing Version 10
copy Critical Path Training 2012 All Rights Reserved 35
wwwCriticalPathTrainingcom
11 On the Specify Farm Security Settings page for the Passphrase and Confirm Passphrase boxes enter Password1 and click Next
12 On the Configure SharePoint Central Administration Web Application page check the Specify port number checkbox and enter a value of 9999 then Click Next
Creating a SharePoint Server 2013 Environment for Development and Testing Version 10
copy Critical Path Training 2012 All Rights Reserved 36
wwwCriticalPathTrainingcom
13 On the Completing the SharePoint Products Configuration Wizard page click Next
14 When the installer completes it will display the Confirmation Successful page
15 Click Finish This will launch Internet Explorer to go through the configuration process
Creating a SharePoint Server 2013 Environment for Development and Testing Version 10
copy Critical Path Training 2012 All Rights Reserved 37
wwwCriticalPathTrainingcom
At this point you have successfully installed SharePoint Server 2013
Configure SharePoint Server 2013
In this section you will create a new SharePoint Server 2013 farm and perform minimal configuration tasks
After installing SharePoint Sever 2013 the SharePoint Products Configuration Wizard will launch the browser-based Initial Farm Configuration Wizard
1 In the first page of the wizard you are prompted to Help Make SharePoint Better Select which ever option you want and click OK
2 On the Welcome page that asks How do you want to configure your SharePoint farm click the Start the Wizard button
3 On the Services page do the following and then click Next
a) Service Account Select Create new managed account
i) Username WINGTIPSP_Services
ii) Password Password1
b) Services Uncheck the following services
Creating a SharePoint Server 2013 Environment for Development and Testing Version 10
copy Critical Path Training 2012 All Rights Reserved 38
wwwCriticalPathTrainingcom
i) Access Services 2010
ii) App Management Service
In SharePoint Server 2013 the Search Service Application processes specifically noderunnerexe can consume a considerable amount of memory and processor time If you are not going to work with search you might consider unchecking this option for now You can always go back into Central Administration and create a new instance of the Search Service Application at a later date if you need it
Why did we remove Access Services 2010 amp App Management Service service applications The Access Services 2010 service application is included for backwards compatibility and isnrsquot needed in new installations unless you are migrating solutions built with Access Services 2010 from SharePoint Server 2010 (if so you can create this service application later within Central Administration Application Management Manage Service Applications) The App Management Service service application will be created in a later step in this setup guide therefor it is skipped here
4 The creation of the service applications can take quite a while so be patient If it exceeds 20 minutes it is fairly safe to assume the page is hung up One option is to close the browser then launch Central Administration (Start All Programs Microsoft SharePoint 2013 Products SharePoint 2013 Central Administration) and look at the Service Application page (Application Management Manage Service Applications) to see if they were all created
Configure DNS
In this section you will configure DNS for hosting SharePoint sites amp Apps
1 Ensure you are logged into the WingtipServer VM using the account wingtipadministrator | Password1
2 Open the DNS window Start Administrative Tools DNS
3 Expand the hierarchy on the left-hand side of the window until you get to DNS WINGTIPSERVER Forward Lookup Zones wingtipcom
4 Create a new wildcard so all requests for http[]wingtipcom will be forwarded to our SharePoint machine
a) Next right-click wingtipcom and select New Host (A or AAAA)
Creating a SharePoint Server 2013 Environment for Development and Testing Version 10
copy Critical Path Training 2012 All Rights Reserved 39
wwwCriticalPathTrainingcom
b) In the New Host dialog enter the following and click OK
i) Alias Name
ii) IP Address 192168150102 Then click Add Host The following figure shows how this looks
This new record is telling DNS to forward any request for http[]wingtipcom to the webserver WINGTIPSERVER where the
requests will be served by SharePoint
5 Verify this DNS entry is working
a) Open Windows PowerShell Start All Programs Accessories Windows PowerShell Windows PowerShell
b) Run the following commands and press ENTER
PS CUsersAdministratorgt nslookup somethingwingtipcom PS CUsersAdministratorgt nslookup somethingappswingtipcom
c) You should get a response that points to the WingtipServer server as shown in the following figure
Creating a SharePoint Server 2013 Environment for Development and Testing Version 10
copy Critical Path Training 2012 All Rights Reserved 40
wwwCriticalPathTrainingcom
Configure SharePoint Server 2013 for Host-Named Site Collections amp Create Initial Site
Collections
In this section you will create new SharePoint 2013 site collections for testing and hosting apps
Microsoft recommends to create host-named site collections (HNSC) instead of using the path based site collection addressing The difference is the following a path based site created at something such as httpintranetwingtipcomsitesdevtest as an HNSC site would be more like httpdevtestwingtipcom This is how it works in the cloud (Office 365) and it scales much better for on-prem
deployments This setup guide will show you how to setup your environment to create HNSC The only downside to this approach is that you canrsquot create site collections within Central Administration it must be done via Windows PowerShell API (because Central Administration doesnrsquot instruct you where to put the site
This is implemented in various parts First DNS must be configured to send all requests for httpwingtipcom to a Web Application
(implemented in the last section) Second this Web Application must be extended with SharePoint and have no host header bindings (so it handles all requests) Third it must have a default site collection at the root of the Web Application but it will not be used for anything (in fact it doesnrsquot need a template assigned to it)
You can read more about HNSCrsquos on TechNet httptechnetmicrosoftcomen-uslibrarycc424952aspx
PowerShell Script Alert The steps in this section are automated in the script SetupSharePointForHNSCps1 found in the files that
accompany this setup guide Open the script and read the header for documentation on how to use it
1 Ensure you are logged into the WingtipServer VM using the account wingtipadministrator | Password1
2 Open Central Administration Start All Programs Microsoft SharePoint 2013 Products SharePoint 2013 Central Administration
3 Select Application Management Manage Web Applications
4 Delete the default Web Application created by the configuration wizard
a) Delete the existing default Web Application
i) Select the Web Application SharePoint ndash 80 the one with the URL of httpwingtipserver and click Delete in the ribbon
ii) When prompted to delete the associated IIS Web Site amp SQL Server database select both options to delete them and click OK
The reason you are doing this is because the setup wizard you ran previously when creating the service applications automatically created it The problem is that it used the same identity (WINGTIPSP_Services) for the app pool that is used for all the service
applications which is not desired
5 Create a new Web Application to handle Host-Named Site Collections (HNSC)
Creating a SharePoint Server 2013 Environment for Development and Testing Version 10
copy Critical Path Training 2012 All Rights Reserved 41
wwwCriticalPathTrainingcom
a) In the ribbon click the New button
b) In the Create New Web Application dialog enter the following values in the properties and click OK Leave all properties not mentioned
i) Select the radio button Create a new IIS web site
(1) Name SharePoint HNSC Host ndash 80
(2) Port 80
ii) Application Pool
(1) Select the radio button Create a new application pool
(a) Application Pool Name SharePoint Default HNSC AppPool
(b) Select a security account for this application pool WINGTIPSP_Content
If WINGTIPSP_Content is not listed as an available managed account create it by selecting the appropriate option and using
Password1 for the password
iii) Database Name and Authentication
(1) Database Name WSS_Content_HNSCDefaultHost
c) This process will take a few moments At the end of the process SharePoint will ask if you want to create a site collection You do but you donrsquot want to do it through the browser as this will not be a HNSC To create a HNSC you must create it via Windows PowerShell
6 Create a default not template site collection at the root of the web application
a) Open SharePoint 2013 Management Shell Start All Programs Microsoft SharePoint 2013 Products SharePoint 2013 Management Shell
7 Create Site Collections for Testing SharePoint amp SharePoint Apps
a) Open SharePoint 2013 Management Shell Start All Programs Microsoft SharePoint 2013 Products SharePoint 2013 Management Shell
b) Get a reference to the HNSC web application you just created by running the following Windows PowerShell script in the SharePoint 2013 Management Shell
$hnscWebApp = Get-SPWebApplication | Where-Object $_DisplayName -eq SharePoint HNSC Host - 80
c) Create a non-templated site at the root of the web application for Workflow to connect to by executing the following Windows PowerShell script in the SharePoint 2013 Management Shell
New-SPSite -Name Root HNSC Site Collection -Url httpwingtipcom -HostHeaderWebApplication $hnscWebApp -OwnerAlias WINGTIPAdministrator
d) Create a team site by executing the following Windows PowerShell script in the SharePoint 2013 Management Shell
New-SPSite -Name Wingtip Intranet -Url httpintranetwingtipcom ndashHostHeaderWebApplication $hnscWebApp -Template STS0 -OwnerAlias WINGTIPAdministrator
e) Create a developer site by executing the following Windows PowerShell script in the SharePoint 2013 Management Shell
New-SPSite -Name Wingtip Developer Site -Url httpdevwingtipcom ndashHostHeaderWebApplication $hnscWebApp -Template DEV0 -OwnerAlias WINGTIPAdministrator
You can only create debug and test apps using a developer site
At this point you now have a site collection to use as a team site (httpintranetwingtipcom) and to develop and test custom SharePoint apps (httpdevwingtipcom)
Creating a SharePoint Server 2013 Environment for Development and Testing Version 10
copy Critical Path Training 2012 All Rights Reserved 42
wwwCriticalPathTrainingcom
Configure SharePoint 2013 for Hosting Apps
In this setup you will setup your SharePoint 2013 environment for hosting apps
PowerShell Script Alert Everything in the next immediate step is provided in the script ConfigureSpFarmForAppsps1 found in the
files that accompany this setup guide Open the script and read the header for documentation on how to use it
1 Ensure you are logged into the WingtipServer VM using the account wingtipadministrator | Password1
2 Create the necessary SharePoint App Management service applications and start the necessary services via Windows PowerShell
a) Open SharePoint 2013 Management Shell Start All Programs Microsoft SharePoint 2013 Products SharePoint 2013 Management Shell
b) Execute the following Windows PowerShell script in the SharePoint 2013 Management Shell
$appHostDomain = appswingtipcom $adminService = Get-Service -Name spadminv4 if ($adminServiceStatus -ne Running) Start-Service $adminService $timerService = Get-Service -Name sptimerv4 if ($timerServiceStatus -ne Running) Start-Service $timerService Set-SPAppDomain $appHostDomain $appMgmtSvcInstance = Get-SPServiceInstance | Where-Object $_GetType()Name -eq AppManagementServiceInstance if ($appMgmtSvcInstanceStatus -ne Online) Start-SPServiceInstance -Identity $appMgmtSvcInstance $appSubSettingSvcInstance = Get-SPServiceInstance | Where-Object $_GetType()Name -eq SPSubscriptionSettingsServiceInstance if ($appSubSettingSvcInstanceStatus -ne Online) Start-SPServiceInstance -Identity $appSubSettingSvcInstance $appPoolServiceApps = Get-SPServiceApplicationPool -Identity SharePoint Web Services Default $appSubSvc = New-SPSubscriptionSettingsServiceApplication ndashApplicationPool $appPoolServiceApps ndashName Settings Service Application ndashDatabaseName SettingsServiceDB $proxySubSvc = New-SPSubscriptionSettingsServiceApplicationProxy ndashServiceApplication $appSubSvc $appAppSvc = New-SPAppManagementServiceApplication -ApplicationPool $appPoolServiceApps -Name App Management Service Application -DatabaseName AppServiceDB $proxyAppSvc = New-SPAppManagementServiceApplicationProxy -ServiceApplication $appAppSvc Set-SPAppSiteSubscriptionName -Name app -Confirm$false
3 Verify the script configured SharePoint 2013 for hosting apps
a) Open Central Administration Start All Programs Microsoft SharePoint 2013 Products SharePoint 2013 Central Administration
b) Verify service applications created
i) Open the Service Applications page Application Management Manage Service Applications
ii) Verify you have two service applications created
(1) App Management Service Application
(2) Settings Service Application
c) Verify service instances are running
i) Open the Services on Server page System Settings Manage Services on Server
ii) Verify the following services are Started
(1) App Management Service
(2) Microsoft SharePoint Foundation Subscription Settings Service
Creating a SharePoint Server 2013 Environment for Development and Testing Version 10
copy Critical Path Training 2012 All Rights Reserved 43
wwwCriticalPathTrainingcom
d) Verify App URLs are correct
i) Open the Configure App URLs page Apps Configure app URLs
ii) Verify the following
(1) App Domain appswingtipcom
(2) App Prefix app
At this point your SharePoint Server 2013 environment is ready to host SharePoint apps
Creating a SharePoint Server 2013 Environment for Development and Testing Version 10
copy Critical Path Training 2012 All Rights Reserved 44
wwwCriticalPathTrainingcom
Start the SharePoint 2013 Sandbox Service
By default the service that executes sandbox solutions is not running In this step you will start the service
1 Open Central Administration Start All Programs Microsoft SharePoint 2013 Products SharePoint 2013 Central Administration
2 Open the Services on Server page System Settings Manage Services on Server
3 Click the Start link to the left of the Microsoft SharePoint Foundation Sandboxed Code Service
At this point your installation can support sandbox solutions
Configure CRL Verification for Disconnected Environments
SharePoint periodically ldquophones homerdquo to a specific address hosted by Microsoft under certain conditions When your environment is disconnected this can cause an unnecessary delay or failures when starting up the sandbox The following steps outline a workaround to bypass this check
1 Launch Notepad as an administrator Start All Programs Accessories right-click Notepad and select Run as Administrator
2 Open the hosts file by selecting File Open and finding the file
cWindowsSystem32Driversetchosts
3 Add the following line to the end of the file
127001 crlmicrosoftcom
4 Save and close the hosts file
Update Internet Explorer to Bypass the App URL amp Automatically Login to SharePoint Sites
In this section you will update Internet Explorer to add the App hosting URL to the bypass list so you can navigate to the domain after deploying SharePoint hosted apps
1 Ensure you are logged into the WingtipServer VM using the account wingtipadministrator | Password1
1 Launch Internet Explorer Start All Programs Internet Explorer
2 Configure Internet Explorer to bypass the App URL
a) In the top-right corner click the gear icon and select Internet Options
b) On the Security tab select the Local Intranet and click the Sites button
c) Uncheck the box next to Automatically detect intranet network
d) Click the Advanced button and add two entries to the Exceptions list
i) httpwingtipcom
ii) httpappswingtipcom
Creating a SharePoint Server 2013 Environment for Development and Testing Version 10
copy Critical Path Training 2012 All Rights Reserved 45
wwwCriticalPathTrainingcom
e) Click the Close button followed by the OK button multiple times to close out of the dialogs
At this point Internet Explorer is setup to bypass your app URL so you can navigate to apps (httpappswingtipcom) as well as automatically authenticate to sites hosted at httpwingtipcom
Exercise 6 Configure SharePoint to Host My Sites
In this exercise you will configure SharePoint to create and host My Sites In order to host My Sites you will need a new Web Application that is configured for Self-Service Site Creation and has a My Site Host site collection
1 Create a new SharePoint web application to host the My Sites
a) Ensure you are logged into the WingtipServer VM using the account wingtipadministrator | Password1
b) Open Central Administration Start All Programs Microsoft SharePoint 2013 Products SharePoint 2013 Central Administration
c) Select Application Management Manage Web Applications
d) In the ribbon click the New button
e) In the Create New Web Application dialog enter the following values in the properties and click OK Leave all properties not mentioned
i) Select the radio button Create a new IIS web site
(1) Name SharePoint MySite Host ndash 80
(2) Port 80
(3) Host Header mywingtipcom
ii) Application Pool
(1) Select the radio button Use existing application pool
(a) Application Pool Name SharePoint Default HNSC AppPool
iii) Database Name and Authentication
(1) Database Name WSS_Content_SocialWingtipCom
f) This process will take a few moments At the end of the process SharePoint will ask if you want to create a site collection Click the link provided to create a new site collection amp continue to the next step
2 Create a My Site Host site collection
a) On the Create Site Collection page use the following information to complete the form and click OK
Creating a SharePoint Server 2013 Environment for Development and Testing Version 10
copy Critical Path Training 2012 All Rights Reserved 46
wwwCriticalPathTrainingcom
i) Title My Site Host
ii) URL
iii) Template Selection My Site Host (found under the Enterprise tab)
iv) Primary Site Collection Administrator WINGTIPAdministrator
3 Update the Web Application to host my sites
a) Within Central Administration in the left-hand navigation navigate to the Manage Web Applications page Application Management Manage Web Applications
b) Select the SharePoint MySite Host ndash 80 web application
c) Click the Managed Paths button in the ribbon
d) Remove the sites managed path and add two new managed paths and click OK
i) personal ndash Wildcard inclusion
ii) my ndash Explicit inclusion
e) With the SharePoint MySite Host ndash 80 web application still selected click the Self-Service Site Creation button
f) On the Self-Service Site Creation page use the following values to complete the form and click OK
i) Site Collections On
4 Next configure the User Profile Service Application My Site settings
a) Browse to the User Profile Service Application management page Application Management Manage Service Applications User Profile Service Application
b) Under the My Site Settings section click the Setup My Sites
c) On the My Site Settings page use the following information to complete the form and click OK
i) My Site Host httpmywingtipcom
ii) Personal Site Location personal
At this point your SharePoint deployment is now configured to automatically create My Sites under httpmywingtipcomPersonalUserName when users first browse to them
Exercise 7 Install amp Configure Workflow Manager 10
In this exercise you will configure the WingtipServer VM to host Workflow Manager 10 and connect it to your SharePoint installation
1 Ensure you are logged into the WingtipServer VM using the account wingtipadministrator | Password1
Verify SQL Server 2012 Network Configuration
In this section yoursquoll verify the network configuration is correct for SQL Server 2012 in order to install Workflow Manager 10
Creating a SharePoint Server 2013 Environment for Development and Testing Version 10
copy Critical Path Training 2012 All Rights Reserved 47
wwwCriticalPathTrainingcom
1 Configure SQL Server 2012 to have the TCPIP connection protocol enabled
a) Open the SQL Server Configuration Manager Start All Programs Microsoft SQL Server 2012 Configuration Tools SQL Server Configuration Manager
b) Expand the hierarchy on the left-hand side to the following SQL Server Connection Manager (local) SQL Server Network Configuration Protocols for MSSQLSERVER
c) In the main window if TCPIP is Disabled right-click TCPIP and select Enable
d) When prompted with a warning click OK
2 SQL Server must be restarted in order to reflect this change
a) In the hierarchy on the left-hand side of the window select SQL Server Services
b) Right-click SQL Server (MSSQLSERVER) and select Restart
At this point SQL Server is now configured with the TCPIP protocol enabled a requirement when configuring Service Bus
Configure the Workflow Service Account with the Necessary Rights
In this section you will verify the service account that will run Workflow Manager and Service Bus
1 Ensure you are logged into the WingtipServer VM using the account WINGTIPadministrator | Password1
2 Grant the WINGTIPSP_Content account securityadmin amp dbcreator permissions in SQL Server
a) Launch SQL Server Management Studio Start All Programs Microsoft SQL Server 2012 SQL Server Management Studio
b) When SQL Server Management Studio launches within the Connect to Server dialog login using the default settings and click Connect
c) In the Object Explorer tool window expand the WINGTIPSERVER server hierarchy to the Security Logins node
d) Find the WINGTIPSP_Content account right-click it and select Properties
Creating a SharePoint Server 2013 Environment for Development and Testing Version 10
copy Critical Path Training 2012 All Rights Reserved 48
wwwCriticalPathTrainingcom
e) In the Select a page pane select Server Roles
f) Check securityadmin amp dbcreator and click OK
g) Close SQL Server Management Studio
3 Add the Workflow service account to the local administrators group
a) Open the Active Directory Users and Computers window Start Administrative Tools Active Directory Users and Computers
b) In the hierarchy on the left-hand side of the window expand it to the following Active Directory Users and Computers wingtipcom Builtin
c) In the main window right-click Administrators and select Properties
d) In the Administrators Properties dialog select the Members tab and click Add
e) In the Enter the object names to select box enter wingtipsp_content and click the Check Names button
f) In the Administrators Properties dialog click OK
g) Close the Active Directory Users and Computers window
At this point the service account that will host Workflow Manager and Service Bus has been configured correctly
Creating a SharePoint Server 2013 Environment for Development and Testing Version 10
copy Critical Path Training 2012 All Rights Reserved 49
wwwCriticalPathTrainingcom
Download amp Install Workflow Manager and Service Bus
In this section you will install Workflow Manager and Service Bus
1 Ensure you are logged into the WingtipServer VM using the account WINGTIPSP_Content | Password1
It is important you are logged in as the user that will run workflow when you install amp configure Workflow Manager and Service Bus
2 Launch the Web Platform Installer Start All Programs Microsoft Web Platform Installer
a) If the Web Platform Installer is not present on your machine you can download amp install it from here httpwwwmicrosoftcomwebdownloadsplatformaspx
If you do not have internet access within the virtual machine it is possible to download everything needed for workflow using the command line version of the Web Platform Installer (WebPICMD) You can get WebPICMD from httplearniisnetpageaspx1072web-platform-installer-v4-command-line-webpicmdexe-preview-release Specifically for
workflow enter the following command to download Workflow Beta 1 and all prerequisites
webpicmd offline ProductsWorkflow Pathc[path]
3 When the Web Platform Installer loads execute a search for Workflow select Workflow Manager 10 and click Add
4 Click the Install button at the bottom of the Web Platform Installer 40 window
5 On the Prerequisites page click I Accept
Note The Web Platform Installer 40 may prompt you to keep certain products updated using Microsoft Update If it does select Use Microsoft Update when I check for updates (recommended) and click Continue
6 When the installer completes the following dialog will appear Click Continue and then Finish to start the configuration process
Creating a SharePoint Server 2013 Environment for Development and Testing Version 10
copy Critical Path Training 2012 All Rights Reserved 50
wwwCriticalPathTrainingcom
At this point Workflow Manager amp Service Bus are installed
Configure Workflow Manager and Service Bus
In this section you will install Workflow Manager and Service Bus
1 If the Workflow Manager Configuration Wizard is not open open it Start All Programs Workflow Manager 10 Workflow Configuration
2 On the Welcome page click Configure Workflow Manager with Default Settings (Recommended)
Creating a SharePoint Server 2013 Environment for Development and Testing Version 10
copy Critical Path Training 2012 All Rights Reserved 51
wwwCriticalPathTrainingcom
3 On the New Farm Configuration page do the following
a) In the section Configure Service Account set the credentials to
i) User ID sp_contentwingtipcom
ii) Password Password1
b) Check the Allow Workflow management over HTTP on this computer checkbox
Ensure the username is entered in the fully qualified UPN format not as the default shows in the installer (sp_contentwingtip) or the domainusername format
In a production environment you should be doing everything over SSL
c) Click the Test Connection button to verify the connection credentials before proceeding
Creating a SharePoint Server 2013 Environment for Development and Testing Version 10
copy Critical Path Training 2012 All Rights Reserved 52
wwwCriticalPathTrainingcom
d) In the Certificate Generation Key and Confirm Certificate Generation Key enter Password1 into both fields
4 Click the right arrow in the bottom right corner to proceed
5 On the Summary page review your settings and click the check at the bottom right of the widow to start the configuration process
Creating a SharePoint Server 2013 Environment for Development and Testing Version 10
copy Critical Path Training 2012 All Rights Reserved 53
wwwCriticalPathTrainingcom
6 After a few minutes the Configuration Progress screen will show that everything has been configured correctly
Creating a SharePoint Server 2013 Environment for Development and Testing Version 10
copy Critical Path Training 2012 All Rights Reserved 54
wwwCriticalPathTrainingcom
7 Click the check in the bottom right corner
At this point Workflow Manager amp Service Bus has been installed and a new Workflow Manager farm has been created The next step is to connect the SharePoint 2013 farm to the Workflow Manager farm
Connect SharePoint 2013 to Workflow Manager
In this section you will connect SharePoint 2013 and Workflow Manager together
1 Ensure you are logged into the WingtipServer VM using the account WINGTIPadministrator | Password1
2 Get the Workflow Manager endpoint
a) Open the Workflow Manager PowerShell console Start All Programs Workflow Manager 10
b) Execute the Windows PowerShell following cmdlet
Get-WFFarm | ft HttpPort
c) Take note of this port (12291) This port number is what you will use to connect the SharePoint 2013 farm to the Workflow Manager 10 farm
In production you should connect to the HTTPS port listed in the HttpsPort property when you run Get-WFFarm
d) Close the Workflow Manager PowerShell window
3 Connect the SharePoint 2013 farm to Workflow Manager
Creating a SharePoint Server 2013 Environment for Development and Testing Version 10
copy Critical Path Training 2012 All Rights Reserved 55
wwwCriticalPathTrainingcom
a) Open SharePoint 2013 Management Shell Start All Programs Microsoft SharePoint 2013 Products SharePoint 2013 Management Shell
b) Execute the following Windows PowerShell script in the SharePoint 2013 Management Shell
Register-SPWorkflowService ndashSPSite httpintranetwingtipcom ndashWorkflowHostUri httpwingtipserver12291 ndashAllowOAuthHttp
This script is telling SharePoint the endpoint it should use to talk to Workflow Manager as well as Workflow Manager the SharePoint site collection it should talk to for calls into the CSOM It is also configuring all communication over HTTP rather than HTTPS for performance reasons In production you should always use HTTPS
This step will take a moment with no feedback during the process Be patient
c) Close the SharePoint 2013 Management Shell
At this point the SharePoint 2013 farm is connected to the Workflow Manager 10 farm
Configure SharePoint User Profile Service Application AD Sync
Users in SharePoint 2013 are validated by Workflow Manager against SharePoint to ensure they have permissions to start a workflow This is done by looking up the user by their AD UserPrincipalName (UPN) attribute in the User Profile Service Application (UPA) If no matching user is found the workflow will be automatically cancelled by Workflow Manager In this section you will setup UPA to connect amp sync with the local Active Directory so user accounts in AD will have their UPN synchronized to UPA
1 Open Central Administration Start All Programs Microsoft SharePoint 2013 Products SharePoint 2013 Central Administration
2 Go to the User Profile Service Application management page Application Management Manage Service Applications User Profile Service Application
3 The first step is to configure the User Profile Service Application to allow for Active Directory (AD) synchronization
a) Under Synchronization select Configure Synchronization Settings
b) For Synchronization select Use SharePoint Active Directory Import and click OK
4 Next establish a connection to the wingtipcom AD
a) Under Synchronization select Configure Synchronization Connections
b) On the Synchronization Connections page select Create New Connection
c) Enter the following values on this form and click OK
i) Connection Name WINGTIPCOM AD
ii) Type Active Directory Import
iii) Connection Settings
(1) Fully Qualified Domain Name wingtipcom
(2) Authentication Provider Type Windows Authentication
(3) Account Name WINGTIPAdministrator
(4) Password (and Confirm Password) Password1
iv) Containers
(1) Click Populate Containers
(2) After it loads check the box next to WINGTP or click the Select All button below the box
5 Go back to the User Profile Service Application management page Application Management Manage Service Applications User Profile Service Application
6 Finally start a synchronization import
a) Under Synchronization select Start Profile Synchronization
Creating a SharePoint Server 2013 Environment for Development and Testing Version 10
copy Critical Path Training 2012 All Rights Reserved 56
wwwCriticalPathTrainingcom
b) Select Start Full Synchronization and click OK
c) You will be taken back to the User Profile Service Application management page Notice in the top-right corner there is a status block that reports how many profiles are in the UPA database Refresh the page to see it increase to a handful of profiles as the import process runs
At this point you have successfully configured the User Profile Service Application to import profiles from the local AD
Exercise 8 Install the Microsoft Office 2013 Professional Clients
In this exercise you will install the Microsoft Office 2013 client applications
1 Download the Office 2013 into the WingtipServer VM For this you need to create an Office 365 Trial account login to Office 365 go to the Admin Dashboard and then download the latest version httpwwwmicrosoftcomofficepreviewentry-office-preview
2 Download the SharePoint Designer 2013 into the WingtipServer VM from here httpwwwmicrosoftcomen-usdownloaddetailsaspxid=35491
3 Download the Visio Professional 2013 into the WingtipServer VM from here httptechnetmicrosoftcomen-usevalcenterhh973399
Install Microsoft Office Professional Plus 2013
In this section you will install the Microsoft Office 2013 clients
1 Ensure you are logged into the WingtipServer VM using the account WINGTIPadministrator | Password1
2 Execute the installer OfficeProfessionalPlus_English_x64exe
3 On the Read the Microsoft Software License Terms dialog click the checkbox next to I accept the terms of this agreement and click Continue
4 On the Choose the installation you want dialog click the Install Now button
5 The installer will proceed and install all the Office products
6 When the installer completes click the Close button
7 Apply your Office Professional Plus 2013 license key
a) Launch Word 2013 Start All Programs Microsoft Office 2013 Word 2013
b) In the First things first dialog select Use recommended settings and click Accept
c) In the Welcome to Office dialog that opens click the [X] icon in the top-right corner to close it
d) In the left-hand pane click Open Other Documents
e) In the left-hand pane click Account
f) In the Product Information section within the Activation Required box click Change Product Key
g) Enter your license key for Office Professional Plus 2013 check the box next to Attempt to automatically activate my product online and click Install
h) Click OK
At this point you have installed Office Professional Plus 2013
Install Microsoft Office Visio 2013
In this section you will install Microsoft Office 2013 Visio
1 Ensure you are logged into the WingtipServer VM using the account WINGTIPadministrator | Password1
2 Execute the installer VisioProfessional_English_x64exe
3 On the Read the Microsoft Software License Terms dialog click the checkbox next to I accept the terms of this agreement and click Continue
Creating a SharePoint Server 2013 Environment for Development and Testing Version 10
copy Critical Path Training 2012 All Rights Reserved 57
wwwCriticalPathTrainingcom
4 On the Choose the installation you want dialog click the Install Now button
5 The installer will proceed and install all Visio 2013
6 When the installer completes click the Close button
7 Apply your Visio 2013 license key
a) Launch Visio 2013 Start All Programs Microsoft Office 2013 Visio 2013
b) In the First things first dialog select Use recommended settings and click Accept
c) In the Welcome to Office dialog that opens click the X icon in the top-right corner to close it
d) In the left-hand pane click Open Other Documents
e) In the left-hand pane click Account
f) In the Product Information section within the Activation Required box click Change Product Key
g) Enter your license key for Visio 2013 check the box next to Attempt to automatically activate my product online and click Install
h) Click OK
At this point you have installed Visio 2013
Install Microsoft Office 2013 SharePoint Designer
In this section you will install Microsoft Office 2013 SharePoint Designer
1 Ensure you are logged into the WingtipServer VM using the account WINGTIPadministrator | Password1
2 Execute the installer SharePointDesigner_English_x64exe
3 On the Read the Microsoft Software License Terms dialog click the checkbox next to I accept the terms of this agreement and click Continue
4 On the Choose the installation you want dialog click the Install Now button
5 The installer will proceed and install all SharePoint Designer 2013
6 When the installer completes click the Close button
At this point you have installed SharePoint Designer 2013
Exercise 9 Install Visual Studio 2012
In this exercise you will install Visual Studio 2012
1 Ensure you are logged into the WingtipServer VM using the account WINGTIPadministrator | Password1
2 Start the install of Visual Studio 2012 Ultimate Trial by downloading the installer from here httpwwwmicrosoftcomvisualstudio11en-usdownloads
3 On the installation splash screen check the box next to I agree to the License terms and conditions and click the Next button
Creating a SharePoint Server 2013 Environment for Development and Testing Version 10
copy Critical Path Training 2012 All Rights Reserved 58
wwwCriticalPathTrainingcom
4 On the Optional Features to install dialog click Install
5 After some time the installer will complete Click the Launch button to launch Visual Studio 2012
Creating a SharePoint Server 2013 Environment for Development and Testing Version 10
copy Critical Path Training 2012 All Rights Reserved 59
wwwCriticalPathTrainingcom
6 In the Choose Default Environment Settings select Visual C Development Settings and click Start Visual Studio
7 Close Visual Studio 2012
At this point Visual Studio 2012 RTM is installed
Install Office amp SharePoint 2013 Developer Tools
In this section you will install the Office and SharePoint 2013 developer tools for Visual Studio
1 Ensure you are logged into the WingtipServer VM using the account WINGTIPadministrator | Password1
2 Launch the Web Platform Installer Start All Programs Microsoft Web Platform Installer
3 In the search box at the top-right corner of the Web Platform Installer 40 window type sharepoint and press Enter
4 Click the Add button to the right of Microsoft Office Developer Tools for Visual Studio 2012 - Preview 2
5 Click the Install button at the bottom of the Web Platform Installer 40 window
6 On the Prerequisites page click I Accept
Creating a SharePoint Server 2013 Environment for Development and Testing Version 10
copy Critical Path Training 2012 All Rights Reserved 60
wwwCriticalPathTrainingcom
At this point you have installed the SharePoint 2013 amp Office 2013 development tools in Visual Studio 2012
Creating a SharePoint Server 2013 Environment for Development and Testing Version 10
copy Critical Path Training 2012 All Rights Reserved 61
wwwCriticalPathTrainingcom
Appendix 1 Download Manifest
The following lists everything referenced that you will or may need to download in this environment
Windows Server 2008 R2 with Service Pack 1 (installer ISO)
o httptechnetmicrosoftcomen-usevalcenterdd459137aspx
Windows Server 2008 R2 with Service Pack 1 (prebuilt VHD)
o httpwwwmicrosoftcomdownloadsdetailsaspxFamilyId=9040a4be-c3cf-44a5-9052-a70314452305
Windows Server 2008 R2 Service Pack 1
o httpwwwmicrosoftcomen-usdownloaddetailsaspxid=5842
SQL Server 2012 Trial
o httpwwwmicrosoftcombetaexperiencepdSQL2012EvalCTAenusdefaultaspx
SharePoint Server 2013
o httptechnetmicrosoftcomen-USevalcenterhh973397aspx
Hotfixes for SharePoint Server 2013 (post-install)
o KB2554876 The SharePoint Parsing Process Crashes in Windows Server 2008 R2
o KB2708075 IIS 75 Configurations are not Updated when you use the ServerManager Class to Commit
Configuration Changes
o KB2759112 Hotfix is Available for NET Framework 45 that Resolves an ASPNET Race Condition Issue in
Windows Server 2008 R2 Windows Server 2008 R2 SP1
o KB2765317 Hotfix is Available for NET Framework 45 that Resolves an ASPNET Race Condition Issue in
Windows 8 Windows RT and Windows Server 2012
Web Platform Installer
o httpwwwmicrosoftcomwebdownloadsplatformaspx
Web Platform Installer ndash Command Line Version
o httplearniisnetpageaspx1072web-platform-installer-v4-command-line-webpicmdexe-preview-release
Workflow Manager 10
o Download using the Microsoft Web Platform Installer
Office 2013
o httpwwwmicrosoftcomofficepreviewentry-office-preview
SharePoint Designer 2013
o httpwwwmicrosoftcomen-usdownloaddetailsaspxid=35491
Visio Professional 2013
o httptechnetmicrosoftcomen-usevalcenterhh973399
Visual Studio 2012
o httpwwwmicrosoftcomvisualstudio11en-usdownloads
Office Developer Tools for Visual Studio 2012 ndash Preview 2
o Download using the Microsoft Web Platform Installer
Creating a SharePoint Server 2013 Environment for Development and Testing Version 10
copy Critical Path Training 2012 All Rights Reserved 62
wwwCriticalPathTrainingcom
Appendix 2 Windows PowerShell Script Manifest
The following lists all Windows PowerShell scripts that are provided with this setup guide
AddDisableLoopbackCheckRegKeyps1
o The following steps automate creating the registry key outlined as Method 2 in the Microsoft Knowledgebase article
httpsupportmicrosoftcomkb896861 using Windows PowerShell This key DisableLoopbackCheck will allow
you to browse SharePoint sites on the same machine Without this key (or following Method 1 in the KB article) you
would need to browse any SharePoint sites from a different computer than the one which SharePoint is installed on
ConfigureSpFarmForAppsps1
o Configures a SharePoint 2013 for hosting apps This ensures everything you need is installed running and
configured This is documented here httpmsdnmicrosoftcomen-uslibraryfp179923(v=office15)
CreateSpServiceAccountsps1
o Creates the minimal necessary service accounts for SharePoint Server 2013 SP_Farm SP_Content amp
SP_Services
SetupSharePointForHNSCps1
o Configures a SharePoint 2013 install for hosting Host-Named Site Collections (HNSC) This involves creating a Web
Application in SharePoint that has no host header bindings Using DNS all requests are mapped to this Web
Application You then create the site collections via PowerShell as you cant create HNSCs via the browser (Central
Administration)
Creating a SharePoint Server 2013 Environment for Development and Testing Version 10
copy Critical Path Training 2012 All Rights Reserved 63
wwwCriticalPathTrainingcom
Appendix 3 Create Sample Adventure Works Database
The following steps document downloading and installing the sample Adventure Works OLTP database provided by Microsoft
1 Launch Internet Explorer and navigate to httpmsftdbprodsamplescodeplexcom
2 Download the Adventure Works 2012 OLTP Script
3 Extract the ZIP into a folder on the desktop
4 Launch SQL Server Management Studio Start All Programs Microsoft SQL Server 2012 SQL Server Management Studio
5 When SQL Server Management Studio launches within the Connect to Server dialog login using the default settings and click Connect
6 Within SQL Server Management Studio select File Open File
7 Select the file instawdbsql from the extracted ZIP and click Open
8 If prompted to re-login to the database engine do it
9 Select Query SQLCMD Mode
10 Scroll down to line 42 the line that starts with the following
setvar SqlSamplesSourceDataPath
11 Change the folder location of where you unzipped the Adventure Works 2012 OLTP Script
12 Select Query Execute
13 When the script completes the AdventureWorks2012 database will have been created
Creating a SharePoint Server 2013 Environment for Development and Testing Version 10
copy Critical Path Training 2012 All Rights Reserved 64
wwwCriticalPathTrainingcom
Change Log
Change Version Description
August 22 2012 v 01 Pre-release for review
August 27 2012 v 02 Initial public release ndash install guide based on SharePoint Server Beta 2
August 28 2012 v 03 Updated URL for the site collection used to connect SharePoint to WAW
August 31 2012 v 04 Typo Removed SQL Server Analysis Services as part of the install Not required in a
SharePoint dev box (unless you are doing business intelligence which is not covered
in the guide)
Updated all references to Windows Azure Workflow to Workflow Manager the new
official name for the new workflow product
Updated SetupSharePointForHNSCps1 script to lookup HNSC Web Application by
name rather than URL which is more reliable
Typo Updated WingtipAllUp public NIC to use a different IP than the WingtipDC
Typo Replaced a reference to WingtipServer with WingtipDC
Typo Fixed handful of minor typos
September 1 2012 v 05 Removed SQL Server Reporting Services from install guide
Added step to uncheck IErsquos ldquoAutomatically detect proxyrdquo
Added post workflow install steps to setup User Profile Service Application to sync with
local Active Directory
September 5 2012 v 06 Added step to create a default root site collection in the HNSC web app
Updated minor typos and added extra notes for context
Updated PowerShell script SetupSharePointForHNSCps1 to remove content
database of default Web Application when setting up HNSC Web App
Added a new exercise 8 (after SharePoint install amp config and before the Workflow
install and config) to setup support for My Sites
October 20 2012 v 07 Updated script SetupSharePointForHNSCps1 to fix a bug where it would fail on line
111 if you didnrsquot already have a WINGTIPSP_Content managed account
Added section to bypass SharePointrsquos check for crlmicrosoftcom
Updated workflowrsquos registration PowerShell script to point to
httpintranetwingtipcom
Switched order of post-SharePoint install to setup HSNC hosting before configuring for
hosting apps
November 29 2012
v 10 Changed setup guide to use a single VM instead of two VMs
Updated guide for SharePoint 2013 RTM
Creating a SharePoint Server 2013 Environment for Development and Testing Version 10
copy Critical Path Training 2012 All Rights Reserved 2
wwwCriticalPathTrainingcom
Verify SQL Server 2012 Network Configuration 46
Configure the Workflow Service Account with the Necessary Rights 47
Download amp Install Workflow Manager and Service Bus 49
Configure Workflow Manager and Service Bus 50
Connect SharePoint 2013 to Workflow Manager 54
Configure SharePoint User Profile Service Application AD Sync 55
Exercise 8 Install the Microsoft Office 2013 Professional Clients 56
Install Microsoft Office Professional Plus 2013 56
Install Microsoft Office Visio 2013 56
Install Microsoft Office 2013 SharePoint Designer 57
Exercise 9 Install Visual Studio 2012 57
Install Office amp SharePoint 2013 Developer Tools 59
Appendix 1 Download Manifest 61
Appendix 2 Windows PowerShell Script Manifest 62
Appendix 3 Create Sample Adventure Works Database 63
Change Log 64
Creating a SharePoint Server 2013 Environment for Development and Testing Version 10
copy Critical Path Training 2012 All Rights Reserved 3
wwwCriticalPathTrainingcom
Overview
This document provides links to Internet resources and step by step instructions for building a Virtual Machine (VM) sample SharePoint Server 2013 environment This VM can be used to complete the lab exercises in SharePoint 2013 training courses authored by Critical Path Training LLC The VM can also be used for general testing and development with SharePoint 2013
This setup guide gives you the option of using free trial software or supplying your own product keys The software products that require product keys include Windows Server 2008 R2 SQL Server 2012 Developer SharePoint Server 2013 and Office 2013 If you plan to use evaluation software to build your VM there are optional steps for downloading Microsoftrsquos free trial VM for Windows Server 2008 R2 so you can use that as your starting point You can alternatively install Windows Server 2008 R2 yourself using your own product key so you do not have to worry about the operating system on the VM expiring after a certain amount of time Further you could use Windows Server 2012 but this setup guide will focus on Windows Server 2008 R2 because the user interface of Windows Server 2012 is so different from the more traditional Windows interface
Note that the requirements for building out a SharePoint 2013 development environment are more relaxed and have fewer requirements compared to building out a SharePoint 2013 production environment Therefore you should not rely on this document as your only resource when you are installing SharePoint 2013 for production use The following list of assumptions has been made
One server
o All-Up Server (everything needed for SharePoint development including Active Directory)
All Application Pools hosting SharePoint Service Applications will be configured to run under a single AD account
All Application Pools hosting SharePoint Web Applications amp Workflow will be configured to run under a single AD account
Hardware Requirements amp Recommendations
SharePoint 2013 has higher hardware requirements than SharePoint 2010 Specifically
Memory The server where SharePoint 2013 is installed should be allocated at least 10GB of memory
Note Pre-release versions of SharePoint 2013 required the Workflow Manager product be installed on a server that was not running Active Directory This has changed and thus to simplify things this guide assumes yoursquoll build everything on one server
To do this you will need a host computer with at least 16GB of RAM Any computer that can support 16GB of RAM
should have an adequate CPU and disk Yoursquoll get the best performance if you use solid state drives (SSD) and ensure
the virtual machines run on a separate drive from the drive where the host operating system is running
Creating a SharePoint Server 2013 Environment for Development and Testing Version 10
copy Critical Path Training 2012 All Rights Reserved 4
wwwCriticalPathTrainingcom
Virtualization Details
This guide assumes you will use Microsoftrsquos Hyper-V virtualization technology Hyper-V is available starting in Windows Server 2008 Windows Server 2008 R2 Windows Server 2012 and Windows 8 Virtualizing a SharePoint installation is not required nor is Hyper-V is required
You can install on physical servers or using a different virtualization technology of your choice such as VMWare or VirtualBox This guide only deals with Hyper-V in the following ways
Create a virtual network
Create two virtual machines
Configure the processors memory and networking on the virtual machines
If you elect to use something other than Hyper-V you can skip the first section of this guide however the remainder of the guide will assume you setup two servers the way they were configured and setup in exercises 2 amp 3
High-Level View of Creating a SharePoint 2013 Environment
The process of creating a SharePoint 2013 environment for development is not a trivial task This guide walks through various required exercises A summary of these exercises are as follows
1 Configure Host Computer Hyper-V amp Networking Before creating a virtual machine you need to configure the host
environment This includes creating a virtual network both machines will communicate on
2 Install amp Configure a Windows Server SharePoint 2013 must run using domain accounts (as opposed to local accounts)
3 Install Active Directory Domain Services With both servers created next you will need to install and configure Active
Directory
4 Install SQL Server 2012 SharePoint needs to install its databases in SQL Server In this exercise you will install SQL Server
5 Install amp Configure SharePoint Server 2013 Obviously you need to install SharePoint 2013 to create a SharePoint 2013
environment
6 Install amp Configure Workflow Manager and Service Bus SharePoint 2013 relies on a new product Workflow Manager to
handle all workflows In this exercise you will install and configure Workflow Manager as well as its prerequisites (such as
Service Bus) and then connect your SharePoint 2013 farm to it Workflow Manager
7 Install the Microsoft Office 2013 Professional Clients In this exercise you will install and configure Office 2013
Professional clients including Visio and SharePoint Designer
8 Install Visual Studio 2012 Finally you install Visual Studio 2012 and the Office and SharePoint 2013 developer tools
Creating a SharePoint Server 2013 Environment for Development and Testing Version 10
copy Critical Path Training 2012 All Rights Reserved 5
wwwCriticalPathTrainingcom
Creating a SharePoint Server 2013 Environment for Development amp
Testing
Lab Time 2-4 hours
Lab Folder CStudentGettingStartedLab
Lab Overview In this lab you will create a new SharePoint environment to use for testing SharePoint 2013 It covers how to install
and configure the host computer for hosting virtual machines networking them together and installing everything needed If you are not interested in doing development you can omit the last exercise which has you install Visual Studio 2012
Exercise 1 Configure Host Computer Hyper-V amp Networking
In this exercise you will configure your host computerrsquos Hyper-V role for hosting multiple networked virtual machines This involves creating a two virtual networks that will be used to connect the virtual machines together and to connect to the Internet
1 Launch the Hyper-V Manager Start Administrative Tools Hyper-V Manager
2 Create a new virtual network to connect to the Internet
a) In the Actions pane on the right-hand side of the screen click Virtual Network Manager
b) In the Virtual Network Manager dialog create a new virtual network by clicking the Add button (it doesnrsquot matter what you select as the network type) Use the following settings to create the network
i) Name External LAN
ii) Connection Type External (select the network card on the host computer thatrsquos connected to the Internet)
This will be used to connect the VM to the Internet
3 Click OK to save your changes
4 Create a new virtual network the virtual machines will use to communicate with each other
a) In the Actions pane on the right-hand side of the screen click Virtual Network Manager
b) In the Virtual Network Manager dialog create a new virtual network by clicking the Add button (it doesnrsquot matter what you select as the network type) Use the following settings to create the network
i) Name Internal LAN
ii) Connection Type Internal Only
Creating a SharePoint Server 2013 Environment for Development and Testing Version 10
copy Critical Path Training 2012 All Rights Reserved 6
wwwCriticalPathTrainingcom
This will be used to connect the two VMs together so they can talk to each other
5 Click OK to save your changes
When you create a virtual Internal Only network Hyper-V creates a virtual network interface card (NIC) in the list of all NICrsquos installed on the host computer (Start [search] ldquoView Network Connectionsrdquo) If you configure the IP of this card to be on the same network with a different IP address than you use for your machines you will be able to login to these machines using the Remote Desktop Connection app in Windows
A Private Virtual Machine Network the other connection type available is similar to an Internal network except that it does not create
the virtual NIC in the host computer
Exercise 2 Install amp Configure a Windows Server
In this exercise you will create install configure and update a new server to act as the Active Directory domain controller for the SharePoint environment using Windows Server 2008 R2 with Service Pack 1
If you are using a different virtualization product other than Hyper-V or if you are creating physical machines you can skip to the section Install the Windows Server 2008 R2 Operating System
1 If it is not open launch the Hyper-V Manager Start Administrative Tools Hyper-V Manager
2 Inside the left-hand side of the Hyper-V Manager locate the node with the name of the local host computer and select it
Creating a SharePoint Server 2013 Environment for Development and Testing Version 10
copy Critical Path Training 2012 All Rights Reserved 7
wwwCriticalPathTrainingcom
Create a New Virtual Machine
In this section you will create a new virtual machine in Hyper-V
1 In the Actions pane select New Virtual Machine When you execute this menu command the Hyper-V Manager will launch the New Virtual machine Wizard
2 In the Specify Name and location dialog enter a Name of WingtipServer and click Next
3 In the Assign Memory dialog enter the amount of Memory to allocate to the virtual machine in MB to 12288 and click Next
Creating a SharePoint Server 2013 Environment for Development and Testing Version 10
copy Critical Path Training 2012 All Rights Reserved 8
wwwCriticalPathTrainingcom
4 In the Configure Networking dialog use the drop down box to assign a Connection value of Internal LAN and click Next
5 In the Connect Virtual Hard Disk dialog accept the default options to create a virtual hard disk amp click Finish
If possible configure the location so that the VHD file for the VM is created on a separate drive than the host computerrsquos operating system
6 In the Hyper-V Manager window right-click the VM you just created and select Settings
7 In the Settings for WingtipServer dialog select Add Hardware select Network Adapter and click Add
Creating a SharePoint Server 2013 Environment for Development and Testing Version 10
copy Critical Path Training 2012 All Rights Reserved 9
wwwCriticalPathTrainingcom
8 Obtain a copy of the Windows Server 2008 R2 with Service Pack 1 install binaries
The install image (ISO) is available to MSDN or TechNet subscribers or as a trial download available here httptechnetmicrosoftcomen-usevalcenterdd459137aspx
Obviously you can also use your own licensed copy of Windows Server 2008 R2 with Service Pack 1
Microsoft also provides a pre-installed 180-day trial Windows Server 2008 R2 Hyper-V VHD file that you can download (httpwwwmicrosoftcomdownloadsdetailsaspxFamilyId=9040a4be-c3cf-44a5-9052-a70314452305) instead of installing it
yourself If you elect to go this route
Make sure you specify the VHD file you downloaded in the following step for the Hard Drive of the VM
Do not specify a DVD Drive in the following step as you will not be installing anything
If you elect to do this step jump down to section Configure Windows Server 2008 R2
9 In the Settings for WingtipServer dialog update the VM to have the following settings When finished click OK
a) Processor 2 Virtual Processors
b) DVD Drive Image File ndash Map to the Windows Server 2008 R2 ISO installer file
c) Network Adapter Internal LAN
d) Network Adapter Not Connected
10 Start up the WingtipServer VM and install Windows Server 2008 R2
a) In the Hyper-V Manager window right-click the VM you just created and select Settings
b) Right-click on the VM named WingtipServer and select the Connecthellip menu
c) In the Virtual Machine Connection window drop down the Action menu and select Start
Creating a SharePoint Server 2013 Environment for Development and Testing Version 10
copy Critical Path Training 2012 All Rights Reserved 10
wwwCriticalPathTrainingcom
If you elected to use the fully installed trial VHD from Microsoft instead of installing your own server skip to the section Configure Windows Server 2008 R2
Install the Windows Server 2008 R2 Operating System
In this section you will install the operating system
1 After the setup program for Windows Server 2008 R2 loads it will prompt you with a dialog asking you to select a language Accept the default of English and click Install to continue
2 At the next dialog click the Install Now button to begin the installation
Creating a SharePoint Server 2013 Environment for Development and Testing Version 10
copy Critical Path Training 2012 All Rights Reserved 11
wwwCriticalPathTrainingcom
3 The next dialog instructs you to select the operating system you want to install Select the operating system named Windows Server 2008 R2 Enterprise (Full Installation) with the x64 architecture Click Next to continue
4 Agree to the licensing terms and click Next
5 Click on Custom (advanced) to select the type of installation
6 The next dialog asks you where you want to install Windows Accept the default configuration which uses a location of Disk 0 Unallocated Space as shown below Click Next to continue
At this point you have given the Windows setup program enough information to install the basic operating system Setup program will now run for a while as it copies and expands files and installs Windows features You now have a few minutes to get a cup of coffee or catch up on email
7 When the setup program completes it will ask you to assign a new password for the built-in Administrator account Click OK to continue
8 Set the password for Administrator account to Password1
9 When you have updated the Administrator password you will get a confirmation that the update was successful Click OK to complete the installation of the operating system
If you elected to use the pre-installed trial VHD Microsoft offers you will pick up the configuration exercise at this point
Configure Windows Server 2008 R2
In this section you will configure the server
1 When you log in Windows Server automatically displays the Initial Configuration Tasks window Click the check box with the caption Do not show this window at logon and then click the Close button
Creating a SharePoint Server 2013 Environment for Development and Testing Version 10
copy Critical Path Training 2012 All Rights Reserved 12
wwwCriticalPathTrainingcom
2 After you close the Initial Configuration Tasks window Windows Server will display the Server Manager
Creating a SharePoint Server 2013 Environment for Development and Testing Version 10
copy Critical Path Training 2012 All Rights Reserved 13
wwwCriticalPathTrainingcom
3 Configure the Administrator account so that its password does not expire
a) Inside the Configuration node of the Server Manager navigate to Local Users and Groups Users (as shown in the following screenshot) and locate the local Administrator account
b) Right-click on the Administrator account and click Properties
c) In the Administrator Properties dialog unselect the option for User must change password at next logon and select the option for Password never expires Click OK
4 Rename the computer name of the VM
a) In the Server Manager navigate to the top-level node to display the Server Summary page Click Change System Properties
b) On the Computer Name tab of the System Properties dialog click the Change button
c) Enter a new computer name of WingtipServer and click OK
Creating a SharePoint Server 2013 Environment for Development and Testing Version 10
copy Critical Path Training 2012 All Rights Reserved 14
wwwCriticalPathTrainingcom
5 After changing the computer name you will be prompted to restart the VM Choose OK to restart After the VM has restarted log in again using [administrator | Password1] (username | password)
6 Disable Windows Firewall and Enhanced Security Configuration
a) In the Server Manager navigate to the top-level node to display the Server Summary page Inside the Security Information section locate the links for Go to Windows Firewall and Configure IE ECS
b) Click on Configure IE ECS link Disable Enhanced Security Configuration for both Administrators and Users by selecting the Off radio buttons and click OK
c) Now click the Go to Windows Firewall link to display the page for the Windows Firewall Click on the Windows Firewall Properties link at the bottom of the Overview section
d) In the Domain Profile tab of the Windows Fire dialog change the Firewall state property setting from On to Off Click to Apply button to save your changes
e) Once you have turned off the firewall in the Domain Profile tab go to the Private profile tab and the Public profile tab and follow the same steps to disable the firewall for these profiles as well
f) Click OK to dismiss the Windows Firewall dialog once you have turned off the firewall for all three profiles
7 Enable Remote Desktop for your VM
a) In the Server Manager navigate to the top-level node to display the Server Summary page Inside the Computer Information section locate and click the link for Configure Remote Desktop
b) In the Remote tab of the System Properties dialog select the last option for Allow connections only from computers running Remote Desktop with Network Level Authentication Click OK to save changes and dismiss the System Properties dialog
Creating a SharePoint Server 2013 Environment for Development and Testing Version 10
copy Critical Path Training 2012 All Rights Reserved 15
wwwCriticalPathTrainingcom
8 Enable the Windows Server Features for the Desktop Experience and the PowerShell Integrated Scripting Environment
a) In Server Manager choose Add Feature to bring up the Add Features Wizard dialog
b) Select the feature Desktop Experience
When you first click the checkbox for the Desktop Experience the wizard will prompt you with the following dialog to add support for Ink and Handwriting Services Click the Add Required Features button to continue
c) Scroll down the list of features in the Add Features Wizard dialog and select the feature Windows PowerShell Integrated Scripting Environment (ISE)
Creating a SharePoint Server 2013 Environment for Development and Testing Version 10
copy Critical Path Training 2012 All Rights Reserved 16
wwwCriticalPathTrainingcom
When you first click the checkbox for the Windows PowerShell Integrated Scripting Environment (ISE) the wizard will prompt you with the following dialog to add support for NET Framework 351 Features Click the Add Required Features button to continue
d) Click the Next button on the Add Features Wizard dialog to continue with the install
e) On the Confirm Installation Selection wizard page click the Install button
f) When you see the Installation Results screen the Add Features Wizard informs you a computer restart is required Click Close button to dismiss this dialog
9 After the VM has restarted log in again using [administrator | Password1] (username | password)
Configure the Virtual Machinersquos Networking Setup
In this section yoursquoll configure the two NICrsquos you added to the VM in previous steps One NIC (Internal LAN) will be used to communicate with other VMs in this environment while the other (External LAN) will be used to connect to the internet
1 Configure the NIC that is linked to the Internal LAN network
a) Open the Network Connections dialog by pressing Start enter view network connections in the search box Click the View Network Connections shortcut
b) Two network connections will be shown but only one will show as connected
The connected one is the one that is connected to the Internal LAN network The other one is currently ldquounpluggedrdquohellip this is why we didnrsquot connect a network to the second network when initially configuring the VM as this makes it easier to see which NIC is which in the VM
c) Rename the two NICrsquos
i) Right-click the connected NIC and select Rename Give it a name of Internal LAN
Creating a SharePoint Server 2013 Environment for Development and Testing Version 10
copy Critical Path Training 2012 All Rights Reserved 17
wwwCriticalPathTrainingcom
ii) Right-click the disconnected NIC and select Rename Give it a name of External LAN
d) Right-click the Internal LAN NIC and select Properties
e) In the Local Area Connection Properties dialog select the Internet Protocol Version 4 (TCPIPv4) item and click Properties
f) Enter the following information into the resulting dialog to configure the NICrsquos IP settings
i) Use the Following IP Address
(1) IP Address 192168150102
(2) Subnet mast 2552552550
(3) Default Gateway 192168150102
ii) Use the Following DNS Server Addresses
(1) Preferred DNS Server 192168150102
g) Click OK to accept the IP settings and Close to accept the changes to the NIC
Why not use 101 as the start NIC When you created the virtual internal network Hyper-V created a virtual NIC on the host computer If you set the IP of that NIC to 192168150101 you can use the Remote Desktop Connection app in Windows to connect to your virtual machines and easily copy-paste amp share drives
2 Configure the NIC that is linked to the External LAN network
a) Open the Network Connections window if it is not still open using the same steps from the previous step
b) Right-click the External LAN NIC and select Properties
c) In the Local Area Connection Properties dialog select the Internet Protocol Version 4 (TCPIPv4) item and click Properties
d) Enter the following information into the resulting dialog to configure the NICrsquos IP settings
i) Obtain an IP Address Automatically
ii) Use the Following DNS Server Addresses
(1) Preferred DNS Server 192168150102
e) Click the Advanced button to open the Advanced TCPIP Settings dialog
f) In the Advanced TCPIP Settings dialog click the DNS tab
i) Uncheck the Register this Connections Address in DNS
Creating a SharePoint Server 2013 Environment for Development and Testing Version 10
copy Critical Path Training 2012 All Rights Reserved 18
wwwCriticalPathTrainingcom
g) In the Advanced TCPIP Settings dialog click the WINS tab
i) Click the Add button and specify a new WINS Server as 192168150102
h) Click OK Close multiple times to accept all TCPIP settings
The external NIC will now obtain an IP dynamically amp will not register itself in the DHCPrsquos DNS server which is a good thing when there are multiple people on the same network this this type of a setup
3 Connect the second NIC to the External LAN network
a) Go back to the host computer and open the Hyper-V Manager
b) In the Hyper-V Manager window right-click the VM WingtipServer and select Settings
c) Select the second NIC the one that is not connected
d) For the Network select External LAN and click OK This will effectively plug the external network into the VM
4 Go back into the WingtipServer VM and if it is not still open open the Network Connections dialog You should now see both connections plugged in
a) To refresh the connection select the connection you just plugged in and click the Disable this Network Device button in the toolbar After the connection is disabled select it and click the Enable this Network Device button
b) After a few seconds the VM should be able to connect to the internet which you can test by browsing to a site such as httpwwwbingcom
Configure Windows Update and Update the Server
In this section you will verify the server is fully patched and updated
1 Verify Service Pack 1 is installed
a) Verify the version of the operating system installed by clicking Start right-click on Computer select Properties
b) If the server simply says Windows Server 2008 R2 Enterprise as shown in the following figure download and install Service Pack 1 from the following location httpwwwmicrosoftcomen-usdownloaddetailsaspxid=5842
Creating a SharePoint Server 2013 Environment for Development and Testing Version 10
copy Critical Path Training 2012 All Rights Reserved 19
wwwCriticalPathTrainingcom
c) If Service Pack 1 is installed it will state it
2 Update the server using Windows Update
a) Selecting Start All Programs Windows Update
b) First disable Windows Update from running automatically
i) Click the link Change Settings
ii) Under the Important Updates list select Never check for updates (not recommended)
This isnrsquot what you would do in a production environment but for a development machine it is ok
c) Now update the server
i) Click the Check for Updates button
ii) If prompted install any updates to the Windows Update dialog
iii) Select the Check for Updates link
iv) Windows Update will the report how many updates are available Select all important and recommended updates and click the Install Updates button
v) If prompted select I accept the license terms for any updates that require it
vi) Keep going through the process of running Windows Update checking for updates and installing them after each reboot until it says there are no updates left to install
This step is likely going to take quite a bit of time so be patient
Activate Windows Server 2008 R2
In this section you will activate the server if you have a product key
1 If you have a product key for Windows Server 2008 R2 use it to activate Windows
a) In the Server Manager window navigate to the top-level node to display the Server Summary page Click Activate Windows
b) You will be prompted to enter your product key
i) Enter your product key and click to button to activate Windows
Creating a SharePoint Server 2013 Environment for Development and Testing Version 10
copy Critical Path Training 2012 All Rights Reserved 20
wwwCriticalPathTrainingcom
ii) After a few seconds your VM should be able to connect to a Microsoft site and successfully activate Windows
At this point you have a fully patched operating system VM created that will act as the Active Directory domain controller
Apply the DisableLoopbackCheck Registry Fix
Configure the DisableLoopbackCheck registry setting (Microsoft KB httpsupportmicrosoftcomkb896861)
The following steps automate creating the registry key outlined as Method 2 in the Microsoft KB article httpsupportmicrosoftcomkb896861 using Windows PowerShell
PowerShell Script Alert You can also find this PowerShell script AddDisableLoopbackCheckRegKeyps1 in the files that
accompany this setup guide
1 Click the Windows PowerShell icon in the Taskbar
2 Run the following PowerShell commands pressing [ENTER] after each one
$regKeyPath = HKLMSystemCurrentControlSetControlLsa $key = DisableLoopbackCheck New-ItemProperty -Path $regKeyPath -Name $key -Value 1 -PropertyType dword
a) Close the Windows PowerShell console by typing EXIT and pressing [ENTER]
Exercise 3 Install Active Directory Domain Services
Now you will promote your WingtipServer VM to a domain controller and create a new domain named wingtipcom
1 Login to the WingtipServer virtual machine using administrator | Password1
2 Add and configure the role for Active Directory Domain Services
a) Launch Server Manager and select the Roles node
b) Click the Add Roles link to start the Add Roles Wizard
c) On the Before you begin page click Next
d) On the Server Roles page select Active Directory Domain Services Click the Add Required Features button if prompted to install prerequisites
e) Click Next
Creating a SharePoint Server 2013 Environment for Development and Testing Version 10
copy Critical Path Training 2012 All Rights Reserved 21
wwwCriticalPathTrainingcom
f) On the next page of the wizard click Next which will bring you to the Confirm Installation Selections page
g) Click Install
After Active Directory Domain Services has been installed you will see the Installation Results page in the Add Roles Wizard
3 Click on the link with the big long caption of Close this wizard and launch the Active Directory Domain Services Installation Wizard (dcpromoexe)
4 On the first page of the Active Directory Domain Services Installation Wizard click the Use Advanced Mode Installation checkbox and click Next
Creating a SharePoint Server 2013 Environment for Development and Testing Version 10
copy Critical Path Training 2012 All Rights Reserved 22
wwwCriticalPathTrainingcom
5 On the Operating System Compatibility page click Next
6 On the Choose a Deployment Configuration select Create a new domain in a new forest and click Next
7 On the Name the Forrest Root Domain enter the following and click Next
a) FQDN of the forest root domain wingtipcom
8 On the Domain NetBIOS Name set it to WINGTIP and click Next
9 On the Set Forest Functional Level page select Windows Server 2008 R2 and click Next
10 On the Additional Domain Controller Options accept the default options and click Next
11 You might be prompted with the dialog shown below providing a warning that This computer has dynamically assigned IP address(es) This is not a problem when you are running your development environment on a domain controller Click Yes to dismiss the dialog
12 At this point the wizard will prompt you with a dialog information you a delegation for the DNS Server cannot be created because it cannot find the authoritative parent zone This is not a problem because the wizard will automatically configure the DNS of the VM to point to itself Click on the Yes button to dismiss this dialog
Creating a SharePoint Server 2013 Environment for Development and Testing Version 10
copy Critical Path Training 2012 All Rights Reserved 23
wwwCriticalPathTrainingcom
13 On the Location for Database Log Files and SYSVOL page accept all the default values and click Next
14 On the Directory Services Restore Mode Administrator Password page enter Password1 in both textboxes and click Next
15 On the Summary page click Next to start the process of configuring the new Active Directory domain
16 The wizard will display the dialog below to show you the progress of the configuration process You will be required to reboot when the configuration has been completed Check the option for Reboot on completion and then wait for the configuration to complete and the machine to reboot
17 After the VM reboots login to the server with wingtipadministrator | Password1
Configure Windows Update and Update the Server
In this section you will verify the server is fully patched and updated
1 Update the server using Windows Update
a) Selecting Start All Programs Windows Update
b) Select the Check for Updates link
c) Windows Update will the report how many updates are available Select all important and recommended updates and click the Install Updates button
d) If prompted select I accept the license terms for any updates that require it
e) Keep running Windows Update after each reboot and update install until it says there are no updates left to install
Creating a SharePoint Server 2013 Environment for Development and Testing Version 10
copy Critical Path Training 2012 All Rights Reserved 24
wwwCriticalPathTrainingcom
This step could take quite a bit of time so be patient
At this point you have a fully installed Active Directory Domain Controller for the Wingtipcom domain hosted on the server WingtipServer
Exercise 4 Install SQL Server 2012
In this exercise you will install SQL Server 2012 that will be used to store all required databases
1 Download the SQL Server 2012 Evaluation Edition specifically the DVD x64 ISO image to the host computer from here httpwwwmicrosoftcombetaexperiencepdSQL2012EvalCTAenusdefaultaspx or you can use your own licensed copy
2 Mount the SQL Server 2012 ISO to the WingtipServer VM
a) On the host computer open the Hyper-V Manager
b) Right-click the VM WingtipServer and select Settings
c) Select DVD Drive in the left-hand panel
d) In the right-hand panel select Image File and browse to the ISO file that contains SQL Server 2012 and click OK
3 Login to the WingtipServer VM as wingtipadministrator | Password1
Install SQL Server 2012
In this section you will install SQL Server 2012
1 If the AutoPlay dialog box is open click Run SETUPEXE If it isnrsquot use Windows Explorer to navigate to the DVD drive and execute the setupexe file in the root of the DVD drive
2 In the SQL Server Installation Center click Installation on the left-hand side
Creating a SharePoint Server 2013 Environment for Development and Testing Version 10
copy Critical Path Training 2012 All Rights Reserved 25
wwwCriticalPathTrainingcom
3 Next select New SQL Server stand-alone installation or add features to an existing installation
4 On the Setup Support Rules page the installer will check for issues before installing Click OK
5 On the Product Key page click the Specify a free edition radio box and select Evaluation then click Next
6 On the License Terms page click the I accept the license terms checkbox and click Next
7 On the Setup Support Rules page the installer will check for any problems with the server you are installing on Click Next when this completes
Creating a SharePoint Server 2013 Environment for Development and Testing Version 10
copy Critical Path Training 2012 All Rights Reserved 26
wwwCriticalPathTrainingcom
8 On the Support Role page select SQL Server Feature Installation and click Next
9 On the Feature Selection page check the following options and click Next
a) Instances Features
i) Database Engine Services
(1) Full-Text and Semantic Extractions for Search
b) Shared Features
i) Management Tools ndash Basic
(1) Management Tools ndash Complete
Creating a SharePoint Server 2013 Environment for Development and Testing Version 10
copy Critical Path Training 2012 All Rights Reserved 27
wwwCriticalPathTrainingcom
10 On the Installation Rules page click Next
11 On the Instance Configuration page click Next
12 On the Disk Space Requirements page click Next
13 On the Server Configuration page do the following and click Next
a) On the Service Account tab change the Startup Type for the SQL Server Agent to Automatic
14 On the Database Engine Configuration page do the following and click Next
a) On the Server Configuration tab click Add Current User
b) On the FILESTREAM tab
i) Check Enable FILESTREAM for Transact-SQL Access
ii) Check Enable FILESTREAM for file IO access
15 On the Error Reporting page click Next
16 On the Installation Configuration Rules page click Next
17 On the Ready to Install page click Install
Installation of SQL Server 2012 will take some time please be patient
18 When the installation completes the Complete page will be shown Click Close
At this point you have now successfully installed SQL Server 2012
Creating a SharePoint Server 2013 Environment for Development and Testing Version 10
copy Critical Path Training 2012 All Rights Reserved 28
wwwCriticalPathTrainingcom
Exercise 5 Install amp Configure SharePoint Server 2013
In this exercise you will install SharePoint 2013
1 Download the SharePoint Server 2013 to the host computer from here httptechnetmicrosoftcomen-USevalcenterhh973397aspx
2 Mount the SharePoint Server 2013 ISO to the WingtipServer VM
a) On the host computer open the Hyper-V Manager
b) Right-click the VM WingtipServer and select Settings
c) Select DVD Drive in the left-hand panel
The file that Microsoft provides is saved in the IMG format Hyper-V Manager wonrsquot allow you to mount an IMG file so rename it to ISO before mounting it
d) In the right-hand panel select Image File and browse to the ISO file that contains SharePoint Server 2013 and click OK
Create SharePoint Service Accounts amp Grant Rights to SQL Server 2012
In this section you will create the necessary service accounts that will be used by SharePoint in Active Directory and grant them necessary rights in SQL Server 2012
PowerShell Script Alert The creation of users and granting them rights to SQL Server 2012 steps in this section are automated in the Windows PowerShell script CreateSpServiceAccountsps1 found in the files that accompany this setup guide Open the script
and read the header for documentation on how to use it
1 Open the Active Directory Users and Computers Start Administrative Tools Active Directory Users and Computers
2 Expand the tree in the left-hand pane to see the Users OU Select the Users OU
3 Create a new user SP_Farm
a) In the toolbar select Action New User
Creating a SharePoint Server 2013 Environment for Development and Testing Version 10
copy Critical Path Training 2012 All Rights Reserved 29
wwwCriticalPathTrainingcom
b) Set the userrsquos Full Name amp User Login Name to SP_Farm and click Next
c) In the password dialog enter the following and click Next
i) Password (and Confirm Password) Password1
ii) User must change password at next login unchecked
iii) User cannot change password unchecked
iv) Password never expires checked
v) Account is disabled unchecked
Creating a SharePoint Server 2013 Environment for Development and Testing Version 10
copy Critical Path Training 2012 All Rights Reserved 30
wwwCriticalPathTrainingcom
vi) Click Finish
4 Repeat the previous step to create two more accounts
a) SP_Content
b) SP_Services
At this point you have created all the necessary service accounts
Install SharePoint Server 2013 Prerequisites
In this section you will install the SharePoint Server 2013 Prerequisites
1 Ensure you are logged into the WingtipServer VM using the account wingtipadministrator | Password1
2 If the AutoPlay dialog box is open click Run splashhta If it isnrsquot use Windows Explorer to navigate to the DVD drive and execute the splashhta file in the root of the DVD drive
Creating a SharePoint Server 2013 Environment for Development and Testing Version 10
copy Critical Path Training 2012 All Rights Reserved 31
wwwCriticalPathTrainingcom
3 Click the Install Software Prerequisites link
4 In the Microsoft SharePoint 2013 Products Preparation Tool window click Next
5 On the License Terms for Software Products page
a) Check I accept the terms of the License Agreement(s)
b) Click Next
6 The tool will download and install all prerequisites for SharePoint Server 2013 This will take some time It may prompt you to reboot the server If so reboot the server and login using wingtipadministrator | Password1
Creating a SharePoint Server 2013 Environment for Development and Testing Version 10
copy Critical Path Training 2012 All Rights Reserved 32
wwwCriticalPathTrainingcom
7 When the prerequisite installer is complete it will present a summary of everything it did
8 Click Finish
9 Restart the WingtipServer VMhellip some additional installations and changes that the prerequisite installer did will require a restart before installing SharePoint Server 2013
At this point all prerequisites required by SharePoint Server 2013 have been installed and any necessary configuration changes have been applied to the server However it is strongly recommend that you run Windows Update and install any pending updates Further Microsoft recommends installing the following hotfixes if they are not already installed
KB2554876 The SharePoint Parsing Process Crashes in Windows Server 2008 R2
KB2708075 IIS 75 Configurations are not Updated when you use the ServerManager Class to Commit Configuration Changes
KB2759112 Hotfix is Available for NET Framework 45 that Resolves an ASPNET Race Condition Issue in Windows Server 2008 R2 Windows Server 2008 R2 SP1
KB2765317 Hotfix is Available for NET Framework 45 that Resolves an ASPNET Race Condition Issue in Windows
8 Windows RT and Windows Server 2012
Install SharePoint Server 2013
In this section you will install SharePoint Server 2013
1 Ensure you are logged into the WingtipServer VM using the account wingtipadministrator | Password1
2 If the AutoPlay dialog box is open click Run splashhta If it isnrsquot use Windows Explorer to navigate to the DVD drive and execute the splashhta file in the root of the DVD drive
Creating a SharePoint Server 2013 Environment for Development and Testing Version 10
copy Critical Path Training 2012 All Rights Reserved 33
wwwCriticalPathTrainingcom
3 Click Install SharePoint Server
4 When prompted to Enter your Product Key enter the key you obtained for the trial install and click Continue
5 On the Read the Microsoft Software License Terms page check the I accept the terms of this agreement checkbox and click Continue
6 On the Choose a file location page click Install Now
Creating a SharePoint Server 2013 Environment for Development and Testing Version 10
copy Critical Path Training 2012 All Rights Reserved 34
wwwCriticalPathTrainingcom
7 When the installation is complete select the Run the SharePoint Products Configuration Wizard checkbox and click Close
8 On the Welcome to SharePoint Products page click Next
a) If prompted to start or reset services click Yes
9 On the Connect to a server farm page select Create a new server farm and click Next
10 On the Specify Configuration Database Settings page use the following to complete the page and click Next
a) Database server WINGTIPSERVER
b) Database name SharePoint_Config
c) Username WINGTIPSP_Farm
d) Password Password1
Creating a SharePoint Server 2013 Environment for Development and Testing Version 10
copy Critical Path Training 2012 All Rights Reserved 35
wwwCriticalPathTrainingcom
11 On the Specify Farm Security Settings page for the Passphrase and Confirm Passphrase boxes enter Password1 and click Next
12 On the Configure SharePoint Central Administration Web Application page check the Specify port number checkbox and enter a value of 9999 then Click Next
Creating a SharePoint Server 2013 Environment for Development and Testing Version 10
copy Critical Path Training 2012 All Rights Reserved 36
wwwCriticalPathTrainingcom
13 On the Completing the SharePoint Products Configuration Wizard page click Next
14 When the installer completes it will display the Confirmation Successful page
15 Click Finish This will launch Internet Explorer to go through the configuration process
Creating a SharePoint Server 2013 Environment for Development and Testing Version 10
copy Critical Path Training 2012 All Rights Reserved 37
wwwCriticalPathTrainingcom
At this point you have successfully installed SharePoint Server 2013
Configure SharePoint Server 2013
In this section you will create a new SharePoint Server 2013 farm and perform minimal configuration tasks
After installing SharePoint Sever 2013 the SharePoint Products Configuration Wizard will launch the browser-based Initial Farm Configuration Wizard
1 In the first page of the wizard you are prompted to Help Make SharePoint Better Select which ever option you want and click OK
2 On the Welcome page that asks How do you want to configure your SharePoint farm click the Start the Wizard button
3 On the Services page do the following and then click Next
a) Service Account Select Create new managed account
i) Username WINGTIPSP_Services
ii) Password Password1
b) Services Uncheck the following services
Creating a SharePoint Server 2013 Environment for Development and Testing Version 10
copy Critical Path Training 2012 All Rights Reserved 38
wwwCriticalPathTrainingcom
i) Access Services 2010
ii) App Management Service
In SharePoint Server 2013 the Search Service Application processes specifically noderunnerexe can consume a considerable amount of memory and processor time If you are not going to work with search you might consider unchecking this option for now You can always go back into Central Administration and create a new instance of the Search Service Application at a later date if you need it
Why did we remove Access Services 2010 amp App Management Service service applications The Access Services 2010 service application is included for backwards compatibility and isnrsquot needed in new installations unless you are migrating solutions built with Access Services 2010 from SharePoint Server 2010 (if so you can create this service application later within Central Administration Application Management Manage Service Applications) The App Management Service service application will be created in a later step in this setup guide therefor it is skipped here
4 The creation of the service applications can take quite a while so be patient If it exceeds 20 minutes it is fairly safe to assume the page is hung up One option is to close the browser then launch Central Administration (Start All Programs Microsoft SharePoint 2013 Products SharePoint 2013 Central Administration) and look at the Service Application page (Application Management Manage Service Applications) to see if they were all created
Configure DNS
In this section you will configure DNS for hosting SharePoint sites amp Apps
1 Ensure you are logged into the WingtipServer VM using the account wingtipadministrator | Password1
2 Open the DNS window Start Administrative Tools DNS
3 Expand the hierarchy on the left-hand side of the window until you get to DNS WINGTIPSERVER Forward Lookup Zones wingtipcom
4 Create a new wildcard so all requests for http[]wingtipcom will be forwarded to our SharePoint machine
a) Next right-click wingtipcom and select New Host (A or AAAA)
Creating a SharePoint Server 2013 Environment for Development and Testing Version 10
copy Critical Path Training 2012 All Rights Reserved 39
wwwCriticalPathTrainingcom
b) In the New Host dialog enter the following and click OK
i) Alias Name
ii) IP Address 192168150102 Then click Add Host The following figure shows how this looks
This new record is telling DNS to forward any request for http[]wingtipcom to the webserver WINGTIPSERVER where the
requests will be served by SharePoint
5 Verify this DNS entry is working
a) Open Windows PowerShell Start All Programs Accessories Windows PowerShell Windows PowerShell
b) Run the following commands and press ENTER
PS CUsersAdministratorgt nslookup somethingwingtipcom PS CUsersAdministratorgt nslookup somethingappswingtipcom
c) You should get a response that points to the WingtipServer server as shown in the following figure
Creating a SharePoint Server 2013 Environment for Development and Testing Version 10
copy Critical Path Training 2012 All Rights Reserved 40
wwwCriticalPathTrainingcom
Configure SharePoint Server 2013 for Host-Named Site Collections amp Create Initial Site
Collections
In this section you will create new SharePoint 2013 site collections for testing and hosting apps
Microsoft recommends to create host-named site collections (HNSC) instead of using the path based site collection addressing The difference is the following a path based site created at something such as httpintranetwingtipcomsitesdevtest as an HNSC site would be more like httpdevtestwingtipcom This is how it works in the cloud (Office 365) and it scales much better for on-prem
deployments This setup guide will show you how to setup your environment to create HNSC The only downside to this approach is that you canrsquot create site collections within Central Administration it must be done via Windows PowerShell API (because Central Administration doesnrsquot instruct you where to put the site
This is implemented in various parts First DNS must be configured to send all requests for httpwingtipcom to a Web Application
(implemented in the last section) Second this Web Application must be extended with SharePoint and have no host header bindings (so it handles all requests) Third it must have a default site collection at the root of the Web Application but it will not be used for anything (in fact it doesnrsquot need a template assigned to it)
You can read more about HNSCrsquos on TechNet httptechnetmicrosoftcomen-uslibrarycc424952aspx
PowerShell Script Alert The steps in this section are automated in the script SetupSharePointForHNSCps1 found in the files that
accompany this setup guide Open the script and read the header for documentation on how to use it
1 Ensure you are logged into the WingtipServer VM using the account wingtipadministrator | Password1
2 Open Central Administration Start All Programs Microsoft SharePoint 2013 Products SharePoint 2013 Central Administration
3 Select Application Management Manage Web Applications
4 Delete the default Web Application created by the configuration wizard
a) Delete the existing default Web Application
i) Select the Web Application SharePoint ndash 80 the one with the URL of httpwingtipserver and click Delete in the ribbon
ii) When prompted to delete the associated IIS Web Site amp SQL Server database select both options to delete them and click OK
The reason you are doing this is because the setup wizard you ran previously when creating the service applications automatically created it The problem is that it used the same identity (WINGTIPSP_Services) for the app pool that is used for all the service
applications which is not desired
5 Create a new Web Application to handle Host-Named Site Collections (HNSC)
Creating a SharePoint Server 2013 Environment for Development and Testing Version 10
copy Critical Path Training 2012 All Rights Reserved 41
wwwCriticalPathTrainingcom
a) In the ribbon click the New button
b) In the Create New Web Application dialog enter the following values in the properties and click OK Leave all properties not mentioned
i) Select the radio button Create a new IIS web site
(1) Name SharePoint HNSC Host ndash 80
(2) Port 80
ii) Application Pool
(1) Select the radio button Create a new application pool
(a) Application Pool Name SharePoint Default HNSC AppPool
(b) Select a security account for this application pool WINGTIPSP_Content
If WINGTIPSP_Content is not listed as an available managed account create it by selecting the appropriate option and using
Password1 for the password
iii) Database Name and Authentication
(1) Database Name WSS_Content_HNSCDefaultHost
c) This process will take a few moments At the end of the process SharePoint will ask if you want to create a site collection You do but you donrsquot want to do it through the browser as this will not be a HNSC To create a HNSC you must create it via Windows PowerShell
6 Create a default not template site collection at the root of the web application
a) Open SharePoint 2013 Management Shell Start All Programs Microsoft SharePoint 2013 Products SharePoint 2013 Management Shell
7 Create Site Collections for Testing SharePoint amp SharePoint Apps
a) Open SharePoint 2013 Management Shell Start All Programs Microsoft SharePoint 2013 Products SharePoint 2013 Management Shell
b) Get a reference to the HNSC web application you just created by running the following Windows PowerShell script in the SharePoint 2013 Management Shell
$hnscWebApp = Get-SPWebApplication | Where-Object $_DisplayName -eq SharePoint HNSC Host - 80
c) Create a non-templated site at the root of the web application for Workflow to connect to by executing the following Windows PowerShell script in the SharePoint 2013 Management Shell
New-SPSite -Name Root HNSC Site Collection -Url httpwingtipcom -HostHeaderWebApplication $hnscWebApp -OwnerAlias WINGTIPAdministrator
d) Create a team site by executing the following Windows PowerShell script in the SharePoint 2013 Management Shell
New-SPSite -Name Wingtip Intranet -Url httpintranetwingtipcom ndashHostHeaderWebApplication $hnscWebApp -Template STS0 -OwnerAlias WINGTIPAdministrator
e) Create a developer site by executing the following Windows PowerShell script in the SharePoint 2013 Management Shell
New-SPSite -Name Wingtip Developer Site -Url httpdevwingtipcom ndashHostHeaderWebApplication $hnscWebApp -Template DEV0 -OwnerAlias WINGTIPAdministrator
You can only create debug and test apps using a developer site
At this point you now have a site collection to use as a team site (httpintranetwingtipcom) and to develop and test custom SharePoint apps (httpdevwingtipcom)
Creating a SharePoint Server 2013 Environment for Development and Testing Version 10
copy Critical Path Training 2012 All Rights Reserved 42
wwwCriticalPathTrainingcom
Configure SharePoint 2013 for Hosting Apps
In this setup you will setup your SharePoint 2013 environment for hosting apps
PowerShell Script Alert Everything in the next immediate step is provided in the script ConfigureSpFarmForAppsps1 found in the
files that accompany this setup guide Open the script and read the header for documentation on how to use it
1 Ensure you are logged into the WingtipServer VM using the account wingtipadministrator | Password1
2 Create the necessary SharePoint App Management service applications and start the necessary services via Windows PowerShell
a) Open SharePoint 2013 Management Shell Start All Programs Microsoft SharePoint 2013 Products SharePoint 2013 Management Shell
b) Execute the following Windows PowerShell script in the SharePoint 2013 Management Shell
$appHostDomain = appswingtipcom $adminService = Get-Service -Name spadminv4 if ($adminServiceStatus -ne Running) Start-Service $adminService $timerService = Get-Service -Name sptimerv4 if ($timerServiceStatus -ne Running) Start-Service $timerService Set-SPAppDomain $appHostDomain $appMgmtSvcInstance = Get-SPServiceInstance | Where-Object $_GetType()Name -eq AppManagementServiceInstance if ($appMgmtSvcInstanceStatus -ne Online) Start-SPServiceInstance -Identity $appMgmtSvcInstance $appSubSettingSvcInstance = Get-SPServiceInstance | Where-Object $_GetType()Name -eq SPSubscriptionSettingsServiceInstance if ($appSubSettingSvcInstanceStatus -ne Online) Start-SPServiceInstance -Identity $appSubSettingSvcInstance $appPoolServiceApps = Get-SPServiceApplicationPool -Identity SharePoint Web Services Default $appSubSvc = New-SPSubscriptionSettingsServiceApplication ndashApplicationPool $appPoolServiceApps ndashName Settings Service Application ndashDatabaseName SettingsServiceDB $proxySubSvc = New-SPSubscriptionSettingsServiceApplicationProxy ndashServiceApplication $appSubSvc $appAppSvc = New-SPAppManagementServiceApplication -ApplicationPool $appPoolServiceApps -Name App Management Service Application -DatabaseName AppServiceDB $proxyAppSvc = New-SPAppManagementServiceApplicationProxy -ServiceApplication $appAppSvc Set-SPAppSiteSubscriptionName -Name app -Confirm$false
3 Verify the script configured SharePoint 2013 for hosting apps
a) Open Central Administration Start All Programs Microsoft SharePoint 2013 Products SharePoint 2013 Central Administration
b) Verify service applications created
i) Open the Service Applications page Application Management Manage Service Applications
ii) Verify you have two service applications created
(1) App Management Service Application
(2) Settings Service Application
c) Verify service instances are running
i) Open the Services on Server page System Settings Manage Services on Server
ii) Verify the following services are Started
(1) App Management Service
(2) Microsoft SharePoint Foundation Subscription Settings Service
Creating a SharePoint Server 2013 Environment for Development and Testing Version 10
copy Critical Path Training 2012 All Rights Reserved 43
wwwCriticalPathTrainingcom
d) Verify App URLs are correct
i) Open the Configure App URLs page Apps Configure app URLs
ii) Verify the following
(1) App Domain appswingtipcom
(2) App Prefix app
At this point your SharePoint Server 2013 environment is ready to host SharePoint apps
Creating a SharePoint Server 2013 Environment for Development and Testing Version 10
copy Critical Path Training 2012 All Rights Reserved 44
wwwCriticalPathTrainingcom
Start the SharePoint 2013 Sandbox Service
By default the service that executes sandbox solutions is not running In this step you will start the service
1 Open Central Administration Start All Programs Microsoft SharePoint 2013 Products SharePoint 2013 Central Administration
2 Open the Services on Server page System Settings Manage Services on Server
3 Click the Start link to the left of the Microsoft SharePoint Foundation Sandboxed Code Service
At this point your installation can support sandbox solutions
Configure CRL Verification for Disconnected Environments
SharePoint periodically ldquophones homerdquo to a specific address hosted by Microsoft under certain conditions When your environment is disconnected this can cause an unnecessary delay or failures when starting up the sandbox The following steps outline a workaround to bypass this check
1 Launch Notepad as an administrator Start All Programs Accessories right-click Notepad and select Run as Administrator
2 Open the hosts file by selecting File Open and finding the file
cWindowsSystem32Driversetchosts
3 Add the following line to the end of the file
127001 crlmicrosoftcom
4 Save and close the hosts file
Update Internet Explorer to Bypass the App URL amp Automatically Login to SharePoint Sites
In this section you will update Internet Explorer to add the App hosting URL to the bypass list so you can navigate to the domain after deploying SharePoint hosted apps
1 Ensure you are logged into the WingtipServer VM using the account wingtipadministrator | Password1
1 Launch Internet Explorer Start All Programs Internet Explorer
2 Configure Internet Explorer to bypass the App URL
a) In the top-right corner click the gear icon and select Internet Options
b) On the Security tab select the Local Intranet and click the Sites button
c) Uncheck the box next to Automatically detect intranet network
d) Click the Advanced button and add two entries to the Exceptions list
i) httpwingtipcom
ii) httpappswingtipcom
Creating a SharePoint Server 2013 Environment for Development and Testing Version 10
copy Critical Path Training 2012 All Rights Reserved 45
wwwCriticalPathTrainingcom
e) Click the Close button followed by the OK button multiple times to close out of the dialogs
At this point Internet Explorer is setup to bypass your app URL so you can navigate to apps (httpappswingtipcom) as well as automatically authenticate to sites hosted at httpwingtipcom
Exercise 6 Configure SharePoint to Host My Sites
In this exercise you will configure SharePoint to create and host My Sites In order to host My Sites you will need a new Web Application that is configured for Self-Service Site Creation and has a My Site Host site collection
1 Create a new SharePoint web application to host the My Sites
a) Ensure you are logged into the WingtipServer VM using the account wingtipadministrator | Password1
b) Open Central Administration Start All Programs Microsoft SharePoint 2013 Products SharePoint 2013 Central Administration
c) Select Application Management Manage Web Applications
d) In the ribbon click the New button
e) In the Create New Web Application dialog enter the following values in the properties and click OK Leave all properties not mentioned
i) Select the radio button Create a new IIS web site
(1) Name SharePoint MySite Host ndash 80
(2) Port 80
(3) Host Header mywingtipcom
ii) Application Pool
(1) Select the radio button Use existing application pool
(a) Application Pool Name SharePoint Default HNSC AppPool
iii) Database Name and Authentication
(1) Database Name WSS_Content_SocialWingtipCom
f) This process will take a few moments At the end of the process SharePoint will ask if you want to create a site collection Click the link provided to create a new site collection amp continue to the next step
2 Create a My Site Host site collection
a) On the Create Site Collection page use the following information to complete the form and click OK
Creating a SharePoint Server 2013 Environment for Development and Testing Version 10
copy Critical Path Training 2012 All Rights Reserved 46
wwwCriticalPathTrainingcom
i) Title My Site Host
ii) URL
iii) Template Selection My Site Host (found under the Enterprise tab)
iv) Primary Site Collection Administrator WINGTIPAdministrator
3 Update the Web Application to host my sites
a) Within Central Administration in the left-hand navigation navigate to the Manage Web Applications page Application Management Manage Web Applications
b) Select the SharePoint MySite Host ndash 80 web application
c) Click the Managed Paths button in the ribbon
d) Remove the sites managed path and add two new managed paths and click OK
i) personal ndash Wildcard inclusion
ii) my ndash Explicit inclusion
e) With the SharePoint MySite Host ndash 80 web application still selected click the Self-Service Site Creation button
f) On the Self-Service Site Creation page use the following values to complete the form and click OK
i) Site Collections On
4 Next configure the User Profile Service Application My Site settings
a) Browse to the User Profile Service Application management page Application Management Manage Service Applications User Profile Service Application
b) Under the My Site Settings section click the Setup My Sites
c) On the My Site Settings page use the following information to complete the form and click OK
i) My Site Host httpmywingtipcom
ii) Personal Site Location personal
At this point your SharePoint deployment is now configured to automatically create My Sites under httpmywingtipcomPersonalUserName when users first browse to them
Exercise 7 Install amp Configure Workflow Manager 10
In this exercise you will configure the WingtipServer VM to host Workflow Manager 10 and connect it to your SharePoint installation
1 Ensure you are logged into the WingtipServer VM using the account wingtipadministrator | Password1
Verify SQL Server 2012 Network Configuration
In this section yoursquoll verify the network configuration is correct for SQL Server 2012 in order to install Workflow Manager 10
Creating a SharePoint Server 2013 Environment for Development and Testing Version 10
copy Critical Path Training 2012 All Rights Reserved 47
wwwCriticalPathTrainingcom
1 Configure SQL Server 2012 to have the TCPIP connection protocol enabled
a) Open the SQL Server Configuration Manager Start All Programs Microsoft SQL Server 2012 Configuration Tools SQL Server Configuration Manager
b) Expand the hierarchy on the left-hand side to the following SQL Server Connection Manager (local) SQL Server Network Configuration Protocols for MSSQLSERVER
c) In the main window if TCPIP is Disabled right-click TCPIP and select Enable
d) When prompted with a warning click OK
2 SQL Server must be restarted in order to reflect this change
a) In the hierarchy on the left-hand side of the window select SQL Server Services
b) Right-click SQL Server (MSSQLSERVER) and select Restart
At this point SQL Server is now configured with the TCPIP protocol enabled a requirement when configuring Service Bus
Configure the Workflow Service Account with the Necessary Rights
In this section you will verify the service account that will run Workflow Manager and Service Bus
1 Ensure you are logged into the WingtipServer VM using the account WINGTIPadministrator | Password1
2 Grant the WINGTIPSP_Content account securityadmin amp dbcreator permissions in SQL Server
a) Launch SQL Server Management Studio Start All Programs Microsoft SQL Server 2012 SQL Server Management Studio
b) When SQL Server Management Studio launches within the Connect to Server dialog login using the default settings and click Connect
c) In the Object Explorer tool window expand the WINGTIPSERVER server hierarchy to the Security Logins node
d) Find the WINGTIPSP_Content account right-click it and select Properties
Creating a SharePoint Server 2013 Environment for Development and Testing Version 10
copy Critical Path Training 2012 All Rights Reserved 48
wwwCriticalPathTrainingcom
e) In the Select a page pane select Server Roles
f) Check securityadmin amp dbcreator and click OK
g) Close SQL Server Management Studio
3 Add the Workflow service account to the local administrators group
a) Open the Active Directory Users and Computers window Start Administrative Tools Active Directory Users and Computers
b) In the hierarchy on the left-hand side of the window expand it to the following Active Directory Users and Computers wingtipcom Builtin
c) In the main window right-click Administrators and select Properties
d) In the Administrators Properties dialog select the Members tab and click Add
e) In the Enter the object names to select box enter wingtipsp_content and click the Check Names button
f) In the Administrators Properties dialog click OK
g) Close the Active Directory Users and Computers window
At this point the service account that will host Workflow Manager and Service Bus has been configured correctly
Creating a SharePoint Server 2013 Environment for Development and Testing Version 10
copy Critical Path Training 2012 All Rights Reserved 49
wwwCriticalPathTrainingcom
Download amp Install Workflow Manager and Service Bus
In this section you will install Workflow Manager and Service Bus
1 Ensure you are logged into the WingtipServer VM using the account WINGTIPSP_Content | Password1
It is important you are logged in as the user that will run workflow when you install amp configure Workflow Manager and Service Bus
2 Launch the Web Platform Installer Start All Programs Microsoft Web Platform Installer
a) If the Web Platform Installer is not present on your machine you can download amp install it from here httpwwwmicrosoftcomwebdownloadsplatformaspx
If you do not have internet access within the virtual machine it is possible to download everything needed for workflow using the command line version of the Web Platform Installer (WebPICMD) You can get WebPICMD from httplearniisnetpageaspx1072web-platform-installer-v4-command-line-webpicmdexe-preview-release Specifically for
workflow enter the following command to download Workflow Beta 1 and all prerequisites
webpicmd offline ProductsWorkflow Pathc[path]
3 When the Web Platform Installer loads execute a search for Workflow select Workflow Manager 10 and click Add
4 Click the Install button at the bottom of the Web Platform Installer 40 window
5 On the Prerequisites page click I Accept
Note The Web Platform Installer 40 may prompt you to keep certain products updated using Microsoft Update If it does select Use Microsoft Update when I check for updates (recommended) and click Continue
6 When the installer completes the following dialog will appear Click Continue and then Finish to start the configuration process
Creating a SharePoint Server 2013 Environment for Development and Testing Version 10
copy Critical Path Training 2012 All Rights Reserved 50
wwwCriticalPathTrainingcom
At this point Workflow Manager amp Service Bus are installed
Configure Workflow Manager and Service Bus
In this section you will install Workflow Manager and Service Bus
1 If the Workflow Manager Configuration Wizard is not open open it Start All Programs Workflow Manager 10 Workflow Configuration
2 On the Welcome page click Configure Workflow Manager with Default Settings (Recommended)
Creating a SharePoint Server 2013 Environment for Development and Testing Version 10
copy Critical Path Training 2012 All Rights Reserved 51
wwwCriticalPathTrainingcom
3 On the New Farm Configuration page do the following
a) In the section Configure Service Account set the credentials to
i) User ID sp_contentwingtipcom
ii) Password Password1
b) Check the Allow Workflow management over HTTP on this computer checkbox
Ensure the username is entered in the fully qualified UPN format not as the default shows in the installer (sp_contentwingtip) or the domainusername format
In a production environment you should be doing everything over SSL
c) Click the Test Connection button to verify the connection credentials before proceeding
Creating a SharePoint Server 2013 Environment for Development and Testing Version 10
copy Critical Path Training 2012 All Rights Reserved 52
wwwCriticalPathTrainingcom
d) In the Certificate Generation Key and Confirm Certificate Generation Key enter Password1 into both fields
4 Click the right arrow in the bottom right corner to proceed
5 On the Summary page review your settings and click the check at the bottom right of the widow to start the configuration process
Creating a SharePoint Server 2013 Environment for Development and Testing Version 10
copy Critical Path Training 2012 All Rights Reserved 53
wwwCriticalPathTrainingcom
6 After a few minutes the Configuration Progress screen will show that everything has been configured correctly
Creating a SharePoint Server 2013 Environment for Development and Testing Version 10
copy Critical Path Training 2012 All Rights Reserved 54
wwwCriticalPathTrainingcom
7 Click the check in the bottom right corner
At this point Workflow Manager amp Service Bus has been installed and a new Workflow Manager farm has been created The next step is to connect the SharePoint 2013 farm to the Workflow Manager farm
Connect SharePoint 2013 to Workflow Manager
In this section you will connect SharePoint 2013 and Workflow Manager together
1 Ensure you are logged into the WingtipServer VM using the account WINGTIPadministrator | Password1
2 Get the Workflow Manager endpoint
a) Open the Workflow Manager PowerShell console Start All Programs Workflow Manager 10
b) Execute the Windows PowerShell following cmdlet
Get-WFFarm | ft HttpPort
c) Take note of this port (12291) This port number is what you will use to connect the SharePoint 2013 farm to the Workflow Manager 10 farm
In production you should connect to the HTTPS port listed in the HttpsPort property when you run Get-WFFarm
d) Close the Workflow Manager PowerShell window
3 Connect the SharePoint 2013 farm to Workflow Manager
Creating a SharePoint Server 2013 Environment for Development and Testing Version 10
copy Critical Path Training 2012 All Rights Reserved 55
wwwCriticalPathTrainingcom
a) Open SharePoint 2013 Management Shell Start All Programs Microsoft SharePoint 2013 Products SharePoint 2013 Management Shell
b) Execute the following Windows PowerShell script in the SharePoint 2013 Management Shell
Register-SPWorkflowService ndashSPSite httpintranetwingtipcom ndashWorkflowHostUri httpwingtipserver12291 ndashAllowOAuthHttp
This script is telling SharePoint the endpoint it should use to talk to Workflow Manager as well as Workflow Manager the SharePoint site collection it should talk to for calls into the CSOM It is also configuring all communication over HTTP rather than HTTPS for performance reasons In production you should always use HTTPS
This step will take a moment with no feedback during the process Be patient
c) Close the SharePoint 2013 Management Shell
At this point the SharePoint 2013 farm is connected to the Workflow Manager 10 farm
Configure SharePoint User Profile Service Application AD Sync
Users in SharePoint 2013 are validated by Workflow Manager against SharePoint to ensure they have permissions to start a workflow This is done by looking up the user by their AD UserPrincipalName (UPN) attribute in the User Profile Service Application (UPA) If no matching user is found the workflow will be automatically cancelled by Workflow Manager In this section you will setup UPA to connect amp sync with the local Active Directory so user accounts in AD will have their UPN synchronized to UPA
1 Open Central Administration Start All Programs Microsoft SharePoint 2013 Products SharePoint 2013 Central Administration
2 Go to the User Profile Service Application management page Application Management Manage Service Applications User Profile Service Application
3 The first step is to configure the User Profile Service Application to allow for Active Directory (AD) synchronization
a) Under Synchronization select Configure Synchronization Settings
b) For Synchronization select Use SharePoint Active Directory Import and click OK
4 Next establish a connection to the wingtipcom AD
a) Under Synchronization select Configure Synchronization Connections
b) On the Synchronization Connections page select Create New Connection
c) Enter the following values on this form and click OK
i) Connection Name WINGTIPCOM AD
ii) Type Active Directory Import
iii) Connection Settings
(1) Fully Qualified Domain Name wingtipcom
(2) Authentication Provider Type Windows Authentication
(3) Account Name WINGTIPAdministrator
(4) Password (and Confirm Password) Password1
iv) Containers
(1) Click Populate Containers
(2) After it loads check the box next to WINGTP or click the Select All button below the box
5 Go back to the User Profile Service Application management page Application Management Manage Service Applications User Profile Service Application
6 Finally start a synchronization import
a) Under Synchronization select Start Profile Synchronization
Creating a SharePoint Server 2013 Environment for Development and Testing Version 10
copy Critical Path Training 2012 All Rights Reserved 56
wwwCriticalPathTrainingcom
b) Select Start Full Synchronization and click OK
c) You will be taken back to the User Profile Service Application management page Notice in the top-right corner there is a status block that reports how many profiles are in the UPA database Refresh the page to see it increase to a handful of profiles as the import process runs
At this point you have successfully configured the User Profile Service Application to import profiles from the local AD
Exercise 8 Install the Microsoft Office 2013 Professional Clients
In this exercise you will install the Microsoft Office 2013 client applications
1 Download the Office 2013 into the WingtipServer VM For this you need to create an Office 365 Trial account login to Office 365 go to the Admin Dashboard and then download the latest version httpwwwmicrosoftcomofficepreviewentry-office-preview
2 Download the SharePoint Designer 2013 into the WingtipServer VM from here httpwwwmicrosoftcomen-usdownloaddetailsaspxid=35491
3 Download the Visio Professional 2013 into the WingtipServer VM from here httptechnetmicrosoftcomen-usevalcenterhh973399
Install Microsoft Office Professional Plus 2013
In this section you will install the Microsoft Office 2013 clients
1 Ensure you are logged into the WingtipServer VM using the account WINGTIPadministrator | Password1
2 Execute the installer OfficeProfessionalPlus_English_x64exe
3 On the Read the Microsoft Software License Terms dialog click the checkbox next to I accept the terms of this agreement and click Continue
4 On the Choose the installation you want dialog click the Install Now button
5 The installer will proceed and install all the Office products
6 When the installer completes click the Close button
7 Apply your Office Professional Plus 2013 license key
a) Launch Word 2013 Start All Programs Microsoft Office 2013 Word 2013
b) In the First things first dialog select Use recommended settings and click Accept
c) In the Welcome to Office dialog that opens click the [X] icon in the top-right corner to close it
d) In the left-hand pane click Open Other Documents
e) In the left-hand pane click Account
f) In the Product Information section within the Activation Required box click Change Product Key
g) Enter your license key for Office Professional Plus 2013 check the box next to Attempt to automatically activate my product online and click Install
h) Click OK
At this point you have installed Office Professional Plus 2013
Install Microsoft Office Visio 2013
In this section you will install Microsoft Office 2013 Visio
1 Ensure you are logged into the WingtipServer VM using the account WINGTIPadministrator | Password1
2 Execute the installer VisioProfessional_English_x64exe
3 On the Read the Microsoft Software License Terms dialog click the checkbox next to I accept the terms of this agreement and click Continue
Creating a SharePoint Server 2013 Environment for Development and Testing Version 10
copy Critical Path Training 2012 All Rights Reserved 57
wwwCriticalPathTrainingcom
4 On the Choose the installation you want dialog click the Install Now button
5 The installer will proceed and install all Visio 2013
6 When the installer completes click the Close button
7 Apply your Visio 2013 license key
a) Launch Visio 2013 Start All Programs Microsoft Office 2013 Visio 2013
b) In the First things first dialog select Use recommended settings and click Accept
c) In the Welcome to Office dialog that opens click the X icon in the top-right corner to close it
d) In the left-hand pane click Open Other Documents
e) In the left-hand pane click Account
f) In the Product Information section within the Activation Required box click Change Product Key
g) Enter your license key for Visio 2013 check the box next to Attempt to automatically activate my product online and click Install
h) Click OK
At this point you have installed Visio 2013
Install Microsoft Office 2013 SharePoint Designer
In this section you will install Microsoft Office 2013 SharePoint Designer
1 Ensure you are logged into the WingtipServer VM using the account WINGTIPadministrator | Password1
2 Execute the installer SharePointDesigner_English_x64exe
3 On the Read the Microsoft Software License Terms dialog click the checkbox next to I accept the terms of this agreement and click Continue
4 On the Choose the installation you want dialog click the Install Now button
5 The installer will proceed and install all SharePoint Designer 2013
6 When the installer completes click the Close button
At this point you have installed SharePoint Designer 2013
Exercise 9 Install Visual Studio 2012
In this exercise you will install Visual Studio 2012
1 Ensure you are logged into the WingtipServer VM using the account WINGTIPadministrator | Password1
2 Start the install of Visual Studio 2012 Ultimate Trial by downloading the installer from here httpwwwmicrosoftcomvisualstudio11en-usdownloads
3 On the installation splash screen check the box next to I agree to the License terms and conditions and click the Next button
Creating a SharePoint Server 2013 Environment for Development and Testing Version 10
copy Critical Path Training 2012 All Rights Reserved 58
wwwCriticalPathTrainingcom
4 On the Optional Features to install dialog click Install
5 After some time the installer will complete Click the Launch button to launch Visual Studio 2012
Creating a SharePoint Server 2013 Environment for Development and Testing Version 10
copy Critical Path Training 2012 All Rights Reserved 59
wwwCriticalPathTrainingcom
6 In the Choose Default Environment Settings select Visual C Development Settings and click Start Visual Studio
7 Close Visual Studio 2012
At this point Visual Studio 2012 RTM is installed
Install Office amp SharePoint 2013 Developer Tools
In this section you will install the Office and SharePoint 2013 developer tools for Visual Studio
1 Ensure you are logged into the WingtipServer VM using the account WINGTIPadministrator | Password1
2 Launch the Web Platform Installer Start All Programs Microsoft Web Platform Installer
3 In the search box at the top-right corner of the Web Platform Installer 40 window type sharepoint and press Enter
4 Click the Add button to the right of Microsoft Office Developer Tools for Visual Studio 2012 - Preview 2
5 Click the Install button at the bottom of the Web Platform Installer 40 window
6 On the Prerequisites page click I Accept
Creating a SharePoint Server 2013 Environment for Development and Testing Version 10
copy Critical Path Training 2012 All Rights Reserved 60
wwwCriticalPathTrainingcom
At this point you have installed the SharePoint 2013 amp Office 2013 development tools in Visual Studio 2012
Creating a SharePoint Server 2013 Environment for Development and Testing Version 10
copy Critical Path Training 2012 All Rights Reserved 61
wwwCriticalPathTrainingcom
Appendix 1 Download Manifest
The following lists everything referenced that you will or may need to download in this environment
Windows Server 2008 R2 with Service Pack 1 (installer ISO)
o httptechnetmicrosoftcomen-usevalcenterdd459137aspx
Windows Server 2008 R2 with Service Pack 1 (prebuilt VHD)
o httpwwwmicrosoftcomdownloadsdetailsaspxFamilyId=9040a4be-c3cf-44a5-9052-a70314452305
Windows Server 2008 R2 Service Pack 1
o httpwwwmicrosoftcomen-usdownloaddetailsaspxid=5842
SQL Server 2012 Trial
o httpwwwmicrosoftcombetaexperiencepdSQL2012EvalCTAenusdefaultaspx
SharePoint Server 2013
o httptechnetmicrosoftcomen-USevalcenterhh973397aspx
Hotfixes for SharePoint Server 2013 (post-install)
o KB2554876 The SharePoint Parsing Process Crashes in Windows Server 2008 R2
o KB2708075 IIS 75 Configurations are not Updated when you use the ServerManager Class to Commit
Configuration Changes
o KB2759112 Hotfix is Available for NET Framework 45 that Resolves an ASPNET Race Condition Issue in
Windows Server 2008 R2 Windows Server 2008 R2 SP1
o KB2765317 Hotfix is Available for NET Framework 45 that Resolves an ASPNET Race Condition Issue in
Windows 8 Windows RT and Windows Server 2012
Web Platform Installer
o httpwwwmicrosoftcomwebdownloadsplatformaspx
Web Platform Installer ndash Command Line Version
o httplearniisnetpageaspx1072web-platform-installer-v4-command-line-webpicmdexe-preview-release
Workflow Manager 10
o Download using the Microsoft Web Platform Installer
Office 2013
o httpwwwmicrosoftcomofficepreviewentry-office-preview
SharePoint Designer 2013
o httpwwwmicrosoftcomen-usdownloaddetailsaspxid=35491
Visio Professional 2013
o httptechnetmicrosoftcomen-usevalcenterhh973399
Visual Studio 2012
o httpwwwmicrosoftcomvisualstudio11en-usdownloads
Office Developer Tools for Visual Studio 2012 ndash Preview 2
o Download using the Microsoft Web Platform Installer
Creating a SharePoint Server 2013 Environment for Development and Testing Version 10
copy Critical Path Training 2012 All Rights Reserved 62
wwwCriticalPathTrainingcom
Appendix 2 Windows PowerShell Script Manifest
The following lists all Windows PowerShell scripts that are provided with this setup guide
AddDisableLoopbackCheckRegKeyps1
o The following steps automate creating the registry key outlined as Method 2 in the Microsoft Knowledgebase article
httpsupportmicrosoftcomkb896861 using Windows PowerShell This key DisableLoopbackCheck will allow
you to browse SharePoint sites on the same machine Without this key (or following Method 1 in the KB article) you
would need to browse any SharePoint sites from a different computer than the one which SharePoint is installed on
ConfigureSpFarmForAppsps1
o Configures a SharePoint 2013 for hosting apps This ensures everything you need is installed running and
configured This is documented here httpmsdnmicrosoftcomen-uslibraryfp179923(v=office15)
CreateSpServiceAccountsps1
o Creates the minimal necessary service accounts for SharePoint Server 2013 SP_Farm SP_Content amp
SP_Services
SetupSharePointForHNSCps1
o Configures a SharePoint 2013 install for hosting Host-Named Site Collections (HNSC) This involves creating a Web
Application in SharePoint that has no host header bindings Using DNS all requests are mapped to this Web
Application You then create the site collections via PowerShell as you cant create HNSCs via the browser (Central
Administration)
Creating a SharePoint Server 2013 Environment for Development and Testing Version 10
copy Critical Path Training 2012 All Rights Reserved 63
wwwCriticalPathTrainingcom
Appendix 3 Create Sample Adventure Works Database
The following steps document downloading and installing the sample Adventure Works OLTP database provided by Microsoft
1 Launch Internet Explorer and navigate to httpmsftdbprodsamplescodeplexcom
2 Download the Adventure Works 2012 OLTP Script
3 Extract the ZIP into a folder on the desktop
4 Launch SQL Server Management Studio Start All Programs Microsoft SQL Server 2012 SQL Server Management Studio
5 When SQL Server Management Studio launches within the Connect to Server dialog login using the default settings and click Connect
6 Within SQL Server Management Studio select File Open File
7 Select the file instawdbsql from the extracted ZIP and click Open
8 If prompted to re-login to the database engine do it
9 Select Query SQLCMD Mode
10 Scroll down to line 42 the line that starts with the following
setvar SqlSamplesSourceDataPath
11 Change the folder location of where you unzipped the Adventure Works 2012 OLTP Script
12 Select Query Execute
13 When the script completes the AdventureWorks2012 database will have been created
Creating a SharePoint Server 2013 Environment for Development and Testing Version 10
copy Critical Path Training 2012 All Rights Reserved 64
wwwCriticalPathTrainingcom
Change Log
Change Version Description
August 22 2012 v 01 Pre-release for review
August 27 2012 v 02 Initial public release ndash install guide based on SharePoint Server Beta 2
August 28 2012 v 03 Updated URL for the site collection used to connect SharePoint to WAW
August 31 2012 v 04 Typo Removed SQL Server Analysis Services as part of the install Not required in a
SharePoint dev box (unless you are doing business intelligence which is not covered
in the guide)
Updated all references to Windows Azure Workflow to Workflow Manager the new
official name for the new workflow product
Updated SetupSharePointForHNSCps1 script to lookup HNSC Web Application by
name rather than URL which is more reliable
Typo Updated WingtipAllUp public NIC to use a different IP than the WingtipDC
Typo Replaced a reference to WingtipServer with WingtipDC
Typo Fixed handful of minor typos
September 1 2012 v 05 Removed SQL Server Reporting Services from install guide
Added step to uncheck IErsquos ldquoAutomatically detect proxyrdquo
Added post workflow install steps to setup User Profile Service Application to sync with
local Active Directory
September 5 2012 v 06 Added step to create a default root site collection in the HNSC web app
Updated minor typos and added extra notes for context
Updated PowerShell script SetupSharePointForHNSCps1 to remove content
database of default Web Application when setting up HNSC Web App
Added a new exercise 8 (after SharePoint install amp config and before the Workflow
install and config) to setup support for My Sites
October 20 2012 v 07 Updated script SetupSharePointForHNSCps1 to fix a bug where it would fail on line
111 if you didnrsquot already have a WINGTIPSP_Content managed account
Added section to bypass SharePointrsquos check for crlmicrosoftcom
Updated workflowrsquos registration PowerShell script to point to
httpintranetwingtipcom
Switched order of post-SharePoint install to setup HSNC hosting before configuring for
hosting apps
November 29 2012
v 10 Changed setup guide to use a single VM instead of two VMs
Updated guide for SharePoint 2013 RTM

Creating a SharePoint Server 2013 Environment for Development and Testing Version 10
copy Critical Path Training 2012 All Rights Reserved 3
wwwCriticalPathTrainingcom
Overview
This document provides links to Internet resources and step by step instructions for building a Virtual Machine (VM) sample SharePoint Server 2013 environment This VM can be used to complete the lab exercises in SharePoint 2013 training courses authored by Critical Path Training LLC The VM can also be used for general testing and development with SharePoint 2013
This setup guide gives you the option of using free trial software or supplying your own product keys The software products that require product keys include Windows Server 2008 R2 SQL Server 2012 Developer SharePoint Server 2013 and Office 2013 If you plan to use evaluation software to build your VM there are optional steps for downloading Microsoftrsquos free trial VM for Windows Server 2008 R2 so you can use that as your starting point You can alternatively install Windows Server 2008 R2 yourself using your own product key so you do not have to worry about the operating system on the VM expiring after a certain amount of time Further you could use Windows Server 2012 but this setup guide will focus on Windows Server 2008 R2 because the user interface of Windows Server 2012 is so different from the more traditional Windows interface
Note that the requirements for building out a SharePoint 2013 development environment are more relaxed and have fewer requirements compared to building out a SharePoint 2013 production environment Therefore you should not rely on this document as your only resource when you are installing SharePoint 2013 for production use The following list of assumptions has been made
One server
o All-Up Server (everything needed for SharePoint development including Active Directory)
All Application Pools hosting SharePoint Service Applications will be configured to run under a single AD account
All Application Pools hosting SharePoint Web Applications amp Workflow will be configured to run under a single AD account
Hardware Requirements amp Recommendations
SharePoint 2013 has higher hardware requirements than SharePoint 2010 Specifically
Memory The server where SharePoint 2013 is installed should be allocated at least 10GB of memory
Note Pre-release versions of SharePoint 2013 required the Workflow Manager product be installed on a server that was not running Active Directory This has changed and thus to simplify things this guide assumes yoursquoll build everything on one server
To do this you will need a host computer with at least 16GB of RAM Any computer that can support 16GB of RAM
should have an adequate CPU and disk Yoursquoll get the best performance if you use solid state drives (SSD) and ensure
the virtual machines run on a separate drive from the drive where the host operating system is running
Creating a SharePoint Server 2013 Environment for Development and Testing Version 10
copy Critical Path Training 2012 All Rights Reserved 4
wwwCriticalPathTrainingcom
Virtualization Details
This guide assumes you will use Microsoftrsquos Hyper-V virtualization technology Hyper-V is available starting in Windows Server 2008 Windows Server 2008 R2 Windows Server 2012 and Windows 8 Virtualizing a SharePoint installation is not required nor is Hyper-V is required
You can install on physical servers or using a different virtualization technology of your choice such as VMWare or VirtualBox This guide only deals with Hyper-V in the following ways
Create a virtual network
Create two virtual machines
Configure the processors memory and networking on the virtual machines
If you elect to use something other than Hyper-V you can skip the first section of this guide however the remainder of the guide will assume you setup two servers the way they were configured and setup in exercises 2 amp 3
High-Level View of Creating a SharePoint 2013 Environment
The process of creating a SharePoint 2013 environment for development is not a trivial task This guide walks through various required exercises A summary of these exercises are as follows
1 Configure Host Computer Hyper-V amp Networking Before creating a virtual machine you need to configure the host
environment This includes creating a virtual network both machines will communicate on
2 Install amp Configure a Windows Server SharePoint 2013 must run using domain accounts (as opposed to local accounts)
3 Install Active Directory Domain Services With both servers created next you will need to install and configure Active
Directory
4 Install SQL Server 2012 SharePoint needs to install its databases in SQL Server In this exercise you will install SQL Server
5 Install amp Configure SharePoint Server 2013 Obviously you need to install SharePoint 2013 to create a SharePoint 2013
environment
6 Install amp Configure Workflow Manager and Service Bus SharePoint 2013 relies on a new product Workflow Manager to
handle all workflows In this exercise you will install and configure Workflow Manager as well as its prerequisites (such as
Service Bus) and then connect your SharePoint 2013 farm to it Workflow Manager
7 Install the Microsoft Office 2013 Professional Clients In this exercise you will install and configure Office 2013
Professional clients including Visio and SharePoint Designer
8 Install Visual Studio 2012 Finally you install Visual Studio 2012 and the Office and SharePoint 2013 developer tools
Creating a SharePoint Server 2013 Environment for Development and Testing Version 10
copy Critical Path Training 2012 All Rights Reserved 5
wwwCriticalPathTrainingcom
Creating a SharePoint Server 2013 Environment for Development amp
Testing
Lab Time 2-4 hours
Lab Folder CStudentGettingStartedLab
Lab Overview In this lab you will create a new SharePoint environment to use for testing SharePoint 2013 It covers how to install
and configure the host computer for hosting virtual machines networking them together and installing everything needed If you are not interested in doing development you can omit the last exercise which has you install Visual Studio 2012
Exercise 1 Configure Host Computer Hyper-V amp Networking
In this exercise you will configure your host computerrsquos Hyper-V role for hosting multiple networked virtual machines This involves creating a two virtual networks that will be used to connect the virtual machines together and to connect to the Internet
1 Launch the Hyper-V Manager Start Administrative Tools Hyper-V Manager
2 Create a new virtual network to connect to the Internet
a) In the Actions pane on the right-hand side of the screen click Virtual Network Manager
b) In the Virtual Network Manager dialog create a new virtual network by clicking the Add button (it doesnrsquot matter what you select as the network type) Use the following settings to create the network
i) Name External LAN
ii) Connection Type External (select the network card on the host computer thatrsquos connected to the Internet)
This will be used to connect the VM to the Internet
3 Click OK to save your changes
4 Create a new virtual network the virtual machines will use to communicate with each other
a) In the Actions pane on the right-hand side of the screen click Virtual Network Manager
b) In the Virtual Network Manager dialog create a new virtual network by clicking the Add button (it doesnrsquot matter what you select as the network type) Use the following settings to create the network
i) Name Internal LAN
ii) Connection Type Internal Only
Creating a SharePoint Server 2013 Environment for Development and Testing Version 10
copy Critical Path Training 2012 All Rights Reserved 6
wwwCriticalPathTrainingcom
This will be used to connect the two VMs together so they can talk to each other
5 Click OK to save your changes
When you create a virtual Internal Only network Hyper-V creates a virtual network interface card (NIC) in the list of all NICrsquos installed on the host computer (Start [search] ldquoView Network Connectionsrdquo) If you configure the IP of this card to be on the same network with a different IP address than you use for your machines you will be able to login to these machines using the Remote Desktop Connection app in Windows
A Private Virtual Machine Network the other connection type available is similar to an Internal network except that it does not create
the virtual NIC in the host computer
Exercise 2 Install amp Configure a Windows Server
In this exercise you will create install configure and update a new server to act as the Active Directory domain controller for the SharePoint environment using Windows Server 2008 R2 with Service Pack 1
If you are using a different virtualization product other than Hyper-V or if you are creating physical machines you can skip to the section Install the Windows Server 2008 R2 Operating System
1 If it is not open launch the Hyper-V Manager Start Administrative Tools Hyper-V Manager
2 Inside the left-hand side of the Hyper-V Manager locate the node with the name of the local host computer and select it
Creating a SharePoint Server 2013 Environment for Development and Testing Version 10
copy Critical Path Training 2012 All Rights Reserved 7
wwwCriticalPathTrainingcom
Create a New Virtual Machine
In this section you will create a new virtual machine in Hyper-V
1 In the Actions pane select New Virtual Machine When you execute this menu command the Hyper-V Manager will launch the New Virtual machine Wizard
2 In the Specify Name and location dialog enter a Name of WingtipServer and click Next
3 In the Assign Memory dialog enter the amount of Memory to allocate to the virtual machine in MB to 12288 and click Next
Creating a SharePoint Server 2013 Environment for Development and Testing Version 10
copy Critical Path Training 2012 All Rights Reserved 8
wwwCriticalPathTrainingcom
4 In the Configure Networking dialog use the drop down box to assign a Connection value of Internal LAN and click Next
5 In the Connect Virtual Hard Disk dialog accept the default options to create a virtual hard disk amp click Finish
If possible configure the location so that the VHD file for the VM is created on a separate drive than the host computerrsquos operating system
6 In the Hyper-V Manager window right-click the VM you just created and select Settings
7 In the Settings for WingtipServer dialog select Add Hardware select Network Adapter and click Add
Creating a SharePoint Server 2013 Environment for Development and Testing Version 10
copy Critical Path Training 2012 All Rights Reserved 9
wwwCriticalPathTrainingcom
8 Obtain a copy of the Windows Server 2008 R2 with Service Pack 1 install binaries
The install image (ISO) is available to MSDN or TechNet subscribers or as a trial download available here httptechnetmicrosoftcomen-usevalcenterdd459137aspx
Obviously you can also use your own licensed copy of Windows Server 2008 R2 with Service Pack 1
Microsoft also provides a pre-installed 180-day trial Windows Server 2008 R2 Hyper-V VHD file that you can download (httpwwwmicrosoftcomdownloadsdetailsaspxFamilyId=9040a4be-c3cf-44a5-9052-a70314452305) instead of installing it
yourself If you elect to go this route
Make sure you specify the VHD file you downloaded in the following step for the Hard Drive of the VM
Do not specify a DVD Drive in the following step as you will not be installing anything
If you elect to do this step jump down to section Configure Windows Server 2008 R2
9 In the Settings for WingtipServer dialog update the VM to have the following settings When finished click OK
a) Processor 2 Virtual Processors
b) DVD Drive Image File ndash Map to the Windows Server 2008 R2 ISO installer file
c) Network Adapter Internal LAN
d) Network Adapter Not Connected
10 Start up the WingtipServer VM and install Windows Server 2008 R2
a) In the Hyper-V Manager window right-click the VM you just created and select Settings
b) Right-click on the VM named WingtipServer and select the Connecthellip menu
c) In the Virtual Machine Connection window drop down the Action menu and select Start
Creating a SharePoint Server 2013 Environment for Development and Testing Version 10
copy Critical Path Training 2012 All Rights Reserved 10
wwwCriticalPathTrainingcom
If you elected to use the fully installed trial VHD from Microsoft instead of installing your own server skip to the section Configure Windows Server 2008 R2
Install the Windows Server 2008 R2 Operating System
In this section you will install the operating system
1 After the setup program for Windows Server 2008 R2 loads it will prompt you with a dialog asking you to select a language Accept the default of English and click Install to continue
2 At the next dialog click the Install Now button to begin the installation
Creating a SharePoint Server 2013 Environment for Development and Testing Version 10
copy Critical Path Training 2012 All Rights Reserved 11
wwwCriticalPathTrainingcom
3 The next dialog instructs you to select the operating system you want to install Select the operating system named Windows Server 2008 R2 Enterprise (Full Installation) with the x64 architecture Click Next to continue
4 Agree to the licensing terms and click Next
5 Click on Custom (advanced) to select the type of installation
6 The next dialog asks you where you want to install Windows Accept the default configuration which uses a location of Disk 0 Unallocated Space as shown below Click Next to continue
At this point you have given the Windows setup program enough information to install the basic operating system Setup program will now run for a while as it copies and expands files and installs Windows features You now have a few minutes to get a cup of coffee or catch up on email
7 When the setup program completes it will ask you to assign a new password for the built-in Administrator account Click OK to continue
8 Set the password for Administrator account to Password1
9 When you have updated the Administrator password you will get a confirmation that the update was successful Click OK to complete the installation of the operating system
If you elected to use the pre-installed trial VHD Microsoft offers you will pick up the configuration exercise at this point
Configure Windows Server 2008 R2
In this section you will configure the server
1 When you log in Windows Server automatically displays the Initial Configuration Tasks window Click the check box with the caption Do not show this window at logon and then click the Close button
Creating a SharePoint Server 2013 Environment for Development and Testing Version 10
copy Critical Path Training 2012 All Rights Reserved 12
wwwCriticalPathTrainingcom
2 After you close the Initial Configuration Tasks window Windows Server will display the Server Manager
Creating a SharePoint Server 2013 Environment for Development and Testing Version 10
copy Critical Path Training 2012 All Rights Reserved 13
wwwCriticalPathTrainingcom
3 Configure the Administrator account so that its password does not expire
a) Inside the Configuration node of the Server Manager navigate to Local Users and Groups Users (as shown in the following screenshot) and locate the local Administrator account
b) Right-click on the Administrator account and click Properties
c) In the Administrator Properties dialog unselect the option for User must change password at next logon and select the option for Password never expires Click OK
4 Rename the computer name of the VM
a) In the Server Manager navigate to the top-level node to display the Server Summary page Click Change System Properties
b) On the Computer Name tab of the System Properties dialog click the Change button
c) Enter a new computer name of WingtipServer and click OK
Creating a SharePoint Server 2013 Environment for Development and Testing Version 10
copy Critical Path Training 2012 All Rights Reserved 14
wwwCriticalPathTrainingcom
5 After changing the computer name you will be prompted to restart the VM Choose OK to restart After the VM has restarted log in again using [administrator | Password1] (username | password)
6 Disable Windows Firewall and Enhanced Security Configuration
a) In the Server Manager navigate to the top-level node to display the Server Summary page Inside the Security Information section locate the links for Go to Windows Firewall and Configure IE ECS
b) Click on Configure IE ECS link Disable Enhanced Security Configuration for both Administrators and Users by selecting the Off radio buttons and click OK
c) Now click the Go to Windows Firewall link to display the page for the Windows Firewall Click on the Windows Firewall Properties link at the bottom of the Overview section
d) In the Domain Profile tab of the Windows Fire dialog change the Firewall state property setting from On to Off Click to Apply button to save your changes
e) Once you have turned off the firewall in the Domain Profile tab go to the Private profile tab and the Public profile tab and follow the same steps to disable the firewall for these profiles as well
f) Click OK to dismiss the Windows Firewall dialog once you have turned off the firewall for all three profiles
7 Enable Remote Desktop for your VM
a) In the Server Manager navigate to the top-level node to display the Server Summary page Inside the Computer Information section locate and click the link for Configure Remote Desktop
b) In the Remote tab of the System Properties dialog select the last option for Allow connections only from computers running Remote Desktop with Network Level Authentication Click OK to save changes and dismiss the System Properties dialog
Creating a SharePoint Server 2013 Environment for Development and Testing Version 10
copy Critical Path Training 2012 All Rights Reserved 15
wwwCriticalPathTrainingcom
8 Enable the Windows Server Features for the Desktop Experience and the PowerShell Integrated Scripting Environment
a) In Server Manager choose Add Feature to bring up the Add Features Wizard dialog
b) Select the feature Desktop Experience
When you first click the checkbox for the Desktop Experience the wizard will prompt you with the following dialog to add support for Ink and Handwriting Services Click the Add Required Features button to continue
c) Scroll down the list of features in the Add Features Wizard dialog and select the feature Windows PowerShell Integrated Scripting Environment (ISE)
Creating a SharePoint Server 2013 Environment for Development and Testing Version 10
copy Critical Path Training 2012 All Rights Reserved 16
wwwCriticalPathTrainingcom
When you first click the checkbox for the Windows PowerShell Integrated Scripting Environment (ISE) the wizard will prompt you with the following dialog to add support for NET Framework 351 Features Click the Add Required Features button to continue
d) Click the Next button on the Add Features Wizard dialog to continue with the install
e) On the Confirm Installation Selection wizard page click the Install button
f) When you see the Installation Results screen the Add Features Wizard informs you a computer restart is required Click Close button to dismiss this dialog
9 After the VM has restarted log in again using [administrator | Password1] (username | password)
Configure the Virtual Machinersquos Networking Setup
In this section yoursquoll configure the two NICrsquos you added to the VM in previous steps One NIC (Internal LAN) will be used to communicate with other VMs in this environment while the other (External LAN) will be used to connect to the internet
1 Configure the NIC that is linked to the Internal LAN network
a) Open the Network Connections dialog by pressing Start enter view network connections in the search box Click the View Network Connections shortcut
b) Two network connections will be shown but only one will show as connected
The connected one is the one that is connected to the Internal LAN network The other one is currently ldquounpluggedrdquohellip this is why we didnrsquot connect a network to the second network when initially configuring the VM as this makes it easier to see which NIC is which in the VM
c) Rename the two NICrsquos
i) Right-click the connected NIC and select Rename Give it a name of Internal LAN
Creating a SharePoint Server 2013 Environment for Development and Testing Version 10
copy Critical Path Training 2012 All Rights Reserved 17
wwwCriticalPathTrainingcom
ii) Right-click the disconnected NIC and select Rename Give it a name of External LAN
d) Right-click the Internal LAN NIC and select Properties
e) In the Local Area Connection Properties dialog select the Internet Protocol Version 4 (TCPIPv4) item and click Properties
f) Enter the following information into the resulting dialog to configure the NICrsquos IP settings
i) Use the Following IP Address
(1) IP Address 192168150102
(2) Subnet mast 2552552550
(3) Default Gateway 192168150102
ii) Use the Following DNS Server Addresses
(1) Preferred DNS Server 192168150102
g) Click OK to accept the IP settings and Close to accept the changes to the NIC
Why not use 101 as the start NIC When you created the virtual internal network Hyper-V created a virtual NIC on the host computer If you set the IP of that NIC to 192168150101 you can use the Remote Desktop Connection app in Windows to connect to your virtual machines and easily copy-paste amp share drives
2 Configure the NIC that is linked to the External LAN network
a) Open the Network Connections window if it is not still open using the same steps from the previous step
b) Right-click the External LAN NIC and select Properties
c) In the Local Area Connection Properties dialog select the Internet Protocol Version 4 (TCPIPv4) item and click Properties
d) Enter the following information into the resulting dialog to configure the NICrsquos IP settings
i) Obtain an IP Address Automatically
ii) Use the Following DNS Server Addresses
(1) Preferred DNS Server 192168150102
e) Click the Advanced button to open the Advanced TCPIP Settings dialog
f) In the Advanced TCPIP Settings dialog click the DNS tab
i) Uncheck the Register this Connections Address in DNS
Creating a SharePoint Server 2013 Environment for Development and Testing Version 10
copy Critical Path Training 2012 All Rights Reserved 18
wwwCriticalPathTrainingcom
g) In the Advanced TCPIP Settings dialog click the WINS tab
i) Click the Add button and specify a new WINS Server as 192168150102
h) Click OK Close multiple times to accept all TCPIP settings
The external NIC will now obtain an IP dynamically amp will not register itself in the DHCPrsquos DNS server which is a good thing when there are multiple people on the same network this this type of a setup
3 Connect the second NIC to the External LAN network
a) Go back to the host computer and open the Hyper-V Manager
b) In the Hyper-V Manager window right-click the VM WingtipServer and select Settings
c) Select the second NIC the one that is not connected
d) For the Network select External LAN and click OK This will effectively plug the external network into the VM
4 Go back into the WingtipServer VM and if it is not still open open the Network Connections dialog You should now see both connections plugged in
a) To refresh the connection select the connection you just plugged in and click the Disable this Network Device button in the toolbar After the connection is disabled select it and click the Enable this Network Device button
b) After a few seconds the VM should be able to connect to the internet which you can test by browsing to a site such as httpwwwbingcom
Configure Windows Update and Update the Server
In this section you will verify the server is fully patched and updated
1 Verify Service Pack 1 is installed
a) Verify the version of the operating system installed by clicking Start right-click on Computer select Properties
b) If the server simply says Windows Server 2008 R2 Enterprise as shown in the following figure download and install Service Pack 1 from the following location httpwwwmicrosoftcomen-usdownloaddetailsaspxid=5842
Creating a SharePoint Server 2013 Environment for Development and Testing Version 10
copy Critical Path Training 2012 All Rights Reserved 19
wwwCriticalPathTrainingcom
c) If Service Pack 1 is installed it will state it
2 Update the server using Windows Update
a) Selecting Start All Programs Windows Update
b) First disable Windows Update from running automatically
i) Click the link Change Settings
ii) Under the Important Updates list select Never check for updates (not recommended)
This isnrsquot what you would do in a production environment but for a development machine it is ok
c) Now update the server
i) Click the Check for Updates button
ii) If prompted install any updates to the Windows Update dialog
iii) Select the Check for Updates link
iv) Windows Update will the report how many updates are available Select all important and recommended updates and click the Install Updates button
v) If prompted select I accept the license terms for any updates that require it
vi) Keep going through the process of running Windows Update checking for updates and installing them after each reboot until it says there are no updates left to install
This step is likely going to take quite a bit of time so be patient
Activate Windows Server 2008 R2
In this section you will activate the server if you have a product key
1 If you have a product key for Windows Server 2008 R2 use it to activate Windows
a) In the Server Manager window navigate to the top-level node to display the Server Summary page Click Activate Windows
b) You will be prompted to enter your product key
i) Enter your product key and click to button to activate Windows
Creating a SharePoint Server 2013 Environment for Development and Testing Version 10
copy Critical Path Training 2012 All Rights Reserved 20
wwwCriticalPathTrainingcom
ii) After a few seconds your VM should be able to connect to a Microsoft site and successfully activate Windows
At this point you have a fully patched operating system VM created that will act as the Active Directory domain controller
Apply the DisableLoopbackCheck Registry Fix
Configure the DisableLoopbackCheck registry setting (Microsoft KB httpsupportmicrosoftcomkb896861)
The following steps automate creating the registry key outlined as Method 2 in the Microsoft KB article httpsupportmicrosoftcomkb896861 using Windows PowerShell
PowerShell Script Alert You can also find this PowerShell script AddDisableLoopbackCheckRegKeyps1 in the files that
accompany this setup guide
1 Click the Windows PowerShell icon in the Taskbar
2 Run the following PowerShell commands pressing [ENTER] after each one
$regKeyPath = HKLMSystemCurrentControlSetControlLsa $key = DisableLoopbackCheck New-ItemProperty -Path $regKeyPath -Name $key -Value 1 -PropertyType dword
a) Close the Windows PowerShell console by typing EXIT and pressing [ENTER]
Exercise 3 Install Active Directory Domain Services
Now you will promote your WingtipServer VM to a domain controller and create a new domain named wingtipcom
1 Login to the WingtipServer virtual machine using administrator | Password1
2 Add and configure the role for Active Directory Domain Services
a) Launch Server Manager and select the Roles node
b) Click the Add Roles link to start the Add Roles Wizard
c) On the Before you begin page click Next
d) On the Server Roles page select Active Directory Domain Services Click the Add Required Features button if prompted to install prerequisites
e) Click Next
Creating a SharePoint Server 2013 Environment for Development and Testing Version 10
copy Critical Path Training 2012 All Rights Reserved 21
wwwCriticalPathTrainingcom
f) On the next page of the wizard click Next which will bring you to the Confirm Installation Selections page
g) Click Install
After Active Directory Domain Services has been installed you will see the Installation Results page in the Add Roles Wizard
3 Click on the link with the big long caption of Close this wizard and launch the Active Directory Domain Services Installation Wizard (dcpromoexe)
4 On the first page of the Active Directory Domain Services Installation Wizard click the Use Advanced Mode Installation checkbox and click Next
Creating a SharePoint Server 2013 Environment for Development and Testing Version 10
copy Critical Path Training 2012 All Rights Reserved 22
wwwCriticalPathTrainingcom
5 On the Operating System Compatibility page click Next
6 On the Choose a Deployment Configuration select Create a new domain in a new forest and click Next
7 On the Name the Forrest Root Domain enter the following and click Next
a) FQDN of the forest root domain wingtipcom
8 On the Domain NetBIOS Name set it to WINGTIP and click Next
9 On the Set Forest Functional Level page select Windows Server 2008 R2 and click Next
10 On the Additional Domain Controller Options accept the default options and click Next
11 You might be prompted with the dialog shown below providing a warning that This computer has dynamically assigned IP address(es) This is not a problem when you are running your development environment on a domain controller Click Yes to dismiss the dialog
12 At this point the wizard will prompt you with a dialog information you a delegation for the DNS Server cannot be created because it cannot find the authoritative parent zone This is not a problem because the wizard will automatically configure the DNS of the VM to point to itself Click on the Yes button to dismiss this dialog
Creating a SharePoint Server 2013 Environment for Development and Testing Version 10
copy Critical Path Training 2012 All Rights Reserved 23
wwwCriticalPathTrainingcom
13 On the Location for Database Log Files and SYSVOL page accept all the default values and click Next
14 On the Directory Services Restore Mode Administrator Password page enter Password1 in both textboxes and click Next
15 On the Summary page click Next to start the process of configuring the new Active Directory domain
16 The wizard will display the dialog below to show you the progress of the configuration process You will be required to reboot when the configuration has been completed Check the option for Reboot on completion and then wait for the configuration to complete and the machine to reboot
17 After the VM reboots login to the server with wingtipadministrator | Password1
Configure Windows Update and Update the Server
In this section you will verify the server is fully patched and updated
1 Update the server using Windows Update
a) Selecting Start All Programs Windows Update
b) Select the Check for Updates link
c) Windows Update will the report how many updates are available Select all important and recommended updates and click the Install Updates button
d) If prompted select I accept the license terms for any updates that require it
e) Keep running Windows Update after each reboot and update install until it says there are no updates left to install
Creating a SharePoint Server 2013 Environment for Development and Testing Version 10
copy Critical Path Training 2012 All Rights Reserved 24
wwwCriticalPathTrainingcom
This step could take quite a bit of time so be patient
At this point you have a fully installed Active Directory Domain Controller for the Wingtipcom domain hosted on the server WingtipServer
Exercise 4 Install SQL Server 2012
In this exercise you will install SQL Server 2012 that will be used to store all required databases
1 Download the SQL Server 2012 Evaluation Edition specifically the DVD x64 ISO image to the host computer from here httpwwwmicrosoftcombetaexperiencepdSQL2012EvalCTAenusdefaultaspx or you can use your own licensed copy
2 Mount the SQL Server 2012 ISO to the WingtipServer VM
a) On the host computer open the Hyper-V Manager
b) Right-click the VM WingtipServer and select Settings
c) Select DVD Drive in the left-hand panel
d) In the right-hand panel select Image File and browse to the ISO file that contains SQL Server 2012 and click OK
3 Login to the WingtipServer VM as wingtipadministrator | Password1
Install SQL Server 2012
In this section you will install SQL Server 2012
1 If the AutoPlay dialog box is open click Run SETUPEXE If it isnrsquot use Windows Explorer to navigate to the DVD drive and execute the setupexe file in the root of the DVD drive
2 In the SQL Server Installation Center click Installation on the left-hand side
Creating a SharePoint Server 2013 Environment for Development and Testing Version 10
copy Critical Path Training 2012 All Rights Reserved 25
wwwCriticalPathTrainingcom
3 Next select New SQL Server stand-alone installation or add features to an existing installation
4 On the Setup Support Rules page the installer will check for issues before installing Click OK
5 On the Product Key page click the Specify a free edition radio box and select Evaluation then click Next
6 On the License Terms page click the I accept the license terms checkbox and click Next
7 On the Setup Support Rules page the installer will check for any problems with the server you are installing on Click Next when this completes
Creating a SharePoint Server 2013 Environment for Development and Testing Version 10
copy Critical Path Training 2012 All Rights Reserved 26
wwwCriticalPathTrainingcom
8 On the Support Role page select SQL Server Feature Installation and click Next
9 On the Feature Selection page check the following options and click Next
a) Instances Features
i) Database Engine Services
(1) Full-Text and Semantic Extractions for Search
b) Shared Features
i) Management Tools ndash Basic
(1) Management Tools ndash Complete
Creating a SharePoint Server 2013 Environment for Development and Testing Version 10
copy Critical Path Training 2012 All Rights Reserved 27
wwwCriticalPathTrainingcom
10 On the Installation Rules page click Next
11 On the Instance Configuration page click Next
12 On the Disk Space Requirements page click Next
13 On the Server Configuration page do the following and click Next
a) On the Service Account tab change the Startup Type for the SQL Server Agent to Automatic
14 On the Database Engine Configuration page do the following and click Next
a) On the Server Configuration tab click Add Current User
b) On the FILESTREAM tab
i) Check Enable FILESTREAM for Transact-SQL Access
ii) Check Enable FILESTREAM for file IO access
15 On the Error Reporting page click Next
16 On the Installation Configuration Rules page click Next
17 On the Ready to Install page click Install
Installation of SQL Server 2012 will take some time please be patient
18 When the installation completes the Complete page will be shown Click Close
At this point you have now successfully installed SQL Server 2012
Creating a SharePoint Server 2013 Environment for Development and Testing Version 10
copy Critical Path Training 2012 All Rights Reserved 28
wwwCriticalPathTrainingcom
Exercise 5 Install amp Configure SharePoint Server 2013
In this exercise you will install SharePoint 2013
1 Download the SharePoint Server 2013 to the host computer from here httptechnetmicrosoftcomen-USevalcenterhh973397aspx
2 Mount the SharePoint Server 2013 ISO to the WingtipServer VM
a) On the host computer open the Hyper-V Manager
b) Right-click the VM WingtipServer and select Settings
c) Select DVD Drive in the left-hand panel
The file that Microsoft provides is saved in the IMG format Hyper-V Manager wonrsquot allow you to mount an IMG file so rename it to ISO before mounting it
d) In the right-hand panel select Image File and browse to the ISO file that contains SharePoint Server 2013 and click OK
Create SharePoint Service Accounts amp Grant Rights to SQL Server 2012
In this section you will create the necessary service accounts that will be used by SharePoint in Active Directory and grant them necessary rights in SQL Server 2012
PowerShell Script Alert The creation of users and granting them rights to SQL Server 2012 steps in this section are automated in the Windows PowerShell script CreateSpServiceAccountsps1 found in the files that accompany this setup guide Open the script
and read the header for documentation on how to use it
1 Open the Active Directory Users and Computers Start Administrative Tools Active Directory Users and Computers
2 Expand the tree in the left-hand pane to see the Users OU Select the Users OU
3 Create a new user SP_Farm
a) In the toolbar select Action New User
Creating a SharePoint Server 2013 Environment for Development and Testing Version 10
copy Critical Path Training 2012 All Rights Reserved 29
wwwCriticalPathTrainingcom
b) Set the userrsquos Full Name amp User Login Name to SP_Farm and click Next
c) In the password dialog enter the following and click Next
i) Password (and Confirm Password) Password1
ii) User must change password at next login unchecked
iii) User cannot change password unchecked
iv) Password never expires checked
v) Account is disabled unchecked
Creating a SharePoint Server 2013 Environment for Development and Testing Version 10
copy Critical Path Training 2012 All Rights Reserved 30
wwwCriticalPathTrainingcom
vi) Click Finish
4 Repeat the previous step to create two more accounts
a) SP_Content
b) SP_Services
At this point you have created all the necessary service accounts
Install SharePoint Server 2013 Prerequisites
In this section you will install the SharePoint Server 2013 Prerequisites
1 Ensure you are logged into the WingtipServer VM using the account wingtipadministrator | Password1
2 If the AutoPlay dialog box is open click Run splashhta If it isnrsquot use Windows Explorer to navigate to the DVD drive and execute the splashhta file in the root of the DVD drive
Creating a SharePoint Server 2013 Environment for Development and Testing Version 10
copy Critical Path Training 2012 All Rights Reserved 31
wwwCriticalPathTrainingcom
3 Click the Install Software Prerequisites link
4 In the Microsoft SharePoint 2013 Products Preparation Tool window click Next
5 On the License Terms for Software Products page
a) Check I accept the terms of the License Agreement(s)
b) Click Next
6 The tool will download and install all prerequisites for SharePoint Server 2013 This will take some time It may prompt you to reboot the server If so reboot the server and login using wingtipadministrator | Password1
Creating a SharePoint Server 2013 Environment for Development and Testing Version 10
copy Critical Path Training 2012 All Rights Reserved 32
wwwCriticalPathTrainingcom
7 When the prerequisite installer is complete it will present a summary of everything it did
8 Click Finish
9 Restart the WingtipServer VMhellip some additional installations and changes that the prerequisite installer did will require a restart before installing SharePoint Server 2013
At this point all prerequisites required by SharePoint Server 2013 have been installed and any necessary configuration changes have been applied to the server However it is strongly recommend that you run Windows Update and install any pending updates Further Microsoft recommends installing the following hotfixes if they are not already installed
KB2554876 The SharePoint Parsing Process Crashes in Windows Server 2008 R2
KB2708075 IIS 75 Configurations are not Updated when you use the ServerManager Class to Commit Configuration Changes
KB2759112 Hotfix is Available for NET Framework 45 that Resolves an ASPNET Race Condition Issue in Windows Server 2008 R2 Windows Server 2008 R2 SP1
KB2765317 Hotfix is Available for NET Framework 45 that Resolves an ASPNET Race Condition Issue in Windows
8 Windows RT and Windows Server 2012
Install SharePoint Server 2013
In this section you will install SharePoint Server 2013
1 Ensure you are logged into the WingtipServer VM using the account wingtipadministrator | Password1
2 If the AutoPlay dialog box is open click Run splashhta If it isnrsquot use Windows Explorer to navigate to the DVD drive and execute the splashhta file in the root of the DVD drive
Creating a SharePoint Server 2013 Environment for Development and Testing Version 10
copy Critical Path Training 2012 All Rights Reserved 33
wwwCriticalPathTrainingcom
3 Click Install SharePoint Server
4 When prompted to Enter your Product Key enter the key you obtained for the trial install and click Continue
5 On the Read the Microsoft Software License Terms page check the I accept the terms of this agreement checkbox and click Continue
6 On the Choose a file location page click Install Now
Creating a SharePoint Server 2013 Environment for Development and Testing Version 10
copy Critical Path Training 2012 All Rights Reserved 34
wwwCriticalPathTrainingcom
7 When the installation is complete select the Run the SharePoint Products Configuration Wizard checkbox and click Close
8 On the Welcome to SharePoint Products page click Next
a) If prompted to start or reset services click Yes
9 On the Connect to a server farm page select Create a new server farm and click Next
10 On the Specify Configuration Database Settings page use the following to complete the page and click Next
a) Database server WINGTIPSERVER
b) Database name SharePoint_Config
c) Username WINGTIPSP_Farm
d) Password Password1
Creating a SharePoint Server 2013 Environment for Development and Testing Version 10
copy Critical Path Training 2012 All Rights Reserved 35
wwwCriticalPathTrainingcom
11 On the Specify Farm Security Settings page for the Passphrase and Confirm Passphrase boxes enter Password1 and click Next
12 On the Configure SharePoint Central Administration Web Application page check the Specify port number checkbox and enter a value of 9999 then Click Next
Creating a SharePoint Server 2013 Environment for Development and Testing Version 10
copy Critical Path Training 2012 All Rights Reserved 36
wwwCriticalPathTrainingcom
13 On the Completing the SharePoint Products Configuration Wizard page click Next
14 When the installer completes it will display the Confirmation Successful page
15 Click Finish This will launch Internet Explorer to go through the configuration process
Creating a SharePoint Server 2013 Environment for Development and Testing Version 10
copy Critical Path Training 2012 All Rights Reserved 37
wwwCriticalPathTrainingcom
At this point you have successfully installed SharePoint Server 2013
Configure SharePoint Server 2013
In this section you will create a new SharePoint Server 2013 farm and perform minimal configuration tasks
After installing SharePoint Sever 2013 the SharePoint Products Configuration Wizard will launch the browser-based Initial Farm Configuration Wizard
1 In the first page of the wizard you are prompted to Help Make SharePoint Better Select which ever option you want and click OK
2 On the Welcome page that asks How do you want to configure your SharePoint farm click the Start the Wizard button
3 On the Services page do the following and then click Next
a) Service Account Select Create new managed account
i) Username WINGTIPSP_Services
ii) Password Password1
b) Services Uncheck the following services
Creating a SharePoint Server 2013 Environment for Development and Testing Version 10
copy Critical Path Training 2012 All Rights Reserved 38
wwwCriticalPathTrainingcom
i) Access Services 2010
ii) App Management Service
In SharePoint Server 2013 the Search Service Application processes specifically noderunnerexe can consume a considerable amount of memory and processor time If you are not going to work with search you might consider unchecking this option for now You can always go back into Central Administration and create a new instance of the Search Service Application at a later date if you need it
Why did we remove Access Services 2010 amp App Management Service service applications The Access Services 2010 service application is included for backwards compatibility and isnrsquot needed in new installations unless you are migrating solutions built with Access Services 2010 from SharePoint Server 2010 (if so you can create this service application later within Central Administration Application Management Manage Service Applications) The App Management Service service application will be created in a later step in this setup guide therefor it is skipped here
4 The creation of the service applications can take quite a while so be patient If it exceeds 20 minutes it is fairly safe to assume the page is hung up One option is to close the browser then launch Central Administration (Start All Programs Microsoft SharePoint 2013 Products SharePoint 2013 Central Administration) and look at the Service Application page (Application Management Manage Service Applications) to see if they were all created
Configure DNS
In this section you will configure DNS for hosting SharePoint sites amp Apps
1 Ensure you are logged into the WingtipServer VM using the account wingtipadministrator | Password1
2 Open the DNS window Start Administrative Tools DNS
3 Expand the hierarchy on the left-hand side of the window until you get to DNS WINGTIPSERVER Forward Lookup Zones wingtipcom
4 Create a new wildcard so all requests for http[]wingtipcom will be forwarded to our SharePoint machine
a) Next right-click wingtipcom and select New Host (A or AAAA)
Creating a SharePoint Server 2013 Environment for Development and Testing Version 10
copy Critical Path Training 2012 All Rights Reserved 39
wwwCriticalPathTrainingcom
b) In the New Host dialog enter the following and click OK
i) Alias Name
ii) IP Address 192168150102 Then click Add Host The following figure shows how this looks
This new record is telling DNS to forward any request for http[]wingtipcom to the webserver WINGTIPSERVER where the
requests will be served by SharePoint
5 Verify this DNS entry is working
a) Open Windows PowerShell Start All Programs Accessories Windows PowerShell Windows PowerShell
b) Run the following commands and press ENTER
PS CUsersAdministratorgt nslookup somethingwingtipcom PS CUsersAdministratorgt nslookup somethingappswingtipcom
c) You should get a response that points to the WingtipServer server as shown in the following figure
Creating a SharePoint Server 2013 Environment for Development and Testing Version 10
copy Critical Path Training 2012 All Rights Reserved 40
wwwCriticalPathTrainingcom
Configure SharePoint Server 2013 for Host-Named Site Collections amp Create Initial Site
Collections
In this section you will create new SharePoint 2013 site collections for testing and hosting apps
Microsoft recommends to create host-named site collections (HNSC) instead of using the path based site collection addressing The difference is the following a path based site created at something such as httpintranetwingtipcomsitesdevtest as an HNSC site would be more like httpdevtestwingtipcom This is how it works in the cloud (Office 365) and it scales much better for on-prem
deployments This setup guide will show you how to setup your environment to create HNSC The only downside to this approach is that you canrsquot create site collections within Central Administration it must be done via Windows PowerShell API (because Central Administration doesnrsquot instruct you where to put the site
This is implemented in various parts First DNS must be configured to send all requests for httpwingtipcom to a Web Application
(implemented in the last section) Second this Web Application must be extended with SharePoint and have no host header bindings (so it handles all requests) Third it must have a default site collection at the root of the Web Application but it will not be used for anything (in fact it doesnrsquot need a template assigned to it)
You can read more about HNSCrsquos on TechNet httptechnetmicrosoftcomen-uslibrarycc424952aspx
PowerShell Script Alert The steps in this section are automated in the script SetupSharePointForHNSCps1 found in the files that
accompany this setup guide Open the script and read the header for documentation on how to use it
1 Ensure you are logged into the WingtipServer VM using the account wingtipadministrator | Password1
2 Open Central Administration Start All Programs Microsoft SharePoint 2013 Products SharePoint 2013 Central Administration
3 Select Application Management Manage Web Applications
4 Delete the default Web Application created by the configuration wizard
a) Delete the existing default Web Application
i) Select the Web Application SharePoint ndash 80 the one with the URL of httpwingtipserver and click Delete in the ribbon
ii) When prompted to delete the associated IIS Web Site amp SQL Server database select both options to delete them and click OK
The reason you are doing this is because the setup wizard you ran previously when creating the service applications automatically created it The problem is that it used the same identity (WINGTIPSP_Services) for the app pool that is used for all the service
applications which is not desired
5 Create a new Web Application to handle Host-Named Site Collections (HNSC)
Creating a SharePoint Server 2013 Environment for Development and Testing Version 10
copy Critical Path Training 2012 All Rights Reserved 41
wwwCriticalPathTrainingcom
a) In the ribbon click the New button
b) In the Create New Web Application dialog enter the following values in the properties and click OK Leave all properties not mentioned
i) Select the radio button Create a new IIS web site
(1) Name SharePoint HNSC Host ndash 80
(2) Port 80
ii) Application Pool
(1) Select the radio button Create a new application pool
(a) Application Pool Name SharePoint Default HNSC AppPool
(b) Select a security account for this application pool WINGTIPSP_Content
If WINGTIPSP_Content is not listed as an available managed account create it by selecting the appropriate option and using
Password1 for the password
iii) Database Name and Authentication
(1) Database Name WSS_Content_HNSCDefaultHost
c) This process will take a few moments At the end of the process SharePoint will ask if you want to create a site collection You do but you donrsquot want to do it through the browser as this will not be a HNSC To create a HNSC you must create it via Windows PowerShell
6 Create a default not template site collection at the root of the web application
a) Open SharePoint 2013 Management Shell Start All Programs Microsoft SharePoint 2013 Products SharePoint 2013 Management Shell
7 Create Site Collections for Testing SharePoint amp SharePoint Apps
a) Open SharePoint 2013 Management Shell Start All Programs Microsoft SharePoint 2013 Products SharePoint 2013 Management Shell
b) Get a reference to the HNSC web application you just created by running the following Windows PowerShell script in the SharePoint 2013 Management Shell
$hnscWebApp = Get-SPWebApplication | Where-Object $_DisplayName -eq SharePoint HNSC Host - 80
c) Create a non-templated site at the root of the web application for Workflow to connect to by executing the following Windows PowerShell script in the SharePoint 2013 Management Shell
New-SPSite -Name Root HNSC Site Collection -Url httpwingtipcom -HostHeaderWebApplication $hnscWebApp -OwnerAlias WINGTIPAdministrator
d) Create a team site by executing the following Windows PowerShell script in the SharePoint 2013 Management Shell
New-SPSite -Name Wingtip Intranet -Url httpintranetwingtipcom ndashHostHeaderWebApplication $hnscWebApp -Template STS0 -OwnerAlias WINGTIPAdministrator
e) Create a developer site by executing the following Windows PowerShell script in the SharePoint 2013 Management Shell
New-SPSite -Name Wingtip Developer Site -Url httpdevwingtipcom ndashHostHeaderWebApplication $hnscWebApp -Template DEV0 -OwnerAlias WINGTIPAdministrator
You can only create debug and test apps using a developer site
At this point you now have a site collection to use as a team site (httpintranetwingtipcom) and to develop and test custom SharePoint apps (httpdevwingtipcom)
Creating a SharePoint Server 2013 Environment for Development and Testing Version 10
copy Critical Path Training 2012 All Rights Reserved 42
wwwCriticalPathTrainingcom
Configure SharePoint 2013 for Hosting Apps
In this setup you will setup your SharePoint 2013 environment for hosting apps
PowerShell Script Alert Everything in the next immediate step is provided in the script ConfigureSpFarmForAppsps1 found in the
files that accompany this setup guide Open the script and read the header for documentation on how to use it
1 Ensure you are logged into the WingtipServer VM using the account wingtipadministrator | Password1
2 Create the necessary SharePoint App Management service applications and start the necessary services via Windows PowerShell
a) Open SharePoint 2013 Management Shell Start All Programs Microsoft SharePoint 2013 Products SharePoint 2013 Management Shell
b) Execute the following Windows PowerShell script in the SharePoint 2013 Management Shell
$appHostDomain = appswingtipcom $adminService = Get-Service -Name spadminv4 if ($adminServiceStatus -ne Running) Start-Service $adminService $timerService = Get-Service -Name sptimerv4 if ($timerServiceStatus -ne Running) Start-Service $timerService Set-SPAppDomain $appHostDomain $appMgmtSvcInstance = Get-SPServiceInstance | Where-Object $_GetType()Name -eq AppManagementServiceInstance if ($appMgmtSvcInstanceStatus -ne Online) Start-SPServiceInstance -Identity $appMgmtSvcInstance $appSubSettingSvcInstance = Get-SPServiceInstance | Where-Object $_GetType()Name -eq SPSubscriptionSettingsServiceInstance if ($appSubSettingSvcInstanceStatus -ne Online) Start-SPServiceInstance -Identity $appSubSettingSvcInstance $appPoolServiceApps = Get-SPServiceApplicationPool -Identity SharePoint Web Services Default $appSubSvc = New-SPSubscriptionSettingsServiceApplication ndashApplicationPool $appPoolServiceApps ndashName Settings Service Application ndashDatabaseName SettingsServiceDB $proxySubSvc = New-SPSubscriptionSettingsServiceApplicationProxy ndashServiceApplication $appSubSvc $appAppSvc = New-SPAppManagementServiceApplication -ApplicationPool $appPoolServiceApps -Name App Management Service Application -DatabaseName AppServiceDB $proxyAppSvc = New-SPAppManagementServiceApplicationProxy -ServiceApplication $appAppSvc Set-SPAppSiteSubscriptionName -Name app -Confirm$false
3 Verify the script configured SharePoint 2013 for hosting apps
a) Open Central Administration Start All Programs Microsoft SharePoint 2013 Products SharePoint 2013 Central Administration
b) Verify service applications created
i) Open the Service Applications page Application Management Manage Service Applications
ii) Verify you have two service applications created
(1) App Management Service Application
(2) Settings Service Application
c) Verify service instances are running
i) Open the Services on Server page System Settings Manage Services on Server
ii) Verify the following services are Started
(1) App Management Service
(2) Microsoft SharePoint Foundation Subscription Settings Service
Creating a SharePoint Server 2013 Environment for Development and Testing Version 10
copy Critical Path Training 2012 All Rights Reserved 43
wwwCriticalPathTrainingcom
d) Verify App URLs are correct
i) Open the Configure App URLs page Apps Configure app URLs
ii) Verify the following
(1) App Domain appswingtipcom
(2) App Prefix app
At this point your SharePoint Server 2013 environment is ready to host SharePoint apps
Creating a SharePoint Server 2013 Environment for Development and Testing Version 10
copy Critical Path Training 2012 All Rights Reserved 44
wwwCriticalPathTrainingcom
Start the SharePoint 2013 Sandbox Service
By default the service that executes sandbox solutions is not running In this step you will start the service
1 Open Central Administration Start All Programs Microsoft SharePoint 2013 Products SharePoint 2013 Central Administration
2 Open the Services on Server page System Settings Manage Services on Server
3 Click the Start link to the left of the Microsoft SharePoint Foundation Sandboxed Code Service
At this point your installation can support sandbox solutions
Configure CRL Verification for Disconnected Environments
SharePoint periodically ldquophones homerdquo to a specific address hosted by Microsoft under certain conditions When your environment is disconnected this can cause an unnecessary delay or failures when starting up the sandbox The following steps outline a workaround to bypass this check
1 Launch Notepad as an administrator Start All Programs Accessories right-click Notepad and select Run as Administrator
2 Open the hosts file by selecting File Open and finding the file
cWindowsSystem32Driversetchosts
3 Add the following line to the end of the file
127001 crlmicrosoftcom
4 Save and close the hosts file
Update Internet Explorer to Bypass the App URL amp Automatically Login to SharePoint Sites
In this section you will update Internet Explorer to add the App hosting URL to the bypass list so you can navigate to the domain after deploying SharePoint hosted apps
1 Ensure you are logged into the WingtipServer VM using the account wingtipadministrator | Password1
1 Launch Internet Explorer Start All Programs Internet Explorer
2 Configure Internet Explorer to bypass the App URL
a) In the top-right corner click the gear icon and select Internet Options
b) On the Security tab select the Local Intranet and click the Sites button
c) Uncheck the box next to Automatically detect intranet network
d) Click the Advanced button and add two entries to the Exceptions list
i) httpwingtipcom
ii) httpappswingtipcom
Creating a SharePoint Server 2013 Environment for Development and Testing Version 10
copy Critical Path Training 2012 All Rights Reserved 45
wwwCriticalPathTrainingcom
e) Click the Close button followed by the OK button multiple times to close out of the dialogs
At this point Internet Explorer is setup to bypass your app URL so you can navigate to apps (httpappswingtipcom) as well as automatically authenticate to sites hosted at httpwingtipcom
Exercise 6 Configure SharePoint to Host My Sites
In this exercise you will configure SharePoint to create and host My Sites In order to host My Sites you will need a new Web Application that is configured for Self-Service Site Creation and has a My Site Host site collection
1 Create a new SharePoint web application to host the My Sites
a) Ensure you are logged into the WingtipServer VM using the account wingtipadministrator | Password1
b) Open Central Administration Start All Programs Microsoft SharePoint 2013 Products SharePoint 2013 Central Administration
c) Select Application Management Manage Web Applications
d) In the ribbon click the New button
e) In the Create New Web Application dialog enter the following values in the properties and click OK Leave all properties not mentioned
i) Select the radio button Create a new IIS web site
(1) Name SharePoint MySite Host ndash 80
(2) Port 80
(3) Host Header mywingtipcom
ii) Application Pool
(1) Select the radio button Use existing application pool
(a) Application Pool Name SharePoint Default HNSC AppPool
iii) Database Name and Authentication
(1) Database Name WSS_Content_SocialWingtipCom
f) This process will take a few moments At the end of the process SharePoint will ask if you want to create a site collection Click the link provided to create a new site collection amp continue to the next step
2 Create a My Site Host site collection
a) On the Create Site Collection page use the following information to complete the form and click OK
Creating a SharePoint Server 2013 Environment for Development and Testing Version 10
copy Critical Path Training 2012 All Rights Reserved 46
wwwCriticalPathTrainingcom
i) Title My Site Host
ii) URL
iii) Template Selection My Site Host (found under the Enterprise tab)
iv) Primary Site Collection Administrator WINGTIPAdministrator
3 Update the Web Application to host my sites
a) Within Central Administration in the left-hand navigation navigate to the Manage Web Applications page Application Management Manage Web Applications
b) Select the SharePoint MySite Host ndash 80 web application
c) Click the Managed Paths button in the ribbon
d) Remove the sites managed path and add two new managed paths and click OK
i) personal ndash Wildcard inclusion
ii) my ndash Explicit inclusion
e) With the SharePoint MySite Host ndash 80 web application still selected click the Self-Service Site Creation button
f) On the Self-Service Site Creation page use the following values to complete the form and click OK
i) Site Collections On
4 Next configure the User Profile Service Application My Site settings
a) Browse to the User Profile Service Application management page Application Management Manage Service Applications User Profile Service Application
b) Under the My Site Settings section click the Setup My Sites
c) On the My Site Settings page use the following information to complete the form and click OK
i) My Site Host httpmywingtipcom
ii) Personal Site Location personal
At this point your SharePoint deployment is now configured to automatically create My Sites under httpmywingtipcomPersonalUserName when users first browse to them
Exercise 7 Install amp Configure Workflow Manager 10
In this exercise you will configure the WingtipServer VM to host Workflow Manager 10 and connect it to your SharePoint installation
1 Ensure you are logged into the WingtipServer VM using the account wingtipadministrator | Password1
Verify SQL Server 2012 Network Configuration
In this section yoursquoll verify the network configuration is correct for SQL Server 2012 in order to install Workflow Manager 10
Creating a SharePoint Server 2013 Environment for Development and Testing Version 10
copy Critical Path Training 2012 All Rights Reserved 47
wwwCriticalPathTrainingcom
1 Configure SQL Server 2012 to have the TCPIP connection protocol enabled
a) Open the SQL Server Configuration Manager Start All Programs Microsoft SQL Server 2012 Configuration Tools SQL Server Configuration Manager
b) Expand the hierarchy on the left-hand side to the following SQL Server Connection Manager (local) SQL Server Network Configuration Protocols for MSSQLSERVER
c) In the main window if TCPIP is Disabled right-click TCPIP and select Enable
d) When prompted with a warning click OK
2 SQL Server must be restarted in order to reflect this change
a) In the hierarchy on the left-hand side of the window select SQL Server Services
b) Right-click SQL Server (MSSQLSERVER) and select Restart
At this point SQL Server is now configured with the TCPIP protocol enabled a requirement when configuring Service Bus
Configure the Workflow Service Account with the Necessary Rights
In this section you will verify the service account that will run Workflow Manager and Service Bus
1 Ensure you are logged into the WingtipServer VM using the account WINGTIPadministrator | Password1
2 Grant the WINGTIPSP_Content account securityadmin amp dbcreator permissions in SQL Server
a) Launch SQL Server Management Studio Start All Programs Microsoft SQL Server 2012 SQL Server Management Studio
b) When SQL Server Management Studio launches within the Connect to Server dialog login using the default settings and click Connect
c) In the Object Explorer tool window expand the WINGTIPSERVER server hierarchy to the Security Logins node
d) Find the WINGTIPSP_Content account right-click it and select Properties
Creating a SharePoint Server 2013 Environment for Development and Testing Version 10
copy Critical Path Training 2012 All Rights Reserved 48
wwwCriticalPathTrainingcom
e) In the Select a page pane select Server Roles
f) Check securityadmin amp dbcreator and click OK
g) Close SQL Server Management Studio
3 Add the Workflow service account to the local administrators group
a) Open the Active Directory Users and Computers window Start Administrative Tools Active Directory Users and Computers
b) In the hierarchy on the left-hand side of the window expand it to the following Active Directory Users and Computers wingtipcom Builtin
c) In the main window right-click Administrators and select Properties
d) In the Administrators Properties dialog select the Members tab and click Add
e) In the Enter the object names to select box enter wingtipsp_content and click the Check Names button
f) In the Administrators Properties dialog click OK
g) Close the Active Directory Users and Computers window
At this point the service account that will host Workflow Manager and Service Bus has been configured correctly
Creating a SharePoint Server 2013 Environment for Development and Testing Version 10
copy Critical Path Training 2012 All Rights Reserved 49
wwwCriticalPathTrainingcom
Download amp Install Workflow Manager and Service Bus
In this section you will install Workflow Manager and Service Bus
1 Ensure you are logged into the WingtipServer VM using the account WINGTIPSP_Content | Password1
It is important you are logged in as the user that will run workflow when you install amp configure Workflow Manager and Service Bus
2 Launch the Web Platform Installer Start All Programs Microsoft Web Platform Installer
a) If the Web Platform Installer is not present on your machine you can download amp install it from here httpwwwmicrosoftcomwebdownloadsplatformaspx
If you do not have internet access within the virtual machine it is possible to download everything needed for workflow using the command line version of the Web Platform Installer (WebPICMD) You can get WebPICMD from httplearniisnetpageaspx1072web-platform-installer-v4-command-line-webpicmdexe-preview-release Specifically for
workflow enter the following command to download Workflow Beta 1 and all prerequisites
webpicmd offline ProductsWorkflow Pathc[path]
3 When the Web Platform Installer loads execute a search for Workflow select Workflow Manager 10 and click Add
4 Click the Install button at the bottom of the Web Platform Installer 40 window
5 On the Prerequisites page click I Accept
Note The Web Platform Installer 40 may prompt you to keep certain products updated using Microsoft Update If it does select Use Microsoft Update when I check for updates (recommended) and click Continue
6 When the installer completes the following dialog will appear Click Continue and then Finish to start the configuration process
Creating a SharePoint Server 2013 Environment for Development and Testing Version 10
copy Critical Path Training 2012 All Rights Reserved 50
wwwCriticalPathTrainingcom
At this point Workflow Manager amp Service Bus are installed
Configure Workflow Manager and Service Bus
In this section you will install Workflow Manager and Service Bus
1 If the Workflow Manager Configuration Wizard is not open open it Start All Programs Workflow Manager 10 Workflow Configuration
2 On the Welcome page click Configure Workflow Manager with Default Settings (Recommended)
Creating a SharePoint Server 2013 Environment for Development and Testing Version 10
copy Critical Path Training 2012 All Rights Reserved 51
wwwCriticalPathTrainingcom
3 On the New Farm Configuration page do the following
a) In the section Configure Service Account set the credentials to
i) User ID sp_contentwingtipcom
ii) Password Password1
b) Check the Allow Workflow management over HTTP on this computer checkbox
Ensure the username is entered in the fully qualified UPN format not as the default shows in the installer (sp_contentwingtip) or the domainusername format
In a production environment you should be doing everything over SSL
c) Click the Test Connection button to verify the connection credentials before proceeding
Creating a SharePoint Server 2013 Environment for Development and Testing Version 10
copy Critical Path Training 2012 All Rights Reserved 52
wwwCriticalPathTrainingcom
d) In the Certificate Generation Key and Confirm Certificate Generation Key enter Password1 into both fields
4 Click the right arrow in the bottom right corner to proceed
5 On the Summary page review your settings and click the check at the bottom right of the widow to start the configuration process
Creating a SharePoint Server 2013 Environment for Development and Testing Version 10
copy Critical Path Training 2012 All Rights Reserved 53
wwwCriticalPathTrainingcom
6 After a few minutes the Configuration Progress screen will show that everything has been configured correctly
Creating a SharePoint Server 2013 Environment for Development and Testing Version 10
copy Critical Path Training 2012 All Rights Reserved 54
wwwCriticalPathTrainingcom
7 Click the check in the bottom right corner
At this point Workflow Manager amp Service Bus has been installed and a new Workflow Manager farm has been created The next step is to connect the SharePoint 2013 farm to the Workflow Manager farm
Connect SharePoint 2013 to Workflow Manager
In this section you will connect SharePoint 2013 and Workflow Manager together
1 Ensure you are logged into the WingtipServer VM using the account WINGTIPadministrator | Password1
2 Get the Workflow Manager endpoint
a) Open the Workflow Manager PowerShell console Start All Programs Workflow Manager 10
b) Execute the Windows PowerShell following cmdlet
Get-WFFarm | ft HttpPort
c) Take note of this port (12291) This port number is what you will use to connect the SharePoint 2013 farm to the Workflow Manager 10 farm
In production you should connect to the HTTPS port listed in the HttpsPort property when you run Get-WFFarm
d) Close the Workflow Manager PowerShell window
3 Connect the SharePoint 2013 farm to Workflow Manager
Creating a SharePoint Server 2013 Environment for Development and Testing Version 10
copy Critical Path Training 2012 All Rights Reserved 55
wwwCriticalPathTrainingcom
a) Open SharePoint 2013 Management Shell Start All Programs Microsoft SharePoint 2013 Products SharePoint 2013 Management Shell
b) Execute the following Windows PowerShell script in the SharePoint 2013 Management Shell
Register-SPWorkflowService ndashSPSite httpintranetwingtipcom ndashWorkflowHostUri httpwingtipserver12291 ndashAllowOAuthHttp
This script is telling SharePoint the endpoint it should use to talk to Workflow Manager as well as Workflow Manager the SharePoint site collection it should talk to for calls into the CSOM It is also configuring all communication over HTTP rather than HTTPS for performance reasons In production you should always use HTTPS
This step will take a moment with no feedback during the process Be patient
c) Close the SharePoint 2013 Management Shell
At this point the SharePoint 2013 farm is connected to the Workflow Manager 10 farm
Configure SharePoint User Profile Service Application AD Sync
Users in SharePoint 2013 are validated by Workflow Manager against SharePoint to ensure they have permissions to start a workflow This is done by looking up the user by their AD UserPrincipalName (UPN) attribute in the User Profile Service Application (UPA) If no matching user is found the workflow will be automatically cancelled by Workflow Manager In this section you will setup UPA to connect amp sync with the local Active Directory so user accounts in AD will have their UPN synchronized to UPA
1 Open Central Administration Start All Programs Microsoft SharePoint 2013 Products SharePoint 2013 Central Administration
2 Go to the User Profile Service Application management page Application Management Manage Service Applications User Profile Service Application
3 The first step is to configure the User Profile Service Application to allow for Active Directory (AD) synchronization
a) Under Synchronization select Configure Synchronization Settings
b) For Synchronization select Use SharePoint Active Directory Import and click OK
4 Next establish a connection to the wingtipcom AD
a) Under Synchronization select Configure Synchronization Connections
b) On the Synchronization Connections page select Create New Connection
c) Enter the following values on this form and click OK
i) Connection Name WINGTIPCOM AD
ii) Type Active Directory Import
iii) Connection Settings
(1) Fully Qualified Domain Name wingtipcom
(2) Authentication Provider Type Windows Authentication
(3) Account Name WINGTIPAdministrator
(4) Password (and Confirm Password) Password1
iv) Containers
(1) Click Populate Containers
(2) After it loads check the box next to WINGTP or click the Select All button below the box
5 Go back to the User Profile Service Application management page Application Management Manage Service Applications User Profile Service Application
6 Finally start a synchronization import
a) Under Synchronization select Start Profile Synchronization
Creating a SharePoint Server 2013 Environment for Development and Testing Version 10
copy Critical Path Training 2012 All Rights Reserved 56
wwwCriticalPathTrainingcom
b) Select Start Full Synchronization and click OK
c) You will be taken back to the User Profile Service Application management page Notice in the top-right corner there is a status block that reports how many profiles are in the UPA database Refresh the page to see it increase to a handful of profiles as the import process runs
At this point you have successfully configured the User Profile Service Application to import profiles from the local AD
Exercise 8 Install the Microsoft Office 2013 Professional Clients
In this exercise you will install the Microsoft Office 2013 client applications
1 Download the Office 2013 into the WingtipServer VM For this you need to create an Office 365 Trial account login to Office 365 go to the Admin Dashboard and then download the latest version httpwwwmicrosoftcomofficepreviewentry-office-preview
2 Download the SharePoint Designer 2013 into the WingtipServer VM from here httpwwwmicrosoftcomen-usdownloaddetailsaspxid=35491
3 Download the Visio Professional 2013 into the WingtipServer VM from here httptechnetmicrosoftcomen-usevalcenterhh973399
Install Microsoft Office Professional Plus 2013
In this section you will install the Microsoft Office 2013 clients
1 Ensure you are logged into the WingtipServer VM using the account WINGTIPadministrator | Password1
2 Execute the installer OfficeProfessionalPlus_English_x64exe
3 On the Read the Microsoft Software License Terms dialog click the checkbox next to I accept the terms of this agreement and click Continue
4 On the Choose the installation you want dialog click the Install Now button
5 The installer will proceed and install all the Office products
6 When the installer completes click the Close button
7 Apply your Office Professional Plus 2013 license key
a) Launch Word 2013 Start All Programs Microsoft Office 2013 Word 2013
b) In the First things first dialog select Use recommended settings and click Accept
c) In the Welcome to Office dialog that opens click the [X] icon in the top-right corner to close it
d) In the left-hand pane click Open Other Documents
e) In the left-hand pane click Account
f) In the Product Information section within the Activation Required box click Change Product Key
g) Enter your license key for Office Professional Plus 2013 check the box next to Attempt to automatically activate my product online and click Install
h) Click OK
At this point you have installed Office Professional Plus 2013
Install Microsoft Office Visio 2013
In this section you will install Microsoft Office 2013 Visio
1 Ensure you are logged into the WingtipServer VM using the account WINGTIPadministrator | Password1
2 Execute the installer VisioProfessional_English_x64exe
3 On the Read the Microsoft Software License Terms dialog click the checkbox next to I accept the terms of this agreement and click Continue
Creating a SharePoint Server 2013 Environment for Development and Testing Version 10
copy Critical Path Training 2012 All Rights Reserved 57
wwwCriticalPathTrainingcom
4 On the Choose the installation you want dialog click the Install Now button
5 The installer will proceed and install all Visio 2013
6 When the installer completes click the Close button
7 Apply your Visio 2013 license key
a) Launch Visio 2013 Start All Programs Microsoft Office 2013 Visio 2013
b) In the First things first dialog select Use recommended settings and click Accept
c) In the Welcome to Office dialog that opens click the X icon in the top-right corner to close it
d) In the left-hand pane click Open Other Documents
e) In the left-hand pane click Account
f) In the Product Information section within the Activation Required box click Change Product Key
g) Enter your license key for Visio 2013 check the box next to Attempt to automatically activate my product online and click Install
h) Click OK
At this point you have installed Visio 2013
Install Microsoft Office 2013 SharePoint Designer
In this section you will install Microsoft Office 2013 SharePoint Designer
1 Ensure you are logged into the WingtipServer VM using the account WINGTIPadministrator | Password1
2 Execute the installer SharePointDesigner_English_x64exe
3 On the Read the Microsoft Software License Terms dialog click the checkbox next to I accept the terms of this agreement and click Continue
4 On the Choose the installation you want dialog click the Install Now button
5 The installer will proceed and install all SharePoint Designer 2013
6 When the installer completes click the Close button
At this point you have installed SharePoint Designer 2013
Exercise 9 Install Visual Studio 2012
In this exercise you will install Visual Studio 2012
1 Ensure you are logged into the WingtipServer VM using the account WINGTIPadministrator | Password1
2 Start the install of Visual Studio 2012 Ultimate Trial by downloading the installer from here httpwwwmicrosoftcomvisualstudio11en-usdownloads
3 On the installation splash screen check the box next to I agree to the License terms and conditions and click the Next button
Creating a SharePoint Server 2013 Environment for Development and Testing Version 10
copy Critical Path Training 2012 All Rights Reserved 58
wwwCriticalPathTrainingcom
4 On the Optional Features to install dialog click Install
5 After some time the installer will complete Click the Launch button to launch Visual Studio 2012
Creating a SharePoint Server 2013 Environment for Development and Testing Version 10
copy Critical Path Training 2012 All Rights Reserved 59
wwwCriticalPathTrainingcom
6 In the Choose Default Environment Settings select Visual C Development Settings and click Start Visual Studio
7 Close Visual Studio 2012
At this point Visual Studio 2012 RTM is installed
Install Office amp SharePoint 2013 Developer Tools
In this section you will install the Office and SharePoint 2013 developer tools for Visual Studio
1 Ensure you are logged into the WingtipServer VM using the account WINGTIPadministrator | Password1
2 Launch the Web Platform Installer Start All Programs Microsoft Web Platform Installer
3 In the search box at the top-right corner of the Web Platform Installer 40 window type sharepoint and press Enter
4 Click the Add button to the right of Microsoft Office Developer Tools for Visual Studio 2012 - Preview 2
5 Click the Install button at the bottom of the Web Platform Installer 40 window
6 On the Prerequisites page click I Accept
Creating a SharePoint Server 2013 Environment for Development and Testing Version 10
copy Critical Path Training 2012 All Rights Reserved 60
wwwCriticalPathTrainingcom
At this point you have installed the SharePoint 2013 amp Office 2013 development tools in Visual Studio 2012
Creating a SharePoint Server 2013 Environment for Development and Testing Version 10
copy Critical Path Training 2012 All Rights Reserved 61
wwwCriticalPathTrainingcom
Appendix 1 Download Manifest
The following lists everything referenced that you will or may need to download in this environment
Windows Server 2008 R2 with Service Pack 1 (installer ISO)
o httptechnetmicrosoftcomen-usevalcenterdd459137aspx
Windows Server 2008 R2 with Service Pack 1 (prebuilt VHD)
o httpwwwmicrosoftcomdownloadsdetailsaspxFamilyId=9040a4be-c3cf-44a5-9052-a70314452305
Windows Server 2008 R2 Service Pack 1
o httpwwwmicrosoftcomen-usdownloaddetailsaspxid=5842
SQL Server 2012 Trial
o httpwwwmicrosoftcombetaexperiencepdSQL2012EvalCTAenusdefaultaspx
SharePoint Server 2013
o httptechnetmicrosoftcomen-USevalcenterhh973397aspx
Hotfixes for SharePoint Server 2013 (post-install)
o KB2554876 The SharePoint Parsing Process Crashes in Windows Server 2008 R2
o KB2708075 IIS 75 Configurations are not Updated when you use the ServerManager Class to Commit
Configuration Changes
o KB2759112 Hotfix is Available for NET Framework 45 that Resolves an ASPNET Race Condition Issue in
Windows Server 2008 R2 Windows Server 2008 R2 SP1
o KB2765317 Hotfix is Available for NET Framework 45 that Resolves an ASPNET Race Condition Issue in
Windows 8 Windows RT and Windows Server 2012
Web Platform Installer
o httpwwwmicrosoftcomwebdownloadsplatformaspx
Web Platform Installer ndash Command Line Version
o httplearniisnetpageaspx1072web-platform-installer-v4-command-line-webpicmdexe-preview-release
Workflow Manager 10
o Download using the Microsoft Web Platform Installer
Office 2013
o httpwwwmicrosoftcomofficepreviewentry-office-preview
SharePoint Designer 2013
o httpwwwmicrosoftcomen-usdownloaddetailsaspxid=35491
Visio Professional 2013
o httptechnetmicrosoftcomen-usevalcenterhh973399
Visual Studio 2012
o httpwwwmicrosoftcomvisualstudio11en-usdownloads
Office Developer Tools for Visual Studio 2012 ndash Preview 2
o Download using the Microsoft Web Platform Installer
Creating a SharePoint Server 2013 Environment for Development and Testing Version 10
copy Critical Path Training 2012 All Rights Reserved 62
wwwCriticalPathTrainingcom
Appendix 2 Windows PowerShell Script Manifest
The following lists all Windows PowerShell scripts that are provided with this setup guide
AddDisableLoopbackCheckRegKeyps1
o The following steps automate creating the registry key outlined as Method 2 in the Microsoft Knowledgebase article
httpsupportmicrosoftcomkb896861 using Windows PowerShell This key DisableLoopbackCheck will allow
you to browse SharePoint sites on the same machine Without this key (or following Method 1 in the KB article) you
would need to browse any SharePoint sites from a different computer than the one which SharePoint is installed on
ConfigureSpFarmForAppsps1
o Configures a SharePoint 2013 for hosting apps This ensures everything you need is installed running and
configured This is documented here httpmsdnmicrosoftcomen-uslibraryfp179923(v=office15)
CreateSpServiceAccountsps1
o Creates the minimal necessary service accounts for SharePoint Server 2013 SP_Farm SP_Content amp
SP_Services
SetupSharePointForHNSCps1
o Configures a SharePoint 2013 install for hosting Host-Named Site Collections (HNSC) This involves creating a Web
Application in SharePoint that has no host header bindings Using DNS all requests are mapped to this Web
Application You then create the site collections via PowerShell as you cant create HNSCs via the browser (Central
Administration)
Creating a SharePoint Server 2013 Environment for Development and Testing Version 10
copy Critical Path Training 2012 All Rights Reserved 63
wwwCriticalPathTrainingcom
Appendix 3 Create Sample Adventure Works Database
The following steps document downloading and installing the sample Adventure Works OLTP database provided by Microsoft
1 Launch Internet Explorer and navigate to httpmsftdbprodsamplescodeplexcom
2 Download the Adventure Works 2012 OLTP Script
3 Extract the ZIP into a folder on the desktop
4 Launch SQL Server Management Studio Start All Programs Microsoft SQL Server 2012 SQL Server Management Studio
5 When SQL Server Management Studio launches within the Connect to Server dialog login using the default settings and click Connect
6 Within SQL Server Management Studio select File Open File
7 Select the file instawdbsql from the extracted ZIP and click Open
8 If prompted to re-login to the database engine do it
9 Select Query SQLCMD Mode
10 Scroll down to line 42 the line that starts with the following
setvar SqlSamplesSourceDataPath
11 Change the folder location of where you unzipped the Adventure Works 2012 OLTP Script
12 Select Query Execute
13 When the script completes the AdventureWorks2012 database will have been created
Creating a SharePoint Server 2013 Environment for Development and Testing Version 10
copy Critical Path Training 2012 All Rights Reserved 64
wwwCriticalPathTrainingcom
Change Log
Change Version Description
August 22 2012 v 01 Pre-release for review
August 27 2012 v 02 Initial public release ndash install guide based on SharePoint Server Beta 2
August 28 2012 v 03 Updated URL for the site collection used to connect SharePoint to WAW
August 31 2012 v 04 Typo Removed SQL Server Analysis Services as part of the install Not required in a
SharePoint dev box (unless you are doing business intelligence which is not covered
in the guide)
Updated all references to Windows Azure Workflow to Workflow Manager the new
official name for the new workflow product
Updated SetupSharePointForHNSCps1 script to lookup HNSC Web Application by
name rather than URL which is more reliable
Typo Updated WingtipAllUp public NIC to use a different IP than the WingtipDC
Typo Replaced a reference to WingtipServer with WingtipDC
Typo Fixed handful of minor typos
September 1 2012 v 05 Removed SQL Server Reporting Services from install guide
Added step to uncheck IErsquos ldquoAutomatically detect proxyrdquo
Added post workflow install steps to setup User Profile Service Application to sync with
local Active Directory
September 5 2012 v 06 Added step to create a default root site collection in the HNSC web app
Updated minor typos and added extra notes for context
Updated PowerShell script SetupSharePointForHNSCps1 to remove content
database of default Web Application when setting up HNSC Web App
Added a new exercise 8 (after SharePoint install amp config and before the Workflow
install and config) to setup support for My Sites
October 20 2012 v 07 Updated script SetupSharePointForHNSCps1 to fix a bug where it would fail on line
111 if you didnrsquot already have a WINGTIPSP_Content managed account
Added section to bypass SharePointrsquos check for crlmicrosoftcom
Updated workflowrsquos registration PowerShell script to point to
httpintranetwingtipcom
Switched order of post-SharePoint install to setup HSNC hosting before configuring for
hosting apps
November 29 2012
v 10 Changed setup guide to use a single VM instead of two VMs
Updated guide for SharePoint 2013 RTM
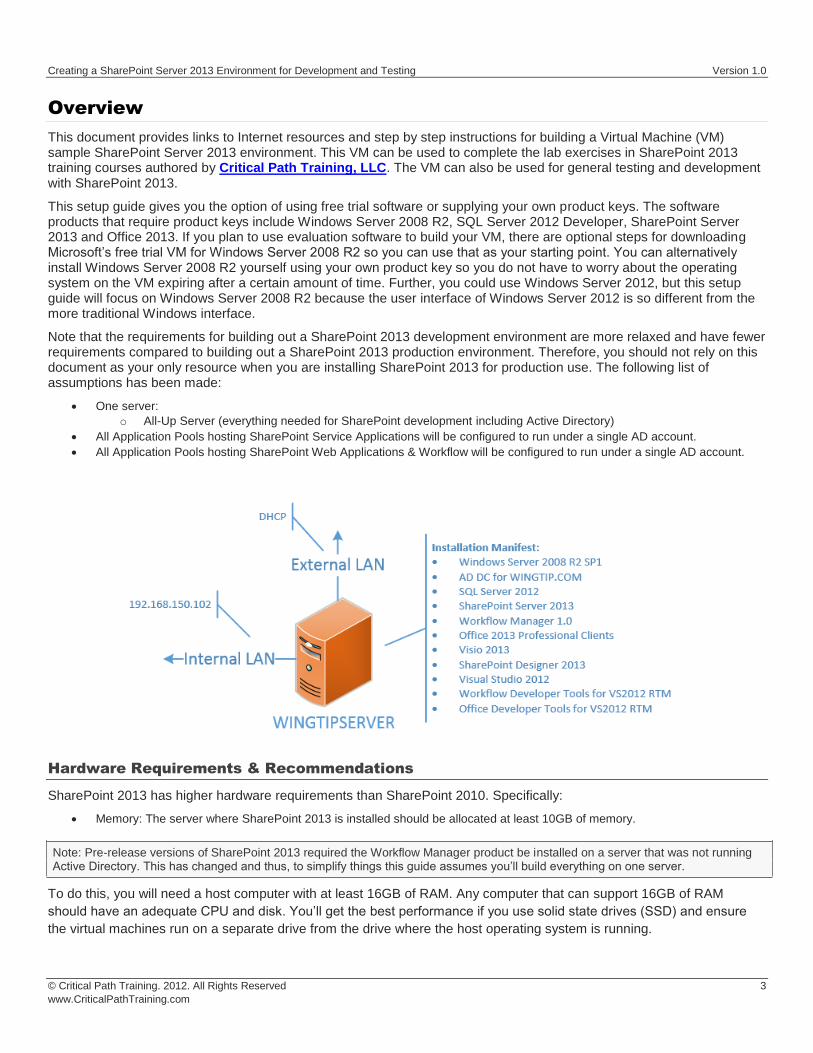
Creating a SharePoint Server 2013 Environment for Development and Testing Version 10
copy Critical Path Training 2012 All Rights Reserved 5
wwwCriticalPathTrainingcom
Creating a SharePoint Server 2013 Environment for Development amp
Testing
Lab Time 2-4 hours
Lab Folder CStudentGettingStartedLab
Lab Overview In this lab you will create a new SharePoint environment to use for testing SharePoint 2013 It covers how to install
and configure the host computer for hosting virtual machines networking them together and installing everything needed If you are not interested in doing development you can omit the last exercise which has you install Visual Studio 2012
Exercise 1 Configure Host Computer Hyper-V amp Networking
In this exercise you will configure your host computerrsquos Hyper-V role for hosting multiple networked virtual machines This involves creating a two virtual networks that will be used to connect the virtual machines together and to connect to the Internet
1 Launch the Hyper-V Manager Start Administrative Tools Hyper-V Manager
2 Create a new virtual network to connect to the Internet
a) In the Actions pane on the right-hand side of the screen click Virtual Network Manager
b) In the Virtual Network Manager dialog create a new virtual network by clicking the Add button (it doesnrsquot matter what you select as the network type) Use the following settings to create the network
i) Name External LAN
ii) Connection Type External (select the network card on the host computer thatrsquos connected to the Internet)
This will be used to connect the VM to the Internet
3 Click OK to save your changes
4 Create a new virtual network the virtual machines will use to communicate with each other
a) In the Actions pane on the right-hand side of the screen click Virtual Network Manager
b) In the Virtual Network Manager dialog create a new virtual network by clicking the Add button (it doesnrsquot matter what you select as the network type) Use the following settings to create the network
i) Name Internal LAN
ii) Connection Type Internal Only
Creating a SharePoint Server 2013 Environment for Development and Testing Version 10
copy Critical Path Training 2012 All Rights Reserved 6
wwwCriticalPathTrainingcom
This will be used to connect the two VMs together so they can talk to each other
5 Click OK to save your changes
When you create a virtual Internal Only network Hyper-V creates a virtual network interface card (NIC) in the list of all NICrsquos installed on the host computer (Start [search] ldquoView Network Connectionsrdquo) If you configure the IP of this card to be on the same network with a different IP address than you use for your machines you will be able to login to these machines using the Remote Desktop Connection app in Windows
A Private Virtual Machine Network the other connection type available is similar to an Internal network except that it does not create
the virtual NIC in the host computer
Exercise 2 Install amp Configure a Windows Server
In this exercise you will create install configure and update a new server to act as the Active Directory domain controller for the SharePoint environment using Windows Server 2008 R2 with Service Pack 1
If you are using a different virtualization product other than Hyper-V or if you are creating physical machines you can skip to the section Install the Windows Server 2008 R2 Operating System
1 If it is not open launch the Hyper-V Manager Start Administrative Tools Hyper-V Manager
2 Inside the left-hand side of the Hyper-V Manager locate the node with the name of the local host computer and select it
Creating a SharePoint Server 2013 Environment for Development and Testing Version 10
copy Critical Path Training 2012 All Rights Reserved 7
wwwCriticalPathTrainingcom
Create a New Virtual Machine
In this section you will create a new virtual machine in Hyper-V
1 In the Actions pane select New Virtual Machine When you execute this menu command the Hyper-V Manager will launch the New Virtual machine Wizard
2 In the Specify Name and location dialog enter a Name of WingtipServer and click Next
3 In the Assign Memory dialog enter the amount of Memory to allocate to the virtual machine in MB to 12288 and click Next
Creating a SharePoint Server 2013 Environment for Development and Testing Version 10
copy Critical Path Training 2012 All Rights Reserved 8
wwwCriticalPathTrainingcom
4 In the Configure Networking dialog use the drop down box to assign a Connection value of Internal LAN and click Next
5 In the Connect Virtual Hard Disk dialog accept the default options to create a virtual hard disk amp click Finish
If possible configure the location so that the VHD file for the VM is created on a separate drive than the host computerrsquos operating system
6 In the Hyper-V Manager window right-click the VM you just created and select Settings
7 In the Settings for WingtipServer dialog select Add Hardware select Network Adapter and click Add
Creating a SharePoint Server 2013 Environment for Development and Testing Version 10
copy Critical Path Training 2012 All Rights Reserved 9
wwwCriticalPathTrainingcom
8 Obtain a copy of the Windows Server 2008 R2 with Service Pack 1 install binaries
The install image (ISO) is available to MSDN or TechNet subscribers or as a trial download available here httptechnetmicrosoftcomen-usevalcenterdd459137aspx
Obviously you can also use your own licensed copy of Windows Server 2008 R2 with Service Pack 1
Microsoft also provides a pre-installed 180-day trial Windows Server 2008 R2 Hyper-V VHD file that you can download (httpwwwmicrosoftcomdownloadsdetailsaspxFamilyId=9040a4be-c3cf-44a5-9052-a70314452305) instead of installing it
yourself If you elect to go this route
Make sure you specify the VHD file you downloaded in the following step for the Hard Drive of the VM
Do not specify a DVD Drive in the following step as you will not be installing anything
If you elect to do this step jump down to section Configure Windows Server 2008 R2
9 In the Settings for WingtipServer dialog update the VM to have the following settings When finished click OK
a) Processor 2 Virtual Processors
b) DVD Drive Image File ndash Map to the Windows Server 2008 R2 ISO installer file
c) Network Adapter Internal LAN
d) Network Adapter Not Connected
10 Start up the WingtipServer VM and install Windows Server 2008 R2
a) In the Hyper-V Manager window right-click the VM you just created and select Settings
b) Right-click on the VM named WingtipServer and select the Connecthellip menu
c) In the Virtual Machine Connection window drop down the Action menu and select Start
Creating a SharePoint Server 2013 Environment for Development and Testing Version 10
copy Critical Path Training 2012 All Rights Reserved 10
wwwCriticalPathTrainingcom
If you elected to use the fully installed trial VHD from Microsoft instead of installing your own server skip to the section Configure Windows Server 2008 R2
Install the Windows Server 2008 R2 Operating System
In this section you will install the operating system
1 After the setup program for Windows Server 2008 R2 loads it will prompt you with a dialog asking you to select a language Accept the default of English and click Install to continue
2 At the next dialog click the Install Now button to begin the installation
Creating a SharePoint Server 2013 Environment for Development and Testing Version 10
copy Critical Path Training 2012 All Rights Reserved 11
wwwCriticalPathTrainingcom
3 The next dialog instructs you to select the operating system you want to install Select the operating system named Windows Server 2008 R2 Enterprise (Full Installation) with the x64 architecture Click Next to continue
4 Agree to the licensing terms and click Next
5 Click on Custom (advanced) to select the type of installation
6 The next dialog asks you where you want to install Windows Accept the default configuration which uses a location of Disk 0 Unallocated Space as shown below Click Next to continue
At this point you have given the Windows setup program enough information to install the basic operating system Setup program will now run for a while as it copies and expands files and installs Windows features You now have a few minutes to get a cup of coffee or catch up on email
7 When the setup program completes it will ask you to assign a new password for the built-in Administrator account Click OK to continue
8 Set the password for Administrator account to Password1
9 When you have updated the Administrator password you will get a confirmation that the update was successful Click OK to complete the installation of the operating system
If you elected to use the pre-installed trial VHD Microsoft offers you will pick up the configuration exercise at this point
Configure Windows Server 2008 R2
In this section you will configure the server
1 When you log in Windows Server automatically displays the Initial Configuration Tasks window Click the check box with the caption Do not show this window at logon and then click the Close button
Creating a SharePoint Server 2013 Environment for Development and Testing Version 10
copy Critical Path Training 2012 All Rights Reserved 12
wwwCriticalPathTrainingcom
2 After you close the Initial Configuration Tasks window Windows Server will display the Server Manager
Creating a SharePoint Server 2013 Environment for Development and Testing Version 10
copy Critical Path Training 2012 All Rights Reserved 13
wwwCriticalPathTrainingcom
3 Configure the Administrator account so that its password does not expire
a) Inside the Configuration node of the Server Manager navigate to Local Users and Groups Users (as shown in the following screenshot) and locate the local Administrator account
b) Right-click on the Administrator account and click Properties
c) In the Administrator Properties dialog unselect the option for User must change password at next logon and select the option for Password never expires Click OK
4 Rename the computer name of the VM
a) In the Server Manager navigate to the top-level node to display the Server Summary page Click Change System Properties
b) On the Computer Name tab of the System Properties dialog click the Change button
c) Enter a new computer name of WingtipServer and click OK
Creating a SharePoint Server 2013 Environment for Development and Testing Version 10
copy Critical Path Training 2012 All Rights Reserved 14
wwwCriticalPathTrainingcom
5 After changing the computer name you will be prompted to restart the VM Choose OK to restart After the VM has restarted log in again using [administrator | Password1] (username | password)
6 Disable Windows Firewall and Enhanced Security Configuration
a) In the Server Manager navigate to the top-level node to display the Server Summary page Inside the Security Information section locate the links for Go to Windows Firewall and Configure IE ECS
b) Click on Configure IE ECS link Disable Enhanced Security Configuration for both Administrators and Users by selecting the Off radio buttons and click OK
c) Now click the Go to Windows Firewall link to display the page for the Windows Firewall Click on the Windows Firewall Properties link at the bottom of the Overview section
d) In the Domain Profile tab of the Windows Fire dialog change the Firewall state property setting from On to Off Click to Apply button to save your changes
e) Once you have turned off the firewall in the Domain Profile tab go to the Private profile tab and the Public profile tab and follow the same steps to disable the firewall for these profiles as well
f) Click OK to dismiss the Windows Firewall dialog once you have turned off the firewall for all three profiles
7 Enable Remote Desktop for your VM
a) In the Server Manager navigate to the top-level node to display the Server Summary page Inside the Computer Information section locate and click the link for Configure Remote Desktop
b) In the Remote tab of the System Properties dialog select the last option for Allow connections only from computers running Remote Desktop with Network Level Authentication Click OK to save changes and dismiss the System Properties dialog
Creating a SharePoint Server 2013 Environment for Development and Testing Version 10
copy Critical Path Training 2012 All Rights Reserved 15
wwwCriticalPathTrainingcom
8 Enable the Windows Server Features for the Desktop Experience and the PowerShell Integrated Scripting Environment
a) In Server Manager choose Add Feature to bring up the Add Features Wizard dialog
b) Select the feature Desktop Experience
When you first click the checkbox for the Desktop Experience the wizard will prompt you with the following dialog to add support for Ink and Handwriting Services Click the Add Required Features button to continue
c) Scroll down the list of features in the Add Features Wizard dialog and select the feature Windows PowerShell Integrated Scripting Environment (ISE)
Creating a SharePoint Server 2013 Environment for Development and Testing Version 10
copy Critical Path Training 2012 All Rights Reserved 16
wwwCriticalPathTrainingcom
When you first click the checkbox for the Windows PowerShell Integrated Scripting Environment (ISE) the wizard will prompt you with the following dialog to add support for NET Framework 351 Features Click the Add Required Features button to continue
d) Click the Next button on the Add Features Wizard dialog to continue with the install
e) On the Confirm Installation Selection wizard page click the Install button
f) When you see the Installation Results screen the Add Features Wizard informs you a computer restart is required Click Close button to dismiss this dialog
9 After the VM has restarted log in again using [administrator | Password1] (username | password)
Configure the Virtual Machinersquos Networking Setup
In this section yoursquoll configure the two NICrsquos you added to the VM in previous steps One NIC (Internal LAN) will be used to communicate with other VMs in this environment while the other (External LAN) will be used to connect to the internet
1 Configure the NIC that is linked to the Internal LAN network
a) Open the Network Connections dialog by pressing Start enter view network connections in the search box Click the View Network Connections shortcut
b) Two network connections will be shown but only one will show as connected
The connected one is the one that is connected to the Internal LAN network The other one is currently ldquounpluggedrdquohellip this is why we didnrsquot connect a network to the second network when initially configuring the VM as this makes it easier to see which NIC is which in the VM
c) Rename the two NICrsquos
i) Right-click the connected NIC and select Rename Give it a name of Internal LAN
Creating a SharePoint Server 2013 Environment for Development and Testing Version 10
copy Critical Path Training 2012 All Rights Reserved 17
wwwCriticalPathTrainingcom
ii) Right-click the disconnected NIC and select Rename Give it a name of External LAN
d) Right-click the Internal LAN NIC and select Properties
e) In the Local Area Connection Properties dialog select the Internet Protocol Version 4 (TCPIPv4) item and click Properties
f) Enter the following information into the resulting dialog to configure the NICrsquos IP settings
i) Use the Following IP Address
(1) IP Address 192168150102
(2) Subnet mast 2552552550
(3) Default Gateway 192168150102
ii) Use the Following DNS Server Addresses
(1) Preferred DNS Server 192168150102
g) Click OK to accept the IP settings and Close to accept the changes to the NIC
Why not use 101 as the start NIC When you created the virtual internal network Hyper-V created a virtual NIC on the host computer If you set the IP of that NIC to 192168150101 you can use the Remote Desktop Connection app in Windows to connect to your virtual machines and easily copy-paste amp share drives
2 Configure the NIC that is linked to the External LAN network
a) Open the Network Connections window if it is not still open using the same steps from the previous step
b) Right-click the External LAN NIC and select Properties
c) In the Local Area Connection Properties dialog select the Internet Protocol Version 4 (TCPIPv4) item and click Properties
d) Enter the following information into the resulting dialog to configure the NICrsquos IP settings
i) Obtain an IP Address Automatically
ii) Use the Following DNS Server Addresses
(1) Preferred DNS Server 192168150102
e) Click the Advanced button to open the Advanced TCPIP Settings dialog
f) In the Advanced TCPIP Settings dialog click the DNS tab
i) Uncheck the Register this Connections Address in DNS
Creating a SharePoint Server 2013 Environment for Development and Testing Version 10
copy Critical Path Training 2012 All Rights Reserved 18
wwwCriticalPathTrainingcom
g) In the Advanced TCPIP Settings dialog click the WINS tab
i) Click the Add button and specify a new WINS Server as 192168150102
h) Click OK Close multiple times to accept all TCPIP settings
The external NIC will now obtain an IP dynamically amp will not register itself in the DHCPrsquos DNS server which is a good thing when there are multiple people on the same network this this type of a setup
3 Connect the second NIC to the External LAN network
a) Go back to the host computer and open the Hyper-V Manager
b) In the Hyper-V Manager window right-click the VM WingtipServer and select Settings
c) Select the second NIC the one that is not connected
d) For the Network select External LAN and click OK This will effectively plug the external network into the VM
4 Go back into the WingtipServer VM and if it is not still open open the Network Connections dialog You should now see both connections plugged in
a) To refresh the connection select the connection you just plugged in and click the Disable this Network Device button in the toolbar After the connection is disabled select it and click the Enable this Network Device button
b) After a few seconds the VM should be able to connect to the internet which you can test by browsing to a site such as httpwwwbingcom
Configure Windows Update and Update the Server
In this section you will verify the server is fully patched and updated
1 Verify Service Pack 1 is installed
a) Verify the version of the operating system installed by clicking Start right-click on Computer select Properties
b) If the server simply says Windows Server 2008 R2 Enterprise as shown in the following figure download and install Service Pack 1 from the following location httpwwwmicrosoftcomen-usdownloaddetailsaspxid=5842
Creating a SharePoint Server 2013 Environment for Development and Testing Version 10
copy Critical Path Training 2012 All Rights Reserved 19
wwwCriticalPathTrainingcom
c) If Service Pack 1 is installed it will state it
2 Update the server using Windows Update
a) Selecting Start All Programs Windows Update
b) First disable Windows Update from running automatically
i) Click the link Change Settings
ii) Under the Important Updates list select Never check for updates (not recommended)
This isnrsquot what you would do in a production environment but for a development machine it is ok
c) Now update the server
i) Click the Check for Updates button
ii) If prompted install any updates to the Windows Update dialog
iii) Select the Check for Updates link
iv) Windows Update will the report how many updates are available Select all important and recommended updates and click the Install Updates button
v) If prompted select I accept the license terms for any updates that require it
vi) Keep going through the process of running Windows Update checking for updates and installing them after each reboot until it says there are no updates left to install
This step is likely going to take quite a bit of time so be patient
Activate Windows Server 2008 R2
In this section you will activate the server if you have a product key
1 If you have a product key for Windows Server 2008 R2 use it to activate Windows
a) In the Server Manager window navigate to the top-level node to display the Server Summary page Click Activate Windows
b) You will be prompted to enter your product key
i) Enter your product key and click to button to activate Windows
Creating a SharePoint Server 2013 Environment for Development and Testing Version 10
copy Critical Path Training 2012 All Rights Reserved 20
wwwCriticalPathTrainingcom
ii) After a few seconds your VM should be able to connect to a Microsoft site and successfully activate Windows
At this point you have a fully patched operating system VM created that will act as the Active Directory domain controller
Apply the DisableLoopbackCheck Registry Fix
Configure the DisableLoopbackCheck registry setting (Microsoft KB httpsupportmicrosoftcomkb896861)
The following steps automate creating the registry key outlined as Method 2 in the Microsoft KB article httpsupportmicrosoftcomkb896861 using Windows PowerShell
PowerShell Script Alert You can also find this PowerShell script AddDisableLoopbackCheckRegKeyps1 in the files that
accompany this setup guide
1 Click the Windows PowerShell icon in the Taskbar
2 Run the following PowerShell commands pressing [ENTER] after each one
$regKeyPath = HKLMSystemCurrentControlSetControlLsa $key = DisableLoopbackCheck New-ItemProperty -Path $regKeyPath -Name $key -Value 1 -PropertyType dword
a) Close the Windows PowerShell console by typing EXIT and pressing [ENTER]
Exercise 3 Install Active Directory Domain Services
Now you will promote your WingtipServer VM to a domain controller and create a new domain named wingtipcom
1 Login to the WingtipServer virtual machine using administrator | Password1
2 Add and configure the role for Active Directory Domain Services
a) Launch Server Manager and select the Roles node
b) Click the Add Roles link to start the Add Roles Wizard
c) On the Before you begin page click Next
d) On the Server Roles page select Active Directory Domain Services Click the Add Required Features button if prompted to install prerequisites
e) Click Next
Creating a SharePoint Server 2013 Environment for Development and Testing Version 10
copy Critical Path Training 2012 All Rights Reserved 21
wwwCriticalPathTrainingcom
f) On the next page of the wizard click Next which will bring you to the Confirm Installation Selections page
g) Click Install
After Active Directory Domain Services has been installed you will see the Installation Results page in the Add Roles Wizard
3 Click on the link with the big long caption of Close this wizard and launch the Active Directory Domain Services Installation Wizard (dcpromoexe)
4 On the first page of the Active Directory Domain Services Installation Wizard click the Use Advanced Mode Installation checkbox and click Next
Creating a SharePoint Server 2013 Environment for Development and Testing Version 10
copy Critical Path Training 2012 All Rights Reserved 22
wwwCriticalPathTrainingcom
5 On the Operating System Compatibility page click Next
6 On the Choose a Deployment Configuration select Create a new domain in a new forest and click Next
7 On the Name the Forrest Root Domain enter the following and click Next
a) FQDN of the forest root domain wingtipcom
8 On the Domain NetBIOS Name set it to WINGTIP and click Next
9 On the Set Forest Functional Level page select Windows Server 2008 R2 and click Next
10 On the Additional Domain Controller Options accept the default options and click Next
11 You might be prompted with the dialog shown below providing a warning that This computer has dynamically assigned IP address(es) This is not a problem when you are running your development environment on a domain controller Click Yes to dismiss the dialog
12 At this point the wizard will prompt you with a dialog information you a delegation for the DNS Server cannot be created because it cannot find the authoritative parent zone This is not a problem because the wizard will automatically configure the DNS of the VM to point to itself Click on the Yes button to dismiss this dialog
Creating a SharePoint Server 2013 Environment for Development and Testing Version 10
copy Critical Path Training 2012 All Rights Reserved 23
wwwCriticalPathTrainingcom
13 On the Location for Database Log Files and SYSVOL page accept all the default values and click Next
14 On the Directory Services Restore Mode Administrator Password page enter Password1 in both textboxes and click Next
15 On the Summary page click Next to start the process of configuring the new Active Directory domain
16 The wizard will display the dialog below to show you the progress of the configuration process You will be required to reboot when the configuration has been completed Check the option for Reboot on completion and then wait for the configuration to complete and the machine to reboot
17 After the VM reboots login to the server with wingtipadministrator | Password1
Configure Windows Update and Update the Server
In this section you will verify the server is fully patched and updated
1 Update the server using Windows Update
a) Selecting Start All Programs Windows Update
b) Select the Check for Updates link
c) Windows Update will the report how many updates are available Select all important and recommended updates and click the Install Updates button
d) If prompted select I accept the license terms for any updates that require it
e) Keep running Windows Update after each reboot and update install until it says there are no updates left to install
Creating a SharePoint Server 2013 Environment for Development and Testing Version 10
copy Critical Path Training 2012 All Rights Reserved 24
wwwCriticalPathTrainingcom
This step could take quite a bit of time so be patient
At this point you have a fully installed Active Directory Domain Controller for the Wingtipcom domain hosted on the server WingtipServer
Exercise 4 Install SQL Server 2012
In this exercise you will install SQL Server 2012 that will be used to store all required databases
1 Download the SQL Server 2012 Evaluation Edition specifically the DVD x64 ISO image to the host computer from here httpwwwmicrosoftcombetaexperiencepdSQL2012EvalCTAenusdefaultaspx or you can use your own licensed copy
2 Mount the SQL Server 2012 ISO to the WingtipServer VM
a) On the host computer open the Hyper-V Manager
b) Right-click the VM WingtipServer and select Settings
c) Select DVD Drive in the left-hand panel
d) In the right-hand panel select Image File and browse to the ISO file that contains SQL Server 2012 and click OK
3 Login to the WingtipServer VM as wingtipadministrator | Password1
Install SQL Server 2012
In this section you will install SQL Server 2012
1 If the AutoPlay dialog box is open click Run SETUPEXE If it isnrsquot use Windows Explorer to navigate to the DVD drive and execute the setupexe file in the root of the DVD drive
2 In the SQL Server Installation Center click Installation on the left-hand side
Creating a SharePoint Server 2013 Environment for Development and Testing Version 10
copy Critical Path Training 2012 All Rights Reserved 25
wwwCriticalPathTrainingcom
3 Next select New SQL Server stand-alone installation or add features to an existing installation
4 On the Setup Support Rules page the installer will check for issues before installing Click OK
5 On the Product Key page click the Specify a free edition radio box and select Evaluation then click Next
6 On the License Terms page click the I accept the license terms checkbox and click Next
7 On the Setup Support Rules page the installer will check for any problems with the server you are installing on Click Next when this completes
Creating a SharePoint Server 2013 Environment for Development and Testing Version 10
copy Critical Path Training 2012 All Rights Reserved 26
wwwCriticalPathTrainingcom
8 On the Support Role page select SQL Server Feature Installation and click Next
9 On the Feature Selection page check the following options and click Next
a) Instances Features
i) Database Engine Services
(1) Full-Text and Semantic Extractions for Search
b) Shared Features
i) Management Tools ndash Basic
(1) Management Tools ndash Complete
Creating a SharePoint Server 2013 Environment for Development and Testing Version 10
copy Critical Path Training 2012 All Rights Reserved 27
wwwCriticalPathTrainingcom
10 On the Installation Rules page click Next
11 On the Instance Configuration page click Next
12 On the Disk Space Requirements page click Next
13 On the Server Configuration page do the following and click Next
a) On the Service Account tab change the Startup Type for the SQL Server Agent to Automatic
14 On the Database Engine Configuration page do the following and click Next
a) On the Server Configuration tab click Add Current User
b) On the FILESTREAM tab
i) Check Enable FILESTREAM for Transact-SQL Access
ii) Check Enable FILESTREAM for file IO access
15 On the Error Reporting page click Next
16 On the Installation Configuration Rules page click Next
17 On the Ready to Install page click Install
Installation of SQL Server 2012 will take some time please be patient
18 When the installation completes the Complete page will be shown Click Close
At this point you have now successfully installed SQL Server 2012
Creating a SharePoint Server 2013 Environment for Development and Testing Version 10
copy Critical Path Training 2012 All Rights Reserved 28
wwwCriticalPathTrainingcom
Exercise 5 Install amp Configure SharePoint Server 2013
In this exercise you will install SharePoint 2013
1 Download the SharePoint Server 2013 to the host computer from here httptechnetmicrosoftcomen-USevalcenterhh973397aspx
2 Mount the SharePoint Server 2013 ISO to the WingtipServer VM
a) On the host computer open the Hyper-V Manager
b) Right-click the VM WingtipServer and select Settings
c) Select DVD Drive in the left-hand panel
The file that Microsoft provides is saved in the IMG format Hyper-V Manager wonrsquot allow you to mount an IMG file so rename it to ISO before mounting it
d) In the right-hand panel select Image File and browse to the ISO file that contains SharePoint Server 2013 and click OK
Create SharePoint Service Accounts amp Grant Rights to SQL Server 2012
In this section you will create the necessary service accounts that will be used by SharePoint in Active Directory and grant them necessary rights in SQL Server 2012
PowerShell Script Alert The creation of users and granting them rights to SQL Server 2012 steps in this section are automated in the Windows PowerShell script CreateSpServiceAccountsps1 found in the files that accompany this setup guide Open the script
and read the header for documentation on how to use it
1 Open the Active Directory Users and Computers Start Administrative Tools Active Directory Users and Computers
2 Expand the tree in the left-hand pane to see the Users OU Select the Users OU
3 Create a new user SP_Farm
a) In the toolbar select Action New User
Creating a SharePoint Server 2013 Environment for Development and Testing Version 10
copy Critical Path Training 2012 All Rights Reserved 29
wwwCriticalPathTrainingcom
b) Set the userrsquos Full Name amp User Login Name to SP_Farm and click Next
c) In the password dialog enter the following and click Next
i) Password (and Confirm Password) Password1
ii) User must change password at next login unchecked
iii) User cannot change password unchecked
iv) Password never expires checked
v) Account is disabled unchecked
Creating a SharePoint Server 2013 Environment for Development and Testing Version 10
copy Critical Path Training 2012 All Rights Reserved 30
wwwCriticalPathTrainingcom
vi) Click Finish
4 Repeat the previous step to create two more accounts
a) SP_Content
b) SP_Services
At this point you have created all the necessary service accounts
Install SharePoint Server 2013 Prerequisites
In this section you will install the SharePoint Server 2013 Prerequisites
1 Ensure you are logged into the WingtipServer VM using the account wingtipadministrator | Password1
2 If the AutoPlay dialog box is open click Run splashhta If it isnrsquot use Windows Explorer to navigate to the DVD drive and execute the splashhta file in the root of the DVD drive
Creating a SharePoint Server 2013 Environment for Development and Testing Version 10
copy Critical Path Training 2012 All Rights Reserved 31
wwwCriticalPathTrainingcom
3 Click the Install Software Prerequisites link
4 In the Microsoft SharePoint 2013 Products Preparation Tool window click Next
5 On the License Terms for Software Products page
a) Check I accept the terms of the License Agreement(s)
b) Click Next
6 The tool will download and install all prerequisites for SharePoint Server 2013 This will take some time It may prompt you to reboot the server If so reboot the server and login using wingtipadministrator | Password1
Creating a SharePoint Server 2013 Environment for Development and Testing Version 10
copy Critical Path Training 2012 All Rights Reserved 32
wwwCriticalPathTrainingcom
7 When the prerequisite installer is complete it will present a summary of everything it did
8 Click Finish
9 Restart the WingtipServer VMhellip some additional installations and changes that the prerequisite installer did will require a restart before installing SharePoint Server 2013
At this point all prerequisites required by SharePoint Server 2013 have been installed and any necessary configuration changes have been applied to the server However it is strongly recommend that you run Windows Update and install any pending updates Further Microsoft recommends installing the following hotfixes if they are not already installed
KB2554876 The SharePoint Parsing Process Crashes in Windows Server 2008 R2
KB2708075 IIS 75 Configurations are not Updated when you use the ServerManager Class to Commit Configuration Changes
KB2759112 Hotfix is Available for NET Framework 45 that Resolves an ASPNET Race Condition Issue in Windows Server 2008 R2 Windows Server 2008 R2 SP1
KB2765317 Hotfix is Available for NET Framework 45 that Resolves an ASPNET Race Condition Issue in Windows
8 Windows RT and Windows Server 2012
Install SharePoint Server 2013
In this section you will install SharePoint Server 2013
1 Ensure you are logged into the WingtipServer VM using the account wingtipadministrator | Password1
2 If the AutoPlay dialog box is open click Run splashhta If it isnrsquot use Windows Explorer to navigate to the DVD drive and execute the splashhta file in the root of the DVD drive
Creating a SharePoint Server 2013 Environment for Development and Testing Version 10
copy Critical Path Training 2012 All Rights Reserved 33
wwwCriticalPathTrainingcom
3 Click Install SharePoint Server
4 When prompted to Enter your Product Key enter the key you obtained for the trial install and click Continue
5 On the Read the Microsoft Software License Terms page check the I accept the terms of this agreement checkbox and click Continue
6 On the Choose a file location page click Install Now
Creating a SharePoint Server 2013 Environment for Development and Testing Version 10
copy Critical Path Training 2012 All Rights Reserved 34
wwwCriticalPathTrainingcom
7 When the installation is complete select the Run the SharePoint Products Configuration Wizard checkbox and click Close
8 On the Welcome to SharePoint Products page click Next
a) If prompted to start or reset services click Yes
9 On the Connect to a server farm page select Create a new server farm and click Next
10 On the Specify Configuration Database Settings page use the following to complete the page and click Next
a) Database server WINGTIPSERVER
b) Database name SharePoint_Config
c) Username WINGTIPSP_Farm
d) Password Password1
Creating a SharePoint Server 2013 Environment for Development and Testing Version 10
copy Critical Path Training 2012 All Rights Reserved 35
wwwCriticalPathTrainingcom
11 On the Specify Farm Security Settings page for the Passphrase and Confirm Passphrase boxes enter Password1 and click Next
12 On the Configure SharePoint Central Administration Web Application page check the Specify port number checkbox and enter a value of 9999 then Click Next
Creating a SharePoint Server 2013 Environment for Development and Testing Version 10
copy Critical Path Training 2012 All Rights Reserved 36
wwwCriticalPathTrainingcom
13 On the Completing the SharePoint Products Configuration Wizard page click Next
14 When the installer completes it will display the Confirmation Successful page
15 Click Finish This will launch Internet Explorer to go through the configuration process
Creating a SharePoint Server 2013 Environment for Development and Testing Version 10
copy Critical Path Training 2012 All Rights Reserved 37
wwwCriticalPathTrainingcom
At this point you have successfully installed SharePoint Server 2013
Configure SharePoint Server 2013
In this section you will create a new SharePoint Server 2013 farm and perform minimal configuration tasks
After installing SharePoint Sever 2013 the SharePoint Products Configuration Wizard will launch the browser-based Initial Farm Configuration Wizard
1 In the first page of the wizard you are prompted to Help Make SharePoint Better Select which ever option you want and click OK
2 On the Welcome page that asks How do you want to configure your SharePoint farm click the Start the Wizard button
3 On the Services page do the following and then click Next
a) Service Account Select Create new managed account
i) Username WINGTIPSP_Services
ii) Password Password1
b) Services Uncheck the following services
Creating a SharePoint Server 2013 Environment for Development and Testing Version 10
copy Critical Path Training 2012 All Rights Reserved 38
wwwCriticalPathTrainingcom
i) Access Services 2010
ii) App Management Service
In SharePoint Server 2013 the Search Service Application processes specifically noderunnerexe can consume a considerable amount of memory and processor time If you are not going to work with search you might consider unchecking this option for now You can always go back into Central Administration and create a new instance of the Search Service Application at a later date if you need it
Why did we remove Access Services 2010 amp App Management Service service applications The Access Services 2010 service application is included for backwards compatibility and isnrsquot needed in new installations unless you are migrating solutions built with Access Services 2010 from SharePoint Server 2010 (if so you can create this service application later within Central Administration Application Management Manage Service Applications) The App Management Service service application will be created in a later step in this setup guide therefor it is skipped here
4 The creation of the service applications can take quite a while so be patient If it exceeds 20 minutes it is fairly safe to assume the page is hung up One option is to close the browser then launch Central Administration (Start All Programs Microsoft SharePoint 2013 Products SharePoint 2013 Central Administration) and look at the Service Application page (Application Management Manage Service Applications) to see if they were all created
Configure DNS
In this section you will configure DNS for hosting SharePoint sites amp Apps
1 Ensure you are logged into the WingtipServer VM using the account wingtipadministrator | Password1
2 Open the DNS window Start Administrative Tools DNS
3 Expand the hierarchy on the left-hand side of the window until you get to DNS WINGTIPSERVER Forward Lookup Zones wingtipcom
4 Create a new wildcard so all requests for http[]wingtipcom will be forwarded to our SharePoint machine
a) Next right-click wingtipcom and select New Host (A or AAAA)
Creating a SharePoint Server 2013 Environment for Development and Testing Version 10
copy Critical Path Training 2012 All Rights Reserved 39
wwwCriticalPathTrainingcom
b) In the New Host dialog enter the following and click OK
i) Alias Name
ii) IP Address 192168150102 Then click Add Host The following figure shows how this looks
This new record is telling DNS to forward any request for http[]wingtipcom to the webserver WINGTIPSERVER where the
requests will be served by SharePoint
5 Verify this DNS entry is working
a) Open Windows PowerShell Start All Programs Accessories Windows PowerShell Windows PowerShell
b) Run the following commands and press ENTER
PS CUsersAdministratorgt nslookup somethingwingtipcom PS CUsersAdministratorgt nslookup somethingappswingtipcom
c) You should get a response that points to the WingtipServer server as shown in the following figure
Creating a SharePoint Server 2013 Environment for Development and Testing Version 10
copy Critical Path Training 2012 All Rights Reserved 40
wwwCriticalPathTrainingcom
Configure SharePoint Server 2013 for Host-Named Site Collections amp Create Initial Site
Collections
In this section you will create new SharePoint 2013 site collections for testing and hosting apps
Microsoft recommends to create host-named site collections (HNSC) instead of using the path based site collection addressing The difference is the following a path based site created at something such as httpintranetwingtipcomsitesdevtest as an HNSC site would be more like httpdevtestwingtipcom This is how it works in the cloud (Office 365) and it scales much better for on-prem
deployments This setup guide will show you how to setup your environment to create HNSC The only downside to this approach is that you canrsquot create site collections within Central Administration it must be done via Windows PowerShell API (because Central Administration doesnrsquot instruct you where to put the site
This is implemented in various parts First DNS must be configured to send all requests for httpwingtipcom to a Web Application
(implemented in the last section) Second this Web Application must be extended with SharePoint and have no host header bindings (so it handles all requests) Third it must have a default site collection at the root of the Web Application but it will not be used for anything (in fact it doesnrsquot need a template assigned to it)
You can read more about HNSCrsquos on TechNet httptechnetmicrosoftcomen-uslibrarycc424952aspx
PowerShell Script Alert The steps in this section are automated in the script SetupSharePointForHNSCps1 found in the files that
accompany this setup guide Open the script and read the header for documentation on how to use it
1 Ensure you are logged into the WingtipServer VM using the account wingtipadministrator | Password1
2 Open Central Administration Start All Programs Microsoft SharePoint 2013 Products SharePoint 2013 Central Administration
3 Select Application Management Manage Web Applications
4 Delete the default Web Application created by the configuration wizard
a) Delete the existing default Web Application
i) Select the Web Application SharePoint ndash 80 the one with the URL of httpwingtipserver and click Delete in the ribbon
ii) When prompted to delete the associated IIS Web Site amp SQL Server database select both options to delete them and click OK
The reason you are doing this is because the setup wizard you ran previously when creating the service applications automatically created it The problem is that it used the same identity (WINGTIPSP_Services) for the app pool that is used for all the service
applications which is not desired
5 Create a new Web Application to handle Host-Named Site Collections (HNSC)
Creating a SharePoint Server 2013 Environment for Development and Testing Version 10
copy Critical Path Training 2012 All Rights Reserved 41
wwwCriticalPathTrainingcom
a) In the ribbon click the New button
b) In the Create New Web Application dialog enter the following values in the properties and click OK Leave all properties not mentioned
i) Select the radio button Create a new IIS web site
(1) Name SharePoint HNSC Host ndash 80
(2) Port 80
ii) Application Pool
(1) Select the radio button Create a new application pool
(a) Application Pool Name SharePoint Default HNSC AppPool
(b) Select a security account for this application pool WINGTIPSP_Content
If WINGTIPSP_Content is not listed as an available managed account create it by selecting the appropriate option and using
Password1 for the password
iii) Database Name and Authentication
(1) Database Name WSS_Content_HNSCDefaultHost
c) This process will take a few moments At the end of the process SharePoint will ask if you want to create a site collection You do but you donrsquot want to do it through the browser as this will not be a HNSC To create a HNSC you must create it via Windows PowerShell
6 Create a default not template site collection at the root of the web application
a) Open SharePoint 2013 Management Shell Start All Programs Microsoft SharePoint 2013 Products SharePoint 2013 Management Shell
7 Create Site Collections for Testing SharePoint amp SharePoint Apps
a) Open SharePoint 2013 Management Shell Start All Programs Microsoft SharePoint 2013 Products SharePoint 2013 Management Shell
b) Get a reference to the HNSC web application you just created by running the following Windows PowerShell script in the SharePoint 2013 Management Shell
$hnscWebApp = Get-SPWebApplication | Where-Object $_DisplayName -eq SharePoint HNSC Host - 80
c) Create a non-templated site at the root of the web application for Workflow to connect to by executing the following Windows PowerShell script in the SharePoint 2013 Management Shell
New-SPSite -Name Root HNSC Site Collection -Url httpwingtipcom -HostHeaderWebApplication $hnscWebApp -OwnerAlias WINGTIPAdministrator
d) Create a team site by executing the following Windows PowerShell script in the SharePoint 2013 Management Shell
New-SPSite -Name Wingtip Intranet -Url httpintranetwingtipcom ndashHostHeaderWebApplication $hnscWebApp -Template STS0 -OwnerAlias WINGTIPAdministrator
e) Create a developer site by executing the following Windows PowerShell script in the SharePoint 2013 Management Shell
New-SPSite -Name Wingtip Developer Site -Url httpdevwingtipcom ndashHostHeaderWebApplication $hnscWebApp -Template DEV0 -OwnerAlias WINGTIPAdministrator
You can only create debug and test apps using a developer site
At this point you now have a site collection to use as a team site (httpintranetwingtipcom) and to develop and test custom SharePoint apps (httpdevwingtipcom)
Creating a SharePoint Server 2013 Environment for Development and Testing Version 10
copy Critical Path Training 2012 All Rights Reserved 42
wwwCriticalPathTrainingcom
Configure SharePoint 2013 for Hosting Apps
In this setup you will setup your SharePoint 2013 environment for hosting apps
PowerShell Script Alert Everything in the next immediate step is provided in the script ConfigureSpFarmForAppsps1 found in the
files that accompany this setup guide Open the script and read the header for documentation on how to use it
1 Ensure you are logged into the WingtipServer VM using the account wingtipadministrator | Password1
2 Create the necessary SharePoint App Management service applications and start the necessary services via Windows PowerShell
a) Open SharePoint 2013 Management Shell Start All Programs Microsoft SharePoint 2013 Products SharePoint 2013 Management Shell
b) Execute the following Windows PowerShell script in the SharePoint 2013 Management Shell
$appHostDomain = appswingtipcom $adminService = Get-Service -Name spadminv4 if ($adminServiceStatus -ne Running) Start-Service $adminService $timerService = Get-Service -Name sptimerv4 if ($timerServiceStatus -ne Running) Start-Service $timerService Set-SPAppDomain $appHostDomain $appMgmtSvcInstance = Get-SPServiceInstance | Where-Object $_GetType()Name -eq AppManagementServiceInstance if ($appMgmtSvcInstanceStatus -ne Online) Start-SPServiceInstance -Identity $appMgmtSvcInstance $appSubSettingSvcInstance = Get-SPServiceInstance | Where-Object $_GetType()Name -eq SPSubscriptionSettingsServiceInstance if ($appSubSettingSvcInstanceStatus -ne Online) Start-SPServiceInstance -Identity $appSubSettingSvcInstance $appPoolServiceApps = Get-SPServiceApplicationPool -Identity SharePoint Web Services Default $appSubSvc = New-SPSubscriptionSettingsServiceApplication ndashApplicationPool $appPoolServiceApps ndashName Settings Service Application ndashDatabaseName SettingsServiceDB $proxySubSvc = New-SPSubscriptionSettingsServiceApplicationProxy ndashServiceApplication $appSubSvc $appAppSvc = New-SPAppManagementServiceApplication -ApplicationPool $appPoolServiceApps -Name App Management Service Application -DatabaseName AppServiceDB $proxyAppSvc = New-SPAppManagementServiceApplicationProxy -ServiceApplication $appAppSvc Set-SPAppSiteSubscriptionName -Name app -Confirm$false
3 Verify the script configured SharePoint 2013 for hosting apps
a) Open Central Administration Start All Programs Microsoft SharePoint 2013 Products SharePoint 2013 Central Administration
b) Verify service applications created
i) Open the Service Applications page Application Management Manage Service Applications
ii) Verify you have two service applications created
(1) App Management Service Application
(2) Settings Service Application
c) Verify service instances are running
i) Open the Services on Server page System Settings Manage Services on Server
ii) Verify the following services are Started
(1) App Management Service
(2) Microsoft SharePoint Foundation Subscription Settings Service
Creating a SharePoint Server 2013 Environment for Development and Testing Version 10
copy Critical Path Training 2012 All Rights Reserved 43
wwwCriticalPathTrainingcom
d) Verify App URLs are correct
i) Open the Configure App URLs page Apps Configure app URLs
ii) Verify the following
(1) App Domain appswingtipcom
(2) App Prefix app
At this point your SharePoint Server 2013 environment is ready to host SharePoint apps
Creating a SharePoint Server 2013 Environment for Development and Testing Version 10
copy Critical Path Training 2012 All Rights Reserved 44
wwwCriticalPathTrainingcom
Start the SharePoint 2013 Sandbox Service
By default the service that executes sandbox solutions is not running In this step you will start the service
1 Open Central Administration Start All Programs Microsoft SharePoint 2013 Products SharePoint 2013 Central Administration
2 Open the Services on Server page System Settings Manage Services on Server
3 Click the Start link to the left of the Microsoft SharePoint Foundation Sandboxed Code Service
At this point your installation can support sandbox solutions
Configure CRL Verification for Disconnected Environments
SharePoint periodically ldquophones homerdquo to a specific address hosted by Microsoft under certain conditions When your environment is disconnected this can cause an unnecessary delay or failures when starting up the sandbox The following steps outline a workaround to bypass this check
1 Launch Notepad as an administrator Start All Programs Accessories right-click Notepad and select Run as Administrator
2 Open the hosts file by selecting File Open and finding the file
cWindowsSystem32Driversetchosts
3 Add the following line to the end of the file
127001 crlmicrosoftcom
4 Save and close the hosts file
Update Internet Explorer to Bypass the App URL amp Automatically Login to SharePoint Sites
In this section you will update Internet Explorer to add the App hosting URL to the bypass list so you can navigate to the domain after deploying SharePoint hosted apps
1 Ensure you are logged into the WingtipServer VM using the account wingtipadministrator | Password1
1 Launch Internet Explorer Start All Programs Internet Explorer
2 Configure Internet Explorer to bypass the App URL
a) In the top-right corner click the gear icon and select Internet Options
b) On the Security tab select the Local Intranet and click the Sites button
c) Uncheck the box next to Automatically detect intranet network
d) Click the Advanced button and add two entries to the Exceptions list
i) httpwingtipcom
ii) httpappswingtipcom
Creating a SharePoint Server 2013 Environment for Development and Testing Version 10
copy Critical Path Training 2012 All Rights Reserved 45
wwwCriticalPathTrainingcom
e) Click the Close button followed by the OK button multiple times to close out of the dialogs
At this point Internet Explorer is setup to bypass your app URL so you can navigate to apps (httpappswingtipcom) as well as automatically authenticate to sites hosted at httpwingtipcom
Exercise 6 Configure SharePoint to Host My Sites
In this exercise you will configure SharePoint to create and host My Sites In order to host My Sites you will need a new Web Application that is configured for Self-Service Site Creation and has a My Site Host site collection
1 Create a new SharePoint web application to host the My Sites
a) Ensure you are logged into the WingtipServer VM using the account wingtipadministrator | Password1
b) Open Central Administration Start All Programs Microsoft SharePoint 2013 Products SharePoint 2013 Central Administration
c) Select Application Management Manage Web Applications
d) In the ribbon click the New button
e) In the Create New Web Application dialog enter the following values in the properties and click OK Leave all properties not mentioned
i) Select the radio button Create a new IIS web site
(1) Name SharePoint MySite Host ndash 80
(2) Port 80
(3) Host Header mywingtipcom
ii) Application Pool
(1) Select the radio button Use existing application pool
(a) Application Pool Name SharePoint Default HNSC AppPool
iii) Database Name and Authentication
(1) Database Name WSS_Content_SocialWingtipCom
f) This process will take a few moments At the end of the process SharePoint will ask if you want to create a site collection Click the link provided to create a new site collection amp continue to the next step
2 Create a My Site Host site collection
a) On the Create Site Collection page use the following information to complete the form and click OK
Creating a SharePoint Server 2013 Environment for Development and Testing Version 10
copy Critical Path Training 2012 All Rights Reserved 46
wwwCriticalPathTrainingcom
i) Title My Site Host
ii) URL
iii) Template Selection My Site Host (found under the Enterprise tab)
iv) Primary Site Collection Administrator WINGTIPAdministrator
3 Update the Web Application to host my sites
a) Within Central Administration in the left-hand navigation navigate to the Manage Web Applications page Application Management Manage Web Applications
b) Select the SharePoint MySite Host ndash 80 web application
c) Click the Managed Paths button in the ribbon
d) Remove the sites managed path and add two new managed paths and click OK
i) personal ndash Wildcard inclusion
ii) my ndash Explicit inclusion
e) With the SharePoint MySite Host ndash 80 web application still selected click the Self-Service Site Creation button
f) On the Self-Service Site Creation page use the following values to complete the form and click OK
i) Site Collections On
4 Next configure the User Profile Service Application My Site settings
a) Browse to the User Profile Service Application management page Application Management Manage Service Applications User Profile Service Application
b) Under the My Site Settings section click the Setup My Sites
c) On the My Site Settings page use the following information to complete the form and click OK
i) My Site Host httpmywingtipcom
ii) Personal Site Location personal
At this point your SharePoint deployment is now configured to automatically create My Sites under httpmywingtipcomPersonalUserName when users first browse to them
Exercise 7 Install amp Configure Workflow Manager 10
In this exercise you will configure the WingtipServer VM to host Workflow Manager 10 and connect it to your SharePoint installation
1 Ensure you are logged into the WingtipServer VM using the account wingtipadministrator | Password1
Verify SQL Server 2012 Network Configuration
In this section yoursquoll verify the network configuration is correct for SQL Server 2012 in order to install Workflow Manager 10
Creating a SharePoint Server 2013 Environment for Development and Testing Version 10
copy Critical Path Training 2012 All Rights Reserved 47
wwwCriticalPathTrainingcom
1 Configure SQL Server 2012 to have the TCPIP connection protocol enabled
a) Open the SQL Server Configuration Manager Start All Programs Microsoft SQL Server 2012 Configuration Tools SQL Server Configuration Manager
b) Expand the hierarchy on the left-hand side to the following SQL Server Connection Manager (local) SQL Server Network Configuration Protocols for MSSQLSERVER
c) In the main window if TCPIP is Disabled right-click TCPIP and select Enable
d) When prompted with a warning click OK
2 SQL Server must be restarted in order to reflect this change
a) In the hierarchy on the left-hand side of the window select SQL Server Services
b) Right-click SQL Server (MSSQLSERVER) and select Restart
At this point SQL Server is now configured with the TCPIP protocol enabled a requirement when configuring Service Bus
Configure the Workflow Service Account with the Necessary Rights
In this section you will verify the service account that will run Workflow Manager and Service Bus
1 Ensure you are logged into the WingtipServer VM using the account WINGTIPadministrator | Password1
2 Grant the WINGTIPSP_Content account securityadmin amp dbcreator permissions in SQL Server
a) Launch SQL Server Management Studio Start All Programs Microsoft SQL Server 2012 SQL Server Management Studio
b) When SQL Server Management Studio launches within the Connect to Server dialog login using the default settings and click Connect
c) In the Object Explorer tool window expand the WINGTIPSERVER server hierarchy to the Security Logins node
d) Find the WINGTIPSP_Content account right-click it and select Properties
Creating a SharePoint Server 2013 Environment for Development and Testing Version 10
copy Critical Path Training 2012 All Rights Reserved 48
wwwCriticalPathTrainingcom
e) In the Select a page pane select Server Roles
f) Check securityadmin amp dbcreator and click OK
g) Close SQL Server Management Studio
3 Add the Workflow service account to the local administrators group
a) Open the Active Directory Users and Computers window Start Administrative Tools Active Directory Users and Computers
b) In the hierarchy on the left-hand side of the window expand it to the following Active Directory Users and Computers wingtipcom Builtin
c) In the main window right-click Administrators and select Properties
d) In the Administrators Properties dialog select the Members tab and click Add
e) In the Enter the object names to select box enter wingtipsp_content and click the Check Names button
f) In the Administrators Properties dialog click OK
g) Close the Active Directory Users and Computers window
At this point the service account that will host Workflow Manager and Service Bus has been configured correctly
Creating a SharePoint Server 2013 Environment for Development and Testing Version 10
copy Critical Path Training 2012 All Rights Reserved 49
wwwCriticalPathTrainingcom
Download amp Install Workflow Manager and Service Bus
In this section you will install Workflow Manager and Service Bus
1 Ensure you are logged into the WingtipServer VM using the account WINGTIPSP_Content | Password1
It is important you are logged in as the user that will run workflow when you install amp configure Workflow Manager and Service Bus
2 Launch the Web Platform Installer Start All Programs Microsoft Web Platform Installer
a) If the Web Platform Installer is not present on your machine you can download amp install it from here httpwwwmicrosoftcomwebdownloadsplatformaspx
If you do not have internet access within the virtual machine it is possible to download everything needed for workflow using the command line version of the Web Platform Installer (WebPICMD) You can get WebPICMD from httplearniisnetpageaspx1072web-platform-installer-v4-command-line-webpicmdexe-preview-release Specifically for
workflow enter the following command to download Workflow Beta 1 and all prerequisites
webpicmd offline ProductsWorkflow Pathc[path]
3 When the Web Platform Installer loads execute a search for Workflow select Workflow Manager 10 and click Add
4 Click the Install button at the bottom of the Web Platform Installer 40 window
5 On the Prerequisites page click I Accept
Note The Web Platform Installer 40 may prompt you to keep certain products updated using Microsoft Update If it does select Use Microsoft Update when I check for updates (recommended) and click Continue
6 When the installer completes the following dialog will appear Click Continue and then Finish to start the configuration process
Creating a SharePoint Server 2013 Environment for Development and Testing Version 10
copy Critical Path Training 2012 All Rights Reserved 50
wwwCriticalPathTrainingcom
At this point Workflow Manager amp Service Bus are installed
Configure Workflow Manager and Service Bus
In this section you will install Workflow Manager and Service Bus
1 If the Workflow Manager Configuration Wizard is not open open it Start All Programs Workflow Manager 10 Workflow Configuration
2 On the Welcome page click Configure Workflow Manager with Default Settings (Recommended)
Creating a SharePoint Server 2013 Environment for Development and Testing Version 10
copy Critical Path Training 2012 All Rights Reserved 51
wwwCriticalPathTrainingcom
3 On the New Farm Configuration page do the following
a) In the section Configure Service Account set the credentials to
i) User ID sp_contentwingtipcom
ii) Password Password1
b) Check the Allow Workflow management over HTTP on this computer checkbox
Ensure the username is entered in the fully qualified UPN format not as the default shows in the installer (sp_contentwingtip) or the domainusername format
In a production environment you should be doing everything over SSL
c) Click the Test Connection button to verify the connection credentials before proceeding
Creating a SharePoint Server 2013 Environment for Development and Testing Version 10
copy Critical Path Training 2012 All Rights Reserved 52
wwwCriticalPathTrainingcom
d) In the Certificate Generation Key and Confirm Certificate Generation Key enter Password1 into both fields
4 Click the right arrow in the bottom right corner to proceed
5 On the Summary page review your settings and click the check at the bottom right of the widow to start the configuration process
Creating a SharePoint Server 2013 Environment for Development and Testing Version 10
copy Critical Path Training 2012 All Rights Reserved 53
wwwCriticalPathTrainingcom
6 After a few minutes the Configuration Progress screen will show that everything has been configured correctly
Creating a SharePoint Server 2013 Environment for Development and Testing Version 10
copy Critical Path Training 2012 All Rights Reserved 54
wwwCriticalPathTrainingcom
7 Click the check in the bottom right corner
At this point Workflow Manager amp Service Bus has been installed and a new Workflow Manager farm has been created The next step is to connect the SharePoint 2013 farm to the Workflow Manager farm
Connect SharePoint 2013 to Workflow Manager
In this section you will connect SharePoint 2013 and Workflow Manager together
1 Ensure you are logged into the WingtipServer VM using the account WINGTIPadministrator | Password1
2 Get the Workflow Manager endpoint
a) Open the Workflow Manager PowerShell console Start All Programs Workflow Manager 10
b) Execute the Windows PowerShell following cmdlet
Get-WFFarm | ft HttpPort
c) Take note of this port (12291) This port number is what you will use to connect the SharePoint 2013 farm to the Workflow Manager 10 farm
In production you should connect to the HTTPS port listed in the HttpsPort property when you run Get-WFFarm
d) Close the Workflow Manager PowerShell window
3 Connect the SharePoint 2013 farm to Workflow Manager
Creating a SharePoint Server 2013 Environment for Development and Testing Version 10
copy Critical Path Training 2012 All Rights Reserved 55
wwwCriticalPathTrainingcom
a) Open SharePoint 2013 Management Shell Start All Programs Microsoft SharePoint 2013 Products SharePoint 2013 Management Shell
b) Execute the following Windows PowerShell script in the SharePoint 2013 Management Shell
Register-SPWorkflowService ndashSPSite httpintranetwingtipcom ndashWorkflowHostUri httpwingtipserver12291 ndashAllowOAuthHttp
This script is telling SharePoint the endpoint it should use to talk to Workflow Manager as well as Workflow Manager the SharePoint site collection it should talk to for calls into the CSOM It is also configuring all communication over HTTP rather than HTTPS for performance reasons In production you should always use HTTPS
This step will take a moment with no feedback during the process Be patient
c) Close the SharePoint 2013 Management Shell
At this point the SharePoint 2013 farm is connected to the Workflow Manager 10 farm
Configure SharePoint User Profile Service Application AD Sync
Users in SharePoint 2013 are validated by Workflow Manager against SharePoint to ensure they have permissions to start a workflow This is done by looking up the user by their AD UserPrincipalName (UPN) attribute in the User Profile Service Application (UPA) If no matching user is found the workflow will be automatically cancelled by Workflow Manager In this section you will setup UPA to connect amp sync with the local Active Directory so user accounts in AD will have their UPN synchronized to UPA
1 Open Central Administration Start All Programs Microsoft SharePoint 2013 Products SharePoint 2013 Central Administration
2 Go to the User Profile Service Application management page Application Management Manage Service Applications User Profile Service Application
3 The first step is to configure the User Profile Service Application to allow for Active Directory (AD) synchronization
a) Under Synchronization select Configure Synchronization Settings
b) For Synchronization select Use SharePoint Active Directory Import and click OK
4 Next establish a connection to the wingtipcom AD
a) Under Synchronization select Configure Synchronization Connections
b) On the Synchronization Connections page select Create New Connection
c) Enter the following values on this form and click OK
i) Connection Name WINGTIPCOM AD
ii) Type Active Directory Import
iii) Connection Settings
(1) Fully Qualified Domain Name wingtipcom
(2) Authentication Provider Type Windows Authentication
(3) Account Name WINGTIPAdministrator
(4) Password (and Confirm Password) Password1
iv) Containers
(1) Click Populate Containers
(2) After it loads check the box next to WINGTP or click the Select All button below the box
5 Go back to the User Profile Service Application management page Application Management Manage Service Applications User Profile Service Application
6 Finally start a synchronization import
a) Under Synchronization select Start Profile Synchronization
Creating a SharePoint Server 2013 Environment for Development and Testing Version 10
copy Critical Path Training 2012 All Rights Reserved 56
wwwCriticalPathTrainingcom
b) Select Start Full Synchronization and click OK
c) You will be taken back to the User Profile Service Application management page Notice in the top-right corner there is a status block that reports how many profiles are in the UPA database Refresh the page to see it increase to a handful of profiles as the import process runs
At this point you have successfully configured the User Profile Service Application to import profiles from the local AD
Exercise 8 Install the Microsoft Office 2013 Professional Clients
In this exercise you will install the Microsoft Office 2013 client applications
1 Download the Office 2013 into the WingtipServer VM For this you need to create an Office 365 Trial account login to Office 365 go to the Admin Dashboard and then download the latest version httpwwwmicrosoftcomofficepreviewentry-office-preview
2 Download the SharePoint Designer 2013 into the WingtipServer VM from here httpwwwmicrosoftcomen-usdownloaddetailsaspxid=35491
3 Download the Visio Professional 2013 into the WingtipServer VM from here httptechnetmicrosoftcomen-usevalcenterhh973399
Install Microsoft Office Professional Plus 2013
In this section you will install the Microsoft Office 2013 clients
1 Ensure you are logged into the WingtipServer VM using the account WINGTIPadministrator | Password1
2 Execute the installer OfficeProfessionalPlus_English_x64exe
3 On the Read the Microsoft Software License Terms dialog click the checkbox next to I accept the terms of this agreement and click Continue
4 On the Choose the installation you want dialog click the Install Now button
5 The installer will proceed and install all the Office products
6 When the installer completes click the Close button
7 Apply your Office Professional Plus 2013 license key
a) Launch Word 2013 Start All Programs Microsoft Office 2013 Word 2013
b) In the First things first dialog select Use recommended settings and click Accept
c) In the Welcome to Office dialog that opens click the [X] icon in the top-right corner to close it
d) In the left-hand pane click Open Other Documents
e) In the left-hand pane click Account
f) In the Product Information section within the Activation Required box click Change Product Key
g) Enter your license key for Office Professional Plus 2013 check the box next to Attempt to automatically activate my product online and click Install
h) Click OK
At this point you have installed Office Professional Plus 2013
Install Microsoft Office Visio 2013
In this section you will install Microsoft Office 2013 Visio
1 Ensure you are logged into the WingtipServer VM using the account WINGTIPadministrator | Password1
2 Execute the installer VisioProfessional_English_x64exe
3 On the Read the Microsoft Software License Terms dialog click the checkbox next to I accept the terms of this agreement and click Continue
Creating a SharePoint Server 2013 Environment for Development and Testing Version 10
copy Critical Path Training 2012 All Rights Reserved 57
wwwCriticalPathTrainingcom
4 On the Choose the installation you want dialog click the Install Now button
5 The installer will proceed and install all Visio 2013
6 When the installer completes click the Close button
7 Apply your Visio 2013 license key
a) Launch Visio 2013 Start All Programs Microsoft Office 2013 Visio 2013
b) In the First things first dialog select Use recommended settings and click Accept
c) In the Welcome to Office dialog that opens click the X icon in the top-right corner to close it
d) In the left-hand pane click Open Other Documents
e) In the left-hand pane click Account
f) In the Product Information section within the Activation Required box click Change Product Key
g) Enter your license key for Visio 2013 check the box next to Attempt to automatically activate my product online and click Install
h) Click OK
At this point you have installed Visio 2013
Install Microsoft Office 2013 SharePoint Designer
In this section you will install Microsoft Office 2013 SharePoint Designer
1 Ensure you are logged into the WingtipServer VM using the account WINGTIPadministrator | Password1
2 Execute the installer SharePointDesigner_English_x64exe
3 On the Read the Microsoft Software License Terms dialog click the checkbox next to I accept the terms of this agreement and click Continue
4 On the Choose the installation you want dialog click the Install Now button
5 The installer will proceed and install all SharePoint Designer 2013
6 When the installer completes click the Close button
At this point you have installed SharePoint Designer 2013
Exercise 9 Install Visual Studio 2012
In this exercise you will install Visual Studio 2012
1 Ensure you are logged into the WingtipServer VM using the account WINGTIPadministrator | Password1
2 Start the install of Visual Studio 2012 Ultimate Trial by downloading the installer from here httpwwwmicrosoftcomvisualstudio11en-usdownloads
3 On the installation splash screen check the box next to I agree to the License terms and conditions and click the Next button
Creating a SharePoint Server 2013 Environment for Development and Testing Version 10
copy Critical Path Training 2012 All Rights Reserved 58
wwwCriticalPathTrainingcom
4 On the Optional Features to install dialog click Install
5 After some time the installer will complete Click the Launch button to launch Visual Studio 2012
Creating a SharePoint Server 2013 Environment for Development and Testing Version 10
copy Critical Path Training 2012 All Rights Reserved 59
wwwCriticalPathTrainingcom
6 In the Choose Default Environment Settings select Visual C Development Settings and click Start Visual Studio
7 Close Visual Studio 2012
At this point Visual Studio 2012 RTM is installed
Install Office amp SharePoint 2013 Developer Tools
In this section you will install the Office and SharePoint 2013 developer tools for Visual Studio
1 Ensure you are logged into the WingtipServer VM using the account WINGTIPadministrator | Password1
2 Launch the Web Platform Installer Start All Programs Microsoft Web Platform Installer
3 In the search box at the top-right corner of the Web Platform Installer 40 window type sharepoint and press Enter
4 Click the Add button to the right of Microsoft Office Developer Tools for Visual Studio 2012 - Preview 2
5 Click the Install button at the bottom of the Web Platform Installer 40 window
6 On the Prerequisites page click I Accept
Creating a SharePoint Server 2013 Environment for Development and Testing Version 10
copy Critical Path Training 2012 All Rights Reserved 60
wwwCriticalPathTrainingcom
At this point you have installed the SharePoint 2013 amp Office 2013 development tools in Visual Studio 2012
Creating a SharePoint Server 2013 Environment for Development and Testing Version 10
copy Critical Path Training 2012 All Rights Reserved 61
wwwCriticalPathTrainingcom
Appendix 1 Download Manifest
The following lists everything referenced that you will or may need to download in this environment
Windows Server 2008 R2 with Service Pack 1 (installer ISO)
o httptechnetmicrosoftcomen-usevalcenterdd459137aspx
Windows Server 2008 R2 with Service Pack 1 (prebuilt VHD)
o httpwwwmicrosoftcomdownloadsdetailsaspxFamilyId=9040a4be-c3cf-44a5-9052-a70314452305
Windows Server 2008 R2 Service Pack 1
o httpwwwmicrosoftcomen-usdownloaddetailsaspxid=5842
SQL Server 2012 Trial
o httpwwwmicrosoftcombetaexperiencepdSQL2012EvalCTAenusdefaultaspx
SharePoint Server 2013
o httptechnetmicrosoftcomen-USevalcenterhh973397aspx
Hotfixes for SharePoint Server 2013 (post-install)
o KB2554876 The SharePoint Parsing Process Crashes in Windows Server 2008 R2
o KB2708075 IIS 75 Configurations are not Updated when you use the ServerManager Class to Commit
Configuration Changes
o KB2759112 Hotfix is Available for NET Framework 45 that Resolves an ASPNET Race Condition Issue in
Windows Server 2008 R2 Windows Server 2008 R2 SP1
o KB2765317 Hotfix is Available for NET Framework 45 that Resolves an ASPNET Race Condition Issue in
Windows 8 Windows RT and Windows Server 2012
Web Platform Installer
o httpwwwmicrosoftcomwebdownloadsplatformaspx
Web Platform Installer ndash Command Line Version
o httplearniisnetpageaspx1072web-platform-installer-v4-command-line-webpicmdexe-preview-release
Workflow Manager 10
o Download using the Microsoft Web Platform Installer
Office 2013
o httpwwwmicrosoftcomofficepreviewentry-office-preview
SharePoint Designer 2013
o httpwwwmicrosoftcomen-usdownloaddetailsaspxid=35491
Visio Professional 2013
o httptechnetmicrosoftcomen-usevalcenterhh973399
Visual Studio 2012
o httpwwwmicrosoftcomvisualstudio11en-usdownloads
Office Developer Tools for Visual Studio 2012 ndash Preview 2
o Download using the Microsoft Web Platform Installer
Creating a SharePoint Server 2013 Environment for Development and Testing Version 10
copy Critical Path Training 2012 All Rights Reserved 62
wwwCriticalPathTrainingcom
Appendix 2 Windows PowerShell Script Manifest
The following lists all Windows PowerShell scripts that are provided with this setup guide
AddDisableLoopbackCheckRegKeyps1
o The following steps automate creating the registry key outlined as Method 2 in the Microsoft Knowledgebase article
httpsupportmicrosoftcomkb896861 using Windows PowerShell This key DisableLoopbackCheck will allow
you to browse SharePoint sites on the same machine Without this key (or following Method 1 in the KB article) you
would need to browse any SharePoint sites from a different computer than the one which SharePoint is installed on
ConfigureSpFarmForAppsps1
o Configures a SharePoint 2013 for hosting apps This ensures everything you need is installed running and
configured This is documented here httpmsdnmicrosoftcomen-uslibraryfp179923(v=office15)
CreateSpServiceAccountsps1
o Creates the minimal necessary service accounts for SharePoint Server 2013 SP_Farm SP_Content amp
SP_Services
SetupSharePointForHNSCps1
o Configures a SharePoint 2013 install for hosting Host-Named Site Collections (HNSC) This involves creating a Web
Application in SharePoint that has no host header bindings Using DNS all requests are mapped to this Web
Application You then create the site collections via PowerShell as you cant create HNSCs via the browser (Central
Administration)
Creating a SharePoint Server 2013 Environment for Development and Testing Version 10
copy Critical Path Training 2012 All Rights Reserved 63
wwwCriticalPathTrainingcom
Appendix 3 Create Sample Adventure Works Database
The following steps document downloading and installing the sample Adventure Works OLTP database provided by Microsoft
1 Launch Internet Explorer and navigate to httpmsftdbprodsamplescodeplexcom
2 Download the Adventure Works 2012 OLTP Script
3 Extract the ZIP into a folder on the desktop
4 Launch SQL Server Management Studio Start All Programs Microsoft SQL Server 2012 SQL Server Management Studio
5 When SQL Server Management Studio launches within the Connect to Server dialog login using the default settings and click Connect
6 Within SQL Server Management Studio select File Open File
7 Select the file instawdbsql from the extracted ZIP and click Open
8 If prompted to re-login to the database engine do it
9 Select Query SQLCMD Mode
10 Scroll down to line 42 the line that starts with the following
setvar SqlSamplesSourceDataPath
11 Change the folder location of where you unzipped the Adventure Works 2012 OLTP Script
12 Select Query Execute
13 When the script completes the AdventureWorks2012 database will have been created
Creating a SharePoint Server 2013 Environment for Development and Testing Version 10
copy Critical Path Training 2012 All Rights Reserved 64
wwwCriticalPathTrainingcom
Change Log
Change Version Description
August 22 2012 v 01 Pre-release for review
August 27 2012 v 02 Initial public release ndash install guide based on SharePoint Server Beta 2
August 28 2012 v 03 Updated URL for the site collection used to connect SharePoint to WAW
August 31 2012 v 04 Typo Removed SQL Server Analysis Services as part of the install Not required in a
SharePoint dev box (unless you are doing business intelligence which is not covered
in the guide)
Updated all references to Windows Azure Workflow to Workflow Manager the new
official name for the new workflow product
Updated SetupSharePointForHNSCps1 script to lookup HNSC Web Application by
name rather than URL which is more reliable
Typo Updated WingtipAllUp public NIC to use a different IP than the WingtipDC
Typo Replaced a reference to WingtipServer with WingtipDC
Typo Fixed handful of minor typos
September 1 2012 v 05 Removed SQL Server Reporting Services from install guide
Added step to uncheck IErsquos ldquoAutomatically detect proxyrdquo
Added post workflow install steps to setup User Profile Service Application to sync with
local Active Directory
September 5 2012 v 06 Added step to create a default root site collection in the HNSC web app
Updated minor typos and added extra notes for context
Updated PowerShell script SetupSharePointForHNSCps1 to remove content
database of default Web Application when setting up HNSC Web App
Added a new exercise 8 (after SharePoint install amp config and before the Workflow
install and config) to setup support for My Sites
October 20 2012 v 07 Updated script SetupSharePointForHNSCps1 to fix a bug where it would fail on line
111 if you didnrsquot already have a WINGTIPSP_Content managed account
Added section to bypass SharePointrsquos check for crlmicrosoftcom
Updated workflowrsquos registration PowerShell script to point to
httpintranetwingtipcom
Switched order of post-SharePoint install to setup HSNC hosting before configuring for
hosting apps
November 29 2012
v 10 Changed setup guide to use a single VM instead of two VMs
Updated guide for SharePoint 2013 RTM
Creating a SharePoint Server 2013 Environment for Development and Testing Version 10
copy Critical Path Training 2012 All Rights Reserved 6
wwwCriticalPathTrainingcom
This will be used to connect the two VMs together so they can talk to each other
5 Click OK to save your changes
When you create a virtual Internal Only network Hyper-V creates a virtual network interface card (NIC) in the list of all NICrsquos installed on the host computer (Start [search] ldquoView Network Connectionsrdquo) If you configure the IP of this card to be on the same network with a different IP address than you use for your machines you will be able to login to these machines using the Remote Desktop Connection app in Windows
A Private Virtual Machine Network the other connection type available is similar to an Internal network except that it does not create
the virtual NIC in the host computer
Exercise 2 Install amp Configure a Windows Server
In this exercise you will create install configure and update a new server to act as the Active Directory domain controller for the SharePoint environment using Windows Server 2008 R2 with Service Pack 1
If you are using a different virtualization product other than Hyper-V or if you are creating physical machines you can skip to the section Install the Windows Server 2008 R2 Operating System
1 If it is not open launch the Hyper-V Manager Start Administrative Tools Hyper-V Manager
2 Inside the left-hand side of the Hyper-V Manager locate the node with the name of the local host computer and select it
Creating a SharePoint Server 2013 Environment for Development and Testing Version 10
copy Critical Path Training 2012 All Rights Reserved 7
wwwCriticalPathTrainingcom
Create a New Virtual Machine
In this section you will create a new virtual machine in Hyper-V
1 In the Actions pane select New Virtual Machine When you execute this menu command the Hyper-V Manager will launch the New Virtual machine Wizard
2 In the Specify Name and location dialog enter a Name of WingtipServer and click Next
3 In the Assign Memory dialog enter the amount of Memory to allocate to the virtual machine in MB to 12288 and click Next
Creating a SharePoint Server 2013 Environment for Development and Testing Version 10
copy Critical Path Training 2012 All Rights Reserved 8
wwwCriticalPathTrainingcom
4 In the Configure Networking dialog use the drop down box to assign a Connection value of Internal LAN and click Next
5 In the Connect Virtual Hard Disk dialog accept the default options to create a virtual hard disk amp click Finish
If possible configure the location so that the VHD file for the VM is created on a separate drive than the host computerrsquos operating system
6 In the Hyper-V Manager window right-click the VM you just created and select Settings
7 In the Settings for WingtipServer dialog select Add Hardware select Network Adapter and click Add
Creating a SharePoint Server 2013 Environment for Development and Testing Version 10
copy Critical Path Training 2012 All Rights Reserved 9
wwwCriticalPathTrainingcom
8 Obtain a copy of the Windows Server 2008 R2 with Service Pack 1 install binaries
The install image (ISO) is available to MSDN or TechNet subscribers or as a trial download available here httptechnetmicrosoftcomen-usevalcenterdd459137aspx
Obviously you can also use your own licensed copy of Windows Server 2008 R2 with Service Pack 1
Microsoft also provides a pre-installed 180-day trial Windows Server 2008 R2 Hyper-V VHD file that you can download (httpwwwmicrosoftcomdownloadsdetailsaspxFamilyId=9040a4be-c3cf-44a5-9052-a70314452305) instead of installing it
yourself If you elect to go this route
Make sure you specify the VHD file you downloaded in the following step for the Hard Drive of the VM
Do not specify a DVD Drive in the following step as you will not be installing anything
If you elect to do this step jump down to section Configure Windows Server 2008 R2
9 In the Settings for WingtipServer dialog update the VM to have the following settings When finished click OK
a) Processor 2 Virtual Processors
b) DVD Drive Image File ndash Map to the Windows Server 2008 R2 ISO installer file
c) Network Adapter Internal LAN
d) Network Adapter Not Connected
10 Start up the WingtipServer VM and install Windows Server 2008 R2
a) In the Hyper-V Manager window right-click the VM you just created and select Settings
b) Right-click on the VM named WingtipServer and select the Connecthellip menu
c) In the Virtual Machine Connection window drop down the Action menu and select Start
Creating a SharePoint Server 2013 Environment for Development and Testing Version 10
copy Critical Path Training 2012 All Rights Reserved 10
wwwCriticalPathTrainingcom
If you elected to use the fully installed trial VHD from Microsoft instead of installing your own server skip to the section Configure Windows Server 2008 R2
Install the Windows Server 2008 R2 Operating System
In this section you will install the operating system
1 After the setup program for Windows Server 2008 R2 loads it will prompt you with a dialog asking you to select a language Accept the default of English and click Install to continue
2 At the next dialog click the Install Now button to begin the installation
Creating a SharePoint Server 2013 Environment for Development and Testing Version 10
copy Critical Path Training 2012 All Rights Reserved 11
wwwCriticalPathTrainingcom
3 The next dialog instructs you to select the operating system you want to install Select the operating system named Windows Server 2008 R2 Enterprise (Full Installation) with the x64 architecture Click Next to continue
4 Agree to the licensing terms and click Next
5 Click on Custom (advanced) to select the type of installation
6 The next dialog asks you where you want to install Windows Accept the default configuration which uses a location of Disk 0 Unallocated Space as shown below Click Next to continue
At this point you have given the Windows setup program enough information to install the basic operating system Setup program will now run for a while as it copies and expands files and installs Windows features You now have a few minutes to get a cup of coffee or catch up on email
7 When the setup program completes it will ask you to assign a new password for the built-in Administrator account Click OK to continue
8 Set the password for Administrator account to Password1
9 When you have updated the Administrator password you will get a confirmation that the update was successful Click OK to complete the installation of the operating system
If you elected to use the pre-installed trial VHD Microsoft offers you will pick up the configuration exercise at this point
Configure Windows Server 2008 R2
In this section you will configure the server
1 When you log in Windows Server automatically displays the Initial Configuration Tasks window Click the check box with the caption Do not show this window at logon and then click the Close button
Creating a SharePoint Server 2013 Environment for Development and Testing Version 10
copy Critical Path Training 2012 All Rights Reserved 12
wwwCriticalPathTrainingcom
2 After you close the Initial Configuration Tasks window Windows Server will display the Server Manager
Creating a SharePoint Server 2013 Environment for Development and Testing Version 10
copy Critical Path Training 2012 All Rights Reserved 13
wwwCriticalPathTrainingcom
3 Configure the Administrator account so that its password does not expire
a) Inside the Configuration node of the Server Manager navigate to Local Users and Groups Users (as shown in the following screenshot) and locate the local Administrator account
b) Right-click on the Administrator account and click Properties
c) In the Administrator Properties dialog unselect the option for User must change password at next logon and select the option for Password never expires Click OK
4 Rename the computer name of the VM
a) In the Server Manager navigate to the top-level node to display the Server Summary page Click Change System Properties
b) On the Computer Name tab of the System Properties dialog click the Change button
c) Enter a new computer name of WingtipServer and click OK
Creating a SharePoint Server 2013 Environment for Development and Testing Version 10
copy Critical Path Training 2012 All Rights Reserved 14
wwwCriticalPathTrainingcom
5 After changing the computer name you will be prompted to restart the VM Choose OK to restart After the VM has restarted log in again using [administrator | Password1] (username | password)
6 Disable Windows Firewall and Enhanced Security Configuration
a) In the Server Manager navigate to the top-level node to display the Server Summary page Inside the Security Information section locate the links for Go to Windows Firewall and Configure IE ECS
b) Click on Configure IE ECS link Disable Enhanced Security Configuration for both Administrators and Users by selecting the Off radio buttons and click OK
c) Now click the Go to Windows Firewall link to display the page for the Windows Firewall Click on the Windows Firewall Properties link at the bottom of the Overview section
d) In the Domain Profile tab of the Windows Fire dialog change the Firewall state property setting from On to Off Click to Apply button to save your changes
e) Once you have turned off the firewall in the Domain Profile tab go to the Private profile tab and the Public profile tab and follow the same steps to disable the firewall for these profiles as well
f) Click OK to dismiss the Windows Firewall dialog once you have turned off the firewall for all three profiles
7 Enable Remote Desktop for your VM
a) In the Server Manager navigate to the top-level node to display the Server Summary page Inside the Computer Information section locate and click the link for Configure Remote Desktop
b) In the Remote tab of the System Properties dialog select the last option for Allow connections only from computers running Remote Desktop with Network Level Authentication Click OK to save changes and dismiss the System Properties dialog
Creating a SharePoint Server 2013 Environment for Development and Testing Version 10
copy Critical Path Training 2012 All Rights Reserved 15
wwwCriticalPathTrainingcom
8 Enable the Windows Server Features for the Desktop Experience and the PowerShell Integrated Scripting Environment
a) In Server Manager choose Add Feature to bring up the Add Features Wizard dialog
b) Select the feature Desktop Experience
When you first click the checkbox for the Desktop Experience the wizard will prompt you with the following dialog to add support for Ink and Handwriting Services Click the Add Required Features button to continue
c) Scroll down the list of features in the Add Features Wizard dialog and select the feature Windows PowerShell Integrated Scripting Environment (ISE)
Creating a SharePoint Server 2013 Environment for Development and Testing Version 10
copy Critical Path Training 2012 All Rights Reserved 16
wwwCriticalPathTrainingcom
When you first click the checkbox for the Windows PowerShell Integrated Scripting Environment (ISE) the wizard will prompt you with the following dialog to add support for NET Framework 351 Features Click the Add Required Features button to continue
d) Click the Next button on the Add Features Wizard dialog to continue with the install
e) On the Confirm Installation Selection wizard page click the Install button
f) When you see the Installation Results screen the Add Features Wizard informs you a computer restart is required Click Close button to dismiss this dialog
9 After the VM has restarted log in again using [administrator | Password1] (username | password)
Configure the Virtual Machinersquos Networking Setup
In this section yoursquoll configure the two NICrsquos you added to the VM in previous steps One NIC (Internal LAN) will be used to communicate with other VMs in this environment while the other (External LAN) will be used to connect to the internet
1 Configure the NIC that is linked to the Internal LAN network
a) Open the Network Connections dialog by pressing Start enter view network connections in the search box Click the View Network Connections shortcut
b) Two network connections will be shown but only one will show as connected
The connected one is the one that is connected to the Internal LAN network The other one is currently ldquounpluggedrdquohellip this is why we didnrsquot connect a network to the second network when initially configuring the VM as this makes it easier to see which NIC is which in the VM
c) Rename the two NICrsquos
i) Right-click the connected NIC and select Rename Give it a name of Internal LAN
Creating a SharePoint Server 2013 Environment for Development and Testing Version 10
copy Critical Path Training 2012 All Rights Reserved 17
wwwCriticalPathTrainingcom
ii) Right-click the disconnected NIC and select Rename Give it a name of External LAN
d) Right-click the Internal LAN NIC and select Properties
e) In the Local Area Connection Properties dialog select the Internet Protocol Version 4 (TCPIPv4) item and click Properties
f) Enter the following information into the resulting dialog to configure the NICrsquos IP settings
i) Use the Following IP Address
(1) IP Address 192168150102
(2) Subnet mast 2552552550
(3) Default Gateway 192168150102
ii) Use the Following DNS Server Addresses
(1) Preferred DNS Server 192168150102
g) Click OK to accept the IP settings and Close to accept the changes to the NIC
Why not use 101 as the start NIC When you created the virtual internal network Hyper-V created a virtual NIC on the host computer If you set the IP of that NIC to 192168150101 you can use the Remote Desktop Connection app in Windows to connect to your virtual machines and easily copy-paste amp share drives
2 Configure the NIC that is linked to the External LAN network
a) Open the Network Connections window if it is not still open using the same steps from the previous step
b) Right-click the External LAN NIC and select Properties
c) In the Local Area Connection Properties dialog select the Internet Protocol Version 4 (TCPIPv4) item and click Properties
d) Enter the following information into the resulting dialog to configure the NICrsquos IP settings
i) Obtain an IP Address Automatically
ii) Use the Following DNS Server Addresses
(1) Preferred DNS Server 192168150102
e) Click the Advanced button to open the Advanced TCPIP Settings dialog
f) In the Advanced TCPIP Settings dialog click the DNS tab
i) Uncheck the Register this Connections Address in DNS
Creating a SharePoint Server 2013 Environment for Development and Testing Version 10
copy Critical Path Training 2012 All Rights Reserved 18
wwwCriticalPathTrainingcom
g) In the Advanced TCPIP Settings dialog click the WINS tab
i) Click the Add button and specify a new WINS Server as 192168150102
h) Click OK Close multiple times to accept all TCPIP settings
The external NIC will now obtain an IP dynamically amp will not register itself in the DHCPrsquos DNS server which is a good thing when there are multiple people on the same network this this type of a setup
3 Connect the second NIC to the External LAN network
a) Go back to the host computer and open the Hyper-V Manager
b) In the Hyper-V Manager window right-click the VM WingtipServer and select Settings
c) Select the second NIC the one that is not connected
d) For the Network select External LAN and click OK This will effectively plug the external network into the VM
4 Go back into the WingtipServer VM and if it is not still open open the Network Connections dialog You should now see both connections plugged in
a) To refresh the connection select the connection you just plugged in and click the Disable this Network Device button in the toolbar After the connection is disabled select it and click the Enable this Network Device button
b) After a few seconds the VM should be able to connect to the internet which you can test by browsing to a site such as httpwwwbingcom
Configure Windows Update and Update the Server
In this section you will verify the server is fully patched and updated
1 Verify Service Pack 1 is installed
a) Verify the version of the operating system installed by clicking Start right-click on Computer select Properties
b) If the server simply says Windows Server 2008 R2 Enterprise as shown in the following figure download and install Service Pack 1 from the following location httpwwwmicrosoftcomen-usdownloaddetailsaspxid=5842
Creating a SharePoint Server 2013 Environment for Development and Testing Version 10
copy Critical Path Training 2012 All Rights Reserved 19
wwwCriticalPathTrainingcom
c) If Service Pack 1 is installed it will state it
2 Update the server using Windows Update
a) Selecting Start All Programs Windows Update
b) First disable Windows Update from running automatically
i) Click the link Change Settings
ii) Under the Important Updates list select Never check for updates (not recommended)
This isnrsquot what you would do in a production environment but for a development machine it is ok
c) Now update the server
i) Click the Check for Updates button
ii) If prompted install any updates to the Windows Update dialog
iii) Select the Check for Updates link
iv) Windows Update will the report how many updates are available Select all important and recommended updates and click the Install Updates button
v) If prompted select I accept the license terms for any updates that require it
vi) Keep going through the process of running Windows Update checking for updates and installing them after each reboot until it says there are no updates left to install
This step is likely going to take quite a bit of time so be patient
Activate Windows Server 2008 R2
In this section you will activate the server if you have a product key
1 If you have a product key for Windows Server 2008 R2 use it to activate Windows
a) In the Server Manager window navigate to the top-level node to display the Server Summary page Click Activate Windows
b) You will be prompted to enter your product key
i) Enter your product key and click to button to activate Windows
Creating a SharePoint Server 2013 Environment for Development and Testing Version 10
copy Critical Path Training 2012 All Rights Reserved 20
wwwCriticalPathTrainingcom
ii) After a few seconds your VM should be able to connect to a Microsoft site and successfully activate Windows
At this point you have a fully patched operating system VM created that will act as the Active Directory domain controller
Apply the DisableLoopbackCheck Registry Fix
Configure the DisableLoopbackCheck registry setting (Microsoft KB httpsupportmicrosoftcomkb896861)
The following steps automate creating the registry key outlined as Method 2 in the Microsoft KB article httpsupportmicrosoftcomkb896861 using Windows PowerShell
PowerShell Script Alert You can also find this PowerShell script AddDisableLoopbackCheckRegKeyps1 in the files that
accompany this setup guide
1 Click the Windows PowerShell icon in the Taskbar
2 Run the following PowerShell commands pressing [ENTER] after each one
$regKeyPath = HKLMSystemCurrentControlSetControlLsa $key = DisableLoopbackCheck New-ItemProperty -Path $regKeyPath -Name $key -Value 1 -PropertyType dword
a) Close the Windows PowerShell console by typing EXIT and pressing [ENTER]
Exercise 3 Install Active Directory Domain Services
Now you will promote your WingtipServer VM to a domain controller and create a new domain named wingtipcom
1 Login to the WingtipServer virtual machine using administrator | Password1
2 Add and configure the role for Active Directory Domain Services
a) Launch Server Manager and select the Roles node
b) Click the Add Roles link to start the Add Roles Wizard
c) On the Before you begin page click Next
d) On the Server Roles page select Active Directory Domain Services Click the Add Required Features button if prompted to install prerequisites
e) Click Next
Creating a SharePoint Server 2013 Environment for Development and Testing Version 10
copy Critical Path Training 2012 All Rights Reserved 21
wwwCriticalPathTrainingcom
f) On the next page of the wizard click Next which will bring you to the Confirm Installation Selections page
g) Click Install
After Active Directory Domain Services has been installed you will see the Installation Results page in the Add Roles Wizard
3 Click on the link with the big long caption of Close this wizard and launch the Active Directory Domain Services Installation Wizard (dcpromoexe)
4 On the first page of the Active Directory Domain Services Installation Wizard click the Use Advanced Mode Installation checkbox and click Next
Creating a SharePoint Server 2013 Environment for Development and Testing Version 10
copy Critical Path Training 2012 All Rights Reserved 22
wwwCriticalPathTrainingcom
5 On the Operating System Compatibility page click Next
6 On the Choose a Deployment Configuration select Create a new domain in a new forest and click Next
7 On the Name the Forrest Root Domain enter the following and click Next
a) FQDN of the forest root domain wingtipcom
8 On the Domain NetBIOS Name set it to WINGTIP and click Next
9 On the Set Forest Functional Level page select Windows Server 2008 R2 and click Next
10 On the Additional Domain Controller Options accept the default options and click Next
11 You might be prompted with the dialog shown below providing a warning that This computer has dynamically assigned IP address(es) This is not a problem when you are running your development environment on a domain controller Click Yes to dismiss the dialog
12 At this point the wizard will prompt you with a dialog information you a delegation for the DNS Server cannot be created because it cannot find the authoritative parent zone This is not a problem because the wizard will automatically configure the DNS of the VM to point to itself Click on the Yes button to dismiss this dialog
Creating a SharePoint Server 2013 Environment for Development and Testing Version 10
copy Critical Path Training 2012 All Rights Reserved 23
wwwCriticalPathTrainingcom
13 On the Location for Database Log Files and SYSVOL page accept all the default values and click Next
14 On the Directory Services Restore Mode Administrator Password page enter Password1 in both textboxes and click Next
15 On the Summary page click Next to start the process of configuring the new Active Directory domain
16 The wizard will display the dialog below to show you the progress of the configuration process You will be required to reboot when the configuration has been completed Check the option for Reboot on completion and then wait for the configuration to complete and the machine to reboot
17 After the VM reboots login to the server with wingtipadministrator | Password1
Configure Windows Update and Update the Server
In this section you will verify the server is fully patched and updated
1 Update the server using Windows Update
a) Selecting Start All Programs Windows Update
b) Select the Check for Updates link
c) Windows Update will the report how many updates are available Select all important and recommended updates and click the Install Updates button
d) If prompted select I accept the license terms for any updates that require it
e) Keep running Windows Update after each reboot and update install until it says there are no updates left to install
Creating a SharePoint Server 2013 Environment for Development and Testing Version 10
copy Critical Path Training 2012 All Rights Reserved 24
wwwCriticalPathTrainingcom
This step could take quite a bit of time so be patient
At this point you have a fully installed Active Directory Domain Controller for the Wingtipcom domain hosted on the server WingtipServer
Exercise 4 Install SQL Server 2012
In this exercise you will install SQL Server 2012 that will be used to store all required databases
1 Download the SQL Server 2012 Evaluation Edition specifically the DVD x64 ISO image to the host computer from here httpwwwmicrosoftcombetaexperiencepdSQL2012EvalCTAenusdefaultaspx or you can use your own licensed copy
2 Mount the SQL Server 2012 ISO to the WingtipServer VM
a) On the host computer open the Hyper-V Manager
b) Right-click the VM WingtipServer and select Settings
c) Select DVD Drive in the left-hand panel
d) In the right-hand panel select Image File and browse to the ISO file that contains SQL Server 2012 and click OK
3 Login to the WingtipServer VM as wingtipadministrator | Password1
Install SQL Server 2012
In this section you will install SQL Server 2012
1 If the AutoPlay dialog box is open click Run SETUPEXE If it isnrsquot use Windows Explorer to navigate to the DVD drive and execute the setupexe file in the root of the DVD drive
2 In the SQL Server Installation Center click Installation on the left-hand side
Creating a SharePoint Server 2013 Environment for Development and Testing Version 10
copy Critical Path Training 2012 All Rights Reserved 25
wwwCriticalPathTrainingcom
3 Next select New SQL Server stand-alone installation or add features to an existing installation
4 On the Setup Support Rules page the installer will check for issues before installing Click OK
5 On the Product Key page click the Specify a free edition radio box and select Evaluation then click Next
6 On the License Terms page click the I accept the license terms checkbox and click Next
7 On the Setup Support Rules page the installer will check for any problems with the server you are installing on Click Next when this completes
Creating a SharePoint Server 2013 Environment for Development and Testing Version 10
copy Critical Path Training 2012 All Rights Reserved 26
wwwCriticalPathTrainingcom
8 On the Support Role page select SQL Server Feature Installation and click Next
9 On the Feature Selection page check the following options and click Next
a) Instances Features
i) Database Engine Services
(1) Full-Text and Semantic Extractions for Search
b) Shared Features
i) Management Tools ndash Basic
(1) Management Tools ndash Complete
Creating a SharePoint Server 2013 Environment for Development and Testing Version 10
copy Critical Path Training 2012 All Rights Reserved 27
wwwCriticalPathTrainingcom
10 On the Installation Rules page click Next
11 On the Instance Configuration page click Next
12 On the Disk Space Requirements page click Next
13 On the Server Configuration page do the following and click Next
a) On the Service Account tab change the Startup Type for the SQL Server Agent to Automatic
14 On the Database Engine Configuration page do the following and click Next
a) On the Server Configuration tab click Add Current User
b) On the FILESTREAM tab
i) Check Enable FILESTREAM for Transact-SQL Access
ii) Check Enable FILESTREAM for file IO access
15 On the Error Reporting page click Next
16 On the Installation Configuration Rules page click Next
17 On the Ready to Install page click Install
Installation of SQL Server 2012 will take some time please be patient
18 When the installation completes the Complete page will be shown Click Close
At this point you have now successfully installed SQL Server 2012
Creating a SharePoint Server 2013 Environment for Development and Testing Version 10
copy Critical Path Training 2012 All Rights Reserved 28
wwwCriticalPathTrainingcom
Exercise 5 Install amp Configure SharePoint Server 2013
In this exercise you will install SharePoint 2013
1 Download the SharePoint Server 2013 to the host computer from here httptechnetmicrosoftcomen-USevalcenterhh973397aspx
2 Mount the SharePoint Server 2013 ISO to the WingtipServer VM
a) On the host computer open the Hyper-V Manager
b) Right-click the VM WingtipServer and select Settings
c) Select DVD Drive in the left-hand panel
The file that Microsoft provides is saved in the IMG format Hyper-V Manager wonrsquot allow you to mount an IMG file so rename it to ISO before mounting it
d) In the right-hand panel select Image File and browse to the ISO file that contains SharePoint Server 2013 and click OK
Create SharePoint Service Accounts amp Grant Rights to SQL Server 2012
In this section you will create the necessary service accounts that will be used by SharePoint in Active Directory and grant them necessary rights in SQL Server 2012
PowerShell Script Alert The creation of users and granting them rights to SQL Server 2012 steps in this section are automated in the Windows PowerShell script CreateSpServiceAccountsps1 found in the files that accompany this setup guide Open the script
and read the header for documentation on how to use it
1 Open the Active Directory Users and Computers Start Administrative Tools Active Directory Users and Computers
2 Expand the tree in the left-hand pane to see the Users OU Select the Users OU
3 Create a new user SP_Farm
a) In the toolbar select Action New User
Creating a SharePoint Server 2013 Environment for Development and Testing Version 10
copy Critical Path Training 2012 All Rights Reserved 29
wwwCriticalPathTrainingcom
b) Set the userrsquos Full Name amp User Login Name to SP_Farm and click Next
c) In the password dialog enter the following and click Next
i) Password (and Confirm Password) Password1
ii) User must change password at next login unchecked
iii) User cannot change password unchecked
iv) Password never expires checked
v) Account is disabled unchecked
Creating a SharePoint Server 2013 Environment for Development and Testing Version 10
copy Critical Path Training 2012 All Rights Reserved 30
wwwCriticalPathTrainingcom
vi) Click Finish
4 Repeat the previous step to create two more accounts
a) SP_Content
b) SP_Services
At this point you have created all the necessary service accounts
Install SharePoint Server 2013 Prerequisites
In this section you will install the SharePoint Server 2013 Prerequisites
1 Ensure you are logged into the WingtipServer VM using the account wingtipadministrator | Password1
2 If the AutoPlay dialog box is open click Run splashhta If it isnrsquot use Windows Explorer to navigate to the DVD drive and execute the splashhta file in the root of the DVD drive
Creating a SharePoint Server 2013 Environment for Development and Testing Version 10
copy Critical Path Training 2012 All Rights Reserved 31
wwwCriticalPathTrainingcom
3 Click the Install Software Prerequisites link
4 In the Microsoft SharePoint 2013 Products Preparation Tool window click Next
5 On the License Terms for Software Products page
a) Check I accept the terms of the License Agreement(s)
b) Click Next
6 The tool will download and install all prerequisites for SharePoint Server 2013 This will take some time It may prompt you to reboot the server If so reboot the server and login using wingtipadministrator | Password1
Creating a SharePoint Server 2013 Environment for Development and Testing Version 10
copy Critical Path Training 2012 All Rights Reserved 32
wwwCriticalPathTrainingcom
7 When the prerequisite installer is complete it will present a summary of everything it did
8 Click Finish
9 Restart the WingtipServer VMhellip some additional installations and changes that the prerequisite installer did will require a restart before installing SharePoint Server 2013
At this point all prerequisites required by SharePoint Server 2013 have been installed and any necessary configuration changes have been applied to the server However it is strongly recommend that you run Windows Update and install any pending updates Further Microsoft recommends installing the following hotfixes if they are not already installed
KB2554876 The SharePoint Parsing Process Crashes in Windows Server 2008 R2
KB2708075 IIS 75 Configurations are not Updated when you use the ServerManager Class to Commit Configuration Changes
KB2759112 Hotfix is Available for NET Framework 45 that Resolves an ASPNET Race Condition Issue in Windows Server 2008 R2 Windows Server 2008 R2 SP1
KB2765317 Hotfix is Available for NET Framework 45 that Resolves an ASPNET Race Condition Issue in Windows
8 Windows RT and Windows Server 2012
Install SharePoint Server 2013
In this section you will install SharePoint Server 2013
1 Ensure you are logged into the WingtipServer VM using the account wingtipadministrator | Password1
2 If the AutoPlay dialog box is open click Run splashhta If it isnrsquot use Windows Explorer to navigate to the DVD drive and execute the splashhta file in the root of the DVD drive
Creating a SharePoint Server 2013 Environment for Development and Testing Version 10
copy Critical Path Training 2012 All Rights Reserved 33
wwwCriticalPathTrainingcom
3 Click Install SharePoint Server
4 When prompted to Enter your Product Key enter the key you obtained for the trial install and click Continue
5 On the Read the Microsoft Software License Terms page check the I accept the terms of this agreement checkbox and click Continue
6 On the Choose a file location page click Install Now
Creating a SharePoint Server 2013 Environment for Development and Testing Version 10
copy Critical Path Training 2012 All Rights Reserved 34
wwwCriticalPathTrainingcom
7 When the installation is complete select the Run the SharePoint Products Configuration Wizard checkbox and click Close
8 On the Welcome to SharePoint Products page click Next
a) If prompted to start or reset services click Yes
9 On the Connect to a server farm page select Create a new server farm and click Next
10 On the Specify Configuration Database Settings page use the following to complete the page and click Next
a) Database server WINGTIPSERVER
b) Database name SharePoint_Config
c) Username WINGTIPSP_Farm
d) Password Password1
Creating a SharePoint Server 2013 Environment for Development and Testing Version 10
copy Critical Path Training 2012 All Rights Reserved 35
wwwCriticalPathTrainingcom
11 On the Specify Farm Security Settings page for the Passphrase and Confirm Passphrase boxes enter Password1 and click Next
12 On the Configure SharePoint Central Administration Web Application page check the Specify port number checkbox and enter a value of 9999 then Click Next
Creating a SharePoint Server 2013 Environment for Development and Testing Version 10
copy Critical Path Training 2012 All Rights Reserved 36
wwwCriticalPathTrainingcom
13 On the Completing the SharePoint Products Configuration Wizard page click Next
14 When the installer completes it will display the Confirmation Successful page
15 Click Finish This will launch Internet Explorer to go through the configuration process
Creating a SharePoint Server 2013 Environment for Development and Testing Version 10
copy Critical Path Training 2012 All Rights Reserved 37
wwwCriticalPathTrainingcom
At this point you have successfully installed SharePoint Server 2013
Configure SharePoint Server 2013
In this section you will create a new SharePoint Server 2013 farm and perform minimal configuration tasks
After installing SharePoint Sever 2013 the SharePoint Products Configuration Wizard will launch the browser-based Initial Farm Configuration Wizard
1 In the first page of the wizard you are prompted to Help Make SharePoint Better Select which ever option you want and click OK
2 On the Welcome page that asks How do you want to configure your SharePoint farm click the Start the Wizard button
3 On the Services page do the following and then click Next
a) Service Account Select Create new managed account
i) Username WINGTIPSP_Services
ii) Password Password1
b) Services Uncheck the following services
Creating a SharePoint Server 2013 Environment for Development and Testing Version 10
copy Critical Path Training 2012 All Rights Reserved 38
wwwCriticalPathTrainingcom
i) Access Services 2010
ii) App Management Service
In SharePoint Server 2013 the Search Service Application processes specifically noderunnerexe can consume a considerable amount of memory and processor time If you are not going to work with search you might consider unchecking this option for now You can always go back into Central Administration and create a new instance of the Search Service Application at a later date if you need it
Why did we remove Access Services 2010 amp App Management Service service applications The Access Services 2010 service application is included for backwards compatibility and isnrsquot needed in new installations unless you are migrating solutions built with Access Services 2010 from SharePoint Server 2010 (if so you can create this service application later within Central Administration Application Management Manage Service Applications) The App Management Service service application will be created in a later step in this setup guide therefor it is skipped here
4 The creation of the service applications can take quite a while so be patient If it exceeds 20 minutes it is fairly safe to assume the page is hung up One option is to close the browser then launch Central Administration (Start All Programs Microsoft SharePoint 2013 Products SharePoint 2013 Central Administration) and look at the Service Application page (Application Management Manage Service Applications) to see if they were all created
Configure DNS
In this section you will configure DNS for hosting SharePoint sites amp Apps
1 Ensure you are logged into the WingtipServer VM using the account wingtipadministrator | Password1
2 Open the DNS window Start Administrative Tools DNS
3 Expand the hierarchy on the left-hand side of the window until you get to DNS WINGTIPSERVER Forward Lookup Zones wingtipcom
4 Create a new wildcard so all requests for http[]wingtipcom will be forwarded to our SharePoint machine
a) Next right-click wingtipcom and select New Host (A or AAAA)
Creating a SharePoint Server 2013 Environment for Development and Testing Version 10
copy Critical Path Training 2012 All Rights Reserved 39
wwwCriticalPathTrainingcom
b) In the New Host dialog enter the following and click OK
i) Alias Name
ii) IP Address 192168150102 Then click Add Host The following figure shows how this looks
This new record is telling DNS to forward any request for http[]wingtipcom to the webserver WINGTIPSERVER where the
requests will be served by SharePoint
5 Verify this DNS entry is working
a) Open Windows PowerShell Start All Programs Accessories Windows PowerShell Windows PowerShell
b) Run the following commands and press ENTER
PS CUsersAdministratorgt nslookup somethingwingtipcom PS CUsersAdministratorgt nslookup somethingappswingtipcom
c) You should get a response that points to the WingtipServer server as shown in the following figure
Creating a SharePoint Server 2013 Environment for Development and Testing Version 10
copy Critical Path Training 2012 All Rights Reserved 40
wwwCriticalPathTrainingcom
Configure SharePoint Server 2013 for Host-Named Site Collections amp Create Initial Site
Collections
In this section you will create new SharePoint 2013 site collections for testing and hosting apps
Microsoft recommends to create host-named site collections (HNSC) instead of using the path based site collection addressing The difference is the following a path based site created at something such as httpintranetwingtipcomsitesdevtest as an HNSC site would be more like httpdevtestwingtipcom This is how it works in the cloud (Office 365) and it scales much better for on-prem
deployments This setup guide will show you how to setup your environment to create HNSC The only downside to this approach is that you canrsquot create site collections within Central Administration it must be done via Windows PowerShell API (because Central Administration doesnrsquot instruct you where to put the site
This is implemented in various parts First DNS must be configured to send all requests for httpwingtipcom to a Web Application
(implemented in the last section) Second this Web Application must be extended with SharePoint and have no host header bindings (so it handles all requests) Third it must have a default site collection at the root of the Web Application but it will not be used for anything (in fact it doesnrsquot need a template assigned to it)
You can read more about HNSCrsquos on TechNet httptechnetmicrosoftcomen-uslibrarycc424952aspx
PowerShell Script Alert The steps in this section are automated in the script SetupSharePointForHNSCps1 found in the files that
accompany this setup guide Open the script and read the header for documentation on how to use it
1 Ensure you are logged into the WingtipServer VM using the account wingtipadministrator | Password1
2 Open Central Administration Start All Programs Microsoft SharePoint 2013 Products SharePoint 2013 Central Administration
3 Select Application Management Manage Web Applications
4 Delete the default Web Application created by the configuration wizard
a) Delete the existing default Web Application
i) Select the Web Application SharePoint ndash 80 the one with the URL of httpwingtipserver and click Delete in the ribbon
ii) When prompted to delete the associated IIS Web Site amp SQL Server database select both options to delete them and click OK
The reason you are doing this is because the setup wizard you ran previously when creating the service applications automatically created it The problem is that it used the same identity (WINGTIPSP_Services) for the app pool that is used for all the service
applications which is not desired
5 Create a new Web Application to handle Host-Named Site Collections (HNSC)
Creating a SharePoint Server 2013 Environment for Development and Testing Version 10
copy Critical Path Training 2012 All Rights Reserved 41
wwwCriticalPathTrainingcom
a) In the ribbon click the New button
b) In the Create New Web Application dialog enter the following values in the properties and click OK Leave all properties not mentioned
i) Select the radio button Create a new IIS web site
(1) Name SharePoint HNSC Host ndash 80
(2) Port 80
ii) Application Pool
(1) Select the radio button Create a new application pool
(a) Application Pool Name SharePoint Default HNSC AppPool
(b) Select a security account for this application pool WINGTIPSP_Content
If WINGTIPSP_Content is not listed as an available managed account create it by selecting the appropriate option and using
Password1 for the password
iii) Database Name and Authentication
(1) Database Name WSS_Content_HNSCDefaultHost
c) This process will take a few moments At the end of the process SharePoint will ask if you want to create a site collection You do but you donrsquot want to do it through the browser as this will not be a HNSC To create a HNSC you must create it via Windows PowerShell
6 Create a default not template site collection at the root of the web application
a) Open SharePoint 2013 Management Shell Start All Programs Microsoft SharePoint 2013 Products SharePoint 2013 Management Shell
7 Create Site Collections for Testing SharePoint amp SharePoint Apps
a) Open SharePoint 2013 Management Shell Start All Programs Microsoft SharePoint 2013 Products SharePoint 2013 Management Shell
b) Get a reference to the HNSC web application you just created by running the following Windows PowerShell script in the SharePoint 2013 Management Shell
$hnscWebApp = Get-SPWebApplication | Where-Object $_DisplayName -eq SharePoint HNSC Host - 80
c) Create a non-templated site at the root of the web application for Workflow to connect to by executing the following Windows PowerShell script in the SharePoint 2013 Management Shell
New-SPSite -Name Root HNSC Site Collection -Url httpwingtipcom -HostHeaderWebApplication $hnscWebApp -OwnerAlias WINGTIPAdministrator
d) Create a team site by executing the following Windows PowerShell script in the SharePoint 2013 Management Shell
New-SPSite -Name Wingtip Intranet -Url httpintranetwingtipcom ndashHostHeaderWebApplication $hnscWebApp -Template STS0 -OwnerAlias WINGTIPAdministrator
e) Create a developer site by executing the following Windows PowerShell script in the SharePoint 2013 Management Shell
New-SPSite -Name Wingtip Developer Site -Url httpdevwingtipcom ndashHostHeaderWebApplication $hnscWebApp -Template DEV0 -OwnerAlias WINGTIPAdministrator
You can only create debug and test apps using a developer site
At this point you now have a site collection to use as a team site (httpintranetwingtipcom) and to develop and test custom SharePoint apps (httpdevwingtipcom)
Creating a SharePoint Server 2013 Environment for Development and Testing Version 10
copy Critical Path Training 2012 All Rights Reserved 42
wwwCriticalPathTrainingcom
Configure SharePoint 2013 for Hosting Apps
In this setup you will setup your SharePoint 2013 environment for hosting apps
PowerShell Script Alert Everything in the next immediate step is provided in the script ConfigureSpFarmForAppsps1 found in the
files that accompany this setup guide Open the script and read the header for documentation on how to use it
1 Ensure you are logged into the WingtipServer VM using the account wingtipadministrator | Password1
2 Create the necessary SharePoint App Management service applications and start the necessary services via Windows PowerShell
a) Open SharePoint 2013 Management Shell Start All Programs Microsoft SharePoint 2013 Products SharePoint 2013 Management Shell
b) Execute the following Windows PowerShell script in the SharePoint 2013 Management Shell
$appHostDomain = appswingtipcom $adminService = Get-Service -Name spadminv4 if ($adminServiceStatus -ne Running) Start-Service $adminService $timerService = Get-Service -Name sptimerv4 if ($timerServiceStatus -ne Running) Start-Service $timerService Set-SPAppDomain $appHostDomain $appMgmtSvcInstance = Get-SPServiceInstance | Where-Object $_GetType()Name -eq AppManagementServiceInstance if ($appMgmtSvcInstanceStatus -ne Online) Start-SPServiceInstance -Identity $appMgmtSvcInstance $appSubSettingSvcInstance = Get-SPServiceInstance | Where-Object $_GetType()Name -eq SPSubscriptionSettingsServiceInstance if ($appSubSettingSvcInstanceStatus -ne Online) Start-SPServiceInstance -Identity $appSubSettingSvcInstance $appPoolServiceApps = Get-SPServiceApplicationPool -Identity SharePoint Web Services Default $appSubSvc = New-SPSubscriptionSettingsServiceApplication ndashApplicationPool $appPoolServiceApps ndashName Settings Service Application ndashDatabaseName SettingsServiceDB $proxySubSvc = New-SPSubscriptionSettingsServiceApplicationProxy ndashServiceApplication $appSubSvc $appAppSvc = New-SPAppManagementServiceApplication -ApplicationPool $appPoolServiceApps -Name App Management Service Application -DatabaseName AppServiceDB $proxyAppSvc = New-SPAppManagementServiceApplicationProxy -ServiceApplication $appAppSvc Set-SPAppSiteSubscriptionName -Name app -Confirm$false
3 Verify the script configured SharePoint 2013 for hosting apps
a) Open Central Administration Start All Programs Microsoft SharePoint 2013 Products SharePoint 2013 Central Administration
b) Verify service applications created
i) Open the Service Applications page Application Management Manage Service Applications
ii) Verify you have two service applications created
(1) App Management Service Application
(2) Settings Service Application
c) Verify service instances are running
i) Open the Services on Server page System Settings Manage Services on Server
ii) Verify the following services are Started
(1) App Management Service
(2) Microsoft SharePoint Foundation Subscription Settings Service
Creating a SharePoint Server 2013 Environment for Development and Testing Version 10
copy Critical Path Training 2012 All Rights Reserved 43
wwwCriticalPathTrainingcom
d) Verify App URLs are correct
i) Open the Configure App URLs page Apps Configure app URLs
ii) Verify the following
(1) App Domain appswingtipcom
(2) App Prefix app
At this point your SharePoint Server 2013 environment is ready to host SharePoint apps
Creating a SharePoint Server 2013 Environment for Development and Testing Version 10
copy Critical Path Training 2012 All Rights Reserved 44
wwwCriticalPathTrainingcom
Start the SharePoint 2013 Sandbox Service
By default the service that executes sandbox solutions is not running In this step you will start the service
1 Open Central Administration Start All Programs Microsoft SharePoint 2013 Products SharePoint 2013 Central Administration
2 Open the Services on Server page System Settings Manage Services on Server
3 Click the Start link to the left of the Microsoft SharePoint Foundation Sandboxed Code Service
At this point your installation can support sandbox solutions
Configure CRL Verification for Disconnected Environments
SharePoint periodically ldquophones homerdquo to a specific address hosted by Microsoft under certain conditions When your environment is disconnected this can cause an unnecessary delay or failures when starting up the sandbox The following steps outline a workaround to bypass this check
1 Launch Notepad as an administrator Start All Programs Accessories right-click Notepad and select Run as Administrator
2 Open the hosts file by selecting File Open and finding the file
cWindowsSystem32Driversetchosts
3 Add the following line to the end of the file
127001 crlmicrosoftcom
4 Save and close the hosts file
Update Internet Explorer to Bypass the App URL amp Automatically Login to SharePoint Sites
In this section you will update Internet Explorer to add the App hosting URL to the bypass list so you can navigate to the domain after deploying SharePoint hosted apps
1 Ensure you are logged into the WingtipServer VM using the account wingtipadministrator | Password1
1 Launch Internet Explorer Start All Programs Internet Explorer
2 Configure Internet Explorer to bypass the App URL
a) In the top-right corner click the gear icon and select Internet Options
b) On the Security tab select the Local Intranet and click the Sites button
c) Uncheck the box next to Automatically detect intranet network
d) Click the Advanced button and add two entries to the Exceptions list
i) httpwingtipcom
ii) httpappswingtipcom
Creating a SharePoint Server 2013 Environment for Development and Testing Version 10
copy Critical Path Training 2012 All Rights Reserved 45
wwwCriticalPathTrainingcom
e) Click the Close button followed by the OK button multiple times to close out of the dialogs
At this point Internet Explorer is setup to bypass your app URL so you can navigate to apps (httpappswingtipcom) as well as automatically authenticate to sites hosted at httpwingtipcom
Exercise 6 Configure SharePoint to Host My Sites
In this exercise you will configure SharePoint to create and host My Sites In order to host My Sites you will need a new Web Application that is configured for Self-Service Site Creation and has a My Site Host site collection
1 Create a new SharePoint web application to host the My Sites
a) Ensure you are logged into the WingtipServer VM using the account wingtipadministrator | Password1
b) Open Central Administration Start All Programs Microsoft SharePoint 2013 Products SharePoint 2013 Central Administration
c) Select Application Management Manage Web Applications
d) In the ribbon click the New button
e) In the Create New Web Application dialog enter the following values in the properties and click OK Leave all properties not mentioned
i) Select the radio button Create a new IIS web site
(1) Name SharePoint MySite Host ndash 80
(2) Port 80
(3) Host Header mywingtipcom
ii) Application Pool
(1) Select the radio button Use existing application pool
(a) Application Pool Name SharePoint Default HNSC AppPool
iii) Database Name and Authentication
(1) Database Name WSS_Content_SocialWingtipCom
f) This process will take a few moments At the end of the process SharePoint will ask if you want to create a site collection Click the link provided to create a new site collection amp continue to the next step
2 Create a My Site Host site collection
a) On the Create Site Collection page use the following information to complete the form and click OK
Creating a SharePoint Server 2013 Environment for Development and Testing Version 10
copy Critical Path Training 2012 All Rights Reserved 46
wwwCriticalPathTrainingcom
i) Title My Site Host
ii) URL
iii) Template Selection My Site Host (found under the Enterprise tab)
iv) Primary Site Collection Administrator WINGTIPAdministrator
3 Update the Web Application to host my sites
a) Within Central Administration in the left-hand navigation navigate to the Manage Web Applications page Application Management Manage Web Applications
b) Select the SharePoint MySite Host ndash 80 web application
c) Click the Managed Paths button in the ribbon
d) Remove the sites managed path and add two new managed paths and click OK
i) personal ndash Wildcard inclusion
ii) my ndash Explicit inclusion
e) With the SharePoint MySite Host ndash 80 web application still selected click the Self-Service Site Creation button
f) On the Self-Service Site Creation page use the following values to complete the form and click OK
i) Site Collections On
4 Next configure the User Profile Service Application My Site settings
a) Browse to the User Profile Service Application management page Application Management Manage Service Applications User Profile Service Application
b) Under the My Site Settings section click the Setup My Sites
c) On the My Site Settings page use the following information to complete the form and click OK
i) My Site Host httpmywingtipcom
ii) Personal Site Location personal
At this point your SharePoint deployment is now configured to automatically create My Sites under httpmywingtipcomPersonalUserName when users first browse to them
Exercise 7 Install amp Configure Workflow Manager 10
In this exercise you will configure the WingtipServer VM to host Workflow Manager 10 and connect it to your SharePoint installation
1 Ensure you are logged into the WingtipServer VM using the account wingtipadministrator | Password1
Verify SQL Server 2012 Network Configuration
In this section yoursquoll verify the network configuration is correct for SQL Server 2012 in order to install Workflow Manager 10
Creating a SharePoint Server 2013 Environment for Development and Testing Version 10
copy Critical Path Training 2012 All Rights Reserved 47
wwwCriticalPathTrainingcom
1 Configure SQL Server 2012 to have the TCPIP connection protocol enabled
a) Open the SQL Server Configuration Manager Start All Programs Microsoft SQL Server 2012 Configuration Tools SQL Server Configuration Manager
b) Expand the hierarchy on the left-hand side to the following SQL Server Connection Manager (local) SQL Server Network Configuration Protocols for MSSQLSERVER
c) In the main window if TCPIP is Disabled right-click TCPIP and select Enable
d) When prompted with a warning click OK
2 SQL Server must be restarted in order to reflect this change
a) In the hierarchy on the left-hand side of the window select SQL Server Services
b) Right-click SQL Server (MSSQLSERVER) and select Restart
At this point SQL Server is now configured with the TCPIP protocol enabled a requirement when configuring Service Bus
Configure the Workflow Service Account with the Necessary Rights
In this section you will verify the service account that will run Workflow Manager and Service Bus
1 Ensure you are logged into the WingtipServer VM using the account WINGTIPadministrator | Password1
2 Grant the WINGTIPSP_Content account securityadmin amp dbcreator permissions in SQL Server
a) Launch SQL Server Management Studio Start All Programs Microsoft SQL Server 2012 SQL Server Management Studio
b) When SQL Server Management Studio launches within the Connect to Server dialog login using the default settings and click Connect
c) In the Object Explorer tool window expand the WINGTIPSERVER server hierarchy to the Security Logins node
d) Find the WINGTIPSP_Content account right-click it and select Properties
Creating a SharePoint Server 2013 Environment for Development and Testing Version 10
copy Critical Path Training 2012 All Rights Reserved 48
wwwCriticalPathTrainingcom
e) In the Select a page pane select Server Roles
f) Check securityadmin amp dbcreator and click OK
g) Close SQL Server Management Studio
3 Add the Workflow service account to the local administrators group
a) Open the Active Directory Users and Computers window Start Administrative Tools Active Directory Users and Computers
b) In the hierarchy on the left-hand side of the window expand it to the following Active Directory Users and Computers wingtipcom Builtin
c) In the main window right-click Administrators and select Properties
d) In the Administrators Properties dialog select the Members tab and click Add
e) In the Enter the object names to select box enter wingtipsp_content and click the Check Names button
f) In the Administrators Properties dialog click OK
g) Close the Active Directory Users and Computers window
At this point the service account that will host Workflow Manager and Service Bus has been configured correctly
Creating a SharePoint Server 2013 Environment for Development and Testing Version 10
copy Critical Path Training 2012 All Rights Reserved 49
wwwCriticalPathTrainingcom
Download amp Install Workflow Manager and Service Bus
In this section you will install Workflow Manager and Service Bus
1 Ensure you are logged into the WingtipServer VM using the account WINGTIPSP_Content | Password1
It is important you are logged in as the user that will run workflow when you install amp configure Workflow Manager and Service Bus
2 Launch the Web Platform Installer Start All Programs Microsoft Web Platform Installer
a) If the Web Platform Installer is not present on your machine you can download amp install it from here httpwwwmicrosoftcomwebdownloadsplatformaspx
If you do not have internet access within the virtual machine it is possible to download everything needed for workflow using the command line version of the Web Platform Installer (WebPICMD) You can get WebPICMD from httplearniisnetpageaspx1072web-platform-installer-v4-command-line-webpicmdexe-preview-release Specifically for
workflow enter the following command to download Workflow Beta 1 and all prerequisites
webpicmd offline ProductsWorkflow Pathc[path]
3 When the Web Platform Installer loads execute a search for Workflow select Workflow Manager 10 and click Add
4 Click the Install button at the bottom of the Web Platform Installer 40 window
5 On the Prerequisites page click I Accept
Note The Web Platform Installer 40 may prompt you to keep certain products updated using Microsoft Update If it does select Use Microsoft Update when I check for updates (recommended) and click Continue
6 When the installer completes the following dialog will appear Click Continue and then Finish to start the configuration process
Creating a SharePoint Server 2013 Environment for Development and Testing Version 10
copy Critical Path Training 2012 All Rights Reserved 50
wwwCriticalPathTrainingcom
At this point Workflow Manager amp Service Bus are installed
Configure Workflow Manager and Service Bus
In this section you will install Workflow Manager and Service Bus
1 If the Workflow Manager Configuration Wizard is not open open it Start All Programs Workflow Manager 10 Workflow Configuration
2 On the Welcome page click Configure Workflow Manager with Default Settings (Recommended)
Creating a SharePoint Server 2013 Environment for Development and Testing Version 10
copy Critical Path Training 2012 All Rights Reserved 51
wwwCriticalPathTrainingcom
3 On the New Farm Configuration page do the following
a) In the section Configure Service Account set the credentials to
i) User ID sp_contentwingtipcom
ii) Password Password1
b) Check the Allow Workflow management over HTTP on this computer checkbox
Ensure the username is entered in the fully qualified UPN format not as the default shows in the installer (sp_contentwingtip) or the domainusername format
In a production environment you should be doing everything over SSL
c) Click the Test Connection button to verify the connection credentials before proceeding
Creating a SharePoint Server 2013 Environment for Development and Testing Version 10
copy Critical Path Training 2012 All Rights Reserved 52
wwwCriticalPathTrainingcom
d) In the Certificate Generation Key and Confirm Certificate Generation Key enter Password1 into both fields
4 Click the right arrow in the bottom right corner to proceed
5 On the Summary page review your settings and click the check at the bottom right of the widow to start the configuration process
Creating a SharePoint Server 2013 Environment for Development and Testing Version 10
copy Critical Path Training 2012 All Rights Reserved 53
wwwCriticalPathTrainingcom
6 After a few minutes the Configuration Progress screen will show that everything has been configured correctly
Creating a SharePoint Server 2013 Environment for Development and Testing Version 10
copy Critical Path Training 2012 All Rights Reserved 54
wwwCriticalPathTrainingcom
7 Click the check in the bottom right corner
At this point Workflow Manager amp Service Bus has been installed and a new Workflow Manager farm has been created The next step is to connect the SharePoint 2013 farm to the Workflow Manager farm
Connect SharePoint 2013 to Workflow Manager
In this section you will connect SharePoint 2013 and Workflow Manager together
1 Ensure you are logged into the WingtipServer VM using the account WINGTIPadministrator | Password1
2 Get the Workflow Manager endpoint
a) Open the Workflow Manager PowerShell console Start All Programs Workflow Manager 10
b) Execute the Windows PowerShell following cmdlet
Get-WFFarm | ft HttpPort
c) Take note of this port (12291) This port number is what you will use to connect the SharePoint 2013 farm to the Workflow Manager 10 farm
In production you should connect to the HTTPS port listed in the HttpsPort property when you run Get-WFFarm
d) Close the Workflow Manager PowerShell window
3 Connect the SharePoint 2013 farm to Workflow Manager
Creating a SharePoint Server 2013 Environment for Development and Testing Version 10
copy Critical Path Training 2012 All Rights Reserved 55
wwwCriticalPathTrainingcom
a) Open SharePoint 2013 Management Shell Start All Programs Microsoft SharePoint 2013 Products SharePoint 2013 Management Shell
b) Execute the following Windows PowerShell script in the SharePoint 2013 Management Shell
Register-SPWorkflowService ndashSPSite httpintranetwingtipcom ndashWorkflowHostUri httpwingtipserver12291 ndashAllowOAuthHttp
This script is telling SharePoint the endpoint it should use to talk to Workflow Manager as well as Workflow Manager the SharePoint site collection it should talk to for calls into the CSOM It is also configuring all communication over HTTP rather than HTTPS for performance reasons In production you should always use HTTPS
This step will take a moment with no feedback during the process Be patient
c) Close the SharePoint 2013 Management Shell
At this point the SharePoint 2013 farm is connected to the Workflow Manager 10 farm
Configure SharePoint User Profile Service Application AD Sync
Users in SharePoint 2013 are validated by Workflow Manager against SharePoint to ensure they have permissions to start a workflow This is done by looking up the user by their AD UserPrincipalName (UPN) attribute in the User Profile Service Application (UPA) If no matching user is found the workflow will be automatically cancelled by Workflow Manager In this section you will setup UPA to connect amp sync with the local Active Directory so user accounts in AD will have their UPN synchronized to UPA
1 Open Central Administration Start All Programs Microsoft SharePoint 2013 Products SharePoint 2013 Central Administration
2 Go to the User Profile Service Application management page Application Management Manage Service Applications User Profile Service Application
3 The first step is to configure the User Profile Service Application to allow for Active Directory (AD) synchronization
a) Under Synchronization select Configure Synchronization Settings
b) For Synchronization select Use SharePoint Active Directory Import and click OK
4 Next establish a connection to the wingtipcom AD
a) Under Synchronization select Configure Synchronization Connections
b) On the Synchronization Connections page select Create New Connection
c) Enter the following values on this form and click OK
i) Connection Name WINGTIPCOM AD
ii) Type Active Directory Import
iii) Connection Settings
(1) Fully Qualified Domain Name wingtipcom
(2) Authentication Provider Type Windows Authentication
(3) Account Name WINGTIPAdministrator
(4) Password (and Confirm Password) Password1
iv) Containers
(1) Click Populate Containers
(2) After it loads check the box next to WINGTP or click the Select All button below the box
5 Go back to the User Profile Service Application management page Application Management Manage Service Applications User Profile Service Application
6 Finally start a synchronization import
a) Under Synchronization select Start Profile Synchronization
Creating a SharePoint Server 2013 Environment for Development and Testing Version 10
copy Critical Path Training 2012 All Rights Reserved 56
wwwCriticalPathTrainingcom
b) Select Start Full Synchronization and click OK
c) You will be taken back to the User Profile Service Application management page Notice in the top-right corner there is a status block that reports how many profiles are in the UPA database Refresh the page to see it increase to a handful of profiles as the import process runs
At this point you have successfully configured the User Profile Service Application to import profiles from the local AD
Exercise 8 Install the Microsoft Office 2013 Professional Clients
In this exercise you will install the Microsoft Office 2013 client applications
1 Download the Office 2013 into the WingtipServer VM For this you need to create an Office 365 Trial account login to Office 365 go to the Admin Dashboard and then download the latest version httpwwwmicrosoftcomofficepreviewentry-office-preview
2 Download the SharePoint Designer 2013 into the WingtipServer VM from here httpwwwmicrosoftcomen-usdownloaddetailsaspxid=35491
3 Download the Visio Professional 2013 into the WingtipServer VM from here httptechnetmicrosoftcomen-usevalcenterhh973399
Install Microsoft Office Professional Plus 2013
In this section you will install the Microsoft Office 2013 clients
1 Ensure you are logged into the WingtipServer VM using the account WINGTIPadministrator | Password1
2 Execute the installer OfficeProfessionalPlus_English_x64exe
3 On the Read the Microsoft Software License Terms dialog click the checkbox next to I accept the terms of this agreement and click Continue
4 On the Choose the installation you want dialog click the Install Now button
5 The installer will proceed and install all the Office products
6 When the installer completes click the Close button
7 Apply your Office Professional Plus 2013 license key
a) Launch Word 2013 Start All Programs Microsoft Office 2013 Word 2013
b) In the First things first dialog select Use recommended settings and click Accept
c) In the Welcome to Office dialog that opens click the [X] icon in the top-right corner to close it
d) In the left-hand pane click Open Other Documents
e) In the left-hand pane click Account
f) In the Product Information section within the Activation Required box click Change Product Key
g) Enter your license key for Office Professional Plus 2013 check the box next to Attempt to automatically activate my product online and click Install
h) Click OK
At this point you have installed Office Professional Plus 2013
Install Microsoft Office Visio 2013
In this section you will install Microsoft Office 2013 Visio
1 Ensure you are logged into the WingtipServer VM using the account WINGTIPadministrator | Password1
2 Execute the installer VisioProfessional_English_x64exe
3 On the Read the Microsoft Software License Terms dialog click the checkbox next to I accept the terms of this agreement and click Continue
Creating a SharePoint Server 2013 Environment for Development and Testing Version 10
copy Critical Path Training 2012 All Rights Reserved 57
wwwCriticalPathTrainingcom
4 On the Choose the installation you want dialog click the Install Now button
5 The installer will proceed and install all Visio 2013
6 When the installer completes click the Close button
7 Apply your Visio 2013 license key
a) Launch Visio 2013 Start All Programs Microsoft Office 2013 Visio 2013
b) In the First things first dialog select Use recommended settings and click Accept
c) In the Welcome to Office dialog that opens click the X icon in the top-right corner to close it
d) In the left-hand pane click Open Other Documents
e) In the left-hand pane click Account
f) In the Product Information section within the Activation Required box click Change Product Key
g) Enter your license key for Visio 2013 check the box next to Attempt to automatically activate my product online and click Install
h) Click OK
At this point you have installed Visio 2013
Install Microsoft Office 2013 SharePoint Designer
In this section you will install Microsoft Office 2013 SharePoint Designer
1 Ensure you are logged into the WingtipServer VM using the account WINGTIPadministrator | Password1
2 Execute the installer SharePointDesigner_English_x64exe
3 On the Read the Microsoft Software License Terms dialog click the checkbox next to I accept the terms of this agreement and click Continue
4 On the Choose the installation you want dialog click the Install Now button
5 The installer will proceed and install all SharePoint Designer 2013
6 When the installer completes click the Close button
At this point you have installed SharePoint Designer 2013
Exercise 9 Install Visual Studio 2012
In this exercise you will install Visual Studio 2012
1 Ensure you are logged into the WingtipServer VM using the account WINGTIPadministrator | Password1
2 Start the install of Visual Studio 2012 Ultimate Trial by downloading the installer from here httpwwwmicrosoftcomvisualstudio11en-usdownloads
3 On the installation splash screen check the box next to I agree to the License terms and conditions and click the Next button
Creating a SharePoint Server 2013 Environment for Development and Testing Version 10
copy Critical Path Training 2012 All Rights Reserved 58
wwwCriticalPathTrainingcom
4 On the Optional Features to install dialog click Install
5 After some time the installer will complete Click the Launch button to launch Visual Studio 2012
Creating a SharePoint Server 2013 Environment for Development and Testing Version 10
copy Critical Path Training 2012 All Rights Reserved 59
wwwCriticalPathTrainingcom
6 In the Choose Default Environment Settings select Visual C Development Settings and click Start Visual Studio
7 Close Visual Studio 2012
At this point Visual Studio 2012 RTM is installed
Install Office amp SharePoint 2013 Developer Tools
In this section you will install the Office and SharePoint 2013 developer tools for Visual Studio
1 Ensure you are logged into the WingtipServer VM using the account WINGTIPadministrator | Password1
2 Launch the Web Platform Installer Start All Programs Microsoft Web Platform Installer
3 In the search box at the top-right corner of the Web Platform Installer 40 window type sharepoint and press Enter
4 Click the Add button to the right of Microsoft Office Developer Tools for Visual Studio 2012 - Preview 2
5 Click the Install button at the bottom of the Web Platform Installer 40 window
6 On the Prerequisites page click I Accept
Creating a SharePoint Server 2013 Environment for Development and Testing Version 10
copy Critical Path Training 2012 All Rights Reserved 60
wwwCriticalPathTrainingcom
At this point you have installed the SharePoint 2013 amp Office 2013 development tools in Visual Studio 2012
Creating a SharePoint Server 2013 Environment for Development and Testing Version 10
copy Critical Path Training 2012 All Rights Reserved 61
wwwCriticalPathTrainingcom
Appendix 1 Download Manifest
The following lists everything referenced that you will or may need to download in this environment
Windows Server 2008 R2 with Service Pack 1 (installer ISO)
o httptechnetmicrosoftcomen-usevalcenterdd459137aspx
Windows Server 2008 R2 with Service Pack 1 (prebuilt VHD)
o httpwwwmicrosoftcomdownloadsdetailsaspxFamilyId=9040a4be-c3cf-44a5-9052-a70314452305
Windows Server 2008 R2 Service Pack 1
o httpwwwmicrosoftcomen-usdownloaddetailsaspxid=5842
SQL Server 2012 Trial
o httpwwwmicrosoftcombetaexperiencepdSQL2012EvalCTAenusdefaultaspx
SharePoint Server 2013
o httptechnetmicrosoftcomen-USevalcenterhh973397aspx
Hotfixes for SharePoint Server 2013 (post-install)
o KB2554876 The SharePoint Parsing Process Crashes in Windows Server 2008 R2
o KB2708075 IIS 75 Configurations are not Updated when you use the ServerManager Class to Commit
Configuration Changes
o KB2759112 Hotfix is Available for NET Framework 45 that Resolves an ASPNET Race Condition Issue in
Windows Server 2008 R2 Windows Server 2008 R2 SP1
o KB2765317 Hotfix is Available for NET Framework 45 that Resolves an ASPNET Race Condition Issue in
Windows 8 Windows RT and Windows Server 2012
Web Platform Installer
o httpwwwmicrosoftcomwebdownloadsplatformaspx
Web Platform Installer ndash Command Line Version
o httplearniisnetpageaspx1072web-platform-installer-v4-command-line-webpicmdexe-preview-release
Workflow Manager 10
o Download using the Microsoft Web Platform Installer
Office 2013
o httpwwwmicrosoftcomofficepreviewentry-office-preview
SharePoint Designer 2013
o httpwwwmicrosoftcomen-usdownloaddetailsaspxid=35491
Visio Professional 2013
o httptechnetmicrosoftcomen-usevalcenterhh973399
Visual Studio 2012
o httpwwwmicrosoftcomvisualstudio11en-usdownloads
Office Developer Tools for Visual Studio 2012 ndash Preview 2
o Download using the Microsoft Web Platform Installer
Creating a SharePoint Server 2013 Environment for Development and Testing Version 10
copy Critical Path Training 2012 All Rights Reserved 62
wwwCriticalPathTrainingcom
Appendix 2 Windows PowerShell Script Manifest
The following lists all Windows PowerShell scripts that are provided with this setup guide
AddDisableLoopbackCheckRegKeyps1
o The following steps automate creating the registry key outlined as Method 2 in the Microsoft Knowledgebase article
httpsupportmicrosoftcomkb896861 using Windows PowerShell This key DisableLoopbackCheck will allow
you to browse SharePoint sites on the same machine Without this key (or following Method 1 in the KB article) you
would need to browse any SharePoint sites from a different computer than the one which SharePoint is installed on
ConfigureSpFarmForAppsps1
o Configures a SharePoint 2013 for hosting apps This ensures everything you need is installed running and
configured This is documented here httpmsdnmicrosoftcomen-uslibraryfp179923(v=office15)
CreateSpServiceAccountsps1
o Creates the minimal necessary service accounts for SharePoint Server 2013 SP_Farm SP_Content amp
SP_Services
SetupSharePointForHNSCps1
o Configures a SharePoint 2013 install for hosting Host-Named Site Collections (HNSC) This involves creating a Web
Application in SharePoint that has no host header bindings Using DNS all requests are mapped to this Web
Application You then create the site collections via PowerShell as you cant create HNSCs via the browser (Central
Administration)
Creating a SharePoint Server 2013 Environment for Development and Testing Version 10
copy Critical Path Training 2012 All Rights Reserved 63
wwwCriticalPathTrainingcom
Appendix 3 Create Sample Adventure Works Database
The following steps document downloading and installing the sample Adventure Works OLTP database provided by Microsoft
1 Launch Internet Explorer and navigate to httpmsftdbprodsamplescodeplexcom
2 Download the Adventure Works 2012 OLTP Script
3 Extract the ZIP into a folder on the desktop
4 Launch SQL Server Management Studio Start All Programs Microsoft SQL Server 2012 SQL Server Management Studio
5 When SQL Server Management Studio launches within the Connect to Server dialog login using the default settings and click Connect
6 Within SQL Server Management Studio select File Open File
7 Select the file instawdbsql from the extracted ZIP and click Open
8 If prompted to re-login to the database engine do it
9 Select Query SQLCMD Mode
10 Scroll down to line 42 the line that starts with the following
setvar SqlSamplesSourceDataPath
11 Change the folder location of where you unzipped the Adventure Works 2012 OLTP Script
12 Select Query Execute
13 When the script completes the AdventureWorks2012 database will have been created
Creating a SharePoint Server 2013 Environment for Development and Testing Version 10
copy Critical Path Training 2012 All Rights Reserved 64
wwwCriticalPathTrainingcom
Change Log
Change Version Description
August 22 2012 v 01 Pre-release for review
August 27 2012 v 02 Initial public release ndash install guide based on SharePoint Server Beta 2
August 28 2012 v 03 Updated URL for the site collection used to connect SharePoint to WAW
August 31 2012 v 04 Typo Removed SQL Server Analysis Services as part of the install Not required in a
SharePoint dev box (unless you are doing business intelligence which is not covered
in the guide)
Updated all references to Windows Azure Workflow to Workflow Manager the new
official name for the new workflow product
Updated SetupSharePointForHNSCps1 script to lookup HNSC Web Application by
name rather than URL which is more reliable
Typo Updated WingtipAllUp public NIC to use a different IP than the WingtipDC
Typo Replaced a reference to WingtipServer with WingtipDC
Typo Fixed handful of minor typos
September 1 2012 v 05 Removed SQL Server Reporting Services from install guide
Added step to uncheck IErsquos ldquoAutomatically detect proxyrdquo
Added post workflow install steps to setup User Profile Service Application to sync with
local Active Directory
September 5 2012 v 06 Added step to create a default root site collection in the HNSC web app
Updated minor typos and added extra notes for context
Updated PowerShell script SetupSharePointForHNSCps1 to remove content
database of default Web Application when setting up HNSC Web App
Added a new exercise 8 (after SharePoint install amp config and before the Workflow
install and config) to setup support for My Sites
October 20 2012 v 07 Updated script SetupSharePointForHNSCps1 to fix a bug where it would fail on line
111 if you didnrsquot already have a WINGTIPSP_Content managed account
Added section to bypass SharePointrsquos check for crlmicrosoftcom
Updated workflowrsquos registration PowerShell script to point to
httpintranetwingtipcom
Switched order of post-SharePoint install to setup HSNC hosting before configuring for
hosting apps
November 29 2012
v 10 Changed setup guide to use a single VM instead of two VMs
Updated guide for SharePoint 2013 RTM

Creating a SharePoint Server 2013 Environment for Development and Testing Version 10
copy Critical Path Training 2012 All Rights Reserved 7
wwwCriticalPathTrainingcom
Create a New Virtual Machine
In this section you will create a new virtual machine in Hyper-V
1 In the Actions pane select New Virtual Machine When you execute this menu command the Hyper-V Manager will launch the New Virtual machine Wizard
2 In the Specify Name and location dialog enter a Name of WingtipServer and click Next
3 In the Assign Memory dialog enter the amount of Memory to allocate to the virtual machine in MB to 12288 and click Next
Creating a SharePoint Server 2013 Environment for Development and Testing Version 10
copy Critical Path Training 2012 All Rights Reserved 8
wwwCriticalPathTrainingcom
4 In the Configure Networking dialog use the drop down box to assign a Connection value of Internal LAN and click Next
5 In the Connect Virtual Hard Disk dialog accept the default options to create a virtual hard disk amp click Finish
If possible configure the location so that the VHD file for the VM is created on a separate drive than the host computerrsquos operating system
6 In the Hyper-V Manager window right-click the VM you just created and select Settings
7 In the Settings for WingtipServer dialog select Add Hardware select Network Adapter and click Add
Creating a SharePoint Server 2013 Environment for Development and Testing Version 10
copy Critical Path Training 2012 All Rights Reserved 9
wwwCriticalPathTrainingcom
8 Obtain a copy of the Windows Server 2008 R2 with Service Pack 1 install binaries
The install image (ISO) is available to MSDN or TechNet subscribers or as a trial download available here httptechnetmicrosoftcomen-usevalcenterdd459137aspx
Obviously you can also use your own licensed copy of Windows Server 2008 R2 with Service Pack 1
Microsoft also provides a pre-installed 180-day trial Windows Server 2008 R2 Hyper-V VHD file that you can download (httpwwwmicrosoftcomdownloadsdetailsaspxFamilyId=9040a4be-c3cf-44a5-9052-a70314452305) instead of installing it
yourself If you elect to go this route
Make sure you specify the VHD file you downloaded in the following step for the Hard Drive of the VM
Do not specify a DVD Drive in the following step as you will not be installing anything
If you elect to do this step jump down to section Configure Windows Server 2008 R2
9 In the Settings for WingtipServer dialog update the VM to have the following settings When finished click OK
a) Processor 2 Virtual Processors
b) DVD Drive Image File ndash Map to the Windows Server 2008 R2 ISO installer file
c) Network Adapter Internal LAN
d) Network Adapter Not Connected
10 Start up the WingtipServer VM and install Windows Server 2008 R2
a) In the Hyper-V Manager window right-click the VM you just created and select Settings
b) Right-click on the VM named WingtipServer and select the Connecthellip menu
c) In the Virtual Machine Connection window drop down the Action menu and select Start
Creating a SharePoint Server 2013 Environment for Development and Testing Version 10
copy Critical Path Training 2012 All Rights Reserved 10
wwwCriticalPathTrainingcom
If you elected to use the fully installed trial VHD from Microsoft instead of installing your own server skip to the section Configure Windows Server 2008 R2
Install the Windows Server 2008 R2 Operating System
In this section you will install the operating system
1 After the setup program for Windows Server 2008 R2 loads it will prompt you with a dialog asking you to select a language Accept the default of English and click Install to continue
2 At the next dialog click the Install Now button to begin the installation
Creating a SharePoint Server 2013 Environment for Development and Testing Version 10
copy Critical Path Training 2012 All Rights Reserved 11
wwwCriticalPathTrainingcom
3 The next dialog instructs you to select the operating system you want to install Select the operating system named Windows Server 2008 R2 Enterprise (Full Installation) with the x64 architecture Click Next to continue
4 Agree to the licensing terms and click Next
5 Click on Custom (advanced) to select the type of installation
6 The next dialog asks you where you want to install Windows Accept the default configuration which uses a location of Disk 0 Unallocated Space as shown below Click Next to continue
At this point you have given the Windows setup program enough information to install the basic operating system Setup program will now run for a while as it copies and expands files and installs Windows features You now have a few minutes to get a cup of coffee or catch up on email
7 When the setup program completes it will ask you to assign a new password for the built-in Administrator account Click OK to continue
8 Set the password for Administrator account to Password1
9 When you have updated the Administrator password you will get a confirmation that the update was successful Click OK to complete the installation of the operating system
If you elected to use the pre-installed trial VHD Microsoft offers you will pick up the configuration exercise at this point
Configure Windows Server 2008 R2
In this section you will configure the server
1 When you log in Windows Server automatically displays the Initial Configuration Tasks window Click the check box with the caption Do not show this window at logon and then click the Close button
Creating a SharePoint Server 2013 Environment for Development and Testing Version 10
copy Critical Path Training 2012 All Rights Reserved 12
wwwCriticalPathTrainingcom
2 After you close the Initial Configuration Tasks window Windows Server will display the Server Manager
Creating a SharePoint Server 2013 Environment for Development and Testing Version 10
copy Critical Path Training 2012 All Rights Reserved 13
wwwCriticalPathTrainingcom
3 Configure the Administrator account so that its password does not expire
a) Inside the Configuration node of the Server Manager navigate to Local Users and Groups Users (as shown in the following screenshot) and locate the local Administrator account
b) Right-click on the Administrator account and click Properties
c) In the Administrator Properties dialog unselect the option for User must change password at next logon and select the option for Password never expires Click OK
4 Rename the computer name of the VM
a) In the Server Manager navigate to the top-level node to display the Server Summary page Click Change System Properties
b) On the Computer Name tab of the System Properties dialog click the Change button
c) Enter a new computer name of WingtipServer and click OK
Creating a SharePoint Server 2013 Environment for Development and Testing Version 10
copy Critical Path Training 2012 All Rights Reserved 14
wwwCriticalPathTrainingcom
5 After changing the computer name you will be prompted to restart the VM Choose OK to restart After the VM has restarted log in again using [administrator | Password1] (username | password)
6 Disable Windows Firewall and Enhanced Security Configuration
a) In the Server Manager navigate to the top-level node to display the Server Summary page Inside the Security Information section locate the links for Go to Windows Firewall and Configure IE ECS
b) Click on Configure IE ECS link Disable Enhanced Security Configuration for both Administrators and Users by selecting the Off radio buttons and click OK
c) Now click the Go to Windows Firewall link to display the page for the Windows Firewall Click on the Windows Firewall Properties link at the bottom of the Overview section
d) In the Domain Profile tab of the Windows Fire dialog change the Firewall state property setting from On to Off Click to Apply button to save your changes
e) Once you have turned off the firewall in the Domain Profile tab go to the Private profile tab and the Public profile tab and follow the same steps to disable the firewall for these profiles as well
f) Click OK to dismiss the Windows Firewall dialog once you have turned off the firewall for all three profiles
7 Enable Remote Desktop for your VM
a) In the Server Manager navigate to the top-level node to display the Server Summary page Inside the Computer Information section locate and click the link for Configure Remote Desktop
b) In the Remote tab of the System Properties dialog select the last option for Allow connections only from computers running Remote Desktop with Network Level Authentication Click OK to save changes and dismiss the System Properties dialog
Creating a SharePoint Server 2013 Environment for Development and Testing Version 10
copy Critical Path Training 2012 All Rights Reserved 15
wwwCriticalPathTrainingcom
8 Enable the Windows Server Features for the Desktop Experience and the PowerShell Integrated Scripting Environment
a) In Server Manager choose Add Feature to bring up the Add Features Wizard dialog
b) Select the feature Desktop Experience
When you first click the checkbox for the Desktop Experience the wizard will prompt you with the following dialog to add support for Ink and Handwriting Services Click the Add Required Features button to continue
c) Scroll down the list of features in the Add Features Wizard dialog and select the feature Windows PowerShell Integrated Scripting Environment (ISE)
Creating a SharePoint Server 2013 Environment for Development and Testing Version 10
copy Critical Path Training 2012 All Rights Reserved 16
wwwCriticalPathTrainingcom
When you first click the checkbox for the Windows PowerShell Integrated Scripting Environment (ISE) the wizard will prompt you with the following dialog to add support for NET Framework 351 Features Click the Add Required Features button to continue
d) Click the Next button on the Add Features Wizard dialog to continue with the install
e) On the Confirm Installation Selection wizard page click the Install button
f) When you see the Installation Results screen the Add Features Wizard informs you a computer restart is required Click Close button to dismiss this dialog
9 After the VM has restarted log in again using [administrator | Password1] (username | password)
Configure the Virtual Machinersquos Networking Setup
In this section yoursquoll configure the two NICrsquos you added to the VM in previous steps One NIC (Internal LAN) will be used to communicate with other VMs in this environment while the other (External LAN) will be used to connect to the internet
1 Configure the NIC that is linked to the Internal LAN network
a) Open the Network Connections dialog by pressing Start enter view network connections in the search box Click the View Network Connections shortcut
b) Two network connections will be shown but only one will show as connected
The connected one is the one that is connected to the Internal LAN network The other one is currently ldquounpluggedrdquohellip this is why we didnrsquot connect a network to the second network when initially configuring the VM as this makes it easier to see which NIC is which in the VM
c) Rename the two NICrsquos
i) Right-click the connected NIC and select Rename Give it a name of Internal LAN
Creating a SharePoint Server 2013 Environment for Development and Testing Version 10
copy Critical Path Training 2012 All Rights Reserved 17
wwwCriticalPathTrainingcom
ii) Right-click the disconnected NIC and select Rename Give it a name of External LAN
d) Right-click the Internal LAN NIC and select Properties
e) In the Local Area Connection Properties dialog select the Internet Protocol Version 4 (TCPIPv4) item and click Properties
f) Enter the following information into the resulting dialog to configure the NICrsquos IP settings
i) Use the Following IP Address
(1) IP Address 192168150102
(2) Subnet mast 2552552550
(3) Default Gateway 192168150102
ii) Use the Following DNS Server Addresses
(1) Preferred DNS Server 192168150102
g) Click OK to accept the IP settings and Close to accept the changes to the NIC
Why not use 101 as the start NIC When you created the virtual internal network Hyper-V created a virtual NIC on the host computer If you set the IP of that NIC to 192168150101 you can use the Remote Desktop Connection app in Windows to connect to your virtual machines and easily copy-paste amp share drives
2 Configure the NIC that is linked to the External LAN network
a) Open the Network Connections window if it is not still open using the same steps from the previous step
b) Right-click the External LAN NIC and select Properties
c) In the Local Area Connection Properties dialog select the Internet Protocol Version 4 (TCPIPv4) item and click Properties
d) Enter the following information into the resulting dialog to configure the NICrsquos IP settings
i) Obtain an IP Address Automatically
ii) Use the Following DNS Server Addresses
(1) Preferred DNS Server 192168150102
e) Click the Advanced button to open the Advanced TCPIP Settings dialog
f) In the Advanced TCPIP Settings dialog click the DNS tab
i) Uncheck the Register this Connections Address in DNS
Creating a SharePoint Server 2013 Environment for Development and Testing Version 10
copy Critical Path Training 2012 All Rights Reserved 18
wwwCriticalPathTrainingcom
g) In the Advanced TCPIP Settings dialog click the WINS tab
i) Click the Add button and specify a new WINS Server as 192168150102
h) Click OK Close multiple times to accept all TCPIP settings
The external NIC will now obtain an IP dynamically amp will not register itself in the DHCPrsquos DNS server which is a good thing when there are multiple people on the same network this this type of a setup
3 Connect the second NIC to the External LAN network
a) Go back to the host computer and open the Hyper-V Manager
b) In the Hyper-V Manager window right-click the VM WingtipServer and select Settings
c) Select the second NIC the one that is not connected
d) For the Network select External LAN and click OK This will effectively plug the external network into the VM
4 Go back into the WingtipServer VM and if it is not still open open the Network Connections dialog You should now see both connections plugged in
a) To refresh the connection select the connection you just plugged in and click the Disable this Network Device button in the toolbar After the connection is disabled select it and click the Enable this Network Device button
b) After a few seconds the VM should be able to connect to the internet which you can test by browsing to a site such as httpwwwbingcom
Configure Windows Update and Update the Server
In this section you will verify the server is fully patched and updated
1 Verify Service Pack 1 is installed
a) Verify the version of the operating system installed by clicking Start right-click on Computer select Properties
b) If the server simply says Windows Server 2008 R2 Enterprise as shown in the following figure download and install Service Pack 1 from the following location httpwwwmicrosoftcomen-usdownloaddetailsaspxid=5842
Creating a SharePoint Server 2013 Environment for Development and Testing Version 10
copy Critical Path Training 2012 All Rights Reserved 19
wwwCriticalPathTrainingcom
c) If Service Pack 1 is installed it will state it
2 Update the server using Windows Update
a) Selecting Start All Programs Windows Update
b) First disable Windows Update from running automatically
i) Click the link Change Settings
ii) Under the Important Updates list select Never check for updates (not recommended)
This isnrsquot what you would do in a production environment but for a development machine it is ok
c) Now update the server
i) Click the Check for Updates button
ii) If prompted install any updates to the Windows Update dialog
iii) Select the Check for Updates link
iv) Windows Update will the report how many updates are available Select all important and recommended updates and click the Install Updates button
v) If prompted select I accept the license terms for any updates that require it
vi) Keep going through the process of running Windows Update checking for updates and installing them after each reboot until it says there are no updates left to install
This step is likely going to take quite a bit of time so be patient
Activate Windows Server 2008 R2
In this section you will activate the server if you have a product key
1 If you have a product key for Windows Server 2008 R2 use it to activate Windows
a) In the Server Manager window navigate to the top-level node to display the Server Summary page Click Activate Windows
b) You will be prompted to enter your product key
i) Enter your product key and click to button to activate Windows
Creating a SharePoint Server 2013 Environment for Development and Testing Version 10
copy Critical Path Training 2012 All Rights Reserved 20
wwwCriticalPathTrainingcom
ii) After a few seconds your VM should be able to connect to a Microsoft site and successfully activate Windows
At this point you have a fully patched operating system VM created that will act as the Active Directory domain controller
Apply the DisableLoopbackCheck Registry Fix
Configure the DisableLoopbackCheck registry setting (Microsoft KB httpsupportmicrosoftcomkb896861)
The following steps automate creating the registry key outlined as Method 2 in the Microsoft KB article httpsupportmicrosoftcomkb896861 using Windows PowerShell
PowerShell Script Alert You can also find this PowerShell script AddDisableLoopbackCheckRegKeyps1 in the files that
accompany this setup guide
1 Click the Windows PowerShell icon in the Taskbar
2 Run the following PowerShell commands pressing [ENTER] after each one
$regKeyPath = HKLMSystemCurrentControlSetControlLsa $key = DisableLoopbackCheck New-ItemProperty -Path $regKeyPath -Name $key -Value 1 -PropertyType dword
a) Close the Windows PowerShell console by typing EXIT and pressing [ENTER]
Exercise 3 Install Active Directory Domain Services
Now you will promote your WingtipServer VM to a domain controller and create a new domain named wingtipcom
1 Login to the WingtipServer virtual machine using administrator | Password1
2 Add and configure the role for Active Directory Domain Services
a) Launch Server Manager and select the Roles node
b) Click the Add Roles link to start the Add Roles Wizard
c) On the Before you begin page click Next
d) On the Server Roles page select Active Directory Domain Services Click the Add Required Features button if prompted to install prerequisites
e) Click Next
Creating a SharePoint Server 2013 Environment for Development and Testing Version 10
copy Critical Path Training 2012 All Rights Reserved 21
wwwCriticalPathTrainingcom
f) On the next page of the wizard click Next which will bring you to the Confirm Installation Selections page
g) Click Install
After Active Directory Domain Services has been installed you will see the Installation Results page in the Add Roles Wizard
3 Click on the link with the big long caption of Close this wizard and launch the Active Directory Domain Services Installation Wizard (dcpromoexe)
4 On the first page of the Active Directory Domain Services Installation Wizard click the Use Advanced Mode Installation checkbox and click Next
Creating a SharePoint Server 2013 Environment for Development and Testing Version 10
copy Critical Path Training 2012 All Rights Reserved 22
wwwCriticalPathTrainingcom
5 On the Operating System Compatibility page click Next
6 On the Choose a Deployment Configuration select Create a new domain in a new forest and click Next
7 On the Name the Forrest Root Domain enter the following and click Next
a) FQDN of the forest root domain wingtipcom
8 On the Domain NetBIOS Name set it to WINGTIP and click Next
9 On the Set Forest Functional Level page select Windows Server 2008 R2 and click Next
10 On the Additional Domain Controller Options accept the default options and click Next
11 You might be prompted with the dialog shown below providing a warning that This computer has dynamically assigned IP address(es) This is not a problem when you are running your development environment on a domain controller Click Yes to dismiss the dialog
12 At this point the wizard will prompt you with a dialog information you a delegation for the DNS Server cannot be created because it cannot find the authoritative parent zone This is not a problem because the wizard will automatically configure the DNS of the VM to point to itself Click on the Yes button to dismiss this dialog
Creating a SharePoint Server 2013 Environment for Development and Testing Version 10
copy Critical Path Training 2012 All Rights Reserved 23
wwwCriticalPathTrainingcom
13 On the Location for Database Log Files and SYSVOL page accept all the default values and click Next
14 On the Directory Services Restore Mode Administrator Password page enter Password1 in both textboxes and click Next
15 On the Summary page click Next to start the process of configuring the new Active Directory domain
16 The wizard will display the dialog below to show you the progress of the configuration process You will be required to reboot when the configuration has been completed Check the option for Reboot on completion and then wait for the configuration to complete and the machine to reboot
17 After the VM reboots login to the server with wingtipadministrator | Password1
Configure Windows Update and Update the Server
In this section you will verify the server is fully patched and updated
1 Update the server using Windows Update
a) Selecting Start All Programs Windows Update
b) Select the Check for Updates link
c) Windows Update will the report how many updates are available Select all important and recommended updates and click the Install Updates button
d) If prompted select I accept the license terms for any updates that require it
e) Keep running Windows Update after each reboot and update install until it says there are no updates left to install
Creating a SharePoint Server 2013 Environment for Development and Testing Version 10
copy Critical Path Training 2012 All Rights Reserved 24
wwwCriticalPathTrainingcom
This step could take quite a bit of time so be patient
At this point you have a fully installed Active Directory Domain Controller for the Wingtipcom domain hosted on the server WingtipServer
Exercise 4 Install SQL Server 2012
In this exercise you will install SQL Server 2012 that will be used to store all required databases
1 Download the SQL Server 2012 Evaluation Edition specifically the DVD x64 ISO image to the host computer from here httpwwwmicrosoftcombetaexperiencepdSQL2012EvalCTAenusdefaultaspx or you can use your own licensed copy
2 Mount the SQL Server 2012 ISO to the WingtipServer VM
a) On the host computer open the Hyper-V Manager
b) Right-click the VM WingtipServer and select Settings
c) Select DVD Drive in the left-hand panel
d) In the right-hand panel select Image File and browse to the ISO file that contains SQL Server 2012 and click OK
3 Login to the WingtipServer VM as wingtipadministrator | Password1
Install SQL Server 2012
In this section you will install SQL Server 2012
1 If the AutoPlay dialog box is open click Run SETUPEXE If it isnrsquot use Windows Explorer to navigate to the DVD drive and execute the setupexe file in the root of the DVD drive
2 In the SQL Server Installation Center click Installation on the left-hand side
Creating a SharePoint Server 2013 Environment for Development and Testing Version 10
copy Critical Path Training 2012 All Rights Reserved 25
wwwCriticalPathTrainingcom
3 Next select New SQL Server stand-alone installation or add features to an existing installation
4 On the Setup Support Rules page the installer will check for issues before installing Click OK
5 On the Product Key page click the Specify a free edition radio box and select Evaluation then click Next
6 On the License Terms page click the I accept the license terms checkbox and click Next
7 On the Setup Support Rules page the installer will check for any problems with the server you are installing on Click Next when this completes
Creating a SharePoint Server 2013 Environment for Development and Testing Version 10
copy Critical Path Training 2012 All Rights Reserved 26
wwwCriticalPathTrainingcom
8 On the Support Role page select SQL Server Feature Installation and click Next
9 On the Feature Selection page check the following options and click Next
a) Instances Features
i) Database Engine Services
(1) Full-Text and Semantic Extractions for Search
b) Shared Features
i) Management Tools ndash Basic
(1) Management Tools ndash Complete
Creating a SharePoint Server 2013 Environment for Development and Testing Version 10
copy Critical Path Training 2012 All Rights Reserved 27
wwwCriticalPathTrainingcom
10 On the Installation Rules page click Next
11 On the Instance Configuration page click Next
12 On the Disk Space Requirements page click Next
13 On the Server Configuration page do the following and click Next
a) On the Service Account tab change the Startup Type for the SQL Server Agent to Automatic
14 On the Database Engine Configuration page do the following and click Next
a) On the Server Configuration tab click Add Current User
b) On the FILESTREAM tab
i) Check Enable FILESTREAM for Transact-SQL Access
ii) Check Enable FILESTREAM for file IO access
15 On the Error Reporting page click Next
16 On the Installation Configuration Rules page click Next
17 On the Ready to Install page click Install
Installation of SQL Server 2012 will take some time please be patient
18 When the installation completes the Complete page will be shown Click Close
At this point you have now successfully installed SQL Server 2012
Creating a SharePoint Server 2013 Environment for Development and Testing Version 10
copy Critical Path Training 2012 All Rights Reserved 28
wwwCriticalPathTrainingcom
Exercise 5 Install amp Configure SharePoint Server 2013
In this exercise you will install SharePoint 2013
1 Download the SharePoint Server 2013 to the host computer from here httptechnetmicrosoftcomen-USevalcenterhh973397aspx
2 Mount the SharePoint Server 2013 ISO to the WingtipServer VM
a) On the host computer open the Hyper-V Manager
b) Right-click the VM WingtipServer and select Settings
c) Select DVD Drive in the left-hand panel
The file that Microsoft provides is saved in the IMG format Hyper-V Manager wonrsquot allow you to mount an IMG file so rename it to ISO before mounting it
d) In the right-hand panel select Image File and browse to the ISO file that contains SharePoint Server 2013 and click OK
Create SharePoint Service Accounts amp Grant Rights to SQL Server 2012
In this section you will create the necessary service accounts that will be used by SharePoint in Active Directory and grant them necessary rights in SQL Server 2012
PowerShell Script Alert The creation of users and granting them rights to SQL Server 2012 steps in this section are automated in the Windows PowerShell script CreateSpServiceAccountsps1 found in the files that accompany this setup guide Open the script
and read the header for documentation on how to use it
1 Open the Active Directory Users and Computers Start Administrative Tools Active Directory Users and Computers
2 Expand the tree in the left-hand pane to see the Users OU Select the Users OU
3 Create a new user SP_Farm
a) In the toolbar select Action New User
Creating a SharePoint Server 2013 Environment for Development and Testing Version 10
copy Critical Path Training 2012 All Rights Reserved 29
wwwCriticalPathTrainingcom
b) Set the userrsquos Full Name amp User Login Name to SP_Farm and click Next
c) In the password dialog enter the following and click Next
i) Password (and Confirm Password) Password1
ii) User must change password at next login unchecked
iii) User cannot change password unchecked
iv) Password never expires checked
v) Account is disabled unchecked
Creating a SharePoint Server 2013 Environment for Development and Testing Version 10
copy Critical Path Training 2012 All Rights Reserved 30
wwwCriticalPathTrainingcom
vi) Click Finish
4 Repeat the previous step to create two more accounts
a) SP_Content
b) SP_Services
At this point you have created all the necessary service accounts
Install SharePoint Server 2013 Prerequisites
In this section you will install the SharePoint Server 2013 Prerequisites
1 Ensure you are logged into the WingtipServer VM using the account wingtipadministrator | Password1
2 If the AutoPlay dialog box is open click Run splashhta If it isnrsquot use Windows Explorer to navigate to the DVD drive and execute the splashhta file in the root of the DVD drive
Creating a SharePoint Server 2013 Environment for Development and Testing Version 10
copy Critical Path Training 2012 All Rights Reserved 31
wwwCriticalPathTrainingcom
3 Click the Install Software Prerequisites link
4 In the Microsoft SharePoint 2013 Products Preparation Tool window click Next
5 On the License Terms for Software Products page
a) Check I accept the terms of the License Agreement(s)
b) Click Next
6 The tool will download and install all prerequisites for SharePoint Server 2013 This will take some time It may prompt you to reboot the server If so reboot the server and login using wingtipadministrator | Password1
Creating a SharePoint Server 2013 Environment for Development and Testing Version 10
copy Critical Path Training 2012 All Rights Reserved 32
wwwCriticalPathTrainingcom
7 When the prerequisite installer is complete it will present a summary of everything it did
8 Click Finish
9 Restart the WingtipServer VMhellip some additional installations and changes that the prerequisite installer did will require a restart before installing SharePoint Server 2013
At this point all prerequisites required by SharePoint Server 2013 have been installed and any necessary configuration changes have been applied to the server However it is strongly recommend that you run Windows Update and install any pending updates Further Microsoft recommends installing the following hotfixes if they are not already installed
KB2554876 The SharePoint Parsing Process Crashes in Windows Server 2008 R2
KB2708075 IIS 75 Configurations are not Updated when you use the ServerManager Class to Commit Configuration Changes
KB2759112 Hotfix is Available for NET Framework 45 that Resolves an ASPNET Race Condition Issue in Windows Server 2008 R2 Windows Server 2008 R2 SP1
KB2765317 Hotfix is Available for NET Framework 45 that Resolves an ASPNET Race Condition Issue in Windows
8 Windows RT and Windows Server 2012
Install SharePoint Server 2013
In this section you will install SharePoint Server 2013
1 Ensure you are logged into the WingtipServer VM using the account wingtipadministrator | Password1
2 If the AutoPlay dialog box is open click Run splashhta If it isnrsquot use Windows Explorer to navigate to the DVD drive and execute the splashhta file in the root of the DVD drive
Creating a SharePoint Server 2013 Environment for Development and Testing Version 10
copy Critical Path Training 2012 All Rights Reserved 33
wwwCriticalPathTrainingcom
3 Click Install SharePoint Server
4 When prompted to Enter your Product Key enter the key you obtained for the trial install and click Continue
5 On the Read the Microsoft Software License Terms page check the I accept the terms of this agreement checkbox and click Continue
6 On the Choose a file location page click Install Now
Creating a SharePoint Server 2013 Environment for Development and Testing Version 10
copy Critical Path Training 2012 All Rights Reserved 34
wwwCriticalPathTrainingcom
7 When the installation is complete select the Run the SharePoint Products Configuration Wizard checkbox and click Close
8 On the Welcome to SharePoint Products page click Next
a) If prompted to start or reset services click Yes
9 On the Connect to a server farm page select Create a new server farm and click Next
10 On the Specify Configuration Database Settings page use the following to complete the page and click Next
a) Database server WINGTIPSERVER
b) Database name SharePoint_Config
c) Username WINGTIPSP_Farm
d) Password Password1
Creating a SharePoint Server 2013 Environment for Development and Testing Version 10
copy Critical Path Training 2012 All Rights Reserved 35
wwwCriticalPathTrainingcom
11 On the Specify Farm Security Settings page for the Passphrase and Confirm Passphrase boxes enter Password1 and click Next
12 On the Configure SharePoint Central Administration Web Application page check the Specify port number checkbox and enter a value of 9999 then Click Next
Creating a SharePoint Server 2013 Environment for Development and Testing Version 10
copy Critical Path Training 2012 All Rights Reserved 36
wwwCriticalPathTrainingcom
13 On the Completing the SharePoint Products Configuration Wizard page click Next
14 When the installer completes it will display the Confirmation Successful page
15 Click Finish This will launch Internet Explorer to go through the configuration process
Creating a SharePoint Server 2013 Environment for Development and Testing Version 10
copy Critical Path Training 2012 All Rights Reserved 37
wwwCriticalPathTrainingcom
At this point you have successfully installed SharePoint Server 2013
Configure SharePoint Server 2013
In this section you will create a new SharePoint Server 2013 farm and perform minimal configuration tasks
After installing SharePoint Sever 2013 the SharePoint Products Configuration Wizard will launch the browser-based Initial Farm Configuration Wizard
1 In the first page of the wizard you are prompted to Help Make SharePoint Better Select which ever option you want and click OK
2 On the Welcome page that asks How do you want to configure your SharePoint farm click the Start the Wizard button
3 On the Services page do the following and then click Next
a) Service Account Select Create new managed account
i) Username WINGTIPSP_Services
ii) Password Password1
b) Services Uncheck the following services
Creating a SharePoint Server 2013 Environment for Development and Testing Version 10
copy Critical Path Training 2012 All Rights Reserved 38
wwwCriticalPathTrainingcom
i) Access Services 2010
ii) App Management Service
In SharePoint Server 2013 the Search Service Application processes specifically noderunnerexe can consume a considerable amount of memory and processor time If you are not going to work with search you might consider unchecking this option for now You can always go back into Central Administration and create a new instance of the Search Service Application at a later date if you need it
Why did we remove Access Services 2010 amp App Management Service service applications The Access Services 2010 service application is included for backwards compatibility and isnrsquot needed in new installations unless you are migrating solutions built with Access Services 2010 from SharePoint Server 2010 (if so you can create this service application later within Central Administration Application Management Manage Service Applications) The App Management Service service application will be created in a later step in this setup guide therefor it is skipped here
4 The creation of the service applications can take quite a while so be patient If it exceeds 20 minutes it is fairly safe to assume the page is hung up One option is to close the browser then launch Central Administration (Start All Programs Microsoft SharePoint 2013 Products SharePoint 2013 Central Administration) and look at the Service Application page (Application Management Manage Service Applications) to see if they were all created
Configure DNS
In this section you will configure DNS for hosting SharePoint sites amp Apps
1 Ensure you are logged into the WingtipServer VM using the account wingtipadministrator | Password1
2 Open the DNS window Start Administrative Tools DNS
3 Expand the hierarchy on the left-hand side of the window until you get to DNS WINGTIPSERVER Forward Lookup Zones wingtipcom
4 Create a new wildcard so all requests for http[]wingtipcom will be forwarded to our SharePoint machine
a) Next right-click wingtipcom and select New Host (A or AAAA)
Creating a SharePoint Server 2013 Environment for Development and Testing Version 10
copy Critical Path Training 2012 All Rights Reserved 39
wwwCriticalPathTrainingcom
b) In the New Host dialog enter the following and click OK
i) Alias Name
ii) IP Address 192168150102 Then click Add Host The following figure shows how this looks
This new record is telling DNS to forward any request for http[]wingtipcom to the webserver WINGTIPSERVER where the
requests will be served by SharePoint
5 Verify this DNS entry is working
a) Open Windows PowerShell Start All Programs Accessories Windows PowerShell Windows PowerShell
b) Run the following commands and press ENTER
PS CUsersAdministratorgt nslookup somethingwingtipcom PS CUsersAdministratorgt nslookup somethingappswingtipcom
c) You should get a response that points to the WingtipServer server as shown in the following figure
Creating a SharePoint Server 2013 Environment for Development and Testing Version 10
copy Critical Path Training 2012 All Rights Reserved 40
wwwCriticalPathTrainingcom
Configure SharePoint Server 2013 for Host-Named Site Collections amp Create Initial Site
Collections
In this section you will create new SharePoint 2013 site collections for testing and hosting apps
Microsoft recommends to create host-named site collections (HNSC) instead of using the path based site collection addressing The difference is the following a path based site created at something such as httpintranetwingtipcomsitesdevtest as an HNSC site would be more like httpdevtestwingtipcom This is how it works in the cloud (Office 365) and it scales much better for on-prem
deployments This setup guide will show you how to setup your environment to create HNSC The only downside to this approach is that you canrsquot create site collections within Central Administration it must be done via Windows PowerShell API (because Central Administration doesnrsquot instruct you where to put the site
This is implemented in various parts First DNS must be configured to send all requests for httpwingtipcom to a Web Application
(implemented in the last section) Second this Web Application must be extended with SharePoint and have no host header bindings (so it handles all requests) Third it must have a default site collection at the root of the Web Application but it will not be used for anything (in fact it doesnrsquot need a template assigned to it)
You can read more about HNSCrsquos on TechNet httptechnetmicrosoftcomen-uslibrarycc424952aspx
PowerShell Script Alert The steps in this section are automated in the script SetupSharePointForHNSCps1 found in the files that
accompany this setup guide Open the script and read the header for documentation on how to use it
1 Ensure you are logged into the WingtipServer VM using the account wingtipadministrator | Password1
2 Open Central Administration Start All Programs Microsoft SharePoint 2013 Products SharePoint 2013 Central Administration
3 Select Application Management Manage Web Applications
4 Delete the default Web Application created by the configuration wizard
a) Delete the existing default Web Application
i) Select the Web Application SharePoint ndash 80 the one with the URL of httpwingtipserver and click Delete in the ribbon
ii) When prompted to delete the associated IIS Web Site amp SQL Server database select both options to delete them and click OK
The reason you are doing this is because the setup wizard you ran previously when creating the service applications automatically created it The problem is that it used the same identity (WINGTIPSP_Services) for the app pool that is used for all the service
applications which is not desired
5 Create a new Web Application to handle Host-Named Site Collections (HNSC)
Creating a SharePoint Server 2013 Environment for Development and Testing Version 10
copy Critical Path Training 2012 All Rights Reserved 41
wwwCriticalPathTrainingcom
a) In the ribbon click the New button
b) In the Create New Web Application dialog enter the following values in the properties and click OK Leave all properties not mentioned
i) Select the radio button Create a new IIS web site
(1) Name SharePoint HNSC Host ndash 80
(2) Port 80
ii) Application Pool
(1) Select the radio button Create a new application pool
(a) Application Pool Name SharePoint Default HNSC AppPool
(b) Select a security account for this application pool WINGTIPSP_Content
If WINGTIPSP_Content is not listed as an available managed account create it by selecting the appropriate option and using
Password1 for the password
iii) Database Name and Authentication
(1) Database Name WSS_Content_HNSCDefaultHost
c) This process will take a few moments At the end of the process SharePoint will ask if you want to create a site collection You do but you donrsquot want to do it through the browser as this will not be a HNSC To create a HNSC you must create it via Windows PowerShell
6 Create a default not template site collection at the root of the web application
a) Open SharePoint 2013 Management Shell Start All Programs Microsoft SharePoint 2013 Products SharePoint 2013 Management Shell
7 Create Site Collections for Testing SharePoint amp SharePoint Apps
a) Open SharePoint 2013 Management Shell Start All Programs Microsoft SharePoint 2013 Products SharePoint 2013 Management Shell
b) Get a reference to the HNSC web application you just created by running the following Windows PowerShell script in the SharePoint 2013 Management Shell
$hnscWebApp = Get-SPWebApplication | Where-Object $_DisplayName -eq SharePoint HNSC Host - 80
c) Create a non-templated site at the root of the web application for Workflow to connect to by executing the following Windows PowerShell script in the SharePoint 2013 Management Shell
New-SPSite -Name Root HNSC Site Collection -Url httpwingtipcom -HostHeaderWebApplication $hnscWebApp -OwnerAlias WINGTIPAdministrator
d) Create a team site by executing the following Windows PowerShell script in the SharePoint 2013 Management Shell
New-SPSite -Name Wingtip Intranet -Url httpintranetwingtipcom ndashHostHeaderWebApplication $hnscWebApp -Template STS0 -OwnerAlias WINGTIPAdministrator
e) Create a developer site by executing the following Windows PowerShell script in the SharePoint 2013 Management Shell
New-SPSite -Name Wingtip Developer Site -Url httpdevwingtipcom ndashHostHeaderWebApplication $hnscWebApp -Template DEV0 -OwnerAlias WINGTIPAdministrator
You can only create debug and test apps using a developer site
At this point you now have a site collection to use as a team site (httpintranetwingtipcom) and to develop and test custom SharePoint apps (httpdevwingtipcom)
Creating a SharePoint Server 2013 Environment for Development and Testing Version 10
copy Critical Path Training 2012 All Rights Reserved 42
wwwCriticalPathTrainingcom
Configure SharePoint 2013 for Hosting Apps
In this setup you will setup your SharePoint 2013 environment for hosting apps
PowerShell Script Alert Everything in the next immediate step is provided in the script ConfigureSpFarmForAppsps1 found in the
files that accompany this setup guide Open the script and read the header for documentation on how to use it
1 Ensure you are logged into the WingtipServer VM using the account wingtipadministrator | Password1
2 Create the necessary SharePoint App Management service applications and start the necessary services via Windows PowerShell
a) Open SharePoint 2013 Management Shell Start All Programs Microsoft SharePoint 2013 Products SharePoint 2013 Management Shell
b) Execute the following Windows PowerShell script in the SharePoint 2013 Management Shell
$appHostDomain = appswingtipcom $adminService = Get-Service -Name spadminv4 if ($adminServiceStatus -ne Running) Start-Service $adminService $timerService = Get-Service -Name sptimerv4 if ($timerServiceStatus -ne Running) Start-Service $timerService Set-SPAppDomain $appHostDomain $appMgmtSvcInstance = Get-SPServiceInstance | Where-Object $_GetType()Name -eq AppManagementServiceInstance if ($appMgmtSvcInstanceStatus -ne Online) Start-SPServiceInstance -Identity $appMgmtSvcInstance $appSubSettingSvcInstance = Get-SPServiceInstance | Where-Object $_GetType()Name -eq SPSubscriptionSettingsServiceInstance if ($appSubSettingSvcInstanceStatus -ne Online) Start-SPServiceInstance -Identity $appSubSettingSvcInstance $appPoolServiceApps = Get-SPServiceApplicationPool -Identity SharePoint Web Services Default $appSubSvc = New-SPSubscriptionSettingsServiceApplication ndashApplicationPool $appPoolServiceApps ndashName Settings Service Application ndashDatabaseName SettingsServiceDB $proxySubSvc = New-SPSubscriptionSettingsServiceApplicationProxy ndashServiceApplication $appSubSvc $appAppSvc = New-SPAppManagementServiceApplication -ApplicationPool $appPoolServiceApps -Name App Management Service Application -DatabaseName AppServiceDB $proxyAppSvc = New-SPAppManagementServiceApplicationProxy -ServiceApplication $appAppSvc Set-SPAppSiteSubscriptionName -Name app -Confirm$false
3 Verify the script configured SharePoint 2013 for hosting apps
a) Open Central Administration Start All Programs Microsoft SharePoint 2013 Products SharePoint 2013 Central Administration
b) Verify service applications created
i) Open the Service Applications page Application Management Manage Service Applications
ii) Verify you have two service applications created
(1) App Management Service Application
(2) Settings Service Application
c) Verify service instances are running
i) Open the Services on Server page System Settings Manage Services on Server
ii) Verify the following services are Started
(1) App Management Service
(2) Microsoft SharePoint Foundation Subscription Settings Service
Creating a SharePoint Server 2013 Environment for Development and Testing Version 10
copy Critical Path Training 2012 All Rights Reserved 43
wwwCriticalPathTrainingcom
d) Verify App URLs are correct
i) Open the Configure App URLs page Apps Configure app URLs
ii) Verify the following
(1) App Domain appswingtipcom
(2) App Prefix app
At this point your SharePoint Server 2013 environment is ready to host SharePoint apps
Creating a SharePoint Server 2013 Environment for Development and Testing Version 10
copy Critical Path Training 2012 All Rights Reserved 44
wwwCriticalPathTrainingcom
Start the SharePoint 2013 Sandbox Service
By default the service that executes sandbox solutions is not running In this step you will start the service
1 Open Central Administration Start All Programs Microsoft SharePoint 2013 Products SharePoint 2013 Central Administration
2 Open the Services on Server page System Settings Manage Services on Server
3 Click the Start link to the left of the Microsoft SharePoint Foundation Sandboxed Code Service
At this point your installation can support sandbox solutions
Configure CRL Verification for Disconnected Environments
SharePoint periodically ldquophones homerdquo to a specific address hosted by Microsoft under certain conditions When your environment is disconnected this can cause an unnecessary delay or failures when starting up the sandbox The following steps outline a workaround to bypass this check
1 Launch Notepad as an administrator Start All Programs Accessories right-click Notepad and select Run as Administrator
2 Open the hosts file by selecting File Open and finding the file
cWindowsSystem32Driversetchosts
3 Add the following line to the end of the file
127001 crlmicrosoftcom
4 Save and close the hosts file
Update Internet Explorer to Bypass the App URL amp Automatically Login to SharePoint Sites
In this section you will update Internet Explorer to add the App hosting URL to the bypass list so you can navigate to the domain after deploying SharePoint hosted apps
1 Ensure you are logged into the WingtipServer VM using the account wingtipadministrator | Password1
1 Launch Internet Explorer Start All Programs Internet Explorer
2 Configure Internet Explorer to bypass the App URL
a) In the top-right corner click the gear icon and select Internet Options
b) On the Security tab select the Local Intranet and click the Sites button
c) Uncheck the box next to Automatically detect intranet network
d) Click the Advanced button and add two entries to the Exceptions list
i) httpwingtipcom
ii) httpappswingtipcom
Creating a SharePoint Server 2013 Environment for Development and Testing Version 10
copy Critical Path Training 2012 All Rights Reserved 45
wwwCriticalPathTrainingcom
e) Click the Close button followed by the OK button multiple times to close out of the dialogs
At this point Internet Explorer is setup to bypass your app URL so you can navigate to apps (httpappswingtipcom) as well as automatically authenticate to sites hosted at httpwingtipcom
Exercise 6 Configure SharePoint to Host My Sites
In this exercise you will configure SharePoint to create and host My Sites In order to host My Sites you will need a new Web Application that is configured for Self-Service Site Creation and has a My Site Host site collection
1 Create a new SharePoint web application to host the My Sites
a) Ensure you are logged into the WingtipServer VM using the account wingtipadministrator | Password1
b) Open Central Administration Start All Programs Microsoft SharePoint 2013 Products SharePoint 2013 Central Administration
c) Select Application Management Manage Web Applications
d) In the ribbon click the New button
e) In the Create New Web Application dialog enter the following values in the properties and click OK Leave all properties not mentioned
i) Select the radio button Create a new IIS web site
(1) Name SharePoint MySite Host ndash 80
(2) Port 80
(3) Host Header mywingtipcom
ii) Application Pool
(1) Select the radio button Use existing application pool
(a) Application Pool Name SharePoint Default HNSC AppPool
iii) Database Name and Authentication
(1) Database Name WSS_Content_SocialWingtipCom
f) This process will take a few moments At the end of the process SharePoint will ask if you want to create a site collection Click the link provided to create a new site collection amp continue to the next step
2 Create a My Site Host site collection
a) On the Create Site Collection page use the following information to complete the form and click OK
Creating a SharePoint Server 2013 Environment for Development and Testing Version 10
copy Critical Path Training 2012 All Rights Reserved 46
wwwCriticalPathTrainingcom
i) Title My Site Host
ii) URL
iii) Template Selection My Site Host (found under the Enterprise tab)
iv) Primary Site Collection Administrator WINGTIPAdministrator
3 Update the Web Application to host my sites
a) Within Central Administration in the left-hand navigation navigate to the Manage Web Applications page Application Management Manage Web Applications
b) Select the SharePoint MySite Host ndash 80 web application
c) Click the Managed Paths button in the ribbon
d) Remove the sites managed path and add two new managed paths and click OK
i) personal ndash Wildcard inclusion
ii) my ndash Explicit inclusion
e) With the SharePoint MySite Host ndash 80 web application still selected click the Self-Service Site Creation button
f) On the Self-Service Site Creation page use the following values to complete the form and click OK
i) Site Collections On
4 Next configure the User Profile Service Application My Site settings
a) Browse to the User Profile Service Application management page Application Management Manage Service Applications User Profile Service Application
b) Under the My Site Settings section click the Setup My Sites
c) On the My Site Settings page use the following information to complete the form and click OK
i) My Site Host httpmywingtipcom
ii) Personal Site Location personal
At this point your SharePoint deployment is now configured to automatically create My Sites under httpmywingtipcomPersonalUserName when users first browse to them
Exercise 7 Install amp Configure Workflow Manager 10
In this exercise you will configure the WingtipServer VM to host Workflow Manager 10 and connect it to your SharePoint installation
1 Ensure you are logged into the WingtipServer VM using the account wingtipadministrator | Password1
Verify SQL Server 2012 Network Configuration
In this section yoursquoll verify the network configuration is correct for SQL Server 2012 in order to install Workflow Manager 10
Creating a SharePoint Server 2013 Environment for Development and Testing Version 10
copy Critical Path Training 2012 All Rights Reserved 47
wwwCriticalPathTrainingcom
1 Configure SQL Server 2012 to have the TCPIP connection protocol enabled
a) Open the SQL Server Configuration Manager Start All Programs Microsoft SQL Server 2012 Configuration Tools SQL Server Configuration Manager
b) Expand the hierarchy on the left-hand side to the following SQL Server Connection Manager (local) SQL Server Network Configuration Protocols for MSSQLSERVER
c) In the main window if TCPIP is Disabled right-click TCPIP and select Enable
d) When prompted with a warning click OK
2 SQL Server must be restarted in order to reflect this change
a) In the hierarchy on the left-hand side of the window select SQL Server Services
b) Right-click SQL Server (MSSQLSERVER) and select Restart
At this point SQL Server is now configured with the TCPIP protocol enabled a requirement when configuring Service Bus
Configure the Workflow Service Account with the Necessary Rights
In this section you will verify the service account that will run Workflow Manager and Service Bus
1 Ensure you are logged into the WingtipServer VM using the account WINGTIPadministrator | Password1
2 Grant the WINGTIPSP_Content account securityadmin amp dbcreator permissions in SQL Server
a) Launch SQL Server Management Studio Start All Programs Microsoft SQL Server 2012 SQL Server Management Studio
b) When SQL Server Management Studio launches within the Connect to Server dialog login using the default settings and click Connect
c) In the Object Explorer tool window expand the WINGTIPSERVER server hierarchy to the Security Logins node
d) Find the WINGTIPSP_Content account right-click it and select Properties
Creating a SharePoint Server 2013 Environment for Development and Testing Version 10
copy Critical Path Training 2012 All Rights Reserved 48
wwwCriticalPathTrainingcom
e) In the Select a page pane select Server Roles
f) Check securityadmin amp dbcreator and click OK
g) Close SQL Server Management Studio
3 Add the Workflow service account to the local administrators group
a) Open the Active Directory Users and Computers window Start Administrative Tools Active Directory Users and Computers
b) In the hierarchy on the left-hand side of the window expand it to the following Active Directory Users and Computers wingtipcom Builtin
c) In the main window right-click Administrators and select Properties
d) In the Administrators Properties dialog select the Members tab and click Add
e) In the Enter the object names to select box enter wingtipsp_content and click the Check Names button
f) In the Administrators Properties dialog click OK
g) Close the Active Directory Users and Computers window
At this point the service account that will host Workflow Manager and Service Bus has been configured correctly
Creating a SharePoint Server 2013 Environment for Development and Testing Version 10
copy Critical Path Training 2012 All Rights Reserved 49
wwwCriticalPathTrainingcom
Download amp Install Workflow Manager and Service Bus
In this section you will install Workflow Manager and Service Bus
1 Ensure you are logged into the WingtipServer VM using the account WINGTIPSP_Content | Password1
It is important you are logged in as the user that will run workflow when you install amp configure Workflow Manager and Service Bus
2 Launch the Web Platform Installer Start All Programs Microsoft Web Platform Installer
a) If the Web Platform Installer is not present on your machine you can download amp install it from here httpwwwmicrosoftcomwebdownloadsplatformaspx
If you do not have internet access within the virtual machine it is possible to download everything needed for workflow using the command line version of the Web Platform Installer (WebPICMD) You can get WebPICMD from httplearniisnetpageaspx1072web-platform-installer-v4-command-line-webpicmdexe-preview-release Specifically for
workflow enter the following command to download Workflow Beta 1 and all prerequisites
webpicmd offline ProductsWorkflow Pathc[path]
3 When the Web Platform Installer loads execute a search for Workflow select Workflow Manager 10 and click Add
4 Click the Install button at the bottom of the Web Platform Installer 40 window
5 On the Prerequisites page click I Accept
Note The Web Platform Installer 40 may prompt you to keep certain products updated using Microsoft Update If it does select Use Microsoft Update when I check for updates (recommended) and click Continue
6 When the installer completes the following dialog will appear Click Continue and then Finish to start the configuration process
Creating a SharePoint Server 2013 Environment for Development and Testing Version 10
copy Critical Path Training 2012 All Rights Reserved 50
wwwCriticalPathTrainingcom
At this point Workflow Manager amp Service Bus are installed
Configure Workflow Manager and Service Bus
In this section you will install Workflow Manager and Service Bus
1 If the Workflow Manager Configuration Wizard is not open open it Start All Programs Workflow Manager 10 Workflow Configuration
2 On the Welcome page click Configure Workflow Manager with Default Settings (Recommended)
Creating a SharePoint Server 2013 Environment for Development and Testing Version 10
copy Critical Path Training 2012 All Rights Reserved 51
wwwCriticalPathTrainingcom
3 On the New Farm Configuration page do the following
a) In the section Configure Service Account set the credentials to
i) User ID sp_contentwingtipcom
ii) Password Password1
b) Check the Allow Workflow management over HTTP on this computer checkbox
Ensure the username is entered in the fully qualified UPN format not as the default shows in the installer (sp_contentwingtip) or the domainusername format
In a production environment you should be doing everything over SSL
c) Click the Test Connection button to verify the connection credentials before proceeding
Creating a SharePoint Server 2013 Environment for Development and Testing Version 10
copy Critical Path Training 2012 All Rights Reserved 52
wwwCriticalPathTrainingcom
d) In the Certificate Generation Key and Confirm Certificate Generation Key enter Password1 into both fields
4 Click the right arrow in the bottom right corner to proceed
5 On the Summary page review your settings and click the check at the bottom right of the widow to start the configuration process
Creating a SharePoint Server 2013 Environment for Development and Testing Version 10
copy Critical Path Training 2012 All Rights Reserved 53
wwwCriticalPathTrainingcom
6 After a few minutes the Configuration Progress screen will show that everything has been configured correctly
Creating a SharePoint Server 2013 Environment for Development and Testing Version 10
copy Critical Path Training 2012 All Rights Reserved 54
wwwCriticalPathTrainingcom
7 Click the check in the bottom right corner
At this point Workflow Manager amp Service Bus has been installed and a new Workflow Manager farm has been created The next step is to connect the SharePoint 2013 farm to the Workflow Manager farm
Connect SharePoint 2013 to Workflow Manager
In this section you will connect SharePoint 2013 and Workflow Manager together
1 Ensure you are logged into the WingtipServer VM using the account WINGTIPadministrator | Password1
2 Get the Workflow Manager endpoint
a) Open the Workflow Manager PowerShell console Start All Programs Workflow Manager 10
b) Execute the Windows PowerShell following cmdlet
Get-WFFarm | ft HttpPort
c) Take note of this port (12291) This port number is what you will use to connect the SharePoint 2013 farm to the Workflow Manager 10 farm
In production you should connect to the HTTPS port listed in the HttpsPort property when you run Get-WFFarm
d) Close the Workflow Manager PowerShell window
3 Connect the SharePoint 2013 farm to Workflow Manager
Creating a SharePoint Server 2013 Environment for Development and Testing Version 10
copy Critical Path Training 2012 All Rights Reserved 55
wwwCriticalPathTrainingcom
a) Open SharePoint 2013 Management Shell Start All Programs Microsoft SharePoint 2013 Products SharePoint 2013 Management Shell
b) Execute the following Windows PowerShell script in the SharePoint 2013 Management Shell
Register-SPWorkflowService ndashSPSite httpintranetwingtipcom ndashWorkflowHostUri httpwingtipserver12291 ndashAllowOAuthHttp
This script is telling SharePoint the endpoint it should use to talk to Workflow Manager as well as Workflow Manager the SharePoint site collection it should talk to for calls into the CSOM It is also configuring all communication over HTTP rather than HTTPS for performance reasons In production you should always use HTTPS
This step will take a moment with no feedback during the process Be patient
c) Close the SharePoint 2013 Management Shell
At this point the SharePoint 2013 farm is connected to the Workflow Manager 10 farm
Configure SharePoint User Profile Service Application AD Sync
Users in SharePoint 2013 are validated by Workflow Manager against SharePoint to ensure they have permissions to start a workflow This is done by looking up the user by their AD UserPrincipalName (UPN) attribute in the User Profile Service Application (UPA) If no matching user is found the workflow will be automatically cancelled by Workflow Manager In this section you will setup UPA to connect amp sync with the local Active Directory so user accounts in AD will have their UPN synchronized to UPA
1 Open Central Administration Start All Programs Microsoft SharePoint 2013 Products SharePoint 2013 Central Administration
2 Go to the User Profile Service Application management page Application Management Manage Service Applications User Profile Service Application
3 The first step is to configure the User Profile Service Application to allow for Active Directory (AD) synchronization
a) Under Synchronization select Configure Synchronization Settings
b) For Synchronization select Use SharePoint Active Directory Import and click OK
4 Next establish a connection to the wingtipcom AD
a) Under Synchronization select Configure Synchronization Connections
b) On the Synchronization Connections page select Create New Connection
c) Enter the following values on this form and click OK
i) Connection Name WINGTIPCOM AD
ii) Type Active Directory Import
iii) Connection Settings
(1) Fully Qualified Domain Name wingtipcom
(2) Authentication Provider Type Windows Authentication
(3) Account Name WINGTIPAdministrator
(4) Password (and Confirm Password) Password1
iv) Containers
(1) Click Populate Containers
(2) After it loads check the box next to WINGTP or click the Select All button below the box
5 Go back to the User Profile Service Application management page Application Management Manage Service Applications User Profile Service Application
6 Finally start a synchronization import
a) Under Synchronization select Start Profile Synchronization
Creating a SharePoint Server 2013 Environment for Development and Testing Version 10
copy Critical Path Training 2012 All Rights Reserved 56
wwwCriticalPathTrainingcom
b) Select Start Full Synchronization and click OK
c) You will be taken back to the User Profile Service Application management page Notice in the top-right corner there is a status block that reports how many profiles are in the UPA database Refresh the page to see it increase to a handful of profiles as the import process runs
At this point you have successfully configured the User Profile Service Application to import profiles from the local AD
Exercise 8 Install the Microsoft Office 2013 Professional Clients
In this exercise you will install the Microsoft Office 2013 client applications
1 Download the Office 2013 into the WingtipServer VM For this you need to create an Office 365 Trial account login to Office 365 go to the Admin Dashboard and then download the latest version httpwwwmicrosoftcomofficepreviewentry-office-preview
2 Download the SharePoint Designer 2013 into the WingtipServer VM from here httpwwwmicrosoftcomen-usdownloaddetailsaspxid=35491
3 Download the Visio Professional 2013 into the WingtipServer VM from here httptechnetmicrosoftcomen-usevalcenterhh973399
Install Microsoft Office Professional Plus 2013
In this section you will install the Microsoft Office 2013 clients
1 Ensure you are logged into the WingtipServer VM using the account WINGTIPadministrator | Password1
2 Execute the installer OfficeProfessionalPlus_English_x64exe
3 On the Read the Microsoft Software License Terms dialog click the checkbox next to I accept the terms of this agreement and click Continue
4 On the Choose the installation you want dialog click the Install Now button
5 The installer will proceed and install all the Office products
6 When the installer completes click the Close button
7 Apply your Office Professional Plus 2013 license key
a) Launch Word 2013 Start All Programs Microsoft Office 2013 Word 2013
b) In the First things first dialog select Use recommended settings and click Accept
c) In the Welcome to Office dialog that opens click the [X] icon in the top-right corner to close it
d) In the left-hand pane click Open Other Documents
e) In the left-hand pane click Account
f) In the Product Information section within the Activation Required box click Change Product Key
g) Enter your license key for Office Professional Plus 2013 check the box next to Attempt to automatically activate my product online and click Install
h) Click OK
At this point you have installed Office Professional Plus 2013
Install Microsoft Office Visio 2013
In this section you will install Microsoft Office 2013 Visio
1 Ensure you are logged into the WingtipServer VM using the account WINGTIPadministrator | Password1
2 Execute the installer VisioProfessional_English_x64exe
3 On the Read the Microsoft Software License Terms dialog click the checkbox next to I accept the terms of this agreement and click Continue
Creating a SharePoint Server 2013 Environment for Development and Testing Version 10
copy Critical Path Training 2012 All Rights Reserved 57
wwwCriticalPathTrainingcom
4 On the Choose the installation you want dialog click the Install Now button
5 The installer will proceed and install all Visio 2013
6 When the installer completes click the Close button
7 Apply your Visio 2013 license key
a) Launch Visio 2013 Start All Programs Microsoft Office 2013 Visio 2013
b) In the First things first dialog select Use recommended settings and click Accept
c) In the Welcome to Office dialog that opens click the X icon in the top-right corner to close it
d) In the left-hand pane click Open Other Documents
e) In the left-hand pane click Account
f) In the Product Information section within the Activation Required box click Change Product Key
g) Enter your license key for Visio 2013 check the box next to Attempt to automatically activate my product online and click Install
h) Click OK
At this point you have installed Visio 2013
Install Microsoft Office 2013 SharePoint Designer
In this section you will install Microsoft Office 2013 SharePoint Designer
1 Ensure you are logged into the WingtipServer VM using the account WINGTIPadministrator | Password1
2 Execute the installer SharePointDesigner_English_x64exe
3 On the Read the Microsoft Software License Terms dialog click the checkbox next to I accept the terms of this agreement and click Continue
4 On the Choose the installation you want dialog click the Install Now button
5 The installer will proceed and install all SharePoint Designer 2013
6 When the installer completes click the Close button
At this point you have installed SharePoint Designer 2013
Exercise 9 Install Visual Studio 2012
In this exercise you will install Visual Studio 2012
1 Ensure you are logged into the WingtipServer VM using the account WINGTIPadministrator | Password1
2 Start the install of Visual Studio 2012 Ultimate Trial by downloading the installer from here httpwwwmicrosoftcomvisualstudio11en-usdownloads
3 On the installation splash screen check the box next to I agree to the License terms and conditions and click the Next button
Creating a SharePoint Server 2013 Environment for Development and Testing Version 10
copy Critical Path Training 2012 All Rights Reserved 58
wwwCriticalPathTrainingcom
4 On the Optional Features to install dialog click Install
5 After some time the installer will complete Click the Launch button to launch Visual Studio 2012
Creating a SharePoint Server 2013 Environment for Development and Testing Version 10
copy Critical Path Training 2012 All Rights Reserved 59
wwwCriticalPathTrainingcom
6 In the Choose Default Environment Settings select Visual C Development Settings and click Start Visual Studio
7 Close Visual Studio 2012
At this point Visual Studio 2012 RTM is installed
Install Office amp SharePoint 2013 Developer Tools
In this section you will install the Office and SharePoint 2013 developer tools for Visual Studio
1 Ensure you are logged into the WingtipServer VM using the account WINGTIPadministrator | Password1
2 Launch the Web Platform Installer Start All Programs Microsoft Web Platform Installer
3 In the search box at the top-right corner of the Web Platform Installer 40 window type sharepoint and press Enter
4 Click the Add button to the right of Microsoft Office Developer Tools for Visual Studio 2012 - Preview 2
5 Click the Install button at the bottom of the Web Platform Installer 40 window
6 On the Prerequisites page click I Accept
Creating a SharePoint Server 2013 Environment for Development and Testing Version 10
copy Critical Path Training 2012 All Rights Reserved 60
wwwCriticalPathTrainingcom
At this point you have installed the SharePoint 2013 amp Office 2013 development tools in Visual Studio 2012
Creating a SharePoint Server 2013 Environment for Development and Testing Version 10
copy Critical Path Training 2012 All Rights Reserved 61
wwwCriticalPathTrainingcom
Appendix 1 Download Manifest
The following lists everything referenced that you will or may need to download in this environment
Windows Server 2008 R2 with Service Pack 1 (installer ISO)
o httptechnetmicrosoftcomen-usevalcenterdd459137aspx
Windows Server 2008 R2 with Service Pack 1 (prebuilt VHD)
o httpwwwmicrosoftcomdownloadsdetailsaspxFamilyId=9040a4be-c3cf-44a5-9052-a70314452305
Windows Server 2008 R2 Service Pack 1
o httpwwwmicrosoftcomen-usdownloaddetailsaspxid=5842
SQL Server 2012 Trial
o httpwwwmicrosoftcombetaexperiencepdSQL2012EvalCTAenusdefaultaspx
SharePoint Server 2013
o httptechnetmicrosoftcomen-USevalcenterhh973397aspx
Hotfixes for SharePoint Server 2013 (post-install)
o KB2554876 The SharePoint Parsing Process Crashes in Windows Server 2008 R2
o KB2708075 IIS 75 Configurations are not Updated when you use the ServerManager Class to Commit
Configuration Changes
o KB2759112 Hotfix is Available for NET Framework 45 that Resolves an ASPNET Race Condition Issue in
Windows Server 2008 R2 Windows Server 2008 R2 SP1
o KB2765317 Hotfix is Available for NET Framework 45 that Resolves an ASPNET Race Condition Issue in
Windows 8 Windows RT and Windows Server 2012
Web Platform Installer
o httpwwwmicrosoftcomwebdownloadsplatformaspx
Web Platform Installer ndash Command Line Version
o httplearniisnetpageaspx1072web-platform-installer-v4-command-line-webpicmdexe-preview-release
Workflow Manager 10
o Download using the Microsoft Web Platform Installer
Office 2013
o httpwwwmicrosoftcomofficepreviewentry-office-preview
SharePoint Designer 2013
o httpwwwmicrosoftcomen-usdownloaddetailsaspxid=35491
Visio Professional 2013
o httptechnetmicrosoftcomen-usevalcenterhh973399
Visual Studio 2012
o httpwwwmicrosoftcomvisualstudio11en-usdownloads
Office Developer Tools for Visual Studio 2012 ndash Preview 2
o Download using the Microsoft Web Platform Installer
Creating a SharePoint Server 2013 Environment for Development and Testing Version 10
copy Critical Path Training 2012 All Rights Reserved 62
wwwCriticalPathTrainingcom
Appendix 2 Windows PowerShell Script Manifest
The following lists all Windows PowerShell scripts that are provided with this setup guide
AddDisableLoopbackCheckRegKeyps1
o The following steps automate creating the registry key outlined as Method 2 in the Microsoft Knowledgebase article
httpsupportmicrosoftcomkb896861 using Windows PowerShell This key DisableLoopbackCheck will allow
you to browse SharePoint sites on the same machine Without this key (or following Method 1 in the KB article) you
would need to browse any SharePoint sites from a different computer than the one which SharePoint is installed on
ConfigureSpFarmForAppsps1
o Configures a SharePoint 2013 for hosting apps This ensures everything you need is installed running and
configured This is documented here httpmsdnmicrosoftcomen-uslibraryfp179923(v=office15)
CreateSpServiceAccountsps1
o Creates the minimal necessary service accounts for SharePoint Server 2013 SP_Farm SP_Content amp
SP_Services
SetupSharePointForHNSCps1
o Configures a SharePoint 2013 install for hosting Host-Named Site Collections (HNSC) This involves creating a Web
Application in SharePoint that has no host header bindings Using DNS all requests are mapped to this Web
Application You then create the site collections via PowerShell as you cant create HNSCs via the browser (Central
Administration)
Creating a SharePoint Server 2013 Environment for Development and Testing Version 10
copy Critical Path Training 2012 All Rights Reserved 63
wwwCriticalPathTrainingcom
Appendix 3 Create Sample Adventure Works Database
The following steps document downloading and installing the sample Adventure Works OLTP database provided by Microsoft
1 Launch Internet Explorer and navigate to httpmsftdbprodsamplescodeplexcom
2 Download the Adventure Works 2012 OLTP Script
3 Extract the ZIP into a folder on the desktop
4 Launch SQL Server Management Studio Start All Programs Microsoft SQL Server 2012 SQL Server Management Studio
5 When SQL Server Management Studio launches within the Connect to Server dialog login using the default settings and click Connect
6 Within SQL Server Management Studio select File Open File
7 Select the file instawdbsql from the extracted ZIP and click Open
8 If prompted to re-login to the database engine do it
9 Select Query SQLCMD Mode
10 Scroll down to line 42 the line that starts with the following
setvar SqlSamplesSourceDataPath
11 Change the folder location of where you unzipped the Adventure Works 2012 OLTP Script
12 Select Query Execute
13 When the script completes the AdventureWorks2012 database will have been created
Creating a SharePoint Server 2013 Environment for Development and Testing Version 10
copy Critical Path Training 2012 All Rights Reserved 64
wwwCriticalPathTrainingcom
Change Log
Change Version Description
August 22 2012 v 01 Pre-release for review
August 27 2012 v 02 Initial public release ndash install guide based on SharePoint Server Beta 2
August 28 2012 v 03 Updated URL for the site collection used to connect SharePoint to WAW
August 31 2012 v 04 Typo Removed SQL Server Analysis Services as part of the install Not required in a
SharePoint dev box (unless you are doing business intelligence which is not covered
in the guide)
Updated all references to Windows Azure Workflow to Workflow Manager the new
official name for the new workflow product
Updated SetupSharePointForHNSCps1 script to lookup HNSC Web Application by
name rather than URL which is more reliable
Typo Updated WingtipAllUp public NIC to use a different IP than the WingtipDC
Typo Replaced a reference to WingtipServer with WingtipDC
Typo Fixed handful of minor typos
September 1 2012 v 05 Removed SQL Server Reporting Services from install guide
Added step to uncheck IErsquos ldquoAutomatically detect proxyrdquo
Added post workflow install steps to setup User Profile Service Application to sync with
local Active Directory
September 5 2012 v 06 Added step to create a default root site collection in the HNSC web app
Updated minor typos and added extra notes for context
Updated PowerShell script SetupSharePointForHNSCps1 to remove content
database of default Web Application when setting up HNSC Web App
Added a new exercise 8 (after SharePoint install amp config and before the Workflow
install and config) to setup support for My Sites
October 20 2012 v 07 Updated script SetupSharePointForHNSCps1 to fix a bug where it would fail on line
111 if you didnrsquot already have a WINGTIPSP_Content managed account
Added section to bypass SharePointrsquos check for crlmicrosoftcom
Updated workflowrsquos registration PowerShell script to point to
httpintranetwingtipcom
Switched order of post-SharePoint install to setup HSNC hosting before configuring for
hosting apps
November 29 2012
v 10 Changed setup guide to use a single VM instead of two VMs
Updated guide for SharePoint 2013 RTM
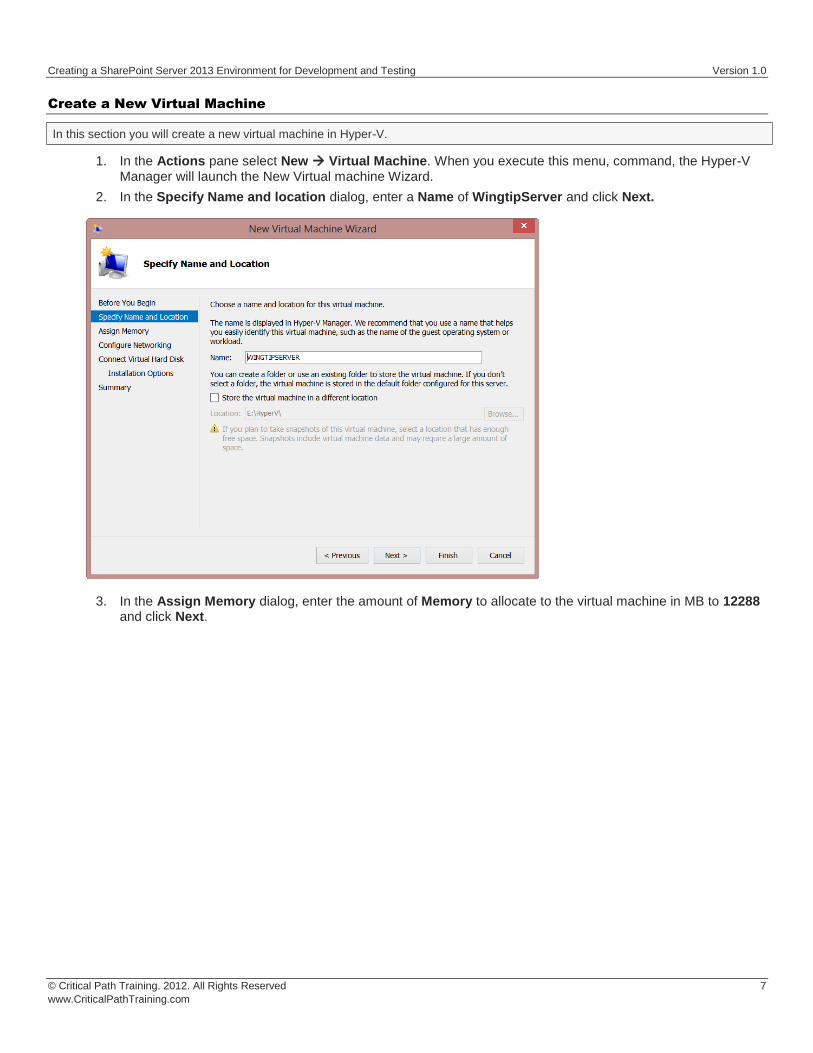
Creating a SharePoint Server 2013 Environment for Development and Testing Version 10
copy Critical Path Training 2012 All Rights Reserved 8
wwwCriticalPathTrainingcom
4 In the Configure Networking dialog use the drop down box to assign a Connection value of Internal LAN and click Next
5 In the Connect Virtual Hard Disk dialog accept the default options to create a virtual hard disk amp click Finish
If possible configure the location so that the VHD file for the VM is created on a separate drive than the host computerrsquos operating system
6 In the Hyper-V Manager window right-click the VM you just created and select Settings
7 In the Settings for WingtipServer dialog select Add Hardware select Network Adapter and click Add
Creating a SharePoint Server 2013 Environment for Development and Testing Version 10
copy Critical Path Training 2012 All Rights Reserved 9
wwwCriticalPathTrainingcom
8 Obtain a copy of the Windows Server 2008 R2 with Service Pack 1 install binaries
The install image (ISO) is available to MSDN or TechNet subscribers or as a trial download available here httptechnetmicrosoftcomen-usevalcenterdd459137aspx
Obviously you can also use your own licensed copy of Windows Server 2008 R2 with Service Pack 1
Microsoft also provides a pre-installed 180-day trial Windows Server 2008 R2 Hyper-V VHD file that you can download (httpwwwmicrosoftcomdownloadsdetailsaspxFamilyId=9040a4be-c3cf-44a5-9052-a70314452305) instead of installing it
yourself If you elect to go this route
Make sure you specify the VHD file you downloaded in the following step for the Hard Drive of the VM
Do not specify a DVD Drive in the following step as you will not be installing anything
If you elect to do this step jump down to section Configure Windows Server 2008 R2
9 In the Settings for WingtipServer dialog update the VM to have the following settings When finished click OK
a) Processor 2 Virtual Processors
b) DVD Drive Image File ndash Map to the Windows Server 2008 R2 ISO installer file
c) Network Adapter Internal LAN
d) Network Adapter Not Connected
10 Start up the WingtipServer VM and install Windows Server 2008 R2
a) In the Hyper-V Manager window right-click the VM you just created and select Settings
b) Right-click on the VM named WingtipServer and select the Connecthellip menu
c) In the Virtual Machine Connection window drop down the Action menu and select Start
Creating a SharePoint Server 2013 Environment for Development and Testing Version 10
copy Critical Path Training 2012 All Rights Reserved 10
wwwCriticalPathTrainingcom
If you elected to use the fully installed trial VHD from Microsoft instead of installing your own server skip to the section Configure Windows Server 2008 R2
Install the Windows Server 2008 R2 Operating System
In this section you will install the operating system
1 After the setup program for Windows Server 2008 R2 loads it will prompt you with a dialog asking you to select a language Accept the default of English and click Install to continue
2 At the next dialog click the Install Now button to begin the installation
Creating a SharePoint Server 2013 Environment for Development and Testing Version 10
copy Critical Path Training 2012 All Rights Reserved 11
wwwCriticalPathTrainingcom
3 The next dialog instructs you to select the operating system you want to install Select the operating system named Windows Server 2008 R2 Enterprise (Full Installation) with the x64 architecture Click Next to continue
4 Agree to the licensing terms and click Next
5 Click on Custom (advanced) to select the type of installation
6 The next dialog asks you where you want to install Windows Accept the default configuration which uses a location of Disk 0 Unallocated Space as shown below Click Next to continue
At this point you have given the Windows setup program enough information to install the basic operating system Setup program will now run for a while as it copies and expands files and installs Windows features You now have a few minutes to get a cup of coffee or catch up on email
7 When the setup program completes it will ask you to assign a new password for the built-in Administrator account Click OK to continue
8 Set the password for Administrator account to Password1
9 When you have updated the Administrator password you will get a confirmation that the update was successful Click OK to complete the installation of the operating system
If you elected to use the pre-installed trial VHD Microsoft offers you will pick up the configuration exercise at this point
Configure Windows Server 2008 R2
In this section you will configure the server
1 When you log in Windows Server automatically displays the Initial Configuration Tasks window Click the check box with the caption Do not show this window at logon and then click the Close button
Creating a SharePoint Server 2013 Environment for Development and Testing Version 10
copy Critical Path Training 2012 All Rights Reserved 12
wwwCriticalPathTrainingcom
2 After you close the Initial Configuration Tasks window Windows Server will display the Server Manager
Creating a SharePoint Server 2013 Environment for Development and Testing Version 10
copy Critical Path Training 2012 All Rights Reserved 13
wwwCriticalPathTrainingcom
3 Configure the Administrator account so that its password does not expire
a) Inside the Configuration node of the Server Manager navigate to Local Users and Groups Users (as shown in the following screenshot) and locate the local Administrator account
b) Right-click on the Administrator account and click Properties
c) In the Administrator Properties dialog unselect the option for User must change password at next logon and select the option for Password never expires Click OK
4 Rename the computer name of the VM
a) In the Server Manager navigate to the top-level node to display the Server Summary page Click Change System Properties
b) On the Computer Name tab of the System Properties dialog click the Change button
c) Enter a new computer name of WingtipServer and click OK
Creating a SharePoint Server 2013 Environment for Development and Testing Version 10
copy Critical Path Training 2012 All Rights Reserved 14
wwwCriticalPathTrainingcom
5 After changing the computer name you will be prompted to restart the VM Choose OK to restart After the VM has restarted log in again using [administrator | Password1] (username | password)
6 Disable Windows Firewall and Enhanced Security Configuration
a) In the Server Manager navigate to the top-level node to display the Server Summary page Inside the Security Information section locate the links for Go to Windows Firewall and Configure IE ECS
b) Click on Configure IE ECS link Disable Enhanced Security Configuration for both Administrators and Users by selecting the Off radio buttons and click OK
c) Now click the Go to Windows Firewall link to display the page for the Windows Firewall Click on the Windows Firewall Properties link at the bottom of the Overview section
d) In the Domain Profile tab of the Windows Fire dialog change the Firewall state property setting from On to Off Click to Apply button to save your changes
e) Once you have turned off the firewall in the Domain Profile tab go to the Private profile tab and the Public profile tab and follow the same steps to disable the firewall for these profiles as well
f) Click OK to dismiss the Windows Firewall dialog once you have turned off the firewall for all three profiles
7 Enable Remote Desktop for your VM
a) In the Server Manager navigate to the top-level node to display the Server Summary page Inside the Computer Information section locate and click the link for Configure Remote Desktop
b) In the Remote tab of the System Properties dialog select the last option for Allow connections only from computers running Remote Desktop with Network Level Authentication Click OK to save changes and dismiss the System Properties dialog
Creating a SharePoint Server 2013 Environment for Development and Testing Version 10
copy Critical Path Training 2012 All Rights Reserved 15
wwwCriticalPathTrainingcom
8 Enable the Windows Server Features for the Desktop Experience and the PowerShell Integrated Scripting Environment
a) In Server Manager choose Add Feature to bring up the Add Features Wizard dialog
b) Select the feature Desktop Experience
When you first click the checkbox for the Desktop Experience the wizard will prompt you with the following dialog to add support for Ink and Handwriting Services Click the Add Required Features button to continue
c) Scroll down the list of features in the Add Features Wizard dialog and select the feature Windows PowerShell Integrated Scripting Environment (ISE)
Creating a SharePoint Server 2013 Environment for Development and Testing Version 10
copy Critical Path Training 2012 All Rights Reserved 16
wwwCriticalPathTrainingcom
When you first click the checkbox for the Windows PowerShell Integrated Scripting Environment (ISE) the wizard will prompt you with the following dialog to add support for NET Framework 351 Features Click the Add Required Features button to continue
d) Click the Next button on the Add Features Wizard dialog to continue with the install
e) On the Confirm Installation Selection wizard page click the Install button
f) When you see the Installation Results screen the Add Features Wizard informs you a computer restart is required Click Close button to dismiss this dialog
9 After the VM has restarted log in again using [administrator | Password1] (username | password)
Configure the Virtual Machinersquos Networking Setup
In this section yoursquoll configure the two NICrsquos you added to the VM in previous steps One NIC (Internal LAN) will be used to communicate with other VMs in this environment while the other (External LAN) will be used to connect to the internet
1 Configure the NIC that is linked to the Internal LAN network
a) Open the Network Connections dialog by pressing Start enter view network connections in the search box Click the View Network Connections shortcut
b) Two network connections will be shown but only one will show as connected
The connected one is the one that is connected to the Internal LAN network The other one is currently ldquounpluggedrdquohellip this is why we didnrsquot connect a network to the second network when initially configuring the VM as this makes it easier to see which NIC is which in the VM
c) Rename the two NICrsquos
i) Right-click the connected NIC and select Rename Give it a name of Internal LAN
Creating a SharePoint Server 2013 Environment for Development and Testing Version 10
copy Critical Path Training 2012 All Rights Reserved 17
wwwCriticalPathTrainingcom
ii) Right-click the disconnected NIC and select Rename Give it a name of External LAN
d) Right-click the Internal LAN NIC and select Properties
e) In the Local Area Connection Properties dialog select the Internet Protocol Version 4 (TCPIPv4) item and click Properties
f) Enter the following information into the resulting dialog to configure the NICrsquos IP settings
i) Use the Following IP Address
(1) IP Address 192168150102
(2) Subnet mast 2552552550
(3) Default Gateway 192168150102
ii) Use the Following DNS Server Addresses
(1) Preferred DNS Server 192168150102
g) Click OK to accept the IP settings and Close to accept the changes to the NIC
Why not use 101 as the start NIC When you created the virtual internal network Hyper-V created a virtual NIC on the host computer If you set the IP of that NIC to 192168150101 you can use the Remote Desktop Connection app in Windows to connect to your virtual machines and easily copy-paste amp share drives
2 Configure the NIC that is linked to the External LAN network
a) Open the Network Connections window if it is not still open using the same steps from the previous step
b) Right-click the External LAN NIC and select Properties
c) In the Local Area Connection Properties dialog select the Internet Protocol Version 4 (TCPIPv4) item and click Properties
d) Enter the following information into the resulting dialog to configure the NICrsquos IP settings
i) Obtain an IP Address Automatically
ii) Use the Following DNS Server Addresses
(1) Preferred DNS Server 192168150102
e) Click the Advanced button to open the Advanced TCPIP Settings dialog
f) In the Advanced TCPIP Settings dialog click the DNS tab
i) Uncheck the Register this Connections Address in DNS
Creating a SharePoint Server 2013 Environment for Development and Testing Version 10
copy Critical Path Training 2012 All Rights Reserved 18
wwwCriticalPathTrainingcom
g) In the Advanced TCPIP Settings dialog click the WINS tab
i) Click the Add button and specify a new WINS Server as 192168150102
h) Click OK Close multiple times to accept all TCPIP settings
The external NIC will now obtain an IP dynamically amp will not register itself in the DHCPrsquos DNS server which is a good thing when there are multiple people on the same network this this type of a setup
3 Connect the second NIC to the External LAN network
a) Go back to the host computer and open the Hyper-V Manager
b) In the Hyper-V Manager window right-click the VM WingtipServer and select Settings
c) Select the second NIC the one that is not connected
d) For the Network select External LAN and click OK This will effectively plug the external network into the VM
4 Go back into the WingtipServer VM and if it is not still open open the Network Connections dialog You should now see both connections plugged in
a) To refresh the connection select the connection you just plugged in and click the Disable this Network Device button in the toolbar After the connection is disabled select it and click the Enable this Network Device button
b) After a few seconds the VM should be able to connect to the internet which you can test by browsing to a site such as httpwwwbingcom
Configure Windows Update and Update the Server
In this section you will verify the server is fully patched and updated
1 Verify Service Pack 1 is installed
a) Verify the version of the operating system installed by clicking Start right-click on Computer select Properties
b) If the server simply says Windows Server 2008 R2 Enterprise as shown in the following figure download and install Service Pack 1 from the following location httpwwwmicrosoftcomen-usdownloaddetailsaspxid=5842
Creating a SharePoint Server 2013 Environment for Development and Testing Version 10
copy Critical Path Training 2012 All Rights Reserved 19
wwwCriticalPathTrainingcom
c) If Service Pack 1 is installed it will state it
2 Update the server using Windows Update
a) Selecting Start All Programs Windows Update
b) First disable Windows Update from running automatically
i) Click the link Change Settings
ii) Under the Important Updates list select Never check for updates (not recommended)
This isnrsquot what you would do in a production environment but for a development machine it is ok
c) Now update the server
i) Click the Check for Updates button
ii) If prompted install any updates to the Windows Update dialog
iii) Select the Check for Updates link
iv) Windows Update will the report how many updates are available Select all important and recommended updates and click the Install Updates button
v) If prompted select I accept the license terms for any updates that require it
vi) Keep going through the process of running Windows Update checking for updates and installing them after each reboot until it says there are no updates left to install
This step is likely going to take quite a bit of time so be patient
Activate Windows Server 2008 R2
In this section you will activate the server if you have a product key
1 If you have a product key for Windows Server 2008 R2 use it to activate Windows
a) In the Server Manager window navigate to the top-level node to display the Server Summary page Click Activate Windows
b) You will be prompted to enter your product key
i) Enter your product key and click to button to activate Windows
Creating a SharePoint Server 2013 Environment for Development and Testing Version 10
copy Critical Path Training 2012 All Rights Reserved 20
wwwCriticalPathTrainingcom
ii) After a few seconds your VM should be able to connect to a Microsoft site and successfully activate Windows
At this point you have a fully patched operating system VM created that will act as the Active Directory domain controller
Apply the DisableLoopbackCheck Registry Fix
Configure the DisableLoopbackCheck registry setting (Microsoft KB httpsupportmicrosoftcomkb896861)
The following steps automate creating the registry key outlined as Method 2 in the Microsoft KB article httpsupportmicrosoftcomkb896861 using Windows PowerShell
PowerShell Script Alert You can also find this PowerShell script AddDisableLoopbackCheckRegKeyps1 in the files that
accompany this setup guide
1 Click the Windows PowerShell icon in the Taskbar
2 Run the following PowerShell commands pressing [ENTER] after each one
$regKeyPath = HKLMSystemCurrentControlSetControlLsa $key = DisableLoopbackCheck New-ItemProperty -Path $regKeyPath -Name $key -Value 1 -PropertyType dword
a) Close the Windows PowerShell console by typing EXIT and pressing [ENTER]
Exercise 3 Install Active Directory Domain Services
Now you will promote your WingtipServer VM to a domain controller and create a new domain named wingtipcom
1 Login to the WingtipServer virtual machine using administrator | Password1
2 Add and configure the role for Active Directory Domain Services
a) Launch Server Manager and select the Roles node
b) Click the Add Roles link to start the Add Roles Wizard
c) On the Before you begin page click Next
d) On the Server Roles page select Active Directory Domain Services Click the Add Required Features button if prompted to install prerequisites
e) Click Next
Creating a SharePoint Server 2013 Environment for Development and Testing Version 10
copy Critical Path Training 2012 All Rights Reserved 21
wwwCriticalPathTrainingcom
f) On the next page of the wizard click Next which will bring you to the Confirm Installation Selections page
g) Click Install
After Active Directory Domain Services has been installed you will see the Installation Results page in the Add Roles Wizard
3 Click on the link with the big long caption of Close this wizard and launch the Active Directory Domain Services Installation Wizard (dcpromoexe)
4 On the first page of the Active Directory Domain Services Installation Wizard click the Use Advanced Mode Installation checkbox and click Next
Creating a SharePoint Server 2013 Environment for Development and Testing Version 10
copy Critical Path Training 2012 All Rights Reserved 22
wwwCriticalPathTrainingcom
5 On the Operating System Compatibility page click Next
6 On the Choose a Deployment Configuration select Create a new domain in a new forest and click Next
7 On the Name the Forrest Root Domain enter the following and click Next
a) FQDN of the forest root domain wingtipcom
8 On the Domain NetBIOS Name set it to WINGTIP and click Next
9 On the Set Forest Functional Level page select Windows Server 2008 R2 and click Next
10 On the Additional Domain Controller Options accept the default options and click Next
11 You might be prompted with the dialog shown below providing a warning that This computer has dynamically assigned IP address(es) This is not a problem when you are running your development environment on a domain controller Click Yes to dismiss the dialog
12 At this point the wizard will prompt you with a dialog information you a delegation for the DNS Server cannot be created because it cannot find the authoritative parent zone This is not a problem because the wizard will automatically configure the DNS of the VM to point to itself Click on the Yes button to dismiss this dialog
Creating a SharePoint Server 2013 Environment for Development and Testing Version 10
copy Critical Path Training 2012 All Rights Reserved 23
wwwCriticalPathTrainingcom
13 On the Location for Database Log Files and SYSVOL page accept all the default values and click Next
14 On the Directory Services Restore Mode Administrator Password page enter Password1 in both textboxes and click Next
15 On the Summary page click Next to start the process of configuring the new Active Directory domain
16 The wizard will display the dialog below to show you the progress of the configuration process You will be required to reboot when the configuration has been completed Check the option for Reboot on completion and then wait for the configuration to complete and the machine to reboot
17 After the VM reboots login to the server with wingtipadministrator | Password1
Configure Windows Update and Update the Server
In this section you will verify the server is fully patched and updated
1 Update the server using Windows Update
a) Selecting Start All Programs Windows Update
b) Select the Check for Updates link
c) Windows Update will the report how many updates are available Select all important and recommended updates and click the Install Updates button
d) If prompted select I accept the license terms for any updates that require it
e) Keep running Windows Update after each reboot and update install until it says there are no updates left to install
Creating a SharePoint Server 2013 Environment for Development and Testing Version 10
copy Critical Path Training 2012 All Rights Reserved 24
wwwCriticalPathTrainingcom
This step could take quite a bit of time so be patient
At this point you have a fully installed Active Directory Domain Controller for the Wingtipcom domain hosted on the server WingtipServer
Exercise 4 Install SQL Server 2012
In this exercise you will install SQL Server 2012 that will be used to store all required databases
1 Download the SQL Server 2012 Evaluation Edition specifically the DVD x64 ISO image to the host computer from here httpwwwmicrosoftcombetaexperiencepdSQL2012EvalCTAenusdefaultaspx or you can use your own licensed copy
2 Mount the SQL Server 2012 ISO to the WingtipServer VM
a) On the host computer open the Hyper-V Manager
b) Right-click the VM WingtipServer and select Settings
c) Select DVD Drive in the left-hand panel
d) In the right-hand panel select Image File and browse to the ISO file that contains SQL Server 2012 and click OK
3 Login to the WingtipServer VM as wingtipadministrator | Password1
Install SQL Server 2012
In this section you will install SQL Server 2012
1 If the AutoPlay dialog box is open click Run SETUPEXE If it isnrsquot use Windows Explorer to navigate to the DVD drive and execute the setupexe file in the root of the DVD drive
2 In the SQL Server Installation Center click Installation on the left-hand side
Creating a SharePoint Server 2013 Environment for Development and Testing Version 10
copy Critical Path Training 2012 All Rights Reserved 25
wwwCriticalPathTrainingcom
3 Next select New SQL Server stand-alone installation or add features to an existing installation
4 On the Setup Support Rules page the installer will check for issues before installing Click OK
5 On the Product Key page click the Specify a free edition radio box and select Evaluation then click Next
6 On the License Terms page click the I accept the license terms checkbox and click Next
7 On the Setup Support Rules page the installer will check for any problems with the server you are installing on Click Next when this completes
Creating a SharePoint Server 2013 Environment for Development and Testing Version 10
copy Critical Path Training 2012 All Rights Reserved 26
wwwCriticalPathTrainingcom
8 On the Support Role page select SQL Server Feature Installation and click Next
9 On the Feature Selection page check the following options and click Next
a) Instances Features
i) Database Engine Services
(1) Full-Text and Semantic Extractions for Search
b) Shared Features
i) Management Tools ndash Basic
(1) Management Tools ndash Complete
Creating a SharePoint Server 2013 Environment for Development and Testing Version 10
copy Critical Path Training 2012 All Rights Reserved 27
wwwCriticalPathTrainingcom
10 On the Installation Rules page click Next
11 On the Instance Configuration page click Next
12 On the Disk Space Requirements page click Next
13 On the Server Configuration page do the following and click Next
a) On the Service Account tab change the Startup Type for the SQL Server Agent to Automatic
14 On the Database Engine Configuration page do the following and click Next
a) On the Server Configuration tab click Add Current User
b) On the FILESTREAM tab
i) Check Enable FILESTREAM for Transact-SQL Access
ii) Check Enable FILESTREAM for file IO access
15 On the Error Reporting page click Next
16 On the Installation Configuration Rules page click Next
17 On the Ready to Install page click Install
Installation of SQL Server 2012 will take some time please be patient
18 When the installation completes the Complete page will be shown Click Close
At this point you have now successfully installed SQL Server 2012
Creating a SharePoint Server 2013 Environment for Development and Testing Version 10
copy Critical Path Training 2012 All Rights Reserved 28
wwwCriticalPathTrainingcom
Exercise 5 Install amp Configure SharePoint Server 2013
In this exercise you will install SharePoint 2013
1 Download the SharePoint Server 2013 to the host computer from here httptechnetmicrosoftcomen-USevalcenterhh973397aspx
2 Mount the SharePoint Server 2013 ISO to the WingtipServer VM
a) On the host computer open the Hyper-V Manager
b) Right-click the VM WingtipServer and select Settings
c) Select DVD Drive in the left-hand panel
The file that Microsoft provides is saved in the IMG format Hyper-V Manager wonrsquot allow you to mount an IMG file so rename it to ISO before mounting it
d) In the right-hand panel select Image File and browse to the ISO file that contains SharePoint Server 2013 and click OK
Create SharePoint Service Accounts amp Grant Rights to SQL Server 2012
In this section you will create the necessary service accounts that will be used by SharePoint in Active Directory and grant them necessary rights in SQL Server 2012
PowerShell Script Alert The creation of users and granting them rights to SQL Server 2012 steps in this section are automated in the Windows PowerShell script CreateSpServiceAccountsps1 found in the files that accompany this setup guide Open the script
and read the header for documentation on how to use it
1 Open the Active Directory Users and Computers Start Administrative Tools Active Directory Users and Computers
2 Expand the tree in the left-hand pane to see the Users OU Select the Users OU
3 Create a new user SP_Farm
a) In the toolbar select Action New User
Creating a SharePoint Server 2013 Environment for Development and Testing Version 10
copy Critical Path Training 2012 All Rights Reserved 29
wwwCriticalPathTrainingcom
b) Set the userrsquos Full Name amp User Login Name to SP_Farm and click Next
c) In the password dialog enter the following and click Next
i) Password (and Confirm Password) Password1
ii) User must change password at next login unchecked
iii) User cannot change password unchecked
iv) Password never expires checked
v) Account is disabled unchecked
Creating a SharePoint Server 2013 Environment for Development and Testing Version 10
copy Critical Path Training 2012 All Rights Reserved 30
wwwCriticalPathTrainingcom
vi) Click Finish
4 Repeat the previous step to create two more accounts
a) SP_Content
b) SP_Services
At this point you have created all the necessary service accounts
Install SharePoint Server 2013 Prerequisites
In this section you will install the SharePoint Server 2013 Prerequisites
1 Ensure you are logged into the WingtipServer VM using the account wingtipadministrator | Password1
2 If the AutoPlay dialog box is open click Run splashhta If it isnrsquot use Windows Explorer to navigate to the DVD drive and execute the splashhta file in the root of the DVD drive
Creating a SharePoint Server 2013 Environment for Development and Testing Version 10
copy Critical Path Training 2012 All Rights Reserved 31
wwwCriticalPathTrainingcom
3 Click the Install Software Prerequisites link
4 In the Microsoft SharePoint 2013 Products Preparation Tool window click Next
5 On the License Terms for Software Products page
a) Check I accept the terms of the License Agreement(s)
b) Click Next
6 The tool will download and install all prerequisites for SharePoint Server 2013 This will take some time It may prompt you to reboot the server If so reboot the server and login using wingtipadministrator | Password1
Creating a SharePoint Server 2013 Environment for Development and Testing Version 10
copy Critical Path Training 2012 All Rights Reserved 32
wwwCriticalPathTrainingcom
7 When the prerequisite installer is complete it will present a summary of everything it did
8 Click Finish
9 Restart the WingtipServer VMhellip some additional installations and changes that the prerequisite installer did will require a restart before installing SharePoint Server 2013
At this point all prerequisites required by SharePoint Server 2013 have been installed and any necessary configuration changes have been applied to the server However it is strongly recommend that you run Windows Update and install any pending updates Further Microsoft recommends installing the following hotfixes if they are not already installed
KB2554876 The SharePoint Parsing Process Crashes in Windows Server 2008 R2
KB2708075 IIS 75 Configurations are not Updated when you use the ServerManager Class to Commit Configuration Changes
KB2759112 Hotfix is Available for NET Framework 45 that Resolves an ASPNET Race Condition Issue in Windows Server 2008 R2 Windows Server 2008 R2 SP1
KB2765317 Hotfix is Available for NET Framework 45 that Resolves an ASPNET Race Condition Issue in Windows
8 Windows RT and Windows Server 2012
Install SharePoint Server 2013
In this section you will install SharePoint Server 2013
1 Ensure you are logged into the WingtipServer VM using the account wingtipadministrator | Password1
2 If the AutoPlay dialog box is open click Run splashhta If it isnrsquot use Windows Explorer to navigate to the DVD drive and execute the splashhta file in the root of the DVD drive
Creating a SharePoint Server 2013 Environment for Development and Testing Version 10
copy Critical Path Training 2012 All Rights Reserved 33
wwwCriticalPathTrainingcom
3 Click Install SharePoint Server
4 When prompted to Enter your Product Key enter the key you obtained for the trial install and click Continue
5 On the Read the Microsoft Software License Terms page check the I accept the terms of this agreement checkbox and click Continue
6 On the Choose a file location page click Install Now
Creating a SharePoint Server 2013 Environment for Development and Testing Version 10
copy Critical Path Training 2012 All Rights Reserved 34
wwwCriticalPathTrainingcom
7 When the installation is complete select the Run the SharePoint Products Configuration Wizard checkbox and click Close
8 On the Welcome to SharePoint Products page click Next
a) If prompted to start or reset services click Yes
9 On the Connect to a server farm page select Create a new server farm and click Next
10 On the Specify Configuration Database Settings page use the following to complete the page and click Next
a) Database server WINGTIPSERVER
b) Database name SharePoint_Config
c) Username WINGTIPSP_Farm
d) Password Password1
Creating a SharePoint Server 2013 Environment for Development and Testing Version 10
copy Critical Path Training 2012 All Rights Reserved 35
wwwCriticalPathTrainingcom
11 On the Specify Farm Security Settings page for the Passphrase and Confirm Passphrase boxes enter Password1 and click Next
12 On the Configure SharePoint Central Administration Web Application page check the Specify port number checkbox and enter a value of 9999 then Click Next
Creating a SharePoint Server 2013 Environment for Development and Testing Version 10
copy Critical Path Training 2012 All Rights Reserved 36
wwwCriticalPathTrainingcom
13 On the Completing the SharePoint Products Configuration Wizard page click Next
14 When the installer completes it will display the Confirmation Successful page
15 Click Finish This will launch Internet Explorer to go through the configuration process
Creating a SharePoint Server 2013 Environment for Development and Testing Version 10
copy Critical Path Training 2012 All Rights Reserved 37
wwwCriticalPathTrainingcom
At this point you have successfully installed SharePoint Server 2013
Configure SharePoint Server 2013
In this section you will create a new SharePoint Server 2013 farm and perform minimal configuration tasks
After installing SharePoint Sever 2013 the SharePoint Products Configuration Wizard will launch the browser-based Initial Farm Configuration Wizard
1 In the first page of the wizard you are prompted to Help Make SharePoint Better Select which ever option you want and click OK
2 On the Welcome page that asks How do you want to configure your SharePoint farm click the Start the Wizard button
3 On the Services page do the following and then click Next
a) Service Account Select Create new managed account
i) Username WINGTIPSP_Services
ii) Password Password1
b) Services Uncheck the following services
Creating a SharePoint Server 2013 Environment for Development and Testing Version 10
copy Critical Path Training 2012 All Rights Reserved 38
wwwCriticalPathTrainingcom
i) Access Services 2010
ii) App Management Service
In SharePoint Server 2013 the Search Service Application processes specifically noderunnerexe can consume a considerable amount of memory and processor time If you are not going to work with search you might consider unchecking this option for now You can always go back into Central Administration and create a new instance of the Search Service Application at a later date if you need it
Why did we remove Access Services 2010 amp App Management Service service applications The Access Services 2010 service application is included for backwards compatibility and isnrsquot needed in new installations unless you are migrating solutions built with Access Services 2010 from SharePoint Server 2010 (if so you can create this service application later within Central Administration Application Management Manage Service Applications) The App Management Service service application will be created in a later step in this setup guide therefor it is skipped here
4 The creation of the service applications can take quite a while so be patient If it exceeds 20 minutes it is fairly safe to assume the page is hung up One option is to close the browser then launch Central Administration (Start All Programs Microsoft SharePoint 2013 Products SharePoint 2013 Central Administration) and look at the Service Application page (Application Management Manage Service Applications) to see if they were all created
Configure DNS
In this section you will configure DNS for hosting SharePoint sites amp Apps
1 Ensure you are logged into the WingtipServer VM using the account wingtipadministrator | Password1
2 Open the DNS window Start Administrative Tools DNS
3 Expand the hierarchy on the left-hand side of the window until you get to DNS WINGTIPSERVER Forward Lookup Zones wingtipcom
4 Create a new wildcard so all requests for http[]wingtipcom will be forwarded to our SharePoint machine
a) Next right-click wingtipcom and select New Host (A or AAAA)
Creating a SharePoint Server 2013 Environment for Development and Testing Version 10
copy Critical Path Training 2012 All Rights Reserved 39
wwwCriticalPathTrainingcom
b) In the New Host dialog enter the following and click OK
i) Alias Name
ii) IP Address 192168150102 Then click Add Host The following figure shows how this looks
This new record is telling DNS to forward any request for http[]wingtipcom to the webserver WINGTIPSERVER where the
requests will be served by SharePoint
5 Verify this DNS entry is working
a) Open Windows PowerShell Start All Programs Accessories Windows PowerShell Windows PowerShell
b) Run the following commands and press ENTER
PS CUsersAdministratorgt nslookup somethingwingtipcom PS CUsersAdministratorgt nslookup somethingappswingtipcom
c) You should get a response that points to the WingtipServer server as shown in the following figure
Creating a SharePoint Server 2013 Environment for Development and Testing Version 10
copy Critical Path Training 2012 All Rights Reserved 40
wwwCriticalPathTrainingcom
Configure SharePoint Server 2013 for Host-Named Site Collections amp Create Initial Site
Collections
In this section you will create new SharePoint 2013 site collections for testing and hosting apps
Microsoft recommends to create host-named site collections (HNSC) instead of using the path based site collection addressing The difference is the following a path based site created at something such as httpintranetwingtipcomsitesdevtest as an HNSC site would be more like httpdevtestwingtipcom This is how it works in the cloud (Office 365) and it scales much better for on-prem
deployments This setup guide will show you how to setup your environment to create HNSC The only downside to this approach is that you canrsquot create site collections within Central Administration it must be done via Windows PowerShell API (because Central Administration doesnrsquot instruct you where to put the site
This is implemented in various parts First DNS must be configured to send all requests for httpwingtipcom to a Web Application
(implemented in the last section) Second this Web Application must be extended with SharePoint and have no host header bindings (so it handles all requests) Third it must have a default site collection at the root of the Web Application but it will not be used for anything (in fact it doesnrsquot need a template assigned to it)
You can read more about HNSCrsquos on TechNet httptechnetmicrosoftcomen-uslibrarycc424952aspx
PowerShell Script Alert The steps in this section are automated in the script SetupSharePointForHNSCps1 found in the files that
accompany this setup guide Open the script and read the header for documentation on how to use it
1 Ensure you are logged into the WingtipServer VM using the account wingtipadministrator | Password1
2 Open Central Administration Start All Programs Microsoft SharePoint 2013 Products SharePoint 2013 Central Administration
3 Select Application Management Manage Web Applications
4 Delete the default Web Application created by the configuration wizard
a) Delete the existing default Web Application
i) Select the Web Application SharePoint ndash 80 the one with the URL of httpwingtipserver and click Delete in the ribbon
ii) When prompted to delete the associated IIS Web Site amp SQL Server database select both options to delete them and click OK
The reason you are doing this is because the setup wizard you ran previously when creating the service applications automatically created it The problem is that it used the same identity (WINGTIPSP_Services) for the app pool that is used for all the service
applications which is not desired
5 Create a new Web Application to handle Host-Named Site Collections (HNSC)
Creating a SharePoint Server 2013 Environment for Development and Testing Version 10
copy Critical Path Training 2012 All Rights Reserved 41
wwwCriticalPathTrainingcom
a) In the ribbon click the New button
b) In the Create New Web Application dialog enter the following values in the properties and click OK Leave all properties not mentioned
i) Select the radio button Create a new IIS web site
(1) Name SharePoint HNSC Host ndash 80
(2) Port 80
ii) Application Pool
(1) Select the radio button Create a new application pool
(a) Application Pool Name SharePoint Default HNSC AppPool
(b) Select a security account for this application pool WINGTIPSP_Content
If WINGTIPSP_Content is not listed as an available managed account create it by selecting the appropriate option and using
Password1 for the password
iii) Database Name and Authentication
(1) Database Name WSS_Content_HNSCDefaultHost
c) This process will take a few moments At the end of the process SharePoint will ask if you want to create a site collection You do but you donrsquot want to do it through the browser as this will not be a HNSC To create a HNSC you must create it via Windows PowerShell
6 Create a default not template site collection at the root of the web application
a) Open SharePoint 2013 Management Shell Start All Programs Microsoft SharePoint 2013 Products SharePoint 2013 Management Shell
7 Create Site Collections for Testing SharePoint amp SharePoint Apps
a) Open SharePoint 2013 Management Shell Start All Programs Microsoft SharePoint 2013 Products SharePoint 2013 Management Shell
b) Get a reference to the HNSC web application you just created by running the following Windows PowerShell script in the SharePoint 2013 Management Shell
$hnscWebApp = Get-SPWebApplication | Where-Object $_DisplayName -eq SharePoint HNSC Host - 80
c) Create a non-templated site at the root of the web application for Workflow to connect to by executing the following Windows PowerShell script in the SharePoint 2013 Management Shell
New-SPSite -Name Root HNSC Site Collection -Url httpwingtipcom -HostHeaderWebApplication $hnscWebApp -OwnerAlias WINGTIPAdministrator
d) Create a team site by executing the following Windows PowerShell script in the SharePoint 2013 Management Shell
New-SPSite -Name Wingtip Intranet -Url httpintranetwingtipcom ndashHostHeaderWebApplication $hnscWebApp -Template STS0 -OwnerAlias WINGTIPAdministrator
e) Create a developer site by executing the following Windows PowerShell script in the SharePoint 2013 Management Shell
New-SPSite -Name Wingtip Developer Site -Url httpdevwingtipcom ndashHostHeaderWebApplication $hnscWebApp -Template DEV0 -OwnerAlias WINGTIPAdministrator
You can only create debug and test apps using a developer site
At this point you now have a site collection to use as a team site (httpintranetwingtipcom) and to develop and test custom SharePoint apps (httpdevwingtipcom)
Creating a SharePoint Server 2013 Environment for Development and Testing Version 10
copy Critical Path Training 2012 All Rights Reserved 42
wwwCriticalPathTrainingcom
Configure SharePoint 2013 for Hosting Apps
In this setup you will setup your SharePoint 2013 environment for hosting apps
PowerShell Script Alert Everything in the next immediate step is provided in the script ConfigureSpFarmForAppsps1 found in the
files that accompany this setup guide Open the script and read the header for documentation on how to use it
1 Ensure you are logged into the WingtipServer VM using the account wingtipadministrator | Password1
2 Create the necessary SharePoint App Management service applications and start the necessary services via Windows PowerShell
a) Open SharePoint 2013 Management Shell Start All Programs Microsoft SharePoint 2013 Products SharePoint 2013 Management Shell
b) Execute the following Windows PowerShell script in the SharePoint 2013 Management Shell
$appHostDomain = appswingtipcom $adminService = Get-Service -Name spadminv4 if ($adminServiceStatus -ne Running) Start-Service $adminService $timerService = Get-Service -Name sptimerv4 if ($timerServiceStatus -ne Running) Start-Service $timerService Set-SPAppDomain $appHostDomain $appMgmtSvcInstance = Get-SPServiceInstance | Where-Object $_GetType()Name -eq AppManagementServiceInstance if ($appMgmtSvcInstanceStatus -ne Online) Start-SPServiceInstance -Identity $appMgmtSvcInstance $appSubSettingSvcInstance = Get-SPServiceInstance | Where-Object $_GetType()Name -eq SPSubscriptionSettingsServiceInstance if ($appSubSettingSvcInstanceStatus -ne Online) Start-SPServiceInstance -Identity $appSubSettingSvcInstance $appPoolServiceApps = Get-SPServiceApplicationPool -Identity SharePoint Web Services Default $appSubSvc = New-SPSubscriptionSettingsServiceApplication ndashApplicationPool $appPoolServiceApps ndashName Settings Service Application ndashDatabaseName SettingsServiceDB $proxySubSvc = New-SPSubscriptionSettingsServiceApplicationProxy ndashServiceApplication $appSubSvc $appAppSvc = New-SPAppManagementServiceApplication -ApplicationPool $appPoolServiceApps -Name App Management Service Application -DatabaseName AppServiceDB $proxyAppSvc = New-SPAppManagementServiceApplicationProxy -ServiceApplication $appAppSvc Set-SPAppSiteSubscriptionName -Name app -Confirm$false
3 Verify the script configured SharePoint 2013 for hosting apps
a) Open Central Administration Start All Programs Microsoft SharePoint 2013 Products SharePoint 2013 Central Administration
b) Verify service applications created
i) Open the Service Applications page Application Management Manage Service Applications
ii) Verify you have two service applications created
(1) App Management Service Application
(2) Settings Service Application
c) Verify service instances are running
i) Open the Services on Server page System Settings Manage Services on Server
ii) Verify the following services are Started
(1) App Management Service
(2) Microsoft SharePoint Foundation Subscription Settings Service
Creating a SharePoint Server 2013 Environment for Development and Testing Version 10
copy Critical Path Training 2012 All Rights Reserved 43
wwwCriticalPathTrainingcom
d) Verify App URLs are correct
i) Open the Configure App URLs page Apps Configure app URLs
ii) Verify the following
(1) App Domain appswingtipcom
(2) App Prefix app
At this point your SharePoint Server 2013 environment is ready to host SharePoint apps
Creating a SharePoint Server 2013 Environment for Development and Testing Version 10
copy Critical Path Training 2012 All Rights Reserved 44
wwwCriticalPathTrainingcom
Start the SharePoint 2013 Sandbox Service
By default the service that executes sandbox solutions is not running In this step you will start the service
1 Open Central Administration Start All Programs Microsoft SharePoint 2013 Products SharePoint 2013 Central Administration
2 Open the Services on Server page System Settings Manage Services on Server
3 Click the Start link to the left of the Microsoft SharePoint Foundation Sandboxed Code Service
At this point your installation can support sandbox solutions
Configure CRL Verification for Disconnected Environments
SharePoint periodically ldquophones homerdquo to a specific address hosted by Microsoft under certain conditions When your environment is disconnected this can cause an unnecessary delay or failures when starting up the sandbox The following steps outline a workaround to bypass this check
1 Launch Notepad as an administrator Start All Programs Accessories right-click Notepad and select Run as Administrator
2 Open the hosts file by selecting File Open and finding the file
cWindowsSystem32Driversetchosts
3 Add the following line to the end of the file
127001 crlmicrosoftcom
4 Save and close the hosts file
Update Internet Explorer to Bypass the App URL amp Automatically Login to SharePoint Sites
In this section you will update Internet Explorer to add the App hosting URL to the bypass list so you can navigate to the domain after deploying SharePoint hosted apps
1 Ensure you are logged into the WingtipServer VM using the account wingtipadministrator | Password1
1 Launch Internet Explorer Start All Programs Internet Explorer
2 Configure Internet Explorer to bypass the App URL
a) In the top-right corner click the gear icon and select Internet Options
b) On the Security tab select the Local Intranet and click the Sites button
c) Uncheck the box next to Automatically detect intranet network
d) Click the Advanced button and add two entries to the Exceptions list
i) httpwingtipcom
ii) httpappswingtipcom
Creating a SharePoint Server 2013 Environment for Development and Testing Version 10
copy Critical Path Training 2012 All Rights Reserved 45
wwwCriticalPathTrainingcom
e) Click the Close button followed by the OK button multiple times to close out of the dialogs
At this point Internet Explorer is setup to bypass your app URL so you can navigate to apps (httpappswingtipcom) as well as automatically authenticate to sites hosted at httpwingtipcom
Exercise 6 Configure SharePoint to Host My Sites
In this exercise you will configure SharePoint to create and host My Sites In order to host My Sites you will need a new Web Application that is configured for Self-Service Site Creation and has a My Site Host site collection
1 Create a new SharePoint web application to host the My Sites
a) Ensure you are logged into the WingtipServer VM using the account wingtipadministrator | Password1
b) Open Central Administration Start All Programs Microsoft SharePoint 2013 Products SharePoint 2013 Central Administration
c) Select Application Management Manage Web Applications
d) In the ribbon click the New button
e) In the Create New Web Application dialog enter the following values in the properties and click OK Leave all properties not mentioned
i) Select the radio button Create a new IIS web site
(1) Name SharePoint MySite Host ndash 80
(2) Port 80
(3) Host Header mywingtipcom
ii) Application Pool
(1) Select the radio button Use existing application pool
(a) Application Pool Name SharePoint Default HNSC AppPool
iii) Database Name and Authentication
(1) Database Name WSS_Content_SocialWingtipCom
f) This process will take a few moments At the end of the process SharePoint will ask if you want to create a site collection Click the link provided to create a new site collection amp continue to the next step
2 Create a My Site Host site collection
a) On the Create Site Collection page use the following information to complete the form and click OK
Creating a SharePoint Server 2013 Environment for Development and Testing Version 10
copy Critical Path Training 2012 All Rights Reserved 46
wwwCriticalPathTrainingcom
i) Title My Site Host
ii) URL
iii) Template Selection My Site Host (found under the Enterprise tab)
iv) Primary Site Collection Administrator WINGTIPAdministrator
3 Update the Web Application to host my sites
a) Within Central Administration in the left-hand navigation navigate to the Manage Web Applications page Application Management Manage Web Applications
b) Select the SharePoint MySite Host ndash 80 web application
c) Click the Managed Paths button in the ribbon
d) Remove the sites managed path and add two new managed paths and click OK
i) personal ndash Wildcard inclusion
ii) my ndash Explicit inclusion
e) With the SharePoint MySite Host ndash 80 web application still selected click the Self-Service Site Creation button
f) On the Self-Service Site Creation page use the following values to complete the form and click OK
i) Site Collections On
4 Next configure the User Profile Service Application My Site settings
a) Browse to the User Profile Service Application management page Application Management Manage Service Applications User Profile Service Application
b) Under the My Site Settings section click the Setup My Sites
c) On the My Site Settings page use the following information to complete the form and click OK
i) My Site Host httpmywingtipcom
ii) Personal Site Location personal
At this point your SharePoint deployment is now configured to automatically create My Sites under httpmywingtipcomPersonalUserName when users first browse to them
Exercise 7 Install amp Configure Workflow Manager 10
In this exercise you will configure the WingtipServer VM to host Workflow Manager 10 and connect it to your SharePoint installation
1 Ensure you are logged into the WingtipServer VM using the account wingtipadministrator | Password1
Verify SQL Server 2012 Network Configuration
In this section yoursquoll verify the network configuration is correct for SQL Server 2012 in order to install Workflow Manager 10
Creating a SharePoint Server 2013 Environment for Development and Testing Version 10
copy Critical Path Training 2012 All Rights Reserved 47
wwwCriticalPathTrainingcom
1 Configure SQL Server 2012 to have the TCPIP connection protocol enabled
a) Open the SQL Server Configuration Manager Start All Programs Microsoft SQL Server 2012 Configuration Tools SQL Server Configuration Manager
b) Expand the hierarchy on the left-hand side to the following SQL Server Connection Manager (local) SQL Server Network Configuration Protocols for MSSQLSERVER
c) In the main window if TCPIP is Disabled right-click TCPIP and select Enable
d) When prompted with a warning click OK
2 SQL Server must be restarted in order to reflect this change
a) In the hierarchy on the left-hand side of the window select SQL Server Services
b) Right-click SQL Server (MSSQLSERVER) and select Restart
At this point SQL Server is now configured with the TCPIP protocol enabled a requirement when configuring Service Bus
Configure the Workflow Service Account with the Necessary Rights
In this section you will verify the service account that will run Workflow Manager and Service Bus
1 Ensure you are logged into the WingtipServer VM using the account WINGTIPadministrator | Password1
2 Grant the WINGTIPSP_Content account securityadmin amp dbcreator permissions in SQL Server
a) Launch SQL Server Management Studio Start All Programs Microsoft SQL Server 2012 SQL Server Management Studio
b) When SQL Server Management Studio launches within the Connect to Server dialog login using the default settings and click Connect
c) In the Object Explorer tool window expand the WINGTIPSERVER server hierarchy to the Security Logins node
d) Find the WINGTIPSP_Content account right-click it and select Properties
Creating a SharePoint Server 2013 Environment for Development and Testing Version 10
copy Critical Path Training 2012 All Rights Reserved 48
wwwCriticalPathTrainingcom
e) In the Select a page pane select Server Roles
f) Check securityadmin amp dbcreator and click OK
g) Close SQL Server Management Studio
3 Add the Workflow service account to the local administrators group
a) Open the Active Directory Users and Computers window Start Administrative Tools Active Directory Users and Computers
b) In the hierarchy on the left-hand side of the window expand it to the following Active Directory Users and Computers wingtipcom Builtin
c) In the main window right-click Administrators and select Properties
d) In the Administrators Properties dialog select the Members tab and click Add
e) In the Enter the object names to select box enter wingtipsp_content and click the Check Names button
f) In the Administrators Properties dialog click OK
g) Close the Active Directory Users and Computers window
At this point the service account that will host Workflow Manager and Service Bus has been configured correctly
Creating a SharePoint Server 2013 Environment for Development and Testing Version 10
copy Critical Path Training 2012 All Rights Reserved 49
wwwCriticalPathTrainingcom
Download amp Install Workflow Manager and Service Bus
In this section you will install Workflow Manager and Service Bus
1 Ensure you are logged into the WingtipServer VM using the account WINGTIPSP_Content | Password1
It is important you are logged in as the user that will run workflow when you install amp configure Workflow Manager and Service Bus
2 Launch the Web Platform Installer Start All Programs Microsoft Web Platform Installer
a) If the Web Platform Installer is not present on your machine you can download amp install it from here httpwwwmicrosoftcomwebdownloadsplatformaspx
If you do not have internet access within the virtual machine it is possible to download everything needed for workflow using the command line version of the Web Platform Installer (WebPICMD) You can get WebPICMD from httplearniisnetpageaspx1072web-platform-installer-v4-command-line-webpicmdexe-preview-release Specifically for
workflow enter the following command to download Workflow Beta 1 and all prerequisites
webpicmd offline ProductsWorkflow Pathc[path]
3 When the Web Platform Installer loads execute a search for Workflow select Workflow Manager 10 and click Add
4 Click the Install button at the bottom of the Web Platform Installer 40 window
5 On the Prerequisites page click I Accept
Note The Web Platform Installer 40 may prompt you to keep certain products updated using Microsoft Update If it does select Use Microsoft Update when I check for updates (recommended) and click Continue
6 When the installer completes the following dialog will appear Click Continue and then Finish to start the configuration process
Creating a SharePoint Server 2013 Environment for Development and Testing Version 10
copy Critical Path Training 2012 All Rights Reserved 50
wwwCriticalPathTrainingcom
At this point Workflow Manager amp Service Bus are installed
Configure Workflow Manager and Service Bus
In this section you will install Workflow Manager and Service Bus
1 If the Workflow Manager Configuration Wizard is not open open it Start All Programs Workflow Manager 10 Workflow Configuration
2 On the Welcome page click Configure Workflow Manager with Default Settings (Recommended)
Creating a SharePoint Server 2013 Environment for Development and Testing Version 10
copy Critical Path Training 2012 All Rights Reserved 51
wwwCriticalPathTrainingcom
3 On the New Farm Configuration page do the following
a) In the section Configure Service Account set the credentials to
i) User ID sp_contentwingtipcom
ii) Password Password1
b) Check the Allow Workflow management over HTTP on this computer checkbox
Ensure the username is entered in the fully qualified UPN format not as the default shows in the installer (sp_contentwingtip) or the domainusername format
In a production environment you should be doing everything over SSL
c) Click the Test Connection button to verify the connection credentials before proceeding
Creating a SharePoint Server 2013 Environment for Development and Testing Version 10
copy Critical Path Training 2012 All Rights Reserved 52
wwwCriticalPathTrainingcom
d) In the Certificate Generation Key and Confirm Certificate Generation Key enter Password1 into both fields
4 Click the right arrow in the bottom right corner to proceed
5 On the Summary page review your settings and click the check at the bottom right of the widow to start the configuration process
Creating a SharePoint Server 2013 Environment for Development and Testing Version 10
copy Critical Path Training 2012 All Rights Reserved 53
wwwCriticalPathTrainingcom
6 After a few minutes the Configuration Progress screen will show that everything has been configured correctly
Creating a SharePoint Server 2013 Environment for Development and Testing Version 10
copy Critical Path Training 2012 All Rights Reserved 54
wwwCriticalPathTrainingcom
7 Click the check in the bottom right corner
At this point Workflow Manager amp Service Bus has been installed and a new Workflow Manager farm has been created The next step is to connect the SharePoint 2013 farm to the Workflow Manager farm
Connect SharePoint 2013 to Workflow Manager
In this section you will connect SharePoint 2013 and Workflow Manager together
1 Ensure you are logged into the WingtipServer VM using the account WINGTIPadministrator | Password1
2 Get the Workflow Manager endpoint
a) Open the Workflow Manager PowerShell console Start All Programs Workflow Manager 10
b) Execute the Windows PowerShell following cmdlet
Get-WFFarm | ft HttpPort
c) Take note of this port (12291) This port number is what you will use to connect the SharePoint 2013 farm to the Workflow Manager 10 farm
In production you should connect to the HTTPS port listed in the HttpsPort property when you run Get-WFFarm
d) Close the Workflow Manager PowerShell window
3 Connect the SharePoint 2013 farm to Workflow Manager
Creating a SharePoint Server 2013 Environment for Development and Testing Version 10
copy Critical Path Training 2012 All Rights Reserved 55
wwwCriticalPathTrainingcom
a) Open SharePoint 2013 Management Shell Start All Programs Microsoft SharePoint 2013 Products SharePoint 2013 Management Shell
b) Execute the following Windows PowerShell script in the SharePoint 2013 Management Shell
Register-SPWorkflowService ndashSPSite httpintranetwingtipcom ndashWorkflowHostUri httpwingtipserver12291 ndashAllowOAuthHttp
This script is telling SharePoint the endpoint it should use to talk to Workflow Manager as well as Workflow Manager the SharePoint site collection it should talk to for calls into the CSOM It is also configuring all communication over HTTP rather than HTTPS for performance reasons In production you should always use HTTPS
This step will take a moment with no feedback during the process Be patient
c) Close the SharePoint 2013 Management Shell
At this point the SharePoint 2013 farm is connected to the Workflow Manager 10 farm
Configure SharePoint User Profile Service Application AD Sync
Users in SharePoint 2013 are validated by Workflow Manager against SharePoint to ensure they have permissions to start a workflow This is done by looking up the user by their AD UserPrincipalName (UPN) attribute in the User Profile Service Application (UPA) If no matching user is found the workflow will be automatically cancelled by Workflow Manager In this section you will setup UPA to connect amp sync with the local Active Directory so user accounts in AD will have their UPN synchronized to UPA
1 Open Central Administration Start All Programs Microsoft SharePoint 2013 Products SharePoint 2013 Central Administration
2 Go to the User Profile Service Application management page Application Management Manage Service Applications User Profile Service Application
3 The first step is to configure the User Profile Service Application to allow for Active Directory (AD) synchronization
a) Under Synchronization select Configure Synchronization Settings
b) For Synchronization select Use SharePoint Active Directory Import and click OK
4 Next establish a connection to the wingtipcom AD
a) Under Synchronization select Configure Synchronization Connections
b) On the Synchronization Connections page select Create New Connection
c) Enter the following values on this form and click OK
i) Connection Name WINGTIPCOM AD
ii) Type Active Directory Import
iii) Connection Settings
(1) Fully Qualified Domain Name wingtipcom
(2) Authentication Provider Type Windows Authentication
(3) Account Name WINGTIPAdministrator
(4) Password (and Confirm Password) Password1
iv) Containers
(1) Click Populate Containers
(2) After it loads check the box next to WINGTP or click the Select All button below the box
5 Go back to the User Profile Service Application management page Application Management Manage Service Applications User Profile Service Application
6 Finally start a synchronization import
a) Under Synchronization select Start Profile Synchronization
Creating a SharePoint Server 2013 Environment for Development and Testing Version 10
copy Critical Path Training 2012 All Rights Reserved 56
wwwCriticalPathTrainingcom
b) Select Start Full Synchronization and click OK
c) You will be taken back to the User Profile Service Application management page Notice in the top-right corner there is a status block that reports how many profiles are in the UPA database Refresh the page to see it increase to a handful of profiles as the import process runs
At this point you have successfully configured the User Profile Service Application to import profiles from the local AD
Exercise 8 Install the Microsoft Office 2013 Professional Clients
In this exercise you will install the Microsoft Office 2013 client applications
1 Download the Office 2013 into the WingtipServer VM For this you need to create an Office 365 Trial account login to Office 365 go to the Admin Dashboard and then download the latest version httpwwwmicrosoftcomofficepreviewentry-office-preview
2 Download the SharePoint Designer 2013 into the WingtipServer VM from here httpwwwmicrosoftcomen-usdownloaddetailsaspxid=35491
3 Download the Visio Professional 2013 into the WingtipServer VM from here httptechnetmicrosoftcomen-usevalcenterhh973399
Install Microsoft Office Professional Plus 2013
In this section you will install the Microsoft Office 2013 clients
1 Ensure you are logged into the WingtipServer VM using the account WINGTIPadministrator | Password1
2 Execute the installer OfficeProfessionalPlus_English_x64exe
3 On the Read the Microsoft Software License Terms dialog click the checkbox next to I accept the terms of this agreement and click Continue
4 On the Choose the installation you want dialog click the Install Now button
5 The installer will proceed and install all the Office products
6 When the installer completes click the Close button
7 Apply your Office Professional Plus 2013 license key
a) Launch Word 2013 Start All Programs Microsoft Office 2013 Word 2013
b) In the First things first dialog select Use recommended settings and click Accept
c) In the Welcome to Office dialog that opens click the [X] icon in the top-right corner to close it
d) In the left-hand pane click Open Other Documents
e) In the left-hand pane click Account
f) In the Product Information section within the Activation Required box click Change Product Key
g) Enter your license key for Office Professional Plus 2013 check the box next to Attempt to automatically activate my product online and click Install
h) Click OK
At this point you have installed Office Professional Plus 2013
Install Microsoft Office Visio 2013
In this section you will install Microsoft Office 2013 Visio
1 Ensure you are logged into the WingtipServer VM using the account WINGTIPadministrator | Password1
2 Execute the installer VisioProfessional_English_x64exe
3 On the Read the Microsoft Software License Terms dialog click the checkbox next to I accept the terms of this agreement and click Continue
Creating a SharePoint Server 2013 Environment for Development and Testing Version 10
copy Critical Path Training 2012 All Rights Reserved 57
wwwCriticalPathTrainingcom
4 On the Choose the installation you want dialog click the Install Now button
5 The installer will proceed and install all Visio 2013
6 When the installer completes click the Close button
7 Apply your Visio 2013 license key
a) Launch Visio 2013 Start All Programs Microsoft Office 2013 Visio 2013
b) In the First things first dialog select Use recommended settings and click Accept
c) In the Welcome to Office dialog that opens click the X icon in the top-right corner to close it
d) In the left-hand pane click Open Other Documents
e) In the left-hand pane click Account
f) In the Product Information section within the Activation Required box click Change Product Key
g) Enter your license key for Visio 2013 check the box next to Attempt to automatically activate my product online and click Install
h) Click OK
At this point you have installed Visio 2013
Install Microsoft Office 2013 SharePoint Designer
In this section you will install Microsoft Office 2013 SharePoint Designer
1 Ensure you are logged into the WingtipServer VM using the account WINGTIPadministrator | Password1
2 Execute the installer SharePointDesigner_English_x64exe
3 On the Read the Microsoft Software License Terms dialog click the checkbox next to I accept the terms of this agreement and click Continue
4 On the Choose the installation you want dialog click the Install Now button
5 The installer will proceed and install all SharePoint Designer 2013
6 When the installer completes click the Close button
At this point you have installed SharePoint Designer 2013
Exercise 9 Install Visual Studio 2012
In this exercise you will install Visual Studio 2012
1 Ensure you are logged into the WingtipServer VM using the account WINGTIPadministrator | Password1
2 Start the install of Visual Studio 2012 Ultimate Trial by downloading the installer from here httpwwwmicrosoftcomvisualstudio11en-usdownloads
3 On the installation splash screen check the box next to I agree to the License terms and conditions and click the Next button
Creating a SharePoint Server 2013 Environment for Development and Testing Version 10
copy Critical Path Training 2012 All Rights Reserved 58
wwwCriticalPathTrainingcom
4 On the Optional Features to install dialog click Install
5 After some time the installer will complete Click the Launch button to launch Visual Studio 2012
Creating a SharePoint Server 2013 Environment for Development and Testing Version 10
copy Critical Path Training 2012 All Rights Reserved 59
wwwCriticalPathTrainingcom
6 In the Choose Default Environment Settings select Visual C Development Settings and click Start Visual Studio
7 Close Visual Studio 2012
At this point Visual Studio 2012 RTM is installed
Install Office amp SharePoint 2013 Developer Tools
In this section you will install the Office and SharePoint 2013 developer tools for Visual Studio
1 Ensure you are logged into the WingtipServer VM using the account WINGTIPadministrator | Password1
2 Launch the Web Platform Installer Start All Programs Microsoft Web Platform Installer
3 In the search box at the top-right corner of the Web Platform Installer 40 window type sharepoint and press Enter
4 Click the Add button to the right of Microsoft Office Developer Tools for Visual Studio 2012 - Preview 2
5 Click the Install button at the bottom of the Web Platform Installer 40 window
6 On the Prerequisites page click I Accept
Creating a SharePoint Server 2013 Environment for Development and Testing Version 10
copy Critical Path Training 2012 All Rights Reserved 60
wwwCriticalPathTrainingcom
At this point you have installed the SharePoint 2013 amp Office 2013 development tools in Visual Studio 2012
Creating a SharePoint Server 2013 Environment for Development and Testing Version 10
copy Critical Path Training 2012 All Rights Reserved 61
wwwCriticalPathTrainingcom
Appendix 1 Download Manifest
The following lists everything referenced that you will or may need to download in this environment
Windows Server 2008 R2 with Service Pack 1 (installer ISO)
o httptechnetmicrosoftcomen-usevalcenterdd459137aspx
Windows Server 2008 R2 with Service Pack 1 (prebuilt VHD)
o httpwwwmicrosoftcomdownloadsdetailsaspxFamilyId=9040a4be-c3cf-44a5-9052-a70314452305
Windows Server 2008 R2 Service Pack 1
o httpwwwmicrosoftcomen-usdownloaddetailsaspxid=5842
SQL Server 2012 Trial
o httpwwwmicrosoftcombetaexperiencepdSQL2012EvalCTAenusdefaultaspx
SharePoint Server 2013
o httptechnetmicrosoftcomen-USevalcenterhh973397aspx
Hotfixes for SharePoint Server 2013 (post-install)
o KB2554876 The SharePoint Parsing Process Crashes in Windows Server 2008 R2
o KB2708075 IIS 75 Configurations are not Updated when you use the ServerManager Class to Commit
Configuration Changes
o KB2759112 Hotfix is Available for NET Framework 45 that Resolves an ASPNET Race Condition Issue in
Windows Server 2008 R2 Windows Server 2008 R2 SP1
o KB2765317 Hotfix is Available for NET Framework 45 that Resolves an ASPNET Race Condition Issue in
Windows 8 Windows RT and Windows Server 2012
Web Platform Installer
o httpwwwmicrosoftcomwebdownloadsplatformaspx
Web Platform Installer ndash Command Line Version
o httplearniisnetpageaspx1072web-platform-installer-v4-command-line-webpicmdexe-preview-release
Workflow Manager 10
o Download using the Microsoft Web Platform Installer
Office 2013
o httpwwwmicrosoftcomofficepreviewentry-office-preview
SharePoint Designer 2013
o httpwwwmicrosoftcomen-usdownloaddetailsaspxid=35491
Visio Professional 2013
o httptechnetmicrosoftcomen-usevalcenterhh973399
Visual Studio 2012
o httpwwwmicrosoftcomvisualstudio11en-usdownloads
Office Developer Tools for Visual Studio 2012 ndash Preview 2
o Download using the Microsoft Web Platform Installer
Creating a SharePoint Server 2013 Environment for Development and Testing Version 10
copy Critical Path Training 2012 All Rights Reserved 62
wwwCriticalPathTrainingcom
Appendix 2 Windows PowerShell Script Manifest
The following lists all Windows PowerShell scripts that are provided with this setup guide
AddDisableLoopbackCheckRegKeyps1
o The following steps automate creating the registry key outlined as Method 2 in the Microsoft Knowledgebase article
httpsupportmicrosoftcomkb896861 using Windows PowerShell This key DisableLoopbackCheck will allow
you to browse SharePoint sites on the same machine Without this key (or following Method 1 in the KB article) you
would need to browse any SharePoint sites from a different computer than the one which SharePoint is installed on
ConfigureSpFarmForAppsps1
o Configures a SharePoint 2013 for hosting apps This ensures everything you need is installed running and
configured This is documented here httpmsdnmicrosoftcomen-uslibraryfp179923(v=office15)
CreateSpServiceAccountsps1
o Creates the minimal necessary service accounts for SharePoint Server 2013 SP_Farm SP_Content amp
SP_Services
SetupSharePointForHNSCps1
o Configures a SharePoint 2013 install for hosting Host-Named Site Collections (HNSC) This involves creating a Web
Application in SharePoint that has no host header bindings Using DNS all requests are mapped to this Web
Application You then create the site collections via PowerShell as you cant create HNSCs via the browser (Central
Administration)
Creating a SharePoint Server 2013 Environment for Development and Testing Version 10
copy Critical Path Training 2012 All Rights Reserved 63
wwwCriticalPathTrainingcom
Appendix 3 Create Sample Adventure Works Database
The following steps document downloading and installing the sample Adventure Works OLTP database provided by Microsoft
1 Launch Internet Explorer and navigate to httpmsftdbprodsamplescodeplexcom
2 Download the Adventure Works 2012 OLTP Script
3 Extract the ZIP into a folder on the desktop
4 Launch SQL Server Management Studio Start All Programs Microsoft SQL Server 2012 SQL Server Management Studio
5 When SQL Server Management Studio launches within the Connect to Server dialog login using the default settings and click Connect
6 Within SQL Server Management Studio select File Open File
7 Select the file instawdbsql from the extracted ZIP and click Open
8 If prompted to re-login to the database engine do it
9 Select Query SQLCMD Mode
10 Scroll down to line 42 the line that starts with the following
setvar SqlSamplesSourceDataPath
11 Change the folder location of where you unzipped the Adventure Works 2012 OLTP Script
12 Select Query Execute
13 When the script completes the AdventureWorks2012 database will have been created
Creating a SharePoint Server 2013 Environment for Development and Testing Version 10
copy Critical Path Training 2012 All Rights Reserved 64
wwwCriticalPathTrainingcom
Change Log
Change Version Description
August 22 2012 v 01 Pre-release for review
August 27 2012 v 02 Initial public release ndash install guide based on SharePoint Server Beta 2
August 28 2012 v 03 Updated URL for the site collection used to connect SharePoint to WAW
August 31 2012 v 04 Typo Removed SQL Server Analysis Services as part of the install Not required in a
SharePoint dev box (unless you are doing business intelligence which is not covered
in the guide)
Updated all references to Windows Azure Workflow to Workflow Manager the new
official name for the new workflow product
Updated SetupSharePointForHNSCps1 script to lookup HNSC Web Application by
name rather than URL which is more reliable
Typo Updated WingtipAllUp public NIC to use a different IP than the WingtipDC
Typo Replaced a reference to WingtipServer with WingtipDC
Typo Fixed handful of minor typos
September 1 2012 v 05 Removed SQL Server Reporting Services from install guide
Added step to uncheck IErsquos ldquoAutomatically detect proxyrdquo
Added post workflow install steps to setup User Profile Service Application to sync with
local Active Directory
September 5 2012 v 06 Added step to create a default root site collection in the HNSC web app
Updated minor typos and added extra notes for context
Updated PowerShell script SetupSharePointForHNSCps1 to remove content
database of default Web Application when setting up HNSC Web App
Added a new exercise 8 (after SharePoint install amp config and before the Workflow
install and config) to setup support for My Sites
October 20 2012 v 07 Updated script SetupSharePointForHNSCps1 to fix a bug where it would fail on line
111 if you didnrsquot already have a WINGTIPSP_Content managed account
Added section to bypass SharePointrsquos check for crlmicrosoftcom
Updated workflowrsquos registration PowerShell script to point to
httpintranetwingtipcom
Switched order of post-SharePoint install to setup HSNC hosting before configuring for
hosting apps
November 29 2012
v 10 Changed setup guide to use a single VM instead of two VMs
Updated guide for SharePoint 2013 RTM
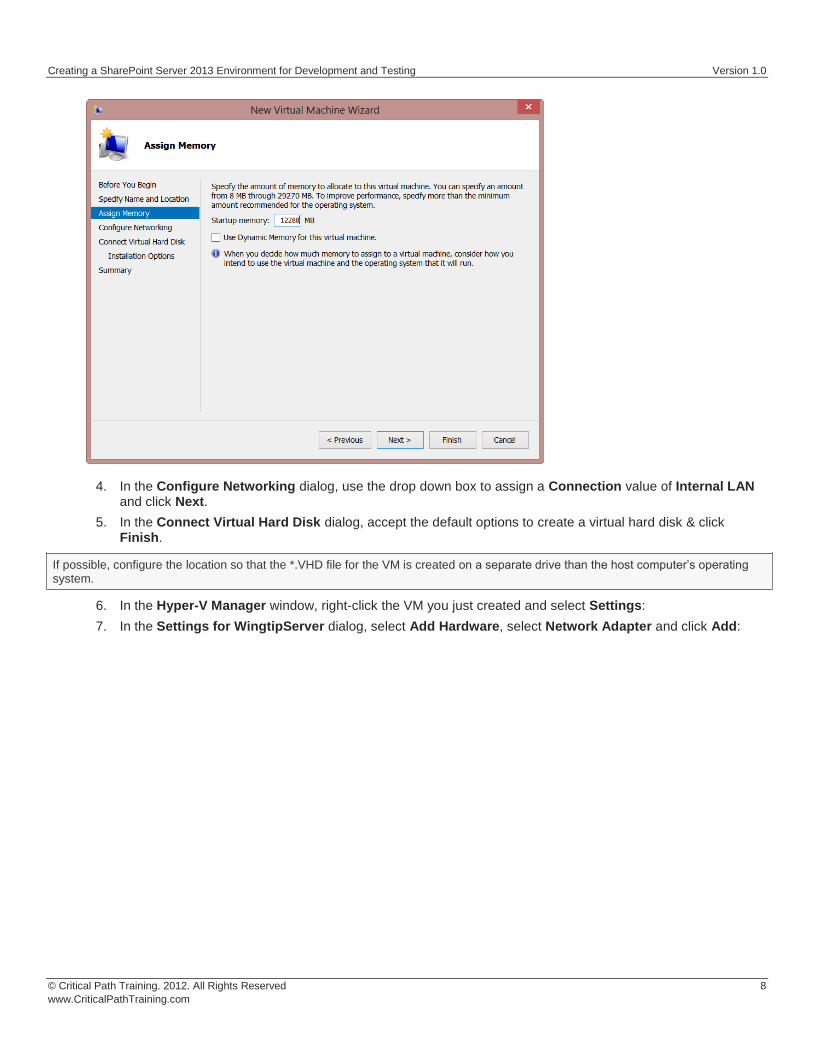
Creating a SharePoint Server 2013 Environment for Development and Testing Version 10
copy Critical Path Training 2012 All Rights Reserved 9
wwwCriticalPathTrainingcom
8 Obtain a copy of the Windows Server 2008 R2 with Service Pack 1 install binaries
The install image (ISO) is available to MSDN or TechNet subscribers or as a trial download available here httptechnetmicrosoftcomen-usevalcenterdd459137aspx
Obviously you can also use your own licensed copy of Windows Server 2008 R2 with Service Pack 1
Microsoft also provides a pre-installed 180-day trial Windows Server 2008 R2 Hyper-V VHD file that you can download (httpwwwmicrosoftcomdownloadsdetailsaspxFamilyId=9040a4be-c3cf-44a5-9052-a70314452305) instead of installing it
yourself If you elect to go this route
Make sure you specify the VHD file you downloaded in the following step for the Hard Drive of the VM
Do not specify a DVD Drive in the following step as you will not be installing anything
If you elect to do this step jump down to section Configure Windows Server 2008 R2
9 In the Settings for WingtipServer dialog update the VM to have the following settings When finished click OK
a) Processor 2 Virtual Processors
b) DVD Drive Image File ndash Map to the Windows Server 2008 R2 ISO installer file
c) Network Adapter Internal LAN
d) Network Adapter Not Connected
10 Start up the WingtipServer VM and install Windows Server 2008 R2
a) In the Hyper-V Manager window right-click the VM you just created and select Settings
b) Right-click on the VM named WingtipServer and select the Connecthellip menu
c) In the Virtual Machine Connection window drop down the Action menu and select Start
Creating a SharePoint Server 2013 Environment for Development and Testing Version 10
copy Critical Path Training 2012 All Rights Reserved 10
wwwCriticalPathTrainingcom
If you elected to use the fully installed trial VHD from Microsoft instead of installing your own server skip to the section Configure Windows Server 2008 R2
Install the Windows Server 2008 R2 Operating System
In this section you will install the operating system
1 After the setup program for Windows Server 2008 R2 loads it will prompt you with a dialog asking you to select a language Accept the default of English and click Install to continue
2 At the next dialog click the Install Now button to begin the installation
Creating a SharePoint Server 2013 Environment for Development and Testing Version 10
copy Critical Path Training 2012 All Rights Reserved 11
wwwCriticalPathTrainingcom
3 The next dialog instructs you to select the operating system you want to install Select the operating system named Windows Server 2008 R2 Enterprise (Full Installation) with the x64 architecture Click Next to continue
4 Agree to the licensing terms and click Next
5 Click on Custom (advanced) to select the type of installation
6 The next dialog asks you where you want to install Windows Accept the default configuration which uses a location of Disk 0 Unallocated Space as shown below Click Next to continue
At this point you have given the Windows setup program enough information to install the basic operating system Setup program will now run for a while as it copies and expands files and installs Windows features You now have a few minutes to get a cup of coffee or catch up on email
7 When the setup program completes it will ask you to assign a new password for the built-in Administrator account Click OK to continue
8 Set the password for Administrator account to Password1
9 When you have updated the Administrator password you will get a confirmation that the update was successful Click OK to complete the installation of the operating system
If you elected to use the pre-installed trial VHD Microsoft offers you will pick up the configuration exercise at this point
Configure Windows Server 2008 R2
In this section you will configure the server
1 When you log in Windows Server automatically displays the Initial Configuration Tasks window Click the check box with the caption Do not show this window at logon and then click the Close button
Creating a SharePoint Server 2013 Environment for Development and Testing Version 10
copy Critical Path Training 2012 All Rights Reserved 12
wwwCriticalPathTrainingcom
2 After you close the Initial Configuration Tasks window Windows Server will display the Server Manager
Creating a SharePoint Server 2013 Environment for Development and Testing Version 10
copy Critical Path Training 2012 All Rights Reserved 13
wwwCriticalPathTrainingcom
3 Configure the Administrator account so that its password does not expire
a) Inside the Configuration node of the Server Manager navigate to Local Users and Groups Users (as shown in the following screenshot) and locate the local Administrator account
b) Right-click on the Administrator account and click Properties
c) In the Administrator Properties dialog unselect the option for User must change password at next logon and select the option for Password never expires Click OK
4 Rename the computer name of the VM
a) In the Server Manager navigate to the top-level node to display the Server Summary page Click Change System Properties
b) On the Computer Name tab of the System Properties dialog click the Change button
c) Enter a new computer name of WingtipServer and click OK
Creating a SharePoint Server 2013 Environment for Development and Testing Version 10
copy Critical Path Training 2012 All Rights Reserved 14
wwwCriticalPathTrainingcom
5 After changing the computer name you will be prompted to restart the VM Choose OK to restart After the VM has restarted log in again using [administrator | Password1] (username | password)
6 Disable Windows Firewall and Enhanced Security Configuration
a) In the Server Manager navigate to the top-level node to display the Server Summary page Inside the Security Information section locate the links for Go to Windows Firewall and Configure IE ECS
b) Click on Configure IE ECS link Disable Enhanced Security Configuration for both Administrators and Users by selecting the Off radio buttons and click OK
c) Now click the Go to Windows Firewall link to display the page for the Windows Firewall Click on the Windows Firewall Properties link at the bottom of the Overview section
d) In the Domain Profile tab of the Windows Fire dialog change the Firewall state property setting from On to Off Click to Apply button to save your changes
e) Once you have turned off the firewall in the Domain Profile tab go to the Private profile tab and the Public profile tab and follow the same steps to disable the firewall for these profiles as well
f) Click OK to dismiss the Windows Firewall dialog once you have turned off the firewall for all three profiles
7 Enable Remote Desktop for your VM
a) In the Server Manager navigate to the top-level node to display the Server Summary page Inside the Computer Information section locate and click the link for Configure Remote Desktop
b) In the Remote tab of the System Properties dialog select the last option for Allow connections only from computers running Remote Desktop with Network Level Authentication Click OK to save changes and dismiss the System Properties dialog
Creating a SharePoint Server 2013 Environment for Development and Testing Version 10
copy Critical Path Training 2012 All Rights Reserved 15
wwwCriticalPathTrainingcom
8 Enable the Windows Server Features for the Desktop Experience and the PowerShell Integrated Scripting Environment
a) In Server Manager choose Add Feature to bring up the Add Features Wizard dialog
b) Select the feature Desktop Experience
When you first click the checkbox for the Desktop Experience the wizard will prompt you with the following dialog to add support for Ink and Handwriting Services Click the Add Required Features button to continue
c) Scroll down the list of features in the Add Features Wizard dialog and select the feature Windows PowerShell Integrated Scripting Environment (ISE)
Creating a SharePoint Server 2013 Environment for Development and Testing Version 10
copy Critical Path Training 2012 All Rights Reserved 16
wwwCriticalPathTrainingcom
When you first click the checkbox for the Windows PowerShell Integrated Scripting Environment (ISE) the wizard will prompt you with the following dialog to add support for NET Framework 351 Features Click the Add Required Features button to continue
d) Click the Next button on the Add Features Wizard dialog to continue with the install
e) On the Confirm Installation Selection wizard page click the Install button
f) When you see the Installation Results screen the Add Features Wizard informs you a computer restart is required Click Close button to dismiss this dialog
9 After the VM has restarted log in again using [administrator | Password1] (username | password)
Configure the Virtual Machinersquos Networking Setup
In this section yoursquoll configure the two NICrsquos you added to the VM in previous steps One NIC (Internal LAN) will be used to communicate with other VMs in this environment while the other (External LAN) will be used to connect to the internet
1 Configure the NIC that is linked to the Internal LAN network
a) Open the Network Connections dialog by pressing Start enter view network connections in the search box Click the View Network Connections shortcut
b) Two network connections will be shown but only one will show as connected
The connected one is the one that is connected to the Internal LAN network The other one is currently ldquounpluggedrdquohellip this is why we didnrsquot connect a network to the second network when initially configuring the VM as this makes it easier to see which NIC is which in the VM
c) Rename the two NICrsquos
i) Right-click the connected NIC and select Rename Give it a name of Internal LAN
Creating a SharePoint Server 2013 Environment for Development and Testing Version 10
copy Critical Path Training 2012 All Rights Reserved 17
wwwCriticalPathTrainingcom
ii) Right-click the disconnected NIC and select Rename Give it a name of External LAN
d) Right-click the Internal LAN NIC and select Properties
e) In the Local Area Connection Properties dialog select the Internet Protocol Version 4 (TCPIPv4) item and click Properties
f) Enter the following information into the resulting dialog to configure the NICrsquos IP settings
i) Use the Following IP Address
(1) IP Address 192168150102
(2) Subnet mast 2552552550
(3) Default Gateway 192168150102
ii) Use the Following DNS Server Addresses
(1) Preferred DNS Server 192168150102
g) Click OK to accept the IP settings and Close to accept the changes to the NIC
Why not use 101 as the start NIC When you created the virtual internal network Hyper-V created a virtual NIC on the host computer If you set the IP of that NIC to 192168150101 you can use the Remote Desktop Connection app in Windows to connect to your virtual machines and easily copy-paste amp share drives
2 Configure the NIC that is linked to the External LAN network
a) Open the Network Connections window if it is not still open using the same steps from the previous step
b) Right-click the External LAN NIC and select Properties
c) In the Local Area Connection Properties dialog select the Internet Protocol Version 4 (TCPIPv4) item and click Properties
d) Enter the following information into the resulting dialog to configure the NICrsquos IP settings
i) Obtain an IP Address Automatically
ii) Use the Following DNS Server Addresses
(1) Preferred DNS Server 192168150102
e) Click the Advanced button to open the Advanced TCPIP Settings dialog
f) In the Advanced TCPIP Settings dialog click the DNS tab
i) Uncheck the Register this Connections Address in DNS
Creating a SharePoint Server 2013 Environment for Development and Testing Version 10
copy Critical Path Training 2012 All Rights Reserved 18
wwwCriticalPathTrainingcom
g) In the Advanced TCPIP Settings dialog click the WINS tab
i) Click the Add button and specify a new WINS Server as 192168150102
h) Click OK Close multiple times to accept all TCPIP settings
The external NIC will now obtain an IP dynamically amp will not register itself in the DHCPrsquos DNS server which is a good thing when there are multiple people on the same network this this type of a setup
3 Connect the second NIC to the External LAN network
a) Go back to the host computer and open the Hyper-V Manager
b) In the Hyper-V Manager window right-click the VM WingtipServer and select Settings
c) Select the second NIC the one that is not connected
d) For the Network select External LAN and click OK This will effectively plug the external network into the VM
4 Go back into the WingtipServer VM and if it is not still open open the Network Connections dialog You should now see both connections plugged in
a) To refresh the connection select the connection you just plugged in and click the Disable this Network Device button in the toolbar After the connection is disabled select it and click the Enable this Network Device button
b) After a few seconds the VM should be able to connect to the internet which you can test by browsing to a site such as httpwwwbingcom
Configure Windows Update and Update the Server
In this section you will verify the server is fully patched and updated
1 Verify Service Pack 1 is installed
a) Verify the version of the operating system installed by clicking Start right-click on Computer select Properties
b) If the server simply says Windows Server 2008 R2 Enterprise as shown in the following figure download and install Service Pack 1 from the following location httpwwwmicrosoftcomen-usdownloaddetailsaspxid=5842
Creating a SharePoint Server 2013 Environment for Development and Testing Version 10
copy Critical Path Training 2012 All Rights Reserved 19
wwwCriticalPathTrainingcom
c) If Service Pack 1 is installed it will state it
2 Update the server using Windows Update
a) Selecting Start All Programs Windows Update
b) First disable Windows Update from running automatically
i) Click the link Change Settings
ii) Under the Important Updates list select Never check for updates (not recommended)
This isnrsquot what you would do in a production environment but for a development machine it is ok
c) Now update the server
i) Click the Check for Updates button
ii) If prompted install any updates to the Windows Update dialog
iii) Select the Check for Updates link
iv) Windows Update will the report how many updates are available Select all important and recommended updates and click the Install Updates button
v) If prompted select I accept the license terms for any updates that require it
vi) Keep going through the process of running Windows Update checking for updates and installing them after each reboot until it says there are no updates left to install
This step is likely going to take quite a bit of time so be patient
Activate Windows Server 2008 R2
In this section you will activate the server if you have a product key
1 If you have a product key for Windows Server 2008 R2 use it to activate Windows
a) In the Server Manager window navigate to the top-level node to display the Server Summary page Click Activate Windows
b) You will be prompted to enter your product key
i) Enter your product key and click to button to activate Windows
Creating a SharePoint Server 2013 Environment for Development and Testing Version 10
copy Critical Path Training 2012 All Rights Reserved 20
wwwCriticalPathTrainingcom
ii) After a few seconds your VM should be able to connect to a Microsoft site and successfully activate Windows
At this point you have a fully patched operating system VM created that will act as the Active Directory domain controller
Apply the DisableLoopbackCheck Registry Fix
Configure the DisableLoopbackCheck registry setting (Microsoft KB httpsupportmicrosoftcomkb896861)
The following steps automate creating the registry key outlined as Method 2 in the Microsoft KB article httpsupportmicrosoftcomkb896861 using Windows PowerShell
PowerShell Script Alert You can also find this PowerShell script AddDisableLoopbackCheckRegKeyps1 in the files that
accompany this setup guide
1 Click the Windows PowerShell icon in the Taskbar
2 Run the following PowerShell commands pressing [ENTER] after each one
$regKeyPath = HKLMSystemCurrentControlSetControlLsa $key = DisableLoopbackCheck New-ItemProperty -Path $regKeyPath -Name $key -Value 1 -PropertyType dword
a) Close the Windows PowerShell console by typing EXIT and pressing [ENTER]
Exercise 3 Install Active Directory Domain Services
Now you will promote your WingtipServer VM to a domain controller and create a new domain named wingtipcom
1 Login to the WingtipServer virtual machine using administrator | Password1
2 Add and configure the role for Active Directory Domain Services
a) Launch Server Manager and select the Roles node
b) Click the Add Roles link to start the Add Roles Wizard
c) On the Before you begin page click Next
d) On the Server Roles page select Active Directory Domain Services Click the Add Required Features button if prompted to install prerequisites
e) Click Next
Creating a SharePoint Server 2013 Environment for Development and Testing Version 10
copy Critical Path Training 2012 All Rights Reserved 21
wwwCriticalPathTrainingcom
f) On the next page of the wizard click Next which will bring you to the Confirm Installation Selections page
g) Click Install
After Active Directory Domain Services has been installed you will see the Installation Results page in the Add Roles Wizard
3 Click on the link with the big long caption of Close this wizard and launch the Active Directory Domain Services Installation Wizard (dcpromoexe)
4 On the first page of the Active Directory Domain Services Installation Wizard click the Use Advanced Mode Installation checkbox and click Next
Creating a SharePoint Server 2013 Environment for Development and Testing Version 10
copy Critical Path Training 2012 All Rights Reserved 22
wwwCriticalPathTrainingcom
5 On the Operating System Compatibility page click Next
6 On the Choose a Deployment Configuration select Create a new domain in a new forest and click Next
7 On the Name the Forrest Root Domain enter the following and click Next
a) FQDN of the forest root domain wingtipcom
8 On the Domain NetBIOS Name set it to WINGTIP and click Next
9 On the Set Forest Functional Level page select Windows Server 2008 R2 and click Next
10 On the Additional Domain Controller Options accept the default options and click Next
11 You might be prompted with the dialog shown below providing a warning that This computer has dynamically assigned IP address(es) This is not a problem when you are running your development environment on a domain controller Click Yes to dismiss the dialog
12 At this point the wizard will prompt you with a dialog information you a delegation for the DNS Server cannot be created because it cannot find the authoritative parent zone This is not a problem because the wizard will automatically configure the DNS of the VM to point to itself Click on the Yes button to dismiss this dialog
Creating a SharePoint Server 2013 Environment for Development and Testing Version 10
copy Critical Path Training 2012 All Rights Reserved 23
wwwCriticalPathTrainingcom
13 On the Location for Database Log Files and SYSVOL page accept all the default values and click Next
14 On the Directory Services Restore Mode Administrator Password page enter Password1 in both textboxes and click Next
15 On the Summary page click Next to start the process of configuring the new Active Directory domain
16 The wizard will display the dialog below to show you the progress of the configuration process You will be required to reboot when the configuration has been completed Check the option for Reboot on completion and then wait for the configuration to complete and the machine to reboot
17 After the VM reboots login to the server with wingtipadministrator | Password1
Configure Windows Update and Update the Server
In this section you will verify the server is fully patched and updated
1 Update the server using Windows Update
a) Selecting Start All Programs Windows Update
b) Select the Check for Updates link
c) Windows Update will the report how many updates are available Select all important and recommended updates and click the Install Updates button
d) If prompted select I accept the license terms for any updates that require it
e) Keep running Windows Update after each reboot and update install until it says there are no updates left to install
Creating a SharePoint Server 2013 Environment for Development and Testing Version 10
copy Critical Path Training 2012 All Rights Reserved 24
wwwCriticalPathTrainingcom
This step could take quite a bit of time so be patient
At this point you have a fully installed Active Directory Domain Controller for the Wingtipcom domain hosted on the server WingtipServer
Exercise 4 Install SQL Server 2012
In this exercise you will install SQL Server 2012 that will be used to store all required databases
1 Download the SQL Server 2012 Evaluation Edition specifically the DVD x64 ISO image to the host computer from here httpwwwmicrosoftcombetaexperiencepdSQL2012EvalCTAenusdefaultaspx or you can use your own licensed copy
2 Mount the SQL Server 2012 ISO to the WingtipServer VM
a) On the host computer open the Hyper-V Manager
b) Right-click the VM WingtipServer and select Settings
c) Select DVD Drive in the left-hand panel
d) In the right-hand panel select Image File and browse to the ISO file that contains SQL Server 2012 and click OK
3 Login to the WingtipServer VM as wingtipadministrator | Password1
Install SQL Server 2012
In this section you will install SQL Server 2012
1 If the AutoPlay dialog box is open click Run SETUPEXE If it isnrsquot use Windows Explorer to navigate to the DVD drive and execute the setupexe file in the root of the DVD drive
2 In the SQL Server Installation Center click Installation on the left-hand side
Creating a SharePoint Server 2013 Environment for Development and Testing Version 10
copy Critical Path Training 2012 All Rights Reserved 25
wwwCriticalPathTrainingcom
3 Next select New SQL Server stand-alone installation or add features to an existing installation
4 On the Setup Support Rules page the installer will check for issues before installing Click OK
5 On the Product Key page click the Specify a free edition radio box and select Evaluation then click Next
6 On the License Terms page click the I accept the license terms checkbox and click Next
7 On the Setup Support Rules page the installer will check for any problems with the server you are installing on Click Next when this completes
Creating a SharePoint Server 2013 Environment for Development and Testing Version 10
copy Critical Path Training 2012 All Rights Reserved 26
wwwCriticalPathTrainingcom
8 On the Support Role page select SQL Server Feature Installation and click Next
9 On the Feature Selection page check the following options and click Next
a) Instances Features
i) Database Engine Services
(1) Full-Text and Semantic Extractions for Search
b) Shared Features
i) Management Tools ndash Basic
(1) Management Tools ndash Complete
Creating a SharePoint Server 2013 Environment for Development and Testing Version 10
copy Critical Path Training 2012 All Rights Reserved 27
wwwCriticalPathTrainingcom
10 On the Installation Rules page click Next
11 On the Instance Configuration page click Next
12 On the Disk Space Requirements page click Next
13 On the Server Configuration page do the following and click Next
a) On the Service Account tab change the Startup Type for the SQL Server Agent to Automatic
14 On the Database Engine Configuration page do the following and click Next
a) On the Server Configuration tab click Add Current User
b) On the FILESTREAM tab
i) Check Enable FILESTREAM for Transact-SQL Access
ii) Check Enable FILESTREAM for file IO access
15 On the Error Reporting page click Next
16 On the Installation Configuration Rules page click Next
17 On the Ready to Install page click Install
Installation of SQL Server 2012 will take some time please be patient
18 When the installation completes the Complete page will be shown Click Close
At this point you have now successfully installed SQL Server 2012
Creating a SharePoint Server 2013 Environment for Development and Testing Version 10
copy Critical Path Training 2012 All Rights Reserved 28
wwwCriticalPathTrainingcom
Exercise 5 Install amp Configure SharePoint Server 2013
In this exercise you will install SharePoint 2013
1 Download the SharePoint Server 2013 to the host computer from here httptechnetmicrosoftcomen-USevalcenterhh973397aspx
2 Mount the SharePoint Server 2013 ISO to the WingtipServer VM
a) On the host computer open the Hyper-V Manager
b) Right-click the VM WingtipServer and select Settings
c) Select DVD Drive in the left-hand panel
The file that Microsoft provides is saved in the IMG format Hyper-V Manager wonrsquot allow you to mount an IMG file so rename it to ISO before mounting it
d) In the right-hand panel select Image File and browse to the ISO file that contains SharePoint Server 2013 and click OK
Create SharePoint Service Accounts amp Grant Rights to SQL Server 2012
In this section you will create the necessary service accounts that will be used by SharePoint in Active Directory and grant them necessary rights in SQL Server 2012
PowerShell Script Alert The creation of users and granting them rights to SQL Server 2012 steps in this section are automated in the Windows PowerShell script CreateSpServiceAccountsps1 found in the files that accompany this setup guide Open the script
and read the header for documentation on how to use it
1 Open the Active Directory Users and Computers Start Administrative Tools Active Directory Users and Computers
2 Expand the tree in the left-hand pane to see the Users OU Select the Users OU
3 Create a new user SP_Farm
a) In the toolbar select Action New User
Creating a SharePoint Server 2013 Environment for Development and Testing Version 10
copy Critical Path Training 2012 All Rights Reserved 29
wwwCriticalPathTrainingcom
b) Set the userrsquos Full Name amp User Login Name to SP_Farm and click Next
c) In the password dialog enter the following and click Next
i) Password (and Confirm Password) Password1
ii) User must change password at next login unchecked
iii) User cannot change password unchecked
iv) Password never expires checked
v) Account is disabled unchecked
Creating a SharePoint Server 2013 Environment for Development and Testing Version 10
copy Critical Path Training 2012 All Rights Reserved 30
wwwCriticalPathTrainingcom
vi) Click Finish
4 Repeat the previous step to create two more accounts
a) SP_Content
b) SP_Services
At this point you have created all the necessary service accounts
Install SharePoint Server 2013 Prerequisites
In this section you will install the SharePoint Server 2013 Prerequisites
1 Ensure you are logged into the WingtipServer VM using the account wingtipadministrator | Password1
2 If the AutoPlay dialog box is open click Run splashhta If it isnrsquot use Windows Explorer to navigate to the DVD drive and execute the splashhta file in the root of the DVD drive
Creating a SharePoint Server 2013 Environment for Development and Testing Version 10
copy Critical Path Training 2012 All Rights Reserved 31
wwwCriticalPathTrainingcom
3 Click the Install Software Prerequisites link
4 In the Microsoft SharePoint 2013 Products Preparation Tool window click Next
5 On the License Terms for Software Products page
a) Check I accept the terms of the License Agreement(s)
b) Click Next
6 The tool will download and install all prerequisites for SharePoint Server 2013 This will take some time It may prompt you to reboot the server If so reboot the server and login using wingtipadministrator | Password1
Creating a SharePoint Server 2013 Environment for Development and Testing Version 10
copy Critical Path Training 2012 All Rights Reserved 32
wwwCriticalPathTrainingcom
7 When the prerequisite installer is complete it will present a summary of everything it did
8 Click Finish
9 Restart the WingtipServer VMhellip some additional installations and changes that the prerequisite installer did will require a restart before installing SharePoint Server 2013
At this point all prerequisites required by SharePoint Server 2013 have been installed and any necessary configuration changes have been applied to the server However it is strongly recommend that you run Windows Update and install any pending updates Further Microsoft recommends installing the following hotfixes if they are not already installed
KB2554876 The SharePoint Parsing Process Crashes in Windows Server 2008 R2
KB2708075 IIS 75 Configurations are not Updated when you use the ServerManager Class to Commit Configuration Changes
KB2759112 Hotfix is Available for NET Framework 45 that Resolves an ASPNET Race Condition Issue in Windows Server 2008 R2 Windows Server 2008 R2 SP1
KB2765317 Hotfix is Available for NET Framework 45 that Resolves an ASPNET Race Condition Issue in Windows
8 Windows RT and Windows Server 2012
Install SharePoint Server 2013
In this section you will install SharePoint Server 2013
1 Ensure you are logged into the WingtipServer VM using the account wingtipadministrator | Password1
2 If the AutoPlay dialog box is open click Run splashhta If it isnrsquot use Windows Explorer to navigate to the DVD drive and execute the splashhta file in the root of the DVD drive
Creating a SharePoint Server 2013 Environment for Development and Testing Version 10
copy Critical Path Training 2012 All Rights Reserved 33
wwwCriticalPathTrainingcom
3 Click Install SharePoint Server
4 When prompted to Enter your Product Key enter the key you obtained for the trial install and click Continue
5 On the Read the Microsoft Software License Terms page check the I accept the terms of this agreement checkbox and click Continue
6 On the Choose a file location page click Install Now
Creating a SharePoint Server 2013 Environment for Development and Testing Version 10
copy Critical Path Training 2012 All Rights Reserved 34
wwwCriticalPathTrainingcom
7 When the installation is complete select the Run the SharePoint Products Configuration Wizard checkbox and click Close
8 On the Welcome to SharePoint Products page click Next
a) If prompted to start or reset services click Yes
9 On the Connect to a server farm page select Create a new server farm and click Next
10 On the Specify Configuration Database Settings page use the following to complete the page and click Next
a) Database server WINGTIPSERVER
b) Database name SharePoint_Config
c) Username WINGTIPSP_Farm
d) Password Password1
Creating a SharePoint Server 2013 Environment for Development and Testing Version 10
copy Critical Path Training 2012 All Rights Reserved 35
wwwCriticalPathTrainingcom
11 On the Specify Farm Security Settings page for the Passphrase and Confirm Passphrase boxes enter Password1 and click Next
12 On the Configure SharePoint Central Administration Web Application page check the Specify port number checkbox and enter a value of 9999 then Click Next
Creating a SharePoint Server 2013 Environment for Development and Testing Version 10
copy Critical Path Training 2012 All Rights Reserved 36
wwwCriticalPathTrainingcom
13 On the Completing the SharePoint Products Configuration Wizard page click Next
14 When the installer completes it will display the Confirmation Successful page
15 Click Finish This will launch Internet Explorer to go through the configuration process
Creating a SharePoint Server 2013 Environment for Development and Testing Version 10
copy Critical Path Training 2012 All Rights Reserved 37
wwwCriticalPathTrainingcom
At this point you have successfully installed SharePoint Server 2013
Configure SharePoint Server 2013
In this section you will create a new SharePoint Server 2013 farm and perform minimal configuration tasks
After installing SharePoint Sever 2013 the SharePoint Products Configuration Wizard will launch the browser-based Initial Farm Configuration Wizard
1 In the first page of the wizard you are prompted to Help Make SharePoint Better Select which ever option you want and click OK
2 On the Welcome page that asks How do you want to configure your SharePoint farm click the Start the Wizard button
3 On the Services page do the following and then click Next
a) Service Account Select Create new managed account
i) Username WINGTIPSP_Services
ii) Password Password1
b) Services Uncheck the following services
Creating a SharePoint Server 2013 Environment for Development and Testing Version 10
copy Critical Path Training 2012 All Rights Reserved 38
wwwCriticalPathTrainingcom
i) Access Services 2010
ii) App Management Service
In SharePoint Server 2013 the Search Service Application processes specifically noderunnerexe can consume a considerable amount of memory and processor time If you are not going to work with search you might consider unchecking this option for now You can always go back into Central Administration and create a new instance of the Search Service Application at a later date if you need it
Why did we remove Access Services 2010 amp App Management Service service applications The Access Services 2010 service application is included for backwards compatibility and isnrsquot needed in new installations unless you are migrating solutions built with Access Services 2010 from SharePoint Server 2010 (if so you can create this service application later within Central Administration Application Management Manage Service Applications) The App Management Service service application will be created in a later step in this setup guide therefor it is skipped here
4 The creation of the service applications can take quite a while so be patient If it exceeds 20 minutes it is fairly safe to assume the page is hung up One option is to close the browser then launch Central Administration (Start All Programs Microsoft SharePoint 2013 Products SharePoint 2013 Central Administration) and look at the Service Application page (Application Management Manage Service Applications) to see if they were all created
Configure DNS
In this section you will configure DNS for hosting SharePoint sites amp Apps
1 Ensure you are logged into the WingtipServer VM using the account wingtipadministrator | Password1
2 Open the DNS window Start Administrative Tools DNS
3 Expand the hierarchy on the left-hand side of the window until you get to DNS WINGTIPSERVER Forward Lookup Zones wingtipcom
4 Create a new wildcard so all requests for http[]wingtipcom will be forwarded to our SharePoint machine
a) Next right-click wingtipcom and select New Host (A or AAAA)
Creating a SharePoint Server 2013 Environment for Development and Testing Version 10
copy Critical Path Training 2012 All Rights Reserved 39
wwwCriticalPathTrainingcom
b) In the New Host dialog enter the following and click OK
i) Alias Name
ii) IP Address 192168150102 Then click Add Host The following figure shows how this looks
This new record is telling DNS to forward any request for http[]wingtipcom to the webserver WINGTIPSERVER where the
requests will be served by SharePoint
5 Verify this DNS entry is working
a) Open Windows PowerShell Start All Programs Accessories Windows PowerShell Windows PowerShell
b) Run the following commands and press ENTER
PS CUsersAdministratorgt nslookup somethingwingtipcom PS CUsersAdministratorgt nslookup somethingappswingtipcom
c) You should get a response that points to the WingtipServer server as shown in the following figure
Creating a SharePoint Server 2013 Environment for Development and Testing Version 10
copy Critical Path Training 2012 All Rights Reserved 40
wwwCriticalPathTrainingcom
Configure SharePoint Server 2013 for Host-Named Site Collections amp Create Initial Site
Collections
In this section you will create new SharePoint 2013 site collections for testing and hosting apps
Microsoft recommends to create host-named site collections (HNSC) instead of using the path based site collection addressing The difference is the following a path based site created at something such as httpintranetwingtipcomsitesdevtest as an HNSC site would be more like httpdevtestwingtipcom This is how it works in the cloud (Office 365) and it scales much better for on-prem
deployments This setup guide will show you how to setup your environment to create HNSC The only downside to this approach is that you canrsquot create site collections within Central Administration it must be done via Windows PowerShell API (because Central Administration doesnrsquot instruct you where to put the site
This is implemented in various parts First DNS must be configured to send all requests for httpwingtipcom to a Web Application
(implemented in the last section) Second this Web Application must be extended with SharePoint and have no host header bindings (so it handles all requests) Third it must have a default site collection at the root of the Web Application but it will not be used for anything (in fact it doesnrsquot need a template assigned to it)
You can read more about HNSCrsquos on TechNet httptechnetmicrosoftcomen-uslibrarycc424952aspx
PowerShell Script Alert The steps in this section are automated in the script SetupSharePointForHNSCps1 found in the files that
accompany this setup guide Open the script and read the header for documentation on how to use it
1 Ensure you are logged into the WingtipServer VM using the account wingtipadministrator | Password1
2 Open Central Administration Start All Programs Microsoft SharePoint 2013 Products SharePoint 2013 Central Administration
3 Select Application Management Manage Web Applications
4 Delete the default Web Application created by the configuration wizard
a) Delete the existing default Web Application
i) Select the Web Application SharePoint ndash 80 the one with the URL of httpwingtipserver and click Delete in the ribbon
ii) When prompted to delete the associated IIS Web Site amp SQL Server database select both options to delete them and click OK
The reason you are doing this is because the setup wizard you ran previously when creating the service applications automatically created it The problem is that it used the same identity (WINGTIPSP_Services) for the app pool that is used for all the service
applications which is not desired
5 Create a new Web Application to handle Host-Named Site Collections (HNSC)
Creating a SharePoint Server 2013 Environment for Development and Testing Version 10
copy Critical Path Training 2012 All Rights Reserved 41
wwwCriticalPathTrainingcom
a) In the ribbon click the New button
b) In the Create New Web Application dialog enter the following values in the properties and click OK Leave all properties not mentioned
i) Select the radio button Create a new IIS web site
(1) Name SharePoint HNSC Host ndash 80
(2) Port 80
ii) Application Pool
(1) Select the radio button Create a new application pool
(a) Application Pool Name SharePoint Default HNSC AppPool
(b) Select a security account for this application pool WINGTIPSP_Content
If WINGTIPSP_Content is not listed as an available managed account create it by selecting the appropriate option and using
Password1 for the password
iii) Database Name and Authentication
(1) Database Name WSS_Content_HNSCDefaultHost
c) This process will take a few moments At the end of the process SharePoint will ask if you want to create a site collection You do but you donrsquot want to do it through the browser as this will not be a HNSC To create a HNSC you must create it via Windows PowerShell
6 Create a default not template site collection at the root of the web application
a) Open SharePoint 2013 Management Shell Start All Programs Microsoft SharePoint 2013 Products SharePoint 2013 Management Shell
7 Create Site Collections for Testing SharePoint amp SharePoint Apps
a) Open SharePoint 2013 Management Shell Start All Programs Microsoft SharePoint 2013 Products SharePoint 2013 Management Shell
b) Get a reference to the HNSC web application you just created by running the following Windows PowerShell script in the SharePoint 2013 Management Shell
$hnscWebApp = Get-SPWebApplication | Where-Object $_DisplayName -eq SharePoint HNSC Host - 80
c) Create a non-templated site at the root of the web application for Workflow to connect to by executing the following Windows PowerShell script in the SharePoint 2013 Management Shell
New-SPSite -Name Root HNSC Site Collection -Url httpwingtipcom -HostHeaderWebApplication $hnscWebApp -OwnerAlias WINGTIPAdministrator
d) Create a team site by executing the following Windows PowerShell script in the SharePoint 2013 Management Shell
New-SPSite -Name Wingtip Intranet -Url httpintranetwingtipcom ndashHostHeaderWebApplication $hnscWebApp -Template STS0 -OwnerAlias WINGTIPAdministrator
e) Create a developer site by executing the following Windows PowerShell script in the SharePoint 2013 Management Shell
New-SPSite -Name Wingtip Developer Site -Url httpdevwingtipcom ndashHostHeaderWebApplication $hnscWebApp -Template DEV0 -OwnerAlias WINGTIPAdministrator
You can only create debug and test apps using a developer site
At this point you now have a site collection to use as a team site (httpintranetwingtipcom) and to develop and test custom SharePoint apps (httpdevwingtipcom)
Creating a SharePoint Server 2013 Environment for Development and Testing Version 10
copy Critical Path Training 2012 All Rights Reserved 42
wwwCriticalPathTrainingcom
Configure SharePoint 2013 for Hosting Apps
In this setup you will setup your SharePoint 2013 environment for hosting apps
PowerShell Script Alert Everything in the next immediate step is provided in the script ConfigureSpFarmForAppsps1 found in the
files that accompany this setup guide Open the script and read the header for documentation on how to use it
1 Ensure you are logged into the WingtipServer VM using the account wingtipadministrator | Password1
2 Create the necessary SharePoint App Management service applications and start the necessary services via Windows PowerShell
a) Open SharePoint 2013 Management Shell Start All Programs Microsoft SharePoint 2013 Products SharePoint 2013 Management Shell
b) Execute the following Windows PowerShell script in the SharePoint 2013 Management Shell
$appHostDomain = appswingtipcom $adminService = Get-Service -Name spadminv4 if ($adminServiceStatus -ne Running) Start-Service $adminService $timerService = Get-Service -Name sptimerv4 if ($timerServiceStatus -ne Running) Start-Service $timerService Set-SPAppDomain $appHostDomain $appMgmtSvcInstance = Get-SPServiceInstance | Where-Object $_GetType()Name -eq AppManagementServiceInstance if ($appMgmtSvcInstanceStatus -ne Online) Start-SPServiceInstance -Identity $appMgmtSvcInstance $appSubSettingSvcInstance = Get-SPServiceInstance | Where-Object $_GetType()Name -eq SPSubscriptionSettingsServiceInstance if ($appSubSettingSvcInstanceStatus -ne Online) Start-SPServiceInstance -Identity $appSubSettingSvcInstance $appPoolServiceApps = Get-SPServiceApplicationPool -Identity SharePoint Web Services Default $appSubSvc = New-SPSubscriptionSettingsServiceApplication ndashApplicationPool $appPoolServiceApps ndashName Settings Service Application ndashDatabaseName SettingsServiceDB $proxySubSvc = New-SPSubscriptionSettingsServiceApplicationProxy ndashServiceApplication $appSubSvc $appAppSvc = New-SPAppManagementServiceApplication -ApplicationPool $appPoolServiceApps -Name App Management Service Application -DatabaseName AppServiceDB $proxyAppSvc = New-SPAppManagementServiceApplicationProxy -ServiceApplication $appAppSvc Set-SPAppSiteSubscriptionName -Name app -Confirm$false
3 Verify the script configured SharePoint 2013 for hosting apps
a) Open Central Administration Start All Programs Microsoft SharePoint 2013 Products SharePoint 2013 Central Administration
b) Verify service applications created
i) Open the Service Applications page Application Management Manage Service Applications
ii) Verify you have two service applications created
(1) App Management Service Application
(2) Settings Service Application
c) Verify service instances are running
i) Open the Services on Server page System Settings Manage Services on Server
ii) Verify the following services are Started
(1) App Management Service
(2) Microsoft SharePoint Foundation Subscription Settings Service
Creating a SharePoint Server 2013 Environment for Development and Testing Version 10
copy Critical Path Training 2012 All Rights Reserved 43
wwwCriticalPathTrainingcom
d) Verify App URLs are correct
i) Open the Configure App URLs page Apps Configure app URLs
ii) Verify the following
(1) App Domain appswingtipcom
(2) App Prefix app
At this point your SharePoint Server 2013 environment is ready to host SharePoint apps
Creating a SharePoint Server 2013 Environment for Development and Testing Version 10
copy Critical Path Training 2012 All Rights Reserved 44
wwwCriticalPathTrainingcom
Start the SharePoint 2013 Sandbox Service
By default the service that executes sandbox solutions is not running In this step you will start the service
1 Open Central Administration Start All Programs Microsoft SharePoint 2013 Products SharePoint 2013 Central Administration
2 Open the Services on Server page System Settings Manage Services on Server
3 Click the Start link to the left of the Microsoft SharePoint Foundation Sandboxed Code Service
At this point your installation can support sandbox solutions
Configure CRL Verification for Disconnected Environments
SharePoint periodically ldquophones homerdquo to a specific address hosted by Microsoft under certain conditions When your environment is disconnected this can cause an unnecessary delay or failures when starting up the sandbox The following steps outline a workaround to bypass this check
1 Launch Notepad as an administrator Start All Programs Accessories right-click Notepad and select Run as Administrator
2 Open the hosts file by selecting File Open and finding the file
cWindowsSystem32Driversetchosts
3 Add the following line to the end of the file
127001 crlmicrosoftcom
4 Save and close the hosts file
Update Internet Explorer to Bypass the App URL amp Automatically Login to SharePoint Sites
In this section you will update Internet Explorer to add the App hosting URL to the bypass list so you can navigate to the domain after deploying SharePoint hosted apps
1 Ensure you are logged into the WingtipServer VM using the account wingtipadministrator | Password1
1 Launch Internet Explorer Start All Programs Internet Explorer
2 Configure Internet Explorer to bypass the App URL
a) In the top-right corner click the gear icon and select Internet Options
b) On the Security tab select the Local Intranet and click the Sites button
c) Uncheck the box next to Automatically detect intranet network
d) Click the Advanced button and add two entries to the Exceptions list
i) httpwingtipcom
ii) httpappswingtipcom
Creating a SharePoint Server 2013 Environment for Development and Testing Version 10
copy Critical Path Training 2012 All Rights Reserved 45
wwwCriticalPathTrainingcom
e) Click the Close button followed by the OK button multiple times to close out of the dialogs
At this point Internet Explorer is setup to bypass your app URL so you can navigate to apps (httpappswingtipcom) as well as automatically authenticate to sites hosted at httpwingtipcom
Exercise 6 Configure SharePoint to Host My Sites
In this exercise you will configure SharePoint to create and host My Sites In order to host My Sites you will need a new Web Application that is configured for Self-Service Site Creation and has a My Site Host site collection
1 Create a new SharePoint web application to host the My Sites
a) Ensure you are logged into the WingtipServer VM using the account wingtipadministrator | Password1
b) Open Central Administration Start All Programs Microsoft SharePoint 2013 Products SharePoint 2013 Central Administration
c) Select Application Management Manage Web Applications
d) In the ribbon click the New button
e) In the Create New Web Application dialog enter the following values in the properties and click OK Leave all properties not mentioned
i) Select the radio button Create a new IIS web site
(1) Name SharePoint MySite Host ndash 80
(2) Port 80
(3) Host Header mywingtipcom
ii) Application Pool
(1) Select the radio button Use existing application pool
(a) Application Pool Name SharePoint Default HNSC AppPool
iii) Database Name and Authentication
(1) Database Name WSS_Content_SocialWingtipCom
f) This process will take a few moments At the end of the process SharePoint will ask if you want to create a site collection Click the link provided to create a new site collection amp continue to the next step
2 Create a My Site Host site collection
a) On the Create Site Collection page use the following information to complete the form and click OK
Creating a SharePoint Server 2013 Environment for Development and Testing Version 10
copy Critical Path Training 2012 All Rights Reserved 46
wwwCriticalPathTrainingcom
i) Title My Site Host
ii) URL
iii) Template Selection My Site Host (found under the Enterprise tab)
iv) Primary Site Collection Administrator WINGTIPAdministrator
3 Update the Web Application to host my sites
a) Within Central Administration in the left-hand navigation navigate to the Manage Web Applications page Application Management Manage Web Applications
b) Select the SharePoint MySite Host ndash 80 web application
c) Click the Managed Paths button in the ribbon
d) Remove the sites managed path and add two new managed paths and click OK
i) personal ndash Wildcard inclusion
ii) my ndash Explicit inclusion
e) With the SharePoint MySite Host ndash 80 web application still selected click the Self-Service Site Creation button
f) On the Self-Service Site Creation page use the following values to complete the form and click OK
i) Site Collections On
4 Next configure the User Profile Service Application My Site settings
a) Browse to the User Profile Service Application management page Application Management Manage Service Applications User Profile Service Application
b) Under the My Site Settings section click the Setup My Sites
c) On the My Site Settings page use the following information to complete the form and click OK
i) My Site Host httpmywingtipcom
ii) Personal Site Location personal
At this point your SharePoint deployment is now configured to automatically create My Sites under httpmywingtipcomPersonalUserName when users first browse to them
Exercise 7 Install amp Configure Workflow Manager 10
In this exercise you will configure the WingtipServer VM to host Workflow Manager 10 and connect it to your SharePoint installation
1 Ensure you are logged into the WingtipServer VM using the account wingtipadministrator | Password1
Verify SQL Server 2012 Network Configuration
In this section yoursquoll verify the network configuration is correct for SQL Server 2012 in order to install Workflow Manager 10
Creating a SharePoint Server 2013 Environment for Development and Testing Version 10
copy Critical Path Training 2012 All Rights Reserved 47
wwwCriticalPathTrainingcom
1 Configure SQL Server 2012 to have the TCPIP connection protocol enabled
a) Open the SQL Server Configuration Manager Start All Programs Microsoft SQL Server 2012 Configuration Tools SQL Server Configuration Manager
b) Expand the hierarchy on the left-hand side to the following SQL Server Connection Manager (local) SQL Server Network Configuration Protocols for MSSQLSERVER
c) In the main window if TCPIP is Disabled right-click TCPIP and select Enable
d) When prompted with a warning click OK
2 SQL Server must be restarted in order to reflect this change
a) In the hierarchy on the left-hand side of the window select SQL Server Services
b) Right-click SQL Server (MSSQLSERVER) and select Restart
At this point SQL Server is now configured with the TCPIP protocol enabled a requirement when configuring Service Bus
Configure the Workflow Service Account with the Necessary Rights
In this section you will verify the service account that will run Workflow Manager and Service Bus
1 Ensure you are logged into the WingtipServer VM using the account WINGTIPadministrator | Password1
2 Grant the WINGTIPSP_Content account securityadmin amp dbcreator permissions in SQL Server
a) Launch SQL Server Management Studio Start All Programs Microsoft SQL Server 2012 SQL Server Management Studio
b) When SQL Server Management Studio launches within the Connect to Server dialog login using the default settings and click Connect
c) In the Object Explorer tool window expand the WINGTIPSERVER server hierarchy to the Security Logins node
d) Find the WINGTIPSP_Content account right-click it and select Properties
Creating a SharePoint Server 2013 Environment for Development and Testing Version 10
copy Critical Path Training 2012 All Rights Reserved 48
wwwCriticalPathTrainingcom
e) In the Select a page pane select Server Roles
f) Check securityadmin amp dbcreator and click OK
g) Close SQL Server Management Studio
3 Add the Workflow service account to the local administrators group
a) Open the Active Directory Users and Computers window Start Administrative Tools Active Directory Users and Computers
b) In the hierarchy on the left-hand side of the window expand it to the following Active Directory Users and Computers wingtipcom Builtin
c) In the main window right-click Administrators and select Properties
d) In the Administrators Properties dialog select the Members tab and click Add
e) In the Enter the object names to select box enter wingtipsp_content and click the Check Names button
f) In the Administrators Properties dialog click OK
g) Close the Active Directory Users and Computers window
At this point the service account that will host Workflow Manager and Service Bus has been configured correctly
Creating a SharePoint Server 2013 Environment for Development and Testing Version 10
copy Critical Path Training 2012 All Rights Reserved 49
wwwCriticalPathTrainingcom
Download amp Install Workflow Manager and Service Bus
In this section you will install Workflow Manager and Service Bus
1 Ensure you are logged into the WingtipServer VM using the account WINGTIPSP_Content | Password1
It is important you are logged in as the user that will run workflow when you install amp configure Workflow Manager and Service Bus
2 Launch the Web Platform Installer Start All Programs Microsoft Web Platform Installer
a) If the Web Platform Installer is not present on your machine you can download amp install it from here httpwwwmicrosoftcomwebdownloadsplatformaspx
If you do not have internet access within the virtual machine it is possible to download everything needed for workflow using the command line version of the Web Platform Installer (WebPICMD) You can get WebPICMD from httplearniisnetpageaspx1072web-platform-installer-v4-command-line-webpicmdexe-preview-release Specifically for
workflow enter the following command to download Workflow Beta 1 and all prerequisites
webpicmd offline ProductsWorkflow Pathc[path]
3 When the Web Platform Installer loads execute a search for Workflow select Workflow Manager 10 and click Add
4 Click the Install button at the bottom of the Web Platform Installer 40 window
5 On the Prerequisites page click I Accept
Note The Web Platform Installer 40 may prompt you to keep certain products updated using Microsoft Update If it does select Use Microsoft Update when I check for updates (recommended) and click Continue
6 When the installer completes the following dialog will appear Click Continue and then Finish to start the configuration process
Creating a SharePoint Server 2013 Environment for Development and Testing Version 10
copy Critical Path Training 2012 All Rights Reserved 50
wwwCriticalPathTrainingcom
At this point Workflow Manager amp Service Bus are installed
Configure Workflow Manager and Service Bus
In this section you will install Workflow Manager and Service Bus
1 If the Workflow Manager Configuration Wizard is not open open it Start All Programs Workflow Manager 10 Workflow Configuration
2 On the Welcome page click Configure Workflow Manager with Default Settings (Recommended)
Creating a SharePoint Server 2013 Environment for Development and Testing Version 10
copy Critical Path Training 2012 All Rights Reserved 51
wwwCriticalPathTrainingcom
3 On the New Farm Configuration page do the following
a) In the section Configure Service Account set the credentials to
i) User ID sp_contentwingtipcom
ii) Password Password1
b) Check the Allow Workflow management over HTTP on this computer checkbox
Ensure the username is entered in the fully qualified UPN format not as the default shows in the installer (sp_contentwingtip) or the domainusername format
In a production environment you should be doing everything over SSL
c) Click the Test Connection button to verify the connection credentials before proceeding
Creating a SharePoint Server 2013 Environment for Development and Testing Version 10
copy Critical Path Training 2012 All Rights Reserved 52
wwwCriticalPathTrainingcom
d) In the Certificate Generation Key and Confirm Certificate Generation Key enter Password1 into both fields
4 Click the right arrow in the bottom right corner to proceed
5 On the Summary page review your settings and click the check at the bottom right of the widow to start the configuration process
Creating a SharePoint Server 2013 Environment for Development and Testing Version 10
copy Critical Path Training 2012 All Rights Reserved 53
wwwCriticalPathTrainingcom
6 After a few minutes the Configuration Progress screen will show that everything has been configured correctly
Creating a SharePoint Server 2013 Environment for Development and Testing Version 10
copy Critical Path Training 2012 All Rights Reserved 54
wwwCriticalPathTrainingcom
7 Click the check in the bottom right corner
At this point Workflow Manager amp Service Bus has been installed and a new Workflow Manager farm has been created The next step is to connect the SharePoint 2013 farm to the Workflow Manager farm
Connect SharePoint 2013 to Workflow Manager
In this section you will connect SharePoint 2013 and Workflow Manager together
1 Ensure you are logged into the WingtipServer VM using the account WINGTIPadministrator | Password1
2 Get the Workflow Manager endpoint
a) Open the Workflow Manager PowerShell console Start All Programs Workflow Manager 10
b) Execute the Windows PowerShell following cmdlet
Get-WFFarm | ft HttpPort
c) Take note of this port (12291) This port number is what you will use to connect the SharePoint 2013 farm to the Workflow Manager 10 farm
In production you should connect to the HTTPS port listed in the HttpsPort property when you run Get-WFFarm
d) Close the Workflow Manager PowerShell window
3 Connect the SharePoint 2013 farm to Workflow Manager
Creating a SharePoint Server 2013 Environment for Development and Testing Version 10
copy Critical Path Training 2012 All Rights Reserved 55
wwwCriticalPathTrainingcom
a) Open SharePoint 2013 Management Shell Start All Programs Microsoft SharePoint 2013 Products SharePoint 2013 Management Shell
b) Execute the following Windows PowerShell script in the SharePoint 2013 Management Shell
Register-SPWorkflowService ndashSPSite httpintranetwingtipcom ndashWorkflowHostUri httpwingtipserver12291 ndashAllowOAuthHttp
This script is telling SharePoint the endpoint it should use to talk to Workflow Manager as well as Workflow Manager the SharePoint site collection it should talk to for calls into the CSOM It is also configuring all communication over HTTP rather than HTTPS for performance reasons In production you should always use HTTPS
This step will take a moment with no feedback during the process Be patient
c) Close the SharePoint 2013 Management Shell
At this point the SharePoint 2013 farm is connected to the Workflow Manager 10 farm
Configure SharePoint User Profile Service Application AD Sync
Users in SharePoint 2013 are validated by Workflow Manager against SharePoint to ensure they have permissions to start a workflow This is done by looking up the user by their AD UserPrincipalName (UPN) attribute in the User Profile Service Application (UPA) If no matching user is found the workflow will be automatically cancelled by Workflow Manager In this section you will setup UPA to connect amp sync with the local Active Directory so user accounts in AD will have their UPN synchronized to UPA
1 Open Central Administration Start All Programs Microsoft SharePoint 2013 Products SharePoint 2013 Central Administration
2 Go to the User Profile Service Application management page Application Management Manage Service Applications User Profile Service Application
3 The first step is to configure the User Profile Service Application to allow for Active Directory (AD) synchronization
a) Under Synchronization select Configure Synchronization Settings
b) For Synchronization select Use SharePoint Active Directory Import and click OK
4 Next establish a connection to the wingtipcom AD
a) Under Synchronization select Configure Synchronization Connections
b) On the Synchronization Connections page select Create New Connection
c) Enter the following values on this form and click OK
i) Connection Name WINGTIPCOM AD
ii) Type Active Directory Import
iii) Connection Settings
(1) Fully Qualified Domain Name wingtipcom
(2) Authentication Provider Type Windows Authentication
(3) Account Name WINGTIPAdministrator
(4) Password (and Confirm Password) Password1
iv) Containers
(1) Click Populate Containers
(2) After it loads check the box next to WINGTP or click the Select All button below the box
5 Go back to the User Profile Service Application management page Application Management Manage Service Applications User Profile Service Application
6 Finally start a synchronization import
a) Under Synchronization select Start Profile Synchronization
Creating a SharePoint Server 2013 Environment for Development and Testing Version 10
copy Critical Path Training 2012 All Rights Reserved 56
wwwCriticalPathTrainingcom
b) Select Start Full Synchronization and click OK
c) You will be taken back to the User Profile Service Application management page Notice in the top-right corner there is a status block that reports how many profiles are in the UPA database Refresh the page to see it increase to a handful of profiles as the import process runs
At this point you have successfully configured the User Profile Service Application to import profiles from the local AD
Exercise 8 Install the Microsoft Office 2013 Professional Clients
In this exercise you will install the Microsoft Office 2013 client applications
1 Download the Office 2013 into the WingtipServer VM For this you need to create an Office 365 Trial account login to Office 365 go to the Admin Dashboard and then download the latest version httpwwwmicrosoftcomofficepreviewentry-office-preview
2 Download the SharePoint Designer 2013 into the WingtipServer VM from here httpwwwmicrosoftcomen-usdownloaddetailsaspxid=35491
3 Download the Visio Professional 2013 into the WingtipServer VM from here httptechnetmicrosoftcomen-usevalcenterhh973399
Install Microsoft Office Professional Plus 2013
In this section you will install the Microsoft Office 2013 clients
1 Ensure you are logged into the WingtipServer VM using the account WINGTIPadministrator | Password1
2 Execute the installer OfficeProfessionalPlus_English_x64exe
3 On the Read the Microsoft Software License Terms dialog click the checkbox next to I accept the terms of this agreement and click Continue
4 On the Choose the installation you want dialog click the Install Now button
5 The installer will proceed and install all the Office products
6 When the installer completes click the Close button
7 Apply your Office Professional Plus 2013 license key
a) Launch Word 2013 Start All Programs Microsoft Office 2013 Word 2013
b) In the First things first dialog select Use recommended settings and click Accept
c) In the Welcome to Office dialog that opens click the [X] icon in the top-right corner to close it
d) In the left-hand pane click Open Other Documents
e) In the left-hand pane click Account
f) In the Product Information section within the Activation Required box click Change Product Key
g) Enter your license key for Office Professional Plus 2013 check the box next to Attempt to automatically activate my product online and click Install
h) Click OK
At this point you have installed Office Professional Plus 2013
Install Microsoft Office Visio 2013
In this section you will install Microsoft Office 2013 Visio
1 Ensure you are logged into the WingtipServer VM using the account WINGTIPadministrator | Password1
2 Execute the installer VisioProfessional_English_x64exe
3 On the Read the Microsoft Software License Terms dialog click the checkbox next to I accept the terms of this agreement and click Continue
Creating a SharePoint Server 2013 Environment for Development and Testing Version 10
copy Critical Path Training 2012 All Rights Reserved 57
wwwCriticalPathTrainingcom
4 On the Choose the installation you want dialog click the Install Now button
5 The installer will proceed and install all Visio 2013
6 When the installer completes click the Close button
7 Apply your Visio 2013 license key
a) Launch Visio 2013 Start All Programs Microsoft Office 2013 Visio 2013
b) In the First things first dialog select Use recommended settings and click Accept
c) In the Welcome to Office dialog that opens click the X icon in the top-right corner to close it
d) In the left-hand pane click Open Other Documents
e) In the left-hand pane click Account
f) In the Product Information section within the Activation Required box click Change Product Key
g) Enter your license key for Visio 2013 check the box next to Attempt to automatically activate my product online and click Install
h) Click OK
At this point you have installed Visio 2013
Install Microsoft Office 2013 SharePoint Designer
In this section you will install Microsoft Office 2013 SharePoint Designer
1 Ensure you are logged into the WingtipServer VM using the account WINGTIPadministrator | Password1
2 Execute the installer SharePointDesigner_English_x64exe
3 On the Read the Microsoft Software License Terms dialog click the checkbox next to I accept the terms of this agreement and click Continue
4 On the Choose the installation you want dialog click the Install Now button
5 The installer will proceed and install all SharePoint Designer 2013
6 When the installer completes click the Close button
At this point you have installed SharePoint Designer 2013
Exercise 9 Install Visual Studio 2012
In this exercise you will install Visual Studio 2012
1 Ensure you are logged into the WingtipServer VM using the account WINGTIPadministrator | Password1
2 Start the install of Visual Studio 2012 Ultimate Trial by downloading the installer from here httpwwwmicrosoftcomvisualstudio11en-usdownloads
3 On the installation splash screen check the box next to I agree to the License terms and conditions and click the Next button
Creating a SharePoint Server 2013 Environment for Development and Testing Version 10
copy Critical Path Training 2012 All Rights Reserved 58
wwwCriticalPathTrainingcom
4 On the Optional Features to install dialog click Install
5 After some time the installer will complete Click the Launch button to launch Visual Studio 2012
Creating a SharePoint Server 2013 Environment for Development and Testing Version 10
copy Critical Path Training 2012 All Rights Reserved 59
wwwCriticalPathTrainingcom
6 In the Choose Default Environment Settings select Visual C Development Settings and click Start Visual Studio
7 Close Visual Studio 2012
At this point Visual Studio 2012 RTM is installed
Install Office amp SharePoint 2013 Developer Tools
In this section you will install the Office and SharePoint 2013 developer tools for Visual Studio
1 Ensure you are logged into the WingtipServer VM using the account WINGTIPadministrator | Password1
2 Launch the Web Platform Installer Start All Programs Microsoft Web Platform Installer
3 In the search box at the top-right corner of the Web Platform Installer 40 window type sharepoint and press Enter
4 Click the Add button to the right of Microsoft Office Developer Tools for Visual Studio 2012 - Preview 2
5 Click the Install button at the bottom of the Web Platform Installer 40 window
6 On the Prerequisites page click I Accept
Creating a SharePoint Server 2013 Environment for Development and Testing Version 10
copy Critical Path Training 2012 All Rights Reserved 60
wwwCriticalPathTrainingcom
At this point you have installed the SharePoint 2013 amp Office 2013 development tools in Visual Studio 2012
Creating a SharePoint Server 2013 Environment for Development and Testing Version 10
copy Critical Path Training 2012 All Rights Reserved 61
wwwCriticalPathTrainingcom
Appendix 1 Download Manifest
The following lists everything referenced that you will or may need to download in this environment
Windows Server 2008 R2 with Service Pack 1 (installer ISO)
o httptechnetmicrosoftcomen-usevalcenterdd459137aspx
Windows Server 2008 R2 with Service Pack 1 (prebuilt VHD)
o httpwwwmicrosoftcomdownloadsdetailsaspxFamilyId=9040a4be-c3cf-44a5-9052-a70314452305
Windows Server 2008 R2 Service Pack 1
o httpwwwmicrosoftcomen-usdownloaddetailsaspxid=5842
SQL Server 2012 Trial
o httpwwwmicrosoftcombetaexperiencepdSQL2012EvalCTAenusdefaultaspx
SharePoint Server 2013
o httptechnetmicrosoftcomen-USevalcenterhh973397aspx
Hotfixes for SharePoint Server 2013 (post-install)
o KB2554876 The SharePoint Parsing Process Crashes in Windows Server 2008 R2
o KB2708075 IIS 75 Configurations are not Updated when you use the ServerManager Class to Commit
Configuration Changes
o KB2759112 Hotfix is Available for NET Framework 45 that Resolves an ASPNET Race Condition Issue in
Windows Server 2008 R2 Windows Server 2008 R2 SP1
o KB2765317 Hotfix is Available for NET Framework 45 that Resolves an ASPNET Race Condition Issue in
Windows 8 Windows RT and Windows Server 2012
Web Platform Installer
o httpwwwmicrosoftcomwebdownloadsplatformaspx
Web Platform Installer ndash Command Line Version
o httplearniisnetpageaspx1072web-platform-installer-v4-command-line-webpicmdexe-preview-release
Workflow Manager 10
o Download using the Microsoft Web Platform Installer
Office 2013
o httpwwwmicrosoftcomofficepreviewentry-office-preview
SharePoint Designer 2013
o httpwwwmicrosoftcomen-usdownloaddetailsaspxid=35491
Visio Professional 2013
o httptechnetmicrosoftcomen-usevalcenterhh973399
Visual Studio 2012
o httpwwwmicrosoftcomvisualstudio11en-usdownloads
Office Developer Tools for Visual Studio 2012 ndash Preview 2
o Download using the Microsoft Web Platform Installer
Creating a SharePoint Server 2013 Environment for Development and Testing Version 10
copy Critical Path Training 2012 All Rights Reserved 62
wwwCriticalPathTrainingcom
Appendix 2 Windows PowerShell Script Manifest
The following lists all Windows PowerShell scripts that are provided with this setup guide
AddDisableLoopbackCheckRegKeyps1
o The following steps automate creating the registry key outlined as Method 2 in the Microsoft Knowledgebase article
httpsupportmicrosoftcomkb896861 using Windows PowerShell This key DisableLoopbackCheck will allow
you to browse SharePoint sites on the same machine Without this key (or following Method 1 in the KB article) you
would need to browse any SharePoint sites from a different computer than the one which SharePoint is installed on
ConfigureSpFarmForAppsps1
o Configures a SharePoint 2013 for hosting apps This ensures everything you need is installed running and
configured This is documented here httpmsdnmicrosoftcomen-uslibraryfp179923(v=office15)
CreateSpServiceAccountsps1
o Creates the minimal necessary service accounts for SharePoint Server 2013 SP_Farm SP_Content amp
SP_Services
SetupSharePointForHNSCps1
o Configures a SharePoint 2013 install for hosting Host-Named Site Collections (HNSC) This involves creating a Web
Application in SharePoint that has no host header bindings Using DNS all requests are mapped to this Web
Application You then create the site collections via PowerShell as you cant create HNSCs via the browser (Central
Administration)
Creating a SharePoint Server 2013 Environment for Development and Testing Version 10
copy Critical Path Training 2012 All Rights Reserved 63
wwwCriticalPathTrainingcom
Appendix 3 Create Sample Adventure Works Database
The following steps document downloading and installing the sample Adventure Works OLTP database provided by Microsoft
1 Launch Internet Explorer and navigate to httpmsftdbprodsamplescodeplexcom
2 Download the Adventure Works 2012 OLTP Script
3 Extract the ZIP into a folder on the desktop
4 Launch SQL Server Management Studio Start All Programs Microsoft SQL Server 2012 SQL Server Management Studio
5 When SQL Server Management Studio launches within the Connect to Server dialog login using the default settings and click Connect
6 Within SQL Server Management Studio select File Open File
7 Select the file instawdbsql from the extracted ZIP and click Open
8 If prompted to re-login to the database engine do it
9 Select Query SQLCMD Mode
10 Scroll down to line 42 the line that starts with the following
setvar SqlSamplesSourceDataPath
11 Change the folder location of where you unzipped the Adventure Works 2012 OLTP Script
12 Select Query Execute
13 When the script completes the AdventureWorks2012 database will have been created
Creating a SharePoint Server 2013 Environment for Development and Testing Version 10
copy Critical Path Training 2012 All Rights Reserved 64
wwwCriticalPathTrainingcom
Change Log
Change Version Description
August 22 2012 v 01 Pre-release for review
August 27 2012 v 02 Initial public release ndash install guide based on SharePoint Server Beta 2
August 28 2012 v 03 Updated URL for the site collection used to connect SharePoint to WAW
August 31 2012 v 04 Typo Removed SQL Server Analysis Services as part of the install Not required in a
SharePoint dev box (unless you are doing business intelligence which is not covered
in the guide)
Updated all references to Windows Azure Workflow to Workflow Manager the new
official name for the new workflow product
Updated SetupSharePointForHNSCps1 script to lookup HNSC Web Application by
name rather than URL which is more reliable
Typo Updated WingtipAllUp public NIC to use a different IP than the WingtipDC
Typo Replaced a reference to WingtipServer with WingtipDC
Typo Fixed handful of minor typos
September 1 2012 v 05 Removed SQL Server Reporting Services from install guide
Added step to uncheck IErsquos ldquoAutomatically detect proxyrdquo
Added post workflow install steps to setup User Profile Service Application to sync with
local Active Directory
September 5 2012 v 06 Added step to create a default root site collection in the HNSC web app
Updated minor typos and added extra notes for context
Updated PowerShell script SetupSharePointForHNSCps1 to remove content
database of default Web Application when setting up HNSC Web App
Added a new exercise 8 (after SharePoint install amp config and before the Workflow
install and config) to setup support for My Sites
October 20 2012 v 07 Updated script SetupSharePointForHNSCps1 to fix a bug where it would fail on line
111 if you didnrsquot already have a WINGTIPSP_Content managed account
Added section to bypass SharePointrsquos check for crlmicrosoftcom
Updated workflowrsquos registration PowerShell script to point to
httpintranetwingtipcom
Switched order of post-SharePoint install to setup HSNC hosting before configuring for
hosting apps
November 29 2012
v 10 Changed setup guide to use a single VM instead of two VMs
Updated guide for SharePoint 2013 RTM
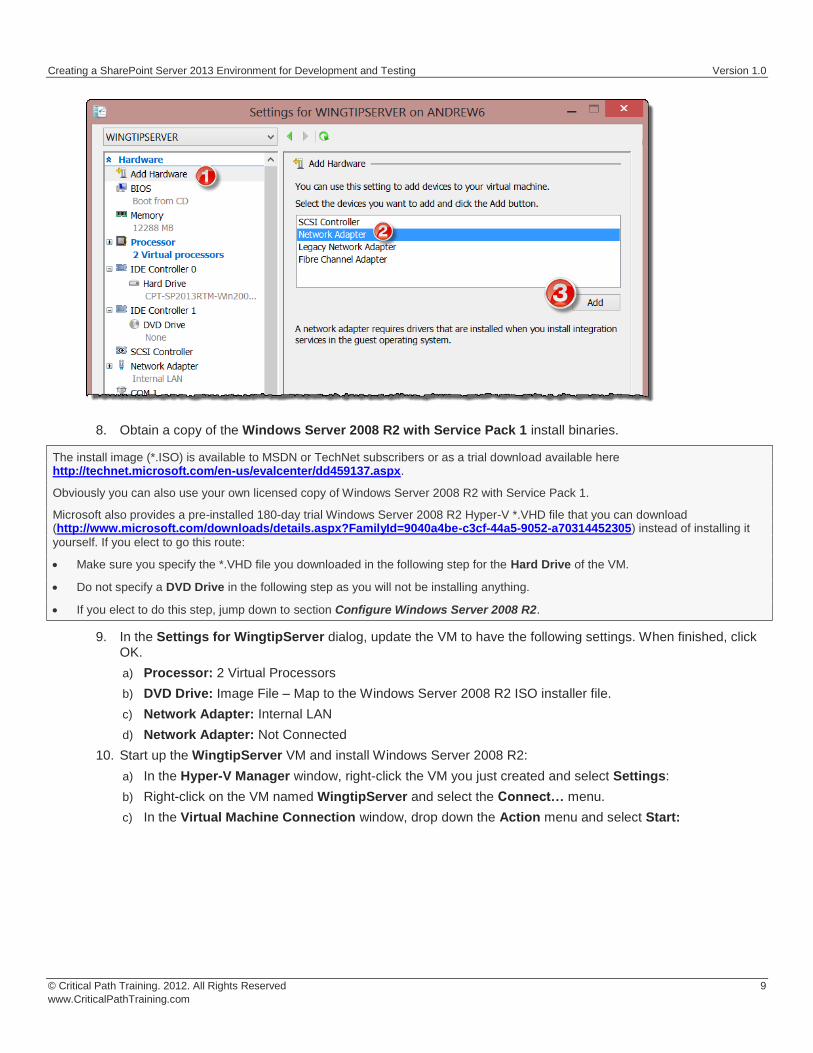
Creating a SharePoint Server 2013 Environment for Development and Testing Version 10
copy Critical Path Training 2012 All Rights Reserved 10
wwwCriticalPathTrainingcom
If you elected to use the fully installed trial VHD from Microsoft instead of installing your own server skip to the section Configure Windows Server 2008 R2
Install the Windows Server 2008 R2 Operating System
In this section you will install the operating system
1 After the setup program for Windows Server 2008 R2 loads it will prompt you with a dialog asking you to select a language Accept the default of English and click Install to continue
2 At the next dialog click the Install Now button to begin the installation
Creating a SharePoint Server 2013 Environment for Development and Testing Version 10
copy Critical Path Training 2012 All Rights Reserved 11
wwwCriticalPathTrainingcom
3 The next dialog instructs you to select the operating system you want to install Select the operating system named Windows Server 2008 R2 Enterprise (Full Installation) with the x64 architecture Click Next to continue
4 Agree to the licensing terms and click Next
5 Click on Custom (advanced) to select the type of installation
6 The next dialog asks you where you want to install Windows Accept the default configuration which uses a location of Disk 0 Unallocated Space as shown below Click Next to continue
At this point you have given the Windows setup program enough information to install the basic operating system Setup program will now run for a while as it copies and expands files and installs Windows features You now have a few minutes to get a cup of coffee or catch up on email
7 When the setup program completes it will ask you to assign a new password for the built-in Administrator account Click OK to continue
8 Set the password for Administrator account to Password1
9 When you have updated the Administrator password you will get a confirmation that the update was successful Click OK to complete the installation of the operating system
If you elected to use the pre-installed trial VHD Microsoft offers you will pick up the configuration exercise at this point
Configure Windows Server 2008 R2
In this section you will configure the server
1 When you log in Windows Server automatically displays the Initial Configuration Tasks window Click the check box with the caption Do not show this window at logon and then click the Close button
Creating a SharePoint Server 2013 Environment for Development and Testing Version 10
copy Critical Path Training 2012 All Rights Reserved 12
wwwCriticalPathTrainingcom
2 After you close the Initial Configuration Tasks window Windows Server will display the Server Manager
Creating a SharePoint Server 2013 Environment for Development and Testing Version 10
copy Critical Path Training 2012 All Rights Reserved 13
wwwCriticalPathTrainingcom
3 Configure the Administrator account so that its password does not expire
a) Inside the Configuration node of the Server Manager navigate to Local Users and Groups Users (as shown in the following screenshot) and locate the local Administrator account
b) Right-click on the Administrator account and click Properties
c) In the Administrator Properties dialog unselect the option for User must change password at next logon and select the option for Password never expires Click OK
4 Rename the computer name of the VM
a) In the Server Manager navigate to the top-level node to display the Server Summary page Click Change System Properties
b) On the Computer Name tab of the System Properties dialog click the Change button
c) Enter a new computer name of WingtipServer and click OK
Creating a SharePoint Server 2013 Environment for Development and Testing Version 10
copy Critical Path Training 2012 All Rights Reserved 14
wwwCriticalPathTrainingcom
5 After changing the computer name you will be prompted to restart the VM Choose OK to restart After the VM has restarted log in again using [administrator | Password1] (username | password)
6 Disable Windows Firewall and Enhanced Security Configuration
a) In the Server Manager navigate to the top-level node to display the Server Summary page Inside the Security Information section locate the links for Go to Windows Firewall and Configure IE ECS
b) Click on Configure IE ECS link Disable Enhanced Security Configuration for both Administrators and Users by selecting the Off radio buttons and click OK
c) Now click the Go to Windows Firewall link to display the page for the Windows Firewall Click on the Windows Firewall Properties link at the bottom of the Overview section
d) In the Domain Profile tab of the Windows Fire dialog change the Firewall state property setting from On to Off Click to Apply button to save your changes
e) Once you have turned off the firewall in the Domain Profile tab go to the Private profile tab and the Public profile tab and follow the same steps to disable the firewall for these profiles as well
f) Click OK to dismiss the Windows Firewall dialog once you have turned off the firewall for all three profiles
7 Enable Remote Desktop for your VM
a) In the Server Manager navigate to the top-level node to display the Server Summary page Inside the Computer Information section locate and click the link for Configure Remote Desktop
b) In the Remote tab of the System Properties dialog select the last option for Allow connections only from computers running Remote Desktop with Network Level Authentication Click OK to save changes and dismiss the System Properties dialog
Creating a SharePoint Server 2013 Environment for Development and Testing Version 10
copy Critical Path Training 2012 All Rights Reserved 15
wwwCriticalPathTrainingcom
8 Enable the Windows Server Features for the Desktop Experience and the PowerShell Integrated Scripting Environment
a) In Server Manager choose Add Feature to bring up the Add Features Wizard dialog
b) Select the feature Desktop Experience
When you first click the checkbox for the Desktop Experience the wizard will prompt you with the following dialog to add support for Ink and Handwriting Services Click the Add Required Features button to continue
c) Scroll down the list of features in the Add Features Wizard dialog and select the feature Windows PowerShell Integrated Scripting Environment (ISE)
Creating a SharePoint Server 2013 Environment for Development and Testing Version 10
copy Critical Path Training 2012 All Rights Reserved 16
wwwCriticalPathTrainingcom
When you first click the checkbox for the Windows PowerShell Integrated Scripting Environment (ISE) the wizard will prompt you with the following dialog to add support for NET Framework 351 Features Click the Add Required Features button to continue
d) Click the Next button on the Add Features Wizard dialog to continue with the install
e) On the Confirm Installation Selection wizard page click the Install button
f) When you see the Installation Results screen the Add Features Wizard informs you a computer restart is required Click Close button to dismiss this dialog
9 After the VM has restarted log in again using [administrator | Password1] (username | password)
Configure the Virtual Machinersquos Networking Setup
In this section yoursquoll configure the two NICrsquos you added to the VM in previous steps One NIC (Internal LAN) will be used to communicate with other VMs in this environment while the other (External LAN) will be used to connect to the internet
1 Configure the NIC that is linked to the Internal LAN network
a) Open the Network Connections dialog by pressing Start enter view network connections in the search box Click the View Network Connections shortcut
b) Two network connections will be shown but only one will show as connected
The connected one is the one that is connected to the Internal LAN network The other one is currently ldquounpluggedrdquohellip this is why we didnrsquot connect a network to the second network when initially configuring the VM as this makes it easier to see which NIC is which in the VM
c) Rename the two NICrsquos
i) Right-click the connected NIC and select Rename Give it a name of Internal LAN
Creating a SharePoint Server 2013 Environment for Development and Testing Version 10
copy Critical Path Training 2012 All Rights Reserved 17
wwwCriticalPathTrainingcom
ii) Right-click the disconnected NIC and select Rename Give it a name of External LAN
d) Right-click the Internal LAN NIC and select Properties
e) In the Local Area Connection Properties dialog select the Internet Protocol Version 4 (TCPIPv4) item and click Properties
f) Enter the following information into the resulting dialog to configure the NICrsquos IP settings
i) Use the Following IP Address
(1) IP Address 192168150102
(2) Subnet mast 2552552550
(3) Default Gateway 192168150102
ii) Use the Following DNS Server Addresses
(1) Preferred DNS Server 192168150102
g) Click OK to accept the IP settings and Close to accept the changes to the NIC
Why not use 101 as the start NIC When you created the virtual internal network Hyper-V created a virtual NIC on the host computer If you set the IP of that NIC to 192168150101 you can use the Remote Desktop Connection app in Windows to connect to your virtual machines and easily copy-paste amp share drives
2 Configure the NIC that is linked to the External LAN network
a) Open the Network Connections window if it is not still open using the same steps from the previous step
b) Right-click the External LAN NIC and select Properties
c) In the Local Area Connection Properties dialog select the Internet Protocol Version 4 (TCPIPv4) item and click Properties
d) Enter the following information into the resulting dialog to configure the NICrsquos IP settings
i) Obtain an IP Address Automatically
ii) Use the Following DNS Server Addresses
(1) Preferred DNS Server 192168150102
e) Click the Advanced button to open the Advanced TCPIP Settings dialog
f) In the Advanced TCPIP Settings dialog click the DNS tab
i) Uncheck the Register this Connections Address in DNS
Creating a SharePoint Server 2013 Environment for Development and Testing Version 10
copy Critical Path Training 2012 All Rights Reserved 18
wwwCriticalPathTrainingcom
g) In the Advanced TCPIP Settings dialog click the WINS tab
i) Click the Add button and specify a new WINS Server as 192168150102
h) Click OK Close multiple times to accept all TCPIP settings
The external NIC will now obtain an IP dynamically amp will not register itself in the DHCPrsquos DNS server which is a good thing when there are multiple people on the same network this this type of a setup
3 Connect the second NIC to the External LAN network
a) Go back to the host computer and open the Hyper-V Manager
b) In the Hyper-V Manager window right-click the VM WingtipServer and select Settings
c) Select the second NIC the one that is not connected
d) For the Network select External LAN and click OK This will effectively plug the external network into the VM
4 Go back into the WingtipServer VM and if it is not still open open the Network Connections dialog You should now see both connections plugged in
a) To refresh the connection select the connection you just plugged in and click the Disable this Network Device button in the toolbar After the connection is disabled select it and click the Enable this Network Device button
b) After a few seconds the VM should be able to connect to the internet which you can test by browsing to a site such as httpwwwbingcom
Configure Windows Update and Update the Server
In this section you will verify the server is fully patched and updated
1 Verify Service Pack 1 is installed
a) Verify the version of the operating system installed by clicking Start right-click on Computer select Properties
b) If the server simply says Windows Server 2008 R2 Enterprise as shown in the following figure download and install Service Pack 1 from the following location httpwwwmicrosoftcomen-usdownloaddetailsaspxid=5842
Creating a SharePoint Server 2013 Environment for Development and Testing Version 10
copy Critical Path Training 2012 All Rights Reserved 19
wwwCriticalPathTrainingcom
c) If Service Pack 1 is installed it will state it
2 Update the server using Windows Update
a) Selecting Start All Programs Windows Update
b) First disable Windows Update from running automatically
i) Click the link Change Settings
ii) Under the Important Updates list select Never check for updates (not recommended)
This isnrsquot what you would do in a production environment but for a development machine it is ok
c) Now update the server
i) Click the Check for Updates button
ii) If prompted install any updates to the Windows Update dialog
iii) Select the Check for Updates link
iv) Windows Update will the report how many updates are available Select all important and recommended updates and click the Install Updates button
v) If prompted select I accept the license terms for any updates that require it
vi) Keep going through the process of running Windows Update checking for updates and installing them after each reboot until it says there are no updates left to install
This step is likely going to take quite a bit of time so be patient
Activate Windows Server 2008 R2
In this section you will activate the server if you have a product key
1 If you have a product key for Windows Server 2008 R2 use it to activate Windows
a) In the Server Manager window navigate to the top-level node to display the Server Summary page Click Activate Windows
b) You will be prompted to enter your product key
i) Enter your product key and click to button to activate Windows
Creating a SharePoint Server 2013 Environment for Development and Testing Version 10
copy Critical Path Training 2012 All Rights Reserved 20
wwwCriticalPathTrainingcom
ii) After a few seconds your VM should be able to connect to a Microsoft site and successfully activate Windows
At this point you have a fully patched operating system VM created that will act as the Active Directory domain controller
Apply the DisableLoopbackCheck Registry Fix
Configure the DisableLoopbackCheck registry setting (Microsoft KB httpsupportmicrosoftcomkb896861)
The following steps automate creating the registry key outlined as Method 2 in the Microsoft KB article httpsupportmicrosoftcomkb896861 using Windows PowerShell
PowerShell Script Alert You can also find this PowerShell script AddDisableLoopbackCheckRegKeyps1 in the files that
accompany this setup guide
1 Click the Windows PowerShell icon in the Taskbar
2 Run the following PowerShell commands pressing [ENTER] after each one
$regKeyPath = HKLMSystemCurrentControlSetControlLsa $key = DisableLoopbackCheck New-ItemProperty -Path $regKeyPath -Name $key -Value 1 -PropertyType dword
a) Close the Windows PowerShell console by typing EXIT and pressing [ENTER]
Exercise 3 Install Active Directory Domain Services
Now you will promote your WingtipServer VM to a domain controller and create a new domain named wingtipcom
1 Login to the WingtipServer virtual machine using administrator | Password1
2 Add and configure the role for Active Directory Domain Services
a) Launch Server Manager and select the Roles node
b) Click the Add Roles link to start the Add Roles Wizard
c) On the Before you begin page click Next
d) On the Server Roles page select Active Directory Domain Services Click the Add Required Features button if prompted to install prerequisites
e) Click Next
Creating a SharePoint Server 2013 Environment for Development and Testing Version 10
copy Critical Path Training 2012 All Rights Reserved 21
wwwCriticalPathTrainingcom
f) On the next page of the wizard click Next which will bring you to the Confirm Installation Selections page
g) Click Install
After Active Directory Domain Services has been installed you will see the Installation Results page in the Add Roles Wizard
3 Click on the link with the big long caption of Close this wizard and launch the Active Directory Domain Services Installation Wizard (dcpromoexe)
4 On the first page of the Active Directory Domain Services Installation Wizard click the Use Advanced Mode Installation checkbox and click Next
Creating a SharePoint Server 2013 Environment for Development and Testing Version 10
copy Critical Path Training 2012 All Rights Reserved 22
wwwCriticalPathTrainingcom
5 On the Operating System Compatibility page click Next
6 On the Choose a Deployment Configuration select Create a new domain in a new forest and click Next
7 On the Name the Forrest Root Domain enter the following and click Next
a) FQDN of the forest root domain wingtipcom
8 On the Domain NetBIOS Name set it to WINGTIP and click Next
9 On the Set Forest Functional Level page select Windows Server 2008 R2 and click Next
10 On the Additional Domain Controller Options accept the default options and click Next
11 You might be prompted with the dialog shown below providing a warning that This computer has dynamically assigned IP address(es) This is not a problem when you are running your development environment on a domain controller Click Yes to dismiss the dialog
12 At this point the wizard will prompt you with a dialog information you a delegation for the DNS Server cannot be created because it cannot find the authoritative parent zone This is not a problem because the wizard will automatically configure the DNS of the VM to point to itself Click on the Yes button to dismiss this dialog
Creating a SharePoint Server 2013 Environment for Development and Testing Version 10
copy Critical Path Training 2012 All Rights Reserved 23
wwwCriticalPathTrainingcom
13 On the Location for Database Log Files and SYSVOL page accept all the default values and click Next
14 On the Directory Services Restore Mode Administrator Password page enter Password1 in both textboxes and click Next
15 On the Summary page click Next to start the process of configuring the new Active Directory domain
16 The wizard will display the dialog below to show you the progress of the configuration process You will be required to reboot when the configuration has been completed Check the option for Reboot on completion and then wait for the configuration to complete and the machine to reboot
17 After the VM reboots login to the server with wingtipadministrator | Password1
Configure Windows Update and Update the Server
In this section you will verify the server is fully patched and updated
1 Update the server using Windows Update
a) Selecting Start All Programs Windows Update
b) Select the Check for Updates link
c) Windows Update will the report how many updates are available Select all important and recommended updates and click the Install Updates button
d) If prompted select I accept the license terms for any updates that require it
e) Keep running Windows Update after each reboot and update install until it says there are no updates left to install
Creating a SharePoint Server 2013 Environment for Development and Testing Version 10
copy Critical Path Training 2012 All Rights Reserved 24
wwwCriticalPathTrainingcom
This step could take quite a bit of time so be patient
At this point you have a fully installed Active Directory Domain Controller for the Wingtipcom domain hosted on the server WingtipServer
Exercise 4 Install SQL Server 2012
In this exercise you will install SQL Server 2012 that will be used to store all required databases
1 Download the SQL Server 2012 Evaluation Edition specifically the DVD x64 ISO image to the host computer from here httpwwwmicrosoftcombetaexperiencepdSQL2012EvalCTAenusdefaultaspx or you can use your own licensed copy
2 Mount the SQL Server 2012 ISO to the WingtipServer VM
a) On the host computer open the Hyper-V Manager
b) Right-click the VM WingtipServer and select Settings
c) Select DVD Drive in the left-hand panel
d) In the right-hand panel select Image File and browse to the ISO file that contains SQL Server 2012 and click OK
3 Login to the WingtipServer VM as wingtipadministrator | Password1
Install SQL Server 2012
In this section you will install SQL Server 2012
1 If the AutoPlay dialog box is open click Run SETUPEXE If it isnrsquot use Windows Explorer to navigate to the DVD drive and execute the setupexe file in the root of the DVD drive
2 In the SQL Server Installation Center click Installation on the left-hand side
Creating a SharePoint Server 2013 Environment for Development and Testing Version 10
copy Critical Path Training 2012 All Rights Reserved 25
wwwCriticalPathTrainingcom
3 Next select New SQL Server stand-alone installation or add features to an existing installation
4 On the Setup Support Rules page the installer will check for issues before installing Click OK
5 On the Product Key page click the Specify a free edition radio box and select Evaluation then click Next
6 On the License Terms page click the I accept the license terms checkbox and click Next
7 On the Setup Support Rules page the installer will check for any problems with the server you are installing on Click Next when this completes
Creating a SharePoint Server 2013 Environment for Development and Testing Version 10
copy Critical Path Training 2012 All Rights Reserved 26
wwwCriticalPathTrainingcom
8 On the Support Role page select SQL Server Feature Installation and click Next
9 On the Feature Selection page check the following options and click Next
a) Instances Features
i) Database Engine Services
(1) Full-Text and Semantic Extractions for Search
b) Shared Features
i) Management Tools ndash Basic
(1) Management Tools ndash Complete
Creating a SharePoint Server 2013 Environment for Development and Testing Version 10
copy Critical Path Training 2012 All Rights Reserved 27
wwwCriticalPathTrainingcom
10 On the Installation Rules page click Next
11 On the Instance Configuration page click Next
12 On the Disk Space Requirements page click Next
13 On the Server Configuration page do the following and click Next
a) On the Service Account tab change the Startup Type for the SQL Server Agent to Automatic
14 On the Database Engine Configuration page do the following and click Next
a) On the Server Configuration tab click Add Current User
b) On the FILESTREAM tab
i) Check Enable FILESTREAM for Transact-SQL Access
ii) Check Enable FILESTREAM for file IO access
15 On the Error Reporting page click Next
16 On the Installation Configuration Rules page click Next
17 On the Ready to Install page click Install
Installation of SQL Server 2012 will take some time please be patient
18 When the installation completes the Complete page will be shown Click Close
At this point you have now successfully installed SQL Server 2012
Creating a SharePoint Server 2013 Environment for Development and Testing Version 10
copy Critical Path Training 2012 All Rights Reserved 28
wwwCriticalPathTrainingcom
Exercise 5 Install amp Configure SharePoint Server 2013
In this exercise you will install SharePoint 2013
1 Download the SharePoint Server 2013 to the host computer from here httptechnetmicrosoftcomen-USevalcenterhh973397aspx
2 Mount the SharePoint Server 2013 ISO to the WingtipServer VM
a) On the host computer open the Hyper-V Manager
b) Right-click the VM WingtipServer and select Settings
c) Select DVD Drive in the left-hand panel
The file that Microsoft provides is saved in the IMG format Hyper-V Manager wonrsquot allow you to mount an IMG file so rename it to ISO before mounting it
d) In the right-hand panel select Image File and browse to the ISO file that contains SharePoint Server 2013 and click OK
Create SharePoint Service Accounts amp Grant Rights to SQL Server 2012
In this section you will create the necessary service accounts that will be used by SharePoint in Active Directory and grant them necessary rights in SQL Server 2012
PowerShell Script Alert The creation of users and granting them rights to SQL Server 2012 steps in this section are automated in the Windows PowerShell script CreateSpServiceAccountsps1 found in the files that accompany this setup guide Open the script
and read the header for documentation on how to use it
1 Open the Active Directory Users and Computers Start Administrative Tools Active Directory Users and Computers
2 Expand the tree in the left-hand pane to see the Users OU Select the Users OU
3 Create a new user SP_Farm
a) In the toolbar select Action New User
Creating a SharePoint Server 2013 Environment for Development and Testing Version 10
copy Critical Path Training 2012 All Rights Reserved 29
wwwCriticalPathTrainingcom
b) Set the userrsquos Full Name amp User Login Name to SP_Farm and click Next
c) In the password dialog enter the following and click Next
i) Password (and Confirm Password) Password1
ii) User must change password at next login unchecked
iii) User cannot change password unchecked
iv) Password never expires checked
v) Account is disabled unchecked
Creating a SharePoint Server 2013 Environment for Development and Testing Version 10
copy Critical Path Training 2012 All Rights Reserved 30
wwwCriticalPathTrainingcom
vi) Click Finish
4 Repeat the previous step to create two more accounts
a) SP_Content
b) SP_Services
At this point you have created all the necessary service accounts
Install SharePoint Server 2013 Prerequisites
In this section you will install the SharePoint Server 2013 Prerequisites
1 Ensure you are logged into the WingtipServer VM using the account wingtipadministrator | Password1
2 If the AutoPlay dialog box is open click Run splashhta If it isnrsquot use Windows Explorer to navigate to the DVD drive and execute the splashhta file in the root of the DVD drive
Creating a SharePoint Server 2013 Environment for Development and Testing Version 10
copy Critical Path Training 2012 All Rights Reserved 31
wwwCriticalPathTrainingcom
3 Click the Install Software Prerequisites link
4 In the Microsoft SharePoint 2013 Products Preparation Tool window click Next
5 On the License Terms for Software Products page
a) Check I accept the terms of the License Agreement(s)
b) Click Next
6 The tool will download and install all prerequisites for SharePoint Server 2013 This will take some time It may prompt you to reboot the server If so reboot the server and login using wingtipadministrator | Password1
Creating a SharePoint Server 2013 Environment for Development and Testing Version 10
copy Critical Path Training 2012 All Rights Reserved 32
wwwCriticalPathTrainingcom
7 When the prerequisite installer is complete it will present a summary of everything it did
8 Click Finish
9 Restart the WingtipServer VMhellip some additional installations and changes that the prerequisite installer did will require a restart before installing SharePoint Server 2013
At this point all prerequisites required by SharePoint Server 2013 have been installed and any necessary configuration changes have been applied to the server However it is strongly recommend that you run Windows Update and install any pending updates Further Microsoft recommends installing the following hotfixes if they are not already installed
KB2554876 The SharePoint Parsing Process Crashes in Windows Server 2008 R2
KB2708075 IIS 75 Configurations are not Updated when you use the ServerManager Class to Commit Configuration Changes
KB2759112 Hotfix is Available for NET Framework 45 that Resolves an ASPNET Race Condition Issue in Windows Server 2008 R2 Windows Server 2008 R2 SP1
KB2765317 Hotfix is Available for NET Framework 45 that Resolves an ASPNET Race Condition Issue in Windows
8 Windows RT and Windows Server 2012
Install SharePoint Server 2013
In this section you will install SharePoint Server 2013
1 Ensure you are logged into the WingtipServer VM using the account wingtipadministrator | Password1
2 If the AutoPlay dialog box is open click Run splashhta If it isnrsquot use Windows Explorer to navigate to the DVD drive and execute the splashhta file in the root of the DVD drive
Creating a SharePoint Server 2013 Environment for Development and Testing Version 10
copy Critical Path Training 2012 All Rights Reserved 33
wwwCriticalPathTrainingcom
3 Click Install SharePoint Server
4 When prompted to Enter your Product Key enter the key you obtained for the trial install and click Continue
5 On the Read the Microsoft Software License Terms page check the I accept the terms of this agreement checkbox and click Continue
6 On the Choose a file location page click Install Now
Creating a SharePoint Server 2013 Environment for Development and Testing Version 10
copy Critical Path Training 2012 All Rights Reserved 34
wwwCriticalPathTrainingcom
7 When the installation is complete select the Run the SharePoint Products Configuration Wizard checkbox and click Close
8 On the Welcome to SharePoint Products page click Next
a) If prompted to start or reset services click Yes
9 On the Connect to a server farm page select Create a new server farm and click Next
10 On the Specify Configuration Database Settings page use the following to complete the page and click Next
a) Database server WINGTIPSERVER
b) Database name SharePoint_Config
c) Username WINGTIPSP_Farm
d) Password Password1
Creating a SharePoint Server 2013 Environment for Development and Testing Version 10
copy Critical Path Training 2012 All Rights Reserved 35
wwwCriticalPathTrainingcom
11 On the Specify Farm Security Settings page for the Passphrase and Confirm Passphrase boxes enter Password1 and click Next
12 On the Configure SharePoint Central Administration Web Application page check the Specify port number checkbox and enter a value of 9999 then Click Next
Creating a SharePoint Server 2013 Environment for Development and Testing Version 10
copy Critical Path Training 2012 All Rights Reserved 36
wwwCriticalPathTrainingcom
13 On the Completing the SharePoint Products Configuration Wizard page click Next
14 When the installer completes it will display the Confirmation Successful page
15 Click Finish This will launch Internet Explorer to go through the configuration process
Creating a SharePoint Server 2013 Environment for Development and Testing Version 10
copy Critical Path Training 2012 All Rights Reserved 37
wwwCriticalPathTrainingcom
At this point you have successfully installed SharePoint Server 2013
Configure SharePoint Server 2013
In this section you will create a new SharePoint Server 2013 farm and perform minimal configuration tasks
After installing SharePoint Sever 2013 the SharePoint Products Configuration Wizard will launch the browser-based Initial Farm Configuration Wizard
1 In the first page of the wizard you are prompted to Help Make SharePoint Better Select which ever option you want and click OK
2 On the Welcome page that asks How do you want to configure your SharePoint farm click the Start the Wizard button
3 On the Services page do the following and then click Next
a) Service Account Select Create new managed account
i) Username WINGTIPSP_Services
ii) Password Password1
b) Services Uncheck the following services
Creating a SharePoint Server 2013 Environment for Development and Testing Version 10
copy Critical Path Training 2012 All Rights Reserved 38
wwwCriticalPathTrainingcom
i) Access Services 2010
ii) App Management Service
In SharePoint Server 2013 the Search Service Application processes specifically noderunnerexe can consume a considerable amount of memory and processor time If you are not going to work with search you might consider unchecking this option for now You can always go back into Central Administration and create a new instance of the Search Service Application at a later date if you need it
Why did we remove Access Services 2010 amp App Management Service service applications The Access Services 2010 service application is included for backwards compatibility and isnrsquot needed in new installations unless you are migrating solutions built with Access Services 2010 from SharePoint Server 2010 (if so you can create this service application later within Central Administration Application Management Manage Service Applications) The App Management Service service application will be created in a later step in this setup guide therefor it is skipped here
4 The creation of the service applications can take quite a while so be patient If it exceeds 20 minutes it is fairly safe to assume the page is hung up One option is to close the browser then launch Central Administration (Start All Programs Microsoft SharePoint 2013 Products SharePoint 2013 Central Administration) and look at the Service Application page (Application Management Manage Service Applications) to see if they were all created
Configure DNS
In this section you will configure DNS for hosting SharePoint sites amp Apps
1 Ensure you are logged into the WingtipServer VM using the account wingtipadministrator | Password1
2 Open the DNS window Start Administrative Tools DNS
3 Expand the hierarchy on the left-hand side of the window until you get to DNS WINGTIPSERVER Forward Lookup Zones wingtipcom
4 Create a new wildcard so all requests for http[]wingtipcom will be forwarded to our SharePoint machine
a) Next right-click wingtipcom and select New Host (A or AAAA)
Creating a SharePoint Server 2013 Environment for Development and Testing Version 10
copy Critical Path Training 2012 All Rights Reserved 39
wwwCriticalPathTrainingcom
b) In the New Host dialog enter the following and click OK
i) Alias Name
ii) IP Address 192168150102 Then click Add Host The following figure shows how this looks
This new record is telling DNS to forward any request for http[]wingtipcom to the webserver WINGTIPSERVER where the
requests will be served by SharePoint
5 Verify this DNS entry is working
a) Open Windows PowerShell Start All Programs Accessories Windows PowerShell Windows PowerShell
b) Run the following commands and press ENTER
PS CUsersAdministratorgt nslookup somethingwingtipcom PS CUsersAdministratorgt nslookup somethingappswingtipcom
c) You should get a response that points to the WingtipServer server as shown in the following figure
Creating a SharePoint Server 2013 Environment for Development and Testing Version 10
copy Critical Path Training 2012 All Rights Reserved 40
wwwCriticalPathTrainingcom
Configure SharePoint Server 2013 for Host-Named Site Collections amp Create Initial Site
Collections
In this section you will create new SharePoint 2013 site collections for testing and hosting apps
Microsoft recommends to create host-named site collections (HNSC) instead of using the path based site collection addressing The difference is the following a path based site created at something such as httpintranetwingtipcomsitesdevtest as an HNSC site would be more like httpdevtestwingtipcom This is how it works in the cloud (Office 365) and it scales much better for on-prem
deployments This setup guide will show you how to setup your environment to create HNSC The only downside to this approach is that you canrsquot create site collections within Central Administration it must be done via Windows PowerShell API (because Central Administration doesnrsquot instruct you where to put the site
This is implemented in various parts First DNS must be configured to send all requests for httpwingtipcom to a Web Application
(implemented in the last section) Second this Web Application must be extended with SharePoint and have no host header bindings (so it handles all requests) Third it must have a default site collection at the root of the Web Application but it will not be used for anything (in fact it doesnrsquot need a template assigned to it)
You can read more about HNSCrsquos on TechNet httptechnetmicrosoftcomen-uslibrarycc424952aspx
PowerShell Script Alert The steps in this section are automated in the script SetupSharePointForHNSCps1 found in the files that
accompany this setup guide Open the script and read the header for documentation on how to use it
1 Ensure you are logged into the WingtipServer VM using the account wingtipadministrator | Password1
2 Open Central Administration Start All Programs Microsoft SharePoint 2013 Products SharePoint 2013 Central Administration
3 Select Application Management Manage Web Applications
4 Delete the default Web Application created by the configuration wizard
a) Delete the existing default Web Application
i) Select the Web Application SharePoint ndash 80 the one with the URL of httpwingtipserver and click Delete in the ribbon
ii) When prompted to delete the associated IIS Web Site amp SQL Server database select both options to delete them and click OK
The reason you are doing this is because the setup wizard you ran previously when creating the service applications automatically created it The problem is that it used the same identity (WINGTIPSP_Services) for the app pool that is used for all the service
applications which is not desired
5 Create a new Web Application to handle Host-Named Site Collections (HNSC)
Creating a SharePoint Server 2013 Environment for Development and Testing Version 10
copy Critical Path Training 2012 All Rights Reserved 41
wwwCriticalPathTrainingcom
a) In the ribbon click the New button
b) In the Create New Web Application dialog enter the following values in the properties and click OK Leave all properties not mentioned
i) Select the radio button Create a new IIS web site
(1) Name SharePoint HNSC Host ndash 80
(2) Port 80
ii) Application Pool
(1) Select the radio button Create a new application pool
(a) Application Pool Name SharePoint Default HNSC AppPool
(b) Select a security account for this application pool WINGTIPSP_Content
If WINGTIPSP_Content is not listed as an available managed account create it by selecting the appropriate option and using
Password1 for the password
iii) Database Name and Authentication
(1) Database Name WSS_Content_HNSCDefaultHost
c) This process will take a few moments At the end of the process SharePoint will ask if you want to create a site collection You do but you donrsquot want to do it through the browser as this will not be a HNSC To create a HNSC you must create it via Windows PowerShell
6 Create a default not template site collection at the root of the web application
a) Open SharePoint 2013 Management Shell Start All Programs Microsoft SharePoint 2013 Products SharePoint 2013 Management Shell
7 Create Site Collections for Testing SharePoint amp SharePoint Apps
a) Open SharePoint 2013 Management Shell Start All Programs Microsoft SharePoint 2013 Products SharePoint 2013 Management Shell
b) Get a reference to the HNSC web application you just created by running the following Windows PowerShell script in the SharePoint 2013 Management Shell
$hnscWebApp = Get-SPWebApplication | Where-Object $_DisplayName -eq SharePoint HNSC Host - 80
c) Create a non-templated site at the root of the web application for Workflow to connect to by executing the following Windows PowerShell script in the SharePoint 2013 Management Shell
New-SPSite -Name Root HNSC Site Collection -Url httpwingtipcom -HostHeaderWebApplication $hnscWebApp -OwnerAlias WINGTIPAdministrator
d) Create a team site by executing the following Windows PowerShell script in the SharePoint 2013 Management Shell
New-SPSite -Name Wingtip Intranet -Url httpintranetwingtipcom ndashHostHeaderWebApplication $hnscWebApp -Template STS0 -OwnerAlias WINGTIPAdministrator
e) Create a developer site by executing the following Windows PowerShell script in the SharePoint 2013 Management Shell
New-SPSite -Name Wingtip Developer Site -Url httpdevwingtipcom ndashHostHeaderWebApplication $hnscWebApp -Template DEV0 -OwnerAlias WINGTIPAdministrator
You can only create debug and test apps using a developer site
At this point you now have a site collection to use as a team site (httpintranetwingtipcom) and to develop and test custom SharePoint apps (httpdevwingtipcom)
Creating a SharePoint Server 2013 Environment for Development and Testing Version 10
copy Critical Path Training 2012 All Rights Reserved 42
wwwCriticalPathTrainingcom
Configure SharePoint 2013 for Hosting Apps
In this setup you will setup your SharePoint 2013 environment for hosting apps
PowerShell Script Alert Everything in the next immediate step is provided in the script ConfigureSpFarmForAppsps1 found in the
files that accompany this setup guide Open the script and read the header for documentation on how to use it
1 Ensure you are logged into the WingtipServer VM using the account wingtipadministrator | Password1
2 Create the necessary SharePoint App Management service applications and start the necessary services via Windows PowerShell
a) Open SharePoint 2013 Management Shell Start All Programs Microsoft SharePoint 2013 Products SharePoint 2013 Management Shell
b) Execute the following Windows PowerShell script in the SharePoint 2013 Management Shell
$appHostDomain = appswingtipcom $adminService = Get-Service -Name spadminv4 if ($adminServiceStatus -ne Running) Start-Service $adminService $timerService = Get-Service -Name sptimerv4 if ($timerServiceStatus -ne Running) Start-Service $timerService Set-SPAppDomain $appHostDomain $appMgmtSvcInstance = Get-SPServiceInstance | Where-Object $_GetType()Name -eq AppManagementServiceInstance if ($appMgmtSvcInstanceStatus -ne Online) Start-SPServiceInstance -Identity $appMgmtSvcInstance $appSubSettingSvcInstance = Get-SPServiceInstance | Where-Object $_GetType()Name -eq SPSubscriptionSettingsServiceInstance if ($appSubSettingSvcInstanceStatus -ne Online) Start-SPServiceInstance -Identity $appSubSettingSvcInstance $appPoolServiceApps = Get-SPServiceApplicationPool -Identity SharePoint Web Services Default $appSubSvc = New-SPSubscriptionSettingsServiceApplication ndashApplicationPool $appPoolServiceApps ndashName Settings Service Application ndashDatabaseName SettingsServiceDB $proxySubSvc = New-SPSubscriptionSettingsServiceApplicationProxy ndashServiceApplication $appSubSvc $appAppSvc = New-SPAppManagementServiceApplication -ApplicationPool $appPoolServiceApps -Name App Management Service Application -DatabaseName AppServiceDB $proxyAppSvc = New-SPAppManagementServiceApplicationProxy -ServiceApplication $appAppSvc Set-SPAppSiteSubscriptionName -Name app -Confirm$false
3 Verify the script configured SharePoint 2013 for hosting apps
a) Open Central Administration Start All Programs Microsoft SharePoint 2013 Products SharePoint 2013 Central Administration
b) Verify service applications created
i) Open the Service Applications page Application Management Manage Service Applications
ii) Verify you have two service applications created
(1) App Management Service Application
(2) Settings Service Application
c) Verify service instances are running
i) Open the Services on Server page System Settings Manage Services on Server
ii) Verify the following services are Started
(1) App Management Service
(2) Microsoft SharePoint Foundation Subscription Settings Service
Creating a SharePoint Server 2013 Environment for Development and Testing Version 10
copy Critical Path Training 2012 All Rights Reserved 43
wwwCriticalPathTrainingcom
d) Verify App URLs are correct
i) Open the Configure App URLs page Apps Configure app URLs
ii) Verify the following
(1) App Domain appswingtipcom
(2) App Prefix app
At this point your SharePoint Server 2013 environment is ready to host SharePoint apps
Creating a SharePoint Server 2013 Environment for Development and Testing Version 10
copy Critical Path Training 2012 All Rights Reserved 44
wwwCriticalPathTrainingcom
Start the SharePoint 2013 Sandbox Service
By default the service that executes sandbox solutions is not running In this step you will start the service
1 Open Central Administration Start All Programs Microsoft SharePoint 2013 Products SharePoint 2013 Central Administration
2 Open the Services on Server page System Settings Manage Services on Server
3 Click the Start link to the left of the Microsoft SharePoint Foundation Sandboxed Code Service
At this point your installation can support sandbox solutions
Configure CRL Verification for Disconnected Environments
SharePoint periodically ldquophones homerdquo to a specific address hosted by Microsoft under certain conditions When your environment is disconnected this can cause an unnecessary delay or failures when starting up the sandbox The following steps outline a workaround to bypass this check
1 Launch Notepad as an administrator Start All Programs Accessories right-click Notepad and select Run as Administrator
2 Open the hosts file by selecting File Open and finding the file
cWindowsSystem32Driversetchosts
3 Add the following line to the end of the file
127001 crlmicrosoftcom
4 Save and close the hosts file
Update Internet Explorer to Bypass the App URL amp Automatically Login to SharePoint Sites
In this section you will update Internet Explorer to add the App hosting URL to the bypass list so you can navigate to the domain after deploying SharePoint hosted apps
1 Ensure you are logged into the WingtipServer VM using the account wingtipadministrator | Password1
1 Launch Internet Explorer Start All Programs Internet Explorer
2 Configure Internet Explorer to bypass the App URL
a) In the top-right corner click the gear icon and select Internet Options
b) On the Security tab select the Local Intranet and click the Sites button
c) Uncheck the box next to Automatically detect intranet network
d) Click the Advanced button and add two entries to the Exceptions list
i) httpwingtipcom
ii) httpappswingtipcom
Creating a SharePoint Server 2013 Environment for Development and Testing Version 10
copy Critical Path Training 2012 All Rights Reserved 45
wwwCriticalPathTrainingcom
e) Click the Close button followed by the OK button multiple times to close out of the dialogs
At this point Internet Explorer is setup to bypass your app URL so you can navigate to apps (httpappswingtipcom) as well as automatically authenticate to sites hosted at httpwingtipcom
Exercise 6 Configure SharePoint to Host My Sites
In this exercise you will configure SharePoint to create and host My Sites In order to host My Sites you will need a new Web Application that is configured for Self-Service Site Creation and has a My Site Host site collection
1 Create a new SharePoint web application to host the My Sites
a) Ensure you are logged into the WingtipServer VM using the account wingtipadministrator | Password1
b) Open Central Administration Start All Programs Microsoft SharePoint 2013 Products SharePoint 2013 Central Administration
c) Select Application Management Manage Web Applications
d) In the ribbon click the New button
e) In the Create New Web Application dialog enter the following values in the properties and click OK Leave all properties not mentioned
i) Select the radio button Create a new IIS web site
(1) Name SharePoint MySite Host ndash 80
(2) Port 80
(3) Host Header mywingtipcom
ii) Application Pool
(1) Select the radio button Use existing application pool
(a) Application Pool Name SharePoint Default HNSC AppPool
iii) Database Name and Authentication
(1) Database Name WSS_Content_SocialWingtipCom
f) This process will take a few moments At the end of the process SharePoint will ask if you want to create a site collection Click the link provided to create a new site collection amp continue to the next step
2 Create a My Site Host site collection
a) On the Create Site Collection page use the following information to complete the form and click OK
Creating a SharePoint Server 2013 Environment for Development and Testing Version 10
copy Critical Path Training 2012 All Rights Reserved 46
wwwCriticalPathTrainingcom
i) Title My Site Host
ii) URL
iii) Template Selection My Site Host (found under the Enterprise tab)
iv) Primary Site Collection Administrator WINGTIPAdministrator
3 Update the Web Application to host my sites
a) Within Central Administration in the left-hand navigation navigate to the Manage Web Applications page Application Management Manage Web Applications
b) Select the SharePoint MySite Host ndash 80 web application
c) Click the Managed Paths button in the ribbon
d) Remove the sites managed path and add two new managed paths and click OK
i) personal ndash Wildcard inclusion
ii) my ndash Explicit inclusion
e) With the SharePoint MySite Host ndash 80 web application still selected click the Self-Service Site Creation button
f) On the Self-Service Site Creation page use the following values to complete the form and click OK
i) Site Collections On
4 Next configure the User Profile Service Application My Site settings
a) Browse to the User Profile Service Application management page Application Management Manage Service Applications User Profile Service Application
b) Under the My Site Settings section click the Setup My Sites
c) On the My Site Settings page use the following information to complete the form and click OK
i) My Site Host httpmywingtipcom
ii) Personal Site Location personal
At this point your SharePoint deployment is now configured to automatically create My Sites under httpmywingtipcomPersonalUserName when users first browse to them
Exercise 7 Install amp Configure Workflow Manager 10
In this exercise you will configure the WingtipServer VM to host Workflow Manager 10 and connect it to your SharePoint installation
1 Ensure you are logged into the WingtipServer VM using the account wingtipadministrator | Password1
Verify SQL Server 2012 Network Configuration
In this section yoursquoll verify the network configuration is correct for SQL Server 2012 in order to install Workflow Manager 10
Creating a SharePoint Server 2013 Environment for Development and Testing Version 10
copy Critical Path Training 2012 All Rights Reserved 47
wwwCriticalPathTrainingcom
1 Configure SQL Server 2012 to have the TCPIP connection protocol enabled
a) Open the SQL Server Configuration Manager Start All Programs Microsoft SQL Server 2012 Configuration Tools SQL Server Configuration Manager
b) Expand the hierarchy on the left-hand side to the following SQL Server Connection Manager (local) SQL Server Network Configuration Protocols for MSSQLSERVER
c) In the main window if TCPIP is Disabled right-click TCPIP and select Enable
d) When prompted with a warning click OK
2 SQL Server must be restarted in order to reflect this change
a) In the hierarchy on the left-hand side of the window select SQL Server Services
b) Right-click SQL Server (MSSQLSERVER) and select Restart
At this point SQL Server is now configured with the TCPIP protocol enabled a requirement when configuring Service Bus
Configure the Workflow Service Account with the Necessary Rights
In this section you will verify the service account that will run Workflow Manager and Service Bus
1 Ensure you are logged into the WingtipServer VM using the account WINGTIPadministrator | Password1
2 Grant the WINGTIPSP_Content account securityadmin amp dbcreator permissions in SQL Server
a) Launch SQL Server Management Studio Start All Programs Microsoft SQL Server 2012 SQL Server Management Studio
b) When SQL Server Management Studio launches within the Connect to Server dialog login using the default settings and click Connect
c) In the Object Explorer tool window expand the WINGTIPSERVER server hierarchy to the Security Logins node
d) Find the WINGTIPSP_Content account right-click it and select Properties
Creating a SharePoint Server 2013 Environment for Development and Testing Version 10
copy Critical Path Training 2012 All Rights Reserved 48
wwwCriticalPathTrainingcom
e) In the Select a page pane select Server Roles
f) Check securityadmin amp dbcreator and click OK
g) Close SQL Server Management Studio
3 Add the Workflow service account to the local administrators group
a) Open the Active Directory Users and Computers window Start Administrative Tools Active Directory Users and Computers
b) In the hierarchy on the left-hand side of the window expand it to the following Active Directory Users and Computers wingtipcom Builtin
c) In the main window right-click Administrators and select Properties
d) In the Administrators Properties dialog select the Members tab and click Add
e) In the Enter the object names to select box enter wingtipsp_content and click the Check Names button
f) In the Administrators Properties dialog click OK
g) Close the Active Directory Users and Computers window
At this point the service account that will host Workflow Manager and Service Bus has been configured correctly
Creating a SharePoint Server 2013 Environment for Development and Testing Version 10
copy Critical Path Training 2012 All Rights Reserved 49
wwwCriticalPathTrainingcom
Download amp Install Workflow Manager and Service Bus
In this section you will install Workflow Manager and Service Bus
1 Ensure you are logged into the WingtipServer VM using the account WINGTIPSP_Content | Password1
It is important you are logged in as the user that will run workflow when you install amp configure Workflow Manager and Service Bus
2 Launch the Web Platform Installer Start All Programs Microsoft Web Platform Installer
a) If the Web Platform Installer is not present on your machine you can download amp install it from here httpwwwmicrosoftcomwebdownloadsplatformaspx
If you do not have internet access within the virtual machine it is possible to download everything needed for workflow using the command line version of the Web Platform Installer (WebPICMD) You can get WebPICMD from httplearniisnetpageaspx1072web-platform-installer-v4-command-line-webpicmdexe-preview-release Specifically for
workflow enter the following command to download Workflow Beta 1 and all prerequisites
webpicmd offline ProductsWorkflow Pathc[path]
3 When the Web Platform Installer loads execute a search for Workflow select Workflow Manager 10 and click Add
4 Click the Install button at the bottom of the Web Platform Installer 40 window
5 On the Prerequisites page click I Accept
Note The Web Platform Installer 40 may prompt you to keep certain products updated using Microsoft Update If it does select Use Microsoft Update when I check for updates (recommended) and click Continue
6 When the installer completes the following dialog will appear Click Continue and then Finish to start the configuration process
Creating a SharePoint Server 2013 Environment for Development and Testing Version 10
copy Critical Path Training 2012 All Rights Reserved 50
wwwCriticalPathTrainingcom
At this point Workflow Manager amp Service Bus are installed
Configure Workflow Manager and Service Bus
In this section you will install Workflow Manager and Service Bus
1 If the Workflow Manager Configuration Wizard is not open open it Start All Programs Workflow Manager 10 Workflow Configuration
2 On the Welcome page click Configure Workflow Manager with Default Settings (Recommended)
Creating a SharePoint Server 2013 Environment for Development and Testing Version 10
copy Critical Path Training 2012 All Rights Reserved 51
wwwCriticalPathTrainingcom
3 On the New Farm Configuration page do the following
a) In the section Configure Service Account set the credentials to
i) User ID sp_contentwingtipcom
ii) Password Password1
b) Check the Allow Workflow management over HTTP on this computer checkbox
Ensure the username is entered in the fully qualified UPN format not as the default shows in the installer (sp_contentwingtip) or the domainusername format
In a production environment you should be doing everything over SSL
c) Click the Test Connection button to verify the connection credentials before proceeding
Creating a SharePoint Server 2013 Environment for Development and Testing Version 10
copy Critical Path Training 2012 All Rights Reserved 52
wwwCriticalPathTrainingcom
d) In the Certificate Generation Key and Confirm Certificate Generation Key enter Password1 into both fields
4 Click the right arrow in the bottom right corner to proceed
5 On the Summary page review your settings and click the check at the bottom right of the widow to start the configuration process
Creating a SharePoint Server 2013 Environment for Development and Testing Version 10
copy Critical Path Training 2012 All Rights Reserved 53
wwwCriticalPathTrainingcom
6 After a few minutes the Configuration Progress screen will show that everything has been configured correctly
Creating a SharePoint Server 2013 Environment for Development and Testing Version 10
copy Critical Path Training 2012 All Rights Reserved 54
wwwCriticalPathTrainingcom
7 Click the check in the bottom right corner
At this point Workflow Manager amp Service Bus has been installed and a new Workflow Manager farm has been created The next step is to connect the SharePoint 2013 farm to the Workflow Manager farm
Connect SharePoint 2013 to Workflow Manager
In this section you will connect SharePoint 2013 and Workflow Manager together
1 Ensure you are logged into the WingtipServer VM using the account WINGTIPadministrator | Password1
2 Get the Workflow Manager endpoint
a) Open the Workflow Manager PowerShell console Start All Programs Workflow Manager 10
b) Execute the Windows PowerShell following cmdlet
Get-WFFarm | ft HttpPort
c) Take note of this port (12291) This port number is what you will use to connect the SharePoint 2013 farm to the Workflow Manager 10 farm
In production you should connect to the HTTPS port listed in the HttpsPort property when you run Get-WFFarm
d) Close the Workflow Manager PowerShell window
3 Connect the SharePoint 2013 farm to Workflow Manager
Creating a SharePoint Server 2013 Environment for Development and Testing Version 10
copy Critical Path Training 2012 All Rights Reserved 55
wwwCriticalPathTrainingcom
a) Open SharePoint 2013 Management Shell Start All Programs Microsoft SharePoint 2013 Products SharePoint 2013 Management Shell
b) Execute the following Windows PowerShell script in the SharePoint 2013 Management Shell
Register-SPWorkflowService ndashSPSite httpintranetwingtipcom ndashWorkflowHostUri httpwingtipserver12291 ndashAllowOAuthHttp
This script is telling SharePoint the endpoint it should use to talk to Workflow Manager as well as Workflow Manager the SharePoint site collection it should talk to for calls into the CSOM It is also configuring all communication over HTTP rather than HTTPS for performance reasons In production you should always use HTTPS
This step will take a moment with no feedback during the process Be patient
c) Close the SharePoint 2013 Management Shell
At this point the SharePoint 2013 farm is connected to the Workflow Manager 10 farm
Configure SharePoint User Profile Service Application AD Sync
Users in SharePoint 2013 are validated by Workflow Manager against SharePoint to ensure they have permissions to start a workflow This is done by looking up the user by their AD UserPrincipalName (UPN) attribute in the User Profile Service Application (UPA) If no matching user is found the workflow will be automatically cancelled by Workflow Manager In this section you will setup UPA to connect amp sync with the local Active Directory so user accounts in AD will have their UPN synchronized to UPA
1 Open Central Administration Start All Programs Microsoft SharePoint 2013 Products SharePoint 2013 Central Administration
2 Go to the User Profile Service Application management page Application Management Manage Service Applications User Profile Service Application
3 The first step is to configure the User Profile Service Application to allow for Active Directory (AD) synchronization
a) Under Synchronization select Configure Synchronization Settings
b) For Synchronization select Use SharePoint Active Directory Import and click OK
4 Next establish a connection to the wingtipcom AD
a) Under Synchronization select Configure Synchronization Connections
b) On the Synchronization Connections page select Create New Connection
c) Enter the following values on this form and click OK
i) Connection Name WINGTIPCOM AD
ii) Type Active Directory Import
iii) Connection Settings
(1) Fully Qualified Domain Name wingtipcom
(2) Authentication Provider Type Windows Authentication
(3) Account Name WINGTIPAdministrator
(4) Password (and Confirm Password) Password1
iv) Containers
(1) Click Populate Containers
(2) After it loads check the box next to WINGTP or click the Select All button below the box
5 Go back to the User Profile Service Application management page Application Management Manage Service Applications User Profile Service Application
6 Finally start a synchronization import
a) Under Synchronization select Start Profile Synchronization
Creating a SharePoint Server 2013 Environment for Development and Testing Version 10
copy Critical Path Training 2012 All Rights Reserved 56
wwwCriticalPathTrainingcom
b) Select Start Full Synchronization and click OK
c) You will be taken back to the User Profile Service Application management page Notice in the top-right corner there is a status block that reports how many profiles are in the UPA database Refresh the page to see it increase to a handful of profiles as the import process runs
At this point you have successfully configured the User Profile Service Application to import profiles from the local AD
Exercise 8 Install the Microsoft Office 2013 Professional Clients
In this exercise you will install the Microsoft Office 2013 client applications
1 Download the Office 2013 into the WingtipServer VM For this you need to create an Office 365 Trial account login to Office 365 go to the Admin Dashboard and then download the latest version httpwwwmicrosoftcomofficepreviewentry-office-preview
2 Download the SharePoint Designer 2013 into the WingtipServer VM from here httpwwwmicrosoftcomen-usdownloaddetailsaspxid=35491
3 Download the Visio Professional 2013 into the WingtipServer VM from here httptechnetmicrosoftcomen-usevalcenterhh973399
Install Microsoft Office Professional Plus 2013
In this section you will install the Microsoft Office 2013 clients
1 Ensure you are logged into the WingtipServer VM using the account WINGTIPadministrator | Password1
2 Execute the installer OfficeProfessionalPlus_English_x64exe
3 On the Read the Microsoft Software License Terms dialog click the checkbox next to I accept the terms of this agreement and click Continue
4 On the Choose the installation you want dialog click the Install Now button
5 The installer will proceed and install all the Office products
6 When the installer completes click the Close button
7 Apply your Office Professional Plus 2013 license key
a) Launch Word 2013 Start All Programs Microsoft Office 2013 Word 2013
b) In the First things first dialog select Use recommended settings and click Accept
c) In the Welcome to Office dialog that opens click the [X] icon in the top-right corner to close it
d) In the left-hand pane click Open Other Documents
e) In the left-hand pane click Account
f) In the Product Information section within the Activation Required box click Change Product Key
g) Enter your license key for Office Professional Plus 2013 check the box next to Attempt to automatically activate my product online and click Install
h) Click OK
At this point you have installed Office Professional Plus 2013
Install Microsoft Office Visio 2013
In this section you will install Microsoft Office 2013 Visio
1 Ensure you are logged into the WingtipServer VM using the account WINGTIPadministrator | Password1
2 Execute the installer VisioProfessional_English_x64exe
3 On the Read the Microsoft Software License Terms dialog click the checkbox next to I accept the terms of this agreement and click Continue
Creating a SharePoint Server 2013 Environment for Development and Testing Version 10
copy Critical Path Training 2012 All Rights Reserved 57
wwwCriticalPathTrainingcom
4 On the Choose the installation you want dialog click the Install Now button
5 The installer will proceed and install all Visio 2013
6 When the installer completes click the Close button
7 Apply your Visio 2013 license key
a) Launch Visio 2013 Start All Programs Microsoft Office 2013 Visio 2013
b) In the First things first dialog select Use recommended settings and click Accept
c) In the Welcome to Office dialog that opens click the X icon in the top-right corner to close it
d) In the left-hand pane click Open Other Documents
e) In the left-hand pane click Account
f) In the Product Information section within the Activation Required box click Change Product Key
g) Enter your license key for Visio 2013 check the box next to Attempt to automatically activate my product online and click Install
h) Click OK
At this point you have installed Visio 2013
Install Microsoft Office 2013 SharePoint Designer
In this section you will install Microsoft Office 2013 SharePoint Designer
1 Ensure you are logged into the WingtipServer VM using the account WINGTIPadministrator | Password1
2 Execute the installer SharePointDesigner_English_x64exe
3 On the Read the Microsoft Software License Terms dialog click the checkbox next to I accept the terms of this agreement and click Continue
4 On the Choose the installation you want dialog click the Install Now button
5 The installer will proceed and install all SharePoint Designer 2013
6 When the installer completes click the Close button
At this point you have installed SharePoint Designer 2013
Exercise 9 Install Visual Studio 2012
In this exercise you will install Visual Studio 2012
1 Ensure you are logged into the WingtipServer VM using the account WINGTIPadministrator | Password1
2 Start the install of Visual Studio 2012 Ultimate Trial by downloading the installer from here httpwwwmicrosoftcomvisualstudio11en-usdownloads
3 On the installation splash screen check the box next to I agree to the License terms and conditions and click the Next button
Creating a SharePoint Server 2013 Environment for Development and Testing Version 10
copy Critical Path Training 2012 All Rights Reserved 58
wwwCriticalPathTrainingcom
4 On the Optional Features to install dialog click Install
5 After some time the installer will complete Click the Launch button to launch Visual Studio 2012
Creating a SharePoint Server 2013 Environment for Development and Testing Version 10
copy Critical Path Training 2012 All Rights Reserved 59
wwwCriticalPathTrainingcom
6 In the Choose Default Environment Settings select Visual C Development Settings and click Start Visual Studio
7 Close Visual Studio 2012
At this point Visual Studio 2012 RTM is installed
Install Office amp SharePoint 2013 Developer Tools
In this section you will install the Office and SharePoint 2013 developer tools for Visual Studio
1 Ensure you are logged into the WingtipServer VM using the account WINGTIPadministrator | Password1
2 Launch the Web Platform Installer Start All Programs Microsoft Web Platform Installer
3 In the search box at the top-right corner of the Web Platform Installer 40 window type sharepoint and press Enter
4 Click the Add button to the right of Microsoft Office Developer Tools for Visual Studio 2012 - Preview 2
5 Click the Install button at the bottom of the Web Platform Installer 40 window
6 On the Prerequisites page click I Accept
Creating a SharePoint Server 2013 Environment for Development and Testing Version 10
copy Critical Path Training 2012 All Rights Reserved 60
wwwCriticalPathTrainingcom
At this point you have installed the SharePoint 2013 amp Office 2013 development tools in Visual Studio 2012
Creating a SharePoint Server 2013 Environment for Development and Testing Version 10
copy Critical Path Training 2012 All Rights Reserved 61
wwwCriticalPathTrainingcom
Appendix 1 Download Manifest
The following lists everything referenced that you will or may need to download in this environment
Windows Server 2008 R2 with Service Pack 1 (installer ISO)
o httptechnetmicrosoftcomen-usevalcenterdd459137aspx
Windows Server 2008 R2 with Service Pack 1 (prebuilt VHD)
o httpwwwmicrosoftcomdownloadsdetailsaspxFamilyId=9040a4be-c3cf-44a5-9052-a70314452305
Windows Server 2008 R2 Service Pack 1
o httpwwwmicrosoftcomen-usdownloaddetailsaspxid=5842
SQL Server 2012 Trial
o httpwwwmicrosoftcombetaexperiencepdSQL2012EvalCTAenusdefaultaspx
SharePoint Server 2013
o httptechnetmicrosoftcomen-USevalcenterhh973397aspx
Hotfixes for SharePoint Server 2013 (post-install)
o KB2554876 The SharePoint Parsing Process Crashes in Windows Server 2008 R2
o KB2708075 IIS 75 Configurations are not Updated when you use the ServerManager Class to Commit
Configuration Changes
o KB2759112 Hotfix is Available for NET Framework 45 that Resolves an ASPNET Race Condition Issue in
Windows Server 2008 R2 Windows Server 2008 R2 SP1
o KB2765317 Hotfix is Available for NET Framework 45 that Resolves an ASPNET Race Condition Issue in
Windows 8 Windows RT and Windows Server 2012
Web Platform Installer
o httpwwwmicrosoftcomwebdownloadsplatformaspx
Web Platform Installer ndash Command Line Version
o httplearniisnetpageaspx1072web-platform-installer-v4-command-line-webpicmdexe-preview-release
Workflow Manager 10
o Download using the Microsoft Web Platform Installer
Office 2013
o httpwwwmicrosoftcomofficepreviewentry-office-preview
SharePoint Designer 2013
o httpwwwmicrosoftcomen-usdownloaddetailsaspxid=35491
Visio Professional 2013
o httptechnetmicrosoftcomen-usevalcenterhh973399
Visual Studio 2012
o httpwwwmicrosoftcomvisualstudio11en-usdownloads
Office Developer Tools for Visual Studio 2012 ndash Preview 2
o Download using the Microsoft Web Platform Installer
Creating a SharePoint Server 2013 Environment for Development and Testing Version 10
copy Critical Path Training 2012 All Rights Reserved 62
wwwCriticalPathTrainingcom
Appendix 2 Windows PowerShell Script Manifest
The following lists all Windows PowerShell scripts that are provided with this setup guide
AddDisableLoopbackCheckRegKeyps1
o The following steps automate creating the registry key outlined as Method 2 in the Microsoft Knowledgebase article
httpsupportmicrosoftcomkb896861 using Windows PowerShell This key DisableLoopbackCheck will allow
you to browse SharePoint sites on the same machine Without this key (or following Method 1 in the KB article) you
would need to browse any SharePoint sites from a different computer than the one which SharePoint is installed on
ConfigureSpFarmForAppsps1
o Configures a SharePoint 2013 for hosting apps This ensures everything you need is installed running and
configured This is documented here httpmsdnmicrosoftcomen-uslibraryfp179923(v=office15)
CreateSpServiceAccountsps1
o Creates the minimal necessary service accounts for SharePoint Server 2013 SP_Farm SP_Content amp
SP_Services
SetupSharePointForHNSCps1
o Configures a SharePoint 2013 install for hosting Host-Named Site Collections (HNSC) This involves creating a Web
Application in SharePoint that has no host header bindings Using DNS all requests are mapped to this Web
Application You then create the site collections via PowerShell as you cant create HNSCs via the browser (Central
Administration)
Creating a SharePoint Server 2013 Environment for Development and Testing Version 10
copy Critical Path Training 2012 All Rights Reserved 63
wwwCriticalPathTrainingcom
Appendix 3 Create Sample Adventure Works Database
The following steps document downloading and installing the sample Adventure Works OLTP database provided by Microsoft
1 Launch Internet Explorer and navigate to httpmsftdbprodsamplescodeplexcom
2 Download the Adventure Works 2012 OLTP Script
3 Extract the ZIP into a folder on the desktop
4 Launch SQL Server Management Studio Start All Programs Microsoft SQL Server 2012 SQL Server Management Studio
5 When SQL Server Management Studio launches within the Connect to Server dialog login using the default settings and click Connect
6 Within SQL Server Management Studio select File Open File
7 Select the file instawdbsql from the extracted ZIP and click Open
8 If prompted to re-login to the database engine do it
9 Select Query SQLCMD Mode
10 Scroll down to line 42 the line that starts with the following
setvar SqlSamplesSourceDataPath
11 Change the folder location of where you unzipped the Adventure Works 2012 OLTP Script
12 Select Query Execute
13 When the script completes the AdventureWorks2012 database will have been created
Creating a SharePoint Server 2013 Environment for Development and Testing Version 10
copy Critical Path Training 2012 All Rights Reserved 64
wwwCriticalPathTrainingcom
Change Log
Change Version Description
August 22 2012 v 01 Pre-release for review
August 27 2012 v 02 Initial public release ndash install guide based on SharePoint Server Beta 2
August 28 2012 v 03 Updated URL for the site collection used to connect SharePoint to WAW
August 31 2012 v 04 Typo Removed SQL Server Analysis Services as part of the install Not required in a
SharePoint dev box (unless you are doing business intelligence which is not covered
in the guide)
Updated all references to Windows Azure Workflow to Workflow Manager the new
official name for the new workflow product
Updated SetupSharePointForHNSCps1 script to lookup HNSC Web Application by
name rather than URL which is more reliable
Typo Updated WingtipAllUp public NIC to use a different IP than the WingtipDC
Typo Replaced a reference to WingtipServer with WingtipDC
Typo Fixed handful of minor typos
September 1 2012 v 05 Removed SQL Server Reporting Services from install guide
Added step to uncheck IErsquos ldquoAutomatically detect proxyrdquo
Added post workflow install steps to setup User Profile Service Application to sync with
local Active Directory
September 5 2012 v 06 Added step to create a default root site collection in the HNSC web app
Updated minor typos and added extra notes for context
Updated PowerShell script SetupSharePointForHNSCps1 to remove content
database of default Web Application when setting up HNSC Web App
Added a new exercise 8 (after SharePoint install amp config and before the Workflow
install and config) to setup support for My Sites
October 20 2012 v 07 Updated script SetupSharePointForHNSCps1 to fix a bug where it would fail on line
111 if you didnrsquot already have a WINGTIPSP_Content managed account
Added section to bypass SharePointrsquos check for crlmicrosoftcom
Updated workflowrsquos registration PowerShell script to point to
httpintranetwingtipcom
Switched order of post-SharePoint install to setup HSNC hosting before configuring for
hosting apps
November 29 2012
v 10 Changed setup guide to use a single VM instead of two VMs
Updated guide for SharePoint 2013 RTM
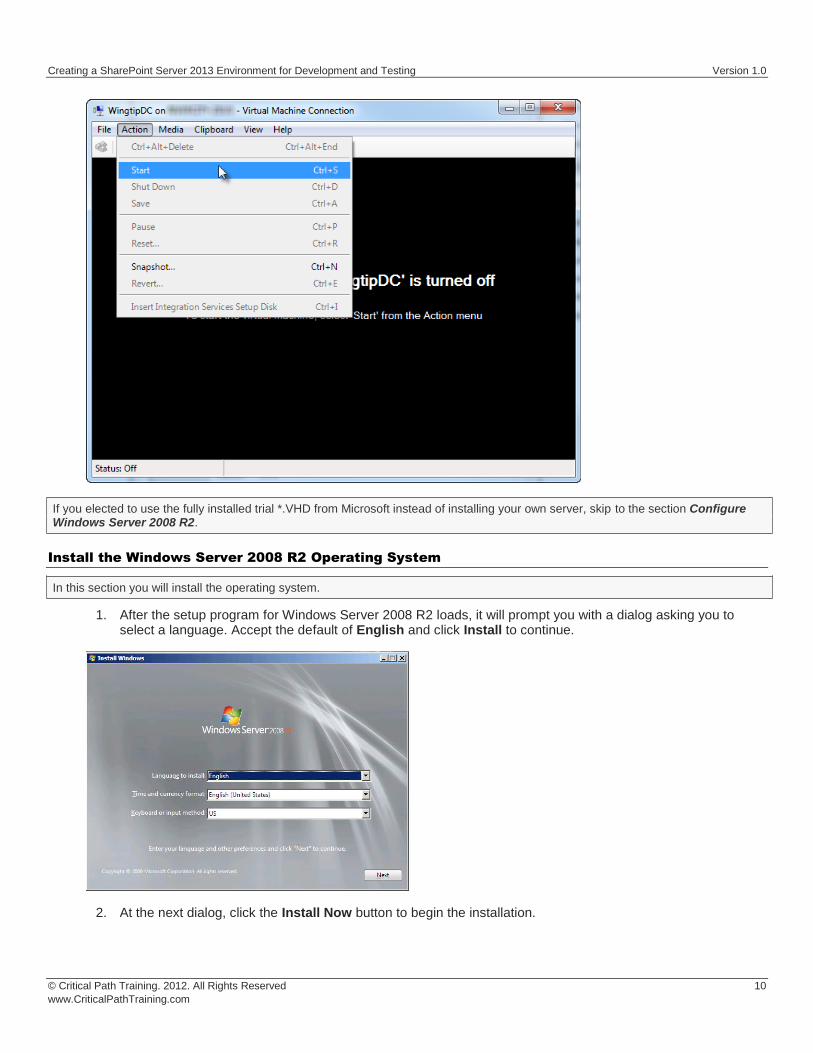
Creating a SharePoint Server 2013 Environment for Development and Testing Version 10
copy Critical Path Training 2012 All Rights Reserved 12
wwwCriticalPathTrainingcom
2 After you close the Initial Configuration Tasks window Windows Server will display the Server Manager
Creating a SharePoint Server 2013 Environment for Development and Testing Version 10
copy Critical Path Training 2012 All Rights Reserved 13
wwwCriticalPathTrainingcom
3 Configure the Administrator account so that its password does not expire
a) Inside the Configuration node of the Server Manager navigate to Local Users and Groups Users (as shown in the following screenshot) and locate the local Administrator account
b) Right-click on the Administrator account and click Properties
c) In the Administrator Properties dialog unselect the option for User must change password at next logon and select the option for Password never expires Click OK
4 Rename the computer name of the VM
a) In the Server Manager navigate to the top-level node to display the Server Summary page Click Change System Properties
b) On the Computer Name tab of the System Properties dialog click the Change button
c) Enter a new computer name of WingtipServer and click OK
Creating a SharePoint Server 2013 Environment for Development and Testing Version 10
copy Critical Path Training 2012 All Rights Reserved 14
wwwCriticalPathTrainingcom
5 After changing the computer name you will be prompted to restart the VM Choose OK to restart After the VM has restarted log in again using [administrator | Password1] (username | password)
6 Disable Windows Firewall and Enhanced Security Configuration
a) In the Server Manager navigate to the top-level node to display the Server Summary page Inside the Security Information section locate the links for Go to Windows Firewall and Configure IE ECS
b) Click on Configure IE ECS link Disable Enhanced Security Configuration for both Administrators and Users by selecting the Off radio buttons and click OK
c) Now click the Go to Windows Firewall link to display the page for the Windows Firewall Click on the Windows Firewall Properties link at the bottom of the Overview section
d) In the Domain Profile tab of the Windows Fire dialog change the Firewall state property setting from On to Off Click to Apply button to save your changes
e) Once you have turned off the firewall in the Domain Profile tab go to the Private profile tab and the Public profile tab and follow the same steps to disable the firewall for these profiles as well
f) Click OK to dismiss the Windows Firewall dialog once you have turned off the firewall for all three profiles
7 Enable Remote Desktop for your VM
a) In the Server Manager navigate to the top-level node to display the Server Summary page Inside the Computer Information section locate and click the link for Configure Remote Desktop
b) In the Remote tab of the System Properties dialog select the last option for Allow connections only from computers running Remote Desktop with Network Level Authentication Click OK to save changes and dismiss the System Properties dialog
Creating a SharePoint Server 2013 Environment for Development and Testing Version 10
copy Critical Path Training 2012 All Rights Reserved 15
wwwCriticalPathTrainingcom
8 Enable the Windows Server Features for the Desktop Experience and the PowerShell Integrated Scripting Environment
a) In Server Manager choose Add Feature to bring up the Add Features Wizard dialog
b) Select the feature Desktop Experience
When you first click the checkbox for the Desktop Experience the wizard will prompt you with the following dialog to add support for Ink and Handwriting Services Click the Add Required Features button to continue
c) Scroll down the list of features in the Add Features Wizard dialog and select the feature Windows PowerShell Integrated Scripting Environment (ISE)
Creating a SharePoint Server 2013 Environment for Development and Testing Version 10
copy Critical Path Training 2012 All Rights Reserved 16
wwwCriticalPathTrainingcom
When you first click the checkbox for the Windows PowerShell Integrated Scripting Environment (ISE) the wizard will prompt you with the following dialog to add support for NET Framework 351 Features Click the Add Required Features button to continue
d) Click the Next button on the Add Features Wizard dialog to continue with the install
e) On the Confirm Installation Selection wizard page click the Install button
f) When you see the Installation Results screen the Add Features Wizard informs you a computer restart is required Click Close button to dismiss this dialog
9 After the VM has restarted log in again using [administrator | Password1] (username | password)
Configure the Virtual Machinersquos Networking Setup
In this section yoursquoll configure the two NICrsquos you added to the VM in previous steps One NIC (Internal LAN) will be used to communicate with other VMs in this environment while the other (External LAN) will be used to connect to the internet
1 Configure the NIC that is linked to the Internal LAN network
a) Open the Network Connections dialog by pressing Start enter view network connections in the search box Click the View Network Connections shortcut
b) Two network connections will be shown but only one will show as connected
The connected one is the one that is connected to the Internal LAN network The other one is currently ldquounpluggedrdquohellip this is why we didnrsquot connect a network to the second network when initially configuring the VM as this makes it easier to see which NIC is which in the VM
c) Rename the two NICrsquos
i) Right-click the connected NIC and select Rename Give it a name of Internal LAN
Creating a SharePoint Server 2013 Environment for Development and Testing Version 10
copy Critical Path Training 2012 All Rights Reserved 17
wwwCriticalPathTrainingcom
ii) Right-click the disconnected NIC and select Rename Give it a name of External LAN
d) Right-click the Internal LAN NIC and select Properties
e) In the Local Area Connection Properties dialog select the Internet Protocol Version 4 (TCPIPv4) item and click Properties
f) Enter the following information into the resulting dialog to configure the NICrsquos IP settings
i) Use the Following IP Address
(1) IP Address 192168150102
(2) Subnet mast 2552552550
(3) Default Gateway 192168150102
ii) Use the Following DNS Server Addresses
(1) Preferred DNS Server 192168150102
g) Click OK to accept the IP settings and Close to accept the changes to the NIC
Why not use 101 as the start NIC When you created the virtual internal network Hyper-V created a virtual NIC on the host computer If you set the IP of that NIC to 192168150101 you can use the Remote Desktop Connection app in Windows to connect to your virtual machines and easily copy-paste amp share drives
2 Configure the NIC that is linked to the External LAN network
a) Open the Network Connections window if it is not still open using the same steps from the previous step
b) Right-click the External LAN NIC and select Properties
c) In the Local Area Connection Properties dialog select the Internet Protocol Version 4 (TCPIPv4) item and click Properties
d) Enter the following information into the resulting dialog to configure the NICrsquos IP settings
i) Obtain an IP Address Automatically
ii) Use the Following DNS Server Addresses
(1) Preferred DNS Server 192168150102
e) Click the Advanced button to open the Advanced TCPIP Settings dialog
f) In the Advanced TCPIP Settings dialog click the DNS tab
i) Uncheck the Register this Connections Address in DNS
Creating a SharePoint Server 2013 Environment for Development and Testing Version 10
copy Critical Path Training 2012 All Rights Reserved 18
wwwCriticalPathTrainingcom
g) In the Advanced TCPIP Settings dialog click the WINS tab
i) Click the Add button and specify a new WINS Server as 192168150102
h) Click OK Close multiple times to accept all TCPIP settings
The external NIC will now obtain an IP dynamically amp will not register itself in the DHCPrsquos DNS server which is a good thing when there are multiple people on the same network this this type of a setup
3 Connect the second NIC to the External LAN network
a) Go back to the host computer and open the Hyper-V Manager
b) In the Hyper-V Manager window right-click the VM WingtipServer and select Settings
c) Select the second NIC the one that is not connected
d) For the Network select External LAN and click OK This will effectively plug the external network into the VM
4 Go back into the WingtipServer VM and if it is not still open open the Network Connections dialog You should now see both connections plugged in
a) To refresh the connection select the connection you just plugged in and click the Disable this Network Device button in the toolbar After the connection is disabled select it and click the Enable this Network Device button
b) After a few seconds the VM should be able to connect to the internet which you can test by browsing to a site such as httpwwwbingcom
Configure Windows Update and Update the Server
In this section you will verify the server is fully patched and updated
1 Verify Service Pack 1 is installed
a) Verify the version of the operating system installed by clicking Start right-click on Computer select Properties
b) If the server simply says Windows Server 2008 R2 Enterprise as shown in the following figure download and install Service Pack 1 from the following location httpwwwmicrosoftcomen-usdownloaddetailsaspxid=5842
Creating a SharePoint Server 2013 Environment for Development and Testing Version 10
copy Critical Path Training 2012 All Rights Reserved 19
wwwCriticalPathTrainingcom
c) If Service Pack 1 is installed it will state it
2 Update the server using Windows Update
a) Selecting Start All Programs Windows Update
b) First disable Windows Update from running automatically
i) Click the link Change Settings
ii) Under the Important Updates list select Never check for updates (not recommended)
This isnrsquot what you would do in a production environment but for a development machine it is ok
c) Now update the server
i) Click the Check for Updates button
ii) If prompted install any updates to the Windows Update dialog
iii) Select the Check for Updates link
iv) Windows Update will the report how many updates are available Select all important and recommended updates and click the Install Updates button
v) If prompted select I accept the license terms for any updates that require it
vi) Keep going through the process of running Windows Update checking for updates and installing them after each reboot until it says there are no updates left to install
This step is likely going to take quite a bit of time so be patient
Activate Windows Server 2008 R2
In this section you will activate the server if you have a product key
1 If you have a product key for Windows Server 2008 R2 use it to activate Windows
a) In the Server Manager window navigate to the top-level node to display the Server Summary page Click Activate Windows
b) You will be prompted to enter your product key
i) Enter your product key and click to button to activate Windows
Creating a SharePoint Server 2013 Environment for Development and Testing Version 10
copy Critical Path Training 2012 All Rights Reserved 20
wwwCriticalPathTrainingcom
ii) After a few seconds your VM should be able to connect to a Microsoft site and successfully activate Windows
At this point you have a fully patched operating system VM created that will act as the Active Directory domain controller
Apply the DisableLoopbackCheck Registry Fix
Configure the DisableLoopbackCheck registry setting (Microsoft KB httpsupportmicrosoftcomkb896861)
The following steps automate creating the registry key outlined as Method 2 in the Microsoft KB article httpsupportmicrosoftcomkb896861 using Windows PowerShell
PowerShell Script Alert You can also find this PowerShell script AddDisableLoopbackCheckRegKeyps1 in the files that
accompany this setup guide
1 Click the Windows PowerShell icon in the Taskbar
2 Run the following PowerShell commands pressing [ENTER] after each one
$regKeyPath = HKLMSystemCurrentControlSetControlLsa $key = DisableLoopbackCheck New-ItemProperty -Path $regKeyPath -Name $key -Value 1 -PropertyType dword
a) Close the Windows PowerShell console by typing EXIT and pressing [ENTER]
Exercise 3 Install Active Directory Domain Services
Now you will promote your WingtipServer VM to a domain controller and create a new domain named wingtipcom
1 Login to the WingtipServer virtual machine using administrator | Password1
2 Add and configure the role for Active Directory Domain Services
a) Launch Server Manager and select the Roles node
b) Click the Add Roles link to start the Add Roles Wizard
c) On the Before you begin page click Next
d) On the Server Roles page select Active Directory Domain Services Click the Add Required Features button if prompted to install prerequisites
e) Click Next
Creating a SharePoint Server 2013 Environment for Development and Testing Version 10
copy Critical Path Training 2012 All Rights Reserved 21
wwwCriticalPathTrainingcom
f) On the next page of the wizard click Next which will bring you to the Confirm Installation Selections page
g) Click Install
After Active Directory Domain Services has been installed you will see the Installation Results page in the Add Roles Wizard
3 Click on the link with the big long caption of Close this wizard and launch the Active Directory Domain Services Installation Wizard (dcpromoexe)
4 On the first page of the Active Directory Domain Services Installation Wizard click the Use Advanced Mode Installation checkbox and click Next
Creating a SharePoint Server 2013 Environment for Development and Testing Version 10
copy Critical Path Training 2012 All Rights Reserved 22
wwwCriticalPathTrainingcom
5 On the Operating System Compatibility page click Next
6 On the Choose a Deployment Configuration select Create a new domain in a new forest and click Next
7 On the Name the Forrest Root Domain enter the following and click Next
a) FQDN of the forest root domain wingtipcom
8 On the Domain NetBIOS Name set it to WINGTIP and click Next
9 On the Set Forest Functional Level page select Windows Server 2008 R2 and click Next
10 On the Additional Domain Controller Options accept the default options and click Next
11 You might be prompted with the dialog shown below providing a warning that This computer has dynamically assigned IP address(es) This is not a problem when you are running your development environment on a domain controller Click Yes to dismiss the dialog
12 At this point the wizard will prompt you with a dialog information you a delegation for the DNS Server cannot be created because it cannot find the authoritative parent zone This is not a problem because the wizard will automatically configure the DNS of the VM to point to itself Click on the Yes button to dismiss this dialog
Creating a SharePoint Server 2013 Environment for Development and Testing Version 10
copy Critical Path Training 2012 All Rights Reserved 23
wwwCriticalPathTrainingcom
13 On the Location for Database Log Files and SYSVOL page accept all the default values and click Next
14 On the Directory Services Restore Mode Administrator Password page enter Password1 in both textboxes and click Next
15 On the Summary page click Next to start the process of configuring the new Active Directory domain
16 The wizard will display the dialog below to show you the progress of the configuration process You will be required to reboot when the configuration has been completed Check the option for Reboot on completion and then wait for the configuration to complete and the machine to reboot
17 After the VM reboots login to the server with wingtipadministrator | Password1
Configure Windows Update and Update the Server
In this section you will verify the server is fully patched and updated
1 Update the server using Windows Update
a) Selecting Start All Programs Windows Update
b) Select the Check for Updates link
c) Windows Update will the report how many updates are available Select all important and recommended updates and click the Install Updates button
d) If prompted select I accept the license terms for any updates that require it
e) Keep running Windows Update after each reboot and update install until it says there are no updates left to install
Creating a SharePoint Server 2013 Environment for Development and Testing Version 10
copy Critical Path Training 2012 All Rights Reserved 24
wwwCriticalPathTrainingcom
This step could take quite a bit of time so be patient
At this point you have a fully installed Active Directory Domain Controller for the Wingtipcom domain hosted on the server WingtipServer
Exercise 4 Install SQL Server 2012
In this exercise you will install SQL Server 2012 that will be used to store all required databases
1 Download the SQL Server 2012 Evaluation Edition specifically the DVD x64 ISO image to the host computer from here httpwwwmicrosoftcombetaexperiencepdSQL2012EvalCTAenusdefaultaspx or you can use your own licensed copy
2 Mount the SQL Server 2012 ISO to the WingtipServer VM
a) On the host computer open the Hyper-V Manager
b) Right-click the VM WingtipServer and select Settings
c) Select DVD Drive in the left-hand panel
d) In the right-hand panel select Image File and browse to the ISO file that contains SQL Server 2012 and click OK
3 Login to the WingtipServer VM as wingtipadministrator | Password1
Install SQL Server 2012
In this section you will install SQL Server 2012
1 If the AutoPlay dialog box is open click Run SETUPEXE If it isnrsquot use Windows Explorer to navigate to the DVD drive and execute the setupexe file in the root of the DVD drive
2 In the SQL Server Installation Center click Installation on the left-hand side
Creating a SharePoint Server 2013 Environment for Development and Testing Version 10
copy Critical Path Training 2012 All Rights Reserved 25
wwwCriticalPathTrainingcom
3 Next select New SQL Server stand-alone installation or add features to an existing installation
4 On the Setup Support Rules page the installer will check for issues before installing Click OK
5 On the Product Key page click the Specify a free edition radio box and select Evaluation then click Next
6 On the License Terms page click the I accept the license terms checkbox and click Next
7 On the Setup Support Rules page the installer will check for any problems with the server you are installing on Click Next when this completes
Creating a SharePoint Server 2013 Environment for Development and Testing Version 10
copy Critical Path Training 2012 All Rights Reserved 26
wwwCriticalPathTrainingcom
8 On the Support Role page select SQL Server Feature Installation and click Next
9 On the Feature Selection page check the following options and click Next
a) Instances Features
i) Database Engine Services
(1) Full-Text and Semantic Extractions for Search
b) Shared Features
i) Management Tools ndash Basic
(1) Management Tools ndash Complete
Creating a SharePoint Server 2013 Environment for Development and Testing Version 10
copy Critical Path Training 2012 All Rights Reserved 27
wwwCriticalPathTrainingcom
10 On the Installation Rules page click Next
11 On the Instance Configuration page click Next
12 On the Disk Space Requirements page click Next
13 On the Server Configuration page do the following and click Next
a) On the Service Account tab change the Startup Type for the SQL Server Agent to Automatic
14 On the Database Engine Configuration page do the following and click Next
a) On the Server Configuration tab click Add Current User
b) On the FILESTREAM tab
i) Check Enable FILESTREAM for Transact-SQL Access
ii) Check Enable FILESTREAM for file IO access
15 On the Error Reporting page click Next
16 On the Installation Configuration Rules page click Next
17 On the Ready to Install page click Install
Installation of SQL Server 2012 will take some time please be patient
18 When the installation completes the Complete page will be shown Click Close
At this point you have now successfully installed SQL Server 2012
Creating a SharePoint Server 2013 Environment for Development and Testing Version 10
copy Critical Path Training 2012 All Rights Reserved 28
wwwCriticalPathTrainingcom
Exercise 5 Install amp Configure SharePoint Server 2013
In this exercise you will install SharePoint 2013
1 Download the SharePoint Server 2013 to the host computer from here httptechnetmicrosoftcomen-USevalcenterhh973397aspx
2 Mount the SharePoint Server 2013 ISO to the WingtipServer VM
a) On the host computer open the Hyper-V Manager
b) Right-click the VM WingtipServer and select Settings
c) Select DVD Drive in the left-hand panel
The file that Microsoft provides is saved in the IMG format Hyper-V Manager wonrsquot allow you to mount an IMG file so rename it to ISO before mounting it
d) In the right-hand panel select Image File and browse to the ISO file that contains SharePoint Server 2013 and click OK
Create SharePoint Service Accounts amp Grant Rights to SQL Server 2012
In this section you will create the necessary service accounts that will be used by SharePoint in Active Directory and grant them necessary rights in SQL Server 2012
PowerShell Script Alert The creation of users and granting them rights to SQL Server 2012 steps in this section are automated in the Windows PowerShell script CreateSpServiceAccountsps1 found in the files that accompany this setup guide Open the script
and read the header for documentation on how to use it
1 Open the Active Directory Users and Computers Start Administrative Tools Active Directory Users and Computers
2 Expand the tree in the left-hand pane to see the Users OU Select the Users OU
3 Create a new user SP_Farm
a) In the toolbar select Action New User
Creating a SharePoint Server 2013 Environment for Development and Testing Version 10
copy Critical Path Training 2012 All Rights Reserved 29
wwwCriticalPathTrainingcom
b) Set the userrsquos Full Name amp User Login Name to SP_Farm and click Next
c) In the password dialog enter the following and click Next
i) Password (and Confirm Password) Password1
ii) User must change password at next login unchecked
iii) User cannot change password unchecked
iv) Password never expires checked
v) Account is disabled unchecked
Creating a SharePoint Server 2013 Environment for Development and Testing Version 10
copy Critical Path Training 2012 All Rights Reserved 30
wwwCriticalPathTrainingcom
vi) Click Finish
4 Repeat the previous step to create two more accounts
a) SP_Content
b) SP_Services
At this point you have created all the necessary service accounts
Install SharePoint Server 2013 Prerequisites
In this section you will install the SharePoint Server 2013 Prerequisites
1 Ensure you are logged into the WingtipServer VM using the account wingtipadministrator | Password1
2 If the AutoPlay dialog box is open click Run splashhta If it isnrsquot use Windows Explorer to navigate to the DVD drive and execute the splashhta file in the root of the DVD drive
Creating a SharePoint Server 2013 Environment for Development and Testing Version 10
copy Critical Path Training 2012 All Rights Reserved 31
wwwCriticalPathTrainingcom
3 Click the Install Software Prerequisites link
4 In the Microsoft SharePoint 2013 Products Preparation Tool window click Next
5 On the License Terms for Software Products page
a) Check I accept the terms of the License Agreement(s)
b) Click Next
6 The tool will download and install all prerequisites for SharePoint Server 2013 This will take some time It may prompt you to reboot the server If so reboot the server and login using wingtipadministrator | Password1
Creating a SharePoint Server 2013 Environment for Development and Testing Version 10
copy Critical Path Training 2012 All Rights Reserved 32
wwwCriticalPathTrainingcom
7 When the prerequisite installer is complete it will present a summary of everything it did
8 Click Finish
9 Restart the WingtipServer VMhellip some additional installations and changes that the prerequisite installer did will require a restart before installing SharePoint Server 2013
At this point all prerequisites required by SharePoint Server 2013 have been installed and any necessary configuration changes have been applied to the server However it is strongly recommend that you run Windows Update and install any pending updates Further Microsoft recommends installing the following hotfixes if they are not already installed
KB2554876 The SharePoint Parsing Process Crashes in Windows Server 2008 R2
KB2708075 IIS 75 Configurations are not Updated when you use the ServerManager Class to Commit Configuration Changes
KB2759112 Hotfix is Available for NET Framework 45 that Resolves an ASPNET Race Condition Issue in Windows Server 2008 R2 Windows Server 2008 R2 SP1
KB2765317 Hotfix is Available for NET Framework 45 that Resolves an ASPNET Race Condition Issue in Windows
8 Windows RT and Windows Server 2012
Install SharePoint Server 2013
In this section you will install SharePoint Server 2013
1 Ensure you are logged into the WingtipServer VM using the account wingtipadministrator | Password1
2 If the AutoPlay dialog box is open click Run splashhta If it isnrsquot use Windows Explorer to navigate to the DVD drive and execute the splashhta file in the root of the DVD drive
Creating a SharePoint Server 2013 Environment for Development and Testing Version 10
copy Critical Path Training 2012 All Rights Reserved 33
wwwCriticalPathTrainingcom
3 Click Install SharePoint Server
4 When prompted to Enter your Product Key enter the key you obtained for the trial install and click Continue
5 On the Read the Microsoft Software License Terms page check the I accept the terms of this agreement checkbox and click Continue
6 On the Choose a file location page click Install Now
Creating a SharePoint Server 2013 Environment for Development and Testing Version 10
copy Critical Path Training 2012 All Rights Reserved 34
wwwCriticalPathTrainingcom
7 When the installation is complete select the Run the SharePoint Products Configuration Wizard checkbox and click Close
8 On the Welcome to SharePoint Products page click Next
a) If prompted to start or reset services click Yes
9 On the Connect to a server farm page select Create a new server farm and click Next
10 On the Specify Configuration Database Settings page use the following to complete the page and click Next
a) Database server WINGTIPSERVER
b) Database name SharePoint_Config
c) Username WINGTIPSP_Farm
d) Password Password1
Creating a SharePoint Server 2013 Environment for Development and Testing Version 10
copy Critical Path Training 2012 All Rights Reserved 35
wwwCriticalPathTrainingcom
11 On the Specify Farm Security Settings page for the Passphrase and Confirm Passphrase boxes enter Password1 and click Next
12 On the Configure SharePoint Central Administration Web Application page check the Specify port number checkbox and enter a value of 9999 then Click Next
Creating a SharePoint Server 2013 Environment for Development and Testing Version 10
copy Critical Path Training 2012 All Rights Reserved 36
wwwCriticalPathTrainingcom
13 On the Completing the SharePoint Products Configuration Wizard page click Next
14 When the installer completes it will display the Confirmation Successful page
15 Click Finish This will launch Internet Explorer to go through the configuration process
Creating a SharePoint Server 2013 Environment for Development and Testing Version 10
copy Critical Path Training 2012 All Rights Reserved 37
wwwCriticalPathTrainingcom
At this point you have successfully installed SharePoint Server 2013
Configure SharePoint Server 2013
In this section you will create a new SharePoint Server 2013 farm and perform minimal configuration tasks
After installing SharePoint Sever 2013 the SharePoint Products Configuration Wizard will launch the browser-based Initial Farm Configuration Wizard
1 In the first page of the wizard you are prompted to Help Make SharePoint Better Select which ever option you want and click OK
2 On the Welcome page that asks How do you want to configure your SharePoint farm click the Start the Wizard button
3 On the Services page do the following and then click Next
a) Service Account Select Create new managed account
i) Username WINGTIPSP_Services
ii) Password Password1
b) Services Uncheck the following services
Creating a SharePoint Server 2013 Environment for Development and Testing Version 10
copy Critical Path Training 2012 All Rights Reserved 38
wwwCriticalPathTrainingcom
i) Access Services 2010
ii) App Management Service
In SharePoint Server 2013 the Search Service Application processes specifically noderunnerexe can consume a considerable amount of memory and processor time If you are not going to work with search you might consider unchecking this option for now You can always go back into Central Administration and create a new instance of the Search Service Application at a later date if you need it
Why did we remove Access Services 2010 amp App Management Service service applications The Access Services 2010 service application is included for backwards compatibility and isnrsquot needed in new installations unless you are migrating solutions built with Access Services 2010 from SharePoint Server 2010 (if so you can create this service application later within Central Administration Application Management Manage Service Applications) The App Management Service service application will be created in a later step in this setup guide therefor it is skipped here
4 The creation of the service applications can take quite a while so be patient If it exceeds 20 minutes it is fairly safe to assume the page is hung up One option is to close the browser then launch Central Administration (Start All Programs Microsoft SharePoint 2013 Products SharePoint 2013 Central Administration) and look at the Service Application page (Application Management Manage Service Applications) to see if they were all created
Configure DNS
In this section you will configure DNS for hosting SharePoint sites amp Apps
1 Ensure you are logged into the WingtipServer VM using the account wingtipadministrator | Password1
2 Open the DNS window Start Administrative Tools DNS
3 Expand the hierarchy on the left-hand side of the window until you get to DNS WINGTIPSERVER Forward Lookup Zones wingtipcom
4 Create a new wildcard so all requests for http[]wingtipcom will be forwarded to our SharePoint machine
a) Next right-click wingtipcom and select New Host (A or AAAA)
Creating a SharePoint Server 2013 Environment for Development and Testing Version 10
copy Critical Path Training 2012 All Rights Reserved 39
wwwCriticalPathTrainingcom
b) In the New Host dialog enter the following and click OK
i) Alias Name
ii) IP Address 192168150102 Then click Add Host The following figure shows how this looks
This new record is telling DNS to forward any request for http[]wingtipcom to the webserver WINGTIPSERVER where the
requests will be served by SharePoint
5 Verify this DNS entry is working
a) Open Windows PowerShell Start All Programs Accessories Windows PowerShell Windows PowerShell
b) Run the following commands and press ENTER
PS CUsersAdministratorgt nslookup somethingwingtipcom PS CUsersAdministratorgt nslookup somethingappswingtipcom
c) You should get a response that points to the WingtipServer server as shown in the following figure
Creating a SharePoint Server 2013 Environment for Development and Testing Version 10
copy Critical Path Training 2012 All Rights Reserved 40
wwwCriticalPathTrainingcom
Configure SharePoint Server 2013 for Host-Named Site Collections amp Create Initial Site
Collections
In this section you will create new SharePoint 2013 site collections for testing and hosting apps
Microsoft recommends to create host-named site collections (HNSC) instead of using the path based site collection addressing The difference is the following a path based site created at something such as httpintranetwingtipcomsitesdevtest as an HNSC site would be more like httpdevtestwingtipcom This is how it works in the cloud (Office 365) and it scales much better for on-prem
deployments This setup guide will show you how to setup your environment to create HNSC The only downside to this approach is that you canrsquot create site collections within Central Administration it must be done via Windows PowerShell API (because Central Administration doesnrsquot instruct you where to put the site
This is implemented in various parts First DNS must be configured to send all requests for httpwingtipcom to a Web Application
(implemented in the last section) Second this Web Application must be extended with SharePoint and have no host header bindings (so it handles all requests) Third it must have a default site collection at the root of the Web Application but it will not be used for anything (in fact it doesnrsquot need a template assigned to it)
You can read more about HNSCrsquos on TechNet httptechnetmicrosoftcomen-uslibrarycc424952aspx
PowerShell Script Alert The steps in this section are automated in the script SetupSharePointForHNSCps1 found in the files that
accompany this setup guide Open the script and read the header for documentation on how to use it
1 Ensure you are logged into the WingtipServer VM using the account wingtipadministrator | Password1
2 Open Central Administration Start All Programs Microsoft SharePoint 2013 Products SharePoint 2013 Central Administration
3 Select Application Management Manage Web Applications
4 Delete the default Web Application created by the configuration wizard
a) Delete the existing default Web Application
i) Select the Web Application SharePoint ndash 80 the one with the URL of httpwingtipserver and click Delete in the ribbon
ii) When prompted to delete the associated IIS Web Site amp SQL Server database select both options to delete them and click OK
The reason you are doing this is because the setup wizard you ran previously when creating the service applications automatically created it The problem is that it used the same identity (WINGTIPSP_Services) for the app pool that is used for all the service
applications which is not desired
5 Create a new Web Application to handle Host-Named Site Collections (HNSC)
Creating a SharePoint Server 2013 Environment for Development and Testing Version 10
copy Critical Path Training 2012 All Rights Reserved 41
wwwCriticalPathTrainingcom
a) In the ribbon click the New button
b) In the Create New Web Application dialog enter the following values in the properties and click OK Leave all properties not mentioned
i) Select the radio button Create a new IIS web site
(1) Name SharePoint HNSC Host ndash 80
(2) Port 80
ii) Application Pool
(1) Select the radio button Create a new application pool
(a) Application Pool Name SharePoint Default HNSC AppPool
(b) Select a security account for this application pool WINGTIPSP_Content
If WINGTIPSP_Content is not listed as an available managed account create it by selecting the appropriate option and using
Password1 for the password
iii) Database Name and Authentication
(1) Database Name WSS_Content_HNSCDefaultHost
c) This process will take a few moments At the end of the process SharePoint will ask if you want to create a site collection You do but you donrsquot want to do it through the browser as this will not be a HNSC To create a HNSC you must create it via Windows PowerShell
6 Create a default not template site collection at the root of the web application
a) Open SharePoint 2013 Management Shell Start All Programs Microsoft SharePoint 2013 Products SharePoint 2013 Management Shell
7 Create Site Collections for Testing SharePoint amp SharePoint Apps
a) Open SharePoint 2013 Management Shell Start All Programs Microsoft SharePoint 2013 Products SharePoint 2013 Management Shell
b) Get a reference to the HNSC web application you just created by running the following Windows PowerShell script in the SharePoint 2013 Management Shell
$hnscWebApp = Get-SPWebApplication | Where-Object $_DisplayName -eq SharePoint HNSC Host - 80
c) Create a non-templated site at the root of the web application for Workflow to connect to by executing the following Windows PowerShell script in the SharePoint 2013 Management Shell
New-SPSite -Name Root HNSC Site Collection -Url httpwingtipcom -HostHeaderWebApplication $hnscWebApp -OwnerAlias WINGTIPAdministrator
d) Create a team site by executing the following Windows PowerShell script in the SharePoint 2013 Management Shell
New-SPSite -Name Wingtip Intranet -Url httpintranetwingtipcom ndashHostHeaderWebApplication $hnscWebApp -Template STS0 -OwnerAlias WINGTIPAdministrator
e) Create a developer site by executing the following Windows PowerShell script in the SharePoint 2013 Management Shell
New-SPSite -Name Wingtip Developer Site -Url httpdevwingtipcom ndashHostHeaderWebApplication $hnscWebApp -Template DEV0 -OwnerAlias WINGTIPAdministrator
You can only create debug and test apps using a developer site
At this point you now have a site collection to use as a team site (httpintranetwingtipcom) and to develop and test custom SharePoint apps (httpdevwingtipcom)
Creating a SharePoint Server 2013 Environment for Development and Testing Version 10
copy Critical Path Training 2012 All Rights Reserved 42
wwwCriticalPathTrainingcom
Configure SharePoint 2013 for Hosting Apps
In this setup you will setup your SharePoint 2013 environment for hosting apps
PowerShell Script Alert Everything in the next immediate step is provided in the script ConfigureSpFarmForAppsps1 found in the
files that accompany this setup guide Open the script and read the header for documentation on how to use it
1 Ensure you are logged into the WingtipServer VM using the account wingtipadministrator | Password1
2 Create the necessary SharePoint App Management service applications and start the necessary services via Windows PowerShell
a) Open SharePoint 2013 Management Shell Start All Programs Microsoft SharePoint 2013 Products SharePoint 2013 Management Shell
b) Execute the following Windows PowerShell script in the SharePoint 2013 Management Shell
$appHostDomain = appswingtipcom $adminService = Get-Service -Name spadminv4 if ($adminServiceStatus -ne Running) Start-Service $adminService $timerService = Get-Service -Name sptimerv4 if ($timerServiceStatus -ne Running) Start-Service $timerService Set-SPAppDomain $appHostDomain $appMgmtSvcInstance = Get-SPServiceInstance | Where-Object $_GetType()Name -eq AppManagementServiceInstance if ($appMgmtSvcInstanceStatus -ne Online) Start-SPServiceInstance -Identity $appMgmtSvcInstance $appSubSettingSvcInstance = Get-SPServiceInstance | Where-Object $_GetType()Name -eq SPSubscriptionSettingsServiceInstance if ($appSubSettingSvcInstanceStatus -ne Online) Start-SPServiceInstance -Identity $appSubSettingSvcInstance $appPoolServiceApps = Get-SPServiceApplicationPool -Identity SharePoint Web Services Default $appSubSvc = New-SPSubscriptionSettingsServiceApplication ndashApplicationPool $appPoolServiceApps ndashName Settings Service Application ndashDatabaseName SettingsServiceDB $proxySubSvc = New-SPSubscriptionSettingsServiceApplicationProxy ndashServiceApplication $appSubSvc $appAppSvc = New-SPAppManagementServiceApplication -ApplicationPool $appPoolServiceApps -Name App Management Service Application -DatabaseName AppServiceDB $proxyAppSvc = New-SPAppManagementServiceApplicationProxy -ServiceApplication $appAppSvc Set-SPAppSiteSubscriptionName -Name app -Confirm$false
3 Verify the script configured SharePoint 2013 for hosting apps
a) Open Central Administration Start All Programs Microsoft SharePoint 2013 Products SharePoint 2013 Central Administration
b) Verify service applications created
i) Open the Service Applications page Application Management Manage Service Applications
ii) Verify you have two service applications created
(1) App Management Service Application
(2) Settings Service Application
c) Verify service instances are running
i) Open the Services on Server page System Settings Manage Services on Server
ii) Verify the following services are Started
(1) App Management Service
(2) Microsoft SharePoint Foundation Subscription Settings Service
Creating a SharePoint Server 2013 Environment for Development and Testing Version 10
copy Critical Path Training 2012 All Rights Reserved 43
wwwCriticalPathTrainingcom
d) Verify App URLs are correct
i) Open the Configure App URLs page Apps Configure app URLs
ii) Verify the following
(1) App Domain appswingtipcom
(2) App Prefix app
At this point your SharePoint Server 2013 environment is ready to host SharePoint apps
Creating a SharePoint Server 2013 Environment for Development and Testing Version 10
copy Critical Path Training 2012 All Rights Reserved 44
wwwCriticalPathTrainingcom
Start the SharePoint 2013 Sandbox Service
By default the service that executes sandbox solutions is not running In this step you will start the service
1 Open Central Administration Start All Programs Microsoft SharePoint 2013 Products SharePoint 2013 Central Administration
2 Open the Services on Server page System Settings Manage Services on Server
3 Click the Start link to the left of the Microsoft SharePoint Foundation Sandboxed Code Service
At this point your installation can support sandbox solutions
Configure CRL Verification for Disconnected Environments
SharePoint periodically ldquophones homerdquo to a specific address hosted by Microsoft under certain conditions When your environment is disconnected this can cause an unnecessary delay or failures when starting up the sandbox The following steps outline a workaround to bypass this check
1 Launch Notepad as an administrator Start All Programs Accessories right-click Notepad and select Run as Administrator
2 Open the hosts file by selecting File Open and finding the file
cWindowsSystem32Driversetchosts
3 Add the following line to the end of the file
127001 crlmicrosoftcom
4 Save and close the hosts file
Update Internet Explorer to Bypass the App URL amp Automatically Login to SharePoint Sites
In this section you will update Internet Explorer to add the App hosting URL to the bypass list so you can navigate to the domain after deploying SharePoint hosted apps
1 Ensure you are logged into the WingtipServer VM using the account wingtipadministrator | Password1
1 Launch Internet Explorer Start All Programs Internet Explorer
2 Configure Internet Explorer to bypass the App URL
a) In the top-right corner click the gear icon and select Internet Options
b) On the Security tab select the Local Intranet and click the Sites button
c) Uncheck the box next to Automatically detect intranet network
d) Click the Advanced button and add two entries to the Exceptions list
i) httpwingtipcom
ii) httpappswingtipcom
Creating a SharePoint Server 2013 Environment for Development and Testing Version 10
copy Critical Path Training 2012 All Rights Reserved 45
wwwCriticalPathTrainingcom
e) Click the Close button followed by the OK button multiple times to close out of the dialogs
At this point Internet Explorer is setup to bypass your app URL so you can navigate to apps (httpappswingtipcom) as well as automatically authenticate to sites hosted at httpwingtipcom
Exercise 6 Configure SharePoint to Host My Sites
In this exercise you will configure SharePoint to create and host My Sites In order to host My Sites you will need a new Web Application that is configured for Self-Service Site Creation and has a My Site Host site collection
1 Create a new SharePoint web application to host the My Sites
a) Ensure you are logged into the WingtipServer VM using the account wingtipadministrator | Password1
b) Open Central Administration Start All Programs Microsoft SharePoint 2013 Products SharePoint 2013 Central Administration
c) Select Application Management Manage Web Applications
d) In the ribbon click the New button
e) In the Create New Web Application dialog enter the following values in the properties and click OK Leave all properties not mentioned
i) Select the radio button Create a new IIS web site
(1) Name SharePoint MySite Host ndash 80
(2) Port 80
(3) Host Header mywingtipcom
ii) Application Pool
(1) Select the radio button Use existing application pool
(a) Application Pool Name SharePoint Default HNSC AppPool
iii) Database Name and Authentication
(1) Database Name WSS_Content_SocialWingtipCom
f) This process will take a few moments At the end of the process SharePoint will ask if you want to create a site collection Click the link provided to create a new site collection amp continue to the next step
2 Create a My Site Host site collection
a) On the Create Site Collection page use the following information to complete the form and click OK
Creating a SharePoint Server 2013 Environment for Development and Testing Version 10
copy Critical Path Training 2012 All Rights Reserved 46
wwwCriticalPathTrainingcom
i) Title My Site Host
ii) URL
iii) Template Selection My Site Host (found under the Enterprise tab)
iv) Primary Site Collection Administrator WINGTIPAdministrator
3 Update the Web Application to host my sites
a) Within Central Administration in the left-hand navigation navigate to the Manage Web Applications page Application Management Manage Web Applications
b) Select the SharePoint MySite Host ndash 80 web application
c) Click the Managed Paths button in the ribbon
d) Remove the sites managed path and add two new managed paths and click OK
i) personal ndash Wildcard inclusion
ii) my ndash Explicit inclusion
e) With the SharePoint MySite Host ndash 80 web application still selected click the Self-Service Site Creation button
f) On the Self-Service Site Creation page use the following values to complete the form and click OK
i) Site Collections On
4 Next configure the User Profile Service Application My Site settings
a) Browse to the User Profile Service Application management page Application Management Manage Service Applications User Profile Service Application
b) Under the My Site Settings section click the Setup My Sites
c) On the My Site Settings page use the following information to complete the form and click OK
i) My Site Host httpmywingtipcom
ii) Personal Site Location personal
At this point your SharePoint deployment is now configured to automatically create My Sites under httpmywingtipcomPersonalUserName when users first browse to them
Exercise 7 Install amp Configure Workflow Manager 10
In this exercise you will configure the WingtipServer VM to host Workflow Manager 10 and connect it to your SharePoint installation
1 Ensure you are logged into the WingtipServer VM using the account wingtipadministrator | Password1
Verify SQL Server 2012 Network Configuration
In this section yoursquoll verify the network configuration is correct for SQL Server 2012 in order to install Workflow Manager 10
Creating a SharePoint Server 2013 Environment for Development and Testing Version 10
copy Critical Path Training 2012 All Rights Reserved 47
wwwCriticalPathTrainingcom
1 Configure SQL Server 2012 to have the TCPIP connection protocol enabled
a) Open the SQL Server Configuration Manager Start All Programs Microsoft SQL Server 2012 Configuration Tools SQL Server Configuration Manager
b) Expand the hierarchy on the left-hand side to the following SQL Server Connection Manager (local) SQL Server Network Configuration Protocols for MSSQLSERVER
c) In the main window if TCPIP is Disabled right-click TCPIP and select Enable
d) When prompted with a warning click OK
2 SQL Server must be restarted in order to reflect this change
a) In the hierarchy on the left-hand side of the window select SQL Server Services
b) Right-click SQL Server (MSSQLSERVER) and select Restart
At this point SQL Server is now configured with the TCPIP protocol enabled a requirement when configuring Service Bus
Configure the Workflow Service Account with the Necessary Rights
In this section you will verify the service account that will run Workflow Manager and Service Bus
1 Ensure you are logged into the WingtipServer VM using the account WINGTIPadministrator | Password1
2 Grant the WINGTIPSP_Content account securityadmin amp dbcreator permissions in SQL Server
a) Launch SQL Server Management Studio Start All Programs Microsoft SQL Server 2012 SQL Server Management Studio
b) When SQL Server Management Studio launches within the Connect to Server dialog login using the default settings and click Connect
c) In the Object Explorer tool window expand the WINGTIPSERVER server hierarchy to the Security Logins node
d) Find the WINGTIPSP_Content account right-click it and select Properties
Creating a SharePoint Server 2013 Environment for Development and Testing Version 10
copy Critical Path Training 2012 All Rights Reserved 48
wwwCriticalPathTrainingcom
e) In the Select a page pane select Server Roles
f) Check securityadmin amp dbcreator and click OK
g) Close SQL Server Management Studio
3 Add the Workflow service account to the local administrators group
a) Open the Active Directory Users and Computers window Start Administrative Tools Active Directory Users and Computers
b) In the hierarchy on the left-hand side of the window expand it to the following Active Directory Users and Computers wingtipcom Builtin
c) In the main window right-click Administrators and select Properties
d) In the Administrators Properties dialog select the Members tab and click Add
e) In the Enter the object names to select box enter wingtipsp_content and click the Check Names button
f) In the Administrators Properties dialog click OK
g) Close the Active Directory Users and Computers window
At this point the service account that will host Workflow Manager and Service Bus has been configured correctly
Creating a SharePoint Server 2013 Environment for Development and Testing Version 10
copy Critical Path Training 2012 All Rights Reserved 49
wwwCriticalPathTrainingcom
Download amp Install Workflow Manager and Service Bus
In this section you will install Workflow Manager and Service Bus
1 Ensure you are logged into the WingtipServer VM using the account WINGTIPSP_Content | Password1
It is important you are logged in as the user that will run workflow when you install amp configure Workflow Manager and Service Bus
2 Launch the Web Platform Installer Start All Programs Microsoft Web Platform Installer
a) If the Web Platform Installer is not present on your machine you can download amp install it from here httpwwwmicrosoftcomwebdownloadsplatformaspx
If you do not have internet access within the virtual machine it is possible to download everything needed for workflow using the command line version of the Web Platform Installer (WebPICMD) You can get WebPICMD from httplearniisnetpageaspx1072web-platform-installer-v4-command-line-webpicmdexe-preview-release Specifically for
workflow enter the following command to download Workflow Beta 1 and all prerequisites
webpicmd offline ProductsWorkflow Pathc[path]
3 When the Web Platform Installer loads execute a search for Workflow select Workflow Manager 10 and click Add
4 Click the Install button at the bottom of the Web Platform Installer 40 window
5 On the Prerequisites page click I Accept
Note The Web Platform Installer 40 may prompt you to keep certain products updated using Microsoft Update If it does select Use Microsoft Update when I check for updates (recommended) and click Continue
6 When the installer completes the following dialog will appear Click Continue and then Finish to start the configuration process
Creating a SharePoint Server 2013 Environment for Development and Testing Version 10
copy Critical Path Training 2012 All Rights Reserved 50
wwwCriticalPathTrainingcom
At this point Workflow Manager amp Service Bus are installed
Configure Workflow Manager and Service Bus
In this section you will install Workflow Manager and Service Bus
1 If the Workflow Manager Configuration Wizard is not open open it Start All Programs Workflow Manager 10 Workflow Configuration
2 On the Welcome page click Configure Workflow Manager with Default Settings (Recommended)
Creating a SharePoint Server 2013 Environment for Development and Testing Version 10
copy Critical Path Training 2012 All Rights Reserved 51
wwwCriticalPathTrainingcom
3 On the New Farm Configuration page do the following
a) In the section Configure Service Account set the credentials to
i) User ID sp_contentwingtipcom
ii) Password Password1
b) Check the Allow Workflow management over HTTP on this computer checkbox
Ensure the username is entered in the fully qualified UPN format not as the default shows in the installer (sp_contentwingtip) or the domainusername format
In a production environment you should be doing everything over SSL
c) Click the Test Connection button to verify the connection credentials before proceeding
Creating a SharePoint Server 2013 Environment for Development and Testing Version 10
copy Critical Path Training 2012 All Rights Reserved 52
wwwCriticalPathTrainingcom
d) In the Certificate Generation Key and Confirm Certificate Generation Key enter Password1 into both fields
4 Click the right arrow in the bottom right corner to proceed
5 On the Summary page review your settings and click the check at the bottom right of the widow to start the configuration process
Creating a SharePoint Server 2013 Environment for Development and Testing Version 10
copy Critical Path Training 2012 All Rights Reserved 53
wwwCriticalPathTrainingcom
6 After a few minutes the Configuration Progress screen will show that everything has been configured correctly
Creating a SharePoint Server 2013 Environment for Development and Testing Version 10
copy Critical Path Training 2012 All Rights Reserved 54
wwwCriticalPathTrainingcom
7 Click the check in the bottom right corner
At this point Workflow Manager amp Service Bus has been installed and a new Workflow Manager farm has been created The next step is to connect the SharePoint 2013 farm to the Workflow Manager farm
Connect SharePoint 2013 to Workflow Manager
In this section you will connect SharePoint 2013 and Workflow Manager together
1 Ensure you are logged into the WingtipServer VM using the account WINGTIPadministrator | Password1
2 Get the Workflow Manager endpoint
a) Open the Workflow Manager PowerShell console Start All Programs Workflow Manager 10
b) Execute the Windows PowerShell following cmdlet
Get-WFFarm | ft HttpPort
c) Take note of this port (12291) This port number is what you will use to connect the SharePoint 2013 farm to the Workflow Manager 10 farm
In production you should connect to the HTTPS port listed in the HttpsPort property when you run Get-WFFarm
d) Close the Workflow Manager PowerShell window
3 Connect the SharePoint 2013 farm to Workflow Manager
Creating a SharePoint Server 2013 Environment for Development and Testing Version 10
copy Critical Path Training 2012 All Rights Reserved 55
wwwCriticalPathTrainingcom
a) Open SharePoint 2013 Management Shell Start All Programs Microsoft SharePoint 2013 Products SharePoint 2013 Management Shell
b) Execute the following Windows PowerShell script in the SharePoint 2013 Management Shell
Register-SPWorkflowService ndashSPSite httpintranetwingtipcom ndashWorkflowHostUri httpwingtipserver12291 ndashAllowOAuthHttp
This script is telling SharePoint the endpoint it should use to talk to Workflow Manager as well as Workflow Manager the SharePoint site collection it should talk to for calls into the CSOM It is also configuring all communication over HTTP rather than HTTPS for performance reasons In production you should always use HTTPS
This step will take a moment with no feedback during the process Be patient
c) Close the SharePoint 2013 Management Shell
At this point the SharePoint 2013 farm is connected to the Workflow Manager 10 farm
Configure SharePoint User Profile Service Application AD Sync
Users in SharePoint 2013 are validated by Workflow Manager against SharePoint to ensure they have permissions to start a workflow This is done by looking up the user by their AD UserPrincipalName (UPN) attribute in the User Profile Service Application (UPA) If no matching user is found the workflow will be automatically cancelled by Workflow Manager In this section you will setup UPA to connect amp sync with the local Active Directory so user accounts in AD will have their UPN synchronized to UPA
1 Open Central Administration Start All Programs Microsoft SharePoint 2013 Products SharePoint 2013 Central Administration
2 Go to the User Profile Service Application management page Application Management Manage Service Applications User Profile Service Application
3 The first step is to configure the User Profile Service Application to allow for Active Directory (AD) synchronization
a) Under Synchronization select Configure Synchronization Settings
b) For Synchronization select Use SharePoint Active Directory Import and click OK
4 Next establish a connection to the wingtipcom AD
a) Under Synchronization select Configure Synchronization Connections
b) On the Synchronization Connections page select Create New Connection
c) Enter the following values on this form and click OK
i) Connection Name WINGTIPCOM AD
ii) Type Active Directory Import
iii) Connection Settings
(1) Fully Qualified Domain Name wingtipcom
(2) Authentication Provider Type Windows Authentication
(3) Account Name WINGTIPAdministrator
(4) Password (and Confirm Password) Password1
iv) Containers
(1) Click Populate Containers
(2) After it loads check the box next to WINGTP or click the Select All button below the box
5 Go back to the User Profile Service Application management page Application Management Manage Service Applications User Profile Service Application
6 Finally start a synchronization import
a) Under Synchronization select Start Profile Synchronization
Creating a SharePoint Server 2013 Environment for Development and Testing Version 10
copy Critical Path Training 2012 All Rights Reserved 56
wwwCriticalPathTrainingcom
b) Select Start Full Synchronization and click OK
c) You will be taken back to the User Profile Service Application management page Notice in the top-right corner there is a status block that reports how many profiles are in the UPA database Refresh the page to see it increase to a handful of profiles as the import process runs
At this point you have successfully configured the User Profile Service Application to import profiles from the local AD
Exercise 8 Install the Microsoft Office 2013 Professional Clients
In this exercise you will install the Microsoft Office 2013 client applications
1 Download the Office 2013 into the WingtipServer VM For this you need to create an Office 365 Trial account login to Office 365 go to the Admin Dashboard and then download the latest version httpwwwmicrosoftcomofficepreviewentry-office-preview
2 Download the SharePoint Designer 2013 into the WingtipServer VM from here httpwwwmicrosoftcomen-usdownloaddetailsaspxid=35491
3 Download the Visio Professional 2013 into the WingtipServer VM from here httptechnetmicrosoftcomen-usevalcenterhh973399
Install Microsoft Office Professional Plus 2013
In this section you will install the Microsoft Office 2013 clients
1 Ensure you are logged into the WingtipServer VM using the account WINGTIPadministrator | Password1
2 Execute the installer OfficeProfessionalPlus_English_x64exe
3 On the Read the Microsoft Software License Terms dialog click the checkbox next to I accept the terms of this agreement and click Continue
4 On the Choose the installation you want dialog click the Install Now button
5 The installer will proceed and install all the Office products
6 When the installer completes click the Close button
7 Apply your Office Professional Plus 2013 license key
a) Launch Word 2013 Start All Programs Microsoft Office 2013 Word 2013
b) In the First things first dialog select Use recommended settings and click Accept
c) In the Welcome to Office dialog that opens click the [X] icon in the top-right corner to close it
d) In the left-hand pane click Open Other Documents
e) In the left-hand pane click Account
f) In the Product Information section within the Activation Required box click Change Product Key
g) Enter your license key for Office Professional Plus 2013 check the box next to Attempt to automatically activate my product online and click Install
h) Click OK
At this point you have installed Office Professional Plus 2013
Install Microsoft Office Visio 2013
In this section you will install Microsoft Office 2013 Visio
1 Ensure you are logged into the WingtipServer VM using the account WINGTIPadministrator | Password1
2 Execute the installer VisioProfessional_English_x64exe
3 On the Read the Microsoft Software License Terms dialog click the checkbox next to I accept the terms of this agreement and click Continue
Creating a SharePoint Server 2013 Environment for Development and Testing Version 10
copy Critical Path Training 2012 All Rights Reserved 57
wwwCriticalPathTrainingcom
4 On the Choose the installation you want dialog click the Install Now button
5 The installer will proceed and install all Visio 2013
6 When the installer completes click the Close button
7 Apply your Visio 2013 license key
a) Launch Visio 2013 Start All Programs Microsoft Office 2013 Visio 2013
b) In the First things first dialog select Use recommended settings and click Accept
c) In the Welcome to Office dialog that opens click the X icon in the top-right corner to close it
d) In the left-hand pane click Open Other Documents
e) In the left-hand pane click Account
f) In the Product Information section within the Activation Required box click Change Product Key
g) Enter your license key for Visio 2013 check the box next to Attempt to automatically activate my product online and click Install
h) Click OK
At this point you have installed Visio 2013
Install Microsoft Office 2013 SharePoint Designer
In this section you will install Microsoft Office 2013 SharePoint Designer
1 Ensure you are logged into the WingtipServer VM using the account WINGTIPadministrator | Password1
2 Execute the installer SharePointDesigner_English_x64exe
3 On the Read the Microsoft Software License Terms dialog click the checkbox next to I accept the terms of this agreement and click Continue
4 On the Choose the installation you want dialog click the Install Now button
5 The installer will proceed and install all SharePoint Designer 2013
6 When the installer completes click the Close button
At this point you have installed SharePoint Designer 2013
Exercise 9 Install Visual Studio 2012
In this exercise you will install Visual Studio 2012
1 Ensure you are logged into the WingtipServer VM using the account WINGTIPadministrator | Password1
2 Start the install of Visual Studio 2012 Ultimate Trial by downloading the installer from here httpwwwmicrosoftcomvisualstudio11en-usdownloads
3 On the installation splash screen check the box next to I agree to the License terms and conditions and click the Next button
Creating a SharePoint Server 2013 Environment for Development and Testing Version 10
copy Critical Path Training 2012 All Rights Reserved 58
wwwCriticalPathTrainingcom
4 On the Optional Features to install dialog click Install
5 After some time the installer will complete Click the Launch button to launch Visual Studio 2012
Creating a SharePoint Server 2013 Environment for Development and Testing Version 10
copy Critical Path Training 2012 All Rights Reserved 59
wwwCriticalPathTrainingcom
6 In the Choose Default Environment Settings select Visual C Development Settings and click Start Visual Studio
7 Close Visual Studio 2012
At this point Visual Studio 2012 RTM is installed
Install Office amp SharePoint 2013 Developer Tools
In this section you will install the Office and SharePoint 2013 developer tools for Visual Studio
1 Ensure you are logged into the WingtipServer VM using the account WINGTIPadministrator | Password1
2 Launch the Web Platform Installer Start All Programs Microsoft Web Platform Installer
3 In the search box at the top-right corner of the Web Platform Installer 40 window type sharepoint and press Enter
4 Click the Add button to the right of Microsoft Office Developer Tools for Visual Studio 2012 - Preview 2
5 Click the Install button at the bottom of the Web Platform Installer 40 window
6 On the Prerequisites page click I Accept
Creating a SharePoint Server 2013 Environment for Development and Testing Version 10
copy Critical Path Training 2012 All Rights Reserved 60
wwwCriticalPathTrainingcom
At this point you have installed the SharePoint 2013 amp Office 2013 development tools in Visual Studio 2012
Creating a SharePoint Server 2013 Environment for Development and Testing Version 10
copy Critical Path Training 2012 All Rights Reserved 61
wwwCriticalPathTrainingcom
Appendix 1 Download Manifest
The following lists everything referenced that you will or may need to download in this environment
Windows Server 2008 R2 with Service Pack 1 (installer ISO)
o httptechnetmicrosoftcomen-usevalcenterdd459137aspx
Windows Server 2008 R2 with Service Pack 1 (prebuilt VHD)
o httpwwwmicrosoftcomdownloadsdetailsaspxFamilyId=9040a4be-c3cf-44a5-9052-a70314452305
Windows Server 2008 R2 Service Pack 1
o httpwwwmicrosoftcomen-usdownloaddetailsaspxid=5842
SQL Server 2012 Trial
o httpwwwmicrosoftcombetaexperiencepdSQL2012EvalCTAenusdefaultaspx
SharePoint Server 2013
o httptechnetmicrosoftcomen-USevalcenterhh973397aspx
Hotfixes for SharePoint Server 2013 (post-install)
o KB2554876 The SharePoint Parsing Process Crashes in Windows Server 2008 R2
o KB2708075 IIS 75 Configurations are not Updated when you use the ServerManager Class to Commit
Configuration Changes
o KB2759112 Hotfix is Available for NET Framework 45 that Resolves an ASPNET Race Condition Issue in
Windows Server 2008 R2 Windows Server 2008 R2 SP1
o KB2765317 Hotfix is Available for NET Framework 45 that Resolves an ASPNET Race Condition Issue in
Windows 8 Windows RT and Windows Server 2012
Web Platform Installer
o httpwwwmicrosoftcomwebdownloadsplatformaspx
Web Platform Installer ndash Command Line Version
o httplearniisnetpageaspx1072web-platform-installer-v4-command-line-webpicmdexe-preview-release
Workflow Manager 10
o Download using the Microsoft Web Platform Installer
Office 2013
o httpwwwmicrosoftcomofficepreviewentry-office-preview
SharePoint Designer 2013
o httpwwwmicrosoftcomen-usdownloaddetailsaspxid=35491
Visio Professional 2013
o httptechnetmicrosoftcomen-usevalcenterhh973399
Visual Studio 2012
o httpwwwmicrosoftcomvisualstudio11en-usdownloads
Office Developer Tools for Visual Studio 2012 ndash Preview 2
o Download using the Microsoft Web Platform Installer
Creating a SharePoint Server 2013 Environment for Development and Testing Version 10
copy Critical Path Training 2012 All Rights Reserved 62
wwwCriticalPathTrainingcom
Appendix 2 Windows PowerShell Script Manifest
The following lists all Windows PowerShell scripts that are provided with this setup guide
AddDisableLoopbackCheckRegKeyps1
o The following steps automate creating the registry key outlined as Method 2 in the Microsoft Knowledgebase article
httpsupportmicrosoftcomkb896861 using Windows PowerShell This key DisableLoopbackCheck will allow
you to browse SharePoint sites on the same machine Without this key (or following Method 1 in the KB article) you
would need to browse any SharePoint sites from a different computer than the one which SharePoint is installed on
ConfigureSpFarmForAppsps1
o Configures a SharePoint 2013 for hosting apps This ensures everything you need is installed running and
configured This is documented here httpmsdnmicrosoftcomen-uslibraryfp179923(v=office15)
CreateSpServiceAccountsps1
o Creates the minimal necessary service accounts for SharePoint Server 2013 SP_Farm SP_Content amp
SP_Services
SetupSharePointForHNSCps1
o Configures a SharePoint 2013 install for hosting Host-Named Site Collections (HNSC) This involves creating a Web
Application in SharePoint that has no host header bindings Using DNS all requests are mapped to this Web
Application You then create the site collections via PowerShell as you cant create HNSCs via the browser (Central
Administration)
Creating a SharePoint Server 2013 Environment for Development and Testing Version 10
copy Critical Path Training 2012 All Rights Reserved 63
wwwCriticalPathTrainingcom
Appendix 3 Create Sample Adventure Works Database
The following steps document downloading and installing the sample Adventure Works OLTP database provided by Microsoft
1 Launch Internet Explorer and navigate to httpmsftdbprodsamplescodeplexcom
2 Download the Adventure Works 2012 OLTP Script
3 Extract the ZIP into a folder on the desktop
4 Launch SQL Server Management Studio Start All Programs Microsoft SQL Server 2012 SQL Server Management Studio
5 When SQL Server Management Studio launches within the Connect to Server dialog login using the default settings and click Connect
6 Within SQL Server Management Studio select File Open File
7 Select the file instawdbsql from the extracted ZIP and click Open
8 If prompted to re-login to the database engine do it
9 Select Query SQLCMD Mode
10 Scroll down to line 42 the line that starts with the following
setvar SqlSamplesSourceDataPath
11 Change the folder location of where you unzipped the Adventure Works 2012 OLTP Script
12 Select Query Execute
13 When the script completes the AdventureWorks2012 database will have been created
Creating a SharePoint Server 2013 Environment for Development and Testing Version 10
copy Critical Path Training 2012 All Rights Reserved 64
wwwCriticalPathTrainingcom
Change Log
Change Version Description
August 22 2012 v 01 Pre-release for review
August 27 2012 v 02 Initial public release ndash install guide based on SharePoint Server Beta 2
August 28 2012 v 03 Updated URL for the site collection used to connect SharePoint to WAW
August 31 2012 v 04 Typo Removed SQL Server Analysis Services as part of the install Not required in a
SharePoint dev box (unless you are doing business intelligence which is not covered
in the guide)
Updated all references to Windows Azure Workflow to Workflow Manager the new
official name for the new workflow product
Updated SetupSharePointForHNSCps1 script to lookup HNSC Web Application by
name rather than URL which is more reliable
Typo Updated WingtipAllUp public NIC to use a different IP than the WingtipDC
Typo Replaced a reference to WingtipServer with WingtipDC
Typo Fixed handful of minor typos
September 1 2012 v 05 Removed SQL Server Reporting Services from install guide
Added step to uncheck IErsquos ldquoAutomatically detect proxyrdquo
Added post workflow install steps to setup User Profile Service Application to sync with
local Active Directory
September 5 2012 v 06 Added step to create a default root site collection in the HNSC web app
Updated minor typos and added extra notes for context
Updated PowerShell script SetupSharePointForHNSCps1 to remove content
database of default Web Application when setting up HNSC Web App
Added a new exercise 8 (after SharePoint install amp config and before the Workflow
install and config) to setup support for My Sites
October 20 2012 v 07 Updated script SetupSharePointForHNSCps1 to fix a bug where it would fail on line
111 if you didnrsquot already have a WINGTIPSP_Content managed account
Added section to bypass SharePointrsquos check for crlmicrosoftcom
Updated workflowrsquos registration PowerShell script to point to
httpintranetwingtipcom
Switched order of post-SharePoint install to setup HSNC hosting before configuring for
hosting apps
November 29 2012
v 10 Changed setup guide to use a single VM instead of two VMs
Updated guide for SharePoint 2013 RTM
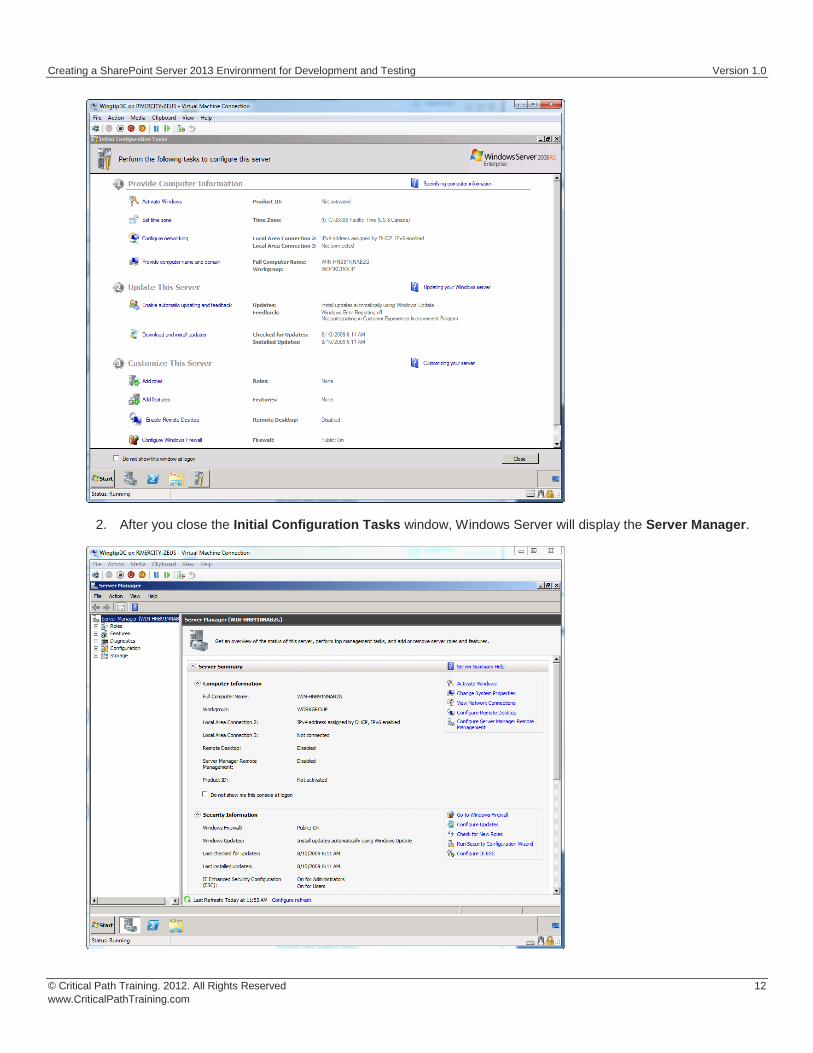
Creating a SharePoint Server 2013 Environment for Development and Testing Version 10
copy Critical Path Training 2012 All Rights Reserved 13
wwwCriticalPathTrainingcom
3 Configure the Administrator account so that its password does not expire
a) Inside the Configuration node of the Server Manager navigate to Local Users and Groups Users (as shown in the following screenshot) and locate the local Administrator account
b) Right-click on the Administrator account and click Properties
c) In the Administrator Properties dialog unselect the option for User must change password at next logon and select the option for Password never expires Click OK
4 Rename the computer name of the VM
a) In the Server Manager navigate to the top-level node to display the Server Summary page Click Change System Properties
b) On the Computer Name tab of the System Properties dialog click the Change button
c) Enter a new computer name of WingtipServer and click OK
Creating a SharePoint Server 2013 Environment for Development and Testing Version 10
copy Critical Path Training 2012 All Rights Reserved 14
wwwCriticalPathTrainingcom
5 After changing the computer name you will be prompted to restart the VM Choose OK to restart After the VM has restarted log in again using [administrator | Password1] (username | password)
6 Disable Windows Firewall and Enhanced Security Configuration
a) In the Server Manager navigate to the top-level node to display the Server Summary page Inside the Security Information section locate the links for Go to Windows Firewall and Configure IE ECS
b) Click on Configure IE ECS link Disable Enhanced Security Configuration for both Administrators and Users by selecting the Off radio buttons and click OK
c) Now click the Go to Windows Firewall link to display the page for the Windows Firewall Click on the Windows Firewall Properties link at the bottom of the Overview section
d) In the Domain Profile tab of the Windows Fire dialog change the Firewall state property setting from On to Off Click to Apply button to save your changes
e) Once you have turned off the firewall in the Domain Profile tab go to the Private profile tab and the Public profile tab and follow the same steps to disable the firewall for these profiles as well
f) Click OK to dismiss the Windows Firewall dialog once you have turned off the firewall for all three profiles
7 Enable Remote Desktop for your VM
a) In the Server Manager navigate to the top-level node to display the Server Summary page Inside the Computer Information section locate and click the link for Configure Remote Desktop
b) In the Remote tab of the System Properties dialog select the last option for Allow connections only from computers running Remote Desktop with Network Level Authentication Click OK to save changes and dismiss the System Properties dialog
Creating a SharePoint Server 2013 Environment for Development and Testing Version 10
copy Critical Path Training 2012 All Rights Reserved 15
wwwCriticalPathTrainingcom
8 Enable the Windows Server Features for the Desktop Experience and the PowerShell Integrated Scripting Environment
a) In Server Manager choose Add Feature to bring up the Add Features Wizard dialog
b) Select the feature Desktop Experience
When you first click the checkbox for the Desktop Experience the wizard will prompt you with the following dialog to add support for Ink and Handwriting Services Click the Add Required Features button to continue
c) Scroll down the list of features in the Add Features Wizard dialog and select the feature Windows PowerShell Integrated Scripting Environment (ISE)
Creating a SharePoint Server 2013 Environment for Development and Testing Version 10
copy Critical Path Training 2012 All Rights Reserved 16
wwwCriticalPathTrainingcom
When you first click the checkbox for the Windows PowerShell Integrated Scripting Environment (ISE) the wizard will prompt you with the following dialog to add support for NET Framework 351 Features Click the Add Required Features button to continue
d) Click the Next button on the Add Features Wizard dialog to continue with the install
e) On the Confirm Installation Selection wizard page click the Install button
f) When you see the Installation Results screen the Add Features Wizard informs you a computer restart is required Click Close button to dismiss this dialog
9 After the VM has restarted log in again using [administrator | Password1] (username | password)
Configure the Virtual Machinersquos Networking Setup
In this section yoursquoll configure the two NICrsquos you added to the VM in previous steps One NIC (Internal LAN) will be used to communicate with other VMs in this environment while the other (External LAN) will be used to connect to the internet
1 Configure the NIC that is linked to the Internal LAN network
a) Open the Network Connections dialog by pressing Start enter view network connections in the search box Click the View Network Connections shortcut
b) Two network connections will be shown but only one will show as connected
The connected one is the one that is connected to the Internal LAN network The other one is currently ldquounpluggedrdquohellip this is why we didnrsquot connect a network to the second network when initially configuring the VM as this makes it easier to see which NIC is which in the VM
c) Rename the two NICrsquos
i) Right-click the connected NIC and select Rename Give it a name of Internal LAN
Creating a SharePoint Server 2013 Environment for Development and Testing Version 10
copy Critical Path Training 2012 All Rights Reserved 17
wwwCriticalPathTrainingcom
ii) Right-click the disconnected NIC and select Rename Give it a name of External LAN
d) Right-click the Internal LAN NIC and select Properties
e) In the Local Area Connection Properties dialog select the Internet Protocol Version 4 (TCPIPv4) item and click Properties
f) Enter the following information into the resulting dialog to configure the NICrsquos IP settings
i) Use the Following IP Address
(1) IP Address 192168150102
(2) Subnet mast 2552552550
(3) Default Gateway 192168150102
ii) Use the Following DNS Server Addresses
(1) Preferred DNS Server 192168150102
g) Click OK to accept the IP settings and Close to accept the changes to the NIC
Why not use 101 as the start NIC When you created the virtual internal network Hyper-V created a virtual NIC on the host computer If you set the IP of that NIC to 192168150101 you can use the Remote Desktop Connection app in Windows to connect to your virtual machines and easily copy-paste amp share drives
2 Configure the NIC that is linked to the External LAN network
a) Open the Network Connections window if it is not still open using the same steps from the previous step
b) Right-click the External LAN NIC and select Properties
c) In the Local Area Connection Properties dialog select the Internet Protocol Version 4 (TCPIPv4) item and click Properties
d) Enter the following information into the resulting dialog to configure the NICrsquos IP settings
i) Obtain an IP Address Automatically
ii) Use the Following DNS Server Addresses
(1) Preferred DNS Server 192168150102
e) Click the Advanced button to open the Advanced TCPIP Settings dialog
f) In the Advanced TCPIP Settings dialog click the DNS tab
i) Uncheck the Register this Connections Address in DNS
Creating a SharePoint Server 2013 Environment for Development and Testing Version 10
copy Critical Path Training 2012 All Rights Reserved 18
wwwCriticalPathTrainingcom
g) In the Advanced TCPIP Settings dialog click the WINS tab
i) Click the Add button and specify a new WINS Server as 192168150102
h) Click OK Close multiple times to accept all TCPIP settings
The external NIC will now obtain an IP dynamically amp will not register itself in the DHCPrsquos DNS server which is a good thing when there are multiple people on the same network this this type of a setup
3 Connect the second NIC to the External LAN network
a) Go back to the host computer and open the Hyper-V Manager
b) In the Hyper-V Manager window right-click the VM WingtipServer and select Settings
c) Select the second NIC the one that is not connected
d) For the Network select External LAN and click OK This will effectively plug the external network into the VM
4 Go back into the WingtipServer VM and if it is not still open open the Network Connections dialog You should now see both connections plugged in
a) To refresh the connection select the connection you just plugged in and click the Disable this Network Device button in the toolbar After the connection is disabled select it and click the Enable this Network Device button
b) After a few seconds the VM should be able to connect to the internet which you can test by browsing to a site such as httpwwwbingcom
Configure Windows Update and Update the Server
In this section you will verify the server is fully patched and updated
1 Verify Service Pack 1 is installed
a) Verify the version of the operating system installed by clicking Start right-click on Computer select Properties
b) If the server simply says Windows Server 2008 R2 Enterprise as shown in the following figure download and install Service Pack 1 from the following location httpwwwmicrosoftcomen-usdownloaddetailsaspxid=5842
Creating a SharePoint Server 2013 Environment for Development and Testing Version 10
copy Critical Path Training 2012 All Rights Reserved 19
wwwCriticalPathTrainingcom
c) If Service Pack 1 is installed it will state it
2 Update the server using Windows Update
a) Selecting Start All Programs Windows Update
b) First disable Windows Update from running automatically
i) Click the link Change Settings
ii) Under the Important Updates list select Never check for updates (not recommended)
This isnrsquot what you would do in a production environment but for a development machine it is ok
c) Now update the server
i) Click the Check for Updates button
ii) If prompted install any updates to the Windows Update dialog
iii) Select the Check for Updates link
iv) Windows Update will the report how many updates are available Select all important and recommended updates and click the Install Updates button
v) If prompted select I accept the license terms for any updates that require it
vi) Keep going through the process of running Windows Update checking for updates and installing them after each reboot until it says there are no updates left to install
This step is likely going to take quite a bit of time so be patient
Activate Windows Server 2008 R2
In this section you will activate the server if you have a product key
1 If you have a product key for Windows Server 2008 R2 use it to activate Windows
a) In the Server Manager window navigate to the top-level node to display the Server Summary page Click Activate Windows
b) You will be prompted to enter your product key
i) Enter your product key and click to button to activate Windows
Creating a SharePoint Server 2013 Environment for Development and Testing Version 10
copy Critical Path Training 2012 All Rights Reserved 20
wwwCriticalPathTrainingcom
ii) After a few seconds your VM should be able to connect to a Microsoft site and successfully activate Windows
At this point you have a fully patched operating system VM created that will act as the Active Directory domain controller
Apply the DisableLoopbackCheck Registry Fix
Configure the DisableLoopbackCheck registry setting (Microsoft KB httpsupportmicrosoftcomkb896861)
The following steps automate creating the registry key outlined as Method 2 in the Microsoft KB article httpsupportmicrosoftcomkb896861 using Windows PowerShell
PowerShell Script Alert You can also find this PowerShell script AddDisableLoopbackCheckRegKeyps1 in the files that
accompany this setup guide
1 Click the Windows PowerShell icon in the Taskbar
2 Run the following PowerShell commands pressing [ENTER] after each one
$regKeyPath = HKLMSystemCurrentControlSetControlLsa $key = DisableLoopbackCheck New-ItemProperty -Path $regKeyPath -Name $key -Value 1 -PropertyType dword
a) Close the Windows PowerShell console by typing EXIT and pressing [ENTER]
Exercise 3 Install Active Directory Domain Services
Now you will promote your WingtipServer VM to a domain controller and create a new domain named wingtipcom
1 Login to the WingtipServer virtual machine using administrator | Password1
2 Add and configure the role for Active Directory Domain Services
a) Launch Server Manager and select the Roles node
b) Click the Add Roles link to start the Add Roles Wizard
c) On the Before you begin page click Next
d) On the Server Roles page select Active Directory Domain Services Click the Add Required Features button if prompted to install prerequisites
e) Click Next
Creating a SharePoint Server 2013 Environment for Development and Testing Version 10
copy Critical Path Training 2012 All Rights Reserved 21
wwwCriticalPathTrainingcom
f) On the next page of the wizard click Next which will bring you to the Confirm Installation Selections page
g) Click Install
After Active Directory Domain Services has been installed you will see the Installation Results page in the Add Roles Wizard
3 Click on the link with the big long caption of Close this wizard and launch the Active Directory Domain Services Installation Wizard (dcpromoexe)
4 On the first page of the Active Directory Domain Services Installation Wizard click the Use Advanced Mode Installation checkbox and click Next
Creating a SharePoint Server 2013 Environment for Development and Testing Version 10
copy Critical Path Training 2012 All Rights Reserved 22
wwwCriticalPathTrainingcom
5 On the Operating System Compatibility page click Next
6 On the Choose a Deployment Configuration select Create a new domain in a new forest and click Next
7 On the Name the Forrest Root Domain enter the following and click Next
a) FQDN of the forest root domain wingtipcom
8 On the Domain NetBIOS Name set it to WINGTIP and click Next
9 On the Set Forest Functional Level page select Windows Server 2008 R2 and click Next
10 On the Additional Domain Controller Options accept the default options and click Next
11 You might be prompted with the dialog shown below providing a warning that This computer has dynamically assigned IP address(es) This is not a problem when you are running your development environment on a domain controller Click Yes to dismiss the dialog
12 At this point the wizard will prompt you with a dialog information you a delegation for the DNS Server cannot be created because it cannot find the authoritative parent zone This is not a problem because the wizard will automatically configure the DNS of the VM to point to itself Click on the Yes button to dismiss this dialog
Creating a SharePoint Server 2013 Environment for Development and Testing Version 10
copy Critical Path Training 2012 All Rights Reserved 23
wwwCriticalPathTrainingcom
13 On the Location for Database Log Files and SYSVOL page accept all the default values and click Next
14 On the Directory Services Restore Mode Administrator Password page enter Password1 in both textboxes and click Next
15 On the Summary page click Next to start the process of configuring the new Active Directory domain
16 The wizard will display the dialog below to show you the progress of the configuration process You will be required to reboot when the configuration has been completed Check the option for Reboot on completion and then wait for the configuration to complete and the machine to reboot
17 After the VM reboots login to the server with wingtipadministrator | Password1
Configure Windows Update and Update the Server
In this section you will verify the server is fully patched and updated
1 Update the server using Windows Update
a) Selecting Start All Programs Windows Update
b) Select the Check for Updates link
c) Windows Update will the report how many updates are available Select all important and recommended updates and click the Install Updates button
d) If prompted select I accept the license terms for any updates that require it
e) Keep running Windows Update after each reboot and update install until it says there are no updates left to install
Creating a SharePoint Server 2013 Environment for Development and Testing Version 10
copy Critical Path Training 2012 All Rights Reserved 24
wwwCriticalPathTrainingcom
This step could take quite a bit of time so be patient
At this point you have a fully installed Active Directory Domain Controller for the Wingtipcom domain hosted on the server WingtipServer
Exercise 4 Install SQL Server 2012
In this exercise you will install SQL Server 2012 that will be used to store all required databases
1 Download the SQL Server 2012 Evaluation Edition specifically the DVD x64 ISO image to the host computer from here httpwwwmicrosoftcombetaexperiencepdSQL2012EvalCTAenusdefaultaspx or you can use your own licensed copy
2 Mount the SQL Server 2012 ISO to the WingtipServer VM
a) On the host computer open the Hyper-V Manager
b) Right-click the VM WingtipServer and select Settings
c) Select DVD Drive in the left-hand panel
d) In the right-hand panel select Image File and browse to the ISO file that contains SQL Server 2012 and click OK
3 Login to the WingtipServer VM as wingtipadministrator | Password1
Install SQL Server 2012
In this section you will install SQL Server 2012
1 If the AutoPlay dialog box is open click Run SETUPEXE If it isnrsquot use Windows Explorer to navigate to the DVD drive and execute the setupexe file in the root of the DVD drive
2 In the SQL Server Installation Center click Installation on the left-hand side
Creating a SharePoint Server 2013 Environment for Development and Testing Version 10
copy Critical Path Training 2012 All Rights Reserved 25
wwwCriticalPathTrainingcom
3 Next select New SQL Server stand-alone installation or add features to an existing installation
4 On the Setup Support Rules page the installer will check for issues before installing Click OK
5 On the Product Key page click the Specify a free edition radio box and select Evaluation then click Next
6 On the License Terms page click the I accept the license terms checkbox and click Next
7 On the Setup Support Rules page the installer will check for any problems with the server you are installing on Click Next when this completes
Creating a SharePoint Server 2013 Environment for Development and Testing Version 10
copy Critical Path Training 2012 All Rights Reserved 26
wwwCriticalPathTrainingcom
8 On the Support Role page select SQL Server Feature Installation and click Next
9 On the Feature Selection page check the following options and click Next
a) Instances Features
i) Database Engine Services
(1) Full-Text and Semantic Extractions for Search
b) Shared Features
i) Management Tools ndash Basic
(1) Management Tools ndash Complete
Creating a SharePoint Server 2013 Environment for Development and Testing Version 10
copy Critical Path Training 2012 All Rights Reserved 27
wwwCriticalPathTrainingcom
10 On the Installation Rules page click Next
11 On the Instance Configuration page click Next
12 On the Disk Space Requirements page click Next
13 On the Server Configuration page do the following and click Next
a) On the Service Account tab change the Startup Type for the SQL Server Agent to Automatic
14 On the Database Engine Configuration page do the following and click Next
a) On the Server Configuration tab click Add Current User
b) On the FILESTREAM tab
i) Check Enable FILESTREAM for Transact-SQL Access
ii) Check Enable FILESTREAM for file IO access
15 On the Error Reporting page click Next
16 On the Installation Configuration Rules page click Next
17 On the Ready to Install page click Install
Installation of SQL Server 2012 will take some time please be patient
18 When the installation completes the Complete page will be shown Click Close
At this point you have now successfully installed SQL Server 2012
Creating a SharePoint Server 2013 Environment for Development and Testing Version 10
copy Critical Path Training 2012 All Rights Reserved 28
wwwCriticalPathTrainingcom
Exercise 5 Install amp Configure SharePoint Server 2013
In this exercise you will install SharePoint 2013
1 Download the SharePoint Server 2013 to the host computer from here httptechnetmicrosoftcomen-USevalcenterhh973397aspx
2 Mount the SharePoint Server 2013 ISO to the WingtipServer VM
a) On the host computer open the Hyper-V Manager
b) Right-click the VM WingtipServer and select Settings
c) Select DVD Drive in the left-hand panel
The file that Microsoft provides is saved in the IMG format Hyper-V Manager wonrsquot allow you to mount an IMG file so rename it to ISO before mounting it
d) In the right-hand panel select Image File and browse to the ISO file that contains SharePoint Server 2013 and click OK
Create SharePoint Service Accounts amp Grant Rights to SQL Server 2012
In this section you will create the necessary service accounts that will be used by SharePoint in Active Directory and grant them necessary rights in SQL Server 2012
PowerShell Script Alert The creation of users and granting them rights to SQL Server 2012 steps in this section are automated in the Windows PowerShell script CreateSpServiceAccountsps1 found in the files that accompany this setup guide Open the script
and read the header for documentation on how to use it
1 Open the Active Directory Users and Computers Start Administrative Tools Active Directory Users and Computers
2 Expand the tree in the left-hand pane to see the Users OU Select the Users OU
3 Create a new user SP_Farm
a) In the toolbar select Action New User
Creating a SharePoint Server 2013 Environment for Development and Testing Version 10
copy Critical Path Training 2012 All Rights Reserved 29
wwwCriticalPathTrainingcom
b) Set the userrsquos Full Name amp User Login Name to SP_Farm and click Next
c) In the password dialog enter the following and click Next
i) Password (and Confirm Password) Password1
ii) User must change password at next login unchecked
iii) User cannot change password unchecked
iv) Password never expires checked
v) Account is disabled unchecked
Creating a SharePoint Server 2013 Environment for Development and Testing Version 10
copy Critical Path Training 2012 All Rights Reserved 30
wwwCriticalPathTrainingcom
vi) Click Finish
4 Repeat the previous step to create two more accounts
a) SP_Content
b) SP_Services
At this point you have created all the necessary service accounts
Install SharePoint Server 2013 Prerequisites
In this section you will install the SharePoint Server 2013 Prerequisites
1 Ensure you are logged into the WingtipServer VM using the account wingtipadministrator | Password1
2 If the AutoPlay dialog box is open click Run splashhta If it isnrsquot use Windows Explorer to navigate to the DVD drive and execute the splashhta file in the root of the DVD drive
Creating a SharePoint Server 2013 Environment for Development and Testing Version 10
copy Critical Path Training 2012 All Rights Reserved 31
wwwCriticalPathTrainingcom
3 Click the Install Software Prerequisites link
4 In the Microsoft SharePoint 2013 Products Preparation Tool window click Next
5 On the License Terms for Software Products page
a) Check I accept the terms of the License Agreement(s)
b) Click Next
6 The tool will download and install all prerequisites for SharePoint Server 2013 This will take some time It may prompt you to reboot the server If so reboot the server and login using wingtipadministrator | Password1
Creating a SharePoint Server 2013 Environment for Development and Testing Version 10
copy Critical Path Training 2012 All Rights Reserved 32
wwwCriticalPathTrainingcom
7 When the prerequisite installer is complete it will present a summary of everything it did
8 Click Finish
9 Restart the WingtipServer VMhellip some additional installations and changes that the prerequisite installer did will require a restart before installing SharePoint Server 2013
At this point all prerequisites required by SharePoint Server 2013 have been installed and any necessary configuration changes have been applied to the server However it is strongly recommend that you run Windows Update and install any pending updates Further Microsoft recommends installing the following hotfixes if they are not already installed
KB2554876 The SharePoint Parsing Process Crashes in Windows Server 2008 R2
KB2708075 IIS 75 Configurations are not Updated when you use the ServerManager Class to Commit Configuration Changes
KB2759112 Hotfix is Available for NET Framework 45 that Resolves an ASPNET Race Condition Issue in Windows Server 2008 R2 Windows Server 2008 R2 SP1
KB2765317 Hotfix is Available for NET Framework 45 that Resolves an ASPNET Race Condition Issue in Windows
8 Windows RT and Windows Server 2012
Install SharePoint Server 2013
In this section you will install SharePoint Server 2013
1 Ensure you are logged into the WingtipServer VM using the account wingtipadministrator | Password1
2 If the AutoPlay dialog box is open click Run splashhta If it isnrsquot use Windows Explorer to navigate to the DVD drive and execute the splashhta file in the root of the DVD drive
Creating a SharePoint Server 2013 Environment for Development and Testing Version 10
copy Critical Path Training 2012 All Rights Reserved 33
wwwCriticalPathTrainingcom
3 Click Install SharePoint Server
4 When prompted to Enter your Product Key enter the key you obtained for the trial install and click Continue
5 On the Read the Microsoft Software License Terms page check the I accept the terms of this agreement checkbox and click Continue
6 On the Choose a file location page click Install Now
Creating a SharePoint Server 2013 Environment for Development and Testing Version 10
copy Critical Path Training 2012 All Rights Reserved 34
wwwCriticalPathTrainingcom
7 When the installation is complete select the Run the SharePoint Products Configuration Wizard checkbox and click Close
8 On the Welcome to SharePoint Products page click Next
a) If prompted to start or reset services click Yes
9 On the Connect to a server farm page select Create a new server farm and click Next
10 On the Specify Configuration Database Settings page use the following to complete the page and click Next
a) Database server WINGTIPSERVER
b) Database name SharePoint_Config
c) Username WINGTIPSP_Farm
d) Password Password1
Creating a SharePoint Server 2013 Environment for Development and Testing Version 10
copy Critical Path Training 2012 All Rights Reserved 35
wwwCriticalPathTrainingcom
11 On the Specify Farm Security Settings page for the Passphrase and Confirm Passphrase boxes enter Password1 and click Next
12 On the Configure SharePoint Central Administration Web Application page check the Specify port number checkbox and enter a value of 9999 then Click Next
Creating a SharePoint Server 2013 Environment for Development and Testing Version 10
copy Critical Path Training 2012 All Rights Reserved 36
wwwCriticalPathTrainingcom
13 On the Completing the SharePoint Products Configuration Wizard page click Next
14 When the installer completes it will display the Confirmation Successful page
15 Click Finish This will launch Internet Explorer to go through the configuration process
Creating a SharePoint Server 2013 Environment for Development and Testing Version 10
copy Critical Path Training 2012 All Rights Reserved 37
wwwCriticalPathTrainingcom
At this point you have successfully installed SharePoint Server 2013
Configure SharePoint Server 2013
In this section you will create a new SharePoint Server 2013 farm and perform minimal configuration tasks
After installing SharePoint Sever 2013 the SharePoint Products Configuration Wizard will launch the browser-based Initial Farm Configuration Wizard
1 In the first page of the wizard you are prompted to Help Make SharePoint Better Select which ever option you want and click OK
2 On the Welcome page that asks How do you want to configure your SharePoint farm click the Start the Wizard button
3 On the Services page do the following and then click Next
a) Service Account Select Create new managed account
i) Username WINGTIPSP_Services
ii) Password Password1
b) Services Uncheck the following services
Creating a SharePoint Server 2013 Environment for Development and Testing Version 10
copy Critical Path Training 2012 All Rights Reserved 38
wwwCriticalPathTrainingcom
i) Access Services 2010
ii) App Management Service
In SharePoint Server 2013 the Search Service Application processes specifically noderunnerexe can consume a considerable amount of memory and processor time If you are not going to work with search you might consider unchecking this option for now You can always go back into Central Administration and create a new instance of the Search Service Application at a later date if you need it
Why did we remove Access Services 2010 amp App Management Service service applications The Access Services 2010 service application is included for backwards compatibility and isnrsquot needed in new installations unless you are migrating solutions built with Access Services 2010 from SharePoint Server 2010 (if so you can create this service application later within Central Administration Application Management Manage Service Applications) The App Management Service service application will be created in a later step in this setup guide therefor it is skipped here
4 The creation of the service applications can take quite a while so be patient If it exceeds 20 minutes it is fairly safe to assume the page is hung up One option is to close the browser then launch Central Administration (Start All Programs Microsoft SharePoint 2013 Products SharePoint 2013 Central Administration) and look at the Service Application page (Application Management Manage Service Applications) to see if they were all created
Configure DNS
In this section you will configure DNS for hosting SharePoint sites amp Apps
1 Ensure you are logged into the WingtipServer VM using the account wingtipadministrator | Password1
2 Open the DNS window Start Administrative Tools DNS
3 Expand the hierarchy on the left-hand side of the window until you get to DNS WINGTIPSERVER Forward Lookup Zones wingtipcom
4 Create a new wildcard so all requests for http[]wingtipcom will be forwarded to our SharePoint machine
a) Next right-click wingtipcom and select New Host (A or AAAA)
Creating a SharePoint Server 2013 Environment for Development and Testing Version 10
copy Critical Path Training 2012 All Rights Reserved 39
wwwCriticalPathTrainingcom
b) In the New Host dialog enter the following and click OK
i) Alias Name
ii) IP Address 192168150102 Then click Add Host The following figure shows how this looks
This new record is telling DNS to forward any request for http[]wingtipcom to the webserver WINGTIPSERVER where the
requests will be served by SharePoint
5 Verify this DNS entry is working
a) Open Windows PowerShell Start All Programs Accessories Windows PowerShell Windows PowerShell
b) Run the following commands and press ENTER
PS CUsersAdministratorgt nslookup somethingwingtipcom PS CUsersAdministratorgt nslookup somethingappswingtipcom
c) You should get a response that points to the WingtipServer server as shown in the following figure
Creating a SharePoint Server 2013 Environment for Development and Testing Version 10
copy Critical Path Training 2012 All Rights Reserved 40
wwwCriticalPathTrainingcom
Configure SharePoint Server 2013 for Host-Named Site Collections amp Create Initial Site
Collections
In this section you will create new SharePoint 2013 site collections for testing and hosting apps
Microsoft recommends to create host-named site collections (HNSC) instead of using the path based site collection addressing The difference is the following a path based site created at something such as httpintranetwingtipcomsitesdevtest as an HNSC site would be more like httpdevtestwingtipcom This is how it works in the cloud (Office 365) and it scales much better for on-prem
deployments This setup guide will show you how to setup your environment to create HNSC The only downside to this approach is that you canrsquot create site collections within Central Administration it must be done via Windows PowerShell API (because Central Administration doesnrsquot instruct you where to put the site
This is implemented in various parts First DNS must be configured to send all requests for httpwingtipcom to a Web Application
(implemented in the last section) Second this Web Application must be extended with SharePoint and have no host header bindings (so it handles all requests) Third it must have a default site collection at the root of the Web Application but it will not be used for anything (in fact it doesnrsquot need a template assigned to it)
You can read more about HNSCrsquos on TechNet httptechnetmicrosoftcomen-uslibrarycc424952aspx
PowerShell Script Alert The steps in this section are automated in the script SetupSharePointForHNSCps1 found in the files that
accompany this setup guide Open the script and read the header for documentation on how to use it
1 Ensure you are logged into the WingtipServer VM using the account wingtipadministrator | Password1
2 Open Central Administration Start All Programs Microsoft SharePoint 2013 Products SharePoint 2013 Central Administration
3 Select Application Management Manage Web Applications
4 Delete the default Web Application created by the configuration wizard
a) Delete the existing default Web Application
i) Select the Web Application SharePoint ndash 80 the one with the URL of httpwingtipserver and click Delete in the ribbon
ii) When prompted to delete the associated IIS Web Site amp SQL Server database select both options to delete them and click OK
The reason you are doing this is because the setup wizard you ran previously when creating the service applications automatically created it The problem is that it used the same identity (WINGTIPSP_Services) for the app pool that is used for all the service
applications which is not desired
5 Create a new Web Application to handle Host-Named Site Collections (HNSC)
Creating a SharePoint Server 2013 Environment for Development and Testing Version 10
copy Critical Path Training 2012 All Rights Reserved 41
wwwCriticalPathTrainingcom
a) In the ribbon click the New button
b) In the Create New Web Application dialog enter the following values in the properties and click OK Leave all properties not mentioned
i) Select the radio button Create a new IIS web site
(1) Name SharePoint HNSC Host ndash 80
(2) Port 80
ii) Application Pool
(1) Select the radio button Create a new application pool
(a) Application Pool Name SharePoint Default HNSC AppPool
(b) Select a security account for this application pool WINGTIPSP_Content
If WINGTIPSP_Content is not listed as an available managed account create it by selecting the appropriate option and using
Password1 for the password
iii) Database Name and Authentication
(1) Database Name WSS_Content_HNSCDefaultHost
c) This process will take a few moments At the end of the process SharePoint will ask if you want to create a site collection You do but you donrsquot want to do it through the browser as this will not be a HNSC To create a HNSC you must create it via Windows PowerShell
6 Create a default not template site collection at the root of the web application
a) Open SharePoint 2013 Management Shell Start All Programs Microsoft SharePoint 2013 Products SharePoint 2013 Management Shell
7 Create Site Collections for Testing SharePoint amp SharePoint Apps
a) Open SharePoint 2013 Management Shell Start All Programs Microsoft SharePoint 2013 Products SharePoint 2013 Management Shell
b) Get a reference to the HNSC web application you just created by running the following Windows PowerShell script in the SharePoint 2013 Management Shell
$hnscWebApp = Get-SPWebApplication | Where-Object $_DisplayName -eq SharePoint HNSC Host - 80
c) Create a non-templated site at the root of the web application for Workflow to connect to by executing the following Windows PowerShell script in the SharePoint 2013 Management Shell
New-SPSite -Name Root HNSC Site Collection -Url httpwingtipcom -HostHeaderWebApplication $hnscWebApp -OwnerAlias WINGTIPAdministrator
d) Create a team site by executing the following Windows PowerShell script in the SharePoint 2013 Management Shell
New-SPSite -Name Wingtip Intranet -Url httpintranetwingtipcom ndashHostHeaderWebApplication $hnscWebApp -Template STS0 -OwnerAlias WINGTIPAdministrator
e) Create a developer site by executing the following Windows PowerShell script in the SharePoint 2013 Management Shell
New-SPSite -Name Wingtip Developer Site -Url httpdevwingtipcom ndashHostHeaderWebApplication $hnscWebApp -Template DEV0 -OwnerAlias WINGTIPAdministrator
You can only create debug and test apps using a developer site
At this point you now have a site collection to use as a team site (httpintranetwingtipcom) and to develop and test custom SharePoint apps (httpdevwingtipcom)
Creating a SharePoint Server 2013 Environment for Development and Testing Version 10
copy Critical Path Training 2012 All Rights Reserved 42
wwwCriticalPathTrainingcom
Configure SharePoint 2013 for Hosting Apps
In this setup you will setup your SharePoint 2013 environment for hosting apps
PowerShell Script Alert Everything in the next immediate step is provided in the script ConfigureSpFarmForAppsps1 found in the
files that accompany this setup guide Open the script and read the header for documentation on how to use it
1 Ensure you are logged into the WingtipServer VM using the account wingtipadministrator | Password1
2 Create the necessary SharePoint App Management service applications and start the necessary services via Windows PowerShell
a) Open SharePoint 2013 Management Shell Start All Programs Microsoft SharePoint 2013 Products SharePoint 2013 Management Shell
b) Execute the following Windows PowerShell script in the SharePoint 2013 Management Shell
$appHostDomain = appswingtipcom $adminService = Get-Service -Name spadminv4 if ($adminServiceStatus -ne Running) Start-Service $adminService $timerService = Get-Service -Name sptimerv4 if ($timerServiceStatus -ne Running) Start-Service $timerService Set-SPAppDomain $appHostDomain $appMgmtSvcInstance = Get-SPServiceInstance | Where-Object $_GetType()Name -eq AppManagementServiceInstance if ($appMgmtSvcInstanceStatus -ne Online) Start-SPServiceInstance -Identity $appMgmtSvcInstance $appSubSettingSvcInstance = Get-SPServiceInstance | Where-Object $_GetType()Name -eq SPSubscriptionSettingsServiceInstance if ($appSubSettingSvcInstanceStatus -ne Online) Start-SPServiceInstance -Identity $appSubSettingSvcInstance $appPoolServiceApps = Get-SPServiceApplicationPool -Identity SharePoint Web Services Default $appSubSvc = New-SPSubscriptionSettingsServiceApplication ndashApplicationPool $appPoolServiceApps ndashName Settings Service Application ndashDatabaseName SettingsServiceDB $proxySubSvc = New-SPSubscriptionSettingsServiceApplicationProxy ndashServiceApplication $appSubSvc $appAppSvc = New-SPAppManagementServiceApplication -ApplicationPool $appPoolServiceApps -Name App Management Service Application -DatabaseName AppServiceDB $proxyAppSvc = New-SPAppManagementServiceApplicationProxy -ServiceApplication $appAppSvc Set-SPAppSiteSubscriptionName -Name app -Confirm$false
3 Verify the script configured SharePoint 2013 for hosting apps
a) Open Central Administration Start All Programs Microsoft SharePoint 2013 Products SharePoint 2013 Central Administration
b) Verify service applications created
i) Open the Service Applications page Application Management Manage Service Applications
ii) Verify you have two service applications created
(1) App Management Service Application
(2) Settings Service Application
c) Verify service instances are running
i) Open the Services on Server page System Settings Manage Services on Server
ii) Verify the following services are Started
(1) App Management Service
(2) Microsoft SharePoint Foundation Subscription Settings Service
Creating a SharePoint Server 2013 Environment for Development and Testing Version 10
copy Critical Path Training 2012 All Rights Reserved 43
wwwCriticalPathTrainingcom
d) Verify App URLs are correct
i) Open the Configure App URLs page Apps Configure app URLs
ii) Verify the following
(1) App Domain appswingtipcom
(2) App Prefix app
At this point your SharePoint Server 2013 environment is ready to host SharePoint apps
Creating a SharePoint Server 2013 Environment for Development and Testing Version 10
copy Critical Path Training 2012 All Rights Reserved 44
wwwCriticalPathTrainingcom
Start the SharePoint 2013 Sandbox Service
By default the service that executes sandbox solutions is not running In this step you will start the service
1 Open Central Administration Start All Programs Microsoft SharePoint 2013 Products SharePoint 2013 Central Administration
2 Open the Services on Server page System Settings Manage Services on Server
3 Click the Start link to the left of the Microsoft SharePoint Foundation Sandboxed Code Service
At this point your installation can support sandbox solutions
Configure CRL Verification for Disconnected Environments
SharePoint periodically ldquophones homerdquo to a specific address hosted by Microsoft under certain conditions When your environment is disconnected this can cause an unnecessary delay or failures when starting up the sandbox The following steps outline a workaround to bypass this check
1 Launch Notepad as an administrator Start All Programs Accessories right-click Notepad and select Run as Administrator
2 Open the hosts file by selecting File Open and finding the file
cWindowsSystem32Driversetchosts
3 Add the following line to the end of the file
127001 crlmicrosoftcom
4 Save and close the hosts file
Update Internet Explorer to Bypass the App URL amp Automatically Login to SharePoint Sites
In this section you will update Internet Explorer to add the App hosting URL to the bypass list so you can navigate to the domain after deploying SharePoint hosted apps
1 Ensure you are logged into the WingtipServer VM using the account wingtipadministrator | Password1
1 Launch Internet Explorer Start All Programs Internet Explorer
2 Configure Internet Explorer to bypass the App URL
a) In the top-right corner click the gear icon and select Internet Options
b) On the Security tab select the Local Intranet and click the Sites button
c) Uncheck the box next to Automatically detect intranet network
d) Click the Advanced button and add two entries to the Exceptions list
i) httpwingtipcom
ii) httpappswingtipcom
Creating a SharePoint Server 2013 Environment for Development and Testing Version 10
copy Critical Path Training 2012 All Rights Reserved 45
wwwCriticalPathTrainingcom
e) Click the Close button followed by the OK button multiple times to close out of the dialogs
At this point Internet Explorer is setup to bypass your app URL so you can navigate to apps (httpappswingtipcom) as well as automatically authenticate to sites hosted at httpwingtipcom
Exercise 6 Configure SharePoint to Host My Sites
In this exercise you will configure SharePoint to create and host My Sites In order to host My Sites you will need a new Web Application that is configured for Self-Service Site Creation and has a My Site Host site collection
1 Create a new SharePoint web application to host the My Sites
a) Ensure you are logged into the WingtipServer VM using the account wingtipadministrator | Password1
b) Open Central Administration Start All Programs Microsoft SharePoint 2013 Products SharePoint 2013 Central Administration
c) Select Application Management Manage Web Applications
d) In the ribbon click the New button
e) In the Create New Web Application dialog enter the following values in the properties and click OK Leave all properties not mentioned
i) Select the radio button Create a new IIS web site
(1) Name SharePoint MySite Host ndash 80
(2) Port 80
(3) Host Header mywingtipcom
ii) Application Pool
(1) Select the radio button Use existing application pool
(a) Application Pool Name SharePoint Default HNSC AppPool
iii) Database Name and Authentication
(1) Database Name WSS_Content_SocialWingtipCom
f) This process will take a few moments At the end of the process SharePoint will ask if you want to create a site collection Click the link provided to create a new site collection amp continue to the next step
2 Create a My Site Host site collection
a) On the Create Site Collection page use the following information to complete the form and click OK
Creating a SharePoint Server 2013 Environment for Development and Testing Version 10
copy Critical Path Training 2012 All Rights Reserved 46
wwwCriticalPathTrainingcom
i) Title My Site Host
ii) URL
iii) Template Selection My Site Host (found under the Enterprise tab)
iv) Primary Site Collection Administrator WINGTIPAdministrator
3 Update the Web Application to host my sites
a) Within Central Administration in the left-hand navigation navigate to the Manage Web Applications page Application Management Manage Web Applications
b) Select the SharePoint MySite Host ndash 80 web application
c) Click the Managed Paths button in the ribbon
d) Remove the sites managed path and add two new managed paths and click OK
i) personal ndash Wildcard inclusion
ii) my ndash Explicit inclusion
e) With the SharePoint MySite Host ndash 80 web application still selected click the Self-Service Site Creation button
f) On the Self-Service Site Creation page use the following values to complete the form and click OK
i) Site Collections On
4 Next configure the User Profile Service Application My Site settings
a) Browse to the User Profile Service Application management page Application Management Manage Service Applications User Profile Service Application
b) Under the My Site Settings section click the Setup My Sites
c) On the My Site Settings page use the following information to complete the form and click OK
i) My Site Host httpmywingtipcom
ii) Personal Site Location personal
At this point your SharePoint deployment is now configured to automatically create My Sites under httpmywingtipcomPersonalUserName when users first browse to them
Exercise 7 Install amp Configure Workflow Manager 10
In this exercise you will configure the WingtipServer VM to host Workflow Manager 10 and connect it to your SharePoint installation
1 Ensure you are logged into the WingtipServer VM using the account wingtipadministrator | Password1
Verify SQL Server 2012 Network Configuration
In this section yoursquoll verify the network configuration is correct for SQL Server 2012 in order to install Workflow Manager 10
Creating a SharePoint Server 2013 Environment for Development and Testing Version 10
copy Critical Path Training 2012 All Rights Reserved 47
wwwCriticalPathTrainingcom
1 Configure SQL Server 2012 to have the TCPIP connection protocol enabled
a) Open the SQL Server Configuration Manager Start All Programs Microsoft SQL Server 2012 Configuration Tools SQL Server Configuration Manager
b) Expand the hierarchy on the left-hand side to the following SQL Server Connection Manager (local) SQL Server Network Configuration Protocols for MSSQLSERVER
c) In the main window if TCPIP is Disabled right-click TCPIP and select Enable
d) When prompted with a warning click OK
2 SQL Server must be restarted in order to reflect this change
a) In the hierarchy on the left-hand side of the window select SQL Server Services
b) Right-click SQL Server (MSSQLSERVER) and select Restart
At this point SQL Server is now configured with the TCPIP protocol enabled a requirement when configuring Service Bus
Configure the Workflow Service Account with the Necessary Rights
In this section you will verify the service account that will run Workflow Manager and Service Bus
1 Ensure you are logged into the WingtipServer VM using the account WINGTIPadministrator | Password1
2 Grant the WINGTIPSP_Content account securityadmin amp dbcreator permissions in SQL Server
a) Launch SQL Server Management Studio Start All Programs Microsoft SQL Server 2012 SQL Server Management Studio
b) When SQL Server Management Studio launches within the Connect to Server dialog login using the default settings and click Connect
c) In the Object Explorer tool window expand the WINGTIPSERVER server hierarchy to the Security Logins node
d) Find the WINGTIPSP_Content account right-click it and select Properties
Creating a SharePoint Server 2013 Environment for Development and Testing Version 10
copy Critical Path Training 2012 All Rights Reserved 48
wwwCriticalPathTrainingcom
e) In the Select a page pane select Server Roles
f) Check securityadmin amp dbcreator and click OK
g) Close SQL Server Management Studio
3 Add the Workflow service account to the local administrators group
a) Open the Active Directory Users and Computers window Start Administrative Tools Active Directory Users and Computers
b) In the hierarchy on the left-hand side of the window expand it to the following Active Directory Users and Computers wingtipcom Builtin
c) In the main window right-click Administrators and select Properties
d) In the Administrators Properties dialog select the Members tab and click Add
e) In the Enter the object names to select box enter wingtipsp_content and click the Check Names button
f) In the Administrators Properties dialog click OK
g) Close the Active Directory Users and Computers window
At this point the service account that will host Workflow Manager and Service Bus has been configured correctly
Creating a SharePoint Server 2013 Environment for Development and Testing Version 10
copy Critical Path Training 2012 All Rights Reserved 49
wwwCriticalPathTrainingcom
Download amp Install Workflow Manager and Service Bus
In this section you will install Workflow Manager and Service Bus
1 Ensure you are logged into the WingtipServer VM using the account WINGTIPSP_Content | Password1
It is important you are logged in as the user that will run workflow when you install amp configure Workflow Manager and Service Bus
2 Launch the Web Platform Installer Start All Programs Microsoft Web Platform Installer
a) If the Web Platform Installer is not present on your machine you can download amp install it from here httpwwwmicrosoftcomwebdownloadsplatformaspx
If you do not have internet access within the virtual machine it is possible to download everything needed for workflow using the command line version of the Web Platform Installer (WebPICMD) You can get WebPICMD from httplearniisnetpageaspx1072web-platform-installer-v4-command-line-webpicmdexe-preview-release Specifically for
workflow enter the following command to download Workflow Beta 1 and all prerequisites
webpicmd offline ProductsWorkflow Pathc[path]
3 When the Web Platform Installer loads execute a search for Workflow select Workflow Manager 10 and click Add
4 Click the Install button at the bottom of the Web Platform Installer 40 window
5 On the Prerequisites page click I Accept
Note The Web Platform Installer 40 may prompt you to keep certain products updated using Microsoft Update If it does select Use Microsoft Update when I check for updates (recommended) and click Continue
6 When the installer completes the following dialog will appear Click Continue and then Finish to start the configuration process
Creating a SharePoint Server 2013 Environment for Development and Testing Version 10
copy Critical Path Training 2012 All Rights Reserved 50
wwwCriticalPathTrainingcom
At this point Workflow Manager amp Service Bus are installed
Configure Workflow Manager and Service Bus
In this section you will install Workflow Manager and Service Bus
1 If the Workflow Manager Configuration Wizard is not open open it Start All Programs Workflow Manager 10 Workflow Configuration
2 On the Welcome page click Configure Workflow Manager with Default Settings (Recommended)
Creating a SharePoint Server 2013 Environment for Development and Testing Version 10
copy Critical Path Training 2012 All Rights Reserved 51
wwwCriticalPathTrainingcom
3 On the New Farm Configuration page do the following
a) In the section Configure Service Account set the credentials to
i) User ID sp_contentwingtipcom
ii) Password Password1
b) Check the Allow Workflow management over HTTP on this computer checkbox
Ensure the username is entered in the fully qualified UPN format not as the default shows in the installer (sp_contentwingtip) or the domainusername format
In a production environment you should be doing everything over SSL
c) Click the Test Connection button to verify the connection credentials before proceeding
Creating a SharePoint Server 2013 Environment for Development and Testing Version 10
copy Critical Path Training 2012 All Rights Reserved 52
wwwCriticalPathTrainingcom
d) In the Certificate Generation Key and Confirm Certificate Generation Key enter Password1 into both fields
4 Click the right arrow in the bottom right corner to proceed
5 On the Summary page review your settings and click the check at the bottom right of the widow to start the configuration process
Creating a SharePoint Server 2013 Environment for Development and Testing Version 10
copy Critical Path Training 2012 All Rights Reserved 53
wwwCriticalPathTrainingcom
6 After a few minutes the Configuration Progress screen will show that everything has been configured correctly
Creating a SharePoint Server 2013 Environment for Development and Testing Version 10
copy Critical Path Training 2012 All Rights Reserved 54
wwwCriticalPathTrainingcom
7 Click the check in the bottom right corner
At this point Workflow Manager amp Service Bus has been installed and a new Workflow Manager farm has been created The next step is to connect the SharePoint 2013 farm to the Workflow Manager farm
Connect SharePoint 2013 to Workflow Manager
In this section you will connect SharePoint 2013 and Workflow Manager together
1 Ensure you are logged into the WingtipServer VM using the account WINGTIPadministrator | Password1
2 Get the Workflow Manager endpoint
a) Open the Workflow Manager PowerShell console Start All Programs Workflow Manager 10
b) Execute the Windows PowerShell following cmdlet
Get-WFFarm | ft HttpPort
c) Take note of this port (12291) This port number is what you will use to connect the SharePoint 2013 farm to the Workflow Manager 10 farm
In production you should connect to the HTTPS port listed in the HttpsPort property when you run Get-WFFarm
d) Close the Workflow Manager PowerShell window
3 Connect the SharePoint 2013 farm to Workflow Manager
Creating a SharePoint Server 2013 Environment for Development and Testing Version 10
copy Critical Path Training 2012 All Rights Reserved 55
wwwCriticalPathTrainingcom
a) Open SharePoint 2013 Management Shell Start All Programs Microsoft SharePoint 2013 Products SharePoint 2013 Management Shell
b) Execute the following Windows PowerShell script in the SharePoint 2013 Management Shell
Register-SPWorkflowService ndashSPSite httpintranetwingtipcom ndashWorkflowHostUri httpwingtipserver12291 ndashAllowOAuthHttp
This script is telling SharePoint the endpoint it should use to talk to Workflow Manager as well as Workflow Manager the SharePoint site collection it should talk to for calls into the CSOM It is also configuring all communication over HTTP rather than HTTPS for performance reasons In production you should always use HTTPS
This step will take a moment with no feedback during the process Be patient
c) Close the SharePoint 2013 Management Shell
At this point the SharePoint 2013 farm is connected to the Workflow Manager 10 farm
Configure SharePoint User Profile Service Application AD Sync
Users in SharePoint 2013 are validated by Workflow Manager against SharePoint to ensure they have permissions to start a workflow This is done by looking up the user by their AD UserPrincipalName (UPN) attribute in the User Profile Service Application (UPA) If no matching user is found the workflow will be automatically cancelled by Workflow Manager In this section you will setup UPA to connect amp sync with the local Active Directory so user accounts in AD will have their UPN synchronized to UPA
1 Open Central Administration Start All Programs Microsoft SharePoint 2013 Products SharePoint 2013 Central Administration
2 Go to the User Profile Service Application management page Application Management Manage Service Applications User Profile Service Application
3 The first step is to configure the User Profile Service Application to allow for Active Directory (AD) synchronization
a) Under Synchronization select Configure Synchronization Settings
b) For Synchronization select Use SharePoint Active Directory Import and click OK
4 Next establish a connection to the wingtipcom AD
a) Under Synchronization select Configure Synchronization Connections
b) On the Synchronization Connections page select Create New Connection
c) Enter the following values on this form and click OK
i) Connection Name WINGTIPCOM AD
ii) Type Active Directory Import
iii) Connection Settings
(1) Fully Qualified Domain Name wingtipcom
(2) Authentication Provider Type Windows Authentication
(3) Account Name WINGTIPAdministrator
(4) Password (and Confirm Password) Password1
iv) Containers
(1) Click Populate Containers
(2) After it loads check the box next to WINGTP or click the Select All button below the box
5 Go back to the User Profile Service Application management page Application Management Manage Service Applications User Profile Service Application
6 Finally start a synchronization import
a) Under Synchronization select Start Profile Synchronization
Creating a SharePoint Server 2013 Environment for Development and Testing Version 10
copy Critical Path Training 2012 All Rights Reserved 56
wwwCriticalPathTrainingcom
b) Select Start Full Synchronization and click OK
c) You will be taken back to the User Profile Service Application management page Notice in the top-right corner there is a status block that reports how many profiles are in the UPA database Refresh the page to see it increase to a handful of profiles as the import process runs
At this point you have successfully configured the User Profile Service Application to import profiles from the local AD
Exercise 8 Install the Microsoft Office 2013 Professional Clients
In this exercise you will install the Microsoft Office 2013 client applications
1 Download the Office 2013 into the WingtipServer VM For this you need to create an Office 365 Trial account login to Office 365 go to the Admin Dashboard and then download the latest version httpwwwmicrosoftcomofficepreviewentry-office-preview
2 Download the SharePoint Designer 2013 into the WingtipServer VM from here httpwwwmicrosoftcomen-usdownloaddetailsaspxid=35491
3 Download the Visio Professional 2013 into the WingtipServer VM from here httptechnetmicrosoftcomen-usevalcenterhh973399
Install Microsoft Office Professional Plus 2013
In this section you will install the Microsoft Office 2013 clients
1 Ensure you are logged into the WingtipServer VM using the account WINGTIPadministrator | Password1
2 Execute the installer OfficeProfessionalPlus_English_x64exe
3 On the Read the Microsoft Software License Terms dialog click the checkbox next to I accept the terms of this agreement and click Continue
4 On the Choose the installation you want dialog click the Install Now button
5 The installer will proceed and install all the Office products
6 When the installer completes click the Close button
7 Apply your Office Professional Plus 2013 license key
a) Launch Word 2013 Start All Programs Microsoft Office 2013 Word 2013
b) In the First things first dialog select Use recommended settings and click Accept
c) In the Welcome to Office dialog that opens click the [X] icon in the top-right corner to close it
d) In the left-hand pane click Open Other Documents
e) In the left-hand pane click Account
f) In the Product Information section within the Activation Required box click Change Product Key
g) Enter your license key for Office Professional Plus 2013 check the box next to Attempt to automatically activate my product online and click Install
h) Click OK
At this point you have installed Office Professional Plus 2013
Install Microsoft Office Visio 2013
In this section you will install Microsoft Office 2013 Visio
1 Ensure you are logged into the WingtipServer VM using the account WINGTIPadministrator | Password1
2 Execute the installer VisioProfessional_English_x64exe
3 On the Read the Microsoft Software License Terms dialog click the checkbox next to I accept the terms of this agreement and click Continue
Creating a SharePoint Server 2013 Environment for Development and Testing Version 10
copy Critical Path Training 2012 All Rights Reserved 57
wwwCriticalPathTrainingcom
4 On the Choose the installation you want dialog click the Install Now button
5 The installer will proceed and install all Visio 2013
6 When the installer completes click the Close button
7 Apply your Visio 2013 license key
a) Launch Visio 2013 Start All Programs Microsoft Office 2013 Visio 2013
b) In the First things first dialog select Use recommended settings and click Accept
c) In the Welcome to Office dialog that opens click the X icon in the top-right corner to close it
d) In the left-hand pane click Open Other Documents
e) In the left-hand pane click Account
f) In the Product Information section within the Activation Required box click Change Product Key
g) Enter your license key for Visio 2013 check the box next to Attempt to automatically activate my product online and click Install
h) Click OK
At this point you have installed Visio 2013
Install Microsoft Office 2013 SharePoint Designer
In this section you will install Microsoft Office 2013 SharePoint Designer
1 Ensure you are logged into the WingtipServer VM using the account WINGTIPadministrator | Password1
2 Execute the installer SharePointDesigner_English_x64exe
3 On the Read the Microsoft Software License Terms dialog click the checkbox next to I accept the terms of this agreement and click Continue
4 On the Choose the installation you want dialog click the Install Now button
5 The installer will proceed and install all SharePoint Designer 2013
6 When the installer completes click the Close button
At this point you have installed SharePoint Designer 2013
Exercise 9 Install Visual Studio 2012
In this exercise you will install Visual Studio 2012
1 Ensure you are logged into the WingtipServer VM using the account WINGTIPadministrator | Password1
2 Start the install of Visual Studio 2012 Ultimate Trial by downloading the installer from here httpwwwmicrosoftcomvisualstudio11en-usdownloads
3 On the installation splash screen check the box next to I agree to the License terms and conditions and click the Next button
Creating a SharePoint Server 2013 Environment for Development and Testing Version 10
copy Critical Path Training 2012 All Rights Reserved 58
wwwCriticalPathTrainingcom
4 On the Optional Features to install dialog click Install
5 After some time the installer will complete Click the Launch button to launch Visual Studio 2012
Creating a SharePoint Server 2013 Environment for Development and Testing Version 10
copy Critical Path Training 2012 All Rights Reserved 59
wwwCriticalPathTrainingcom
6 In the Choose Default Environment Settings select Visual C Development Settings and click Start Visual Studio
7 Close Visual Studio 2012
At this point Visual Studio 2012 RTM is installed
Install Office amp SharePoint 2013 Developer Tools
In this section you will install the Office and SharePoint 2013 developer tools for Visual Studio
1 Ensure you are logged into the WingtipServer VM using the account WINGTIPadministrator | Password1
2 Launch the Web Platform Installer Start All Programs Microsoft Web Platform Installer
3 In the search box at the top-right corner of the Web Platform Installer 40 window type sharepoint and press Enter
4 Click the Add button to the right of Microsoft Office Developer Tools for Visual Studio 2012 - Preview 2
5 Click the Install button at the bottom of the Web Platform Installer 40 window
6 On the Prerequisites page click I Accept
Creating a SharePoint Server 2013 Environment for Development and Testing Version 10
copy Critical Path Training 2012 All Rights Reserved 60
wwwCriticalPathTrainingcom
At this point you have installed the SharePoint 2013 amp Office 2013 development tools in Visual Studio 2012
Creating a SharePoint Server 2013 Environment for Development and Testing Version 10
copy Critical Path Training 2012 All Rights Reserved 61
wwwCriticalPathTrainingcom
Appendix 1 Download Manifest
The following lists everything referenced that you will or may need to download in this environment
Windows Server 2008 R2 with Service Pack 1 (installer ISO)
o httptechnetmicrosoftcomen-usevalcenterdd459137aspx
Windows Server 2008 R2 with Service Pack 1 (prebuilt VHD)
o httpwwwmicrosoftcomdownloadsdetailsaspxFamilyId=9040a4be-c3cf-44a5-9052-a70314452305
Windows Server 2008 R2 Service Pack 1
o httpwwwmicrosoftcomen-usdownloaddetailsaspxid=5842
SQL Server 2012 Trial
o httpwwwmicrosoftcombetaexperiencepdSQL2012EvalCTAenusdefaultaspx
SharePoint Server 2013
o httptechnetmicrosoftcomen-USevalcenterhh973397aspx
Hotfixes for SharePoint Server 2013 (post-install)
o KB2554876 The SharePoint Parsing Process Crashes in Windows Server 2008 R2
o KB2708075 IIS 75 Configurations are not Updated when you use the ServerManager Class to Commit
Configuration Changes
o KB2759112 Hotfix is Available for NET Framework 45 that Resolves an ASPNET Race Condition Issue in
Windows Server 2008 R2 Windows Server 2008 R2 SP1
o KB2765317 Hotfix is Available for NET Framework 45 that Resolves an ASPNET Race Condition Issue in
Windows 8 Windows RT and Windows Server 2012
Web Platform Installer
o httpwwwmicrosoftcomwebdownloadsplatformaspx
Web Platform Installer ndash Command Line Version
o httplearniisnetpageaspx1072web-platform-installer-v4-command-line-webpicmdexe-preview-release
Workflow Manager 10
o Download using the Microsoft Web Platform Installer
Office 2013
o httpwwwmicrosoftcomofficepreviewentry-office-preview
SharePoint Designer 2013
o httpwwwmicrosoftcomen-usdownloaddetailsaspxid=35491
Visio Professional 2013
o httptechnetmicrosoftcomen-usevalcenterhh973399
Visual Studio 2012
o httpwwwmicrosoftcomvisualstudio11en-usdownloads
Office Developer Tools for Visual Studio 2012 ndash Preview 2
o Download using the Microsoft Web Platform Installer
Creating a SharePoint Server 2013 Environment for Development and Testing Version 10
copy Critical Path Training 2012 All Rights Reserved 62
wwwCriticalPathTrainingcom
Appendix 2 Windows PowerShell Script Manifest
The following lists all Windows PowerShell scripts that are provided with this setup guide
AddDisableLoopbackCheckRegKeyps1
o The following steps automate creating the registry key outlined as Method 2 in the Microsoft Knowledgebase article
httpsupportmicrosoftcomkb896861 using Windows PowerShell This key DisableLoopbackCheck will allow
you to browse SharePoint sites on the same machine Without this key (or following Method 1 in the KB article) you
would need to browse any SharePoint sites from a different computer than the one which SharePoint is installed on
ConfigureSpFarmForAppsps1
o Configures a SharePoint 2013 for hosting apps This ensures everything you need is installed running and
configured This is documented here httpmsdnmicrosoftcomen-uslibraryfp179923(v=office15)
CreateSpServiceAccountsps1
o Creates the minimal necessary service accounts for SharePoint Server 2013 SP_Farm SP_Content amp
SP_Services
SetupSharePointForHNSCps1
o Configures a SharePoint 2013 install for hosting Host-Named Site Collections (HNSC) This involves creating a Web
Application in SharePoint that has no host header bindings Using DNS all requests are mapped to this Web
Application You then create the site collections via PowerShell as you cant create HNSCs via the browser (Central
Administration)
Creating a SharePoint Server 2013 Environment for Development and Testing Version 10
copy Critical Path Training 2012 All Rights Reserved 63
wwwCriticalPathTrainingcom
Appendix 3 Create Sample Adventure Works Database
The following steps document downloading and installing the sample Adventure Works OLTP database provided by Microsoft
1 Launch Internet Explorer and navigate to httpmsftdbprodsamplescodeplexcom
2 Download the Adventure Works 2012 OLTP Script
3 Extract the ZIP into a folder on the desktop
4 Launch SQL Server Management Studio Start All Programs Microsoft SQL Server 2012 SQL Server Management Studio
5 When SQL Server Management Studio launches within the Connect to Server dialog login using the default settings and click Connect
6 Within SQL Server Management Studio select File Open File
7 Select the file instawdbsql from the extracted ZIP and click Open
8 If prompted to re-login to the database engine do it
9 Select Query SQLCMD Mode
10 Scroll down to line 42 the line that starts with the following
setvar SqlSamplesSourceDataPath
11 Change the folder location of where you unzipped the Adventure Works 2012 OLTP Script
12 Select Query Execute
13 When the script completes the AdventureWorks2012 database will have been created
Creating a SharePoint Server 2013 Environment for Development and Testing Version 10
copy Critical Path Training 2012 All Rights Reserved 64
wwwCriticalPathTrainingcom
Change Log
Change Version Description
August 22 2012 v 01 Pre-release for review
August 27 2012 v 02 Initial public release ndash install guide based on SharePoint Server Beta 2
August 28 2012 v 03 Updated URL for the site collection used to connect SharePoint to WAW
August 31 2012 v 04 Typo Removed SQL Server Analysis Services as part of the install Not required in a
SharePoint dev box (unless you are doing business intelligence which is not covered
in the guide)
Updated all references to Windows Azure Workflow to Workflow Manager the new
official name for the new workflow product
Updated SetupSharePointForHNSCps1 script to lookup HNSC Web Application by
name rather than URL which is more reliable
Typo Updated WingtipAllUp public NIC to use a different IP than the WingtipDC
Typo Replaced a reference to WingtipServer with WingtipDC
Typo Fixed handful of minor typos
September 1 2012 v 05 Removed SQL Server Reporting Services from install guide
Added step to uncheck IErsquos ldquoAutomatically detect proxyrdquo
Added post workflow install steps to setup User Profile Service Application to sync with
local Active Directory
September 5 2012 v 06 Added step to create a default root site collection in the HNSC web app
Updated minor typos and added extra notes for context
Updated PowerShell script SetupSharePointForHNSCps1 to remove content
database of default Web Application when setting up HNSC Web App
Added a new exercise 8 (after SharePoint install amp config and before the Workflow
install and config) to setup support for My Sites
October 20 2012 v 07 Updated script SetupSharePointForHNSCps1 to fix a bug where it would fail on line
111 if you didnrsquot already have a WINGTIPSP_Content managed account
Added section to bypass SharePointrsquos check for crlmicrosoftcom
Updated workflowrsquos registration PowerShell script to point to
httpintranetwingtipcom
Switched order of post-SharePoint install to setup HSNC hosting before configuring for
hosting apps
November 29 2012
v 10 Changed setup guide to use a single VM instead of two VMs
Updated guide for SharePoint 2013 RTM
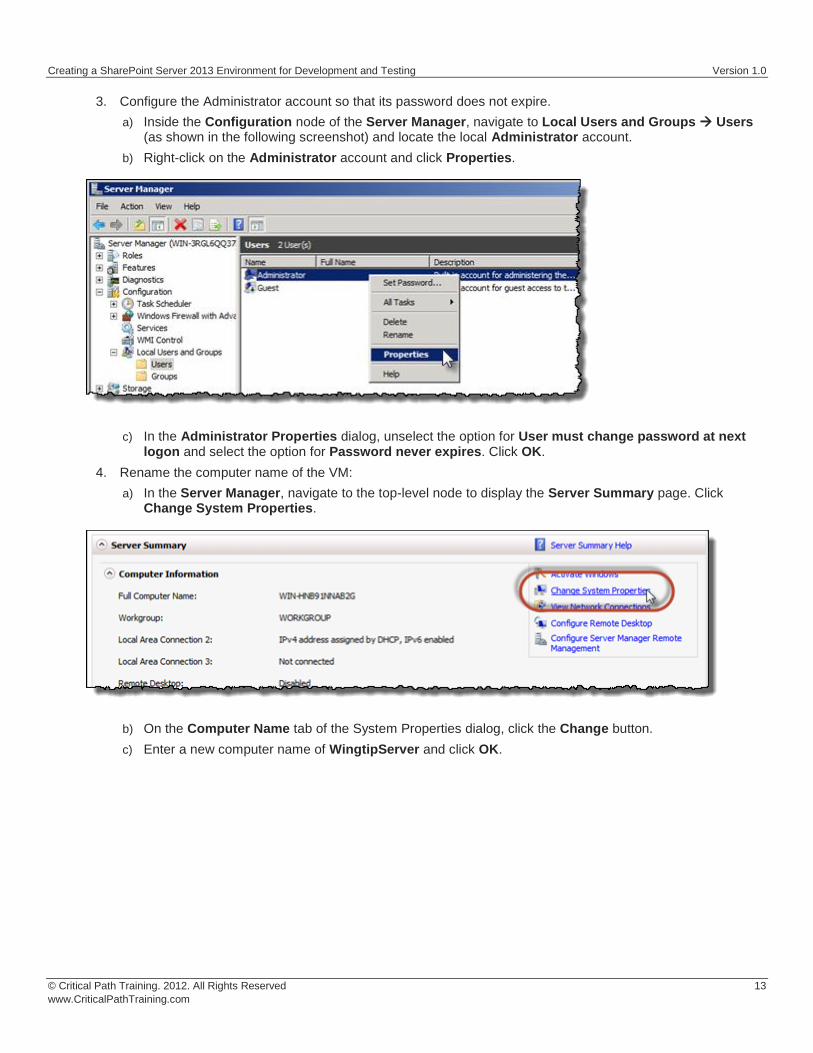
Creating a SharePoint Server 2013 Environment for Development and Testing Version 10
copy Critical Path Training 2012 All Rights Reserved 15
wwwCriticalPathTrainingcom
8 Enable the Windows Server Features for the Desktop Experience and the PowerShell Integrated Scripting Environment
a) In Server Manager choose Add Feature to bring up the Add Features Wizard dialog
b) Select the feature Desktop Experience
When you first click the checkbox for the Desktop Experience the wizard will prompt you with the following dialog to add support for Ink and Handwriting Services Click the Add Required Features button to continue
c) Scroll down the list of features in the Add Features Wizard dialog and select the feature Windows PowerShell Integrated Scripting Environment (ISE)
Creating a SharePoint Server 2013 Environment for Development and Testing Version 10
copy Critical Path Training 2012 All Rights Reserved 16
wwwCriticalPathTrainingcom
When you first click the checkbox for the Windows PowerShell Integrated Scripting Environment (ISE) the wizard will prompt you with the following dialog to add support for NET Framework 351 Features Click the Add Required Features button to continue
d) Click the Next button on the Add Features Wizard dialog to continue with the install
e) On the Confirm Installation Selection wizard page click the Install button
f) When you see the Installation Results screen the Add Features Wizard informs you a computer restart is required Click Close button to dismiss this dialog
9 After the VM has restarted log in again using [administrator | Password1] (username | password)
Configure the Virtual Machinersquos Networking Setup
In this section yoursquoll configure the two NICrsquos you added to the VM in previous steps One NIC (Internal LAN) will be used to communicate with other VMs in this environment while the other (External LAN) will be used to connect to the internet
1 Configure the NIC that is linked to the Internal LAN network
a) Open the Network Connections dialog by pressing Start enter view network connections in the search box Click the View Network Connections shortcut
b) Two network connections will be shown but only one will show as connected
The connected one is the one that is connected to the Internal LAN network The other one is currently ldquounpluggedrdquohellip this is why we didnrsquot connect a network to the second network when initially configuring the VM as this makes it easier to see which NIC is which in the VM
c) Rename the two NICrsquos
i) Right-click the connected NIC and select Rename Give it a name of Internal LAN
Creating a SharePoint Server 2013 Environment for Development and Testing Version 10
copy Critical Path Training 2012 All Rights Reserved 17
wwwCriticalPathTrainingcom
ii) Right-click the disconnected NIC and select Rename Give it a name of External LAN
d) Right-click the Internal LAN NIC and select Properties
e) In the Local Area Connection Properties dialog select the Internet Protocol Version 4 (TCPIPv4) item and click Properties
f) Enter the following information into the resulting dialog to configure the NICrsquos IP settings
i) Use the Following IP Address
(1) IP Address 192168150102
(2) Subnet mast 2552552550
(3) Default Gateway 192168150102
ii) Use the Following DNS Server Addresses
(1) Preferred DNS Server 192168150102
g) Click OK to accept the IP settings and Close to accept the changes to the NIC
Why not use 101 as the start NIC When you created the virtual internal network Hyper-V created a virtual NIC on the host computer If you set the IP of that NIC to 192168150101 you can use the Remote Desktop Connection app in Windows to connect to your virtual machines and easily copy-paste amp share drives
2 Configure the NIC that is linked to the External LAN network
a) Open the Network Connections window if it is not still open using the same steps from the previous step
b) Right-click the External LAN NIC and select Properties
c) In the Local Area Connection Properties dialog select the Internet Protocol Version 4 (TCPIPv4) item and click Properties
d) Enter the following information into the resulting dialog to configure the NICrsquos IP settings
i) Obtain an IP Address Automatically
ii) Use the Following DNS Server Addresses
(1) Preferred DNS Server 192168150102
e) Click the Advanced button to open the Advanced TCPIP Settings dialog
f) In the Advanced TCPIP Settings dialog click the DNS tab
i) Uncheck the Register this Connections Address in DNS
Creating a SharePoint Server 2013 Environment for Development and Testing Version 10
copy Critical Path Training 2012 All Rights Reserved 18
wwwCriticalPathTrainingcom
g) In the Advanced TCPIP Settings dialog click the WINS tab
i) Click the Add button and specify a new WINS Server as 192168150102
h) Click OK Close multiple times to accept all TCPIP settings
The external NIC will now obtain an IP dynamically amp will not register itself in the DHCPrsquos DNS server which is a good thing when there are multiple people on the same network this this type of a setup
3 Connect the second NIC to the External LAN network
a) Go back to the host computer and open the Hyper-V Manager
b) In the Hyper-V Manager window right-click the VM WingtipServer and select Settings
c) Select the second NIC the one that is not connected
d) For the Network select External LAN and click OK This will effectively plug the external network into the VM
4 Go back into the WingtipServer VM and if it is not still open open the Network Connections dialog You should now see both connections plugged in
a) To refresh the connection select the connection you just plugged in and click the Disable this Network Device button in the toolbar After the connection is disabled select it and click the Enable this Network Device button
b) After a few seconds the VM should be able to connect to the internet which you can test by browsing to a site such as httpwwwbingcom
Configure Windows Update and Update the Server
In this section you will verify the server is fully patched and updated
1 Verify Service Pack 1 is installed
a) Verify the version of the operating system installed by clicking Start right-click on Computer select Properties
b) If the server simply says Windows Server 2008 R2 Enterprise as shown in the following figure download and install Service Pack 1 from the following location httpwwwmicrosoftcomen-usdownloaddetailsaspxid=5842
Creating a SharePoint Server 2013 Environment for Development and Testing Version 10
copy Critical Path Training 2012 All Rights Reserved 19
wwwCriticalPathTrainingcom
c) If Service Pack 1 is installed it will state it
2 Update the server using Windows Update
a) Selecting Start All Programs Windows Update
b) First disable Windows Update from running automatically
i) Click the link Change Settings
ii) Under the Important Updates list select Never check for updates (not recommended)
This isnrsquot what you would do in a production environment but for a development machine it is ok
c) Now update the server
i) Click the Check for Updates button
ii) If prompted install any updates to the Windows Update dialog
iii) Select the Check for Updates link
iv) Windows Update will the report how many updates are available Select all important and recommended updates and click the Install Updates button
v) If prompted select I accept the license terms for any updates that require it
vi) Keep going through the process of running Windows Update checking for updates and installing them after each reboot until it says there are no updates left to install
This step is likely going to take quite a bit of time so be patient
Activate Windows Server 2008 R2
In this section you will activate the server if you have a product key
1 If you have a product key for Windows Server 2008 R2 use it to activate Windows
a) In the Server Manager window navigate to the top-level node to display the Server Summary page Click Activate Windows
b) You will be prompted to enter your product key
i) Enter your product key and click to button to activate Windows
Creating a SharePoint Server 2013 Environment for Development and Testing Version 10
copy Critical Path Training 2012 All Rights Reserved 20
wwwCriticalPathTrainingcom
ii) After a few seconds your VM should be able to connect to a Microsoft site and successfully activate Windows
At this point you have a fully patched operating system VM created that will act as the Active Directory domain controller
Apply the DisableLoopbackCheck Registry Fix
Configure the DisableLoopbackCheck registry setting (Microsoft KB httpsupportmicrosoftcomkb896861)
The following steps automate creating the registry key outlined as Method 2 in the Microsoft KB article httpsupportmicrosoftcomkb896861 using Windows PowerShell
PowerShell Script Alert You can also find this PowerShell script AddDisableLoopbackCheckRegKeyps1 in the files that
accompany this setup guide
1 Click the Windows PowerShell icon in the Taskbar
2 Run the following PowerShell commands pressing [ENTER] after each one
$regKeyPath = HKLMSystemCurrentControlSetControlLsa $key = DisableLoopbackCheck New-ItemProperty -Path $regKeyPath -Name $key -Value 1 -PropertyType dword
a) Close the Windows PowerShell console by typing EXIT and pressing [ENTER]
Exercise 3 Install Active Directory Domain Services
Now you will promote your WingtipServer VM to a domain controller and create a new domain named wingtipcom
1 Login to the WingtipServer virtual machine using administrator | Password1
2 Add and configure the role for Active Directory Domain Services
a) Launch Server Manager and select the Roles node
b) Click the Add Roles link to start the Add Roles Wizard
c) On the Before you begin page click Next
d) On the Server Roles page select Active Directory Domain Services Click the Add Required Features button if prompted to install prerequisites
e) Click Next
Creating a SharePoint Server 2013 Environment for Development and Testing Version 10
copy Critical Path Training 2012 All Rights Reserved 21
wwwCriticalPathTrainingcom
f) On the next page of the wizard click Next which will bring you to the Confirm Installation Selections page
g) Click Install
After Active Directory Domain Services has been installed you will see the Installation Results page in the Add Roles Wizard
3 Click on the link with the big long caption of Close this wizard and launch the Active Directory Domain Services Installation Wizard (dcpromoexe)
4 On the first page of the Active Directory Domain Services Installation Wizard click the Use Advanced Mode Installation checkbox and click Next
Creating a SharePoint Server 2013 Environment for Development and Testing Version 10
copy Critical Path Training 2012 All Rights Reserved 22
wwwCriticalPathTrainingcom
5 On the Operating System Compatibility page click Next
6 On the Choose a Deployment Configuration select Create a new domain in a new forest and click Next
7 On the Name the Forrest Root Domain enter the following and click Next
a) FQDN of the forest root domain wingtipcom
8 On the Domain NetBIOS Name set it to WINGTIP and click Next
9 On the Set Forest Functional Level page select Windows Server 2008 R2 and click Next
10 On the Additional Domain Controller Options accept the default options and click Next
11 You might be prompted with the dialog shown below providing a warning that This computer has dynamically assigned IP address(es) This is not a problem when you are running your development environment on a domain controller Click Yes to dismiss the dialog
12 At this point the wizard will prompt you with a dialog information you a delegation for the DNS Server cannot be created because it cannot find the authoritative parent zone This is not a problem because the wizard will automatically configure the DNS of the VM to point to itself Click on the Yes button to dismiss this dialog
Creating a SharePoint Server 2013 Environment for Development and Testing Version 10
copy Critical Path Training 2012 All Rights Reserved 23
wwwCriticalPathTrainingcom
13 On the Location for Database Log Files and SYSVOL page accept all the default values and click Next
14 On the Directory Services Restore Mode Administrator Password page enter Password1 in both textboxes and click Next
15 On the Summary page click Next to start the process of configuring the new Active Directory domain
16 The wizard will display the dialog below to show you the progress of the configuration process You will be required to reboot when the configuration has been completed Check the option for Reboot on completion and then wait for the configuration to complete and the machine to reboot
17 After the VM reboots login to the server with wingtipadministrator | Password1
Configure Windows Update and Update the Server
In this section you will verify the server is fully patched and updated
1 Update the server using Windows Update
a) Selecting Start All Programs Windows Update
b) Select the Check for Updates link
c) Windows Update will the report how many updates are available Select all important and recommended updates and click the Install Updates button
d) If prompted select I accept the license terms for any updates that require it
e) Keep running Windows Update after each reboot and update install until it says there are no updates left to install
Creating a SharePoint Server 2013 Environment for Development and Testing Version 10
copy Critical Path Training 2012 All Rights Reserved 24
wwwCriticalPathTrainingcom
This step could take quite a bit of time so be patient
At this point you have a fully installed Active Directory Domain Controller for the Wingtipcom domain hosted on the server WingtipServer
Exercise 4 Install SQL Server 2012
In this exercise you will install SQL Server 2012 that will be used to store all required databases
1 Download the SQL Server 2012 Evaluation Edition specifically the DVD x64 ISO image to the host computer from here httpwwwmicrosoftcombetaexperiencepdSQL2012EvalCTAenusdefaultaspx or you can use your own licensed copy
2 Mount the SQL Server 2012 ISO to the WingtipServer VM
a) On the host computer open the Hyper-V Manager
b) Right-click the VM WingtipServer and select Settings
c) Select DVD Drive in the left-hand panel
d) In the right-hand panel select Image File and browse to the ISO file that contains SQL Server 2012 and click OK
3 Login to the WingtipServer VM as wingtipadministrator | Password1
Install SQL Server 2012
In this section you will install SQL Server 2012
1 If the AutoPlay dialog box is open click Run SETUPEXE If it isnrsquot use Windows Explorer to navigate to the DVD drive and execute the setupexe file in the root of the DVD drive
2 In the SQL Server Installation Center click Installation on the left-hand side
Creating a SharePoint Server 2013 Environment for Development and Testing Version 10
copy Critical Path Training 2012 All Rights Reserved 25
wwwCriticalPathTrainingcom
3 Next select New SQL Server stand-alone installation or add features to an existing installation
4 On the Setup Support Rules page the installer will check for issues before installing Click OK
5 On the Product Key page click the Specify a free edition radio box and select Evaluation then click Next
6 On the License Terms page click the I accept the license terms checkbox and click Next
7 On the Setup Support Rules page the installer will check for any problems with the server you are installing on Click Next when this completes
Creating a SharePoint Server 2013 Environment for Development and Testing Version 10
copy Critical Path Training 2012 All Rights Reserved 26
wwwCriticalPathTrainingcom
8 On the Support Role page select SQL Server Feature Installation and click Next
9 On the Feature Selection page check the following options and click Next
a) Instances Features
i) Database Engine Services
(1) Full-Text and Semantic Extractions for Search
b) Shared Features
i) Management Tools ndash Basic
(1) Management Tools ndash Complete
Creating a SharePoint Server 2013 Environment for Development and Testing Version 10
copy Critical Path Training 2012 All Rights Reserved 27
wwwCriticalPathTrainingcom
10 On the Installation Rules page click Next
11 On the Instance Configuration page click Next
12 On the Disk Space Requirements page click Next
13 On the Server Configuration page do the following and click Next
a) On the Service Account tab change the Startup Type for the SQL Server Agent to Automatic
14 On the Database Engine Configuration page do the following and click Next
a) On the Server Configuration tab click Add Current User
b) On the FILESTREAM tab
i) Check Enable FILESTREAM for Transact-SQL Access
ii) Check Enable FILESTREAM for file IO access
15 On the Error Reporting page click Next
16 On the Installation Configuration Rules page click Next
17 On the Ready to Install page click Install
Installation of SQL Server 2012 will take some time please be patient
18 When the installation completes the Complete page will be shown Click Close
At this point you have now successfully installed SQL Server 2012
Creating a SharePoint Server 2013 Environment for Development and Testing Version 10
copy Critical Path Training 2012 All Rights Reserved 28
wwwCriticalPathTrainingcom
Exercise 5 Install amp Configure SharePoint Server 2013
In this exercise you will install SharePoint 2013
1 Download the SharePoint Server 2013 to the host computer from here httptechnetmicrosoftcomen-USevalcenterhh973397aspx
2 Mount the SharePoint Server 2013 ISO to the WingtipServer VM
a) On the host computer open the Hyper-V Manager
b) Right-click the VM WingtipServer and select Settings
c) Select DVD Drive in the left-hand panel
The file that Microsoft provides is saved in the IMG format Hyper-V Manager wonrsquot allow you to mount an IMG file so rename it to ISO before mounting it
d) In the right-hand panel select Image File and browse to the ISO file that contains SharePoint Server 2013 and click OK
Create SharePoint Service Accounts amp Grant Rights to SQL Server 2012
In this section you will create the necessary service accounts that will be used by SharePoint in Active Directory and grant them necessary rights in SQL Server 2012
PowerShell Script Alert The creation of users and granting them rights to SQL Server 2012 steps in this section are automated in the Windows PowerShell script CreateSpServiceAccountsps1 found in the files that accompany this setup guide Open the script
and read the header for documentation on how to use it
1 Open the Active Directory Users and Computers Start Administrative Tools Active Directory Users and Computers
2 Expand the tree in the left-hand pane to see the Users OU Select the Users OU
3 Create a new user SP_Farm
a) In the toolbar select Action New User
Creating a SharePoint Server 2013 Environment for Development and Testing Version 10
copy Critical Path Training 2012 All Rights Reserved 29
wwwCriticalPathTrainingcom
b) Set the userrsquos Full Name amp User Login Name to SP_Farm and click Next
c) In the password dialog enter the following and click Next
i) Password (and Confirm Password) Password1
ii) User must change password at next login unchecked
iii) User cannot change password unchecked
iv) Password never expires checked
v) Account is disabled unchecked
Creating a SharePoint Server 2013 Environment for Development and Testing Version 10
copy Critical Path Training 2012 All Rights Reserved 30
wwwCriticalPathTrainingcom
vi) Click Finish
4 Repeat the previous step to create two more accounts
a) SP_Content
b) SP_Services
At this point you have created all the necessary service accounts
Install SharePoint Server 2013 Prerequisites
In this section you will install the SharePoint Server 2013 Prerequisites
1 Ensure you are logged into the WingtipServer VM using the account wingtipadministrator | Password1
2 If the AutoPlay dialog box is open click Run splashhta If it isnrsquot use Windows Explorer to navigate to the DVD drive and execute the splashhta file in the root of the DVD drive
Creating a SharePoint Server 2013 Environment for Development and Testing Version 10
copy Critical Path Training 2012 All Rights Reserved 31
wwwCriticalPathTrainingcom
3 Click the Install Software Prerequisites link
4 In the Microsoft SharePoint 2013 Products Preparation Tool window click Next
5 On the License Terms for Software Products page
a) Check I accept the terms of the License Agreement(s)
b) Click Next
6 The tool will download and install all prerequisites for SharePoint Server 2013 This will take some time It may prompt you to reboot the server If so reboot the server and login using wingtipadministrator | Password1
Creating a SharePoint Server 2013 Environment for Development and Testing Version 10
copy Critical Path Training 2012 All Rights Reserved 32
wwwCriticalPathTrainingcom
7 When the prerequisite installer is complete it will present a summary of everything it did
8 Click Finish
9 Restart the WingtipServer VMhellip some additional installations and changes that the prerequisite installer did will require a restart before installing SharePoint Server 2013
At this point all prerequisites required by SharePoint Server 2013 have been installed and any necessary configuration changes have been applied to the server However it is strongly recommend that you run Windows Update and install any pending updates Further Microsoft recommends installing the following hotfixes if they are not already installed
KB2554876 The SharePoint Parsing Process Crashes in Windows Server 2008 R2
KB2708075 IIS 75 Configurations are not Updated when you use the ServerManager Class to Commit Configuration Changes
KB2759112 Hotfix is Available for NET Framework 45 that Resolves an ASPNET Race Condition Issue in Windows Server 2008 R2 Windows Server 2008 R2 SP1
KB2765317 Hotfix is Available for NET Framework 45 that Resolves an ASPNET Race Condition Issue in Windows
8 Windows RT and Windows Server 2012
Install SharePoint Server 2013
In this section you will install SharePoint Server 2013
1 Ensure you are logged into the WingtipServer VM using the account wingtipadministrator | Password1
2 If the AutoPlay dialog box is open click Run splashhta If it isnrsquot use Windows Explorer to navigate to the DVD drive and execute the splashhta file in the root of the DVD drive
Creating a SharePoint Server 2013 Environment for Development and Testing Version 10
copy Critical Path Training 2012 All Rights Reserved 33
wwwCriticalPathTrainingcom
3 Click Install SharePoint Server
4 When prompted to Enter your Product Key enter the key you obtained for the trial install and click Continue
5 On the Read the Microsoft Software License Terms page check the I accept the terms of this agreement checkbox and click Continue
6 On the Choose a file location page click Install Now
Creating a SharePoint Server 2013 Environment for Development and Testing Version 10
copy Critical Path Training 2012 All Rights Reserved 34
wwwCriticalPathTrainingcom
7 When the installation is complete select the Run the SharePoint Products Configuration Wizard checkbox and click Close
8 On the Welcome to SharePoint Products page click Next
a) If prompted to start or reset services click Yes
9 On the Connect to a server farm page select Create a new server farm and click Next
10 On the Specify Configuration Database Settings page use the following to complete the page and click Next
a) Database server WINGTIPSERVER
b) Database name SharePoint_Config
c) Username WINGTIPSP_Farm
d) Password Password1
Creating a SharePoint Server 2013 Environment for Development and Testing Version 10
copy Critical Path Training 2012 All Rights Reserved 35
wwwCriticalPathTrainingcom
11 On the Specify Farm Security Settings page for the Passphrase and Confirm Passphrase boxes enter Password1 and click Next
12 On the Configure SharePoint Central Administration Web Application page check the Specify port number checkbox and enter a value of 9999 then Click Next
Creating a SharePoint Server 2013 Environment for Development and Testing Version 10
copy Critical Path Training 2012 All Rights Reserved 36
wwwCriticalPathTrainingcom
13 On the Completing the SharePoint Products Configuration Wizard page click Next
14 When the installer completes it will display the Confirmation Successful page
15 Click Finish This will launch Internet Explorer to go through the configuration process
Creating a SharePoint Server 2013 Environment for Development and Testing Version 10
copy Critical Path Training 2012 All Rights Reserved 37
wwwCriticalPathTrainingcom
At this point you have successfully installed SharePoint Server 2013
Configure SharePoint Server 2013
In this section you will create a new SharePoint Server 2013 farm and perform minimal configuration tasks
After installing SharePoint Sever 2013 the SharePoint Products Configuration Wizard will launch the browser-based Initial Farm Configuration Wizard
1 In the first page of the wizard you are prompted to Help Make SharePoint Better Select which ever option you want and click OK
2 On the Welcome page that asks How do you want to configure your SharePoint farm click the Start the Wizard button
3 On the Services page do the following and then click Next
a) Service Account Select Create new managed account
i) Username WINGTIPSP_Services
ii) Password Password1
b) Services Uncheck the following services
Creating a SharePoint Server 2013 Environment for Development and Testing Version 10
copy Critical Path Training 2012 All Rights Reserved 38
wwwCriticalPathTrainingcom
i) Access Services 2010
ii) App Management Service
In SharePoint Server 2013 the Search Service Application processes specifically noderunnerexe can consume a considerable amount of memory and processor time If you are not going to work with search you might consider unchecking this option for now You can always go back into Central Administration and create a new instance of the Search Service Application at a later date if you need it
Why did we remove Access Services 2010 amp App Management Service service applications The Access Services 2010 service application is included for backwards compatibility and isnrsquot needed in new installations unless you are migrating solutions built with Access Services 2010 from SharePoint Server 2010 (if so you can create this service application later within Central Administration Application Management Manage Service Applications) The App Management Service service application will be created in a later step in this setup guide therefor it is skipped here
4 The creation of the service applications can take quite a while so be patient If it exceeds 20 minutes it is fairly safe to assume the page is hung up One option is to close the browser then launch Central Administration (Start All Programs Microsoft SharePoint 2013 Products SharePoint 2013 Central Administration) and look at the Service Application page (Application Management Manage Service Applications) to see if they were all created
Configure DNS
In this section you will configure DNS for hosting SharePoint sites amp Apps
1 Ensure you are logged into the WingtipServer VM using the account wingtipadministrator | Password1
2 Open the DNS window Start Administrative Tools DNS
3 Expand the hierarchy on the left-hand side of the window until you get to DNS WINGTIPSERVER Forward Lookup Zones wingtipcom
4 Create a new wildcard so all requests for http[]wingtipcom will be forwarded to our SharePoint machine
a) Next right-click wingtipcom and select New Host (A or AAAA)
Creating a SharePoint Server 2013 Environment for Development and Testing Version 10
copy Critical Path Training 2012 All Rights Reserved 39
wwwCriticalPathTrainingcom
b) In the New Host dialog enter the following and click OK
i) Alias Name
ii) IP Address 192168150102 Then click Add Host The following figure shows how this looks
This new record is telling DNS to forward any request for http[]wingtipcom to the webserver WINGTIPSERVER where the
requests will be served by SharePoint
5 Verify this DNS entry is working
a) Open Windows PowerShell Start All Programs Accessories Windows PowerShell Windows PowerShell
b) Run the following commands and press ENTER
PS CUsersAdministratorgt nslookup somethingwingtipcom PS CUsersAdministratorgt nslookup somethingappswingtipcom
c) You should get a response that points to the WingtipServer server as shown in the following figure
Creating a SharePoint Server 2013 Environment for Development and Testing Version 10
copy Critical Path Training 2012 All Rights Reserved 40
wwwCriticalPathTrainingcom
Configure SharePoint Server 2013 for Host-Named Site Collections amp Create Initial Site
Collections
In this section you will create new SharePoint 2013 site collections for testing and hosting apps
Microsoft recommends to create host-named site collections (HNSC) instead of using the path based site collection addressing The difference is the following a path based site created at something such as httpintranetwingtipcomsitesdevtest as an HNSC site would be more like httpdevtestwingtipcom This is how it works in the cloud (Office 365) and it scales much better for on-prem
deployments This setup guide will show you how to setup your environment to create HNSC The only downside to this approach is that you canrsquot create site collections within Central Administration it must be done via Windows PowerShell API (because Central Administration doesnrsquot instruct you where to put the site
This is implemented in various parts First DNS must be configured to send all requests for httpwingtipcom to a Web Application
(implemented in the last section) Second this Web Application must be extended with SharePoint and have no host header bindings (so it handles all requests) Third it must have a default site collection at the root of the Web Application but it will not be used for anything (in fact it doesnrsquot need a template assigned to it)
You can read more about HNSCrsquos on TechNet httptechnetmicrosoftcomen-uslibrarycc424952aspx
PowerShell Script Alert The steps in this section are automated in the script SetupSharePointForHNSCps1 found in the files that
accompany this setup guide Open the script and read the header for documentation on how to use it
1 Ensure you are logged into the WingtipServer VM using the account wingtipadministrator | Password1
2 Open Central Administration Start All Programs Microsoft SharePoint 2013 Products SharePoint 2013 Central Administration
3 Select Application Management Manage Web Applications
4 Delete the default Web Application created by the configuration wizard
a) Delete the existing default Web Application
i) Select the Web Application SharePoint ndash 80 the one with the URL of httpwingtipserver and click Delete in the ribbon
ii) When prompted to delete the associated IIS Web Site amp SQL Server database select both options to delete them and click OK
The reason you are doing this is because the setup wizard you ran previously when creating the service applications automatically created it The problem is that it used the same identity (WINGTIPSP_Services) for the app pool that is used for all the service
applications which is not desired
5 Create a new Web Application to handle Host-Named Site Collections (HNSC)
Creating a SharePoint Server 2013 Environment for Development and Testing Version 10
copy Critical Path Training 2012 All Rights Reserved 41
wwwCriticalPathTrainingcom
a) In the ribbon click the New button
b) In the Create New Web Application dialog enter the following values in the properties and click OK Leave all properties not mentioned
i) Select the radio button Create a new IIS web site
(1) Name SharePoint HNSC Host ndash 80
(2) Port 80
ii) Application Pool
(1) Select the radio button Create a new application pool
(a) Application Pool Name SharePoint Default HNSC AppPool
(b) Select a security account for this application pool WINGTIPSP_Content
If WINGTIPSP_Content is not listed as an available managed account create it by selecting the appropriate option and using
Password1 for the password
iii) Database Name and Authentication
(1) Database Name WSS_Content_HNSCDefaultHost
c) This process will take a few moments At the end of the process SharePoint will ask if you want to create a site collection You do but you donrsquot want to do it through the browser as this will not be a HNSC To create a HNSC you must create it via Windows PowerShell
6 Create a default not template site collection at the root of the web application
a) Open SharePoint 2013 Management Shell Start All Programs Microsoft SharePoint 2013 Products SharePoint 2013 Management Shell
7 Create Site Collections for Testing SharePoint amp SharePoint Apps
a) Open SharePoint 2013 Management Shell Start All Programs Microsoft SharePoint 2013 Products SharePoint 2013 Management Shell
b) Get a reference to the HNSC web application you just created by running the following Windows PowerShell script in the SharePoint 2013 Management Shell
$hnscWebApp = Get-SPWebApplication | Where-Object $_DisplayName -eq SharePoint HNSC Host - 80
c) Create a non-templated site at the root of the web application for Workflow to connect to by executing the following Windows PowerShell script in the SharePoint 2013 Management Shell
New-SPSite -Name Root HNSC Site Collection -Url httpwingtipcom -HostHeaderWebApplication $hnscWebApp -OwnerAlias WINGTIPAdministrator
d) Create a team site by executing the following Windows PowerShell script in the SharePoint 2013 Management Shell
New-SPSite -Name Wingtip Intranet -Url httpintranetwingtipcom ndashHostHeaderWebApplication $hnscWebApp -Template STS0 -OwnerAlias WINGTIPAdministrator
e) Create a developer site by executing the following Windows PowerShell script in the SharePoint 2013 Management Shell
New-SPSite -Name Wingtip Developer Site -Url httpdevwingtipcom ndashHostHeaderWebApplication $hnscWebApp -Template DEV0 -OwnerAlias WINGTIPAdministrator
You can only create debug and test apps using a developer site
At this point you now have a site collection to use as a team site (httpintranetwingtipcom) and to develop and test custom SharePoint apps (httpdevwingtipcom)
Creating a SharePoint Server 2013 Environment for Development and Testing Version 10
copy Critical Path Training 2012 All Rights Reserved 42
wwwCriticalPathTrainingcom
Configure SharePoint 2013 for Hosting Apps
In this setup you will setup your SharePoint 2013 environment for hosting apps
PowerShell Script Alert Everything in the next immediate step is provided in the script ConfigureSpFarmForAppsps1 found in the
files that accompany this setup guide Open the script and read the header for documentation on how to use it
1 Ensure you are logged into the WingtipServer VM using the account wingtipadministrator | Password1
2 Create the necessary SharePoint App Management service applications and start the necessary services via Windows PowerShell
a) Open SharePoint 2013 Management Shell Start All Programs Microsoft SharePoint 2013 Products SharePoint 2013 Management Shell
b) Execute the following Windows PowerShell script in the SharePoint 2013 Management Shell
$appHostDomain = appswingtipcom $adminService = Get-Service -Name spadminv4 if ($adminServiceStatus -ne Running) Start-Service $adminService $timerService = Get-Service -Name sptimerv4 if ($timerServiceStatus -ne Running) Start-Service $timerService Set-SPAppDomain $appHostDomain $appMgmtSvcInstance = Get-SPServiceInstance | Where-Object $_GetType()Name -eq AppManagementServiceInstance if ($appMgmtSvcInstanceStatus -ne Online) Start-SPServiceInstance -Identity $appMgmtSvcInstance $appSubSettingSvcInstance = Get-SPServiceInstance | Where-Object $_GetType()Name -eq SPSubscriptionSettingsServiceInstance if ($appSubSettingSvcInstanceStatus -ne Online) Start-SPServiceInstance -Identity $appSubSettingSvcInstance $appPoolServiceApps = Get-SPServiceApplicationPool -Identity SharePoint Web Services Default $appSubSvc = New-SPSubscriptionSettingsServiceApplication ndashApplicationPool $appPoolServiceApps ndashName Settings Service Application ndashDatabaseName SettingsServiceDB $proxySubSvc = New-SPSubscriptionSettingsServiceApplicationProxy ndashServiceApplication $appSubSvc $appAppSvc = New-SPAppManagementServiceApplication -ApplicationPool $appPoolServiceApps -Name App Management Service Application -DatabaseName AppServiceDB $proxyAppSvc = New-SPAppManagementServiceApplicationProxy -ServiceApplication $appAppSvc Set-SPAppSiteSubscriptionName -Name app -Confirm$false
3 Verify the script configured SharePoint 2013 for hosting apps
a) Open Central Administration Start All Programs Microsoft SharePoint 2013 Products SharePoint 2013 Central Administration
b) Verify service applications created
i) Open the Service Applications page Application Management Manage Service Applications
ii) Verify you have two service applications created
(1) App Management Service Application
(2) Settings Service Application
c) Verify service instances are running
i) Open the Services on Server page System Settings Manage Services on Server
ii) Verify the following services are Started
(1) App Management Service
(2) Microsoft SharePoint Foundation Subscription Settings Service
Creating a SharePoint Server 2013 Environment for Development and Testing Version 10
copy Critical Path Training 2012 All Rights Reserved 43
wwwCriticalPathTrainingcom
d) Verify App URLs are correct
i) Open the Configure App URLs page Apps Configure app URLs
ii) Verify the following
(1) App Domain appswingtipcom
(2) App Prefix app
At this point your SharePoint Server 2013 environment is ready to host SharePoint apps
Creating a SharePoint Server 2013 Environment for Development and Testing Version 10
copy Critical Path Training 2012 All Rights Reserved 44
wwwCriticalPathTrainingcom
Start the SharePoint 2013 Sandbox Service
By default the service that executes sandbox solutions is not running In this step you will start the service
1 Open Central Administration Start All Programs Microsoft SharePoint 2013 Products SharePoint 2013 Central Administration
2 Open the Services on Server page System Settings Manage Services on Server
3 Click the Start link to the left of the Microsoft SharePoint Foundation Sandboxed Code Service
At this point your installation can support sandbox solutions
Configure CRL Verification for Disconnected Environments
SharePoint periodically ldquophones homerdquo to a specific address hosted by Microsoft under certain conditions When your environment is disconnected this can cause an unnecessary delay or failures when starting up the sandbox The following steps outline a workaround to bypass this check
1 Launch Notepad as an administrator Start All Programs Accessories right-click Notepad and select Run as Administrator
2 Open the hosts file by selecting File Open and finding the file
cWindowsSystem32Driversetchosts
3 Add the following line to the end of the file
127001 crlmicrosoftcom
4 Save and close the hosts file
Update Internet Explorer to Bypass the App URL amp Automatically Login to SharePoint Sites
In this section you will update Internet Explorer to add the App hosting URL to the bypass list so you can navigate to the domain after deploying SharePoint hosted apps
1 Ensure you are logged into the WingtipServer VM using the account wingtipadministrator | Password1
1 Launch Internet Explorer Start All Programs Internet Explorer
2 Configure Internet Explorer to bypass the App URL
a) In the top-right corner click the gear icon and select Internet Options
b) On the Security tab select the Local Intranet and click the Sites button
c) Uncheck the box next to Automatically detect intranet network
d) Click the Advanced button and add two entries to the Exceptions list
i) httpwingtipcom
ii) httpappswingtipcom
Creating a SharePoint Server 2013 Environment for Development and Testing Version 10
copy Critical Path Training 2012 All Rights Reserved 45
wwwCriticalPathTrainingcom
e) Click the Close button followed by the OK button multiple times to close out of the dialogs
At this point Internet Explorer is setup to bypass your app URL so you can navigate to apps (httpappswingtipcom) as well as automatically authenticate to sites hosted at httpwingtipcom
Exercise 6 Configure SharePoint to Host My Sites
In this exercise you will configure SharePoint to create and host My Sites In order to host My Sites you will need a new Web Application that is configured for Self-Service Site Creation and has a My Site Host site collection
1 Create a new SharePoint web application to host the My Sites
a) Ensure you are logged into the WingtipServer VM using the account wingtipadministrator | Password1
b) Open Central Administration Start All Programs Microsoft SharePoint 2013 Products SharePoint 2013 Central Administration
c) Select Application Management Manage Web Applications
d) In the ribbon click the New button
e) In the Create New Web Application dialog enter the following values in the properties and click OK Leave all properties not mentioned
i) Select the radio button Create a new IIS web site
(1) Name SharePoint MySite Host ndash 80
(2) Port 80
(3) Host Header mywingtipcom
ii) Application Pool
(1) Select the radio button Use existing application pool
(a) Application Pool Name SharePoint Default HNSC AppPool
iii) Database Name and Authentication
(1) Database Name WSS_Content_SocialWingtipCom
f) This process will take a few moments At the end of the process SharePoint will ask if you want to create a site collection Click the link provided to create a new site collection amp continue to the next step
2 Create a My Site Host site collection
a) On the Create Site Collection page use the following information to complete the form and click OK
Creating a SharePoint Server 2013 Environment for Development and Testing Version 10
copy Critical Path Training 2012 All Rights Reserved 46
wwwCriticalPathTrainingcom
i) Title My Site Host
ii) URL
iii) Template Selection My Site Host (found under the Enterprise tab)
iv) Primary Site Collection Administrator WINGTIPAdministrator
3 Update the Web Application to host my sites
a) Within Central Administration in the left-hand navigation navigate to the Manage Web Applications page Application Management Manage Web Applications
b) Select the SharePoint MySite Host ndash 80 web application
c) Click the Managed Paths button in the ribbon
d) Remove the sites managed path and add two new managed paths and click OK
i) personal ndash Wildcard inclusion
ii) my ndash Explicit inclusion
e) With the SharePoint MySite Host ndash 80 web application still selected click the Self-Service Site Creation button
f) On the Self-Service Site Creation page use the following values to complete the form and click OK
i) Site Collections On
4 Next configure the User Profile Service Application My Site settings
a) Browse to the User Profile Service Application management page Application Management Manage Service Applications User Profile Service Application
b) Under the My Site Settings section click the Setup My Sites
c) On the My Site Settings page use the following information to complete the form and click OK
i) My Site Host httpmywingtipcom
ii) Personal Site Location personal
At this point your SharePoint deployment is now configured to automatically create My Sites under httpmywingtipcomPersonalUserName when users first browse to them
Exercise 7 Install amp Configure Workflow Manager 10
In this exercise you will configure the WingtipServer VM to host Workflow Manager 10 and connect it to your SharePoint installation
1 Ensure you are logged into the WingtipServer VM using the account wingtipadministrator | Password1
Verify SQL Server 2012 Network Configuration
In this section yoursquoll verify the network configuration is correct for SQL Server 2012 in order to install Workflow Manager 10
Creating a SharePoint Server 2013 Environment for Development and Testing Version 10
copy Critical Path Training 2012 All Rights Reserved 47
wwwCriticalPathTrainingcom
1 Configure SQL Server 2012 to have the TCPIP connection protocol enabled
a) Open the SQL Server Configuration Manager Start All Programs Microsoft SQL Server 2012 Configuration Tools SQL Server Configuration Manager
b) Expand the hierarchy on the left-hand side to the following SQL Server Connection Manager (local) SQL Server Network Configuration Protocols for MSSQLSERVER
c) In the main window if TCPIP is Disabled right-click TCPIP and select Enable
d) When prompted with a warning click OK
2 SQL Server must be restarted in order to reflect this change
a) In the hierarchy on the left-hand side of the window select SQL Server Services
b) Right-click SQL Server (MSSQLSERVER) and select Restart
At this point SQL Server is now configured with the TCPIP protocol enabled a requirement when configuring Service Bus
Configure the Workflow Service Account with the Necessary Rights
In this section you will verify the service account that will run Workflow Manager and Service Bus
1 Ensure you are logged into the WingtipServer VM using the account WINGTIPadministrator | Password1
2 Grant the WINGTIPSP_Content account securityadmin amp dbcreator permissions in SQL Server
a) Launch SQL Server Management Studio Start All Programs Microsoft SQL Server 2012 SQL Server Management Studio
b) When SQL Server Management Studio launches within the Connect to Server dialog login using the default settings and click Connect
c) In the Object Explorer tool window expand the WINGTIPSERVER server hierarchy to the Security Logins node
d) Find the WINGTIPSP_Content account right-click it and select Properties
Creating a SharePoint Server 2013 Environment for Development and Testing Version 10
copy Critical Path Training 2012 All Rights Reserved 48
wwwCriticalPathTrainingcom
e) In the Select a page pane select Server Roles
f) Check securityadmin amp dbcreator and click OK
g) Close SQL Server Management Studio
3 Add the Workflow service account to the local administrators group
a) Open the Active Directory Users and Computers window Start Administrative Tools Active Directory Users and Computers
b) In the hierarchy on the left-hand side of the window expand it to the following Active Directory Users and Computers wingtipcom Builtin
c) In the main window right-click Administrators and select Properties
d) In the Administrators Properties dialog select the Members tab and click Add
e) In the Enter the object names to select box enter wingtipsp_content and click the Check Names button
f) In the Administrators Properties dialog click OK
g) Close the Active Directory Users and Computers window
At this point the service account that will host Workflow Manager and Service Bus has been configured correctly
Creating a SharePoint Server 2013 Environment for Development and Testing Version 10
copy Critical Path Training 2012 All Rights Reserved 49
wwwCriticalPathTrainingcom
Download amp Install Workflow Manager and Service Bus
In this section you will install Workflow Manager and Service Bus
1 Ensure you are logged into the WingtipServer VM using the account WINGTIPSP_Content | Password1
It is important you are logged in as the user that will run workflow when you install amp configure Workflow Manager and Service Bus
2 Launch the Web Platform Installer Start All Programs Microsoft Web Platform Installer
a) If the Web Platform Installer is not present on your machine you can download amp install it from here httpwwwmicrosoftcomwebdownloadsplatformaspx
If you do not have internet access within the virtual machine it is possible to download everything needed for workflow using the command line version of the Web Platform Installer (WebPICMD) You can get WebPICMD from httplearniisnetpageaspx1072web-platform-installer-v4-command-line-webpicmdexe-preview-release Specifically for
workflow enter the following command to download Workflow Beta 1 and all prerequisites
webpicmd offline ProductsWorkflow Pathc[path]
3 When the Web Platform Installer loads execute a search for Workflow select Workflow Manager 10 and click Add
4 Click the Install button at the bottom of the Web Platform Installer 40 window
5 On the Prerequisites page click I Accept
Note The Web Platform Installer 40 may prompt you to keep certain products updated using Microsoft Update If it does select Use Microsoft Update when I check for updates (recommended) and click Continue
6 When the installer completes the following dialog will appear Click Continue and then Finish to start the configuration process
Creating a SharePoint Server 2013 Environment for Development and Testing Version 10
copy Critical Path Training 2012 All Rights Reserved 50
wwwCriticalPathTrainingcom
At this point Workflow Manager amp Service Bus are installed
Configure Workflow Manager and Service Bus
In this section you will install Workflow Manager and Service Bus
1 If the Workflow Manager Configuration Wizard is not open open it Start All Programs Workflow Manager 10 Workflow Configuration
2 On the Welcome page click Configure Workflow Manager with Default Settings (Recommended)
Creating a SharePoint Server 2013 Environment for Development and Testing Version 10
copy Critical Path Training 2012 All Rights Reserved 51
wwwCriticalPathTrainingcom
3 On the New Farm Configuration page do the following
a) In the section Configure Service Account set the credentials to
i) User ID sp_contentwingtipcom
ii) Password Password1
b) Check the Allow Workflow management over HTTP on this computer checkbox
Ensure the username is entered in the fully qualified UPN format not as the default shows in the installer (sp_contentwingtip) or the domainusername format
In a production environment you should be doing everything over SSL
c) Click the Test Connection button to verify the connection credentials before proceeding
Creating a SharePoint Server 2013 Environment for Development and Testing Version 10
copy Critical Path Training 2012 All Rights Reserved 52
wwwCriticalPathTrainingcom
d) In the Certificate Generation Key and Confirm Certificate Generation Key enter Password1 into both fields
4 Click the right arrow in the bottom right corner to proceed
5 On the Summary page review your settings and click the check at the bottom right of the widow to start the configuration process
Creating a SharePoint Server 2013 Environment for Development and Testing Version 10
copy Critical Path Training 2012 All Rights Reserved 53
wwwCriticalPathTrainingcom
6 After a few minutes the Configuration Progress screen will show that everything has been configured correctly
Creating a SharePoint Server 2013 Environment for Development and Testing Version 10
copy Critical Path Training 2012 All Rights Reserved 54
wwwCriticalPathTrainingcom
7 Click the check in the bottom right corner
At this point Workflow Manager amp Service Bus has been installed and a new Workflow Manager farm has been created The next step is to connect the SharePoint 2013 farm to the Workflow Manager farm
Connect SharePoint 2013 to Workflow Manager
In this section you will connect SharePoint 2013 and Workflow Manager together
1 Ensure you are logged into the WingtipServer VM using the account WINGTIPadministrator | Password1
2 Get the Workflow Manager endpoint
a) Open the Workflow Manager PowerShell console Start All Programs Workflow Manager 10
b) Execute the Windows PowerShell following cmdlet
Get-WFFarm | ft HttpPort
c) Take note of this port (12291) This port number is what you will use to connect the SharePoint 2013 farm to the Workflow Manager 10 farm
In production you should connect to the HTTPS port listed in the HttpsPort property when you run Get-WFFarm
d) Close the Workflow Manager PowerShell window
3 Connect the SharePoint 2013 farm to Workflow Manager
Creating a SharePoint Server 2013 Environment for Development and Testing Version 10
copy Critical Path Training 2012 All Rights Reserved 55
wwwCriticalPathTrainingcom
a) Open SharePoint 2013 Management Shell Start All Programs Microsoft SharePoint 2013 Products SharePoint 2013 Management Shell
b) Execute the following Windows PowerShell script in the SharePoint 2013 Management Shell
Register-SPWorkflowService ndashSPSite httpintranetwingtipcom ndashWorkflowHostUri httpwingtipserver12291 ndashAllowOAuthHttp
This script is telling SharePoint the endpoint it should use to talk to Workflow Manager as well as Workflow Manager the SharePoint site collection it should talk to for calls into the CSOM It is also configuring all communication over HTTP rather than HTTPS for performance reasons In production you should always use HTTPS
This step will take a moment with no feedback during the process Be patient
c) Close the SharePoint 2013 Management Shell
At this point the SharePoint 2013 farm is connected to the Workflow Manager 10 farm
Configure SharePoint User Profile Service Application AD Sync
Users in SharePoint 2013 are validated by Workflow Manager against SharePoint to ensure they have permissions to start a workflow This is done by looking up the user by their AD UserPrincipalName (UPN) attribute in the User Profile Service Application (UPA) If no matching user is found the workflow will be automatically cancelled by Workflow Manager In this section you will setup UPA to connect amp sync with the local Active Directory so user accounts in AD will have their UPN synchronized to UPA
1 Open Central Administration Start All Programs Microsoft SharePoint 2013 Products SharePoint 2013 Central Administration
2 Go to the User Profile Service Application management page Application Management Manage Service Applications User Profile Service Application
3 The first step is to configure the User Profile Service Application to allow for Active Directory (AD) synchronization
a) Under Synchronization select Configure Synchronization Settings
b) For Synchronization select Use SharePoint Active Directory Import and click OK
4 Next establish a connection to the wingtipcom AD
a) Under Synchronization select Configure Synchronization Connections
b) On the Synchronization Connections page select Create New Connection
c) Enter the following values on this form and click OK
i) Connection Name WINGTIPCOM AD
ii) Type Active Directory Import
iii) Connection Settings
(1) Fully Qualified Domain Name wingtipcom
(2) Authentication Provider Type Windows Authentication
(3) Account Name WINGTIPAdministrator
(4) Password (and Confirm Password) Password1
iv) Containers
(1) Click Populate Containers
(2) After it loads check the box next to WINGTP or click the Select All button below the box
5 Go back to the User Profile Service Application management page Application Management Manage Service Applications User Profile Service Application
6 Finally start a synchronization import
a) Under Synchronization select Start Profile Synchronization
Creating a SharePoint Server 2013 Environment for Development and Testing Version 10
copy Critical Path Training 2012 All Rights Reserved 56
wwwCriticalPathTrainingcom
b) Select Start Full Synchronization and click OK
c) You will be taken back to the User Profile Service Application management page Notice in the top-right corner there is a status block that reports how many profiles are in the UPA database Refresh the page to see it increase to a handful of profiles as the import process runs
At this point you have successfully configured the User Profile Service Application to import profiles from the local AD
Exercise 8 Install the Microsoft Office 2013 Professional Clients
In this exercise you will install the Microsoft Office 2013 client applications
1 Download the Office 2013 into the WingtipServer VM For this you need to create an Office 365 Trial account login to Office 365 go to the Admin Dashboard and then download the latest version httpwwwmicrosoftcomofficepreviewentry-office-preview
2 Download the SharePoint Designer 2013 into the WingtipServer VM from here httpwwwmicrosoftcomen-usdownloaddetailsaspxid=35491
3 Download the Visio Professional 2013 into the WingtipServer VM from here httptechnetmicrosoftcomen-usevalcenterhh973399
Install Microsoft Office Professional Plus 2013
In this section you will install the Microsoft Office 2013 clients
1 Ensure you are logged into the WingtipServer VM using the account WINGTIPadministrator | Password1
2 Execute the installer OfficeProfessionalPlus_English_x64exe
3 On the Read the Microsoft Software License Terms dialog click the checkbox next to I accept the terms of this agreement and click Continue
4 On the Choose the installation you want dialog click the Install Now button
5 The installer will proceed and install all the Office products
6 When the installer completes click the Close button
7 Apply your Office Professional Plus 2013 license key
a) Launch Word 2013 Start All Programs Microsoft Office 2013 Word 2013
b) In the First things first dialog select Use recommended settings and click Accept
c) In the Welcome to Office dialog that opens click the [X] icon in the top-right corner to close it
d) In the left-hand pane click Open Other Documents
e) In the left-hand pane click Account
f) In the Product Information section within the Activation Required box click Change Product Key
g) Enter your license key for Office Professional Plus 2013 check the box next to Attempt to automatically activate my product online and click Install
h) Click OK
At this point you have installed Office Professional Plus 2013
Install Microsoft Office Visio 2013
In this section you will install Microsoft Office 2013 Visio
1 Ensure you are logged into the WingtipServer VM using the account WINGTIPadministrator | Password1
2 Execute the installer VisioProfessional_English_x64exe
3 On the Read the Microsoft Software License Terms dialog click the checkbox next to I accept the terms of this agreement and click Continue
Creating a SharePoint Server 2013 Environment for Development and Testing Version 10
copy Critical Path Training 2012 All Rights Reserved 57
wwwCriticalPathTrainingcom
4 On the Choose the installation you want dialog click the Install Now button
5 The installer will proceed and install all Visio 2013
6 When the installer completes click the Close button
7 Apply your Visio 2013 license key
a) Launch Visio 2013 Start All Programs Microsoft Office 2013 Visio 2013
b) In the First things first dialog select Use recommended settings and click Accept
c) In the Welcome to Office dialog that opens click the X icon in the top-right corner to close it
d) In the left-hand pane click Open Other Documents
e) In the left-hand pane click Account
f) In the Product Information section within the Activation Required box click Change Product Key
g) Enter your license key for Visio 2013 check the box next to Attempt to automatically activate my product online and click Install
h) Click OK
At this point you have installed Visio 2013
Install Microsoft Office 2013 SharePoint Designer
In this section you will install Microsoft Office 2013 SharePoint Designer
1 Ensure you are logged into the WingtipServer VM using the account WINGTIPadministrator | Password1
2 Execute the installer SharePointDesigner_English_x64exe
3 On the Read the Microsoft Software License Terms dialog click the checkbox next to I accept the terms of this agreement and click Continue
4 On the Choose the installation you want dialog click the Install Now button
5 The installer will proceed and install all SharePoint Designer 2013
6 When the installer completes click the Close button
At this point you have installed SharePoint Designer 2013
Exercise 9 Install Visual Studio 2012
In this exercise you will install Visual Studio 2012
1 Ensure you are logged into the WingtipServer VM using the account WINGTIPadministrator | Password1
2 Start the install of Visual Studio 2012 Ultimate Trial by downloading the installer from here httpwwwmicrosoftcomvisualstudio11en-usdownloads
3 On the installation splash screen check the box next to I agree to the License terms and conditions and click the Next button
Creating a SharePoint Server 2013 Environment for Development and Testing Version 10
copy Critical Path Training 2012 All Rights Reserved 58
wwwCriticalPathTrainingcom
4 On the Optional Features to install dialog click Install
5 After some time the installer will complete Click the Launch button to launch Visual Studio 2012
Creating a SharePoint Server 2013 Environment for Development and Testing Version 10
copy Critical Path Training 2012 All Rights Reserved 59
wwwCriticalPathTrainingcom
6 In the Choose Default Environment Settings select Visual C Development Settings and click Start Visual Studio
7 Close Visual Studio 2012
At this point Visual Studio 2012 RTM is installed
Install Office amp SharePoint 2013 Developer Tools
In this section you will install the Office and SharePoint 2013 developer tools for Visual Studio
1 Ensure you are logged into the WingtipServer VM using the account WINGTIPadministrator | Password1
2 Launch the Web Platform Installer Start All Programs Microsoft Web Platform Installer
3 In the search box at the top-right corner of the Web Platform Installer 40 window type sharepoint and press Enter
4 Click the Add button to the right of Microsoft Office Developer Tools for Visual Studio 2012 - Preview 2
5 Click the Install button at the bottom of the Web Platform Installer 40 window
6 On the Prerequisites page click I Accept
Creating a SharePoint Server 2013 Environment for Development and Testing Version 10
copy Critical Path Training 2012 All Rights Reserved 60
wwwCriticalPathTrainingcom
At this point you have installed the SharePoint 2013 amp Office 2013 development tools in Visual Studio 2012
Creating a SharePoint Server 2013 Environment for Development and Testing Version 10
copy Critical Path Training 2012 All Rights Reserved 61
wwwCriticalPathTrainingcom
Appendix 1 Download Manifest
The following lists everything referenced that you will or may need to download in this environment
Windows Server 2008 R2 with Service Pack 1 (installer ISO)
o httptechnetmicrosoftcomen-usevalcenterdd459137aspx
Windows Server 2008 R2 with Service Pack 1 (prebuilt VHD)
o httpwwwmicrosoftcomdownloadsdetailsaspxFamilyId=9040a4be-c3cf-44a5-9052-a70314452305
Windows Server 2008 R2 Service Pack 1
o httpwwwmicrosoftcomen-usdownloaddetailsaspxid=5842
SQL Server 2012 Trial
o httpwwwmicrosoftcombetaexperiencepdSQL2012EvalCTAenusdefaultaspx
SharePoint Server 2013
o httptechnetmicrosoftcomen-USevalcenterhh973397aspx
Hotfixes for SharePoint Server 2013 (post-install)
o KB2554876 The SharePoint Parsing Process Crashes in Windows Server 2008 R2
o KB2708075 IIS 75 Configurations are not Updated when you use the ServerManager Class to Commit
Configuration Changes
o KB2759112 Hotfix is Available for NET Framework 45 that Resolves an ASPNET Race Condition Issue in
Windows Server 2008 R2 Windows Server 2008 R2 SP1
o KB2765317 Hotfix is Available for NET Framework 45 that Resolves an ASPNET Race Condition Issue in
Windows 8 Windows RT and Windows Server 2012
Web Platform Installer
o httpwwwmicrosoftcomwebdownloadsplatformaspx
Web Platform Installer ndash Command Line Version
o httplearniisnetpageaspx1072web-platform-installer-v4-command-line-webpicmdexe-preview-release
Workflow Manager 10
o Download using the Microsoft Web Platform Installer
Office 2013
o httpwwwmicrosoftcomofficepreviewentry-office-preview
SharePoint Designer 2013
o httpwwwmicrosoftcomen-usdownloaddetailsaspxid=35491
Visio Professional 2013
o httptechnetmicrosoftcomen-usevalcenterhh973399
Visual Studio 2012
o httpwwwmicrosoftcomvisualstudio11en-usdownloads
Office Developer Tools for Visual Studio 2012 ndash Preview 2
o Download using the Microsoft Web Platform Installer
Creating a SharePoint Server 2013 Environment for Development and Testing Version 10
copy Critical Path Training 2012 All Rights Reserved 62
wwwCriticalPathTrainingcom
Appendix 2 Windows PowerShell Script Manifest
The following lists all Windows PowerShell scripts that are provided with this setup guide
AddDisableLoopbackCheckRegKeyps1
o The following steps automate creating the registry key outlined as Method 2 in the Microsoft Knowledgebase article
httpsupportmicrosoftcomkb896861 using Windows PowerShell This key DisableLoopbackCheck will allow
you to browse SharePoint sites on the same machine Without this key (or following Method 1 in the KB article) you
would need to browse any SharePoint sites from a different computer than the one which SharePoint is installed on
ConfigureSpFarmForAppsps1
o Configures a SharePoint 2013 for hosting apps This ensures everything you need is installed running and
configured This is documented here httpmsdnmicrosoftcomen-uslibraryfp179923(v=office15)
CreateSpServiceAccountsps1
o Creates the minimal necessary service accounts for SharePoint Server 2013 SP_Farm SP_Content amp
SP_Services
SetupSharePointForHNSCps1
o Configures a SharePoint 2013 install for hosting Host-Named Site Collections (HNSC) This involves creating a Web
Application in SharePoint that has no host header bindings Using DNS all requests are mapped to this Web
Application You then create the site collections via PowerShell as you cant create HNSCs via the browser (Central
Administration)
Creating a SharePoint Server 2013 Environment for Development and Testing Version 10
copy Critical Path Training 2012 All Rights Reserved 63
wwwCriticalPathTrainingcom
Appendix 3 Create Sample Adventure Works Database
The following steps document downloading and installing the sample Adventure Works OLTP database provided by Microsoft
1 Launch Internet Explorer and navigate to httpmsftdbprodsamplescodeplexcom
2 Download the Adventure Works 2012 OLTP Script
3 Extract the ZIP into a folder on the desktop
4 Launch SQL Server Management Studio Start All Programs Microsoft SQL Server 2012 SQL Server Management Studio
5 When SQL Server Management Studio launches within the Connect to Server dialog login using the default settings and click Connect
6 Within SQL Server Management Studio select File Open File
7 Select the file instawdbsql from the extracted ZIP and click Open
8 If prompted to re-login to the database engine do it
9 Select Query SQLCMD Mode
10 Scroll down to line 42 the line that starts with the following
setvar SqlSamplesSourceDataPath
11 Change the folder location of where you unzipped the Adventure Works 2012 OLTP Script
12 Select Query Execute
13 When the script completes the AdventureWorks2012 database will have been created
Creating a SharePoint Server 2013 Environment for Development and Testing Version 10
copy Critical Path Training 2012 All Rights Reserved 64
wwwCriticalPathTrainingcom
Change Log
Change Version Description
August 22 2012 v 01 Pre-release for review
August 27 2012 v 02 Initial public release ndash install guide based on SharePoint Server Beta 2
August 28 2012 v 03 Updated URL for the site collection used to connect SharePoint to WAW
August 31 2012 v 04 Typo Removed SQL Server Analysis Services as part of the install Not required in a
SharePoint dev box (unless you are doing business intelligence which is not covered
in the guide)
Updated all references to Windows Azure Workflow to Workflow Manager the new
official name for the new workflow product
Updated SetupSharePointForHNSCps1 script to lookup HNSC Web Application by
name rather than URL which is more reliable
Typo Updated WingtipAllUp public NIC to use a different IP than the WingtipDC
Typo Replaced a reference to WingtipServer with WingtipDC
Typo Fixed handful of minor typos
September 1 2012 v 05 Removed SQL Server Reporting Services from install guide
Added step to uncheck IErsquos ldquoAutomatically detect proxyrdquo
Added post workflow install steps to setup User Profile Service Application to sync with
local Active Directory
September 5 2012 v 06 Added step to create a default root site collection in the HNSC web app
Updated minor typos and added extra notes for context
Updated PowerShell script SetupSharePointForHNSCps1 to remove content
database of default Web Application when setting up HNSC Web App
Added a new exercise 8 (after SharePoint install amp config and before the Workflow
install and config) to setup support for My Sites
October 20 2012 v 07 Updated script SetupSharePointForHNSCps1 to fix a bug where it would fail on line
111 if you didnrsquot already have a WINGTIPSP_Content managed account
Added section to bypass SharePointrsquos check for crlmicrosoftcom
Updated workflowrsquos registration PowerShell script to point to
httpintranetwingtipcom
Switched order of post-SharePoint install to setup HSNC hosting before configuring for
hosting apps
November 29 2012
v 10 Changed setup guide to use a single VM instead of two VMs
Updated guide for SharePoint 2013 RTM
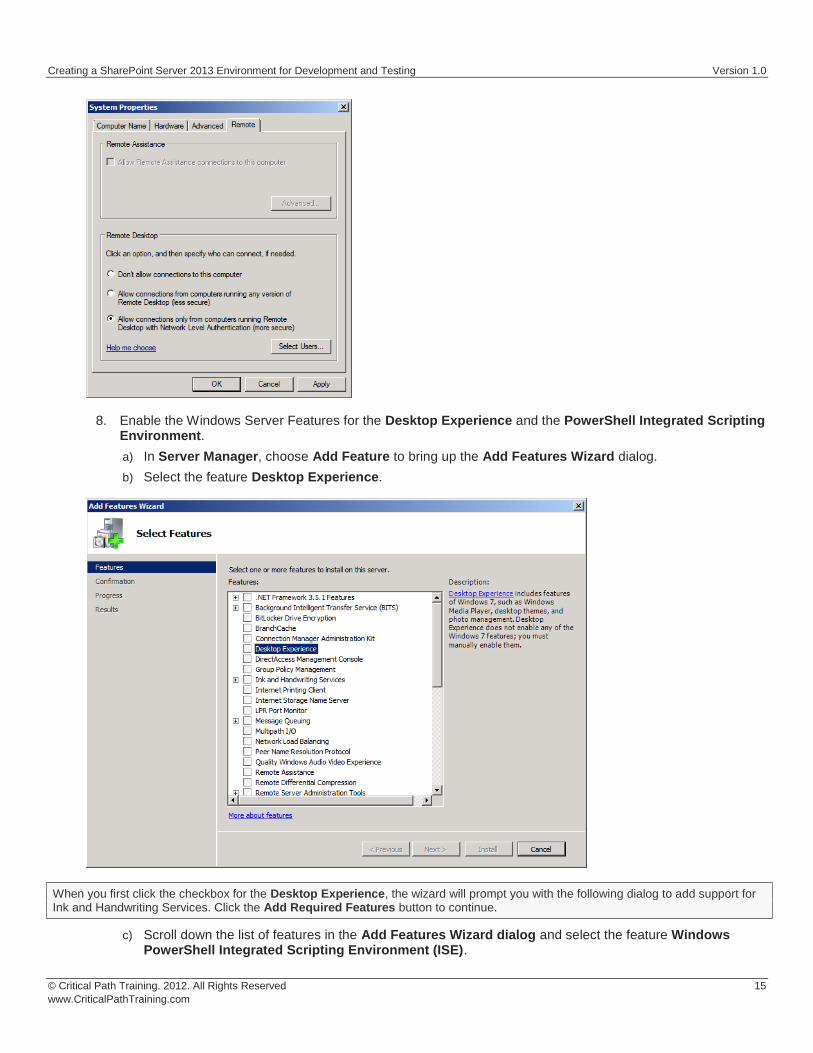
Creating a SharePoint Server 2013 Environment for Development and Testing Version 10
copy Critical Path Training 2012 All Rights Reserved 16
wwwCriticalPathTrainingcom
When you first click the checkbox for the Windows PowerShell Integrated Scripting Environment (ISE) the wizard will prompt you with the following dialog to add support for NET Framework 351 Features Click the Add Required Features button to continue
d) Click the Next button on the Add Features Wizard dialog to continue with the install
e) On the Confirm Installation Selection wizard page click the Install button
f) When you see the Installation Results screen the Add Features Wizard informs you a computer restart is required Click Close button to dismiss this dialog
9 After the VM has restarted log in again using [administrator | Password1] (username | password)
Configure the Virtual Machinersquos Networking Setup
In this section yoursquoll configure the two NICrsquos you added to the VM in previous steps One NIC (Internal LAN) will be used to communicate with other VMs in this environment while the other (External LAN) will be used to connect to the internet
1 Configure the NIC that is linked to the Internal LAN network
a) Open the Network Connections dialog by pressing Start enter view network connections in the search box Click the View Network Connections shortcut
b) Two network connections will be shown but only one will show as connected
The connected one is the one that is connected to the Internal LAN network The other one is currently ldquounpluggedrdquohellip this is why we didnrsquot connect a network to the second network when initially configuring the VM as this makes it easier to see which NIC is which in the VM
c) Rename the two NICrsquos
i) Right-click the connected NIC and select Rename Give it a name of Internal LAN
Creating a SharePoint Server 2013 Environment for Development and Testing Version 10
copy Critical Path Training 2012 All Rights Reserved 17
wwwCriticalPathTrainingcom
ii) Right-click the disconnected NIC and select Rename Give it a name of External LAN
d) Right-click the Internal LAN NIC and select Properties
e) In the Local Area Connection Properties dialog select the Internet Protocol Version 4 (TCPIPv4) item and click Properties
f) Enter the following information into the resulting dialog to configure the NICrsquos IP settings
i) Use the Following IP Address
(1) IP Address 192168150102
(2) Subnet mast 2552552550
(3) Default Gateway 192168150102
ii) Use the Following DNS Server Addresses
(1) Preferred DNS Server 192168150102
g) Click OK to accept the IP settings and Close to accept the changes to the NIC
Why not use 101 as the start NIC When you created the virtual internal network Hyper-V created a virtual NIC on the host computer If you set the IP of that NIC to 192168150101 you can use the Remote Desktop Connection app in Windows to connect to your virtual machines and easily copy-paste amp share drives
2 Configure the NIC that is linked to the External LAN network
a) Open the Network Connections window if it is not still open using the same steps from the previous step
b) Right-click the External LAN NIC and select Properties
c) In the Local Area Connection Properties dialog select the Internet Protocol Version 4 (TCPIPv4) item and click Properties
d) Enter the following information into the resulting dialog to configure the NICrsquos IP settings
i) Obtain an IP Address Automatically
ii) Use the Following DNS Server Addresses
(1) Preferred DNS Server 192168150102
e) Click the Advanced button to open the Advanced TCPIP Settings dialog
f) In the Advanced TCPIP Settings dialog click the DNS tab
i) Uncheck the Register this Connections Address in DNS
Creating a SharePoint Server 2013 Environment for Development and Testing Version 10
copy Critical Path Training 2012 All Rights Reserved 18
wwwCriticalPathTrainingcom
g) In the Advanced TCPIP Settings dialog click the WINS tab
i) Click the Add button and specify a new WINS Server as 192168150102
h) Click OK Close multiple times to accept all TCPIP settings
The external NIC will now obtain an IP dynamically amp will not register itself in the DHCPrsquos DNS server which is a good thing when there are multiple people on the same network this this type of a setup
3 Connect the second NIC to the External LAN network
a) Go back to the host computer and open the Hyper-V Manager
b) In the Hyper-V Manager window right-click the VM WingtipServer and select Settings
c) Select the second NIC the one that is not connected
d) For the Network select External LAN and click OK This will effectively plug the external network into the VM
4 Go back into the WingtipServer VM and if it is not still open open the Network Connections dialog You should now see both connections plugged in
a) To refresh the connection select the connection you just plugged in and click the Disable this Network Device button in the toolbar After the connection is disabled select it and click the Enable this Network Device button
b) After a few seconds the VM should be able to connect to the internet which you can test by browsing to a site such as httpwwwbingcom
Configure Windows Update and Update the Server
In this section you will verify the server is fully patched and updated
1 Verify Service Pack 1 is installed
a) Verify the version of the operating system installed by clicking Start right-click on Computer select Properties
b) If the server simply says Windows Server 2008 R2 Enterprise as shown in the following figure download and install Service Pack 1 from the following location httpwwwmicrosoftcomen-usdownloaddetailsaspxid=5842
Creating a SharePoint Server 2013 Environment for Development and Testing Version 10
copy Critical Path Training 2012 All Rights Reserved 19
wwwCriticalPathTrainingcom
c) If Service Pack 1 is installed it will state it
2 Update the server using Windows Update
a) Selecting Start All Programs Windows Update
b) First disable Windows Update from running automatically
i) Click the link Change Settings
ii) Under the Important Updates list select Never check for updates (not recommended)
This isnrsquot what you would do in a production environment but for a development machine it is ok
c) Now update the server
i) Click the Check for Updates button
ii) If prompted install any updates to the Windows Update dialog
iii) Select the Check for Updates link
iv) Windows Update will the report how many updates are available Select all important and recommended updates and click the Install Updates button
v) If prompted select I accept the license terms for any updates that require it
vi) Keep going through the process of running Windows Update checking for updates and installing them after each reboot until it says there are no updates left to install
This step is likely going to take quite a bit of time so be patient
Activate Windows Server 2008 R2
In this section you will activate the server if you have a product key
1 If you have a product key for Windows Server 2008 R2 use it to activate Windows
a) In the Server Manager window navigate to the top-level node to display the Server Summary page Click Activate Windows
b) You will be prompted to enter your product key
i) Enter your product key and click to button to activate Windows
Creating a SharePoint Server 2013 Environment for Development and Testing Version 10
copy Critical Path Training 2012 All Rights Reserved 20
wwwCriticalPathTrainingcom
ii) After a few seconds your VM should be able to connect to a Microsoft site and successfully activate Windows
At this point you have a fully patched operating system VM created that will act as the Active Directory domain controller
Apply the DisableLoopbackCheck Registry Fix
Configure the DisableLoopbackCheck registry setting (Microsoft KB httpsupportmicrosoftcomkb896861)
The following steps automate creating the registry key outlined as Method 2 in the Microsoft KB article httpsupportmicrosoftcomkb896861 using Windows PowerShell
PowerShell Script Alert You can also find this PowerShell script AddDisableLoopbackCheckRegKeyps1 in the files that
accompany this setup guide
1 Click the Windows PowerShell icon in the Taskbar
2 Run the following PowerShell commands pressing [ENTER] after each one
$regKeyPath = HKLMSystemCurrentControlSetControlLsa $key = DisableLoopbackCheck New-ItemProperty -Path $regKeyPath -Name $key -Value 1 -PropertyType dword
a) Close the Windows PowerShell console by typing EXIT and pressing [ENTER]
Exercise 3 Install Active Directory Domain Services
Now you will promote your WingtipServer VM to a domain controller and create a new domain named wingtipcom
1 Login to the WingtipServer virtual machine using administrator | Password1
2 Add and configure the role for Active Directory Domain Services
a) Launch Server Manager and select the Roles node
b) Click the Add Roles link to start the Add Roles Wizard
c) On the Before you begin page click Next
d) On the Server Roles page select Active Directory Domain Services Click the Add Required Features button if prompted to install prerequisites
e) Click Next
Creating a SharePoint Server 2013 Environment for Development and Testing Version 10
copy Critical Path Training 2012 All Rights Reserved 21
wwwCriticalPathTrainingcom
f) On the next page of the wizard click Next which will bring you to the Confirm Installation Selections page
g) Click Install
After Active Directory Domain Services has been installed you will see the Installation Results page in the Add Roles Wizard
3 Click on the link with the big long caption of Close this wizard and launch the Active Directory Domain Services Installation Wizard (dcpromoexe)
4 On the first page of the Active Directory Domain Services Installation Wizard click the Use Advanced Mode Installation checkbox and click Next
Creating a SharePoint Server 2013 Environment for Development and Testing Version 10
copy Critical Path Training 2012 All Rights Reserved 22
wwwCriticalPathTrainingcom
5 On the Operating System Compatibility page click Next
6 On the Choose a Deployment Configuration select Create a new domain in a new forest and click Next
7 On the Name the Forrest Root Domain enter the following and click Next
a) FQDN of the forest root domain wingtipcom
8 On the Domain NetBIOS Name set it to WINGTIP and click Next
9 On the Set Forest Functional Level page select Windows Server 2008 R2 and click Next
10 On the Additional Domain Controller Options accept the default options and click Next
11 You might be prompted with the dialog shown below providing a warning that This computer has dynamically assigned IP address(es) This is not a problem when you are running your development environment on a domain controller Click Yes to dismiss the dialog
12 At this point the wizard will prompt you with a dialog information you a delegation for the DNS Server cannot be created because it cannot find the authoritative parent zone This is not a problem because the wizard will automatically configure the DNS of the VM to point to itself Click on the Yes button to dismiss this dialog
Creating a SharePoint Server 2013 Environment for Development and Testing Version 10
copy Critical Path Training 2012 All Rights Reserved 23
wwwCriticalPathTrainingcom
13 On the Location for Database Log Files and SYSVOL page accept all the default values and click Next
14 On the Directory Services Restore Mode Administrator Password page enter Password1 in both textboxes and click Next
15 On the Summary page click Next to start the process of configuring the new Active Directory domain
16 The wizard will display the dialog below to show you the progress of the configuration process You will be required to reboot when the configuration has been completed Check the option for Reboot on completion and then wait for the configuration to complete and the machine to reboot
17 After the VM reboots login to the server with wingtipadministrator | Password1
Configure Windows Update and Update the Server
In this section you will verify the server is fully patched and updated
1 Update the server using Windows Update
a) Selecting Start All Programs Windows Update
b) Select the Check for Updates link
c) Windows Update will the report how many updates are available Select all important and recommended updates and click the Install Updates button
d) If prompted select I accept the license terms for any updates that require it
e) Keep running Windows Update after each reboot and update install until it says there are no updates left to install
Creating a SharePoint Server 2013 Environment for Development and Testing Version 10
copy Critical Path Training 2012 All Rights Reserved 24
wwwCriticalPathTrainingcom
This step could take quite a bit of time so be patient
At this point you have a fully installed Active Directory Domain Controller for the Wingtipcom domain hosted on the server WingtipServer
Exercise 4 Install SQL Server 2012
In this exercise you will install SQL Server 2012 that will be used to store all required databases
1 Download the SQL Server 2012 Evaluation Edition specifically the DVD x64 ISO image to the host computer from here httpwwwmicrosoftcombetaexperiencepdSQL2012EvalCTAenusdefaultaspx or you can use your own licensed copy
2 Mount the SQL Server 2012 ISO to the WingtipServer VM
a) On the host computer open the Hyper-V Manager
b) Right-click the VM WingtipServer and select Settings
c) Select DVD Drive in the left-hand panel
d) In the right-hand panel select Image File and browse to the ISO file that contains SQL Server 2012 and click OK
3 Login to the WingtipServer VM as wingtipadministrator | Password1
Install SQL Server 2012
In this section you will install SQL Server 2012
1 If the AutoPlay dialog box is open click Run SETUPEXE If it isnrsquot use Windows Explorer to navigate to the DVD drive and execute the setupexe file in the root of the DVD drive
2 In the SQL Server Installation Center click Installation on the left-hand side
Creating a SharePoint Server 2013 Environment for Development and Testing Version 10
copy Critical Path Training 2012 All Rights Reserved 25
wwwCriticalPathTrainingcom
3 Next select New SQL Server stand-alone installation or add features to an existing installation
4 On the Setup Support Rules page the installer will check for issues before installing Click OK
5 On the Product Key page click the Specify a free edition radio box and select Evaluation then click Next
6 On the License Terms page click the I accept the license terms checkbox and click Next
7 On the Setup Support Rules page the installer will check for any problems with the server you are installing on Click Next when this completes
Creating a SharePoint Server 2013 Environment for Development and Testing Version 10
copy Critical Path Training 2012 All Rights Reserved 26
wwwCriticalPathTrainingcom
8 On the Support Role page select SQL Server Feature Installation and click Next
9 On the Feature Selection page check the following options and click Next
a) Instances Features
i) Database Engine Services
(1) Full-Text and Semantic Extractions for Search
b) Shared Features
i) Management Tools ndash Basic
(1) Management Tools ndash Complete
Creating a SharePoint Server 2013 Environment for Development and Testing Version 10
copy Critical Path Training 2012 All Rights Reserved 27
wwwCriticalPathTrainingcom
10 On the Installation Rules page click Next
11 On the Instance Configuration page click Next
12 On the Disk Space Requirements page click Next
13 On the Server Configuration page do the following and click Next
a) On the Service Account tab change the Startup Type for the SQL Server Agent to Automatic
14 On the Database Engine Configuration page do the following and click Next
a) On the Server Configuration tab click Add Current User
b) On the FILESTREAM tab
i) Check Enable FILESTREAM for Transact-SQL Access
ii) Check Enable FILESTREAM for file IO access
15 On the Error Reporting page click Next
16 On the Installation Configuration Rules page click Next
17 On the Ready to Install page click Install
Installation of SQL Server 2012 will take some time please be patient
18 When the installation completes the Complete page will be shown Click Close
At this point you have now successfully installed SQL Server 2012
Creating a SharePoint Server 2013 Environment for Development and Testing Version 10
copy Critical Path Training 2012 All Rights Reserved 28
wwwCriticalPathTrainingcom
Exercise 5 Install amp Configure SharePoint Server 2013
In this exercise you will install SharePoint 2013
1 Download the SharePoint Server 2013 to the host computer from here httptechnetmicrosoftcomen-USevalcenterhh973397aspx
2 Mount the SharePoint Server 2013 ISO to the WingtipServer VM
a) On the host computer open the Hyper-V Manager
b) Right-click the VM WingtipServer and select Settings
c) Select DVD Drive in the left-hand panel
The file that Microsoft provides is saved in the IMG format Hyper-V Manager wonrsquot allow you to mount an IMG file so rename it to ISO before mounting it
d) In the right-hand panel select Image File and browse to the ISO file that contains SharePoint Server 2013 and click OK
Create SharePoint Service Accounts amp Grant Rights to SQL Server 2012
In this section you will create the necessary service accounts that will be used by SharePoint in Active Directory and grant them necessary rights in SQL Server 2012
PowerShell Script Alert The creation of users and granting them rights to SQL Server 2012 steps in this section are automated in the Windows PowerShell script CreateSpServiceAccountsps1 found in the files that accompany this setup guide Open the script
and read the header for documentation on how to use it
1 Open the Active Directory Users and Computers Start Administrative Tools Active Directory Users and Computers
2 Expand the tree in the left-hand pane to see the Users OU Select the Users OU
3 Create a new user SP_Farm
a) In the toolbar select Action New User
Creating a SharePoint Server 2013 Environment for Development and Testing Version 10
copy Critical Path Training 2012 All Rights Reserved 29
wwwCriticalPathTrainingcom
b) Set the userrsquos Full Name amp User Login Name to SP_Farm and click Next
c) In the password dialog enter the following and click Next
i) Password (and Confirm Password) Password1
ii) User must change password at next login unchecked
iii) User cannot change password unchecked
iv) Password never expires checked
v) Account is disabled unchecked
Creating a SharePoint Server 2013 Environment for Development and Testing Version 10
copy Critical Path Training 2012 All Rights Reserved 30
wwwCriticalPathTrainingcom
vi) Click Finish
4 Repeat the previous step to create two more accounts
a) SP_Content
b) SP_Services
At this point you have created all the necessary service accounts
Install SharePoint Server 2013 Prerequisites
In this section you will install the SharePoint Server 2013 Prerequisites
1 Ensure you are logged into the WingtipServer VM using the account wingtipadministrator | Password1
2 If the AutoPlay dialog box is open click Run splashhta If it isnrsquot use Windows Explorer to navigate to the DVD drive and execute the splashhta file in the root of the DVD drive
Creating a SharePoint Server 2013 Environment for Development and Testing Version 10
copy Critical Path Training 2012 All Rights Reserved 31
wwwCriticalPathTrainingcom
3 Click the Install Software Prerequisites link
4 In the Microsoft SharePoint 2013 Products Preparation Tool window click Next
5 On the License Terms for Software Products page
a) Check I accept the terms of the License Agreement(s)
b) Click Next
6 The tool will download and install all prerequisites for SharePoint Server 2013 This will take some time It may prompt you to reboot the server If so reboot the server and login using wingtipadministrator | Password1
Creating a SharePoint Server 2013 Environment for Development and Testing Version 10
copy Critical Path Training 2012 All Rights Reserved 32
wwwCriticalPathTrainingcom
7 When the prerequisite installer is complete it will present a summary of everything it did
8 Click Finish
9 Restart the WingtipServer VMhellip some additional installations and changes that the prerequisite installer did will require a restart before installing SharePoint Server 2013
At this point all prerequisites required by SharePoint Server 2013 have been installed and any necessary configuration changes have been applied to the server However it is strongly recommend that you run Windows Update and install any pending updates Further Microsoft recommends installing the following hotfixes if they are not already installed
KB2554876 The SharePoint Parsing Process Crashes in Windows Server 2008 R2
KB2708075 IIS 75 Configurations are not Updated when you use the ServerManager Class to Commit Configuration Changes
KB2759112 Hotfix is Available for NET Framework 45 that Resolves an ASPNET Race Condition Issue in Windows Server 2008 R2 Windows Server 2008 R2 SP1
KB2765317 Hotfix is Available for NET Framework 45 that Resolves an ASPNET Race Condition Issue in Windows
8 Windows RT and Windows Server 2012
Install SharePoint Server 2013
In this section you will install SharePoint Server 2013
1 Ensure you are logged into the WingtipServer VM using the account wingtipadministrator | Password1
2 If the AutoPlay dialog box is open click Run splashhta If it isnrsquot use Windows Explorer to navigate to the DVD drive and execute the splashhta file in the root of the DVD drive
Creating a SharePoint Server 2013 Environment for Development and Testing Version 10
copy Critical Path Training 2012 All Rights Reserved 33
wwwCriticalPathTrainingcom
3 Click Install SharePoint Server
4 When prompted to Enter your Product Key enter the key you obtained for the trial install and click Continue
5 On the Read the Microsoft Software License Terms page check the I accept the terms of this agreement checkbox and click Continue
6 On the Choose a file location page click Install Now
Creating a SharePoint Server 2013 Environment for Development and Testing Version 10
copy Critical Path Training 2012 All Rights Reserved 34
wwwCriticalPathTrainingcom
7 When the installation is complete select the Run the SharePoint Products Configuration Wizard checkbox and click Close
8 On the Welcome to SharePoint Products page click Next
a) If prompted to start or reset services click Yes
9 On the Connect to a server farm page select Create a new server farm and click Next
10 On the Specify Configuration Database Settings page use the following to complete the page and click Next
a) Database server WINGTIPSERVER
b) Database name SharePoint_Config
c) Username WINGTIPSP_Farm
d) Password Password1
Creating a SharePoint Server 2013 Environment for Development and Testing Version 10
copy Critical Path Training 2012 All Rights Reserved 35
wwwCriticalPathTrainingcom
11 On the Specify Farm Security Settings page for the Passphrase and Confirm Passphrase boxes enter Password1 and click Next
12 On the Configure SharePoint Central Administration Web Application page check the Specify port number checkbox and enter a value of 9999 then Click Next
Creating a SharePoint Server 2013 Environment for Development and Testing Version 10
copy Critical Path Training 2012 All Rights Reserved 36
wwwCriticalPathTrainingcom
13 On the Completing the SharePoint Products Configuration Wizard page click Next
14 When the installer completes it will display the Confirmation Successful page
15 Click Finish This will launch Internet Explorer to go through the configuration process
Creating a SharePoint Server 2013 Environment for Development and Testing Version 10
copy Critical Path Training 2012 All Rights Reserved 37
wwwCriticalPathTrainingcom
At this point you have successfully installed SharePoint Server 2013
Configure SharePoint Server 2013
In this section you will create a new SharePoint Server 2013 farm and perform minimal configuration tasks
After installing SharePoint Sever 2013 the SharePoint Products Configuration Wizard will launch the browser-based Initial Farm Configuration Wizard
1 In the first page of the wizard you are prompted to Help Make SharePoint Better Select which ever option you want and click OK
2 On the Welcome page that asks How do you want to configure your SharePoint farm click the Start the Wizard button
3 On the Services page do the following and then click Next
a) Service Account Select Create new managed account
i) Username WINGTIPSP_Services
ii) Password Password1
b) Services Uncheck the following services
Creating a SharePoint Server 2013 Environment for Development and Testing Version 10
copy Critical Path Training 2012 All Rights Reserved 38
wwwCriticalPathTrainingcom
i) Access Services 2010
ii) App Management Service
In SharePoint Server 2013 the Search Service Application processes specifically noderunnerexe can consume a considerable amount of memory and processor time If you are not going to work with search you might consider unchecking this option for now You can always go back into Central Administration and create a new instance of the Search Service Application at a later date if you need it
Why did we remove Access Services 2010 amp App Management Service service applications The Access Services 2010 service application is included for backwards compatibility and isnrsquot needed in new installations unless you are migrating solutions built with Access Services 2010 from SharePoint Server 2010 (if so you can create this service application later within Central Administration Application Management Manage Service Applications) The App Management Service service application will be created in a later step in this setup guide therefor it is skipped here
4 The creation of the service applications can take quite a while so be patient If it exceeds 20 minutes it is fairly safe to assume the page is hung up One option is to close the browser then launch Central Administration (Start All Programs Microsoft SharePoint 2013 Products SharePoint 2013 Central Administration) and look at the Service Application page (Application Management Manage Service Applications) to see if they were all created
Configure DNS
In this section you will configure DNS for hosting SharePoint sites amp Apps
1 Ensure you are logged into the WingtipServer VM using the account wingtipadministrator | Password1
2 Open the DNS window Start Administrative Tools DNS
3 Expand the hierarchy on the left-hand side of the window until you get to DNS WINGTIPSERVER Forward Lookup Zones wingtipcom
4 Create a new wildcard so all requests for http[]wingtipcom will be forwarded to our SharePoint machine
a) Next right-click wingtipcom and select New Host (A or AAAA)
Creating a SharePoint Server 2013 Environment for Development and Testing Version 10
copy Critical Path Training 2012 All Rights Reserved 39
wwwCriticalPathTrainingcom
b) In the New Host dialog enter the following and click OK
i) Alias Name
ii) IP Address 192168150102 Then click Add Host The following figure shows how this looks
This new record is telling DNS to forward any request for http[]wingtipcom to the webserver WINGTIPSERVER where the
requests will be served by SharePoint
5 Verify this DNS entry is working
a) Open Windows PowerShell Start All Programs Accessories Windows PowerShell Windows PowerShell
b) Run the following commands and press ENTER
PS CUsersAdministratorgt nslookup somethingwingtipcom PS CUsersAdministratorgt nslookup somethingappswingtipcom
c) You should get a response that points to the WingtipServer server as shown in the following figure
Creating a SharePoint Server 2013 Environment for Development and Testing Version 10
copy Critical Path Training 2012 All Rights Reserved 40
wwwCriticalPathTrainingcom
Configure SharePoint Server 2013 for Host-Named Site Collections amp Create Initial Site
Collections
In this section you will create new SharePoint 2013 site collections for testing and hosting apps
Microsoft recommends to create host-named site collections (HNSC) instead of using the path based site collection addressing The difference is the following a path based site created at something such as httpintranetwingtipcomsitesdevtest as an HNSC site would be more like httpdevtestwingtipcom This is how it works in the cloud (Office 365) and it scales much better for on-prem
deployments This setup guide will show you how to setup your environment to create HNSC The only downside to this approach is that you canrsquot create site collections within Central Administration it must be done via Windows PowerShell API (because Central Administration doesnrsquot instruct you where to put the site
This is implemented in various parts First DNS must be configured to send all requests for httpwingtipcom to a Web Application
(implemented in the last section) Second this Web Application must be extended with SharePoint and have no host header bindings (so it handles all requests) Third it must have a default site collection at the root of the Web Application but it will not be used for anything (in fact it doesnrsquot need a template assigned to it)
You can read more about HNSCrsquos on TechNet httptechnetmicrosoftcomen-uslibrarycc424952aspx
PowerShell Script Alert The steps in this section are automated in the script SetupSharePointForHNSCps1 found in the files that
accompany this setup guide Open the script and read the header for documentation on how to use it
1 Ensure you are logged into the WingtipServer VM using the account wingtipadministrator | Password1
2 Open Central Administration Start All Programs Microsoft SharePoint 2013 Products SharePoint 2013 Central Administration
3 Select Application Management Manage Web Applications
4 Delete the default Web Application created by the configuration wizard
a) Delete the existing default Web Application
i) Select the Web Application SharePoint ndash 80 the one with the URL of httpwingtipserver and click Delete in the ribbon
ii) When prompted to delete the associated IIS Web Site amp SQL Server database select both options to delete them and click OK
The reason you are doing this is because the setup wizard you ran previously when creating the service applications automatically created it The problem is that it used the same identity (WINGTIPSP_Services) for the app pool that is used for all the service
applications which is not desired
5 Create a new Web Application to handle Host-Named Site Collections (HNSC)
Creating a SharePoint Server 2013 Environment for Development and Testing Version 10
copy Critical Path Training 2012 All Rights Reserved 41
wwwCriticalPathTrainingcom
a) In the ribbon click the New button
b) In the Create New Web Application dialog enter the following values in the properties and click OK Leave all properties not mentioned
i) Select the radio button Create a new IIS web site
(1) Name SharePoint HNSC Host ndash 80
(2) Port 80
ii) Application Pool
(1) Select the radio button Create a new application pool
(a) Application Pool Name SharePoint Default HNSC AppPool
(b) Select a security account for this application pool WINGTIPSP_Content
If WINGTIPSP_Content is not listed as an available managed account create it by selecting the appropriate option and using
Password1 for the password
iii) Database Name and Authentication
(1) Database Name WSS_Content_HNSCDefaultHost
c) This process will take a few moments At the end of the process SharePoint will ask if you want to create a site collection You do but you donrsquot want to do it through the browser as this will not be a HNSC To create a HNSC you must create it via Windows PowerShell
6 Create a default not template site collection at the root of the web application
a) Open SharePoint 2013 Management Shell Start All Programs Microsoft SharePoint 2013 Products SharePoint 2013 Management Shell
7 Create Site Collections for Testing SharePoint amp SharePoint Apps
a) Open SharePoint 2013 Management Shell Start All Programs Microsoft SharePoint 2013 Products SharePoint 2013 Management Shell
b) Get a reference to the HNSC web application you just created by running the following Windows PowerShell script in the SharePoint 2013 Management Shell
$hnscWebApp = Get-SPWebApplication | Where-Object $_DisplayName -eq SharePoint HNSC Host - 80
c) Create a non-templated site at the root of the web application for Workflow to connect to by executing the following Windows PowerShell script in the SharePoint 2013 Management Shell
New-SPSite -Name Root HNSC Site Collection -Url httpwingtipcom -HostHeaderWebApplication $hnscWebApp -OwnerAlias WINGTIPAdministrator
d) Create a team site by executing the following Windows PowerShell script in the SharePoint 2013 Management Shell
New-SPSite -Name Wingtip Intranet -Url httpintranetwingtipcom ndashHostHeaderWebApplication $hnscWebApp -Template STS0 -OwnerAlias WINGTIPAdministrator
e) Create a developer site by executing the following Windows PowerShell script in the SharePoint 2013 Management Shell
New-SPSite -Name Wingtip Developer Site -Url httpdevwingtipcom ndashHostHeaderWebApplication $hnscWebApp -Template DEV0 -OwnerAlias WINGTIPAdministrator
You can only create debug and test apps using a developer site
At this point you now have a site collection to use as a team site (httpintranetwingtipcom) and to develop and test custom SharePoint apps (httpdevwingtipcom)
Creating a SharePoint Server 2013 Environment for Development and Testing Version 10
copy Critical Path Training 2012 All Rights Reserved 42
wwwCriticalPathTrainingcom
Configure SharePoint 2013 for Hosting Apps
In this setup you will setup your SharePoint 2013 environment for hosting apps
PowerShell Script Alert Everything in the next immediate step is provided in the script ConfigureSpFarmForAppsps1 found in the
files that accompany this setup guide Open the script and read the header for documentation on how to use it
1 Ensure you are logged into the WingtipServer VM using the account wingtipadministrator | Password1
2 Create the necessary SharePoint App Management service applications and start the necessary services via Windows PowerShell
a) Open SharePoint 2013 Management Shell Start All Programs Microsoft SharePoint 2013 Products SharePoint 2013 Management Shell
b) Execute the following Windows PowerShell script in the SharePoint 2013 Management Shell
$appHostDomain = appswingtipcom $adminService = Get-Service -Name spadminv4 if ($adminServiceStatus -ne Running) Start-Service $adminService $timerService = Get-Service -Name sptimerv4 if ($timerServiceStatus -ne Running) Start-Service $timerService Set-SPAppDomain $appHostDomain $appMgmtSvcInstance = Get-SPServiceInstance | Where-Object $_GetType()Name -eq AppManagementServiceInstance if ($appMgmtSvcInstanceStatus -ne Online) Start-SPServiceInstance -Identity $appMgmtSvcInstance $appSubSettingSvcInstance = Get-SPServiceInstance | Where-Object $_GetType()Name -eq SPSubscriptionSettingsServiceInstance if ($appSubSettingSvcInstanceStatus -ne Online) Start-SPServiceInstance -Identity $appSubSettingSvcInstance $appPoolServiceApps = Get-SPServiceApplicationPool -Identity SharePoint Web Services Default $appSubSvc = New-SPSubscriptionSettingsServiceApplication ndashApplicationPool $appPoolServiceApps ndashName Settings Service Application ndashDatabaseName SettingsServiceDB $proxySubSvc = New-SPSubscriptionSettingsServiceApplicationProxy ndashServiceApplication $appSubSvc $appAppSvc = New-SPAppManagementServiceApplication -ApplicationPool $appPoolServiceApps -Name App Management Service Application -DatabaseName AppServiceDB $proxyAppSvc = New-SPAppManagementServiceApplicationProxy -ServiceApplication $appAppSvc Set-SPAppSiteSubscriptionName -Name app -Confirm$false
3 Verify the script configured SharePoint 2013 for hosting apps
a) Open Central Administration Start All Programs Microsoft SharePoint 2013 Products SharePoint 2013 Central Administration
b) Verify service applications created
i) Open the Service Applications page Application Management Manage Service Applications
ii) Verify you have two service applications created
(1) App Management Service Application
(2) Settings Service Application
c) Verify service instances are running
i) Open the Services on Server page System Settings Manage Services on Server
ii) Verify the following services are Started
(1) App Management Service
(2) Microsoft SharePoint Foundation Subscription Settings Service
Creating a SharePoint Server 2013 Environment for Development and Testing Version 10
copy Critical Path Training 2012 All Rights Reserved 43
wwwCriticalPathTrainingcom
d) Verify App URLs are correct
i) Open the Configure App URLs page Apps Configure app URLs
ii) Verify the following
(1) App Domain appswingtipcom
(2) App Prefix app
At this point your SharePoint Server 2013 environment is ready to host SharePoint apps
Creating a SharePoint Server 2013 Environment for Development and Testing Version 10
copy Critical Path Training 2012 All Rights Reserved 44
wwwCriticalPathTrainingcom
Start the SharePoint 2013 Sandbox Service
By default the service that executes sandbox solutions is not running In this step you will start the service
1 Open Central Administration Start All Programs Microsoft SharePoint 2013 Products SharePoint 2013 Central Administration
2 Open the Services on Server page System Settings Manage Services on Server
3 Click the Start link to the left of the Microsoft SharePoint Foundation Sandboxed Code Service
At this point your installation can support sandbox solutions
Configure CRL Verification for Disconnected Environments
SharePoint periodically ldquophones homerdquo to a specific address hosted by Microsoft under certain conditions When your environment is disconnected this can cause an unnecessary delay or failures when starting up the sandbox The following steps outline a workaround to bypass this check
1 Launch Notepad as an administrator Start All Programs Accessories right-click Notepad and select Run as Administrator
2 Open the hosts file by selecting File Open and finding the file
cWindowsSystem32Driversetchosts
3 Add the following line to the end of the file
127001 crlmicrosoftcom
4 Save and close the hosts file
Update Internet Explorer to Bypass the App URL amp Automatically Login to SharePoint Sites
In this section you will update Internet Explorer to add the App hosting URL to the bypass list so you can navigate to the domain after deploying SharePoint hosted apps
1 Ensure you are logged into the WingtipServer VM using the account wingtipadministrator | Password1
1 Launch Internet Explorer Start All Programs Internet Explorer
2 Configure Internet Explorer to bypass the App URL
a) In the top-right corner click the gear icon and select Internet Options
b) On the Security tab select the Local Intranet and click the Sites button
c) Uncheck the box next to Automatically detect intranet network
d) Click the Advanced button and add two entries to the Exceptions list
i) httpwingtipcom
ii) httpappswingtipcom
Creating a SharePoint Server 2013 Environment for Development and Testing Version 10
copy Critical Path Training 2012 All Rights Reserved 45
wwwCriticalPathTrainingcom
e) Click the Close button followed by the OK button multiple times to close out of the dialogs
At this point Internet Explorer is setup to bypass your app URL so you can navigate to apps (httpappswingtipcom) as well as automatically authenticate to sites hosted at httpwingtipcom
Exercise 6 Configure SharePoint to Host My Sites
In this exercise you will configure SharePoint to create and host My Sites In order to host My Sites you will need a new Web Application that is configured for Self-Service Site Creation and has a My Site Host site collection
1 Create a new SharePoint web application to host the My Sites
a) Ensure you are logged into the WingtipServer VM using the account wingtipadministrator | Password1
b) Open Central Administration Start All Programs Microsoft SharePoint 2013 Products SharePoint 2013 Central Administration
c) Select Application Management Manage Web Applications
d) In the ribbon click the New button
e) In the Create New Web Application dialog enter the following values in the properties and click OK Leave all properties not mentioned
i) Select the radio button Create a new IIS web site
(1) Name SharePoint MySite Host ndash 80
(2) Port 80
(3) Host Header mywingtipcom
ii) Application Pool
(1) Select the radio button Use existing application pool
(a) Application Pool Name SharePoint Default HNSC AppPool
iii) Database Name and Authentication
(1) Database Name WSS_Content_SocialWingtipCom
f) This process will take a few moments At the end of the process SharePoint will ask if you want to create a site collection Click the link provided to create a new site collection amp continue to the next step
2 Create a My Site Host site collection
a) On the Create Site Collection page use the following information to complete the form and click OK
Creating a SharePoint Server 2013 Environment for Development and Testing Version 10
copy Critical Path Training 2012 All Rights Reserved 46
wwwCriticalPathTrainingcom
i) Title My Site Host
ii) URL
iii) Template Selection My Site Host (found under the Enterprise tab)
iv) Primary Site Collection Administrator WINGTIPAdministrator
3 Update the Web Application to host my sites
a) Within Central Administration in the left-hand navigation navigate to the Manage Web Applications page Application Management Manage Web Applications
b) Select the SharePoint MySite Host ndash 80 web application
c) Click the Managed Paths button in the ribbon
d) Remove the sites managed path and add two new managed paths and click OK
i) personal ndash Wildcard inclusion
ii) my ndash Explicit inclusion
e) With the SharePoint MySite Host ndash 80 web application still selected click the Self-Service Site Creation button
f) On the Self-Service Site Creation page use the following values to complete the form and click OK
i) Site Collections On
4 Next configure the User Profile Service Application My Site settings
a) Browse to the User Profile Service Application management page Application Management Manage Service Applications User Profile Service Application
b) Under the My Site Settings section click the Setup My Sites
c) On the My Site Settings page use the following information to complete the form and click OK
i) My Site Host httpmywingtipcom
ii) Personal Site Location personal
At this point your SharePoint deployment is now configured to automatically create My Sites under httpmywingtipcomPersonalUserName when users first browse to them
Exercise 7 Install amp Configure Workflow Manager 10
In this exercise you will configure the WingtipServer VM to host Workflow Manager 10 and connect it to your SharePoint installation
1 Ensure you are logged into the WingtipServer VM using the account wingtipadministrator | Password1
Verify SQL Server 2012 Network Configuration
In this section yoursquoll verify the network configuration is correct for SQL Server 2012 in order to install Workflow Manager 10
Creating a SharePoint Server 2013 Environment for Development and Testing Version 10
copy Critical Path Training 2012 All Rights Reserved 47
wwwCriticalPathTrainingcom
1 Configure SQL Server 2012 to have the TCPIP connection protocol enabled
a) Open the SQL Server Configuration Manager Start All Programs Microsoft SQL Server 2012 Configuration Tools SQL Server Configuration Manager
b) Expand the hierarchy on the left-hand side to the following SQL Server Connection Manager (local) SQL Server Network Configuration Protocols for MSSQLSERVER
c) In the main window if TCPIP is Disabled right-click TCPIP and select Enable
d) When prompted with a warning click OK
2 SQL Server must be restarted in order to reflect this change
a) In the hierarchy on the left-hand side of the window select SQL Server Services
b) Right-click SQL Server (MSSQLSERVER) and select Restart
At this point SQL Server is now configured with the TCPIP protocol enabled a requirement when configuring Service Bus
Configure the Workflow Service Account with the Necessary Rights
In this section you will verify the service account that will run Workflow Manager and Service Bus
1 Ensure you are logged into the WingtipServer VM using the account WINGTIPadministrator | Password1
2 Grant the WINGTIPSP_Content account securityadmin amp dbcreator permissions in SQL Server
a) Launch SQL Server Management Studio Start All Programs Microsoft SQL Server 2012 SQL Server Management Studio
b) When SQL Server Management Studio launches within the Connect to Server dialog login using the default settings and click Connect
c) In the Object Explorer tool window expand the WINGTIPSERVER server hierarchy to the Security Logins node
d) Find the WINGTIPSP_Content account right-click it and select Properties
Creating a SharePoint Server 2013 Environment for Development and Testing Version 10
copy Critical Path Training 2012 All Rights Reserved 48
wwwCriticalPathTrainingcom
e) In the Select a page pane select Server Roles
f) Check securityadmin amp dbcreator and click OK
g) Close SQL Server Management Studio
3 Add the Workflow service account to the local administrators group
a) Open the Active Directory Users and Computers window Start Administrative Tools Active Directory Users and Computers
b) In the hierarchy on the left-hand side of the window expand it to the following Active Directory Users and Computers wingtipcom Builtin
c) In the main window right-click Administrators and select Properties
d) In the Administrators Properties dialog select the Members tab and click Add
e) In the Enter the object names to select box enter wingtipsp_content and click the Check Names button
f) In the Administrators Properties dialog click OK
g) Close the Active Directory Users and Computers window
At this point the service account that will host Workflow Manager and Service Bus has been configured correctly
Creating a SharePoint Server 2013 Environment for Development and Testing Version 10
copy Critical Path Training 2012 All Rights Reserved 49
wwwCriticalPathTrainingcom
Download amp Install Workflow Manager and Service Bus
In this section you will install Workflow Manager and Service Bus
1 Ensure you are logged into the WingtipServer VM using the account WINGTIPSP_Content | Password1
It is important you are logged in as the user that will run workflow when you install amp configure Workflow Manager and Service Bus
2 Launch the Web Platform Installer Start All Programs Microsoft Web Platform Installer
a) If the Web Platform Installer is not present on your machine you can download amp install it from here httpwwwmicrosoftcomwebdownloadsplatformaspx
If you do not have internet access within the virtual machine it is possible to download everything needed for workflow using the command line version of the Web Platform Installer (WebPICMD) You can get WebPICMD from httplearniisnetpageaspx1072web-platform-installer-v4-command-line-webpicmdexe-preview-release Specifically for
workflow enter the following command to download Workflow Beta 1 and all prerequisites
webpicmd offline ProductsWorkflow Pathc[path]
3 When the Web Platform Installer loads execute a search for Workflow select Workflow Manager 10 and click Add
4 Click the Install button at the bottom of the Web Platform Installer 40 window
5 On the Prerequisites page click I Accept
Note The Web Platform Installer 40 may prompt you to keep certain products updated using Microsoft Update If it does select Use Microsoft Update when I check for updates (recommended) and click Continue
6 When the installer completes the following dialog will appear Click Continue and then Finish to start the configuration process
Creating a SharePoint Server 2013 Environment for Development and Testing Version 10
copy Critical Path Training 2012 All Rights Reserved 50
wwwCriticalPathTrainingcom
At this point Workflow Manager amp Service Bus are installed
Configure Workflow Manager and Service Bus
In this section you will install Workflow Manager and Service Bus
1 If the Workflow Manager Configuration Wizard is not open open it Start All Programs Workflow Manager 10 Workflow Configuration
2 On the Welcome page click Configure Workflow Manager with Default Settings (Recommended)
Creating a SharePoint Server 2013 Environment for Development and Testing Version 10
copy Critical Path Training 2012 All Rights Reserved 51
wwwCriticalPathTrainingcom
3 On the New Farm Configuration page do the following
a) In the section Configure Service Account set the credentials to
i) User ID sp_contentwingtipcom
ii) Password Password1
b) Check the Allow Workflow management over HTTP on this computer checkbox
Ensure the username is entered in the fully qualified UPN format not as the default shows in the installer (sp_contentwingtip) or the domainusername format
In a production environment you should be doing everything over SSL
c) Click the Test Connection button to verify the connection credentials before proceeding
Creating a SharePoint Server 2013 Environment for Development and Testing Version 10
copy Critical Path Training 2012 All Rights Reserved 52
wwwCriticalPathTrainingcom
d) In the Certificate Generation Key and Confirm Certificate Generation Key enter Password1 into both fields
4 Click the right arrow in the bottom right corner to proceed
5 On the Summary page review your settings and click the check at the bottom right of the widow to start the configuration process
Creating a SharePoint Server 2013 Environment for Development and Testing Version 10
copy Critical Path Training 2012 All Rights Reserved 53
wwwCriticalPathTrainingcom
6 After a few minutes the Configuration Progress screen will show that everything has been configured correctly
Creating a SharePoint Server 2013 Environment for Development and Testing Version 10
copy Critical Path Training 2012 All Rights Reserved 54
wwwCriticalPathTrainingcom
7 Click the check in the bottom right corner
At this point Workflow Manager amp Service Bus has been installed and a new Workflow Manager farm has been created The next step is to connect the SharePoint 2013 farm to the Workflow Manager farm
Connect SharePoint 2013 to Workflow Manager
In this section you will connect SharePoint 2013 and Workflow Manager together
1 Ensure you are logged into the WingtipServer VM using the account WINGTIPadministrator | Password1
2 Get the Workflow Manager endpoint
a) Open the Workflow Manager PowerShell console Start All Programs Workflow Manager 10
b) Execute the Windows PowerShell following cmdlet
Get-WFFarm | ft HttpPort
c) Take note of this port (12291) This port number is what you will use to connect the SharePoint 2013 farm to the Workflow Manager 10 farm
In production you should connect to the HTTPS port listed in the HttpsPort property when you run Get-WFFarm
d) Close the Workflow Manager PowerShell window
3 Connect the SharePoint 2013 farm to Workflow Manager
Creating a SharePoint Server 2013 Environment for Development and Testing Version 10
copy Critical Path Training 2012 All Rights Reserved 55
wwwCriticalPathTrainingcom
a) Open SharePoint 2013 Management Shell Start All Programs Microsoft SharePoint 2013 Products SharePoint 2013 Management Shell
b) Execute the following Windows PowerShell script in the SharePoint 2013 Management Shell
Register-SPWorkflowService ndashSPSite httpintranetwingtipcom ndashWorkflowHostUri httpwingtipserver12291 ndashAllowOAuthHttp
This script is telling SharePoint the endpoint it should use to talk to Workflow Manager as well as Workflow Manager the SharePoint site collection it should talk to for calls into the CSOM It is also configuring all communication over HTTP rather than HTTPS for performance reasons In production you should always use HTTPS
This step will take a moment with no feedback during the process Be patient
c) Close the SharePoint 2013 Management Shell
At this point the SharePoint 2013 farm is connected to the Workflow Manager 10 farm
Configure SharePoint User Profile Service Application AD Sync
Users in SharePoint 2013 are validated by Workflow Manager against SharePoint to ensure they have permissions to start a workflow This is done by looking up the user by their AD UserPrincipalName (UPN) attribute in the User Profile Service Application (UPA) If no matching user is found the workflow will be automatically cancelled by Workflow Manager In this section you will setup UPA to connect amp sync with the local Active Directory so user accounts in AD will have their UPN synchronized to UPA
1 Open Central Administration Start All Programs Microsoft SharePoint 2013 Products SharePoint 2013 Central Administration
2 Go to the User Profile Service Application management page Application Management Manage Service Applications User Profile Service Application
3 The first step is to configure the User Profile Service Application to allow for Active Directory (AD) synchronization
a) Under Synchronization select Configure Synchronization Settings
b) For Synchronization select Use SharePoint Active Directory Import and click OK
4 Next establish a connection to the wingtipcom AD
a) Under Synchronization select Configure Synchronization Connections
b) On the Synchronization Connections page select Create New Connection
c) Enter the following values on this form and click OK
i) Connection Name WINGTIPCOM AD
ii) Type Active Directory Import
iii) Connection Settings
(1) Fully Qualified Domain Name wingtipcom
(2) Authentication Provider Type Windows Authentication
(3) Account Name WINGTIPAdministrator
(4) Password (and Confirm Password) Password1
iv) Containers
(1) Click Populate Containers
(2) After it loads check the box next to WINGTP or click the Select All button below the box
5 Go back to the User Profile Service Application management page Application Management Manage Service Applications User Profile Service Application
6 Finally start a synchronization import
a) Under Synchronization select Start Profile Synchronization
Creating a SharePoint Server 2013 Environment for Development and Testing Version 10
copy Critical Path Training 2012 All Rights Reserved 56
wwwCriticalPathTrainingcom
b) Select Start Full Synchronization and click OK
c) You will be taken back to the User Profile Service Application management page Notice in the top-right corner there is a status block that reports how many profiles are in the UPA database Refresh the page to see it increase to a handful of profiles as the import process runs
At this point you have successfully configured the User Profile Service Application to import profiles from the local AD
Exercise 8 Install the Microsoft Office 2013 Professional Clients
In this exercise you will install the Microsoft Office 2013 client applications
1 Download the Office 2013 into the WingtipServer VM For this you need to create an Office 365 Trial account login to Office 365 go to the Admin Dashboard and then download the latest version httpwwwmicrosoftcomofficepreviewentry-office-preview
2 Download the SharePoint Designer 2013 into the WingtipServer VM from here httpwwwmicrosoftcomen-usdownloaddetailsaspxid=35491
3 Download the Visio Professional 2013 into the WingtipServer VM from here httptechnetmicrosoftcomen-usevalcenterhh973399
Install Microsoft Office Professional Plus 2013
In this section you will install the Microsoft Office 2013 clients
1 Ensure you are logged into the WingtipServer VM using the account WINGTIPadministrator | Password1
2 Execute the installer OfficeProfessionalPlus_English_x64exe
3 On the Read the Microsoft Software License Terms dialog click the checkbox next to I accept the terms of this agreement and click Continue
4 On the Choose the installation you want dialog click the Install Now button
5 The installer will proceed and install all the Office products
6 When the installer completes click the Close button
7 Apply your Office Professional Plus 2013 license key
a) Launch Word 2013 Start All Programs Microsoft Office 2013 Word 2013
b) In the First things first dialog select Use recommended settings and click Accept
c) In the Welcome to Office dialog that opens click the [X] icon in the top-right corner to close it
d) In the left-hand pane click Open Other Documents
e) In the left-hand pane click Account
f) In the Product Information section within the Activation Required box click Change Product Key
g) Enter your license key for Office Professional Plus 2013 check the box next to Attempt to automatically activate my product online and click Install
h) Click OK
At this point you have installed Office Professional Plus 2013
Install Microsoft Office Visio 2013
In this section you will install Microsoft Office 2013 Visio
1 Ensure you are logged into the WingtipServer VM using the account WINGTIPadministrator | Password1
2 Execute the installer VisioProfessional_English_x64exe
3 On the Read the Microsoft Software License Terms dialog click the checkbox next to I accept the terms of this agreement and click Continue
Creating a SharePoint Server 2013 Environment for Development and Testing Version 10
copy Critical Path Training 2012 All Rights Reserved 57
wwwCriticalPathTrainingcom
4 On the Choose the installation you want dialog click the Install Now button
5 The installer will proceed and install all Visio 2013
6 When the installer completes click the Close button
7 Apply your Visio 2013 license key
a) Launch Visio 2013 Start All Programs Microsoft Office 2013 Visio 2013
b) In the First things first dialog select Use recommended settings and click Accept
c) In the Welcome to Office dialog that opens click the X icon in the top-right corner to close it
d) In the left-hand pane click Open Other Documents
e) In the left-hand pane click Account
f) In the Product Information section within the Activation Required box click Change Product Key
g) Enter your license key for Visio 2013 check the box next to Attempt to automatically activate my product online and click Install
h) Click OK
At this point you have installed Visio 2013
Install Microsoft Office 2013 SharePoint Designer
In this section you will install Microsoft Office 2013 SharePoint Designer
1 Ensure you are logged into the WingtipServer VM using the account WINGTIPadministrator | Password1
2 Execute the installer SharePointDesigner_English_x64exe
3 On the Read the Microsoft Software License Terms dialog click the checkbox next to I accept the terms of this agreement and click Continue
4 On the Choose the installation you want dialog click the Install Now button
5 The installer will proceed and install all SharePoint Designer 2013
6 When the installer completes click the Close button
At this point you have installed SharePoint Designer 2013
Exercise 9 Install Visual Studio 2012
In this exercise you will install Visual Studio 2012
1 Ensure you are logged into the WingtipServer VM using the account WINGTIPadministrator | Password1
2 Start the install of Visual Studio 2012 Ultimate Trial by downloading the installer from here httpwwwmicrosoftcomvisualstudio11en-usdownloads
3 On the installation splash screen check the box next to I agree to the License terms and conditions and click the Next button
Creating a SharePoint Server 2013 Environment for Development and Testing Version 10
copy Critical Path Training 2012 All Rights Reserved 58
wwwCriticalPathTrainingcom
4 On the Optional Features to install dialog click Install
5 After some time the installer will complete Click the Launch button to launch Visual Studio 2012
Creating a SharePoint Server 2013 Environment for Development and Testing Version 10
copy Critical Path Training 2012 All Rights Reserved 59
wwwCriticalPathTrainingcom
6 In the Choose Default Environment Settings select Visual C Development Settings and click Start Visual Studio
7 Close Visual Studio 2012
At this point Visual Studio 2012 RTM is installed
Install Office amp SharePoint 2013 Developer Tools
In this section you will install the Office and SharePoint 2013 developer tools for Visual Studio
1 Ensure you are logged into the WingtipServer VM using the account WINGTIPadministrator | Password1
2 Launch the Web Platform Installer Start All Programs Microsoft Web Platform Installer
3 In the search box at the top-right corner of the Web Platform Installer 40 window type sharepoint and press Enter
4 Click the Add button to the right of Microsoft Office Developer Tools for Visual Studio 2012 - Preview 2
5 Click the Install button at the bottom of the Web Platform Installer 40 window
6 On the Prerequisites page click I Accept
Creating a SharePoint Server 2013 Environment for Development and Testing Version 10
copy Critical Path Training 2012 All Rights Reserved 60
wwwCriticalPathTrainingcom
At this point you have installed the SharePoint 2013 amp Office 2013 development tools in Visual Studio 2012
Creating a SharePoint Server 2013 Environment for Development and Testing Version 10
copy Critical Path Training 2012 All Rights Reserved 61
wwwCriticalPathTrainingcom
Appendix 1 Download Manifest
The following lists everything referenced that you will or may need to download in this environment
Windows Server 2008 R2 with Service Pack 1 (installer ISO)
o httptechnetmicrosoftcomen-usevalcenterdd459137aspx
Windows Server 2008 R2 with Service Pack 1 (prebuilt VHD)
o httpwwwmicrosoftcomdownloadsdetailsaspxFamilyId=9040a4be-c3cf-44a5-9052-a70314452305
Windows Server 2008 R2 Service Pack 1
o httpwwwmicrosoftcomen-usdownloaddetailsaspxid=5842
SQL Server 2012 Trial
o httpwwwmicrosoftcombetaexperiencepdSQL2012EvalCTAenusdefaultaspx
SharePoint Server 2013
o httptechnetmicrosoftcomen-USevalcenterhh973397aspx
Hotfixes for SharePoint Server 2013 (post-install)
o KB2554876 The SharePoint Parsing Process Crashes in Windows Server 2008 R2
o KB2708075 IIS 75 Configurations are not Updated when you use the ServerManager Class to Commit
Configuration Changes
o KB2759112 Hotfix is Available for NET Framework 45 that Resolves an ASPNET Race Condition Issue in
Windows Server 2008 R2 Windows Server 2008 R2 SP1
o KB2765317 Hotfix is Available for NET Framework 45 that Resolves an ASPNET Race Condition Issue in
Windows 8 Windows RT and Windows Server 2012
Web Platform Installer
o httpwwwmicrosoftcomwebdownloadsplatformaspx
Web Platform Installer ndash Command Line Version
o httplearniisnetpageaspx1072web-platform-installer-v4-command-line-webpicmdexe-preview-release
Workflow Manager 10
o Download using the Microsoft Web Platform Installer
Office 2013
o httpwwwmicrosoftcomofficepreviewentry-office-preview
SharePoint Designer 2013
o httpwwwmicrosoftcomen-usdownloaddetailsaspxid=35491
Visio Professional 2013
o httptechnetmicrosoftcomen-usevalcenterhh973399
Visual Studio 2012
o httpwwwmicrosoftcomvisualstudio11en-usdownloads
Office Developer Tools for Visual Studio 2012 ndash Preview 2
o Download using the Microsoft Web Platform Installer
Creating a SharePoint Server 2013 Environment for Development and Testing Version 10
copy Critical Path Training 2012 All Rights Reserved 62
wwwCriticalPathTrainingcom
Appendix 2 Windows PowerShell Script Manifest
The following lists all Windows PowerShell scripts that are provided with this setup guide
AddDisableLoopbackCheckRegKeyps1
o The following steps automate creating the registry key outlined as Method 2 in the Microsoft Knowledgebase article
httpsupportmicrosoftcomkb896861 using Windows PowerShell This key DisableLoopbackCheck will allow
you to browse SharePoint sites on the same machine Without this key (or following Method 1 in the KB article) you
would need to browse any SharePoint sites from a different computer than the one which SharePoint is installed on
ConfigureSpFarmForAppsps1
o Configures a SharePoint 2013 for hosting apps This ensures everything you need is installed running and
configured This is documented here httpmsdnmicrosoftcomen-uslibraryfp179923(v=office15)
CreateSpServiceAccountsps1
o Creates the minimal necessary service accounts for SharePoint Server 2013 SP_Farm SP_Content amp
SP_Services
SetupSharePointForHNSCps1
o Configures a SharePoint 2013 install for hosting Host-Named Site Collections (HNSC) This involves creating a Web
Application in SharePoint that has no host header bindings Using DNS all requests are mapped to this Web
Application You then create the site collections via PowerShell as you cant create HNSCs via the browser (Central
Administration)
Creating a SharePoint Server 2013 Environment for Development and Testing Version 10
copy Critical Path Training 2012 All Rights Reserved 63
wwwCriticalPathTrainingcom
Appendix 3 Create Sample Adventure Works Database
The following steps document downloading and installing the sample Adventure Works OLTP database provided by Microsoft
1 Launch Internet Explorer and navigate to httpmsftdbprodsamplescodeplexcom
2 Download the Adventure Works 2012 OLTP Script
3 Extract the ZIP into a folder on the desktop
4 Launch SQL Server Management Studio Start All Programs Microsoft SQL Server 2012 SQL Server Management Studio
5 When SQL Server Management Studio launches within the Connect to Server dialog login using the default settings and click Connect
6 Within SQL Server Management Studio select File Open File
7 Select the file instawdbsql from the extracted ZIP and click Open
8 If prompted to re-login to the database engine do it
9 Select Query SQLCMD Mode
10 Scroll down to line 42 the line that starts with the following
setvar SqlSamplesSourceDataPath
11 Change the folder location of where you unzipped the Adventure Works 2012 OLTP Script
12 Select Query Execute
13 When the script completes the AdventureWorks2012 database will have been created
Creating a SharePoint Server 2013 Environment for Development and Testing Version 10
copy Critical Path Training 2012 All Rights Reserved 64
wwwCriticalPathTrainingcom
Change Log
Change Version Description
August 22 2012 v 01 Pre-release for review
August 27 2012 v 02 Initial public release ndash install guide based on SharePoint Server Beta 2
August 28 2012 v 03 Updated URL for the site collection used to connect SharePoint to WAW
August 31 2012 v 04 Typo Removed SQL Server Analysis Services as part of the install Not required in a
SharePoint dev box (unless you are doing business intelligence which is not covered
in the guide)
Updated all references to Windows Azure Workflow to Workflow Manager the new
official name for the new workflow product
Updated SetupSharePointForHNSCps1 script to lookup HNSC Web Application by
name rather than URL which is more reliable
Typo Updated WingtipAllUp public NIC to use a different IP than the WingtipDC
Typo Replaced a reference to WingtipServer with WingtipDC
Typo Fixed handful of minor typos
September 1 2012 v 05 Removed SQL Server Reporting Services from install guide
Added step to uncheck IErsquos ldquoAutomatically detect proxyrdquo
Added post workflow install steps to setup User Profile Service Application to sync with
local Active Directory
September 5 2012 v 06 Added step to create a default root site collection in the HNSC web app
Updated minor typos and added extra notes for context
Updated PowerShell script SetupSharePointForHNSCps1 to remove content
database of default Web Application when setting up HNSC Web App
Added a new exercise 8 (after SharePoint install amp config and before the Workflow
install and config) to setup support for My Sites
October 20 2012 v 07 Updated script SetupSharePointForHNSCps1 to fix a bug where it would fail on line
111 if you didnrsquot already have a WINGTIPSP_Content managed account
Added section to bypass SharePointrsquos check for crlmicrosoftcom
Updated workflowrsquos registration PowerShell script to point to
httpintranetwingtipcom
Switched order of post-SharePoint install to setup HSNC hosting before configuring for
hosting apps
November 29 2012
v 10 Changed setup guide to use a single VM instead of two VMs
Updated guide for SharePoint 2013 RTM
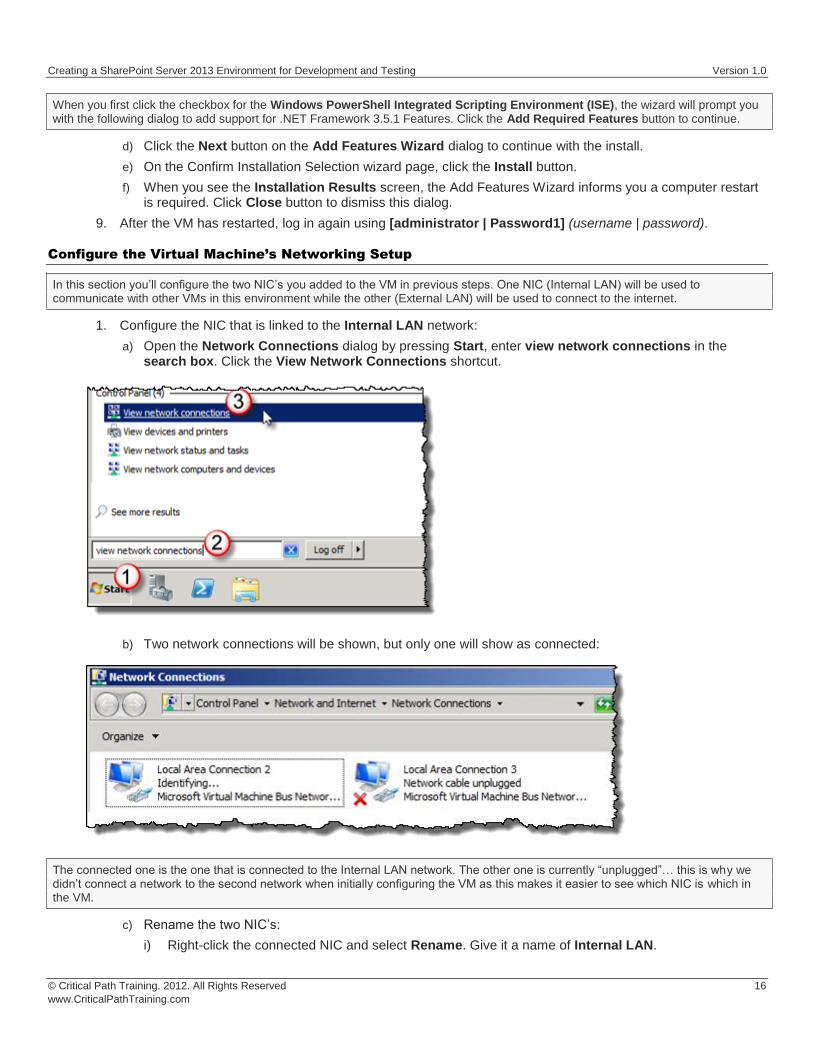
Creating a SharePoint Server 2013 Environment for Development and Testing Version 10
copy Critical Path Training 2012 All Rights Reserved 17
wwwCriticalPathTrainingcom
ii) Right-click the disconnected NIC and select Rename Give it a name of External LAN
d) Right-click the Internal LAN NIC and select Properties
e) In the Local Area Connection Properties dialog select the Internet Protocol Version 4 (TCPIPv4) item and click Properties
f) Enter the following information into the resulting dialog to configure the NICrsquos IP settings
i) Use the Following IP Address
(1) IP Address 192168150102
(2) Subnet mast 2552552550
(3) Default Gateway 192168150102
ii) Use the Following DNS Server Addresses
(1) Preferred DNS Server 192168150102
g) Click OK to accept the IP settings and Close to accept the changes to the NIC
Why not use 101 as the start NIC When you created the virtual internal network Hyper-V created a virtual NIC on the host computer If you set the IP of that NIC to 192168150101 you can use the Remote Desktop Connection app in Windows to connect to your virtual machines and easily copy-paste amp share drives
2 Configure the NIC that is linked to the External LAN network
a) Open the Network Connections window if it is not still open using the same steps from the previous step
b) Right-click the External LAN NIC and select Properties
c) In the Local Area Connection Properties dialog select the Internet Protocol Version 4 (TCPIPv4) item and click Properties
d) Enter the following information into the resulting dialog to configure the NICrsquos IP settings
i) Obtain an IP Address Automatically
ii) Use the Following DNS Server Addresses
(1) Preferred DNS Server 192168150102
e) Click the Advanced button to open the Advanced TCPIP Settings dialog
f) In the Advanced TCPIP Settings dialog click the DNS tab
i) Uncheck the Register this Connections Address in DNS
Creating a SharePoint Server 2013 Environment for Development and Testing Version 10
copy Critical Path Training 2012 All Rights Reserved 18
wwwCriticalPathTrainingcom
g) In the Advanced TCPIP Settings dialog click the WINS tab
i) Click the Add button and specify a new WINS Server as 192168150102
h) Click OK Close multiple times to accept all TCPIP settings
The external NIC will now obtain an IP dynamically amp will not register itself in the DHCPrsquos DNS server which is a good thing when there are multiple people on the same network this this type of a setup
3 Connect the second NIC to the External LAN network
a) Go back to the host computer and open the Hyper-V Manager
b) In the Hyper-V Manager window right-click the VM WingtipServer and select Settings
c) Select the second NIC the one that is not connected
d) For the Network select External LAN and click OK This will effectively plug the external network into the VM
4 Go back into the WingtipServer VM and if it is not still open open the Network Connections dialog You should now see both connections plugged in
a) To refresh the connection select the connection you just plugged in and click the Disable this Network Device button in the toolbar After the connection is disabled select it and click the Enable this Network Device button
b) After a few seconds the VM should be able to connect to the internet which you can test by browsing to a site such as httpwwwbingcom
Configure Windows Update and Update the Server
In this section you will verify the server is fully patched and updated
1 Verify Service Pack 1 is installed
a) Verify the version of the operating system installed by clicking Start right-click on Computer select Properties
b) If the server simply says Windows Server 2008 R2 Enterprise as shown in the following figure download and install Service Pack 1 from the following location httpwwwmicrosoftcomen-usdownloaddetailsaspxid=5842
Creating a SharePoint Server 2013 Environment for Development and Testing Version 10
copy Critical Path Training 2012 All Rights Reserved 19
wwwCriticalPathTrainingcom
c) If Service Pack 1 is installed it will state it
2 Update the server using Windows Update
a) Selecting Start All Programs Windows Update
b) First disable Windows Update from running automatically
i) Click the link Change Settings
ii) Under the Important Updates list select Never check for updates (not recommended)
This isnrsquot what you would do in a production environment but for a development machine it is ok
c) Now update the server
i) Click the Check for Updates button
ii) If prompted install any updates to the Windows Update dialog
iii) Select the Check for Updates link
iv) Windows Update will the report how many updates are available Select all important and recommended updates and click the Install Updates button
v) If prompted select I accept the license terms for any updates that require it
vi) Keep going through the process of running Windows Update checking for updates and installing them after each reboot until it says there are no updates left to install
This step is likely going to take quite a bit of time so be patient
Activate Windows Server 2008 R2
In this section you will activate the server if you have a product key
1 If you have a product key for Windows Server 2008 R2 use it to activate Windows
a) In the Server Manager window navigate to the top-level node to display the Server Summary page Click Activate Windows
b) You will be prompted to enter your product key
i) Enter your product key and click to button to activate Windows
Creating a SharePoint Server 2013 Environment for Development and Testing Version 10
copy Critical Path Training 2012 All Rights Reserved 20
wwwCriticalPathTrainingcom
ii) After a few seconds your VM should be able to connect to a Microsoft site and successfully activate Windows
At this point you have a fully patched operating system VM created that will act as the Active Directory domain controller
Apply the DisableLoopbackCheck Registry Fix
Configure the DisableLoopbackCheck registry setting (Microsoft KB httpsupportmicrosoftcomkb896861)
The following steps automate creating the registry key outlined as Method 2 in the Microsoft KB article httpsupportmicrosoftcomkb896861 using Windows PowerShell
PowerShell Script Alert You can also find this PowerShell script AddDisableLoopbackCheckRegKeyps1 in the files that
accompany this setup guide
1 Click the Windows PowerShell icon in the Taskbar
2 Run the following PowerShell commands pressing [ENTER] after each one
$regKeyPath = HKLMSystemCurrentControlSetControlLsa $key = DisableLoopbackCheck New-ItemProperty -Path $regKeyPath -Name $key -Value 1 -PropertyType dword
a) Close the Windows PowerShell console by typing EXIT and pressing [ENTER]
Exercise 3 Install Active Directory Domain Services
Now you will promote your WingtipServer VM to a domain controller and create a new domain named wingtipcom
1 Login to the WingtipServer virtual machine using administrator | Password1
2 Add and configure the role for Active Directory Domain Services
a) Launch Server Manager and select the Roles node
b) Click the Add Roles link to start the Add Roles Wizard
c) On the Before you begin page click Next
d) On the Server Roles page select Active Directory Domain Services Click the Add Required Features button if prompted to install prerequisites
e) Click Next
Creating a SharePoint Server 2013 Environment for Development and Testing Version 10
copy Critical Path Training 2012 All Rights Reserved 21
wwwCriticalPathTrainingcom
f) On the next page of the wizard click Next which will bring you to the Confirm Installation Selections page
g) Click Install
After Active Directory Domain Services has been installed you will see the Installation Results page in the Add Roles Wizard
3 Click on the link with the big long caption of Close this wizard and launch the Active Directory Domain Services Installation Wizard (dcpromoexe)
4 On the first page of the Active Directory Domain Services Installation Wizard click the Use Advanced Mode Installation checkbox and click Next
Creating a SharePoint Server 2013 Environment for Development and Testing Version 10
copy Critical Path Training 2012 All Rights Reserved 22
wwwCriticalPathTrainingcom
5 On the Operating System Compatibility page click Next
6 On the Choose a Deployment Configuration select Create a new domain in a new forest and click Next
7 On the Name the Forrest Root Domain enter the following and click Next
a) FQDN of the forest root domain wingtipcom
8 On the Domain NetBIOS Name set it to WINGTIP and click Next
9 On the Set Forest Functional Level page select Windows Server 2008 R2 and click Next
10 On the Additional Domain Controller Options accept the default options and click Next
11 You might be prompted with the dialog shown below providing a warning that This computer has dynamically assigned IP address(es) This is not a problem when you are running your development environment on a domain controller Click Yes to dismiss the dialog
12 At this point the wizard will prompt you with a dialog information you a delegation for the DNS Server cannot be created because it cannot find the authoritative parent zone This is not a problem because the wizard will automatically configure the DNS of the VM to point to itself Click on the Yes button to dismiss this dialog
Creating a SharePoint Server 2013 Environment for Development and Testing Version 10
copy Critical Path Training 2012 All Rights Reserved 23
wwwCriticalPathTrainingcom
13 On the Location for Database Log Files and SYSVOL page accept all the default values and click Next
14 On the Directory Services Restore Mode Administrator Password page enter Password1 in both textboxes and click Next
15 On the Summary page click Next to start the process of configuring the new Active Directory domain
16 The wizard will display the dialog below to show you the progress of the configuration process You will be required to reboot when the configuration has been completed Check the option for Reboot on completion and then wait for the configuration to complete and the machine to reboot
17 After the VM reboots login to the server with wingtipadministrator | Password1
Configure Windows Update and Update the Server
In this section you will verify the server is fully patched and updated
1 Update the server using Windows Update
a) Selecting Start All Programs Windows Update
b) Select the Check for Updates link
c) Windows Update will the report how many updates are available Select all important and recommended updates and click the Install Updates button
d) If prompted select I accept the license terms for any updates that require it
e) Keep running Windows Update after each reboot and update install until it says there are no updates left to install
Creating a SharePoint Server 2013 Environment for Development and Testing Version 10
copy Critical Path Training 2012 All Rights Reserved 24
wwwCriticalPathTrainingcom
This step could take quite a bit of time so be patient
At this point you have a fully installed Active Directory Domain Controller for the Wingtipcom domain hosted on the server WingtipServer
Exercise 4 Install SQL Server 2012
In this exercise you will install SQL Server 2012 that will be used to store all required databases
1 Download the SQL Server 2012 Evaluation Edition specifically the DVD x64 ISO image to the host computer from here httpwwwmicrosoftcombetaexperiencepdSQL2012EvalCTAenusdefaultaspx or you can use your own licensed copy
2 Mount the SQL Server 2012 ISO to the WingtipServer VM
a) On the host computer open the Hyper-V Manager
b) Right-click the VM WingtipServer and select Settings
c) Select DVD Drive in the left-hand panel
d) In the right-hand panel select Image File and browse to the ISO file that contains SQL Server 2012 and click OK
3 Login to the WingtipServer VM as wingtipadministrator | Password1
Install SQL Server 2012
In this section you will install SQL Server 2012
1 If the AutoPlay dialog box is open click Run SETUPEXE If it isnrsquot use Windows Explorer to navigate to the DVD drive and execute the setupexe file in the root of the DVD drive
2 In the SQL Server Installation Center click Installation on the left-hand side
Creating a SharePoint Server 2013 Environment for Development and Testing Version 10
copy Critical Path Training 2012 All Rights Reserved 25
wwwCriticalPathTrainingcom
3 Next select New SQL Server stand-alone installation or add features to an existing installation
4 On the Setup Support Rules page the installer will check for issues before installing Click OK
5 On the Product Key page click the Specify a free edition radio box and select Evaluation then click Next
6 On the License Terms page click the I accept the license terms checkbox and click Next
7 On the Setup Support Rules page the installer will check for any problems with the server you are installing on Click Next when this completes
Creating a SharePoint Server 2013 Environment for Development and Testing Version 10
copy Critical Path Training 2012 All Rights Reserved 26
wwwCriticalPathTrainingcom
8 On the Support Role page select SQL Server Feature Installation and click Next
9 On the Feature Selection page check the following options and click Next
a) Instances Features
i) Database Engine Services
(1) Full-Text and Semantic Extractions for Search
b) Shared Features
i) Management Tools ndash Basic
(1) Management Tools ndash Complete
Creating a SharePoint Server 2013 Environment for Development and Testing Version 10
copy Critical Path Training 2012 All Rights Reserved 27
wwwCriticalPathTrainingcom
10 On the Installation Rules page click Next
11 On the Instance Configuration page click Next
12 On the Disk Space Requirements page click Next
13 On the Server Configuration page do the following and click Next
a) On the Service Account tab change the Startup Type for the SQL Server Agent to Automatic
14 On the Database Engine Configuration page do the following and click Next
a) On the Server Configuration tab click Add Current User
b) On the FILESTREAM tab
i) Check Enable FILESTREAM for Transact-SQL Access
ii) Check Enable FILESTREAM for file IO access
15 On the Error Reporting page click Next
16 On the Installation Configuration Rules page click Next
17 On the Ready to Install page click Install
Installation of SQL Server 2012 will take some time please be patient
18 When the installation completes the Complete page will be shown Click Close
At this point you have now successfully installed SQL Server 2012
Creating a SharePoint Server 2013 Environment for Development and Testing Version 10
copy Critical Path Training 2012 All Rights Reserved 28
wwwCriticalPathTrainingcom
Exercise 5 Install amp Configure SharePoint Server 2013
In this exercise you will install SharePoint 2013
1 Download the SharePoint Server 2013 to the host computer from here httptechnetmicrosoftcomen-USevalcenterhh973397aspx
2 Mount the SharePoint Server 2013 ISO to the WingtipServer VM
a) On the host computer open the Hyper-V Manager
b) Right-click the VM WingtipServer and select Settings
c) Select DVD Drive in the left-hand panel
The file that Microsoft provides is saved in the IMG format Hyper-V Manager wonrsquot allow you to mount an IMG file so rename it to ISO before mounting it
d) In the right-hand panel select Image File and browse to the ISO file that contains SharePoint Server 2013 and click OK
Create SharePoint Service Accounts amp Grant Rights to SQL Server 2012
In this section you will create the necessary service accounts that will be used by SharePoint in Active Directory and grant them necessary rights in SQL Server 2012
PowerShell Script Alert The creation of users and granting them rights to SQL Server 2012 steps in this section are automated in the Windows PowerShell script CreateSpServiceAccountsps1 found in the files that accompany this setup guide Open the script
and read the header for documentation on how to use it
1 Open the Active Directory Users and Computers Start Administrative Tools Active Directory Users and Computers
2 Expand the tree in the left-hand pane to see the Users OU Select the Users OU
3 Create a new user SP_Farm
a) In the toolbar select Action New User
Creating a SharePoint Server 2013 Environment for Development and Testing Version 10
copy Critical Path Training 2012 All Rights Reserved 29
wwwCriticalPathTrainingcom
b) Set the userrsquos Full Name amp User Login Name to SP_Farm and click Next
c) In the password dialog enter the following and click Next
i) Password (and Confirm Password) Password1
ii) User must change password at next login unchecked
iii) User cannot change password unchecked
iv) Password never expires checked
v) Account is disabled unchecked
Creating a SharePoint Server 2013 Environment for Development and Testing Version 10
copy Critical Path Training 2012 All Rights Reserved 30
wwwCriticalPathTrainingcom
vi) Click Finish
4 Repeat the previous step to create two more accounts
a) SP_Content
b) SP_Services
At this point you have created all the necessary service accounts
Install SharePoint Server 2013 Prerequisites
In this section you will install the SharePoint Server 2013 Prerequisites
1 Ensure you are logged into the WingtipServer VM using the account wingtipadministrator | Password1
2 If the AutoPlay dialog box is open click Run splashhta If it isnrsquot use Windows Explorer to navigate to the DVD drive and execute the splashhta file in the root of the DVD drive
Creating a SharePoint Server 2013 Environment for Development and Testing Version 10
copy Critical Path Training 2012 All Rights Reserved 31
wwwCriticalPathTrainingcom
3 Click the Install Software Prerequisites link
4 In the Microsoft SharePoint 2013 Products Preparation Tool window click Next
5 On the License Terms for Software Products page
a) Check I accept the terms of the License Agreement(s)
b) Click Next
6 The tool will download and install all prerequisites for SharePoint Server 2013 This will take some time It may prompt you to reboot the server If so reboot the server and login using wingtipadministrator | Password1
Creating a SharePoint Server 2013 Environment for Development and Testing Version 10
copy Critical Path Training 2012 All Rights Reserved 32
wwwCriticalPathTrainingcom
7 When the prerequisite installer is complete it will present a summary of everything it did
8 Click Finish
9 Restart the WingtipServer VMhellip some additional installations and changes that the prerequisite installer did will require a restart before installing SharePoint Server 2013
At this point all prerequisites required by SharePoint Server 2013 have been installed and any necessary configuration changes have been applied to the server However it is strongly recommend that you run Windows Update and install any pending updates Further Microsoft recommends installing the following hotfixes if they are not already installed
KB2554876 The SharePoint Parsing Process Crashes in Windows Server 2008 R2
KB2708075 IIS 75 Configurations are not Updated when you use the ServerManager Class to Commit Configuration Changes
KB2759112 Hotfix is Available for NET Framework 45 that Resolves an ASPNET Race Condition Issue in Windows Server 2008 R2 Windows Server 2008 R2 SP1
KB2765317 Hotfix is Available for NET Framework 45 that Resolves an ASPNET Race Condition Issue in Windows
8 Windows RT and Windows Server 2012
Install SharePoint Server 2013
In this section you will install SharePoint Server 2013
1 Ensure you are logged into the WingtipServer VM using the account wingtipadministrator | Password1
2 If the AutoPlay dialog box is open click Run splashhta If it isnrsquot use Windows Explorer to navigate to the DVD drive and execute the splashhta file in the root of the DVD drive
Creating a SharePoint Server 2013 Environment for Development and Testing Version 10
copy Critical Path Training 2012 All Rights Reserved 33
wwwCriticalPathTrainingcom
3 Click Install SharePoint Server
4 When prompted to Enter your Product Key enter the key you obtained for the trial install and click Continue
5 On the Read the Microsoft Software License Terms page check the I accept the terms of this agreement checkbox and click Continue
6 On the Choose a file location page click Install Now
Creating a SharePoint Server 2013 Environment for Development and Testing Version 10
copy Critical Path Training 2012 All Rights Reserved 34
wwwCriticalPathTrainingcom
7 When the installation is complete select the Run the SharePoint Products Configuration Wizard checkbox and click Close
8 On the Welcome to SharePoint Products page click Next
a) If prompted to start or reset services click Yes
9 On the Connect to a server farm page select Create a new server farm and click Next
10 On the Specify Configuration Database Settings page use the following to complete the page and click Next
a) Database server WINGTIPSERVER
b) Database name SharePoint_Config
c) Username WINGTIPSP_Farm
d) Password Password1
Creating a SharePoint Server 2013 Environment for Development and Testing Version 10
copy Critical Path Training 2012 All Rights Reserved 35
wwwCriticalPathTrainingcom
11 On the Specify Farm Security Settings page for the Passphrase and Confirm Passphrase boxes enter Password1 and click Next
12 On the Configure SharePoint Central Administration Web Application page check the Specify port number checkbox and enter a value of 9999 then Click Next
Creating a SharePoint Server 2013 Environment for Development and Testing Version 10
copy Critical Path Training 2012 All Rights Reserved 36
wwwCriticalPathTrainingcom
13 On the Completing the SharePoint Products Configuration Wizard page click Next
14 When the installer completes it will display the Confirmation Successful page
15 Click Finish This will launch Internet Explorer to go through the configuration process
Creating a SharePoint Server 2013 Environment for Development and Testing Version 10
copy Critical Path Training 2012 All Rights Reserved 37
wwwCriticalPathTrainingcom
At this point you have successfully installed SharePoint Server 2013
Configure SharePoint Server 2013
In this section you will create a new SharePoint Server 2013 farm and perform minimal configuration tasks
After installing SharePoint Sever 2013 the SharePoint Products Configuration Wizard will launch the browser-based Initial Farm Configuration Wizard
1 In the first page of the wizard you are prompted to Help Make SharePoint Better Select which ever option you want and click OK
2 On the Welcome page that asks How do you want to configure your SharePoint farm click the Start the Wizard button
3 On the Services page do the following and then click Next
a) Service Account Select Create new managed account
i) Username WINGTIPSP_Services
ii) Password Password1
b) Services Uncheck the following services
Creating a SharePoint Server 2013 Environment for Development and Testing Version 10
copy Critical Path Training 2012 All Rights Reserved 38
wwwCriticalPathTrainingcom
i) Access Services 2010
ii) App Management Service
In SharePoint Server 2013 the Search Service Application processes specifically noderunnerexe can consume a considerable amount of memory and processor time If you are not going to work with search you might consider unchecking this option for now You can always go back into Central Administration and create a new instance of the Search Service Application at a later date if you need it
Why did we remove Access Services 2010 amp App Management Service service applications The Access Services 2010 service application is included for backwards compatibility and isnrsquot needed in new installations unless you are migrating solutions built with Access Services 2010 from SharePoint Server 2010 (if so you can create this service application later within Central Administration Application Management Manage Service Applications) The App Management Service service application will be created in a later step in this setup guide therefor it is skipped here
4 The creation of the service applications can take quite a while so be patient If it exceeds 20 minutes it is fairly safe to assume the page is hung up One option is to close the browser then launch Central Administration (Start All Programs Microsoft SharePoint 2013 Products SharePoint 2013 Central Administration) and look at the Service Application page (Application Management Manage Service Applications) to see if they were all created
Configure DNS
In this section you will configure DNS for hosting SharePoint sites amp Apps
1 Ensure you are logged into the WingtipServer VM using the account wingtipadministrator | Password1
2 Open the DNS window Start Administrative Tools DNS
3 Expand the hierarchy on the left-hand side of the window until you get to DNS WINGTIPSERVER Forward Lookup Zones wingtipcom
4 Create a new wildcard so all requests for http[]wingtipcom will be forwarded to our SharePoint machine
a) Next right-click wingtipcom and select New Host (A or AAAA)
Creating a SharePoint Server 2013 Environment for Development and Testing Version 10
copy Critical Path Training 2012 All Rights Reserved 39
wwwCriticalPathTrainingcom
b) In the New Host dialog enter the following and click OK
i) Alias Name
ii) IP Address 192168150102 Then click Add Host The following figure shows how this looks
This new record is telling DNS to forward any request for http[]wingtipcom to the webserver WINGTIPSERVER where the
requests will be served by SharePoint
5 Verify this DNS entry is working
a) Open Windows PowerShell Start All Programs Accessories Windows PowerShell Windows PowerShell
b) Run the following commands and press ENTER
PS CUsersAdministratorgt nslookup somethingwingtipcom PS CUsersAdministratorgt nslookup somethingappswingtipcom
c) You should get a response that points to the WingtipServer server as shown in the following figure
Creating a SharePoint Server 2013 Environment for Development and Testing Version 10
copy Critical Path Training 2012 All Rights Reserved 40
wwwCriticalPathTrainingcom
Configure SharePoint Server 2013 for Host-Named Site Collections amp Create Initial Site
Collections
In this section you will create new SharePoint 2013 site collections for testing and hosting apps
Microsoft recommends to create host-named site collections (HNSC) instead of using the path based site collection addressing The difference is the following a path based site created at something such as httpintranetwingtipcomsitesdevtest as an HNSC site would be more like httpdevtestwingtipcom This is how it works in the cloud (Office 365) and it scales much better for on-prem
deployments This setup guide will show you how to setup your environment to create HNSC The only downside to this approach is that you canrsquot create site collections within Central Administration it must be done via Windows PowerShell API (because Central Administration doesnrsquot instruct you where to put the site
This is implemented in various parts First DNS must be configured to send all requests for httpwingtipcom to a Web Application
(implemented in the last section) Second this Web Application must be extended with SharePoint and have no host header bindings (so it handles all requests) Third it must have a default site collection at the root of the Web Application but it will not be used for anything (in fact it doesnrsquot need a template assigned to it)
You can read more about HNSCrsquos on TechNet httptechnetmicrosoftcomen-uslibrarycc424952aspx
PowerShell Script Alert The steps in this section are automated in the script SetupSharePointForHNSCps1 found in the files that
accompany this setup guide Open the script and read the header for documentation on how to use it
1 Ensure you are logged into the WingtipServer VM using the account wingtipadministrator | Password1
2 Open Central Administration Start All Programs Microsoft SharePoint 2013 Products SharePoint 2013 Central Administration
3 Select Application Management Manage Web Applications
4 Delete the default Web Application created by the configuration wizard
a) Delete the existing default Web Application
i) Select the Web Application SharePoint ndash 80 the one with the URL of httpwingtipserver and click Delete in the ribbon
ii) When prompted to delete the associated IIS Web Site amp SQL Server database select both options to delete them and click OK
The reason you are doing this is because the setup wizard you ran previously when creating the service applications automatically created it The problem is that it used the same identity (WINGTIPSP_Services) for the app pool that is used for all the service
applications which is not desired
5 Create a new Web Application to handle Host-Named Site Collections (HNSC)
Creating a SharePoint Server 2013 Environment for Development and Testing Version 10
copy Critical Path Training 2012 All Rights Reserved 41
wwwCriticalPathTrainingcom
a) In the ribbon click the New button
b) In the Create New Web Application dialog enter the following values in the properties and click OK Leave all properties not mentioned
i) Select the radio button Create a new IIS web site
(1) Name SharePoint HNSC Host ndash 80
(2) Port 80
ii) Application Pool
(1) Select the radio button Create a new application pool
(a) Application Pool Name SharePoint Default HNSC AppPool
(b) Select a security account for this application pool WINGTIPSP_Content
If WINGTIPSP_Content is not listed as an available managed account create it by selecting the appropriate option and using
Password1 for the password
iii) Database Name and Authentication
(1) Database Name WSS_Content_HNSCDefaultHost
c) This process will take a few moments At the end of the process SharePoint will ask if you want to create a site collection You do but you donrsquot want to do it through the browser as this will not be a HNSC To create a HNSC you must create it via Windows PowerShell
6 Create a default not template site collection at the root of the web application
a) Open SharePoint 2013 Management Shell Start All Programs Microsoft SharePoint 2013 Products SharePoint 2013 Management Shell
7 Create Site Collections for Testing SharePoint amp SharePoint Apps
a) Open SharePoint 2013 Management Shell Start All Programs Microsoft SharePoint 2013 Products SharePoint 2013 Management Shell
b) Get a reference to the HNSC web application you just created by running the following Windows PowerShell script in the SharePoint 2013 Management Shell
$hnscWebApp = Get-SPWebApplication | Where-Object $_DisplayName -eq SharePoint HNSC Host - 80
c) Create a non-templated site at the root of the web application for Workflow to connect to by executing the following Windows PowerShell script in the SharePoint 2013 Management Shell
New-SPSite -Name Root HNSC Site Collection -Url httpwingtipcom -HostHeaderWebApplication $hnscWebApp -OwnerAlias WINGTIPAdministrator
d) Create a team site by executing the following Windows PowerShell script in the SharePoint 2013 Management Shell
New-SPSite -Name Wingtip Intranet -Url httpintranetwingtipcom ndashHostHeaderWebApplication $hnscWebApp -Template STS0 -OwnerAlias WINGTIPAdministrator
e) Create a developer site by executing the following Windows PowerShell script in the SharePoint 2013 Management Shell
New-SPSite -Name Wingtip Developer Site -Url httpdevwingtipcom ndashHostHeaderWebApplication $hnscWebApp -Template DEV0 -OwnerAlias WINGTIPAdministrator
You can only create debug and test apps using a developer site
At this point you now have a site collection to use as a team site (httpintranetwingtipcom) and to develop and test custom SharePoint apps (httpdevwingtipcom)
Creating a SharePoint Server 2013 Environment for Development and Testing Version 10
copy Critical Path Training 2012 All Rights Reserved 42
wwwCriticalPathTrainingcom
Configure SharePoint 2013 for Hosting Apps
In this setup you will setup your SharePoint 2013 environment for hosting apps
PowerShell Script Alert Everything in the next immediate step is provided in the script ConfigureSpFarmForAppsps1 found in the
files that accompany this setup guide Open the script and read the header for documentation on how to use it
1 Ensure you are logged into the WingtipServer VM using the account wingtipadministrator | Password1
2 Create the necessary SharePoint App Management service applications and start the necessary services via Windows PowerShell
a) Open SharePoint 2013 Management Shell Start All Programs Microsoft SharePoint 2013 Products SharePoint 2013 Management Shell
b) Execute the following Windows PowerShell script in the SharePoint 2013 Management Shell
$appHostDomain = appswingtipcom $adminService = Get-Service -Name spadminv4 if ($adminServiceStatus -ne Running) Start-Service $adminService $timerService = Get-Service -Name sptimerv4 if ($timerServiceStatus -ne Running) Start-Service $timerService Set-SPAppDomain $appHostDomain $appMgmtSvcInstance = Get-SPServiceInstance | Where-Object $_GetType()Name -eq AppManagementServiceInstance if ($appMgmtSvcInstanceStatus -ne Online) Start-SPServiceInstance -Identity $appMgmtSvcInstance $appSubSettingSvcInstance = Get-SPServiceInstance | Where-Object $_GetType()Name -eq SPSubscriptionSettingsServiceInstance if ($appSubSettingSvcInstanceStatus -ne Online) Start-SPServiceInstance -Identity $appSubSettingSvcInstance $appPoolServiceApps = Get-SPServiceApplicationPool -Identity SharePoint Web Services Default $appSubSvc = New-SPSubscriptionSettingsServiceApplication ndashApplicationPool $appPoolServiceApps ndashName Settings Service Application ndashDatabaseName SettingsServiceDB $proxySubSvc = New-SPSubscriptionSettingsServiceApplicationProxy ndashServiceApplication $appSubSvc $appAppSvc = New-SPAppManagementServiceApplication -ApplicationPool $appPoolServiceApps -Name App Management Service Application -DatabaseName AppServiceDB $proxyAppSvc = New-SPAppManagementServiceApplicationProxy -ServiceApplication $appAppSvc Set-SPAppSiteSubscriptionName -Name app -Confirm$false
3 Verify the script configured SharePoint 2013 for hosting apps
a) Open Central Administration Start All Programs Microsoft SharePoint 2013 Products SharePoint 2013 Central Administration
b) Verify service applications created
i) Open the Service Applications page Application Management Manage Service Applications
ii) Verify you have two service applications created
(1) App Management Service Application
(2) Settings Service Application
c) Verify service instances are running
i) Open the Services on Server page System Settings Manage Services on Server
ii) Verify the following services are Started
(1) App Management Service
(2) Microsoft SharePoint Foundation Subscription Settings Service
Creating a SharePoint Server 2013 Environment for Development and Testing Version 10
copy Critical Path Training 2012 All Rights Reserved 43
wwwCriticalPathTrainingcom
d) Verify App URLs are correct
i) Open the Configure App URLs page Apps Configure app URLs
ii) Verify the following
(1) App Domain appswingtipcom
(2) App Prefix app
At this point your SharePoint Server 2013 environment is ready to host SharePoint apps
Creating a SharePoint Server 2013 Environment for Development and Testing Version 10
copy Critical Path Training 2012 All Rights Reserved 44
wwwCriticalPathTrainingcom
Start the SharePoint 2013 Sandbox Service
By default the service that executes sandbox solutions is not running In this step you will start the service
1 Open Central Administration Start All Programs Microsoft SharePoint 2013 Products SharePoint 2013 Central Administration
2 Open the Services on Server page System Settings Manage Services on Server
3 Click the Start link to the left of the Microsoft SharePoint Foundation Sandboxed Code Service
At this point your installation can support sandbox solutions
Configure CRL Verification for Disconnected Environments
SharePoint periodically ldquophones homerdquo to a specific address hosted by Microsoft under certain conditions When your environment is disconnected this can cause an unnecessary delay or failures when starting up the sandbox The following steps outline a workaround to bypass this check
1 Launch Notepad as an administrator Start All Programs Accessories right-click Notepad and select Run as Administrator
2 Open the hosts file by selecting File Open and finding the file
cWindowsSystem32Driversetchosts
3 Add the following line to the end of the file
127001 crlmicrosoftcom
4 Save and close the hosts file
Update Internet Explorer to Bypass the App URL amp Automatically Login to SharePoint Sites
In this section you will update Internet Explorer to add the App hosting URL to the bypass list so you can navigate to the domain after deploying SharePoint hosted apps
1 Ensure you are logged into the WingtipServer VM using the account wingtipadministrator | Password1
1 Launch Internet Explorer Start All Programs Internet Explorer
2 Configure Internet Explorer to bypass the App URL
a) In the top-right corner click the gear icon and select Internet Options
b) On the Security tab select the Local Intranet and click the Sites button
c) Uncheck the box next to Automatically detect intranet network
d) Click the Advanced button and add two entries to the Exceptions list
i) httpwingtipcom
ii) httpappswingtipcom
Creating a SharePoint Server 2013 Environment for Development and Testing Version 10
copy Critical Path Training 2012 All Rights Reserved 45
wwwCriticalPathTrainingcom
e) Click the Close button followed by the OK button multiple times to close out of the dialogs
At this point Internet Explorer is setup to bypass your app URL so you can navigate to apps (httpappswingtipcom) as well as automatically authenticate to sites hosted at httpwingtipcom
Exercise 6 Configure SharePoint to Host My Sites
In this exercise you will configure SharePoint to create and host My Sites In order to host My Sites you will need a new Web Application that is configured for Self-Service Site Creation and has a My Site Host site collection
1 Create a new SharePoint web application to host the My Sites
a) Ensure you are logged into the WingtipServer VM using the account wingtipadministrator | Password1
b) Open Central Administration Start All Programs Microsoft SharePoint 2013 Products SharePoint 2013 Central Administration
c) Select Application Management Manage Web Applications
d) In the ribbon click the New button
e) In the Create New Web Application dialog enter the following values in the properties and click OK Leave all properties not mentioned
i) Select the radio button Create a new IIS web site
(1) Name SharePoint MySite Host ndash 80
(2) Port 80
(3) Host Header mywingtipcom
ii) Application Pool
(1) Select the radio button Use existing application pool
(a) Application Pool Name SharePoint Default HNSC AppPool
iii) Database Name and Authentication
(1) Database Name WSS_Content_SocialWingtipCom
f) This process will take a few moments At the end of the process SharePoint will ask if you want to create a site collection Click the link provided to create a new site collection amp continue to the next step
2 Create a My Site Host site collection
a) On the Create Site Collection page use the following information to complete the form and click OK
Creating a SharePoint Server 2013 Environment for Development and Testing Version 10
copy Critical Path Training 2012 All Rights Reserved 46
wwwCriticalPathTrainingcom
i) Title My Site Host
ii) URL
iii) Template Selection My Site Host (found under the Enterprise tab)
iv) Primary Site Collection Administrator WINGTIPAdministrator
3 Update the Web Application to host my sites
a) Within Central Administration in the left-hand navigation navigate to the Manage Web Applications page Application Management Manage Web Applications
b) Select the SharePoint MySite Host ndash 80 web application
c) Click the Managed Paths button in the ribbon
d) Remove the sites managed path and add two new managed paths and click OK
i) personal ndash Wildcard inclusion
ii) my ndash Explicit inclusion
e) With the SharePoint MySite Host ndash 80 web application still selected click the Self-Service Site Creation button
f) On the Self-Service Site Creation page use the following values to complete the form and click OK
i) Site Collections On
4 Next configure the User Profile Service Application My Site settings
a) Browse to the User Profile Service Application management page Application Management Manage Service Applications User Profile Service Application
b) Under the My Site Settings section click the Setup My Sites
c) On the My Site Settings page use the following information to complete the form and click OK
i) My Site Host httpmywingtipcom
ii) Personal Site Location personal
At this point your SharePoint deployment is now configured to automatically create My Sites under httpmywingtipcomPersonalUserName when users first browse to them
Exercise 7 Install amp Configure Workflow Manager 10
In this exercise you will configure the WingtipServer VM to host Workflow Manager 10 and connect it to your SharePoint installation
1 Ensure you are logged into the WingtipServer VM using the account wingtipadministrator | Password1
Verify SQL Server 2012 Network Configuration
In this section yoursquoll verify the network configuration is correct for SQL Server 2012 in order to install Workflow Manager 10
Creating a SharePoint Server 2013 Environment for Development and Testing Version 10
copy Critical Path Training 2012 All Rights Reserved 47
wwwCriticalPathTrainingcom
1 Configure SQL Server 2012 to have the TCPIP connection protocol enabled
a) Open the SQL Server Configuration Manager Start All Programs Microsoft SQL Server 2012 Configuration Tools SQL Server Configuration Manager
b) Expand the hierarchy on the left-hand side to the following SQL Server Connection Manager (local) SQL Server Network Configuration Protocols for MSSQLSERVER
c) In the main window if TCPIP is Disabled right-click TCPIP and select Enable
d) When prompted with a warning click OK
2 SQL Server must be restarted in order to reflect this change
a) In the hierarchy on the left-hand side of the window select SQL Server Services
b) Right-click SQL Server (MSSQLSERVER) and select Restart
At this point SQL Server is now configured with the TCPIP protocol enabled a requirement when configuring Service Bus
Configure the Workflow Service Account with the Necessary Rights
In this section you will verify the service account that will run Workflow Manager and Service Bus
1 Ensure you are logged into the WingtipServer VM using the account WINGTIPadministrator | Password1
2 Grant the WINGTIPSP_Content account securityadmin amp dbcreator permissions in SQL Server
a) Launch SQL Server Management Studio Start All Programs Microsoft SQL Server 2012 SQL Server Management Studio
b) When SQL Server Management Studio launches within the Connect to Server dialog login using the default settings and click Connect
c) In the Object Explorer tool window expand the WINGTIPSERVER server hierarchy to the Security Logins node
d) Find the WINGTIPSP_Content account right-click it and select Properties
Creating a SharePoint Server 2013 Environment for Development and Testing Version 10
copy Critical Path Training 2012 All Rights Reserved 48
wwwCriticalPathTrainingcom
e) In the Select a page pane select Server Roles
f) Check securityadmin amp dbcreator and click OK
g) Close SQL Server Management Studio
3 Add the Workflow service account to the local administrators group
a) Open the Active Directory Users and Computers window Start Administrative Tools Active Directory Users and Computers
b) In the hierarchy on the left-hand side of the window expand it to the following Active Directory Users and Computers wingtipcom Builtin
c) In the main window right-click Administrators and select Properties
d) In the Administrators Properties dialog select the Members tab and click Add
e) In the Enter the object names to select box enter wingtipsp_content and click the Check Names button
f) In the Administrators Properties dialog click OK
g) Close the Active Directory Users and Computers window
At this point the service account that will host Workflow Manager and Service Bus has been configured correctly
Creating a SharePoint Server 2013 Environment for Development and Testing Version 10
copy Critical Path Training 2012 All Rights Reserved 49
wwwCriticalPathTrainingcom
Download amp Install Workflow Manager and Service Bus
In this section you will install Workflow Manager and Service Bus
1 Ensure you are logged into the WingtipServer VM using the account WINGTIPSP_Content | Password1
It is important you are logged in as the user that will run workflow when you install amp configure Workflow Manager and Service Bus
2 Launch the Web Platform Installer Start All Programs Microsoft Web Platform Installer
a) If the Web Platform Installer is not present on your machine you can download amp install it from here httpwwwmicrosoftcomwebdownloadsplatformaspx
If you do not have internet access within the virtual machine it is possible to download everything needed for workflow using the command line version of the Web Platform Installer (WebPICMD) You can get WebPICMD from httplearniisnetpageaspx1072web-platform-installer-v4-command-line-webpicmdexe-preview-release Specifically for
workflow enter the following command to download Workflow Beta 1 and all prerequisites
webpicmd offline ProductsWorkflow Pathc[path]
3 When the Web Platform Installer loads execute a search for Workflow select Workflow Manager 10 and click Add
4 Click the Install button at the bottom of the Web Platform Installer 40 window
5 On the Prerequisites page click I Accept
Note The Web Platform Installer 40 may prompt you to keep certain products updated using Microsoft Update If it does select Use Microsoft Update when I check for updates (recommended) and click Continue
6 When the installer completes the following dialog will appear Click Continue and then Finish to start the configuration process
Creating a SharePoint Server 2013 Environment for Development and Testing Version 10
copy Critical Path Training 2012 All Rights Reserved 50
wwwCriticalPathTrainingcom
At this point Workflow Manager amp Service Bus are installed
Configure Workflow Manager and Service Bus
In this section you will install Workflow Manager and Service Bus
1 If the Workflow Manager Configuration Wizard is not open open it Start All Programs Workflow Manager 10 Workflow Configuration
2 On the Welcome page click Configure Workflow Manager with Default Settings (Recommended)
Creating a SharePoint Server 2013 Environment for Development and Testing Version 10
copy Critical Path Training 2012 All Rights Reserved 51
wwwCriticalPathTrainingcom
3 On the New Farm Configuration page do the following
a) In the section Configure Service Account set the credentials to
i) User ID sp_contentwingtipcom
ii) Password Password1
b) Check the Allow Workflow management over HTTP on this computer checkbox
Ensure the username is entered in the fully qualified UPN format not as the default shows in the installer (sp_contentwingtip) or the domainusername format
In a production environment you should be doing everything over SSL
c) Click the Test Connection button to verify the connection credentials before proceeding
Creating a SharePoint Server 2013 Environment for Development and Testing Version 10
copy Critical Path Training 2012 All Rights Reserved 52
wwwCriticalPathTrainingcom
d) In the Certificate Generation Key and Confirm Certificate Generation Key enter Password1 into both fields
4 Click the right arrow in the bottom right corner to proceed
5 On the Summary page review your settings and click the check at the bottom right of the widow to start the configuration process
Creating a SharePoint Server 2013 Environment for Development and Testing Version 10
copy Critical Path Training 2012 All Rights Reserved 53
wwwCriticalPathTrainingcom
6 After a few minutes the Configuration Progress screen will show that everything has been configured correctly
Creating a SharePoint Server 2013 Environment for Development and Testing Version 10
copy Critical Path Training 2012 All Rights Reserved 54
wwwCriticalPathTrainingcom
7 Click the check in the bottom right corner
At this point Workflow Manager amp Service Bus has been installed and a new Workflow Manager farm has been created The next step is to connect the SharePoint 2013 farm to the Workflow Manager farm
Connect SharePoint 2013 to Workflow Manager
In this section you will connect SharePoint 2013 and Workflow Manager together
1 Ensure you are logged into the WingtipServer VM using the account WINGTIPadministrator | Password1
2 Get the Workflow Manager endpoint
a) Open the Workflow Manager PowerShell console Start All Programs Workflow Manager 10
b) Execute the Windows PowerShell following cmdlet
Get-WFFarm | ft HttpPort
c) Take note of this port (12291) This port number is what you will use to connect the SharePoint 2013 farm to the Workflow Manager 10 farm
In production you should connect to the HTTPS port listed in the HttpsPort property when you run Get-WFFarm
d) Close the Workflow Manager PowerShell window
3 Connect the SharePoint 2013 farm to Workflow Manager
Creating a SharePoint Server 2013 Environment for Development and Testing Version 10
copy Critical Path Training 2012 All Rights Reserved 55
wwwCriticalPathTrainingcom
a) Open SharePoint 2013 Management Shell Start All Programs Microsoft SharePoint 2013 Products SharePoint 2013 Management Shell
b) Execute the following Windows PowerShell script in the SharePoint 2013 Management Shell
Register-SPWorkflowService ndashSPSite httpintranetwingtipcom ndashWorkflowHostUri httpwingtipserver12291 ndashAllowOAuthHttp
This script is telling SharePoint the endpoint it should use to talk to Workflow Manager as well as Workflow Manager the SharePoint site collection it should talk to for calls into the CSOM It is also configuring all communication over HTTP rather than HTTPS for performance reasons In production you should always use HTTPS
This step will take a moment with no feedback during the process Be patient
c) Close the SharePoint 2013 Management Shell
At this point the SharePoint 2013 farm is connected to the Workflow Manager 10 farm
Configure SharePoint User Profile Service Application AD Sync
Users in SharePoint 2013 are validated by Workflow Manager against SharePoint to ensure they have permissions to start a workflow This is done by looking up the user by their AD UserPrincipalName (UPN) attribute in the User Profile Service Application (UPA) If no matching user is found the workflow will be automatically cancelled by Workflow Manager In this section you will setup UPA to connect amp sync with the local Active Directory so user accounts in AD will have their UPN synchronized to UPA
1 Open Central Administration Start All Programs Microsoft SharePoint 2013 Products SharePoint 2013 Central Administration
2 Go to the User Profile Service Application management page Application Management Manage Service Applications User Profile Service Application
3 The first step is to configure the User Profile Service Application to allow for Active Directory (AD) synchronization
a) Under Synchronization select Configure Synchronization Settings
b) For Synchronization select Use SharePoint Active Directory Import and click OK
4 Next establish a connection to the wingtipcom AD
a) Under Synchronization select Configure Synchronization Connections
b) On the Synchronization Connections page select Create New Connection
c) Enter the following values on this form and click OK
i) Connection Name WINGTIPCOM AD
ii) Type Active Directory Import
iii) Connection Settings
(1) Fully Qualified Domain Name wingtipcom
(2) Authentication Provider Type Windows Authentication
(3) Account Name WINGTIPAdministrator
(4) Password (and Confirm Password) Password1
iv) Containers
(1) Click Populate Containers
(2) After it loads check the box next to WINGTP or click the Select All button below the box
5 Go back to the User Profile Service Application management page Application Management Manage Service Applications User Profile Service Application
6 Finally start a synchronization import
a) Under Synchronization select Start Profile Synchronization
Creating a SharePoint Server 2013 Environment for Development and Testing Version 10
copy Critical Path Training 2012 All Rights Reserved 56
wwwCriticalPathTrainingcom
b) Select Start Full Synchronization and click OK
c) You will be taken back to the User Profile Service Application management page Notice in the top-right corner there is a status block that reports how many profiles are in the UPA database Refresh the page to see it increase to a handful of profiles as the import process runs
At this point you have successfully configured the User Profile Service Application to import profiles from the local AD
Exercise 8 Install the Microsoft Office 2013 Professional Clients
In this exercise you will install the Microsoft Office 2013 client applications
1 Download the Office 2013 into the WingtipServer VM For this you need to create an Office 365 Trial account login to Office 365 go to the Admin Dashboard and then download the latest version httpwwwmicrosoftcomofficepreviewentry-office-preview
2 Download the SharePoint Designer 2013 into the WingtipServer VM from here httpwwwmicrosoftcomen-usdownloaddetailsaspxid=35491
3 Download the Visio Professional 2013 into the WingtipServer VM from here httptechnetmicrosoftcomen-usevalcenterhh973399
Install Microsoft Office Professional Plus 2013
In this section you will install the Microsoft Office 2013 clients
1 Ensure you are logged into the WingtipServer VM using the account WINGTIPadministrator | Password1
2 Execute the installer OfficeProfessionalPlus_English_x64exe
3 On the Read the Microsoft Software License Terms dialog click the checkbox next to I accept the terms of this agreement and click Continue
4 On the Choose the installation you want dialog click the Install Now button
5 The installer will proceed and install all the Office products
6 When the installer completes click the Close button
7 Apply your Office Professional Plus 2013 license key
a) Launch Word 2013 Start All Programs Microsoft Office 2013 Word 2013
b) In the First things first dialog select Use recommended settings and click Accept
c) In the Welcome to Office dialog that opens click the [X] icon in the top-right corner to close it
d) In the left-hand pane click Open Other Documents
e) In the left-hand pane click Account
f) In the Product Information section within the Activation Required box click Change Product Key
g) Enter your license key for Office Professional Plus 2013 check the box next to Attempt to automatically activate my product online and click Install
h) Click OK
At this point you have installed Office Professional Plus 2013
Install Microsoft Office Visio 2013
In this section you will install Microsoft Office 2013 Visio
1 Ensure you are logged into the WingtipServer VM using the account WINGTIPadministrator | Password1
2 Execute the installer VisioProfessional_English_x64exe
3 On the Read the Microsoft Software License Terms dialog click the checkbox next to I accept the terms of this agreement and click Continue
Creating a SharePoint Server 2013 Environment for Development and Testing Version 10
copy Critical Path Training 2012 All Rights Reserved 57
wwwCriticalPathTrainingcom
4 On the Choose the installation you want dialog click the Install Now button
5 The installer will proceed and install all Visio 2013
6 When the installer completes click the Close button
7 Apply your Visio 2013 license key
a) Launch Visio 2013 Start All Programs Microsoft Office 2013 Visio 2013
b) In the First things first dialog select Use recommended settings and click Accept
c) In the Welcome to Office dialog that opens click the X icon in the top-right corner to close it
d) In the left-hand pane click Open Other Documents
e) In the left-hand pane click Account
f) In the Product Information section within the Activation Required box click Change Product Key
g) Enter your license key for Visio 2013 check the box next to Attempt to automatically activate my product online and click Install
h) Click OK
At this point you have installed Visio 2013
Install Microsoft Office 2013 SharePoint Designer
In this section you will install Microsoft Office 2013 SharePoint Designer
1 Ensure you are logged into the WingtipServer VM using the account WINGTIPadministrator | Password1
2 Execute the installer SharePointDesigner_English_x64exe
3 On the Read the Microsoft Software License Terms dialog click the checkbox next to I accept the terms of this agreement and click Continue
4 On the Choose the installation you want dialog click the Install Now button
5 The installer will proceed and install all SharePoint Designer 2013
6 When the installer completes click the Close button
At this point you have installed SharePoint Designer 2013
Exercise 9 Install Visual Studio 2012
In this exercise you will install Visual Studio 2012
1 Ensure you are logged into the WingtipServer VM using the account WINGTIPadministrator | Password1
2 Start the install of Visual Studio 2012 Ultimate Trial by downloading the installer from here httpwwwmicrosoftcomvisualstudio11en-usdownloads
3 On the installation splash screen check the box next to I agree to the License terms and conditions and click the Next button
Creating a SharePoint Server 2013 Environment for Development and Testing Version 10
copy Critical Path Training 2012 All Rights Reserved 58
wwwCriticalPathTrainingcom
4 On the Optional Features to install dialog click Install
5 After some time the installer will complete Click the Launch button to launch Visual Studio 2012
Creating a SharePoint Server 2013 Environment for Development and Testing Version 10
copy Critical Path Training 2012 All Rights Reserved 59
wwwCriticalPathTrainingcom
6 In the Choose Default Environment Settings select Visual C Development Settings and click Start Visual Studio
7 Close Visual Studio 2012
At this point Visual Studio 2012 RTM is installed
Install Office amp SharePoint 2013 Developer Tools
In this section you will install the Office and SharePoint 2013 developer tools for Visual Studio
1 Ensure you are logged into the WingtipServer VM using the account WINGTIPadministrator | Password1
2 Launch the Web Platform Installer Start All Programs Microsoft Web Platform Installer
3 In the search box at the top-right corner of the Web Platform Installer 40 window type sharepoint and press Enter
4 Click the Add button to the right of Microsoft Office Developer Tools for Visual Studio 2012 - Preview 2
5 Click the Install button at the bottom of the Web Platform Installer 40 window
6 On the Prerequisites page click I Accept
Creating a SharePoint Server 2013 Environment for Development and Testing Version 10
copy Critical Path Training 2012 All Rights Reserved 60
wwwCriticalPathTrainingcom
At this point you have installed the SharePoint 2013 amp Office 2013 development tools in Visual Studio 2012
Creating a SharePoint Server 2013 Environment for Development and Testing Version 10
copy Critical Path Training 2012 All Rights Reserved 61
wwwCriticalPathTrainingcom
Appendix 1 Download Manifest
The following lists everything referenced that you will or may need to download in this environment
Windows Server 2008 R2 with Service Pack 1 (installer ISO)
o httptechnetmicrosoftcomen-usevalcenterdd459137aspx
Windows Server 2008 R2 with Service Pack 1 (prebuilt VHD)
o httpwwwmicrosoftcomdownloadsdetailsaspxFamilyId=9040a4be-c3cf-44a5-9052-a70314452305
Windows Server 2008 R2 Service Pack 1
o httpwwwmicrosoftcomen-usdownloaddetailsaspxid=5842
SQL Server 2012 Trial
o httpwwwmicrosoftcombetaexperiencepdSQL2012EvalCTAenusdefaultaspx
SharePoint Server 2013
o httptechnetmicrosoftcomen-USevalcenterhh973397aspx
Hotfixes for SharePoint Server 2013 (post-install)
o KB2554876 The SharePoint Parsing Process Crashes in Windows Server 2008 R2
o KB2708075 IIS 75 Configurations are not Updated when you use the ServerManager Class to Commit
Configuration Changes
o KB2759112 Hotfix is Available for NET Framework 45 that Resolves an ASPNET Race Condition Issue in
Windows Server 2008 R2 Windows Server 2008 R2 SP1
o KB2765317 Hotfix is Available for NET Framework 45 that Resolves an ASPNET Race Condition Issue in
Windows 8 Windows RT and Windows Server 2012
Web Platform Installer
o httpwwwmicrosoftcomwebdownloadsplatformaspx
Web Platform Installer ndash Command Line Version
o httplearniisnetpageaspx1072web-platform-installer-v4-command-line-webpicmdexe-preview-release
Workflow Manager 10
o Download using the Microsoft Web Platform Installer
Office 2013
o httpwwwmicrosoftcomofficepreviewentry-office-preview
SharePoint Designer 2013
o httpwwwmicrosoftcomen-usdownloaddetailsaspxid=35491
Visio Professional 2013
o httptechnetmicrosoftcomen-usevalcenterhh973399
Visual Studio 2012
o httpwwwmicrosoftcomvisualstudio11en-usdownloads
Office Developer Tools for Visual Studio 2012 ndash Preview 2
o Download using the Microsoft Web Platform Installer
Creating a SharePoint Server 2013 Environment for Development and Testing Version 10
copy Critical Path Training 2012 All Rights Reserved 62
wwwCriticalPathTrainingcom
Appendix 2 Windows PowerShell Script Manifest
The following lists all Windows PowerShell scripts that are provided with this setup guide
AddDisableLoopbackCheckRegKeyps1
o The following steps automate creating the registry key outlined as Method 2 in the Microsoft Knowledgebase article
httpsupportmicrosoftcomkb896861 using Windows PowerShell This key DisableLoopbackCheck will allow
you to browse SharePoint sites on the same machine Without this key (or following Method 1 in the KB article) you
would need to browse any SharePoint sites from a different computer than the one which SharePoint is installed on
ConfigureSpFarmForAppsps1
o Configures a SharePoint 2013 for hosting apps This ensures everything you need is installed running and
configured This is documented here httpmsdnmicrosoftcomen-uslibraryfp179923(v=office15)
CreateSpServiceAccountsps1
o Creates the minimal necessary service accounts for SharePoint Server 2013 SP_Farm SP_Content amp
SP_Services
SetupSharePointForHNSCps1
o Configures a SharePoint 2013 install for hosting Host-Named Site Collections (HNSC) This involves creating a Web
Application in SharePoint that has no host header bindings Using DNS all requests are mapped to this Web
Application You then create the site collections via PowerShell as you cant create HNSCs via the browser (Central
Administration)
Creating a SharePoint Server 2013 Environment for Development and Testing Version 10
copy Critical Path Training 2012 All Rights Reserved 63
wwwCriticalPathTrainingcom
Appendix 3 Create Sample Adventure Works Database
The following steps document downloading and installing the sample Adventure Works OLTP database provided by Microsoft
1 Launch Internet Explorer and navigate to httpmsftdbprodsamplescodeplexcom
2 Download the Adventure Works 2012 OLTP Script
3 Extract the ZIP into a folder on the desktop
4 Launch SQL Server Management Studio Start All Programs Microsoft SQL Server 2012 SQL Server Management Studio
5 When SQL Server Management Studio launches within the Connect to Server dialog login using the default settings and click Connect
6 Within SQL Server Management Studio select File Open File
7 Select the file instawdbsql from the extracted ZIP and click Open
8 If prompted to re-login to the database engine do it
9 Select Query SQLCMD Mode
10 Scroll down to line 42 the line that starts with the following
setvar SqlSamplesSourceDataPath
11 Change the folder location of where you unzipped the Adventure Works 2012 OLTP Script
12 Select Query Execute
13 When the script completes the AdventureWorks2012 database will have been created
Creating a SharePoint Server 2013 Environment for Development and Testing Version 10
copy Critical Path Training 2012 All Rights Reserved 64
wwwCriticalPathTrainingcom
Change Log
Change Version Description
August 22 2012 v 01 Pre-release for review
August 27 2012 v 02 Initial public release ndash install guide based on SharePoint Server Beta 2
August 28 2012 v 03 Updated URL for the site collection used to connect SharePoint to WAW
August 31 2012 v 04 Typo Removed SQL Server Analysis Services as part of the install Not required in a
SharePoint dev box (unless you are doing business intelligence which is not covered
in the guide)
Updated all references to Windows Azure Workflow to Workflow Manager the new
official name for the new workflow product
Updated SetupSharePointForHNSCps1 script to lookup HNSC Web Application by
name rather than URL which is more reliable
Typo Updated WingtipAllUp public NIC to use a different IP than the WingtipDC
Typo Replaced a reference to WingtipServer with WingtipDC
Typo Fixed handful of minor typos
September 1 2012 v 05 Removed SQL Server Reporting Services from install guide
Added step to uncheck IErsquos ldquoAutomatically detect proxyrdquo
Added post workflow install steps to setup User Profile Service Application to sync with
local Active Directory
September 5 2012 v 06 Added step to create a default root site collection in the HNSC web app
Updated minor typos and added extra notes for context
Updated PowerShell script SetupSharePointForHNSCps1 to remove content
database of default Web Application when setting up HNSC Web App
Added a new exercise 8 (after SharePoint install amp config and before the Workflow
install and config) to setup support for My Sites
October 20 2012 v 07 Updated script SetupSharePointForHNSCps1 to fix a bug where it would fail on line
111 if you didnrsquot already have a WINGTIPSP_Content managed account
Added section to bypass SharePointrsquos check for crlmicrosoftcom
Updated workflowrsquos registration PowerShell script to point to
httpintranetwingtipcom
Switched order of post-SharePoint install to setup HSNC hosting before configuring for
hosting apps
November 29 2012
v 10 Changed setup guide to use a single VM instead of two VMs
Updated guide for SharePoint 2013 RTM
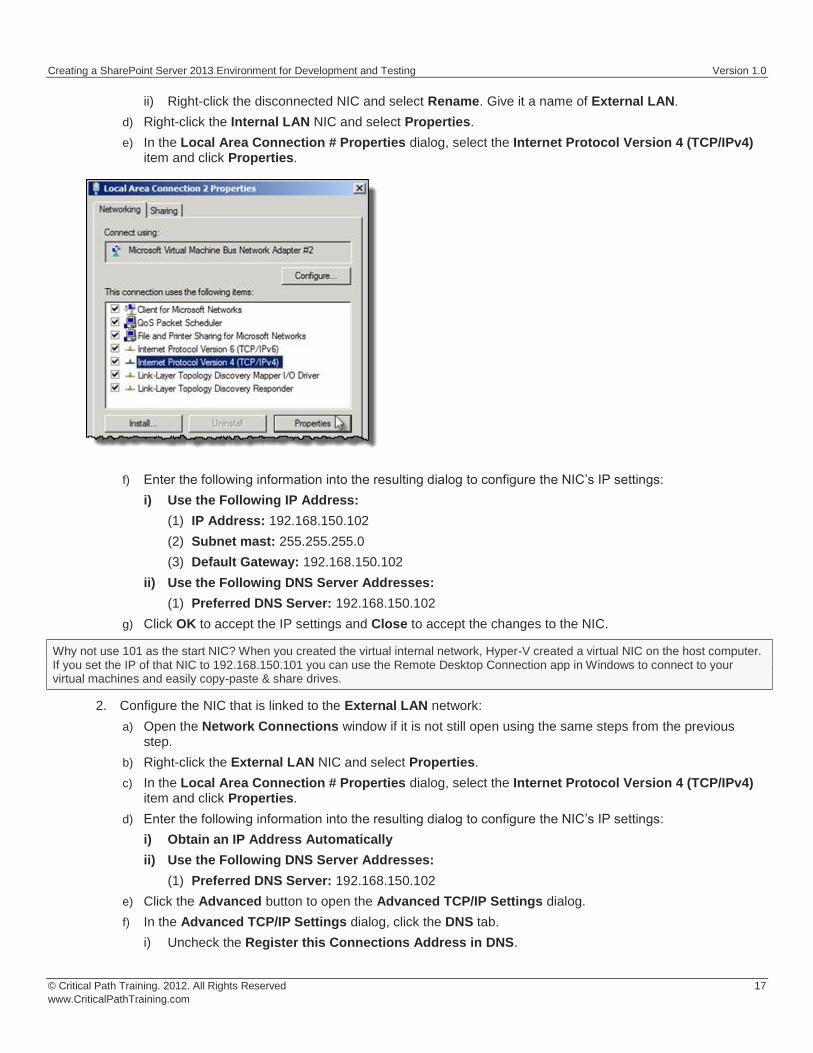
Creating a SharePoint Server 2013 Environment for Development and Testing Version 10
copy Critical Path Training 2012 All Rights Reserved 19
wwwCriticalPathTrainingcom
c) If Service Pack 1 is installed it will state it
2 Update the server using Windows Update
a) Selecting Start All Programs Windows Update
b) First disable Windows Update from running automatically
i) Click the link Change Settings
ii) Under the Important Updates list select Never check for updates (not recommended)
This isnrsquot what you would do in a production environment but for a development machine it is ok
c) Now update the server
i) Click the Check for Updates button
ii) If prompted install any updates to the Windows Update dialog
iii) Select the Check for Updates link
iv) Windows Update will the report how many updates are available Select all important and recommended updates and click the Install Updates button
v) If prompted select I accept the license terms for any updates that require it
vi) Keep going through the process of running Windows Update checking for updates and installing them after each reboot until it says there are no updates left to install
This step is likely going to take quite a bit of time so be patient
Activate Windows Server 2008 R2
In this section you will activate the server if you have a product key
1 If you have a product key for Windows Server 2008 R2 use it to activate Windows
a) In the Server Manager window navigate to the top-level node to display the Server Summary page Click Activate Windows
b) You will be prompted to enter your product key
i) Enter your product key and click to button to activate Windows
Creating a SharePoint Server 2013 Environment for Development and Testing Version 10
copy Critical Path Training 2012 All Rights Reserved 20
wwwCriticalPathTrainingcom
ii) After a few seconds your VM should be able to connect to a Microsoft site and successfully activate Windows
At this point you have a fully patched operating system VM created that will act as the Active Directory domain controller
Apply the DisableLoopbackCheck Registry Fix
Configure the DisableLoopbackCheck registry setting (Microsoft KB httpsupportmicrosoftcomkb896861)
The following steps automate creating the registry key outlined as Method 2 in the Microsoft KB article httpsupportmicrosoftcomkb896861 using Windows PowerShell
PowerShell Script Alert You can also find this PowerShell script AddDisableLoopbackCheckRegKeyps1 in the files that
accompany this setup guide
1 Click the Windows PowerShell icon in the Taskbar
2 Run the following PowerShell commands pressing [ENTER] after each one
$regKeyPath = HKLMSystemCurrentControlSetControlLsa $key = DisableLoopbackCheck New-ItemProperty -Path $regKeyPath -Name $key -Value 1 -PropertyType dword
a) Close the Windows PowerShell console by typing EXIT and pressing [ENTER]
Exercise 3 Install Active Directory Domain Services
Now you will promote your WingtipServer VM to a domain controller and create a new domain named wingtipcom
1 Login to the WingtipServer virtual machine using administrator | Password1
2 Add and configure the role for Active Directory Domain Services
a) Launch Server Manager and select the Roles node
b) Click the Add Roles link to start the Add Roles Wizard
c) On the Before you begin page click Next
d) On the Server Roles page select Active Directory Domain Services Click the Add Required Features button if prompted to install prerequisites
e) Click Next
Creating a SharePoint Server 2013 Environment for Development and Testing Version 10
copy Critical Path Training 2012 All Rights Reserved 21
wwwCriticalPathTrainingcom
f) On the next page of the wizard click Next which will bring you to the Confirm Installation Selections page
g) Click Install
After Active Directory Domain Services has been installed you will see the Installation Results page in the Add Roles Wizard
3 Click on the link with the big long caption of Close this wizard and launch the Active Directory Domain Services Installation Wizard (dcpromoexe)
4 On the first page of the Active Directory Domain Services Installation Wizard click the Use Advanced Mode Installation checkbox and click Next
Creating a SharePoint Server 2013 Environment for Development and Testing Version 10
copy Critical Path Training 2012 All Rights Reserved 22
wwwCriticalPathTrainingcom
5 On the Operating System Compatibility page click Next
6 On the Choose a Deployment Configuration select Create a new domain in a new forest and click Next
7 On the Name the Forrest Root Domain enter the following and click Next
a) FQDN of the forest root domain wingtipcom
8 On the Domain NetBIOS Name set it to WINGTIP and click Next
9 On the Set Forest Functional Level page select Windows Server 2008 R2 and click Next
10 On the Additional Domain Controller Options accept the default options and click Next
11 You might be prompted with the dialog shown below providing a warning that This computer has dynamically assigned IP address(es) This is not a problem when you are running your development environment on a domain controller Click Yes to dismiss the dialog
12 At this point the wizard will prompt you with a dialog information you a delegation for the DNS Server cannot be created because it cannot find the authoritative parent zone This is not a problem because the wizard will automatically configure the DNS of the VM to point to itself Click on the Yes button to dismiss this dialog
Creating a SharePoint Server 2013 Environment for Development and Testing Version 10
copy Critical Path Training 2012 All Rights Reserved 23
wwwCriticalPathTrainingcom
13 On the Location for Database Log Files and SYSVOL page accept all the default values and click Next
14 On the Directory Services Restore Mode Administrator Password page enter Password1 in both textboxes and click Next
15 On the Summary page click Next to start the process of configuring the new Active Directory domain
16 The wizard will display the dialog below to show you the progress of the configuration process You will be required to reboot when the configuration has been completed Check the option for Reboot on completion and then wait for the configuration to complete and the machine to reboot
17 After the VM reboots login to the server with wingtipadministrator | Password1
Configure Windows Update and Update the Server
In this section you will verify the server is fully patched and updated
1 Update the server using Windows Update
a) Selecting Start All Programs Windows Update
b) Select the Check for Updates link
c) Windows Update will the report how many updates are available Select all important and recommended updates and click the Install Updates button
d) If prompted select I accept the license terms for any updates that require it
e) Keep running Windows Update after each reboot and update install until it says there are no updates left to install
Creating a SharePoint Server 2013 Environment for Development and Testing Version 10
copy Critical Path Training 2012 All Rights Reserved 24
wwwCriticalPathTrainingcom
This step could take quite a bit of time so be patient
At this point you have a fully installed Active Directory Domain Controller for the Wingtipcom domain hosted on the server WingtipServer
Exercise 4 Install SQL Server 2012
In this exercise you will install SQL Server 2012 that will be used to store all required databases
1 Download the SQL Server 2012 Evaluation Edition specifically the DVD x64 ISO image to the host computer from here httpwwwmicrosoftcombetaexperiencepdSQL2012EvalCTAenusdefaultaspx or you can use your own licensed copy
2 Mount the SQL Server 2012 ISO to the WingtipServer VM
a) On the host computer open the Hyper-V Manager
b) Right-click the VM WingtipServer and select Settings
c) Select DVD Drive in the left-hand panel
d) In the right-hand panel select Image File and browse to the ISO file that contains SQL Server 2012 and click OK
3 Login to the WingtipServer VM as wingtipadministrator | Password1
Install SQL Server 2012
In this section you will install SQL Server 2012
1 If the AutoPlay dialog box is open click Run SETUPEXE If it isnrsquot use Windows Explorer to navigate to the DVD drive and execute the setupexe file in the root of the DVD drive
2 In the SQL Server Installation Center click Installation on the left-hand side
Creating a SharePoint Server 2013 Environment for Development and Testing Version 10
copy Critical Path Training 2012 All Rights Reserved 25
wwwCriticalPathTrainingcom
3 Next select New SQL Server stand-alone installation or add features to an existing installation
4 On the Setup Support Rules page the installer will check for issues before installing Click OK
5 On the Product Key page click the Specify a free edition radio box and select Evaluation then click Next
6 On the License Terms page click the I accept the license terms checkbox and click Next
7 On the Setup Support Rules page the installer will check for any problems with the server you are installing on Click Next when this completes
Creating a SharePoint Server 2013 Environment for Development and Testing Version 10
copy Critical Path Training 2012 All Rights Reserved 26
wwwCriticalPathTrainingcom
8 On the Support Role page select SQL Server Feature Installation and click Next
9 On the Feature Selection page check the following options and click Next
a) Instances Features
i) Database Engine Services
(1) Full-Text and Semantic Extractions for Search
b) Shared Features
i) Management Tools ndash Basic
(1) Management Tools ndash Complete
Creating a SharePoint Server 2013 Environment for Development and Testing Version 10
copy Critical Path Training 2012 All Rights Reserved 27
wwwCriticalPathTrainingcom
10 On the Installation Rules page click Next
11 On the Instance Configuration page click Next
12 On the Disk Space Requirements page click Next
13 On the Server Configuration page do the following and click Next
a) On the Service Account tab change the Startup Type for the SQL Server Agent to Automatic
14 On the Database Engine Configuration page do the following and click Next
a) On the Server Configuration tab click Add Current User
b) On the FILESTREAM tab
i) Check Enable FILESTREAM for Transact-SQL Access
ii) Check Enable FILESTREAM for file IO access
15 On the Error Reporting page click Next
16 On the Installation Configuration Rules page click Next
17 On the Ready to Install page click Install
Installation of SQL Server 2012 will take some time please be patient
18 When the installation completes the Complete page will be shown Click Close
At this point you have now successfully installed SQL Server 2012
Creating a SharePoint Server 2013 Environment for Development and Testing Version 10
copy Critical Path Training 2012 All Rights Reserved 28
wwwCriticalPathTrainingcom
Exercise 5 Install amp Configure SharePoint Server 2013
In this exercise you will install SharePoint 2013
1 Download the SharePoint Server 2013 to the host computer from here httptechnetmicrosoftcomen-USevalcenterhh973397aspx
2 Mount the SharePoint Server 2013 ISO to the WingtipServer VM
a) On the host computer open the Hyper-V Manager
b) Right-click the VM WingtipServer and select Settings
c) Select DVD Drive in the left-hand panel
The file that Microsoft provides is saved in the IMG format Hyper-V Manager wonrsquot allow you to mount an IMG file so rename it to ISO before mounting it
d) In the right-hand panel select Image File and browse to the ISO file that contains SharePoint Server 2013 and click OK
Create SharePoint Service Accounts amp Grant Rights to SQL Server 2012
In this section you will create the necessary service accounts that will be used by SharePoint in Active Directory and grant them necessary rights in SQL Server 2012
PowerShell Script Alert The creation of users and granting them rights to SQL Server 2012 steps in this section are automated in the Windows PowerShell script CreateSpServiceAccountsps1 found in the files that accompany this setup guide Open the script
and read the header for documentation on how to use it
1 Open the Active Directory Users and Computers Start Administrative Tools Active Directory Users and Computers
2 Expand the tree in the left-hand pane to see the Users OU Select the Users OU
3 Create a new user SP_Farm
a) In the toolbar select Action New User
Creating a SharePoint Server 2013 Environment for Development and Testing Version 10
copy Critical Path Training 2012 All Rights Reserved 29
wwwCriticalPathTrainingcom
b) Set the userrsquos Full Name amp User Login Name to SP_Farm and click Next
c) In the password dialog enter the following and click Next
i) Password (and Confirm Password) Password1
ii) User must change password at next login unchecked
iii) User cannot change password unchecked
iv) Password never expires checked
v) Account is disabled unchecked
Creating a SharePoint Server 2013 Environment for Development and Testing Version 10
copy Critical Path Training 2012 All Rights Reserved 30
wwwCriticalPathTrainingcom
vi) Click Finish
4 Repeat the previous step to create two more accounts
a) SP_Content
b) SP_Services
At this point you have created all the necessary service accounts
Install SharePoint Server 2013 Prerequisites
In this section you will install the SharePoint Server 2013 Prerequisites
1 Ensure you are logged into the WingtipServer VM using the account wingtipadministrator | Password1
2 If the AutoPlay dialog box is open click Run splashhta If it isnrsquot use Windows Explorer to navigate to the DVD drive and execute the splashhta file in the root of the DVD drive
Creating a SharePoint Server 2013 Environment for Development and Testing Version 10
copy Critical Path Training 2012 All Rights Reserved 31
wwwCriticalPathTrainingcom
3 Click the Install Software Prerequisites link
4 In the Microsoft SharePoint 2013 Products Preparation Tool window click Next
5 On the License Terms for Software Products page
a) Check I accept the terms of the License Agreement(s)
b) Click Next
6 The tool will download and install all prerequisites for SharePoint Server 2013 This will take some time It may prompt you to reboot the server If so reboot the server and login using wingtipadministrator | Password1
Creating a SharePoint Server 2013 Environment for Development and Testing Version 10
copy Critical Path Training 2012 All Rights Reserved 32
wwwCriticalPathTrainingcom
7 When the prerequisite installer is complete it will present a summary of everything it did
8 Click Finish
9 Restart the WingtipServer VMhellip some additional installations and changes that the prerequisite installer did will require a restart before installing SharePoint Server 2013
At this point all prerequisites required by SharePoint Server 2013 have been installed and any necessary configuration changes have been applied to the server However it is strongly recommend that you run Windows Update and install any pending updates Further Microsoft recommends installing the following hotfixes if they are not already installed
KB2554876 The SharePoint Parsing Process Crashes in Windows Server 2008 R2
KB2708075 IIS 75 Configurations are not Updated when you use the ServerManager Class to Commit Configuration Changes
KB2759112 Hotfix is Available for NET Framework 45 that Resolves an ASPNET Race Condition Issue in Windows Server 2008 R2 Windows Server 2008 R2 SP1
KB2765317 Hotfix is Available for NET Framework 45 that Resolves an ASPNET Race Condition Issue in Windows
8 Windows RT and Windows Server 2012
Install SharePoint Server 2013
In this section you will install SharePoint Server 2013
1 Ensure you are logged into the WingtipServer VM using the account wingtipadministrator | Password1
2 If the AutoPlay dialog box is open click Run splashhta If it isnrsquot use Windows Explorer to navigate to the DVD drive and execute the splashhta file in the root of the DVD drive
Creating a SharePoint Server 2013 Environment for Development and Testing Version 10
copy Critical Path Training 2012 All Rights Reserved 33
wwwCriticalPathTrainingcom
3 Click Install SharePoint Server
4 When prompted to Enter your Product Key enter the key you obtained for the trial install and click Continue
5 On the Read the Microsoft Software License Terms page check the I accept the terms of this agreement checkbox and click Continue
6 On the Choose a file location page click Install Now
Creating a SharePoint Server 2013 Environment for Development and Testing Version 10
copy Critical Path Training 2012 All Rights Reserved 34
wwwCriticalPathTrainingcom
7 When the installation is complete select the Run the SharePoint Products Configuration Wizard checkbox and click Close
8 On the Welcome to SharePoint Products page click Next
a) If prompted to start or reset services click Yes
9 On the Connect to a server farm page select Create a new server farm and click Next
10 On the Specify Configuration Database Settings page use the following to complete the page and click Next
a) Database server WINGTIPSERVER
b) Database name SharePoint_Config
c) Username WINGTIPSP_Farm
d) Password Password1
Creating a SharePoint Server 2013 Environment for Development and Testing Version 10
copy Critical Path Training 2012 All Rights Reserved 35
wwwCriticalPathTrainingcom
11 On the Specify Farm Security Settings page for the Passphrase and Confirm Passphrase boxes enter Password1 and click Next
12 On the Configure SharePoint Central Administration Web Application page check the Specify port number checkbox and enter a value of 9999 then Click Next
Creating a SharePoint Server 2013 Environment for Development and Testing Version 10
copy Critical Path Training 2012 All Rights Reserved 36
wwwCriticalPathTrainingcom
13 On the Completing the SharePoint Products Configuration Wizard page click Next
14 When the installer completes it will display the Confirmation Successful page
15 Click Finish This will launch Internet Explorer to go through the configuration process
Creating a SharePoint Server 2013 Environment for Development and Testing Version 10
copy Critical Path Training 2012 All Rights Reserved 37
wwwCriticalPathTrainingcom
At this point you have successfully installed SharePoint Server 2013
Configure SharePoint Server 2013
In this section you will create a new SharePoint Server 2013 farm and perform minimal configuration tasks
After installing SharePoint Sever 2013 the SharePoint Products Configuration Wizard will launch the browser-based Initial Farm Configuration Wizard
1 In the first page of the wizard you are prompted to Help Make SharePoint Better Select which ever option you want and click OK
2 On the Welcome page that asks How do you want to configure your SharePoint farm click the Start the Wizard button
3 On the Services page do the following and then click Next
a) Service Account Select Create new managed account
i) Username WINGTIPSP_Services
ii) Password Password1
b) Services Uncheck the following services
Creating a SharePoint Server 2013 Environment for Development and Testing Version 10
copy Critical Path Training 2012 All Rights Reserved 38
wwwCriticalPathTrainingcom
i) Access Services 2010
ii) App Management Service
In SharePoint Server 2013 the Search Service Application processes specifically noderunnerexe can consume a considerable amount of memory and processor time If you are not going to work with search you might consider unchecking this option for now You can always go back into Central Administration and create a new instance of the Search Service Application at a later date if you need it
Why did we remove Access Services 2010 amp App Management Service service applications The Access Services 2010 service application is included for backwards compatibility and isnrsquot needed in new installations unless you are migrating solutions built with Access Services 2010 from SharePoint Server 2010 (if so you can create this service application later within Central Administration Application Management Manage Service Applications) The App Management Service service application will be created in a later step in this setup guide therefor it is skipped here
4 The creation of the service applications can take quite a while so be patient If it exceeds 20 minutes it is fairly safe to assume the page is hung up One option is to close the browser then launch Central Administration (Start All Programs Microsoft SharePoint 2013 Products SharePoint 2013 Central Administration) and look at the Service Application page (Application Management Manage Service Applications) to see if they were all created
Configure DNS
In this section you will configure DNS for hosting SharePoint sites amp Apps
1 Ensure you are logged into the WingtipServer VM using the account wingtipadministrator | Password1
2 Open the DNS window Start Administrative Tools DNS
3 Expand the hierarchy on the left-hand side of the window until you get to DNS WINGTIPSERVER Forward Lookup Zones wingtipcom
4 Create a new wildcard so all requests for http[]wingtipcom will be forwarded to our SharePoint machine
a) Next right-click wingtipcom and select New Host (A or AAAA)
Creating a SharePoint Server 2013 Environment for Development and Testing Version 10
copy Critical Path Training 2012 All Rights Reserved 39
wwwCriticalPathTrainingcom
b) In the New Host dialog enter the following and click OK
i) Alias Name
ii) IP Address 192168150102 Then click Add Host The following figure shows how this looks
This new record is telling DNS to forward any request for http[]wingtipcom to the webserver WINGTIPSERVER where the
requests will be served by SharePoint
5 Verify this DNS entry is working
a) Open Windows PowerShell Start All Programs Accessories Windows PowerShell Windows PowerShell
b) Run the following commands and press ENTER
PS CUsersAdministratorgt nslookup somethingwingtipcom PS CUsersAdministratorgt nslookup somethingappswingtipcom
c) You should get a response that points to the WingtipServer server as shown in the following figure
Creating a SharePoint Server 2013 Environment for Development and Testing Version 10
copy Critical Path Training 2012 All Rights Reserved 40
wwwCriticalPathTrainingcom
Configure SharePoint Server 2013 for Host-Named Site Collections amp Create Initial Site
Collections
In this section you will create new SharePoint 2013 site collections for testing and hosting apps
Microsoft recommends to create host-named site collections (HNSC) instead of using the path based site collection addressing The difference is the following a path based site created at something such as httpintranetwingtipcomsitesdevtest as an HNSC site would be more like httpdevtestwingtipcom This is how it works in the cloud (Office 365) and it scales much better for on-prem
deployments This setup guide will show you how to setup your environment to create HNSC The only downside to this approach is that you canrsquot create site collections within Central Administration it must be done via Windows PowerShell API (because Central Administration doesnrsquot instruct you where to put the site
This is implemented in various parts First DNS must be configured to send all requests for httpwingtipcom to a Web Application
(implemented in the last section) Second this Web Application must be extended with SharePoint and have no host header bindings (so it handles all requests) Third it must have a default site collection at the root of the Web Application but it will not be used for anything (in fact it doesnrsquot need a template assigned to it)
You can read more about HNSCrsquos on TechNet httptechnetmicrosoftcomen-uslibrarycc424952aspx
PowerShell Script Alert The steps in this section are automated in the script SetupSharePointForHNSCps1 found in the files that
accompany this setup guide Open the script and read the header for documentation on how to use it
1 Ensure you are logged into the WingtipServer VM using the account wingtipadministrator | Password1
2 Open Central Administration Start All Programs Microsoft SharePoint 2013 Products SharePoint 2013 Central Administration
3 Select Application Management Manage Web Applications
4 Delete the default Web Application created by the configuration wizard
a) Delete the existing default Web Application
i) Select the Web Application SharePoint ndash 80 the one with the URL of httpwingtipserver and click Delete in the ribbon
ii) When prompted to delete the associated IIS Web Site amp SQL Server database select both options to delete them and click OK
The reason you are doing this is because the setup wizard you ran previously when creating the service applications automatically created it The problem is that it used the same identity (WINGTIPSP_Services) for the app pool that is used for all the service
applications which is not desired
5 Create a new Web Application to handle Host-Named Site Collections (HNSC)
Creating a SharePoint Server 2013 Environment for Development and Testing Version 10
copy Critical Path Training 2012 All Rights Reserved 41
wwwCriticalPathTrainingcom
a) In the ribbon click the New button
b) In the Create New Web Application dialog enter the following values in the properties and click OK Leave all properties not mentioned
i) Select the radio button Create a new IIS web site
(1) Name SharePoint HNSC Host ndash 80
(2) Port 80
ii) Application Pool
(1) Select the radio button Create a new application pool
(a) Application Pool Name SharePoint Default HNSC AppPool
(b) Select a security account for this application pool WINGTIPSP_Content
If WINGTIPSP_Content is not listed as an available managed account create it by selecting the appropriate option and using
Password1 for the password
iii) Database Name and Authentication
(1) Database Name WSS_Content_HNSCDefaultHost
c) This process will take a few moments At the end of the process SharePoint will ask if you want to create a site collection You do but you donrsquot want to do it through the browser as this will not be a HNSC To create a HNSC you must create it via Windows PowerShell
6 Create a default not template site collection at the root of the web application
a) Open SharePoint 2013 Management Shell Start All Programs Microsoft SharePoint 2013 Products SharePoint 2013 Management Shell
7 Create Site Collections for Testing SharePoint amp SharePoint Apps
a) Open SharePoint 2013 Management Shell Start All Programs Microsoft SharePoint 2013 Products SharePoint 2013 Management Shell
b) Get a reference to the HNSC web application you just created by running the following Windows PowerShell script in the SharePoint 2013 Management Shell
$hnscWebApp = Get-SPWebApplication | Where-Object $_DisplayName -eq SharePoint HNSC Host - 80
c) Create a non-templated site at the root of the web application for Workflow to connect to by executing the following Windows PowerShell script in the SharePoint 2013 Management Shell
New-SPSite -Name Root HNSC Site Collection -Url httpwingtipcom -HostHeaderWebApplication $hnscWebApp -OwnerAlias WINGTIPAdministrator
d) Create a team site by executing the following Windows PowerShell script in the SharePoint 2013 Management Shell
New-SPSite -Name Wingtip Intranet -Url httpintranetwingtipcom ndashHostHeaderWebApplication $hnscWebApp -Template STS0 -OwnerAlias WINGTIPAdministrator
e) Create a developer site by executing the following Windows PowerShell script in the SharePoint 2013 Management Shell
New-SPSite -Name Wingtip Developer Site -Url httpdevwingtipcom ndashHostHeaderWebApplication $hnscWebApp -Template DEV0 -OwnerAlias WINGTIPAdministrator
You can only create debug and test apps using a developer site
At this point you now have a site collection to use as a team site (httpintranetwingtipcom) and to develop and test custom SharePoint apps (httpdevwingtipcom)
Creating a SharePoint Server 2013 Environment for Development and Testing Version 10
copy Critical Path Training 2012 All Rights Reserved 42
wwwCriticalPathTrainingcom
Configure SharePoint 2013 for Hosting Apps
In this setup you will setup your SharePoint 2013 environment for hosting apps
PowerShell Script Alert Everything in the next immediate step is provided in the script ConfigureSpFarmForAppsps1 found in the
files that accompany this setup guide Open the script and read the header for documentation on how to use it
1 Ensure you are logged into the WingtipServer VM using the account wingtipadministrator | Password1
2 Create the necessary SharePoint App Management service applications and start the necessary services via Windows PowerShell
a) Open SharePoint 2013 Management Shell Start All Programs Microsoft SharePoint 2013 Products SharePoint 2013 Management Shell
b) Execute the following Windows PowerShell script in the SharePoint 2013 Management Shell
$appHostDomain = appswingtipcom $adminService = Get-Service -Name spadminv4 if ($adminServiceStatus -ne Running) Start-Service $adminService $timerService = Get-Service -Name sptimerv4 if ($timerServiceStatus -ne Running) Start-Service $timerService Set-SPAppDomain $appHostDomain $appMgmtSvcInstance = Get-SPServiceInstance | Where-Object $_GetType()Name -eq AppManagementServiceInstance if ($appMgmtSvcInstanceStatus -ne Online) Start-SPServiceInstance -Identity $appMgmtSvcInstance $appSubSettingSvcInstance = Get-SPServiceInstance | Where-Object $_GetType()Name -eq SPSubscriptionSettingsServiceInstance if ($appSubSettingSvcInstanceStatus -ne Online) Start-SPServiceInstance -Identity $appSubSettingSvcInstance $appPoolServiceApps = Get-SPServiceApplicationPool -Identity SharePoint Web Services Default $appSubSvc = New-SPSubscriptionSettingsServiceApplication ndashApplicationPool $appPoolServiceApps ndashName Settings Service Application ndashDatabaseName SettingsServiceDB $proxySubSvc = New-SPSubscriptionSettingsServiceApplicationProxy ndashServiceApplication $appSubSvc $appAppSvc = New-SPAppManagementServiceApplication -ApplicationPool $appPoolServiceApps -Name App Management Service Application -DatabaseName AppServiceDB $proxyAppSvc = New-SPAppManagementServiceApplicationProxy -ServiceApplication $appAppSvc Set-SPAppSiteSubscriptionName -Name app -Confirm$false
3 Verify the script configured SharePoint 2013 for hosting apps
a) Open Central Administration Start All Programs Microsoft SharePoint 2013 Products SharePoint 2013 Central Administration
b) Verify service applications created
i) Open the Service Applications page Application Management Manage Service Applications
ii) Verify you have two service applications created
(1) App Management Service Application
(2) Settings Service Application
c) Verify service instances are running
i) Open the Services on Server page System Settings Manage Services on Server
ii) Verify the following services are Started
(1) App Management Service
(2) Microsoft SharePoint Foundation Subscription Settings Service
Creating a SharePoint Server 2013 Environment for Development and Testing Version 10
copy Critical Path Training 2012 All Rights Reserved 43
wwwCriticalPathTrainingcom
d) Verify App URLs are correct
i) Open the Configure App URLs page Apps Configure app URLs
ii) Verify the following
(1) App Domain appswingtipcom
(2) App Prefix app
At this point your SharePoint Server 2013 environment is ready to host SharePoint apps
Creating a SharePoint Server 2013 Environment for Development and Testing Version 10
copy Critical Path Training 2012 All Rights Reserved 44
wwwCriticalPathTrainingcom
Start the SharePoint 2013 Sandbox Service
By default the service that executes sandbox solutions is not running In this step you will start the service
1 Open Central Administration Start All Programs Microsoft SharePoint 2013 Products SharePoint 2013 Central Administration
2 Open the Services on Server page System Settings Manage Services on Server
3 Click the Start link to the left of the Microsoft SharePoint Foundation Sandboxed Code Service
At this point your installation can support sandbox solutions
Configure CRL Verification for Disconnected Environments
SharePoint periodically ldquophones homerdquo to a specific address hosted by Microsoft under certain conditions When your environment is disconnected this can cause an unnecessary delay or failures when starting up the sandbox The following steps outline a workaround to bypass this check
1 Launch Notepad as an administrator Start All Programs Accessories right-click Notepad and select Run as Administrator
2 Open the hosts file by selecting File Open and finding the file
cWindowsSystem32Driversetchosts
3 Add the following line to the end of the file
127001 crlmicrosoftcom
4 Save and close the hosts file
Update Internet Explorer to Bypass the App URL amp Automatically Login to SharePoint Sites
In this section you will update Internet Explorer to add the App hosting URL to the bypass list so you can navigate to the domain after deploying SharePoint hosted apps
1 Ensure you are logged into the WingtipServer VM using the account wingtipadministrator | Password1
1 Launch Internet Explorer Start All Programs Internet Explorer
2 Configure Internet Explorer to bypass the App URL
a) In the top-right corner click the gear icon and select Internet Options
b) On the Security tab select the Local Intranet and click the Sites button
c) Uncheck the box next to Automatically detect intranet network
d) Click the Advanced button and add two entries to the Exceptions list
i) httpwingtipcom
ii) httpappswingtipcom
Creating a SharePoint Server 2013 Environment for Development and Testing Version 10
copy Critical Path Training 2012 All Rights Reserved 45
wwwCriticalPathTrainingcom
e) Click the Close button followed by the OK button multiple times to close out of the dialogs
At this point Internet Explorer is setup to bypass your app URL so you can navigate to apps (httpappswingtipcom) as well as automatically authenticate to sites hosted at httpwingtipcom
Exercise 6 Configure SharePoint to Host My Sites
In this exercise you will configure SharePoint to create and host My Sites In order to host My Sites you will need a new Web Application that is configured for Self-Service Site Creation and has a My Site Host site collection
1 Create a new SharePoint web application to host the My Sites
a) Ensure you are logged into the WingtipServer VM using the account wingtipadministrator | Password1
b) Open Central Administration Start All Programs Microsoft SharePoint 2013 Products SharePoint 2013 Central Administration
c) Select Application Management Manage Web Applications
d) In the ribbon click the New button
e) In the Create New Web Application dialog enter the following values in the properties and click OK Leave all properties not mentioned
i) Select the radio button Create a new IIS web site
(1) Name SharePoint MySite Host ndash 80
(2) Port 80
(3) Host Header mywingtipcom
ii) Application Pool
(1) Select the radio button Use existing application pool
(a) Application Pool Name SharePoint Default HNSC AppPool
iii) Database Name and Authentication
(1) Database Name WSS_Content_SocialWingtipCom
f) This process will take a few moments At the end of the process SharePoint will ask if you want to create a site collection Click the link provided to create a new site collection amp continue to the next step
2 Create a My Site Host site collection
a) On the Create Site Collection page use the following information to complete the form and click OK
Creating a SharePoint Server 2013 Environment for Development and Testing Version 10
copy Critical Path Training 2012 All Rights Reserved 46
wwwCriticalPathTrainingcom
i) Title My Site Host
ii) URL
iii) Template Selection My Site Host (found under the Enterprise tab)
iv) Primary Site Collection Administrator WINGTIPAdministrator
3 Update the Web Application to host my sites
a) Within Central Administration in the left-hand navigation navigate to the Manage Web Applications page Application Management Manage Web Applications
b) Select the SharePoint MySite Host ndash 80 web application
c) Click the Managed Paths button in the ribbon
d) Remove the sites managed path and add two new managed paths and click OK
i) personal ndash Wildcard inclusion
ii) my ndash Explicit inclusion
e) With the SharePoint MySite Host ndash 80 web application still selected click the Self-Service Site Creation button
f) On the Self-Service Site Creation page use the following values to complete the form and click OK
i) Site Collections On
4 Next configure the User Profile Service Application My Site settings
a) Browse to the User Profile Service Application management page Application Management Manage Service Applications User Profile Service Application
b) Under the My Site Settings section click the Setup My Sites
c) On the My Site Settings page use the following information to complete the form and click OK
i) My Site Host httpmywingtipcom
ii) Personal Site Location personal
At this point your SharePoint deployment is now configured to automatically create My Sites under httpmywingtipcomPersonalUserName when users first browse to them
Exercise 7 Install amp Configure Workflow Manager 10
In this exercise you will configure the WingtipServer VM to host Workflow Manager 10 and connect it to your SharePoint installation
1 Ensure you are logged into the WingtipServer VM using the account wingtipadministrator | Password1
Verify SQL Server 2012 Network Configuration
In this section yoursquoll verify the network configuration is correct for SQL Server 2012 in order to install Workflow Manager 10
Creating a SharePoint Server 2013 Environment for Development and Testing Version 10
copy Critical Path Training 2012 All Rights Reserved 47
wwwCriticalPathTrainingcom
1 Configure SQL Server 2012 to have the TCPIP connection protocol enabled
a) Open the SQL Server Configuration Manager Start All Programs Microsoft SQL Server 2012 Configuration Tools SQL Server Configuration Manager
b) Expand the hierarchy on the left-hand side to the following SQL Server Connection Manager (local) SQL Server Network Configuration Protocols for MSSQLSERVER
c) In the main window if TCPIP is Disabled right-click TCPIP and select Enable
d) When prompted with a warning click OK
2 SQL Server must be restarted in order to reflect this change
a) In the hierarchy on the left-hand side of the window select SQL Server Services
b) Right-click SQL Server (MSSQLSERVER) and select Restart
At this point SQL Server is now configured with the TCPIP protocol enabled a requirement when configuring Service Bus
Configure the Workflow Service Account with the Necessary Rights
In this section you will verify the service account that will run Workflow Manager and Service Bus
1 Ensure you are logged into the WingtipServer VM using the account WINGTIPadministrator | Password1
2 Grant the WINGTIPSP_Content account securityadmin amp dbcreator permissions in SQL Server
a) Launch SQL Server Management Studio Start All Programs Microsoft SQL Server 2012 SQL Server Management Studio
b) When SQL Server Management Studio launches within the Connect to Server dialog login using the default settings and click Connect
c) In the Object Explorer tool window expand the WINGTIPSERVER server hierarchy to the Security Logins node
d) Find the WINGTIPSP_Content account right-click it and select Properties
Creating a SharePoint Server 2013 Environment for Development and Testing Version 10
copy Critical Path Training 2012 All Rights Reserved 48
wwwCriticalPathTrainingcom
e) In the Select a page pane select Server Roles
f) Check securityadmin amp dbcreator and click OK
g) Close SQL Server Management Studio
3 Add the Workflow service account to the local administrators group
a) Open the Active Directory Users and Computers window Start Administrative Tools Active Directory Users and Computers
b) In the hierarchy on the left-hand side of the window expand it to the following Active Directory Users and Computers wingtipcom Builtin
c) In the main window right-click Administrators and select Properties
d) In the Administrators Properties dialog select the Members tab and click Add
e) In the Enter the object names to select box enter wingtipsp_content and click the Check Names button
f) In the Administrators Properties dialog click OK
g) Close the Active Directory Users and Computers window
At this point the service account that will host Workflow Manager and Service Bus has been configured correctly
Creating a SharePoint Server 2013 Environment for Development and Testing Version 10
copy Critical Path Training 2012 All Rights Reserved 49
wwwCriticalPathTrainingcom
Download amp Install Workflow Manager and Service Bus
In this section you will install Workflow Manager and Service Bus
1 Ensure you are logged into the WingtipServer VM using the account WINGTIPSP_Content | Password1
It is important you are logged in as the user that will run workflow when you install amp configure Workflow Manager and Service Bus
2 Launch the Web Platform Installer Start All Programs Microsoft Web Platform Installer
a) If the Web Platform Installer is not present on your machine you can download amp install it from here httpwwwmicrosoftcomwebdownloadsplatformaspx
If you do not have internet access within the virtual machine it is possible to download everything needed for workflow using the command line version of the Web Platform Installer (WebPICMD) You can get WebPICMD from httplearniisnetpageaspx1072web-platform-installer-v4-command-line-webpicmdexe-preview-release Specifically for
workflow enter the following command to download Workflow Beta 1 and all prerequisites
webpicmd offline ProductsWorkflow Pathc[path]
3 When the Web Platform Installer loads execute a search for Workflow select Workflow Manager 10 and click Add
4 Click the Install button at the bottom of the Web Platform Installer 40 window
5 On the Prerequisites page click I Accept
Note The Web Platform Installer 40 may prompt you to keep certain products updated using Microsoft Update If it does select Use Microsoft Update when I check for updates (recommended) and click Continue
6 When the installer completes the following dialog will appear Click Continue and then Finish to start the configuration process
Creating a SharePoint Server 2013 Environment for Development and Testing Version 10
copy Critical Path Training 2012 All Rights Reserved 50
wwwCriticalPathTrainingcom
At this point Workflow Manager amp Service Bus are installed
Configure Workflow Manager and Service Bus
In this section you will install Workflow Manager and Service Bus
1 If the Workflow Manager Configuration Wizard is not open open it Start All Programs Workflow Manager 10 Workflow Configuration
2 On the Welcome page click Configure Workflow Manager with Default Settings (Recommended)
Creating a SharePoint Server 2013 Environment for Development and Testing Version 10
copy Critical Path Training 2012 All Rights Reserved 51
wwwCriticalPathTrainingcom
3 On the New Farm Configuration page do the following
a) In the section Configure Service Account set the credentials to
i) User ID sp_contentwingtipcom
ii) Password Password1
b) Check the Allow Workflow management over HTTP on this computer checkbox
Ensure the username is entered in the fully qualified UPN format not as the default shows in the installer (sp_contentwingtip) or the domainusername format
In a production environment you should be doing everything over SSL
c) Click the Test Connection button to verify the connection credentials before proceeding
Creating a SharePoint Server 2013 Environment for Development and Testing Version 10
copy Critical Path Training 2012 All Rights Reserved 52
wwwCriticalPathTrainingcom
d) In the Certificate Generation Key and Confirm Certificate Generation Key enter Password1 into both fields
4 Click the right arrow in the bottom right corner to proceed
5 On the Summary page review your settings and click the check at the bottom right of the widow to start the configuration process
Creating a SharePoint Server 2013 Environment for Development and Testing Version 10
copy Critical Path Training 2012 All Rights Reserved 53
wwwCriticalPathTrainingcom
6 After a few minutes the Configuration Progress screen will show that everything has been configured correctly
Creating a SharePoint Server 2013 Environment for Development and Testing Version 10
copy Critical Path Training 2012 All Rights Reserved 54
wwwCriticalPathTrainingcom
7 Click the check in the bottom right corner
At this point Workflow Manager amp Service Bus has been installed and a new Workflow Manager farm has been created The next step is to connect the SharePoint 2013 farm to the Workflow Manager farm
Connect SharePoint 2013 to Workflow Manager
In this section you will connect SharePoint 2013 and Workflow Manager together
1 Ensure you are logged into the WingtipServer VM using the account WINGTIPadministrator | Password1
2 Get the Workflow Manager endpoint
a) Open the Workflow Manager PowerShell console Start All Programs Workflow Manager 10
b) Execute the Windows PowerShell following cmdlet
Get-WFFarm | ft HttpPort
c) Take note of this port (12291) This port number is what you will use to connect the SharePoint 2013 farm to the Workflow Manager 10 farm
In production you should connect to the HTTPS port listed in the HttpsPort property when you run Get-WFFarm
d) Close the Workflow Manager PowerShell window
3 Connect the SharePoint 2013 farm to Workflow Manager
Creating a SharePoint Server 2013 Environment for Development and Testing Version 10
copy Critical Path Training 2012 All Rights Reserved 55
wwwCriticalPathTrainingcom
a) Open SharePoint 2013 Management Shell Start All Programs Microsoft SharePoint 2013 Products SharePoint 2013 Management Shell
b) Execute the following Windows PowerShell script in the SharePoint 2013 Management Shell
Register-SPWorkflowService ndashSPSite httpintranetwingtipcom ndashWorkflowHostUri httpwingtipserver12291 ndashAllowOAuthHttp
This script is telling SharePoint the endpoint it should use to talk to Workflow Manager as well as Workflow Manager the SharePoint site collection it should talk to for calls into the CSOM It is also configuring all communication over HTTP rather than HTTPS for performance reasons In production you should always use HTTPS
This step will take a moment with no feedback during the process Be patient
c) Close the SharePoint 2013 Management Shell
At this point the SharePoint 2013 farm is connected to the Workflow Manager 10 farm
Configure SharePoint User Profile Service Application AD Sync
Users in SharePoint 2013 are validated by Workflow Manager against SharePoint to ensure they have permissions to start a workflow This is done by looking up the user by their AD UserPrincipalName (UPN) attribute in the User Profile Service Application (UPA) If no matching user is found the workflow will be automatically cancelled by Workflow Manager In this section you will setup UPA to connect amp sync with the local Active Directory so user accounts in AD will have their UPN synchronized to UPA
1 Open Central Administration Start All Programs Microsoft SharePoint 2013 Products SharePoint 2013 Central Administration
2 Go to the User Profile Service Application management page Application Management Manage Service Applications User Profile Service Application
3 The first step is to configure the User Profile Service Application to allow for Active Directory (AD) synchronization
a) Under Synchronization select Configure Synchronization Settings
b) For Synchronization select Use SharePoint Active Directory Import and click OK
4 Next establish a connection to the wingtipcom AD
a) Under Synchronization select Configure Synchronization Connections
b) On the Synchronization Connections page select Create New Connection
c) Enter the following values on this form and click OK
i) Connection Name WINGTIPCOM AD
ii) Type Active Directory Import
iii) Connection Settings
(1) Fully Qualified Domain Name wingtipcom
(2) Authentication Provider Type Windows Authentication
(3) Account Name WINGTIPAdministrator
(4) Password (and Confirm Password) Password1
iv) Containers
(1) Click Populate Containers
(2) After it loads check the box next to WINGTP or click the Select All button below the box
5 Go back to the User Profile Service Application management page Application Management Manage Service Applications User Profile Service Application
6 Finally start a synchronization import
a) Under Synchronization select Start Profile Synchronization
Creating a SharePoint Server 2013 Environment for Development and Testing Version 10
copy Critical Path Training 2012 All Rights Reserved 56
wwwCriticalPathTrainingcom
b) Select Start Full Synchronization and click OK
c) You will be taken back to the User Profile Service Application management page Notice in the top-right corner there is a status block that reports how many profiles are in the UPA database Refresh the page to see it increase to a handful of profiles as the import process runs
At this point you have successfully configured the User Profile Service Application to import profiles from the local AD
Exercise 8 Install the Microsoft Office 2013 Professional Clients
In this exercise you will install the Microsoft Office 2013 client applications
1 Download the Office 2013 into the WingtipServer VM For this you need to create an Office 365 Trial account login to Office 365 go to the Admin Dashboard and then download the latest version httpwwwmicrosoftcomofficepreviewentry-office-preview
2 Download the SharePoint Designer 2013 into the WingtipServer VM from here httpwwwmicrosoftcomen-usdownloaddetailsaspxid=35491
3 Download the Visio Professional 2013 into the WingtipServer VM from here httptechnetmicrosoftcomen-usevalcenterhh973399
Install Microsoft Office Professional Plus 2013
In this section you will install the Microsoft Office 2013 clients
1 Ensure you are logged into the WingtipServer VM using the account WINGTIPadministrator | Password1
2 Execute the installer OfficeProfessionalPlus_English_x64exe
3 On the Read the Microsoft Software License Terms dialog click the checkbox next to I accept the terms of this agreement and click Continue
4 On the Choose the installation you want dialog click the Install Now button
5 The installer will proceed and install all the Office products
6 When the installer completes click the Close button
7 Apply your Office Professional Plus 2013 license key
a) Launch Word 2013 Start All Programs Microsoft Office 2013 Word 2013
b) In the First things first dialog select Use recommended settings and click Accept
c) In the Welcome to Office dialog that opens click the [X] icon in the top-right corner to close it
d) In the left-hand pane click Open Other Documents
e) In the left-hand pane click Account
f) In the Product Information section within the Activation Required box click Change Product Key
g) Enter your license key for Office Professional Plus 2013 check the box next to Attempt to automatically activate my product online and click Install
h) Click OK
At this point you have installed Office Professional Plus 2013
Install Microsoft Office Visio 2013
In this section you will install Microsoft Office 2013 Visio
1 Ensure you are logged into the WingtipServer VM using the account WINGTIPadministrator | Password1
2 Execute the installer VisioProfessional_English_x64exe
3 On the Read the Microsoft Software License Terms dialog click the checkbox next to I accept the terms of this agreement and click Continue
Creating a SharePoint Server 2013 Environment for Development and Testing Version 10
copy Critical Path Training 2012 All Rights Reserved 57
wwwCriticalPathTrainingcom
4 On the Choose the installation you want dialog click the Install Now button
5 The installer will proceed and install all Visio 2013
6 When the installer completes click the Close button
7 Apply your Visio 2013 license key
a) Launch Visio 2013 Start All Programs Microsoft Office 2013 Visio 2013
b) In the First things first dialog select Use recommended settings and click Accept
c) In the Welcome to Office dialog that opens click the X icon in the top-right corner to close it
d) In the left-hand pane click Open Other Documents
e) In the left-hand pane click Account
f) In the Product Information section within the Activation Required box click Change Product Key
g) Enter your license key for Visio 2013 check the box next to Attempt to automatically activate my product online and click Install
h) Click OK
At this point you have installed Visio 2013
Install Microsoft Office 2013 SharePoint Designer
In this section you will install Microsoft Office 2013 SharePoint Designer
1 Ensure you are logged into the WingtipServer VM using the account WINGTIPadministrator | Password1
2 Execute the installer SharePointDesigner_English_x64exe
3 On the Read the Microsoft Software License Terms dialog click the checkbox next to I accept the terms of this agreement and click Continue
4 On the Choose the installation you want dialog click the Install Now button
5 The installer will proceed and install all SharePoint Designer 2013
6 When the installer completes click the Close button
At this point you have installed SharePoint Designer 2013
Exercise 9 Install Visual Studio 2012
In this exercise you will install Visual Studio 2012
1 Ensure you are logged into the WingtipServer VM using the account WINGTIPadministrator | Password1
2 Start the install of Visual Studio 2012 Ultimate Trial by downloading the installer from here httpwwwmicrosoftcomvisualstudio11en-usdownloads
3 On the installation splash screen check the box next to I agree to the License terms and conditions and click the Next button
Creating a SharePoint Server 2013 Environment for Development and Testing Version 10
copy Critical Path Training 2012 All Rights Reserved 58
wwwCriticalPathTrainingcom
4 On the Optional Features to install dialog click Install
5 After some time the installer will complete Click the Launch button to launch Visual Studio 2012
Creating a SharePoint Server 2013 Environment for Development and Testing Version 10
copy Critical Path Training 2012 All Rights Reserved 59
wwwCriticalPathTrainingcom
6 In the Choose Default Environment Settings select Visual C Development Settings and click Start Visual Studio
7 Close Visual Studio 2012
At this point Visual Studio 2012 RTM is installed
Install Office amp SharePoint 2013 Developer Tools
In this section you will install the Office and SharePoint 2013 developer tools for Visual Studio
1 Ensure you are logged into the WingtipServer VM using the account WINGTIPadministrator | Password1
2 Launch the Web Platform Installer Start All Programs Microsoft Web Platform Installer
3 In the search box at the top-right corner of the Web Platform Installer 40 window type sharepoint and press Enter
4 Click the Add button to the right of Microsoft Office Developer Tools for Visual Studio 2012 - Preview 2
5 Click the Install button at the bottom of the Web Platform Installer 40 window
6 On the Prerequisites page click I Accept
Creating a SharePoint Server 2013 Environment for Development and Testing Version 10
copy Critical Path Training 2012 All Rights Reserved 60
wwwCriticalPathTrainingcom
At this point you have installed the SharePoint 2013 amp Office 2013 development tools in Visual Studio 2012
Creating a SharePoint Server 2013 Environment for Development and Testing Version 10
copy Critical Path Training 2012 All Rights Reserved 61
wwwCriticalPathTrainingcom
Appendix 1 Download Manifest
The following lists everything referenced that you will or may need to download in this environment
Windows Server 2008 R2 with Service Pack 1 (installer ISO)
o httptechnetmicrosoftcomen-usevalcenterdd459137aspx
Windows Server 2008 R2 with Service Pack 1 (prebuilt VHD)
o httpwwwmicrosoftcomdownloadsdetailsaspxFamilyId=9040a4be-c3cf-44a5-9052-a70314452305
Windows Server 2008 R2 Service Pack 1
o httpwwwmicrosoftcomen-usdownloaddetailsaspxid=5842
SQL Server 2012 Trial
o httpwwwmicrosoftcombetaexperiencepdSQL2012EvalCTAenusdefaultaspx
SharePoint Server 2013
o httptechnetmicrosoftcomen-USevalcenterhh973397aspx
Hotfixes for SharePoint Server 2013 (post-install)
o KB2554876 The SharePoint Parsing Process Crashes in Windows Server 2008 R2
o KB2708075 IIS 75 Configurations are not Updated when you use the ServerManager Class to Commit
Configuration Changes
o KB2759112 Hotfix is Available for NET Framework 45 that Resolves an ASPNET Race Condition Issue in
Windows Server 2008 R2 Windows Server 2008 R2 SP1
o KB2765317 Hotfix is Available for NET Framework 45 that Resolves an ASPNET Race Condition Issue in
Windows 8 Windows RT and Windows Server 2012
Web Platform Installer
o httpwwwmicrosoftcomwebdownloadsplatformaspx
Web Platform Installer ndash Command Line Version
o httplearniisnetpageaspx1072web-platform-installer-v4-command-line-webpicmdexe-preview-release
Workflow Manager 10
o Download using the Microsoft Web Platform Installer
Office 2013
o httpwwwmicrosoftcomofficepreviewentry-office-preview
SharePoint Designer 2013
o httpwwwmicrosoftcomen-usdownloaddetailsaspxid=35491
Visio Professional 2013
o httptechnetmicrosoftcomen-usevalcenterhh973399
Visual Studio 2012
o httpwwwmicrosoftcomvisualstudio11en-usdownloads
Office Developer Tools for Visual Studio 2012 ndash Preview 2
o Download using the Microsoft Web Platform Installer
Creating a SharePoint Server 2013 Environment for Development and Testing Version 10
copy Critical Path Training 2012 All Rights Reserved 62
wwwCriticalPathTrainingcom
Appendix 2 Windows PowerShell Script Manifest
The following lists all Windows PowerShell scripts that are provided with this setup guide
AddDisableLoopbackCheckRegKeyps1
o The following steps automate creating the registry key outlined as Method 2 in the Microsoft Knowledgebase article
httpsupportmicrosoftcomkb896861 using Windows PowerShell This key DisableLoopbackCheck will allow
you to browse SharePoint sites on the same machine Without this key (or following Method 1 in the KB article) you
would need to browse any SharePoint sites from a different computer than the one which SharePoint is installed on
ConfigureSpFarmForAppsps1
o Configures a SharePoint 2013 for hosting apps This ensures everything you need is installed running and
configured This is documented here httpmsdnmicrosoftcomen-uslibraryfp179923(v=office15)
CreateSpServiceAccountsps1
o Creates the minimal necessary service accounts for SharePoint Server 2013 SP_Farm SP_Content amp
SP_Services
SetupSharePointForHNSCps1
o Configures a SharePoint 2013 install for hosting Host-Named Site Collections (HNSC) This involves creating a Web
Application in SharePoint that has no host header bindings Using DNS all requests are mapped to this Web
Application You then create the site collections via PowerShell as you cant create HNSCs via the browser (Central
Administration)
Creating a SharePoint Server 2013 Environment for Development and Testing Version 10
copy Critical Path Training 2012 All Rights Reserved 63
wwwCriticalPathTrainingcom
Appendix 3 Create Sample Adventure Works Database
The following steps document downloading and installing the sample Adventure Works OLTP database provided by Microsoft
1 Launch Internet Explorer and navigate to httpmsftdbprodsamplescodeplexcom
2 Download the Adventure Works 2012 OLTP Script
3 Extract the ZIP into a folder on the desktop
4 Launch SQL Server Management Studio Start All Programs Microsoft SQL Server 2012 SQL Server Management Studio
5 When SQL Server Management Studio launches within the Connect to Server dialog login using the default settings and click Connect
6 Within SQL Server Management Studio select File Open File
7 Select the file instawdbsql from the extracted ZIP and click Open
8 If prompted to re-login to the database engine do it
9 Select Query SQLCMD Mode
10 Scroll down to line 42 the line that starts with the following
setvar SqlSamplesSourceDataPath
11 Change the folder location of where you unzipped the Adventure Works 2012 OLTP Script
12 Select Query Execute
13 When the script completes the AdventureWorks2012 database will have been created
Creating a SharePoint Server 2013 Environment for Development and Testing Version 10
copy Critical Path Training 2012 All Rights Reserved 64
wwwCriticalPathTrainingcom
Change Log
Change Version Description
August 22 2012 v 01 Pre-release for review
August 27 2012 v 02 Initial public release ndash install guide based on SharePoint Server Beta 2
August 28 2012 v 03 Updated URL for the site collection used to connect SharePoint to WAW
August 31 2012 v 04 Typo Removed SQL Server Analysis Services as part of the install Not required in a
SharePoint dev box (unless you are doing business intelligence which is not covered
in the guide)
Updated all references to Windows Azure Workflow to Workflow Manager the new
official name for the new workflow product
Updated SetupSharePointForHNSCps1 script to lookup HNSC Web Application by
name rather than URL which is more reliable
Typo Updated WingtipAllUp public NIC to use a different IP than the WingtipDC
Typo Replaced a reference to WingtipServer with WingtipDC
Typo Fixed handful of minor typos
September 1 2012 v 05 Removed SQL Server Reporting Services from install guide
Added step to uncheck IErsquos ldquoAutomatically detect proxyrdquo
Added post workflow install steps to setup User Profile Service Application to sync with
local Active Directory
September 5 2012 v 06 Added step to create a default root site collection in the HNSC web app
Updated minor typos and added extra notes for context
Updated PowerShell script SetupSharePointForHNSCps1 to remove content
database of default Web Application when setting up HNSC Web App
Added a new exercise 8 (after SharePoint install amp config and before the Workflow
install and config) to setup support for My Sites
October 20 2012 v 07 Updated script SetupSharePointForHNSCps1 to fix a bug where it would fail on line
111 if you didnrsquot already have a WINGTIPSP_Content managed account
Added section to bypass SharePointrsquos check for crlmicrosoftcom
Updated workflowrsquos registration PowerShell script to point to
httpintranetwingtipcom
Switched order of post-SharePoint install to setup HSNC hosting before configuring for
hosting apps
November 29 2012
v 10 Changed setup guide to use a single VM instead of two VMs
Updated guide for SharePoint 2013 RTM
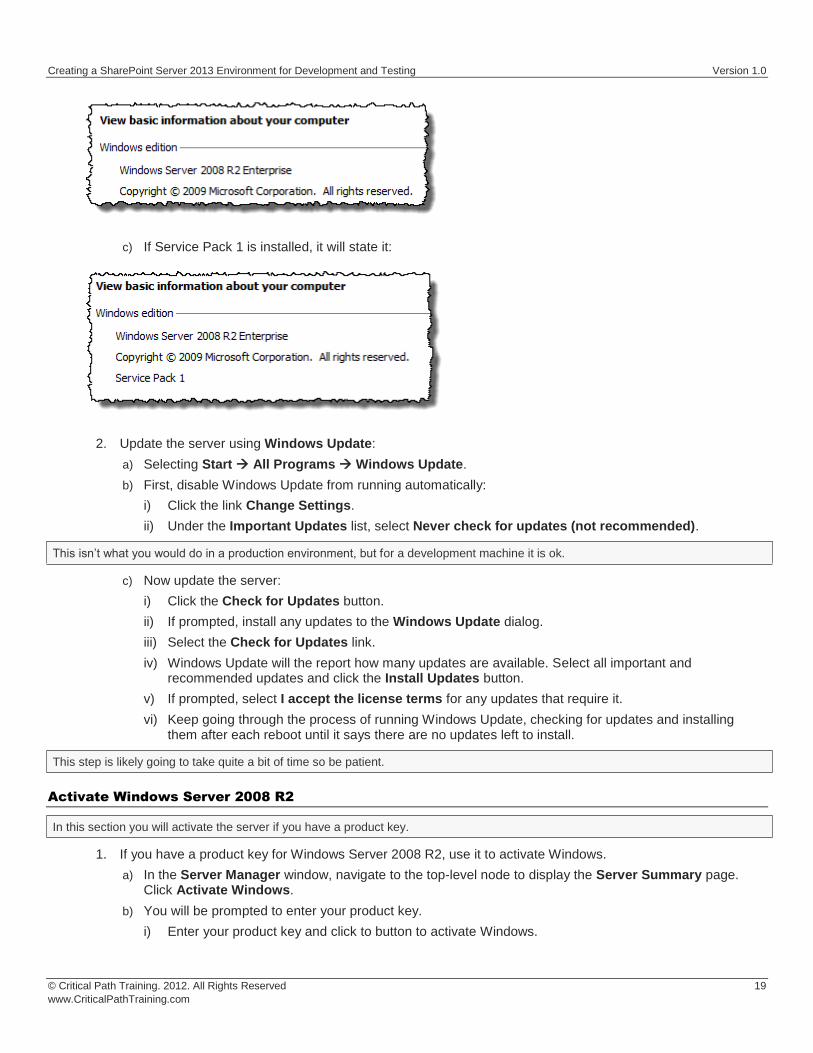
Creating a SharePoint Server 2013 Environment for Development and Testing Version 10
copy Critical Path Training 2012 All Rights Reserved 20
wwwCriticalPathTrainingcom
ii) After a few seconds your VM should be able to connect to a Microsoft site and successfully activate Windows
At this point you have a fully patched operating system VM created that will act as the Active Directory domain controller
Apply the DisableLoopbackCheck Registry Fix
Configure the DisableLoopbackCheck registry setting (Microsoft KB httpsupportmicrosoftcomkb896861)
The following steps automate creating the registry key outlined as Method 2 in the Microsoft KB article httpsupportmicrosoftcomkb896861 using Windows PowerShell
PowerShell Script Alert You can also find this PowerShell script AddDisableLoopbackCheckRegKeyps1 in the files that
accompany this setup guide
1 Click the Windows PowerShell icon in the Taskbar
2 Run the following PowerShell commands pressing [ENTER] after each one
$regKeyPath = HKLMSystemCurrentControlSetControlLsa $key = DisableLoopbackCheck New-ItemProperty -Path $regKeyPath -Name $key -Value 1 -PropertyType dword
a) Close the Windows PowerShell console by typing EXIT and pressing [ENTER]
Exercise 3 Install Active Directory Domain Services
Now you will promote your WingtipServer VM to a domain controller and create a new domain named wingtipcom
1 Login to the WingtipServer virtual machine using administrator | Password1
2 Add and configure the role for Active Directory Domain Services
a) Launch Server Manager and select the Roles node
b) Click the Add Roles link to start the Add Roles Wizard
c) On the Before you begin page click Next
d) On the Server Roles page select Active Directory Domain Services Click the Add Required Features button if prompted to install prerequisites
e) Click Next
Creating a SharePoint Server 2013 Environment for Development and Testing Version 10
copy Critical Path Training 2012 All Rights Reserved 21
wwwCriticalPathTrainingcom
f) On the next page of the wizard click Next which will bring you to the Confirm Installation Selections page
g) Click Install
After Active Directory Domain Services has been installed you will see the Installation Results page in the Add Roles Wizard
3 Click on the link with the big long caption of Close this wizard and launch the Active Directory Domain Services Installation Wizard (dcpromoexe)
4 On the first page of the Active Directory Domain Services Installation Wizard click the Use Advanced Mode Installation checkbox and click Next
Creating a SharePoint Server 2013 Environment for Development and Testing Version 10
copy Critical Path Training 2012 All Rights Reserved 22
wwwCriticalPathTrainingcom
5 On the Operating System Compatibility page click Next
6 On the Choose a Deployment Configuration select Create a new domain in a new forest and click Next
7 On the Name the Forrest Root Domain enter the following and click Next
a) FQDN of the forest root domain wingtipcom
8 On the Domain NetBIOS Name set it to WINGTIP and click Next
9 On the Set Forest Functional Level page select Windows Server 2008 R2 and click Next
10 On the Additional Domain Controller Options accept the default options and click Next
11 You might be prompted with the dialog shown below providing a warning that This computer has dynamically assigned IP address(es) This is not a problem when you are running your development environment on a domain controller Click Yes to dismiss the dialog
12 At this point the wizard will prompt you with a dialog information you a delegation for the DNS Server cannot be created because it cannot find the authoritative parent zone This is not a problem because the wizard will automatically configure the DNS of the VM to point to itself Click on the Yes button to dismiss this dialog
Creating a SharePoint Server 2013 Environment for Development and Testing Version 10
copy Critical Path Training 2012 All Rights Reserved 23
wwwCriticalPathTrainingcom
13 On the Location for Database Log Files and SYSVOL page accept all the default values and click Next
14 On the Directory Services Restore Mode Administrator Password page enter Password1 in both textboxes and click Next
15 On the Summary page click Next to start the process of configuring the new Active Directory domain
16 The wizard will display the dialog below to show you the progress of the configuration process You will be required to reboot when the configuration has been completed Check the option for Reboot on completion and then wait for the configuration to complete and the machine to reboot
17 After the VM reboots login to the server with wingtipadministrator | Password1
Configure Windows Update and Update the Server
In this section you will verify the server is fully patched and updated
1 Update the server using Windows Update
a) Selecting Start All Programs Windows Update
b) Select the Check for Updates link
c) Windows Update will the report how many updates are available Select all important and recommended updates and click the Install Updates button
d) If prompted select I accept the license terms for any updates that require it
e) Keep running Windows Update after each reboot and update install until it says there are no updates left to install
Creating a SharePoint Server 2013 Environment for Development and Testing Version 10
copy Critical Path Training 2012 All Rights Reserved 24
wwwCriticalPathTrainingcom
This step could take quite a bit of time so be patient
At this point you have a fully installed Active Directory Domain Controller for the Wingtipcom domain hosted on the server WingtipServer
Exercise 4 Install SQL Server 2012
In this exercise you will install SQL Server 2012 that will be used to store all required databases
1 Download the SQL Server 2012 Evaluation Edition specifically the DVD x64 ISO image to the host computer from here httpwwwmicrosoftcombetaexperiencepdSQL2012EvalCTAenusdefaultaspx or you can use your own licensed copy
2 Mount the SQL Server 2012 ISO to the WingtipServer VM
a) On the host computer open the Hyper-V Manager
b) Right-click the VM WingtipServer and select Settings
c) Select DVD Drive in the left-hand panel
d) In the right-hand panel select Image File and browse to the ISO file that contains SQL Server 2012 and click OK
3 Login to the WingtipServer VM as wingtipadministrator | Password1
Install SQL Server 2012
In this section you will install SQL Server 2012
1 If the AutoPlay dialog box is open click Run SETUPEXE If it isnrsquot use Windows Explorer to navigate to the DVD drive and execute the setupexe file in the root of the DVD drive
2 In the SQL Server Installation Center click Installation on the left-hand side
Creating a SharePoint Server 2013 Environment for Development and Testing Version 10
copy Critical Path Training 2012 All Rights Reserved 25
wwwCriticalPathTrainingcom
3 Next select New SQL Server stand-alone installation or add features to an existing installation
4 On the Setup Support Rules page the installer will check for issues before installing Click OK
5 On the Product Key page click the Specify a free edition radio box and select Evaluation then click Next
6 On the License Terms page click the I accept the license terms checkbox and click Next
7 On the Setup Support Rules page the installer will check for any problems with the server you are installing on Click Next when this completes
Creating a SharePoint Server 2013 Environment for Development and Testing Version 10
copy Critical Path Training 2012 All Rights Reserved 26
wwwCriticalPathTrainingcom
8 On the Support Role page select SQL Server Feature Installation and click Next
9 On the Feature Selection page check the following options and click Next
a) Instances Features
i) Database Engine Services
(1) Full-Text and Semantic Extractions for Search
b) Shared Features
i) Management Tools ndash Basic
(1) Management Tools ndash Complete
Creating a SharePoint Server 2013 Environment for Development and Testing Version 10
copy Critical Path Training 2012 All Rights Reserved 27
wwwCriticalPathTrainingcom
10 On the Installation Rules page click Next
11 On the Instance Configuration page click Next
12 On the Disk Space Requirements page click Next
13 On the Server Configuration page do the following and click Next
a) On the Service Account tab change the Startup Type for the SQL Server Agent to Automatic
14 On the Database Engine Configuration page do the following and click Next
a) On the Server Configuration tab click Add Current User
b) On the FILESTREAM tab
i) Check Enable FILESTREAM for Transact-SQL Access
ii) Check Enable FILESTREAM for file IO access
15 On the Error Reporting page click Next
16 On the Installation Configuration Rules page click Next
17 On the Ready to Install page click Install
Installation of SQL Server 2012 will take some time please be patient
18 When the installation completes the Complete page will be shown Click Close
At this point you have now successfully installed SQL Server 2012
Creating a SharePoint Server 2013 Environment for Development and Testing Version 10
copy Critical Path Training 2012 All Rights Reserved 28
wwwCriticalPathTrainingcom
Exercise 5 Install amp Configure SharePoint Server 2013
In this exercise you will install SharePoint 2013
1 Download the SharePoint Server 2013 to the host computer from here httptechnetmicrosoftcomen-USevalcenterhh973397aspx
2 Mount the SharePoint Server 2013 ISO to the WingtipServer VM
a) On the host computer open the Hyper-V Manager
b) Right-click the VM WingtipServer and select Settings
c) Select DVD Drive in the left-hand panel
The file that Microsoft provides is saved in the IMG format Hyper-V Manager wonrsquot allow you to mount an IMG file so rename it to ISO before mounting it
d) In the right-hand panel select Image File and browse to the ISO file that contains SharePoint Server 2013 and click OK
Create SharePoint Service Accounts amp Grant Rights to SQL Server 2012
In this section you will create the necessary service accounts that will be used by SharePoint in Active Directory and grant them necessary rights in SQL Server 2012
PowerShell Script Alert The creation of users and granting them rights to SQL Server 2012 steps in this section are automated in the Windows PowerShell script CreateSpServiceAccountsps1 found in the files that accompany this setup guide Open the script
and read the header for documentation on how to use it
1 Open the Active Directory Users and Computers Start Administrative Tools Active Directory Users and Computers
2 Expand the tree in the left-hand pane to see the Users OU Select the Users OU
3 Create a new user SP_Farm
a) In the toolbar select Action New User
Creating a SharePoint Server 2013 Environment for Development and Testing Version 10
copy Critical Path Training 2012 All Rights Reserved 29
wwwCriticalPathTrainingcom
b) Set the userrsquos Full Name amp User Login Name to SP_Farm and click Next
c) In the password dialog enter the following and click Next
i) Password (and Confirm Password) Password1
ii) User must change password at next login unchecked
iii) User cannot change password unchecked
iv) Password never expires checked
v) Account is disabled unchecked
Creating a SharePoint Server 2013 Environment for Development and Testing Version 10
copy Critical Path Training 2012 All Rights Reserved 30
wwwCriticalPathTrainingcom
vi) Click Finish
4 Repeat the previous step to create two more accounts
a) SP_Content
b) SP_Services
At this point you have created all the necessary service accounts
Install SharePoint Server 2013 Prerequisites
In this section you will install the SharePoint Server 2013 Prerequisites
1 Ensure you are logged into the WingtipServer VM using the account wingtipadministrator | Password1
2 If the AutoPlay dialog box is open click Run splashhta If it isnrsquot use Windows Explorer to navigate to the DVD drive and execute the splashhta file in the root of the DVD drive
Creating a SharePoint Server 2013 Environment for Development and Testing Version 10
copy Critical Path Training 2012 All Rights Reserved 31
wwwCriticalPathTrainingcom
3 Click the Install Software Prerequisites link
4 In the Microsoft SharePoint 2013 Products Preparation Tool window click Next
5 On the License Terms for Software Products page
a) Check I accept the terms of the License Agreement(s)
b) Click Next
6 The tool will download and install all prerequisites for SharePoint Server 2013 This will take some time It may prompt you to reboot the server If so reboot the server and login using wingtipadministrator | Password1
Creating a SharePoint Server 2013 Environment for Development and Testing Version 10
copy Critical Path Training 2012 All Rights Reserved 32
wwwCriticalPathTrainingcom
7 When the prerequisite installer is complete it will present a summary of everything it did
8 Click Finish
9 Restart the WingtipServer VMhellip some additional installations and changes that the prerequisite installer did will require a restart before installing SharePoint Server 2013
At this point all prerequisites required by SharePoint Server 2013 have been installed and any necessary configuration changes have been applied to the server However it is strongly recommend that you run Windows Update and install any pending updates Further Microsoft recommends installing the following hotfixes if they are not already installed
KB2554876 The SharePoint Parsing Process Crashes in Windows Server 2008 R2
KB2708075 IIS 75 Configurations are not Updated when you use the ServerManager Class to Commit Configuration Changes
KB2759112 Hotfix is Available for NET Framework 45 that Resolves an ASPNET Race Condition Issue in Windows Server 2008 R2 Windows Server 2008 R2 SP1
KB2765317 Hotfix is Available for NET Framework 45 that Resolves an ASPNET Race Condition Issue in Windows
8 Windows RT and Windows Server 2012
Install SharePoint Server 2013
In this section you will install SharePoint Server 2013
1 Ensure you are logged into the WingtipServer VM using the account wingtipadministrator | Password1
2 If the AutoPlay dialog box is open click Run splashhta If it isnrsquot use Windows Explorer to navigate to the DVD drive and execute the splashhta file in the root of the DVD drive
Creating a SharePoint Server 2013 Environment for Development and Testing Version 10
copy Critical Path Training 2012 All Rights Reserved 33
wwwCriticalPathTrainingcom
3 Click Install SharePoint Server
4 When prompted to Enter your Product Key enter the key you obtained for the trial install and click Continue
5 On the Read the Microsoft Software License Terms page check the I accept the terms of this agreement checkbox and click Continue
6 On the Choose a file location page click Install Now
Creating a SharePoint Server 2013 Environment for Development and Testing Version 10
copy Critical Path Training 2012 All Rights Reserved 34
wwwCriticalPathTrainingcom
7 When the installation is complete select the Run the SharePoint Products Configuration Wizard checkbox and click Close
8 On the Welcome to SharePoint Products page click Next
a) If prompted to start or reset services click Yes
9 On the Connect to a server farm page select Create a new server farm and click Next
10 On the Specify Configuration Database Settings page use the following to complete the page and click Next
a) Database server WINGTIPSERVER
b) Database name SharePoint_Config
c) Username WINGTIPSP_Farm
d) Password Password1
Creating a SharePoint Server 2013 Environment for Development and Testing Version 10
copy Critical Path Training 2012 All Rights Reserved 35
wwwCriticalPathTrainingcom
11 On the Specify Farm Security Settings page for the Passphrase and Confirm Passphrase boxes enter Password1 and click Next
12 On the Configure SharePoint Central Administration Web Application page check the Specify port number checkbox and enter a value of 9999 then Click Next
Creating a SharePoint Server 2013 Environment for Development and Testing Version 10
copy Critical Path Training 2012 All Rights Reserved 36
wwwCriticalPathTrainingcom
13 On the Completing the SharePoint Products Configuration Wizard page click Next
14 When the installer completes it will display the Confirmation Successful page
15 Click Finish This will launch Internet Explorer to go through the configuration process
Creating a SharePoint Server 2013 Environment for Development and Testing Version 10
copy Critical Path Training 2012 All Rights Reserved 37
wwwCriticalPathTrainingcom
At this point you have successfully installed SharePoint Server 2013
Configure SharePoint Server 2013
In this section you will create a new SharePoint Server 2013 farm and perform minimal configuration tasks
After installing SharePoint Sever 2013 the SharePoint Products Configuration Wizard will launch the browser-based Initial Farm Configuration Wizard
1 In the first page of the wizard you are prompted to Help Make SharePoint Better Select which ever option you want and click OK
2 On the Welcome page that asks How do you want to configure your SharePoint farm click the Start the Wizard button
3 On the Services page do the following and then click Next
a) Service Account Select Create new managed account
i) Username WINGTIPSP_Services
ii) Password Password1
b) Services Uncheck the following services
Creating a SharePoint Server 2013 Environment for Development and Testing Version 10
copy Critical Path Training 2012 All Rights Reserved 38
wwwCriticalPathTrainingcom
i) Access Services 2010
ii) App Management Service
In SharePoint Server 2013 the Search Service Application processes specifically noderunnerexe can consume a considerable amount of memory and processor time If you are not going to work with search you might consider unchecking this option for now You can always go back into Central Administration and create a new instance of the Search Service Application at a later date if you need it
Why did we remove Access Services 2010 amp App Management Service service applications The Access Services 2010 service application is included for backwards compatibility and isnrsquot needed in new installations unless you are migrating solutions built with Access Services 2010 from SharePoint Server 2010 (if so you can create this service application later within Central Administration Application Management Manage Service Applications) The App Management Service service application will be created in a later step in this setup guide therefor it is skipped here
4 The creation of the service applications can take quite a while so be patient If it exceeds 20 minutes it is fairly safe to assume the page is hung up One option is to close the browser then launch Central Administration (Start All Programs Microsoft SharePoint 2013 Products SharePoint 2013 Central Administration) and look at the Service Application page (Application Management Manage Service Applications) to see if they were all created
Configure DNS
In this section you will configure DNS for hosting SharePoint sites amp Apps
1 Ensure you are logged into the WingtipServer VM using the account wingtipadministrator | Password1
2 Open the DNS window Start Administrative Tools DNS
3 Expand the hierarchy on the left-hand side of the window until you get to DNS WINGTIPSERVER Forward Lookup Zones wingtipcom
4 Create a new wildcard so all requests for http[]wingtipcom will be forwarded to our SharePoint machine
a) Next right-click wingtipcom and select New Host (A or AAAA)
Creating a SharePoint Server 2013 Environment for Development and Testing Version 10
copy Critical Path Training 2012 All Rights Reserved 39
wwwCriticalPathTrainingcom
b) In the New Host dialog enter the following and click OK
i) Alias Name
ii) IP Address 192168150102 Then click Add Host The following figure shows how this looks
This new record is telling DNS to forward any request for http[]wingtipcom to the webserver WINGTIPSERVER where the
requests will be served by SharePoint
5 Verify this DNS entry is working
a) Open Windows PowerShell Start All Programs Accessories Windows PowerShell Windows PowerShell
b) Run the following commands and press ENTER
PS CUsersAdministratorgt nslookup somethingwingtipcom PS CUsersAdministratorgt nslookup somethingappswingtipcom
c) You should get a response that points to the WingtipServer server as shown in the following figure
Creating a SharePoint Server 2013 Environment for Development and Testing Version 10
copy Critical Path Training 2012 All Rights Reserved 40
wwwCriticalPathTrainingcom
Configure SharePoint Server 2013 for Host-Named Site Collections amp Create Initial Site
Collections
In this section you will create new SharePoint 2013 site collections for testing and hosting apps
Microsoft recommends to create host-named site collections (HNSC) instead of using the path based site collection addressing The difference is the following a path based site created at something such as httpintranetwingtipcomsitesdevtest as an HNSC site would be more like httpdevtestwingtipcom This is how it works in the cloud (Office 365) and it scales much better for on-prem
deployments This setup guide will show you how to setup your environment to create HNSC The only downside to this approach is that you canrsquot create site collections within Central Administration it must be done via Windows PowerShell API (because Central Administration doesnrsquot instruct you where to put the site
This is implemented in various parts First DNS must be configured to send all requests for httpwingtipcom to a Web Application
(implemented in the last section) Second this Web Application must be extended with SharePoint and have no host header bindings (so it handles all requests) Third it must have a default site collection at the root of the Web Application but it will not be used for anything (in fact it doesnrsquot need a template assigned to it)
You can read more about HNSCrsquos on TechNet httptechnetmicrosoftcomen-uslibrarycc424952aspx
PowerShell Script Alert The steps in this section are automated in the script SetupSharePointForHNSCps1 found in the files that
accompany this setup guide Open the script and read the header for documentation on how to use it
1 Ensure you are logged into the WingtipServer VM using the account wingtipadministrator | Password1
2 Open Central Administration Start All Programs Microsoft SharePoint 2013 Products SharePoint 2013 Central Administration
3 Select Application Management Manage Web Applications
4 Delete the default Web Application created by the configuration wizard
a) Delete the existing default Web Application
i) Select the Web Application SharePoint ndash 80 the one with the URL of httpwingtipserver and click Delete in the ribbon
ii) When prompted to delete the associated IIS Web Site amp SQL Server database select both options to delete them and click OK
The reason you are doing this is because the setup wizard you ran previously when creating the service applications automatically created it The problem is that it used the same identity (WINGTIPSP_Services) for the app pool that is used for all the service
applications which is not desired
5 Create a new Web Application to handle Host-Named Site Collections (HNSC)
Creating a SharePoint Server 2013 Environment for Development and Testing Version 10
copy Critical Path Training 2012 All Rights Reserved 41
wwwCriticalPathTrainingcom
a) In the ribbon click the New button
b) In the Create New Web Application dialog enter the following values in the properties and click OK Leave all properties not mentioned
i) Select the radio button Create a new IIS web site
(1) Name SharePoint HNSC Host ndash 80
(2) Port 80
ii) Application Pool
(1) Select the radio button Create a new application pool
(a) Application Pool Name SharePoint Default HNSC AppPool
(b) Select a security account for this application pool WINGTIPSP_Content
If WINGTIPSP_Content is not listed as an available managed account create it by selecting the appropriate option and using
Password1 for the password
iii) Database Name and Authentication
(1) Database Name WSS_Content_HNSCDefaultHost
c) This process will take a few moments At the end of the process SharePoint will ask if you want to create a site collection You do but you donrsquot want to do it through the browser as this will not be a HNSC To create a HNSC you must create it via Windows PowerShell
6 Create a default not template site collection at the root of the web application
a) Open SharePoint 2013 Management Shell Start All Programs Microsoft SharePoint 2013 Products SharePoint 2013 Management Shell
7 Create Site Collections for Testing SharePoint amp SharePoint Apps
a) Open SharePoint 2013 Management Shell Start All Programs Microsoft SharePoint 2013 Products SharePoint 2013 Management Shell
b) Get a reference to the HNSC web application you just created by running the following Windows PowerShell script in the SharePoint 2013 Management Shell
$hnscWebApp = Get-SPWebApplication | Where-Object $_DisplayName -eq SharePoint HNSC Host - 80
c) Create a non-templated site at the root of the web application for Workflow to connect to by executing the following Windows PowerShell script in the SharePoint 2013 Management Shell
New-SPSite -Name Root HNSC Site Collection -Url httpwingtipcom -HostHeaderWebApplication $hnscWebApp -OwnerAlias WINGTIPAdministrator
d) Create a team site by executing the following Windows PowerShell script in the SharePoint 2013 Management Shell
New-SPSite -Name Wingtip Intranet -Url httpintranetwingtipcom ndashHostHeaderWebApplication $hnscWebApp -Template STS0 -OwnerAlias WINGTIPAdministrator
e) Create a developer site by executing the following Windows PowerShell script in the SharePoint 2013 Management Shell
New-SPSite -Name Wingtip Developer Site -Url httpdevwingtipcom ndashHostHeaderWebApplication $hnscWebApp -Template DEV0 -OwnerAlias WINGTIPAdministrator
You can only create debug and test apps using a developer site
At this point you now have a site collection to use as a team site (httpintranetwingtipcom) and to develop and test custom SharePoint apps (httpdevwingtipcom)
Creating a SharePoint Server 2013 Environment for Development and Testing Version 10
copy Critical Path Training 2012 All Rights Reserved 42
wwwCriticalPathTrainingcom
Configure SharePoint 2013 for Hosting Apps
In this setup you will setup your SharePoint 2013 environment for hosting apps
PowerShell Script Alert Everything in the next immediate step is provided in the script ConfigureSpFarmForAppsps1 found in the
files that accompany this setup guide Open the script and read the header for documentation on how to use it
1 Ensure you are logged into the WingtipServer VM using the account wingtipadministrator | Password1
2 Create the necessary SharePoint App Management service applications and start the necessary services via Windows PowerShell
a) Open SharePoint 2013 Management Shell Start All Programs Microsoft SharePoint 2013 Products SharePoint 2013 Management Shell
b) Execute the following Windows PowerShell script in the SharePoint 2013 Management Shell
$appHostDomain = appswingtipcom $adminService = Get-Service -Name spadminv4 if ($adminServiceStatus -ne Running) Start-Service $adminService $timerService = Get-Service -Name sptimerv4 if ($timerServiceStatus -ne Running) Start-Service $timerService Set-SPAppDomain $appHostDomain $appMgmtSvcInstance = Get-SPServiceInstance | Where-Object $_GetType()Name -eq AppManagementServiceInstance if ($appMgmtSvcInstanceStatus -ne Online) Start-SPServiceInstance -Identity $appMgmtSvcInstance $appSubSettingSvcInstance = Get-SPServiceInstance | Where-Object $_GetType()Name -eq SPSubscriptionSettingsServiceInstance if ($appSubSettingSvcInstanceStatus -ne Online) Start-SPServiceInstance -Identity $appSubSettingSvcInstance $appPoolServiceApps = Get-SPServiceApplicationPool -Identity SharePoint Web Services Default $appSubSvc = New-SPSubscriptionSettingsServiceApplication ndashApplicationPool $appPoolServiceApps ndashName Settings Service Application ndashDatabaseName SettingsServiceDB $proxySubSvc = New-SPSubscriptionSettingsServiceApplicationProxy ndashServiceApplication $appSubSvc $appAppSvc = New-SPAppManagementServiceApplication -ApplicationPool $appPoolServiceApps -Name App Management Service Application -DatabaseName AppServiceDB $proxyAppSvc = New-SPAppManagementServiceApplicationProxy -ServiceApplication $appAppSvc Set-SPAppSiteSubscriptionName -Name app -Confirm$false
3 Verify the script configured SharePoint 2013 for hosting apps
a) Open Central Administration Start All Programs Microsoft SharePoint 2013 Products SharePoint 2013 Central Administration
b) Verify service applications created
i) Open the Service Applications page Application Management Manage Service Applications
ii) Verify you have two service applications created
(1) App Management Service Application
(2) Settings Service Application
c) Verify service instances are running
i) Open the Services on Server page System Settings Manage Services on Server
ii) Verify the following services are Started
(1) App Management Service
(2) Microsoft SharePoint Foundation Subscription Settings Service
Creating a SharePoint Server 2013 Environment for Development and Testing Version 10
copy Critical Path Training 2012 All Rights Reserved 43
wwwCriticalPathTrainingcom
d) Verify App URLs are correct
i) Open the Configure App URLs page Apps Configure app URLs
ii) Verify the following
(1) App Domain appswingtipcom
(2) App Prefix app
At this point your SharePoint Server 2013 environment is ready to host SharePoint apps
Creating a SharePoint Server 2013 Environment for Development and Testing Version 10
copy Critical Path Training 2012 All Rights Reserved 44
wwwCriticalPathTrainingcom
Start the SharePoint 2013 Sandbox Service
By default the service that executes sandbox solutions is not running In this step you will start the service
1 Open Central Administration Start All Programs Microsoft SharePoint 2013 Products SharePoint 2013 Central Administration
2 Open the Services on Server page System Settings Manage Services on Server
3 Click the Start link to the left of the Microsoft SharePoint Foundation Sandboxed Code Service
At this point your installation can support sandbox solutions
Configure CRL Verification for Disconnected Environments
SharePoint periodically ldquophones homerdquo to a specific address hosted by Microsoft under certain conditions When your environment is disconnected this can cause an unnecessary delay or failures when starting up the sandbox The following steps outline a workaround to bypass this check
1 Launch Notepad as an administrator Start All Programs Accessories right-click Notepad and select Run as Administrator
2 Open the hosts file by selecting File Open and finding the file
cWindowsSystem32Driversetchosts
3 Add the following line to the end of the file
127001 crlmicrosoftcom
4 Save and close the hosts file
Update Internet Explorer to Bypass the App URL amp Automatically Login to SharePoint Sites
In this section you will update Internet Explorer to add the App hosting URL to the bypass list so you can navigate to the domain after deploying SharePoint hosted apps
1 Ensure you are logged into the WingtipServer VM using the account wingtipadministrator | Password1
1 Launch Internet Explorer Start All Programs Internet Explorer
2 Configure Internet Explorer to bypass the App URL
a) In the top-right corner click the gear icon and select Internet Options
b) On the Security tab select the Local Intranet and click the Sites button
c) Uncheck the box next to Automatically detect intranet network
d) Click the Advanced button and add two entries to the Exceptions list
i) httpwingtipcom
ii) httpappswingtipcom
Creating a SharePoint Server 2013 Environment for Development and Testing Version 10
copy Critical Path Training 2012 All Rights Reserved 45
wwwCriticalPathTrainingcom
e) Click the Close button followed by the OK button multiple times to close out of the dialogs
At this point Internet Explorer is setup to bypass your app URL so you can navigate to apps (httpappswingtipcom) as well as automatically authenticate to sites hosted at httpwingtipcom
Exercise 6 Configure SharePoint to Host My Sites
In this exercise you will configure SharePoint to create and host My Sites In order to host My Sites you will need a new Web Application that is configured for Self-Service Site Creation and has a My Site Host site collection
1 Create a new SharePoint web application to host the My Sites
a) Ensure you are logged into the WingtipServer VM using the account wingtipadministrator | Password1
b) Open Central Administration Start All Programs Microsoft SharePoint 2013 Products SharePoint 2013 Central Administration
c) Select Application Management Manage Web Applications
d) In the ribbon click the New button
e) In the Create New Web Application dialog enter the following values in the properties and click OK Leave all properties not mentioned
i) Select the radio button Create a new IIS web site
(1) Name SharePoint MySite Host ndash 80
(2) Port 80
(3) Host Header mywingtipcom
ii) Application Pool
(1) Select the radio button Use existing application pool
(a) Application Pool Name SharePoint Default HNSC AppPool
iii) Database Name and Authentication
(1) Database Name WSS_Content_SocialWingtipCom
f) This process will take a few moments At the end of the process SharePoint will ask if you want to create a site collection Click the link provided to create a new site collection amp continue to the next step
2 Create a My Site Host site collection
a) On the Create Site Collection page use the following information to complete the form and click OK
Creating a SharePoint Server 2013 Environment for Development and Testing Version 10
copy Critical Path Training 2012 All Rights Reserved 46
wwwCriticalPathTrainingcom
i) Title My Site Host
ii) URL
iii) Template Selection My Site Host (found under the Enterprise tab)
iv) Primary Site Collection Administrator WINGTIPAdministrator
3 Update the Web Application to host my sites
a) Within Central Administration in the left-hand navigation navigate to the Manage Web Applications page Application Management Manage Web Applications
b) Select the SharePoint MySite Host ndash 80 web application
c) Click the Managed Paths button in the ribbon
d) Remove the sites managed path and add two new managed paths and click OK
i) personal ndash Wildcard inclusion
ii) my ndash Explicit inclusion
e) With the SharePoint MySite Host ndash 80 web application still selected click the Self-Service Site Creation button
f) On the Self-Service Site Creation page use the following values to complete the form and click OK
i) Site Collections On
4 Next configure the User Profile Service Application My Site settings
a) Browse to the User Profile Service Application management page Application Management Manage Service Applications User Profile Service Application
b) Under the My Site Settings section click the Setup My Sites
c) On the My Site Settings page use the following information to complete the form and click OK
i) My Site Host httpmywingtipcom
ii) Personal Site Location personal
At this point your SharePoint deployment is now configured to automatically create My Sites under httpmywingtipcomPersonalUserName when users first browse to them
Exercise 7 Install amp Configure Workflow Manager 10
In this exercise you will configure the WingtipServer VM to host Workflow Manager 10 and connect it to your SharePoint installation
1 Ensure you are logged into the WingtipServer VM using the account wingtipadministrator | Password1
Verify SQL Server 2012 Network Configuration
In this section yoursquoll verify the network configuration is correct for SQL Server 2012 in order to install Workflow Manager 10
Creating a SharePoint Server 2013 Environment for Development and Testing Version 10
copy Critical Path Training 2012 All Rights Reserved 47
wwwCriticalPathTrainingcom
1 Configure SQL Server 2012 to have the TCPIP connection protocol enabled
a) Open the SQL Server Configuration Manager Start All Programs Microsoft SQL Server 2012 Configuration Tools SQL Server Configuration Manager
b) Expand the hierarchy on the left-hand side to the following SQL Server Connection Manager (local) SQL Server Network Configuration Protocols for MSSQLSERVER
c) In the main window if TCPIP is Disabled right-click TCPIP and select Enable
d) When prompted with a warning click OK
2 SQL Server must be restarted in order to reflect this change
a) In the hierarchy on the left-hand side of the window select SQL Server Services
b) Right-click SQL Server (MSSQLSERVER) and select Restart
At this point SQL Server is now configured with the TCPIP protocol enabled a requirement when configuring Service Bus
Configure the Workflow Service Account with the Necessary Rights
In this section you will verify the service account that will run Workflow Manager and Service Bus
1 Ensure you are logged into the WingtipServer VM using the account WINGTIPadministrator | Password1
2 Grant the WINGTIPSP_Content account securityadmin amp dbcreator permissions in SQL Server
a) Launch SQL Server Management Studio Start All Programs Microsoft SQL Server 2012 SQL Server Management Studio
b) When SQL Server Management Studio launches within the Connect to Server dialog login using the default settings and click Connect
c) In the Object Explorer tool window expand the WINGTIPSERVER server hierarchy to the Security Logins node
d) Find the WINGTIPSP_Content account right-click it and select Properties
Creating a SharePoint Server 2013 Environment for Development and Testing Version 10
copy Critical Path Training 2012 All Rights Reserved 48
wwwCriticalPathTrainingcom
e) In the Select a page pane select Server Roles
f) Check securityadmin amp dbcreator and click OK
g) Close SQL Server Management Studio
3 Add the Workflow service account to the local administrators group
a) Open the Active Directory Users and Computers window Start Administrative Tools Active Directory Users and Computers
b) In the hierarchy on the left-hand side of the window expand it to the following Active Directory Users and Computers wingtipcom Builtin
c) In the main window right-click Administrators and select Properties
d) In the Administrators Properties dialog select the Members tab and click Add
e) In the Enter the object names to select box enter wingtipsp_content and click the Check Names button
f) In the Administrators Properties dialog click OK
g) Close the Active Directory Users and Computers window
At this point the service account that will host Workflow Manager and Service Bus has been configured correctly
Creating a SharePoint Server 2013 Environment for Development and Testing Version 10
copy Critical Path Training 2012 All Rights Reserved 49
wwwCriticalPathTrainingcom
Download amp Install Workflow Manager and Service Bus
In this section you will install Workflow Manager and Service Bus
1 Ensure you are logged into the WingtipServer VM using the account WINGTIPSP_Content | Password1
It is important you are logged in as the user that will run workflow when you install amp configure Workflow Manager and Service Bus
2 Launch the Web Platform Installer Start All Programs Microsoft Web Platform Installer
a) If the Web Platform Installer is not present on your machine you can download amp install it from here httpwwwmicrosoftcomwebdownloadsplatformaspx
If you do not have internet access within the virtual machine it is possible to download everything needed for workflow using the command line version of the Web Platform Installer (WebPICMD) You can get WebPICMD from httplearniisnetpageaspx1072web-platform-installer-v4-command-line-webpicmdexe-preview-release Specifically for
workflow enter the following command to download Workflow Beta 1 and all prerequisites
webpicmd offline ProductsWorkflow Pathc[path]
3 When the Web Platform Installer loads execute a search for Workflow select Workflow Manager 10 and click Add
4 Click the Install button at the bottom of the Web Platform Installer 40 window
5 On the Prerequisites page click I Accept
Note The Web Platform Installer 40 may prompt you to keep certain products updated using Microsoft Update If it does select Use Microsoft Update when I check for updates (recommended) and click Continue
6 When the installer completes the following dialog will appear Click Continue and then Finish to start the configuration process
Creating a SharePoint Server 2013 Environment for Development and Testing Version 10
copy Critical Path Training 2012 All Rights Reserved 50
wwwCriticalPathTrainingcom
At this point Workflow Manager amp Service Bus are installed
Configure Workflow Manager and Service Bus
In this section you will install Workflow Manager and Service Bus
1 If the Workflow Manager Configuration Wizard is not open open it Start All Programs Workflow Manager 10 Workflow Configuration
2 On the Welcome page click Configure Workflow Manager with Default Settings (Recommended)
Creating a SharePoint Server 2013 Environment for Development and Testing Version 10
copy Critical Path Training 2012 All Rights Reserved 51
wwwCriticalPathTrainingcom
3 On the New Farm Configuration page do the following
a) In the section Configure Service Account set the credentials to
i) User ID sp_contentwingtipcom
ii) Password Password1
b) Check the Allow Workflow management over HTTP on this computer checkbox
Ensure the username is entered in the fully qualified UPN format not as the default shows in the installer (sp_contentwingtip) or the domainusername format
In a production environment you should be doing everything over SSL
c) Click the Test Connection button to verify the connection credentials before proceeding
Creating a SharePoint Server 2013 Environment for Development and Testing Version 10
copy Critical Path Training 2012 All Rights Reserved 52
wwwCriticalPathTrainingcom
d) In the Certificate Generation Key and Confirm Certificate Generation Key enter Password1 into both fields
4 Click the right arrow in the bottom right corner to proceed
5 On the Summary page review your settings and click the check at the bottom right of the widow to start the configuration process
Creating a SharePoint Server 2013 Environment for Development and Testing Version 10
copy Critical Path Training 2012 All Rights Reserved 53
wwwCriticalPathTrainingcom
6 After a few minutes the Configuration Progress screen will show that everything has been configured correctly
Creating a SharePoint Server 2013 Environment for Development and Testing Version 10
copy Critical Path Training 2012 All Rights Reserved 54
wwwCriticalPathTrainingcom
7 Click the check in the bottom right corner
At this point Workflow Manager amp Service Bus has been installed and a new Workflow Manager farm has been created The next step is to connect the SharePoint 2013 farm to the Workflow Manager farm
Connect SharePoint 2013 to Workflow Manager
In this section you will connect SharePoint 2013 and Workflow Manager together
1 Ensure you are logged into the WingtipServer VM using the account WINGTIPadministrator | Password1
2 Get the Workflow Manager endpoint
a) Open the Workflow Manager PowerShell console Start All Programs Workflow Manager 10
b) Execute the Windows PowerShell following cmdlet
Get-WFFarm | ft HttpPort
c) Take note of this port (12291) This port number is what you will use to connect the SharePoint 2013 farm to the Workflow Manager 10 farm
In production you should connect to the HTTPS port listed in the HttpsPort property when you run Get-WFFarm
d) Close the Workflow Manager PowerShell window
3 Connect the SharePoint 2013 farm to Workflow Manager
Creating a SharePoint Server 2013 Environment for Development and Testing Version 10
copy Critical Path Training 2012 All Rights Reserved 55
wwwCriticalPathTrainingcom
a) Open SharePoint 2013 Management Shell Start All Programs Microsoft SharePoint 2013 Products SharePoint 2013 Management Shell
b) Execute the following Windows PowerShell script in the SharePoint 2013 Management Shell
Register-SPWorkflowService ndashSPSite httpintranetwingtipcom ndashWorkflowHostUri httpwingtipserver12291 ndashAllowOAuthHttp
This script is telling SharePoint the endpoint it should use to talk to Workflow Manager as well as Workflow Manager the SharePoint site collection it should talk to for calls into the CSOM It is also configuring all communication over HTTP rather than HTTPS for performance reasons In production you should always use HTTPS
This step will take a moment with no feedback during the process Be patient
c) Close the SharePoint 2013 Management Shell
At this point the SharePoint 2013 farm is connected to the Workflow Manager 10 farm
Configure SharePoint User Profile Service Application AD Sync
Users in SharePoint 2013 are validated by Workflow Manager against SharePoint to ensure they have permissions to start a workflow This is done by looking up the user by their AD UserPrincipalName (UPN) attribute in the User Profile Service Application (UPA) If no matching user is found the workflow will be automatically cancelled by Workflow Manager In this section you will setup UPA to connect amp sync with the local Active Directory so user accounts in AD will have their UPN synchronized to UPA
1 Open Central Administration Start All Programs Microsoft SharePoint 2013 Products SharePoint 2013 Central Administration
2 Go to the User Profile Service Application management page Application Management Manage Service Applications User Profile Service Application
3 The first step is to configure the User Profile Service Application to allow for Active Directory (AD) synchronization
a) Under Synchronization select Configure Synchronization Settings
b) For Synchronization select Use SharePoint Active Directory Import and click OK
4 Next establish a connection to the wingtipcom AD
a) Under Synchronization select Configure Synchronization Connections
b) On the Synchronization Connections page select Create New Connection
c) Enter the following values on this form and click OK
i) Connection Name WINGTIPCOM AD
ii) Type Active Directory Import
iii) Connection Settings
(1) Fully Qualified Domain Name wingtipcom
(2) Authentication Provider Type Windows Authentication
(3) Account Name WINGTIPAdministrator
(4) Password (and Confirm Password) Password1
iv) Containers
(1) Click Populate Containers
(2) After it loads check the box next to WINGTP or click the Select All button below the box
5 Go back to the User Profile Service Application management page Application Management Manage Service Applications User Profile Service Application
6 Finally start a synchronization import
a) Under Synchronization select Start Profile Synchronization
Creating a SharePoint Server 2013 Environment for Development and Testing Version 10
copy Critical Path Training 2012 All Rights Reserved 56
wwwCriticalPathTrainingcom
b) Select Start Full Synchronization and click OK
c) You will be taken back to the User Profile Service Application management page Notice in the top-right corner there is a status block that reports how many profiles are in the UPA database Refresh the page to see it increase to a handful of profiles as the import process runs
At this point you have successfully configured the User Profile Service Application to import profiles from the local AD
Exercise 8 Install the Microsoft Office 2013 Professional Clients
In this exercise you will install the Microsoft Office 2013 client applications
1 Download the Office 2013 into the WingtipServer VM For this you need to create an Office 365 Trial account login to Office 365 go to the Admin Dashboard and then download the latest version httpwwwmicrosoftcomofficepreviewentry-office-preview
2 Download the SharePoint Designer 2013 into the WingtipServer VM from here httpwwwmicrosoftcomen-usdownloaddetailsaspxid=35491
3 Download the Visio Professional 2013 into the WingtipServer VM from here httptechnetmicrosoftcomen-usevalcenterhh973399
Install Microsoft Office Professional Plus 2013
In this section you will install the Microsoft Office 2013 clients
1 Ensure you are logged into the WingtipServer VM using the account WINGTIPadministrator | Password1
2 Execute the installer OfficeProfessionalPlus_English_x64exe
3 On the Read the Microsoft Software License Terms dialog click the checkbox next to I accept the terms of this agreement and click Continue
4 On the Choose the installation you want dialog click the Install Now button
5 The installer will proceed and install all the Office products
6 When the installer completes click the Close button
7 Apply your Office Professional Plus 2013 license key
a) Launch Word 2013 Start All Programs Microsoft Office 2013 Word 2013
b) In the First things first dialog select Use recommended settings and click Accept
c) In the Welcome to Office dialog that opens click the [X] icon in the top-right corner to close it
d) In the left-hand pane click Open Other Documents
e) In the left-hand pane click Account
f) In the Product Information section within the Activation Required box click Change Product Key
g) Enter your license key for Office Professional Plus 2013 check the box next to Attempt to automatically activate my product online and click Install
h) Click OK
At this point you have installed Office Professional Plus 2013
Install Microsoft Office Visio 2013
In this section you will install Microsoft Office 2013 Visio
1 Ensure you are logged into the WingtipServer VM using the account WINGTIPadministrator | Password1
2 Execute the installer VisioProfessional_English_x64exe
3 On the Read the Microsoft Software License Terms dialog click the checkbox next to I accept the terms of this agreement and click Continue
Creating a SharePoint Server 2013 Environment for Development and Testing Version 10
copy Critical Path Training 2012 All Rights Reserved 57
wwwCriticalPathTrainingcom
4 On the Choose the installation you want dialog click the Install Now button
5 The installer will proceed and install all Visio 2013
6 When the installer completes click the Close button
7 Apply your Visio 2013 license key
a) Launch Visio 2013 Start All Programs Microsoft Office 2013 Visio 2013
b) In the First things first dialog select Use recommended settings and click Accept
c) In the Welcome to Office dialog that opens click the X icon in the top-right corner to close it
d) In the left-hand pane click Open Other Documents
e) In the left-hand pane click Account
f) In the Product Information section within the Activation Required box click Change Product Key
g) Enter your license key for Visio 2013 check the box next to Attempt to automatically activate my product online and click Install
h) Click OK
At this point you have installed Visio 2013
Install Microsoft Office 2013 SharePoint Designer
In this section you will install Microsoft Office 2013 SharePoint Designer
1 Ensure you are logged into the WingtipServer VM using the account WINGTIPadministrator | Password1
2 Execute the installer SharePointDesigner_English_x64exe
3 On the Read the Microsoft Software License Terms dialog click the checkbox next to I accept the terms of this agreement and click Continue
4 On the Choose the installation you want dialog click the Install Now button
5 The installer will proceed and install all SharePoint Designer 2013
6 When the installer completes click the Close button
At this point you have installed SharePoint Designer 2013
Exercise 9 Install Visual Studio 2012
In this exercise you will install Visual Studio 2012
1 Ensure you are logged into the WingtipServer VM using the account WINGTIPadministrator | Password1
2 Start the install of Visual Studio 2012 Ultimate Trial by downloading the installer from here httpwwwmicrosoftcomvisualstudio11en-usdownloads
3 On the installation splash screen check the box next to I agree to the License terms and conditions and click the Next button
Creating a SharePoint Server 2013 Environment for Development and Testing Version 10
copy Critical Path Training 2012 All Rights Reserved 58
wwwCriticalPathTrainingcom
4 On the Optional Features to install dialog click Install
5 After some time the installer will complete Click the Launch button to launch Visual Studio 2012
Creating a SharePoint Server 2013 Environment for Development and Testing Version 10
copy Critical Path Training 2012 All Rights Reserved 59
wwwCriticalPathTrainingcom
6 In the Choose Default Environment Settings select Visual C Development Settings and click Start Visual Studio
7 Close Visual Studio 2012
At this point Visual Studio 2012 RTM is installed
Install Office amp SharePoint 2013 Developer Tools
In this section you will install the Office and SharePoint 2013 developer tools for Visual Studio
1 Ensure you are logged into the WingtipServer VM using the account WINGTIPadministrator | Password1
2 Launch the Web Platform Installer Start All Programs Microsoft Web Platform Installer
3 In the search box at the top-right corner of the Web Platform Installer 40 window type sharepoint and press Enter
4 Click the Add button to the right of Microsoft Office Developer Tools for Visual Studio 2012 - Preview 2
5 Click the Install button at the bottom of the Web Platform Installer 40 window
6 On the Prerequisites page click I Accept
Creating a SharePoint Server 2013 Environment for Development and Testing Version 10
copy Critical Path Training 2012 All Rights Reserved 60
wwwCriticalPathTrainingcom
At this point you have installed the SharePoint 2013 amp Office 2013 development tools in Visual Studio 2012
Creating a SharePoint Server 2013 Environment for Development and Testing Version 10
copy Critical Path Training 2012 All Rights Reserved 61
wwwCriticalPathTrainingcom
Appendix 1 Download Manifest
The following lists everything referenced that you will or may need to download in this environment
Windows Server 2008 R2 with Service Pack 1 (installer ISO)
o httptechnetmicrosoftcomen-usevalcenterdd459137aspx
Windows Server 2008 R2 with Service Pack 1 (prebuilt VHD)
o httpwwwmicrosoftcomdownloadsdetailsaspxFamilyId=9040a4be-c3cf-44a5-9052-a70314452305
Windows Server 2008 R2 Service Pack 1
o httpwwwmicrosoftcomen-usdownloaddetailsaspxid=5842
SQL Server 2012 Trial
o httpwwwmicrosoftcombetaexperiencepdSQL2012EvalCTAenusdefaultaspx
SharePoint Server 2013
o httptechnetmicrosoftcomen-USevalcenterhh973397aspx
Hotfixes for SharePoint Server 2013 (post-install)
o KB2554876 The SharePoint Parsing Process Crashes in Windows Server 2008 R2
o KB2708075 IIS 75 Configurations are not Updated when you use the ServerManager Class to Commit
Configuration Changes
o KB2759112 Hotfix is Available for NET Framework 45 that Resolves an ASPNET Race Condition Issue in
Windows Server 2008 R2 Windows Server 2008 R2 SP1
o KB2765317 Hotfix is Available for NET Framework 45 that Resolves an ASPNET Race Condition Issue in
Windows 8 Windows RT and Windows Server 2012
Web Platform Installer
o httpwwwmicrosoftcomwebdownloadsplatformaspx
Web Platform Installer ndash Command Line Version
o httplearniisnetpageaspx1072web-platform-installer-v4-command-line-webpicmdexe-preview-release
Workflow Manager 10
o Download using the Microsoft Web Platform Installer
Office 2013
o httpwwwmicrosoftcomofficepreviewentry-office-preview
SharePoint Designer 2013
o httpwwwmicrosoftcomen-usdownloaddetailsaspxid=35491
Visio Professional 2013
o httptechnetmicrosoftcomen-usevalcenterhh973399
Visual Studio 2012
o httpwwwmicrosoftcomvisualstudio11en-usdownloads
Office Developer Tools for Visual Studio 2012 ndash Preview 2
o Download using the Microsoft Web Platform Installer
Creating a SharePoint Server 2013 Environment for Development and Testing Version 10
copy Critical Path Training 2012 All Rights Reserved 62
wwwCriticalPathTrainingcom
Appendix 2 Windows PowerShell Script Manifest
The following lists all Windows PowerShell scripts that are provided with this setup guide
AddDisableLoopbackCheckRegKeyps1
o The following steps automate creating the registry key outlined as Method 2 in the Microsoft Knowledgebase article
httpsupportmicrosoftcomkb896861 using Windows PowerShell This key DisableLoopbackCheck will allow
you to browse SharePoint sites on the same machine Without this key (or following Method 1 in the KB article) you
would need to browse any SharePoint sites from a different computer than the one which SharePoint is installed on
ConfigureSpFarmForAppsps1
o Configures a SharePoint 2013 for hosting apps This ensures everything you need is installed running and
configured This is documented here httpmsdnmicrosoftcomen-uslibraryfp179923(v=office15)
CreateSpServiceAccountsps1
o Creates the minimal necessary service accounts for SharePoint Server 2013 SP_Farm SP_Content amp
SP_Services
SetupSharePointForHNSCps1
o Configures a SharePoint 2013 install for hosting Host-Named Site Collections (HNSC) This involves creating a Web
Application in SharePoint that has no host header bindings Using DNS all requests are mapped to this Web
Application You then create the site collections via PowerShell as you cant create HNSCs via the browser (Central
Administration)
Creating a SharePoint Server 2013 Environment for Development and Testing Version 10
copy Critical Path Training 2012 All Rights Reserved 63
wwwCriticalPathTrainingcom
Appendix 3 Create Sample Adventure Works Database
The following steps document downloading and installing the sample Adventure Works OLTP database provided by Microsoft
1 Launch Internet Explorer and navigate to httpmsftdbprodsamplescodeplexcom
2 Download the Adventure Works 2012 OLTP Script
3 Extract the ZIP into a folder on the desktop
4 Launch SQL Server Management Studio Start All Programs Microsoft SQL Server 2012 SQL Server Management Studio
5 When SQL Server Management Studio launches within the Connect to Server dialog login using the default settings and click Connect
6 Within SQL Server Management Studio select File Open File
7 Select the file instawdbsql from the extracted ZIP and click Open
8 If prompted to re-login to the database engine do it
9 Select Query SQLCMD Mode
10 Scroll down to line 42 the line that starts with the following
setvar SqlSamplesSourceDataPath
11 Change the folder location of where you unzipped the Adventure Works 2012 OLTP Script
12 Select Query Execute
13 When the script completes the AdventureWorks2012 database will have been created
Creating a SharePoint Server 2013 Environment for Development and Testing Version 10
copy Critical Path Training 2012 All Rights Reserved 64
wwwCriticalPathTrainingcom
Change Log
Change Version Description
August 22 2012 v 01 Pre-release for review
August 27 2012 v 02 Initial public release ndash install guide based on SharePoint Server Beta 2
August 28 2012 v 03 Updated URL for the site collection used to connect SharePoint to WAW
August 31 2012 v 04 Typo Removed SQL Server Analysis Services as part of the install Not required in a
SharePoint dev box (unless you are doing business intelligence which is not covered
in the guide)
Updated all references to Windows Azure Workflow to Workflow Manager the new
official name for the new workflow product
Updated SetupSharePointForHNSCps1 script to lookup HNSC Web Application by
name rather than URL which is more reliable
Typo Updated WingtipAllUp public NIC to use a different IP than the WingtipDC
Typo Replaced a reference to WingtipServer with WingtipDC
Typo Fixed handful of minor typos
September 1 2012 v 05 Removed SQL Server Reporting Services from install guide
Added step to uncheck IErsquos ldquoAutomatically detect proxyrdquo
Added post workflow install steps to setup User Profile Service Application to sync with
local Active Directory
September 5 2012 v 06 Added step to create a default root site collection in the HNSC web app
Updated minor typos and added extra notes for context
Updated PowerShell script SetupSharePointForHNSCps1 to remove content
database of default Web Application when setting up HNSC Web App
Added a new exercise 8 (after SharePoint install amp config and before the Workflow
install and config) to setup support for My Sites
October 20 2012 v 07 Updated script SetupSharePointForHNSCps1 to fix a bug where it would fail on line
111 if you didnrsquot already have a WINGTIPSP_Content managed account
Added section to bypass SharePointrsquos check for crlmicrosoftcom
Updated workflowrsquos registration PowerShell script to point to
httpintranetwingtipcom
Switched order of post-SharePoint install to setup HSNC hosting before configuring for
hosting apps
November 29 2012
v 10 Changed setup guide to use a single VM instead of two VMs
Updated guide for SharePoint 2013 RTM
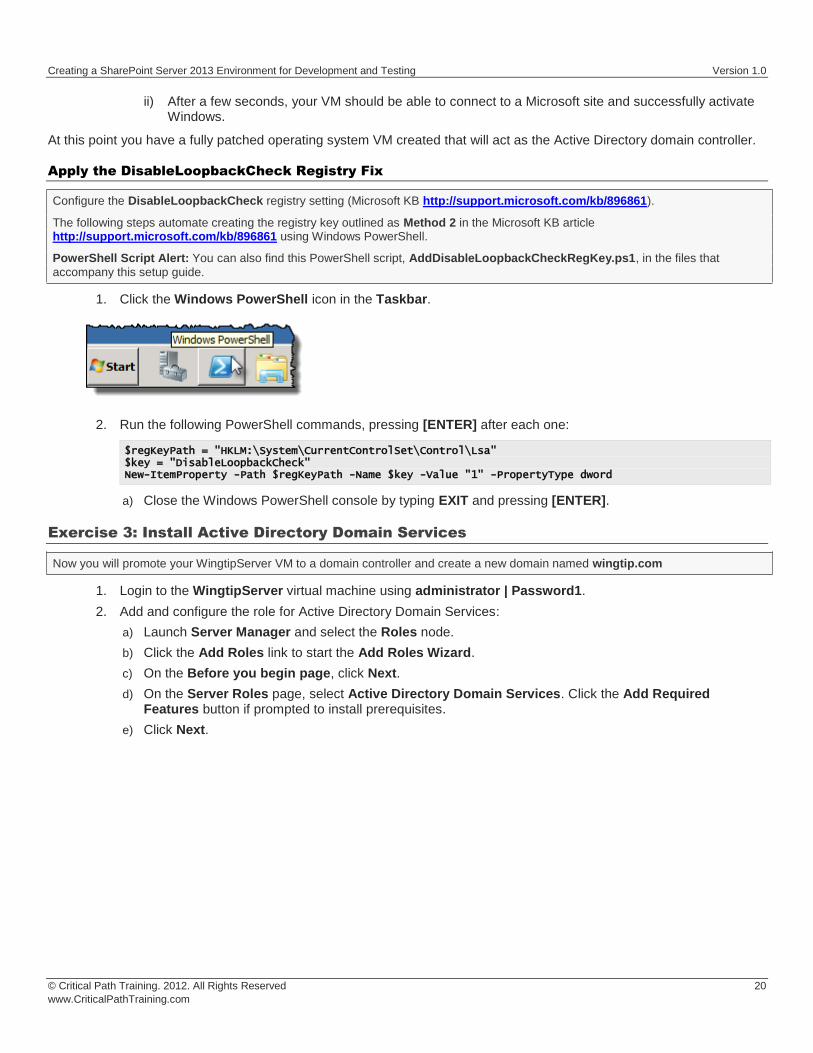
Creating a SharePoint Server 2013 Environment for Development and Testing Version 10
copy Critical Path Training 2012 All Rights Reserved 21
wwwCriticalPathTrainingcom
f) On the next page of the wizard click Next which will bring you to the Confirm Installation Selections page
g) Click Install
After Active Directory Domain Services has been installed you will see the Installation Results page in the Add Roles Wizard
3 Click on the link with the big long caption of Close this wizard and launch the Active Directory Domain Services Installation Wizard (dcpromoexe)
4 On the first page of the Active Directory Domain Services Installation Wizard click the Use Advanced Mode Installation checkbox and click Next
Creating a SharePoint Server 2013 Environment for Development and Testing Version 10
copy Critical Path Training 2012 All Rights Reserved 22
wwwCriticalPathTrainingcom
5 On the Operating System Compatibility page click Next
6 On the Choose a Deployment Configuration select Create a new domain in a new forest and click Next
7 On the Name the Forrest Root Domain enter the following and click Next
a) FQDN of the forest root domain wingtipcom
8 On the Domain NetBIOS Name set it to WINGTIP and click Next
9 On the Set Forest Functional Level page select Windows Server 2008 R2 and click Next
10 On the Additional Domain Controller Options accept the default options and click Next
11 You might be prompted with the dialog shown below providing a warning that This computer has dynamically assigned IP address(es) This is not a problem when you are running your development environment on a domain controller Click Yes to dismiss the dialog
12 At this point the wizard will prompt you with a dialog information you a delegation for the DNS Server cannot be created because it cannot find the authoritative parent zone This is not a problem because the wizard will automatically configure the DNS of the VM to point to itself Click on the Yes button to dismiss this dialog
Creating a SharePoint Server 2013 Environment for Development and Testing Version 10
copy Critical Path Training 2012 All Rights Reserved 23
wwwCriticalPathTrainingcom
13 On the Location for Database Log Files and SYSVOL page accept all the default values and click Next
14 On the Directory Services Restore Mode Administrator Password page enter Password1 in both textboxes and click Next
15 On the Summary page click Next to start the process of configuring the new Active Directory domain
16 The wizard will display the dialog below to show you the progress of the configuration process You will be required to reboot when the configuration has been completed Check the option for Reboot on completion and then wait for the configuration to complete and the machine to reboot
17 After the VM reboots login to the server with wingtipadministrator | Password1
Configure Windows Update and Update the Server
In this section you will verify the server is fully patched and updated
1 Update the server using Windows Update
a) Selecting Start All Programs Windows Update
b) Select the Check for Updates link
c) Windows Update will the report how many updates are available Select all important and recommended updates and click the Install Updates button
d) If prompted select I accept the license terms for any updates that require it
e) Keep running Windows Update after each reboot and update install until it says there are no updates left to install
Creating a SharePoint Server 2013 Environment for Development and Testing Version 10
copy Critical Path Training 2012 All Rights Reserved 24
wwwCriticalPathTrainingcom
This step could take quite a bit of time so be patient
At this point you have a fully installed Active Directory Domain Controller for the Wingtipcom domain hosted on the server WingtipServer
Exercise 4 Install SQL Server 2012
In this exercise you will install SQL Server 2012 that will be used to store all required databases
1 Download the SQL Server 2012 Evaluation Edition specifically the DVD x64 ISO image to the host computer from here httpwwwmicrosoftcombetaexperiencepdSQL2012EvalCTAenusdefaultaspx or you can use your own licensed copy
2 Mount the SQL Server 2012 ISO to the WingtipServer VM
a) On the host computer open the Hyper-V Manager
b) Right-click the VM WingtipServer and select Settings
c) Select DVD Drive in the left-hand panel
d) In the right-hand panel select Image File and browse to the ISO file that contains SQL Server 2012 and click OK
3 Login to the WingtipServer VM as wingtipadministrator | Password1
Install SQL Server 2012
In this section you will install SQL Server 2012
1 If the AutoPlay dialog box is open click Run SETUPEXE If it isnrsquot use Windows Explorer to navigate to the DVD drive and execute the setupexe file in the root of the DVD drive
2 In the SQL Server Installation Center click Installation on the left-hand side
Creating a SharePoint Server 2013 Environment for Development and Testing Version 10
copy Critical Path Training 2012 All Rights Reserved 25
wwwCriticalPathTrainingcom
3 Next select New SQL Server stand-alone installation or add features to an existing installation
4 On the Setup Support Rules page the installer will check for issues before installing Click OK
5 On the Product Key page click the Specify a free edition radio box and select Evaluation then click Next
6 On the License Terms page click the I accept the license terms checkbox and click Next
7 On the Setup Support Rules page the installer will check for any problems with the server you are installing on Click Next when this completes
Creating a SharePoint Server 2013 Environment for Development and Testing Version 10
copy Critical Path Training 2012 All Rights Reserved 26
wwwCriticalPathTrainingcom
8 On the Support Role page select SQL Server Feature Installation and click Next
9 On the Feature Selection page check the following options and click Next
a) Instances Features
i) Database Engine Services
(1) Full-Text and Semantic Extractions for Search
b) Shared Features
i) Management Tools ndash Basic
(1) Management Tools ndash Complete
Creating a SharePoint Server 2013 Environment for Development and Testing Version 10
copy Critical Path Training 2012 All Rights Reserved 27
wwwCriticalPathTrainingcom
10 On the Installation Rules page click Next
11 On the Instance Configuration page click Next
12 On the Disk Space Requirements page click Next
13 On the Server Configuration page do the following and click Next
a) On the Service Account tab change the Startup Type for the SQL Server Agent to Automatic
14 On the Database Engine Configuration page do the following and click Next
a) On the Server Configuration tab click Add Current User
b) On the FILESTREAM tab
i) Check Enable FILESTREAM for Transact-SQL Access
ii) Check Enable FILESTREAM for file IO access
15 On the Error Reporting page click Next
16 On the Installation Configuration Rules page click Next
17 On the Ready to Install page click Install
Installation of SQL Server 2012 will take some time please be patient
18 When the installation completes the Complete page will be shown Click Close
At this point you have now successfully installed SQL Server 2012
Creating a SharePoint Server 2013 Environment for Development and Testing Version 10
copy Critical Path Training 2012 All Rights Reserved 28
wwwCriticalPathTrainingcom
Exercise 5 Install amp Configure SharePoint Server 2013
In this exercise you will install SharePoint 2013
1 Download the SharePoint Server 2013 to the host computer from here httptechnetmicrosoftcomen-USevalcenterhh973397aspx
2 Mount the SharePoint Server 2013 ISO to the WingtipServer VM
a) On the host computer open the Hyper-V Manager
b) Right-click the VM WingtipServer and select Settings
c) Select DVD Drive in the left-hand panel
The file that Microsoft provides is saved in the IMG format Hyper-V Manager wonrsquot allow you to mount an IMG file so rename it to ISO before mounting it
d) In the right-hand panel select Image File and browse to the ISO file that contains SharePoint Server 2013 and click OK
Create SharePoint Service Accounts amp Grant Rights to SQL Server 2012
In this section you will create the necessary service accounts that will be used by SharePoint in Active Directory and grant them necessary rights in SQL Server 2012
PowerShell Script Alert The creation of users and granting them rights to SQL Server 2012 steps in this section are automated in the Windows PowerShell script CreateSpServiceAccountsps1 found in the files that accompany this setup guide Open the script
and read the header for documentation on how to use it
1 Open the Active Directory Users and Computers Start Administrative Tools Active Directory Users and Computers
2 Expand the tree in the left-hand pane to see the Users OU Select the Users OU
3 Create a new user SP_Farm
a) In the toolbar select Action New User
Creating a SharePoint Server 2013 Environment for Development and Testing Version 10
copy Critical Path Training 2012 All Rights Reserved 29
wwwCriticalPathTrainingcom
b) Set the userrsquos Full Name amp User Login Name to SP_Farm and click Next
c) In the password dialog enter the following and click Next
i) Password (and Confirm Password) Password1
ii) User must change password at next login unchecked
iii) User cannot change password unchecked
iv) Password never expires checked
v) Account is disabled unchecked
Creating a SharePoint Server 2013 Environment for Development and Testing Version 10
copy Critical Path Training 2012 All Rights Reserved 30
wwwCriticalPathTrainingcom
vi) Click Finish
4 Repeat the previous step to create two more accounts
a) SP_Content
b) SP_Services
At this point you have created all the necessary service accounts
Install SharePoint Server 2013 Prerequisites
In this section you will install the SharePoint Server 2013 Prerequisites
1 Ensure you are logged into the WingtipServer VM using the account wingtipadministrator | Password1
2 If the AutoPlay dialog box is open click Run splashhta If it isnrsquot use Windows Explorer to navigate to the DVD drive and execute the splashhta file in the root of the DVD drive
Creating a SharePoint Server 2013 Environment for Development and Testing Version 10
copy Critical Path Training 2012 All Rights Reserved 31
wwwCriticalPathTrainingcom
3 Click the Install Software Prerequisites link
4 In the Microsoft SharePoint 2013 Products Preparation Tool window click Next
5 On the License Terms for Software Products page
a) Check I accept the terms of the License Agreement(s)
b) Click Next
6 The tool will download and install all prerequisites for SharePoint Server 2013 This will take some time It may prompt you to reboot the server If so reboot the server and login using wingtipadministrator | Password1
Creating a SharePoint Server 2013 Environment for Development and Testing Version 10
copy Critical Path Training 2012 All Rights Reserved 32
wwwCriticalPathTrainingcom
7 When the prerequisite installer is complete it will present a summary of everything it did
8 Click Finish
9 Restart the WingtipServer VMhellip some additional installations and changes that the prerequisite installer did will require a restart before installing SharePoint Server 2013
At this point all prerequisites required by SharePoint Server 2013 have been installed and any necessary configuration changes have been applied to the server However it is strongly recommend that you run Windows Update and install any pending updates Further Microsoft recommends installing the following hotfixes if they are not already installed
KB2554876 The SharePoint Parsing Process Crashes in Windows Server 2008 R2
KB2708075 IIS 75 Configurations are not Updated when you use the ServerManager Class to Commit Configuration Changes
KB2759112 Hotfix is Available for NET Framework 45 that Resolves an ASPNET Race Condition Issue in Windows Server 2008 R2 Windows Server 2008 R2 SP1
KB2765317 Hotfix is Available for NET Framework 45 that Resolves an ASPNET Race Condition Issue in Windows
8 Windows RT and Windows Server 2012
Install SharePoint Server 2013
In this section you will install SharePoint Server 2013
1 Ensure you are logged into the WingtipServer VM using the account wingtipadministrator | Password1
2 If the AutoPlay dialog box is open click Run splashhta If it isnrsquot use Windows Explorer to navigate to the DVD drive and execute the splashhta file in the root of the DVD drive
Creating a SharePoint Server 2013 Environment for Development and Testing Version 10
copy Critical Path Training 2012 All Rights Reserved 33
wwwCriticalPathTrainingcom
3 Click Install SharePoint Server
4 When prompted to Enter your Product Key enter the key you obtained for the trial install and click Continue
5 On the Read the Microsoft Software License Terms page check the I accept the terms of this agreement checkbox and click Continue
6 On the Choose a file location page click Install Now
Creating a SharePoint Server 2013 Environment for Development and Testing Version 10
copy Critical Path Training 2012 All Rights Reserved 34
wwwCriticalPathTrainingcom
7 When the installation is complete select the Run the SharePoint Products Configuration Wizard checkbox and click Close
8 On the Welcome to SharePoint Products page click Next
a) If prompted to start or reset services click Yes
9 On the Connect to a server farm page select Create a new server farm and click Next
10 On the Specify Configuration Database Settings page use the following to complete the page and click Next
a) Database server WINGTIPSERVER
b) Database name SharePoint_Config
c) Username WINGTIPSP_Farm
d) Password Password1
Creating a SharePoint Server 2013 Environment for Development and Testing Version 10
copy Critical Path Training 2012 All Rights Reserved 35
wwwCriticalPathTrainingcom
11 On the Specify Farm Security Settings page for the Passphrase and Confirm Passphrase boxes enter Password1 and click Next
12 On the Configure SharePoint Central Administration Web Application page check the Specify port number checkbox and enter a value of 9999 then Click Next
Creating a SharePoint Server 2013 Environment for Development and Testing Version 10
copy Critical Path Training 2012 All Rights Reserved 36
wwwCriticalPathTrainingcom
13 On the Completing the SharePoint Products Configuration Wizard page click Next
14 When the installer completes it will display the Confirmation Successful page
15 Click Finish This will launch Internet Explorer to go through the configuration process
Creating a SharePoint Server 2013 Environment for Development and Testing Version 10
copy Critical Path Training 2012 All Rights Reserved 37
wwwCriticalPathTrainingcom
At this point you have successfully installed SharePoint Server 2013
Configure SharePoint Server 2013
In this section you will create a new SharePoint Server 2013 farm and perform minimal configuration tasks
After installing SharePoint Sever 2013 the SharePoint Products Configuration Wizard will launch the browser-based Initial Farm Configuration Wizard
1 In the first page of the wizard you are prompted to Help Make SharePoint Better Select which ever option you want and click OK
2 On the Welcome page that asks How do you want to configure your SharePoint farm click the Start the Wizard button
3 On the Services page do the following and then click Next
a) Service Account Select Create new managed account
i) Username WINGTIPSP_Services
ii) Password Password1
b) Services Uncheck the following services
Creating a SharePoint Server 2013 Environment for Development and Testing Version 10
copy Critical Path Training 2012 All Rights Reserved 38
wwwCriticalPathTrainingcom
i) Access Services 2010
ii) App Management Service
In SharePoint Server 2013 the Search Service Application processes specifically noderunnerexe can consume a considerable amount of memory and processor time If you are not going to work with search you might consider unchecking this option for now You can always go back into Central Administration and create a new instance of the Search Service Application at a later date if you need it
Why did we remove Access Services 2010 amp App Management Service service applications The Access Services 2010 service application is included for backwards compatibility and isnrsquot needed in new installations unless you are migrating solutions built with Access Services 2010 from SharePoint Server 2010 (if so you can create this service application later within Central Administration Application Management Manage Service Applications) The App Management Service service application will be created in a later step in this setup guide therefor it is skipped here
4 The creation of the service applications can take quite a while so be patient If it exceeds 20 minutes it is fairly safe to assume the page is hung up One option is to close the browser then launch Central Administration (Start All Programs Microsoft SharePoint 2013 Products SharePoint 2013 Central Administration) and look at the Service Application page (Application Management Manage Service Applications) to see if they were all created
Configure DNS
In this section you will configure DNS for hosting SharePoint sites amp Apps
1 Ensure you are logged into the WingtipServer VM using the account wingtipadministrator | Password1
2 Open the DNS window Start Administrative Tools DNS
3 Expand the hierarchy on the left-hand side of the window until you get to DNS WINGTIPSERVER Forward Lookup Zones wingtipcom
4 Create a new wildcard so all requests for http[]wingtipcom will be forwarded to our SharePoint machine
a) Next right-click wingtipcom and select New Host (A or AAAA)
Creating a SharePoint Server 2013 Environment for Development and Testing Version 10
copy Critical Path Training 2012 All Rights Reserved 39
wwwCriticalPathTrainingcom
b) In the New Host dialog enter the following and click OK
i) Alias Name
ii) IP Address 192168150102 Then click Add Host The following figure shows how this looks
This new record is telling DNS to forward any request for http[]wingtipcom to the webserver WINGTIPSERVER where the
requests will be served by SharePoint
5 Verify this DNS entry is working
a) Open Windows PowerShell Start All Programs Accessories Windows PowerShell Windows PowerShell
b) Run the following commands and press ENTER
PS CUsersAdministratorgt nslookup somethingwingtipcom PS CUsersAdministratorgt nslookup somethingappswingtipcom
c) You should get a response that points to the WingtipServer server as shown in the following figure
Creating a SharePoint Server 2013 Environment for Development and Testing Version 10
copy Critical Path Training 2012 All Rights Reserved 40
wwwCriticalPathTrainingcom
Configure SharePoint Server 2013 for Host-Named Site Collections amp Create Initial Site
Collections
In this section you will create new SharePoint 2013 site collections for testing and hosting apps
Microsoft recommends to create host-named site collections (HNSC) instead of using the path based site collection addressing The difference is the following a path based site created at something such as httpintranetwingtipcomsitesdevtest as an HNSC site would be more like httpdevtestwingtipcom This is how it works in the cloud (Office 365) and it scales much better for on-prem
deployments This setup guide will show you how to setup your environment to create HNSC The only downside to this approach is that you canrsquot create site collections within Central Administration it must be done via Windows PowerShell API (because Central Administration doesnrsquot instruct you where to put the site
This is implemented in various parts First DNS must be configured to send all requests for httpwingtipcom to a Web Application
(implemented in the last section) Second this Web Application must be extended with SharePoint and have no host header bindings (so it handles all requests) Third it must have a default site collection at the root of the Web Application but it will not be used for anything (in fact it doesnrsquot need a template assigned to it)
You can read more about HNSCrsquos on TechNet httptechnetmicrosoftcomen-uslibrarycc424952aspx
PowerShell Script Alert The steps in this section are automated in the script SetupSharePointForHNSCps1 found in the files that
accompany this setup guide Open the script and read the header for documentation on how to use it
1 Ensure you are logged into the WingtipServer VM using the account wingtipadministrator | Password1
2 Open Central Administration Start All Programs Microsoft SharePoint 2013 Products SharePoint 2013 Central Administration
3 Select Application Management Manage Web Applications
4 Delete the default Web Application created by the configuration wizard
a) Delete the existing default Web Application
i) Select the Web Application SharePoint ndash 80 the one with the URL of httpwingtipserver and click Delete in the ribbon
ii) When prompted to delete the associated IIS Web Site amp SQL Server database select both options to delete them and click OK
The reason you are doing this is because the setup wizard you ran previously when creating the service applications automatically created it The problem is that it used the same identity (WINGTIPSP_Services) for the app pool that is used for all the service
applications which is not desired
5 Create a new Web Application to handle Host-Named Site Collections (HNSC)
Creating a SharePoint Server 2013 Environment for Development and Testing Version 10
copy Critical Path Training 2012 All Rights Reserved 41
wwwCriticalPathTrainingcom
a) In the ribbon click the New button
b) In the Create New Web Application dialog enter the following values in the properties and click OK Leave all properties not mentioned
i) Select the radio button Create a new IIS web site
(1) Name SharePoint HNSC Host ndash 80
(2) Port 80
ii) Application Pool
(1) Select the radio button Create a new application pool
(a) Application Pool Name SharePoint Default HNSC AppPool
(b) Select a security account for this application pool WINGTIPSP_Content
If WINGTIPSP_Content is not listed as an available managed account create it by selecting the appropriate option and using
Password1 for the password
iii) Database Name and Authentication
(1) Database Name WSS_Content_HNSCDefaultHost
c) This process will take a few moments At the end of the process SharePoint will ask if you want to create a site collection You do but you donrsquot want to do it through the browser as this will not be a HNSC To create a HNSC you must create it via Windows PowerShell
6 Create a default not template site collection at the root of the web application
a) Open SharePoint 2013 Management Shell Start All Programs Microsoft SharePoint 2013 Products SharePoint 2013 Management Shell
7 Create Site Collections for Testing SharePoint amp SharePoint Apps
a) Open SharePoint 2013 Management Shell Start All Programs Microsoft SharePoint 2013 Products SharePoint 2013 Management Shell
b) Get a reference to the HNSC web application you just created by running the following Windows PowerShell script in the SharePoint 2013 Management Shell
$hnscWebApp = Get-SPWebApplication | Where-Object $_DisplayName -eq SharePoint HNSC Host - 80
c) Create a non-templated site at the root of the web application for Workflow to connect to by executing the following Windows PowerShell script in the SharePoint 2013 Management Shell
New-SPSite -Name Root HNSC Site Collection -Url httpwingtipcom -HostHeaderWebApplication $hnscWebApp -OwnerAlias WINGTIPAdministrator
d) Create a team site by executing the following Windows PowerShell script in the SharePoint 2013 Management Shell
New-SPSite -Name Wingtip Intranet -Url httpintranetwingtipcom ndashHostHeaderWebApplication $hnscWebApp -Template STS0 -OwnerAlias WINGTIPAdministrator
e) Create a developer site by executing the following Windows PowerShell script in the SharePoint 2013 Management Shell
New-SPSite -Name Wingtip Developer Site -Url httpdevwingtipcom ndashHostHeaderWebApplication $hnscWebApp -Template DEV0 -OwnerAlias WINGTIPAdministrator
You can only create debug and test apps using a developer site
At this point you now have a site collection to use as a team site (httpintranetwingtipcom) and to develop and test custom SharePoint apps (httpdevwingtipcom)
Creating a SharePoint Server 2013 Environment for Development and Testing Version 10
copy Critical Path Training 2012 All Rights Reserved 42
wwwCriticalPathTrainingcom
Configure SharePoint 2013 for Hosting Apps
In this setup you will setup your SharePoint 2013 environment for hosting apps
PowerShell Script Alert Everything in the next immediate step is provided in the script ConfigureSpFarmForAppsps1 found in the
files that accompany this setup guide Open the script and read the header for documentation on how to use it
1 Ensure you are logged into the WingtipServer VM using the account wingtipadministrator | Password1
2 Create the necessary SharePoint App Management service applications and start the necessary services via Windows PowerShell
a) Open SharePoint 2013 Management Shell Start All Programs Microsoft SharePoint 2013 Products SharePoint 2013 Management Shell
b) Execute the following Windows PowerShell script in the SharePoint 2013 Management Shell
$appHostDomain = appswingtipcom $adminService = Get-Service -Name spadminv4 if ($adminServiceStatus -ne Running) Start-Service $adminService $timerService = Get-Service -Name sptimerv4 if ($timerServiceStatus -ne Running) Start-Service $timerService Set-SPAppDomain $appHostDomain $appMgmtSvcInstance = Get-SPServiceInstance | Where-Object $_GetType()Name -eq AppManagementServiceInstance if ($appMgmtSvcInstanceStatus -ne Online) Start-SPServiceInstance -Identity $appMgmtSvcInstance $appSubSettingSvcInstance = Get-SPServiceInstance | Where-Object $_GetType()Name -eq SPSubscriptionSettingsServiceInstance if ($appSubSettingSvcInstanceStatus -ne Online) Start-SPServiceInstance -Identity $appSubSettingSvcInstance $appPoolServiceApps = Get-SPServiceApplicationPool -Identity SharePoint Web Services Default $appSubSvc = New-SPSubscriptionSettingsServiceApplication ndashApplicationPool $appPoolServiceApps ndashName Settings Service Application ndashDatabaseName SettingsServiceDB $proxySubSvc = New-SPSubscriptionSettingsServiceApplicationProxy ndashServiceApplication $appSubSvc $appAppSvc = New-SPAppManagementServiceApplication -ApplicationPool $appPoolServiceApps -Name App Management Service Application -DatabaseName AppServiceDB $proxyAppSvc = New-SPAppManagementServiceApplicationProxy -ServiceApplication $appAppSvc Set-SPAppSiteSubscriptionName -Name app -Confirm$false
3 Verify the script configured SharePoint 2013 for hosting apps
a) Open Central Administration Start All Programs Microsoft SharePoint 2013 Products SharePoint 2013 Central Administration
b) Verify service applications created
i) Open the Service Applications page Application Management Manage Service Applications
ii) Verify you have two service applications created
(1) App Management Service Application
(2) Settings Service Application
c) Verify service instances are running
i) Open the Services on Server page System Settings Manage Services on Server
ii) Verify the following services are Started
(1) App Management Service
(2) Microsoft SharePoint Foundation Subscription Settings Service
Creating a SharePoint Server 2013 Environment for Development and Testing Version 10
copy Critical Path Training 2012 All Rights Reserved 43
wwwCriticalPathTrainingcom
d) Verify App URLs are correct
i) Open the Configure App URLs page Apps Configure app URLs
ii) Verify the following
(1) App Domain appswingtipcom
(2) App Prefix app
At this point your SharePoint Server 2013 environment is ready to host SharePoint apps
Creating a SharePoint Server 2013 Environment for Development and Testing Version 10
copy Critical Path Training 2012 All Rights Reserved 44
wwwCriticalPathTrainingcom
Start the SharePoint 2013 Sandbox Service
By default the service that executes sandbox solutions is not running In this step you will start the service
1 Open Central Administration Start All Programs Microsoft SharePoint 2013 Products SharePoint 2013 Central Administration
2 Open the Services on Server page System Settings Manage Services on Server
3 Click the Start link to the left of the Microsoft SharePoint Foundation Sandboxed Code Service
At this point your installation can support sandbox solutions
Configure CRL Verification for Disconnected Environments
SharePoint periodically ldquophones homerdquo to a specific address hosted by Microsoft under certain conditions When your environment is disconnected this can cause an unnecessary delay or failures when starting up the sandbox The following steps outline a workaround to bypass this check
1 Launch Notepad as an administrator Start All Programs Accessories right-click Notepad and select Run as Administrator
2 Open the hosts file by selecting File Open and finding the file
cWindowsSystem32Driversetchosts
3 Add the following line to the end of the file
127001 crlmicrosoftcom
4 Save and close the hosts file
Update Internet Explorer to Bypass the App URL amp Automatically Login to SharePoint Sites
In this section you will update Internet Explorer to add the App hosting URL to the bypass list so you can navigate to the domain after deploying SharePoint hosted apps
1 Ensure you are logged into the WingtipServer VM using the account wingtipadministrator | Password1
1 Launch Internet Explorer Start All Programs Internet Explorer
2 Configure Internet Explorer to bypass the App URL
a) In the top-right corner click the gear icon and select Internet Options
b) On the Security tab select the Local Intranet and click the Sites button
c) Uncheck the box next to Automatically detect intranet network
d) Click the Advanced button and add two entries to the Exceptions list
i) httpwingtipcom
ii) httpappswingtipcom
Creating a SharePoint Server 2013 Environment for Development and Testing Version 10
copy Critical Path Training 2012 All Rights Reserved 45
wwwCriticalPathTrainingcom
e) Click the Close button followed by the OK button multiple times to close out of the dialogs
At this point Internet Explorer is setup to bypass your app URL so you can navigate to apps (httpappswingtipcom) as well as automatically authenticate to sites hosted at httpwingtipcom
Exercise 6 Configure SharePoint to Host My Sites
In this exercise you will configure SharePoint to create and host My Sites In order to host My Sites you will need a new Web Application that is configured for Self-Service Site Creation and has a My Site Host site collection
1 Create a new SharePoint web application to host the My Sites
a) Ensure you are logged into the WingtipServer VM using the account wingtipadministrator | Password1
b) Open Central Administration Start All Programs Microsoft SharePoint 2013 Products SharePoint 2013 Central Administration
c) Select Application Management Manage Web Applications
d) In the ribbon click the New button
e) In the Create New Web Application dialog enter the following values in the properties and click OK Leave all properties not mentioned
i) Select the radio button Create a new IIS web site
(1) Name SharePoint MySite Host ndash 80
(2) Port 80
(3) Host Header mywingtipcom
ii) Application Pool
(1) Select the radio button Use existing application pool
(a) Application Pool Name SharePoint Default HNSC AppPool
iii) Database Name and Authentication
(1) Database Name WSS_Content_SocialWingtipCom
f) This process will take a few moments At the end of the process SharePoint will ask if you want to create a site collection Click the link provided to create a new site collection amp continue to the next step
2 Create a My Site Host site collection
a) On the Create Site Collection page use the following information to complete the form and click OK
Creating a SharePoint Server 2013 Environment for Development and Testing Version 10
copy Critical Path Training 2012 All Rights Reserved 46
wwwCriticalPathTrainingcom
i) Title My Site Host
ii) URL
iii) Template Selection My Site Host (found under the Enterprise tab)
iv) Primary Site Collection Administrator WINGTIPAdministrator
3 Update the Web Application to host my sites
a) Within Central Administration in the left-hand navigation navigate to the Manage Web Applications page Application Management Manage Web Applications
b) Select the SharePoint MySite Host ndash 80 web application
c) Click the Managed Paths button in the ribbon
d) Remove the sites managed path and add two new managed paths and click OK
i) personal ndash Wildcard inclusion
ii) my ndash Explicit inclusion
e) With the SharePoint MySite Host ndash 80 web application still selected click the Self-Service Site Creation button
f) On the Self-Service Site Creation page use the following values to complete the form and click OK
i) Site Collections On
4 Next configure the User Profile Service Application My Site settings
a) Browse to the User Profile Service Application management page Application Management Manage Service Applications User Profile Service Application
b) Under the My Site Settings section click the Setup My Sites
c) On the My Site Settings page use the following information to complete the form and click OK
i) My Site Host httpmywingtipcom
ii) Personal Site Location personal
At this point your SharePoint deployment is now configured to automatically create My Sites under httpmywingtipcomPersonalUserName when users first browse to them
Exercise 7 Install amp Configure Workflow Manager 10
In this exercise you will configure the WingtipServer VM to host Workflow Manager 10 and connect it to your SharePoint installation
1 Ensure you are logged into the WingtipServer VM using the account wingtipadministrator | Password1
Verify SQL Server 2012 Network Configuration
In this section yoursquoll verify the network configuration is correct for SQL Server 2012 in order to install Workflow Manager 10
Creating a SharePoint Server 2013 Environment for Development and Testing Version 10
copy Critical Path Training 2012 All Rights Reserved 47
wwwCriticalPathTrainingcom
1 Configure SQL Server 2012 to have the TCPIP connection protocol enabled
a) Open the SQL Server Configuration Manager Start All Programs Microsoft SQL Server 2012 Configuration Tools SQL Server Configuration Manager
b) Expand the hierarchy on the left-hand side to the following SQL Server Connection Manager (local) SQL Server Network Configuration Protocols for MSSQLSERVER
c) In the main window if TCPIP is Disabled right-click TCPIP and select Enable
d) When prompted with a warning click OK
2 SQL Server must be restarted in order to reflect this change
a) In the hierarchy on the left-hand side of the window select SQL Server Services
b) Right-click SQL Server (MSSQLSERVER) and select Restart
At this point SQL Server is now configured with the TCPIP protocol enabled a requirement when configuring Service Bus
Configure the Workflow Service Account with the Necessary Rights
In this section you will verify the service account that will run Workflow Manager and Service Bus
1 Ensure you are logged into the WingtipServer VM using the account WINGTIPadministrator | Password1
2 Grant the WINGTIPSP_Content account securityadmin amp dbcreator permissions in SQL Server
a) Launch SQL Server Management Studio Start All Programs Microsoft SQL Server 2012 SQL Server Management Studio
b) When SQL Server Management Studio launches within the Connect to Server dialog login using the default settings and click Connect
c) In the Object Explorer tool window expand the WINGTIPSERVER server hierarchy to the Security Logins node
d) Find the WINGTIPSP_Content account right-click it and select Properties
Creating a SharePoint Server 2013 Environment for Development and Testing Version 10
copy Critical Path Training 2012 All Rights Reserved 48
wwwCriticalPathTrainingcom
e) In the Select a page pane select Server Roles
f) Check securityadmin amp dbcreator and click OK
g) Close SQL Server Management Studio
3 Add the Workflow service account to the local administrators group
a) Open the Active Directory Users and Computers window Start Administrative Tools Active Directory Users and Computers
b) In the hierarchy on the left-hand side of the window expand it to the following Active Directory Users and Computers wingtipcom Builtin
c) In the main window right-click Administrators and select Properties
d) In the Administrators Properties dialog select the Members tab and click Add
e) In the Enter the object names to select box enter wingtipsp_content and click the Check Names button
f) In the Administrators Properties dialog click OK
g) Close the Active Directory Users and Computers window
At this point the service account that will host Workflow Manager and Service Bus has been configured correctly
Creating a SharePoint Server 2013 Environment for Development and Testing Version 10
copy Critical Path Training 2012 All Rights Reserved 49
wwwCriticalPathTrainingcom
Download amp Install Workflow Manager and Service Bus
In this section you will install Workflow Manager and Service Bus
1 Ensure you are logged into the WingtipServer VM using the account WINGTIPSP_Content | Password1
It is important you are logged in as the user that will run workflow when you install amp configure Workflow Manager and Service Bus
2 Launch the Web Platform Installer Start All Programs Microsoft Web Platform Installer
a) If the Web Platform Installer is not present on your machine you can download amp install it from here httpwwwmicrosoftcomwebdownloadsplatformaspx
If you do not have internet access within the virtual machine it is possible to download everything needed for workflow using the command line version of the Web Platform Installer (WebPICMD) You can get WebPICMD from httplearniisnetpageaspx1072web-platform-installer-v4-command-line-webpicmdexe-preview-release Specifically for
workflow enter the following command to download Workflow Beta 1 and all prerequisites
webpicmd offline ProductsWorkflow Pathc[path]
3 When the Web Platform Installer loads execute a search for Workflow select Workflow Manager 10 and click Add
4 Click the Install button at the bottom of the Web Platform Installer 40 window
5 On the Prerequisites page click I Accept
Note The Web Platform Installer 40 may prompt you to keep certain products updated using Microsoft Update If it does select Use Microsoft Update when I check for updates (recommended) and click Continue
6 When the installer completes the following dialog will appear Click Continue and then Finish to start the configuration process
Creating a SharePoint Server 2013 Environment for Development and Testing Version 10
copy Critical Path Training 2012 All Rights Reserved 50
wwwCriticalPathTrainingcom
At this point Workflow Manager amp Service Bus are installed
Configure Workflow Manager and Service Bus
In this section you will install Workflow Manager and Service Bus
1 If the Workflow Manager Configuration Wizard is not open open it Start All Programs Workflow Manager 10 Workflow Configuration
2 On the Welcome page click Configure Workflow Manager with Default Settings (Recommended)
Creating a SharePoint Server 2013 Environment for Development and Testing Version 10
copy Critical Path Training 2012 All Rights Reserved 51
wwwCriticalPathTrainingcom
3 On the New Farm Configuration page do the following
a) In the section Configure Service Account set the credentials to
i) User ID sp_contentwingtipcom
ii) Password Password1
b) Check the Allow Workflow management over HTTP on this computer checkbox
Ensure the username is entered in the fully qualified UPN format not as the default shows in the installer (sp_contentwingtip) or the domainusername format
In a production environment you should be doing everything over SSL
c) Click the Test Connection button to verify the connection credentials before proceeding
Creating a SharePoint Server 2013 Environment for Development and Testing Version 10
copy Critical Path Training 2012 All Rights Reserved 52
wwwCriticalPathTrainingcom
d) In the Certificate Generation Key and Confirm Certificate Generation Key enter Password1 into both fields
4 Click the right arrow in the bottom right corner to proceed
5 On the Summary page review your settings and click the check at the bottom right of the widow to start the configuration process
Creating a SharePoint Server 2013 Environment for Development and Testing Version 10
copy Critical Path Training 2012 All Rights Reserved 53
wwwCriticalPathTrainingcom
6 After a few minutes the Configuration Progress screen will show that everything has been configured correctly
Creating a SharePoint Server 2013 Environment for Development and Testing Version 10
copy Critical Path Training 2012 All Rights Reserved 54
wwwCriticalPathTrainingcom
7 Click the check in the bottom right corner
At this point Workflow Manager amp Service Bus has been installed and a new Workflow Manager farm has been created The next step is to connect the SharePoint 2013 farm to the Workflow Manager farm
Connect SharePoint 2013 to Workflow Manager
In this section you will connect SharePoint 2013 and Workflow Manager together
1 Ensure you are logged into the WingtipServer VM using the account WINGTIPadministrator | Password1
2 Get the Workflow Manager endpoint
a) Open the Workflow Manager PowerShell console Start All Programs Workflow Manager 10
b) Execute the Windows PowerShell following cmdlet
Get-WFFarm | ft HttpPort
c) Take note of this port (12291) This port number is what you will use to connect the SharePoint 2013 farm to the Workflow Manager 10 farm
In production you should connect to the HTTPS port listed in the HttpsPort property when you run Get-WFFarm
d) Close the Workflow Manager PowerShell window
3 Connect the SharePoint 2013 farm to Workflow Manager
Creating a SharePoint Server 2013 Environment for Development and Testing Version 10
copy Critical Path Training 2012 All Rights Reserved 55
wwwCriticalPathTrainingcom
a) Open SharePoint 2013 Management Shell Start All Programs Microsoft SharePoint 2013 Products SharePoint 2013 Management Shell
b) Execute the following Windows PowerShell script in the SharePoint 2013 Management Shell
Register-SPWorkflowService ndashSPSite httpintranetwingtipcom ndashWorkflowHostUri httpwingtipserver12291 ndashAllowOAuthHttp
This script is telling SharePoint the endpoint it should use to talk to Workflow Manager as well as Workflow Manager the SharePoint site collection it should talk to for calls into the CSOM It is also configuring all communication over HTTP rather than HTTPS for performance reasons In production you should always use HTTPS
This step will take a moment with no feedback during the process Be patient
c) Close the SharePoint 2013 Management Shell
At this point the SharePoint 2013 farm is connected to the Workflow Manager 10 farm
Configure SharePoint User Profile Service Application AD Sync
Users in SharePoint 2013 are validated by Workflow Manager against SharePoint to ensure they have permissions to start a workflow This is done by looking up the user by their AD UserPrincipalName (UPN) attribute in the User Profile Service Application (UPA) If no matching user is found the workflow will be automatically cancelled by Workflow Manager In this section you will setup UPA to connect amp sync with the local Active Directory so user accounts in AD will have their UPN synchronized to UPA
1 Open Central Administration Start All Programs Microsoft SharePoint 2013 Products SharePoint 2013 Central Administration
2 Go to the User Profile Service Application management page Application Management Manage Service Applications User Profile Service Application
3 The first step is to configure the User Profile Service Application to allow for Active Directory (AD) synchronization
a) Under Synchronization select Configure Synchronization Settings
b) For Synchronization select Use SharePoint Active Directory Import and click OK
4 Next establish a connection to the wingtipcom AD
a) Under Synchronization select Configure Synchronization Connections
b) On the Synchronization Connections page select Create New Connection
c) Enter the following values on this form and click OK
i) Connection Name WINGTIPCOM AD
ii) Type Active Directory Import
iii) Connection Settings
(1) Fully Qualified Domain Name wingtipcom
(2) Authentication Provider Type Windows Authentication
(3) Account Name WINGTIPAdministrator
(4) Password (and Confirm Password) Password1
iv) Containers
(1) Click Populate Containers
(2) After it loads check the box next to WINGTP or click the Select All button below the box
5 Go back to the User Profile Service Application management page Application Management Manage Service Applications User Profile Service Application
6 Finally start a synchronization import
a) Under Synchronization select Start Profile Synchronization
Creating a SharePoint Server 2013 Environment for Development and Testing Version 10
copy Critical Path Training 2012 All Rights Reserved 56
wwwCriticalPathTrainingcom
b) Select Start Full Synchronization and click OK
c) You will be taken back to the User Profile Service Application management page Notice in the top-right corner there is a status block that reports how many profiles are in the UPA database Refresh the page to see it increase to a handful of profiles as the import process runs
At this point you have successfully configured the User Profile Service Application to import profiles from the local AD
Exercise 8 Install the Microsoft Office 2013 Professional Clients
In this exercise you will install the Microsoft Office 2013 client applications
1 Download the Office 2013 into the WingtipServer VM For this you need to create an Office 365 Trial account login to Office 365 go to the Admin Dashboard and then download the latest version httpwwwmicrosoftcomofficepreviewentry-office-preview
2 Download the SharePoint Designer 2013 into the WingtipServer VM from here httpwwwmicrosoftcomen-usdownloaddetailsaspxid=35491
3 Download the Visio Professional 2013 into the WingtipServer VM from here httptechnetmicrosoftcomen-usevalcenterhh973399
Install Microsoft Office Professional Plus 2013
In this section you will install the Microsoft Office 2013 clients
1 Ensure you are logged into the WingtipServer VM using the account WINGTIPadministrator | Password1
2 Execute the installer OfficeProfessionalPlus_English_x64exe
3 On the Read the Microsoft Software License Terms dialog click the checkbox next to I accept the terms of this agreement and click Continue
4 On the Choose the installation you want dialog click the Install Now button
5 The installer will proceed and install all the Office products
6 When the installer completes click the Close button
7 Apply your Office Professional Plus 2013 license key
a) Launch Word 2013 Start All Programs Microsoft Office 2013 Word 2013
b) In the First things first dialog select Use recommended settings and click Accept
c) In the Welcome to Office dialog that opens click the [X] icon in the top-right corner to close it
d) In the left-hand pane click Open Other Documents
e) In the left-hand pane click Account
f) In the Product Information section within the Activation Required box click Change Product Key
g) Enter your license key for Office Professional Plus 2013 check the box next to Attempt to automatically activate my product online and click Install
h) Click OK
At this point you have installed Office Professional Plus 2013
Install Microsoft Office Visio 2013
In this section you will install Microsoft Office 2013 Visio
1 Ensure you are logged into the WingtipServer VM using the account WINGTIPadministrator | Password1
2 Execute the installer VisioProfessional_English_x64exe
3 On the Read the Microsoft Software License Terms dialog click the checkbox next to I accept the terms of this agreement and click Continue
Creating a SharePoint Server 2013 Environment for Development and Testing Version 10
copy Critical Path Training 2012 All Rights Reserved 57
wwwCriticalPathTrainingcom
4 On the Choose the installation you want dialog click the Install Now button
5 The installer will proceed and install all Visio 2013
6 When the installer completes click the Close button
7 Apply your Visio 2013 license key
a) Launch Visio 2013 Start All Programs Microsoft Office 2013 Visio 2013
b) In the First things first dialog select Use recommended settings and click Accept
c) In the Welcome to Office dialog that opens click the X icon in the top-right corner to close it
d) In the left-hand pane click Open Other Documents
e) In the left-hand pane click Account
f) In the Product Information section within the Activation Required box click Change Product Key
g) Enter your license key for Visio 2013 check the box next to Attempt to automatically activate my product online and click Install
h) Click OK
At this point you have installed Visio 2013
Install Microsoft Office 2013 SharePoint Designer
In this section you will install Microsoft Office 2013 SharePoint Designer
1 Ensure you are logged into the WingtipServer VM using the account WINGTIPadministrator | Password1
2 Execute the installer SharePointDesigner_English_x64exe
3 On the Read the Microsoft Software License Terms dialog click the checkbox next to I accept the terms of this agreement and click Continue
4 On the Choose the installation you want dialog click the Install Now button
5 The installer will proceed and install all SharePoint Designer 2013
6 When the installer completes click the Close button
At this point you have installed SharePoint Designer 2013
Exercise 9 Install Visual Studio 2012
In this exercise you will install Visual Studio 2012
1 Ensure you are logged into the WingtipServer VM using the account WINGTIPadministrator | Password1
2 Start the install of Visual Studio 2012 Ultimate Trial by downloading the installer from here httpwwwmicrosoftcomvisualstudio11en-usdownloads
3 On the installation splash screen check the box next to I agree to the License terms and conditions and click the Next button
Creating a SharePoint Server 2013 Environment for Development and Testing Version 10
copy Critical Path Training 2012 All Rights Reserved 58
wwwCriticalPathTrainingcom
4 On the Optional Features to install dialog click Install
5 After some time the installer will complete Click the Launch button to launch Visual Studio 2012
Creating a SharePoint Server 2013 Environment for Development and Testing Version 10
copy Critical Path Training 2012 All Rights Reserved 59
wwwCriticalPathTrainingcom
6 In the Choose Default Environment Settings select Visual C Development Settings and click Start Visual Studio
7 Close Visual Studio 2012
At this point Visual Studio 2012 RTM is installed
Install Office amp SharePoint 2013 Developer Tools
In this section you will install the Office and SharePoint 2013 developer tools for Visual Studio
1 Ensure you are logged into the WingtipServer VM using the account WINGTIPadministrator | Password1
2 Launch the Web Platform Installer Start All Programs Microsoft Web Platform Installer
3 In the search box at the top-right corner of the Web Platform Installer 40 window type sharepoint and press Enter
4 Click the Add button to the right of Microsoft Office Developer Tools for Visual Studio 2012 - Preview 2
5 Click the Install button at the bottom of the Web Platform Installer 40 window
6 On the Prerequisites page click I Accept
Creating a SharePoint Server 2013 Environment for Development and Testing Version 10
copy Critical Path Training 2012 All Rights Reserved 60
wwwCriticalPathTrainingcom
At this point you have installed the SharePoint 2013 amp Office 2013 development tools in Visual Studio 2012
Creating a SharePoint Server 2013 Environment for Development and Testing Version 10
copy Critical Path Training 2012 All Rights Reserved 61
wwwCriticalPathTrainingcom
Appendix 1 Download Manifest
The following lists everything referenced that you will or may need to download in this environment
Windows Server 2008 R2 with Service Pack 1 (installer ISO)
o httptechnetmicrosoftcomen-usevalcenterdd459137aspx
Windows Server 2008 R2 with Service Pack 1 (prebuilt VHD)
o httpwwwmicrosoftcomdownloadsdetailsaspxFamilyId=9040a4be-c3cf-44a5-9052-a70314452305
Windows Server 2008 R2 Service Pack 1
o httpwwwmicrosoftcomen-usdownloaddetailsaspxid=5842
SQL Server 2012 Trial
o httpwwwmicrosoftcombetaexperiencepdSQL2012EvalCTAenusdefaultaspx
SharePoint Server 2013
o httptechnetmicrosoftcomen-USevalcenterhh973397aspx
Hotfixes for SharePoint Server 2013 (post-install)
o KB2554876 The SharePoint Parsing Process Crashes in Windows Server 2008 R2
o KB2708075 IIS 75 Configurations are not Updated when you use the ServerManager Class to Commit
Configuration Changes
o KB2759112 Hotfix is Available for NET Framework 45 that Resolves an ASPNET Race Condition Issue in
Windows Server 2008 R2 Windows Server 2008 R2 SP1
o KB2765317 Hotfix is Available for NET Framework 45 that Resolves an ASPNET Race Condition Issue in
Windows 8 Windows RT and Windows Server 2012
Web Platform Installer
o httpwwwmicrosoftcomwebdownloadsplatformaspx
Web Platform Installer ndash Command Line Version
o httplearniisnetpageaspx1072web-platform-installer-v4-command-line-webpicmdexe-preview-release
Workflow Manager 10
o Download using the Microsoft Web Platform Installer
Office 2013
o httpwwwmicrosoftcomofficepreviewentry-office-preview
SharePoint Designer 2013
o httpwwwmicrosoftcomen-usdownloaddetailsaspxid=35491
Visio Professional 2013
o httptechnetmicrosoftcomen-usevalcenterhh973399
Visual Studio 2012
o httpwwwmicrosoftcomvisualstudio11en-usdownloads
Office Developer Tools for Visual Studio 2012 ndash Preview 2
o Download using the Microsoft Web Platform Installer
Creating a SharePoint Server 2013 Environment for Development and Testing Version 10
copy Critical Path Training 2012 All Rights Reserved 62
wwwCriticalPathTrainingcom
Appendix 2 Windows PowerShell Script Manifest
The following lists all Windows PowerShell scripts that are provided with this setup guide
AddDisableLoopbackCheckRegKeyps1
o The following steps automate creating the registry key outlined as Method 2 in the Microsoft Knowledgebase article
httpsupportmicrosoftcomkb896861 using Windows PowerShell This key DisableLoopbackCheck will allow
you to browse SharePoint sites on the same machine Without this key (or following Method 1 in the KB article) you
would need to browse any SharePoint sites from a different computer than the one which SharePoint is installed on
ConfigureSpFarmForAppsps1
o Configures a SharePoint 2013 for hosting apps This ensures everything you need is installed running and
configured This is documented here httpmsdnmicrosoftcomen-uslibraryfp179923(v=office15)
CreateSpServiceAccountsps1
o Creates the minimal necessary service accounts for SharePoint Server 2013 SP_Farm SP_Content amp
SP_Services
SetupSharePointForHNSCps1
o Configures a SharePoint 2013 install for hosting Host-Named Site Collections (HNSC) This involves creating a Web
Application in SharePoint that has no host header bindings Using DNS all requests are mapped to this Web
Application You then create the site collections via PowerShell as you cant create HNSCs via the browser (Central
Administration)
Creating a SharePoint Server 2013 Environment for Development and Testing Version 10
copy Critical Path Training 2012 All Rights Reserved 63
wwwCriticalPathTrainingcom
Appendix 3 Create Sample Adventure Works Database
The following steps document downloading and installing the sample Adventure Works OLTP database provided by Microsoft
1 Launch Internet Explorer and navigate to httpmsftdbprodsamplescodeplexcom
2 Download the Adventure Works 2012 OLTP Script
3 Extract the ZIP into a folder on the desktop
4 Launch SQL Server Management Studio Start All Programs Microsoft SQL Server 2012 SQL Server Management Studio
5 When SQL Server Management Studio launches within the Connect to Server dialog login using the default settings and click Connect
6 Within SQL Server Management Studio select File Open File
7 Select the file instawdbsql from the extracted ZIP and click Open
8 If prompted to re-login to the database engine do it
9 Select Query SQLCMD Mode
10 Scroll down to line 42 the line that starts with the following
setvar SqlSamplesSourceDataPath
11 Change the folder location of where you unzipped the Adventure Works 2012 OLTP Script
12 Select Query Execute
13 When the script completes the AdventureWorks2012 database will have been created
Creating a SharePoint Server 2013 Environment for Development and Testing Version 10
copy Critical Path Training 2012 All Rights Reserved 64
wwwCriticalPathTrainingcom
Change Log
Change Version Description
August 22 2012 v 01 Pre-release for review
August 27 2012 v 02 Initial public release ndash install guide based on SharePoint Server Beta 2
August 28 2012 v 03 Updated URL for the site collection used to connect SharePoint to WAW
August 31 2012 v 04 Typo Removed SQL Server Analysis Services as part of the install Not required in a
SharePoint dev box (unless you are doing business intelligence which is not covered
in the guide)
Updated all references to Windows Azure Workflow to Workflow Manager the new
official name for the new workflow product
Updated SetupSharePointForHNSCps1 script to lookup HNSC Web Application by
name rather than URL which is more reliable
Typo Updated WingtipAllUp public NIC to use a different IP than the WingtipDC
Typo Replaced a reference to WingtipServer with WingtipDC
Typo Fixed handful of minor typos
September 1 2012 v 05 Removed SQL Server Reporting Services from install guide
Added step to uncheck IErsquos ldquoAutomatically detect proxyrdquo
Added post workflow install steps to setup User Profile Service Application to sync with
local Active Directory
September 5 2012 v 06 Added step to create a default root site collection in the HNSC web app
Updated minor typos and added extra notes for context
Updated PowerShell script SetupSharePointForHNSCps1 to remove content
database of default Web Application when setting up HNSC Web App
Added a new exercise 8 (after SharePoint install amp config and before the Workflow
install and config) to setup support for My Sites
October 20 2012 v 07 Updated script SetupSharePointForHNSCps1 to fix a bug where it would fail on line
111 if you didnrsquot already have a WINGTIPSP_Content managed account
Added section to bypass SharePointrsquos check for crlmicrosoftcom
Updated workflowrsquos registration PowerShell script to point to
httpintranetwingtipcom
Switched order of post-SharePoint install to setup HSNC hosting before configuring for
hosting apps
November 29 2012
v 10 Changed setup guide to use a single VM instead of two VMs
Updated guide for SharePoint 2013 RTM
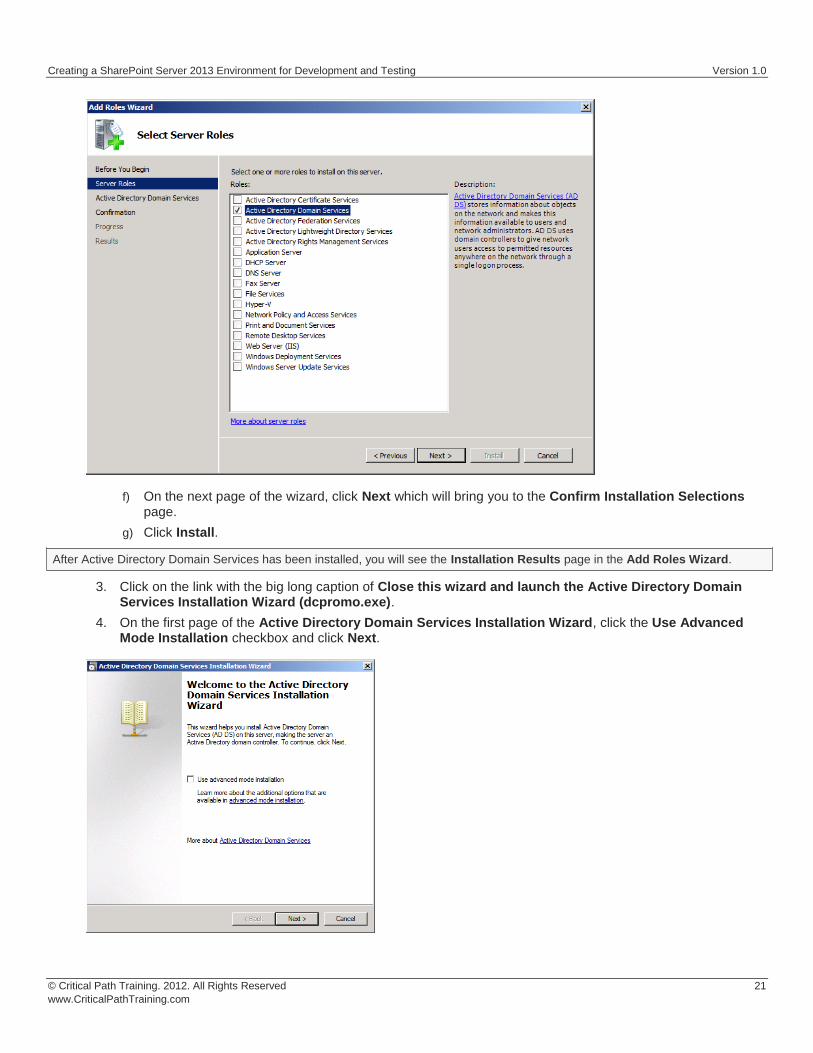
Creating a SharePoint Server 2013 Environment for Development and Testing Version 10
copy Critical Path Training 2012 All Rights Reserved 22
wwwCriticalPathTrainingcom
5 On the Operating System Compatibility page click Next
6 On the Choose a Deployment Configuration select Create a new domain in a new forest and click Next
7 On the Name the Forrest Root Domain enter the following and click Next
a) FQDN of the forest root domain wingtipcom
8 On the Domain NetBIOS Name set it to WINGTIP and click Next
9 On the Set Forest Functional Level page select Windows Server 2008 R2 and click Next
10 On the Additional Domain Controller Options accept the default options and click Next
11 You might be prompted with the dialog shown below providing a warning that This computer has dynamically assigned IP address(es) This is not a problem when you are running your development environment on a domain controller Click Yes to dismiss the dialog
12 At this point the wizard will prompt you with a dialog information you a delegation for the DNS Server cannot be created because it cannot find the authoritative parent zone This is not a problem because the wizard will automatically configure the DNS of the VM to point to itself Click on the Yes button to dismiss this dialog
Creating a SharePoint Server 2013 Environment for Development and Testing Version 10
copy Critical Path Training 2012 All Rights Reserved 23
wwwCriticalPathTrainingcom
13 On the Location for Database Log Files and SYSVOL page accept all the default values and click Next
14 On the Directory Services Restore Mode Administrator Password page enter Password1 in both textboxes and click Next
15 On the Summary page click Next to start the process of configuring the new Active Directory domain
16 The wizard will display the dialog below to show you the progress of the configuration process You will be required to reboot when the configuration has been completed Check the option for Reboot on completion and then wait for the configuration to complete and the machine to reboot
17 After the VM reboots login to the server with wingtipadministrator | Password1
Configure Windows Update and Update the Server
In this section you will verify the server is fully patched and updated
1 Update the server using Windows Update
a) Selecting Start All Programs Windows Update
b) Select the Check for Updates link
c) Windows Update will the report how many updates are available Select all important and recommended updates and click the Install Updates button
d) If prompted select I accept the license terms for any updates that require it
e) Keep running Windows Update after each reboot and update install until it says there are no updates left to install
Creating a SharePoint Server 2013 Environment for Development and Testing Version 10
copy Critical Path Training 2012 All Rights Reserved 24
wwwCriticalPathTrainingcom
This step could take quite a bit of time so be patient
At this point you have a fully installed Active Directory Domain Controller for the Wingtipcom domain hosted on the server WingtipServer
Exercise 4 Install SQL Server 2012
In this exercise you will install SQL Server 2012 that will be used to store all required databases
1 Download the SQL Server 2012 Evaluation Edition specifically the DVD x64 ISO image to the host computer from here httpwwwmicrosoftcombetaexperiencepdSQL2012EvalCTAenusdefaultaspx or you can use your own licensed copy
2 Mount the SQL Server 2012 ISO to the WingtipServer VM
a) On the host computer open the Hyper-V Manager
b) Right-click the VM WingtipServer and select Settings
c) Select DVD Drive in the left-hand panel
d) In the right-hand panel select Image File and browse to the ISO file that contains SQL Server 2012 and click OK
3 Login to the WingtipServer VM as wingtipadministrator | Password1
Install SQL Server 2012
In this section you will install SQL Server 2012
1 If the AutoPlay dialog box is open click Run SETUPEXE If it isnrsquot use Windows Explorer to navigate to the DVD drive and execute the setupexe file in the root of the DVD drive
2 In the SQL Server Installation Center click Installation on the left-hand side
Creating a SharePoint Server 2013 Environment for Development and Testing Version 10
copy Critical Path Training 2012 All Rights Reserved 25
wwwCriticalPathTrainingcom
3 Next select New SQL Server stand-alone installation or add features to an existing installation
4 On the Setup Support Rules page the installer will check for issues before installing Click OK
5 On the Product Key page click the Specify a free edition radio box and select Evaluation then click Next
6 On the License Terms page click the I accept the license terms checkbox and click Next
7 On the Setup Support Rules page the installer will check for any problems with the server you are installing on Click Next when this completes
Creating a SharePoint Server 2013 Environment for Development and Testing Version 10
copy Critical Path Training 2012 All Rights Reserved 26
wwwCriticalPathTrainingcom
8 On the Support Role page select SQL Server Feature Installation and click Next
9 On the Feature Selection page check the following options and click Next
a) Instances Features
i) Database Engine Services
(1) Full-Text and Semantic Extractions for Search
b) Shared Features
i) Management Tools ndash Basic
(1) Management Tools ndash Complete
Creating a SharePoint Server 2013 Environment for Development and Testing Version 10
copy Critical Path Training 2012 All Rights Reserved 27
wwwCriticalPathTrainingcom
10 On the Installation Rules page click Next
11 On the Instance Configuration page click Next
12 On the Disk Space Requirements page click Next
13 On the Server Configuration page do the following and click Next
a) On the Service Account tab change the Startup Type for the SQL Server Agent to Automatic
14 On the Database Engine Configuration page do the following and click Next
a) On the Server Configuration tab click Add Current User
b) On the FILESTREAM tab
i) Check Enable FILESTREAM for Transact-SQL Access
ii) Check Enable FILESTREAM for file IO access
15 On the Error Reporting page click Next
16 On the Installation Configuration Rules page click Next
17 On the Ready to Install page click Install
Installation of SQL Server 2012 will take some time please be patient
18 When the installation completes the Complete page will be shown Click Close
At this point you have now successfully installed SQL Server 2012
Creating a SharePoint Server 2013 Environment for Development and Testing Version 10
copy Critical Path Training 2012 All Rights Reserved 28
wwwCriticalPathTrainingcom
Exercise 5 Install amp Configure SharePoint Server 2013
In this exercise you will install SharePoint 2013
1 Download the SharePoint Server 2013 to the host computer from here httptechnetmicrosoftcomen-USevalcenterhh973397aspx
2 Mount the SharePoint Server 2013 ISO to the WingtipServer VM
a) On the host computer open the Hyper-V Manager
b) Right-click the VM WingtipServer and select Settings
c) Select DVD Drive in the left-hand panel
The file that Microsoft provides is saved in the IMG format Hyper-V Manager wonrsquot allow you to mount an IMG file so rename it to ISO before mounting it
d) In the right-hand panel select Image File and browse to the ISO file that contains SharePoint Server 2013 and click OK
Create SharePoint Service Accounts amp Grant Rights to SQL Server 2012
In this section you will create the necessary service accounts that will be used by SharePoint in Active Directory and grant them necessary rights in SQL Server 2012
PowerShell Script Alert The creation of users and granting them rights to SQL Server 2012 steps in this section are automated in the Windows PowerShell script CreateSpServiceAccountsps1 found in the files that accompany this setup guide Open the script
and read the header for documentation on how to use it
1 Open the Active Directory Users and Computers Start Administrative Tools Active Directory Users and Computers
2 Expand the tree in the left-hand pane to see the Users OU Select the Users OU
3 Create a new user SP_Farm
a) In the toolbar select Action New User
Creating a SharePoint Server 2013 Environment for Development and Testing Version 10
copy Critical Path Training 2012 All Rights Reserved 29
wwwCriticalPathTrainingcom
b) Set the userrsquos Full Name amp User Login Name to SP_Farm and click Next
c) In the password dialog enter the following and click Next
i) Password (and Confirm Password) Password1
ii) User must change password at next login unchecked
iii) User cannot change password unchecked
iv) Password never expires checked
v) Account is disabled unchecked
Creating a SharePoint Server 2013 Environment for Development and Testing Version 10
copy Critical Path Training 2012 All Rights Reserved 30
wwwCriticalPathTrainingcom
vi) Click Finish
4 Repeat the previous step to create two more accounts
a) SP_Content
b) SP_Services
At this point you have created all the necessary service accounts
Install SharePoint Server 2013 Prerequisites
In this section you will install the SharePoint Server 2013 Prerequisites
1 Ensure you are logged into the WingtipServer VM using the account wingtipadministrator | Password1
2 If the AutoPlay dialog box is open click Run splashhta If it isnrsquot use Windows Explorer to navigate to the DVD drive and execute the splashhta file in the root of the DVD drive
Creating a SharePoint Server 2013 Environment for Development and Testing Version 10
copy Critical Path Training 2012 All Rights Reserved 31
wwwCriticalPathTrainingcom
3 Click the Install Software Prerequisites link
4 In the Microsoft SharePoint 2013 Products Preparation Tool window click Next
5 On the License Terms for Software Products page
a) Check I accept the terms of the License Agreement(s)
b) Click Next
6 The tool will download and install all prerequisites for SharePoint Server 2013 This will take some time It may prompt you to reboot the server If so reboot the server and login using wingtipadministrator | Password1
Creating a SharePoint Server 2013 Environment for Development and Testing Version 10
copy Critical Path Training 2012 All Rights Reserved 32
wwwCriticalPathTrainingcom
7 When the prerequisite installer is complete it will present a summary of everything it did
8 Click Finish
9 Restart the WingtipServer VMhellip some additional installations and changes that the prerequisite installer did will require a restart before installing SharePoint Server 2013
At this point all prerequisites required by SharePoint Server 2013 have been installed and any necessary configuration changes have been applied to the server However it is strongly recommend that you run Windows Update and install any pending updates Further Microsoft recommends installing the following hotfixes if they are not already installed
KB2554876 The SharePoint Parsing Process Crashes in Windows Server 2008 R2
KB2708075 IIS 75 Configurations are not Updated when you use the ServerManager Class to Commit Configuration Changes
KB2759112 Hotfix is Available for NET Framework 45 that Resolves an ASPNET Race Condition Issue in Windows Server 2008 R2 Windows Server 2008 R2 SP1
KB2765317 Hotfix is Available for NET Framework 45 that Resolves an ASPNET Race Condition Issue in Windows
8 Windows RT and Windows Server 2012
Install SharePoint Server 2013
In this section you will install SharePoint Server 2013
1 Ensure you are logged into the WingtipServer VM using the account wingtipadministrator | Password1
2 If the AutoPlay dialog box is open click Run splashhta If it isnrsquot use Windows Explorer to navigate to the DVD drive and execute the splashhta file in the root of the DVD drive
Creating a SharePoint Server 2013 Environment for Development and Testing Version 10
copy Critical Path Training 2012 All Rights Reserved 33
wwwCriticalPathTrainingcom
3 Click Install SharePoint Server
4 When prompted to Enter your Product Key enter the key you obtained for the trial install and click Continue
5 On the Read the Microsoft Software License Terms page check the I accept the terms of this agreement checkbox and click Continue
6 On the Choose a file location page click Install Now
Creating a SharePoint Server 2013 Environment for Development and Testing Version 10
copy Critical Path Training 2012 All Rights Reserved 34
wwwCriticalPathTrainingcom
7 When the installation is complete select the Run the SharePoint Products Configuration Wizard checkbox and click Close
8 On the Welcome to SharePoint Products page click Next
a) If prompted to start or reset services click Yes
9 On the Connect to a server farm page select Create a new server farm and click Next
10 On the Specify Configuration Database Settings page use the following to complete the page and click Next
a) Database server WINGTIPSERVER
b) Database name SharePoint_Config
c) Username WINGTIPSP_Farm
d) Password Password1
Creating a SharePoint Server 2013 Environment for Development and Testing Version 10
copy Critical Path Training 2012 All Rights Reserved 35
wwwCriticalPathTrainingcom
11 On the Specify Farm Security Settings page for the Passphrase and Confirm Passphrase boxes enter Password1 and click Next
12 On the Configure SharePoint Central Administration Web Application page check the Specify port number checkbox and enter a value of 9999 then Click Next
Creating a SharePoint Server 2013 Environment for Development and Testing Version 10
copy Critical Path Training 2012 All Rights Reserved 36
wwwCriticalPathTrainingcom
13 On the Completing the SharePoint Products Configuration Wizard page click Next
14 When the installer completes it will display the Confirmation Successful page
15 Click Finish This will launch Internet Explorer to go through the configuration process
Creating a SharePoint Server 2013 Environment for Development and Testing Version 10
copy Critical Path Training 2012 All Rights Reserved 37
wwwCriticalPathTrainingcom
At this point you have successfully installed SharePoint Server 2013
Configure SharePoint Server 2013
In this section you will create a new SharePoint Server 2013 farm and perform minimal configuration tasks
After installing SharePoint Sever 2013 the SharePoint Products Configuration Wizard will launch the browser-based Initial Farm Configuration Wizard
1 In the first page of the wizard you are prompted to Help Make SharePoint Better Select which ever option you want and click OK
2 On the Welcome page that asks How do you want to configure your SharePoint farm click the Start the Wizard button
3 On the Services page do the following and then click Next
a) Service Account Select Create new managed account
i) Username WINGTIPSP_Services
ii) Password Password1
b) Services Uncheck the following services
Creating a SharePoint Server 2013 Environment for Development and Testing Version 10
copy Critical Path Training 2012 All Rights Reserved 38
wwwCriticalPathTrainingcom
i) Access Services 2010
ii) App Management Service
In SharePoint Server 2013 the Search Service Application processes specifically noderunnerexe can consume a considerable amount of memory and processor time If you are not going to work with search you might consider unchecking this option for now You can always go back into Central Administration and create a new instance of the Search Service Application at a later date if you need it
Why did we remove Access Services 2010 amp App Management Service service applications The Access Services 2010 service application is included for backwards compatibility and isnrsquot needed in new installations unless you are migrating solutions built with Access Services 2010 from SharePoint Server 2010 (if so you can create this service application later within Central Administration Application Management Manage Service Applications) The App Management Service service application will be created in a later step in this setup guide therefor it is skipped here
4 The creation of the service applications can take quite a while so be patient If it exceeds 20 minutes it is fairly safe to assume the page is hung up One option is to close the browser then launch Central Administration (Start All Programs Microsoft SharePoint 2013 Products SharePoint 2013 Central Administration) and look at the Service Application page (Application Management Manage Service Applications) to see if they were all created
Configure DNS
In this section you will configure DNS for hosting SharePoint sites amp Apps
1 Ensure you are logged into the WingtipServer VM using the account wingtipadministrator | Password1
2 Open the DNS window Start Administrative Tools DNS
3 Expand the hierarchy on the left-hand side of the window until you get to DNS WINGTIPSERVER Forward Lookup Zones wingtipcom
4 Create a new wildcard so all requests for http[]wingtipcom will be forwarded to our SharePoint machine
a) Next right-click wingtipcom and select New Host (A or AAAA)
Creating a SharePoint Server 2013 Environment for Development and Testing Version 10
copy Critical Path Training 2012 All Rights Reserved 39
wwwCriticalPathTrainingcom
b) In the New Host dialog enter the following and click OK
i) Alias Name
ii) IP Address 192168150102 Then click Add Host The following figure shows how this looks
This new record is telling DNS to forward any request for http[]wingtipcom to the webserver WINGTIPSERVER where the
requests will be served by SharePoint
5 Verify this DNS entry is working
a) Open Windows PowerShell Start All Programs Accessories Windows PowerShell Windows PowerShell
b) Run the following commands and press ENTER
PS CUsersAdministratorgt nslookup somethingwingtipcom PS CUsersAdministratorgt nslookup somethingappswingtipcom
c) You should get a response that points to the WingtipServer server as shown in the following figure
Creating a SharePoint Server 2013 Environment for Development and Testing Version 10
copy Critical Path Training 2012 All Rights Reserved 40
wwwCriticalPathTrainingcom
Configure SharePoint Server 2013 for Host-Named Site Collections amp Create Initial Site
Collections
In this section you will create new SharePoint 2013 site collections for testing and hosting apps
Microsoft recommends to create host-named site collections (HNSC) instead of using the path based site collection addressing The difference is the following a path based site created at something such as httpintranetwingtipcomsitesdevtest as an HNSC site would be more like httpdevtestwingtipcom This is how it works in the cloud (Office 365) and it scales much better for on-prem
deployments This setup guide will show you how to setup your environment to create HNSC The only downside to this approach is that you canrsquot create site collections within Central Administration it must be done via Windows PowerShell API (because Central Administration doesnrsquot instruct you where to put the site
This is implemented in various parts First DNS must be configured to send all requests for httpwingtipcom to a Web Application
(implemented in the last section) Second this Web Application must be extended with SharePoint and have no host header bindings (so it handles all requests) Third it must have a default site collection at the root of the Web Application but it will not be used for anything (in fact it doesnrsquot need a template assigned to it)
You can read more about HNSCrsquos on TechNet httptechnetmicrosoftcomen-uslibrarycc424952aspx
PowerShell Script Alert The steps in this section are automated in the script SetupSharePointForHNSCps1 found in the files that
accompany this setup guide Open the script and read the header for documentation on how to use it
1 Ensure you are logged into the WingtipServer VM using the account wingtipadministrator | Password1
2 Open Central Administration Start All Programs Microsoft SharePoint 2013 Products SharePoint 2013 Central Administration
3 Select Application Management Manage Web Applications
4 Delete the default Web Application created by the configuration wizard
a) Delete the existing default Web Application
i) Select the Web Application SharePoint ndash 80 the one with the URL of httpwingtipserver and click Delete in the ribbon
ii) When prompted to delete the associated IIS Web Site amp SQL Server database select both options to delete them and click OK
The reason you are doing this is because the setup wizard you ran previously when creating the service applications automatically created it The problem is that it used the same identity (WINGTIPSP_Services) for the app pool that is used for all the service
applications which is not desired
5 Create a new Web Application to handle Host-Named Site Collections (HNSC)
Creating a SharePoint Server 2013 Environment for Development and Testing Version 10
copy Critical Path Training 2012 All Rights Reserved 41
wwwCriticalPathTrainingcom
a) In the ribbon click the New button
b) In the Create New Web Application dialog enter the following values in the properties and click OK Leave all properties not mentioned
i) Select the radio button Create a new IIS web site
(1) Name SharePoint HNSC Host ndash 80
(2) Port 80
ii) Application Pool
(1) Select the radio button Create a new application pool
(a) Application Pool Name SharePoint Default HNSC AppPool
(b) Select a security account for this application pool WINGTIPSP_Content
If WINGTIPSP_Content is not listed as an available managed account create it by selecting the appropriate option and using
Password1 for the password
iii) Database Name and Authentication
(1) Database Name WSS_Content_HNSCDefaultHost
c) This process will take a few moments At the end of the process SharePoint will ask if you want to create a site collection You do but you donrsquot want to do it through the browser as this will not be a HNSC To create a HNSC you must create it via Windows PowerShell
6 Create a default not template site collection at the root of the web application
a) Open SharePoint 2013 Management Shell Start All Programs Microsoft SharePoint 2013 Products SharePoint 2013 Management Shell
7 Create Site Collections for Testing SharePoint amp SharePoint Apps
a) Open SharePoint 2013 Management Shell Start All Programs Microsoft SharePoint 2013 Products SharePoint 2013 Management Shell
b) Get a reference to the HNSC web application you just created by running the following Windows PowerShell script in the SharePoint 2013 Management Shell
$hnscWebApp = Get-SPWebApplication | Where-Object $_DisplayName -eq SharePoint HNSC Host - 80
c) Create a non-templated site at the root of the web application for Workflow to connect to by executing the following Windows PowerShell script in the SharePoint 2013 Management Shell
New-SPSite -Name Root HNSC Site Collection -Url httpwingtipcom -HostHeaderWebApplication $hnscWebApp -OwnerAlias WINGTIPAdministrator
d) Create a team site by executing the following Windows PowerShell script in the SharePoint 2013 Management Shell
New-SPSite -Name Wingtip Intranet -Url httpintranetwingtipcom ndashHostHeaderWebApplication $hnscWebApp -Template STS0 -OwnerAlias WINGTIPAdministrator
e) Create a developer site by executing the following Windows PowerShell script in the SharePoint 2013 Management Shell
New-SPSite -Name Wingtip Developer Site -Url httpdevwingtipcom ndashHostHeaderWebApplication $hnscWebApp -Template DEV0 -OwnerAlias WINGTIPAdministrator
You can only create debug and test apps using a developer site
At this point you now have a site collection to use as a team site (httpintranetwingtipcom) and to develop and test custom SharePoint apps (httpdevwingtipcom)
Creating a SharePoint Server 2013 Environment for Development and Testing Version 10
copy Critical Path Training 2012 All Rights Reserved 42
wwwCriticalPathTrainingcom
Configure SharePoint 2013 for Hosting Apps
In this setup you will setup your SharePoint 2013 environment for hosting apps
PowerShell Script Alert Everything in the next immediate step is provided in the script ConfigureSpFarmForAppsps1 found in the
files that accompany this setup guide Open the script and read the header for documentation on how to use it
1 Ensure you are logged into the WingtipServer VM using the account wingtipadministrator | Password1
2 Create the necessary SharePoint App Management service applications and start the necessary services via Windows PowerShell
a) Open SharePoint 2013 Management Shell Start All Programs Microsoft SharePoint 2013 Products SharePoint 2013 Management Shell
b) Execute the following Windows PowerShell script in the SharePoint 2013 Management Shell
$appHostDomain = appswingtipcom $adminService = Get-Service -Name spadminv4 if ($adminServiceStatus -ne Running) Start-Service $adminService $timerService = Get-Service -Name sptimerv4 if ($timerServiceStatus -ne Running) Start-Service $timerService Set-SPAppDomain $appHostDomain $appMgmtSvcInstance = Get-SPServiceInstance | Where-Object $_GetType()Name -eq AppManagementServiceInstance if ($appMgmtSvcInstanceStatus -ne Online) Start-SPServiceInstance -Identity $appMgmtSvcInstance $appSubSettingSvcInstance = Get-SPServiceInstance | Where-Object $_GetType()Name -eq SPSubscriptionSettingsServiceInstance if ($appSubSettingSvcInstanceStatus -ne Online) Start-SPServiceInstance -Identity $appSubSettingSvcInstance $appPoolServiceApps = Get-SPServiceApplicationPool -Identity SharePoint Web Services Default $appSubSvc = New-SPSubscriptionSettingsServiceApplication ndashApplicationPool $appPoolServiceApps ndashName Settings Service Application ndashDatabaseName SettingsServiceDB $proxySubSvc = New-SPSubscriptionSettingsServiceApplicationProxy ndashServiceApplication $appSubSvc $appAppSvc = New-SPAppManagementServiceApplication -ApplicationPool $appPoolServiceApps -Name App Management Service Application -DatabaseName AppServiceDB $proxyAppSvc = New-SPAppManagementServiceApplicationProxy -ServiceApplication $appAppSvc Set-SPAppSiteSubscriptionName -Name app -Confirm$false
3 Verify the script configured SharePoint 2013 for hosting apps
a) Open Central Administration Start All Programs Microsoft SharePoint 2013 Products SharePoint 2013 Central Administration
b) Verify service applications created
i) Open the Service Applications page Application Management Manage Service Applications
ii) Verify you have two service applications created
(1) App Management Service Application
(2) Settings Service Application
c) Verify service instances are running
i) Open the Services on Server page System Settings Manage Services on Server
ii) Verify the following services are Started
(1) App Management Service
(2) Microsoft SharePoint Foundation Subscription Settings Service
Creating a SharePoint Server 2013 Environment for Development and Testing Version 10
copy Critical Path Training 2012 All Rights Reserved 43
wwwCriticalPathTrainingcom
d) Verify App URLs are correct
i) Open the Configure App URLs page Apps Configure app URLs
ii) Verify the following
(1) App Domain appswingtipcom
(2) App Prefix app
At this point your SharePoint Server 2013 environment is ready to host SharePoint apps
Creating a SharePoint Server 2013 Environment for Development and Testing Version 10
copy Critical Path Training 2012 All Rights Reserved 44
wwwCriticalPathTrainingcom
Start the SharePoint 2013 Sandbox Service
By default the service that executes sandbox solutions is not running In this step you will start the service
1 Open Central Administration Start All Programs Microsoft SharePoint 2013 Products SharePoint 2013 Central Administration
2 Open the Services on Server page System Settings Manage Services on Server
3 Click the Start link to the left of the Microsoft SharePoint Foundation Sandboxed Code Service
At this point your installation can support sandbox solutions
Configure CRL Verification for Disconnected Environments
SharePoint periodically ldquophones homerdquo to a specific address hosted by Microsoft under certain conditions When your environment is disconnected this can cause an unnecessary delay or failures when starting up the sandbox The following steps outline a workaround to bypass this check
1 Launch Notepad as an administrator Start All Programs Accessories right-click Notepad and select Run as Administrator
2 Open the hosts file by selecting File Open and finding the file
cWindowsSystem32Driversetchosts
3 Add the following line to the end of the file
127001 crlmicrosoftcom
4 Save and close the hosts file
Update Internet Explorer to Bypass the App URL amp Automatically Login to SharePoint Sites
In this section you will update Internet Explorer to add the App hosting URL to the bypass list so you can navigate to the domain after deploying SharePoint hosted apps
1 Ensure you are logged into the WingtipServer VM using the account wingtipadministrator | Password1
1 Launch Internet Explorer Start All Programs Internet Explorer
2 Configure Internet Explorer to bypass the App URL
a) In the top-right corner click the gear icon and select Internet Options
b) On the Security tab select the Local Intranet and click the Sites button
c) Uncheck the box next to Automatically detect intranet network
d) Click the Advanced button and add two entries to the Exceptions list
i) httpwingtipcom
ii) httpappswingtipcom
Creating a SharePoint Server 2013 Environment for Development and Testing Version 10
copy Critical Path Training 2012 All Rights Reserved 45
wwwCriticalPathTrainingcom
e) Click the Close button followed by the OK button multiple times to close out of the dialogs
At this point Internet Explorer is setup to bypass your app URL so you can navigate to apps (httpappswingtipcom) as well as automatically authenticate to sites hosted at httpwingtipcom
Exercise 6 Configure SharePoint to Host My Sites
In this exercise you will configure SharePoint to create and host My Sites In order to host My Sites you will need a new Web Application that is configured for Self-Service Site Creation and has a My Site Host site collection
1 Create a new SharePoint web application to host the My Sites
a) Ensure you are logged into the WingtipServer VM using the account wingtipadministrator | Password1
b) Open Central Administration Start All Programs Microsoft SharePoint 2013 Products SharePoint 2013 Central Administration
c) Select Application Management Manage Web Applications
d) In the ribbon click the New button
e) In the Create New Web Application dialog enter the following values in the properties and click OK Leave all properties not mentioned
i) Select the radio button Create a new IIS web site
(1) Name SharePoint MySite Host ndash 80
(2) Port 80
(3) Host Header mywingtipcom
ii) Application Pool
(1) Select the radio button Use existing application pool
(a) Application Pool Name SharePoint Default HNSC AppPool
iii) Database Name and Authentication
(1) Database Name WSS_Content_SocialWingtipCom
f) This process will take a few moments At the end of the process SharePoint will ask if you want to create a site collection Click the link provided to create a new site collection amp continue to the next step
2 Create a My Site Host site collection
a) On the Create Site Collection page use the following information to complete the form and click OK
Creating a SharePoint Server 2013 Environment for Development and Testing Version 10
copy Critical Path Training 2012 All Rights Reserved 46
wwwCriticalPathTrainingcom
i) Title My Site Host
ii) URL
iii) Template Selection My Site Host (found under the Enterprise tab)
iv) Primary Site Collection Administrator WINGTIPAdministrator
3 Update the Web Application to host my sites
a) Within Central Administration in the left-hand navigation navigate to the Manage Web Applications page Application Management Manage Web Applications
b) Select the SharePoint MySite Host ndash 80 web application
c) Click the Managed Paths button in the ribbon
d) Remove the sites managed path and add two new managed paths and click OK
i) personal ndash Wildcard inclusion
ii) my ndash Explicit inclusion
e) With the SharePoint MySite Host ndash 80 web application still selected click the Self-Service Site Creation button
f) On the Self-Service Site Creation page use the following values to complete the form and click OK
i) Site Collections On
4 Next configure the User Profile Service Application My Site settings
a) Browse to the User Profile Service Application management page Application Management Manage Service Applications User Profile Service Application
b) Under the My Site Settings section click the Setup My Sites
c) On the My Site Settings page use the following information to complete the form and click OK
i) My Site Host httpmywingtipcom
ii) Personal Site Location personal
At this point your SharePoint deployment is now configured to automatically create My Sites under httpmywingtipcomPersonalUserName when users first browse to them
Exercise 7 Install amp Configure Workflow Manager 10
In this exercise you will configure the WingtipServer VM to host Workflow Manager 10 and connect it to your SharePoint installation
1 Ensure you are logged into the WingtipServer VM using the account wingtipadministrator | Password1
Verify SQL Server 2012 Network Configuration
In this section yoursquoll verify the network configuration is correct for SQL Server 2012 in order to install Workflow Manager 10
Creating a SharePoint Server 2013 Environment for Development and Testing Version 10
copy Critical Path Training 2012 All Rights Reserved 47
wwwCriticalPathTrainingcom
1 Configure SQL Server 2012 to have the TCPIP connection protocol enabled
a) Open the SQL Server Configuration Manager Start All Programs Microsoft SQL Server 2012 Configuration Tools SQL Server Configuration Manager
b) Expand the hierarchy on the left-hand side to the following SQL Server Connection Manager (local) SQL Server Network Configuration Protocols for MSSQLSERVER
c) In the main window if TCPIP is Disabled right-click TCPIP and select Enable
d) When prompted with a warning click OK
2 SQL Server must be restarted in order to reflect this change
a) In the hierarchy on the left-hand side of the window select SQL Server Services
b) Right-click SQL Server (MSSQLSERVER) and select Restart
At this point SQL Server is now configured with the TCPIP protocol enabled a requirement when configuring Service Bus
Configure the Workflow Service Account with the Necessary Rights
In this section you will verify the service account that will run Workflow Manager and Service Bus
1 Ensure you are logged into the WingtipServer VM using the account WINGTIPadministrator | Password1
2 Grant the WINGTIPSP_Content account securityadmin amp dbcreator permissions in SQL Server
a) Launch SQL Server Management Studio Start All Programs Microsoft SQL Server 2012 SQL Server Management Studio
b) When SQL Server Management Studio launches within the Connect to Server dialog login using the default settings and click Connect
c) In the Object Explorer tool window expand the WINGTIPSERVER server hierarchy to the Security Logins node
d) Find the WINGTIPSP_Content account right-click it and select Properties
Creating a SharePoint Server 2013 Environment for Development and Testing Version 10
copy Critical Path Training 2012 All Rights Reserved 48
wwwCriticalPathTrainingcom
e) In the Select a page pane select Server Roles
f) Check securityadmin amp dbcreator and click OK
g) Close SQL Server Management Studio
3 Add the Workflow service account to the local administrators group
a) Open the Active Directory Users and Computers window Start Administrative Tools Active Directory Users and Computers
b) In the hierarchy on the left-hand side of the window expand it to the following Active Directory Users and Computers wingtipcom Builtin
c) In the main window right-click Administrators and select Properties
d) In the Administrators Properties dialog select the Members tab and click Add
e) In the Enter the object names to select box enter wingtipsp_content and click the Check Names button
f) In the Administrators Properties dialog click OK
g) Close the Active Directory Users and Computers window
At this point the service account that will host Workflow Manager and Service Bus has been configured correctly
Creating a SharePoint Server 2013 Environment for Development and Testing Version 10
copy Critical Path Training 2012 All Rights Reserved 49
wwwCriticalPathTrainingcom
Download amp Install Workflow Manager and Service Bus
In this section you will install Workflow Manager and Service Bus
1 Ensure you are logged into the WingtipServer VM using the account WINGTIPSP_Content | Password1
It is important you are logged in as the user that will run workflow when you install amp configure Workflow Manager and Service Bus
2 Launch the Web Platform Installer Start All Programs Microsoft Web Platform Installer
a) If the Web Platform Installer is not present on your machine you can download amp install it from here httpwwwmicrosoftcomwebdownloadsplatformaspx
If you do not have internet access within the virtual machine it is possible to download everything needed for workflow using the command line version of the Web Platform Installer (WebPICMD) You can get WebPICMD from httplearniisnetpageaspx1072web-platform-installer-v4-command-line-webpicmdexe-preview-release Specifically for
workflow enter the following command to download Workflow Beta 1 and all prerequisites
webpicmd offline ProductsWorkflow Pathc[path]
3 When the Web Platform Installer loads execute a search for Workflow select Workflow Manager 10 and click Add
4 Click the Install button at the bottom of the Web Platform Installer 40 window
5 On the Prerequisites page click I Accept
Note The Web Platform Installer 40 may prompt you to keep certain products updated using Microsoft Update If it does select Use Microsoft Update when I check for updates (recommended) and click Continue
6 When the installer completes the following dialog will appear Click Continue and then Finish to start the configuration process
Creating a SharePoint Server 2013 Environment for Development and Testing Version 10
copy Critical Path Training 2012 All Rights Reserved 50
wwwCriticalPathTrainingcom
At this point Workflow Manager amp Service Bus are installed
Configure Workflow Manager and Service Bus
In this section you will install Workflow Manager and Service Bus
1 If the Workflow Manager Configuration Wizard is not open open it Start All Programs Workflow Manager 10 Workflow Configuration
2 On the Welcome page click Configure Workflow Manager with Default Settings (Recommended)
Creating a SharePoint Server 2013 Environment for Development and Testing Version 10
copy Critical Path Training 2012 All Rights Reserved 51
wwwCriticalPathTrainingcom
3 On the New Farm Configuration page do the following
a) In the section Configure Service Account set the credentials to
i) User ID sp_contentwingtipcom
ii) Password Password1
b) Check the Allow Workflow management over HTTP on this computer checkbox
Ensure the username is entered in the fully qualified UPN format not as the default shows in the installer (sp_contentwingtip) or the domainusername format
In a production environment you should be doing everything over SSL
c) Click the Test Connection button to verify the connection credentials before proceeding
Creating a SharePoint Server 2013 Environment for Development and Testing Version 10
copy Critical Path Training 2012 All Rights Reserved 52
wwwCriticalPathTrainingcom
d) In the Certificate Generation Key and Confirm Certificate Generation Key enter Password1 into both fields
4 Click the right arrow in the bottom right corner to proceed
5 On the Summary page review your settings and click the check at the bottom right of the widow to start the configuration process
Creating a SharePoint Server 2013 Environment for Development and Testing Version 10
copy Critical Path Training 2012 All Rights Reserved 53
wwwCriticalPathTrainingcom
6 After a few minutes the Configuration Progress screen will show that everything has been configured correctly
Creating a SharePoint Server 2013 Environment for Development and Testing Version 10
copy Critical Path Training 2012 All Rights Reserved 54
wwwCriticalPathTrainingcom
7 Click the check in the bottom right corner
At this point Workflow Manager amp Service Bus has been installed and a new Workflow Manager farm has been created The next step is to connect the SharePoint 2013 farm to the Workflow Manager farm
Connect SharePoint 2013 to Workflow Manager
In this section you will connect SharePoint 2013 and Workflow Manager together
1 Ensure you are logged into the WingtipServer VM using the account WINGTIPadministrator | Password1
2 Get the Workflow Manager endpoint
a) Open the Workflow Manager PowerShell console Start All Programs Workflow Manager 10
b) Execute the Windows PowerShell following cmdlet
Get-WFFarm | ft HttpPort
c) Take note of this port (12291) This port number is what you will use to connect the SharePoint 2013 farm to the Workflow Manager 10 farm
In production you should connect to the HTTPS port listed in the HttpsPort property when you run Get-WFFarm
d) Close the Workflow Manager PowerShell window
3 Connect the SharePoint 2013 farm to Workflow Manager
Creating a SharePoint Server 2013 Environment for Development and Testing Version 10
copy Critical Path Training 2012 All Rights Reserved 55
wwwCriticalPathTrainingcom
a) Open SharePoint 2013 Management Shell Start All Programs Microsoft SharePoint 2013 Products SharePoint 2013 Management Shell
b) Execute the following Windows PowerShell script in the SharePoint 2013 Management Shell
Register-SPWorkflowService ndashSPSite httpintranetwingtipcom ndashWorkflowHostUri httpwingtipserver12291 ndashAllowOAuthHttp
This script is telling SharePoint the endpoint it should use to talk to Workflow Manager as well as Workflow Manager the SharePoint site collection it should talk to for calls into the CSOM It is also configuring all communication over HTTP rather than HTTPS for performance reasons In production you should always use HTTPS
This step will take a moment with no feedback during the process Be patient
c) Close the SharePoint 2013 Management Shell
At this point the SharePoint 2013 farm is connected to the Workflow Manager 10 farm
Configure SharePoint User Profile Service Application AD Sync
Users in SharePoint 2013 are validated by Workflow Manager against SharePoint to ensure they have permissions to start a workflow This is done by looking up the user by their AD UserPrincipalName (UPN) attribute in the User Profile Service Application (UPA) If no matching user is found the workflow will be automatically cancelled by Workflow Manager In this section you will setup UPA to connect amp sync with the local Active Directory so user accounts in AD will have their UPN synchronized to UPA
1 Open Central Administration Start All Programs Microsoft SharePoint 2013 Products SharePoint 2013 Central Administration
2 Go to the User Profile Service Application management page Application Management Manage Service Applications User Profile Service Application
3 The first step is to configure the User Profile Service Application to allow for Active Directory (AD) synchronization
a) Under Synchronization select Configure Synchronization Settings
b) For Synchronization select Use SharePoint Active Directory Import and click OK
4 Next establish a connection to the wingtipcom AD
a) Under Synchronization select Configure Synchronization Connections
b) On the Synchronization Connections page select Create New Connection
c) Enter the following values on this form and click OK
i) Connection Name WINGTIPCOM AD
ii) Type Active Directory Import
iii) Connection Settings
(1) Fully Qualified Domain Name wingtipcom
(2) Authentication Provider Type Windows Authentication
(3) Account Name WINGTIPAdministrator
(4) Password (and Confirm Password) Password1
iv) Containers
(1) Click Populate Containers
(2) After it loads check the box next to WINGTP or click the Select All button below the box
5 Go back to the User Profile Service Application management page Application Management Manage Service Applications User Profile Service Application
6 Finally start a synchronization import
a) Under Synchronization select Start Profile Synchronization
Creating a SharePoint Server 2013 Environment for Development and Testing Version 10
copy Critical Path Training 2012 All Rights Reserved 56
wwwCriticalPathTrainingcom
b) Select Start Full Synchronization and click OK
c) You will be taken back to the User Profile Service Application management page Notice in the top-right corner there is a status block that reports how many profiles are in the UPA database Refresh the page to see it increase to a handful of profiles as the import process runs
At this point you have successfully configured the User Profile Service Application to import profiles from the local AD
Exercise 8 Install the Microsoft Office 2013 Professional Clients
In this exercise you will install the Microsoft Office 2013 client applications
1 Download the Office 2013 into the WingtipServer VM For this you need to create an Office 365 Trial account login to Office 365 go to the Admin Dashboard and then download the latest version httpwwwmicrosoftcomofficepreviewentry-office-preview
2 Download the SharePoint Designer 2013 into the WingtipServer VM from here httpwwwmicrosoftcomen-usdownloaddetailsaspxid=35491
3 Download the Visio Professional 2013 into the WingtipServer VM from here httptechnetmicrosoftcomen-usevalcenterhh973399
Install Microsoft Office Professional Plus 2013
In this section you will install the Microsoft Office 2013 clients
1 Ensure you are logged into the WingtipServer VM using the account WINGTIPadministrator | Password1
2 Execute the installer OfficeProfessionalPlus_English_x64exe
3 On the Read the Microsoft Software License Terms dialog click the checkbox next to I accept the terms of this agreement and click Continue
4 On the Choose the installation you want dialog click the Install Now button
5 The installer will proceed and install all the Office products
6 When the installer completes click the Close button
7 Apply your Office Professional Plus 2013 license key
a) Launch Word 2013 Start All Programs Microsoft Office 2013 Word 2013
b) In the First things first dialog select Use recommended settings and click Accept
c) In the Welcome to Office dialog that opens click the [X] icon in the top-right corner to close it
d) In the left-hand pane click Open Other Documents
e) In the left-hand pane click Account
f) In the Product Information section within the Activation Required box click Change Product Key
g) Enter your license key for Office Professional Plus 2013 check the box next to Attempt to automatically activate my product online and click Install
h) Click OK
At this point you have installed Office Professional Plus 2013
Install Microsoft Office Visio 2013
In this section you will install Microsoft Office 2013 Visio
1 Ensure you are logged into the WingtipServer VM using the account WINGTIPadministrator | Password1
2 Execute the installer VisioProfessional_English_x64exe
3 On the Read the Microsoft Software License Terms dialog click the checkbox next to I accept the terms of this agreement and click Continue
Creating a SharePoint Server 2013 Environment for Development and Testing Version 10
copy Critical Path Training 2012 All Rights Reserved 57
wwwCriticalPathTrainingcom
4 On the Choose the installation you want dialog click the Install Now button
5 The installer will proceed and install all Visio 2013
6 When the installer completes click the Close button
7 Apply your Visio 2013 license key
a) Launch Visio 2013 Start All Programs Microsoft Office 2013 Visio 2013
b) In the First things first dialog select Use recommended settings and click Accept
c) In the Welcome to Office dialog that opens click the X icon in the top-right corner to close it
d) In the left-hand pane click Open Other Documents
e) In the left-hand pane click Account
f) In the Product Information section within the Activation Required box click Change Product Key
g) Enter your license key for Visio 2013 check the box next to Attempt to automatically activate my product online and click Install
h) Click OK
At this point you have installed Visio 2013
Install Microsoft Office 2013 SharePoint Designer
In this section you will install Microsoft Office 2013 SharePoint Designer
1 Ensure you are logged into the WingtipServer VM using the account WINGTIPadministrator | Password1
2 Execute the installer SharePointDesigner_English_x64exe
3 On the Read the Microsoft Software License Terms dialog click the checkbox next to I accept the terms of this agreement and click Continue
4 On the Choose the installation you want dialog click the Install Now button
5 The installer will proceed and install all SharePoint Designer 2013
6 When the installer completes click the Close button
At this point you have installed SharePoint Designer 2013
Exercise 9 Install Visual Studio 2012
In this exercise you will install Visual Studio 2012
1 Ensure you are logged into the WingtipServer VM using the account WINGTIPadministrator | Password1
2 Start the install of Visual Studio 2012 Ultimate Trial by downloading the installer from here httpwwwmicrosoftcomvisualstudio11en-usdownloads
3 On the installation splash screen check the box next to I agree to the License terms and conditions and click the Next button
Creating a SharePoint Server 2013 Environment for Development and Testing Version 10
copy Critical Path Training 2012 All Rights Reserved 58
wwwCriticalPathTrainingcom
4 On the Optional Features to install dialog click Install
5 After some time the installer will complete Click the Launch button to launch Visual Studio 2012
Creating a SharePoint Server 2013 Environment for Development and Testing Version 10
copy Critical Path Training 2012 All Rights Reserved 59
wwwCriticalPathTrainingcom
6 In the Choose Default Environment Settings select Visual C Development Settings and click Start Visual Studio
7 Close Visual Studio 2012
At this point Visual Studio 2012 RTM is installed
Install Office amp SharePoint 2013 Developer Tools
In this section you will install the Office and SharePoint 2013 developer tools for Visual Studio
1 Ensure you are logged into the WingtipServer VM using the account WINGTIPadministrator | Password1
2 Launch the Web Platform Installer Start All Programs Microsoft Web Platform Installer
3 In the search box at the top-right corner of the Web Platform Installer 40 window type sharepoint and press Enter
4 Click the Add button to the right of Microsoft Office Developer Tools for Visual Studio 2012 - Preview 2
5 Click the Install button at the bottom of the Web Platform Installer 40 window
6 On the Prerequisites page click I Accept
Creating a SharePoint Server 2013 Environment for Development and Testing Version 10
copy Critical Path Training 2012 All Rights Reserved 60
wwwCriticalPathTrainingcom
At this point you have installed the SharePoint 2013 amp Office 2013 development tools in Visual Studio 2012
Creating a SharePoint Server 2013 Environment for Development and Testing Version 10
copy Critical Path Training 2012 All Rights Reserved 61
wwwCriticalPathTrainingcom
Appendix 1 Download Manifest
The following lists everything referenced that you will or may need to download in this environment
Windows Server 2008 R2 with Service Pack 1 (installer ISO)
o httptechnetmicrosoftcomen-usevalcenterdd459137aspx
Windows Server 2008 R2 with Service Pack 1 (prebuilt VHD)
o httpwwwmicrosoftcomdownloadsdetailsaspxFamilyId=9040a4be-c3cf-44a5-9052-a70314452305
Windows Server 2008 R2 Service Pack 1
o httpwwwmicrosoftcomen-usdownloaddetailsaspxid=5842
SQL Server 2012 Trial
o httpwwwmicrosoftcombetaexperiencepdSQL2012EvalCTAenusdefaultaspx
SharePoint Server 2013
o httptechnetmicrosoftcomen-USevalcenterhh973397aspx
Hotfixes for SharePoint Server 2013 (post-install)
o KB2554876 The SharePoint Parsing Process Crashes in Windows Server 2008 R2
o KB2708075 IIS 75 Configurations are not Updated when you use the ServerManager Class to Commit
Configuration Changes
o KB2759112 Hotfix is Available for NET Framework 45 that Resolves an ASPNET Race Condition Issue in
Windows Server 2008 R2 Windows Server 2008 R2 SP1
o KB2765317 Hotfix is Available for NET Framework 45 that Resolves an ASPNET Race Condition Issue in
Windows 8 Windows RT and Windows Server 2012
Web Platform Installer
o httpwwwmicrosoftcomwebdownloadsplatformaspx
Web Platform Installer ndash Command Line Version
o httplearniisnetpageaspx1072web-platform-installer-v4-command-line-webpicmdexe-preview-release
Workflow Manager 10
o Download using the Microsoft Web Platform Installer
Office 2013
o httpwwwmicrosoftcomofficepreviewentry-office-preview
SharePoint Designer 2013
o httpwwwmicrosoftcomen-usdownloaddetailsaspxid=35491
Visio Professional 2013
o httptechnetmicrosoftcomen-usevalcenterhh973399
Visual Studio 2012
o httpwwwmicrosoftcomvisualstudio11en-usdownloads
Office Developer Tools for Visual Studio 2012 ndash Preview 2
o Download using the Microsoft Web Platform Installer
Creating a SharePoint Server 2013 Environment for Development and Testing Version 10
copy Critical Path Training 2012 All Rights Reserved 62
wwwCriticalPathTrainingcom
Appendix 2 Windows PowerShell Script Manifest
The following lists all Windows PowerShell scripts that are provided with this setup guide
AddDisableLoopbackCheckRegKeyps1
o The following steps automate creating the registry key outlined as Method 2 in the Microsoft Knowledgebase article
httpsupportmicrosoftcomkb896861 using Windows PowerShell This key DisableLoopbackCheck will allow
you to browse SharePoint sites on the same machine Without this key (or following Method 1 in the KB article) you
would need to browse any SharePoint sites from a different computer than the one which SharePoint is installed on
ConfigureSpFarmForAppsps1
o Configures a SharePoint 2013 for hosting apps This ensures everything you need is installed running and
configured This is documented here httpmsdnmicrosoftcomen-uslibraryfp179923(v=office15)
CreateSpServiceAccountsps1
o Creates the minimal necessary service accounts for SharePoint Server 2013 SP_Farm SP_Content amp
SP_Services
SetupSharePointForHNSCps1
o Configures a SharePoint 2013 install for hosting Host-Named Site Collections (HNSC) This involves creating a Web
Application in SharePoint that has no host header bindings Using DNS all requests are mapped to this Web
Application You then create the site collections via PowerShell as you cant create HNSCs via the browser (Central
Administration)
Creating a SharePoint Server 2013 Environment for Development and Testing Version 10
copy Critical Path Training 2012 All Rights Reserved 63
wwwCriticalPathTrainingcom
Appendix 3 Create Sample Adventure Works Database
The following steps document downloading and installing the sample Adventure Works OLTP database provided by Microsoft
1 Launch Internet Explorer and navigate to httpmsftdbprodsamplescodeplexcom
2 Download the Adventure Works 2012 OLTP Script
3 Extract the ZIP into a folder on the desktop
4 Launch SQL Server Management Studio Start All Programs Microsoft SQL Server 2012 SQL Server Management Studio
5 When SQL Server Management Studio launches within the Connect to Server dialog login using the default settings and click Connect
6 Within SQL Server Management Studio select File Open File
7 Select the file instawdbsql from the extracted ZIP and click Open
8 If prompted to re-login to the database engine do it
9 Select Query SQLCMD Mode
10 Scroll down to line 42 the line that starts with the following
setvar SqlSamplesSourceDataPath
11 Change the folder location of where you unzipped the Adventure Works 2012 OLTP Script
12 Select Query Execute
13 When the script completes the AdventureWorks2012 database will have been created
Creating a SharePoint Server 2013 Environment for Development and Testing Version 10
copy Critical Path Training 2012 All Rights Reserved 64
wwwCriticalPathTrainingcom
Change Log
Change Version Description
August 22 2012 v 01 Pre-release for review
August 27 2012 v 02 Initial public release ndash install guide based on SharePoint Server Beta 2
August 28 2012 v 03 Updated URL for the site collection used to connect SharePoint to WAW
August 31 2012 v 04 Typo Removed SQL Server Analysis Services as part of the install Not required in a
SharePoint dev box (unless you are doing business intelligence which is not covered
in the guide)
Updated all references to Windows Azure Workflow to Workflow Manager the new
official name for the new workflow product
Updated SetupSharePointForHNSCps1 script to lookup HNSC Web Application by
name rather than URL which is more reliable
Typo Updated WingtipAllUp public NIC to use a different IP than the WingtipDC
Typo Replaced a reference to WingtipServer with WingtipDC
Typo Fixed handful of minor typos
September 1 2012 v 05 Removed SQL Server Reporting Services from install guide
Added step to uncheck IErsquos ldquoAutomatically detect proxyrdquo
Added post workflow install steps to setup User Profile Service Application to sync with
local Active Directory
September 5 2012 v 06 Added step to create a default root site collection in the HNSC web app
Updated minor typos and added extra notes for context
Updated PowerShell script SetupSharePointForHNSCps1 to remove content
database of default Web Application when setting up HNSC Web App
Added a new exercise 8 (after SharePoint install amp config and before the Workflow
install and config) to setup support for My Sites
October 20 2012 v 07 Updated script SetupSharePointForHNSCps1 to fix a bug where it would fail on line
111 if you didnrsquot already have a WINGTIPSP_Content managed account
Added section to bypass SharePointrsquos check for crlmicrosoftcom
Updated workflowrsquos registration PowerShell script to point to
httpintranetwingtipcom
Switched order of post-SharePoint install to setup HSNC hosting before configuring for
hosting apps
November 29 2012
v 10 Changed setup guide to use a single VM instead of two VMs
Updated guide for SharePoint 2013 RTM
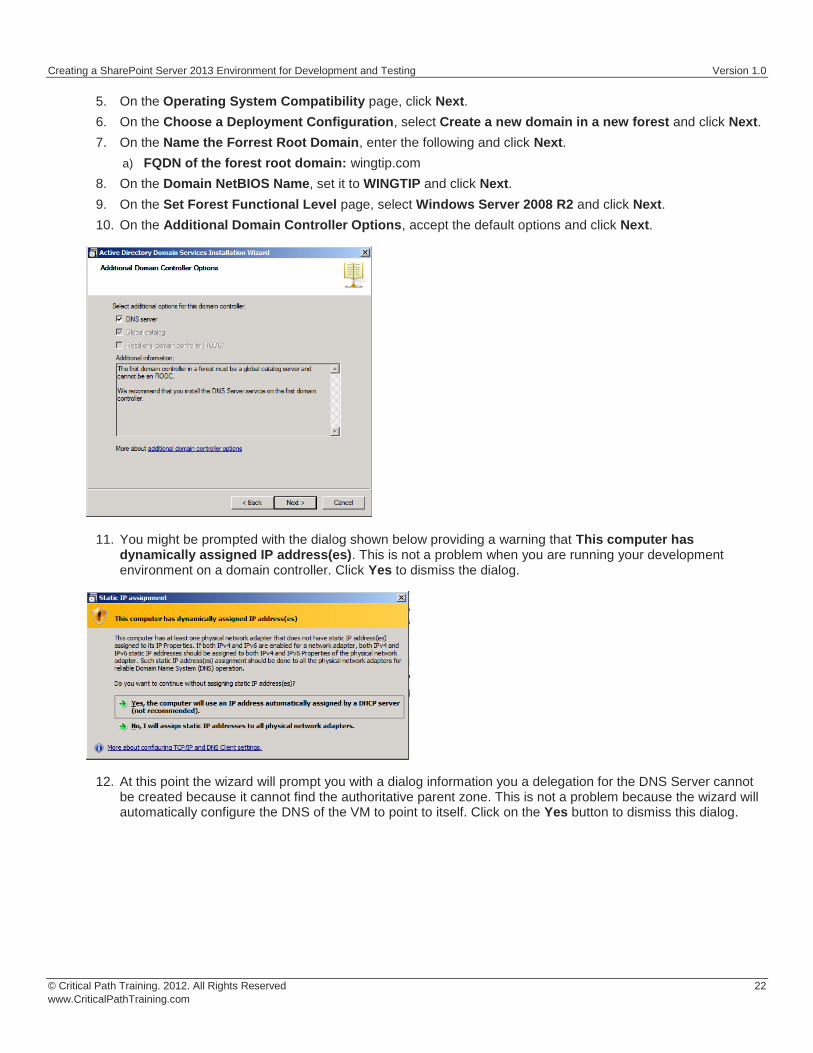
Creating a SharePoint Server 2013 Environment for Development and Testing Version 10
copy Critical Path Training 2012 All Rights Reserved 24
wwwCriticalPathTrainingcom
This step could take quite a bit of time so be patient
At this point you have a fully installed Active Directory Domain Controller for the Wingtipcom domain hosted on the server WingtipServer
Exercise 4 Install SQL Server 2012
In this exercise you will install SQL Server 2012 that will be used to store all required databases
1 Download the SQL Server 2012 Evaluation Edition specifically the DVD x64 ISO image to the host computer from here httpwwwmicrosoftcombetaexperiencepdSQL2012EvalCTAenusdefaultaspx or you can use your own licensed copy
2 Mount the SQL Server 2012 ISO to the WingtipServer VM
a) On the host computer open the Hyper-V Manager
b) Right-click the VM WingtipServer and select Settings
c) Select DVD Drive in the left-hand panel
d) In the right-hand panel select Image File and browse to the ISO file that contains SQL Server 2012 and click OK
3 Login to the WingtipServer VM as wingtipadministrator | Password1
Install SQL Server 2012
In this section you will install SQL Server 2012
1 If the AutoPlay dialog box is open click Run SETUPEXE If it isnrsquot use Windows Explorer to navigate to the DVD drive and execute the setupexe file in the root of the DVD drive
2 In the SQL Server Installation Center click Installation on the left-hand side
Creating a SharePoint Server 2013 Environment for Development and Testing Version 10
copy Critical Path Training 2012 All Rights Reserved 25
wwwCriticalPathTrainingcom
3 Next select New SQL Server stand-alone installation or add features to an existing installation
4 On the Setup Support Rules page the installer will check for issues before installing Click OK
5 On the Product Key page click the Specify a free edition radio box and select Evaluation then click Next
6 On the License Terms page click the I accept the license terms checkbox and click Next
7 On the Setup Support Rules page the installer will check for any problems with the server you are installing on Click Next when this completes
Creating a SharePoint Server 2013 Environment for Development and Testing Version 10
copy Critical Path Training 2012 All Rights Reserved 26
wwwCriticalPathTrainingcom
8 On the Support Role page select SQL Server Feature Installation and click Next
9 On the Feature Selection page check the following options and click Next
a) Instances Features
i) Database Engine Services
(1) Full-Text and Semantic Extractions for Search
b) Shared Features
i) Management Tools ndash Basic
(1) Management Tools ndash Complete
Creating a SharePoint Server 2013 Environment for Development and Testing Version 10
copy Critical Path Training 2012 All Rights Reserved 27
wwwCriticalPathTrainingcom
10 On the Installation Rules page click Next
11 On the Instance Configuration page click Next
12 On the Disk Space Requirements page click Next
13 On the Server Configuration page do the following and click Next
a) On the Service Account tab change the Startup Type for the SQL Server Agent to Automatic
14 On the Database Engine Configuration page do the following and click Next
a) On the Server Configuration tab click Add Current User
b) On the FILESTREAM tab
i) Check Enable FILESTREAM for Transact-SQL Access
ii) Check Enable FILESTREAM for file IO access
15 On the Error Reporting page click Next
16 On the Installation Configuration Rules page click Next
17 On the Ready to Install page click Install
Installation of SQL Server 2012 will take some time please be patient
18 When the installation completes the Complete page will be shown Click Close
At this point you have now successfully installed SQL Server 2012
Creating a SharePoint Server 2013 Environment for Development and Testing Version 10
copy Critical Path Training 2012 All Rights Reserved 28
wwwCriticalPathTrainingcom
Exercise 5 Install amp Configure SharePoint Server 2013
In this exercise you will install SharePoint 2013
1 Download the SharePoint Server 2013 to the host computer from here httptechnetmicrosoftcomen-USevalcenterhh973397aspx
2 Mount the SharePoint Server 2013 ISO to the WingtipServer VM
a) On the host computer open the Hyper-V Manager
b) Right-click the VM WingtipServer and select Settings
c) Select DVD Drive in the left-hand panel
The file that Microsoft provides is saved in the IMG format Hyper-V Manager wonrsquot allow you to mount an IMG file so rename it to ISO before mounting it
d) In the right-hand panel select Image File and browse to the ISO file that contains SharePoint Server 2013 and click OK
Create SharePoint Service Accounts amp Grant Rights to SQL Server 2012
In this section you will create the necessary service accounts that will be used by SharePoint in Active Directory and grant them necessary rights in SQL Server 2012
PowerShell Script Alert The creation of users and granting them rights to SQL Server 2012 steps in this section are automated in the Windows PowerShell script CreateSpServiceAccountsps1 found in the files that accompany this setup guide Open the script
and read the header for documentation on how to use it
1 Open the Active Directory Users and Computers Start Administrative Tools Active Directory Users and Computers
2 Expand the tree in the left-hand pane to see the Users OU Select the Users OU
3 Create a new user SP_Farm
a) In the toolbar select Action New User
Creating a SharePoint Server 2013 Environment for Development and Testing Version 10
copy Critical Path Training 2012 All Rights Reserved 29
wwwCriticalPathTrainingcom
b) Set the userrsquos Full Name amp User Login Name to SP_Farm and click Next
c) In the password dialog enter the following and click Next
i) Password (and Confirm Password) Password1
ii) User must change password at next login unchecked
iii) User cannot change password unchecked
iv) Password never expires checked
v) Account is disabled unchecked
Creating a SharePoint Server 2013 Environment for Development and Testing Version 10
copy Critical Path Training 2012 All Rights Reserved 30
wwwCriticalPathTrainingcom
vi) Click Finish
4 Repeat the previous step to create two more accounts
a) SP_Content
b) SP_Services
At this point you have created all the necessary service accounts
Install SharePoint Server 2013 Prerequisites
In this section you will install the SharePoint Server 2013 Prerequisites
1 Ensure you are logged into the WingtipServer VM using the account wingtipadministrator | Password1
2 If the AutoPlay dialog box is open click Run splashhta If it isnrsquot use Windows Explorer to navigate to the DVD drive and execute the splashhta file in the root of the DVD drive
Creating a SharePoint Server 2013 Environment for Development and Testing Version 10
copy Critical Path Training 2012 All Rights Reserved 31
wwwCriticalPathTrainingcom
3 Click the Install Software Prerequisites link
4 In the Microsoft SharePoint 2013 Products Preparation Tool window click Next
5 On the License Terms for Software Products page
a) Check I accept the terms of the License Agreement(s)
b) Click Next
6 The tool will download and install all prerequisites for SharePoint Server 2013 This will take some time It may prompt you to reboot the server If so reboot the server and login using wingtipadministrator | Password1
Creating a SharePoint Server 2013 Environment for Development and Testing Version 10
copy Critical Path Training 2012 All Rights Reserved 32
wwwCriticalPathTrainingcom
7 When the prerequisite installer is complete it will present a summary of everything it did
8 Click Finish
9 Restart the WingtipServer VMhellip some additional installations and changes that the prerequisite installer did will require a restart before installing SharePoint Server 2013
At this point all prerequisites required by SharePoint Server 2013 have been installed and any necessary configuration changes have been applied to the server However it is strongly recommend that you run Windows Update and install any pending updates Further Microsoft recommends installing the following hotfixes if they are not already installed
KB2554876 The SharePoint Parsing Process Crashes in Windows Server 2008 R2
KB2708075 IIS 75 Configurations are not Updated when you use the ServerManager Class to Commit Configuration Changes
KB2759112 Hotfix is Available for NET Framework 45 that Resolves an ASPNET Race Condition Issue in Windows Server 2008 R2 Windows Server 2008 R2 SP1
KB2765317 Hotfix is Available for NET Framework 45 that Resolves an ASPNET Race Condition Issue in Windows
8 Windows RT and Windows Server 2012
Install SharePoint Server 2013
In this section you will install SharePoint Server 2013
1 Ensure you are logged into the WingtipServer VM using the account wingtipadministrator | Password1
2 If the AutoPlay dialog box is open click Run splashhta If it isnrsquot use Windows Explorer to navigate to the DVD drive and execute the splashhta file in the root of the DVD drive
Creating a SharePoint Server 2013 Environment for Development and Testing Version 10
copy Critical Path Training 2012 All Rights Reserved 33
wwwCriticalPathTrainingcom
3 Click Install SharePoint Server
4 When prompted to Enter your Product Key enter the key you obtained for the trial install and click Continue
5 On the Read the Microsoft Software License Terms page check the I accept the terms of this agreement checkbox and click Continue
6 On the Choose a file location page click Install Now
Creating a SharePoint Server 2013 Environment for Development and Testing Version 10
copy Critical Path Training 2012 All Rights Reserved 34
wwwCriticalPathTrainingcom
7 When the installation is complete select the Run the SharePoint Products Configuration Wizard checkbox and click Close
8 On the Welcome to SharePoint Products page click Next
a) If prompted to start or reset services click Yes
9 On the Connect to a server farm page select Create a new server farm and click Next
10 On the Specify Configuration Database Settings page use the following to complete the page and click Next
a) Database server WINGTIPSERVER
b) Database name SharePoint_Config
c) Username WINGTIPSP_Farm
d) Password Password1
Creating a SharePoint Server 2013 Environment for Development and Testing Version 10
copy Critical Path Training 2012 All Rights Reserved 35
wwwCriticalPathTrainingcom
11 On the Specify Farm Security Settings page for the Passphrase and Confirm Passphrase boxes enter Password1 and click Next
12 On the Configure SharePoint Central Administration Web Application page check the Specify port number checkbox and enter a value of 9999 then Click Next
Creating a SharePoint Server 2013 Environment for Development and Testing Version 10
copy Critical Path Training 2012 All Rights Reserved 36
wwwCriticalPathTrainingcom
13 On the Completing the SharePoint Products Configuration Wizard page click Next
14 When the installer completes it will display the Confirmation Successful page
15 Click Finish This will launch Internet Explorer to go through the configuration process
Creating a SharePoint Server 2013 Environment for Development and Testing Version 10
copy Critical Path Training 2012 All Rights Reserved 37
wwwCriticalPathTrainingcom
At this point you have successfully installed SharePoint Server 2013
Configure SharePoint Server 2013
In this section you will create a new SharePoint Server 2013 farm and perform minimal configuration tasks
After installing SharePoint Sever 2013 the SharePoint Products Configuration Wizard will launch the browser-based Initial Farm Configuration Wizard
1 In the first page of the wizard you are prompted to Help Make SharePoint Better Select which ever option you want and click OK
2 On the Welcome page that asks How do you want to configure your SharePoint farm click the Start the Wizard button
3 On the Services page do the following and then click Next
a) Service Account Select Create new managed account
i) Username WINGTIPSP_Services
ii) Password Password1
b) Services Uncheck the following services
Creating a SharePoint Server 2013 Environment for Development and Testing Version 10
copy Critical Path Training 2012 All Rights Reserved 38
wwwCriticalPathTrainingcom
i) Access Services 2010
ii) App Management Service
In SharePoint Server 2013 the Search Service Application processes specifically noderunnerexe can consume a considerable amount of memory and processor time If you are not going to work with search you might consider unchecking this option for now You can always go back into Central Administration and create a new instance of the Search Service Application at a later date if you need it
Why did we remove Access Services 2010 amp App Management Service service applications The Access Services 2010 service application is included for backwards compatibility and isnrsquot needed in new installations unless you are migrating solutions built with Access Services 2010 from SharePoint Server 2010 (if so you can create this service application later within Central Administration Application Management Manage Service Applications) The App Management Service service application will be created in a later step in this setup guide therefor it is skipped here
4 The creation of the service applications can take quite a while so be patient If it exceeds 20 minutes it is fairly safe to assume the page is hung up One option is to close the browser then launch Central Administration (Start All Programs Microsoft SharePoint 2013 Products SharePoint 2013 Central Administration) and look at the Service Application page (Application Management Manage Service Applications) to see if they were all created
Configure DNS
In this section you will configure DNS for hosting SharePoint sites amp Apps
1 Ensure you are logged into the WingtipServer VM using the account wingtipadministrator | Password1
2 Open the DNS window Start Administrative Tools DNS
3 Expand the hierarchy on the left-hand side of the window until you get to DNS WINGTIPSERVER Forward Lookup Zones wingtipcom
4 Create a new wildcard so all requests for http[]wingtipcom will be forwarded to our SharePoint machine
a) Next right-click wingtipcom and select New Host (A or AAAA)
Creating a SharePoint Server 2013 Environment for Development and Testing Version 10
copy Critical Path Training 2012 All Rights Reserved 39
wwwCriticalPathTrainingcom
b) In the New Host dialog enter the following and click OK
i) Alias Name
ii) IP Address 192168150102 Then click Add Host The following figure shows how this looks
This new record is telling DNS to forward any request for http[]wingtipcom to the webserver WINGTIPSERVER where the
requests will be served by SharePoint
5 Verify this DNS entry is working
a) Open Windows PowerShell Start All Programs Accessories Windows PowerShell Windows PowerShell
b) Run the following commands and press ENTER
PS CUsersAdministratorgt nslookup somethingwingtipcom PS CUsersAdministratorgt nslookup somethingappswingtipcom
c) You should get a response that points to the WingtipServer server as shown in the following figure
Creating a SharePoint Server 2013 Environment for Development and Testing Version 10
copy Critical Path Training 2012 All Rights Reserved 40
wwwCriticalPathTrainingcom
Configure SharePoint Server 2013 for Host-Named Site Collections amp Create Initial Site
Collections
In this section you will create new SharePoint 2013 site collections for testing and hosting apps
Microsoft recommends to create host-named site collections (HNSC) instead of using the path based site collection addressing The difference is the following a path based site created at something such as httpintranetwingtipcomsitesdevtest as an HNSC site would be more like httpdevtestwingtipcom This is how it works in the cloud (Office 365) and it scales much better for on-prem
deployments This setup guide will show you how to setup your environment to create HNSC The only downside to this approach is that you canrsquot create site collections within Central Administration it must be done via Windows PowerShell API (because Central Administration doesnrsquot instruct you where to put the site
This is implemented in various parts First DNS must be configured to send all requests for httpwingtipcom to a Web Application
(implemented in the last section) Second this Web Application must be extended with SharePoint and have no host header bindings (so it handles all requests) Third it must have a default site collection at the root of the Web Application but it will not be used for anything (in fact it doesnrsquot need a template assigned to it)
You can read more about HNSCrsquos on TechNet httptechnetmicrosoftcomen-uslibrarycc424952aspx
PowerShell Script Alert The steps in this section are automated in the script SetupSharePointForHNSCps1 found in the files that
accompany this setup guide Open the script and read the header for documentation on how to use it
1 Ensure you are logged into the WingtipServer VM using the account wingtipadministrator | Password1
2 Open Central Administration Start All Programs Microsoft SharePoint 2013 Products SharePoint 2013 Central Administration
3 Select Application Management Manage Web Applications
4 Delete the default Web Application created by the configuration wizard
a) Delete the existing default Web Application
i) Select the Web Application SharePoint ndash 80 the one with the URL of httpwingtipserver and click Delete in the ribbon
ii) When prompted to delete the associated IIS Web Site amp SQL Server database select both options to delete them and click OK
The reason you are doing this is because the setup wizard you ran previously when creating the service applications automatically created it The problem is that it used the same identity (WINGTIPSP_Services) for the app pool that is used for all the service
applications which is not desired
5 Create a new Web Application to handle Host-Named Site Collections (HNSC)
Creating a SharePoint Server 2013 Environment for Development and Testing Version 10
copy Critical Path Training 2012 All Rights Reserved 41
wwwCriticalPathTrainingcom
a) In the ribbon click the New button
b) In the Create New Web Application dialog enter the following values in the properties and click OK Leave all properties not mentioned
i) Select the radio button Create a new IIS web site
(1) Name SharePoint HNSC Host ndash 80
(2) Port 80
ii) Application Pool
(1) Select the radio button Create a new application pool
(a) Application Pool Name SharePoint Default HNSC AppPool
(b) Select a security account for this application pool WINGTIPSP_Content
If WINGTIPSP_Content is not listed as an available managed account create it by selecting the appropriate option and using
Password1 for the password
iii) Database Name and Authentication
(1) Database Name WSS_Content_HNSCDefaultHost
c) This process will take a few moments At the end of the process SharePoint will ask if you want to create a site collection You do but you donrsquot want to do it through the browser as this will not be a HNSC To create a HNSC you must create it via Windows PowerShell
6 Create a default not template site collection at the root of the web application
a) Open SharePoint 2013 Management Shell Start All Programs Microsoft SharePoint 2013 Products SharePoint 2013 Management Shell
7 Create Site Collections for Testing SharePoint amp SharePoint Apps
a) Open SharePoint 2013 Management Shell Start All Programs Microsoft SharePoint 2013 Products SharePoint 2013 Management Shell
b) Get a reference to the HNSC web application you just created by running the following Windows PowerShell script in the SharePoint 2013 Management Shell
$hnscWebApp = Get-SPWebApplication | Where-Object $_DisplayName -eq SharePoint HNSC Host - 80
c) Create a non-templated site at the root of the web application for Workflow to connect to by executing the following Windows PowerShell script in the SharePoint 2013 Management Shell
New-SPSite -Name Root HNSC Site Collection -Url httpwingtipcom -HostHeaderWebApplication $hnscWebApp -OwnerAlias WINGTIPAdministrator
d) Create a team site by executing the following Windows PowerShell script in the SharePoint 2013 Management Shell
New-SPSite -Name Wingtip Intranet -Url httpintranetwingtipcom ndashHostHeaderWebApplication $hnscWebApp -Template STS0 -OwnerAlias WINGTIPAdministrator
e) Create a developer site by executing the following Windows PowerShell script in the SharePoint 2013 Management Shell
New-SPSite -Name Wingtip Developer Site -Url httpdevwingtipcom ndashHostHeaderWebApplication $hnscWebApp -Template DEV0 -OwnerAlias WINGTIPAdministrator
You can only create debug and test apps using a developer site
At this point you now have a site collection to use as a team site (httpintranetwingtipcom) and to develop and test custom SharePoint apps (httpdevwingtipcom)
Creating a SharePoint Server 2013 Environment for Development and Testing Version 10
copy Critical Path Training 2012 All Rights Reserved 42
wwwCriticalPathTrainingcom
Configure SharePoint 2013 for Hosting Apps
In this setup you will setup your SharePoint 2013 environment for hosting apps
PowerShell Script Alert Everything in the next immediate step is provided in the script ConfigureSpFarmForAppsps1 found in the
files that accompany this setup guide Open the script and read the header for documentation on how to use it
1 Ensure you are logged into the WingtipServer VM using the account wingtipadministrator | Password1
2 Create the necessary SharePoint App Management service applications and start the necessary services via Windows PowerShell
a) Open SharePoint 2013 Management Shell Start All Programs Microsoft SharePoint 2013 Products SharePoint 2013 Management Shell
b) Execute the following Windows PowerShell script in the SharePoint 2013 Management Shell
$appHostDomain = appswingtipcom $adminService = Get-Service -Name spadminv4 if ($adminServiceStatus -ne Running) Start-Service $adminService $timerService = Get-Service -Name sptimerv4 if ($timerServiceStatus -ne Running) Start-Service $timerService Set-SPAppDomain $appHostDomain $appMgmtSvcInstance = Get-SPServiceInstance | Where-Object $_GetType()Name -eq AppManagementServiceInstance if ($appMgmtSvcInstanceStatus -ne Online) Start-SPServiceInstance -Identity $appMgmtSvcInstance $appSubSettingSvcInstance = Get-SPServiceInstance | Where-Object $_GetType()Name -eq SPSubscriptionSettingsServiceInstance if ($appSubSettingSvcInstanceStatus -ne Online) Start-SPServiceInstance -Identity $appSubSettingSvcInstance $appPoolServiceApps = Get-SPServiceApplicationPool -Identity SharePoint Web Services Default $appSubSvc = New-SPSubscriptionSettingsServiceApplication ndashApplicationPool $appPoolServiceApps ndashName Settings Service Application ndashDatabaseName SettingsServiceDB $proxySubSvc = New-SPSubscriptionSettingsServiceApplicationProxy ndashServiceApplication $appSubSvc $appAppSvc = New-SPAppManagementServiceApplication -ApplicationPool $appPoolServiceApps -Name App Management Service Application -DatabaseName AppServiceDB $proxyAppSvc = New-SPAppManagementServiceApplicationProxy -ServiceApplication $appAppSvc Set-SPAppSiteSubscriptionName -Name app -Confirm$false
3 Verify the script configured SharePoint 2013 for hosting apps
a) Open Central Administration Start All Programs Microsoft SharePoint 2013 Products SharePoint 2013 Central Administration
b) Verify service applications created
i) Open the Service Applications page Application Management Manage Service Applications
ii) Verify you have two service applications created
(1) App Management Service Application
(2) Settings Service Application
c) Verify service instances are running
i) Open the Services on Server page System Settings Manage Services on Server
ii) Verify the following services are Started
(1) App Management Service
(2) Microsoft SharePoint Foundation Subscription Settings Service
Creating a SharePoint Server 2013 Environment for Development and Testing Version 10
copy Critical Path Training 2012 All Rights Reserved 43
wwwCriticalPathTrainingcom
d) Verify App URLs are correct
i) Open the Configure App URLs page Apps Configure app URLs
ii) Verify the following
(1) App Domain appswingtipcom
(2) App Prefix app
At this point your SharePoint Server 2013 environment is ready to host SharePoint apps
Creating a SharePoint Server 2013 Environment for Development and Testing Version 10
copy Critical Path Training 2012 All Rights Reserved 44
wwwCriticalPathTrainingcom
Start the SharePoint 2013 Sandbox Service
By default the service that executes sandbox solutions is not running In this step you will start the service
1 Open Central Administration Start All Programs Microsoft SharePoint 2013 Products SharePoint 2013 Central Administration
2 Open the Services on Server page System Settings Manage Services on Server
3 Click the Start link to the left of the Microsoft SharePoint Foundation Sandboxed Code Service
At this point your installation can support sandbox solutions
Configure CRL Verification for Disconnected Environments
SharePoint periodically ldquophones homerdquo to a specific address hosted by Microsoft under certain conditions When your environment is disconnected this can cause an unnecessary delay or failures when starting up the sandbox The following steps outline a workaround to bypass this check
1 Launch Notepad as an administrator Start All Programs Accessories right-click Notepad and select Run as Administrator
2 Open the hosts file by selecting File Open and finding the file
cWindowsSystem32Driversetchosts
3 Add the following line to the end of the file
127001 crlmicrosoftcom
4 Save and close the hosts file
Update Internet Explorer to Bypass the App URL amp Automatically Login to SharePoint Sites
In this section you will update Internet Explorer to add the App hosting URL to the bypass list so you can navigate to the domain after deploying SharePoint hosted apps
1 Ensure you are logged into the WingtipServer VM using the account wingtipadministrator | Password1
1 Launch Internet Explorer Start All Programs Internet Explorer
2 Configure Internet Explorer to bypass the App URL
a) In the top-right corner click the gear icon and select Internet Options
b) On the Security tab select the Local Intranet and click the Sites button
c) Uncheck the box next to Automatically detect intranet network
d) Click the Advanced button and add two entries to the Exceptions list
i) httpwingtipcom
ii) httpappswingtipcom
Creating a SharePoint Server 2013 Environment for Development and Testing Version 10
copy Critical Path Training 2012 All Rights Reserved 45
wwwCriticalPathTrainingcom
e) Click the Close button followed by the OK button multiple times to close out of the dialogs
At this point Internet Explorer is setup to bypass your app URL so you can navigate to apps (httpappswingtipcom) as well as automatically authenticate to sites hosted at httpwingtipcom
Exercise 6 Configure SharePoint to Host My Sites
In this exercise you will configure SharePoint to create and host My Sites In order to host My Sites you will need a new Web Application that is configured for Self-Service Site Creation and has a My Site Host site collection
1 Create a new SharePoint web application to host the My Sites
a) Ensure you are logged into the WingtipServer VM using the account wingtipadministrator | Password1
b) Open Central Administration Start All Programs Microsoft SharePoint 2013 Products SharePoint 2013 Central Administration
c) Select Application Management Manage Web Applications
d) In the ribbon click the New button
e) In the Create New Web Application dialog enter the following values in the properties and click OK Leave all properties not mentioned
i) Select the radio button Create a new IIS web site
(1) Name SharePoint MySite Host ndash 80
(2) Port 80
(3) Host Header mywingtipcom
ii) Application Pool
(1) Select the radio button Use existing application pool
(a) Application Pool Name SharePoint Default HNSC AppPool
iii) Database Name and Authentication
(1) Database Name WSS_Content_SocialWingtipCom
f) This process will take a few moments At the end of the process SharePoint will ask if you want to create a site collection Click the link provided to create a new site collection amp continue to the next step
2 Create a My Site Host site collection
a) On the Create Site Collection page use the following information to complete the form and click OK
Creating a SharePoint Server 2013 Environment for Development and Testing Version 10
copy Critical Path Training 2012 All Rights Reserved 46
wwwCriticalPathTrainingcom
i) Title My Site Host
ii) URL
iii) Template Selection My Site Host (found under the Enterprise tab)
iv) Primary Site Collection Administrator WINGTIPAdministrator
3 Update the Web Application to host my sites
a) Within Central Administration in the left-hand navigation navigate to the Manage Web Applications page Application Management Manage Web Applications
b) Select the SharePoint MySite Host ndash 80 web application
c) Click the Managed Paths button in the ribbon
d) Remove the sites managed path and add two new managed paths and click OK
i) personal ndash Wildcard inclusion
ii) my ndash Explicit inclusion
e) With the SharePoint MySite Host ndash 80 web application still selected click the Self-Service Site Creation button
f) On the Self-Service Site Creation page use the following values to complete the form and click OK
i) Site Collections On
4 Next configure the User Profile Service Application My Site settings
a) Browse to the User Profile Service Application management page Application Management Manage Service Applications User Profile Service Application
b) Under the My Site Settings section click the Setup My Sites
c) On the My Site Settings page use the following information to complete the form and click OK
i) My Site Host httpmywingtipcom
ii) Personal Site Location personal
At this point your SharePoint deployment is now configured to automatically create My Sites under httpmywingtipcomPersonalUserName when users first browse to them
Exercise 7 Install amp Configure Workflow Manager 10
In this exercise you will configure the WingtipServer VM to host Workflow Manager 10 and connect it to your SharePoint installation
1 Ensure you are logged into the WingtipServer VM using the account wingtipadministrator | Password1
Verify SQL Server 2012 Network Configuration
In this section yoursquoll verify the network configuration is correct for SQL Server 2012 in order to install Workflow Manager 10
Creating a SharePoint Server 2013 Environment for Development and Testing Version 10
copy Critical Path Training 2012 All Rights Reserved 47
wwwCriticalPathTrainingcom
1 Configure SQL Server 2012 to have the TCPIP connection protocol enabled
a) Open the SQL Server Configuration Manager Start All Programs Microsoft SQL Server 2012 Configuration Tools SQL Server Configuration Manager
b) Expand the hierarchy on the left-hand side to the following SQL Server Connection Manager (local) SQL Server Network Configuration Protocols for MSSQLSERVER
c) In the main window if TCPIP is Disabled right-click TCPIP and select Enable
d) When prompted with a warning click OK
2 SQL Server must be restarted in order to reflect this change
a) In the hierarchy on the left-hand side of the window select SQL Server Services
b) Right-click SQL Server (MSSQLSERVER) and select Restart
At this point SQL Server is now configured with the TCPIP protocol enabled a requirement when configuring Service Bus
Configure the Workflow Service Account with the Necessary Rights
In this section you will verify the service account that will run Workflow Manager and Service Bus
1 Ensure you are logged into the WingtipServer VM using the account WINGTIPadministrator | Password1
2 Grant the WINGTIPSP_Content account securityadmin amp dbcreator permissions in SQL Server
a) Launch SQL Server Management Studio Start All Programs Microsoft SQL Server 2012 SQL Server Management Studio
b) When SQL Server Management Studio launches within the Connect to Server dialog login using the default settings and click Connect
c) In the Object Explorer tool window expand the WINGTIPSERVER server hierarchy to the Security Logins node
d) Find the WINGTIPSP_Content account right-click it and select Properties
Creating a SharePoint Server 2013 Environment for Development and Testing Version 10
copy Critical Path Training 2012 All Rights Reserved 48
wwwCriticalPathTrainingcom
e) In the Select a page pane select Server Roles
f) Check securityadmin amp dbcreator and click OK
g) Close SQL Server Management Studio
3 Add the Workflow service account to the local administrators group
a) Open the Active Directory Users and Computers window Start Administrative Tools Active Directory Users and Computers
b) In the hierarchy on the left-hand side of the window expand it to the following Active Directory Users and Computers wingtipcom Builtin
c) In the main window right-click Administrators and select Properties
d) In the Administrators Properties dialog select the Members tab and click Add
e) In the Enter the object names to select box enter wingtipsp_content and click the Check Names button
f) In the Administrators Properties dialog click OK
g) Close the Active Directory Users and Computers window
At this point the service account that will host Workflow Manager and Service Bus has been configured correctly
Creating a SharePoint Server 2013 Environment for Development and Testing Version 10
copy Critical Path Training 2012 All Rights Reserved 49
wwwCriticalPathTrainingcom
Download amp Install Workflow Manager and Service Bus
In this section you will install Workflow Manager and Service Bus
1 Ensure you are logged into the WingtipServer VM using the account WINGTIPSP_Content | Password1
It is important you are logged in as the user that will run workflow when you install amp configure Workflow Manager and Service Bus
2 Launch the Web Platform Installer Start All Programs Microsoft Web Platform Installer
a) If the Web Platform Installer is not present on your machine you can download amp install it from here httpwwwmicrosoftcomwebdownloadsplatformaspx
If you do not have internet access within the virtual machine it is possible to download everything needed for workflow using the command line version of the Web Platform Installer (WebPICMD) You can get WebPICMD from httplearniisnetpageaspx1072web-platform-installer-v4-command-line-webpicmdexe-preview-release Specifically for
workflow enter the following command to download Workflow Beta 1 and all prerequisites
webpicmd offline ProductsWorkflow Pathc[path]
3 When the Web Platform Installer loads execute a search for Workflow select Workflow Manager 10 and click Add
4 Click the Install button at the bottom of the Web Platform Installer 40 window
5 On the Prerequisites page click I Accept
Note The Web Platform Installer 40 may prompt you to keep certain products updated using Microsoft Update If it does select Use Microsoft Update when I check for updates (recommended) and click Continue
6 When the installer completes the following dialog will appear Click Continue and then Finish to start the configuration process
Creating a SharePoint Server 2013 Environment for Development and Testing Version 10
copy Critical Path Training 2012 All Rights Reserved 50
wwwCriticalPathTrainingcom
At this point Workflow Manager amp Service Bus are installed
Configure Workflow Manager and Service Bus
In this section you will install Workflow Manager and Service Bus
1 If the Workflow Manager Configuration Wizard is not open open it Start All Programs Workflow Manager 10 Workflow Configuration
2 On the Welcome page click Configure Workflow Manager with Default Settings (Recommended)
Creating a SharePoint Server 2013 Environment for Development and Testing Version 10
copy Critical Path Training 2012 All Rights Reserved 51
wwwCriticalPathTrainingcom
3 On the New Farm Configuration page do the following
a) In the section Configure Service Account set the credentials to
i) User ID sp_contentwingtipcom
ii) Password Password1
b) Check the Allow Workflow management over HTTP on this computer checkbox
Ensure the username is entered in the fully qualified UPN format not as the default shows in the installer (sp_contentwingtip) or the domainusername format
In a production environment you should be doing everything over SSL
c) Click the Test Connection button to verify the connection credentials before proceeding
Creating a SharePoint Server 2013 Environment for Development and Testing Version 10
copy Critical Path Training 2012 All Rights Reserved 52
wwwCriticalPathTrainingcom
d) In the Certificate Generation Key and Confirm Certificate Generation Key enter Password1 into both fields
4 Click the right arrow in the bottom right corner to proceed
5 On the Summary page review your settings and click the check at the bottom right of the widow to start the configuration process
Creating a SharePoint Server 2013 Environment for Development and Testing Version 10
copy Critical Path Training 2012 All Rights Reserved 53
wwwCriticalPathTrainingcom
6 After a few minutes the Configuration Progress screen will show that everything has been configured correctly
Creating a SharePoint Server 2013 Environment for Development and Testing Version 10
copy Critical Path Training 2012 All Rights Reserved 54
wwwCriticalPathTrainingcom
7 Click the check in the bottom right corner
At this point Workflow Manager amp Service Bus has been installed and a new Workflow Manager farm has been created The next step is to connect the SharePoint 2013 farm to the Workflow Manager farm
Connect SharePoint 2013 to Workflow Manager
In this section you will connect SharePoint 2013 and Workflow Manager together
1 Ensure you are logged into the WingtipServer VM using the account WINGTIPadministrator | Password1
2 Get the Workflow Manager endpoint
a) Open the Workflow Manager PowerShell console Start All Programs Workflow Manager 10
b) Execute the Windows PowerShell following cmdlet
Get-WFFarm | ft HttpPort
c) Take note of this port (12291) This port number is what you will use to connect the SharePoint 2013 farm to the Workflow Manager 10 farm
In production you should connect to the HTTPS port listed in the HttpsPort property when you run Get-WFFarm
d) Close the Workflow Manager PowerShell window
3 Connect the SharePoint 2013 farm to Workflow Manager
Creating a SharePoint Server 2013 Environment for Development and Testing Version 10
copy Critical Path Training 2012 All Rights Reserved 55
wwwCriticalPathTrainingcom
a) Open SharePoint 2013 Management Shell Start All Programs Microsoft SharePoint 2013 Products SharePoint 2013 Management Shell
b) Execute the following Windows PowerShell script in the SharePoint 2013 Management Shell
Register-SPWorkflowService ndashSPSite httpintranetwingtipcom ndashWorkflowHostUri httpwingtipserver12291 ndashAllowOAuthHttp
This script is telling SharePoint the endpoint it should use to talk to Workflow Manager as well as Workflow Manager the SharePoint site collection it should talk to for calls into the CSOM It is also configuring all communication over HTTP rather than HTTPS for performance reasons In production you should always use HTTPS
This step will take a moment with no feedback during the process Be patient
c) Close the SharePoint 2013 Management Shell
At this point the SharePoint 2013 farm is connected to the Workflow Manager 10 farm
Configure SharePoint User Profile Service Application AD Sync
Users in SharePoint 2013 are validated by Workflow Manager against SharePoint to ensure they have permissions to start a workflow This is done by looking up the user by their AD UserPrincipalName (UPN) attribute in the User Profile Service Application (UPA) If no matching user is found the workflow will be automatically cancelled by Workflow Manager In this section you will setup UPA to connect amp sync with the local Active Directory so user accounts in AD will have their UPN synchronized to UPA
1 Open Central Administration Start All Programs Microsoft SharePoint 2013 Products SharePoint 2013 Central Administration
2 Go to the User Profile Service Application management page Application Management Manage Service Applications User Profile Service Application
3 The first step is to configure the User Profile Service Application to allow for Active Directory (AD) synchronization
a) Under Synchronization select Configure Synchronization Settings
b) For Synchronization select Use SharePoint Active Directory Import and click OK
4 Next establish a connection to the wingtipcom AD
a) Under Synchronization select Configure Synchronization Connections
b) On the Synchronization Connections page select Create New Connection
c) Enter the following values on this form and click OK
i) Connection Name WINGTIPCOM AD
ii) Type Active Directory Import
iii) Connection Settings
(1) Fully Qualified Domain Name wingtipcom
(2) Authentication Provider Type Windows Authentication
(3) Account Name WINGTIPAdministrator
(4) Password (and Confirm Password) Password1
iv) Containers
(1) Click Populate Containers
(2) After it loads check the box next to WINGTP or click the Select All button below the box
5 Go back to the User Profile Service Application management page Application Management Manage Service Applications User Profile Service Application
6 Finally start a synchronization import
a) Under Synchronization select Start Profile Synchronization
Creating a SharePoint Server 2013 Environment for Development and Testing Version 10
copy Critical Path Training 2012 All Rights Reserved 56
wwwCriticalPathTrainingcom
b) Select Start Full Synchronization and click OK
c) You will be taken back to the User Profile Service Application management page Notice in the top-right corner there is a status block that reports how many profiles are in the UPA database Refresh the page to see it increase to a handful of profiles as the import process runs
At this point you have successfully configured the User Profile Service Application to import profiles from the local AD
Exercise 8 Install the Microsoft Office 2013 Professional Clients
In this exercise you will install the Microsoft Office 2013 client applications
1 Download the Office 2013 into the WingtipServer VM For this you need to create an Office 365 Trial account login to Office 365 go to the Admin Dashboard and then download the latest version httpwwwmicrosoftcomofficepreviewentry-office-preview
2 Download the SharePoint Designer 2013 into the WingtipServer VM from here httpwwwmicrosoftcomen-usdownloaddetailsaspxid=35491
3 Download the Visio Professional 2013 into the WingtipServer VM from here httptechnetmicrosoftcomen-usevalcenterhh973399
Install Microsoft Office Professional Plus 2013
In this section you will install the Microsoft Office 2013 clients
1 Ensure you are logged into the WingtipServer VM using the account WINGTIPadministrator | Password1
2 Execute the installer OfficeProfessionalPlus_English_x64exe
3 On the Read the Microsoft Software License Terms dialog click the checkbox next to I accept the terms of this agreement and click Continue
4 On the Choose the installation you want dialog click the Install Now button
5 The installer will proceed and install all the Office products
6 When the installer completes click the Close button
7 Apply your Office Professional Plus 2013 license key
a) Launch Word 2013 Start All Programs Microsoft Office 2013 Word 2013
b) In the First things first dialog select Use recommended settings and click Accept
c) In the Welcome to Office dialog that opens click the [X] icon in the top-right corner to close it
d) In the left-hand pane click Open Other Documents
e) In the left-hand pane click Account
f) In the Product Information section within the Activation Required box click Change Product Key
g) Enter your license key for Office Professional Plus 2013 check the box next to Attempt to automatically activate my product online and click Install
h) Click OK
At this point you have installed Office Professional Plus 2013
Install Microsoft Office Visio 2013
In this section you will install Microsoft Office 2013 Visio
1 Ensure you are logged into the WingtipServer VM using the account WINGTIPadministrator | Password1
2 Execute the installer VisioProfessional_English_x64exe
3 On the Read the Microsoft Software License Terms dialog click the checkbox next to I accept the terms of this agreement and click Continue
Creating a SharePoint Server 2013 Environment for Development and Testing Version 10
copy Critical Path Training 2012 All Rights Reserved 57
wwwCriticalPathTrainingcom
4 On the Choose the installation you want dialog click the Install Now button
5 The installer will proceed and install all Visio 2013
6 When the installer completes click the Close button
7 Apply your Visio 2013 license key
a) Launch Visio 2013 Start All Programs Microsoft Office 2013 Visio 2013
b) In the First things first dialog select Use recommended settings and click Accept
c) In the Welcome to Office dialog that opens click the X icon in the top-right corner to close it
d) In the left-hand pane click Open Other Documents
e) In the left-hand pane click Account
f) In the Product Information section within the Activation Required box click Change Product Key
g) Enter your license key for Visio 2013 check the box next to Attempt to automatically activate my product online and click Install
h) Click OK
At this point you have installed Visio 2013
Install Microsoft Office 2013 SharePoint Designer
In this section you will install Microsoft Office 2013 SharePoint Designer
1 Ensure you are logged into the WingtipServer VM using the account WINGTIPadministrator | Password1
2 Execute the installer SharePointDesigner_English_x64exe
3 On the Read the Microsoft Software License Terms dialog click the checkbox next to I accept the terms of this agreement and click Continue
4 On the Choose the installation you want dialog click the Install Now button
5 The installer will proceed and install all SharePoint Designer 2013
6 When the installer completes click the Close button
At this point you have installed SharePoint Designer 2013
Exercise 9 Install Visual Studio 2012
In this exercise you will install Visual Studio 2012
1 Ensure you are logged into the WingtipServer VM using the account WINGTIPadministrator | Password1
2 Start the install of Visual Studio 2012 Ultimate Trial by downloading the installer from here httpwwwmicrosoftcomvisualstudio11en-usdownloads
3 On the installation splash screen check the box next to I agree to the License terms and conditions and click the Next button
Creating a SharePoint Server 2013 Environment for Development and Testing Version 10
copy Critical Path Training 2012 All Rights Reserved 58
wwwCriticalPathTrainingcom
4 On the Optional Features to install dialog click Install
5 After some time the installer will complete Click the Launch button to launch Visual Studio 2012
Creating a SharePoint Server 2013 Environment for Development and Testing Version 10
copy Critical Path Training 2012 All Rights Reserved 59
wwwCriticalPathTrainingcom
6 In the Choose Default Environment Settings select Visual C Development Settings and click Start Visual Studio
7 Close Visual Studio 2012
At this point Visual Studio 2012 RTM is installed
Install Office amp SharePoint 2013 Developer Tools
In this section you will install the Office and SharePoint 2013 developer tools for Visual Studio
1 Ensure you are logged into the WingtipServer VM using the account WINGTIPadministrator | Password1
2 Launch the Web Platform Installer Start All Programs Microsoft Web Platform Installer
3 In the search box at the top-right corner of the Web Platform Installer 40 window type sharepoint and press Enter
4 Click the Add button to the right of Microsoft Office Developer Tools for Visual Studio 2012 - Preview 2
5 Click the Install button at the bottom of the Web Platform Installer 40 window
6 On the Prerequisites page click I Accept
Creating a SharePoint Server 2013 Environment for Development and Testing Version 10
copy Critical Path Training 2012 All Rights Reserved 60
wwwCriticalPathTrainingcom
At this point you have installed the SharePoint 2013 amp Office 2013 development tools in Visual Studio 2012
Creating a SharePoint Server 2013 Environment for Development and Testing Version 10
copy Critical Path Training 2012 All Rights Reserved 61
wwwCriticalPathTrainingcom
Appendix 1 Download Manifest
The following lists everything referenced that you will or may need to download in this environment
Windows Server 2008 R2 with Service Pack 1 (installer ISO)
o httptechnetmicrosoftcomen-usevalcenterdd459137aspx
Windows Server 2008 R2 with Service Pack 1 (prebuilt VHD)
o httpwwwmicrosoftcomdownloadsdetailsaspxFamilyId=9040a4be-c3cf-44a5-9052-a70314452305
Windows Server 2008 R2 Service Pack 1
o httpwwwmicrosoftcomen-usdownloaddetailsaspxid=5842
SQL Server 2012 Trial
o httpwwwmicrosoftcombetaexperiencepdSQL2012EvalCTAenusdefaultaspx
SharePoint Server 2013
o httptechnetmicrosoftcomen-USevalcenterhh973397aspx
Hotfixes for SharePoint Server 2013 (post-install)
o KB2554876 The SharePoint Parsing Process Crashes in Windows Server 2008 R2
o KB2708075 IIS 75 Configurations are not Updated when you use the ServerManager Class to Commit
Configuration Changes
o KB2759112 Hotfix is Available for NET Framework 45 that Resolves an ASPNET Race Condition Issue in
Windows Server 2008 R2 Windows Server 2008 R2 SP1
o KB2765317 Hotfix is Available for NET Framework 45 that Resolves an ASPNET Race Condition Issue in
Windows 8 Windows RT and Windows Server 2012
Web Platform Installer
o httpwwwmicrosoftcomwebdownloadsplatformaspx
Web Platform Installer ndash Command Line Version
o httplearniisnetpageaspx1072web-platform-installer-v4-command-line-webpicmdexe-preview-release
Workflow Manager 10
o Download using the Microsoft Web Platform Installer
Office 2013
o httpwwwmicrosoftcomofficepreviewentry-office-preview
SharePoint Designer 2013
o httpwwwmicrosoftcomen-usdownloaddetailsaspxid=35491
Visio Professional 2013
o httptechnetmicrosoftcomen-usevalcenterhh973399
Visual Studio 2012
o httpwwwmicrosoftcomvisualstudio11en-usdownloads
Office Developer Tools for Visual Studio 2012 ndash Preview 2
o Download using the Microsoft Web Platform Installer
Creating a SharePoint Server 2013 Environment for Development and Testing Version 10
copy Critical Path Training 2012 All Rights Reserved 62
wwwCriticalPathTrainingcom
Appendix 2 Windows PowerShell Script Manifest
The following lists all Windows PowerShell scripts that are provided with this setup guide
AddDisableLoopbackCheckRegKeyps1
o The following steps automate creating the registry key outlined as Method 2 in the Microsoft Knowledgebase article
httpsupportmicrosoftcomkb896861 using Windows PowerShell This key DisableLoopbackCheck will allow
you to browse SharePoint sites on the same machine Without this key (or following Method 1 in the KB article) you
would need to browse any SharePoint sites from a different computer than the one which SharePoint is installed on
ConfigureSpFarmForAppsps1
o Configures a SharePoint 2013 for hosting apps This ensures everything you need is installed running and
configured This is documented here httpmsdnmicrosoftcomen-uslibraryfp179923(v=office15)
CreateSpServiceAccountsps1
o Creates the minimal necessary service accounts for SharePoint Server 2013 SP_Farm SP_Content amp
SP_Services
SetupSharePointForHNSCps1
o Configures a SharePoint 2013 install for hosting Host-Named Site Collections (HNSC) This involves creating a Web
Application in SharePoint that has no host header bindings Using DNS all requests are mapped to this Web
Application You then create the site collections via PowerShell as you cant create HNSCs via the browser (Central
Administration)
Creating a SharePoint Server 2013 Environment for Development and Testing Version 10
copy Critical Path Training 2012 All Rights Reserved 63
wwwCriticalPathTrainingcom
Appendix 3 Create Sample Adventure Works Database
The following steps document downloading and installing the sample Adventure Works OLTP database provided by Microsoft
1 Launch Internet Explorer and navigate to httpmsftdbprodsamplescodeplexcom
2 Download the Adventure Works 2012 OLTP Script
3 Extract the ZIP into a folder on the desktop
4 Launch SQL Server Management Studio Start All Programs Microsoft SQL Server 2012 SQL Server Management Studio
5 When SQL Server Management Studio launches within the Connect to Server dialog login using the default settings and click Connect
6 Within SQL Server Management Studio select File Open File
7 Select the file instawdbsql from the extracted ZIP and click Open
8 If prompted to re-login to the database engine do it
9 Select Query SQLCMD Mode
10 Scroll down to line 42 the line that starts with the following
setvar SqlSamplesSourceDataPath
11 Change the folder location of where you unzipped the Adventure Works 2012 OLTP Script
12 Select Query Execute
13 When the script completes the AdventureWorks2012 database will have been created
Creating a SharePoint Server 2013 Environment for Development and Testing Version 10
copy Critical Path Training 2012 All Rights Reserved 64
wwwCriticalPathTrainingcom
Change Log
Change Version Description
August 22 2012 v 01 Pre-release for review
August 27 2012 v 02 Initial public release ndash install guide based on SharePoint Server Beta 2
August 28 2012 v 03 Updated URL for the site collection used to connect SharePoint to WAW
August 31 2012 v 04 Typo Removed SQL Server Analysis Services as part of the install Not required in a
SharePoint dev box (unless you are doing business intelligence which is not covered
in the guide)
Updated all references to Windows Azure Workflow to Workflow Manager the new
official name for the new workflow product
Updated SetupSharePointForHNSCps1 script to lookup HNSC Web Application by
name rather than URL which is more reliable
Typo Updated WingtipAllUp public NIC to use a different IP than the WingtipDC
Typo Replaced a reference to WingtipServer with WingtipDC
Typo Fixed handful of minor typos
September 1 2012 v 05 Removed SQL Server Reporting Services from install guide
Added step to uncheck IErsquos ldquoAutomatically detect proxyrdquo
Added post workflow install steps to setup User Profile Service Application to sync with
local Active Directory
September 5 2012 v 06 Added step to create a default root site collection in the HNSC web app
Updated minor typos and added extra notes for context
Updated PowerShell script SetupSharePointForHNSCps1 to remove content
database of default Web Application when setting up HNSC Web App
Added a new exercise 8 (after SharePoint install amp config and before the Workflow
install and config) to setup support for My Sites
October 20 2012 v 07 Updated script SetupSharePointForHNSCps1 to fix a bug where it would fail on line
111 if you didnrsquot already have a WINGTIPSP_Content managed account
Added section to bypass SharePointrsquos check for crlmicrosoftcom
Updated workflowrsquos registration PowerShell script to point to
httpintranetwingtipcom
Switched order of post-SharePoint install to setup HSNC hosting before configuring for
hosting apps
November 29 2012
v 10 Changed setup guide to use a single VM instead of two VMs
Updated guide for SharePoint 2013 RTM
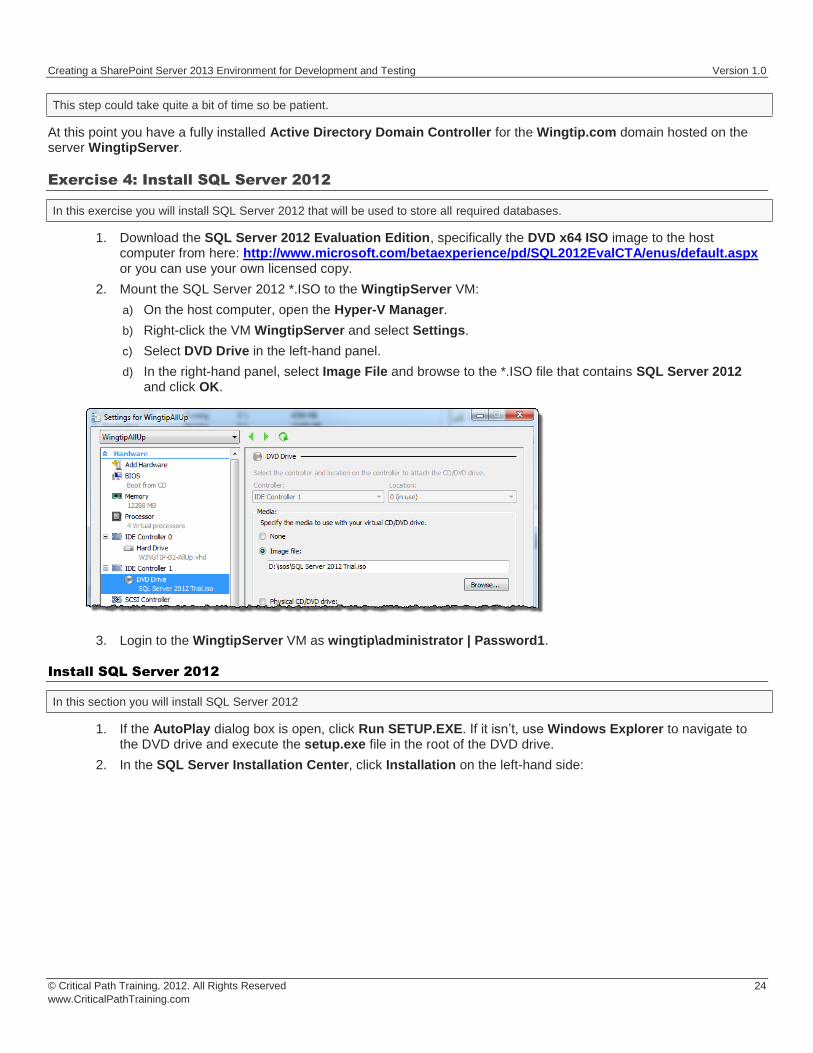
Creating a SharePoint Server 2013 Environment for Development and Testing Version 10
copy Critical Path Training 2012 All Rights Reserved 26
wwwCriticalPathTrainingcom
8 On the Support Role page select SQL Server Feature Installation and click Next
9 On the Feature Selection page check the following options and click Next
a) Instances Features
i) Database Engine Services
(1) Full-Text and Semantic Extractions for Search
b) Shared Features
i) Management Tools ndash Basic
(1) Management Tools ndash Complete
Creating a SharePoint Server 2013 Environment for Development and Testing Version 10
copy Critical Path Training 2012 All Rights Reserved 27
wwwCriticalPathTrainingcom
10 On the Installation Rules page click Next
11 On the Instance Configuration page click Next
12 On the Disk Space Requirements page click Next
13 On the Server Configuration page do the following and click Next
a) On the Service Account tab change the Startup Type for the SQL Server Agent to Automatic
14 On the Database Engine Configuration page do the following and click Next
a) On the Server Configuration tab click Add Current User
b) On the FILESTREAM tab
i) Check Enable FILESTREAM for Transact-SQL Access
ii) Check Enable FILESTREAM for file IO access
15 On the Error Reporting page click Next
16 On the Installation Configuration Rules page click Next
17 On the Ready to Install page click Install
Installation of SQL Server 2012 will take some time please be patient
18 When the installation completes the Complete page will be shown Click Close
At this point you have now successfully installed SQL Server 2012
Creating a SharePoint Server 2013 Environment for Development and Testing Version 10
copy Critical Path Training 2012 All Rights Reserved 28
wwwCriticalPathTrainingcom
Exercise 5 Install amp Configure SharePoint Server 2013
In this exercise you will install SharePoint 2013
1 Download the SharePoint Server 2013 to the host computer from here httptechnetmicrosoftcomen-USevalcenterhh973397aspx
2 Mount the SharePoint Server 2013 ISO to the WingtipServer VM
a) On the host computer open the Hyper-V Manager
b) Right-click the VM WingtipServer and select Settings
c) Select DVD Drive in the left-hand panel
The file that Microsoft provides is saved in the IMG format Hyper-V Manager wonrsquot allow you to mount an IMG file so rename it to ISO before mounting it
d) In the right-hand panel select Image File and browse to the ISO file that contains SharePoint Server 2013 and click OK
Create SharePoint Service Accounts amp Grant Rights to SQL Server 2012
In this section you will create the necessary service accounts that will be used by SharePoint in Active Directory and grant them necessary rights in SQL Server 2012
PowerShell Script Alert The creation of users and granting them rights to SQL Server 2012 steps in this section are automated in the Windows PowerShell script CreateSpServiceAccountsps1 found in the files that accompany this setup guide Open the script
and read the header for documentation on how to use it
1 Open the Active Directory Users and Computers Start Administrative Tools Active Directory Users and Computers
2 Expand the tree in the left-hand pane to see the Users OU Select the Users OU
3 Create a new user SP_Farm
a) In the toolbar select Action New User
Creating a SharePoint Server 2013 Environment for Development and Testing Version 10
copy Critical Path Training 2012 All Rights Reserved 29
wwwCriticalPathTrainingcom
b) Set the userrsquos Full Name amp User Login Name to SP_Farm and click Next
c) In the password dialog enter the following and click Next
i) Password (and Confirm Password) Password1
ii) User must change password at next login unchecked
iii) User cannot change password unchecked
iv) Password never expires checked
v) Account is disabled unchecked
Creating a SharePoint Server 2013 Environment for Development and Testing Version 10
copy Critical Path Training 2012 All Rights Reserved 30
wwwCriticalPathTrainingcom
vi) Click Finish
4 Repeat the previous step to create two more accounts
a) SP_Content
b) SP_Services
At this point you have created all the necessary service accounts
Install SharePoint Server 2013 Prerequisites
In this section you will install the SharePoint Server 2013 Prerequisites
1 Ensure you are logged into the WingtipServer VM using the account wingtipadministrator | Password1
2 If the AutoPlay dialog box is open click Run splashhta If it isnrsquot use Windows Explorer to navigate to the DVD drive and execute the splashhta file in the root of the DVD drive
Creating a SharePoint Server 2013 Environment for Development and Testing Version 10
copy Critical Path Training 2012 All Rights Reserved 31
wwwCriticalPathTrainingcom
3 Click the Install Software Prerequisites link
4 In the Microsoft SharePoint 2013 Products Preparation Tool window click Next
5 On the License Terms for Software Products page
a) Check I accept the terms of the License Agreement(s)
b) Click Next
6 The tool will download and install all prerequisites for SharePoint Server 2013 This will take some time It may prompt you to reboot the server If so reboot the server and login using wingtipadministrator | Password1
Creating a SharePoint Server 2013 Environment for Development and Testing Version 10
copy Critical Path Training 2012 All Rights Reserved 32
wwwCriticalPathTrainingcom
7 When the prerequisite installer is complete it will present a summary of everything it did
8 Click Finish
9 Restart the WingtipServer VMhellip some additional installations and changes that the prerequisite installer did will require a restart before installing SharePoint Server 2013
At this point all prerequisites required by SharePoint Server 2013 have been installed and any necessary configuration changes have been applied to the server However it is strongly recommend that you run Windows Update and install any pending updates Further Microsoft recommends installing the following hotfixes if they are not already installed
KB2554876 The SharePoint Parsing Process Crashes in Windows Server 2008 R2
KB2708075 IIS 75 Configurations are not Updated when you use the ServerManager Class to Commit Configuration Changes
KB2759112 Hotfix is Available for NET Framework 45 that Resolves an ASPNET Race Condition Issue in Windows Server 2008 R2 Windows Server 2008 R2 SP1
KB2765317 Hotfix is Available for NET Framework 45 that Resolves an ASPNET Race Condition Issue in Windows
8 Windows RT and Windows Server 2012
Install SharePoint Server 2013
In this section you will install SharePoint Server 2013
1 Ensure you are logged into the WingtipServer VM using the account wingtipadministrator | Password1
2 If the AutoPlay dialog box is open click Run splashhta If it isnrsquot use Windows Explorer to navigate to the DVD drive and execute the splashhta file in the root of the DVD drive
Creating a SharePoint Server 2013 Environment for Development and Testing Version 10
copy Critical Path Training 2012 All Rights Reserved 33
wwwCriticalPathTrainingcom
3 Click Install SharePoint Server
4 When prompted to Enter your Product Key enter the key you obtained for the trial install and click Continue
5 On the Read the Microsoft Software License Terms page check the I accept the terms of this agreement checkbox and click Continue
6 On the Choose a file location page click Install Now
Creating a SharePoint Server 2013 Environment for Development and Testing Version 10
copy Critical Path Training 2012 All Rights Reserved 34
wwwCriticalPathTrainingcom
7 When the installation is complete select the Run the SharePoint Products Configuration Wizard checkbox and click Close
8 On the Welcome to SharePoint Products page click Next
a) If prompted to start or reset services click Yes
9 On the Connect to a server farm page select Create a new server farm and click Next
10 On the Specify Configuration Database Settings page use the following to complete the page and click Next
a) Database server WINGTIPSERVER
b) Database name SharePoint_Config
c) Username WINGTIPSP_Farm
d) Password Password1
Creating a SharePoint Server 2013 Environment for Development and Testing Version 10
copy Critical Path Training 2012 All Rights Reserved 35
wwwCriticalPathTrainingcom
11 On the Specify Farm Security Settings page for the Passphrase and Confirm Passphrase boxes enter Password1 and click Next
12 On the Configure SharePoint Central Administration Web Application page check the Specify port number checkbox and enter a value of 9999 then Click Next
Creating a SharePoint Server 2013 Environment for Development and Testing Version 10
copy Critical Path Training 2012 All Rights Reserved 36
wwwCriticalPathTrainingcom
13 On the Completing the SharePoint Products Configuration Wizard page click Next
14 When the installer completes it will display the Confirmation Successful page
15 Click Finish This will launch Internet Explorer to go through the configuration process
Creating a SharePoint Server 2013 Environment for Development and Testing Version 10
copy Critical Path Training 2012 All Rights Reserved 37
wwwCriticalPathTrainingcom
At this point you have successfully installed SharePoint Server 2013
Configure SharePoint Server 2013
In this section you will create a new SharePoint Server 2013 farm and perform minimal configuration tasks
After installing SharePoint Sever 2013 the SharePoint Products Configuration Wizard will launch the browser-based Initial Farm Configuration Wizard
1 In the first page of the wizard you are prompted to Help Make SharePoint Better Select which ever option you want and click OK
2 On the Welcome page that asks How do you want to configure your SharePoint farm click the Start the Wizard button
3 On the Services page do the following and then click Next
a) Service Account Select Create new managed account
i) Username WINGTIPSP_Services
ii) Password Password1
b) Services Uncheck the following services
Creating a SharePoint Server 2013 Environment for Development and Testing Version 10
copy Critical Path Training 2012 All Rights Reserved 38
wwwCriticalPathTrainingcom
i) Access Services 2010
ii) App Management Service
In SharePoint Server 2013 the Search Service Application processes specifically noderunnerexe can consume a considerable amount of memory and processor time If you are not going to work with search you might consider unchecking this option for now You can always go back into Central Administration and create a new instance of the Search Service Application at a later date if you need it
Why did we remove Access Services 2010 amp App Management Service service applications The Access Services 2010 service application is included for backwards compatibility and isnrsquot needed in new installations unless you are migrating solutions built with Access Services 2010 from SharePoint Server 2010 (if so you can create this service application later within Central Administration Application Management Manage Service Applications) The App Management Service service application will be created in a later step in this setup guide therefor it is skipped here
4 The creation of the service applications can take quite a while so be patient If it exceeds 20 minutes it is fairly safe to assume the page is hung up One option is to close the browser then launch Central Administration (Start All Programs Microsoft SharePoint 2013 Products SharePoint 2013 Central Administration) and look at the Service Application page (Application Management Manage Service Applications) to see if they were all created
Configure DNS
In this section you will configure DNS for hosting SharePoint sites amp Apps
1 Ensure you are logged into the WingtipServer VM using the account wingtipadministrator | Password1
2 Open the DNS window Start Administrative Tools DNS
3 Expand the hierarchy on the left-hand side of the window until you get to DNS WINGTIPSERVER Forward Lookup Zones wingtipcom
4 Create a new wildcard so all requests for http[]wingtipcom will be forwarded to our SharePoint machine
a) Next right-click wingtipcom and select New Host (A or AAAA)
Creating a SharePoint Server 2013 Environment for Development and Testing Version 10
copy Critical Path Training 2012 All Rights Reserved 39
wwwCriticalPathTrainingcom
b) In the New Host dialog enter the following and click OK
i) Alias Name
ii) IP Address 192168150102 Then click Add Host The following figure shows how this looks
This new record is telling DNS to forward any request for http[]wingtipcom to the webserver WINGTIPSERVER where the
requests will be served by SharePoint
5 Verify this DNS entry is working
a) Open Windows PowerShell Start All Programs Accessories Windows PowerShell Windows PowerShell
b) Run the following commands and press ENTER
PS CUsersAdministratorgt nslookup somethingwingtipcom PS CUsersAdministratorgt nslookup somethingappswingtipcom
c) You should get a response that points to the WingtipServer server as shown in the following figure
Creating a SharePoint Server 2013 Environment for Development and Testing Version 10
copy Critical Path Training 2012 All Rights Reserved 40
wwwCriticalPathTrainingcom
Configure SharePoint Server 2013 for Host-Named Site Collections amp Create Initial Site
Collections
In this section you will create new SharePoint 2013 site collections for testing and hosting apps
Microsoft recommends to create host-named site collections (HNSC) instead of using the path based site collection addressing The difference is the following a path based site created at something such as httpintranetwingtipcomsitesdevtest as an HNSC site would be more like httpdevtestwingtipcom This is how it works in the cloud (Office 365) and it scales much better for on-prem
deployments This setup guide will show you how to setup your environment to create HNSC The only downside to this approach is that you canrsquot create site collections within Central Administration it must be done via Windows PowerShell API (because Central Administration doesnrsquot instruct you where to put the site
This is implemented in various parts First DNS must be configured to send all requests for httpwingtipcom to a Web Application
(implemented in the last section) Second this Web Application must be extended with SharePoint and have no host header bindings (so it handles all requests) Third it must have a default site collection at the root of the Web Application but it will not be used for anything (in fact it doesnrsquot need a template assigned to it)
You can read more about HNSCrsquos on TechNet httptechnetmicrosoftcomen-uslibrarycc424952aspx
PowerShell Script Alert The steps in this section are automated in the script SetupSharePointForHNSCps1 found in the files that
accompany this setup guide Open the script and read the header for documentation on how to use it
1 Ensure you are logged into the WingtipServer VM using the account wingtipadministrator | Password1
2 Open Central Administration Start All Programs Microsoft SharePoint 2013 Products SharePoint 2013 Central Administration
3 Select Application Management Manage Web Applications
4 Delete the default Web Application created by the configuration wizard
a) Delete the existing default Web Application
i) Select the Web Application SharePoint ndash 80 the one with the URL of httpwingtipserver and click Delete in the ribbon
ii) When prompted to delete the associated IIS Web Site amp SQL Server database select both options to delete them and click OK
The reason you are doing this is because the setup wizard you ran previously when creating the service applications automatically created it The problem is that it used the same identity (WINGTIPSP_Services) for the app pool that is used for all the service
applications which is not desired
5 Create a new Web Application to handle Host-Named Site Collections (HNSC)
Creating a SharePoint Server 2013 Environment for Development and Testing Version 10
copy Critical Path Training 2012 All Rights Reserved 41
wwwCriticalPathTrainingcom
a) In the ribbon click the New button
b) In the Create New Web Application dialog enter the following values in the properties and click OK Leave all properties not mentioned
i) Select the radio button Create a new IIS web site
(1) Name SharePoint HNSC Host ndash 80
(2) Port 80
ii) Application Pool
(1) Select the radio button Create a new application pool
(a) Application Pool Name SharePoint Default HNSC AppPool
(b) Select a security account for this application pool WINGTIPSP_Content
If WINGTIPSP_Content is not listed as an available managed account create it by selecting the appropriate option and using
Password1 for the password
iii) Database Name and Authentication
(1) Database Name WSS_Content_HNSCDefaultHost
c) This process will take a few moments At the end of the process SharePoint will ask if you want to create a site collection You do but you donrsquot want to do it through the browser as this will not be a HNSC To create a HNSC you must create it via Windows PowerShell
6 Create a default not template site collection at the root of the web application
a) Open SharePoint 2013 Management Shell Start All Programs Microsoft SharePoint 2013 Products SharePoint 2013 Management Shell
7 Create Site Collections for Testing SharePoint amp SharePoint Apps
a) Open SharePoint 2013 Management Shell Start All Programs Microsoft SharePoint 2013 Products SharePoint 2013 Management Shell
b) Get a reference to the HNSC web application you just created by running the following Windows PowerShell script in the SharePoint 2013 Management Shell
$hnscWebApp = Get-SPWebApplication | Where-Object $_DisplayName -eq SharePoint HNSC Host - 80
c) Create a non-templated site at the root of the web application for Workflow to connect to by executing the following Windows PowerShell script in the SharePoint 2013 Management Shell
New-SPSite -Name Root HNSC Site Collection -Url httpwingtipcom -HostHeaderWebApplication $hnscWebApp -OwnerAlias WINGTIPAdministrator
d) Create a team site by executing the following Windows PowerShell script in the SharePoint 2013 Management Shell
New-SPSite -Name Wingtip Intranet -Url httpintranetwingtipcom ndashHostHeaderWebApplication $hnscWebApp -Template STS0 -OwnerAlias WINGTIPAdministrator
e) Create a developer site by executing the following Windows PowerShell script in the SharePoint 2013 Management Shell
New-SPSite -Name Wingtip Developer Site -Url httpdevwingtipcom ndashHostHeaderWebApplication $hnscWebApp -Template DEV0 -OwnerAlias WINGTIPAdministrator
You can only create debug and test apps using a developer site
At this point you now have a site collection to use as a team site (httpintranetwingtipcom) and to develop and test custom SharePoint apps (httpdevwingtipcom)
Creating a SharePoint Server 2013 Environment for Development and Testing Version 10
copy Critical Path Training 2012 All Rights Reserved 42
wwwCriticalPathTrainingcom
Configure SharePoint 2013 for Hosting Apps
In this setup you will setup your SharePoint 2013 environment for hosting apps
PowerShell Script Alert Everything in the next immediate step is provided in the script ConfigureSpFarmForAppsps1 found in the
files that accompany this setup guide Open the script and read the header for documentation on how to use it
1 Ensure you are logged into the WingtipServer VM using the account wingtipadministrator | Password1
2 Create the necessary SharePoint App Management service applications and start the necessary services via Windows PowerShell
a) Open SharePoint 2013 Management Shell Start All Programs Microsoft SharePoint 2013 Products SharePoint 2013 Management Shell
b) Execute the following Windows PowerShell script in the SharePoint 2013 Management Shell
$appHostDomain = appswingtipcom $adminService = Get-Service -Name spadminv4 if ($adminServiceStatus -ne Running) Start-Service $adminService $timerService = Get-Service -Name sptimerv4 if ($timerServiceStatus -ne Running) Start-Service $timerService Set-SPAppDomain $appHostDomain $appMgmtSvcInstance = Get-SPServiceInstance | Where-Object $_GetType()Name -eq AppManagementServiceInstance if ($appMgmtSvcInstanceStatus -ne Online) Start-SPServiceInstance -Identity $appMgmtSvcInstance $appSubSettingSvcInstance = Get-SPServiceInstance | Where-Object $_GetType()Name -eq SPSubscriptionSettingsServiceInstance if ($appSubSettingSvcInstanceStatus -ne Online) Start-SPServiceInstance -Identity $appSubSettingSvcInstance $appPoolServiceApps = Get-SPServiceApplicationPool -Identity SharePoint Web Services Default $appSubSvc = New-SPSubscriptionSettingsServiceApplication ndashApplicationPool $appPoolServiceApps ndashName Settings Service Application ndashDatabaseName SettingsServiceDB $proxySubSvc = New-SPSubscriptionSettingsServiceApplicationProxy ndashServiceApplication $appSubSvc $appAppSvc = New-SPAppManagementServiceApplication -ApplicationPool $appPoolServiceApps -Name App Management Service Application -DatabaseName AppServiceDB $proxyAppSvc = New-SPAppManagementServiceApplicationProxy -ServiceApplication $appAppSvc Set-SPAppSiteSubscriptionName -Name app -Confirm$false
3 Verify the script configured SharePoint 2013 for hosting apps
a) Open Central Administration Start All Programs Microsoft SharePoint 2013 Products SharePoint 2013 Central Administration
b) Verify service applications created
i) Open the Service Applications page Application Management Manage Service Applications
ii) Verify you have two service applications created
(1) App Management Service Application
(2) Settings Service Application
c) Verify service instances are running
i) Open the Services on Server page System Settings Manage Services on Server
ii) Verify the following services are Started
(1) App Management Service
(2) Microsoft SharePoint Foundation Subscription Settings Service
Creating a SharePoint Server 2013 Environment for Development and Testing Version 10
copy Critical Path Training 2012 All Rights Reserved 43
wwwCriticalPathTrainingcom
d) Verify App URLs are correct
i) Open the Configure App URLs page Apps Configure app URLs
ii) Verify the following
(1) App Domain appswingtipcom
(2) App Prefix app
At this point your SharePoint Server 2013 environment is ready to host SharePoint apps
Creating a SharePoint Server 2013 Environment for Development and Testing Version 10
copy Critical Path Training 2012 All Rights Reserved 44
wwwCriticalPathTrainingcom
Start the SharePoint 2013 Sandbox Service
By default the service that executes sandbox solutions is not running In this step you will start the service
1 Open Central Administration Start All Programs Microsoft SharePoint 2013 Products SharePoint 2013 Central Administration
2 Open the Services on Server page System Settings Manage Services on Server
3 Click the Start link to the left of the Microsoft SharePoint Foundation Sandboxed Code Service
At this point your installation can support sandbox solutions
Configure CRL Verification for Disconnected Environments
SharePoint periodically ldquophones homerdquo to a specific address hosted by Microsoft under certain conditions When your environment is disconnected this can cause an unnecessary delay or failures when starting up the sandbox The following steps outline a workaround to bypass this check
1 Launch Notepad as an administrator Start All Programs Accessories right-click Notepad and select Run as Administrator
2 Open the hosts file by selecting File Open and finding the file
cWindowsSystem32Driversetchosts
3 Add the following line to the end of the file
127001 crlmicrosoftcom
4 Save and close the hosts file
Update Internet Explorer to Bypass the App URL amp Automatically Login to SharePoint Sites
In this section you will update Internet Explorer to add the App hosting URL to the bypass list so you can navigate to the domain after deploying SharePoint hosted apps
1 Ensure you are logged into the WingtipServer VM using the account wingtipadministrator | Password1
1 Launch Internet Explorer Start All Programs Internet Explorer
2 Configure Internet Explorer to bypass the App URL
a) In the top-right corner click the gear icon and select Internet Options
b) On the Security tab select the Local Intranet and click the Sites button
c) Uncheck the box next to Automatically detect intranet network
d) Click the Advanced button and add two entries to the Exceptions list
i) httpwingtipcom
ii) httpappswingtipcom
Creating a SharePoint Server 2013 Environment for Development and Testing Version 10
copy Critical Path Training 2012 All Rights Reserved 45
wwwCriticalPathTrainingcom
e) Click the Close button followed by the OK button multiple times to close out of the dialogs
At this point Internet Explorer is setup to bypass your app URL so you can navigate to apps (httpappswingtipcom) as well as automatically authenticate to sites hosted at httpwingtipcom
Exercise 6 Configure SharePoint to Host My Sites
In this exercise you will configure SharePoint to create and host My Sites In order to host My Sites you will need a new Web Application that is configured for Self-Service Site Creation and has a My Site Host site collection
1 Create a new SharePoint web application to host the My Sites
a) Ensure you are logged into the WingtipServer VM using the account wingtipadministrator | Password1
b) Open Central Administration Start All Programs Microsoft SharePoint 2013 Products SharePoint 2013 Central Administration
c) Select Application Management Manage Web Applications
d) In the ribbon click the New button
e) In the Create New Web Application dialog enter the following values in the properties and click OK Leave all properties not mentioned
i) Select the radio button Create a new IIS web site
(1) Name SharePoint MySite Host ndash 80
(2) Port 80
(3) Host Header mywingtipcom
ii) Application Pool
(1) Select the radio button Use existing application pool
(a) Application Pool Name SharePoint Default HNSC AppPool
iii) Database Name and Authentication
(1) Database Name WSS_Content_SocialWingtipCom
f) This process will take a few moments At the end of the process SharePoint will ask if you want to create a site collection Click the link provided to create a new site collection amp continue to the next step
2 Create a My Site Host site collection
a) On the Create Site Collection page use the following information to complete the form and click OK
Creating a SharePoint Server 2013 Environment for Development and Testing Version 10
copy Critical Path Training 2012 All Rights Reserved 46
wwwCriticalPathTrainingcom
i) Title My Site Host
ii) URL
iii) Template Selection My Site Host (found under the Enterprise tab)
iv) Primary Site Collection Administrator WINGTIPAdministrator
3 Update the Web Application to host my sites
a) Within Central Administration in the left-hand navigation navigate to the Manage Web Applications page Application Management Manage Web Applications
b) Select the SharePoint MySite Host ndash 80 web application
c) Click the Managed Paths button in the ribbon
d) Remove the sites managed path and add two new managed paths and click OK
i) personal ndash Wildcard inclusion
ii) my ndash Explicit inclusion
e) With the SharePoint MySite Host ndash 80 web application still selected click the Self-Service Site Creation button
f) On the Self-Service Site Creation page use the following values to complete the form and click OK
i) Site Collections On
4 Next configure the User Profile Service Application My Site settings
a) Browse to the User Profile Service Application management page Application Management Manage Service Applications User Profile Service Application
b) Under the My Site Settings section click the Setup My Sites
c) On the My Site Settings page use the following information to complete the form and click OK
i) My Site Host httpmywingtipcom
ii) Personal Site Location personal
At this point your SharePoint deployment is now configured to automatically create My Sites under httpmywingtipcomPersonalUserName when users first browse to them
Exercise 7 Install amp Configure Workflow Manager 10
In this exercise you will configure the WingtipServer VM to host Workflow Manager 10 and connect it to your SharePoint installation
1 Ensure you are logged into the WingtipServer VM using the account wingtipadministrator | Password1
Verify SQL Server 2012 Network Configuration
In this section yoursquoll verify the network configuration is correct for SQL Server 2012 in order to install Workflow Manager 10
Creating a SharePoint Server 2013 Environment for Development and Testing Version 10
copy Critical Path Training 2012 All Rights Reserved 47
wwwCriticalPathTrainingcom
1 Configure SQL Server 2012 to have the TCPIP connection protocol enabled
a) Open the SQL Server Configuration Manager Start All Programs Microsoft SQL Server 2012 Configuration Tools SQL Server Configuration Manager
b) Expand the hierarchy on the left-hand side to the following SQL Server Connection Manager (local) SQL Server Network Configuration Protocols for MSSQLSERVER
c) In the main window if TCPIP is Disabled right-click TCPIP and select Enable
d) When prompted with a warning click OK
2 SQL Server must be restarted in order to reflect this change
a) In the hierarchy on the left-hand side of the window select SQL Server Services
b) Right-click SQL Server (MSSQLSERVER) and select Restart
At this point SQL Server is now configured with the TCPIP protocol enabled a requirement when configuring Service Bus
Configure the Workflow Service Account with the Necessary Rights
In this section you will verify the service account that will run Workflow Manager and Service Bus
1 Ensure you are logged into the WingtipServer VM using the account WINGTIPadministrator | Password1
2 Grant the WINGTIPSP_Content account securityadmin amp dbcreator permissions in SQL Server
a) Launch SQL Server Management Studio Start All Programs Microsoft SQL Server 2012 SQL Server Management Studio
b) When SQL Server Management Studio launches within the Connect to Server dialog login using the default settings and click Connect
c) In the Object Explorer tool window expand the WINGTIPSERVER server hierarchy to the Security Logins node
d) Find the WINGTIPSP_Content account right-click it and select Properties
Creating a SharePoint Server 2013 Environment for Development and Testing Version 10
copy Critical Path Training 2012 All Rights Reserved 48
wwwCriticalPathTrainingcom
e) In the Select a page pane select Server Roles
f) Check securityadmin amp dbcreator and click OK
g) Close SQL Server Management Studio
3 Add the Workflow service account to the local administrators group
a) Open the Active Directory Users and Computers window Start Administrative Tools Active Directory Users and Computers
b) In the hierarchy on the left-hand side of the window expand it to the following Active Directory Users and Computers wingtipcom Builtin
c) In the main window right-click Administrators and select Properties
d) In the Administrators Properties dialog select the Members tab and click Add
e) In the Enter the object names to select box enter wingtipsp_content and click the Check Names button
f) In the Administrators Properties dialog click OK
g) Close the Active Directory Users and Computers window
At this point the service account that will host Workflow Manager and Service Bus has been configured correctly
Creating a SharePoint Server 2013 Environment for Development and Testing Version 10
copy Critical Path Training 2012 All Rights Reserved 49
wwwCriticalPathTrainingcom
Download amp Install Workflow Manager and Service Bus
In this section you will install Workflow Manager and Service Bus
1 Ensure you are logged into the WingtipServer VM using the account WINGTIPSP_Content | Password1
It is important you are logged in as the user that will run workflow when you install amp configure Workflow Manager and Service Bus
2 Launch the Web Platform Installer Start All Programs Microsoft Web Platform Installer
a) If the Web Platform Installer is not present on your machine you can download amp install it from here httpwwwmicrosoftcomwebdownloadsplatformaspx
If you do not have internet access within the virtual machine it is possible to download everything needed for workflow using the command line version of the Web Platform Installer (WebPICMD) You can get WebPICMD from httplearniisnetpageaspx1072web-platform-installer-v4-command-line-webpicmdexe-preview-release Specifically for
workflow enter the following command to download Workflow Beta 1 and all prerequisites
webpicmd offline ProductsWorkflow Pathc[path]
3 When the Web Platform Installer loads execute a search for Workflow select Workflow Manager 10 and click Add
4 Click the Install button at the bottom of the Web Platform Installer 40 window
5 On the Prerequisites page click I Accept
Note The Web Platform Installer 40 may prompt you to keep certain products updated using Microsoft Update If it does select Use Microsoft Update when I check for updates (recommended) and click Continue
6 When the installer completes the following dialog will appear Click Continue and then Finish to start the configuration process
Creating a SharePoint Server 2013 Environment for Development and Testing Version 10
copy Critical Path Training 2012 All Rights Reserved 50
wwwCriticalPathTrainingcom
At this point Workflow Manager amp Service Bus are installed
Configure Workflow Manager and Service Bus
In this section you will install Workflow Manager and Service Bus
1 If the Workflow Manager Configuration Wizard is not open open it Start All Programs Workflow Manager 10 Workflow Configuration
2 On the Welcome page click Configure Workflow Manager with Default Settings (Recommended)
Creating a SharePoint Server 2013 Environment for Development and Testing Version 10
copy Critical Path Training 2012 All Rights Reserved 51
wwwCriticalPathTrainingcom
3 On the New Farm Configuration page do the following
a) In the section Configure Service Account set the credentials to
i) User ID sp_contentwingtipcom
ii) Password Password1
b) Check the Allow Workflow management over HTTP on this computer checkbox
Ensure the username is entered in the fully qualified UPN format not as the default shows in the installer (sp_contentwingtip) or the domainusername format
In a production environment you should be doing everything over SSL
c) Click the Test Connection button to verify the connection credentials before proceeding
Creating a SharePoint Server 2013 Environment for Development and Testing Version 10
copy Critical Path Training 2012 All Rights Reserved 52
wwwCriticalPathTrainingcom
d) In the Certificate Generation Key and Confirm Certificate Generation Key enter Password1 into both fields
4 Click the right arrow in the bottom right corner to proceed
5 On the Summary page review your settings and click the check at the bottom right of the widow to start the configuration process
Creating a SharePoint Server 2013 Environment for Development and Testing Version 10
copy Critical Path Training 2012 All Rights Reserved 53
wwwCriticalPathTrainingcom
6 After a few minutes the Configuration Progress screen will show that everything has been configured correctly
Creating a SharePoint Server 2013 Environment for Development and Testing Version 10
copy Critical Path Training 2012 All Rights Reserved 54
wwwCriticalPathTrainingcom
7 Click the check in the bottom right corner
At this point Workflow Manager amp Service Bus has been installed and a new Workflow Manager farm has been created The next step is to connect the SharePoint 2013 farm to the Workflow Manager farm
Connect SharePoint 2013 to Workflow Manager
In this section you will connect SharePoint 2013 and Workflow Manager together
1 Ensure you are logged into the WingtipServer VM using the account WINGTIPadministrator | Password1
2 Get the Workflow Manager endpoint
a) Open the Workflow Manager PowerShell console Start All Programs Workflow Manager 10
b) Execute the Windows PowerShell following cmdlet
Get-WFFarm | ft HttpPort
c) Take note of this port (12291) This port number is what you will use to connect the SharePoint 2013 farm to the Workflow Manager 10 farm
In production you should connect to the HTTPS port listed in the HttpsPort property when you run Get-WFFarm
d) Close the Workflow Manager PowerShell window
3 Connect the SharePoint 2013 farm to Workflow Manager
Creating a SharePoint Server 2013 Environment for Development and Testing Version 10
copy Critical Path Training 2012 All Rights Reserved 55
wwwCriticalPathTrainingcom
a) Open SharePoint 2013 Management Shell Start All Programs Microsoft SharePoint 2013 Products SharePoint 2013 Management Shell
b) Execute the following Windows PowerShell script in the SharePoint 2013 Management Shell
Register-SPWorkflowService ndashSPSite httpintranetwingtipcom ndashWorkflowHostUri httpwingtipserver12291 ndashAllowOAuthHttp
This script is telling SharePoint the endpoint it should use to talk to Workflow Manager as well as Workflow Manager the SharePoint site collection it should talk to for calls into the CSOM It is also configuring all communication over HTTP rather than HTTPS for performance reasons In production you should always use HTTPS
This step will take a moment with no feedback during the process Be patient
c) Close the SharePoint 2013 Management Shell
At this point the SharePoint 2013 farm is connected to the Workflow Manager 10 farm
Configure SharePoint User Profile Service Application AD Sync
Users in SharePoint 2013 are validated by Workflow Manager against SharePoint to ensure they have permissions to start a workflow This is done by looking up the user by their AD UserPrincipalName (UPN) attribute in the User Profile Service Application (UPA) If no matching user is found the workflow will be automatically cancelled by Workflow Manager In this section you will setup UPA to connect amp sync with the local Active Directory so user accounts in AD will have their UPN synchronized to UPA
1 Open Central Administration Start All Programs Microsoft SharePoint 2013 Products SharePoint 2013 Central Administration
2 Go to the User Profile Service Application management page Application Management Manage Service Applications User Profile Service Application
3 The first step is to configure the User Profile Service Application to allow for Active Directory (AD) synchronization
a) Under Synchronization select Configure Synchronization Settings
b) For Synchronization select Use SharePoint Active Directory Import and click OK
4 Next establish a connection to the wingtipcom AD
a) Under Synchronization select Configure Synchronization Connections
b) On the Synchronization Connections page select Create New Connection
c) Enter the following values on this form and click OK
i) Connection Name WINGTIPCOM AD
ii) Type Active Directory Import
iii) Connection Settings
(1) Fully Qualified Domain Name wingtipcom
(2) Authentication Provider Type Windows Authentication
(3) Account Name WINGTIPAdministrator
(4) Password (and Confirm Password) Password1
iv) Containers
(1) Click Populate Containers
(2) After it loads check the box next to WINGTP or click the Select All button below the box
5 Go back to the User Profile Service Application management page Application Management Manage Service Applications User Profile Service Application
6 Finally start a synchronization import
a) Under Synchronization select Start Profile Synchronization
Creating a SharePoint Server 2013 Environment for Development and Testing Version 10
copy Critical Path Training 2012 All Rights Reserved 56
wwwCriticalPathTrainingcom
b) Select Start Full Synchronization and click OK
c) You will be taken back to the User Profile Service Application management page Notice in the top-right corner there is a status block that reports how many profiles are in the UPA database Refresh the page to see it increase to a handful of profiles as the import process runs
At this point you have successfully configured the User Profile Service Application to import profiles from the local AD
Exercise 8 Install the Microsoft Office 2013 Professional Clients
In this exercise you will install the Microsoft Office 2013 client applications
1 Download the Office 2013 into the WingtipServer VM For this you need to create an Office 365 Trial account login to Office 365 go to the Admin Dashboard and then download the latest version httpwwwmicrosoftcomofficepreviewentry-office-preview
2 Download the SharePoint Designer 2013 into the WingtipServer VM from here httpwwwmicrosoftcomen-usdownloaddetailsaspxid=35491
3 Download the Visio Professional 2013 into the WingtipServer VM from here httptechnetmicrosoftcomen-usevalcenterhh973399
Install Microsoft Office Professional Plus 2013
In this section you will install the Microsoft Office 2013 clients
1 Ensure you are logged into the WingtipServer VM using the account WINGTIPadministrator | Password1
2 Execute the installer OfficeProfessionalPlus_English_x64exe
3 On the Read the Microsoft Software License Terms dialog click the checkbox next to I accept the terms of this agreement and click Continue
4 On the Choose the installation you want dialog click the Install Now button
5 The installer will proceed and install all the Office products
6 When the installer completes click the Close button
7 Apply your Office Professional Plus 2013 license key
a) Launch Word 2013 Start All Programs Microsoft Office 2013 Word 2013
b) In the First things first dialog select Use recommended settings and click Accept
c) In the Welcome to Office dialog that opens click the [X] icon in the top-right corner to close it
d) In the left-hand pane click Open Other Documents
e) In the left-hand pane click Account
f) In the Product Information section within the Activation Required box click Change Product Key
g) Enter your license key for Office Professional Plus 2013 check the box next to Attempt to automatically activate my product online and click Install
h) Click OK
At this point you have installed Office Professional Plus 2013
Install Microsoft Office Visio 2013
In this section you will install Microsoft Office 2013 Visio
1 Ensure you are logged into the WingtipServer VM using the account WINGTIPadministrator | Password1
2 Execute the installer VisioProfessional_English_x64exe
3 On the Read the Microsoft Software License Terms dialog click the checkbox next to I accept the terms of this agreement and click Continue
Creating a SharePoint Server 2013 Environment for Development and Testing Version 10
copy Critical Path Training 2012 All Rights Reserved 57
wwwCriticalPathTrainingcom
4 On the Choose the installation you want dialog click the Install Now button
5 The installer will proceed and install all Visio 2013
6 When the installer completes click the Close button
7 Apply your Visio 2013 license key
a) Launch Visio 2013 Start All Programs Microsoft Office 2013 Visio 2013
b) In the First things first dialog select Use recommended settings and click Accept
c) In the Welcome to Office dialog that opens click the X icon in the top-right corner to close it
d) In the left-hand pane click Open Other Documents
e) In the left-hand pane click Account
f) In the Product Information section within the Activation Required box click Change Product Key
g) Enter your license key for Visio 2013 check the box next to Attempt to automatically activate my product online and click Install
h) Click OK
At this point you have installed Visio 2013
Install Microsoft Office 2013 SharePoint Designer
In this section you will install Microsoft Office 2013 SharePoint Designer
1 Ensure you are logged into the WingtipServer VM using the account WINGTIPadministrator | Password1
2 Execute the installer SharePointDesigner_English_x64exe
3 On the Read the Microsoft Software License Terms dialog click the checkbox next to I accept the terms of this agreement and click Continue
4 On the Choose the installation you want dialog click the Install Now button
5 The installer will proceed and install all SharePoint Designer 2013
6 When the installer completes click the Close button
At this point you have installed SharePoint Designer 2013
Exercise 9 Install Visual Studio 2012
In this exercise you will install Visual Studio 2012
1 Ensure you are logged into the WingtipServer VM using the account WINGTIPadministrator | Password1
2 Start the install of Visual Studio 2012 Ultimate Trial by downloading the installer from here httpwwwmicrosoftcomvisualstudio11en-usdownloads
3 On the installation splash screen check the box next to I agree to the License terms and conditions and click the Next button
Creating a SharePoint Server 2013 Environment for Development and Testing Version 10
copy Critical Path Training 2012 All Rights Reserved 58
wwwCriticalPathTrainingcom
4 On the Optional Features to install dialog click Install
5 After some time the installer will complete Click the Launch button to launch Visual Studio 2012
Creating a SharePoint Server 2013 Environment for Development and Testing Version 10
copy Critical Path Training 2012 All Rights Reserved 59
wwwCriticalPathTrainingcom
6 In the Choose Default Environment Settings select Visual C Development Settings and click Start Visual Studio
7 Close Visual Studio 2012
At this point Visual Studio 2012 RTM is installed
Install Office amp SharePoint 2013 Developer Tools
In this section you will install the Office and SharePoint 2013 developer tools for Visual Studio
1 Ensure you are logged into the WingtipServer VM using the account WINGTIPadministrator | Password1
2 Launch the Web Platform Installer Start All Programs Microsoft Web Platform Installer
3 In the search box at the top-right corner of the Web Platform Installer 40 window type sharepoint and press Enter
4 Click the Add button to the right of Microsoft Office Developer Tools for Visual Studio 2012 - Preview 2
5 Click the Install button at the bottom of the Web Platform Installer 40 window
6 On the Prerequisites page click I Accept
Creating a SharePoint Server 2013 Environment for Development and Testing Version 10
copy Critical Path Training 2012 All Rights Reserved 60
wwwCriticalPathTrainingcom
At this point you have installed the SharePoint 2013 amp Office 2013 development tools in Visual Studio 2012
Creating a SharePoint Server 2013 Environment for Development and Testing Version 10
copy Critical Path Training 2012 All Rights Reserved 61
wwwCriticalPathTrainingcom
Appendix 1 Download Manifest
The following lists everything referenced that you will or may need to download in this environment
Windows Server 2008 R2 with Service Pack 1 (installer ISO)
o httptechnetmicrosoftcomen-usevalcenterdd459137aspx
Windows Server 2008 R2 with Service Pack 1 (prebuilt VHD)
o httpwwwmicrosoftcomdownloadsdetailsaspxFamilyId=9040a4be-c3cf-44a5-9052-a70314452305
Windows Server 2008 R2 Service Pack 1
o httpwwwmicrosoftcomen-usdownloaddetailsaspxid=5842
SQL Server 2012 Trial
o httpwwwmicrosoftcombetaexperiencepdSQL2012EvalCTAenusdefaultaspx
SharePoint Server 2013
o httptechnetmicrosoftcomen-USevalcenterhh973397aspx
Hotfixes for SharePoint Server 2013 (post-install)
o KB2554876 The SharePoint Parsing Process Crashes in Windows Server 2008 R2
o KB2708075 IIS 75 Configurations are not Updated when you use the ServerManager Class to Commit
Configuration Changes
o KB2759112 Hotfix is Available for NET Framework 45 that Resolves an ASPNET Race Condition Issue in
Windows Server 2008 R2 Windows Server 2008 R2 SP1
o KB2765317 Hotfix is Available for NET Framework 45 that Resolves an ASPNET Race Condition Issue in
Windows 8 Windows RT and Windows Server 2012
Web Platform Installer
o httpwwwmicrosoftcomwebdownloadsplatformaspx
Web Platform Installer ndash Command Line Version
o httplearniisnetpageaspx1072web-platform-installer-v4-command-line-webpicmdexe-preview-release
Workflow Manager 10
o Download using the Microsoft Web Platform Installer
Office 2013
o httpwwwmicrosoftcomofficepreviewentry-office-preview
SharePoint Designer 2013
o httpwwwmicrosoftcomen-usdownloaddetailsaspxid=35491
Visio Professional 2013
o httptechnetmicrosoftcomen-usevalcenterhh973399
Visual Studio 2012
o httpwwwmicrosoftcomvisualstudio11en-usdownloads
Office Developer Tools for Visual Studio 2012 ndash Preview 2
o Download using the Microsoft Web Platform Installer
Creating a SharePoint Server 2013 Environment for Development and Testing Version 10
copy Critical Path Training 2012 All Rights Reserved 62
wwwCriticalPathTrainingcom
Appendix 2 Windows PowerShell Script Manifest
The following lists all Windows PowerShell scripts that are provided with this setup guide
AddDisableLoopbackCheckRegKeyps1
o The following steps automate creating the registry key outlined as Method 2 in the Microsoft Knowledgebase article
httpsupportmicrosoftcomkb896861 using Windows PowerShell This key DisableLoopbackCheck will allow
you to browse SharePoint sites on the same machine Without this key (or following Method 1 in the KB article) you
would need to browse any SharePoint sites from a different computer than the one which SharePoint is installed on
ConfigureSpFarmForAppsps1
o Configures a SharePoint 2013 for hosting apps This ensures everything you need is installed running and
configured This is documented here httpmsdnmicrosoftcomen-uslibraryfp179923(v=office15)
CreateSpServiceAccountsps1
o Creates the minimal necessary service accounts for SharePoint Server 2013 SP_Farm SP_Content amp
SP_Services
SetupSharePointForHNSCps1
o Configures a SharePoint 2013 install for hosting Host-Named Site Collections (HNSC) This involves creating a Web
Application in SharePoint that has no host header bindings Using DNS all requests are mapped to this Web
Application You then create the site collections via PowerShell as you cant create HNSCs via the browser (Central
Administration)
Creating a SharePoint Server 2013 Environment for Development and Testing Version 10
copy Critical Path Training 2012 All Rights Reserved 63
wwwCriticalPathTrainingcom
Appendix 3 Create Sample Adventure Works Database
The following steps document downloading and installing the sample Adventure Works OLTP database provided by Microsoft
1 Launch Internet Explorer and navigate to httpmsftdbprodsamplescodeplexcom
2 Download the Adventure Works 2012 OLTP Script
3 Extract the ZIP into a folder on the desktop
4 Launch SQL Server Management Studio Start All Programs Microsoft SQL Server 2012 SQL Server Management Studio
5 When SQL Server Management Studio launches within the Connect to Server dialog login using the default settings and click Connect
6 Within SQL Server Management Studio select File Open File
7 Select the file instawdbsql from the extracted ZIP and click Open
8 If prompted to re-login to the database engine do it
9 Select Query SQLCMD Mode
10 Scroll down to line 42 the line that starts with the following
setvar SqlSamplesSourceDataPath
11 Change the folder location of where you unzipped the Adventure Works 2012 OLTP Script
12 Select Query Execute
13 When the script completes the AdventureWorks2012 database will have been created
Creating a SharePoint Server 2013 Environment for Development and Testing Version 10
copy Critical Path Training 2012 All Rights Reserved 64
wwwCriticalPathTrainingcom
Change Log
Change Version Description
August 22 2012 v 01 Pre-release for review
August 27 2012 v 02 Initial public release ndash install guide based on SharePoint Server Beta 2
August 28 2012 v 03 Updated URL for the site collection used to connect SharePoint to WAW
August 31 2012 v 04 Typo Removed SQL Server Analysis Services as part of the install Not required in a
SharePoint dev box (unless you are doing business intelligence which is not covered
in the guide)
Updated all references to Windows Azure Workflow to Workflow Manager the new
official name for the new workflow product
Updated SetupSharePointForHNSCps1 script to lookup HNSC Web Application by
name rather than URL which is more reliable
Typo Updated WingtipAllUp public NIC to use a different IP than the WingtipDC
Typo Replaced a reference to WingtipServer with WingtipDC
Typo Fixed handful of minor typos
September 1 2012 v 05 Removed SQL Server Reporting Services from install guide
Added step to uncheck IErsquos ldquoAutomatically detect proxyrdquo
Added post workflow install steps to setup User Profile Service Application to sync with
local Active Directory
September 5 2012 v 06 Added step to create a default root site collection in the HNSC web app
Updated minor typos and added extra notes for context
Updated PowerShell script SetupSharePointForHNSCps1 to remove content
database of default Web Application when setting up HNSC Web App
Added a new exercise 8 (after SharePoint install amp config and before the Workflow
install and config) to setup support for My Sites
October 20 2012 v 07 Updated script SetupSharePointForHNSCps1 to fix a bug where it would fail on line
111 if you didnrsquot already have a WINGTIPSP_Content managed account
Added section to bypass SharePointrsquos check for crlmicrosoftcom
Updated workflowrsquos registration PowerShell script to point to
httpintranetwingtipcom
Switched order of post-SharePoint install to setup HSNC hosting before configuring for
hosting apps
November 29 2012
v 10 Changed setup guide to use a single VM instead of two VMs
Updated guide for SharePoint 2013 RTM
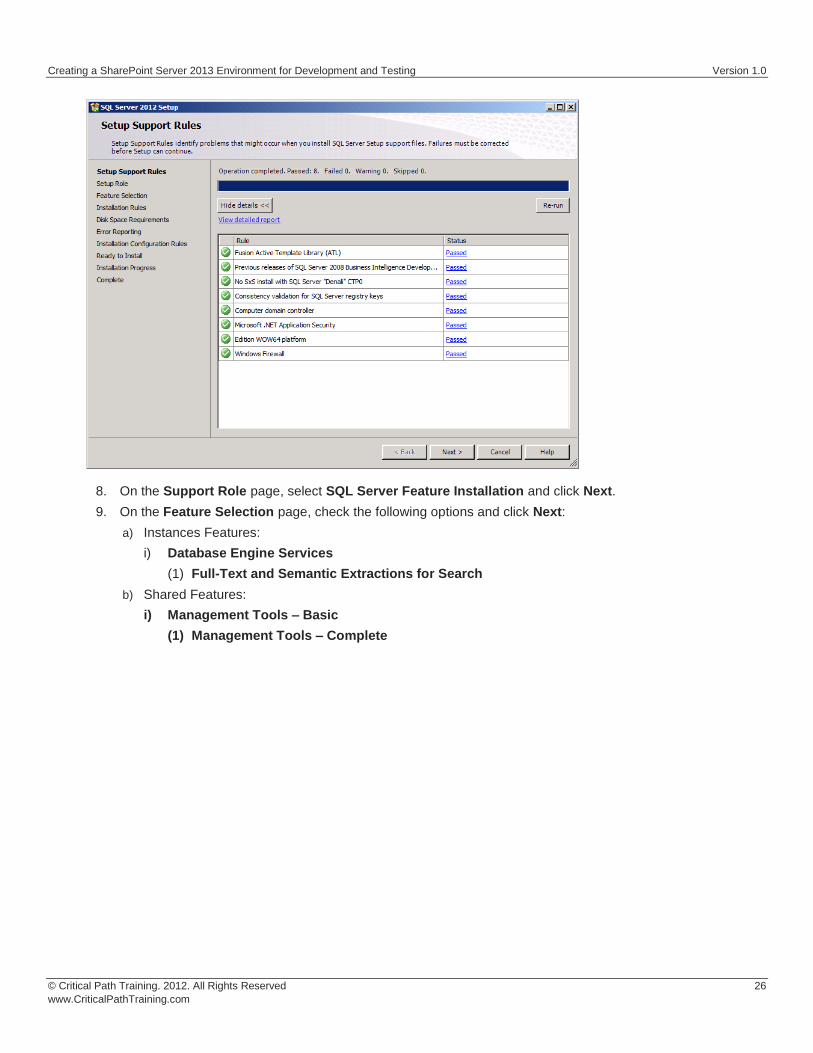
Creating a SharePoint Server 2013 Environment for Development and Testing Version 10
copy Critical Path Training 2012 All Rights Reserved 27
wwwCriticalPathTrainingcom
10 On the Installation Rules page click Next
11 On the Instance Configuration page click Next
12 On the Disk Space Requirements page click Next
13 On the Server Configuration page do the following and click Next
a) On the Service Account tab change the Startup Type for the SQL Server Agent to Automatic
14 On the Database Engine Configuration page do the following and click Next
a) On the Server Configuration tab click Add Current User
b) On the FILESTREAM tab
i) Check Enable FILESTREAM for Transact-SQL Access
ii) Check Enable FILESTREAM for file IO access
15 On the Error Reporting page click Next
16 On the Installation Configuration Rules page click Next
17 On the Ready to Install page click Install
Installation of SQL Server 2012 will take some time please be patient
18 When the installation completes the Complete page will be shown Click Close
At this point you have now successfully installed SQL Server 2012
Creating a SharePoint Server 2013 Environment for Development and Testing Version 10
copy Critical Path Training 2012 All Rights Reserved 28
wwwCriticalPathTrainingcom
Exercise 5 Install amp Configure SharePoint Server 2013
In this exercise you will install SharePoint 2013
1 Download the SharePoint Server 2013 to the host computer from here httptechnetmicrosoftcomen-USevalcenterhh973397aspx
2 Mount the SharePoint Server 2013 ISO to the WingtipServer VM
a) On the host computer open the Hyper-V Manager
b) Right-click the VM WingtipServer and select Settings
c) Select DVD Drive in the left-hand panel
The file that Microsoft provides is saved in the IMG format Hyper-V Manager wonrsquot allow you to mount an IMG file so rename it to ISO before mounting it
d) In the right-hand panel select Image File and browse to the ISO file that contains SharePoint Server 2013 and click OK
Create SharePoint Service Accounts amp Grant Rights to SQL Server 2012
In this section you will create the necessary service accounts that will be used by SharePoint in Active Directory and grant them necessary rights in SQL Server 2012
PowerShell Script Alert The creation of users and granting them rights to SQL Server 2012 steps in this section are automated in the Windows PowerShell script CreateSpServiceAccountsps1 found in the files that accompany this setup guide Open the script
and read the header for documentation on how to use it
1 Open the Active Directory Users and Computers Start Administrative Tools Active Directory Users and Computers
2 Expand the tree in the left-hand pane to see the Users OU Select the Users OU
3 Create a new user SP_Farm
a) In the toolbar select Action New User
Creating a SharePoint Server 2013 Environment for Development and Testing Version 10
copy Critical Path Training 2012 All Rights Reserved 29
wwwCriticalPathTrainingcom
b) Set the userrsquos Full Name amp User Login Name to SP_Farm and click Next
c) In the password dialog enter the following and click Next
i) Password (and Confirm Password) Password1
ii) User must change password at next login unchecked
iii) User cannot change password unchecked
iv) Password never expires checked
v) Account is disabled unchecked
Creating a SharePoint Server 2013 Environment for Development and Testing Version 10
copy Critical Path Training 2012 All Rights Reserved 30
wwwCriticalPathTrainingcom
vi) Click Finish
4 Repeat the previous step to create two more accounts
a) SP_Content
b) SP_Services
At this point you have created all the necessary service accounts
Install SharePoint Server 2013 Prerequisites
In this section you will install the SharePoint Server 2013 Prerequisites
1 Ensure you are logged into the WingtipServer VM using the account wingtipadministrator | Password1
2 If the AutoPlay dialog box is open click Run splashhta If it isnrsquot use Windows Explorer to navigate to the DVD drive and execute the splashhta file in the root of the DVD drive
Creating a SharePoint Server 2013 Environment for Development and Testing Version 10
copy Critical Path Training 2012 All Rights Reserved 31
wwwCriticalPathTrainingcom
3 Click the Install Software Prerequisites link
4 In the Microsoft SharePoint 2013 Products Preparation Tool window click Next
5 On the License Terms for Software Products page
a) Check I accept the terms of the License Agreement(s)
b) Click Next
6 The tool will download and install all prerequisites for SharePoint Server 2013 This will take some time It may prompt you to reboot the server If so reboot the server and login using wingtipadministrator | Password1
Creating a SharePoint Server 2013 Environment for Development and Testing Version 10
copy Critical Path Training 2012 All Rights Reserved 32
wwwCriticalPathTrainingcom
7 When the prerequisite installer is complete it will present a summary of everything it did
8 Click Finish
9 Restart the WingtipServer VMhellip some additional installations and changes that the prerequisite installer did will require a restart before installing SharePoint Server 2013
At this point all prerequisites required by SharePoint Server 2013 have been installed and any necessary configuration changes have been applied to the server However it is strongly recommend that you run Windows Update and install any pending updates Further Microsoft recommends installing the following hotfixes if they are not already installed
KB2554876 The SharePoint Parsing Process Crashes in Windows Server 2008 R2
KB2708075 IIS 75 Configurations are not Updated when you use the ServerManager Class to Commit Configuration Changes
KB2759112 Hotfix is Available for NET Framework 45 that Resolves an ASPNET Race Condition Issue in Windows Server 2008 R2 Windows Server 2008 R2 SP1
KB2765317 Hotfix is Available for NET Framework 45 that Resolves an ASPNET Race Condition Issue in Windows
8 Windows RT and Windows Server 2012
Install SharePoint Server 2013
In this section you will install SharePoint Server 2013
1 Ensure you are logged into the WingtipServer VM using the account wingtipadministrator | Password1
2 If the AutoPlay dialog box is open click Run splashhta If it isnrsquot use Windows Explorer to navigate to the DVD drive and execute the splashhta file in the root of the DVD drive
Creating a SharePoint Server 2013 Environment for Development and Testing Version 10
copy Critical Path Training 2012 All Rights Reserved 33
wwwCriticalPathTrainingcom
3 Click Install SharePoint Server
4 When prompted to Enter your Product Key enter the key you obtained for the trial install and click Continue
5 On the Read the Microsoft Software License Terms page check the I accept the terms of this agreement checkbox and click Continue
6 On the Choose a file location page click Install Now
Creating a SharePoint Server 2013 Environment for Development and Testing Version 10
copy Critical Path Training 2012 All Rights Reserved 34
wwwCriticalPathTrainingcom
7 When the installation is complete select the Run the SharePoint Products Configuration Wizard checkbox and click Close
8 On the Welcome to SharePoint Products page click Next
a) If prompted to start or reset services click Yes
9 On the Connect to a server farm page select Create a new server farm and click Next
10 On the Specify Configuration Database Settings page use the following to complete the page and click Next
a) Database server WINGTIPSERVER
b) Database name SharePoint_Config
c) Username WINGTIPSP_Farm
d) Password Password1
Creating a SharePoint Server 2013 Environment for Development and Testing Version 10
copy Critical Path Training 2012 All Rights Reserved 35
wwwCriticalPathTrainingcom
11 On the Specify Farm Security Settings page for the Passphrase and Confirm Passphrase boxes enter Password1 and click Next
12 On the Configure SharePoint Central Administration Web Application page check the Specify port number checkbox and enter a value of 9999 then Click Next
Creating a SharePoint Server 2013 Environment for Development and Testing Version 10
copy Critical Path Training 2012 All Rights Reserved 36
wwwCriticalPathTrainingcom
13 On the Completing the SharePoint Products Configuration Wizard page click Next
14 When the installer completes it will display the Confirmation Successful page
15 Click Finish This will launch Internet Explorer to go through the configuration process
Creating a SharePoint Server 2013 Environment for Development and Testing Version 10
copy Critical Path Training 2012 All Rights Reserved 37
wwwCriticalPathTrainingcom
At this point you have successfully installed SharePoint Server 2013
Configure SharePoint Server 2013
In this section you will create a new SharePoint Server 2013 farm and perform minimal configuration tasks
After installing SharePoint Sever 2013 the SharePoint Products Configuration Wizard will launch the browser-based Initial Farm Configuration Wizard
1 In the first page of the wizard you are prompted to Help Make SharePoint Better Select which ever option you want and click OK
2 On the Welcome page that asks How do you want to configure your SharePoint farm click the Start the Wizard button
3 On the Services page do the following and then click Next
a) Service Account Select Create new managed account
i) Username WINGTIPSP_Services
ii) Password Password1
b) Services Uncheck the following services
Creating a SharePoint Server 2013 Environment for Development and Testing Version 10
copy Critical Path Training 2012 All Rights Reserved 38
wwwCriticalPathTrainingcom
i) Access Services 2010
ii) App Management Service
In SharePoint Server 2013 the Search Service Application processes specifically noderunnerexe can consume a considerable amount of memory and processor time If you are not going to work with search you might consider unchecking this option for now You can always go back into Central Administration and create a new instance of the Search Service Application at a later date if you need it
Why did we remove Access Services 2010 amp App Management Service service applications The Access Services 2010 service application is included for backwards compatibility and isnrsquot needed in new installations unless you are migrating solutions built with Access Services 2010 from SharePoint Server 2010 (if so you can create this service application later within Central Administration Application Management Manage Service Applications) The App Management Service service application will be created in a later step in this setup guide therefor it is skipped here
4 The creation of the service applications can take quite a while so be patient If it exceeds 20 minutes it is fairly safe to assume the page is hung up One option is to close the browser then launch Central Administration (Start All Programs Microsoft SharePoint 2013 Products SharePoint 2013 Central Administration) and look at the Service Application page (Application Management Manage Service Applications) to see if they were all created
Configure DNS
In this section you will configure DNS for hosting SharePoint sites amp Apps
1 Ensure you are logged into the WingtipServer VM using the account wingtipadministrator | Password1
2 Open the DNS window Start Administrative Tools DNS
3 Expand the hierarchy on the left-hand side of the window until you get to DNS WINGTIPSERVER Forward Lookup Zones wingtipcom
4 Create a new wildcard so all requests for http[]wingtipcom will be forwarded to our SharePoint machine
a) Next right-click wingtipcom and select New Host (A or AAAA)
Creating a SharePoint Server 2013 Environment for Development and Testing Version 10
copy Critical Path Training 2012 All Rights Reserved 39
wwwCriticalPathTrainingcom
b) In the New Host dialog enter the following and click OK
i) Alias Name
ii) IP Address 192168150102 Then click Add Host The following figure shows how this looks
This new record is telling DNS to forward any request for http[]wingtipcom to the webserver WINGTIPSERVER where the
requests will be served by SharePoint
5 Verify this DNS entry is working
a) Open Windows PowerShell Start All Programs Accessories Windows PowerShell Windows PowerShell
b) Run the following commands and press ENTER
PS CUsersAdministratorgt nslookup somethingwingtipcom PS CUsersAdministratorgt nslookup somethingappswingtipcom
c) You should get a response that points to the WingtipServer server as shown in the following figure
Creating a SharePoint Server 2013 Environment for Development and Testing Version 10
copy Critical Path Training 2012 All Rights Reserved 40
wwwCriticalPathTrainingcom
Configure SharePoint Server 2013 for Host-Named Site Collections amp Create Initial Site
Collections
In this section you will create new SharePoint 2013 site collections for testing and hosting apps
Microsoft recommends to create host-named site collections (HNSC) instead of using the path based site collection addressing The difference is the following a path based site created at something such as httpintranetwingtipcomsitesdevtest as an HNSC site would be more like httpdevtestwingtipcom This is how it works in the cloud (Office 365) and it scales much better for on-prem
deployments This setup guide will show you how to setup your environment to create HNSC The only downside to this approach is that you canrsquot create site collections within Central Administration it must be done via Windows PowerShell API (because Central Administration doesnrsquot instruct you where to put the site
This is implemented in various parts First DNS must be configured to send all requests for httpwingtipcom to a Web Application
(implemented in the last section) Second this Web Application must be extended with SharePoint and have no host header bindings (so it handles all requests) Third it must have a default site collection at the root of the Web Application but it will not be used for anything (in fact it doesnrsquot need a template assigned to it)
You can read more about HNSCrsquos on TechNet httptechnetmicrosoftcomen-uslibrarycc424952aspx
PowerShell Script Alert The steps in this section are automated in the script SetupSharePointForHNSCps1 found in the files that
accompany this setup guide Open the script and read the header for documentation on how to use it
1 Ensure you are logged into the WingtipServer VM using the account wingtipadministrator | Password1
2 Open Central Administration Start All Programs Microsoft SharePoint 2013 Products SharePoint 2013 Central Administration
3 Select Application Management Manage Web Applications
4 Delete the default Web Application created by the configuration wizard
a) Delete the existing default Web Application
i) Select the Web Application SharePoint ndash 80 the one with the URL of httpwingtipserver and click Delete in the ribbon
ii) When prompted to delete the associated IIS Web Site amp SQL Server database select both options to delete them and click OK
The reason you are doing this is because the setup wizard you ran previously when creating the service applications automatically created it The problem is that it used the same identity (WINGTIPSP_Services) for the app pool that is used for all the service
applications which is not desired
5 Create a new Web Application to handle Host-Named Site Collections (HNSC)
Creating a SharePoint Server 2013 Environment for Development and Testing Version 10
copy Critical Path Training 2012 All Rights Reserved 41
wwwCriticalPathTrainingcom
a) In the ribbon click the New button
b) In the Create New Web Application dialog enter the following values in the properties and click OK Leave all properties not mentioned
i) Select the radio button Create a new IIS web site
(1) Name SharePoint HNSC Host ndash 80
(2) Port 80
ii) Application Pool
(1) Select the radio button Create a new application pool
(a) Application Pool Name SharePoint Default HNSC AppPool
(b) Select a security account for this application pool WINGTIPSP_Content
If WINGTIPSP_Content is not listed as an available managed account create it by selecting the appropriate option and using
Password1 for the password
iii) Database Name and Authentication
(1) Database Name WSS_Content_HNSCDefaultHost
c) This process will take a few moments At the end of the process SharePoint will ask if you want to create a site collection You do but you donrsquot want to do it through the browser as this will not be a HNSC To create a HNSC you must create it via Windows PowerShell
6 Create a default not template site collection at the root of the web application
a) Open SharePoint 2013 Management Shell Start All Programs Microsoft SharePoint 2013 Products SharePoint 2013 Management Shell
7 Create Site Collections for Testing SharePoint amp SharePoint Apps
a) Open SharePoint 2013 Management Shell Start All Programs Microsoft SharePoint 2013 Products SharePoint 2013 Management Shell
b) Get a reference to the HNSC web application you just created by running the following Windows PowerShell script in the SharePoint 2013 Management Shell
$hnscWebApp = Get-SPWebApplication | Where-Object $_DisplayName -eq SharePoint HNSC Host - 80
c) Create a non-templated site at the root of the web application for Workflow to connect to by executing the following Windows PowerShell script in the SharePoint 2013 Management Shell
New-SPSite -Name Root HNSC Site Collection -Url httpwingtipcom -HostHeaderWebApplication $hnscWebApp -OwnerAlias WINGTIPAdministrator
d) Create a team site by executing the following Windows PowerShell script in the SharePoint 2013 Management Shell
New-SPSite -Name Wingtip Intranet -Url httpintranetwingtipcom ndashHostHeaderWebApplication $hnscWebApp -Template STS0 -OwnerAlias WINGTIPAdministrator
e) Create a developer site by executing the following Windows PowerShell script in the SharePoint 2013 Management Shell
New-SPSite -Name Wingtip Developer Site -Url httpdevwingtipcom ndashHostHeaderWebApplication $hnscWebApp -Template DEV0 -OwnerAlias WINGTIPAdministrator
You can only create debug and test apps using a developer site
At this point you now have a site collection to use as a team site (httpintranetwingtipcom) and to develop and test custom SharePoint apps (httpdevwingtipcom)
Creating a SharePoint Server 2013 Environment for Development and Testing Version 10
copy Critical Path Training 2012 All Rights Reserved 42
wwwCriticalPathTrainingcom
Configure SharePoint 2013 for Hosting Apps
In this setup you will setup your SharePoint 2013 environment for hosting apps
PowerShell Script Alert Everything in the next immediate step is provided in the script ConfigureSpFarmForAppsps1 found in the
files that accompany this setup guide Open the script and read the header for documentation on how to use it
1 Ensure you are logged into the WingtipServer VM using the account wingtipadministrator | Password1
2 Create the necessary SharePoint App Management service applications and start the necessary services via Windows PowerShell
a) Open SharePoint 2013 Management Shell Start All Programs Microsoft SharePoint 2013 Products SharePoint 2013 Management Shell
b) Execute the following Windows PowerShell script in the SharePoint 2013 Management Shell
$appHostDomain = appswingtipcom $adminService = Get-Service -Name spadminv4 if ($adminServiceStatus -ne Running) Start-Service $adminService $timerService = Get-Service -Name sptimerv4 if ($timerServiceStatus -ne Running) Start-Service $timerService Set-SPAppDomain $appHostDomain $appMgmtSvcInstance = Get-SPServiceInstance | Where-Object $_GetType()Name -eq AppManagementServiceInstance if ($appMgmtSvcInstanceStatus -ne Online) Start-SPServiceInstance -Identity $appMgmtSvcInstance $appSubSettingSvcInstance = Get-SPServiceInstance | Where-Object $_GetType()Name -eq SPSubscriptionSettingsServiceInstance if ($appSubSettingSvcInstanceStatus -ne Online) Start-SPServiceInstance -Identity $appSubSettingSvcInstance $appPoolServiceApps = Get-SPServiceApplicationPool -Identity SharePoint Web Services Default $appSubSvc = New-SPSubscriptionSettingsServiceApplication ndashApplicationPool $appPoolServiceApps ndashName Settings Service Application ndashDatabaseName SettingsServiceDB $proxySubSvc = New-SPSubscriptionSettingsServiceApplicationProxy ndashServiceApplication $appSubSvc $appAppSvc = New-SPAppManagementServiceApplication -ApplicationPool $appPoolServiceApps -Name App Management Service Application -DatabaseName AppServiceDB $proxyAppSvc = New-SPAppManagementServiceApplicationProxy -ServiceApplication $appAppSvc Set-SPAppSiteSubscriptionName -Name app -Confirm$false
3 Verify the script configured SharePoint 2013 for hosting apps
a) Open Central Administration Start All Programs Microsoft SharePoint 2013 Products SharePoint 2013 Central Administration
b) Verify service applications created
i) Open the Service Applications page Application Management Manage Service Applications
ii) Verify you have two service applications created
(1) App Management Service Application
(2) Settings Service Application
c) Verify service instances are running
i) Open the Services on Server page System Settings Manage Services on Server
ii) Verify the following services are Started
(1) App Management Service
(2) Microsoft SharePoint Foundation Subscription Settings Service
Creating a SharePoint Server 2013 Environment for Development and Testing Version 10
copy Critical Path Training 2012 All Rights Reserved 43
wwwCriticalPathTrainingcom
d) Verify App URLs are correct
i) Open the Configure App URLs page Apps Configure app URLs
ii) Verify the following
(1) App Domain appswingtipcom
(2) App Prefix app
At this point your SharePoint Server 2013 environment is ready to host SharePoint apps
Creating a SharePoint Server 2013 Environment for Development and Testing Version 10
copy Critical Path Training 2012 All Rights Reserved 44
wwwCriticalPathTrainingcom
Start the SharePoint 2013 Sandbox Service
By default the service that executes sandbox solutions is not running In this step you will start the service
1 Open Central Administration Start All Programs Microsoft SharePoint 2013 Products SharePoint 2013 Central Administration
2 Open the Services on Server page System Settings Manage Services on Server
3 Click the Start link to the left of the Microsoft SharePoint Foundation Sandboxed Code Service
At this point your installation can support sandbox solutions
Configure CRL Verification for Disconnected Environments
SharePoint periodically ldquophones homerdquo to a specific address hosted by Microsoft under certain conditions When your environment is disconnected this can cause an unnecessary delay or failures when starting up the sandbox The following steps outline a workaround to bypass this check
1 Launch Notepad as an administrator Start All Programs Accessories right-click Notepad and select Run as Administrator
2 Open the hosts file by selecting File Open and finding the file
cWindowsSystem32Driversetchosts
3 Add the following line to the end of the file
127001 crlmicrosoftcom
4 Save and close the hosts file
Update Internet Explorer to Bypass the App URL amp Automatically Login to SharePoint Sites
In this section you will update Internet Explorer to add the App hosting URL to the bypass list so you can navigate to the domain after deploying SharePoint hosted apps
1 Ensure you are logged into the WingtipServer VM using the account wingtipadministrator | Password1
1 Launch Internet Explorer Start All Programs Internet Explorer
2 Configure Internet Explorer to bypass the App URL
a) In the top-right corner click the gear icon and select Internet Options
b) On the Security tab select the Local Intranet and click the Sites button
c) Uncheck the box next to Automatically detect intranet network
d) Click the Advanced button and add two entries to the Exceptions list
i) httpwingtipcom
ii) httpappswingtipcom
Creating a SharePoint Server 2013 Environment for Development and Testing Version 10
copy Critical Path Training 2012 All Rights Reserved 45
wwwCriticalPathTrainingcom
e) Click the Close button followed by the OK button multiple times to close out of the dialogs
At this point Internet Explorer is setup to bypass your app URL so you can navigate to apps (httpappswingtipcom) as well as automatically authenticate to sites hosted at httpwingtipcom
Exercise 6 Configure SharePoint to Host My Sites
In this exercise you will configure SharePoint to create and host My Sites In order to host My Sites you will need a new Web Application that is configured for Self-Service Site Creation and has a My Site Host site collection
1 Create a new SharePoint web application to host the My Sites
a) Ensure you are logged into the WingtipServer VM using the account wingtipadministrator | Password1
b) Open Central Administration Start All Programs Microsoft SharePoint 2013 Products SharePoint 2013 Central Administration
c) Select Application Management Manage Web Applications
d) In the ribbon click the New button
e) In the Create New Web Application dialog enter the following values in the properties and click OK Leave all properties not mentioned
i) Select the radio button Create a new IIS web site
(1) Name SharePoint MySite Host ndash 80
(2) Port 80
(3) Host Header mywingtipcom
ii) Application Pool
(1) Select the radio button Use existing application pool
(a) Application Pool Name SharePoint Default HNSC AppPool
iii) Database Name and Authentication
(1) Database Name WSS_Content_SocialWingtipCom
f) This process will take a few moments At the end of the process SharePoint will ask if you want to create a site collection Click the link provided to create a new site collection amp continue to the next step
2 Create a My Site Host site collection
a) On the Create Site Collection page use the following information to complete the form and click OK
Creating a SharePoint Server 2013 Environment for Development and Testing Version 10
copy Critical Path Training 2012 All Rights Reserved 46
wwwCriticalPathTrainingcom
i) Title My Site Host
ii) URL
iii) Template Selection My Site Host (found under the Enterprise tab)
iv) Primary Site Collection Administrator WINGTIPAdministrator
3 Update the Web Application to host my sites
a) Within Central Administration in the left-hand navigation navigate to the Manage Web Applications page Application Management Manage Web Applications
b) Select the SharePoint MySite Host ndash 80 web application
c) Click the Managed Paths button in the ribbon
d) Remove the sites managed path and add two new managed paths and click OK
i) personal ndash Wildcard inclusion
ii) my ndash Explicit inclusion
e) With the SharePoint MySite Host ndash 80 web application still selected click the Self-Service Site Creation button
f) On the Self-Service Site Creation page use the following values to complete the form and click OK
i) Site Collections On
4 Next configure the User Profile Service Application My Site settings
a) Browse to the User Profile Service Application management page Application Management Manage Service Applications User Profile Service Application
b) Under the My Site Settings section click the Setup My Sites
c) On the My Site Settings page use the following information to complete the form and click OK
i) My Site Host httpmywingtipcom
ii) Personal Site Location personal
At this point your SharePoint deployment is now configured to automatically create My Sites under httpmywingtipcomPersonalUserName when users first browse to them
Exercise 7 Install amp Configure Workflow Manager 10
In this exercise you will configure the WingtipServer VM to host Workflow Manager 10 and connect it to your SharePoint installation
1 Ensure you are logged into the WingtipServer VM using the account wingtipadministrator | Password1
Verify SQL Server 2012 Network Configuration
In this section yoursquoll verify the network configuration is correct for SQL Server 2012 in order to install Workflow Manager 10
Creating a SharePoint Server 2013 Environment for Development and Testing Version 10
copy Critical Path Training 2012 All Rights Reserved 47
wwwCriticalPathTrainingcom
1 Configure SQL Server 2012 to have the TCPIP connection protocol enabled
a) Open the SQL Server Configuration Manager Start All Programs Microsoft SQL Server 2012 Configuration Tools SQL Server Configuration Manager
b) Expand the hierarchy on the left-hand side to the following SQL Server Connection Manager (local) SQL Server Network Configuration Protocols for MSSQLSERVER
c) In the main window if TCPIP is Disabled right-click TCPIP and select Enable
d) When prompted with a warning click OK
2 SQL Server must be restarted in order to reflect this change
a) In the hierarchy on the left-hand side of the window select SQL Server Services
b) Right-click SQL Server (MSSQLSERVER) and select Restart
At this point SQL Server is now configured with the TCPIP protocol enabled a requirement when configuring Service Bus
Configure the Workflow Service Account with the Necessary Rights
In this section you will verify the service account that will run Workflow Manager and Service Bus
1 Ensure you are logged into the WingtipServer VM using the account WINGTIPadministrator | Password1
2 Grant the WINGTIPSP_Content account securityadmin amp dbcreator permissions in SQL Server
a) Launch SQL Server Management Studio Start All Programs Microsoft SQL Server 2012 SQL Server Management Studio
b) When SQL Server Management Studio launches within the Connect to Server dialog login using the default settings and click Connect
c) In the Object Explorer tool window expand the WINGTIPSERVER server hierarchy to the Security Logins node
d) Find the WINGTIPSP_Content account right-click it and select Properties
Creating a SharePoint Server 2013 Environment for Development and Testing Version 10
copy Critical Path Training 2012 All Rights Reserved 48
wwwCriticalPathTrainingcom
e) In the Select a page pane select Server Roles
f) Check securityadmin amp dbcreator and click OK
g) Close SQL Server Management Studio
3 Add the Workflow service account to the local administrators group
a) Open the Active Directory Users and Computers window Start Administrative Tools Active Directory Users and Computers
b) In the hierarchy on the left-hand side of the window expand it to the following Active Directory Users and Computers wingtipcom Builtin
c) In the main window right-click Administrators and select Properties
d) In the Administrators Properties dialog select the Members tab and click Add
e) In the Enter the object names to select box enter wingtipsp_content and click the Check Names button
f) In the Administrators Properties dialog click OK
g) Close the Active Directory Users and Computers window
At this point the service account that will host Workflow Manager and Service Bus has been configured correctly
Creating a SharePoint Server 2013 Environment for Development and Testing Version 10
copy Critical Path Training 2012 All Rights Reserved 49
wwwCriticalPathTrainingcom
Download amp Install Workflow Manager and Service Bus
In this section you will install Workflow Manager and Service Bus
1 Ensure you are logged into the WingtipServer VM using the account WINGTIPSP_Content | Password1
It is important you are logged in as the user that will run workflow when you install amp configure Workflow Manager and Service Bus
2 Launch the Web Platform Installer Start All Programs Microsoft Web Platform Installer
a) If the Web Platform Installer is not present on your machine you can download amp install it from here httpwwwmicrosoftcomwebdownloadsplatformaspx
If you do not have internet access within the virtual machine it is possible to download everything needed for workflow using the command line version of the Web Platform Installer (WebPICMD) You can get WebPICMD from httplearniisnetpageaspx1072web-platform-installer-v4-command-line-webpicmdexe-preview-release Specifically for
workflow enter the following command to download Workflow Beta 1 and all prerequisites
webpicmd offline ProductsWorkflow Pathc[path]
3 When the Web Platform Installer loads execute a search for Workflow select Workflow Manager 10 and click Add
4 Click the Install button at the bottom of the Web Platform Installer 40 window
5 On the Prerequisites page click I Accept
Note The Web Platform Installer 40 may prompt you to keep certain products updated using Microsoft Update If it does select Use Microsoft Update when I check for updates (recommended) and click Continue
6 When the installer completes the following dialog will appear Click Continue and then Finish to start the configuration process
Creating a SharePoint Server 2013 Environment for Development and Testing Version 10
copy Critical Path Training 2012 All Rights Reserved 50
wwwCriticalPathTrainingcom
At this point Workflow Manager amp Service Bus are installed
Configure Workflow Manager and Service Bus
In this section you will install Workflow Manager and Service Bus
1 If the Workflow Manager Configuration Wizard is not open open it Start All Programs Workflow Manager 10 Workflow Configuration
2 On the Welcome page click Configure Workflow Manager with Default Settings (Recommended)
Creating a SharePoint Server 2013 Environment for Development and Testing Version 10
copy Critical Path Training 2012 All Rights Reserved 51
wwwCriticalPathTrainingcom
3 On the New Farm Configuration page do the following
a) In the section Configure Service Account set the credentials to
i) User ID sp_contentwingtipcom
ii) Password Password1
b) Check the Allow Workflow management over HTTP on this computer checkbox
Ensure the username is entered in the fully qualified UPN format not as the default shows in the installer (sp_contentwingtip) or the domainusername format
In a production environment you should be doing everything over SSL
c) Click the Test Connection button to verify the connection credentials before proceeding
Creating a SharePoint Server 2013 Environment for Development and Testing Version 10
copy Critical Path Training 2012 All Rights Reserved 52
wwwCriticalPathTrainingcom
d) In the Certificate Generation Key and Confirm Certificate Generation Key enter Password1 into both fields
4 Click the right arrow in the bottom right corner to proceed
5 On the Summary page review your settings and click the check at the bottom right of the widow to start the configuration process
Creating a SharePoint Server 2013 Environment for Development and Testing Version 10
copy Critical Path Training 2012 All Rights Reserved 53
wwwCriticalPathTrainingcom
6 After a few minutes the Configuration Progress screen will show that everything has been configured correctly
Creating a SharePoint Server 2013 Environment for Development and Testing Version 10
copy Critical Path Training 2012 All Rights Reserved 54
wwwCriticalPathTrainingcom
7 Click the check in the bottom right corner
At this point Workflow Manager amp Service Bus has been installed and a new Workflow Manager farm has been created The next step is to connect the SharePoint 2013 farm to the Workflow Manager farm
Connect SharePoint 2013 to Workflow Manager
In this section you will connect SharePoint 2013 and Workflow Manager together
1 Ensure you are logged into the WingtipServer VM using the account WINGTIPadministrator | Password1
2 Get the Workflow Manager endpoint
a) Open the Workflow Manager PowerShell console Start All Programs Workflow Manager 10
b) Execute the Windows PowerShell following cmdlet
Get-WFFarm | ft HttpPort
c) Take note of this port (12291) This port number is what you will use to connect the SharePoint 2013 farm to the Workflow Manager 10 farm
In production you should connect to the HTTPS port listed in the HttpsPort property when you run Get-WFFarm
d) Close the Workflow Manager PowerShell window
3 Connect the SharePoint 2013 farm to Workflow Manager
Creating a SharePoint Server 2013 Environment for Development and Testing Version 10
copy Critical Path Training 2012 All Rights Reserved 55
wwwCriticalPathTrainingcom
a) Open SharePoint 2013 Management Shell Start All Programs Microsoft SharePoint 2013 Products SharePoint 2013 Management Shell
b) Execute the following Windows PowerShell script in the SharePoint 2013 Management Shell
Register-SPWorkflowService ndashSPSite httpintranetwingtipcom ndashWorkflowHostUri httpwingtipserver12291 ndashAllowOAuthHttp
This script is telling SharePoint the endpoint it should use to talk to Workflow Manager as well as Workflow Manager the SharePoint site collection it should talk to for calls into the CSOM It is also configuring all communication over HTTP rather than HTTPS for performance reasons In production you should always use HTTPS
This step will take a moment with no feedback during the process Be patient
c) Close the SharePoint 2013 Management Shell
At this point the SharePoint 2013 farm is connected to the Workflow Manager 10 farm
Configure SharePoint User Profile Service Application AD Sync
Users in SharePoint 2013 are validated by Workflow Manager against SharePoint to ensure they have permissions to start a workflow This is done by looking up the user by their AD UserPrincipalName (UPN) attribute in the User Profile Service Application (UPA) If no matching user is found the workflow will be automatically cancelled by Workflow Manager In this section you will setup UPA to connect amp sync with the local Active Directory so user accounts in AD will have their UPN synchronized to UPA
1 Open Central Administration Start All Programs Microsoft SharePoint 2013 Products SharePoint 2013 Central Administration
2 Go to the User Profile Service Application management page Application Management Manage Service Applications User Profile Service Application
3 The first step is to configure the User Profile Service Application to allow for Active Directory (AD) synchronization
a) Under Synchronization select Configure Synchronization Settings
b) For Synchronization select Use SharePoint Active Directory Import and click OK
4 Next establish a connection to the wingtipcom AD
a) Under Synchronization select Configure Synchronization Connections
b) On the Synchronization Connections page select Create New Connection
c) Enter the following values on this form and click OK
i) Connection Name WINGTIPCOM AD
ii) Type Active Directory Import
iii) Connection Settings
(1) Fully Qualified Domain Name wingtipcom
(2) Authentication Provider Type Windows Authentication
(3) Account Name WINGTIPAdministrator
(4) Password (and Confirm Password) Password1
iv) Containers
(1) Click Populate Containers
(2) After it loads check the box next to WINGTP or click the Select All button below the box
5 Go back to the User Profile Service Application management page Application Management Manage Service Applications User Profile Service Application
6 Finally start a synchronization import
a) Under Synchronization select Start Profile Synchronization
Creating a SharePoint Server 2013 Environment for Development and Testing Version 10
copy Critical Path Training 2012 All Rights Reserved 56
wwwCriticalPathTrainingcom
b) Select Start Full Synchronization and click OK
c) You will be taken back to the User Profile Service Application management page Notice in the top-right corner there is a status block that reports how many profiles are in the UPA database Refresh the page to see it increase to a handful of profiles as the import process runs
At this point you have successfully configured the User Profile Service Application to import profiles from the local AD
Exercise 8 Install the Microsoft Office 2013 Professional Clients
In this exercise you will install the Microsoft Office 2013 client applications
1 Download the Office 2013 into the WingtipServer VM For this you need to create an Office 365 Trial account login to Office 365 go to the Admin Dashboard and then download the latest version httpwwwmicrosoftcomofficepreviewentry-office-preview
2 Download the SharePoint Designer 2013 into the WingtipServer VM from here httpwwwmicrosoftcomen-usdownloaddetailsaspxid=35491
3 Download the Visio Professional 2013 into the WingtipServer VM from here httptechnetmicrosoftcomen-usevalcenterhh973399
Install Microsoft Office Professional Plus 2013
In this section you will install the Microsoft Office 2013 clients
1 Ensure you are logged into the WingtipServer VM using the account WINGTIPadministrator | Password1
2 Execute the installer OfficeProfessionalPlus_English_x64exe
3 On the Read the Microsoft Software License Terms dialog click the checkbox next to I accept the terms of this agreement and click Continue
4 On the Choose the installation you want dialog click the Install Now button
5 The installer will proceed and install all the Office products
6 When the installer completes click the Close button
7 Apply your Office Professional Plus 2013 license key
a) Launch Word 2013 Start All Programs Microsoft Office 2013 Word 2013
b) In the First things first dialog select Use recommended settings and click Accept
c) In the Welcome to Office dialog that opens click the [X] icon in the top-right corner to close it
d) In the left-hand pane click Open Other Documents
e) In the left-hand pane click Account
f) In the Product Information section within the Activation Required box click Change Product Key
g) Enter your license key for Office Professional Plus 2013 check the box next to Attempt to automatically activate my product online and click Install
h) Click OK
At this point you have installed Office Professional Plus 2013
Install Microsoft Office Visio 2013
In this section you will install Microsoft Office 2013 Visio
1 Ensure you are logged into the WingtipServer VM using the account WINGTIPadministrator | Password1
2 Execute the installer VisioProfessional_English_x64exe
3 On the Read the Microsoft Software License Terms dialog click the checkbox next to I accept the terms of this agreement and click Continue
Creating a SharePoint Server 2013 Environment for Development and Testing Version 10
copy Critical Path Training 2012 All Rights Reserved 57
wwwCriticalPathTrainingcom
4 On the Choose the installation you want dialog click the Install Now button
5 The installer will proceed and install all Visio 2013
6 When the installer completes click the Close button
7 Apply your Visio 2013 license key
a) Launch Visio 2013 Start All Programs Microsoft Office 2013 Visio 2013
b) In the First things first dialog select Use recommended settings and click Accept
c) In the Welcome to Office dialog that opens click the X icon in the top-right corner to close it
d) In the left-hand pane click Open Other Documents
e) In the left-hand pane click Account
f) In the Product Information section within the Activation Required box click Change Product Key
g) Enter your license key for Visio 2013 check the box next to Attempt to automatically activate my product online and click Install
h) Click OK
At this point you have installed Visio 2013
Install Microsoft Office 2013 SharePoint Designer
In this section you will install Microsoft Office 2013 SharePoint Designer
1 Ensure you are logged into the WingtipServer VM using the account WINGTIPadministrator | Password1
2 Execute the installer SharePointDesigner_English_x64exe
3 On the Read the Microsoft Software License Terms dialog click the checkbox next to I accept the terms of this agreement and click Continue
4 On the Choose the installation you want dialog click the Install Now button
5 The installer will proceed and install all SharePoint Designer 2013
6 When the installer completes click the Close button
At this point you have installed SharePoint Designer 2013
Exercise 9 Install Visual Studio 2012
In this exercise you will install Visual Studio 2012
1 Ensure you are logged into the WingtipServer VM using the account WINGTIPadministrator | Password1
2 Start the install of Visual Studio 2012 Ultimate Trial by downloading the installer from here httpwwwmicrosoftcomvisualstudio11en-usdownloads
3 On the installation splash screen check the box next to I agree to the License terms and conditions and click the Next button
Creating a SharePoint Server 2013 Environment for Development and Testing Version 10
copy Critical Path Training 2012 All Rights Reserved 58
wwwCriticalPathTrainingcom
4 On the Optional Features to install dialog click Install
5 After some time the installer will complete Click the Launch button to launch Visual Studio 2012
Creating a SharePoint Server 2013 Environment for Development and Testing Version 10
copy Critical Path Training 2012 All Rights Reserved 59
wwwCriticalPathTrainingcom
6 In the Choose Default Environment Settings select Visual C Development Settings and click Start Visual Studio
7 Close Visual Studio 2012
At this point Visual Studio 2012 RTM is installed
Install Office amp SharePoint 2013 Developer Tools
In this section you will install the Office and SharePoint 2013 developer tools for Visual Studio
1 Ensure you are logged into the WingtipServer VM using the account WINGTIPadministrator | Password1
2 Launch the Web Platform Installer Start All Programs Microsoft Web Platform Installer
3 In the search box at the top-right corner of the Web Platform Installer 40 window type sharepoint and press Enter
4 Click the Add button to the right of Microsoft Office Developer Tools for Visual Studio 2012 - Preview 2
5 Click the Install button at the bottom of the Web Platform Installer 40 window
6 On the Prerequisites page click I Accept
Creating a SharePoint Server 2013 Environment for Development and Testing Version 10
copy Critical Path Training 2012 All Rights Reserved 60
wwwCriticalPathTrainingcom
At this point you have installed the SharePoint 2013 amp Office 2013 development tools in Visual Studio 2012
Creating a SharePoint Server 2013 Environment for Development and Testing Version 10
copy Critical Path Training 2012 All Rights Reserved 61
wwwCriticalPathTrainingcom
Appendix 1 Download Manifest
The following lists everything referenced that you will or may need to download in this environment
Windows Server 2008 R2 with Service Pack 1 (installer ISO)
o httptechnetmicrosoftcomen-usevalcenterdd459137aspx
Windows Server 2008 R2 with Service Pack 1 (prebuilt VHD)
o httpwwwmicrosoftcomdownloadsdetailsaspxFamilyId=9040a4be-c3cf-44a5-9052-a70314452305
Windows Server 2008 R2 Service Pack 1
o httpwwwmicrosoftcomen-usdownloaddetailsaspxid=5842
SQL Server 2012 Trial
o httpwwwmicrosoftcombetaexperiencepdSQL2012EvalCTAenusdefaultaspx
SharePoint Server 2013
o httptechnetmicrosoftcomen-USevalcenterhh973397aspx
Hotfixes for SharePoint Server 2013 (post-install)
o KB2554876 The SharePoint Parsing Process Crashes in Windows Server 2008 R2
o KB2708075 IIS 75 Configurations are not Updated when you use the ServerManager Class to Commit
Configuration Changes
o KB2759112 Hotfix is Available for NET Framework 45 that Resolves an ASPNET Race Condition Issue in
Windows Server 2008 R2 Windows Server 2008 R2 SP1
o KB2765317 Hotfix is Available for NET Framework 45 that Resolves an ASPNET Race Condition Issue in
Windows 8 Windows RT and Windows Server 2012
Web Platform Installer
o httpwwwmicrosoftcomwebdownloadsplatformaspx
Web Platform Installer ndash Command Line Version
o httplearniisnetpageaspx1072web-platform-installer-v4-command-line-webpicmdexe-preview-release
Workflow Manager 10
o Download using the Microsoft Web Platform Installer
Office 2013
o httpwwwmicrosoftcomofficepreviewentry-office-preview
SharePoint Designer 2013
o httpwwwmicrosoftcomen-usdownloaddetailsaspxid=35491
Visio Professional 2013
o httptechnetmicrosoftcomen-usevalcenterhh973399
Visual Studio 2012
o httpwwwmicrosoftcomvisualstudio11en-usdownloads
Office Developer Tools for Visual Studio 2012 ndash Preview 2
o Download using the Microsoft Web Platform Installer
Creating a SharePoint Server 2013 Environment for Development and Testing Version 10
copy Critical Path Training 2012 All Rights Reserved 62
wwwCriticalPathTrainingcom
Appendix 2 Windows PowerShell Script Manifest
The following lists all Windows PowerShell scripts that are provided with this setup guide
AddDisableLoopbackCheckRegKeyps1
o The following steps automate creating the registry key outlined as Method 2 in the Microsoft Knowledgebase article
httpsupportmicrosoftcomkb896861 using Windows PowerShell This key DisableLoopbackCheck will allow
you to browse SharePoint sites on the same machine Without this key (or following Method 1 in the KB article) you
would need to browse any SharePoint sites from a different computer than the one which SharePoint is installed on
ConfigureSpFarmForAppsps1
o Configures a SharePoint 2013 for hosting apps This ensures everything you need is installed running and
configured This is documented here httpmsdnmicrosoftcomen-uslibraryfp179923(v=office15)
CreateSpServiceAccountsps1
o Creates the minimal necessary service accounts for SharePoint Server 2013 SP_Farm SP_Content amp
SP_Services
SetupSharePointForHNSCps1
o Configures a SharePoint 2013 install for hosting Host-Named Site Collections (HNSC) This involves creating a Web
Application in SharePoint that has no host header bindings Using DNS all requests are mapped to this Web
Application You then create the site collections via PowerShell as you cant create HNSCs via the browser (Central
Administration)
Creating a SharePoint Server 2013 Environment for Development and Testing Version 10
copy Critical Path Training 2012 All Rights Reserved 63
wwwCriticalPathTrainingcom
Appendix 3 Create Sample Adventure Works Database
The following steps document downloading and installing the sample Adventure Works OLTP database provided by Microsoft
1 Launch Internet Explorer and navigate to httpmsftdbprodsamplescodeplexcom
2 Download the Adventure Works 2012 OLTP Script
3 Extract the ZIP into a folder on the desktop
4 Launch SQL Server Management Studio Start All Programs Microsoft SQL Server 2012 SQL Server Management Studio
5 When SQL Server Management Studio launches within the Connect to Server dialog login using the default settings and click Connect
6 Within SQL Server Management Studio select File Open File
7 Select the file instawdbsql from the extracted ZIP and click Open
8 If prompted to re-login to the database engine do it
9 Select Query SQLCMD Mode
10 Scroll down to line 42 the line that starts with the following
setvar SqlSamplesSourceDataPath
11 Change the folder location of where you unzipped the Adventure Works 2012 OLTP Script
12 Select Query Execute
13 When the script completes the AdventureWorks2012 database will have been created
Creating a SharePoint Server 2013 Environment for Development and Testing Version 10
copy Critical Path Training 2012 All Rights Reserved 64
wwwCriticalPathTrainingcom
Change Log
Change Version Description
August 22 2012 v 01 Pre-release for review
August 27 2012 v 02 Initial public release ndash install guide based on SharePoint Server Beta 2
August 28 2012 v 03 Updated URL for the site collection used to connect SharePoint to WAW
August 31 2012 v 04 Typo Removed SQL Server Analysis Services as part of the install Not required in a
SharePoint dev box (unless you are doing business intelligence which is not covered
in the guide)
Updated all references to Windows Azure Workflow to Workflow Manager the new
official name for the new workflow product
Updated SetupSharePointForHNSCps1 script to lookup HNSC Web Application by
name rather than URL which is more reliable
Typo Updated WingtipAllUp public NIC to use a different IP than the WingtipDC
Typo Replaced a reference to WingtipServer with WingtipDC
Typo Fixed handful of minor typos
September 1 2012 v 05 Removed SQL Server Reporting Services from install guide
Added step to uncheck IErsquos ldquoAutomatically detect proxyrdquo
Added post workflow install steps to setup User Profile Service Application to sync with
local Active Directory
September 5 2012 v 06 Added step to create a default root site collection in the HNSC web app
Updated minor typos and added extra notes for context
Updated PowerShell script SetupSharePointForHNSCps1 to remove content
database of default Web Application when setting up HNSC Web App
Added a new exercise 8 (after SharePoint install amp config and before the Workflow
install and config) to setup support for My Sites
October 20 2012 v 07 Updated script SetupSharePointForHNSCps1 to fix a bug where it would fail on line
111 if you didnrsquot already have a WINGTIPSP_Content managed account
Added section to bypass SharePointrsquos check for crlmicrosoftcom
Updated workflowrsquos registration PowerShell script to point to
httpintranetwingtipcom
Switched order of post-SharePoint install to setup HSNC hosting before configuring for
hosting apps
November 29 2012
v 10 Changed setup guide to use a single VM instead of two VMs
Updated guide for SharePoint 2013 RTM
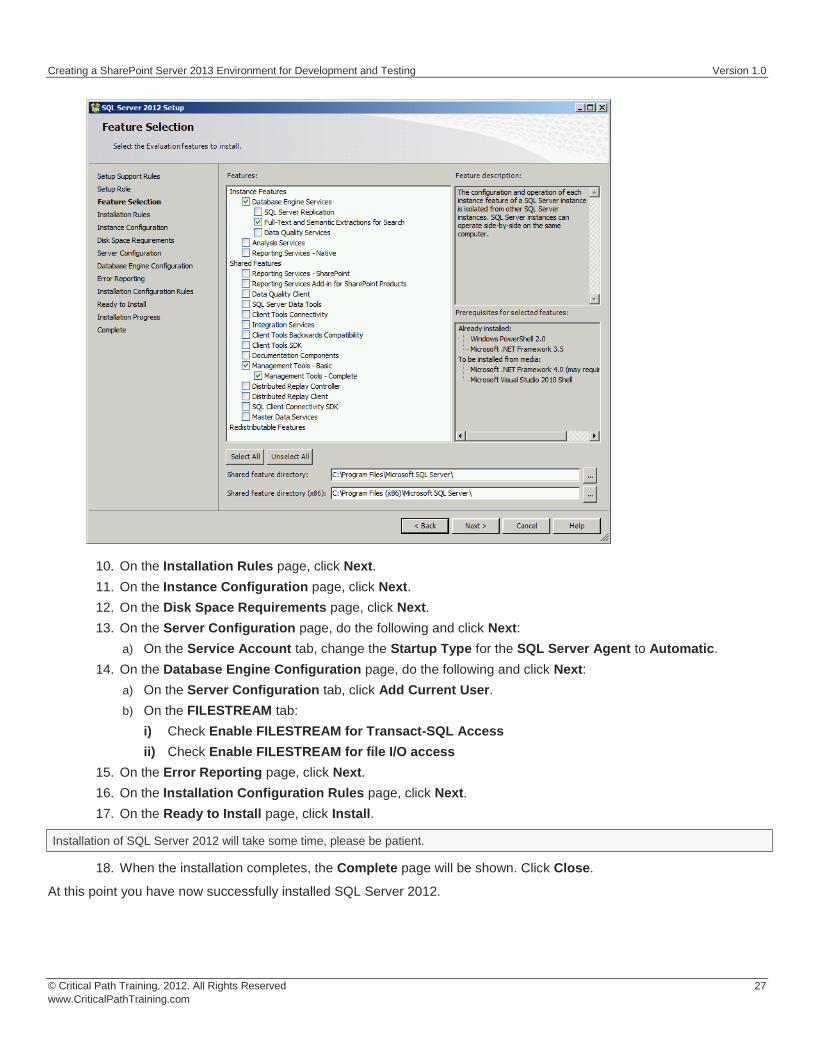
Creating a SharePoint Server 2013 Environment for Development and Testing Version 10
copy Critical Path Training 2012 All Rights Reserved 28
wwwCriticalPathTrainingcom
Exercise 5 Install amp Configure SharePoint Server 2013
In this exercise you will install SharePoint 2013
1 Download the SharePoint Server 2013 to the host computer from here httptechnetmicrosoftcomen-USevalcenterhh973397aspx
2 Mount the SharePoint Server 2013 ISO to the WingtipServer VM
a) On the host computer open the Hyper-V Manager
b) Right-click the VM WingtipServer and select Settings
c) Select DVD Drive in the left-hand panel
The file that Microsoft provides is saved in the IMG format Hyper-V Manager wonrsquot allow you to mount an IMG file so rename it to ISO before mounting it
d) In the right-hand panel select Image File and browse to the ISO file that contains SharePoint Server 2013 and click OK
Create SharePoint Service Accounts amp Grant Rights to SQL Server 2012
In this section you will create the necessary service accounts that will be used by SharePoint in Active Directory and grant them necessary rights in SQL Server 2012
PowerShell Script Alert The creation of users and granting them rights to SQL Server 2012 steps in this section are automated in the Windows PowerShell script CreateSpServiceAccountsps1 found in the files that accompany this setup guide Open the script
and read the header for documentation on how to use it
1 Open the Active Directory Users and Computers Start Administrative Tools Active Directory Users and Computers
2 Expand the tree in the left-hand pane to see the Users OU Select the Users OU
3 Create a new user SP_Farm
a) In the toolbar select Action New User
Creating a SharePoint Server 2013 Environment for Development and Testing Version 10
copy Critical Path Training 2012 All Rights Reserved 29
wwwCriticalPathTrainingcom
b) Set the userrsquos Full Name amp User Login Name to SP_Farm and click Next
c) In the password dialog enter the following and click Next
i) Password (and Confirm Password) Password1
ii) User must change password at next login unchecked
iii) User cannot change password unchecked
iv) Password never expires checked
v) Account is disabled unchecked
Creating a SharePoint Server 2013 Environment for Development and Testing Version 10
copy Critical Path Training 2012 All Rights Reserved 30
wwwCriticalPathTrainingcom
vi) Click Finish
4 Repeat the previous step to create two more accounts
a) SP_Content
b) SP_Services
At this point you have created all the necessary service accounts
Install SharePoint Server 2013 Prerequisites
In this section you will install the SharePoint Server 2013 Prerequisites
1 Ensure you are logged into the WingtipServer VM using the account wingtipadministrator | Password1
2 If the AutoPlay dialog box is open click Run splashhta If it isnrsquot use Windows Explorer to navigate to the DVD drive and execute the splashhta file in the root of the DVD drive
Creating a SharePoint Server 2013 Environment for Development and Testing Version 10
copy Critical Path Training 2012 All Rights Reserved 31
wwwCriticalPathTrainingcom
3 Click the Install Software Prerequisites link
4 In the Microsoft SharePoint 2013 Products Preparation Tool window click Next
5 On the License Terms for Software Products page
a) Check I accept the terms of the License Agreement(s)
b) Click Next
6 The tool will download and install all prerequisites for SharePoint Server 2013 This will take some time It may prompt you to reboot the server If so reboot the server and login using wingtipadministrator | Password1
Creating a SharePoint Server 2013 Environment for Development and Testing Version 10
copy Critical Path Training 2012 All Rights Reserved 32
wwwCriticalPathTrainingcom
7 When the prerequisite installer is complete it will present a summary of everything it did
8 Click Finish
9 Restart the WingtipServer VMhellip some additional installations and changes that the prerequisite installer did will require a restart before installing SharePoint Server 2013
At this point all prerequisites required by SharePoint Server 2013 have been installed and any necessary configuration changes have been applied to the server However it is strongly recommend that you run Windows Update and install any pending updates Further Microsoft recommends installing the following hotfixes if they are not already installed
KB2554876 The SharePoint Parsing Process Crashes in Windows Server 2008 R2
KB2708075 IIS 75 Configurations are not Updated when you use the ServerManager Class to Commit Configuration Changes
KB2759112 Hotfix is Available for NET Framework 45 that Resolves an ASPNET Race Condition Issue in Windows Server 2008 R2 Windows Server 2008 R2 SP1
KB2765317 Hotfix is Available for NET Framework 45 that Resolves an ASPNET Race Condition Issue in Windows
8 Windows RT and Windows Server 2012
Install SharePoint Server 2013
In this section you will install SharePoint Server 2013
1 Ensure you are logged into the WingtipServer VM using the account wingtipadministrator | Password1
2 If the AutoPlay dialog box is open click Run splashhta If it isnrsquot use Windows Explorer to navigate to the DVD drive and execute the splashhta file in the root of the DVD drive
Creating a SharePoint Server 2013 Environment for Development and Testing Version 10
copy Critical Path Training 2012 All Rights Reserved 33
wwwCriticalPathTrainingcom
3 Click Install SharePoint Server
4 When prompted to Enter your Product Key enter the key you obtained for the trial install and click Continue
5 On the Read the Microsoft Software License Terms page check the I accept the terms of this agreement checkbox and click Continue
6 On the Choose a file location page click Install Now
Creating a SharePoint Server 2013 Environment for Development and Testing Version 10
copy Critical Path Training 2012 All Rights Reserved 34
wwwCriticalPathTrainingcom
7 When the installation is complete select the Run the SharePoint Products Configuration Wizard checkbox and click Close
8 On the Welcome to SharePoint Products page click Next
a) If prompted to start or reset services click Yes
9 On the Connect to a server farm page select Create a new server farm and click Next
10 On the Specify Configuration Database Settings page use the following to complete the page and click Next
a) Database server WINGTIPSERVER
b) Database name SharePoint_Config
c) Username WINGTIPSP_Farm
d) Password Password1
Creating a SharePoint Server 2013 Environment for Development and Testing Version 10
copy Critical Path Training 2012 All Rights Reserved 35
wwwCriticalPathTrainingcom
11 On the Specify Farm Security Settings page for the Passphrase and Confirm Passphrase boxes enter Password1 and click Next
12 On the Configure SharePoint Central Administration Web Application page check the Specify port number checkbox and enter a value of 9999 then Click Next
Creating a SharePoint Server 2013 Environment for Development and Testing Version 10
copy Critical Path Training 2012 All Rights Reserved 36
wwwCriticalPathTrainingcom
13 On the Completing the SharePoint Products Configuration Wizard page click Next
14 When the installer completes it will display the Confirmation Successful page
15 Click Finish This will launch Internet Explorer to go through the configuration process
Creating a SharePoint Server 2013 Environment for Development and Testing Version 10
copy Critical Path Training 2012 All Rights Reserved 37
wwwCriticalPathTrainingcom
At this point you have successfully installed SharePoint Server 2013
Configure SharePoint Server 2013
In this section you will create a new SharePoint Server 2013 farm and perform minimal configuration tasks
After installing SharePoint Sever 2013 the SharePoint Products Configuration Wizard will launch the browser-based Initial Farm Configuration Wizard
1 In the first page of the wizard you are prompted to Help Make SharePoint Better Select which ever option you want and click OK
2 On the Welcome page that asks How do you want to configure your SharePoint farm click the Start the Wizard button
3 On the Services page do the following and then click Next
a) Service Account Select Create new managed account
i) Username WINGTIPSP_Services
ii) Password Password1
b) Services Uncheck the following services
Creating a SharePoint Server 2013 Environment for Development and Testing Version 10
copy Critical Path Training 2012 All Rights Reserved 38
wwwCriticalPathTrainingcom
i) Access Services 2010
ii) App Management Service
In SharePoint Server 2013 the Search Service Application processes specifically noderunnerexe can consume a considerable amount of memory and processor time If you are not going to work with search you might consider unchecking this option for now You can always go back into Central Administration and create a new instance of the Search Service Application at a later date if you need it
Why did we remove Access Services 2010 amp App Management Service service applications The Access Services 2010 service application is included for backwards compatibility and isnrsquot needed in new installations unless you are migrating solutions built with Access Services 2010 from SharePoint Server 2010 (if so you can create this service application later within Central Administration Application Management Manage Service Applications) The App Management Service service application will be created in a later step in this setup guide therefor it is skipped here
4 The creation of the service applications can take quite a while so be patient If it exceeds 20 minutes it is fairly safe to assume the page is hung up One option is to close the browser then launch Central Administration (Start All Programs Microsoft SharePoint 2013 Products SharePoint 2013 Central Administration) and look at the Service Application page (Application Management Manage Service Applications) to see if they were all created
Configure DNS
In this section you will configure DNS for hosting SharePoint sites amp Apps
1 Ensure you are logged into the WingtipServer VM using the account wingtipadministrator | Password1
2 Open the DNS window Start Administrative Tools DNS
3 Expand the hierarchy on the left-hand side of the window until you get to DNS WINGTIPSERVER Forward Lookup Zones wingtipcom
4 Create a new wildcard so all requests for http[]wingtipcom will be forwarded to our SharePoint machine
a) Next right-click wingtipcom and select New Host (A or AAAA)
Creating a SharePoint Server 2013 Environment for Development and Testing Version 10
copy Critical Path Training 2012 All Rights Reserved 39
wwwCriticalPathTrainingcom
b) In the New Host dialog enter the following and click OK
i) Alias Name
ii) IP Address 192168150102 Then click Add Host The following figure shows how this looks
This new record is telling DNS to forward any request for http[]wingtipcom to the webserver WINGTIPSERVER where the
requests will be served by SharePoint
5 Verify this DNS entry is working
a) Open Windows PowerShell Start All Programs Accessories Windows PowerShell Windows PowerShell
b) Run the following commands and press ENTER
PS CUsersAdministratorgt nslookup somethingwingtipcom PS CUsersAdministratorgt nslookup somethingappswingtipcom
c) You should get a response that points to the WingtipServer server as shown in the following figure
Creating a SharePoint Server 2013 Environment for Development and Testing Version 10
copy Critical Path Training 2012 All Rights Reserved 40
wwwCriticalPathTrainingcom
Configure SharePoint Server 2013 for Host-Named Site Collections amp Create Initial Site
Collections
In this section you will create new SharePoint 2013 site collections for testing and hosting apps
Microsoft recommends to create host-named site collections (HNSC) instead of using the path based site collection addressing The difference is the following a path based site created at something such as httpintranetwingtipcomsitesdevtest as an HNSC site would be more like httpdevtestwingtipcom This is how it works in the cloud (Office 365) and it scales much better for on-prem
deployments This setup guide will show you how to setup your environment to create HNSC The only downside to this approach is that you canrsquot create site collections within Central Administration it must be done via Windows PowerShell API (because Central Administration doesnrsquot instruct you where to put the site
This is implemented in various parts First DNS must be configured to send all requests for httpwingtipcom to a Web Application
(implemented in the last section) Second this Web Application must be extended with SharePoint and have no host header bindings (so it handles all requests) Third it must have a default site collection at the root of the Web Application but it will not be used for anything (in fact it doesnrsquot need a template assigned to it)
You can read more about HNSCrsquos on TechNet httptechnetmicrosoftcomen-uslibrarycc424952aspx
PowerShell Script Alert The steps in this section are automated in the script SetupSharePointForHNSCps1 found in the files that
accompany this setup guide Open the script and read the header for documentation on how to use it
1 Ensure you are logged into the WingtipServer VM using the account wingtipadministrator | Password1
2 Open Central Administration Start All Programs Microsoft SharePoint 2013 Products SharePoint 2013 Central Administration
3 Select Application Management Manage Web Applications
4 Delete the default Web Application created by the configuration wizard
a) Delete the existing default Web Application
i) Select the Web Application SharePoint ndash 80 the one with the URL of httpwingtipserver and click Delete in the ribbon
ii) When prompted to delete the associated IIS Web Site amp SQL Server database select both options to delete them and click OK
The reason you are doing this is because the setup wizard you ran previously when creating the service applications automatically created it The problem is that it used the same identity (WINGTIPSP_Services) for the app pool that is used for all the service
applications which is not desired
5 Create a new Web Application to handle Host-Named Site Collections (HNSC)
Creating a SharePoint Server 2013 Environment for Development and Testing Version 10
copy Critical Path Training 2012 All Rights Reserved 41
wwwCriticalPathTrainingcom
a) In the ribbon click the New button
b) In the Create New Web Application dialog enter the following values in the properties and click OK Leave all properties not mentioned
i) Select the radio button Create a new IIS web site
(1) Name SharePoint HNSC Host ndash 80
(2) Port 80
ii) Application Pool
(1) Select the radio button Create a new application pool
(a) Application Pool Name SharePoint Default HNSC AppPool
(b) Select a security account for this application pool WINGTIPSP_Content
If WINGTIPSP_Content is not listed as an available managed account create it by selecting the appropriate option and using
Password1 for the password
iii) Database Name and Authentication
(1) Database Name WSS_Content_HNSCDefaultHost
c) This process will take a few moments At the end of the process SharePoint will ask if you want to create a site collection You do but you donrsquot want to do it through the browser as this will not be a HNSC To create a HNSC you must create it via Windows PowerShell
6 Create a default not template site collection at the root of the web application
a) Open SharePoint 2013 Management Shell Start All Programs Microsoft SharePoint 2013 Products SharePoint 2013 Management Shell
7 Create Site Collections for Testing SharePoint amp SharePoint Apps
a) Open SharePoint 2013 Management Shell Start All Programs Microsoft SharePoint 2013 Products SharePoint 2013 Management Shell
b) Get a reference to the HNSC web application you just created by running the following Windows PowerShell script in the SharePoint 2013 Management Shell
$hnscWebApp = Get-SPWebApplication | Where-Object $_DisplayName -eq SharePoint HNSC Host - 80
c) Create a non-templated site at the root of the web application for Workflow to connect to by executing the following Windows PowerShell script in the SharePoint 2013 Management Shell
New-SPSite -Name Root HNSC Site Collection -Url httpwingtipcom -HostHeaderWebApplication $hnscWebApp -OwnerAlias WINGTIPAdministrator
d) Create a team site by executing the following Windows PowerShell script in the SharePoint 2013 Management Shell
New-SPSite -Name Wingtip Intranet -Url httpintranetwingtipcom ndashHostHeaderWebApplication $hnscWebApp -Template STS0 -OwnerAlias WINGTIPAdministrator
e) Create a developer site by executing the following Windows PowerShell script in the SharePoint 2013 Management Shell
New-SPSite -Name Wingtip Developer Site -Url httpdevwingtipcom ndashHostHeaderWebApplication $hnscWebApp -Template DEV0 -OwnerAlias WINGTIPAdministrator
You can only create debug and test apps using a developer site
At this point you now have a site collection to use as a team site (httpintranetwingtipcom) and to develop and test custom SharePoint apps (httpdevwingtipcom)
Creating a SharePoint Server 2013 Environment for Development and Testing Version 10
copy Critical Path Training 2012 All Rights Reserved 42
wwwCriticalPathTrainingcom
Configure SharePoint 2013 for Hosting Apps
In this setup you will setup your SharePoint 2013 environment for hosting apps
PowerShell Script Alert Everything in the next immediate step is provided in the script ConfigureSpFarmForAppsps1 found in the
files that accompany this setup guide Open the script and read the header for documentation on how to use it
1 Ensure you are logged into the WingtipServer VM using the account wingtipadministrator | Password1
2 Create the necessary SharePoint App Management service applications and start the necessary services via Windows PowerShell
a) Open SharePoint 2013 Management Shell Start All Programs Microsoft SharePoint 2013 Products SharePoint 2013 Management Shell
b) Execute the following Windows PowerShell script in the SharePoint 2013 Management Shell
$appHostDomain = appswingtipcom $adminService = Get-Service -Name spadminv4 if ($adminServiceStatus -ne Running) Start-Service $adminService $timerService = Get-Service -Name sptimerv4 if ($timerServiceStatus -ne Running) Start-Service $timerService Set-SPAppDomain $appHostDomain $appMgmtSvcInstance = Get-SPServiceInstance | Where-Object $_GetType()Name -eq AppManagementServiceInstance if ($appMgmtSvcInstanceStatus -ne Online) Start-SPServiceInstance -Identity $appMgmtSvcInstance $appSubSettingSvcInstance = Get-SPServiceInstance | Where-Object $_GetType()Name -eq SPSubscriptionSettingsServiceInstance if ($appSubSettingSvcInstanceStatus -ne Online) Start-SPServiceInstance -Identity $appSubSettingSvcInstance $appPoolServiceApps = Get-SPServiceApplicationPool -Identity SharePoint Web Services Default $appSubSvc = New-SPSubscriptionSettingsServiceApplication ndashApplicationPool $appPoolServiceApps ndashName Settings Service Application ndashDatabaseName SettingsServiceDB $proxySubSvc = New-SPSubscriptionSettingsServiceApplicationProxy ndashServiceApplication $appSubSvc $appAppSvc = New-SPAppManagementServiceApplication -ApplicationPool $appPoolServiceApps -Name App Management Service Application -DatabaseName AppServiceDB $proxyAppSvc = New-SPAppManagementServiceApplicationProxy -ServiceApplication $appAppSvc Set-SPAppSiteSubscriptionName -Name app -Confirm$false
3 Verify the script configured SharePoint 2013 for hosting apps
a) Open Central Administration Start All Programs Microsoft SharePoint 2013 Products SharePoint 2013 Central Administration
b) Verify service applications created
i) Open the Service Applications page Application Management Manage Service Applications
ii) Verify you have two service applications created
(1) App Management Service Application
(2) Settings Service Application
c) Verify service instances are running
i) Open the Services on Server page System Settings Manage Services on Server
ii) Verify the following services are Started
(1) App Management Service
(2) Microsoft SharePoint Foundation Subscription Settings Service
Creating a SharePoint Server 2013 Environment for Development and Testing Version 10
copy Critical Path Training 2012 All Rights Reserved 43
wwwCriticalPathTrainingcom
d) Verify App URLs are correct
i) Open the Configure App URLs page Apps Configure app URLs
ii) Verify the following
(1) App Domain appswingtipcom
(2) App Prefix app
At this point your SharePoint Server 2013 environment is ready to host SharePoint apps
Creating a SharePoint Server 2013 Environment for Development and Testing Version 10
copy Critical Path Training 2012 All Rights Reserved 44
wwwCriticalPathTrainingcom
Start the SharePoint 2013 Sandbox Service
By default the service that executes sandbox solutions is not running In this step you will start the service
1 Open Central Administration Start All Programs Microsoft SharePoint 2013 Products SharePoint 2013 Central Administration
2 Open the Services on Server page System Settings Manage Services on Server
3 Click the Start link to the left of the Microsoft SharePoint Foundation Sandboxed Code Service
At this point your installation can support sandbox solutions
Configure CRL Verification for Disconnected Environments
SharePoint periodically ldquophones homerdquo to a specific address hosted by Microsoft under certain conditions When your environment is disconnected this can cause an unnecessary delay or failures when starting up the sandbox The following steps outline a workaround to bypass this check
1 Launch Notepad as an administrator Start All Programs Accessories right-click Notepad and select Run as Administrator
2 Open the hosts file by selecting File Open and finding the file
cWindowsSystem32Driversetchosts
3 Add the following line to the end of the file
127001 crlmicrosoftcom
4 Save and close the hosts file
Update Internet Explorer to Bypass the App URL amp Automatically Login to SharePoint Sites
In this section you will update Internet Explorer to add the App hosting URL to the bypass list so you can navigate to the domain after deploying SharePoint hosted apps
1 Ensure you are logged into the WingtipServer VM using the account wingtipadministrator | Password1
1 Launch Internet Explorer Start All Programs Internet Explorer
2 Configure Internet Explorer to bypass the App URL
a) In the top-right corner click the gear icon and select Internet Options
b) On the Security tab select the Local Intranet and click the Sites button
c) Uncheck the box next to Automatically detect intranet network
d) Click the Advanced button and add two entries to the Exceptions list
i) httpwingtipcom
ii) httpappswingtipcom
Creating a SharePoint Server 2013 Environment for Development and Testing Version 10
copy Critical Path Training 2012 All Rights Reserved 45
wwwCriticalPathTrainingcom
e) Click the Close button followed by the OK button multiple times to close out of the dialogs
At this point Internet Explorer is setup to bypass your app URL so you can navigate to apps (httpappswingtipcom) as well as automatically authenticate to sites hosted at httpwingtipcom
Exercise 6 Configure SharePoint to Host My Sites
In this exercise you will configure SharePoint to create and host My Sites In order to host My Sites you will need a new Web Application that is configured for Self-Service Site Creation and has a My Site Host site collection
1 Create a new SharePoint web application to host the My Sites
a) Ensure you are logged into the WingtipServer VM using the account wingtipadministrator | Password1
b) Open Central Administration Start All Programs Microsoft SharePoint 2013 Products SharePoint 2013 Central Administration
c) Select Application Management Manage Web Applications
d) In the ribbon click the New button
e) In the Create New Web Application dialog enter the following values in the properties and click OK Leave all properties not mentioned
i) Select the radio button Create a new IIS web site
(1) Name SharePoint MySite Host ndash 80
(2) Port 80
(3) Host Header mywingtipcom
ii) Application Pool
(1) Select the radio button Use existing application pool
(a) Application Pool Name SharePoint Default HNSC AppPool
iii) Database Name and Authentication
(1) Database Name WSS_Content_SocialWingtipCom
f) This process will take a few moments At the end of the process SharePoint will ask if you want to create a site collection Click the link provided to create a new site collection amp continue to the next step
2 Create a My Site Host site collection
a) On the Create Site Collection page use the following information to complete the form and click OK
Creating a SharePoint Server 2013 Environment for Development and Testing Version 10
copy Critical Path Training 2012 All Rights Reserved 46
wwwCriticalPathTrainingcom
i) Title My Site Host
ii) URL
iii) Template Selection My Site Host (found under the Enterprise tab)
iv) Primary Site Collection Administrator WINGTIPAdministrator
3 Update the Web Application to host my sites
a) Within Central Administration in the left-hand navigation navigate to the Manage Web Applications page Application Management Manage Web Applications
b) Select the SharePoint MySite Host ndash 80 web application
c) Click the Managed Paths button in the ribbon
d) Remove the sites managed path and add two new managed paths and click OK
i) personal ndash Wildcard inclusion
ii) my ndash Explicit inclusion
e) With the SharePoint MySite Host ndash 80 web application still selected click the Self-Service Site Creation button
f) On the Self-Service Site Creation page use the following values to complete the form and click OK
i) Site Collections On
4 Next configure the User Profile Service Application My Site settings
a) Browse to the User Profile Service Application management page Application Management Manage Service Applications User Profile Service Application
b) Under the My Site Settings section click the Setup My Sites
c) On the My Site Settings page use the following information to complete the form and click OK
i) My Site Host httpmywingtipcom
ii) Personal Site Location personal
At this point your SharePoint deployment is now configured to automatically create My Sites under httpmywingtipcomPersonalUserName when users first browse to them
Exercise 7 Install amp Configure Workflow Manager 10
In this exercise you will configure the WingtipServer VM to host Workflow Manager 10 and connect it to your SharePoint installation
1 Ensure you are logged into the WingtipServer VM using the account wingtipadministrator | Password1
Verify SQL Server 2012 Network Configuration
In this section yoursquoll verify the network configuration is correct for SQL Server 2012 in order to install Workflow Manager 10
Creating a SharePoint Server 2013 Environment for Development and Testing Version 10
copy Critical Path Training 2012 All Rights Reserved 47
wwwCriticalPathTrainingcom
1 Configure SQL Server 2012 to have the TCPIP connection protocol enabled
a) Open the SQL Server Configuration Manager Start All Programs Microsoft SQL Server 2012 Configuration Tools SQL Server Configuration Manager
b) Expand the hierarchy on the left-hand side to the following SQL Server Connection Manager (local) SQL Server Network Configuration Protocols for MSSQLSERVER
c) In the main window if TCPIP is Disabled right-click TCPIP and select Enable
d) When prompted with a warning click OK
2 SQL Server must be restarted in order to reflect this change
a) In the hierarchy on the left-hand side of the window select SQL Server Services
b) Right-click SQL Server (MSSQLSERVER) and select Restart
At this point SQL Server is now configured with the TCPIP protocol enabled a requirement when configuring Service Bus
Configure the Workflow Service Account with the Necessary Rights
In this section you will verify the service account that will run Workflow Manager and Service Bus
1 Ensure you are logged into the WingtipServer VM using the account WINGTIPadministrator | Password1
2 Grant the WINGTIPSP_Content account securityadmin amp dbcreator permissions in SQL Server
a) Launch SQL Server Management Studio Start All Programs Microsoft SQL Server 2012 SQL Server Management Studio
b) When SQL Server Management Studio launches within the Connect to Server dialog login using the default settings and click Connect
c) In the Object Explorer tool window expand the WINGTIPSERVER server hierarchy to the Security Logins node
d) Find the WINGTIPSP_Content account right-click it and select Properties
Creating a SharePoint Server 2013 Environment for Development and Testing Version 10
copy Critical Path Training 2012 All Rights Reserved 48
wwwCriticalPathTrainingcom
e) In the Select a page pane select Server Roles
f) Check securityadmin amp dbcreator and click OK
g) Close SQL Server Management Studio
3 Add the Workflow service account to the local administrators group
a) Open the Active Directory Users and Computers window Start Administrative Tools Active Directory Users and Computers
b) In the hierarchy on the left-hand side of the window expand it to the following Active Directory Users and Computers wingtipcom Builtin
c) In the main window right-click Administrators and select Properties
d) In the Administrators Properties dialog select the Members tab and click Add
e) In the Enter the object names to select box enter wingtipsp_content and click the Check Names button
f) In the Administrators Properties dialog click OK
g) Close the Active Directory Users and Computers window
At this point the service account that will host Workflow Manager and Service Bus has been configured correctly
Creating a SharePoint Server 2013 Environment for Development and Testing Version 10
copy Critical Path Training 2012 All Rights Reserved 49
wwwCriticalPathTrainingcom
Download amp Install Workflow Manager and Service Bus
In this section you will install Workflow Manager and Service Bus
1 Ensure you are logged into the WingtipServer VM using the account WINGTIPSP_Content | Password1
It is important you are logged in as the user that will run workflow when you install amp configure Workflow Manager and Service Bus
2 Launch the Web Platform Installer Start All Programs Microsoft Web Platform Installer
a) If the Web Platform Installer is not present on your machine you can download amp install it from here httpwwwmicrosoftcomwebdownloadsplatformaspx
If you do not have internet access within the virtual machine it is possible to download everything needed for workflow using the command line version of the Web Platform Installer (WebPICMD) You can get WebPICMD from httplearniisnetpageaspx1072web-platform-installer-v4-command-line-webpicmdexe-preview-release Specifically for
workflow enter the following command to download Workflow Beta 1 and all prerequisites
webpicmd offline ProductsWorkflow Pathc[path]
3 When the Web Platform Installer loads execute a search for Workflow select Workflow Manager 10 and click Add
4 Click the Install button at the bottom of the Web Platform Installer 40 window
5 On the Prerequisites page click I Accept
Note The Web Platform Installer 40 may prompt you to keep certain products updated using Microsoft Update If it does select Use Microsoft Update when I check for updates (recommended) and click Continue
6 When the installer completes the following dialog will appear Click Continue and then Finish to start the configuration process
Creating a SharePoint Server 2013 Environment for Development and Testing Version 10
copy Critical Path Training 2012 All Rights Reserved 50
wwwCriticalPathTrainingcom
At this point Workflow Manager amp Service Bus are installed
Configure Workflow Manager and Service Bus
In this section you will install Workflow Manager and Service Bus
1 If the Workflow Manager Configuration Wizard is not open open it Start All Programs Workflow Manager 10 Workflow Configuration
2 On the Welcome page click Configure Workflow Manager with Default Settings (Recommended)
Creating a SharePoint Server 2013 Environment for Development and Testing Version 10
copy Critical Path Training 2012 All Rights Reserved 51
wwwCriticalPathTrainingcom
3 On the New Farm Configuration page do the following
a) In the section Configure Service Account set the credentials to
i) User ID sp_contentwingtipcom
ii) Password Password1
b) Check the Allow Workflow management over HTTP on this computer checkbox
Ensure the username is entered in the fully qualified UPN format not as the default shows in the installer (sp_contentwingtip) or the domainusername format
In a production environment you should be doing everything over SSL
c) Click the Test Connection button to verify the connection credentials before proceeding
Creating a SharePoint Server 2013 Environment for Development and Testing Version 10
copy Critical Path Training 2012 All Rights Reserved 52
wwwCriticalPathTrainingcom
d) In the Certificate Generation Key and Confirm Certificate Generation Key enter Password1 into both fields
4 Click the right arrow in the bottom right corner to proceed
5 On the Summary page review your settings and click the check at the bottom right of the widow to start the configuration process
Creating a SharePoint Server 2013 Environment for Development and Testing Version 10
copy Critical Path Training 2012 All Rights Reserved 53
wwwCriticalPathTrainingcom
6 After a few minutes the Configuration Progress screen will show that everything has been configured correctly
Creating a SharePoint Server 2013 Environment for Development and Testing Version 10
copy Critical Path Training 2012 All Rights Reserved 54
wwwCriticalPathTrainingcom
7 Click the check in the bottom right corner
At this point Workflow Manager amp Service Bus has been installed and a new Workflow Manager farm has been created The next step is to connect the SharePoint 2013 farm to the Workflow Manager farm
Connect SharePoint 2013 to Workflow Manager
In this section you will connect SharePoint 2013 and Workflow Manager together
1 Ensure you are logged into the WingtipServer VM using the account WINGTIPadministrator | Password1
2 Get the Workflow Manager endpoint
a) Open the Workflow Manager PowerShell console Start All Programs Workflow Manager 10
b) Execute the Windows PowerShell following cmdlet
Get-WFFarm | ft HttpPort
c) Take note of this port (12291) This port number is what you will use to connect the SharePoint 2013 farm to the Workflow Manager 10 farm
In production you should connect to the HTTPS port listed in the HttpsPort property when you run Get-WFFarm
d) Close the Workflow Manager PowerShell window
3 Connect the SharePoint 2013 farm to Workflow Manager
Creating a SharePoint Server 2013 Environment for Development and Testing Version 10
copy Critical Path Training 2012 All Rights Reserved 55
wwwCriticalPathTrainingcom
a) Open SharePoint 2013 Management Shell Start All Programs Microsoft SharePoint 2013 Products SharePoint 2013 Management Shell
b) Execute the following Windows PowerShell script in the SharePoint 2013 Management Shell
Register-SPWorkflowService ndashSPSite httpintranetwingtipcom ndashWorkflowHostUri httpwingtipserver12291 ndashAllowOAuthHttp
This script is telling SharePoint the endpoint it should use to talk to Workflow Manager as well as Workflow Manager the SharePoint site collection it should talk to for calls into the CSOM It is also configuring all communication over HTTP rather than HTTPS for performance reasons In production you should always use HTTPS
This step will take a moment with no feedback during the process Be patient
c) Close the SharePoint 2013 Management Shell
At this point the SharePoint 2013 farm is connected to the Workflow Manager 10 farm
Configure SharePoint User Profile Service Application AD Sync
Users in SharePoint 2013 are validated by Workflow Manager against SharePoint to ensure they have permissions to start a workflow This is done by looking up the user by their AD UserPrincipalName (UPN) attribute in the User Profile Service Application (UPA) If no matching user is found the workflow will be automatically cancelled by Workflow Manager In this section you will setup UPA to connect amp sync with the local Active Directory so user accounts in AD will have their UPN synchronized to UPA
1 Open Central Administration Start All Programs Microsoft SharePoint 2013 Products SharePoint 2013 Central Administration
2 Go to the User Profile Service Application management page Application Management Manage Service Applications User Profile Service Application
3 The first step is to configure the User Profile Service Application to allow for Active Directory (AD) synchronization
a) Under Synchronization select Configure Synchronization Settings
b) For Synchronization select Use SharePoint Active Directory Import and click OK
4 Next establish a connection to the wingtipcom AD
a) Under Synchronization select Configure Synchronization Connections
b) On the Synchronization Connections page select Create New Connection
c) Enter the following values on this form and click OK
i) Connection Name WINGTIPCOM AD
ii) Type Active Directory Import
iii) Connection Settings
(1) Fully Qualified Domain Name wingtipcom
(2) Authentication Provider Type Windows Authentication
(3) Account Name WINGTIPAdministrator
(4) Password (and Confirm Password) Password1
iv) Containers
(1) Click Populate Containers
(2) After it loads check the box next to WINGTP or click the Select All button below the box
5 Go back to the User Profile Service Application management page Application Management Manage Service Applications User Profile Service Application
6 Finally start a synchronization import
a) Under Synchronization select Start Profile Synchronization
Creating a SharePoint Server 2013 Environment for Development and Testing Version 10
copy Critical Path Training 2012 All Rights Reserved 56
wwwCriticalPathTrainingcom
b) Select Start Full Synchronization and click OK
c) You will be taken back to the User Profile Service Application management page Notice in the top-right corner there is a status block that reports how many profiles are in the UPA database Refresh the page to see it increase to a handful of profiles as the import process runs
At this point you have successfully configured the User Profile Service Application to import profiles from the local AD
Exercise 8 Install the Microsoft Office 2013 Professional Clients
In this exercise you will install the Microsoft Office 2013 client applications
1 Download the Office 2013 into the WingtipServer VM For this you need to create an Office 365 Trial account login to Office 365 go to the Admin Dashboard and then download the latest version httpwwwmicrosoftcomofficepreviewentry-office-preview
2 Download the SharePoint Designer 2013 into the WingtipServer VM from here httpwwwmicrosoftcomen-usdownloaddetailsaspxid=35491
3 Download the Visio Professional 2013 into the WingtipServer VM from here httptechnetmicrosoftcomen-usevalcenterhh973399
Install Microsoft Office Professional Plus 2013
In this section you will install the Microsoft Office 2013 clients
1 Ensure you are logged into the WingtipServer VM using the account WINGTIPadministrator | Password1
2 Execute the installer OfficeProfessionalPlus_English_x64exe
3 On the Read the Microsoft Software License Terms dialog click the checkbox next to I accept the terms of this agreement and click Continue
4 On the Choose the installation you want dialog click the Install Now button
5 The installer will proceed and install all the Office products
6 When the installer completes click the Close button
7 Apply your Office Professional Plus 2013 license key
a) Launch Word 2013 Start All Programs Microsoft Office 2013 Word 2013
b) In the First things first dialog select Use recommended settings and click Accept
c) In the Welcome to Office dialog that opens click the [X] icon in the top-right corner to close it
d) In the left-hand pane click Open Other Documents
e) In the left-hand pane click Account
f) In the Product Information section within the Activation Required box click Change Product Key
g) Enter your license key for Office Professional Plus 2013 check the box next to Attempt to automatically activate my product online and click Install
h) Click OK
At this point you have installed Office Professional Plus 2013
Install Microsoft Office Visio 2013
In this section you will install Microsoft Office 2013 Visio
1 Ensure you are logged into the WingtipServer VM using the account WINGTIPadministrator | Password1
2 Execute the installer VisioProfessional_English_x64exe
3 On the Read the Microsoft Software License Terms dialog click the checkbox next to I accept the terms of this agreement and click Continue
Creating a SharePoint Server 2013 Environment for Development and Testing Version 10
copy Critical Path Training 2012 All Rights Reserved 57
wwwCriticalPathTrainingcom
4 On the Choose the installation you want dialog click the Install Now button
5 The installer will proceed and install all Visio 2013
6 When the installer completes click the Close button
7 Apply your Visio 2013 license key
a) Launch Visio 2013 Start All Programs Microsoft Office 2013 Visio 2013
b) In the First things first dialog select Use recommended settings and click Accept
c) In the Welcome to Office dialog that opens click the X icon in the top-right corner to close it
d) In the left-hand pane click Open Other Documents
e) In the left-hand pane click Account
f) In the Product Information section within the Activation Required box click Change Product Key
g) Enter your license key for Visio 2013 check the box next to Attempt to automatically activate my product online and click Install
h) Click OK
At this point you have installed Visio 2013
Install Microsoft Office 2013 SharePoint Designer
In this section you will install Microsoft Office 2013 SharePoint Designer
1 Ensure you are logged into the WingtipServer VM using the account WINGTIPadministrator | Password1
2 Execute the installer SharePointDesigner_English_x64exe
3 On the Read the Microsoft Software License Terms dialog click the checkbox next to I accept the terms of this agreement and click Continue
4 On the Choose the installation you want dialog click the Install Now button
5 The installer will proceed and install all SharePoint Designer 2013
6 When the installer completes click the Close button
At this point you have installed SharePoint Designer 2013
Exercise 9 Install Visual Studio 2012
In this exercise you will install Visual Studio 2012
1 Ensure you are logged into the WingtipServer VM using the account WINGTIPadministrator | Password1
2 Start the install of Visual Studio 2012 Ultimate Trial by downloading the installer from here httpwwwmicrosoftcomvisualstudio11en-usdownloads
3 On the installation splash screen check the box next to I agree to the License terms and conditions and click the Next button
Creating a SharePoint Server 2013 Environment for Development and Testing Version 10
copy Critical Path Training 2012 All Rights Reserved 58
wwwCriticalPathTrainingcom
4 On the Optional Features to install dialog click Install
5 After some time the installer will complete Click the Launch button to launch Visual Studio 2012
Creating a SharePoint Server 2013 Environment for Development and Testing Version 10
copy Critical Path Training 2012 All Rights Reserved 59
wwwCriticalPathTrainingcom
6 In the Choose Default Environment Settings select Visual C Development Settings and click Start Visual Studio
7 Close Visual Studio 2012
At this point Visual Studio 2012 RTM is installed
Install Office amp SharePoint 2013 Developer Tools
In this section you will install the Office and SharePoint 2013 developer tools for Visual Studio
1 Ensure you are logged into the WingtipServer VM using the account WINGTIPadministrator | Password1
2 Launch the Web Platform Installer Start All Programs Microsoft Web Platform Installer
3 In the search box at the top-right corner of the Web Platform Installer 40 window type sharepoint and press Enter
4 Click the Add button to the right of Microsoft Office Developer Tools for Visual Studio 2012 - Preview 2
5 Click the Install button at the bottom of the Web Platform Installer 40 window
6 On the Prerequisites page click I Accept
Creating a SharePoint Server 2013 Environment for Development and Testing Version 10
copy Critical Path Training 2012 All Rights Reserved 60
wwwCriticalPathTrainingcom
At this point you have installed the SharePoint 2013 amp Office 2013 development tools in Visual Studio 2012
Creating a SharePoint Server 2013 Environment for Development and Testing Version 10
copy Critical Path Training 2012 All Rights Reserved 61
wwwCriticalPathTrainingcom
Appendix 1 Download Manifest
The following lists everything referenced that you will or may need to download in this environment
Windows Server 2008 R2 with Service Pack 1 (installer ISO)
o httptechnetmicrosoftcomen-usevalcenterdd459137aspx
Windows Server 2008 R2 with Service Pack 1 (prebuilt VHD)
o httpwwwmicrosoftcomdownloadsdetailsaspxFamilyId=9040a4be-c3cf-44a5-9052-a70314452305
Windows Server 2008 R2 Service Pack 1
o httpwwwmicrosoftcomen-usdownloaddetailsaspxid=5842
SQL Server 2012 Trial
o httpwwwmicrosoftcombetaexperiencepdSQL2012EvalCTAenusdefaultaspx
SharePoint Server 2013
o httptechnetmicrosoftcomen-USevalcenterhh973397aspx
Hotfixes for SharePoint Server 2013 (post-install)
o KB2554876 The SharePoint Parsing Process Crashes in Windows Server 2008 R2
o KB2708075 IIS 75 Configurations are not Updated when you use the ServerManager Class to Commit
Configuration Changes
o KB2759112 Hotfix is Available for NET Framework 45 that Resolves an ASPNET Race Condition Issue in
Windows Server 2008 R2 Windows Server 2008 R2 SP1
o KB2765317 Hotfix is Available for NET Framework 45 that Resolves an ASPNET Race Condition Issue in
Windows 8 Windows RT and Windows Server 2012
Web Platform Installer
o httpwwwmicrosoftcomwebdownloadsplatformaspx
Web Platform Installer ndash Command Line Version
o httplearniisnetpageaspx1072web-platform-installer-v4-command-line-webpicmdexe-preview-release
Workflow Manager 10
o Download using the Microsoft Web Platform Installer
Office 2013
o httpwwwmicrosoftcomofficepreviewentry-office-preview
SharePoint Designer 2013
o httpwwwmicrosoftcomen-usdownloaddetailsaspxid=35491
Visio Professional 2013
o httptechnetmicrosoftcomen-usevalcenterhh973399
Visual Studio 2012
o httpwwwmicrosoftcomvisualstudio11en-usdownloads
Office Developer Tools for Visual Studio 2012 ndash Preview 2
o Download using the Microsoft Web Platform Installer
Creating a SharePoint Server 2013 Environment for Development and Testing Version 10
copy Critical Path Training 2012 All Rights Reserved 62
wwwCriticalPathTrainingcom
Appendix 2 Windows PowerShell Script Manifest
The following lists all Windows PowerShell scripts that are provided with this setup guide
AddDisableLoopbackCheckRegKeyps1
o The following steps automate creating the registry key outlined as Method 2 in the Microsoft Knowledgebase article
httpsupportmicrosoftcomkb896861 using Windows PowerShell This key DisableLoopbackCheck will allow
you to browse SharePoint sites on the same machine Without this key (or following Method 1 in the KB article) you
would need to browse any SharePoint sites from a different computer than the one which SharePoint is installed on
ConfigureSpFarmForAppsps1
o Configures a SharePoint 2013 for hosting apps This ensures everything you need is installed running and
configured This is documented here httpmsdnmicrosoftcomen-uslibraryfp179923(v=office15)
CreateSpServiceAccountsps1
o Creates the minimal necessary service accounts for SharePoint Server 2013 SP_Farm SP_Content amp
SP_Services
SetupSharePointForHNSCps1
o Configures a SharePoint 2013 install for hosting Host-Named Site Collections (HNSC) This involves creating a Web
Application in SharePoint that has no host header bindings Using DNS all requests are mapped to this Web
Application You then create the site collections via PowerShell as you cant create HNSCs via the browser (Central
Administration)
Creating a SharePoint Server 2013 Environment for Development and Testing Version 10
copy Critical Path Training 2012 All Rights Reserved 63
wwwCriticalPathTrainingcom
Appendix 3 Create Sample Adventure Works Database
The following steps document downloading and installing the sample Adventure Works OLTP database provided by Microsoft
1 Launch Internet Explorer and navigate to httpmsftdbprodsamplescodeplexcom
2 Download the Adventure Works 2012 OLTP Script
3 Extract the ZIP into a folder on the desktop
4 Launch SQL Server Management Studio Start All Programs Microsoft SQL Server 2012 SQL Server Management Studio
5 When SQL Server Management Studio launches within the Connect to Server dialog login using the default settings and click Connect
6 Within SQL Server Management Studio select File Open File
7 Select the file instawdbsql from the extracted ZIP and click Open
8 If prompted to re-login to the database engine do it
9 Select Query SQLCMD Mode
10 Scroll down to line 42 the line that starts with the following
setvar SqlSamplesSourceDataPath
11 Change the folder location of where you unzipped the Adventure Works 2012 OLTP Script
12 Select Query Execute
13 When the script completes the AdventureWorks2012 database will have been created
Creating a SharePoint Server 2013 Environment for Development and Testing Version 10
copy Critical Path Training 2012 All Rights Reserved 64
wwwCriticalPathTrainingcom
Change Log
Change Version Description
August 22 2012 v 01 Pre-release for review
August 27 2012 v 02 Initial public release ndash install guide based on SharePoint Server Beta 2
August 28 2012 v 03 Updated URL for the site collection used to connect SharePoint to WAW
August 31 2012 v 04 Typo Removed SQL Server Analysis Services as part of the install Not required in a
SharePoint dev box (unless you are doing business intelligence which is not covered
in the guide)
Updated all references to Windows Azure Workflow to Workflow Manager the new
official name for the new workflow product
Updated SetupSharePointForHNSCps1 script to lookup HNSC Web Application by
name rather than URL which is more reliable
Typo Updated WingtipAllUp public NIC to use a different IP than the WingtipDC
Typo Replaced a reference to WingtipServer with WingtipDC
Typo Fixed handful of minor typos
September 1 2012 v 05 Removed SQL Server Reporting Services from install guide
Added step to uncheck IErsquos ldquoAutomatically detect proxyrdquo
Added post workflow install steps to setup User Profile Service Application to sync with
local Active Directory
September 5 2012 v 06 Added step to create a default root site collection in the HNSC web app
Updated minor typos and added extra notes for context
Updated PowerShell script SetupSharePointForHNSCps1 to remove content
database of default Web Application when setting up HNSC Web App
Added a new exercise 8 (after SharePoint install amp config and before the Workflow
install and config) to setup support for My Sites
October 20 2012 v 07 Updated script SetupSharePointForHNSCps1 to fix a bug where it would fail on line
111 if you didnrsquot already have a WINGTIPSP_Content managed account
Added section to bypass SharePointrsquos check for crlmicrosoftcom
Updated workflowrsquos registration PowerShell script to point to
httpintranetwingtipcom
Switched order of post-SharePoint install to setup HSNC hosting before configuring for
hosting apps
November 29 2012
v 10 Changed setup guide to use a single VM instead of two VMs
Updated guide for SharePoint 2013 RTM
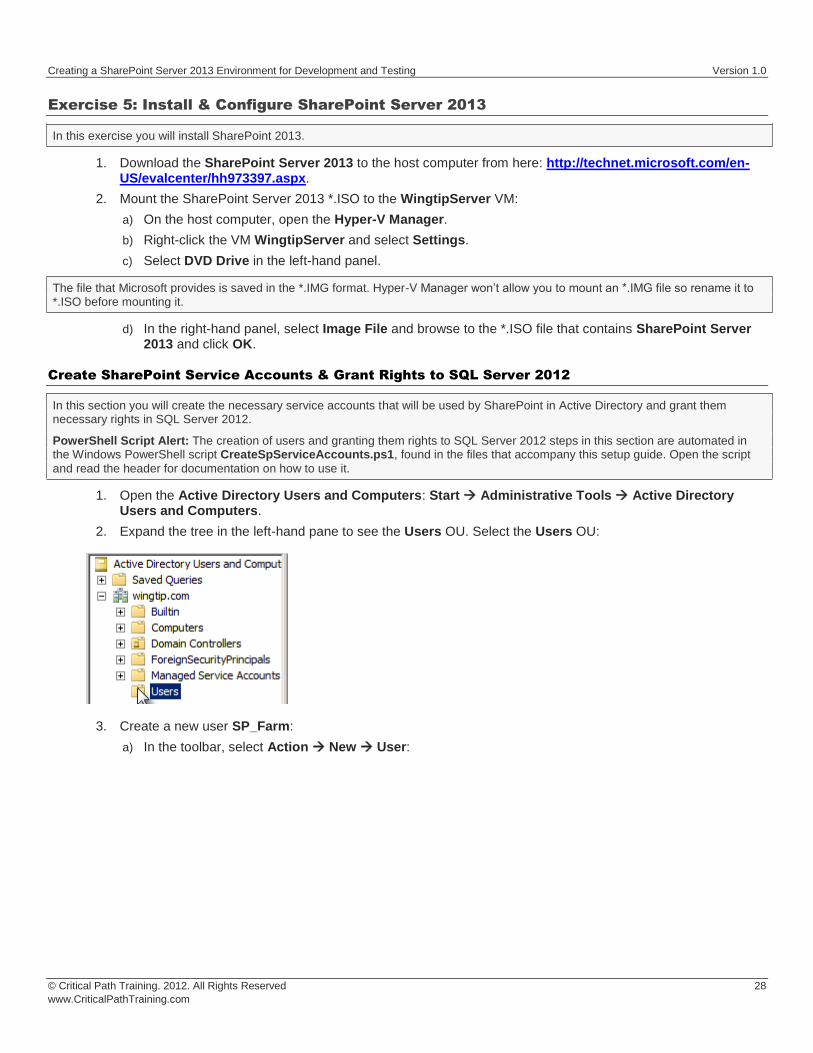
Creating a SharePoint Server 2013 Environment for Development and Testing Version 10
copy Critical Path Training 2012 All Rights Reserved 30
wwwCriticalPathTrainingcom
vi) Click Finish
4 Repeat the previous step to create two more accounts
a) SP_Content
b) SP_Services
At this point you have created all the necessary service accounts
Install SharePoint Server 2013 Prerequisites
In this section you will install the SharePoint Server 2013 Prerequisites
1 Ensure you are logged into the WingtipServer VM using the account wingtipadministrator | Password1
2 If the AutoPlay dialog box is open click Run splashhta If it isnrsquot use Windows Explorer to navigate to the DVD drive and execute the splashhta file in the root of the DVD drive
Creating a SharePoint Server 2013 Environment for Development and Testing Version 10
copy Critical Path Training 2012 All Rights Reserved 31
wwwCriticalPathTrainingcom
3 Click the Install Software Prerequisites link
4 In the Microsoft SharePoint 2013 Products Preparation Tool window click Next
5 On the License Terms for Software Products page
a) Check I accept the terms of the License Agreement(s)
b) Click Next
6 The tool will download and install all prerequisites for SharePoint Server 2013 This will take some time It may prompt you to reboot the server If so reboot the server and login using wingtipadministrator | Password1
Creating a SharePoint Server 2013 Environment for Development and Testing Version 10
copy Critical Path Training 2012 All Rights Reserved 32
wwwCriticalPathTrainingcom
7 When the prerequisite installer is complete it will present a summary of everything it did
8 Click Finish
9 Restart the WingtipServer VMhellip some additional installations and changes that the prerequisite installer did will require a restart before installing SharePoint Server 2013
At this point all prerequisites required by SharePoint Server 2013 have been installed and any necessary configuration changes have been applied to the server However it is strongly recommend that you run Windows Update and install any pending updates Further Microsoft recommends installing the following hotfixes if they are not already installed
KB2554876 The SharePoint Parsing Process Crashes in Windows Server 2008 R2
KB2708075 IIS 75 Configurations are not Updated when you use the ServerManager Class to Commit Configuration Changes
KB2759112 Hotfix is Available for NET Framework 45 that Resolves an ASPNET Race Condition Issue in Windows Server 2008 R2 Windows Server 2008 R2 SP1
KB2765317 Hotfix is Available for NET Framework 45 that Resolves an ASPNET Race Condition Issue in Windows
8 Windows RT and Windows Server 2012
Install SharePoint Server 2013
In this section you will install SharePoint Server 2013
1 Ensure you are logged into the WingtipServer VM using the account wingtipadministrator | Password1
2 If the AutoPlay dialog box is open click Run splashhta If it isnrsquot use Windows Explorer to navigate to the DVD drive and execute the splashhta file in the root of the DVD drive
Creating a SharePoint Server 2013 Environment for Development and Testing Version 10
copy Critical Path Training 2012 All Rights Reserved 33
wwwCriticalPathTrainingcom
3 Click Install SharePoint Server
4 When prompted to Enter your Product Key enter the key you obtained for the trial install and click Continue
5 On the Read the Microsoft Software License Terms page check the I accept the terms of this agreement checkbox and click Continue
6 On the Choose a file location page click Install Now
Creating a SharePoint Server 2013 Environment for Development and Testing Version 10
copy Critical Path Training 2012 All Rights Reserved 34
wwwCriticalPathTrainingcom
7 When the installation is complete select the Run the SharePoint Products Configuration Wizard checkbox and click Close
8 On the Welcome to SharePoint Products page click Next
a) If prompted to start or reset services click Yes
9 On the Connect to a server farm page select Create a new server farm and click Next
10 On the Specify Configuration Database Settings page use the following to complete the page and click Next
a) Database server WINGTIPSERVER
b) Database name SharePoint_Config
c) Username WINGTIPSP_Farm
d) Password Password1
Creating a SharePoint Server 2013 Environment for Development and Testing Version 10
copy Critical Path Training 2012 All Rights Reserved 35
wwwCriticalPathTrainingcom
11 On the Specify Farm Security Settings page for the Passphrase and Confirm Passphrase boxes enter Password1 and click Next
12 On the Configure SharePoint Central Administration Web Application page check the Specify port number checkbox and enter a value of 9999 then Click Next
Creating a SharePoint Server 2013 Environment for Development and Testing Version 10
copy Critical Path Training 2012 All Rights Reserved 36
wwwCriticalPathTrainingcom
13 On the Completing the SharePoint Products Configuration Wizard page click Next
14 When the installer completes it will display the Confirmation Successful page
15 Click Finish This will launch Internet Explorer to go through the configuration process
Creating a SharePoint Server 2013 Environment for Development and Testing Version 10
copy Critical Path Training 2012 All Rights Reserved 37
wwwCriticalPathTrainingcom
At this point you have successfully installed SharePoint Server 2013
Configure SharePoint Server 2013
In this section you will create a new SharePoint Server 2013 farm and perform minimal configuration tasks
After installing SharePoint Sever 2013 the SharePoint Products Configuration Wizard will launch the browser-based Initial Farm Configuration Wizard
1 In the first page of the wizard you are prompted to Help Make SharePoint Better Select which ever option you want and click OK
2 On the Welcome page that asks How do you want to configure your SharePoint farm click the Start the Wizard button
3 On the Services page do the following and then click Next
a) Service Account Select Create new managed account
i) Username WINGTIPSP_Services
ii) Password Password1
b) Services Uncheck the following services
Creating a SharePoint Server 2013 Environment for Development and Testing Version 10
copy Critical Path Training 2012 All Rights Reserved 38
wwwCriticalPathTrainingcom
i) Access Services 2010
ii) App Management Service
In SharePoint Server 2013 the Search Service Application processes specifically noderunnerexe can consume a considerable amount of memory and processor time If you are not going to work with search you might consider unchecking this option for now You can always go back into Central Administration and create a new instance of the Search Service Application at a later date if you need it
Why did we remove Access Services 2010 amp App Management Service service applications The Access Services 2010 service application is included for backwards compatibility and isnrsquot needed in new installations unless you are migrating solutions built with Access Services 2010 from SharePoint Server 2010 (if so you can create this service application later within Central Administration Application Management Manage Service Applications) The App Management Service service application will be created in a later step in this setup guide therefor it is skipped here
4 The creation of the service applications can take quite a while so be patient If it exceeds 20 minutes it is fairly safe to assume the page is hung up One option is to close the browser then launch Central Administration (Start All Programs Microsoft SharePoint 2013 Products SharePoint 2013 Central Administration) and look at the Service Application page (Application Management Manage Service Applications) to see if they were all created
Configure DNS
In this section you will configure DNS for hosting SharePoint sites amp Apps
1 Ensure you are logged into the WingtipServer VM using the account wingtipadministrator | Password1
2 Open the DNS window Start Administrative Tools DNS
3 Expand the hierarchy on the left-hand side of the window until you get to DNS WINGTIPSERVER Forward Lookup Zones wingtipcom
4 Create a new wildcard so all requests for http[]wingtipcom will be forwarded to our SharePoint machine
a) Next right-click wingtipcom and select New Host (A or AAAA)
Creating a SharePoint Server 2013 Environment for Development and Testing Version 10
copy Critical Path Training 2012 All Rights Reserved 39
wwwCriticalPathTrainingcom
b) In the New Host dialog enter the following and click OK
i) Alias Name
ii) IP Address 192168150102 Then click Add Host The following figure shows how this looks
This new record is telling DNS to forward any request for http[]wingtipcom to the webserver WINGTIPSERVER where the
requests will be served by SharePoint
5 Verify this DNS entry is working
a) Open Windows PowerShell Start All Programs Accessories Windows PowerShell Windows PowerShell
b) Run the following commands and press ENTER
PS CUsersAdministratorgt nslookup somethingwingtipcom PS CUsersAdministratorgt nslookup somethingappswingtipcom
c) You should get a response that points to the WingtipServer server as shown in the following figure
Creating a SharePoint Server 2013 Environment for Development and Testing Version 10
copy Critical Path Training 2012 All Rights Reserved 40
wwwCriticalPathTrainingcom
Configure SharePoint Server 2013 for Host-Named Site Collections amp Create Initial Site
Collections
In this section you will create new SharePoint 2013 site collections for testing and hosting apps
Microsoft recommends to create host-named site collections (HNSC) instead of using the path based site collection addressing The difference is the following a path based site created at something such as httpintranetwingtipcomsitesdevtest as an HNSC site would be more like httpdevtestwingtipcom This is how it works in the cloud (Office 365) and it scales much better for on-prem
deployments This setup guide will show you how to setup your environment to create HNSC The only downside to this approach is that you canrsquot create site collections within Central Administration it must be done via Windows PowerShell API (because Central Administration doesnrsquot instruct you where to put the site
This is implemented in various parts First DNS must be configured to send all requests for httpwingtipcom to a Web Application
(implemented in the last section) Second this Web Application must be extended with SharePoint and have no host header bindings (so it handles all requests) Third it must have a default site collection at the root of the Web Application but it will not be used for anything (in fact it doesnrsquot need a template assigned to it)
You can read more about HNSCrsquos on TechNet httptechnetmicrosoftcomen-uslibrarycc424952aspx
PowerShell Script Alert The steps in this section are automated in the script SetupSharePointForHNSCps1 found in the files that
accompany this setup guide Open the script and read the header for documentation on how to use it
1 Ensure you are logged into the WingtipServer VM using the account wingtipadministrator | Password1
2 Open Central Administration Start All Programs Microsoft SharePoint 2013 Products SharePoint 2013 Central Administration
3 Select Application Management Manage Web Applications
4 Delete the default Web Application created by the configuration wizard
a) Delete the existing default Web Application
i) Select the Web Application SharePoint ndash 80 the one with the URL of httpwingtipserver and click Delete in the ribbon
ii) When prompted to delete the associated IIS Web Site amp SQL Server database select both options to delete them and click OK
The reason you are doing this is because the setup wizard you ran previously when creating the service applications automatically created it The problem is that it used the same identity (WINGTIPSP_Services) for the app pool that is used for all the service
applications which is not desired
5 Create a new Web Application to handle Host-Named Site Collections (HNSC)
Creating a SharePoint Server 2013 Environment for Development and Testing Version 10
copy Critical Path Training 2012 All Rights Reserved 41
wwwCriticalPathTrainingcom
a) In the ribbon click the New button
b) In the Create New Web Application dialog enter the following values in the properties and click OK Leave all properties not mentioned
i) Select the radio button Create a new IIS web site
(1) Name SharePoint HNSC Host ndash 80
(2) Port 80
ii) Application Pool
(1) Select the radio button Create a new application pool
(a) Application Pool Name SharePoint Default HNSC AppPool
(b) Select a security account for this application pool WINGTIPSP_Content
If WINGTIPSP_Content is not listed as an available managed account create it by selecting the appropriate option and using
Password1 for the password
iii) Database Name and Authentication
(1) Database Name WSS_Content_HNSCDefaultHost
c) This process will take a few moments At the end of the process SharePoint will ask if you want to create a site collection You do but you donrsquot want to do it through the browser as this will not be a HNSC To create a HNSC you must create it via Windows PowerShell
6 Create a default not template site collection at the root of the web application
a) Open SharePoint 2013 Management Shell Start All Programs Microsoft SharePoint 2013 Products SharePoint 2013 Management Shell
7 Create Site Collections for Testing SharePoint amp SharePoint Apps
a) Open SharePoint 2013 Management Shell Start All Programs Microsoft SharePoint 2013 Products SharePoint 2013 Management Shell
b) Get a reference to the HNSC web application you just created by running the following Windows PowerShell script in the SharePoint 2013 Management Shell
$hnscWebApp = Get-SPWebApplication | Where-Object $_DisplayName -eq SharePoint HNSC Host - 80
c) Create a non-templated site at the root of the web application for Workflow to connect to by executing the following Windows PowerShell script in the SharePoint 2013 Management Shell
New-SPSite -Name Root HNSC Site Collection -Url httpwingtipcom -HostHeaderWebApplication $hnscWebApp -OwnerAlias WINGTIPAdministrator
d) Create a team site by executing the following Windows PowerShell script in the SharePoint 2013 Management Shell
New-SPSite -Name Wingtip Intranet -Url httpintranetwingtipcom ndashHostHeaderWebApplication $hnscWebApp -Template STS0 -OwnerAlias WINGTIPAdministrator
e) Create a developer site by executing the following Windows PowerShell script in the SharePoint 2013 Management Shell
New-SPSite -Name Wingtip Developer Site -Url httpdevwingtipcom ndashHostHeaderWebApplication $hnscWebApp -Template DEV0 -OwnerAlias WINGTIPAdministrator
You can only create debug and test apps using a developer site
At this point you now have a site collection to use as a team site (httpintranetwingtipcom) and to develop and test custom SharePoint apps (httpdevwingtipcom)
Creating a SharePoint Server 2013 Environment for Development and Testing Version 10
copy Critical Path Training 2012 All Rights Reserved 42
wwwCriticalPathTrainingcom
Configure SharePoint 2013 for Hosting Apps
In this setup you will setup your SharePoint 2013 environment for hosting apps
PowerShell Script Alert Everything in the next immediate step is provided in the script ConfigureSpFarmForAppsps1 found in the
files that accompany this setup guide Open the script and read the header for documentation on how to use it
1 Ensure you are logged into the WingtipServer VM using the account wingtipadministrator | Password1
2 Create the necessary SharePoint App Management service applications and start the necessary services via Windows PowerShell
a) Open SharePoint 2013 Management Shell Start All Programs Microsoft SharePoint 2013 Products SharePoint 2013 Management Shell
b) Execute the following Windows PowerShell script in the SharePoint 2013 Management Shell
$appHostDomain = appswingtipcom $adminService = Get-Service -Name spadminv4 if ($adminServiceStatus -ne Running) Start-Service $adminService $timerService = Get-Service -Name sptimerv4 if ($timerServiceStatus -ne Running) Start-Service $timerService Set-SPAppDomain $appHostDomain $appMgmtSvcInstance = Get-SPServiceInstance | Where-Object $_GetType()Name -eq AppManagementServiceInstance if ($appMgmtSvcInstanceStatus -ne Online) Start-SPServiceInstance -Identity $appMgmtSvcInstance $appSubSettingSvcInstance = Get-SPServiceInstance | Where-Object $_GetType()Name -eq SPSubscriptionSettingsServiceInstance if ($appSubSettingSvcInstanceStatus -ne Online) Start-SPServiceInstance -Identity $appSubSettingSvcInstance $appPoolServiceApps = Get-SPServiceApplicationPool -Identity SharePoint Web Services Default $appSubSvc = New-SPSubscriptionSettingsServiceApplication ndashApplicationPool $appPoolServiceApps ndashName Settings Service Application ndashDatabaseName SettingsServiceDB $proxySubSvc = New-SPSubscriptionSettingsServiceApplicationProxy ndashServiceApplication $appSubSvc $appAppSvc = New-SPAppManagementServiceApplication -ApplicationPool $appPoolServiceApps -Name App Management Service Application -DatabaseName AppServiceDB $proxyAppSvc = New-SPAppManagementServiceApplicationProxy -ServiceApplication $appAppSvc Set-SPAppSiteSubscriptionName -Name app -Confirm$false
3 Verify the script configured SharePoint 2013 for hosting apps
a) Open Central Administration Start All Programs Microsoft SharePoint 2013 Products SharePoint 2013 Central Administration
b) Verify service applications created
i) Open the Service Applications page Application Management Manage Service Applications
ii) Verify you have two service applications created
(1) App Management Service Application
(2) Settings Service Application
c) Verify service instances are running
i) Open the Services on Server page System Settings Manage Services on Server
ii) Verify the following services are Started
(1) App Management Service
(2) Microsoft SharePoint Foundation Subscription Settings Service
Creating a SharePoint Server 2013 Environment for Development and Testing Version 10
copy Critical Path Training 2012 All Rights Reserved 43
wwwCriticalPathTrainingcom
d) Verify App URLs are correct
i) Open the Configure App URLs page Apps Configure app URLs
ii) Verify the following
(1) App Domain appswingtipcom
(2) App Prefix app
At this point your SharePoint Server 2013 environment is ready to host SharePoint apps
Creating a SharePoint Server 2013 Environment for Development and Testing Version 10
copy Critical Path Training 2012 All Rights Reserved 44
wwwCriticalPathTrainingcom
Start the SharePoint 2013 Sandbox Service
By default the service that executes sandbox solutions is not running In this step you will start the service
1 Open Central Administration Start All Programs Microsoft SharePoint 2013 Products SharePoint 2013 Central Administration
2 Open the Services on Server page System Settings Manage Services on Server
3 Click the Start link to the left of the Microsoft SharePoint Foundation Sandboxed Code Service
At this point your installation can support sandbox solutions
Configure CRL Verification for Disconnected Environments
SharePoint periodically ldquophones homerdquo to a specific address hosted by Microsoft under certain conditions When your environment is disconnected this can cause an unnecessary delay or failures when starting up the sandbox The following steps outline a workaround to bypass this check
1 Launch Notepad as an administrator Start All Programs Accessories right-click Notepad and select Run as Administrator
2 Open the hosts file by selecting File Open and finding the file
cWindowsSystem32Driversetchosts
3 Add the following line to the end of the file
127001 crlmicrosoftcom
4 Save and close the hosts file
Update Internet Explorer to Bypass the App URL amp Automatically Login to SharePoint Sites
In this section you will update Internet Explorer to add the App hosting URL to the bypass list so you can navigate to the domain after deploying SharePoint hosted apps
1 Ensure you are logged into the WingtipServer VM using the account wingtipadministrator | Password1
1 Launch Internet Explorer Start All Programs Internet Explorer
2 Configure Internet Explorer to bypass the App URL
a) In the top-right corner click the gear icon and select Internet Options
b) On the Security tab select the Local Intranet and click the Sites button
c) Uncheck the box next to Automatically detect intranet network
d) Click the Advanced button and add two entries to the Exceptions list
i) httpwingtipcom
ii) httpappswingtipcom
Creating a SharePoint Server 2013 Environment for Development and Testing Version 10
copy Critical Path Training 2012 All Rights Reserved 45
wwwCriticalPathTrainingcom
e) Click the Close button followed by the OK button multiple times to close out of the dialogs
At this point Internet Explorer is setup to bypass your app URL so you can navigate to apps (httpappswingtipcom) as well as automatically authenticate to sites hosted at httpwingtipcom
Exercise 6 Configure SharePoint to Host My Sites
In this exercise you will configure SharePoint to create and host My Sites In order to host My Sites you will need a new Web Application that is configured for Self-Service Site Creation and has a My Site Host site collection
1 Create a new SharePoint web application to host the My Sites
a) Ensure you are logged into the WingtipServer VM using the account wingtipadministrator | Password1
b) Open Central Administration Start All Programs Microsoft SharePoint 2013 Products SharePoint 2013 Central Administration
c) Select Application Management Manage Web Applications
d) In the ribbon click the New button
e) In the Create New Web Application dialog enter the following values in the properties and click OK Leave all properties not mentioned
i) Select the radio button Create a new IIS web site
(1) Name SharePoint MySite Host ndash 80
(2) Port 80
(3) Host Header mywingtipcom
ii) Application Pool
(1) Select the radio button Use existing application pool
(a) Application Pool Name SharePoint Default HNSC AppPool
iii) Database Name and Authentication
(1) Database Name WSS_Content_SocialWingtipCom
f) This process will take a few moments At the end of the process SharePoint will ask if you want to create a site collection Click the link provided to create a new site collection amp continue to the next step
2 Create a My Site Host site collection
a) On the Create Site Collection page use the following information to complete the form and click OK
Creating a SharePoint Server 2013 Environment for Development and Testing Version 10
copy Critical Path Training 2012 All Rights Reserved 46
wwwCriticalPathTrainingcom
i) Title My Site Host
ii) URL
iii) Template Selection My Site Host (found under the Enterprise tab)
iv) Primary Site Collection Administrator WINGTIPAdministrator
3 Update the Web Application to host my sites
a) Within Central Administration in the left-hand navigation navigate to the Manage Web Applications page Application Management Manage Web Applications
b) Select the SharePoint MySite Host ndash 80 web application
c) Click the Managed Paths button in the ribbon
d) Remove the sites managed path and add two new managed paths and click OK
i) personal ndash Wildcard inclusion
ii) my ndash Explicit inclusion
e) With the SharePoint MySite Host ndash 80 web application still selected click the Self-Service Site Creation button
f) On the Self-Service Site Creation page use the following values to complete the form and click OK
i) Site Collections On
4 Next configure the User Profile Service Application My Site settings
a) Browse to the User Profile Service Application management page Application Management Manage Service Applications User Profile Service Application
b) Under the My Site Settings section click the Setup My Sites
c) On the My Site Settings page use the following information to complete the form and click OK
i) My Site Host httpmywingtipcom
ii) Personal Site Location personal
At this point your SharePoint deployment is now configured to automatically create My Sites under httpmywingtipcomPersonalUserName when users first browse to them
Exercise 7 Install amp Configure Workflow Manager 10
In this exercise you will configure the WingtipServer VM to host Workflow Manager 10 and connect it to your SharePoint installation
1 Ensure you are logged into the WingtipServer VM using the account wingtipadministrator | Password1
Verify SQL Server 2012 Network Configuration
In this section yoursquoll verify the network configuration is correct for SQL Server 2012 in order to install Workflow Manager 10
Creating a SharePoint Server 2013 Environment for Development and Testing Version 10
copy Critical Path Training 2012 All Rights Reserved 47
wwwCriticalPathTrainingcom
1 Configure SQL Server 2012 to have the TCPIP connection protocol enabled
a) Open the SQL Server Configuration Manager Start All Programs Microsoft SQL Server 2012 Configuration Tools SQL Server Configuration Manager
b) Expand the hierarchy on the left-hand side to the following SQL Server Connection Manager (local) SQL Server Network Configuration Protocols for MSSQLSERVER
c) In the main window if TCPIP is Disabled right-click TCPIP and select Enable
d) When prompted with a warning click OK
2 SQL Server must be restarted in order to reflect this change
a) In the hierarchy on the left-hand side of the window select SQL Server Services
b) Right-click SQL Server (MSSQLSERVER) and select Restart
At this point SQL Server is now configured with the TCPIP protocol enabled a requirement when configuring Service Bus
Configure the Workflow Service Account with the Necessary Rights
In this section you will verify the service account that will run Workflow Manager and Service Bus
1 Ensure you are logged into the WingtipServer VM using the account WINGTIPadministrator | Password1
2 Grant the WINGTIPSP_Content account securityadmin amp dbcreator permissions in SQL Server
a) Launch SQL Server Management Studio Start All Programs Microsoft SQL Server 2012 SQL Server Management Studio
b) When SQL Server Management Studio launches within the Connect to Server dialog login using the default settings and click Connect
c) In the Object Explorer tool window expand the WINGTIPSERVER server hierarchy to the Security Logins node
d) Find the WINGTIPSP_Content account right-click it and select Properties
Creating a SharePoint Server 2013 Environment for Development and Testing Version 10
copy Critical Path Training 2012 All Rights Reserved 48
wwwCriticalPathTrainingcom
e) In the Select a page pane select Server Roles
f) Check securityadmin amp dbcreator and click OK
g) Close SQL Server Management Studio
3 Add the Workflow service account to the local administrators group
a) Open the Active Directory Users and Computers window Start Administrative Tools Active Directory Users and Computers
b) In the hierarchy on the left-hand side of the window expand it to the following Active Directory Users and Computers wingtipcom Builtin
c) In the main window right-click Administrators and select Properties
d) In the Administrators Properties dialog select the Members tab and click Add
e) In the Enter the object names to select box enter wingtipsp_content and click the Check Names button
f) In the Administrators Properties dialog click OK
g) Close the Active Directory Users and Computers window
At this point the service account that will host Workflow Manager and Service Bus has been configured correctly
Creating a SharePoint Server 2013 Environment for Development and Testing Version 10
copy Critical Path Training 2012 All Rights Reserved 49
wwwCriticalPathTrainingcom
Download amp Install Workflow Manager and Service Bus
In this section you will install Workflow Manager and Service Bus
1 Ensure you are logged into the WingtipServer VM using the account WINGTIPSP_Content | Password1
It is important you are logged in as the user that will run workflow when you install amp configure Workflow Manager and Service Bus
2 Launch the Web Platform Installer Start All Programs Microsoft Web Platform Installer
a) If the Web Platform Installer is not present on your machine you can download amp install it from here httpwwwmicrosoftcomwebdownloadsplatformaspx
If you do not have internet access within the virtual machine it is possible to download everything needed for workflow using the command line version of the Web Platform Installer (WebPICMD) You can get WebPICMD from httplearniisnetpageaspx1072web-platform-installer-v4-command-line-webpicmdexe-preview-release Specifically for
workflow enter the following command to download Workflow Beta 1 and all prerequisites
webpicmd offline ProductsWorkflow Pathc[path]
3 When the Web Platform Installer loads execute a search for Workflow select Workflow Manager 10 and click Add
4 Click the Install button at the bottom of the Web Platform Installer 40 window
5 On the Prerequisites page click I Accept
Note The Web Platform Installer 40 may prompt you to keep certain products updated using Microsoft Update If it does select Use Microsoft Update when I check for updates (recommended) and click Continue
6 When the installer completes the following dialog will appear Click Continue and then Finish to start the configuration process
Creating a SharePoint Server 2013 Environment for Development and Testing Version 10
copy Critical Path Training 2012 All Rights Reserved 50
wwwCriticalPathTrainingcom
At this point Workflow Manager amp Service Bus are installed
Configure Workflow Manager and Service Bus
In this section you will install Workflow Manager and Service Bus
1 If the Workflow Manager Configuration Wizard is not open open it Start All Programs Workflow Manager 10 Workflow Configuration
2 On the Welcome page click Configure Workflow Manager with Default Settings (Recommended)
Creating a SharePoint Server 2013 Environment for Development and Testing Version 10
copy Critical Path Training 2012 All Rights Reserved 51
wwwCriticalPathTrainingcom
3 On the New Farm Configuration page do the following
a) In the section Configure Service Account set the credentials to
i) User ID sp_contentwingtipcom
ii) Password Password1
b) Check the Allow Workflow management over HTTP on this computer checkbox
Ensure the username is entered in the fully qualified UPN format not as the default shows in the installer (sp_contentwingtip) or the domainusername format
In a production environment you should be doing everything over SSL
c) Click the Test Connection button to verify the connection credentials before proceeding
Creating a SharePoint Server 2013 Environment for Development and Testing Version 10
copy Critical Path Training 2012 All Rights Reserved 52
wwwCriticalPathTrainingcom
d) In the Certificate Generation Key and Confirm Certificate Generation Key enter Password1 into both fields
4 Click the right arrow in the bottom right corner to proceed
5 On the Summary page review your settings and click the check at the bottom right of the widow to start the configuration process
Creating a SharePoint Server 2013 Environment for Development and Testing Version 10
copy Critical Path Training 2012 All Rights Reserved 53
wwwCriticalPathTrainingcom
6 After a few minutes the Configuration Progress screen will show that everything has been configured correctly
Creating a SharePoint Server 2013 Environment for Development and Testing Version 10
copy Critical Path Training 2012 All Rights Reserved 54
wwwCriticalPathTrainingcom
7 Click the check in the bottom right corner
At this point Workflow Manager amp Service Bus has been installed and a new Workflow Manager farm has been created The next step is to connect the SharePoint 2013 farm to the Workflow Manager farm
Connect SharePoint 2013 to Workflow Manager
In this section you will connect SharePoint 2013 and Workflow Manager together
1 Ensure you are logged into the WingtipServer VM using the account WINGTIPadministrator | Password1
2 Get the Workflow Manager endpoint
a) Open the Workflow Manager PowerShell console Start All Programs Workflow Manager 10
b) Execute the Windows PowerShell following cmdlet
Get-WFFarm | ft HttpPort
c) Take note of this port (12291) This port number is what you will use to connect the SharePoint 2013 farm to the Workflow Manager 10 farm
In production you should connect to the HTTPS port listed in the HttpsPort property when you run Get-WFFarm
d) Close the Workflow Manager PowerShell window
3 Connect the SharePoint 2013 farm to Workflow Manager
Creating a SharePoint Server 2013 Environment for Development and Testing Version 10
copy Critical Path Training 2012 All Rights Reserved 55
wwwCriticalPathTrainingcom
a) Open SharePoint 2013 Management Shell Start All Programs Microsoft SharePoint 2013 Products SharePoint 2013 Management Shell
b) Execute the following Windows PowerShell script in the SharePoint 2013 Management Shell
Register-SPWorkflowService ndashSPSite httpintranetwingtipcom ndashWorkflowHostUri httpwingtipserver12291 ndashAllowOAuthHttp
This script is telling SharePoint the endpoint it should use to talk to Workflow Manager as well as Workflow Manager the SharePoint site collection it should talk to for calls into the CSOM It is also configuring all communication over HTTP rather than HTTPS for performance reasons In production you should always use HTTPS
This step will take a moment with no feedback during the process Be patient
c) Close the SharePoint 2013 Management Shell
At this point the SharePoint 2013 farm is connected to the Workflow Manager 10 farm
Configure SharePoint User Profile Service Application AD Sync
Users in SharePoint 2013 are validated by Workflow Manager against SharePoint to ensure they have permissions to start a workflow This is done by looking up the user by their AD UserPrincipalName (UPN) attribute in the User Profile Service Application (UPA) If no matching user is found the workflow will be automatically cancelled by Workflow Manager In this section you will setup UPA to connect amp sync with the local Active Directory so user accounts in AD will have their UPN synchronized to UPA
1 Open Central Administration Start All Programs Microsoft SharePoint 2013 Products SharePoint 2013 Central Administration
2 Go to the User Profile Service Application management page Application Management Manage Service Applications User Profile Service Application
3 The first step is to configure the User Profile Service Application to allow for Active Directory (AD) synchronization
a) Under Synchronization select Configure Synchronization Settings
b) For Synchronization select Use SharePoint Active Directory Import and click OK
4 Next establish a connection to the wingtipcom AD
a) Under Synchronization select Configure Synchronization Connections
b) On the Synchronization Connections page select Create New Connection
c) Enter the following values on this form and click OK
i) Connection Name WINGTIPCOM AD
ii) Type Active Directory Import
iii) Connection Settings
(1) Fully Qualified Domain Name wingtipcom
(2) Authentication Provider Type Windows Authentication
(3) Account Name WINGTIPAdministrator
(4) Password (and Confirm Password) Password1
iv) Containers
(1) Click Populate Containers
(2) After it loads check the box next to WINGTP or click the Select All button below the box
5 Go back to the User Profile Service Application management page Application Management Manage Service Applications User Profile Service Application
6 Finally start a synchronization import
a) Under Synchronization select Start Profile Synchronization
Creating a SharePoint Server 2013 Environment for Development and Testing Version 10
copy Critical Path Training 2012 All Rights Reserved 56
wwwCriticalPathTrainingcom
b) Select Start Full Synchronization and click OK
c) You will be taken back to the User Profile Service Application management page Notice in the top-right corner there is a status block that reports how many profiles are in the UPA database Refresh the page to see it increase to a handful of profiles as the import process runs
At this point you have successfully configured the User Profile Service Application to import profiles from the local AD
Exercise 8 Install the Microsoft Office 2013 Professional Clients
In this exercise you will install the Microsoft Office 2013 client applications
1 Download the Office 2013 into the WingtipServer VM For this you need to create an Office 365 Trial account login to Office 365 go to the Admin Dashboard and then download the latest version httpwwwmicrosoftcomofficepreviewentry-office-preview
2 Download the SharePoint Designer 2013 into the WingtipServer VM from here httpwwwmicrosoftcomen-usdownloaddetailsaspxid=35491
3 Download the Visio Professional 2013 into the WingtipServer VM from here httptechnetmicrosoftcomen-usevalcenterhh973399
Install Microsoft Office Professional Plus 2013
In this section you will install the Microsoft Office 2013 clients
1 Ensure you are logged into the WingtipServer VM using the account WINGTIPadministrator | Password1
2 Execute the installer OfficeProfessionalPlus_English_x64exe
3 On the Read the Microsoft Software License Terms dialog click the checkbox next to I accept the terms of this agreement and click Continue
4 On the Choose the installation you want dialog click the Install Now button
5 The installer will proceed and install all the Office products
6 When the installer completes click the Close button
7 Apply your Office Professional Plus 2013 license key
a) Launch Word 2013 Start All Programs Microsoft Office 2013 Word 2013
b) In the First things first dialog select Use recommended settings and click Accept
c) In the Welcome to Office dialog that opens click the [X] icon in the top-right corner to close it
d) In the left-hand pane click Open Other Documents
e) In the left-hand pane click Account
f) In the Product Information section within the Activation Required box click Change Product Key
g) Enter your license key for Office Professional Plus 2013 check the box next to Attempt to automatically activate my product online and click Install
h) Click OK
At this point you have installed Office Professional Plus 2013
Install Microsoft Office Visio 2013
In this section you will install Microsoft Office 2013 Visio
1 Ensure you are logged into the WingtipServer VM using the account WINGTIPadministrator | Password1
2 Execute the installer VisioProfessional_English_x64exe
3 On the Read the Microsoft Software License Terms dialog click the checkbox next to I accept the terms of this agreement and click Continue
Creating a SharePoint Server 2013 Environment for Development and Testing Version 10
copy Critical Path Training 2012 All Rights Reserved 57
wwwCriticalPathTrainingcom
4 On the Choose the installation you want dialog click the Install Now button
5 The installer will proceed and install all Visio 2013
6 When the installer completes click the Close button
7 Apply your Visio 2013 license key
a) Launch Visio 2013 Start All Programs Microsoft Office 2013 Visio 2013
b) In the First things first dialog select Use recommended settings and click Accept
c) In the Welcome to Office dialog that opens click the X icon in the top-right corner to close it
d) In the left-hand pane click Open Other Documents
e) In the left-hand pane click Account
f) In the Product Information section within the Activation Required box click Change Product Key
g) Enter your license key for Visio 2013 check the box next to Attempt to automatically activate my product online and click Install
h) Click OK
At this point you have installed Visio 2013
Install Microsoft Office 2013 SharePoint Designer
In this section you will install Microsoft Office 2013 SharePoint Designer
1 Ensure you are logged into the WingtipServer VM using the account WINGTIPadministrator | Password1
2 Execute the installer SharePointDesigner_English_x64exe
3 On the Read the Microsoft Software License Terms dialog click the checkbox next to I accept the terms of this agreement and click Continue
4 On the Choose the installation you want dialog click the Install Now button
5 The installer will proceed and install all SharePoint Designer 2013
6 When the installer completes click the Close button
At this point you have installed SharePoint Designer 2013
Exercise 9 Install Visual Studio 2012
In this exercise you will install Visual Studio 2012
1 Ensure you are logged into the WingtipServer VM using the account WINGTIPadministrator | Password1
2 Start the install of Visual Studio 2012 Ultimate Trial by downloading the installer from here httpwwwmicrosoftcomvisualstudio11en-usdownloads
3 On the installation splash screen check the box next to I agree to the License terms and conditions and click the Next button
Creating a SharePoint Server 2013 Environment for Development and Testing Version 10
copy Critical Path Training 2012 All Rights Reserved 58
wwwCriticalPathTrainingcom
4 On the Optional Features to install dialog click Install
5 After some time the installer will complete Click the Launch button to launch Visual Studio 2012
Creating a SharePoint Server 2013 Environment for Development and Testing Version 10
copy Critical Path Training 2012 All Rights Reserved 59
wwwCriticalPathTrainingcom
6 In the Choose Default Environment Settings select Visual C Development Settings and click Start Visual Studio
7 Close Visual Studio 2012
At this point Visual Studio 2012 RTM is installed
Install Office amp SharePoint 2013 Developer Tools
In this section you will install the Office and SharePoint 2013 developer tools for Visual Studio
1 Ensure you are logged into the WingtipServer VM using the account WINGTIPadministrator | Password1
2 Launch the Web Platform Installer Start All Programs Microsoft Web Platform Installer
3 In the search box at the top-right corner of the Web Platform Installer 40 window type sharepoint and press Enter
4 Click the Add button to the right of Microsoft Office Developer Tools for Visual Studio 2012 - Preview 2
5 Click the Install button at the bottom of the Web Platform Installer 40 window
6 On the Prerequisites page click I Accept
Creating a SharePoint Server 2013 Environment for Development and Testing Version 10
copy Critical Path Training 2012 All Rights Reserved 60
wwwCriticalPathTrainingcom
At this point you have installed the SharePoint 2013 amp Office 2013 development tools in Visual Studio 2012
Creating a SharePoint Server 2013 Environment for Development and Testing Version 10
copy Critical Path Training 2012 All Rights Reserved 61
wwwCriticalPathTrainingcom
Appendix 1 Download Manifest
The following lists everything referenced that you will or may need to download in this environment
Windows Server 2008 R2 with Service Pack 1 (installer ISO)
o httptechnetmicrosoftcomen-usevalcenterdd459137aspx
Windows Server 2008 R2 with Service Pack 1 (prebuilt VHD)
o httpwwwmicrosoftcomdownloadsdetailsaspxFamilyId=9040a4be-c3cf-44a5-9052-a70314452305
Windows Server 2008 R2 Service Pack 1
o httpwwwmicrosoftcomen-usdownloaddetailsaspxid=5842
SQL Server 2012 Trial
o httpwwwmicrosoftcombetaexperiencepdSQL2012EvalCTAenusdefaultaspx
SharePoint Server 2013
o httptechnetmicrosoftcomen-USevalcenterhh973397aspx
Hotfixes for SharePoint Server 2013 (post-install)
o KB2554876 The SharePoint Parsing Process Crashes in Windows Server 2008 R2
o KB2708075 IIS 75 Configurations are not Updated when you use the ServerManager Class to Commit
Configuration Changes
o KB2759112 Hotfix is Available for NET Framework 45 that Resolves an ASPNET Race Condition Issue in
Windows Server 2008 R2 Windows Server 2008 R2 SP1
o KB2765317 Hotfix is Available for NET Framework 45 that Resolves an ASPNET Race Condition Issue in
Windows 8 Windows RT and Windows Server 2012
Web Platform Installer
o httpwwwmicrosoftcomwebdownloadsplatformaspx
Web Platform Installer ndash Command Line Version
o httplearniisnetpageaspx1072web-platform-installer-v4-command-line-webpicmdexe-preview-release
Workflow Manager 10
o Download using the Microsoft Web Platform Installer
Office 2013
o httpwwwmicrosoftcomofficepreviewentry-office-preview
SharePoint Designer 2013
o httpwwwmicrosoftcomen-usdownloaddetailsaspxid=35491
Visio Professional 2013
o httptechnetmicrosoftcomen-usevalcenterhh973399
Visual Studio 2012
o httpwwwmicrosoftcomvisualstudio11en-usdownloads
Office Developer Tools for Visual Studio 2012 ndash Preview 2
o Download using the Microsoft Web Platform Installer
Creating a SharePoint Server 2013 Environment for Development and Testing Version 10
copy Critical Path Training 2012 All Rights Reserved 62
wwwCriticalPathTrainingcom
Appendix 2 Windows PowerShell Script Manifest
The following lists all Windows PowerShell scripts that are provided with this setup guide
AddDisableLoopbackCheckRegKeyps1
o The following steps automate creating the registry key outlined as Method 2 in the Microsoft Knowledgebase article
httpsupportmicrosoftcomkb896861 using Windows PowerShell This key DisableLoopbackCheck will allow
you to browse SharePoint sites on the same machine Without this key (or following Method 1 in the KB article) you
would need to browse any SharePoint sites from a different computer than the one which SharePoint is installed on
ConfigureSpFarmForAppsps1
o Configures a SharePoint 2013 for hosting apps This ensures everything you need is installed running and
configured This is documented here httpmsdnmicrosoftcomen-uslibraryfp179923(v=office15)
CreateSpServiceAccountsps1
o Creates the minimal necessary service accounts for SharePoint Server 2013 SP_Farm SP_Content amp
SP_Services
SetupSharePointForHNSCps1
o Configures a SharePoint 2013 install for hosting Host-Named Site Collections (HNSC) This involves creating a Web
Application in SharePoint that has no host header bindings Using DNS all requests are mapped to this Web
Application You then create the site collections via PowerShell as you cant create HNSCs via the browser (Central
Administration)
Creating a SharePoint Server 2013 Environment for Development and Testing Version 10
copy Critical Path Training 2012 All Rights Reserved 63
wwwCriticalPathTrainingcom
Appendix 3 Create Sample Adventure Works Database
The following steps document downloading and installing the sample Adventure Works OLTP database provided by Microsoft
1 Launch Internet Explorer and navigate to httpmsftdbprodsamplescodeplexcom
2 Download the Adventure Works 2012 OLTP Script
3 Extract the ZIP into a folder on the desktop
4 Launch SQL Server Management Studio Start All Programs Microsoft SQL Server 2012 SQL Server Management Studio
5 When SQL Server Management Studio launches within the Connect to Server dialog login using the default settings and click Connect
6 Within SQL Server Management Studio select File Open File
7 Select the file instawdbsql from the extracted ZIP and click Open
8 If prompted to re-login to the database engine do it
9 Select Query SQLCMD Mode
10 Scroll down to line 42 the line that starts with the following
setvar SqlSamplesSourceDataPath
11 Change the folder location of where you unzipped the Adventure Works 2012 OLTP Script
12 Select Query Execute
13 When the script completes the AdventureWorks2012 database will have been created
Creating a SharePoint Server 2013 Environment for Development and Testing Version 10
copy Critical Path Training 2012 All Rights Reserved 64
wwwCriticalPathTrainingcom
Change Log
Change Version Description
August 22 2012 v 01 Pre-release for review
August 27 2012 v 02 Initial public release ndash install guide based on SharePoint Server Beta 2
August 28 2012 v 03 Updated URL for the site collection used to connect SharePoint to WAW
August 31 2012 v 04 Typo Removed SQL Server Analysis Services as part of the install Not required in a
SharePoint dev box (unless you are doing business intelligence which is not covered
in the guide)
Updated all references to Windows Azure Workflow to Workflow Manager the new
official name for the new workflow product
Updated SetupSharePointForHNSCps1 script to lookup HNSC Web Application by
name rather than URL which is more reliable
Typo Updated WingtipAllUp public NIC to use a different IP than the WingtipDC
Typo Replaced a reference to WingtipServer with WingtipDC
Typo Fixed handful of minor typos
September 1 2012 v 05 Removed SQL Server Reporting Services from install guide
Added step to uncheck IErsquos ldquoAutomatically detect proxyrdquo
Added post workflow install steps to setup User Profile Service Application to sync with
local Active Directory
September 5 2012 v 06 Added step to create a default root site collection in the HNSC web app
Updated minor typos and added extra notes for context
Updated PowerShell script SetupSharePointForHNSCps1 to remove content
database of default Web Application when setting up HNSC Web App
Added a new exercise 8 (after SharePoint install amp config and before the Workflow
install and config) to setup support for My Sites
October 20 2012 v 07 Updated script SetupSharePointForHNSCps1 to fix a bug where it would fail on line
111 if you didnrsquot already have a WINGTIPSP_Content managed account
Added section to bypass SharePointrsquos check for crlmicrosoftcom
Updated workflowrsquos registration PowerShell script to point to
httpintranetwingtipcom
Switched order of post-SharePoint install to setup HSNC hosting before configuring for
hosting apps
November 29 2012
v 10 Changed setup guide to use a single VM instead of two VMs
Updated guide for SharePoint 2013 RTM
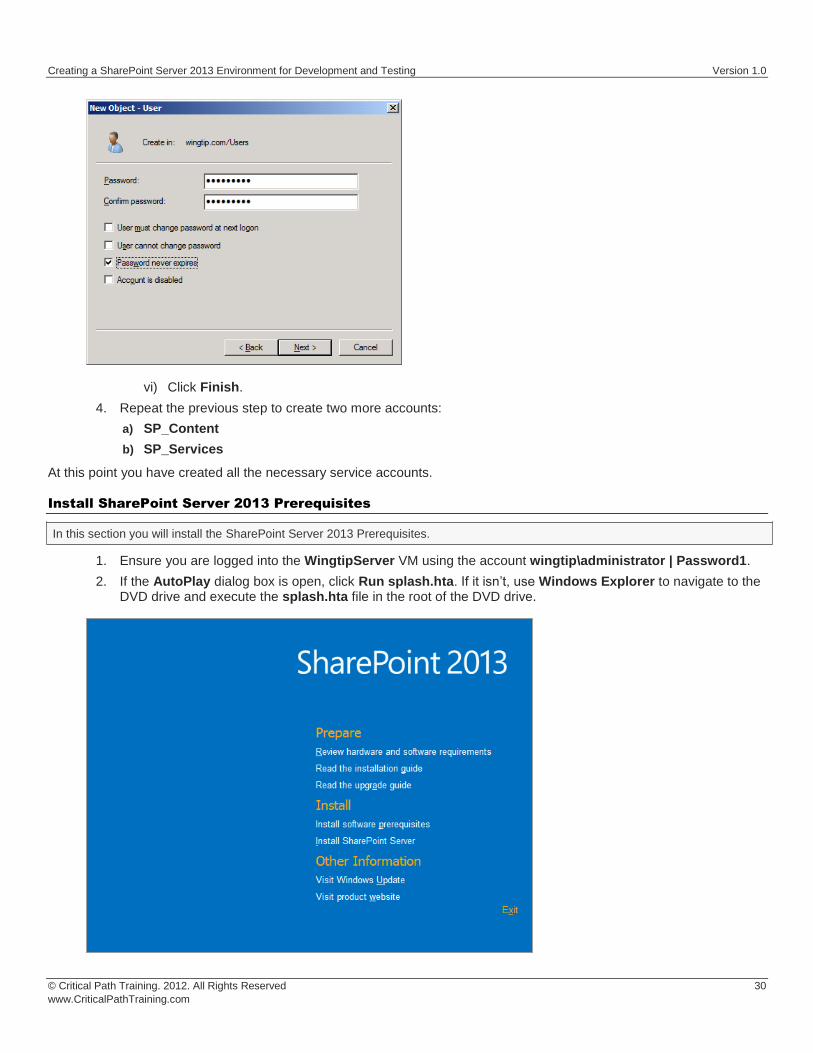
Creating a SharePoint Server 2013 Environment for Development and Testing Version 10
copy Critical Path Training 2012 All Rights Reserved 31
wwwCriticalPathTrainingcom
3 Click the Install Software Prerequisites link
4 In the Microsoft SharePoint 2013 Products Preparation Tool window click Next
5 On the License Terms for Software Products page
a) Check I accept the terms of the License Agreement(s)
b) Click Next
6 The tool will download and install all prerequisites for SharePoint Server 2013 This will take some time It may prompt you to reboot the server If so reboot the server and login using wingtipadministrator | Password1
Creating a SharePoint Server 2013 Environment for Development and Testing Version 10
copy Critical Path Training 2012 All Rights Reserved 32
wwwCriticalPathTrainingcom
7 When the prerequisite installer is complete it will present a summary of everything it did
8 Click Finish
9 Restart the WingtipServer VMhellip some additional installations and changes that the prerequisite installer did will require a restart before installing SharePoint Server 2013
At this point all prerequisites required by SharePoint Server 2013 have been installed and any necessary configuration changes have been applied to the server However it is strongly recommend that you run Windows Update and install any pending updates Further Microsoft recommends installing the following hotfixes if they are not already installed
KB2554876 The SharePoint Parsing Process Crashes in Windows Server 2008 R2
KB2708075 IIS 75 Configurations are not Updated when you use the ServerManager Class to Commit Configuration Changes
KB2759112 Hotfix is Available for NET Framework 45 that Resolves an ASPNET Race Condition Issue in Windows Server 2008 R2 Windows Server 2008 R2 SP1
KB2765317 Hotfix is Available for NET Framework 45 that Resolves an ASPNET Race Condition Issue in Windows
8 Windows RT and Windows Server 2012
Install SharePoint Server 2013
In this section you will install SharePoint Server 2013
1 Ensure you are logged into the WingtipServer VM using the account wingtipadministrator | Password1
2 If the AutoPlay dialog box is open click Run splashhta If it isnrsquot use Windows Explorer to navigate to the DVD drive and execute the splashhta file in the root of the DVD drive
Creating a SharePoint Server 2013 Environment for Development and Testing Version 10
copy Critical Path Training 2012 All Rights Reserved 33
wwwCriticalPathTrainingcom
3 Click Install SharePoint Server
4 When prompted to Enter your Product Key enter the key you obtained for the trial install and click Continue
5 On the Read the Microsoft Software License Terms page check the I accept the terms of this agreement checkbox and click Continue
6 On the Choose a file location page click Install Now
Creating a SharePoint Server 2013 Environment for Development and Testing Version 10
copy Critical Path Training 2012 All Rights Reserved 34
wwwCriticalPathTrainingcom
7 When the installation is complete select the Run the SharePoint Products Configuration Wizard checkbox and click Close
8 On the Welcome to SharePoint Products page click Next
a) If prompted to start or reset services click Yes
9 On the Connect to a server farm page select Create a new server farm and click Next
10 On the Specify Configuration Database Settings page use the following to complete the page and click Next
a) Database server WINGTIPSERVER
b) Database name SharePoint_Config
c) Username WINGTIPSP_Farm
d) Password Password1
Creating a SharePoint Server 2013 Environment for Development and Testing Version 10
copy Critical Path Training 2012 All Rights Reserved 35
wwwCriticalPathTrainingcom
11 On the Specify Farm Security Settings page for the Passphrase and Confirm Passphrase boxes enter Password1 and click Next
12 On the Configure SharePoint Central Administration Web Application page check the Specify port number checkbox and enter a value of 9999 then Click Next
Creating a SharePoint Server 2013 Environment for Development and Testing Version 10
copy Critical Path Training 2012 All Rights Reserved 36
wwwCriticalPathTrainingcom
13 On the Completing the SharePoint Products Configuration Wizard page click Next
14 When the installer completes it will display the Confirmation Successful page
15 Click Finish This will launch Internet Explorer to go through the configuration process
Creating a SharePoint Server 2013 Environment for Development and Testing Version 10
copy Critical Path Training 2012 All Rights Reserved 37
wwwCriticalPathTrainingcom
At this point you have successfully installed SharePoint Server 2013
Configure SharePoint Server 2013
In this section you will create a new SharePoint Server 2013 farm and perform minimal configuration tasks
After installing SharePoint Sever 2013 the SharePoint Products Configuration Wizard will launch the browser-based Initial Farm Configuration Wizard
1 In the first page of the wizard you are prompted to Help Make SharePoint Better Select which ever option you want and click OK
2 On the Welcome page that asks How do you want to configure your SharePoint farm click the Start the Wizard button
3 On the Services page do the following and then click Next
a) Service Account Select Create new managed account
i) Username WINGTIPSP_Services
ii) Password Password1
b) Services Uncheck the following services
Creating a SharePoint Server 2013 Environment for Development and Testing Version 10
copy Critical Path Training 2012 All Rights Reserved 38
wwwCriticalPathTrainingcom
i) Access Services 2010
ii) App Management Service
In SharePoint Server 2013 the Search Service Application processes specifically noderunnerexe can consume a considerable amount of memory and processor time If you are not going to work with search you might consider unchecking this option for now You can always go back into Central Administration and create a new instance of the Search Service Application at a later date if you need it
Why did we remove Access Services 2010 amp App Management Service service applications The Access Services 2010 service application is included for backwards compatibility and isnrsquot needed in new installations unless you are migrating solutions built with Access Services 2010 from SharePoint Server 2010 (if so you can create this service application later within Central Administration Application Management Manage Service Applications) The App Management Service service application will be created in a later step in this setup guide therefor it is skipped here
4 The creation of the service applications can take quite a while so be patient If it exceeds 20 minutes it is fairly safe to assume the page is hung up One option is to close the browser then launch Central Administration (Start All Programs Microsoft SharePoint 2013 Products SharePoint 2013 Central Administration) and look at the Service Application page (Application Management Manage Service Applications) to see if they were all created
Configure DNS
In this section you will configure DNS for hosting SharePoint sites amp Apps
1 Ensure you are logged into the WingtipServer VM using the account wingtipadministrator | Password1
2 Open the DNS window Start Administrative Tools DNS
3 Expand the hierarchy on the left-hand side of the window until you get to DNS WINGTIPSERVER Forward Lookup Zones wingtipcom
4 Create a new wildcard so all requests for http[]wingtipcom will be forwarded to our SharePoint machine
a) Next right-click wingtipcom and select New Host (A or AAAA)
Creating a SharePoint Server 2013 Environment for Development and Testing Version 10
copy Critical Path Training 2012 All Rights Reserved 39
wwwCriticalPathTrainingcom
b) In the New Host dialog enter the following and click OK
i) Alias Name
ii) IP Address 192168150102 Then click Add Host The following figure shows how this looks
This new record is telling DNS to forward any request for http[]wingtipcom to the webserver WINGTIPSERVER where the
requests will be served by SharePoint
5 Verify this DNS entry is working
a) Open Windows PowerShell Start All Programs Accessories Windows PowerShell Windows PowerShell
b) Run the following commands and press ENTER
PS CUsersAdministratorgt nslookup somethingwingtipcom PS CUsersAdministratorgt nslookup somethingappswingtipcom
c) You should get a response that points to the WingtipServer server as shown in the following figure
Creating a SharePoint Server 2013 Environment for Development and Testing Version 10
copy Critical Path Training 2012 All Rights Reserved 40
wwwCriticalPathTrainingcom
Configure SharePoint Server 2013 for Host-Named Site Collections amp Create Initial Site
Collections
In this section you will create new SharePoint 2013 site collections for testing and hosting apps
Microsoft recommends to create host-named site collections (HNSC) instead of using the path based site collection addressing The difference is the following a path based site created at something such as httpintranetwingtipcomsitesdevtest as an HNSC site would be more like httpdevtestwingtipcom This is how it works in the cloud (Office 365) and it scales much better for on-prem
deployments This setup guide will show you how to setup your environment to create HNSC The only downside to this approach is that you canrsquot create site collections within Central Administration it must be done via Windows PowerShell API (because Central Administration doesnrsquot instruct you where to put the site
This is implemented in various parts First DNS must be configured to send all requests for httpwingtipcom to a Web Application
(implemented in the last section) Second this Web Application must be extended with SharePoint and have no host header bindings (so it handles all requests) Third it must have a default site collection at the root of the Web Application but it will not be used for anything (in fact it doesnrsquot need a template assigned to it)
You can read more about HNSCrsquos on TechNet httptechnetmicrosoftcomen-uslibrarycc424952aspx
PowerShell Script Alert The steps in this section are automated in the script SetupSharePointForHNSCps1 found in the files that
accompany this setup guide Open the script and read the header for documentation on how to use it
1 Ensure you are logged into the WingtipServer VM using the account wingtipadministrator | Password1
2 Open Central Administration Start All Programs Microsoft SharePoint 2013 Products SharePoint 2013 Central Administration
3 Select Application Management Manage Web Applications
4 Delete the default Web Application created by the configuration wizard
a) Delete the existing default Web Application
i) Select the Web Application SharePoint ndash 80 the one with the URL of httpwingtipserver and click Delete in the ribbon
ii) When prompted to delete the associated IIS Web Site amp SQL Server database select both options to delete them and click OK
The reason you are doing this is because the setup wizard you ran previously when creating the service applications automatically created it The problem is that it used the same identity (WINGTIPSP_Services) for the app pool that is used for all the service
applications which is not desired
5 Create a new Web Application to handle Host-Named Site Collections (HNSC)
Creating a SharePoint Server 2013 Environment for Development and Testing Version 10
copy Critical Path Training 2012 All Rights Reserved 41
wwwCriticalPathTrainingcom
a) In the ribbon click the New button
b) In the Create New Web Application dialog enter the following values in the properties and click OK Leave all properties not mentioned
i) Select the radio button Create a new IIS web site
(1) Name SharePoint HNSC Host ndash 80
(2) Port 80
ii) Application Pool
(1) Select the radio button Create a new application pool
(a) Application Pool Name SharePoint Default HNSC AppPool
(b) Select a security account for this application pool WINGTIPSP_Content
If WINGTIPSP_Content is not listed as an available managed account create it by selecting the appropriate option and using
Password1 for the password
iii) Database Name and Authentication
(1) Database Name WSS_Content_HNSCDefaultHost
c) This process will take a few moments At the end of the process SharePoint will ask if you want to create a site collection You do but you donrsquot want to do it through the browser as this will not be a HNSC To create a HNSC you must create it via Windows PowerShell
6 Create a default not template site collection at the root of the web application
a) Open SharePoint 2013 Management Shell Start All Programs Microsoft SharePoint 2013 Products SharePoint 2013 Management Shell
7 Create Site Collections for Testing SharePoint amp SharePoint Apps
a) Open SharePoint 2013 Management Shell Start All Programs Microsoft SharePoint 2013 Products SharePoint 2013 Management Shell
b) Get a reference to the HNSC web application you just created by running the following Windows PowerShell script in the SharePoint 2013 Management Shell
$hnscWebApp = Get-SPWebApplication | Where-Object $_DisplayName -eq SharePoint HNSC Host - 80
c) Create a non-templated site at the root of the web application for Workflow to connect to by executing the following Windows PowerShell script in the SharePoint 2013 Management Shell
New-SPSite -Name Root HNSC Site Collection -Url httpwingtipcom -HostHeaderWebApplication $hnscWebApp -OwnerAlias WINGTIPAdministrator
d) Create a team site by executing the following Windows PowerShell script in the SharePoint 2013 Management Shell
New-SPSite -Name Wingtip Intranet -Url httpintranetwingtipcom ndashHostHeaderWebApplication $hnscWebApp -Template STS0 -OwnerAlias WINGTIPAdministrator
e) Create a developer site by executing the following Windows PowerShell script in the SharePoint 2013 Management Shell
New-SPSite -Name Wingtip Developer Site -Url httpdevwingtipcom ndashHostHeaderWebApplication $hnscWebApp -Template DEV0 -OwnerAlias WINGTIPAdministrator
You can only create debug and test apps using a developer site
At this point you now have a site collection to use as a team site (httpintranetwingtipcom) and to develop and test custom SharePoint apps (httpdevwingtipcom)
Creating a SharePoint Server 2013 Environment for Development and Testing Version 10
copy Critical Path Training 2012 All Rights Reserved 42
wwwCriticalPathTrainingcom
Configure SharePoint 2013 for Hosting Apps
In this setup you will setup your SharePoint 2013 environment for hosting apps
PowerShell Script Alert Everything in the next immediate step is provided in the script ConfigureSpFarmForAppsps1 found in the
files that accompany this setup guide Open the script and read the header for documentation on how to use it
1 Ensure you are logged into the WingtipServer VM using the account wingtipadministrator | Password1
2 Create the necessary SharePoint App Management service applications and start the necessary services via Windows PowerShell
a) Open SharePoint 2013 Management Shell Start All Programs Microsoft SharePoint 2013 Products SharePoint 2013 Management Shell
b) Execute the following Windows PowerShell script in the SharePoint 2013 Management Shell
$appHostDomain = appswingtipcom $adminService = Get-Service -Name spadminv4 if ($adminServiceStatus -ne Running) Start-Service $adminService $timerService = Get-Service -Name sptimerv4 if ($timerServiceStatus -ne Running) Start-Service $timerService Set-SPAppDomain $appHostDomain $appMgmtSvcInstance = Get-SPServiceInstance | Where-Object $_GetType()Name -eq AppManagementServiceInstance if ($appMgmtSvcInstanceStatus -ne Online) Start-SPServiceInstance -Identity $appMgmtSvcInstance $appSubSettingSvcInstance = Get-SPServiceInstance | Where-Object $_GetType()Name -eq SPSubscriptionSettingsServiceInstance if ($appSubSettingSvcInstanceStatus -ne Online) Start-SPServiceInstance -Identity $appSubSettingSvcInstance $appPoolServiceApps = Get-SPServiceApplicationPool -Identity SharePoint Web Services Default $appSubSvc = New-SPSubscriptionSettingsServiceApplication ndashApplicationPool $appPoolServiceApps ndashName Settings Service Application ndashDatabaseName SettingsServiceDB $proxySubSvc = New-SPSubscriptionSettingsServiceApplicationProxy ndashServiceApplication $appSubSvc $appAppSvc = New-SPAppManagementServiceApplication -ApplicationPool $appPoolServiceApps -Name App Management Service Application -DatabaseName AppServiceDB $proxyAppSvc = New-SPAppManagementServiceApplicationProxy -ServiceApplication $appAppSvc Set-SPAppSiteSubscriptionName -Name app -Confirm$false
3 Verify the script configured SharePoint 2013 for hosting apps
a) Open Central Administration Start All Programs Microsoft SharePoint 2013 Products SharePoint 2013 Central Administration
b) Verify service applications created
i) Open the Service Applications page Application Management Manage Service Applications
ii) Verify you have two service applications created
(1) App Management Service Application
(2) Settings Service Application
c) Verify service instances are running
i) Open the Services on Server page System Settings Manage Services on Server
ii) Verify the following services are Started
(1) App Management Service
(2) Microsoft SharePoint Foundation Subscription Settings Service
Creating a SharePoint Server 2013 Environment for Development and Testing Version 10
copy Critical Path Training 2012 All Rights Reserved 43
wwwCriticalPathTrainingcom
d) Verify App URLs are correct
i) Open the Configure App URLs page Apps Configure app URLs
ii) Verify the following
(1) App Domain appswingtipcom
(2) App Prefix app
At this point your SharePoint Server 2013 environment is ready to host SharePoint apps
Creating a SharePoint Server 2013 Environment for Development and Testing Version 10
copy Critical Path Training 2012 All Rights Reserved 44
wwwCriticalPathTrainingcom
Start the SharePoint 2013 Sandbox Service
By default the service that executes sandbox solutions is not running In this step you will start the service
1 Open Central Administration Start All Programs Microsoft SharePoint 2013 Products SharePoint 2013 Central Administration
2 Open the Services on Server page System Settings Manage Services on Server
3 Click the Start link to the left of the Microsoft SharePoint Foundation Sandboxed Code Service
At this point your installation can support sandbox solutions
Configure CRL Verification for Disconnected Environments
SharePoint periodically ldquophones homerdquo to a specific address hosted by Microsoft under certain conditions When your environment is disconnected this can cause an unnecessary delay or failures when starting up the sandbox The following steps outline a workaround to bypass this check
1 Launch Notepad as an administrator Start All Programs Accessories right-click Notepad and select Run as Administrator
2 Open the hosts file by selecting File Open and finding the file
cWindowsSystem32Driversetchosts
3 Add the following line to the end of the file
127001 crlmicrosoftcom
4 Save and close the hosts file
Update Internet Explorer to Bypass the App URL amp Automatically Login to SharePoint Sites
In this section you will update Internet Explorer to add the App hosting URL to the bypass list so you can navigate to the domain after deploying SharePoint hosted apps
1 Ensure you are logged into the WingtipServer VM using the account wingtipadministrator | Password1
1 Launch Internet Explorer Start All Programs Internet Explorer
2 Configure Internet Explorer to bypass the App URL
a) In the top-right corner click the gear icon and select Internet Options
b) On the Security tab select the Local Intranet and click the Sites button
c) Uncheck the box next to Automatically detect intranet network
d) Click the Advanced button and add two entries to the Exceptions list
i) httpwingtipcom
ii) httpappswingtipcom
Creating a SharePoint Server 2013 Environment for Development and Testing Version 10
copy Critical Path Training 2012 All Rights Reserved 45
wwwCriticalPathTrainingcom
e) Click the Close button followed by the OK button multiple times to close out of the dialogs
At this point Internet Explorer is setup to bypass your app URL so you can navigate to apps (httpappswingtipcom) as well as automatically authenticate to sites hosted at httpwingtipcom
Exercise 6 Configure SharePoint to Host My Sites
In this exercise you will configure SharePoint to create and host My Sites In order to host My Sites you will need a new Web Application that is configured for Self-Service Site Creation and has a My Site Host site collection
1 Create a new SharePoint web application to host the My Sites
a) Ensure you are logged into the WingtipServer VM using the account wingtipadministrator | Password1
b) Open Central Administration Start All Programs Microsoft SharePoint 2013 Products SharePoint 2013 Central Administration
c) Select Application Management Manage Web Applications
d) In the ribbon click the New button
e) In the Create New Web Application dialog enter the following values in the properties and click OK Leave all properties not mentioned
i) Select the radio button Create a new IIS web site
(1) Name SharePoint MySite Host ndash 80
(2) Port 80
(3) Host Header mywingtipcom
ii) Application Pool
(1) Select the radio button Use existing application pool
(a) Application Pool Name SharePoint Default HNSC AppPool
iii) Database Name and Authentication
(1) Database Name WSS_Content_SocialWingtipCom
f) This process will take a few moments At the end of the process SharePoint will ask if you want to create a site collection Click the link provided to create a new site collection amp continue to the next step
2 Create a My Site Host site collection
a) On the Create Site Collection page use the following information to complete the form and click OK
Creating a SharePoint Server 2013 Environment for Development and Testing Version 10
copy Critical Path Training 2012 All Rights Reserved 46
wwwCriticalPathTrainingcom
i) Title My Site Host
ii) URL
iii) Template Selection My Site Host (found under the Enterprise tab)
iv) Primary Site Collection Administrator WINGTIPAdministrator
3 Update the Web Application to host my sites
a) Within Central Administration in the left-hand navigation navigate to the Manage Web Applications page Application Management Manage Web Applications
b) Select the SharePoint MySite Host ndash 80 web application
c) Click the Managed Paths button in the ribbon
d) Remove the sites managed path and add two new managed paths and click OK
i) personal ndash Wildcard inclusion
ii) my ndash Explicit inclusion
e) With the SharePoint MySite Host ndash 80 web application still selected click the Self-Service Site Creation button
f) On the Self-Service Site Creation page use the following values to complete the form and click OK
i) Site Collections On
4 Next configure the User Profile Service Application My Site settings
a) Browse to the User Profile Service Application management page Application Management Manage Service Applications User Profile Service Application
b) Under the My Site Settings section click the Setup My Sites
c) On the My Site Settings page use the following information to complete the form and click OK
i) My Site Host httpmywingtipcom
ii) Personal Site Location personal
At this point your SharePoint deployment is now configured to automatically create My Sites under httpmywingtipcomPersonalUserName when users first browse to them
Exercise 7 Install amp Configure Workflow Manager 10
In this exercise you will configure the WingtipServer VM to host Workflow Manager 10 and connect it to your SharePoint installation
1 Ensure you are logged into the WingtipServer VM using the account wingtipadministrator | Password1
Verify SQL Server 2012 Network Configuration
In this section yoursquoll verify the network configuration is correct for SQL Server 2012 in order to install Workflow Manager 10
Creating a SharePoint Server 2013 Environment for Development and Testing Version 10
copy Critical Path Training 2012 All Rights Reserved 47
wwwCriticalPathTrainingcom
1 Configure SQL Server 2012 to have the TCPIP connection protocol enabled
a) Open the SQL Server Configuration Manager Start All Programs Microsoft SQL Server 2012 Configuration Tools SQL Server Configuration Manager
b) Expand the hierarchy on the left-hand side to the following SQL Server Connection Manager (local) SQL Server Network Configuration Protocols for MSSQLSERVER
c) In the main window if TCPIP is Disabled right-click TCPIP and select Enable
d) When prompted with a warning click OK
2 SQL Server must be restarted in order to reflect this change
a) In the hierarchy on the left-hand side of the window select SQL Server Services
b) Right-click SQL Server (MSSQLSERVER) and select Restart
At this point SQL Server is now configured with the TCPIP protocol enabled a requirement when configuring Service Bus
Configure the Workflow Service Account with the Necessary Rights
In this section you will verify the service account that will run Workflow Manager and Service Bus
1 Ensure you are logged into the WingtipServer VM using the account WINGTIPadministrator | Password1
2 Grant the WINGTIPSP_Content account securityadmin amp dbcreator permissions in SQL Server
a) Launch SQL Server Management Studio Start All Programs Microsoft SQL Server 2012 SQL Server Management Studio
b) When SQL Server Management Studio launches within the Connect to Server dialog login using the default settings and click Connect
c) In the Object Explorer tool window expand the WINGTIPSERVER server hierarchy to the Security Logins node
d) Find the WINGTIPSP_Content account right-click it and select Properties
Creating a SharePoint Server 2013 Environment for Development and Testing Version 10
copy Critical Path Training 2012 All Rights Reserved 48
wwwCriticalPathTrainingcom
e) In the Select a page pane select Server Roles
f) Check securityadmin amp dbcreator and click OK
g) Close SQL Server Management Studio
3 Add the Workflow service account to the local administrators group
a) Open the Active Directory Users and Computers window Start Administrative Tools Active Directory Users and Computers
b) In the hierarchy on the left-hand side of the window expand it to the following Active Directory Users and Computers wingtipcom Builtin
c) In the main window right-click Administrators and select Properties
d) In the Administrators Properties dialog select the Members tab and click Add
e) In the Enter the object names to select box enter wingtipsp_content and click the Check Names button
f) In the Administrators Properties dialog click OK
g) Close the Active Directory Users and Computers window
At this point the service account that will host Workflow Manager and Service Bus has been configured correctly
Creating a SharePoint Server 2013 Environment for Development and Testing Version 10
copy Critical Path Training 2012 All Rights Reserved 49
wwwCriticalPathTrainingcom
Download amp Install Workflow Manager and Service Bus
In this section you will install Workflow Manager and Service Bus
1 Ensure you are logged into the WingtipServer VM using the account WINGTIPSP_Content | Password1
It is important you are logged in as the user that will run workflow when you install amp configure Workflow Manager and Service Bus
2 Launch the Web Platform Installer Start All Programs Microsoft Web Platform Installer
a) If the Web Platform Installer is not present on your machine you can download amp install it from here httpwwwmicrosoftcomwebdownloadsplatformaspx
If you do not have internet access within the virtual machine it is possible to download everything needed for workflow using the command line version of the Web Platform Installer (WebPICMD) You can get WebPICMD from httplearniisnetpageaspx1072web-platform-installer-v4-command-line-webpicmdexe-preview-release Specifically for
workflow enter the following command to download Workflow Beta 1 and all prerequisites
webpicmd offline ProductsWorkflow Pathc[path]
3 When the Web Platform Installer loads execute a search for Workflow select Workflow Manager 10 and click Add
4 Click the Install button at the bottom of the Web Platform Installer 40 window
5 On the Prerequisites page click I Accept
Note The Web Platform Installer 40 may prompt you to keep certain products updated using Microsoft Update If it does select Use Microsoft Update when I check for updates (recommended) and click Continue
6 When the installer completes the following dialog will appear Click Continue and then Finish to start the configuration process
Creating a SharePoint Server 2013 Environment for Development and Testing Version 10
copy Critical Path Training 2012 All Rights Reserved 50
wwwCriticalPathTrainingcom
At this point Workflow Manager amp Service Bus are installed
Configure Workflow Manager and Service Bus
In this section you will install Workflow Manager and Service Bus
1 If the Workflow Manager Configuration Wizard is not open open it Start All Programs Workflow Manager 10 Workflow Configuration
2 On the Welcome page click Configure Workflow Manager with Default Settings (Recommended)
Creating a SharePoint Server 2013 Environment for Development and Testing Version 10
copy Critical Path Training 2012 All Rights Reserved 51
wwwCriticalPathTrainingcom
3 On the New Farm Configuration page do the following
a) In the section Configure Service Account set the credentials to
i) User ID sp_contentwingtipcom
ii) Password Password1
b) Check the Allow Workflow management over HTTP on this computer checkbox
Ensure the username is entered in the fully qualified UPN format not as the default shows in the installer (sp_contentwingtip) or the domainusername format
In a production environment you should be doing everything over SSL
c) Click the Test Connection button to verify the connection credentials before proceeding
Creating a SharePoint Server 2013 Environment for Development and Testing Version 10
copy Critical Path Training 2012 All Rights Reserved 52
wwwCriticalPathTrainingcom
d) In the Certificate Generation Key and Confirm Certificate Generation Key enter Password1 into both fields
4 Click the right arrow in the bottom right corner to proceed
5 On the Summary page review your settings and click the check at the bottom right of the widow to start the configuration process
Creating a SharePoint Server 2013 Environment for Development and Testing Version 10
copy Critical Path Training 2012 All Rights Reserved 53
wwwCriticalPathTrainingcom
6 After a few minutes the Configuration Progress screen will show that everything has been configured correctly
Creating a SharePoint Server 2013 Environment for Development and Testing Version 10
copy Critical Path Training 2012 All Rights Reserved 54
wwwCriticalPathTrainingcom
7 Click the check in the bottom right corner
At this point Workflow Manager amp Service Bus has been installed and a new Workflow Manager farm has been created The next step is to connect the SharePoint 2013 farm to the Workflow Manager farm
Connect SharePoint 2013 to Workflow Manager
In this section you will connect SharePoint 2013 and Workflow Manager together
1 Ensure you are logged into the WingtipServer VM using the account WINGTIPadministrator | Password1
2 Get the Workflow Manager endpoint
a) Open the Workflow Manager PowerShell console Start All Programs Workflow Manager 10
b) Execute the Windows PowerShell following cmdlet
Get-WFFarm | ft HttpPort
c) Take note of this port (12291) This port number is what you will use to connect the SharePoint 2013 farm to the Workflow Manager 10 farm
In production you should connect to the HTTPS port listed in the HttpsPort property when you run Get-WFFarm
d) Close the Workflow Manager PowerShell window
3 Connect the SharePoint 2013 farm to Workflow Manager
Creating a SharePoint Server 2013 Environment for Development and Testing Version 10
copy Critical Path Training 2012 All Rights Reserved 55
wwwCriticalPathTrainingcom
a) Open SharePoint 2013 Management Shell Start All Programs Microsoft SharePoint 2013 Products SharePoint 2013 Management Shell
b) Execute the following Windows PowerShell script in the SharePoint 2013 Management Shell
Register-SPWorkflowService ndashSPSite httpintranetwingtipcom ndashWorkflowHostUri httpwingtipserver12291 ndashAllowOAuthHttp
This script is telling SharePoint the endpoint it should use to talk to Workflow Manager as well as Workflow Manager the SharePoint site collection it should talk to for calls into the CSOM It is also configuring all communication over HTTP rather than HTTPS for performance reasons In production you should always use HTTPS
This step will take a moment with no feedback during the process Be patient
c) Close the SharePoint 2013 Management Shell
At this point the SharePoint 2013 farm is connected to the Workflow Manager 10 farm
Configure SharePoint User Profile Service Application AD Sync
Users in SharePoint 2013 are validated by Workflow Manager against SharePoint to ensure they have permissions to start a workflow This is done by looking up the user by their AD UserPrincipalName (UPN) attribute in the User Profile Service Application (UPA) If no matching user is found the workflow will be automatically cancelled by Workflow Manager In this section you will setup UPA to connect amp sync with the local Active Directory so user accounts in AD will have their UPN synchronized to UPA
1 Open Central Administration Start All Programs Microsoft SharePoint 2013 Products SharePoint 2013 Central Administration
2 Go to the User Profile Service Application management page Application Management Manage Service Applications User Profile Service Application
3 The first step is to configure the User Profile Service Application to allow for Active Directory (AD) synchronization
a) Under Synchronization select Configure Synchronization Settings
b) For Synchronization select Use SharePoint Active Directory Import and click OK
4 Next establish a connection to the wingtipcom AD
a) Under Synchronization select Configure Synchronization Connections
b) On the Synchronization Connections page select Create New Connection
c) Enter the following values on this form and click OK
i) Connection Name WINGTIPCOM AD
ii) Type Active Directory Import
iii) Connection Settings
(1) Fully Qualified Domain Name wingtipcom
(2) Authentication Provider Type Windows Authentication
(3) Account Name WINGTIPAdministrator
(4) Password (and Confirm Password) Password1
iv) Containers
(1) Click Populate Containers
(2) After it loads check the box next to WINGTP or click the Select All button below the box
5 Go back to the User Profile Service Application management page Application Management Manage Service Applications User Profile Service Application
6 Finally start a synchronization import
a) Under Synchronization select Start Profile Synchronization
Creating a SharePoint Server 2013 Environment for Development and Testing Version 10
copy Critical Path Training 2012 All Rights Reserved 56
wwwCriticalPathTrainingcom
b) Select Start Full Synchronization and click OK
c) You will be taken back to the User Profile Service Application management page Notice in the top-right corner there is a status block that reports how many profiles are in the UPA database Refresh the page to see it increase to a handful of profiles as the import process runs
At this point you have successfully configured the User Profile Service Application to import profiles from the local AD
Exercise 8 Install the Microsoft Office 2013 Professional Clients
In this exercise you will install the Microsoft Office 2013 client applications
1 Download the Office 2013 into the WingtipServer VM For this you need to create an Office 365 Trial account login to Office 365 go to the Admin Dashboard and then download the latest version httpwwwmicrosoftcomofficepreviewentry-office-preview
2 Download the SharePoint Designer 2013 into the WingtipServer VM from here httpwwwmicrosoftcomen-usdownloaddetailsaspxid=35491
3 Download the Visio Professional 2013 into the WingtipServer VM from here httptechnetmicrosoftcomen-usevalcenterhh973399
Install Microsoft Office Professional Plus 2013
In this section you will install the Microsoft Office 2013 clients
1 Ensure you are logged into the WingtipServer VM using the account WINGTIPadministrator | Password1
2 Execute the installer OfficeProfessionalPlus_English_x64exe
3 On the Read the Microsoft Software License Terms dialog click the checkbox next to I accept the terms of this agreement and click Continue
4 On the Choose the installation you want dialog click the Install Now button
5 The installer will proceed and install all the Office products
6 When the installer completes click the Close button
7 Apply your Office Professional Plus 2013 license key
a) Launch Word 2013 Start All Programs Microsoft Office 2013 Word 2013
b) In the First things first dialog select Use recommended settings and click Accept
c) In the Welcome to Office dialog that opens click the [X] icon in the top-right corner to close it
d) In the left-hand pane click Open Other Documents
e) In the left-hand pane click Account
f) In the Product Information section within the Activation Required box click Change Product Key
g) Enter your license key for Office Professional Plus 2013 check the box next to Attempt to automatically activate my product online and click Install
h) Click OK
At this point you have installed Office Professional Plus 2013
Install Microsoft Office Visio 2013
In this section you will install Microsoft Office 2013 Visio
1 Ensure you are logged into the WingtipServer VM using the account WINGTIPadministrator | Password1
2 Execute the installer VisioProfessional_English_x64exe
3 On the Read the Microsoft Software License Terms dialog click the checkbox next to I accept the terms of this agreement and click Continue
Creating a SharePoint Server 2013 Environment for Development and Testing Version 10
copy Critical Path Training 2012 All Rights Reserved 57
wwwCriticalPathTrainingcom
4 On the Choose the installation you want dialog click the Install Now button
5 The installer will proceed and install all Visio 2013
6 When the installer completes click the Close button
7 Apply your Visio 2013 license key
a) Launch Visio 2013 Start All Programs Microsoft Office 2013 Visio 2013
b) In the First things first dialog select Use recommended settings and click Accept
c) In the Welcome to Office dialog that opens click the X icon in the top-right corner to close it
d) In the left-hand pane click Open Other Documents
e) In the left-hand pane click Account
f) In the Product Information section within the Activation Required box click Change Product Key
g) Enter your license key for Visio 2013 check the box next to Attempt to automatically activate my product online and click Install
h) Click OK
At this point you have installed Visio 2013
Install Microsoft Office 2013 SharePoint Designer
In this section you will install Microsoft Office 2013 SharePoint Designer
1 Ensure you are logged into the WingtipServer VM using the account WINGTIPadministrator | Password1
2 Execute the installer SharePointDesigner_English_x64exe
3 On the Read the Microsoft Software License Terms dialog click the checkbox next to I accept the terms of this agreement and click Continue
4 On the Choose the installation you want dialog click the Install Now button
5 The installer will proceed and install all SharePoint Designer 2013
6 When the installer completes click the Close button
At this point you have installed SharePoint Designer 2013
Exercise 9 Install Visual Studio 2012
In this exercise you will install Visual Studio 2012
1 Ensure you are logged into the WingtipServer VM using the account WINGTIPadministrator | Password1
2 Start the install of Visual Studio 2012 Ultimate Trial by downloading the installer from here httpwwwmicrosoftcomvisualstudio11en-usdownloads
3 On the installation splash screen check the box next to I agree to the License terms and conditions and click the Next button
Creating a SharePoint Server 2013 Environment for Development and Testing Version 10
copy Critical Path Training 2012 All Rights Reserved 58
wwwCriticalPathTrainingcom
4 On the Optional Features to install dialog click Install
5 After some time the installer will complete Click the Launch button to launch Visual Studio 2012
Creating a SharePoint Server 2013 Environment for Development and Testing Version 10
copy Critical Path Training 2012 All Rights Reserved 59
wwwCriticalPathTrainingcom
6 In the Choose Default Environment Settings select Visual C Development Settings and click Start Visual Studio
7 Close Visual Studio 2012
At this point Visual Studio 2012 RTM is installed
Install Office amp SharePoint 2013 Developer Tools
In this section you will install the Office and SharePoint 2013 developer tools for Visual Studio
1 Ensure you are logged into the WingtipServer VM using the account WINGTIPadministrator | Password1
2 Launch the Web Platform Installer Start All Programs Microsoft Web Platform Installer
3 In the search box at the top-right corner of the Web Platform Installer 40 window type sharepoint and press Enter
4 Click the Add button to the right of Microsoft Office Developer Tools for Visual Studio 2012 - Preview 2
5 Click the Install button at the bottom of the Web Platform Installer 40 window
6 On the Prerequisites page click I Accept
Creating a SharePoint Server 2013 Environment for Development and Testing Version 10
copy Critical Path Training 2012 All Rights Reserved 60
wwwCriticalPathTrainingcom
At this point you have installed the SharePoint 2013 amp Office 2013 development tools in Visual Studio 2012
Creating a SharePoint Server 2013 Environment for Development and Testing Version 10
copy Critical Path Training 2012 All Rights Reserved 61
wwwCriticalPathTrainingcom
Appendix 1 Download Manifest
The following lists everything referenced that you will or may need to download in this environment
Windows Server 2008 R2 with Service Pack 1 (installer ISO)
o httptechnetmicrosoftcomen-usevalcenterdd459137aspx
Windows Server 2008 R2 with Service Pack 1 (prebuilt VHD)
o httpwwwmicrosoftcomdownloadsdetailsaspxFamilyId=9040a4be-c3cf-44a5-9052-a70314452305
Windows Server 2008 R2 Service Pack 1
o httpwwwmicrosoftcomen-usdownloaddetailsaspxid=5842
SQL Server 2012 Trial
o httpwwwmicrosoftcombetaexperiencepdSQL2012EvalCTAenusdefaultaspx
SharePoint Server 2013
o httptechnetmicrosoftcomen-USevalcenterhh973397aspx
Hotfixes for SharePoint Server 2013 (post-install)
o KB2554876 The SharePoint Parsing Process Crashes in Windows Server 2008 R2
o KB2708075 IIS 75 Configurations are not Updated when you use the ServerManager Class to Commit
Configuration Changes
o KB2759112 Hotfix is Available for NET Framework 45 that Resolves an ASPNET Race Condition Issue in
Windows Server 2008 R2 Windows Server 2008 R2 SP1
o KB2765317 Hotfix is Available for NET Framework 45 that Resolves an ASPNET Race Condition Issue in
Windows 8 Windows RT and Windows Server 2012
Web Platform Installer
o httpwwwmicrosoftcomwebdownloadsplatformaspx
Web Platform Installer ndash Command Line Version
o httplearniisnetpageaspx1072web-platform-installer-v4-command-line-webpicmdexe-preview-release
Workflow Manager 10
o Download using the Microsoft Web Platform Installer
Office 2013
o httpwwwmicrosoftcomofficepreviewentry-office-preview
SharePoint Designer 2013
o httpwwwmicrosoftcomen-usdownloaddetailsaspxid=35491
Visio Professional 2013
o httptechnetmicrosoftcomen-usevalcenterhh973399
Visual Studio 2012
o httpwwwmicrosoftcomvisualstudio11en-usdownloads
Office Developer Tools for Visual Studio 2012 ndash Preview 2
o Download using the Microsoft Web Platform Installer
Creating a SharePoint Server 2013 Environment for Development and Testing Version 10
copy Critical Path Training 2012 All Rights Reserved 62
wwwCriticalPathTrainingcom
Appendix 2 Windows PowerShell Script Manifest
The following lists all Windows PowerShell scripts that are provided with this setup guide
AddDisableLoopbackCheckRegKeyps1
o The following steps automate creating the registry key outlined as Method 2 in the Microsoft Knowledgebase article
httpsupportmicrosoftcomkb896861 using Windows PowerShell This key DisableLoopbackCheck will allow
you to browse SharePoint sites on the same machine Without this key (or following Method 1 in the KB article) you
would need to browse any SharePoint sites from a different computer than the one which SharePoint is installed on
ConfigureSpFarmForAppsps1
o Configures a SharePoint 2013 for hosting apps This ensures everything you need is installed running and
configured This is documented here httpmsdnmicrosoftcomen-uslibraryfp179923(v=office15)
CreateSpServiceAccountsps1
o Creates the minimal necessary service accounts for SharePoint Server 2013 SP_Farm SP_Content amp
SP_Services
SetupSharePointForHNSCps1
o Configures a SharePoint 2013 install for hosting Host-Named Site Collections (HNSC) This involves creating a Web
Application in SharePoint that has no host header bindings Using DNS all requests are mapped to this Web
Application You then create the site collections via PowerShell as you cant create HNSCs via the browser (Central
Administration)
Creating a SharePoint Server 2013 Environment for Development and Testing Version 10
copy Critical Path Training 2012 All Rights Reserved 63
wwwCriticalPathTrainingcom
Appendix 3 Create Sample Adventure Works Database
The following steps document downloading and installing the sample Adventure Works OLTP database provided by Microsoft
1 Launch Internet Explorer and navigate to httpmsftdbprodsamplescodeplexcom
2 Download the Adventure Works 2012 OLTP Script
3 Extract the ZIP into a folder on the desktop
4 Launch SQL Server Management Studio Start All Programs Microsoft SQL Server 2012 SQL Server Management Studio
5 When SQL Server Management Studio launches within the Connect to Server dialog login using the default settings and click Connect
6 Within SQL Server Management Studio select File Open File
7 Select the file instawdbsql from the extracted ZIP and click Open
8 If prompted to re-login to the database engine do it
9 Select Query SQLCMD Mode
10 Scroll down to line 42 the line that starts with the following
setvar SqlSamplesSourceDataPath
11 Change the folder location of where you unzipped the Adventure Works 2012 OLTP Script
12 Select Query Execute
13 When the script completes the AdventureWorks2012 database will have been created
Creating a SharePoint Server 2013 Environment for Development and Testing Version 10
copy Critical Path Training 2012 All Rights Reserved 64
wwwCriticalPathTrainingcom
Change Log
Change Version Description
August 22 2012 v 01 Pre-release for review
August 27 2012 v 02 Initial public release ndash install guide based on SharePoint Server Beta 2
August 28 2012 v 03 Updated URL for the site collection used to connect SharePoint to WAW
August 31 2012 v 04 Typo Removed SQL Server Analysis Services as part of the install Not required in a
SharePoint dev box (unless you are doing business intelligence which is not covered
in the guide)
Updated all references to Windows Azure Workflow to Workflow Manager the new
official name for the new workflow product
Updated SetupSharePointForHNSCps1 script to lookup HNSC Web Application by
name rather than URL which is more reliable
Typo Updated WingtipAllUp public NIC to use a different IP than the WingtipDC
Typo Replaced a reference to WingtipServer with WingtipDC
Typo Fixed handful of minor typos
September 1 2012 v 05 Removed SQL Server Reporting Services from install guide
Added step to uncheck IErsquos ldquoAutomatically detect proxyrdquo
Added post workflow install steps to setup User Profile Service Application to sync with
local Active Directory
September 5 2012 v 06 Added step to create a default root site collection in the HNSC web app
Updated minor typos and added extra notes for context
Updated PowerShell script SetupSharePointForHNSCps1 to remove content
database of default Web Application when setting up HNSC Web App
Added a new exercise 8 (after SharePoint install amp config and before the Workflow
install and config) to setup support for My Sites
October 20 2012 v 07 Updated script SetupSharePointForHNSCps1 to fix a bug where it would fail on line
111 if you didnrsquot already have a WINGTIPSP_Content managed account
Added section to bypass SharePointrsquos check for crlmicrosoftcom
Updated workflowrsquos registration PowerShell script to point to
httpintranetwingtipcom
Switched order of post-SharePoint install to setup HSNC hosting before configuring for
hosting apps
November 29 2012
v 10 Changed setup guide to use a single VM instead of two VMs
Updated guide for SharePoint 2013 RTM
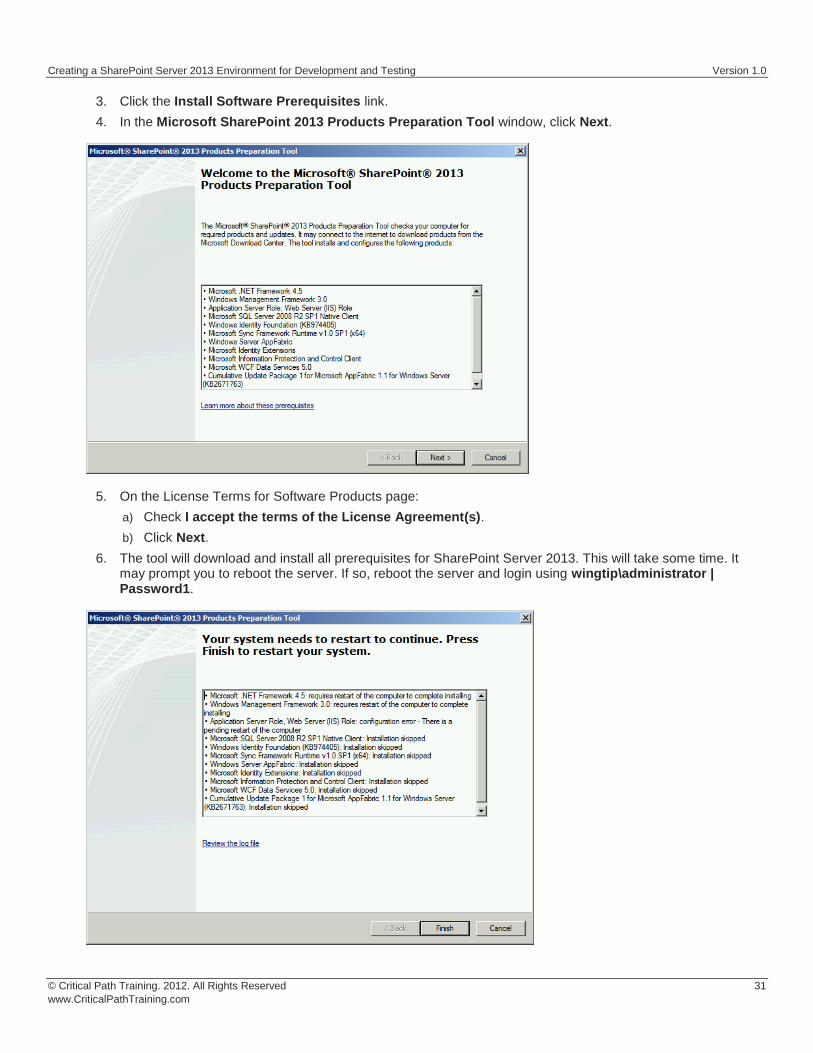
Creating a SharePoint Server 2013 Environment for Development and Testing Version 10
copy Critical Path Training 2012 All Rights Reserved 32
wwwCriticalPathTrainingcom
7 When the prerequisite installer is complete it will present a summary of everything it did
8 Click Finish
9 Restart the WingtipServer VMhellip some additional installations and changes that the prerequisite installer did will require a restart before installing SharePoint Server 2013
At this point all prerequisites required by SharePoint Server 2013 have been installed and any necessary configuration changes have been applied to the server However it is strongly recommend that you run Windows Update and install any pending updates Further Microsoft recommends installing the following hotfixes if they are not already installed
KB2554876 The SharePoint Parsing Process Crashes in Windows Server 2008 R2
KB2708075 IIS 75 Configurations are not Updated when you use the ServerManager Class to Commit Configuration Changes
KB2759112 Hotfix is Available for NET Framework 45 that Resolves an ASPNET Race Condition Issue in Windows Server 2008 R2 Windows Server 2008 R2 SP1
KB2765317 Hotfix is Available for NET Framework 45 that Resolves an ASPNET Race Condition Issue in Windows
8 Windows RT and Windows Server 2012
Install SharePoint Server 2013
In this section you will install SharePoint Server 2013
1 Ensure you are logged into the WingtipServer VM using the account wingtipadministrator | Password1
2 If the AutoPlay dialog box is open click Run splashhta If it isnrsquot use Windows Explorer to navigate to the DVD drive and execute the splashhta file in the root of the DVD drive
Creating a SharePoint Server 2013 Environment for Development and Testing Version 10
copy Critical Path Training 2012 All Rights Reserved 33
wwwCriticalPathTrainingcom
3 Click Install SharePoint Server
4 When prompted to Enter your Product Key enter the key you obtained for the trial install and click Continue
5 On the Read the Microsoft Software License Terms page check the I accept the terms of this agreement checkbox and click Continue
6 On the Choose a file location page click Install Now
Creating a SharePoint Server 2013 Environment for Development and Testing Version 10
copy Critical Path Training 2012 All Rights Reserved 34
wwwCriticalPathTrainingcom
7 When the installation is complete select the Run the SharePoint Products Configuration Wizard checkbox and click Close
8 On the Welcome to SharePoint Products page click Next
a) If prompted to start or reset services click Yes
9 On the Connect to a server farm page select Create a new server farm and click Next
10 On the Specify Configuration Database Settings page use the following to complete the page and click Next
a) Database server WINGTIPSERVER
b) Database name SharePoint_Config
c) Username WINGTIPSP_Farm
d) Password Password1
Creating a SharePoint Server 2013 Environment for Development and Testing Version 10
copy Critical Path Training 2012 All Rights Reserved 35
wwwCriticalPathTrainingcom
11 On the Specify Farm Security Settings page for the Passphrase and Confirm Passphrase boxes enter Password1 and click Next
12 On the Configure SharePoint Central Administration Web Application page check the Specify port number checkbox and enter a value of 9999 then Click Next
Creating a SharePoint Server 2013 Environment for Development and Testing Version 10
copy Critical Path Training 2012 All Rights Reserved 36
wwwCriticalPathTrainingcom
13 On the Completing the SharePoint Products Configuration Wizard page click Next
14 When the installer completes it will display the Confirmation Successful page
15 Click Finish This will launch Internet Explorer to go through the configuration process
Creating a SharePoint Server 2013 Environment for Development and Testing Version 10
copy Critical Path Training 2012 All Rights Reserved 37
wwwCriticalPathTrainingcom
At this point you have successfully installed SharePoint Server 2013
Configure SharePoint Server 2013
In this section you will create a new SharePoint Server 2013 farm and perform minimal configuration tasks
After installing SharePoint Sever 2013 the SharePoint Products Configuration Wizard will launch the browser-based Initial Farm Configuration Wizard
1 In the first page of the wizard you are prompted to Help Make SharePoint Better Select which ever option you want and click OK
2 On the Welcome page that asks How do you want to configure your SharePoint farm click the Start the Wizard button
3 On the Services page do the following and then click Next
a) Service Account Select Create new managed account
i) Username WINGTIPSP_Services
ii) Password Password1
b) Services Uncheck the following services
Creating a SharePoint Server 2013 Environment for Development and Testing Version 10
copy Critical Path Training 2012 All Rights Reserved 38
wwwCriticalPathTrainingcom
i) Access Services 2010
ii) App Management Service
In SharePoint Server 2013 the Search Service Application processes specifically noderunnerexe can consume a considerable amount of memory and processor time If you are not going to work with search you might consider unchecking this option for now You can always go back into Central Administration and create a new instance of the Search Service Application at a later date if you need it
Why did we remove Access Services 2010 amp App Management Service service applications The Access Services 2010 service application is included for backwards compatibility and isnrsquot needed in new installations unless you are migrating solutions built with Access Services 2010 from SharePoint Server 2010 (if so you can create this service application later within Central Administration Application Management Manage Service Applications) The App Management Service service application will be created in a later step in this setup guide therefor it is skipped here
4 The creation of the service applications can take quite a while so be patient If it exceeds 20 minutes it is fairly safe to assume the page is hung up One option is to close the browser then launch Central Administration (Start All Programs Microsoft SharePoint 2013 Products SharePoint 2013 Central Administration) and look at the Service Application page (Application Management Manage Service Applications) to see if they were all created
Configure DNS
In this section you will configure DNS for hosting SharePoint sites amp Apps
1 Ensure you are logged into the WingtipServer VM using the account wingtipadministrator | Password1
2 Open the DNS window Start Administrative Tools DNS
3 Expand the hierarchy on the left-hand side of the window until you get to DNS WINGTIPSERVER Forward Lookup Zones wingtipcom
4 Create a new wildcard so all requests for http[]wingtipcom will be forwarded to our SharePoint machine
a) Next right-click wingtipcom and select New Host (A or AAAA)
Creating a SharePoint Server 2013 Environment for Development and Testing Version 10
copy Critical Path Training 2012 All Rights Reserved 39
wwwCriticalPathTrainingcom
b) In the New Host dialog enter the following and click OK
i) Alias Name
ii) IP Address 192168150102 Then click Add Host The following figure shows how this looks
This new record is telling DNS to forward any request for http[]wingtipcom to the webserver WINGTIPSERVER where the
requests will be served by SharePoint
5 Verify this DNS entry is working
a) Open Windows PowerShell Start All Programs Accessories Windows PowerShell Windows PowerShell
b) Run the following commands and press ENTER
PS CUsersAdministratorgt nslookup somethingwingtipcom PS CUsersAdministratorgt nslookup somethingappswingtipcom
c) You should get a response that points to the WingtipServer server as shown in the following figure
Creating a SharePoint Server 2013 Environment for Development and Testing Version 10
copy Critical Path Training 2012 All Rights Reserved 40
wwwCriticalPathTrainingcom
Configure SharePoint Server 2013 for Host-Named Site Collections amp Create Initial Site
Collections
In this section you will create new SharePoint 2013 site collections for testing and hosting apps
Microsoft recommends to create host-named site collections (HNSC) instead of using the path based site collection addressing The difference is the following a path based site created at something such as httpintranetwingtipcomsitesdevtest as an HNSC site would be more like httpdevtestwingtipcom This is how it works in the cloud (Office 365) and it scales much better for on-prem
deployments This setup guide will show you how to setup your environment to create HNSC The only downside to this approach is that you canrsquot create site collections within Central Administration it must be done via Windows PowerShell API (because Central Administration doesnrsquot instruct you where to put the site
This is implemented in various parts First DNS must be configured to send all requests for httpwingtipcom to a Web Application
(implemented in the last section) Second this Web Application must be extended with SharePoint and have no host header bindings (so it handles all requests) Third it must have a default site collection at the root of the Web Application but it will not be used for anything (in fact it doesnrsquot need a template assigned to it)
You can read more about HNSCrsquos on TechNet httptechnetmicrosoftcomen-uslibrarycc424952aspx
PowerShell Script Alert The steps in this section are automated in the script SetupSharePointForHNSCps1 found in the files that
accompany this setup guide Open the script and read the header for documentation on how to use it
1 Ensure you are logged into the WingtipServer VM using the account wingtipadministrator | Password1
2 Open Central Administration Start All Programs Microsoft SharePoint 2013 Products SharePoint 2013 Central Administration
3 Select Application Management Manage Web Applications
4 Delete the default Web Application created by the configuration wizard
a) Delete the existing default Web Application
i) Select the Web Application SharePoint ndash 80 the one with the URL of httpwingtipserver and click Delete in the ribbon
ii) When prompted to delete the associated IIS Web Site amp SQL Server database select both options to delete them and click OK
The reason you are doing this is because the setup wizard you ran previously when creating the service applications automatically created it The problem is that it used the same identity (WINGTIPSP_Services) for the app pool that is used for all the service
applications which is not desired
5 Create a new Web Application to handle Host-Named Site Collections (HNSC)
Creating a SharePoint Server 2013 Environment for Development and Testing Version 10
copy Critical Path Training 2012 All Rights Reserved 41
wwwCriticalPathTrainingcom
a) In the ribbon click the New button
b) In the Create New Web Application dialog enter the following values in the properties and click OK Leave all properties not mentioned
i) Select the radio button Create a new IIS web site
(1) Name SharePoint HNSC Host ndash 80
(2) Port 80
ii) Application Pool
(1) Select the radio button Create a new application pool
(a) Application Pool Name SharePoint Default HNSC AppPool
(b) Select a security account for this application pool WINGTIPSP_Content
If WINGTIPSP_Content is not listed as an available managed account create it by selecting the appropriate option and using
Password1 for the password
iii) Database Name and Authentication
(1) Database Name WSS_Content_HNSCDefaultHost
c) This process will take a few moments At the end of the process SharePoint will ask if you want to create a site collection You do but you donrsquot want to do it through the browser as this will not be a HNSC To create a HNSC you must create it via Windows PowerShell
6 Create a default not template site collection at the root of the web application
a) Open SharePoint 2013 Management Shell Start All Programs Microsoft SharePoint 2013 Products SharePoint 2013 Management Shell
7 Create Site Collections for Testing SharePoint amp SharePoint Apps
a) Open SharePoint 2013 Management Shell Start All Programs Microsoft SharePoint 2013 Products SharePoint 2013 Management Shell
b) Get a reference to the HNSC web application you just created by running the following Windows PowerShell script in the SharePoint 2013 Management Shell
$hnscWebApp = Get-SPWebApplication | Where-Object $_DisplayName -eq SharePoint HNSC Host - 80
c) Create a non-templated site at the root of the web application for Workflow to connect to by executing the following Windows PowerShell script in the SharePoint 2013 Management Shell
New-SPSite -Name Root HNSC Site Collection -Url httpwingtipcom -HostHeaderWebApplication $hnscWebApp -OwnerAlias WINGTIPAdministrator
d) Create a team site by executing the following Windows PowerShell script in the SharePoint 2013 Management Shell
New-SPSite -Name Wingtip Intranet -Url httpintranetwingtipcom ndashHostHeaderWebApplication $hnscWebApp -Template STS0 -OwnerAlias WINGTIPAdministrator
e) Create a developer site by executing the following Windows PowerShell script in the SharePoint 2013 Management Shell
New-SPSite -Name Wingtip Developer Site -Url httpdevwingtipcom ndashHostHeaderWebApplication $hnscWebApp -Template DEV0 -OwnerAlias WINGTIPAdministrator
You can only create debug and test apps using a developer site
At this point you now have a site collection to use as a team site (httpintranetwingtipcom) and to develop and test custom SharePoint apps (httpdevwingtipcom)
Creating a SharePoint Server 2013 Environment for Development and Testing Version 10
copy Critical Path Training 2012 All Rights Reserved 42
wwwCriticalPathTrainingcom
Configure SharePoint 2013 for Hosting Apps
In this setup you will setup your SharePoint 2013 environment for hosting apps
PowerShell Script Alert Everything in the next immediate step is provided in the script ConfigureSpFarmForAppsps1 found in the
files that accompany this setup guide Open the script and read the header for documentation on how to use it
1 Ensure you are logged into the WingtipServer VM using the account wingtipadministrator | Password1
2 Create the necessary SharePoint App Management service applications and start the necessary services via Windows PowerShell
a) Open SharePoint 2013 Management Shell Start All Programs Microsoft SharePoint 2013 Products SharePoint 2013 Management Shell
b) Execute the following Windows PowerShell script in the SharePoint 2013 Management Shell
$appHostDomain = appswingtipcom $adminService = Get-Service -Name spadminv4 if ($adminServiceStatus -ne Running) Start-Service $adminService $timerService = Get-Service -Name sptimerv4 if ($timerServiceStatus -ne Running) Start-Service $timerService Set-SPAppDomain $appHostDomain $appMgmtSvcInstance = Get-SPServiceInstance | Where-Object $_GetType()Name -eq AppManagementServiceInstance if ($appMgmtSvcInstanceStatus -ne Online) Start-SPServiceInstance -Identity $appMgmtSvcInstance $appSubSettingSvcInstance = Get-SPServiceInstance | Where-Object $_GetType()Name -eq SPSubscriptionSettingsServiceInstance if ($appSubSettingSvcInstanceStatus -ne Online) Start-SPServiceInstance -Identity $appSubSettingSvcInstance $appPoolServiceApps = Get-SPServiceApplicationPool -Identity SharePoint Web Services Default $appSubSvc = New-SPSubscriptionSettingsServiceApplication ndashApplicationPool $appPoolServiceApps ndashName Settings Service Application ndashDatabaseName SettingsServiceDB $proxySubSvc = New-SPSubscriptionSettingsServiceApplicationProxy ndashServiceApplication $appSubSvc $appAppSvc = New-SPAppManagementServiceApplication -ApplicationPool $appPoolServiceApps -Name App Management Service Application -DatabaseName AppServiceDB $proxyAppSvc = New-SPAppManagementServiceApplicationProxy -ServiceApplication $appAppSvc Set-SPAppSiteSubscriptionName -Name app -Confirm$false
3 Verify the script configured SharePoint 2013 for hosting apps
a) Open Central Administration Start All Programs Microsoft SharePoint 2013 Products SharePoint 2013 Central Administration
b) Verify service applications created
i) Open the Service Applications page Application Management Manage Service Applications
ii) Verify you have two service applications created
(1) App Management Service Application
(2) Settings Service Application
c) Verify service instances are running
i) Open the Services on Server page System Settings Manage Services on Server
ii) Verify the following services are Started
(1) App Management Service
(2) Microsoft SharePoint Foundation Subscription Settings Service
Creating a SharePoint Server 2013 Environment for Development and Testing Version 10
copy Critical Path Training 2012 All Rights Reserved 43
wwwCriticalPathTrainingcom
d) Verify App URLs are correct
i) Open the Configure App URLs page Apps Configure app URLs
ii) Verify the following
(1) App Domain appswingtipcom
(2) App Prefix app
At this point your SharePoint Server 2013 environment is ready to host SharePoint apps
Creating a SharePoint Server 2013 Environment for Development and Testing Version 10
copy Critical Path Training 2012 All Rights Reserved 44
wwwCriticalPathTrainingcom
Start the SharePoint 2013 Sandbox Service
By default the service that executes sandbox solutions is not running In this step you will start the service
1 Open Central Administration Start All Programs Microsoft SharePoint 2013 Products SharePoint 2013 Central Administration
2 Open the Services on Server page System Settings Manage Services on Server
3 Click the Start link to the left of the Microsoft SharePoint Foundation Sandboxed Code Service
At this point your installation can support sandbox solutions
Configure CRL Verification for Disconnected Environments
SharePoint periodically ldquophones homerdquo to a specific address hosted by Microsoft under certain conditions When your environment is disconnected this can cause an unnecessary delay or failures when starting up the sandbox The following steps outline a workaround to bypass this check
1 Launch Notepad as an administrator Start All Programs Accessories right-click Notepad and select Run as Administrator
2 Open the hosts file by selecting File Open and finding the file
cWindowsSystem32Driversetchosts
3 Add the following line to the end of the file
127001 crlmicrosoftcom
4 Save and close the hosts file
Update Internet Explorer to Bypass the App URL amp Automatically Login to SharePoint Sites
In this section you will update Internet Explorer to add the App hosting URL to the bypass list so you can navigate to the domain after deploying SharePoint hosted apps
1 Ensure you are logged into the WingtipServer VM using the account wingtipadministrator | Password1
1 Launch Internet Explorer Start All Programs Internet Explorer
2 Configure Internet Explorer to bypass the App URL
a) In the top-right corner click the gear icon and select Internet Options
b) On the Security tab select the Local Intranet and click the Sites button
c) Uncheck the box next to Automatically detect intranet network
d) Click the Advanced button and add two entries to the Exceptions list
i) httpwingtipcom
ii) httpappswingtipcom
Creating a SharePoint Server 2013 Environment for Development and Testing Version 10
copy Critical Path Training 2012 All Rights Reserved 45
wwwCriticalPathTrainingcom
e) Click the Close button followed by the OK button multiple times to close out of the dialogs
At this point Internet Explorer is setup to bypass your app URL so you can navigate to apps (httpappswingtipcom) as well as automatically authenticate to sites hosted at httpwingtipcom
Exercise 6 Configure SharePoint to Host My Sites
In this exercise you will configure SharePoint to create and host My Sites In order to host My Sites you will need a new Web Application that is configured for Self-Service Site Creation and has a My Site Host site collection
1 Create a new SharePoint web application to host the My Sites
a) Ensure you are logged into the WingtipServer VM using the account wingtipadministrator | Password1
b) Open Central Administration Start All Programs Microsoft SharePoint 2013 Products SharePoint 2013 Central Administration
c) Select Application Management Manage Web Applications
d) In the ribbon click the New button
e) In the Create New Web Application dialog enter the following values in the properties and click OK Leave all properties not mentioned
i) Select the radio button Create a new IIS web site
(1) Name SharePoint MySite Host ndash 80
(2) Port 80
(3) Host Header mywingtipcom
ii) Application Pool
(1) Select the radio button Use existing application pool
(a) Application Pool Name SharePoint Default HNSC AppPool
iii) Database Name and Authentication
(1) Database Name WSS_Content_SocialWingtipCom
f) This process will take a few moments At the end of the process SharePoint will ask if you want to create a site collection Click the link provided to create a new site collection amp continue to the next step
2 Create a My Site Host site collection
a) On the Create Site Collection page use the following information to complete the form and click OK
Creating a SharePoint Server 2013 Environment for Development and Testing Version 10
copy Critical Path Training 2012 All Rights Reserved 46
wwwCriticalPathTrainingcom
i) Title My Site Host
ii) URL
iii) Template Selection My Site Host (found under the Enterprise tab)
iv) Primary Site Collection Administrator WINGTIPAdministrator
3 Update the Web Application to host my sites
a) Within Central Administration in the left-hand navigation navigate to the Manage Web Applications page Application Management Manage Web Applications
b) Select the SharePoint MySite Host ndash 80 web application
c) Click the Managed Paths button in the ribbon
d) Remove the sites managed path and add two new managed paths and click OK
i) personal ndash Wildcard inclusion
ii) my ndash Explicit inclusion
e) With the SharePoint MySite Host ndash 80 web application still selected click the Self-Service Site Creation button
f) On the Self-Service Site Creation page use the following values to complete the form and click OK
i) Site Collections On
4 Next configure the User Profile Service Application My Site settings
a) Browse to the User Profile Service Application management page Application Management Manage Service Applications User Profile Service Application
b) Under the My Site Settings section click the Setup My Sites
c) On the My Site Settings page use the following information to complete the form and click OK
i) My Site Host httpmywingtipcom
ii) Personal Site Location personal
At this point your SharePoint deployment is now configured to automatically create My Sites under httpmywingtipcomPersonalUserName when users first browse to them
Exercise 7 Install amp Configure Workflow Manager 10
In this exercise you will configure the WingtipServer VM to host Workflow Manager 10 and connect it to your SharePoint installation
1 Ensure you are logged into the WingtipServer VM using the account wingtipadministrator | Password1
Verify SQL Server 2012 Network Configuration
In this section yoursquoll verify the network configuration is correct for SQL Server 2012 in order to install Workflow Manager 10
Creating a SharePoint Server 2013 Environment for Development and Testing Version 10
copy Critical Path Training 2012 All Rights Reserved 47
wwwCriticalPathTrainingcom
1 Configure SQL Server 2012 to have the TCPIP connection protocol enabled
a) Open the SQL Server Configuration Manager Start All Programs Microsoft SQL Server 2012 Configuration Tools SQL Server Configuration Manager
b) Expand the hierarchy on the left-hand side to the following SQL Server Connection Manager (local) SQL Server Network Configuration Protocols for MSSQLSERVER
c) In the main window if TCPIP is Disabled right-click TCPIP and select Enable
d) When prompted with a warning click OK
2 SQL Server must be restarted in order to reflect this change
a) In the hierarchy on the left-hand side of the window select SQL Server Services
b) Right-click SQL Server (MSSQLSERVER) and select Restart
At this point SQL Server is now configured with the TCPIP protocol enabled a requirement when configuring Service Bus
Configure the Workflow Service Account with the Necessary Rights
In this section you will verify the service account that will run Workflow Manager and Service Bus
1 Ensure you are logged into the WingtipServer VM using the account WINGTIPadministrator | Password1
2 Grant the WINGTIPSP_Content account securityadmin amp dbcreator permissions in SQL Server
a) Launch SQL Server Management Studio Start All Programs Microsoft SQL Server 2012 SQL Server Management Studio
b) When SQL Server Management Studio launches within the Connect to Server dialog login using the default settings and click Connect
c) In the Object Explorer tool window expand the WINGTIPSERVER server hierarchy to the Security Logins node
d) Find the WINGTIPSP_Content account right-click it and select Properties
Creating a SharePoint Server 2013 Environment for Development and Testing Version 10
copy Critical Path Training 2012 All Rights Reserved 48
wwwCriticalPathTrainingcom
e) In the Select a page pane select Server Roles
f) Check securityadmin amp dbcreator and click OK
g) Close SQL Server Management Studio
3 Add the Workflow service account to the local administrators group
a) Open the Active Directory Users and Computers window Start Administrative Tools Active Directory Users and Computers
b) In the hierarchy on the left-hand side of the window expand it to the following Active Directory Users and Computers wingtipcom Builtin
c) In the main window right-click Administrators and select Properties
d) In the Administrators Properties dialog select the Members tab and click Add
e) In the Enter the object names to select box enter wingtipsp_content and click the Check Names button
f) In the Administrators Properties dialog click OK
g) Close the Active Directory Users and Computers window
At this point the service account that will host Workflow Manager and Service Bus has been configured correctly
Creating a SharePoint Server 2013 Environment for Development and Testing Version 10
copy Critical Path Training 2012 All Rights Reserved 49
wwwCriticalPathTrainingcom
Download amp Install Workflow Manager and Service Bus
In this section you will install Workflow Manager and Service Bus
1 Ensure you are logged into the WingtipServer VM using the account WINGTIPSP_Content | Password1
It is important you are logged in as the user that will run workflow when you install amp configure Workflow Manager and Service Bus
2 Launch the Web Platform Installer Start All Programs Microsoft Web Platform Installer
a) If the Web Platform Installer is not present on your machine you can download amp install it from here httpwwwmicrosoftcomwebdownloadsplatformaspx
If you do not have internet access within the virtual machine it is possible to download everything needed for workflow using the command line version of the Web Platform Installer (WebPICMD) You can get WebPICMD from httplearniisnetpageaspx1072web-platform-installer-v4-command-line-webpicmdexe-preview-release Specifically for
workflow enter the following command to download Workflow Beta 1 and all prerequisites
webpicmd offline ProductsWorkflow Pathc[path]
3 When the Web Platform Installer loads execute a search for Workflow select Workflow Manager 10 and click Add
4 Click the Install button at the bottom of the Web Platform Installer 40 window
5 On the Prerequisites page click I Accept
Note The Web Platform Installer 40 may prompt you to keep certain products updated using Microsoft Update If it does select Use Microsoft Update when I check for updates (recommended) and click Continue
6 When the installer completes the following dialog will appear Click Continue and then Finish to start the configuration process
Creating a SharePoint Server 2013 Environment for Development and Testing Version 10
copy Critical Path Training 2012 All Rights Reserved 50
wwwCriticalPathTrainingcom
At this point Workflow Manager amp Service Bus are installed
Configure Workflow Manager and Service Bus
In this section you will install Workflow Manager and Service Bus
1 If the Workflow Manager Configuration Wizard is not open open it Start All Programs Workflow Manager 10 Workflow Configuration
2 On the Welcome page click Configure Workflow Manager with Default Settings (Recommended)
Creating a SharePoint Server 2013 Environment for Development and Testing Version 10
copy Critical Path Training 2012 All Rights Reserved 51
wwwCriticalPathTrainingcom
3 On the New Farm Configuration page do the following
a) In the section Configure Service Account set the credentials to
i) User ID sp_contentwingtipcom
ii) Password Password1
b) Check the Allow Workflow management over HTTP on this computer checkbox
Ensure the username is entered in the fully qualified UPN format not as the default shows in the installer (sp_contentwingtip) or the domainusername format
In a production environment you should be doing everything over SSL
c) Click the Test Connection button to verify the connection credentials before proceeding
Creating a SharePoint Server 2013 Environment for Development and Testing Version 10
copy Critical Path Training 2012 All Rights Reserved 52
wwwCriticalPathTrainingcom
d) In the Certificate Generation Key and Confirm Certificate Generation Key enter Password1 into both fields
4 Click the right arrow in the bottom right corner to proceed
5 On the Summary page review your settings and click the check at the bottom right of the widow to start the configuration process
Creating a SharePoint Server 2013 Environment for Development and Testing Version 10
copy Critical Path Training 2012 All Rights Reserved 53
wwwCriticalPathTrainingcom
6 After a few minutes the Configuration Progress screen will show that everything has been configured correctly
Creating a SharePoint Server 2013 Environment for Development and Testing Version 10
copy Critical Path Training 2012 All Rights Reserved 54
wwwCriticalPathTrainingcom
7 Click the check in the bottom right corner
At this point Workflow Manager amp Service Bus has been installed and a new Workflow Manager farm has been created The next step is to connect the SharePoint 2013 farm to the Workflow Manager farm
Connect SharePoint 2013 to Workflow Manager
In this section you will connect SharePoint 2013 and Workflow Manager together
1 Ensure you are logged into the WingtipServer VM using the account WINGTIPadministrator | Password1
2 Get the Workflow Manager endpoint
a) Open the Workflow Manager PowerShell console Start All Programs Workflow Manager 10
b) Execute the Windows PowerShell following cmdlet
Get-WFFarm | ft HttpPort
c) Take note of this port (12291) This port number is what you will use to connect the SharePoint 2013 farm to the Workflow Manager 10 farm
In production you should connect to the HTTPS port listed in the HttpsPort property when you run Get-WFFarm
d) Close the Workflow Manager PowerShell window
3 Connect the SharePoint 2013 farm to Workflow Manager
Creating a SharePoint Server 2013 Environment for Development and Testing Version 10
copy Critical Path Training 2012 All Rights Reserved 55
wwwCriticalPathTrainingcom
a) Open SharePoint 2013 Management Shell Start All Programs Microsoft SharePoint 2013 Products SharePoint 2013 Management Shell
b) Execute the following Windows PowerShell script in the SharePoint 2013 Management Shell
Register-SPWorkflowService ndashSPSite httpintranetwingtipcom ndashWorkflowHostUri httpwingtipserver12291 ndashAllowOAuthHttp
This script is telling SharePoint the endpoint it should use to talk to Workflow Manager as well as Workflow Manager the SharePoint site collection it should talk to for calls into the CSOM It is also configuring all communication over HTTP rather than HTTPS for performance reasons In production you should always use HTTPS
This step will take a moment with no feedback during the process Be patient
c) Close the SharePoint 2013 Management Shell
At this point the SharePoint 2013 farm is connected to the Workflow Manager 10 farm
Configure SharePoint User Profile Service Application AD Sync
Users in SharePoint 2013 are validated by Workflow Manager against SharePoint to ensure they have permissions to start a workflow This is done by looking up the user by their AD UserPrincipalName (UPN) attribute in the User Profile Service Application (UPA) If no matching user is found the workflow will be automatically cancelled by Workflow Manager In this section you will setup UPA to connect amp sync with the local Active Directory so user accounts in AD will have their UPN synchronized to UPA
1 Open Central Administration Start All Programs Microsoft SharePoint 2013 Products SharePoint 2013 Central Administration
2 Go to the User Profile Service Application management page Application Management Manage Service Applications User Profile Service Application
3 The first step is to configure the User Profile Service Application to allow for Active Directory (AD) synchronization
a) Under Synchronization select Configure Synchronization Settings
b) For Synchronization select Use SharePoint Active Directory Import and click OK
4 Next establish a connection to the wingtipcom AD
a) Under Synchronization select Configure Synchronization Connections
b) On the Synchronization Connections page select Create New Connection
c) Enter the following values on this form and click OK
i) Connection Name WINGTIPCOM AD
ii) Type Active Directory Import
iii) Connection Settings
(1) Fully Qualified Domain Name wingtipcom
(2) Authentication Provider Type Windows Authentication
(3) Account Name WINGTIPAdministrator
(4) Password (and Confirm Password) Password1
iv) Containers
(1) Click Populate Containers
(2) After it loads check the box next to WINGTP or click the Select All button below the box
5 Go back to the User Profile Service Application management page Application Management Manage Service Applications User Profile Service Application
6 Finally start a synchronization import
a) Under Synchronization select Start Profile Synchronization
Creating a SharePoint Server 2013 Environment for Development and Testing Version 10
copy Critical Path Training 2012 All Rights Reserved 56
wwwCriticalPathTrainingcom
b) Select Start Full Synchronization and click OK
c) You will be taken back to the User Profile Service Application management page Notice in the top-right corner there is a status block that reports how many profiles are in the UPA database Refresh the page to see it increase to a handful of profiles as the import process runs
At this point you have successfully configured the User Profile Service Application to import profiles from the local AD
Exercise 8 Install the Microsoft Office 2013 Professional Clients
In this exercise you will install the Microsoft Office 2013 client applications
1 Download the Office 2013 into the WingtipServer VM For this you need to create an Office 365 Trial account login to Office 365 go to the Admin Dashboard and then download the latest version httpwwwmicrosoftcomofficepreviewentry-office-preview
2 Download the SharePoint Designer 2013 into the WingtipServer VM from here httpwwwmicrosoftcomen-usdownloaddetailsaspxid=35491
3 Download the Visio Professional 2013 into the WingtipServer VM from here httptechnetmicrosoftcomen-usevalcenterhh973399
Install Microsoft Office Professional Plus 2013
In this section you will install the Microsoft Office 2013 clients
1 Ensure you are logged into the WingtipServer VM using the account WINGTIPadministrator | Password1
2 Execute the installer OfficeProfessionalPlus_English_x64exe
3 On the Read the Microsoft Software License Terms dialog click the checkbox next to I accept the terms of this agreement and click Continue
4 On the Choose the installation you want dialog click the Install Now button
5 The installer will proceed and install all the Office products
6 When the installer completes click the Close button
7 Apply your Office Professional Plus 2013 license key
a) Launch Word 2013 Start All Programs Microsoft Office 2013 Word 2013
b) In the First things first dialog select Use recommended settings and click Accept
c) In the Welcome to Office dialog that opens click the [X] icon in the top-right corner to close it
d) In the left-hand pane click Open Other Documents
e) In the left-hand pane click Account
f) In the Product Information section within the Activation Required box click Change Product Key
g) Enter your license key for Office Professional Plus 2013 check the box next to Attempt to automatically activate my product online and click Install
h) Click OK
At this point you have installed Office Professional Plus 2013
Install Microsoft Office Visio 2013
In this section you will install Microsoft Office 2013 Visio
1 Ensure you are logged into the WingtipServer VM using the account WINGTIPadministrator | Password1
2 Execute the installer VisioProfessional_English_x64exe
3 On the Read the Microsoft Software License Terms dialog click the checkbox next to I accept the terms of this agreement and click Continue
Creating a SharePoint Server 2013 Environment for Development and Testing Version 10
copy Critical Path Training 2012 All Rights Reserved 57
wwwCriticalPathTrainingcom
4 On the Choose the installation you want dialog click the Install Now button
5 The installer will proceed and install all Visio 2013
6 When the installer completes click the Close button
7 Apply your Visio 2013 license key
a) Launch Visio 2013 Start All Programs Microsoft Office 2013 Visio 2013
b) In the First things first dialog select Use recommended settings and click Accept
c) In the Welcome to Office dialog that opens click the X icon in the top-right corner to close it
d) In the left-hand pane click Open Other Documents
e) In the left-hand pane click Account
f) In the Product Information section within the Activation Required box click Change Product Key
g) Enter your license key for Visio 2013 check the box next to Attempt to automatically activate my product online and click Install
h) Click OK
At this point you have installed Visio 2013
Install Microsoft Office 2013 SharePoint Designer
In this section you will install Microsoft Office 2013 SharePoint Designer
1 Ensure you are logged into the WingtipServer VM using the account WINGTIPadministrator | Password1
2 Execute the installer SharePointDesigner_English_x64exe
3 On the Read the Microsoft Software License Terms dialog click the checkbox next to I accept the terms of this agreement and click Continue
4 On the Choose the installation you want dialog click the Install Now button
5 The installer will proceed and install all SharePoint Designer 2013
6 When the installer completes click the Close button
At this point you have installed SharePoint Designer 2013
Exercise 9 Install Visual Studio 2012
In this exercise you will install Visual Studio 2012
1 Ensure you are logged into the WingtipServer VM using the account WINGTIPadministrator | Password1
2 Start the install of Visual Studio 2012 Ultimate Trial by downloading the installer from here httpwwwmicrosoftcomvisualstudio11en-usdownloads
3 On the installation splash screen check the box next to I agree to the License terms and conditions and click the Next button
Creating a SharePoint Server 2013 Environment for Development and Testing Version 10
copy Critical Path Training 2012 All Rights Reserved 58
wwwCriticalPathTrainingcom
4 On the Optional Features to install dialog click Install
5 After some time the installer will complete Click the Launch button to launch Visual Studio 2012
Creating a SharePoint Server 2013 Environment for Development and Testing Version 10
copy Critical Path Training 2012 All Rights Reserved 59
wwwCriticalPathTrainingcom
6 In the Choose Default Environment Settings select Visual C Development Settings and click Start Visual Studio
7 Close Visual Studio 2012
At this point Visual Studio 2012 RTM is installed
Install Office amp SharePoint 2013 Developer Tools
In this section you will install the Office and SharePoint 2013 developer tools for Visual Studio
1 Ensure you are logged into the WingtipServer VM using the account WINGTIPadministrator | Password1
2 Launch the Web Platform Installer Start All Programs Microsoft Web Platform Installer
3 In the search box at the top-right corner of the Web Platform Installer 40 window type sharepoint and press Enter
4 Click the Add button to the right of Microsoft Office Developer Tools for Visual Studio 2012 - Preview 2
5 Click the Install button at the bottom of the Web Platform Installer 40 window
6 On the Prerequisites page click I Accept
Creating a SharePoint Server 2013 Environment for Development and Testing Version 10
copy Critical Path Training 2012 All Rights Reserved 60
wwwCriticalPathTrainingcom
At this point you have installed the SharePoint 2013 amp Office 2013 development tools in Visual Studio 2012
Creating a SharePoint Server 2013 Environment for Development and Testing Version 10
copy Critical Path Training 2012 All Rights Reserved 61
wwwCriticalPathTrainingcom
Appendix 1 Download Manifest
The following lists everything referenced that you will or may need to download in this environment
Windows Server 2008 R2 with Service Pack 1 (installer ISO)
o httptechnetmicrosoftcomen-usevalcenterdd459137aspx
Windows Server 2008 R2 with Service Pack 1 (prebuilt VHD)
o httpwwwmicrosoftcomdownloadsdetailsaspxFamilyId=9040a4be-c3cf-44a5-9052-a70314452305
Windows Server 2008 R2 Service Pack 1
o httpwwwmicrosoftcomen-usdownloaddetailsaspxid=5842
SQL Server 2012 Trial
o httpwwwmicrosoftcombetaexperiencepdSQL2012EvalCTAenusdefaultaspx
SharePoint Server 2013
o httptechnetmicrosoftcomen-USevalcenterhh973397aspx
Hotfixes for SharePoint Server 2013 (post-install)
o KB2554876 The SharePoint Parsing Process Crashes in Windows Server 2008 R2
o KB2708075 IIS 75 Configurations are not Updated when you use the ServerManager Class to Commit
Configuration Changes
o KB2759112 Hotfix is Available for NET Framework 45 that Resolves an ASPNET Race Condition Issue in
Windows Server 2008 R2 Windows Server 2008 R2 SP1
o KB2765317 Hotfix is Available for NET Framework 45 that Resolves an ASPNET Race Condition Issue in
Windows 8 Windows RT and Windows Server 2012
Web Platform Installer
o httpwwwmicrosoftcomwebdownloadsplatformaspx
Web Platform Installer ndash Command Line Version
o httplearniisnetpageaspx1072web-platform-installer-v4-command-line-webpicmdexe-preview-release
Workflow Manager 10
o Download using the Microsoft Web Platform Installer
Office 2013
o httpwwwmicrosoftcomofficepreviewentry-office-preview
SharePoint Designer 2013
o httpwwwmicrosoftcomen-usdownloaddetailsaspxid=35491
Visio Professional 2013
o httptechnetmicrosoftcomen-usevalcenterhh973399
Visual Studio 2012
o httpwwwmicrosoftcomvisualstudio11en-usdownloads
Office Developer Tools for Visual Studio 2012 ndash Preview 2
o Download using the Microsoft Web Platform Installer
Creating a SharePoint Server 2013 Environment for Development and Testing Version 10
copy Critical Path Training 2012 All Rights Reserved 62
wwwCriticalPathTrainingcom
Appendix 2 Windows PowerShell Script Manifest
The following lists all Windows PowerShell scripts that are provided with this setup guide
AddDisableLoopbackCheckRegKeyps1
o The following steps automate creating the registry key outlined as Method 2 in the Microsoft Knowledgebase article
httpsupportmicrosoftcomkb896861 using Windows PowerShell This key DisableLoopbackCheck will allow
you to browse SharePoint sites on the same machine Without this key (or following Method 1 in the KB article) you
would need to browse any SharePoint sites from a different computer than the one which SharePoint is installed on
ConfigureSpFarmForAppsps1
o Configures a SharePoint 2013 for hosting apps This ensures everything you need is installed running and
configured This is documented here httpmsdnmicrosoftcomen-uslibraryfp179923(v=office15)
CreateSpServiceAccountsps1
o Creates the minimal necessary service accounts for SharePoint Server 2013 SP_Farm SP_Content amp
SP_Services
SetupSharePointForHNSCps1
o Configures a SharePoint 2013 install for hosting Host-Named Site Collections (HNSC) This involves creating a Web
Application in SharePoint that has no host header bindings Using DNS all requests are mapped to this Web
Application You then create the site collections via PowerShell as you cant create HNSCs via the browser (Central
Administration)
Creating a SharePoint Server 2013 Environment for Development and Testing Version 10
copy Critical Path Training 2012 All Rights Reserved 63
wwwCriticalPathTrainingcom
Appendix 3 Create Sample Adventure Works Database
The following steps document downloading and installing the sample Adventure Works OLTP database provided by Microsoft
1 Launch Internet Explorer and navigate to httpmsftdbprodsamplescodeplexcom
2 Download the Adventure Works 2012 OLTP Script
3 Extract the ZIP into a folder on the desktop
4 Launch SQL Server Management Studio Start All Programs Microsoft SQL Server 2012 SQL Server Management Studio
5 When SQL Server Management Studio launches within the Connect to Server dialog login using the default settings and click Connect
6 Within SQL Server Management Studio select File Open File
7 Select the file instawdbsql from the extracted ZIP and click Open
8 If prompted to re-login to the database engine do it
9 Select Query SQLCMD Mode
10 Scroll down to line 42 the line that starts with the following
setvar SqlSamplesSourceDataPath
11 Change the folder location of where you unzipped the Adventure Works 2012 OLTP Script
12 Select Query Execute
13 When the script completes the AdventureWorks2012 database will have been created
Creating a SharePoint Server 2013 Environment for Development and Testing Version 10
copy Critical Path Training 2012 All Rights Reserved 64
wwwCriticalPathTrainingcom
Change Log
Change Version Description
August 22 2012 v 01 Pre-release for review
August 27 2012 v 02 Initial public release ndash install guide based on SharePoint Server Beta 2
August 28 2012 v 03 Updated URL for the site collection used to connect SharePoint to WAW
August 31 2012 v 04 Typo Removed SQL Server Analysis Services as part of the install Not required in a
SharePoint dev box (unless you are doing business intelligence which is not covered
in the guide)
Updated all references to Windows Azure Workflow to Workflow Manager the new
official name for the new workflow product
Updated SetupSharePointForHNSCps1 script to lookup HNSC Web Application by
name rather than URL which is more reliable
Typo Updated WingtipAllUp public NIC to use a different IP than the WingtipDC
Typo Replaced a reference to WingtipServer with WingtipDC
Typo Fixed handful of minor typos
September 1 2012 v 05 Removed SQL Server Reporting Services from install guide
Added step to uncheck IErsquos ldquoAutomatically detect proxyrdquo
Added post workflow install steps to setup User Profile Service Application to sync with
local Active Directory
September 5 2012 v 06 Added step to create a default root site collection in the HNSC web app
Updated minor typos and added extra notes for context
Updated PowerShell script SetupSharePointForHNSCps1 to remove content
database of default Web Application when setting up HNSC Web App
Added a new exercise 8 (after SharePoint install amp config and before the Workflow
install and config) to setup support for My Sites
October 20 2012 v 07 Updated script SetupSharePointForHNSCps1 to fix a bug where it would fail on line
111 if you didnrsquot already have a WINGTIPSP_Content managed account
Added section to bypass SharePointrsquos check for crlmicrosoftcom
Updated workflowrsquos registration PowerShell script to point to
httpintranetwingtipcom
Switched order of post-SharePoint install to setup HSNC hosting before configuring for
hosting apps
November 29 2012
v 10 Changed setup guide to use a single VM instead of two VMs
Updated guide for SharePoint 2013 RTM
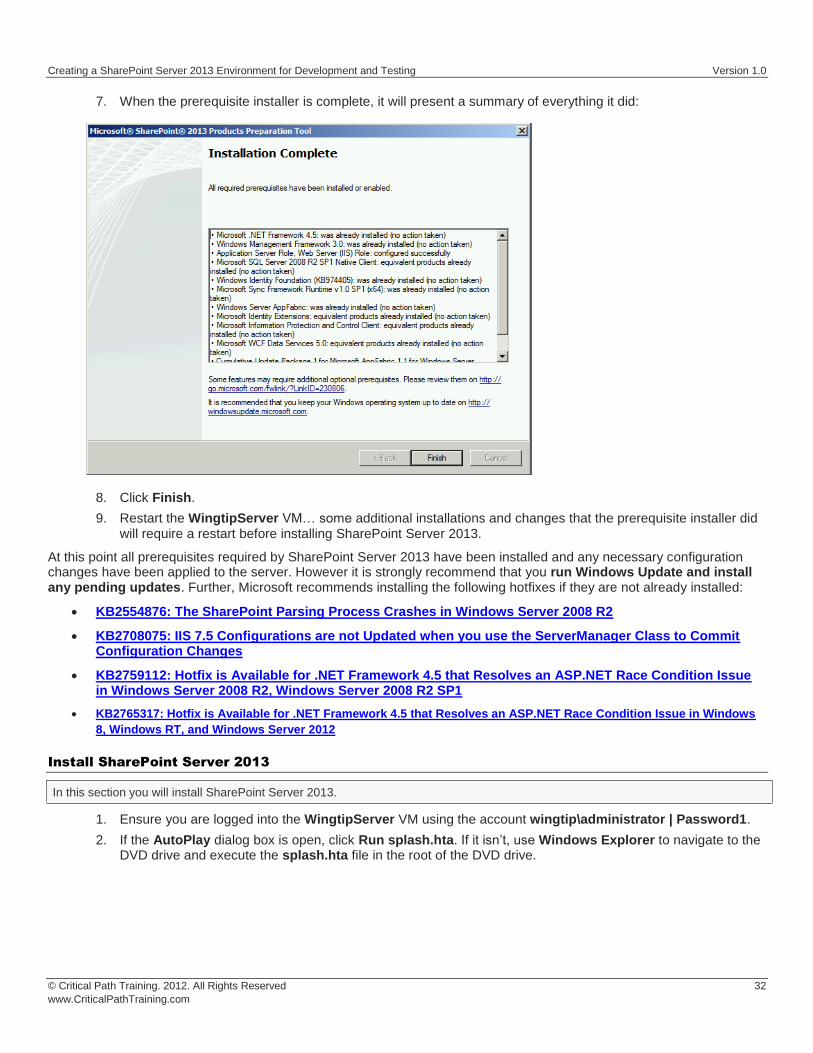
Creating a SharePoint Server 2013 Environment for Development and Testing Version 10
copy Critical Path Training 2012 All Rights Reserved 33
wwwCriticalPathTrainingcom
3 Click Install SharePoint Server
4 When prompted to Enter your Product Key enter the key you obtained for the trial install and click Continue
5 On the Read the Microsoft Software License Terms page check the I accept the terms of this agreement checkbox and click Continue
6 On the Choose a file location page click Install Now
Creating a SharePoint Server 2013 Environment for Development and Testing Version 10
copy Critical Path Training 2012 All Rights Reserved 34
wwwCriticalPathTrainingcom
7 When the installation is complete select the Run the SharePoint Products Configuration Wizard checkbox and click Close
8 On the Welcome to SharePoint Products page click Next
a) If prompted to start or reset services click Yes
9 On the Connect to a server farm page select Create a new server farm and click Next
10 On the Specify Configuration Database Settings page use the following to complete the page and click Next
a) Database server WINGTIPSERVER
b) Database name SharePoint_Config
c) Username WINGTIPSP_Farm
d) Password Password1
Creating a SharePoint Server 2013 Environment for Development and Testing Version 10
copy Critical Path Training 2012 All Rights Reserved 35
wwwCriticalPathTrainingcom
11 On the Specify Farm Security Settings page for the Passphrase and Confirm Passphrase boxes enter Password1 and click Next
12 On the Configure SharePoint Central Administration Web Application page check the Specify port number checkbox and enter a value of 9999 then Click Next
Creating a SharePoint Server 2013 Environment for Development and Testing Version 10
copy Critical Path Training 2012 All Rights Reserved 36
wwwCriticalPathTrainingcom
13 On the Completing the SharePoint Products Configuration Wizard page click Next
14 When the installer completes it will display the Confirmation Successful page
15 Click Finish This will launch Internet Explorer to go through the configuration process
Creating a SharePoint Server 2013 Environment for Development and Testing Version 10
copy Critical Path Training 2012 All Rights Reserved 37
wwwCriticalPathTrainingcom
At this point you have successfully installed SharePoint Server 2013
Configure SharePoint Server 2013
In this section you will create a new SharePoint Server 2013 farm and perform minimal configuration tasks
After installing SharePoint Sever 2013 the SharePoint Products Configuration Wizard will launch the browser-based Initial Farm Configuration Wizard
1 In the first page of the wizard you are prompted to Help Make SharePoint Better Select which ever option you want and click OK
2 On the Welcome page that asks How do you want to configure your SharePoint farm click the Start the Wizard button
3 On the Services page do the following and then click Next
a) Service Account Select Create new managed account
i) Username WINGTIPSP_Services
ii) Password Password1
b) Services Uncheck the following services
Creating a SharePoint Server 2013 Environment for Development and Testing Version 10
copy Critical Path Training 2012 All Rights Reserved 38
wwwCriticalPathTrainingcom
i) Access Services 2010
ii) App Management Service
In SharePoint Server 2013 the Search Service Application processes specifically noderunnerexe can consume a considerable amount of memory and processor time If you are not going to work with search you might consider unchecking this option for now You can always go back into Central Administration and create a new instance of the Search Service Application at a later date if you need it
Why did we remove Access Services 2010 amp App Management Service service applications The Access Services 2010 service application is included for backwards compatibility and isnrsquot needed in new installations unless you are migrating solutions built with Access Services 2010 from SharePoint Server 2010 (if so you can create this service application later within Central Administration Application Management Manage Service Applications) The App Management Service service application will be created in a later step in this setup guide therefor it is skipped here
4 The creation of the service applications can take quite a while so be patient If it exceeds 20 minutes it is fairly safe to assume the page is hung up One option is to close the browser then launch Central Administration (Start All Programs Microsoft SharePoint 2013 Products SharePoint 2013 Central Administration) and look at the Service Application page (Application Management Manage Service Applications) to see if they were all created
Configure DNS
In this section you will configure DNS for hosting SharePoint sites amp Apps
1 Ensure you are logged into the WingtipServer VM using the account wingtipadministrator | Password1
2 Open the DNS window Start Administrative Tools DNS
3 Expand the hierarchy on the left-hand side of the window until you get to DNS WINGTIPSERVER Forward Lookup Zones wingtipcom
4 Create a new wildcard so all requests for http[]wingtipcom will be forwarded to our SharePoint machine
a) Next right-click wingtipcom and select New Host (A or AAAA)
Creating a SharePoint Server 2013 Environment for Development and Testing Version 10
copy Critical Path Training 2012 All Rights Reserved 39
wwwCriticalPathTrainingcom
b) In the New Host dialog enter the following and click OK
i) Alias Name
ii) IP Address 192168150102 Then click Add Host The following figure shows how this looks
This new record is telling DNS to forward any request for http[]wingtipcom to the webserver WINGTIPSERVER where the
requests will be served by SharePoint
5 Verify this DNS entry is working
a) Open Windows PowerShell Start All Programs Accessories Windows PowerShell Windows PowerShell
b) Run the following commands and press ENTER
PS CUsersAdministratorgt nslookup somethingwingtipcom PS CUsersAdministratorgt nslookup somethingappswingtipcom
c) You should get a response that points to the WingtipServer server as shown in the following figure
Creating a SharePoint Server 2013 Environment for Development and Testing Version 10
copy Critical Path Training 2012 All Rights Reserved 40
wwwCriticalPathTrainingcom
Configure SharePoint Server 2013 for Host-Named Site Collections amp Create Initial Site
Collections
In this section you will create new SharePoint 2013 site collections for testing and hosting apps
Microsoft recommends to create host-named site collections (HNSC) instead of using the path based site collection addressing The difference is the following a path based site created at something such as httpintranetwingtipcomsitesdevtest as an HNSC site would be more like httpdevtestwingtipcom This is how it works in the cloud (Office 365) and it scales much better for on-prem
deployments This setup guide will show you how to setup your environment to create HNSC The only downside to this approach is that you canrsquot create site collections within Central Administration it must be done via Windows PowerShell API (because Central Administration doesnrsquot instruct you where to put the site
This is implemented in various parts First DNS must be configured to send all requests for httpwingtipcom to a Web Application
(implemented in the last section) Second this Web Application must be extended with SharePoint and have no host header bindings (so it handles all requests) Third it must have a default site collection at the root of the Web Application but it will not be used for anything (in fact it doesnrsquot need a template assigned to it)
You can read more about HNSCrsquos on TechNet httptechnetmicrosoftcomen-uslibrarycc424952aspx
PowerShell Script Alert The steps in this section are automated in the script SetupSharePointForHNSCps1 found in the files that
accompany this setup guide Open the script and read the header for documentation on how to use it
1 Ensure you are logged into the WingtipServer VM using the account wingtipadministrator | Password1
2 Open Central Administration Start All Programs Microsoft SharePoint 2013 Products SharePoint 2013 Central Administration
3 Select Application Management Manage Web Applications
4 Delete the default Web Application created by the configuration wizard
a) Delete the existing default Web Application
i) Select the Web Application SharePoint ndash 80 the one with the URL of httpwingtipserver and click Delete in the ribbon
ii) When prompted to delete the associated IIS Web Site amp SQL Server database select both options to delete them and click OK
The reason you are doing this is because the setup wizard you ran previously when creating the service applications automatically created it The problem is that it used the same identity (WINGTIPSP_Services) for the app pool that is used for all the service
applications which is not desired
5 Create a new Web Application to handle Host-Named Site Collections (HNSC)
Creating a SharePoint Server 2013 Environment for Development and Testing Version 10
copy Critical Path Training 2012 All Rights Reserved 41
wwwCriticalPathTrainingcom
a) In the ribbon click the New button
b) In the Create New Web Application dialog enter the following values in the properties and click OK Leave all properties not mentioned
i) Select the radio button Create a new IIS web site
(1) Name SharePoint HNSC Host ndash 80
(2) Port 80
ii) Application Pool
(1) Select the radio button Create a new application pool
(a) Application Pool Name SharePoint Default HNSC AppPool
(b) Select a security account for this application pool WINGTIPSP_Content
If WINGTIPSP_Content is not listed as an available managed account create it by selecting the appropriate option and using
Password1 for the password
iii) Database Name and Authentication
(1) Database Name WSS_Content_HNSCDefaultHost
c) This process will take a few moments At the end of the process SharePoint will ask if you want to create a site collection You do but you donrsquot want to do it through the browser as this will not be a HNSC To create a HNSC you must create it via Windows PowerShell
6 Create a default not template site collection at the root of the web application
a) Open SharePoint 2013 Management Shell Start All Programs Microsoft SharePoint 2013 Products SharePoint 2013 Management Shell
7 Create Site Collections for Testing SharePoint amp SharePoint Apps
a) Open SharePoint 2013 Management Shell Start All Programs Microsoft SharePoint 2013 Products SharePoint 2013 Management Shell
b) Get a reference to the HNSC web application you just created by running the following Windows PowerShell script in the SharePoint 2013 Management Shell
$hnscWebApp = Get-SPWebApplication | Where-Object $_DisplayName -eq SharePoint HNSC Host - 80
c) Create a non-templated site at the root of the web application for Workflow to connect to by executing the following Windows PowerShell script in the SharePoint 2013 Management Shell
New-SPSite -Name Root HNSC Site Collection -Url httpwingtipcom -HostHeaderWebApplication $hnscWebApp -OwnerAlias WINGTIPAdministrator
d) Create a team site by executing the following Windows PowerShell script in the SharePoint 2013 Management Shell
New-SPSite -Name Wingtip Intranet -Url httpintranetwingtipcom ndashHostHeaderWebApplication $hnscWebApp -Template STS0 -OwnerAlias WINGTIPAdministrator
e) Create a developer site by executing the following Windows PowerShell script in the SharePoint 2013 Management Shell
New-SPSite -Name Wingtip Developer Site -Url httpdevwingtipcom ndashHostHeaderWebApplication $hnscWebApp -Template DEV0 -OwnerAlias WINGTIPAdministrator
You can only create debug and test apps using a developer site
At this point you now have a site collection to use as a team site (httpintranetwingtipcom) and to develop and test custom SharePoint apps (httpdevwingtipcom)
Creating a SharePoint Server 2013 Environment for Development and Testing Version 10
copy Critical Path Training 2012 All Rights Reserved 42
wwwCriticalPathTrainingcom
Configure SharePoint 2013 for Hosting Apps
In this setup you will setup your SharePoint 2013 environment for hosting apps
PowerShell Script Alert Everything in the next immediate step is provided in the script ConfigureSpFarmForAppsps1 found in the
files that accompany this setup guide Open the script and read the header for documentation on how to use it
1 Ensure you are logged into the WingtipServer VM using the account wingtipadministrator | Password1
2 Create the necessary SharePoint App Management service applications and start the necessary services via Windows PowerShell
a) Open SharePoint 2013 Management Shell Start All Programs Microsoft SharePoint 2013 Products SharePoint 2013 Management Shell
b) Execute the following Windows PowerShell script in the SharePoint 2013 Management Shell
$appHostDomain = appswingtipcom $adminService = Get-Service -Name spadminv4 if ($adminServiceStatus -ne Running) Start-Service $adminService $timerService = Get-Service -Name sptimerv4 if ($timerServiceStatus -ne Running) Start-Service $timerService Set-SPAppDomain $appHostDomain $appMgmtSvcInstance = Get-SPServiceInstance | Where-Object $_GetType()Name -eq AppManagementServiceInstance if ($appMgmtSvcInstanceStatus -ne Online) Start-SPServiceInstance -Identity $appMgmtSvcInstance $appSubSettingSvcInstance = Get-SPServiceInstance | Where-Object $_GetType()Name -eq SPSubscriptionSettingsServiceInstance if ($appSubSettingSvcInstanceStatus -ne Online) Start-SPServiceInstance -Identity $appSubSettingSvcInstance $appPoolServiceApps = Get-SPServiceApplicationPool -Identity SharePoint Web Services Default $appSubSvc = New-SPSubscriptionSettingsServiceApplication ndashApplicationPool $appPoolServiceApps ndashName Settings Service Application ndashDatabaseName SettingsServiceDB $proxySubSvc = New-SPSubscriptionSettingsServiceApplicationProxy ndashServiceApplication $appSubSvc $appAppSvc = New-SPAppManagementServiceApplication -ApplicationPool $appPoolServiceApps -Name App Management Service Application -DatabaseName AppServiceDB $proxyAppSvc = New-SPAppManagementServiceApplicationProxy -ServiceApplication $appAppSvc Set-SPAppSiteSubscriptionName -Name app -Confirm$false
3 Verify the script configured SharePoint 2013 for hosting apps
a) Open Central Administration Start All Programs Microsoft SharePoint 2013 Products SharePoint 2013 Central Administration
b) Verify service applications created
i) Open the Service Applications page Application Management Manage Service Applications
ii) Verify you have two service applications created
(1) App Management Service Application
(2) Settings Service Application
c) Verify service instances are running
i) Open the Services on Server page System Settings Manage Services on Server
ii) Verify the following services are Started
(1) App Management Service
(2) Microsoft SharePoint Foundation Subscription Settings Service
Creating a SharePoint Server 2013 Environment for Development and Testing Version 10
copy Critical Path Training 2012 All Rights Reserved 43
wwwCriticalPathTrainingcom
d) Verify App URLs are correct
i) Open the Configure App URLs page Apps Configure app URLs
ii) Verify the following
(1) App Domain appswingtipcom
(2) App Prefix app
At this point your SharePoint Server 2013 environment is ready to host SharePoint apps
Creating a SharePoint Server 2013 Environment for Development and Testing Version 10
copy Critical Path Training 2012 All Rights Reserved 44
wwwCriticalPathTrainingcom
Start the SharePoint 2013 Sandbox Service
By default the service that executes sandbox solutions is not running In this step you will start the service
1 Open Central Administration Start All Programs Microsoft SharePoint 2013 Products SharePoint 2013 Central Administration
2 Open the Services on Server page System Settings Manage Services on Server
3 Click the Start link to the left of the Microsoft SharePoint Foundation Sandboxed Code Service
At this point your installation can support sandbox solutions
Configure CRL Verification for Disconnected Environments
SharePoint periodically ldquophones homerdquo to a specific address hosted by Microsoft under certain conditions When your environment is disconnected this can cause an unnecessary delay or failures when starting up the sandbox The following steps outline a workaround to bypass this check
1 Launch Notepad as an administrator Start All Programs Accessories right-click Notepad and select Run as Administrator
2 Open the hosts file by selecting File Open and finding the file
cWindowsSystem32Driversetchosts
3 Add the following line to the end of the file
127001 crlmicrosoftcom
4 Save and close the hosts file
Update Internet Explorer to Bypass the App URL amp Automatically Login to SharePoint Sites
In this section you will update Internet Explorer to add the App hosting URL to the bypass list so you can navigate to the domain after deploying SharePoint hosted apps
1 Ensure you are logged into the WingtipServer VM using the account wingtipadministrator | Password1
1 Launch Internet Explorer Start All Programs Internet Explorer
2 Configure Internet Explorer to bypass the App URL
a) In the top-right corner click the gear icon and select Internet Options
b) On the Security tab select the Local Intranet and click the Sites button
c) Uncheck the box next to Automatically detect intranet network
d) Click the Advanced button and add two entries to the Exceptions list
i) httpwingtipcom
ii) httpappswingtipcom
Creating a SharePoint Server 2013 Environment for Development and Testing Version 10
copy Critical Path Training 2012 All Rights Reserved 45
wwwCriticalPathTrainingcom
e) Click the Close button followed by the OK button multiple times to close out of the dialogs
At this point Internet Explorer is setup to bypass your app URL so you can navigate to apps (httpappswingtipcom) as well as automatically authenticate to sites hosted at httpwingtipcom
Exercise 6 Configure SharePoint to Host My Sites
In this exercise you will configure SharePoint to create and host My Sites In order to host My Sites you will need a new Web Application that is configured for Self-Service Site Creation and has a My Site Host site collection
1 Create a new SharePoint web application to host the My Sites
a) Ensure you are logged into the WingtipServer VM using the account wingtipadministrator | Password1
b) Open Central Administration Start All Programs Microsoft SharePoint 2013 Products SharePoint 2013 Central Administration
c) Select Application Management Manage Web Applications
d) In the ribbon click the New button
e) In the Create New Web Application dialog enter the following values in the properties and click OK Leave all properties not mentioned
i) Select the radio button Create a new IIS web site
(1) Name SharePoint MySite Host ndash 80
(2) Port 80
(3) Host Header mywingtipcom
ii) Application Pool
(1) Select the radio button Use existing application pool
(a) Application Pool Name SharePoint Default HNSC AppPool
iii) Database Name and Authentication
(1) Database Name WSS_Content_SocialWingtipCom
f) This process will take a few moments At the end of the process SharePoint will ask if you want to create a site collection Click the link provided to create a new site collection amp continue to the next step
2 Create a My Site Host site collection
a) On the Create Site Collection page use the following information to complete the form and click OK
Creating a SharePoint Server 2013 Environment for Development and Testing Version 10
copy Critical Path Training 2012 All Rights Reserved 46
wwwCriticalPathTrainingcom
i) Title My Site Host
ii) URL
iii) Template Selection My Site Host (found under the Enterprise tab)
iv) Primary Site Collection Administrator WINGTIPAdministrator
3 Update the Web Application to host my sites
a) Within Central Administration in the left-hand navigation navigate to the Manage Web Applications page Application Management Manage Web Applications
b) Select the SharePoint MySite Host ndash 80 web application
c) Click the Managed Paths button in the ribbon
d) Remove the sites managed path and add two new managed paths and click OK
i) personal ndash Wildcard inclusion
ii) my ndash Explicit inclusion
e) With the SharePoint MySite Host ndash 80 web application still selected click the Self-Service Site Creation button
f) On the Self-Service Site Creation page use the following values to complete the form and click OK
i) Site Collections On
4 Next configure the User Profile Service Application My Site settings
a) Browse to the User Profile Service Application management page Application Management Manage Service Applications User Profile Service Application
b) Under the My Site Settings section click the Setup My Sites
c) On the My Site Settings page use the following information to complete the form and click OK
i) My Site Host httpmywingtipcom
ii) Personal Site Location personal
At this point your SharePoint deployment is now configured to automatically create My Sites under httpmywingtipcomPersonalUserName when users first browse to them
Exercise 7 Install amp Configure Workflow Manager 10
In this exercise you will configure the WingtipServer VM to host Workflow Manager 10 and connect it to your SharePoint installation
1 Ensure you are logged into the WingtipServer VM using the account wingtipadministrator | Password1
Verify SQL Server 2012 Network Configuration
In this section yoursquoll verify the network configuration is correct for SQL Server 2012 in order to install Workflow Manager 10
Creating a SharePoint Server 2013 Environment for Development and Testing Version 10
copy Critical Path Training 2012 All Rights Reserved 47
wwwCriticalPathTrainingcom
1 Configure SQL Server 2012 to have the TCPIP connection protocol enabled
a) Open the SQL Server Configuration Manager Start All Programs Microsoft SQL Server 2012 Configuration Tools SQL Server Configuration Manager
b) Expand the hierarchy on the left-hand side to the following SQL Server Connection Manager (local) SQL Server Network Configuration Protocols for MSSQLSERVER
c) In the main window if TCPIP is Disabled right-click TCPIP and select Enable
d) When prompted with a warning click OK
2 SQL Server must be restarted in order to reflect this change
a) In the hierarchy on the left-hand side of the window select SQL Server Services
b) Right-click SQL Server (MSSQLSERVER) and select Restart
At this point SQL Server is now configured with the TCPIP protocol enabled a requirement when configuring Service Bus
Configure the Workflow Service Account with the Necessary Rights
In this section you will verify the service account that will run Workflow Manager and Service Bus
1 Ensure you are logged into the WingtipServer VM using the account WINGTIPadministrator | Password1
2 Grant the WINGTIPSP_Content account securityadmin amp dbcreator permissions in SQL Server
a) Launch SQL Server Management Studio Start All Programs Microsoft SQL Server 2012 SQL Server Management Studio
b) When SQL Server Management Studio launches within the Connect to Server dialog login using the default settings and click Connect
c) In the Object Explorer tool window expand the WINGTIPSERVER server hierarchy to the Security Logins node
d) Find the WINGTIPSP_Content account right-click it and select Properties
Creating a SharePoint Server 2013 Environment for Development and Testing Version 10
copy Critical Path Training 2012 All Rights Reserved 48
wwwCriticalPathTrainingcom
e) In the Select a page pane select Server Roles
f) Check securityadmin amp dbcreator and click OK
g) Close SQL Server Management Studio
3 Add the Workflow service account to the local administrators group
a) Open the Active Directory Users and Computers window Start Administrative Tools Active Directory Users and Computers
b) In the hierarchy on the left-hand side of the window expand it to the following Active Directory Users and Computers wingtipcom Builtin
c) In the main window right-click Administrators and select Properties
d) In the Administrators Properties dialog select the Members tab and click Add
e) In the Enter the object names to select box enter wingtipsp_content and click the Check Names button
f) In the Administrators Properties dialog click OK
g) Close the Active Directory Users and Computers window
At this point the service account that will host Workflow Manager and Service Bus has been configured correctly
Creating a SharePoint Server 2013 Environment for Development and Testing Version 10
copy Critical Path Training 2012 All Rights Reserved 49
wwwCriticalPathTrainingcom
Download amp Install Workflow Manager and Service Bus
In this section you will install Workflow Manager and Service Bus
1 Ensure you are logged into the WingtipServer VM using the account WINGTIPSP_Content | Password1
It is important you are logged in as the user that will run workflow when you install amp configure Workflow Manager and Service Bus
2 Launch the Web Platform Installer Start All Programs Microsoft Web Platform Installer
a) If the Web Platform Installer is not present on your machine you can download amp install it from here httpwwwmicrosoftcomwebdownloadsplatformaspx
If you do not have internet access within the virtual machine it is possible to download everything needed for workflow using the command line version of the Web Platform Installer (WebPICMD) You can get WebPICMD from httplearniisnetpageaspx1072web-platform-installer-v4-command-line-webpicmdexe-preview-release Specifically for
workflow enter the following command to download Workflow Beta 1 and all prerequisites
webpicmd offline ProductsWorkflow Pathc[path]
3 When the Web Platform Installer loads execute a search for Workflow select Workflow Manager 10 and click Add
4 Click the Install button at the bottom of the Web Platform Installer 40 window
5 On the Prerequisites page click I Accept
Note The Web Platform Installer 40 may prompt you to keep certain products updated using Microsoft Update If it does select Use Microsoft Update when I check for updates (recommended) and click Continue
6 When the installer completes the following dialog will appear Click Continue and then Finish to start the configuration process
Creating a SharePoint Server 2013 Environment for Development and Testing Version 10
copy Critical Path Training 2012 All Rights Reserved 50
wwwCriticalPathTrainingcom
At this point Workflow Manager amp Service Bus are installed
Configure Workflow Manager and Service Bus
In this section you will install Workflow Manager and Service Bus
1 If the Workflow Manager Configuration Wizard is not open open it Start All Programs Workflow Manager 10 Workflow Configuration
2 On the Welcome page click Configure Workflow Manager with Default Settings (Recommended)
Creating a SharePoint Server 2013 Environment for Development and Testing Version 10
copy Critical Path Training 2012 All Rights Reserved 51
wwwCriticalPathTrainingcom
3 On the New Farm Configuration page do the following
a) In the section Configure Service Account set the credentials to
i) User ID sp_contentwingtipcom
ii) Password Password1
b) Check the Allow Workflow management over HTTP on this computer checkbox
Ensure the username is entered in the fully qualified UPN format not as the default shows in the installer (sp_contentwingtip) or the domainusername format
In a production environment you should be doing everything over SSL
c) Click the Test Connection button to verify the connection credentials before proceeding
Creating a SharePoint Server 2013 Environment for Development and Testing Version 10
copy Critical Path Training 2012 All Rights Reserved 52
wwwCriticalPathTrainingcom
d) In the Certificate Generation Key and Confirm Certificate Generation Key enter Password1 into both fields
4 Click the right arrow in the bottom right corner to proceed
5 On the Summary page review your settings and click the check at the bottom right of the widow to start the configuration process
Creating a SharePoint Server 2013 Environment for Development and Testing Version 10
copy Critical Path Training 2012 All Rights Reserved 53
wwwCriticalPathTrainingcom
6 After a few minutes the Configuration Progress screen will show that everything has been configured correctly
Creating a SharePoint Server 2013 Environment for Development and Testing Version 10
copy Critical Path Training 2012 All Rights Reserved 54
wwwCriticalPathTrainingcom
7 Click the check in the bottom right corner
At this point Workflow Manager amp Service Bus has been installed and a new Workflow Manager farm has been created The next step is to connect the SharePoint 2013 farm to the Workflow Manager farm
Connect SharePoint 2013 to Workflow Manager
In this section you will connect SharePoint 2013 and Workflow Manager together
1 Ensure you are logged into the WingtipServer VM using the account WINGTIPadministrator | Password1
2 Get the Workflow Manager endpoint
a) Open the Workflow Manager PowerShell console Start All Programs Workflow Manager 10
b) Execute the Windows PowerShell following cmdlet
Get-WFFarm | ft HttpPort
c) Take note of this port (12291) This port number is what you will use to connect the SharePoint 2013 farm to the Workflow Manager 10 farm
In production you should connect to the HTTPS port listed in the HttpsPort property when you run Get-WFFarm
d) Close the Workflow Manager PowerShell window
3 Connect the SharePoint 2013 farm to Workflow Manager
Creating a SharePoint Server 2013 Environment for Development and Testing Version 10
copy Critical Path Training 2012 All Rights Reserved 55
wwwCriticalPathTrainingcom
a) Open SharePoint 2013 Management Shell Start All Programs Microsoft SharePoint 2013 Products SharePoint 2013 Management Shell
b) Execute the following Windows PowerShell script in the SharePoint 2013 Management Shell
Register-SPWorkflowService ndashSPSite httpintranetwingtipcom ndashWorkflowHostUri httpwingtipserver12291 ndashAllowOAuthHttp
This script is telling SharePoint the endpoint it should use to talk to Workflow Manager as well as Workflow Manager the SharePoint site collection it should talk to for calls into the CSOM It is also configuring all communication over HTTP rather than HTTPS for performance reasons In production you should always use HTTPS
This step will take a moment with no feedback during the process Be patient
c) Close the SharePoint 2013 Management Shell
At this point the SharePoint 2013 farm is connected to the Workflow Manager 10 farm
Configure SharePoint User Profile Service Application AD Sync
Users in SharePoint 2013 are validated by Workflow Manager against SharePoint to ensure they have permissions to start a workflow This is done by looking up the user by their AD UserPrincipalName (UPN) attribute in the User Profile Service Application (UPA) If no matching user is found the workflow will be automatically cancelled by Workflow Manager In this section you will setup UPA to connect amp sync with the local Active Directory so user accounts in AD will have their UPN synchronized to UPA
1 Open Central Administration Start All Programs Microsoft SharePoint 2013 Products SharePoint 2013 Central Administration
2 Go to the User Profile Service Application management page Application Management Manage Service Applications User Profile Service Application
3 The first step is to configure the User Profile Service Application to allow for Active Directory (AD) synchronization
a) Under Synchronization select Configure Synchronization Settings
b) For Synchronization select Use SharePoint Active Directory Import and click OK
4 Next establish a connection to the wingtipcom AD
a) Under Synchronization select Configure Synchronization Connections
b) On the Synchronization Connections page select Create New Connection
c) Enter the following values on this form and click OK
i) Connection Name WINGTIPCOM AD
ii) Type Active Directory Import
iii) Connection Settings
(1) Fully Qualified Domain Name wingtipcom
(2) Authentication Provider Type Windows Authentication
(3) Account Name WINGTIPAdministrator
(4) Password (and Confirm Password) Password1
iv) Containers
(1) Click Populate Containers
(2) After it loads check the box next to WINGTP or click the Select All button below the box
5 Go back to the User Profile Service Application management page Application Management Manage Service Applications User Profile Service Application
6 Finally start a synchronization import
a) Under Synchronization select Start Profile Synchronization
Creating a SharePoint Server 2013 Environment for Development and Testing Version 10
copy Critical Path Training 2012 All Rights Reserved 56
wwwCriticalPathTrainingcom
b) Select Start Full Synchronization and click OK
c) You will be taken back to the User Profile Service Application management page Notice in the top-right corner there is a status block that reports how many profiles are in the UPA database Refresh the page to see it increase to a handful of profiles as the import process runs
At this point you have successfully configured the User Profile Service Application to import profiles from the local AD
Exercise 8 Install the Microsoft Office 2013 Professional Clients
In this exercise you will install the Microsoft Office 2013 client applications
1 Download the Office 2013 into the WingtipServer VM For this you need to create an Office 365 Trial account login to Office 365 go to the Admin Dashboard and then download the latest version httpwwwmicrosoftcomofficepreviewentry-office-preview
2 Download the SharePoint Designer 2013 into the WingtipServer VM from here httpwwwmicrosoftcomen-usdownloaddetailsaspxid=35491
3 Download the Visio Professional 2013 into the WingtipServer VM from here httptechnetmicrosoftcomen-usevalcenterhh973399
Install Microsoft Office Professional Plus 2013
In this section you will install the Microsoft Office 2013 clients
1 Ensure you are logged into the WingtipServer VM using the account WINGTIPadministrator | Password1
2 Execute the installer OfficeProfessionalPlus_English_x64exe
3 On the Read the Microsoft Software License Terms dialog click the checkbox next to I accept the terms of this agreement and click Continue
4 On the Choose the installation you want dialog click the Install Now button
5 The installer will proceed and install all the Office products
6 When the installer completes click the Close button
7 Apply your Office Professional Plus 2013 license key
a) Launch Word 2013 Start All Programs Microsoft Office 2013 Word 2013
b) In the First things first dialog select Use recommended settings and click Accept
c) In the Welcome to Office dialog that opens click the [X] icon in the top-right corner to close it
d) In the left-hand pane click Open Other Documents
e) In the left-hand pane click Account
f) In the Product Information section within the Activation Required box click Change Product Key
g) Enter your license key for Office Professional Plus 2013 check the box next to Attempt to automatically activate my product online and click Install
h) Click OK
At this point you have installed Office Professional Plus 2013
Install Microsoft Office Visio 2013
In this section you will install Microsoft Office 2013 Visio
1 Ensure you are logged into the WingtipServer VM using the account WINGTIPadministrator | Password1
2 Execute the installer VisioProfessional_English_x64exe
3 On the Read the Microsoft Software License Terms dialog click the checkbox next to I accept the terms of this agreement and click Continue
Creating a SharePoint Server 2013 Environment for Development and Testing Version 10
copy Critical Path Training 2012 All Rights Reserved 57
wwwCriticalPathTrainingcom
4 On the Choose the installation you want dialog click the Install Now button
5 The installer will proceed and install all Visio 2013
6 When the installer completes click the Close button
7 Apply your Visio 2013 license key
a) Launch Visio 2013 Start All Programs Microsoft Office 2013 Visio 2013
b) In the First things first dialog select Use recommended settings and click Accept
c) In the Welcome to Office dialog that opens click the X icon in the top-right corner to close it
d) In the left-hand pane click Open Other Documents
e) In the left-hand pane click Account
f) In the Product Information section within the Activation Required box click Change Product Key
g) Enter your license key for Visio 2013 check the box next to Attempt to automatically activate my product online and click Install
h) Click OK
At this point you have installed Visio 2013
Install Microsoft Office 2013 SharePoint Designer
In this section you will install Microsoft Office 2013 SharePoint Designer
1 Ensure you are logged into the WingtipServer VM using the account WINGTIPadministrator | Password1
2 Execute the installer SharePointDesigner_English_x64exe
3 On the Read the Microsoft Software License Terms dialog click the checkbox next to I accept the terms of this agreement and click Continue
4 On the Choose the installation you want dialog click the Install Now button
5 The installer will proceed and install all SharePoint Designer 2013
6 When the installer completes click the Close button
At this point you have installed SharePoint Designer 2013
Exercise 9 Install Visual Studio 2012
In this exercise you will install Visual Studio 2012
1 Ensure you are logged into the WingtipServer VM using the account WINGTIPadministrator | Password1
2 Start the install of Visual Studio 2012 Ultimate Trial by downloading the installer from here httpwwwmicrosoftcomvisualstudio11en-usdownloads
3 On the installation splash screen check the box next to I agree to the License terms and conditions and click the Next button
Creating a SharePoint Server 2013 Environment for Development and Testing Version 10
copy Critical Path Training 2012 All Rights Reserved 58
wwwCriticalPathTrainingcom
4 On the Optional Features to install dialog click Install
5 After some time the installer will complete Click the Launch button to launch Visual Studio 2012
Creating a SharePoint Server 2013 Environment for Development and Testing Version 10
copy Critical Path Training 2012 All Rights Reserved 59
wwwCriticalPathTrainingcom
6 In the Choose Default Environment Settings select Visual C Development Settings and click Start Visual Studio
7 Close Visual Studio 2012
At this point Visual Studio 2012 RTM is installed
Install Office amp SharePoint 2013 Developer Tools
In this section you will install the Office and SharePoint 2013 developer tools for Visual Studio
1 Ensure you are logged into the WingtipServer VM using the account WINGTIPadministrator | Password1
2 Launch the Web Platform Installer Start All Programs Microsoft Web Platform Installer
3 In the search box at the top-right corner of the Web Platform Installer 40 window type sharepoint and press Enter
4 Click the Add button to the right of Microsoft Office Developer Tools for Visual Studio 2012 - Preview 2
5 Click the Install button at the bottom of the Web Platform Installer 40 window
6 On the Prerequisites page click I Accept
Creating a SharePoint Server 2013 Environment for Development and Testing Version 10
copy Critical Path Training 2012 All Rights Reserved 60
wwwCriticalPathTrainingcom
At this point you have installed the SharePoint 2013 amp Office 2013 development tools in Visual Studio 2012
Creating a SharePoint Server 2013 Environment for Development and Testing Version 10
copy Critical Path Training 2012 All Rights Reserved 61
wwwCriticalPathTrainingcom
Appendix 1 Download Manifest
The following lists everything referenced that you will or may need to download in this environment
Windows Server 2008 R2 with Service Pack 1 (installer ISO)
o httptechnetmicrosoftcomen-usevalcenterdd459137aspx
Windows Server 2008 R2 with Service Pack 1 (prebuilt VHD)
o httpwwwmicrosoftcomdownloadsdetailsaspxFamilyId=9040a4be-c3cf-44a5-9052-a70314452305
Windows Server 2008 R2 Service Pack 1
o httpwwwmicrosoftcomen-usdownloaddetailsaspxid=5842
SQL Server 2012 Trial
o httpwwwmicrosoftcombetaexperiencepdSQL2012EvalCTAenusdefaultaspx
SharePoint Server 2013
o httptechnetmicrosoftcomen-USevalcenterhh973397aspx
Hotfixes for SharePoint Server 2013 (post-install)
o KB2554876 The SharePoint Parsing Process Crashes in Windows Server 2008 R2
o KB2708075 IIS 75 Configurations are not Updated when you use the ServerManager Class to Commit
Configuration Changes
o KB2759112 Hotfix is Available for NET Framework 45 that Resolves an ASPNET Race Condition Issue in
Windows Server 2008 R2 Windows Server 2008 R2 SP1
o KB2765317 Hotfix is Available for NET Framework 45 that Resolves an ASPNET Race Condition Issue in
Windows 8 Windows RT and Windows Server 2012
Web Platform Installer
o httpwwwmicrosoftcomwebdownloadsplatformaspx
Web Platform Installer ndash Command Line Version
o httplearniisnetpageaspx1072web-platform-installer-v4-command-line-webpicmdexe-preview-release
Workflow Manager 10
o Download using the Microsoft Web Platform Installer
Office 2013
o httpwwwmicrosoftcomofficepreviewentry-office-preview
SharePoint Designer 2013
o httpwwwmicrosoftcomen-usdownloaddetailsaspxid=35491
Visio Professional 2013
o httptechnetmicrosoftcomen-usevalcenterhh973399
Visual Studio 2012
o httpwwwmicrosoftcomvisualstudio11en-usdownloads
Office Developer Tools for Visual Studio 2012 ndash Preview 2
o Download using the Microsoft Web Platform Installer
Creating a SharePoint Server 2013 Environment for Development and Testing Version 10
copy Critical Path Training 2012 All Rights Reserved 62
wwwCriticalPathTrainingcom
Appendix 2 Windows PowerShell Script Manifest
The following lists all Windows PowerShell scripts that are provided with this setup guide
AddDisableLoopbackCheckRegKeyps1
o The following steps automate creating the registry key outlined as Method 2 in the Microsoft Knowledgebase article
httpsupportmicrosoftcomkb896861 using Windows PowerShell This key DisableLoopbackCheck will allow
you to browse SharePoint sites on the same machine Without this key (or following Method 1 in the KB article) you
would need to browse any SharePoint sites from a different computer than the one which SharePoint is installed on
ConfigureSpFarmForAppsps1
o Configures a SharePoint 2013 for hosting apps This ensures everything you need is installed running and
configured This is documented here httpmsdnmicrosoftcomen-uslibraryfp179923(v=office15)
CreateSpServiceAccountsps1
o Creates the minimal necessary service accounts for SharePoint Server 2013 SP_Farm SP_Content amp
SP_Services
SetupSharePointForHNSCps1
o Configures a SharePoint 2013 install for hosting Host-Named Site Collections (HNSC) This involves creating a Web
Application in SharePoint that has no host header bindings Using DNS all requests are mapped to this Web
Application You then create the site collections via PowerShell as you cant create HNSCs via the browser (Central
Administration)
Creating a SharePoint Server 2013 Environment for Development and Testing Version 10
copy Critical Path Training 2012 All Rights Reserved 63
wwwCriticalPathTrainingcom
Appendix 3 Create Sample Adventure Works Database
The following steps document downloading and installing the sample Adventure Works OLTP database provided by Microsoft
1 Launch Internet Explorer and navigate to httpmsftdbprodsamplescodeplexcom
2 Download the Adventure Works 2012 OLTP Script
3 Extract the ZIP into a folder on the desktop
4 Launch SQL Server Management Studio Start All Programs Microsoft SQL Server 2012 SQL Server Management Studio
5 When SQL Server Management Studio launches within the Connect to Server dialog login using the default settings and click Connect
6 Within SQL Server Management Studio select File Open File
7 Select the file instawdbsql from the extracted ZIP and click Open
8 If prompted to re-login to the database engine do it
9 Select Query SQLCMD Mode
10 Scroll down to line 42 the line that starts with the following
setvar SqlSamplesSourceDataPath
11 Change the folder location of where you unzipped the Adventure Works 2012 OLTP Script
12 Select Query Execute
13 When the script completes the AdventureWorks2012 database will have been created
Creating a SharePoint Server 2013 Environment for Development and Testing Version 10
copy Critical Path Training 2012 All Rights Reserved 64
wwwCriticalPathTrainingcom
Change Log
Change Version Description
August 22 2012 v 01 Pre-release for review
August 27 2012 v 02 Initial public release ndash install guide based on SharePoint Server Beta 2
August 28 2012 v 03 Updated URL for the site collection used to connect SharePoint to WAW
August 31 2012 v 04 Typo Removed SQL Server Analysis Services as part of the install Not required in a
SharePoint dev box (unless you are doing business intelligence which is not covered
in the guide)
Updated all references to Windows Azure Workflow to Workflow Manager the new
official name for the new workflow product
Updated SetupSharePointForHNSCps1 script to lookup HNSC Web Application by
name rather than URL which is more reliable
Typo Updated WingtipAllUp public NIC to use a different IP than the WingtipDC
Typo Replaced a reference to WingtipServer with WingtipDC
Typo Fixed handful of minor typos
September 1 2012 v 05 Removed SQL Server Reporting Services from install guide
Added step to uncheck IErsquos ldquoAutomatically detect proxyrdquo
Added post workflow install steps to setup User Profile Service Application to sync with
local Active Directory
September 5 2012 v 06 Added step to create a default root site collection in the HNSC web app
Updated minor typos and added extra notes for context
Updated PowerShell script SetupSharePointForHNSCps1 to remove content
database of default Web Application when setting up HNSC Web App
Added a new exercise 8 (after SharePoint install amp config and before the Workflow
install and config) to setup support for My Sites
October 20 2012 v 07 Updated script SetupSharePointForHNSCps1 to fix a bug where it would fail on line
111 if you didnrsquot already have a WINGTIPSP_Content managed account
Added section to bypass SharePointrsquos check for crlmicrosoftcom
Updated workflowrsquos registration PowerShell script to point to
httpintranetwingtipcom
Switched order of post-SharePoint install to setup HSNC hosting before configuring for
hosting apps
November 29 2012
v 10 Changed setup guide to use a single VM instead of two VMs
Updated guide for SharePoint 2013 RTM
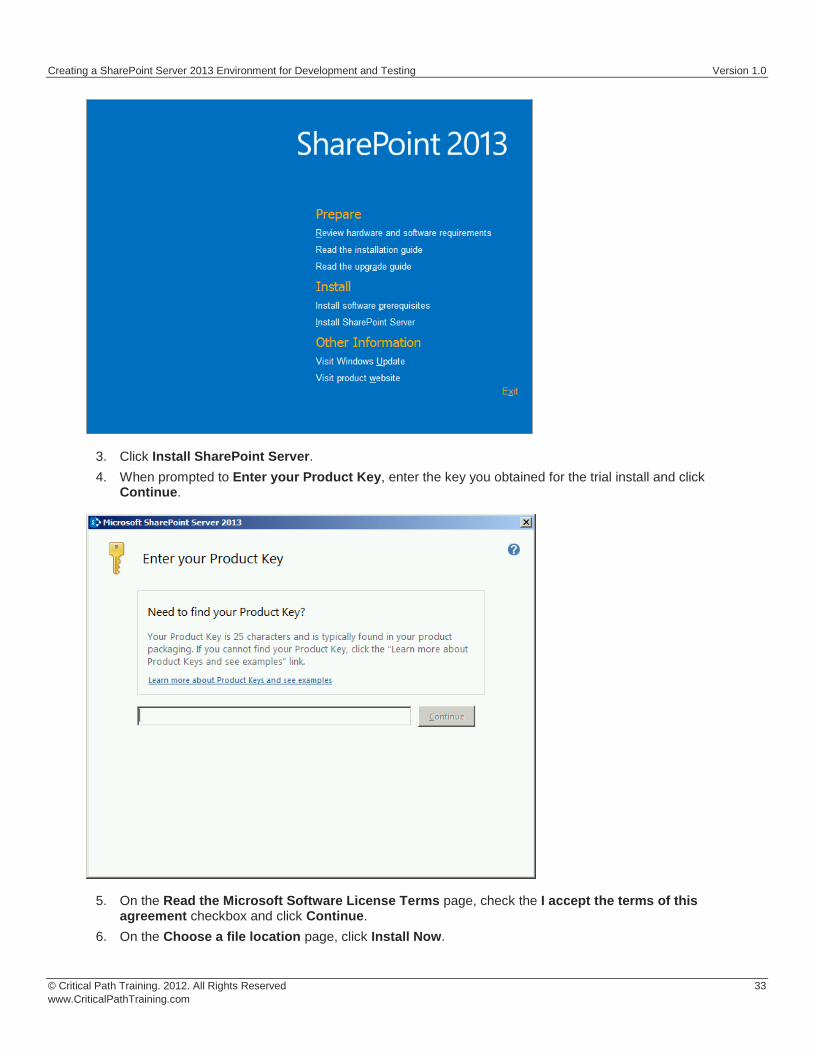
Creating a SharePoint Server 2013 Environment for Development and Testing Version 10
copy Critical Path Training 2012 All Rights Reserved 34
wwwCriticalPathTrainingcom
7 When the installation is complete select the Run the SharePoint Products Configuration Wizard checkbox and click Close
8 On the Welcome to SharePoint Products page click Next
a) If prompted to start or reset services click Yes
9 On the Connect to a server farm page select Create a new server farm and click Next
10 On the Specify Configuration Database Settings page use the following to complete the page and click Next
a) Database server WINGTIPSERVER
b) Database name SharePoint_Config
c) Username WINGTIPSP_Farm
d) Password Password1
Creating a SharePoint Server 2013 Environment for Development and Testing Version 10
copy Critical Path Training 2012 All Rights Reserved 35
wwwCriticalPathTrainingcom
11 On the Specify Farm Security Settings page for the Passphrase and Confirm Passphrase boxes enter Password1 and click Next
12 On the Configure SharePoint Central Administration Web Application page check the Specify port number checkbox and enter a value of 9999 then Click Next
Creating a SharePoint Server 2013 Environment for Development and Testing Version 10
copy Critical Path Training 2012 All Rights Reserved 36
wwwCriticalPathTrainingcom
13 On the Completing the SharePoint Products Configuration Wizard page click Next
14 When the installer completes it will display the Confirmation Successful page
15 Click Finish This will launch Internet Explorer to go through the configuration process
Creating a SharePoint Server 2013 Environment for Development and Testing Version 10
copy Critical Path Training 2012 All Rights Reserved 37
wwwCriticalPathTrainingcom
At this point you have successfully installed SharePoint Server 2013
Configure SharePoint Server 2013
In this section you will create a new SharePoint Server 2013 farm and perform minimal configuration tasks
After installing SharePoint Sever 2013 the SharePoint Products Configuration Wizard will launch the browser-based Initial Farm Configuration Wizard
1 In the first page of the wizard you are prompted to Help Make SharePoint Better Select which ever option you want and click OK
2 On the Welcome page that asks How do you want to configure your SharePoint farm click the Start the Wizard button
3 On the Services page do the following and then click Next
a) Service Account Select Create new managed account
i) Username WINGTIPSP_Services
ii) Password Password1
b) Services Uncheck the following services
Creating a SharePoint Server 2013 Environment for Development and Testing Version 10
copy Critical Path Training 2012 All Rights Reserved 38
wwwCriticalPathTrainingcom
i) Access Services 2010
ii) App Management Service
In SharePoint Server 2013 the Search Service Application processes specifically noderunnerexe can consume a considerable amount of memory and processor time If you are not going to work with search you might consider unchecking this option for now You can always go back into Central Administration and create a new instance of the Search Service Application at a later date if you need it
Why did we remove Access Services 2010 amp App Management Service service applications The Access Services 2010 service application is included for backwards compatibility and isnrsquot needed in new installations unless you are migrating solutions built with Access Services 2010 from SharePoint Server 2010 (if so you can create this service application later within Central Administration Application Management Manage Service Applications) The App Management Service service application will be created in a later step in this setup guide therefor it is skipped here
4 The creation of the service applications can take quite a while so be patient If it exceeds 20 minutes it is fairly safe to assume the page is hung up One option is to close the browser then launch Central Administration (Start All Programs Microsoft SharePoint 2013 Products SharePoint 2013 Central Administration) and look at the Service Application page (Application Management Manage Service Applications) to see if they were all created
Configure DNS
In this section you will configure DNS for hosting SharePoint sites amp Apps
1 Ensure you are logged into the WingtipServer VM using the account wingtipadministrator | Password1
2 Open the DNS window Start Administrative Tools DNS
3 Expand the hierarchy on the left-hand side of the window until you get to DNS WINGTIPSERVER Forward Lookup Zones wingtipcom
4 Create a new wildcard so all requests for http[]wingtipcom will be forwarded to our SharePoint machine
a) Next right-click wingtipcom and select New Host (A or AAAA)
Creating a SharePoint Server 2013 Environment for Development and Testing Version 10
copy Critical Path Training 2012 All Rights Reserved 39
wwwCriticalPathTrainingcom
b) In the New Host dialog enter the following and click OK
i) Alias Name
ii) IP Address 192168150102 Then click Add Host The following figure shows how this looks
This new record is telling DNS to forward any request for http[]wingtipcom to the webserver WINGTIPSERVER where the
requests will be served by SharePoint
5 Verify this DNS entry is working
a) Open Windows PowerShell Start All Programs Accessories Windows PowerShell Windows PowerShell
b) Run the following commands and press ENTER
PS CUsersAdministratorgt nslookup somethingwingtipcom PS CUsersAdministratorgt nslookup somethingappswingtipcom
c) You should get a response that points to the WingtipServer server as shown in the following figure
Creating a SharePoint Server 2013 Environment for Development and Testing Version 10
copy Critical Path Training 2012 All Rights Reserved 40
wwwCriticalPathTrainingcom
Configure SharePoint Server 2013 for Host-Named Site Collections amp Create Initial Site
Collections
In this section you will create new SharePoint 2013 site collections for testing and hosting apps
Microsoft recommends to create host-named site collections (HNSC) instead of using the path based site collection addressing The difference is the following a path based site created at something such as httpintranetwingtipcomsitesdevtest as an HNSC site would be more like httpdevtestwingtipcom This is how it works in the cloud (Office 365) and it scales much better for on-prem
deployments This setup guide will show you how to setup your environment to create HNSC The only downside to this approach is that you canrsquot create site collections within Central Administration it must be done via Windows PowerShell API (because Central Administration doesnrsquot instruct you where to put the site
This is implemented in various parts First DNS must be configured to send all requests for httpwingtipcom to a Web Application
(implemented in the last section) Second this Web Application must be extended with SharePoint and have no host header bindings (so it handles all requests) Third it must have a default site collection at the root of the Web Application but it will not be used for anything (in fact it doesnrsquot need a template assigned to it)
You can read more about HNSCrsquos on TechNet httptechnetmicrosoftcomen-uslibrarycc424952aspx
PowerShell Script Alert The steps in this section are automated in the script SetupSharePointForHNSCps1 found in the files that
accompany this setup guide Open the script and read the header for documentation on how to use it
1 Ensure you are logged into the WingtipServer VM using the account wingtipadministrator | Password1
2 Open Central Administration Start All Programs Microsoft SharePoint 2013 Products SharePoint 2013 Central Administration
3 Select Application Management Manage Web Applications
4 Delete the default Web Application created by the configuration wizard
a) Delete the existing default Web Application
i) Select the Web Application SharePoint ndash 80 the one with the URL of httpwingtipserver and click Delete in the ribbon
ii) When prompted to delete the associated IIS Web Site amp SQL Server database select both options to delete them and click OK
The reason you are doing this is because the setup wizard you ran previously when creating the service applications automatically created it The problem is that it used the same identity (WINGTIPSP_Services) for the app pool that is used for all the service
applications which is not desired
5 Create a new Web Application to handle Host-Named Site Collections (HNSC)
Creating a SharePoint Server 2013 Environment for Development and Testing Version 10
copy Critical Path Training 2012 All Rights Reserved 41
wwwCriticalPathTrainingcom
a) In the ribbon click the New button
b) In the Create New Web Application dialog enter the following values in the properties and click OK Leave all properties not mentioned
i) Select the radio button Create a new IIS web site
(1) Name SharePoint HNSC Host ndash 80
(2) Port 80
ii) Application Pool
(1) Select the radio button Create a new application pool
(a) Application Pool Name SharePoint Default HNSC AppPool
(b) Select a security account for this application pool WINGTIPSP_Content
If WINGTIPSP_Content is not listed as an available managed account create it by selecting the appropriate option and using
Password1 for the password
iii) Database Name and Authentication
(1) Database Name WSS_Content_HNSCDefaultHost
c) This process will take a few moments At the end of the process SharePoint will ask if you want to create a site collection You do but you donrsquot want to do it through the browser as this will not be a HNSC To create a HNSC you must create it via Windows PowerShell
6 Create a default not template site collection at the root of the web application
a) Open SharePoint 2013 Management Shell Start All Programs Microsoft SharePoint 2013 Products SharePoint 2013 Management Shell
7 Create Site Collections for Testing SharePoint amp SharePoint Apps
a) Open SharePoint 2013 Management Shell Start All Programs Microsoft SharePoint 2013 Products SharePoint 2013 Management Shell
b) Get a reference to the HNSC web application you just created by running the following Windows PowerShell script in the SharePoint 2013 Management Shell
$hnscWebApp = Get-SPWebApplication | Where-Object $_DisplayName -eq SharePoint HNSC Host - 80
c) Create a non-templated site at the root of the web application for Workflow to connect to by executing the following Windows PowerShell script in the SharePoint 2013 Management Shell
New-SPSite -Name Root HNSC Site Collection -Url httpwingtipcom -HostHeaderWebApplication $hnscWebApp -OwnerAlias WINGTIPAdministrator
d) Create a team site by executing the following Windows PowerShell script in the SharePoint 2013 Management Shell
New-SPSite -Name Wingtip Intranet -Url httpintranetwingtipcom ndashHostHeaderWebApplication $hnscWebApp -Template STS0 -OwnerAlias WINGTIPAdministrator
e) Create a developer site by executing the following Windows PowerShell script in the SharePoint 2013 Management Shell
New-SPSite -Name Wingtip Developer Site -Url httpdevwingtipcom ndashHostHeaderWebApplication $hnscWebApp -Template DEV0 -OwnerAlias WINGTIPAdministrator
You can only create debug and test apps using a developer site
At this point you now have a site collection to use as a team site (httpintranetwingtipcom) and to develop and test custom SharePoint apps (httpdevwingtipcom)
Creating a SharePoint Server 2013 Environment for Development and Testing Version 10
copy Critical Path Training 2012 All Rights Reserved 42
wwwCriticalPathTrainingcom
Configure SharePoint 2013 for Hosting Apps
In this setup you will setup your SharePoint 2013 environment for hosting apps
PowerShell Script Alert Everything in the next immediate step is provided in the script ConfigureSpFarmForAppsps1 found in the
files that accompany this setup guide Open the script and read the header for documentation on how to use it
1 Ensure you are logged into the WingtipServer VM using the account wingtipadministrator | Password1
2 Create the necessary SharePoint App Management service applications and start the necessary services via Windows PowerShell
a) Open SharePoint 2013 Management Shell Start All Programs Microsoft SharePoint 2013 Products SharePoint 2013 Management Shell
b) Execute the following Windows PowerShell script in the SharePoint 2013 Management Shell
$appHostDomain = appswingtipcom $adminService = Get-Service -Name spadminv4 if ($adminServiceStatus -ne Running) Start-Service $adminService $timerService = Get-Service -Name sptimerv4 if ($timerServiceStatus -ne Running) Start-Service $timerService Set-SPAppDomain $appHostDomain $appMgmtSvcInstance = Get-SPServiceInstance | Where-Object $_GetType()Name -eq AppManagementServiceInstance if ($appMgmtSvcInstanceStatus -ne Online) Start-SPServiceInstance -Identity $appMgmtSvcInstance $appSubSettingSvcInstance = Get-SPServiceInstance | Where-Object $_GetType()Name -eq SPSubscriptionSettingsServiceInstance if ($appSubSettingSvcInstanceStatus -ne Online) Start-SPServiceInstance -Identity $appSubSettingSvcInstance $appPoolServiceApps = Get-SPServiceApplicationPool -Identity SharePoint Web Services Default $appSubSvc = New-SPSubscriptionSettingsServiceApplication ndashApplicationPool $appPoolServiceApps ndashName Settings Service Application ndashDatabaseName SettingsServiceDB $proxySubSvc = New-SPSubscriptionSettingsServiceApplicationProxy ndashServiceApplication $appSubSvc $appAppSvc = New-SPAppManagementServiceApplication -ApplicationPool $appPoolServiceApps -Name App Management Service Application -DatabaseName AppServiceDB $proxyAppSvc = New-SPAppManagementServiceApplicationProxy -ServiceApplication $appAppSvc Set-SPAppSiteSubscriptionName -Name app -Confirm$false
3 Verify the script configured SharePoint 2013 for hosting apps
a) Open Central Administration Start All Programs Microsoft SharePoint 2013 Products SharePoint 2013 Central Administration
b) Verify service applications created
i) Open the Service Applications page Application Management Manage Service Applications
ii) Verify you have two service applications created
(1) App Management Service Application
(2) Settings Service Application
c) Verify service instances are running
i) Open the Services on Server page System Settings Manage Services on Server
ii) Verify the following services are Started
(1) App Management Service
(2) Microsoft SharePoint Foundation Subscription Settings Service
Creating a SharePoint Server 2013 Environment for Development and Testing Version 10
copy Critical Path Training 2012 All Rights Reserved 43
wwwCriticalPathTrainingcom
d) Verify App URLs are correct
i) Open the Configure App URLs page Apps Configure app URLs
ii) Verify the following
(1) App Domain appswingtipcom
(2) App Prefix app
At this point your SharePoint Server 2013 environment is ready to host SharePoint apps
Creating a SharePoint Server 2013 Environment for Development and Testing Version 10
copy Critical Path Training 2012 All Rights Reserved 44
wwwCriticalPathTrainingcom
Start the SharePoint 2013 Sandbox Service
By default the service that executes sandbox solutions is not running In this step you will start the service
1 Open Central Administration Start All Programs Microsoft SharePoint 2013 Products SharePoint 2013 Central Administration
2 Open the Services on Server page System Settings Manage Services on Server
3 Click the Start link to the left of the Microsoft SharePoint Foundation Sandboxed Code Service
At this point your installation can support sandbox solutions
Configure CRL Verification for Disconnected Environments
SharePoint periodically ldquophones homerdquo to a specific address hosted by Microsoft under certain conditions When your environment is disconnected this can cause an unnecessary delay or failures when starting up the sandbox The following steps outline a workaround to bypass this check
1 Launch Notepad as an administrator Start All Programs Accessories right-click Notepad and select Run as Administrator
2 Open the hosts file by selecting File Open and finding the file
cWindowsSystem32Driversetchosts
3 Add the following line to the end of the file
127001 crlmicrosoftcom
4 Save and close the hosts file
Update Internet Explorer to Bypass the App URL amp Automatically Login to SharePoint Sites
In this section you will update Internet Explorer to add the App hosting URL to the bypass list so you can navigate to the domain after deploying SharePoint hosted apps
1 Ensure you are logged into the WingtipServer VM using the account wingtipadministrator | Password1
1 Launch Internet Explorer Start All Programs Internet Explorer
2 Configure Internet Explorer to bypass the App URL
a) In the top-right corner click the gear icon and select Internet Options
b) On the Security tab select the Local Intranet and click the Sites button
c) Uncheck the box next to Automatically detect intranet network
d) Click the Advanced button and add two entries to the Exceptions list
i) httpwingtipcom
ii) httpappswingtipcom
Creating a SharePoint Server 2013 Environment for Development and Testing Version 10
copy Critical Path Training 2012 All Rights Reserved 45
wwwCriticalPathTrainingcom
e) Click the Close button followed by the OK button multiple times to close out of the dialogs
At this point Internet Explorer is setup to bypass your app URL so you can navigate to apps (httpappswingtipcom) as well as automatically authenticate to sites hosted at httpwingtipcom
Exercise 6 Configure SharePoint to Host My Sites
In this exercise you will configure SharePoint to create and host My Sites In order to host My Sites you will need a new Web Application that is configured for Self-Service Site Creation and has a My Site Host site collection
1 Create a new SharePoint web application to host the My Sites
a) Ensure you are logged into the WingtipServer VM using the account wingtipadministrator | Password1
b) Open Central Administration Start All Programs Microsoft SharePoint 2013 Products SharePoint 2013 Central Administration
c) Select Application Management Manage Web Applications
d) In the ribbon click the New button
e) In the Create New Web Application dialog enter the following values in the properties and click OK Leave all properties not mentioned
i) Select the radio button Create a new IIS web site
(1) Name SharePoint MySite Host ndash 80
(2) Port 80
(3) Host Header mywingtipcom
ii) Application Pool
(1) Select the radio button Use existing application pool
(a) Application Pool Name SharePoint Default HNSC AppPool
iii) Database Name and Authentication
(1) Database Name WSS_Content_SocialWingtipCom
f) This process will take a few moments At the end of the process SharePoint will ask if you want to create a site collection Click the link provided to create a new site collection amp continue to the next step
2 Create a My Site Host site collection
a) On the Create Site Collection page use the following information to complete the form and click OK
Creating a SharePoint Server 2013 Environment for Development and Testing Version 10
copy Critical Path Training 2012 All Rights Reserved 46
wwwCriticalPathTrainingcom
i) Title My Site Host
ii) URL
iii) Template Selection My Site Host (found under the Enterprise tab)
iv) Primary Site Collection Administrator WINGTIPAdministrator
3 Update the Web Application to host my sites
a) Within Central Administration in the left-hand navigation navigate to the Manage Web Applications page Application Management Manage Web Applications
b) Select the SharePoint MySite Host ndash 80 web application
c) Click the Managed Paths button in the ribbon
d) Remove the sites managed path and add two new managed paths and click OK
i) personal ndash Wildcard inclusion
ii) my ndash Explicit inclusion
e) With the SharePoint MySite Host ndash 80 web application still selected click the Self-Service Site Creation button
f) On the Self-Service Site Creation page use the following values to complete the form and click OK
i) Site Collections On
4 Next configure the User Profile Service Application My Site settings
a) Browse to the User Profile Service Application management page Application Management Manage Service Applications User Profile Service Application
b) Under the My Site Settings section click the Setup My Sites
c) On the My Site Settings page use the following information to complete the form and click OK
i) My Site Host httpmywingtipcom
ii) Personal Site Location personal
At this point your SharePoint deployment is now configured to automatically create My Sites under httpmywingtipcomPersonalUserName when users first browse to them
Exercise 7 Install amp Configure Workflow Manager 10
In this exercise you will configure the WingtipServer VM to host Workflow Manager 10 and connect it to your SharePoint installation
1 Ensure you are logged into the WingtipServer VM using the account wingtipadministrator | Password1
Verify SQL Server 2012 Network Configuration
In this section yoursquoll verify the network configuration is correct for SQL Server 2012 in order to install Workflow Manager 10
Creating a SharePoint Server 2013 Environment for Development and Testing Version 10
copy Critical Path Training 2012 All Rights Reserved 47
wwwCriticalPathTrainingcom
1 Configure SQL Server 2012 to have the TCPIP connection protocol enabled
a) Open the SQL Server Configuration Manager Start All Programs Microsoft SQL Server 2012 Configuration Tools SQL Server Configuration Manager
b) Expand the hierarchy on the left-hand side to the following SQL Server Connection Manager (local) SQL Server Network Configuration Protocols for MSSQLSERVER
c) In the main window if TCPIP is Disabled right-click TCPIP and select Enable
d) When prompted with a warning click OK
2 SQL Server must be restarted in order to reflect this change
a) In the hierarchy on the left-hand side of the window select SQL Server Services
b) Right-click SQL Server (MSSQLSERVER) and select Restart
At this point SQL Server is now configured with the TCPIP protocol enabled a requirement when configuring Service Bus
Configure the Workflow Service Account with the Necessary Rights
In this section you will verify the service account that will run Workflow Manager and Service Bus
1 Ensure you are logged into the WingtipServer VM using the account WINGTIPadministrator | Password1
2 Grant the WINGTIPSP_Content account securityadmin amp dbcreator permissions in SQL Server
a) Launch SQL Server Management Studio Start All Programs Microsoft SQL Server 2012 SQL Server Management Studio
b) When SQL Server Management Studio launches within the Connect to Server dialog login using the default settings and click Connect
c) In the Object Explorer tool window expand the WINGTIPSERVER server hierarchy to the Security Logins node
d) Find the WINGTIPSP_Content account right-click it and select Properties
Creating a SharePoint Server 2013 Environment for Development and Testing Version 10
copy Critical Path Training 2012 All Rights Reserved 48
wwwCriticalPathTrainingcom
e) In the Select a page pane select Server Roles
f) Check securityadmin amp dbcreator and click OK
g) Close SQL Server Management Studio
3 Add the Workflow service account to the local administrators group
a) Open the Active Directory Users and Computers window Start Administrative Tools Active Directory Users and Computers
b) In the hierarchy on the left-hand side of the window expand it to the following Active Directory Users and Computers wingtipcom Builtin
c) In the main window right-click Administrators and select Properties
d) In the Administrators Properties dialog select the Members tab and click Add
e) In the Enter the object names to select box enter wingtipsp_content and click the Check Names button
f) In the Administrators Properties dialog click OK
g) Close the Active Directory Users and Computers window
At this point the service account that will host Workflow Manager and Service Bus has been configured correctly
Creating a SharePoint Server 2013 Environment for Development and Testing Version 10
copy Critical Path Training 2012 All Rights Reserved 49
wwwCriticalPathTrainingcom
Download amp Install Workflow Manager and Service Bus
In this section you will install Workflow Manager and Service Bus
1 Ensure you are logged into the WingtipServer VM using the account WINGTIPSP_Content | Password1
It is important you are logged in as the user that will run workflow when you install amp configure Workflow Manager and Service Bus
2 Launch the Web Platform Installer Start All Programs Microsoft Web Platform Installer
a) If the Web Platform Installer is not present on your machine you can download amp install it from here httpwwwmicrosoftcomwebdownloadsplatformaspx
If you do not have internet access within the virtual machine it is possible to download everything needed for workflow using the command line version of the Web Platform Installer (WebPICMD) You can get WebPICMD from httplearniisnetpageaspx1072web-platform-installer-v4-command-line-webpicmdexe-preview-release Specifically for
workflow enter the following command to download Workflow Beta 1 and all prerequisites
webpicmd offline ProductsWorkflow Pathc[path]
3 When the Web Platform Installer loads execute a search for Workflow select Workflow Manager 10 and click Add
4 Click the Install button at the bottom of the Web Platform Installer 40 window
5 On the Prerequisites page click I Accept
Note The Web Platform Installer 40 may prompt you to keep certain products updated using Microsoft Update If it does select Use Microsoft Update when I check for updates (recommended) and click Continue
6 When the installer completes the following dialog will appear Click Continue and then Finish to start the configuration process
Creating a SharePoint Server 2013 Environment for Development and Testing Version 10
copy Critical Path Training 2012 All Rights Reserved 50
wwwCriticalPathTrainingcom
At this point Workflow Manager amp Service Bus are installed
Configure Workflow Manager and Service Bus
In this section you will install Workflow Manager and Service Bus
1 If the Workflow Manager Configuration Wizard is not open open it Start All Programs Workflow Manager 10 Workflow Configuration
2 On the Welcome page click Configure Workflow Manager with Default Settings (Recommended)
Creating a SharePoint Server 2013 Environment for Development and Testing Version 10
copy Critical Path Training 2012 All Rights Reserved 51
wwwCriticalPathTrainingcom
3 On the New Farm Configuration page do the following
a) In the section Configure Service Account set the credentials to
i) User ID sp_contentwingtipcom
ii) Password Password1
b) Check the Allow Workflow management over HTTP on this computer checkbox
Ensure the username is entered in the fully qualified UPN format not as the default shows in the installer (sp_contentwingtip) or the domainusername format
In a production environment you should be doing everything over SSL
c) Click the Test Connection button to verify the connection credentials before proceeding
Creating a SharePoint Server 2013 Environment for Development and Testing Version 10
copy Critical Path Training 2012 All Rights Reserved 52
wwwCriticalPathTrainingcom
d) In the Certificate Generation Key and Confirm Certificate Generation Key enter Password1 into both fields
4 Click the right arrow in the bottom right corner to proceed
5 On the Summary page review your settings and click the check at the bottom right of the widow to start the configuration process
Creating a SharePoint Server 2013 Environment for Development and Testing Version 10
copy Critical Path Training 2012 All Rights Reserved 53
wwwCriticalPathTrainingcom
6 After a few minutes the Configuration Progress screen will show that everything has been configured correctly
Creating a SharePoint Server 2013 Environment for Development and Testing Version 10
copy Critical Path Training 2012 All Rights Reserved 54
wwwCriticalPathTrainingcom
7 Click the check in the bottom right corner
At this point Workflow Manager amp Service Bus has been installed and a new Workflow Manager farm has been created The next step is to connect the SharePoint 2013 farm to the Workflow Manager farm
Connect SharePoint 2013 to Workflow Manager
In this section you will connect SharePoint 2013 and Workflow Manager together
1 Ensure you are logged into the WingtipServer VM using the account WINGTIPadministrator | Password1
2 Get the Workflow Manager endpoint
a) Open the Workflow Manager PowerShell console Start All Programs Workflow Manager 10
b) Execute the Windows PowerShell following cmdlet
Get-WFFarm | ft HttpPort
c) Take note of this port (12291) This port number is what you will use to connect the SharePoint 2013 farm to the Workflow Manager 10 farm
In production you should connect to the HTTPS port listed in the HttpsPort property when you run Get-WFFarm
d) Close the Workflow Manager PowerShell window
3 Connect the SharePoint 2013 farm to Workflow Manager
Creating a SharePoint Server 2013 Environment for Development and Testing Version 10
copy Critical Path Training 2012 All Rights Reserved 55
wwwCriticalPathTrainingcom
a) Open SharePoint 2013 Management Shell Start All Programs Microsoft SharePoint 2013 Products SharePoint 2013 Management Shell
b) Execute the following Windows PowerShell script in the SharePoint 2013 Management Shell
Register-SPWorkflowService ndashSPSite httpintranetwingtipcom ndashWorkflowHostUri httpwingtipserver12291 ndashAllowOAuthHttp
This script is telling SharePoint the endpoint it should use to talk to Workflow Manager as well as Workflow Manager the SharePoint site collection it should talk to for calls into the CSOM It is also configuring all communication over HTTP rather than HTTPS for performance reasons In production you should always use HTTPS
This step will take a moment with no feedback during the process Be patient
c) Close the SharePoint 2013 Management Shell
At this point the SharePoint 2013 farm is connected to the Workflow Manager 10 farm
Configure SharePoint User Profile Service Application AD Sync
Users in SharePoint 2013 are validated by Workflow Manager against SharePoint to ensure they have permissions to start a workflow This is done by looking up the user by their AD UserPrincipalName (UPN) attribute in the User Profile Service Application (UPA) If no matching user is found the workflow will be automatically cancelled by Workflow Manager In this section you will setup UPA to connect amp sync with the local Active Directory so user accounts in AD will have their UPN synchronized to UPA
1 Open Central Administration Start All Programs Microsoft SharePoint 2013 Products SharePoint 2013 Central Administration
2 Go to the User Profile Service Application management page Application Management Manage Service Applications User Profile Service Application
3 The first step is to configure the User Profile Service Application to allow for Active Directory (AD) synchronization
a) Under Synchronization select Configure Synchronization Settings
b) For Synchronization select Use SharePoint Active Directory Import and click OK
4 Next establish a connection to the wingtipcom AD
a) Under Synchronization select Configure Synchronization Connections
b) On the Synchronization Connections page select Create New Connection
c) Enter the following values on this form and click OK
i) Connection Name WINGTIPCOM AD
ii) Type Active Directory Import
iii) Connection Settings
(1) Fully Qualified Domain Name wingtipcom
(2) Authentication Provider Type Windows Authentication
(3) Account Name WINGTIPAdministrator
(4) Password (and Confirm Password) Password1
iv) Containers
(1) Click Populate Containers
(2) After it loads check the box next to WINGTP or click the Select All button below the box
5 Go back to the User Profile Service Application management page Application Management Manage Service Applications User Profile Service Application
6 Finally start a synchronization import
a) Under Synchronization select Start Profile Synchronization
Creating a SharePoint Server 2013 Environment for Development and Testing Version 10
copy Critical Path Training 2012 All Rights Reserved 56
wwwCriticalPathTrainingcom
b) Select Start Full Synchronization and click OK
c) You will be taken back to the User Profile Service Application management page Notice in the top-right corner there is a status block that reports how many profiles are in the UPA database Refresh the page to see it increase to a handful of profiles as the import process runs
At this point you have successfully configured the User Profile Service Application to import profiles from the local AD
Exercise 8 Install the Microsoft Office 2013 Professional Clients
In this exercise you will install the Microsoft Office 2013 client applications
1 Download the Office 2013 into the WingtipServer VM For this you need to create an Office 365 Trial account login to Office 365 go to the Admin Dashboard and then download the latest version httpwwwmicrosoftcomofficepreviewentry-office-preview
2 Download the SharePoint Designer 2013 into the WingtipServer VM from here httpwwwmicrosoftcomen-usdownloaddetailsaspxid=35491
3 Download the Visio Professional 2013 into the WingtipServer VM from here httptechnetmicrosoftcomen-usevalcenterhh973399
Install Microsoft Office Professional Plus 2013
In this section you will install the Microsoft Office 2013 clients
1 Ensure you are logged into the WingtipServer VM using the account WINGTIPadministrator | Password1
2 Execute the installer OfficeProfessionalPlus_English_x64exe
3 On the Read the Microsoft Software License Terms dialog click the checkbox next to I accept the terms of this agreement and click Continue
4 On the Choose the installation you want dialog click the Install Now button
5 The installer will proceed and install all the Office products
6 When the installer completes click the Close button
7 Apply your Office Professional Plus 2013 license key
a) Launch Word 2013 Start All Programs Microsoft Office 2013 Word 2013
b) In the First things first dialog select Use recommended settings and click Accept
c) In the Welcome to Office dialog that opens click the [X] icon in the top-right corner to close it
d) In the left-hand pane click Open Other Documents
e) In the left-hand pane click Account
f) In the Product Information section within the Activation Required box click Change Product Key
g) Enter your license key for Office Professional Plus 2013 check the box next to Attempt to automatically activate my product online and click Install
h) Click OK
At this point you have installed Office Professional Plus 2013
Install Microsoft Office Visio 2013
In this section you will install Microsoft Office 2013 Visio
1 Ensure you are logged into the WingtipServer VM using the account WINGTIPadministrator | Password1
2 Execute the installer VisioProfessional_English_x64exe
3 On the Read the Microsoft Software License Terms dialog click the checkbox next to I accept the terms of this agreement and click Continue
Creating a SharePoint Server 2013 Environment for Development and Testing Version 10
copy Critical Path Training 2012 All Rights Reserved 57
wwwCriticalPathTrainingcom
4 On the Choose the installation you want dialog click the Install Now button
5 The installer will proceed and install all Visio 2013
6 When the installer completes click the Close button
7 Apply your Visio 2013 license key
a) Launch Visio 2013 Start All Programs Microsoft Office 2013 Visio 2013
b) In the First things first dialog select Use recommended settings and click Accept
c) In the Welcome to Office dialog that opens click the X icon in the top-right corner to close it
d) In the left-hand pane click Open Other Documents
e) In the left-hand pane click Account
f) In the Product Information section within the Activation Required box click Change Product Key
g) Enter your license key for Visio 2013 check the box next to Attempt to automatically activate my product online and click Install
h) Click OK
At this point you have installed Visio 2013
Install Microsoft Office 2013 SharePoint Designer
In this section you will install Microsoft Office 2013 SharePoint Designer
1 Ensure you are logged into the WingtipServer VM using the account WINGTIPadministrator | Password1
2 Execute the installer SharePointDesigner_English_x64exe
3 On the Read the Microsoft Software License Terms dialog click the checkbox next to I accept the terms of this agreement and click Continue
4 On the Choose the installation you want dialog click the Install Now button
5 The installer will proceed and install all SharePoint Designer 2013
6 When the installer completes click the Close button
At this point you have installed SharePoint Designer 2013
Exercise 9 Install Visual Studio 2012
In this exercise you will install Visual Studio 2012
1 Ensure you are logged into the WingtipServer VM using the account WINGTIPadministrator | Password1
2 Start the install of Visual Studio 2012 Ultimate Trial by downloading the installer from here httpwwwmicrosoftcomvisualstudio11en-usdownloads
3 On the installation splash screen check the box next to I agree to the License terms and conditions and click the Next button
Creating a SharePoint Server 2013 Environment for Development and Testing Version 10
copy Critical Path Training 2012 All Rights Reserved 58
wwwCriticalPathTrainingcom
4 On the Optional Features to install dialog click Install
5 After some time the installer will complete Click the Launch button to launch Visual Studio 2012
Creating a SharePoint Server 2013 Environment for Development and Testing Version 10
copy Critical Path Training 2012 All Rights Reserved 59
wwwCriticalPathTrainingcom
6 In the Choose Default Environment Settings select Visual C Development Settings and click Start Visual Studio
7 Close Visual Studio 2012
At this point Visual Studio 2012 RTM is installed
Install Office amp SharePoint 2013 Developer Tools
In this section you will install the Office and SharePoint 2013 developer tools for Visual Studio
1 Ensure you are logged into the WingtipServer VM using the account WINGTIPadministrator | Password1
2 Launch the Web Platform Installer Start All Programs Microsoft Web Platform Installer
3 In the search box at the top-right corner of the Web Platform Installer 40 window type sharepoint and press Enter
4 Click the Add button to the right of Microsoft Office Developer Tools for Visual Studio 2012 - Preview 2
5 Click the Install button at the bottom of the Web Platform Installer 40 window
6 On the Prerequisites page click I Accept
Creating a SharePoint Server 2013 Environment for Development and Testing Version 10
copy Critical Path Training 2012 All Rights Reserved 60
wwwCriticalPathTrainingcom
At this point you have installed the SharePoint 2013 amp Office 2013 development tools in Visual Studio 2012
Creating a SharePoint Server 2013 Environment for Development and Testing Version 10
copy Critical Path Training 2012 All Rights Reserved 61
wwwCriticalPathTrainingcom
Appendix 1 Download Manifest
The following lists everything referenced that you will or may need to download in this environment
Windows Server 2008 R2 with Service Pack 1 (installer ISO)
o httptechnetmicrosoftcomen-usevalcenterdd459137aspx
Windows Server 2008 R2 with Service Pack 1 (prebuilt VHD)
o httpwwwmicrosoftcomdownloadsdetailsaspxFamilyId=9040a4be-c3cf-44a5-9052-a70314452305
Windows Server 2008 R2 Service Pack 1
o httpwwwmicrosoftcomen-usdownloaddetailsaspxid=5842
SQL Server 2012 Trial
o httpwwwmicrosoftcombetaexperiencepdSQL2012EvalCTAenusdefaultaspx
SharePoint Server 2013
o httptechnetmicrosoftcomen-USevalcenterhh973397aspx
Hotfixes for SharePoint Server 2013 (post-install)
o KB2554876 The SharePoint Parsing Process Crashes in Windows Server 2008 R2
o KB2708075 IIS 75 Configurations are not Updated when you use the ServerManager Class to Commit
Configuration Changes
o KB2759112 Hotfix is Available for NET Framework 45 that Resolves an ASPNET Race Condition Issue in
Windows Server 2008 R2 Windows Server 2008 R2 SP1
o KB2765317 Hotfix is Available for NET Framework 45 that Resolves an ASPNET Race Condition Issue in
Windows 8 Windows RT and Windows Server 2012
Web Platform Installer
o httpwwwmicrosoftcomwebdownloadsplatformaspx
Web Platform Installer ndash Command Line Version
o httplearniisnetpageaspx1072web-platform-installer-v4-command-line-webpicmdexe-preview-release
Workflow Manager 10
o Download using the Microsoft Web Platform Installer
Office 2013
o httpwwwmicrosoftcomofficepreviewentry-office-preview
SharePoint Designer 2013
o httpwwwmicrosoftcomen-usdownloaddetailsaspxid=35491
Visio Professional 2013
o httptechnetmicrosoftcomen-usevalcenterhh973399
Visual Studio 2012
o httpwwwmicrosoftcomvisualstudio11en-usdownloads
Office Developer Tools for Visual Studio 2012 ndash Preview 2
o Download using the Microsoft Web Platform Installer
Creating a SharePoint Server 2013 Environment for Development and Testing Version 10
copy Critical Path Training 2012 All Rights Reserved 62
wwwCriticalPathTrainingcom
Appendix 2 Windows PowerShell Script Manifest
The following lists all Windows PowerShell scripts that are provided with this setup guide
AddDisableLoopbackCheckRegKeyps1
o The following steps automate creating the registry key outlined as Method 2 in the Microsoft Knowledgebase article
httpsupportmicrosoftcomkb896861 using Windows PowerShell This key DisableLoopbackCheck will allow
you to browse SharePoint sites on the same machine Without this key (or following Method 1 in the KB article) you
would need to browse any SharePoint sites from a different computer than the one which SharePoint is installed on
ConfigureSpFarmForAppsps1
o Configures a SharePoint 2013 for hosting apps This ensures everything you need is installed running and
configured This is documented here httpmsdnmicrosoftcomen-uslibraryfp179923(v=office15)
CreateSpServiceAccountsps1
o Creates the minimal necessary service accounts for SharePoint Server 2013 SP_Farm SP_Content amp
SP_Services
SetupSharePointForHNSCps1
o Configures a SharePoint 2013 install for hosting Host-Named Site Collections (HNSC) This involves creating a Web
Application in SharePoint that has no host header bindings Using DNS all requests are mapped to this Web
Application You then create the site collections via PowerShell as you cant create HNSCs via the browser (Central
Administration)
Creating a SharePoint Server 2013 Environment for Development and Testing Version 10
copy Critical Path Training 2012 All Rights Reserved 63
wwwCriticalPathTrainingcom
Appendix 3 Create Sample Adventure Works Database
The following steps document downloading and installing the sample Adventure Works OLTP database provided by Microsoft
1 Launch Internet Explorer and navigate to httpmsftdbprodsamplescodeplexcom
2 Download the Adventure Works 2012 OLTP Script
3 Extract the ZIP into a folder on the desktop
4 Launch SQL Server Management Studio Start All Programs Microsoft SQL Server 2012 SQL Server Management Studio
5 When SQL Server Management Studio launches within the Connect to Server dialog login using the default settings and click Connect
6 Within SQL Server Management Studio select File Open File
7 Select the file instawdbsql from the extracted ZIP and click Open
8 If prompted to re-login to the database engine do it
9 Select Query SQLCMD Mode
10 Scroll down to line 42 the line that starts with the following
setvar SqlSamplesSourceDataPath
11 Change the folder location of where you unzipped the Adventure Works 2012 OLTP Script
12 Select Query Execute
13 When the script completes the AdventureWorks2012 database will have been created
Creating a SharePoint Server 2013 Environment for Development and Testing Version 10
copy Critical Path Training 2012 All Rights Reserved 64
wwwCriticalPathTrainingcom
Change Log
Change Version Description
August 22 2012 v 01 Pre-release for review
August 27 2012 v 02 Initial public release ndash install guide based on SharePoint Server Beta 2
August 28 2012 v 03 Updated URL for the site collection used to connect SharePoint to WAW
August 31 2012 v 04 Typo Removed SQL Server Analysis Services as part of the install Not required in a
SharePoint dev box (unless you are doing business intelligence which is not covered
in the guide)
Updated all references to Windows Azure Workflow to Workflow Manager the new
official name for the new workflow product
Updated SetupSharePointForHNSCps1 script to lookup HNSC Web Application by
name rather than URL which is more reliable
Typo Updated WingtipAllUp public NIC to use a different IP than the WingtipDC
Typo Replaced a reference to WingtipServer with WingtipDC
Typo Fixed handful of minor typos
September 1 2012 v 05 Removed SQL Server Reporting Services from install guide
Added step to uncheck IErsquos ldquoAutomatically detect proxyrdquo
Added post workflow install steps to setup User Profile Service Application to sync with
local Active Directory
September 5 2012 v 06 Added step to create a default root site collection in the HNSC web app
Updated minor typos and added extra notes for context
Updated PowerShell script SetupSharePointForHNSCps1 to remove content
database of default Web Application when setting up HNSC Web App
Added a new exercise 8 (after SharePoint install amp config and before the Workflow
install and config) to setup support for My Sites
October 20 2012 v 07 Updated script SetupSharePointForHNSCps1 to fix a bug where it would fail on line
111 if you didnrsquot already have a WINGTIPSP_Content managed account
Added section to bypass SharePointrsquos check for crlmicrosoftcom
Updated workflowrsquos registration PowerShell script to point to
httpintranetwingtipcom
Switched order of post-SharePoint install to setup HSNC hosting before configuring for
hosting apps
November 29 2012
v 10 Changed setup guide to use a single VM instead of two VMs
Updated guide for SharePoint 2013 RTM
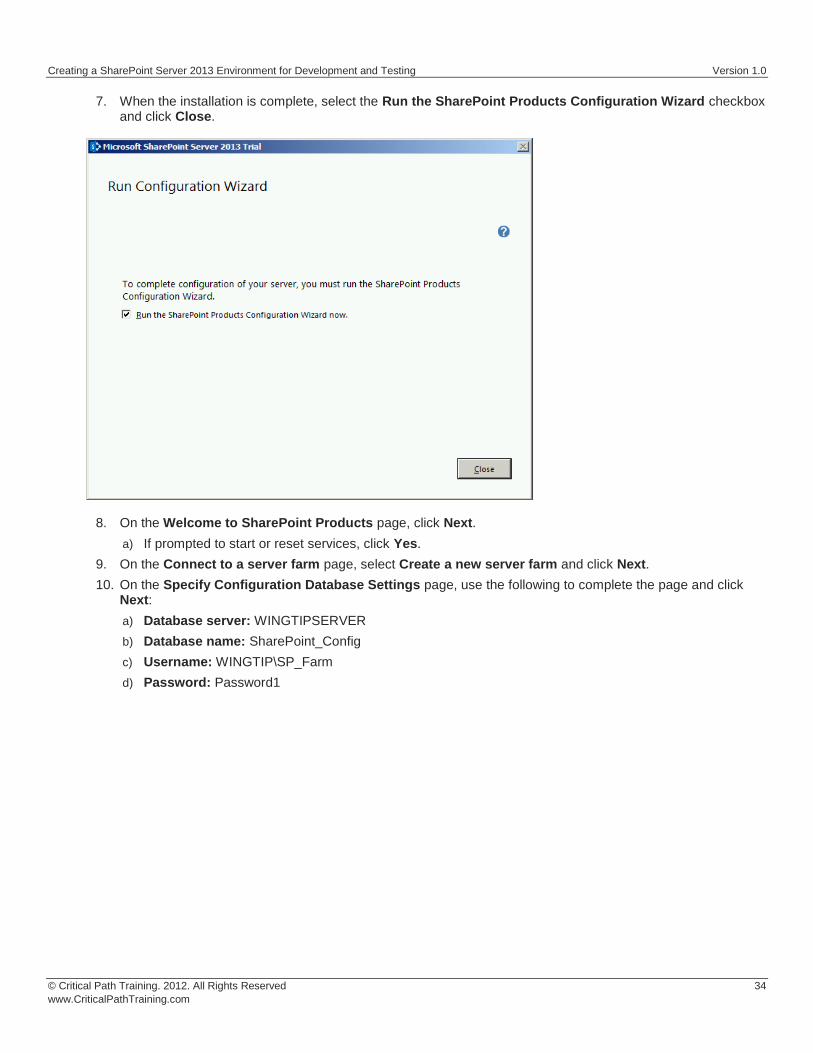
Creating a SharePoint Server 2013 Environment for Development and Testing Version 10
copy Critical Path Training 2012 All Rights Reserved 35
wwwCriticalPathTrainingcom
11 On the Specify Farm Security Settings page for the Passphrase and Confirm Passphrase boxes enter Password1 and click Next
12 On the Configure SharePoint Central Administration Web Application page check the Specify port number checkbox and enter a value of 9999 then Click Next
Creating a SharePoint Server 2013 Environment for Development and Testing Version 10
copy Critical Path Training 2012 All Rights Reserved 36
wwwCriticalPathTrainingcom
13 On the Completing the SharePoint Products Configuration Wizard page click Next
14 When the installer completes it will display the Confirmation Successful page
15 Click Finish This will launch Internet Explorer to go through the configuration process
Creating a SharePoint Server 2013 Environment for Development and Testing Version 10
copy Critical Path Training 2012 All Rights Reserved 37
wwwCriticalPathTrainingcom
At this point you have successfully installed SharePoint Server 2013
Configure SharePoint Server 2013
In this section you will create a new SharePoint Server 2013 farm and perform minimal configuration tasks
After installing SharePoint Sever 2013 the SharePoint Products Configuration Wizard will launch the browser-based Initial Farm Configuration Wizard
1 In the first page of the wizard you are prompted to Help Make SharePoint Better Select which ever option you want and click OK
2 On the Welcome page that asks How do you want to configure your SharePoint farm click the Start the Wizard button
3 On the Services page do the following and then click Next
a) Service Account Select Create new managed account
i) Username WINGTIPSP_Services
ii) Password Password1
b) Services Uncheck the following services
Creating a SharePoint Server 2013 Environment for Development and Testing Version 10
copy Critical Path Training 2012 All Rights Reserved 38
wwwCriticalPathTrainingcom
i) Access Services 2010
ii) App Management Service
In SharePoint Server 2013 the Search Service Application processes specifically noderunnerexe can consume a considerable amount of memory and processor time If you are not going to work with search you might consider unchecking this option for now You can always go back into Central Administration and create a new instance of the Search Service Application at a later date if you need it
Why did we remove Access Services 2010 amp App Management Service service applications The Access Services 2010 service application is included for backwards compatibility and isnrsquot needed in new installations unless you are migrating solutions built with Access Services 2010 from SharePoint Server 2010 (if so you can create this service application later within Central Administration Application Management Manage Service Applications) The App Management Service service application will be created in a later step in this setup guide therefor it is skipped here
4 The creation of the service applications can take quite a while so be patient If it exceeds 20 minutes it is fairly safe to assume the page is hung up One option is to close the browser then launch Central Administration (Start All Programs Microsoft SharePoint 2013 Products SharePoint 2013 Central Administration) and look at the Service Application page (Application Management Manage Service Applications) to see if they were all created
Configure DNS
In this section you will configure DNS for hosting SharePoint sites amp Apps
1 Ensure you are logged into the WingtipServer VM using the account wingtipadministrator | Password1
2 Open the DNS window Start Administrative Tools DNS
3 Expand the hierarchy on the left-hand side of the window until you get to DNS WINGTIPSERVER Forward Lookup Zones wingtipcom
4 Create a new wildcard so all requests for http[]wingtipcom will be forwarded to our SharePoint machine
a) Next right-click wingtipcom and select New Host (A or AAAA)
Creating a SharePoint Server 2013 Environment for Development and Testing Version 10
copy Critical Path Training 2012 All Rights Reserved 39
wwwCriticalPathTrainingcom
b) In the New Host dialog enter the following and click OK
i) Alias Name
ii) IP Address 192168150102 Then click Add Host The following figure shows how this looks
This new record is telling DNS to forward any request for http[]wingtipcom to the webserver WINGTIPSERVER where the
requests will be served by SharePoint
5 Verify this DNS entry is working
a) Open Windows PowerShell Start All Programs Accessories Windows PowerShell Windows PowerShell
b) Run the following commands and press ENTER
PS CUsersAdministratorgt nslookup somethingwingtipcom PS CUsersAdministratorgt nslookup somethingappswingtipcom
c) You should get a response that points to the WingtipServer server as shown in the following figure
Creating a SharePoint Server 2013 Environment for Development and Testing Version 10
copy Critical Path Training 2012 All Rights Reserved 40
wwwCriticalPathTrainingcom
Configure SharePoint Server 2013 for Host-Named Site Collections amp Create Initial Site
Collections
In this section you will create new SharePoint 2013 site collections for testing and hosting apps
Microsoft recommends to create host-named site collections (HNSC) instead of using the path based site collection addressing The difference is the following a path based site created at something such as httpintranetwingtipcomsitesdevtest as an HNSC site would be more like httpdevtestwingtipcom This is how it works in the cloud (Office 365) and it scales much better for on-prem
deployments This setup guide will show you how to setup your environment to create HNSC The only downside to this approach is that you canrsquot create site collections within Central Administration it must be done via Windows PowerShell API (because Central Administration doesnrsquot instruct you where to put the site
This is implemented in various parts First DNS must be configured to send all requests for httpwingtipcom to a Web Application
(implemented in the last section) Second this Web Application must be extended with SharePoint and have no host header bindings (so it handles all requests) Third it must have a default site collection at the root of the Web Application but it will not be used for anything (in fact it doesnrsquot need a template assigned to it)
You can read more about HNSCrsquos on TechNet httptechnetmicrosoftcomen-uslibrarycc424952aspx
PowerShell Script Alert The steps in this section are automated in the script SetupSharePointForHNSCps1 found in the files that
accompany this setup guide Open the script and read the header for documentation on how to use it
1 Ensure you are logged into the WingtipServer VM using the account wingtipadministrator | Password1
2 Open Central Administration Start All Programs Microsoft SharePoint 2013 Products SharePoint 2013 Central Administration
3 Select Application Management Manage Web Applications
4 Delete the default Web Application created by the configuration wizard
a) Delete the existing default Web Application
i) Select the Web Application SharePoint ndash 80 the one with the URL of httpwingtipserver and click Delete in the ribbon
ii) When prompted to delete the associated IIS Web Site amp SQL Server database select both options to delete them and click OK
The reason you are doing this is because the setup wizard you ran previously when creating the service applications automatically created it The problem is that it used the same identity (WINGTIPSP_Services) for the app pool that is used for all the service
applications which is not desired
5 Create a new Web Application to handle Host-Named Site Collections (HNSC)
Creating a SharePoint Server 2013 Environment for Development and Testing Version 10
copy Critical Path Training 2012 All Rights Reserved 41
wwwCriticalPathTrainingcom
a) In the ribbon click the New button
b) In the Create New Web Application dialog enter the following values in the properties and click OK Leave all properties not mentioned
i) Select the radio button Create a new IIS web site
(1) Name SharePoint HNSC Host ndash 80
(2) Port 80
ii) Application Pool
(1) Select the radio button Create a new application pool
(a) Application Pool Name SharePoint Default HNSC AppPool
(b) Select a security account for this application pool WINGTIPSP_Content
If WINGTIPSP_Content is not listed as an available managed account create it by selecting the appropriate option and using
Password1 for the password
iii) Database Name and Authentication
(1) Database Name WSS_Content_HNSCDefaultHost
c) This process will take a few moments At the end of the process SharePoint will ask if you want to create a site collection You do but you donrsquot want to do it through the browser as this will not be a HNSC To create a HNSC you must create it via Windows PowerShell
6 Create a default not template site collection at the root of the web application
a) Open SharePoint 2013 Management Shell Start All Programs Microsoft SharePoint 2013 Products SharePoint 2013 Management Shell
7 Create Site Collections for Testing SharePoint amp SharePoint Apps
a) Open SharePoint 2013 Management Shell Start All Programs Microsoft SharePoint 2013 Products SharePoint 2013 Management Shell
b) Get a reference to the HNSC web application you just created by running the following Windows PowerShell script in the SharePoint 2013 Management Shell
$hnscWebApp = Get-SPWebApplication | Where-Object $_DisplayName -eq SharePoint HNSC Host - 80
c) Create a non-templated site at the root of the web application for Workflow to connect to by executing the following Windows PowerShell script in the SharePoint 2013 Management Shell
New-SPSite -Name Root HNSC Site Collection -Url httpwingtipcom -HostHeaderWebApplication $hnscWebApp -OwnerAlias WINGTIPAdministrator
d) Create a team site by executing the following Windows PowerShell script in the SharePoint 2013 Management Shell
New-SPSite -Name Wingtip Intranet -Url httpintranetwingtipcom ndashHostHeaderWebApplication $hnscWebApp -Template STS0 -OwnerAlias WINGTIPAdministrator
e) Create a developer site by executing the following Windows PowerShell script in the SharePoint 2013 Management Shell
New-SPSite -Name Wingtip Developer Site -Url httpdevwingtipcom ndashHostHeaderWebApplication $hnscWebApp -Template DEV0 -OwnerAlias WINGTIPAdministrator
You can only create debug and test apps using a developer site
At this point you now have a site collection to use as a team site (httpintranetwingtipcom) and to develop and test custom SharePoint apps (httpdevwingtipcom)
Creating a SharePoint Server 2013 Environment for Development and Testing Version 10
copy Critical Path Training 2012 All Rights Reserved 42
wwwCriticalPathTrainingcom
Configure SharePoint 2013 for Hosting Apps
In this setup you will setup your SharePoint 2013 environment for hosting apps
PowerShell Script Alert Everything in the next immediate step is provided in the script ConfigureSpFarmForAppsps1 found in the
files that accompany this setup guide Open the script and read the header for documentation on how to use it
1 Ensure you are logged into the WingtipServer VM using the account wingtipadministrator | Password1
2 Create the necessary SharePoint App Management service applications and start the necessary services via Windows PowerShell
a) Open SharePoint 2013 Management Shell Start All Programs Microsoft SharePoint 2013 Products SharePoint 2013 Management Shell
b) Execute the following Windows PowerShell script in the SharePoint 2013 Management Shell
$appHostDomain = appswingtipcom $adminService = Get-Service -Name spadminv4 if ($adminServiceStatus -ne Running) Start-Service $adminService $timerService = Get-Service -Name sptimerv4 if ($timerServiceStatus -ne Running) Start-Service $timerService Set-SPAppDomain $appHostDomain $appMgmtSvcInstance = Get-SPServiceInstance | Where-Object $_GetType()Name -eq AppManagementServiceInstance if ($appMgmtSvcInstanceStatus -ne Online) Start-SPServiceInstance -Identity $appMgmtSvcInstance $appSubSettingSvcInstance = Get-SPServiceInstance | Where-Object $_GetType()Name -eq SPSubscriptionSettingsServiceInstance if ($appSubSettingSvcInstanceStatus -ne Online) Start-SPServiceInstance -Identity $appSubSettingSvcInstance $appPoolServiceApps = Get-SPServiceApplicationPool -Identity SharePoint Web Services Default $appSubSvc = New-SPSubscriptionSettingsServiceApplication ndashApplicationPool $appPoolServiceApps ndashName Settings Service Application ndashDatabaseName SettingsServiceDB $proxySubSvc = New-SPSubscriptionSettingsServiceApplicationProxy ndashServiceApplication $appSubSvc $appAppSvc = New-SPAppManagementServiceApplication -ApplicationPool $appPoolServiceApps -Name App Management Service Application -DatabaseName AppServiceDB $proxyAppSvc = New-SPAppManagementServiceApplicationProxy -ServiceApplication $appAppSvc Set-SPAppSiteSubscriptionName -Name app -Confirm$false
3 Verify the script configured SharePoint 2013 for hosting apps
a) Open Central Administration Start All Programs Microsoft SharePoint 2013 Products SharePoint 2013 Central Administration
b) Verify service applications created
i) Open the Service Applications page Application Management Manage Service Applications
ii) Verify you have two service applications created
(1) App Management Service Application
(2) Settings Service Application
c) Verify service instances are running
i) Open the Services on Server page System Settings Manage Services on Server
ii) Verify the following services are Started
(1) App Management Service
(2) Microsoft SharePoint Foundation Subscription Settings Service
Creating a SharePoint Server 2013 Environment for Development and Testing Version 10
copy Critical Path Training 2012 All Rights Reserved 43
wwwCriticalPathTrainingcom
d) Verify App URLs are correct
i) Open the Configure App URLs page Apps Configure app URLs
ii) Verify the following
(1) App Domain appswingtipcom
(2) App Prefix app
At this point your SharePoint Server 2013 environment is ready to host SharePoint apps
Creating a SharePoint Server 2013 Environment for Development and Testing Version 10
copy Critical Path Training 2012 All Rights Reserved 44
wwwCriticalPathTrainingcom
Start the SharePoint 2013 Sandbox Service
By default the service that executes sandbox solutions is not running In this step you will start the service
1 Open Central Administration Start All Programs Microsoft SharePoint 2013 Products SharePoint 2013 Central Administration
2 Open the Services on Server page System Settings Manage Services on Server
3 Click the Start link to the left of the Microsoft SharePoint Foundation Sandboxed Code Service
At this point your installation can support sandbox solutions
Configure CRL Verification for Disconnected Environments
SharePoint periodically ldquophones homerdquo to a specific address hosted by Microsoft under certain conditions When your environment is disconnected this can cause an unnecessary delay or failures when starting up the sandbox The following steps outline a workaround to bypass this check
1 Launch Notepad as an administrator Start All Programs Accessories right-click Notepad and select Run as Administrator
2 Open the hosts file by selecting File Open and finding the file
cWindowsSystem32Driversetchosts
3 Add the following line to the end of the file
127001 crlmicrosoftcom
4 Save and close the hosts file
Update Internet Explorer to Bypass the App URL amp Automatically Login to SharePoint Sites
In this section you will update Internet Explorer to add the App hosting URL to the bypass list so you can navigate to the domain after deploying SharePoint hosted apps
1 Ensure you are logged into the WingtipServer VM using the account wingtipadministrator | Password1
1 Launch Internet Explorer Start All Programs Internet Explorer
2 Configure Internet Explorer to bypass the App URL
a) In the top-right corner click the gear icon and select Internet Options
b) On the Security tab select the Local Intranet and click the Sites button
c) Uncheck the box next to Automatically detect intranet network
d) Click the Advanced button and add two entries to the Exceptions list
i) httpwingtipcom
ii) httpappswingtipcom
Creating a SharePoint Server 2013 Environment for Development and Testing Version 10
copy Critical Path Training 2012 All Rights Reserved 45
wwwCriticalPathTrainingcom
e) Click the Close button followed by the OK button multiple times to close out of the dialogs
At this point Internet Explorer is setup to bypass your app URL so you can navigate to apps (httpappswingtipcom) as well as automatically authenticate to sites hosted at httpwingtipcom
Exercise 6 Configure SharePoint to Host My Sites
In this exercise you will configure SharePoint to create and host My Sites In order to host My Sites you will need a new Web Application that is configured for Self-Service Site Creation and has a My Site Host site collection
1 Create a new SharePoint web application to host the My Sites
a) Ensure you are logged into the WingtipServer VM using the account wingtipadministrator | Password1
b) Open Central Administration Start All Programs Microsoft SharePoint 2013 Products SharePoint 2013 Central Administration
c) Select Application Management Manage Web Applications
d) In the ribbon click the New button
e) In the Create New Web Application dialog enter the following values in the properties and click OK Leave all properties not mentioned
i) Select the radio button Create a new IIS web site
(1) Name SharePoint MySite Host ndash 80
(2) Port 80
(3) Host Header mywingtipcom
ii) Application Pool
(1) Select the radio button Use existing application pool
(a) Application Pool Name SharePoint Default HNSC AppPool
iii) Database Name and Authentication
(1) Database Name WSS_Content_SocialWingtipCom
f) This process will take a few moments At the end of the process SharePoint will ask if you want to create a site collection Click the link provided to create a new site collection amp continue to the next step
2 Create a My Site Host site collection
a) On the Create Site Collection page use the following information to complete the form and click OK
Creating a SharePoint Server 2013 Environment for Development and Testing Version 10
copy Critical Path Training 2012 All Rights Reserved 46
wwwCriticalPathTrainingcom
i) Title My Site Host
ii) URL
iii) Template Selection My Site Host (found under the Enterprise tab)
iv) Primary Site Collection Administrator WINGTIPAdministrator
3 Update the Web Application to host my sites
a) Within Central Administration in the left-hand navigation navigate to the Manage Web Applications page Application Management Manage Web Applications
b) Select the SharePoint MySite Host ndash 80 web application
c) Click the Managed Paths button in the ribbon
d) Remove the sites managed path and add two new managed paths and click OK
i) personal ndash Wildcard inclusion
ii) my ndash Explicit inclusion
e) With the SharePoint MySite Host ndash 80 web application still selected click the Self-Service Site Creation button
f) On the Self-Service Site Creation page use the following values to complete the form and click OK
i) Site Collections On
4 Next configure the User Profile Service Application My Site settings
a) Browse to the User Profile Service Application management page Application Management Manage Service Applications User Profile Service Application
b) Under the My Site Settings section click the Setup My Sites
c) On the My Site Settings page use the following information to complete the form and click OK
i) My Site Host httpmywingtipcom
ii) Personal Site Location personal
At this point your SharePoint deployment is now configured to automatically create My Sites under httpmywingtipcomPersonalUserName when users first browse to them
Exercise 7 Install amp Configure Workflow Manager 10
In this exercise you will configure the WingtipServer VM to host Workflow Manager 10 and connect it to your SharePoint installation
1 Ensure you are logged into the WingtipServer VM using the account wingtipadministrator | Password1
Verify SQL Server 2012 Network Configuration
In this section yoursquoll verify the network configuration is correct for SQL Server 2012 in order to install Workflow Manager 10
Creating a SharePoint Server 2013 Environment for Development and Testing Version 10
copy Critical Path Training 2012 All Rights Reserved 47
wwwCriticalPathTrainingcom
1 Configure SQL Server 2012 to have the TCPIP connection protocol enabled
a) Open the SQL Server Configuration Manager Start All Programs Microsoft SQL Server 2012 Configuration Tools SQL Server Configuration Manager
b) Expand the hierarchy on the left-hand side to the following SQL Server Connection Manager (local) SQL Server Network Configuration Protocols for MSSQLSERVER
c) In the main window if TCPIP is Disabled right-click TCPIP and select Enable
d) When prompted with a warning click OK
2 SQL Server must be restarted in order to reflect this change
a) In the hierarchy on the left-hand side of the window select SQL Server Services
b) Right-click SQL Server (MSSQLSERVER) and select Restart
At this point SQL Server is now configured with the TCPIP protocol enabled a requirement when configuring Service Bus
Configure the Workflow Service Account with the Necessary Rights
In this section you will verify the service account that will run Workflow Manager and Service Bus
1 Ensure you are logged into the WingtipServer VM using the account WINGTIPadministrator | Password1
2 Grant the WINGTIPSP_Content account securityadmin amp dbcreator permissions in SQL Server
a) Launch SQL Server Management Studio Start All Programs Microsoft SQL Server 2012 SQL Server Management Studio
b) When SQL Server Management Studio launches within the Connect to Server dialog login using the default settings and click Connect
c) In the Object Explorer tool window expand the WINGTIPSERVER server hierarchy to the Security Logins node
d) Find the WINGTIPSP_Content account right-click it and select Properties
Creating a SharePoint Server 2013 Environment for Development and Testing Version 10
copy Critical Path Training 2012 All Rights Reserved 48
wwwCriticalPathTrainingcom
e) In the Select a page pane select Server Roles
f) Check securityadmin amp dbcreator and click OK
g) Close SQL Server Management Studio
3 Add the Workflow service account to the local administrators group
a) Open the Active Directory Users and Computers window Start Administrative Tools Active Directory Users and Computers
b) In the hierarchy on the left-hand side of the window expand it to the following Active Directory Users and Computers wingtipcom Builtin
c) In the main window right-click Administrators and select Properties
d) In the Administrators Properties dialog select the Members tab and click Add
e) In the Enter the object names to select box enter wingtipsp_content and click the Check Names button
f) In the Administrators Properties dialog click OK
g) Close the Active Directory Users and Computers window
At this point the service account that will host Workflow Manager and Service Bus has been configured correctly
Creating a SharePoint Server 2013 Environment for Development and Testing Version 10
copy Critical Path Training 2012 All Rights Reserved 49
wwwCriticalPathTrainingcom
Download amp Install Workflow Manager and Service Bus
In this section you will install Workflow Manager and Service Bus
1 Ensure you are logged into the WingtipServer VM using the account WINGTIPSP_Content | Password1
It is important you are logged in as the user that will run workflow when you install amp configure Workflow Manager and Service Bus
2 Launch the Web Platform Installer Start All Programs Microsoft Web Platform Installer
a) If the Web Platform Installer is not present on your machine you can download amp install it from here httpwwwmicrosoftcomwebdownloadsplatformaspx
If you do not have internet access within the virtual machine it is possible to download everything needed for workflow using the command line version of the Web Platform Installer (WebPICMD) You can get WebPICMD from httplearniisnetpageaspx1072web-platform-installer-v4-command-line-webpicmdexe-preview-release Specifically for
workflow enter the following command to download Workflow Beta 1 and all prerequisites
webpicmd offline ProductsWorkflow Pathc[path]
3 When the Web Platform Installer loads execute a search for Workflow select Workflow Manager 10 and click Add
4 Click the Install button at the bottom of the Web Platform Installer 40 window
5 On the Prerequisites page click I Accept
Note The Web Platform Installer 40 may prompt you to keep certain products updated using Microsoft Update If it does select Use Microsoft Update when I check for updates (recommended) and click Continue
6 When the installer completes the following dialog will appear Click Continue and then Finish to start the configuration process
Creating a SharePoint Server 2013 Environment for Development and Testing Version 10
copy Critical Path Training 2012 All Rights Reserved 50
wwwCriticalPathTrainingcom
At this point Workflow Manager amp Service Bus are installed
Configure Workflow Manager and Service Bus
In this section you will install Workflow Manager and Service Bus
1 If the Workflow Manager Configuration Wizard is not open open it Start All Programs Workflow Manager 10 Workflow Configuration
2 On the Welcome page click Configure Workflow Manager with Default Settings (Recommended)
Creating a SharePoint Server 2013 Environment for Development and Testing Version 10
copy Critical Path Training 2012 All Rights Reserved 51
wwwCriticalPathTrainingcom
3 On the New Farm Configuration page do the following
a) In the section Configure Service Account set the credentials to
i) User ID sp_contentwingtipcom
ii) Password Password1
b) Check the Allow Workflow management over HTTP on this computer checkbox
Ensure the username is entered in the fully qualified UPN format not as the default shows in the installer (sp_contentwingtip) or the domainusername format
In a production environment you should be doing everything over SSL
c) Click the Test Connection button to verify the connection credentials before proceeding
Creating a SharePoint Server 2013 Environment for Development and Testing Version 10
copy Critical Path Training 2012 All Rights Reserved 52
wwwCriticalPathTrainingcom
d) In the Certificate Generation Key and Confirm Certificate Generation Key enter Password1 into both fields
4 Click the right arrow in the bottom right corner to proceed
5 On the Summary page review your settings and click the check at the bottom right of the widow to start the configuration process
Creating a SharePoint Server 2013 Environment for Development and Testing Version 10
copy Critical Path Training 2012 All Rights Reserved 53
wwwCriticalPathTrainingcom
6 After a few minutes the Configuration Progress screen will show that everything has been configured correctly
Creating a SharePoint Server 2013 Environment for Development and Testing Version 10
copy Critical Path Training 2012 All Rights Reserved 54
wwwCriticalPathTrainingcom
7 Click the check in the bottom right corner
At this point Workflow Manager amp Service Bus has been installed and a new Workflow Manager farm has been created The next step is to connect the SharePoint 2013 farm to the Workflow Manager farm
Connect SharePoint 2013 to Workflow Manager
In this section you will connect SharePoint 2013 and Workflow Manager together
1 Ensure you are logged into the WingtipServer VM using the account WINGTIPadministrator | Password1
2 Get the Workflow Manager endpoint
a) Open the Workflow Manager PowerShell console Start All Programs Workflow Manager 10
b) Execute the Windows PowerShell following cmdlet
Get-WFFarm | ft HttpPort
c) Take note of this port (12291) This port number is what you will use to connect the SharePoint 2013 farm to the Workflow Manager 10 farm
In production you should connect to the HTTPS port listed in the HttpsPort property when you run Get-WFFarm
d) Close the Workflow Manager PowerShell window
3 Connect the SharePoint 2013 farm to Workflow Manager
Creating a SharePoint Server 2013 Environment for Development and Testing Version 10
copy Critical Path Training 2012 All Rights Reserved 55
wwwCriticalPathTrainingcom
a) Open SharePoint 2013 Management Shell Start All Programs Microsoft SharePoint 2013 Products SharePoint 2013 Management Shell
b) Execute the following Windows PowerShell script in the SharePoint 2013 Management Shell
Register-SPWorkflowService ndashSPSite httpintranetwingtipcom ndashWorkflowHostUri httpwingtipserver12291 ndashAllowOAuthHttp
This script is telling SharePoint the endpoint it should use to talk to Workflow Manager as well as Workflow Manager the SharePoint site collection it should talk to for calls into the CSOM It is also configuring all communication over HTTP rather than HTTPS for performance reasons In production you should always use HTTPS
This step will take a moment with no feedback during the process Be patient
c) Close the SharePoint 2013 Management Shell
At this point the SharePoint 2013 farm is connected to the Workflow Manager 10 farm
Configure SharePoint User Profile Service Application AD Sync
Users in SharePoint 2013 are validated by Workflow Manager against SharePoint to ensure they have permissions to start a workflow This is done by looking up the user by their AD UserPrincipalName (UPN) attribute in the User Profile Service Application (UPA) If no matching user is found the workflow will be automatically cancelled by Workflow Manager In this section you will setup UPA to connect amp sync with the local Active Directory so user accounts in AD will have their UPN synchronized to UPA
1 Open Central Administration Start All Programs Microsoft SharePoint 2013 Products SharePoint 2013 Central Administration
2 Go to the User Profile Service Application management page Application Management Manage Service Applications User Profile Service Application
3 The first step is to configure the User Profile Service Application to allow for Active Directory (AD) synchronization
a) Under Synchronization select Configure Synchronization Settings
b) For Synchronization select Use SharePoint Active Directory Import and click OK
4 Next establish a connection to the wingtipcom AD
a) Under Synchronization select Configure Synchronization Connections
b) On the Synchronization Connections page select Create New Connection
c) Enter the following values on this form and click OK
i) Connection Name WINGTIPCOM AD
ii) Type Active Directory Import
iii) Connection Settings
(1) Fully Qualified Domain Name wingtipcom
(2) Authentication Provider Type Windows Authentication
(3) Account Name WINGTIPAdministrator
(4) Password (and Confirm Password) Password1
iv) Containers
(1) Click Populate Containers
(2) After it loads check the box next to WINGTP or click the Select All button below the box
5 Go back to the User Profile Service Application management page Application Management Manage Service Applications User Profile Service Application
6 Finally start a synchronization import
a) Under Synchronization select Start Profile Synchronization
Creating a SharePoint Server 2013 Environment for Development and Testing Version 10
copy Critical Path Training 2012 All Rights Reserved 56
wwwCriticalPathTrainingcom
b) Select Start Full Synchronization and click OK
c) You will be taken back to the User Profile Service Application management page Notice in the top-right corner there is a status block that reports how many profiles are in the UPA database Refresh the page to see it increase to a handful of profiles as the import process runs
At this point you have successfully configured the User Profile Service Application to import profiles from the local AD
Exercise 8 Install the Microsoft Office 2013 Professional Clients
In this exercise you will install the Microsoft Office 2013 client applications
1 Download the Office 2013 into the WingtipServer VM For this you need to create an Office 365 Trial account login to Office 365 go to the Admin Dashboard and then download the latest version httpwwwmicrosoftcomofficepreviewentry-office-preview
2 Download the SharePoint Designer 2013 into the WingtipServer VM from here httpwwwmicrosoftcomen-usdownloaddetailsaspxid=35491
3 Download the Visio Professional 2013 into the WingtipServer VM from here httptechnetmicrosoftcomen-usevalcenterhh973399
Install Microsoft Office Professional Plus 2013
In this section you will install the Microsoft Office 2013 clients
1 Ensure you are logged into the WingtipServer VM using the account WINGTIPadministrator | Password1
2 Execute the installer OfficeProfessionalPlus_English_x64exe
3 On the Read the Microsoft Software License Terms dialog click the checkbox next to I accept the terms of this agreement and click Continue
4 On the Choose the installation you want dialog click the Install Now button
5 The installer will proceed and install all the Office products
6 When the installer completes click the Close button
7 Apply your Office Professional Plus 2013 license key
a) Launch Word 2013 Start All Programs Microsoft Office 2013 Word 2013
b) In the First things first dialog select Use recommended settings and click Accept
c) In the Welcome to Office dialog that opens click the [X] icon in the top-right corner to close it
d) In the left-hand pane click Open Other Documents
e) In the left-hand pane click Account
f) In the Product Information section within the Activation Required box click Change Product Key
g) Enter your license key for Office Professional Plus 2013 check the box next to Attempt to automatically activate my product online and click Install
h) Click OK
At this point you have installed Office Professional Plus 2013
Install Microsoft Office Visio 2013
In this section you will install Microsoft Office 2013 Visio
1 Ensure you are logged into the WingtipServer VM using the account WINGTIPadministrator | Password1
2 Execute the installer VisioProfessional_English_x64exe
3 On the Read the Microsoft Software License Terms dialog click the checkbox next to I accept the terms of this agreement and click Continue
Creating a SharePoint Server 2013 Environment for Development and Testing Version 10
copy Critical Path Training 2012 All Rights Reserved 57
wwwCriticalPathTrainingcom
4 On the Choose the installation you want dialog click the Install Now button
5 The installer will proceed and install all Visio 2013
6 When the installer completes click the Close button
7 Apply your Visio 2013 license key
a) Launch Visio 2013 Start All Programs Microsoft Office 2013 Visio 2013
b) In the First things first dialog select Use recommended settings and click Accept
c) In the Welcome to Office dialog that opens click the X icon in the top-right corner to close it
d) In the left-hand pane click Open Other Documents
e) In the left-hand pane click Account
f) In the Product Information section within the Activation Required box click Change Product Key
g) Enter your license key for Visio 2013 check the box next to Attempt to automatically activate my product online and click Install
h) Click OK
At this point you have installed Visio 2013
Install Microsoft Office 2013 SharePoint Designer
In this section you will install Microsoft Office 2013 SharePoint Designer
1 Ensure you are logged into the WingtipServer VM using the account WINGTIPadministrator | Password1
2 Execute the installer SharePointDesigner_English_x64exe
3 On the Read the Microsoft Software License Terms dialog click the checkbox next to I accept the terms of this agreement and click Continue
4 On the Choose the installation you want dialog click the Install Now button
5 The installer will proceed and install all SharePoint Designer 2013
6 When the installer completes click the Close button
At this point you have installed SharePoint Designer 2013
Exercise 9 Install Visual Studio 2012
In this exercise you will install Visual Studio 2012
1 Ensure you are logged into the WingtipServer VM using the account WINGTIPadministrator | Password1
2 Start the install of Visual Studio 2012 Ultimate Trial by downloading the installer from here httpwwwmicrosoftcomvisualstudio11en-usdownloads
3 On the installation splash screen check the box next to I agree to the License terms and conditions and click the Next button
Creating a SharePoint Server 2013 Environment for Development and Testing Version 10
copy Critical Path Training 2012 All Rights Reserved 58
wwwCriticalPathTrainingcom
4 On the Optional Features to install dialog click Install
5 After some time the installer will complete Click the Launch button to launch Visual Studio 2012
Creating a SharePoint Server 2013 Environment for Development and Testing Version 10
copy Critical Path Training 2012 All Rights Reserved 59
wwwCriticalPathTrainingcom
6 In the Choose Default Environment Settings select Visual C Development Settings and click Start Visual Studio
7 Close Visual Studio 2012
At this point Visual Studio 2012 RTM is installed
Install Office amp SharePoint 2013 Developer Tools
In this section you will install the Office and SharePoint 2013 developer tools for Visual Studio
1 Ensure you are logged into the WingtipServer VM using the account WINGTIPadministrator | Password1
2 Launch the Web Platform Installer Start All Programs Microsoft Web Platform Installer
3 In the search box at the top-right corner of the Web Platform Installer 40 window type sharepoint and press Enter
4 Click the Add button to the right of Microsoft Office Developer Tools for Visual Studio 2012 - Preview 2
5 Click the Install button at the bottom of the Web Platform Installer 40 window
6 On the Prerequisites page click I Accept
Creating a SharePoint Server 2013 Environment for Development and Testing Version 10
copy Critical Path Training 2012 All Rights Reserved 60
wwwCriticalPathTrainingcom
At this point you have installed the SharePoint 2013 amp Office 2013 development tools in Visual Studio 2012
Creating a SharePoint Server 2013 Environment for Development and Testing Version 10
copy Critical Path Training 2012 All Rights Reserved 61
wwwCriticalPathTrainingcom
Appendix 1 Download Manifest
The following lists everything referenced that you will or may need to download in this environment
Windows Server 2008 R2 with Service Pack 1 (installer ISO)
o httptechnetmicrosoftcomen-usevalcenterdd459137aspx
Windows Server 2008 R2 with Service Pack 1 (prebuilt VHD)
o httpwwwmicrosoftcomdownloadsdetailsaspxFamilyId=9040a4be-c3cf-44a5-9052-a70314452305
Windows Server 2008 R2 Service Pack 1
o httpwwwmicrosoftcomen-usdownloaddetailsaspxid=5842
SQL Server 2012 Trial
o httpwwwmicrosoftcombetaexperiencepdSQL2012EvalCTAenusdefaultaspx
SharePoint Server 2013
o httptechnetmicrosoftcomen-USevalcenterhh973397aspx
Hotfixes for SharePoint Server 2013 (post-install)
o KB2554876 The SharePoint Parsing Process Crashes in Windows Server 2008 R2
o KB2708075 IIS 75 Configurations are not Updated when you use the ServerManager Class to Commit
Configuration Changes
o KB2759112 Hotfix is Available for NET Framework 45 that Resolves an ASPNET Race Condition Issue in
Windows Server 2008 R2 Windows Server 2008 R2 SP1
o KB2765317 Hotfix is Available for NET Framework 45 that Resolves an ASPNET Race Condition Issue in
Windows 8 Windows RT and Windows Server 2012
Web Platform Installer
o httpwwwmicrosoftcomwebdownloadsplatformaspx
Web Platform Installer ndash Command Line Version
o httplearniisnetpageaspx1072web-platform-installer-v4-command-line-webpicmdexe-preview-release
Workflow Manager 10
o Download using the Microsoft Web Platform Installer
Office 2013
o httpwwwmicrosoftcomofficepreviewentry-office-preview
SharePoint Designer 2013
o httpwwwmicrosoftcomen-usdownloaddetailsaspxid=35491
Visio Professional 2013
o httptechnetmicrosoftcomen-usevalcenterhh973399
Visual Studio 2012
o httpwwwmicrosoftcomvisualstudio11en-usdownloads
Office Developer Tools for Visual Studio 2012 ndash Preview 2
o Download using the Microsoft Web Platform Installer
Creating a SharePoint Server 2013 Environment for Development and Testing Version 10
copy Critical Path Training 2012 All Rights Reserved 62
wwwCriticalPathTrainingcom
Appendix 2 Windows PowerShell Script Manifest
The following lists all Windows PowerShell scripts that are provided with this setup guide
AddDisableLoopbackCheckRegKeyps1
o The following steps automate creating the registry key outlined as Method 2 in the Microsoft Knowledgebase article
httpsupportmicrosoftcomkb896861 using Windows PowerShell This key DisableLoopbackCheck will allow
you to browse SharePoint sites on the same machine Without this key (or following Method 1 in the KB article) you
would need to browse any SharePoint sites from a different computer than the one which SharePoint is installed on
ConfigureSpFarmForAppsps1
o Configures a SharePoint 2013 for hosting apps This ensures everything you need is installed running and
configured This is documented here httpmsdnmicrosoftcomen-uslibraryfp179923(v=office15)
CreateSpServiceAccountsps1
o Creates the minimal necessary service accounts for SharePoint Server 2013 SP_Farm SP_Content amp
SP_Services
SetupSharePointForHNSCps1
o Configures a SharePoint 2013 install for hosting Host-Named Site Collections (HNSC) This involves creating a Web
Application in SharePoint that has no host header bindings Using DNS all requests are mapped to this Web
Application You then create the site collections via PowerShell as you cant create HNSCs via the browser (Central
Administration)
Creating a SharePoint Server 2013 Environment for Development and Testing Version 10
copy Critical Path Training 2012 All Rights Reserved 63
wwwCriticalPathTrainingcom
Appendix 3 Create Sample Adventure Works Database
The following steps document downloading and installing the sample Adventure Works OLTP database provided by Microsoft
1 Launch Internet Explorer and navigate to httpmsftdbprodsamplescodeplexcom
2 Download the Adventure Works 2012 OLTP Script
3 Extract the ZIP into a folder on the desktop
4 Launch SQL Server Management Studio Start All Programs Microsoft SQL Server 2012 SQL Server Management Studio
5 When SQL Server Management Studio launches within the Connect to Server dialog login using the default settings and click Connect
6 Within SQL Server Management Studio select File Open File
7 Select the file instawdbsql from the extracted ZIP and click Open
8 If prompted to re-login to the database engine do it
9 Select Query SQLCMD Mode
10 Scroll down to line 42 the line that starts with the following
setvar SqlSamplesSourceDataPath
11 Change the folder location of where you unzipped the Adventure Works 2012 OLTP Script
12 Select Query Execute
13 When the script completes the AdventureWorks2012 database will have been created
Creating a SharePoint Server 2013 Environment for Development and Testing Version 10
copy Critical Path Training 2012 All Rights Reserved 64
wwwCriticalPathTrainingcom
Change Log
Change Version Description
August 22 2012 v 01 Pre-release for review
August 27 2012 v 02 Initial public release ndash install guide based on SharePoint Server Beta 2
August 28 2012 v 03 Updated URL for the site collection used to connect SharePoint to WAW
August 31 2012 v 04 Typo Removed SQL Server Analysis Services as part of the install Not required in a
SharePoint dev box (unless you are doing business intelligence which is not covered
in the guide)
Updated all references to Windows Azure Workflow to Workflow Manager the new
official name for the new workflow product
Updated SetupSharePointForHNSCps1 script to lookup HNSC Web Application by
name rather than URL which is more reliable
Typo Updated WingtipAllUp public NIC to use a different IP than the WingtipDC
Typo Replaced a reference to WingtipServer with WingtipDC
Typo Fixed handful of minor typos
September 1 2012 v 05 Removed SQL Server Reporting Services from install guide
Added step to uncheck IErsquos ldquoAutomatically detect proxyrdquo
Added post workflow install steps to setup User Profile Service Application to sync with
local Active Directory
September 5 2012 v 06 Added step to create a default root site collection in the HNSC web app
Updated minor typos and added extra notes for context
Updated PowerShell script SetupSharePointForHNSCps1 to remove content
database of default Web Application when setting up HNSC Web App
Added a new exercise 8 (after SharePoint install amp config and before the Workflow
install and config) to setup support for My Sites
October 20 2012 v 07 Updated script SetupSharePointForHNSCps1 to fix a bug where it would fail on line
111 if you didnrsquot already have a WINGTIPSP_Content managed account
Added section to bypass SharePointrsquos check for crlmicrosoftcom
Updated workflowrsquos registration PowerShell script to point to
httpintranetwingtipcom
Switched order of post-SharePoint install to setup HSNC hosting before configuring for
hosting apps
November 29 2012
v 10 Changed setup guide to use a single VM instead of two VMs
Updated guide for SharePoint 2013 RTM
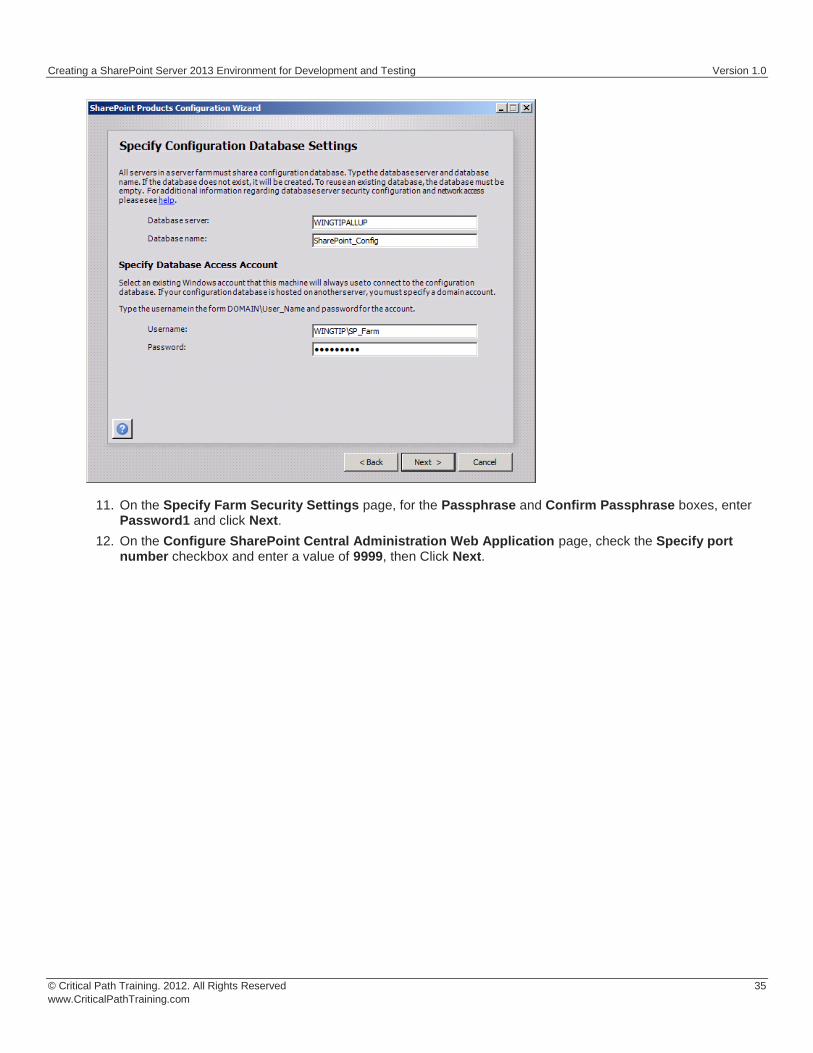
Creating a SharePoint Server 2013 Environment for Development and Testing Version 10
copy Critical Path Training 2012 All Rights Reserved 37
wwwCriticalPathTrainingcom
At this point you have successfully installed SharePoint Server 2013
Configure SharePoint Server 2013
In this section you will create a new SharePoint Server 2013 farm and perform minimal configuration tasks
After installing SharePoint Sever 2013 the SharePoint Products Configuration Wizard will launch the browser-based Initial Farm Configuration Wizard
1 In the first page of the wizard you are prompted to Help Make SharePoint Better Select which ever option you want and click OK
2 On the Welcome page that asks How do you want to configure your SharePoint farm click the Start the Wizard button
3 On the Services page do the following and then click Next
a) Service Account Select Create new managed account
i) Username WINGTIPSP_Services
ii) Password Password1
b) Services Uncheck the following services
Creating a SharePoint Server 2013 Environment for Development and Testing Version 10
copy Critical Path Training 2012 All Rights Reserved 38
wwwCriticalPathTrainingcom
i) Access Services 2010
ii) App Management Service
In SharePoint Server 2013 the Search Service Application processes specifically noderunnerexe can consume a considerable amount of memory and processor time If you are not going to work with search you might consider unchecking this option for now You can always go back into Central Administration and create a new instance of the Search Service Application at a later date if you need it
Why did we remove Access Services 2010 amp App Management Service service applications The Access Services 2010 service application is included for backwards compatibility and isnrsquot needed in new installations unless you are migrating solutions built with Access Services 2010 from SharePoint Server 2010 (if so you can create this service application later within Central Administration Application Management Manage Service Applications) The App Management Service service application will be created in a later step in this setup guide therefor it is skipped here
4 The creation of the service applications can take quite a while so be patient If it exceeds 20 minutes it is fairly safe to assume the page is hung up One option is to close the browser then launch Central Administration (Start All Programs Microsoft SharePoint 2013 Products SharePoint 2013 Central Administration) and look at the Service Application page (Application Management Manage Service Applications) to see if they were all created
Configure DNS
In this section you will configure DNS for hosting SharePoint sites amp Apps
1 Ensure you are logged into the WingtipServer VM using the account wingtipadministrator | Password1
2 Open the DNS window Start Administrative Tools DNS
3 Expand the hierarchy on the left-hand side of the window until you get to DNS WINGTIPSERVER Forward Lookup Zones wingtipcom
4 Create a new wildcard so all requests for http[]wingtipcom will be forwarded to our SharePoint machine
a) Next right-click wingtipcom and select New Host (A or AAAA)
Creating a SharePoint Server 2013 Environment for Development and Testing Version 10
copy Critical Path Training 2012 All Rights Reserved 39
wwwCriticalPathTrainingcom
b) In the New Host dialog enter the following and click OK
i) Alias Name
ii) IP Address 192168150102 Then click Add Host The following figure shows how this looks
This new record is telling DNS to forward any request for http[]wingtipcom to the webserver WINGTIPSERVER where the
requests will be served by SharePoint
5 Verify this DNS entry is working
a) Open Windows PowerShell Start All Programs Accessories Windows PowerShell Windows PowerShell
b) Run the following commands and press ENTER
PS CUsersAdministratorgt nslookup somethingwingtipcom PS CUsersAdministratorgt nslookup somethingappswingtipcom
c) You should get a response that points to the WingtipServer server as shown in the following figure
Creating a SharePoint Server 2013 Environment for Development and Testing Version 10
copy Critical Path Training 2012 All Rights Reserved 40
wwwCriticalPathTrainingcom
Configure SharePoint Server 2013 for Host-Named Site Collections amp Create Initial Site
Collections
In this section you will create new SharePoint 2013 site collections for testing and hosting apps
Microsoft recommends to create host-named site collections (HNSC) instead of using the path based site collection addressing The difference is the following a path based site created at something such as httpintranetwingtipcomsitesdevtest as an HNSC site would be more like httpdevtestwingtipcom This is how it works in the cloud (Office 365) and it scales much better for on-prem
deployments This setup guide will show you how to setup your environment to create HNSC The only downside to this approach is that you canrsquot create site collections within Central Administration it must be done via Windows PowerShell API (because Central Administration doesnrsquot instruct you where to put the site
This is implemented in various parts First DNS must be configured to send all requests for httpwingtipcom to a Web Application
(implemented in the last section) Second this Web Application must be extended with SharePoint and have no host header bindings (so it handles all requests) Third it must have a default site collection at the root of the Web Application but it will not be used for anything (in fact it doesnrsquot need a template assigned to it)
You can read more about HNSCrsquos on TechNet httptechnetmicrosoftcomen-uslibrarycc424952aspx
PowerShell Script Alert The steps in this section are automated in the script SetupSharePointForHNSCps1 found in the files that
accompany this setup guide Open the script and read the header for documentation on how to use it
1 Ensure you are logged into the WingtipServer VM using the account wingtipadministrator | Password1
2 Open Central Administration Start All Programs Microsoft SharePoint 2013 Products SharePoint 2013 Central Administration
3 Select Application Management Manage Web Applications
4 Delete the default Web Application created by the configuration wizard
a) Delete the existing default Web Application
i) Select the Web Application SharePoint ndash 80 the one with the URL of httpwingtipserver and click Delete in the ribbon
ii) When prompted to delete the associated IIS Web Site amp SQL Server database select both options to delete them and click OK
The reason you are doing this is because the setup wizard you ran previously when creating the service applications automatically created it The problem is that it used the same identity (WINGTIPSP_Services) for the app pool that is used for all the service
applications which is not desired
5 Create a new Web Application to handle Host-Named Site Collections (HNSC)
Creating a SharePoint Server 2013 Environment for Development and Testing Version 10
copy Critical Path Training 2012 All Rights Reserved 41
wwwCriticalPathTrainingcom
a) In the ribbon click the New button
b) In the Create New Web Application dialog enter the following values in the properties and click OK Leave all properties not mentioned
i) Select the radio button Create a new IIS web site
(1) Name SharePoint HNSC Host ndash 80
(2) Port 80
ii) Application Pool
(1) Select the radio button Create a new application pool
(a) Application Pool Name SharePoint Default HNSC AppPool
(b) Select a security account for this application pool WINGTIPSP_Content
If WINGTIPSP_Content is not listed as an available managed account create it by selecting the appropriate option and using
Password1 for the password
iii) Database Name and Authentication
(1) Database Name WSS_Content_HNSCDefaultHost
c) This process will take a few moments At the end of the process SharePoint will ask if you want to create a site collection You do but you donrsquot want to do it through the browser as this will not be a HNSC To create a HNSC you must create it via Windows PowerShell
6 Create a default not template site collection at the root of the web application
a) Open SharePoint 2013 Management Shell Start All Programs Microsoft SharePoint 2013 Products SharePoint 2013 Management Shell
7 Create Site Collections for Testing SharePoint amp SharePoint Apps
a) Open SharePoint 2013 Management Shell Start All Programs Microsoft SharePoint 2013 Products SharePoint 2013 Management Shell
b) Get a reference to the HNSC web application you just created by running the following Windows PowerShell script in the SharePoint 2013 Management Shell
$hnscWebApp = Get-SPWebApplication | Where-Object $_DisplayName -eq SharePoint HNSC Host - 80
c) Create a non-templated site at the root of the web application for Workflow to connect to by executing the following Windows PowerShell script in the SharePoint 2013 Management Shell
New-SPSite -Name Root HNSC Site Collection -Url httpwingtipcom -HostHeaderWebApplication $hnscWebApp -OwnerAlias WINGTIPAdministrator
d) Create a team site by executing the following Windows PowerShell script in the SharePoint 2013 Management Shell
New-SPSite -Name Wingtip Intranet -Url httpintranetwingtipcom ndashHostHeaderWebApplication $hnscWebApp -Template STS0 -OwnerAlias WINGTIPAdministrator
e) Create a developer site by executing the following Windows PowerShell script in the SharePoint 2013 Management Shell
New-SPSite -Name Wingtip Developer Site -Url httpdevwingtipcom ndashHostHeaderWebApplication $hnscWebApp -Template DEV0 -OwnerAlias WINGTIPAdministrator
You can only create debug and test apps using a developer site
At this point you now have a site collection to use as a team site (httpintranetwingtipcom) and to develop and test custom SharePoint apps (httpdevwingtipcom)
Creating a SharePoint Server 2013 Environment for Development and Testing Version 10
copy Critical Path Training 2012 All Rights Reserved 42
wwwCriticalPathTrainingcom
Configure SharePoint 2013 for Hosting Apps
In this setup you will setup your SharePoint 2013 environment for hosting apps
PowerShell Script Alert Everything in the next immediate step is provided in the script ConfigureSpFarmForAppsps1 found in the
files that accompany this setup guide Open the script and read the header for documentation on how to use it
1 Ensure you are logged into the WingtipServer VM using the account wingtipadministrator | Password1
2 Create the necessary SharePoint App Management service applications and start the necessary services via Windows PowerShell
a) Open SharePoint 2013 Management Shell Start All Programs Microsoft SharePoint 2013 Products SharePoint 2013 Management Shell
b) Execute the following Windows PowerShell script in the SharePoint 2013 Management Shell
$appHostDomain = appswingtipcom $adminService = Get-Service -Name spadminv4 if ($adminServiceStatus -ne Running) Start-Service $adminService $timerService = Get-Service -Name sptimerv4 if ($timerServiceStatus -ne Running) Start-Service $timerService Set-SPAppDomain $appHostDomain $appMgmtSvcInstance = Get-SPServiceInstance | Where-Object $_GetType()Name -eq AppManagementServiceInstance if ($appMgmtSvcInstanceStatus -ne Online) Start-SPServiceInstance -Identity $appMgmtSvcInstance $appSubSettingSvcInstance = Get-SPServiceInstance | Where-Object $_GetType()Name -eq SPSubscriptionSettingsServiceInstance if ($appSubSettingSvcInstanceStatus -ne Online) Start-SPServiceInstance -Identity $appSubSettingSvcInstance $appPoolServiceApps = Get-SPServiceApplicationPool -Identity SharePoint Web Services Default $appSubSvc = New-SPSubscriptionSettingsServiceApplication ndashApplicationPool $appPoolServiceApps ndashName Settings Service Application ndashDatabaseName SettingsServiceDB $proxySubSvc = New-SPSubscriptionSettingsServiceApplicationProxy ndashServiceApplication $appSubSvc $appAppSvc = New-SPAppManagementServiceApplication -ApplicationPool $appPoolServiceApps -Name App Management Service Application -DatabaseName AppServiceDB $proxyAppSvc = New-SPAppManagementServiceApplicationProxy -ServiceApplication $appAppSvc Set-SPAppSiteSubscriptionName -Name app -Confirm$false
3 Verify the script configured SharePoint 2013 for hosting apps
a) Open Central Administration Start All Programs Microsoft SharePoint 2013 Products SharePoint 2013 Central Administration
b) Verify service applications created
i) Open the Service Applications page Application Management Manage Service Applications
ii) Verify you have two service applications created
(1) App Management Service Application
(2) Settings Service Application
c) Verify service instances are running
i) Open the Services on Server page System Settings Manage Services on Server
ii) Verify the following services are Started
(1) App Management Service
(2) Microsoft SharePoint Foundation Subscription Settings Service
Creating a SharePoint Server 2013 Environment for Development and Testing Version 10
copy Critical Path Training 2012 All Rights Reserved 43
wwwCriticalPathTrainingcom
d) Verify App URLs are correct
i) Open the Configure App URLs page Apps Configure app URLs
ii) Verify the following
(1) App Domain appswingtipcom
(2) App Prefix app
At this point your SharePoint Server 2013 environment is ready to host SharePoint apps
Creating a SharePoint Server 2013 Environment for Development and Testing Version 10
copy Critical Path Training 2012 All Rights Reserved 44
wwwCriticalPathTrainingcom
Start the SharePoint 2013 Sandbox Service
By default the service that executes sandbox solutions is not running In this step you will start the service
1 Open Central Administration Start All Programs Microsoft SharePoint 2013 Products SharePoint 2013 Central Administration
2 Open the Services on Server page System Settings Manage Services on Server
3 Click the Start link to the left of the Microsoft SharePoint Foundation Sandboxed Code Service
At this point your installation can support sandbox solutions
Configure CRL Verification for Disconnected Environments
SharePoint periodically ldquophones homerdquo to a specific address hosted by Microsoft under certain conditions When your environment is disconnected this can cause an unnecessary delay or failures when starting up the sandbox The following steps outline a workaround to bypass this check
1 Launch Notepad as an administrator Start All Programs Accessories right-click Notepad and select Run as Administrator
2 Open the hosts file by selecting File Open and finding the file
cWindowsSystem32Driversetchosts
3 Add the following line to the end of the file
127001 crlmicrosoftcom
4 Save and close the hosts file
Update Internet Explorer to Bypass the App URL amp Automatically Login to SharePoint Sites
In this section you will update Internet Explorer to add the App hosting URL to the bypass list so you can navigate to the domain after deploying SharePoint hosted apps
1 Ensure you are logged into the WingtipServer VM using the account wingtipadministrator | Password1
1 Launch Internet Explorer Start All Programs Internet Explorer
2 Configure Internet Explorer to bypass the App URL
a) In the top-right corner click the gear icon and select Internet Options
b) On the Security tab select the Local Intranet and click the Sites button
c) Uncheck the box next to Automatically detect intranet network
d) Click the Advanced button and add two entries to the Exceptions list
i) httpwingtipcom
ii) httpappswingtipcom
Creating a SharePoint Server 2013 Environment for Development and Testing Version 10
copy Critical Path Training 2012 All Rights Reserved 45
wwwCriticalPathTrainingcom
e) Click the Close button followed by the OK button multiple times to close out of the dialogs
At this point Internet Explorer is setup to bypass your app URL so you can navigate to apps (httpappswingtipcom) as well as automatically authenticate to sites hosted at httpwingtipcom
Exercise 6 Configure SharePoint to Host My Sites
In this exercise you will configure SharePoint to create and host My Sites In order to host My Sites you will need a new Web Application that is configured for Self-Service Site Creation and has a My Site Host site collection
1 Create a new SharePoint web application to host the My Sites
a) Ensure you are logged into the WingtipServer VM using the account wingtipadministrator | Password1
b) Open Central Administration Start All Programs Microsoft SharePoint 2013 Products SharePoint 2013 Central Administration
c) Select Application Management Manage Web Applications
d) In the ribbon click the New button
e) In the Create New Web Application dialog enter the following values in the properties and click OK Leave all properties not mentioned
i) Select the radio button Create a new IIS web site
(1) Name SharePoint MySite Host ndash 80
(2) Port 80
(3) Host Header mywingtipcom
ii) Application Pool
(1) Select the radio button Use existing application pool
(a) Application Pool Name SharePoint Default HNSC AppPool
iii) Database Name and Authentication
(1) Database Name WSS_Content_SocialWingtipCom
f) This process will take a few moments At the end of the process SharePoint will ask if you want to create a site collection Click the link provided to create a new site collection amp continue to the next step
2 Create a My Site Host site collection
a) On the Create Site Collection page use the following information to complete the form and click OK
Creating a SharePoint Server 2013 Environment for Development and Testing Version 10
copy Critical Path Training 2012 All Rights Reserved 46
wwwCriticalPathTrainingcom
i) Title My Site Host
ii) URL
iii) Template Selection My Site Host (found under the Enterprise tab)
iv) Primary Site Collection Administrator WINGTIPAdministrator
3 Update the Web Application to host my sites
a) Within Central Administration in the left-hand navigation navigate to the Manage Web Applications page Application Management Manage Web Applications
b) Select the SharePoint MySite Host ndash 80 web application
c) Click the Managed Paths button in the ribbon
d) Remove the sites managed path and add two new managed paths and click OK
i) personal ndash Wildcard inclusion
ii) my ndash Explicit inclusion
e) With the SharePoint MySite Host ndash 80 web application still selected click the Self-Service Site Creation button
f) On the Self-Service Site Creation page use the following values to complete the form and click OK
i) Site Collections On
4 Next configure the User Profile Service Application My Site settings
a) Browse to the User Profile Service Application management page Application Management Manage Service Applications User Profile Service Application
b) Under the My Site Settings section click the Setup My Sites
c) On the My Site Settings page use the following information to complete the form and click OK
i) My Site Host httpmywingtipcom
ii) Personal Site Location personal
At this point your SharePoint deployment is now configured to automatically create My Sites under httpmywingtipcomPersonalUserName when users first browse to them
Exercise 7 Install amp Configure Workflow Manager 10
In this exercise you will configure the WingtipServer VM to host Workflow Manager 10 and connect it to your SharePoint installation
1 Ensure you are logged into the WingtipServer VM using the account wingtipadministrator | Password1
Verify SQL Server 2012 Network Configuration
In this section yoursquoll verify the network configuration is correct for SQL Server 2012 in order to install Workflow Manager 10
Creating a SharePoint Server 2013 Environment for Development and Testing Version 10
copy Critical Path Training 2012 All Rights Reserved 47
wwwCriticalPathTrainingcom
1 Configure SQL Server 2012 to have the TCPIP connection protocol enabled
a) Open the SQL Server Configuration Manager Start All Programs Microsoft SQL Server 2012 Configuration Tools SQL Server Configuration Manager
b) Expand the hierarchy on the left-hand side to the following SQL Server Connection Manager (local) SQL Server Network Configuration Protocols for MSSQLSERVER
c) In the main window if TCPIP is Disabled right-click TCPIP and select Enable
d) When prompted with a warning click OK
2 SQL Server must be restarted in order to reflect this change
a) In the hierarchy on the left-hand side of the window select SQL Server Services
b) Right-click SQL Server (MSSQLSERVER) and select Restart
At this point SQL Server is now configured with the TCPIP protocol enabled a requirement when configuring Service Bus
Configure the Workflow Service Account with the Necessary Rights
In this section you will verify the service account that will run Workflow Manager and Service Bus
1 Ensure you are logged into the WingtipServer VM using the account WINGTIPadministrator | Password1
2 Grant the WINGTIPSP_Content account securityadmin amp dbcreator permissions in SQL Server
a) Launch SQL Server Management Studio Start All Programs Microsoft SQL Server 2012 SQL Server Management Studio
b) When SQL Server Management Studio launches within the Connect to Server dialog login using the default settings and click Connect
c) In the Object Explorer tool window expand the WINGTIPSERVER server hierarchy to the Security Logins node
d) Find the WINGTIPSP_Content account right-click it and select Properties
Creating a SharePoint Server 2013 Environment for Development and Testing Version 10
copy Critical Path Training 2012 All Rights Reserved 48
wwwCriticalPathTrainingcom
e) In the Select a page pane select Server Roles
f) Check securityadmin amp dbcreator and click OK
g) Close SQL Server Management Studio
3 Add the Workflow service account to the local administrators group
a) Open the Active Directory Users and Computers window Start Administrative Tools Active Directory Users and Computers
b) In the hierarchy on the left-hand side of the window expand it to the following Active Directory Users and Computers wingtipcom Builtin
c) In the main window right-click Administrators and select Properties
d) In the Administrators Properties dialog select the Members tab and click Add
e) In the Enter the object names to select box enter wingtipsp_content and click the Check Names button
f) In the Administrators Properties dialog click OK
g) Close the Active Directory Users and Computers window
At this point the service account that will host Workflow Manager and Service Bus has been configured correctly
Creating a SharePoint Server 2013 Environment for Development and Testing Version 10
copy Critical Path Training 2012 All Rights Reserved 49
wwwCriticalPathTrainingcom
Download amp Install Workflow Manager and Service Bus
In this section you will install Workflow Manager and Service Bus
1 Ensure you are logged into the WingtipServer VM using the account WINGTIPSP_Content | Password1
It is important you are logged in as the user that will run workflow when you install amp configure Workflow Manager and Service Bus
2 Launch the Web Platform Installer Start All Programs Microsoft Web Platform Installer
a) If the Web Platform Installer is not present on your machine you can download amp install it from here httpwwwmicrosoftcomwebdownloadsplatformaspx
If you do not have internet access within the virtual machine it is possible to download everything needed for workflow using the command line version of the Web Platform Installer (WebPICMD) You can get WebPICMD from httplearniisnetpageaspx1072web-platform-installer-v4-command-line-webpicmdexe-preview-release Specifically for
workflow enter the following command to download Workflow Beta 1 and all prerequisites
webpicmd offline ProductsWorkflow Pathc[path]
3 When the Web Platform Installer loads execute a search for Workflow select Workflow Manager 10 and click Add
4 Click the Install button at the bottom of the Web Platform Installer 40 window
5 On the Prerequisites page click I Accept
Note The Web Platform Installer 40 may prompt you to keep certain products updated using Microsoft Update If it does select Use Microsoft Update when I check for updates (recommended) and click Continue
6 When the installer completes the following dialog will appear Click Continue and then Finish to start the configuration process
Creating a SharePoint Server 2013 Environment for Development and Testing Version 10
copy Critical Path Training 2012 All Rights Reserved 50
wwwCriticalPathTrainingcom
At this point Workflow Manager amp Service Bus are installed
Configure Workflow Manager and Service Bus
In this section you will install Workflow Manager and Service Bus
1 If the Workflow Manager Configuration Wizard is not open open it Start All Programs Workflow Manager 10 Workflow Configuration
2 On the Welcome page click Configure Workflow Manager with Default Settings (Recommended)
Creating a SharePoint Server 2013 Environment for Development and Testing Version 10
copy Critical Path Training 2012 All Rights Reserved 51
wwwCriticalPathTrainingcom
3 On the New Farm Configuration page do the following
a) In the section Configure Service Account set the credentials to
i) User ID sp_contentwingtipcom
ii) Password Password1
b) Check the Allow Workflow management over HTTP on this computer checkbox
Ensure the username is entered in the fully qualified UPN format not as the default shows in the installer (sp_contentwingtip) or the domainusername format
In a production environment you should be doing everything over SSL
c) Click the Test Connection button to verify the connection credentials before proceeding
Creating a SharePoint Server 2013 Environment for Development and Testing Version 10
copy Critical Path Training 2012 All Rights Reserved 52
wwwCriticalPathTrainingcom
d) In the Certificate Generation Key and Confirm Certificate Generation Key enter Password1 into both fields
4 Click the right arrow in the bottom right corner to proceed
5 On the Summary page review your settings and click the check at the bottom right of the widow to start the configuration process
Creating a SharePoint Server 2013 Environment for Development and Testing Version 10
copy Critical Path Training 2012 All Rights Reserved 53
wwwCriticalPathTrainingcom
6 After a few minutes the Configuration Progress screen will show that everything has been configured correctly
Creating a SharePoint Server 2013 Environment for Development and Testing Version 10
copy Critical Path Training 2012 All Rights Reserved 54
wwwCriticalPathTrainingcom
7 Click the check in the bottom right corner
At this point Workflow Manager amp Service Bus has been installed and a new Workflow Manager farm has been created The next step is to connect the SharePoint 2013 farm to the Workflow Manager farm
Connect SharePoint 2013 to Workflow Manager
In this section you will connect SharePoint 2013 and Workflow Manager together
1 Ensure you are logged into the WingtipServer VM using the account WINGTIPadministrator | Password1
2 Get the Workflow Manager endpoint
a) Open the Workflow Manager PowerShell console Start All Programs Workflow Manager 10
b) Execute the Windows PowerShell following cmdlet
Get-WFFarm | ft HttpPort
c) Take note of this port (12291) This port number is what you will use to connect the SharePoint 2013 farm to the Workflow Manager 10 farm
In production you should connect to the HTTPS port listed in the HttpsPort property when you run Get-WFFarm
d) Close the Workflow Manager PowerShell window
3 Connect the SharePoint 2013 farm to Workflow Manager
Creating a SharePoint Server 2013 Environment for Development and Testing Version 10
copy Critical Path Training 2012 All Rights Reserved 55
wwwCriticalPathTrainingcom
a) Open SharePoint 2013 Management Shell Start All Programs Microsoft SharePoint 2013 Products SharePoint 2013 Management Shell
b) Execute the following Windows PowerShell script in the SharePoint 2013 Management Shell
Register-SPWorkflowService ndashSPSite httpintranetwingtipcom ndashWorkflowHostUri httpwingtipserver12291 ndashAllowOAuthHttp
This script is telling SharePoint the endpoint it should use to talk to Workflow Manager as well as Workflow Manager the SharePoint site collection it should talk to for calls into the CSOM It is also configuring all communication over HTTP rather than HTTPS for performance reasons In production you should always use HTTPS
This step will take a moment with no feedback during the process Be patient
c) Close the SharePoint 2013 Management Shell
At this point the SharePoint 2013 farm is connected to the Workflow Manager 10 farm
Configure SharePoint User Profile Service Application AD Sync
Users in SharePoint 2013 are validated by Workflow Manager against SharePoint to ensure they have permissions to start a workflow This is done by looking up the user by their AD UserPrincipalName (UPN) attribute in the User Profile Service Application (UPA) If no matching user is found the workflow will be automatically cancelled by Workflow Manager In this section you will setup UPA to connect amp sync with the local Active Directory so user accounts in AD will have their UPN synchronized to UPA
1 Open Central Administration Start All Programs Microsoft SharePoint 2013 Products SharePoint 2013 Central Administration
2 Go to the User Profile Service Application management page Application Management Manage Service Applications User Profile Service Application
3 The first step is to configure the User Profile Service Application to allow for Active Directory (AD) synchronization
a) Under Synchronization select Configure Synchronization Settings
b) For Synchronization select Use SharePoint Active Directory Import and click OK
4 Next establish a connection to the wingtipcom AD
a) Under Synchronization select Configure Synchronization Connections
b) On the Synchronization Connections page select Create New Connection
c) Enter the following values on this form and click OK
i) Connection Name WINGTIPCOM AD
ii) Type Active Directory Import
iii) Connection Settings
(1) Fully Qualified Domain Name wingtipcom
(2) Authentication Provider Type Windows Authentication
(3) Account Name WINGTIPAdministrator
(4) Password (and Confirm Password) Password1
iv) Containers
(1) Click Populate Containers
(2) After it loads check the box next to WINGTP or click the Select All button below the box
5 Go back to the User Profile Service Application management page Application Management Manage Service Applications User Profile Service Application
6 Finally start a synchronization import
a) Under Synchronization select Start Profile Synchronization
Creating a SharePoint Server 2013 Environment for Development and Testing Version 10
copy Critical Path Training 2012 All Rights Reserved 56
wwwCriticalPathTrainingcom
b) Select Start Full Synchronization and click OK
c) You will be taken back to the User Profile Service Application management page Notice in the top-right corner there is a status block that reports how many profiles are in the UPA database Refresh the page to see it increase to a handful of profiles as the import process runs
At this point you have successfully configured the User Profile Service Application to import profiles from the local AD
Exercise 8 Install the Microsoft Office 2013 Professional Clients
In this exercise you will install the Microsoft Office 2013 client applications
1 Download the Office 2013 into the WingtipServer VM For this you need to create an Office 365 Trial account login to Office 365 go to the Admin Dashboard and then download the latest version httpwwwmicrosoftcomofficepreviewentry-office-preview
2 Download the SharePoint Designer 2013 into the WingtipServer VM from here httpwwwmicrosoftcomen-usdownloaddetailsaspxid=35491
3 Download the Visio Professional 2013 into the WingtipServer VM from here httptechnetmicrosoftcomen-usevalcenterhh973399
Install Microsoft Office Professional Plus 2013
In this section you will install the Microsoft Office 2013 clients
1 Ensure you are logged into the WingtipServer VM using the account WINGTIPadministrator | Password1
2 Execute the installer OfficeProfessionalPlus_English_x64exe
3 On the Read the Microsoft Software License Terms dialog click the checkbox next to I accept the terms of this agreement and click Continue
4 On the Choose the installation you want dialog click the Install Now button
5 The installer will proceed and install all the Office products
6 When the installer completes click the Close button
7 Apply your Office Professional Plus 2013 license key
a) Launch Word 2013 Start All Programs Microsoft Office 2013 Word 2013
b) In the First things first dialog select Use recommended settings and click Accept
c) In the Welcome to Office dialog that opens click the [X] icon in the top-right corner to close it
d) In the left-hand pane click Open Other Documents
e) In the left-hand pane click Account
f) In the Product Information section within the Activation Required box click Change Product Key
g) Enter your license key for Office Professional Plus 2013 check the box next to Attempt to automatically activate my product online and click Install
h) Click OK
At this point you have installed Office Professional Plus 2013
Install Microsoft Office Visio 2013
In this section you will install Microsoft Office 2013 Visio
1 Ensure you are logged into the WingtipServer VM using the account WINGTIPadministrator | Password1
2 Execute the installer VisioProfessional_English_x64exe
3 On the Read the Microsoft Software License Terms dialog click the checkbox next to I accept the terms of this agreement and click Continue
Creating a SharePoint Server 2013 Environment for Development and Testing Version 10
copy Critical Path Training 2012 All Rights Reserved 57
wwwCriticalPathTrainingcom
4 On the Choose the installation you want dialog click the Install Now button
5 The installer will proceed and install all Visio 2013
6 When the installer completes click the Close button
7 Apply your Visio 2013 license key
a) Launch Visio 2013 Start All Programs Microsoft Office 2013 Visio 2013
b) In the First things first dialog select Use recommended settings and click Accept
c) In the Welcome to Office dialog that opens click the X icon in the top-right corner to close it
d) In the left-hand pane click Open Other Documents
e) In the left-hand pane click Account
f) In the Product Information section within the Activation Required box click Change Product Key
g) Enter your license key for Visio 2013 check the box next to Attempt to automatically activate my product online and click Install
h) Click OK
At this point you have installed Visio 2013
Install Microsoft Office 2013 SharePoint Designer
In this section you will install Microsoft Office 2013 SharePoint Designer
1 Ensure you are logged into the WingtipServer VM using the account WINGTIPadministrator | Password1
2 Execute the installer SharePointDesigner_English_x64exe
3 On the Read the Microsoft Software License Terms dialog click the checkbox next to I accept the terms of this agreement and click Continue
4 On the Choose the installation you want dialog click the Install Now button
5 The installer will proceed and install all SharePoint Designer 2013
6 When the installer completes click the Close button
At this point you have installed SharePoint Designer 2013
Exercise 9 Install Visual Studio 2012
In this exercise you will install Visual Studio 2012
1 Ensure you are logged into the WingtipServer VM using the account WINGTIPadministrator | Password1
2 Start the install of Visual Studio 2012 Ultimate Trial by downloading the installer from here httpwwwmicrosoftcomvisualstudio11en-usdownloads
3 On the installation splash screen check the box next to I agree to the License terms and conditions and click the Next button
Creating a SharePoint Server 2013 Environment for Development and Testing Version 10
copy Critical Path Training 2012 All Rights Reserved 58
wwwCriticalPathTrainingcom
4 On the Optional Features to install dialog click Install
5 After some time the installer will complete Click the Launch button to launch Visual Studio 2012
Creating a SharePoint Server 2013 Environment for Development and Testing Version 10
copy Critical Path Training 2012 All Rights Reserved 59
wwwCriticalPathTrainingcom
6 In the Choose Default Environment Settings select Visual C Development Settings and click Start Visual Studio
7 Close Visual Studio 2012
At this point Visual Studio 2012 RTM is installed
Install Office amp SharePoint 2013 Developer Tools
In this section you will install the Office and SharePoint 2013 developer tools for Visual Studio
1 Ensure you are logged into the WingtipServer VM using the account WINGTIPadministrator | Password1
2 Launch the Web Platform Installer Start All Programs Microsoft Web Platform Installer
3 In the search box at the top-right corner of the Web Platform Installer 40 window type sharepoint and press Enter
4 Click the Add button to the right of Microsoft Office Developer Tools for Visual Studio 2012 - Preview 2
5 Click the Install button at the bottom of the Web Platform Installer 40 window
6 On the Prerequisites page click I Accept
Creating a SharePoint Server 2013 Environment for Development and Testing Version 10
copy Critical Path Training 2012 All Rights Reserved 60
wwwCriticalPathTrainingcom
At this point you have installed the SharePoint 2013 amp Office 2013 development tools in Visual Studio 2012
Creating a SharePoint Server 2013 Environment for Development and Testing Version 10
copy Critical Path Training 2012 All Rights Reserved 61
wwwCriticalPathTrainingcom
Appendix 1 Download Manifest
The following lists everything referenced that you will or may need to download in this environment
Windows Server 2008 R2 with Service Pack 1 (installer ISO)
o httptechnetmicrosoftcomen-usevalcenterdd459137aspx
Windows Server 2008 R2 with Service Pack 1 (prebuilt VHD)
o httpwwwmicrosoftcomdownloadsdetailsaspxFamilyId=9040a4be-c3cf-44a5-9052-a70314452305
Windows Server 2008 R2 Service Pack 1
o httpwwwmicrosoftcomen-usdownloaddetailsaspxid=5842
SQL Server 2012 Trial
o httpwwwmicrosoftcombetaexperiencepdSQL2012EvalCTAenusdefaultaspx
SharePoint Server 2013
o httptechnetmicrosoftcomen-USevalcenterhh973397aspx
Hotfixes for SharePoint Server 2013 (post-install)
o KB2554876 The SharePoint Parsing Process Crashes in Windows Server 2008 R2
o KB2708075 IIS 75 Configurations are not Updated when you use the ServerManager Class to Commit
Configuration Changes
o KB2759112 Hotfix is Available for NET Framework 45 that Resolves an ASPNET Race Condition Issue in
Windows Server 2008 R2 Windows Server 2008 R2 SP1
o KB2765317 Hotfix is Available for NET Framework 45 that Resolves an ASPNET Race Condition Issue in
Windows 8 Windows RT and Windows Server 2012
Web Platform Installer
o httpwwwmicrosoftcomwebdownloadsplatformaspx
Web Platform Installer ndash Command Line Version
o httplearniisnetpageaspx1072web-platform-installer-v4-command-line-webpicmdexe-preview-release
Workflow Manager 10
o Download using the Microsoft Web Platform Installer
Office 2013
o httpwwwmicrosoftcomofficepreviewentry-office-preview
SharePoint Designer 2013
o httpwwwmicrosoftcomen-usdownloaddetailsaspxid=35491
Visio Professional 2013
o httptechnetmicrosoftcomen-usevalcenterhh973399
Visual Studio 2012
o httpwwwmicrosoftcomvisualstudio11en-usdownloads
Office Developer Tools for Visual Studio 2012 ndash Preview 2
o Download using the Microsoft Web Platform Installer
Creating a SharePoint Server 2013 Environment for Development and Testing Version 10
copy Critical Path Training 2012 All Rights Reserved 62
wwwCriticalPathTrainingcom
Appendix 2 Windows PowerShell Script Manifest
The following lists all Windows PowerShell scripts that are provided with this setup guide
AddDisableLoopbackCheckRegKeyps1
o The following steps automate creating the registry key outlined as Method 2 in the Microsoft Knowledgebase article
httpsupportmicrosoftcomkb896861 using Windows PowerShell This key DisableLoopbackCheck will allow
you to browse SharePoint sites on the same machine Without this key (or following Method 1 in the KB article) you
would need to browse any SharePoint sites from a different computer than the one which SharePoint is installed on
ConfigureSpFarmForAppsps1
o Configures a SharePoint 2013 for hosting apps This ensures everything you need is installed running and
configured This is documented here httpmsdnmicrosoftcomen-uslibraryfp179923(v=office15)
CreateSpServiceAccountsps1
o Creates the minimal necessary service accounts for SharePoint Server 2013 SP_Farm SP_Content amp
SP_Services
SetupSharePointForHNSCps1
o Configures a SharePoint 2013 install for hosting Host-Named Site Collections (HNSC) This involves creating a Web
Application in SharePoint that has no host header bindings Using DNS all requests are mapped to this Web
Application You then create the site collections via PowerShell as you cant create HNSCs via the browser (Central
Administration)
Creating a SharePoint Server 2013 Environment for Development and Testing Version 10
copy Critical Path Training 2012 All Rights Reserved 63
wwwCriticalPathTrainingcom
Appendix 3 Create Sample Adventure Works Database
The following steps document downloading and installing the sample Adventure Works OLTP database provided by Microsoft
1 Launch Internet Explorer and navigate to httpmsftdbprodsamplescodeplexcom
2 Download the Adventure Works 2012 OLTP Script
3 Extract the ZIP into a folder on the desktop
4 Launch SQL Server Management Studio Start All Programs Microsoft SQL Server 2012 SQL Server Management Studio
5 When SQL Server Management Studio launches within the Connect to Server dialog login using the default settings and click Connect
6 Within SQL Server Management Studio select File Open File
7 Select the file instawdbsql from the extracted ZIP and click Open
8 If prompted to re-login to the database engine do it
9 Select Query SQLCMD Mode
10 Scroll down to line 42 the line that starts with the following
setvar SqlSamplesSourceDataPath
11 Change the folder location of where you unzipped the Adventure Works 2012 OLTP Script
12 Select Query Execute
13 When the script completes the AdventureWorks2012 database will have been created
Creating a SharePoint Server 2013 Environment for Development and Testing Version 10
copy Critical Path Training 2012 All Rights Reserved 64
wwwCriticalPathTrainingcom
Change Log
Change Version Description
August 22 2012 v 01 Pre-release for review
August 27 2012 v 02 Initial public release ndash install guide based on SharePoint Server Beta 2
August 28 2012 v 03 Updated URL for the site collection used to connect SharePoint to WAW
August 31 2012 v 04 Typo Removed SQL Server Analysis Services as part of the install Not required in a
SharePoint dev box (unless you are doing business intelligence which is not covered
in the guide)
Updated all references to Windows Azure Workflow to Workflow Manager the new
official name for the new workflow product
Updated SetupSharePointForHNSCps1 script to lookup HNSC Web Application by
name rather than URL which is more reliable
Typo Updated WingtipAllUp public NIC to use a different IP than the WingtipDC
Typo Replaced a reference to WingtipServer with WingtipDC
Typo Fixed handful of minor typos
September 1 2012 v 05 Removed SQL Server Reporting Services from install guide
Added step to uncheck IErsquos ldquoAutomatically detect proxyrdquo
Added post workflow install steps to setup User Profile Service Application to sync with
local Active Directory
September 5 2012 v 06 Added step to create a default root site collection in the HNSC web app
Updated minor typos and added extra notes for context
Updated PowerShell script SetupSharePointForHNSCps1 to remove content
database of default Web Application when setting up HNSC Web App
Added a new exercise 8 (after SharePoint install amp config and before the Workflow
install and config) to setup support for My Sites
October 20 2012 v 07 Updated script SetupSharePointForHNSCps1 to fix a bug where it would fail on line
111 if you didnrsquot already have a WINGTIPSP_Content managed account
Added section to bypass SharePointrsquos check for crlmicrosoftcom
Updated workflowrsquos registration PowerShell script to point to
httpintranetwingtipcom
Switched order of post-SharePoint install to setup HSNC hosting before configuring for
hosting apps
November 29 2012
v 10 Changed setup guide to use a single VM instead of two VMs
Updated guide for SharePoint 2013 RTM
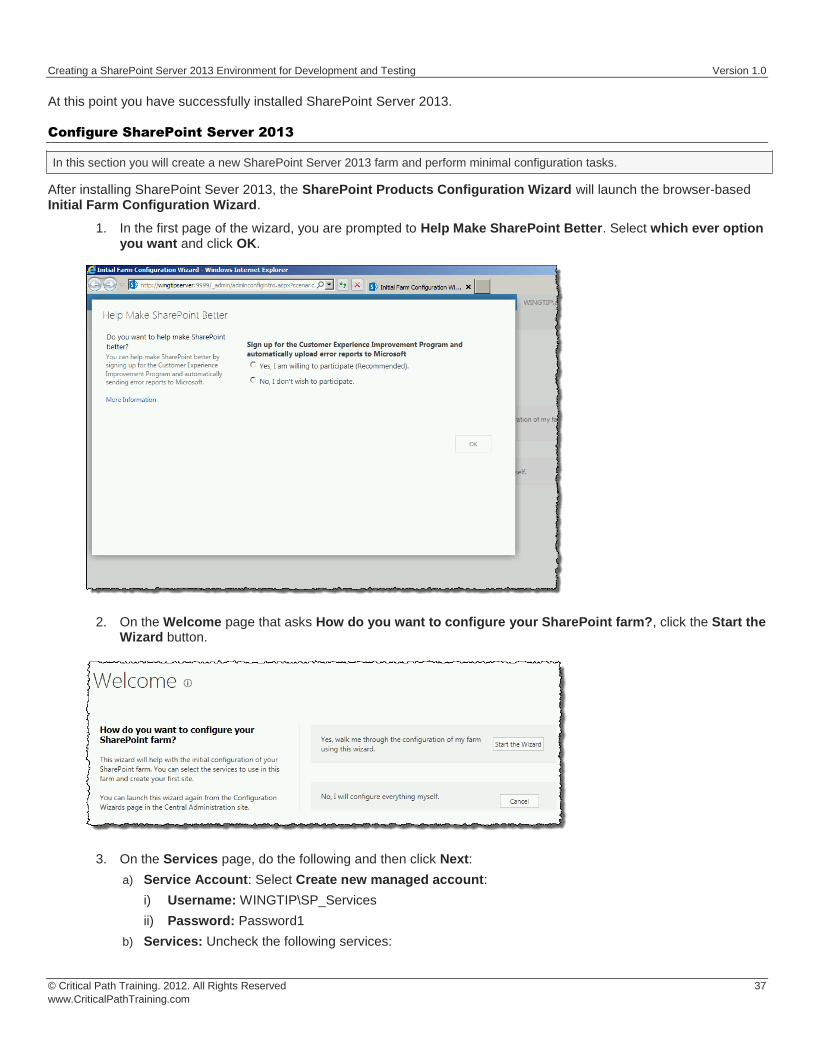
Creating a SharePoint Server 2013 Environment for Development and Testing Version 10
copy Critical Path Training 2012 All Rights Reserved 38
wwwCriticalPathTrainingcom
i) Access Services 2010
ii) App Management Service
In SharePoint Server 2013 the Search Service Application processes specifically noderunnerexe can consume a considerable amount of memory and processor time If you are not going to work with search you might consider unchecking this option for now You can always go back into Central Administration and create a new instance of the Search Service Application at a later date if you need it
Why did we remove Access Services 2010 amp App Management Service service applications The Access Services 2010 service application is included for backwards compatibility and isnrsquot needed in new installations unless you are migrating solutions built with Access Services 2010 from SharePoint Server 2010 (if so you can create this service application later within Central Administration Application Management Manage Service Applications) The App Management Service service application will be created in a later step in this setup guide therefor it is skipped here
4 The creation of the service applications can take quite a while so be patient If it exceeds 20 minutes it is fairly safe to assume the page is hung up One option is to close the browser then launch Central Administration (Start All Programs Microsoft SharePoint 2013 Products SharePoint 2013 Central Administration) and look at the Service Application page (Application Management Manage Service Applications) to see if they were all created
Configure DNS
In this section you will configure DNS for hosting SharePoint sites amp Apps
1 Ensure you are logged into the WingtipServer VM using the account wingtipadministrator | Password1
2 Open the DNS window Start Administrative Tools DNS
3 Expand the hierarchy on the left-hand side of the window until you get to DNS WINGTIPSERVER Forward Lookup Zones wingtipcom
4 Create a new wildcard so all requests for http[]wingtipcom will be forwarded to our SharePoint machine
a) Next right-click wingtipcom and select New Host (A or AAAA)
Creating a SharePoint Server 2013 Environment for Development and Testing Version 10
copy Critical Path Training 2012 All Rights Reserved 39
wwwCriticalPathTrainingcom
b) In the New Host dialog enter the following and click OK
i) Alias Name
ii) IP Address 192168150102 Then click Add Host The following figure shows how this looks
This new record is telling DNS to forward any request for http[]wingtipcom to the webserver WINGTIPSERVER where the
requests will be served by SharePoint
5 Verify this DNS entry is working
a) Open Windows PowerShell Start All Programs Accessories Windows PowerShell Windows PowerShell
b) Run the following commands and press ENTER
PS CUsersAdministratorgt nslookup somethingwingtipcom PS CUsersAdministratorgt nslookup somethingappswingtipcom
c) You should get a response that points to the WingtipServer server as shown in the following figure
Creating a SharePoint Server 2013 Environment for Development and Testing Version 10
copy Critical Path Training 2012 All Rights Reserved 40
wwwCriticalPathTrainingcom
Configure SharePoint Server 2013 for Host-Named Site Collections amp Create Initial Site
Collections
In this section you will create new SharePoint 2013 site collections for testing and hosting apps
Microsoft recommends to create host-named site collections (HNSC) instead of using the path based site collection addressing The difference is the following a path based site created at something such as httpintranetwingtipcomsitesdevtest as an HNSC site would be more like httpdevtestwingtipcom This is how it works in the cloud (Office 365) and it scales much better for on-prem
deployments This setup guide will show you how to setup your environment to create HNSC The only downside to this approach is that you canrsquot create site collections within Central Administration it must be done via Windows PowerShell API (because Central Administration doesnrsquot instruct you where to put the site
This is implemented in various parts First DNS must be configured to send all requests for httpwingtipcom to a Web Application
(implemented in the last section) Second this Web Application must be extended with SharePoint and have no host header bindings (so it handles all requests) Third it must have a default site collection at the root of the Web Application but it will not be used for anything (in fact it doesnrsquot need a template assigned to it)
You can read more about HNSCrsquos on TechNet httptechnetmicrosoftcomen-uslibrarycc424952aspx
PowerShell Script Alert The steps in this section are automated in the script SetupSharePointForHNSCps1 found in the files that
accompany this setup guide Open the script and read the header for documentation on how to use it
1 Ensure you are logged into the WingtipServer VM using the account wingtipadministrator | Password1
2 Open Central Administration Start All Programs Microsoft SharePoint 2013 Products SharePoint 2013 Central Administration
3 Select Application Management Manage Web Applications
4 Delete the default Web Application created by the configuration wizard
a) Delete the existing default Web Application
i) Select the Web Application SharePoint ndash 80 the one with the URL of httpwingtipserver and click Delete in the ribbon
ii) When prompted to delete the associated IIS Web Site amp SQL Server database select both options to delete them and click OK
The reason you are doing this is because the setup wizard you ran previously when creating the service applications automatically created it The problem is that it used the same identity (WINGTIPSP_Services) for the app pool that is used for all the service
applications which is not desired
5 Create a new Web Application to handle Host-Named Site Collections (HNSC)
Creating a SharePoint Server 2013 Environment for Development and Testing Version 10
copy Critical Path Training 2012 All Rights Reserved 41
wwwCriticalPathTrainingcom
a) In the ribbon click the New button
b) In the Create New Web Application dialog enter the following values in the properties and click OK Leave all properties not mentioned
i) Select the radio button Create a new IIS web site
(1) Name SharePoint HNSC Host ndash 80
(2) Port 80
ii) Application Pool
(1) Select the radio button Create a new application pool
(a) Application Pool Name SharePoint Default HNSC AppPool
(b) Select a security account for this application pool WINGTIPSP_Content
If WINGTIPSP_Content is not listed as an available managed account create it by selecting the appropriate option and using
Password1 for the password
iii) Database Name and Authentication
(1) Database Name WSS_Content_HNSCDefaultHost
c) This process will take a few moments At the end of the process SharePoint will ask if you want to create a site collection You do but you donrsquot want to do it through the browser as this will not be a HNSC To create a HNSC you must create it via Windows PowerShell
6 Create a default not template site collection at the root of the web application
a) Open SharePoint 2013 Management Shell Start All Programs Microsoft SharePoint 2013 Products SharePoint 2013 Management Shell
7 Create Site Collections for Testing SharePoint amp SharePoint Apps
a) Open SharePoint 2013 Management Shell Start All Programs Microsoft SharePoint 2013 Products SharePoint 2013 Management Shell
b) Get a reference to the HNSC web application you just created by running the following Windows PowerShell script in the SharePoint 2013 Management Shell
$hnscWebApp = Get-SPWebApplication | Where-Object $_DisplayName -eq SharePoint HNSC Host - 80
c) Create a non-templated site at the root of the web application for Workflow to connect to by executing the following Windows PowerShell script in the SharePoint 2013 Management Shell
New-SPSite -Name Root HNSC Site Collection -Url httpwingtipcom -HostHeaderWebApplication $hnscWebApp -OwnerAlias WINGTIPAdministrator
d) Create a team site by executing the following Windows PowerShell script in the SharePoint 2013 Management Shell
New-SPSite -Name Wingtip Intranet -Url httpintranetwingtipcom ndashHostHeaderWebApplication $hnscWebApp -Template STS0 -OwnerAlias WINGTIPAdministrator
e) Create a developer site by executing the following Windows PowerShell script in the SharePoint 2013 Management Shell
New-SPSite -Name Wingtip Developer Site -Url httpdevwingtipcom ndashHostHeaderWebApplication $hnscWebApp -Template DEV0 -OwnerAlias WINGTIPAdministrator
You can only create debug and test apps using a developer site
At this point you now have a site collection to use as a team site (httpintranetwingtipcom) and to develop and test custom SharePoint apps (httpdevwingtipcom)
Creating a SharePoint Server 2013 Environment for Development and Testing Version 10
copy Critical Path Training 2012 All Rights Reserved 42
wwwCriticalPathTrainingcom
Configure SharePoint 2013 for Hosting Apps
In this setup you will setup your SharePoint 2013 environment for hosting apps
PowerShell Script Alert Everything in the next immediate step is provided in the script ConfigureSpFarmForAppsps1 found in the
files that accompany this setup guide Open the script and read the header for documentation on how to use it
1 Ensure you are logged into the WingtipServer VM using the account wingtipadministrator | Password1
2 Create the necessary SharePoint App Management service applications and start the necessary services via Windows PowerShell
a) Open SharePoint 2013 Management Shell Start All Programs Microsoft SharePoint 2013 Products SharePoint 2013 Management Shell
b) Execute the following Windows PowerShell script in the SharePoint 2013 Management Shell
$appHostDomain = appswingtipcom $adminService = Get-Service -Name spadminv4 if ($adminServiceStatus -ne Running) Start-Service $adminService $timerService = Get-Service -Name sptimerv4 if ($timerServiceStatus -ne Running) Start-Service $timerService Set-SPAppDomain $appHostDomain $appMgmtSvcInstance = Get-SPServiceInstance | Where-Object $_GetType()Name -eq AppManagementServiceInstance if ($appMgmtSvcInstanceStatus -ne Online) Start-SPServiceInstance -Identity $appMgmtSvcInstance $appSubSettingSvcInstance = Get-SPServiceInstance | Where-Object $_GetType()Name -eq SPSubscriptionSettingsServiceInstance if ($appSubSettingSvcInstanceStatus -ne Online) Start-SPServiceInstance -Identity $appSubSettingSvcInstance $appPoolServiceApps = Get-SPServiceApplicationPool -Identity SharePoint Web Services Default $appSubSvc = New-SPSubscriptionSettingsServiceApplication ndashApplicationPool $appPoolServiceApps ndashName Settings Service Application ndashDatabaseName SettingsServiceDB $proxySubSvc = New-SPSubscriptionSettingsServiceApplicationProxy ndashServiceApplication $appSubSvc $appAppSvc = New-SPAppManagementServiceApplication -ApplicationPool $appPoolServiceApps -Name App Management Service Application -DatabaseName AppServiceDB $proxyAppSvc = New-SPAppManagementServiceApplicationProxy -ServiceApplication $appAppSvc Set-SPAppSiteSubscriptionName -Name app -Confirm$false
3 Verify the script configured SharePoint 2013 for hosting apps
a) Open Central Administration Start All Programs Microsoft SharePoint 2013 Products SharePoint 2013 Central Administration
b) Verify service applications created
i) Open the Service Applications page Application Management Manage Service Applications
ii) Verify you have two service applications created
(1) App Management Service Application
(2) Settings Service Application
c) Verify service instances are running
i) Open the Services on Server page System Settings Manage Services on Server
ii) Verify the following services are Started
(1) App Management Service
(2) Microsoft SharePoint Foundation Subscription Settings Service
Creating a SharePoint Server 2013 Environment for Development and Testing Version 10
copy Critical Path Training 2012 All Rights Reserved 43
wwwCriticalPathTrainingcom
d) Verify App URLs are correct
i) Open the Configure App URLs page Apps Configure app URLs
ii) Verify the following
(1) App Domain appswingtipcom
(2) App Prefix app
At this point your SharePoint Server 2013 environment is ready to host SharePoint apps
Creating a SharePoint Server 2013 Environment for Development and Testing Version 10
copy Critical Path Training 2012 All Rights Reserved 44
wwwCriticalPathTrainingcom
Start the SharePoint 2013 Sandbox Service
By default the service that executes sandbox solutions is not running In this step you will start the service
1 Open Central Administration Start All Programs Microsoft SharePoint 2013 Products SharePoint 2013 Central Administration
2 Open the Services on Server page System Settings Manage Services on Server
3 Click the Start link to the left of the Microsoft SharePoint Foundation Sandboxed Code Service
At this point your installation can support sandbox solutions
Configure CRL Verification for Disconnected Environments
SharePoint periodically ldquophones homerdquo to a specific address hosted by Microsoft under certain conditions When your environment is disconnected this can cause an unnecessary delay or failures when starting up the sandbox The following steps outline a workaround to bypass this check
1 Launch Notepad as an administrator Start All Programs Accessories right-click Notepad and select Run as Administrator
2 Open the hosts file by selecting File Open and finding the file
cWindowsSystem32Driversetchosts
3 Add the following line to the end of the file
127001 crlmicrosoftcom
4 Save and close the hosts file
Update Internet Explorer to Bypass the App URL amp Automatically Login to SharePoint Sites
In this section you will update Internet Explorer to add the App hosting URL to the bypass list so you can navigate to the domain after deploying SharePoint hosted apps
1 Ensure you are logged into the WingtipServer VM using the account wingtipadministrator | Password1
1 Launch Internet Explorer Start All Programs Internet Explorer
2 Configure Internet Explorer to bypass the App URL
a) In the top-right corner click the gear icon and select Internet Options
b) On the Security tab select the Local Intranet and click the Sites button
c) Uncheck the box next to Automatically detect intranet network
d) Click the Advanced button and add two entries to the Exceptions list
i) httpwingtipcom
ii) httpappswingtipcom
Creating a SharePoint Server 2013 Environment for Development and Testing Version 10
copy Critical Path Training 2012 All Rights Reserved 45
wwwCriticalPathTrainingcom
e) Click the Close button followed by the OK button multiple times to close out of the dialogs
At this point Internet Explorer is setup to bypass your app URL so you can navigate to apps (httpappswingtipcom) as well as automatically authenticate to sites hosted at httpwingtipcom
Exercise 6 Configure SharePoint to Host My Sites
In this exercise you will configure SharePoint to create and host My Sites In order to host My Sites you will need a new Web Application that is configured for Self-Service Site Creation and has a My Site Host site collection
1 Create a new SharePoint web application to host the My Sites
a) Ensure you are logged into the WingtipServer VM using the account wingtipadministrator | Password1
b) Open Central Administration Start All Programs Microsoft SharePoint 2013 Products SharePoint 2013 Central Administration
c) Select Application Management Manage Web Applications
d) In the ribbon click the New button
e) In the Create New Web Application dialog enter the following values in the properties and click OK Leave all properties not mentioned
i) Select the radio button Create a new IIS web site
(1) Name SharePoint MySite Host ndash 80
(2) Port 80
(3) Host Header mywingtipcom
ii) Application Pool
(1) Select the radio button Use existing application pool
(a) Application Pool Name SharePoint Default HNSC AppPool
iii) Database Name and Authentication
(1) Database Name WSS_Content_SocialWingtipCom
f) This process will take a few moments At the end of the process SharePoint will ask if you want to create a site collection Click the link provided to create a new site collection amp continue to the next step
2 Create a My Site Host site collection
a) On the Create Site Collection page use the following information to complete the form and click OK
Creating a SharePoint Server 2013 Environment for Development and Testing Version 10
copy Critical Path Training 2012 All Rights Reserved 46
wwwCriticalPathTrainingcom
i) Title My Site Host
ii) URL
iii) Template Selection My Site Host (found under the Enterprise tab)
iv) Primary Site Collection Administrator WINGTIPAdministrator
3 Update the Web Application to host my sites
a) Within Central Administration in the left-hand navigation navigate to the Manage Web Applications page Application Management Manage Web Applications
b) Select the SharePoint MySite Host ndash 80 web application
c) Click the Managed Paths button in the ribbon
d) Remove the sites managed path and add two new managed paths and click OK
i) personal ndash Wildcard inclusion
ii) my ndash Explicit inclusion
e) With the SharePoint MySite Host ndash 80 web application still selected click the Self-Service Site Creation button
f) On the Self-Service Site Creation page use the following values to complete the form and click OK
i) Site Collections On
4 Next configure the User Profile Service Application My Site settings
a) Browse to the User Profile Service Application management page Application Management Manage Service Applications User Profile Service Application
b) Under the My Site Settings section click the Setup My Sites
c) On the My Site Settings page use the following information to complete the form and click OK
i) My Site Host httpmywingtipcom
ii) Personal Site Location personal
At this point your SharePoint deployment is now configured to automatically create My Sites under httpmywingtipcomPersonalUserName when users first browse to them
Exercise 7 Install amp Configure Workflow Manager 10
In this exercise you will configure the WingtipServer VM to host Workflow Manager 10 and connect it to your SharePoint installation
1 Ensure you are logged into the WingtipServer VM using the account wingtipadministrator | Password1
Verify SQL Server 2012 Network Configuration
In this section yoursquoll verify the network configuration is correct for SQL Server 2012 in order to install Workflow Manager 10
Creating a SharePoint Server 2013 Environment for Development and Testing Version 10
copy Critical Path Training 2012 All Rights Reserved 47
wwwCriticalPathTrainingcom
1 Configure SQL Server 2012 to have the TCPIP connection protocol enabled
a) Open the SQL Server Configuration Manager Start All Programs Microsoft SQL Server 2012 Configuration Tools SQL Server Configuration Manager
b) Expand the hierarchy on the left-hand side to the following SQL Server Connection Manager (local) SQL Server Network Configuration Protocols for MSSQLSERVER
c) In the main window if TCPIP is Disabled right-click TCPIP and select Enable
d) When prompted with a warning click OK
2 SQL Server must be restarted in order to reflect this change
a) In the hierarchy on the left-hand side of the window select SQL Server Services
b) Right-click SQL Server (MSSQLSERVER) and select Restart
At this point SQL Server is now configured with the TCPIP protocol enabled a requirement when configuring Service Bus
Configure the Workflow Service Account with the Necessary Rights
In this section you will verify the service account that will run Workflow Manager and Service Bus
1 Ensure you are logged into the WingtipServer VM using the account WINGTIPadministrator | Password1
2 Grant the WINGTIPSP_Content account securityadmin amp dbcreator permissions in SQL Server
a) Launch SQL Server Management Studio Start All Programs Microsoft SQL Server 2012 SQL Server Management Studio
b) When SQL Server Management Studio launches within the Connect to Server dialog login using the default settings and click Connect
c) In the Object Explorer tool window expand the WINGTIPSERVER server hierarchy to the Security Logins node
d) Find the WINGTIPSP_Content account right-click it and select Properties
Creating a SharePoint Server 2013 Environment for Development and Testing Version 10
copy Critical Path Training 2012 All Rights Reserved 48
wwwCriticalPathTrainingcom
e) In the Select a page pane select Server Roles
f) Check securityadmin amp dbcreator and click OK
g) Close SQL Server Management Studio
3 Add the Workflow service account to the local administrators group
a) Open the Active Directory Users and Computers window Start Administrative Tools Active Directory Users and Computers
b) In the hierarchy on the left-hand side of the window expand it to the following Active Directory Users and Computers wingtipcom Builtin
c) In the main window right-click Administrators and select Properties
d) In the Administrators Properties dialog select the Members tab and click Add
e) In the Enter the object names to select box enter wingtipsp_content and click the Check Names button
f) In the Administrators Properties dialog click OK
g) Close the Active Directory Users and Computers window
At this point the service account that will host Workflow Manager and Service Bus has been configured correctly
Creating a SharePoint Server 2013 Environment for Development and Testing Version 10
copy Critical Path Training 2012 All Rights Reserved 49
wwwCriticalPathTrainingcom
Download amp Install Workflow Manager and Service Bus
In this section you will install Workflow Manager and Service Bus
1 Ensure you are logged into the WingtipServer VM using the account WINGTIPSP_Content | Password1
It is important you are logged in as the user that will run workflow when you install amp configure Workflow Manager and Service Bus
2 Launch the Web Platform Installer Start All Programs Microsoft Web Platform Installer
a) If the Web Platform Installer is not present on your machine you can download amp install it from here httpwwwmicrosoftcomwebdownloadsplatformaspx
If you do not have internet access within the virtual machine it is possible to download everything needed for workflow using the command line version of the Web Platform Installer (WebPICMD) You can get WebPICMD from httplearniisnetpageaspx1072web-platform-installer-v4-command-line-webpicmdexe-preview-release Specifically for
workflow enter the following command to download Workflow Beta 1 and all prerequisites
webpicmd offline ProductsWorkflow Pathc[path]
3 When the Web Platform Installer loads execute a search for Workflow select Workflow Manager 10 and click Add
4 Click the Install button at the bottom of the Web Platform Installer 40 window
5 On the Prerequisites page click I Accept
Note The Web Platform Installer 40 may prompt you to keep certain products updated using Microsoft Update If it does select Use Microsoft Update when I check for updates (recommended) and click Continue
6 When the installer completes the following dialog will appear Click Continue and then Finish to start the configuration process
Creating a SharePoint Server 2013 Environment for Development and Testing Version 10
copy Critical Path Training 2012 All Rights Reserved 50
wwwCriticalPathTrainingcom
At this point Workflow Manager amp Service Bus are installed
Configure Workflow Manager and Service Bus
In this section you will install Workflow Manager and Service Bus
1 If the Workflow Manager Configuration Wizard is not open open it Start All Programs Workflow Manager 10 Workflow Configuration
2 On the Welcome page click Configure Workflow Manager with Default Settings (Recommended)
Creating a SharePoint Server 2013 Environment for Development and Testing Version 10
copy Critical Path Training 2012 All Rights Reserved 51
wwwCriticalPathTrainingcom
3 On the New Farm Configuration page do the following
a) In the section Configure Service Account set the credentials to
i) User ID sp_contentwingtipcom
ii) Password Password1
b) Check the Allow Workflow management over HTTP on this computer checkbox
Ensure the username is entered in the fully qualified UPN format not as the default shows in the installer (sp_contentwingtip) or the domainusername format
In a production environment you should be doing everything over SSL
c) Click the Test Connection button to verify the connection credentials before proceeding
Creating a SharePoint Server 2013 Environment for Development and Testing Version 10
copy Critical Path Training 2012 All Rights Reserved 52
wwwCriticalPathTrainingcom
d) In the Certificate Generation Key and Confirm Certificate Generation Key enter Password1 into both fields
4 Click the right arrow in the bottom right corner to proceed
5 On the Summary page review your settings and click the check at the bottom right of the widow to start the configuration process
Creating a SharePoint Server 2013 Environment for Development and Testing Version 10
copy Critical Path Training 2012 All Rights Reserved 53
wwwCriticalPathTrainingcom
6 After a few minutes the Configuration Progress screen will show that everything has been configured correctly
Creating a SharePoint Server 2013 Environment for Development and Testing Version 10
copy Critical Path Training 2012 All Rights Reserved 54
wwwCriticalPathTrainingcom
7 Click the check in the bottom right corner
At this point Workflow Manager amp Service Bus has been installed and a new Workflow Manager farm has been created The next step is to connect the SharePoint 2013 farm to the Workflow Manager farm
Connect SharePoint 2013 to Workflow Manager
In this section you will connect SharePoint 2013 and Workflow Manager together
1 Ensure you are logged into the WingtipServer VM using the account WINGTIPadministrator | Password1
2 Get the Workflow Manager endpoint
a) Open the Workflow Manager PowerShell console Start All Programs Workflow Manager 10
b) Execute the Windows PowerShell following cmdlet
Get-WFFarm | ft HttpPort
c) Take note of this port (12291) This port number is what you will use to connect the SharePoint 2013 farm to the Workflow Manager 10 farm
In production you should connect to the HTTPS port listed in the HttpsPort property when you run Get-WFFarm
d) Close the Workflow Manager PowerShell window
3 Connect the SharePoint 2013 farm to Workflow Manager
Creating a SharePoint Server 2013 Environment for Development and Testing Version 10
copy Critical Path Training 2012 All Rights Reserved 55
wwwCriticalPathTrainingcom
a) Open SharePoint 2013 Management Shell Start All Programs Microsoft SharePoint 2013 Products SharePoint 2013 Management Shell
b) Execute the following Windows PowerShell script in the SharePoint 2013 Management Shell
Register-SPWorkflowService ndashSPSite httpintranetwingtipcom ndashWorkflowHostUri httpwingtipserver12291 ndashAllowOAuthHttp
This script is telling SharePoint the endpoint it should use to talk to Workflow Manager as well as Workflow Manager the SharePoint site collection it should talk to for calls into the CSOM It is also configuring all communication over HTTP rather than HTTPS for performance reasons In production you should always use HTTPS
This step will take a moment with no feedback during the process Be patient
c) Close the SharePoint 2013 Management Shell
At this point the SharePoint 2013 farm is connected to the Workflow Manager 10 farm
Configure SharePoint User Profile Service Application AD Sync
Users in SharePoint 2013 are validated by Workflow Manager against SharePoint to ensure they have permissions to start a workflow This is done by looking up the user by their AD UserPrincipalName (UPN) attribute in the User Profile Service Application (UPA) If no matching user is found the workflow will be automatically cancelled by Workflow Manager In this section you will setup UPA to connect amp sync with the local Active Directory so user accounts in AD will have their UPN synchronized to UPA
1 Open Central Administration Start All Programs Microsoft SharePoint 2013 Products SharePoint 2013 Central Administration
2 Go to the User Profile Service Application management page Application Management Manage Service Applications User Profile Service Application
3 The first step is to configure the User Profile Service Application to allow for Active Directory (AD) synchronization
a) Under Synchronization select Configure Synchronization Settings
b) For Synchronization select Use SharePoint Active Directory Import and click OK
4 Next establish a connection to the wingtipcom AD
a) Under Synchronization select Configure Synchronization Connections
b) On the Synchronization Connections page select Create New Connection
c) Enter the following values on this form and click OK
i) Connection Name WINGTIPCOM AD
ii) Type Active Directory Import
iii) Connection Settings
(1) Fully Qualified Domain Name wingtipcom
(2) Authentication Provider Type Windows Authentication
(3) Account Name WINGTIPAdministrator
(4) Password (and Confirm Password) Password1
iv) Containers
(1) Click Populate Containers
(2) After it loads check the box next to WINGTP or click the Select All button below the box
5 Go back to the User Profile Service Application management page Application Management Manage Service Applications User Profile Service Application
6 Finally start a synchronization import
a) Under Synchronization select Start Profile Synchronization
Creating a SharePoint Server 2013 Environment for Development and Testing Version 10
copy Critical Path Training 2012 All Rights Reserved 56
wwwCriticalPathTrainingcom
b) Select Start Full Synchronization and click OK
c) You will be taken back to the User Profile Service Application management page Notice in the top-right corner there is a status block that reports how many profiles are in the UPA database Refresh the page to see it increase to a handful of profiles as the import process runs
At this point you have successfully configured the User Profile Service Application to import profiles from the local AD
Exercise 8 Install the Microsoft Office 2013 Professional Clients
In this exercise you will install the Microsoft Office 2013 client applications
1 Download the Office 2013 into the WingtipServer VM For this you need to create an Office 365 Trial account login to Office 365 go to the Admin Dashboard and then download the latest version httpwwwmicrosoftcomofficepreviewentry-office-preview
2 Download the SharePoint Designer 2013 into the WingtipServer VM from here httpwwwmicrosoftcomen-usdownloaddetailsaspxid=35491
3 Download the Visio Professional 2013 into the WingtipServer VM from here httptechnetmicrosoftcomen-usevalcenterhh973399
Install Microsoft Office Professional Plus 2013
In this section you will install the Microsoft Office 2013 clients
1 Ensure you are logged into the WingtipServer VM using the account WINGTIPadministrator | Password1
2 Execute the installer OfficeProfessionalPlus_English_x64exe
3 On the Read the Microsoft Software License Terms dialog click the checkbox next to I accept the terms of this agreement and click Continue
4 On the Choose the installation you want dialog click the Install Now button
5 The installer will proceed and install all the Office products
6 When the installer completes click the Close button
7 Apply your Office Professional Plus 2013 license key
a) Launch Word 2013 Start All Programs Microsoft Office 2013 Word 2013
b) In the First things first dialog select Use recommended settings and click Accept
c) In the Welcome to Office dialog that opens click the [X] icon in the top-right corner to close it
d) In the left-hand pane click Open Other Documents
e) In the left-hand pane click Account
f) In the Product Information section within the Activation Required box click Change Product Key
g) Enter your license key for Office Professional Plus 2013 check the box next to Attempt to automatically activate my product online and click Install
h) Click OK
At this point you have installed Office Professional Plus 2013
Install Microsoft Office Visio 2013
In this section you will install Microsoft Office 2013 Visio
1 Ensure you are logged into the WingtipServer VM using the account WINGTIPadministrator | Password1
2 Execute the installer VisioProfessional_English_x64exe
3 On the Read the Microsoft Software License Terms dialog click the checkbox next to I accept the terms of this agreement and click Continue
Creating a SharePoint Server 2013 Environment for Development and Testing Version 10
copy Critical Path Training 2012 All Rights Reserved 57
wwwCriticalPathTrainingcom
4 On the Choose the installation you want dialog click the Install Now button
5 The installer will proceed and install all Visio 2013
6 When the installer completes click the Close button
7 Apply your Visio 2013 license key
a) Launch Visio 2013 Start All Programs Microsoft Office 2013 Visio 2013
b) In the First things first dialog select Use recommended settings and click Accept
c) In the Welcome to Office dialog that opens click the X icon in the top-right corner to close it
d) In the left-hand pane click Open Other Documents
e) In the left-hand pane click Account
f) In the Product Information section within the Activation Required box click Change Product Key
g) Enter your license key for Visio 2013 check the box next to Attempt to automatically activate my product online and click Install
h) Click OK
At this point you have installed Visio 2013
Install Microsoft Office 2013 SharePoint Designer
In this section you will install Microsoft Office 2013 SharePoint Designer
1 Ensure you are logged into the WingtipServer VM using the account WINGTIPadministrator | Password1
2 Execute the installer SharePointDesigner_English_x64exe
3 On the Read the Microsoft Software License Terms dialog click the checkbox next to I accept the terms of this agreement and click Continue
4 On the Choose the installation you want dialog click the Install Now button
5 The installer will proceed and install all SharePoint Designer 2013
6 When the installer completes click the Close button
At this point you have installed SharePoint Designer 2013
Exercise 9 Install Visual Studio 2012
In this exercise you will install Visual Studio 2012
1 Ensure you are logged into the WingtipServer VM using the account WINGTIPadministrator | Password1
2 Start the install of Visual Studio 2012 Ultimate Trial by downloading the installer from here httpwwwmicrosoftcomvisualstudio11en-usdownloads
3 On the installation splash screen check the box next to I agree to the License terms and conditions and click the Next button
Creating a SharePoint Server 2013 Environment for Development and Testing Version 10
copy Critical Path Training 2012 All Rights Reserved 58
wwwCriticalPathTrainingcom
4 On the Optional Features to install dialog click Install
5 After some time the installer will complete Click the Launch button to launch Visual Studio 2012
Creating a SharePoint Server 2013 Environment for Development and Testing Version 10
copy Critical Path Training 2012 All Rights Reserved 59
wwwCriticalPathTrainingcom
6 In the Choose Default Environment Settings select Visual C Development Settings and click Start Visual Studio
7 Close Visual Studio 2012
At this point Visual Studio 2012 RTM is installed
Install Office amp SharePoint 2013 Developer Tools
In this section you will install the Office and SharePoint 2013 developer tools for Visual Studio
1 Ensure you are logged into the WingtipServer VM using the account WINGTIPadministrator | Password1
2 Launch the Web Platform Installer Start All Programs Microsoft Web Platform Installer
3 In the search box at the top-right corner of the Web Platform Installer 40 window type sharepoint and press Enter
4 Click the Add button to the right of Microsoft Office Developer Tools for Visual Studio 2012 - Preview 2
5 Click the Install button at the bottom of the Web Platform Installer 40 window
6 On the Prerequisites page click I Accept
Creating a SharePoint Server 2013 Environment for Development and Testing Version 10
copy Critical Path Training 2012 All Rights Reserved 60
wwwCriticalPathTrainingcom
At this point you have installed the SharePoint 2013 amp Office 2013 development tools in Visual Studio 2012
Creating a SharePoint Server 2013 Environment for Development and Testing Version 10
copy Critical Path Training 2012 All Rights Reserved 61
wwwCriticalPathTrainingcom
Appendix 1 Download Manifest
The following lists everything referenced that you will or may need to download in this environment
Windows Server 2008 R2 with Service Pack 1 (installer ISO)
o httptechnetmicrosoftcomen-usevalcenterdd459137aspx
Windows Server 2008 R2 with Service Pack 1 (prebuilt VHD)
o httpwwwmicrosoftcomdownloadsdetailsaspxFamilyId=9040a4be-c3cf-44a5-9052-a70314452305
Windows Server 2008 R2 Service Pack 1
o httpwwwmicrosoftcomen-usdownloaddetailsaspxid=5842
SQL Server 2012 Trial
o httpwwwmicrosoftcombetaexperiencepdSQL2012EvalCTAenusdefaultaspx
SharePoint Server 2013
o httptechnetmicrosoftcomen-USevalcenterhh973397aspx
Hotfixes for SharePoint Server 2013 (post-install)
o KB2554876 The SharePoint Parsing Process Crashes in Windows Server 2008 R2
o KB2708075 IIS 75 Configurations are not Updated when you use the ServerManager Class to Commit
Configuration Changes
o KB2759112 Hotfix is Available for NET Framework 45 that Resolves an ASPNET Race Condition Issue in
Windows Server 2008 R2 Windows Server 2008 R2 SP1
o KB2765317 Hotfix is Available for NET Framework 45 that Resolves an ASPNET Race Condition Issue in
Windows 8 Windows RT and Windows Server 2012
Web Platform Installer
o httpwwwmicrosoftcomwebdownloadsplatformaspx
Web Platform Installer ndash Command Line Version
o httplearniisnetpageaspx1072web-platform-installer-v4-command-line-webpicmdexe-preview-release
Workflow Manager 10
o Download using the Microsoft Web Platform Installer
Office 2013
o httpwwwmicrosoftcomofficepreviewentry-office-preview
SharePoint Designer 2013
o httpwwwmicrosoftcomen-usdownloaddetailsaspxid=35491
Visio Professional 2013
o httptechnetmicrosoftcomen-usevalcenterhh973399
Visual Studio 2012
o httpwwwmicrosoftcomvisualstudio11en-usdownloads
Office Developer Tools for Visual Studio 2012 ndash Preview 2
o Download using the Microsoft Web Platform Installer
Creating a SharePoint Server 2013 Environment for Development and Testing Version 10
copy Critical Path Training 2012 All Rights Reserved 62
wwwCriticalPathTrainingcom
Appendix 2 Windows PowerShell Script Manifest
The following lists all Windows PowerShell scripts that are provided with this setup guide
AddDisableLoopbackCheckRegKeyps1
o The following steps automate creating the registry key outlined as Method 2 in the Microsoft Knowledgebase article
httpsupportmicrosoftcomkb896861 using Windows PowerShell This key DisableLoopbackCheck will allow
you to browse SharePoint sites on the same machine Without this key (or following Method 1 in the KB article) you
would need to browse any SharePoint sites from a different computer than the one which SharePoint is installed on
ConfigureSpFarmForAppsps1
o Configures a SharePoint 2013 for hosting apps This ensures everything you need is installed running and
configured This is documented here httpmsdnmicrosoftcomen-uslibraryfp179923(v=office15)
CreateSpServiceAccountsps1
o Creates the minimal necessary service accounts for SharePoint Server 2013 SP_Farm SP_Content amp
SP_Services
SetupSharePointForHNSCps1
o Configures a SharePoint 2013 install for hosting Host-Named Site Collections (HNSC) This involves creating a Web
Application in SharePoint that has no host header bindings Using DNS all requests are mapped to this Web
Application You then create the site collections via PowerShell as you cant create HNSCs via the browser (Central
Administration)
Creating a SharePoint Server 2013 Environment for Development and Testing Version 10
copy Critical Path Training 2012 All Rights Reserved 63
wwwCriticalPathTrainingcom
Appendix 3 Create Sample Adventure Works Database
The following steps document downloading and installing the sample Adventure Works OLTP database provided by Microsoft
1 Launch Internet Explorer and navigate to httpmsftdbprodsamplescodeplexcom
2 Download the Adventure Works 2012 OLTP Script
3 Extract the ZIP into a folder on the desktop
4 Launch SQL Server Management Studio Start All Programs Microsoft SQL Server 2012 SQL Server Management Studio
5 When SQL Server Management Studio launches within the Connect to Server dialog login using the default settings and click Connect
6 Within SQL Server Management Studio select File Open File
7 Select the file instawdbsql from the extracted ZIP and click Open
8 If prompted to re-login to the database engine do it
9 Select Query SQLCMD Mode
10 Scroll down to line 42 the line that starts with the following
setvar SqlSamplesSourceDataPath
11 Change the folder location of where you unzipped the Adventure Works 2012 OLTP Script
12 Select Query Execute
13 When the script completes the AdventureWorks2012 database will have been created
Creating a SharePoint Server 2013 Environment for Development and Testing Version 10
copy Critical Path Training 2012 All Rights Reserved 64
wwwCriticalPathTrainingcom
Change Log
Change Version Description
August 22 2012 v 01 Pre-release for review
August 27 2012 v 02 Initial public release ndash install guide based on SharePoint Server Beta 2
August 28 2012 v 03 Updated URL for the site collection used to connect SharePoint to WAW
August 31 2012 v 04 Typo Removed SQL Server Analysis Services as part of the install Not required in a
SharePoint dev box (unless you are doing business intelligence which is not covered
in the guide)
Updated all references to Windows Azure Workflow to Workflow Manager the new
official name for the new workflow product
Updated SetupSharePointForHNSCps1 script to lookup HNSC Web Application by
name rather than URL which is more reliable
Typo Updated WingtipAllUp public NIC to use a different IP than the WingtipDC
Typo Replaced a reference to WingtipServer with WingtipDC
Typo Fixed handful of minor typos
September 1 2012 v 05 Removed SQL Server Reporting Services from install guide
Added step to uncheck IErsquos ldquoAutomatically detect proxyrdquo
Added post workflow install steps to setup User Profile Service Application to sync with
local Active Directory
September 5 2012 v 06 Added step to create a default root site collection in the HNSC web app
Updated minor typos and added extra notes for context
Updated PowerShell script SetupSharePointForHNSCps1 to remove content
database of default Web Application when setting up HNSC Web App
Added a new exercise 8 (after SharePoint install amp config and before the Workflow
install and config) to setup support for My Sites
October 20 2012 v 07 Updated script SetupSharePointForHNSCps1 to fix a bug where it would fail on line
111 if you didnrsquot already have a WINGTIPSP_Content managed account
Added section to bypass SharePointrsquos check for crlmicrosoftcom
Updated workflowrsquos registration PowerShell script to point to
httpintranetwingtipcom
Switched order of post-SharePoint install to setup HSNC hosting before configuring for
hosting apps
November 29 2012
v 10 Changed setup guide to use a single VM instead of two VMs
Updated guide for SharePoint 2013 RTM
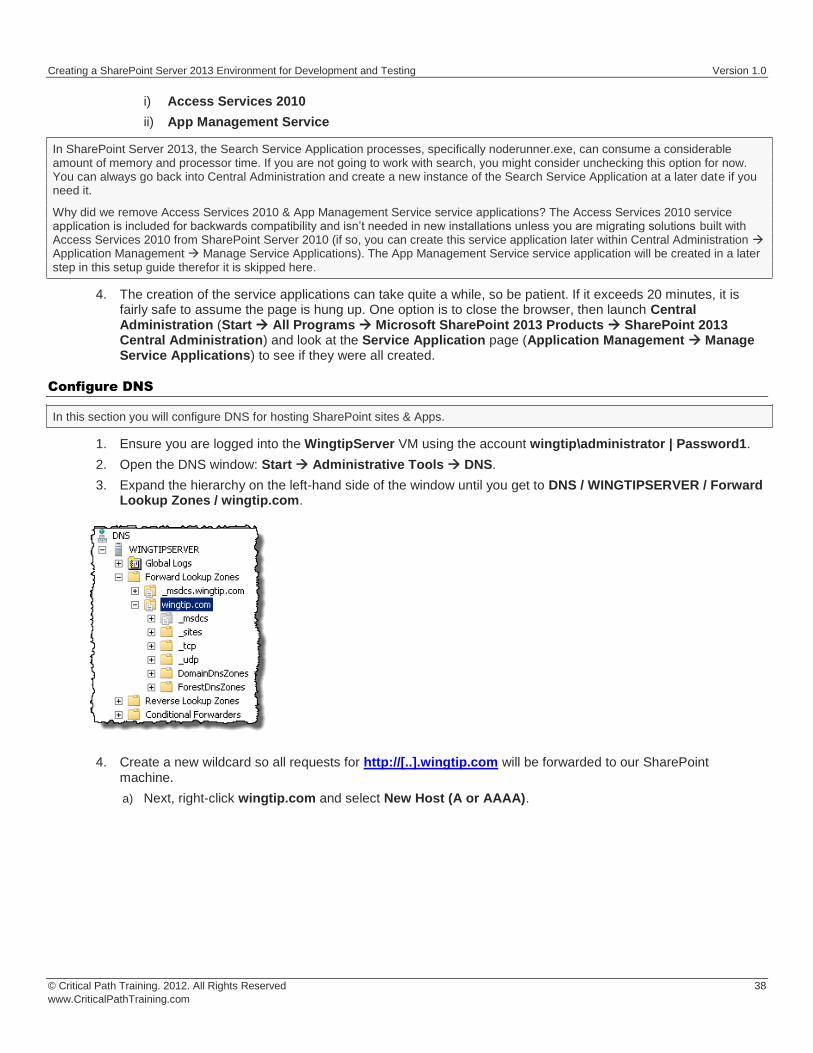
Creating a SharePoint Server 2013 Environment for Development and Testing Version 10
copy Critical Path Training 2012 All Rights Reserved 39
wwwCriticalPathTrainingcom
b) In the New Host dialog enter the following and click OK
i) Alias Name
ii) IP Address 192168150102 Then click Add Host The following figure shows how this looks
This new record is telling DNS to forward any request for http[]wingtipcom to the webserver WINGTIPSERVER where the
requests will be served by SharePoint
5 Verify this DNS entry is working
a) Open Windows PowerShell Start All Programs Accessories Windows PowerShell Windows PowerShell
b) Run the following commands and press ENTER
PS CUsersAdministratorgt nslookup somethingwingtipcom PS CUsersAdministratorgt nslookup somethingappswingtipcom
c) You should get a response that points to the WingtipServer server as shown in the following figure
Creating a SharePoint Server 2013 Environment for Development and Testing Version 10
copy Critical Path Training 2012 All Rights Reserved 40
wwwCriticalPathTrainingcom
Configure SharePoint Server 2013 for Host-Named Site Collections amp Create Initial Site
Collections
In this section you will create new SharePoint 2013 site collections for testing and hosting apps
Microsoft recommends to create host-named site collections (HNSC) instead of using the path based site collection addressing The difference is the following a path based site created at something such as httpintranetwingtipcomsitesdevtest as an HNSC site would be more like httpdevtestwingtipcom This is how it works in the cloud (Office 365) and it scales much better for on-prem
deployments This setup guide will show you how to setup your environment to create HNSC The only downside to this approach is that you canrsquot create site collections within Central Administration it must be done via Windows PowerShell API (because Central Administration doesnrsquot instruct you where to put the site
This is implemented in various parts First DNS must be configured to send all requests for httpwingtipcom to a Web Application
(implemented in the last section) Second this Web Application must be extended with SharePoint and have no host header bindings (so it handles all requests) Third it must have a default site collection at the root of the Web Application but it will not be used for anything (in fact it doesnrsquot need a template assigned to it)
You can read more about HNSCrsquos on TechNet httptechnetmicrosoftcomen-uslibrarycc424952aspx
PowerShell Script Alert The steps in this section are automated in the script SetupSharePointForHNSCps1 found in the files that
accompany this setup guide Open the script and read the header for documentation on how to use it
1 Ensure you are logged into the WingtipServer VM using the account wingtipadministrator | Password1
2 Open Central Administration Start All Programs Microsoft SharePoint 2013 Products SharePoint 2013 Central Administration
3 Select Application Management Manage Web Applications
4 Delete the default Web Application created by the configuration wizard
a) Delete the existing default Web Application
i) Select the Web Application SharePoint ndash 80 the one with the URL of httpwingtipserver and click Delete in the ribbon
ii) When prompted to delete the associated IIS Web Site amp SQL Server database select both options to delete them and click OK
The reason you are doing this is because the setup wizard you ran previously when creating the service applications automatically created it The problem is that it used the same identity (WINGTIPSP_Services) for the app pool that is used for all the service
applications which is not desired
5 Create a new Web Application to handle Host-Named Site Collections (HNSC)
Creating a SharePoint Server 2013 Environment for Development and Testing Version 10
copy Critical Path Training 2012 All Rights Reserved 41
wwwCriticalPathTrainingcom
a) In the ribbon click the New button
b) In the Create New Web Application dialog enter the following values in the properties and click OK Leave all properties not mentioned
i) Select the radio button Create a new IIS web site
(1) Name SharePoint HNSC Host ndash 80
(2) Port 80
ii) Application Pool
(1) Select the radio button Create a new application pool
(a) Application Pool Name SharePoint Default HNSC AppPool
(b) Select a security account for this application pool WINGTIPSP_Content
If WINGTIPSP_Content is not listed as an available managed account create it by selecting the appropriate option and using
Password1 for the password
iii) Database Name and Authentication
(1) Database Name WSS_Content_HNSCDefaultHost
c) This process will take a few moments At the end of the process SharePoint will ask if you want to create a site collection You do but you donrsquot want to do it through the browser as this will not be a HNSC To create a HNSC you must create it via Windows PowerShell
6 Create a default not template site collection at the root of the web application
a) Open SharePoint 2013 Management Shell Start All Programs Microsoft SharePoint 2013 Products SharePoint 2013 Management Shell
7 Create Site Collections for Testing SharePoint amp SharePoint Apps
a) Open SharePoint 2013 Management Shell Start All Programs Microsoft SharePoint 2013 Products SharePoint 2013 Management Shell
b) Get a reference to the HNSC web application you just created by running the following Windows PowerShell script in the SharePoint 2013 Management Shell
$hnscWebApp = Get-SPWebApplication | Where-Object $_DisplayName -eq SharePoint HNSC Host - 80
c) Create a non-templated site at the root of the web application for Workflow to connect to by executing the following Windows PowerShell script in the SharePoint 2013 Management Shell
New-SPSite -Name Root HNSC Site Collection -Url httpwingtipcom -HostHeaderWebApplication $hnscWebApp -OwnerAlias WINGTIPAdministrator
d) Create a team site by executing the following Windows PowerShell script in the SharePoint 2013 Management Shell
New-SPSite -Name Wingtip Intranet -Url httpintranetwingtipcom ndashHostHeaderWebApplication $hnscWebApp -Template STS0 -OwnerAlias WINGTIPAdministrator
e) Create a developer site by executing the following Windows PowerShell script in the SharePoint 2013 Management Shell
New-SPSite -Name Wingtip Developer Site -Url httpdevwingtipcom ndashHostHeaderWebApplication $hnscWebApp -Template DEV0 -OwnerAlias WINGTIPAdministrator
You can only create debug and test apps using a developer site
At this point you now have a site collection to use as a team site (httpintranetwingtipcom) and to develop and test custom SharePoint apps (httpdevwingtipcom)
Creating a SharePoint Server 2013 Environment for Development and Testing Version 10
copy Critical Path Training 2012 All Rights Reserved 42
wwwCriticalPathTrainingcom
Configure SharePoint 2013 for Hosting Apps
In this setup you will setup your SharePoint 2013 environment for hosting apps
PowerShell Script Alert Everything in the next immediate step is provided in the script ConfigureSpFarmForAppsps1 found in the
files that accompany this setup guide Open the script and read the header for documentation on how to use it
1 Ensure you are logged into the WingtipServer VM using the account wingtipadministrator | Password1
2 Create the necessary SharePoint App Management service applications and start the necessary services via Windows PowerShell
a) Open SharePoint 2013 Management Shell Start All Programs Microsoft SharePoint 2013 Products SharePoint 2013 Management Shell
b) Execute the following Windows PowerShell script in the SharePoint 2013 Management Shell
$appHostDomain = appswingtipcom $adminService = Get-Service -Name spadminv4 if ($adminServiceStatus -ne Running) Start-Service $adminService $timerService = Get-Service -Name sptimerv4 if ($timerServiceStatus -ne Running) Start-Service $timerService Set-SPAppDomain $appHostDomain $appMgmtSvcInstance = Get-SPServiceInstance | Where-Object $_GetType()Name -eq AppManagementServiceInstance if ($appMgmtSvcInstanceStatus -ne Online) Start-SPServiceInstance -Identity $appMgmtSvcInstance $appSubSettingSvcInstance = Get-SPServiceInstance | Where-Object $_GetType()Name -eq SPSubscriptionSettingsServiceInstance if ($appSubSettingSvcInstanceStatus -ne Online) Start-SPServiceInstance -Identity $appSubSettingSvcInstance $appPoolServiceApps = Get-SPServiceApplicationPool -Identity SharePoint Web Services Default $appSubSvc = New-SPSubscriptionSettingsServiceApplication ndashApplicationPool $appPoolServiceApps ndashName Settings Service Application ndashDatabaseName SettingsServiceDB $proxySubSvc = New-SPSubscriptionSettingsServiceApplicationProxy ndashServiceApplication $appSubSvc $appAppSvc = New-SPAppManagementServiceApplication -ApplicationPool $appPoolServiceApps -Name App Management Service Application -DatabaseName AppServiceDB $proxyAppSvc = New-SPAppManagementServiceApplicationProxy -ServiceApplication $appAppSvc Set-SPAppSiteSubscriptionName -Name app -Confirm$false
3 Verify the script configured SharePoint 2013 for hosting apps
a) Open Central Administration Start All Programs Microsoft SharePoint 2013 Products SharePoint 2013 Central Administration
b) Verify service applications created
i) Open the Service Applications page Application Management Manage Service Applications
ii) Verify you have two service applications created
(1) App Management Service Application
(2) Settings Service Application
c) Verify service instances are running
i) Open the Services on Server page System Settings Manage Services on Server
ii) Verify the following services are Started
(1) App Management Service
(2) Microsoft SharePoint Foundation Subscription Settings Service
Creating a SharePoint Server 2013 Environment for Development and Testing Version 10
copy Critical Path Training 2012 All Rights Reserved 43
wwwCriticalPathTrainingcom
d) Verify App URLs are correct
i) Open the Configure App URLs page Apps Configure app URLs
ii) Verify the following
(1) App Domain appswingtipcom
(2) App Prefix app
At this point your SharePoint Server 2013 environment is ready to host SharePoint apps
Creating a SharePoint Server 2013 Environment for Development and Testing Version 10
copy Critical Path Training 2012 All Rights Reserved 44
wwwCriticalPathTrainingcom
Start the SharePoint 2013 Sandbox Service
By default the service that executes sandbox solutions is not running In this step you will start the service
1 Open Central Administration Start All Programs Microsoft SharePoint 2013 Products SharePoint 2013 Central Administration
2 Open the Services on Server page System Settings Manage Services on Server
3 Click the Start link to the left of the Microsoft SharePoint Foundation Sandboxed Code Service
At this point your installation can support sandbox solutions
Configure CRL Verification for Disconnected Environments
SharePoint periodically ldquophones homerdquo to a specific address hosted by Microsoft under certain conditions When your environment is disconnected this can cause an unnecessary delay or failures when starting up the sandbox The following steps outline a workaround to bypass this check
1 Launch Notepad as an administrator Start All Programs Accessories right-click Notepad and select Run as Administrator
2 Open the hosts file by selecting File Open and finding the file
cWindowsSystem32Driversetchosts
3 Add the following line to the end of the file
127001 crlmicrosoftcom
4 Save and close the hosts file
Update Internet Explorer to Bypass the App URL amp Automatically Login to SharePoint Sites
In this section you will update Internet Explorer to add the App hosting URL to the bypass list so you can navigate to the domain after deploying SharePoint hosted apps
1 Ensure you are logged into the WingtipServer VM using the account wingtipadministrator | Password1
1 Launch Internet Explorer Start All Programs Internet Explorer
2 Configure Internet Explorer to bypass the App URL
a) In the top-right corner click the gear icon and select Internet Options
b) On the Security tab select the Local Intranet and click the Sites button
c) Uncheck the box next to Automatically detect intranet network
d) Click the Advanced button and add two entries to the Exceptions list
i) httpwingtipcom
ii) httpappswingtipcom
Creating a SharePoint Server 2013 Environment for Development and Testing Version 10
copy Critical Path Training 2012 All Rights Reserved 45
wwwCriticalPathTrainingcom
e) Click the Close button followed by the OK button multiple times to close out of the dialogs
At this point Internet Explorer is setup to bypass your app URL so you can navigate to apps (httpappswingtipcom) as well as automatically authenticate to sites hosted at httpwingtipcom
Exercise 6 Configure SharePoint to Host My Sites
In this exercise you will configure SharePoint to create and host My Sites In order to host My Sites you will need a new Web Application that is configured for Self-Service Site Creation and has a My Site Host site collection
1 Create a new SharePoint web application to host the My Sites
a) Ensure you are logged into the WingtipServer VM using the account wingtipadministrator | Password1
b) Open Central Administration Start All Programs Microsoft SharePoint 2013 Products SharePoint 2013 Central Administration
c) Select Application Management Manage Web Applications
d) In the ribbon click the New button
e) In the Create New Web Application dialog enter the following values in the properties and click OK Leave all properties not mentioned
i) Select the radio button Create a new IIS web site
(1) Name SharePoint MySite Host ndash 80
(2) Port 80
(3) Host Header mywingtipcom
ii) Application Pool
(1) Select the radio button Use existing application pool
(a) Application Pool Name SharePoint Default HNSC AppPool
iii) Database Name and Authentication
(1) Database Name WSS_Content_SocialWingtipCom
f) This process will take a few moments At the end of the process SharePoint will ask if you want to create a site collection Click the link provided to create a new site collection amp continue to the next step
2 Create a My Site Host site collection
a) On the Create Site Collection page use the following information to complete the form and click OK
Creating a SharePoint Server 2013 Environment for Development and Testing Version 10
copy Critical Path Training 2012 All Rights Reserved 46
wwwCriticalPathTrainingcom
i) Title My Site Host
ii) URL
iii) Template Selection My Site Host (found under the Enterprise tab)
iv) Primary Site Collection Administrator WINGTIPAdministrator
3 Update the Web Application to host my sites
a) Within Central Administration in the left-hand navigation navigate to the Manage Web Applications page Application Management Manage Web Applications
b) Select the SharePoint MySite Host ndash 80 web application
c) Click the Managed Paths button in the ribbon
d) Remove the sites managed path and add two new managed paths and click OK
i) personal ndash Wildcard inclusion
ii) my ndash Explicit inclusion
e) With the SharePoint MySite Host ndash 80 web application still selected click the Self-Service Site Creation button
f) On the Self-Service Site Creation page use the following values to complete the form and click OK
i) Site Collections On
4 Next configure the User Profile Service Application My Site settings
a) Browse to the User Profile Service Application management page Application Management Manage Service Applications User Profile Service Application
b) Under the My Site Settings section click the Setup My Sites
c) On the My Site Settings page use the following information to complete the form and click OK
i) My Site Host httpmywingtipcom
ii) Personal Site Location personal
At this point your SharePoint deployment is now configured to automatically create My Sites under httpmywingtipcomPersonalUserName when users first browse to them
Exercise 7 Install amp Configure Workflow Manager 10
In this exercise you will configure the WingtipServer VM to host Workflow Manager 10 and connect it to your SharePoint installation
1 Ensure you are logged into the WingtipServer VM using the account wingtipadministrator | Password1
Verify SQL Server 2012 Network Configuration
In this section yoursquoll verify the network configuration is correct for SQL Server 2012 in order to install Workflow Manager 10
Creating a SharePoint Server 2013 Environment for Development and Testing Version 10
copy Critical Path Training 2012 All Rights Reserved 47
wwwCriticalPathTrainingcom
1 Configure SQL Server 2012 to have the TCPIP connection protocol enabled
a) Open the SQL Server Configuration Manager Start All Programs Microsoft SQL Server 2012 Configuration Tools SQL Server Configuration Manager
b) Expand the hierarchy on the left-hand side to the following SQL Server Connection Manager (local) SQL Server Network Configuration Protocols for MSSQLSERVER
c) In the main window if TCPIP is Disabled right-click TCPIP and select Enable
d) When prompted with a warning click OK
2 SQL Server must be restarted in order to reflect this change
a) In the hierarchy on the left-hand side of the window select SQL Server Services
b) Right-click SQL Server (MSSQLSERVER) and select Restart
At this point SQL Server is now configured with the TCPIP protocol enabled a requirement when configuring Service Bus
Configure the Workflow Service Account with the Necessary Rights
In this section you will verify the service account that will run Workflow Manager and Service Bus
1 Ensure you are logged into the WingtipServer VM using the account WINGTIPadministrator | Password1
2 Grant the WINGTIPSP_Content account securityadmin amp dbcreator permissions in SQL Server
a) Launch SQL Server Management Studio Start All Programs Microsoft SQL Server 2012 SQL Server Management Studio
b) When SQL Server Management Studio launches within the Connect to Server dialog login using the default settings and click Connect
c) In the Object Explorer tool window expand the WINGTIPSERVER server hierarchy to the Security Logins node
d) Find the WINGTIPSP_Content account right-click it and select Properties
Creating a SharePoint Server 2013 Environment for Development and Testing Version 10
copy Critical Path Training 2012 All Rights Reserved 48
wwwCriticalPathTrainingcom
e) In the Select a page pane select Server Roles
f) Check securityadmin amp dbcreator and click OK
g) Close SQL Server Management Studio
3 Add the Workflow service account to the local administrators group
a) Open the Active Directory Users and Computers window Start Administrative Tools Active Directory Users and Computers
b) In the hierarchy on the left-hand side of the window expand it to the following Active Directory Users and Computers wingtipcom Builtin
c) In the main window right-click Administrators and select Properties
d) In the Administrators Properties dialog select the Members tab and click Add
e) In the Enter the object names to select box enter wingtipsp_content and click the Check Names button
f) In the Administrators Properties dialog click OK
g) Close the Active Directory Users and Computers window
At this point the service account that will host Workflow Manager and Service Bus has been configured correctly
Creating a SharePoint Server 2013 Environment for Development and Testing Version 10
copy Critical Path Training 2012 All Rights Reserved 49
wwwCriticalPathTrainingcom
Download amp Install Workflow Manager and Service Bus
In this section you will install Workflow Manager and Service Bus
1 Ensure you are logged into the WingtipServer VM using the account WINGTIPSP_Content | Password1
It is important you are logged in as the user that will run workflow when you install amp configure Workflow Manager and Service Bus
2 Launch the Web Platform Installer Start All Programs Microsoft Web Platform Installer
a) If the Web Platform Installer is not present on your machine you can download amp install it from here httpwwwmicrosoftcomwebdownloadsplatformaspx
If you do not have internet access within the virtual machine it is possible to download everything needed for workflow using the command line version of the Web Platform Installer (WebPICMD) You can get WebPICMD from httplearniisnetpageaspx1072web-platform-installer-v4-command-line-webpicmdexe-preview-release Specifically for
workflow enter the following command to download Workflow Beta 1 and all prerequisites
webpicmd offline ProductsWorkflow Pathc[path]
3 When the Web Platform Installer loads execute a search for Workflow select Workflow Manager 10 and click Add
4 Click the Install button at the bottom of the Web Platform Installer 40 window
5 On the Prerequisites page click I Accept
Note The Web Platform Installer 40 may prompt you to keep certain products updated using Microsoft Update If it does select Use Microsoft Update when I check for updates (recommended) and click Continue
6 When the installer completes the following dialog will appear Click Continue and then Finish to start the configuration process
Creating a SharePoint Server 2013 Environment for Development and Testing Version 10
copy Critical Path Training 2012 All Rights Reserved 50
wwwCriticalPathTrainingcom
At this point Workflow Manager amp Service Bus are installed
Configure Workflow Manager and Service Bus
In this section you will install Workflow Manager and Service Bus
1 If the Workflow Manager Configuration Wizard is not open open it Start All Programs Workflow Manager 10 Workflow Configuration
2 On the Welcome page click Configure Workflow Manager with Default Settings (Recommended)
Creating a SharePoint Server 2013 Environment for Development and Testing Version 10
copy Critical Path Training 2012 All Rights Reserved 51
wwwCriticalPathTrainingcom
3 On the New Farm Configuration page do the following
a) In the section Configure Service Account set the credentials to
i) User ID sp_contentwingtipcom
ii) Password Password1
b) Check the Allow Workflow management over HTTP on this computer checkbox
Ensure the username is entered in the fully qualified UPN format not as the default shows in the installer (sp_contentwingtip) or the domainusername format
In a production environment you should be doing everything over SSL
c) Click the Test Connection button to verify the connection credentials before proceeding
Creating a SharePoint Server 2013 Environment for Development and Testing Version 10
copy Critical Path Training 2012 All Rights Reserved 52
wwwCriticalPathTrainingcom
d) In the Certificate Generation Key and Confirm Certificate Generation Key enter Password1 into both fields
4 Click the right arrow in the bottom right corner to proceed
5 On the Summary page review your settings and click the check at the bottom right of the widow to start the configuration process
Creating a SharePoint Server 2013 Environment for Development and Testing Version 10
copy Critical Path Training 2012 All Rights Reserved 53
wwwCriticalPathTrainingcom
6 After a few minutes the Configuration Progress screen will show that everything has been configured correctly
Creating a SharePoint Server 2013 Environment for Development and Testing Version 10
copy Critical Path Training 2012 All Rights Reserved 54
wwwCriticalPathTrainingcom
7 Click the check in the bottom right corner
At this point Workflow Manager amp Service Bus has been installed and a new Workflow Manager farm has been created The next step is to connect the SharePoint 2013 farm to the Workflow Manager farm
Connect SharePoint 2013 to Workflow Manager
In this section you will connect SharePoint 2013 and Workflow Manager together
1 Ensure you are logged into the WingtipServer VM using the account WINGTIPadministrator | Password1
2 Get the Workflow Manager endpoint
a) Open the Workflow Manager PowerShell console Start All Programs Workflow Manager 10
b) Execute the Windows PowerShell following cmdlet
Get-WFFarm | ft HttpPort
c) Take note of this port (12291) This port number is what you will use to connect the SharePoint 2013 farm to the Workflow Manager 10 farm
In production you should connect to the HTTPS port listed in the HttpsPort property when you run Get-WFFarm
d) Close the Workflow Manager PowerShell window
3 Connect the SharePoint 2013 farm to Workflow Manager
Creating a SharePoint Server 2013 Environment for Development and Testing Version 10
copy Critical Path Training 2012 All Rights Reserved 55
wwwCriticalPathTrainingcom
a) Open SharePoint 2013 Management Shell Start All Programs Microsoft SharePoint 2013 Products SharePoint 2013 Management Shell
b) Execute the following Windows PowerShell script in the SharePoint 2013 Management Shell
Register-SPWorkflowService ndashSPSite httpintranetwingtipcom ndashWorkflowHostUri httpwingtipserver12291 ndashAllowOAuthHttp
This script is telling SharePoint the endpoint it should use to talk to Workflow Manager as well as Workflow Manager the SharePoint site collection it should talk to for calls into the CSOM It is also configuring all communication over HTTP rather than HTTPS for performance reasons In production you should always use HTTPS
This step will take a moment with no feedback during the process Be patient
c) Close the SharePoint 2013 Management Shell
At this point the SharePoint 2013 farm is connected to the Workflow Manager 10 farm
Configure SharePoint User Profile Service Application AD Sync
Users in SharePoint 2013 are validated by Workflow Manager against SharePoint to ensure they have permissions to start a workflow This is done by looking up the user by their AD UserPrincipalName (UPN) attribute in the User Profile Service Application (UPA) If no matching user is found the workflow will be automatically cancelled by Workflow Manager In this section you will setup UPA to connect amp sync with the local Active Directory so user accounts in AD will have their UPN synchronized to UPA
1 Open Central Administration Start All Programs Microsoft SharePoint 2013 Products SharePoint 2013 Central Administration
2 Go to the User Profile Service Application management page Application Management Manage Service Applications User Profile Service Application
3 The first step is to configure the User Profile Service Application to allow for Active Directory (AD) synchronization
a) Under Synchronization select Configure Synchronization Settings
b) For Synchronization select Use SharePoint Active Directory Import and click OK
4 Next establish a connection to the wingtipcom AD
a) Under Synchronization select Configure Synchronization Connections
b) On the Synchronization Connections page select Create New Connection
c) Enter the following values on this form and click OK
i) Connection Name WINGTIPCOM AD
ii) Type Active Directory Import
iii) Connection Settings
(1) Fully Qualified Domain Name wingtipcom
(2) Authentication Provider Type Windows Authentication
(3) Account Name WINGTIPAdministrator
(4) Password (and Confirm Password) Password1
iv) Containers
(1) Click Populate Containers
(2) After it loads check the box next to WINGTP or click the Select All button below the box
5 Go back to the User Profile Service Application management page Application Management Manage Service Applications User Profile Service Application
6 Finally start a synchronization import
a) Under Synchronization select Start Profile Synchronization
Creating a SharePoint Server 2013 Environment for Development and Testing Version 10
copy Critical Path Training 2012 All Rights Reserved 56
wwwCriticalPathTrainingcom
b) Select Start Full Synchronization and click OK
c) You will be taken back to the User Profile Service Application management page Notice in the top-right corner there is a status block that reports how many profiles are in the UPA database Refresh the page to see it increase to a handful of profiles as the import process runs
At this point you have successfully configured the User Profile Service Application to import profiles from the local AD
Exercise 8 Install the Microsoft Office 2013 Professional Clients
In this exercise you will install the Microsoft Office 2013 client applications
1 Download the Office 2013 into the WingtipServer VM For this you need to create an Office 365 Trial account login to Office 365 go to the Admin Dashboard and then download the latest version httpwwwmicrosoftcomofficepreviewentry-office-preview
2 Download the SharePoint Designer 2013 into the WingtipServer VM from here httpwwwmicrosoftcomen-usdownloaddetailsaspxid=35491
3 Download the Visio Professional 2013 into the WingtipServer VM from here httptechnetmicrosoftcomen-usevalcenterhh973399
Install Microsoft Office Professional Plus 2013
In this section you will install the Microsoft Office 2013 clients
1 Ensure you are logged into the WingtipServer VM using the account WINGTIPadministrator | Password1
2 Execute the installer OfficeProfessionalPlus_English_x64exe
3 On the Read the Microsoft Software License Terms dialog click the checkbox next to I accept the terms of this agreement and click Continue
4 On the Choose the installation you want dialog click the Install Now button
5 The installer will proceed and install all the Office products
6 When the installer completes click the Close button
7 Apply your Office Professional Plus 2013 license key
a) Launch Word 2013 Start All Programs Microsoft Office 2013 Word 2013
b) In the First things first dialog select Use recommended settings and click Accept
c) In the Welcome to Office dialog that opens click the [X] icon in the top-right corner to close it
d) In the left-hand pane click Open Other Documents
e) In the left-hand pane click Account
f) In the Product Information section within the Activation Required box click Change Product Key
g) Enter your license key for Office Professional Plus 2013 check the box next to Attempt to automatically activate my product online and click Install
h) Click OK
At this point you have installed Office Professional Plus 2013
Install Microsoft Office Visio 2013
In this section you will install Microsoft Office 2013 Visio
1 Ensure you are logged into the WingtipServer VM using the account WINGTIPadministrator | Password1
2 Execute the installer VisioProfessional_English_x64exe
3 On the Read the Microsoft Software License Terms dialog click the checkbox next to I accept the terms of this agreement and click Continue
Creating a SharePoint Server 2013 Environment for Development and Testing Version 10
copy Critical Path Training 2012 All Rights Reserved 57
wwwCriticalPathTrainingcom
4 On the Choose the installation you want dialog click the Install Now button
5 The installer will proceed and install all Visio 2013
6 When the installer completes click the Close button
7 Apply your Visio 2013 license key
a) Launch Visio 2013 Start All Programs Microsoft Office 2013 Visio 2013
b) In the First things first dialog select Use recommended settings and click Accept
c) In the Welcome to Office dialog that opens click the X icon in the top-right corner to close it
d) In the left-hand pane click Open Other Documents
e) In the left-hand pane click Account
f) In the Product Information section within the Activation Required box click Change Product Key
g) Enter your license key for Visio 2013 check the box next to Attempt to automatically activate my product online and click Install
h) Click OK
At this point you have installed Visio 2013
Install Microsoft Office 2013 SharePoint Designer
In this section you will install Microsoft Office 2013 SharePoint Designer
1 Ensure you are logged into the WingtipServer VM using the account WINGTIPadministrator | Password1
2 Execute the installer SharePointDesigner_English_x64exe
3 On the Read the Microsoft Software License Terms dialog click the checkbox next to I accept the terms of this agreement and click Continue
4 On the Choose the installation you want dialog click the Install Now button
5 The installer will proceed and install all SharePoint Designer 2013
6 When the installer completes click the Close button
At this point you have installed SharePoint Designer 2013
Exercise 9 Install Visual Studio 2012
In this exercise you will install Visual Studio 2012
1 Ensure you are logged into the WingtipServer VM using the account WINGTIPadministrator | Password1
2 Start the install of Visual Studio 2012 Ultimate Trial by downloading the installer from here httpwwwmicrosoftcomvisualstudio11en-usdownloads
3 On the installation splash screen check the box next to I agree to the License terms and conditions and click the Next button
Creating a SharePoint Server 2013 Environment for Development and Testing Version 10
copy Critical Path Training 2012 All Rights Reserved 58
wwwCriticalPathTrainingcom
4 On the Optional Features to install dialog click Install
5 After some time the installer will complete Click the Launch button to launch Visual Studio 2012
Creating a SharePoint Server 2013 Environment for Development and Testing Version 10
copy Critical Path Training 2012 All Rights Reserved 59
wwwCriticalPathTrainingcom
6 In the Choose Default Environment Settings select Visual C Development Settings and click Start Visual Studio
7 Close Visual Studio 2012
At this point Visual Studio 2012 RTM is installed
Install Office amp SharePoint 2013 Developer Tools
In this section you will install the Office and SharePoint 2013 developer tools for Visual Studio
1 Ensure you are logged into the WingtipServer VM using the account WINGTIPadministrator | Password1
2 Launch the Web Platform Installer Start All Programs Microsoft Web Platform Installer
3 In the search box at the top-right corner of the Web Platform Installer 40 window type sharepoint and press Enter
4 Click the Add button to the right of Microsoft Office Developer Tools for Visual Studio 2012 - Preview 2
5 Click the Install button at the bottom of the Web Platform Installer 40 window
6 On the Prerequisites page click I Accept
Creating a SharePoint Server 2013 Environment for Development and Testing Version 10
copy Critical Path Training 2012 All Rights Reserved 60
wwwCriticalPathTrainingcom
At this point you have installed the SharePoint 2013 amp Office 2013 development tools in Visual Studio 2012
Creating a SharePoint Server 2013 Environment for Development and Testing Version 10
copy Critical Path Training 2012 All Rights Reserved 61
wwwCriticalPathTrainingcom
Appendix 1 Download Manifest
The following lists everything referenced that you will or may need to download in this environment
Windows Server 2008 R2 with Service Pack 1 (installer ISO)
o httptechnetmicrosoftcomen-usevalcenterdd459137aspx
Windows Server 2008 R2 with Service Pack 1 (prebuilt VHD)
o httpwwwmicrosoftcomdownloadsdetailsaspxFamilyId=9040a4be-c3cf-44a5-9052-a70314452305
Windows Server 2008 R2 Service Pack 1
o httpwwwmicrosoftcomen-usdownloaddetailsaspxid=5842
SQL Server 2012 Trial
o httpwwwmicrosoftcombetaexperiencepdSQL2012EvalCTAenusdefaultaspx
SharePoint Server 2013
o httptechnetmicrosoftcomen-USevalcenterhh973397aspx
Hotfixes for SharePoint Server 2013 (post-install)
o KB2554876 The SharePoint Parsing Process Crashes in Windows Server 2008 R2
o KB2708075 IIS 75 Configurations are not Updated when you use the ServerManager Class to Commit
Configuration Changes
o KB2759112 Hotfix is Available for NET Framework 45 that Resolves an ASPNET Race Condition Issue in
Windows Server 2008 R2 Windows Server 2008 R2 SP1
o KB2765317 Hotfix is Available for NET Framework 45 that Resolves an ASPNET Race Condition Issue in
Windows 8 Windows RT and Windows Server 2012
Web Platform Installer
o httpwwwmicrosoftcomwebdownloadsplatformaspx
Web Platform Installer ndash Command Line Version
o httplearniisnetpageaspx1072web-platform-installer-v4-command-line-webpicmdexe-preview-release
Workflow Manager 10
o Download using the Microsoft Web Platform Installer
Office 2013
o httpwwwmicrosoftcomofficepreviewentry-office-preview
SharePoint Designer 2013
o httpwwwmicrosoftcomen-usdownloaddetailsaspxid=35491
Visio Professional 2013
o httptechnetmicrosoftcomen-usevalcenterhh973399
Visual Studio 2012
o httpwwwmicrosoftcomvisualstudio11en-usdownloads
Office Developer Tools for Visual Studio 2012 ndash Preview 2
o Download using the Microsoft Web Platform Installer
Creating a SharePoint Server 2013 Environment for Development and Testing Version 10
copy Critical Path Training 2012 All Rights Reserved 62
wwwCriticalPathTrainingcom
Appendix 2 Windows PowerShell Script Manifest
The following lists all Windows PowerShell scripts that are provided with this setup guide
AddDisableLoopbackCheckRegKeyps1
o The following steps automate creating the registry key outlined as Method 2 in the Microsoft Knowledgebase article
httpsupportmicrosoftcomkb896861 using Windows PowerShell This key DisableLoopbackCheck will allow
you to browse SharePoint sites on the same machine Without this key (or following Method 1 in the KB article) you
would need to browse any SharePoint sites from a different computer than the one which SharePoint is installed on
ConfigureSpFarmForAppsps1
o Configures a SharePoint 2013 for hosting apps This ensures everything you need is installed running and
configured This is documented here httpmsdnmicrosoftcomen-uslibraryfp179923(v=office15)
CreateSpServiceAccountsps1
o Creates the minimal necessary service accounts for SharePoint Server 2013 SP_Farm SP_Content amp
SP_Services
SetupSharePointForHNSCps1
o Configures a SharePoint 2013 install for hosting Host-Named Site Collections (HNSC) This involves creating a Web
Application in SharePoint that has no host header bindings Using DNS all requests are mapped to this Web
Application You then create the site collections via PowerShell as you cant create HNSCs via the browser (Central
Administration)
Creating a SharePoint Server 2013 Environment for Development and Testing Version 10
copy Critical Path Training 2012 All Rights Reserved 63
wwwCriticalPathTrainingcom
Appendix 3 Create Sample Adventure Works Database
The following steps document downloading and installing the sample Adventure Works OLTP database provided by Microsoft
1 Launch Internet Explorer and navigate to httpmsftdbprodsamplescodeplexcom
2 Download the Adventure Works 2012 OLTP Script
3 Extract the ZIP into a folder on the desktop
4 Launch SQL Server Management Studio Start All Programs Microsoft SQL Server 2012 SQL Server Management Studio
5 When SQL Server Management Studio launches within the Connect to Server dialog login using the default settings and click Connect
6 Within SQL Server Management Studio select File Open File
7 Select the file instawdbsql from the extracted ZIP and click Open
8 If prompted to re-login to the database engine do it
9 Select Query SQLCMD Mode
10 Scroll down to line 42 the line that starts with the following
setvar SqlSamplesSourceDataPath
11 Change the folder location of where you unzipped the Adventure Works 2012 OLTP Script
12 Select Query Execute
13 When the script completes the AdventureWorks2012 database will have been created
Creating a SharePoint Server 2013 Environment for Development and Testing Version 10
copy Critical Path Training 2012 All Rights Reserved 64
wwwCriticalPathTrainingcom
Change Log
Change Version Description
August 22 2012 v 01 Pre-release for review
August 27 2012 v 02 Initial public release ndash install guide based on SharePoint Server Beta 2
August 28 2012 v 03 Updated URL for the site collection used to connect SharePoint to WAW
August 31 2012 v 04 Typo Removed SQL Server Analysis Services as part of the install Not required in a
SharePoint dev box (unless you are doing business intelligence which is not covered
in the guide)
Updated all references to Windows Azure Workflow to Workflow Manager the new
official name for the new workflow product
Updated SetupSharePointForHNSCps1 script to lookup HNSC Web Application by
name rather than URL which is more reliable
Typo Updated WingtipAllUp public NIC to use a different IP than the WingtipDC
Typo Replaced a reference to WingtipServer with WingtipDC
Typo Fixed handful of minor typos
September 1 2012 v 05 Removed SQL Server Reporting Services from install guide
Added step to uncheck IErsquos ldquoAutomatically detect proxyrdquo
Added post workflow install steps to setup User Profile Service Application to sync with
local Active Directory
September 5 2012 v 06 Added step to create a default root site collection in the HNSC web app
Updated minor typos and added extra notes for context
Updated PowerShell script SetupSharePointForHNSCps1 to remove content
database of default Web Application when setting up HNSC Web App
Added a new exercise 8 (after SharePoint install amp config and before the Workflow
install and config) to setup support for My Sites
October 20 2012 v 07 Updated script SetupSharePointForHNSCps1 to fix a bug where it would fail on line
111 if you didnrsquot already have a WINGTIPSP_Content managed account
Added section to bypass SharePointrsquos check for crlmicrosoftcom
Updated workflowrsquos registration PowerShell script to point to
httpintranetwingtipcom
Switched order of post-SharePoint install to setup HSNC hosting before configuring for
hosting apps
November 29 2012
v 10 Changed setup guide to use a single VM instead of two VMs
Updated guide for SharePoint 2013 RTM
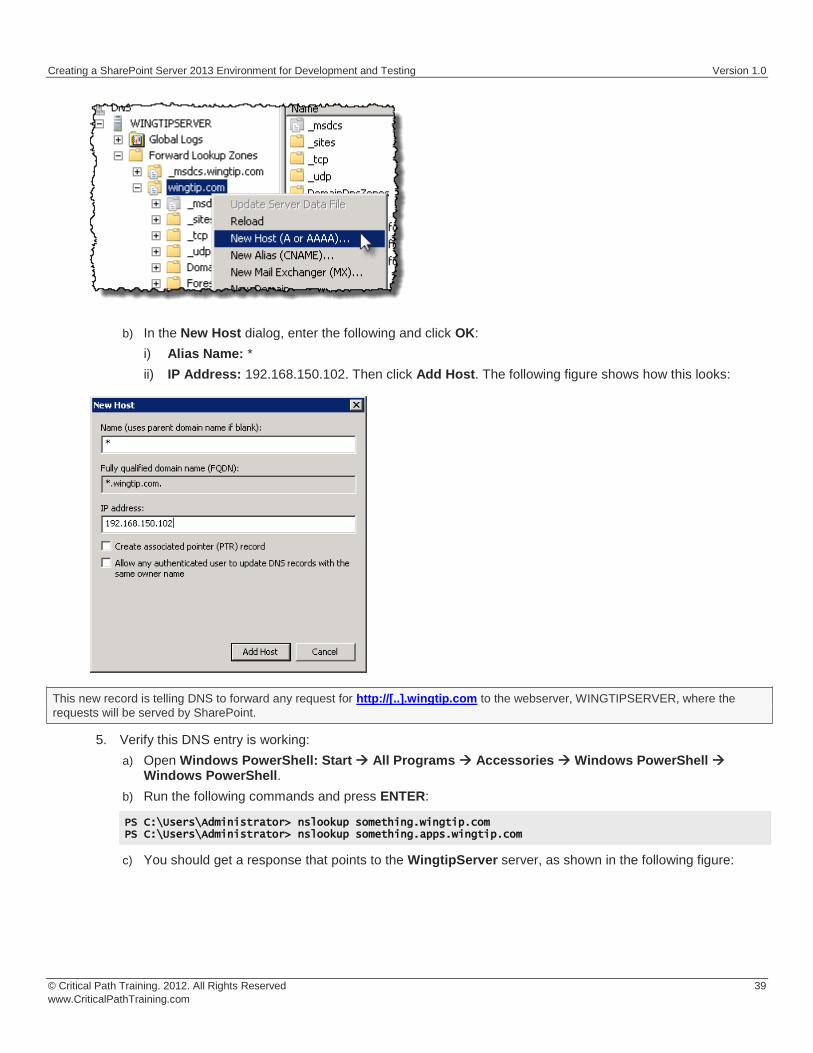
Creating a SharePoint Server 2013 Environment for Development and Testing Version 10
copy Critical Path Training 2012 All Rights Reserved 42
wwwCriticalPathTrainingcom
Configure SharePoint 2013 for Hosting Apps
In this setup you will setup your SharePoint 2013 environment for hosting apps
PowerShell Script Alert Everything in the next immediate step is provided in the script ConfigureSpFarmForAppsps1 found in the
files that accompany this setup guide Open the script and read the header for documentation on how to use it
1 Ensure you are logged into the WingtipServer VM using the account wingtipadministrator | Password1
2 Create the necessary SharePoint App Management service applications and start the necessary services via Windows PowerShell
a) Open SharePoint 2013 Management Shell Start All Programs Microsoft SharePoint 2013 Products SharePoint 2013 Management Shell
b) Execute the following Windows PowerShell script in the SharePoint 2013 Management Shell
$appHostDomain = appswingtipcom $adminService = Get-Service -Name spadminv4 if ($adminServiceStatus -ne Running) Start-Service $adminService $timerService = Get-Service -Name sptimerv4 if ($timerServiceStatus -ne Running) Start-Service $timerService Set-SPAppDomain $appHostDomain $appMgmtSvcInstance = Get-SPServiceInstance | Where-Object $_GetType()Name -eq AppManagementServiceInstance if ($appMgmtSvcInstanceStatus -ne Online) Start-SPServiceInstance -Identity $appMgmtSvcInstance $appSubSettingSvcInstance = Get-SPServiceInstance | Where-Object $_GetType()Name -eq SPSubscriptionSettingsServiceInstance if ($appSubSettingSvcInstanceStatus -ne Online) Start-SPServiceInstance -Identity $appSubSettingSvcInstance $appPoolServiceApps = Get-SPServiceApplicationPool -Identity SharePoint Web Services Default $appSubSvc = New-SPSubscriptionSettingsServiceApplication ndashApplicationPool $appPoolServiceApps ndashName Settings Service Application ndashDatabaseName SettingsServiceDB $proxySubSvc = New-SPSubscriptionSettingsServiceApplicationProxy ndashServiceApplication $appSubSvc $appAppSvc = New-SPAppManagementServiceApplication -ApplicationPool $appPoolServiceApps -Name App Management Service Application -DatabaseName AppServiceDB $proxyAppSvc = New-SPAppManagementServiceApplicationProxy -ServiceApplication $appAppSvc Set-SPAppSiteSubscriptionName -Name app -Confirm$false
3 Verify the script configured SharePoint 2013 for hosting apps
a) Open Central Administration Start All Programs Microsoft SharePoint 2013 Products SharePoint 2013 Central Administration
b) Verify service applications created
i) Open the Service Applications page Application Management Manage Service Applications
ii) Verify you have two service applications created
(1) App Management Service Application
(2) Settings Service Application
c) Verify service instances are running
i) Open the Services on Server page System Settings Manage Services on Server
ii) Verify the following services are Started
(1) App Management Service
(2) Microsoft SharePoint Foundation Subscription Settings Service
Creating a SharePoint Server 2013 Environment for Development and Testing Version 10
copy Critical Path Training 2012 All Rights Reserved 43
wwwCriticalPathTrainingcom
d) Verify App URLs are correct
i) Open the Configure App URLs page Apps Configure app URLs
ii) Verify the following
(1) App Domain appswingtipcom
(2) App Prefix app
At this point your SharePoint Server 2013 environment is ready to host SharePoint apps
Creating a SharePoint Server 2013 Environment for Development and Testing Version 10
copy Critical Path Training 2012 All Rights Reserved 44
wwwCriticalPathTrainingcom
Start the SharePoint 2013 Sandbox Service
By default the service that executes sandbox solutions is not running In this step you will start the service
1 Open Central Administration Start All Programs Microsoft SharePoint 2013 Products SharePoint 2013 Central Administration
2 Open the Services on Server page System Settings Manage Services on Server
3 Click the Start link to the left of the Microsoft SharePoint Foundation Sandboxed Code Service
At this point your installation can support sandbox solutions
Configure CRL Verification for Disconnected Environments
SharePoint periodically ldquophones homerdquo to a specific address hosted by Microsoft under certain conditions When your environment is disconnected this can cause an unnecessary delay or failures when starting up the sandbox The following steps outline a workaround to bypass this check
1 Launch Notepad as an administrator Start All Programs Accessories right-click Notepad and select Run as Administrator
2 Open the hosts file by selecting File Open and finding the file
cWindowsSystem32Driversetchosts
3 Add the following line to the end of the file
127001 crlmicrosoftcom
4 Save and close the hosts file
Update Internet Explorer to Bypass the App URL amp Automatically Login to SharePoint Sites
In this section you will update Internet Explorer to add the App hosting URL to the bypass list so you can navigate to the domain after deploying SharePoint hosted apps
1 Ensure you are logged into the WingtipServer VM using the account wingtipadministrator | Password1
1 Launch Internet Explorer Start All Programs Internet Explorer
2 Configure Internet Explorer to bypass the App URL
a) In the top-right corner click the gear icon and select Internet Options
b) On the Security tab select the Local Intranet and click the Sites button
c) Uncheck the box next to Automatically detect intranet network
d) Click the Advanced button and add two entries to the Exceptions list
i) httpwingtipcom
ii) httpappswingtipcom
Creating a SharePoint Server 2013 Environment for Development and Testing Version 10
copy Critical Path Training 2012 All Rights Reserved 45
wwwCriticalPathTrainingcom
e) Click the Close button followed by the OK button multiple times to close out of the dialogs
At this point Internet Explorer is setup to bypass your app URL so you can navigate to apps (httpappswingtipcom) as well as automatically authenticate to sites hosted at httpwingtipcom
Exercise 6 Configure SharePoint to Host My Sites
In this exercise you will configure SharePoint to create and host My Sites In order to host My Sites you will need a new Web Application that is configured for Self-Service Site Creation and has a My Site Host site collection
1 Create a new SharePoint web application to host the My Sites
a) Ensure you are logged into the WingtipServer VM using the account wingtipadministrator | Password1
b) Open Central Administration Start All Programs Microsoft SharePoint 2013 Products SharePoint 2013 Central Administration
c) Select Application Management Manage Web Applications
d) In the ribbon click the New button
e) In the Create New Web Application dialog enter the following values in the properties and click OK Leave all properties not mentioned
i) Select the radio button Create a new IIS web site
(1) Name SharePoint MySite Host ndash 80
(2) Port 80
(3) Host Header mywingtipcom
ii) Application Pool
(1) Select the radio button Use existing application pool
(a) Application Pool Name SharePoint Default HNSC AppPool
iii) Database Name and Authentication
(1) Database Name WSS_Content_SocialWingtipCom
f) This process will take a few moments At the end of the process SharePoint will ask if you want to create a site collection Click the link provided to create a new site collection amp continue to the next step
2 Create a My Site Host site collection
a) On the Create Site Collection page use the following information to complete the form and click OK
Creating a SharePoint Server 2013 Environment for Development and Testing Version 10
copy Critical Path Training 2012 All Rights Reserved 46
wwwCriticalPathTrainingcom
i) Title My Site Host
ii) URL
iii) Template Selection My Site Host (found under the Enterprise tab)
iv) Primary Site Collection Administrator WINGTIPAdministrator
3 Update the Web Application to host my sites
a) Within Central Administration in the left-hand navigation navigate to the Manage Web Applications page Application Management Manage Web Applications
b) Select the SharePoint MySite Host ndash 80 web application
c) Click the Managed Paths button in the ribbon
d) Remove the sites managed path and add two new managed paths and click OK
i) personal ndash Wildcard inclusion
ii) my ndash Explicit inclusion
e) With the SharePoint MySite Host ndash 80 web application still selected click the Self-Service Site Creation button
f) On the Self-Service Site Creation page use the following values to complete the form and click OK
i) Site Collections On
4 Next configure the User Profile Service Application My Site settings
a) Browse to the User Profile Service Application management page Application Management Manage Service Applications User Profile Service Application
b) Under the My Site Settings section click the Setup My Sites
c) On the My Site Settings page use the following information to complete the form and click OK
i) My Site Host httpmywingtipcom
ii) Personal Site Location personal
At this point your SharePoint deployment is now configured to automatically create My Sites under httpmywingtipcomPersonalUserName when users first browse to them
Exercise 7 Install amp Configure Workflow Manager 10
In this exercise you will configure the WingtipServer VM to host Workflow Manager 10 and connect it to your SharePoint installation
1 Ensure you are logged into the WingtipServer VM using the account wingtipadministrator | Password1
Verify SQL Server 2012 Network Configuration
In this section yoursquoll verify the network configuration is correct for SQL Server 2012 in order to install Workflow Manager 10
Creating a SharePoint Server 2013 Environment for Development and Testing Version 10
copy Critical Path Training 2012 All Rights Reserved 47
wwwCriticalPathTrainingcom
1 Configure SQL Server 2012 to have the TCPIP connection protocol enabled
a) Open the SQL Server Configuration Manager Start All Programs Microsoft SQL Server 2012 Configuration Tools SQL Server Configuration Manager
b) Expand the hierarchy on the left-hand side to the following SQL Server Connection Manager (local) SQL Server Network Configuration Protocols for MSSQLSERVER
c) In the main window if TCPIP is Disabled right-click TCPIP and select Enable
d) When prompted with a warning click OK
2 SQL Server must be restarted in order to reflect this change
a) In the hierarchy on the left-hand side of the window select SQL Server Services
b) Right-click SQL Server (MSSQLSERVER) and select Restart
At this point SQL Server is now configured with the TCPIP protocol enabled a requirement when configuring Service Bus
Configure the Workflow Service Account with the Necessary Rights
In this section you will verify the service account that will run Workflow Manager and Service Bus
1 Ensure you are logged into the WingtipServer VM using the account WINGTIPadministrator | Password1
2 Grant the WINGTIPSP_Content account securityadmin amp dbcreator permissions in SQL Server
a) Launch SQL Server Management Studio Start All Programs Microsoft SQL Server 2012 SQL Server Management Studio
b) When SQL Server Management Studio launches within the Connect to Server dialog login using the default settings and click Connect
c) In the Object Explorer tool window expand the WINGTIPSERVER server hierarchy to the Security Logins node
d) Find the WINGTIPSP_Content account right-click it and select Properties
Creating a SharePoint Server 2013 Environment for Development and Testing Version 10
copy Critical Path Training 2012 All Rights Reserved 48
wwwCriticalPathTrainingcom
e) In the Select a page pane select Server Roles
f) Check securityadmin amp dbcreator and click OK
g) Close SQL Server Management Studio
3 Add the Workflow service account to the local administrators group
a) Open the Active Directory Users and Computers window Start Administrative Tools Active Directory Users and Computers
b) In the hierarchy on the left-hand side of the window expand it to the following Active Directory Users and Computers wingtipcom Builtin
c) In the main window right-click Administrators and select Properties
d) In the Administrators Properties dialog select the Members tab and click Add
e) In the Enter the object names to select box enter wingtipsp_content and click the Check Names button
f) In the Administrators Properties dialog click OK
g) Close the Active Directory Users and Computers window
At this point the service account that will host Workflow Manager and Service Bus has been configured correctly
Creating a SharePoint Server 2013 Environment for Development and Testing Version 10
copy Critical Path Training 2012 All Rights Reserved 49
wwwCriticalPathTrainingcom
Download amp Install Workflow Manager and Service Bus
In this section you will install Workflow Manager and Service Bus
1 Ensure you are logged into the WingtipServer VM using the account WINGTIPSP_Content | Password1
It is important you are logged in as the user that will run workflow when you install amp configure Workflow Manager and Service Bus
2 Launch the Web Platform Installer Start All Programs Microsoft Web Platform Installer
a) If the Web Platform Installer is not present on your machine you can download amp install it from here httpwwwmicrosoftcomwebdownloadsplatformaspx
If you do not have internet access within the virtual machine it is possible to download everything needed for workflow using the command line version of the Web Platform Installer (WebPICMD) You can get WebPICMD from httplearniisnetpageaspx1072web-platform-installer-v4-command-line-webpicmdexe-preview-release Specifically for
workflow enter the following command to download Workflow Beta 1 and all prerequisites
webpicmd offline ProductsWorkflow Pathc[path]
3 When the Web Platform Installer loads execute a search for Workflow select Workflow Manager 10 and click Add
4 Click the Install button at the bottom of the Web Platform Installer 40 window
5 On the Prerequisites page click I Accept
Note The Web Platform Installer 40 may prompt you to keep certain products updated using Microsoft Update If it does select Use Microsoft Update when I check for updates (recommended) and click Continue
6 When the installer completes the following dialog will appear Click Continue and then Finish to start the configuration process
Creating a SharePoint Server 2013 Environment for Development and Testing Version 10
copy Critical Path Training 2012 All Rights Reserved 50
wwwCriticalPathTrainingcom
At this point Workflow Manager amp Service Bus are installed
Configure Workflow Manager and Service Bus
In this section you will install Workflow Manager and Service Bus
1 If the Workflow Manager Configuration Wizard is not open open it Start All Programs Workflow Manager 10 Workflow Configuration
2 On the Welcome page click Configure Workflow Manager with Default Settings (Recommended)
Creating a SharePoint Server 2013 Environment for Development and Testing Version 10
copy Critical Path Training 2012 All Rights Reserved 51
wwwCriticalPathTrainingcom
3 On the New Farm Configuration page do the following
a) In the section Configure Service Account set the credentials to
i) User ID sp_contentwingtipcom
ii) Password Password1
b) Check the Allow Workflow management over HTTP on this computer checkbox
Ensure the username is entered in the fully qualified UPN format not as the default shows in the installer (sp_contentwingtip) or the domainusername format
In a production environment you should be doing everything over SSL
c) Click the Test Connection button to verify the connection credentials before proceeding
Creating a SharePoint Server 2013 Environment for Development and Testing Version 10
copy Critical Path Training 2012 All Rights Reserved 52
wwwCriticalPathTrainingcom
d) In the Certificate Generation Key and Confirm Certificate Generation Key enter Password1 into both fields
4 Click the right arrow in the bottom right corner to proceed
5 On the Summary page review your settings and click the check at the bottom right of the widow to start the configuration process
Creating a SharePoint Server 2013 Environment for Development and Testing Version 10
copy Critical Path Training 2012 All Rights Reserved 53
wwwCriticalPathTrainingcom
6 After a few minutes the Configuration Progress screen will show that everything has been configured correctly
Creating a SharePoint Server 2013 Environment for Development and Testing Version 10
copy Critical Path Training 2012 All Rights Reserved 54
wwwCriticalPathTrainingcom
7 Click the check in the bottom right corner
At this point Workflow Manager amp Service Bus has been installed and a new Workflow Manager farm has been created The next step is to connect the SharePoint 2013 farm to the Workflow Manager farm
Connect SharePoint 2013 to Workflow Manager
In this section you will connect SharePoint 2013 and Workflow Manager together
1 Ensure you are logged into the WingtipServer VM using the account WINGTIPadministrator | Password1
2 Get the Workflow Manager endpoint
a) Open the Workflow Manager PowerShell console Start All Programs Workflow Manager 10
b) Execute the Windows PowerShell following cmdlet
Get-WFFarm | ft HttpPort
c) Take note of this port (12291) This port number is what you will use to connect the SharePoint 2013 farm to the Workflow Manager 10 farm
In production you should connect to the HTTPS port listed in the HttpsPort property when you run Get-WFFarm
d) Close the Workflow Manager PowerShell window
3 Connect the SharePoint 2013 farm to Workflow Manager
Creating a SharePoint Server 2013 Environment for Development and Testing Version 10
copy Critical Path Training 2012 All Rights Reserved 55
wwwCriticalPathTrainingcom
a) Open SharePoint 2013 Management Shell Start All Programs Microsoft SharePoint 2013 Products SharePoint 2013 Management Shell
b) Execute the following Windows PowerShell script in the SharePoint 2013 Management Shell
Register-SPWorkflowService ndashSPSite httpintranetwingtipcom ndashWorkflowHostUri httpwingtipserver12291 ndashAllowOAuthHttp
This script is telling SharePoint the endpoint it should use to talk to Workflow Manager as well as Workflow Manager the SharePoint site collection it should talk to for calls into the CSOM It is also configuring all communication over HTTP rather than HTTPS for performance reasons In production you should always use HTTPS
This step will take a moment with no feedback during the process Be patient
c) Close the SharePoint 2013 Management Shell
At this point the SharePoint 2013 farm is connected to the Workflow Manager 10 farm
Configure SharePoint User Profile Service Application AD Sync
Users in SharePoint 2013 are validated by Workflow Manager against SharePoint to ensure they have permissions to start a workflow This is done by looking up the user by their AD UserPrincipalName (UPN) attribute in the User Profile Service Application (UPA) If no matching user is found the workflow will be automatically cancelled by Workflow Manager In this section you will setup UPA to connect amp sync with the local Active Directory so user accounts in AD will have their UPN synchronized to UPA
1 Open Central Administration Start All Programs Microsoft SharePoint 2013 Products SharePoint 2013 Central Administration
2 Go to the User Profile Service Application management page Application Management Manage Service Applications User Profile Service Application
3 The first step is to configure the User Profile Service Application to allow for Active Directory (AD) synchronization
a) Under Synchronization select Configure Synchronization Settings
b) For Synchronization select Use SharePoint Active Directory Import and click OK
4 Next establish a connection to the wingtipcom AD
a) Under Synchronization select Configure Synchronization Connections
b) On the Synchronization Connections page select Create New Connection
c) Enter the following values on this form and click OK
i) Connection Name WINGTIPCOM AD
ii) Type Active Directory Import
iii) Connection Settings
(1) Fully Qualified Domain Name wingtipcom
(2) Authentication Provider Type Windows Authentication
(3) Account Name WINGTIPAdministrator
(4) Password (and Confirm Password) Password1
iv) Containers
(1) Click Populate Containers
(2) After it loads check the box next to WINGTP or click the Select All button below the box
5 Go back to the User Profile Service Application management page Application Management Manage Service Applications User Profile Service Application
6 Finally start a synchronization import
a) Under Synchronization select Start Profile Synchronization
Creating a SharePoint Server 2013 Environment for Development and Testing Version 10
copy Critical Path Training 2012 All Rights Reserved 56
wwwCriticalPathTrainingcom
b) Select Start Full Synchronization and click OK
c) You will be taken back to the User Profile Service Application management page Notice in the top-right corner there is a status block that reports how many profiles are in the UPA database Refresh the page to see it increase to a handful of profiles as the import process runs
At this point you have successfully configured the User Profile Service Application to import profiles from the local AD
Exercise 8 Install the Microsoft Office 2013 Professional Clients
In this exercise you will install the Microsoft Office 2013 client applications
1 Download the Office 2013 into the WingtipServer VM For this you need to create an Office 365 Trial account login to Office 365 go to the Admin Dashboard and then download the latest version httpwwwmicrosoftcomofficepreviewentry-office-preview
2 Download the SharePoint Designer 2013 into the WingtipServer VM from here httpwwwmicrosoftcomen-usdownloaddetailsaspxid=35491
3 Download the Visio Professional 2013 into the WingtipServer VM from here httptechnetmicrosoftcomen-usevalcenterhh973399
Install Microsoft Office Professional Plus 2013
In this section you will install the Microsoft Office 2013 clients
1 Ensure you are logged into the WingtipServer VM using the account WINGTIPadministrator | Password1
2 Execute the installer OfficeProfessionalPlus_English_x64exe
3 On the Read the Microsoft Software License Terms dialog click the checkbox next to I accept the terms of this agreement and click Continue
4 On the Choose the installation you want dialog click the Install Now button
5 The installer will proceed and install all the Office products
6 When the installer completes click the Close button
7 Apply your Office Professional Plus 2013 license key
a) Launch Word 2013 Start All Programs Microsoft Office 2013 Word 2013
b) In the First things first dialog select Use recommended settings and click Accept
c) In the Welcome to Office dialog that opens click the [X] icon in the top-right corner to close it
d) In the left-hand pane click Open Other Documents
e) In the left-hand pane click Account
f) In the Product Information section within the Activation Required box click Change Product Key
g) Enter your license key for Office Professional Plus 2013 check the box next to Attempt to automatically activate my product online and click Install
h) Click OK
At this point you have installed Office Professional Plus 2013
Install Microsoft Office Visio 2013
In this section you will install Microsoft Office 2013 Visio
1 Ensure you are logged into the WingtipServer VM using the account WINGTIPadministrator | Password1
2 Execute the installer VisioProfessional_English_x64exe
3 On the Read the Microsoft Software License Terms dialog click the checkbox next to I accept the terms of this agreement and click Continue
Creating a SharePoint Server 2013 Environment for Development and Testing Version 10
copy Critical Path Training 2012 All Rights Reserved 57
wwwCriticalPathTrainingcom
4 On the Choose the installation you want dialog click the Install Now button
5 The installer will proceed and install all Visio 2013
6 When the installer completes click the Close button
7 Apply your Visio 2013 license key
a) Launch Visio 2013 Start All Programs Microsoft Office 2013 Visio 2013
b) In the First things first dialog select Use recommended settings and click Accept
c) In the Welcome to Office dialog that opens click the X icon in the top-right corner to close it
d) In the left-hand pane click Open Other Documents
e) In the left-hand pane click Account
f) In the Product Information section within the Activation Required box click Change Product Key
g) Enter your license key for Visio 2013 check the box next to Attempt to automatically activate my product online and click Install
h) Click OK
At this point you have installed Visio 2013
Install Microsoft Office 2013 SharePoint Designer
In this section you will install Microsoft Office 2013 SharePoint Designer
1 Ensure you are logged into the WingtipServer VM using the account WINGTIPadministrator | Password1
2 Execute the installer SharePointDesigner_English_x64exe
3 On the Read the Microsoft Software License Terms dialog click the checkbox next to I accept the terms of this agreement and click Continue
4 On the Choose the installation you want dialog click the Install Now button
5 The installer will proceed and install all SharePoint Designer 2013
6 When the installer completes click the Close button
At this point you have installed SharePoint Designer 2013
Exercise 9 Install Visual Studio 2012
In this exercise you will install Visual Studio 2012
1 Ensure you are logged into the WingtipServer VM using the account WINGTIPadministrator | Password1
2 Start the install of Visual Studio 2012 Ultimate Trial by downloading the installer from here httpwwwmicrosoftcomvisualstudio11en-usdownloads
3 On the installation splash screen check the box next to I agree to the License terms and conditions and click the Next button
Creating a SharePoint Server 2013 Environment for Development and Testing Version 10
copy Critical Path Training 2012 All Rights Reserved 58
wwwCriticalPathTrainingcom
4 On the Optional Features to install dialog click Install
5 After some time the installer will complete Click the Launch button to launch Visual Studio 2012
Creating a SharePoint Server 2013 Environment for Development and Testing Version 10
copy Critical Path Training 2012 All Rights Reserved 59
wwwCriticalPathTrainingcom
6 In the Choose Default Environment Settings select Visual C Development Settings and click Start Visual Studio
7 Close Visual Studio 2012
At this point Visual Studio 2012 RTM is installed
Install Office amp SharePoint 2013 Developer Tools
In this section you will install the Office and SharePoint 2013 developer tools for Visual Studio
1 Ensure you are logged into the WingtipServer VM using the account WINGTIPadministrator | Password1
2 Launch the Web Platform Installer Start All Programs Microsoft Web Platform Installer
3 In the search box at the top-right corner of the Web Platform Installer 40 window type sharepoint and press Enter
4 Click the Add button to the right of Microsoft Office Developer Tools for Visual Studio 2012 - Preview 2
5 Click the Install button at the bottom of the Web Platform Installer 40 window
6 On the Prerequisites page click I Accept
Creating a SharePoint Server 2013 Environment for Development and Testing Version 10
copy Critical Path Training 2012 All Rights Reserved 60
wwwCriticalPathTrainingcom
At this point you have installed the SharePoint 2013 amp Office 2013 development tools in Visual Studio 2012
Creating a SharePoint Server 2013 Environment for Development and Testing Version 10
copy Critical Path Training 2012 All Rights Reserved 61
wwwCriticalPathTrainingcom
Appendix 1 Download Manifest
The following lists everything referenced that you will or may need to download in this environment
Windows Server 2008 R2 with Service Pack 1 (installer ISO)
o httptechnetmicrosoftcomen-usevalcenterdd459137aspx
Windows Server 2008 R2 with Service Pack 1 (prebuilt VHD)
o httpwwwmicrosoftcomdownloadsdetailsaspxFamilyId=9040a4be-c3cf-44a5-9052-a70314452305
Windows Server 2008 R2 Service Pack 1
o httpwwwmicrosoftcomen-usdownloaddetailsaspxid=5842
SQL Server 2012 Trial
o httpwwwmicrosoftcombetaexperiencepdSQL2012EvalCTAenusdefaultaspx
SharePoint Server 2013
o httptechnetmicrosoftcomen-USevalcenterhh973397aspx
Hotfixes for SharePoint Server 2013 (post-install)
o KB2554876 The SharePoint Parsing Process Crashes in Windows Server 2008 R2
o KB2708075 IIS 75 Configurations are not Updated when you use the ServerManager Class to Commit
Configuration Changes
o KB2759112 Hotfix is Available for NET Framework 45 that Resolves an ASPNET Race Condition Issue in
Windows Server 2008 R2 Windows Server 2008 R2 SP1
o KB2765317 Hotfix is Available for NET Framework 45 that Resolves an ASPNET Race Condition Issue in
Windows 8 Windows RT and Windows Server 2012
Web Platform Installer
o httpwwwmicrosoftcomwebdownloadsplatformaspx
Web Platform Installer ndash Command Line Version
o httplearniisnetpageaspx1072web-platform-installer-v4-command-line-webpicmdexe-preview-release
Workflow Manager 10
o Download using the Microsoft Web Platform Installer
Office 2013
o httpwwwmicrosoftcomofficepreviewentry-office-preview
SharePoint Designer 2013
o httpwwwmicrosoftcomen-usdownloaddetailsaspxid=35491
Visio Professional 2013
o httptechnetmicrosoftcomen-usevalcenterhh973399
Visual Studio 2012
o httpwwwmicrosoftcomvisualstudio11en-usdownloads
Office Developer Tools for Visual Studio 2012 ndash Preview 2
o Download using the Microsoft Web Platform Installer
Creating a SharePoint Server 2013 Environment for Development and Testing Version 10
copy Critical Path Training 2012 All Rights Reserved 62
wwwCriticalPathTrainingcom
Appendix 2 Windows PowerShell Script Manifest
The following lists all Windows PowerShell scripts that are provided with this setup guide
AddDisableLoopbackCheckRegKeyps1
o The following steps automate creating the registry key outlined as Method 2 in the Microsoft Knowledgebase article
httpsupportmicrosoftcomkb896861 using Windows PowerShell This key DisableLoopbackCheck will allow
you to browse SharePoint sites on the same machine Without this key (or following Method 1 in the KB article) you
would need to browse any SharePoint sites from a different computer than the one which SharePoint is installed on
ConfigureSpFarmForAppsps1
o Configures a SharePoint 2013 for hosting apps This ensures everything you need is installed running and
configured This is documented here httpmsdnmicrosoftcomen-uslibraryfp179923(v=office15)
CreateSpServiceAccountsps1
o Creates the minimal necessary service accounts for SharePoint Server 2013 SP_Farm SP_Content amp
SP_Services
SetupSharePointForHNSCps1
o Configures a SharePoint 2013 install for hosting Host-Named Site Collections (HNSC) This involves creating a Web
Application in SharePoint that has no host header bindings Using DNS all requests are mapped to this Web
Application You then create the site collections via PowerShell as you cant create HNSCs via the browser (Central
Administration)
Creating a SharePoint Server 2013 Environment for Development and Testing Version 10
copy Critical Path Training 2012 All Rights Reserved 63
wwwCriticalPathTrainingcom
Appendix 3 Create Sample Adventure Works Database
The following steps document downloading and installing the sample Adventure Works OLTP database provided by Microsoft
1 Launch Internet Explorer and navigate to httpmsftdbprodsamplescodeplexcom
2 Download the Adventure Works 2012 OLTP Script
3 Extract the ZIP into a folder on the desktop
4 Launch SQL Server Management Studio Start All Programs Microsoft SQL Server 2012 SQL Server Management Studio
5 When SQL Server Management Studio launches within the Connect to Server dialog login using the default settings and click Connect
6 Within SQL Server Management Studio select File Open File
7 Select the file instawdbsql from the extracted ZIP and click Open
8 If prompted to re-login to the database engine do it
9 Select Query SQLCMD Mode
10 Scroll down to line 42 the line that starts with the following
setvar SqlSamplesSourceDataPath
11 Change the folder location of where you unzipped the Adventure Works 2012 OLTP Script
12 Select Query Execute
13 When the script completes the AdventureWorks2012 database will have been created
Creating a SharePoint Server 2013 Environment for Development and Testing Version 10
copy Critical Path Training 2012 All Rights Reserved 64
wwwCriticalPathTrainingcom
Change Log
Change Version Description
August 22 2012 v 01 Pre-release for review
August 27 2012 v 02 Initial public release ndash install guide based on SharePoint Server Beta 2
August 28 2012 v 03 Updated URL for the site collection used to connect SharePoint to WAW
August 31 2012 v 04 Typo Removed SQL Server Analysis Services as part of the install Not required in a
SharePoint dev box (unless you are doing business intelligence which is not covered
in the guide)
Updated all references to Windows Azure Workflow to Workflow Manager the new
official name for the new workflow product
Updated SetupSharePointForHNSCps1 script to lookup HNSC Web Application by
name rather than URL which is more reliable
Typo Updated WingtipAllUp public NIC to use a different IP than the WingtipDC
Typo Replaced a reference to WingtipServer with WingtipDC
Typo Fixed handful of minor typos
September 1 2012 v 05 Removed SQL Server Reporting Services from install guide
Added step to uncheck IErsquos ldquoAutomatically detect proxyrdquo
Added post workflow install steps to setup User Profile Service Application to sync with
local Active Directory
September 5 2012 v 06 Added step to create a default root site collection in the HNSC web app
Updated minor typos and added extra notes for context
Updated PowerShell script SetupSharePointForHNSCps1 to remove content
database of default Web Application when setting up HNSC Web App
Added a new exercise 8 (after SharePoint install amp config and before the Workflow
install and config) to setup support for My Sites
October 20 2012 v 07 Updated script SetupSharePointForHNSCps1 to fix a bug where it would fail on line
111 if you didnrsquot already have a WINGTIPSP_Content managed account
Added section to bypass SharePointrsquos check for crlmicrosoftcom
Updated workflowrsquos registration PowerShell script to point to
httpintranetwingtipcom
Switched order of post-SharePoint install to setup HSNC hosting before configuring for
hosting apps
November 29 2012
v 10 Changed setup guide to use a single VM instead of two VMs
Updated guide for SharePoint 2013 RTM
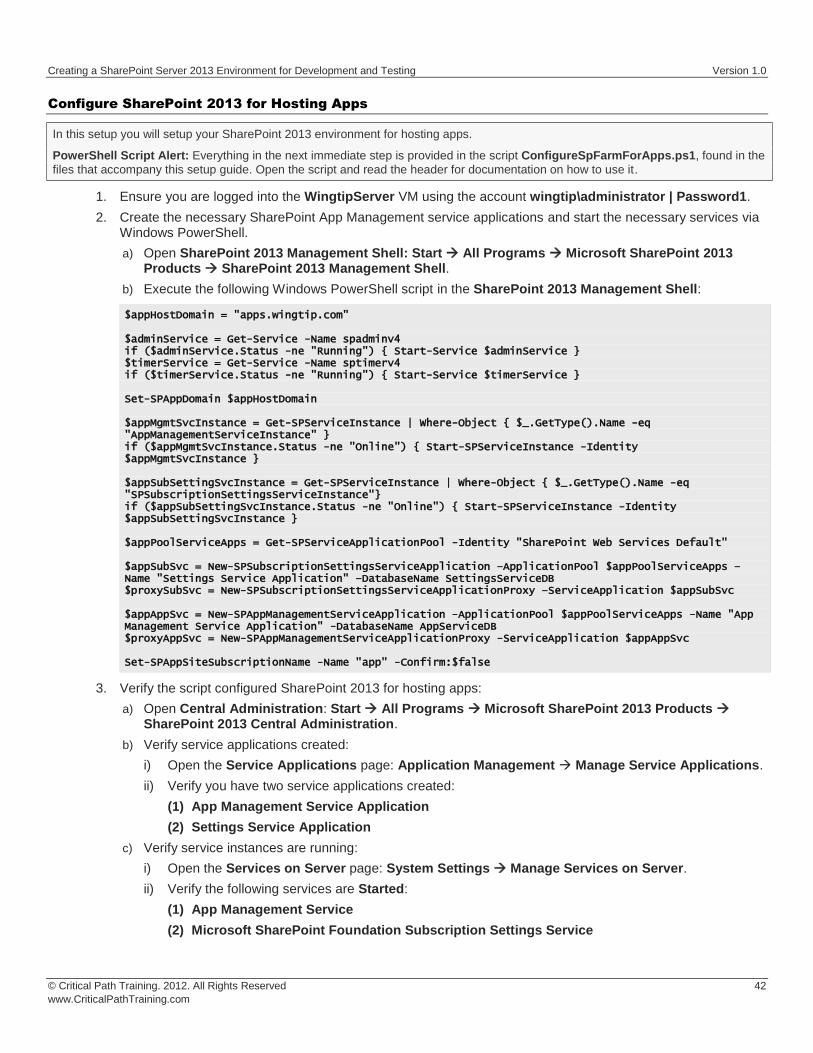
Creating a SharePoint Server 2013 Environment for Development and Testing Version 10
copy Critical Path Training 2012 All Rights Reserved 44
wwwCriticalPathTrainingcom
Start the SharePoint 2013 Sandbox Service
By default the service that executes sandbox solutions is not running In this step you will start the service
1 Open Central Administration Start All Programs Microsoft SharePoint 2013 Products SharePoint 2013 Central Administration
2 Open the Services on Server page System Settings Manage Services on Server
3 Click the Start link to the left of the Microsoft SharePoint Foundation Sandboxed Code Service
At this point your installation can support sandbox solutions
Configure CRL Verification for Disconnected Environments
SharePoint periodically ldquophones homerdquo to a specific address hosted by Microsoft under certain conditions When your environment is disconnected this can cause an unnecessary delay or failures when starting up the sandbox The following steps outline a workaround to bypass this check
1 Launch Notepad as an administrator Start All Programs Accessories right-click Notepad and select Run as Administrator
2 Open the hosts file by selecting File Open and finding the file
cWindowsSystem32Driversetchosts
3 Add the following line to the end of the file
127001 crlmicrosoftcom
4 Save and close the hosts file
Update Internet Explorer to Bypass the App URL amp Automatically Login to SharePoint Sites
In this section you will update Internet Explorer to add the App hosting URL to the bypass list so you can navigate to the domain after deploying SharePoint hosted apps
1 Ensure you are logged into the WingtipServer VM using the account wingtipadministrator | Password1
1 Launch Internet Explorer Start All Programs Internet Explorer
2 Configure Internet Explorer to bypass the App URL
a) In the top-right corner click the gear icon and select Internet Options
b) On the Security tab select the Local Intranet and click the Sites button
c) Uncheck the box next to Automatically detect intranet network
d) Click the Advanced button and add two entries to the Exceptions list
i) httpwingtipcom
ii) httpappswingtipcom
Creating a SharePoint Server 2013 Environment for Development and Testing Version 10
copy Critical Path Training 2012 All Rights Reserved 45
wwwCriticalPathTrainingcom
e) Click the Close button followed by the OK button multiple times to close out of the dialogs
At this point Internet Explorer is setup to bypass your app URL so you can navigate to apps (httpappswingtipcom) as well as automatically authenticate to sites hosted at httpwingtipcom
Exercise 6 Configure SharePoint to Host My Sites
In this exercise you will configure SharePoint to create and host My Sites In order to host My Sites you will need a new Web Application that is configured for Self-Service Site Creation and has a My Site Host site collection
1 Create a new SharePoint web application to host the My Sites
a) Ensure you are logged into the WingtipServer VM using the account wingtipadministrator | Password1
b) Open Central Administration Start All Programs Microsoft SharePoint 2013 Products SharePoint 2013 Central Administration
c) Select Application Management Manage Web Applications
d) In the ribbon click the New button
e) In the Create New Web Application dialog enter the following values in the properties and click OK Leave all properties not mentioned
i) Select the radio button Create a new IIS web site
(1) Name SharePoint MySite Host ndash 80
(2) Port 80
(3) Host Header mywingtipcom
ii) Application Pool
(1) Select the radio button Use existing application pool
(a) Application Pool Name SharePoint Default HNSC AppPool
iii) Database Name and Authentication
(1) Database Name WSS_Content_SocialWingtipCom
f) This process will take a few moments At the end of the process SharePoint will ask if you want to create a site collection Click the link provided to create a new site collection amp continue to the next step
2 Create a My Site Host site collection
a) On the Create Site Collection page use the following information to complete the form and click OK
Creating a SharePoint Server 2013 Environment for Development and Testing Version 10
copy Critical Path Training 2012 All Rights Reserved 46
wwwCriticalPathTrainingcom
i) Title My Site Host
ii) URL
iii) Template Selection My Site Host (found under the Enterprise tab)
iv) Primary Site Collection Administrator WINGTIPAdministrator
3 Update the Web Application to host my sites
a) Within Central Administration in the left-hand navigation navigate to the Manage Web Applications page Application Management Manage Web Applications
b) Select the SharePoint MySite Host ndash 80 web application
c) Click the Managed Paths button in the ribbon
d) Remove the sites managed path and add two new managed paths and click OK
i) personal ndash Wildcard inclusion
ii) my ndash Explicit inclusion
e) With the SharePoint MySite Host ndash 80 web application still selected click the Self-Service Site Creation button
f) On the Self-Service Site Creation page use the following values to complete the form and click OK
i) Site Collections On
4 Next configure the User Profile Service Application My Site settings
a) Browse to the User Profile Service Application management page Application Management Manage Service Applications User Profile Service Application
b) Under the My Site Settings section click the Setup My Sites
c) On the My Site Settings page use the following information to complete the form and click OK
i) My Site Host httpmywingtipcom
ii) Personal Site Location personal
At this point your SharePoint deployment is now configured to automatically create My Sites under httpmywingtipcomPersonalUserName when users first browse to them
Exercise 7 Install amp Configure Workflow Manager 10
In this exercise you will configure the WingtipServer VM to host Workflow Manager 10 and connect it to your SharePoint installation
1 Ensure you are logged into the WingtipServer VM using the account wingtipadministrator | Password1
Verify SQL Server 2012 Network Configuration
In this section yoursquoll verify the network configuration is correct for SQL Server 2012 in order to install Workflow Manager 10
Creating a SharePoint Server 2013 Environment for Development and Testing Version 10
copy Critical Path Training 2012 All Rights Reserved 47
wwwCriticalPathTrainingcom
1 Configure SQL Server 2012 to have the TCPIP connection protocol enabled
a) Open the SQL Server Configuration Manager Start All Programs Microsoft SQL Server 2012 Configuration Tools SQL Server Configuration Manager
b) Expand the hierarchy on the left-hand side to the following SQL Server Connection Manager (local) SQL Server Network Configuration Protocols for MSSQLSERVER
c) In the main window if TCPIP is Disabled right-click TCPIP and select Enable
d) When prompted with a warning click OK
2 SQL Server must be restarted in order to reflect this change
a) In the hierarchy on the left-hand side of the window select SQL Server Services
b) Right-click SQL Server (MSSQLSERVER) and select Restart
At this point SQL Server is now configured with the TCPIP protocol enabled a requirement when configuring Service Bus
Configure the Workflow Service Account with the Necessary Rights
In this section you will verify the service account that will run Workflow Manager and Service Bus
1 Ensure you are logged into the WingtipServer VM using the account WINGTIPadministrator | Password1
2 Grant the WINGTIPSP_Content account securityadmin amp dbcreator permissions in SQL Server
a) Launch SQL Server Management Studio Start All Programs Microsoft SQL Server 2012 SQL Server Management Studio
b) When SQL Server Management Studio launches within the Connect to Server dialog login using the default settings and click Connect
c) In the Object Explorer tool window expand the WINGTIPSERVER server hierarchy to the Security Logins node
d) Find the WINGTIPSP_Content account right-click it and select Properties
Creating a SharePoint Server 2013 Environment for Development and Testing Version 10
copy Critical Path Training 2012 All Rights Reserved 48
wwwCriticalPathTrainingcom
e) In the Select a page pane select Server Roles
f) Check securityadmin amp dbcreator and click OK
g) Close SQL Server Management Studio
3 Add the Workflow service account to the local administrators group
a) Open the Active Directory Users and Computers window Start Administrative Tools Active Directory Users and Computers
b) In the hierarchy on the left-hand side of the window expand it to the following Active Directory Users and Computers wingtipcom Builtin
c) In the main window right-click Administrators and select Properties
d) In the Administrators Properties dialog select the Members tab and click Add
e) In the Enter the object names to select box enter wingtipsp_content and click the Check Names button
f) In the Administrators Properties dialog click OK
g) Close the Active Directory Users and Computers window
At this point the service account that will host Workflow Manager and Service Bus has been configured correctly
Creating a SharePoint Server 2013 Environment for Development and Testing Version 10
copy Critical Path Training 2012 All Rights Reserved 49
wwwCriticalPathTrainingcom
Download amp Install Workflow Manager and Service Bus
In this section you will install Workflow Manager and Service Bus
1 Ensure you are logged into the WingtipServer VM using the account WINGTIPSP_Content | Password1
It is important you are logged in as the user that will run workflow when you install amp configure Workflow Manager and Service Bus
2 Launch the Web Platform Installer Start All Programs Microsoft Web Platform Installer
a) If the Web Platform Installer is not present on your machine you can download amp install it from here httpwwwmicrosoftcomwebdownloadsplatformaspx
If you do not have internet access within the virtual machine it is possible to download everything needed for workflow using the command line version of the Web Platform Installer (WebPICMD) You can get WebPICMD from httplearniisnetpageaspx1072web-platform-installer-v4-command-line-webpicmdexe-preview-release Specifically for
workflow enter the following command to download Workflow Beta 1 and all prerequisites
webpicmd offline ProductsWorkflow Pathc[path]
3 When the Web Platform Installer loads execute a search for Workflow select Workflow Manager 10 and click Add
4 Click the Install button at the bottom of the Web Platform Installer 40 window
5 On the Prerequisites page click I Accept
Note The Web Platform Installer 40 may prompt you to keep certain products updated using Microsoft Update If it does select Use Microsoft Update when I check for updates (recommended) and click Continue
6 When the installer completes the following dialog will appear Click Continue and then Finish to start the configuration process
Creating a SharePoint Server 2013 Environment for Development and Testing Version 10
copy Critical Path Training 2012 All Rights Reserved 50
wwwCriticalPathTrainingcom
At this point Workflow Manager amp Service Bus are installed
Configure Workflow Manager and Service Bus
In this section you will install Workflow Manager and Service Bus
1 If the Workflow Manager Configuration Wizard is not open open it Start All Programs Workflow Manager 10 Workflow Configuration
2 On the Welcome page click Configure Workflow Manager with Default Settings (Recommended)
Creating a SharePoint Server 2013 Environment for Development and Testing Version 10
copy Critical Path Training 2012 All Rights Reserved 51
wwwCriticalPathTrainingcom
3 On the New Farm Configuration page do the following
a) In the section Configure Service Account set the credentials to
i) User ID sp_contentwingtipcom
ii) Password Password1
b) Check the Allow Workflow management over HTTP on this computer checkbox
Ensure the username is entered in the fully qualified UPN format not as the default shows in the installer (sp_contentwingtip) or the domainusername format
In a production environment you should be doing everything over SSL
c) Click the Test Connection button to verify the connection credentials before proceeding
Creating a SharePoint Server 2013 Environment for Development and Testing Version 10
copy Critical Path Training 2012 All Rights Reserved 52
wwwCriticalPathTrainingcom
d) In the Certificate Generation Key and Confirm Certificate Generation Key enter Password1 into both fields
4 Click the right arrow in the bottom right corner to proceed
5 On the Summary page review your settings and click the check at the bottom right of the widow to start the configuration process
Creating a SharePoint Server 2013 Environment for Development and Testing Version 10
copy Critical Path Training 2012 All Rights Reserved 53
wwwCriticalPathTrainingcom
6 After a few minutes the Configuration Progress screen will show that everything has been configured correctly
Creating a SharePoint Server 2013 Environment for Development and Testing Version 10
copy Critical Path Training 2012 All Rights Reserved 54
wwwCriticalPathTrainingcom
7 Click the check in the bottom right corner
At this point Workflow Manager amp Service Bus has been installed and a new Workflow Manager farm has been created The next step is to connect the SharePoint 2013 farm to the Workflow Manager farm
Connect SharePoint 2013 to Workflow Manager
In this section you will connect SharePoint 2013 and Workflow Manager together
1 Ensure you are logged into the WingtipServer VM using the account WINGTIPadministrator | Password1
2 Get the Workflow Manager endpoint
a) Open the Workflow Manager PowerShell console Start All Programs Workflow Manager 10
b) Execute the Windows PowerShell following cmdlet
Get-WFFarm | ft HttpPort
c) Take note of this port (12291) This port number is what you will use to connect the SharePoint 2013 farm to the Workflow Manager 10 farm
In production you should connect to the HTTPS port listed in the HttpsPort property when you run Get-WFFarm
d) Close the Workflow Manager PowerShell window
3 Connect the SharePoint 2013 farm to Workflow Manager
Creating a SharePoint Server 2013 Environment for Development and Testing Version 10
copy Critical Path Training 2012 All Rights Reserved 55
wwwCriticalPathTrainingcom
a) Open SharePoint 2013 Management Shell Start All Programs Microsoft SharePoint 2013 Products SharePoint 2013 Management Shell
b) Execute the following Windows PowerShell script in the SharePoint 2013 Management Shell
Register-SPWorkflowService ndashSPSite httpintranetwingtipcom ndashWorkflowHostUri httpwingtipserver12291 ndashAllowOAuthHttp
This script is telling SharePoint the endpoint it should use to talk to Workflow Manager as well as Workflow Manager the SharePoint site collection it should talk to for calls into the CSOM It is also configuring all communication over HTTP rather than HTTPS for performance reasons In production you should always use HTTPS
This step will take a moment with no feedback during the process Be patient
c) Close the SharePoint 2013 Management Shell
At this point the SharePoint 2013 farm is connected to the Workflow Manager 10 farm
Configure SharePoint User Profile Service Application AD Sync
Users in SharePoint 2013 are validated by Workflow Manager against SharePoint to ensure they have permissions to start a workflow This is done by looking up the user by their AD UserPrincipalName (UPN) attribute in the User Profile Service Application (UPA) If no matching user is found the workflow will be automatically cancelled by Workflow Manager In this section you will setup UPA to connect amp sync with the local Active Directory so user accounts in AD will have their UPN synchronized to UPA
1 Open Central Administration Start All Programs Microsoft SharePoint 2013 Products SharePoint 2013 Central Administration
2 Go to the User Profile Service Application management page Application Management Manage Service Applications User Profile Service Application
3 The first step is to configure the User Profile Service Application to allow for Active Directory (AD) synchronization
a) Under Synchronization select Configure Synchronization Settings
b) For Synchronization select Use SharePoint Active Directory Import and click OK
4 Next establish a connection to the wingtipcom AD
a) Under Synchronization select Configure Synchronization Connections
b) On the Synchronization Connections page select Create New Connection
c) Enter the following values on this form and click OK
i) Connection Name WINGTIPCOM AD
ii) Type Active Directory Import
iii) Connection Settings
(1) Fully Qualified Domain Name wingtipcom
(2) Authentication Provider Type Windows Authentication
(3) Account Name WINGTIPAdministrator
(4) Password (and Confirm Password) Password1
iv) Containers
(1) Click Populate Containers
(2) After it loads check the box next to WINGTP or click the Select All button below the box
5 Go back to the User Profile Service Application management page Application Management Manage Service Applications User Profile Service Application
6 Finally start a synchronization import
a) Under Synchronization select Start Profile Synchronization
Creating a SharePoint Server 2013 Environment for Development and Testing Version 10
copy Critical Path Training 2012 All Rights Reserved 56
wwwCriticalPathTrainingcom
b) Select Start Full Synchronization and click OK
c) You will be taken back to the User Profile Service Application management page Notice in the top-right corner there is a status block that reports how many profiles are in the UPA database Refresh the page to see it increase to a handful of profiles as the import process runs
At this point you have successfully configured the User Profile Service Application to import profiles from the local AD
Exercise 8 Install the Microsoft Office 2013 Professional Clients
In this exercise you will install the Microsoft Office 2013 client applications
1 Download the Office 2013 into the WingtipServer VM For this you need to create an Office 365 Trial account login to Office 365 go to the Admin Dashboard and then download the latest version httpwwwmicrosoftcomofficepreviewentry-office-preview
2 Download the SharePoint Designer 2013 into the WingtipServer VM from here httpwwwmicrosoftcomen-usdownloaddetailsaspxid=35491
3 Download the Visio Professional 2013 into the WingtipServer VM from here httptechnetmicrosoftcomen-usevalcenterhh973399
Install Microsoft Office Professional Plus 2013
In this section you will install the Microsoft Office 2013 clients
1 Ensure you are logged into the WingtipServer VM using the account WINGTIPadministrator | Password1
2 Execute the installer OfficeProfessionalPlus_English_x64exe
3 On the Read the Microsoft Software License Terms dialog click the checkbox next to I accept the terms of this agreement and click Continue
4 On the Choose the installation you want dialog click the Install Now button
5 The installer will proceed and install all the Office products
6 When the installer completes click the Close button
7 Apply your Office Professional Plus 2013 license key
a) Launch Word 2013 Start All Programs Microsoft Office 2013 Word 2013
b) In the First things first dialog select Use recommended settings and click Accept
c) In the Welcome to Office dialog that opens click the [X] icon in the top-right corner to close it
d) In the left-hand pane click Open Other Documents
e) In the left-hand pane click Account
f) In the Product Information section within the Activation Required box click Change Product Key
g) Enter your license key for Office Professional Plus 2013 check the box next to Attempt to automatically activate my product online and click Install
h) Click OK
At this point you have installed Office Professional Plus 2013
Install Microsoft Office Visio 2013
In this section you will install Microsoft Office 2013 Visio
1 Ensure you are logged into the WingtipServer VM using the account WINGTIPadministrator | Password1
2 Execute the installer VisioProfessional_English_x64exe
3 On the Read the Microsoft Software License Terms dialog click the checkbox next to I accept the terms of this agreement and click Continue
Creating a SharePoint Server 2013 Environment for Development and Testing Version 10
copy Critical Path Training 2012 All Rights Reserved 57
wwwCriticalPathTrainingcom
4 On the Choose the installation you want dialog click the Install Now button
5 The installer will proceed and install all Visio 2013
6 When the installer completes click the Close button
7 Apply your Visio 2013 license key
a) Launch Visio 2013 Start All Programs Microsoft Office 2013 Visio 2013
b) In the First things first dialog select Use recommended settings and click Accept
c) In the Welcome to Office dialog that opens click the X icon in the top-right corner to close it
d) In the left-hand pane click Open Other Documents
e) In the left-hand pane click Account
f) In the Product Information section within the Activation Required box click Change Product Key
g) Enter your license key for Visio 2013 check the box next to Attempt to automatically activate my product online and click Install
h) Click OK
At this point you have installed Visio 2013
Install Microsoft Office 2013 SharePoint Designer
In this section you will install Microsoft Office 2013 SharePoint Designer
1 Ensure you are logged into the WingtipServer VM using the account WINGTIPadministrator | Password1
2 Execute the installer SharePointDesigner_English_x64exe
3 On the Read the Microsoft Software License Terms dialog click the checkbox next to I accept the terms of this agreement and click Continue
4 On the Choose the installation you want dialog click the Install Now button
5 The installer will proceed and install all SharePoint Designer 2013
6 When the installer completes click the Close button
At this point you have installed SharePoint Designer 2013
Exercise 9 Install Visual Studio 2012
In this exercise you will install Visual Studio 2012
1 Ensure you are logged into the WingtipServer VM using the account WINGTIPadministrator | Password1
2 Start the install of Visual Studio 2012 Ultimate Trial by downloading the installer from here httpwwwmicrosoftcomvisualstudio11en-usdownloads
3 On the installation splash screen check the box next to I agree to the License terms and conditions and click the Next button
Creating a SharePoint Server 2013 Environment for Development and Testing Version 10
copy Critical Path Training 2012 All Rights Reserved 58
wwwCriticalPathTrainingcom
4 On the Optional Features to install dialog click Install
5 After some time the installer will complete Click the Launch button to launch Visual Studio 2012
Creating a SharePoint Server 2013 Environment for Development and Testing Version 10
copy Critical Path Training 2012 All Rights Reserved 59
wwwCriticalPathTrainingcom
6 In the Choose Default Environment Settings select Visual C Development Settings and click Start Visual Studio
7 Close Visual Studio 2012
At this point Visual Studio 2012 RTM is installed
Install Office amp SharePoint 2013 Developer Tools
In this section you will install the Office and SharePoint 2013 developer tools for Visual Studio
1 Ensure you are logged into the WingtipServer VM using the account WINGTIPadministrator | Password1
2 Launch the Web Platform Installer Start All Programs Microsoft Web Platform Installer
3 In the search box at the top-right corner of the Web Platform Installer 40 window type sharepoint and press Enter
4 Click the Add button to the right of Microsoft Office Developer Tools for Visual Studio 2012 - Preview 2
5 Click the Install button at the bottom of the Web Platform Installer 40 window
6 On the Prerequisites page click I Accept
Creating a SharePoint Server 2013 Environment for Development and Testing Version 10
copy Critical Path Training 2012 All Rights Reserved 60
wwwCriticalPathTrainingcom
At this point you have installed the SharePoint 2013 amp Office 2013 development tools in Visual Studio 2012
Creating a SharePoint Server 2013 Environment for Development and Testing Version 10
copy Critical Path Training 2012 All Rights Reserved 61
wwwCriticalPathTrainingcom
Appendix 1 Download Manifest
The following lists everything referenced that you will or may need to download in this environment
Windows Server 2008 R2 with Service Pack 1 (installer ISO)
o httptechnetmicrosoftcomen-usevalcenterdd459137aspx
Windows Server 2008 R2 with Service Pack 1 (prebuilt VHD)
o httpwwwmicrosoftcomdownloadsdetailsaspxFamilyId=9040a4be-c3cf-44a5-9052-a70314452305
Windows Server 2008 R2 Service Pack 1
o httpwwwmicrosoftcomen-usdownloaddetailsaspxid=5842
SQL Server 2012 Trial
o httpwwwmicrosoftcombetaexperiencepdSQL2012EvalCTAenusdefaultaspx
SharePoint Server 2013
o httptechnetmicrosoftcomen-USevalcenterhh973397aspx
Hotfixes for SharePoint Server 2013 (post-install)
o KB2554876 The SharePoint Parsing Process Crashes in Windows Server 2008 R2
o KB2708075 IIS 75 Configurations are not Updated when you use the ServerManager Class to Commit
Configuration Changes
o KB2759112 Hotfix is Available for NET Framework 45 that Resolves an ASPNET Race Condition Issue in
Windows Server 2008 R2 Windows Server 2008 R2 SP1
o KB2765317 Hotfix is Available for NET Framework 45 that Resolves an ASPNET Race Condition Issue in
Windows 8 Windows RT and Windows Server 2012
Web Platform Installer
o httpwwwmicrosoftcomwebdownloadsplatformaspx
Web Platform Installer ndash Command Line Version
o httplearniisnetpageaspx1072web-platform-installer-v4-command-line-webpicmdexe-preview-release
Workflow Manager 10
o Download using the Microsoft Web Platform Installer
Office 2013
o httpwwwmicrosoftcomofficepreviewentry-office-preview
SharePoint Designer 2013
o httpwwwmicrosoftcomen-usdownloaddetailsaspxid=35491
Visio Professional 2013
o httptechnetmicrosoftcomen-usevalcenterhh973399
Visual Studio 2012
o httpwwwmicrosoftcomvisualstudio11en-usdownloads
Office Developer Tools for Visual Studio 2012 ndash Preview 2
o Download using the Microsoft Web Platform Installer
Creating a SharePoint Server 2013 Environment for Development and Testing Version 10
copy Critical Path Training 2012 All Rights Reserved 62
wwwCriticalPathTrainingcom
Appendix 2 Windows PowerShell Script Manifest
The following lists all Windows PowerShell scripts that are provided with this setup guide
AddDisableLoopbackCheckRegKeyps1
o The following steps automate creating the registry key outlined as Method 2 in the Microsoft Knowledgebase article
httpsupportmicrosoftcomkb896861 using Windows PowerShell This key DisableLoopbackCheck will allow
you to browse SharePoint sites on the same machine Without this key (or following Method 1 in the KB article) you
would need to browse any SharePoint sites from a different computer than the one which SharePoint is installed on
ConfigureSpFarmForAppsps1
o Configures a SharePoint 2013 for hosting apps This ensures everything you need is installed running and
configured This is documented here httpmsdnmicrosoftcomen-uslibraryfp179923(v=office15)
CreateSpServiceAccountsps1
o Creates the minimal necessary service accounts for SharePoint Server 2013 SP_Farm SP_Content amp
SP_Services
SetupSharePointForHNSCps1
o Configures a SharePoint 2013 install for hosting Host-Named Site Collections (HNSC) This involves creating a Web
Application in SharePoint that has no host header bindings Using DNS all requests are mapped to this Web
Application You then create the site collections via PowerShell as you cant create HNSCs via the browser (Central
Administration)
Creating a SharePoint Server 2013 Environment for Development and Testing Version 10
copy Critical Path Training 2012 All Rights Reserved 63
wwwCriticalPathTrainingcom
Appendix 3 Create Sample Adventure Works Database
The following steps document downloading and installing the sample Adventure Works OLTP database provided by Microsoft
1 Launch Internet Explorer and navigate to httpmsftdbprodsamplescodeplexcom
2 Download the Adventure Works 2012 OLTP Script
3 Extract the ZIP into a folder on the desktop
4 Launch SQL Server Management Studio Start All Programs Microsoft SQL Server 2012 SQL Server Management Studio
5 When SQL Server Management Studio launches within the Connect to Server dialog login using the default settings and click Connect
6 Within SQL Server Management Studio select File Open File
7 Select the file instawdbsql from the extracted ZIP and click Open
8 If prompted to re-login to the database engine do it
9 Select Query SQLCMD Mode
10 Scroll down to line 42 the line that starts with the following
setvar SqlSamplesSourceDataPath
11 Change the folder location of where you unzipped the Adventure Works 2012 OLTP Script
12 Select Query Execute
13 When the script completes the AdventureWorks2012 database will have been created
Creating a SharePoint Server 2013 Environment for Development and Testing Version 10
copy Critical Path Training 2012 All Rights Reserved 64
wwwCriticalPathTrainingcom
Change Log
Change Version Description
August 22 2012 v 01 Pre-release for review
August 27 2012 v 02 Initial public release ndash install guide based on SharePoint Server Beta 2
August 28 2012 v 03 Updated URL for the site collection used to connect SharePoint to WAW
August 31 2012 v 04 Typo Removed SQL Server Analysis Services as part of the install Not required in a
SharePoint dev box (unless you are doing business intelligence which is not covered
in the guide)
Updated all references to Windows Azure Workflow to Workflow Manager the new
official name for the new workflow product
Updated SetupSharePointForHNSCps1 script to lookup HNSC Web Application by
name rather than URL which is more reliable
Typo Updated WingtipAllUp public NIC to use a different IP than the WingtipDC
Typo Replaced a reference to WingtipServer with WingtipDC
Typo Fixed handful of minor typos
September 1 2012 v 05 Removed SQL Server Reporting Services from install guide
Added step to uncheck IErsquos ldquoAutomatically detect proxyrdquo
Added post workflow install steps to setup User Profile Service Application to sync with
local Active Directory
September 5 2012 v 06 Added step to create a default root site collection in the HNSC web app
Updated minor typos and added extra notes for context
Updated PowerShell script SetupSharePointForHNSCps1 to remove content
database of default Web Application when setting up HNSC Web App
Added a new exercise 8 (after SharePoint install amp config and before the Workflow
install and config) to setup support for My Sites
October 20 2012 v 07 Updated script SetupSharePointForHNSCps1 to fix a bug where it would fail on line
111 if you didnrsquot already have a WINGTIPSP_Content managed account
Added section to bypass SharePointrsquos check for crlmicrosoftcom
Updated workflowrsquos registration PowerShell script to point to
httpintranetwingtipcom
Switched order of post-SharePoint install to setup HSNC hosting before configuring for
hosting apps
November 29 2012
v 10 Changed setup guide to use a single VM instead of two VMs
Updated guide for SharePoint 2013 RTM
Creating a SharePoint Server 2013 Environment for Development and Testing Version 10
copy Critical Path Training 2012 All Rights Reserved 45
wwwCriticalPathTrainingcom
e) Click the Close button followed by the OK button multiple times to close out of the dialogs
At this point Internet Explorer is setup to bypass your app URL so you can navigate to apps (httpappswingtipcom) as well as automatically authenticate to sites hosted at httpwingtipcom
Exercise 6 Configure SharePoint to Host My Sites
In this exercise you will configure SharePoint to create and host My Sites In order to host My Sites you will need a new Web Application that is configured for Self-Service Site Creation and has a My Site Host site collection
1 Create a new SharePoint web application to host the My Sites
a) Ensure you are logged into the WingtipServer VM using the account wingtipadministrator | Password1
b) Open Central Administration Start All Programs Microsoft SharePoint 2013 Products SharePoint 2013 Central Administration
c) Select Application Management Manage Web Applications
d) In the ribbon click the New button
e) In the Create New Web Application dialog enter the following values in the properties and click OK Leave all properties not mentioned
i) Select the radio button Create a new IIS web site
(1) Name SharePoint MySite Host ndash 80
(2) Port 80
(3) Host Header mywingtipcom
ii) Application Pool
(1) Select the radio button Use existing application pool
(a) Application Pool Name SharePoint Default HNSC AppPool
iii) Database Name and Authentication
(1) Database Name WSS_Content_SocialWingtipCom
f) This process will take a few moments At the end of the process SharePoint will ask if you want to create a site collection Click the link provided to create a new site collection amp continue to the next step
2 Create a My Site Host site collection
a) On the Create Site Collection page use the following information to complete the form and click OK
Creating a SharePoint Server 2013 Environment for Development and Testing Version 10
copy Critical Path Training 2012 All Rights Reserved 46
wwwCriticalPathTrainingcom
i) Title My Site Host
ii) URL
iii) Template Selection My Site Host (found under the Enterprise tab)
iv) Primary Site Collection Administrator WINGTIPAdministrator
3 Update the Web Application to host my sites
a) Within Central Administration in the left-hand navigation navigate to the Manage Web Applications page Application Management Manage Web Applications
b) Select the SharePoint MySite Host ndash 80 web application
c) Click the Managed Paths button in the ribbon
d) Remove the sites managed path and add two new managed paths and click OK
i) personal ndash Wildcard inclusion
ii) my ndash Explicit inclusion
e) With the SharePoint MySite Host ndash 80 web application still selected click the Self-Service Site Creation button
f) On the Self-Service Site Creation page use the following values to complete the form and click OK
i) Site Collections On
4 Next configure the User Profile Service Application My Site settings
a) Browse to the User Profile Service Application management page Application Management Manage Service Applications User Profile Service Application
b) Under the My Site Settings section click the Setup My Sites
c) On the My Site Settings page use the following information to complete the form and click OK
i) My Site Host httpmywingtipcom
ii) Personal Site Location personal
At this point your SharePoint deployment is now configured to automatically create My Sites under httpmywingtipcomPersonalUserName when users first browse to them
Exercise 7 Install amp Configure Workflow Manager 10
In this exercise you will configure the WingtipServer VM to host Workflow Manager 10 and connect it to your SharePoint installation
1 Ensure you are logged into the WingtipServer VM using the account wingtipadministrator | Password1
Verify SQL Server 2012 Network Configuration
In this section yoursquoll verify the network configuration is correct for SQL Server 2012 in order to install Workflow Manager 10
Creating a SharePoint Server 2013 Environment for Development and Testing Version 10
copy Critical Path Training 2012 All Rights Reserved 47
wwwCriticalPathTrainingcom
1 Configure SQL Server 2012 to have the TCPIP connection protocol enabled
a) Open the SQL Server Configuration Manager Start All Programs Microsoft SQL Server 2012 Configuration Tools SQL Server Configuration Manager
b) Expand the hierarchy on the left-hand side to the following SQL Server Connection Manager (local) SQL Server Network Configuration Protocols for MSSQLSERVER
c) In the main window if TCPIP is Disabled right-click TCPIP and select Enable
d) When prompted with a warning click OK
2 SQL Server must be restarted in order to reflect this change
a) In the hierarchy on the left-hand side of the window select SQL Server Services
b) Right-click SQL Server (MSSQLSERVER) and select Restart
At this point SQL Server is now configured with the TCPIP protocol enabled a requirement when configuring Service Bus
Configure the Workflow Service Account with the Necessary Rights
In this section you will verify the service account that will run Workflow Manager and Service Bus
1 Ensure you are logged into the WingtipServer VM using the account WINGTIPadministrator | Password1
2 Grant the WINGTIPSP_Content account securityadmin amp dbcreator permissions in SQL Server
a) Launch SQL Server Management Studio Start All Programs Microsoft SQL Server 2012 SQL Server Management Studio
b) When SQL Server Management Studio launches within the Connect to Server dialog login using the default settings and click Connect
c) In the Object Explorer tool window expand the WINGTIPSERVER server hierarchy to the Security Logins node
d) Find the WINGTIPSP_Content account right-click it and select Properties
Creating a SharePoint Server 2013 Environment for Development and Testing Version 10
copy Critical Path Training 2012 All Rights Reserved 48
wwwCriticalPathTrainingcom
e) In the Select a page pane select Server Roles
f) Check securityadmin amp dbcreator and click OK
g) Close SQL Server Management Studio
3 Add the Workflow service account to the local administrators group
a) Open the Active Directory Users and Computers window Start Administrative Tools Active Directory Users and Computers
b) In the hierarchy on the left-hand side of the window expand it to the following Active Directory Users and Computers wingtipcom Builtin
c) In the main window right-click Administrators and select Properties
d) In the Administrators Properties dialog select the Members tab and click Add
e) In the Enter the object names to select box enter wingtipsp_content and click the Check Names button
f) In the Administrators Properties dialog click OK
g) Close the Active Directory Users and Computers window
At this point the service account that will host Workflow Manager and Service Bus has been configured correctly
Creating a SharePoint Server 2013 Environment for Development and Testing Version 10
copy Critical Path Training 2012 All Rights Reserved 49
wwwCriticalPathTrainingcom
Download amp Install Workflow Manager and Service Bus
In this section you will install Workflow Manager and Service Bus
1 Ensure you are logged into the WingtipServer VM using the account WINGTIPSP_Content | Password1
It is important you are logged in as the user that will run workflow when you install amp configure Workflow Manager and Service Bus
2 Launch the Web Platform Installer Start All Programs Microsoft Web Platform Installer
a) If the Web Platform Installer is not present on your machine you can download amp install it from here httpwwwmicrosoftcomwebdownloadsplatformaspx
If you do not have internet access within the virtual machine it is possible to download everything needed for workflow using the command line version of the Web Platform Installer (WebPICMD) You can get WebPICMD from httplearniisnetpageaspx1072web-platform-installer-v4-command-line-webpicmdexe-preview-release Specifically for
workflow enter the following command to download Workflow Beta 1 and all prerequisites
webpicmd offline ProductsWorkflow Pathc[path]
3 When the Web Platform Installer loads execute a search for Workflow select Workflow Manager 10 and click Add
4 Click the Install button at the bottom of the Web Platform Installer 40 window
5 On the Prerequisites page click I Accept
Note The Web Platform Installer 40 may prompt you to keep certain products updated using Microsoft Update If it does select Use Microsoft Update when I check for updates (recommended) and click Continue
6 When the installer completes the following dialog will appear Click Continue and then Finish to start the configuration process
Creating a SharePoint Server 2013 Environment for Development and Testing Version 10
copy Critical Path Training 2012 All Rights Reserved 50
wwwCriticalPathTrainingcom
At this point Workflow Manager amp Service Bus are installed
Configure Workflow Manager and Service Bus
In this section you will install Workflow Manager and Service Bus
1 If the Workflow Manager Configuration Wizard is not open open it Start All Programs Workflow Manager 10 Workflow Configuration
2 On the Welcome page click Configure Workflow Manager with Default Settings (Recommended)
Creating a SharePoint Server 2013 Environment for Development and Testing Version 10
copy Critical Path Training 2012 All Rights Reserved 51
wwwCriticalPathTrainingcom
3 On the New Farm Configuration page do the following
a) In the section Configure Service Account set the credentials to
i) User ID sp_contentwingtipcom
ii) Password Password1
b) Check the Allow Workflow management over HTTP on this computer checkbox
Ensure the username is entered in the fully qualified UPN format not as the default shows in the installer (sp_contentwingtip) or the domainusername format
In a production environment you should be doing everything over SSL
c) Click the Test Connection button to verify the connection credentials before proceeding
Creating a SharePoint Server 2013 Environment for Development and Testing Version 10
copy Critical Path Training 2012 All Rights Reserved 52
wwwCriticalPathTrainingcom
d) In the Certificate Generation Key and Confirm Certificate Generation Key enter Password1 into both fields
4 Click the right arrow in the bottom right corner to proceed
5 On the Summary page review your settings and click the check at the bottom right of the widow to start the configuration process
Creating a SharePoint Server 2013 Environment for Development and Testing Version 10
copy Critical Path Training 2012 All Rights Reserved 53
wwwCriticalPathTrainingcom
6 After a few minutes the Configuration Progress screen will show that everything has been configured correctly
Creating a SharePoint Server 2013 Environment for Development and Testing Version 10
copy Critical Path Training 2012 All Rights Reserved 54
wwwCriticalPathTrainingcom
7 Click the check in the bottom right corner
At this point Workflow Manager amp Service Bus has been installed and a new Workflow Manager farm has been created The next step is to connect the SharePoint 2013 farm to the Workflow Manager farm
Connect SharePoint 2013 to Workflow Manager
In this section you will connect SharePoint 2013 and Workflow Manager together
1 Ensure you are logged into the WingtipServer VM using the account WINGTIPadministrator | Password1
2 Get the Workflow Manager endpoint
a) Open the Workflow Manager PowerShell console Start All Programs Workflow Manager 10
b) Execute the Windows PowerShell following cmdlet
Get-WFFarm | ft HttpPort
c) Take note of this port (12291) This port number is what you will use to connect the SharePoint 2013 farm to the Workflow Manager 10 farm
In production you should connect to the HTTPS port listed in the HttpsPort property when you run Get-WFFarm
d) Close the Workflow Manager PowerShell window
3 Connect the SharePoint 2013 farm to Workflow Manager
Creating a SharePoint Server 2013 Environment for Development and Testing Version 10
copy Critical Path Training 2012 All Rights Reserved 55
wwwCriticalPathTrainingcom
a) Open SharePoint 2013 Management Shell Start All Programs Microsoft SharePoint 2013 Products SharePoint 2013 Management Shell
b) Execute the following Windows PowerShell script in the SharePoint 2013 Management Shell
Register-SPWorkflowService ndashSPSite httpintranetwingtipcom ndashWorkflowHostUri httpwingtipserver12291 ndashAllowOAuthHttp
This script is telling SharePoint the endpoint it should use to talk to Workflow Manager as well as Workflow Manager the SharePoint site collection it should talk to for calls into the CSOM It is also configuring all communication over HTTP rather than HTTPS for performance reasons In production you should always use HTTPS
This step will take a moment with no feedback during the process Be patient
c) Close the SharePoint 2013 Management Shell
At this point the SharePoint 2013 farm is connected to the Workflow Manager 10 farm
Configure SharePoint User Profile Service Application AD Sync
Users in SharePoint 2013 are validated by Workflow Manager against SharePoint to ensure they have permissions to start a workflow This is done by looking up the user by their AD UserPrincipalName (UPN) attribute in the User Profile Service Application (UPA) If no matching user is found the workflow will be automatically cancelled by Workflow Manager In this section you will setup UPA to connect amp sync with the local Active Directory so user accounts in AD will have their UPN synchronized to UPA
1 Open Central Administration Start All Programs Microsoft SharePoint 2013 Products SharePoint 2013 Central Administration
2 Go to the User Profile Service Application management page Application Management Manage Service Applications User Profile Service Application
3 The first step is to configure the User Profile Service Application to allow for Active Directory (AD) synchronization
a) Under Synchronization select Configure Synchronization Settings
b) For Synchronization select Use SharePoint Active Directory Import and click OK
4 Next establish a connection to the wingtipcom AD
a) Under Synchronization select Configure Synchronization Connections
b) On the Synchronization Connections page select Create New Connection
c) Enter the following values on this form and click OK
i) Connection Name WINGTIPCOM AD
ii) Type Active Directory Import
iii) Connection Settings
(1) Fully Qualified Domain Name wingtipcom
(2) Authentication Provider Type Windows Authentication
(3) Account Name WINGTIPAdministrator
(4) Password (and Confirm Password) Password1
iv) Containers
(1) Click Populate Containers
(2) After it loads check the box next to WINGTP or click the Select All button below the box
5 Go back to the User Profile Service Application management page Application Management Manage Service Applications User Profile Service Application
6 Finally start a synchronization import
a) Under Synchronization select Start Profile Synchronization
Creating a SharePoint Server 2013 Environment for Development and Testing Version 10
copy Critical Path Training 2012 All Rights Reserved 56
wwwCriticalPathTrainingcom
b) Select Start Full Synchronization and click OK
c) You will be taken back to the User Profile Service Application management page Notice in the top-right corner there is a status block that reports how many profiles are in the UPA database Refresh the page to see it increase to a handful of profiles as the import process runs
At this point you have successfully configured the User Profile Service Application to import profiles from the local AD
Exercise 8 Install the Microsoft Office 2013 Professional Clients
In this exercise you will install the Microsoft Office 2013 client applications
1 Download the Office 2013 into the WingtipServer VM For this you need to create an Office 365 Trial account login to Office 365 go to the Admin Dashboard and then download the latest version httpwwwmicrosoftcomofficepreviewentry-office-preview
2 Download the SharePoint Designer 2013 into the WingtipServer VM from here httpwwwmicrosoftcomen-usdownloaddetailsaspxid=35491
3 Download the Visio Professional 2013 into the WingtipServer VM from here httptechnetmicrosoftcomen-usevalcenterhh973399
Install Microsoft Office Professional Plus 2013
In this section you will install the Microsoft Office 2013 clients
1 Ensure you are logged into the WingtipServer VM using the account WINGTIPadministrator | Password1
2 Execute the installer OfficeProfessionalPlus_English_x64exe
3 On the Read the Microsoft Software License Terms dialog click the checkbox next to I accept the terms of this agreement and click Continue
4 On the Choose the installation you want dialog click the Install Now button
5 The installer will proceed and install all the Office products
6 When the installer completes click the Close button
7 Apply your Office Professional Plus 2013 license key
a) Launch Word 2013 Start All Programs Microsoft Office 2013 Word 2013
b) In the First things first dialog select Use recommended settings and click Accept
c) In the Welcome to Office dialog that opens click the [X] icon in the top-right corner to close it
d) In the left-hand pane click Open Other Documents
e) In the left-hand pane click Account
f) In the Product Information section within the Activation Required box click Change Product Key
g) Enter your license key for Office Professional Plus 2013 check the box next to Attempt to automatically activate my product online and click Install
h) Click OK
At this point you have installed Office Professional Plus 2013
Install Microsoft Office Visio 2013
In this section you will install Microsoft Office 2013 Visio
1 Ensure you are logged into the WingtipServer VM using the account WINGTIPadministrator | Password1
2 Execute the installer VisioProfessional_English_x64exe
3 On the Read the Microsoft Software License Terms dialog click the checkbox next to I accept the terms of this agreement and click Continue
Creating a SharePoint Server 2013 Environment for Development and Testing Version 10
copy Critical Path Training 2012 All Rights Reserved 57
wwwCriticalPathTrainingcom
4 On the Choose the installation you want dialog click the Install Now button
5 The installer will proceed and install all Visio 2013
6 When the installer completes click the Close button
7 Apply your Visio 2013 license key
a) Launch Visio 2013 Start All Programs Microsoft Office 2013 Visio 2013
b) In the First things first dialog select Use recommended settings and click Accept
c) In the Welcome to Office dialog that opens click the X icon in the top-right corner to close it
d) In the left-hand pane click Open Other Documents
e) In the left-hand pane click Account
f) In the Product Information section within the Activation Required box click Change Product Key
g) Enter your license key for Visio 2013 check the box next to Attempt to automatically activate my product online and click Install
h) Click OK
At this point you have installed Visio 2013
Install Microsoft Office 2013 SharePoint Designer
In this section you will install Microsoft Office 2013 SharePoint Designer
1 Ensure you are logged into the WingtipServer VM using the account WINGTIPadministrator | Password1
2 Execute the installer SharePointDesigner_English_x64exe
3 On the Read the Microsoft Software License Terms dialog click the checkbox next to I accept the terms of this agreement and click Continue
4 On the Choose the installation you want dialog click the Install Now button
5 The installer will proceed and install all SharePoint Designer 2013
6 When the installer completes click the Close button
At this point you have installed SharePoint Designer 2013
Exercise 9 Install Visual Studio 2012
In this exercise you will install Visual Studio 2012
1 Ensure you are logged into the WingtipServer VM using the account WINGTIPadministrator | Password1
2 Start the install of Visual Studio 2012 Ultimate Trial by downloading the installer from here httpwwwmicrosoftcomvisualstudio11en-usdownloads
3 On the installation splash screen check the box next to I agree to the License terms and conditions and click the Next button
Creating a SharePoint Server 2013 Environment for Development and Testing Version 10
copy Critical Path Training 2012 All Rights Reserved 58
wwwCriticalPathTrainingcom
4 On the Optional Features to install dialog click Install
5 After some time the installer will complete Click the Launch button to launch Visual Studio 2012
Creating a SharePoint Server 2013 Environment for Development and Testing Version 10
copy Critical Path Training 2012 All Rights Reserved 59
wwwCriticalPathTrainingcom
6 In the Choose Default Environment Settings select Visual C Development Settings and click Start Visual Studio
7 Close Visual Studio 2012
At this point Visual Studio 2012 RTM is installed
Install Office amp SharePoint 2013 Developer Tools
In this section you will install the Office and SharePoint 2013 developer tools for Visual Studio
1 Ensure you are logged into the WingtipServer VM using the account WINGTIPadministrator | Password1
2 Launch the Web Platform Installer Start All Programs Microsoft Web Platform Installer
3 In the search box at the top-right corner of the Web Platform Installer 40 window type sharepoint and press Enter
4 Click the Add button to the right of Microsoft Office Developer Tools for Visual Studio 2012 - Preview 2
5 Click the Install button at the bottom of the Web Platform Installer 40 window
6 On the Prerequisites page click I Accept
Creating a SharePoint Server 2013 Environment for Development and Testing Version 10
copy Critical Path Training 2012 All Rights Reserved 60
wwwCriticalPathTrainingcom
At this point you have installed the SharePoint 2013 amp Office 2013 development tools in Visual Studio 2012
Creating a SharePoint Server 2013 Environment for Development and Testing Version 10
copy Critical Path Training 2012 All Rights Reserved 61
wwwCriticalPathTrainingcom
Appendix 1 Download Manifest
The following lists everything referenced that you will or may need to download in this environment
Windows Server 2008 R2 with Service Pack 1 (installer ISO)
o httptechnetmicrosoftcomen-usevalcenterdd459137aspx
Windows Server 2008 R2 with Service Pack 1 (prebuilt VHD)
o httpwwwmicrosoftcomdownloadsdetailsaspxFamilyId=9040a4be-c3cf-44a5-9052-a70314452305
Windows Server 2008 R2 Service Pack 1
o httpwwwmicrosoftcomen-usdownloaddetailsaspxid=5842
SQL Server 2012 Trial
o httpwwwmicrosoftcombetaexperiencepdSQL2012EvalCTAenusdefaultaspx
SharePoint Server 2013
o httptechnetmicrosoftcomen-USevalcenterhh973397aspx
Hotfixes for SharePoint Server 2013 (post-install)
o KB2554876 The SharePoint Parsing Process Crashes in Windows Server 2008 R2
o KB2708075 IIS 75 Configurations are not Updated when you use the ServerManager Class to Commit
Configuration Changes
o KB2759112 Hotfix is Available for NET Framework 45 that Resolves an ASPNET Race Condition Issue in
Windows Server 2008 R2 Windows Server 2008 R2 SP1
o KB2765317 Hotfix is Available for NET Framework 45 that Resolves an ASPNET Race Condition Issue in
Windows 8 Windows RT and Windows Server 2012
Web Platform Installer
o httpwwwmicrosoftcomwebdownloadsplatformaspx
Web Platform Installer ndash Command Line Version
o httplearniisnetpageaspx1072web-platform-installer-v4-command-line-webpicmdexe-preview-release
Workflow Manager 10
o Download using the Microsoft Web Platform Installer
Office 2013
o httpwwwmicrosoftcomofficepreviewentry-office-preview
SharePoint Designer 2013
o httpwwwmicrosoftcomen-usdownloaddetailsaspxid=35491
Visio Professional 2013
o httptechnetmicrosoftcomen-usevalcenterhh973399
Visual Studio 2012
o httpwwwmicrosoftcomvisualstudio11en-usdownloads
Office Developer Tools for Visual Studio 2012 ndash Preview 2
o Download using the Microsoft Web Platform Installer
Creating a SharePoint Server 2013 Environment for Development and Testing Version 10
copy Critical Path Training 2012 All Rights Reserved 62
wwwCriticalPathTrainingcom
Appendix 2 Windows PowerShell Script Manifest
The following lists all Windows PowerShell scripts that are provided with this setup guide
AddDisableLoopbackCheckRegKeyps1
o The following steps automate creating the registry key outlined as Method 2 in the Microsoft Knowledgebase article
httpsupportmicrosoftcomkb896861 using Windows PowerShell This key DisableLoopbackCheck will allow
you to browse SharePoint sites on the same machine Without this key (or following Method 1 in the KB article) you
would need to browse any SharePoint sites from a different computer than the one which SharePoint is installed on
ConfigureSpFarmForAppsps1
o Configures a SharePoint 2013 for hosting apps This ensures everything you need is installed running and
configured This is documented here httpmsdnmicrosoftcomen-uslibraryfp179923(v=office15)
CreateSpServiceAccountsps1
o Creates the minimal necessary service accounts for SharePoint Server 2013 SP_Farm SP_Content amp
SP_Services
SetupSharePointForHNSCps1
o Configures a SharePoint 2013 install for hosting Host-Named Site Collections (HNSC) This involves creating a Web
Application in SharePoint that has no host header bindings Using DNS all requests are mapped to this Web
Application You then create the site collections via PowerShell as you cant create HNSCs via the browser (Central
Administration)
Creating a SharePoint Server 2013 Environment for Development and Testing Version 10
copy Critical Path Training 2012 All Rights Reserved 63
wwwCriticalPathTrainingcom
Appendix 3 Create Sample Adventure Works Database
The following steps document downloading and installing the sample Adventure Works OLTP database provided by Microsoft
1 Launch Internet Explorer and navigate to httpmsftdbprodsamplescodeplexcom
2 Download the Adventure Works 2012 OLTP Script
3 Extract the ZIP into a folder on the desktop
4 Launch SQL Server Management Studio Start All Programs Microsoft SQL Server 2012 SQL Server Management Studio
5 When SQL Server Management Studio launches within the Connect to Server dialog login using the default settings and click Connect
6 Within SQL Server Management Studio select File Open File
7 Select the file instawdbsql from the extracted ZIP and click Open
8 If prompted to re-login to the database engine do it
9 Select Query SQLCMD Mode
10 Scroll down to line 42 the line that starts with the following
setvar SqlSamplesSourceDataPath
11 Change the folder location of where you unzipped the Adventure Works 2012 OLTP Script
12 Select Query Execute
13 When the script completes the AdventureWorks2012 database will have been created
Creating a SharePoint Server 2013 Environment for Development and Testing Version 10
copy Critical Path Training 2012 All Rights Reserved 64
wwwCriticalPathTrainingcom
Change Log
Change Version Description
August 22 2012 v 01 Pre-release for review
August 27 2012 v 02 Initial public release ndash install guide based on SharePoint Server Beta 2
August 28 2012 v 03 Updated URL for the site collection used to connect SharePoint to WAW
August 31 2012 v 04 Typo Removed SQL Server Analysis Services as part of the install Not required in a
SharePoint dev box (unless you are doing business intelligence which is not covered
in the guide)
Updated all references to Windows Azure Workflow to Workflow Manager the new
official name for the new workflow product
Updated SetupSharePointForHNSCps1 script to lookup HNSC Web Application by
name rather than URL which is more reliable
Typo Updated WingtipAllUp public NIC to use a different IP than the WingtipDC
Typo Replaced a reference to WingtipServer with WingtipDC
Typo Fixed handful of minor typos
September 1 2012 v 05 Removed SQL Server Reporting Services from install guide
Added step to uncheck IErsquos ldquoAutomatically detect proxyrdquo
Added post workflow install steps to setup User Profile Service Application to sync with
local Active Directory
September 5 2012 v 06 Added step to create a default root site collection in the HNSC web app
Updated minor typos and added extra notes for context
Updated PowerShell script SetupSharePointForHNSCps1 to remove content
database of default Web Application when setting up HNSC Web App
Added a new exercise 8 (after SharePoint install amp config and before the Workflow
install and config) to setup support for My Sites
October 20 2012 v 07 Updated script SetupSharePointForHNSCps1 to fix a bug where it would fail on line
111 if you didnrsquot already have a WINGTIPSP_Content managed account
Added section to bypass SharePointrsquos check for crlmicrosoftcom
Updated workflowrsquos registration PowerShell script to point to
httpintranetwingtipcom
Switched order of post-SharePoint install to setup HSNC hosting before configuring for
hosting apps
November 29 2012
v 10 Changed setup guide to use a single VM instead of two VMs
Updated guide for SharePoint 2013 RTM

Creating a SharePoint Server 2013 Environment for Development and Testing Version 10
copy Critical Path Training 2012 All Rights Reserved 46
wwwCriticalPathTrainingcom
i) Title My Site Host
ii) URL
iii) Template Selection My Site Host (found under the Enterprise tab)
iv) Primary Site Collection Administrator WINGTIPAdministrator
3 Update the Web Application to host my sites
a) Within Central Administration in the left-hand navigation navigate to the Manage Web Applications page Application Management Manage Web Applications
b) Select the SharePoint MySite Host ndash 80 web application
c) Click the Managed Paths button in the ribbon
d) Remove the sites managed path and add two new managed paths and click OK
i) personal ndash Wildcard inclusion
ii) my ndash Explicit inclusion
e) With the SharePoint MySite Host ndash 80 web application still selected click the Self-Service Site Creation button
f) On the Self-Service Site Creation page use the following values to complete the form and click OK
i) Site Collections On
4 Next configure the User Profile Service Application My Site settings
a) Browse to the User Profile Service Application management page Application Management Manage Service Applications User Profile Service Application
b) Under the My Site Settings section click the Setup My Sites
c) On the My Site Settings page use the following information to complete the form and click OK
i) My Site Host httpmywingtipcom
ii) Personal Site Location personal
At this point your SharePoint deployment is now configured to automatically create My Sites under httpmywingtipcomPersonalUserName when users first browse to them
Exercise 7 Install amp Configure Workflow Manager 10
In this exercise you will configure the WingtipServer VM to host Workflow Manager 10 and connect it to your SharePoint installation
1 Ensure you are logged into the WingtipServer VM using the account wingtipadministrator | Password1
Verify SQL Server 2012 Network Configuration
In this section yoursquoll verify the network configuration is correct for SQL Server 2012 in order to install Workflow Manager 10
Creating a SharePoint Server 2013 Environment for Development and Testing Version 10
copy Critical Path Training 2012 All Rights Reserved 47
wwwCriticalPathTrainingcom
1 Configure SQL Server 2012 to have the TCPIP connection protocol enabled
a) Open the SQL Server Configuration Manager Start All Programs Microsoft SQL Server 2012 Configuration Tools SQL Server Configuration Manager
b) Expand the hierarchy on the left-hand side to the following SQL Server Connection Manager (local) SQL Server Network Configuration Protocols for MSSQLSERVER
c) In the main window if TCPIP is Disabled right-click TCPIP and select Enable
d) When prompted with a warning click OK
2 SQL Server must be restarted in order to reflect this change
a) In the hierarchy on the left-hand side of the window select SQL Server Services
b) Right-click SQL Server (MSSQLSERVER) and select Restart
At this point SQL Server is now configured with the TCPIP protocol enabled a requirement when configuring Service Bus
Configure the Workflow Service Account with the Necessary Rights
In this section you will verify the service account that will run Workflow Manager and Service Bus
1 Ensure you are logged into the WingtipServer VM using the account WINGTIPadministrator | Password1
2 Grant the WINGTIPSP_Content account securityadmin amp dbcreator permissions in SQL Server
a) Launch SQL Server Management Studio Start All Programs Microsoft SQL Server 2012 SQL Server Management Studio
b) When SQL Server Management Studio launches within the Connect to Server dialog login using the default settings and click Connect
c) In the Object Explorer tool window expand the WINGTIPSERVER server hierarchy to the Security Logins node
d) Find the WINGTIPSP_Content account right-click it and select Properties
Creating a SharePoint Server 2013 Environment for Development and Testing Version 10
copy Critical Path Training 2012 All Rights Reserved 48
wwwCriticalPathTrainingcom
e) In the Select a page pane select Server Roles
f) Check securityadmin amp dbcreator and click OK
g) Close SQL Server Management Studio
3 Add the Workflow service account to the local administrators group
a) Open the Active Directory Users and Computers window Start Administrative Tools Active Directory Users and Computers
b) In the hierarchy on the left-hand side of the window expand it to the following Active Directory Users and Computers wingtipcom Builtin
c) In the main window right-click Administrators and select Properties
d) In the Administrators Properties dialog select the Members tab and click Add
e) In the Enter the object names to select box enter wingtipsp_content and click the Check Names button
f) In the Administrators Properties dialog click OK
g) Close the Active Directory Users and Computers window
At this point the service account that will host Workflow Manager and Service Bus has been configured correctly
Creating a SharePoint Server 2013 Environment for Development and Testing Version 10
copy Critical Path Training 2012 All Rights Reserved 49
wwwCriticalPathTrainingcom
Download amp Install Workflow Manager and Service Bus
In this section you will install Workflow Manager and Service Bus
1 Ensure you are logged into the WingtipServer VM using the account WINGTIPSP_Content | Password1
It is important you are logged in as the user that will run workflow when you install amp configure Workflow Manager and Service Bus
2 Launch the Web Platform Installer Start All Programs Microsoft Web Platform Installer
a) If the Web Platform Installer is not present on your machine you can download amp install it from here httpwwwmicrosoftcomwebdownloadsplatformaspx
If you do not have internet access within the virtual machine it is possible to download everything needed for workflow using the command line version of the Web Platform Installer (WebPICMD) You can get WebPICMD from httplearniisnetpageaspx1072web-platform-installer-v4-command-line-webpicmdexe-preview-release Specifically for
workflow enter the following command to download Workflow Beta 1 and all prerequisites
webpicmd offline ProductsWorkflow Pathc[path]
3 When the Web Platform Installer loads execute a search for Workflow select Workflow Manager 10 and click Add
4 Click the Install button at the bottom of the Web Platform Installer 40 window
5 On the Prerequisites page click I Accept
Note The Web Platform Installer 40 may prompt you to keep certain products updated using Microsoft Update If it does select Use Microsoft Update when I check for updates (recommended) and click Continue
6 When the installer completes the following dialog will appear Click Continue and then Finish to start the configuration process
Creating a SharePoint Server 2013 Environment for Development and Testing Version 10
copy Critical Path Training 2012 All Rights Reserved 50
wwwCriticalPathTrainingcom
At this point Workflow Manager amp Service Bus are installed
Configure Workflow Manager and Service Bus
In this section you will install Workflow Manager and Service Bus
1 If the Workflow Manager Configuration Wizard is not open open it Start All Programs Workflow Manager 10 Workflow Configuration
2 On the Welcome page click Configure Workflow Manager with Default Settings (Recommended)
Creating a SharePoint Server 2013 Environment for Development and Testing Version 10
copy Critical Path Training 2012 All Rights Reserved 51
wwwCriticalPathTrainingcom
3 On the New Farm Configuration page do the following
a) In the section Configure Service Account set the credentials to
i) User ID sp_contentwingtipcom
ii) Password Password1
b) Check the Allow Workflow management over HTTP on this computer checkbox
Ensure the username is entered in the fully qualified UPN format not as the default shows in the installer (sp_contentwingtip) or the domainusername format
In a production environment you should be doing everything over SSL
c) Click the Test Connection button to verify the connection credentials before proceeding
Creating a SharePoint Server 2013 Environment for Development and Testing Version 10
copy Critical Path Training 2012 All Rights Reserved 52
wwwCriticalPathTrainingcom
d) In the Certificate Generation Key and Confirm Certificate Generation Key enter Password1 into both fields
4 Click the right arrow in the bottom right corner to proceed
5 On the Summary page review your settings and click the check at the bottom right of the widow to start the configuration process
Creating a SharePoint Server 2013 Environment for Development and Testing Version 10
copy Critical Path Training 2012 All Rights Reserved 53
wwwCriticalPathTrainingcom
6 After a few minutes the Configuration Progress screen will show that everything has been configured correctly
Creating a SharePoint Server 2013 Environment for Development and Testing Version 10
copy Critical Path Training 2012 All Rights Reserved 54
wwwCriticalPathTrainingcom
7 Click the check in the bottom right corner
At this point Workflow Manager amp Service Bus has been installed and a new Workflow Manager farm has been created The next step is to connect the SharePoint 2013 farm to the Workflow Manager farm
Connect SharePoint 2013 to Workflow Manager
In this section you will connect SharePoint 2013 and Workflow Manager together
1 Ensure you are logged into the WingtipServer VM using the account WINGTIPadministrator | Password1
2 Get the Workflow Manager endpoint
a) Open the Workflow Manager PowerShell console Start All Programs Workflow Manager 10
b) Execute the Windows PowerShell following cmdlet
Get-WFFarm | ft HttpPort
c) Take note of this port (12291) This port number is what you will use to connect the SharePoint 2013 farm to the Workflow Manager 10 farm
In production you should connect to the HTTPS port listed in the HttpsPort property when you run Get-WFFarm
d) Close the Workflow Manager PowerShell window
3 Connect the SharePoint 2013 farm to Workflow Manager
Creating a SharePoint Server 2013 Environment for Development and Testing Version 10
copy Critical Path Training 2012 All Rights Reserved 55
wwwCriticalPathTrainingcom
a) Open SharePoint 2013 Management Shell Start All Programs Microsoft SharePoint 2013 Products SharePoint 2013 Management Shell
b) Execute the following Windows PowerShell script in the SharePoint 2013 Management Shell
Register-SPWorkflowService ndashSPSite httpintranetwingtipcom ndashWorkflowHostUri httpwingtipserver12291 ndashAllowOAuthHttp
This script is telling SharePoint the endpoint it should use to talk to Workflow Manager as well as Workflow Manager the SharePoint site collection it should talk to for calls into the CSOM It is also configuring all communication over HTTP rather than HTTPS for performance reasons In production you should always use HTTPS
This step will take a moment with no feedback during the process Be patient
c) Close the SharePoint 2013 Management Shell
At this point the SharePoint 2013 farm is connected to the Workflow Manager 10 farm
Configure SharePoint User Profile Service Application AD Sync
Users in SharePoint 2013 are validated by Workflow Manager against SharePoint to ensure they have permissions to start a workflow This is done by looking up the user by their AD UserPrincipalName (UPN) attribute in the User Profile Service Application (UPA) If no matching user is found the workflow will be automatically cancelled by Workflow Manager In this section you will setup UPA to connect amp sync with the local Active Directory so user accounts in AD will have their UPN synchronized to UPA
1 Open Central Administration Start All Programs Microsoft SharePoint 2013 Products SharePoint 2013 Central Administration
2 Go to the User Profile Service Application management page Application Management Manage Service Applications User Profile Service Application
3 The first step is to configure the User Profile Service Application to allow for Active Directory (AD) synchronization
a) Under Synchronization select Configure Synchronization Settings
b) For Synchronization select Use SharePoint Active Directory Import and click OK
4 Next establish a connection to the wingtipcom AD
a) Under Synchronization select Configure Synchronization Connections
b) On the Synchronization Connections page select Create New Connection
c) Enter the following values on this form and click OK
i) Connection Name WINGTIPCOM AD
ii) Type Active Directory Import
iii) Connection Settings
(1) Fully Qualified Domain Name wingtipcom
(2) Authentication Provider Type Windows Authentication
(3) Account Name WINGTIPAdministrator
(4) Password (and Confirm Password) Password1
iv) Containers
(1) Click Populate Containers
(2) After it loads check the box next to WINGTP or click the Select All button below the box
5 Go back to the User Profile Service Application management page Application Management Manage Service Applications User Profile Service Application
6 Finally start a synchronization import
a) Under Synchronization select Start Profile Synchronization
Creating a SharePoint Server 2013 Environment for Development and Testing Version 10
copy Critical Path Training 2012 All Rights Reserved 56
wwwCriticalPathTrainingcom
b) Select Start Full Synchronization and click OK
c) You will be taken back to the User Profile Service Application management page Notice in the top-right corner there is a status block that reports how many profiles are in the UPA database Refresh the page to see it increase to a handful of profiles as the import process runs
At this point you have successfully configured the User Profile Service Application to import profiles from the local AD
Exercise 8 Install the Microsoft Office 2013 Professional Clients
In this exercise you will install the Microsoft Office 2013 client applications
1 Download the Office 2013 into the WingtipServer VM For this you need to create an Office 365 Trial account login to Office 365 go to the Admin Dashboard and then download the latest version httpwwwmicrosoftcomofficepreviewentry-office-preview
2 Download the SharePoint Designer 2013 into the WingtipServer VM from here httpwwwmicrosoftcomen-usdownloaddetailsaspxid=35491
3 Download the Visio Professional 2013 into the WingtipServer VM from here httptechnetmicrosoftcomen-usevalcenterhh973399
Install Microsoft Office Professional Plus 2013
In this section you will install the Microsoft Office 2013 clients
1 Ensure you are logged into the WingtipServer VM using the account WINGTIPadministrator | Password1
2 Execute the installer OfficeProfessionalPlus_English_x64exe
3 On the Read the Microsoft Software License Terms dialog click the checkbox next to I accept the terms of this agreement and click Continue
4 On the Choose the installation you want dialog click the Install Now button
5 The installer will proceed and install all the Office products
6 When the installer completes click the Close button
7 Apply your Office Professional Plus 2013 license key
a) Launch Word 2013 Start All Programs Microsoft Office 2013 Word 2013
b) In the First things first dialog select Use recommended settings and click Accept
c) In the Welcome to Office dialog that opens click the [X] icon in the top-right corner to close it
d) In the left-hand pane click Open Other Documents
e) In the left-hand pane click Account
f) In the Product Information section within the Activation Required box click Change Product Key
g) Enter your license key for Office Professional Plus 2013 check the box next to Attempt to automatically activate my product online and click Install
h) Click OK
At this point you have installed Office Professional Plus 2013
Install Microsoft Office Visio 2013
In this section you will install Microsoft Office 2013 Visio
1 Ensure you are logged into the WingtipServer VM using the account WINGTIPadministrator | Password1
2 Execute the installer VisioProfessional_English_x64exe
3 On the Read the Microsoft Software License Terms dialog click the checkbox next to I accept the terms of this agreement and click Continue
Creating a SharePoint Server 2013 Environment for Development and Testing Version 10
copy Critical Path Training 2012 All Rights Reserved 57
wwwCriticalPathTrainingcom
4 On the Choose the installation you want dialog click the Install Now button
5 The installer will proceed and install all Visio 2013
6 When the installer completes click the Close button
7 Apply your Visio 2013 license key
a) Launch Visio 2013 Start All Programs Microsoft Office 2013 Visio 2013
b) In the First things first dialog select Use recommended settings and click Accept
c) In the Welcome to Office dialog that opens click the X icon in the top-right corner to close it
d) In the left-hand pane click Open Other Documents
e) In the left-hand pane click Account
f) In the Product Information section within the Activation Required box click Change Product Key
g) Enter your license key for Visio 2013 check the box next to Attempt to automatically activate my product online and click Install
h) Click OK
At this point you have installed Visio 2013
Install Microsoft Office 2013 SharePoint Designer
In this section you will install Microsoft Office 2013 SharePoint Designer
1 Ensure you are logged into the WingtipServer VM using the account WINGTIPadministrator | Password1
2 Execute the installer SharePointDesigner_English_x64exe
3 On the Read the Microsoft Software License Terms dialog click the checkbox next to I accept the terms of this agreement and click Continue
4 On the Choose the installation you want dialog click the Install Now button
5 The installer will proceed and install all SharePoint Designer 2013
6 When the installer completes click the Close button
At this point you have installed SharePoint Designer 2013
Exercise 9 Install Visual Studio 2012
In this exercise you will install Visual Studio 2012
1 Ensure you are logged into the WingtipServer VM using the account WINGTIPadministrator | Password1
2 Start the install of Visual Studio 2012 Ultimate Trial by downloading the installer from here httpwwwmicrosoftcomvisualstudio11en-usdownloads
3 On the installation splash screen check the box next to I agree to the License terms and conditions and click the Next button
Creating a SharePoint Server 2013 Environment for Development and Testing Version 10
copy Critical Path Training 2012 All Rights Reserved 58
wwwCriticalPathTrainingcom
4 On the Optional Features to install dialog click Install
5 After some time the installer will complete Click the Launch button to launch Visual Studio 2012
Creating a SharePoint Server 2013 Environment for Development and Testing Version 10
copy Critical Path Training 2012 All Rights Reserved 59
wwwCriticalPathTrainingcom
6 In the Choose Default Environment Settings select Visual C Development Settings and click Start Visual Studio
7 Close Visual Studio 2012
At this point Visual Studio 2012 RTM is installed
Install Office amp SharePoint 2013 Developer Tools
In this section you will install the Office and SharePoint 2013 developer tools for Visual Studio
1 Ensure you are logged into the WingtipServer VM using the account WINGTIPadministrator | Password1
2 Launch the Web Platform Installer Start All Programs Microsoft Web Platform Installer
3 In the search box at the top-right corner of the Web Platform Installer 40 window type sharepoint and press Enter
4 Click the Add button to the right of Microsoft Office Developer Tools for Visual Studio 2012 - Preview 2
5 Click the Install button at the bottom of the Web Platform Installer 40 window
6 On the Prerequisites page click I Accept
Creating a SharePoint Server 2013 Environment for Development and Testing Version 10
copy Critical Path Training 2012 All Rights Reserved 60
wwwCriticalPathTrainingcom
At this point you have installed the SharePoint 2013 amp Office 2013 development tools in Visual Studio 2012
Creating a SharePoint Server 2013 Environment for Development and Testing Version 10
copy Critical Path Training 2012 All Rights Reserved 61
wwwCriticalPathTrainingcom
Appendix 1 Download Manifest
The following lists everything referenced that you will or may need to download in this environment
Windows Server 2008 R2 with Service Pack 1 (installer ISO)
o httptechnetmicrosoftcomen-usevalcenterdd459137aspx
Windows Server 2008 R2 with Service Pack 1 (prebuilt VHD)
o httpwwwmicrosoftcomdownloadsdetailsaspxFamilyId=9040a4be-c3cf-44a5-9052-a70314452305
Windows Server 2008 R2 Service Pack 1
o httpwwwmicrosoftcomen-usdownloaddetailsaspxid=5842
SQL Server 2012 Trial
o httpwwwmicrosoftcombetaexperiencepdSQL2012EvalCTAenusdefaultaspx
SharePoint Server 2013
o httptechnetmicrosoftcomen-USevalcenterhh973397aspx
Hotfixes for SharePoint Server 2013 (post-install)
o KB2554876 The SharePoint Parsing Process Crashes in Windows Server 2008 R2
o KB2708075 IIS 75 Configurations are not Updated when you use the ServerManager Class to Commit
Configuration Changes
o KB2759112 Hotfix is Available for NET Framework 45 that Resolves an ASPNET Race Condition Issue in
Windows Server 2008 R2 Windows Server 2008 R2 SP1
o KB2765317 Hotfix is Available for NET Framework 45 that Resolves an ASPNET Race Condition Issue in
Windows 8 Windows RT and Windows Server 2012
Web Platform Installer
o httpwwwmicrosoftcomwebdownloadsplatformaspx
Web Platform Installer ndash Command Line Version
o httplearniisnetpageaspx1072web-platform-installer-v4-command-line-webpicmdexe-preview-release
Workflow Manager 10
o Download using the Microsoft Web Platform Installer
Office 2013
o httpwwwmicrosoftcomofficepreviewentry-office-preview
SharePoint Designer 2013
o httpwwwmicrosoftcomen-usdownloaddetailsaspxid=35491
Visio Professional 2013
o httptechnetmicrosoftcomen-usevalcenterhh973399
Visual Studio 2012
o httpwwwmicrosoftcomvisualstudio11en-usdownloads
Office Developer Tools for Visual Studio 2012 ndash Preview 2
o Download using the Microsoft Web Platform Installer
Creating a SharePoint Server 2013 Environment for Development and Testing Version 10
copy Critical Path Training 2012 All Rights Reserved 62
wwwCriticalPathTrainingcom
Appendix 2 Windows PowerShell Script Manifest
The following lists all Windows PowerShell scripts that are provided with this setup guide
AddDisableLoopbackCheckRegKeyps1
o The following steps automate creating the registry key outlined as Method 2 in the Microsoft Knowledgebase article
httpsupportmicrosoftcomkb896861 using Windows PowerShell This key DisableLoopbackCheck will allow
you to browse SharePoint sites on the same machine Without this key (or following Method 1 in the KB article) you
would need to browse any SharePoint sites from a different computer than the one which SharePoint is installed on
ConfigureSpFarmForAppsps1
o Configures a SharePoint 2013 for hosting apps This ensures everything you need is installed running and
configured This is documented here httpmsdnmicrosoftcomen-uslibraryfp179923(v=office15)
CreateSpServiceAccountsps1
o Creates the minimal necessary service accounts for SharePoint Server 2013 SP_Farm SP_Content amp
SP_Services
SetupSharePointForHNSCps1
o Configures a SharePoint 2013 install for hosting Host-Named Site Collections (HNSC) This involves creating a Web
Application in SharePoint that has no host header bindings Using DNS all requests are mapped to this Web
Application You then create the site collections via PowerShell as you cant create HNSCs via the browser (Central
Administration)
Creating a SharePoint Server 2013 Environment for Development and Testing Version 10
copy Critical Path Training 2012 All Rights Reserved 63
wwwCriticalPathTrainingcom
Appendix 3 Create Sample Adventure Works Database
The following steps document downloading and installing the sample Adventure Works OLTP database provided by Microsoft
1 Launch Internet Explorer and navigate to httpmsftdbprodsamplescodeplexcom
2 Download the Adventure Works 2012 OLTP Script
3 Extract the ZIP into a folder on the desktop
4 Launch SQL Server Management Studio Start All Programs Microsoft SQL Server 2012 SQL Server Management Studio
5 When SQL Server Management Studio launches within the Connect to Server dialog login using the default settings and click Connect
6 Within SQL Server Management Studio select File Open File
7 Select the file instawdbsql from the extracted ZIP and click Open
8 If prompted to re-login to the database engine do it
9 Select Query SQLCMD Mode
10 Scroll down to line 42 the line that starts with the following
setvar SqlSamplesSourceDataPath
11 Change the folder location of where you unzipped the Adventure Works 2012 OLTP Script
12 Select Query Execute
13 When the script completes the AdventureWorks2012 database will have been created
Creating a SharePoint Server 2013 Environment for Development and Testing Version 10
copy Critical Path Training 2012 All Rights Reserved 64
wwwCriticalPathTrainingcom
Change Log
Change Version Description
August 22 2012 v 01 Pre-release for review
August 27 2012 v 02 Initial public release ndash install guide based on SharePoint Server Beta 2
August 28 2012 v 03 Updated URL for the site collection used to connect SharePoint to WAW
August 31 2012 v 04 Typo Removed SQL Server Analysis Services as part of the install Not required in a
SharePoint dev box (unless you are doing business intelligence which is not covered
in the guide)
Updated all references to Windows Azure Workflow to Workflow Manager the new
official name for the new workflow product
Updated SetupSharePointForHNSCps1 script to lookup HNSC Web Application by
name rather than URL which is more reliable
Typo Updated WingtipAllUp public NIC to use a different IP than the WingtipDC
Typo Replaced a reference to WingtipServer with WingtipDC
Typo Fixed handful of minor typos
September 1 2012 v 05 Removed SQL Server Reporting Services from install guide
Added step to uncheck IErsquos ldquoAutomatically detect proxyrdquo
Added post workflow install steps to setup User Profile Service Application to sync with
local Active Directory
September 5 2012 v 06 Added step to create a default root site collection in the HNSC web app
Updated minor typos and added extra notes for context
Updated PowerShell script SetupSharePointForHNSCps1 to remove content
database of default Web Application when setting up HNSC Web App
Added a new exercise 8 (after SharePoint install amp config and before the Workflow
install and config) to setup support for My Sites
October 20 2012 v 07 Updated script SetupSharePointForHNSCps1 to fix a bug where it would fail on line
111 if you didnrsquot already have a WINGTIPSP_Content managed account
Added section to bypass SharePointrsquos check for crlmicrosoftcom
Updated workflowrsquos registration PowerShell script to point to
httpintranetwingtipcom
Switched order of post-SharePoint install to setup HSNC hosting before configuring for
hosting apps
November 29 2012
v 10 Changed setup guide to use a single VM instead of two VMs
Updated guide for SharePoint 2013 RTM
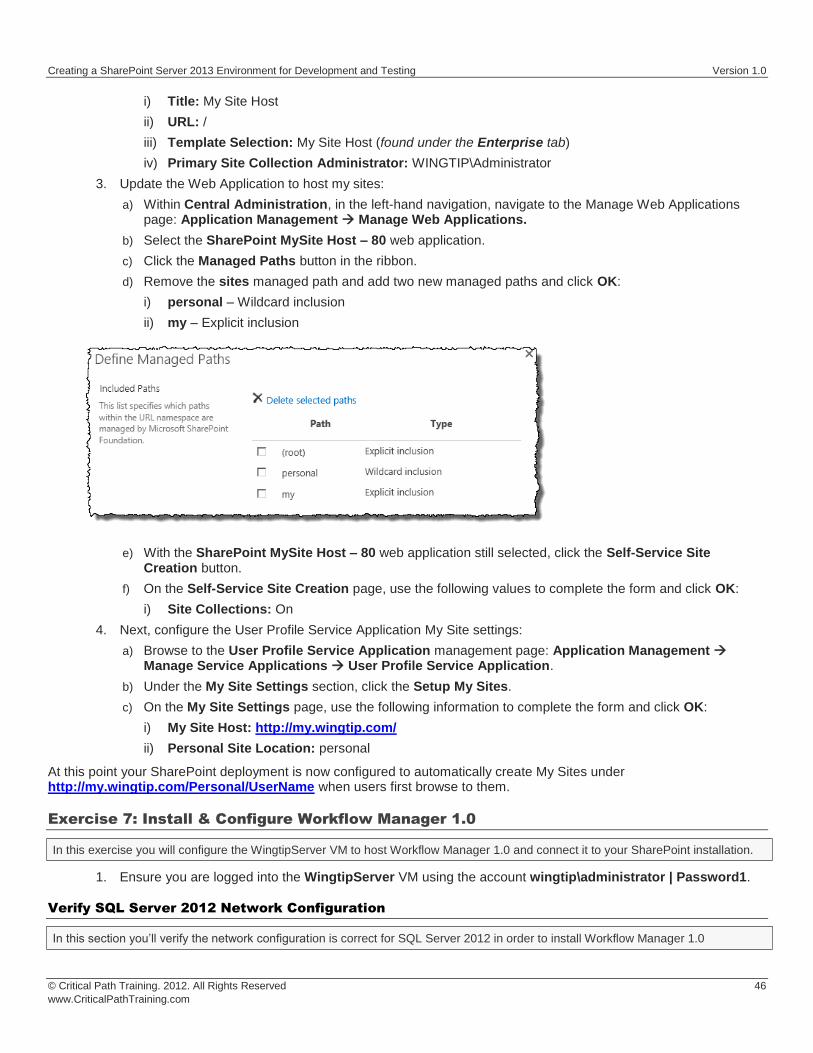
Creating a SharePoint Server 2013 Environment for Development and Testing Version 10
copy Critical Path Training 2012 All Rights Reserved 47
wwwCriticalPathTrainingcom
1 Configure SQL Server 2012 to have the TCPIP connection protocol enabled
a) Open the SQL Server Configuration Manager Start All Programs Microsoft SQL Server 2012 Configuration Tools SQL Server Configuration Manager
b) Expand the hierarchy on the left-hand side to the following SQL Server Connection Manager (local) SQL Server Network Configuration Protocols for MSSQLSERVER
c) In the main window if TCPIP is Disabled right-click TCPIP and select Enable
d) When prompted with a warning click OK
2 SQL Server must be restarted in order to reflect this change
a) In the hierarchy on the left-hand side of the window select SQL Server Services
b) Right-click SQL Server (MSSQLSERVER) and select Restart
At this point SQL Server is now configured with the TCPIP protocol enabled a requirement when configuring Service Bus
Configure the Workflow Service Account with the Necessary Rights
In this section you will verify the service account that will run Workflow Manager and Service Bus
1 Ensure you are logged into the WingtipServer VM using the account WINGTIPadministrator | Password1
2 Grant the WINGTIPSP_Content account securityadmin amp dbcreator permissions in SQL Server
a) Launch SQL Server Management Studio Start All Programs Microsoft SQL Server 2012 SQL Server Management Studio
b) When SQL Server Management Studio launches within the Connect to Server dialog login using the default settings and click Connect
c) In the Object Explorer tool window expand the WINGTIPSERVER server hierarchy to the Security Logins node
d) Find the WINGTIPSP_Content account right-click it and select Properties
Creating a SharePoint Server 2013 Environment for Development and Testing Version 10
copy Critical Path Training 2012 All Rights Reserved 48
wwwCriticalPathTrainingcom
e) In the Select a page pane select Server Roles
f) Check securityadmin amp dbcreator and click OK
g) Close SQL Server Management Studio
3 Add the Workflow service account to the local administrators group
a) Open the Active Directory Users and Computers window Start Administrative Tools Active Directory Users and Computers
b) In the hierarchy on the left-hand side of the window expand it to the following Active Directory Users and Computers wingtipcom Builtin
c) In the main window right-click Administrators and select Properties
d) In the Administrators Properties dialog select the Members tab and click Add
e) In the Enter the object names to select box enter wingtipsp_content and click the Check Names button
f) In the Administrators Properties dialog click OK
g) Close the Active Directory Users and Computers window
At this point the service account that will host Workflow Manager and Service Bus has been configured correctly
Creating a SharePoint Server 2013 Environment for Development and Testing Version 10
copy Critical Path Training 2012 All Rights Reserved 49
wwwCriticalPathTrainingcom
Download amp Install Workflow Manager and Service Bus
In this section you will install Workflow Manager and Service Bus
1 Ensure you are logged into the WingtipServer VM using the account WINGTIPSP_Content | Password1
It is important you are logged in as the user that will run workflow when you install amp configure Workflow Manager and Service Bus
2 Launch the Web Platform Installer Start All Programs Microsoft Web Platform Installer
a) If the Web Platform Installer is not present on your machine you can download amp install it from here httpwwwmicrosoftcomwebdownloadsplatformaspx
If you do not have internet access within the virtual machine it is possible to download everything needed for workflow using the command line version of the Web Platform Installer (WebPICMD) You can get WebPICMD from httplearniisnetpageaspx1072web-platform-installer-v4-command-line-webpicmdexe-preview-release Specifically for
workflow enter the following command to download Workflow Beta 1 and all prerequisites
webpicmd offline ProductsWorkflow Pathc[path]
3 When the Web Platform Installer loads execute a search for Workflow select Workflow Manager 10 and click Add
4 Click the Install button at the bottom of the Web Platform Installer 40 window
5 On the Prerequisites page click I Accept
Note The Web Platform Installer 40 may prompt you to keep certain products updated using Microsoft Update If it does select Use Microsoft Update when I check for updates (recommended) and click Continue
6 When the installer completes the following dialog will appear Click Continue and then Finish to start the configuration process
Creating a SharePoint Server 2013 Environment for Development and Testing Version 10
copy Critical Path Training 2012 All Rights Reserved 50
wwwCriticalPathTrainingcom
At this point Workflow Manager amp Service Bus are installed
Configure Workflow Manager and Service Bus
In this section you will install Workflow Manager and Service Bus
1 If the Workflow Manager Configuration Wizard is not open open it Start All Programs Workflow Manager 10 Workflow Configuration
2 On the Welcome page click Configure Workflow Manager with Default Settings (Recommended)
Creating a SharePoint Server 2013 Environment for Development and Testing Version 10
copy Critical Path Training 2012 All Rights Reserved 51
wwwCriticalPathTrainingcom
3 On the New Farm Configuration page do the following
a) In the section Configure Service Account set the credentials to
i) User ID sp_contentwingtipcom
ii) Password Password1
b) Check the Allow Workflow management over HTTP on this computer checkbox
Ensure the username is entered in the fully qualified UPN format not as the default shows in the installer (sp_contentwingtip) or the domainusername format
In a production environment you should be doing everything over SSL
c) Click the Test Connection button to verify the connection credentials before proceeding
Creating a SharePoint Server 2013 Environment for Development and Testing Version 10
copy Critical Path Training 2012 All Rights Reserved 52
wwwCriticalPathTrainingcom
d) In the Certificate Generation Key and Confirm Certificate Generation Key enter Password1 into both fields
4 Click the right arrow in the bottom right corner to proceed
5 On the Summary page review your settings and click the check at the bottom right of the widow to start the configuration process
Creating a SharePoint Server 2013 Environment for Development and Testing Version 10
copy Critical Path Training 2012 All Rights Reserved 53
wwwCriticalPathTrainingcom
6 After a few minutes the Configuration Progress screen will show that everything has been configured correctly
Creating a SharePoint Server 2013 Environment for Development and Testing Version 10
copy Critical Path Training 2012 All Rights Reserved 54
wwwCriticalPathTrainingcom
7 Click the check in the bottom right corner
At this point Workflow Manager amp Service Bus has been installed and a new Workflow Manager farm has been created The next step is to connect the SharePoint 2013 farm to the Workflow Manager farm
Connect SharePoint 2013 to Workflow Manager
In this section you will connect SharePoint 2013 and Workflow Manager together
1 Ensure you are logged into the WingtipServer VM using the account WINGTIPadministrator | Password1
2 Get the Workflow Manager endpoint
a) Open the Workflow Manager PowerShell console Start All Programs Workflow Manager 10
b) Execute the Windows PowerShell following cmdlet
Get-WFFarm | ft HttpPort
c) Take note of this port (12291) This port number is what you will use to connect the SharePoint 2013 farm to the Workflow Manager 10 farm
In production you should connect to the HTTPS port listed in the HttpsPort property when you run Get-WFFarm
d) Close the Workflow Manager PowerShell window
3 Connect the SharePoint 2013 farm to Workflow Manager
Creating a SharePoint Server 2013 Environment for Development and Testing Version 10
copy Critical Path Training 2012 All Rights Reserved 55
wwwCriticalPathTrainingcom
a) Open SharePoint 2013 Management Shell Start All Programs Microsoft SharePoint 2013 Products SharePoint 2013 Management Shell
b) Execute the following Windows PowerShell script in the SharePoint 2013 Management Shell
Register-SPWorkflowService ndashSPSite httpintranetwingtipcom ndashWorkflowHostUri httpwingtipserver12291 ndashAllowOAuthHttp
This script is telling SharePoint the endpoint it should use to talk to Workflow Manager as well as Workflow Manager the SharePoint site collection it should talk to for calls into the CSOM It is also configuring all communication over HTTP rather than HTTPS for performance reasons In production you should always use HTTPS
This step will take a moment with no feedback during the process Be patient
c) Close the SharePoint 2013 Management Shell
At this point the SharePoint 2013 farm is connected to the Workflow Manager 10 farm
Configure SharePoint User Profile Service Application AD Sync
Users in SharePoint 2013 are validated by Workflow Manager against SharePoint to ensure they have permissions to start a workflow This is done by looking up the user by their AD UserPrincipalName (UPN) attribute in the User Profile Service Application (UPA) If no matching user is found the workflow will be automatically cancelled by Workflow Manager In this section you will setup UPA to connect amp sync with the local Active Directory so user accounts in AD will have their UPN synchronized to UPA
1 Open Central Administration Start All Programs Microsoft SharePoint 2013 Products SharePoint 2013 Central Administration
2 Go to the User Profile Service Application management page Application Management Manage Service Applications User Profile Service Application
3 The first step is to configure the User Profile Service Application to allow for Active Directory (AD) synchronization
a) Under Synchronization select Configure Synchronization Settings
b) For Synchronization select Use SharePoint Active Directory Import and click OK
4 Next establish a connection to the wingtipcom AD
a) Under Synchronization select Configure Synchronization Connections
b) On the Synchronization Connections page select Create New Connection
c) Enter the following values on this form and click OK
i) Connection Name WINGTIPCOM AD
ii) Type Active Directory Import
iii) Connection Settings
(1) Fully Qualified Domain Name wingtipcom
(2) Authentication Provider Type Windows Authentication
(3) Account Name WINGTIPAdministrator
(4) Password (and Confirm Password) Password1
iv) Containers
(1) Click Populate Containers
(2) After it loads check the box next to WINGTP or click the Select All button below the box
5 Go back to the User Profile Service Application management page Application Management Manage Service Applications User Profile Service Application
6 Finally start a synchronization import
a) Under Synchronization select Start Profile Synchronization
Creating a SharePoint Server 2013 Environment for Development and Testing Version 10
copy Critical Path Training 2012 All Rights Reserved 56
wwwCriticalPathTrainingcom
b) Select Start Full Synchronization and click OK
c) You will be taken back to the User Profile Service Application management page Notice in the top-right corner there is a status block that reports how many profiles are in the UPA database Refresh the page to see it increase to a handful of profiles as the import process runs
At this point you have successfully configured the User Profile Service Application to import profiles from the local AD
Exercise 8 Install the Microsoft Office 2013 Professional Clients
In this exercise you will install the Microsoft Office 2013 client applications
1 Download the Office 2013 into the WingtipServer VM For this you need to create an Office 365 Trial account login to Office 365 go to the Admin Dashboard and then download the latest version httpwwwmicrosoftcomofficepreviewentry-office-preview
2 Download the SharePoint Designer 2013 into the WingtipServer VM from here httpwwwmicrosoftcomen-usdownloaddetailsaspxid=35491
3 Download the Visio Professional 2013 into the WingtipServer VM from here httptechnetmicrosoftcomen-usevalcenterhh973399
Install Microsoft Office Professional Plus 2013
In this section you will install the Microsoft Office 2013 clients
1 Ensure you are logged into the WingtipServer VM using the account WINGTIPadministrator | Password1
2 Execute the installer OfficeProfessionalPlus_English_x64exe
3 On the Read the Microsoft Software License Terms dialog click the checkbox next to I accept the terms of this agreement and click Continue
4 On the Choose the installation you want dialog click the Install Now button
5 The installer will proceed and install all the Office products
6 When the installer completes click the Close button
7 Apply your Office Professional Plus 2013 license key
a) Launch Word 2013 Start All Programs Microsoft Office 2013 Word 2013
b) In the First things first dialog select Use recommended settings and click Accept
c) In the Welcome to Office dialog that opens click the [X] icon in the top-right corner to close it
d) In the left-hand pane click Open Other Documents
e) In the left-hand pane click Account
f) In the Product Information section within the Activation Required box click Change Product Key
g) Enter your license key for Office Professional Plus 2013 check the box next to Attempt to automatically activate my product online and click Install
h) Click OK
At this point you have installed Office Professional Plus 2013
Install Microsoft Office Visio 2013
In this section you will install Microsoft Office 2013 Visio
1 Ensure you are logged into the WingtipServer VM using the account WINGTIPadministrator | Password1
2 Execute the installer VisioProfessional_English_x64exe
3 On the Read the Microsoft Software License Terms dialog click the checkbox next to I accept the terms of this agreement and click Continue
Creating a SharePoint Server 2013 Environment for Development and Testing Version 10
copy Critical Path Training 2012 All Rights Reserved 57
wwwCriticalPathTrainingcom
4 On the Choose the installation you want dialog click the Install Now button
5 The installer will proceed and install all Visio 2013
6 When the installer completes click the Close button
7 Apply your Visio 2013 license key
a) Launch Visio 2013 Start All Programs Microsoft Office 2013 Visio 2013
b) In the First things first dialog select Use recommended settings and click Accept
c) In the Welcome to Office dialog that opens click the X icon in the top-right corner to close it
d) In the left-hand pane click Open Other Documents
e) In the left-hand pane click Account
f) In the Product Information section within the Activation Required box click Change Product Key
g) Enter your license key for Visio 2013 check the box next to Attempt to automatically activate my product online and click Install
h) Click OK
At this point you have installed Visio 2013
Install Microsoft Office 2013 SharePoint Designer
In this section you will install Microsoft Office 2013 SharePoint Designer
1 Ensure you are logged into the WingtipServer VM using the account WINGTIPadministrator | Password1
2 Execute the installer SharePointDesigner_English_x64exe
3 On the Read the Microsoft Software License Terms dialog click the checkbox next to I accept the terms of this agreement and click Continue
4 On the Choose the installation you want dialog click the Install Now button
5 The installer will proceed and install all SharePoint Designer 2013
6 When the installer completes click the Close button
At this point you have installed SharePoint Designer 2013
Exercise 9 Install Visual Studio 2012
In this exercise you will install Visual Studio 2012
1 Ensure you are logged into the WingtipServer VM using the account WINGTIPadministrator | Password1
2 Start the install of Visual Studio 2012 Ultimate Trial by downloading the installer from here httpwwwmicrosoftcomvisualstudio11en-usdownloads
3 On the installation splash screen check the box next to I agree to the License terms and conditions and click the Next button
Creating a SharePoint Server 2013 Environment for Development and Testing Version 10
copy Critical Path Training 2012 All Rights Reserved 58
wwwCriticalPathTrainingcom
4 On the Optional Features to install dialog click Install
5 After some time the installer will complete Click the Launch button to launch Visual Studio 2012
Creating a SharePoint Server 2013 Environment for Development and Testing Version 10
copy Critical Path Training 2012 All Rights Reserved 59
wwwCriticalPathTrainingcom
6 In the Choose Default Environment Settings select Visual C Development Settings and click Start Visual Studio
7 Close Visual Studio 2012
At this point Visual Studio 2012 RTM is installed
Install Office amp SharePoint 2013 Developer Tools
In this section you will install the Office and SharePoint 2013 developer tools for Visual Studio
1 Ensure you are logged into the WingtipServer VM using the account WINGTIPadministrator | Password1
2 Launch the Web Platform Installer Start All Programs Microsoft Web Platform Installer
3 In the search box at the top-right corner of the Web Platform Installer 40 window type sharepoint and press Enter
4 Click the Add button to the right of Microsoft Office Developer Tools for Visual Studio 2012 - Preview 2
5 Click the Install button at the bottom of the Web Platform Installer 40 window
6 On the Prerequisites page click I Accept
Creating a SharePoint Server 2013 Environment for Development and Testing Version 10
copy Critical Path Training 2012 All Rights Reserved 60
wwwCriticalPathTrainingcom
At this point you have installed the SharePoint 2013 amp Office 2013 development tools in Visual Studio 2012
Creating a SharePoint Server 2013 Environment for Development and Testing Version 10
copy Critical Path Training 2012 All Rights Reserved 61
wwwCriticalPathTrainingcom
Appendix 1 Download Manifest
The following lists everything referenced that you will or may need to download in this environment
Windows Server 2008 R2 with Service Pack 1 (installer ISO)
o httptechnetmicrosoftcomen-usevalcenterdd459137aspx
Windows Server 2008 R2 with Service Pack 1 (prebuilt VHD)
o httpwwwmicrosoftcomdownloadsdetailsaspxFamilyId=9040a4be-c3cf-44a5-9052-a70314452305
Windows Server 2008 R2 Service Pack 1
o httpwwwmicrosoftcomen-usdownloaddetailsaspxid=5842
SQL Server 2012 Trial
o httpwwwmicrosoftcombetaexperiencepdSQL2012EvalCTAenusdefaultaspx
SharePoint Server 2013
o httptechnetmicrosoftcomen-USevalcenterhh973397aspx
Hotfixes for SharePoint Server 2013 (post-install)
o KB2554876 The SharePoint Parsing Process Crashes in Windows Server 2008 R2
o KB2708075 IIS 75 Configurations are not Updated when you use the ServerManager Class to Commit
Configuration Changes
o KB2759112 Hotfix is Available for NET Framework 45 that Resolves an ASPNET Race Condition Issue in
Windows Server 2008 R2 Windows Server 2008 R2 SP1
o KB2765317 Hotfix is Available for NET Framework 45 that Resolves an ASPNET Race Condition Issue in
Windows 8 Windows RT and Windows Server 2012
Web Platform Installer
o httpwwwmicrosoftcomwebdownloadsplatformaspx
Web Platform Installer ndash Command Line Version
o httplearniisnetpageaspx1072web-platform-installer-v4-command-line-webpicmdexe-preview-release
Workflow Manager 10
o Download using the Microsoft Web Platform Installer
Office 2013
o httpwwwmicrosoftcomofficepreviewentry-office-preview
SharePoint Designer 2013
o httpwwwmicrosoftcomen-usdownloaddetailsaspxid=35491
Visio Professional 2013
o httptechnetmicrosoftcomen-usevalcenterhh973399
Visual Studio 2012
o httpwwwmicrosoftcomvisualstudio11en-usdownloads
Office Developer Tools for Visual Studio 2012 ndash Preview 2
o Download using the Microsoft Web Platform Installer
Creating a SharePoint Server 2013 Environment for Development and Testing Version 10
copy Critical Path Training 2012 All Rights Reserved 62
wwwCriticalPathTrainingcom
Appendix 2 Windows PowerShell Script Manifest
The following lists all Windows PowerShell scripts that are provided with this setup guide
AddDisableLoopbackCheckRegKeyps1
o The following steps automate creating the registry key outlined as Method 2 in the Microsoft Knowledgebase article
httpsupportmicrosoftcomkb896861 using Windows PowerShell This key DisableLoopbackCheck will allow
you to browse SharePoint sites on the same machine Without this key (or following Method 1 in the KB article) you
would need to browse any SharePoint sites from a different computer than the one which SharePoint is installed on
ConfigureSpFarmForAppsps1
o Configures a SharePoint 2013 for hosting apps This ensures everything you need is installed running and
configured This is documented here httpmsdnmicrosoftcomen-uslibraryfp179923(v=office15)
CreateSpServiceAccountsps1
o Creates the minimal necessary service accounts for SharePoint Server 2013 SP_Farm SP_Content amp
SP_Services
SetupSharePointForHNSCps1
o Configures a SharePoint 2013 install for hosting Host-Named Site Collections (HNSC) This involves creating a Web
Application in SharePoint that has no host header bindings Using DNS all requests are mapped to this Web
Application You then create the site collections via PowerShell as you cant create HNSCs via the browser (Central
Administration)
Creating a SharePoint Server 2013 Environment for Development and Testing Version 10
copy Critical Path Training 2012 All Rights Reserved 63
wwwCriticalPathTrainingcom
Appendix 3 Create Sample Adventure Works Database
The following steps document downloading and installing the sample Adventure Works OLTP database provided by Microsoft
1 Launch Internet Explorer and navigate to httpmsftdbprodsamplescodeplexcom
2 Download the Adventure Works 2012 OLTP Script
3 Extract the ZIP into a folder on the desktop
4 Launch SQL Server Management Studio Start All Programs Microsoft SQL Server 2012 SQL Server Management Studio
5 When SQL Server Management Studio launches within the Connect to Server dialog login using the default settings and click Connect
6 Within SQL Server Management Studio select File Open File
7 Select the file instawdbsql from the extracted ZIP and click Open
8 If prompted to re-login to the database engine do it
9 Select Query SQLCMD Mode
10 Scroll down to line 42 the line that starts with the following
setvar SqlSamplesSourceDataPath
11 Change the folder location of where you unzipped the Adventure Works 2012 OLTP Script
12 Select Query Execute
13 When the script completes the AdventureWorks2012 database will have been created
Creating a SharePoint Server 2013 Environment for Development and Testing Version 10
copy Critical Path Training 2012 All Rights Reserved 64
wwwCriticalPathTrainingcom
Change Log
Change Version Description
August 22 2012 v 01 Pre-release for review
August 27 2012 v 02 Initial public release ndash install guide based on SharePoint Server Beta 2
August 28 2012 v 03 Updated URL for the site collection used to connect SharePoint to WAW
August 31 2012 v 04 Typo Removed SQL Server Analysis Services as part of the install Not required in a
SharePoint dev box (unless you are doing business intelligence which is not covered
in the guide)
Updated all references to Windows Azure Workflow to Workflow Manager the new
official name for the new workflow product
Updated SetupSharePointForHNSCps1 script to lookup HNSC Web Application by
name rather than URL which is more reliable
Typo Updated WingtipAllUp public NIC to use a different IP than the WingtipDC
Typo Replaced a reference to WingtipServer with WingtipDC
Typo Fixed handful of minor typos
September 1 2012 v 05 Removed SQL Server Reporting Services from install guide
Added step to uncheck IErsquos ldquoAutomatically detect proxyrdquo
Added post workflow install steps to setup User Profile Service Application to sync with
local Active Directory
September 5 2012 v 06 Added step to create a default root site collection in the HNSC web app
Updated minor typos and added extra notes for context
Updated PowerShell script SetupSharePointForHNSCps1 to remove content
database of default Web Application when setting up HNSC Web App
Added a new exercise 8 (after SharePoint install amp config and before the Workflow
install and config) to setup support for My Sites
October 20 2012 v 07 Updated script SetupSharePointForHNSCps1 to fix a bug where it would fail on line
111 if you didnrsquot already have a WINGTIPSP_Content managed account
Added section to bypass SharePointrsquos check for crlmicrosoftcom
Updated workflowrsquos registration PowerShell script to point to
httpintranetwingtipcom
Switched order of post-SharePoint install to setup HSNC hosting before configuring for
hosting apps
November 29 2012
v 10 Changed setup guide to use a single VM instead of two VMs
Updated guide for SharePoint 2013 RTM
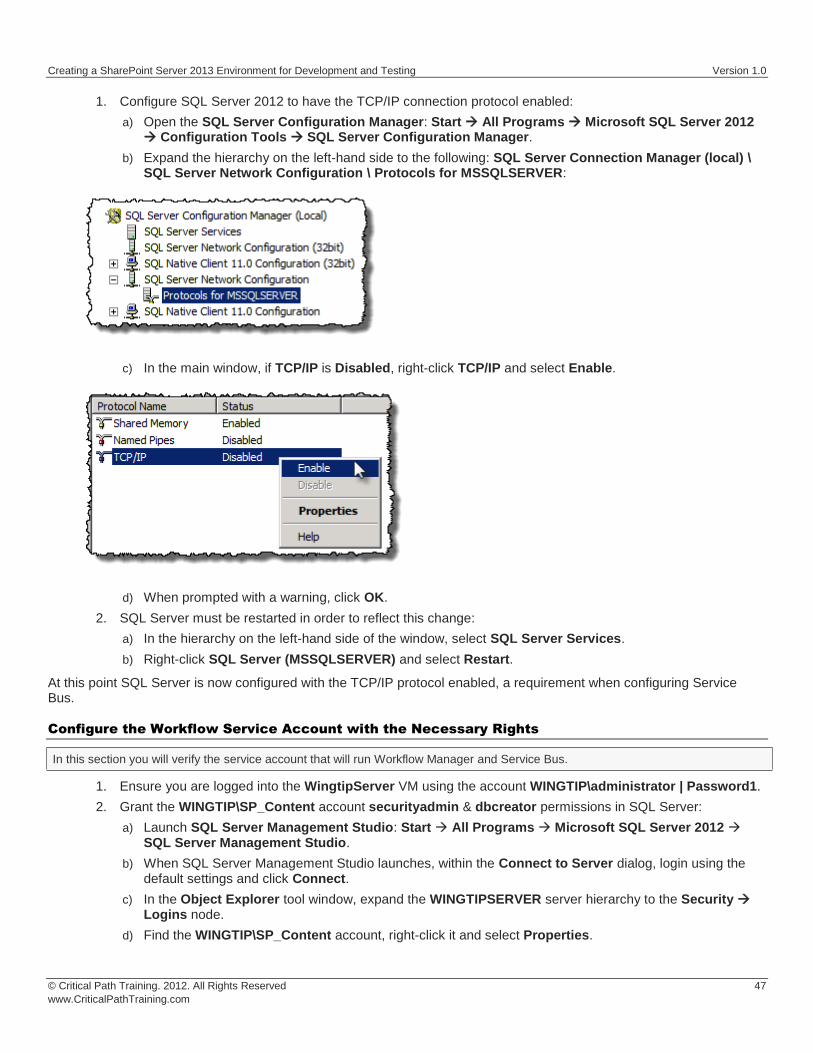
Creating a SharePoint Server 2013 Environment for Development and Testing Version 10
copy Critical Path Training 2012 All Rights Reserved 48
wwwCriticalPathTrainingcom
e) In the Select a page pane select Server Roles
f) Check securityadmin amp dbcreator and click OK
g) Close SQL Server Management Studio
3 Add the Workflow service account to the local administrators group
a) Open the Active Directory Users and Computers window Start Administrative Tools Active Directory Users and Computers
b) In the hierarchy on the left-hand side of the window expand it to the following Active Directory Users and Computers wingtipcom Builtin
c) In the main window right-click Administrators and select Properties
d) In the Administrators Properties dialog select the Members tab and click Add
e) In the Enter the object names to select box enter wingtipsp_content and click the Check Names button
f) In the Administrators Properties dialog click OK
g) Close the Active Directory Users and Computers window
At this point the service account that will host Workflow Manager and Service Bus has been configured correctly
Creating a SharePoint Server 2013 Environment for Development and Testing Version 10
copy Critical Path Training 2012 All Rights Reserved 49
wwwCriticalPathTrainingcom
Download amp Install Workflow Manager and Service Bus
In this section you will install Workflow Manager and Service Bus
1 Ensure you are logged into the WingtipServer VM using the account WINGTIPSP_Content | Password1
It is important you are logged in as the user that will run workflow when you install amp configure Workflow Manager and Service Bus
2 Launch the Web Platform Installer Start All Programs Microsoft Web Platform Installer
a) If the Web Platform Installer is not present on your machine you can download amp install it from here httpwwwmicrosoftcomwebdownloadsplatformaspx
If you do not have internet access within the virtual machine it is possible to download everything needed for workflow using the command line version of the Web Platform Installer (WebPICMD) You can get WebPICMD from httplearniisnetpageaspx1072web-platform-installer-v4-command-line-webpicmdexe-preview-release Specifically for
workflow enter the following command to download Workflow Beta 1 and all prerequisites
webpicmd offline ProductsWorkflow Pathc[path]
3 When the Web Platform Installer loads execute a search for Workflow select Workflow Manager 10 and click Add
4 Click the Install button at the bottom of the Web Platform Installer 40 window
5 On the Prerequisites page click I Accept
Note The Web Platform Installer 40 may prompt you to keep certain products updated using Microsoft Update If it does select Use Microsoft Update when I check for updates (recommended) and click Continue
6 When the installer completes the following dialog will appear Click Continue and then Finish to start the configuration process
Creating a SharePoint Server 2013 Environment for Development and Testing Version 10
copy Critical Path Training 2012 All Rights Reserved 50
wwwCriticalPathTrainingcom
At this point Workflow Manager amp Service Bus are installed
Configure Workflow Manager and Service Bus
In this section you will install Workflow Manager and Service Bus
1 If the Workflow Manager Configuration Wizard is not open open it Start All Programs Workflow Manager 10 Workflow Configuration
2 On the Welcome page click Configure Workflow Manager with Default Settings (Recommended)
Creating a SharePoint Server 2013 Environment for Development and Testing Version 10
copy Critical Path Training 2012 All Rights Reserved 51
wwwCriticalPathTrainingcom
3 On the New Farm Configuration page do the following
a) In the section Configure Service Account set the credentials to
i) User ID sp_contentwingtipcom
ii) Password Password1
b) Check the Allow Workflow management over HTTP on this computer checkbox
Ensure the username is entered in the fully qualified UPN format not as the default shows in the installer (sp_contentwingtip) or the domainusername format
In a production environment you should be doing everything over SSL
c) Click the Test Connection button to verify the connection credentials before proceeding
Creating a SharePoint Server 2013 Environment for Development and Testing Version 10
copy Critical Path Training 2012 All Rights Reserved 52
wwwCriticalPathTrainingcom
d) In the Certificate Generation Key and Confirm Certificate Generation Key enter Password1 into both fields
4 Click the right arrow in the bottom right corner to proceed
5 On the Summary page review your settings and click the check at the bottom right of the widow to start the configuration process
Creating a SharePoint Server 2013 Environment for Development and Testing Version 10
copy Critical Path Training 2012 All Rights Reserved 53
wwwCriticalPathTrainingcom
6 After a few minutes the Configuration Progress screen will show that everything has been configured correctly
Creating a SharePoint Server 2013 Environment for Development and Testing Version 10
copy Critical Path Training 2012 All Rights Reserved 54
wwwCriticalPathTrainingcom
7 Click the check in the bottom right corner
At this point Workflow Manager amp Service Bus has been installed and a new Workflow Manager farm has been created The next step is to connect the SharePoint 2013 farm to the Workflow Manager farm
Connect SharePoint 2013 to Workflow Manager
In this section you will connect SharePoint 2013 and Workflow Manager together
1 Ensure you are logged into the WingtipServer VM using the account WINGTIPadministrator | Password1
2 Get the Workflow Manager endpoint
a) Open the Workflow Manager PowerShell console Start All Programs Workflow Manager 10
b) Execute the Windows PowerShell following cmdlet
Get-WFFarm | ft HttpPort
c) Take note of this port (12291) This port number is what you will use to connect the SharePoint 2013 farm to the Workflow Manager 10 farm
In production you should connect to the HTTPS port listed in the HttpsPort property when you run Get-WFFarm
d) Close the Workflow Manager PowerShell window
3 Connect the SharePoint 2013 farm to Workflow Manager
Creating a SharePoint Server 2013 Environment for Development and Testing Version 10
copy Critical Path Training 2012 All Rights Reserved 55
wwwCriticalPathTrainingcom
a) Open SharePoint 2013 Management Shell Start All Programs Microsoft SharePoint 2013 Products SharePoint 2013 Management Shell
b) Execute the following Windows PowerShell script in the SharePoint 2013 Management Shell
Register-SPWorkflowService ndashSPSite httpintranetwingtipcom ndashWorkflowHostUri httpwingtipserver12291 ndashAllowOAuthHttp
This script is telling SharePoint the endpoint it should use to talk to Workflow Manager as well as Workflow Manager the SharePoint site collection it should talk to for calls into the CSOM It is also configuring all communication over HTTP rather than HTTPS for performance reasons In production you should always use HTTPS
This step will take a moment with no feedback during the process Be patient
c) Close the SharePoint 2013 Management Shell
At this point the SharePoint 2013 farm is connected to the Workflow Manager 10 farm
Configure SharePoint User Profile Service Application AD Sync
Users in SharePoint 2013 are validated by Workflow Manager against SharePoint to ensure they have permissions to start a workflow This is done by looking up the user by their AD UserPrincipalName (UPN) attribute in the User Profile Service Application (UPA) If no matching user is found the workflow will be automatically cancelled by Workflow Manager In this section you will setup UPA to connect amp sync with the local Active Directory so user accounts in AD will have their UPN synchronized to UPA
1 Open Central Administration Start All Programs Microsoft SharePoint 2013 Products SharePoint 2013 Central Administration
2 Go to the User Profile Service Application management page Application Management Manage Service Applications User Profile Service Application
3 The first step is to configure the User Profile Service Application to allow for Active Directory (AD) synchronization
a) Under Synchronization select Configure Synchronization Settings
b) For Synchronization select Use SharePoint Active Directory Import and click OK
4 Next establish a connection to the wingtipcom AD
a) Under Synchronization select Configure Synchronization Connections
b) On the Synchronization Connections page select Create New Connection
c) Enter the following values on this form and click OK
i) Connection Name WINGTIPCOM AD
ii) Type Active Directory Import
iii) Connection Settings
(1) Fully Qualified Domain Name wingtipcom
(2) Authentication Provider Type Windows Authentication
(3) Account Name WINGTIPAdministrator
(4) Password (and Confirm Password) Password1
iv) Containers
(1) Click Populate Containers
(2) After it loads check the box next to WINGTP or click the Select All button below the box
5 Go back to the User Profile Service Application management page Application Management Manage Service Applications User Profile Service Application
6 Finally start a synchronization import
a) Under Synchronization select Start Profile Synchronization
Creating a SharePoint Server 2013 Environment for Development and Testing Version 10
copy Critical Path Training 2012 All Rights Reserved 56
wwwCriticalPathTrainingcom
b) Select Start Full Synchronization and click OK
c) You will be taken back to the User Profile Service Application management page Notice in the top-right corner there is a status block that reports how many profiles are in the UPA database Refresh the page to see it increase to a handful of profiles as the import process runs
At this point you have successfully configured the User Profile Service Application to import profiles from the local AD
Exercise 8 Install the Microsoft Office 2013 Professional Clients
In this exercise you will install the Microsoft Office 2013 client applications
1 Download the Office 2013 into the WingtipServer VM For this you need to create an Office 365 Trial account login to Office 365 go to the Admin Dashboard and then download the latest version httpwwwmicrosoftcomofficepreviewentry-office-preview
2 Download the SharePoint Designer 2013 into the WingtipServer VM from here httpwwwmicrosoftcomen-usdownloaddetailsaspxid=35491
3 Download the Visio Professional 2013 into the WingtipServer VM from here httptechnetmicrosoftcomen-usevalcenterhh973399
Install Microsoft Office Professional Plus 2013
In this section you will install the Microsoft Office 2013 clients
1 Ensure you are logged into the WingtipServer VM using the account WINGTIPadministrator | Password1
2 Execute the installer OfficeProfessionalPlus_English_x64exe
3 On the Read the Microsoft Software License Terms dialog click the checkbox next to I accept the terms of this agreement and click Continue
4 On the Choose the installation you want dialog click the Install Now button
5 The installer will proceed and install all the Office products
6 When the installer completes click the Close button
7 Apply your Office Professional Plus 2013 license key
a) Launch Word 2013 Start All Programs Microsoft Office 2013 Word 2013
b) In the First things first dialog select Use recommended settings and click Accept
c) In the Welcome to Office dialog that opens click the [X] icon in the top-right corner to close it
d) In the left-hand pane click Open Other Documents
e) In the left-hand pane click Account
f) In the Product Information section within the Activation Required box click Change Product Key
g) Enter your license key for Office Professional Plus 2013 check the box next to Attempt to automatically activate my product online and click Install
h) Click OK
At this point you have installed Office Professional Plus 2013
Install Microsoft Office Visio 2013
In this section you will install Microsoft Office 2013 Visio
1 Ensure you are logged into the WingtipServer VM using the account WINGTIPadministrator | Password1
2 Execute the installer VisioProfessional_English_x64exe
3 On the Read the Microsoft Software License Terms dialog click the checkbox next to I accept the terms of this agreement and click Continue
Creating a SharePoint Server 2013 Environment for Development and Testing Version 10
copy Critical Path Training 2012 All Rights Reserved 57
wwwCriticalPathTrainingcom
4 On the Choose the installation you want dialog click the Install Now button
5 The installer will proceed and install all Visio 2013
6 When the installer completes click the Close button
7 Apply your Visio 2013 license key
a) Launch Visio 2013 Start All Programs Microsoft Office 2013 Visio 2013
b) In the First things first dialog select Use recommended settings and click Accept
c) In the Welcome to Office dialog that opens click the X icon in the top-right corner to close it
d) In the left-hand pane click Open Other Documents
e) In the left-hand pane click Account
f) In the Product Information section within the Activation Required box click Change Product Key
g) Enter your license key for Visio 2013 check the box next to Attempt to automatically activate my product online and click Install
h) Click OK
At this point you have installed Visio 2013
Install Microsoft Office 2013 SharePoint Designer
In this section you will install Microsoft Office 2013 SharePoint Designer
1 Ensure you are logged into the WingtipServer VM using the account WINGTIPadministrator | Password1
2 Execute the installer SharePointDesigner_English_x64exe
3 On the Read the Microsoft Software License Terms dialog click the checkbox next to I accept the terms of this agreement and click Continue
4 On the Choose the installation you want dialog click the Install Now button
5 The installer will proceed and install all SharePoint Designer 2013
6 When the installer completes click the Close button
At this point you have installed SharePoint Designer 2013
Exercise 9 Install Visual Studio 2012
In this exercise you will install Visual Studio 2012
1 Ensure you are logged into the WingtipServer VM using the account WINGTIPadministrator | Password1
2 Start the install of Visual Studio 2012 Ultimate Trial by downloading the installer from here httpwwwmicrosoftcomvisualstudio11en-usdownloads
3 On the installation splash screen check the box next to I agree to the License terms and conditions and click the Next button
Creating a SharePoint Server 2013 Environment for Development and Testing Version 10
copy Critical Path Training 2012 All Rights Reserved 58
wwwCriticalPathTrainingcom
4 On the Optional Features to install dialog click Install
5 After some time the installer will complete Click the Launch button to launch Visual Studio 2012
Creating a SharePoint Server 2013 Environment for Development and Testing Version 10
copy Critical Path Training 2012 All Rights Reserved 59
wwwCriticalPathTrainingcom
6 In the Choose Default Environment Settings select Visual C Development Settings and click Start Visual Studio
7 Close Visual Studio 2012
At this point Visual Studio 2012 RTM is installed
Install Office amp SharePoint 2013 Developer Tools
In this section you will install the Office and SharePoint 2013 developer tools for Visual Studio
1 Ensure you are logged into the WingtipServer VM using the account WINGTIPadministrator | Password1
2 Launch the Web Platform Installer Start All Programs Microsoft Web Platform Installer
3 In the search box at the top-right corner of the Web Platform Installer 40 window type sharepoint and press Enter
4 Click the Add button to the right of Microsoft Office Developer Tools for Visual Studio 2012 - Preview 2
5 Click the Install button at the bottom of the Web Platform Installer 40 window
6 On the Prerequisites page click I Accept
Creating a SharePoint Server 2013 Environment for Development and Testing Version 10
copy Critical Path Training 2012 All Rights Reserved 60
wwwCriticalPathTrainingcom
At this point you have installed the SharePoint 2013 amp Office 2013 development tools in Visual Studio 2012
Creating a SharePoint Server 2013 Environment for Development and Testing Version 10
copy Critical Path Training 2012 All Rights Reserved 61
wwwCriticalPathTrainingcom
Appendix 1 Download Manifest
The following lists everything referenced that you will or may need to download in this environment
Windows Server 2008 R2 with Service Pack 1 (installer ISO)
o httptechnetmicrosoftcomen-usevalcenterdd459137aspx
Windows Server 2008 R2 with Service Pack 1 (prebuilt VHD)
o httpwwwmicrosoftcomdownloadsdetailsaspxFamilyId=9040a4be-c3cf-44a5-9052-a70314452305
Windows Server 2008 R2 Service Pack 1
o httpwwwmicrosoftcomen-usdownloaddetailsaspxid=5842
SQL Server 2012 Trial
o httpwwwmicrosoftcombetaexperiencepdSQL2012EvalCTAenusdefaultaspx
SharePoint Server 2013
o httptechnetmicrosoftcomen-USevalcenterhh973397aspx
Hotfixes for SharePoint Server 2013 (post-install)
o KB2554876 The SharePoint Parsing Process Crashes in Windows Server 2008 R2
o KB2708075 IIS 75 Configurations are not Updated when you use the ServerManager Class to Commit
Configuration Changes
o KB2759112 Hotfix is Available for NET Framework 45 that Resolves an ASPNET Race Condition Issue in
Windows Server 2008 R2 Windows Server 2008 R2 SP1
o KB2765317 Hotfix is Available for NET Framework 45 that Resolves an ASPNET Race Condition Issue in
Windows 8 Windows RT and Windows Server 2012
Web Platform Installer
o httpwwwmicrosoftcomwebdownloadsplatformaspx
Web Platform Installer ndash Command Line Version
o httplearniisnetpageaspx1072web-platform-installer-v4-command-line-webpicmdexe-preview-release
Workflow Manager 10
o Download using the Microsoft Web Platform Installer
Office 2013
o httpwwwmicrosoftcomofficepreviewentry-office-preview
SharePoint Designer 2013
o httpwwwmicrosoftcomen-usdownloaddetailsaspxid=35491
Visio Professional 2013
o httptechnetmicrosoftcomen-usevalcenterhh973399
Visual Studio 2012
o httpwwwmicrosoftcomvisualstudio11en-usdownloads
Office Developer Tools for Visual Studio 2012 ndash Preview 2
o Download using the Microsoft Web Platform Installer
Creating a SharePoint Server 2013 Environment for Development and Testing Version 10
copy Critical Path Training 2012 All Rights Reserved 62
wwwCriticalPathTrainingcom
Appendix 2 Windows PowerShell Script Manifest
The following lists all Windows PowerShell scripts that are provided with this setup guide
AddDisableLoopbackCheckRegKeyps1
o The following steps automate creating the registry key outlined as Method 2 in the Microsoft Knowledgebase article
httpsupportmicrosoftcomkb896861 using Windows PowerShell This key DisableLoopbackCheck will allow
you to browse SharePoint sites on the same machine Without this key (or following Method 1 in the KB article) you
would need to browse any SharePoint sites from a different computer than the one which SharePoint is installed on
ConfigureSpFarmForAppsps1
o Configures a SharePoint 2013 for hosting apps This ensures everything you need is installed running and
configured This is documented here httpmsdnmicrosoftcomen-uslibraryfp179923(v=office15)
CreateSpServiceAccountsps1
o Creates the minimal necessary service accounts for SharePoint Server 2013 SP_Farm SP_Content amp
SP_Services
SetupSharePointForHNSCps1
o Configures a SharePoint 2013 install for hosting Host-Named Site Collections (HNSC) This involves creating a Web
Application in SharePoint that has no host header bindings Using DNS all requests are mapped to this Web
Application You then create the site collections via PowerShell as you cant create HNSCs via the browser (Central
Administration)
Creating a SharePoint Server 2013 Environment for Development and Testing Version 10
copy Critical Path Training 2012 All Rights Reserved 63
wwwCriticalPathTrainingcom
Appendix 3 Create Sample Adventure Works Database
The following steps document downloading and installing the sample Adventure Works OLTP database provided by Microsoft
1 Launch Internet Explorer and navigate to httpmsftdbprodsamplescodeplexcom
2 Download the Adventure Works 2012 OLTP Script
3 Extract the ZIP into a folder on the desktop
4 Launch SQL Server Management Studio Start All Programs Microsoft SQL Server 2012 SQL Server Management Studio
5 When SQL Server Management Studio launches within the Connect to Server dialog login using the default settings and click Connect
6 Within SQL Server Management Studio select File Open File
7 Select the file instawdbsql from the extracted ZIP and click Open
8 If prompted to re-login to the database engine do it
9 Select Query SQLCMD Mode
10 Scroll down to line 42 the line that starts with the following
setvar SqlSamplesSourceDataPath
11 Change the folder location of where you unzipped the Adventure Works 2012 OLTP Script
12 Select Query Execute
13 When the script completes the AdventureWorks2012 database will have been created
Creating a SharePoint Server 2013 Environment for Development and Testing Version 10
copy Critical Path Training 2012 All Rights Reserved 64
wwwCriticalPathTrainingcom
Change Log
Change Version Description
August 22 2012 v 01 Pre-release for review
August 27 2012 v 02 Initial public release ndash install guide based on SharePoint Server Beta 2
August 28 2012 v 03 Updated URL for the site collection used to connect SharePoint to WAW
August 31 2012 v 04 Typo Removed SQL Server Analysis Services as part of the install Not required in a
SharePoint dev box (unless you are doing business intelligence which is not covered
in the guide)
Updated all references to Windows Azure Workflow to Workflow Manager the new
official name for the new workflow product
Updated SetupSharePointForHNSCps1 script to lookup HNSC Web Application by
name rather than URL which is more reliable
Typo Updated WingtipAllUp public NIC to use a different IP than the WingtipDC
Typo Replaced a reference to WingtipServer with WingtipDC
Typo Fixed handful of minor typos
September 1 2012 v 05 Removed SQL Server Reporting Services from install guide
Added step to uncheck IErsquos ldquoAutomatically detect proxyrdquo
Added post workflow install steps to setup User Profile Service Application to sync with
local Active Directory
September 5 2012 v 06 Added step to create a default root site collection in the HNSC web app
Updated minor typos and added extra notes for context
Updated PowerShell script SetupSharePointForHNSCps1 to remove content
database of default Web Application when setting up HNSC Web App
Added a new exercise 8 (after SharePoint install amp config and before the Workflow
install and config) to setup support for My Sites
October 20 2012 v 07 Updated script SetupSharePointForHNSCps1 to fix a bug where it would fail on line
111 if you didnrsquot already have a WINGTIPSP_Content managed account
Added section to bypass SharePointrsquos check for crlmicrosoftcom
Updated workflowrsquos registration PowerShell script to point to
httpintranetwingtipcom
Switched order of post-SharePoint install to setup HSNC hosting before configuring for
hosting apps
November 29 2012
v 10 Changed setup guide to use a single VM instead of two VMs
Updated guide for SharePoint 2013 RTM
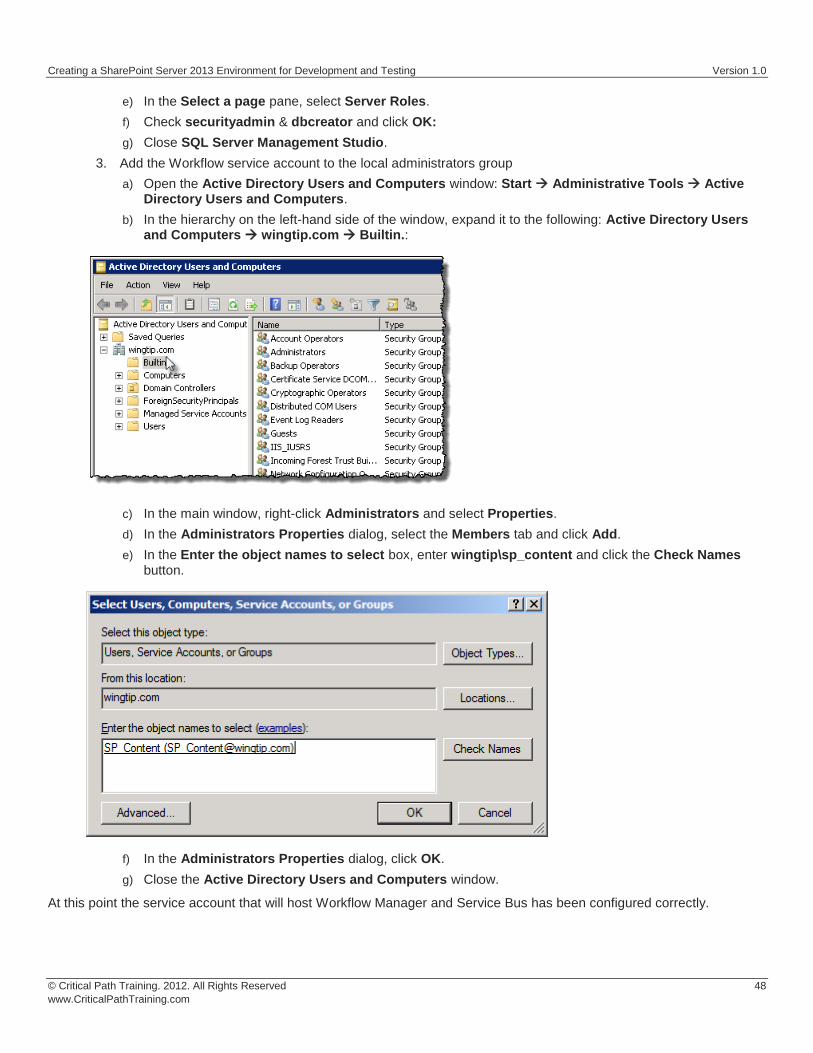
Creating a SharePoint Server 2013 Environment for Development and Testing Version 10
copy Critical Path Training 2012 All Rights Reserved 50
wwwCriticalPathTrainingcom
At this point Workflow Manager amp Service Bus are installed
Configure Workflow Manager and Service Bus
In this section you will install Workflow Manager and Service Bus
1 If the Workflow Manager Configuration Wizard is not open open it Start All Programs Workflow Manager 10 Workflow Configuration
2 On the Welcome page click Configure Workflow Manager with Default Settings (Recommended)
Creating a SharePoint Server 2013 Environment for Development and Testing Version 10
copy Critical Path Training 2012 All Rights Reserved 51
wwwCriticalPathTrainingcom
3 On the New Farm Configuration page do the following
a) In the section Configure Service Account set the credentials to
i) User ID sp_contentwingtipcom
ii) Password Password1
b) Check the Allow Workflow management over HTTP on this computer checkbox
Ensure the username is entered in the fully qualified UPN format not as the default shows in the installer (sp_contentwingtip) or the domainusername format
In a production environment you should be doing everything over SSL
c) Click the Test Connection button to verify the connection credentials before proceeding
Creating a SharePoint Server 2013 Environment for Development and Testing Version 10
copy Critical Path Training 2012 All Rights Reserved 52
wwwCriticalPathTrainingcom
d) In the Certificate Generation Key and Confirm Certificate Generation Key enter Password1 into both fields
4 Click the right arrow in the bottom right corner to proceed
5 On the Summary page review your settings and click the check at the bottom right of the widow to start the configuration process
Creating a SharePoint Server 2013 Environment for Development and Testing Version 10
copy Critical Path Training 2012 All Rights Reserved 53
wwwCriticalPathTrainingcom
6 After a few minutes the Configuration Progress screen will show that everything has been configured correctly
Creating a SharePoint Server 2013 Environment for Development and Testing Version 10
copy Critical Path Training 2012 All Rights Reserved 54
wwwCriticalPathTrainingcom
7 Click the check in the bottom right corner
At this point Workflow Manager amp Service Bus has been installed and a new Workflow Manager farm has been created The next step is to connect the SharePoint 2013 farm to the Workflow Manager farm
Connect SharePoint 2013 to Workflow Manager
In this section you will connect SharePoint 2013 and Workflow Manager together
1 Ensure you are logged into the WingtipServer VM using the account WINGTIPadministrator | Password1
2 Get the Workflow Manager endpoint
a) Open the Workflow Manager PowerShell console Start All Programs Workflow Manager 10
b) Execute the Windows PowerShell following cmdlet
Get-WFFarm | ft HttpPort
c) Take note of this port (12291) This port number is what you will use to connect the SharePoint 2013 farm to the Workflow Manager 10 farm
In production you should connect to the HTTPS port listed in the HttpsPort property when you run Get-WFFarm
d) Close the Workflow Manager PowerShell window
3 Connect the SharePoint 2013 farm to Workflow Manager
Creating a SharePoint Server 2013 Environment for Development and Testing Version 10
copy Critical Path Training 2012 All Rights Reserved 55
wwwCriticalPathTrainingcom
a) Open SharePoint 2013 Management Shell Start All Programs Microsoft SharePoint 2013 Products SharePoint 2013 Management Shell
b) Execute the following Windows PowerShell script in the SharePoint 2013 Management Shell
Register-SPWorkflowService ndashSPSite httpintranetwingtipcom ndashWorkflowHostUri httpwingtipserver12291 ndashAllowOAuthHttp
This script is telling SharePoint the endpoint it should use to talk to Workflow Manager as well as Workflow Manager the SharePoint site collection it should talk to for calls into the CSOM It is also configuring all communication over HTTP rather than HTTPS for performance reasons In production you should always use HTTPS
This step will take a moment with no feedback during the process Be patient
c) Close the SharePoint 2013 Management Shell
At this point the SharePoint 2013 farm is connected to the Workflow Manager 10 farm
Configure SharePoint User Profile Service Application AD Sync
Users in SharePoint 2013 are validated by Workflow Manager against SharePoint to ensure they have permissions to start a workflow This is done by looking up the user by their AD UserPrincipalName (UPN) attribute in the User Profile Service Application (UPA) If no matching user is found the workflow will be automatically cancelled by Workflow Manager In this section you will setup UPA to connect amp sync with the local Active Directory so user accounts in AD will have their UPN synchronized to UPA
1 Open Central Administration Start All Programs Microsoft SharePoint 2013 Products SharePoint 2013 Central Administration
2 Go to the User Profile Service Application management page Application Management Manage Service Applications User Profile Service Application
3 The first step is to configure the User Profile Service Application to allow for Active Directory (AD) synchronization
a) Under Synchronization select Configure Synchronization Settings
b) For Synchronization select Use SharePoint Active Directory Import and click OK
4 Next establish a connection to the wingtipcom AD
a) Under Synchronization select Configure Synchronization Connections
b) On the Synchronization Connections page select Create New Connection
c) Enter the following values on this form and click OK
i) Connection Name WINGTIPCOM AD
ii) Type Active Directory Import
iii) Connection Settings
(1) Fully Qualified Domain Name wingtipcom
(2) Authentication Provider Type Windows Authentication
(3) Account Name WINGTIPAdministrator
(4) Password (and Confirm Password) Password1
iv) Containers
(1) Click Populate Containers
(2) After it loads check the box next to WINGTP or click the Select All button below the box
5 Go back to the User Profile Service Application management page Application Management Manage Service Applications User Profile Service Application
6 Finally start a synchronization import
a) Under Synchronization select Start Profile Synchronization
Creating a SharePoint Server 2013 Environment for Development and Testing Version 10
copy Critical Path Training 2012 All Rights Reserved 56
wwwCriticalPathTrainingcom
b) Select Start Full Synchronization and click OK
c) You will be taken back to the User Profile Service Application management page Notice in the top-right corner there is a status block that reports how many profiles are in the UPA database Refresh the page to see it increase to a handful of profiles as the import process runs
At this point you have successfully configured the User Profile Service Application to import profiles from the local AD
Exercise 8 Install the Microsoft Office 2013 Professional Clients
In this exercise you will install the Microsoft Office 2013 client applications
1 Download the Office 2013 into the WingtipServer VM For this you need to create an Office 365 Trial account login to Office 365 go to the Admin Dashboard and then download the latest version httpwwwmicrosoftcomofficepreviewentry-office-preview
2 Download the SharePoint Designer 2013 into the WingtipServer VM from here httpwwwmicrosoftcomen-usdownloaddetailsaspxid=35491
3 Download the Visio Professional 2013 into the WingtipServer VM from here httptechnetmicrosoftcomen-usevalcenterhh973399
Install Microsoft Office Professional Plus 2013
In this section you will install the Microsoft Office 2013 clients
1 Ensure you are logged into the WingtipServer VM using the account WINGTIPadministrator | Password1
2 Execute the installer OfficeProfessionalPlus_English_x64exe
3 On the Read the Microsoft Software License Terms dialog click the checkbox next to I accept the terms of this agreement and click Continue
4 On the Choose the installation you want dialog click the Install Now button
5 The installer will proceed and install all the Office products
6 When the installer completes click the Close button
7 Apply your Office Professional Plus 2013 license key
a) Launch Word 2013 Start All Programs Microsoft Office 2013 Word 2013
b) In the First things first dialog select Use recommended settings and click Accept
c) In the Welcome to Office dialog that opens click the [X] icon in the top-right corner to close it
d) In the left-hand pane click Open Other Documents
e) In the left-hand pane click Account
f) In the Product Information section within the Activation Required box click Change Product Key
g) Enter your license key for Office Professional Plus 2013 check the box next to Attempt to automatically activate my product online and click Install
h) Click OK
At this point you have installed Office Professional Plus 2013
Install Microsoft Office Visio 2013
In this section you will install Microsoft Office 2013 Visio
1 Ensure you are logged into the WingtipServer VM using the account WINGTIPadministrator | Password1
2 Execute the installer VisioProfessional_English_x64exe
3 On the Read the Microsoft Software License Terms dialog click the checkbox next to I accept the terms of this agreement and click Continue
Creating a SharePoint Server 2013 Environment for Development and Testing Version 10
copy Critical Path Training 2012 All Rights Reserved 57
wwwCriticalPathTrainingcom
4 On the Choose the installation you want dialog click the Install Now button
5 The installer will proceed and install all Visio 2013
6 When the installer completes click the Close button
7 Apply your Visio 2013 license key
a) Launch Visio 2013 Start All Programs Microsoft Office 2013 Visio 2013
b) In the First things first dialog select Use recommended settings and click Accept
c) In the Welcome to Office dialog that opens click the X icon in the top-right corner to close it
d) In the left-hand pane click Open Other Documents
e) In the left-hand pane click Account
f) In the Product Information section within the Activation Required box click Change Product Key
g) Enter your license key for Visio 2013 check the box next to Attempt to automatically activate my product online and click Install
h) Click OK
At this point you have installed Visio 2013
Install Microsoft Office 2013 SharePoint Designer
In this section you will install Microsoft Office 2013 SharePoint Designer
1 Ensure you are logged into the WingtipServer VM using the account WINGTIPadministrator | Password1
2 Execute the installer SharePointDesigner_English_x64exe
3 On the Read the Microsoft Software License Terms dialog click the checkbox next to I accept the terms of this agreement and click Continue
4 On the Choose the installation you want dialog click the Install Now button
5 The installer will proceed and install all SharePoint Designer 2013
6 When the installer completes click the Close button
At this point you have installed SharePoint Designer 2013
Exercise 9 Install Visual Studio 2012
In this exercise you will install Visual Studio 2012
1 Ensure you are logged into the WingtipServer VM using the account WINGTIPadministrator | Password1
2 Start the install of Visual Studio 2012 Ultimate Trial by downloading the installer from here httpwwwmicrosoftcomvisualstudio11en-usdownloads
3 On the installation splash screen check the box next to I agree to the License terms and conditions and click the Next button
Creating a SharePoint Server 2013 Environment for Development and Testing Version 10
copy Critical Path Training 2012 All Rights Reserved 58
wwwCriticalPathTrainingcom
4 On the Optional Features to install dialog click Install
5 After some time the installer will complete Click the Launch button to launch Visual Studio 2012
Creating a SharePoint Server 2013 Environment for Development and Testing Version 10
copy Critical Path Training 2012 All Rights Reserved 59
wwwCriticalPathTrainingcom
6 In the Choose Default Environment Settings select Visual C Development Settings and click Start Visual Studio
7 Close Visual Studio 2012
At this point Visual Studio 2012 RTM is installed
Install Office amp SharePoint 2013 Developer Tools
In this section you will install the Office and SharePoint 2013 developer tools for Visual Studio
1 Ensure you are logged into the WingtipServer VM using the account WINGTIPadministrator | Password1
2 Launch the Web Platform Installer Start All Programs Microsoft Web Platform Installer
3 In the search box at the top-right corner of the Web Platform Installer 40 window type sharepoint and press Enter
4 Click the Add button to the right of Microsoft Office Developer Tools for Visual Studio 2012 - Preview 2
5 Click the Install button at the bottom of the Web Platform Installer 40 window
6 On the Prerequisites page click I Accept
Creating a SharePoint Server 2013 Environment for Development and Testing Version 10
copy Critical Path Training 2012 All Rights Reserved 60
wwwCriticalPathTrainingcom
At this point you have installed the SharePoint 2013 amp Office 2013 development tools in Visual Studio 2012
Creating a SharePoint Server 2013 Environment for Development and Testing Version 10
copy Critical Path Training 2012 All Rights Reserved 61
wwwCriticalPathTrainingcom
Appendix 1 Download Manifest
The following lists everything referenced that you will or may need to download in this environment
Windows Server 2008 R2 with Service Pack 1 (installer ISO)
o httptechnetmicrosoftcomen-usevalcenterdd459137aspx
Windows Server 2008 R2 with Service Pack 1 (prebuilt VHD)
o httpwwwmicrosoftcomdownloadsdetailsaspxFamilyId=9040a4be-c3cf-44a5-9052-a70314452305
Windows Server 2008 R2 Service Pack 1
o httpwwwmicrosoftcomen-usdownloaddetailsaspxid=5842
SQL Server 2012 Trial
o httpwwwmicrosoftcombetaexperiencepdSQL2012EvalCTAenusdefaultaspx
SharePoint Server 2013
o httptechnetmicrosoftcomen-USevalcenterhh973397aspx
Hotfixes for SharePoint Server 2013 (post-install)
o KB2554876 The SharePoint Parsing Process Crashes in Windows Server 2008 R2
o KB2708075 IIS 75 Configurations are not Updated when you use the ServerManager Class to Commit
Configuration Changes
o KB2759112 Hotfix is Available for NET Framework 45 that Resolves an ASPNET Race Condition Issue in
Windows Server 2008 R2 Windows Server 2008 R2 SP1
o KB2765317 Hotfix is Available for NET Framework 45 that Resolves an ASPNET Race Condition Issue in
Windows 8 Windows RT and Windows Server 2012
Web Platform Installer
o httpwwwmicrosoftcomwebdownloadsplatformaspx
Web Platform Installer ndash Command Line Version
o httplearniisnetpageaspx1072web-platform-installer-v4-command-line-webpicmdexe-preview-release
Workflow Manager 10
o Download using the Microsoft Web Platform Installer
Office 2013
o httpwwwmicrosoftcomofficepreviewentry-office-preview
SharePoint Designer 2013
o httpwwwmicrosoftcomen-usdownloaddetailsaspxid=35491
Visio Professional 2013
o httptechnetmicrosoftcomen-usevalcenterhh973399
Visual Studio 2012
o httpwwwmicrosoftcomvisualstudio11en-usdownloads
Office Developer Tools for Visual Studio 2012 ndash Preview 2
o Download using the Microsoft Web Platform Installer
Creating a SharePoint Server 2013 Environment for Development and Testing Version 10
copy Critical Path Training 2012 All Rights Reserved 62
wwwCriticalPathTrainingcom
Appendix 2 Windows PowerShell Script Manifest
The following lists all Windows PowerShell scripts that are provided with this setup guide
AddDisableLoopbackCheckRegKeyps1
o The following steps automate creating the registry key outlined as Method 2 in the Microsoft Knowledgebase article
httpsupportmicrosoftcomkb896861 using Windows PowerShell This key DisableLoopbackCheck will allow
you to browse SharePoint sites on the same machine Without this key (or following Method 1 in the KB article) you
would need to browse any SharePoint sites from a different computer than the one which SharePoint is installed on
ConfigureSpFarmForAppsps1
o Configures a SharePoint 2013 for hosting apps This ensures everything you need is installed running and
configured This is documented here httpmsdnmicrosoftcomen-uslibraryfp179923(v=office15)
CreateSpServiceAccountsps1
o Creates the minimal necessary service accounts for SharePoint Server 2013 SP_Farm SP_Content amp
SP_Services
SetupSharePointForHNSCps1
o Configures a SharePoint 2013 install for hosting Host-Named Site Collections (HNSC) This involves creating a Web
Application in SharePoint that has no host header bindings Using DNS all requests are mapped to this Web
Application You then create the site collections via PowerShell as you cant create HNSCs via the browser (Central
Administration)
Creating a SharePoint Server 2013 Environment for Development and Testing Version 10
copy Critical Path Training 2012 All Rights Reserved 63
wwwCriticalPathTrainingcom
Appendix 3 Create Sample Adventure Works Database
The following steps document downloading and installing the sample Adventure Works OLTP database provided by Microsoft
1 Launch Internet Explorer and navigate to httpmsftdbprodsamplescodeplexcom
2 Download the Adventure Works 2012 OLTP Script
3 Extract the ZIP into a folder on the desktop
4 Launch SQL Server Management Studio Start All Programs Microsoft SQL Server 2012 SQL Server Management Studio
5 When SQL Server Management Studio launches within the Connect to Server dialog login using the default settings and click Connect
6 Within SQL Server Management Studio select File Open File
7 Select the file instawdbsql from the extracted ZIP and click Open
8 If prompted to re-login to the database engine do it
9 Select Query SQLCMD Mode
10 Scroll down to line 42 the line that starts with the following
setvar SqlSamplesSourceDataPath
11 Change the folder location of where you unzipped the Adventure Works 2012 OLTP Script
12 Select Query Execute
13 When the script completes the AdventureWorks2012 database will have been created
Creating a SharePoint Server 2013 Environment for Development and Testing Version 10
copy Critical Path Training 2012 All Rights Reserved 64
wwwCriticalPathTrainingcom
Change Log
Change Version Description
August 22 2012 v 01 Pre-release for review
August 27 2012 v 02 Initial public release ndash install guide based on SharePoint Server Beta 2
August 28 2012 v 03 Updated URL for the site collection used to connect SharePoint to WAW
August 31 2012 v 04 Typo Removed SQL Server Analysis Services as part of the install Not required in a
SharePoint dev box (unless you are doing business intelligence which is not covered
in the guide)
Updated all references to Windows Azure Workflow to Workflow Manager the new
official name for the new workflow product
Updated SetupSharePointForHNSCps1 script to lookup HNSC Web Application by
name rather than URL which is more reliable
Typo Updated WingtipAllUp public NIC to use a different IP than the WingtipDC
Typo Replaced a reference to WingtipServer with WingtipDC
Typo Fixed handful of minor typos
September 1 2012 v 05 Removed SQL Server Reporting Services from install guide
Added step to uncheck IErsquos ldquoAutomatically detect proxyrdquo
Added post workflow install steps to setup User Profile Service Application to sync with
local Active Directory
September 5 2012 v 06 Added step to create a default root site collection in the HNSC web app
Updated minor typos and added extra notes for context
Updated PowerShell script SetupSharePointForHNSCps1 to remove content
database of default Web Application when setting up HNSC Web App
Added a new exercise 8 (after SharePoint install amp config and before the Workflow
install and config) to setup support for My Sites
October 20 2012 v 07 Updated script SetupSharePointForHNSCps1 to fix a bug where it would fail on line
111 if you didnrsquot already have a WINGTIPSP_Content managed account
Added section to bypass SharePointrsquos check for crlmicrosoftcom
Updated workflowrsquos registration PowerShell script to point to
httpintranetwingtipcom
Switched order of post-SharePoint install to setup HSNC hosting before configuring for
hosting apps
November 29 2012
v 10 Changed setup guide to use a single VM instead of two VMs
Updated guide for SharePoint 2013 RTM
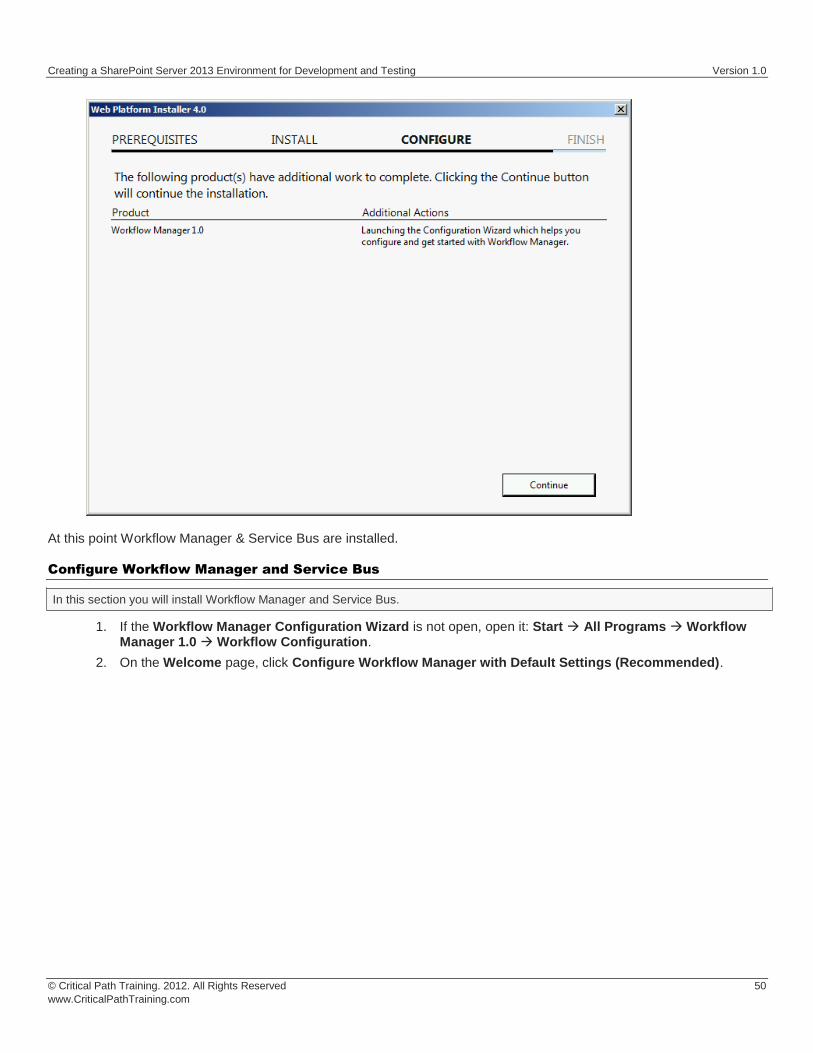
Creating a SharePoint Server 2013 Environment for Development and Testing Version 10
copy Critical Path Training 2012 All Rights Reserved 52
wwwCriticalPathTrainingcom
d) In the Certificate Generation Key and Confirm Certificate Generation Key enter Password1 into both fields
4 Click the right arrow in the bottom right corner to proceed
5 On the Summary page review your settings and click the check at the bottom right of the widow to start the configuration process
Creating a SharePoint Server 2013 Environment for Development and Testing Version 10
copy Critical Path Training 2012 All Rights Reserved 53
wwwCriticalPathTrainingcom
6 After a few minutes the Configuration Progress screen will show that everything has been configured correctly
Creating a SharePoint Server 2013 Environment for Development and Testing Version 10
copy Critical Path Training 2012 All Rights Reserved 54
wwwCriticalPathTrainingcom
7 Click the check in the bottom right corner
At this point Workflow Manager amp Service Bus has been installed and a new Workflow Manager farm has been created The next step is to connect the SharePoint 2013 farm to the Workflow Manager farm
Connect SharePoint 2013 to Workflow Manager
In this section you will connect SharePoint 2013 and Workflow Manager together
1 Ensure you are logged into the WingtipServer VM using the account WINGTIPadministrator | Password1
2 Get the Workflow Manager endpoint
a) Open the Workflow Manager PowerShell console Start All Programs Workflow Manager 10
b) Execute the Windows PowerShell following cmdlet
Get-WFFarm | ft HttpPort
c) Take note of this port (12291) This port number is what you will use to connect the SharePoint 2013 farm to the Workflow Manager 10 farm
In production you should connect to the HTTPS port listed in the HttpsPort property when you run Get-WFFarm
d) Close the Workflow Manager PowerShell window
3 Connect the SharePoint 2013 farm to Workflow Manager
Creating a SharePoint Server 2013 Environment for Development and Testing Version 10
copy Critical Path Training 2012 All Rights Reserved 55
wwwCriticalPathTrainingcom
a) Open SharePoint 2013 Management Shell Start All Programs Microsoft SharePoint 2013 Products SharePoint 2013 Management Shell
b) Execute the following Windows PowerShell script in the SharePoint 2013 Management Shell
Register-SPWorkflowService ndashSPSite httpintranetwingtipcom ndashWorkflowHostUri httpwingtipserver12291 ndashAllowOAuthHttp
This script is telling SharePoint the endpoint it should use to talk to Workflow Manager as well as Workflow Manager the SharePoint site collection it should talk to for calls into the CSOM It is also configuring all communication over HTTP rather than HTTPS for performance reasons In production you should always use HTTPS
This step will take a moment with no feedback during the process Be patient
c) Close the SharePoint 2013 Management Shell
At this point the SharePoint 2013 farm is connected to the Workflow Manager 10 farm
Configure SharePoint User Profile Service Application AD Sync
Users in SharePoint 2013 are validated by Workflow Manager against SharePoint to ensure they have permissions to start a workflow This is done by looking up the user by their AD UserPrincipalName (UPN) attribute in the User Profile Service Application (UPA) If no matching user is found the workflow will be automatically cancelled by Workflow Manager In this section you will setup UPA to connect amp sync with the local Active Directory so user accounts in AD will have their UPN synchronized to UPA
1 Open Central Administration Start All Programs Microsoft SharePoint 2013 Products SharePoint 2013 Central Administration
2 Go to the User Profile Service Application management page Application Management Manage Service Applications User Profile Service Application
3 The first step is to configure the User Profile Service Application to allow for Active Directory (AD) synchronization
a) Under Synchronization select Configure Synchronization Settings
b) For Synchronization select Use SharePoint Active Directory Import and click OK
4 Next establish a connection to the wingtipcom AD
a) Under Synchronization select Configure Synchronization Connections
b) On the Synchronization Connections page select Create New Connection
c) Enter the following values on this form and click OK
i) Connection Name WINGTIPCOM AD
ii) Type Active Directory Import
iii) Connection Settings
(1) Fully Qualified Domain Name wingtipcom
(2) Authentication Provider Type Windows Authentication
(3) Account Name WINGTIPAdministrator
(4) Password (and Confirm Password) Password1
iv) Containers
(1) Click Populate Containers
(2) After it loads check the box next to WINGTP or click the Select All button below the box
5 Go back to the User Profile Service Application management page Application Management Manage Service Applications User Profile Service Application
6 Finally start a synchronization import
a) Under Synchronization select Start Profile Synchronization
Creating a SharePoint Server 2013 Environment for Development and Testing Version 10
copy Critical Path Training 2012 All Rights Reserved 56
wwwCriticalPathTrainingcom
b) Select Start Full Synchronization and click OK
c) You will be taken back to the User Profile Service Application management page Notice in the top-right corner there is a status block that reports how many profiles are in the UPA database Refresh the page to see it increase to a handful of profiles as the import process runs
At this point you have successfully configured the User Profile Service Application to import profiles from the local AD
Exercise 8 Install the Microsoft Office 2013 Professional Clients
In this exercise you will install the Microsoft Office 2013 client applications
1 Download the Office 2013 into the WingtipServer VM For this you need to create an Office 365 Trial account login to Office 365 go to the Admin Dashboard and then download the latest version httpwwwmicrosoftcomofficepreviewentry-office-preview
2 Download the SharePoint Designer 2013 into the WingtipServer VM from here httpwwwmicrosoftcomen-usdownloaddetailsaspxid=35491
3 Download the Visio Professional 2013 into the WingtipServer VM from here httptechnetmicrosoftcomen-usevalcenterhh973399
Install Microsoft Office Professional Plus 2013
In this section you will install the Microsoft Office 2013 clients
1 Ensure you are logged into the WingtipServer VM using the account WINGTIPadministrator | Password1
2 Execute the installer OfficeProfessionalPlus_English_x64exe
3 On the Read the Microsoft Software License Terms dialog click the checkbox next to I accept the terms of this agreement and click Continue
4 On the Choose the installation you want dialog click the Install Now button
5 The installer will proceed and install all the Office products
6 When the installer completes click the Close button
7 Apply your Office Professional Plus 2013 license key
a) Launch Word 2013 Start All Programs Microsoft Office 2013 Word 2013
b) In the First things first dialog select Use recommended settings and click Accept
c) In the Welcome to Office dialog that opens click the [X] icon in the top-right corner to close it
d) In the left-hand pane click Open Other Documents
e) In the left-hand pane click Account
f) In the Product Information section within the Activation Required box click Change Product Key
g) Enter your license key for Office Professional Plus 2013 check the box next to Attempt to automatically activate my product online and click Install
h) Click OK
At this point you have installed Office Professional Plus 2013
Install Microsoft Office Visio 2013
In this section you will install Microsoft Office 2013 Visio
1 Ensure you are logged into the WingtipServer VM using the account WINGTIPadministrator | Password1
2 Execute the installer VisioProfessional_English_x64exe
3 On the Read the Microsoft Software License Terms dialog click the checkbox next to I accept the terms of this agreement and click Continue
Creating a SharePoint Server 2013 Environment for Development and Testing Version 10
copy Critical Path Training 2012 All Rights Reserved 57
wwwCriticalPathTrainingcom
4 On the Choose the installation you want dialog click the Install Now button
5 The installer will proceed and install all Visio 2013
6 When the installer completes click the Close button
7 Apply your Visio 2013 license key
a) Launch Visio 2013 Start All Programs Microsoft Office 2013 Visio 2013
b) In the First things first dialog select Use recommended settings and click Accept
c) In the Welcome to Office dialog that opens click the X icon in the top-right corner to close it
d) In the left-hand pane click Open Other Documents
e) In the left-hand pane click Account
f) In the Product Information section within the Activation Required box click Change Product Key
g) Enter your license key for Visio 2013 check the box next to Attempt to automatically activate my product online and click Install
h) Click OK
At this point you have installed Visio 2013
Install Microsoft Office 2013 SharePoint Designer
In this section you will install Microsoft Office 2013 SharePoint Designer
1 Ensure you are logged into the WingtipServer VM using the account WINGTIPadministrator | Password1
2 Execute the installer SharePointDesigner_English_x64exe
3 On the Read the Microsoft Software License Terms dialog click the checkbox next to I accept the terms of this agreement and click Continue
4 On the Choose the installation you want dialog click the Install Now button
5 The installer will proceed and install all SharePoint Designer 2013
6 When the installer completes click the Close button
At this point you have installed SharePoint Designer 2013
Exercise 9 Install Visual Studio 2012
In this exercise you will install Visual Studio 2012
1 Ensure you are logged into the WingtipServer VM using the account WINGTIPadministrator | Password1
2 Start the install of Visual Studio 2012 Ultimate Trial by downloading the installer from here httpwwwmicrosoftcomvisualstudio11en-usdownloads
3 On the installation splash screen check the box next to I agree to the License terms and conditions and click the Next button
Creating a SharePoint Server 2013 Environment for Development and Testing Version 10
copy Critical Path Training 2012 All Rights Reserved 58
wwwCriticalPathTrainingcom
4 On the Optional Features to install dialog click Install
5 After some time the installer will complete Click the Launch button to launch Visual Studio 2012
Creating a SharePoint Server 2013 Environment for Development and Testing Version 10
copy Critical Path Training 2012 All Rights Reserved 59
wwwCriticalPathTrainingcom
6 In the Choose Default Environment Settings select Visual C Development Settings and click Start Visual Studio
7 Close Visual Studio 2012
At this point Visual Studio 2012 RTM is installed
Install Office amp SharePoint 2013 Developer Tools
In this section you will install the Office and SharePoint 2013 developer tools for Visual Studio
1 Ensure you are logged into the WingtipServer VM using the account WINGTIPadministrator | Password1
2 Launch the Web Platform Installer Start All Programs Microsoft Web Platform Installer
3 In the search box at the top-right corner of the Web Platform Installer 40 window type sharepoint and press Enter
4 Click the Add button to the right of Microsoft Office Developer Tools for Visual Studio 2012 - Preview 2
5 Click the Install button at the bottom of the Web Platform Installer 40 window
6 On the Prerequisites page click I Accept
Creating a SharePoint Server 2013 Environment for Development and Testing Version 10
copy Critical Path Training 2012 All Rights Reserved 60
wwwCriticalPathTrainingcom
At this point you have installed the SharePoint 2013 amp Office 2013 development tools in Visual Studio 2012
Creating a SharePoint Server 2013 Environment for Development and Testing Version 10
copy Critical Path Training 2012 All Rights Reserved 61
wwwCriticalPathTrainingcom
Appendix 1 Download Manifest
The following lists everything referenced that you will or may need to download in this environment
Windows Server 2008 R2 with Service Pack 1 (installer ISO)
o httptechnetmicrosoftcomen-usevalcenterdd459137aspx
Windows Server 2008 R2 with Service Pack 1 (prebuilt VHD)
o httpwwwmicrosoftcomdownloadsdetailsaspxFamilyId=9040a4be-c3cf-44a5-9052-a70314452305
Windows Server 2008 R2 Service Pack 1
o httpwwwmicrosoftcomen-usdownloaddetailsaspxid=5842
SQL Server 2012 Trial
o httpwwwmicrosoftcombetaexperiencepdSQL2012EvalCTAenusdefaultaspx
SharePoint Server 2013
o httptechnetmicrosoftcomen-USevalcenterhh973397aspx
Hotfixes for SharePoint Server 2013 (post-install)
o KB2554876 The SharePoint Parsing Process Crashes in Windows Server 2008 R2
o KB2708075 IIS 75 Configurations are not Updated when you use the ServerManager Class to Commit
Configuration Changes
o KB2759112 Hotfix is Available for NET Framework 45 that Resolves an ASPNET Race Condition Issue in
Windows Server 2008 R2 Windows Server 2008 R2 SP1
o KB2765317 Hotfix is Available for NET Framework 45 that Resolves an ASPNET Race Condition Issue in
Windows 8 Windows RT and Windows Server 2012
Web Platform Installer
o httpwwwmicrosoftcomwebdownloadsplatformaspx
Web Platform Installer ndash Command Line Version
o httplearniisnetpageaspx1072web-platform-installer-v4-command-line-webpicmdexe-preview-release
Workflow Manager 10
o Download using the Microsoft Web Platform Installer
Office 2013
o httpwwwmicrosoftcomofficepreviewentry-office-preview
SharePoint Designer 2013
o httpwwwmicrosoftcomen-usdownloaddetailsaspxid=35491
Visio Professional 2013
o httptechnetmicrosoftcomen-usevalcenterhh973399
Visual Studio 2012
o httpwwwmicrosoftcomvisualstudio11en-usdownloads
Office Developer Tools for Visual Studio 2012 ndash Preview 2
o Download using the Microsoft Web Platform Installer
Creating a SharePoint Server 2013 Environment for Development and Testing Version 10
copy Critical Path Training 2012 All Rights Reserved 62
wwwCriticalPathTrainingcom
Appendix 2 Windows PowerShell Script Manifest
The following lists all Windows PowerShell scripts that are provided with this setup guide
AddDisableLoopbackCheckRegKeyps1
o The following steps automate creating the registry key outlined as Method 2 in the Microsoft Knowledgebase article
httpsupportmicrosoftcomkb896861 using Windows PowerShell This key DisableLoopbackCheck will allow
you to browse SharePoint sites on the same machine Without this key (or following Method 1 in the KB article) you
would need to browse any SharePoint sites from a different computer than the one which SharePoint is installed on
ConfigureSpFarmForAppsps1
o Configures a SharePoint 2013 for hosting apps This ensures everything you need is installed running and
configured This is documented here httpmsdnmicrosoftcomen-uslibraryfp179923(v=office15)
CreateSpServiceAccountsps1
o Creates the minimal necessary service accounts for SharePoint Server 2013 SP_Farm SP_Content amp
SP_Services
SetupSharePointForHNSCps1
o Configures a SharePoint 2013 install for hosting Host-Named Site Collections (HNSC) This involves creating a Web
Application in SharePoint that has no host header bindings Using DNS all requests are mapped to this Web
Application You then create the site collections via PowerShell as you cant create HNSCs via the browser (Central
Administration)
Creating a SharePoint Server 2013 Environment for Development and Testing Version 10
copy Critical Path Training 2012 All Rights Reserved 63
wwwCriticalPathTrainingcom
Appendix 3 Create Sample Adventure Works Database
The following steps document downloading and installing the sample Adventure Works OLTP database provided by Microsoft
1 Launch Internet Explorer and navigate to httpmsftdbprodsamplescodeplexcom
2 Download the Adventure Works 2012 OLTP Script
3 Extract the ZIP into a folder on the desktop
4 Launch SQL Server Management Studio Start All Programs Microsoft SQL Server 2012 SQL Server Management Studio
5 When SQL Server Management Studio launches within the Connect to Server dialog login using the default settings and click Connect
6 Within SQL Server Management Studio select File Open File
7 Select the file instawdbsql from the extracted ZIP and click Open
8 If prompted to re-login to the database engine do it
9 Select Query SQLCMD Mode
10 Scroll down to line 42 the line that starts with the following
setvar SqlSamplesSourceDataPath
11 Change the folder location of where you unzipped the Adventure Works 2012 OLTP Script
12 Select Query Execute
13 When the script completes the AdventureWorks2012 database will have been created
Creating a SharePoint Server 2013 Environment for Development and Testing Version 10
copy Critical Path Training 2012 All Rights Reserved 64
wwwCriticalPathTrainingcom
Change Log
Change Version Description
August 22 2012 v 01 Pre-release for review
August 27 2012 v 02 Initial public release ndash install guide based on SharePoint Server Beta 2
August 28 2012 v 03 Updated URL for the site collection used to connect SharePoint to WAW
August 31 2012 v 04 Typo Removed SQL Server Analysis Services as part of the install Not required in a
SharePoint dev box (unless you are doing business intelligence which is not covered
in the guide)
Updated all references to Windows Azure Workflow to Workflow Manager the new
official name for the new workflow product
Updated SetupSharePointForHNSCps1 script to lookup HNSC Web Application by
name rather than URL which is more reliable
Typo Updated WingtipAllUp public NIC to use a different IP than the WingtipDC
Typo Replaced a reference to WingtipServer with WingtipDC
Typo Fixed handful of minor typos
September 1 2012 v 05 Removed SQL Server Reporting Services from install guide
Added step to uncheck IErsquos ldquoAutomatically detect proxyrdquo
Added post workflow install steps to setup User Profile Service Application to sync with
local Active Directory
September 5 2012 v 06 Added step to create a default root site collection in the HNSC web app
Updated minor typos and added extra notes for context
Updated PowerShell script SetupSharePointForHNSCps1 to remove content
database of default Web Application when setting up HNSC Web App
Added a new exercise 8 (after SharePoint install amp config and before the Workflow
install and config) to setup support for My Sites
October 20 2012 v 07 Updated script SetupSharePointForHNSCps1 to fix a bug where it would fail on line
111 if you didnrsquot already have a WINGTIPSP_Content managed account
Added section to bypass SharePointrsquos check for crlmicrosoftcom
Updated workflowrsquos registration PowerShell script to point to
httpintranetwingtipcom
Switched order of post-SharePoint install to setup HSNC hosting before configuring for
hosting apps
November 29 2012
v 10 Changed setup guide to use a single VM instead of two VMs
Updated guide for SharePoint 2013 RTM
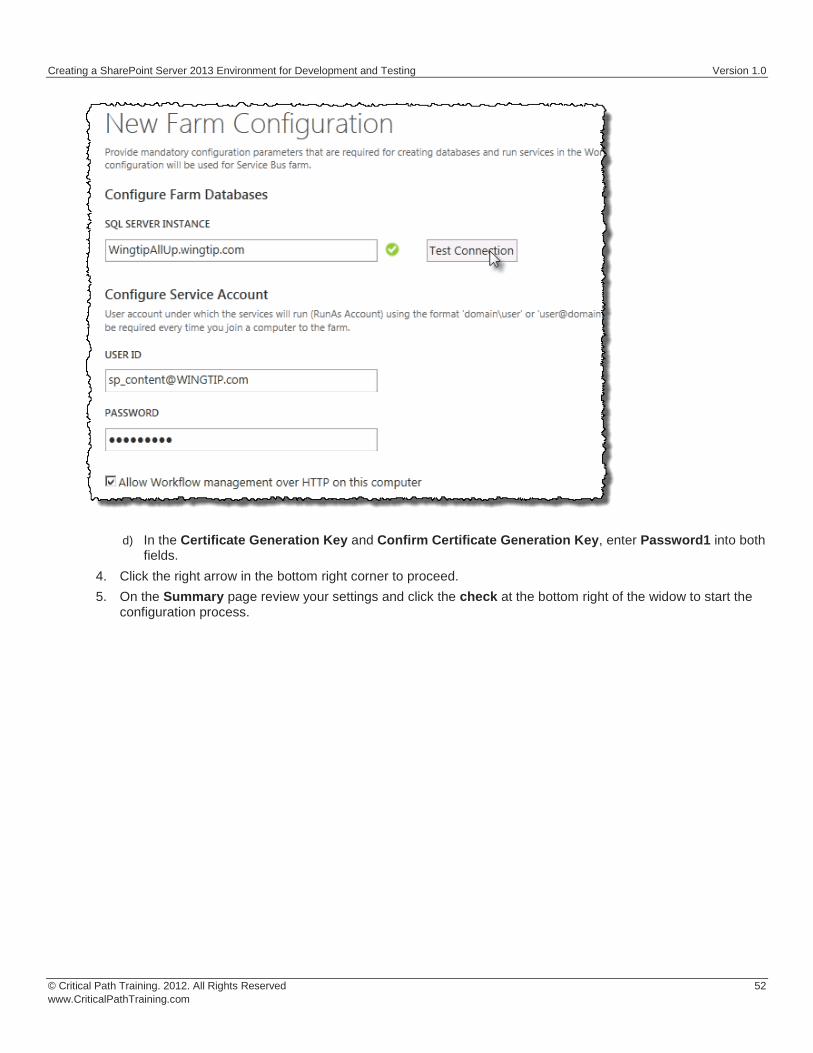
Creating a SharePoint Server 2013 Environment for Development and Testing Version 10
copy Critical Path Training 2012 All Rights Reserved 53
wwwCriticalPathTrainingcom
6 After a few minutes the Configuration Progress screen will show that everything has been configured correctly
Creating a SharePoint Server 2013 Environment for Development and Testing Version 10
copy Critical Path Training 2012 All Rights Reserved 54
wwwCriticalPathTrainingcom
7 Click the check in the bottom right corner
At this point Workflow Manager amp Service Bus has been installed and a new Workflow Manager farm has been created The next step is to connect the SharePoint 2013 farm to the Workflow Manager farm
Connect SharePoint 2013 to Workflow Manager
In this section you will connect SharePoint 2013 and Workflow Manager together
1 Ensure you are logged into the WingtipServer VM using the account WINGTIPadministrator | Password1
2 Get the Workflow Manager endpoint
a) Open the Workflow Manager PowerShell console Start All Programs Workflow Manager 10
b) Execute the Windows PowerShell following cmdlet
Get-WFFarm | ft HttpPort
c) Take note of this port (12291) This port number is what you will use to connect the SharePoint 2013 farm to the Workflow Manager 10 farm
In production you should connect to the HTTPS port listed in the HttpsPort property when you run Get-WFFarm
d) Close the Workflow Manager PowerShell window
3 Connect the SharePoint 2013 farm to Workflow Manager
Creating a SharePoint Server 2013 Environment for Development and Testing Version 10
copy Critical Path Training 2012 All Rights Reserved 55
wwwCriticalPathTrainingcom
a) Open SharePoint 2013 Management Shell Start All Programs Microsoft SharePoint 2013 Products SharePoint 2013 Management Shell
b) Execute the following Windows PowerShell script in the SharePoint 2013 Management Shell
Register-SPWorkflowService ndashSPSite httpintranetwingtipcom ndashWorkflowHostUri httpwingtipserver12291 ndashAllowOAuthHttp
This script is telling SharePoint the endpoint it should use to talk to Workflow Manager as well as Workflow Manager the SharePoint site collection it should talk to for calls into the CSOM It is also configuring all communication over HTTP rather than HTTPS for performance reasons In production you should always use HTTPS
This step will take a moment with no feedback during the process Be patient
c) Close the SharePoint 2013 Management Shell
At this point the SharePoint 2013 farm is connected to the Workflow Manager 10 farm
Configure SharePoint User Profile Service Application AD Sync
Users in SharePoint 2013 are validated by Workflow Manager against SharePoint to ensure they have permissions to start a workflow This is done by looking up the user by their AD UserPrincipalName (UPN) attribute in the User Profile Service Application (UPA) If no matching user is found the workflow will be automatically cancelled by Workflow Manager In this section you will setup UPA to connect amp sync with the local Active Directory so user accounts in AD will have their UPN synchronized to UPA
1 Open Central Administration Start All Programs Microsoft SharePoint 2013 Products SharePoint 2013 Central Administration
2 Go to the User Profile Service Application management page Application Management Manage Service Applications User Profile Service Application
3 The first step is to configure the User Profile Service Application to allow for Active Directory (AD) synchronization
a) Under Synchronization select Configure Synchronization Settings
b) For Synchronization select Use SharePoint Active Directory Import and click OK
4 Next establish a connection to the wingtipcom AD
a) Under Synchronization select Configure Synchronization Connections
b) On the Synchronization Connections page select Create New Connection
c) Enter the following values on this form and click OK
i) Connection Name WINGTIPCOM AD
ii) Type Active Directory Import
iii) Connection Settings
(1) Fully Qualified Domain Name wingtipcom
(2) Authentication Provider Type Windows Authentication
(3) Account Name WINGTIPAdministrator
(4) Password (and Confirm Password) Password1
iv) Containers
(1) Click Populate Containers
(2) After it loads check the box next to WINGTP or click the Select All button below the box
5 Go back to the User Profile Service Application management page Application Management Manage Service Applications User Profile Service Application
6 Finally start a synchronization import
a) Under Synchronization select Start Profile Synchronization
Creating a SharePoint Server 2013 Environment for Development and Testing Version 10
copy Critical Path Training 2012 All Rights Reserved 56
wwwCriticalPathTrainingcom
b) Select Start Full Synchronization and click OK
c) You will be taken back to the User Profile Service Application management page Notice in the top-right corner there is a status block that reports how many profiles are in the UPA database Refresh the page to see it increase to a handful of profiles as the import process runs
At this point you have successfully configured the User Profile Service Application to import profiles from the local AD
Exercise 8 Install the Microsoft Office 2013 Professional Clients
In this exercise you will install the Microsoft Office 2013 client applications
1 Download the Office 2013 into the WingtipServer VM For this you need to create an Office 365 Trial account login to Office 365 go to the Admin Dashboard and then download the latest version httpwwwmicrosoftcomofficepreviewentry-office-preview
2 Download the SharePoint Designer 2013 into the WingtipServer VM from here httpwwwmicrosoftcomen-usdownloaddetailsaspxid=35491
3 Download the Visio Professional 2013 into the WingtipServer VM from here httptechnetmicrosoftcomen-usevalcenterhh973399
Install Microsoft Office Professional Plus 2013
In this section you will install the Microsoft Office 2013 clients
1 Ensure you are logged into the WingtipServer VM using the account WINGTIPadministrator | Password1
2 Execute the installer OfficeProfessionalPlus_English_x64exe
3 On the Read the Microsoft Software License Terms dialog click the checkbox next to I accept the terms of this agreement and click Continue
4 On the Choose the installation you want dialog click the Install Now button
5 The installer will proceed and install all the Office products
6 When the installer completes click the Close button
7 Apply your Office Professional Plus 2013 license key
a) Launch Word 2013 Start All Programs Microsoft Office 2013 Word 2013
b) In the First things first dialog select Use recommended settings and click Accept
c) In the Welcome to Office dialog that opens click the [X] icon in the top-right corner to close it
d) In the left-hand pane click Open Other Documents
e) In the left-hand pane click Account
f) In the Product Information section within the Activation Required box click Change Product Key
g) Enter your license key for Office Professional Plus 2013 check the box next to Attempt to automatically activate my product online and click Install
h) Click OK
At this point you have installed Office Professional Plus 2013
Install Microsoft Office Visio 2013
In this section you will install Microsoft Office 2013 Visio
1 Ensure you are logged into the WingtipServer VM using the account WINGTIPadministrator | Password1
2 Execute the installer VisioProfessional_English_x64exe
3 On the Read the Microsoft Software License Terms dialog click the checkbox next to I accept the terms of this agreement and click Continue
Creating a SharePoint Server 2013 Environment for Development and Testing Version 10
copy Critical Path Training 2012 All Rights Reserved 57
wwwCriticalPathTrainingcom
4 On the Choose the installation you want dialog click the Install Now button
5 The installer will proceed and install all Visio 2013
6 When the installer completes click the Close button
7 Apply your Visio 2013 license key
a) Launch Visio 2013 Start All Programs Microsoft Office 2013 Visio 2013
b) In the First things first dialog select Use recommended settings and click Accept
c) In the Welcome to Office dialog that opens click the X icon in the top-right corner to close it
d) In the left-hand pane click Open Other Documents
e) In the left-hand pane click Account
f) In the Product Information section within the Activation Required box click Change Product Key
g) Enter your license key for Visio 2013 check the box next to Attempt to automatically activate my product online and click Install
h) Click OK
At this point you have installed Visio 2013
Install Microsoft Office 2013 SharePoint Designer
In this section you will install Microsoft Office 2013 SharePoint Designer
1 Ensure you are logged into the WingtipServer VM using the account WINGTIPadministrator | Password1
2 Execute the installer SharePointDesigner_English_x64exe
3 On the Read the Microsoft Software License Terms dialog click the checkbox next to I accept the terms of this agreement and click Continue
4 On the Choose the installation you want dialog click the Install Now button
5 The installer will proceed and install all SharePoint Designer 2013
6 When the installer completes click the Close button
At this point you have installed SharePoint Designer 2013
Exercise 9 Install Visual Studio 2012
In this exercise you will install Visual Studio 2012
1 Ensure you are logged into the WingtipServer VM using the account WINGTIPadministrator | Password1
2 Start the install of Visual Studio 2012 Ultimate Trial by downloading the installer from here httpwwwmicrosoftcomvisualstudio11en-usdownloads
3 On the installation splash screen check the box next to I agree to the License terms and conditions and click the Next button
Creating a SharePoint Server 2013 Environment for Development and Testing Version 10
copy Critical Path Training 2012 All Rights Reserved 58
wwwCriticalPathTrainingcom
4 On the Optional Features to install dialog click Install
5 After some time the installer will complete Click the Launch button to launch Visual Studio 2012
Creating a SharePoint Server 2013 Environment for Development and Testing Version 10
copy Critical Path Training 2012 All Rights Reserved 59
wwwCriticalPathTrainingcom
6 In the Choose Default Environment Settings select Visual C Development Settings and click Start Visual Studio
7 Close Visual Studio 2012
At this point Visual Studio 2012 RTM is installed
Install Office amp SharePoint 2013 Developer Tools
In this section you will install the Office and SharePoint 2013 developer tools for Visual Studio
1 Ensure you are logged into the WingtipServer VM using the account WINGTIPadministrator | Password1
2 Launch the Web Platform Installer Start All Programs Microsoft Web Platform Installer
3 In the search box at the top-right corner of the Web Platform Installer 40 window type sharepoint and press Enter
4 Click the Add button to the right of Microsoft Office Developer Tools for Visual Studio 2012 - Preview 2
5 Click the Install button at the bottom of the Web Platform Installer 40 window
6 On the Prerequisites page click I Accept
Creating a SharePoint Server 2013 Environment for Development and Testing Version 10
copy Critical Path Training 2012 All Rights Reserved 60
wwwCriticalPathTrainingcom
At this point you have installed the SharePoint 2013 amp Office 2013 development tools in Visual Studio 2012
Creating a SharePoint Server 2013 Environment for Development and Testing Version 10
copy Critical Path Training 2012 All Rights Reserved 61
wwwCriticalPathTrainingcom
Appendix 1 Download Manifest
The following lists everything referenced that you will or may need to download in this environment
Windows Server 2008 R2 with Service Pack 1 (installer ISO)
o httptechnetmicrosoftcomen-usevalcenterdd459137aspx
Windows Server 2008 R2 with Service Pack 1 (prebuilt VHD)
o httpwwwmicrosoftcomdownloadsdetailsaspxFamilyId=9040a4be-c3cf-44a5-9052-a70314452305
Windows Server 2008 R2 Service Pack 1
o httpwwwmicrosoftcomen-usdownloaddetailsaspxid=5842
SQL Server 2012 Trial
o httpwwwmicrosoftcombetaexperiencepdSQL2012EvalCTAenusdefaultaspx
SharePoint Server 2013
o httptechnetmicrosoftcomen-USevalcenterhh973397aspx
Hotfixes for SharePoint Server 2013 (post-install)
o KB2554876 The SharePoint Parsing Process Crashes in Windows Server 2008 R2
o KB2708075 IIS 75 Configurations are not Updated when you use the ServerManager Class to Commit
Configuration Changes
o KB2759112 Hotfix is Available for NET Framework 45 that Resolves an ASPNET Race Condition Issue in
Windows Server 2008 R2 Windows Server 2008 R2 SP1
o KB2765317 Hotfix is Available for NET Framework 45 that Resolves an ASPNET Race Condition Issue in
Windows 8 Windows RT and Windows Server 2012
Web Platform Installer
o httpwwwmicrosoftcomwebdownloadsplatformaspx
Web Platform Installer ndash Command Line Version
o httplearniisnetpageaspx1072web-platform-installer-v4-command-line-webpicmdexe-preview-release
Workflow Manager 10
o Download using the Microsoft Web Platform Installer
Office 2013
o httpwwwmicrosoftcomofficepreviewentry-office-preview
SharePoint Designer 2013
o httpwwwmicrosoftcomen-usdownloaddetailsaspxid=35491
Visio Professional 2013
o httptechnetmicrosoftcomen-usevalcenterhh973399
Visual Studio 2012
o httpwwwmicrosoftcomvisualstudio11en-usdownloads
Office Developer Tools for Visual Studio 2012 ndash Preview 2
o Download using the Microsoft Web Platform Installer
Creating a SharePoint Server 2013 Environment for Development and Testing Version 10
copy Critical Path Training 2012 All Rights Reserved 62
wwwCriticalPathTrainingcom
Appendix 2 Windows PowerShell Script Manifest
The following lists all Windows PowerShell scripts that are provided with this setup guide
AddDisableLoopbackCheckRegKeyps1
o The following steps automate creating the registry key outlined as Method 2 in the Microsoft Knowledgebase article
httpsupportmicrosoftcomkb896861 using Windows PowerShell This key DisableLoopbackCheck will allow
you to browse SharePoint sites on the same machine Without this key (or following Method 1 in the KB article) you
would need to browse any SharePoint sites from a different computer than the one which SharePoint is installed on
ConfigureSpFarmForAppsps1
o Configures a SharePoint 2013 for hosting apps This ensures everything you need is installed running and
configured This is documented here httpmsdnmicrosoftcomen-uslibraryfp179923(v=office15)
CreateSpServiceAccountsps1
o Creates the minimal necessary service accounts for SharePoint Server 2013 SP_Farm SP_Content amp
SP_Services
SetupSharePointForHNSCps1
o Configures a SharePoint 2013 install for hosting Host-Named Site Collections (HNSC) This involves creating a Web
Application in SharePoint that has no host header bindings Using DNS all requests are mapped to this Web
Application You then create the site collections via PowerShell as you cant create HNSCs via the browser (Central
Administration)
Creating a SharePoint Server 2013 Environment for Development and Testing Version 10
copy Critical Path Training 2012 All Rights Reserved 63
wwwCriticalPathTrainingcom
Appendix 3 Create Sample Adventure Works Database
The following steps document downloading and installing the sample Adventure Works OLTP database provided by Microsoft
1 Launch Internet Explorer and navigate to httpmsftdbprodsamplescodeplexcom
2 Download the Adventure Works 2012 OLTP Script
3 Extract the ZIP into a folder on the desktop
4 Launch SQL Server Management Studio Start All Programs Microsoft SQL Server 2012 SQL Server Management Studio
5 When SQL Server Management Studio launches within the Connect to Server dialog login using the default settings and click Connect
6 Within SQL Server Management Studio select File Open File
7 Select the file instawdbsql from the extracted ZIP and click Open
8 If prompted to re-login to the database engine do it
9 Select Query SQLCMD Mode
10 Scroll down to line 42 the line that starts with the following
setvar SqlSamplesSourceDataPath
11 Change the folder location of where you unzipped the Adventure Works 2012 OLTP Script
12 Select Query Execute
13 When the script completes the AdventureWorks2012 database will have been created
Creating a SharePoint Server 2013 Environment for Development and Testing Version 10
copy Critical Path Training 2012 All Rights Reserved 64
wwwCriticalPathTrainingcom
Change Log
Change Version Description
August 22 2012 v 01 Pre-release for review
August 27 2012 v 02 Initial public release ndash install guide based on SharePoint Server Beta 2
August 28 2012 v 03 Updated URL for the site collection used to connect SharePoint to WAW
August 31 2012 v 04 Typo Removed SQL Server Analysis Services as part of the install Not required in a
SharePoint dev box (unless you are doing business intelligence which is not covered
in the guide)
Updated all references to Windows Azure Workflow to Workflow Manager the new
official name for the new workflow product
Updated SetupSharePointForHNSCps1 script to lookup HNSC Web Application by
name rather than URL which is more reliable
Typo Updated WingtipAllUp public NIC to use a different IP than the WingtipDC
Typo Replaced a reference to WingtipServer with WingtipDC
Typo Fixed handful of minor typos
September 1 2012 v 05 Removed SQL Server Reporting Services from install guide
Added step to uncheck IErsquos ldquoAutomatically detect proxyrdquo
Added post workflow install steps to setup User Profile Service Application to sync with
local Active Directory
September 5 2012 v 06 Added step to create a default root site collection in the HNSC web app
Updated minor typos and added extra notes for context
Updated PowerShell script SetupSharePointForHNSCps1 to remove content
database of default Web Application when setting up HNSC Web App
Added a new exercise 8 (after SharePoint install amp config and before the Workflow
install and config) to setup support for My Sites
October 20 2012 v 07 Updated script SetupSharePointForHNSCps1 to fix a bug where it would fail on line
111 if you didnrsquot already have a WINGTIPSP_Content managed account
Added section to bypass SharePointrsquos check for crlmicrosoftcom
Updated workflowrsquos registration PowerShell script to point to
httpintranetwingtipcom
Switched order of post-SharePoint install to setup HSNC hosting before configuring for
hosting apps
November 29 2012
v 10 Changed setup guide to use a single VM instead of two VMs
Updated guide for SharePoint 2013 RTM
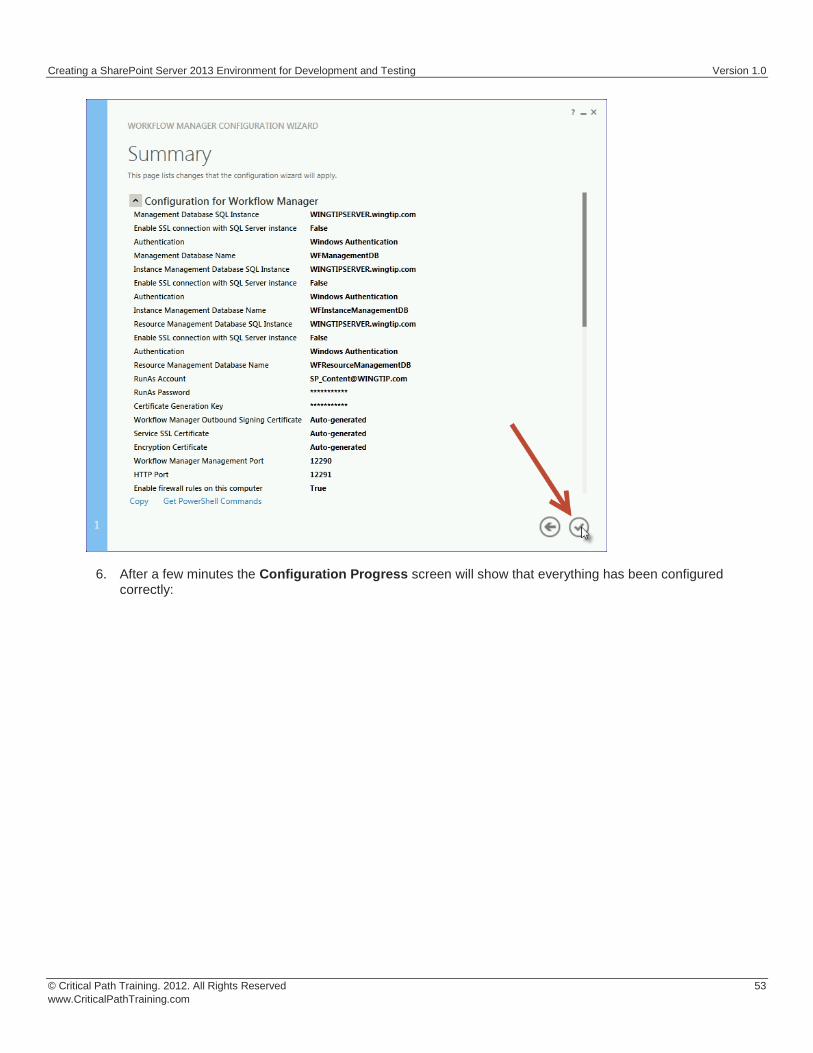
Creating a SharePoint Server 2013 Environment for Development and Testing Version 10
copy Critical Path Training 2012 All Rights Reserved 55
wwwCriticalPathTrainingcom
a) Open SharePoint 2013 Management Shell Start All Programs Microsoft SharePoint 2013 Products SharePoint 2013 Management Shell
b) Execute the following Windows PowerShell script in the SharePoint 2013 Management Shell
Register-SPWorkflowService ndashSPSite httpintranetwingtipcom ndashWorkflowHostUri httpwingtipserver12291 ndashAllowOAuthHttp
This script is telling SharePoint the endpoint it should use to talk to Workflow Manager as well as Workflow Manager the SharePoint site collection it should talk to for calls into the CSOM It is also configuring all communication over HTTP rather than HTTPS for performance reasons In production you should always use HTTPS
This step will take a moment with no feedback during the process Be patient
c) Close the SharePoint 2013 Management Shell
At this point the SharePoint 2013 farm is connected to the Workflow Manager 10 farm
Configure SharePoint User Profile Service Application AD Sync
Users in SharePoint 2013 are validated by Workflow Manager against SharePoint to ensure they have permissions to start a workflow This is done by looking up the user by their AD UserPrincipalName (UPN) attribute in the User Profile Service Application (UPA) If no matching user is found the workflow will be automatically cancelled by Workflow Manager In this section you will setup UPA to connect amp sync with the local Active Directory so user accounts in AD will have their UPN synchronized to UPA
1 Open Central Administration Start All Programs Microsoft SharePoint 2013 Products SharePoint 2013 Central Administration
2 Go to the User Profile Service Application management page Application Management Manage Service Applications User Profile Service Application
3 The first step is to configure the User Profile Service Application to allow for Active Directory (AD) synchronization
a) Under Synchronization select Configure Synchronization Settings
b) For Synchronization select Use SharePoint Active Directory Import and click OK
4 Next establish a connection to the wingtipcom AD
a) Under Synchronization select Configure Synchronization Connections
b) On the Synchronization Connections page select Create New Connection
c) Enter the following values on this form and click OK
i) Connection Name WINGTIPCOM AD
ii) Type Active Directory Import
iii) Connection Settings
(1) Fully Qualified Domain Name wingtipcom
(2) Authentication Provider Type Windows Authentication
(3) Account Name WINGTIPAdministrator
(4) Password (and Confirm Password) Password1
iv) Containers
(1) Click Populate Containers
(2) After it loads check the box next to WINGTP or click the Select All button below the box
5 Go back to the User Profile Service Application management page Application Management Manage Service Applications User Profile Service Application
6 Finally start a synchronization import
a) Under Synchronization select Start Profile Synchronization
Creating a SharePoint Server 2013 Environment for Development and Testing Version 10
copy Critical Path Training 2012 All Rights Reserved 56
wwwCriticalPathTrainingcom
b) Select Start Full Synchronization and click OK
c) You will be taken back to the User Profile Service Application management page Notice in the top-right corner there is a status block that reports how many profiles are in the UPA database Refresh the page to see it increase to a handful of profiles as the import process runs
At this point you have successfully configured the User Profile Service Application to import profiles from the local AD
Exercise 8 Install the Microsoft Office 2013 Professional Clients
In this exercise you will install the Microsoft Office 2013 client applications
1 Download the Office 2013 into the WingtipServer VM For this you need to create an Office 365 Trial account login to Office 365 go to the Admin Dashboard and then download the latest version httpwwwmicrosoftcomofficepreviewentry-office-preview
2 Download the SharePoint Designer 2013 into the WingtipServer VM from here httpwwwmicrosoftcomen-usdownloaddetailsaspxid=35491
3 Download the Visio Professional 2013 into the WingtipServer VM from here httptechnetmicrosoftcomen-usevalcenterhh973399
Install Microsoft Office Professional Plus 2013
In this section you will install the Microsoft Office 2013 clients
1 Ensure you are logged into the WingtipServer VM using the account WINGTIPadministrator | Password1
2 Execute the installer OfficeProfessionalPlus_English_x64exe
3 On the Read the Microsoft Software License Terms dialog click the checkbox next to I accept the terms of this agreement and click Continue
4 On the Choose the installation you want dialog click the Install Now button
5 The installer will proceed and install all the Office products
6 When the installer completes click the Close button
7 Apply your Office Professional Plus 2013 license key
a) Launch Word 2013 Start All Programs Microsoft Office 2013 Word 2013
b) In the First things first dialog select Use recommended settings and click Accept
c) In the Welcome to Office dialog that opens click the [X] icon in the top-right corner to close it
d) In the left-hand pane click Open Other Documents
e) In the left-hand pane click Account
f) In the Product Information section within the Activation Required box click Change Product Key
g) Enter your license key for Office Professional Plus 2013 check the box next to Attempt to automatically activate my product online and click Install
h) Click OK
At this point you have installed Office Professional Plus 2013
Install Microsoft Office Visio 2013
In this section you will install Microsoft Office 2013 Visio
1 Ensure you are logged into the WingtipServer VM using the account WINGTIPadministrator | Password1
2 Execute the installer VisioProfessional_English_x64exe
3 On the Read the Microsoft Software License Terms dialog click the checkbox next to I accept the terms of this agreement and click Continue
Creating a SharePoint Server 2013 Environment for Development and Testing Version 10
copy Critical Path Training 2012 All Rights Reserved 57
wwwCriticalPathTrainingcom
4 On the Choose the installation you want dialog click the Install Now button
5 The installer will proceed and install all Visio 2013
6 When the installer completes click the Close button
7 Apply your Visio 2013 license key
a) Launch Visio 2013 Start All Programs Microsoft Office 2013 Visio 2013
b) In the First things first dialog select Use recommended settings and click Accept
c) In the Welcome to Office dialog that opens click the X icon in the top-right corner to close it
d) In the left-hand pane click Open Other Documents
e) In the left-hand pane click Account
f) In the Product Information section within the Activation Required box click Change Product Key
g) Enter your license key for Visio 2013 check the box next to Attempt to automatically activate my product online and click Install
h) Click OK
At this point you have installed Visio 2013
Install Microsoft Office 2013 SharePoint Designer
In this section you will install Microsoft Office 2013 SharePoint Designer
1 Ensure you are logged into the WingtipServer VM using the account WINGTIPadministrator | Password1
2 Execute the installer SharePointDesigner_English_x64exe
3 On the Read the Microsoft Software License Terms dialog click the checkbox next to I accept the terms of this agreement and click Continue
4 On the Choose the installation you want dialog click the Install Now button
5 The installer will proceed and install all SharePoint Designer 2013
6 When the installer completes click the Close button
At this point you have installed SharePoint Designer 2013
Exercise 9 Install Visual Studio 2012
In this exercise you will install Visual Studio 2012
1 Ensure you are logged into the WingtipServer VM using the account WINGTIPadministrator | Password1
2 Start the install of Visual Studio 2012 Ultimate Trial by downloading the installer from here httpwwwmicrosoftcomvisualstudio11en-usdownloads
3 On the installation splash screen check the box next to I agree to the License terms and conditions and click the Next button
Creating a SharePoint Server 2013 Environment for Development and Testing Version 10
copy Critical Path Training 2012 All Rights Reserved 58
wwwCriticalPathTrainingcom
4 On the Optional Features to install dialog click Install
5 After some time the installer will complete Click the Launch button to launch Visual Studio 2012
Creating a SharePoint Server 2013 Environment for Development and Testing Version 10
copy Critical Path Training 2012 All Rights Reserved 59
wwwCriticalPathTrainingcom
6 In the Choose Default Environment Settings select Visual C Development Settings and click Start Visual Studio
7 Close Visual Studio 2012
At this point Visual Studio 2012 RTM is installed
Install Office amp SharePoint 2013 Developer Tools
In this section you will install the Office and SharePoint 2013 developer tools for Visual Studio
1 Ensure you are logged into the WingtipServer VM using the account WINGTIPadministrator | Password1
2 Launch the Web Platform Installer Start All Programs Microsoft Web Platform Installer
3 In the search box at the top-right corner of the Web Platform Installer 40 window type sharepoint and press Enter
4 Click the Add button to the right of Microsoft Office Developer Tools for Visual Studio 2012 - Preview 2
5 Click the Install button at the bottom of the Web Platform Installer 40 window
6 On the Prerequisites page click I Accept
Creating a SharePoint Server 2013 Environment for Development and Testing Version 10
copy Critical Path Training 2012 All Rights Reserved 60
wwwCriticalPathTrainingcom
At this point you have installed the SharePoint 2013 amp Office 2013 development tools in Visual Studio 2012
Creating a SharePoint Server 2013 Environment for Development and Testing Version 10
copy Critical Path Training 2012 All Rights Reserved 61
wwwCriticalPathTrainingcom
Appendix 1 Download Manifest
The following lists everything referenced that you will or may need to download in this environment
Windows Server 2008 R2 with Service Pack 1 (installer ISO)
o httptechnetmicrosoftcomen-usevalcenterdd459137aspx
Windows Server 2008 R2 with Service Pack 1 (prebuilt VHD)
o httpwwwmicrosoftcomdownloadsdetailsaspxFamilyId=9040a4be-c3cf-44a5-9052-a70314452305
Windows Server 2008 R2 Service Pack 1
o httpwwwmicrosoftcomen-usdownloaddetailsaspxid=5842
SQL Server 2012 Trial
o httpwwwmicrosoftcombetaexperiencepdSQL2012EvalCTAenusdefaultaspx
SharePoint Server 2013
o httptechnetmicrosoftcomen-USevalcenterhh973397aspx
Hotfixes for SharePoint Server 2013 (post-install)
o KB2554876 The SharePoint Parsing Process Crashes in Windows Server 2008 R2
o KB2708075 IIS 75 Configurations are not Updated when you use the ServerManager Class to Commit
Configuration Changes
o KB2759112 Hotfix is Available for NET Framework 45 that Resolves an ASPNET Race Condition Issue in
Windows Server 2008 R2 Windows Server 2008 R2 SP1
o KB2765317 Hotfix is Available for NET Framework 45 that Resolves an ASPNET Race Condition Issue in
Windows 8 Windows RT and Windows Server 2012
Web Platform Installer
o httpwwwmicrosoftcomwebdownloadsplatformaspx
Web Platform Installer ndash Command Line Version
o httplearniisnetpageaspx1072web-platform-installer-v4-command-line-webpicmdexe-preview-release
Workflow Manager 10
o Download using the Microsoft Web Platform Installer
Office 2013
o httpwwwmicrosoftcomofficepreviewentry-office-preview
SharePoint Designer 2013
o httpwwwmicrosoftcomen-usdownloaddetailsaspxid=35491
Visio Professional 2013
o httptechnetmicrosoftcomen-usevalcenterhh973399
Visual Studio 2012
o httpwwwmicrosoftcomvisualstudio11en-usdownloads
Office Developer Tools for Visual Studio 2012 ndash Preview 2
o Download using the Microsoft Web Platform Installer
Creating a SharePoint Server 2013 Environment for Development and Testing Version 10
copy Critical Path Training 2012 All Rights Reserved 62
wwwCriticalPathTrainingcom
Appendix 2 Windows PowerShell Script Manifest
The following lists all Windows PowerShell scripts that are provided with this setup guide
AddDisableLoopbackCheckRegKeyps1
o The following steps automate creating the registry key outlined as Method 2 in the Microsoft Knowledgebase article
httpsupportmicrosoftcomkb896861 using Windows PowerShell This key DisableLoopbackCheck will allow
you to browse SharePoint sites on the same machine Without this key (or following Method 1 in the KB article) you
would need to browse any SharePoint sites from a different computer than the one which SharePoint is installed on
ConfigureSpFarmForAppsps1
o Configures a SharePoint 2013 for hosting apps This ensures everything you need is installed running and
configured This is documented here httpmsdnmicrosoftcomen-uslibraryfp179923(v=office15)
CreateSpServiceAccountsps1
o Creates the minimal necessary service accounts for SharePoint Server 2013 SP_Farm SP_Content amp
SP_Services
SetupSharePointForHNSCps1
o Configures a SharePoint 2013 install for hosting Host-Named Site Collections (HNSC) This involves creating a Web
Application in SharePoint that has no host header bindings Using DNS all requests are mapped to this Web
Application You then create the site collections via PowerShell as you cant create HNSCs via the browser (Central
Administration)
Creating a SharePoint Server 2013 Environment for Development and Testing Version 10
copy Critical Path Training 2012 All Rights Reserved 63
wwwCriticalPathTrainingcom
Appendix 3 Create Sample Adventure Works Database
The following steps document downloading and installing the sample Adventure Works OLTP database provided by Microsoft
1 Launch Internet Explorer and navigate to httpmsftdbprodsamplescodeplexcom
2 Download the Adventure Works 2012 OLTP Script
3 Extract the ZIP into a folder on the desktop
4 Launch SQL Server Management Studio Start All Programs Microsoft SQL Server 2012 SQL Server Management Studio
5 When SQL Server Management Studio launches within the Connect to Server dialog login using the default settings and click Connect
6 Within SQL Server Management Studio select File Open File
7 Select the file instawdbsql from the extracted ZIP and click Open
8 If prompted to re-login to the database engine do it
9 Select Query SQLCMD Mode
10 Scroll down to line 42 the line that starts with the following
setvar SqlSamplesSourceDataPath
11 Change the folder location of where you unzipped the Adventure Works 2012 OLTP Script
12 Select Query Execute
13 When the script completes the AdventureWorks2012 database will have been created
Creating a SharePoint Server 2013 Environment for Development and Testing Version 10
copy Critical Path Training 2012 All Rights Reserved 64
wwwCriticalPathTrainingcom
Change Log
Change Version Description
August 22 2012 v 01 Pre-release for review
August 27 2012 v 02 Initial public release ndash install guide based on SharePoint Server Beta 2
August 28 2012 v 03 Updated URL for the site collection used to connect SharePoint to WAW
August 31 2012 v 04 Typo Removed SQL Server Analysis Services as part of the install Not required in a
SharePoint dev box (unless you are doing business intelligence which is not covered
in the guide)
Updated all references to Windows Azure Workflow to Workflow Manager the new
official name for the new workflow product
Updated SetupSharePointForHNSCps1 script to lookup HNSC Web Application by
name rather than URL which is more reliable
Typo Updated WingtipAllUp public NIC to use a different IP than the WingtipDC
Typo Replaced a reference to WingtipServer with WingtipDC
Typo Fixed handful of minor typos
September 1 2012 v 05 Removed SQL Server Reporting Services from install guide
Added step to uncheck IErsquos ldquoAutomatically detect proxyrdquo
Added post workflow install steps to setup User Profile Service Application to sync with
local Active Directory
September 5 2012 v 06 Added step to create a default root site collection in the HNSC web app
Updated minor typos and added extra notes for context
Updated PowerShell script SetupSharePointForHNSCps1 to remove content
database of default Web Application when setting up HNSC Web App
Added a new exercise 8 (after SharePoint install amp config and before the Workflow
install and config) to setup support for My Sites
October 20 2012 v 07 Updated script SetupSharePointForHNSCps1 to fix a bug where it would fail on line
111 if you didnrsquot already have a WINGTIPSP_Content managed account
Added section to bypass SharePointrsquos check for crlmicrosoftcom
Updated workflowrsquos registration PowerShell script to point to
httpintranetwingtipcom
Switched order of post-SharePoint install to setup HSNC hosting before configuring for
hosting apps
November 29 2012
v 10 Changed setup guide to use a single VM instead of two VMs
Updated guide for SharePoint 2013 RTM
Creating a SharePoint Server 2013 Environment for Development and Testing Version 10
copy Critical Path Training 2012 All Rights Reserved 58
wwwCriticalPathTrainingcom
4 On the Optional Features to install dialog click Install
5 After some time the installer will complete Click the Launch button to launch Visual Studio 2012
Creating a SharePoint Server 2013 Environment for Development and Testing Version 10
copy Critical Path Training 2012 All Rights Reserved 59
wwwCriticalPathTrainingcom
6 In the Choose Default Environment Settings select Visual C Development Settings and click Start Visual Studio
7 Close Visual Studio 2012
At this point Visual Studio 2012 RTM is installed
Install Office amp SharePoint 2013 Developer Tools
In this section you will install the Office and SharePoint 2013 developer tools for Visual Studio
1 Ensure you are logged into the WingtipServer VM using the account WINGTIPadministrator | Password1
2 Launch the Web Platform Installer Start All Programs Microsoft Web Platform Installer
3 In the search box at the top-right corner of the Web Platform Installer 40 window type sharepoint and press Enter
4 Click the Add button to the right of Microsoft Office Developer Tools for Visual Studio 2012 - Preview 2
5 Click the Install button at the bottom of the Web Platform Installer 40 window
6 On the Prerequisites page click I Accept
Creating a SharePoint Server 2013 Environment for Development and Testing Version 10
copy Critical Path Training 2012 All Rights Reserved 60
wwwCriticalPathTrainingcom
At this point you have installed the SharePoint 2013 amp Office 2013 development tools in Visual Studio 2012
Creating a SharePoint Server 2013 Environment for Development and Testing Version 10
copy Critical Path Training 2012 All Rights Reserved 61
wwwCriticalPathTrainingcom
Appendix 1 Download Manifest
The following lists everything referenced that you will or may need to download in this environment
Windows Server 2008 R2 with Service Pack 1 (installer ISO)
o httptechnetmicrosoftcomen-usevalcenterdd459137aspx
Windows Server 2008 R2 with Service Pack 1 (prebuilt VHD)
o httpwwwmicrosoftcomdownloadsdetailsaspxFamilyId=9040a4be-c3cf-44a5-9052-a70314452305
Windows Server 2008 R2 Service Pack 1
o httpwwwmicrosoftcomen-usdownloaddetailsaspxid=5842
SQL Server 2012 Trial
o httpwwwmicrosoftcombetaexperiencepdSQL2012EvalCTAenusdefaultaspx
SharePoint Server 2013
o httptechnetmicrosoftcomen-USevalcenterhh973397aspx
Hotfixes for SharePoint Server 2013 (post-install)
o KB2554876 The SharePoint Parsing Process Crashes in Windows Server 2008 R2
o KB2708075 IIS 75 Configurations are not Updated when you use the ServerManager Class to Commit
Configuration Changes
o KB2759112 Hotfix is Available for NET Framework 45 that Resolves an ASPNET Race Condition Issue in
Windows Server 2008 R2 Windows Server 2008 R2 SP1
o KB2765317 Hotfix is Available for NET Framework 45 that Resolves an ASPNET Race Condition Issue in
Windows 8 Windows RT and Windows Server 2012
Web Platform Installer
o httpwwwmicrosoftcomwebdownloadsplatformaspx
Web Platform Installer ndash Command Line Version
o httplearniisnetpageaspx1072web-platform-installer-v4-command-line-webpicmdexe-preview-release
Workflow Manager 10
o Download using the Microsoft Web Platform Installer
Office 2013
o httpwwwmicrosoftcomofficepreviewentry-office-preview
SharePoint Designer 2013
o httpwwwmicrosoftcomen-usdownloaddetailsaspxid=35491
Visio Professional 2013
o httptechnetmicrosoftcomen-usevalcenterhh973399
Visual Studio 2012
o httpwwwmicrosoftcomvisualstudio11en-usdownloads
Office Developer Tools for Visual Studio 2012 ndash Preview 2
o Download using the Microsoft Web Platform Installer
Creating a SharePoint Server 2013 Environment for Development and Testing Version 10
copy Critical Path Training 2012 All Rights Reserved 62
wwwCriticalPathTrainingcom
Appendix 2 Windows PowerShell Script Manifest
The following lists all Windows PowerShell scripts that are provided with this setup guide
AddDisableLoopbackCheckRegKeyps1
o The following steps automate creating the registry key outlined as Method 2 in the Microsoft Knowledgebase article
httpsupportmicrosoftcomkb896861 using Windows PowerShell This key DisableLoopbackCheck will allow
you to browse SharePoint sites on the same machine Without this key (or following Method 1 in the KB article) you
would need to browse any SharePoint sites from a different computer than the one which SharePoint is installed on
ConfigureSpFarmForAppsps1
o Configures a SharePoint 2013 for hosting apps This ensures everything you need is installed running and
configured This is documented here httpmsdnmicrosoftcomen-uslibraryfp179923(v=office15)
CreateSpServiceAccountsps1
o Creates the minimal necessary service accounts for SharePoint Server 2013 SP_Farm SP_Content amp
SP_Services
SetupSharePointForHNSCps1
o Configures a SharePoint 2013 install for hosting Host-Named Site Collections (HNSC) This involves creating a Web
Application in SharePoint that has no host header bindings Using DNS all requests are mapped to this Web
Application You then create the site collections via PowerShell as you cant create HNSCs via the browser (Central
Administration)
Creating a SharePoint Server 2013 Environment for Development and Testing Version 10
copy Critical Path Training 2012 All Rights Reserved 63
wwwCriticalPathTrainingcom
Appendix 3 Create Sample Adventure Works Database
The following steps document downloading and installing the sample Adventure Works OLTP database provided by Microsoft
1 Launch Internet Explorer and navigate to httpmsftdbprodsamplescodeplexcom
2 Download the Adventure Works 2012 OLTP Script
3 Extract the ZIP into a folder on the desktop
4 Launch SQL Server Management Studio Start All Programs Microsoft SQL Server 2012 SQL Server Management Studio
5 When SQL Server Management Studio launches within the Connect to Server dialog login using the default settings and click Connect
6 Within SQL Server Management Studio select File Open File
7 Select the file instawdbsql from the extracted ZIP and click Open
8 If prompted to re-login to the database engine do it
9 Select Query SQLCMD Mode
10 Scroll down to line 42 the line that starts with the following
setvar SqlSamplesSourceDataPath
11 Change the folder location of where you unzipped the Adventure Works 2012 OLTP Script
12 Select Query Execute
13 When the script completes the AdventureWorks2012 database will have been created
Creating a SharePoint Server 2013 Environment for Development and Testing Version 10
copy Critical Path Training 2012 All Rights Reserved 64
wwwCriticalPathTrainingcom
Change Log
Change Version Description
August 22 2012 v 01 Pre-release for review
August 27 2012 v 02 Initial public release ndash install guide based on SharePoint Server Beta 2
August 28 2012 v 03 Updated URL for the site collection used to connect SharePoint to WAW
August 31 2012 v 04 Typo Removed SQL Server Analysis Services as part of the install Not required in a
SharePoint dev box (unless you are doing business intelligence which is not covered
in the guide)
Updated all references to Windows Azure Workflow to Workflow Manager the new
official name for the new workflow product
Updated SetupSharePointForHNSCps1 script to lookup HNSC Web Application by
name rather than URL which is more reliable
Typo Updated WingtipAllUp public NIC to use a different IP than the WingtipDC
Typo Replaced a reference to WingtipServer with WingtipDC
Typo Fixed handful of minor typos
September 1 2012 v 05 Removed SQL Server Reporting Services from install guide
Added step to uncheck IErsquos ldquoAutomatically detect proxyrdquo
Added post workflow install steps to setup User Profile Service Application to sync with
local Active Directory
September 5 2012 v 06 Added step to create a default root site collection in the HNSC web app
Updated minor typos and added extra notes for context
Updated PowerShell script SetupSharePointForHNSCps1 to remove content
database of default Web Application when setting up HNSC Web App
Added a new exercise 8 (after SharePoint install amp config and before the Workflow
install and config) to setup support for My Sites
October 20 2012 v 07 Updated script SetupSharePointForHNSCps1 to fix a bug where it would fail on line
111 if you didnrsquot already have a WINGTIPSP_Content managed account
Added section to bypass SharePointrsquos check for crlmicrosoftcom
Updated workflowrsquos registration PowerShell script to point to
httpintranetwingtipcom
Switched order of post-SharePoint install to setup HSNC hosting before configuring for
hosting apps
November 29 2012
v 10 Changed setup guide to use a single VM instead of two VMs
Updated guide for SharePoint 2013 RTM
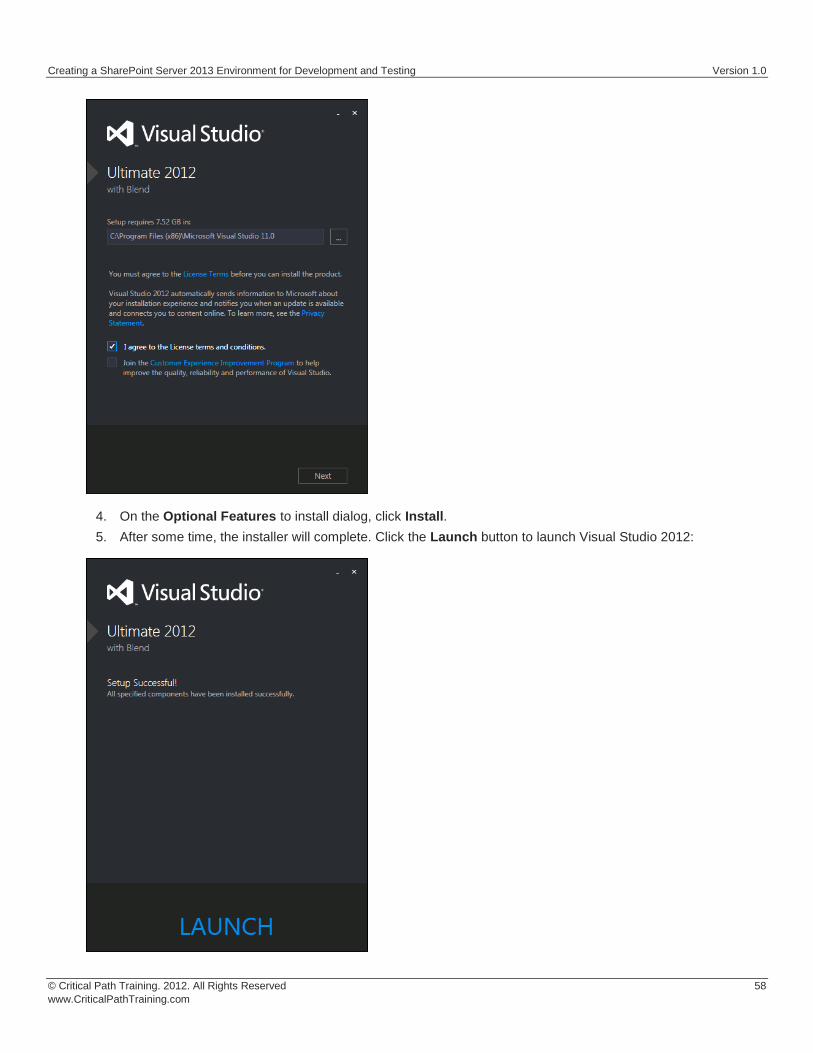
Creating a SharePoint Server 2013 Environment for Development and Testing Version 10
copy Critical Path Training 2012 All Rights Reserved 59
wwwCriticalPathTrainingcom
6 In the Choose Default Environment Settings select Visual C Development Settings and click Start Visual Studio
7 Close Visual Studio 2012
At this point Visual Studio 2012 RTM is installed
Install Office amp SharePoint 2013 Developer Tools
In this section you will install the Office and SharePoint 2013 developer tools for Visual Studio
1 Ensure you are logged into the WingtipServer VM using the account WINGTIPadministrator | Password1
2 Launch the Web Platform Installer Start All Programs Microsoft Web Platform Installer
3 In the search box at the top-right corner of the Web Platform Installer 40 window type sharepoint and press Enter
4 Click the Add button to the right of Microsoft Office Developer Tools for Visual Studio 2012 - Preview 2
5 Click the Install button at the bottom of the Web Platform Installer 40 window
6 On the Prerequisites page click I Accept
Creating a SharePoint Server 2013 Environment for Development and Testing Version 10
copy Critical Path Training 2012 All Rights Reserved 60
wwwCriticalPathTrainingcom
At this point you have installed the SharePoint 2013 amp Office 2013 development tools in Visual Studio 2012
Creating a SharePoint Server 2013 Environment for Development and Testing Version 10
copy Critical Path Training 2012 All Rights Reserved 61
wwwCriticalPathTrainingcom
Appendix 1 Download Manifest
The following lists everything referenced that you will or may need to download in this environment
Windows Server 2008 R2 with Service Pack 1 (installer ISO)
o httptechnetmicrosoftcomen-usevalcenterdd459137aspx
Windows Server 2008 R2 with Service Pack 1 (prebuilt VHD)
o httpwwwmicrosoftcomdownloadsdetailsaspxFamilyId=9040a4be-c3cf-44a5-9052-a70314452305
Windows Server 2008 R2 Service Pack 1
o httpwwwmicrosoftcomen-usdownloaddetailsaspxid=5842
SQL Server 2012 Trial
o httpwwwmicrosoftcombetaexperiencepdSQL2012EvalCTAenusdefaultaspx
SharePoint Server 2013
o httptechnetmicrosoftcomen-USevalcenterhh973397aspx
Hotfixes for SharePoint Server 2013 (post-install)
o KB2554876 The SharePoint Parsing Process Crashes in Windows Server 2008 R2
o KB2708075 IIS 75 Configurations are not Updated when you use the ServerManager Class to Commit
Configuration Changes
o KB2759112 Hotfix is Available for NET Framework 45 that Resolves an ASPNET Race Condition Issue in
Windows Server 2008 R2 Windows Server 2008 R2 SP1
o KB2765317 Hotfix is Available for NET Framework 45 that Resolves an ASPNET Race Condition Issue in
Windows 8 Windows RT and Windows Server 2012
Web Platform Installer
o httpwwwmicrosoftcomwebdownloadsplatformaspx
Web Platform Installer ndash Command Line Version
o httplearniisnetpageaspx1072web-platform-installer-v4-command-line-webpicmdexe-preview-release
Workflow Manager 10
o Download using the Microsoft Web Platform Installer
Office 2013
o httpwwwmicrosoftcomofficepreviewentry-office-preview
SharePoint Designer 2013
o httpwwwmicrosoftcomen-usdownloaddetailsaspxid=35491
Visio Professional 2013
o httptechnetmicrosoftcomen-usevalcenterhh973399
Visual Studio 2012
o httpwwwmicrosoftcomvisualstudio11en-usdownloads
Office Developer Tools for Visual Studio 2012 ndash Preview 2
o Download using the Microsoft Web Platform Installer
Creating a SharePoint Server 2013 Environment for Development and Testing Version 10
copy Critical Path Training 2012 All Rights Reserved 62
wwwCriticalPathTrainingcom
Appendix 2 Windows PowerShell Script Manifest
The following lists all Windows PowerShell scripts that are provided with this setup guide
AddDisableLoopbackCheckRegKeyps1
o The following steps automate creating the registry key outlined as Method 2 in the Microsoft Knowledgebase article
httpsupportmicrosoftcomkb896861 using Windows PowerShell This key DisableLoopbackCheck will allow
you to browse SharePoint sites on the same machine Without this key (or following Method 1 in the KB article) you
would need to browse any SharePoint sites from a different computer than the one which SharePoint is installed on
ConfigureSpFarmForAppsps1
o Configures a SharePoint 2013 for hosting apps This ensures everything you need is installed running and
configured This is documented here httpmsdnmicrosoftcomen-uslibraryfp179923(v=office15)
CreateSpServiceAccountsps1
o Creates the minimal necessary service accounts for SharePoint Server 2013 SP_Farm SP_Content amp
SP_Services
SetupSharePointForHNSCps1
o Configures a SharePoint 2013 install for hosting Host-Named Site Collections (HNSC) This involves creating a Web
Application in SharePoint that has no host header bindings Using DNS all requests are mapped to this Web
Application You then create the site collections via PowerShell as you cant create HNSCs via the browser (Central
Administration)
Creating a SharePoint Server 2013 Environment for Development and Testing Version 10
copy Critical Path Training 2012 All Rights Reserved 63
wwwCriticalPathTrainingcom
Appendix 3 Create Sample Adventure Works Database
The following steps document downloading and installing the sample Adventure Works OLTP database provided by Microsoft
1 Launch Internet Explorer and navigate to httpmsftdbprodsamplescodeplexcom
2 Download the Adventure Works 2012 OLTP Script
3 Extract the ZIP into a folder on the desktop
4 Launch SQL Server Management Studio Start All Programs Microsoft SQL Server 2012 SQL Server Management Studio
5 When SQL Server Management Studio launches within the Connect to Server dialog login using the default settings and click Connect
6 Within SQL Server Management Studio select File Open File
7 Select the file instawdbsql from the extracted ZIP and click Open
8 If prompted to re-login to the database engine do it
9 Select Query SQLCMD Mode
10 Scroll down to line 42 the line that starts with the following
setvar SqlSamplesSourceDataPath
11 Change the folder location of where you unzipped the Adventure Works 2012 OLTP Script
12 Select Query Execute
13 When the script completes the AdventureWorks2012 database will have been created
Creating a SharePoint Server 2013 Environment for Development and Testing Version 10
copy Critical Path Training 2012 All Rights Reserved 64
wwwCriticalPathTrainingcom
Change Log
Change Version Description
August 22 2012 v 01 Pre-release for review
August 27 2012 v 02 Initial public release ndash install guide based on SharePoint Server Beta 2
August 28 2012 v 03 Updated URL for the site collection used to connect SharePoint to WAW
August 31 2012 v 04 Typo Removed SQL Server Analysis Services as part of the install Not required in a
SharePoint dev box (unless you are doing business intelligence which is not covered
in the guide)
Updated all references to Windows Azure Workflow to Workflow Manager the new
official name for the new workflow product
Updated SetupSharePointForHNSCps1 script to lookup HNSC Web Application by
name rather than URL which is more reliable
Typo Updated WingtipAllUp public NIC to use a different IP than the WingtipDC
Typo Replaced a reference to WingtipServer with WingtipDC
Typo Fixed handful of minor typos
September 1 2012 v 05 Removed SQL Server Reporting Services from install guide
Added step to uncheck IErsquos ldquoAutomatically detect proxyrdquo
Added post workflow install steps to setup User Profile Service Application to sync with
local Active Directory
September 5 2012 v 06 Added step to create a default root site collection in the HNSC web app
Updated minor typos and added extra notes for context
Updated PowerShell script SetupSharePointForHNSCps1 to remove content
database of default Web Application when setting up HNSC Web App
Added a new exercise 8 (after SharePoint install amp config and before the Workflow
install and config) to setup support for My Sites
October 20 2012 v 07 Updated script SetupSharePointForHNSCps1 to fix a bug where it would fail on line
111 if you didnrsquot already have a WINGTIPSP_Content managed account
Added section to bypass SharePointrsquos check for crlmicrosoftcom
Updated workflowrsquos registration PowerShell script to point to
httpintranetwingtipcom
Switched order of post-SharePoint install to setup HSNC hosting before configuring for
hosting apps
November 29 2012
v 10 Changed setup guide to use a single VM instead of two VMs
Updated guide for SharePoint 2013 RTM
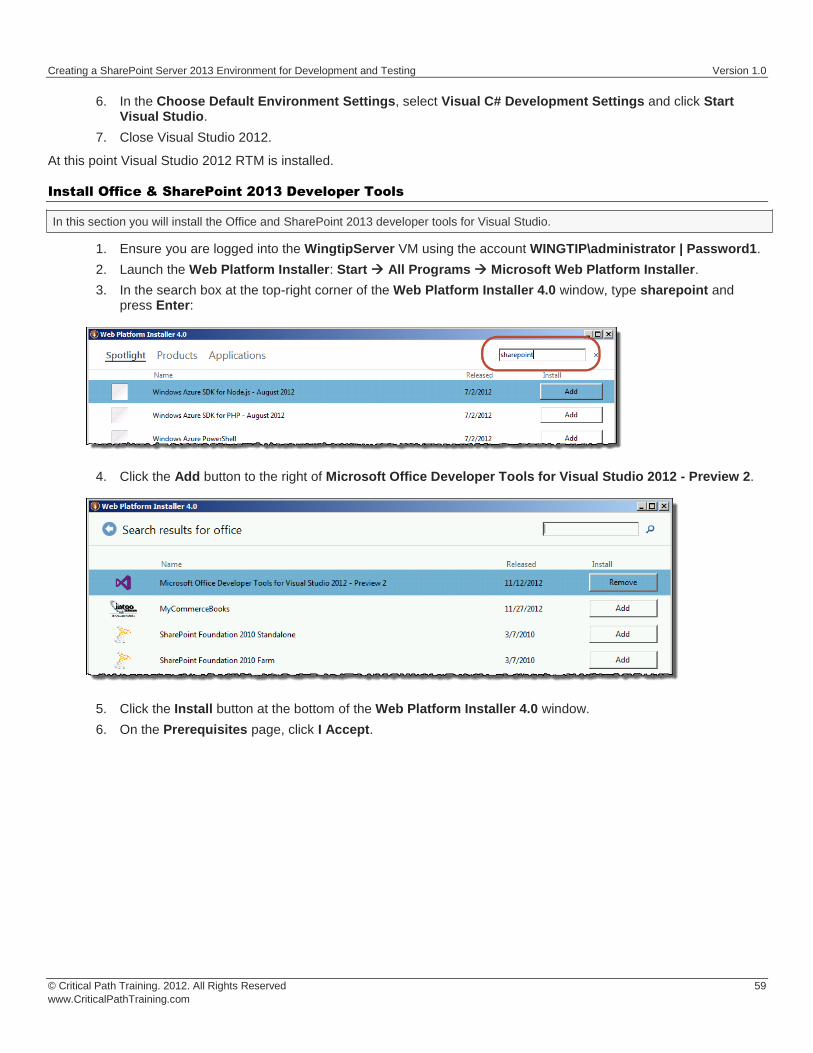
Creating a SharePoint Server 2013 Environment for Development and Testing Version 10
copy Critical Path Training 2012 All Rights Reserved 60
wwwCriticalPathTrainingcom
At this point you have installed the SharePoint 2013 amp Office 2013 development tools in Visual Studio 2012
Creating a SharePoint Server 2013 Environment for Development and Testing Version 10
copy Critical Path Training 2012 All Rights Reserved 61
wwwCriticalPathTrainingcom
Appendix 1 Download Manifest
The following lists everything referenced that you will or may need to download in this environment
Windows Server 2008 R2 with Service Pack 1 (installer ISO)
o httptechnetmicrosoftcomen-usevalcenterdd459137aspx
Windows Server 2008 R2 with Service Pack 1 (prebuilt VHD)
o httpwwwmicrosoftcomdownloadsdetailsaspxFamilyId=9040a4be-c3cf-44a5-9052-a70314452305
Windows Server 2008 R2 Service Pack 1
o httpwwwmicrosoftcomen-usdownloaddetailsaspxid=5842
SQL Server 2012 Trial
o httpwwwmicrosoftcombetaexperiencepdSQL2012EvalCTAenusdefaultaspx
SharePoint Server 2013
o httptechnetmicrosoftcomen-USevalcenterhh973397aspx
Hotfixes for SharePoint Server 2013 (post-install)
o KB2554876 The SharePoint Parsing Process Crashes in Windows Server 2008 R2
o KB2708075 IIS 75 Configurations are not Updated when you use the ServerManager Class to Commit
Configuration Changes
o KB2759112 Hotfix is Available for NET Framework 45 that Resolves an ASPNET Race Condition Issue in
Windows Server 2008 R2 Windows Server 2008 R2 SP1
o KB2765317 Hotfix is Available for NET Framework 45 that Resolves an ASPNET Race Condition Issue in
Windows 8 Windows RT and Windows Server 2012
Web Platform Installer
o httpwwwmicrosoftcomwebdownloadsplatformaspx
Web Platform Installer ndash Command Line Version
o httplearniisnetpageaspx1072web-platform-installer-v4-command-line-webpicmdexe-preview-release
Workflow Manager 10
o Download using the Microsoft Web Platform Installer
Office 2013
o httpwwwmicrosoftcomofficepreviewentry-office-preview
SharePoint Designer 2013
o httpwwwmicrosoftcomen-usdownloaddetailsaspxid=35491
Visio Professional 2013
o httptechnetmicrosoftcomen-usevalcenterhh973399
Visual Studio 2012
o httpwwwmicrosoftcomvisualstudio11en-usdownloads
Office Developer Tools for Visual Studio 2012 ndash Preview 2
o Download using the Microsoft Web Platform Installer
Creating a SharePoint Server 2013 Environment for Development and Testing Version 10
copy Critical Path Training 2012 All Rights Reserved 62
wwwCriticalPathTrainingcom
Appendix 2 Windows PowerShell Script Manifest
The following lists all Windows PowerShell scripts that are provided with this setup guide
AddDisableLoopbackCheckRegKeyps1
o The following steps automate creating the registry key outlined as Method 2 in the Microsoft Knowledgebase article
httpsupportmicrosoftcomkb896861 using Windows PowerShell This key DisableLoopbackCheck will allow
you to browse SharePoint sites on the same machine Without this key (or following Method 1 in the KB article) you
would need to browse any SharePoint sites from a different computer than the one which SharePoint is installed on
ConfigureSpFarmForAppsps1
o Configures a SharePoint 2013 for hosting apps This ensures everything you need is installed running and
configured This is documented here httpmsdnmicrosoftcomen-uslibraryfp179923(v=office15)
CreateSpServiceAccountsps1
o Creates the minimal necessary service accounts for SharePoint Server 2013 SP_Farm SP_Content amp
SP_Services
SetupSharePointForHNSCps1
o Configures a SharePoint 2013 install for hosting Host-Named Site Collections (HNSC) This involves creating a Web
Application in SharePoint that has no host header bindings Using DNS all requests are mapped to this Web
Application You then create the site collections via PowerShell as you cant create HNSCs via the browser (Central
Administration)
Creating a SharePoint Server 2013 Environment for Development and Testing Version 10
copy Critical Path Training 2012 All Rights Reserved 63
wwwCriticalPathTrainingcom
Appendix 3 Create Sample Adventure Works Database
The following steps document downloading and installing the sample Adventure Works OLTP database provided by Microsoft
1 Launch Internet Explorer and navigate to httpmsftdbprodsamplescodeplexcom
2 Download the Adventure Works 2012 OLTP Script
3 Extract the ZIP into a folder on the desktop
4 Launch SQL Server Management Studio Start All Programs Microsoft SQL Server 2012 SQL Server Management Studio
5 When SQL Server Management Studio launches within the Connect to Server dialog login using the default settings and click Connect
6 Within SQL Server Management Studio select File Open File
7 Select the file instawdbsql from the extracted ZIP and click Open
8 If prompted to re-login to the database engine do it
9 Select Query SQLCMD Mode
10 Scroll down to line 42 the line that starts with the following
setvar SqlSamplesSourceDataPath
11 Change the folder location of where you unzipped the Adventure Works 2012 OLTP Script
12 Select Query Execute
13 When the script completes the AdventureWorks2012 database will have been created
Creating a SharePoint Server 2013 Environment for Development and Testing Version 10
copy Critical Path Training 2012 All Rights Reserved 64
wwwCriticalPathTrainingcom
Change Log
Change Version Description
August 22 2012 v 01 Pre-release for review
August 27 2012 v 02 Initial public release ndash install guide based on SharePoint Server Beta 2
August 28 2012 v 03 Updated URL for the site collection used to connect SharePoint to WAW
August 31 2012 v 04 Typo Removed SQL Server Analysis Services as part of the install Not required in a
SharePoint dev box (unless you are doing business intelligence which is not covered
in the guide)
Updated all references to Windows Azure Workflow to Workflow Manager the new
official name for the new workflow product
Updated SetupSharePointForHNSCps1 script to lookup HNSC Web Application by
name rather than URL which is more reliable
Typo Updated WingtipAllUp public NIC to use a different IP than the WingtipDC
Typo Replaced a reference to WingtipServer with WingtipDC
Typo Fixed handful of minor typos
September 1 2012 v 05 Removed SQL Server Reporting Services from install guide
Added step to uncheck IErsquos ldquoAutomatically detect proxyrdquo
Added post workflow install steps to setup User Profile Service Application to sync with
local Active Directory
September 5 2012 v 06 Added step to create a default root site collection in the HNSC web app
Updated minor typos and added extra notes for context
Updated PowerShell script SetupSharePointForHNSCps1 to remove content
database of default Web Application when setting up HNSC Web App
Added a new exercise 8 (after SharePoint install amp config and before the Workflow
install and config) to setup support for My Sites
October 20 2012 v 07 Updated script SetupSharePointForHNSCps1 to fix a bug where it would fail on line
111 if you didnrsquot already have a WINGTIPSP_Content managed account
Added section to bypass SharePointrsquos check for crlmicrosoftcom
Updated workflowrsquos registration PowerShell script to point to
httpintranetwingtipcom
Switched order of post-SharePoint install to setup HSNC hosting before configuring for
hosting apps
November 29 2012
v 10 Changed setup guide to use a single VM instead of two VMs
Updated guide for SharePoint 2013 RTM
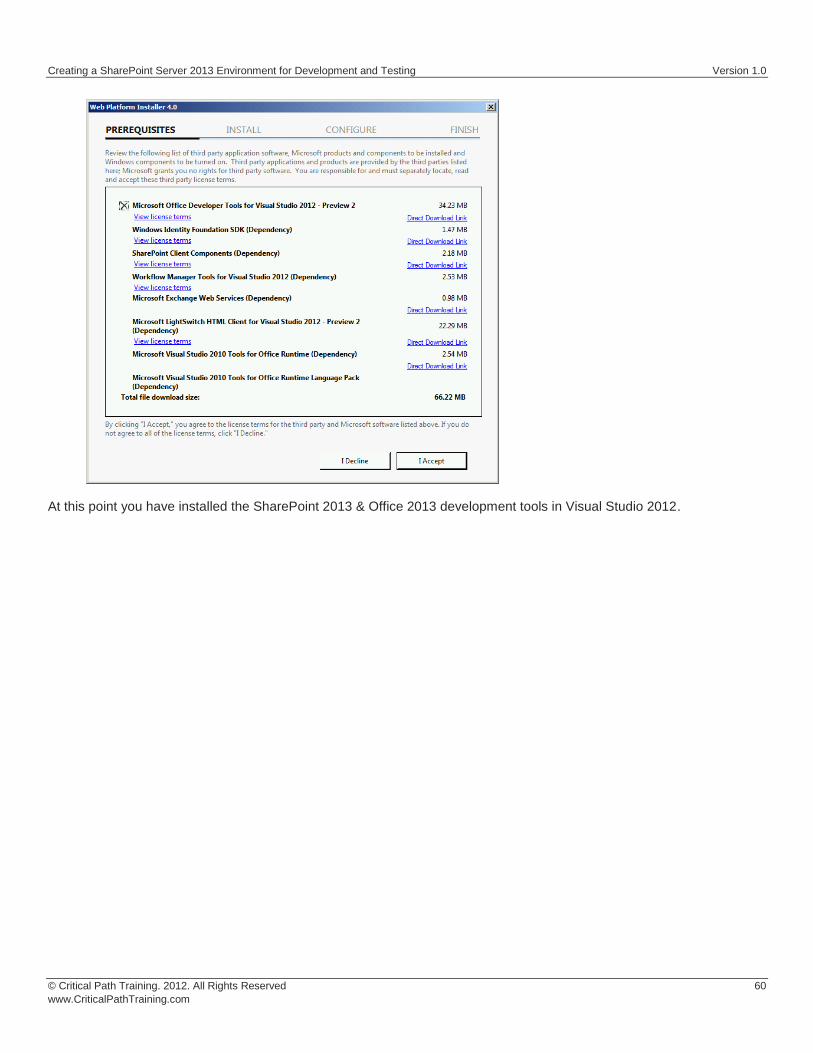
Creating a SharePoint Server 2013 Environment for Development and Testing Version 10
copy Critical Path Training 2012 All Rights Reserved 61
wwwCriticalPathTrainingcom
Appendix 1 Download Manifest
The following lists everything referenced that you will or may need to download in this environment
Windows Server 2008 R2 with Service Pack 1 (installer ISO)
o httptechnetmicrosoftcomen-usevalcenterdd459137aspx
Windows Server 2008 R2 with Service Pack 1 (prebuilt VHD)
o httpwwwmicrosoftcomdownloadsdetailsaspxFamilyId=9040a4be-c3cf-44a5-9052-a70314452305
Windows Server 2008 R2 Service Pack 1
o httpwwwmicrosoftcomen-usdownloaddetailsaspxid=5842
SQL Server 2012 Trial
o httpwwwmicrosoftcombetaexperiencepdSQL2012EvalCTAenusdefaultaspx
SharePoint Server 2013
o httptechnetmicrosoftcomen-USevalcenterhh973397aspx
Hotfixes for SharePoint Server 2013 (post-install)
o KB2554876 The SharePoint Parsing Process Crashes in Windows Server 2008 R2
o KB2708075 IIS 75 Configurations are not Updated when you use the ServerManager Class to Commit
Configuration Changes
o KB2759112 Hotfix is Available for NET Framework 45 that Resolves an ASPNET Race Condition Issue in
Windows Server 2008 R2 Windows Server 2008 R2 SP1
o KB2765317 Hotfix is Available for NET Framework 45 that Resolves an ASPNET Race Condition Issue in
Windows 8 Windows RT and Windows Server 2012
Web Platform Installer
o httpwwwmicrosoftcomwebdownloadsplatformaspx
Web Platform Installer ndash Command Line Version
o httplearniisnetpageaspx1072web-platform-installer-v4-command-line-webpicmdexe-preview-release
Workflow Manager 10
o Download using the Microsoft Web Platform Installer
Office 2013
o httpwwwmicrosoftcomofficepreviewentry-office-preview
SharePoint Designer 2013
o httpwwwmicrosoftcomen-usdownloaddetailsaspxid=35491
Visio Professional 2013
o httptechnetmicrosoftcomen-usevalcenterhh973399
Visual Studio 2012
o httpwwwmicrosoftcomvisualstudio11en-usdownloads
Office Developer Tools for Visual Studio 2012 ndash Preview 2
o Download using the Microsoft Web Platform Installer
Creating a SharePoint Server 2013 Environment for Development and Testing Version 10
copy Critical Path Training 2012 All Rights Reserved 62
wwwCriticalPathTrainingcom
Appendix 2 Windows PowerShell Script Manifest
The following lists all Windows PowerShell scripts that are provided with this setup guide
AddDisableLoopbackCheckRegKeyps1
o The following steps automate creating the registry key outlined as Method 2 in the Microsoft Knowledgebase article
httpsupportmicrosoftcomkb896861 using Windows PowerShell This key DisableLoopbackCheck will allow
you to browse SharePoint sites on the same machine Without this key (or following Method 1 in the KB article) you
would need to browse any SharePoint sites from a different computer than the one which SharePoint is installed on
ConfigureSpFarmForAppsps1
o Configures a SharePoint 2013 for hosting apps This ensures everything you need is installed running and
configured This is documented here httpmsdnmicrosoftcomen-uslibraryfp179923(v=office15)
CreateSpServiceAccountsps1
o Creates the minimal necessary service accounts for SharePoint Server 2013 SP_Farm SP_Content amp
SP_Services
SetupSharePointForHNSCps1
o Configures a SharePoint 2013 install for hosting Host-Named Site Collections (HNSC) This involves creating a Web
Application in SharePoint that has no host header bindings Using DNS all requests are mapped to this Web
Application You then create the site collections via PowerShell as you cant create HNSCs via the browser (Central
Administration)
Creating a SharePoint Server 2013 Environment for Development and Testing Version 10
copy Critical Path Training 2012 All Rights Reserved 63
wwwCriticalPathTrainingcom
Appendix 3 Create Sample Adventure Works Database
The following steps document downloading and installing the sample Adventure Works OLTP database provided by Microsoft
1 Launch Internet Explorer and navigate to httpmsftdbprodsamplescodeplexcom
2 Download the Adventure Works 2012 OLTP Script
3 Extract the ZIP into a folder on the desktop
4 Launch SQL Server Management Studio Start All Programs Microsoft SQL Server 2012 SQL Server Management Studio
5 When SQL Server Management Studio launches within the Connect to Server dialog login using the default settings and click Connect
6 Within SQL Server Management Studio select File Open File
7 Select the file instawdbsql from the extracted ZIP and click Open
8 If prompted to re-login to the database engine do it
9 Select Query SQLCMD Mode
10 Scroll down to line 42 the line that starts with the following
setvar SqlSamplesSourceDataPath
11 Change the folder location of where you unzipped the Adventure Works 2012 OLTP Script
12 Select Query Execute
13 When the script completes the AdventureWorks2012 database will have been created
Creating a SharePoint Server 2013 Environment for Development and Testing Version 10
copy Critical Path Training 2012 All Rights Reserved 64
wwwCriticalPathTrainingcom
Change Log
Change Version Description
August 22 2012 v 01 Pre-release for review
August 27 2012 v 02 Initial public release ndash install guide based on SharePoint Server Beta 2
August 28 2012 v 03 Updated URL for the site collection used to connect SharePoint to WAW
August 31 2012 v 04 Typo Removed SQL Server Analysis Services as part of the install Not required in a
SharePoint dev box (unless you are doing business intelligence which is not covered
in the guide)
Updated all references to Windows Azure Workflow to Workflow Manager the new
official name for the new workflow product
Updated SetupSharePointForHNSCps1 script to lookup HNSC Web Application by
name rather than URL which is more reliable
Typo Updated WingtipAllUp public NIC to use a different IP than the WingtipDC
Typo Replaced a reference to WingtipServer with WingtipDC
Typo Fixed handful of minor typos
September 1 2012 v 05 Removed SQL Server Reporting Services from install guide
Added step to uncheck IErsquos ldquoAutomatically detect proxyrdquo
Added post workflow install steps to setup User Profile Service Application to sync with
local Active Directory
September 5 2012 v 06 Added step to create a default root site collection in the HNSC web app
Updated minor typos and added extra notes for context
Updated PowerShell script SetupSharePointForHNSCps1 to remove content
database of default Web Application when setting up HNSC Web App
Added a new exercise 8 (after SharePoint install amp config and before the Workflow
install and config) to setup support for My Sites
October 20 2012 v 07 Updated script SetupSharePointForHNSCps1 to fix a bug where it would fail on line
111 if you didnrsquot already have a WINGTIPSP_Content managed account
Added section to bypass SharePointrsquos check for crlmicrosoftcom
Updated workflowrsquos registration PowerShell script to point to
httpintranetwingtipcom
Switched order of post-SharePoint install to setup HSNC hosting before configuring for
hosting apps
November 29 2012
v 10 Changed setup guide to use a single VM instead of two VMs
Updated guide for SharePoint 2013 RTM
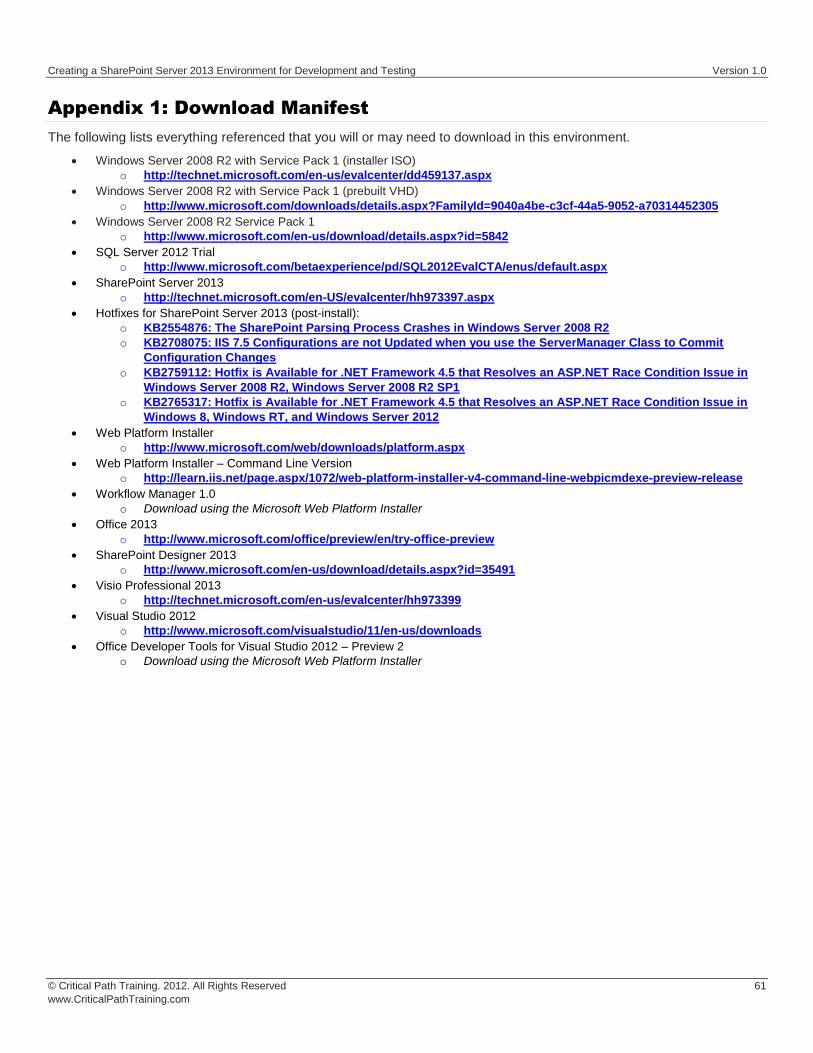
Creating a SharePoint Server 2013 Environment for Development and Testing Version 10
copy Critical Path Training 2012 All Rights Reserved 62
wwwCriticalPathTrainingcom
Appendix 2 Windows PowerShell Script Manifest
The following lists all Windows PowerShell scripts that are provided with this setup guide
AddDisableLoopbackCheckRegKeyps1
o The following steps automate creating the registry key outlined as Method 2 in the Microsoft Knowledgebase article
httpsupportmicrosoftcomkb896861 using Windows PowerShell This key DisableLoopbackCheck will allow
you to browse SharePoint sites on the same machine Without this key (or following Method 1 in the KB article) you
would need to browse any SharePoint sites from a different computer than the one which SharePoint is installed on
ConfigureSpFarmForAppsps1
o Configures a SharePoint 2013 for hosting apps This ensures everything you need is installed running and
configured This is documented here httpmsdnmicrosoftcomen-uslibraryfp179923(v=office15)
CreateSpServiceAccountsps1
o Creates the minimal necessary service accounts for SharePoint Server 2013 SP_Farm SP_Content amp
SP_Services
SetupSharePointForHNSCps1
o Configures a SharePoint 2013 install for hosting Host-Named Site Collections (HNSC) This involves creating a Web
Application in SharePoint that has no host header bindings Using DNS all requests are mapped to this Web
Application You then create the site collections via PowerShell as you cant create HNSCs via the browser (Central
Administration)
Creating a SharePoint Server 2013 Environment for Development and Testing Version 10
copy Critical Path Training 2012 All Rights Reserved 63
wwwCriticalPathTrainingcom
Appendix 3 Create Sample Adventure Works Database
The following steps document downloading and installing the sample Adventure Works OLTP database provided by Microsoft
1 Launch Internet Explorer and navigate to httpmsftdbprodsamplescodeplexcom
2 Download the Adventure Works 2012 OLTP Script
3 Extract the ZIP into a folder on the desktop
4 Launch SQL Server Management Studio Start All Programs Microsoft SQL Server 2012 SQL Server Management Studio
5 When SQL Server Management Studio launches within the Connect to Server dialog login using the default settings and click Connect
6 Within SQL Server Management Studio select File Open File
7 Select the file instawdbsql from the extracted ZIP and click Open
8 If prompted to re-login to the database engine do it
9 Select Query SQLCMD Mode
10 Scroll down to line 42 the line that starts with the following
setvar SqlSamplesSourceDataPath
11 Change the folder location of where you unzipped the Adventure Works 2012 OLTP Script
12 Select Query Execute
13 When the script completes the AdventureWorks2012 database will have been created
Creating a SharePoint Server 2013 Environment for Development and Testing Version 10
copy Critical Path Training 2012 All Rights Reserved 64
wwwCriticalPathTrainingcom
Change Log
Change Version Description
August 22 2012 v 01 Pre-release for review
August 27 2012 v 02 Initial public release ndash install guide based on SharePoint Server Beta 2
August 28 2012 v 03 Updated URL for the site collection used to connect SharePoint to WAW
August 31 2012 v 04 Typo Removed SQL Server Analysis Services as part of the install Not required in a
SharePoint dev box (unless you are doing business intelligence which is not covered
in the guide)
Updated all references to Windows Azure Workflow to Workflow Manager the new
official name for the new workflow product
Updated SetupSharePointForHNSCps1 script to lookup HNSC Web Application by
name rather than URL which is more reliable
Typo Updated WingtipAllUp public NIC to use a different IP than the WingtipDC
Typo Replaced a reference to WingtipServer with WingtipDC
Typo Fixed handful of minor typos
September 1 2012 v 05 Removed SQL Server Reporting Services from install guide
Added step to uncheck IErsquos ldquoAutomatically detect proxyrdquo
Added post workflow install steps to setup User Profile Service Application to sync with
local Active Directory
September 5 2012 v 06 Added step to create a default root site collection in the HNSC web app
Updated minor typos and added extra notes for context
Updated PowerShell script SetupSharePointForHNSCps1 to remove content
database of default Web Application when setting up HNSC Web App
Added a new exercise 8 (after SharePoint install amp config and before the Workflow
install and config) to setup support for My Sites
October 20 2012 v 07 Updated script SetupSharePointForHNSCps1 to fix a bug where it would fail on line
111 if you didnrsquot already have a WINGTIPSP_Content managed account
Added section to bypass SharePointrsquos check for crlmicrosoftcom
Updated workflowrsquos registration PowerShell script to point to
httpintranetwingtipcom
Switched order of post-SharePoint install to setup HSNC hosting before configuring for
hosting apps
November 29 2012
v 10 Changed setup guide to use a single VM instead of two VMs
Updated guide for SharePoint 2013 RTM
Creating a SharePoint Server 2013 Environment for Development and Testing Version 10
copy Critical Path Training 2012 All Rights Reserved 64
wwwCriticalPathTrainingcom
Change Log
Change Version Description
August 22 2012 v 01 Pre-release for review
August 27 2012 v 02 Initial public release ndash install guide based on SharePoint Server Beta 2
August 28 2012 v 03 Updated URL for the site collection used to connect SharePoint to WAW
August 31 2012 v 04 Typo Removed SQL Server Analysis Services as part of the install Not required in a
SharePoint dev box (unless you are doing business intelligence which is not covered
in the guide)
Updated all references to Windows Azure Workflow to Workflow Manager the new
official name for the new workflow product
Updated SetupSharePointForHNSCps1 script to lookup HNSC Web Application by
name rather than URL which is more reliable
Typo Updated WingtipAllUp public NIC to use a different IP than the WingtipDC
Typo Replaced a reference to WingtipServer with WingtipDC
Typo Fixed handful of minor typos
September 1 2012 v 05 Removed SQL Server Reporting Services from install guide
Added step to uncheck IErsquos ldquoAutomatically detect proxyrdquo
Added post workflow install steps to setup User Profile Service Application to sync with
local Active Directory
September 5 2012 v 06 Added step to create a default root site collection in the HNSC web app
Updated minor typos and added extra notes for context
Updated PowerShell script SetupSharePointForHNSCps1 to remove content
database of default Web Application when setting up HNSC Web App
Added a new exercise 8 (after SharePoint install amp config and before the Workflow
install and config) to setup support for My Sites
October 20 2012 v 07 Updated script SetupSharePointForHNSCps1 to fix a bug where it would fail on line
111 if you didnrsquot already have a WINGTIPSP_Content managed account
Added section to bypass SharePointrsquos check for crlmicrosoftcom
Updated workflowrsquos registration PowerShell script to point to
httpintranetwingtipcom
Switched order of post-SharePoint install to setup HSNC hosting before configuring for
hosting apps
November 29 2012
v 10 Changed setup guide to use a single VM instead of two VMs
Updated guide for SharePoint 2013 RTM